
This guide aims to teach the basics of handling the Valkyrie. The ability to tackle higher difficulties depend on your personal loadouts and acquired advantages at present.

Core Playstyle
Physical-Build
- Uses Seeds of Idea as summons to attack for Misteln, which involves all 3 of their command movesets to various effect.
Astral-Build
- Enters a permanent state with no countdown. Can be forcibly ended as normal. Pace of combat is much faster and more reactive as Misteln's combat agility is increased rather dramatically.
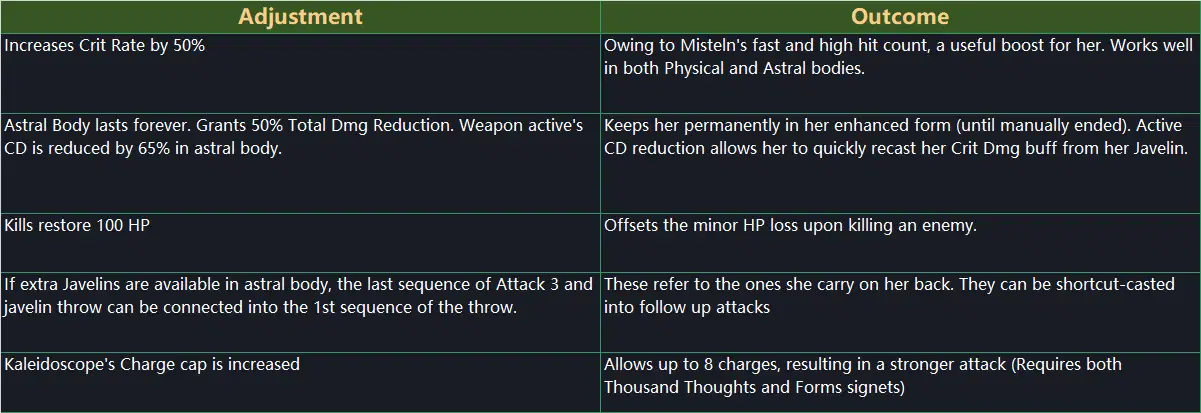
- When initiating Astral Form, there is a SP consumption bonus that enhances her damage output until she exits the form (which she never does). Which means this 50 SP can come from Lightning Empress, or the Gold signet that grants that base +50 SP.
Usage Difficulty
Handling: Easy to Moderate
- Physical Body is easier to manage, thanks to its cyclic combo between weapon active and Basic Atk only. Astral Body on the other hand requires a bit more finesse in maneuvering.
Power Ramping
- Both builds are capable of starting off strong and becoming further enhanced by their secondaries in strength.
Power Drought Situation(s)
- None. Both builds are not burdened by requirements or SP, so only a lapse in control will drop Misteln's DPS.
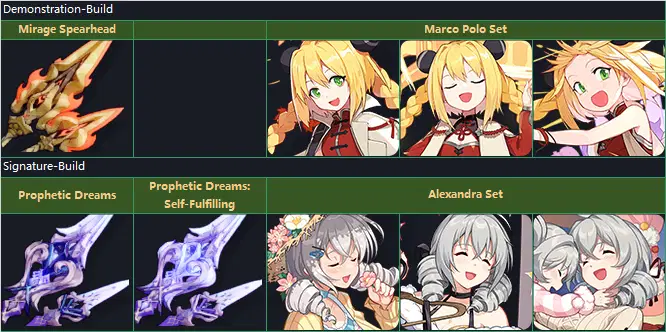
Equipment
Special Adjustments
Exclusive Signets
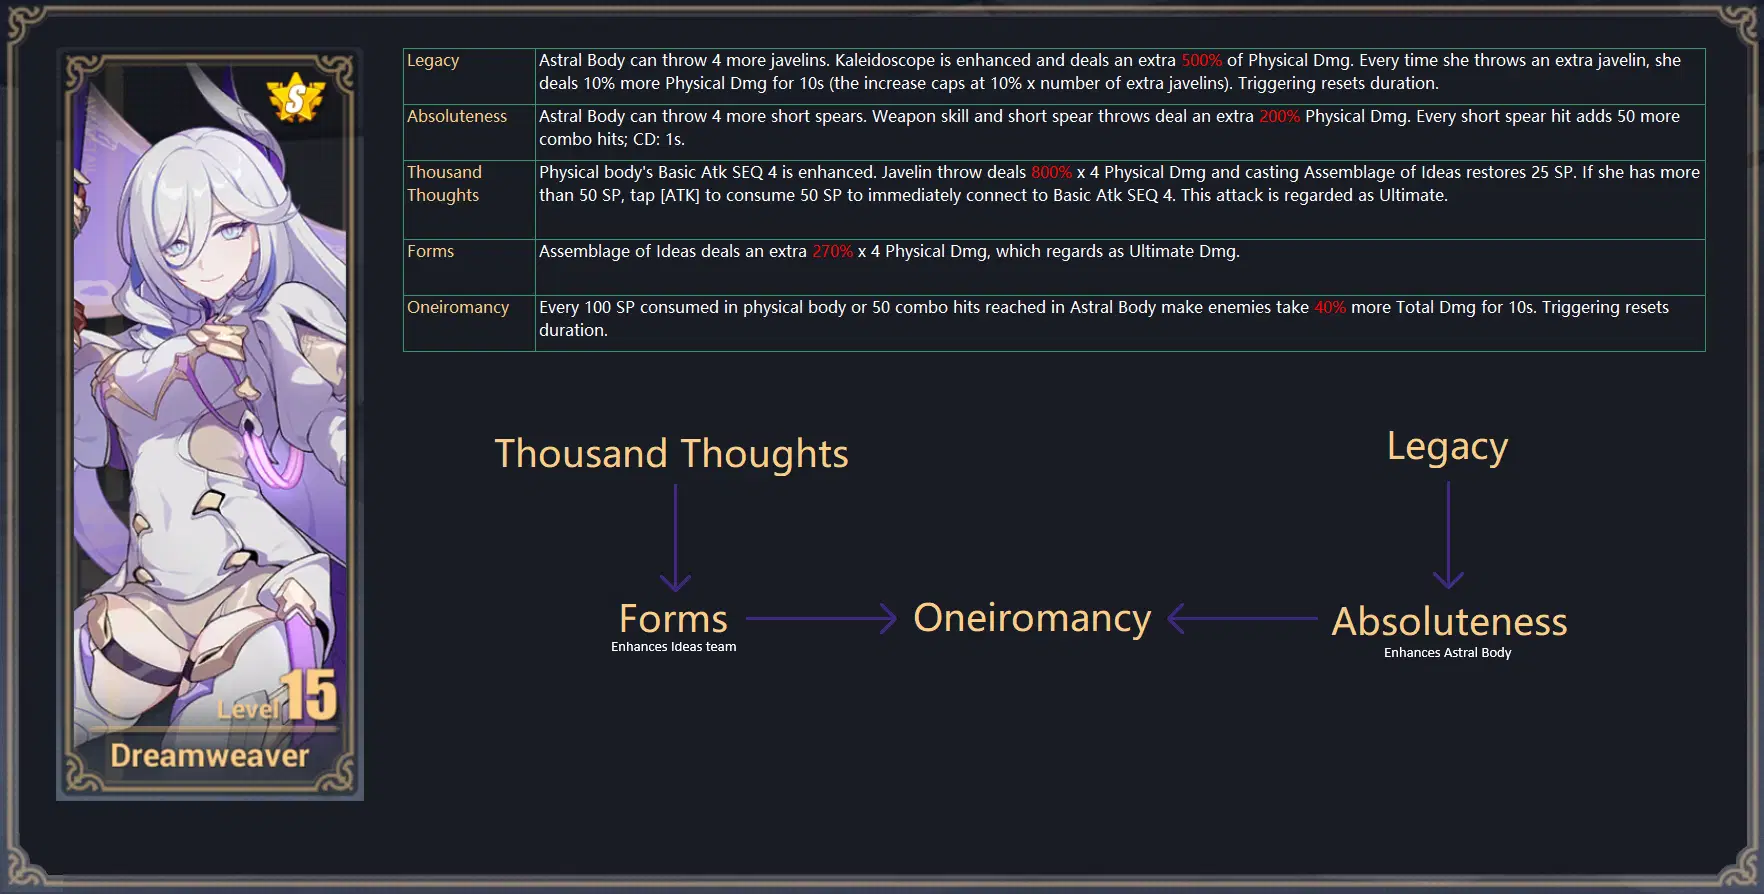
To explain the different stances and abilities of Misteln and her Ideas.
Misteln
Cosmic Dominance - State when Seeds of Ideas are present, gaining 50% Total Dmg Reduction (Physical)
Javelin Meter - The 4x segmented gauge used for Charged Atks (Astral)
Special State - When Javelin Meter glows fully charged, allows casting of Kaleidoscope (Astral)
Kaleidoscope - Charged Atk which traps enemies in rock and violently smashes it (Astral)
Residual Dream - (Weapon Active) Simultaneously throws all 4 short spears, recharging the Javelin Meter instantly (Astral)
Ideas
Assemblage of Ideas - Dive bomb attack where Ideas make their entry
Protective Appearance - Phalanx formation where Ideas line up in a row in front of Misteln
[Thousand Thoughts -> Forms] -> Oneiromancy
Astral Body signets not needed.
Both Thousand Thoughts and Forms are for the Physical Build, which increase the damage output of Misteln's Ideas and convert the used techniques into Ultimate type attacks, cycling between the two repeatedly.
[Absoluteness -> Legacy] -> Oneiromancy
Physical Body signets not needed.
Both Legacy and Absoluteness are for the Astral Build, which increase the damage output of her main technique, Kaleidoscope, and raise the thrown spear/javelin count for it from 4 to 8 max.
- Increasing the max count also means you must commit to having all 8 spears thrown before Kaleidoscope can be used.
- Cutting off the spear-throwing combo midway requires you to restart the entire throwing combo for the remaining ones to be thrown.
- Both Legacy and Absoluteness perform at nearly the same level even when used alone. The key difference is that Absoluteness enables Bodhi and Helix signets greatly in terms of trigger frequency, and makes you less reliant on using Kaleidoscope. This also opens up more signet options for empowerment.
- Kaleidoscope's Crit power is bolstered by the signature spear. So the incentive to do so depends on your ownership of it.
Using Thorn Crown
1) Thousand Thoughts + Forms
- Physical Body build
2) Legacy + Absoluteness
- Astral Body build
Signets
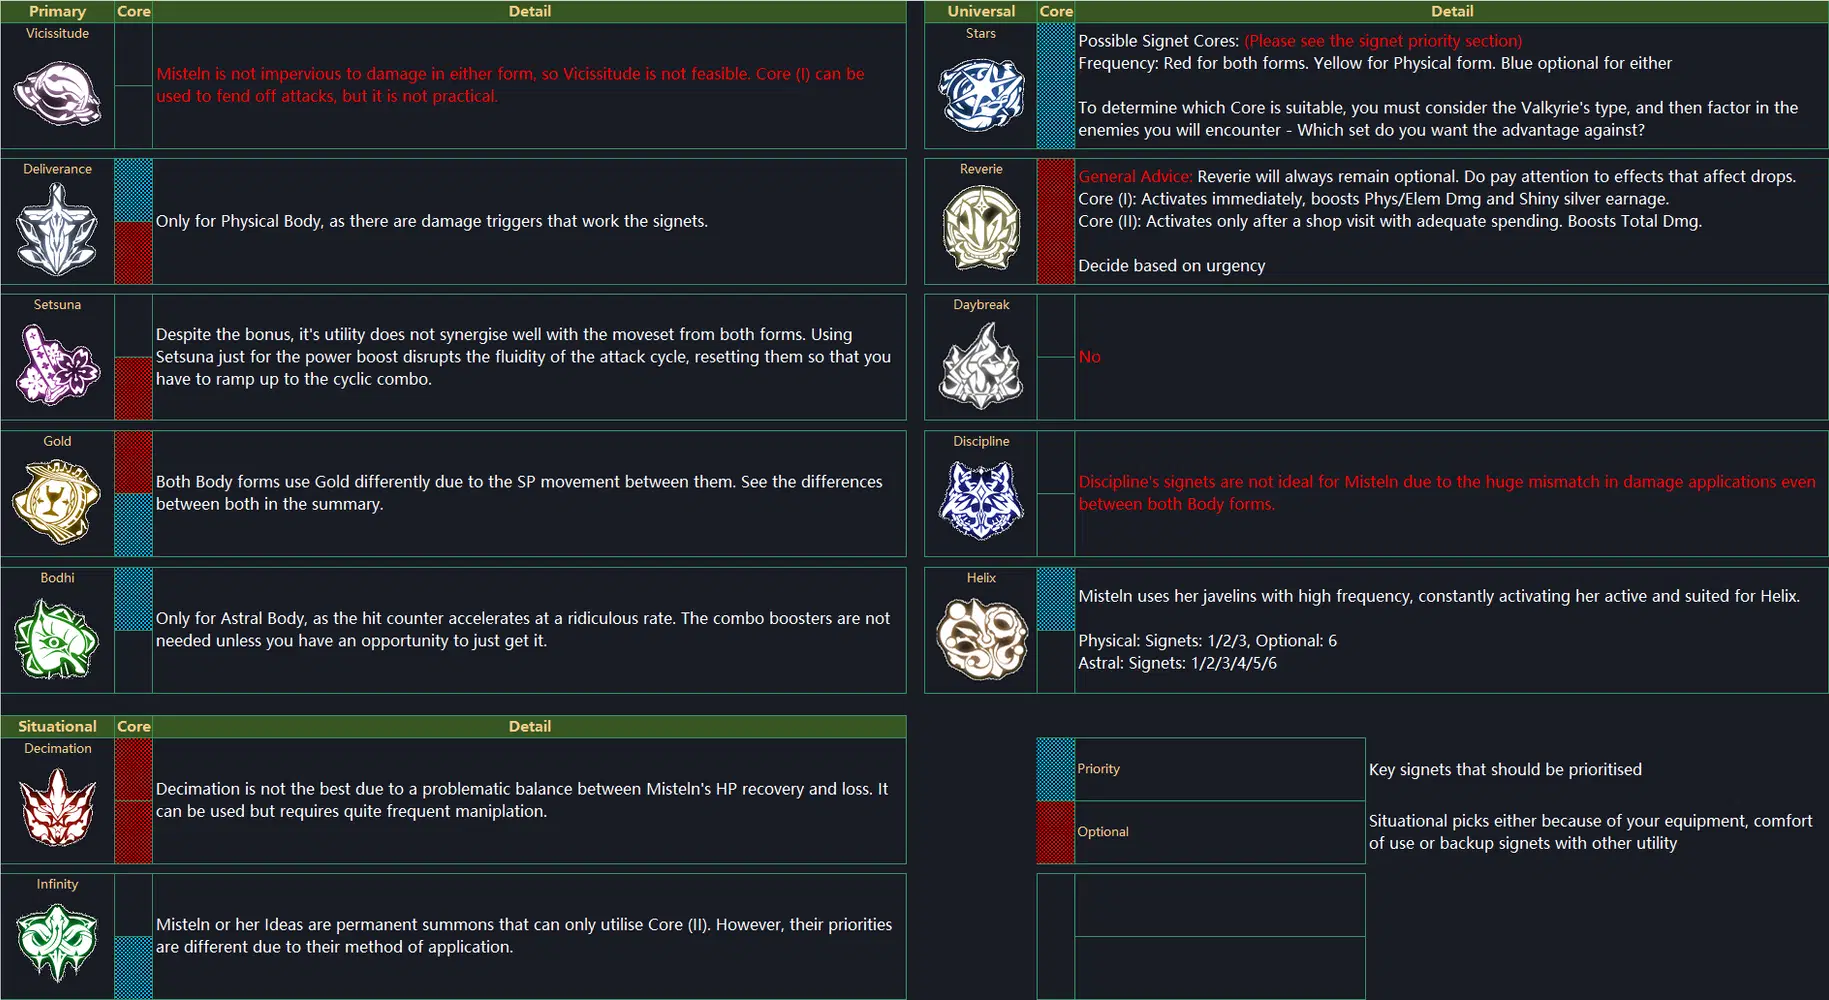
Priorities 1 - Physical
Key Signets - Deliverance, Infinity
Sub Signets - Gold, Helix
- Optional - Decimation
In Physical Build, Misteln's attacks can have the unique property of triggering Ultimate signets together with her weapon active ones in rotation, allowing her more options than normally possible.
- To reiterate - Her active command, "Assemblage of Ideas", will have both properties once you acquire "Forms".
Priorities 2 - Astral
Key Signets - Infinity, Bodhi
Sub Signets - Gold, Helix
- Optional - Setsuna, Decimation
In Astral Build, Misteln becomes the permanent summon body, and gains an accelerated hit rate. Signet use remain similar, with only a minor signet swap.
Core Contributions
Physical Build Only
Deliverance (I) / (II)
- Everytime the enhanced Basic Atk is triggered, Ultimate damage is inflicted and triggers Deliverance. The cyclic combo ensures Deliverance never stops its buff timer.
- Core (II) is negotiable if Misteln has acquired the "Forms" signet as well. This also converts the damage type for the weapon active to Ultimate, which allows both parts of the cyclic combo to trigger Deliverance, doubling up the pace of hits acquired, making it suited for a long or boss battle for enhanced power in totality.
- Deliverance cannot be used by Astral Body, as it is not a Burst mode, and has no way to activate the signets any further.
Daybreak / Stars / Reverie (I) / Discipline
- As mentioned, Ultimate signets will trigger. Take into account signets from any of these sets and plan your (buying) acquisitions accordingly.
Astral Build Only
Bodhi (I)
- Take advantage of the melee bonus in Core (I) and also the Enhanced signets support to manage your enemies.
Setsuna (II) - (Bonus: Time Mastery)
- The continuous movement of the Astral Body can be exploited to power her up.
- The explosive power of Misteln's Astral Body makes this optional if you do not wish to break the attack tempo.
- Not advised for Physical Body because evading resets the attack rhythm for the Seeds' attacks.
Universal
Infinity (II)
- The Ideas and Astral Body are permanent summons. So they fit perfectly into Core (II).
- The signet for accelerating Sentience Sync is not needed for Physical Build - because the Ideas are all permanent, the timer extension will stay indefinite and never need charging again.
- Misteln herself in Astral Build, requires that signet because Sentience Sync does not recognize her as a permanent summon, which is strange considering that she technically will not exit Dreamweaver state.
- Precisely because they are permanent, Misteln cannot use Core (I). Once summoned, there is no way to perform a refresh to continue Mind Sync's timer.
Helix (I)
- Contributes to the rapid active use and is able to keep up with the short timer, can also provide SP support if necessary.
Decimation (II)
- Because Misteln heals HP every kill, it makes using Core (I) difficult to manage. Using the HP consumption isn't a solution either as you will tighten the noose around her neck with no further possibility of healing when it comes to boss fights. All you have is Blood Rose which is still a slow burn.
- Core (II) can be managed at the reduced threshold with a healing ELF, but Enhanced signets will be unusable.
Gold (I) / (II)
- Core (I) takes advantage of the exceptional SP gain, alongside any help from other signets. Makes great support with Thunder of Symphony acquired. (Physical & Astral)
- Core (II) takes greater advantage of the rapid SP expenditure. Because the cyclic combo registers as Ultimate type, that 50 SP counts toward Final Echo charges. It piles up the charges at a staggering rate, exceeding that of any existing Valkyrie, not bound by a time limit, allowing it to exceed beyond 25s. (Physical Only)
- Core (II) is less signet intensive due to not needing the Enhanced signets. But Core (I) will benefit from having all 3.
- Gold should not be used by Astral Body until Bodhi has been established. The rapid Bodhi triggers allow for SP to be gained extremely quick. Astral Body barely gains SP, so Gold is useless without Bodhi has a strong primer first.

Any Questions? Go ahead and write in the comments below too. Thanks for reading!