



[TL;DR]
Character Role
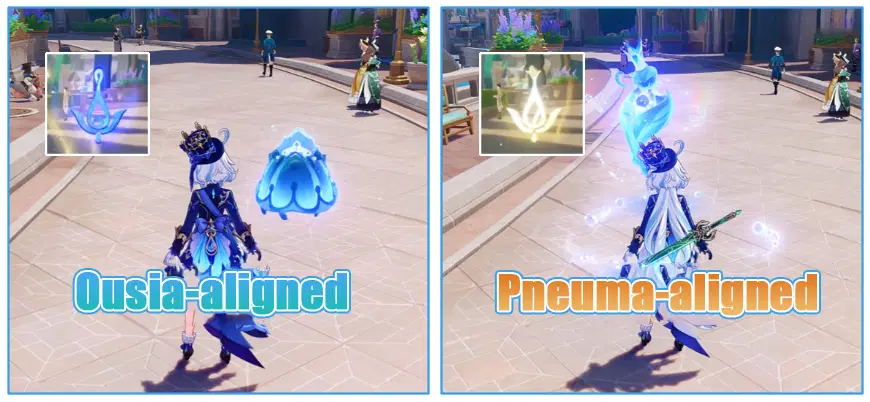
A 5-star Hydro Sword user who mainly plays the role of off-field support and Sub-DPS and relies on her abilities to deal DMG to the enemy while buffing the DMG of her teammates. You can quickly switch between Pneuma and Ousia Arkhe alignments with her Charged Attack
Constellations
Her kit is complete at C0, and C2 is enough if you’re looking for a better DMG buff on her. C6 adds more DPS to her as well as field healing capability.
Pros and Cons
Pros: Persistent off-field Hydro DMG, party DMG buff, has both Arkhe-alignments.
Cons: She needs another group healer in the party with her.
Keywords
Hydro Archon Off-field DMG Buff Pneuma and Ousia-Aligned

[Infographic]
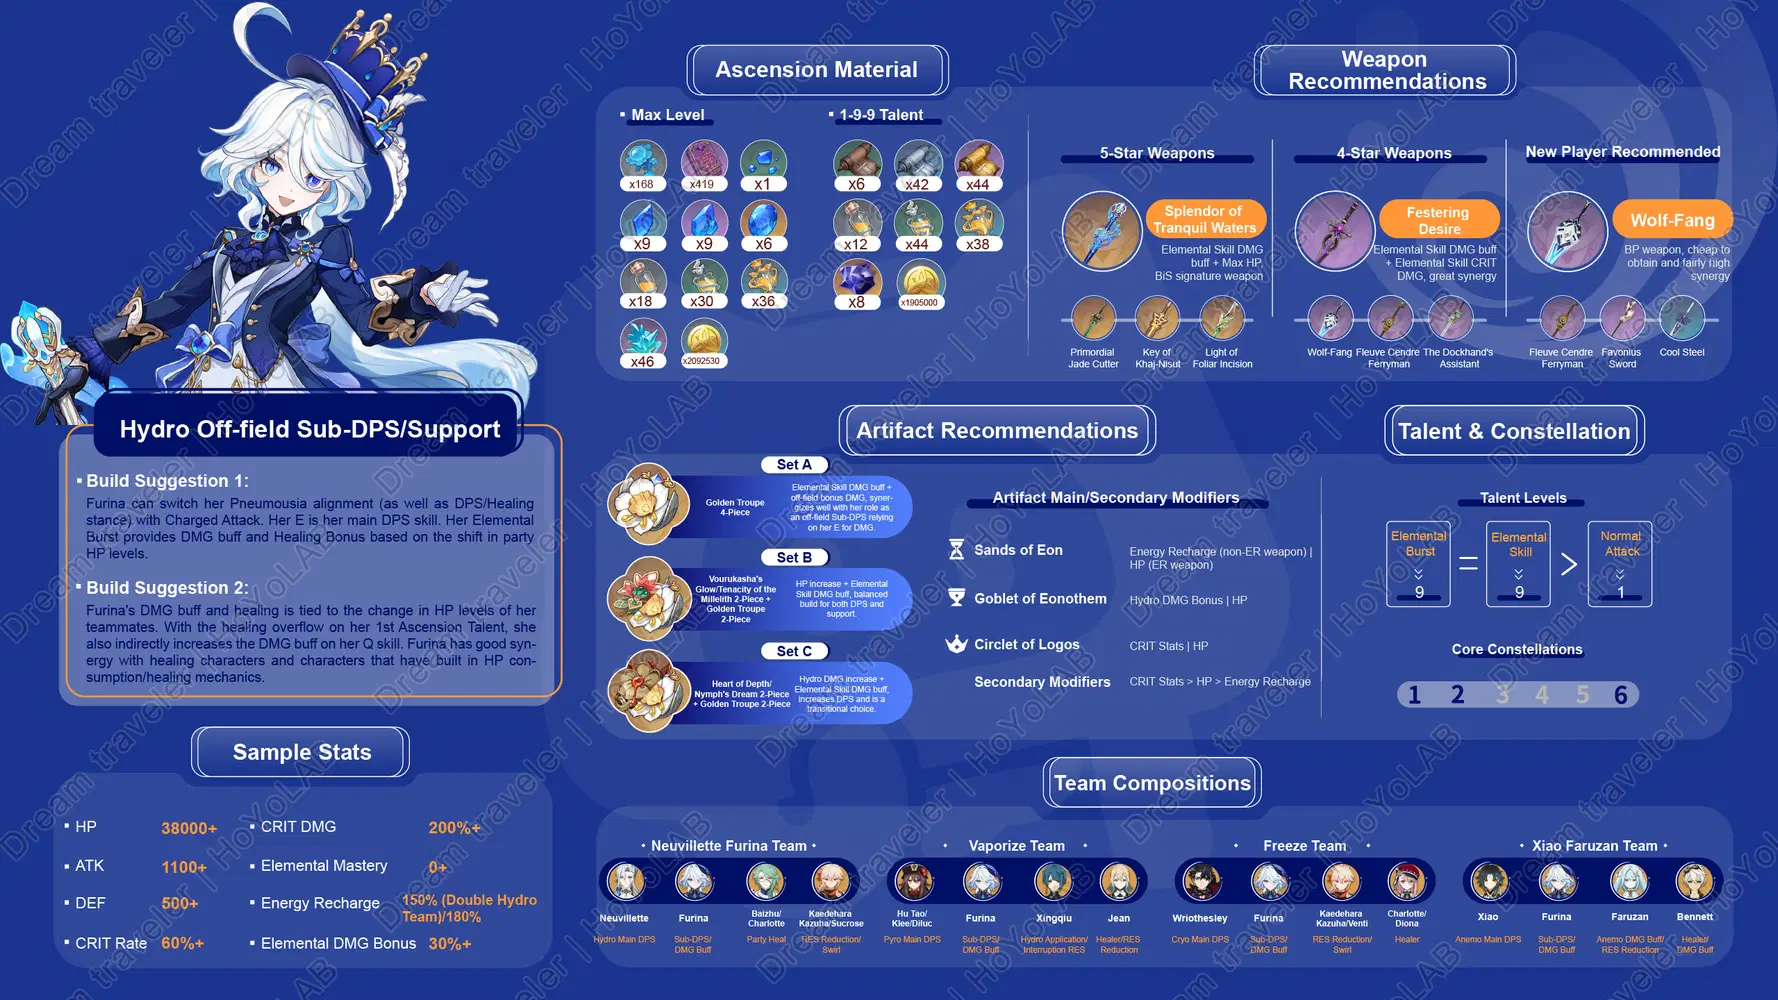
Special Thanks to @Dream traveler_en for the post:[Infographic Character Guide]#Character Guide# – 「Furina」 Character Guide
[Talent Analysis]
Talent Leveling Priority: Elemental Skill ≥ Elemental Burst > Normal Attack
Furina’s core mechanics lie in her Elemental Burst and Elemental Skill. The Elemental Skill is her only source of DPS and also determines her healing in Pneuma form. The Elemental Burst is Furina’s core support ability. Therefore, her recommended skill levels are 1/9/9.
1. Normal Attack
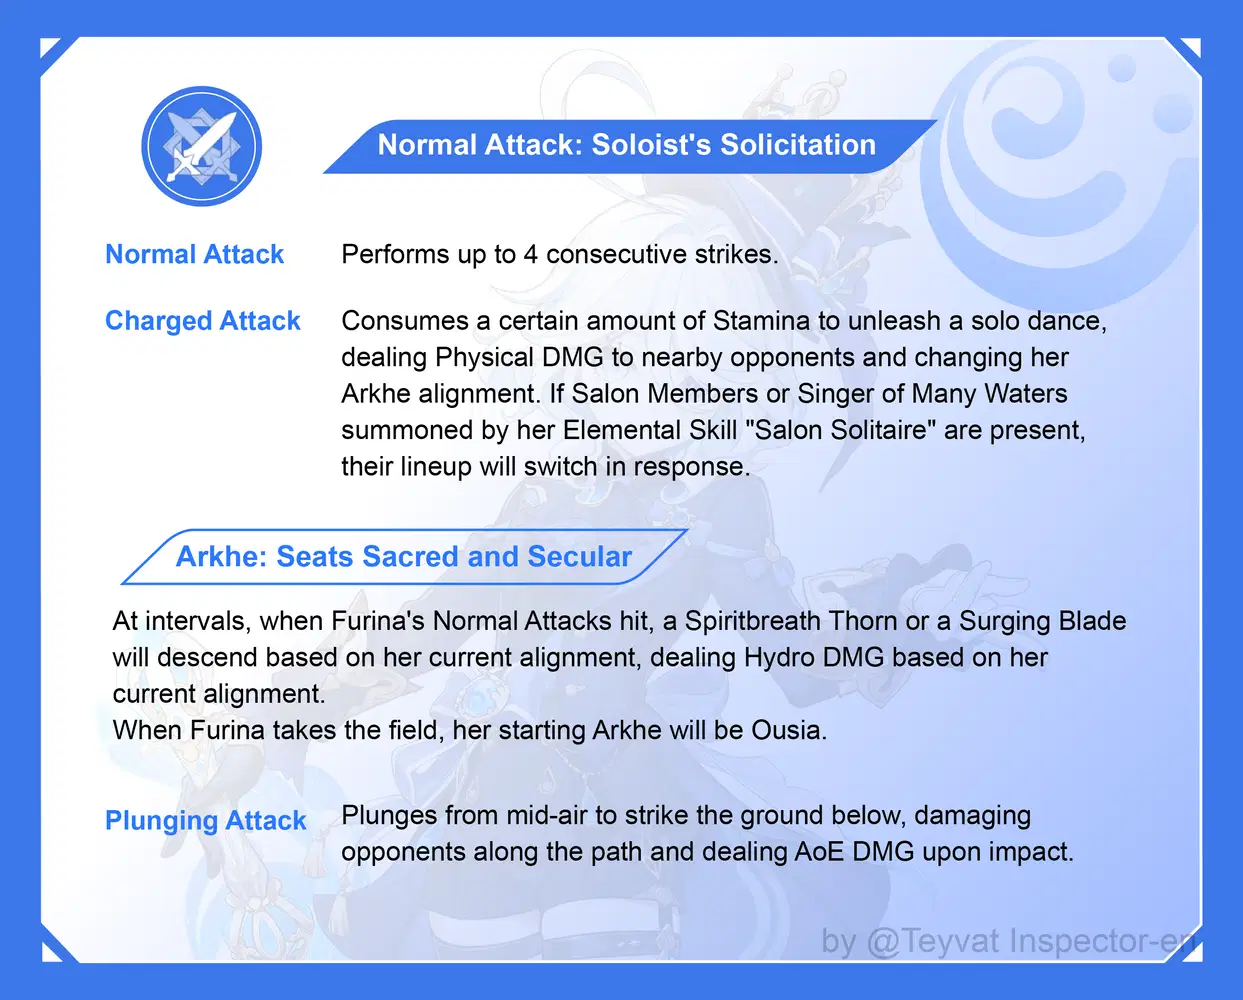
Skill Analysis:
① Normal Attack has four moves and deals Physical DMG under normal circumstances. At C6, it will be converted into Hydro DMG.
② The main use of her Normal Attack is taking care of Pneumousia-aligned enemy mechanics via Charged Attack. The CD is 6s, independently calculated. These attacks deal Hydro DMG and cannot trigger Elemental Reactions.
2. Elemental Skill (E)
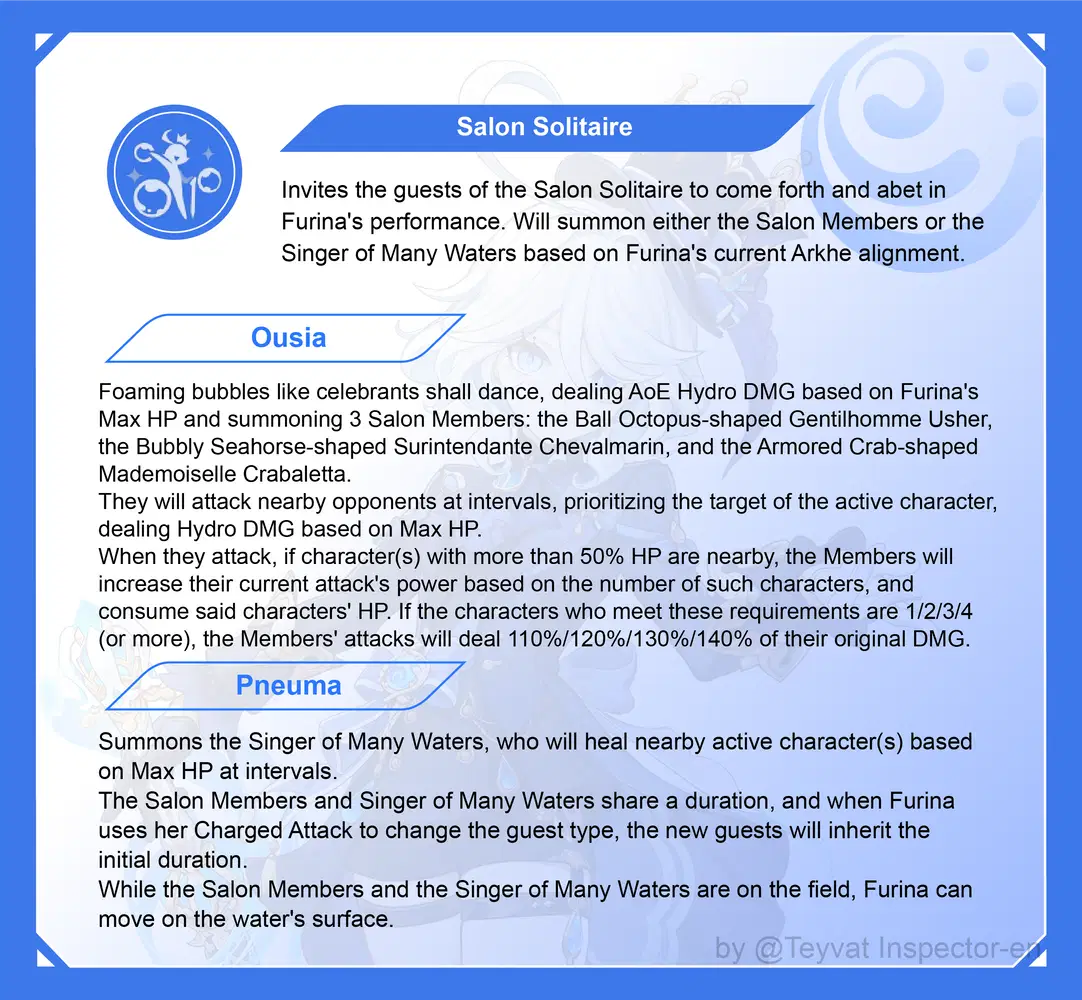
Skill Analysis:
① Cast the Elemental Skill to deal 1 instance of weak Hydro DMG and summons Salon Members or Singer of Many Waters depending on your Arkhe-alignment.
② After summoning, when switching Arkhe-alignment with Charged Attack, the summoned allies will also switch to the type matching your Arkhe-alignment.
③ Regardless of the type of Elemental Skill you cast, Furina will gain the ability to walk on water.
[Key Analysis] Ousia Elemental Skill “Salon Members”
Casting E when Ousia-aligned will summon “Salon Members” – Ball Octopus, Seahorse, and Crab to the field:
① Shared Features:
A. Salon Members generate 1 Hydro Particle when their attacks hit the enemy. The CD on this is 2.5s and it’s shared by all three summons.
B. Their DMG is calculated based on Furina’s dynamic stat changes. The more characters in your party at above 50% HP, the higher DMG the Salon Members will deal as they consume your teammates’ HP.
C. The three Members will prioritize attacking the target of the fielded character. They don’t use snapshotting and work off-field, they will also follow the fielded character around.
D. Casting Elemental Skill deals 1 instance of weak Hydro DMG. The Salon Members also apply weak Hydro DMG.
② Summon Differences:
A. The three summons attack at different frequencies: Seahorse > Octopus > Crab.
B. The three summons deal different levels of DMG and consume different amounts of HP, Crab > Octopus > Seahorse.
[Key Analysis] Pneuma Elemental Skill “Singer of Many Waters”
Casting E when Pneuma-aligned will summon “Singer of Many Waters” to the field:
① Singer of Many Waters will only heal the fielding character based on Max HP. It will not deal DMG, apply Hydro, or generate Energy Orbs.
② The Singer cannot move and will be fixed to the position where it’s summoned, but you can switch Arkhe-alignment with Charged Attack to reposition it.
③ It will heal the fielding character once every 2s. The range is quite large, and characters within effective range will have a colorful water ring around them for display.
3. Elemental Burst (Q)
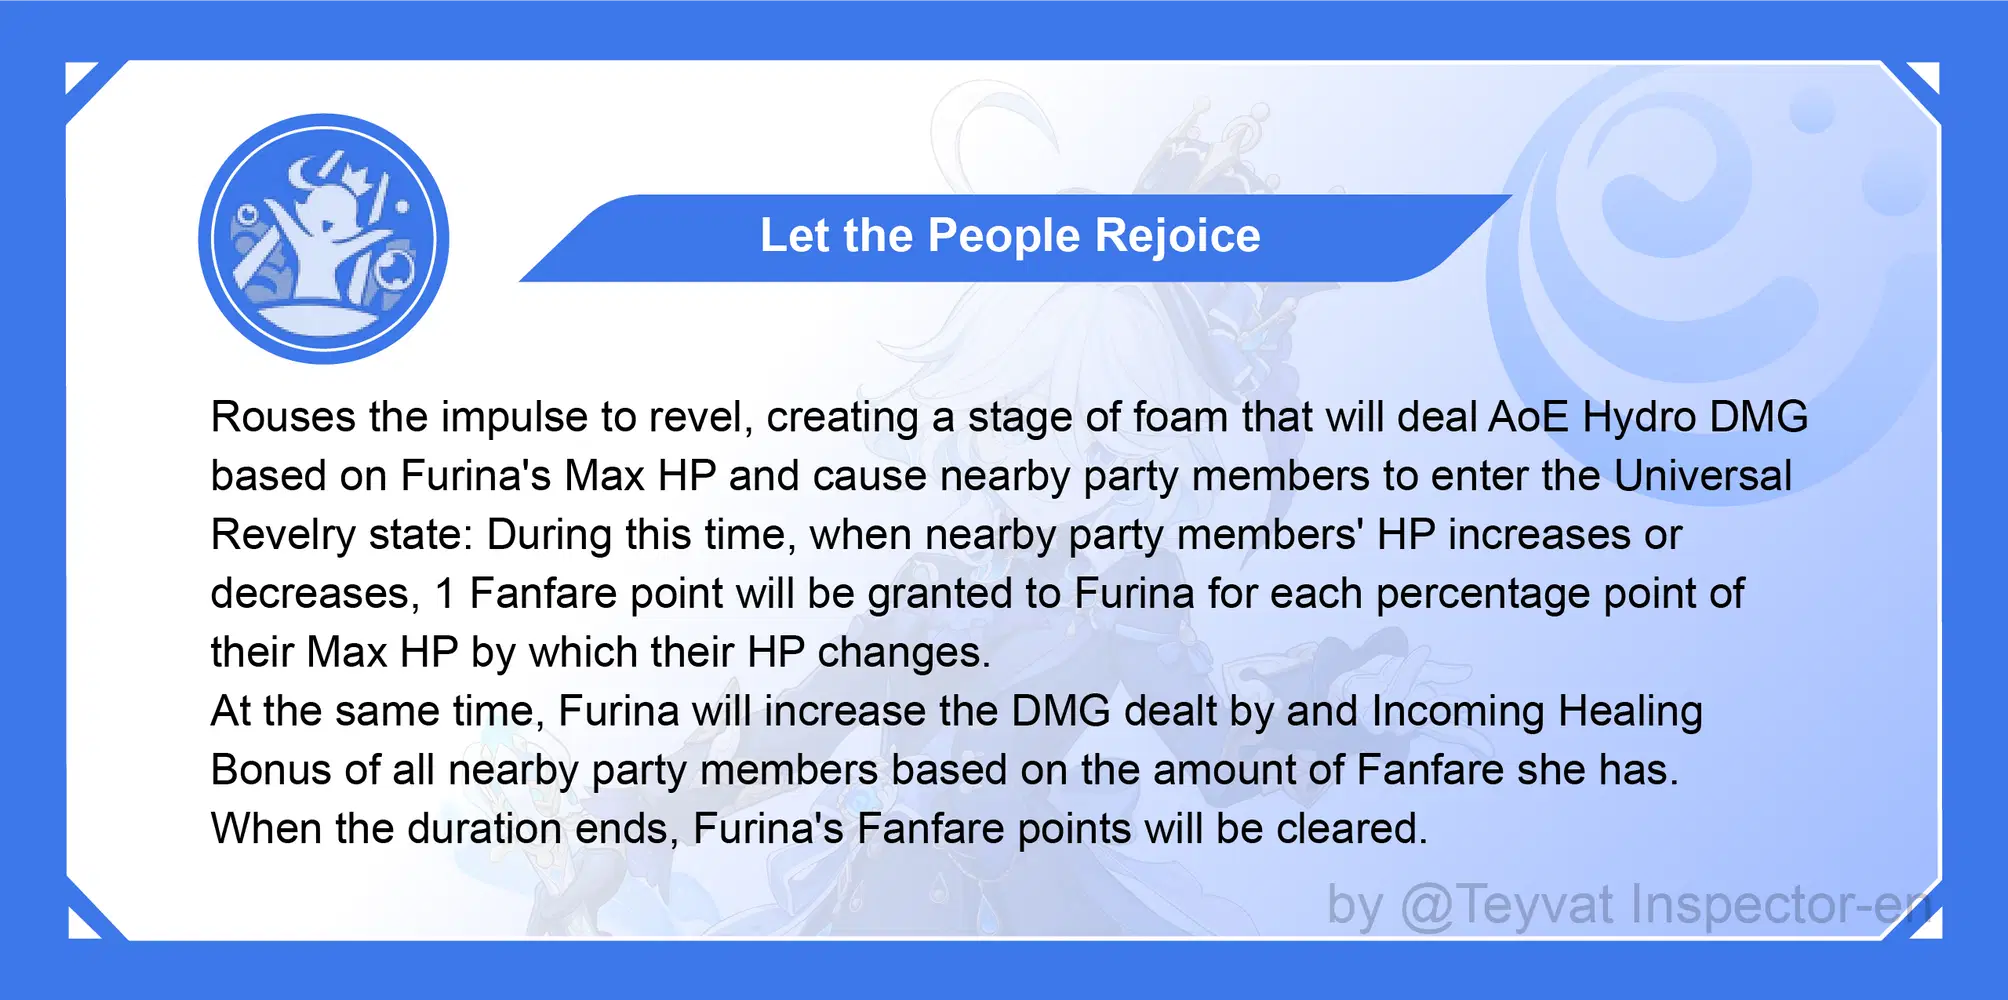
Skill Analysis:
① Casting Q deals Hydro DMG once to enemies around and applies weak Hydro Aura on them. Fanfare points are then converted into a DMG buff and a healing bonus.
② Fanfare points can only be stacked via restoring or consuming character HP. The more Fanfare points you have, the better the DMG and healing buff.
③ DMG buff from the ability goes into the Bonus DMG multiplier block, which is calculated additively with Elemental DMG Bonus; the Incoming Healing Bonus has an independent multiplier block, which calculates multiplicatively with Bonus Healing.
4. Passive Talents
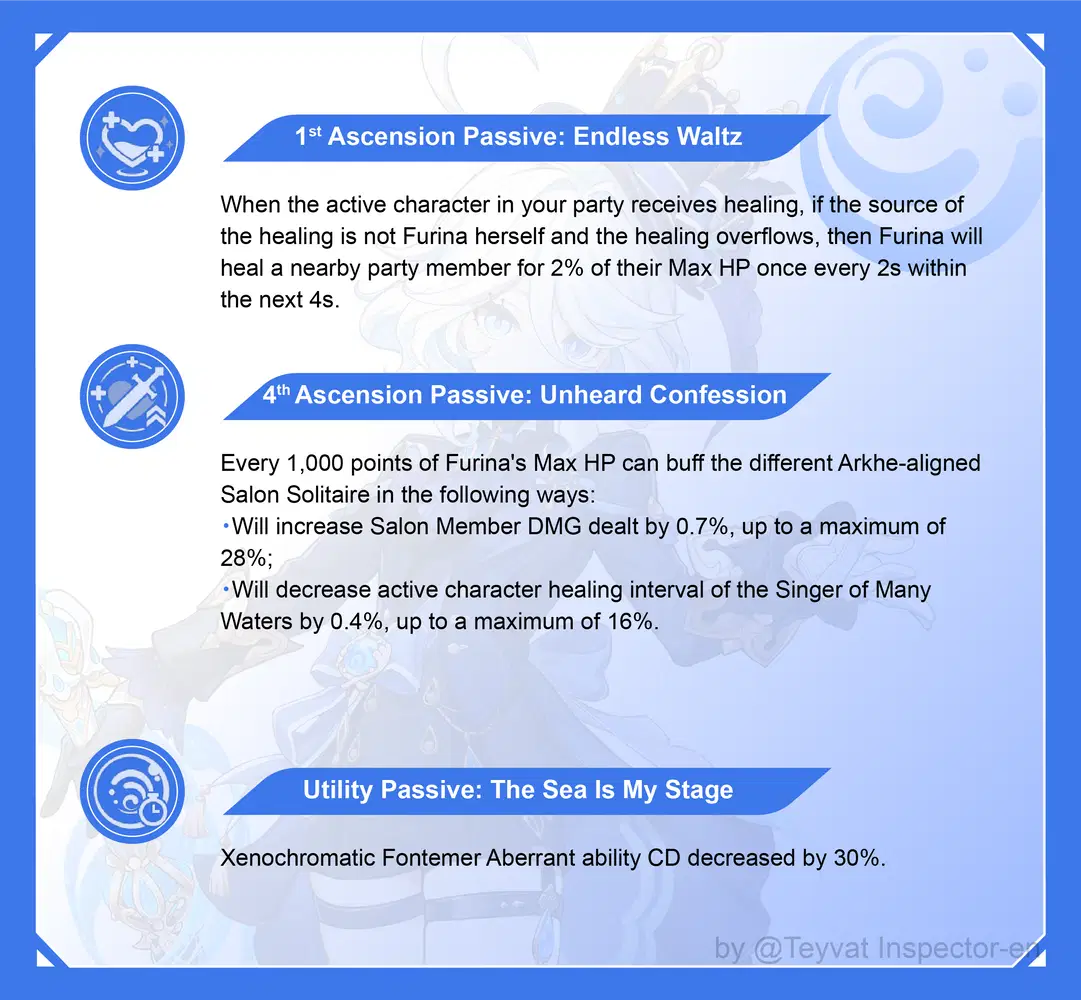
Skill Analysis:
[1st Ascension Passive: Endless Waltz]
Adds a way to heal the party, further improving Furina’s off-field healing. This requires the fielding character to receive overflowing healing to trigger, meaning you’ll need to have another healing character other than Furina in the party.
[4th Ascension Passive: Unheard Confession]
Mainly increases the DMG and Healing of Furina’s E. To max out both, Furina will need 40k Max HP.
[Utility Passive: The Sea Is My Stage]
Reduces the underwater ability CD, improving exploration experience in Fontaine.

[Constellation Analysis]
Constellation Quicklook
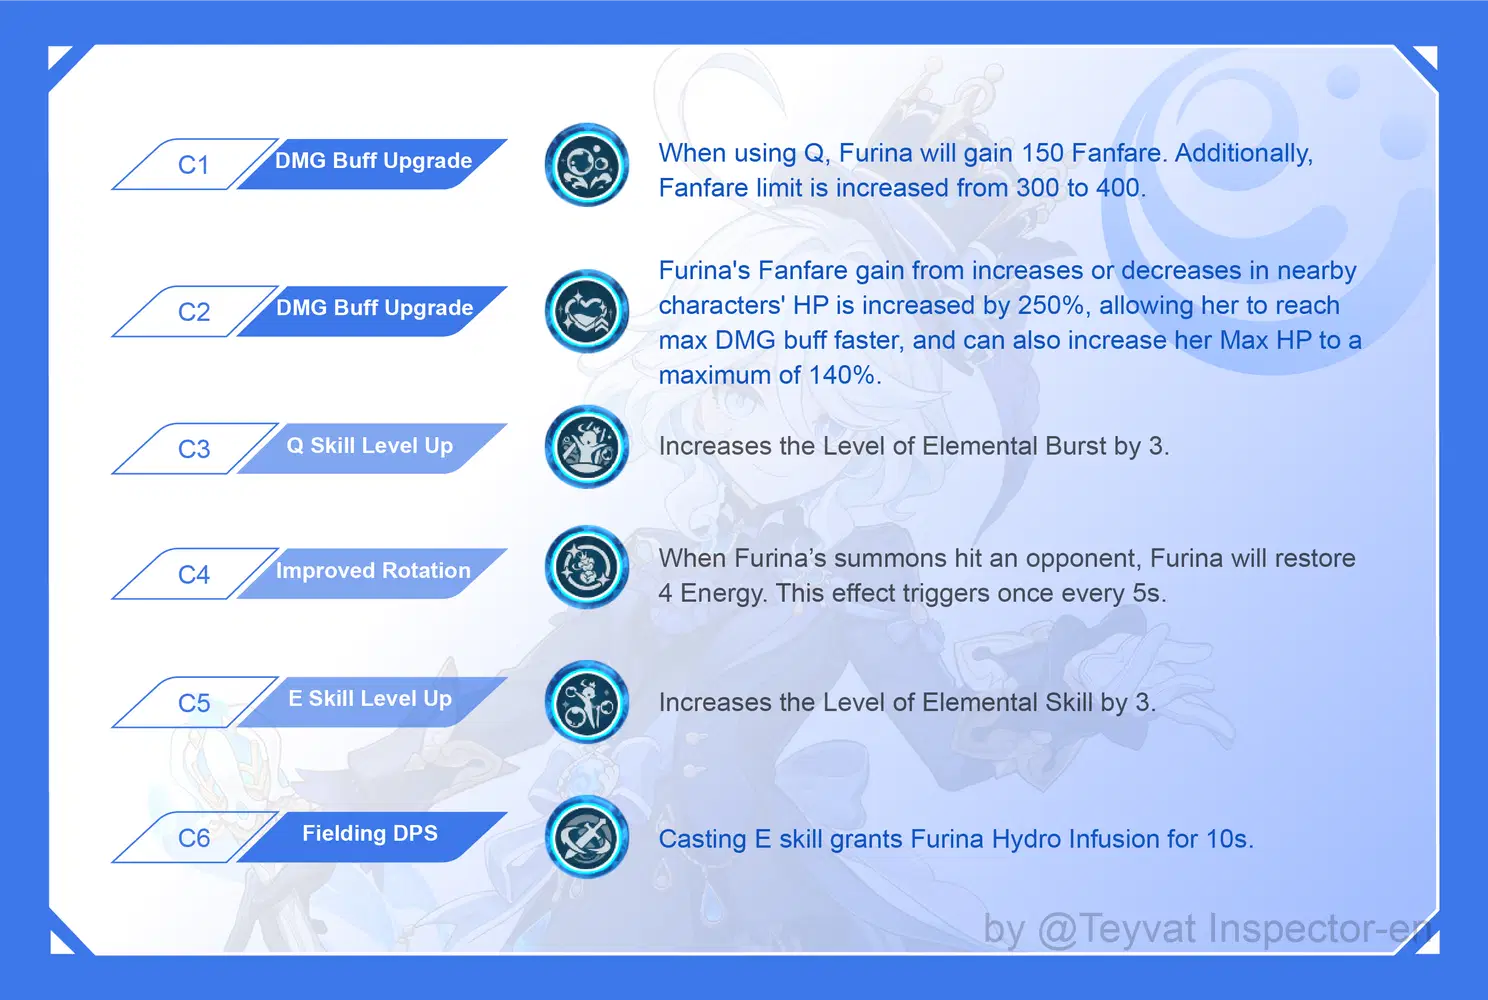
Constellation Upgrade Comparison
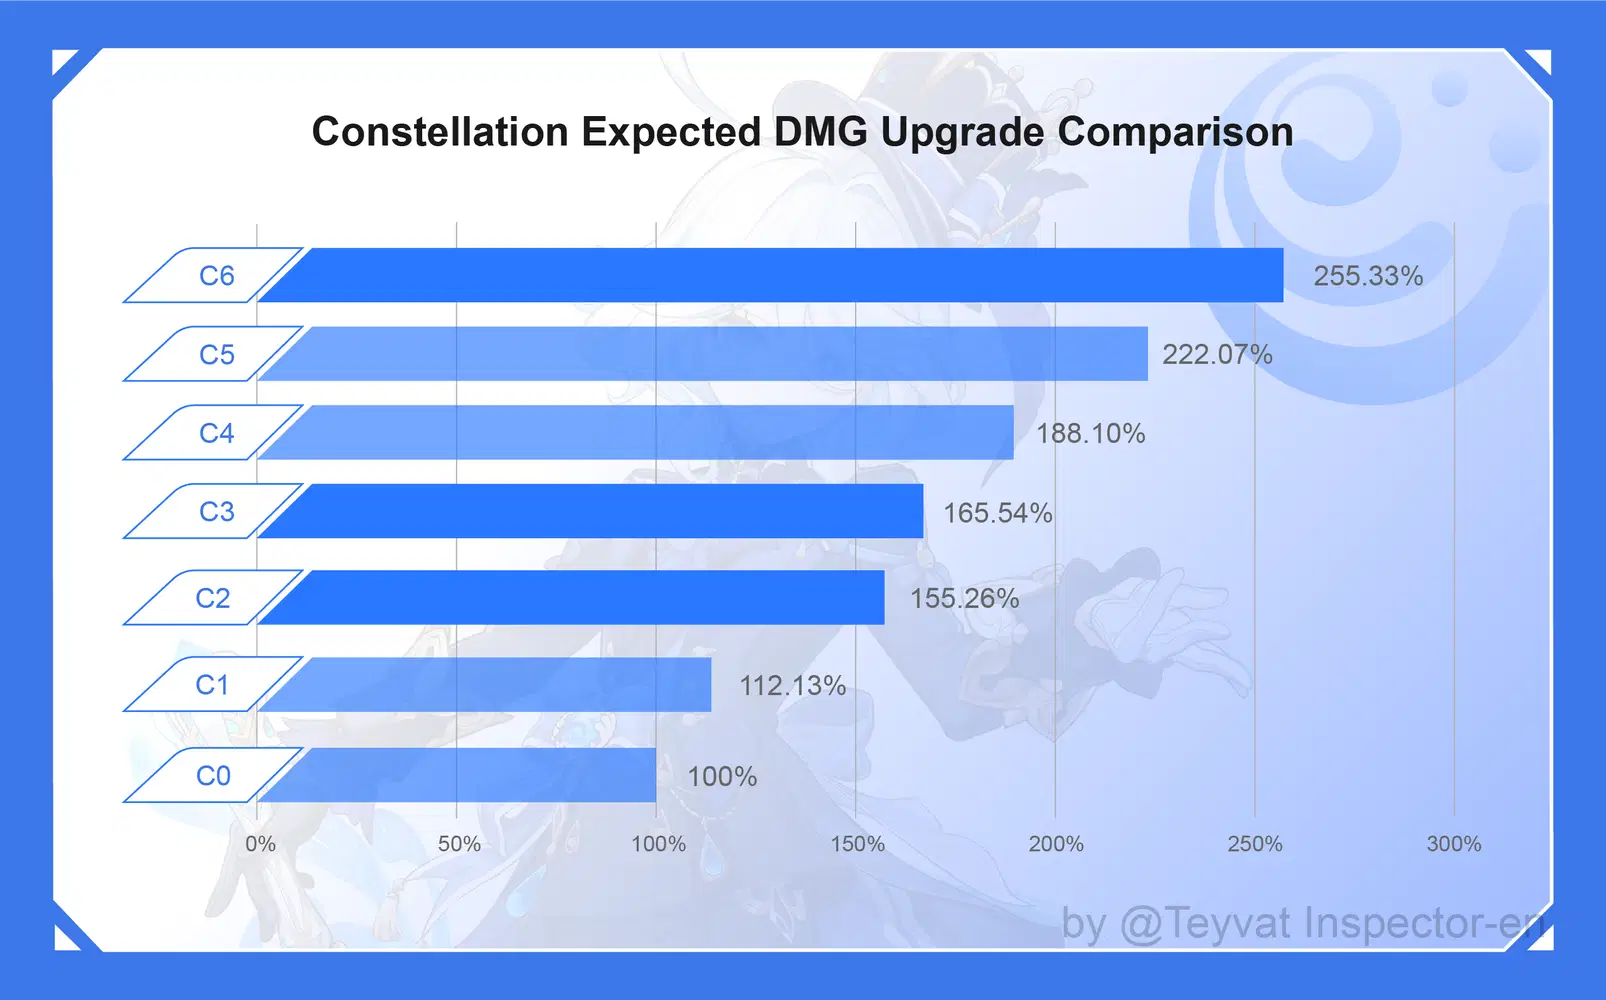
Constellation Breakdown
① C1 instantly grants 150 Fanfare points, improving the maximum DMG buff on her Elemental Burst, providing a baseline level of 37.5% Bonus DMG for the entire party.
② C2 further boosts Fanfare point stacking speed by 2.5x on top of the C1 effect. This not only is a great buff to Furina, but it also provides great buffs to her teammates.
③ C4 effectively reduces Furina’s Energy Recharge problems. Once you’ve unlocked this Constellation, you should prioritize HP Sands on Furina.
④ C6 unlocks Furina’s fielding burst DPS build, giving her burst DPS as well as a party heal while fielding.
Constellation Conclusion
Overall, each Constellation provides a decent boost to Furina. She already possesses some utility and Sub-DPS capability at C0.
C1 and C2 further increase the DMG buff effect from Furina’s Elemental Burst. C4 improves her rotation, and C6 changes Furina’s core gameplay as a DMG buffing support and turns her into a fielding Main DPS. Recommended Constellation targets are C1, C2, and C6.

[Weapon Choice]
Furina is a character who deals direct DMG relying on the HP scaling on her Elemental Burst, so her loadout template is pretty much the same as Yelan’s. When choosing her weapon, we’re leaning towards weapons with CRIT stats, Energy Recharge, and HP.
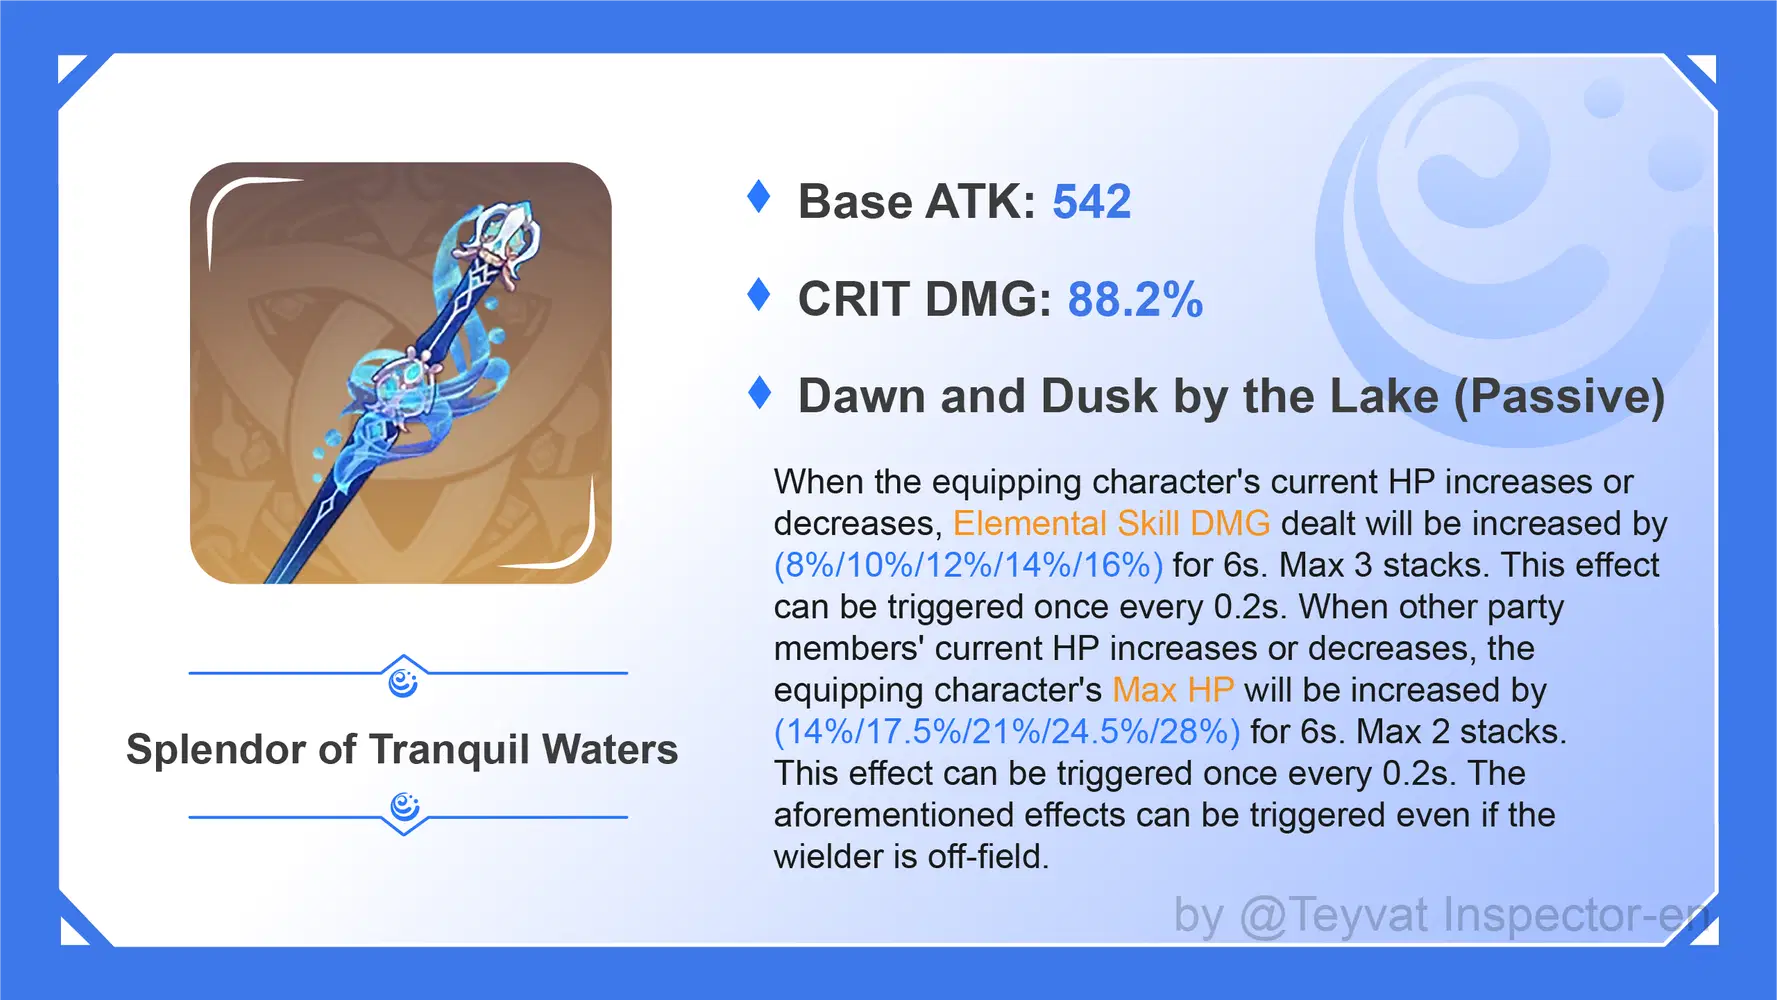
Splendor of Tranquil Waters is Furina’s 5-star BiS Weapon. The weapon passive, appearance, and backstory are designed perfectly for her. At max level, the weapon provides a whooping 88.2% CRIT DMG, and its weapon passive boosts Furina’s HP and the DMG from her Elemental Skill Salon Solitaire when other party members’ HP increases or decreases.
Other 5-star weapon choices: Primordial Jade Cutter, Key of Khaj-Nisut
Non 5-star weapon choices: Festering Desire, Wolf-Fang, Fleuve Cendre Ferryman
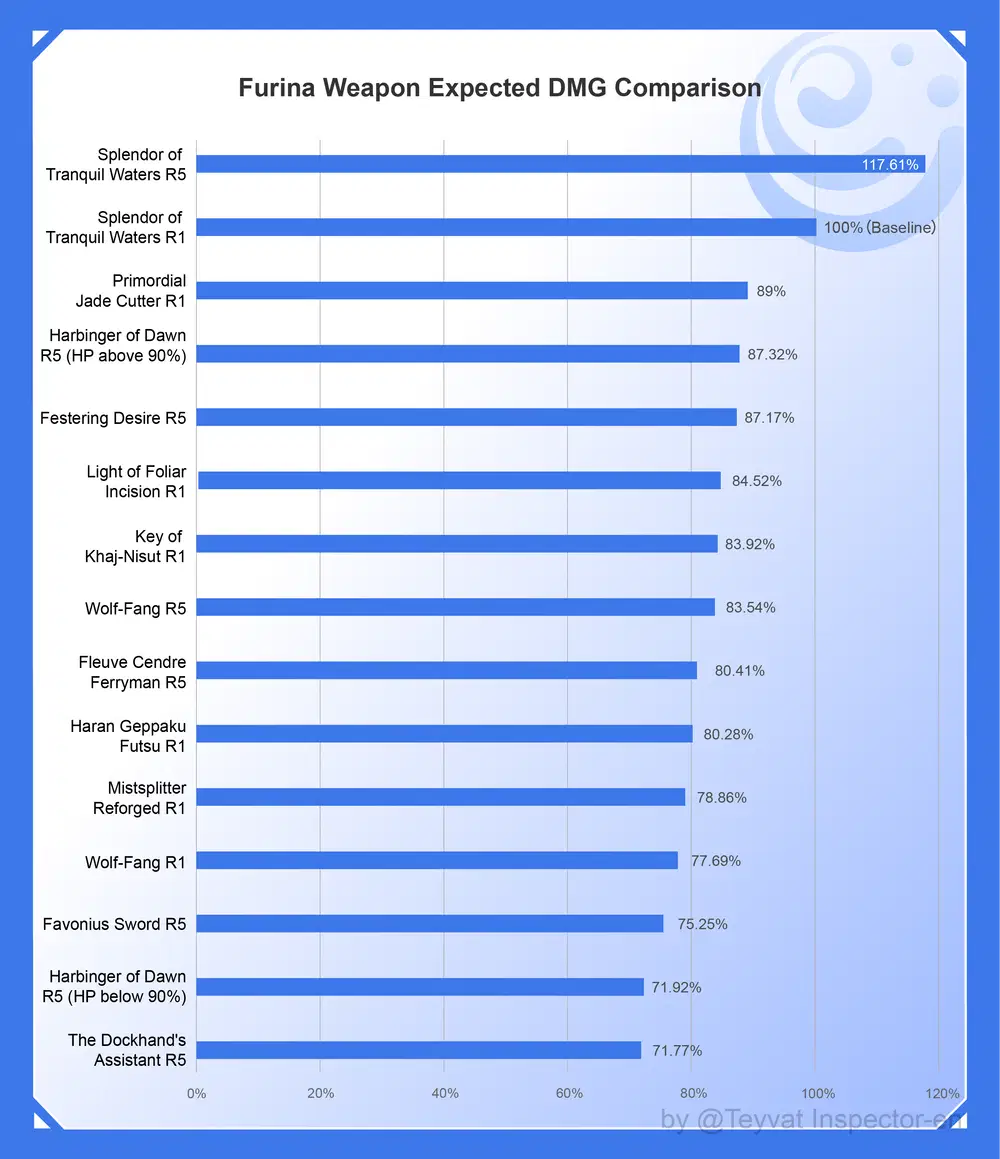
Additional Recommendations
① Primordial Jade Cutter is the second-best choice to her signature weapon. The simple and effective CRIT Rate and %HP bonus require no additional trigger conditions.
② Key of Khaj-Nisut’s weapon passive provides additional HP as well as Elemental Mastery for the party. However, since Furina’s Elemental Burst DMG buff does not affect Transformative Reactions, this weapon is more suitable for Furina when she’s playing in an Amplifying Reaction team.
③ Festering Desire is the 4-star BiS weapon for Furina. The secondary stat provides Energy Recharge which improves her Elemental Burst rotation, and the weapon passive increases Elemental Skill DMG and CRIT Rate. A weapon that serves as both a DPS and support weapon.
④ Wolf-Fang is another obtainable 4-star BiS option for Furina. It increases CRIT Rate and Elemental Skill DMG, but the stacks cannot be gained while off-field; Furina must be fielding and using her Elemental Skill to gain passive stacks.
⑤ The Dockhand's Assistant is a 4-star sword that’s fairly easy to get. The secondary stat provides HP and it increases Furina’s Elemental Skill DMG.

[Artifact Choices]
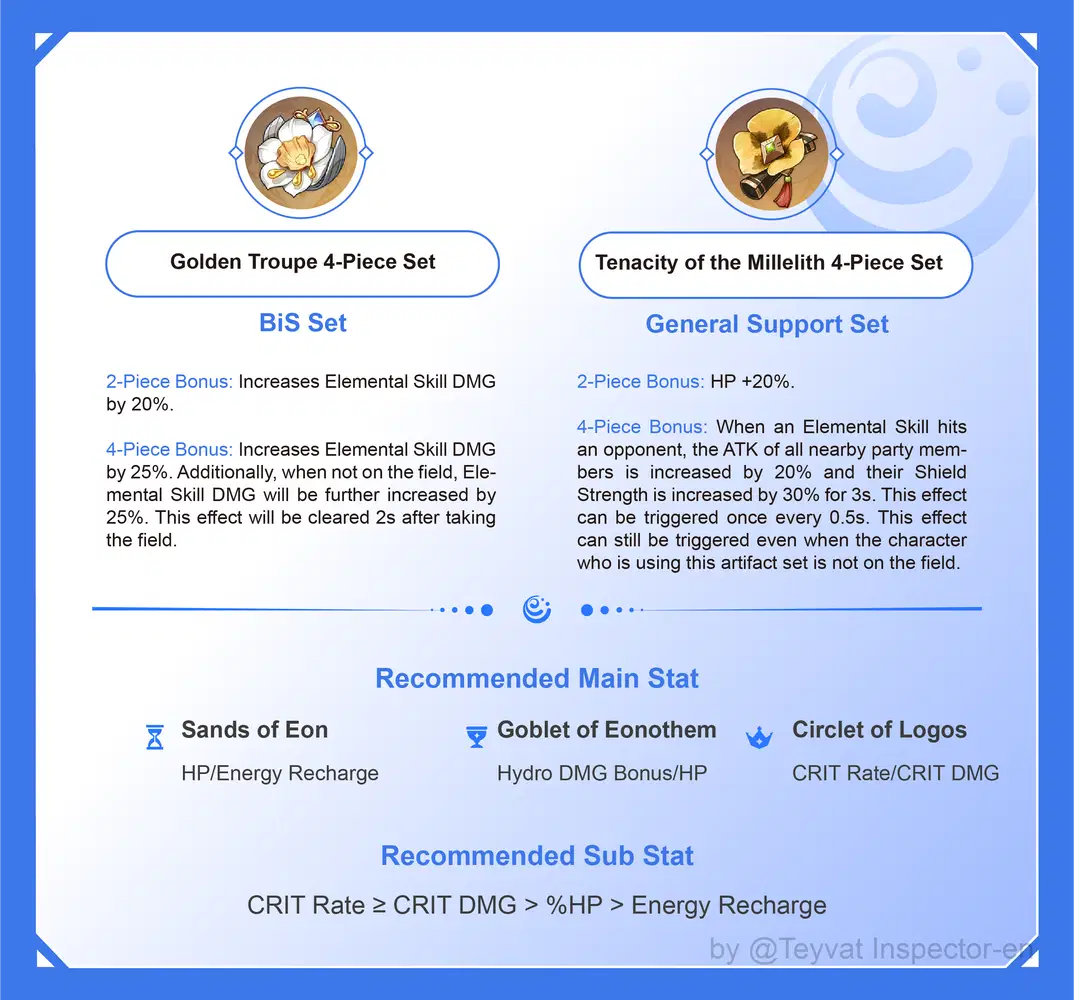
[Artifact Choices Explanation]
① Golden Troupe 4-Piece Set greatly increases Elemental Skill DMG. When Furina is off-field, her Ousia-aligned Elemental Skill deals Hydro DMG constantly, not even her boosted Normal Attack DMG at C6 can compete with the DMG share of her E. Therefore, it’s recommended to have this set as your build target.
② Tenacity of the Millelith is mainly a buff support set. Furina’s Salon Members can constantly trigger the 4-piece set effect.

[Party Setup]
Furina’s DMG buff benefits all multiplier DMG and Amplifying Reactions.
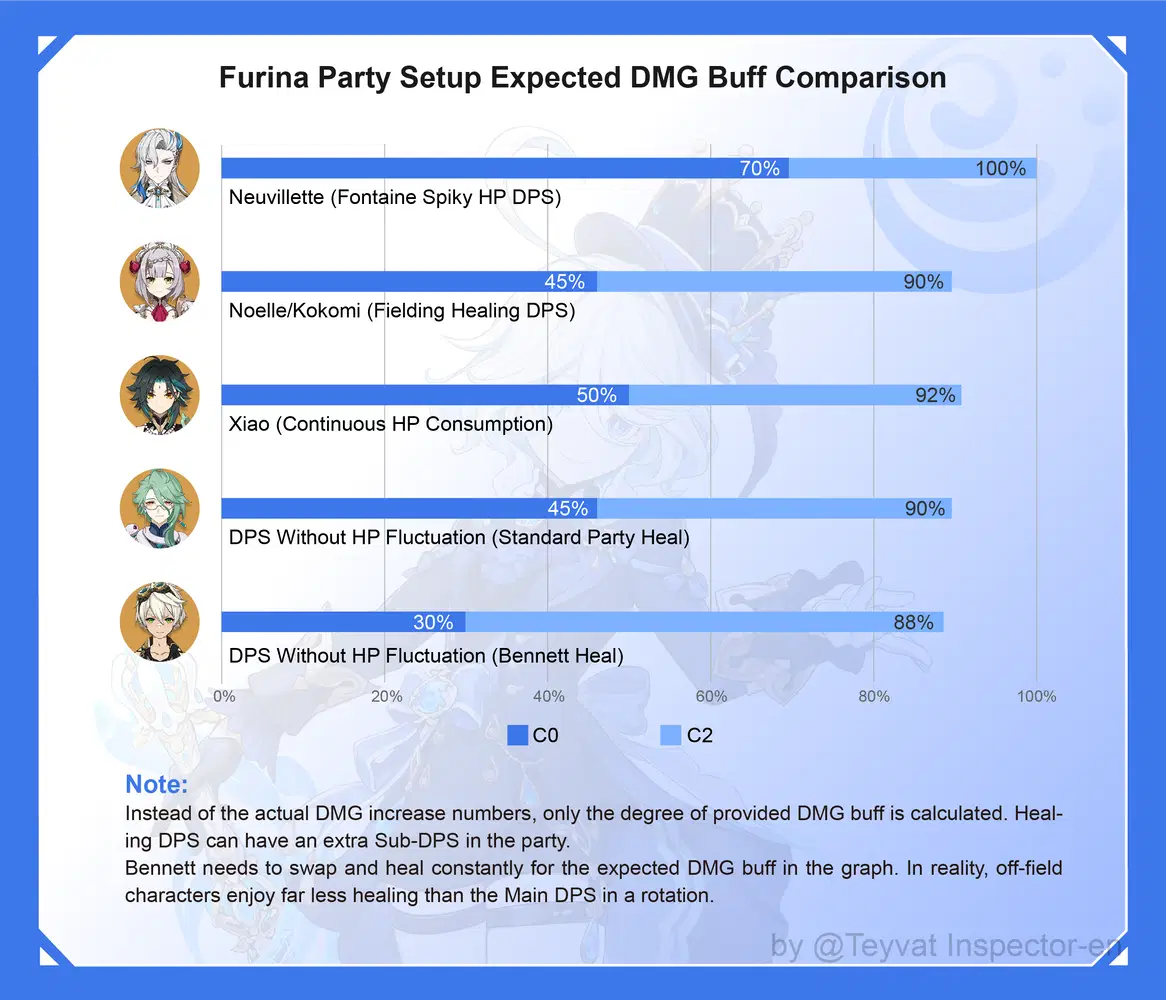
However, because of the stacking mechanic on Fanfare points, C0 Furina needs another healer in the party to have reliable stack generation. Alternatively,unlocking C1 will free her from this setup restriction.
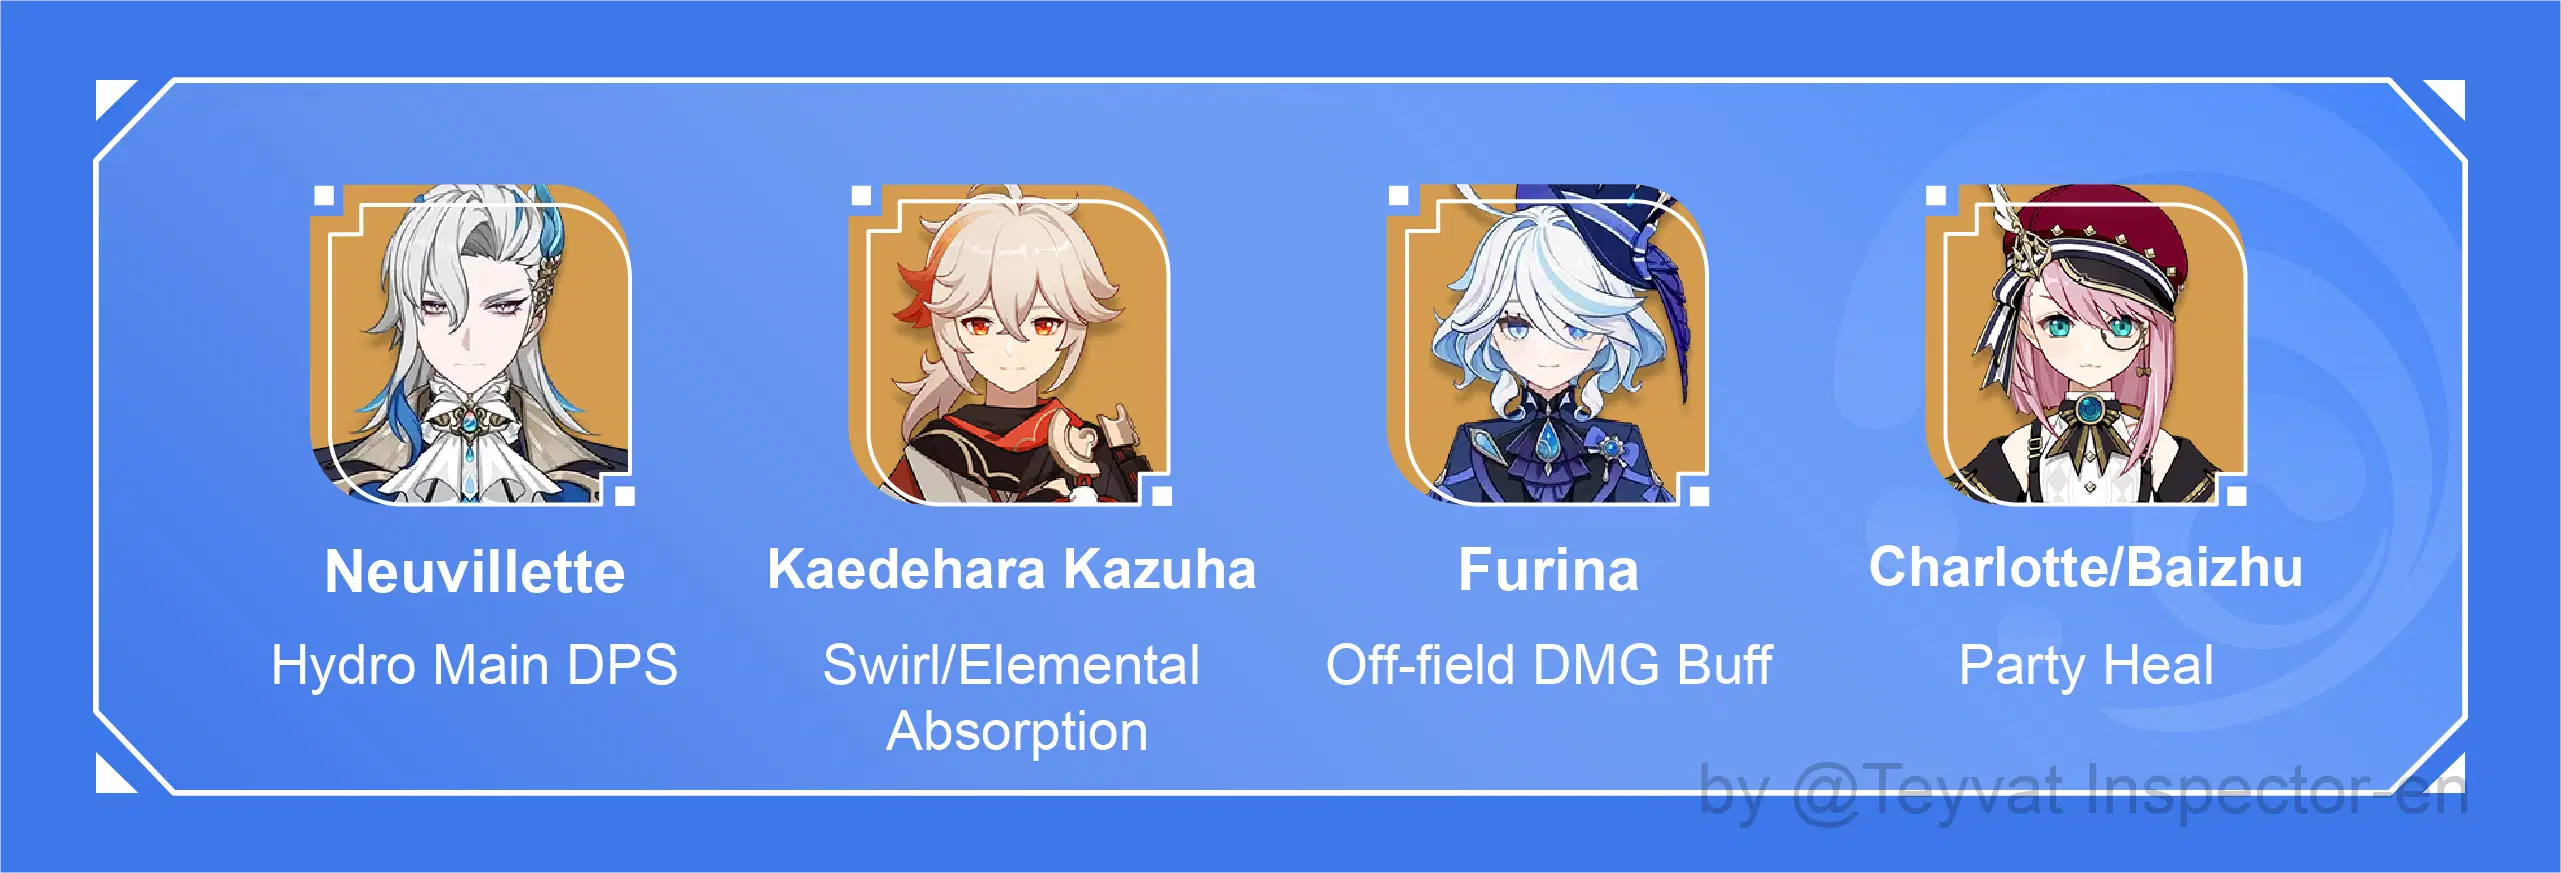
[1] Neuvillette Hydro Team
[How It Works]
1. Neuvillette and Furina’s Hydro Resonance increases the Max HP of the party.
2. Furina increases party DMG, Neuvillette DPS with Charged Attack.
3. Charlotte provides healing for the party with Elemental Burst, increasing Fanfare points.
4. Kaedehara Kazuha with Viridescent Venerer 4-Piece set lowers enemy Hydro RES. You can also consider other Anemo characters with the same set as replacements for Kazuha.
5. Since Furina’s Elemental Skill consumes party HP, you need to consider pairing C0 Furina and Neuvillette with a shield or group healing character, and Baizhu is that choice. C1 Neuvillette has greatly improved Interruption RES, so you can consider Charlotte in this case.
[Recommended Rotation]
Neuvillette EQ, Furina EQ, Kazuha EQ, Charlotte EQ, Neuvillette Charged Attack DPS.
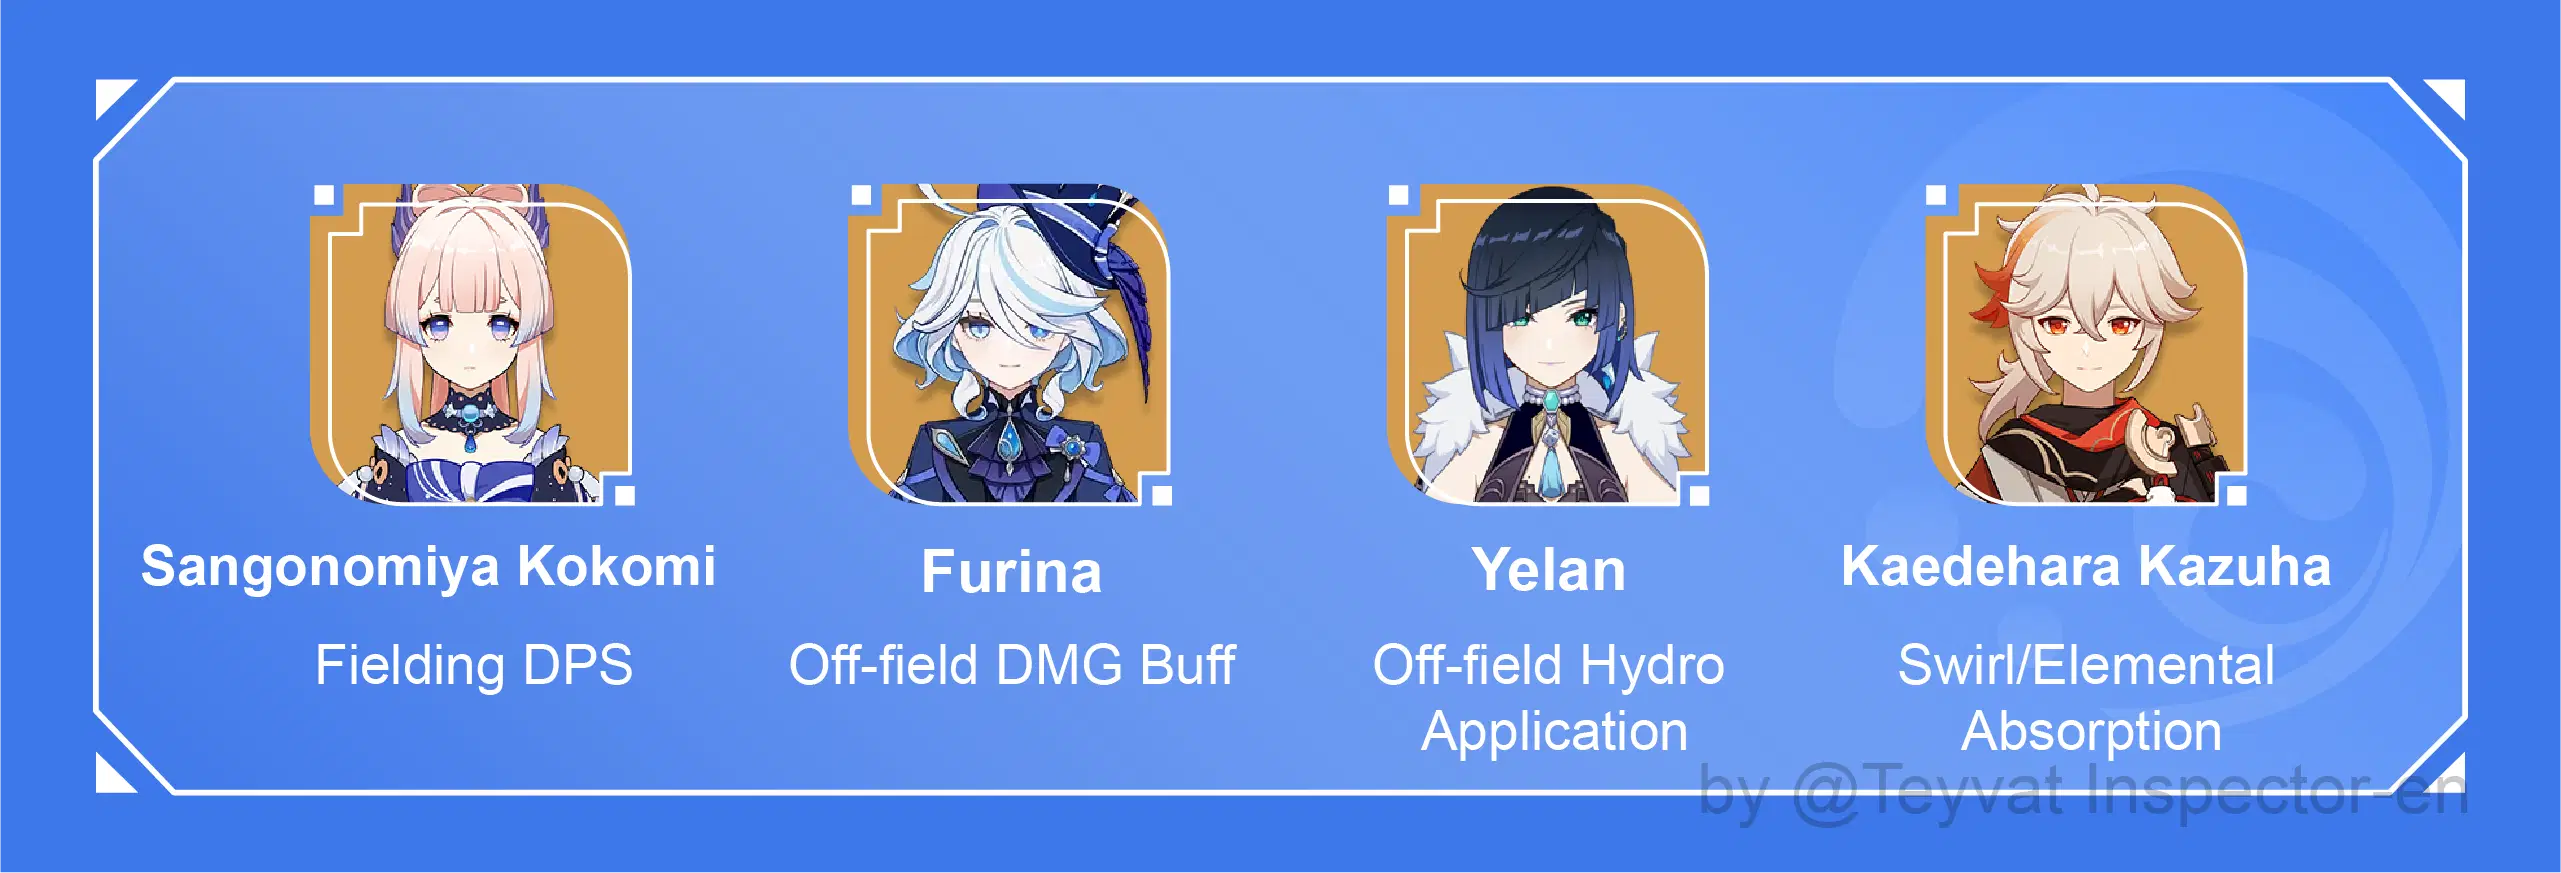
[2] Kokomi + Furina + Yelan + Kauzha
[How It Works]
1. Hydro Resonance increases Max HP for the party.
2. The main DMG of the party comes from Furina and Yelan’s off-field Hydro DMG.
3. Kokomi restores HP for the party with Normal Attacks after casting her Elemental Burst, generating more Fanfare points for Furina, and improving the DMG buff received by the party.
4. With the three Hydro setup, you’ll not have a lot of problems with Energy Recharge, so you can equip HP Sands on all characters. Kokomi can also use the HP/HP/Bonus Healing Artifact main stat loadout.
[Recommended Rotation]
Kokomi E, Furina EQ, Yelan QE, Kokomi Q then Normal Attack.
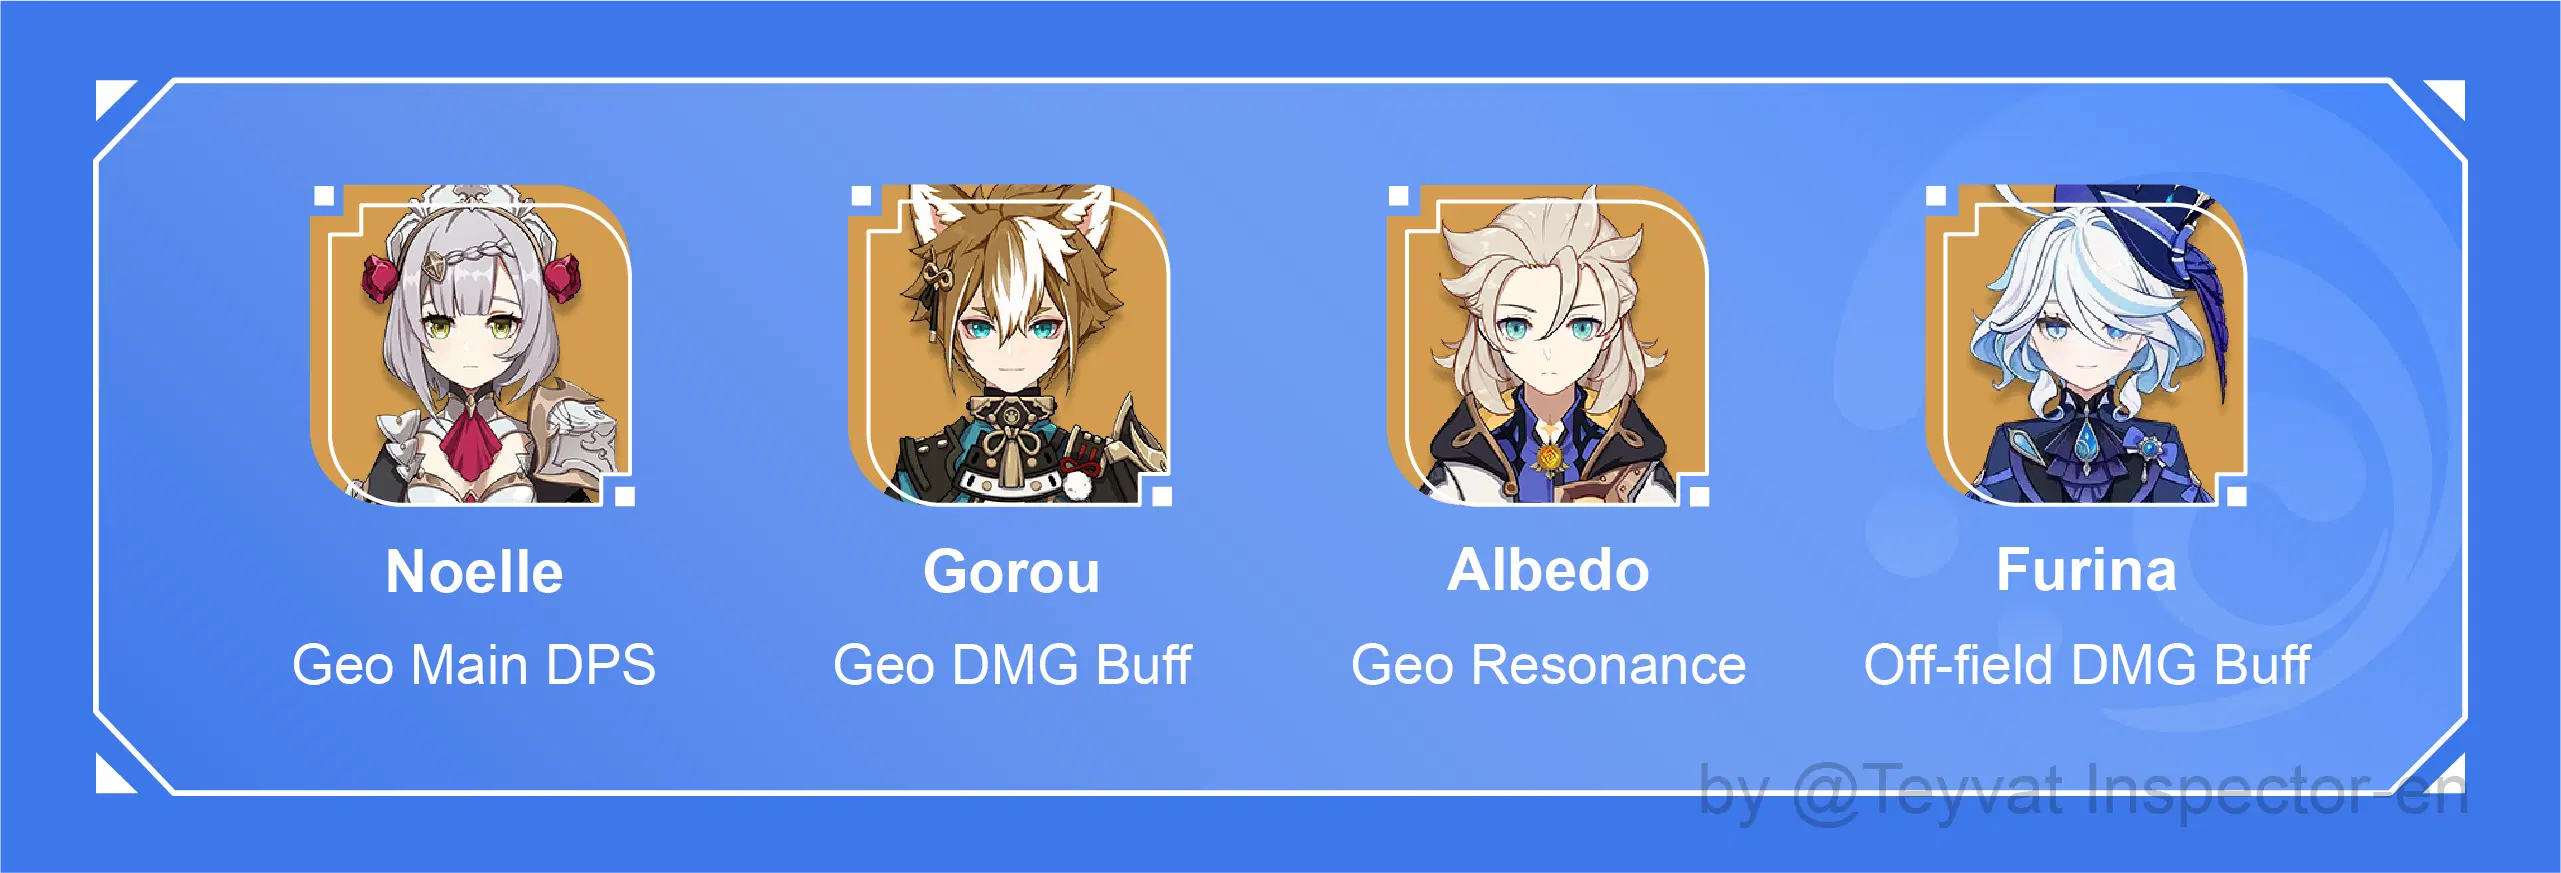
[3] Noelle Geo Team
[How It Works]
1. Geo Resonance increases party DMG and lowers enemy Geo RES.
2. Gorou increases Noelle and Albedo’s DEF, Geo DMG Bonus, as well as Geo CRIT DMG at C6.
3. Albedo deals continuous off-field Geo DMG with his Elemental Skill and generates Geo Particles for Noelle. Furina increases Noelle’s and Albedo’s Geo DMG with her Elemental Burst.
4. If you don’t have Albedo, you can pick Xingqiu or Yelan to activate Hydro Resonance with Furina or pick Zhongli to further lower enemy Geo RES.
[Recommended Rotation]
Gorou E, Albedo E, Furina EQ, Gorou Q, Noelle EQ then Normal Attack and DPS.
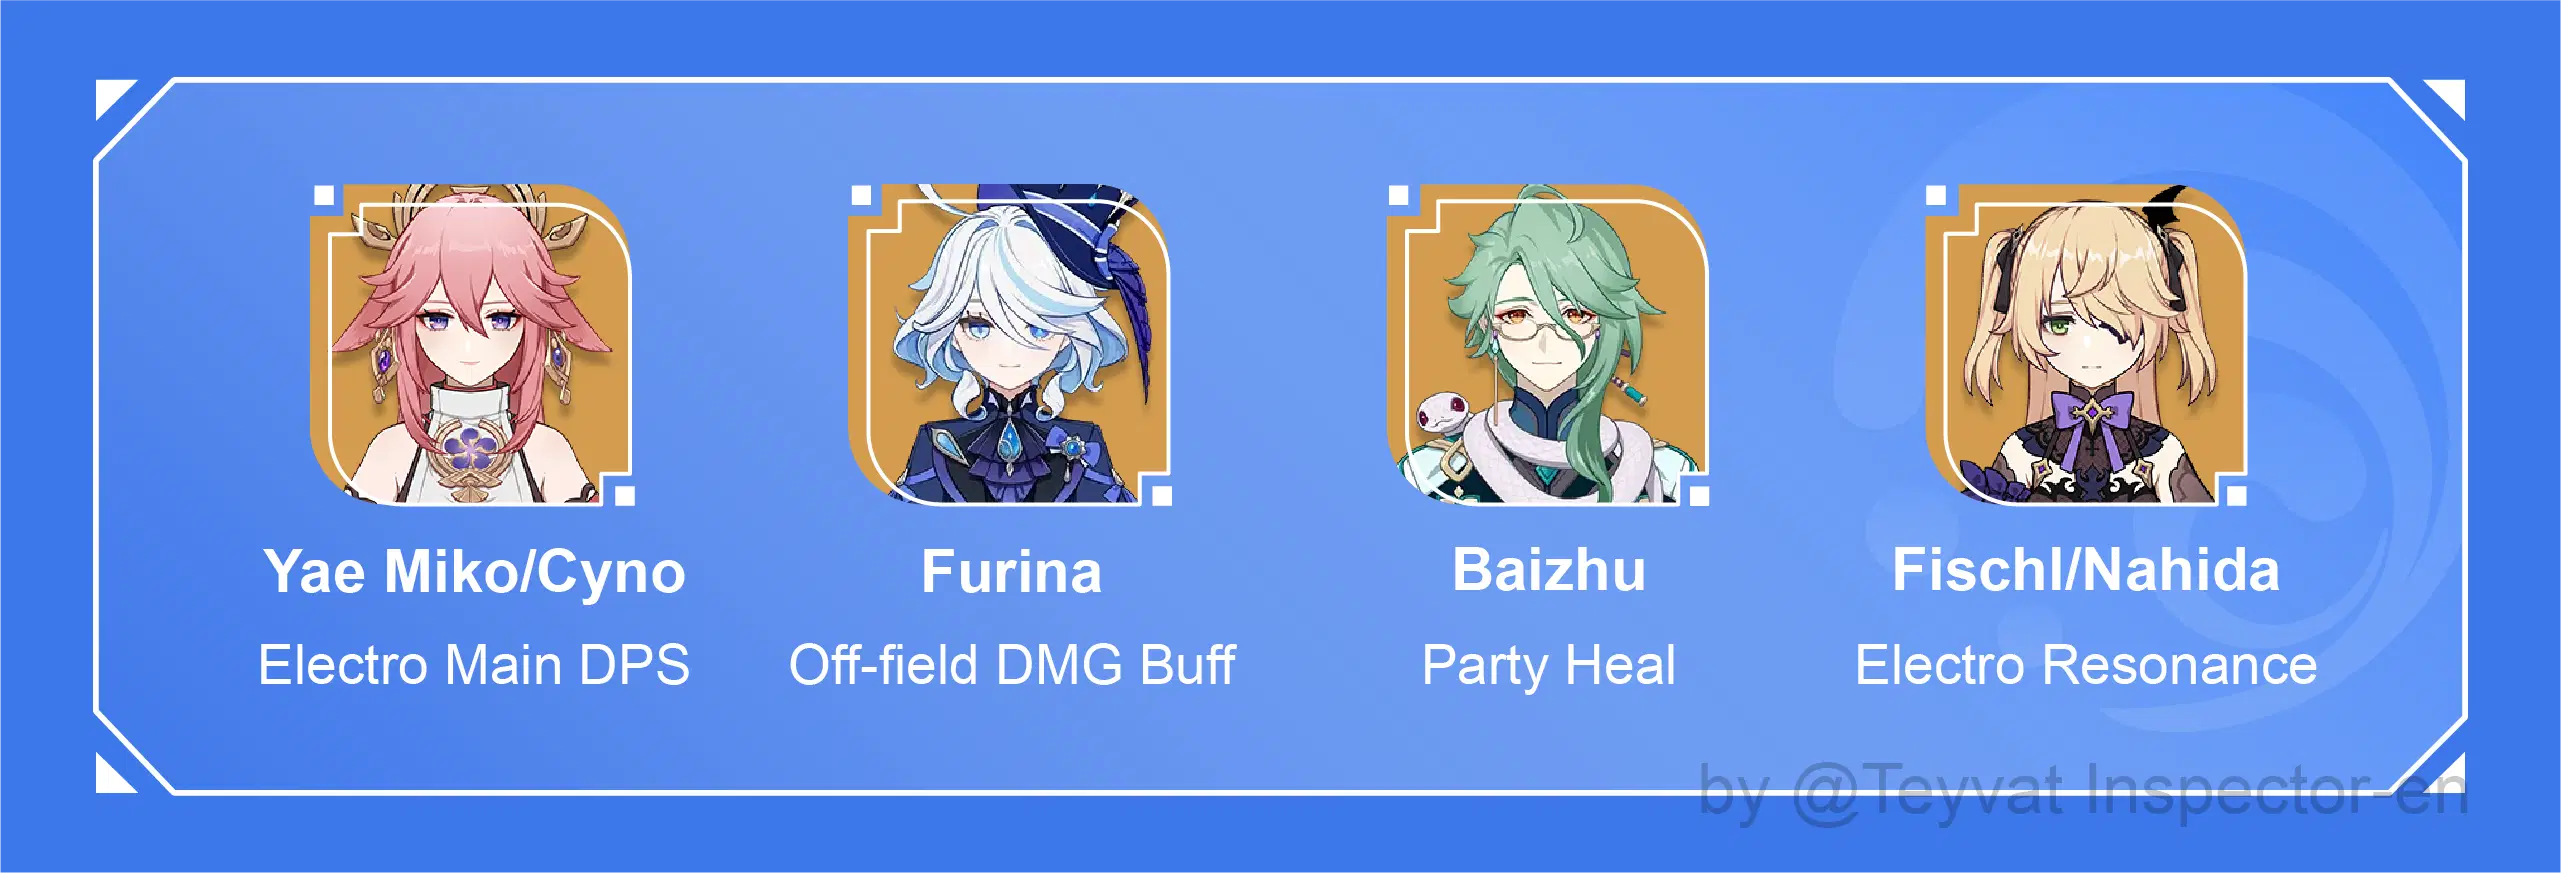
[4] Baizhu + Furina + Fischl Team
[How It Works]
1. In the Yae Miko setup: Yae Miko, Fischl, and Furina do off-field DPS with Elemental Skill. Baizhu will field and apply Dendro constantly with Elemental Skill and Normal Attacks, increasing the frequency of Dendro-based Reactions.
2. In the Cyno setup: Fischl continuously deals Electro DMG and generates Electro Particle for Cyno. Baizhu heals the party and increases the Dendro Reaction DMG of the fielding character. Furina deals Hydro DMG and increases party DMG. Cyno fields and deals persistent Electro DMG.
3. When equipping Energy Recharge Sands on Cyno, you can consider replacing Fischl with Nahida to increase the frequency of Cyno’s Aggravate Reactions.
[Recommended Rotation]
① Yae Miko 3E, Furina EQ, Fischl E, Baizhu EQ then Normal Attack to reapply Dendro.
② Furina EQ, Baizhu EQ, Fischl E, Cyno EQ then Normal Attack DPS.
③ Nahida EQ, Furina EQ, Baizhu EQ, Cyno EQ then Normal Attack DPS.
[5] Alhaitham + Nilou + Furina + Baizhu
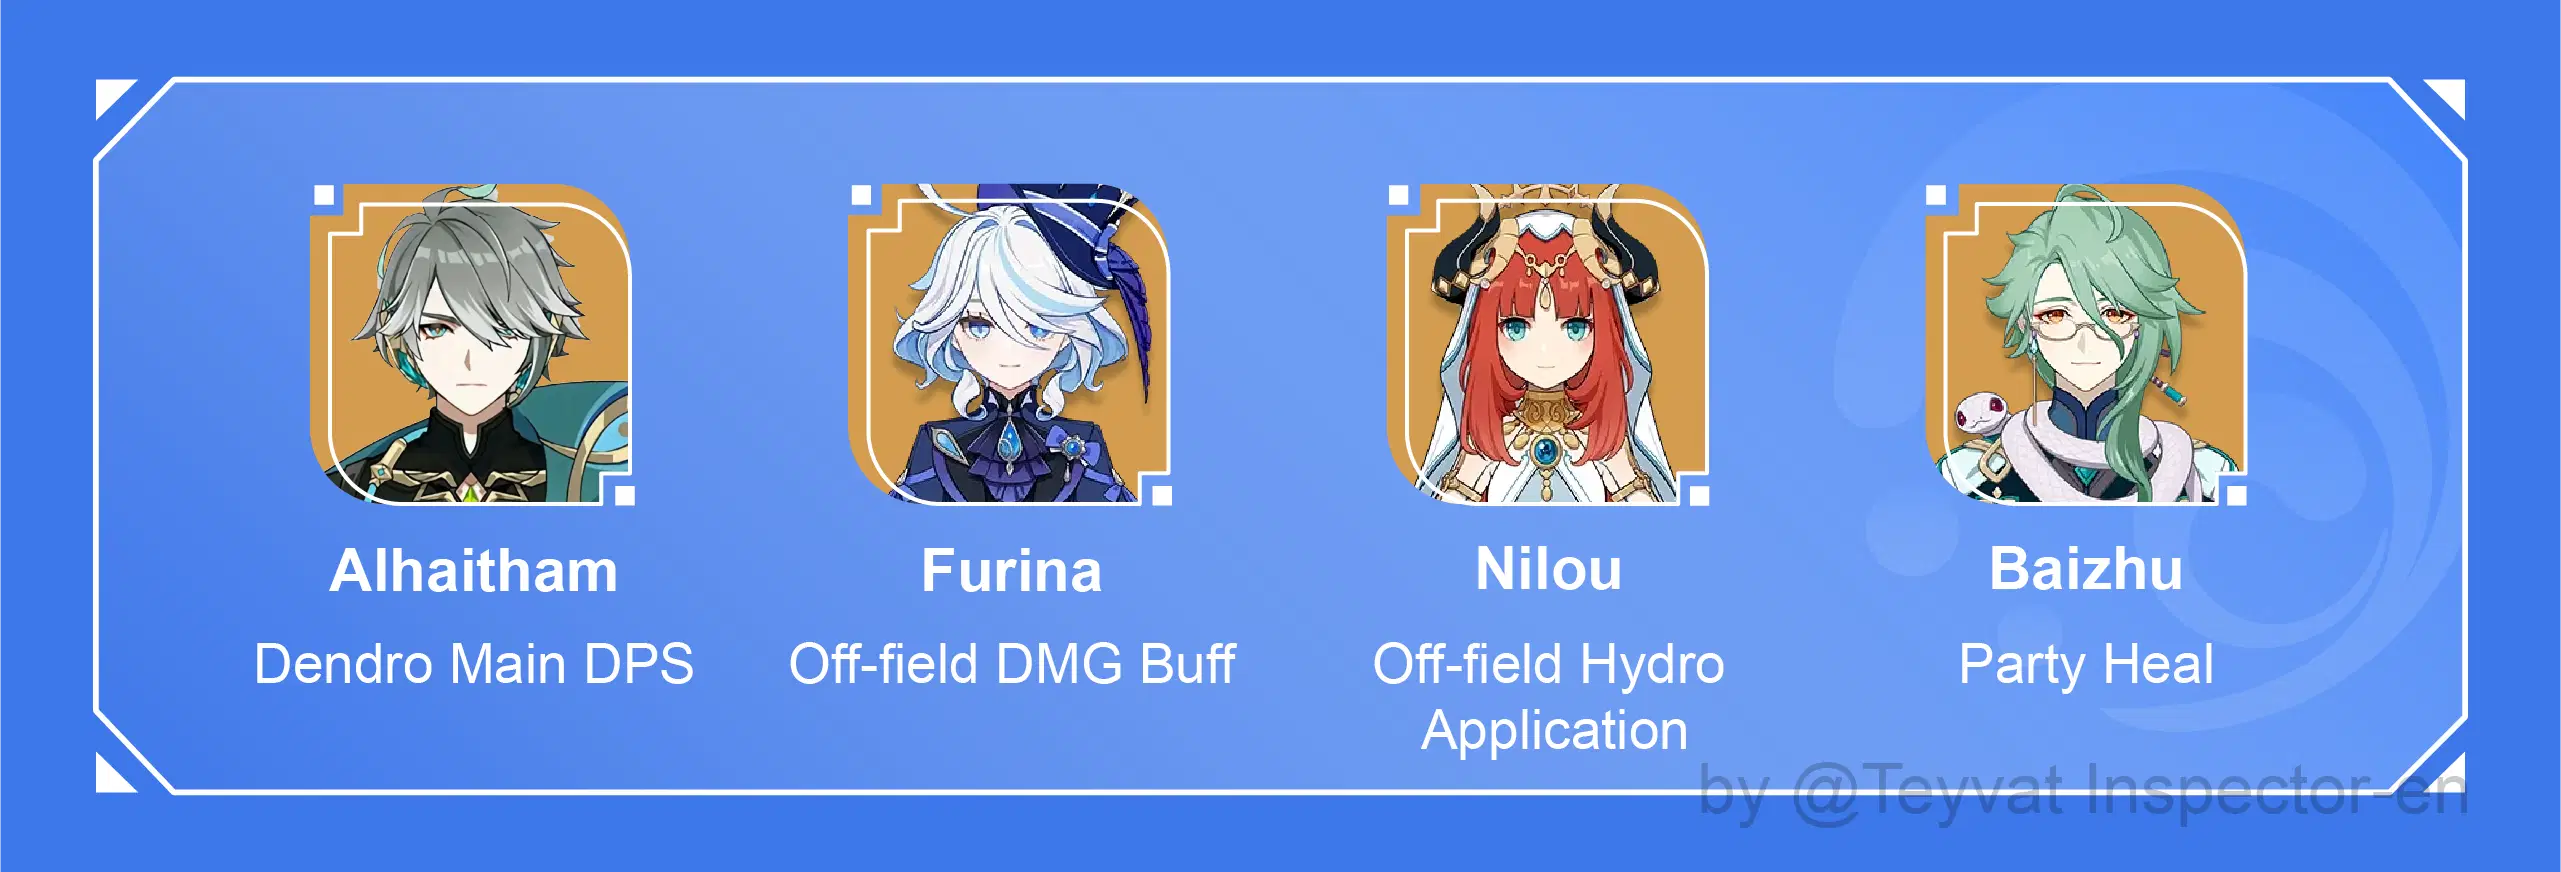
[How It Works]
1. Dendro Resonance increases Alhaitham’s Dendro DMG and the Bloom Reaction DMG of the party. Hydro Resonance enhances Nilou, Baizhu, and Furina’s Elemental Skill.
2. Furina cannot apply her DMG buff to Transformative Reactions, so her role in the Nilou Bloom team is limited to being the off-field Hydro applier and off-field Sub-DPS.
3. The main DMG source of the party is Alhaitham’s direct Dendro DMG and the Bloom Reaction DMG. Baizhu heals the party with Skill and provides shields. Nilou increases Bloom Reaction DMG of the party.
[Recommended Rotation]
Furina EQ, Baizhu EQ, Nilou 4E, Alhaitham E then DPS/Q then DPS.
[6] Raiden + Furina + Jean Team
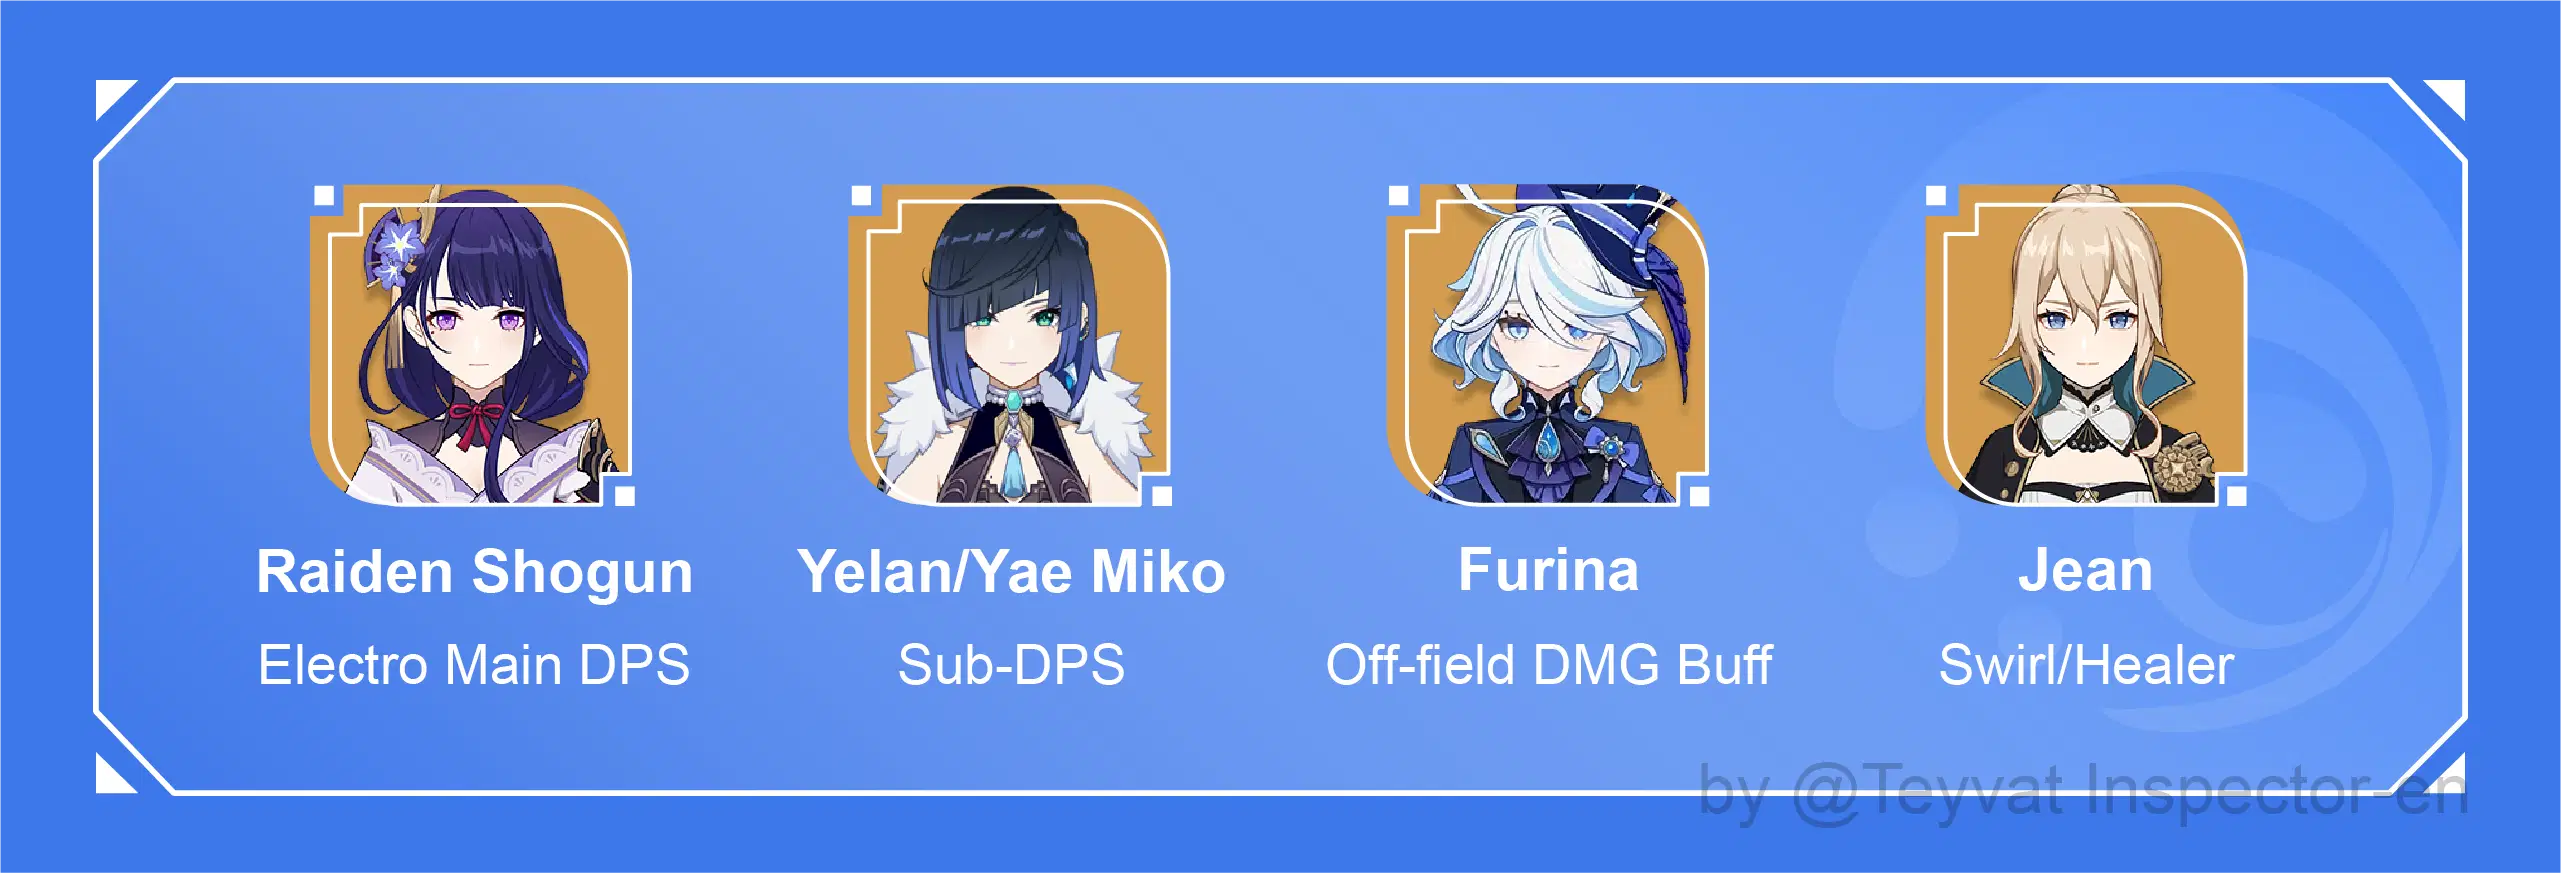
[How It Works]
1. Hydro Resonance increases Yelan and Furina’s DPS. Electro Resonance improves party Energy Recharge. Yelan or Yae Miko increases Raiden Shogun’s DMG output.
2. Furina increases party DMG. Jean uses her Skill to trigger Hydro/Electro Swirl Reaction to lower enemy Hydro/Electro RES, then heals the party with Elemental Burst.
[Recommended Rotation]
① Raiden Shogun E, Furina EQ, Yelan QE, Jean EQ, Raiden Shogun Q then DPS
② Raiden Shogun E, Yae Miko 3E, Furina EQ, Jean EQ, Raiden Shogun Q then DPS.
[7] Wriothesley Cryo Team
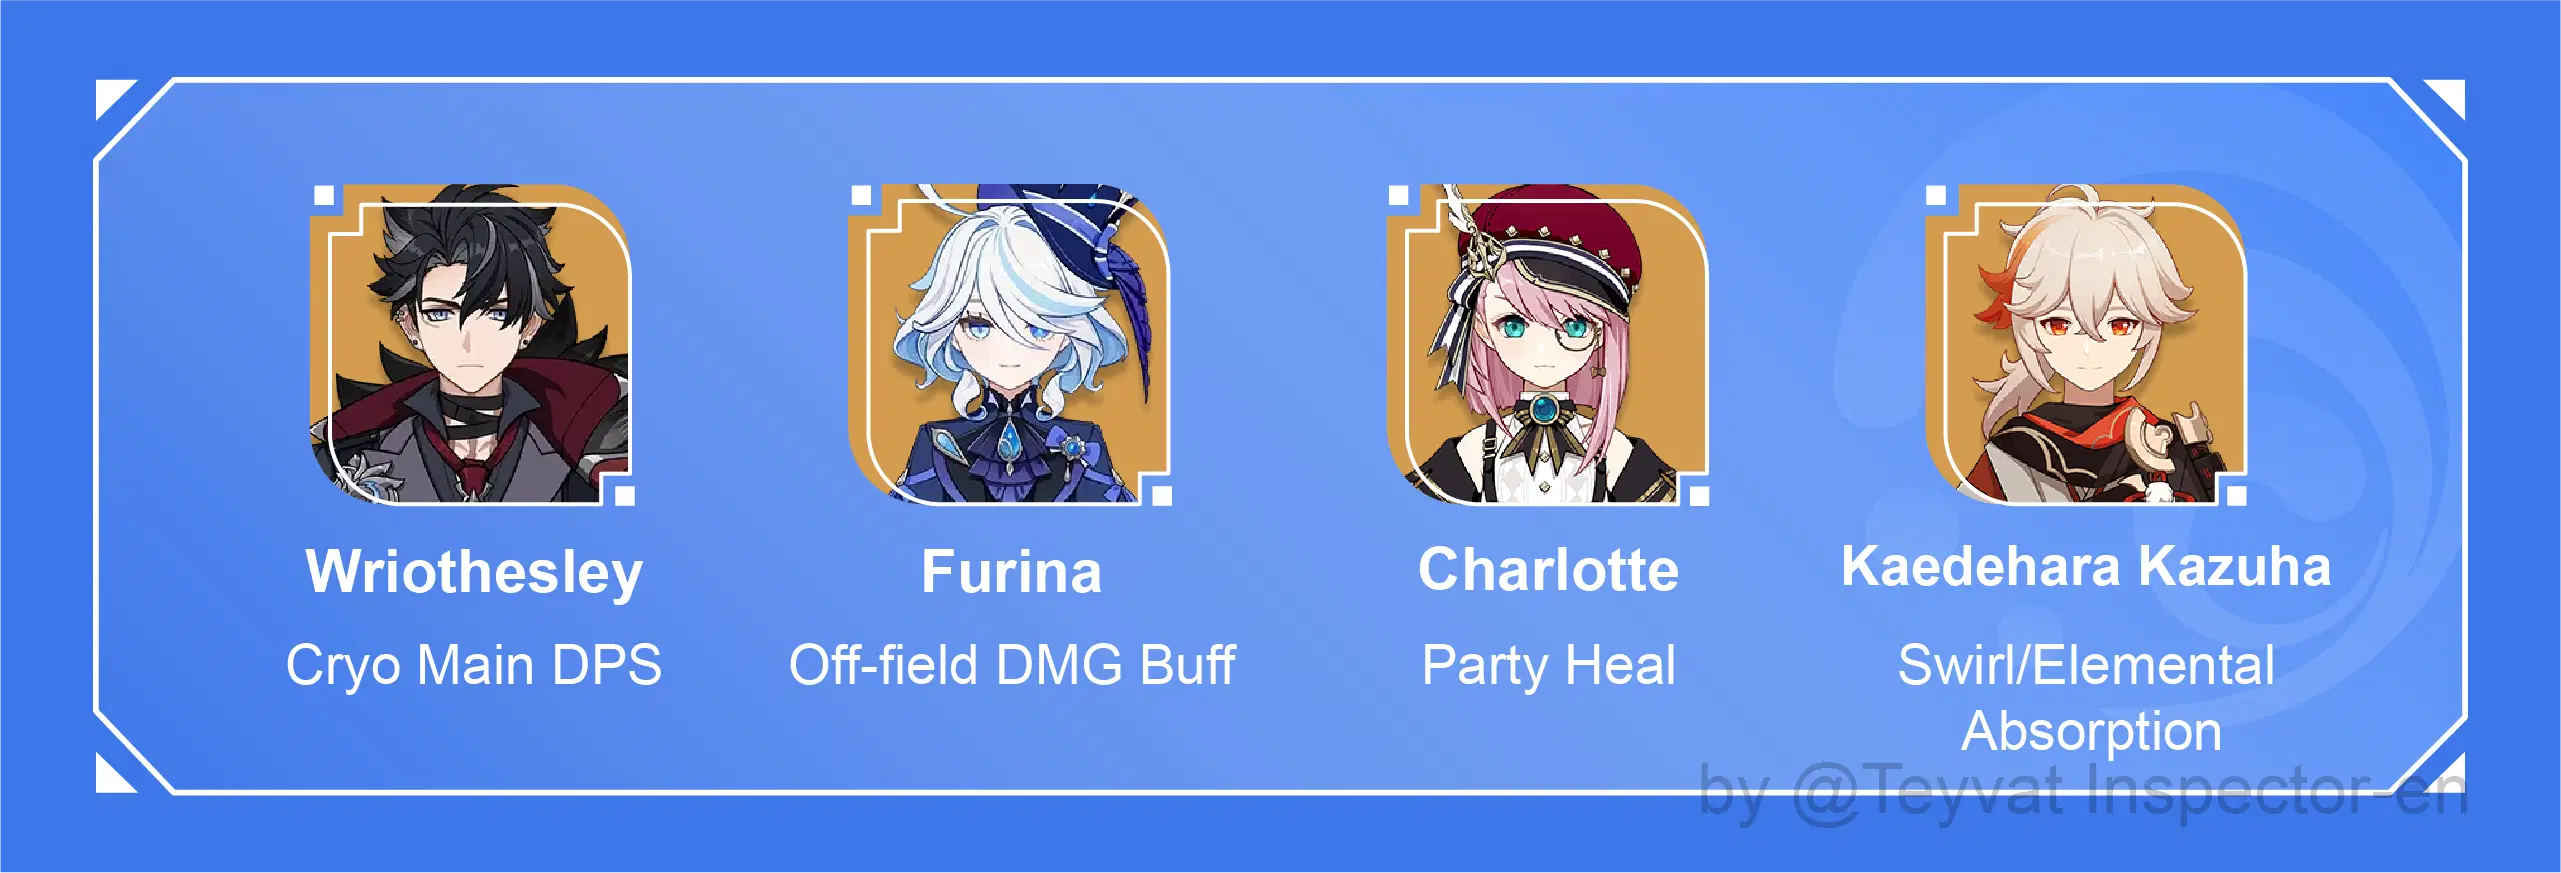
[How It Works]
1. Cryo Resonance increases CRIT Rate against enemies that are affected by Cryo or Freeze.
2. Charlotte provides party healing with Elemental Burst and helps stack Fanfare points for Furina’s Elemental Burst.
3. Furina deals Hydro DMG continuously with Ousia-aligned Elemental Skill, recording the HP changes of the party and generating Fanfare points, increasing party DMG, and helping trigger Freeze Reaction.
4. Kaedehara Kazuha with Viridescent Venerer 4-Piece set lowers enemy Cryo RES. You can also consider other Anemo characters with the same set as replacements for Kazuha.
5. Wriothesley needs to weave multiple Normal Attacks with Charged Attacks when DPSing instead of using Charged Attacks only.
[Recommended Rotation]
Furina EQ, Charlotte Hold E, Kazuha QE, Charlotte Q, Wriothesley QE then Normal Attack.

[Q&A]
Q: How strong is Furina’s DMG buff?
A: Furina is capable of off-field DMG on Yelan’s level while providing a lot of All Elemental DMG buff for the party. Her power as the Hydro Archon is unquestionable, and she’s well worth having an extra healer in your party.

[Conclusion]
Furina has a unique and whole new DMG buff mechanic and she’s very flexible with her team comps. Having the special feat of possessing both Arkhe-alignments in Fontaine, she’ll have an easy time against enemies of both Pneumousia types for a long time in the game, meaning that if you pull her, you’ll likely be using her a lot.



