


~ Please view this post in Dark Mode for the best experience ~
Guide Overview:
Hello, Travelers ~
➥ Today, I am bringing you a comprehensive guide on the locations of all 66 Hydroculus in Erinnyes Forest and the Morte Region of Fontaine.
- This is an extensive guide that will take you through optimized routes to collect all of them in a seamless way.
- The guide will be separated into two sections. The first section of the guide will show you the locations of the hydroculus in Erinnyes Forest, while the second section will take you through the Morte Region.
- At the beginning of each section, there will be a map showing the location of every single hydroculus in the area along with a specified number to indicate the order that they should be collected in.
- Images of the hydroculus will be included in case you need a visual of where they are located.
- Finally, the guide will explain how to get to every single hydroculus in order from the last one you collected.
➥ If you notice any problems or errors in this guide, please let me know in the comments so I can fix it!
Disclaimer: I am making these routes under the assumption that you only have each of the Statues of the Seven unlocked. If you have closer teleport waypoints to the hydroculus, it may be faster to use those.
Discussion Post: What did everyone enjoy the most about the new Version 4.2 areas, Erinnyes Forest and the Morte Region? 4.2NewAreas
- Just like the rest of Fontaine, I absolutely loved the underwater exploration in the Morte Region, specifically in the area underneath the Sealed Ruined Tower. The multitude of puzzles in the surrounding area were really fun to complete.
- My favorite part about Erinnyes Forest was completing the World Quest: The Wild Fairy of Erinnyes. I had a great time completing it and exploring the area with Pahsiv.
Answer in the comments below! :)

Erinnyes Forest

Erinnyes Forest Map
-- -- --
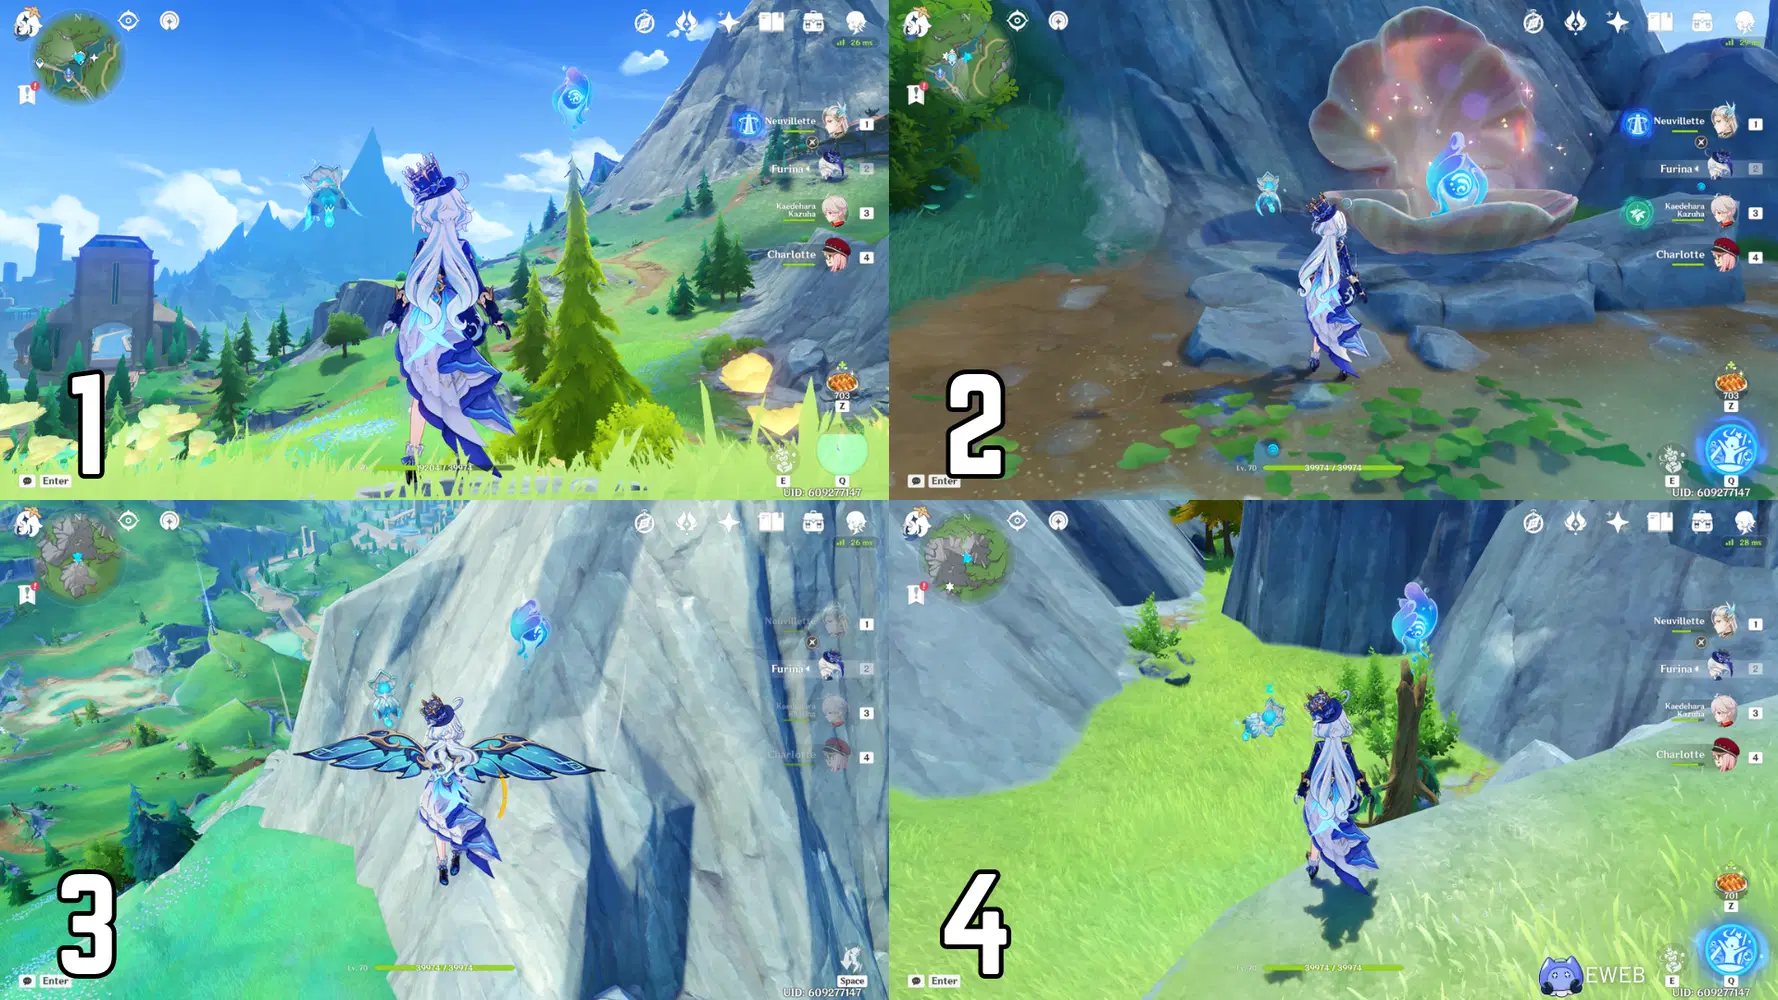
1-4
1. In order to begin, you will need to head to the Statue of the Seven in the Erinnyes Forest region of Fontaine. The Statue of the Seven for this region is northeast of Marcotte Station. As you come to it, you will notice the first hydroculus on top of a tree. You can either climb up the tree or use the Humongous Hat Jellyfish nearby to launch you into the air in order to grab it.
2. Jump off the cliff behind the Statue of the Seven and glide eastward. Locate the Huge Shell and strike it to make it open and show the hydroculus.
3. Turn and head in the northwest direction, up into the mountains in the distance. This hydroculus is elevated in the air between the two mountain peaks, so you will want to climb up one of them so you can jump off and glide over to the hydroculus.
4. Head in the northeast direction, towards the next two mountain peaks. There will be a path in between these two as well, in which the hydroculus will be at the top of a tree trunk.
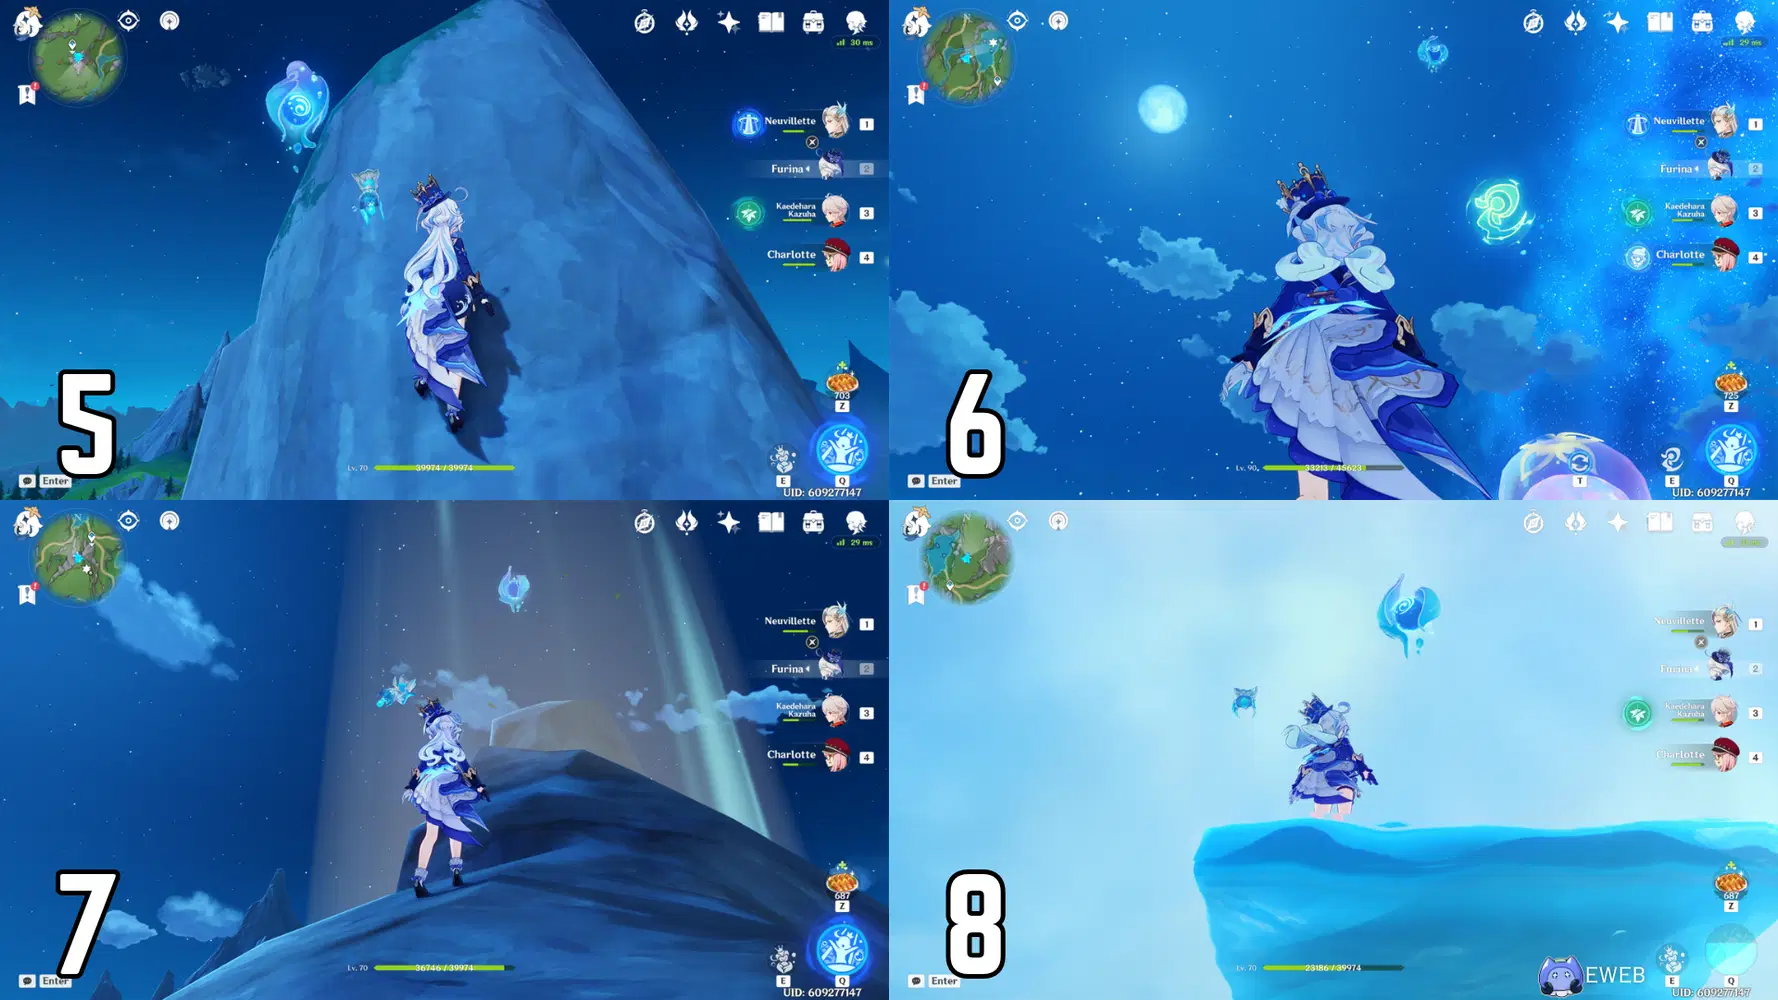
5-8
5. Jump and glide down the mountain in the southeast direction towards another mountain peak in the distance. The hydroculus will be at the top of this peak and you should be able to land on the top by gliding from your current location.
6. Glide directly east towards the point of the hill jutting out in the distance. If you are unable to reach the hydroculus in the sky by gliding over, you can use the Xenochromatic Ball Octopus’ ability to push the Humongous Hat Jellyfish until it is directly under the hydroculus. Then, enter the Humongous Hat Jellyfish to be launched into the sky.
7. Head in the southeast direction towards another mountain peak. This hydroculus will be guarded by an Anemo Hilichurl Rogue. Defeat the enemy and a gust of wind will appear to let you glide up to the hydroculus.
8. Now, glide in the northeast direction towards the hill east of Loch Urania. You will notice an area with multiple Anemo elemental statues. Shoot down the three Anemo slimes to unlock the locked Anemo statue. Activate all three Anemo statues and light the three torches on fire. Defeat the Eye of the Storm to unlock a wind current that will take you high into the sky to obtain the hydroculus.
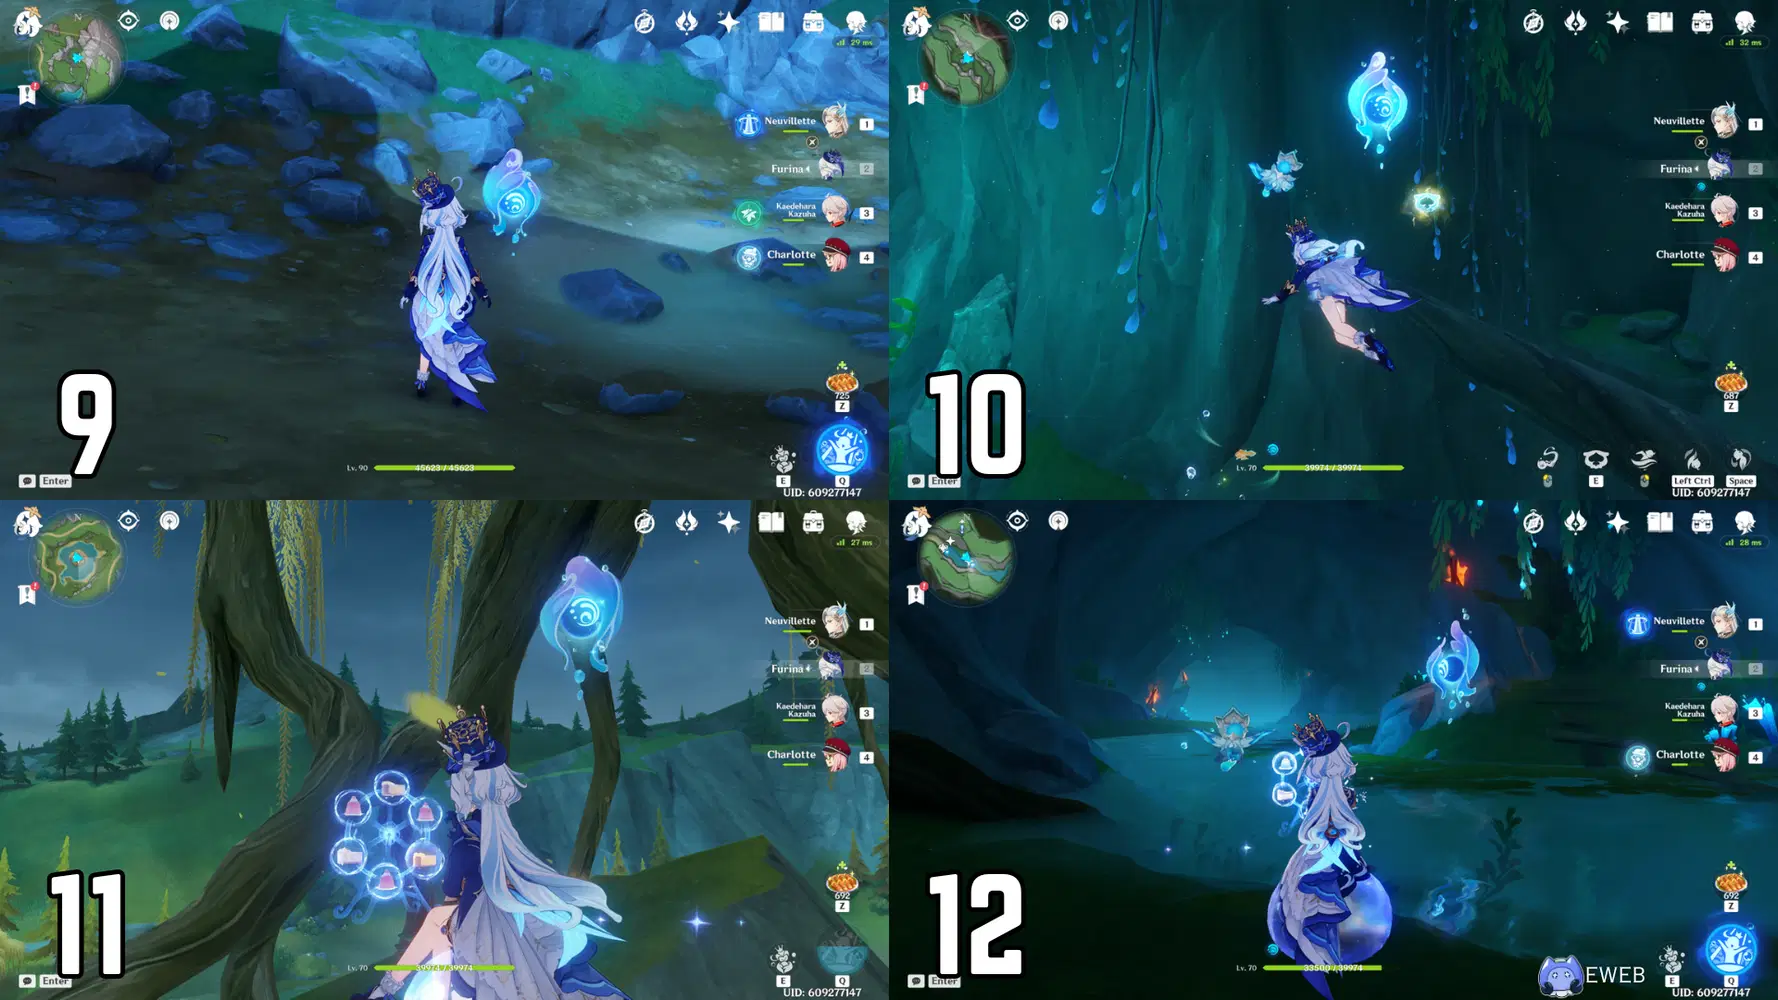
9-12
9. Go north up the hill until you reach the top (you don’t have to climb to the top of the peaks). Then, turn west and glide down into the area with the small pond. The hydroculus is inside the Ousia statue in the pond, but you will need to solve the puzzle before being able to break it open. First, you must catch and investigate the ‘thing’ that is running across the water. After doing so, it will reveal itself as a Seelie and lead you back to its statue nearby. Once it reaches its statue, the water in the pond will recede, allowing you access to the Ousia statue. Open up the Huge Shell which will allow you to pick up the Pneuma block and use it to break open the Ousia statue.
10. Head south until you reach the cliff edge heading into Loch Urania. Jump off and immediately glide down towards the waterfall. You will find an entrance next to the waterfall that you need to enter. Swim through the cavern until you reach the location of the hydroculus.
11. Obtain the Xenochromatic Jellyfish’s ability and continue swimming further into the cavern. At the end, you will need to use your ability to break the rocks and open up the exit of the cavern. If you are able to break the rocks, exit the cavern and swim up to the surface and head towards the island that the Weeping Willow is on. The hydroculus is located in the middle of the tree. If you cannot break the rocks and exit the cavern, you will need to turn around and swim back the way you came. Exit the cavern at the waterfall at Loch Urania and head south until you find the dirt path. Then, travel in the southeastern direction until reaching the Weeping Willow. Head to its island and grab the hydroculus that is in the middle of it.
12. If you go east from the Weeping Willow, across the water, you will find an opening that will lead you down into an underground cavern. Find the cannon and use it to break open the wall in front of you. The hydroculus will be located behind it.
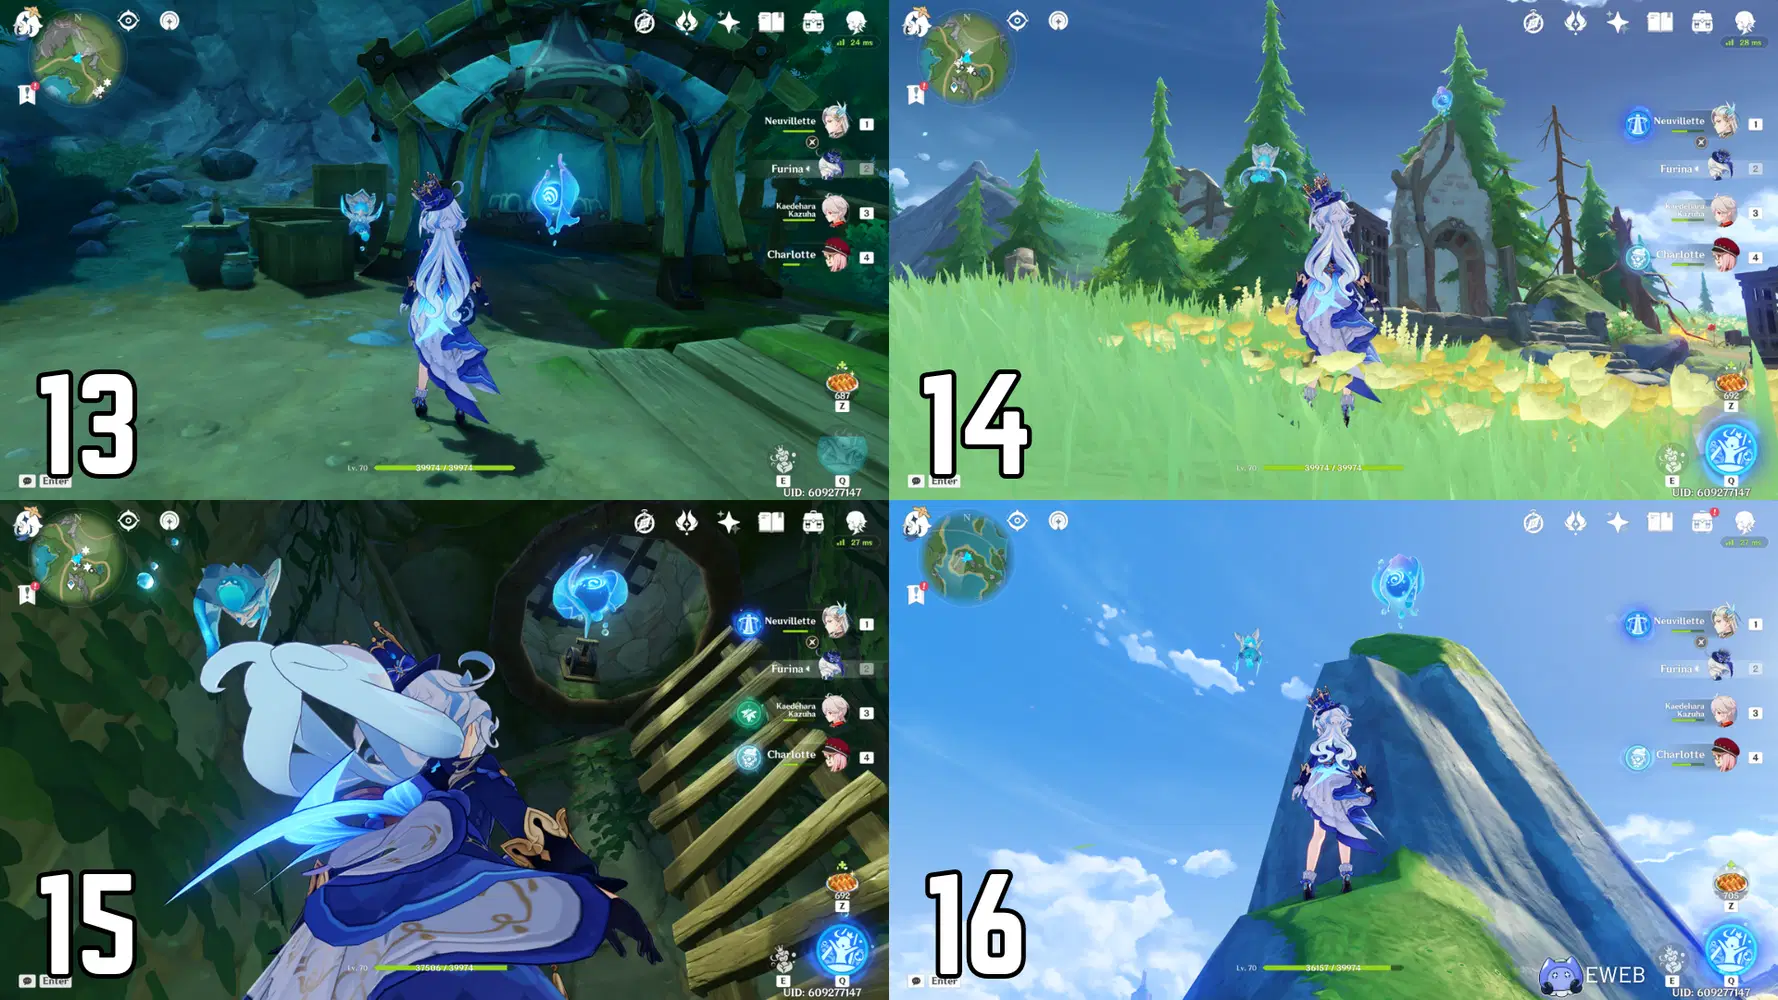
13-16
13. Turn back and head out of the underground cavern. Once reaching the entrance again, head directly north to find the hydroculus in a hut guarded by Local Legend: Rocky Avildsen.
14. Head southeast until you come across a dilapidated house. The hydroculus will be located at the top.
15. This hydroculus is locked in a well that you cannot access from the surface. Continue heading east from its location on the map until you come across a pond that contains Contaminated Bacterial Mats. Cleanse them with the Xenochromatic Ball Octopus’ ability to clear the water. Swim down and enter the void to be transported into an underground hideout. The hydroculus will be located here.
16. Exit the well and head directly east until you reach the island off the coast of the Erinnyes Forest region. This hydroculus is located on top of the mountain peak.
17-20
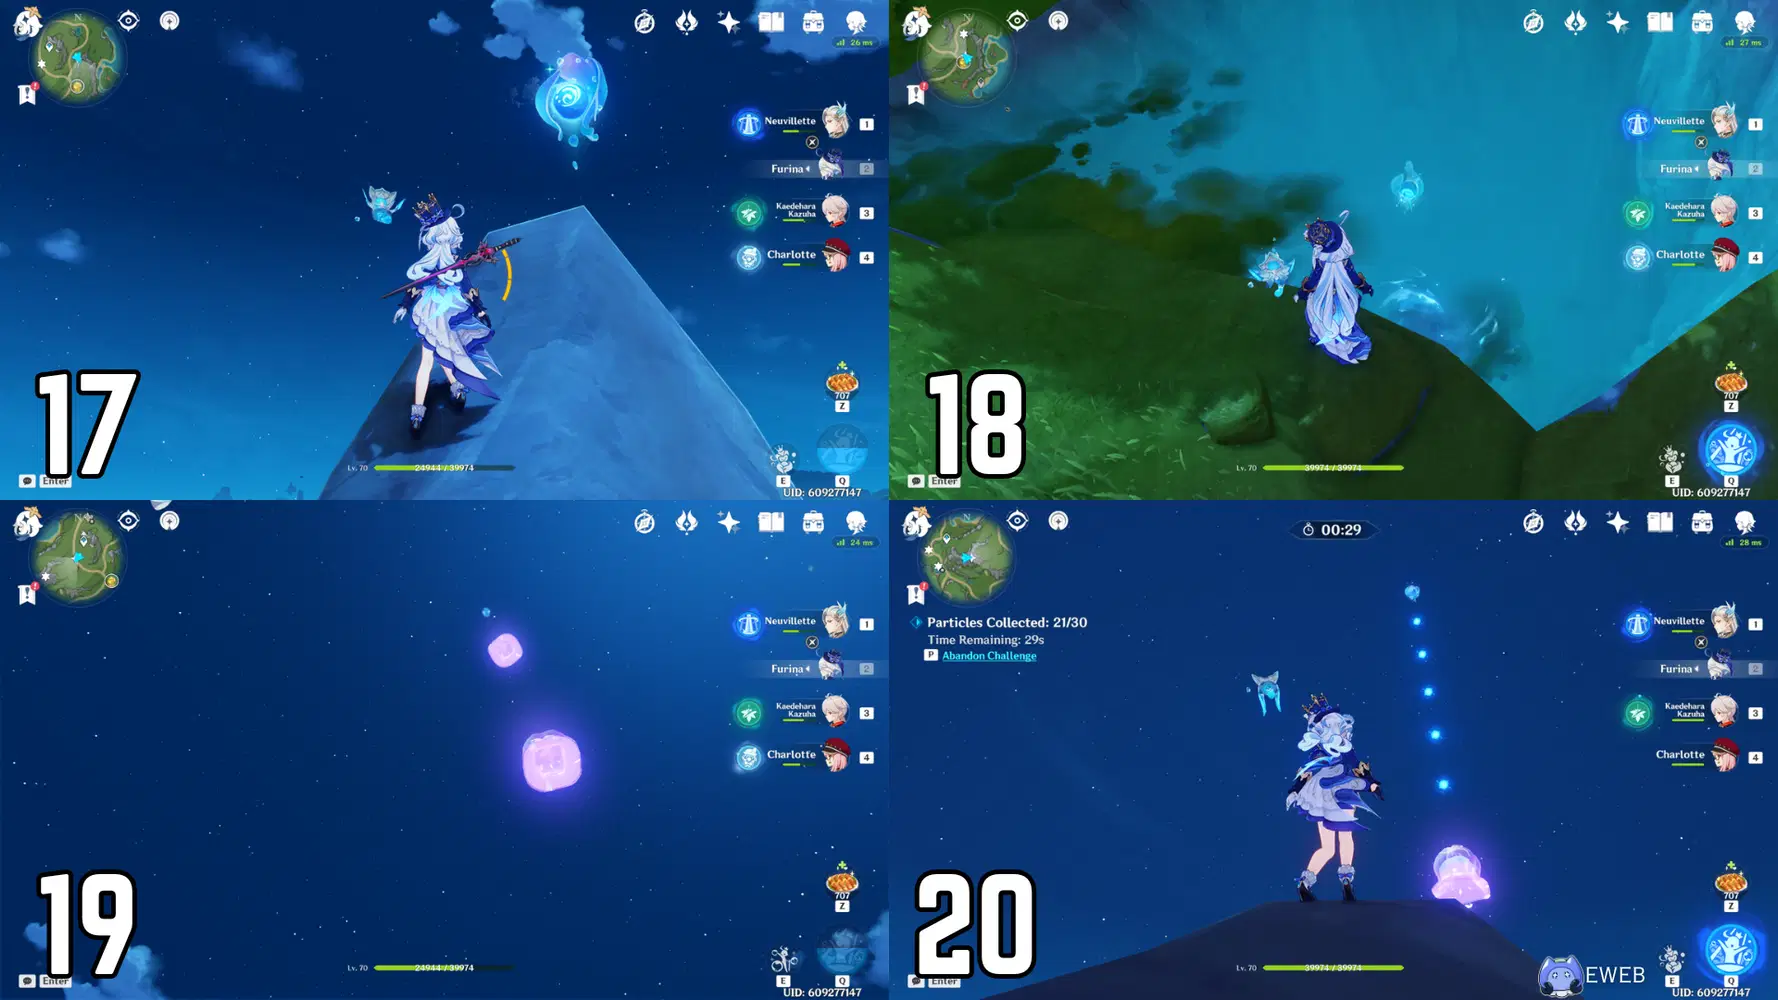
17. Head in the southwest direction and climb to the top of the smaller mountain peak in the distance where the hydroculus is located at the top.
18. Jump and glide south towards the small pond nearby. You will notice a Potential Energy Orb challenge due to the energy circle above the water. Head up the nearby hill’s path to find the Energy Orb. Use the Xenochromatic Ball Octopus’ ability to launch the Energy Orb down the hill and into the water, breaking the rock beneath and unearthing the hydroculus.
19. Head west and take the leftmost path up the hill until you reach the area with the Hydro elemental statues. In order to get the hydroculus in the sky, you will need to complete the puzzle. First, defeat the slimes surrounding the Humongous Hat Jellyfish in the southwest direction, next to the Shrine of Depths. Follow the Humongous Hat Jellyfish to its location. Secondly, continue heading north towards the Humongous Hat Jellyfish close to the waypoint. There will be 4 Hydro statues in the surrounding area that you will need to activate. They have to be activated in ascending order based on how many tree stumps are surrounding the statue (1 → 2 → 3 → 4). Lastly, head over to the last Humongous Hat Jellyfish. Put out the fires on all four of the torches to prompt the Humongous Hat Jellyfish to head over to the other two. Make contact with the Humongous Hat Jellyfish once it takes its place in order to be launched into the sky to grab the hydroculus.
20. Jump off the platform and glide southwest towards the mountain peak next to the Shrine of Depths. The hydroculus is located in the sky above the mountain peak. You will not be able to reach it normally, so you will need to start the Time Trial on a nearby smaller peak to unlock the Humongous Hat Jellyfish which will launch you into the sky so you can grab the hydroculus.
21-24
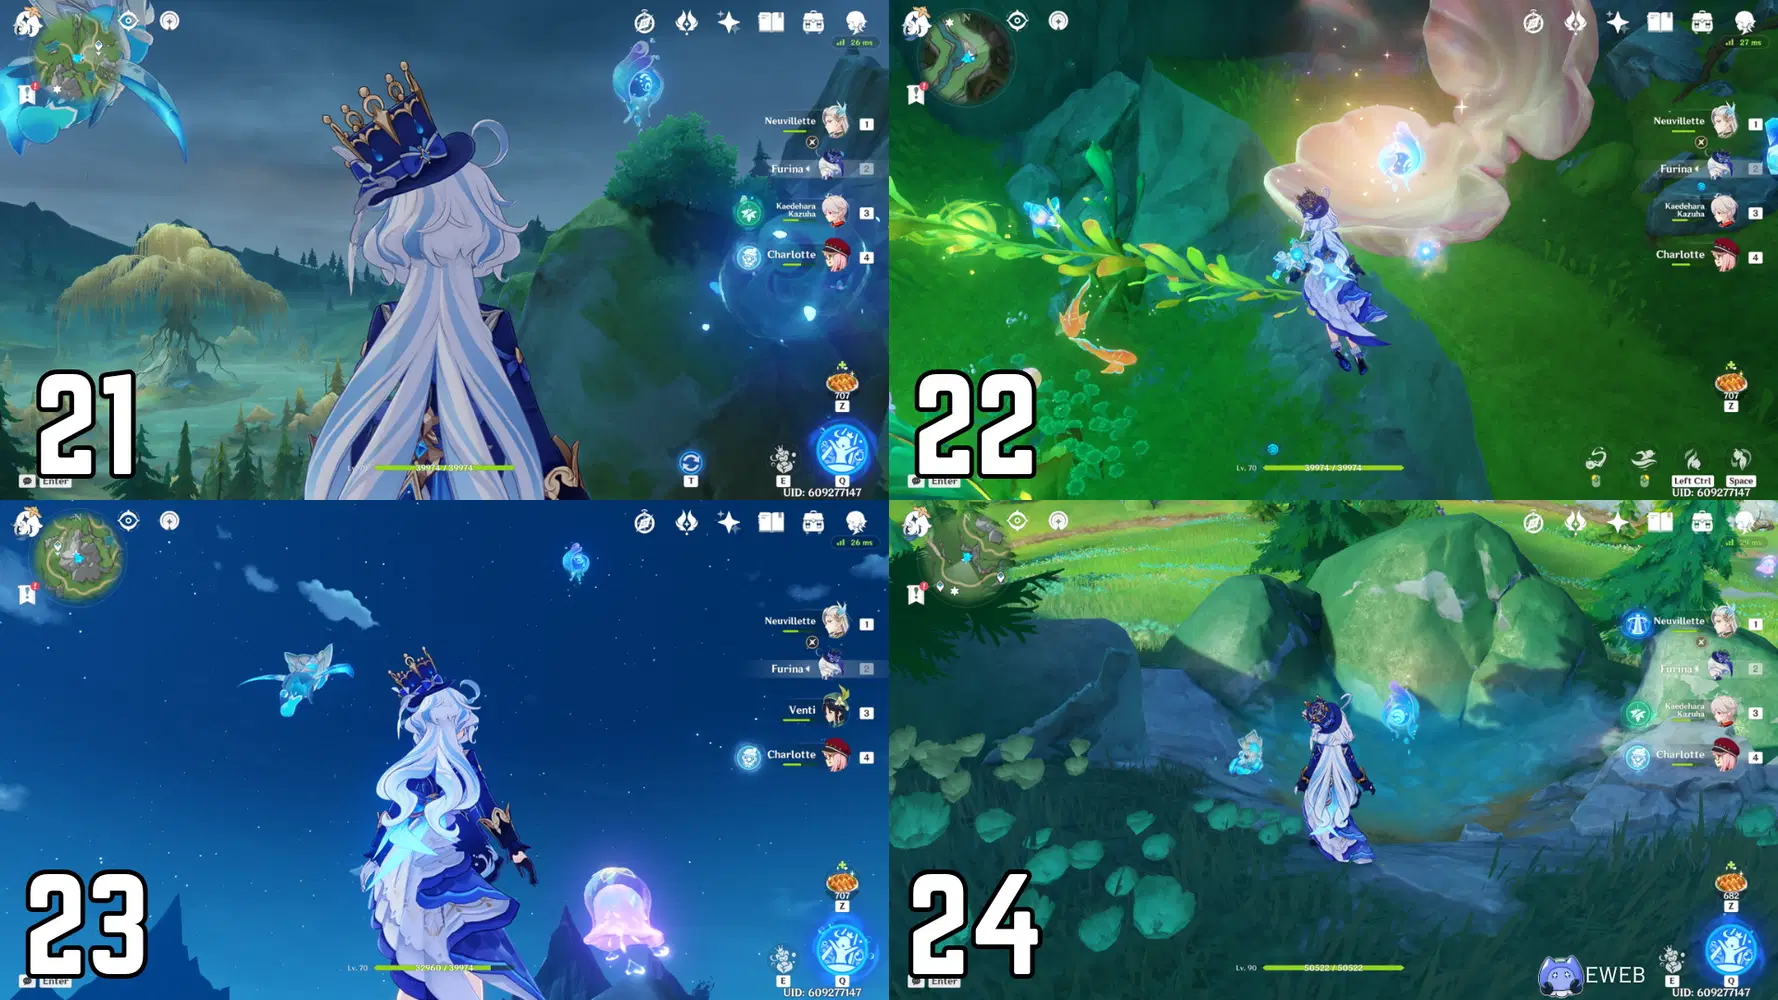
21. Glide in the western direction until you see an oval shaped rock. The hydroculus will be on top of it.
22. Head southeast towards the pond nearby. Dive down into the pond which opens up into a larger underwater cavern. Strike the huge shell to make it open up and allow access to the hydroculus.
23. Exit the water from the way you came and head in the southwest direction towards the large mountain peak next to your location. Climb all the way to the top where the hydroculus is located.
24. Glide in the southwest direction and drop down once you reach a small pond. This hydroculus is trapped in a Pneuma statue in the pond. Grab the Ousia block that is a little farther up the hill to break it open.
25-28
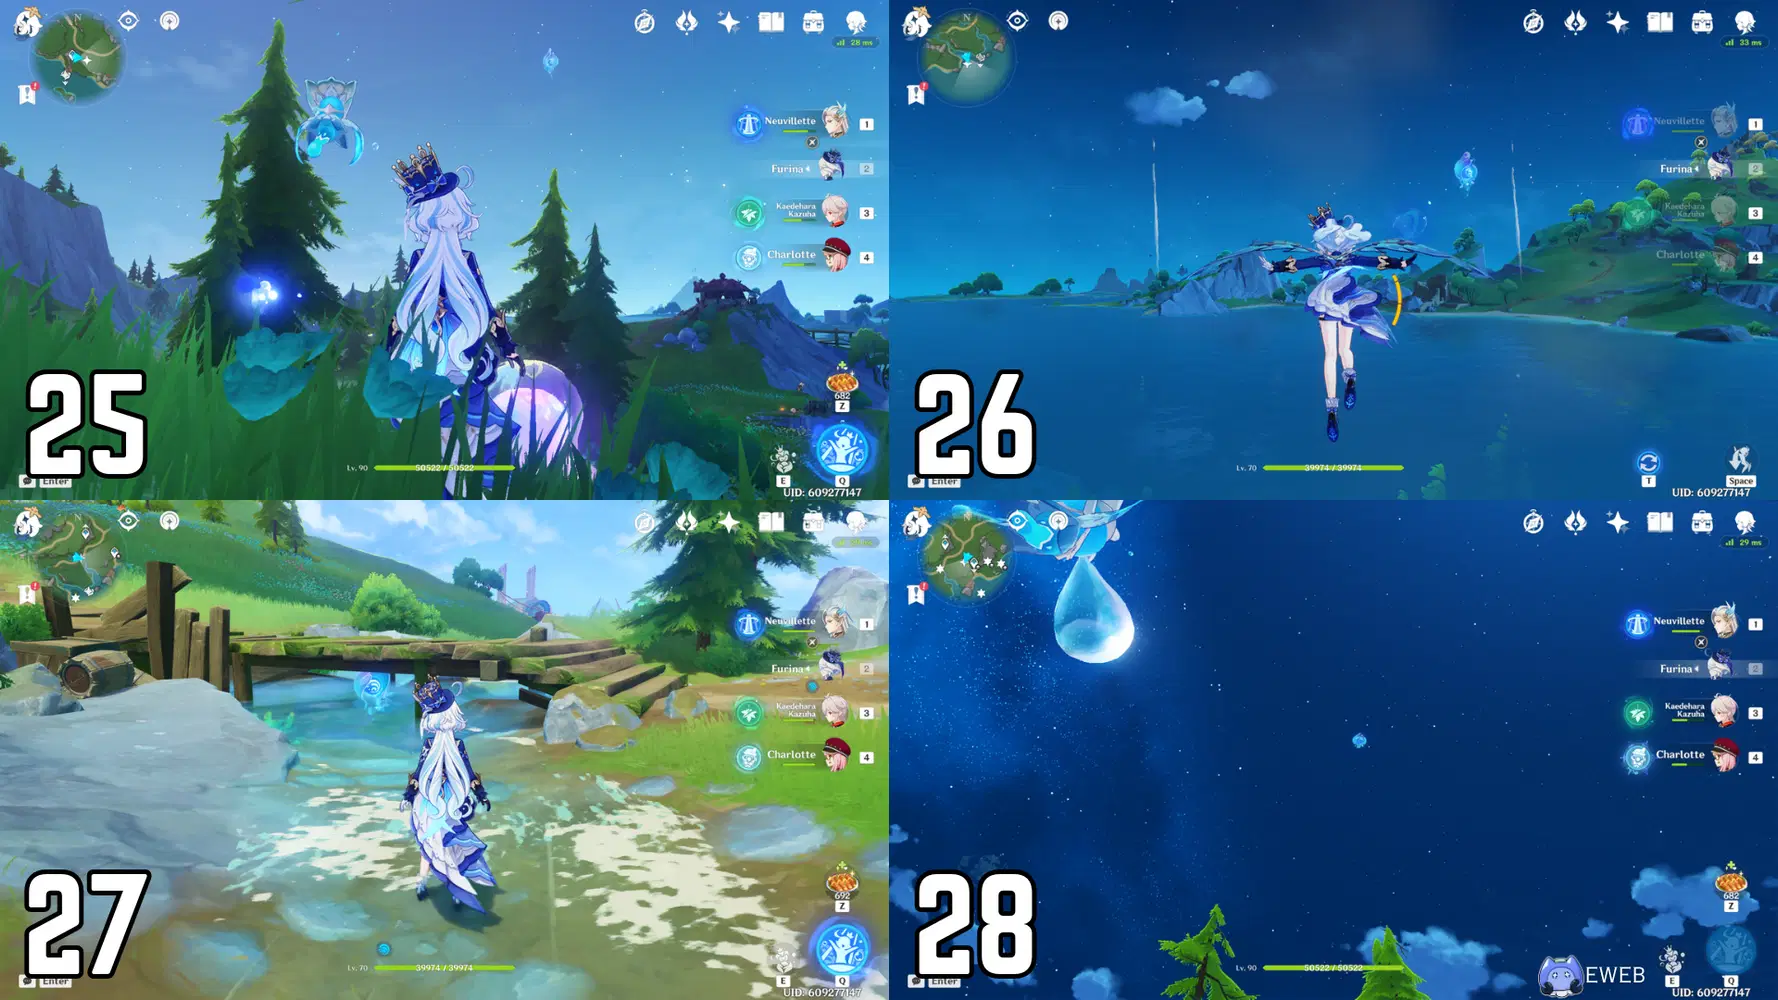
25. Continue heading southwest until you reach a hill near the coast. Use the Xenochromatic Ball Octopus’ ability to push the Humongous Hat Jellyfish until it is directly under the hydroculus in the sky. Make contact and fly up to grab it.
26. Run east along the coast until you reach a small island with a Humongous Hat Jellyfish. Use the Xenochromatic Ball Octopus’ ability to push the Humongous Hat Jellyfish until it is directly under the hydroculus in the sky. Now you can now be launched directly into its path.
27. Head north through the Foggy Forest Path until you reach a small bridge. The hydroculus will be located underneath the bridge.
28. Go east until you reach an area that is contaminated. Cleanse the Contaminated Bacterial Mats with the Xenochromatic Ball Octopus’ ability. The two Humongous Hat Jellyfish will now move into position under the hydroculus. Make contact and fly up to grab it.
29-32
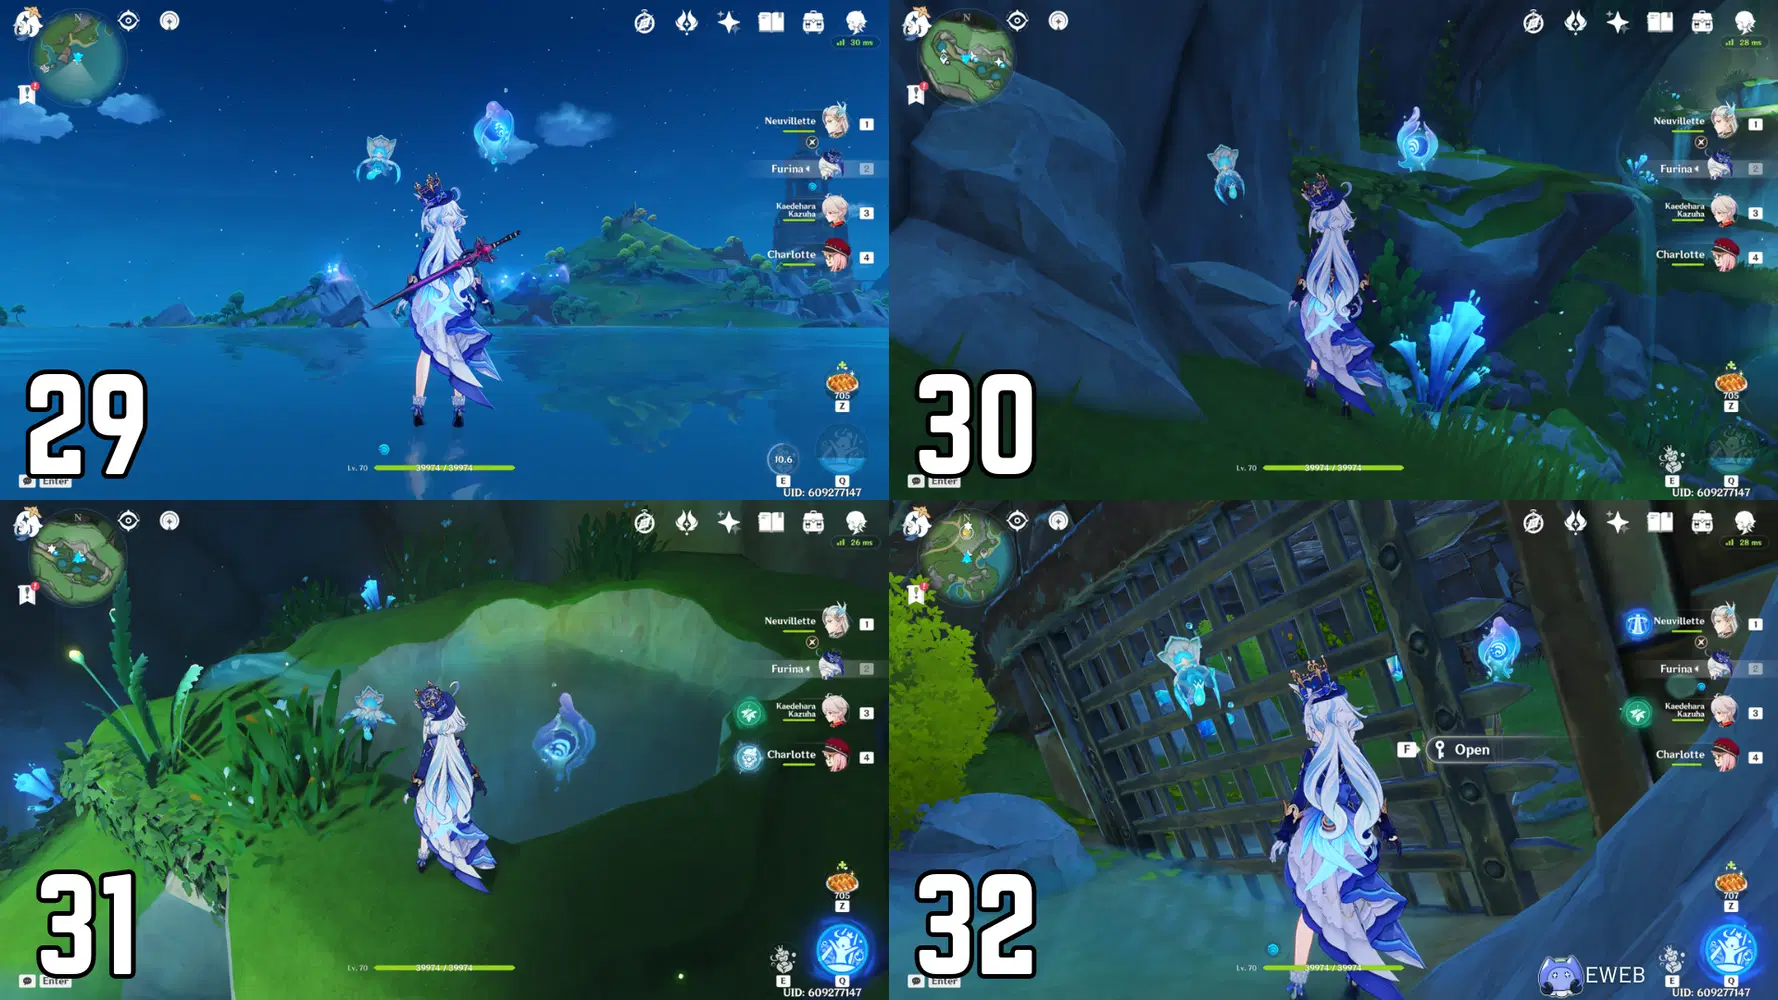
29. Head southeast down towards the coast and a large ship (“The Rusty Rudder”). Near the ship, the hydroculus is elevated over the water. Directly beneath it, underwater, is a Humongous Hat Jellyfish. Dive down and make contact, you will be launched into the sky to grab the hydroculus.
30. Go to the large ship you just passed and head to the top where the cannon is. In order to unlock the area that this hydroculus is in, you must use this cannon to blow up the rocks blocking the entrance to the cavern. Answer the nearby maid’s questions to be able to operate the cannon. Head into the cavern after opening the entrance and the hydroculus will be on the left-hand side when the cavern opens up into a larger room.
31. Keep heading further into the underground cavern. Once you run into the Humongous Hat Jellyfish, make contact so that it can launch you into the air. Glide left towards the rocks with small waterfalls. The hydroculus will be at the top in a small pool of water.
32. Exit the underground cavern from the way you entered and head in the northeast direction until you encounter a large, broken-down ship. The hyrdoculus is located underneath the ship in a locked vault. You will need to gather three keys to unlock the gate. The first key is on top of the ship, next to the bird eggs. The second key is obtained from the chest on the ship, which will be unlocked after you defeat the surrounding enemies. The third key is located next to some traveler’s gear southwest from the shipwreck. After grabbing all of these keys, you will be able to unlock the gate and grab the hydroculus.
33-35
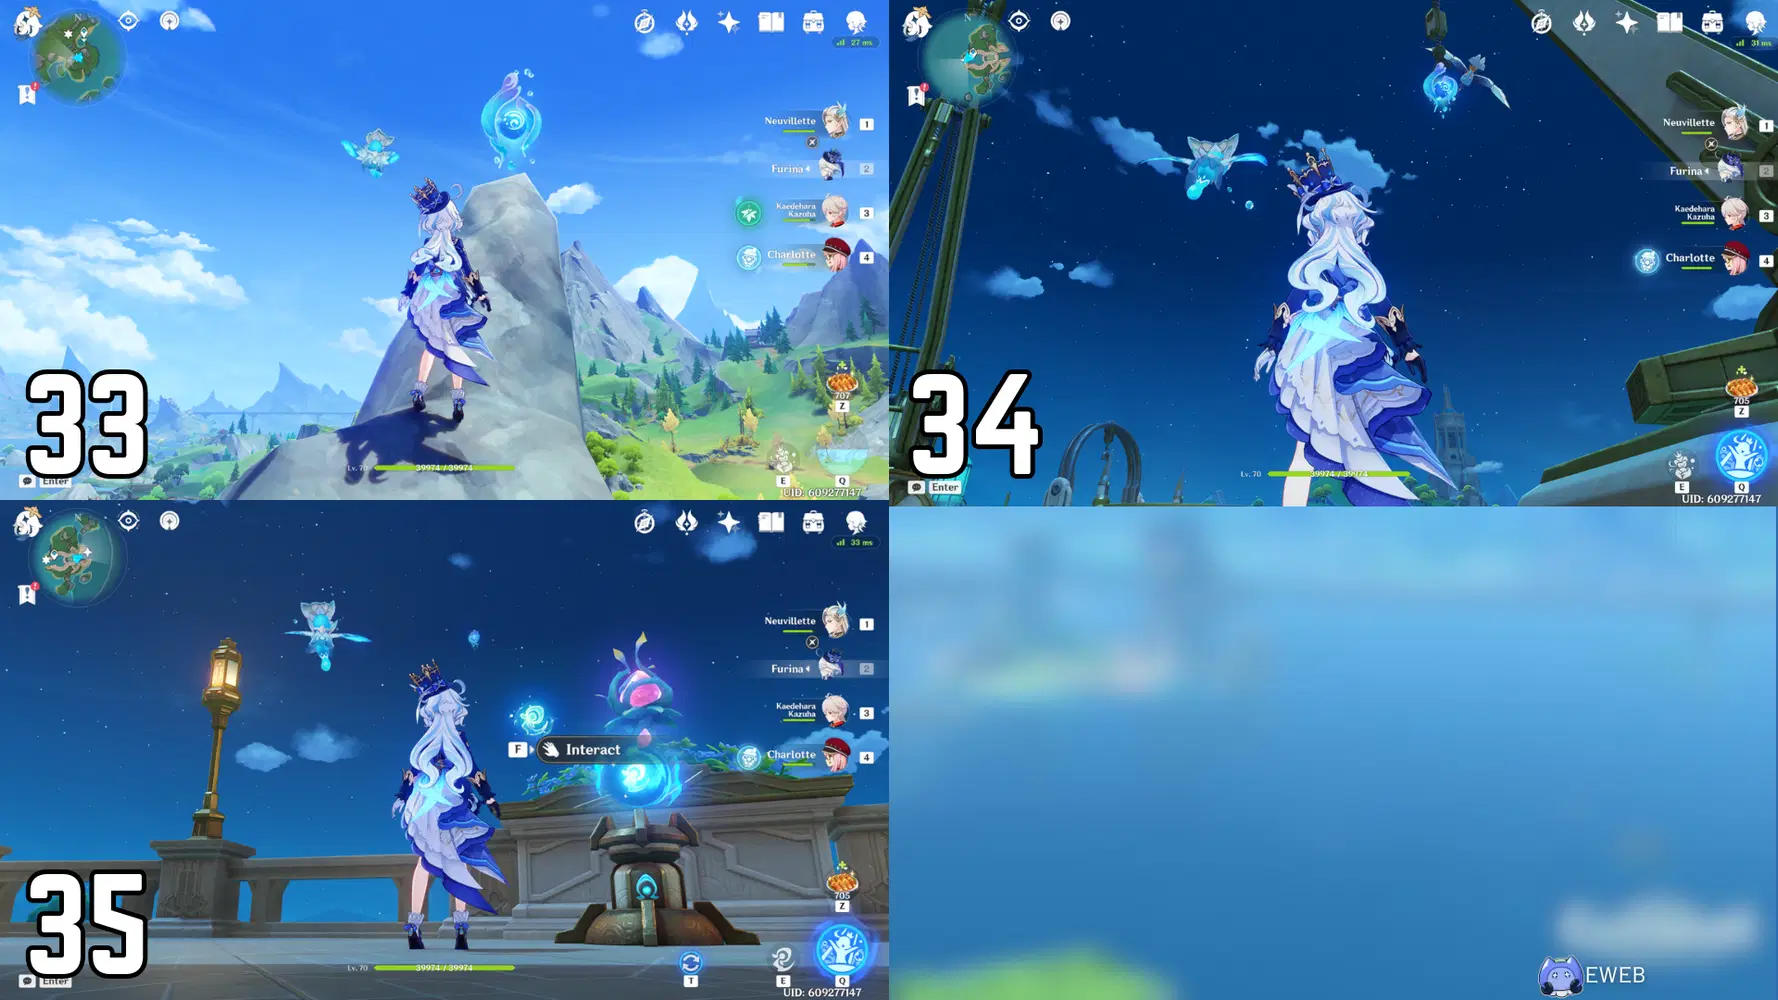
33. Head southwest towards the mountain peak. Climb up and the hydroculus will be located at the top.
34. Head directly south, across the water, towards Lumidouce Harbor. On the west side of the harbor, the hydroculus is elevated in the air under a crane’s hook. Climb the crane and jump off to grab the hydroculus.
35. On the east side of the harbor, use the Xenochromatic Ball Octopus’ ability to activate the Floating Crystal Flower’s platforms. Take the platforms over to the Humongous Hat Jellyfish to launch yourself in the air and grab the hydroculus.

36-38
World Quest: The Wild Fairy of Erinnyes
In order to keep the routes as optimized as possible, the final three hydroculus are obtainable only while playing through/completing the World Quest: The Wild Fairy of Erinnyes. This World Quest can be completed at any time, but you can obtain 35 out of the 38 hydroculus in the Erinnyes Forest region before starting this quest if you would like! The route of these three hydroculus will be in the order that they can be obtained while playing through the World Quest.
36. After completing the quest, “Furious Mouth of the Lake,” in the World Quest: The Wild Fairy of Erinnyes, the storm at Loch Urania will be calmed and you will be able to find the hydroculus above the huge hydro bubble in the middle of the lake. Climb up the cliff north of Loch Urania and head up to one of the smaller mountain peaks nearby. Jump off and glide over to the hydroculus and grab it.
37. This area can only be accessed while completing the fourth part of the World Quest: The Wild Fairy of Erinnyes. You must unlock the secret entrance below the fountain in Marcotte Station and swim through the underwater cavern to reach this hydroculus.
38. You will pass by this area right before completing the World Quest: The Wild Fairy of Erinnyes, but you will not be able to stop and collect the hydroculus at this time. After you have finished the quest, teleport back to the waypoint in the Roots of Erinnyes and swim to the top of the cavern and go through the entrance. You can follow this cavern until you reach the hydroculus.
If you want to follow a guide on this World Quest, consider checking out the one I created below:
Morte Region
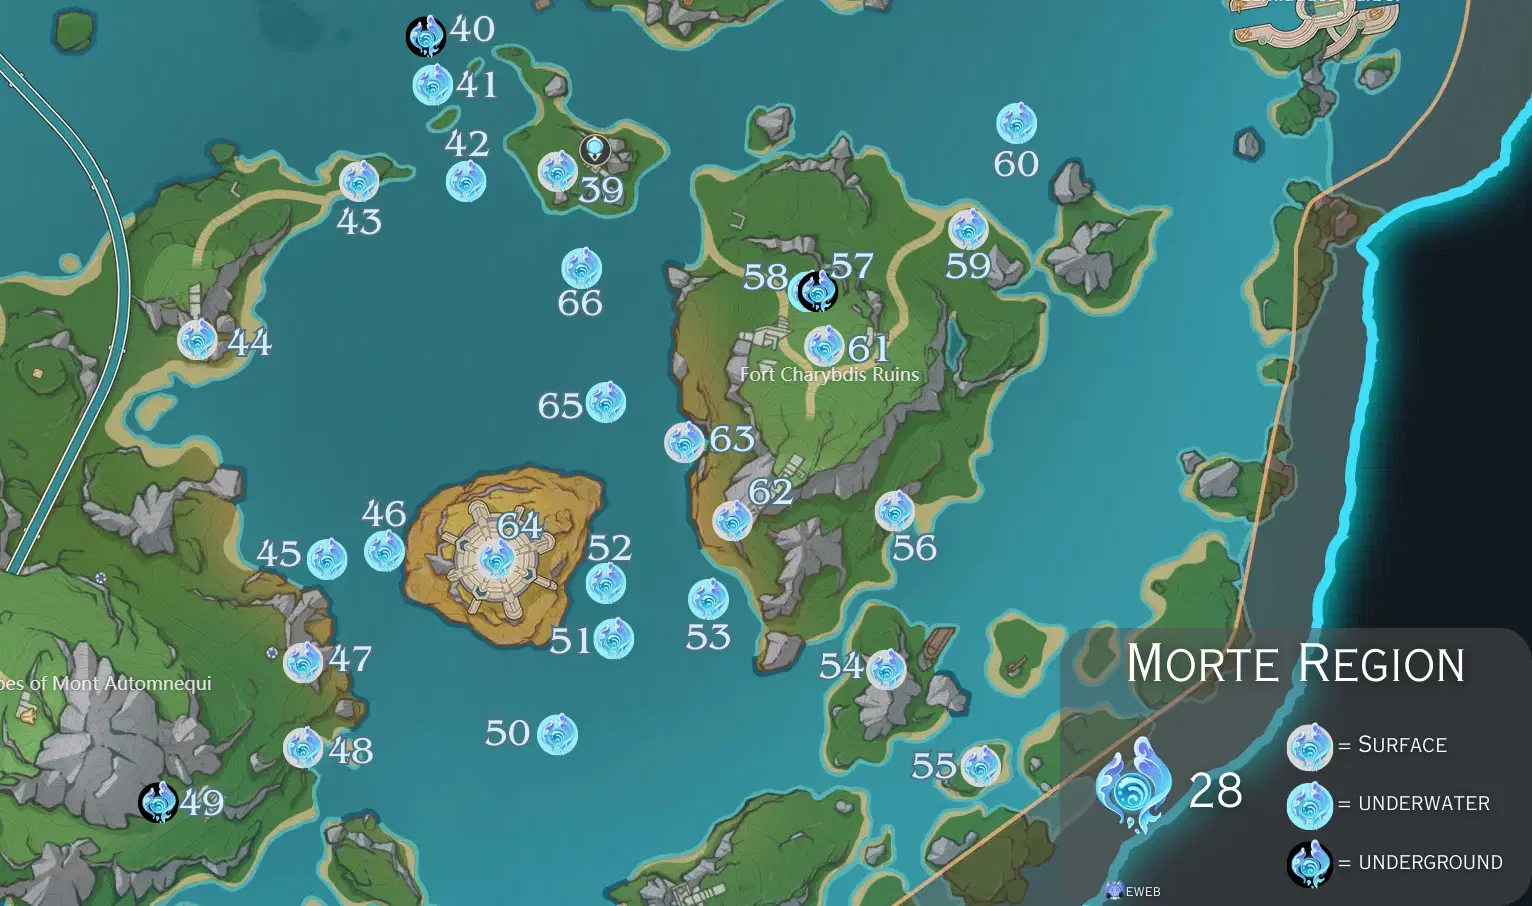
Morte Region Map
-- -- --
39-42
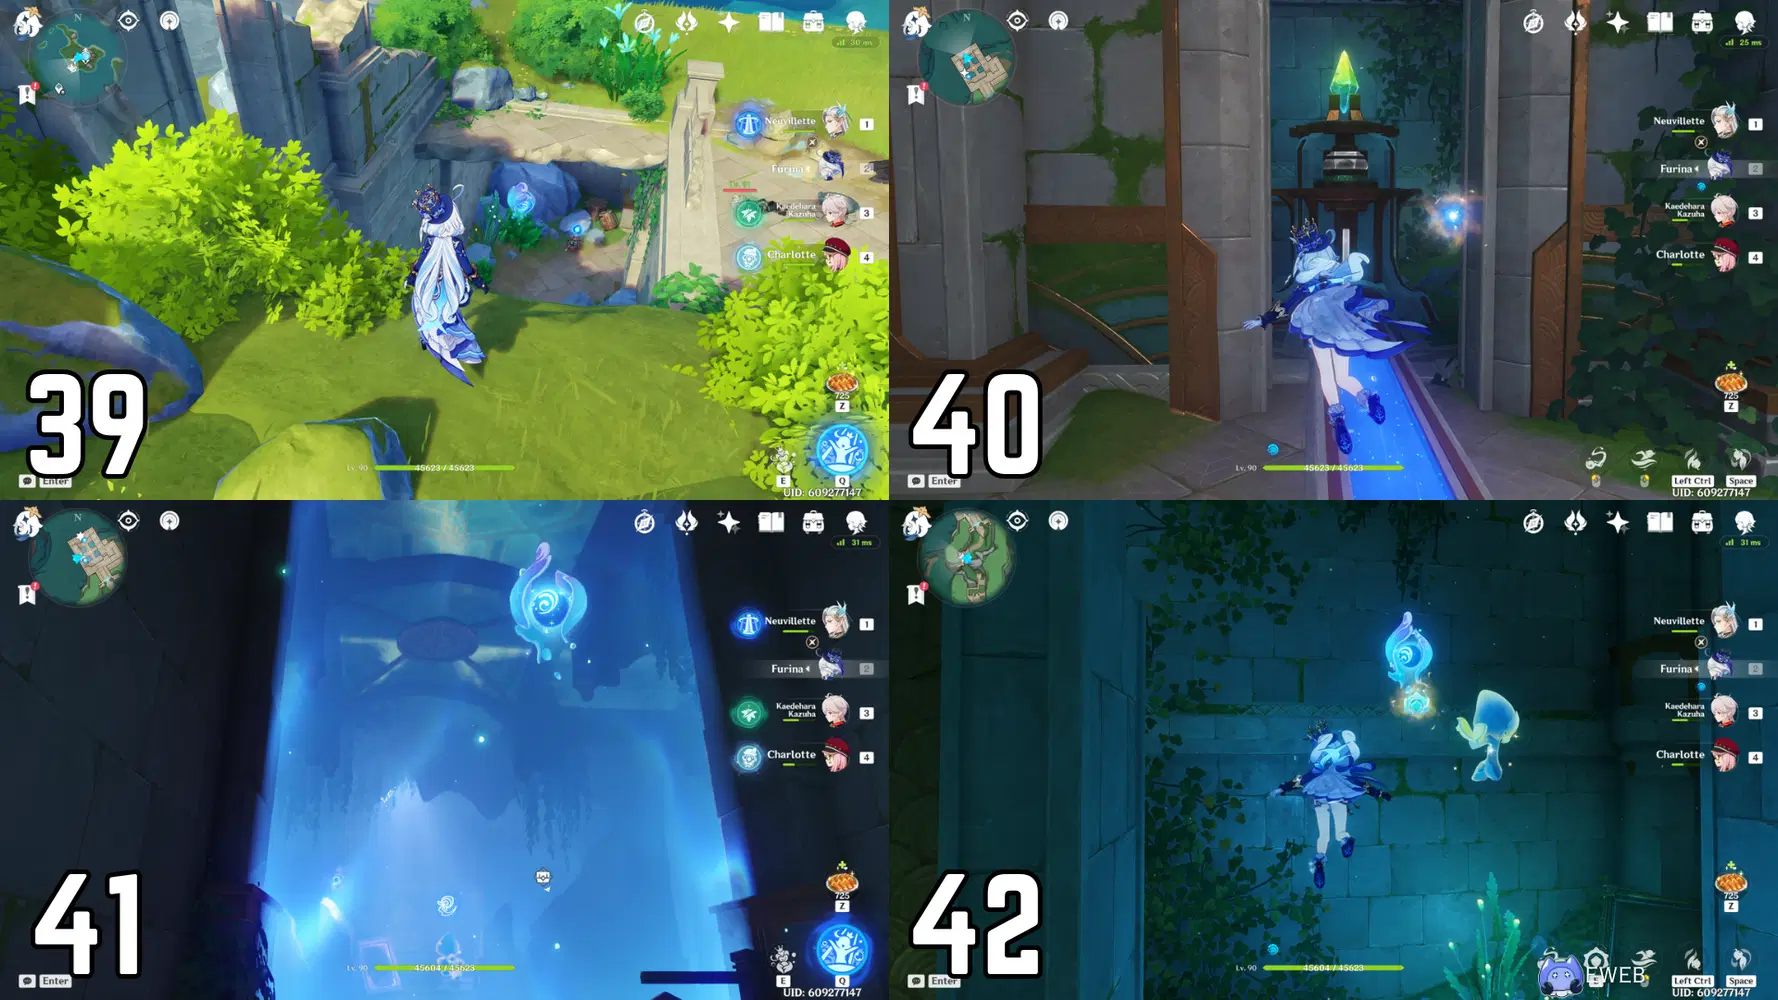
39. Begin at the Statue of the Seven in the Morte Region. It is located on an island to the south of the Erinnyes Forest region and southeast from the Opera Epiclese. Head west from the Statue of the Seven and you will find the hydroculus at the entrance to some underground ruins.
40. Continue further into the ruins by using the Xenochromatic Ball Octopus’ ability on Feather Valves to unlock gates that will lead you even farther into the underground. As you enter the large room, go north from the center towards one of the machines. The hydroculus should be directly behind it.
41. In order to gain access to this hydroculus, you must solve the Energy Flow puzzle in the room. Firstly, release the energy from the machine that had the hydroculus behind it. Then, head to the northeastern side of the room to the next machine. Hit the gem so that it turns orange and then use the Xenochromatic Ball Octopus’ ability to turn the pedestal next to it, making the Eliphas Beam move upward and allow the beam to go through each receiver, opening the gate. Take the elevator down to the next room. Use the Xenochromatic Ball Octopus’ ability to change the tracts coming out of the machine so that they line up to allow energy to flow through. Once done, release the energy from the machine. Head back to the elevator and go back up to the previous floor. Now, release the energy from the machine so that it goes to the center machine in the room. After the puzzle has been solved, the room will completely fill up with water, granting you access to previously inaccessible areas. swim up from the center of the north and head east towards one of the rooms you can enter. After dropping down from the water, enter into the Looking Glass. Fight the enemies in the room it takes you to, and then enter the next Looking Glass. This will take you to the room the hydroculus was locked in.
42. Head back towards the entrance of the underground (now underwater) ruins and you will notice that the hydroculus that you passed when gliding down into the ruins is now accessible. Swim over and grab it.
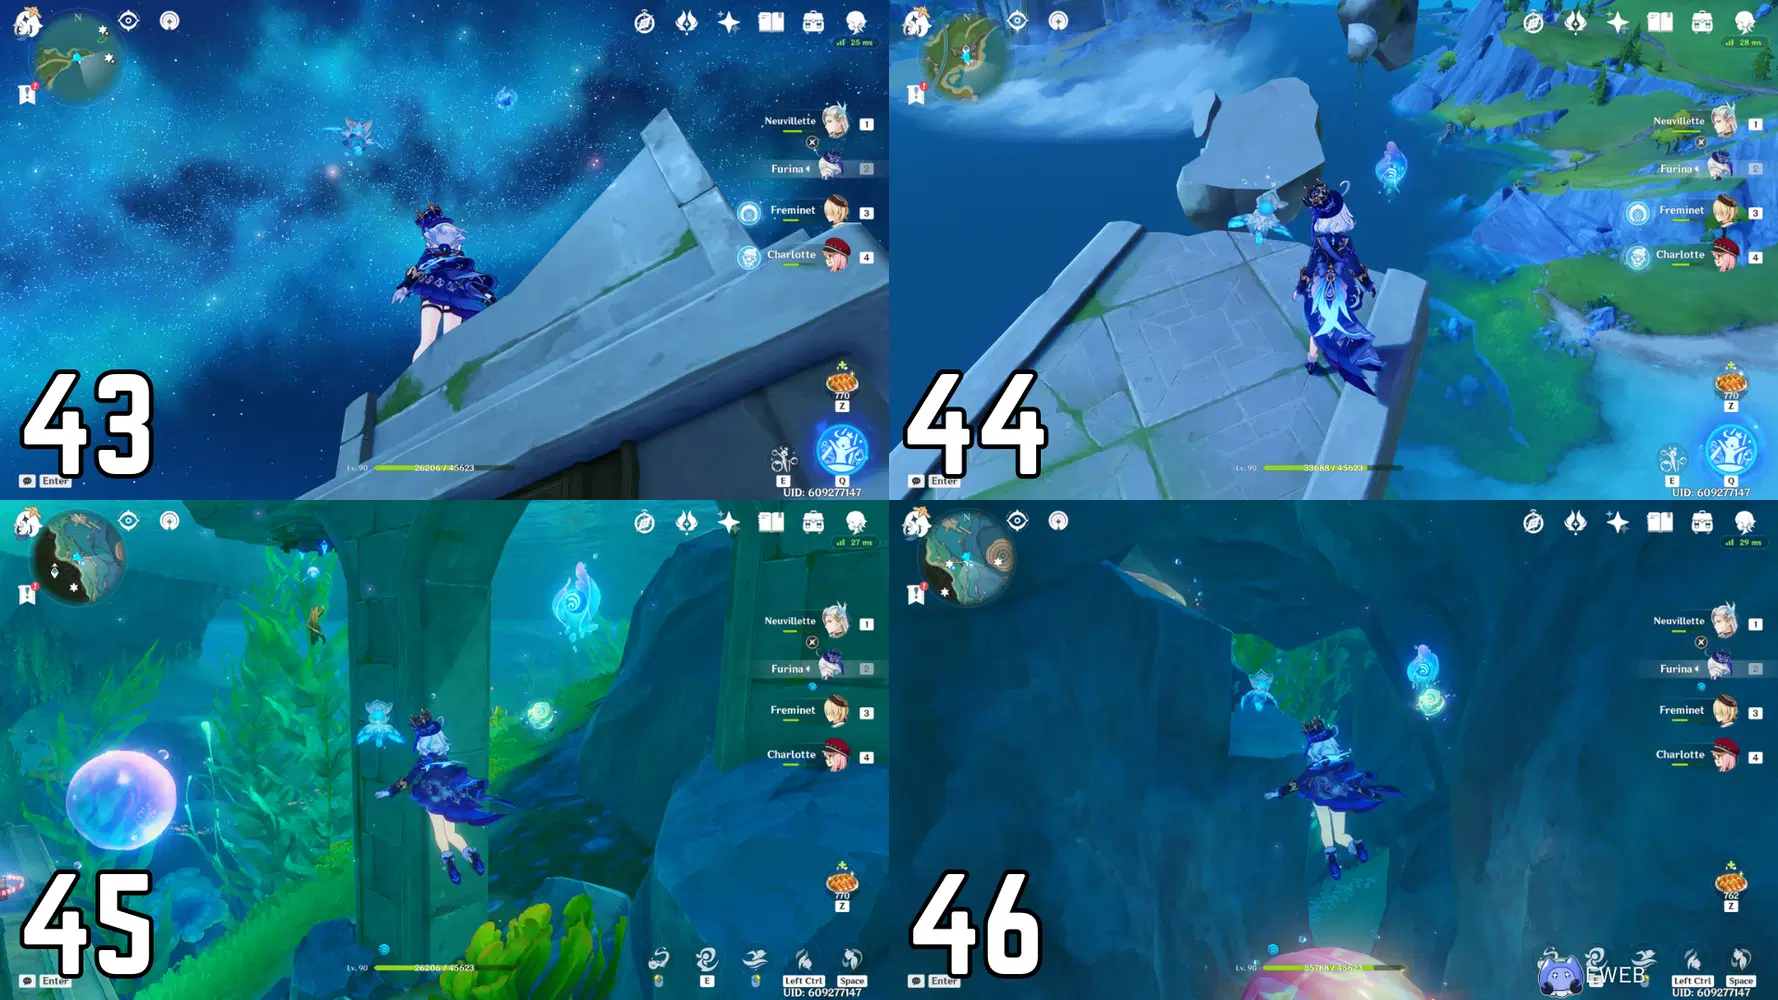
43-46
43. Teleport back to the Statue of the Seven and immediately head west across the water towards the hill in the distance. Once you reach the ruins, climb up one of the columns and jump into the Humongous Hat Jellyfish so that it can launch you into the sky towards the hydroculus.
44. Take the path up the hill towards the waypoint. Once you reach the waypoint, jump across the broken path in the sky. Jump and glide to the hydroculus.
45. Continue gliding in the northeast direction, west of the Sealed Ruined Tower. As long as you have enough stamina, you should be able to glide and hit the water in the area where the hydroculus is located. It will be directly under a bridge, underwater.
46. Swim directly east towards the end of the bridge and then swim downwards between the rock formations. The hydroculus will be above a Huge Shell.
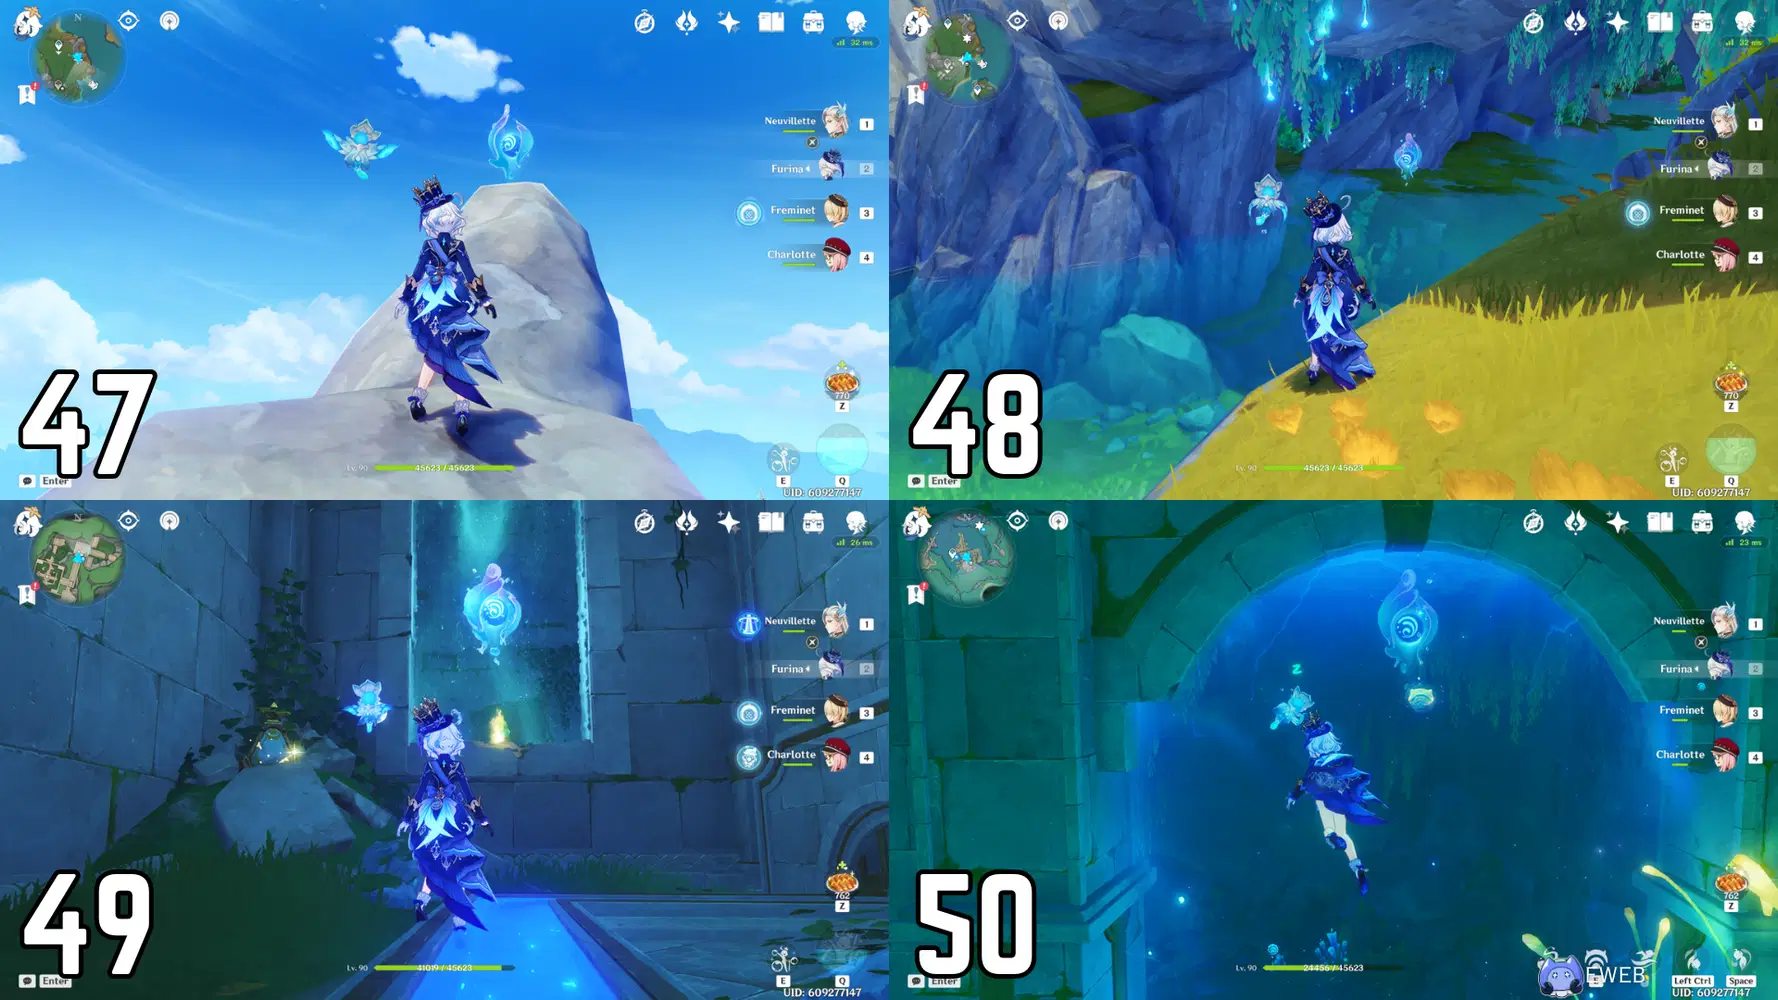
47-50
47. Now, swim back up and in the southwestern direction towards the coast. Once you reach the surface, keep heading in that direction towards the mountain peak directly in front of you. Climb to the top where the hydroculus is located.
48. Glide south towards the entrance to a cave. The hydroculus is hovering over the water, so you can drop down and grab it.
49. Head further into the underwater cavern. In order to unlock the entrance to the ruins, release the energy from the machines on both sides of the entryway. You will need to use the Xenochromatic Octopus’ ability to rotate the crystals and change the direction of the connector that allows the energy to flow through it until it is in the proper position. Once done, the entryway should be unlocked and let you through. You do not have to complete the rest of the puzzle in order to get the hydroculus. Instead, continue heading through the ruins and turn left once reaching the machine with four paths running out of it. Take the elevator up and continue down the path until you reach the hydroculus.
50. Go back to the entrance of the cave and head into the water and swim in the eastern direction a little way past the waypoint. The hydroculus is located at the entrance of some underground ruins that are underwater.

51-54
51. Swim in the northeastern direction and you will find the hydroculus under a rock formation that is jutting out.
52. Now, swim north and head deeper underwater until you reach the hydroculus at the entrance to some ruins.
53. Swim back up until you are closer to the surface and head in a slightly southeast direction towards the southern coast of the Fort Charybdis Ruins where the hydroculus is located.
54. Exit the water and head southeast towards the next island. The hydroculus is at the top of the small mountain peak.

55-58
55. Jump and glide in the southeast direction towards another small island. Use the Humongous Hat Jellyfish surrounded by hilichurls to launch yourself into the sky to grab the hydroculus.
56. Head slightly northwest back towards the island hosting the Fort Charybdis Ruins. The hydroculus is on the southeastern coast above the water and at the entrance to a cave.
57. Head further into the underground cavern. Before you are able to reach this hydroculus, you must solve the Operable Mechanism puzzle. Use the Xenochromatic Ball Octopus’ ability to turn the Eliphas Beam towards the two columns. Now, adjust both columns to be the proper height to receive the beam. Once done, the gate will open, allowing access to the elevator. Take the elevator down into the lower room and defeat the enemy. Hit the blue gem to open the gate and then use a bow character while you are in between the two gates to open up the second gate. Once you reach the next room, immediately head left and glide over to the other platform. Climb on top of the column and jump onto the gear that is moving up and down. Once it reaches the top, a gust of wind will appear, letting you glide up to the hydroculus.
58. Jump into the water that is below the machine at the center of the room. The hydroculus is located here.

59-62
59. Go back to the entrance of the underground cavern and head north towards the other end of the island and you will find some ruins on the coast. Solve the Operable Mechanism puzzle in the building ruins to unlock a gust of wind which will allow you to reach the hydroculus in the sky. First, defeat the enemies in the ruins. Go into the middle of the ruins and pick up the crystals. Bring them to the Eliphas Beam on the west side of the ruins. Now, use the Xenochromatic Ball Octopus’ ability to turn the Eliphas Beam until it is facing the ‘beam receiver’ on the column to the south. Make sure to destroy the items that are blocking the beam’s path. Once that is done, the puzzle will be completed, and you will be able to use the gust of wind to glide up towards the hydroculus.
60. Glide north a little ways and head underwater. The hydroculus will be located inside a broken-down ship.
61. Head south back towards the island and take the path up to the waypoint. At the middle point of the island, complete the combat Time Trial and a hydro launch point will be unlocked. Enter it and you will be brought up until you can utilize the gust of wind to glide and grab the hydroculus.
62. Immediately after obtaining the last hydroculus, take the wind currents over to the southern ruins. Continue past the waypoint and jump across the broken path in the sky. Before reaching the hydroculus, you will have to jump down and glide into the Humongous Hat Jellyfish. It will launch you into the air and you will be able to reach the hydroculus.
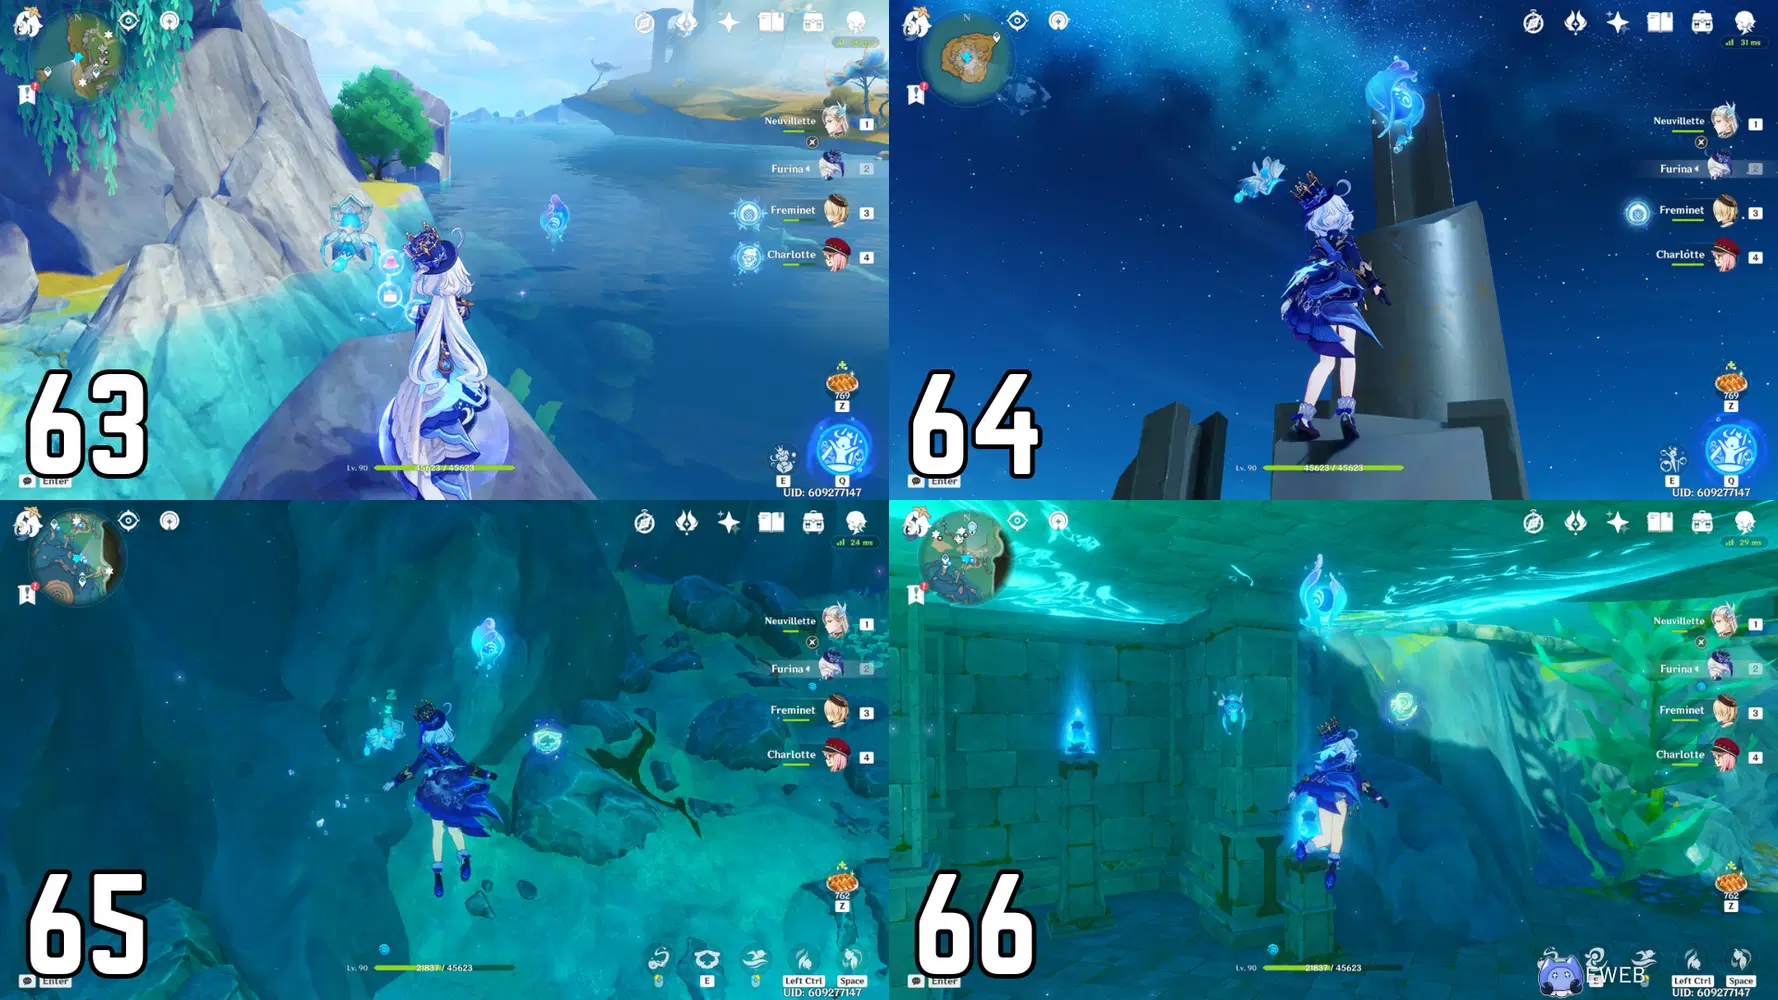
63-66
63. Glide northwest and you will find the hydroculus above the water and at the entrance to a cave.
64. Head west across the water towards the waypoint on the edge of the island containing the Sealed Ruined Tower. Enter the hydro launch point just past the waypoint and it will take you to the top of the tower. Continue climbing to the very top where the hydroculus is located.
65. Jump off of the tower and glide northeast towards the water. Swim underwater and use the nearby Xenochromatic Jellyfish’s ability to break open the rocks and find the hydroculus inside.
66. Swim north to the ruins above where you are currently located. Head into the underground portion of the ruins and grab the Pneuma block. Head to the Ousia statue that is on the side of the ruins that is still underwater and break it open. Grab the two crystals and put them on the nearby pedestal. Use the Xenochromatic Ball Octopus’ ability on the crystal pedestal in order to allow the underground portion of the ruins to completely fill with water. Once done, you will be able to swim up to the hydroculus and grab it.
Conclusion:
➥ Travelers, this marks the end of my comprehensive guide on collecting the 66 hydroculus in Erinnyes Forest and the Morte Region of Fontaine!
- Please refer back to this guide whenever you need more details on the locations of these hydroculus.
-- -- --
♡ Please keep an eye out for any future guides & consider giving me a like and a follow if you enjoyed this guide! ♡


⚛Check out my social media ~eweb's Carrd⚛



