


UID 701948633
Intro

Sucrose is one of the best damage supports in Genshin Impact. Her element, Anemo, allows easy access to resistance reduction, making it a must-have for big number whale videos. Not only that but her kit is also designed to inherit Elemental Mastery to the rest of the party, causing higher damage in elemental reactions.

Not a big-number whale video, but you get the idea!
This analysis is supposed to be released during the Venti banner. Unfortunately, I got busy. But hey, better late than never, right?

Conclusion (TL;DR)
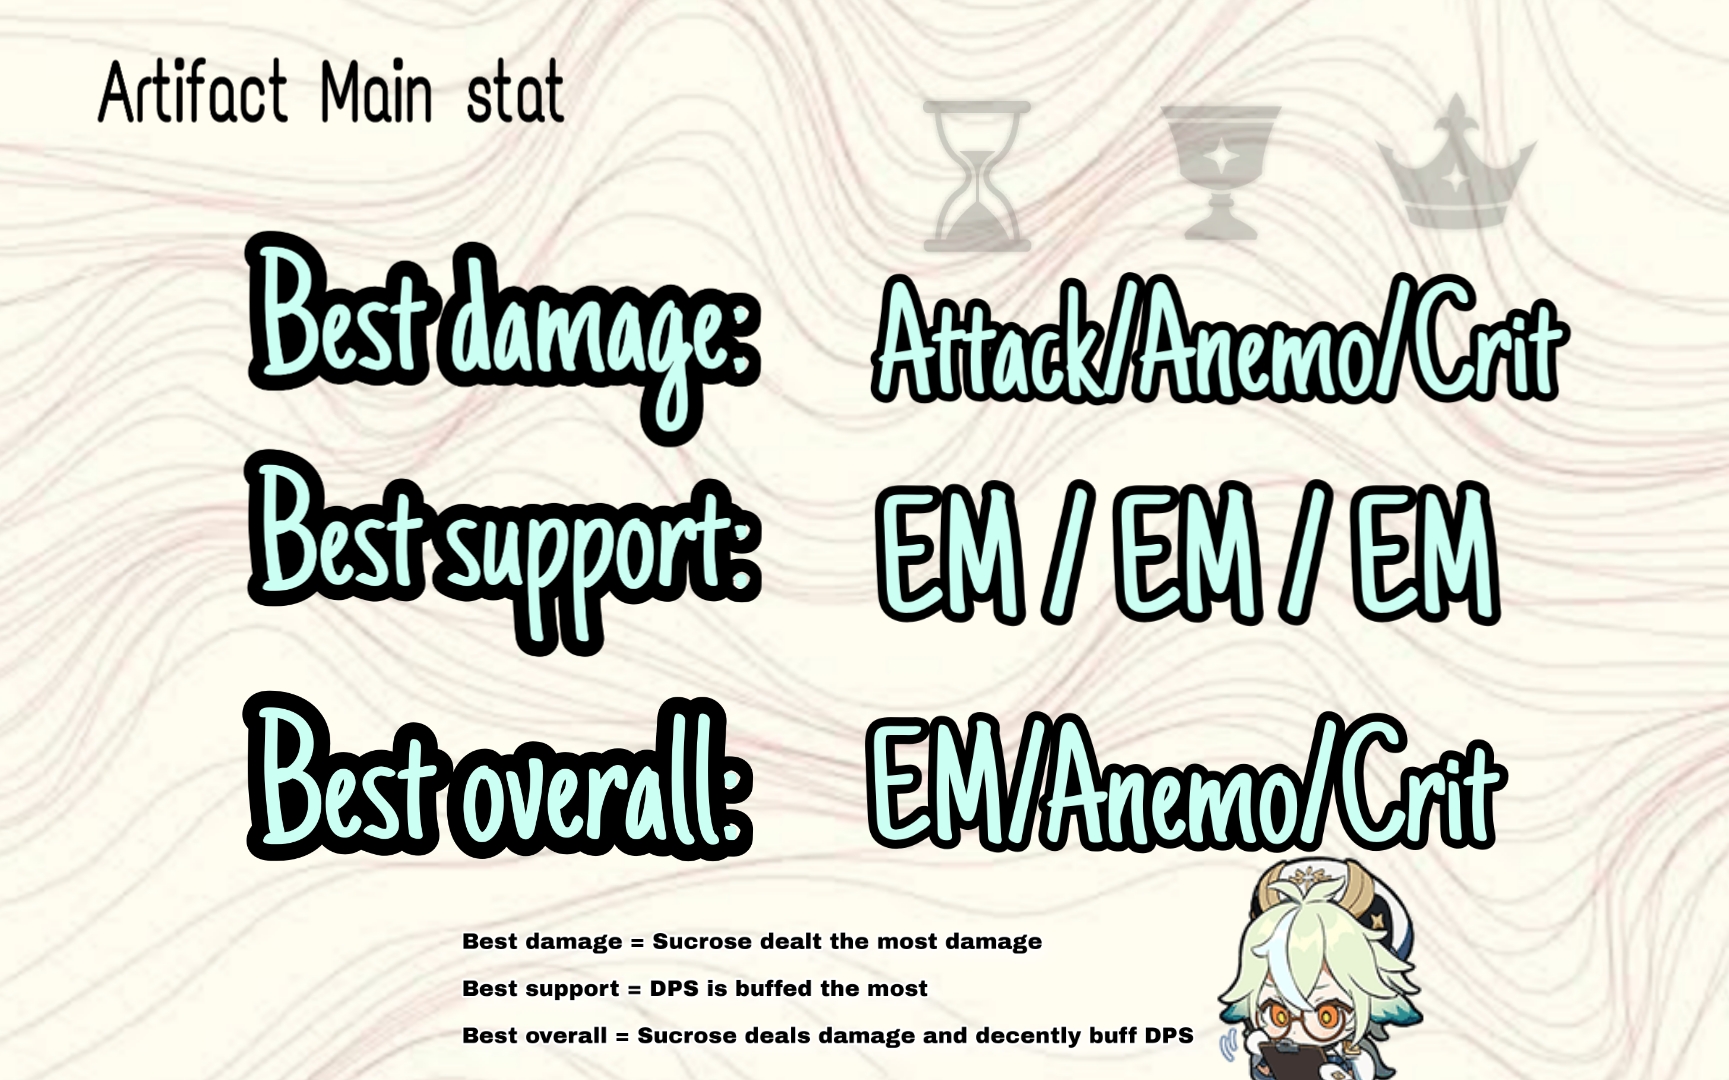
Best Weapon for Damage:
1. Skyward Atlas
2. Lost Prayer to the Sacred Winds
3. Favonius Codex
4. Solar Pearl / The Widsith (Situational)
5. Sacrificial Fragments
6. Mappa Mare
7. Thrilling Tales of the Dragon Slayers
Main stat: Attack/Anemo/Crit
Best Weapon for Support Buff:
1. Thrilling Tales of the Dragon Slayers
2. Sacrificial Fragments, The Widsith (Situational)
3. Mappa Mare
4. Favonius Codex / Solar Pearl / Lost Prayer to the Sacred Winds / Skyward Atlas
Main stat: EM/EM/EM
Note: "Support Buff" weapons are ranked from best to worst at allowing your DPS to deal higher damage while disregarding Sucrose's damage.

Overall Best Weapon (Personal Ranking):
1. Skyward Atlas
2. Lost Prayer to the Sacred Winds
3. Favonius Codex, Sacrificial Fragments
4. The Widsith
5. Thrilling Tales, Solar Pearl
6. Mappa Mare
Main stat: EM/Anemo/Crit
Choosing the Weapon
8 different weapons will be tested on Sucrose:
1. Thrilling Tales
2. Favonius Codex
• Passive will be considered.
3. Mappa Mare
• +16% Elemental Damage bonus is always active.
4. Sacrificial Fragments
• Passive will be considered. At C0, her skill is assumed to be cast 3 times in 30 seconds.
5. Solar Pearl
• +20% Skill and Burst Damage bonus are always active.
6. The Widsith
• Will be tested with a +60% attack and +240 EM. +48% Elemental Damage is not considered because it results in a lower (but similar) result to +60% attack.
7. Skyward Atlas
• Passive will be disregarded.
8. Lost Prayer to the Sacred Winds
• Passive will be disregarded.
Main stat assumption
4 different main stat will be tested.
1. Attack/ Anemo / Crit
2. EM / Anemo / Crit
The Critical Rate will be assumed to be 60%. Skill will be assumed to always crit, while Burst DoT will only crit 60% of the time.
So at C0, 2 out of 3 hits will crit. While at C2, 2 out of 4 hits will crit.
3. EM / EM / EM
4. EM / Anemo / EM
The artifact set tested will be 4-Viridescent Venerer. The sub stat is adjusted based on the main stat.
Note:
EM = Elemental Mastery
ER = Energy Recharge
Final Stat
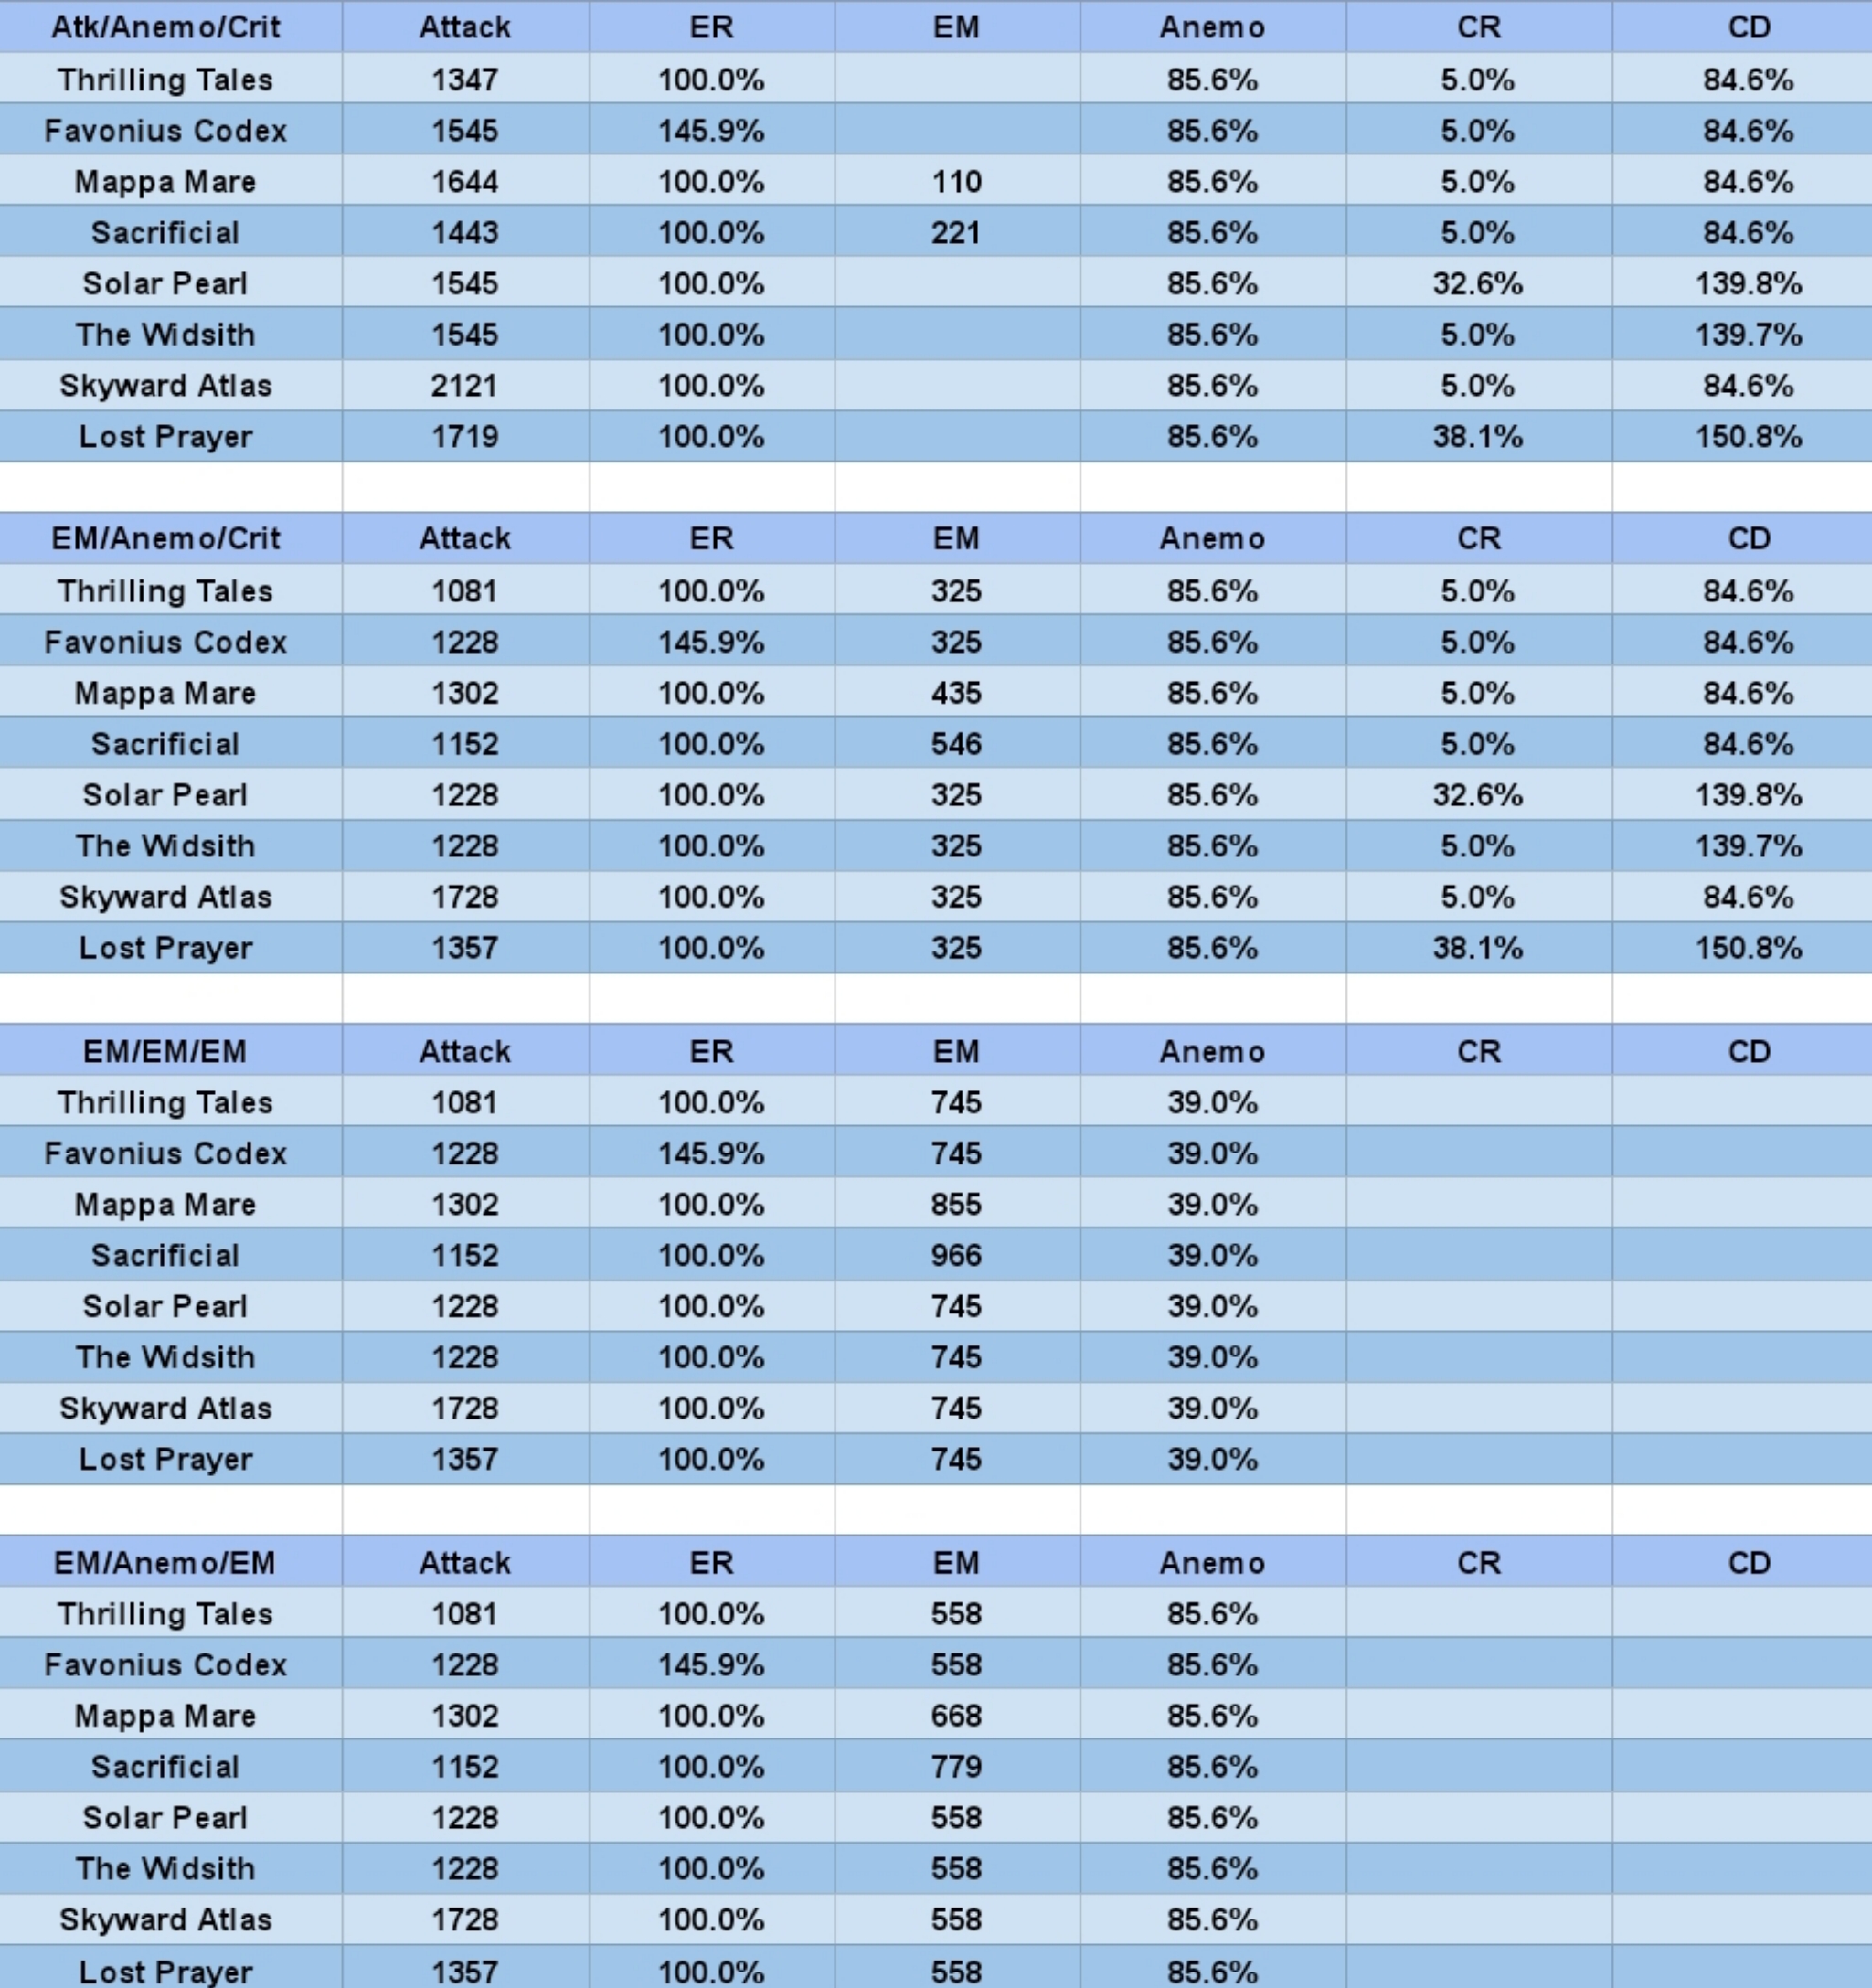
Note: The Widsith is shown without any buff in this table.
Simulation and assumptions
1. She will be tested on C0 and C2.
C0: 1 Skill every 15 seconds.
C2: 2 seconds extra duration on her burst.
C1 is quite tricky to calculate since it does not reduce her cooldown, rather it only gives an extra charge. So I will not be considering it.
2. Burst DoT happens every 2 seconds. 3 times in 6 seconds for C0, and 4 times in 8 seconds for C2.

Swirl will occur 6 times for C0, and 8 times for C2.
3. Sucrose is lv90.
4. The enemy is two lv80 hilichurl, however, the damage output will only show the damage for one hilichurl.
• This is due to how swirl works:
Swirl damage is a small AOE, and if there are two enemies in the burst, then the two enemies will be damaged by two swirls every tick.
If there are three enemies, then the swirl will proc three times every tick, and so on.
The swirl will be assumed to be Cryo/Pyro/Electro.
Hydro swirl appears to be the least effective swirl for some reason, occurring much less than the other three elements.

You can see in the GIF above, Hydro Swirl only procs twice against 2 enemies, while Cryo Swirl procs 6 times against 3 enemies.
It is unclear whether this is a visual issue or not, but let's take the safest assumption.
5. Talent lv6, C0, and C2.
6. Only skill and burst will be considered.
7. No swirl will occur from her elemental skill.
Artifact and Weapon Test
Burst CD:

This is an estimated value of how long it takes until she can get her burst back.
Elemental Mastery bonus estimation:
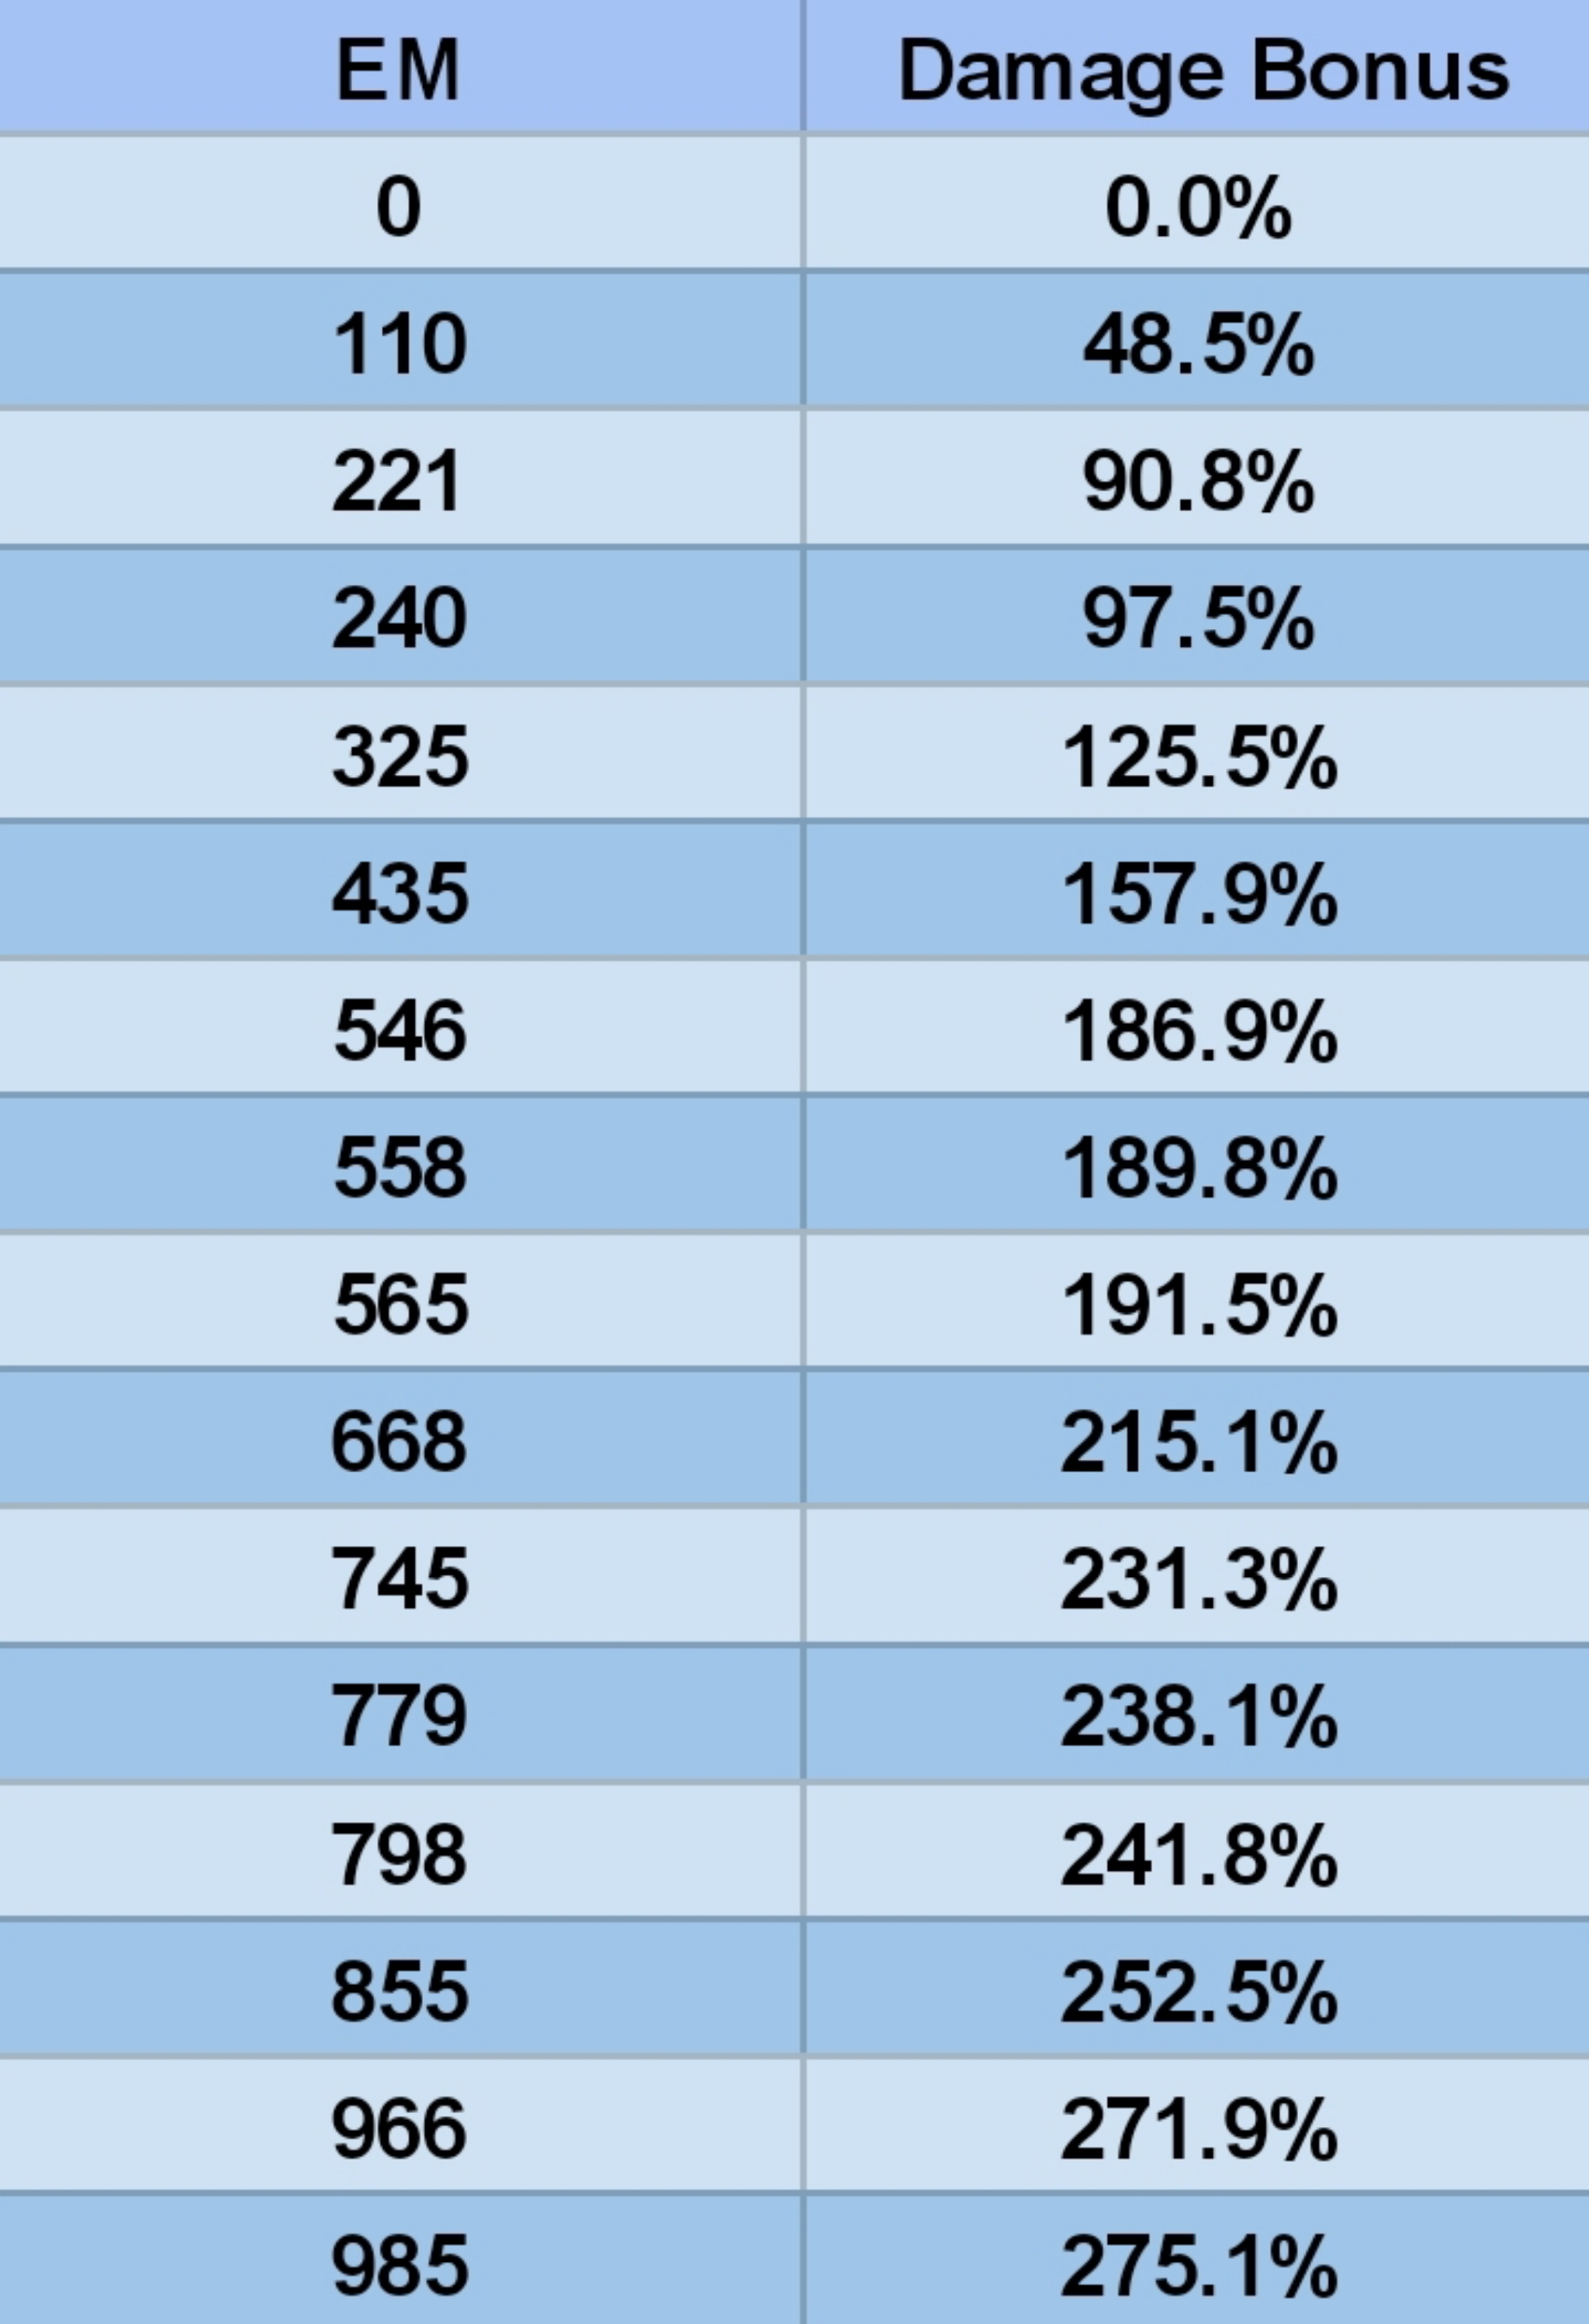
This table shows how much Swirl's bonus she gets from the extra EM.
Damage Overview
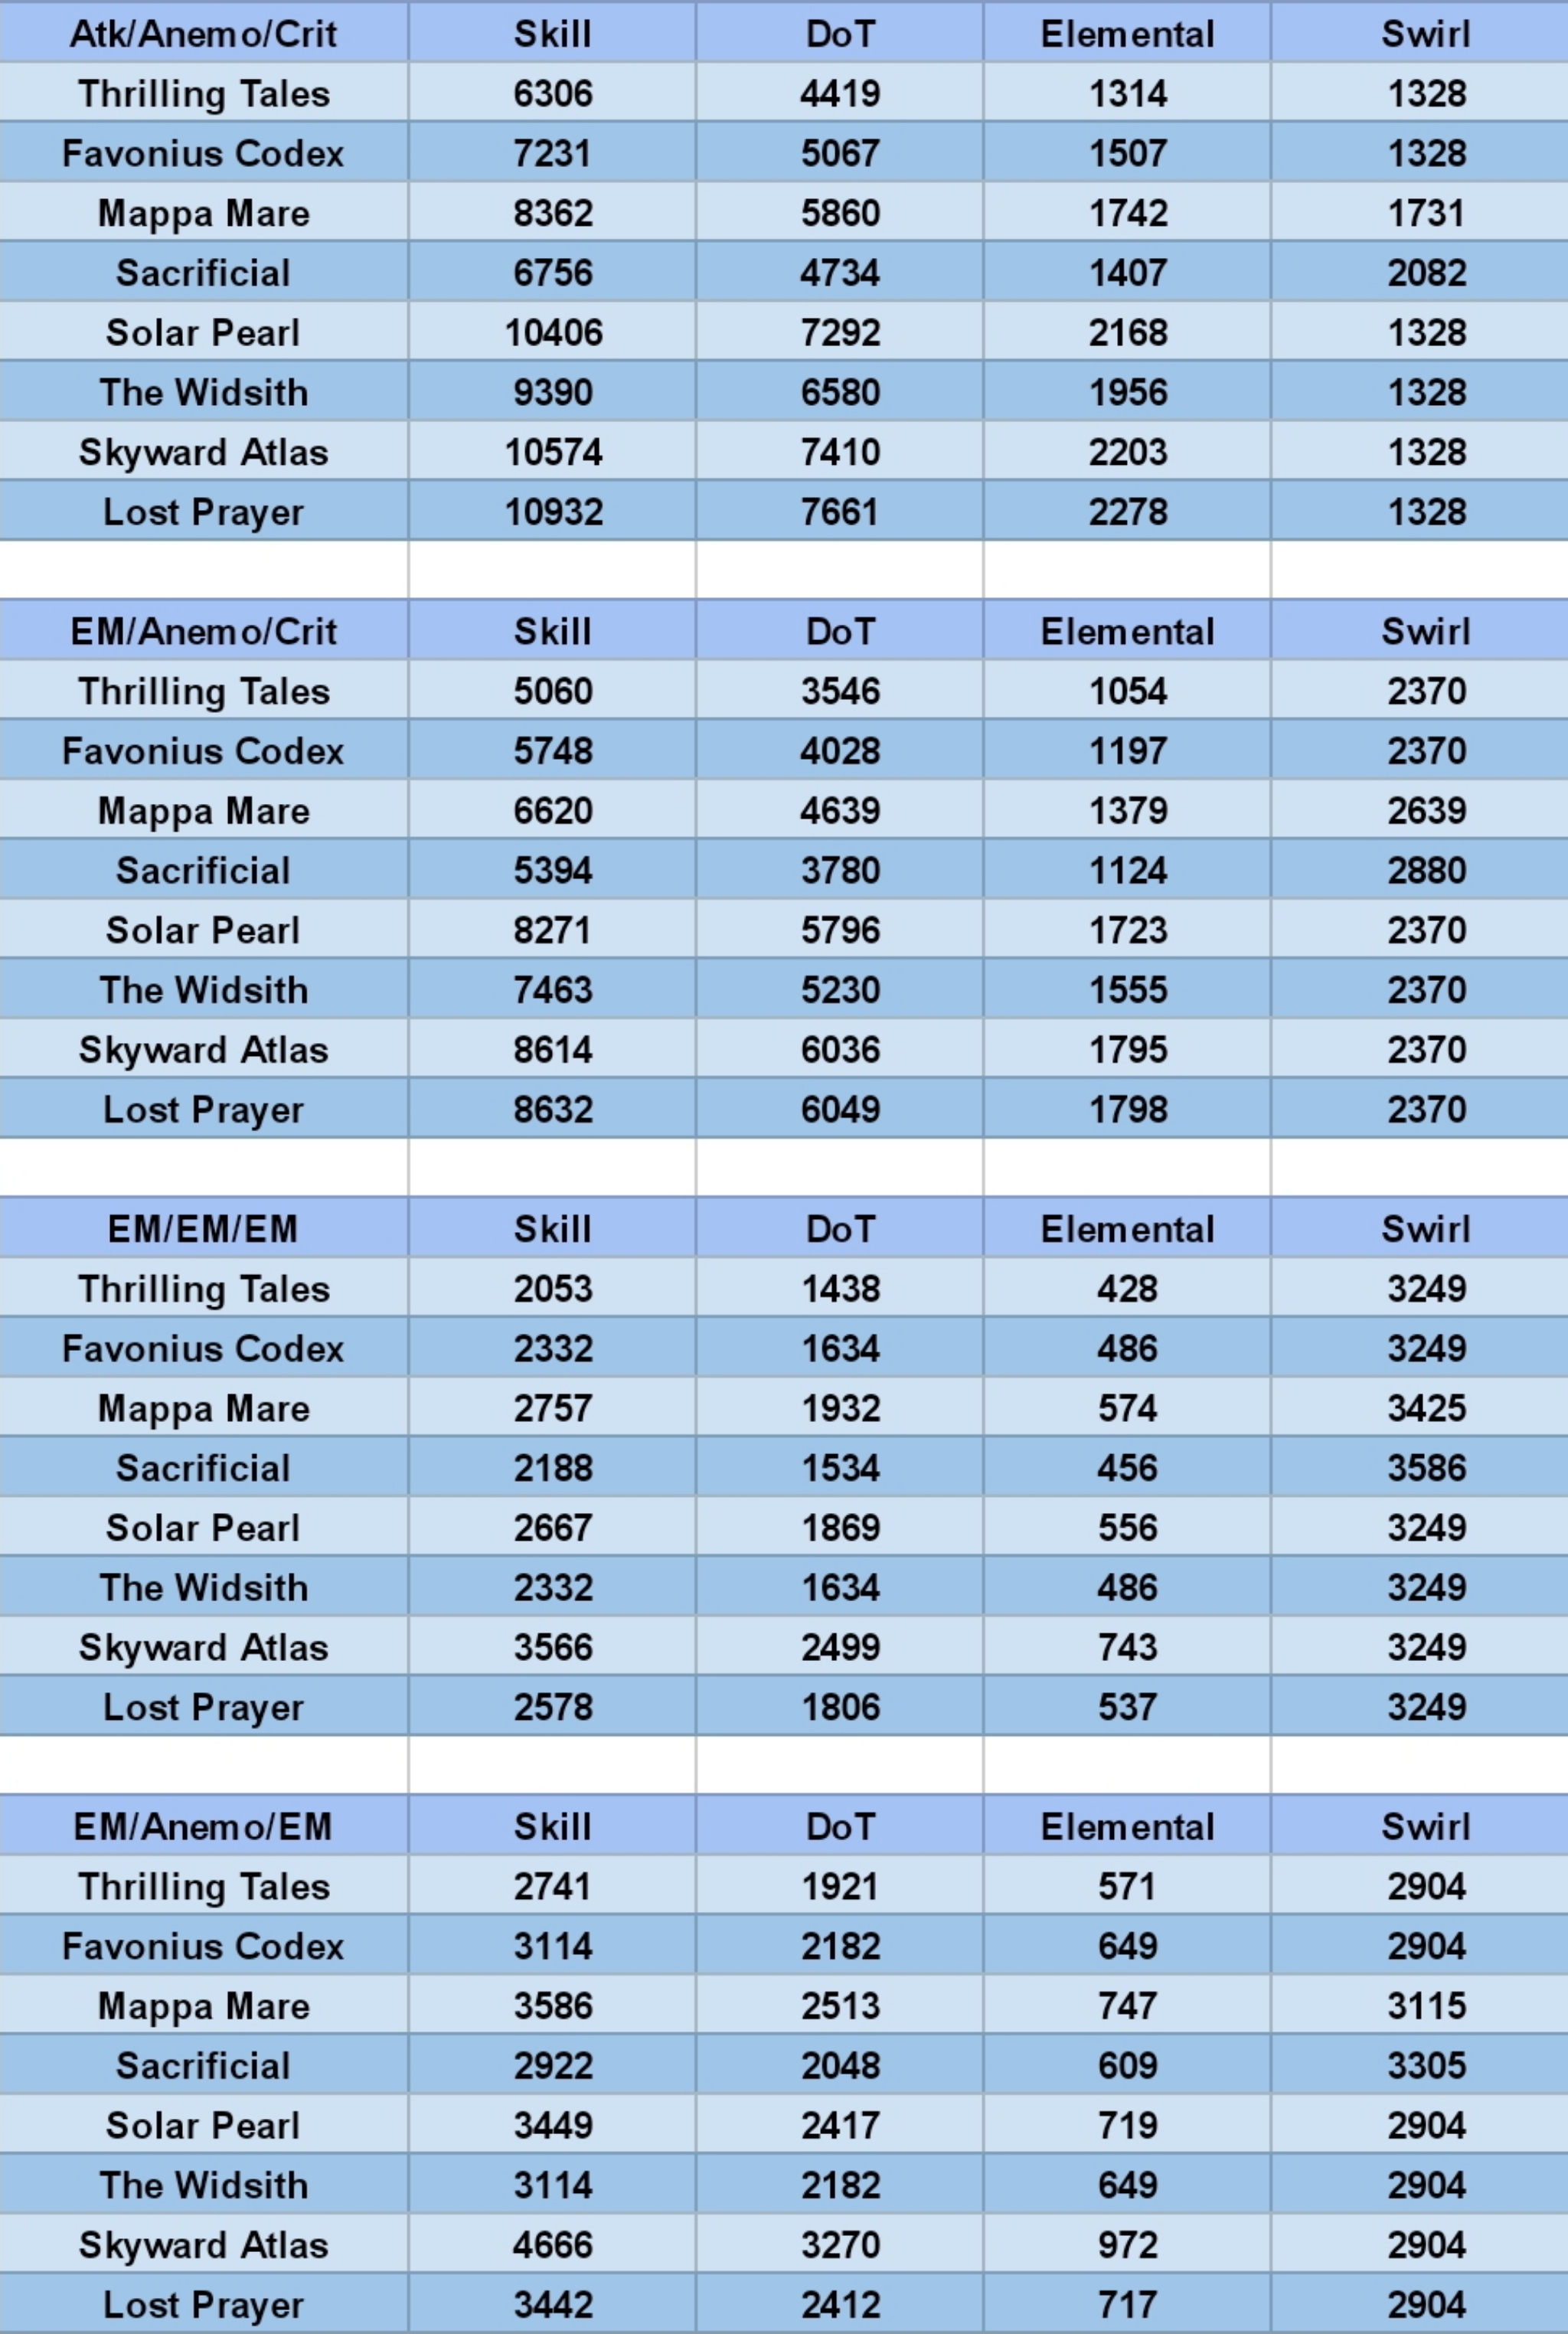
Non-Crit damage overview:
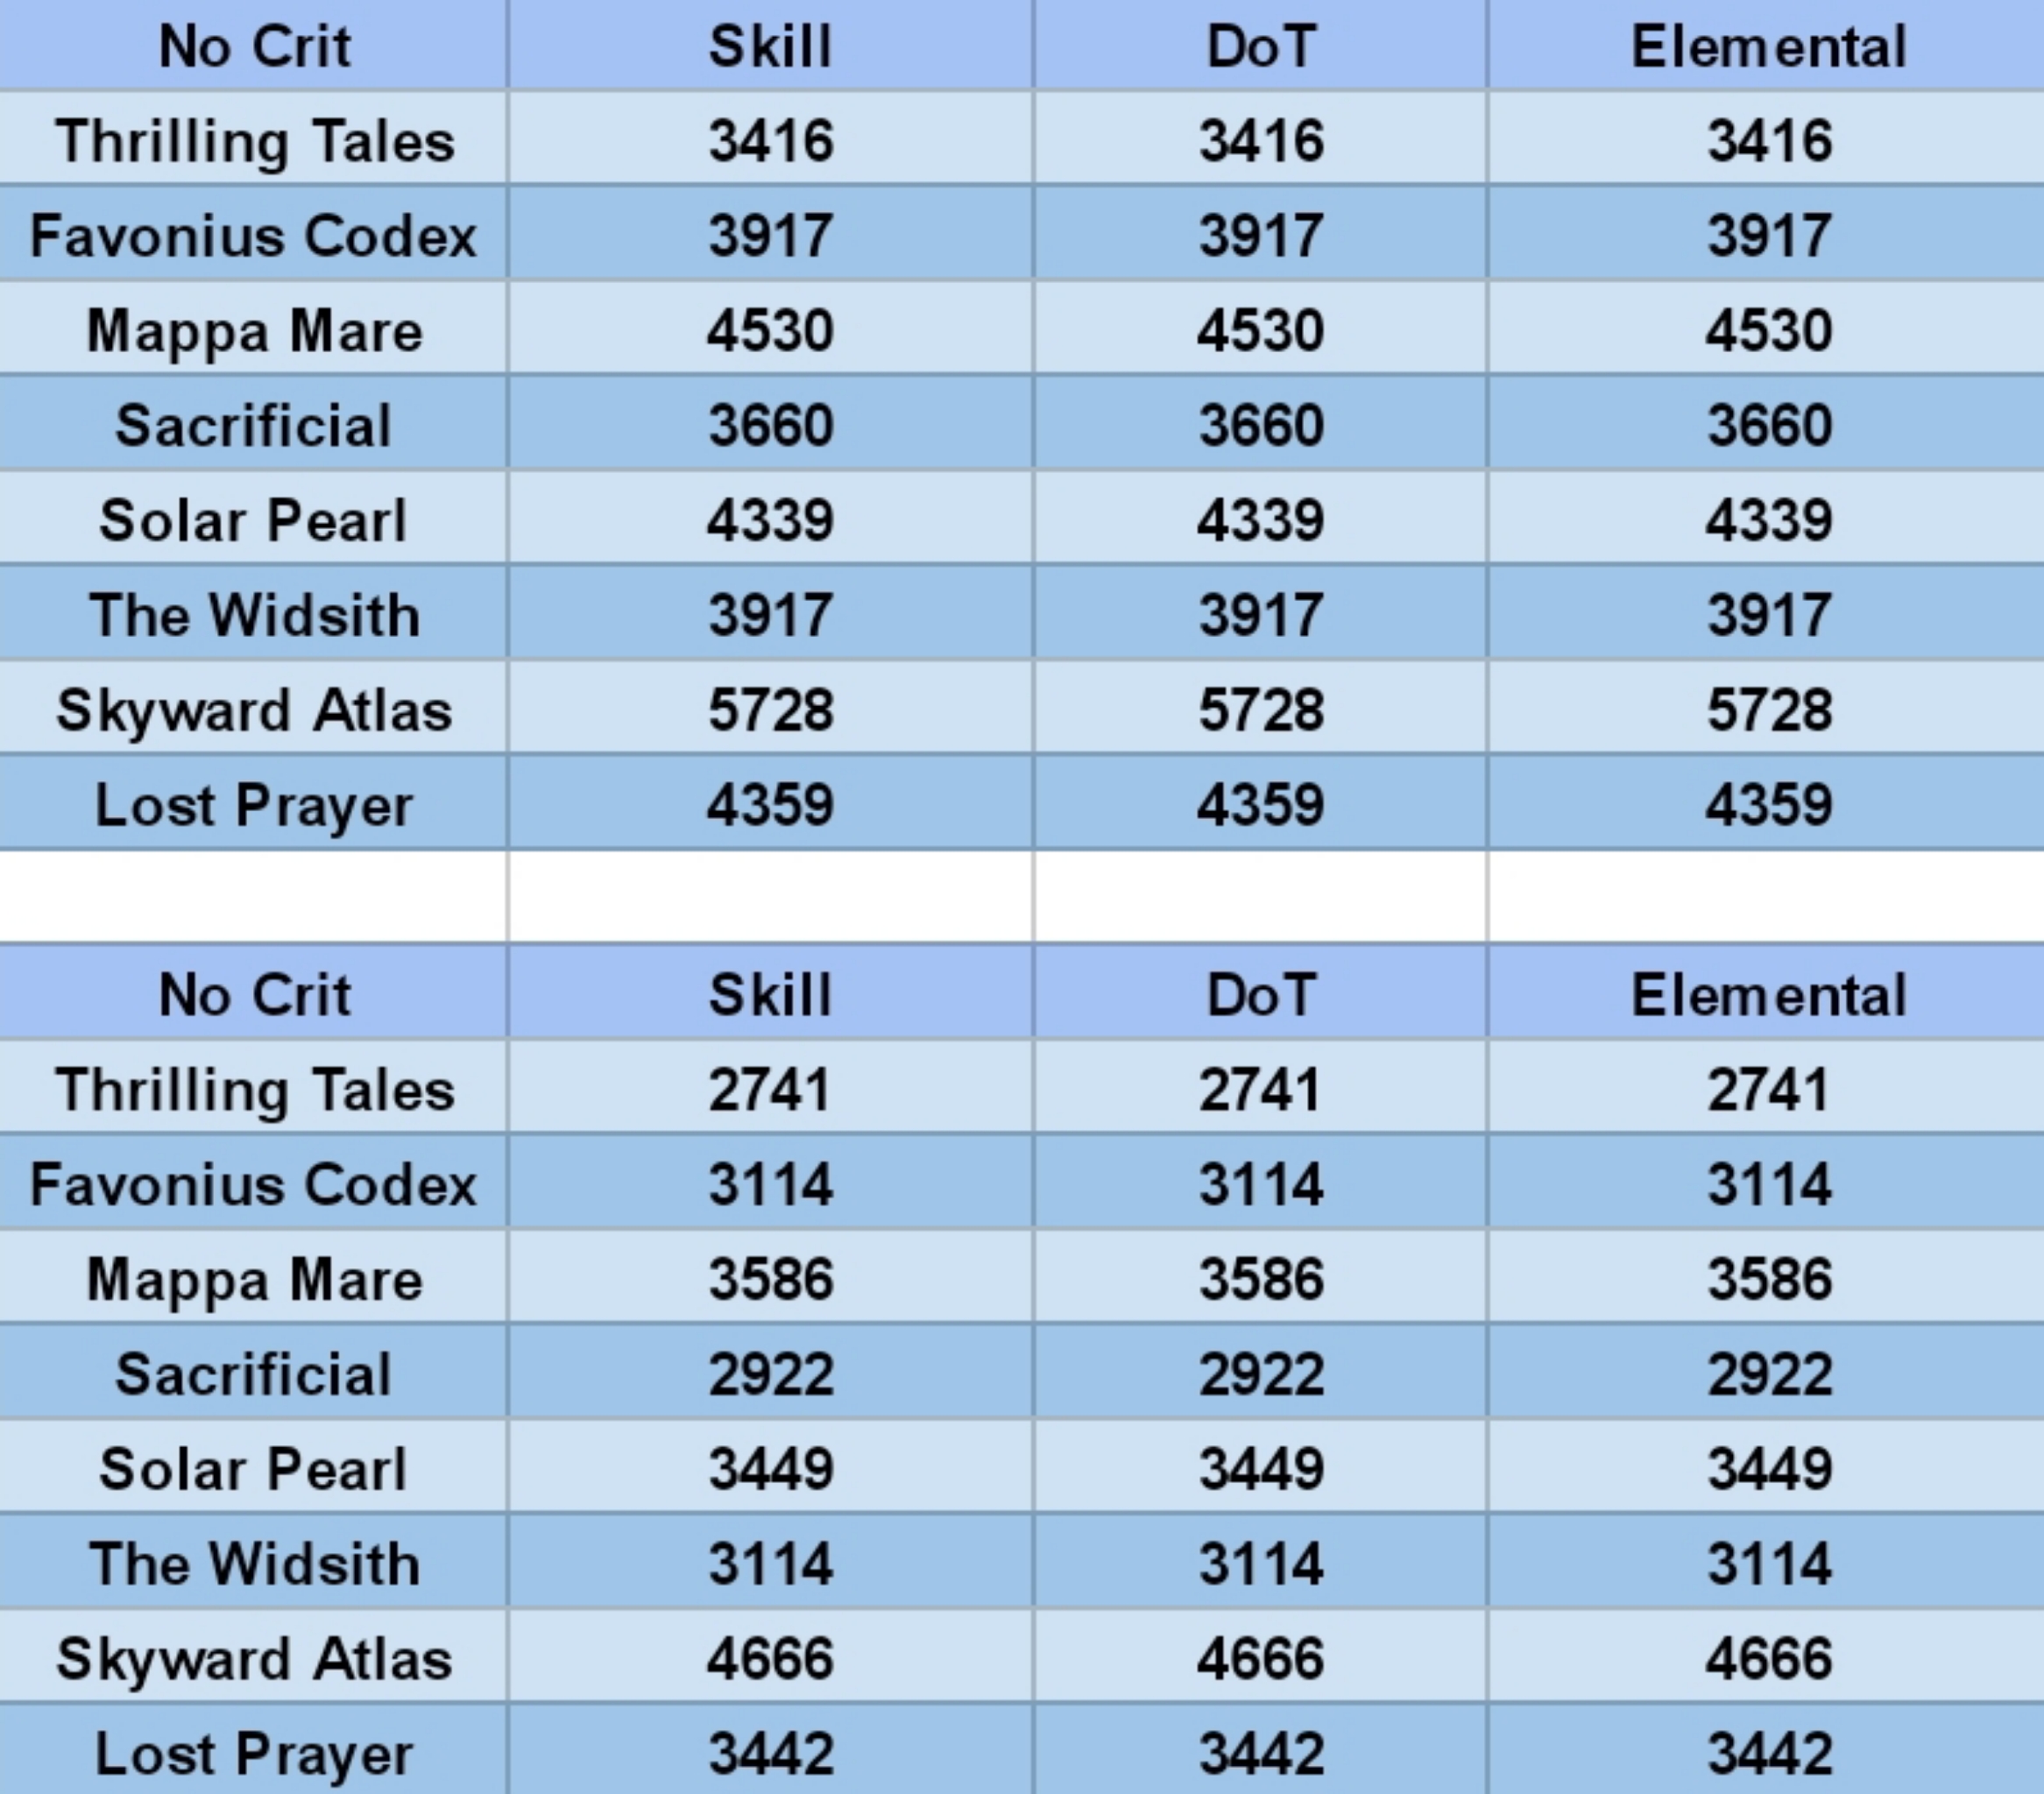
Note:
DoT = The damage overtime of her burst (Every 2 seconds)
Elemental = The bonus damage from elemental infusion in her burst
Simulation Result
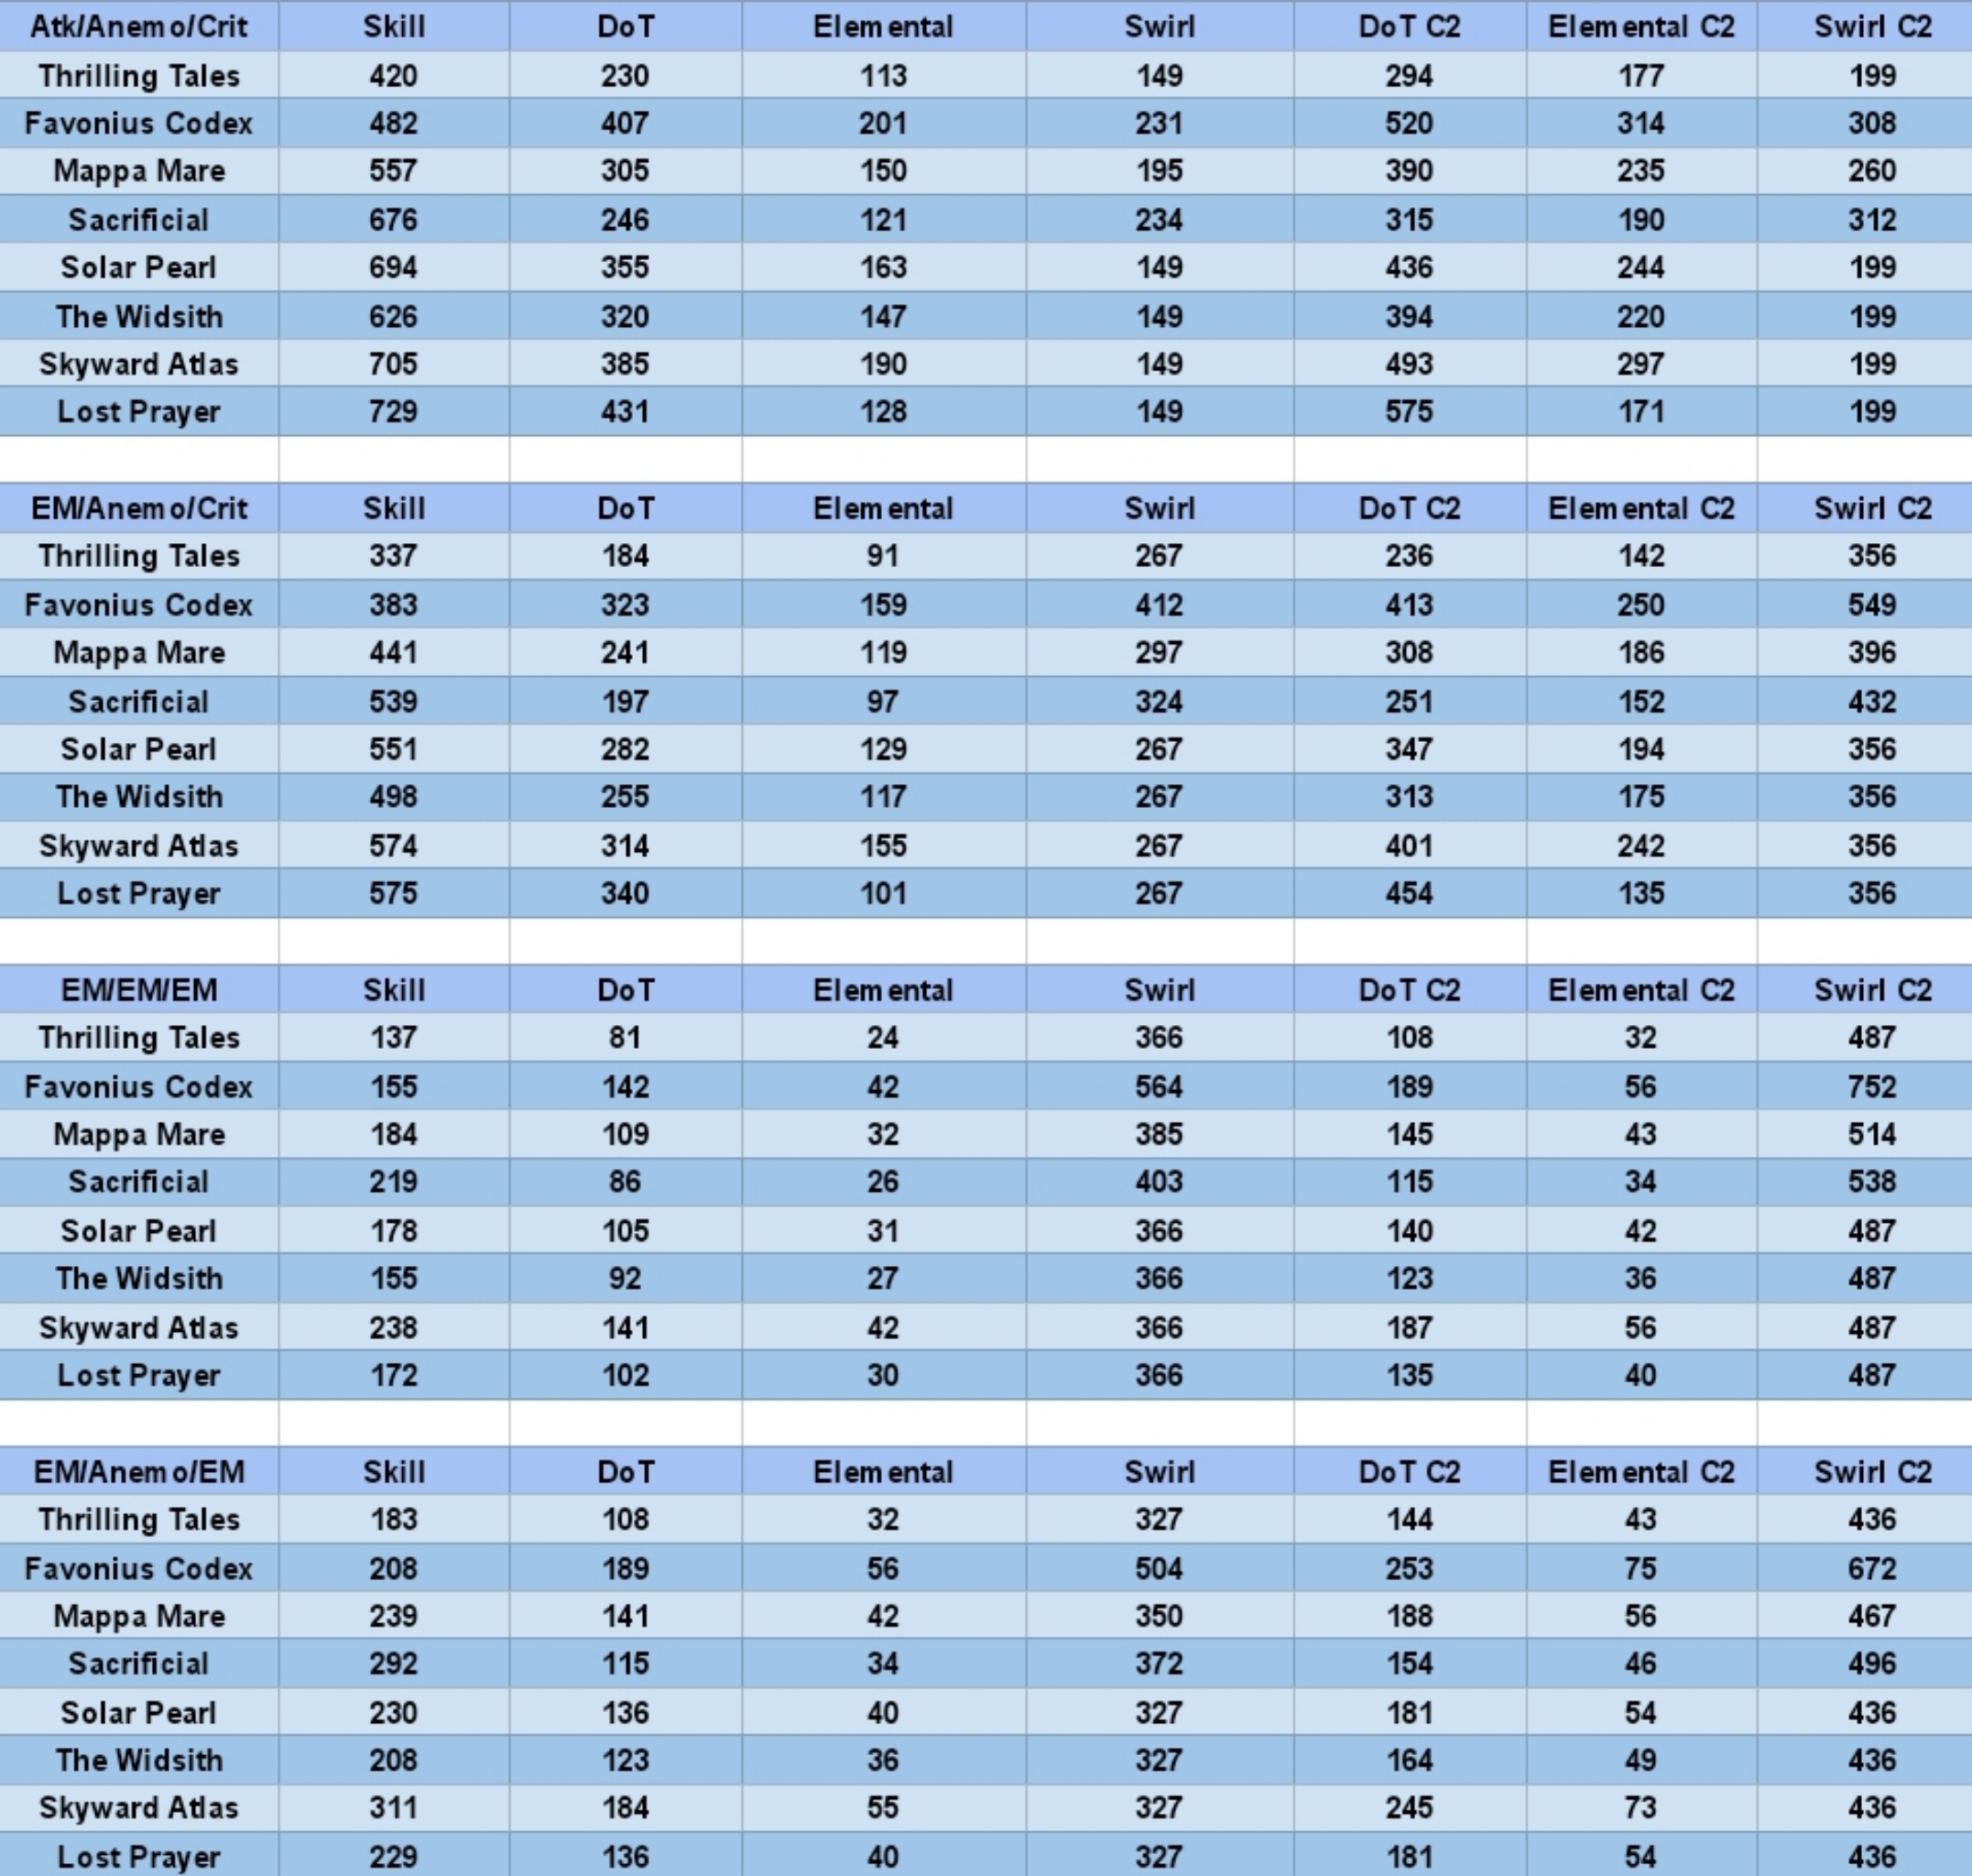
Note:
Skill = Skill / 15 seconds
DoT = DoT x 3 / Burst CD
Elemental = Elemental x 3 / Burst CD
Swirl = Swirl x 6 / Burst CD
Small adjustments are made for Sacrificial Fragments and C2 calculation.
Results Overview
After summing the numbers, now we have:
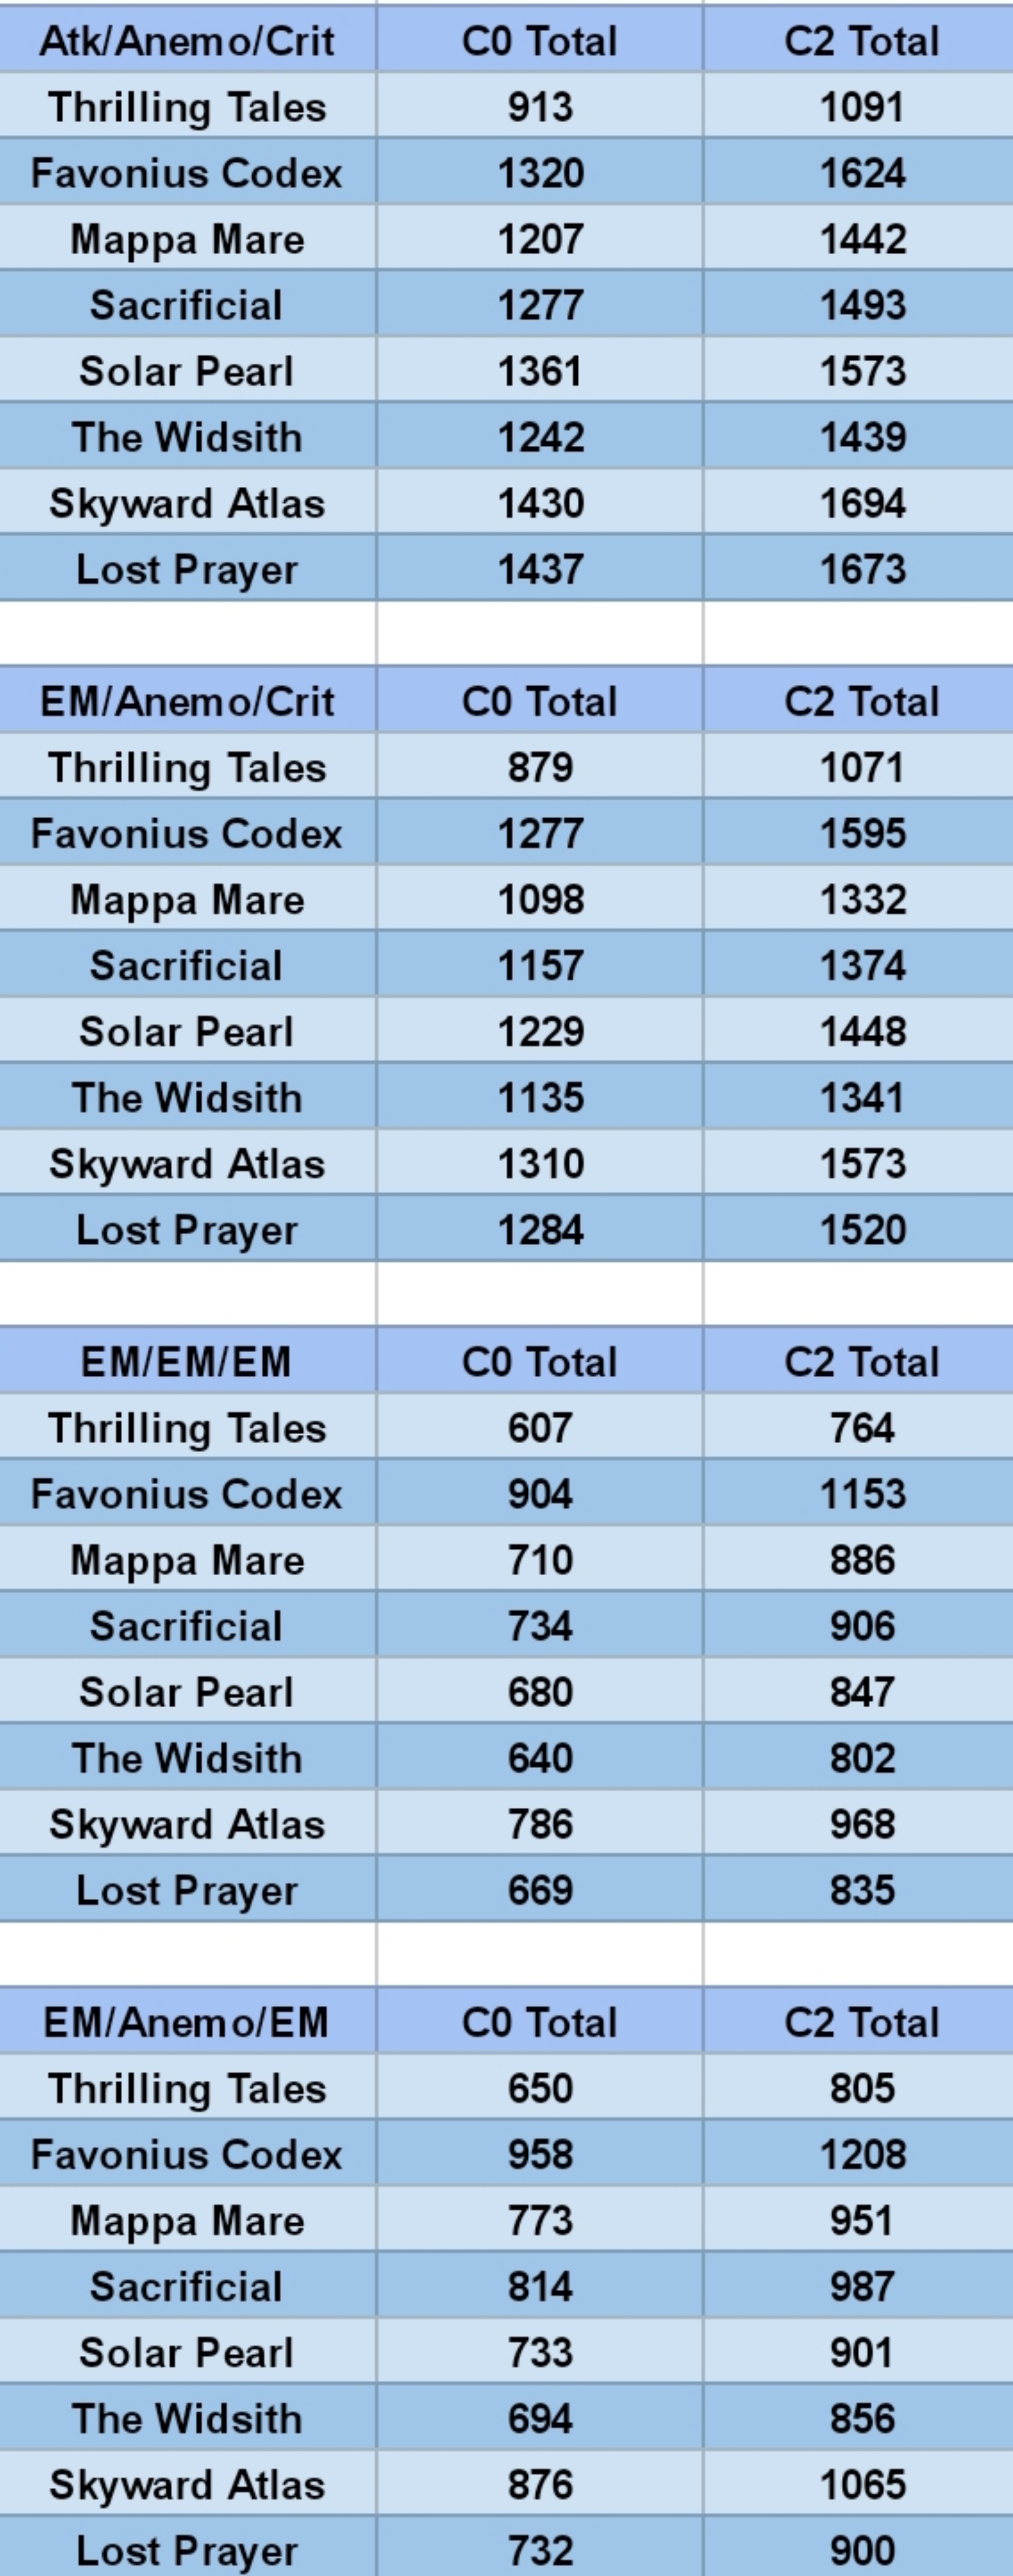
Note:
Favonius Codex has a higher value (than it should be) on the non-crit part. This is because I consider it passive proccing even on non-crit. However, I also tried removing the weapon's passive, and it does not change its position in the list.
Here you can see that Lost Prayer is slightly ahead of Skyward on Attack/Anemo/Crit, but it falls behind on everything else. This makes a lot of sense considering Crit does not enhance Swirl damage.
This EM pattern can also be seen when comparing Favonius Codex and Solar Pearl. The Widsith and Solar Pearl both face a decline in performance with non-crit artifacts.
Do note that these numbers show Widsith with no buff. On +60% attack buff, Widsith outperforms the 5-star weapons. While on 240 EM buff, it performs slightly below Solar Pearl on crit artifacts, and slightly above Solar Pearl on non-crit.
From here, we can conclude that damage-wise, Attack/Anemo/Crit is the best choice for Sucrose. As for the weapon, it can be ranked like so:
1. Skyward Atlas
2. Lost Prayer to the Sacred Winds
3. Favonius Codex
4. Solar Pearl / The Widsith
5. Sacrificial Fragments
6. Mappa Mare
7. Thrilling Tales of the Dragon Slayers
Sucrose Support Test
However, testing her on damage build may be invalid considering that her main feature is the supportive kit. Therefore, I will test Sucrose's buff on Hu Tao's and Ganyu's performances.
Hu Tao will have the following stat:
32245 HP
871 Attack
184.2% Critical Damage
Ganyu will have the following stat:
2372 Attack
150.6% Critical Damage
Hu Tao will be tested with her burst, while Ganyu will be tested with her Frostflake + Bloom.
The Widsith will be assumed to have 240 EM buff.
Elemental Mastery bonus estimation:
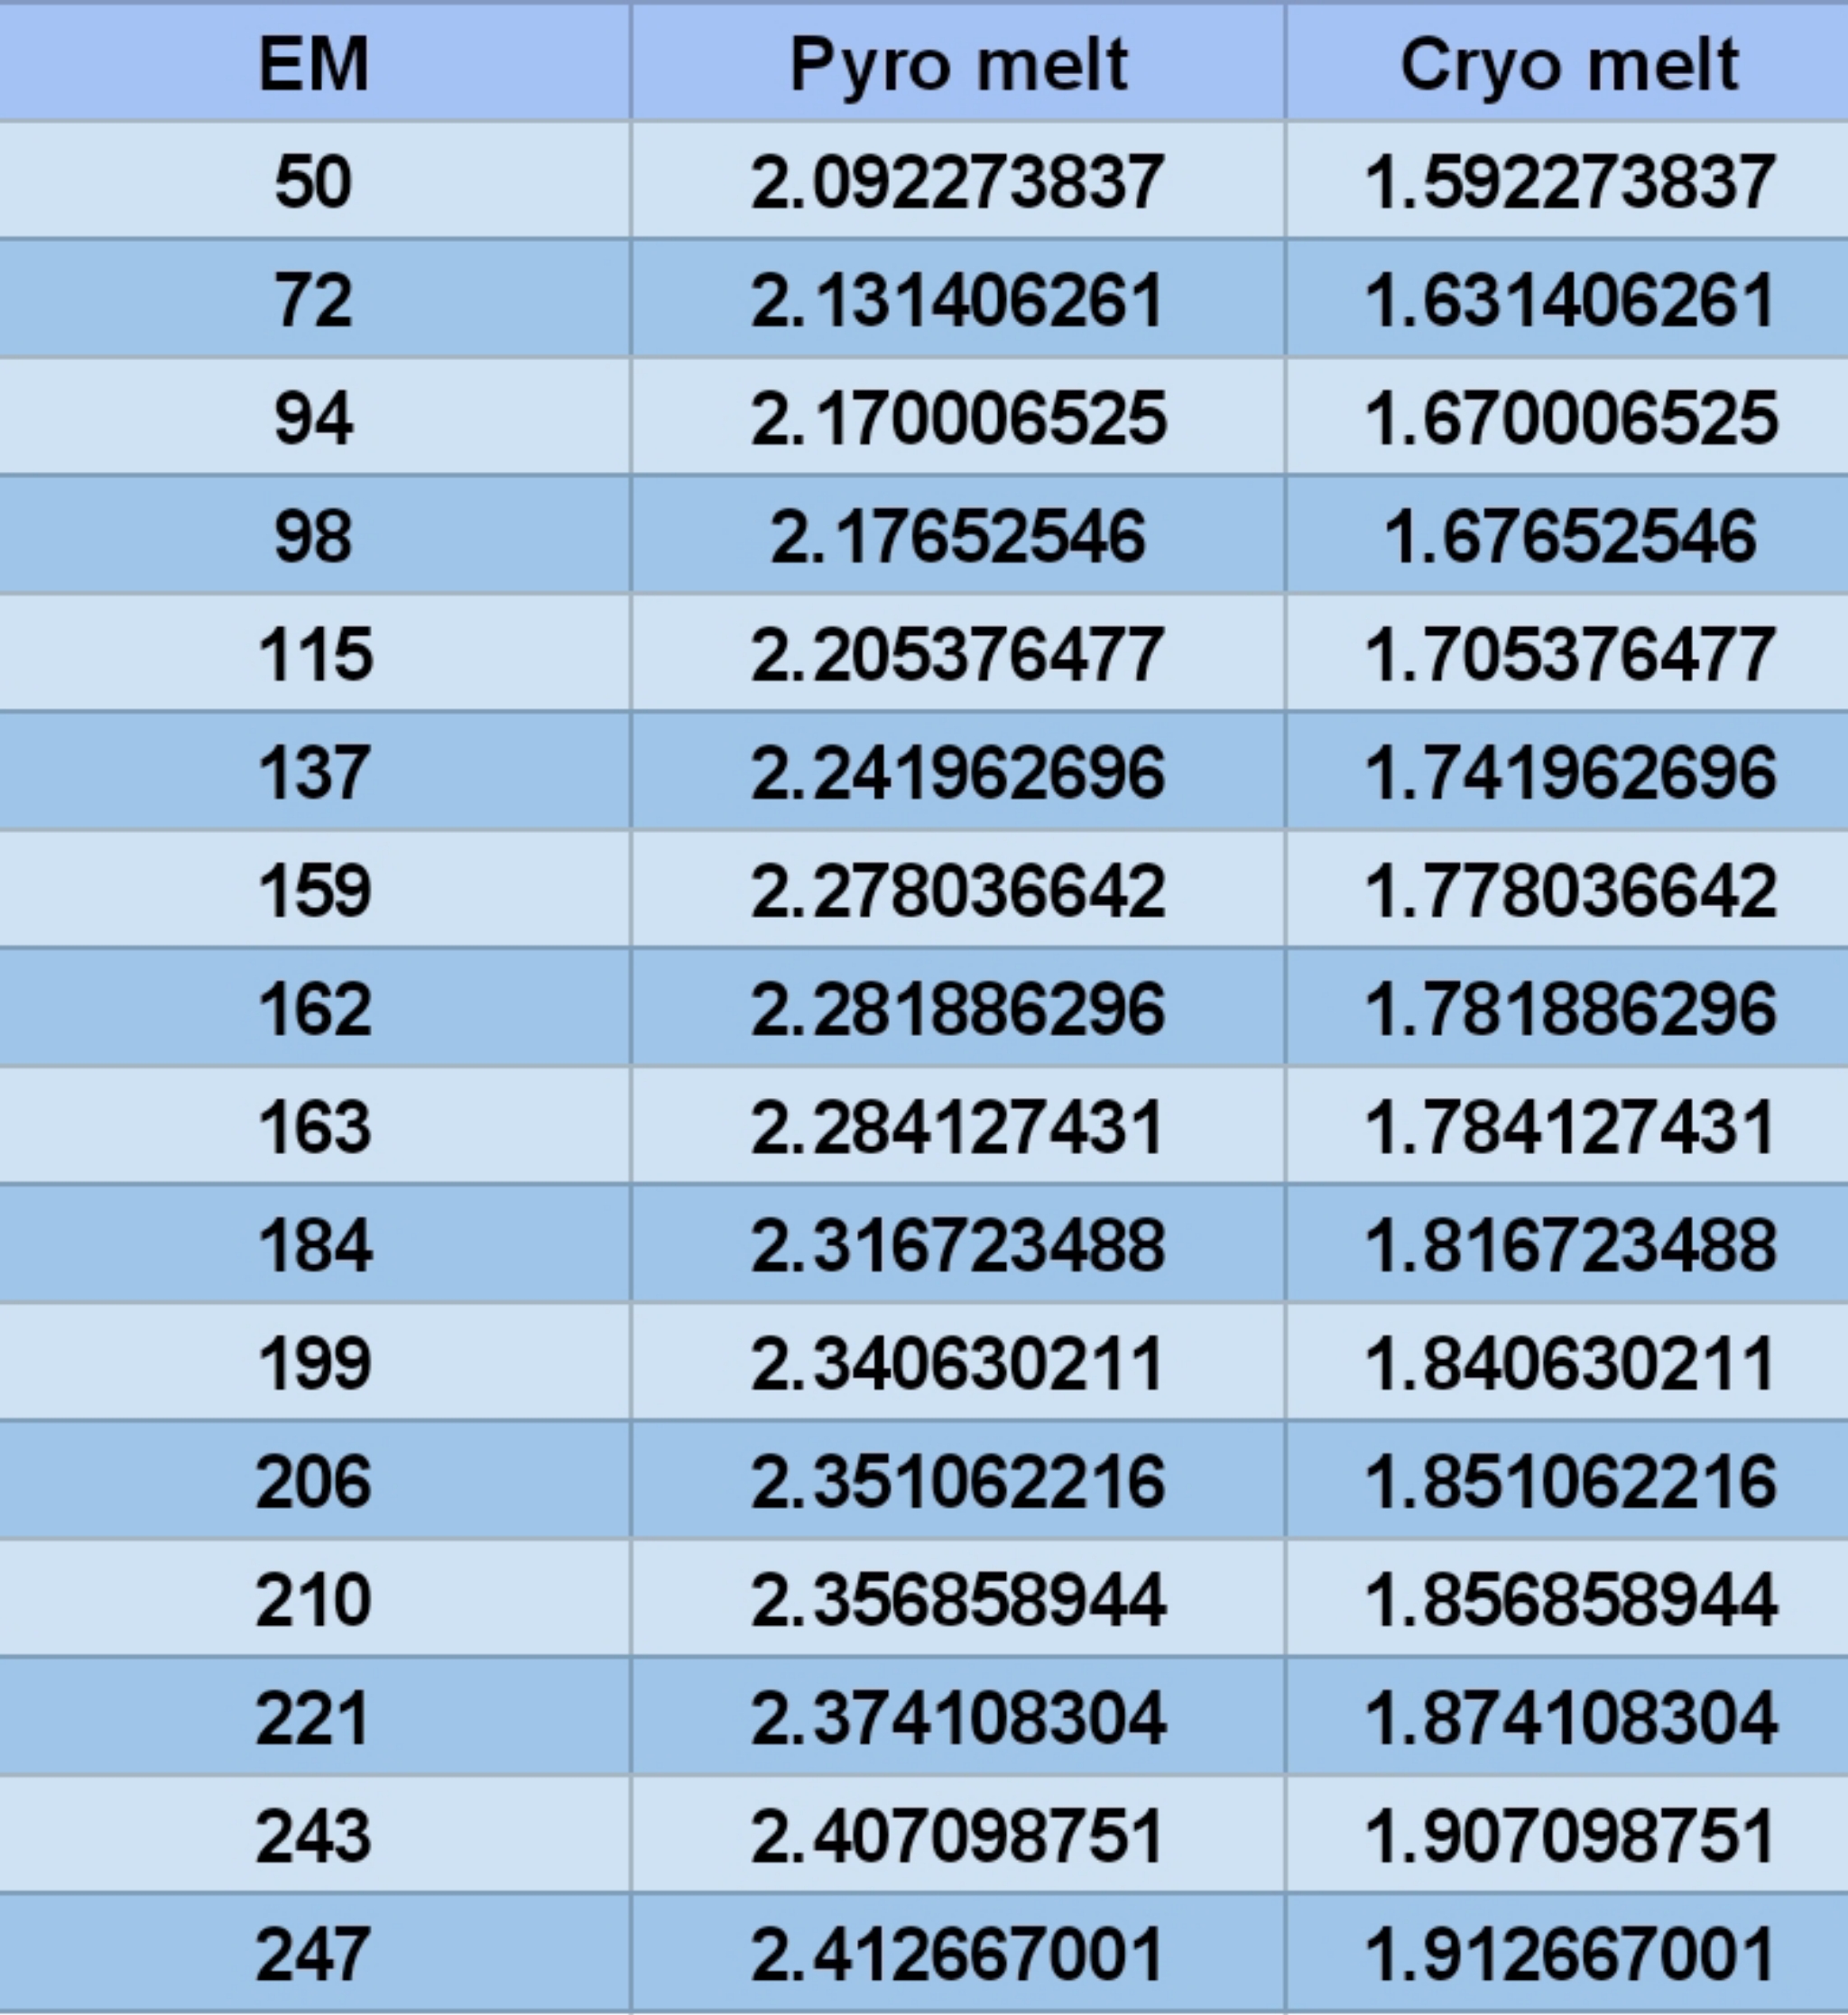
Note: EM represents the amount of Elemental Mastery boost gained from Sucrose's passives.
Result Overview
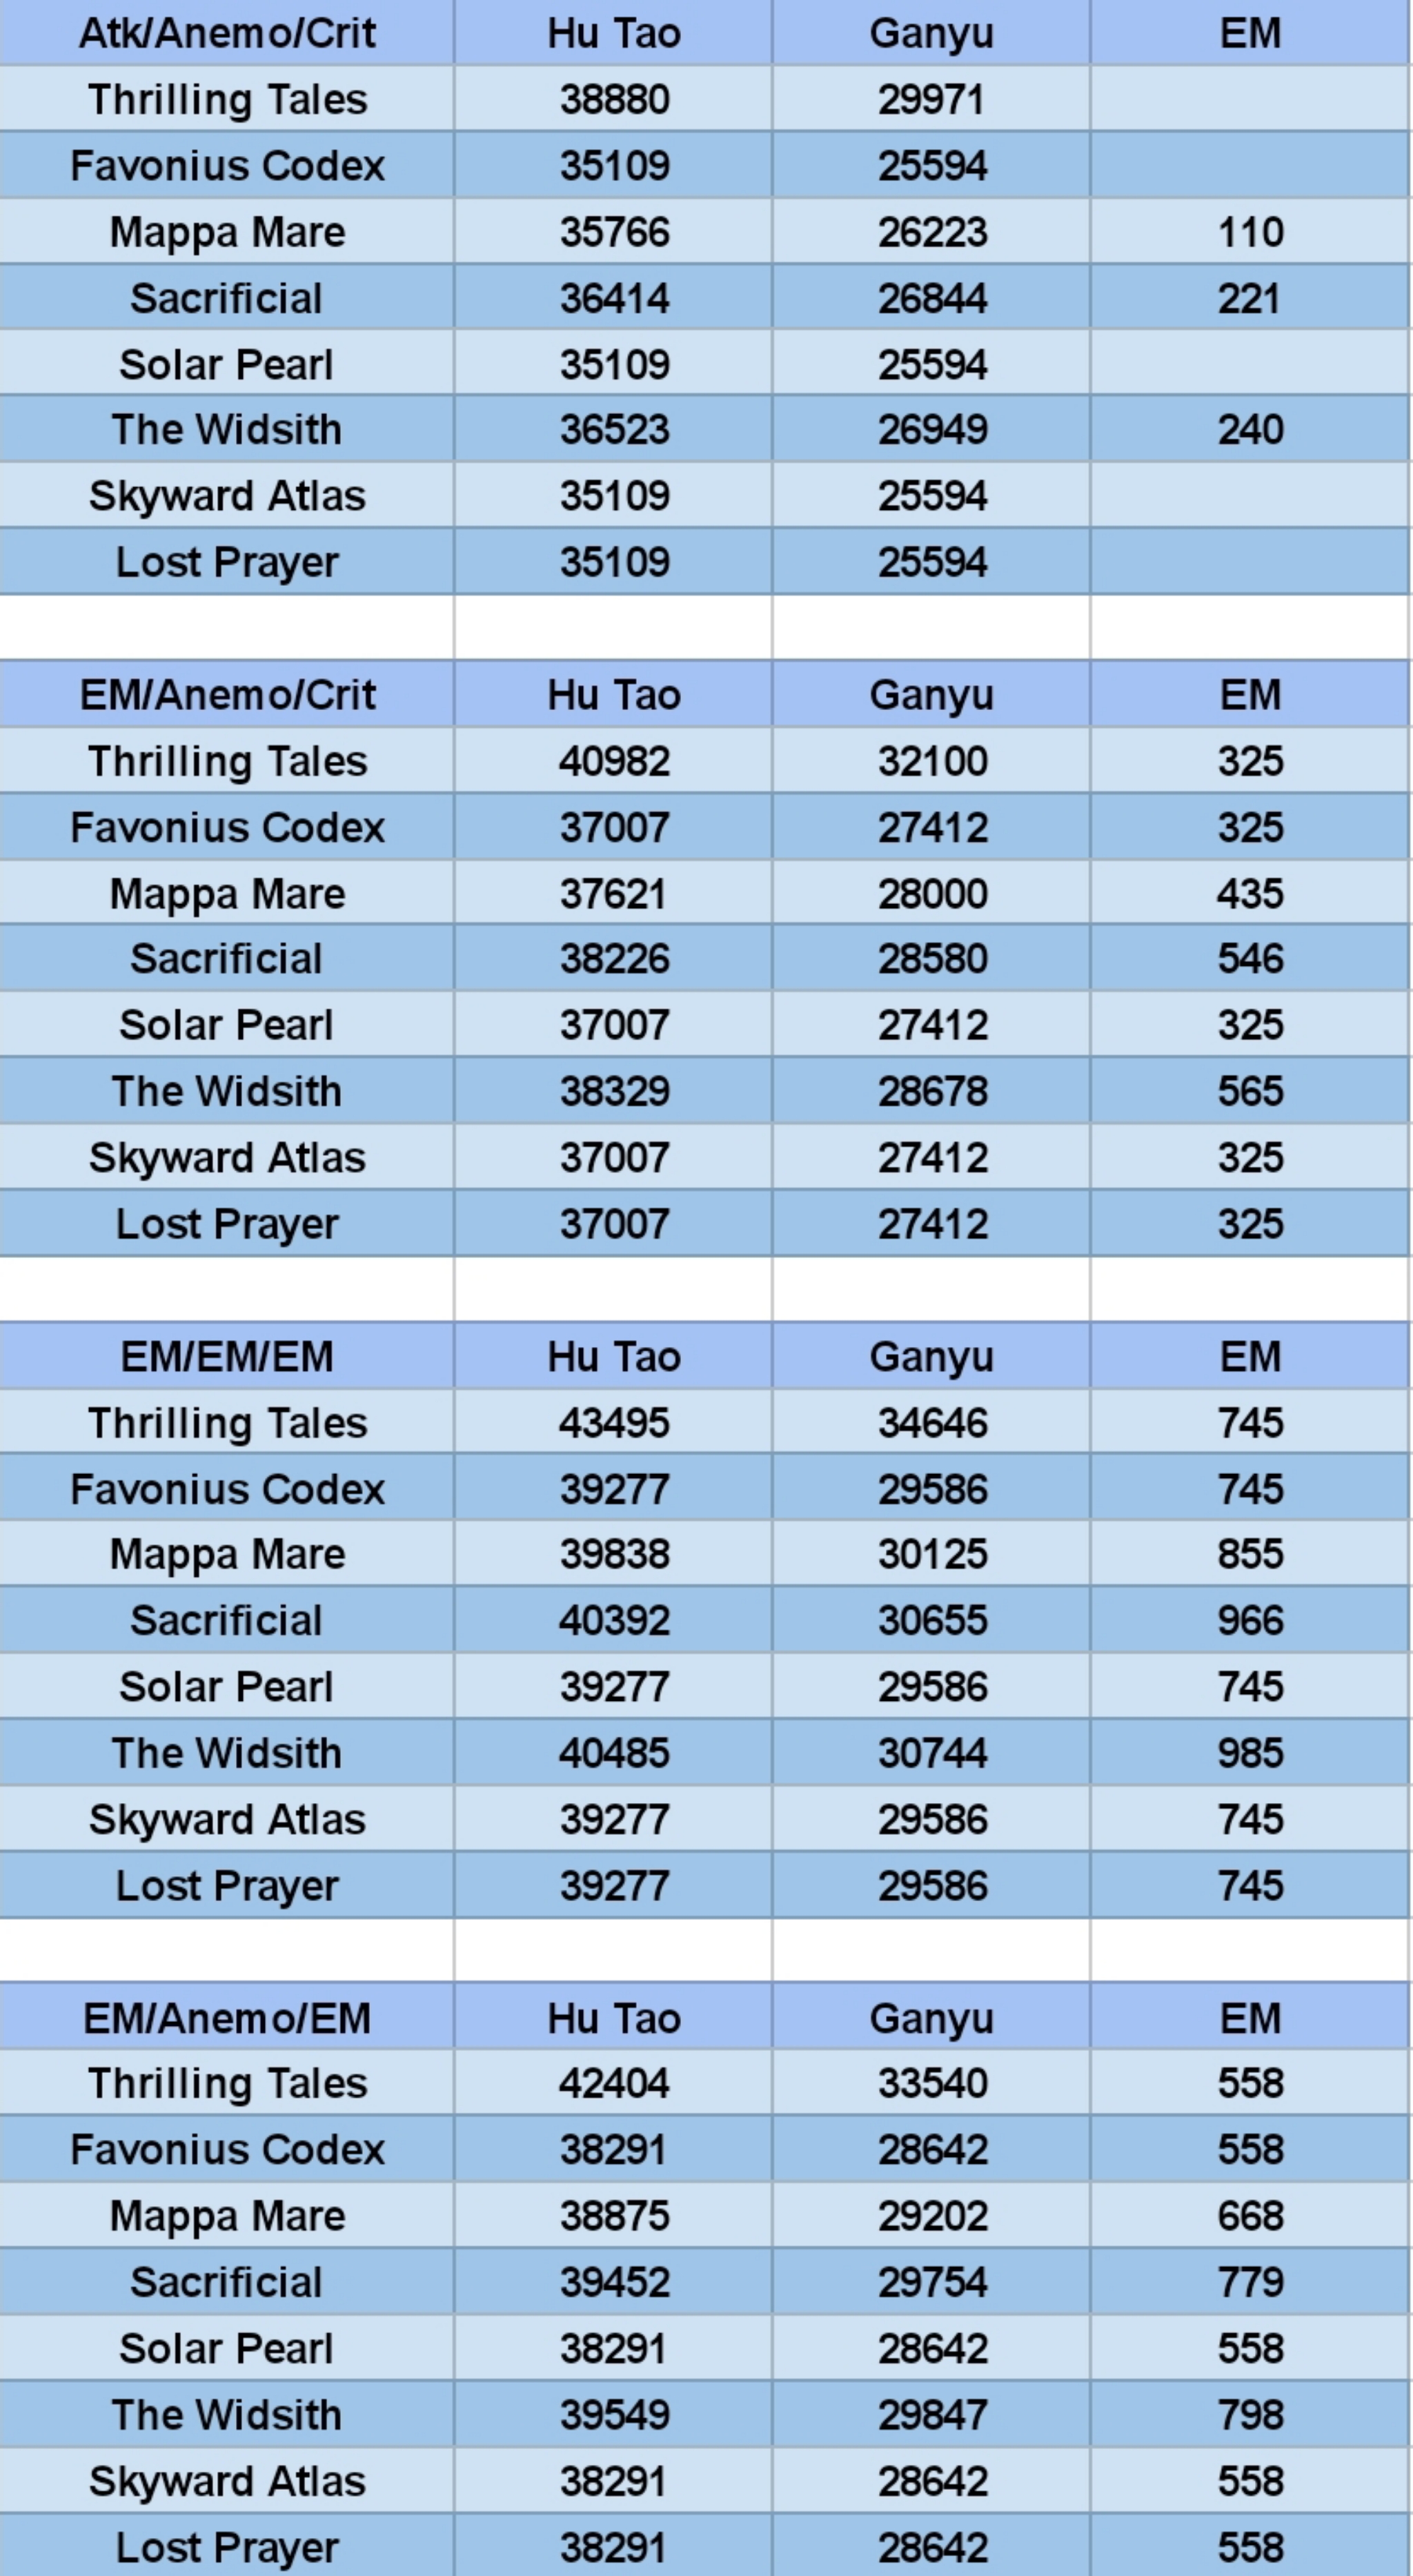
Here you can see that Thrilling Tales results in a higher buff than the rest of the weapons. The Widsith came second, and Sacrificial place third.
Note: EM represents Sucrose's Elemental Mastery.
If we put all the Hu Tao damage from best to worst, we will have:
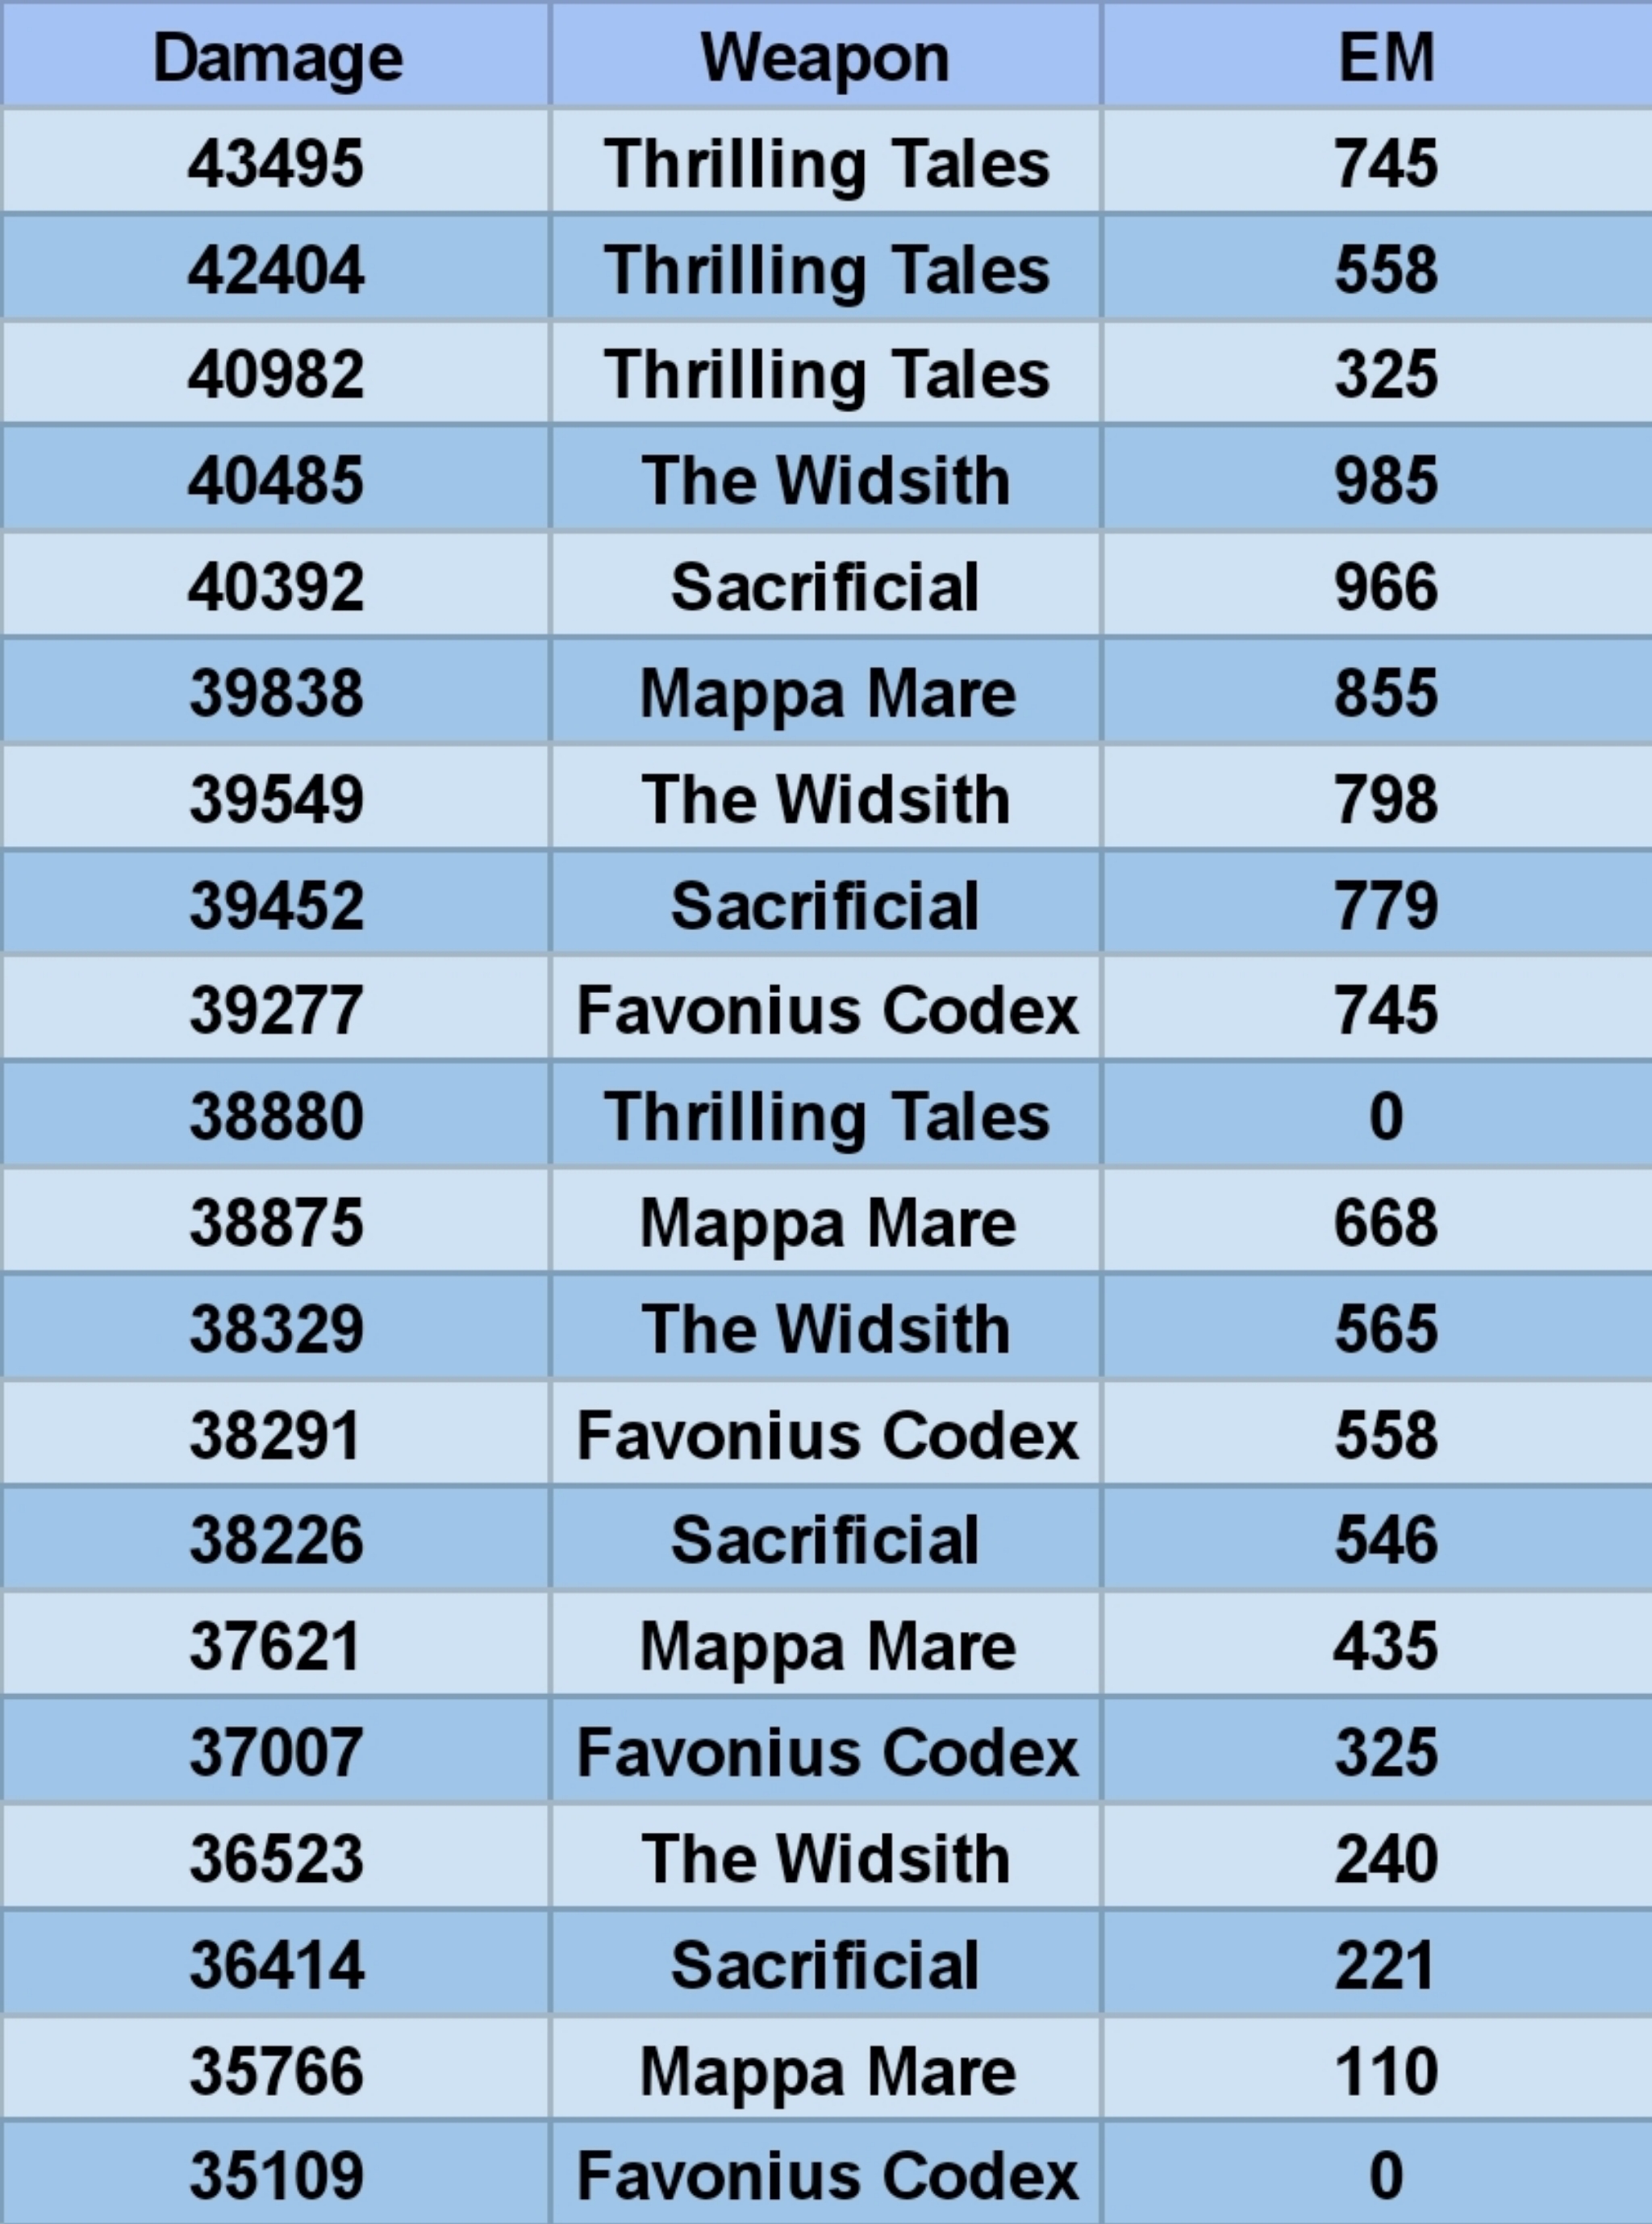
You can see here that Thrilling Tales offers a better buff than the other weapons even on lower EM.
Note: Favonius Codex has the same result as Solar Pearl, Skyward Atlas, and Lost Prayer.
But the bigger question is:
"So which build offers the best overall damage?"
This question is hard to answer because it completely depends on the supported DPS. For example, if we take the Hu Tao and Ganyu damage, and sum it with Sucrose's, we will have:
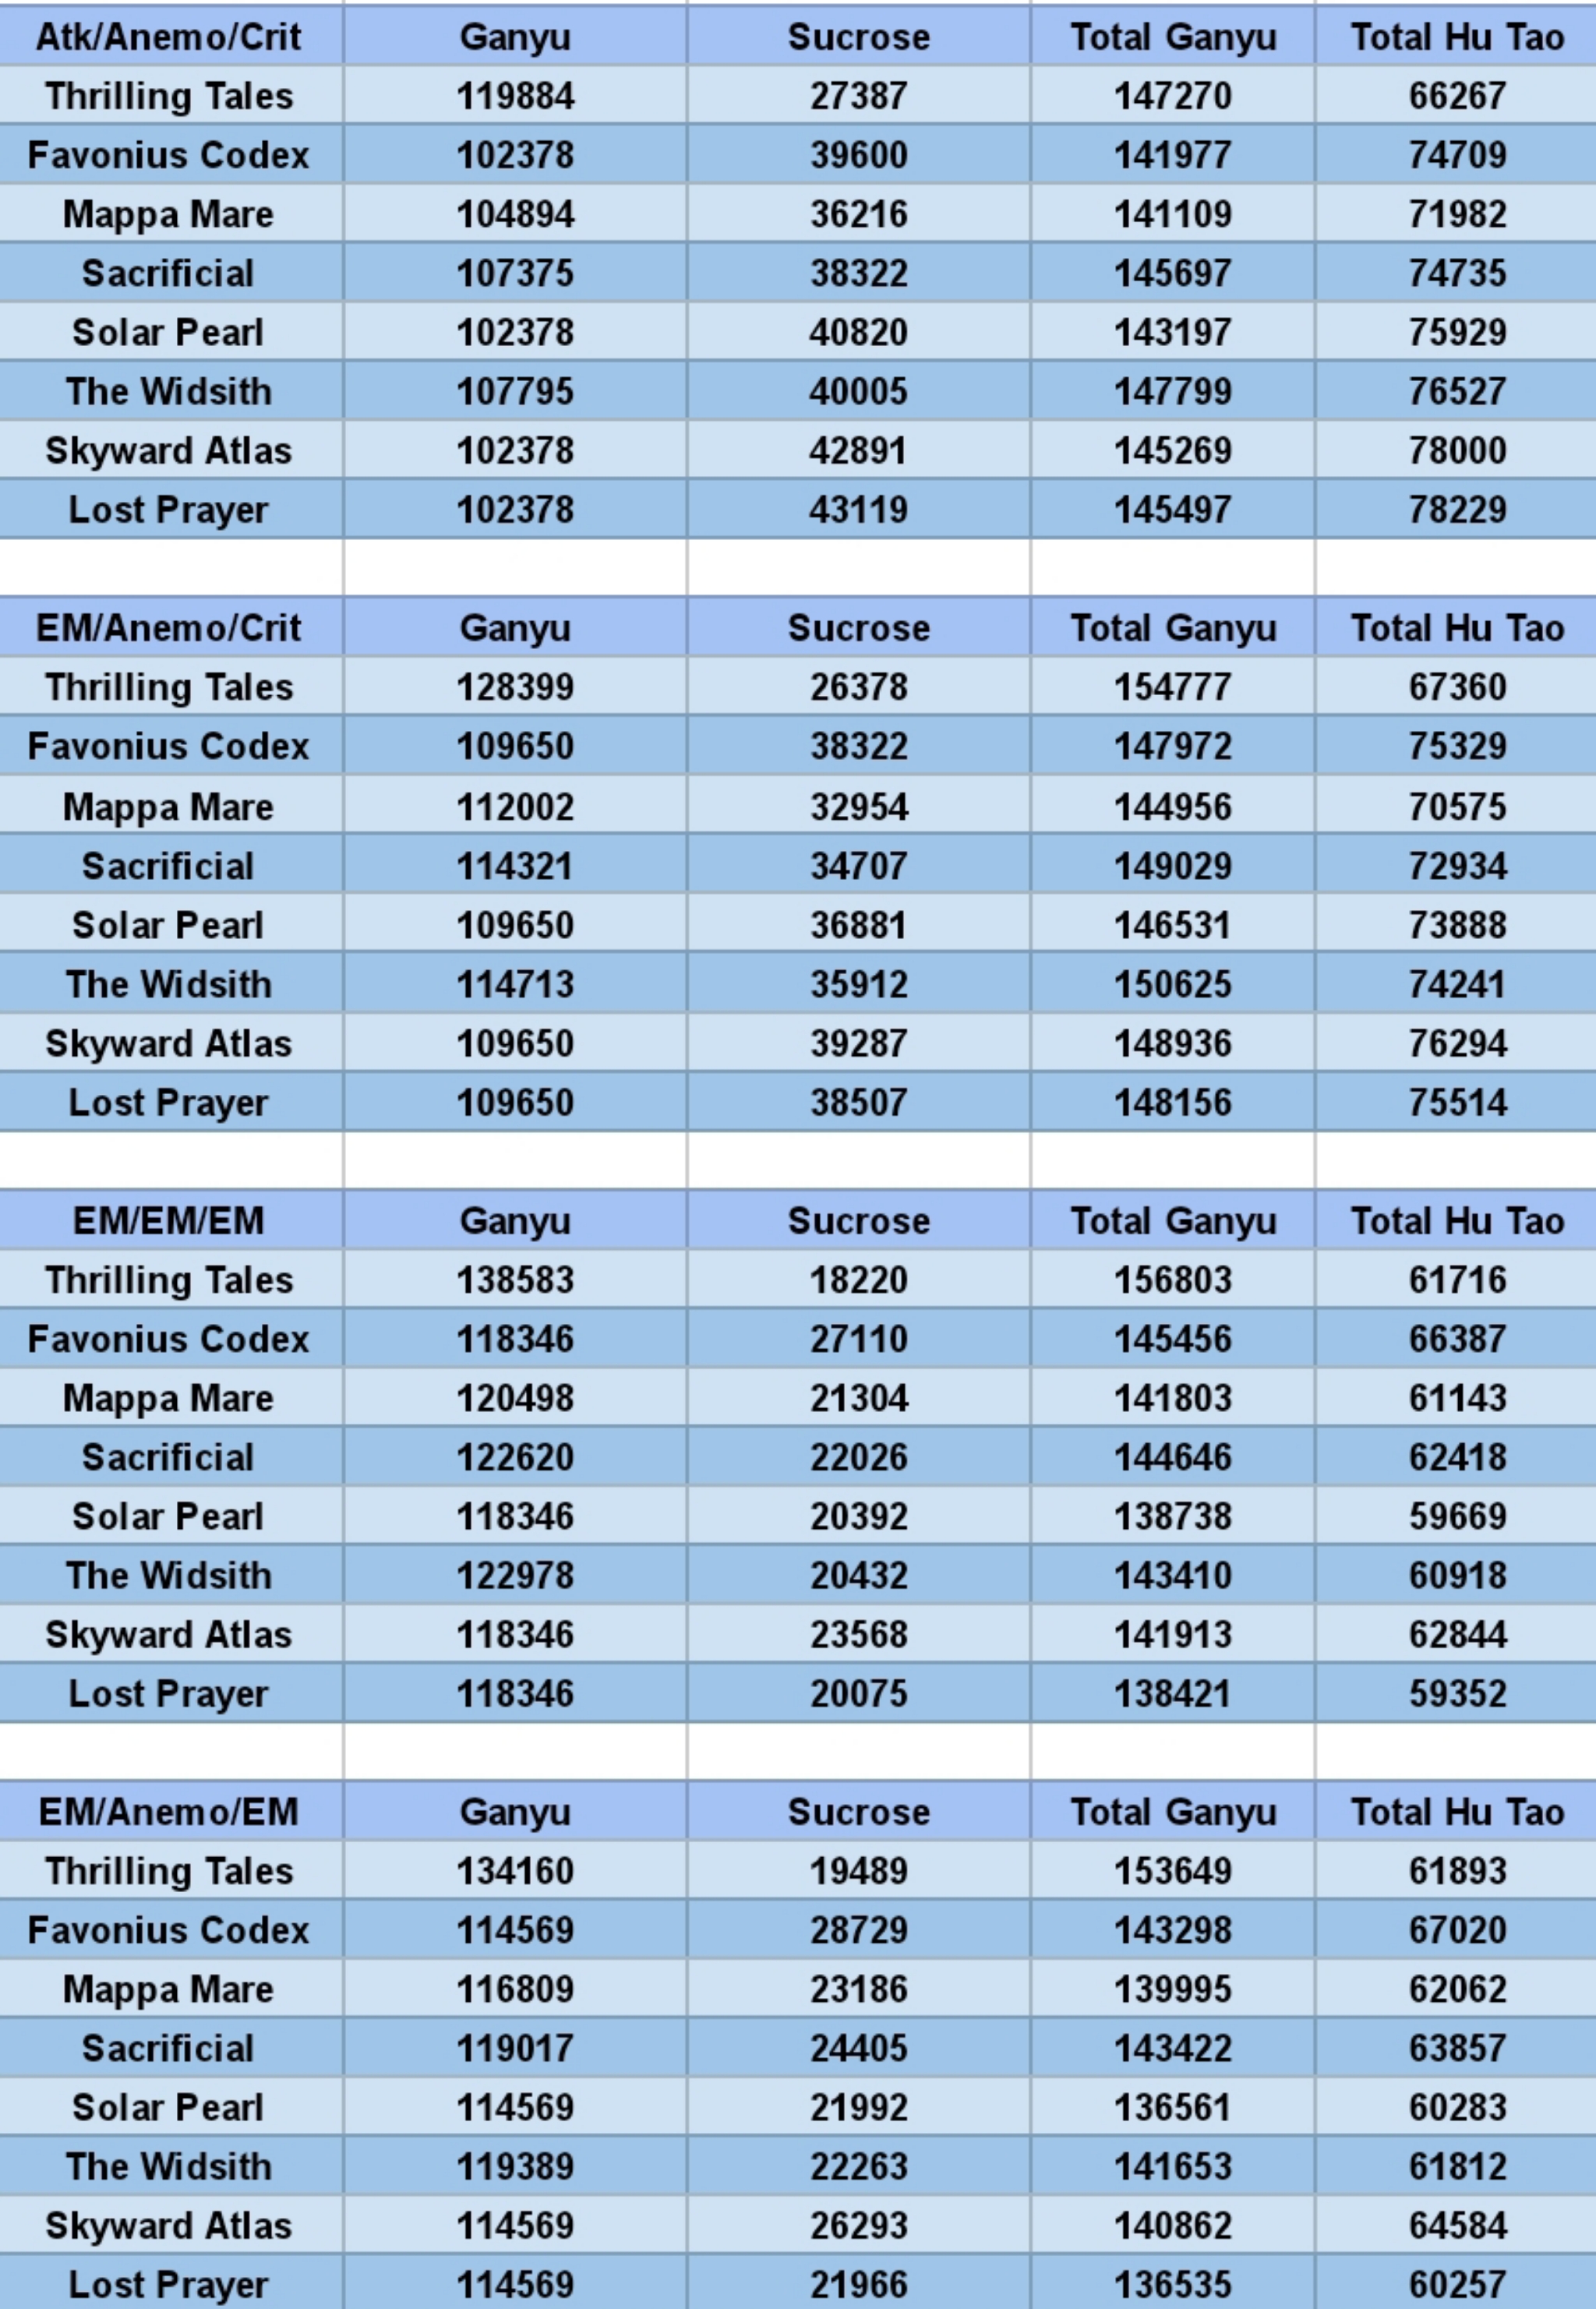
Note:
• I multiply the "Total C0" with 30 to obtain a simulated "Damage per 30 seconds".
Please keep in mind that this is a rough estimation.
• I also multiply Ganyu's damage by 4, to simulate an 8 seconds buff.
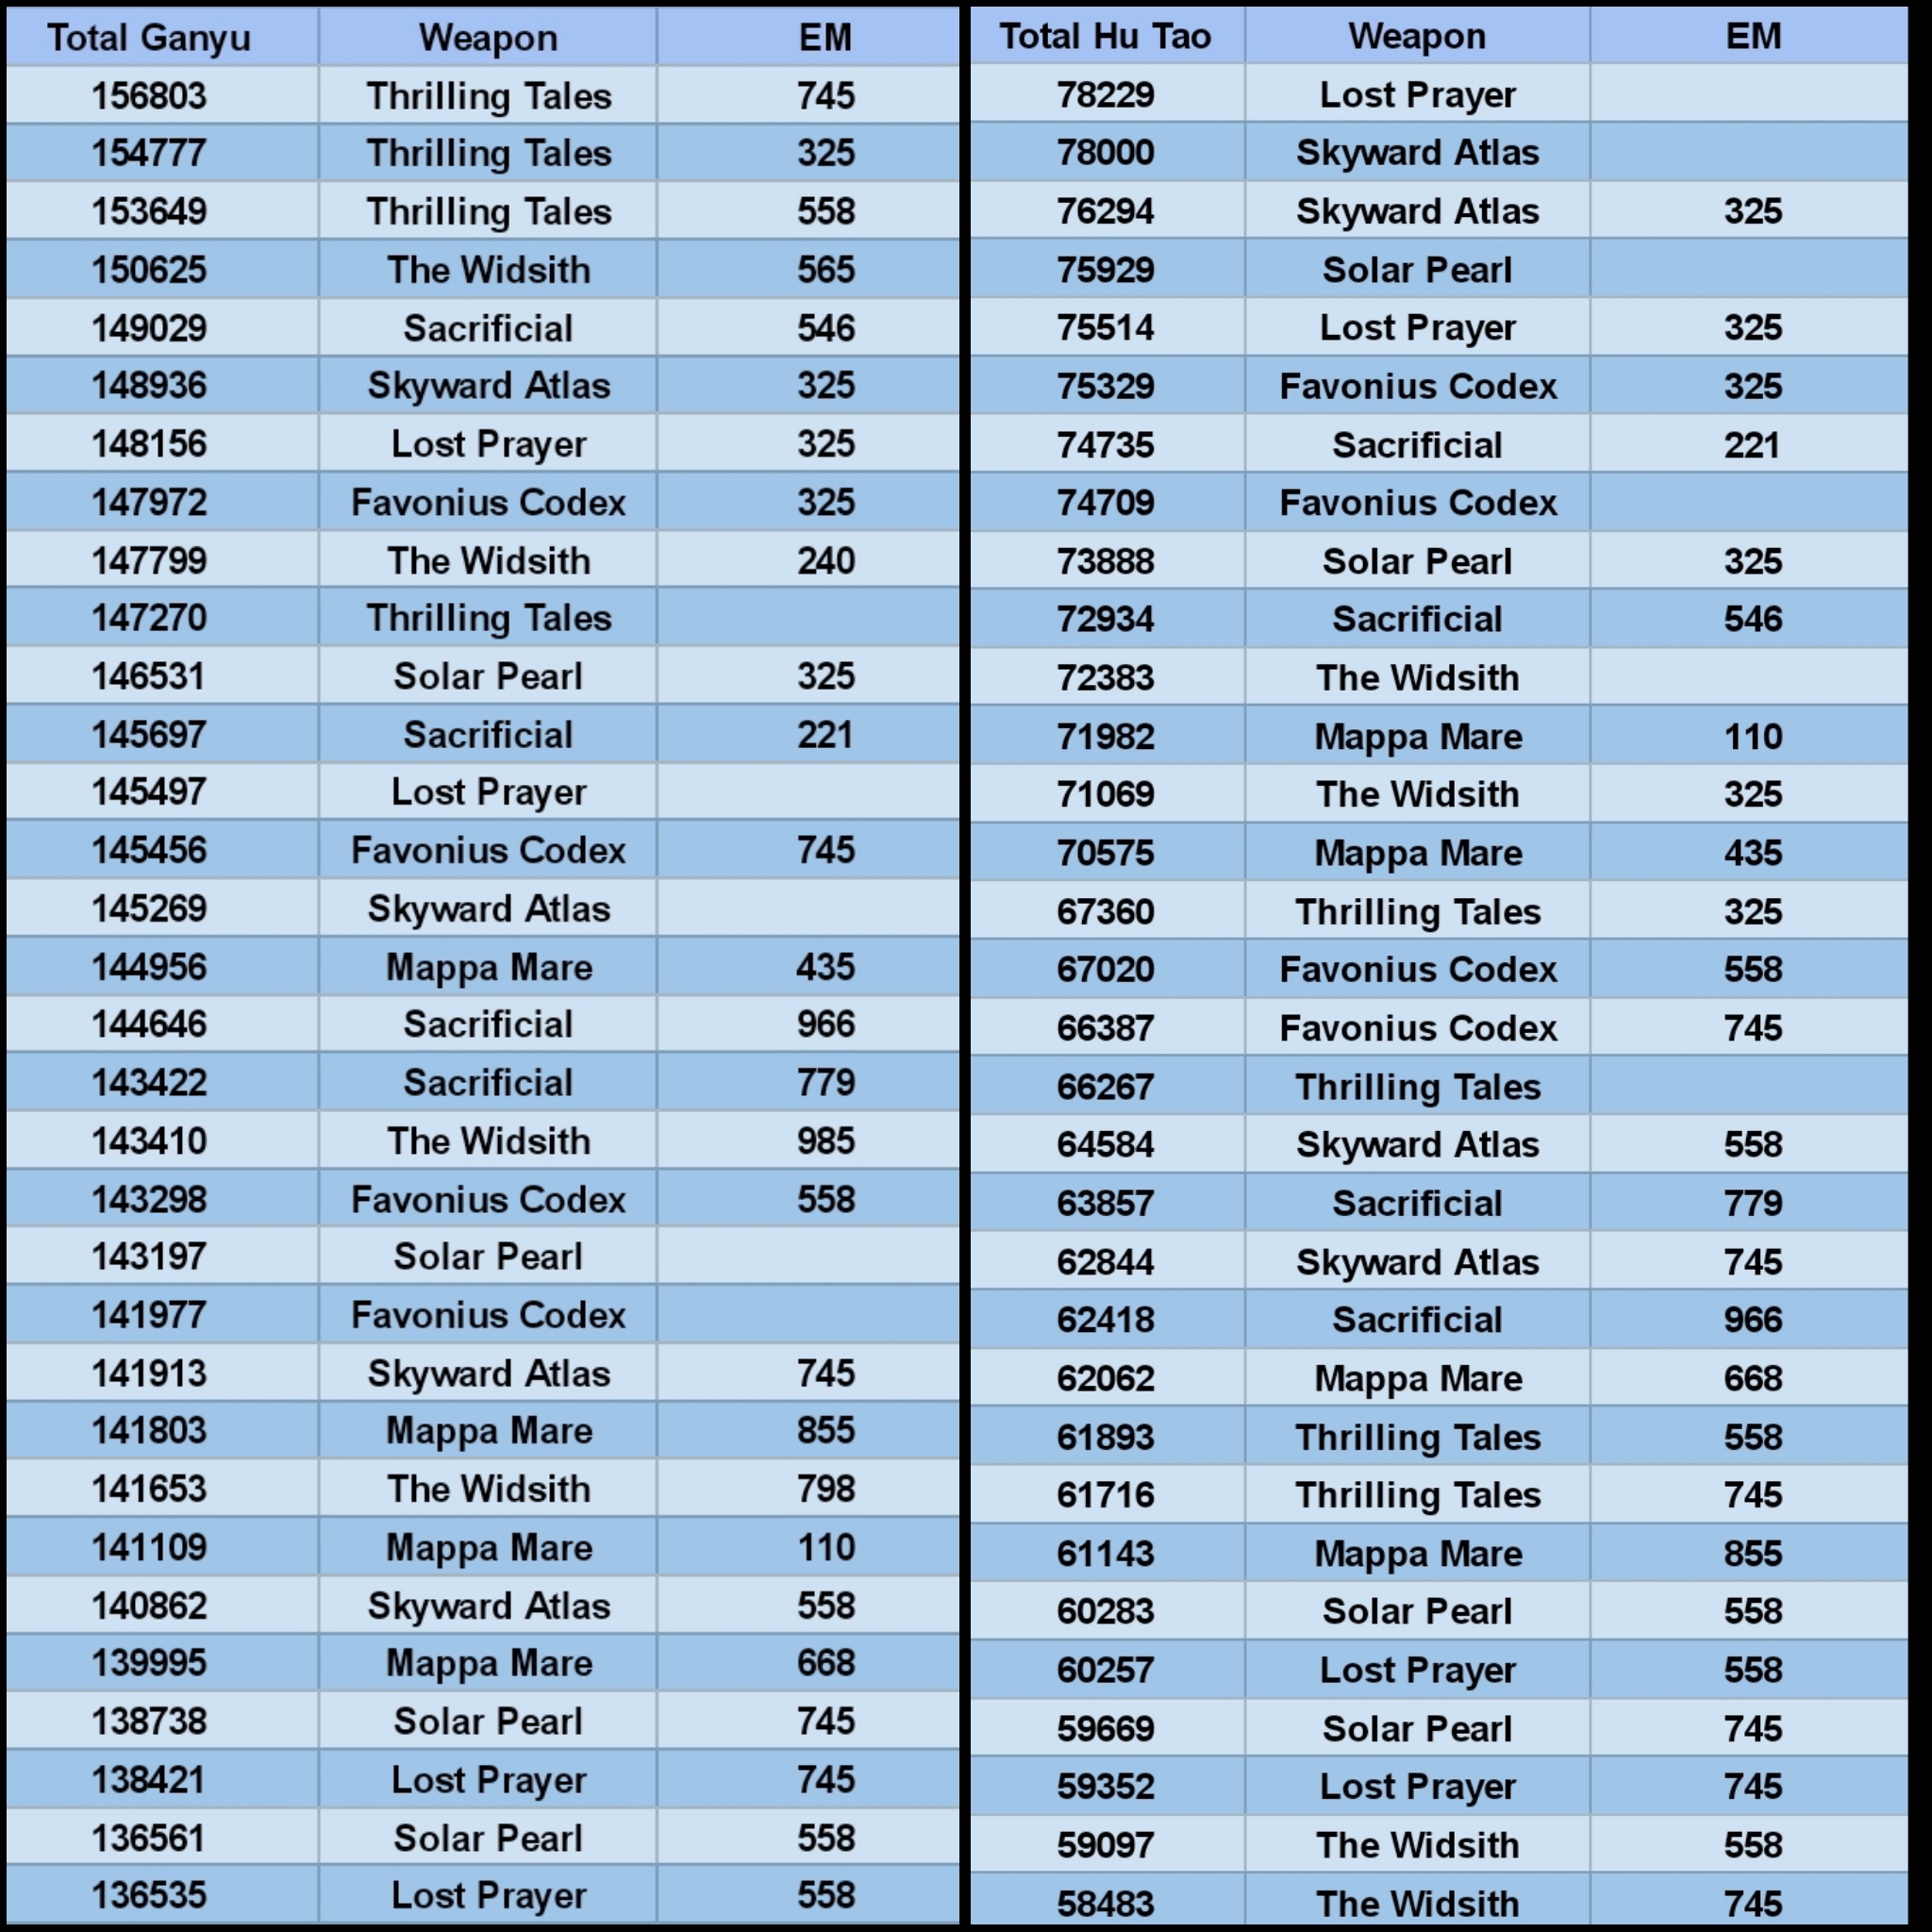
You can see that the result varies for both of them, where higher buffed damage results in EM being more effective, while lower buffed damage results in Attack being more effective.
Personal Opinion
While it seems hard to pull a conclusion, I feel like we can still make a generalization on which weapon is the overall best for Sucrose:
1. Skyward Atlas
2. Lost Prayer to the Sacred Winds
3. Favonius Codex, Sacrificial Fragments
4. The Widsith
5. Thrilling Tale, Solar Pearl
6. Mappa Mare
As for the main stat, I personally would recommend EM/Anemo/Crit over EM/EM/EM, because putting her on triple EM is an overall DPS loss.

If you're wondering why I rank Favonius Codex higher than Sacrificial, it's because:
1. With Favonius, you can burst more often, thus buffing your DPS more as well.
2. Because you can burst more often, Favonius will perform even better at C2, where Sucrose will deal extra damage on her burst.

I think Energy Recharge is rarely considered when doing damage calculations, that's why it's not commonly considered. But I believe that Favonius Codex has a lot of potential for Sucrose. It will also increase the overall party's DPS because the passive recharge energy for everyone.

~•~•~•~•~•~•~•~•~
Interested in more? Click here to see All of my [Analysis]!



