Hello Everyone. 
In this post I will share with you the UPDATED detailed build guide of the 5-star Hydro Sword User Furina.
◇ ◆ ◇ ◆ ◇ ◆ ◇ ◆ ◇ ◆ ◇ ◆ ◇ ◆ ◇ ◆ ◇ ◆
✦✦✦ Complete Build Guide ✦✦✦
◇ ◆ ◇ ◆ ◇ ◆ ◇ ◆ ◇ ◆ ◇ ◆ ◇ ◆ ◇ ◆ ◇ ◆
✦✦✦ Kit and Playstyle ✦✦✦
Furina is a 5-star support character capable of providing a DMG boost to her team, while also offering some healing. She also has two distinct modes based on the Arkhe system. When in her Ousia form, Furina will actively attack opponents using 3 hydro mimics based on her Max HP, at the cost of her own teammates' HP. In her Pneuma form, she will be able to heal the active character .
◇ Normal Attack: Soloist's Solicitation
~ Normal Attack
Performs up to 4 consecutive strikes.
~ Charged Attack
Consumes a certain amount of Stamina to unleash a solo dance, dealing Physical DMG to nearby opponents and changing her Arkhe alignment. If Salon Members or Singer of Many Waters summoned by her Elemental Skill "Salon Solitaire" are present, their lineup will switch in response.
~ Arkhe: Seats Sacred and Secular
At intervals, when Furina's Normal Attacks hit, a Spiritbreath Thorn or a Surging Blade will descend based on her current alignment, dealing Hydro DMG based on her current alignment.
When Furina takes the field, her starting Arkhe will be Ousia.
◇ Elemental Skills (E) : Salon Solitaire
Invites the guests of the Salon Solitaire to come forth and abet in Furina's performance. Will summon either the Salon Members or the Singer of Many Waters based on Furina's current Arkhe alignment.
~ Arkhe: Ousia
Foaming bubbles like celebrants shall dance, dealing AoE Hydro DMG based on Furina's Max HP and summoning 3 Salon Members: the Ball Octopus-shaped Gentilhomme Usher, the Bubbly Seahorse-shaped Surintendante Chevalmarin, and the Armored Crab-shaped Mademoiselle Crabaletta.
They will attack nearby opponents at intervals, prioritizing the target of the active character, dealing Hydro DMG based on Max HP.
When they attack, if character(s) with more than 50% HP are nearby, the Members will increase their current attack's power based on the number of such characters, and consume said characters' HP. If the characters who meet these requirements are 1/2/3/4 (or more), the Members' attacks will deal 110%/120%/130%/140% of their original DMG.
~ Arkhe: Pneuma
Summons the Singer of Many Waters, who will heal nearby active character(s) based on Max HP at intervals.
The Salon Members and Singer of Many Waters share a duration, and when Furina uses her Charged Attack to change the guest type, the new guests will inherit the initial duration.
While the Salon Members and the Singer of Many Waters are on the field, Furina can move on the water's surface.
◇ Elemental Burst (Q) : Let the People Rejoice
Rouses the impulse to revel, creating a stage of foam that will deal AoE Hydro DMG based on Furina's Max HP and cause nearby party members to enter the Universal Revelry state: During this time, when nearby party members' HP increases or decreases, 1 Fanfare point will be granted to Furina for each percentage point of their Max HP by which their HP changes.
At the same time, Furina will increase the DMG dealt by and Incoming Healing Bonus of all nearby party members based on the amount of Fanfare she has.
When the duration ends, Furina's Fanfare points will be cleared.
◇ Passive
~ Endless Waltz
When the active character in your party receives healing, if the source of the healing is not Furina herself and the healing overflows, then Furina will heal a nearby party member for 2% of their Max HP once every 2s within the next 4s.
~ Unheard Confession
Every 1,000 points of Furina's Max HP can buff the different Arkhe-aligned Salon Solitaire in the following ways:
Will increase Salon Member DMG dealt by 0.7%, up to a maximum of 28%.
Will decrease active character healing interval of the Singer of Many Waters by 0.4%, up to a maximum of 16%.
~ The Sea Is My Stage
Xenochromatic Fontemer Aberrant ability CD decreased by 30%.
◇ ◆ ◇ ◆ ◇ ◆ ◇ ◆ ◇ ◆ ◇ ◆ ◇ ◆ ◇ ◆ ◇ ◆
✦✦✦ Ascension & Talent Materials ✦✦✦
◇ Varunada Lazurite
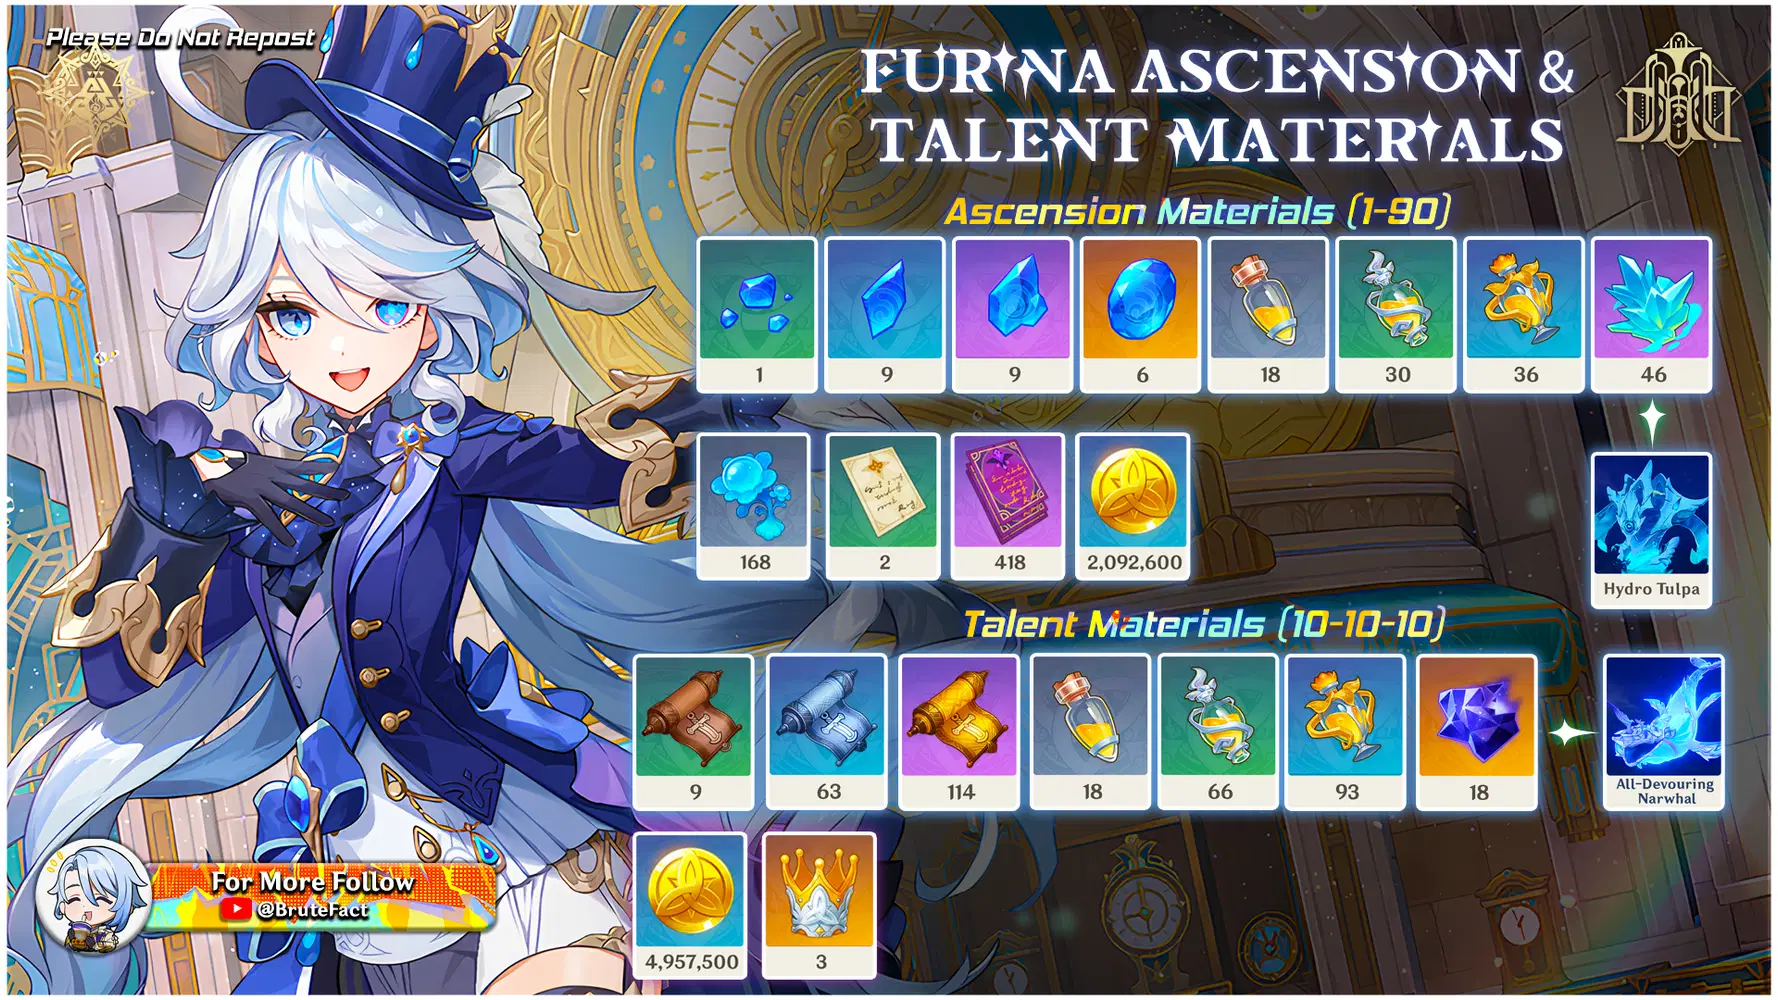
Like all Hydro characters, Furina will need Varunada Lazurite for ascension. Players will need to collect the following amount to ascend her to level 90:
Varunada Lazurite Sliver x1
Varunada Lazurite Fragment x9
Varunada Lazurite Chunk x9
Varunada Lazurite Gemstone x6
======================================
◇ Drops from Whopperflowers
Furina will require a large amount of common resources dropped by Whopperflowers found throughout Teyvat, spanning Mondstadt, Liyue, Inazuma, Sumeru and Fontaine. They also have a knack for mimicking the appearance of other plants, such as Sweet Flowers, Small Lamp Grass, and even Mint.
======================================
◇ Water That Failed To Transcend
Water That Failed To Transcend is a Character Level Up Material dropped by the New Hydro Tulpas world boss.
======================================
◇ Lakelight Lily
Lakelight Lily is a local specialty of the Fontaine and can be found around Erinnyes Forest.
Once you pick these up, they'll respawn after 48 hours.
======================================
◇ Justice Talent Books
You can get Justice talent books by participating in certain limited-time events or fighting through the Pale Forgotten Glory domain every Tuesdays, Fridays, and Sundays.
◇ Lightless Mass from All-devouring Narwhal Weekly Boss
You will need 18 Lightless Mass dropped by All-devouring Narwhal. Keep in mind that players must complete Fontaine Archon quest to unlock this weekly trounce domain.
~ UPDATE: New update will also allow to unlock the boss without completing the archon quest or unlocking the domain. (Open Your Adventure Handbook and go to the Trounce Domain Tab, Scroll down and start the Challenge)
◇ ◆ ◇ ◆ ◇ ◆ ◇ ◆ ◇ ◆ ◇ ◆ ◇ ◆ ◇ ◆ ◇ ◆
✦✦✦ Artifacts & Stats ✦✦✦
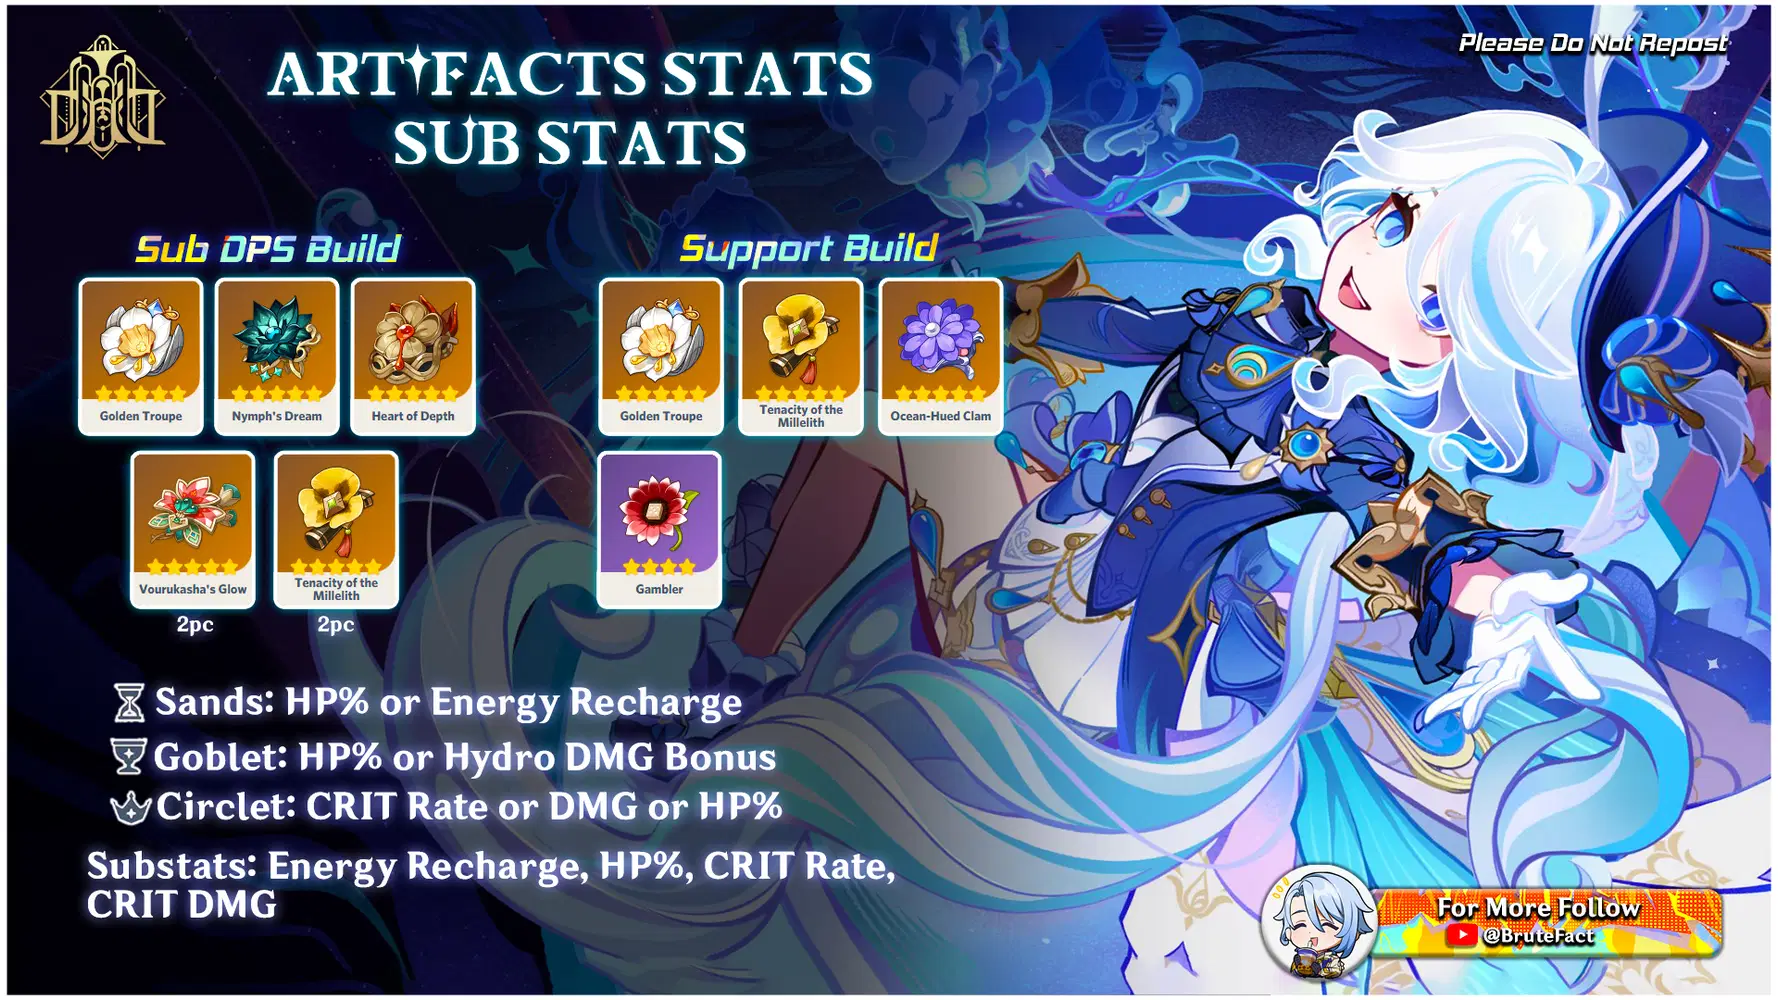
Furina is an HP-scaling Hydro character, so her artifacts should focus on boosting her HP, Hydro DMG, and CRIT stats while also maintaining good Energy Recharge. Depending on how you want to use her, here are the best sets:
◇ Sub-DPS Build
If you’re using Furina for her off-field Hydro application and strong Elemental Skill damage, these artifact sets will be your best choices:
~ 4-piece Golden Troupe → This set is fantastic for boosting Furina’s Elemental Skill damage when she’s off-field. The 2-piece bonus gives a 20% Elemental Skill DMG boost, and the 4-piece effect increases it by another 25% when she's not on the field.
~ 4-piece Nymph’s Dream → This set gives a great mix of Hydro DMG and ATK buffs, stacking up to 30% Hydro DMG Bonus and extra ATK.
~ 4-piece Heart of Depth → A classic Hydro set, boosting Hydro DMG and increasing Normal and Charged Attack damage after using an Elemental Skill.
~ 2-piece Vourukasha’s Glow + 2-piece Tenacity of the Millelith → This combo boosts HP by 20%, making it a solid choice for a balanced approach.
◇ Support Build
If your focus is on supporting your team with healing, buffs, or Hydro application, these sets are excellent choices:
~ 4-piece Golden Troupe → If you still want strong Elemental Skill damage while supporting.
~ 4-piece Tenacity of the Millelith → Provides an HP boost and buffs teammates' ATK and Shield Strength when Furina's Skill hits an enemy.
~ 4-piece Ocean-Hued Clam → Great for healing-focused builds, as it converts healing into DMG.
~ 4-piece Gambler → A niche but fun option that boosts Elemental Skill DMG and resets Skill cooldown when defeating enemies.
◇ Best Artifact Main Stats
HP% is a key stat since Furina’s abilities scale with HP. However, if you’re aiming for higher DPS, Hydro DMG Bonus and CRIT stats are important too.
◇ Final Thoughts
Furina is an incredibly versatile unit, and whether you build her for Sub DPS or support, these artifact sets and stats will help you get the best results.
◇ Energy Requirement
Furina's Energy Recharge needs vary based on her team and constellations. With more Hydro teammates or her C4 passive, she requires less ER (as low as 100%). Without them, she may need up to 220%. A Favonius weapon reduces ER needs by about 10%, and Hydro teammates using their Skill twice also help generate more energy.
Also Furina's Energy Recharge (ER) needs vary based on her constellation level and the number of Hydro teammates in the party:
~ No Hydro teammates:
◆ C0 → C3: 200% - 220% ER
◆ C4+: 140% -160% ER
~ One Hydro teammate:
◆ C0→ C3: 180% -190% ER
◆ C4+: 130% -150% ER
~ Two Hydro teammate:
◆ C0→ C3: 150% -160% ER
◆ C4+: 100% -120% ER
Higher constellations reduce her ER needs, and more Hydro teammates significantly improve energy generation, allowing lower ER investment.
◇ ◆ ◇ ◆ ◇ ◆ ◇ ◆ ◇ ◆ ◇ ◆ ◇ ◆ ◇ ◆ ◇ ◆
✦✦✦ Weapons ✦✦✦
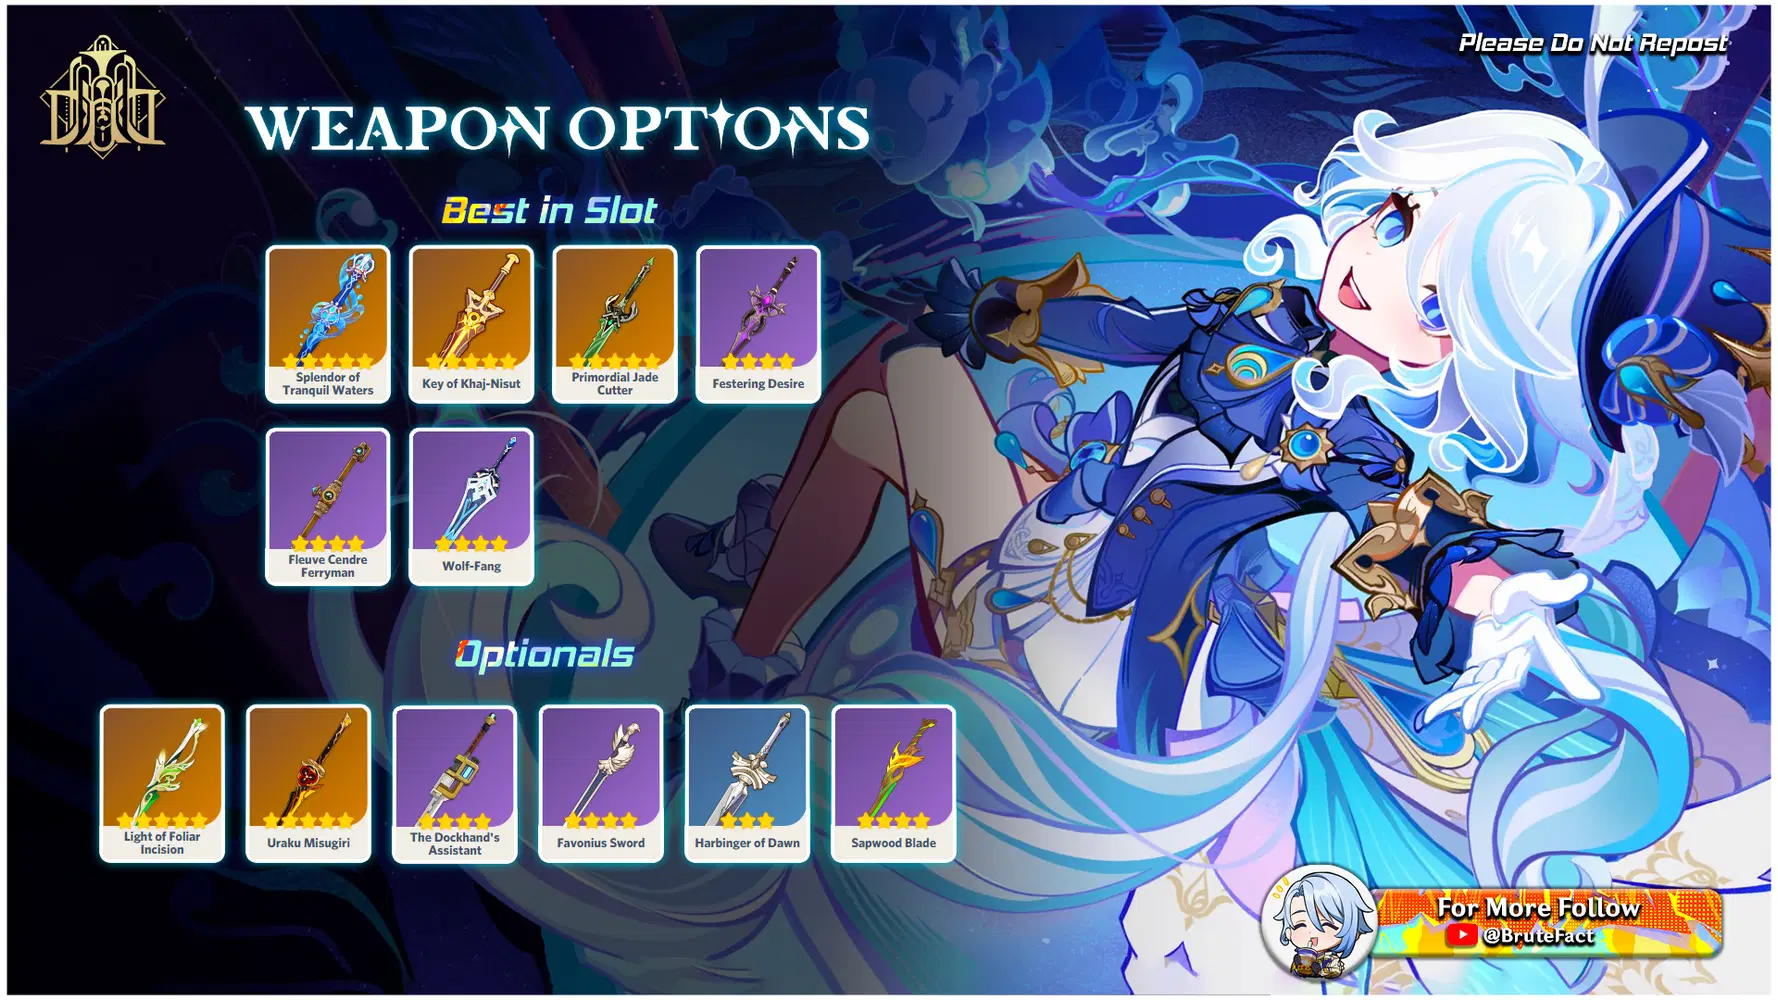
◇ Best in Slot Weapons
These are Furina’s top-performing weapons, offering the best synergy with her kit:
◆ Splendor of Tranquil Waters ★★★★★ (Signature Weapon)
~ Stats: Crit DMG, HP% bonus
~ Passive: Boosts Crit Rate and increases DMG based on HP%.
~ Why it’s good: Perfectly designed for Furina, enhancing her HP-scaling damage and providing Crit DMG for strong personal DPS.
◆ Key of Khaj-Nisut ★★★★★
~ Stats: HP%
~ Passive: Increases Elemental Mastery and boosts HP%.
~ Why it’s good: If focusing on Furina’s HP-scaling abilities and buffing the team, this weapon is an excellent alternative.
◆ Primordial Jade Cutter ★★★★★
~ Stats: Crit Rate, HP% boost
~ Passive: Increases HP% and provides an ATK bonus based on HP%.
~ Why it’s good: Strong option for Crit-focused builds, maintaining a balance between HP scaling and high damage output.
◆ Festering Desire ★★★★ (Event-exclusive)
~ Stats: Energy Recharge, Skill DMG boost
~ Passive: Increases Elemental Skill Crit Rate and DMG.
~ Why it’s good: If you have this event weapon, it’s a solid ER-focused choice, boosting Furina’s Elemental Skill damage.
◆ Fleuve Cendre Ferryman ★★★★
~ Stats: Energy Recharge
~ Passive: Boosts Elemental Skill Crit Rate and restores Energy.
~ Why it’s good: Best 4-star option for teams needing high uptime on Furina’s Burst, ensuring smooth energy management.
◆ Wolf-Fang ★★★★
~ Stats: Crit Rate
~ Passive: Increases Elemental Skill and Burst DMG.
~ Why it’s good: Great for Crit-focused builds, improving consistent damage output from her Skill and Burst.
◇ Optional Weapons
These are alternative weapons if you don’t have the BiS options:
◆ Light of Foliar Incision ★★★★★
~ Stats: Crit DMG
~ Why it’s decent: Good for Crit builds, though its passive doesn’t fully benefit Furina’s kit.
◆ Uraku Misugiri ★★★★★
~ Stats: Crit DMG
~ Why it’s decent: Boosts Normal and Charged Attack DMG, which is situational for Furina’s playstyle.
◆ The Dockhand’s Assistant ★★★★
~ Stats: HP%
~ Why it’s decent: Free-to-play friendly HP-scaling sword, though lacks offensive stats.
◆ Favonius Sword ★★★★
~ Stats: Energy Recharge
~ Why it’s decent: Helps battery the team, useful for ER-heavy builds.
◆ Harbinger of Dawn ★★★
~ Stats: Crit DMG
~ Why it’s decent: Strong F2P Crit option, but requires Furina to stay above 90% HP.
◆ Sapwood Blade ★★★★
~ Stats: Energy Recharge
~ Why it’s decent: Works in Dendro-based teams, but suboptimal otherwise.
◇ Final Thoughts
The ideal weapon depends on your team composition, artifact stats, and playstyle, balancing HP%, Crit, and Energy Recharge for optimal performance.
◇ ◆ ◇ ◆ ◇ ◆ ◇ ◆ ◇ ◆ ◇ ◆ ◇ ◆ ◇ ◆ ◇ ◆
✦✦✦ Talent Priority ✦✦✦
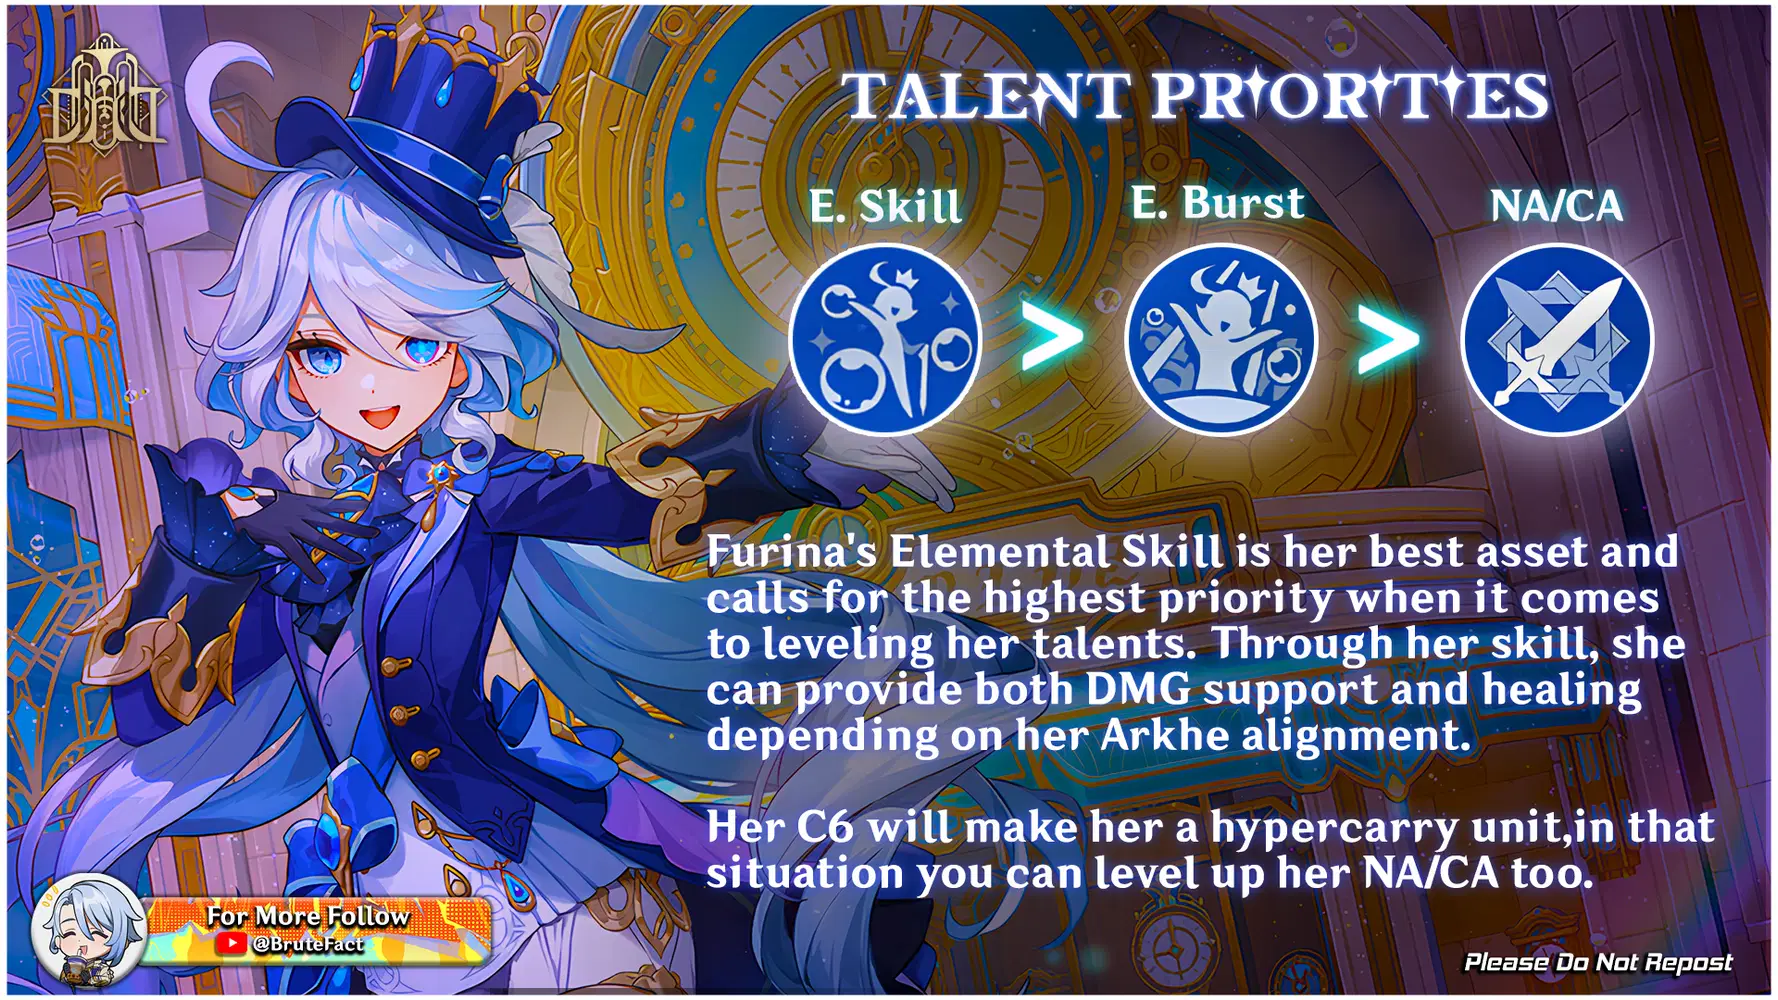
For Furina, the primary talent priority is to level up her Elemental Skill first, as it is the core source of her personal damage, followed closely by her Elemental Burst which provides valuable team buffs; her normal attacks are generally considered less important and can be left at a lower level, especially unless you have her C6 constellation.
◇ Key points about Furina's talent priority:
~ Skill (Salon Solitaire) is the main focus:
Since her skill scales heavily with her Max HP, prioritize leveling it up to maximize damage output.
~ Burst (Song of the Siren) is also important:
While not as high damage as her skill, the burst provides significant team buffs, so level it up as well.
~ Normal Attacks are low priority:
Unless you are specifically building for her C6 constellation, her normal attacks do not contribute significantly to her overall damage.
◇ ◆ ◇ ◆ ◇ ◆ ◇ ◆ ◇ ◆ ◇ ◆ ◇ ◆ ◇ ◆ ◇ ◆
✦✦✦ Team Comps ✦✦✦
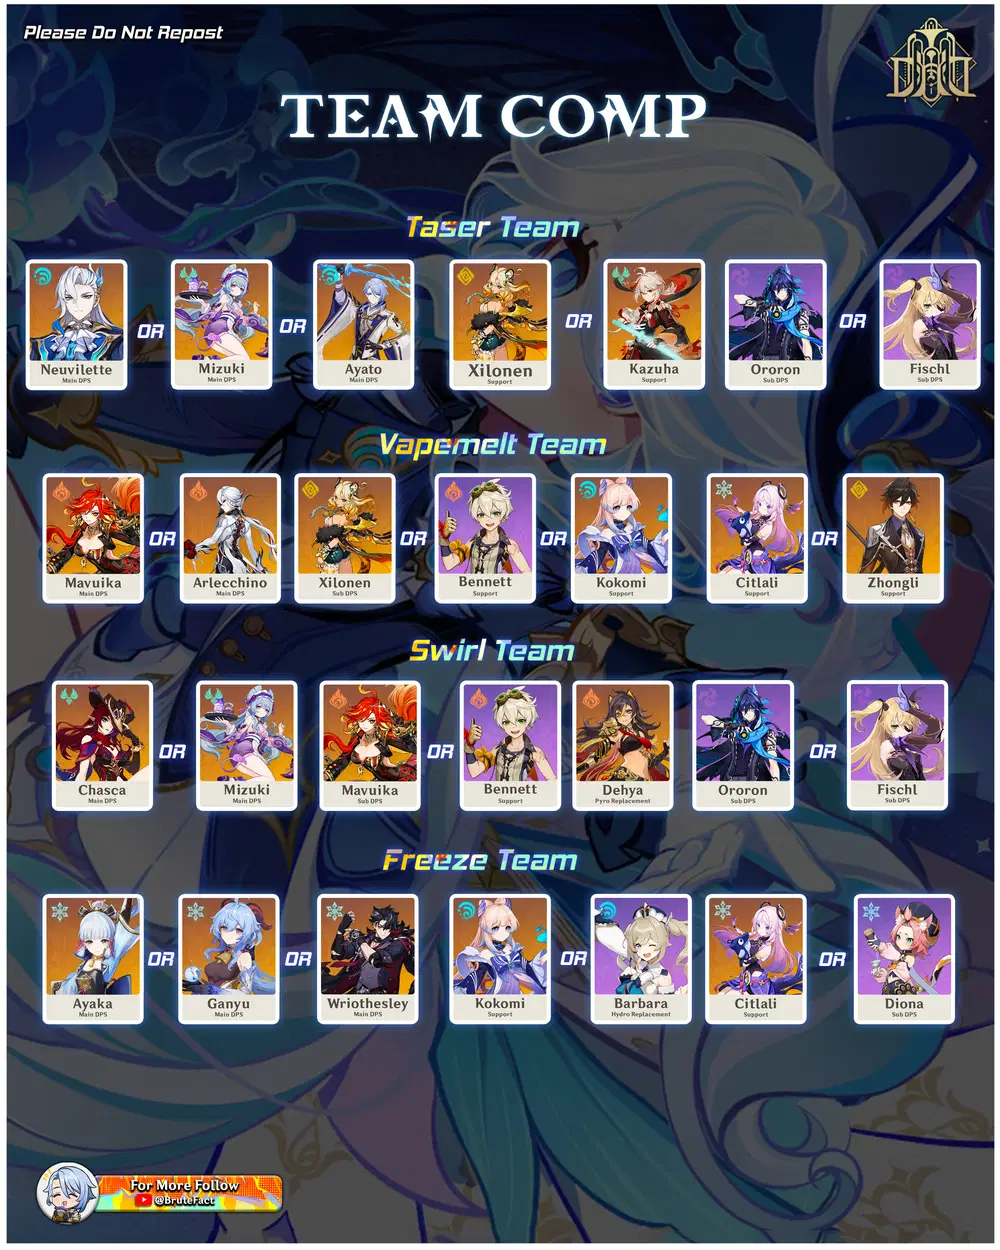
◇ Taser Team (Electro charged)
~ Neuvillette & Furina:
Strong synergy due to Neuvillette's HP drain generating Furina's Fanfare stacks. Double Hydro reduces energy needs.
~ Electro Sub DPS Options:
Fischl, Raiden, Ororon, and Yae Miko provide consistent Electro application. Shinobu offers healing.
~ Anemo Support:
Kazuha & Lan Yan boost damage with VV debuff.
~ Shield Support:
Zhongli provides shields and resistance shred.
◇ Vapemelt Team
~ Core DPS:
Mavuika benefits from Furina's Hydro application for Vaporize. Citlali boosts Elemental DMG and enemy debuffs.
~ Healers & Buffers:
Bennett increases ATK, while Kokomi & Sigewinne provide healing and buffs.
~ Shield Supports:
C6 Diona, Lan Yan (VV debuff), Zhongli (resistance shred).
~ Other Units:
Arlecchino (needs shield support), Xilonen (healing & Scroll set).
◇ Swirl Team
~ Anemo DPS Options:
Chasca and Mizuki deal Swirl DMG; Mizuki also heals. C6 Lan Yan is another Anemo DPS choice.
~ Supports:
Sucrose boosts EM, Furina & Bennett provide damage buffs, Ororon adds extra support.
~ Sub-DPS:
Mavuika (charged by Chasca), Dehya (damage mitigation).
◇ Burgeon Team
~ Hydro Application:
Furina enables Burgeon reactions.
~ Dendro Support:
Baizhu (on-field, shield & healing), Nahida (off-field Dendro).
~ Pyro Trigger:
Pyro Traveler provides off-field Pyro for Burgeon.
◇ Freeze Team
~ Cryo DPS Options:
Wriothesley (fast Cryo application & HP synergy with Furina), Ayaka (Cryo melee), Ganyu (better for Melt).
~ Support & Buffers:
Citlali (Hydro & Cryo DMG buff), Kokomi (Thrilling Tales ATK buff).
~ Anemo & Shields:
Lan Yan (VV debuff), Diona (Cryo shield & healing).
Each team maximizes character synergies for optimal damage and sustain.
◇ ◆ ◇ ◆ ◇ ◆ ◇ ◆ ◇ ◆ ◇ ◆ ◇ ◆ ◇ ◆ ◇ ◆
✦✦✦ How to Play Furina ✦✦✦
◇ Rotation Order:
Start with Let the People Rejoice (Burst) → Salon Solitaire (Skill) → Swap to a party-wide healer
◇ Fanfare Stacks:
Increase team damage by generating Fanfare through HP changes (both loss & healing).
◇ Salon Solitaire (Skill):
Drains HP until 50%; healing from 50%-100% grants 200 Fanfare (overhealing does not contribute).
◇ Charged Attack:
Switches Salon Solitaire members from Ousia → Pneuma.
◇ Ideal Healers:
Full-team healers maximize Fanfare generation, speeding up the damage buff.
◇ Visual Indicators:
Fanfare progress is shown by increasing crowd cheers; max stacks cause a brief white screen flash and intensified bubble effects.
◇ ◆ ◇ ◆ ◇ ◆ ◇ ◆ ◇ ◆ ◇ ◆ ◇ ◆ ◇ ◆ ◇ ◆
✦✦✦ Furina's Constellations ✦✦✦
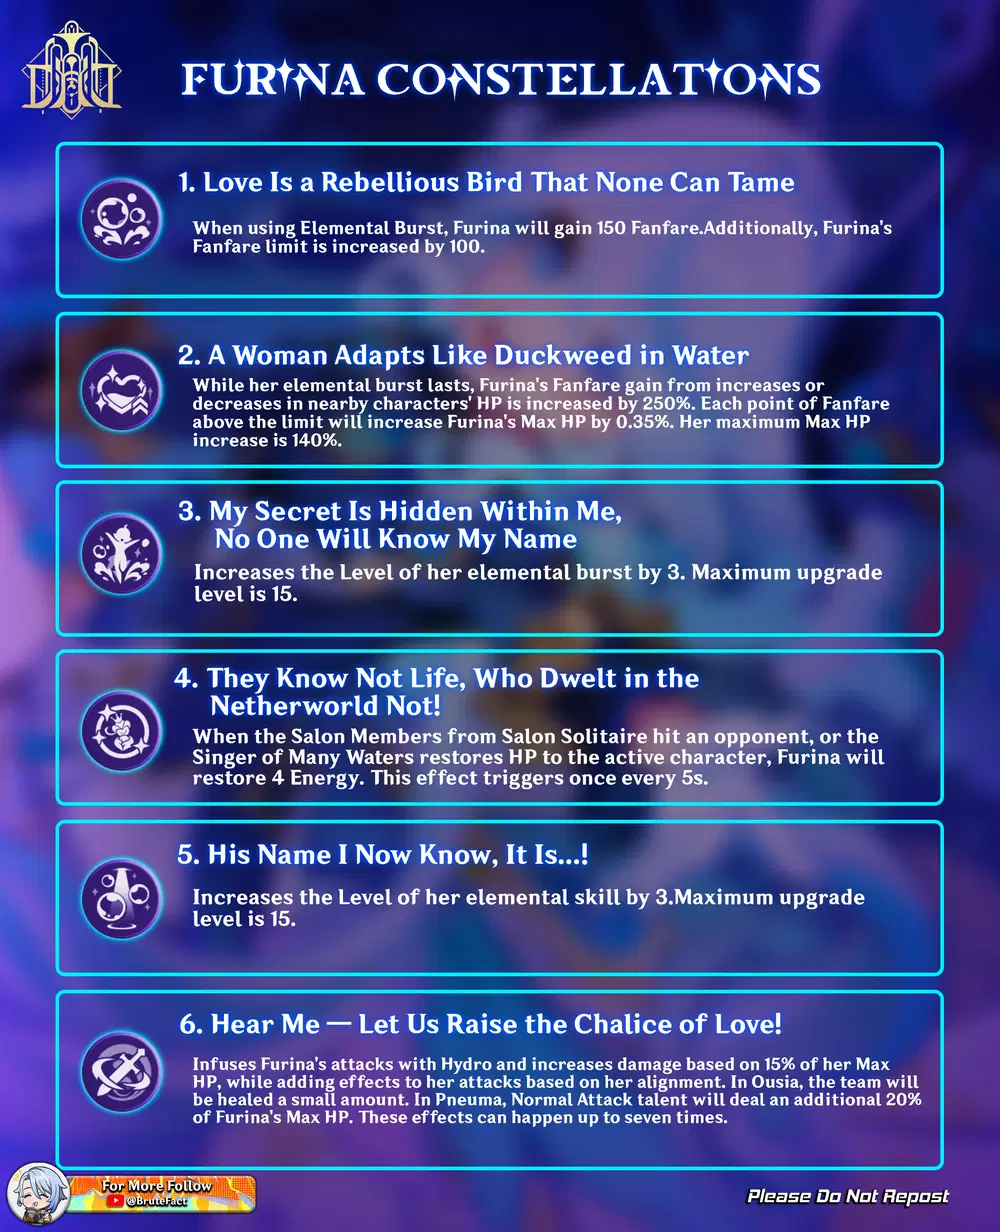
Furina's constellations offer a mix of utility, energy generation, damage boosts, and healing improvements. Here's a breakdown of the best ones and which are worth going for:
◆ Key Constellations to Consider:
~ C1 – Love Is a Rebellious Bird That None Can Tame
◇ Gives 150 Fanfare immediately on Burst use and increases the Fanfare cap by 100.
◇ Why it’s good: Greatly improves her healing and damage potential, making it a very strong early constellation.
~ C2 – A Woman Adapts Like Duckweed in Water
◇ Increases Fanfare gain by 250% and provides an HP bonus based on Fanfare.
◇ Why it’s good: Boosts both survivability and overall performance. Works incredibly well if you have a team that takes frequent HP fluctuations.
~ C6 – Hear Me — Let Us Raise the Chalice of Love!
◇ Converts Normal Attacks to Hydro, increases damage based on 15% of her HP, and provides additional effects depending on her Pneuma/Ousia state.
◇ Why it’s good: Turns her into a main DPS, making her much stronger in all scenarios.
◆ Good Constellation to Aim For:
◇ C1 is the best stopping point if you want a significant boost without spending too much. It directly enhances her core mechanics.
◇ C2 is also great if you can afford to go further, as it makes her even more effective as a buffer and healer.
◆ Constellations That Are Less Valuable:
◇ C3 & C5 (Skill & Burst levels) are nice, but they don’t provide game-changing effects.
◇ C4 is decent for energy regeneration, but Furina’s teams usually don’t struggle much with energy.
◆ Final Recommendation:
◇ If you're a light spender, C1 is the sweet spot. It's affordable and impactful.
◇ If you want to maximize her support potential, C2 is a great place to stop.
◇ If you want to turn her into a full DPS, C6 is worth it, but costly.
◇ ◆ ◇ ◆ ◇ ◆ ◇ ◆ ◇ ◆ ◇ ◆ ◇ ◆ ◇ ◆ ◇ ◆
And that's all for the guide, I hope it will help you to build Furina. For more guides like this, please Follow me on HoYolab And Subscribe my YouTube Channel.
◇ ◆ ◇ ◆ ◇ ◆ ◇ ◆ ◇ ◆ ◇ ◆ ◇ ◆ ◇ ◆ ◇ ◆
For more Guides Please check
Fontaine 4.0 Complete Guide Playlist.
Fontaine 4.1 Complete Guide Playlist.
Fontaine 4.2 Complete Guide Playlist.
Liyue 4.4 (Chenyu Vale) Guide Playlist
Fontaine 4.6 Complete Guide Playlist
Natlan 5.0 Complete Guide Playlist
Natlan 5.2 Complete Guide Playlist
And also Please Visit and SUBSCRIBE my YouTube Channel.
You can visit my other social media sites from All my Socials Links

◇ ◆ ◇ ◆ ◇ ◆ ◇ ◆ ◇ ◆ ◇ ◆ ◇ ◆ ◇ ◆ ◇ ◆
You can also check: