Complete Guide to Building a Basic RPG in Miliastra Wonderland
Introduction
Hi Travelers, long time no see! 
Since Miliastra Wonderland launched, creators have built countless amazing stages across a wide variety of genres-from Roguelikes and Puzzle Games to Team Challenges, Time Challenges, and even Action RPG.
In this guide, I’ll walk you through building a basic RPG system from scratch-starting with developing your core idea and working in the Miliastra Editor, then creating essential systems such as shops, currency, inventory, make enemy, equipment, loot, and finally publishing your stage for other players to enjoy.
Whether you are a beginner or an experienced Craftsperson, this guide will help you turn your stage into a complete RPG experience using clear logic, practical examples, and original node designs.

Chapter 1: From Idea to Game Concept
Part 1: Finding Game Concepts and Ideas
Before opening the Miliastra Wonderland Editor, the most important step is deciding what kind of game you want to create. A clear game concept will guide every decision you make later, from map design to monsters, systems, and ending. This section will help you turn a simple idea into a solid game plan.
a. Core Idea
You don't need a complex story right off the bat. Start with one clear sentence that describes your game.
For Example:
"An adventurer encounters a Slime who asks for help defeating an Evil Dragon."
"A Slime village is destroyed by an Evil Dragon. Help the Slimes restore peace."
If your idea can be explained in one sentence, it's strong enough to be developed.
b. Gameplay Loop
Next, decide what the player will do again and again during gameplay. This is called the gameplay loop.
A basic RPG loop usually looks like this:
- Explore the map or dungeon
- Fight enemies
- Gain EXP, gold, or items
- Upgrade character or equipment
- Enter the next area / defeat final boss
This loop should be simple, clear, and satisfying.
c. Genre and Perspective
Decide the type of game you want to create:
- Action RPG
- Dungeon crawler
- Adventure RPG
Also decide the camera view:
- First-person
- Third person
- Side view
Choosing this early helps you design maps and combat correctly in Miliastra.
d. Player Goal
Every game needs a clear goal to motivate the player.
Examples:
- Defeat a final enemy
- Get all the treasures
- Unlock all areas, etc.
This goal will shape your level design and progression system.
e. Game Concept Sheet
Before moving forward, take some time to create a simple game concept sheet.
You can write it on a piece of paper or in a digital document, covering the following points:
- Game theme
- Core gameplay flow
- Player objectives
- Main systems (RPG mechanics, items, shops, loot, etc.)
This concept sheet will serve as your roadmap, helping you stay focused and organized when you start working inside the Miliastra Editor.
Part 2: Defining Core Gameplay
After finding your game idea, the next step is defining the core gameplay. This is how players play, fight, and grow stronger in your game.
a. Player Actions
Decide what players can do:
- Attack enemies
- Collect items
- Interact with NPCs, etc.
b. Basic Combat
Define how combat works:
- Combat starts
- Player attacks and deals damage
- Enemies are defeated and drop loot, etc.
c. Progression System
Decide how players grow stronger:
- Gain EXP and level up
- Increase stats (HP, ATK, DEF)
- Unlock New Area
d. Rewards & Resources
Decide what players earn:
- Gold
- EXP
- Special items or materials, etc.
e. Game Flow
Create a simple flow:
Start with Objective - Fight enemies - Earn rewards - Become stronger - Explore further - Defeat the final Boss - Ending
📝 Wonderland Guide:
This is an example of a Flow Chart that I made for a game that I developed with the title: Slime & Evil Dragon
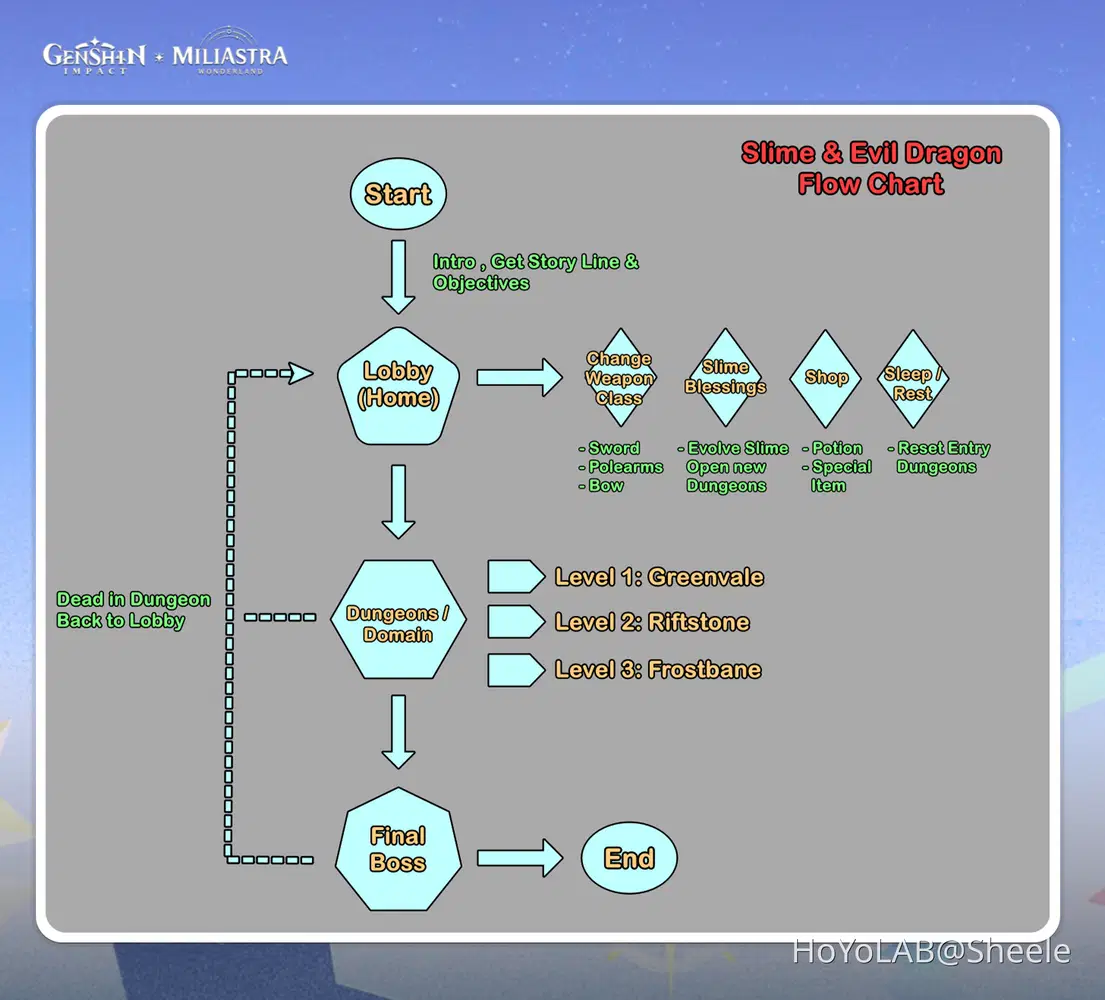
Slime & Evil Dragon is an Action RPG game I developed, where Travelers are tasked with saving the world of Slime from monsters and the Evil Dragon. By giving various items to the Slime, Travelers can increase their power and abilities. The game features a weapon selection system, where each weapon has a different level so choose the one that best suits your playstyle and gameplay strategy.
In addition, there is a shop system that allows players to buy and sell items, including recovery items and special items. The game also includes a rest (sleep) feature, which can be used to change the time of day and reset dungeon entries.
Once your character is considered strong enough, you will unlock the Final Boss area, where the Evil Dragon awaits. Defeating it rewards you with a special item that can be used to unlock the ending and complete the game, or you may choose to continue exploring the world of Slime.
Slime & Evil Dragon - Gameplay & Feature Preview
Stage GUID: 29190107647 [Asia]

Chapter 2: Miliasta Wonderland
a. Miliasta Editor
To use the Miliastra Editor and start creating your game, open the Paimon menu, scroll down, and select "My Miliastra Wonderland." Then, select New Tab and name the tab according to the name of the game you're developing. Finally, select Create New Save.
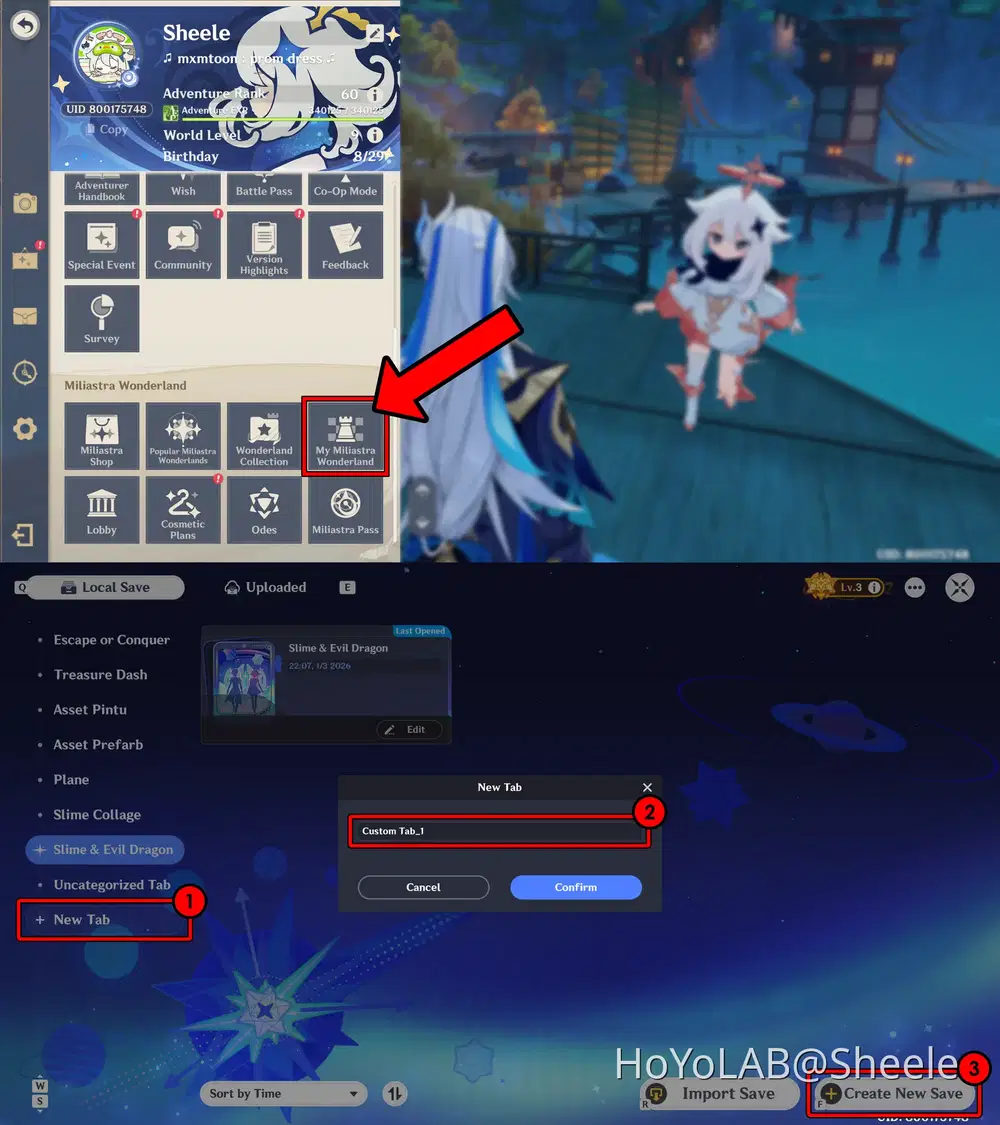
Below is the initial view of the Miliastra Editor, which serves as the main window for handling the visual aspects of your game development, such as placing objects, creating gameplay areas, and managing other visual elements.
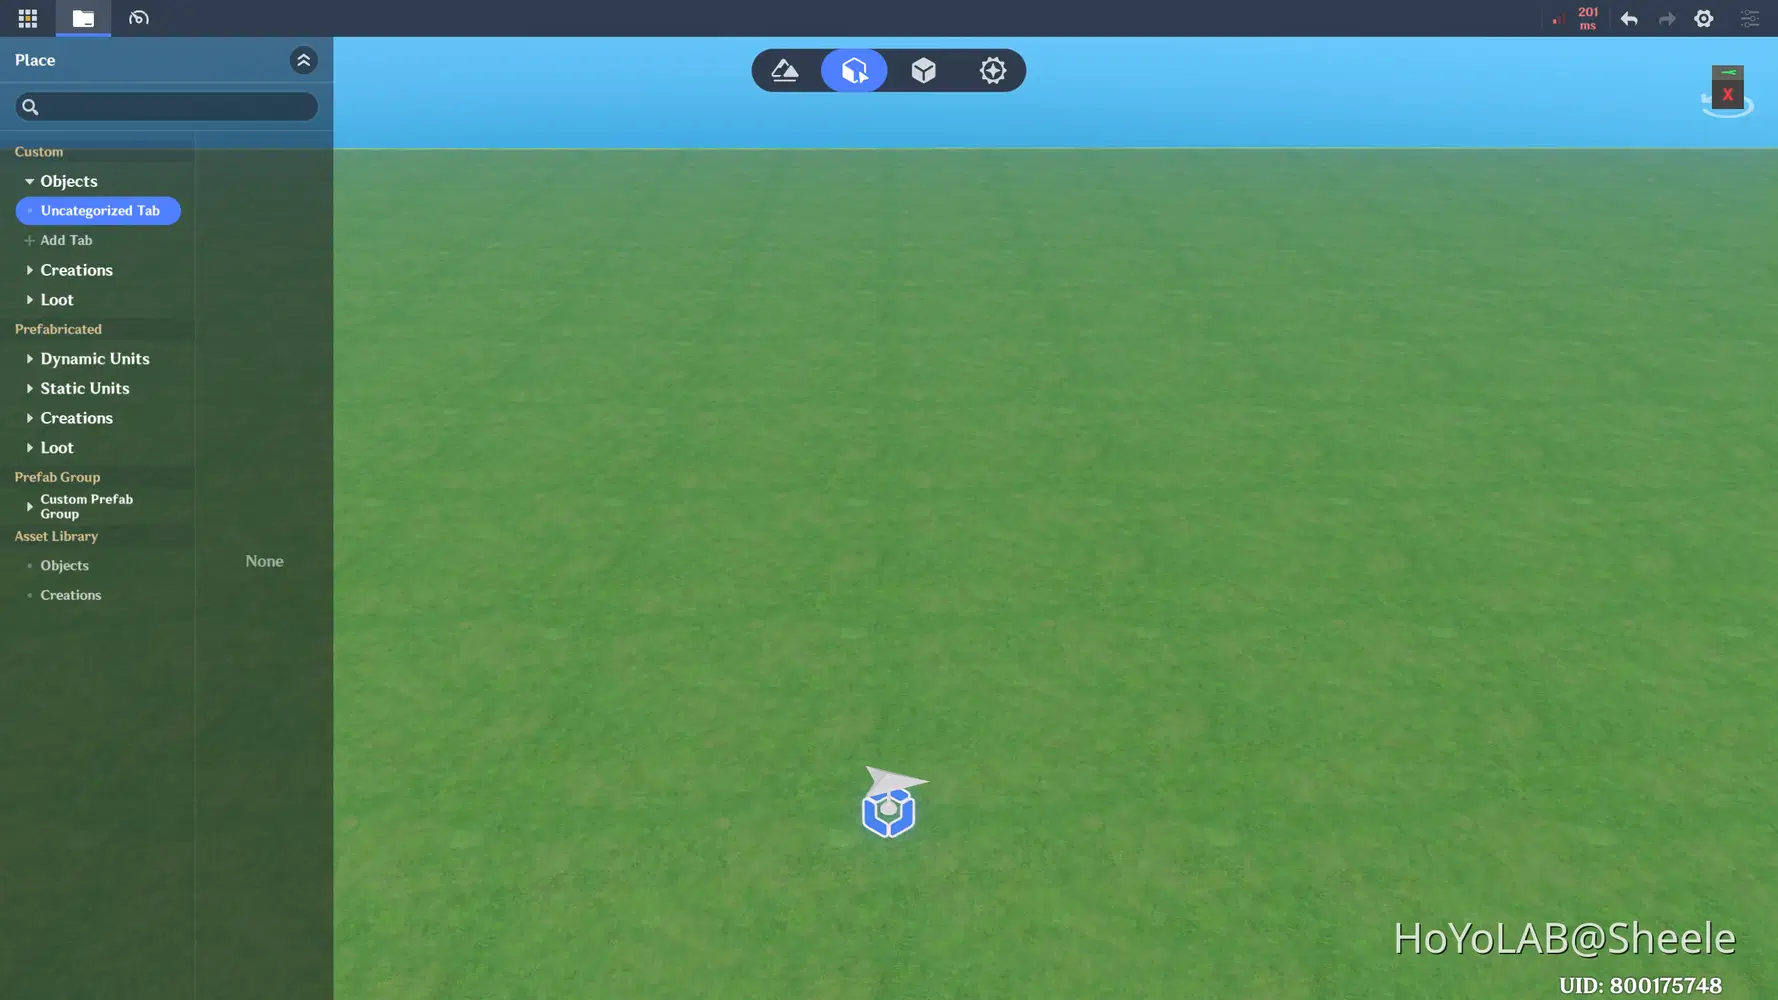
b. Miliasta Sandbox
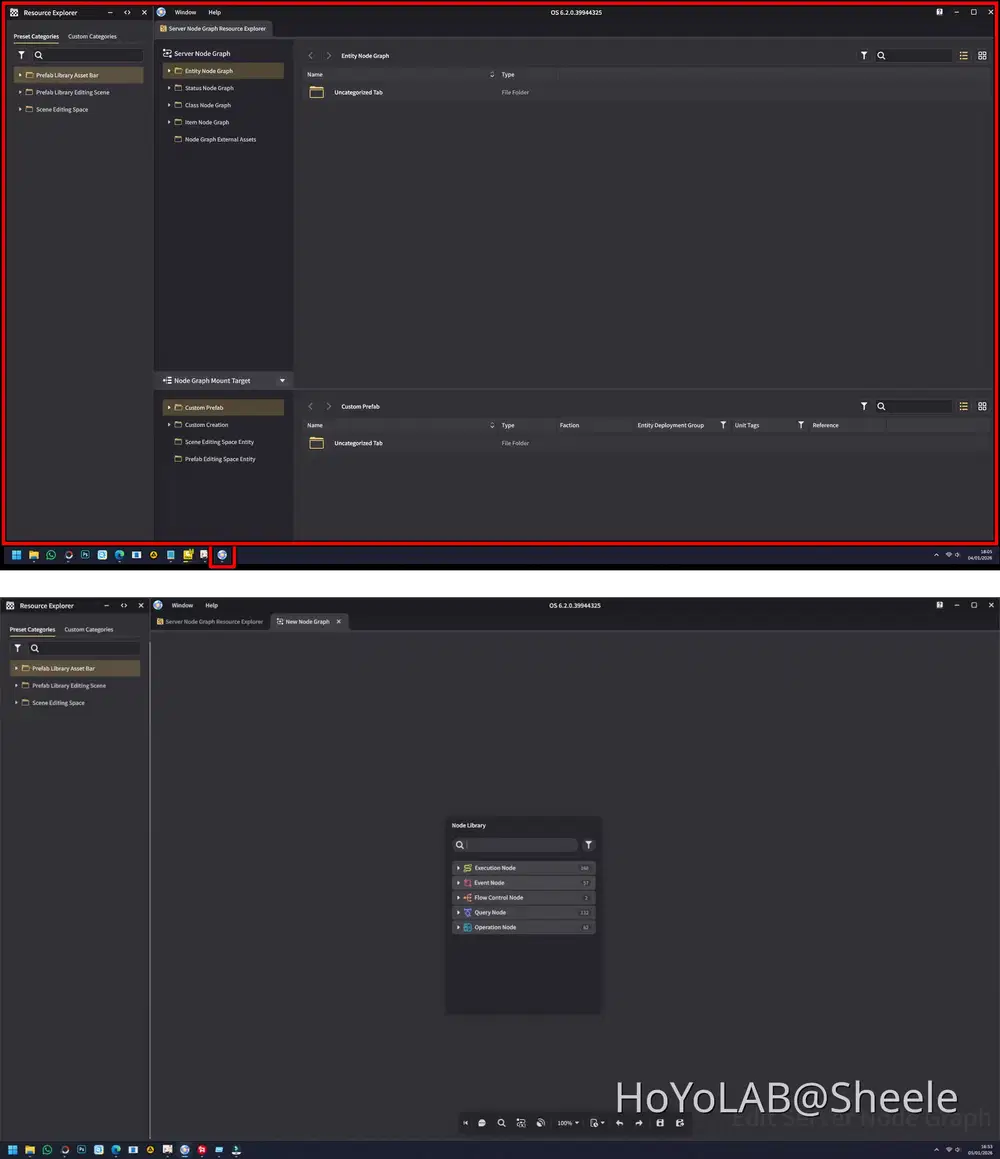
In addition, a second window will also open, which functions as the manager for Nodes, Functions, Connections, Systems, and Logic. If compared to the human body, this part represents the network that structures and connects the entire body.
Right-click on the workspace to open the Node Library, then start creating and configuring the Node functions you need in game development.
Chapter 3: Map Creation & World Design
Part 1: Creating Terrain
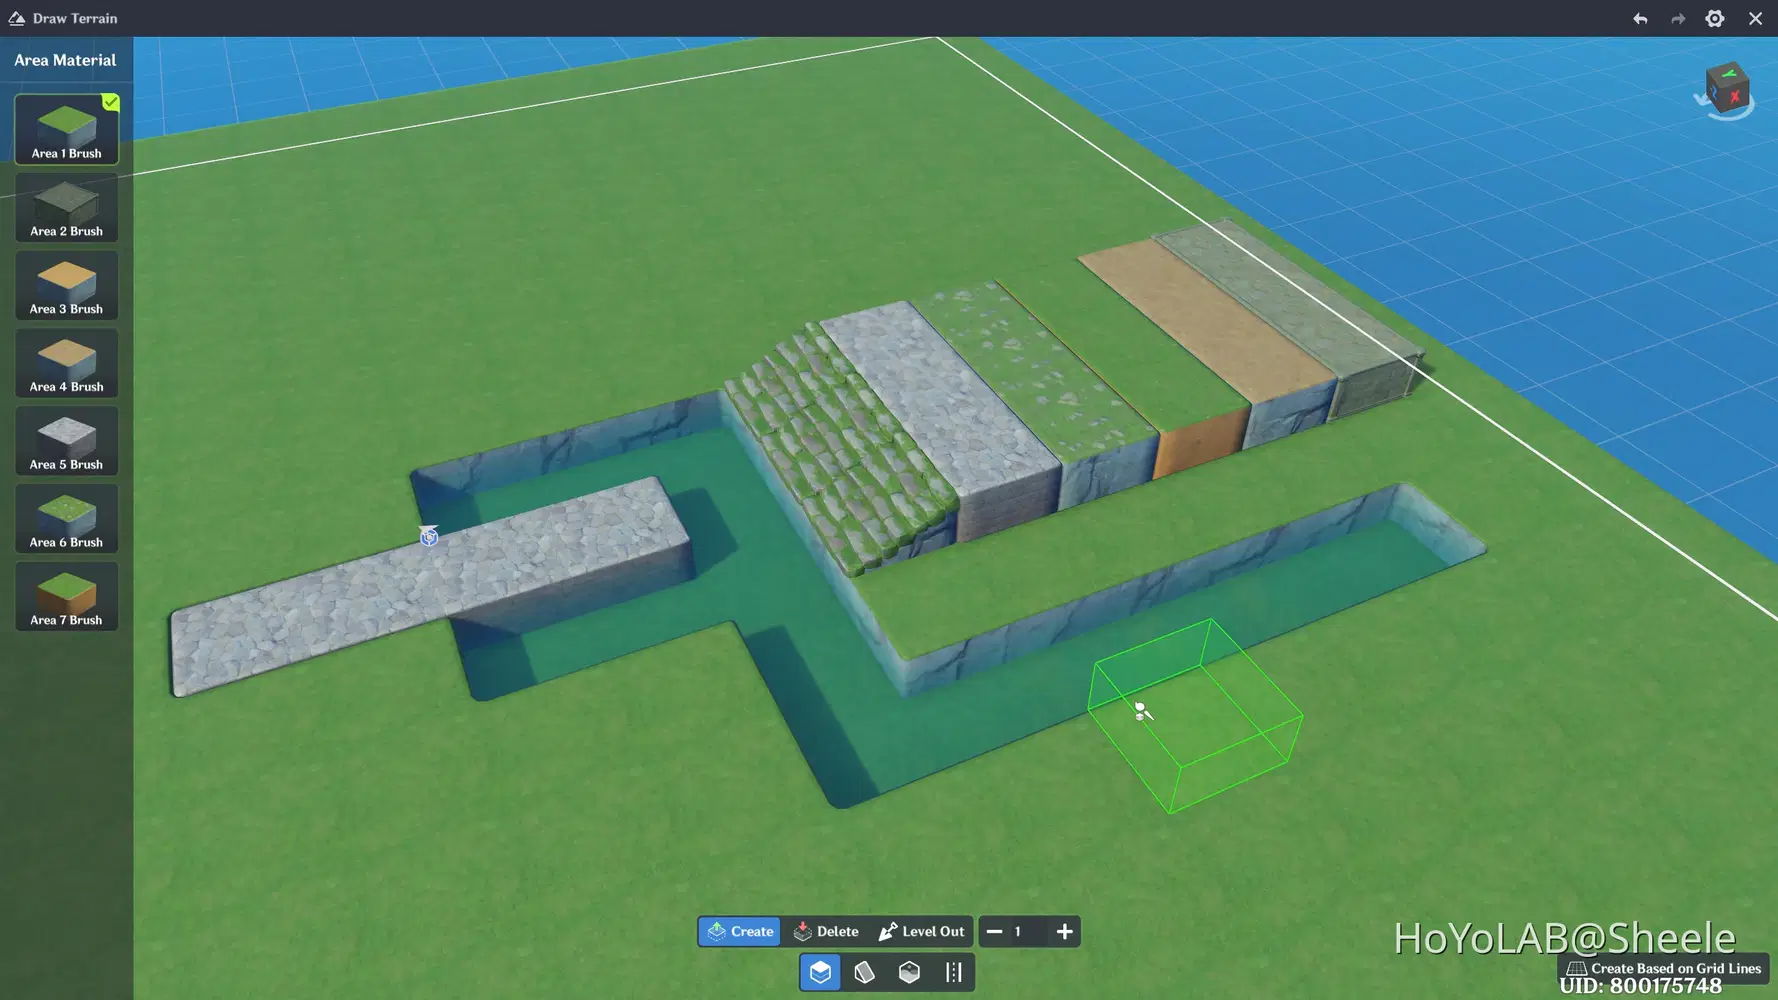
When you first enter the Miliastra Editor, the terrain is basically available by default. However, you still need to add your own touches to turn it into an engaging arena. Select Terrain Editing to start modifying the terrain surface. Here, you can add various shapes and materials such as roads, sand, and other elements.
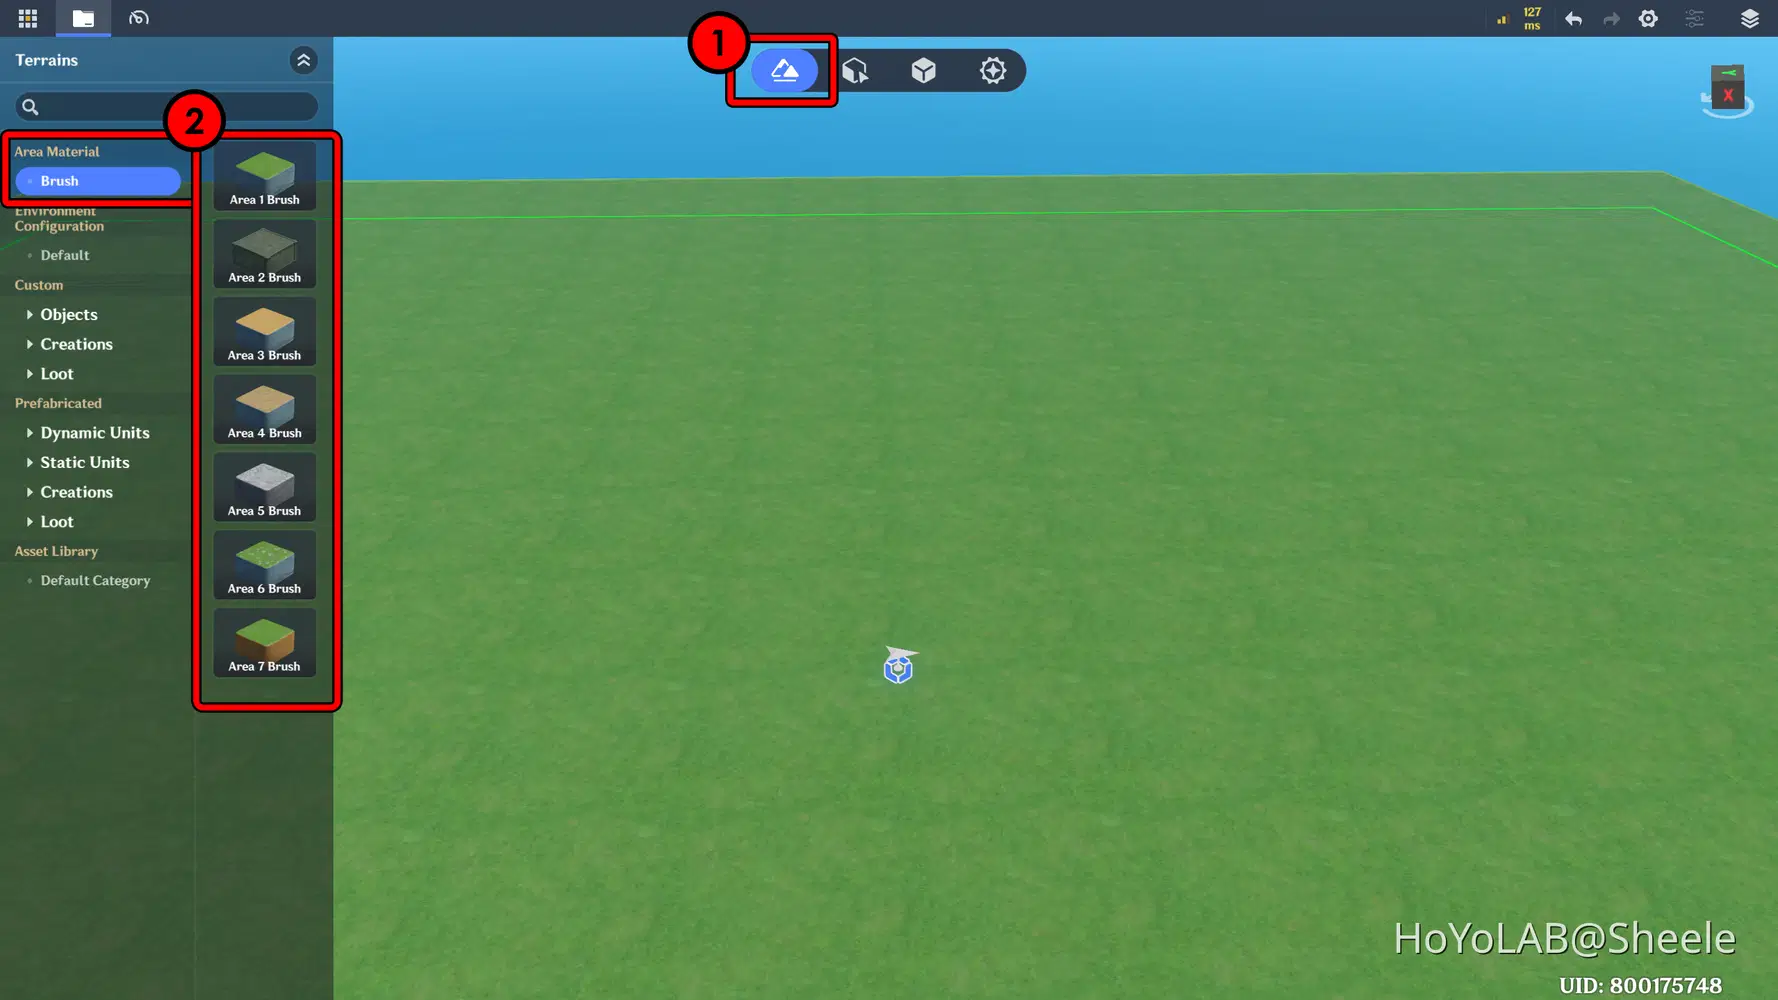
Use your creativity to create an interesting arena 

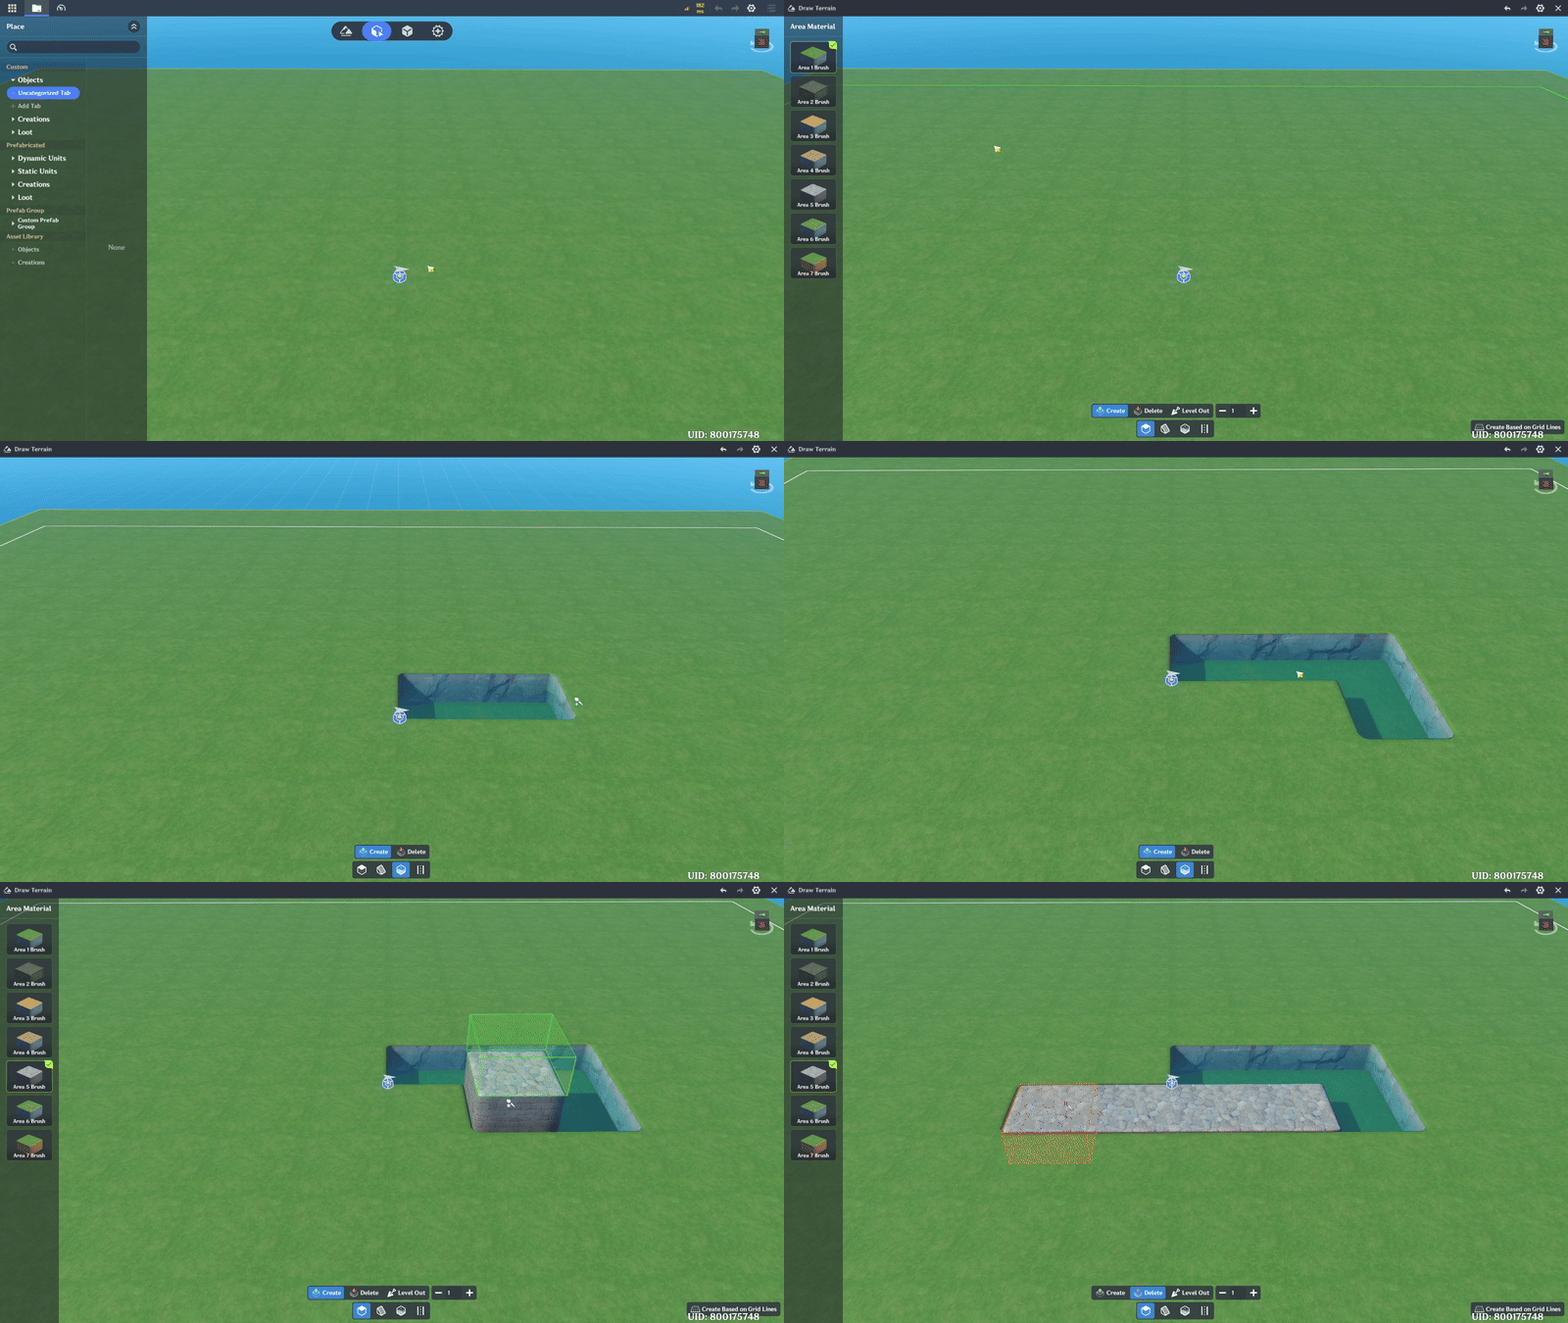
📝 Wonderland Guide:
a. Terrain Levels
In the game I developed, I tried to divide the terrain into each section so that it would be easier for me to manage each section, for example below:
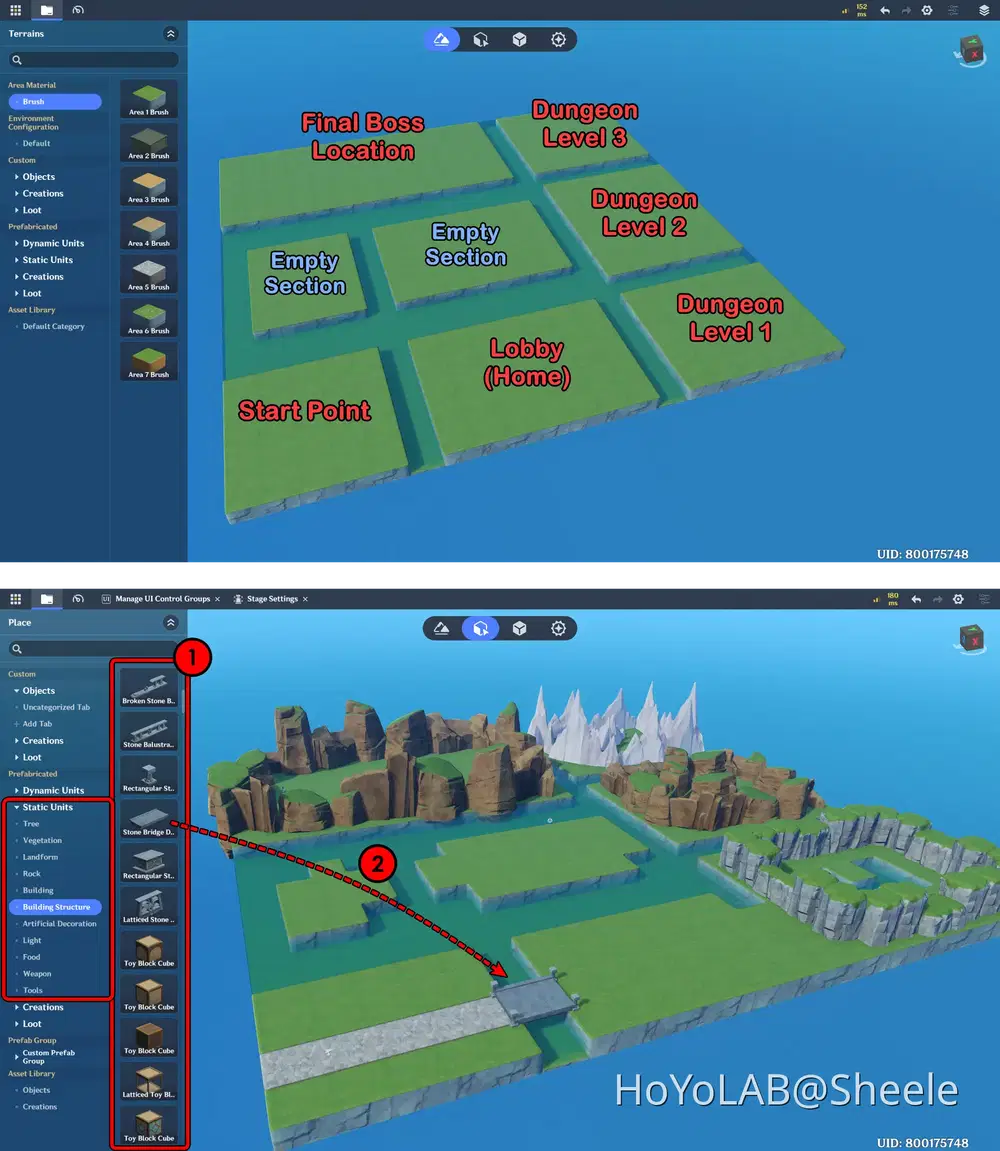
Select Entity Placement from the menu in the center of the screen, and the Place panel will open. Here, you can choose static units and place them onto the terrain. You can start adding buildings, trees, rocks, and other available objects.
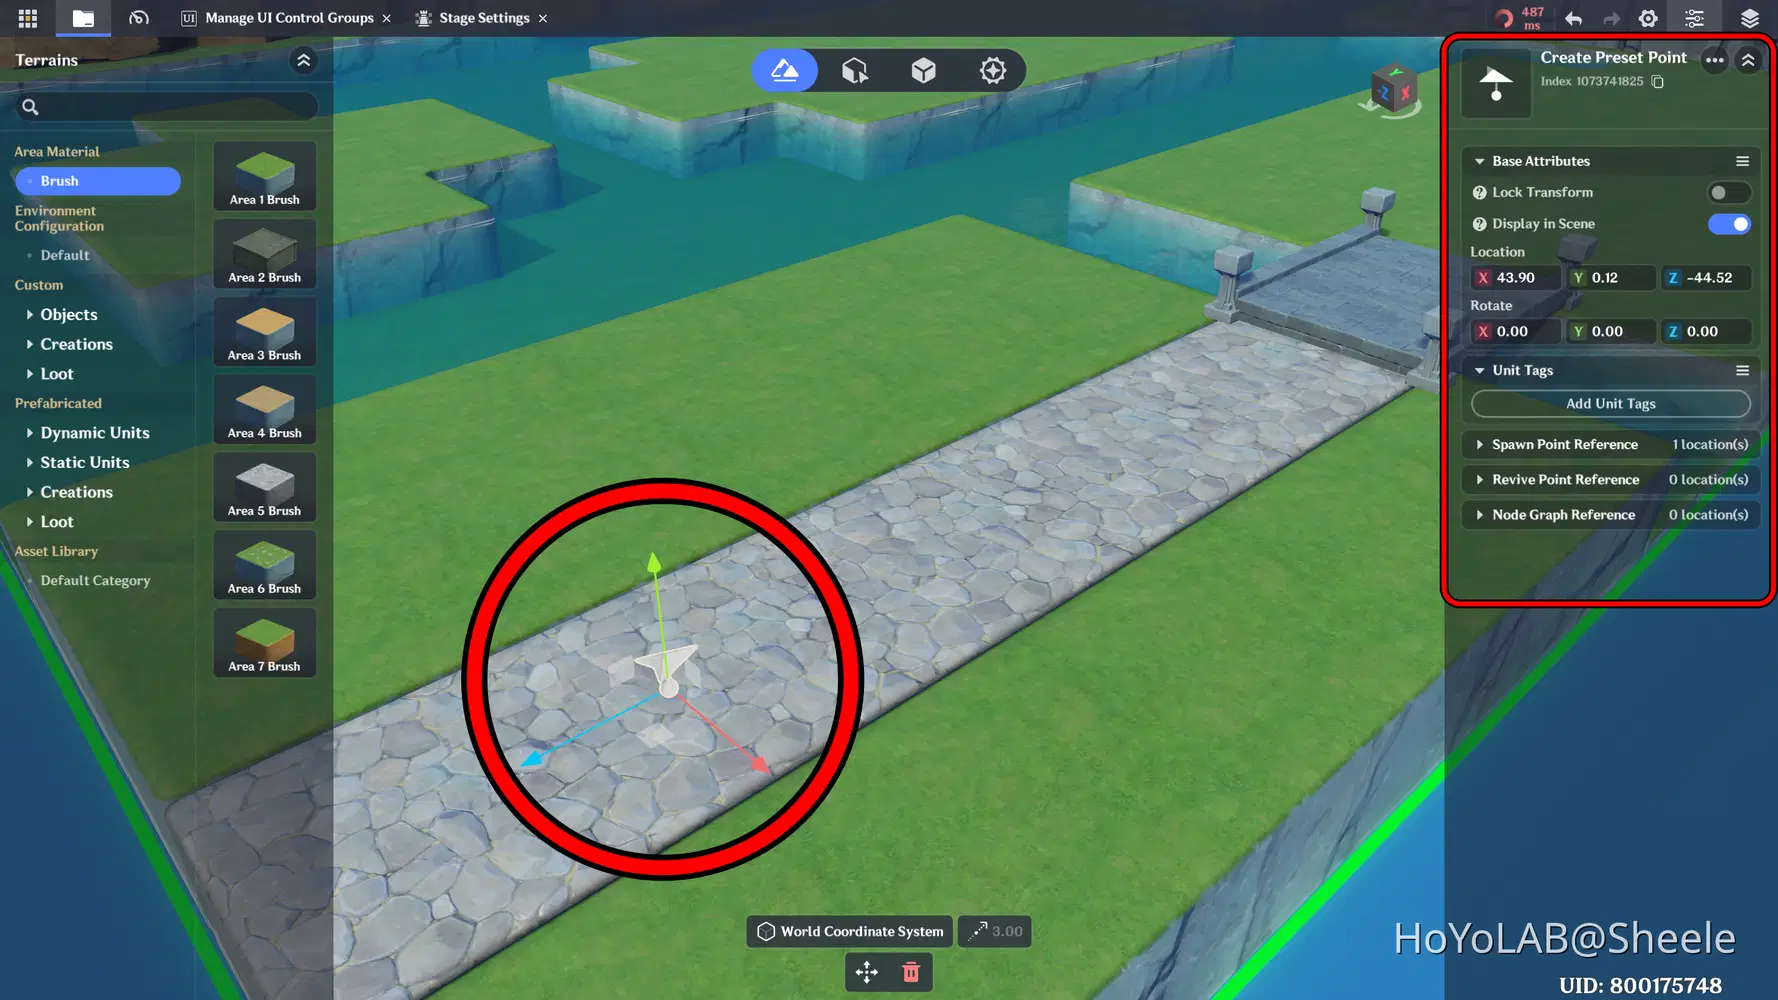
b. Preset Point
A small tip and suggestion: move the Create Preset Point, which is located at the center of the terrain, to the starting location where the player will begin the game.
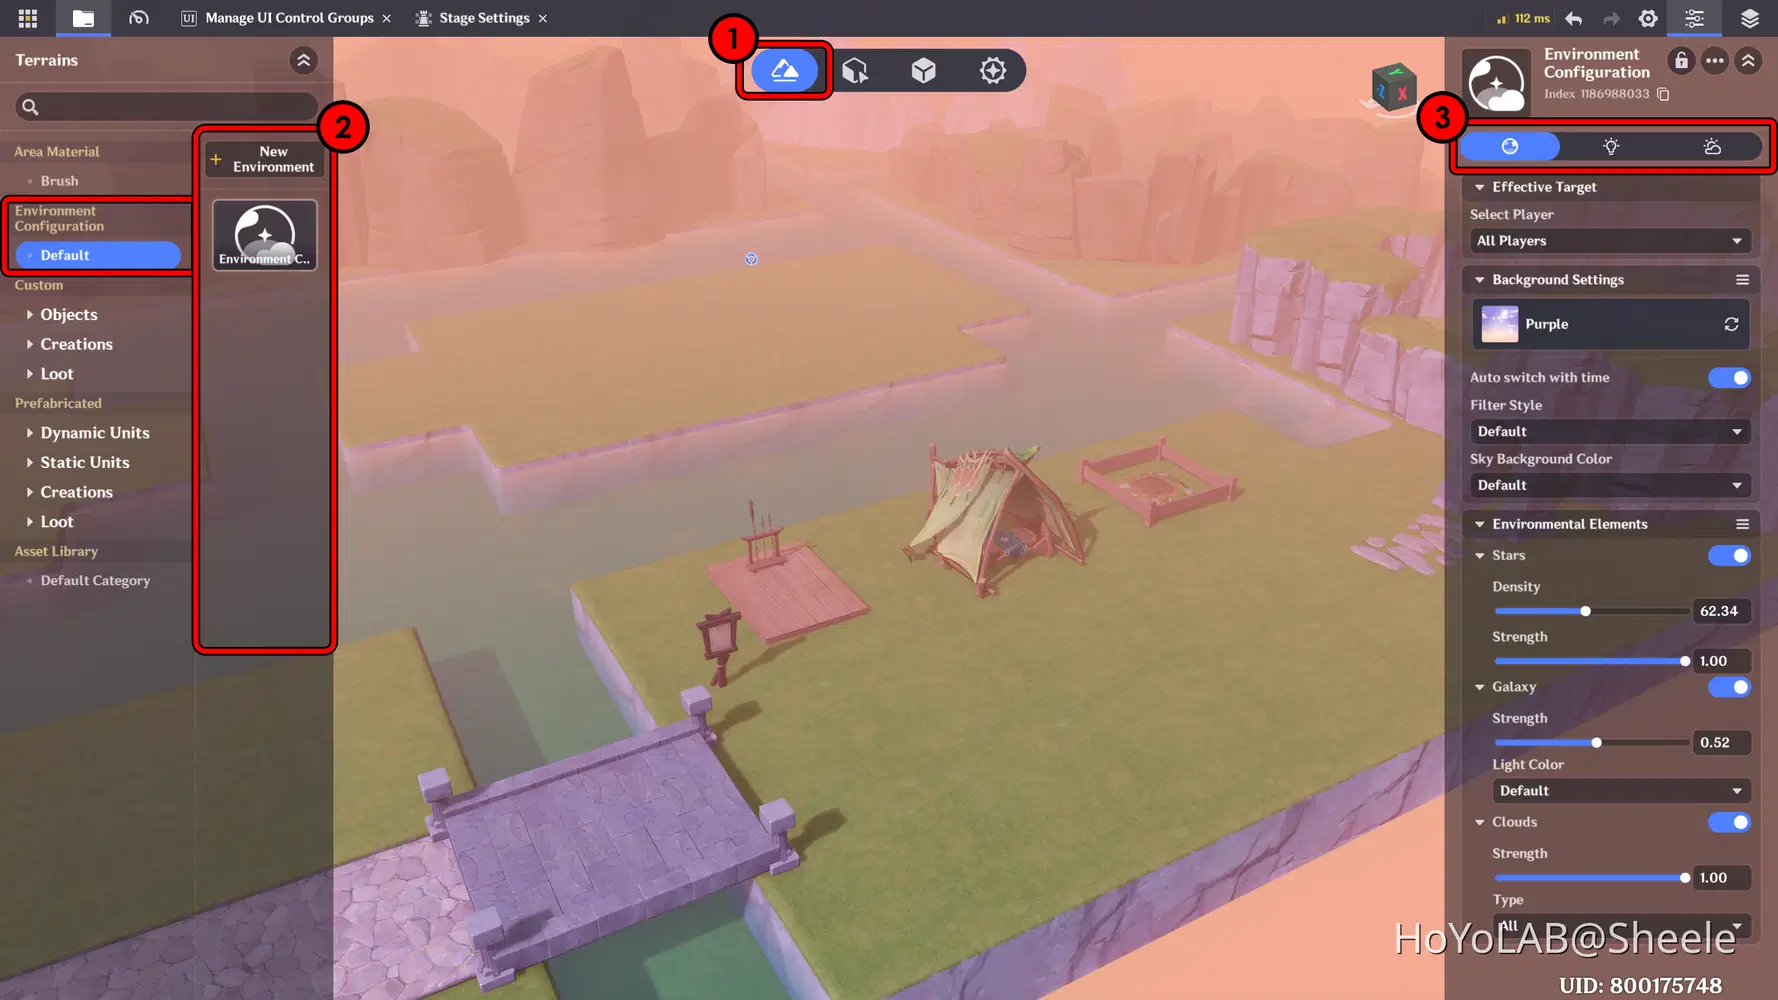
c. Environment
In addition, I also recommend adding an Environment to make your terrain feel more alive and engaging. You can adjust global colors and even add weather effects such as fog.
Part 2: Creating Asset
Prepare prefab assets to be used by organizing, configuring, and validating them before placement, so they can be efficiently integrated into the game world during development.
Go to the Prefab Library from the menu located in the center of the screen, then select and determine which objects you want to use in the game. I recommend choosing objects that you plan to assign Nodes to later, or those that will play an important role in accessing core features within the game. Don't forget to save the objects you select, this will make your object management faster when doing Entity Placement.
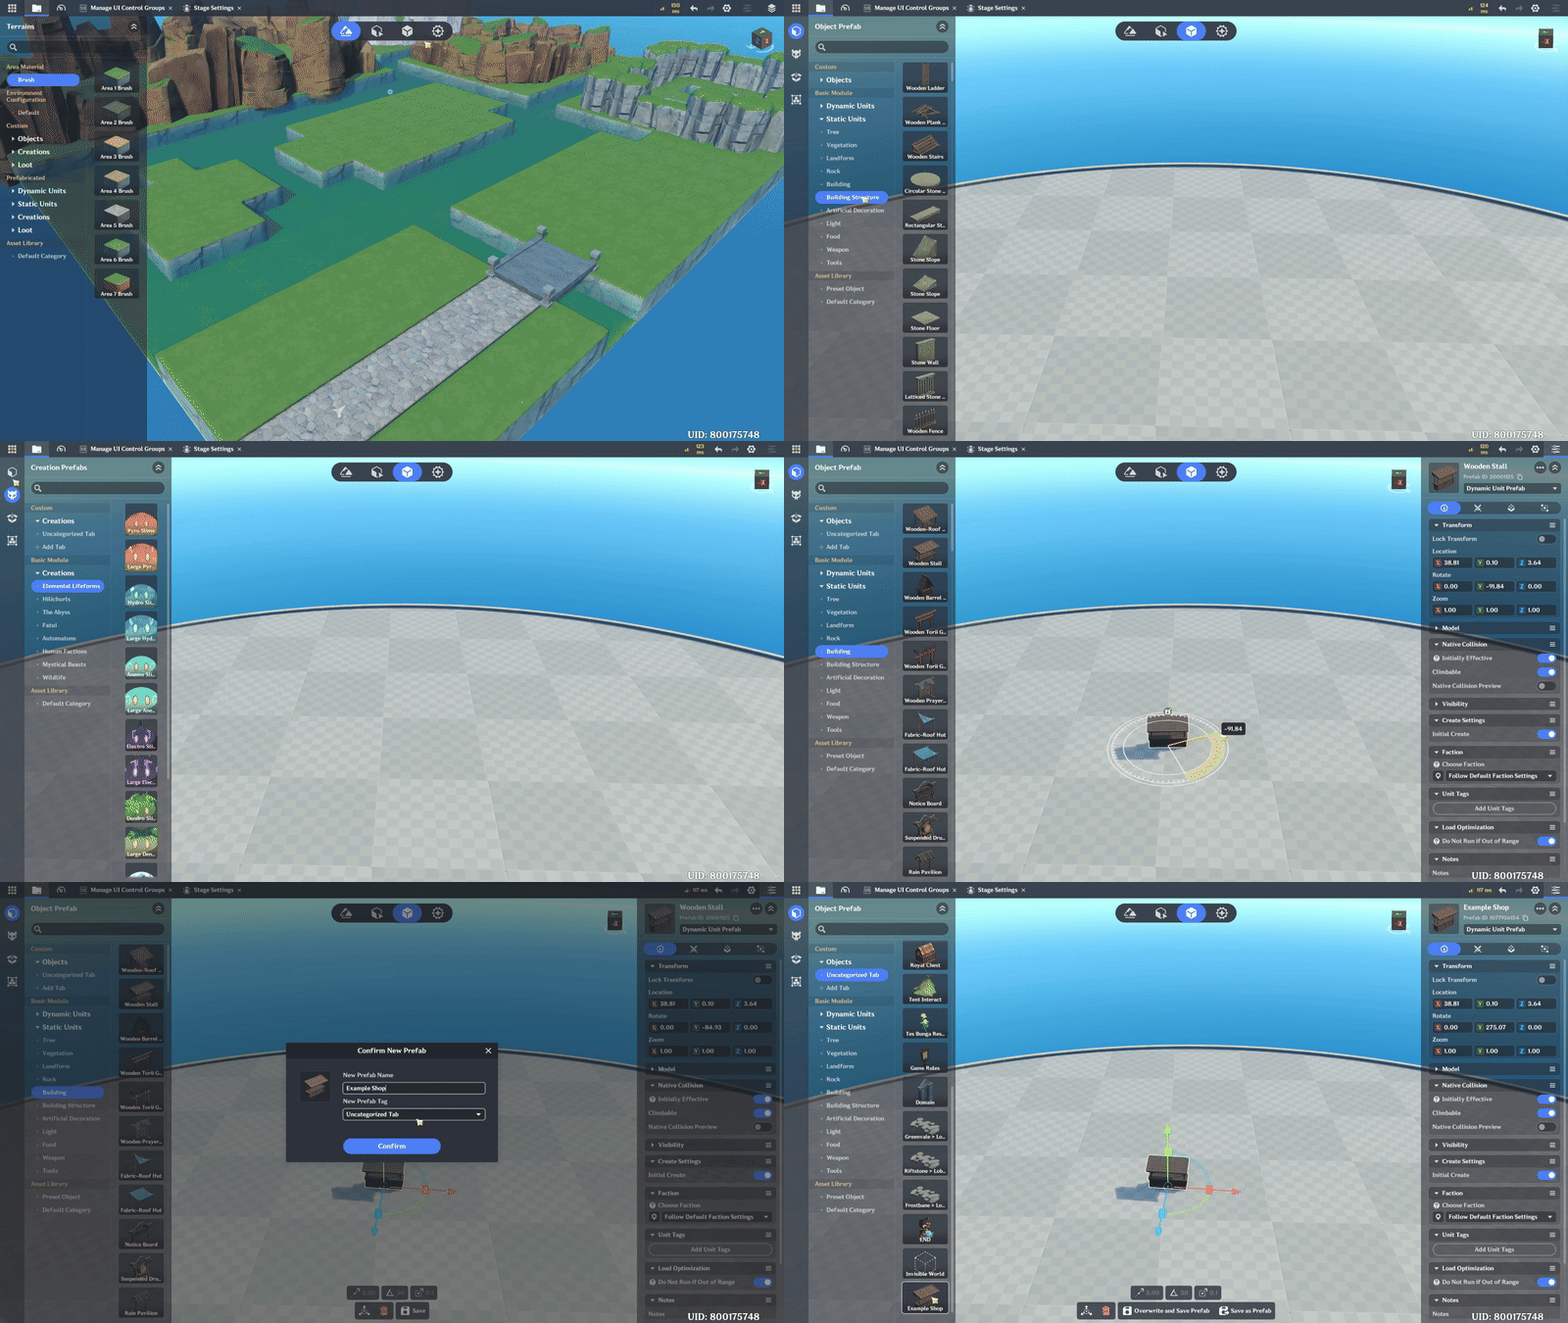
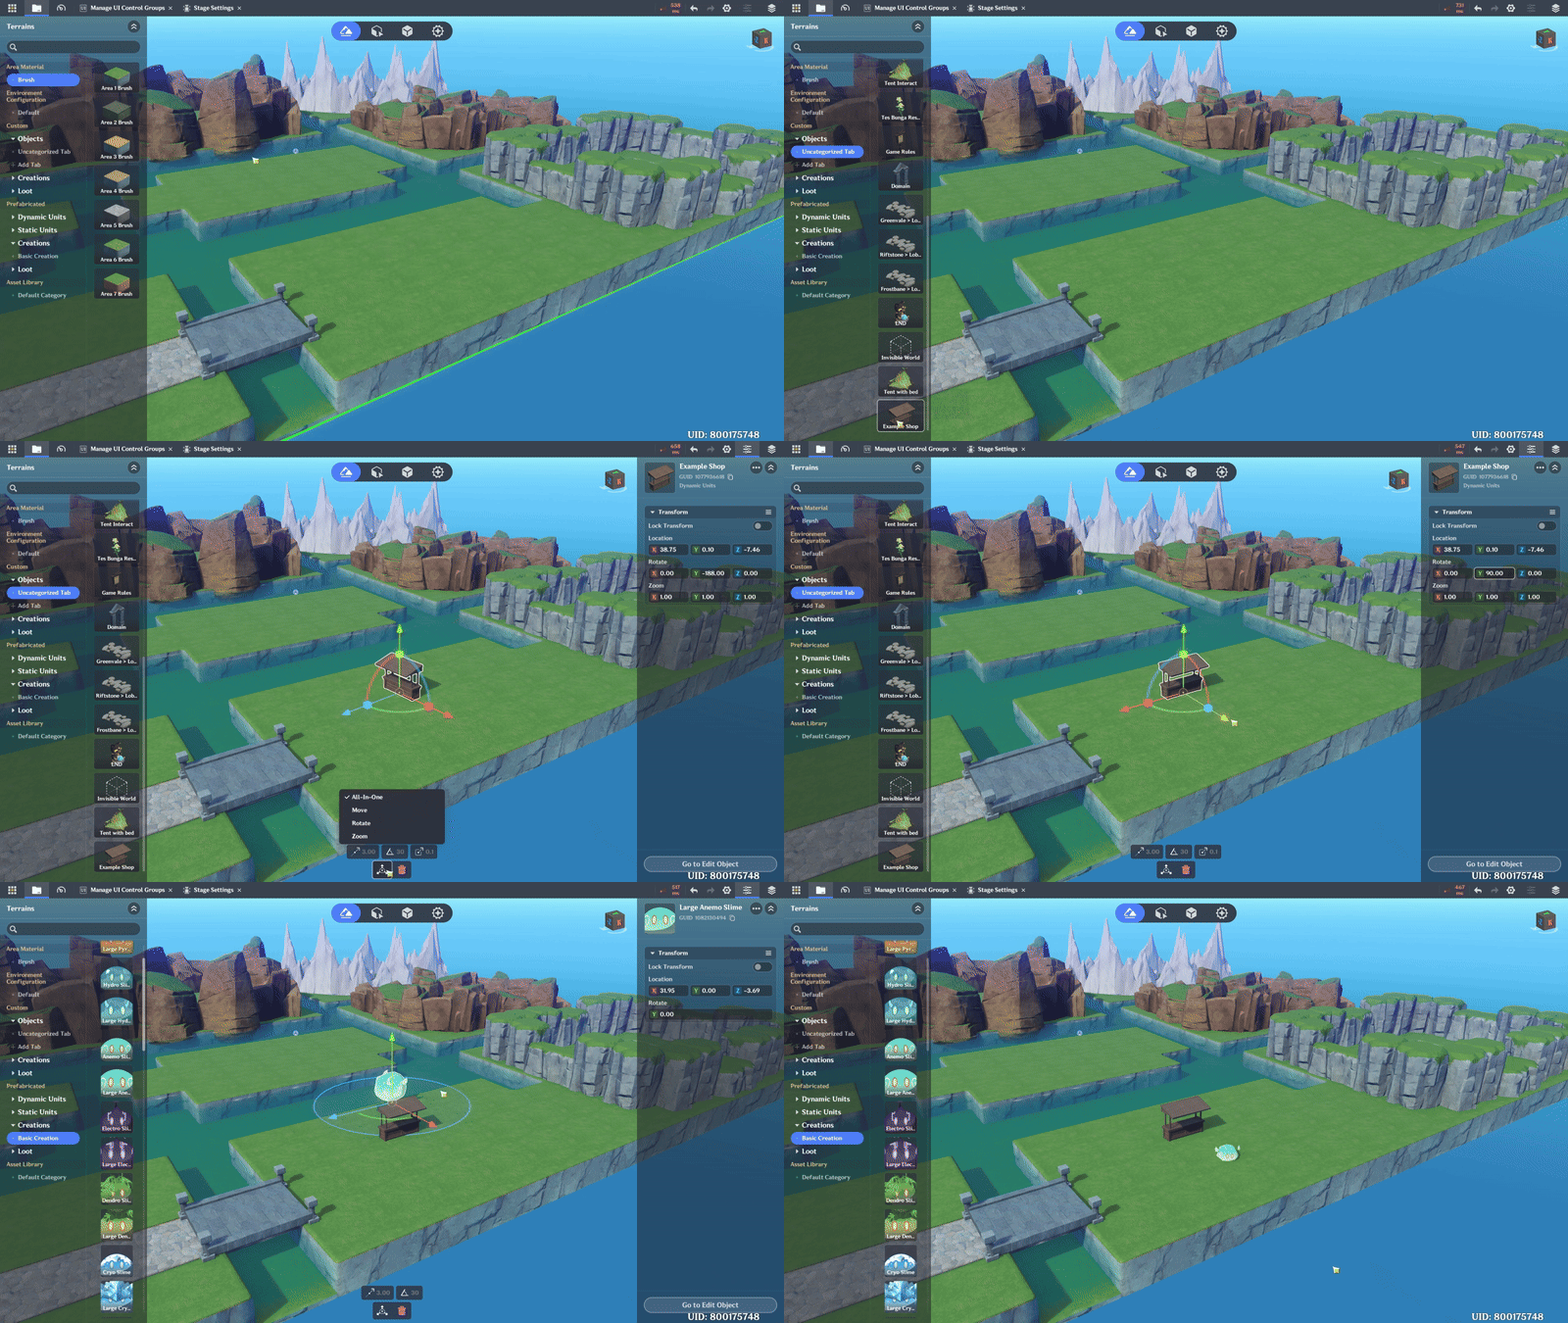
Go to Entity Placement and select the object - Uncategorized tab to place the object you created previously.
📝 Wonderland Guide:
a. Grouping Prefab
In the game that I developed, when creating assets, I grouped them according to their respective functions. This will make it easier for you later when you get into deeper sections, as below:
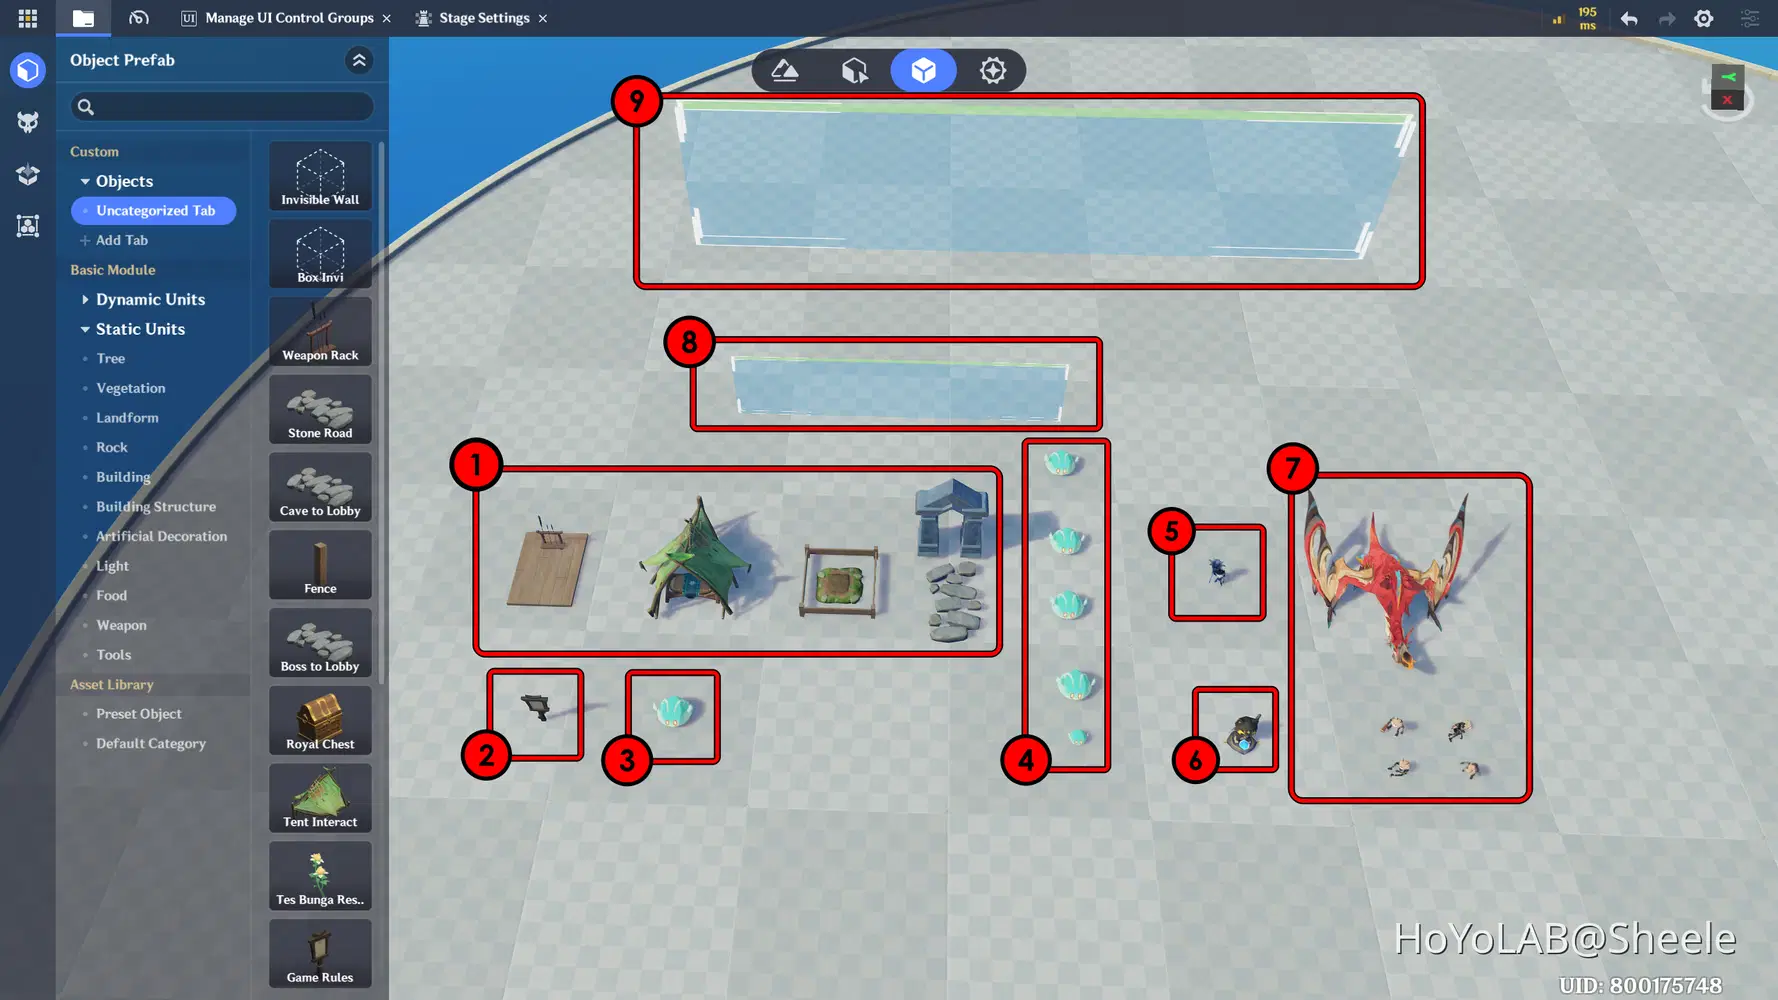
Description:
- Building – Interactive object used by the Player to access core gameplay features and in-game systems.
- Sign for World Rules – To display the game UI which contains a short tutorial.
- Intro NPC – An interactive NPC that provides a brief introduction to the game, explaining its core concept and objectives to the player.
- Evolution Slime – Creatures as a feature to increase Player Level (Set Not Enemy)
- Shop NPC – An interactive object used to access the Shop feature.
- End Game Statue – An interactive statue that serves as the final interaction point, triggering the end-game sequence or completion state.
- Enemies – Hostile entities that the player must fight during the game.
- Invisible Object (Collision Trigger) – An invisible object used to detect collisions and trigger events.
- Invisible Wall – An invisible collision object designed to block player, helping control level boundaries and gameplay flow.
b. Enhancing Prefabs Using Decoration Features
Enhancing prefabs using decorative features allows you to improve visual quality by adding details such as props, ornaments, and aesthetic elements, making each prefab feel more alive and integrated with the game environment.
On the object you create, go to the Model section and select Decoration Editor - Add Decoration, then choose the object you want to add in the Model field.
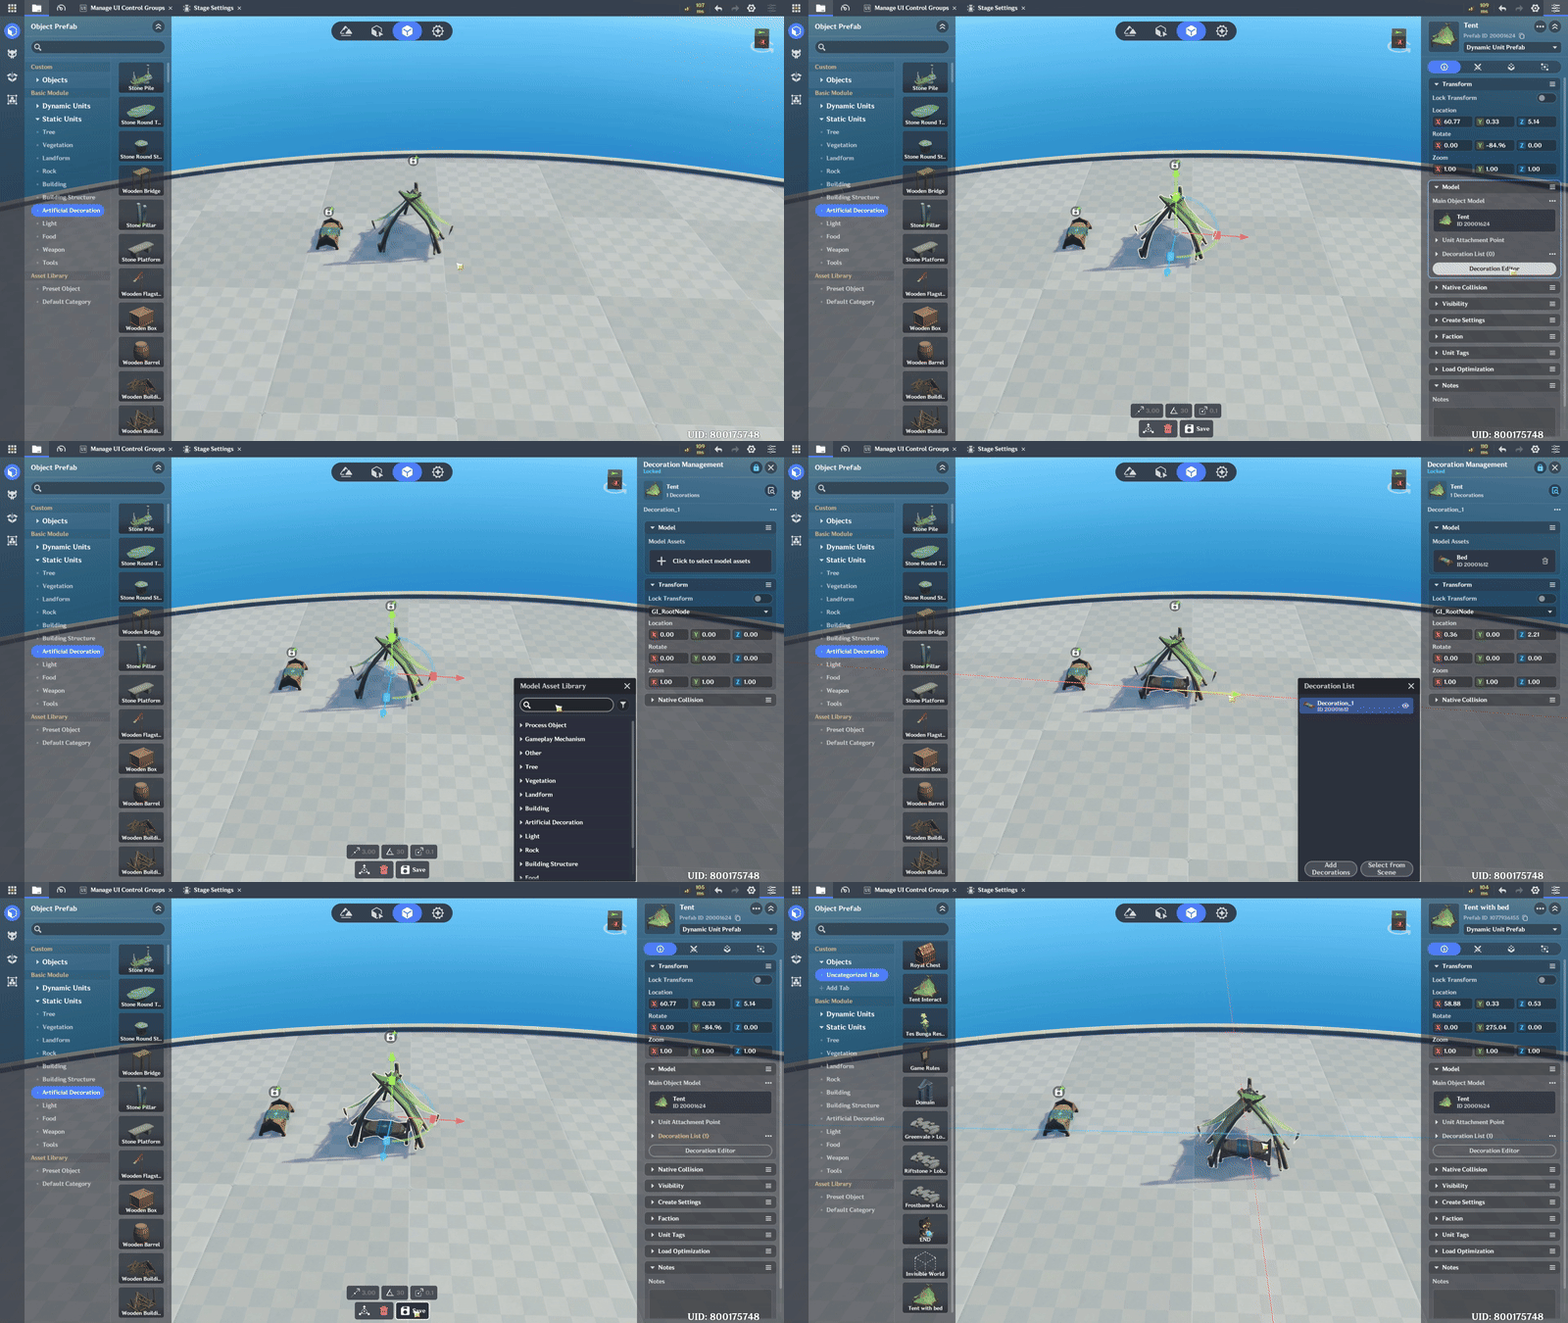
Using this method, the objects will be combined into a single unit, making them easier to move and manage. This approach is especially useful for objects like fences, as you won’t need to move each piece individually when working in Entity Placement.
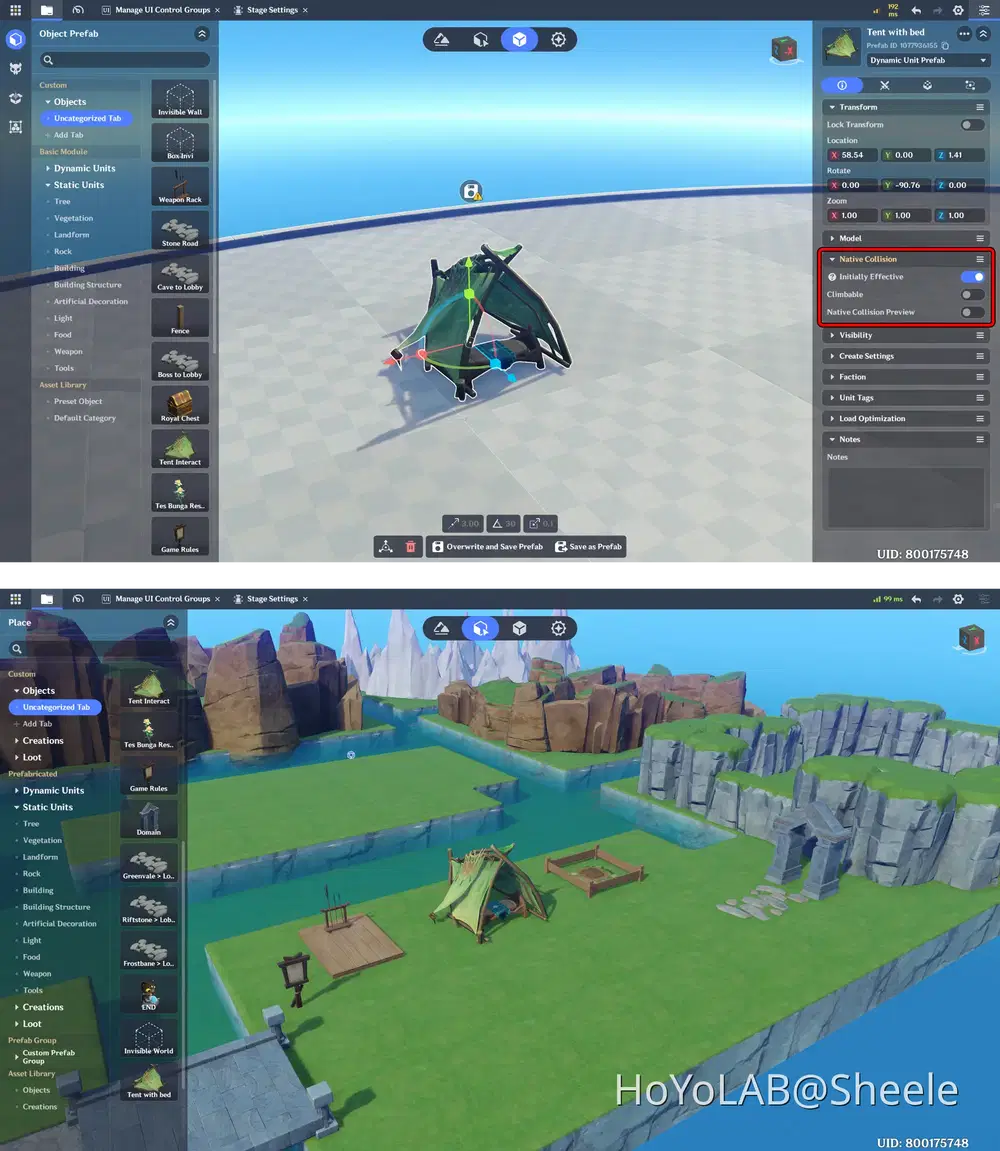
Native Collision and disable Climbable so that every building cannot be climbed.
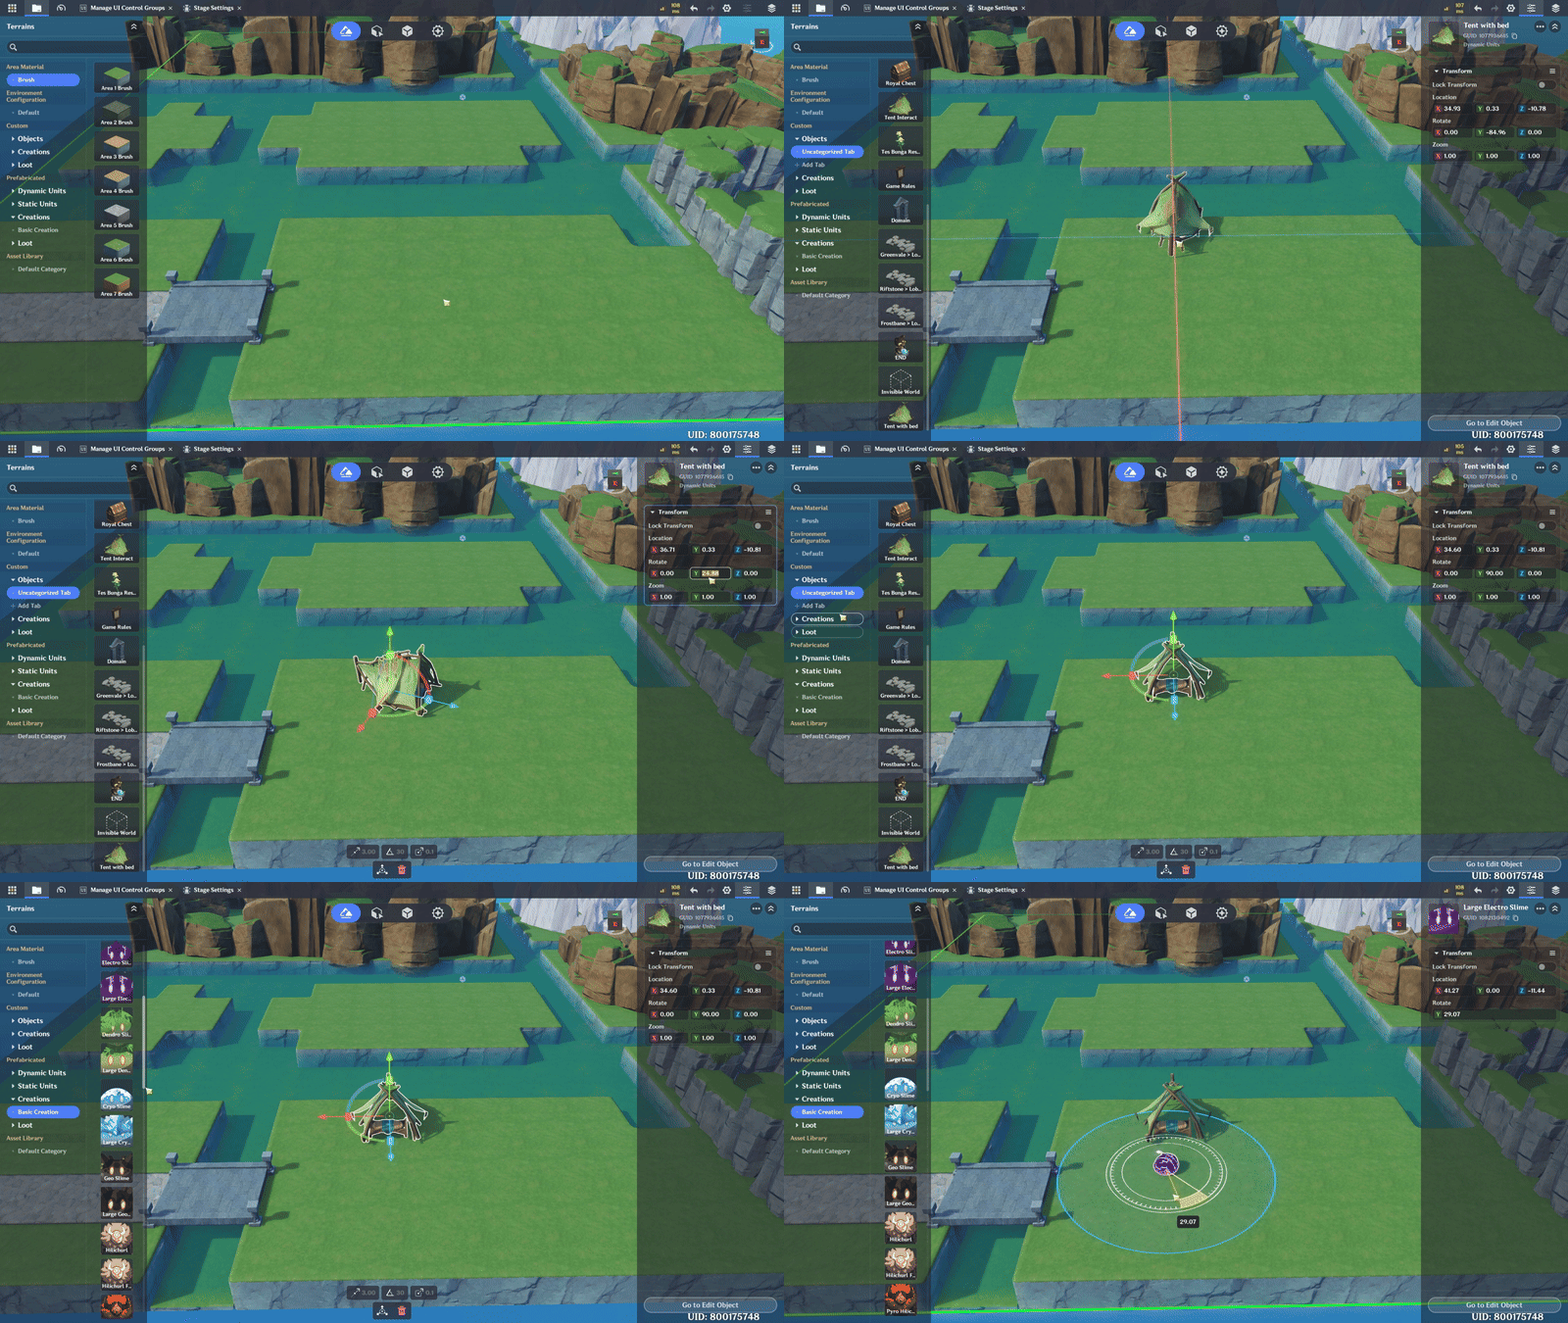
Arrange the object components in Entity Placement that you created earlier, then adjust their positions according to the layout you want.
c. Attractive and interactive visuals
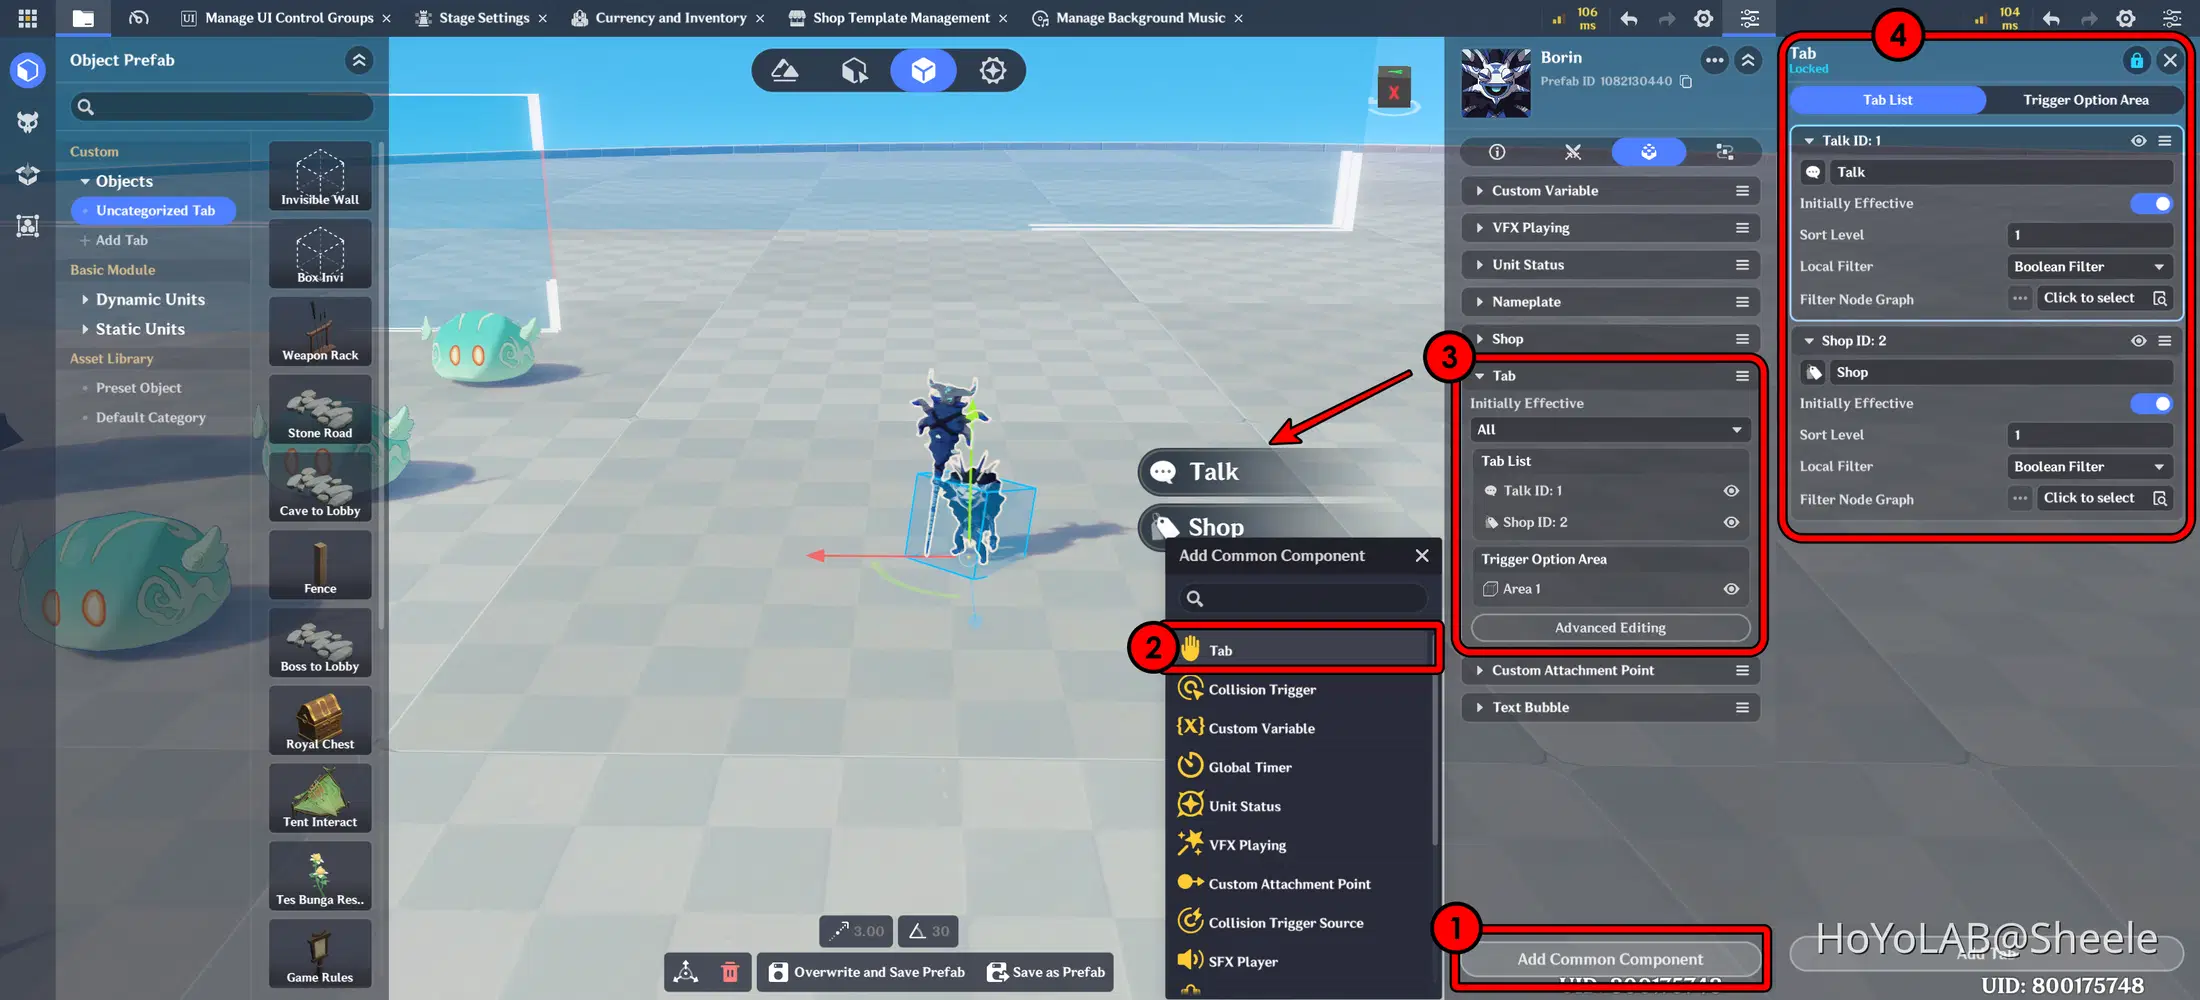
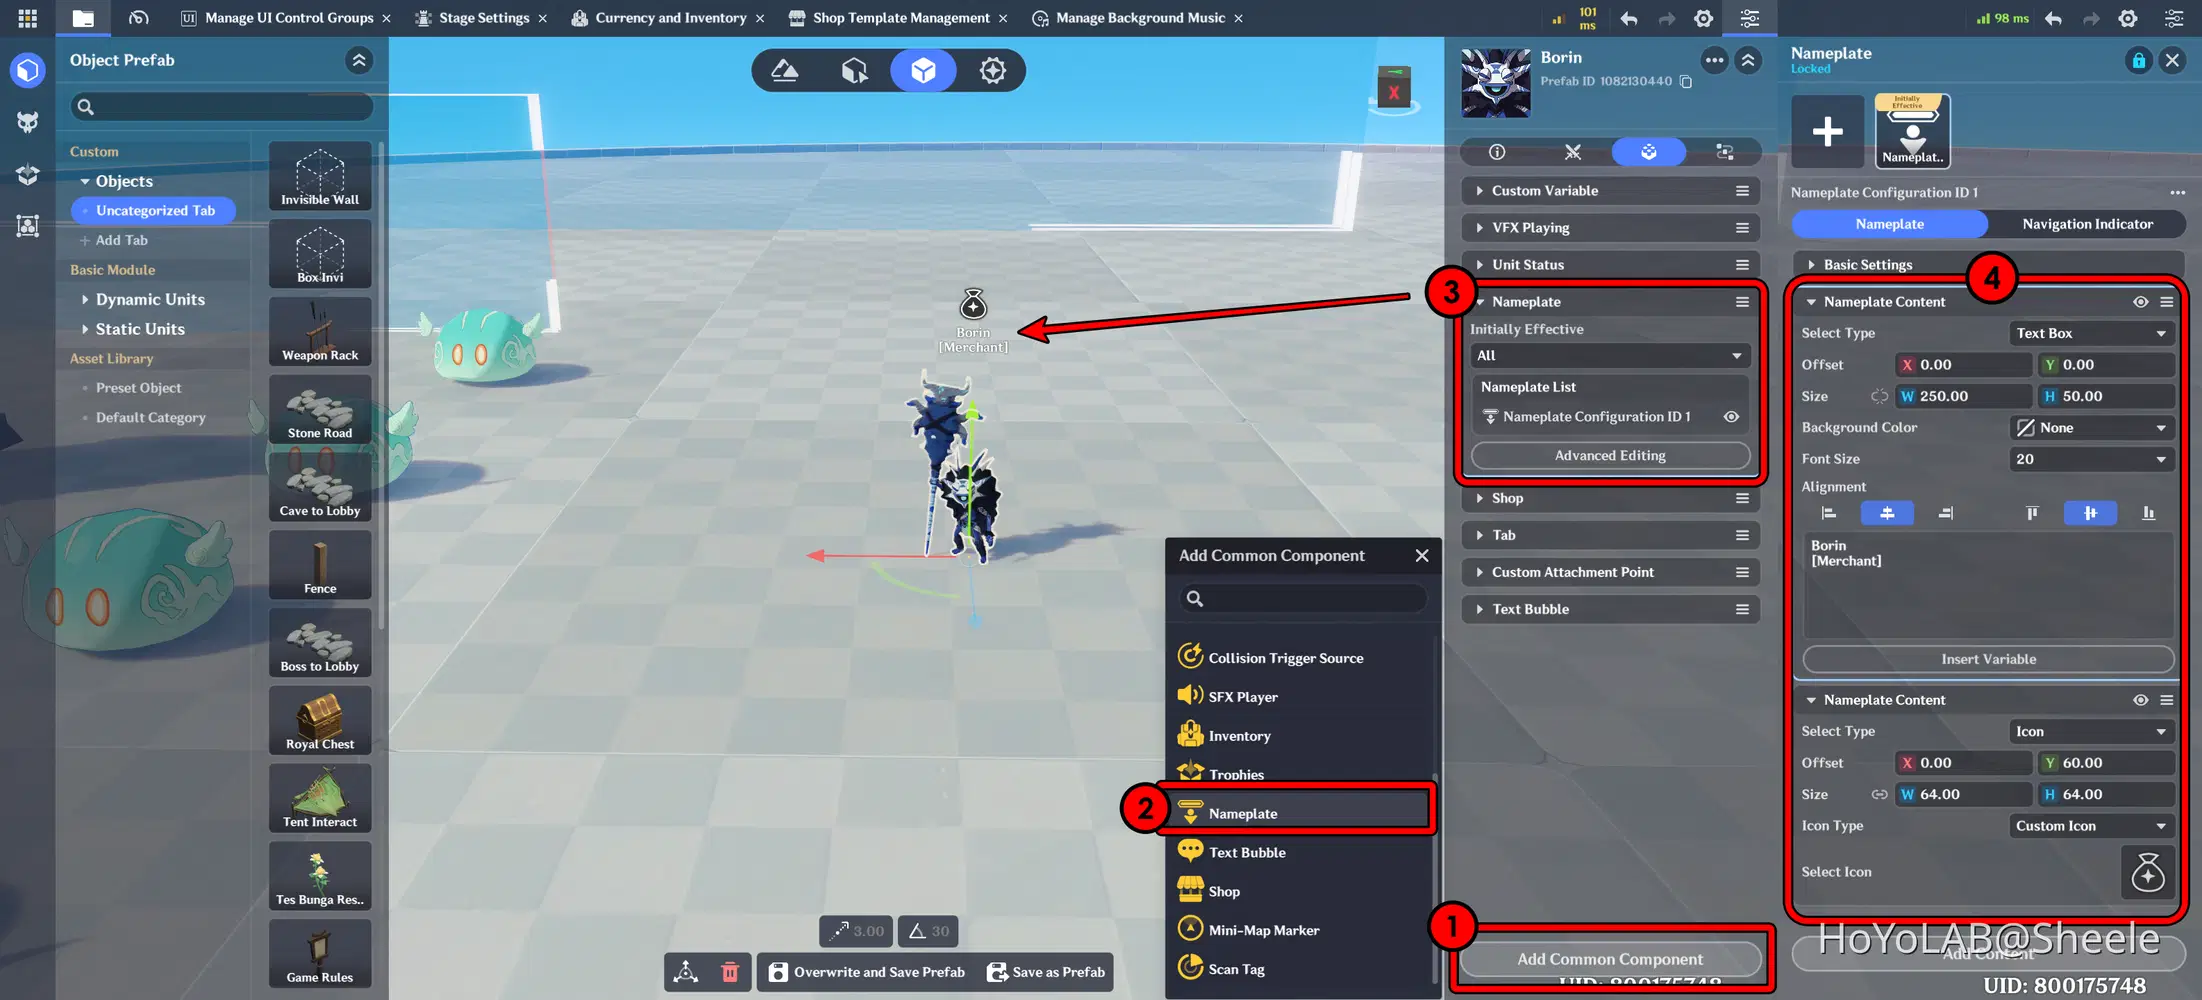
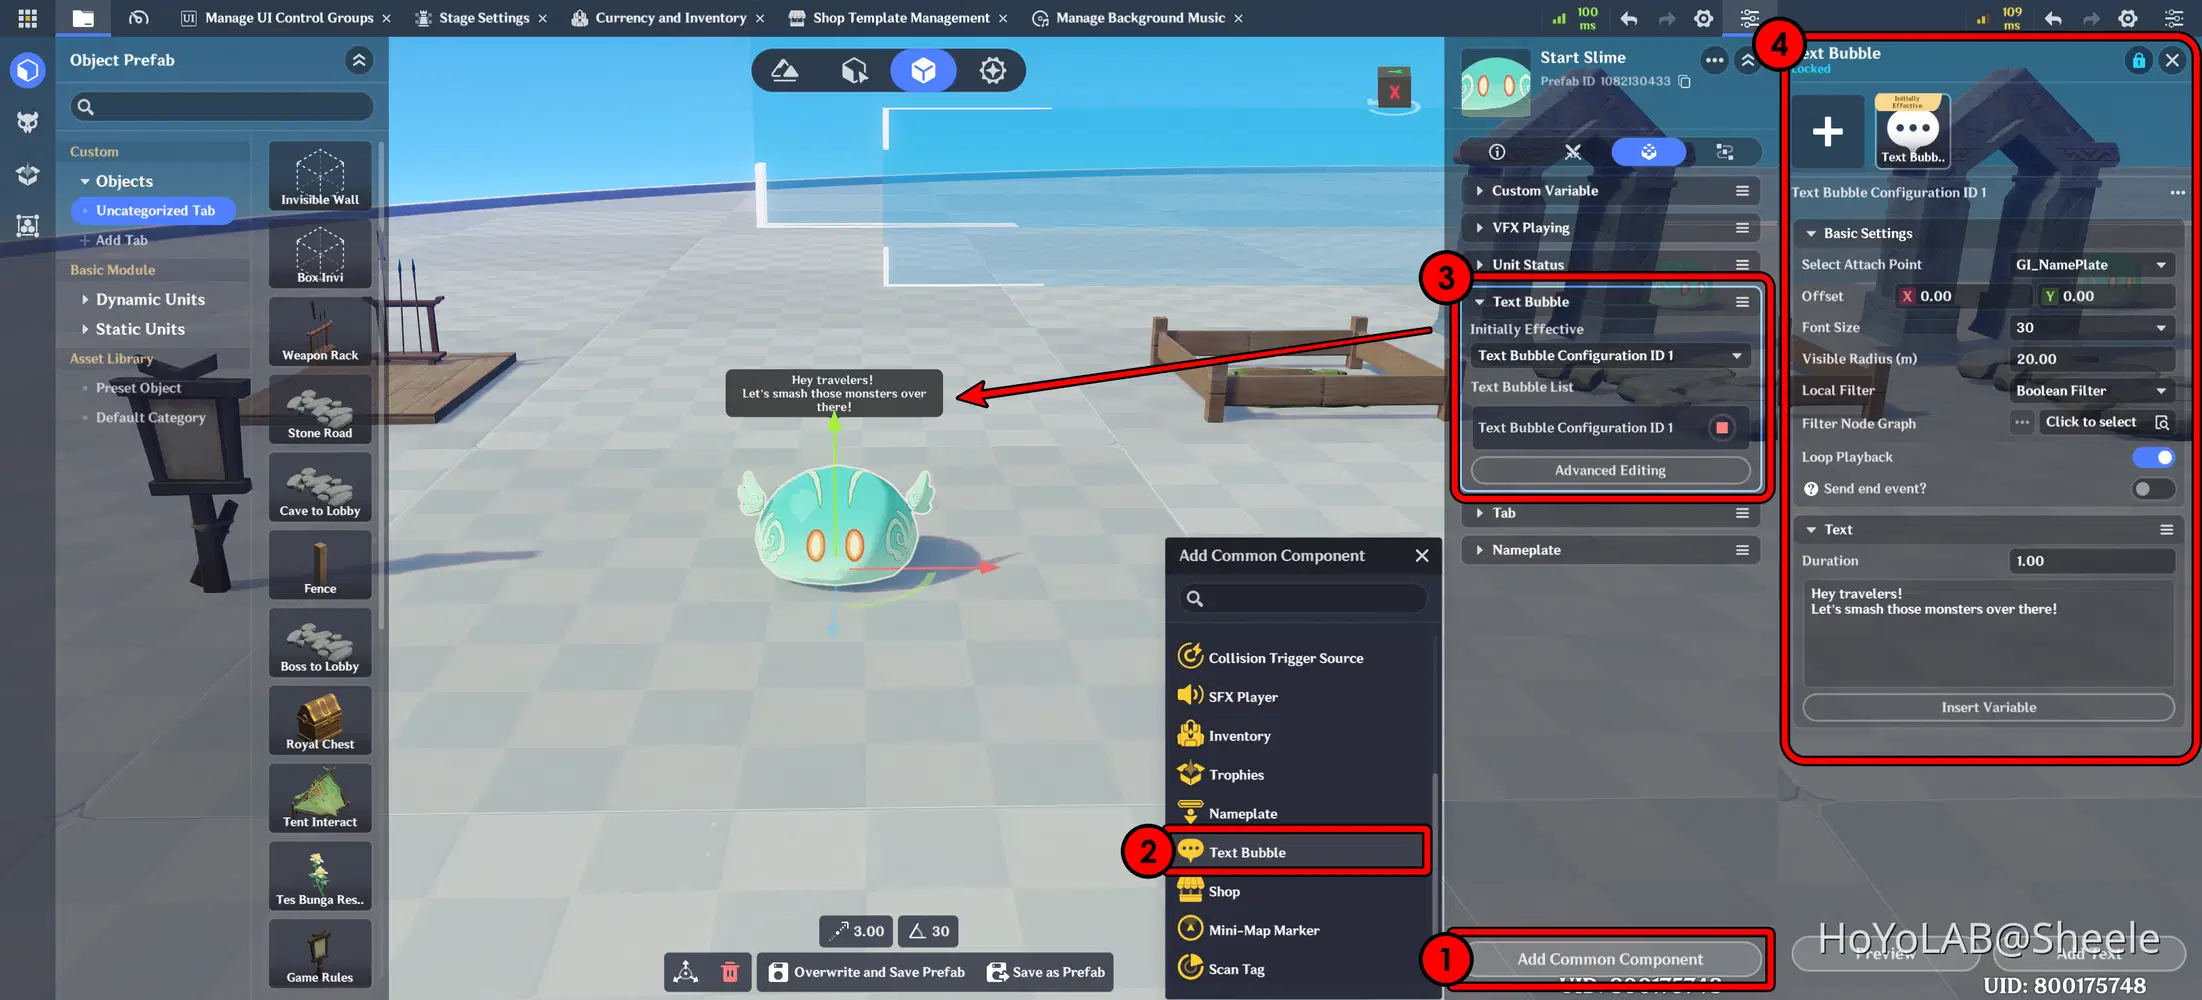
Create attractive and interactive visuals that engage players and respond to their actions. Enhance objects by adding tabs for easy access to information or actions, icons to visually represent their function or status, and text bubble components to display messages or dialogue above characters or objects.
- Add a Tab
- Add a Nameplate
- Add a Text Bubble
Part 3: Player Templete & Class
The next step is to determine how many classes you want to use. A class represents the detailed configuration of a character, including its level, attributes such as HP, ATK, and DEF, as well as the attacks or abilities the character can perform. All of these settings can be defined and customized in this section.
Select the Combat Preset menu from the center of the screen. Then, choose the section you want to configure, either Player Template or Class. The settings can be adjusted from the panel on the right side of the screen. In the Player Template section, you can set the number of Revives available to the player.
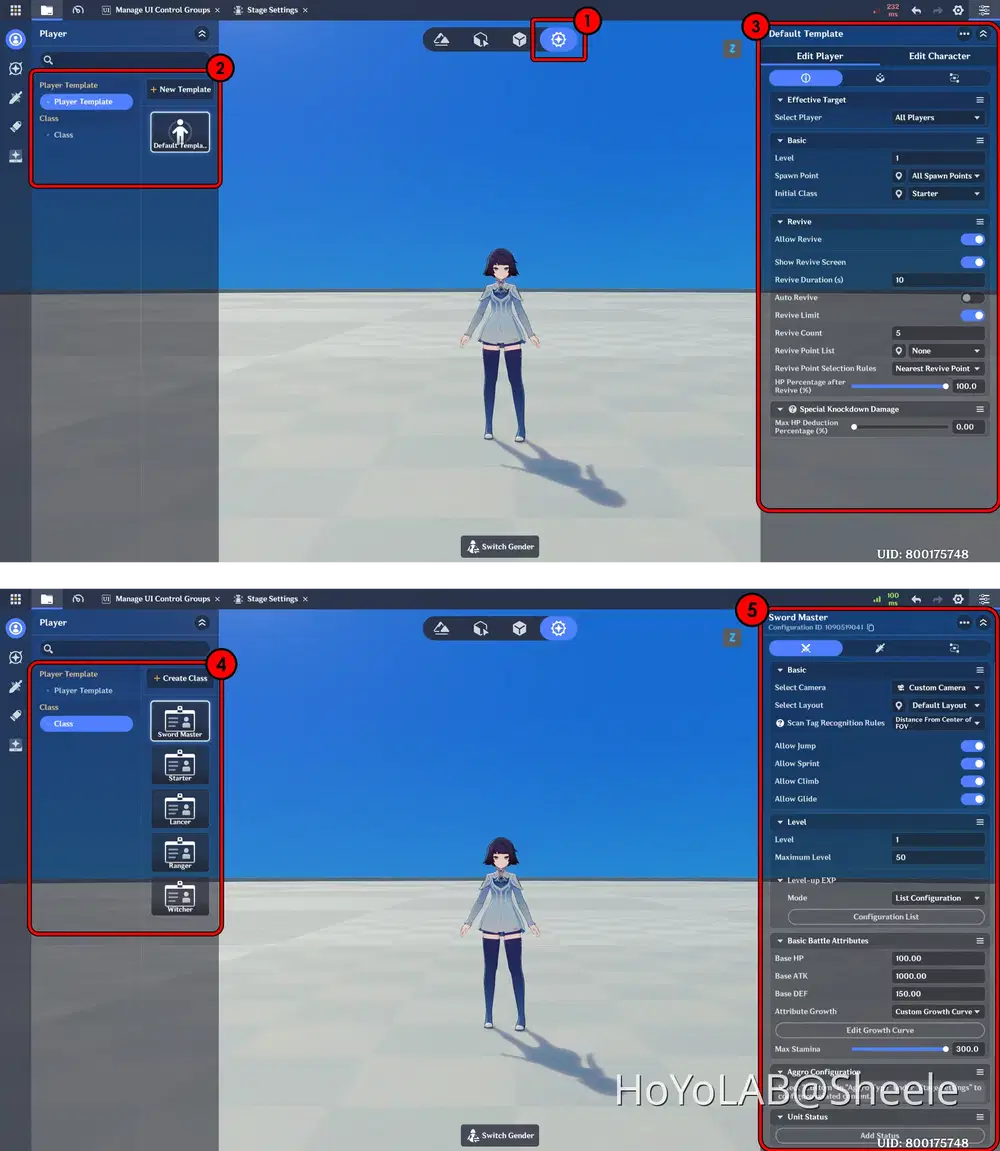
In the Class section, you can also configure the character’s ability limits, such as Jump, Sprint, Climb, and others, according to the gameplay requirements.
📝 Wonderland Guide:
a. Create Class
To create a new Class, select Combat Preset - Class - Create Class, assign names to each class as you wish, then confirm.
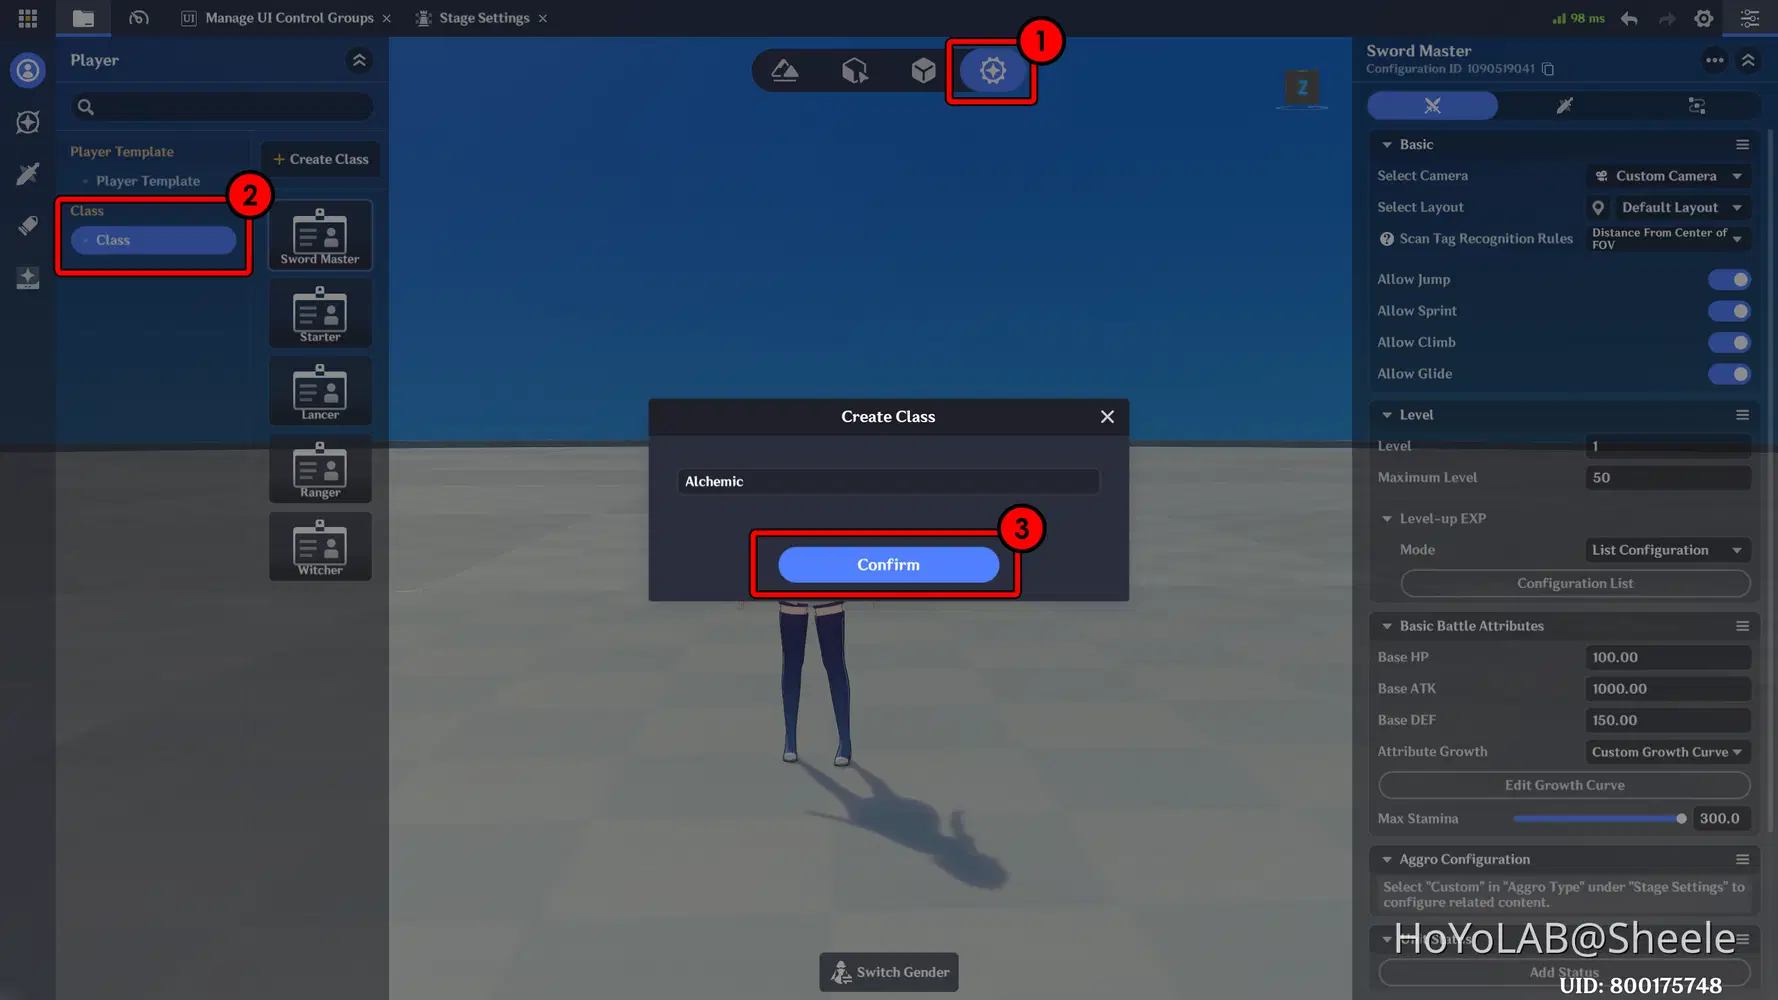
In the game I’m developing, I created 5 Classes:
- Starter Class – This class cannot perform attacks and serves as the default character when the game starts.
- Sword Master – This class attacks with a sword and has higher ATK and DEF attributes compared to other classes.
- Lancer – This class attacks with a polearm and has balanced ATK and DEF attributes.
- Ranger – This class attacks with a bow, has lower DEF than other classes, but excels in long-range attacks.
- Witcher – This class is prepared as an additional class and easter egg that players can unlock.
b. Character Combat Setup
The section where you configure all aspects of a character's combat, attributes, and skills available during battles.
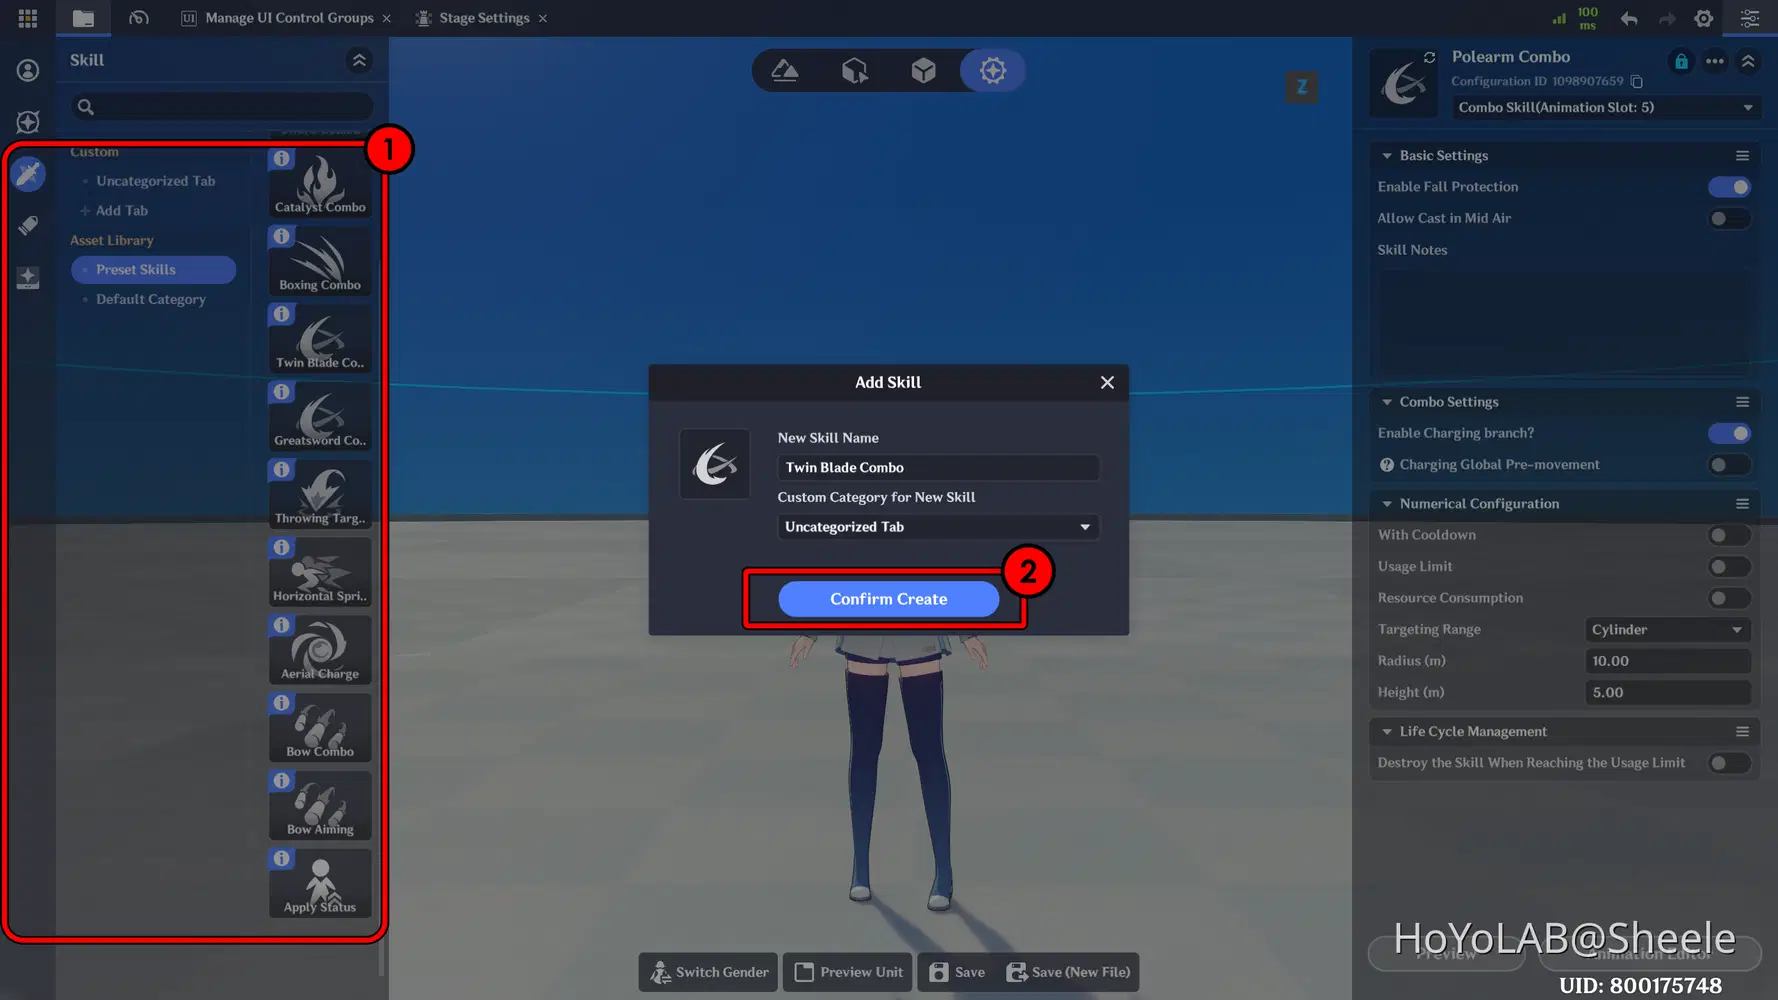
Select the Class you want to add the Combat Setup. In the Details tab on the right, the settings for that class will appear. Next, go to the Skill section in the center menu. Open the Skill Tab to choose from the available skills.
If the skill you want to use is not yet available, you need to create it before assigning it to the character.
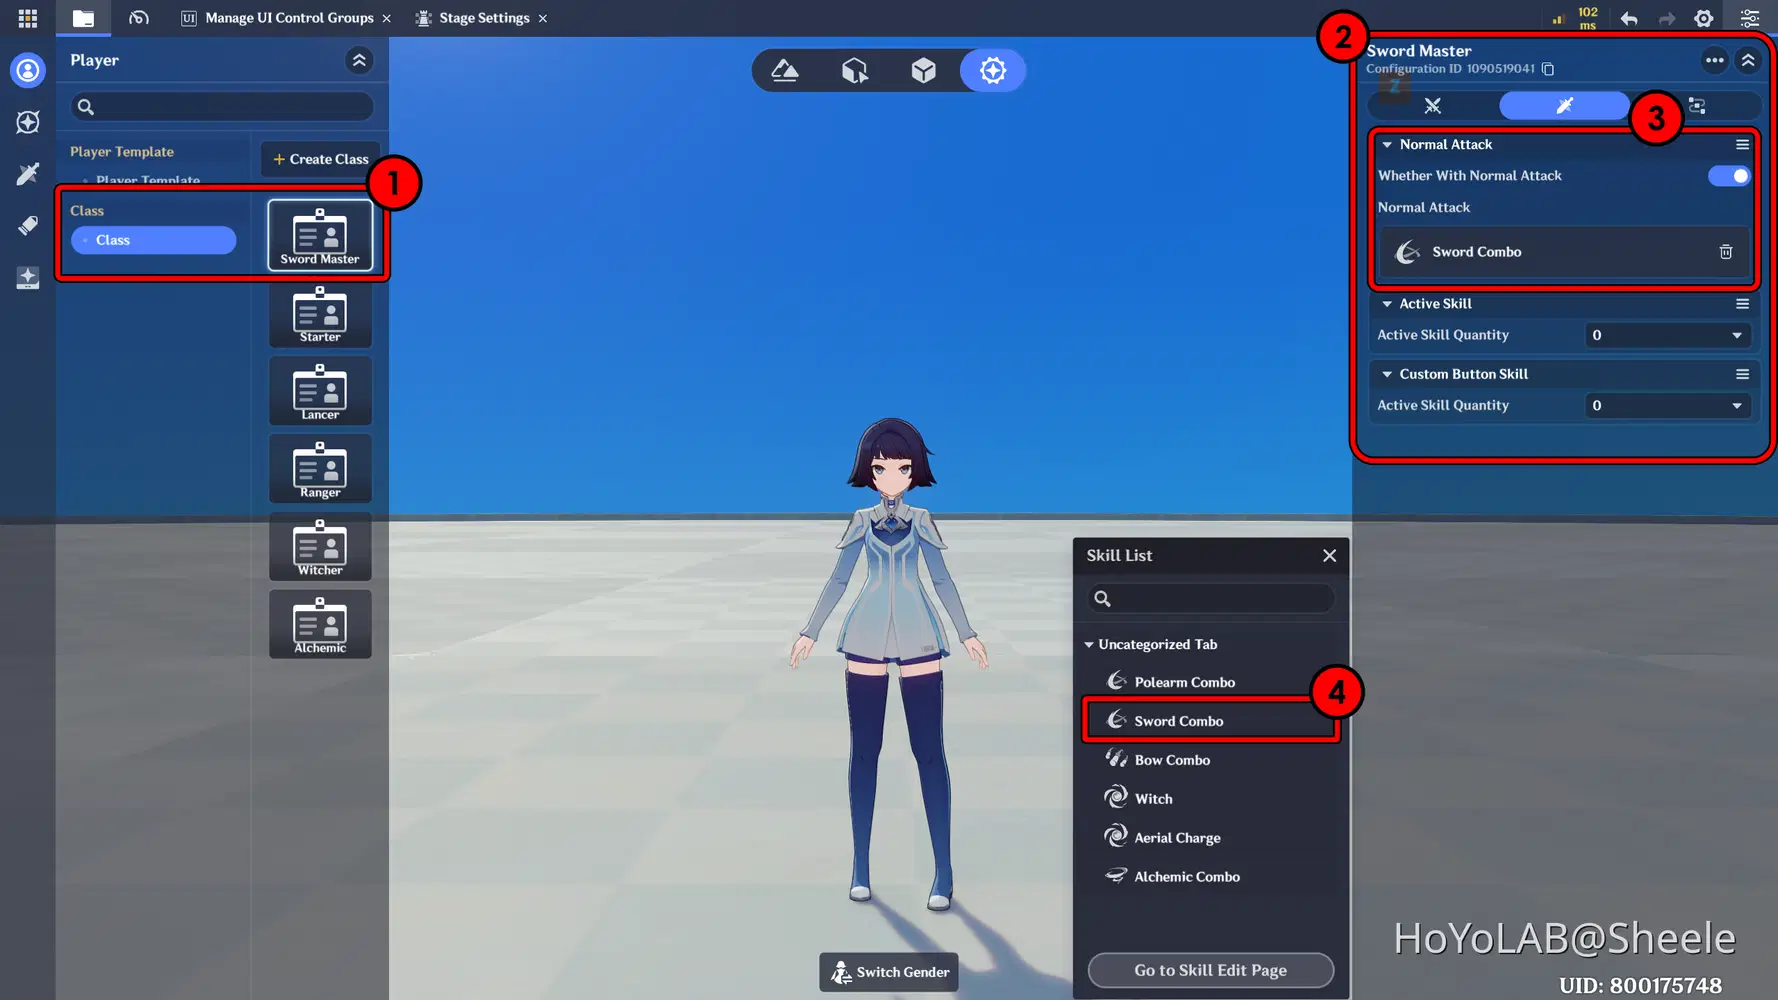
Create a skill by selecting it from the Skill Preset, then choose the skill you want. To preview the skill animation, click the Preview button at the bottom of the Details panel. Afterward, select Confirm Create to save it, then return to the previous step to add this skill to the Class.
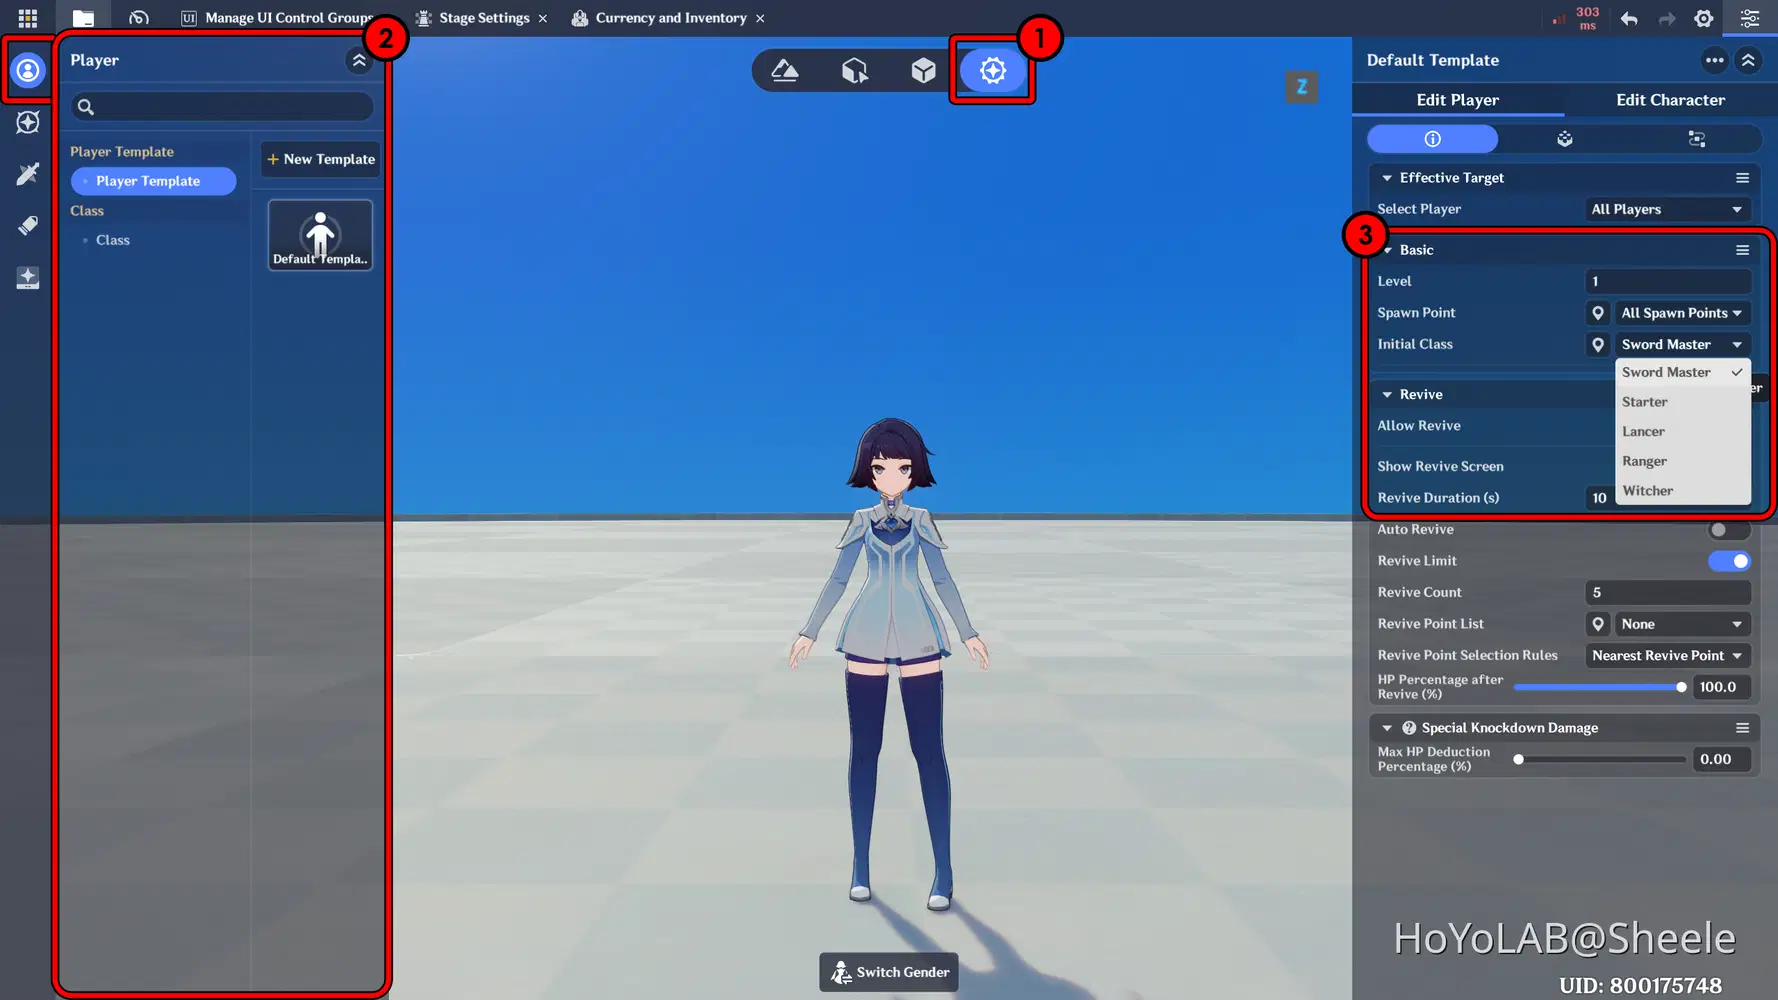
Return to Combat Preset, then select the Player tab and add an Initial Class. This setting determines which Class will be used when the game starts. For example, I choose the Sword Master Class, so when the game begins, my character can already perform sword combo attacks.
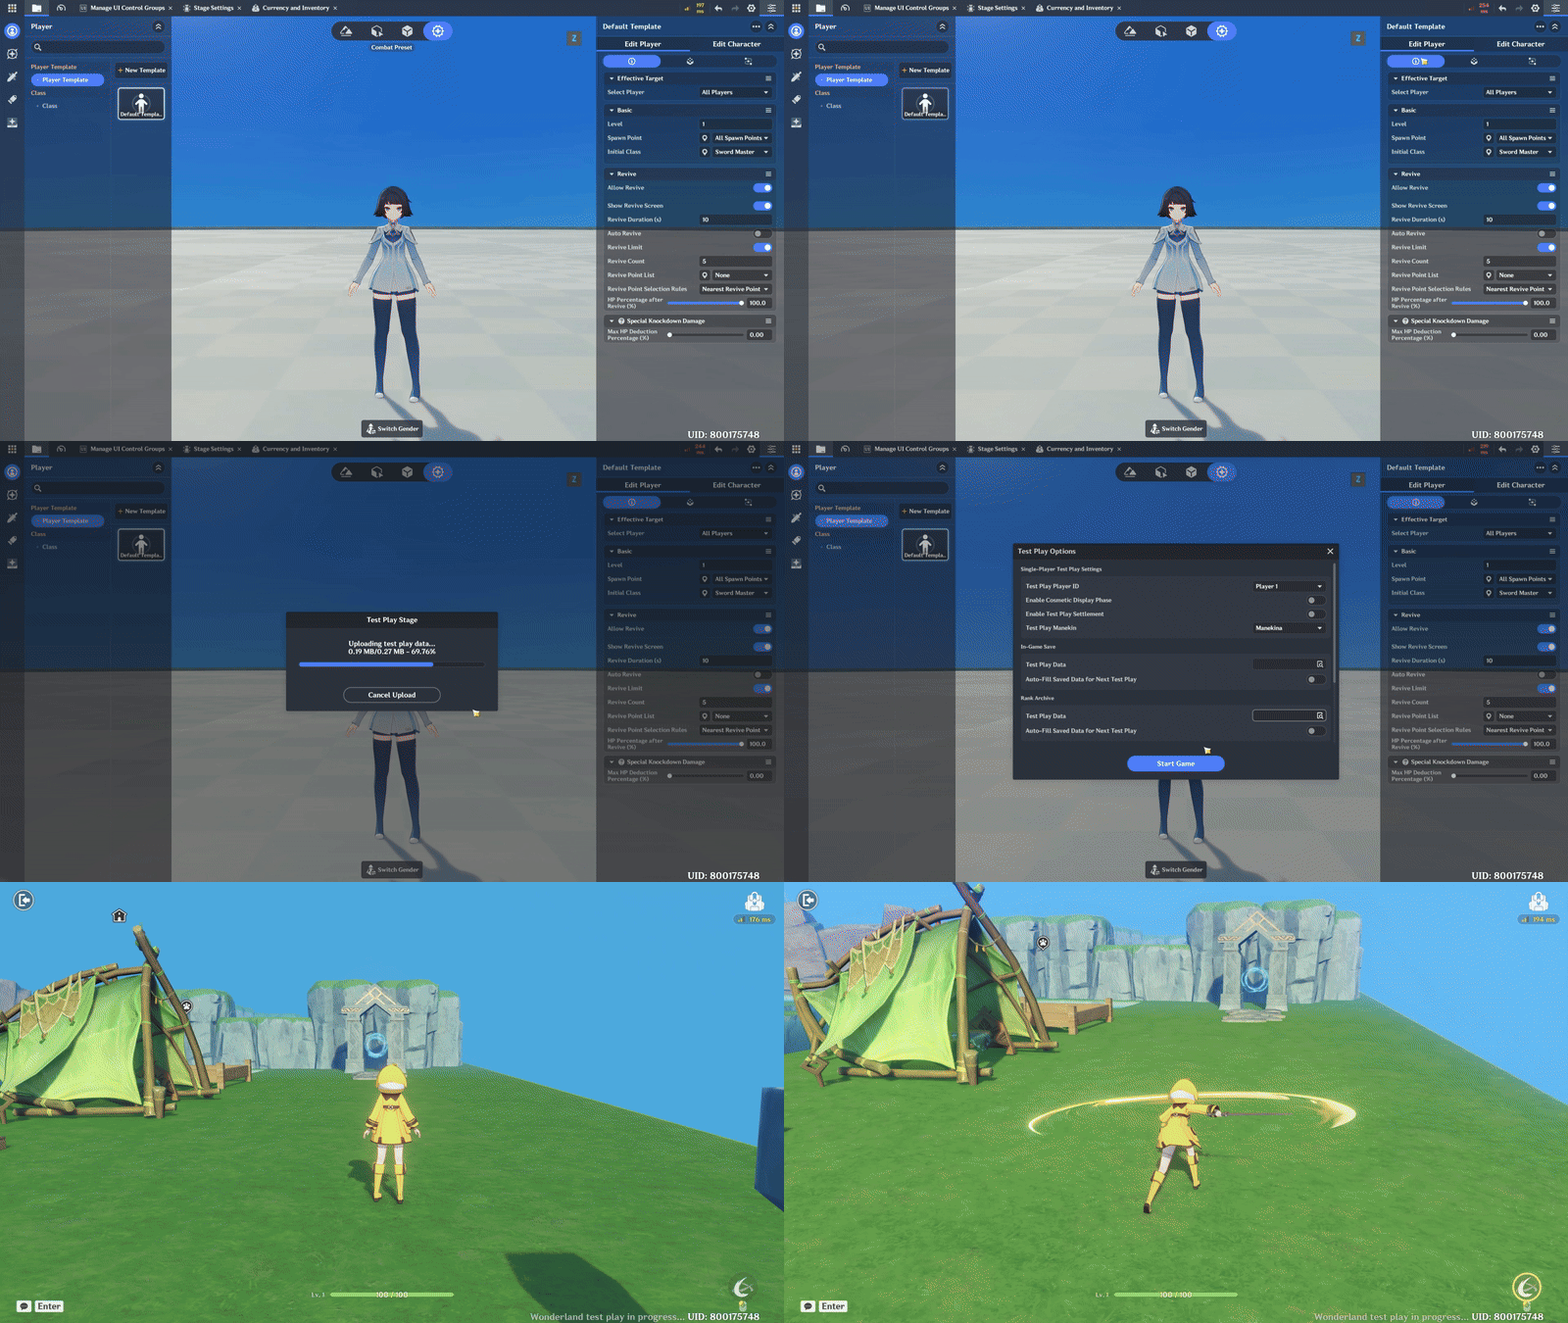
This is an example of when the player can immediately use normal attacks with the sword.
Part 4: Item & Loot Settings
The next section is about creating items and the loot system. Here, you will define the types of items players can find, such as flowers, apples, ores, and more. You can also set their rarity, configure interactions with the player, and other properties. This system helps create a more dynamic gameplay experience, keeping players curious and motivated to explore and discover new items in each area.
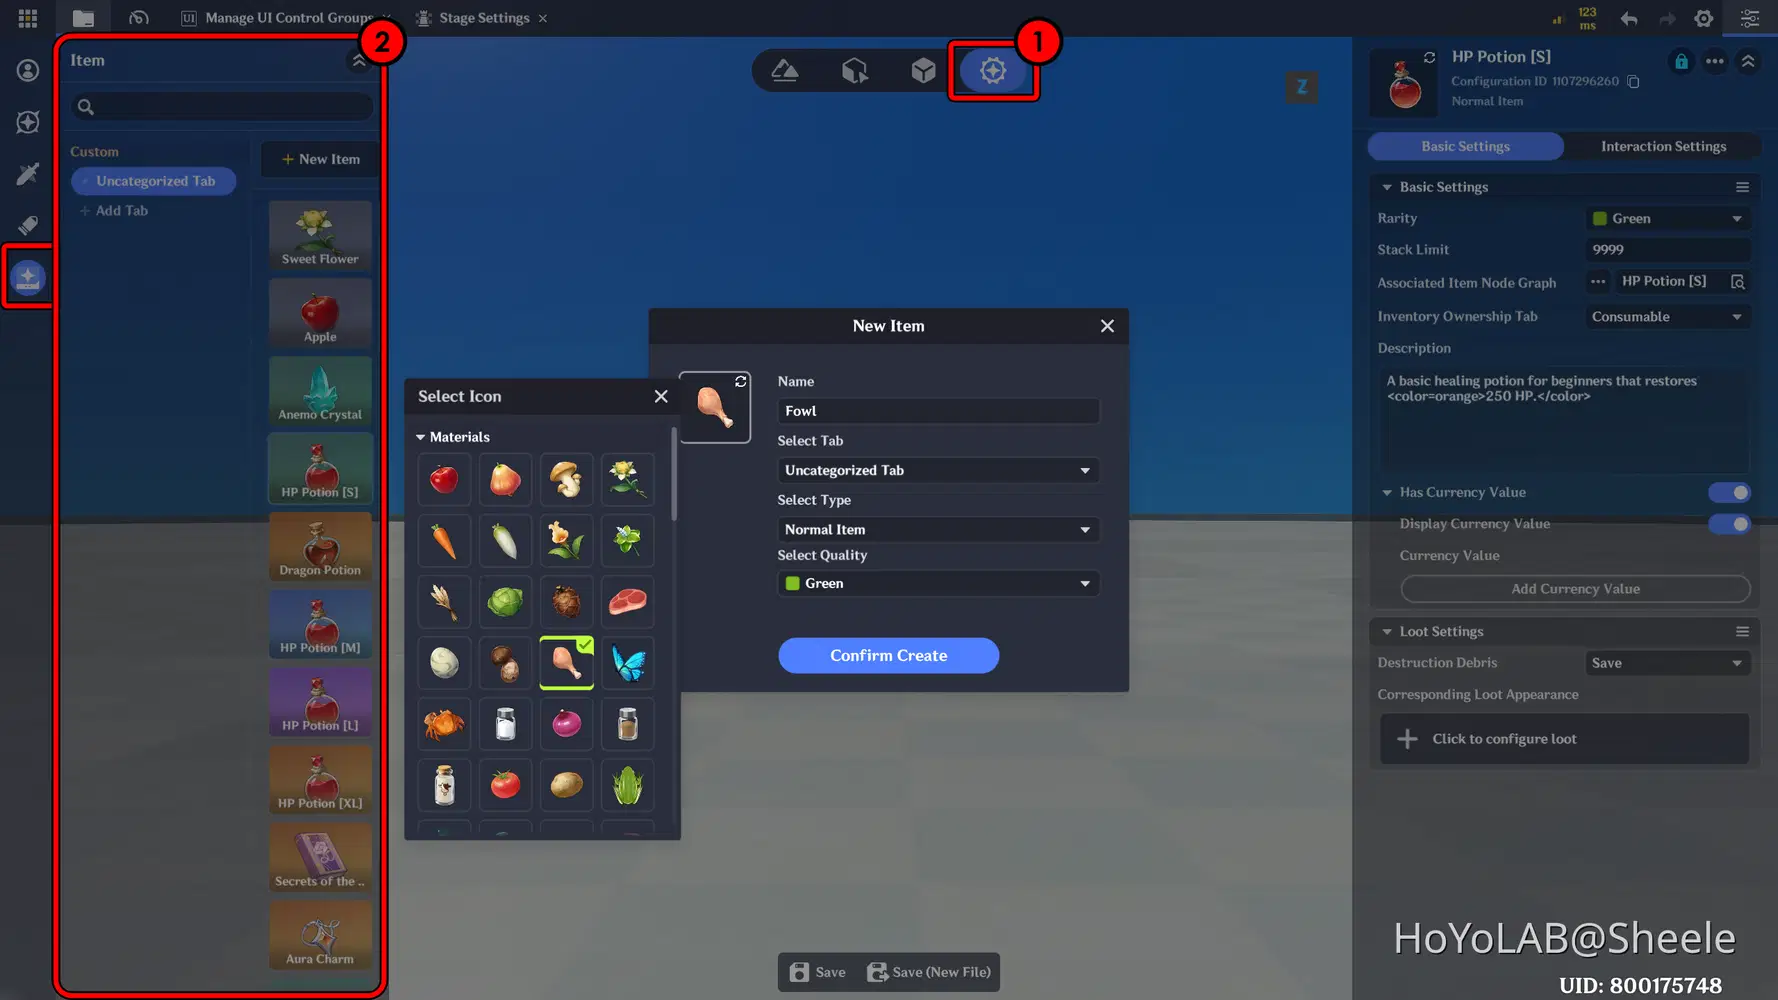
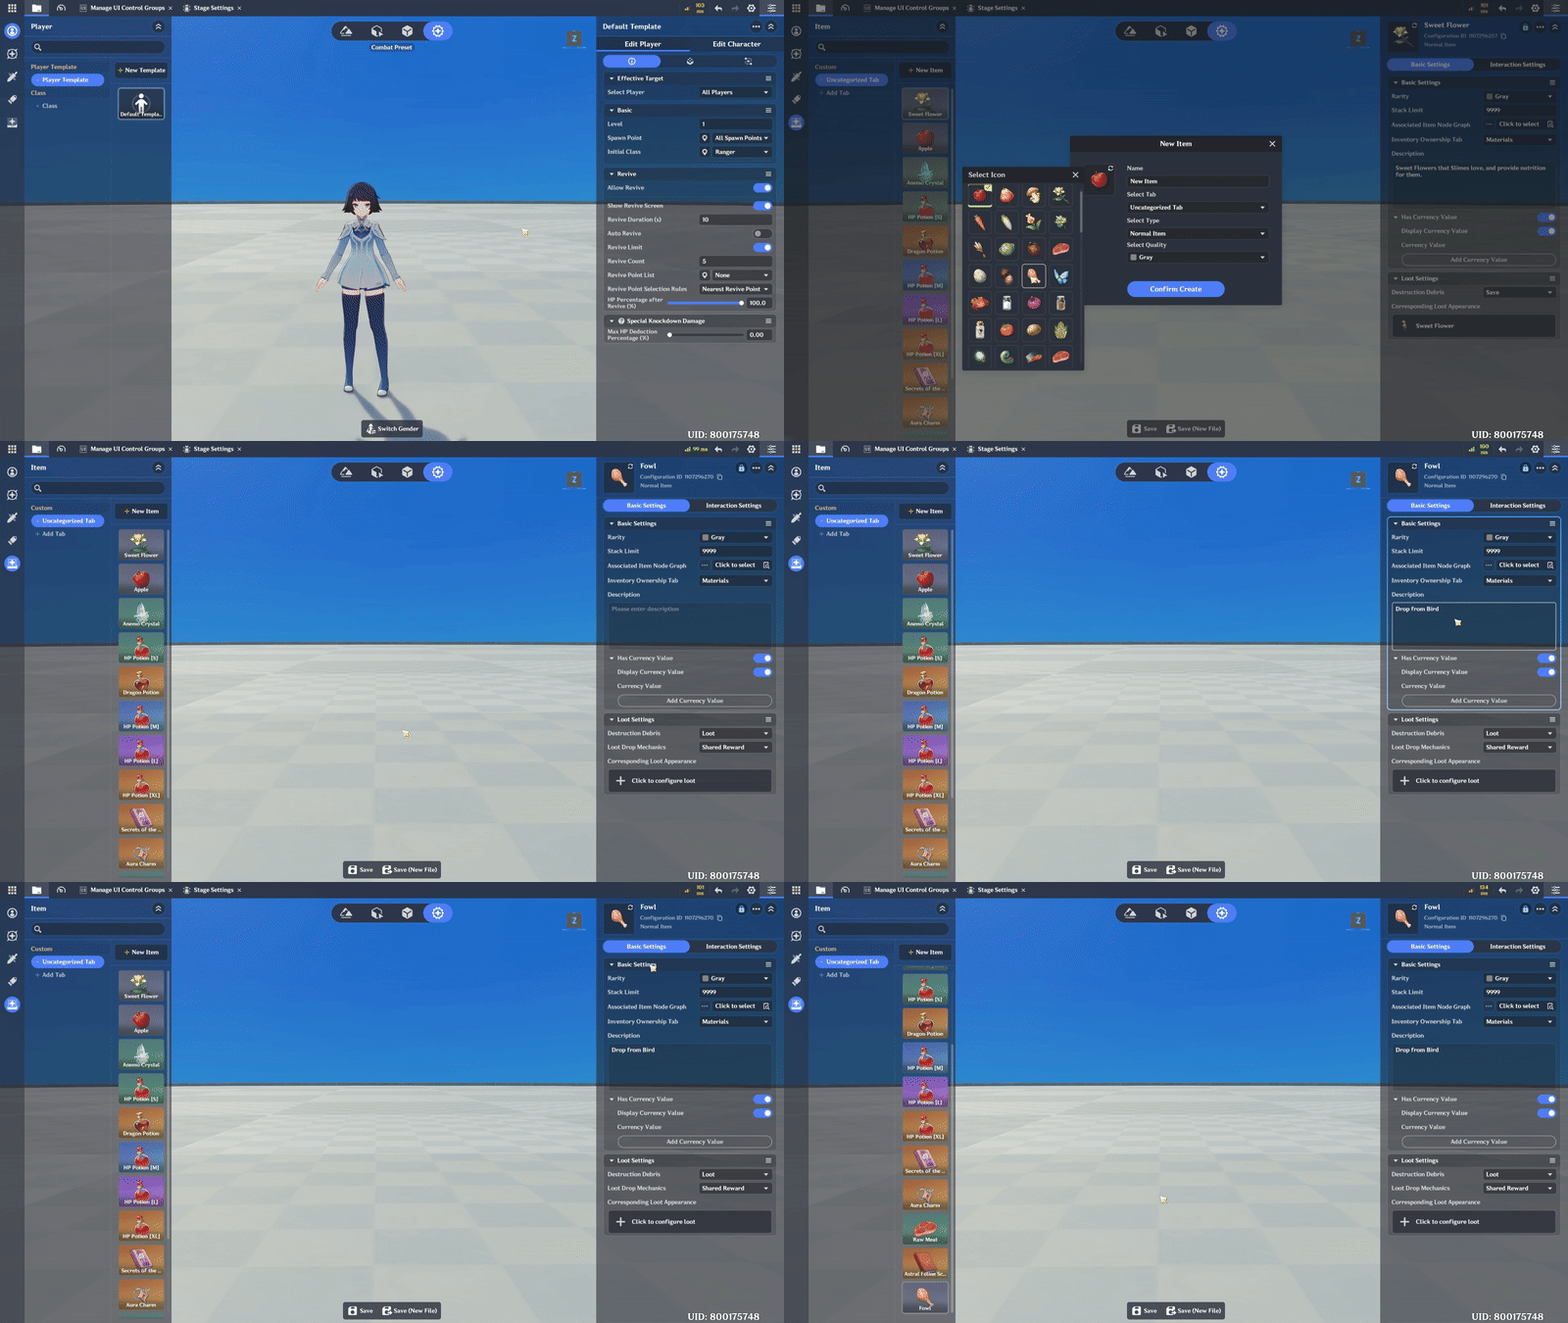
To create an item, go to Combat Preset and select the Item menu on the left side of the screen. Click +New Item to add a new item. You can choose the item’s image from the available options and set its rarity as desired.
📝 Wonderland Guide:
a. Regular Item
A common item that can be easily found during gameplay. These items are usually scattered across multiple areas of the game world. In the game I’m developing, I created 3 Regular Item:
- Sweet Flowers – This item can be found in Dungeon level 1, this item is useful for evolving Slime
- Apple – This item can be found in Dungeon level 2, this item is useful for evolving Slime
- Anemo Crystal – This item can be found in Dungeon level 3, this item is useful for evolving Slime
Below is an example of me making a new item: Fowl.
b. Potions
Next are potion items. These items are used to restore a character’s HP. In the game I am developing, I created four types of potions, each with different rarities, based on the amount of HP they restore.
- HP Potion [S] – Recovers 250 HP when used.
- HP Potion [M] – Recovers 500 HP when used.
- HP Potion [L] – Recovers 1000 HP when used.
- HP Potion [XL] – Recovers 2000 HP when used.
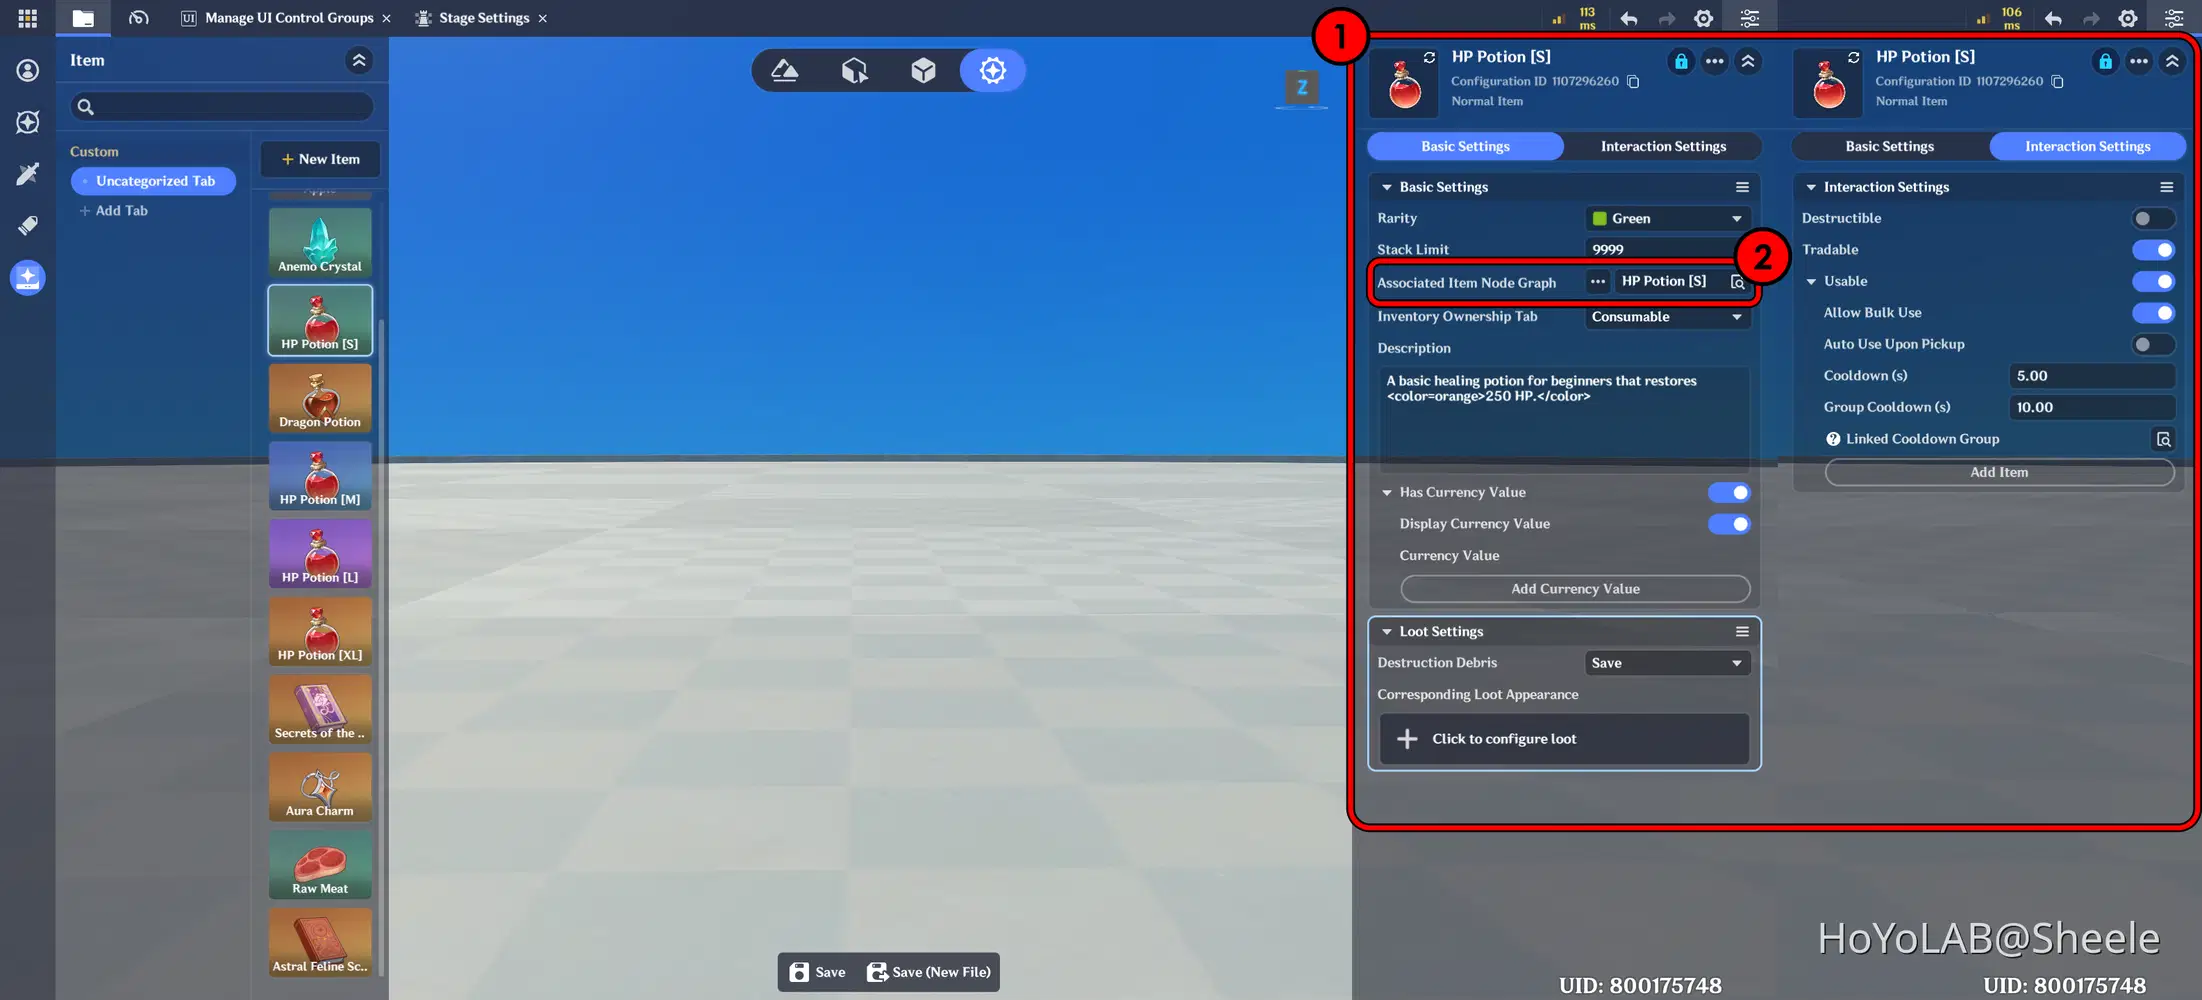
After creating the item as described in the previous step, the next step is to configure the potion so it can be used and restore the character’s HP. In the Details tab, you can follow the settings I use. Then, add a Node Graph in the Associated Item Node Graph section.
The next step is to create a Node Graph. Open the Miliastra Sandbox window, then select the “Server Node Graph Resource Explorer” tab. Next, choose the “Item Node Graph” folder under Uncategorized. In this tab, right-click to create a new Node Graph.
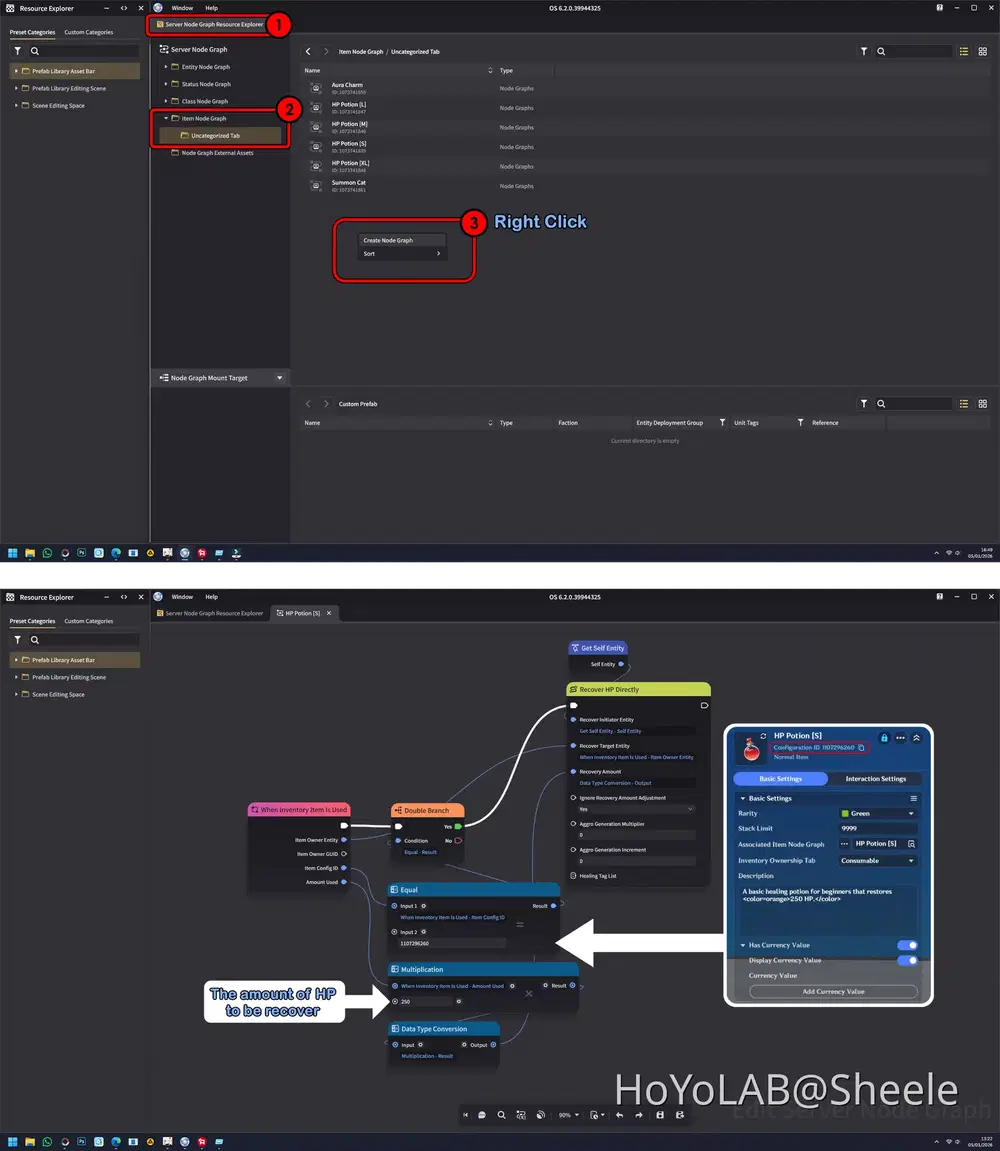
Next, you can create a Node function as shown above. When a potion item in the inventory is used, the target it is used on will recover 250 HP.
⚠️ Create a separate Node function for each Potion. If you have four potion items with different effects, make sure to create four different Node functions as well.
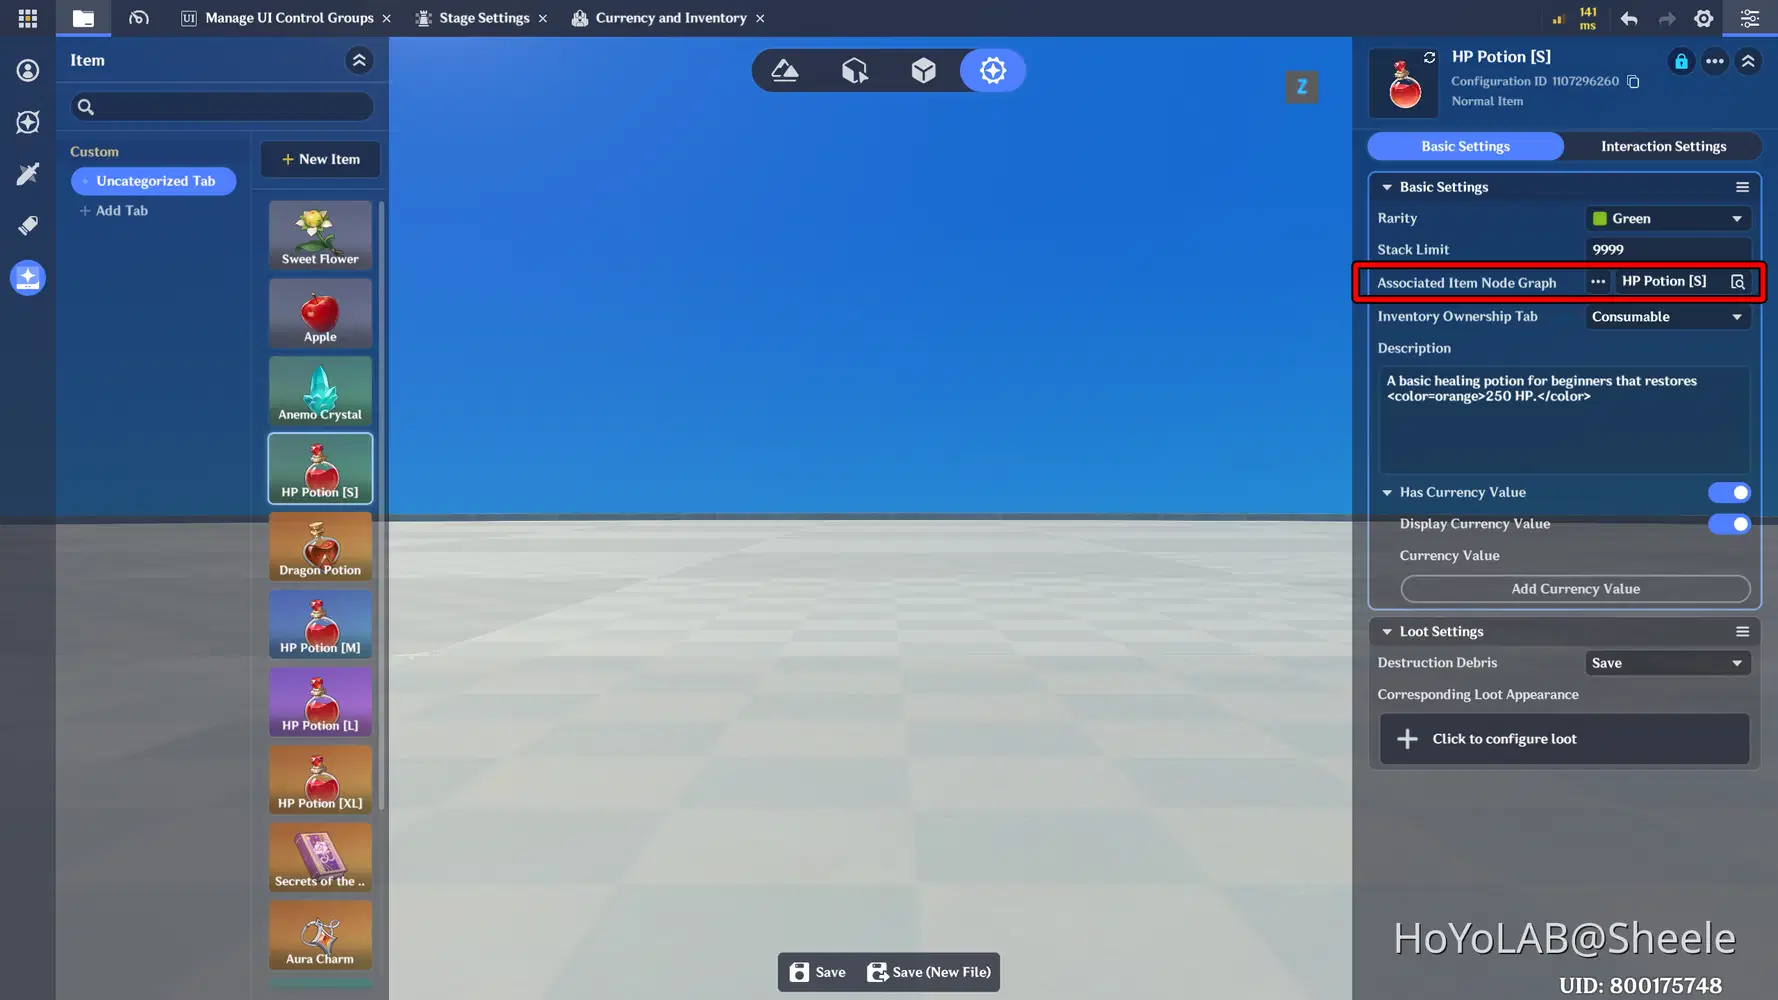
⚠️ Don't forget to go back to the item section and add the Node you created to the Associated Item Node Graph.
c. Loot Settings
Loot refers to items that you can obtain by defeating enemies, discovering items in the open world, or collecting items that you intentionally drop.
The first step is to create an item container (loot content/ loot prefab). Go to the Prefab Library, then select the Loot tab on the left side of the screen and choose Challenge Coin (this is the default prefab provided). In the Details section, you can change the visual model to match the desired item. As the final step, make sure to save it.
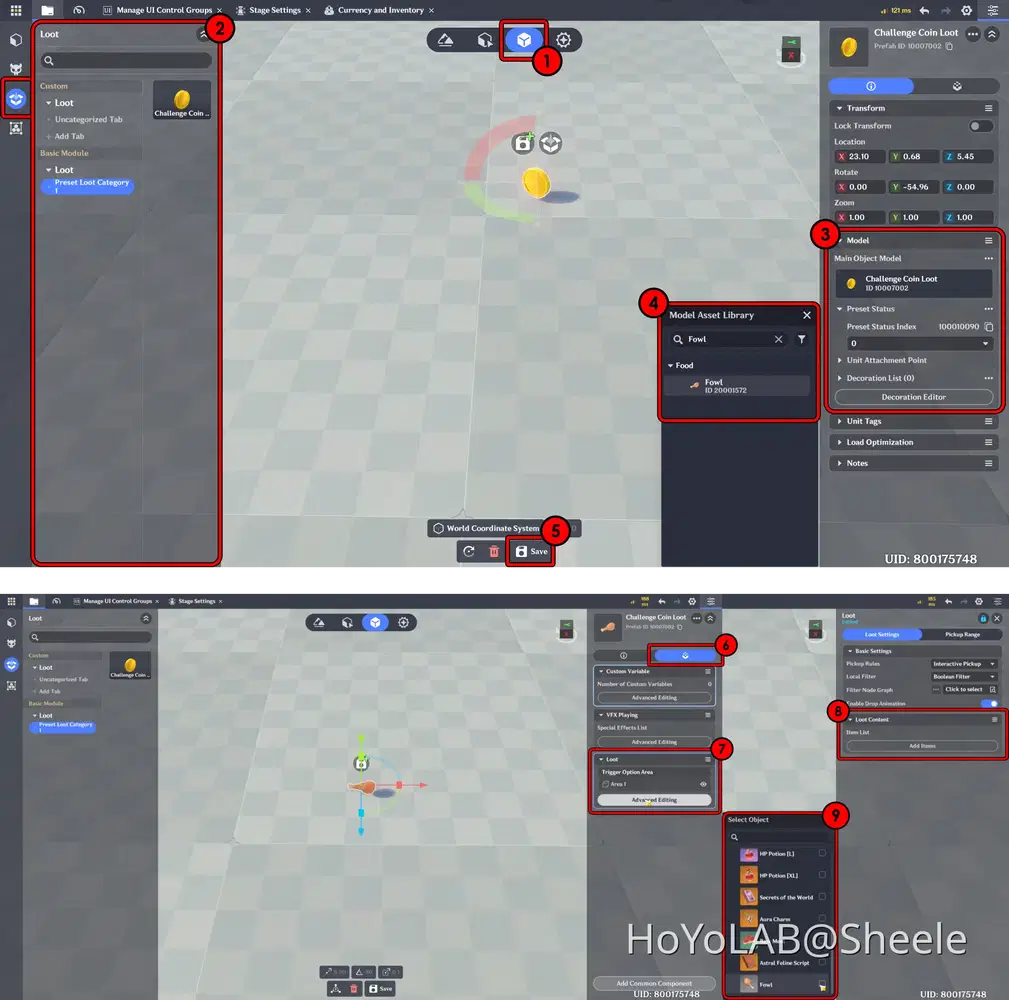
Click the second tab in the Details section, then select Loot - Advanced Editing. A new tab will appear; choose Loot Settings. In the Loot Content section, add an Item, then select the Object and match it with your item.
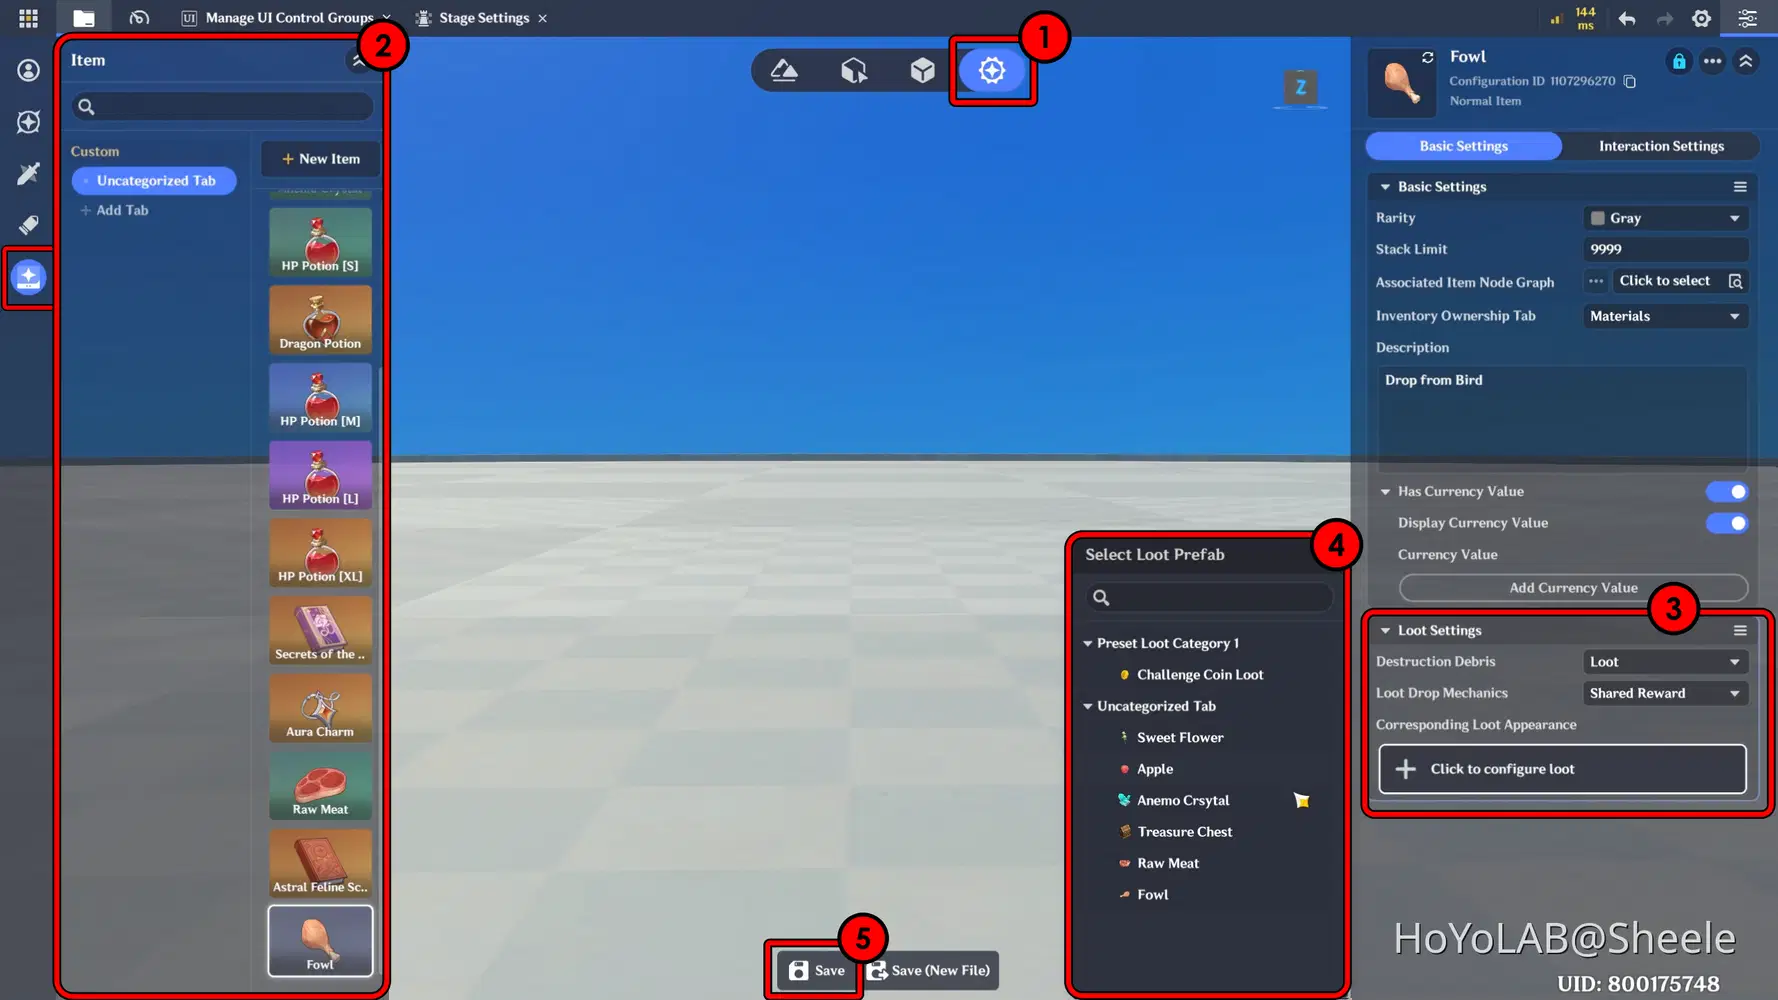
Now go to Combat Preset, choose Item section. Select the Loot you want to configure, then in the Details panel choose Loot Settings. Next, select the Loot Prefab you created earlier, and don’t forget to save it.
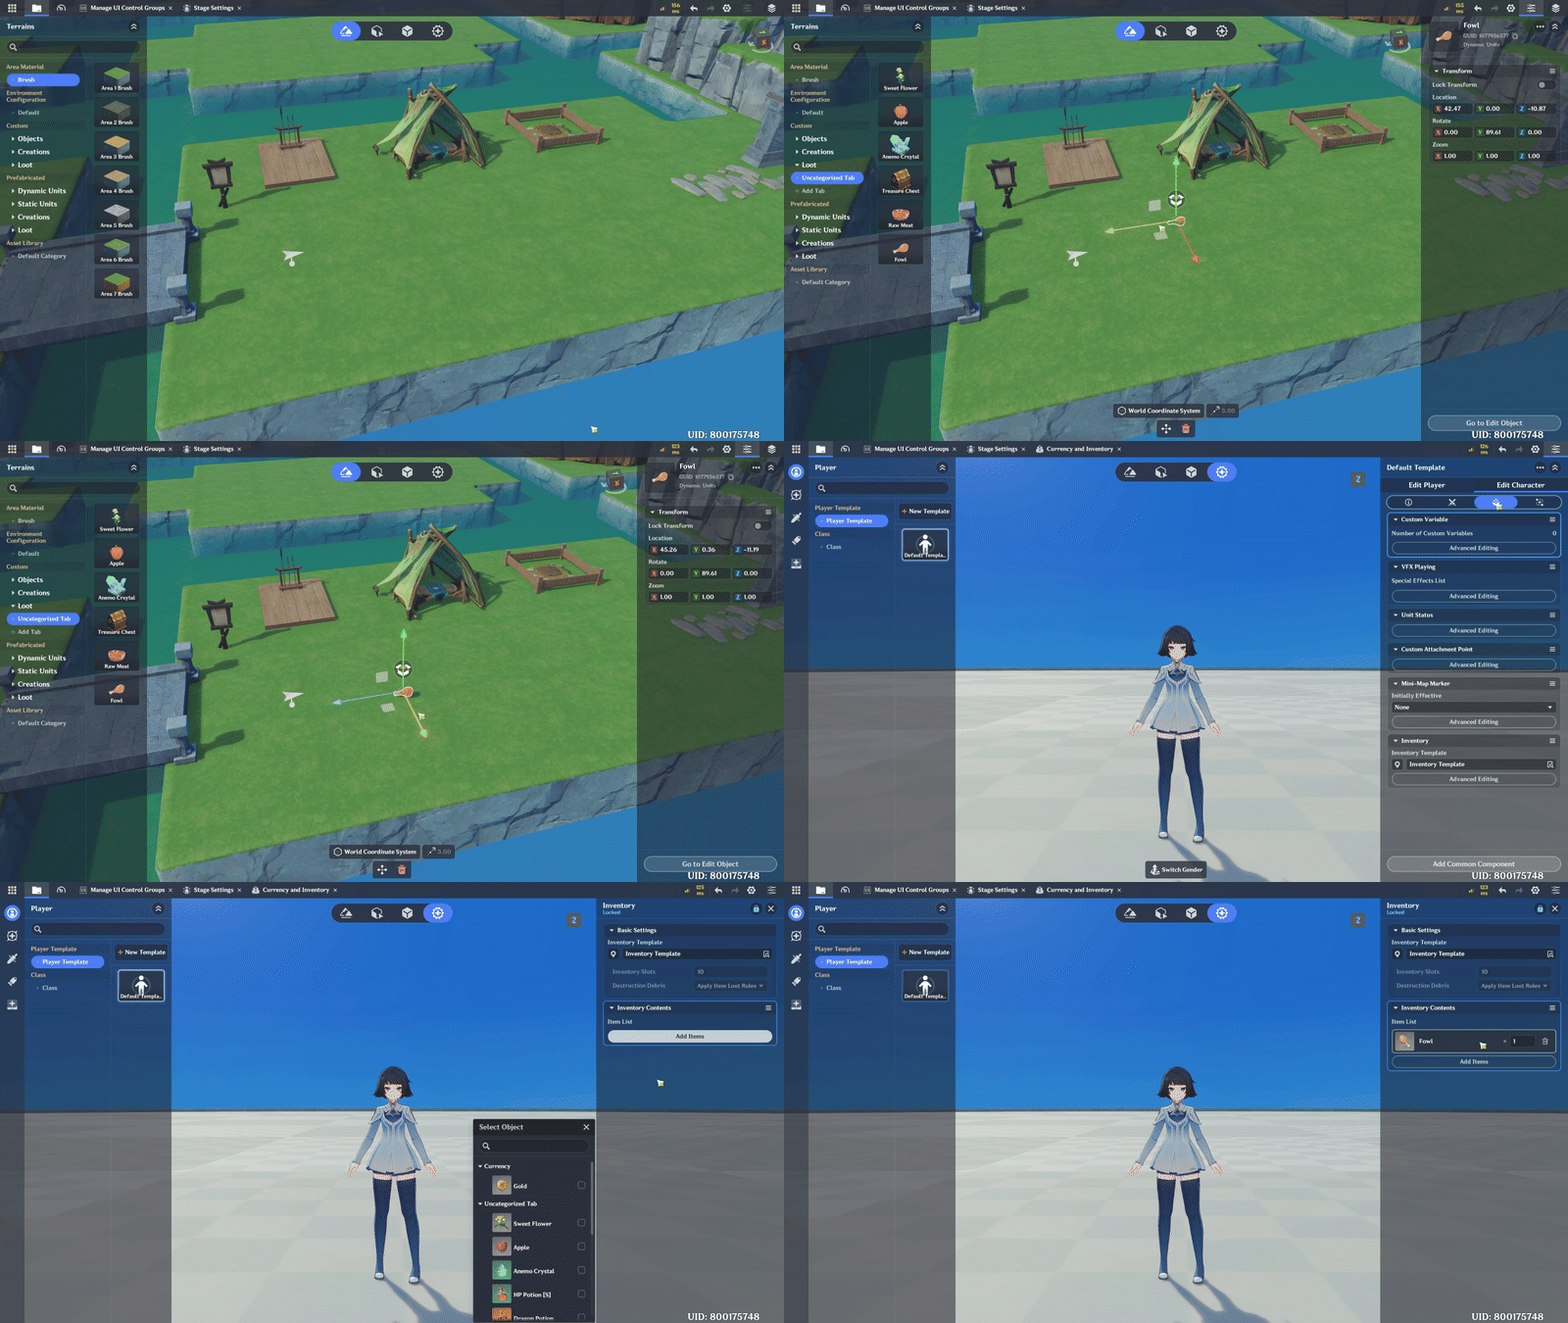
Go to the Terrain Editing section and add the Loot Object you created earlier, then place it at any location you want within the arena.
Alternatively, you can add it directly as an inventory item by configuring it in Player - Edit Character. However, this will be explained in more detail in Part 7: Item Inventory System.
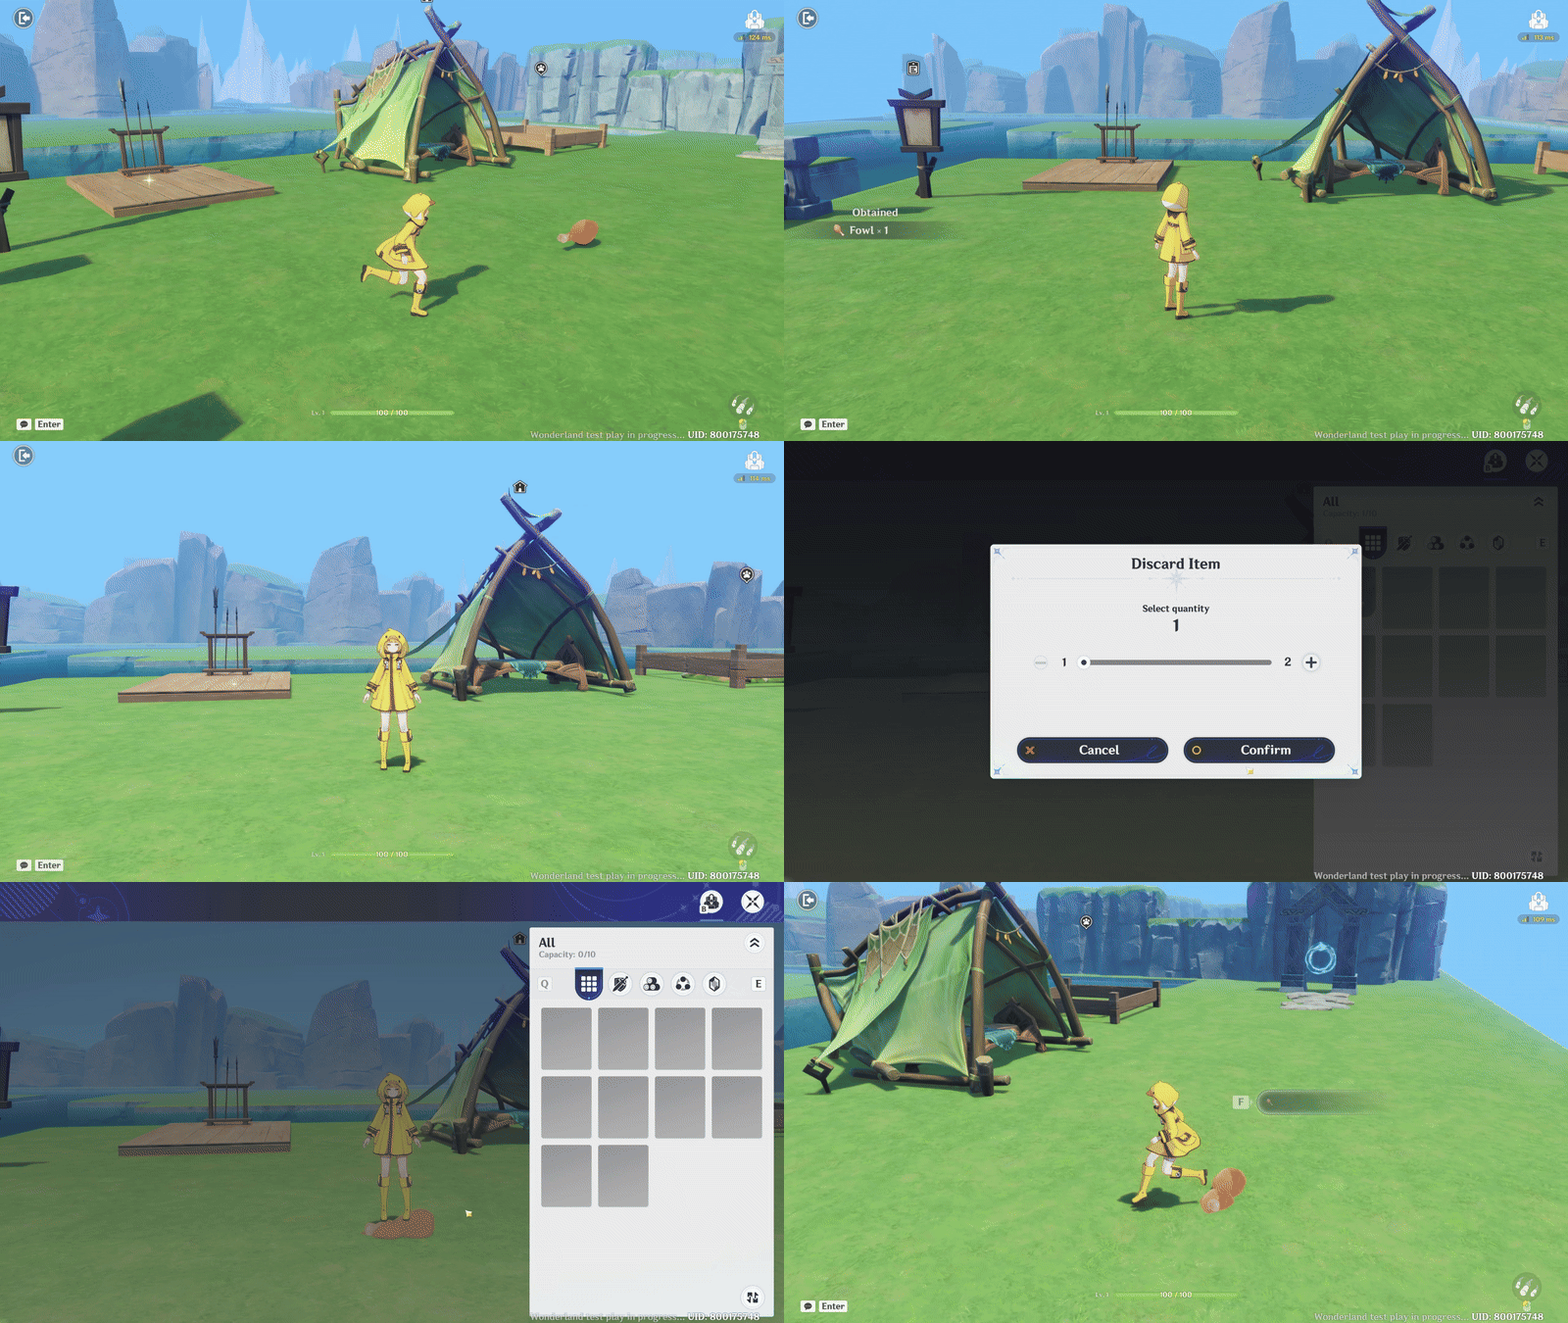
When you interact with a loot object, you will obtain an item, and it will be added to your inventory. If you choose to discard the item, it will be dropped and can be picked up again.
Video Guide
Part 5: Currency & Shop System
Currency & Shop System is a system that manages in-game currency and shop mechanics available to the player. It covers how players earn currency through various activities such as defeating enemies, completing quests, or selling items. The shop system allows players to buy, sell, and exchange items based on gameplay needs.
This system helps guide player progression and provides additional motivation for exploration and resource management.
📝 Wonderland Guide:
a. Add Currency
First, click the menu in the top-left corner to open the main menu Miliastra Editor, then select Currency and Inventory.
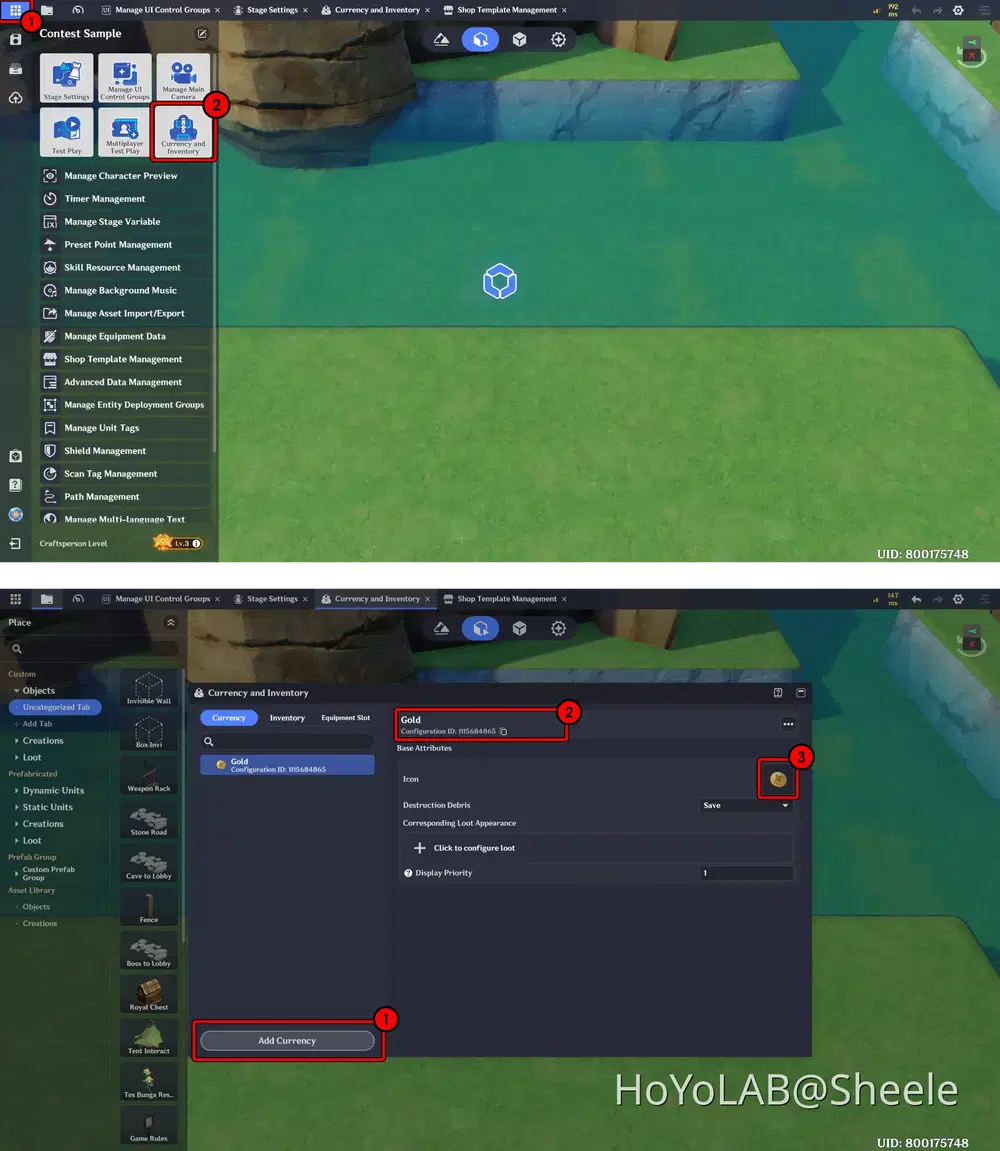
Select Add Currency to create a new currency, then assign a name to be used, such as Gold, Mora, or others. You can also change the currency icon to match your needs.
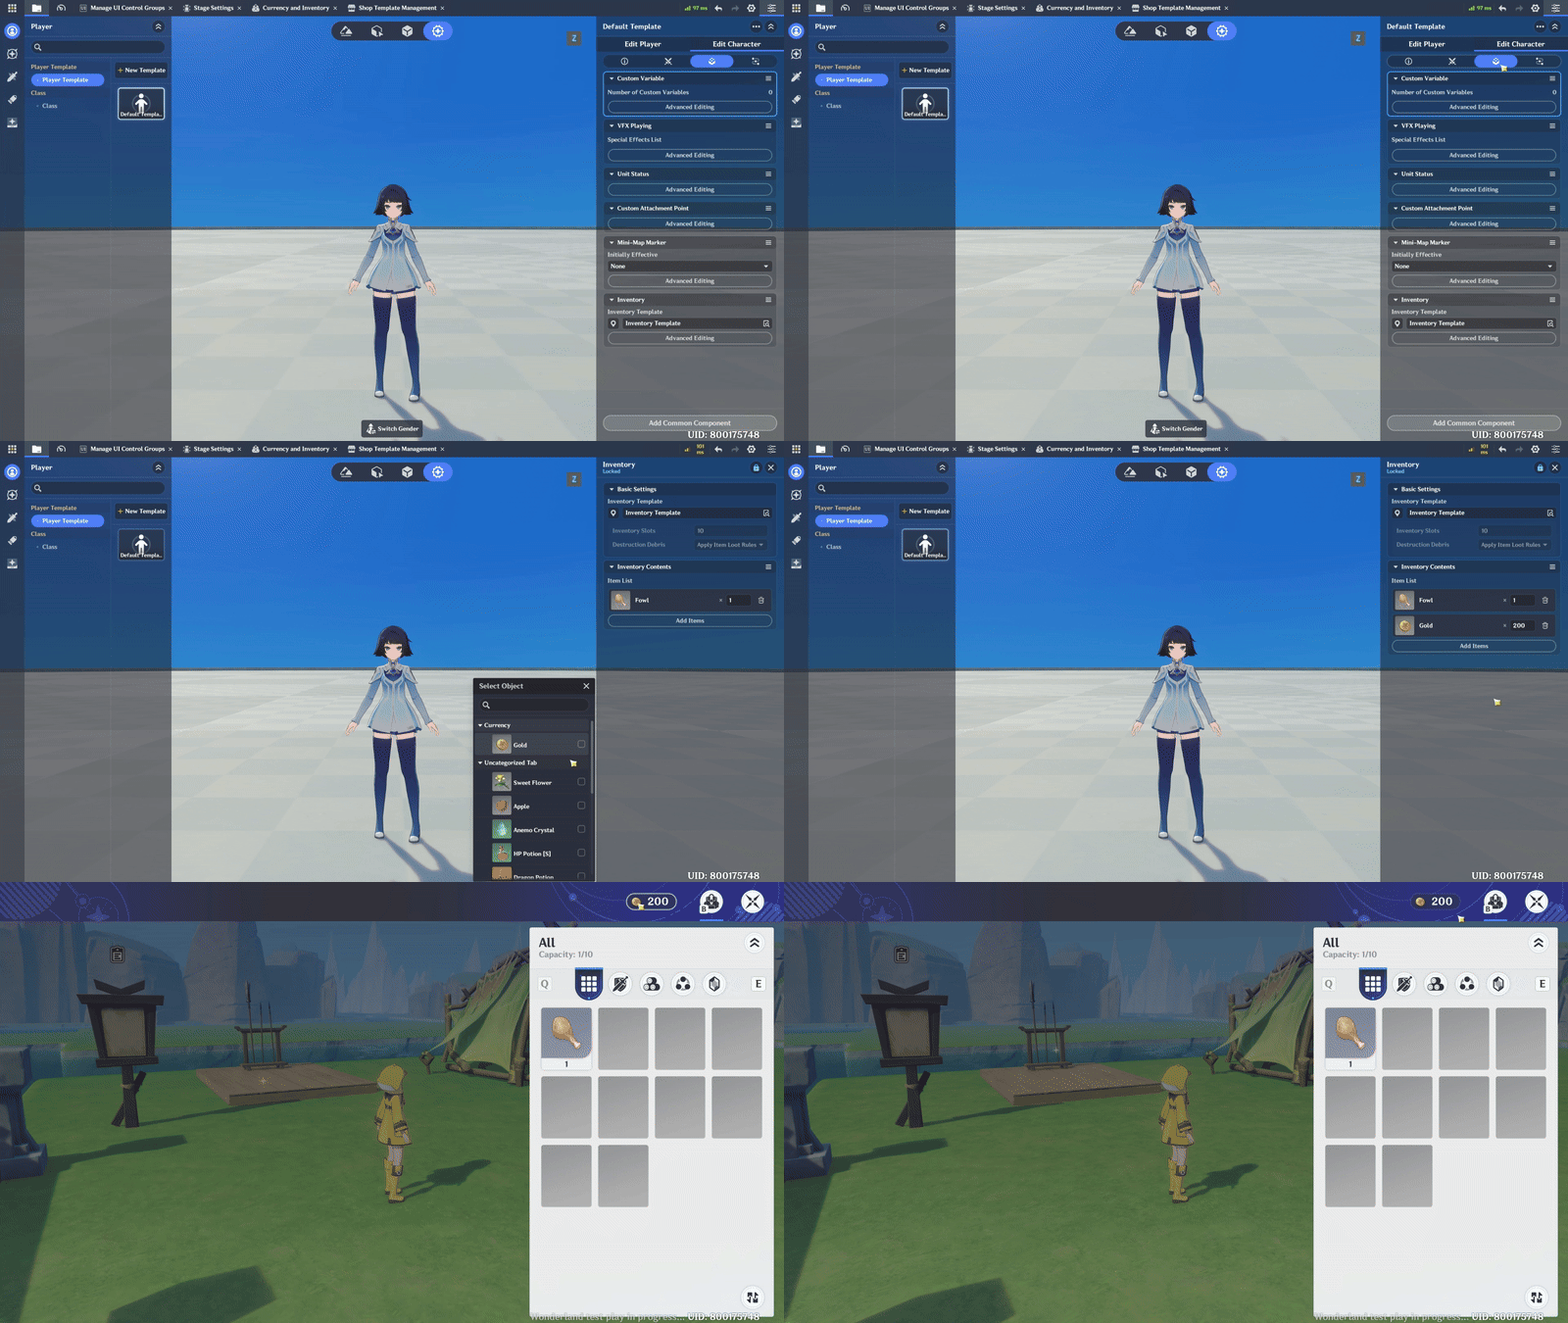
You can also set the currency as a starter item when the game begins. This allows the currency to be automatically available in the player’s inventory from the start.
b. Creating a Shop
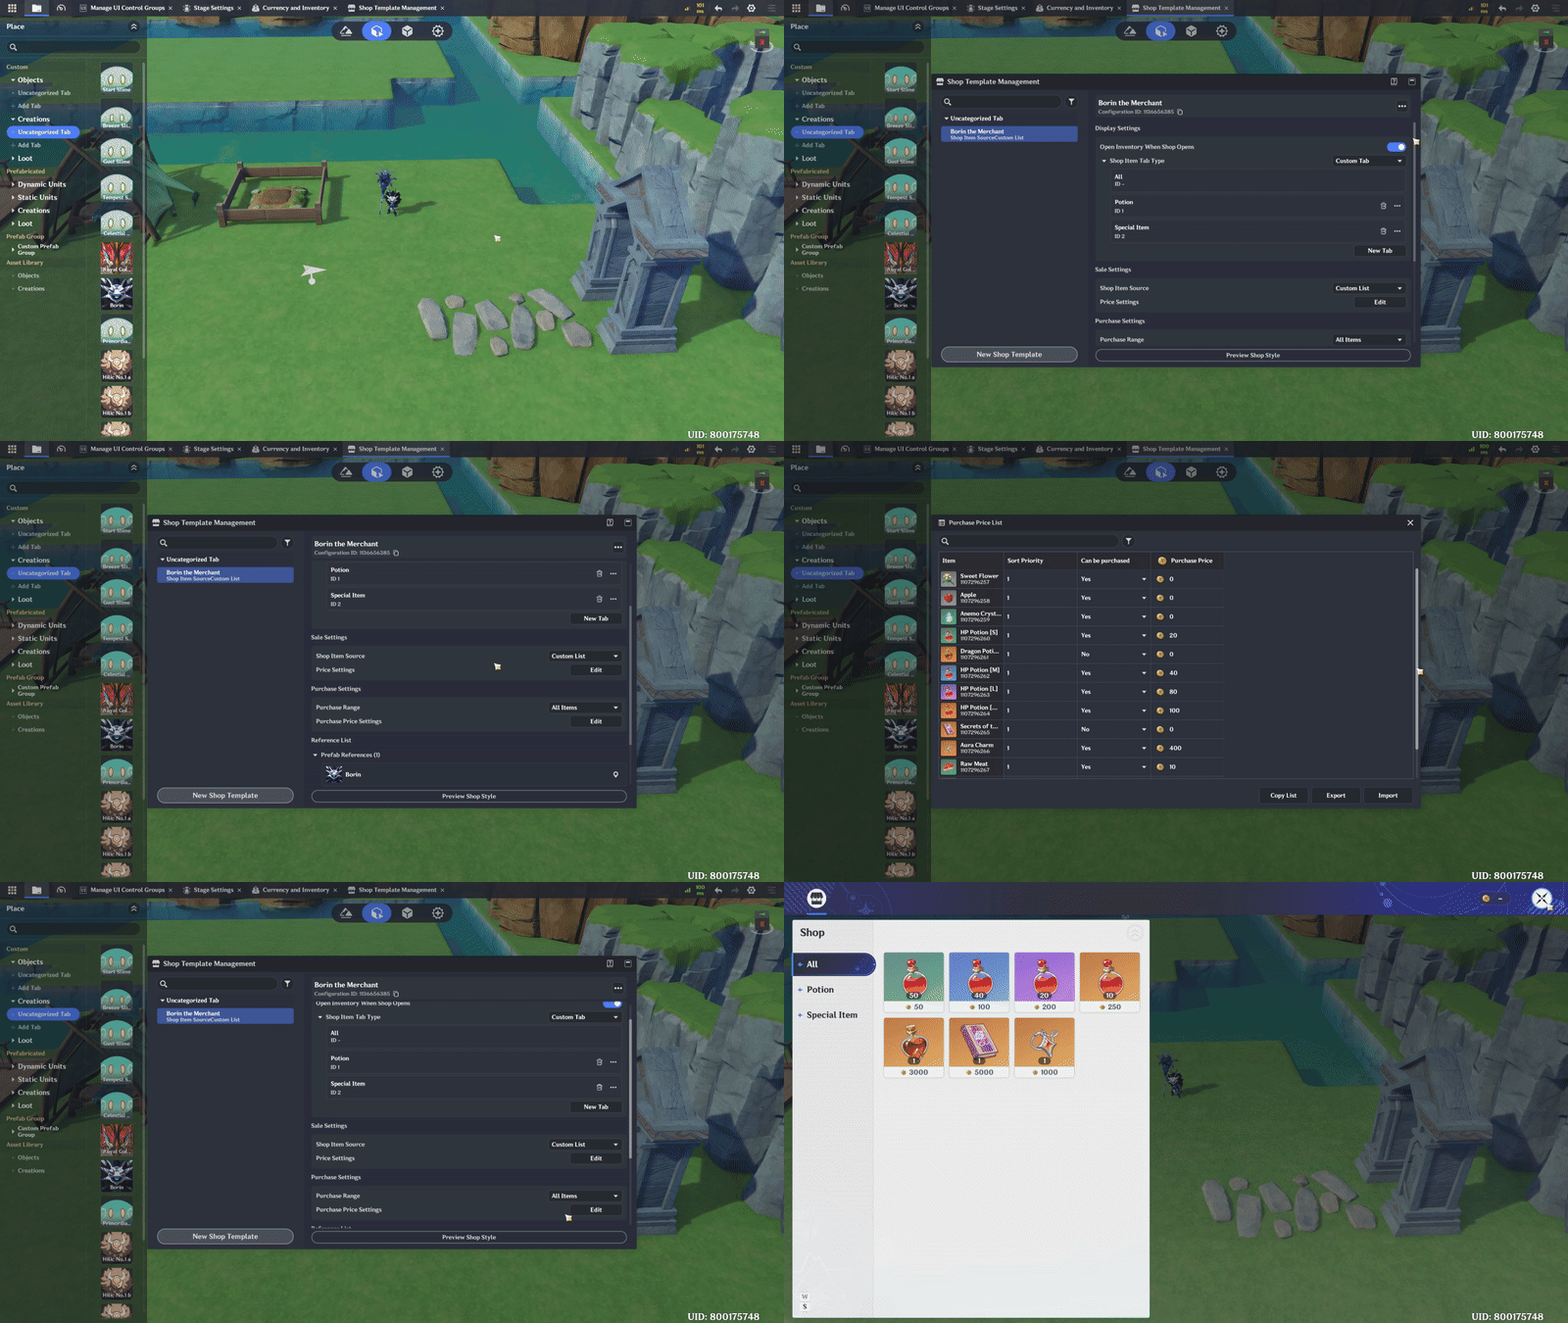
First, click the menu in the top-left corner to open the main menu Miliastra Editor, then select Shop Templete Management.
Create a new template. In this window, you can configure item categories for sale, define which items can be sold or purchased, and set the prices applied to each transaction. For shop settings, you can follow the steps below.
The next step is to prepare an interactive object that allows players to access the Shop. In the game I developed, I used the Samachurl as the Shop NPC, which I had previously created in Part 2: Creating Assets.
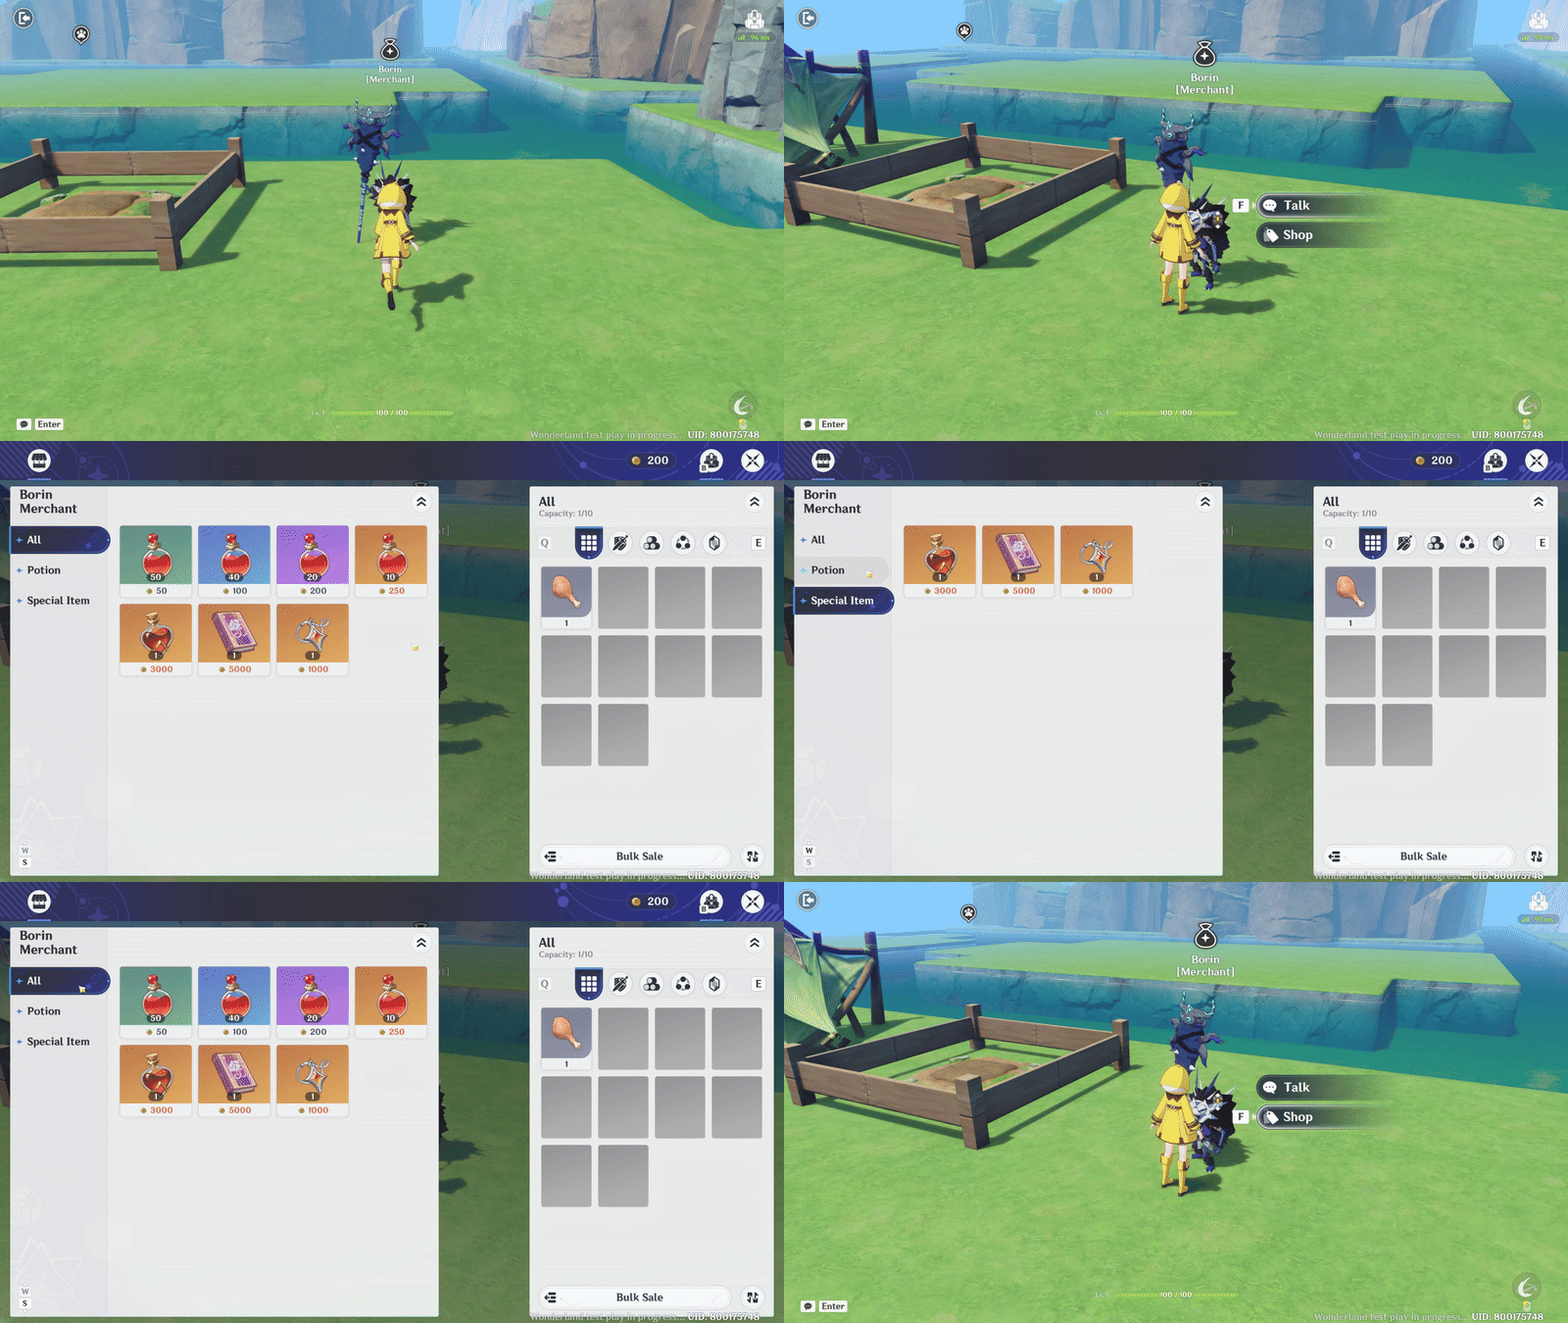
So, when the game starts and you approach this NPC, two tabs will appear. The first tab is Dialog, and the second tab is Shop. When you select the Shop tab, the Shop window will open, allowing you to make transactions there.
For the configuration, you can follow the settings I provide below, including disabling the enemy’s combat settings so the NPC will not attack the player.
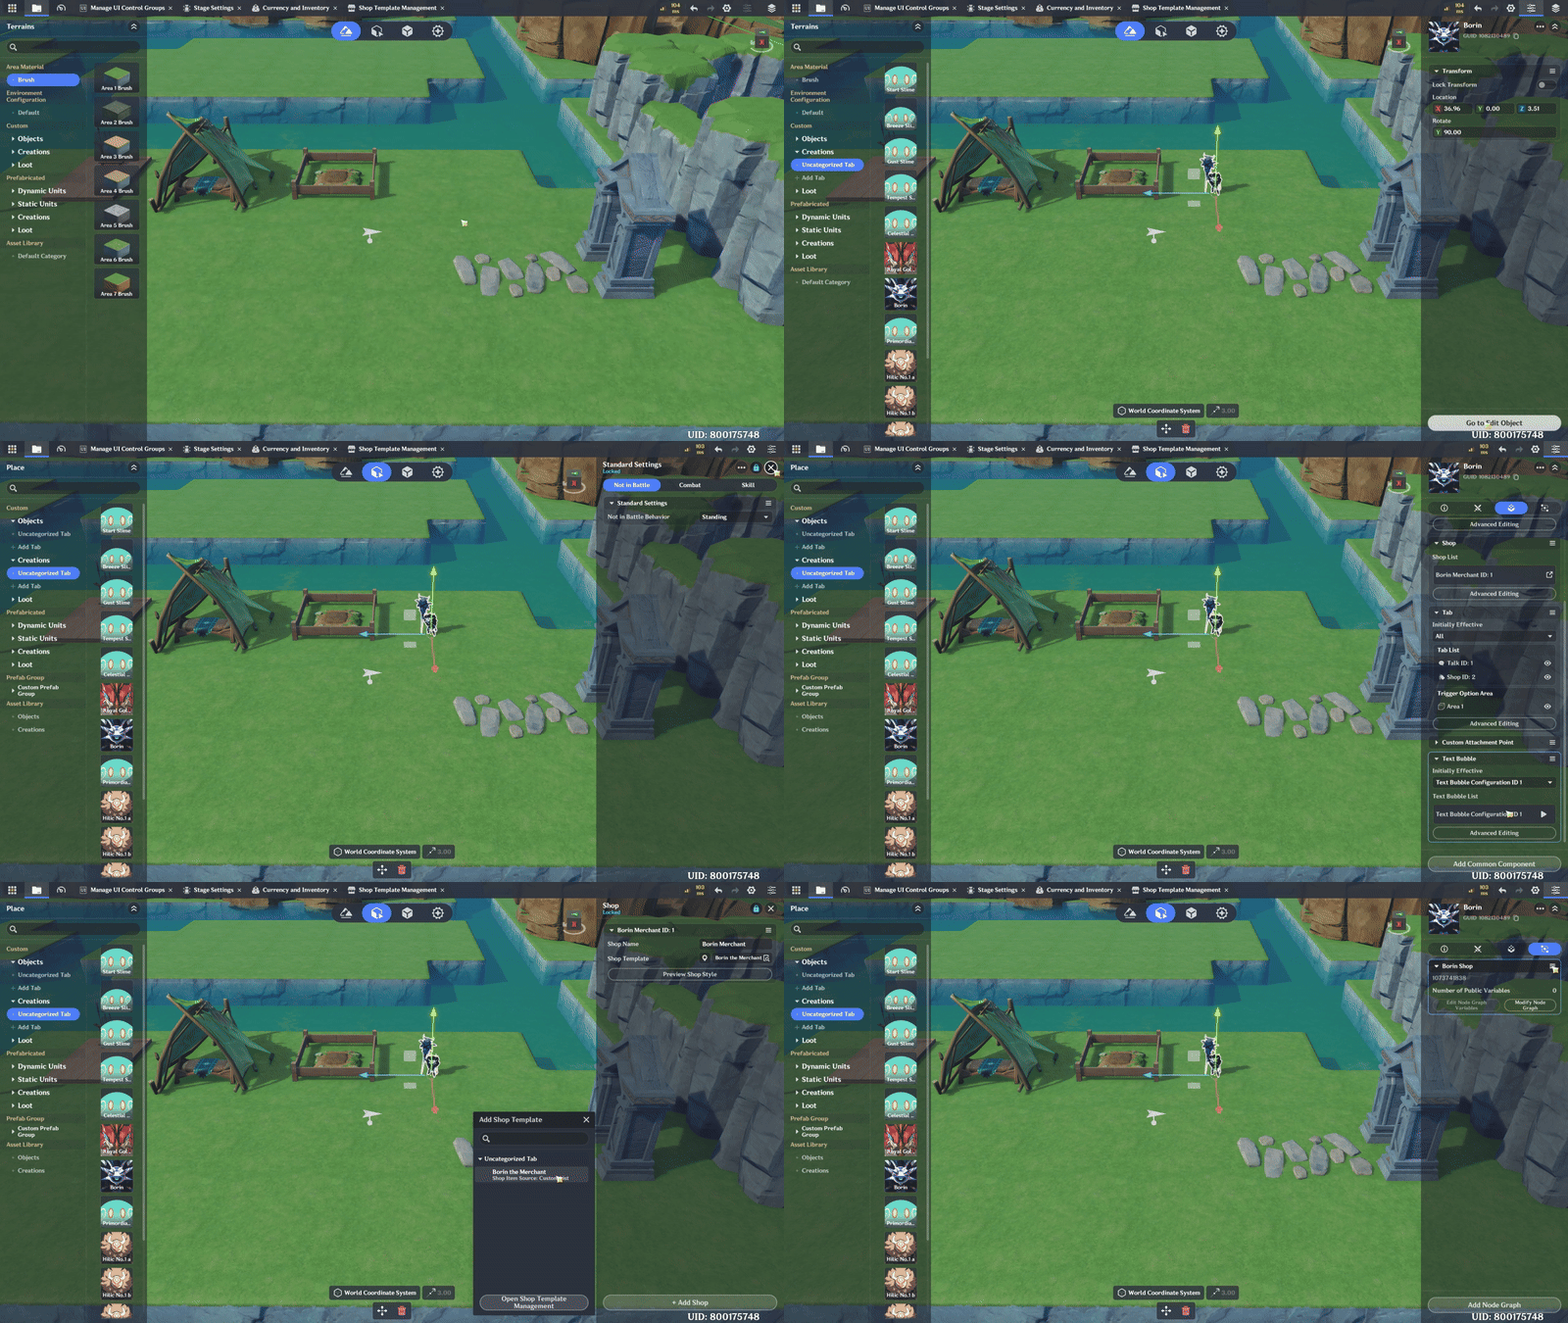
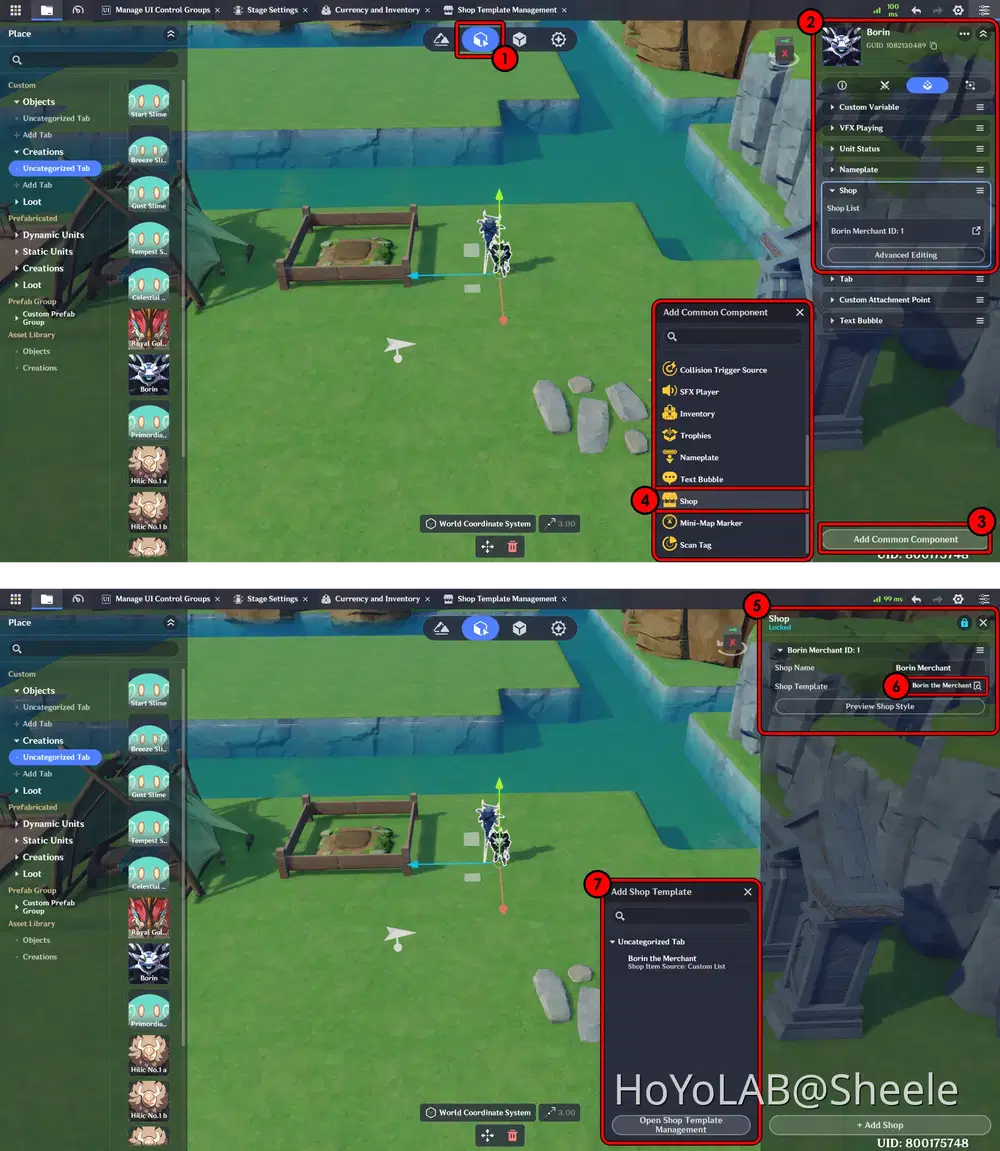
- Adding a Shop component to an NPC: First Select Entity Placement - Select the third Tab of the object Details - Add Component - Scroll down and select Shop.
- Click Advanced Editing to enter the Shop settings that will be applied to the NPC, then enter the Shop Template that you previously created.
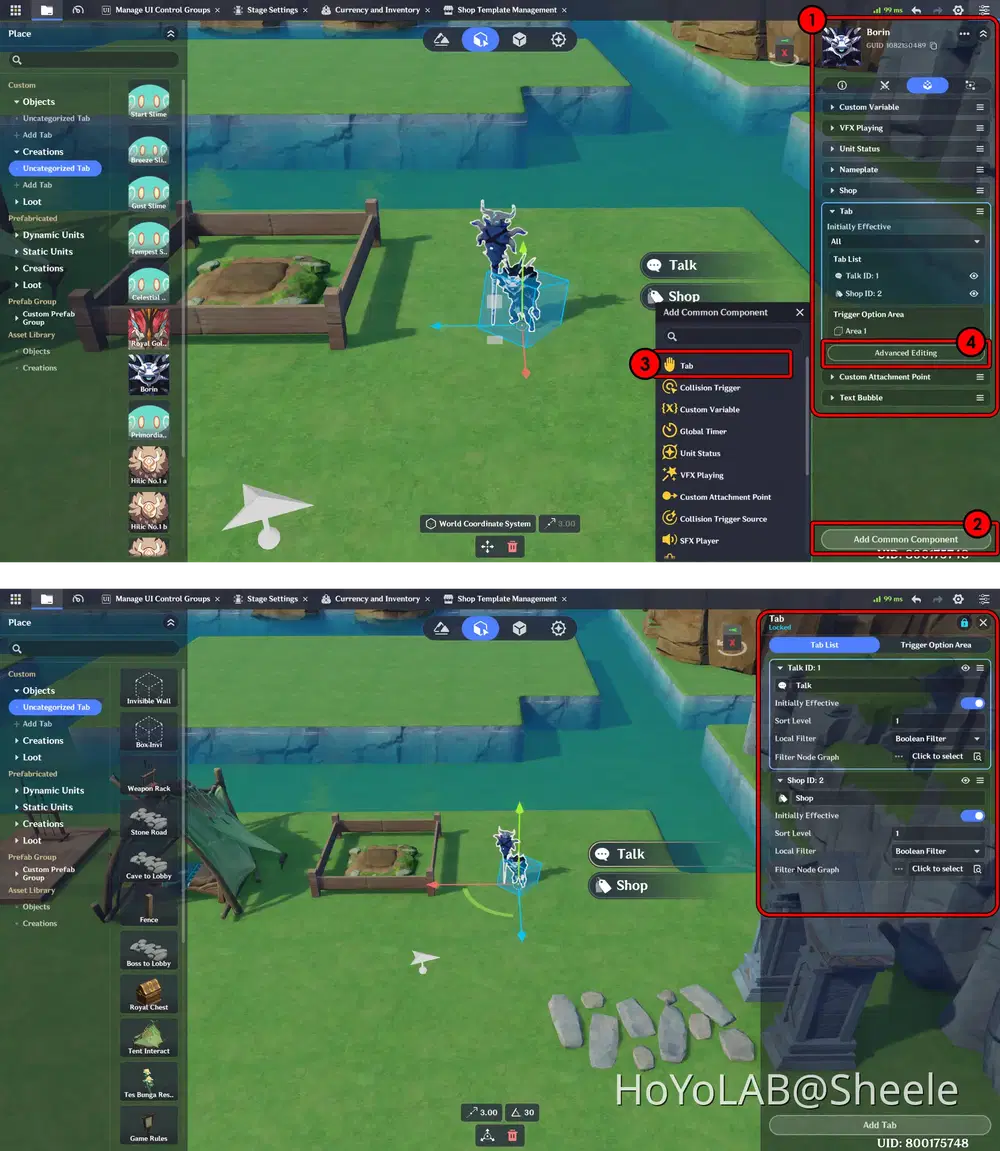
- The next step is to add a Tab feature to define how the character interacts with the NPC and opens the Shop. In the object’s Details panel, add the Tab component.
- Click Advanced Editing to define the number of tabs to display, set the tab icons, and assign tab names. For the remaining settings, you can follow the configuration shown below.
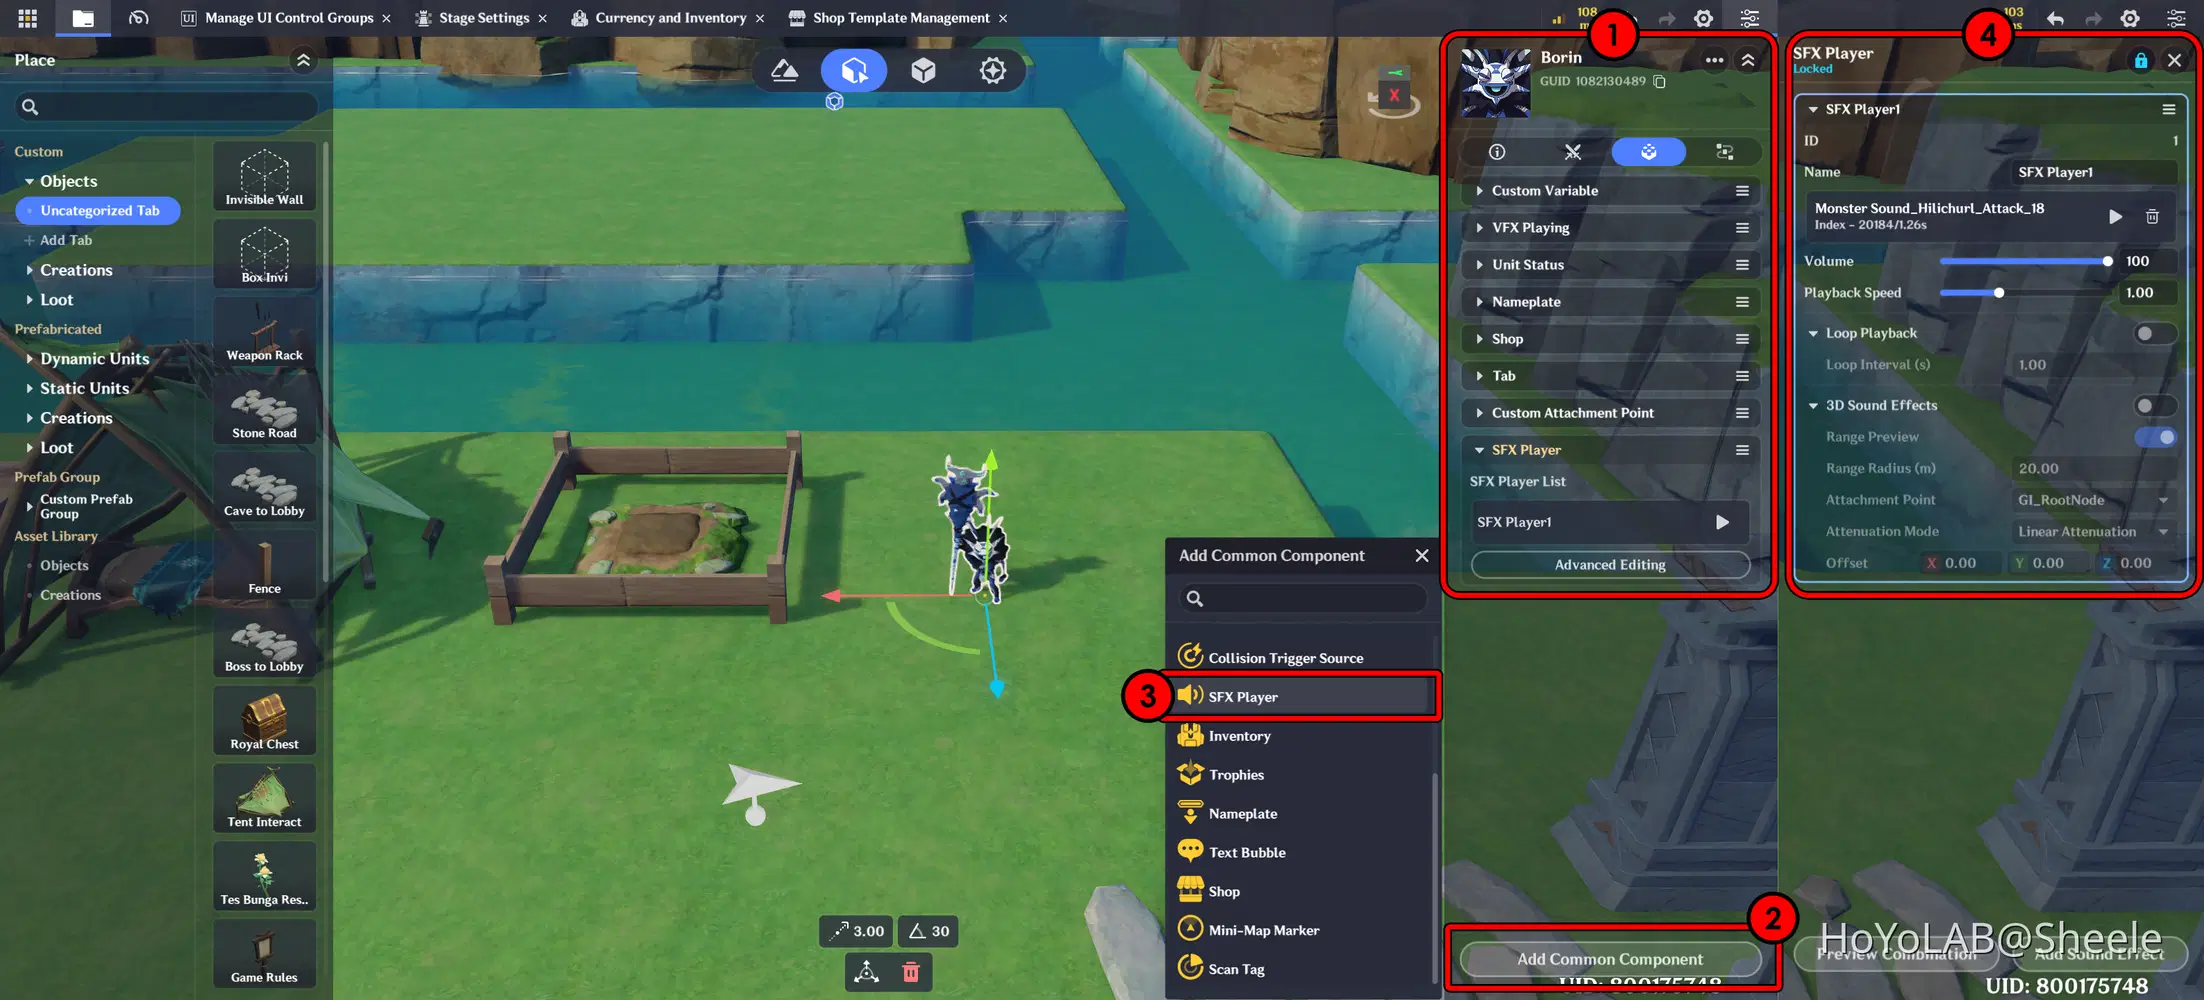
- For Tab 1’s function, I use it to make the Samachurl play a sound. In the object’s Details panel, add the SFX Player component, then go to Advanced Editing to select the sound that will be played during the interaction.
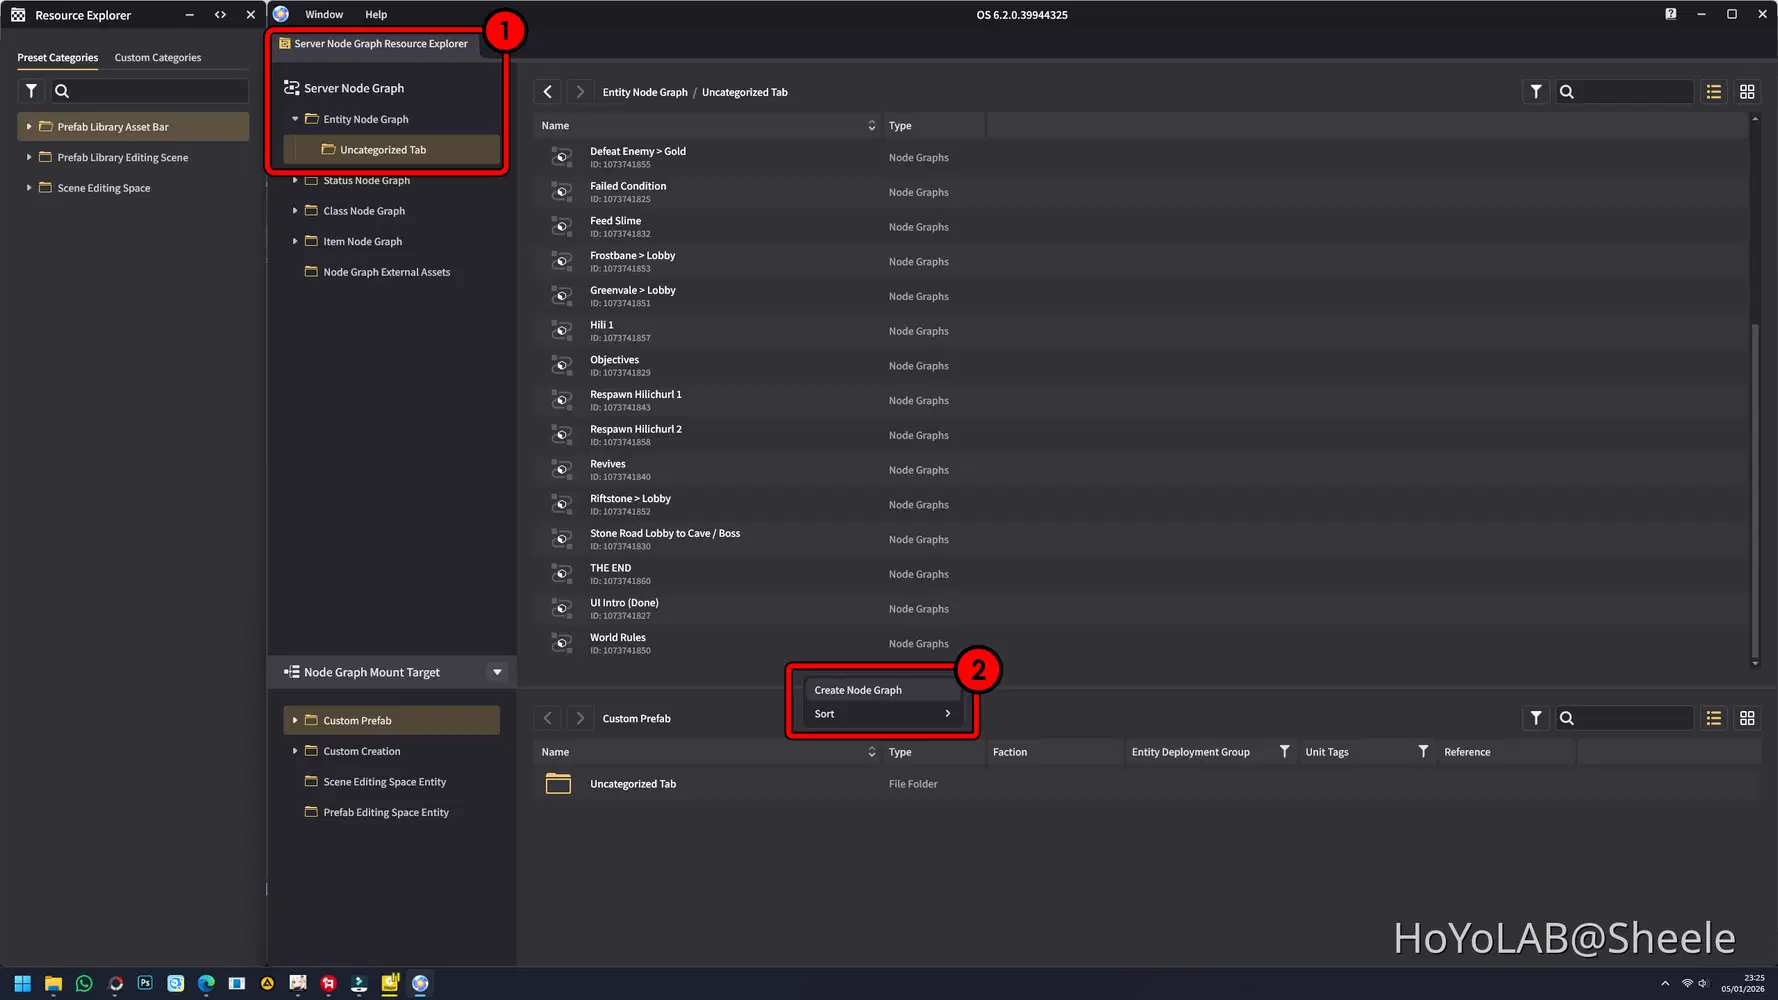
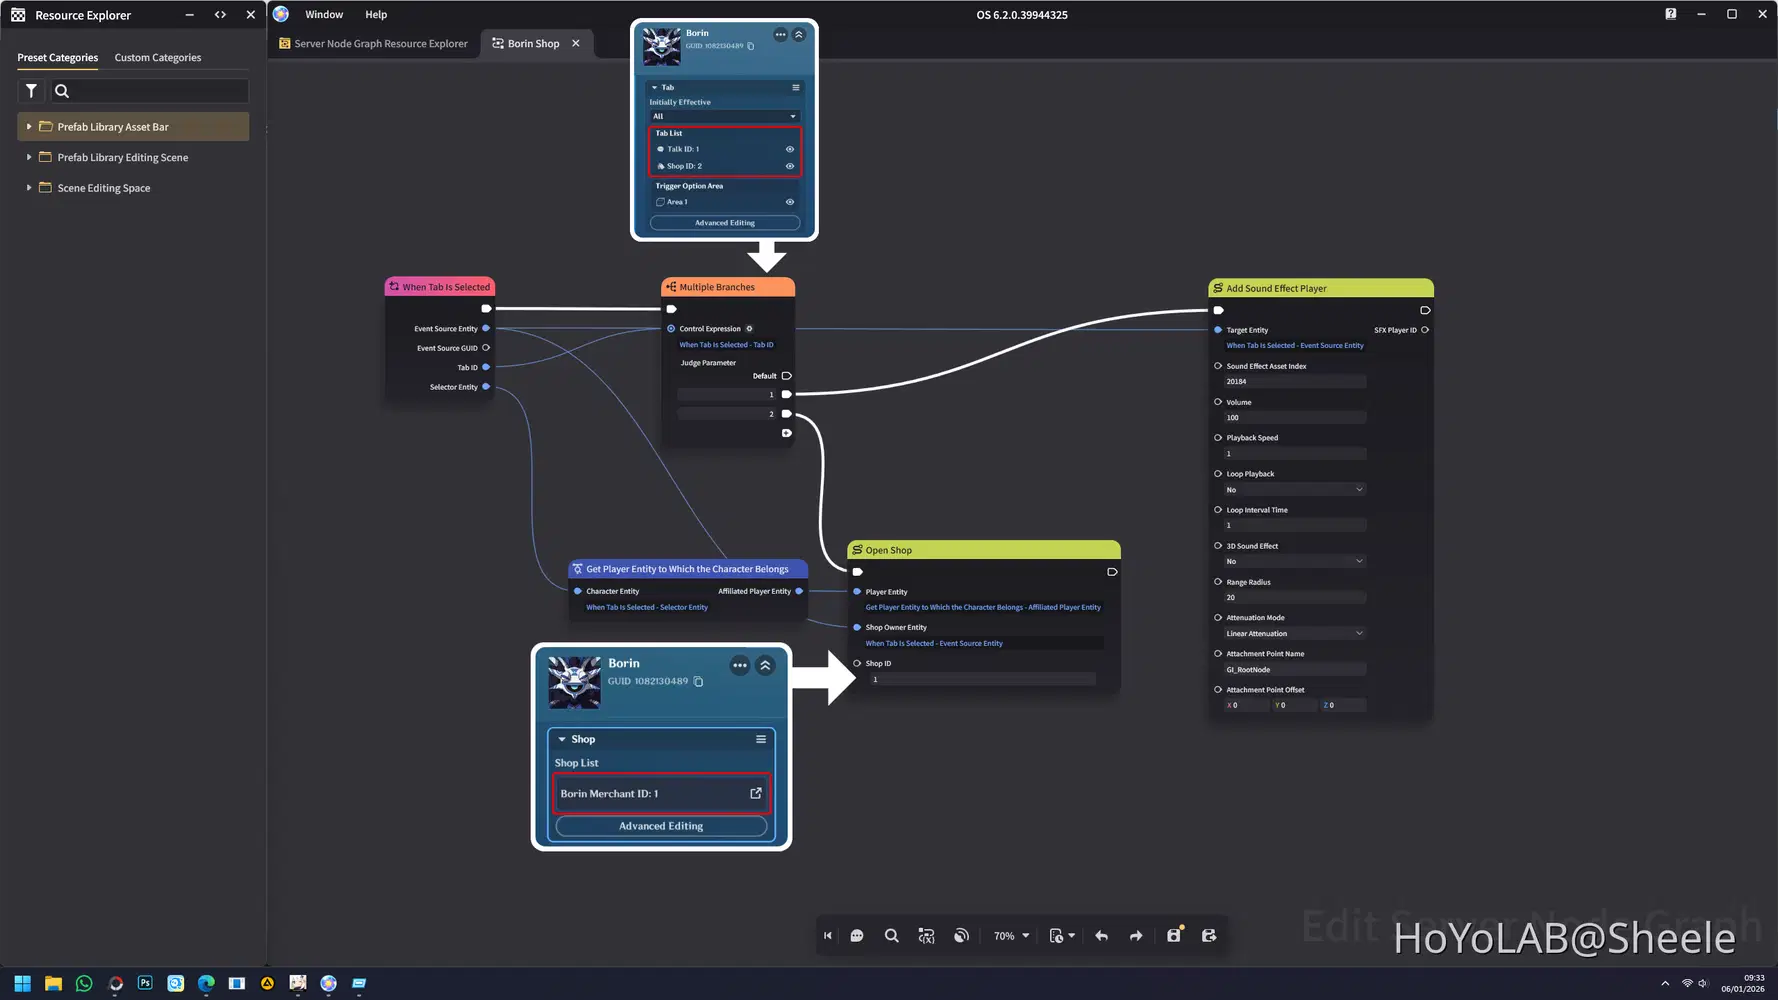
- Next, open Miliastra Sandbox to create a Node. Select Server Node Graph, then right-click on an empty area to create a new Node Graph.
- For the Node functions, you can follow the Node Graph I created below.
- Tab 1 (Talk) triggers the dialogue interaction; when selected, the Samachurl will play its distinctive Hilichurl sound.
- Tab 2 (Shop) opens the Shop feature, and the shop interface will be displayed on the game screen.
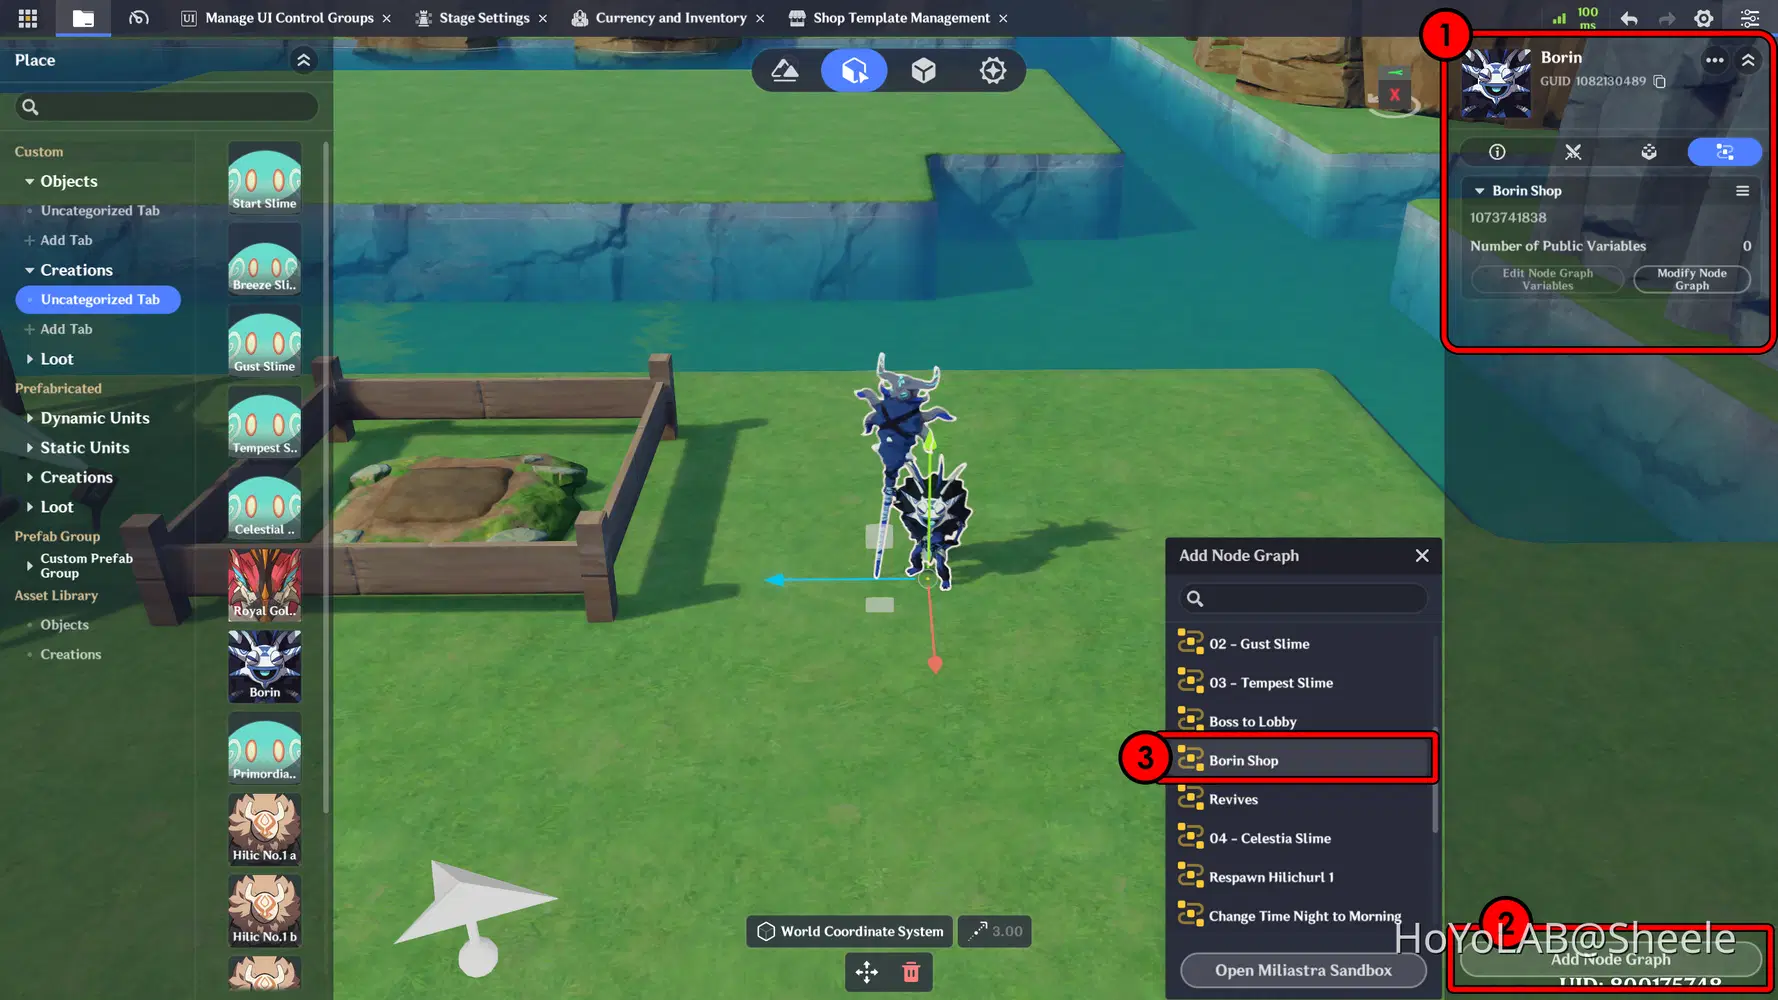
- After the Node Graph is created, don't forget to add it to the NPC Object.
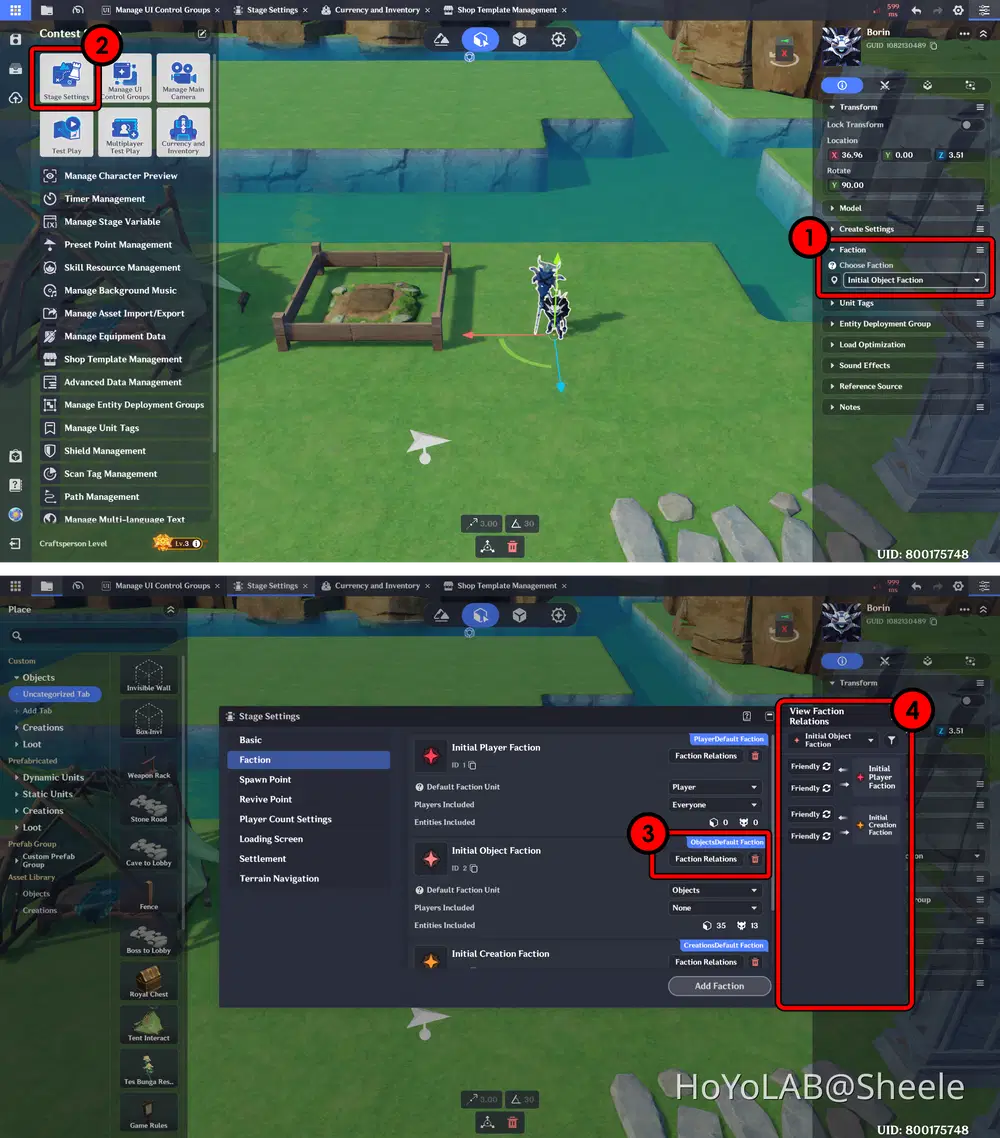
- Last, change the Faction to Object and set the Faction Relations to Friendly. The purpose of this setting is to ensure that both the object and the player do not detect each other as enemies, preventing any combat interactions. For a more in-depth explanation, it will be explained in Part 10, Limiting Character Attacks.
The final result will look like this, so make sure that all the steps you followed were done correctly.
c. Shop Management
Creating a Shop is not only about its visual appearance or how the character accesses it. The most important part is the transaction process that takes place inside. This is where the flow of buying and selling items, handling currency, and validating transactions between the player and the system are defined. With a well-designed transaction system, the Shop feels more functional, balanced, and provides a more immersive gameplay experience.
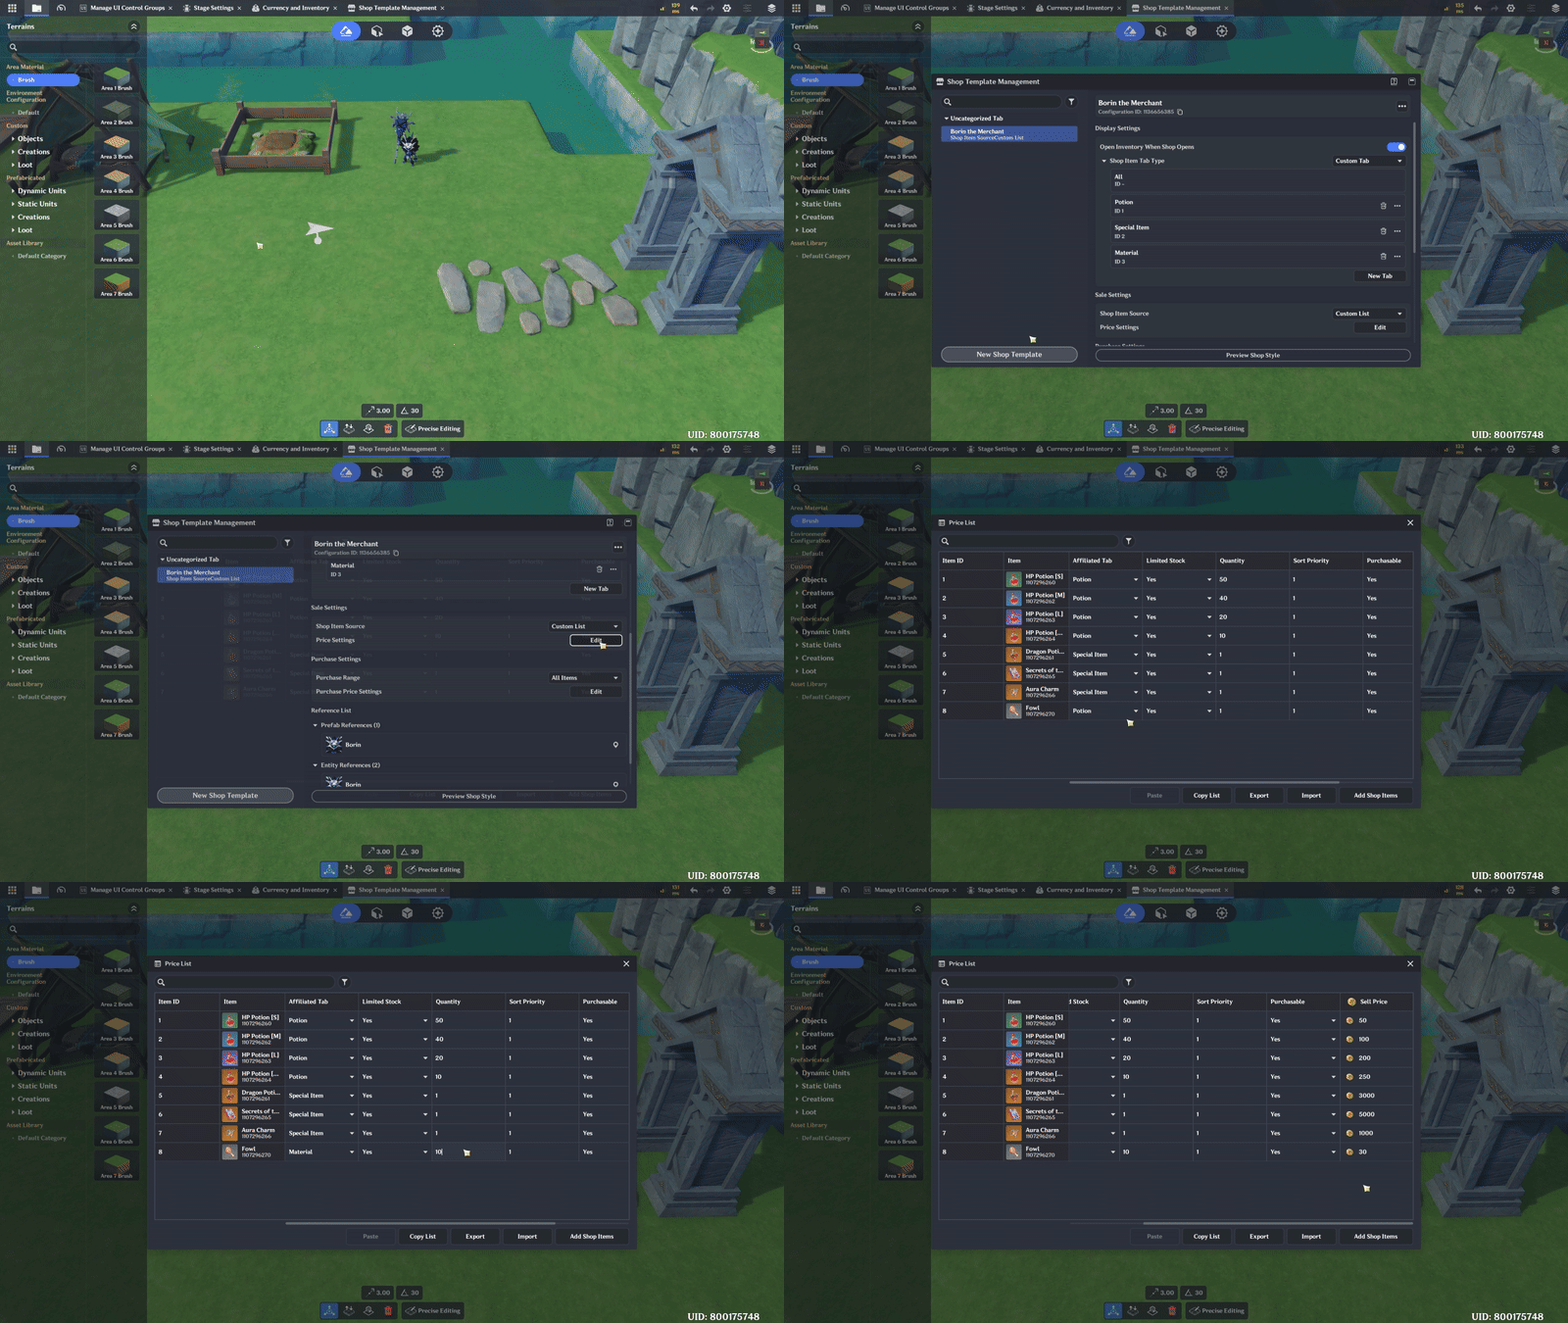
1. Sale Settings
Set the items to be sold in the Shop and define their stock and prices.
Open the Miliastra menu in the top-left corner, then select Shop Template Management. Click Sale Setting and choose Add Shop Item to add new items. Configure everything according to your needs and make sure the buy price is higher than the sell price. To adjust the price, you can drag the slider sideways.
2. Purchase Setting
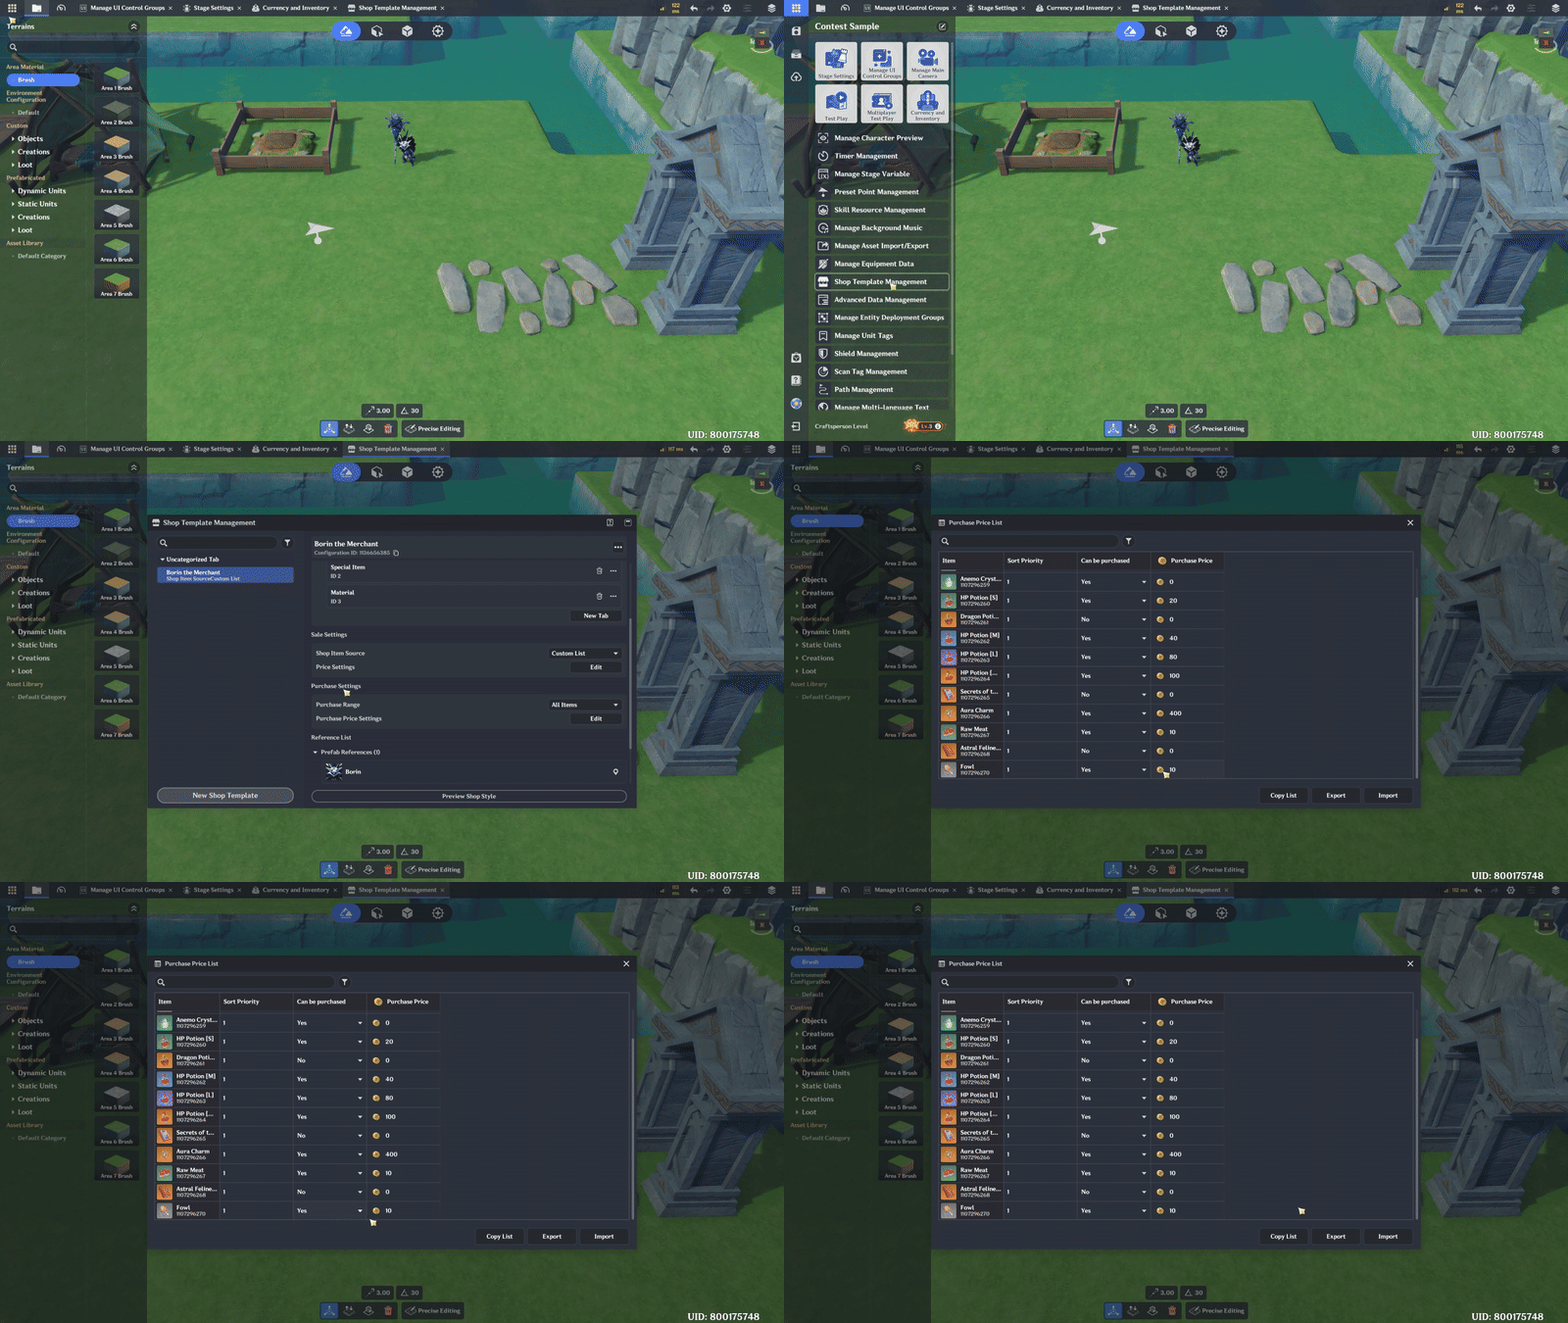
Set the items that can be sold in the Shop and define their prices. Open the Miliastra menu in the top-left corner, then select Shop Template Management. Click Purchase Settings and decide whether the item can be sold or not. In the Purchase Price field, enter the item’s price, and make sure the selling price is lower than the buying price. This setup helps maintain transaction balance within the game.
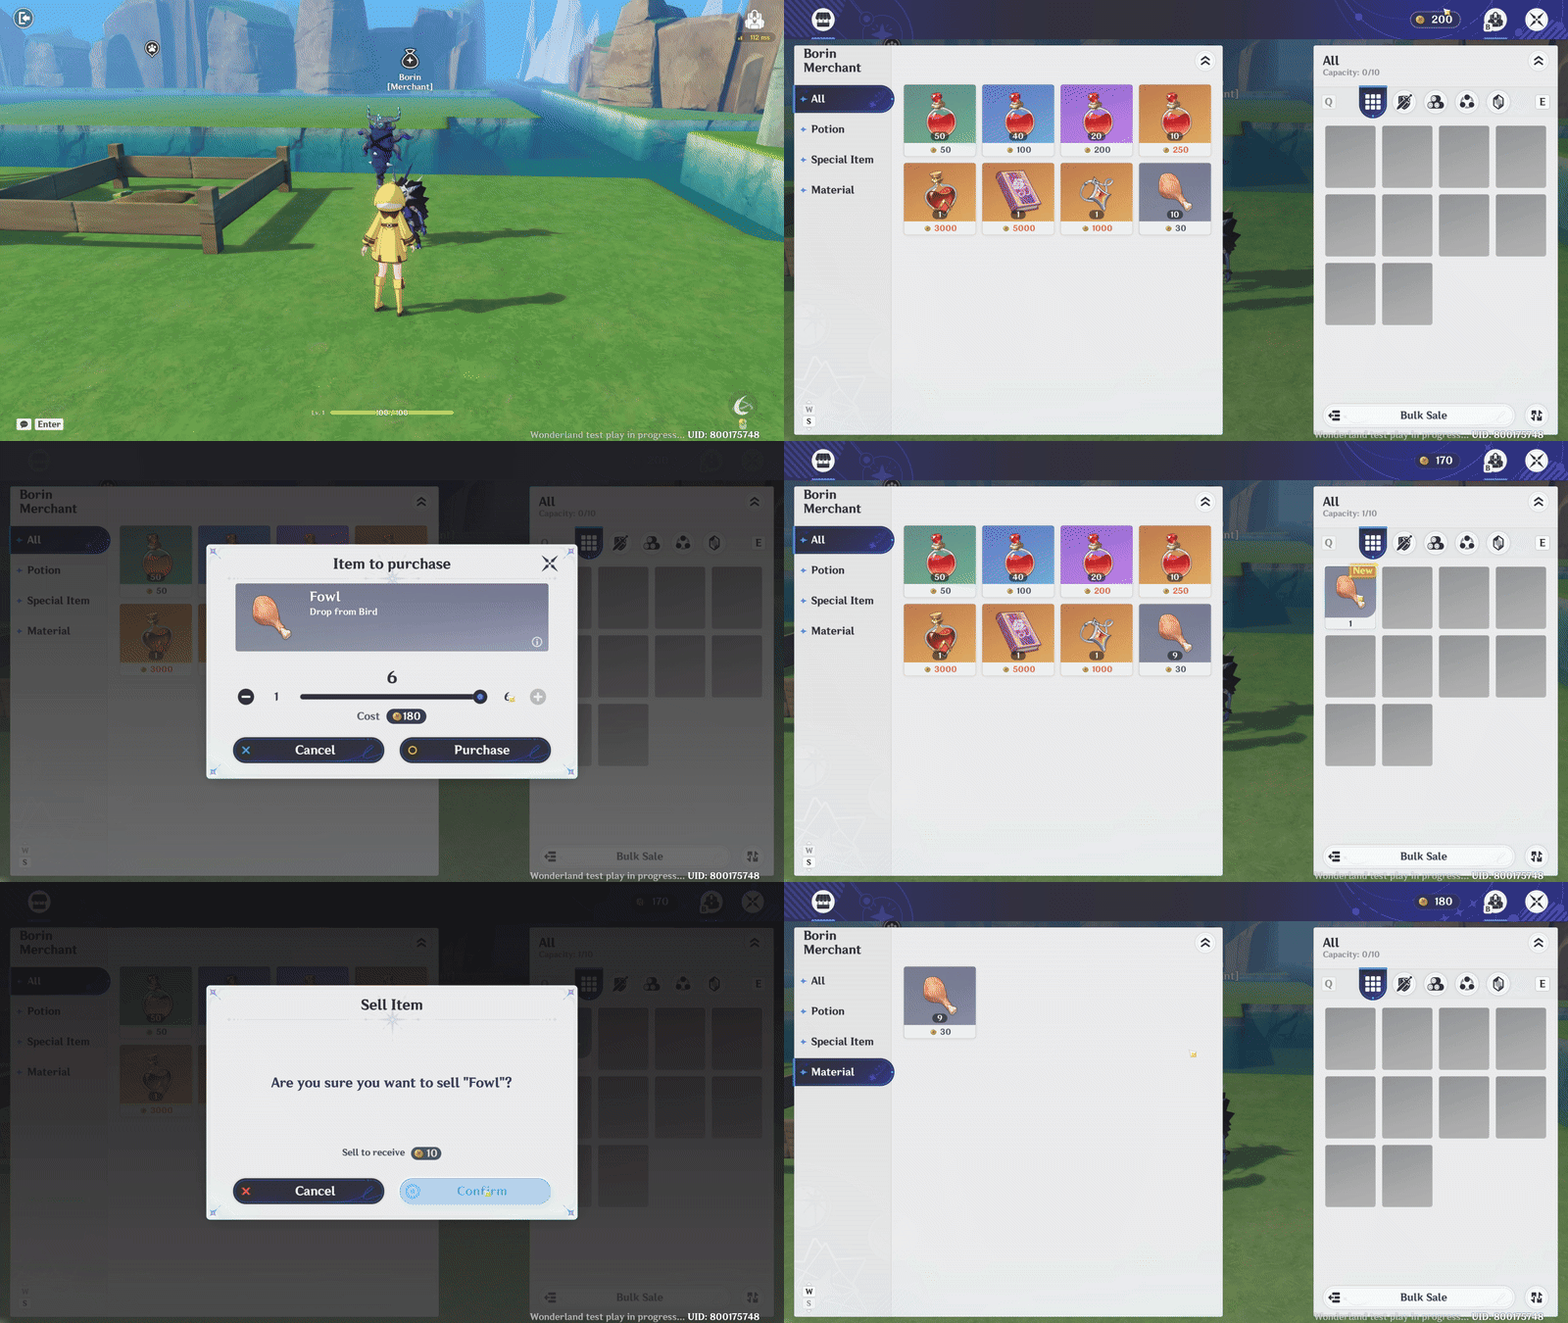
And here is a preview of the shop features applied to NPC.
When the game starts, the character already has 200 Gold (currency). The character then buys Fowl from the Shop at a price of 30 Gold per item and sells it back for 10 Gold per item.
Notice how the currency decreases when purchasing items and increases again when selling items and receiving gold.
Video Guide
Part 6: Enemy and Dungeon Design
In this section, you will design the enemies and dungeons that players will face. This includes defining enemy types, loot drop, difficulty levels, and enemy placement within the dungeon to match the game’s progression. You will also set up the dungeon flow, combat areas, and transitions between zones to create a balanced and engaging exploration and combat experience.
📝 Wonderland Guide:
a. Enemy Types and Level Scaling
I divide enemies into two types.
The first type is normal enemies, which can be found in dungeons or domains.
The second type is Boss enemies, which players will fight at the end of the game.
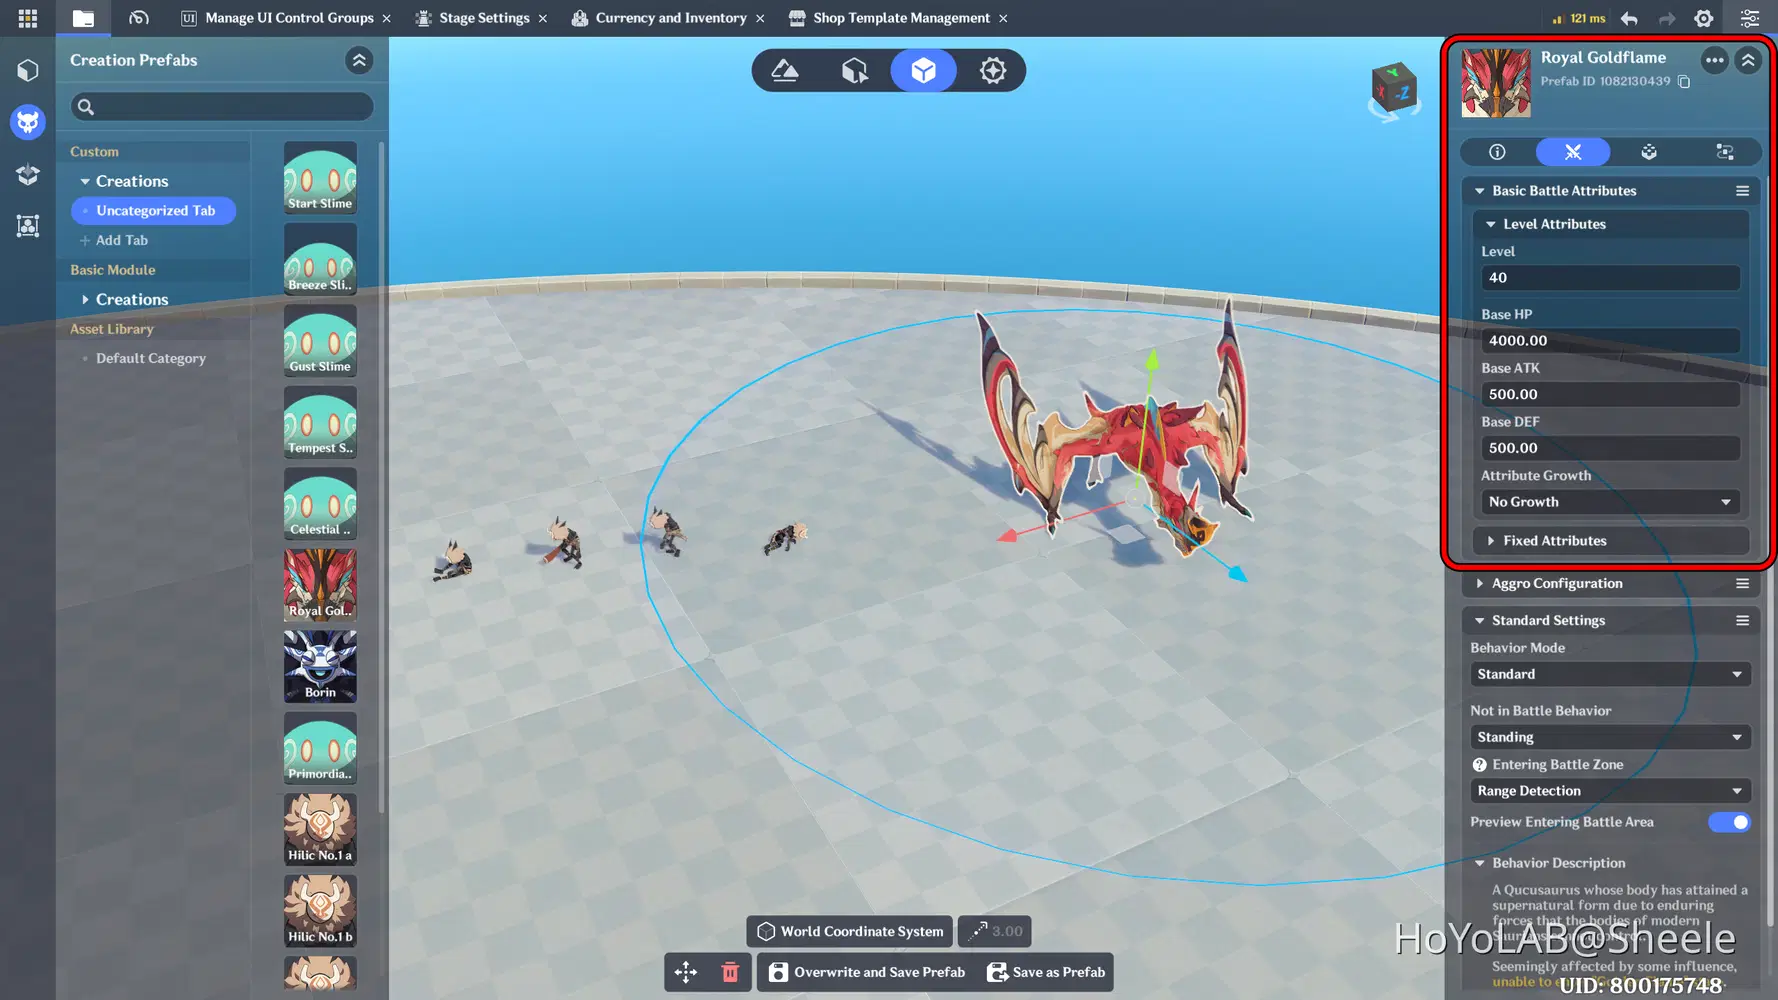
To improve the gameplay, feel, enemies need proper stat and attribute balancing. In the game I developed, enemies are shown with different levels based on the dungeon level.
For example:
- In a Level 1 dungeon, enemies appear at Level 25.
- In a Level 2 dungeon, enemies appear at Level 25 and Level 30.
- In a Level 3 dungeon, all enemies appear at Level 30.
You can set these values in the object’s Details panel under Level Attributes.
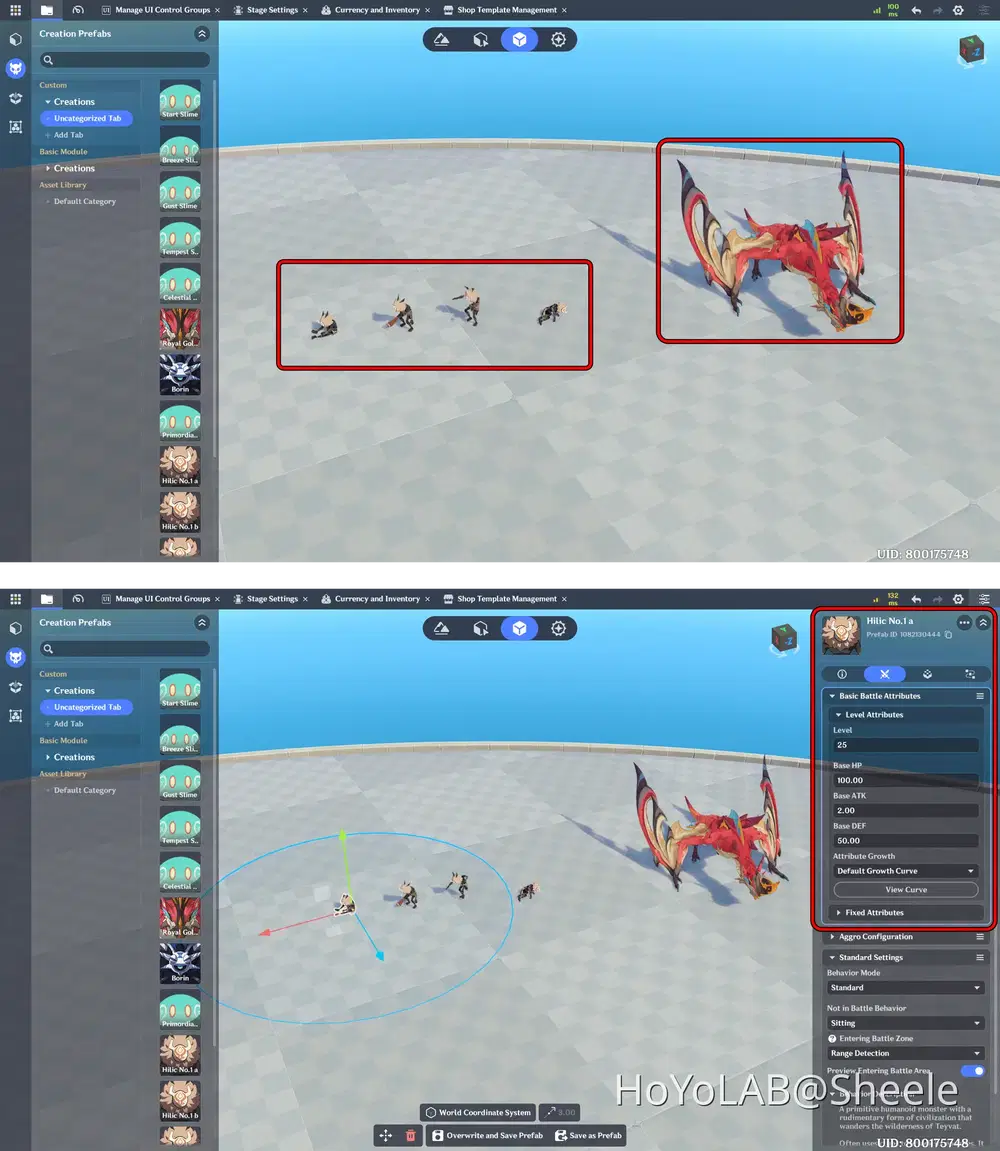
Boss enemies have a higher level than normal enemies. In my game, the Boss appears at Level 40 when it spawns and must be defeated by the player.
b. Loot Item
Next, we add a motivation aspect by giving enemies item drops / loot when they are defeated. Go to the object’s Details panel, open the third tab, and add the Trophies component. In Advanced Settings, add the item that will be dropped when the enemy is defeated. For normal enemies, I set them to drop Raw Meat x1.
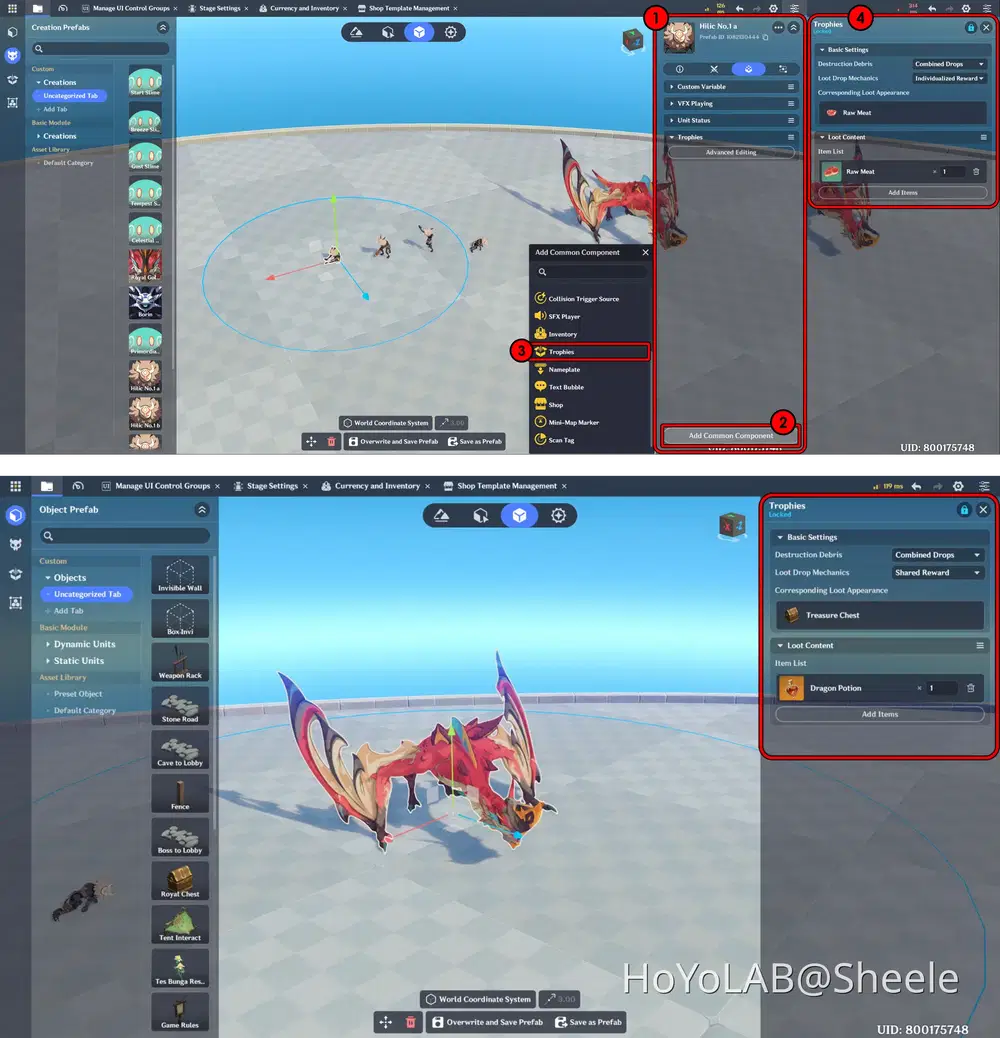
For Boss enemies, you can give better loot with a higher value as a reward.
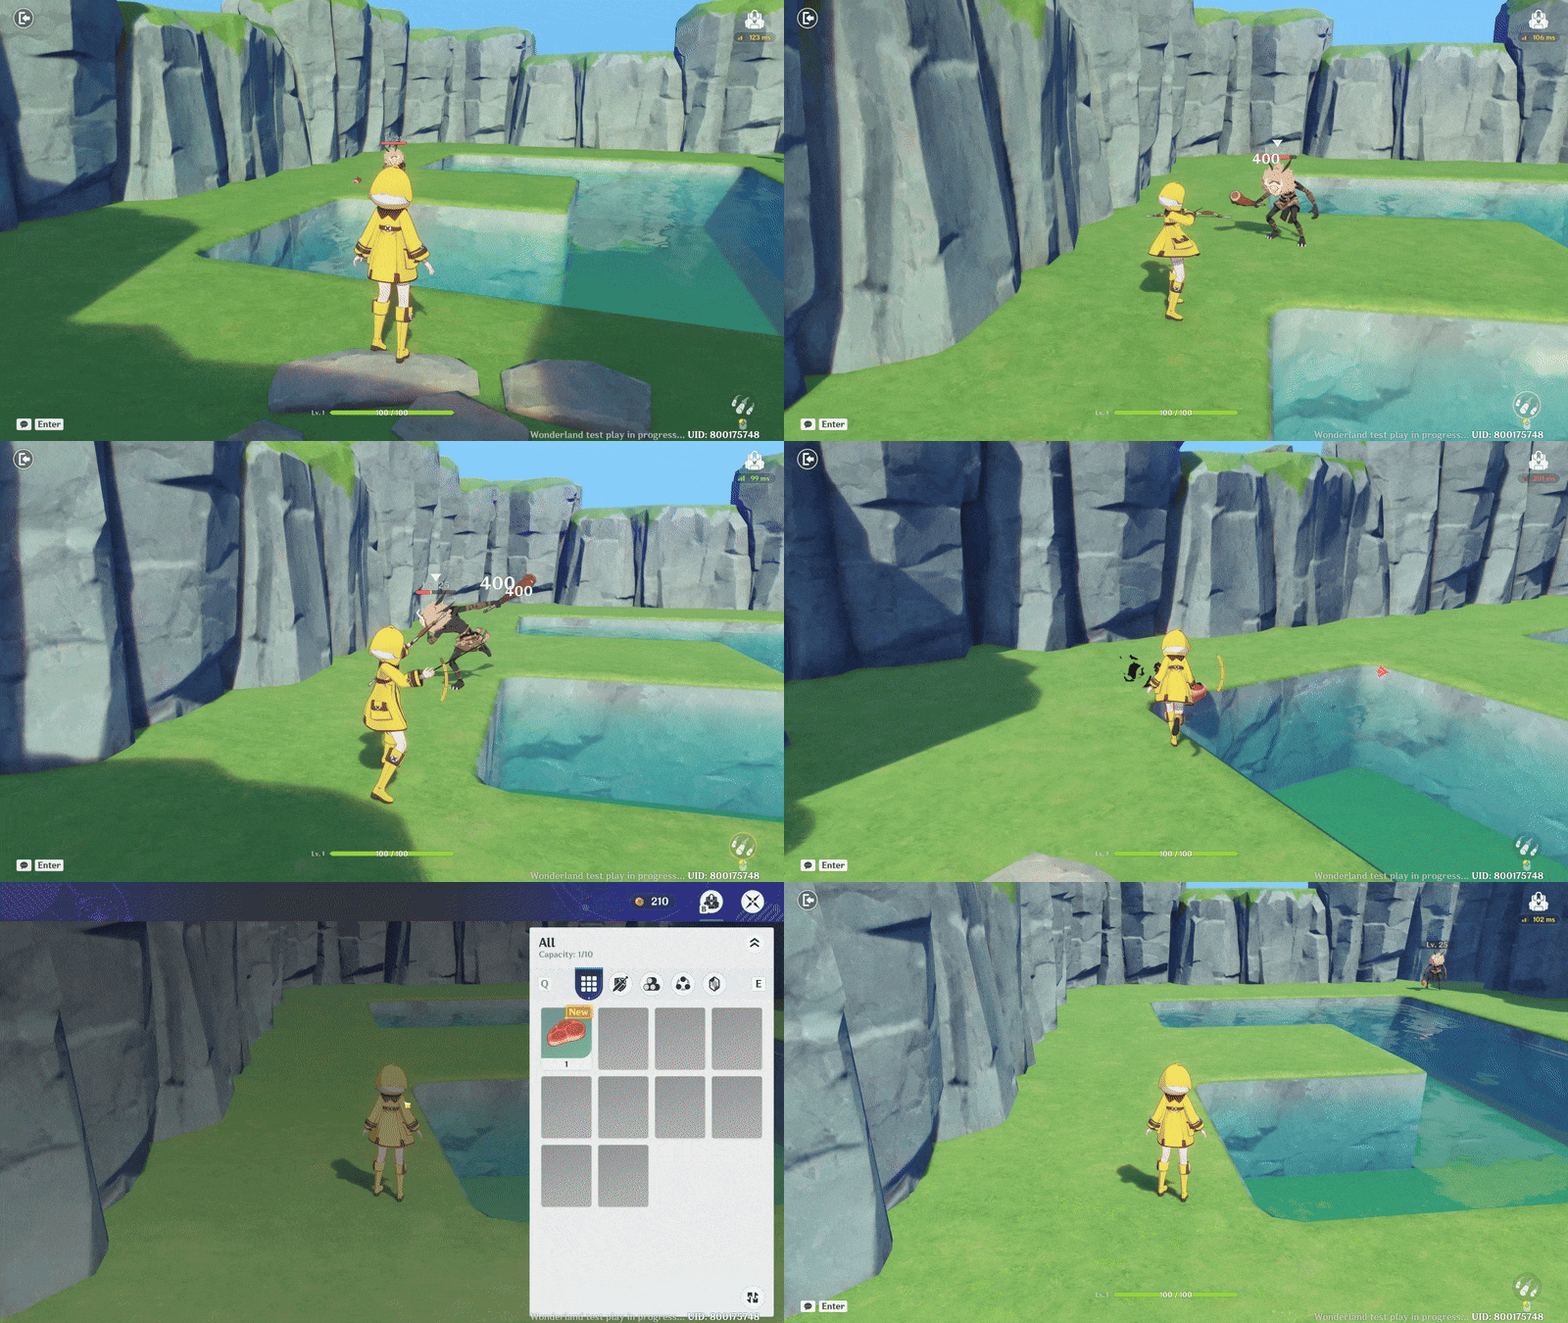
You can see the result below. When you defeat an enemy, it will drop items, and when you pick them up, they will be added to your inventory.
c. EXP and Gold Rewards
EXP and Gold are rewards that players receive after defeating enemies.
EXP is used to level up the character, while Gold is used to buy items in the Shop.
This reward system motivates players to fight enemies, progress through the game, and explore new areas.
Open the Miliastra Sandbox window, then in the Server Node Graph under the Entity section, create a new Node. You can refer to the Node details shown below.
When an entity is destroyed, the system will add 10 (Gold) to the inventory and increase the player class EXP by 100 EXP.
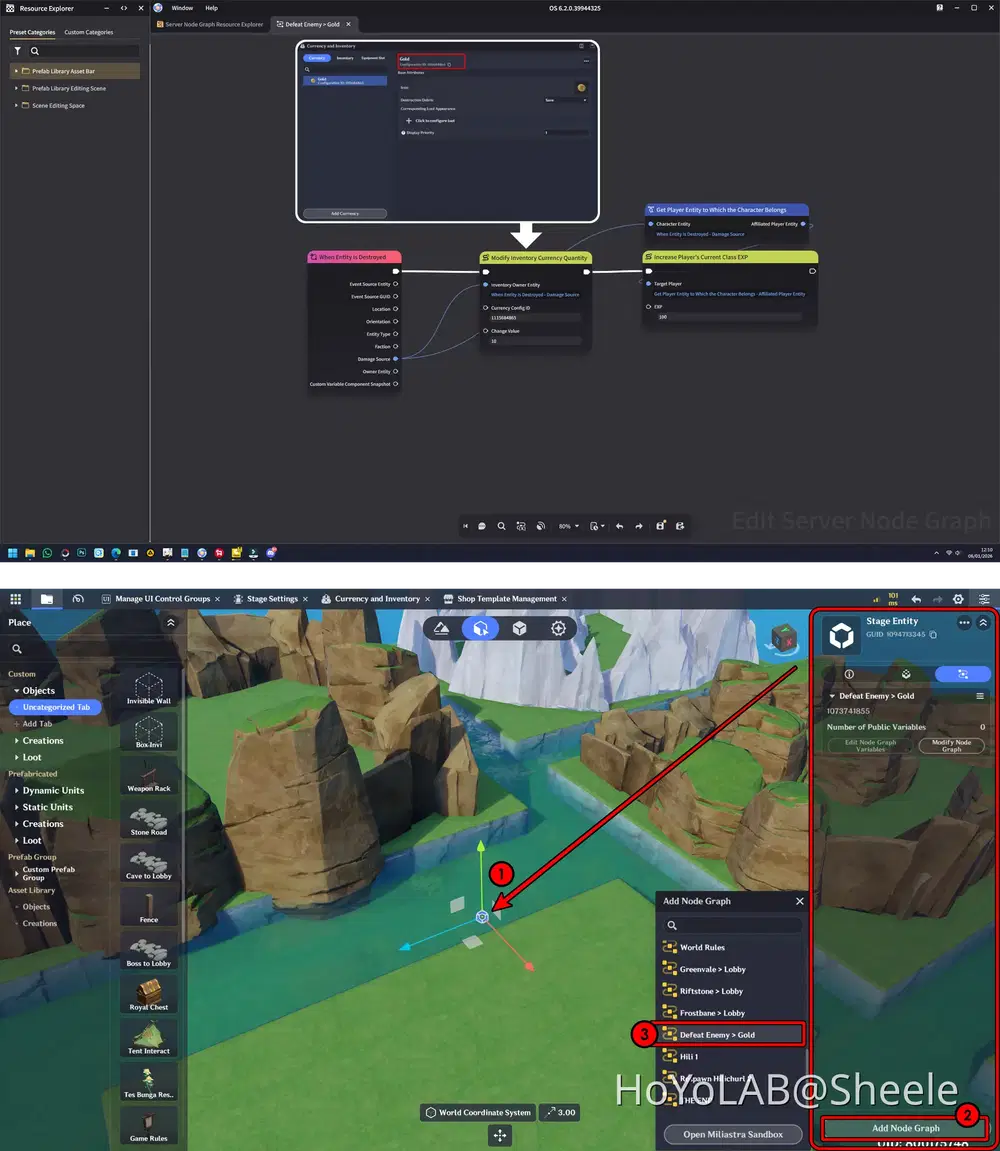
After the Node is created, click the Stage Entity in the center of the Terrain, then add the Node you created earlier to it.
d. Respawn Enemy
In this step, we define how enemies appear in the arena when the player enters the dungeon. This system controls which enemies are spawned, their positions, and when they reappear after being defeated. By setting up enemy respawn correctly, the dungeon feels more alive and provides a consistent challenge for the player.
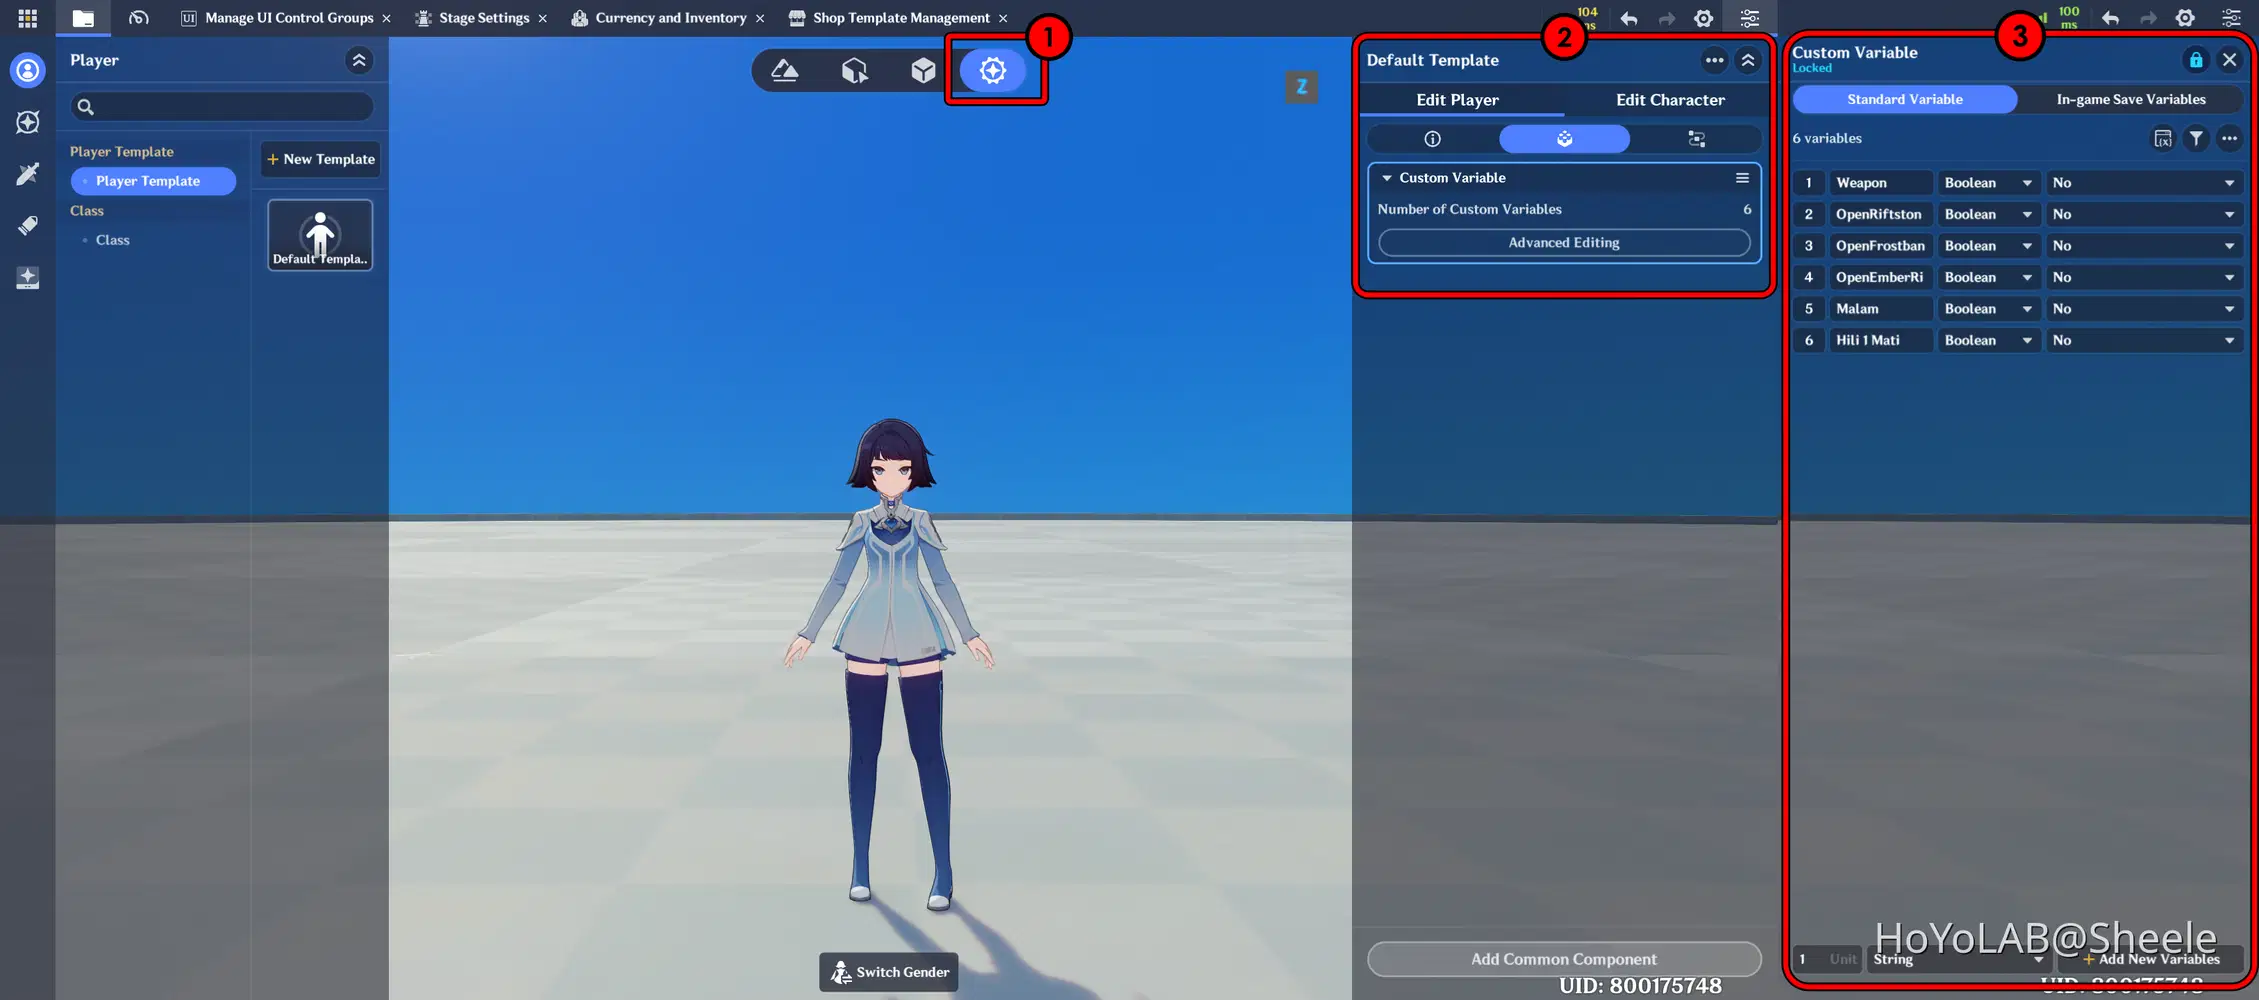
1. Set Variable Chara to Limit Access to the dungeon
Create a variable for the character, if you think of it like a key and a lock, when you have the key you can open the lock and vice versa. Create all the variables in Boolean with the condition No, this is because when the game is running you don't have access to enter the domain.
The next step is to create a Node Graph on the Client side. Create 2 Node Graphs in different conditions No and Yes.
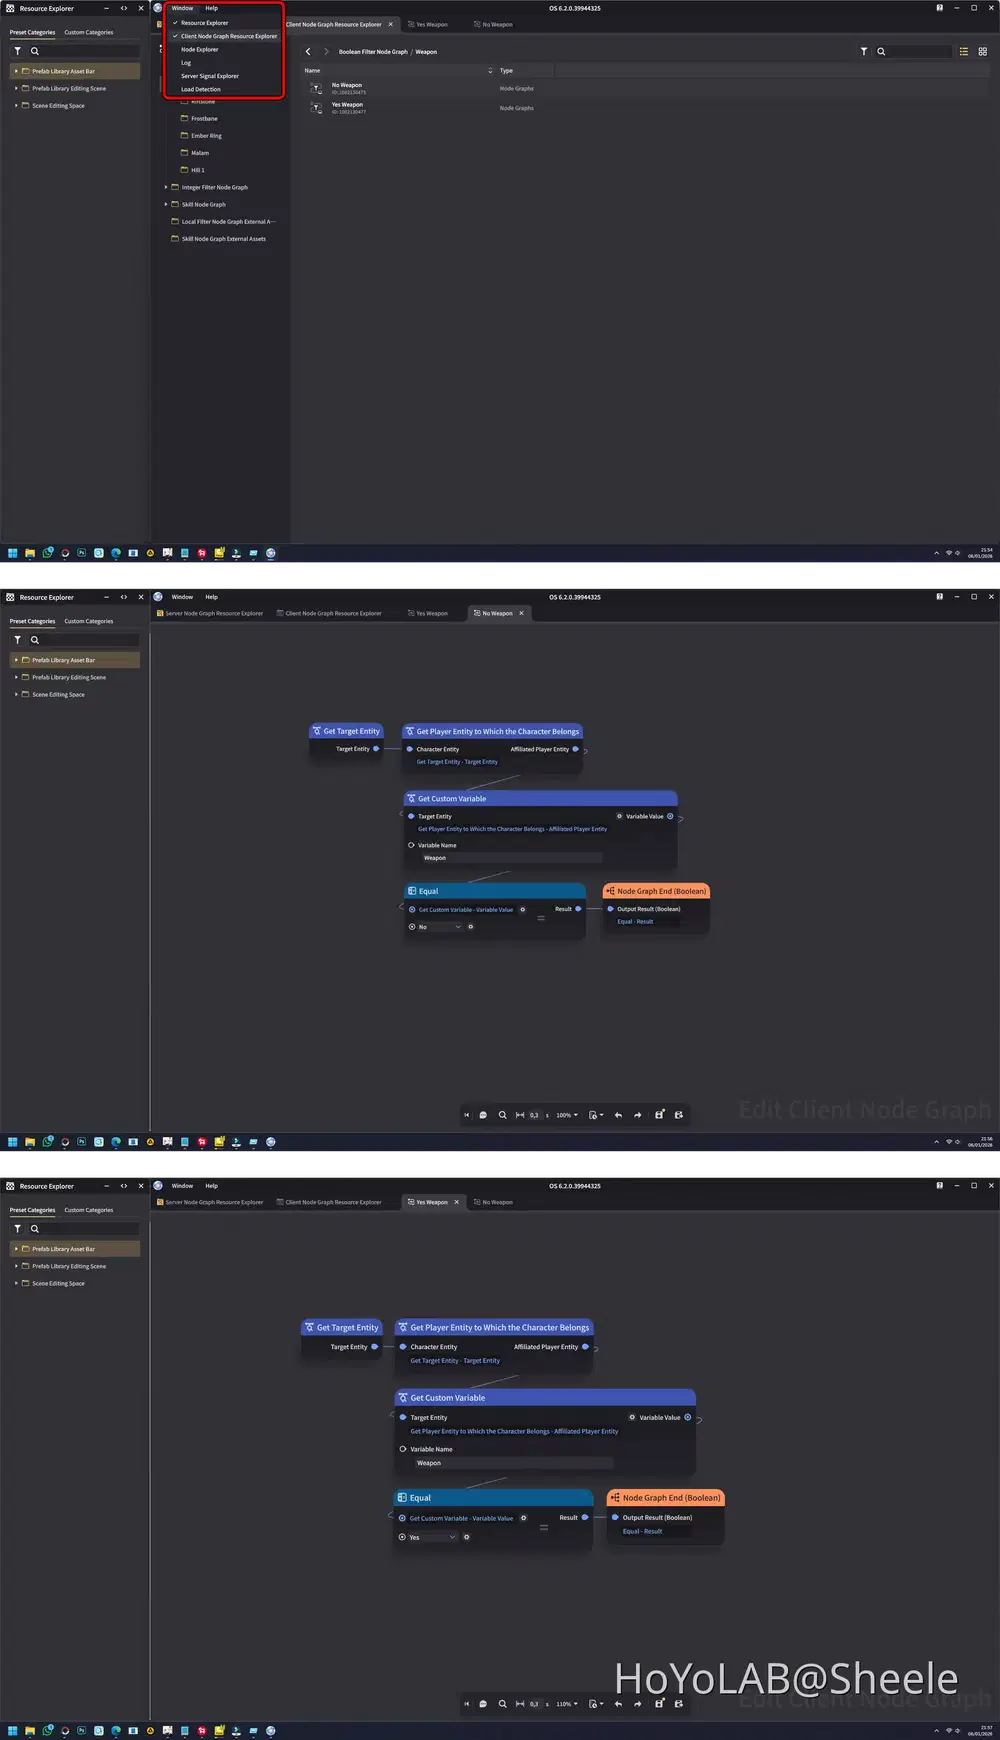
Node set to No.
It will automatically run when the character does not have a Weapon/ a Class.
Node set to Yes.
It will automatically run when the character has a Weapon/ a Class.
The next step is to add this object to the Terrain as an interactive element that the player can use during gameplay.
Or it can be likened to how you get the key to open a padlock. In this object you can add tab components as interactive media.
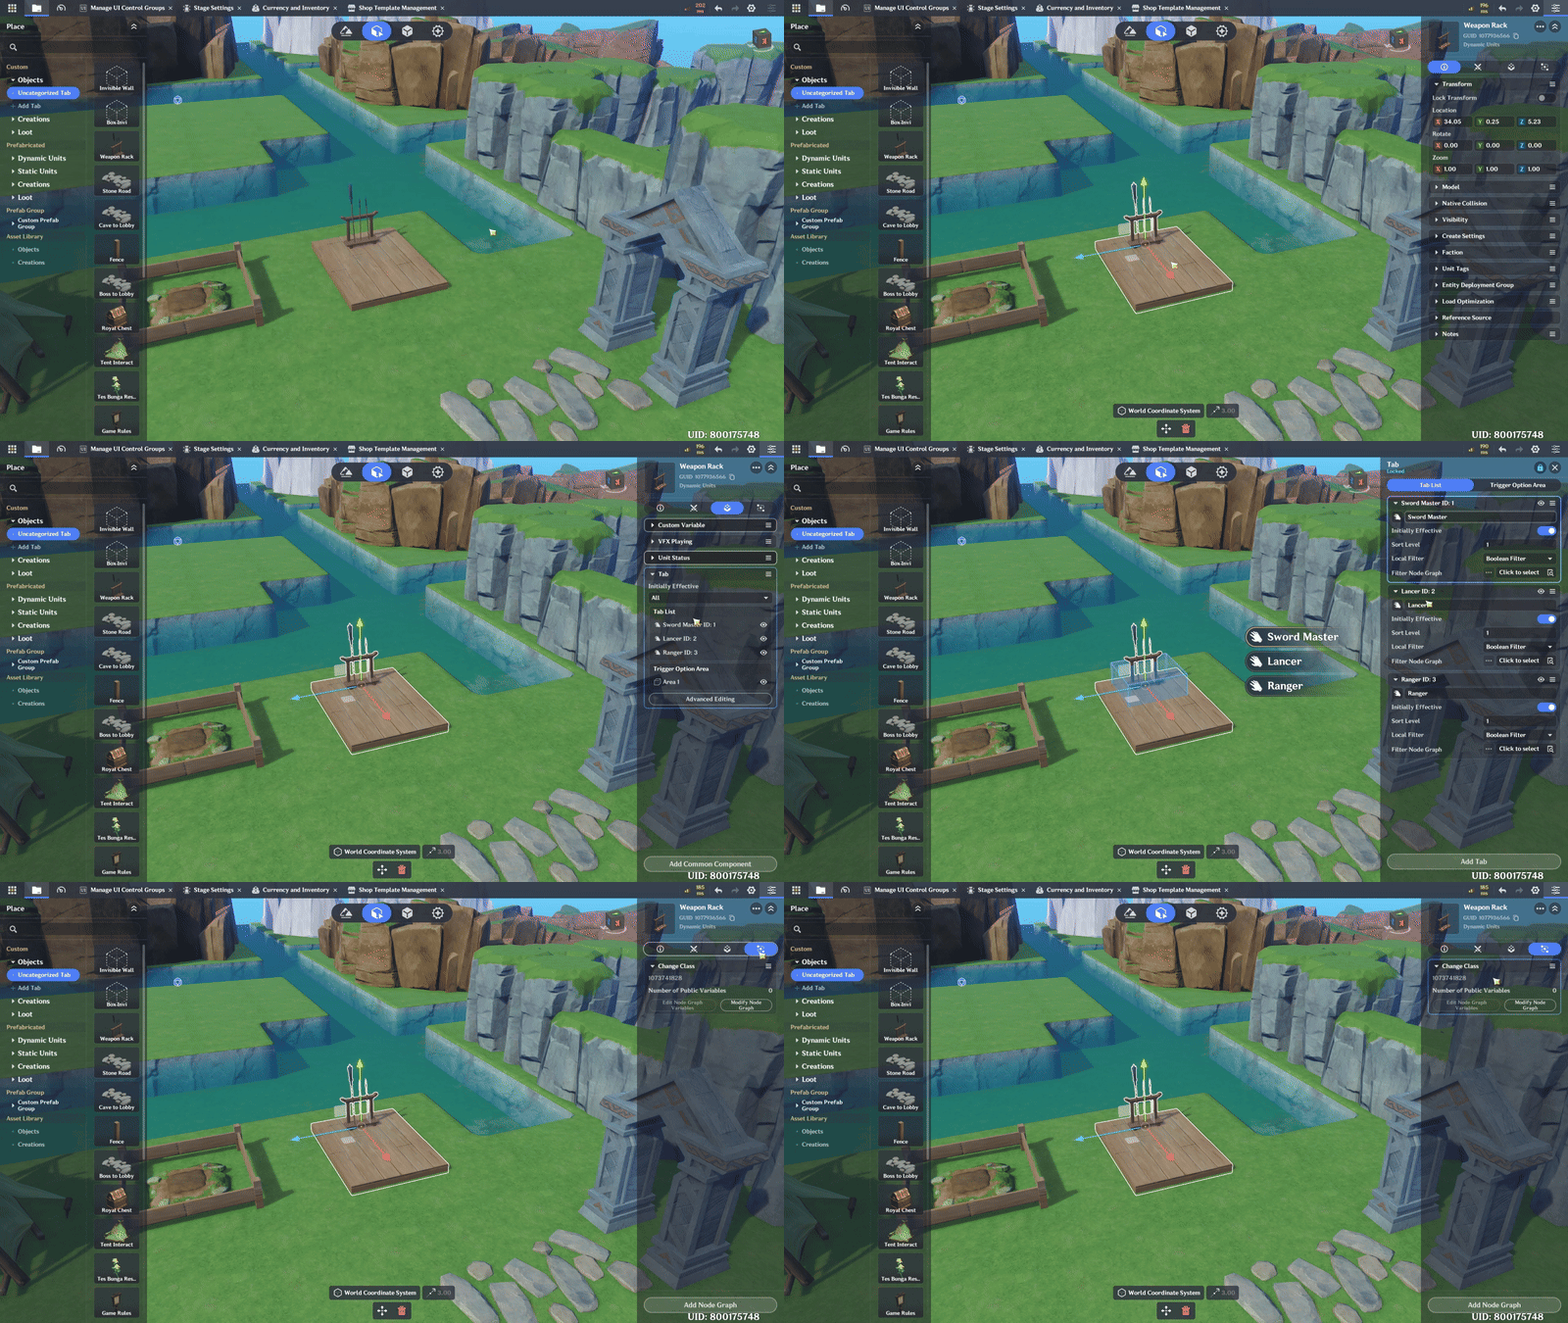
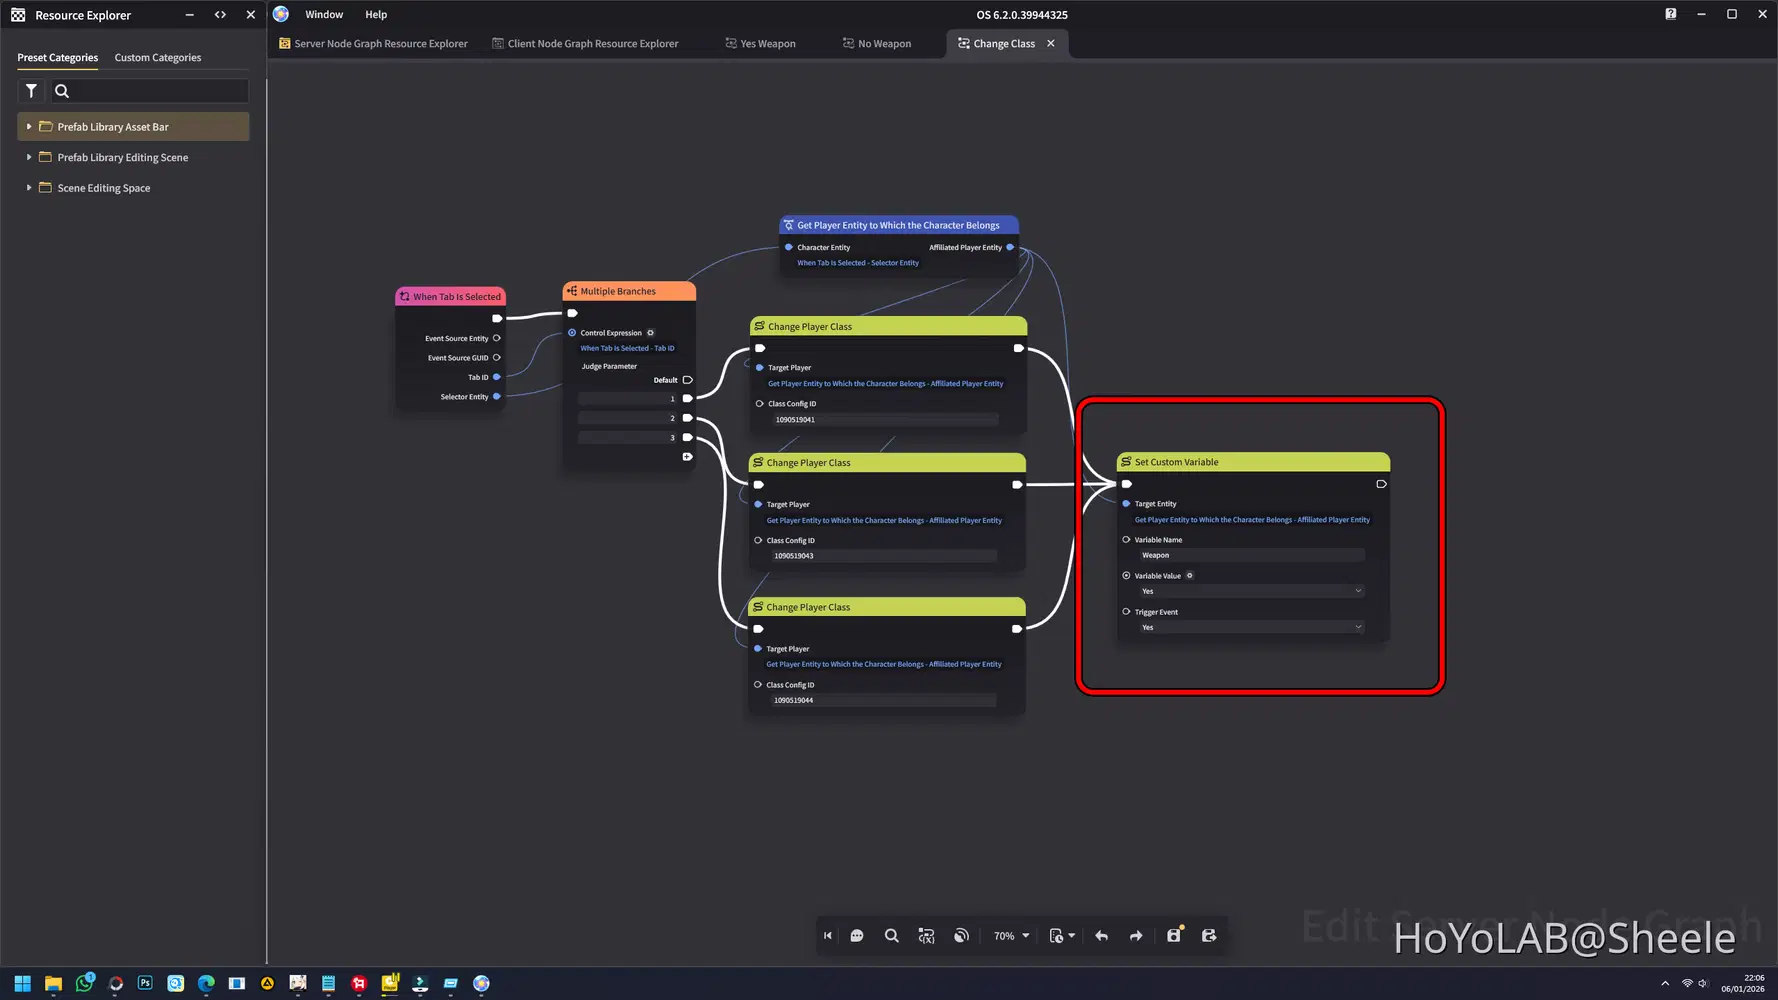
So, when you select one of the available tabs, your Class will change based on the weapon you use, and your variable status will be set to Yes. This allows you to access and enter the dungeon or domain. Add this Node to the previous Object.
2. Enter the Dungeon and Spawn Enemies
This is the entrance to the dungeon. Previously, we created the key, and now it’s time to add the padlock. Add a Tab to the object that acts as the portal or entrance to the domain.
For each created Tab, add a Filter Node Graph (Yes).
This means that when the character’s variable is set to Yes, the tab on the dungeon entrance becomes active, allowing the player to enter the dungeon.
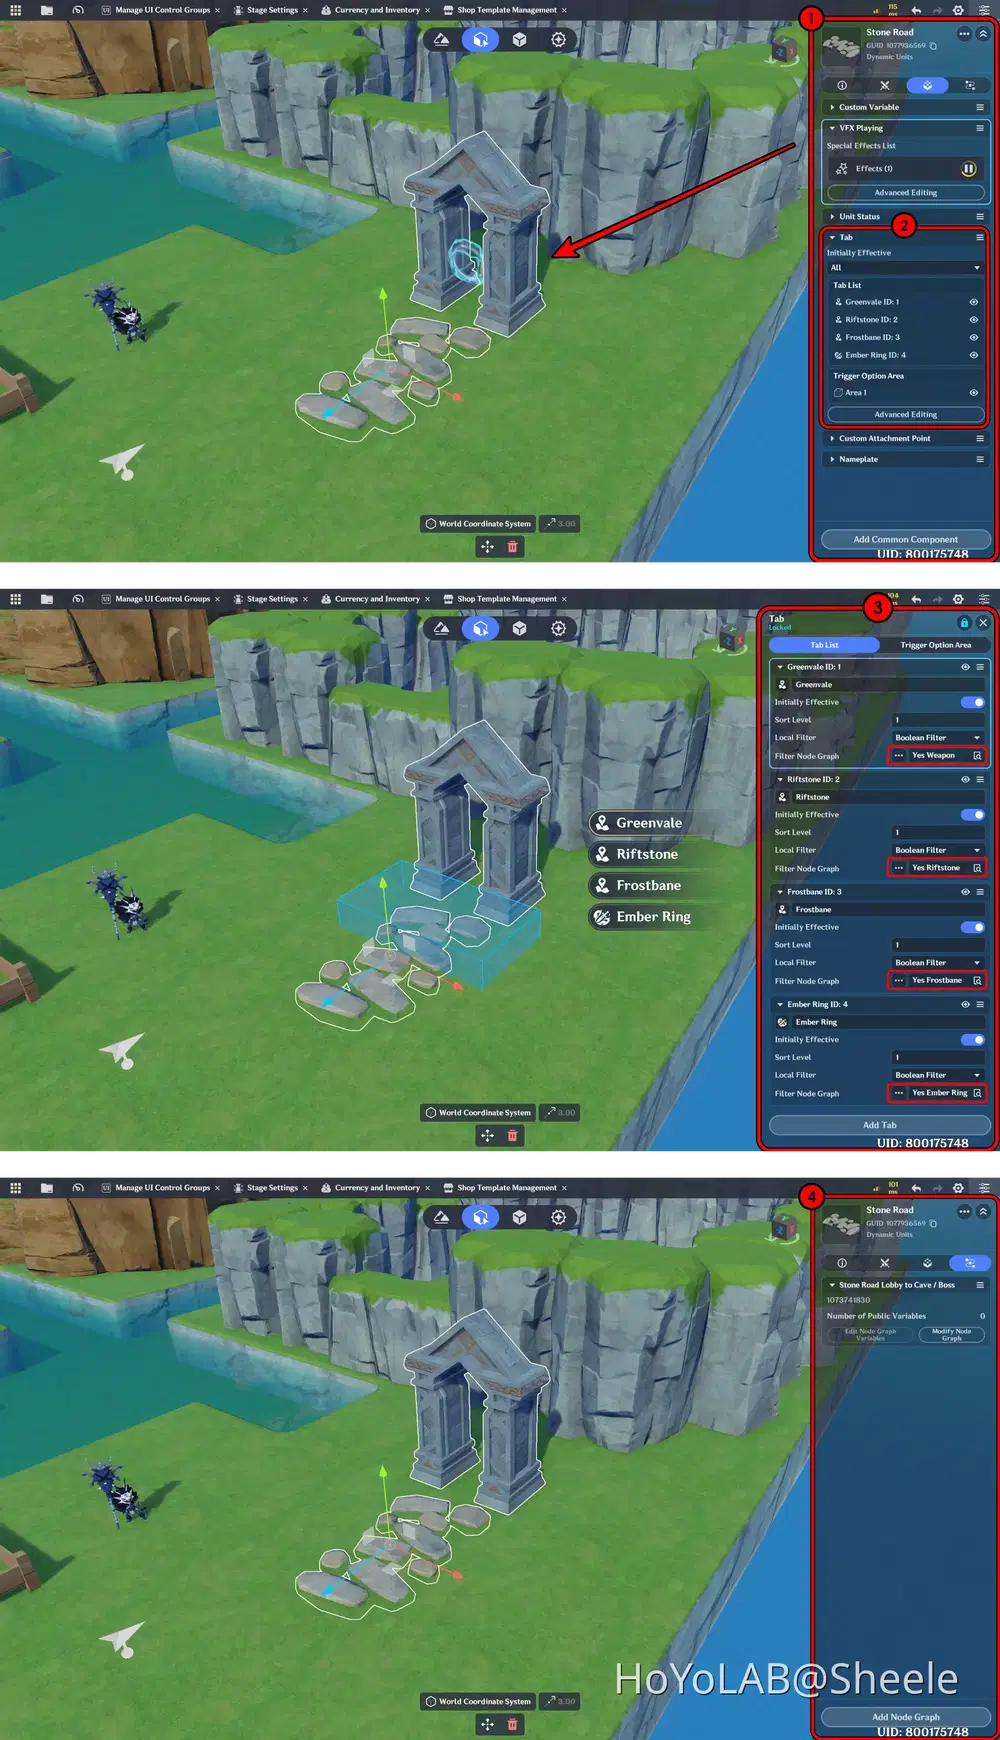
Next is to add a Node to this object so it can be used.
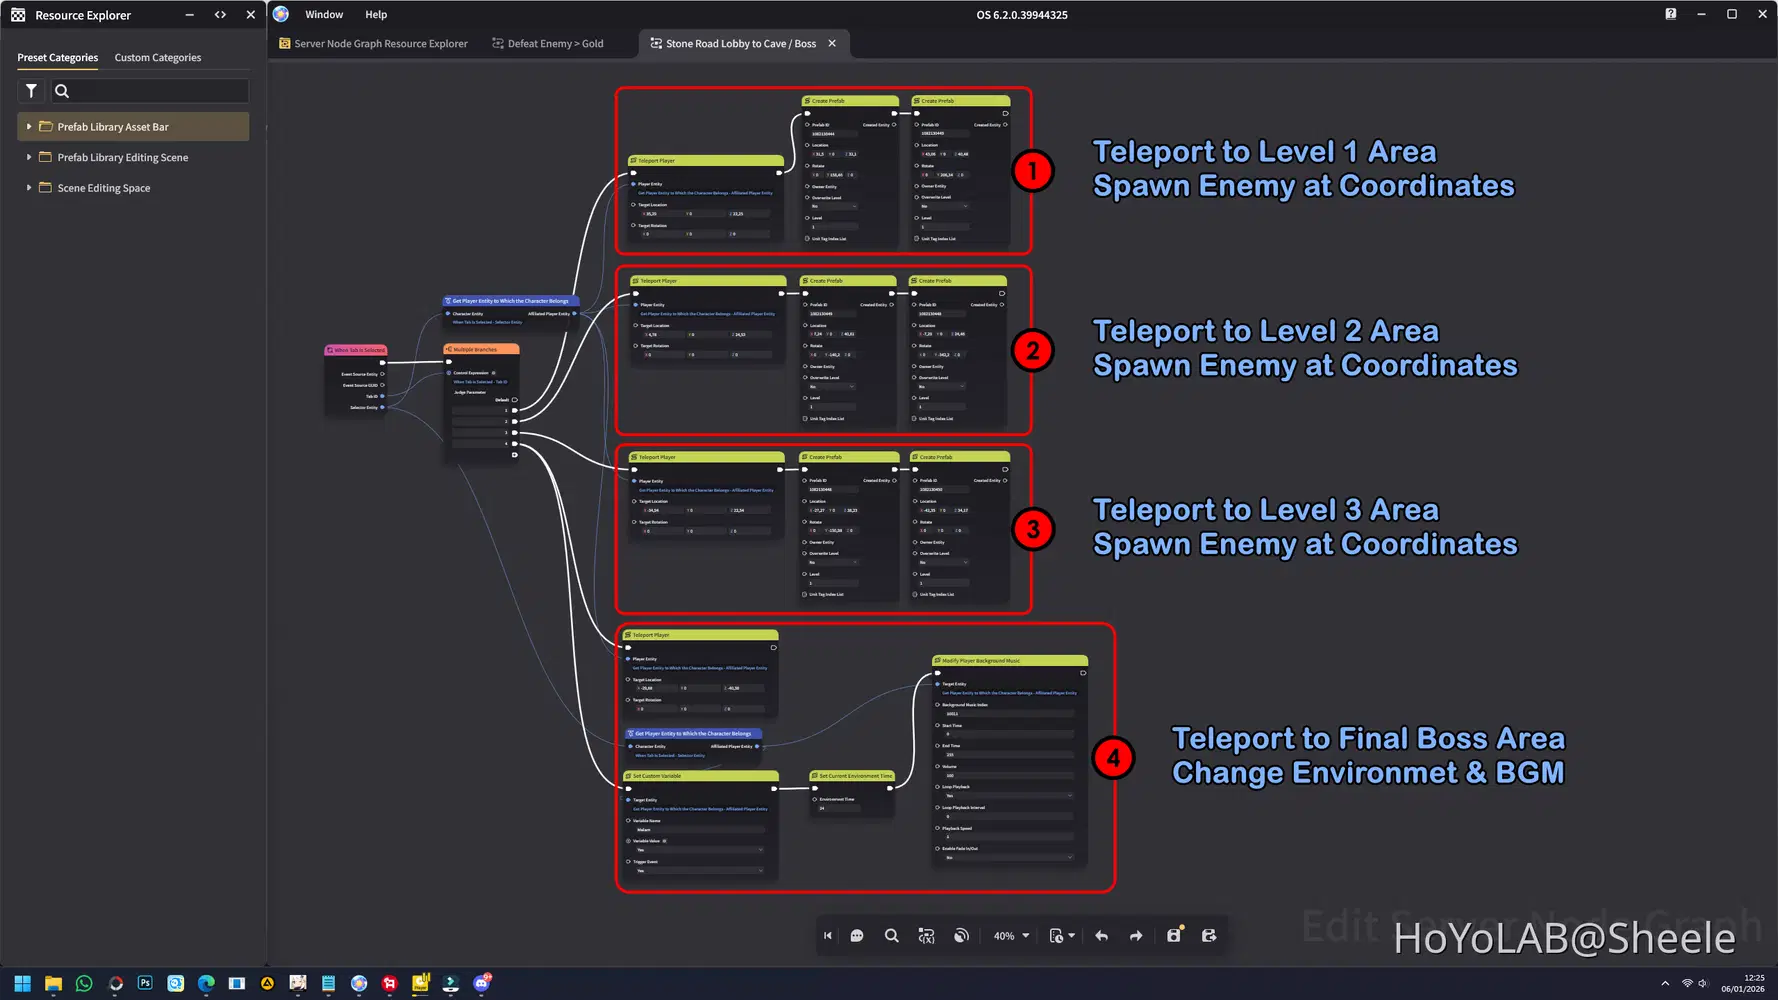
For the Node setup, I created it as shown below.
When the player selects one of the tabs on the object, player will be teleported into the dungeon, and enemies will be spawned based on the Prefab ID.
Make sure to set the coordinates correctly.
To find the right coordinates, you can place an object in the arena as a placeholder, note its position, and then remove it after the enemy spawn coordinates have been defined.
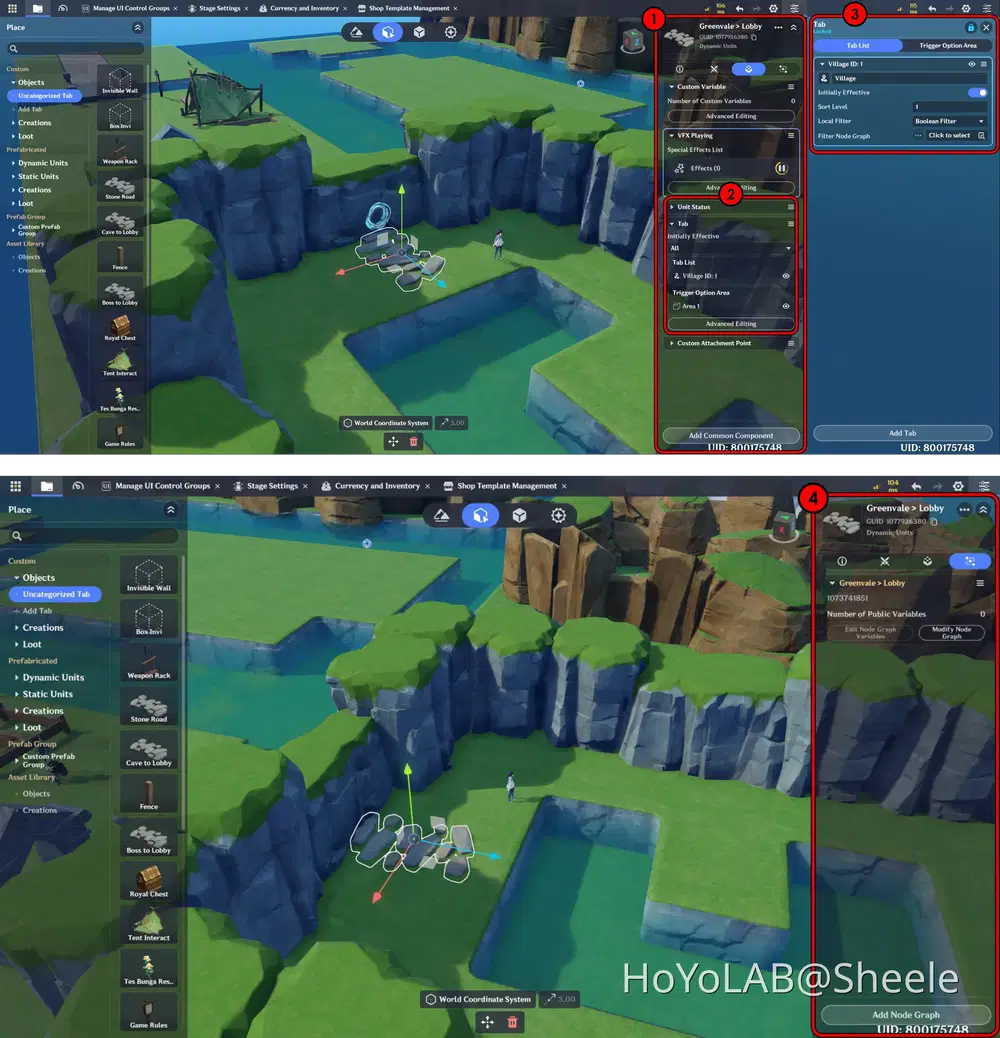
3. Exit the Dungeon
After entering the dungeon, don’t forget to provide a way to exit the dungeon. So, I added a new object and attached a Tab as its interaction component. You can check the object settings in the Details panel shown below.
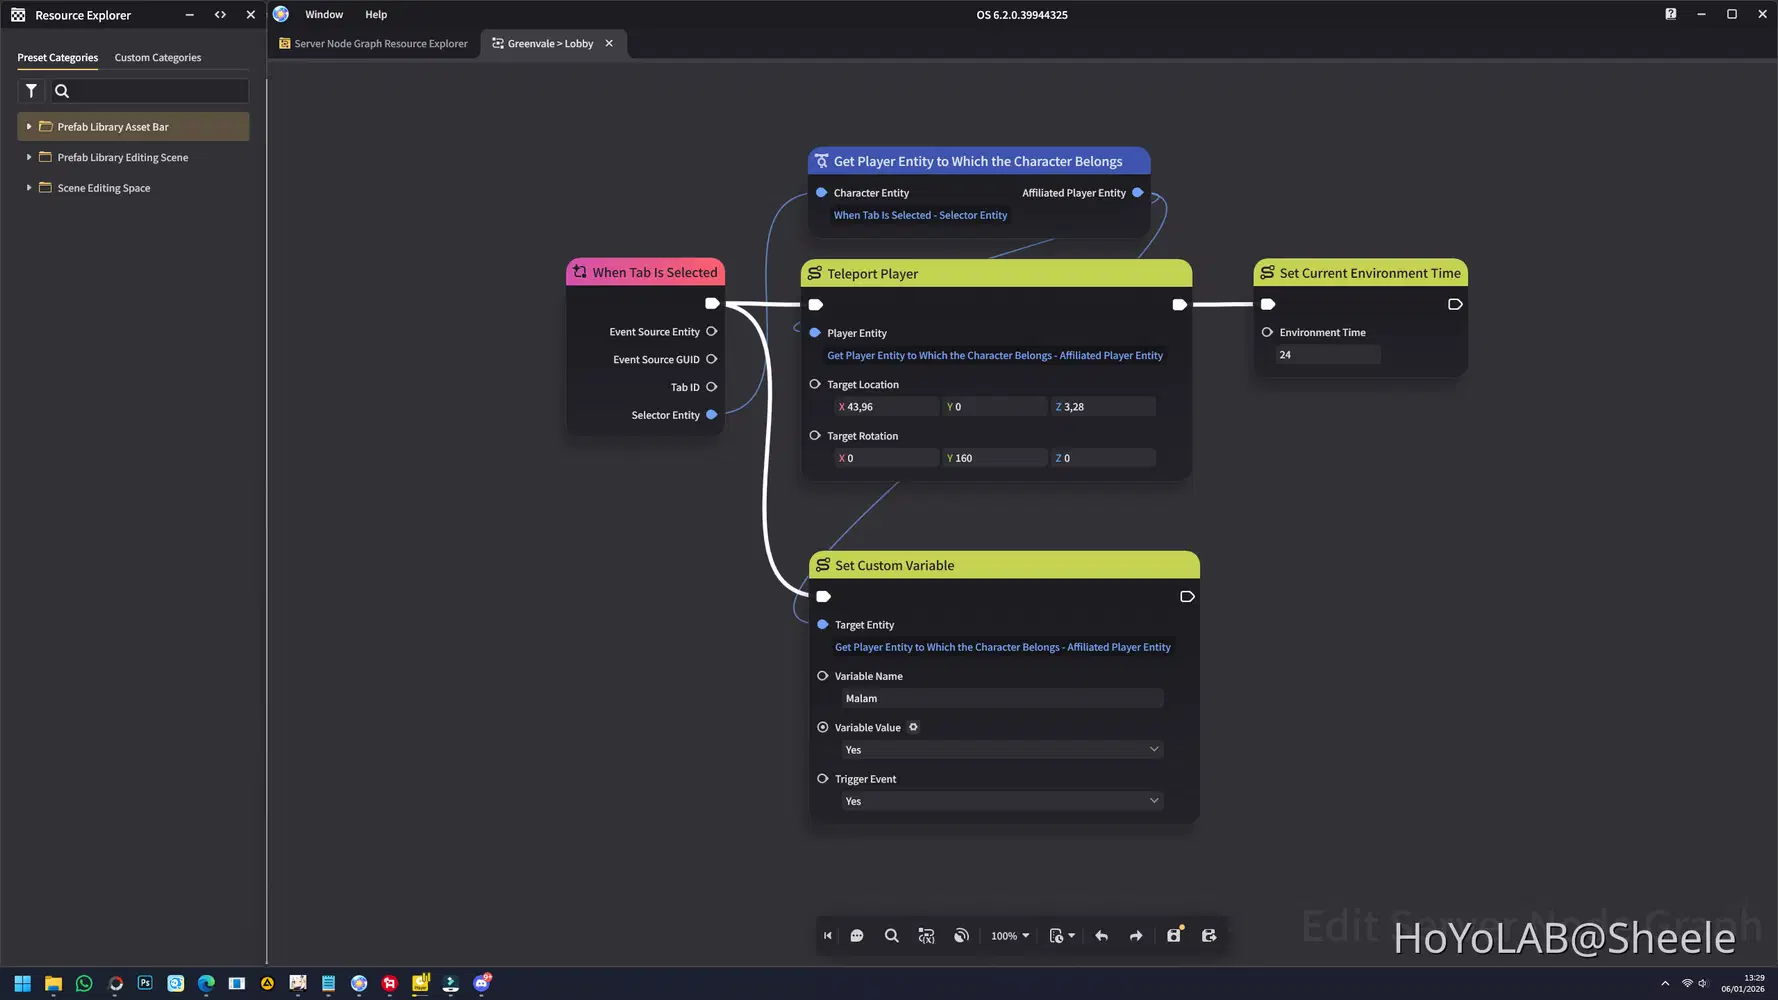
After the object is created, don't forget to add a Node to that object.
For the Node setup on the dungeon exit object, you can see the example below. When the tab is pressed, the player will be teleported back to the village/ lobby. In addition, when exiting the dungeon, the environment time changes to night.
📌 Note. I use the Malam variable for the Sleep feature which will change nighttime to morning.
You can see the final result below.
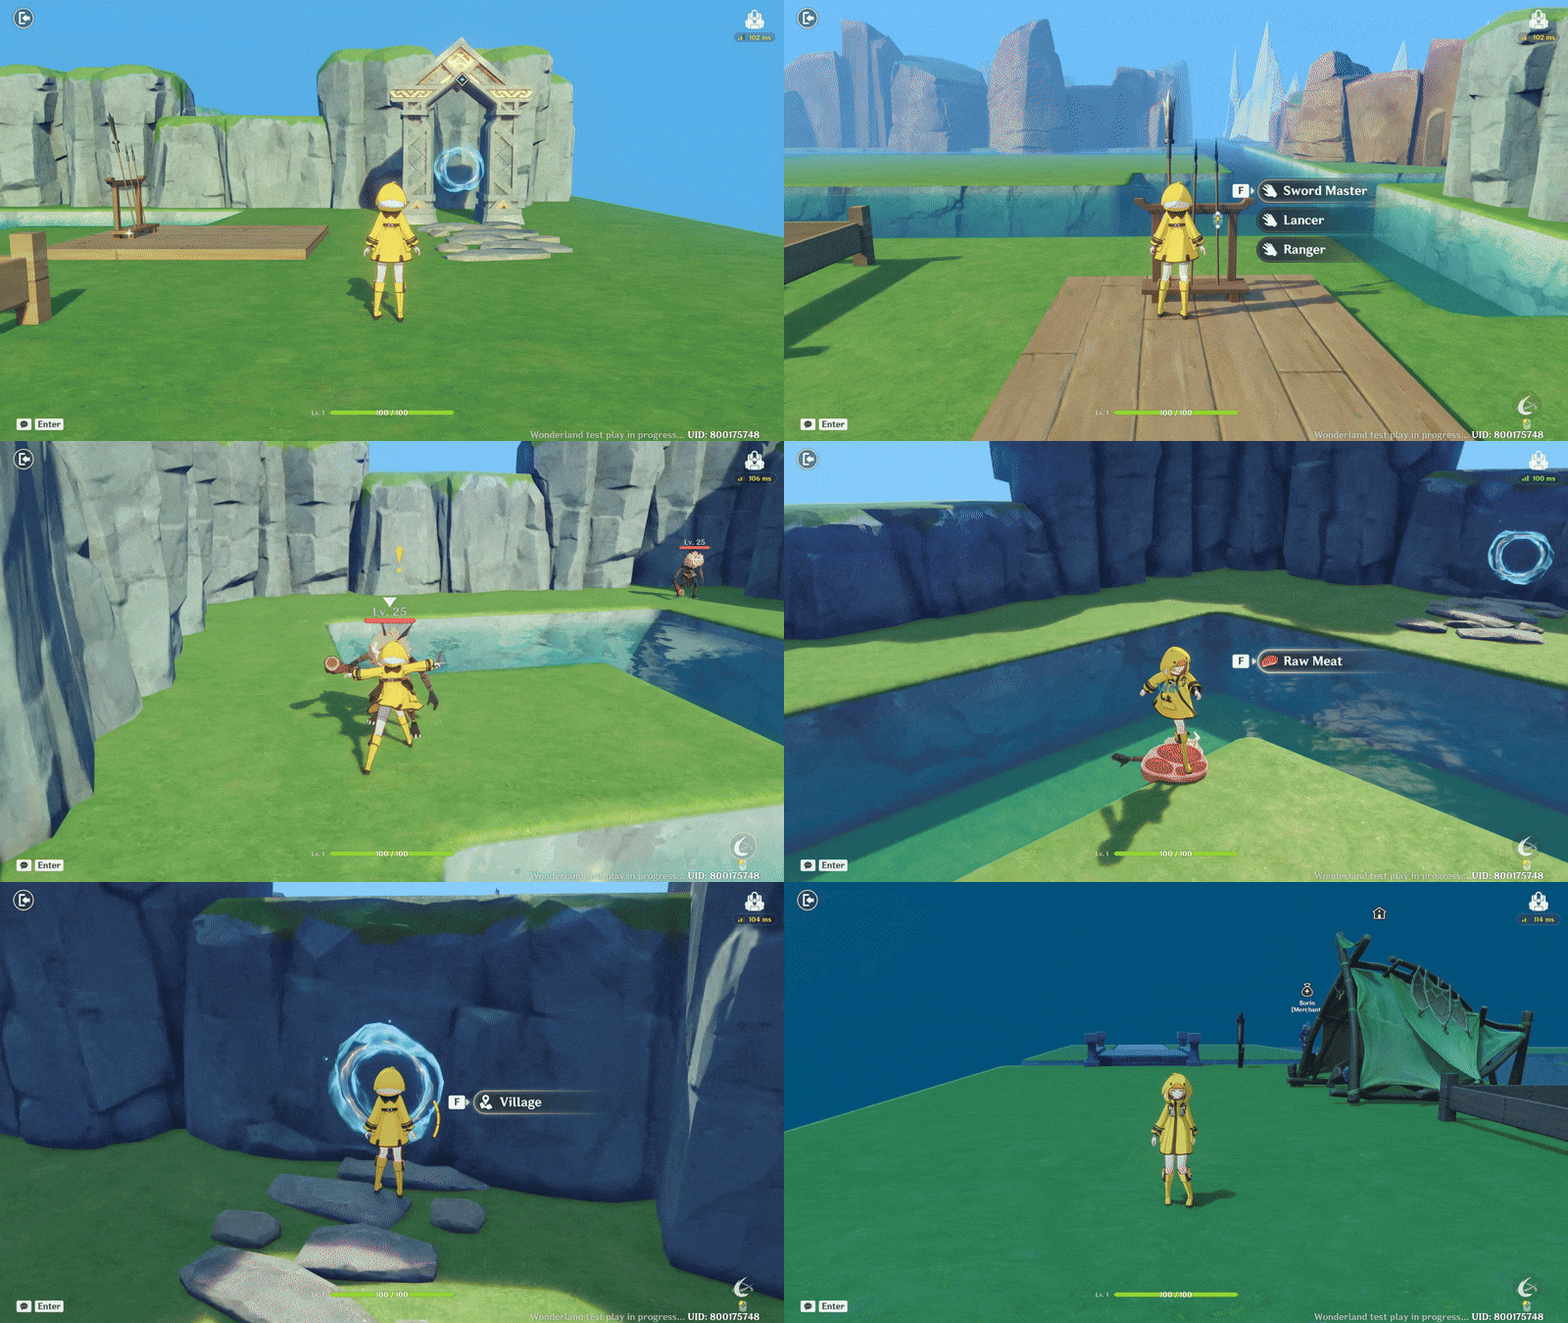
At the start of the game, the player does not have access to the dungeon. The player gains access to the dungeon after selecting a weapon. Once inside the dungeon, enemies spawn automatically, and when they are defeated, they drop items.
After clear the dungeon, the player returns to the lobby or village, where the environment is night.
Part 7: Inventory System
In this section, you will add an Inventory system to the character. The inventory serves as the main storage system for items, currency, and other resources obtained during gameplay. Through this system, players can manage their items, use specific items, store loot from defeated enemies, and carry currency for transactions in the Shop.
The Inventory system also connects multiple game features, such as the loot system, shop system, and character progression, making the gameplay feel more structured and integrated.
📝 Wonderland Guide:
a. Add Inventory
First, you need to create an Inventory Template. This template works as the basic configuration for the inventory system in your game. To do this, open the Currency and Inventory menu in the Miliastra Wonderland Editor.
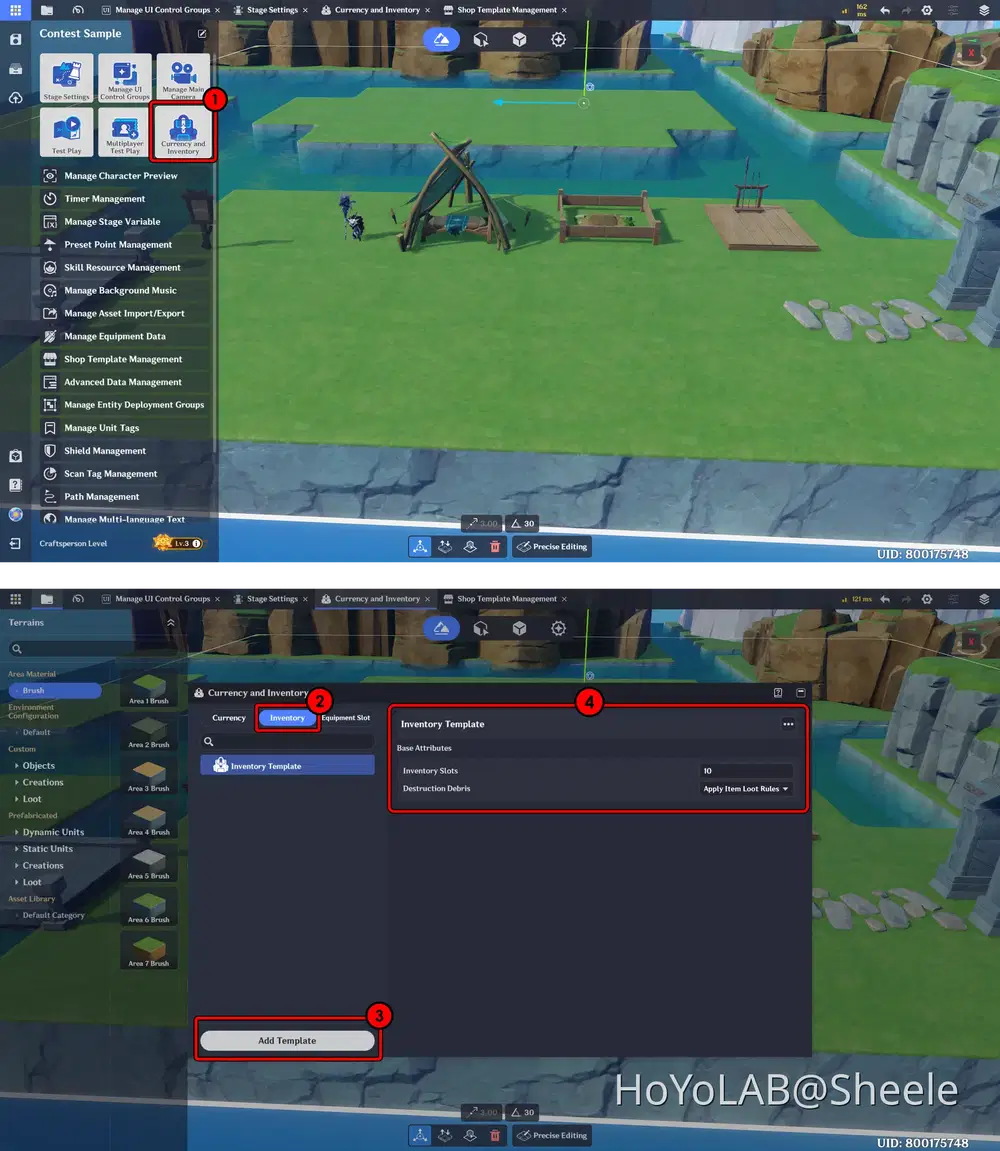
In the Currency and Inventory window, select the inventory tab, then Add Template. In this section, you can set the number of available inventory slots and other settings.
b. Character Inventory Setup
The next step is to add the Inventory component to the character. This step is required so the character can open and access the inventory you created earlier. If this component is not added, the inventory feature will not be available or usable in the game.
Select the Combat Preset tab. In the Character Details, open Edit Character, then go to the Components tab.
Add the Inventory component and assign the Inventory Template you created earlier in the Basic Inventory Settings section.
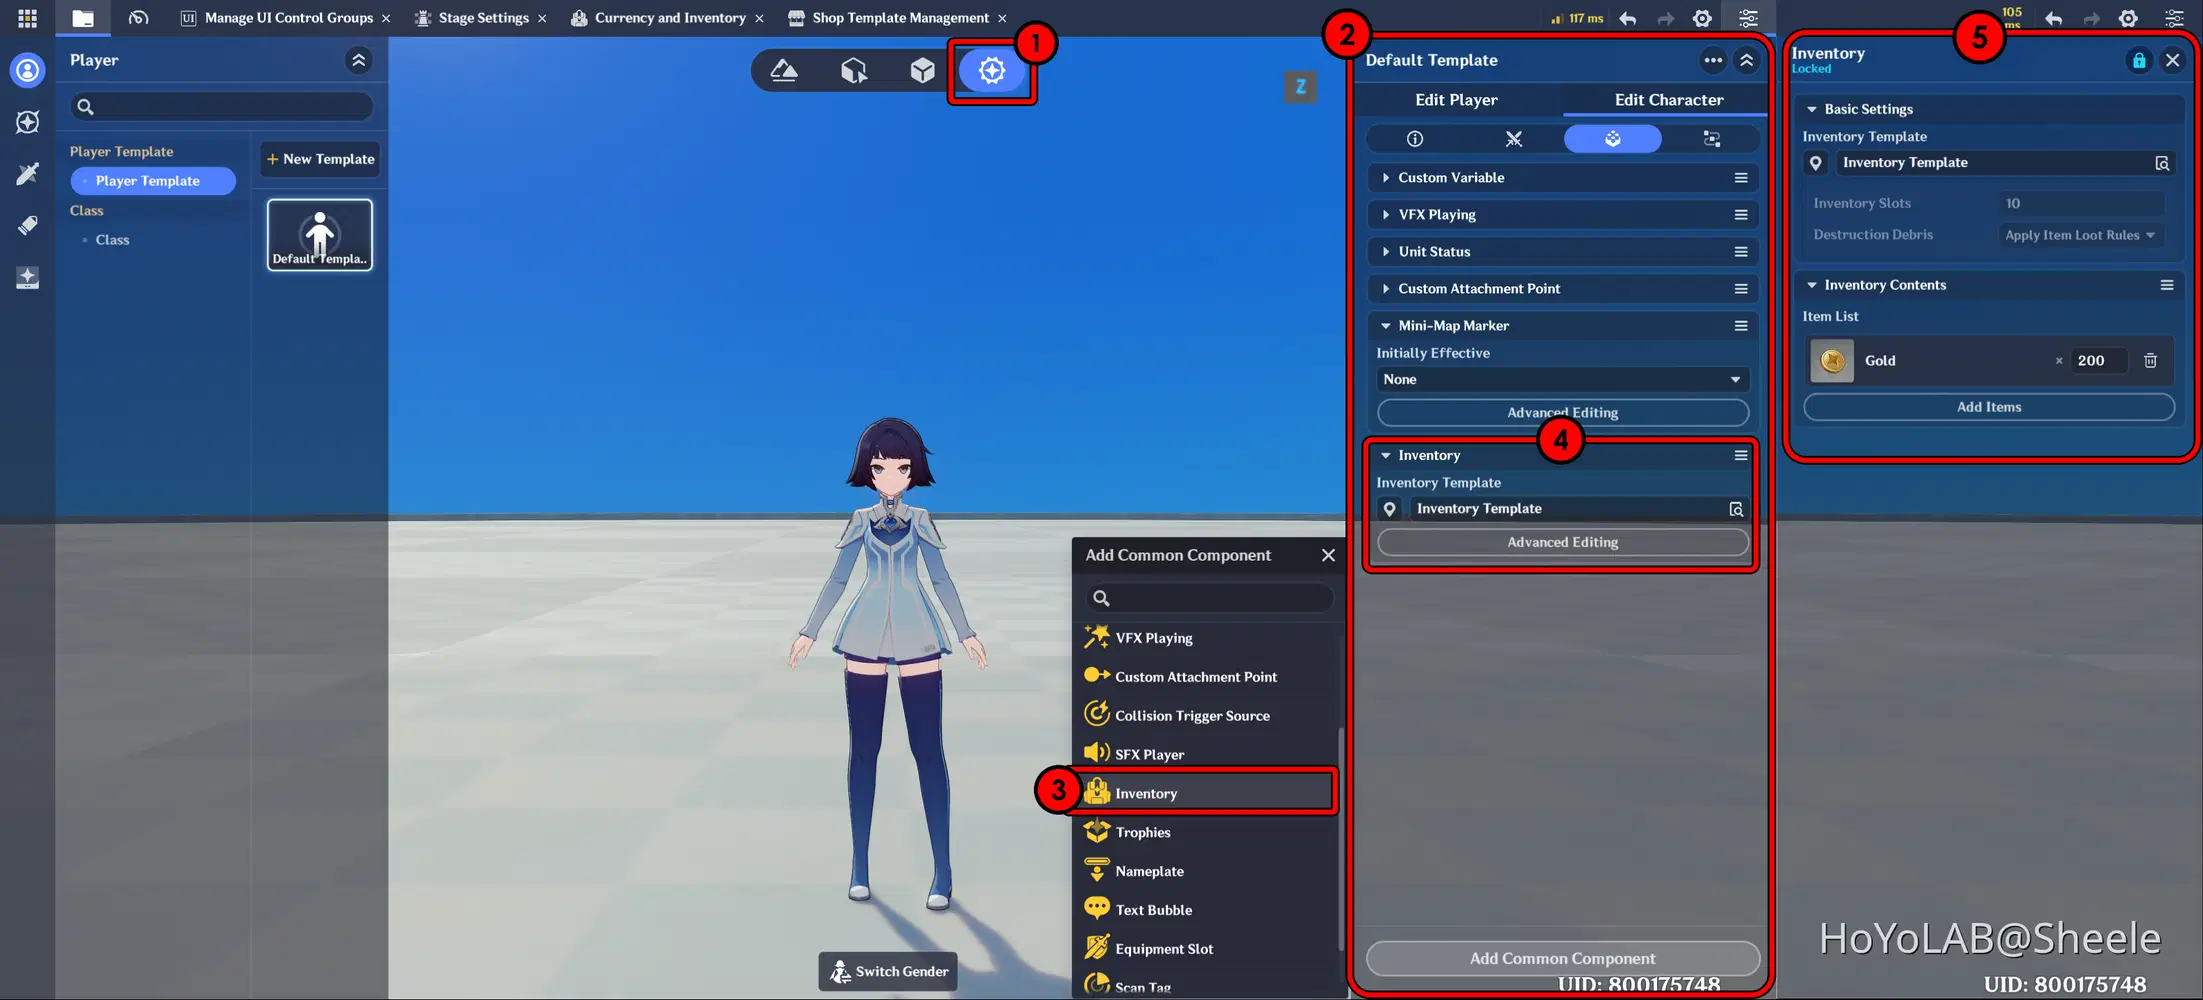
Here, you can also add starting items such as currency or material items. This allows the character’s inventory to be pre-filled with items when the game starts.
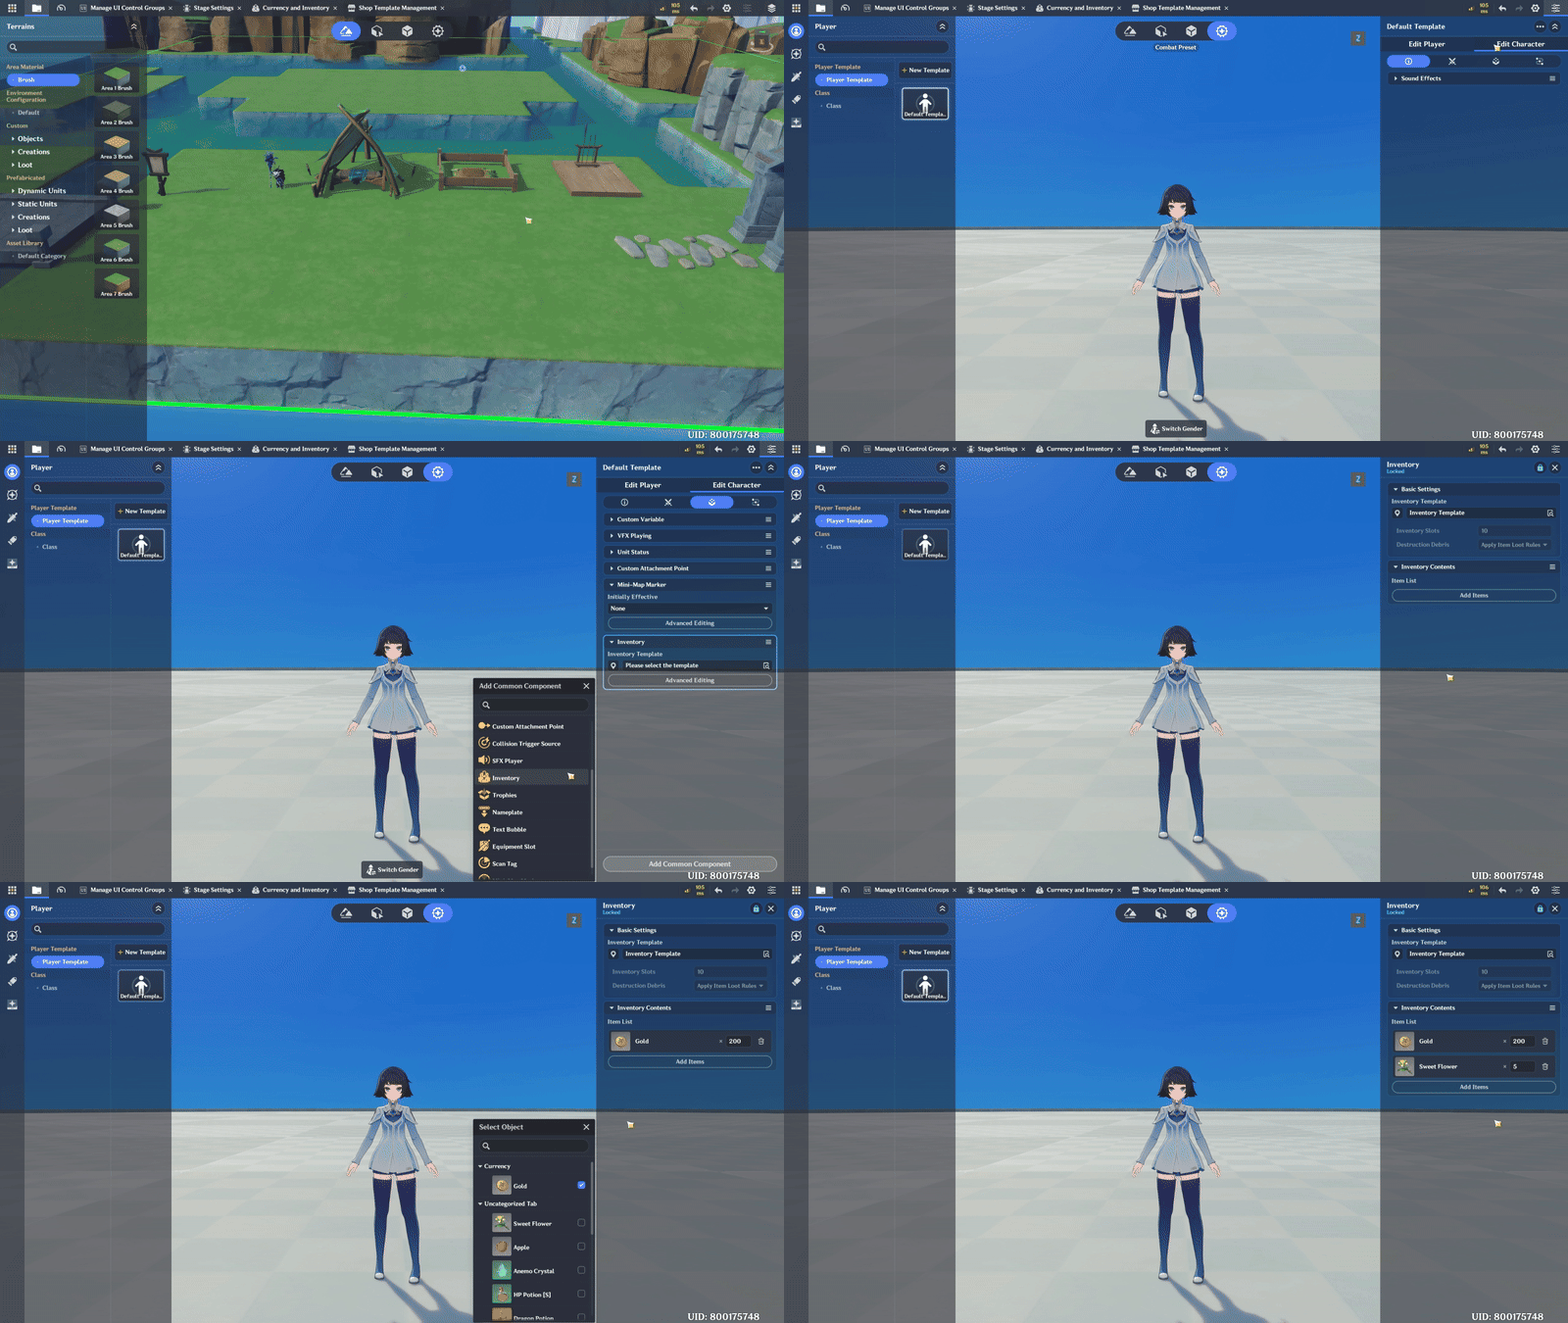
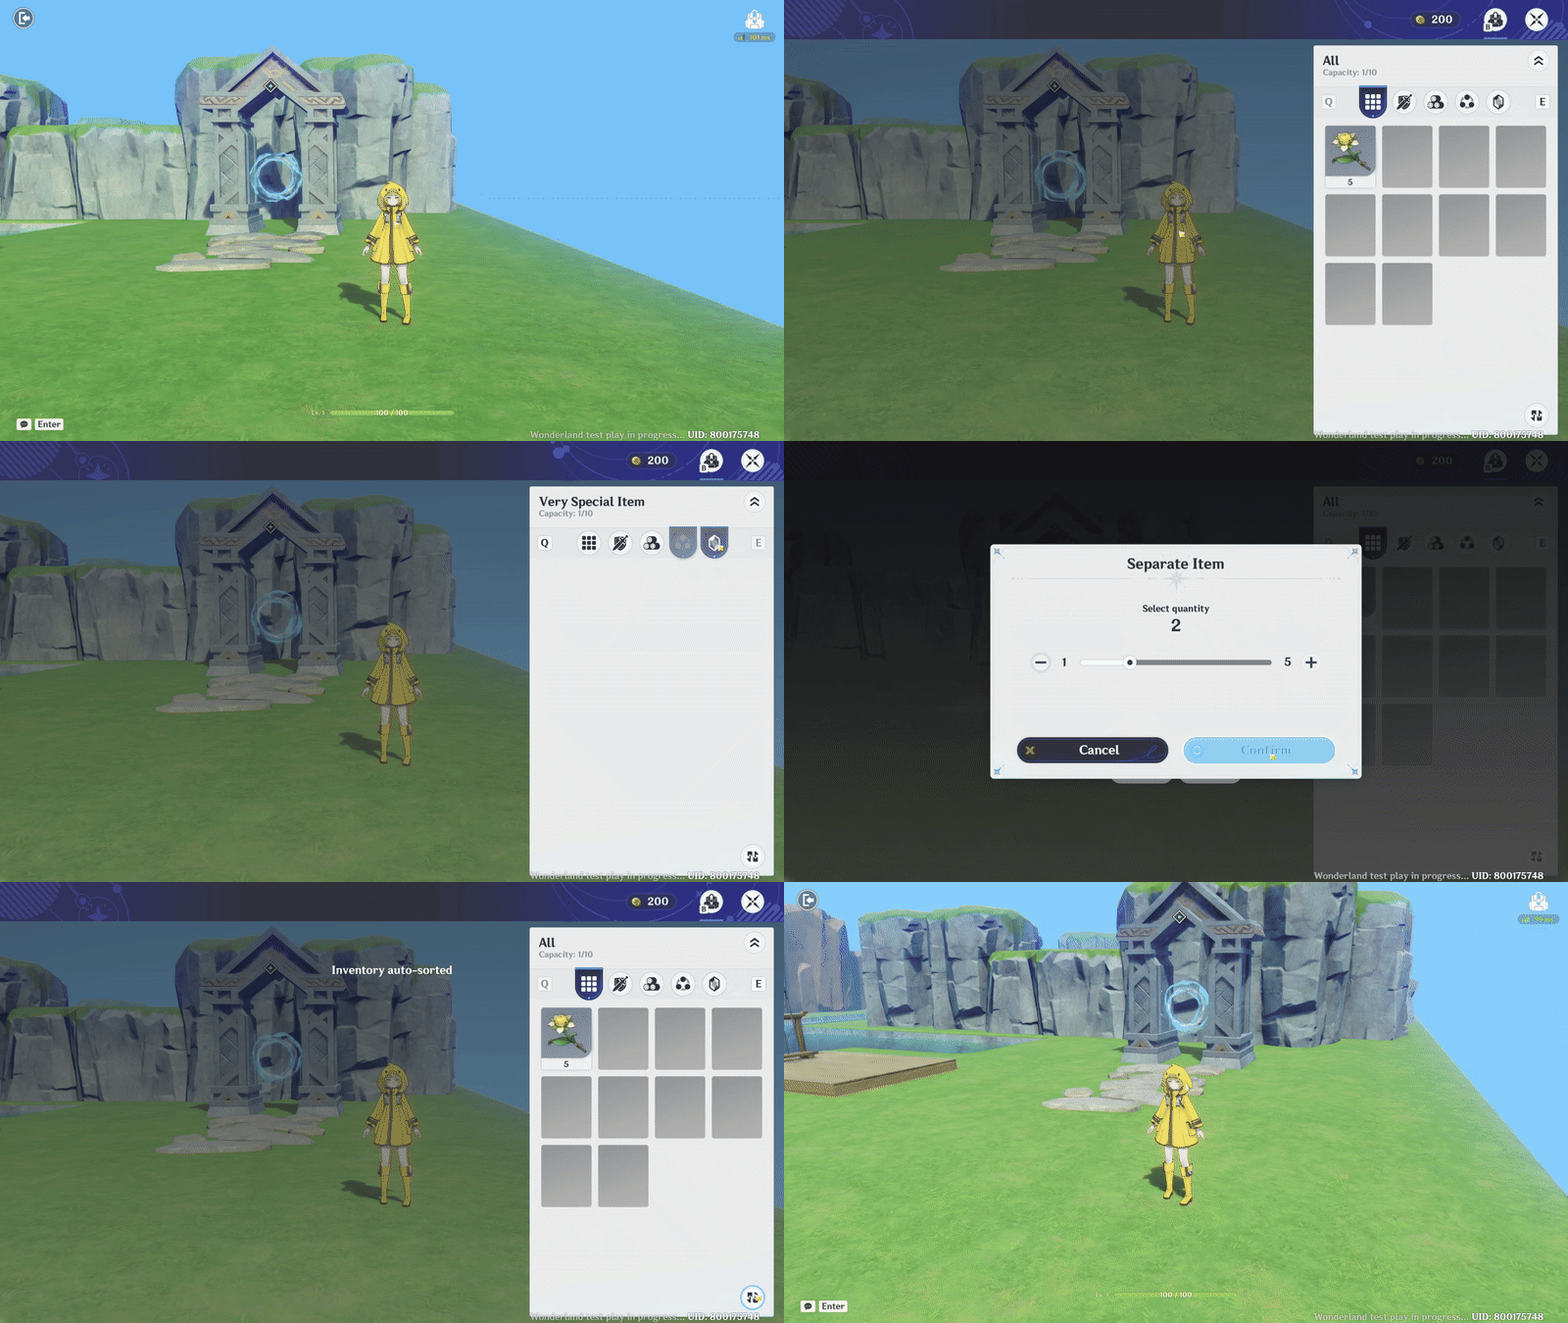
Below is the final result of the Inventory system, showing Currency and Items that are automatically added when the game starts. This also includes when you pick up a loot item, it will be automatically added to the inventory.
Part 8: Background Music
In this section, you will add Background Music (BGM) to the game to enhance the atmosphere and player experience.
Background music plays an important role in creating the right mood for each area, such as the lobby, dungeon, or during Boss encounters.
📝 Wonderland Guide:
a. BGM Lobby / House
Lobby BGM is played when the player is in the main lobby or hub area. This music creates a calm and relaxing atmosphere, allowing players to manage their inventory, prepare their character, and plan the next adventure.
Open Main menu in Miliastra Wonderland Editor - Select the Manage Background Music menu
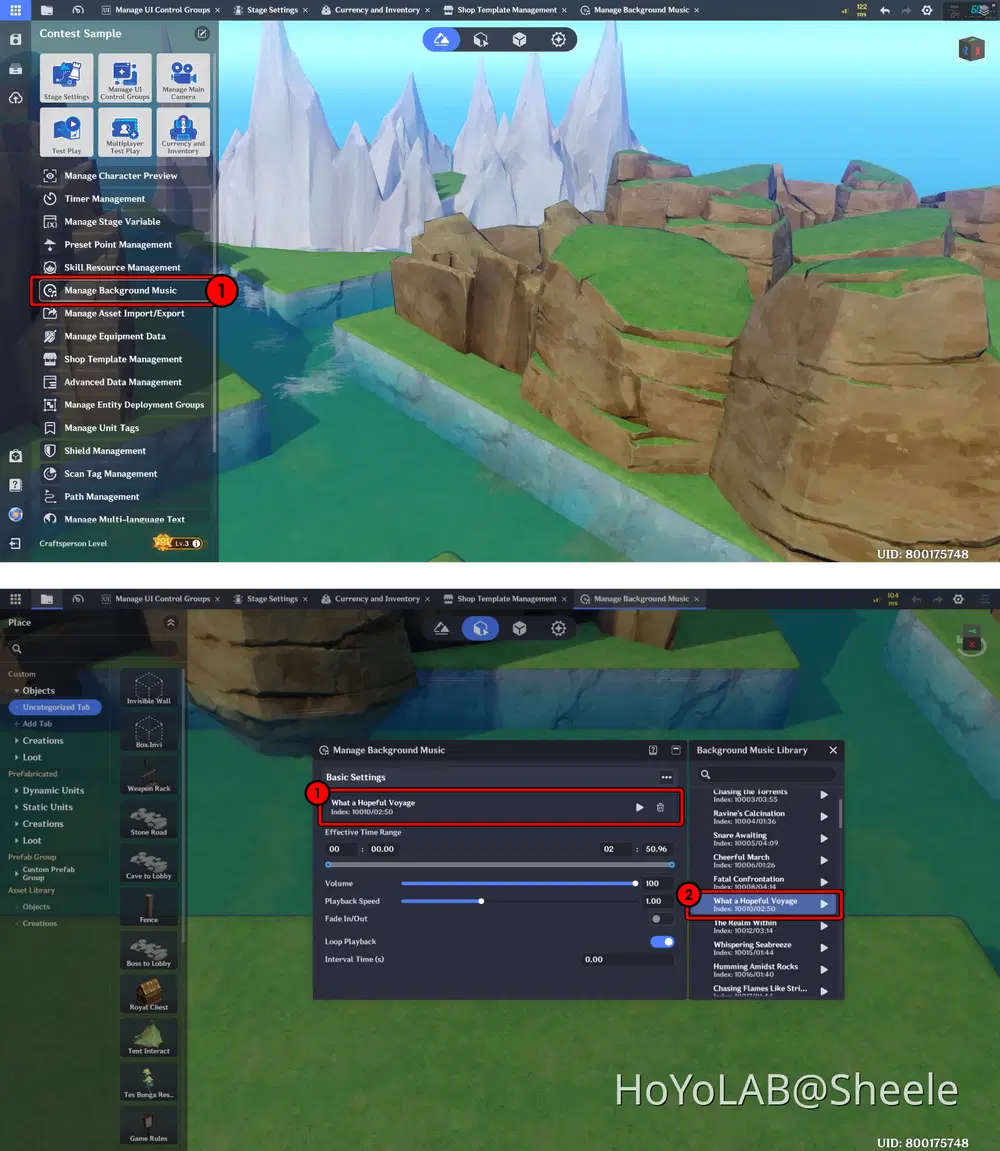
Then, a window will appear where you can configure the BGM settings, such as the music asset, music speed, loop, and other parameters. Select Background Music Asset to open the Music Library and choose the BGM you want to use.
Make sure to enable Loop so the music plays continuously during gameplay.
b. BGM Dungeons
Next, you can change the BGM when the player fights the Final Boss. This is done to increase tension and excitement during the battle. In the game I developed, I use the Modify Player Background Music Node. This node allows you to change or modify the BGM when the player enters a specific dungeon or area, such as the Final Boss arena.
You can determine the BGM Index by matching it with the index shown in the Background Music Library. Make sure the selected index corresponds to the correct music you want to use.
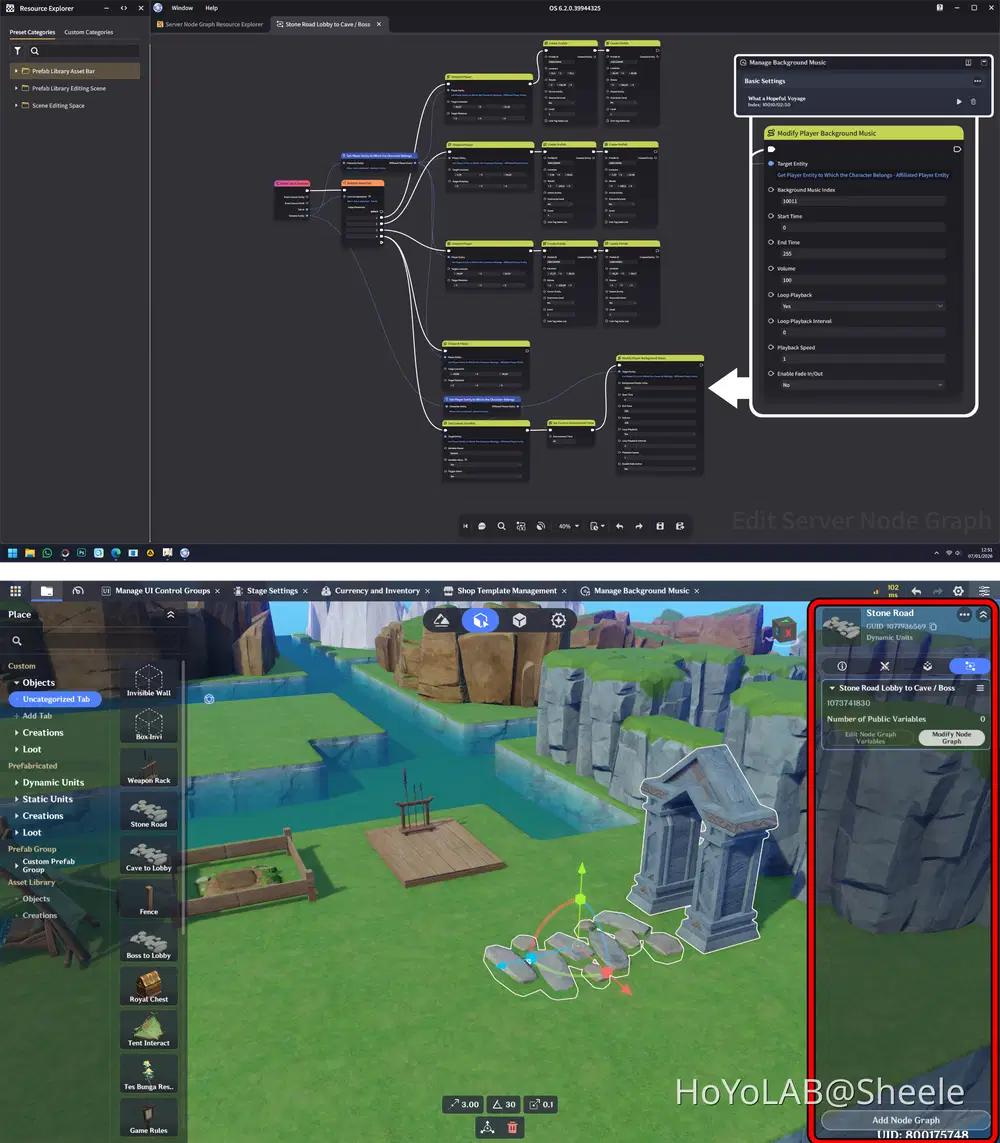
I placed this Node on the Dungeon entrance interaction object.
Don’t forget to add a similar Node to the Dungeon exit, which changes the background music from the Dungeon BGM back to the Lobby / House BGM.
Part 9: UI Management
In this section, you will manage the game’s UI (User Interface) system. UI Management covers various interface elements such as description windows, quest displays, NPC dialogs, and other visual components.
This feature is very important because it serves as the main way to deliver information to the player, including the game storyline, quest objectives, game status, and interaction feedback. In addition, a well-designed UI helps enhance the overall visual appearance of the game, making it clearer, more organized, and more enjoyable to use.
📝 Wonderland Guide:
a. Introduction & Tutorial Interface
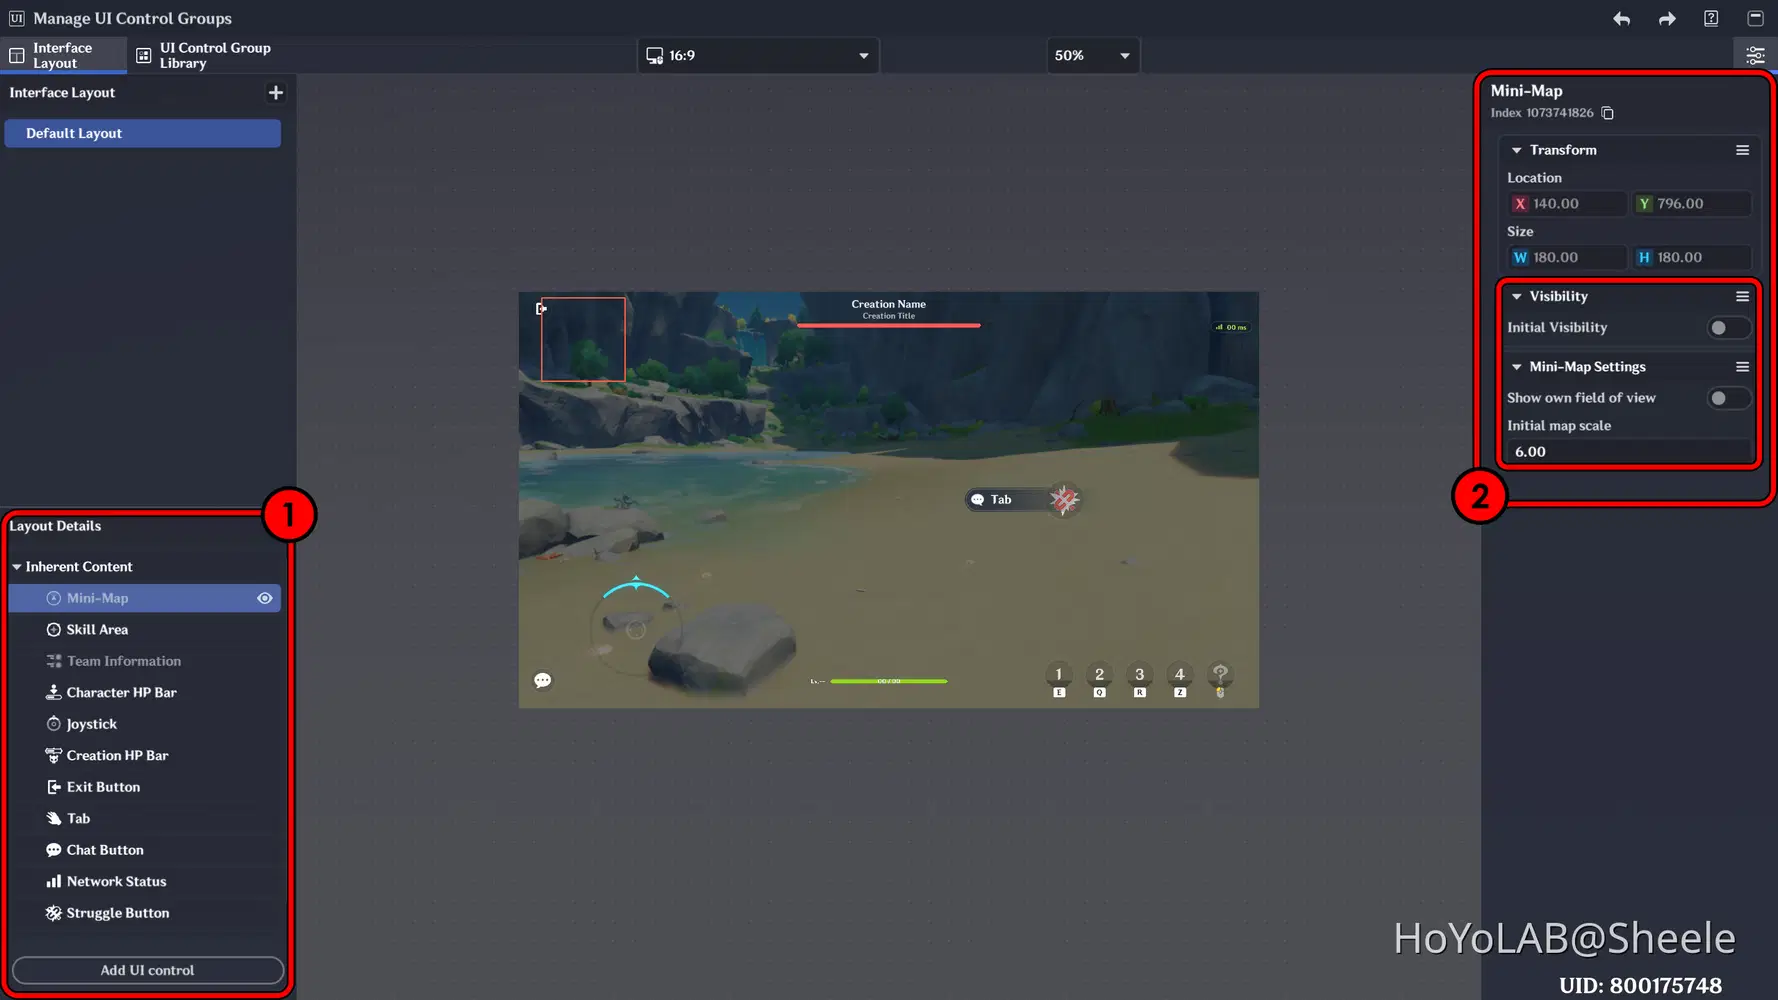
To manage the UI, open the Miliastra Wonderland menu and select Manage UI Control Groups.
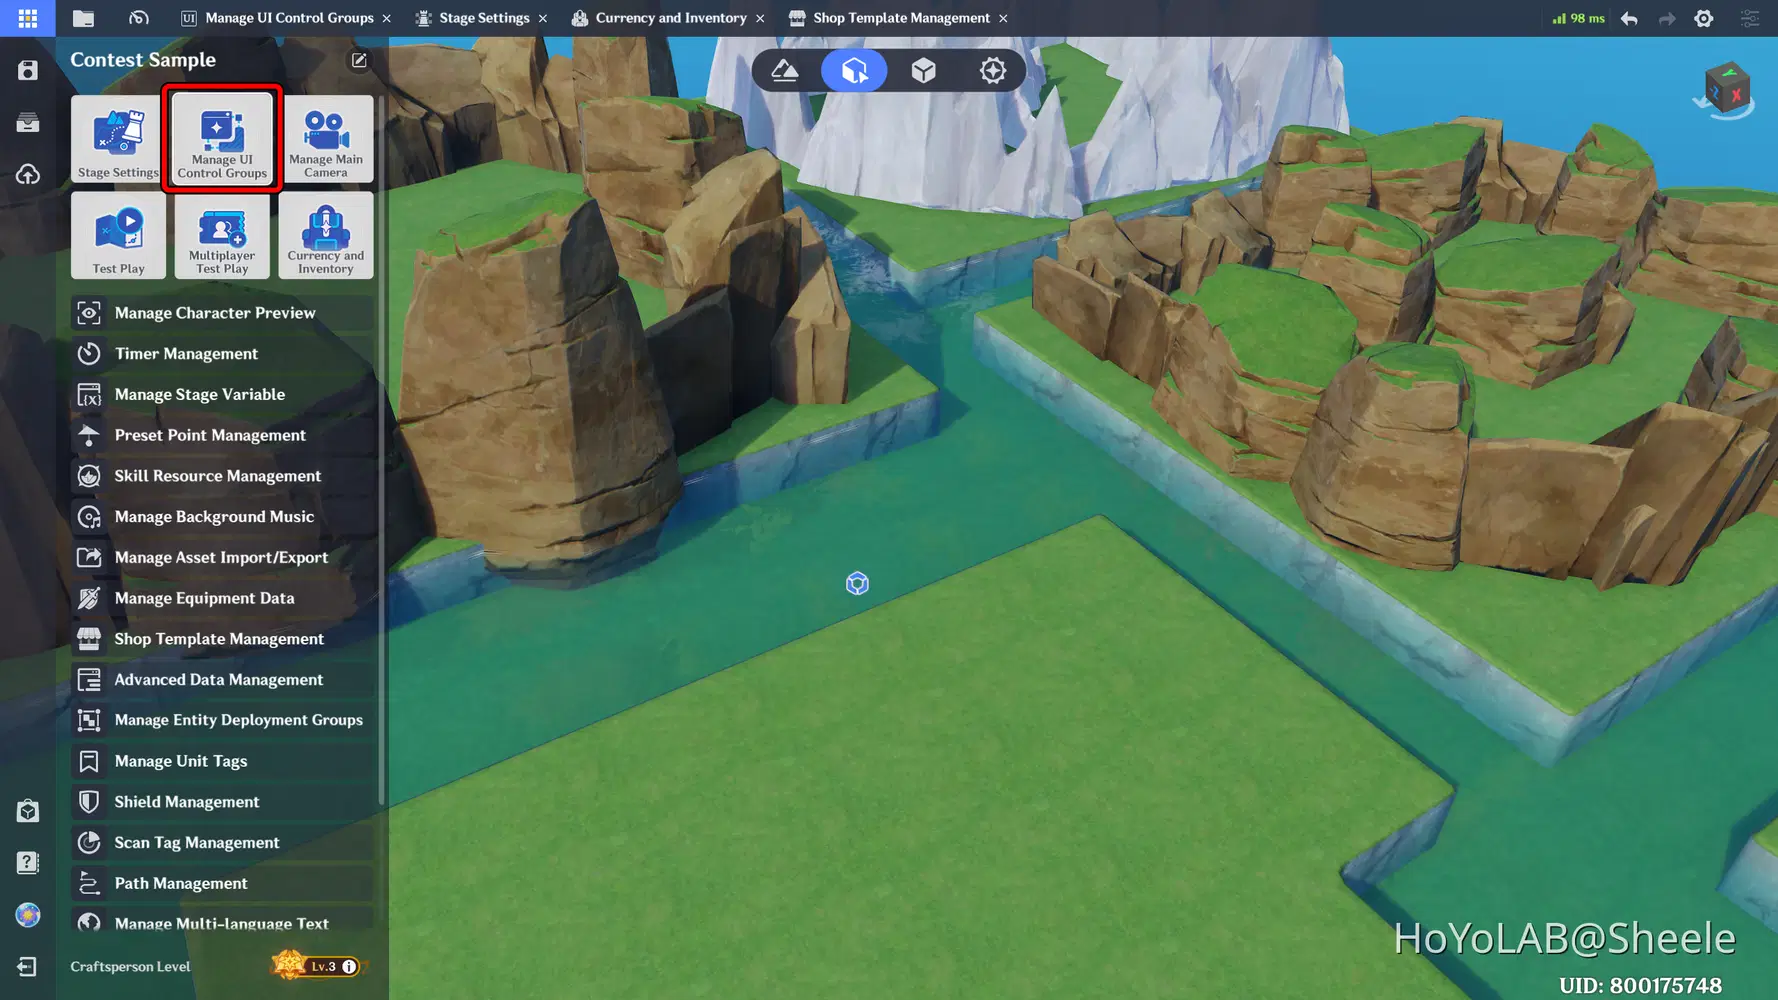
A new window will open showing the default UI screens. Here, you can create and manage the UI components that will be displayed, such as the Mini Map, Skill Area, Character HP Bar, and more.
You can also disable specific UI elements so they will not appear when the game is running. For example, if the Mini Map is disabled, it will not be displayed on the screen during gameplay.
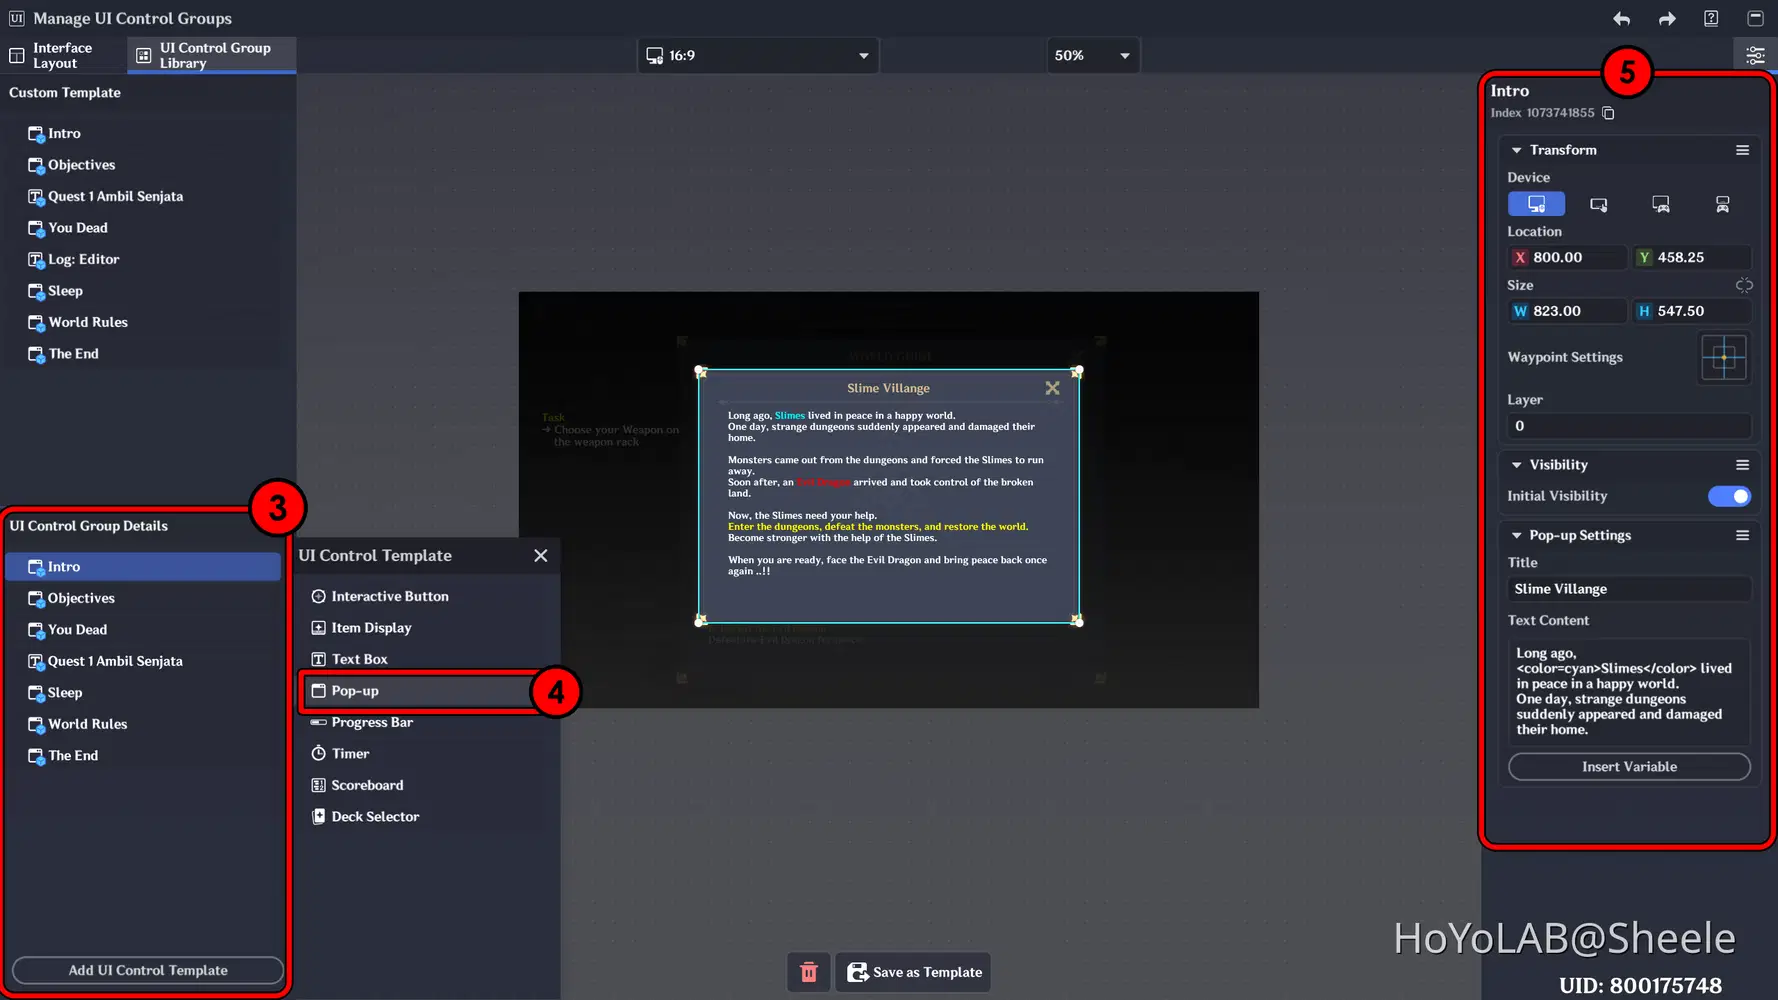
Open the UI Control Group Library, then select Add UI Control Template. Choose the component you want to create, for example a Pop-Up, and it will be displayed on the center of the screen. You can then add or edit the text content, such as descriptions or short game tutorials. You can also enhance your text appearance by using the formatting commands below.
Here are some commonly used Rich Text tags:
- Bold:
- Italic:
- Text Color:
- Text Size:
These tags are commonly used to format text in UI systems such as game interfaces, dialogs, and tutorials.
for example: Text Here
As a result, the following UI will be displayed in the game: Text Here
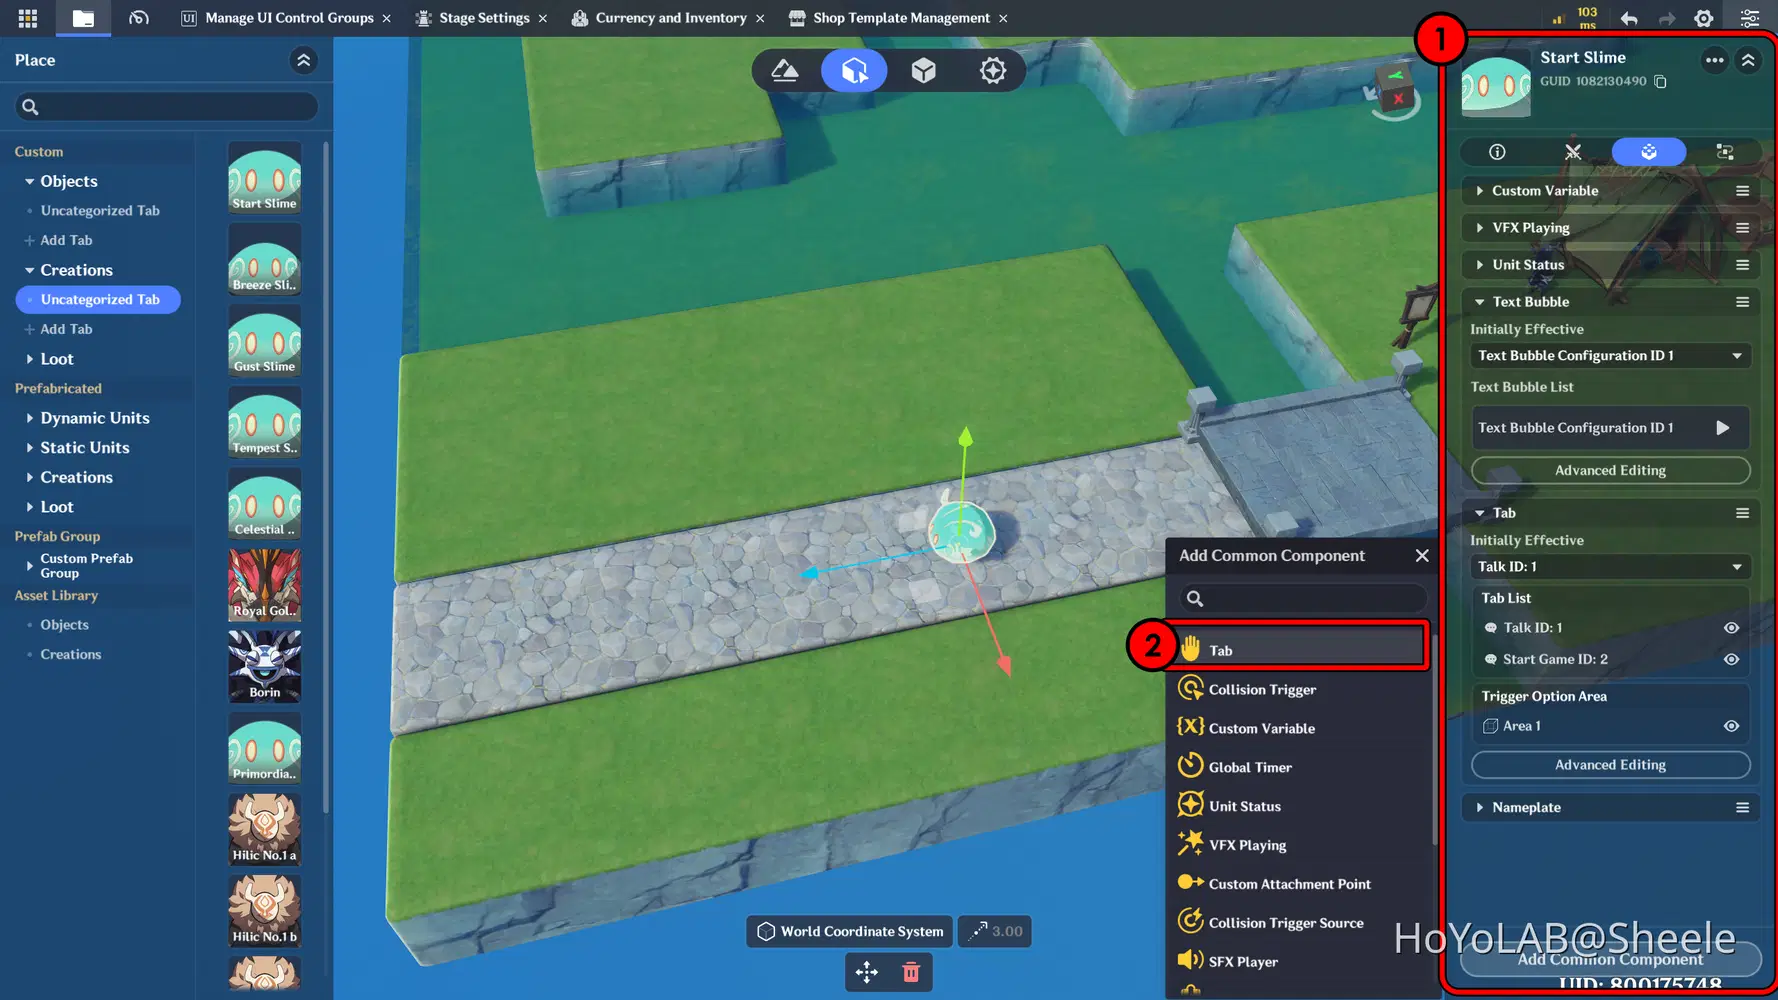
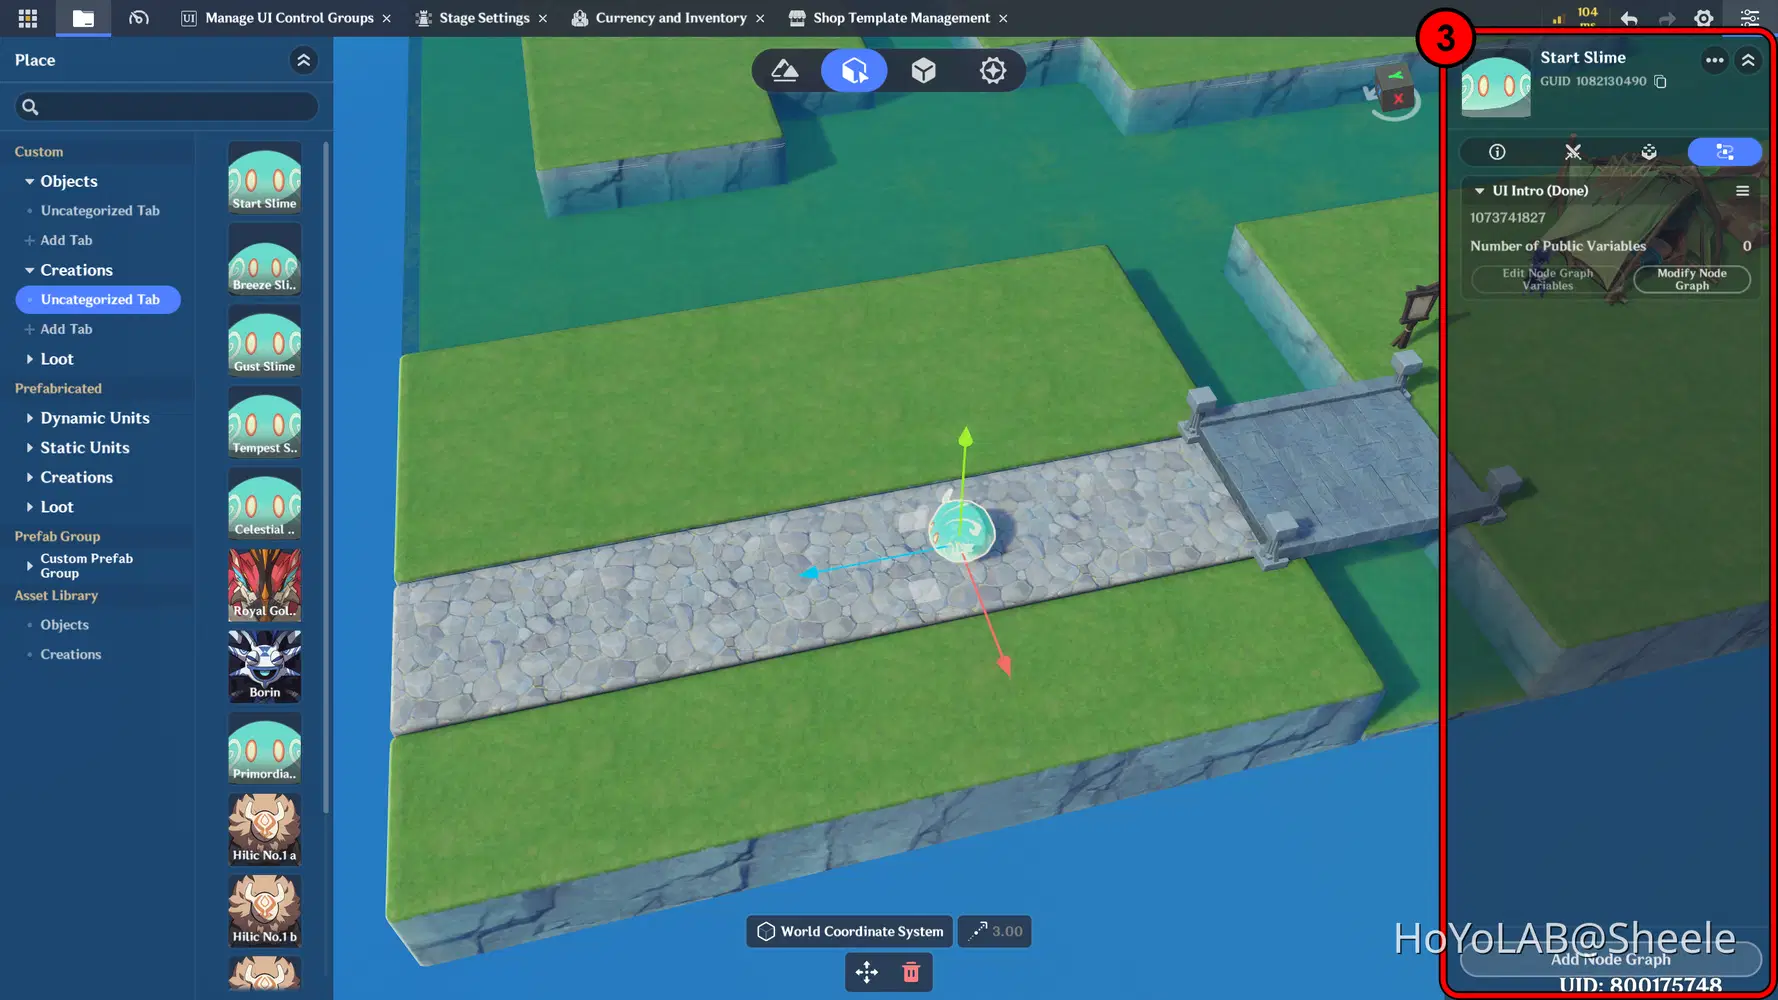
The next step is to create a Node for an interactive object. In the game I developed, for example, I added this node to a Slime character to deliver the storyline or to provide game rules and instructions to the player.
To enable interaction, I added a Tab component to the Slime, allowing players to interact with it and trigger the associated Node.
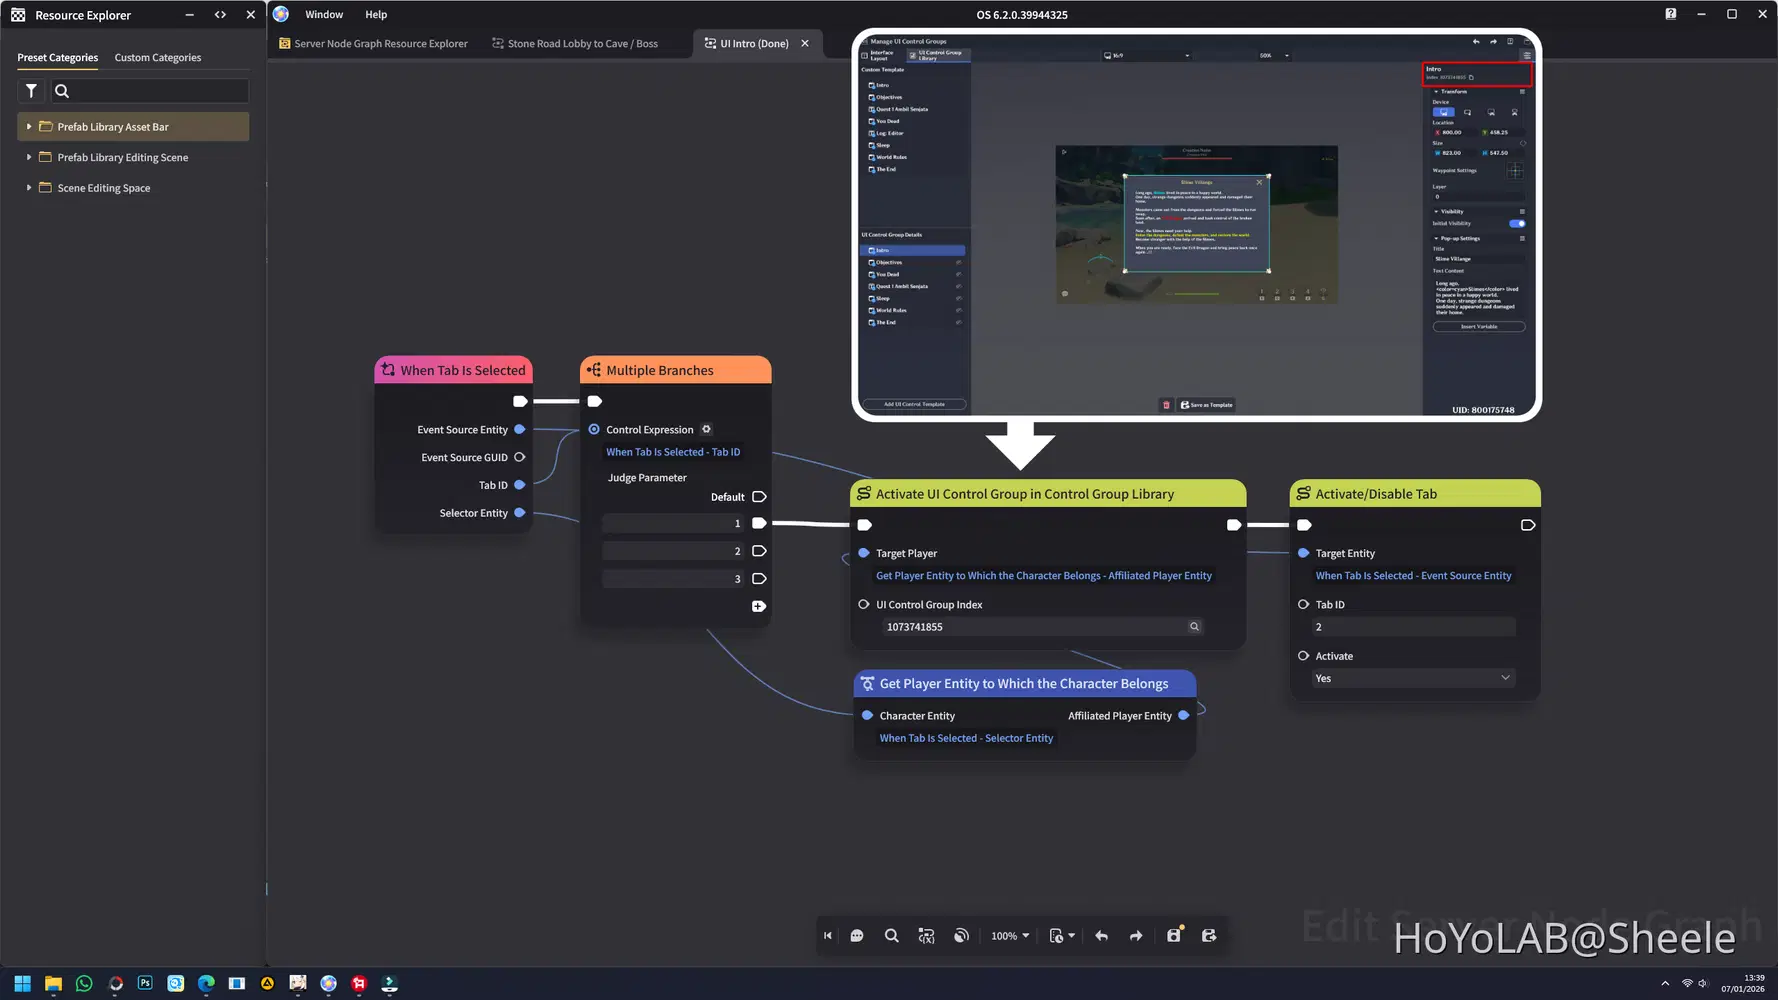
Below are the Nodes I use. When a tab is selected, the UI is displayed, and Tab 2 is activated. And make sure you enter the same UI Control Group Index.
Lastly Make sure you add that Node to the Object.
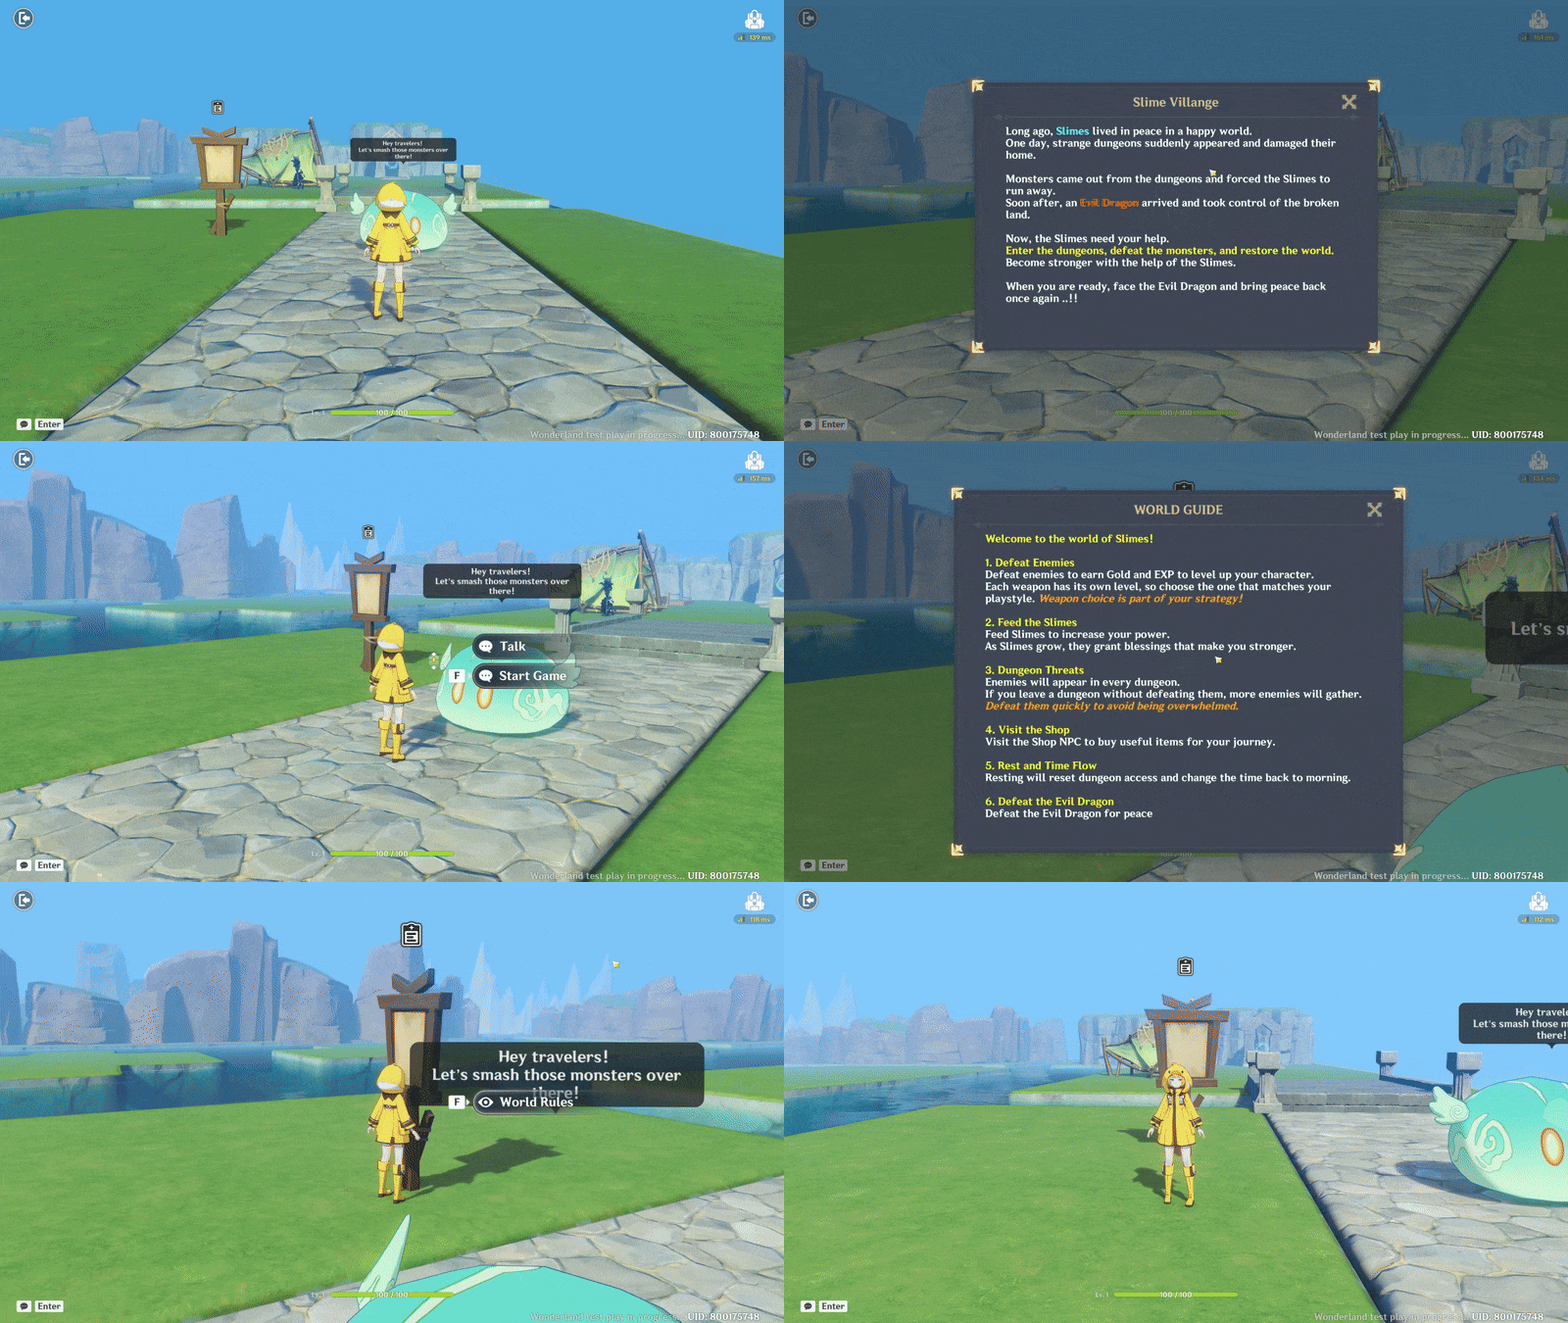
This is the result of displaying from Slime Interaction / Interactive objects to display UI / change UI.
Part 10: Core Game Rules & End Conditions
This section focuses on managing the core gameplay flow and defining the main game rules. It covers the revive system, failure conditions, limitations on character attacks, and how the game reaches its end state.
These systems work together to control player progression, balance difficulty, and ensure the game has clear consequences, structure, and a meaningful ending.
📝 Wonderland Guide:
a. Revives
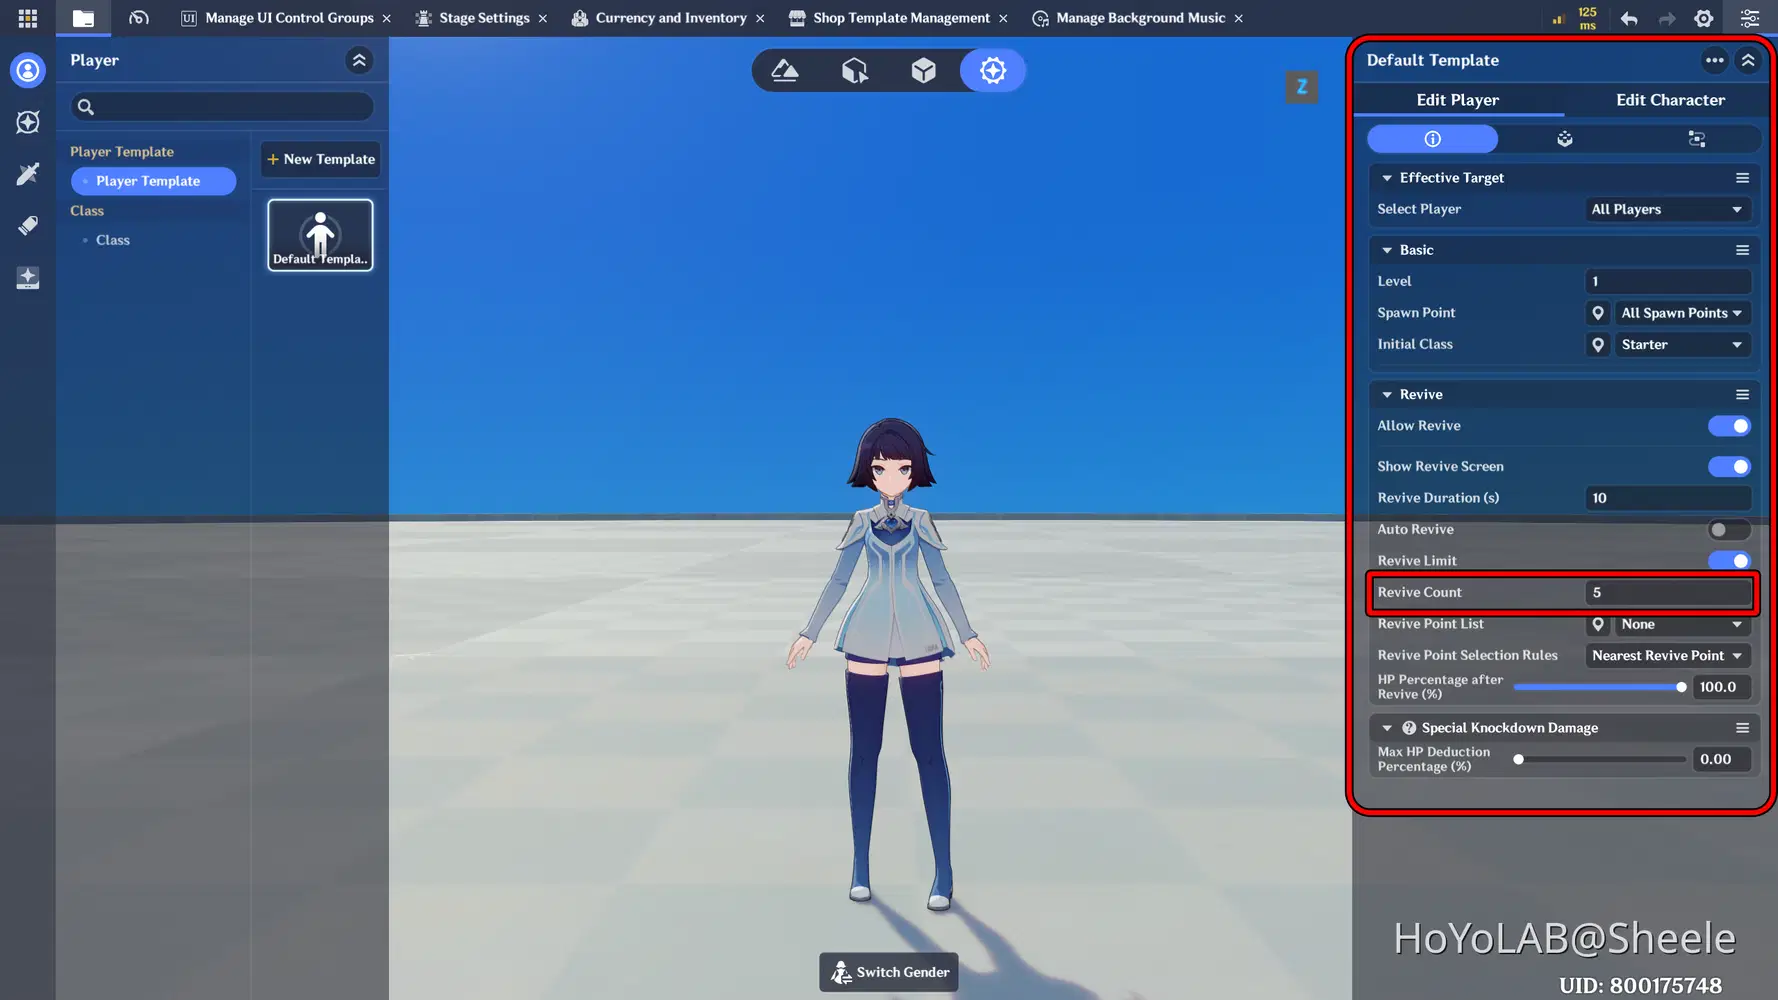
The Revive system determines how many times a character can return to life after being defeated. This system helps balance gameplay by limiting mistakes while still giving players a chance to continue their progress. You can control the number of revives, when they are consumed, and what happens when no revives remain.
Go to combat preset - in details select Edit Player - in the first tab you can set the number of revives and other settings.
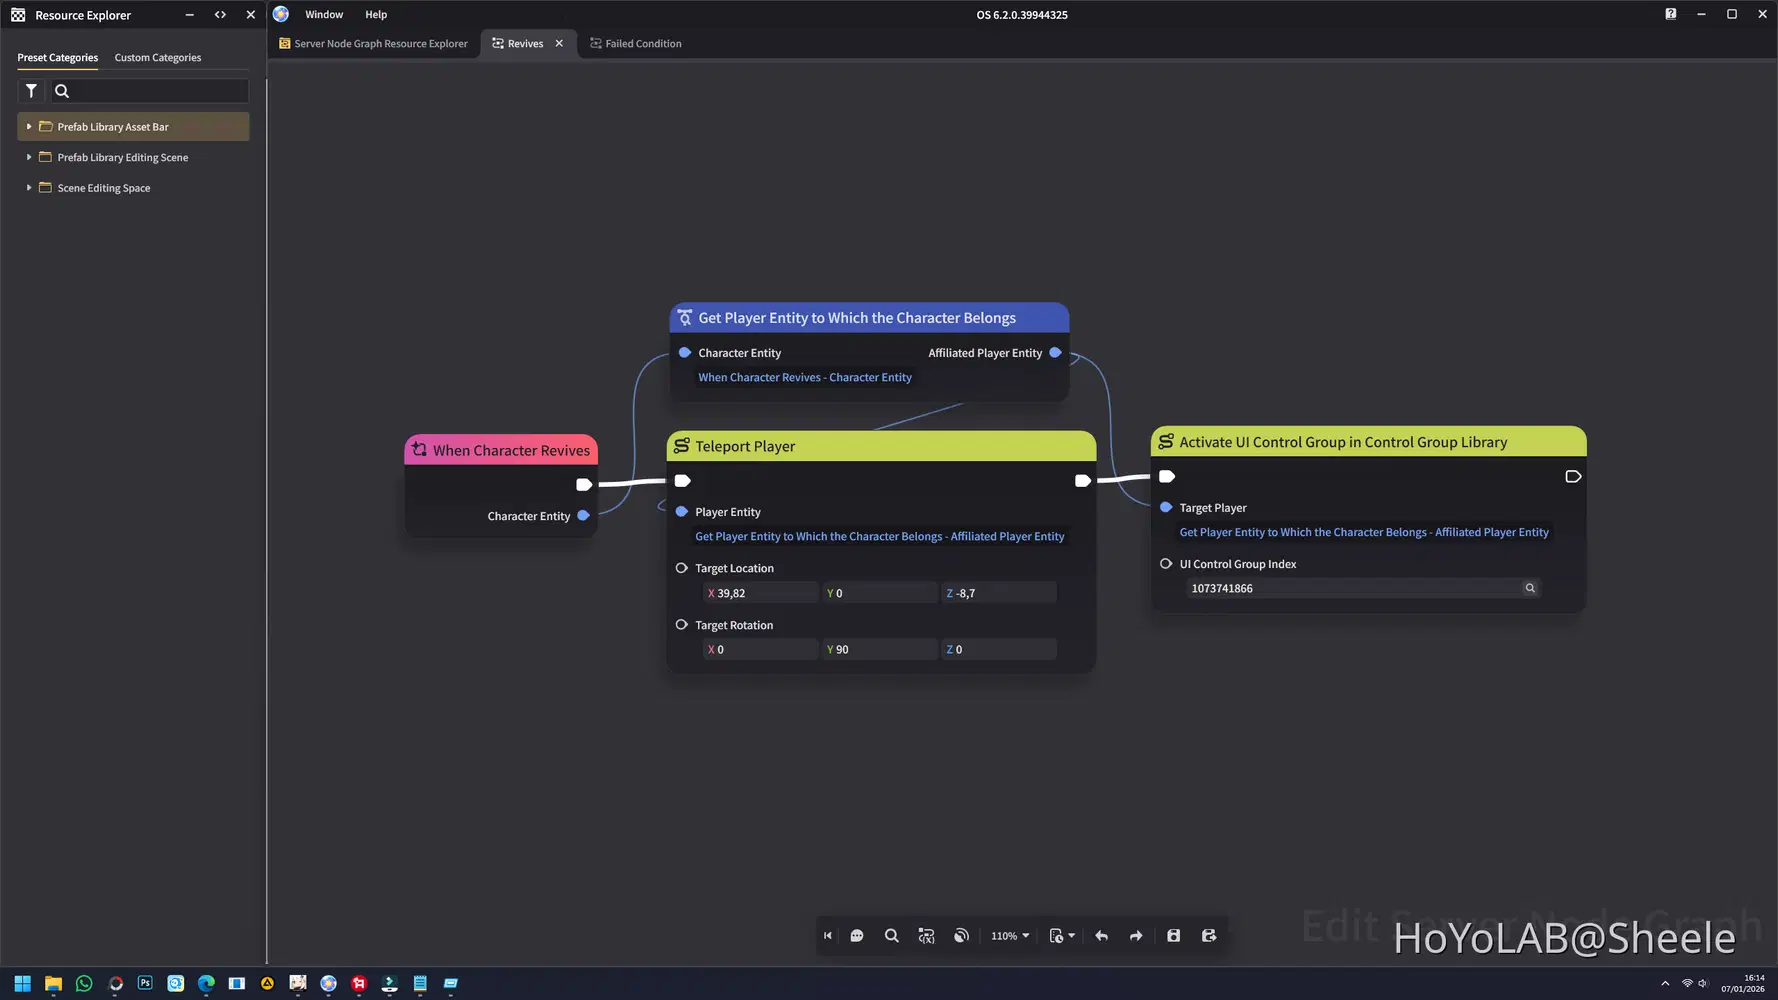
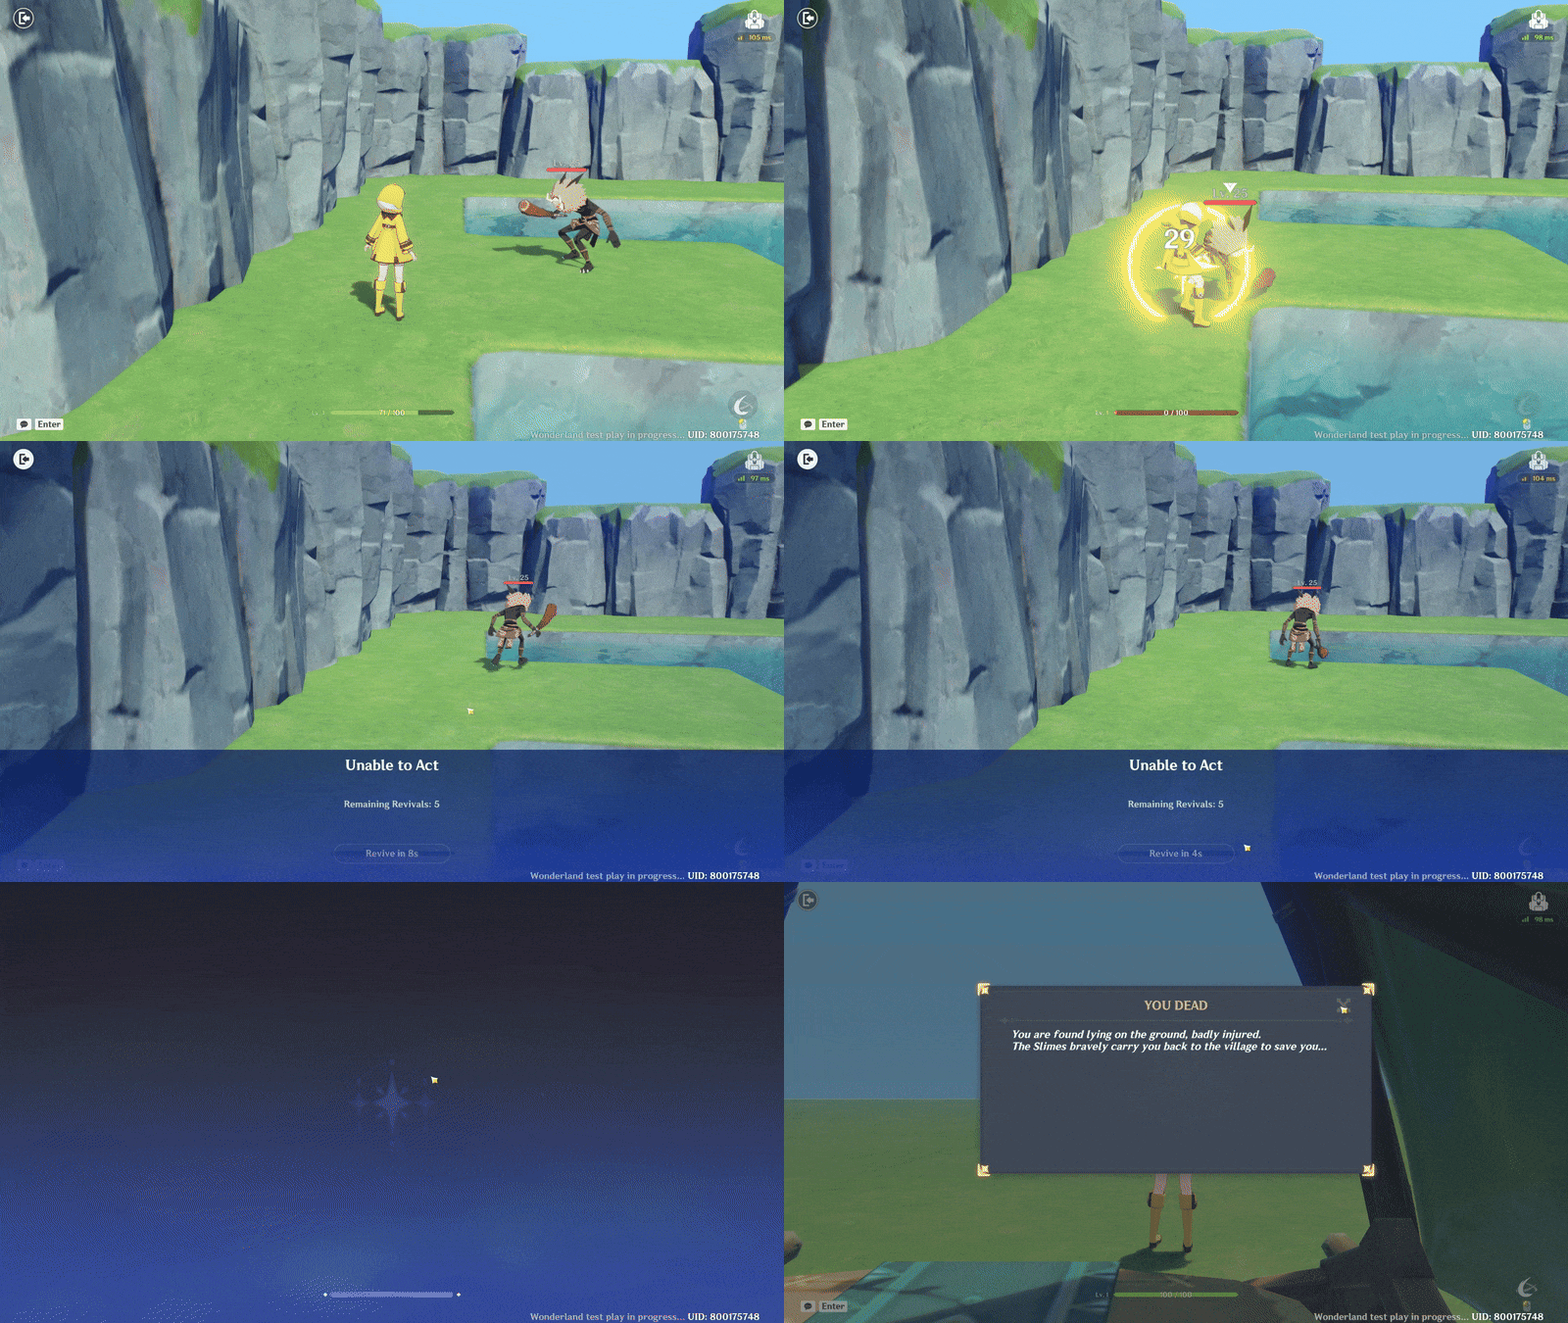
I also added a pop-up notification that appears when the character is revived, informing the player that they have been defeated.
For the node you can see below, When the character revives, it will be teleported to the specified coordinates, and a pop-up UI notification will be displayed.
Then place the Node in Edit Character
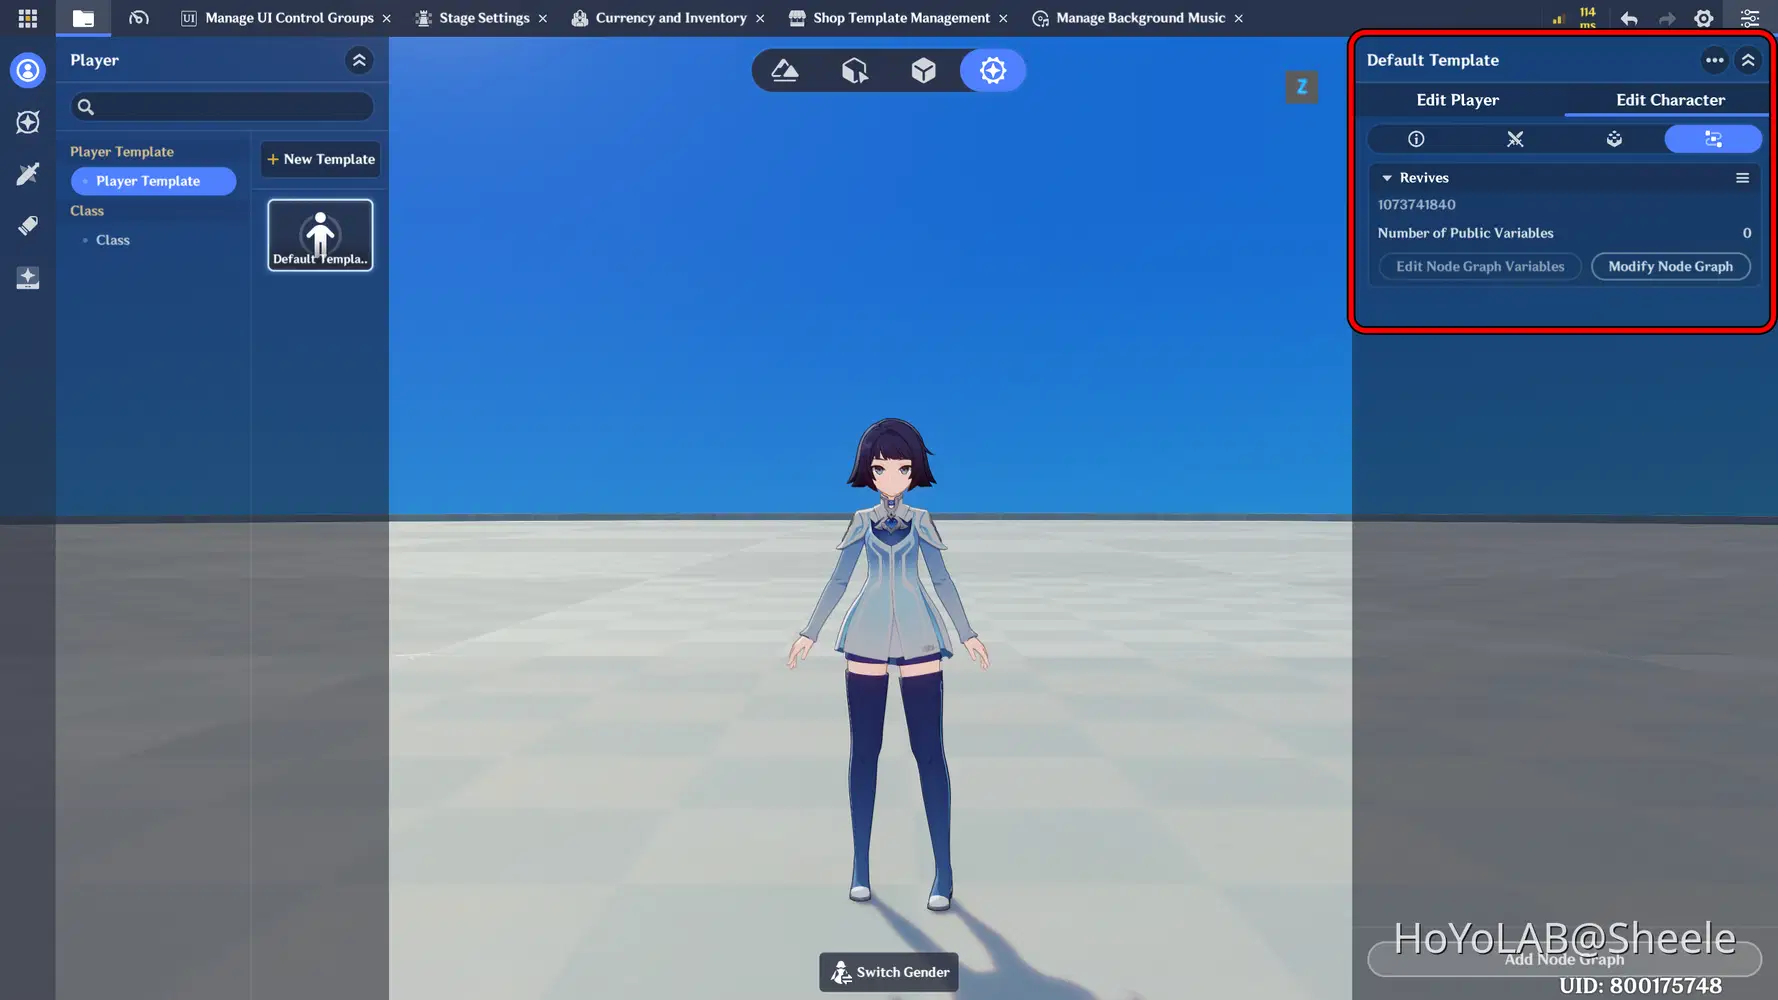
You can see the preview below. When the character is defeated, the revive point is reduced, the character is teleported to the specified coordinates, and a pop-up notification appears indicating that the character has been defeated.
b. Failed Condition
The next step is to add a failure condition. This condition occurs when you revive count reaches zero, resulting in a game over and the end of the game. You can see the Node setup below.
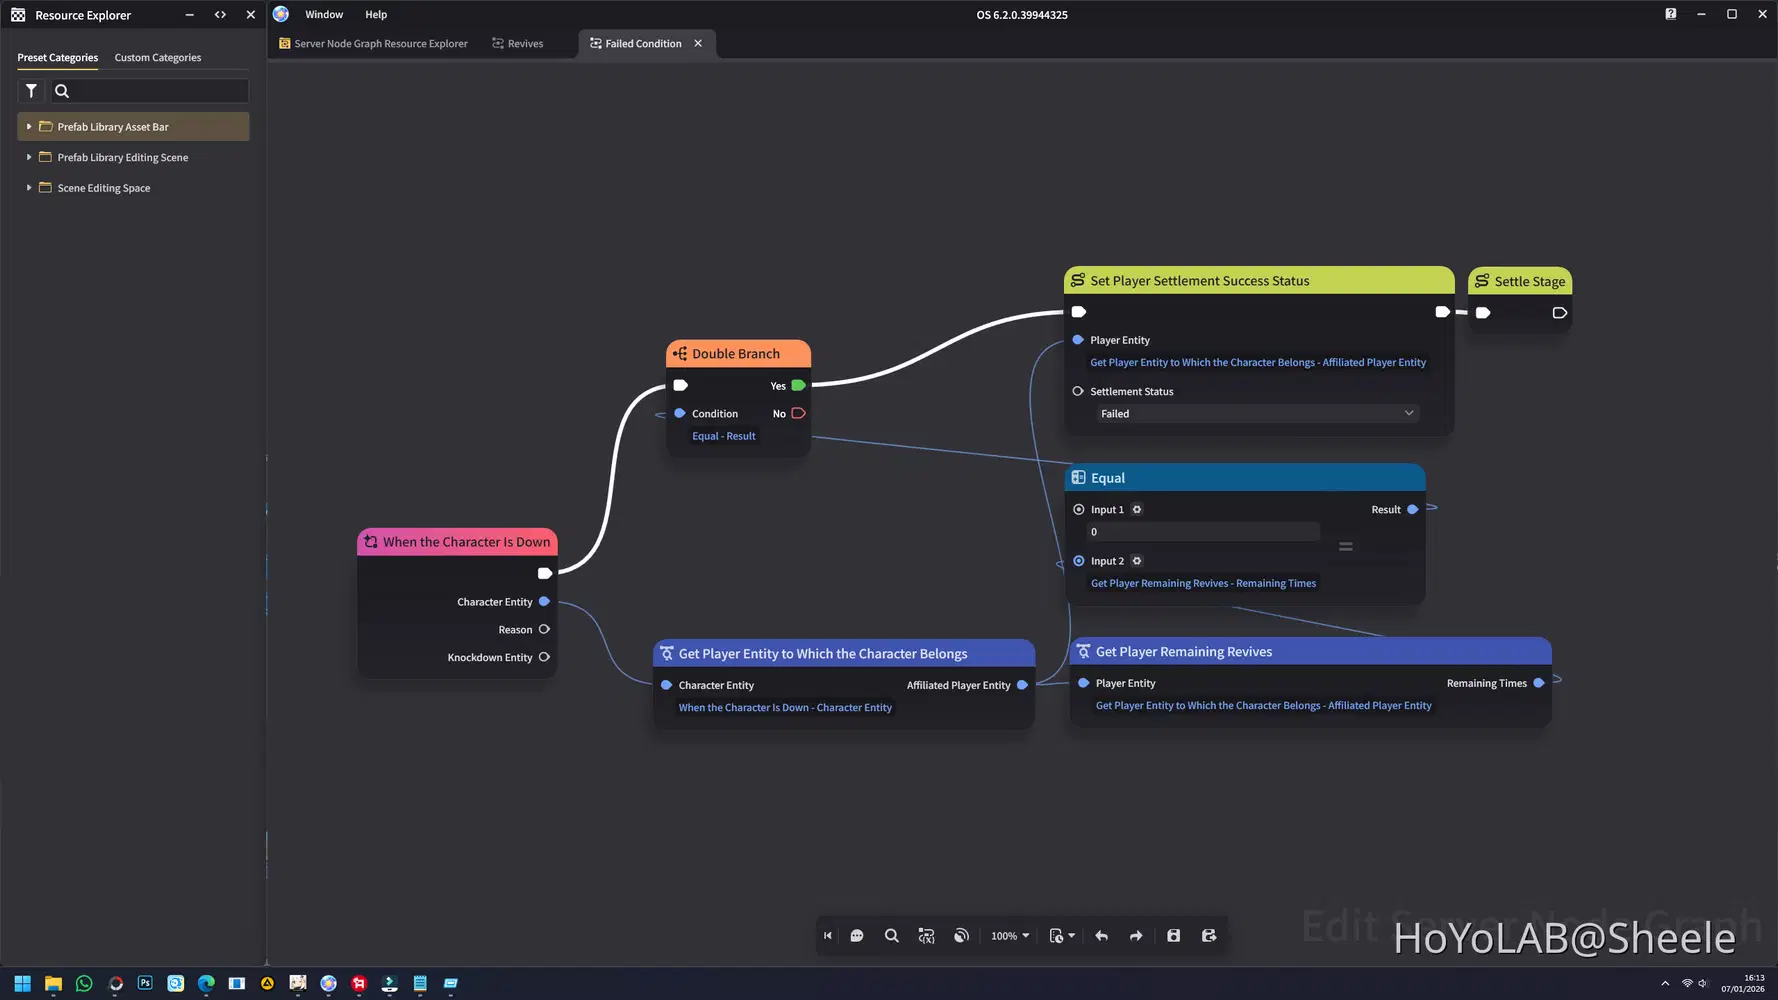
Then add the Node to the Edit character section.
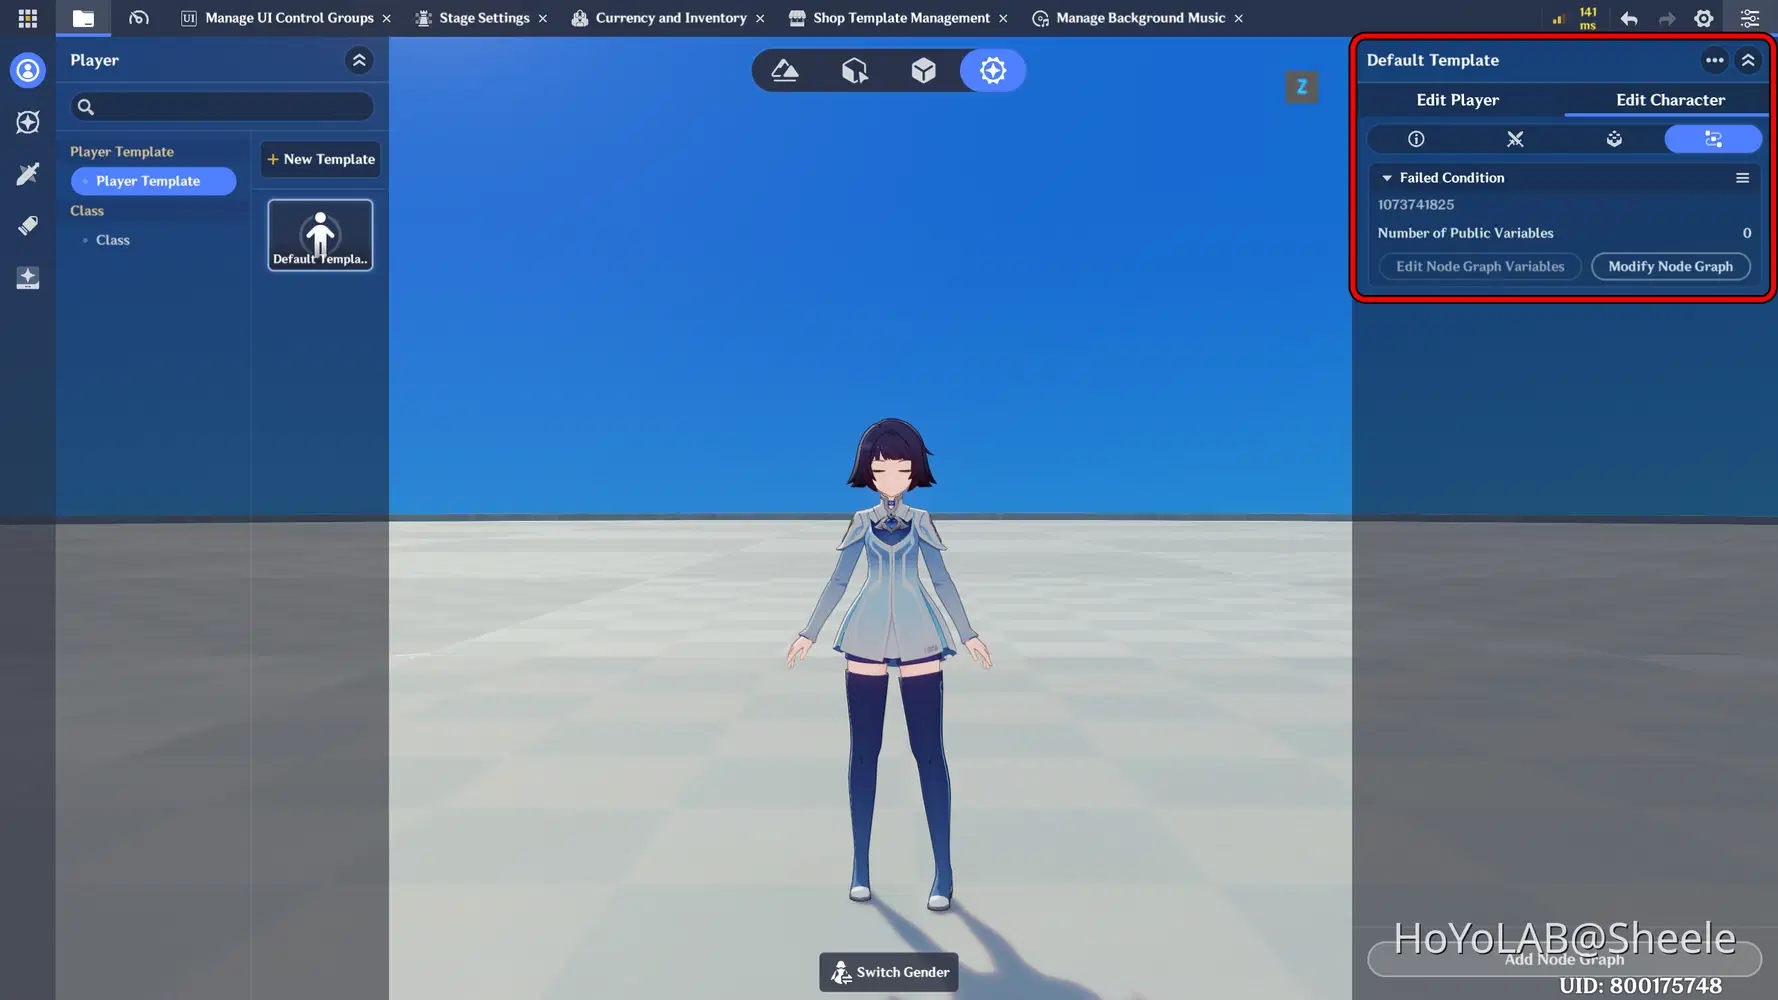
For the results you can see below.
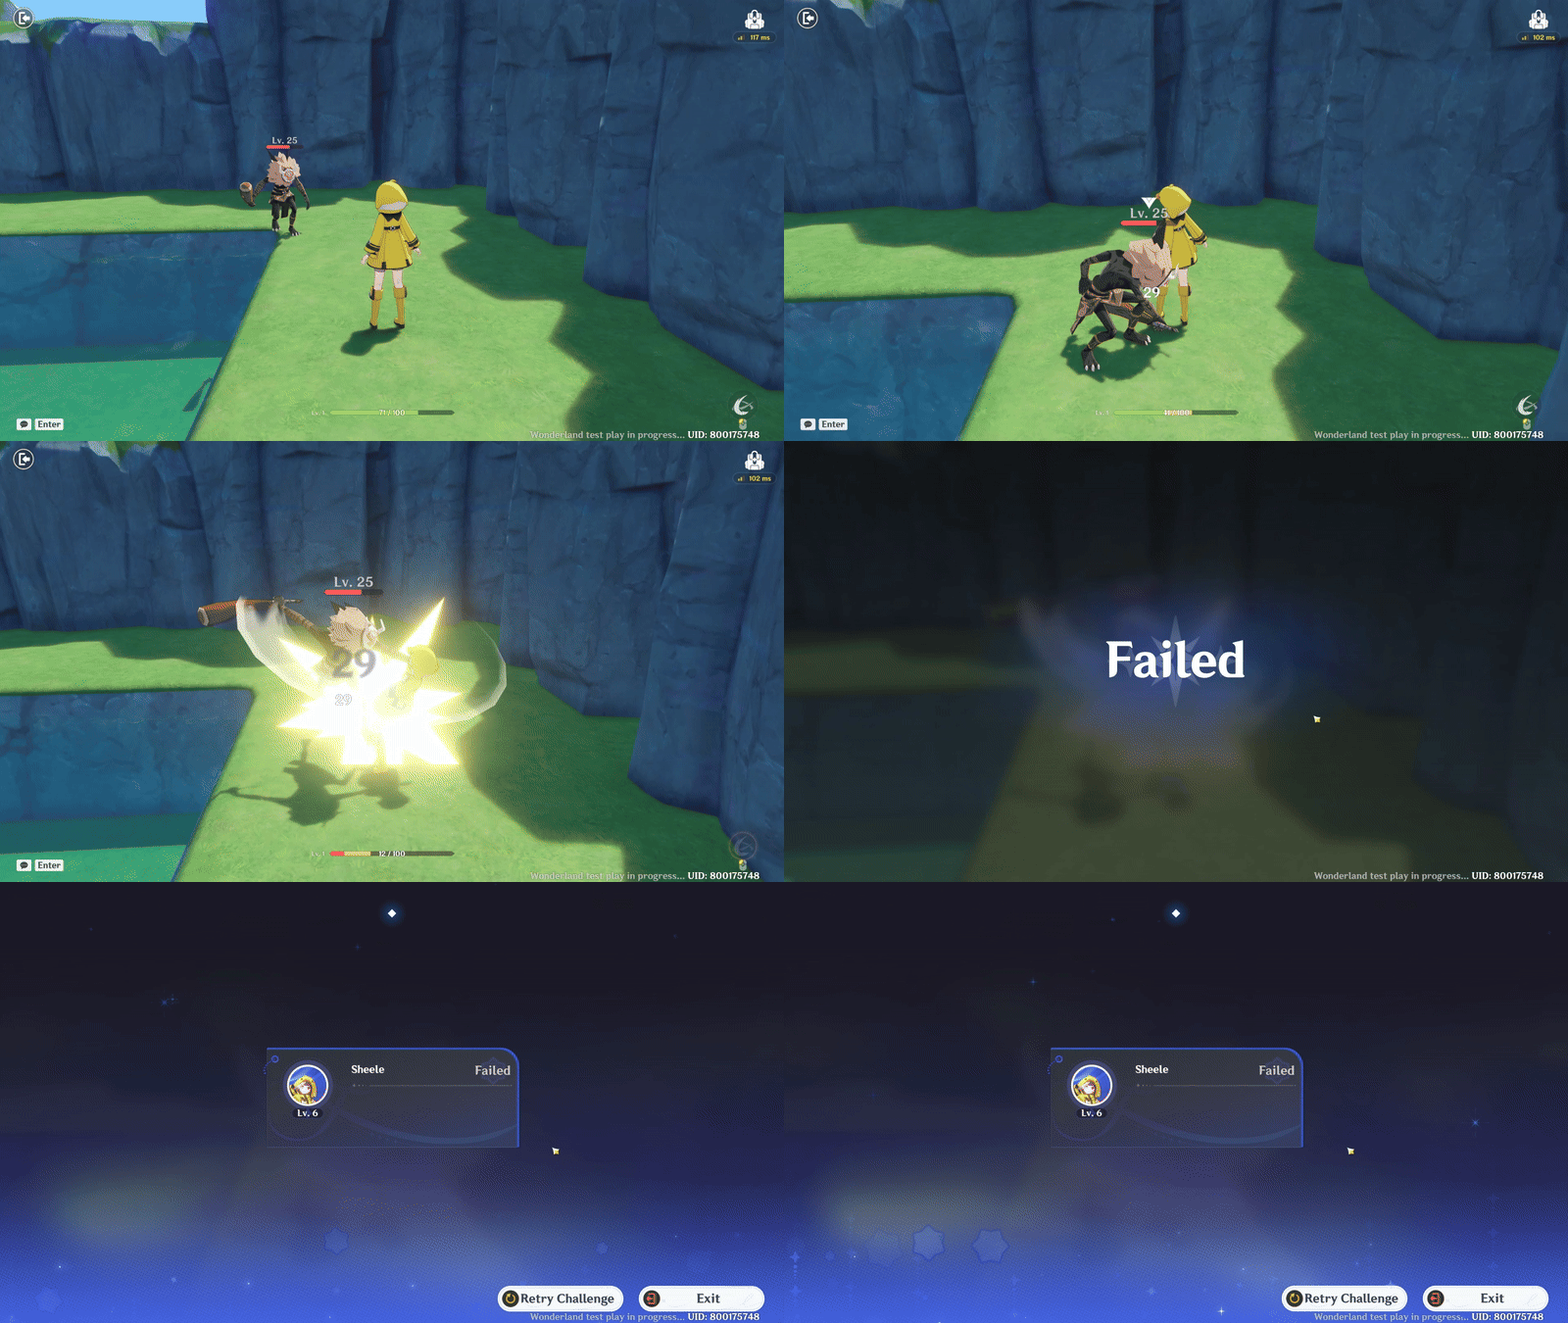
c. Limiting Character Attacks
The next step is to limit character attacks. This can be done by defining conditions, such as the presence of an NPC or monster.
Open the Miliastra Sandbox window, then go to the Client Node Graph. To display it, click the Window menu and open the Uncategorized folder.
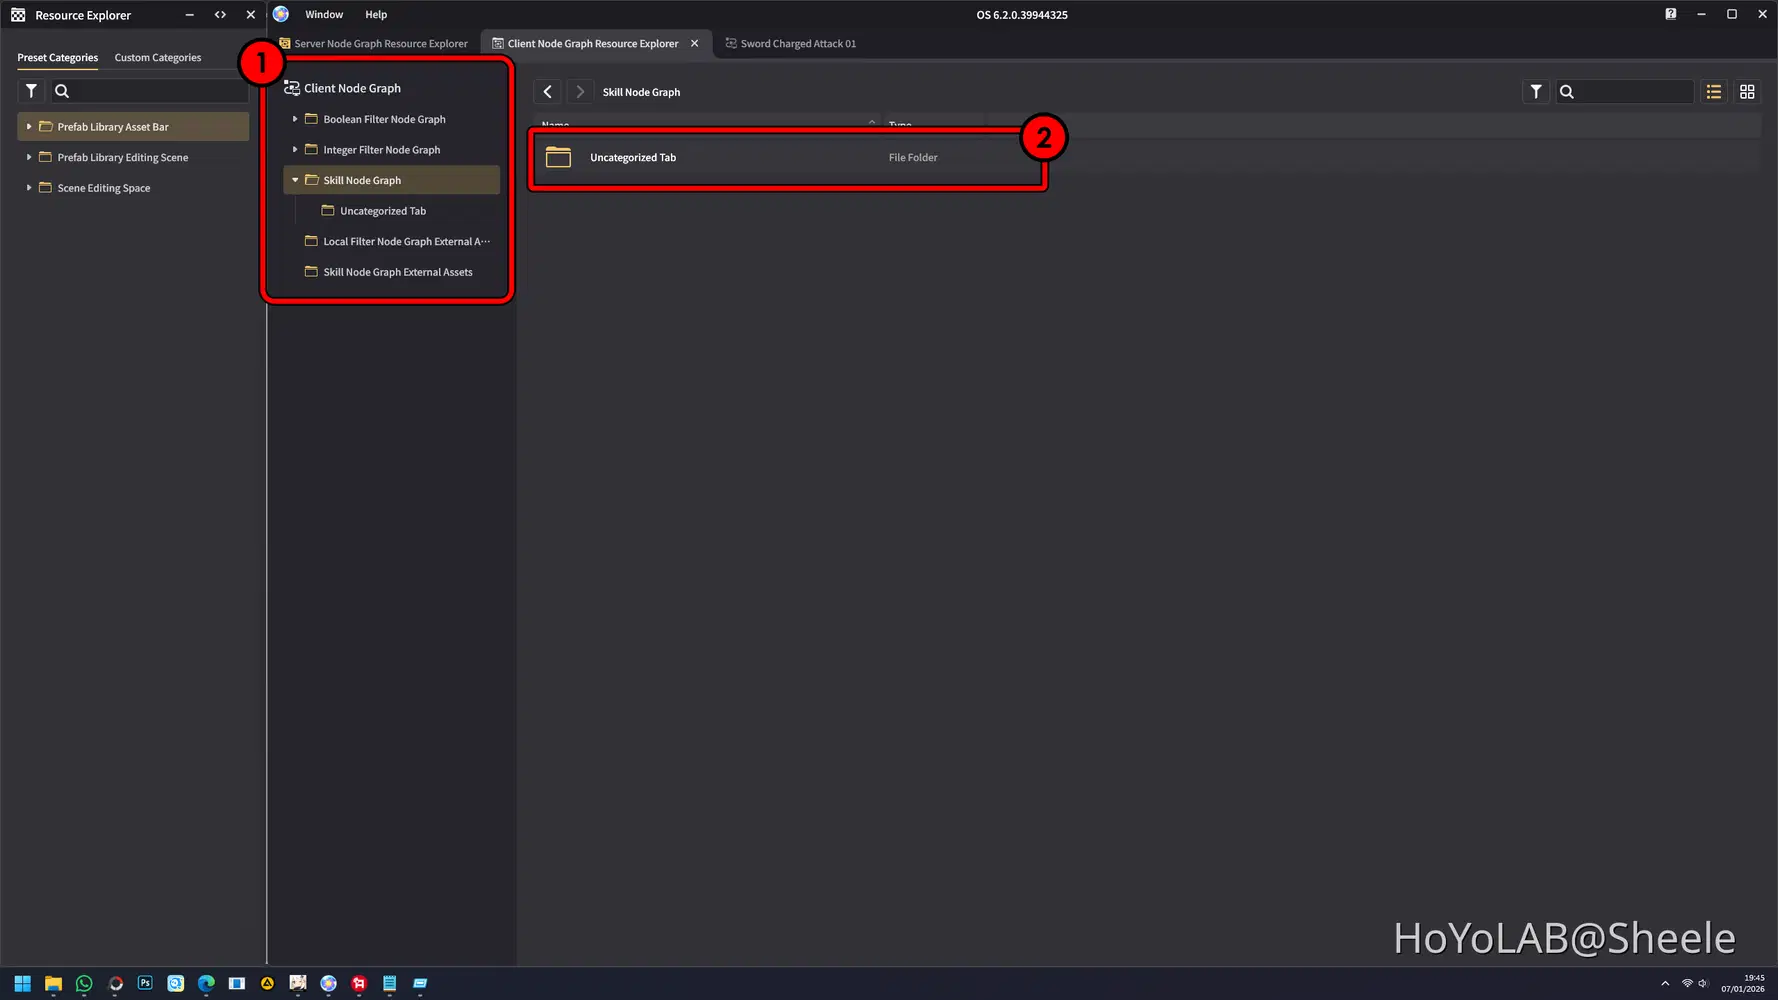
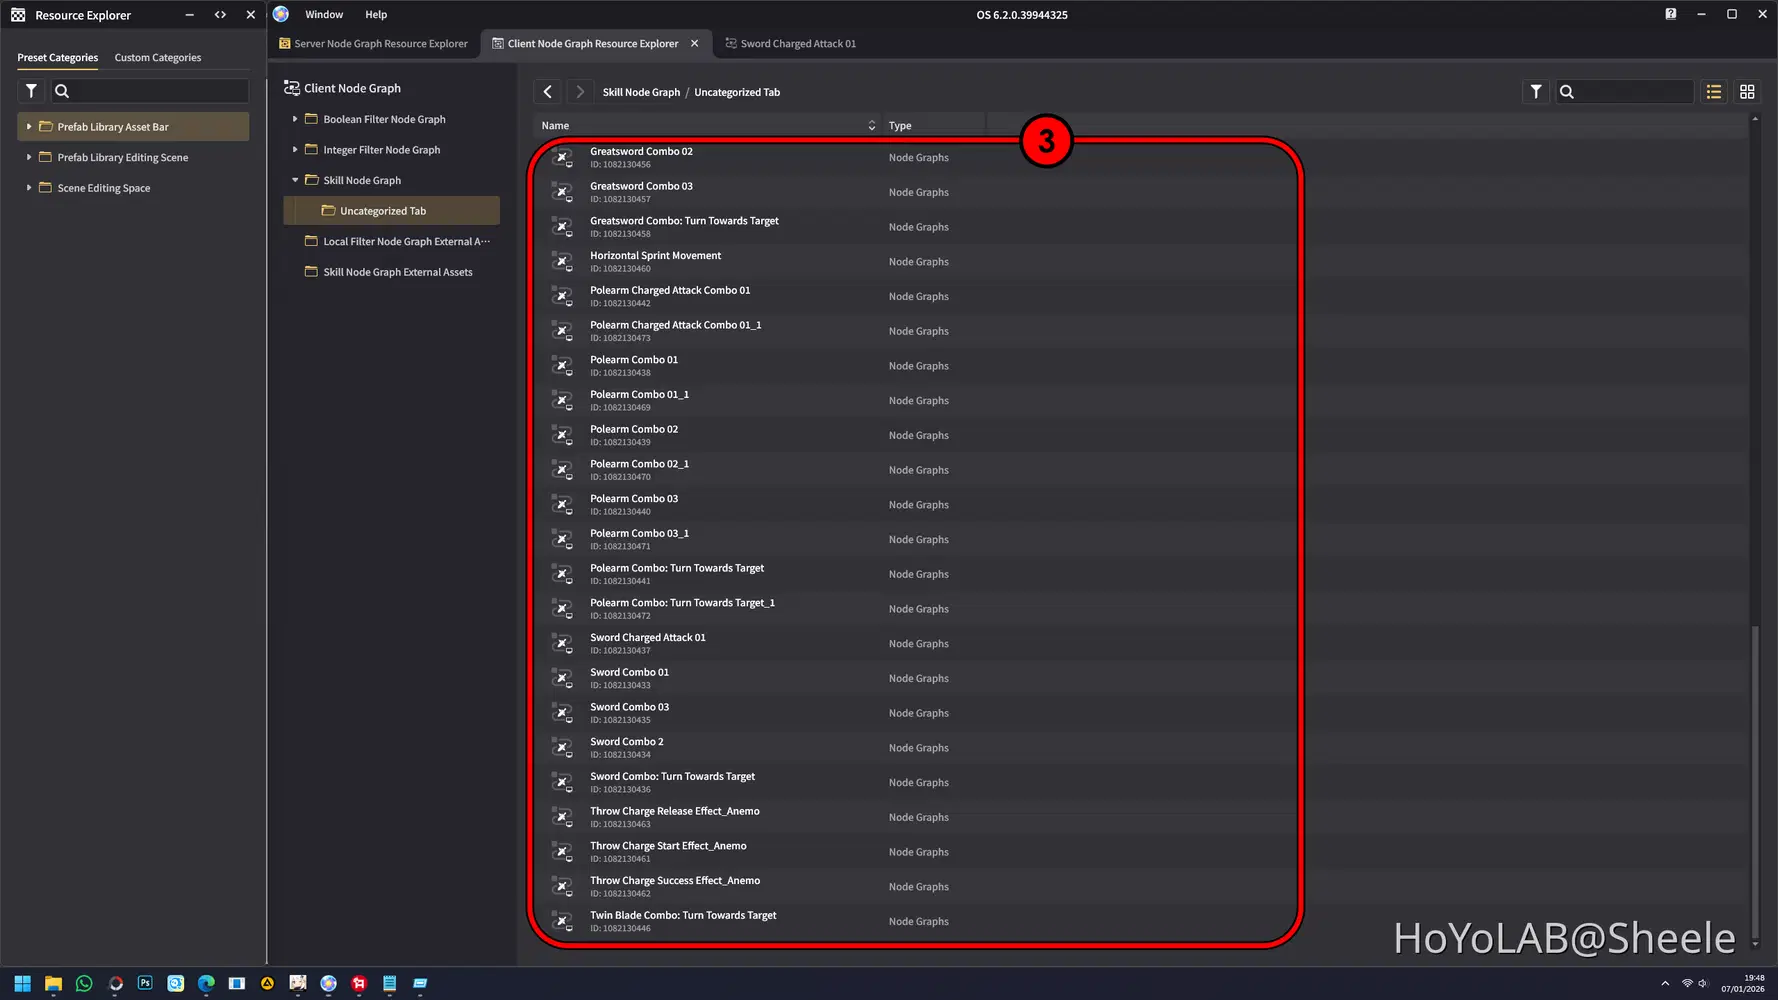
Inside this tab, there are many Nodes related to weapons and attacks. Choose one and its related nodes. For example, I selected Sword.
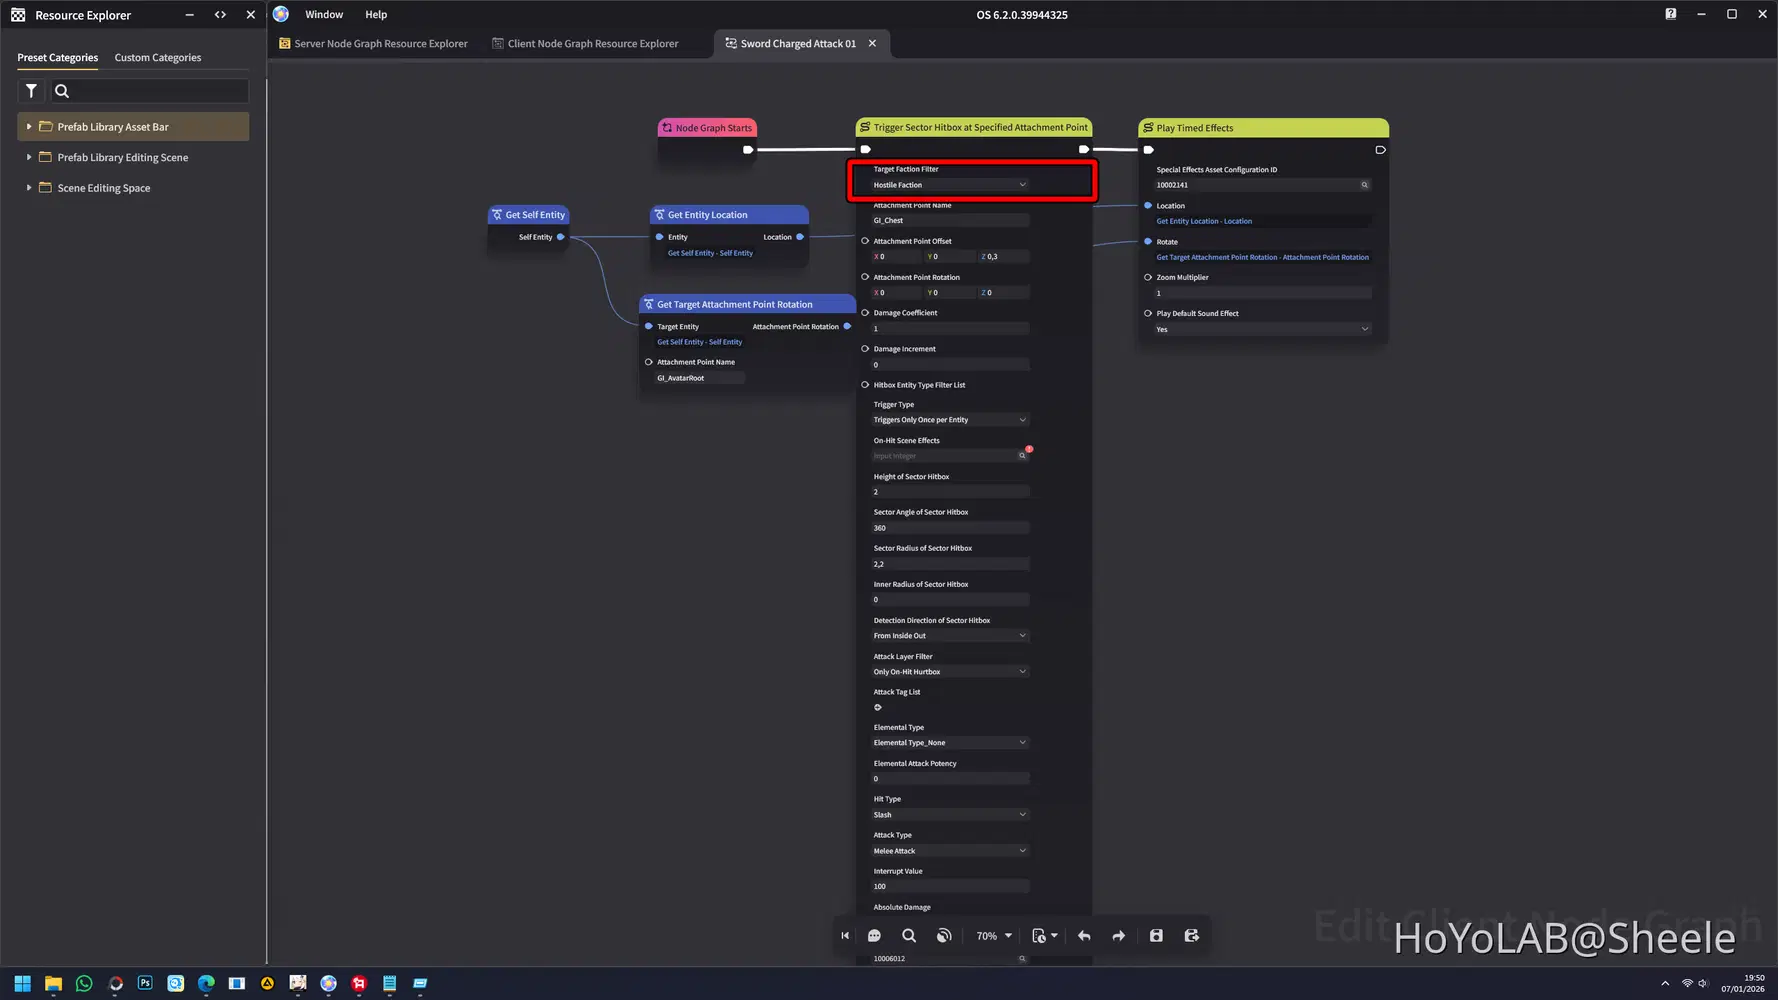
Then in the Target Faction Filter section, set it to Hostile Faction.
Also set the Faction settings like this in the Stage Settings menu.
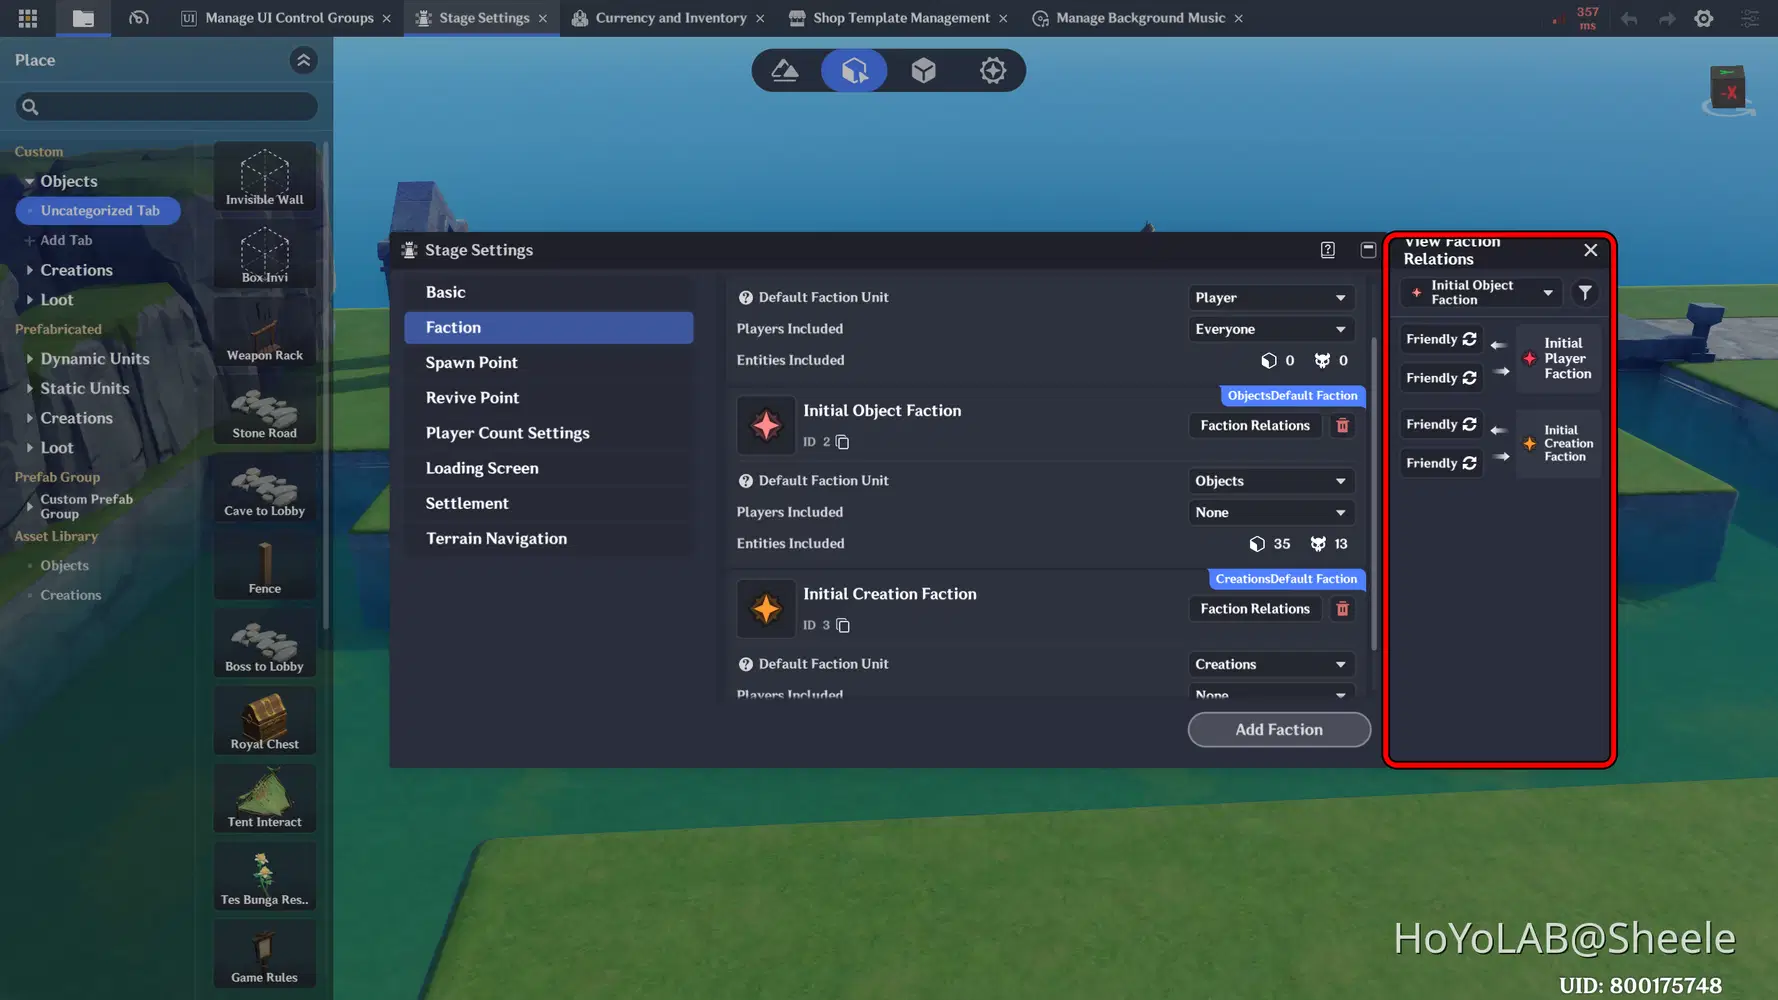
And adjust this Faction also to the desired NPC or Monster.
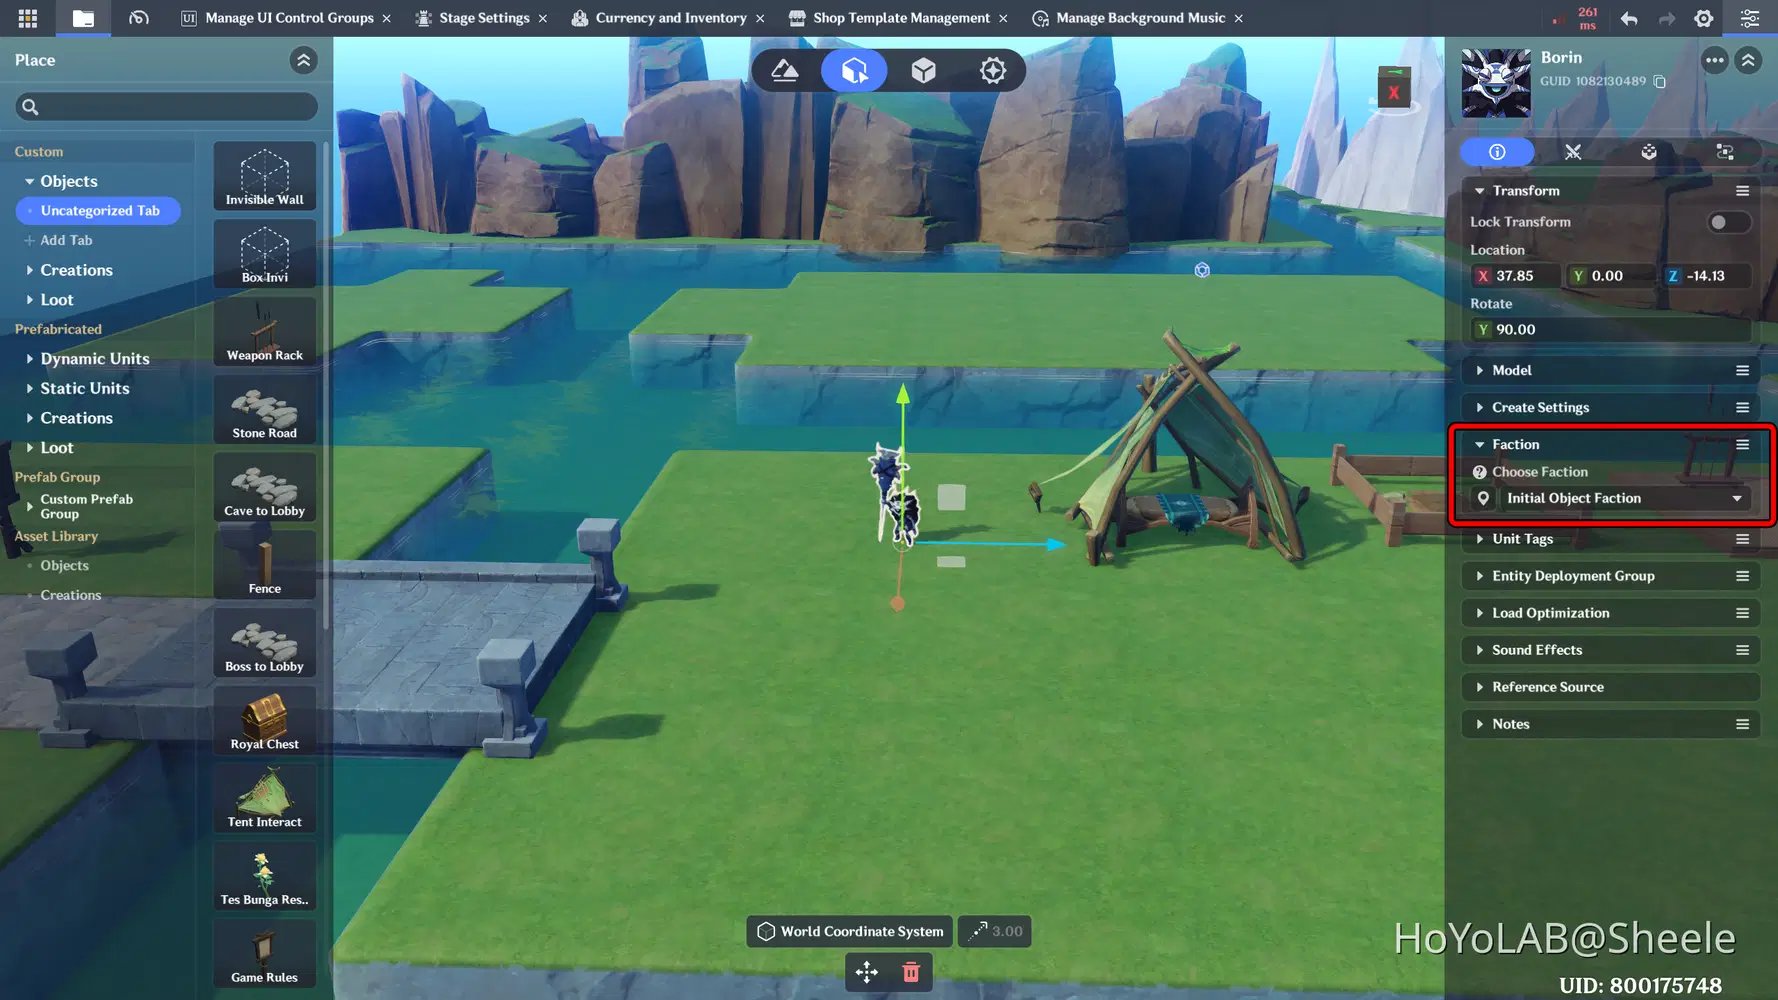
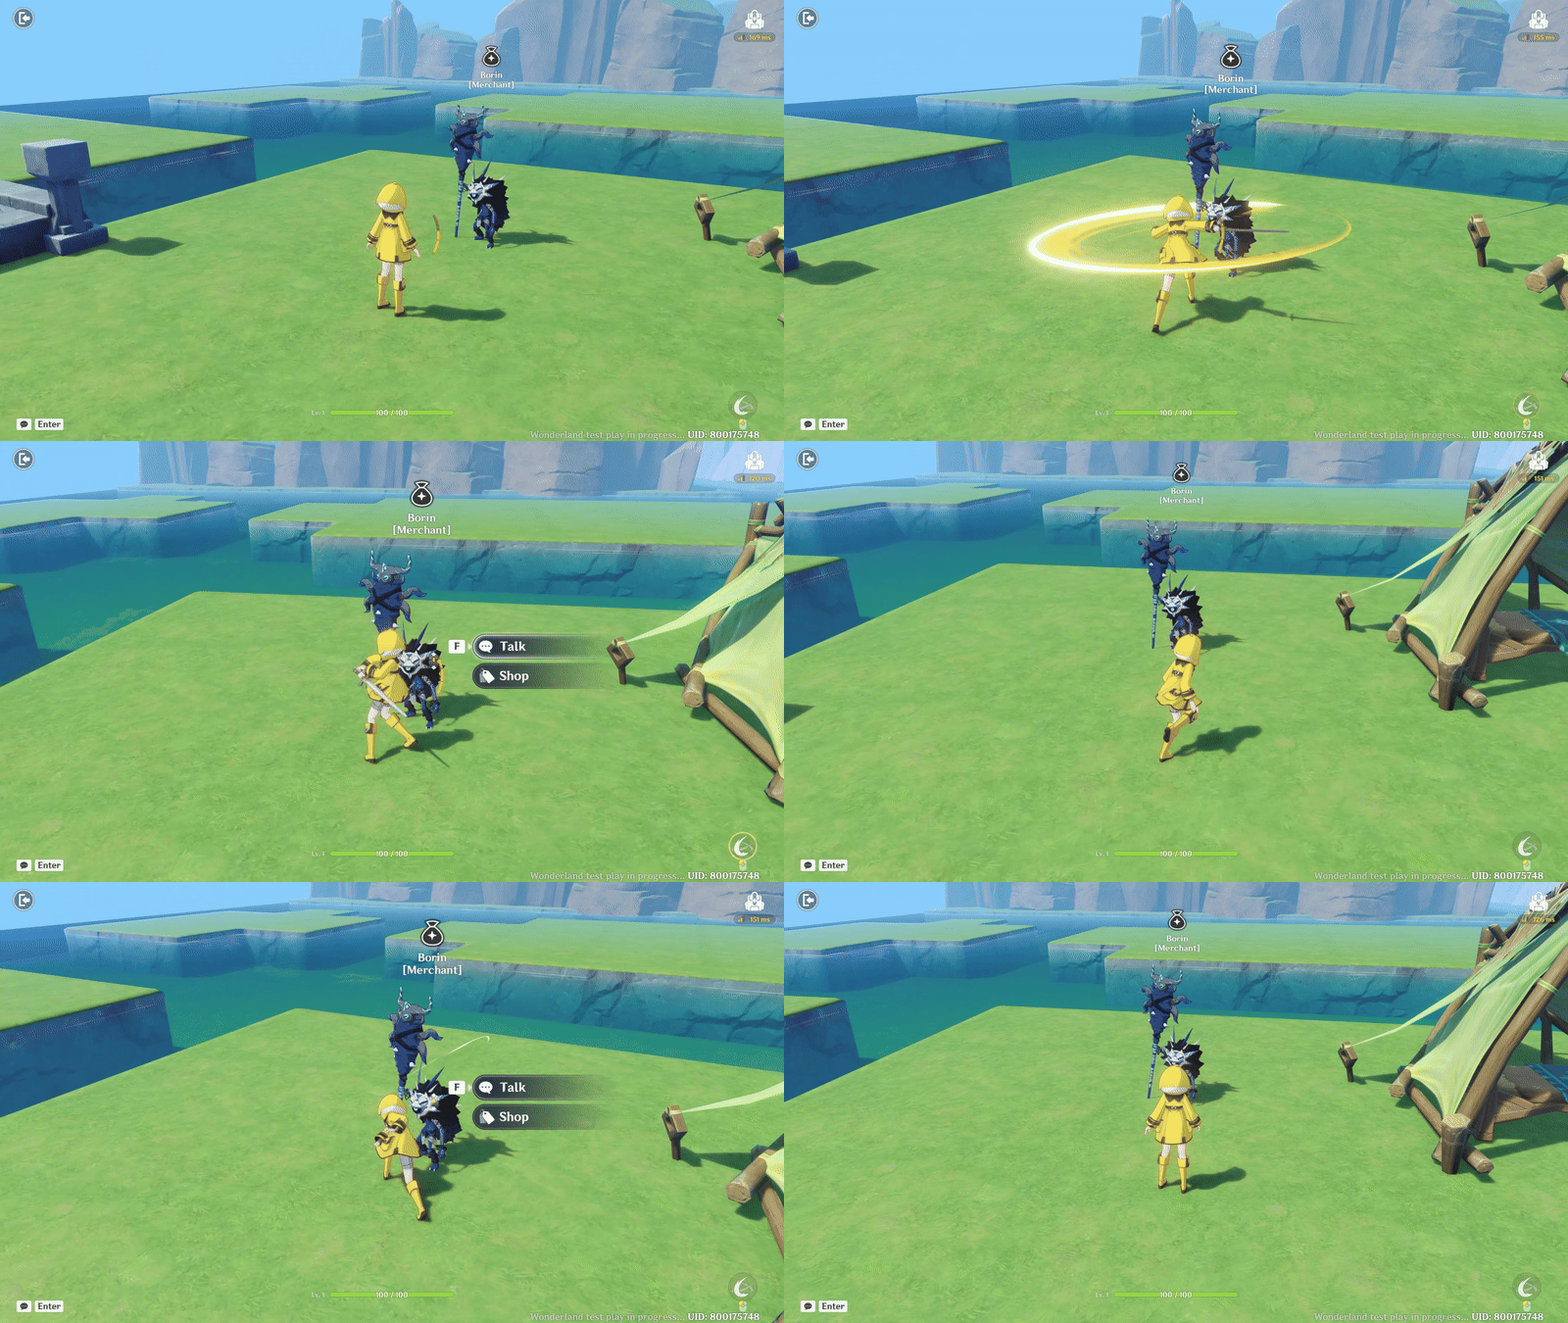
The result should look like this. Make sure to apply this configuration to all related Sword child nodes.
d. End Game
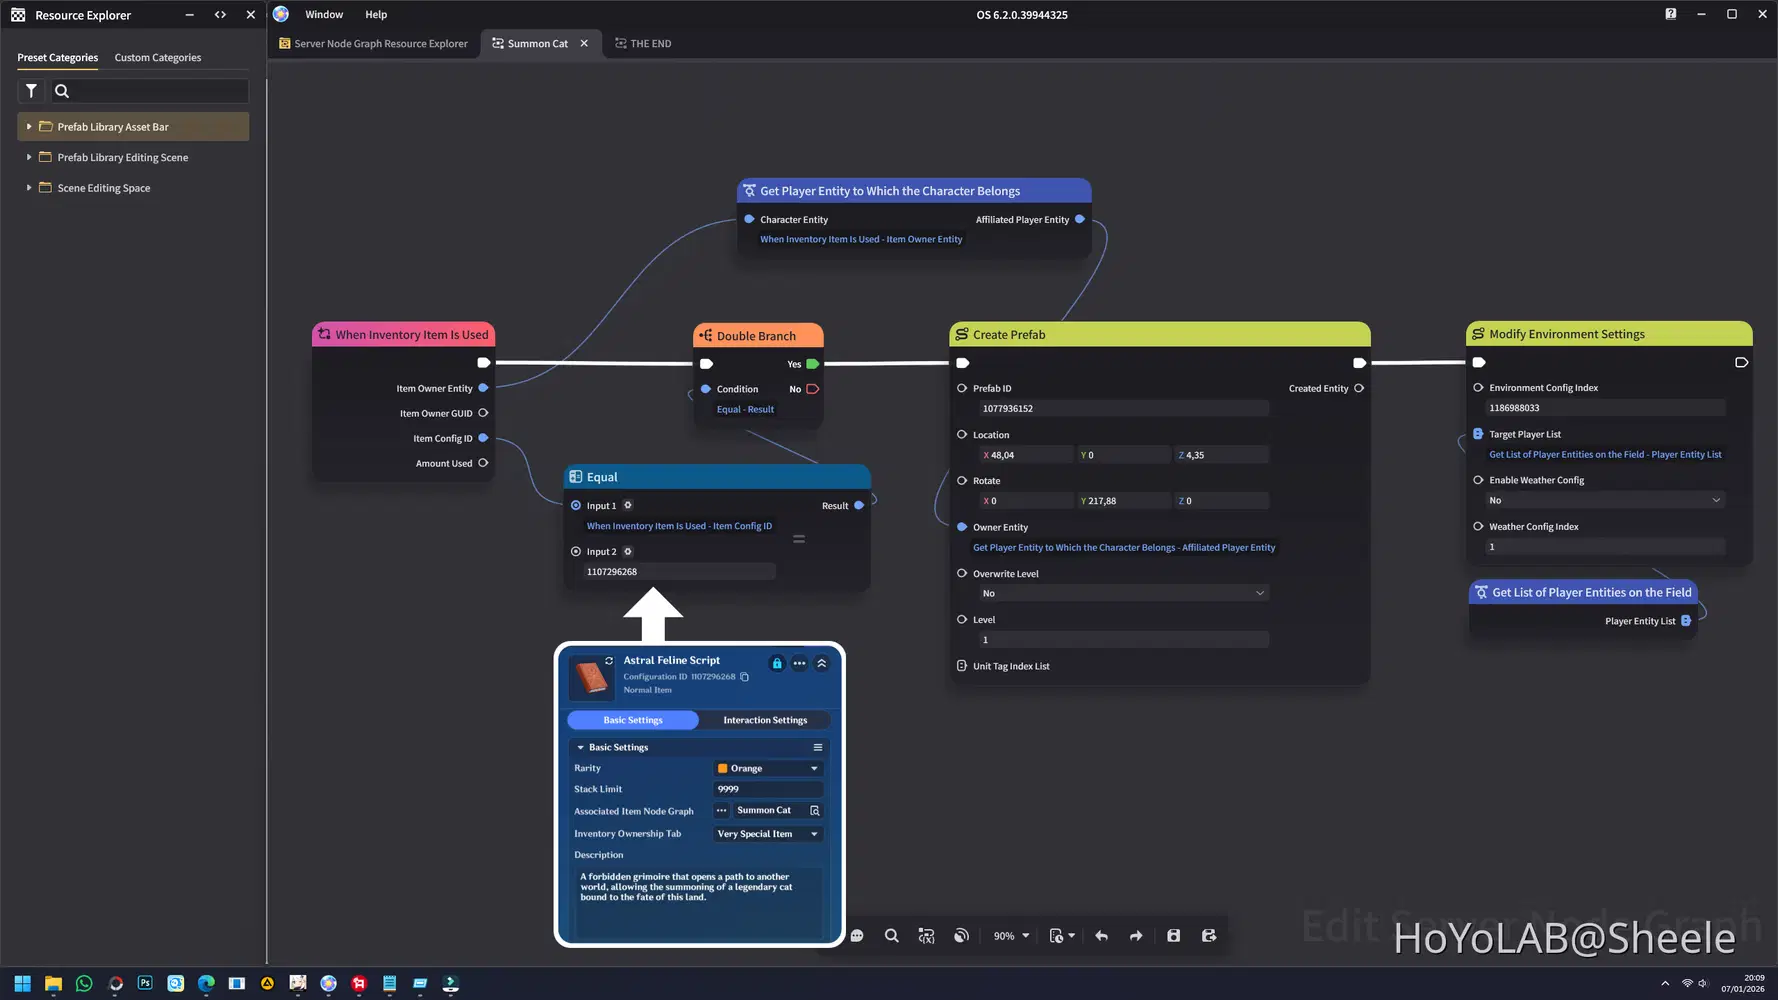
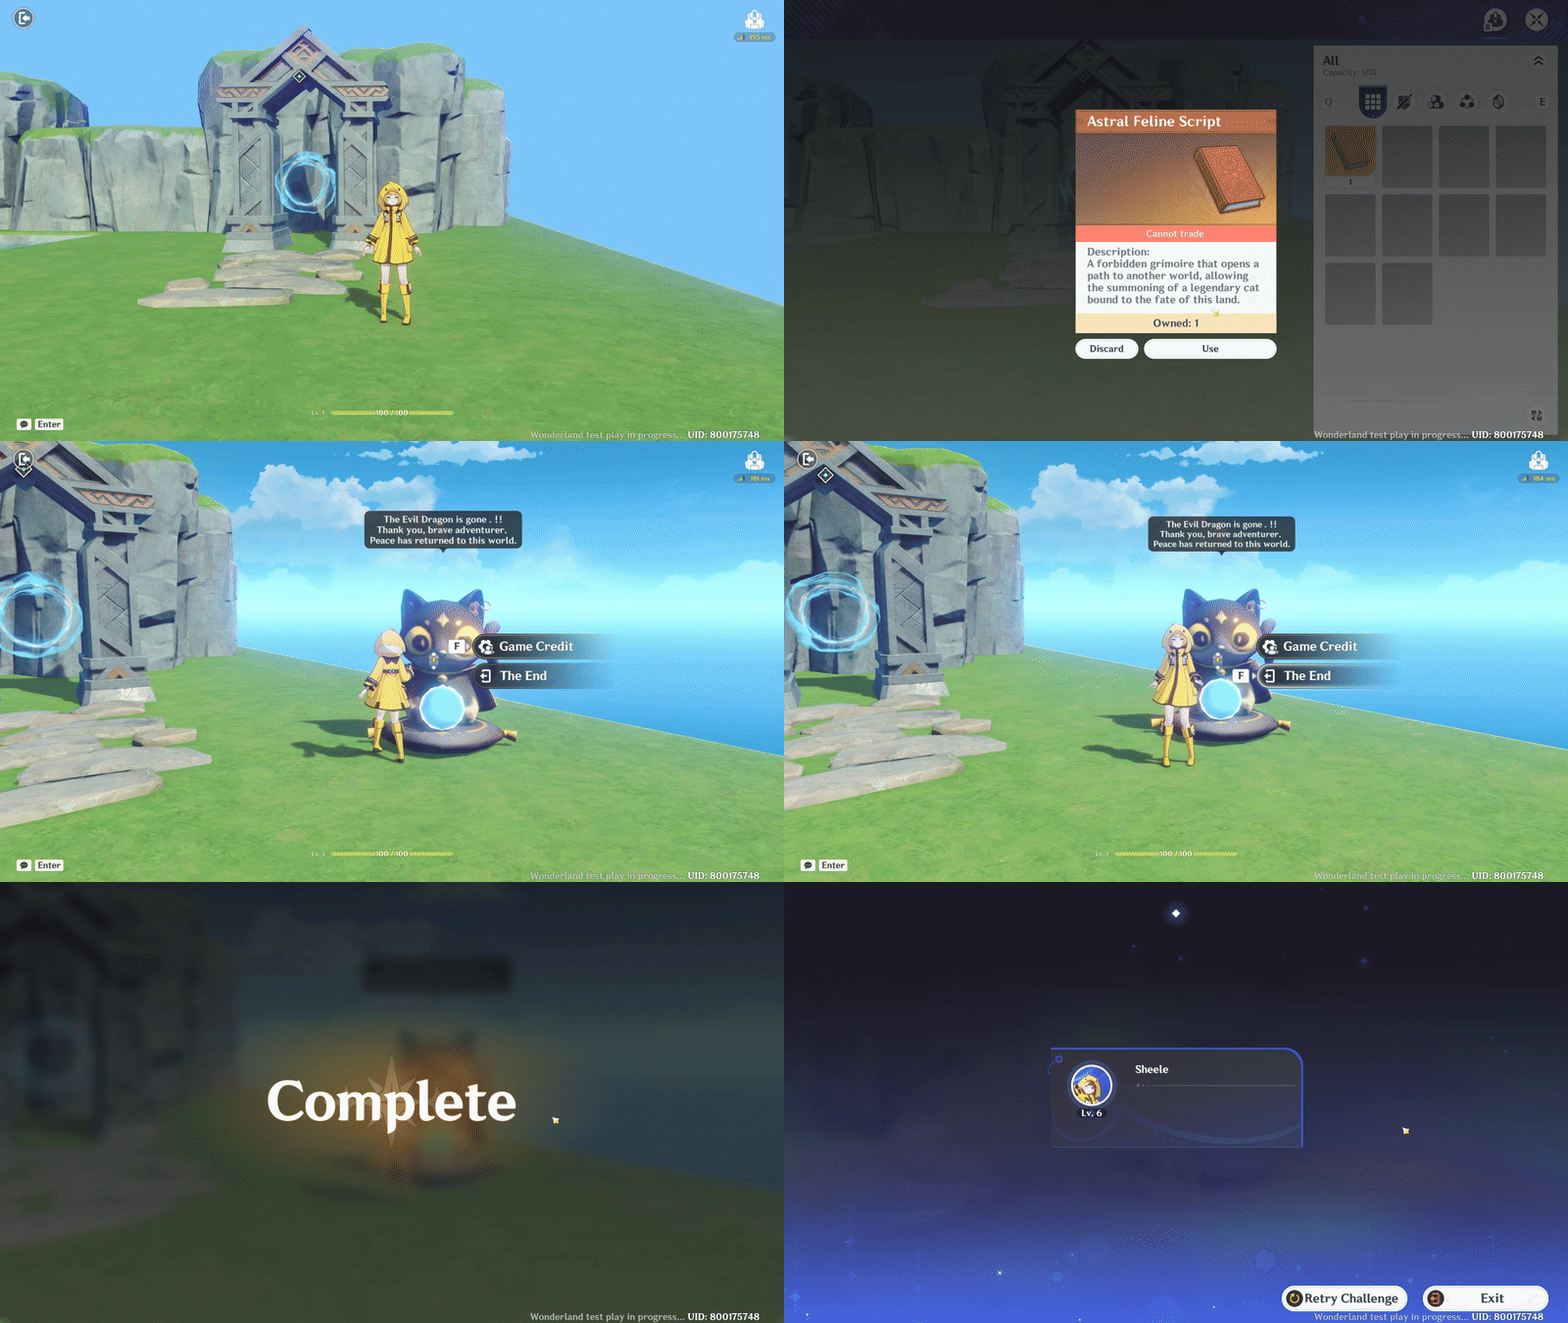
For the end game, I designed the game so it can still be played even after the final enemy is defeated. To achieve this, I created a special item that spawns a statue. Players can interact with this statue to decide whether to end the game or continue playing.
When the Final Boss is defeated, it drops this item. Inside the item, I embedded a Node Graph that triggers the spawning of an interactive object, which serves as the medium for ending the game.
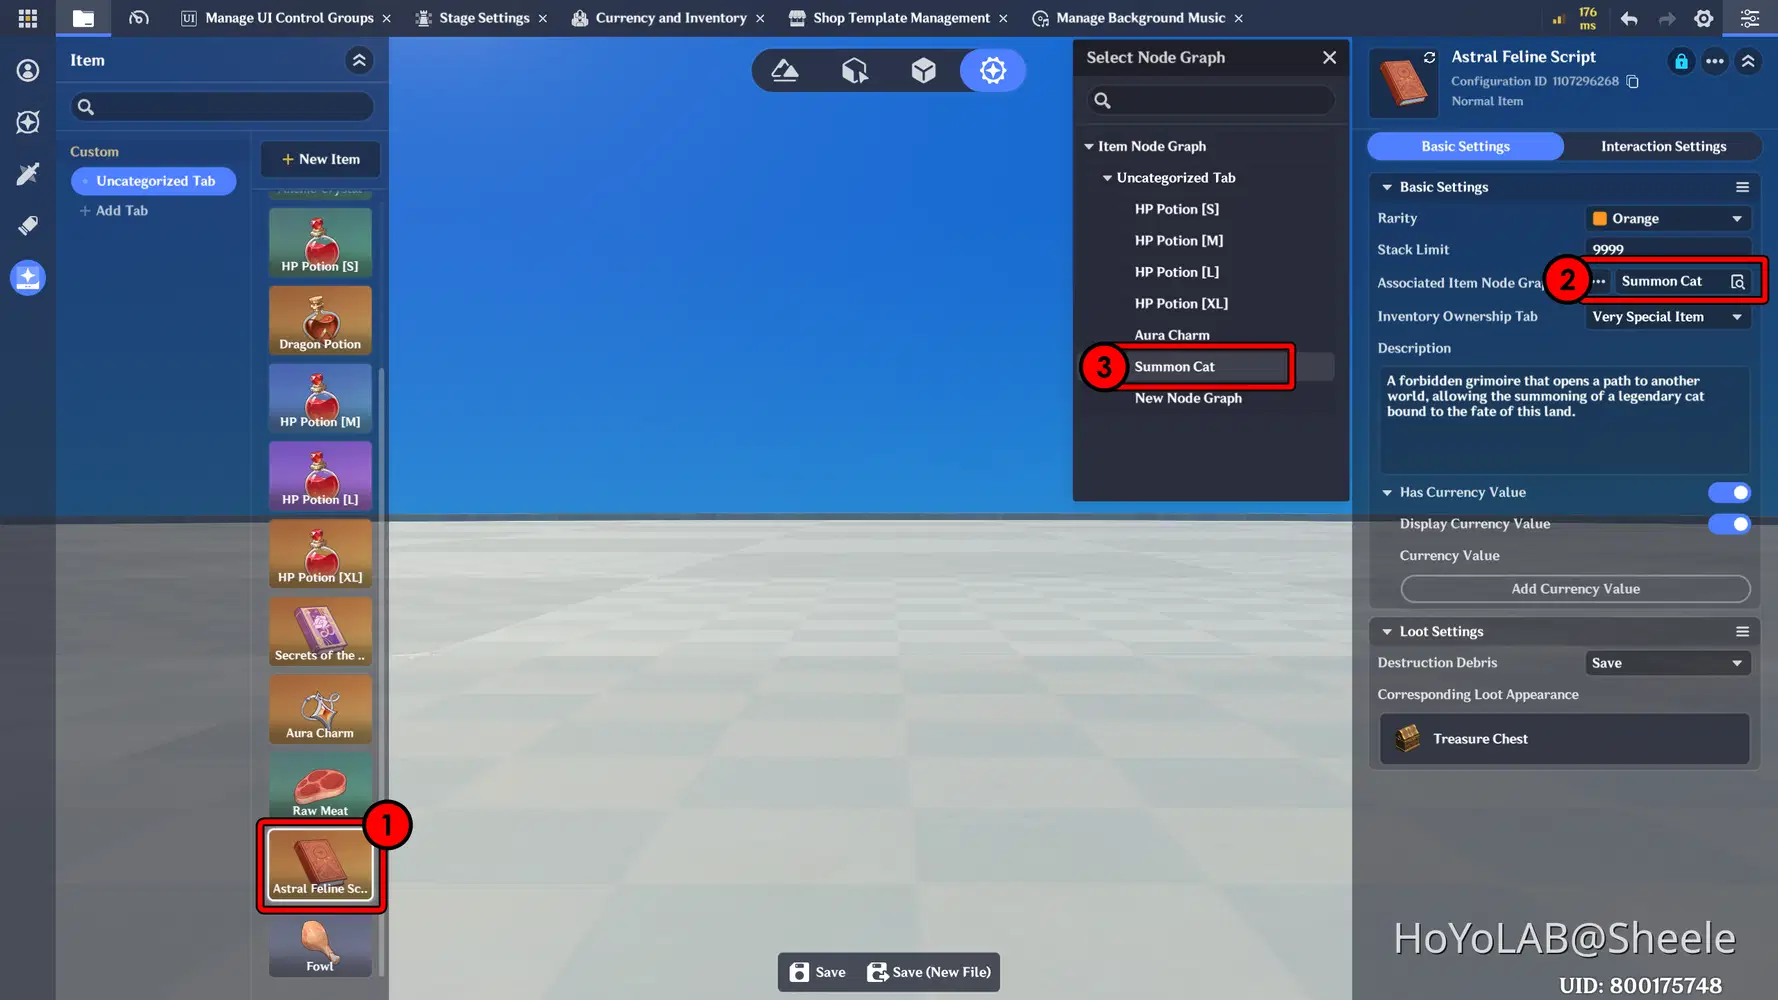
The Node Graph is set up as shown below. When the item is used from the inventory, an object will be spawned at the specified coordinates.
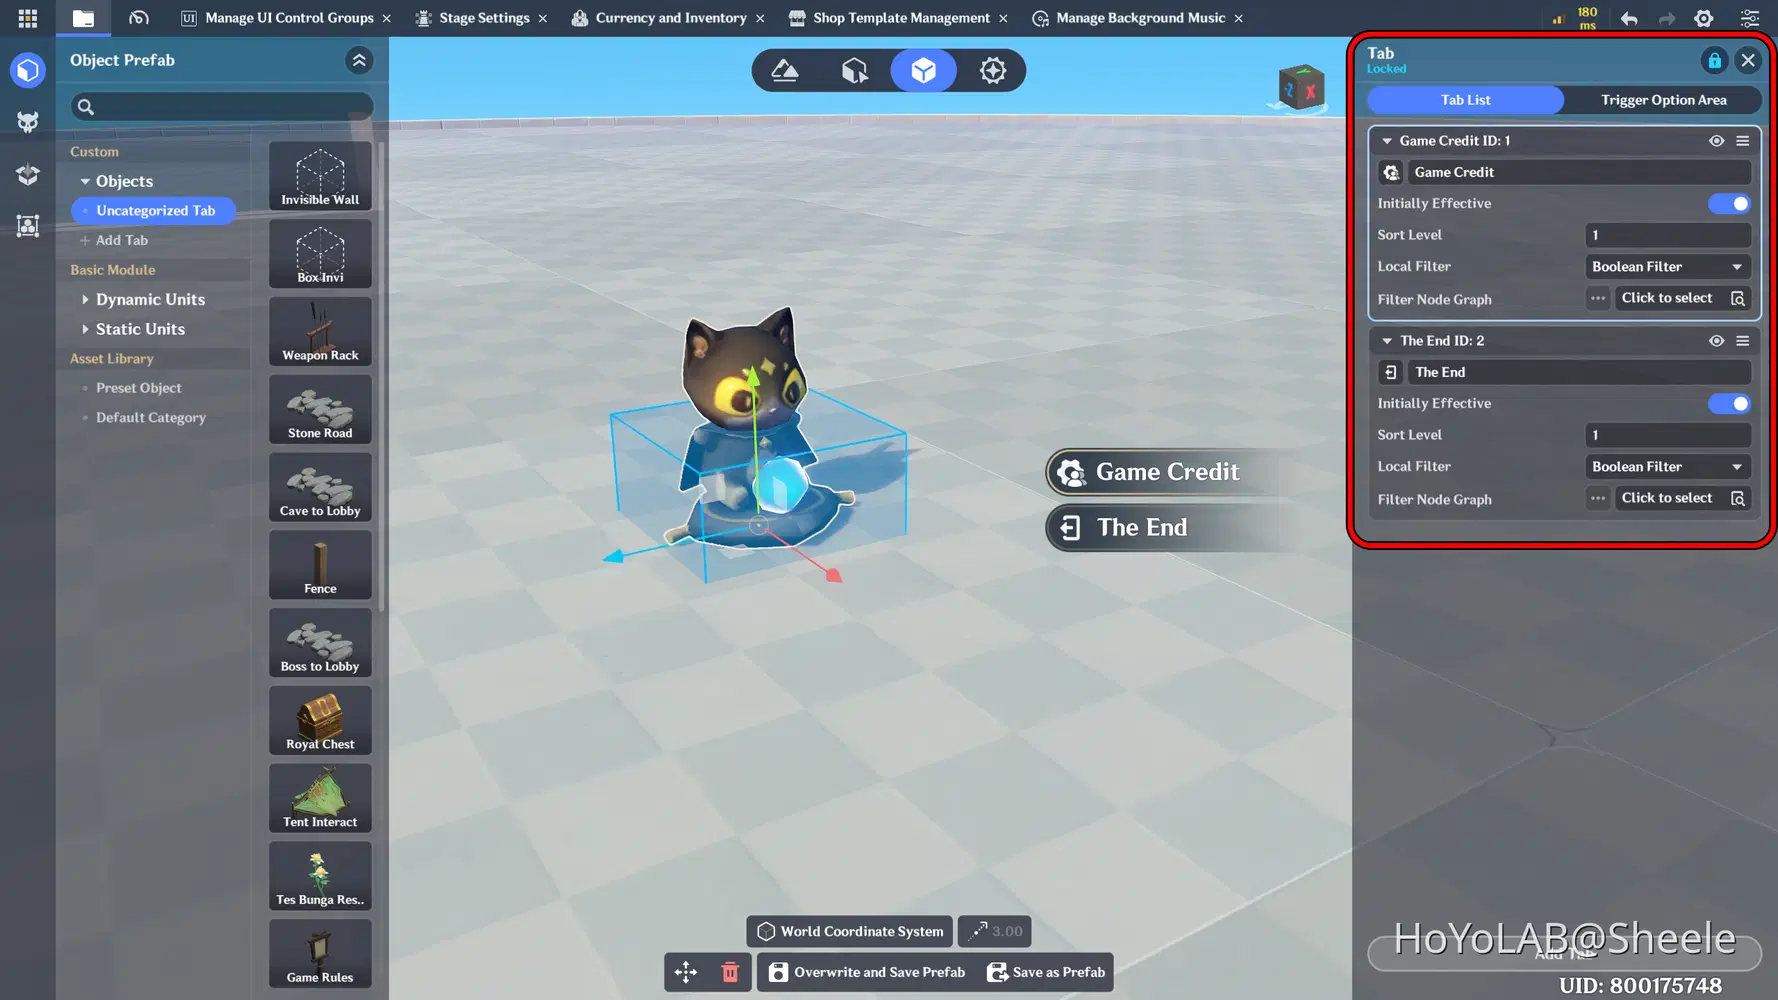
Then also set the object, such as adding a tab as an interactive one.
And then add this Node, when tab 1 is pressed it will bring up a Pop-Up UI for Credit and when tab 2 is pressed it will end and win the game
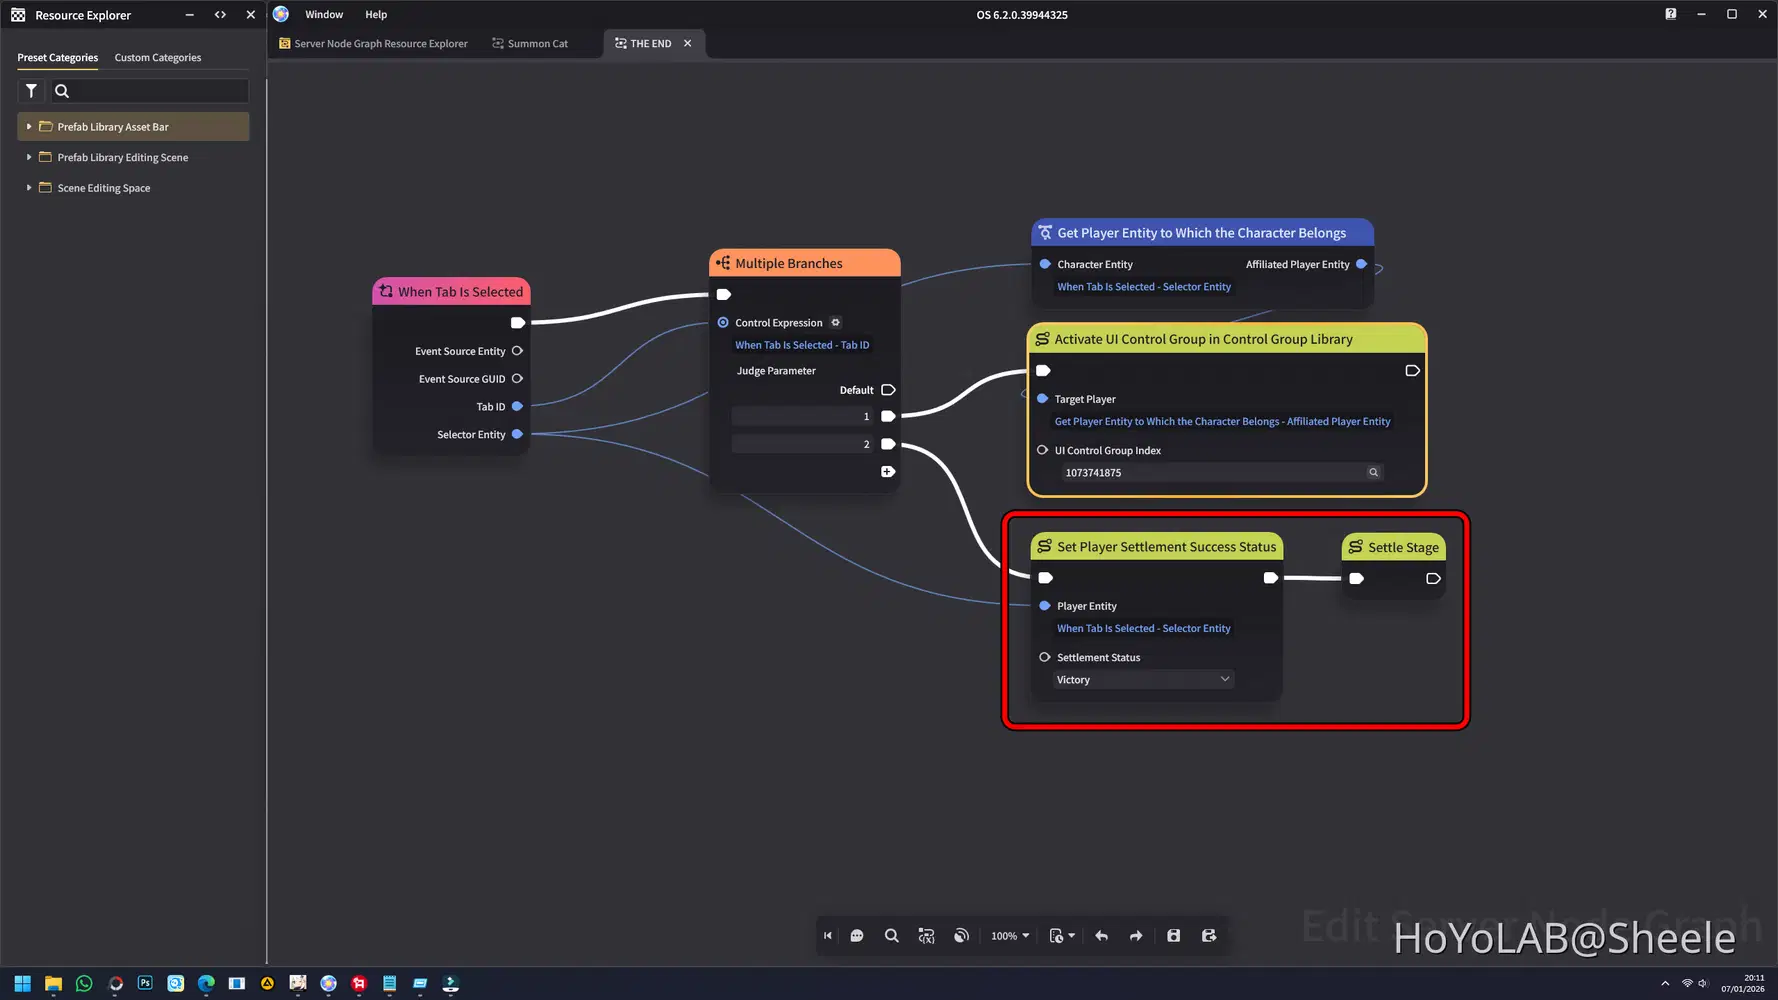
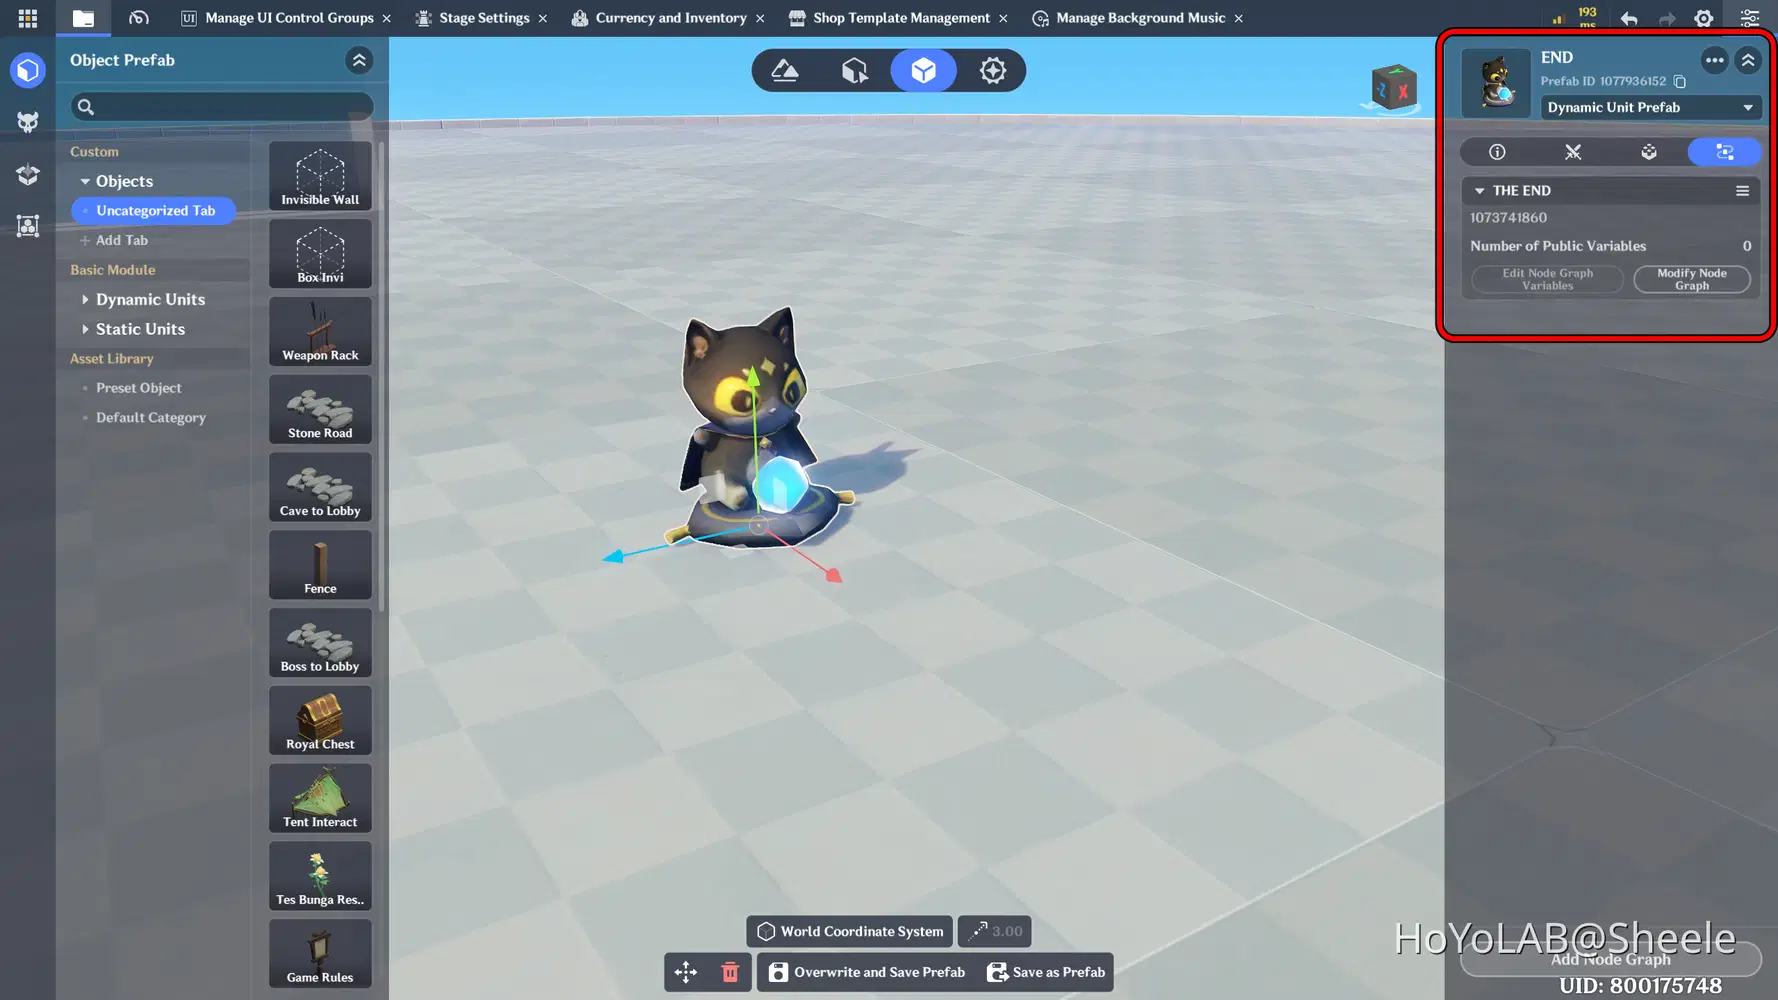
Don't forget to add the Node to the object.
For the results you can see below.
Chapter 4: Final Test
This chapter serves as the final validation stage of the game. In this phase, you will test all implemented systems to ensure they work together as intended. From combat, UI, inventory, enemies, and progression flow to end game conditions, every feature is evaluated in a complete gameplay scenario.
The Final Test helps identify bugs, balance issues, and gameplay inconsistencies before the game is considered complete.
📝 Wonderland Guide:
a. Detailing Terrain
This step focuses on enhancing the terrain by adding details such as props, decorations, and environmental elements. These details help make the game world feel more alive, immersive, and visually appealing, rather than empty or flat.
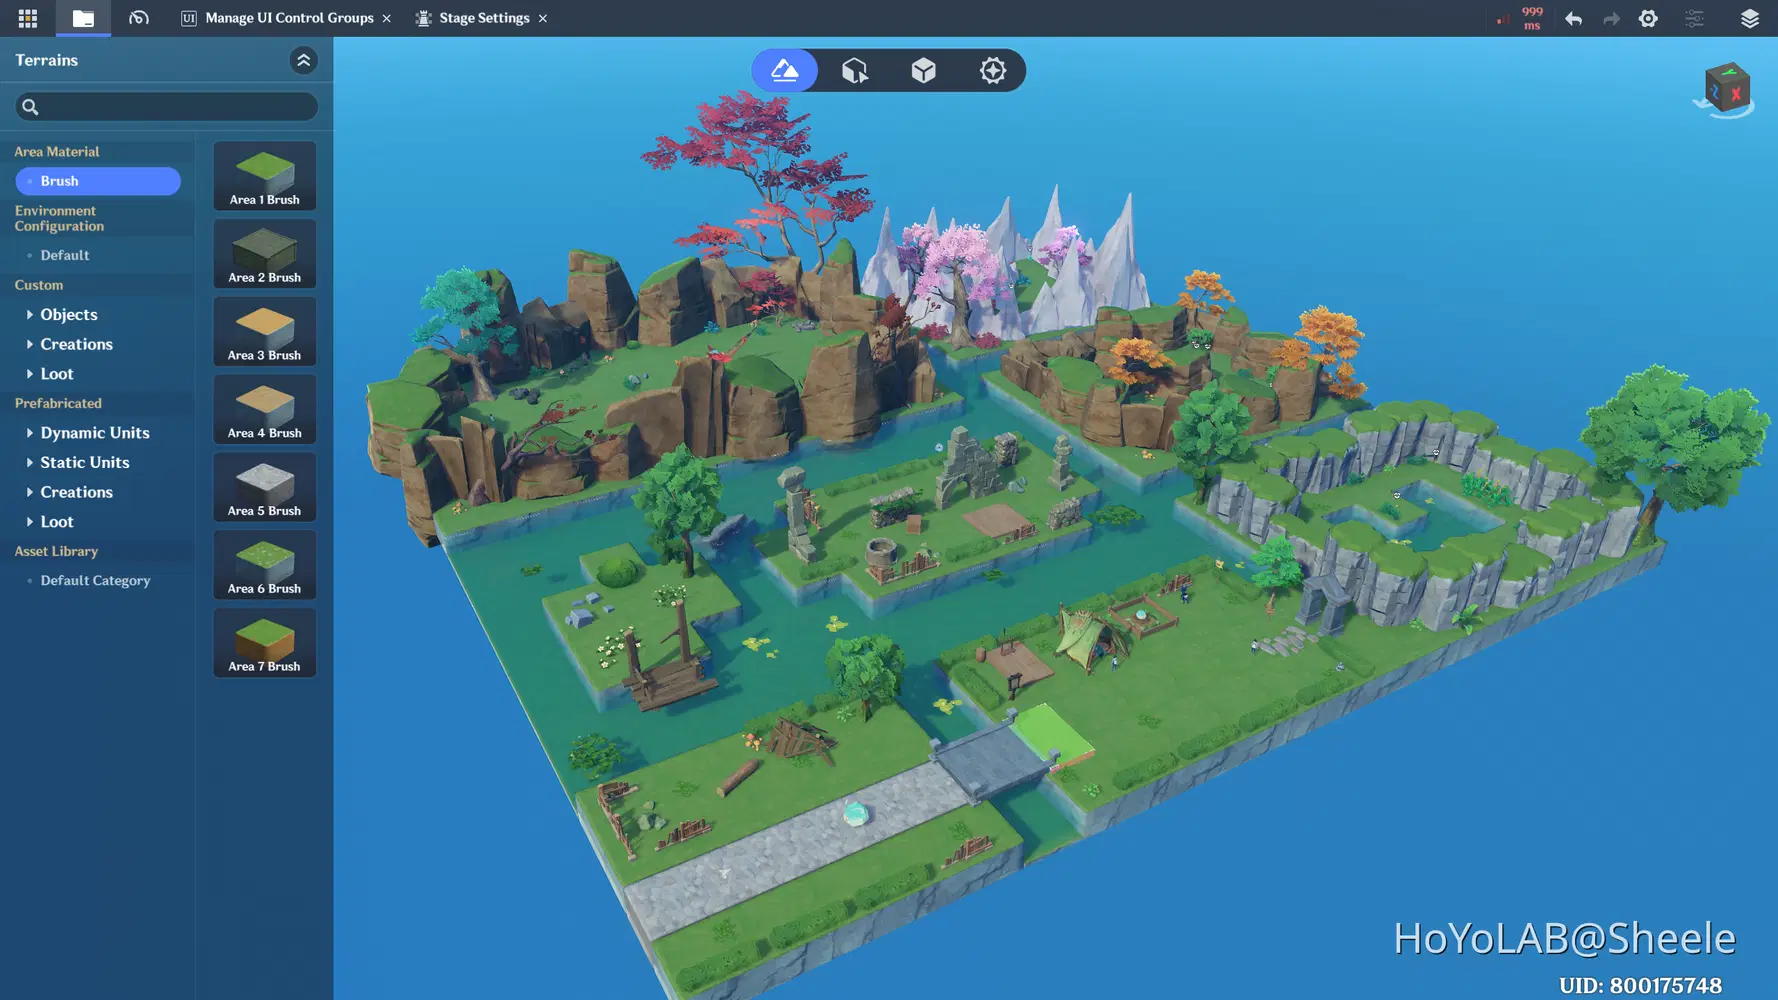
b. Invisible Wall
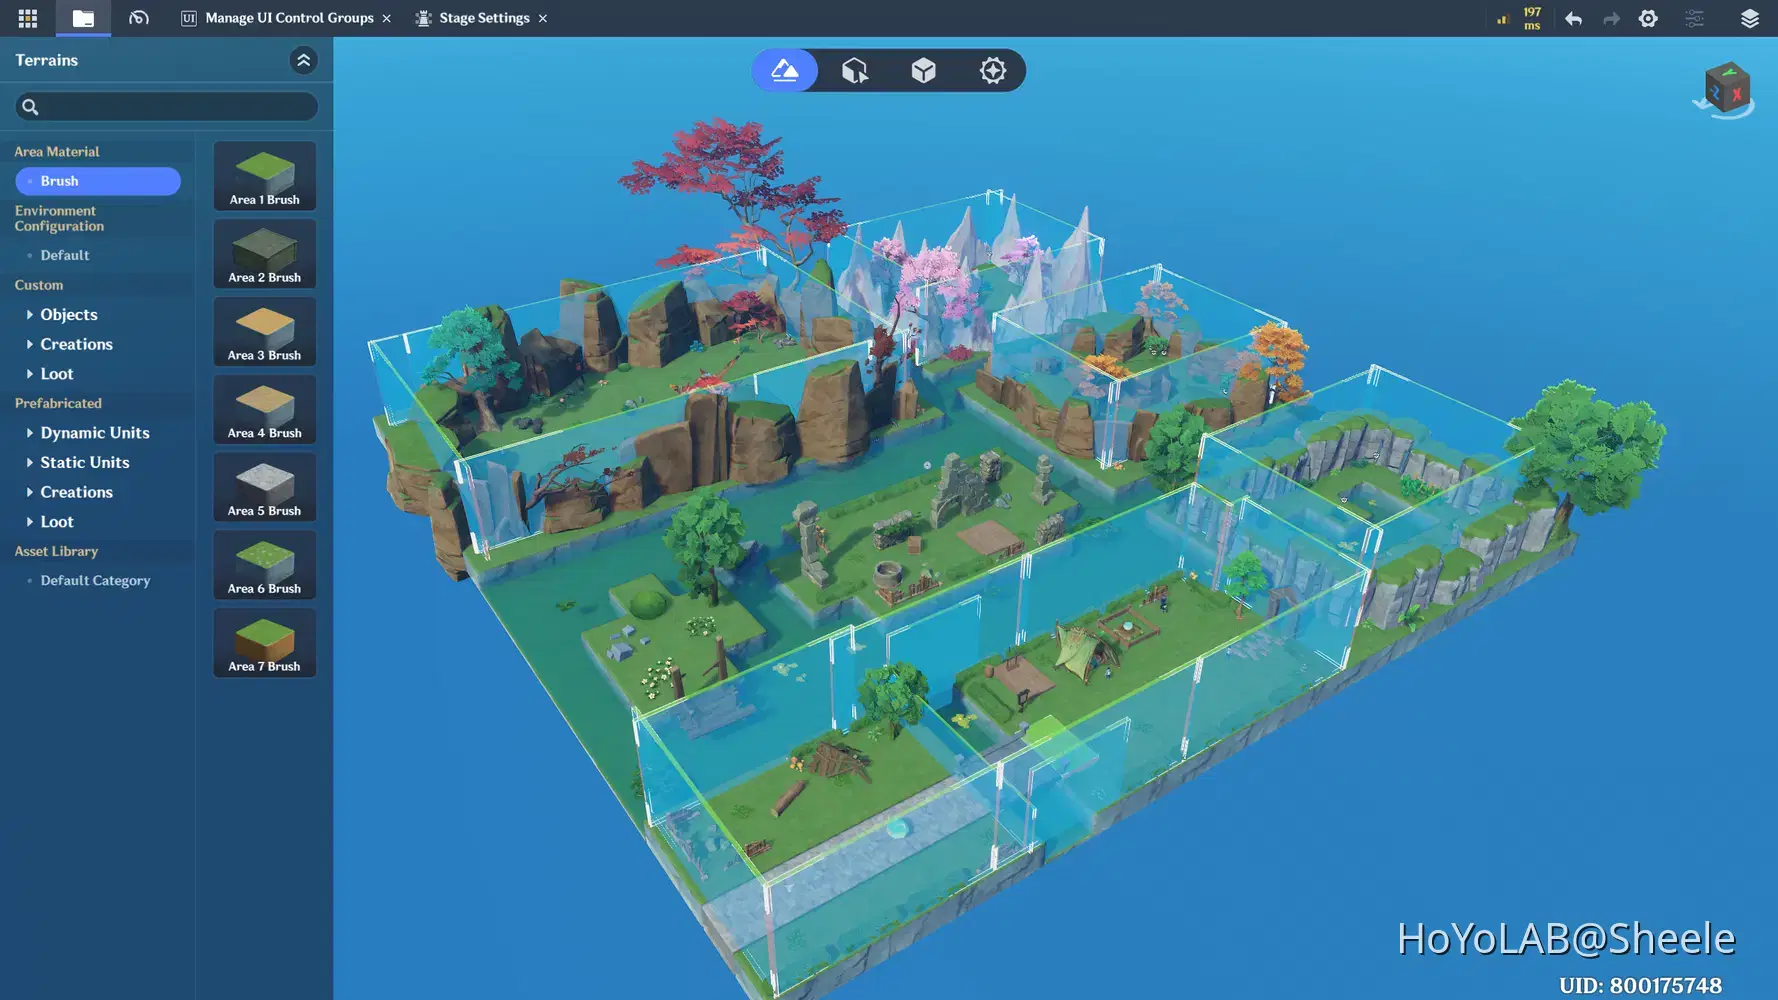
Add an invisible wall object so that the character cannot leave the terrain. This also serves as a barrier for the player so that he does not leave the game flow that the creator wants.
Chapter 5: Publish
The final stage of the game development process in Miliastra Wonderland is publishing the game. To publish it, open the Miliastra Wonderland Editor Main Menu, then select Upload Stage from the menu on the left side. Then select Upload New Stage. Wait until the stage is reviewed and approved, then press the Preview Info section and fill in the section.
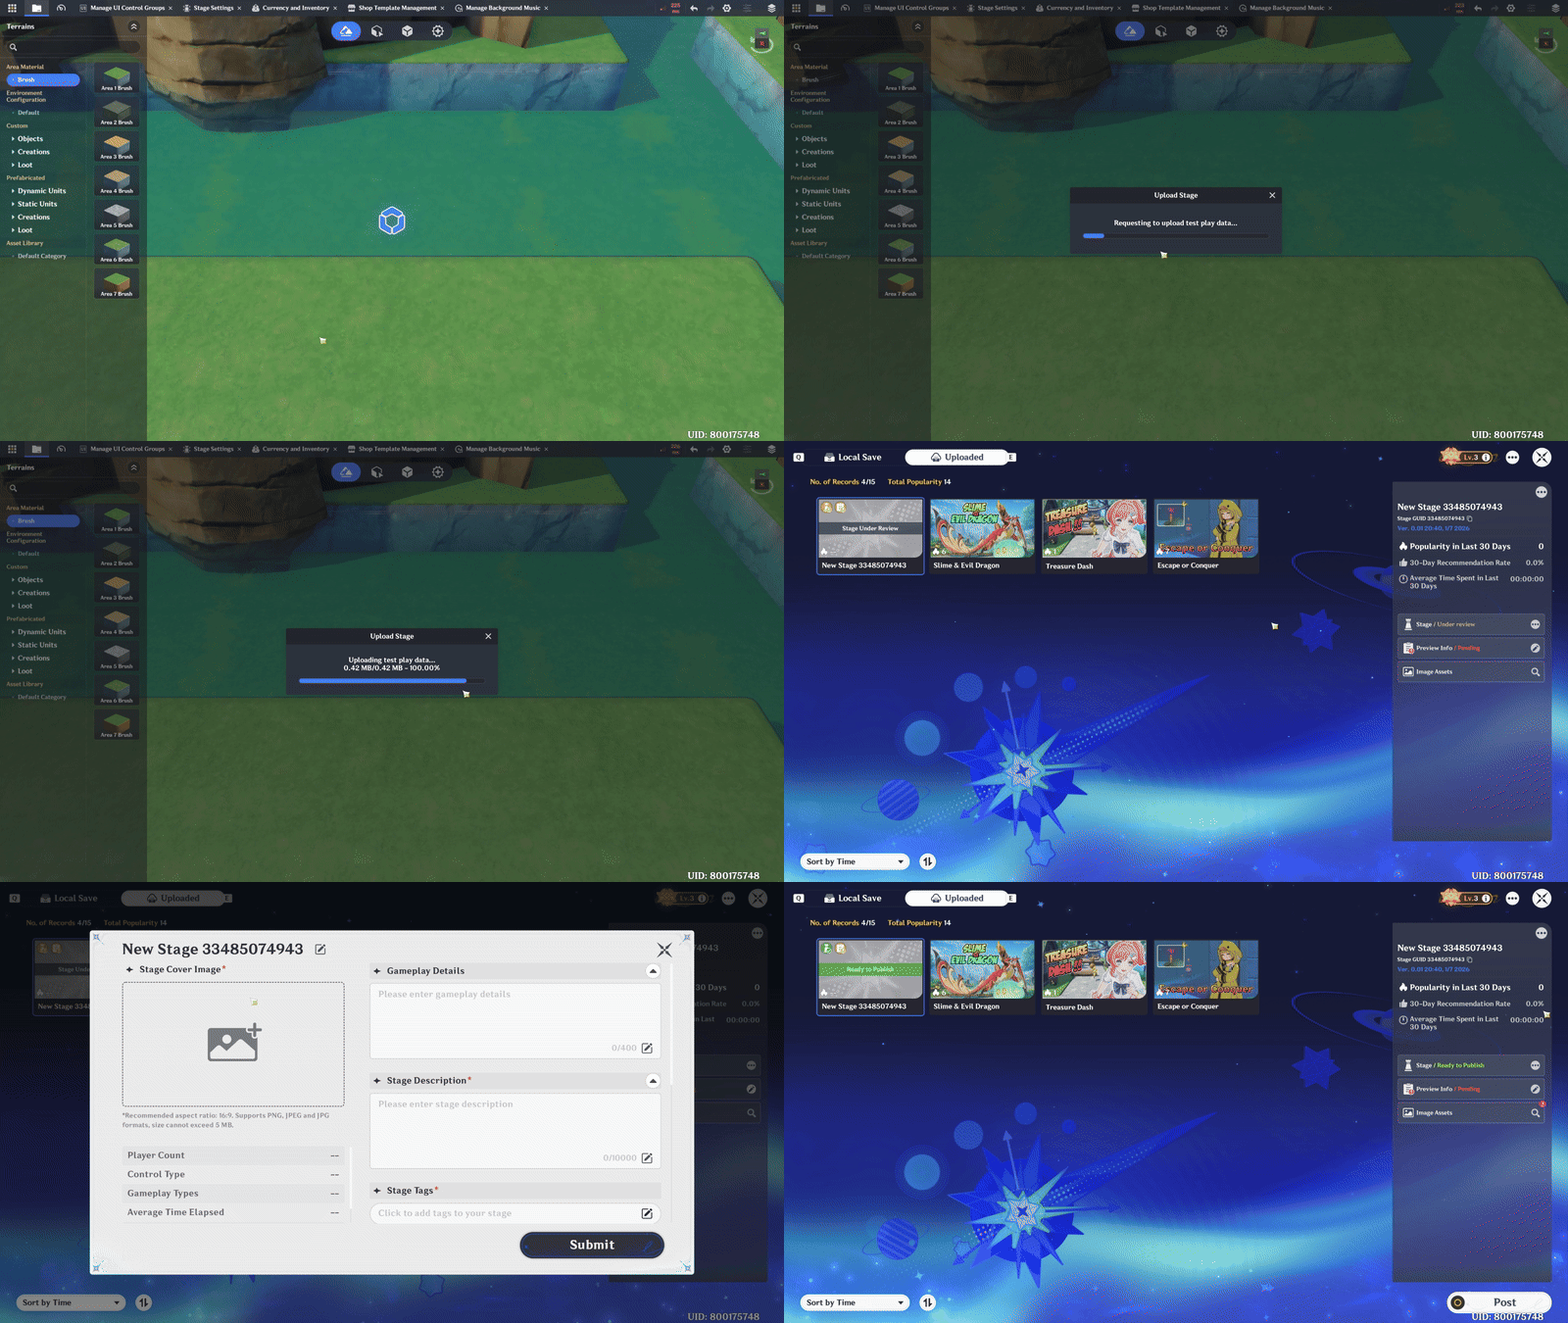
Fill in all components such as the published Stage / Game Name, also add the game cover image, game description, game details, after filling in all sections, select Submit and wait for the approval process so that your game can finally be published successfully. 
Reference Guide
As another source of guidance, you can visit the guide provided by the Official Genshin Impact x Miliastra Wonderland
Miliastra Wonderland - General Guide
Miliastra Wonderland - Tutorial