This topic describes classic RPG gameplay systems such as
- Shop/Currency
- Equipment
- Items & Inventory
- Loot
Detailed Information about the implementation process of these modules is provided below.

Shop/Currency
Currency
First, you need to create your own currency. To do this, open the System Menu and select Currency and Inventory.
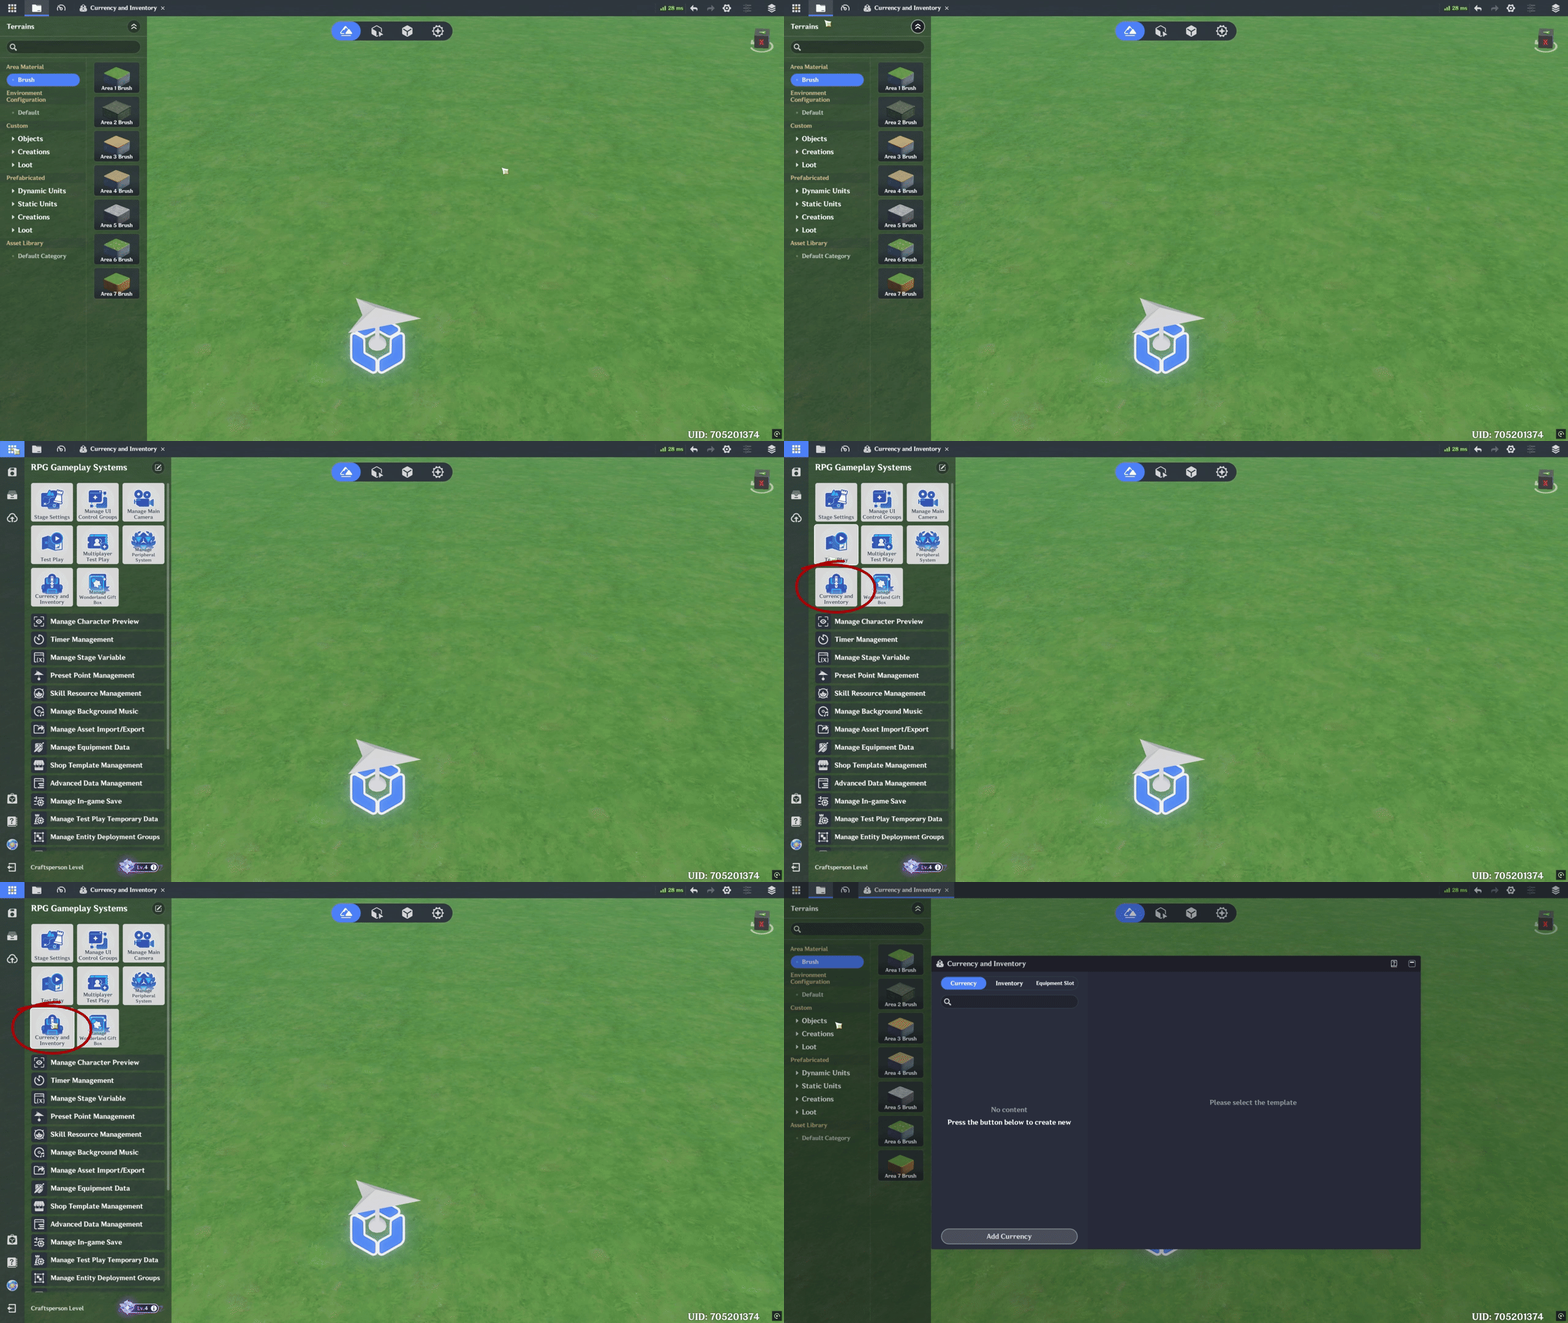
System Menu - Currency and Inventory
Then, click the Add Currency button to create a new currency. In the settings that appear after selecting this button, you can:
- Rename your currency
- Select currency Icon
- Select Destruction Debris
- Select Loot Drop Mechanics
- Configure Corresponding Loot Appearance
- Set Display Priority
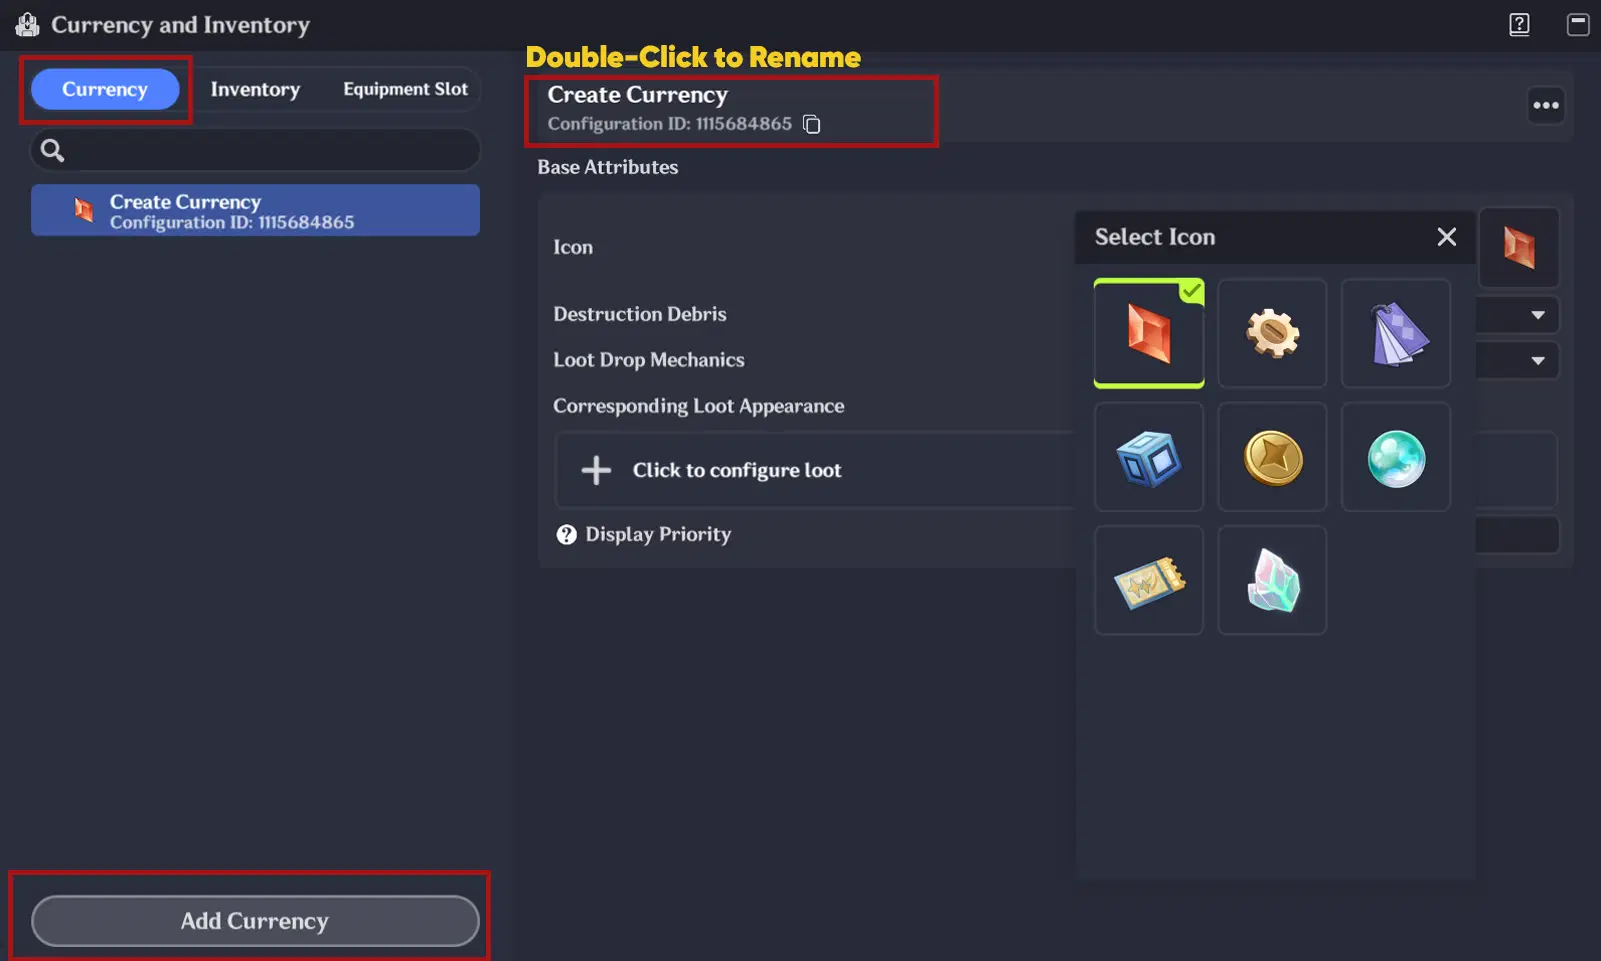
Currency Rename & Icon
Destruction Debris have 3 options:
- Loot (If the character dies, the currency will drop into the scene)
- Destroy (If the character dies, the currency amount will be destroyed)
- Save (If the character dies, the currency amount will be saved. This option applies only to characters)
Loot Drop Mechanics have 2 options:
- Shared rewards (Only one currency loot will be created for all players. If one player picks it up, the others won't be able to do so)
- Individualized Reward (A separate copy of the currency loot will be created for each player, allowing every player to pick it up)
To display currency loot in the scene, you need to configure the Loot Appearance. To do this, open the Prefab Library and select the Loot tab. You can choose Challenge Coin Loot from Preset Loot Category 1 and manually change the loot model if necessary. Finally, click the Save button to store your created loot prefab.
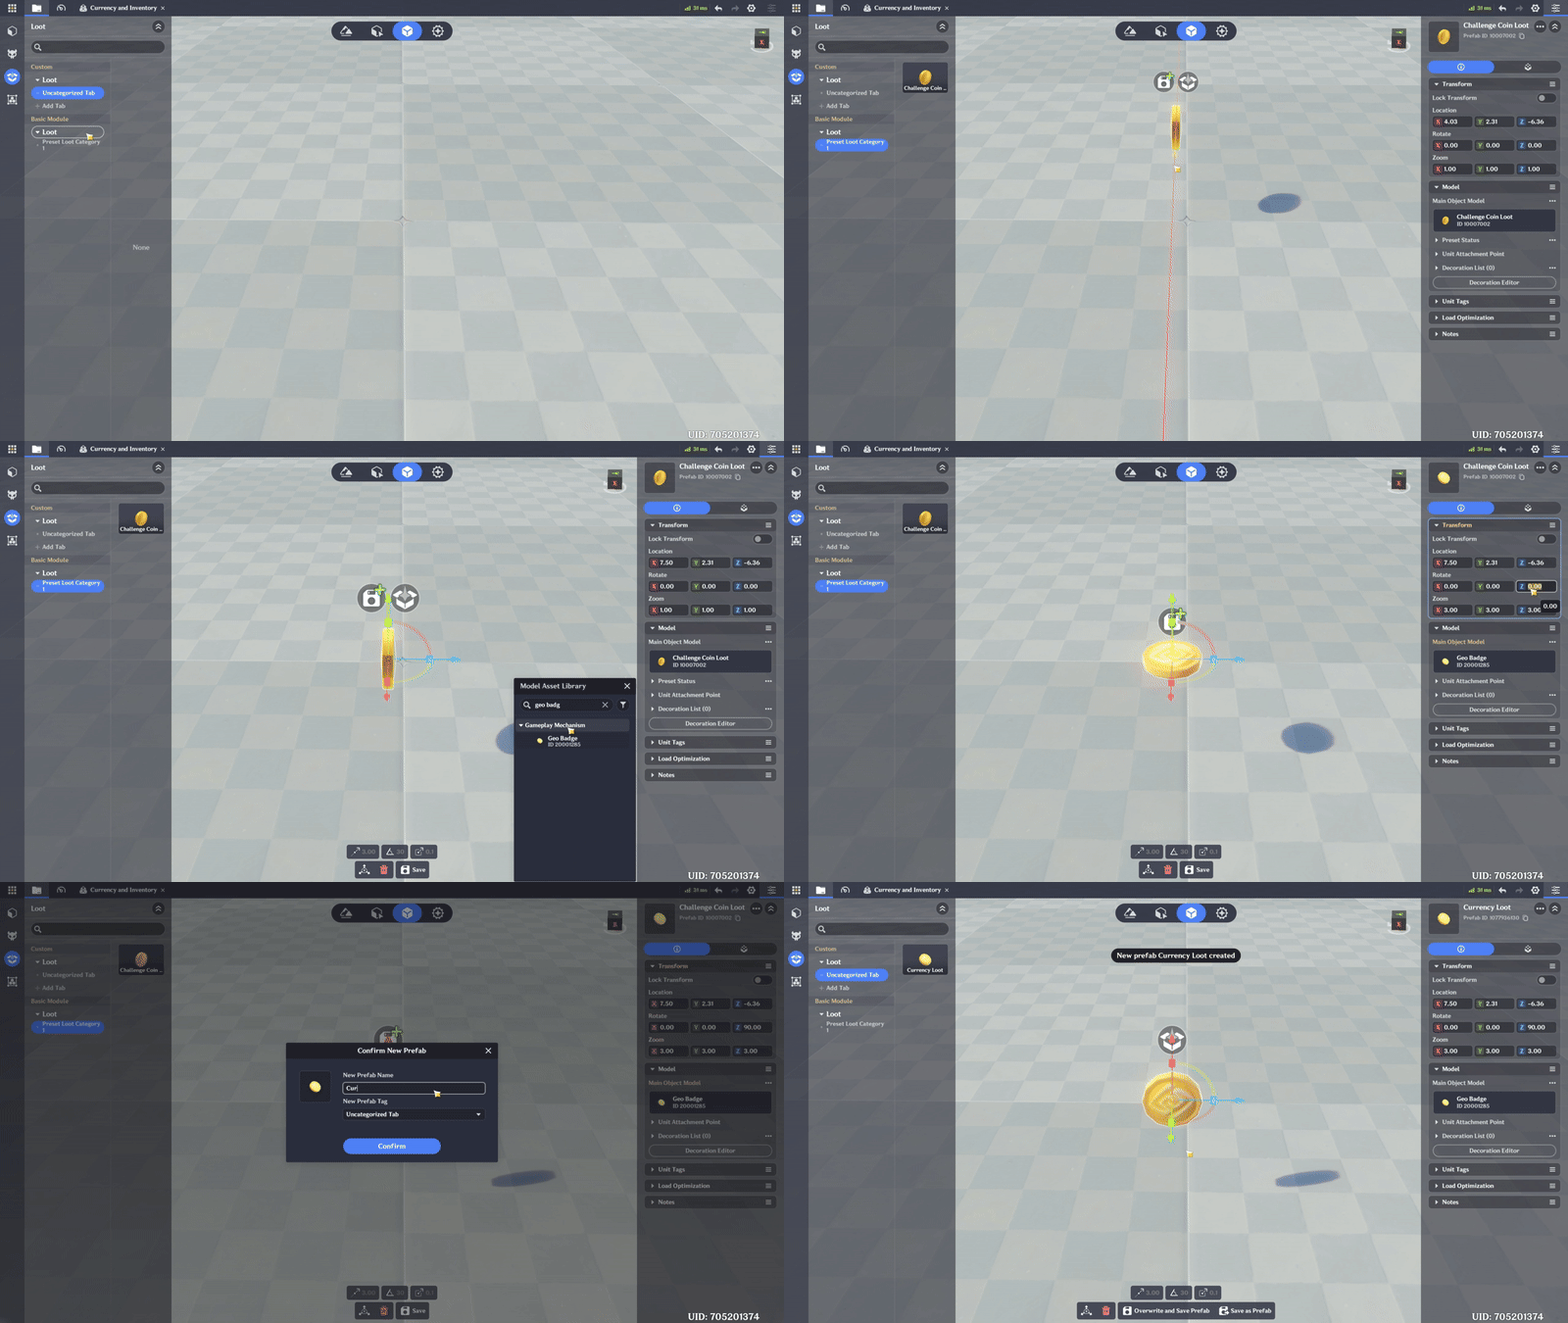
Currency Loot creation
Now in the Currency and Inventory Interface you can choose Loot Appearance between your own Currency Loot Prefab and Preset Challenge Coin Loot Prefab.
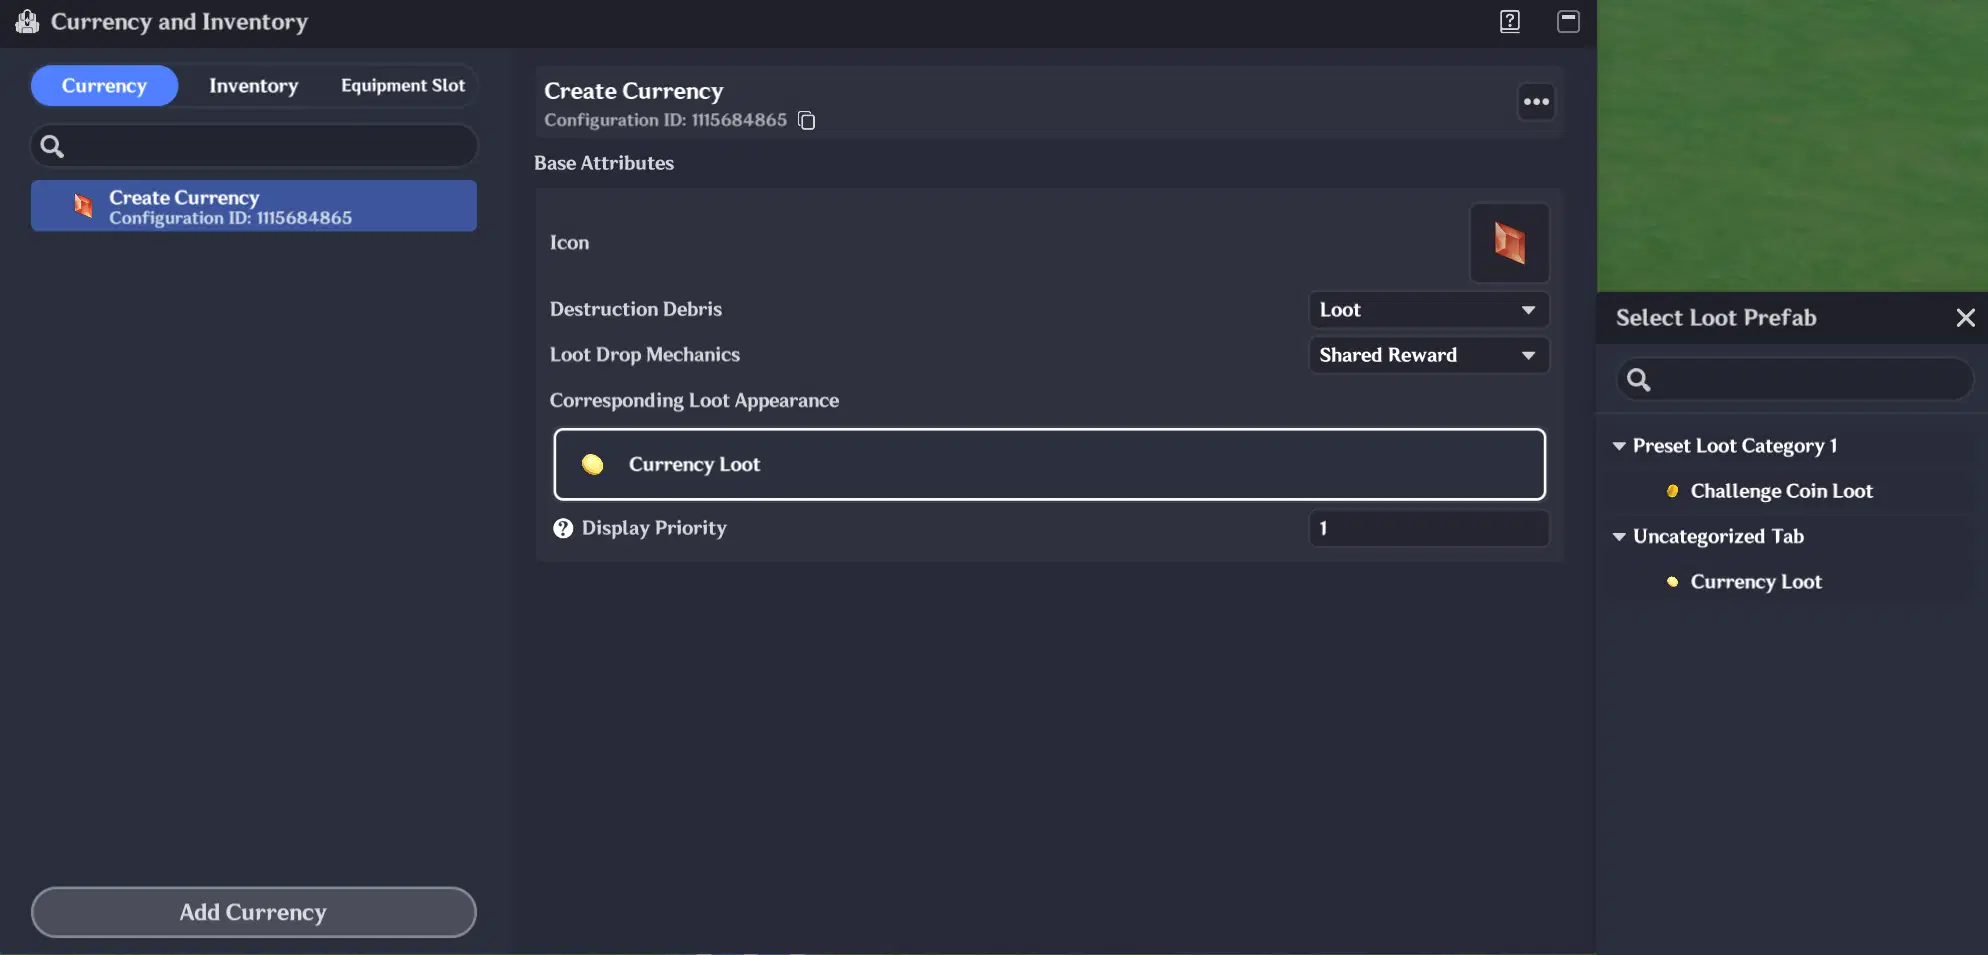
Currency Loot Appearance
Display Priority affects the order in which currencies are displayed from right to left. The higher the value, the further to the left the currency will appear.
Currency can be added to a character via the Inventory Component.
Shop
To create a shop, select Shop Template Management in the System Menu.
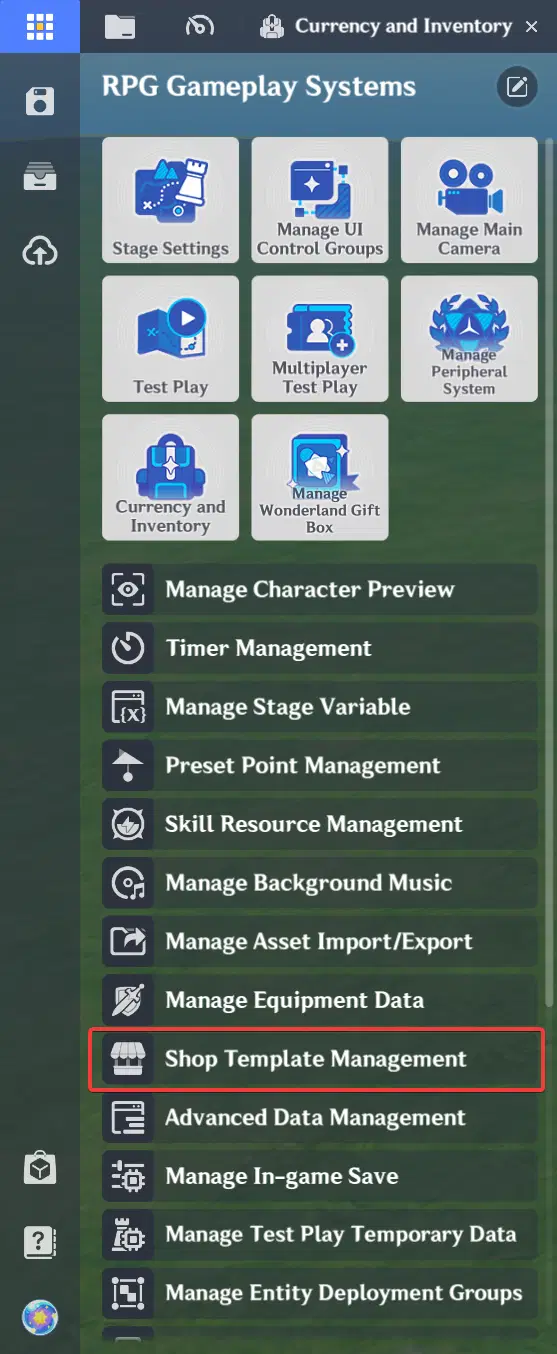
Shop Management
In the Shop Template Management interface, select the New Shop Template button to create a shop template. Choose a Template Name and Tab, then press Confirm Create.
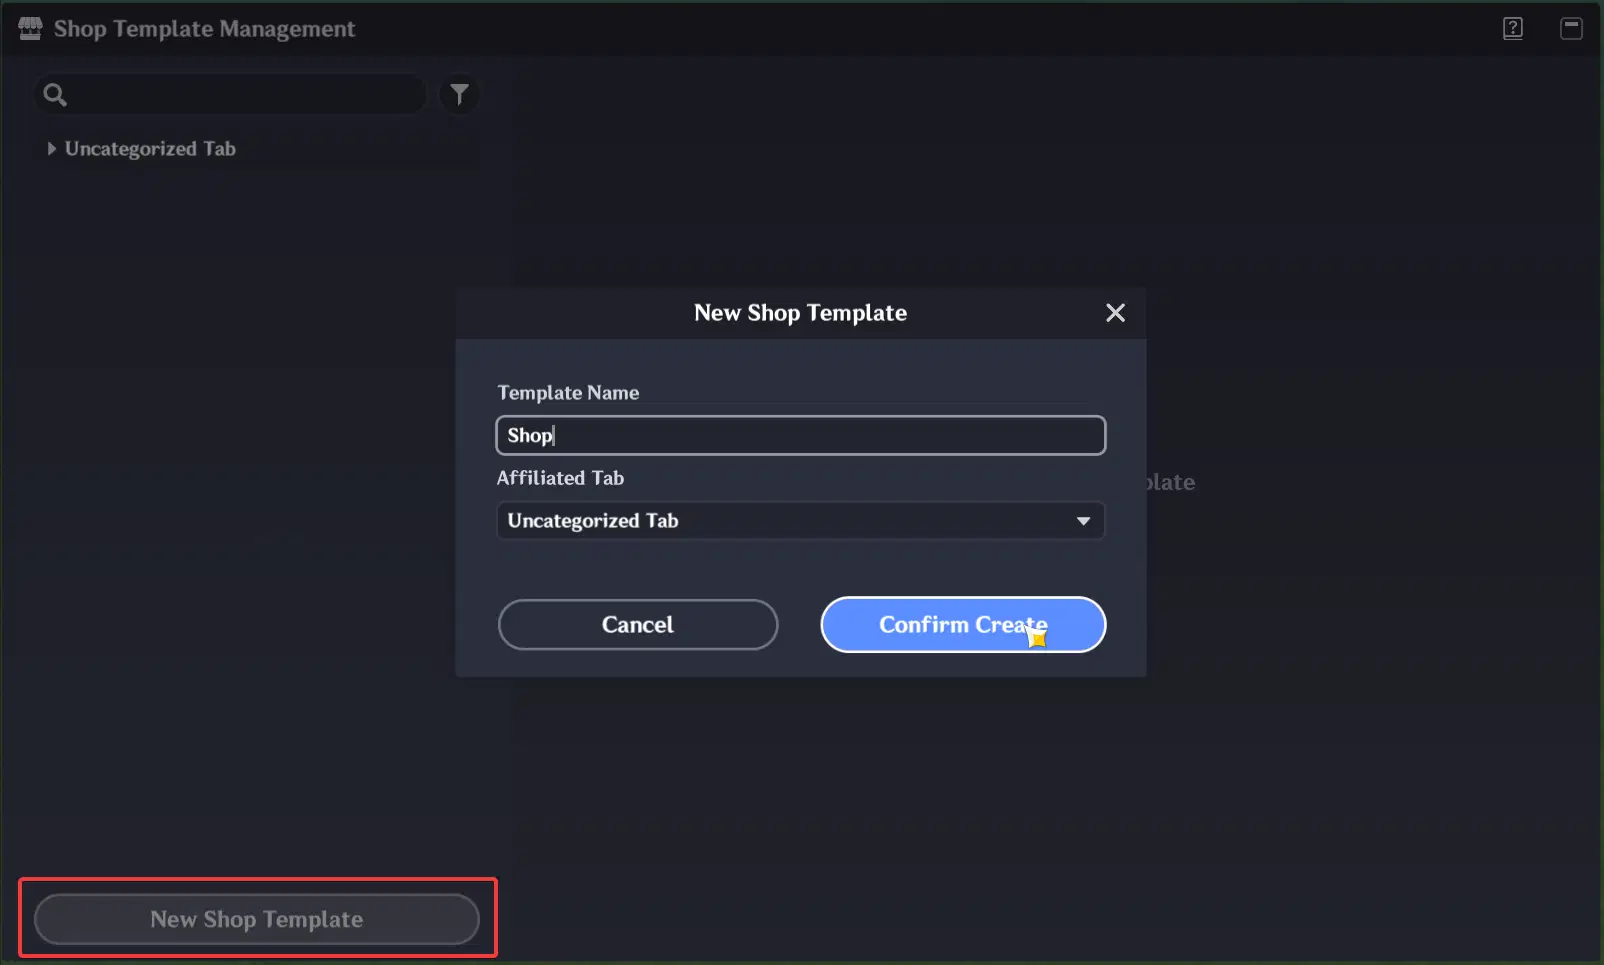
Shop Template creation
In the settings that appear after creating the shop template, you can:
- Rename Shop
- Configure Inventory opening when shop open
- Configure Item Tab Type
- Set Sale settings
- Set Purchase setting
- See Reference List
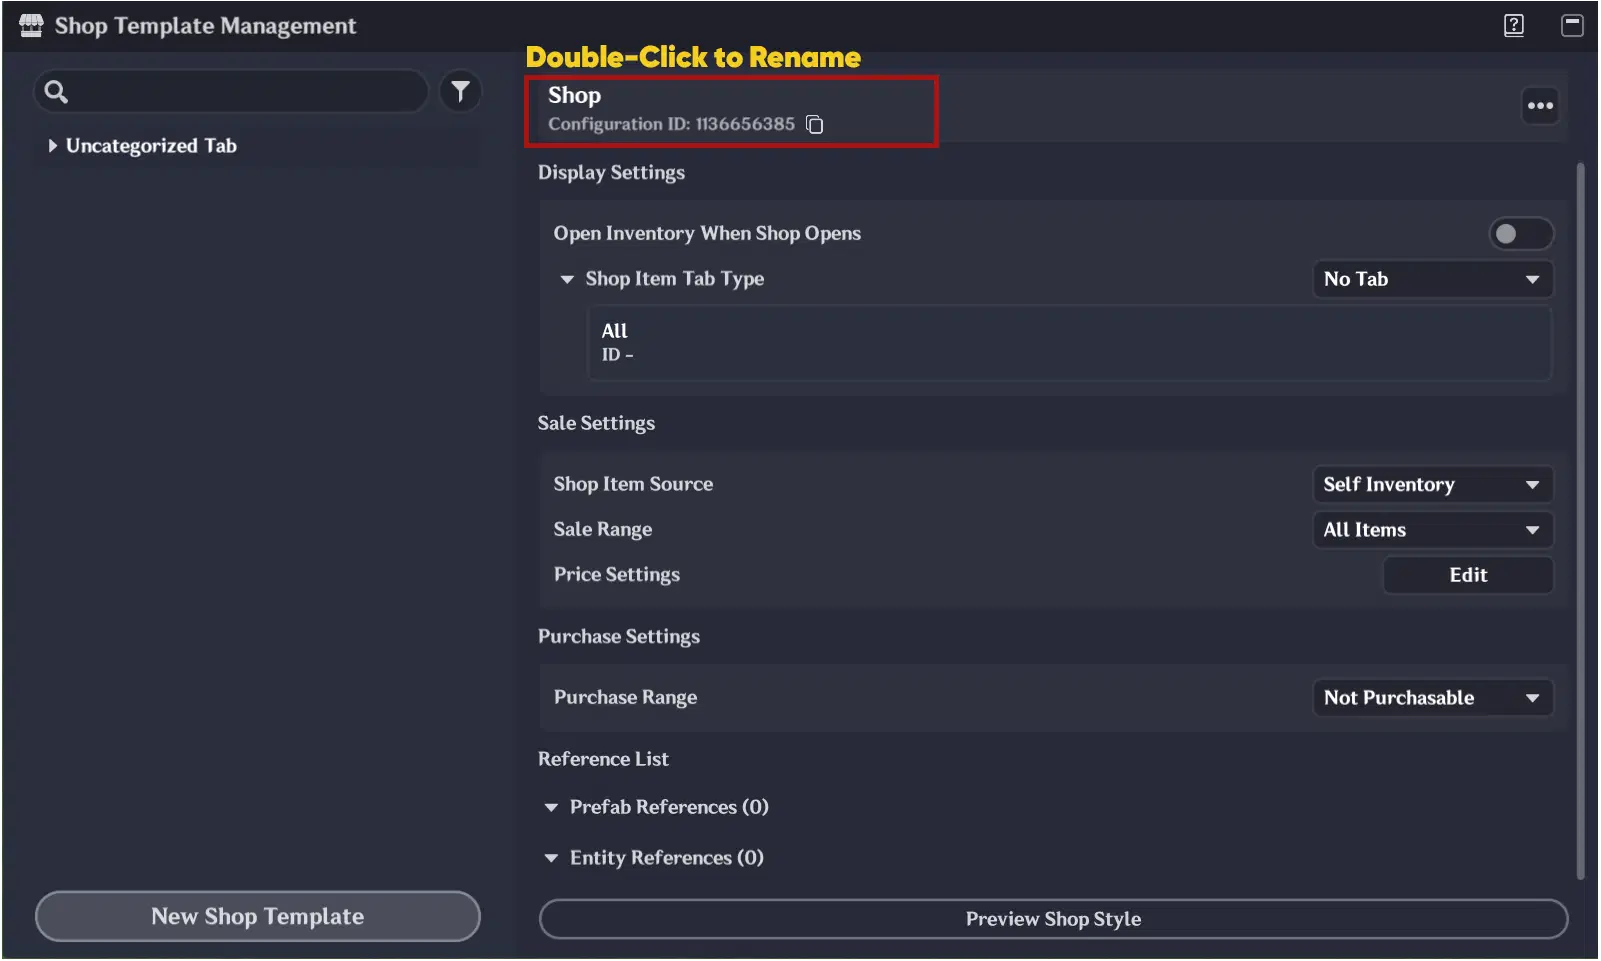
Shop Template settings
Display settings
Shop Item Tab Type has 3 options:
- No Tab (All items will be displayed in a single tab called All)
- Default Tab (Items will be categorized into All / Equip / Consumable / Materials / Very Special Items)
- Custom Tab (Allows you to define a custom number of tabs and their names)
Sale settings
Shop Item Source have 2 options:
- Self Inventory (Items on sale will be taken from the shop entity’s inventory)
- Custom List (Allows you to manually define items on sale, including item quantity and price)
Note that with self Inventory you can customize item quantity and Availability dynamically
Sale Range can be configured only if Self Inventory is chosen. If All Items is selected, the shop will sell all items that have been created.
In Price Settings, you can edit the shop’s price list. To add items to the list, click the Add Shop Items button and select the item you want to include. For each item you can define Affilated Tab, Limited stock, Quantity, Sort Priority, Purchase option and Sell Price.
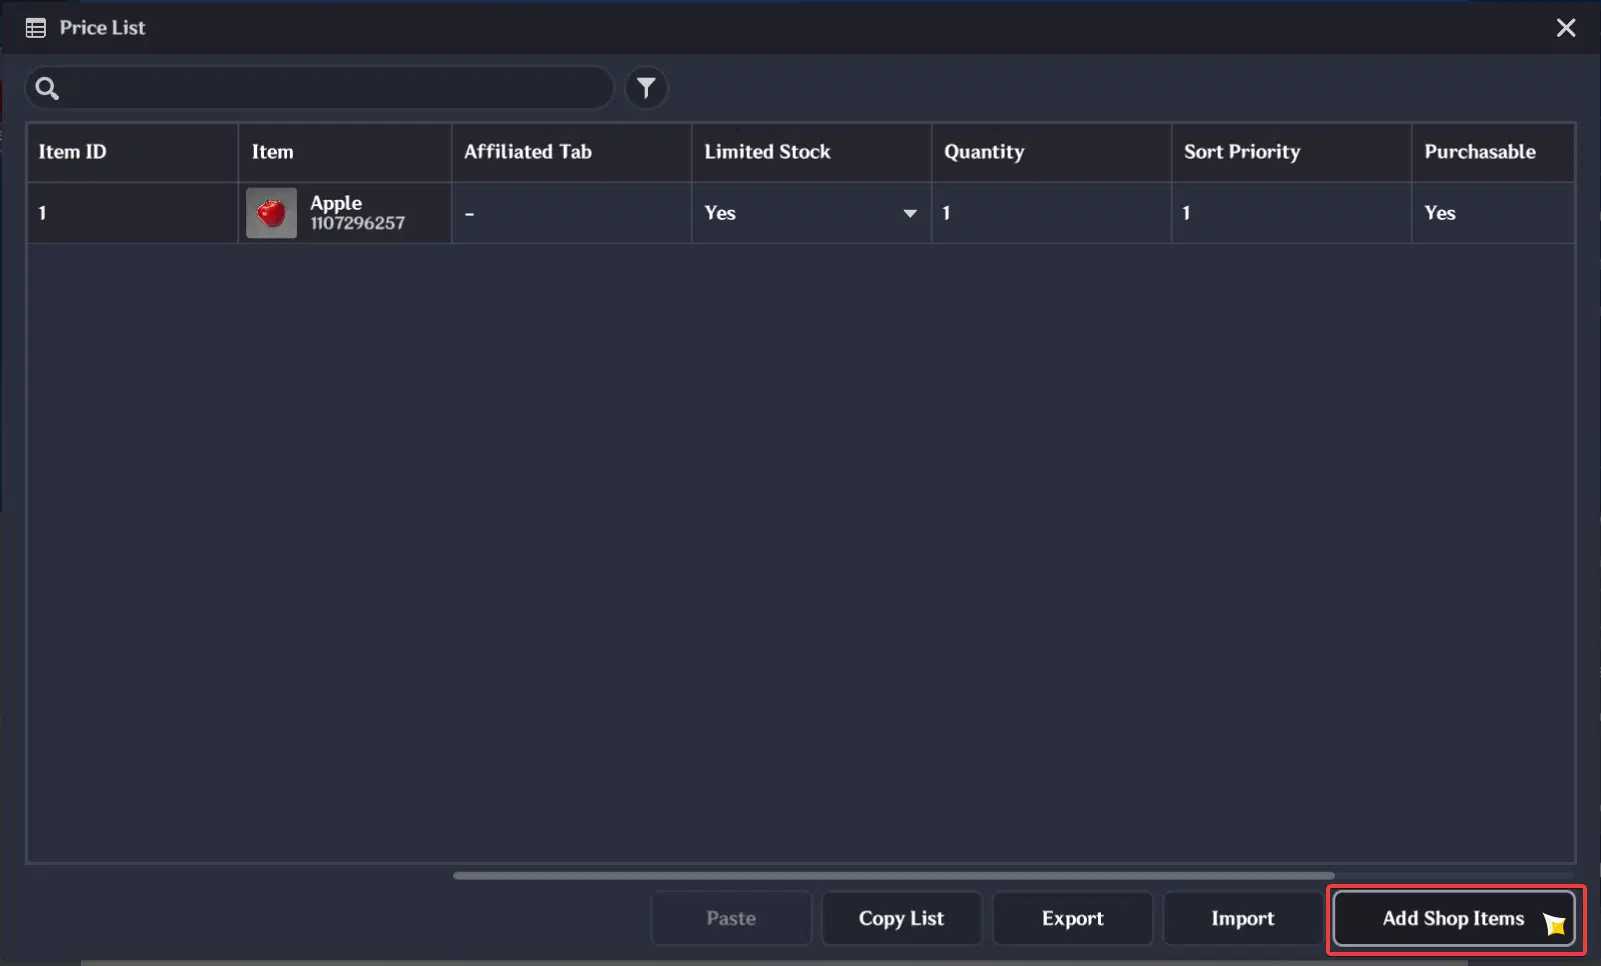
Price List Interface
Purchase settings
Purchase Range defines whether the player can sell items to the shop. Similar to Sale Range, you can select between All Items, Select Items, or turn off the shop purchase option entirely.
Reference List
This list contains Prefabs and Entities to which this shop template is assigned.
Creating Shop Entity in the Scene
To add a shop to the scene, you first need to create a Dynamic Unit (for example, an empty model) and then attach the shop template to it.
To do so, you need to open Common Component Tab, press "Add Common Component" button and select Shop. After that press Advanced Editing, enter the shop name (This name doesn't refer to Shop Name Template) and select created Shop Template.
Note that you can add multiple shops in dynamic unit, using "Add shop" button in Shop Component Advanced Editing.
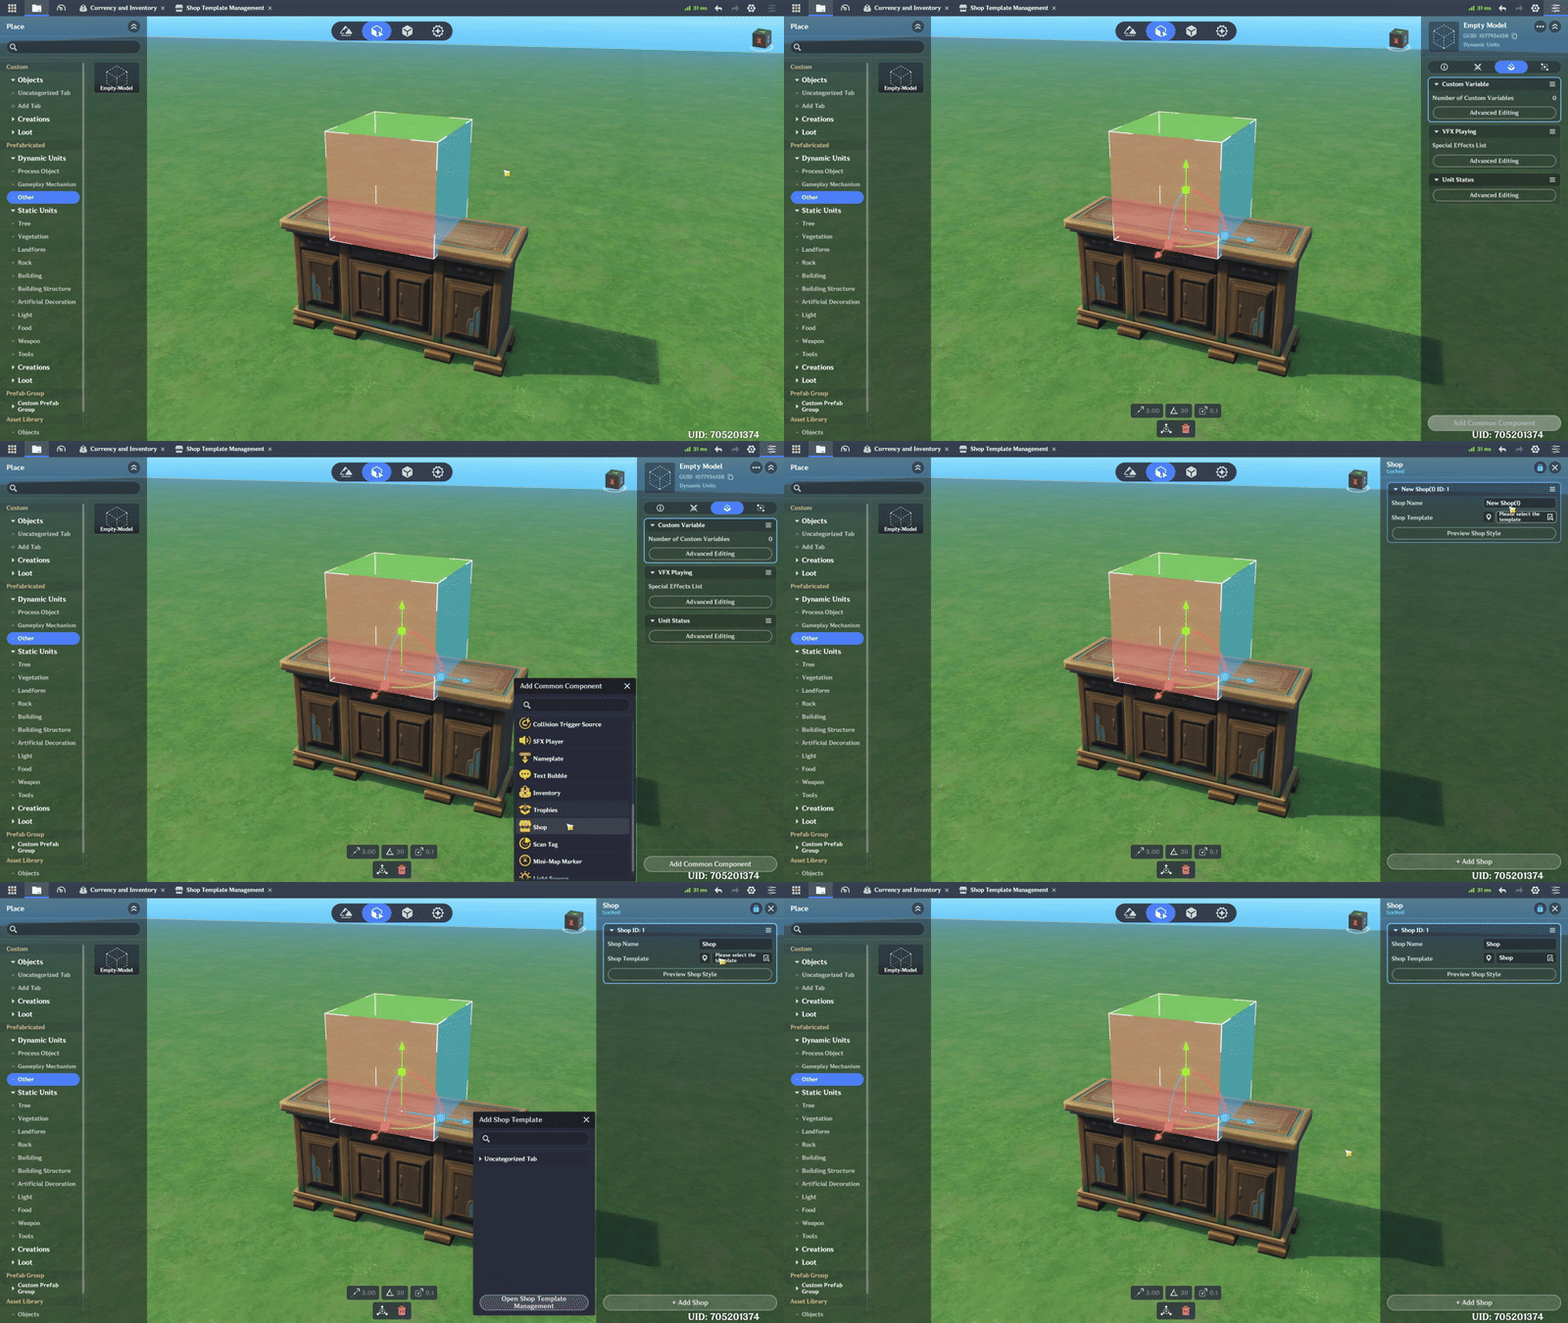
Shop creation in the Scene
To allow the player to open a shop, additional logic must be implemented. For example, you can use the Tab Component.
Similar to the Shop Component, add the Tab Component to the dynamic unit. In Advanced Editing, customize the tab and the trigger area.
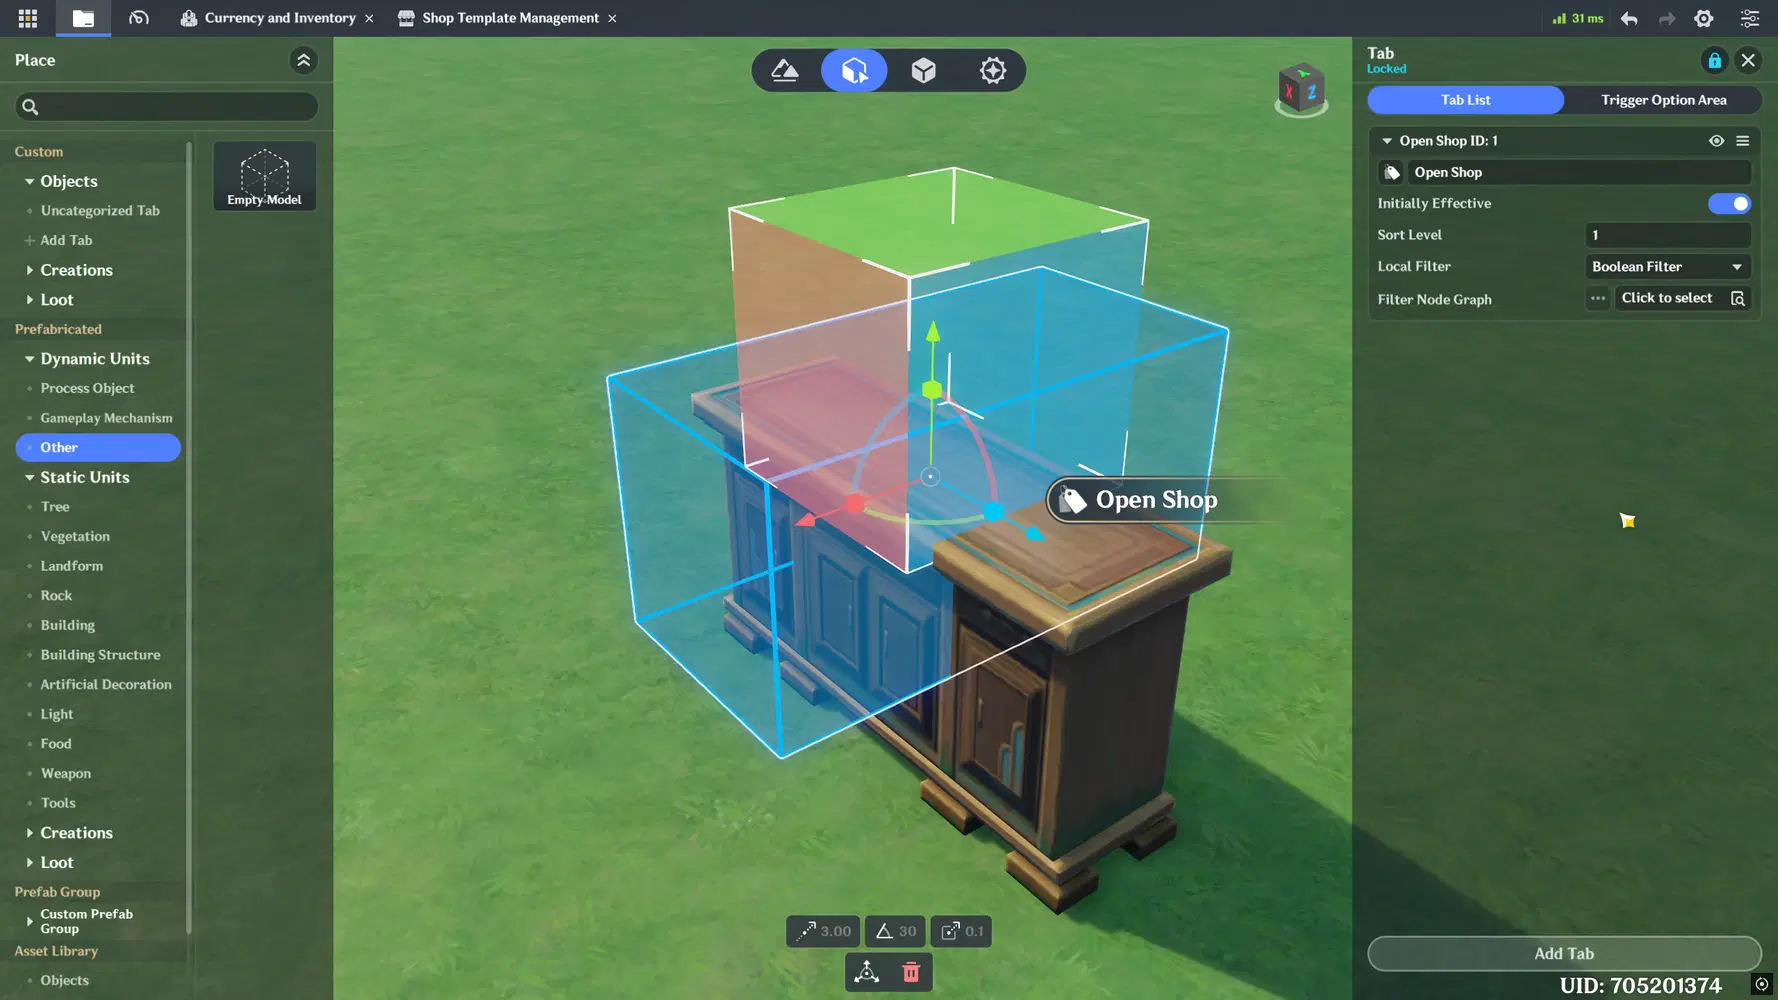
Tab configuration
Finally, open Miliastra Sandbox (located in the lower-left corner of the System Menu) and create a node graph that allows the player to open the shop using the Tab interaction.
In the Entity Node Graph folder, create your node graph. The node graph logic is shown below.
Note: The Inventory Component must be mounted on the character; otherwise, the shop will not open.
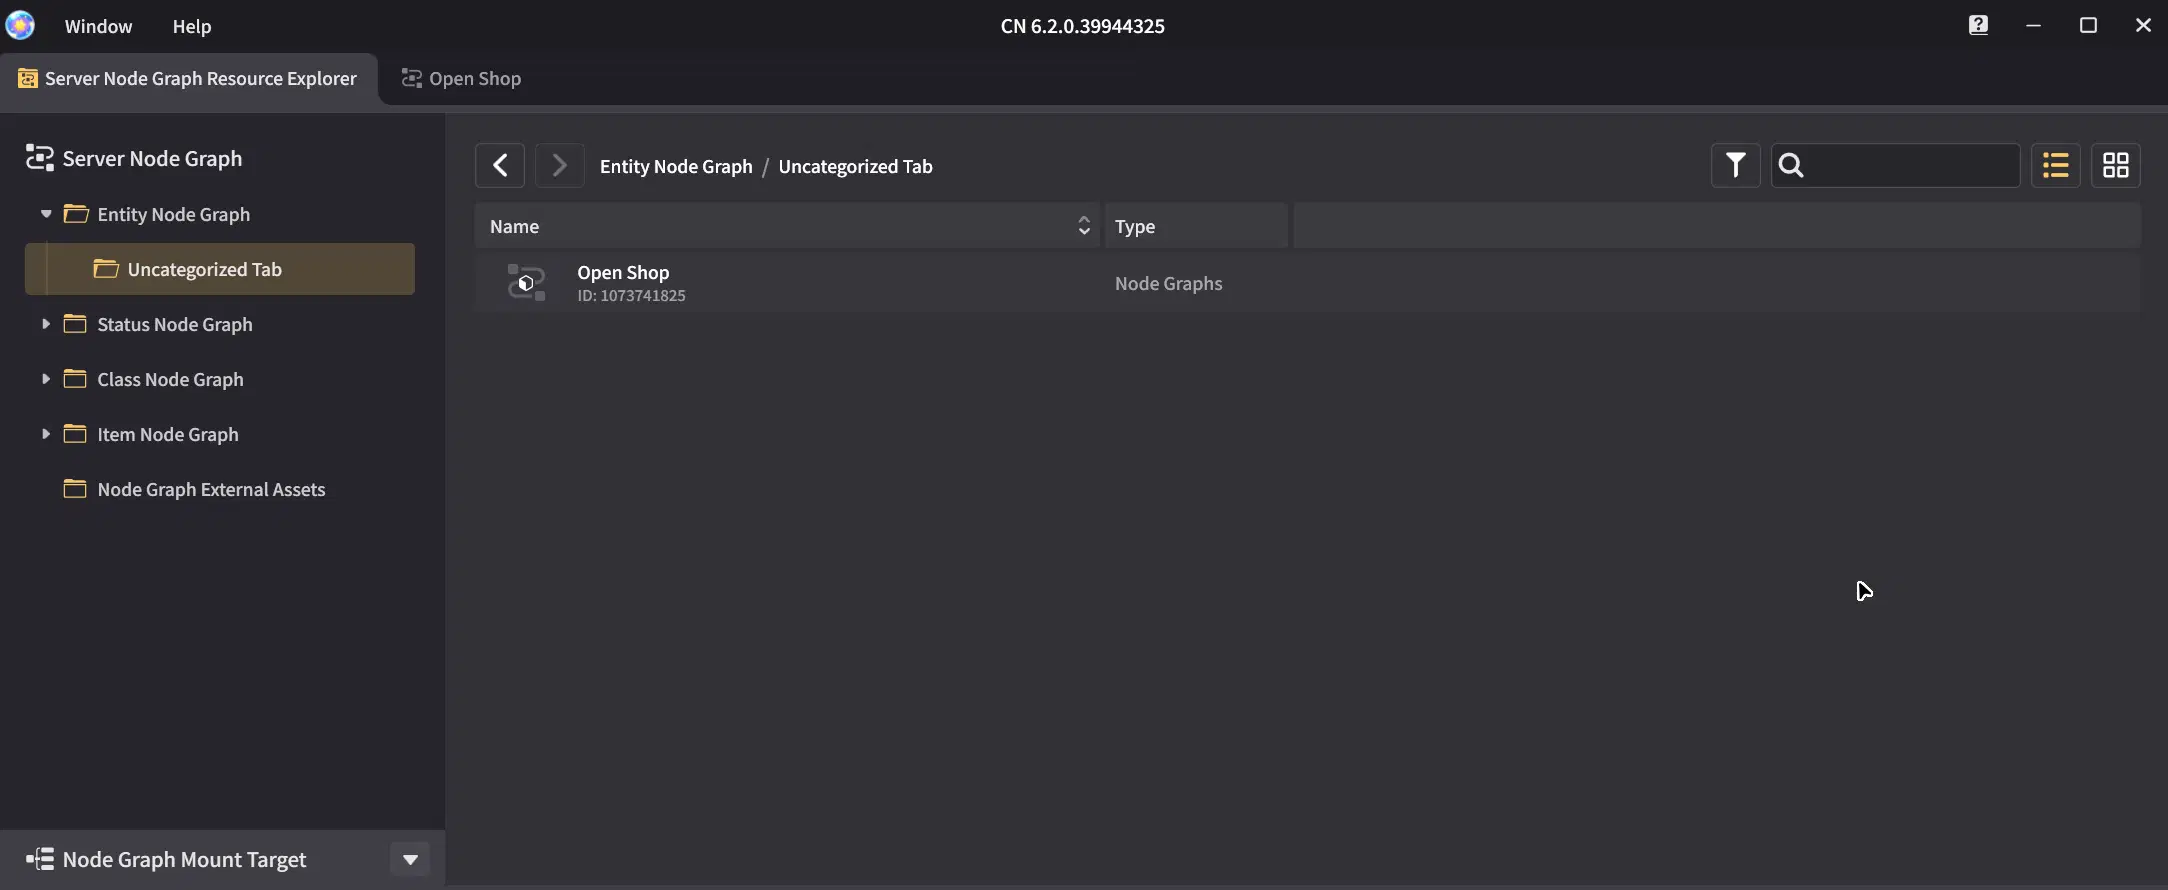
Entity Node Graph Folder
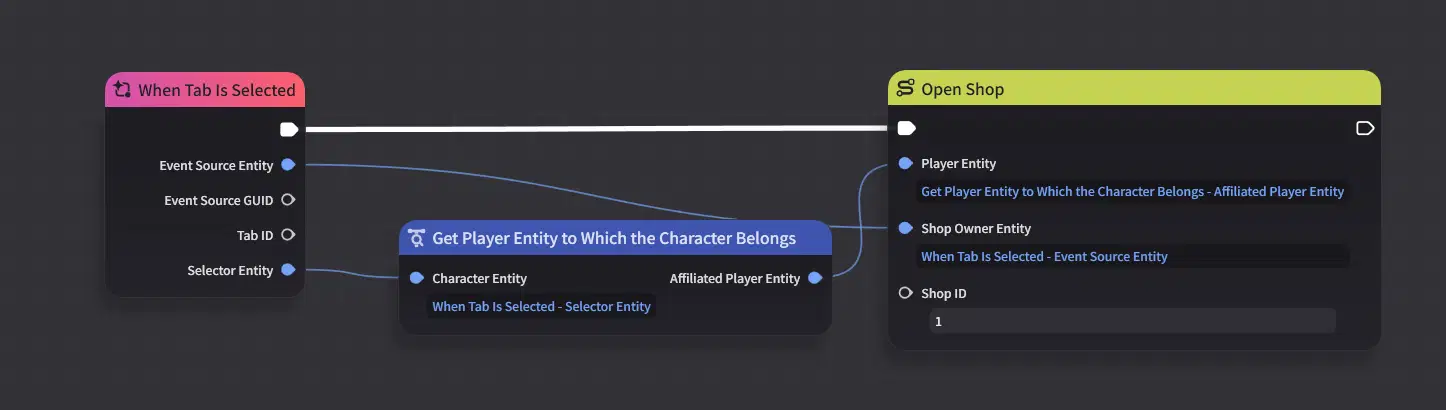
Open Shop logic
Note: In this setup, the Event Source Entity will be the Dynamic Unit Entity, not the character. The Selector Entity will be the character, not the player, so you need to use the Get Player Entity to Which the Character Belongs node.
To mount the node graph to the Dynamic Unit Entity, go to the Node Graph tab and select the created node graph.
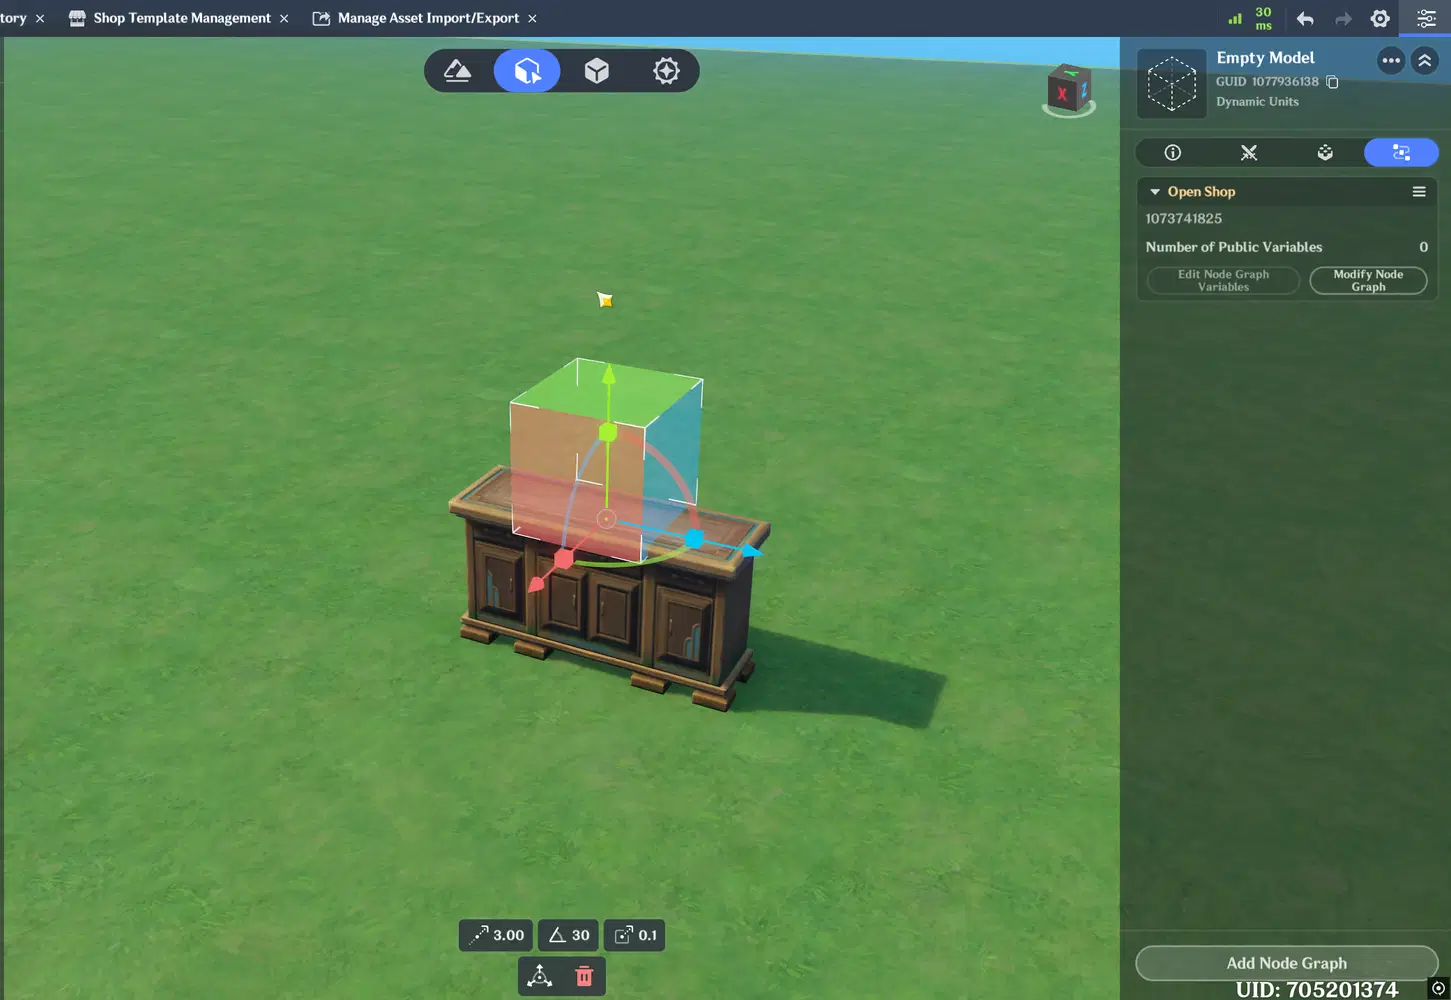
Dynamic Unit Node Graph Tab
Finally you can open Shop in-game!
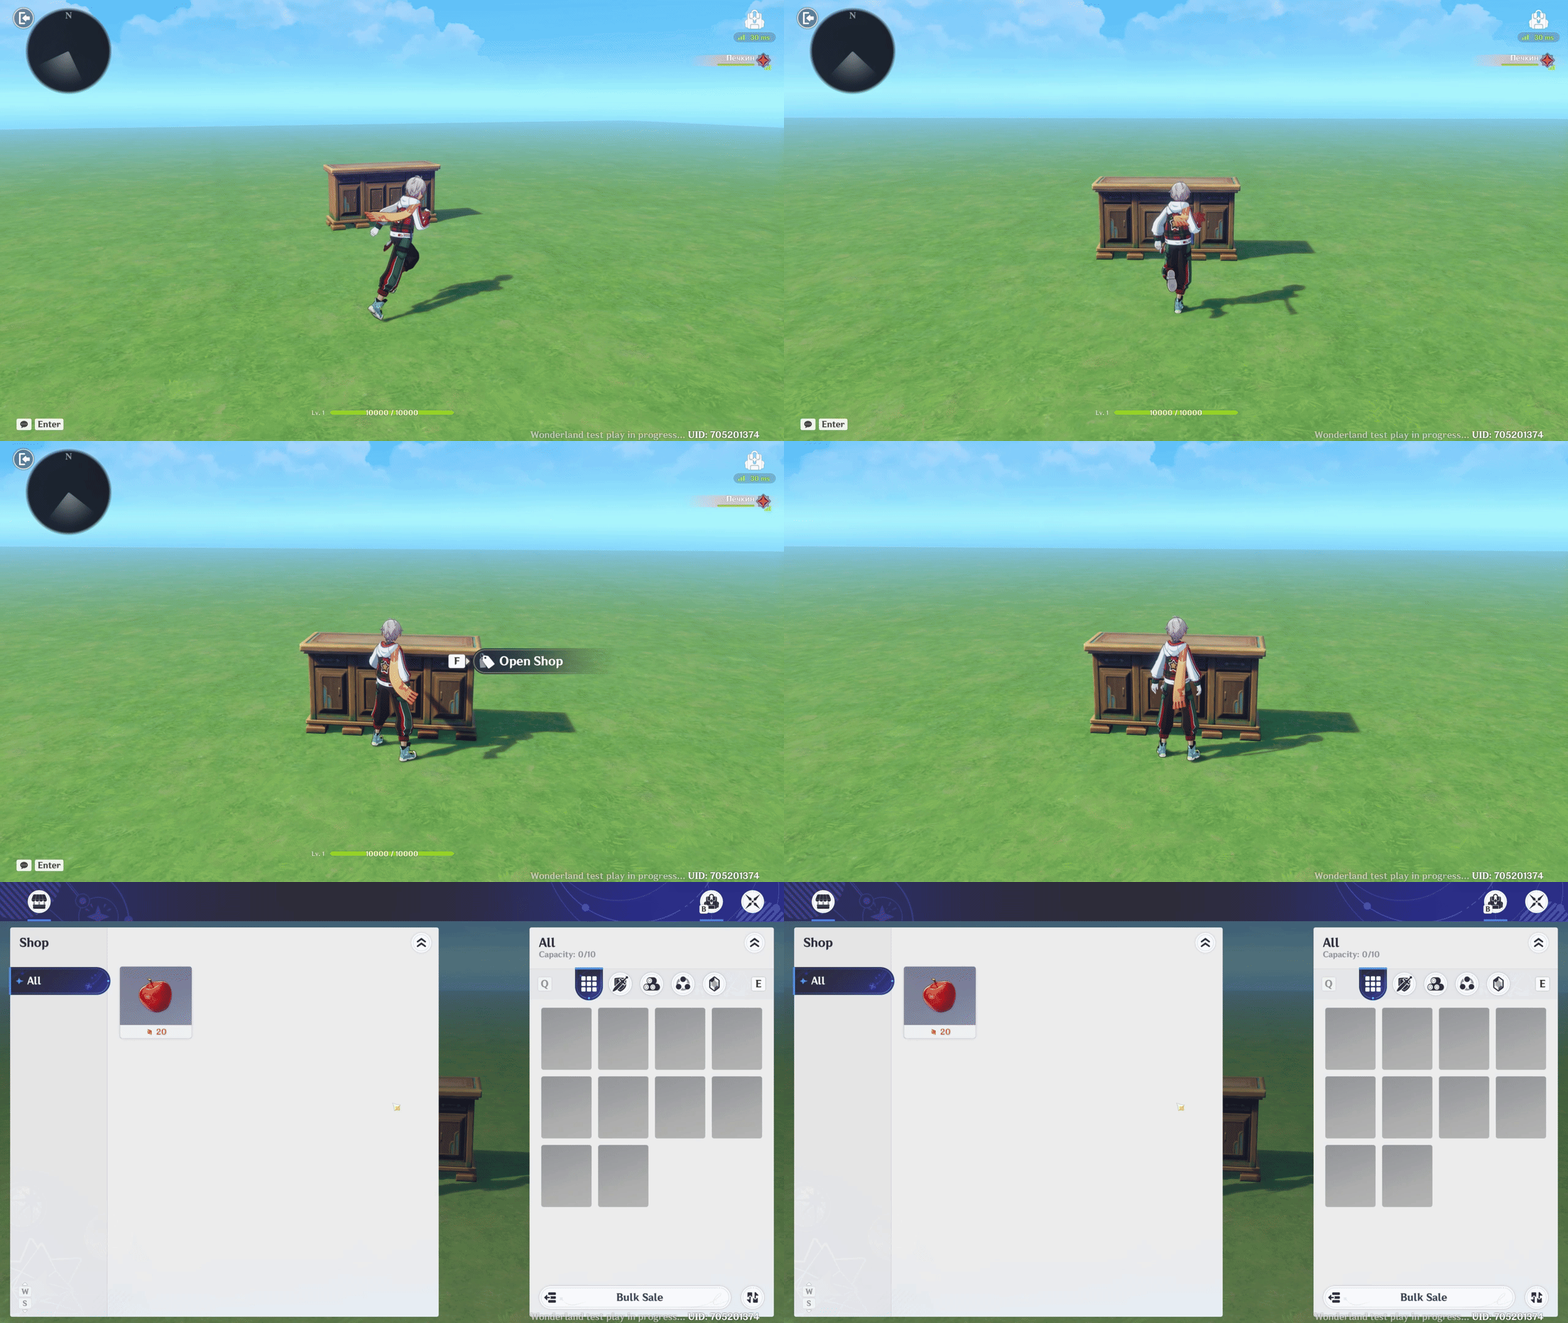
Shop in-game
Equipment
An example using a chestplate is shown below. First, you need to create an equipment item in the Combat Preset, Item tab.
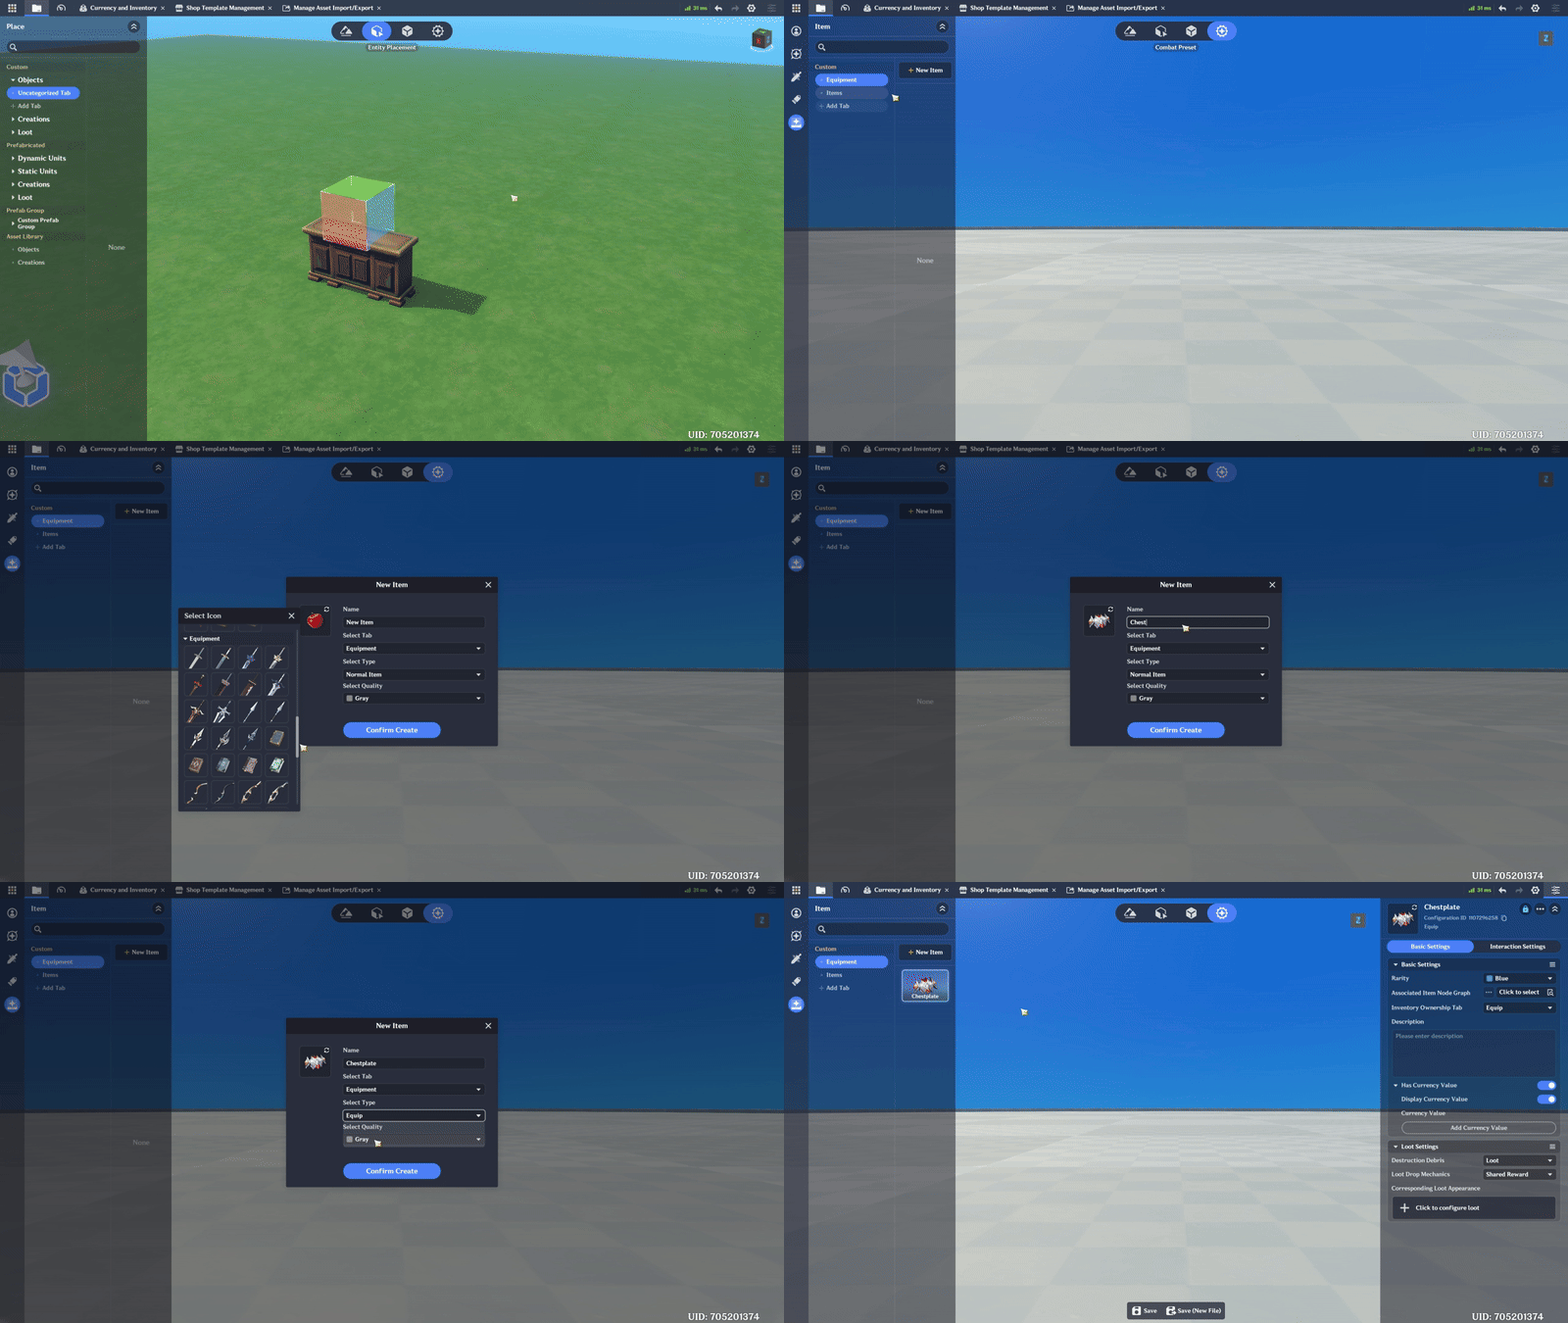
Equipment creation
In Basic Settings you can:
- Set Rarity
- Mount Item Node Graph
- Set Asociated Tab
- Write Description
- Set Item Currency value or disable it
- Configure Loot Setting (Equal to Currency Loot Settings)
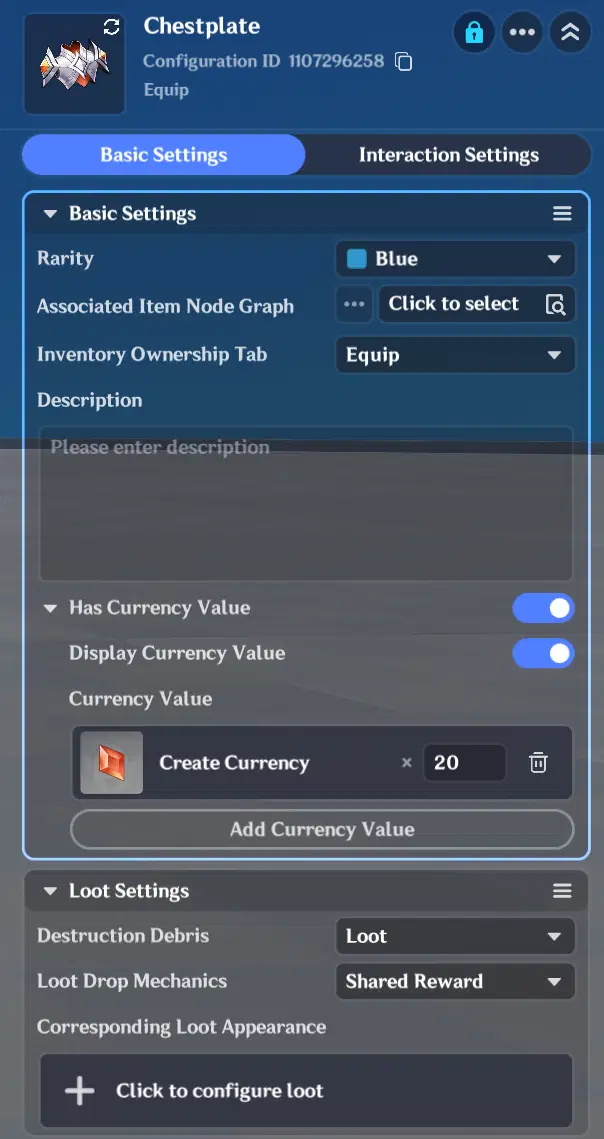
Basic Settings
To create node graphs in the future and properly filter this equipment item, you need to define its equipment type and/or tag.
To do this, select the Equipment Type field and open the Equipment Type Editor interface.
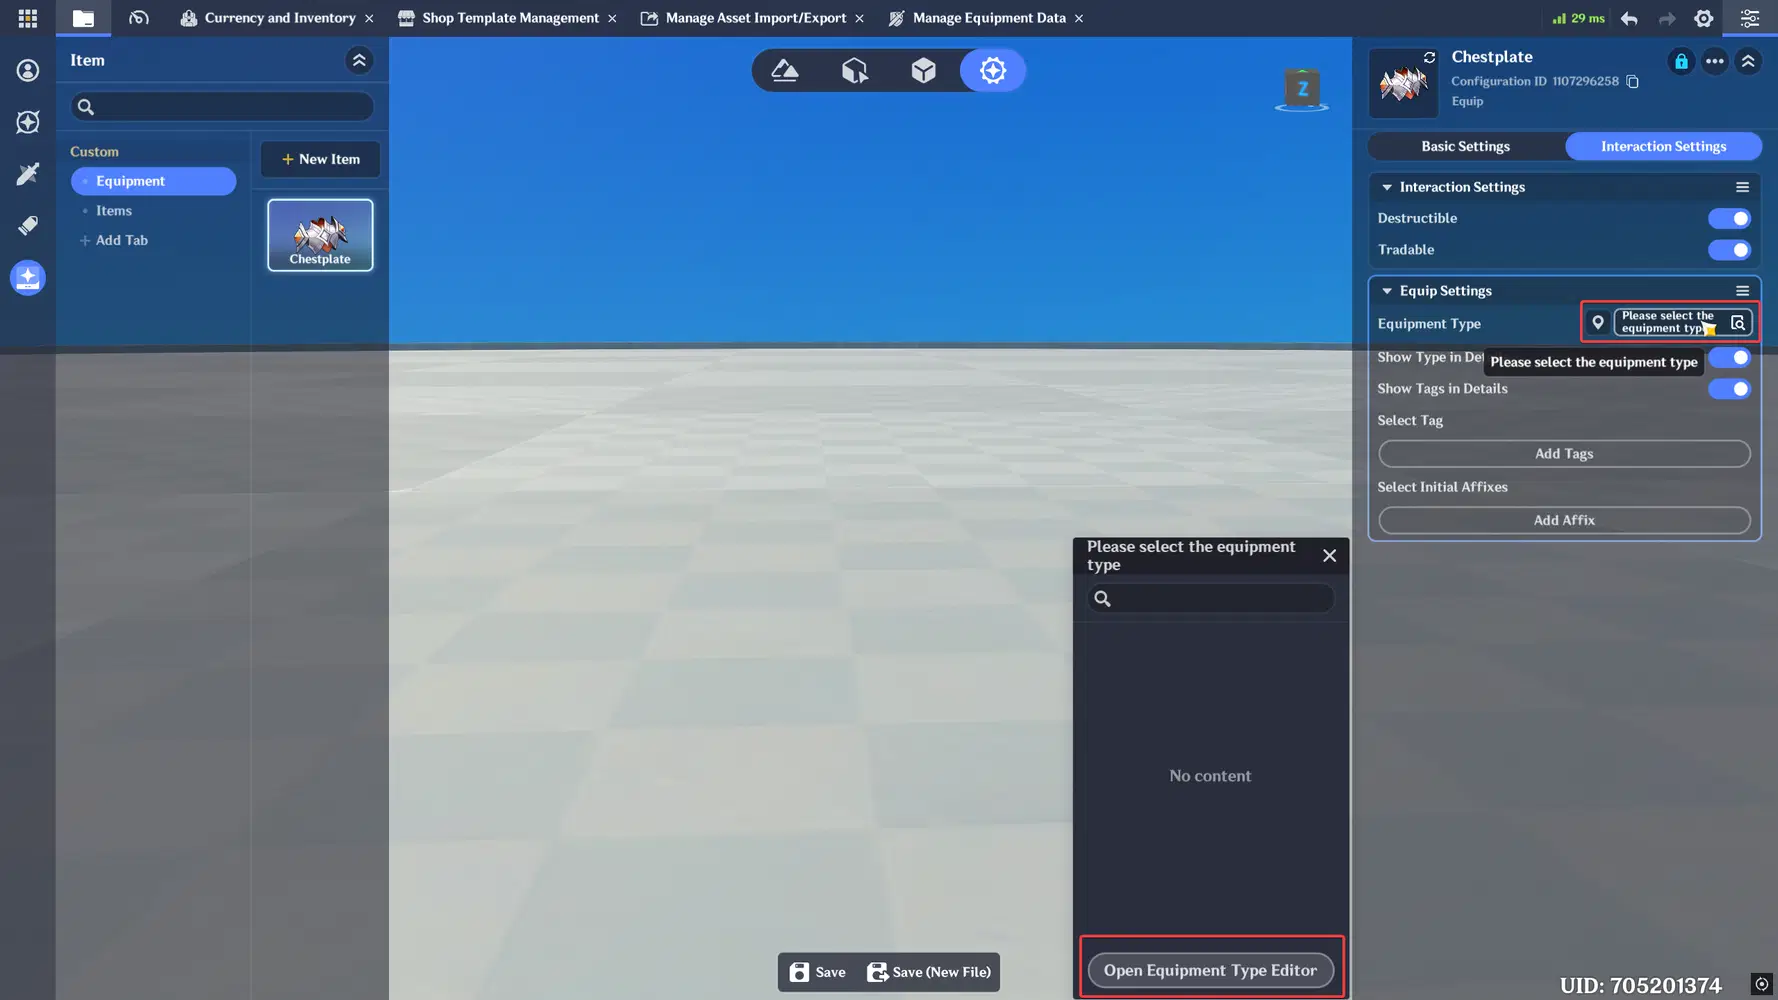
Interaction Settings
Then press Add Type, name it "Chestplates" and press Confirm Create. After this you can select equipment type in the Item Interaction Settings.
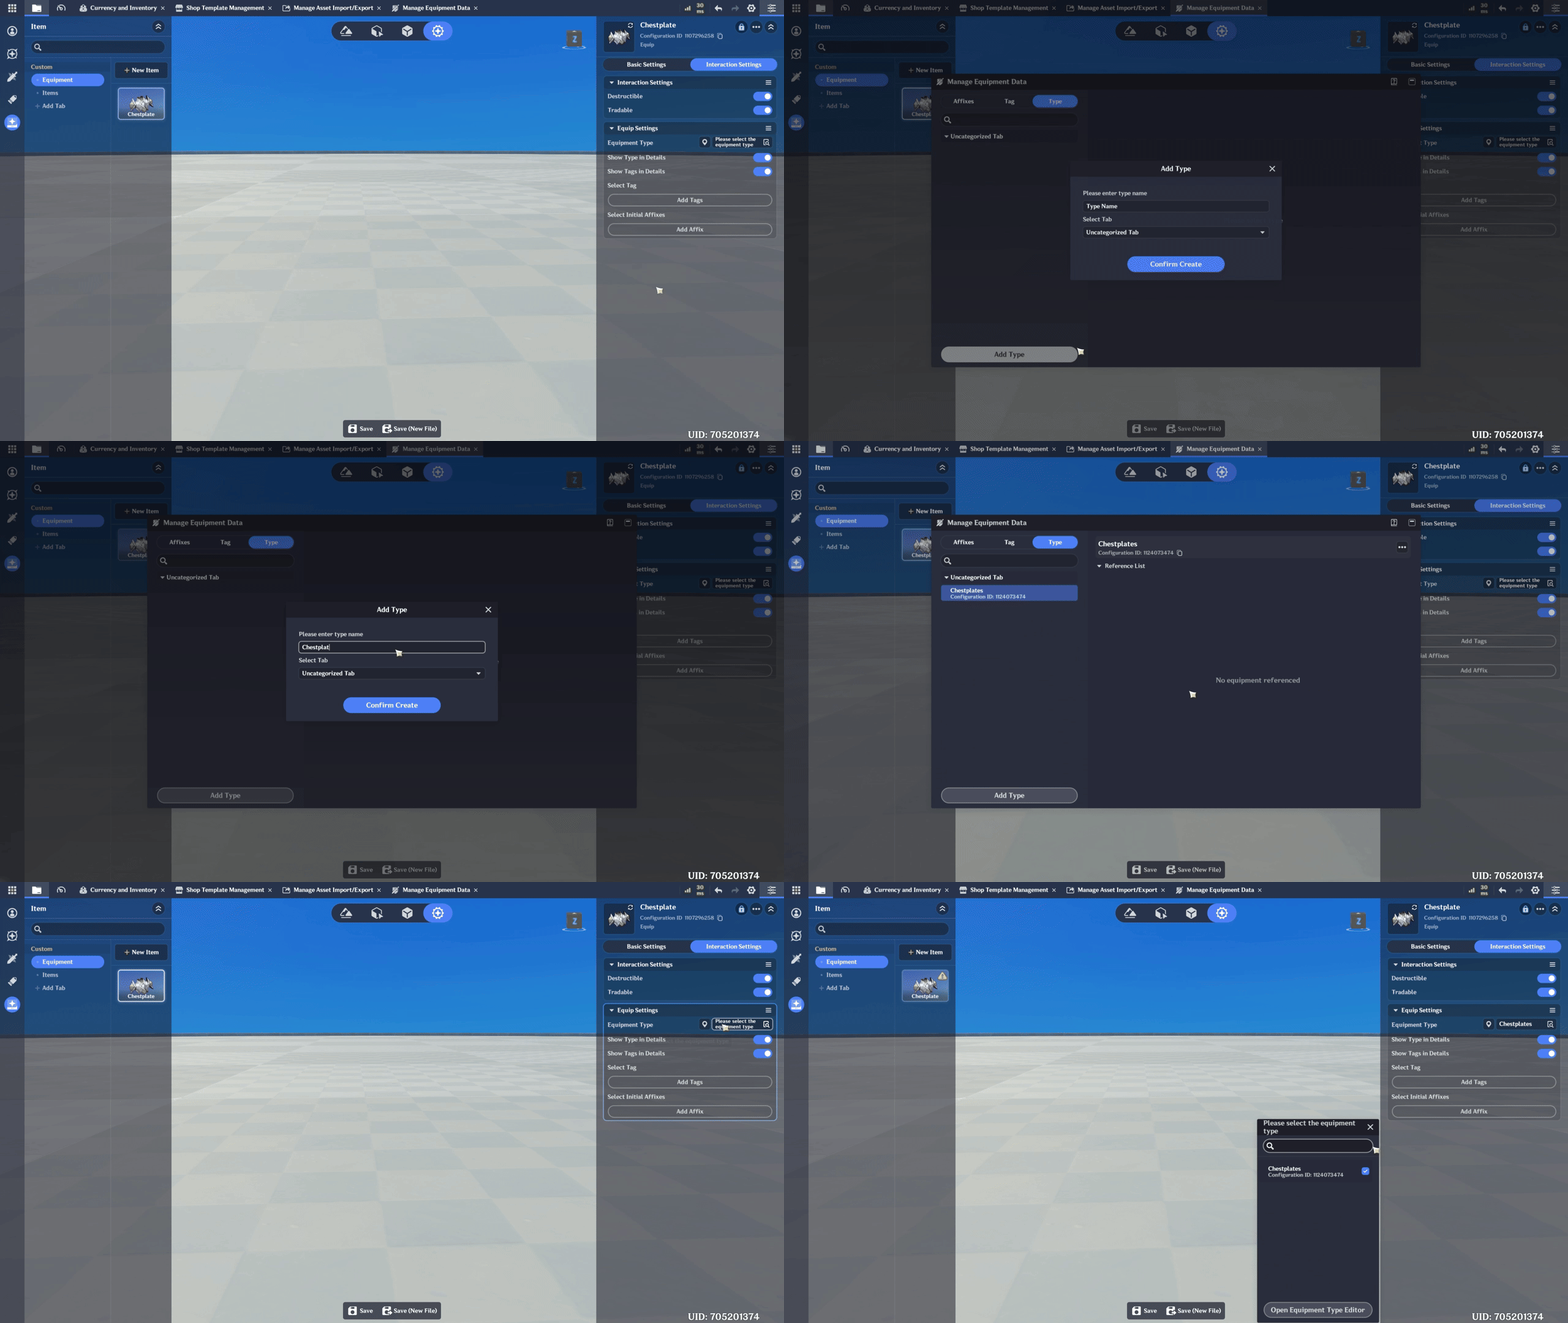
Equipment Type creation
To filter equipment items more clearly, you can use Tags - for example, to filter items by rarity.
In Equipment Data Management, select the Tag tab, click Add Tags, and create a Rarity tag.
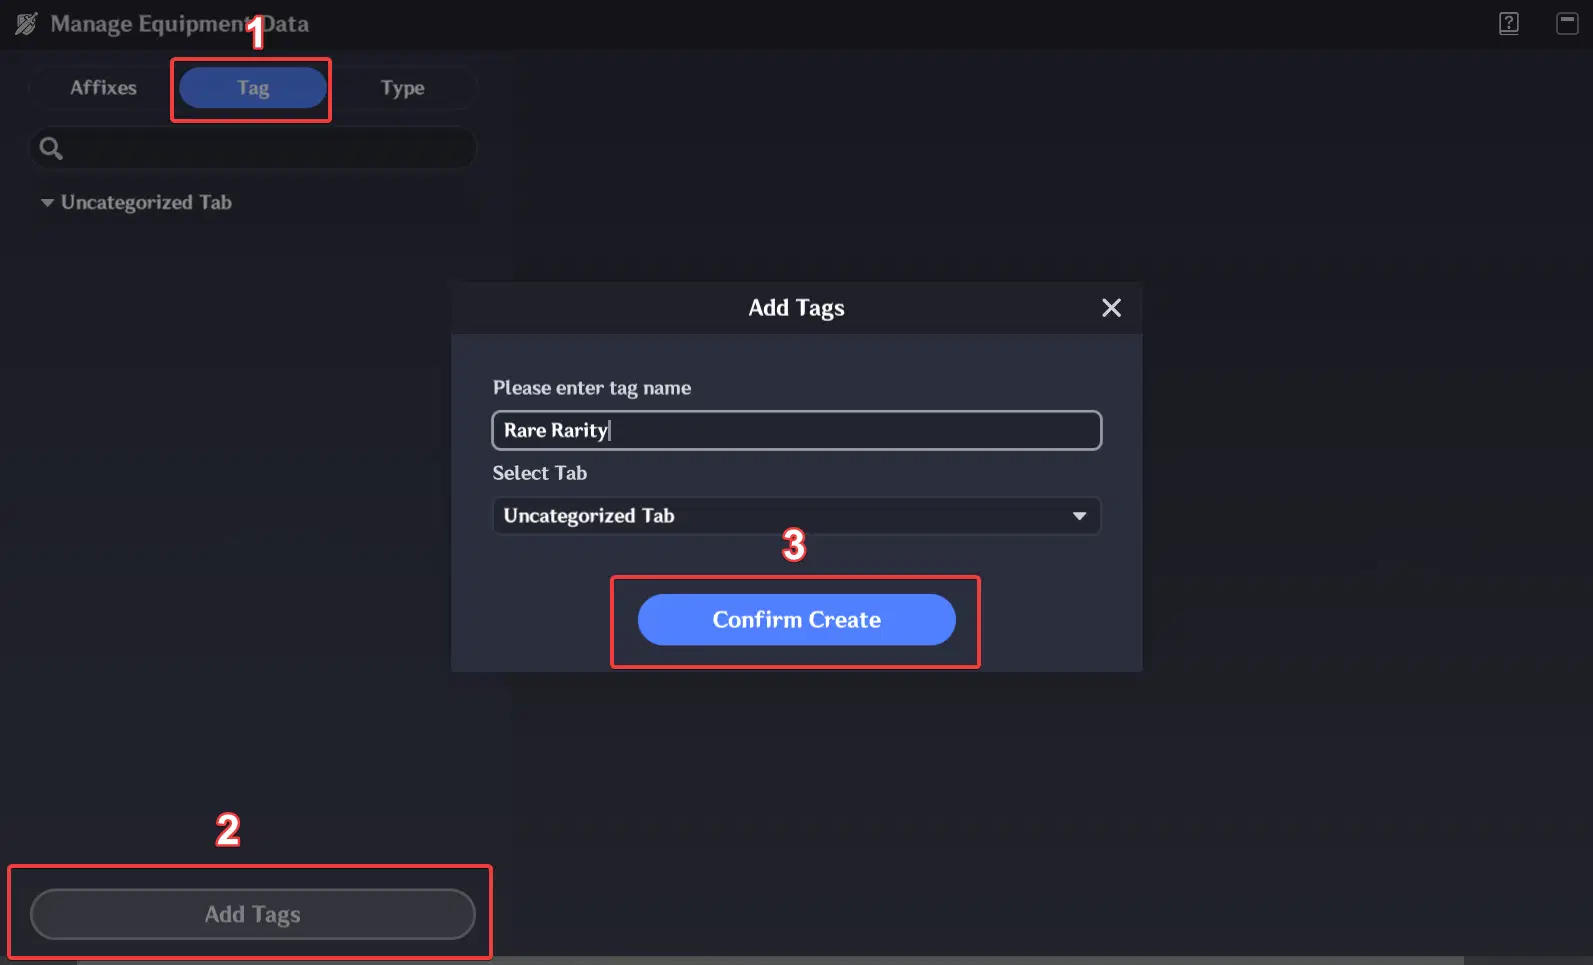
Tag creation
In the Item Interaction Settings, you can now select the Rarity tag by clicking the Add Tags button.
Next, we want to apply a status effect to the player when the item is equipped. To do this, open the Affixes tab in Equipment Data Management, click Add Affix, name it Buff, and then press Confirm Create.
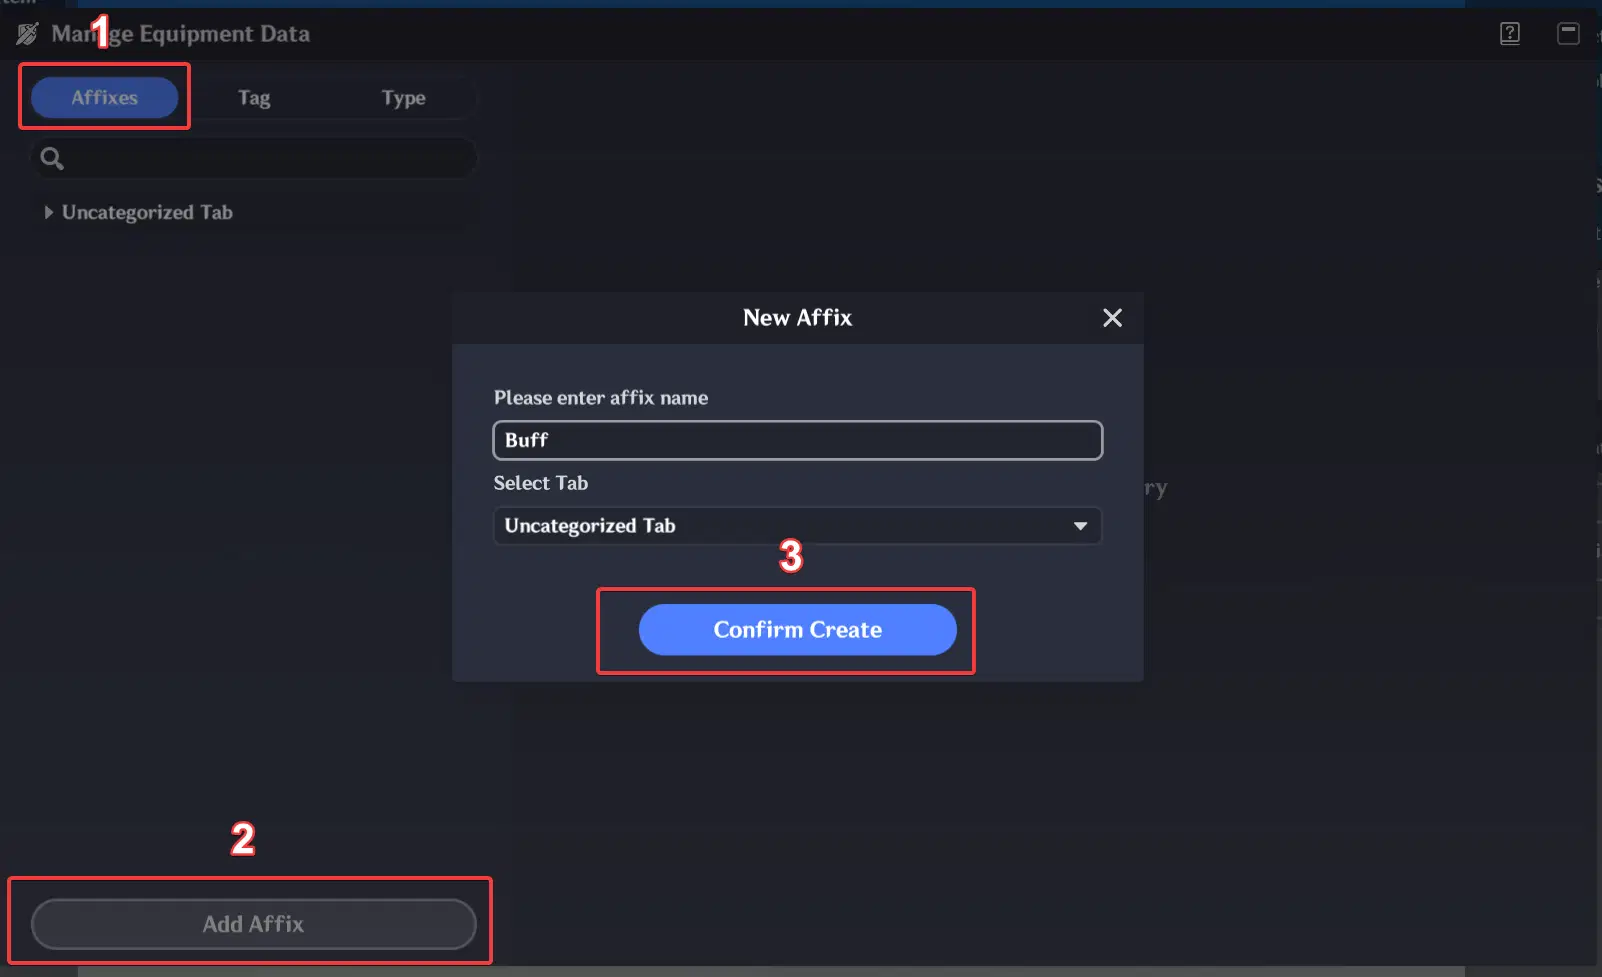
Equipment Affixes
In this example, if player equip chestplate, it will grant player HP Bonus. To do so, select:
- Effective Timing - Effective when equipped
- Affix Type - Base Attributes Bonus
- Select Attribute - HP Correction value
- Bonus Type - Fixed Value
- Fixed Bonus Value - 2500
Note: In the Affix Type settings, you can choose to apply either a node graph or a unit status when the item is equipped. The Bonus Type option is available only for the Base Attributes Bonus affix type.
Once the affix is configured, add it to the item by clicking the Add Affix button in the Item Interaction Settings.
Don’t forget to save your changes!
In order to display equipped item in inventory, you can use Equipment Slots. Open Currency and Inventory Interface, select Equipment Slot Tab, press on "+" and select:
- Current Slot Name - Chestplate
- Equippable Types - Chestplates (Type that we created in Equipment Data Management)
- And select suitable Icon
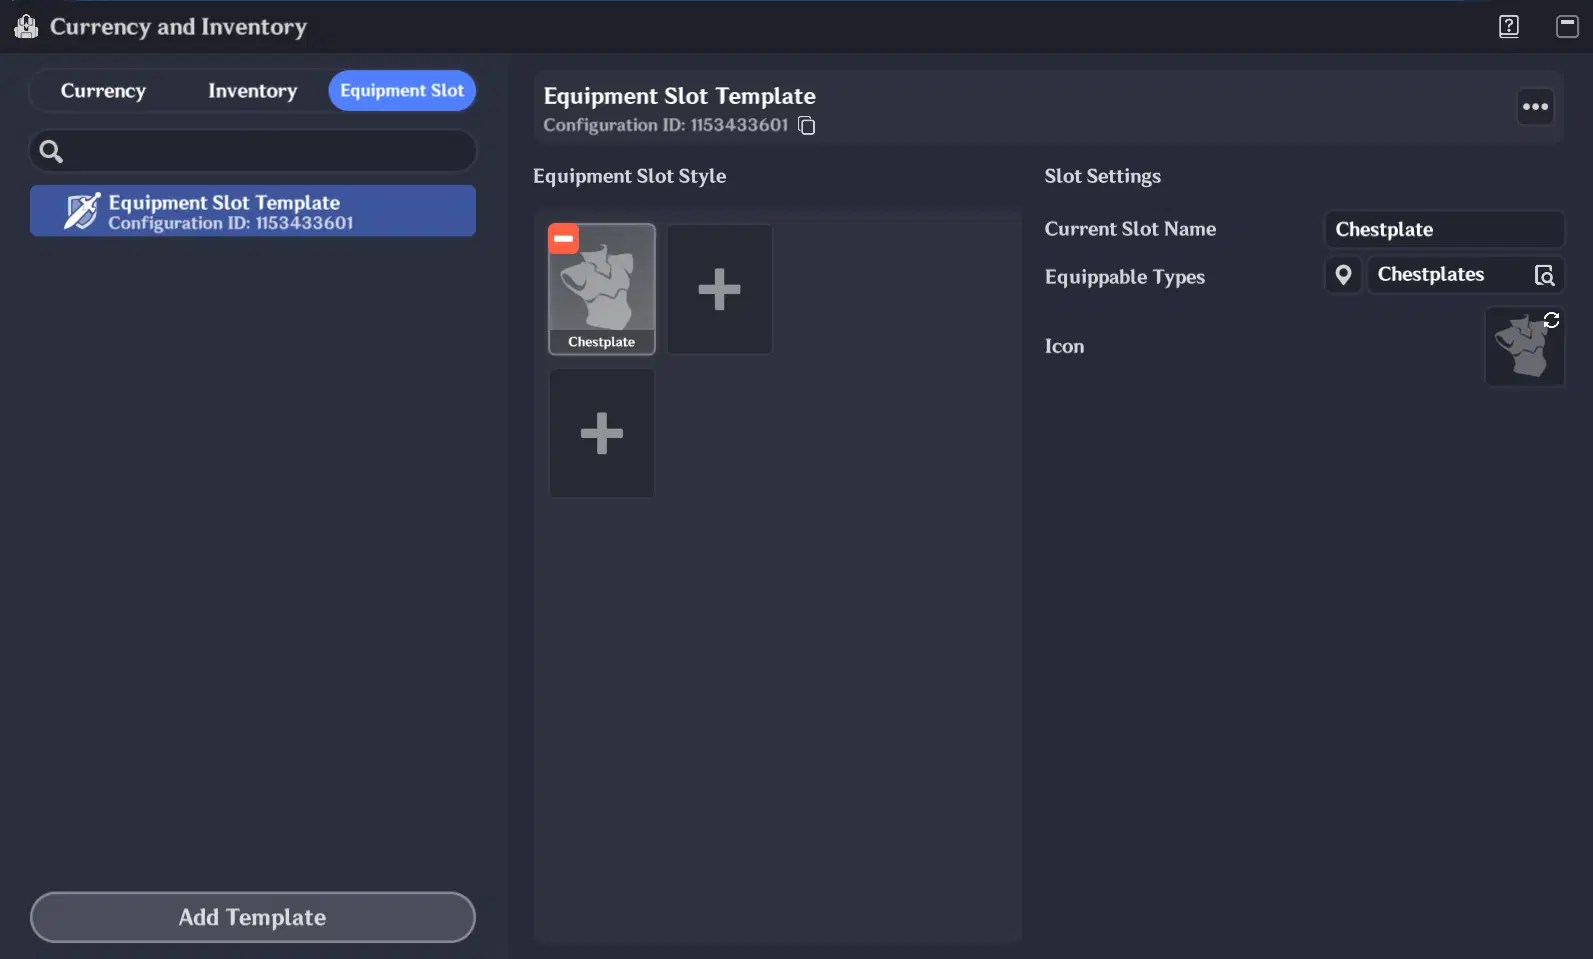
Equipment Slot settings
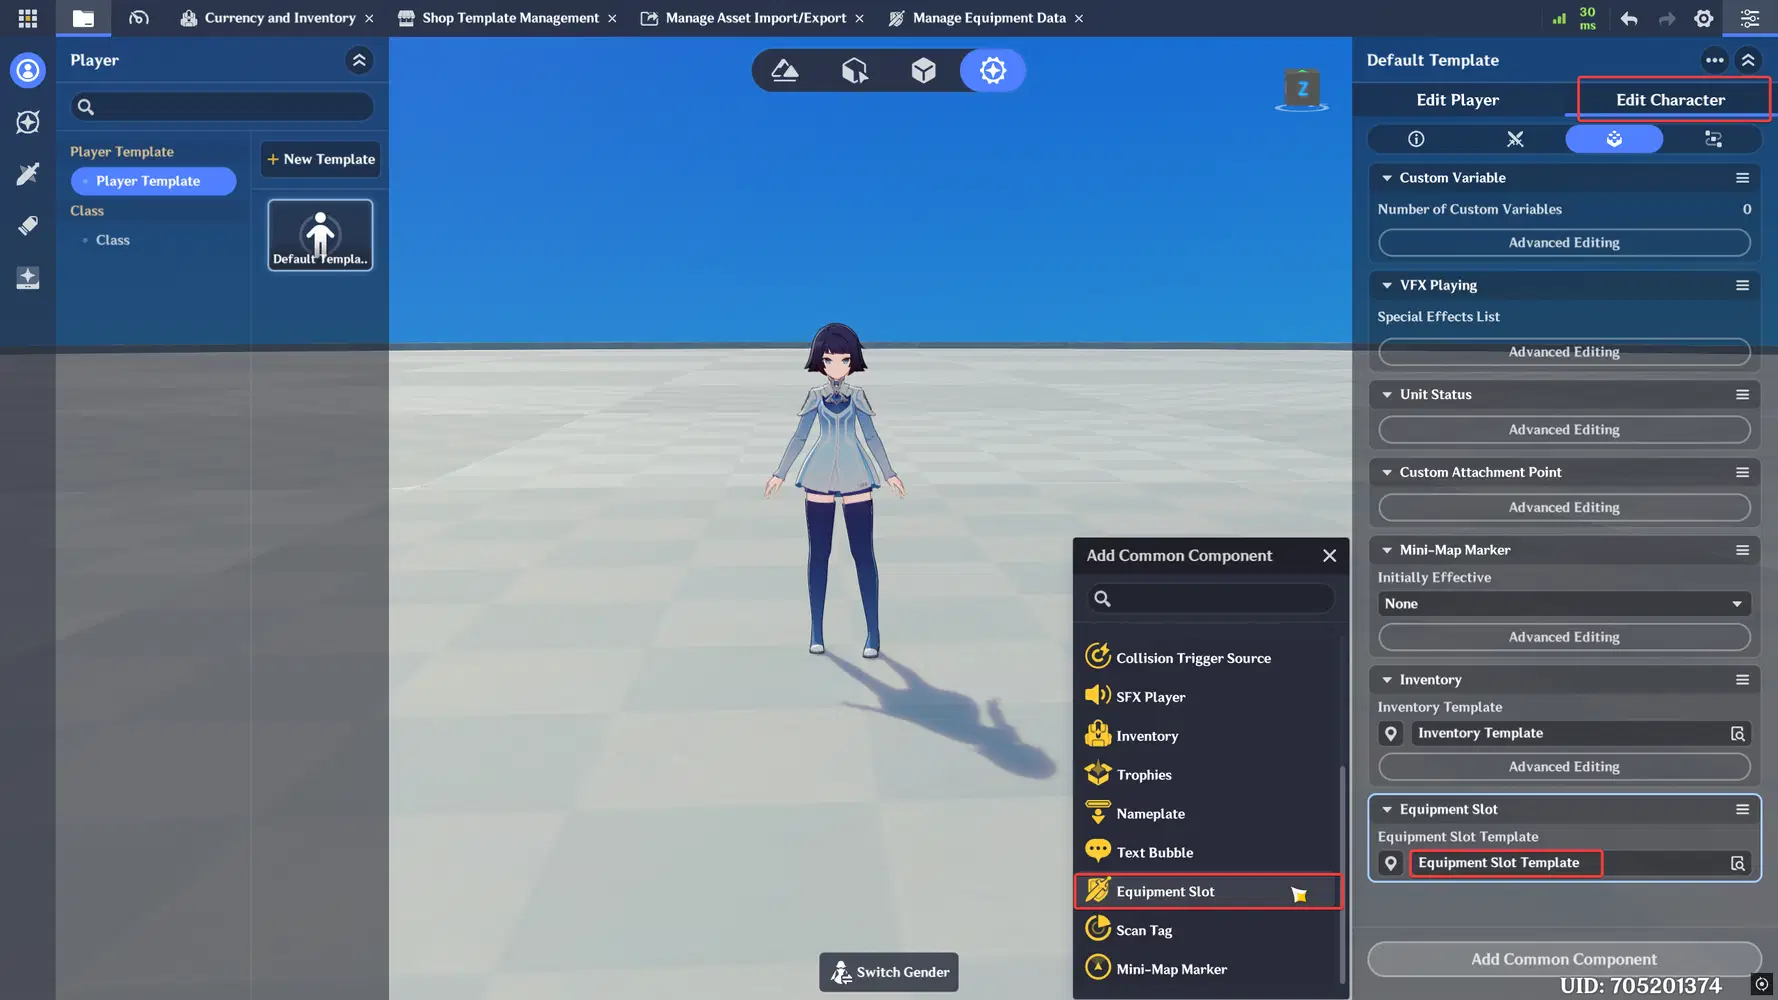
Also add Equipment Slot Component to character and select Equipment Slot Template.
Finally you can test created item in-game.
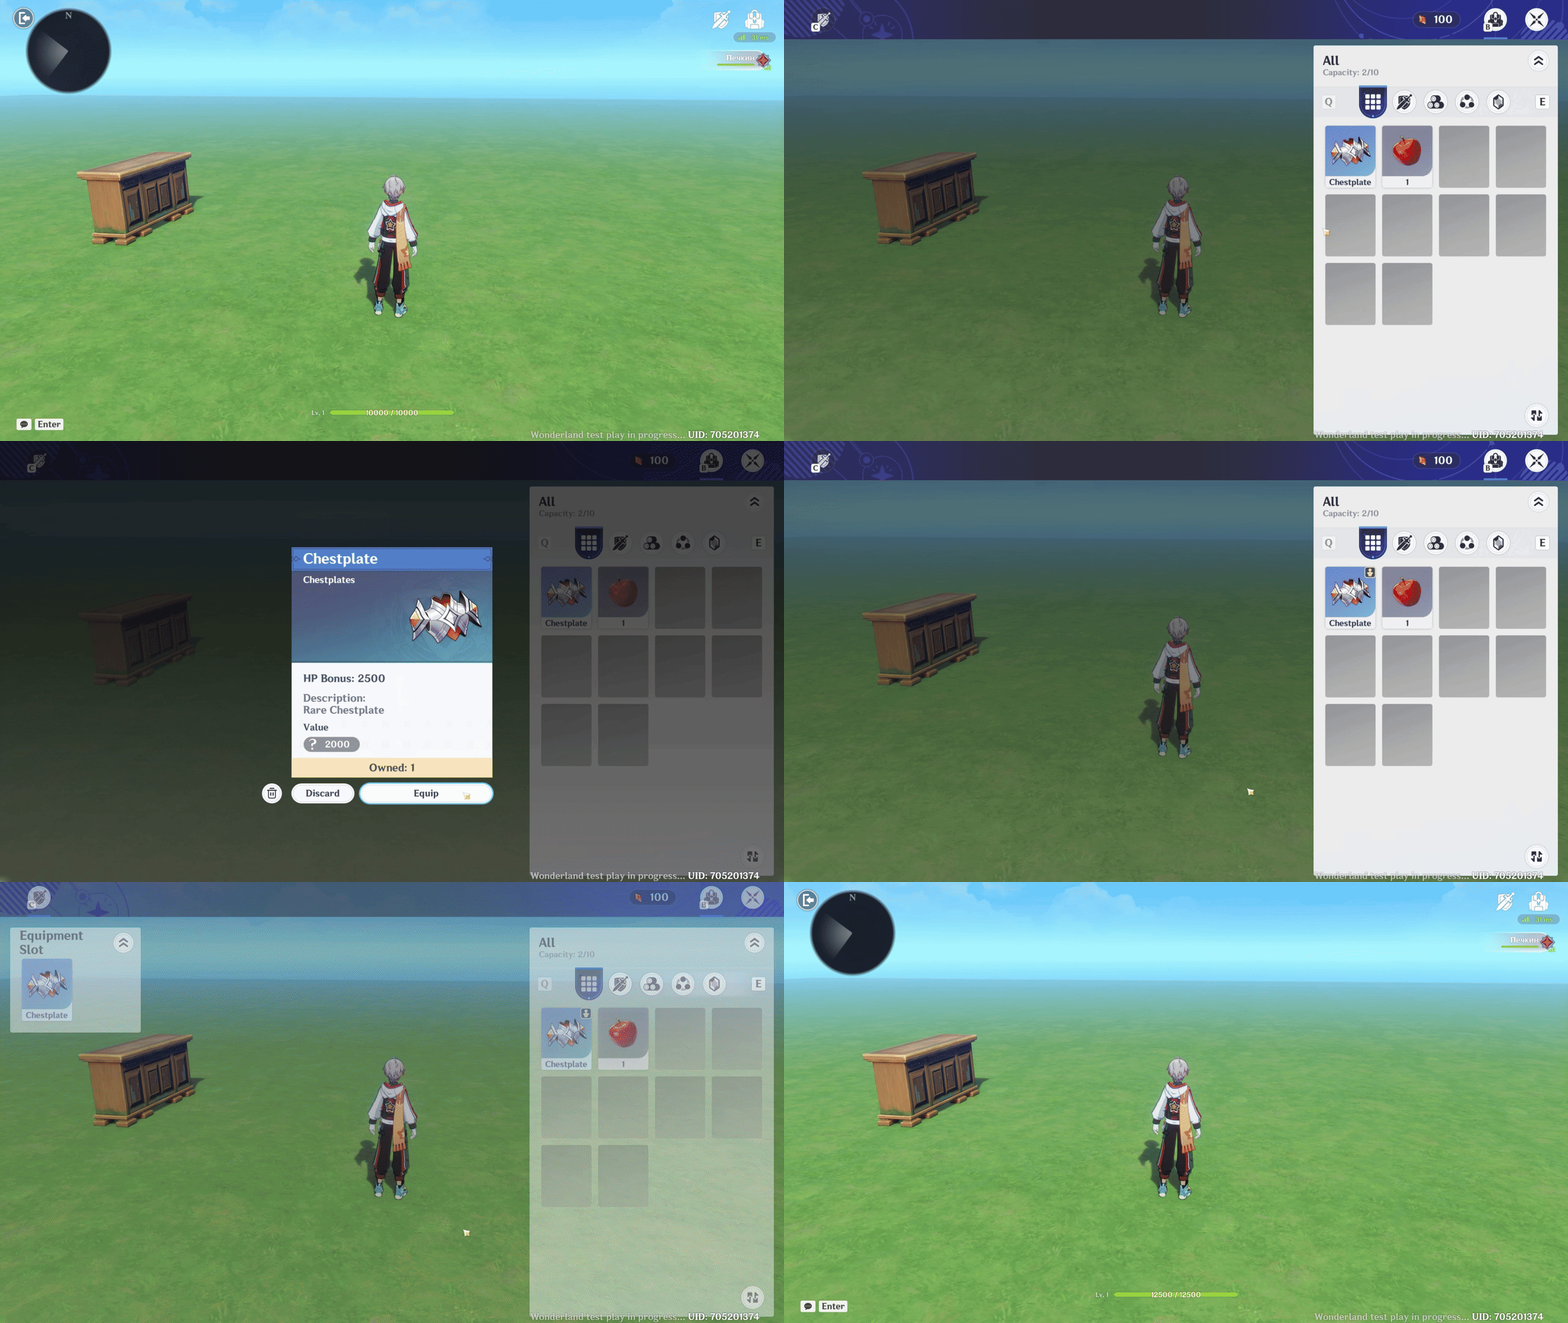
In-game item equipment
To display an equipped item outside of the inventory, you can use the Item Display UI control. Configure it as follows:
- Type - Player's Current Equipment
- Config ID Variable - Player Themself.Chestplate (You need to create a custom variable named Chestplate in the player entity, set its type to Configuration ID, and assign it a value of 0)
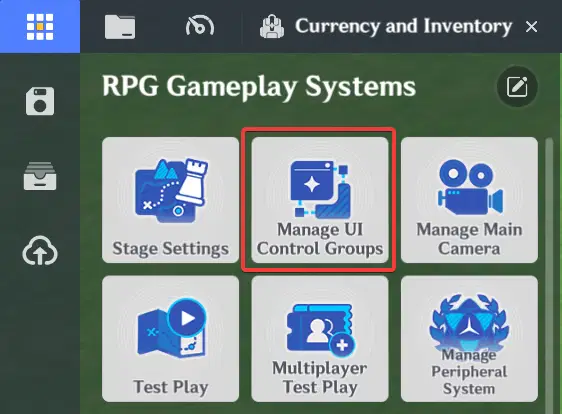
UI Control Groups Management
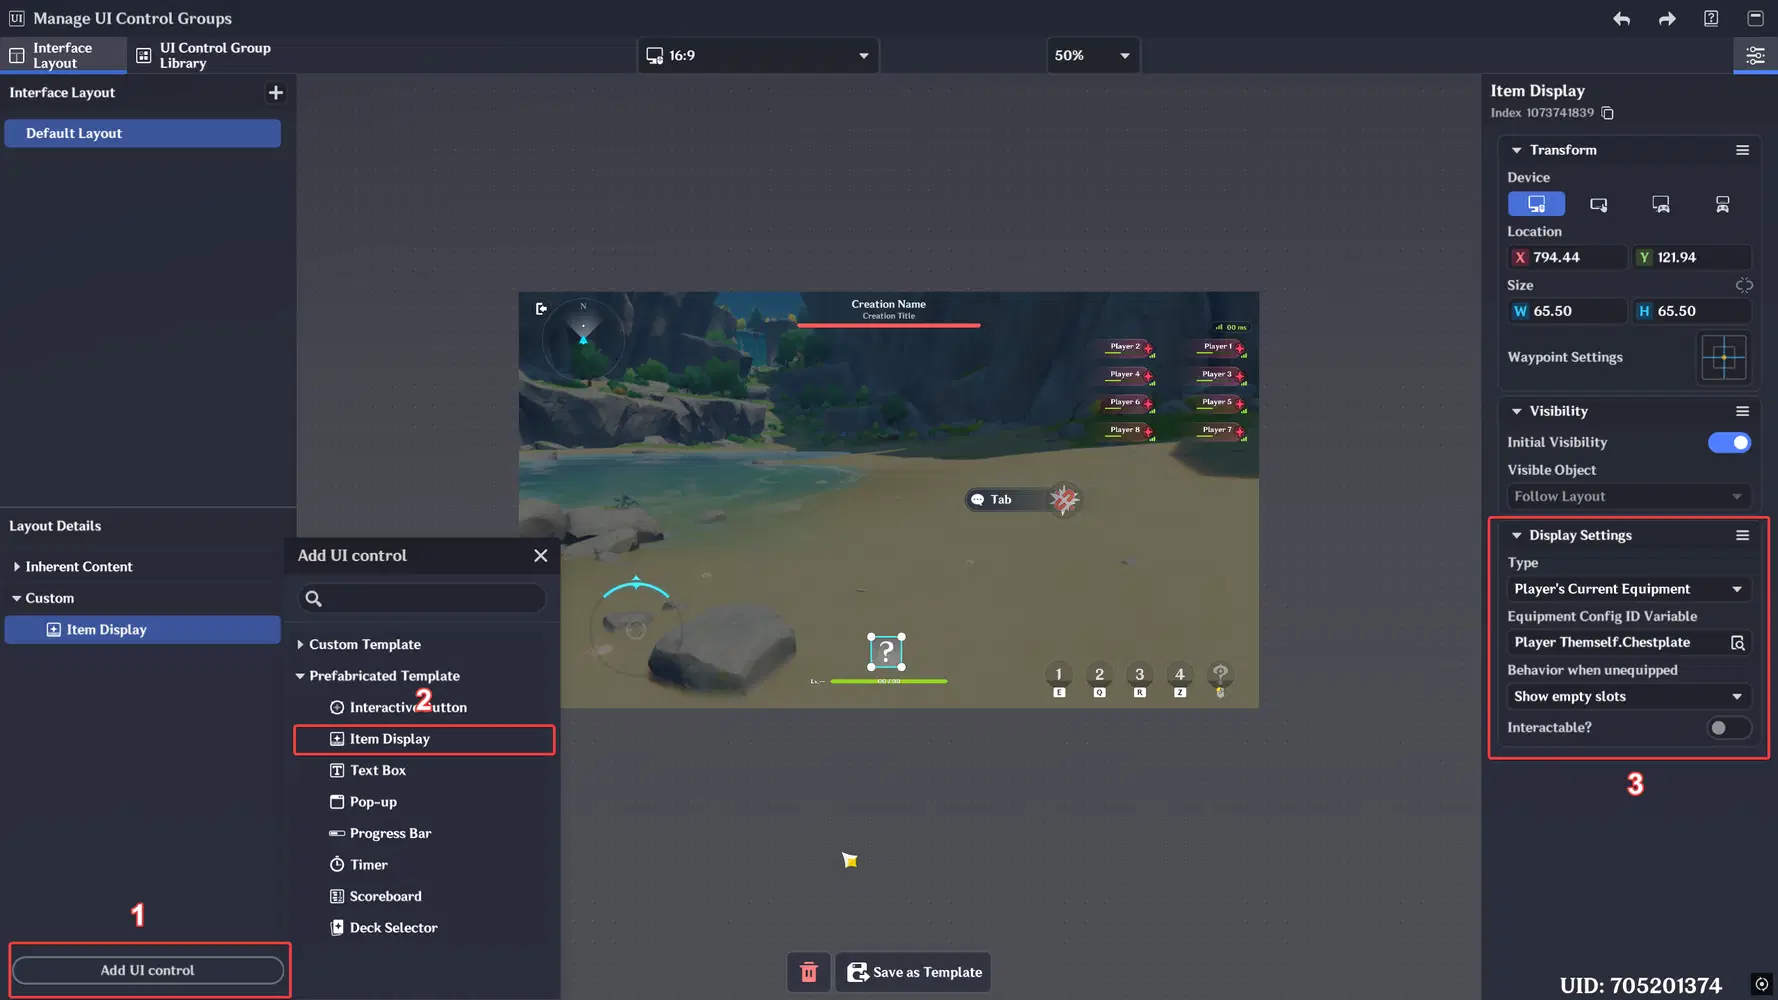
UI Control Management
Then, create a node graph in the Item Node Graph folder using the nodes shown below and mount it to the chestplate item in Item Basic Settings.
Make sure to replace the variable value with your own Item Configuration ID, which is displayed in the Item Settings.
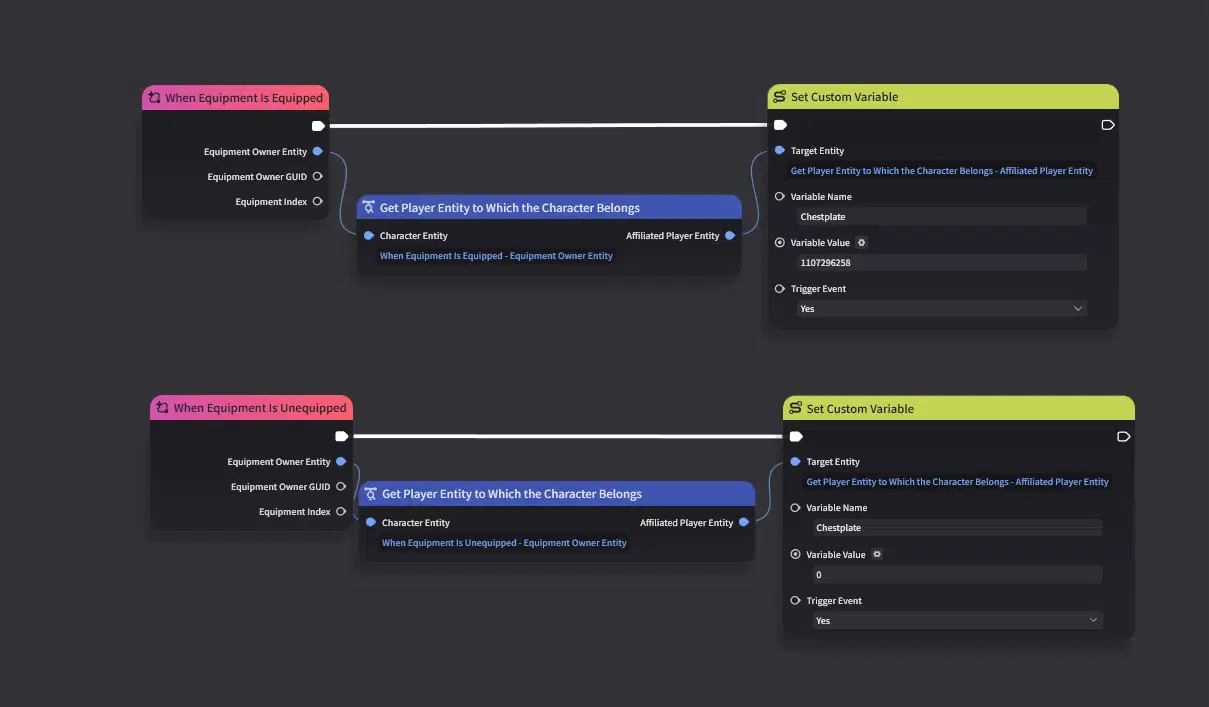
Item Node Graph
Now, if you will equip item, it will display in "Item Display" UI control.
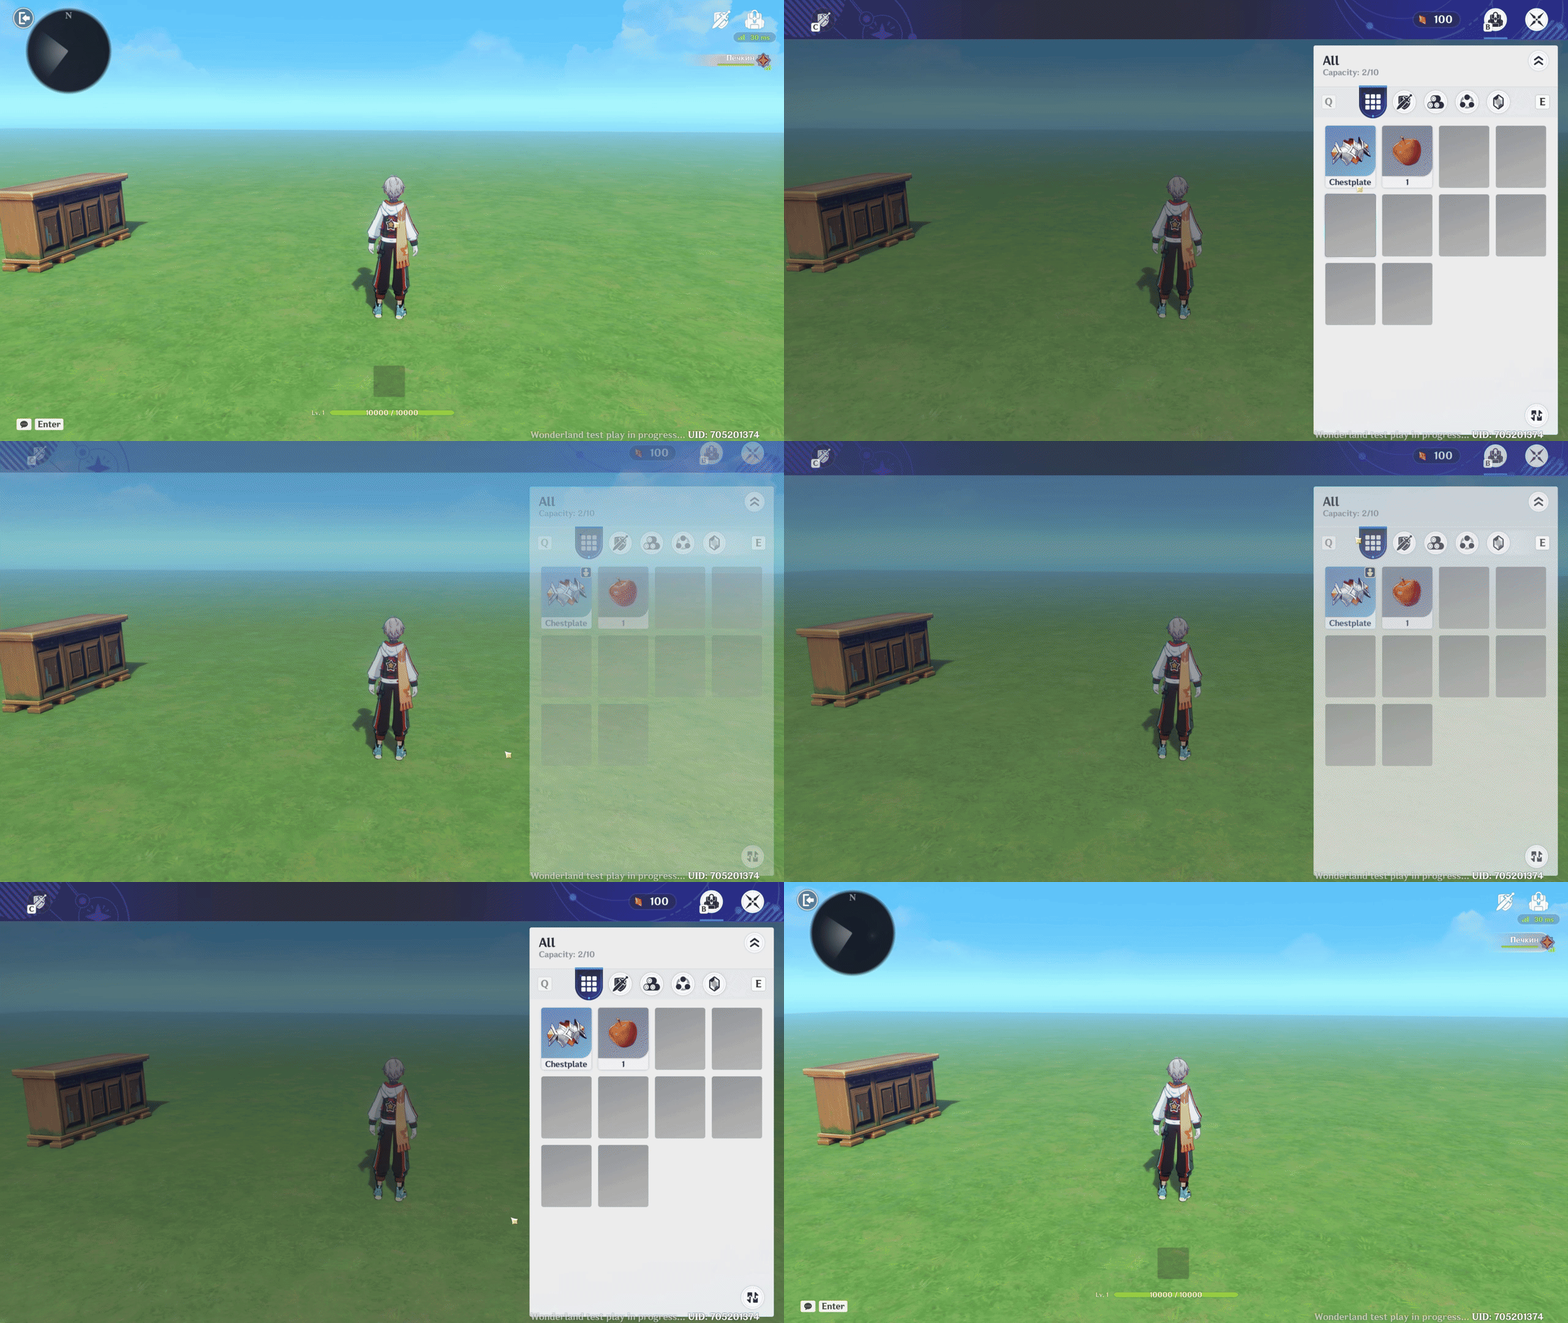
In-game Item equipment
Items & Inventory
Items
To earn currency, you can create items that will drop when enemies die or open Chest Loot, which can then be sold in the shop.
The full item creation process is described in the Equipment module.
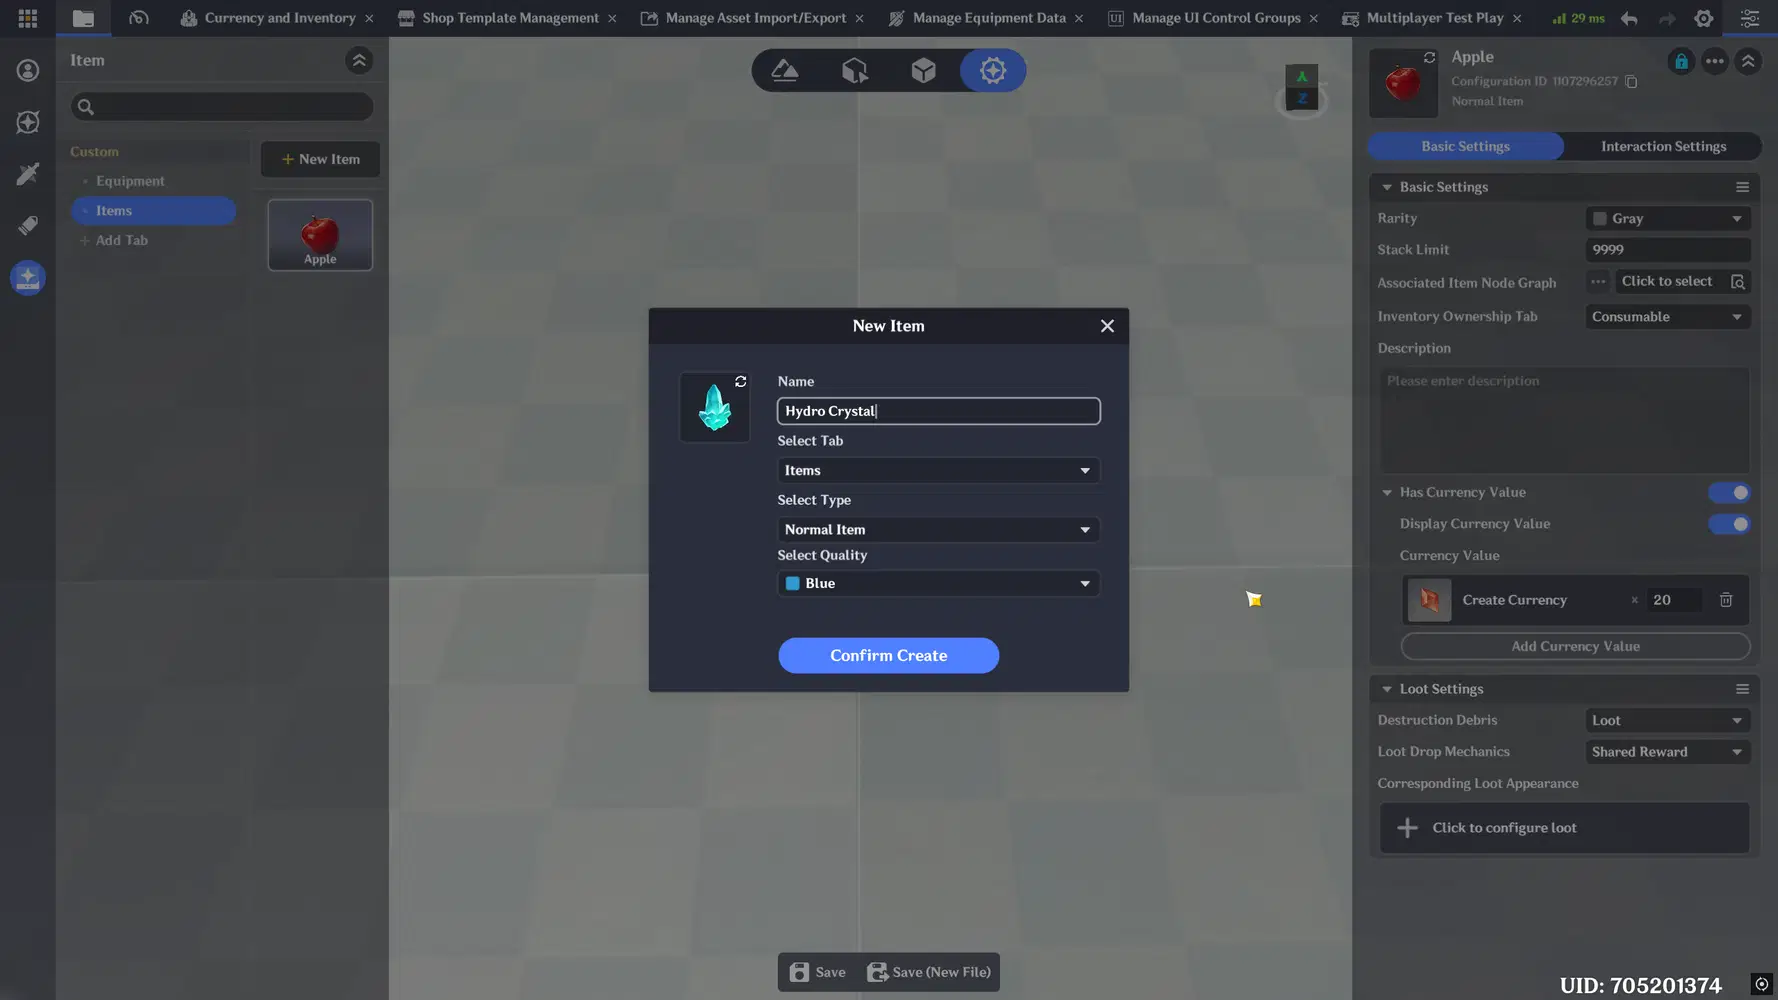
Item creation
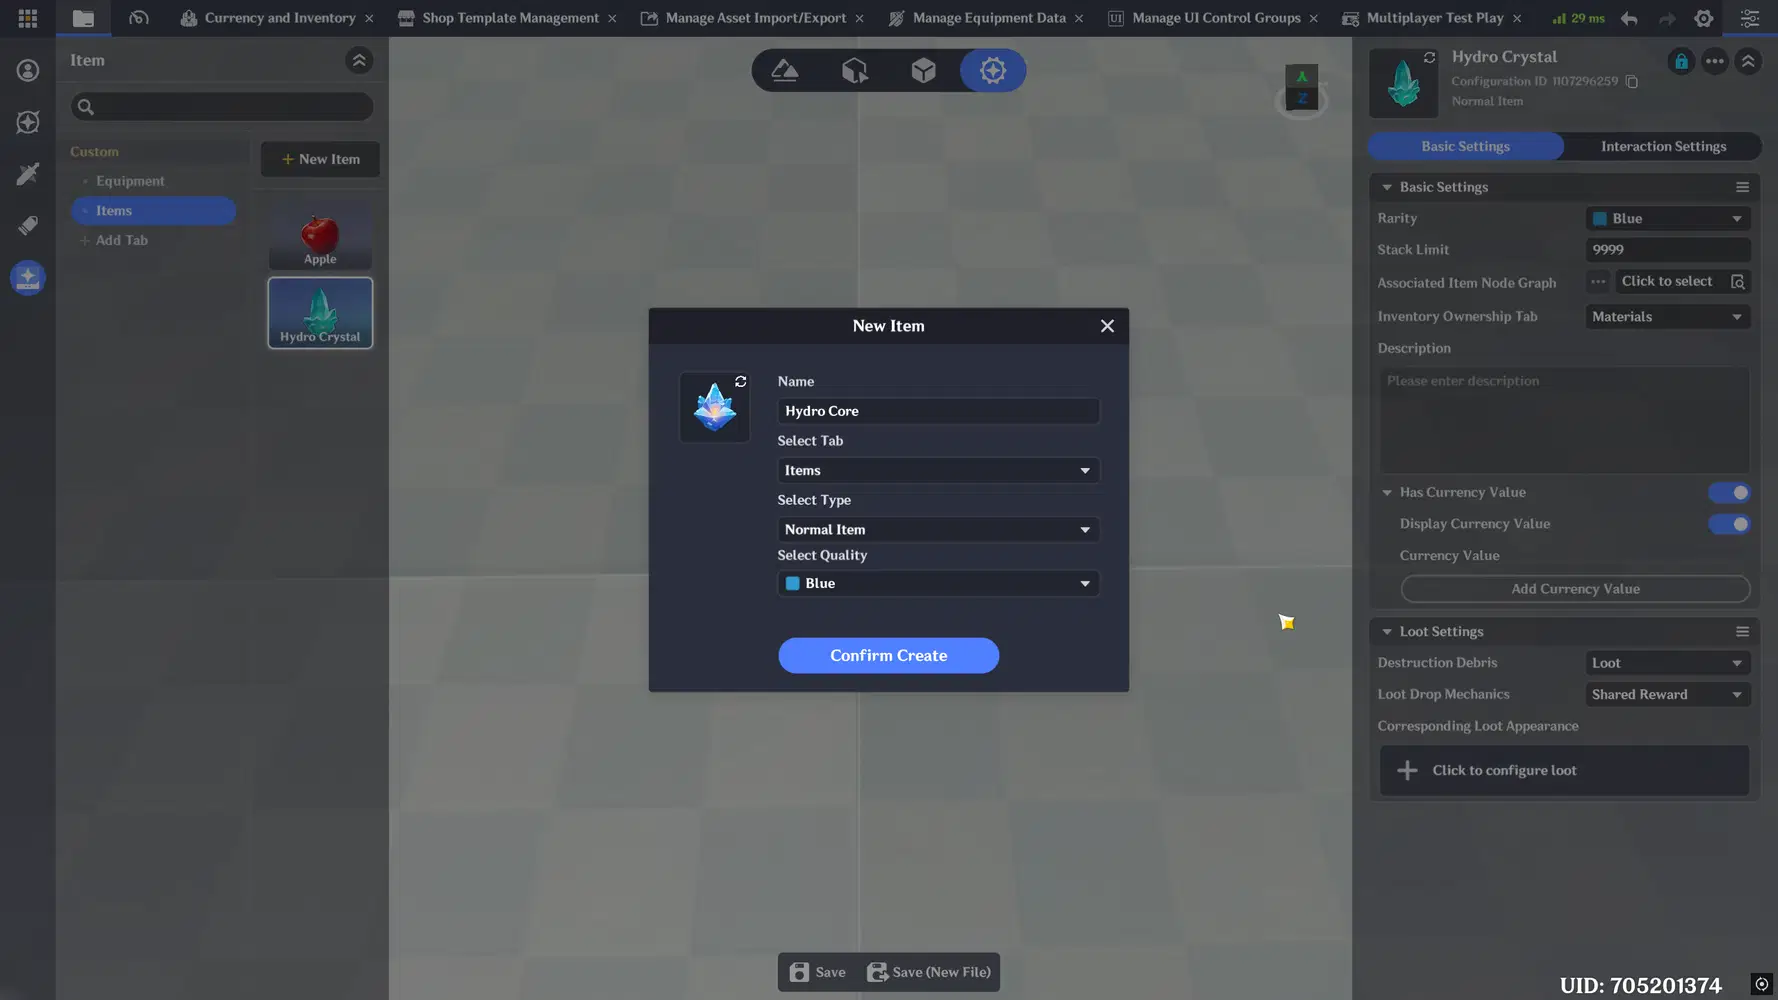
Item creation
Set the Currency Value for the items, and in Interaction Settings, disable item usability to prevent the items from being used.
Inventory
To create an inventory, first open the Currency and Inventory interface and select the Inventory tab. A default inventory template will be created. You can then customize Inventory Slots, Destruction Debris, Loot Drop Mechanics, and the corresponding Loot Appearance.
Note: You can choose Destruction Debris → Apply Item Loot Rules to apply the rules configured for each individual item in Item Settings, rather than using the general inventory rules.
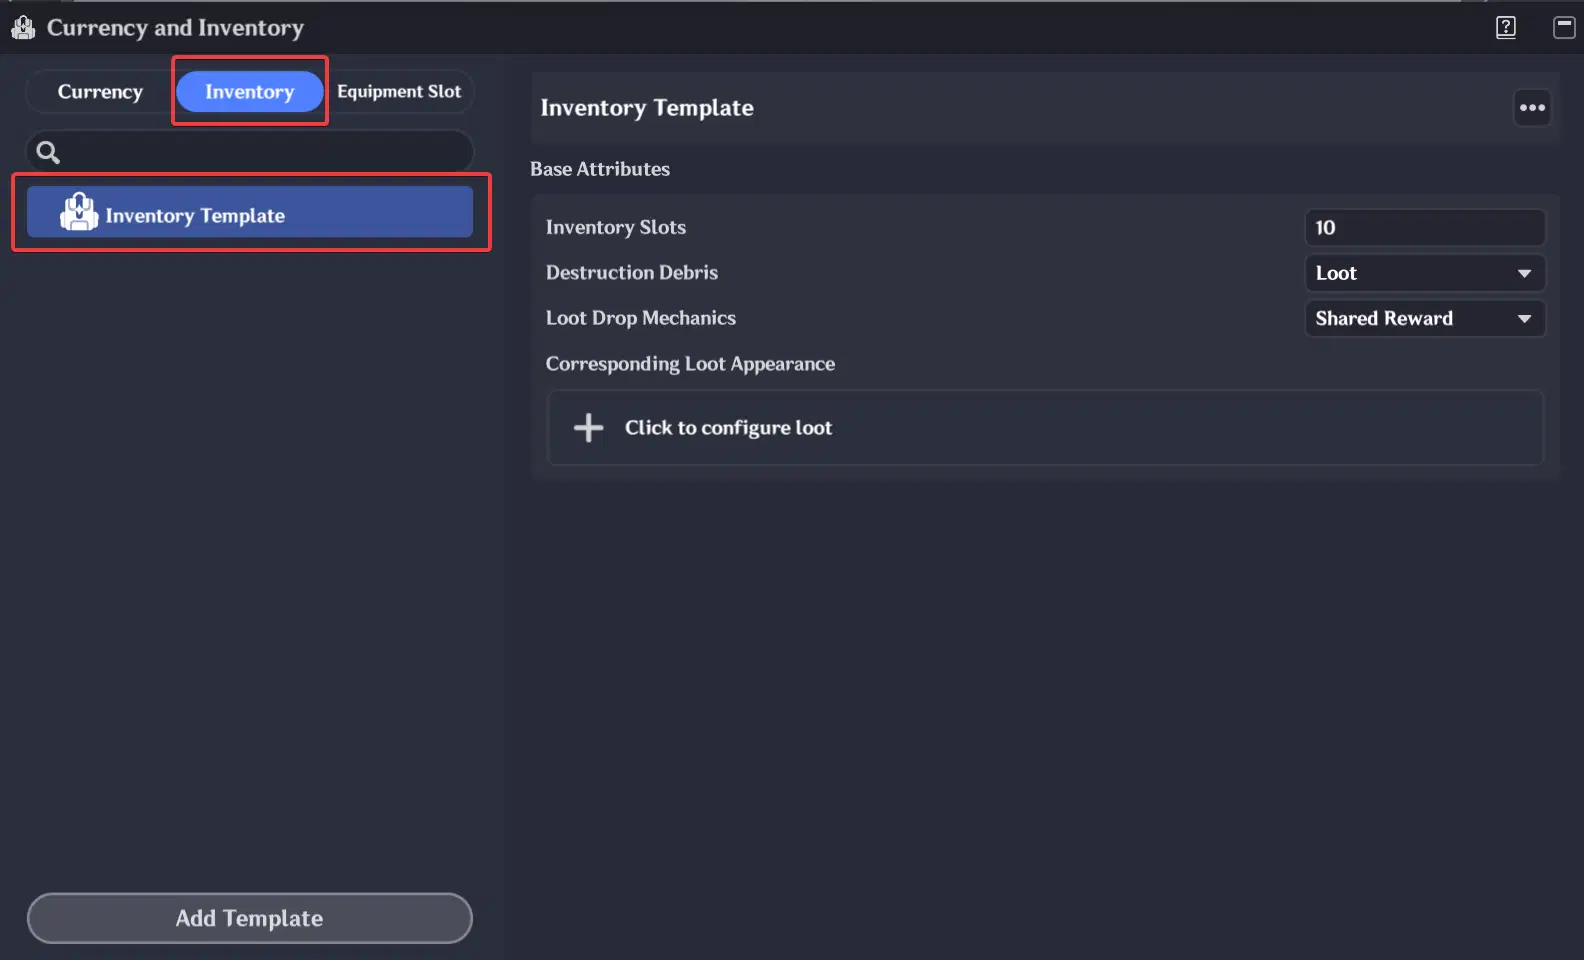
Inventory Template Settings
After configuring the inventory template settings, you need to mount the inventory to the character entity by adding the Inventory Component in the character’s Common Component tab.
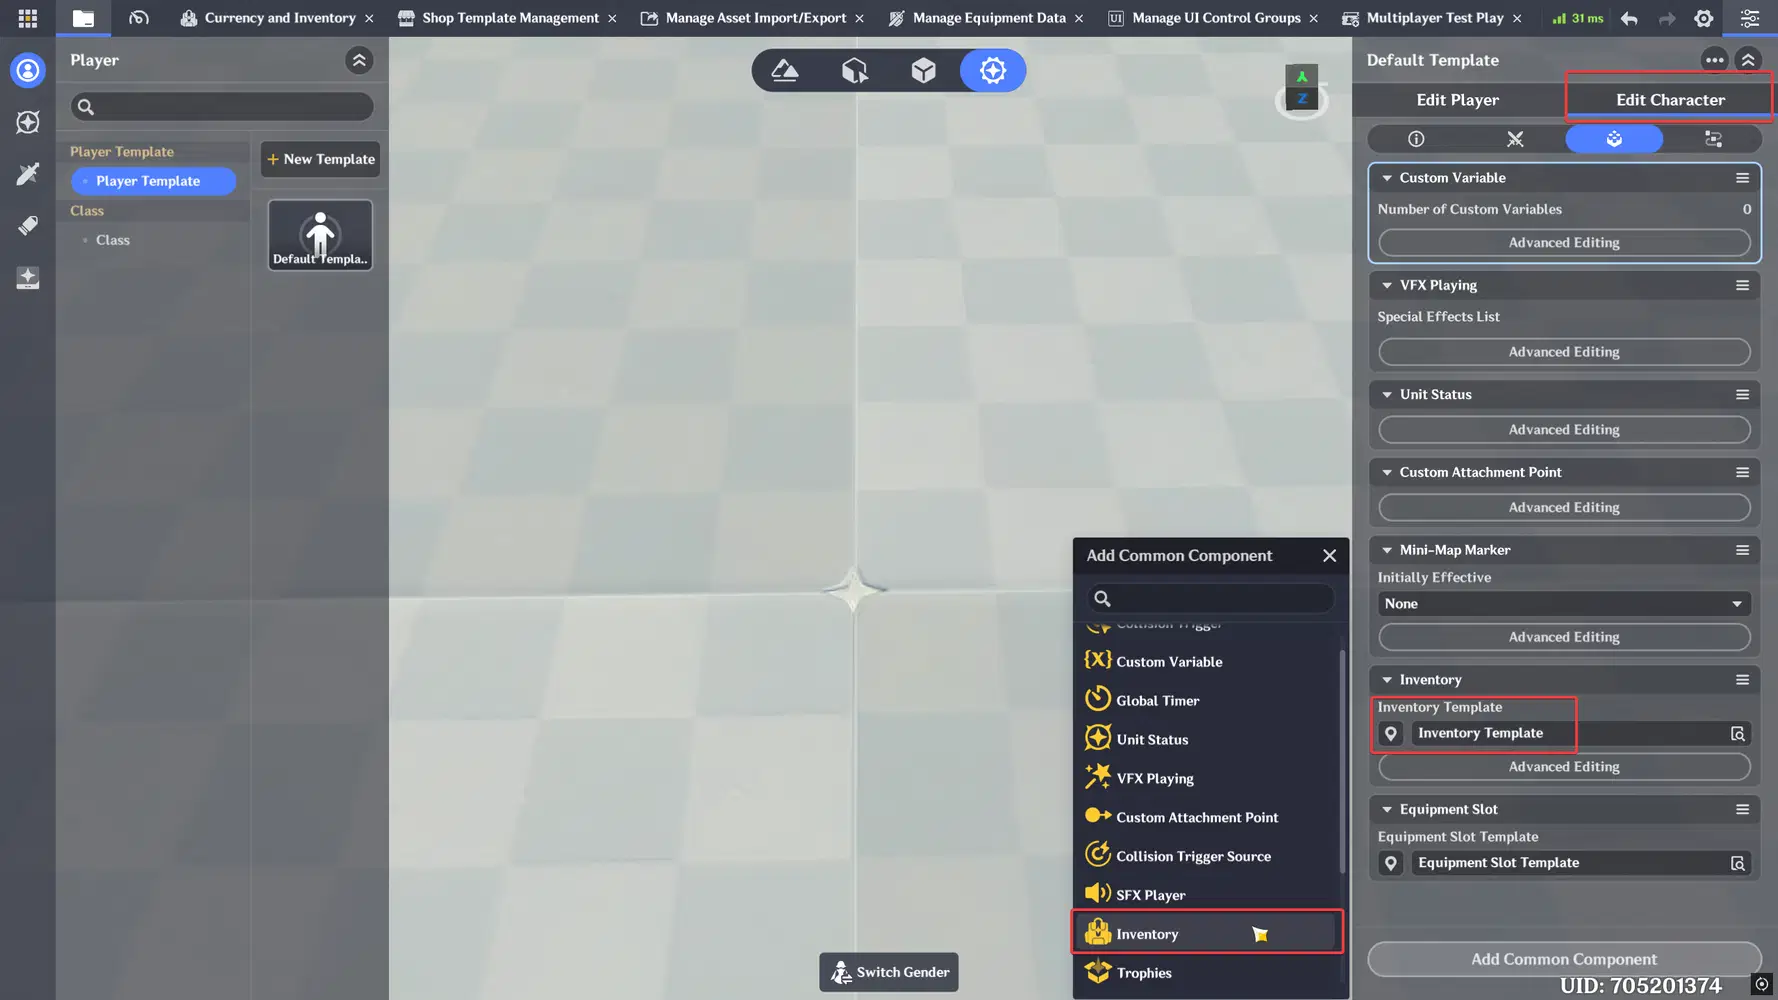
Inventory Component
After adding the Inventory Component, you can assign initial items and currency to the character in Advanced Editing.
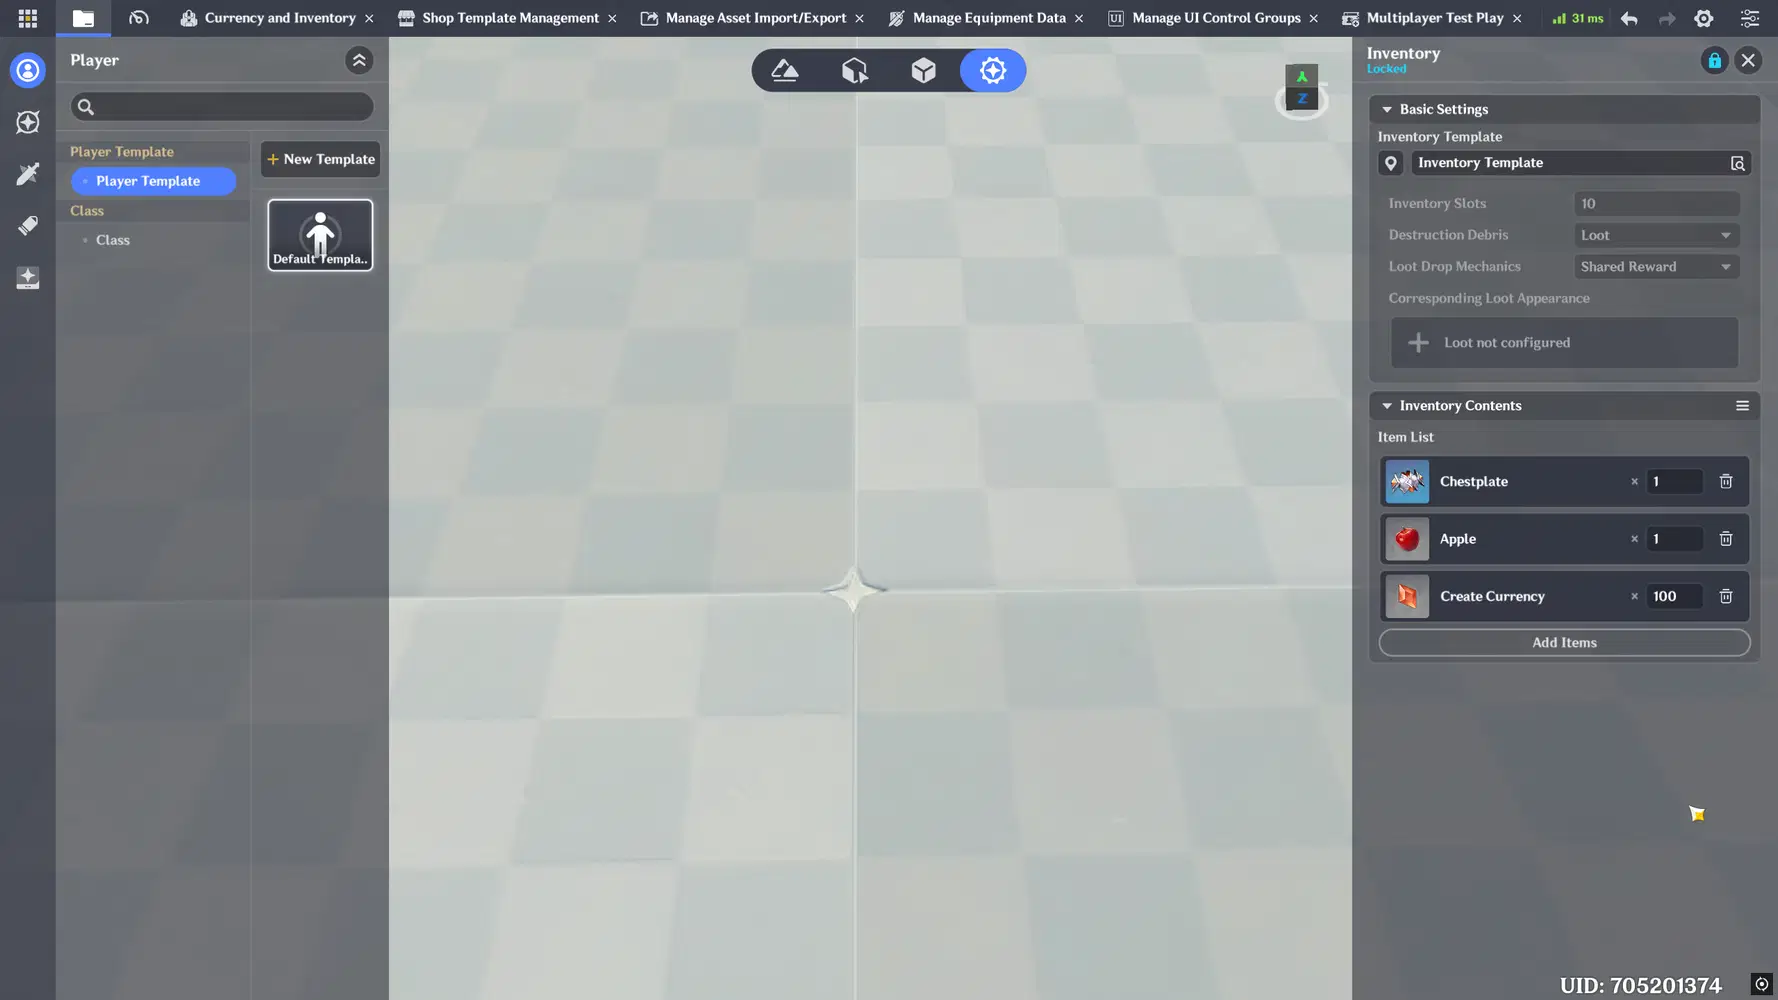
Inventory Component
Loot
Finally, we can create enemies and loot to obtain items that can be sold in the shop.
- In the Prefab Library, go to the Loot tab and select a Loot Prefab.
- Open the Common Component tab and go to Loot Advanced Editing.
- In Loot Settings, you can configure pickup rules, filters, and loot content.
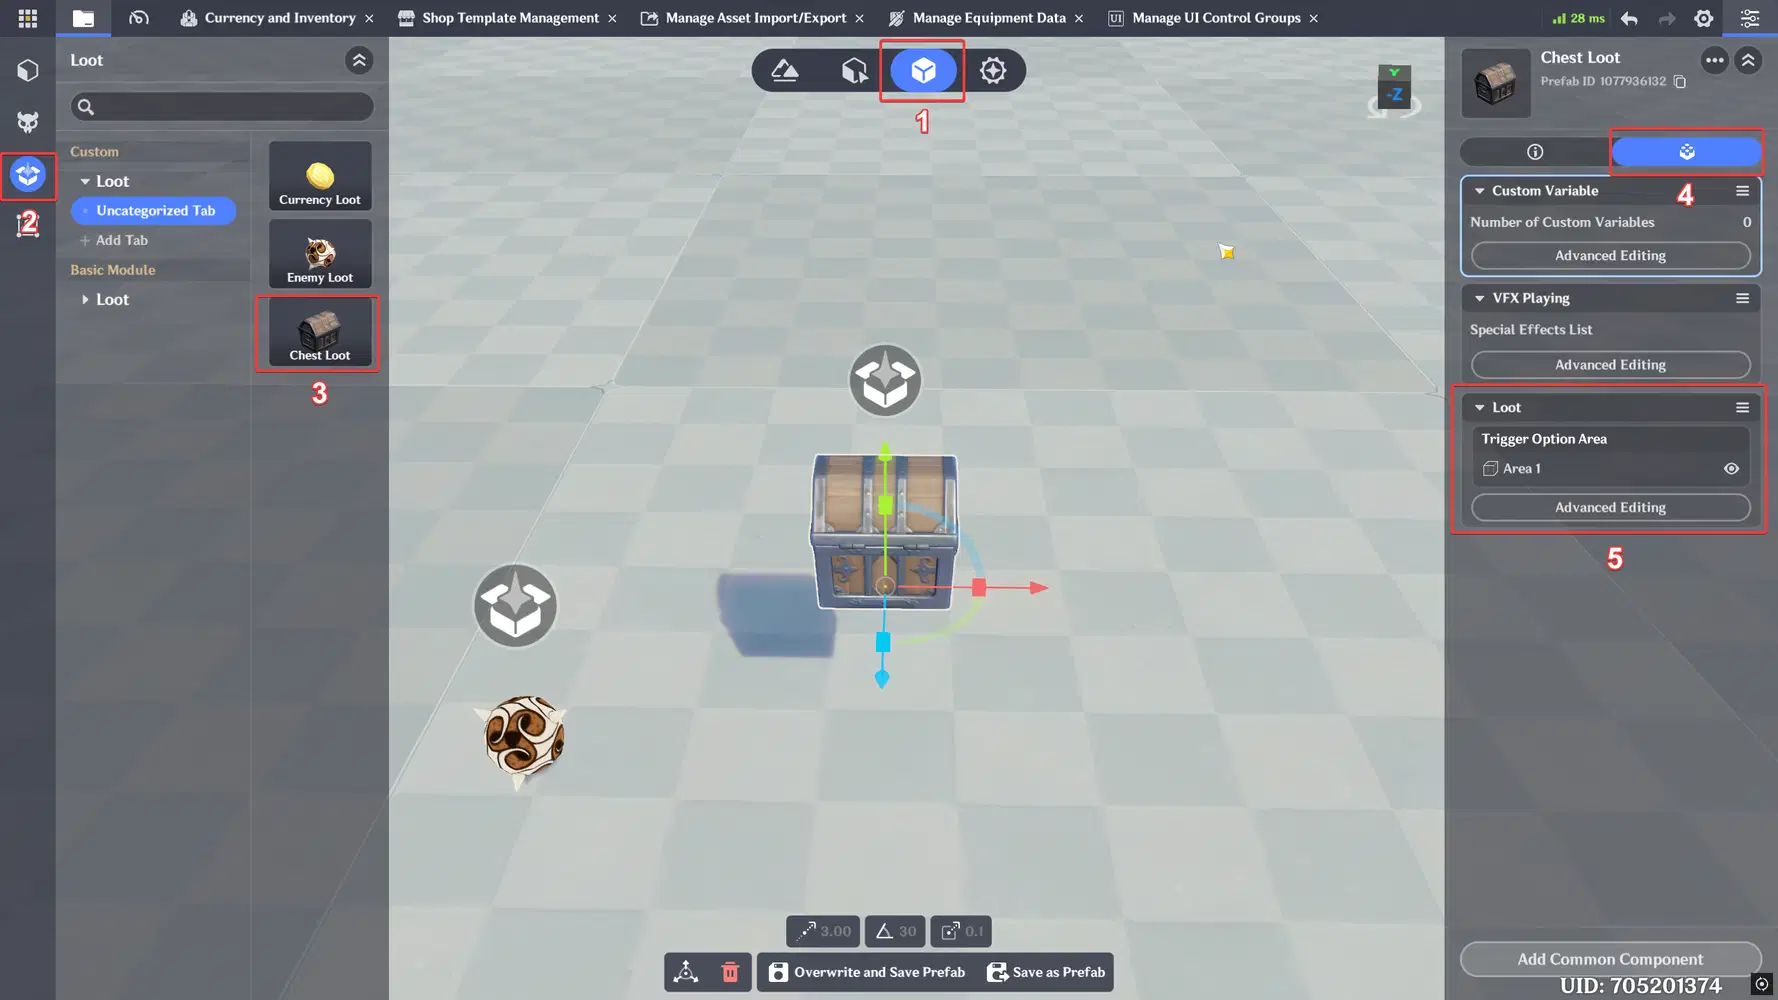
Loot Settings
In pickup rules you can choose:
- Auto Pickup (If you are in Pickup Range, items will automatically go to character Inventory)
- Interactive Pickup (To collect Items, you need to select a Tab)
- Open Pickup Interface (Interface will be opened and you can choose, which items to take)
- Auto-Attract Pickup (Items will move towards character, if he is in the range)
In this example Open Pickup Interface is chosen.
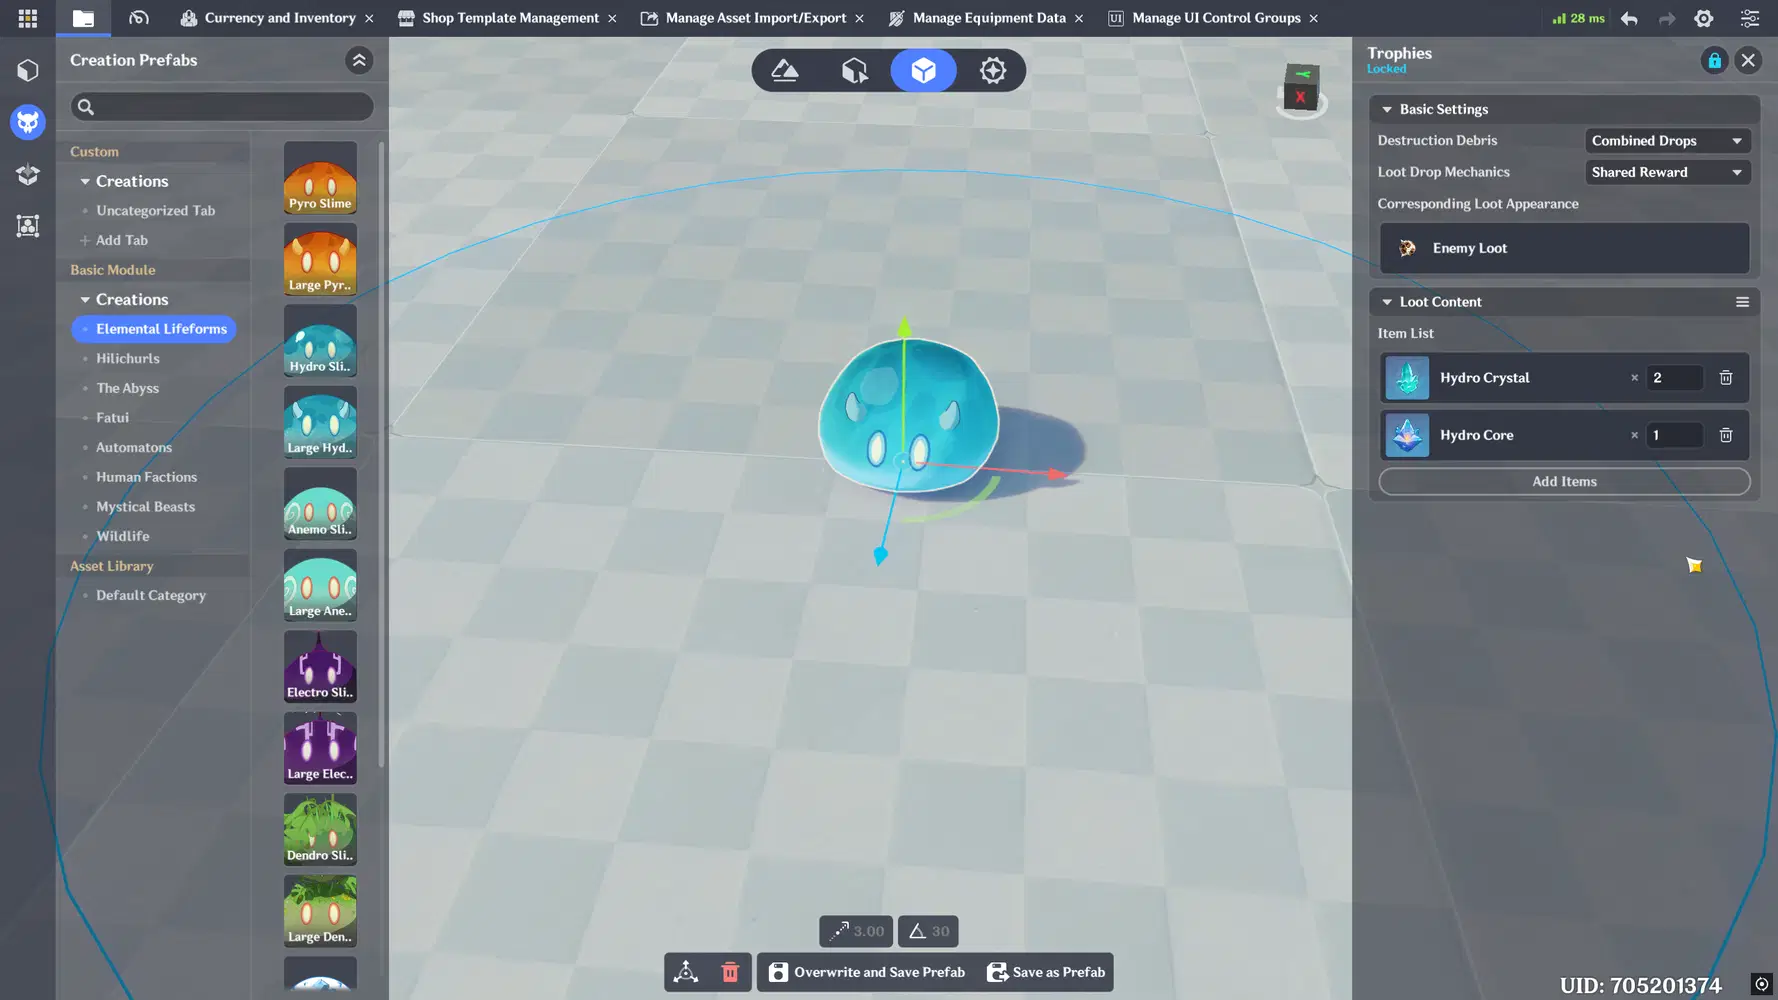
In the Loot Content is added Hydro Crystals x2 and Hydro Core x1.
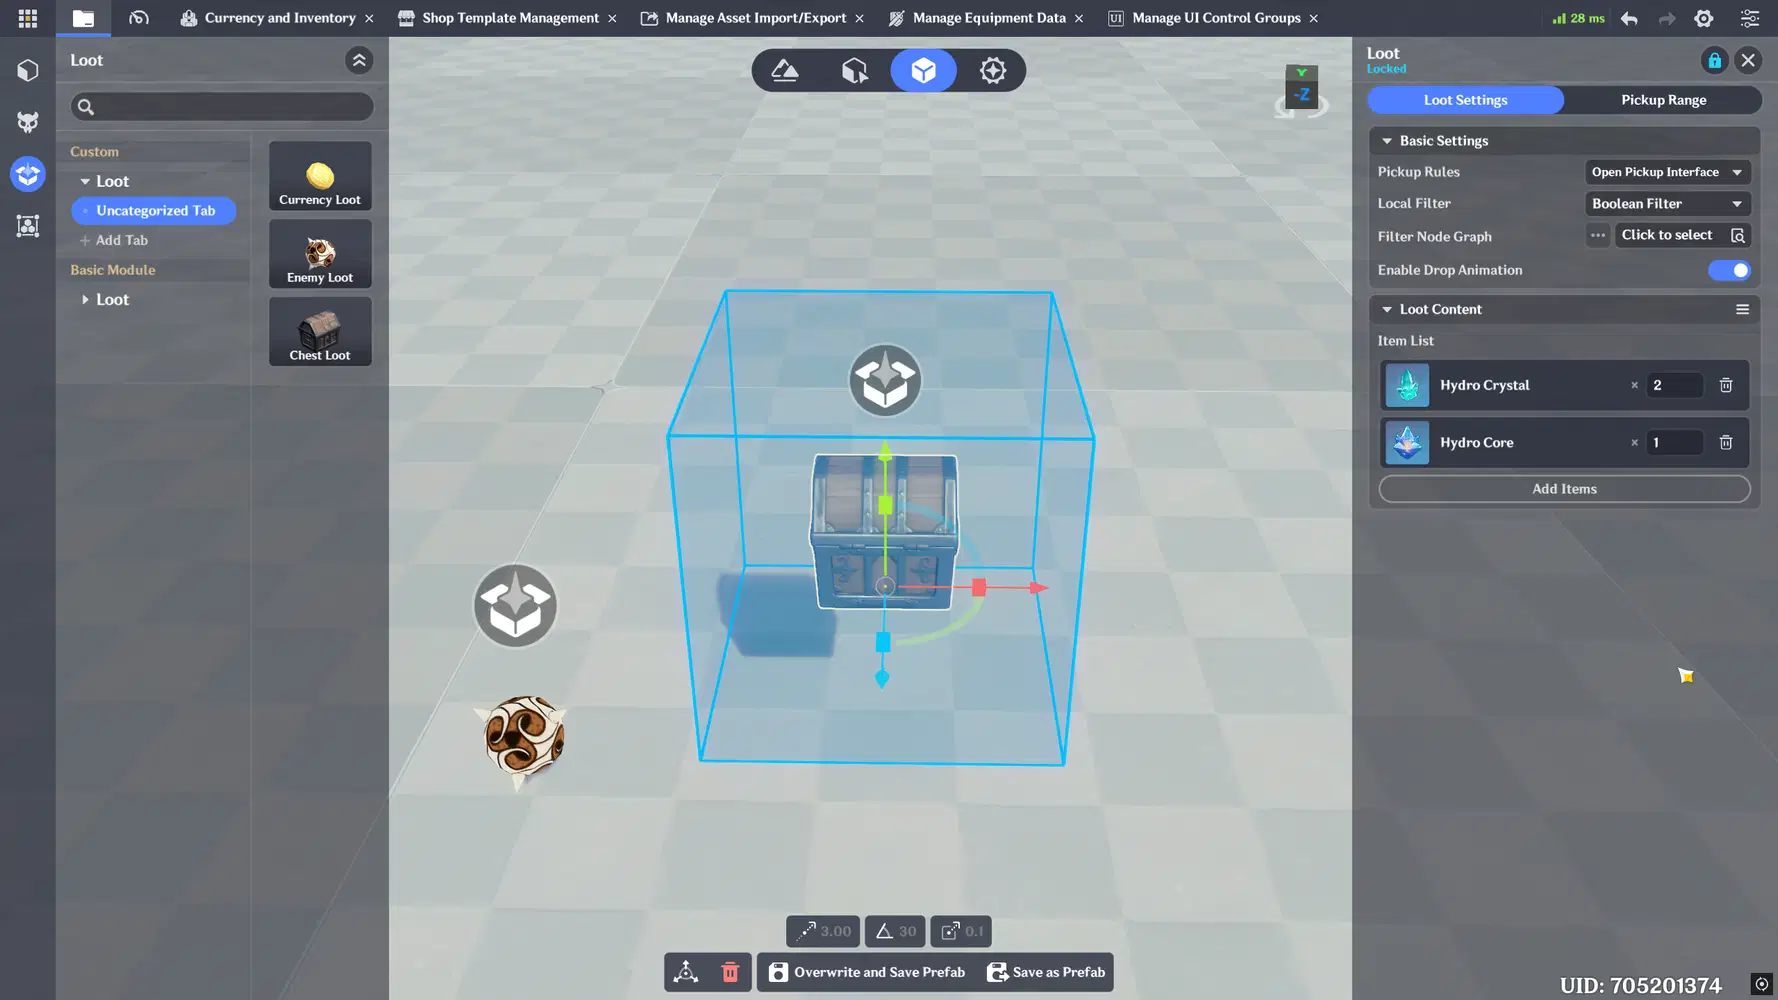
Loot Settings
For enemy loot, set the Pickup Rule to Interactive Pickup and leave the Loot Content empty.
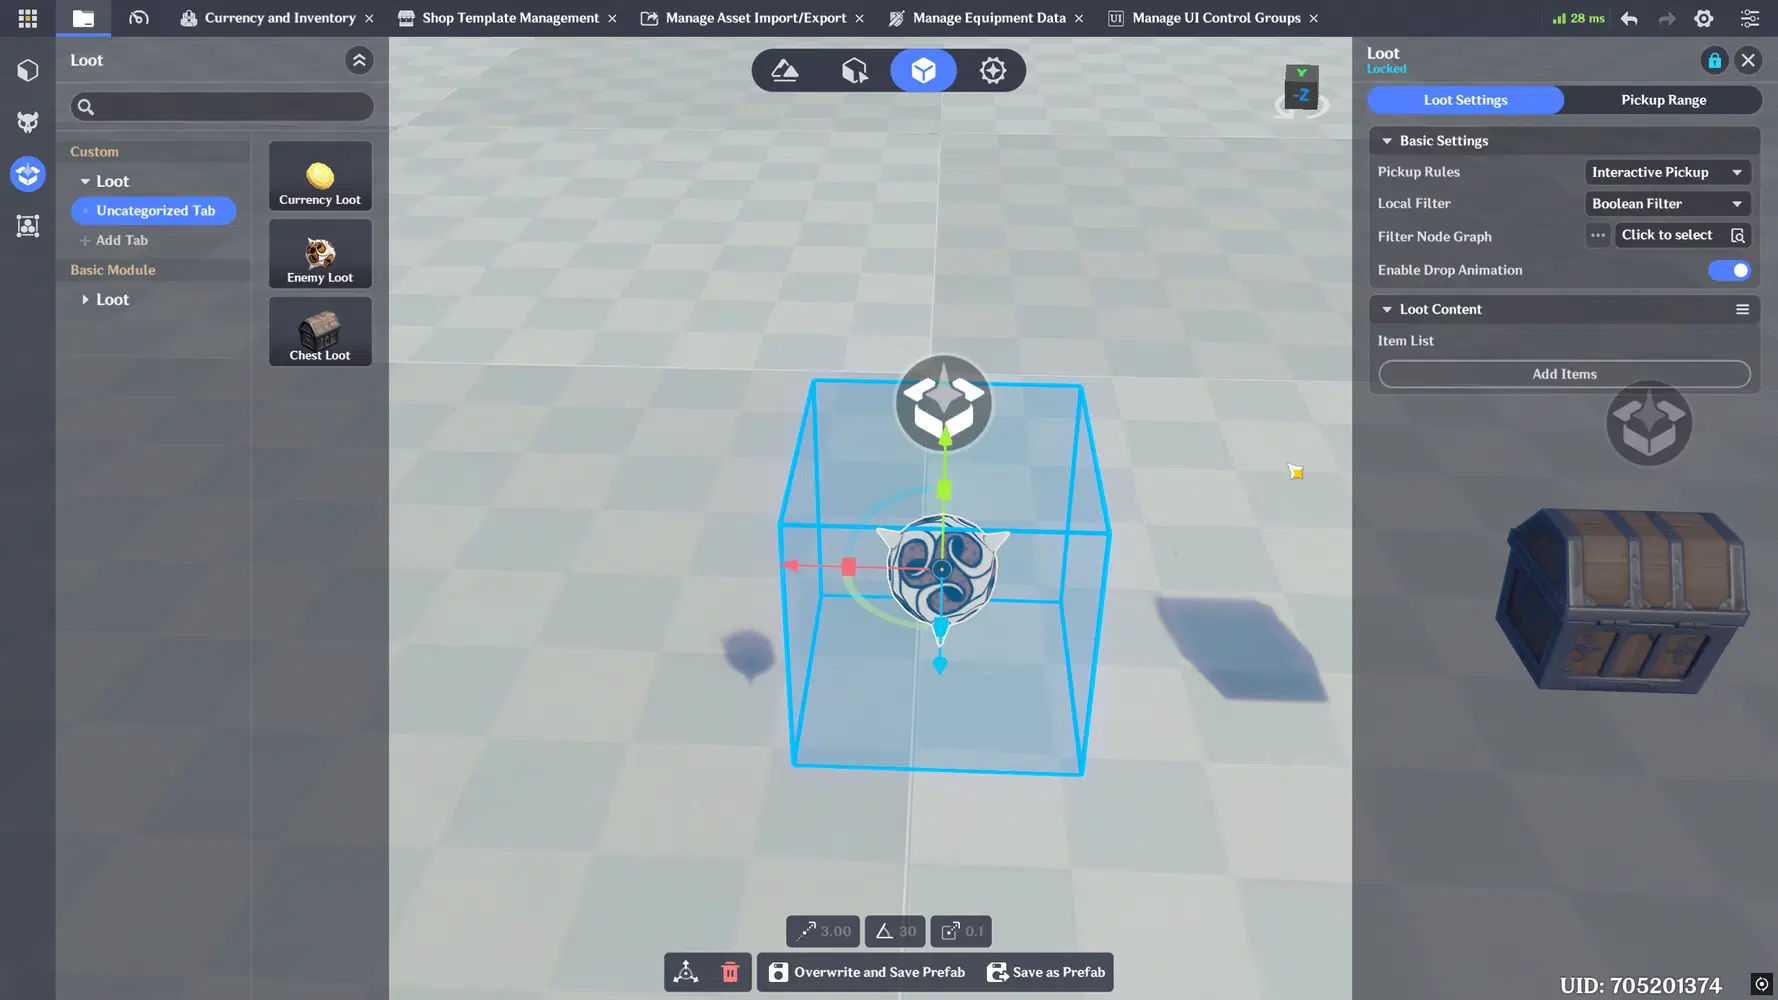
Loot Settings
Create Large Hydro Slime (located in Creation Prefabs → Creations → Elemental Lifeforms).
Then add Trophies Component in the Common Component tab.
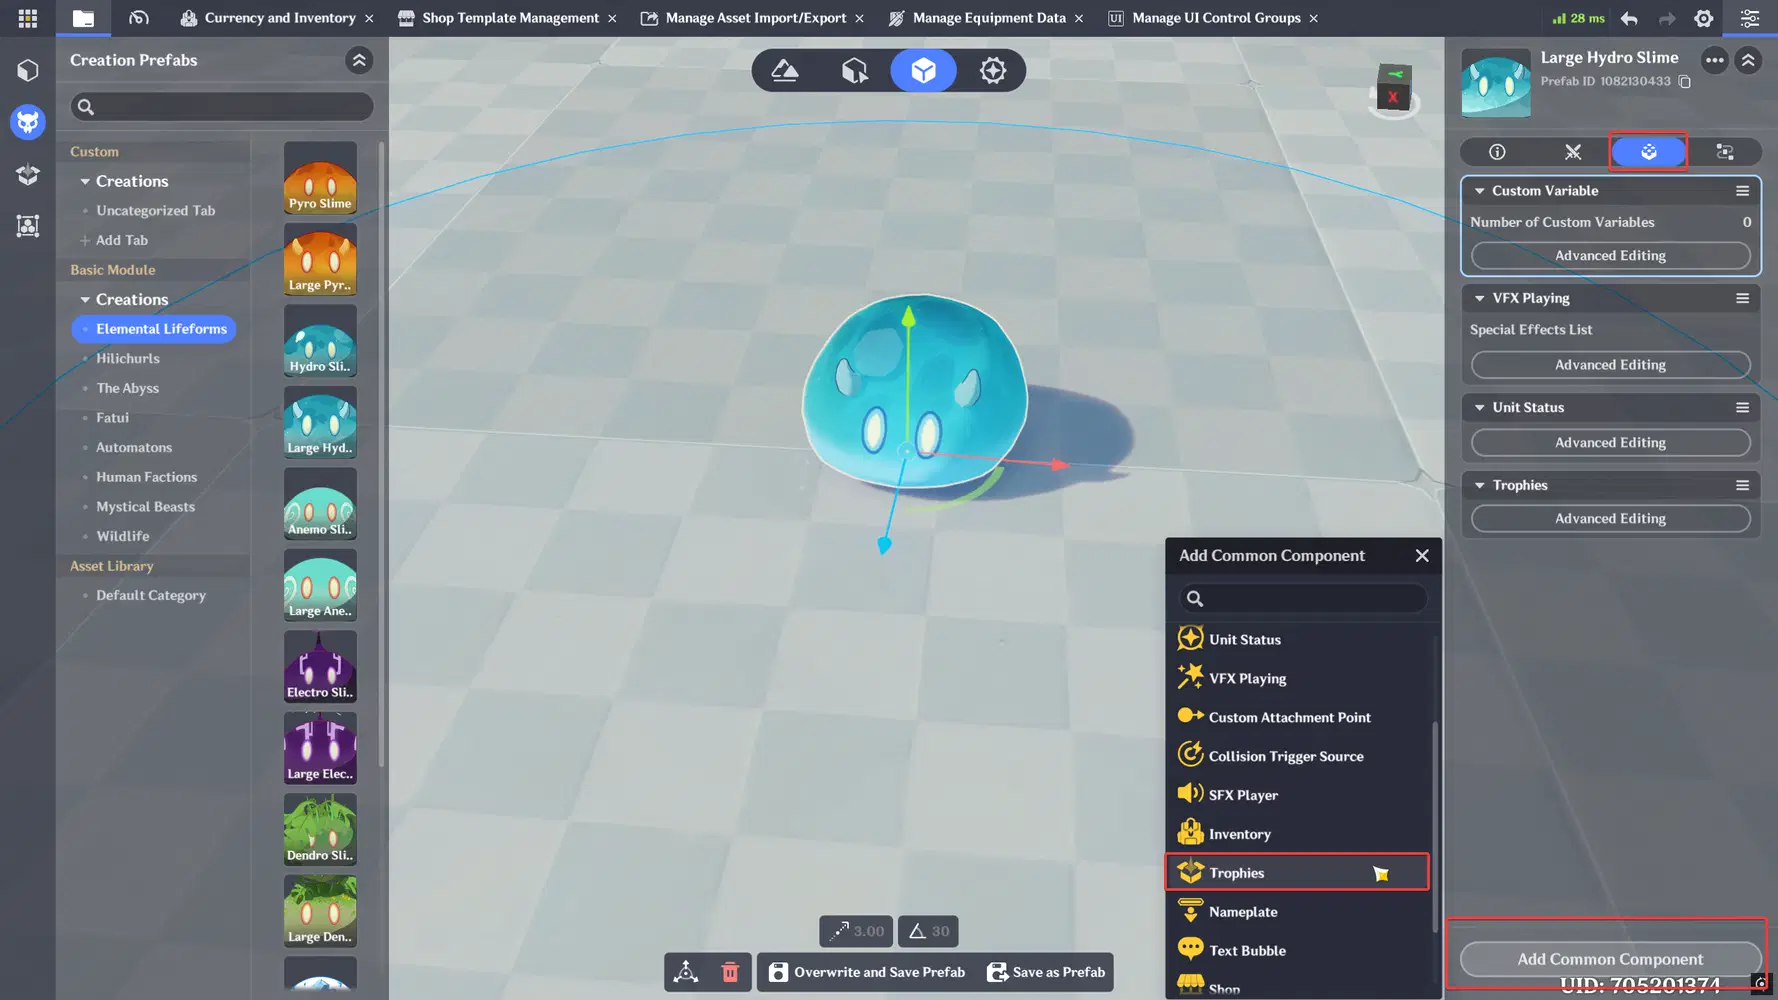
In Advanced Editing, the Enemy Loot appearance is selected and in Loot Content added Hydro Crystals x2 and Hydro Core x1.
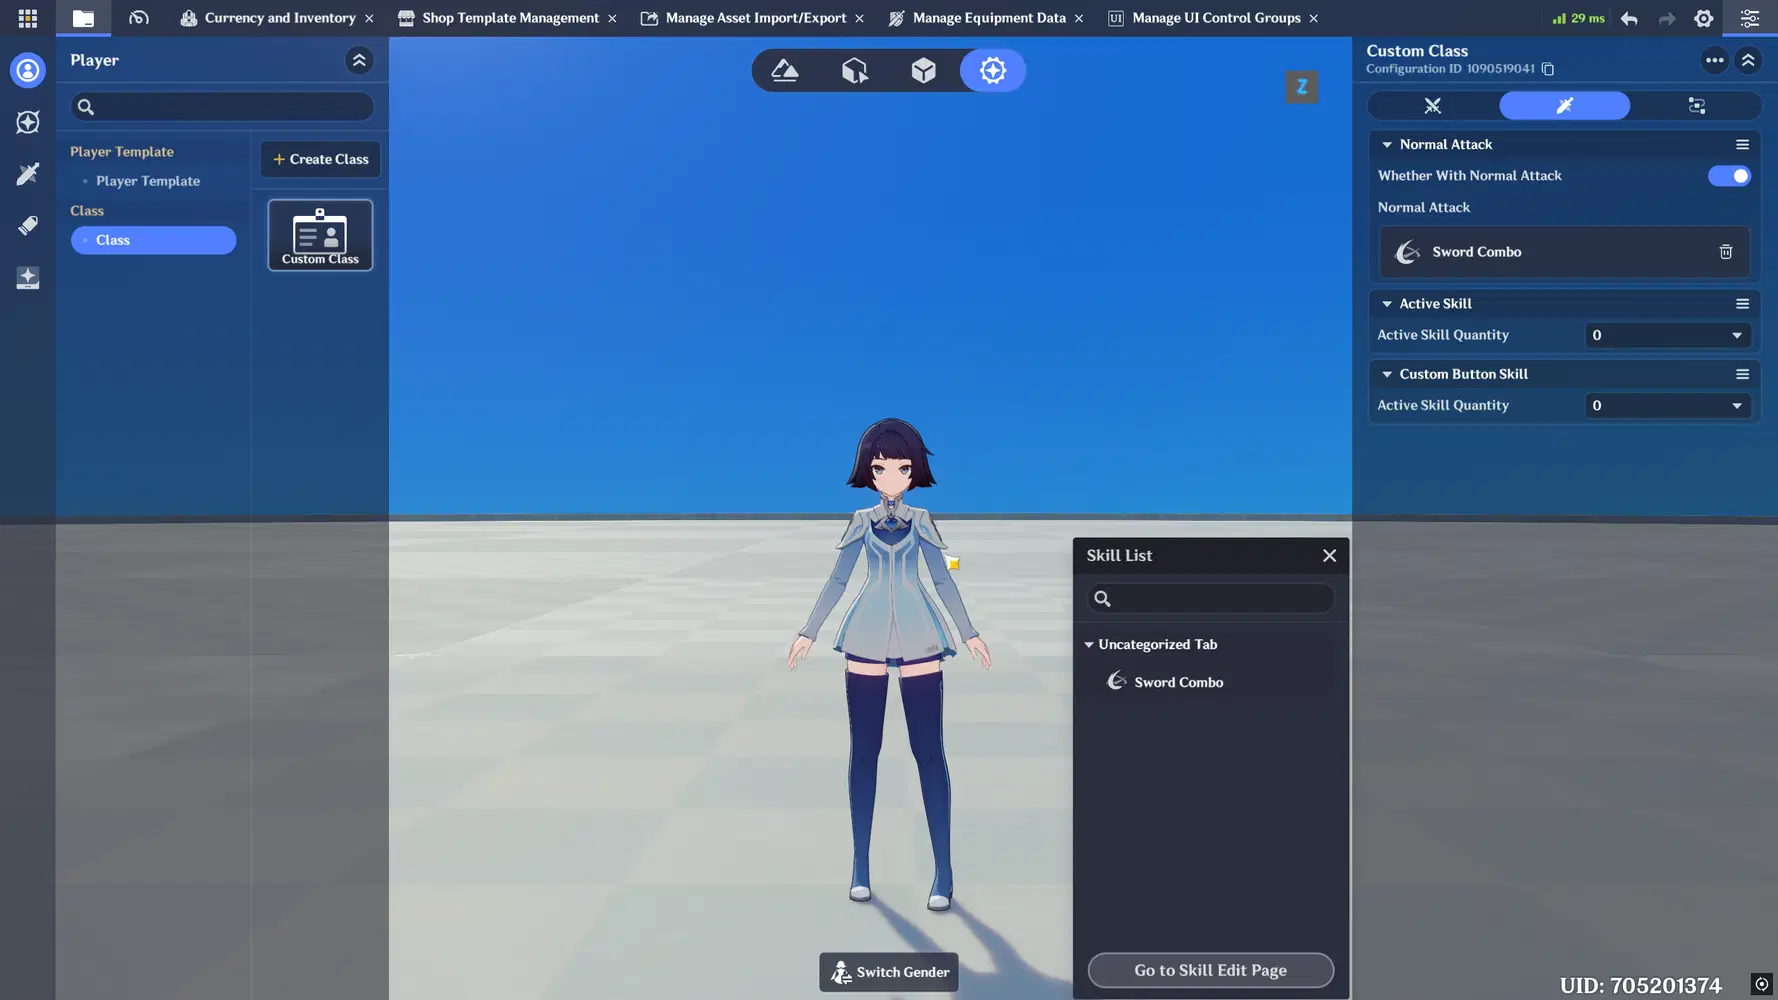
To enable the character to fight the enemy, mount a Normal Attack skill to the Character Class. (You can use a skill from the Preset Skill Library)
Finally, in Shop Template Management under Purchase Settings, set the Purchase Range to Select Items, and then click Edit to add Hydro Crystal and Hydro Core.
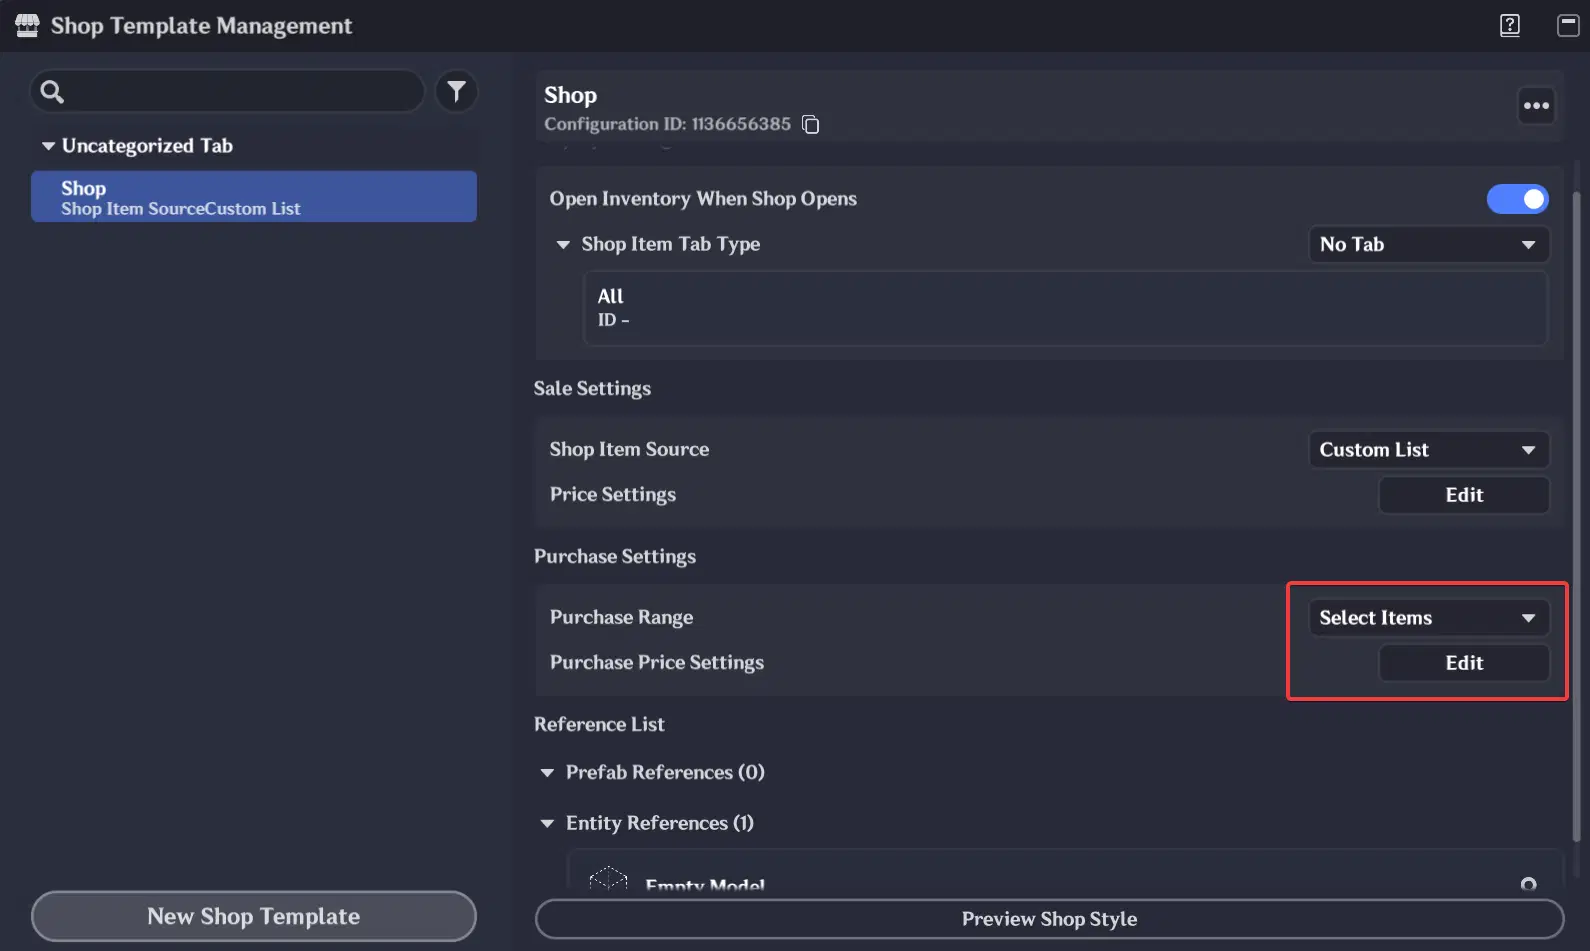
Shop Template Management
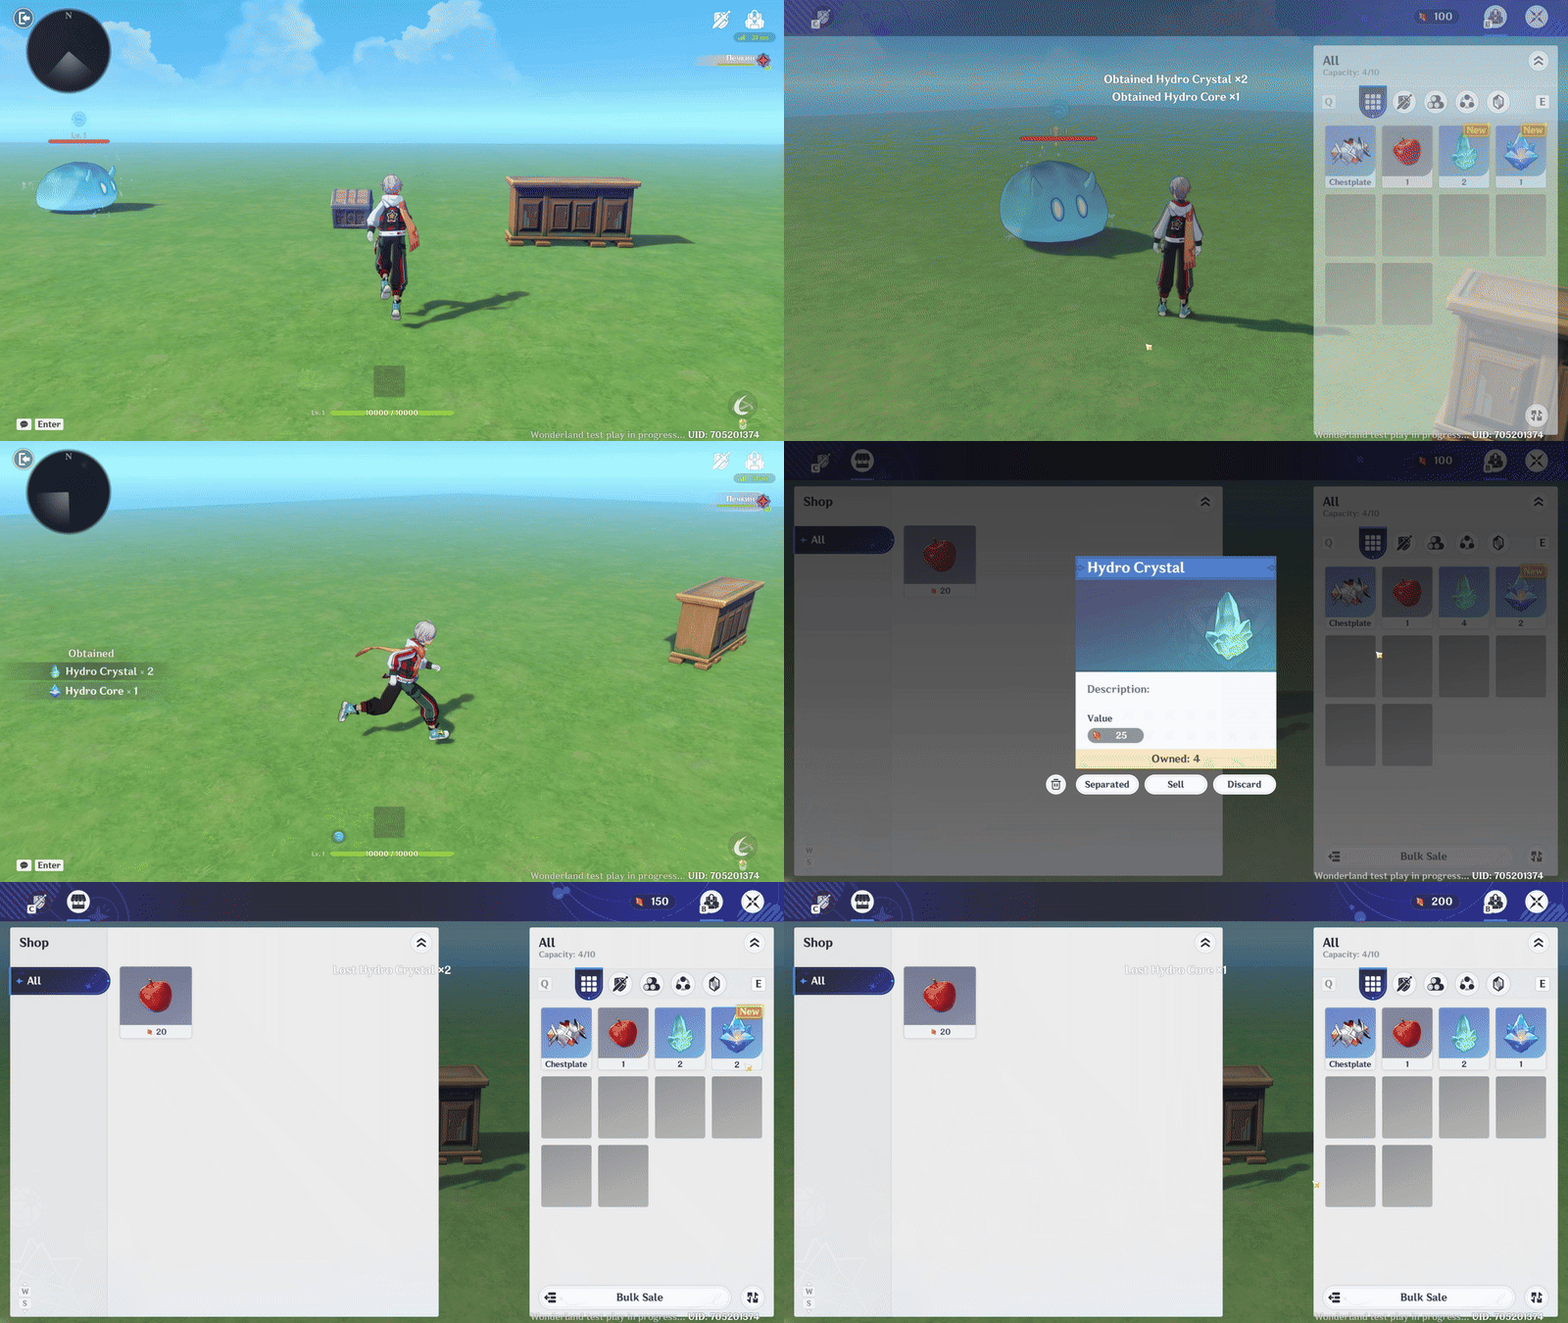
In-game presentation