This guide explains how to create Complex Creations, including:
- Skills
- Skill Management
- Autonomous Logic Parameter Settings
- Creation Status Decision Node Graphs
- Creation Status Node Graphs
- Example with a downloadable asset
Basic vs. Complex Creation explanation
Basic Creations come with built-in configurations and predefined behavior. Their customization options are limited.
Complex Creations, on the other hand, must be configured manually. You define everything — from size and skills to combat behavior and AI logic. This provides much greater flexibility but requires additional configuration.

1. Complex Creation Skills
To create a Skill you need to go to Combat Preset → Skill → Creation Custom Skill → + Skill. In the Add Creation Skill pop-up window, configure:
- Creation Skill Name
- Creation Skill Category
- Creation Skill Type
- Creation Skill Primary Model
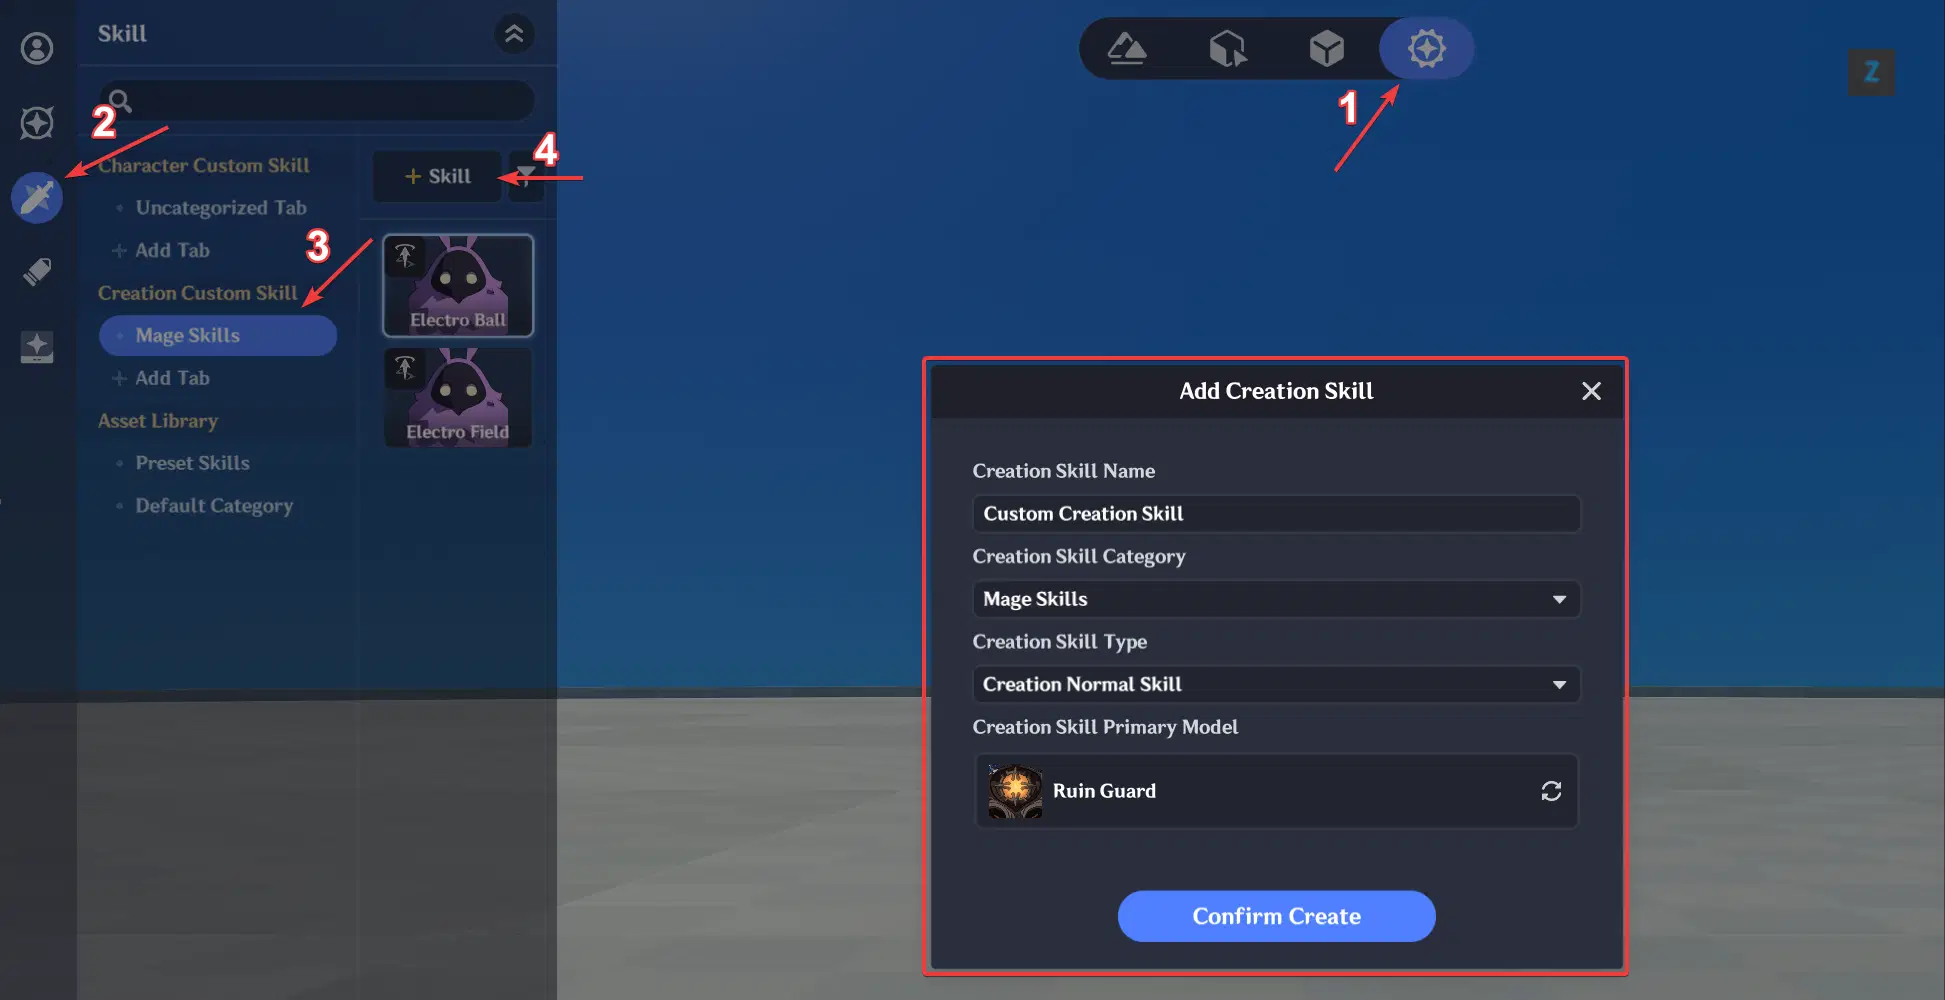
Skill Creation
To create the Creation Skill Node Graph:
MW Sandbox → Window → Client Node Graph Resource Explorer → Creation Skill Node Graph folder
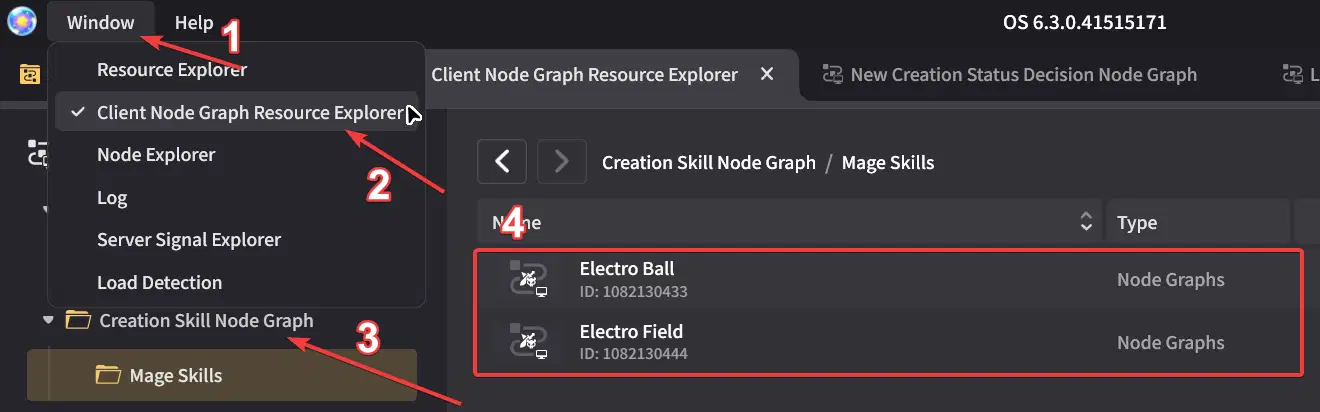
Skill Node Graph location
1.1. Available Skill Types
There are two skill types:
1. Creation Instant Skill
Starts and ends immediately
2. Creation Normal Skill
Similarly to a character skill, but you can configure only animations, node graphs, VFX and creation orientation.
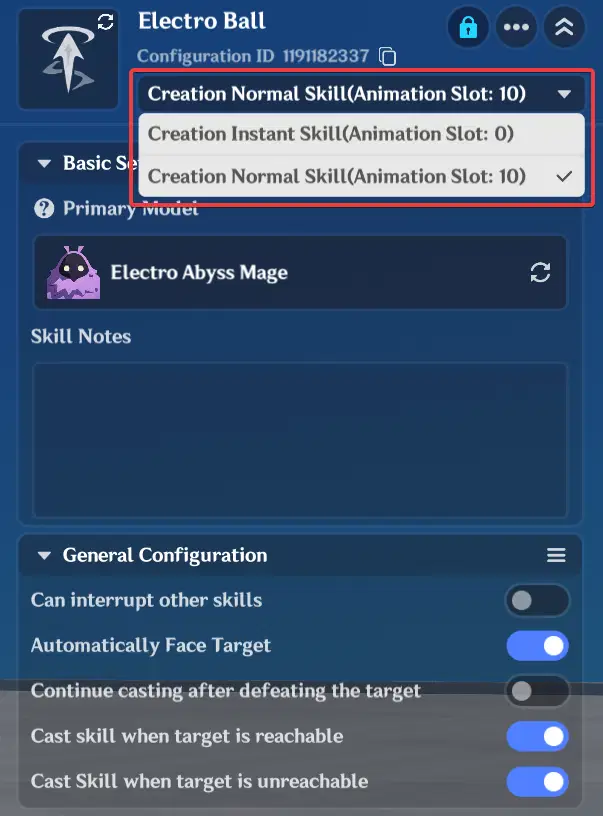
Skill Types
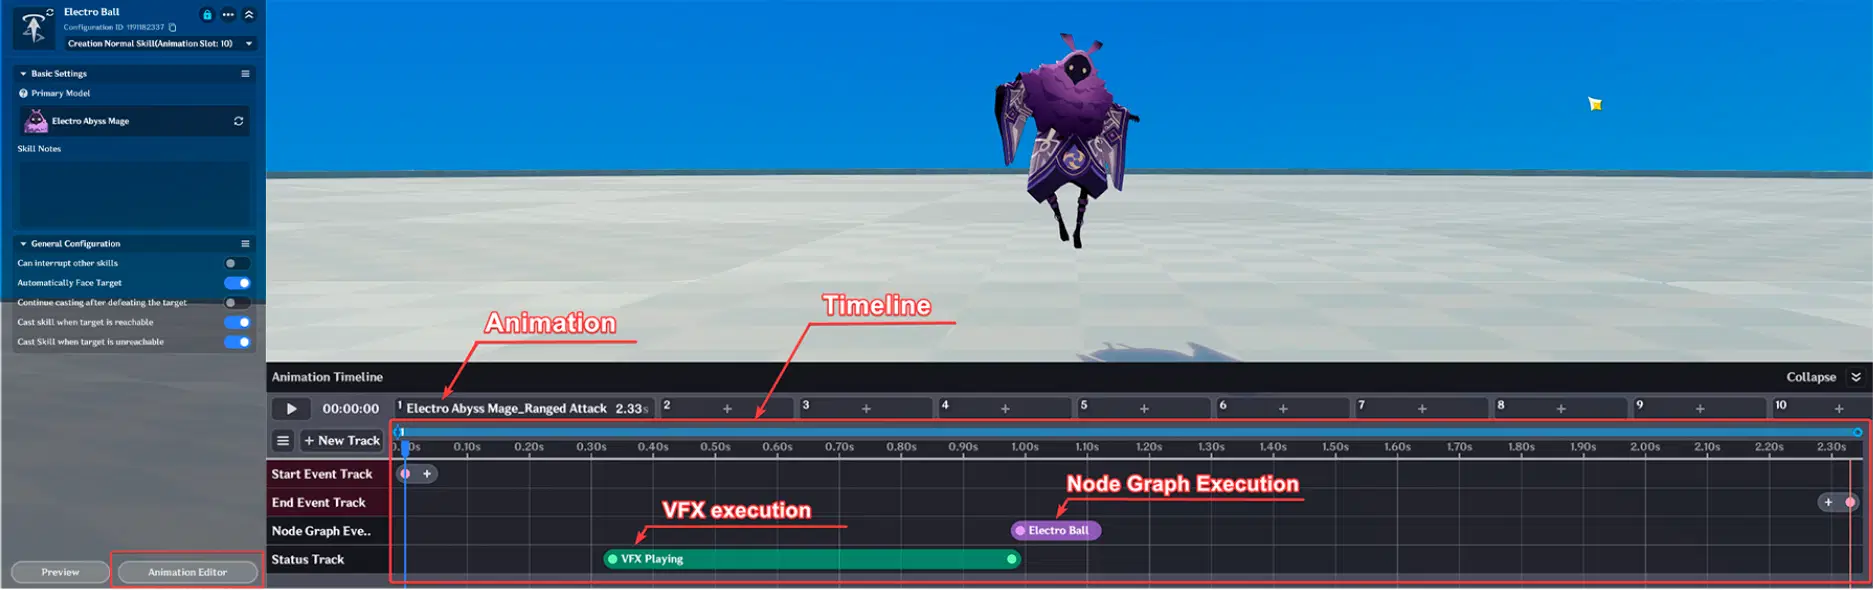
Normal Skill's Animation Editor
1.2. General Configuration
You can configure the following options:
- Can interrupt other skills
- Automatically Face Target (For more dynamic orientation control, use the event "Set Creation Orientation" in the Status Track inside the Skill Animation Editor)
- Continue casting after defeating the target
- Cast skill when target is reachable
- Cast skill when target is unreachable
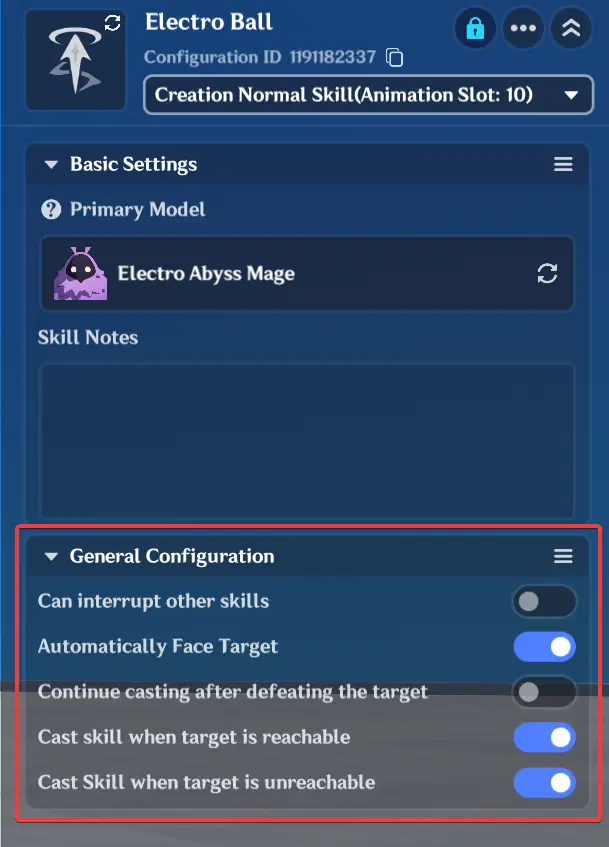
Skill's general configuration
2. Complex Creation Skill Management
To assign a created skill to a complex creation you need to open Creation Skill Management:
Prefab Library → Select Creation → Combat Tab → Creation Skill Management → Edit Details
Note: Click “+” to add a new skill slot.
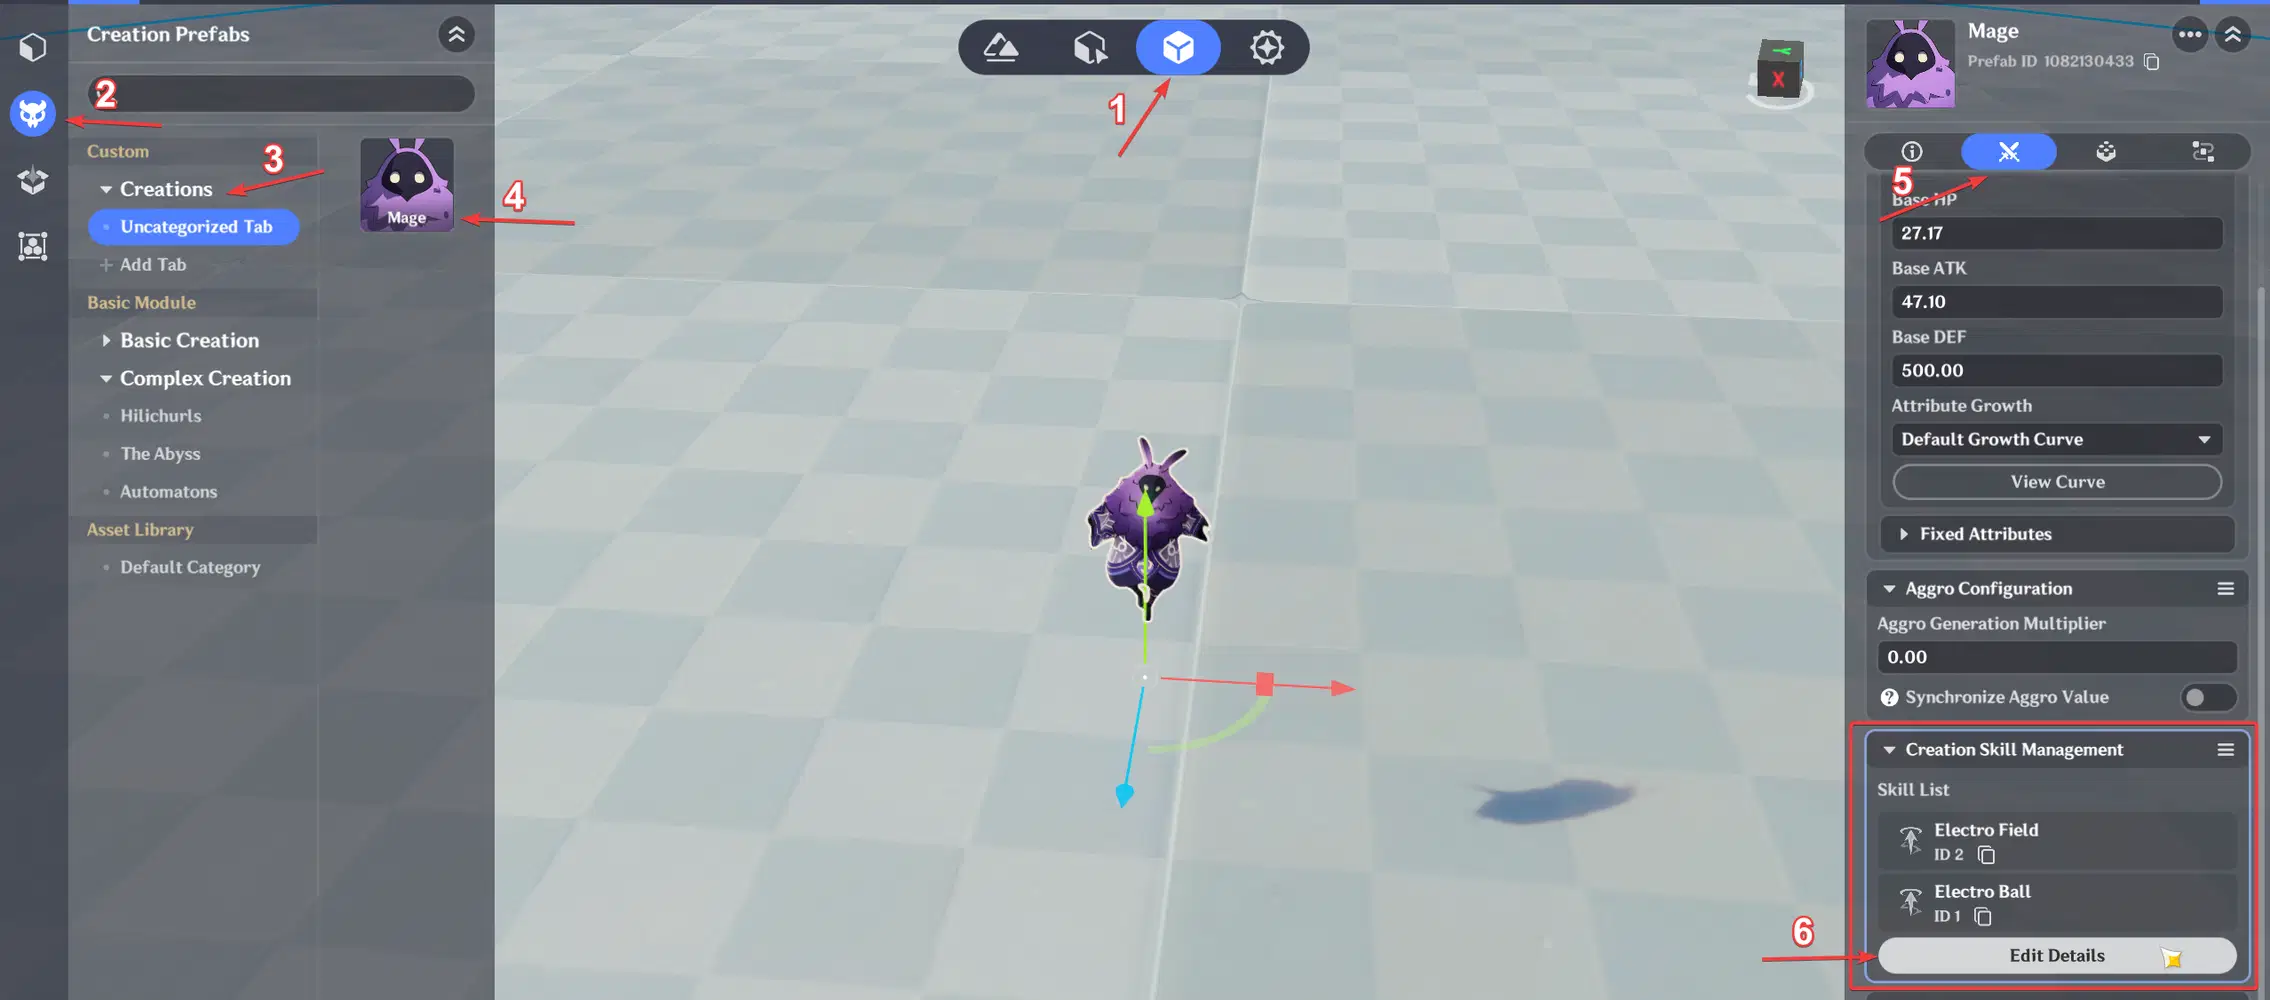
Creation Skill Management
After this manipulations select the created skill as the referenced skill and configure skill cooldown settings.
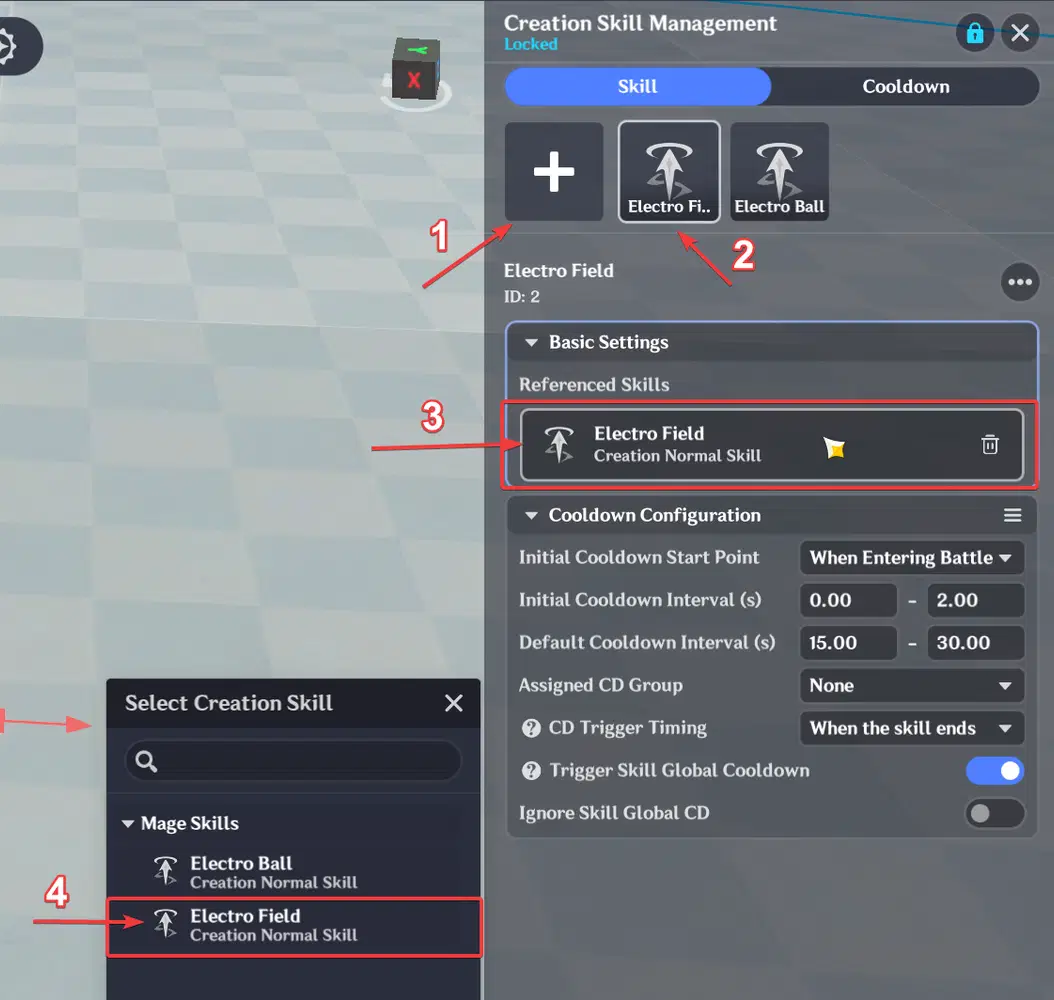
Skill selection in Skill Management
2.1. Cooldonw Settings
1. Initial Cooldown Start Point
- In Battle → Initial cooldown starts when entering battle
- Out of Battle → Initial cooldown starts when exiting battle
2. Initial Cooldown Interval (s)
The skill becomes usable after this initial cooldown.
3. Default Cooldown Interval (s)
The skill becomes reusable after this default cooldown.
4. Assigned CD Group
You can create CD Groups in the Cooldown Tab.
If multiple skills share the same CD Group, using one skill will trigger cooldown for all skills in that group.
5. CD Trigger Timing
Defines whether cooldown starts when the skill begins or ends.
6. Trigger Skill Global Cooldown
If enabled, all skills enter Global Cooldown when this skill is used.
7. Ignore Skill Global Cooldown
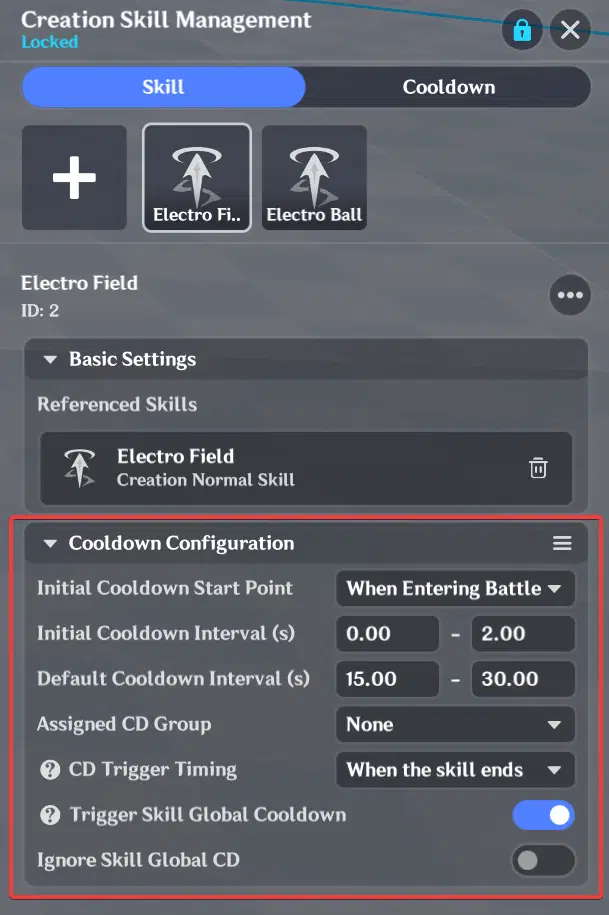
Cooldown Settings
2.2. Global Cooldown
In the Cooldown Tab, you can define a Global Cooldown.
If enabled, when one skill is used, all other skills become unavailable until the Global Cooldown ends.
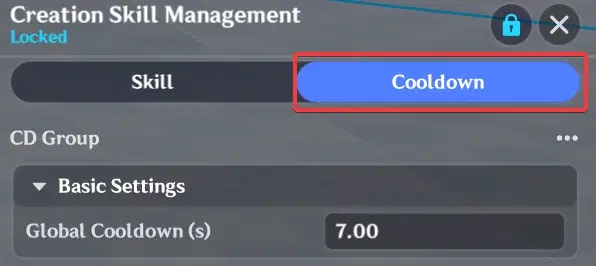
Global Cooldown settings
3. Autonomous Logic Parameter Settings
Below Creation Skill Management, open Autonomous Logic Parameter → Edit Details.
Click “+” to create a new logic template.
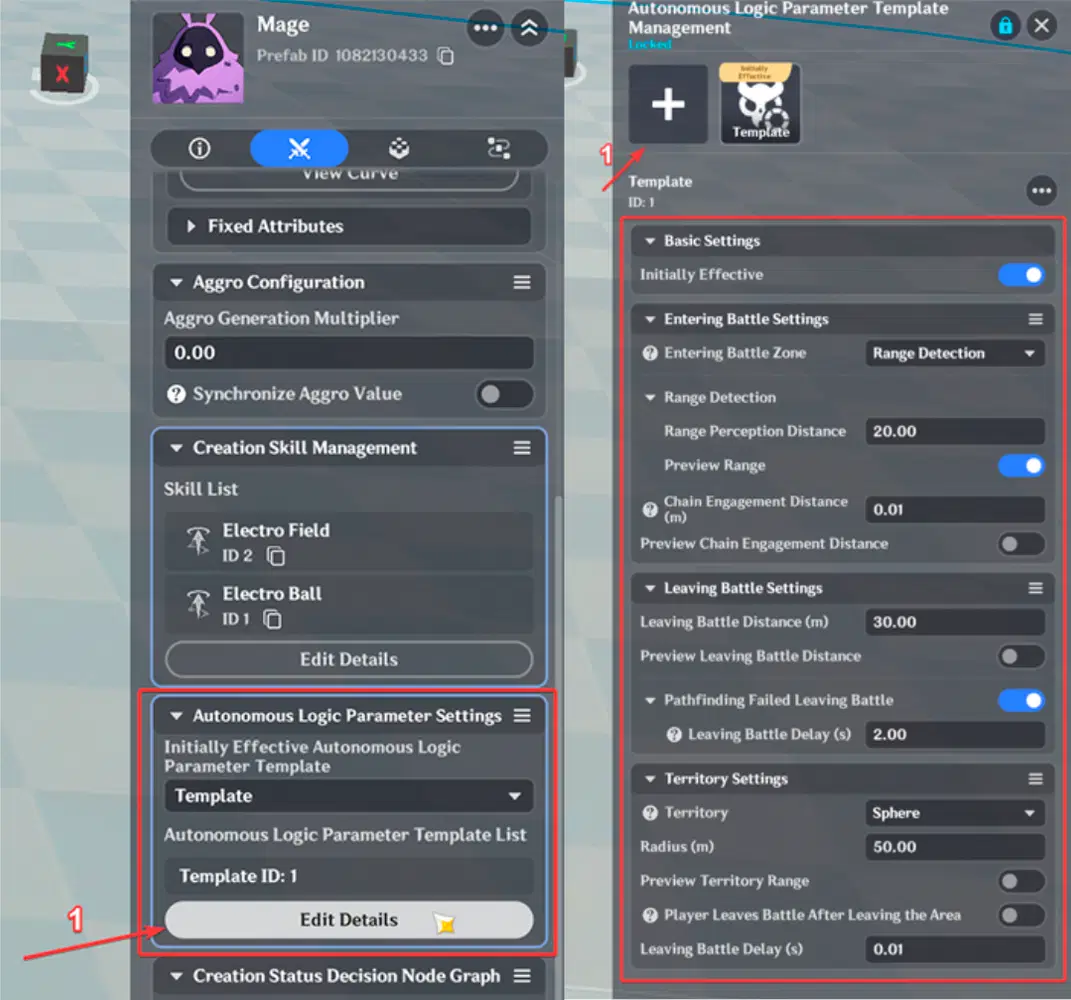
Autonomous Logic Parameter Settings
You can create multiple templates, but only one can be active at a time.
These settings defines creation's battle settings.
3.1. Entering Battle settings
Configure how the creation detects targets:
- FOV Detection
- Range Detection
- FOV & Range Detection
If FOV Detection is selected you can configure:
- FOV Type (Full FOV or Cone)
- Detection Radius
If Range Detection is selected you can configure:
- Range Distance
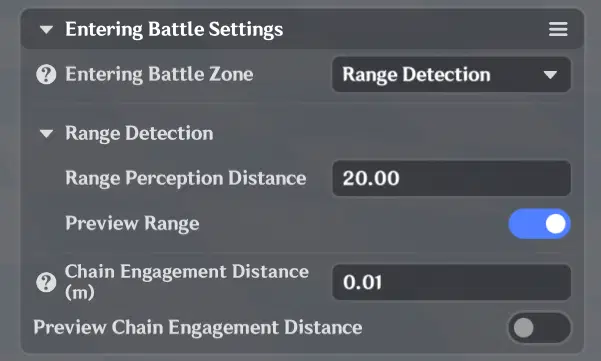
Entering Battle settings

3.1.1. Chain Engagement Distance
To inform nearby creations withing this distance that creation entered battle chain engagement distance is used. If nearby creations will be withing this distance, they will also enter battle against target.

Chain Engagement Distance
3.2. Leaving Battle settings
1. Leaving Battle Distance
This area is centered on the creation and moves with it.
If the target leaves this area, the creation leaves battle state and returns to its territory.
2. Pathfinding Failed Leaving Battle
If enabled, the creation leaves battle state when no target found.
3. Leaving Battle Delay
Adds a delay before leaving battle state after the target exits the battle area.
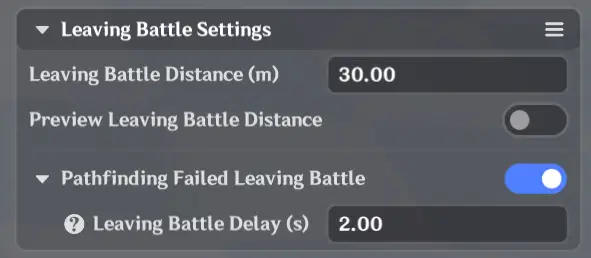
Leaving Battle settings
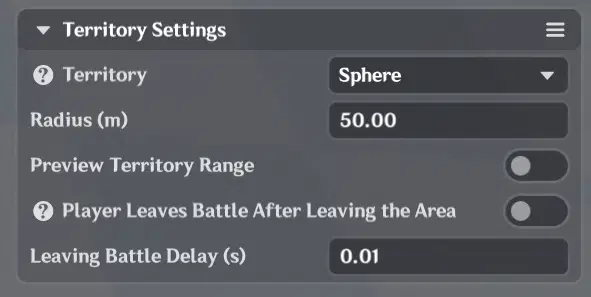
3.3. Territory settings
Unlike Leaving Battle distance, Territory doesn't move along with creation. It is centered on the creation’s spawn initial position. If the creation leaves its territory, it leaves battle state and returns to its spawn point.
You can configure:
- Territory Type (None, Sphere, Cylinder)
- Territory Radius
- Player Leaves Battle After Leaving the Area
If enabled, creation will leave battle state and return to it's spawn point, when target (for example, player) leaves territory.
- Leaving Battle Delay
Adds a delay before leaving battle state.
4. Creation Status Decision Node Graph
To use creation node graphs, first create Creation Status Decision Node Graph:
Miliastra Sandbox → Window → Client Node Graph Resource Explorer → Creation Status Decision Node Graph folder
This graph defines overall behavior logic.
Note: Here, “Status” refers more to behavior.
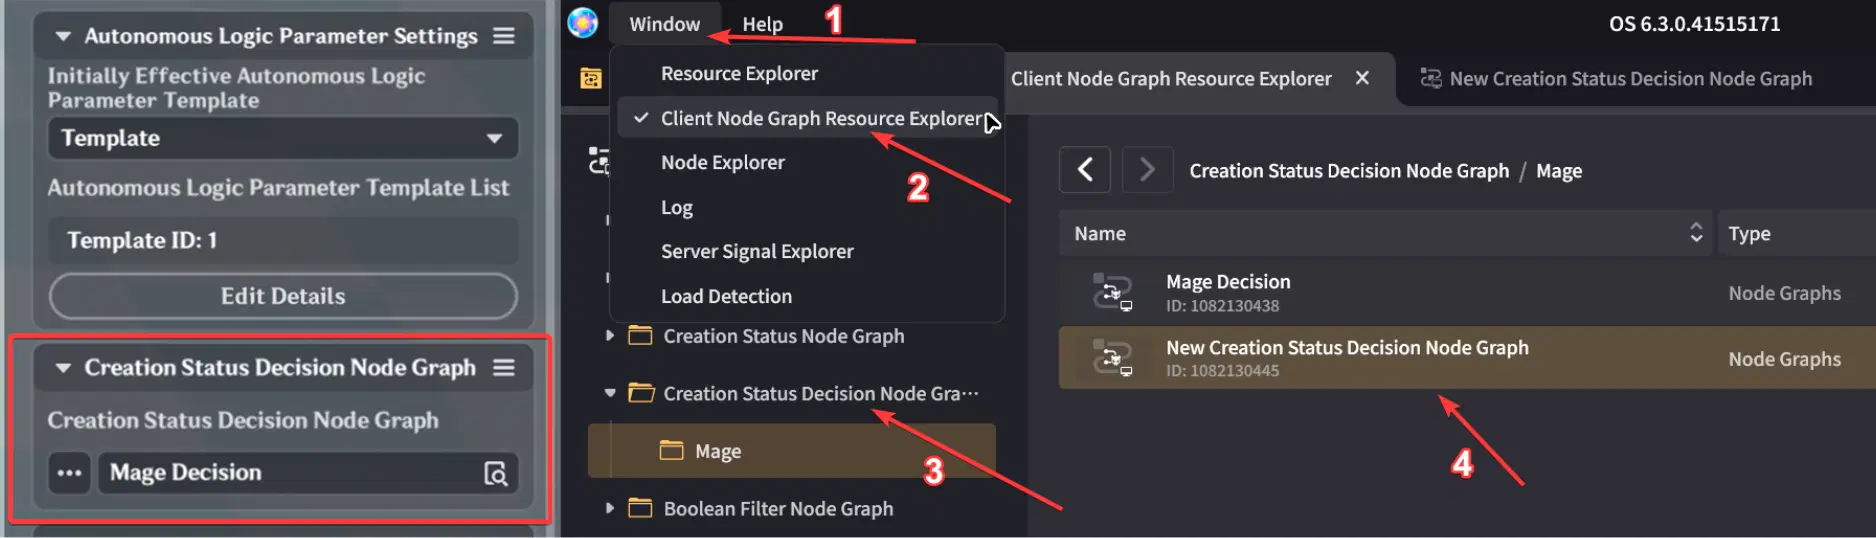
Creation Status Decision Node Graph
4.1. Execution Logic
The Event Node “Execute only by sequence” will attempt executions sequentially (1 → 2 → 3 → etc.).
If node execution fails, the next node is attempted.
Failed executions inside execute nodes trigger the Failed Execution pin (Works similar as event node - if previous execute node will fail, only then next node will attempt to execute).
Each Execute Node requires:
- Status Node Graph Config ID (will automatically appear in list when you will create Creation Status Node Graph)
- Autonomous Logic Parameter ID (optional if only one exists)
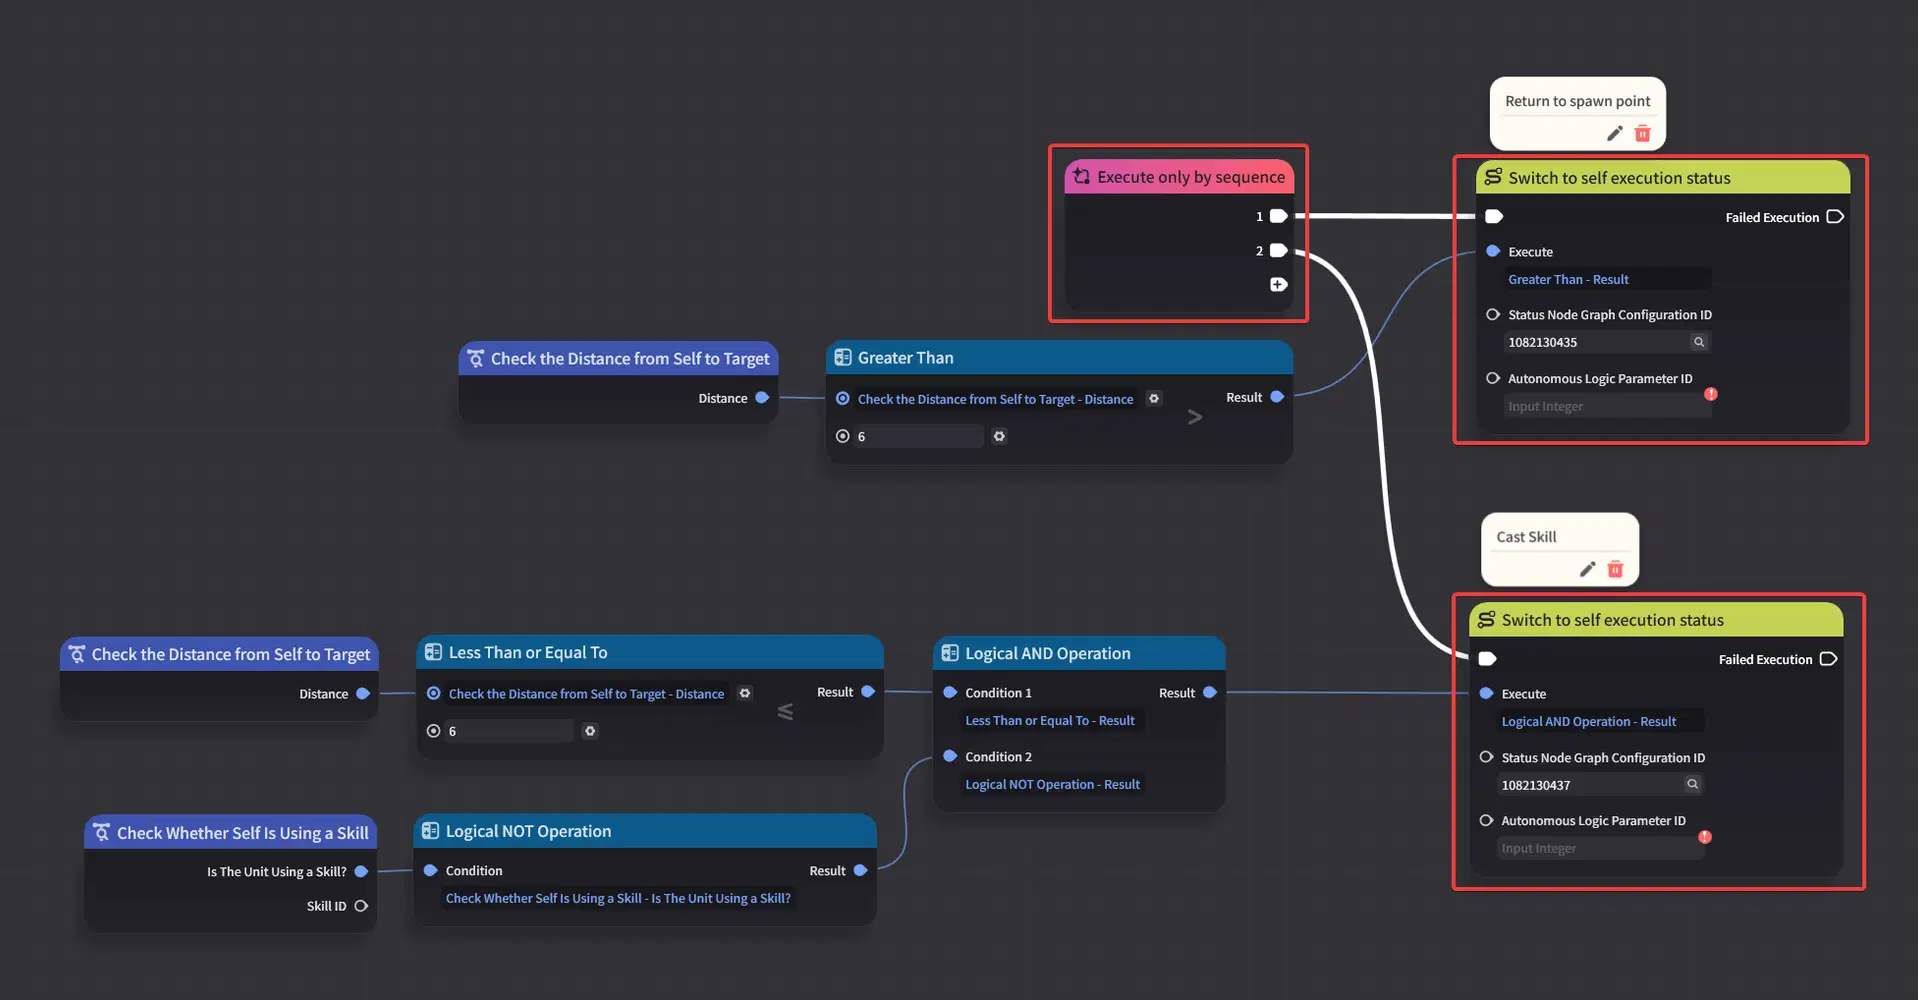
Execution Logic
4.1.1. Example Logic
Example condition setup:
- If player distance > 6m → execute “Return to Spawn”
- If player distance ≤ 6m AND creation is not using a skill → execute “Cast Skill”
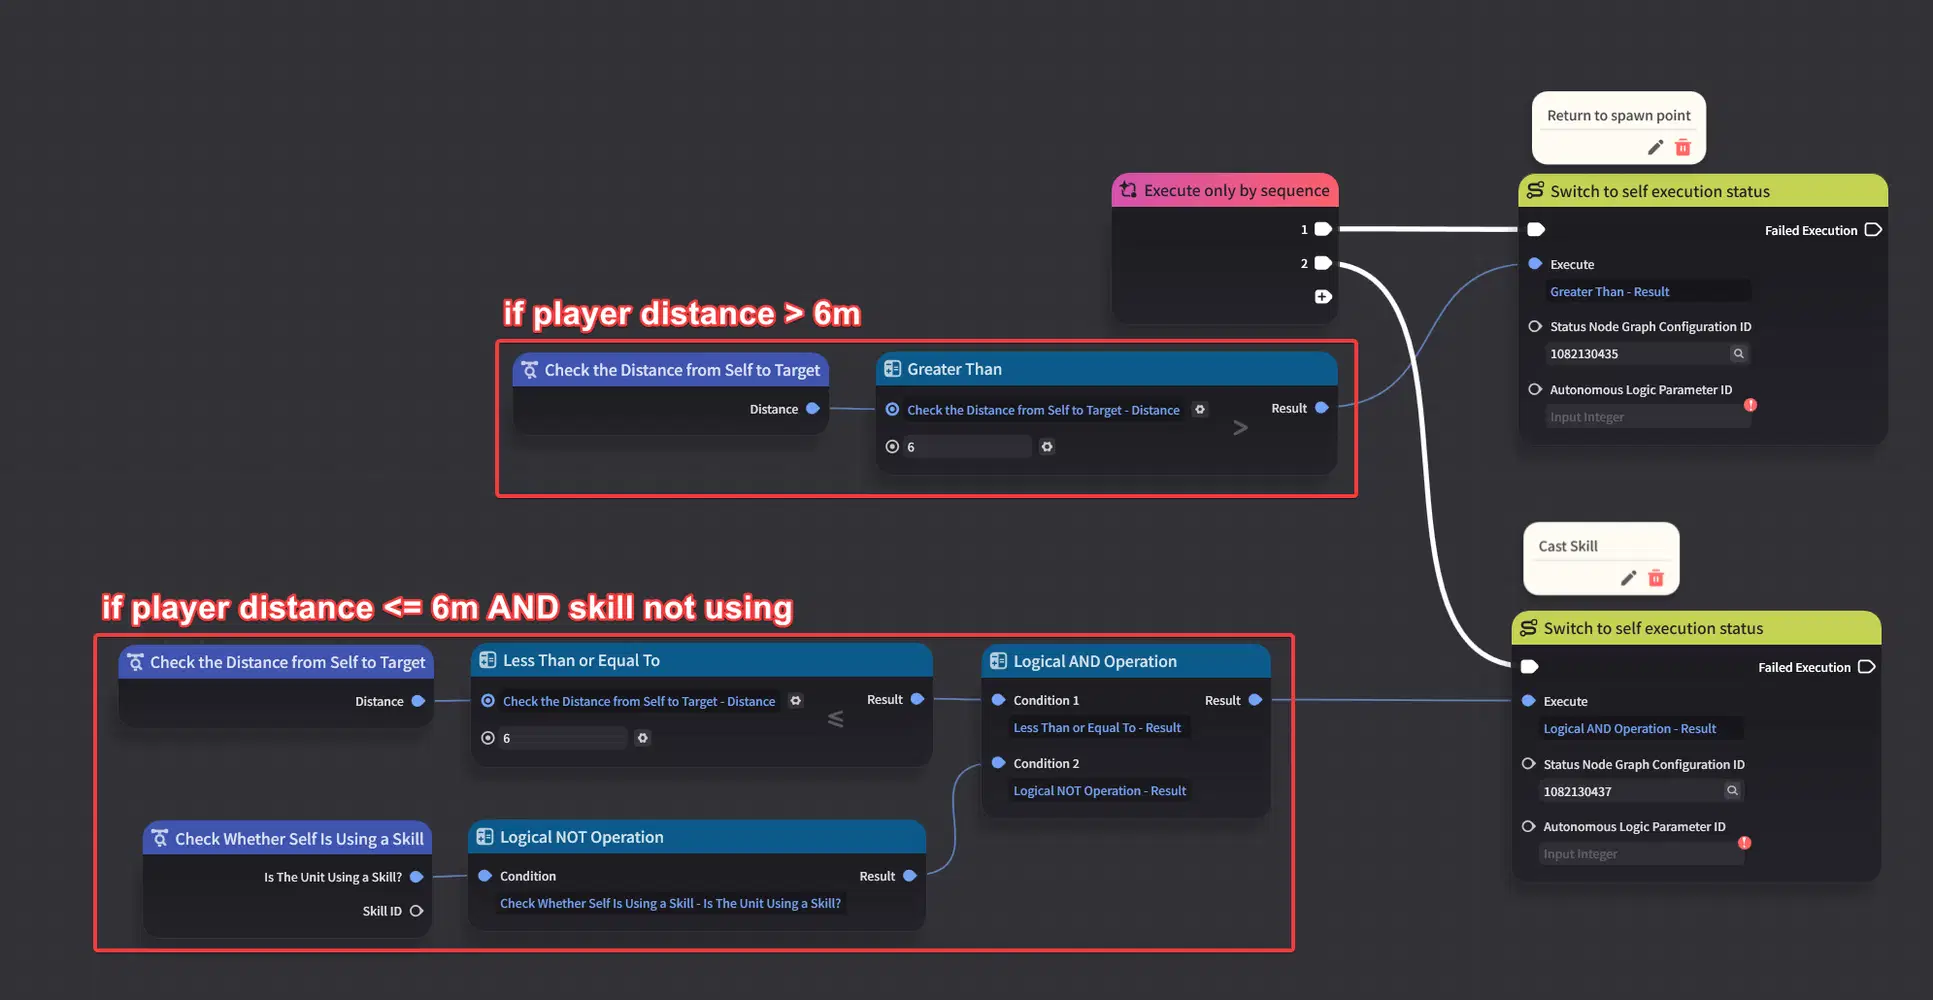
Example Logic
Query and Operation nodes are used to determine these conditions.
5. Creation Status Node Graphs
If the Status Decision Node Graph determines which behavior to use, the Creation Status Node Graph defines how that behavior works.
For example:
- If “Return to Spawn” is triggered in Status Decision Node Graph → the corresponding Status Node Graph runs.
- If “Cast Skill” is triggered → the "Skill" Status Node Graph runs.
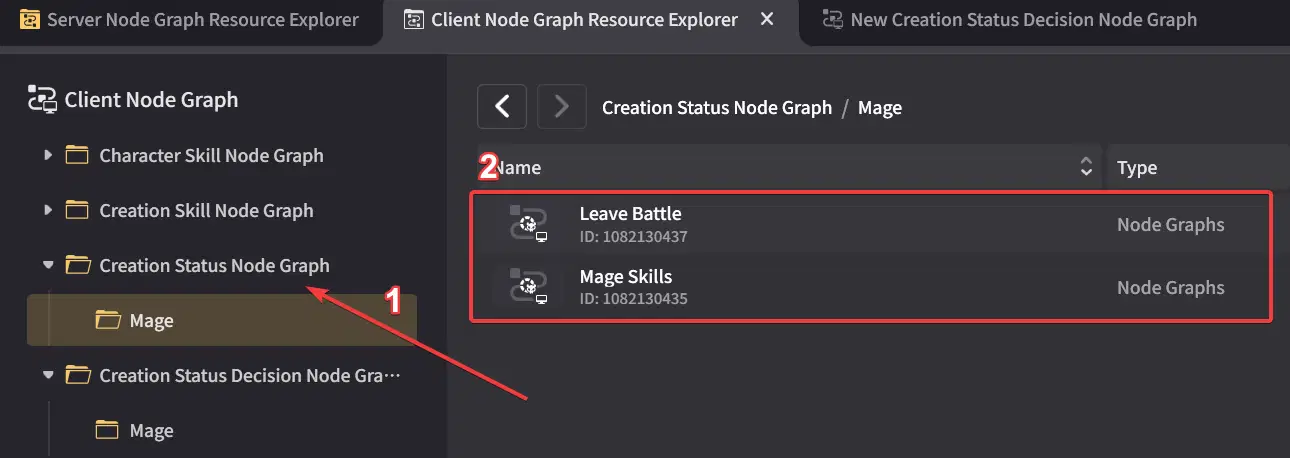
Creation Status Node Graphs
5.1. Tactic Nodes
Status Node Graphs introduce Tactic Nodes, which control behavior.
Example:
- Tactic: Return to Spawn Point After Leaving Battle (will force creation to return to spawn point)
- Tactic: Ground Pursuit (Creation will start pursuit target if the conditions are met)
- Tactic: Move to the Target Entity (Creation will be moved to the target at a specified distance)
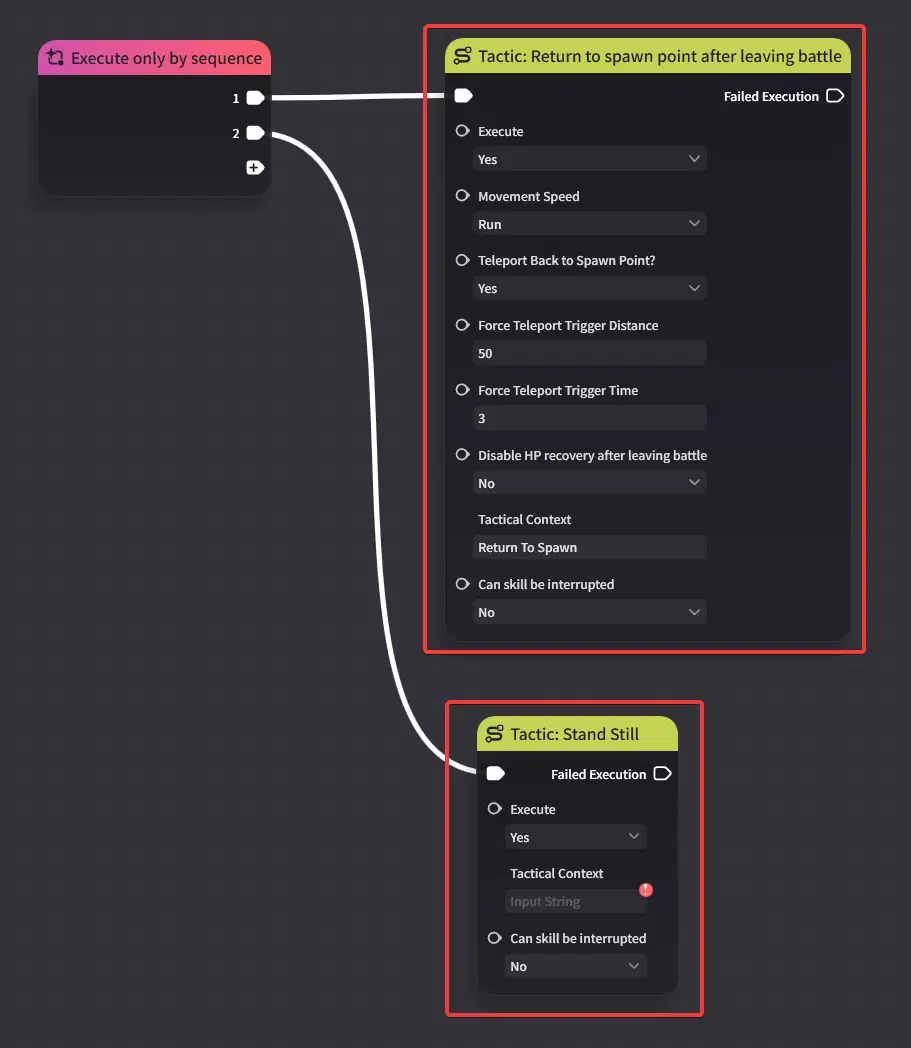
Tactic Nodes
5.1.1. Skill Cast Example
When “Cast Skill” is executed in Status Decision Node Graph:
- The following Status Node Graph attempts to use the skill.
- If the skill is on cooldown → execution fails.
- The "Tactic: Ground Pursuit" node is triggered.
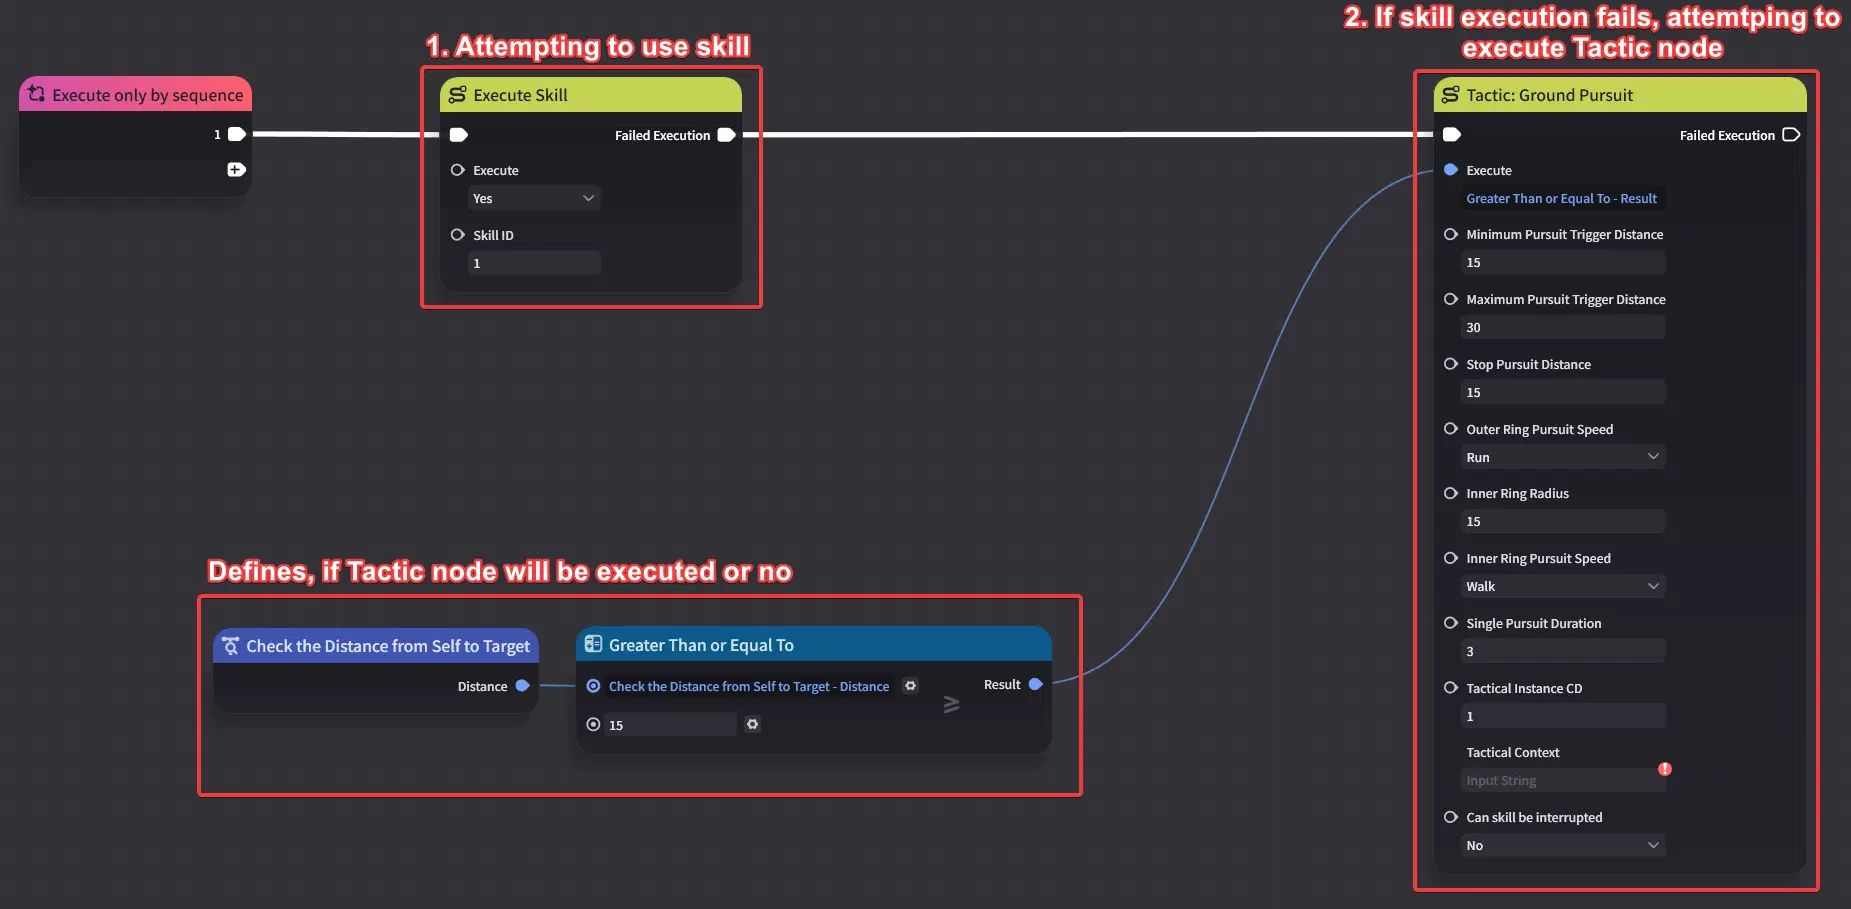
Skill Cast Example
6. Example with downloadable asset
Below is example of a configured Complex Creation.
If you would like to explore this setup in more detail, you can download the asset from the MW Resource Center using the link provided here
6.1. Size configuration & Skill creation
In Prefab Library, I adjusted the creation’s size to 0.5.
After that, in Combat Preset → Skill → Creation Custom Skill two skills are created:
- Electro Ball
- Electro Field
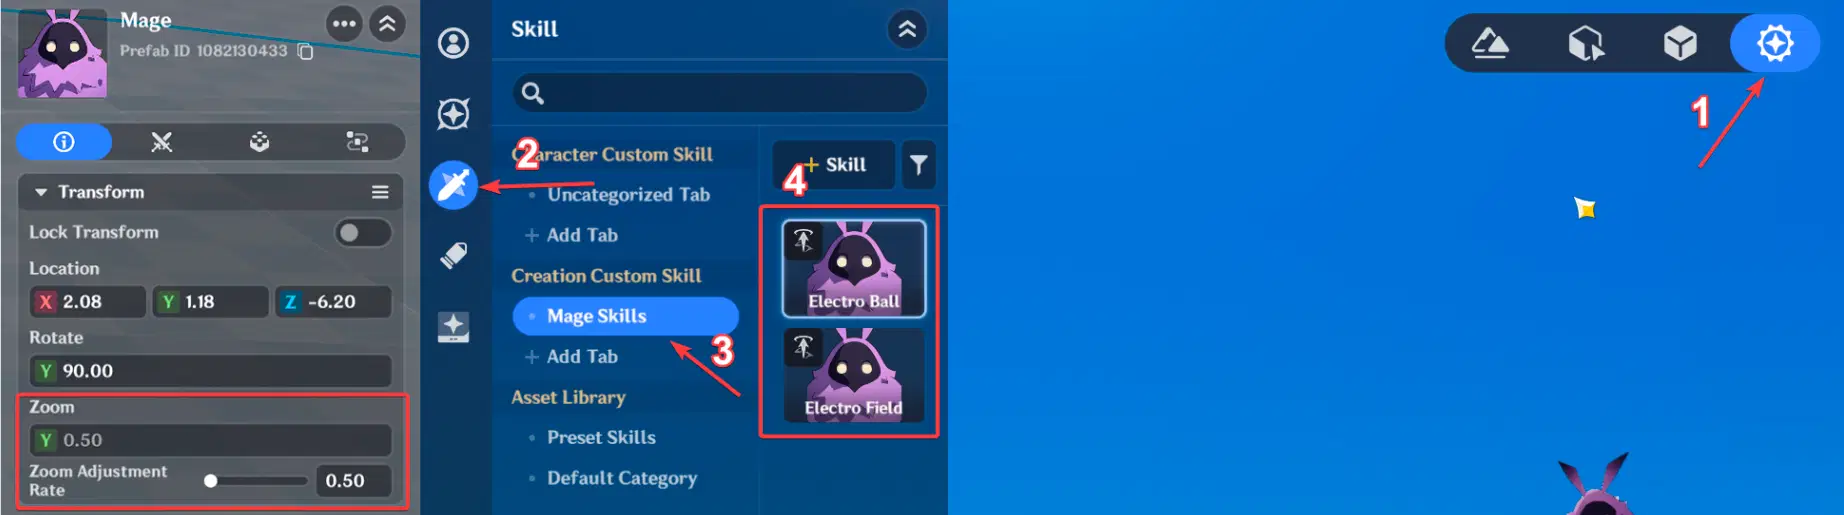
Size configuration & Skill creation
6.1.1. Electro Ball Skill configuration
In the Animation Editor, I selected Electro Abyss Mage Ranged Attack animation.
In the timeline:
- When the mage casts the skill, VFX for the Electro Elemental Energy Orb are played.
- Only after the VFX is triggered, the Node Graph event is executed.
This prevents the projectile from being launched immediately and ensures proper visual timing.
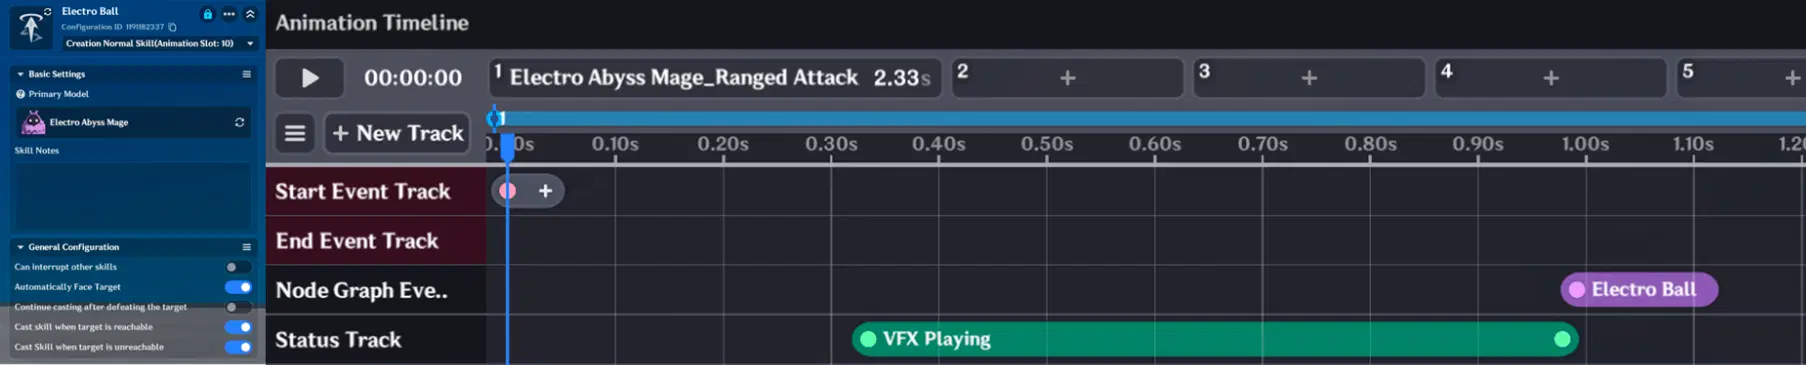
Electro Ball Skill configuration
To create the Creation Skill Node Graph:
MW Sandbox → Window → Client Node Graph Resource Explorer → Creation Skill Node Graph folder
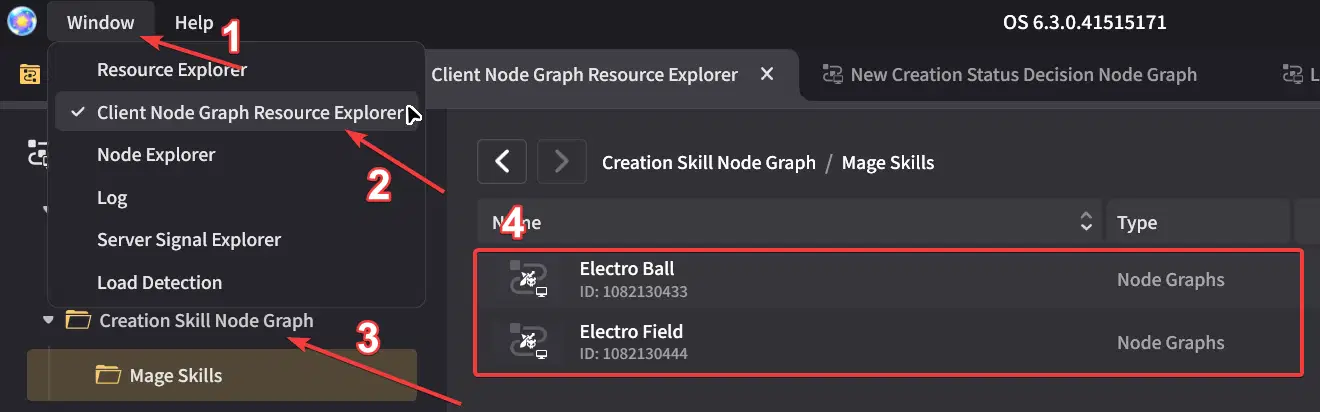
Skill Node Graph location
In the Electro Ball Node Graph:
- A fixed-point projectile is launched when the graph is triggered.
- The projectile uses the GI_HeadMark attachment point location and rotation for accurate spawning.
Target and faction are defined using:
- Query Entity Faction
- Get Creation's Current Target
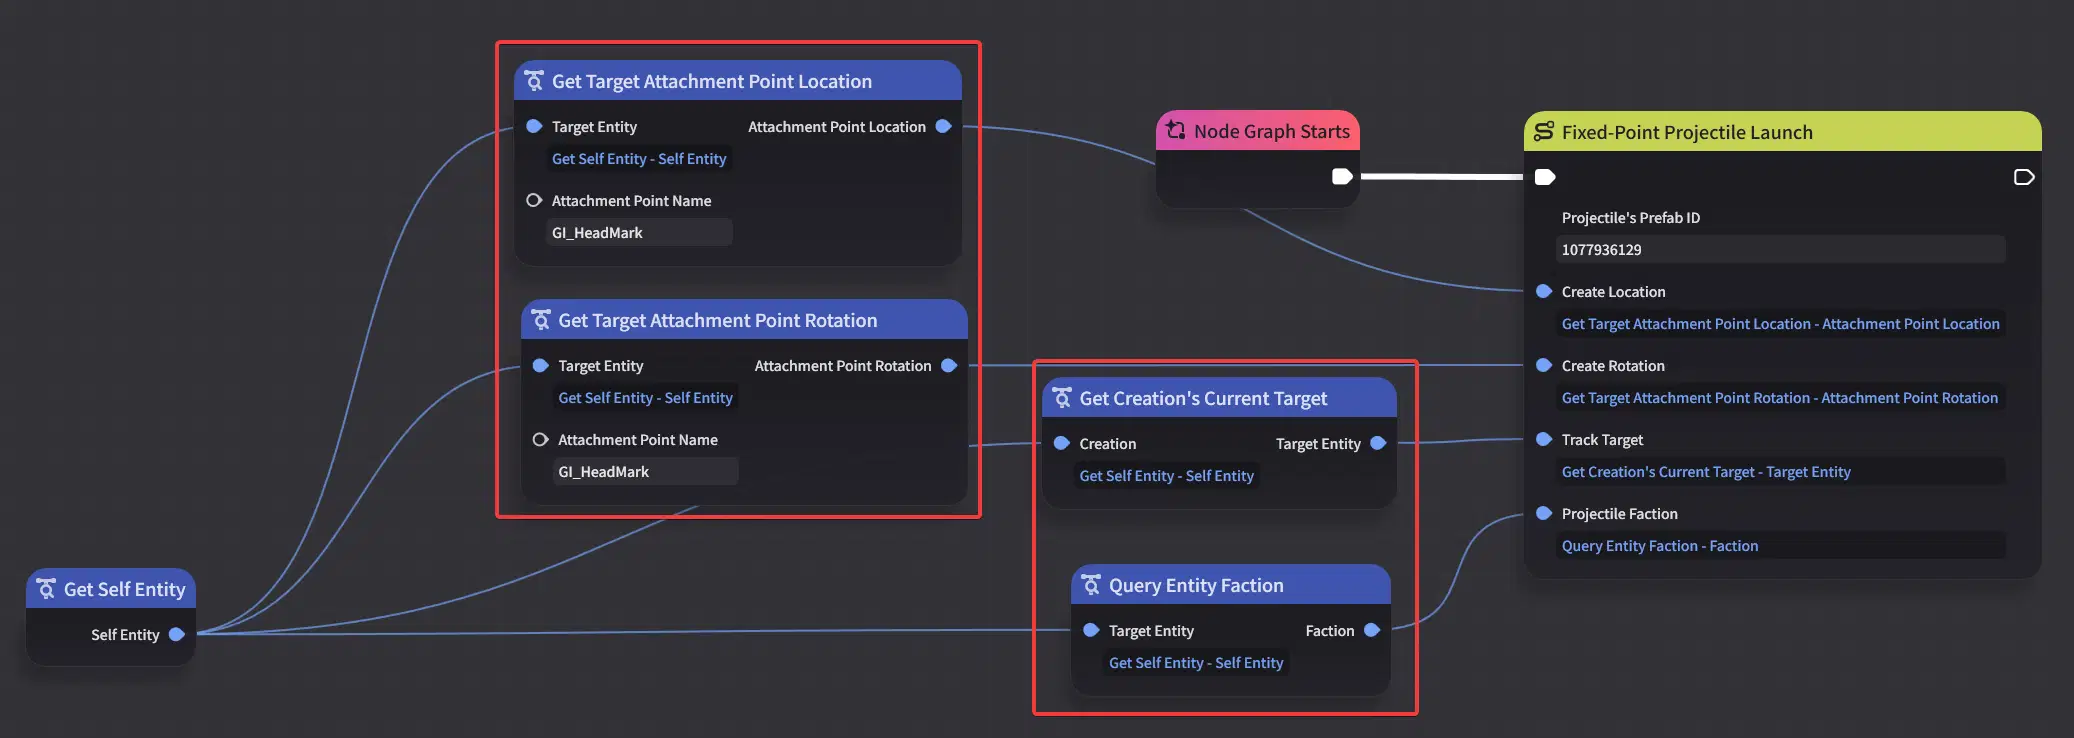
Electro Ball's Skill Node Graph
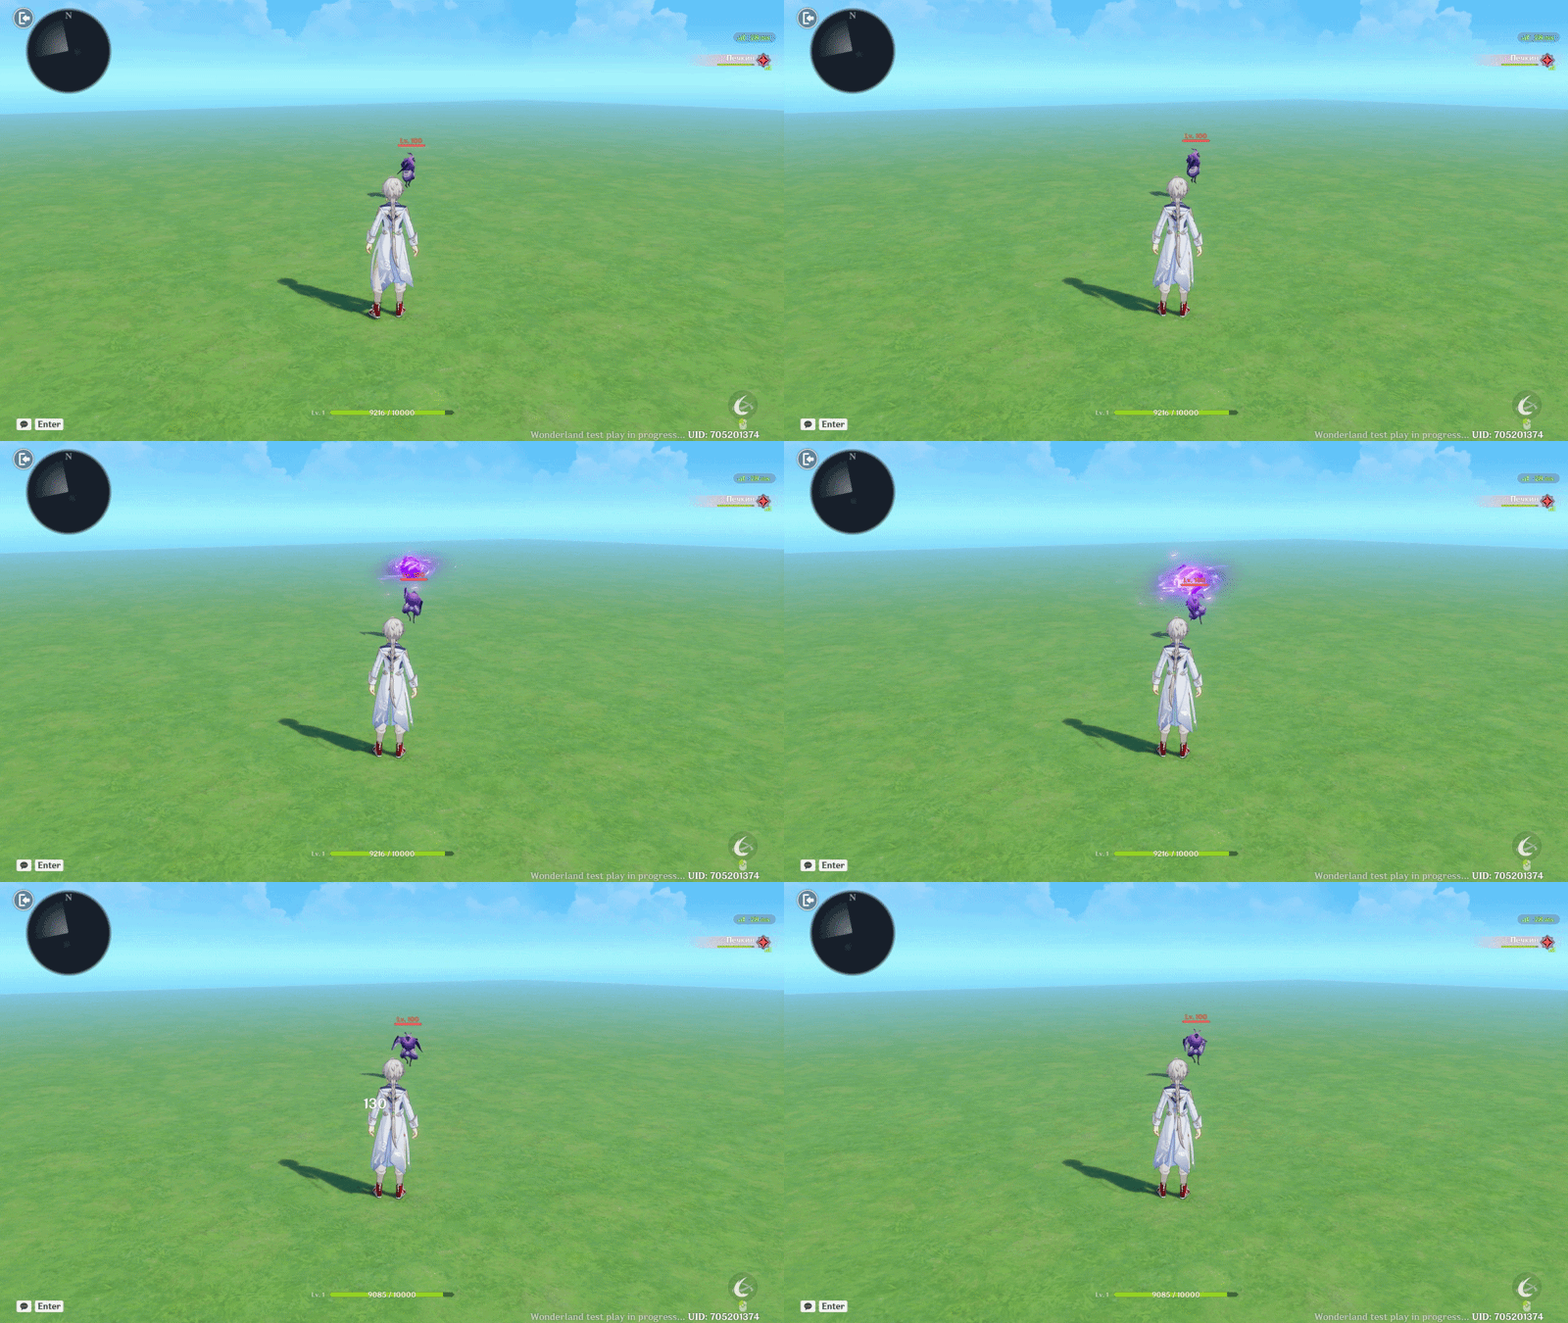
Electro Ball skill showcase
6.1.2. Electro Field Skill configuration
In the Animation Editor, is selected:
- Electro Abyss Mage Special Attack animation
- Random behavior animations

Electro Field Skill configuration
In the timeline, approximately every 1 second, the Electro Field Node Graph is triggered.
This Node Graph:
- Launches a fixed-point projectile
- Plays timed effects
- Uses the target’s location as input data
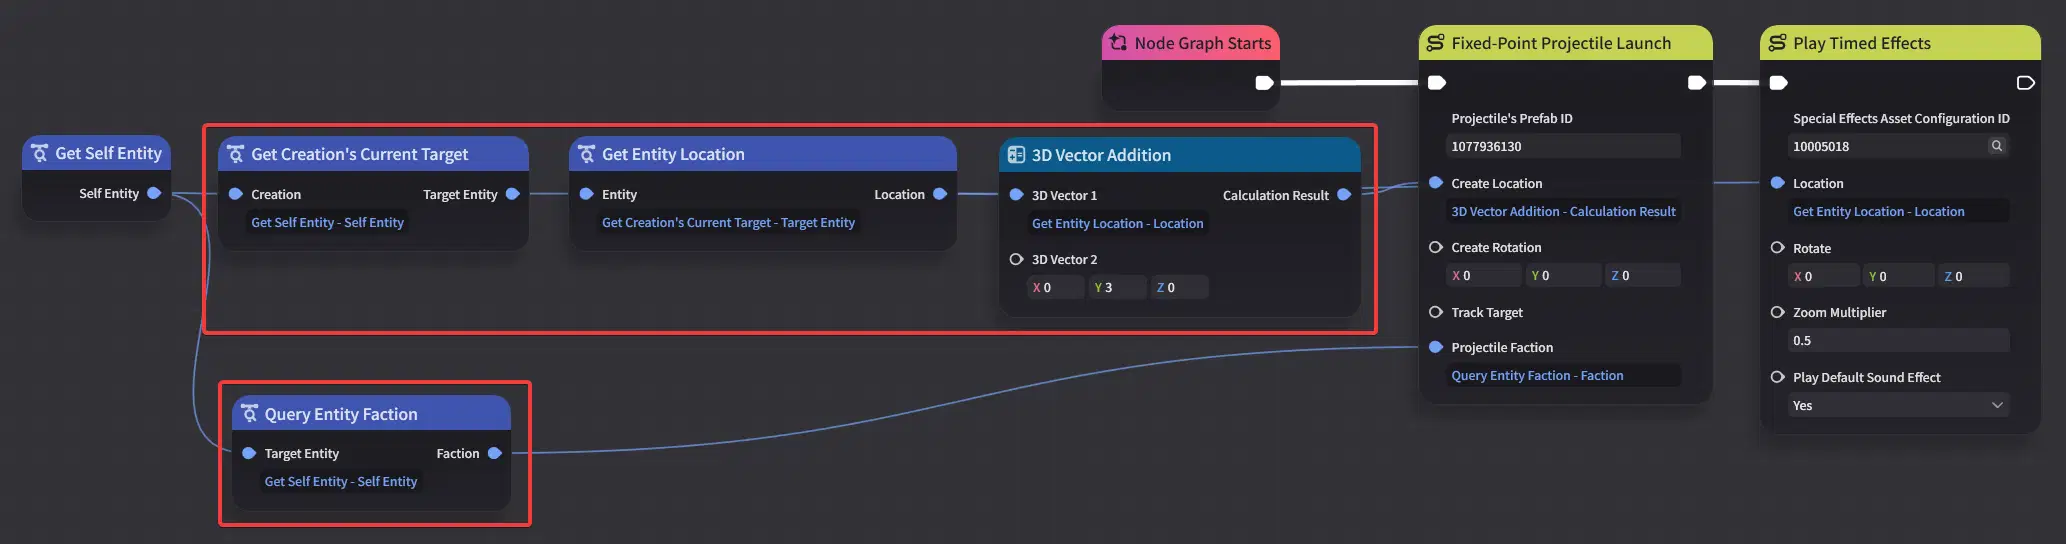
Electro Field Skill Node Graph
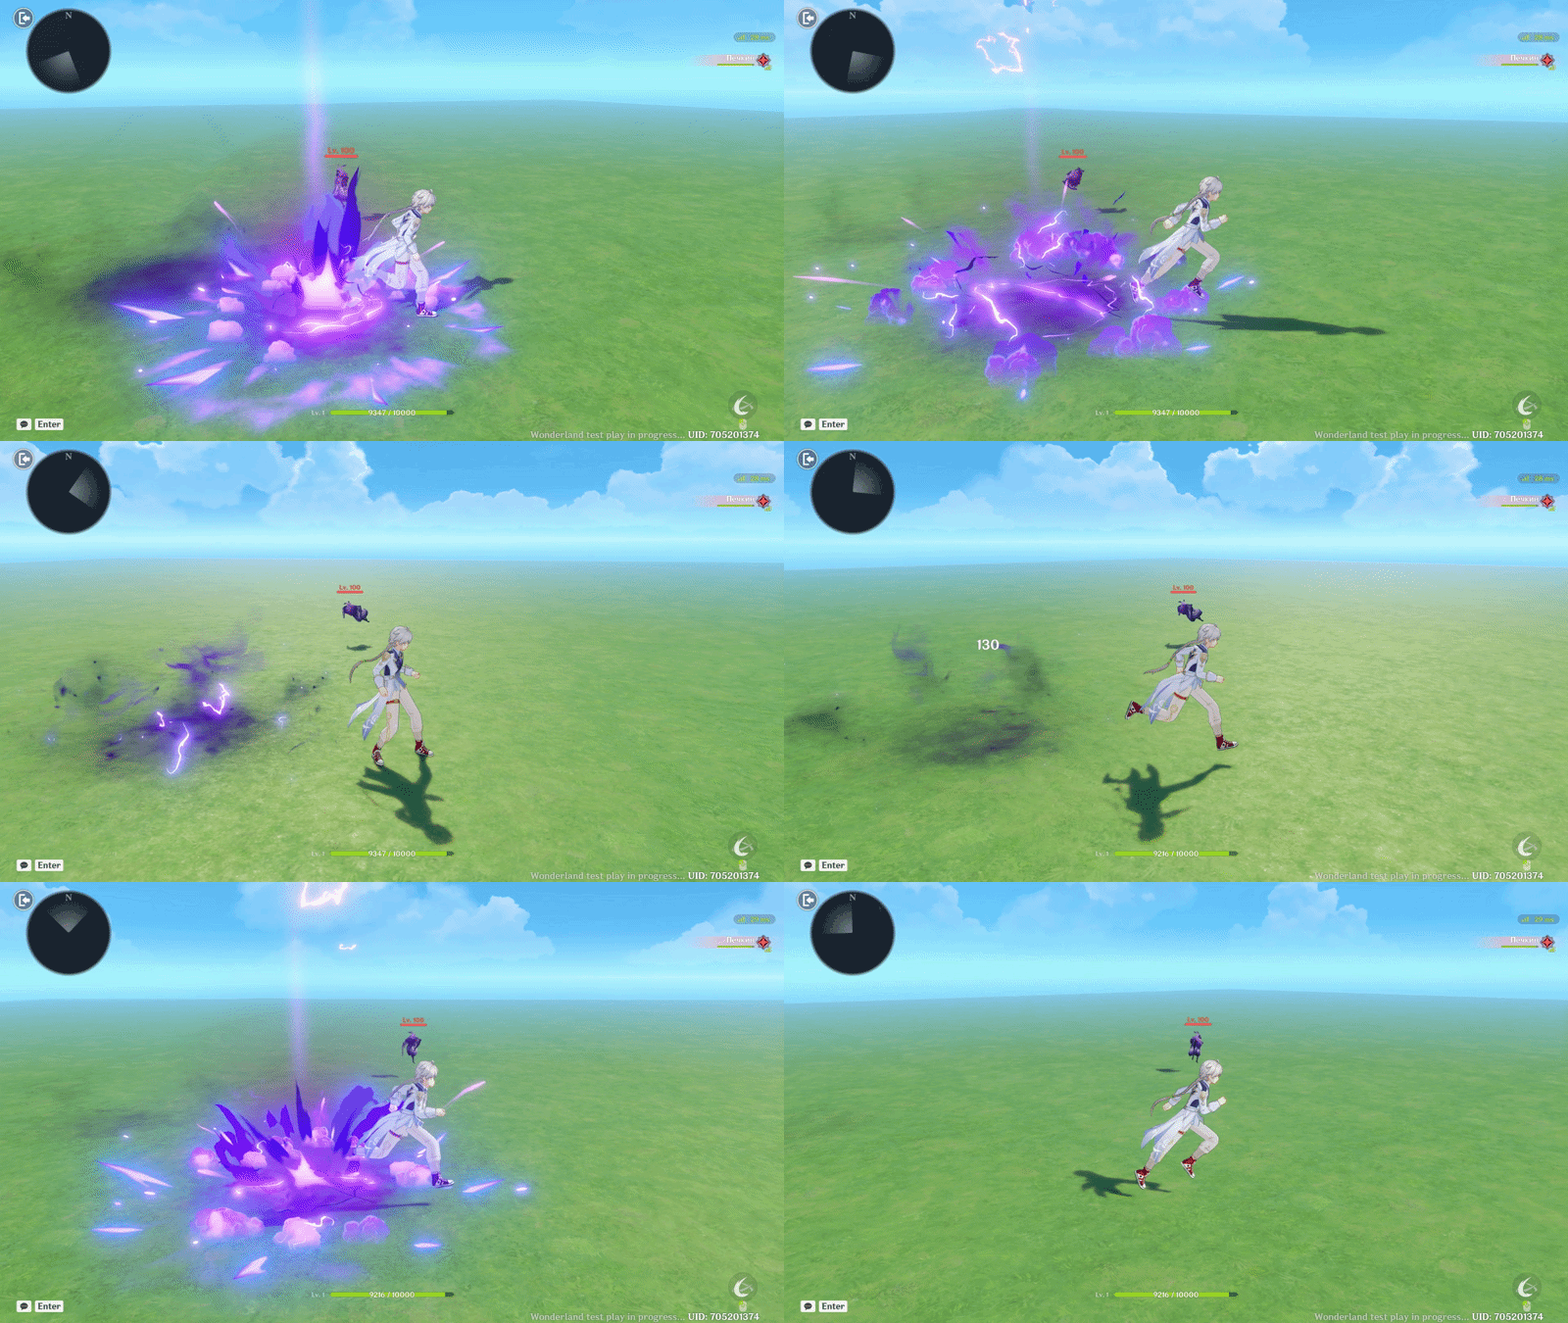
Electro Field skill showcase
6.1.3. Creation Skill Management
To assign the skills to the creation:
- Added two skill slots in Creation Skill Management.
- For Electro Field, is enabled Global Cooldown to prevent other skills from being used immediately after it.
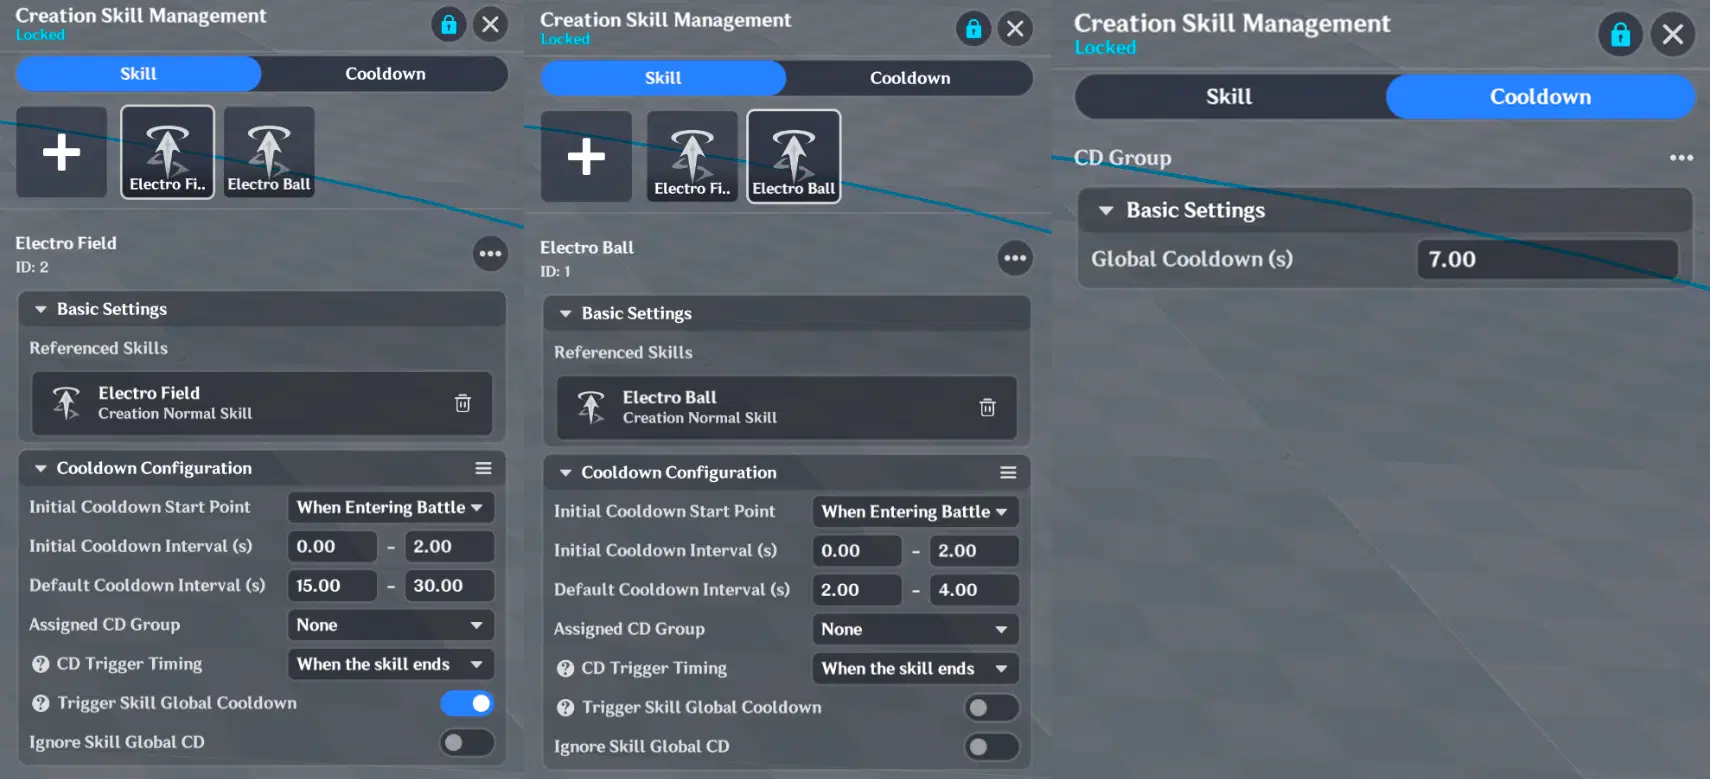
Creation Skill Management
6.2. Autonomous Logic Parameter Template Management
One Autonomous Logic template is created with the following settings:
- Entering Battle Zone: Range Detection (20m)
- Chain Engagement: 0.01 (can be considered as disabled)
- Leaving Battle Distance: 30m
- Leaving Battle Delay: 2 seconds
- Territory Type: Sphere
- Territory Radius: 50m
- Territory Leaving Battle Delay: Near zero
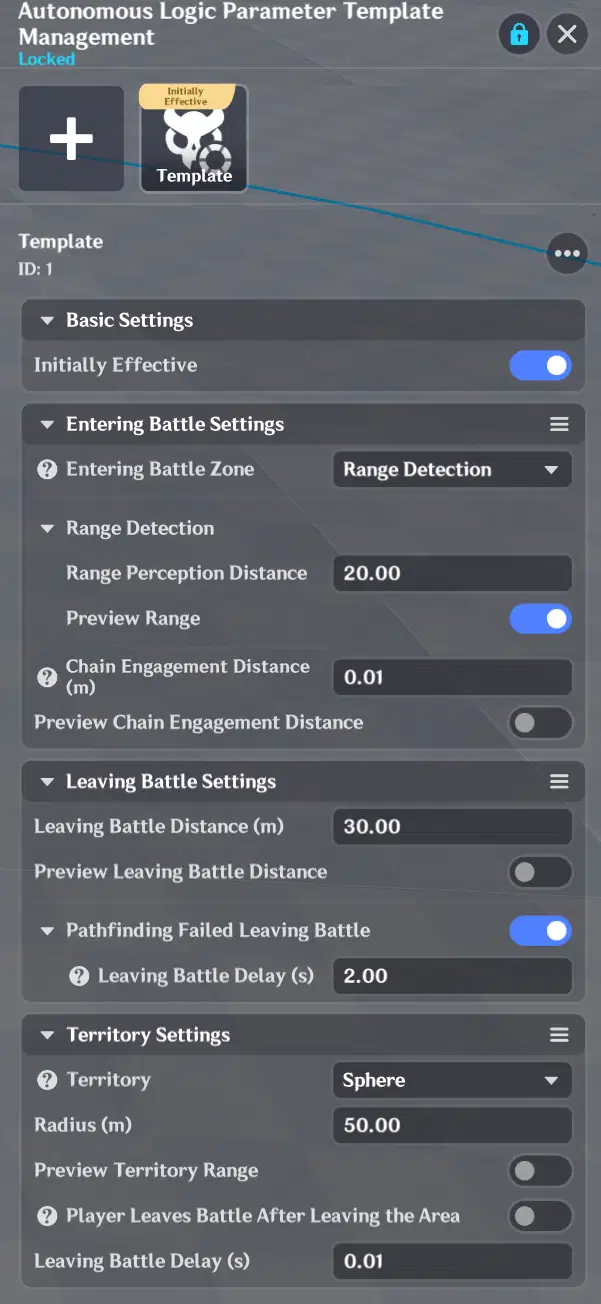
Autonomous Logic Parameter Template Management
6.3. Creation Status Decision Node Graph
The Node Graph logic is simple and based on a single condition:
Is the creation in battle or not?
- If in battle → execute “Cast Skill” Status Node Graph
- If not in battle → execute “Leave Battle” Status Node Graph
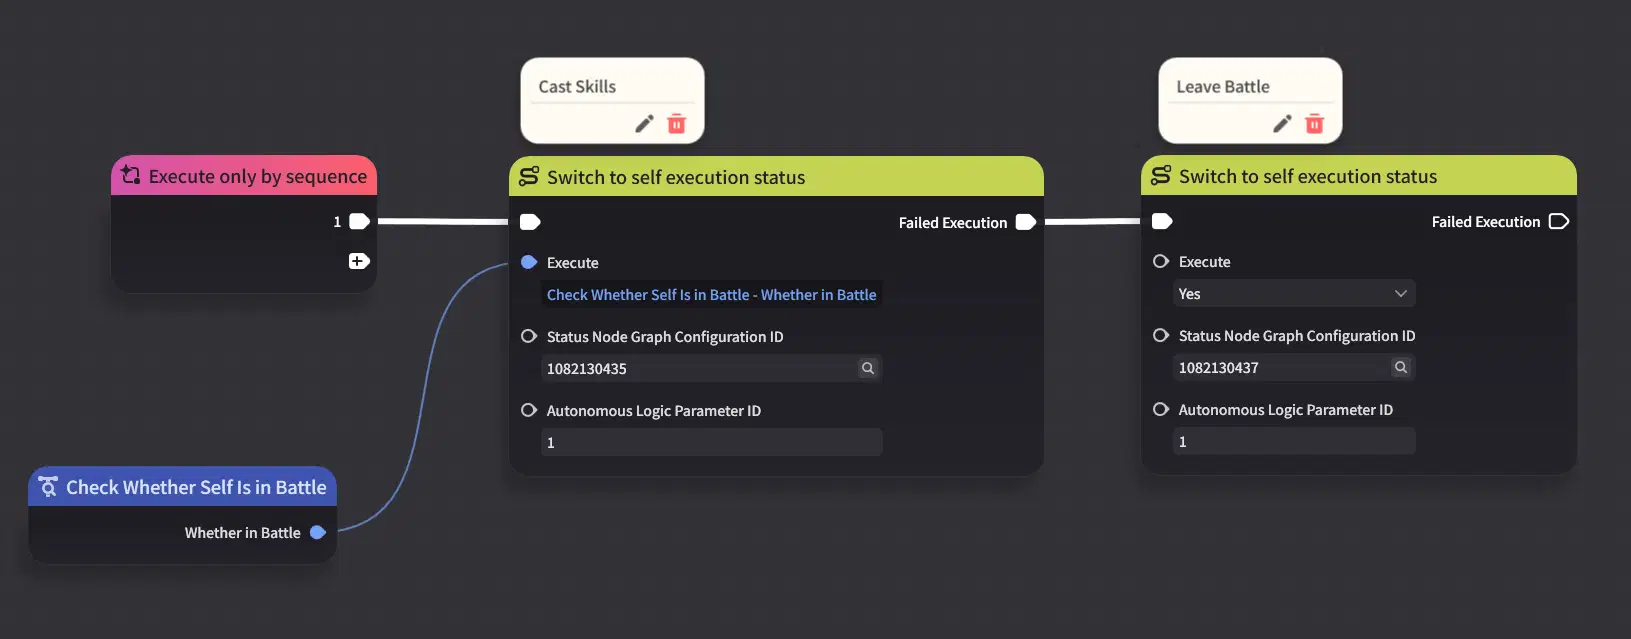
Creation Status Decision Node Graph
6.4. Creation Status Node Graphs
Two Status Node Graphs are used:
- Leave Battle
- Mage Skills
6.4.1. "Leave Battle" Status Node Graph
Execution order:
- Return to Spawn Point After Leaving Battle is attempted first.
This may fail because “Can Skill Be Interrupted” is set to No.
- If it fails, the next sequence executes:
- Tactic: Stand Still
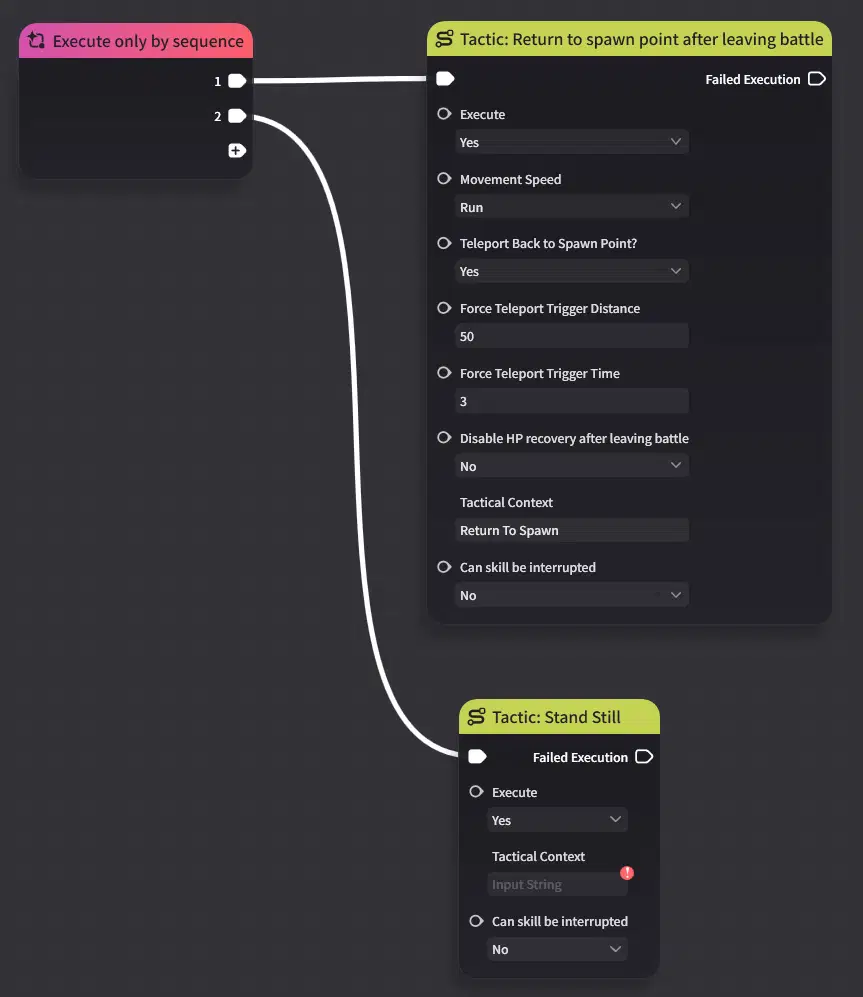
"Leave Battle" Status Node Graph
6.4.2. "Mage Skills" Status Node Graph
Execution order:
- The first skill is attempted.
- If execution fails → Tactic: Ground Pursuit is triggered.
Important note: Even if the Skill Execute Node returns success, it does not guarantee that the skill will be cast. For example:
- The skill may be on cooldown.
- Conditions for casting may not be met.
If the first skill fails, the second skill will then be attempted.
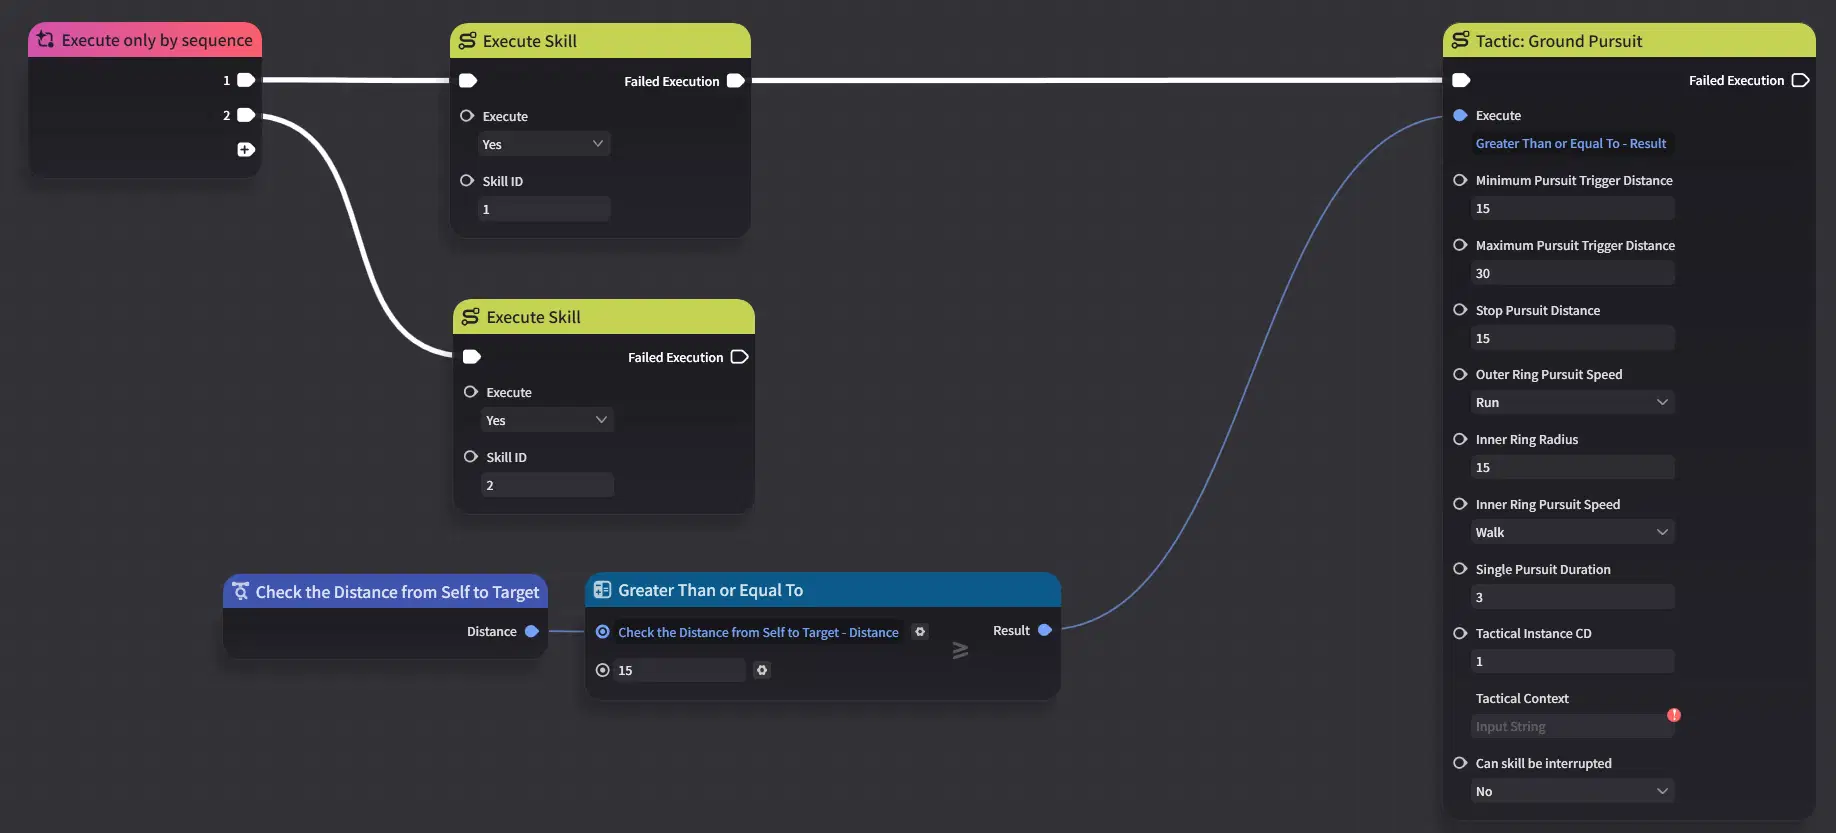
"Mage Skills" Status Node Graph
I hope this guide helps you better understand how to configure Complex Creations and build your own Complex Creation.