


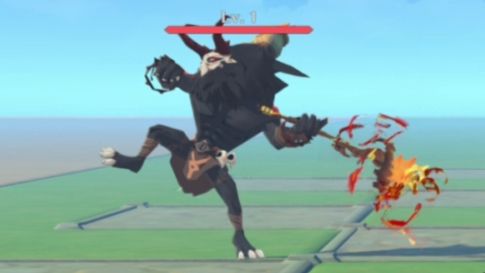
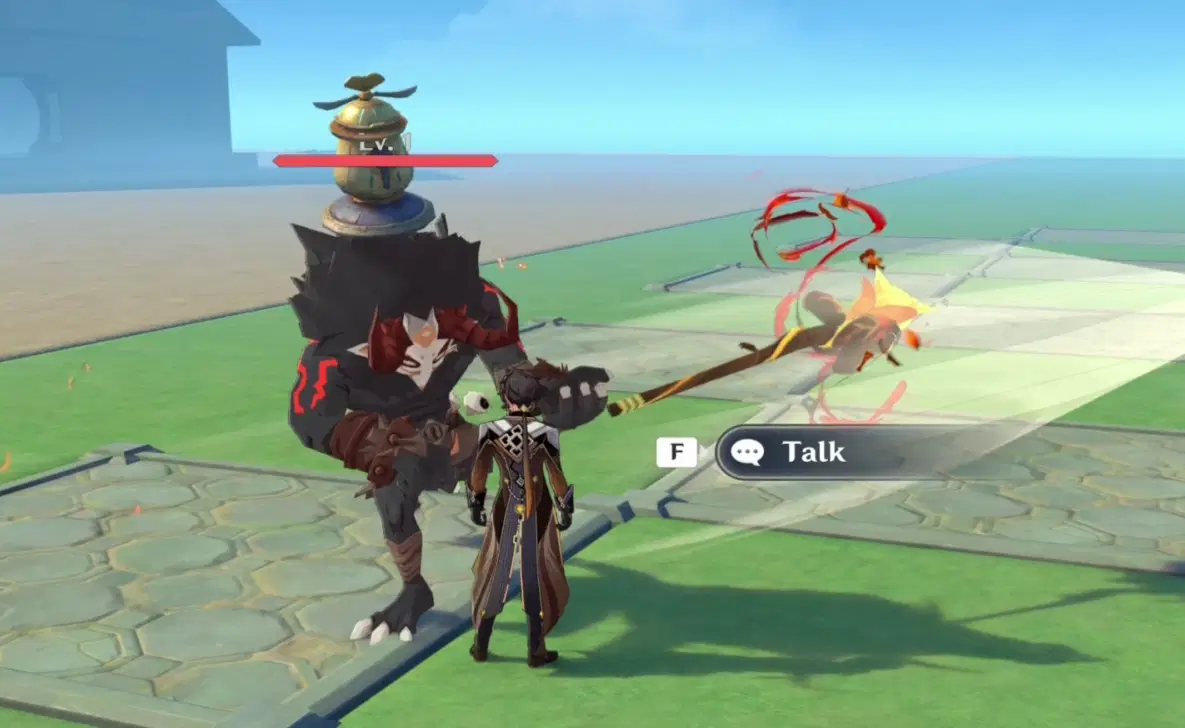
Customized Complex Creation (Blaze Axe Mitachurl).
[Guide] A Complete Guide to Creating Complex Creations in Miliastra Wonderland

★ Introduction ★
While players progress through a level — whether encountering NPCs along the way or monsters blocking their path — introducing a small number of unique individuals with distinct behavior patterns can add personality and variety to the gameplay experience.
In this guide, we’ll introduce how to customize Complex Creations using the available features in Miliastra Wonderland.
 This tutorial is divided into five chapters:
- Creating Complex Creation Entities
- Understanding Autonomous Logic Parameter Templates
- Tactics Overview
- Editing and Managing Complex Creation Skills
- Configuring Creation Status Node Graph and Creation Status Decision Node Graph
Alright — let’s get started.
 Note: This tutorial demonstrates how to create Complex Creations under Classic Mode.
★ Complex Creation Feature Basics ★
🟆 Chapter 1: Creating Complex Creation Entities 🟆
This chapter introduces the Complex Creation entity interface and covers several commonly used settings based on the author’s general workflow.
Under [Prefab] → [Creation Prefabs] → [Basic Module] → [Complex Creation], the editor displays all prefabricated Complex Creations available in the current version.
Select the template you want to use to create a Complex Creation.
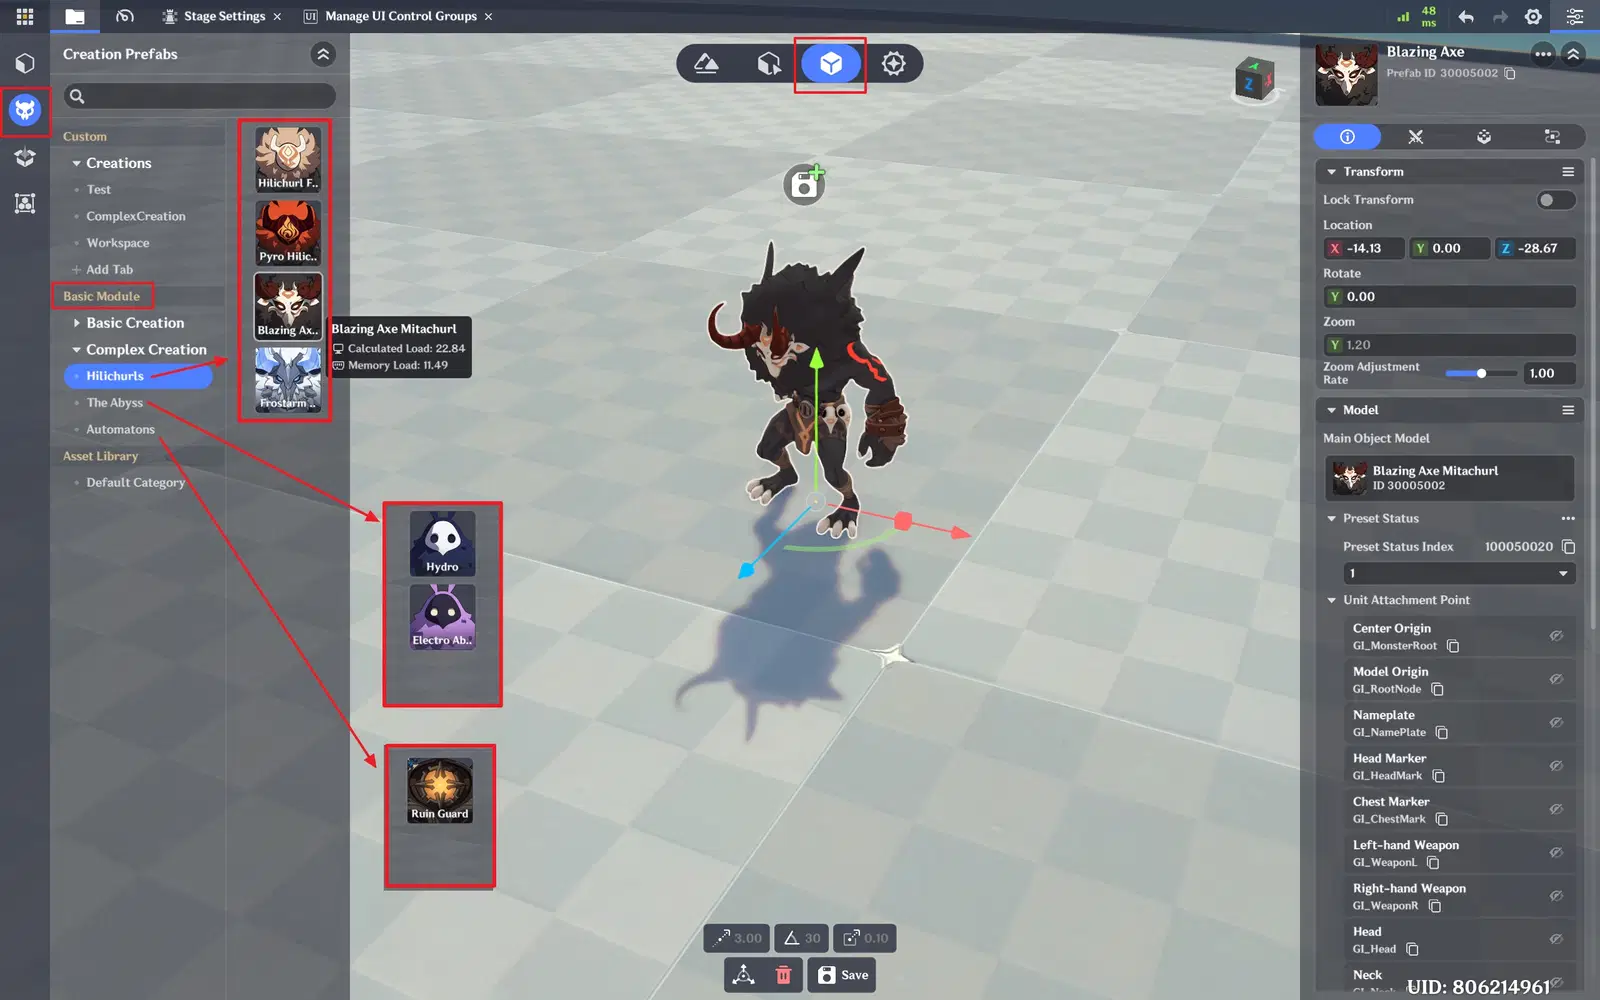
Prefabricated Complex Creations available in the current version.

Basic Information
In this tab, you can configure the following properties:
- Scale
- Preset Status
- (Affects idle/walking animations and other movement behaviors.)
- Decorations
- Faction
- (Viewing) Complex Creation's attachment points
Note:
- In the Server Node Graph, you can dynamically switch the Preset Status using node: [Set the Preset Status Value of the Complex Creation].
- In Classic Mode, the Creation’s faction cannot be modified.
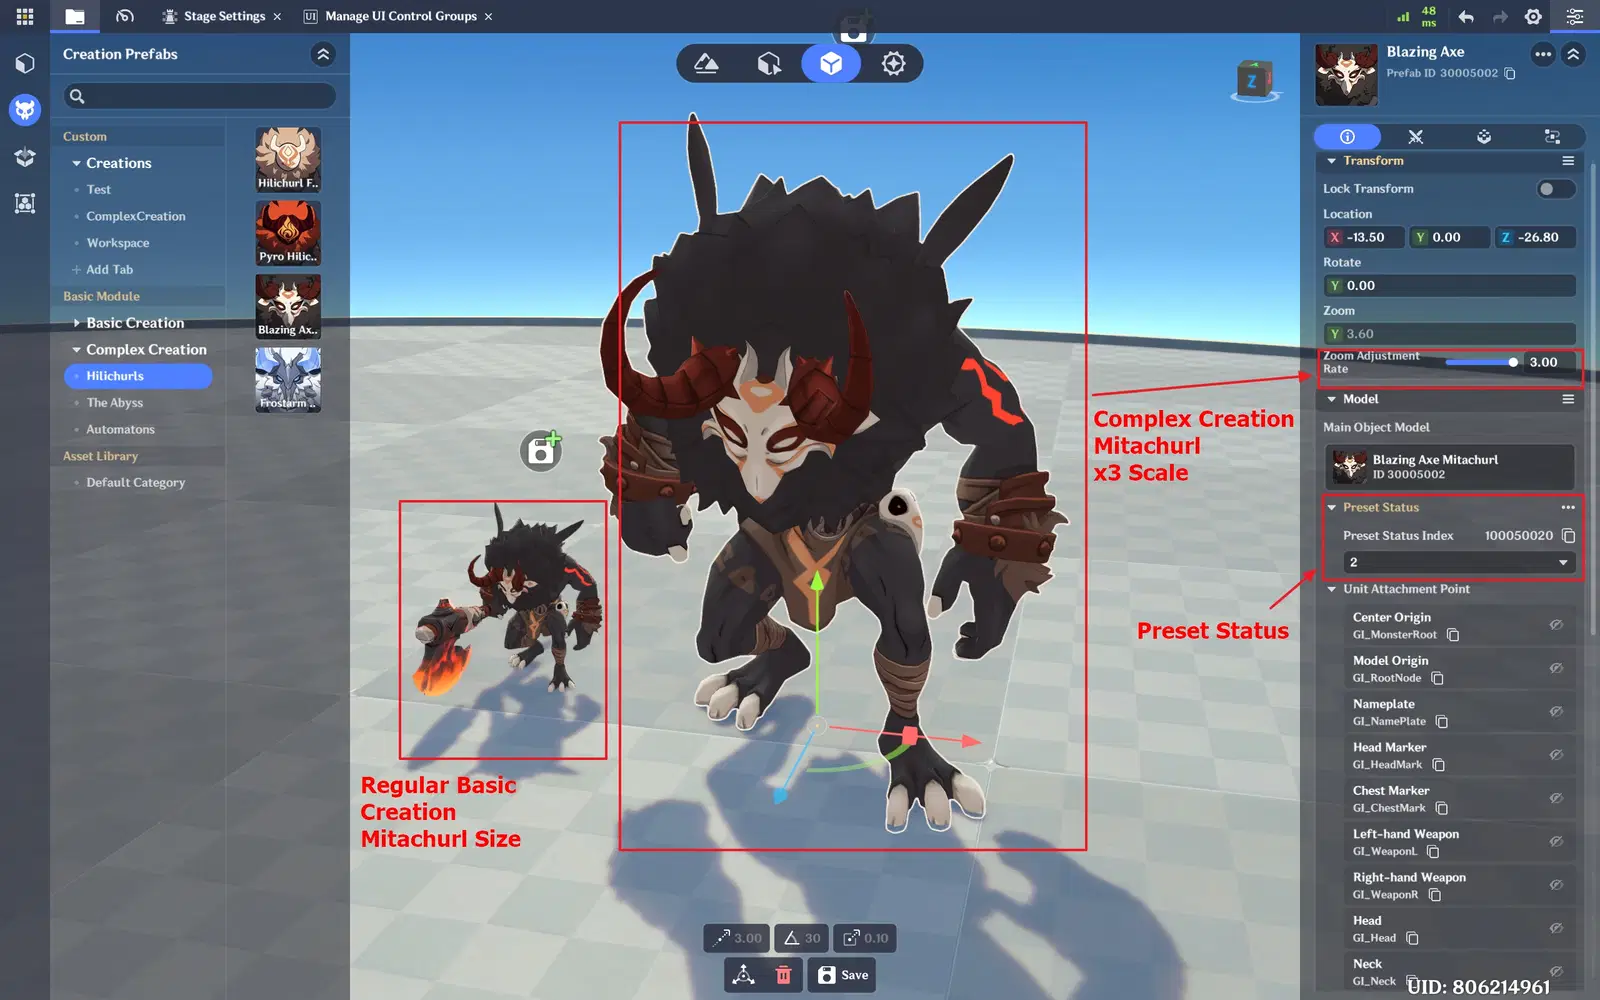
Complex Creation — Basic Information (Part 1)
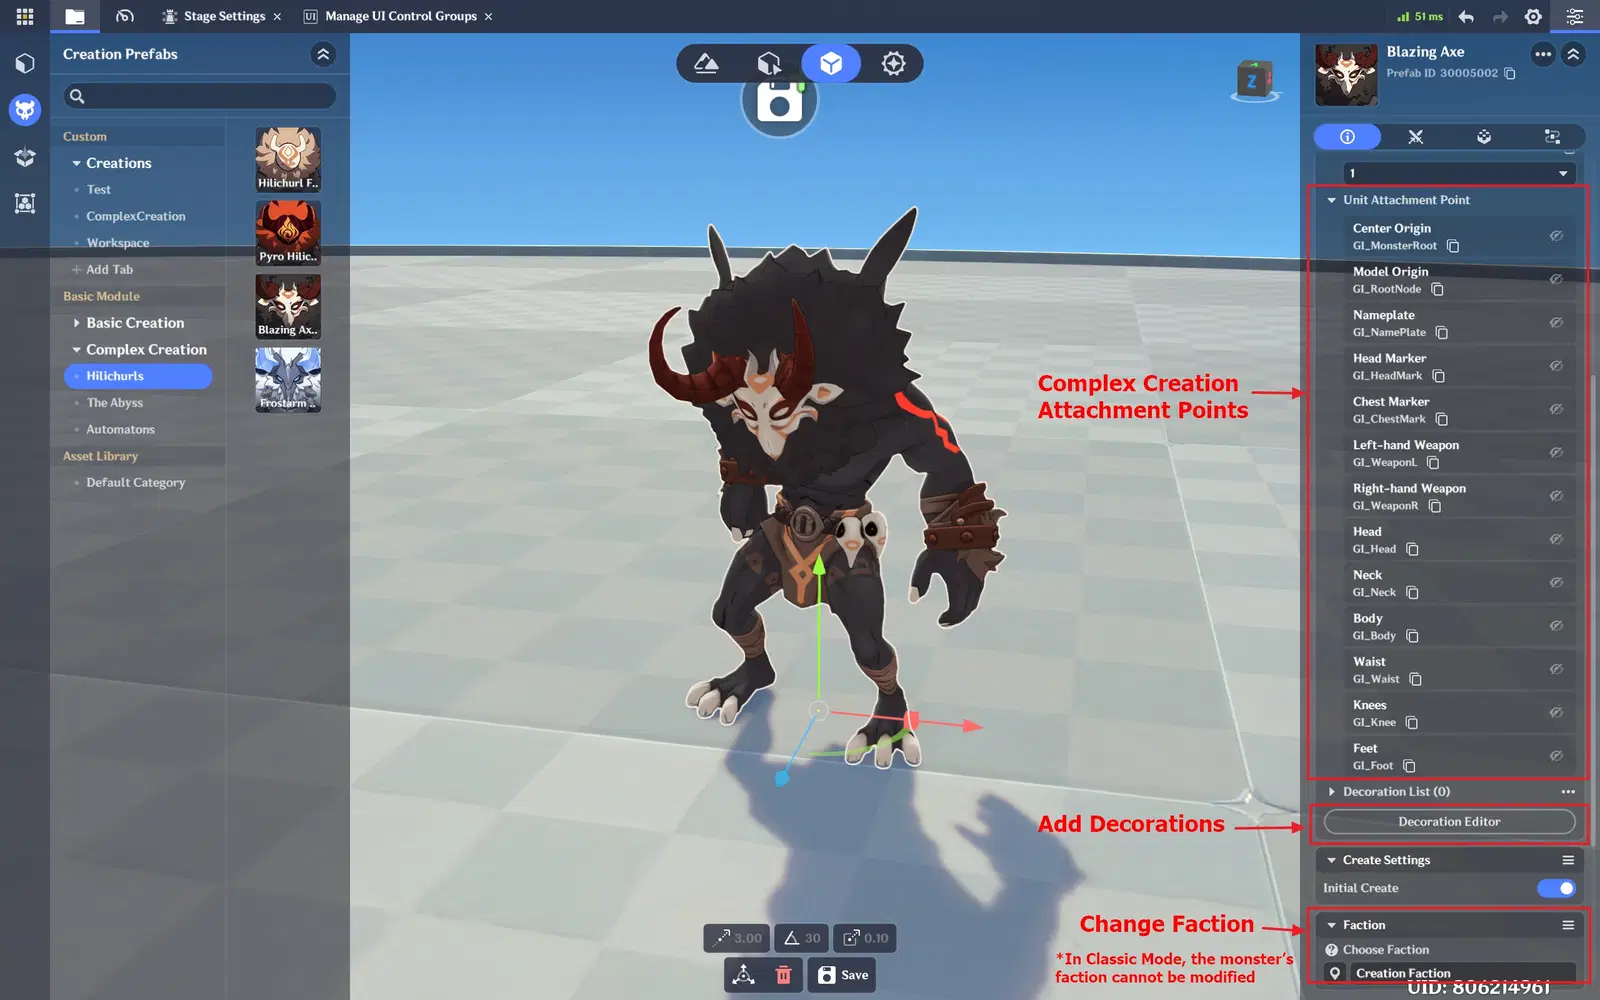
Complex Creation — Basic Information (Part 2)
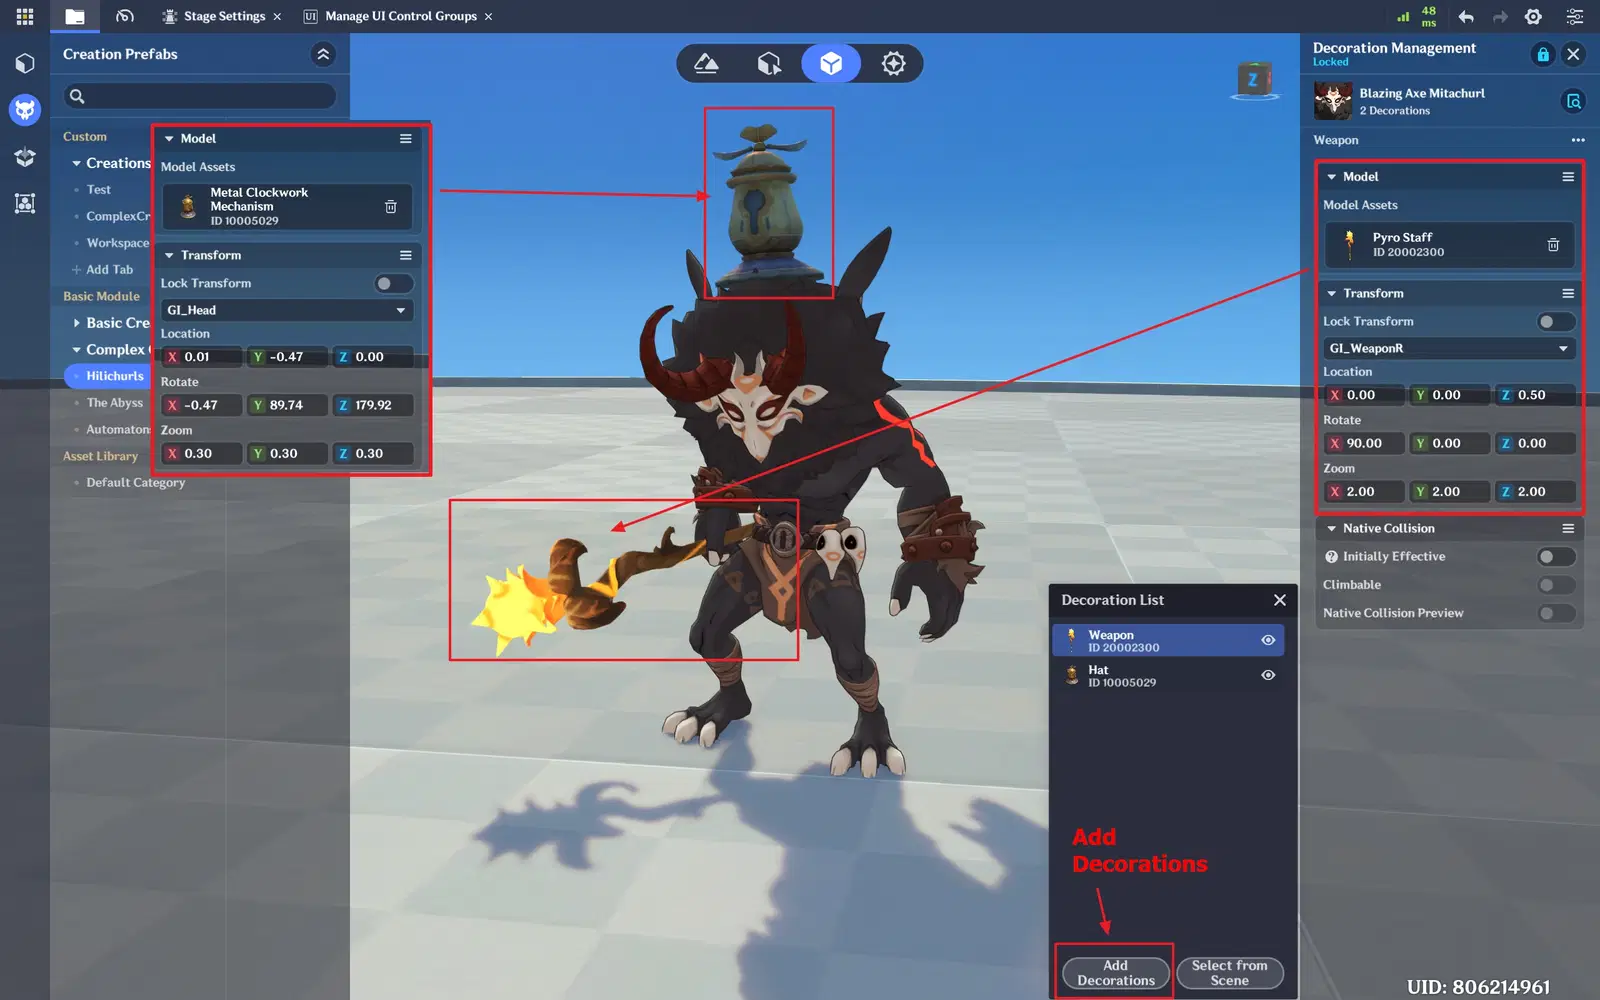
Complex Creation — Add Decorations.
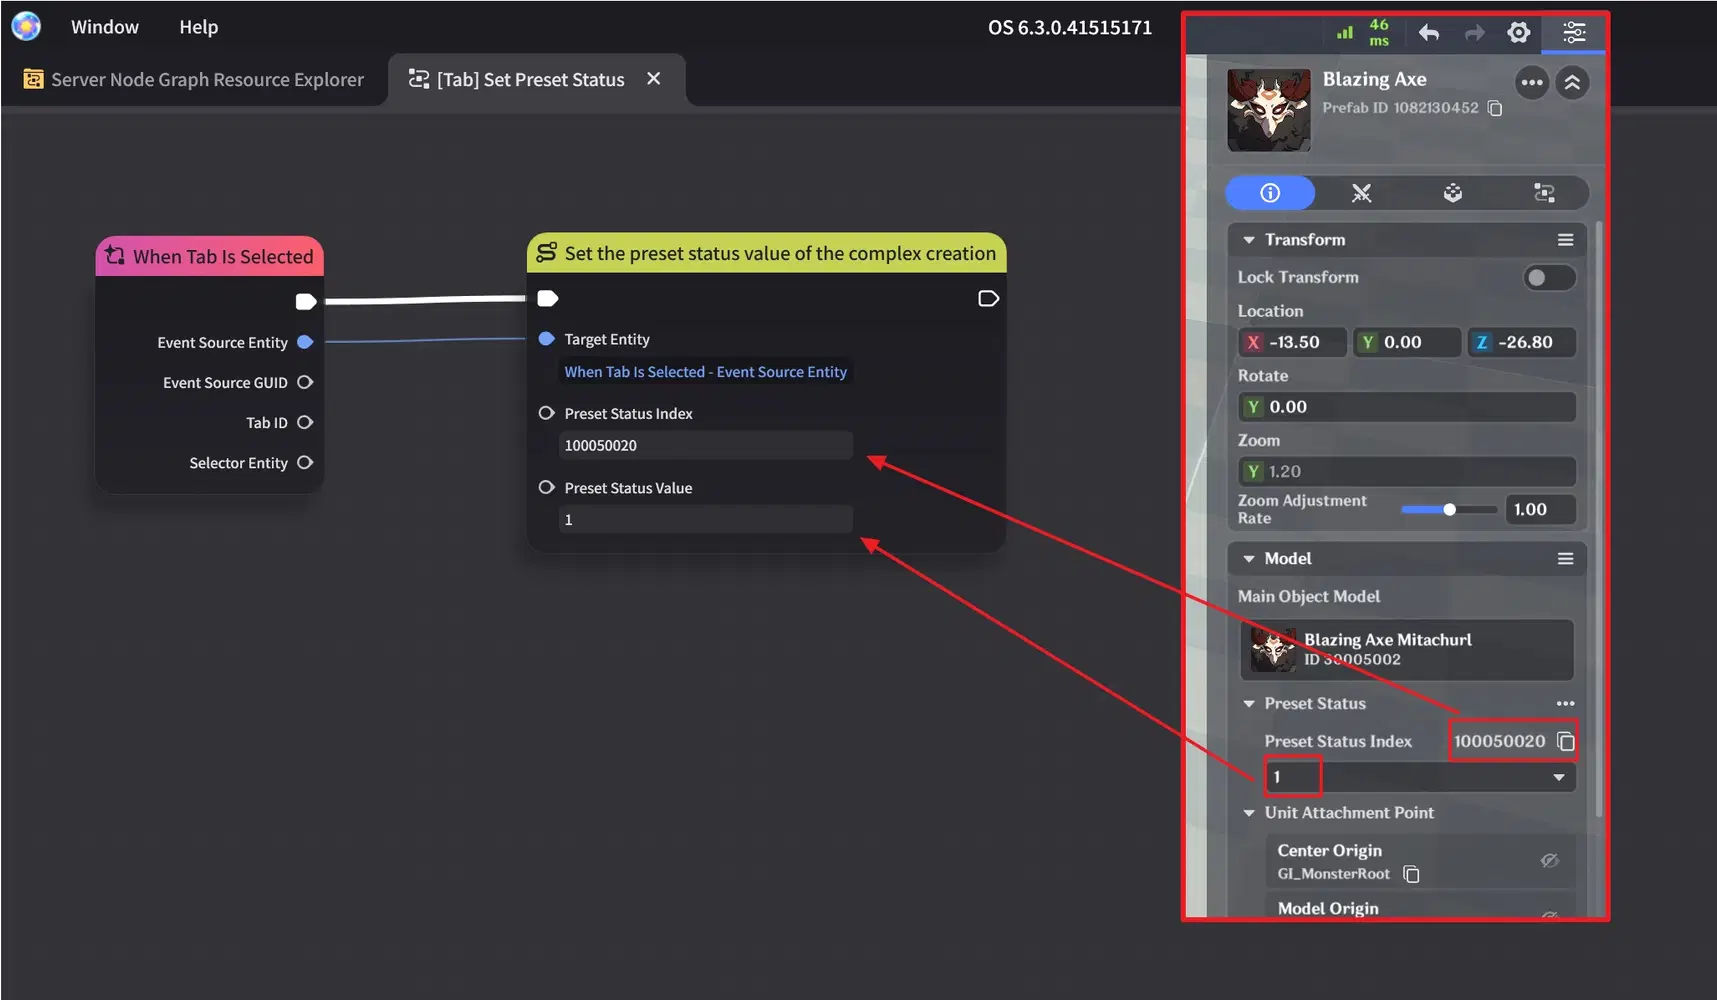
Complex Creation — Dynamically switch the Preset Status in Server Node Graph.
Specialized Configuration
In this tab, you can configure the following settings:
- Base Combat Attributes
- Autonomous Logic Parameter Settings
→ See chapter 2: [Understanding Autonomous Logic Parameter Templates] for more details
- Creation Skill Management
→ See chapter 4: [Editing and Managing Complex Creation Skills] for more details
- Creation Status Decision Node Graph
→ See chapter 5: [Configuring Creation Status Node Graph and Creation Status Decision Node Graph] for more details
- Patrol Settings
→ See chapter 3: [Tactics Overview] → [Tactic: Execute Patrol] for more details
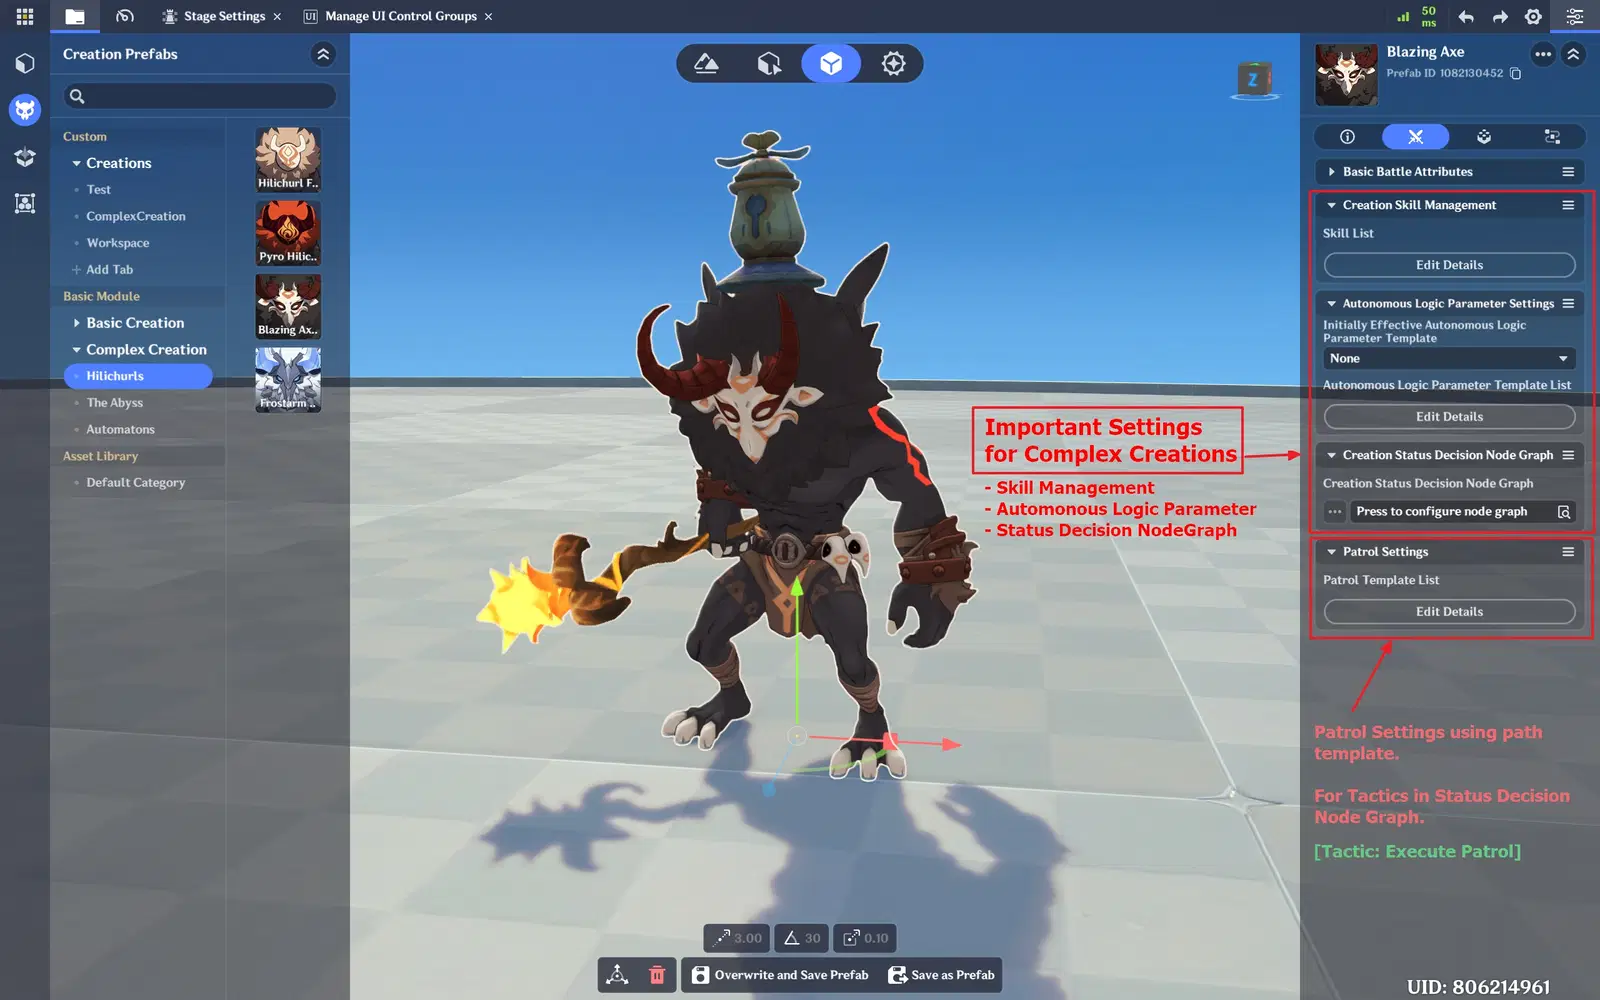
Specialized Configuration — Important Settings (Demonstrated in a Later Chapter).
Component Functions
In this tab, you can configure commonly used component features.
The configuration process is the same as most other object components, so this guide will not cover them in detail.
The components used in this tutorial include:
- Tab
- Custom Variables
- Follow Motion Device
- VFX Playing
- Custom Attachment Points
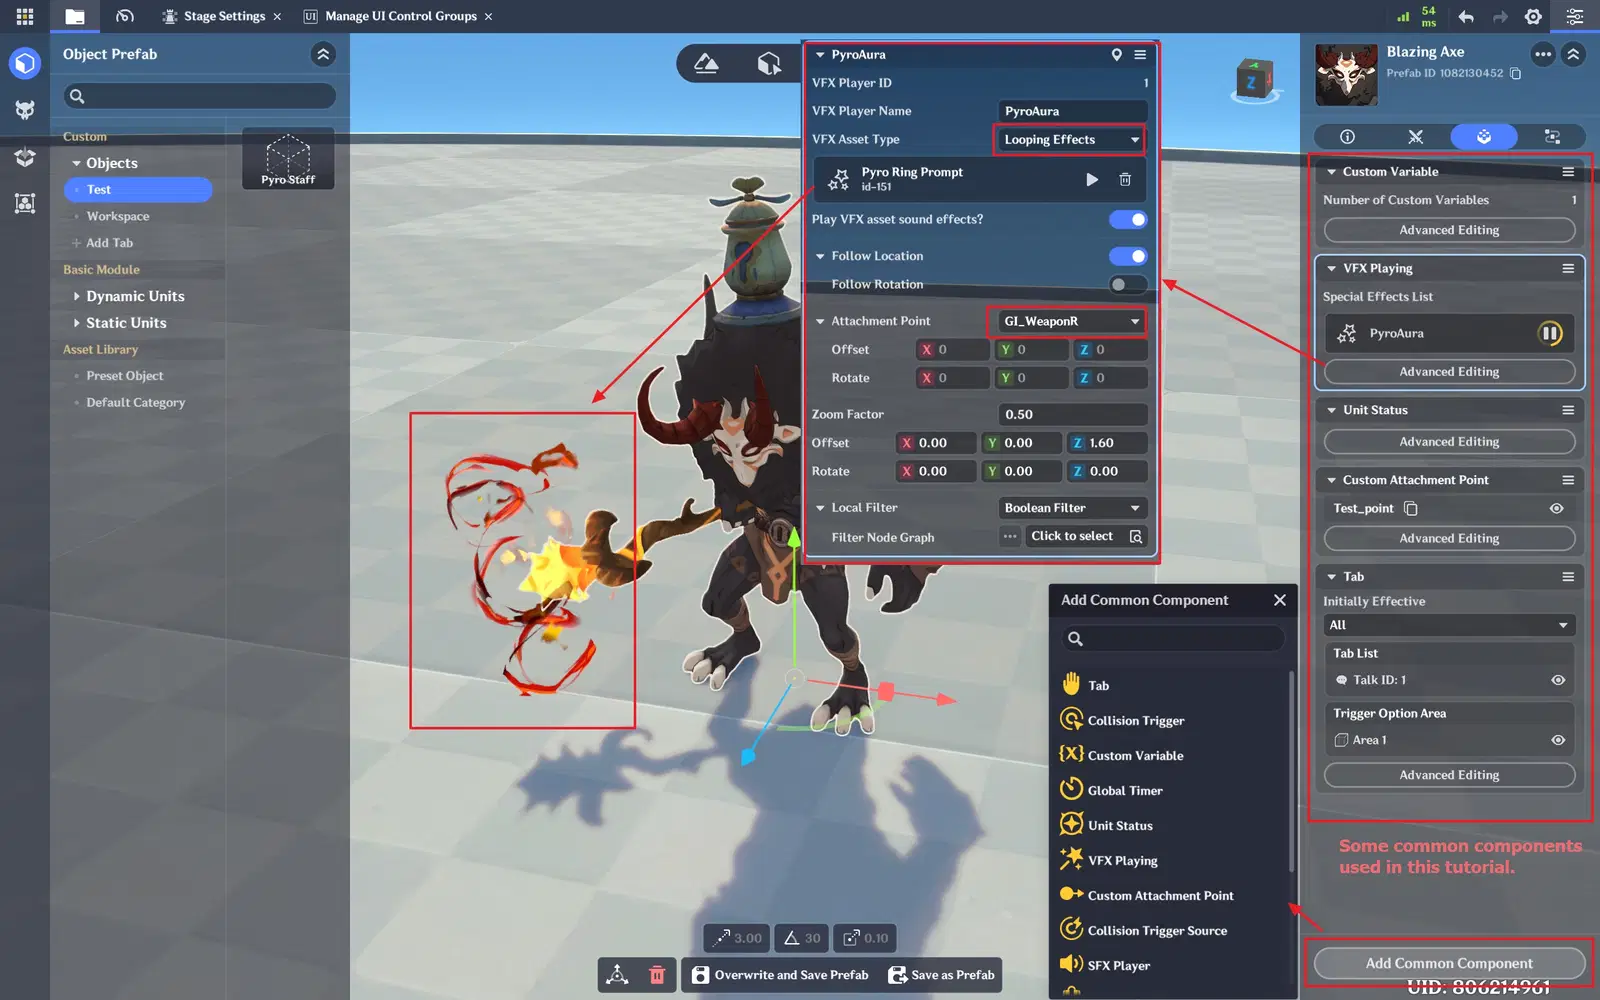
Component Functions — Add VFX Playing, such as weapon VFX.
Note: In some cases, separating equipment from the Creation may be the best approach, allowing equipment to be swapped at runtime. However, this ultimately depends on your design preference.
Node Functions
In this tab, you can attach node graphs to Creations.
🟆 Chapter 2: Understanding Autonomous Logic Parameter Templates 🟆
In the Complex Creation’s Specialized Configuration tab, you can configure [Autonomous Logic Parameter Settings].
Select Edit Details → [+] to create a new Autonomous Logic Parameter Template.
The Autonomous Logic Parameter controls the Creation’s territory, how it detects targets and enters combat, and how it disengages from combat.
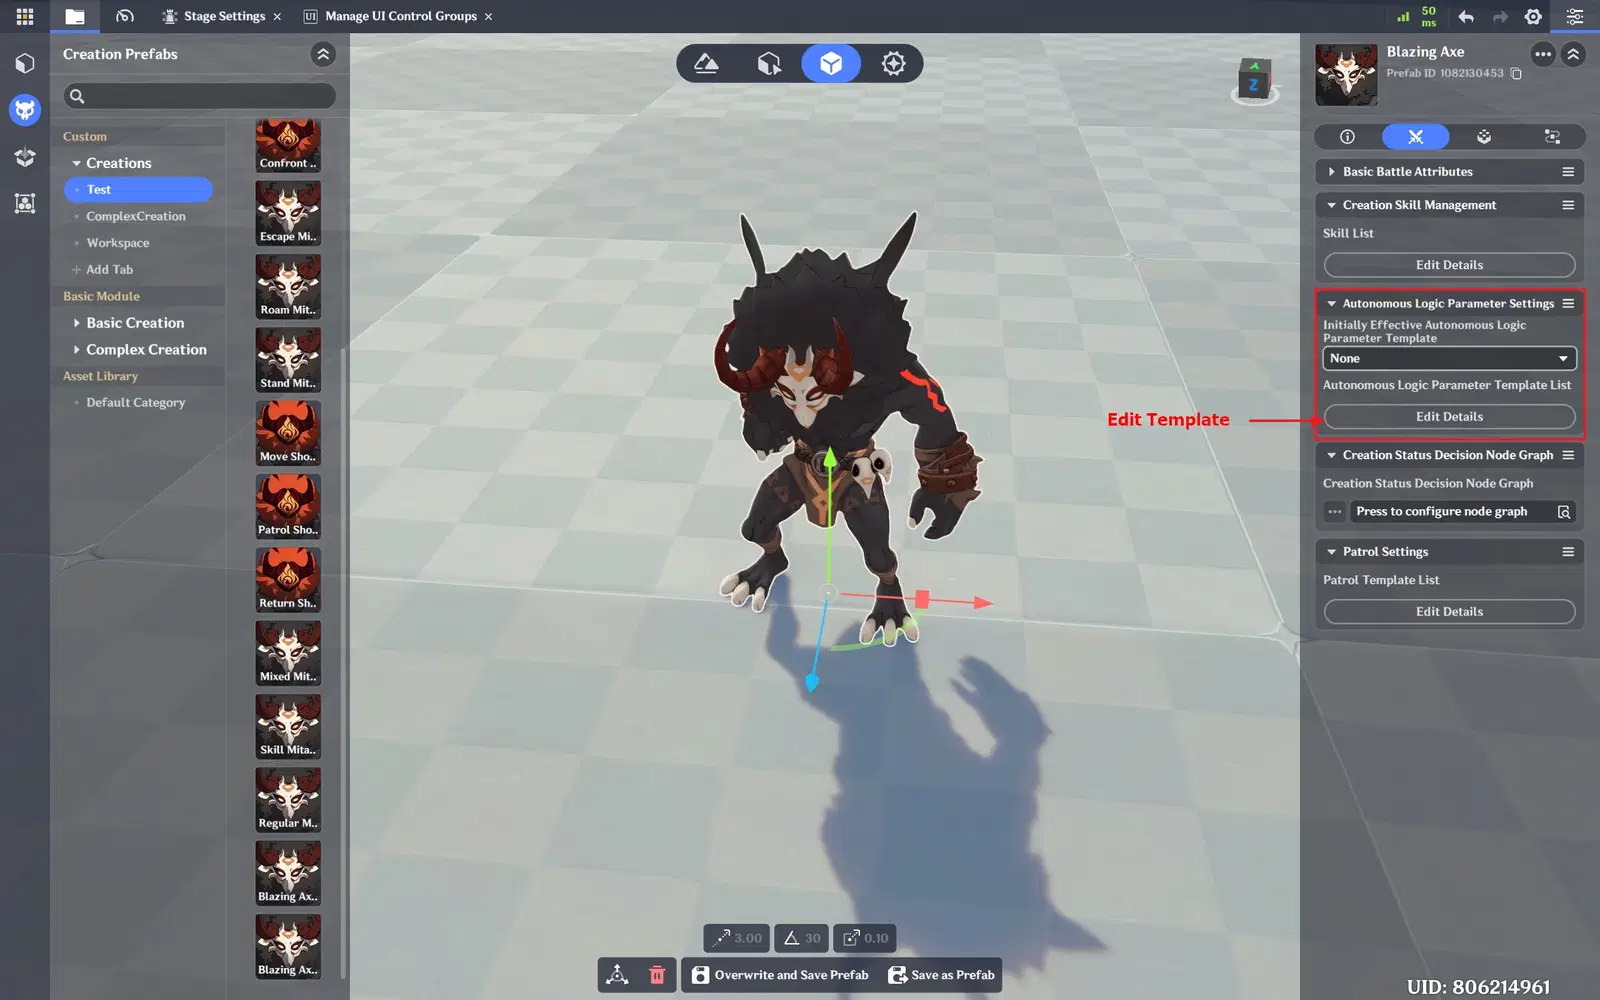
Autonomous Logic Parameter Template — Create New Template (Part 1)
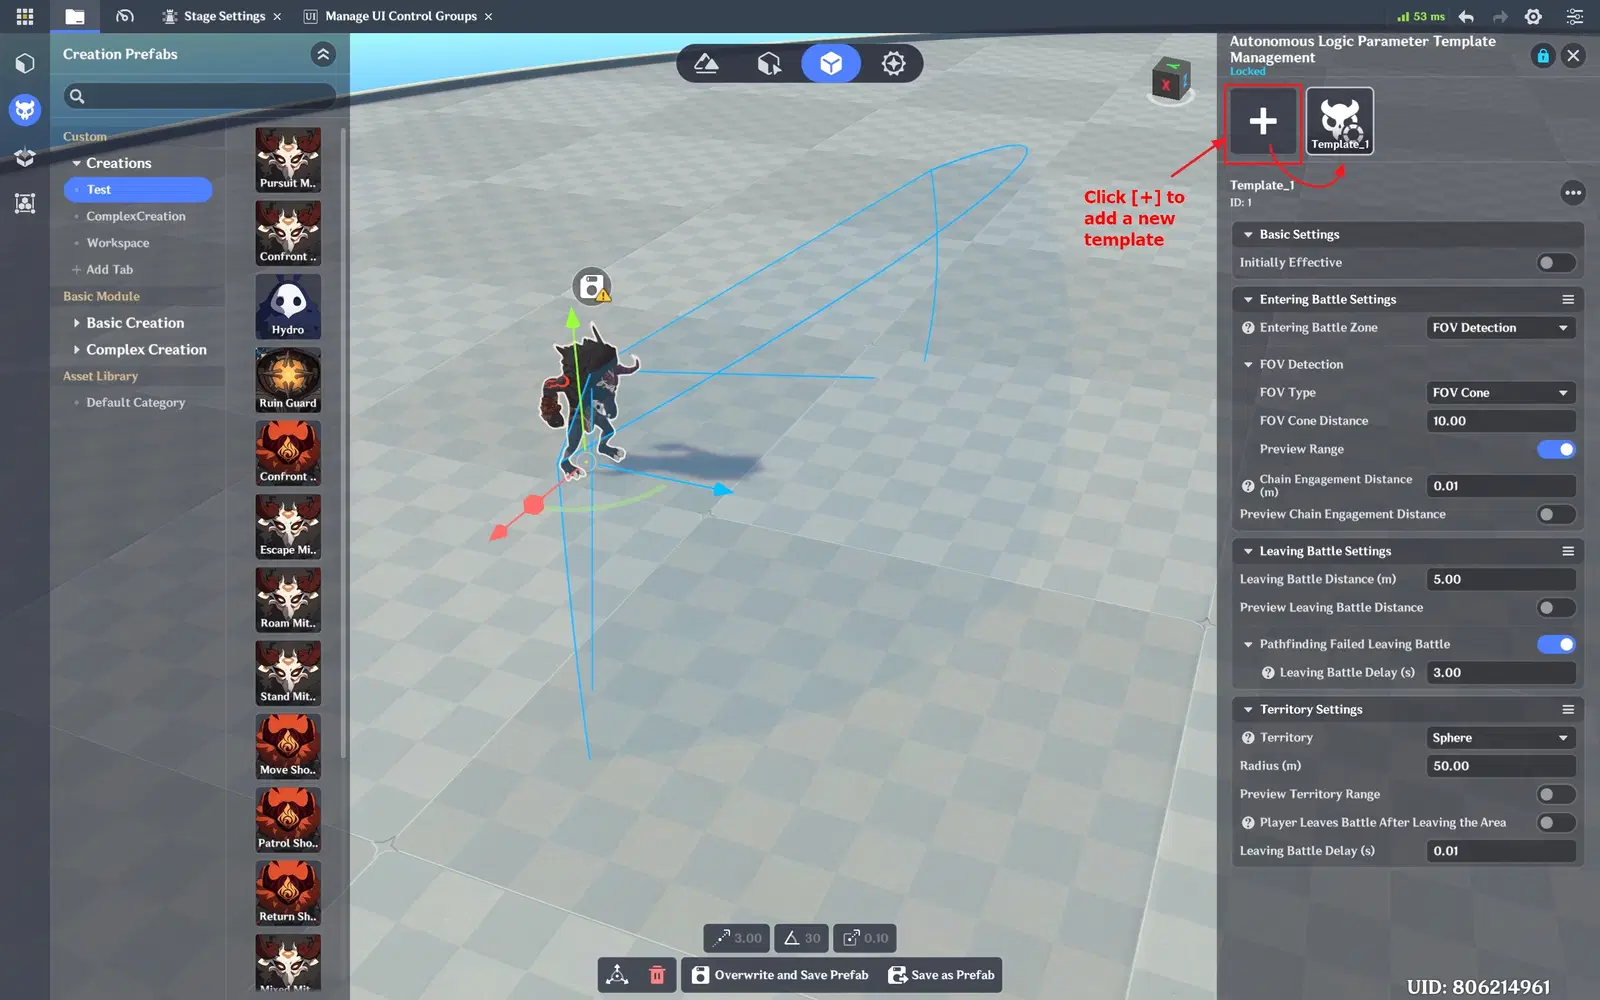
Autonomous Logic Parameter Template — Create New Template (Part 2)
 To explain how these parameters work, we’ll use a regular Creation (Samachurl’s combat settings) to demonstrate an enemy’s Autonomous Logic Parameter.
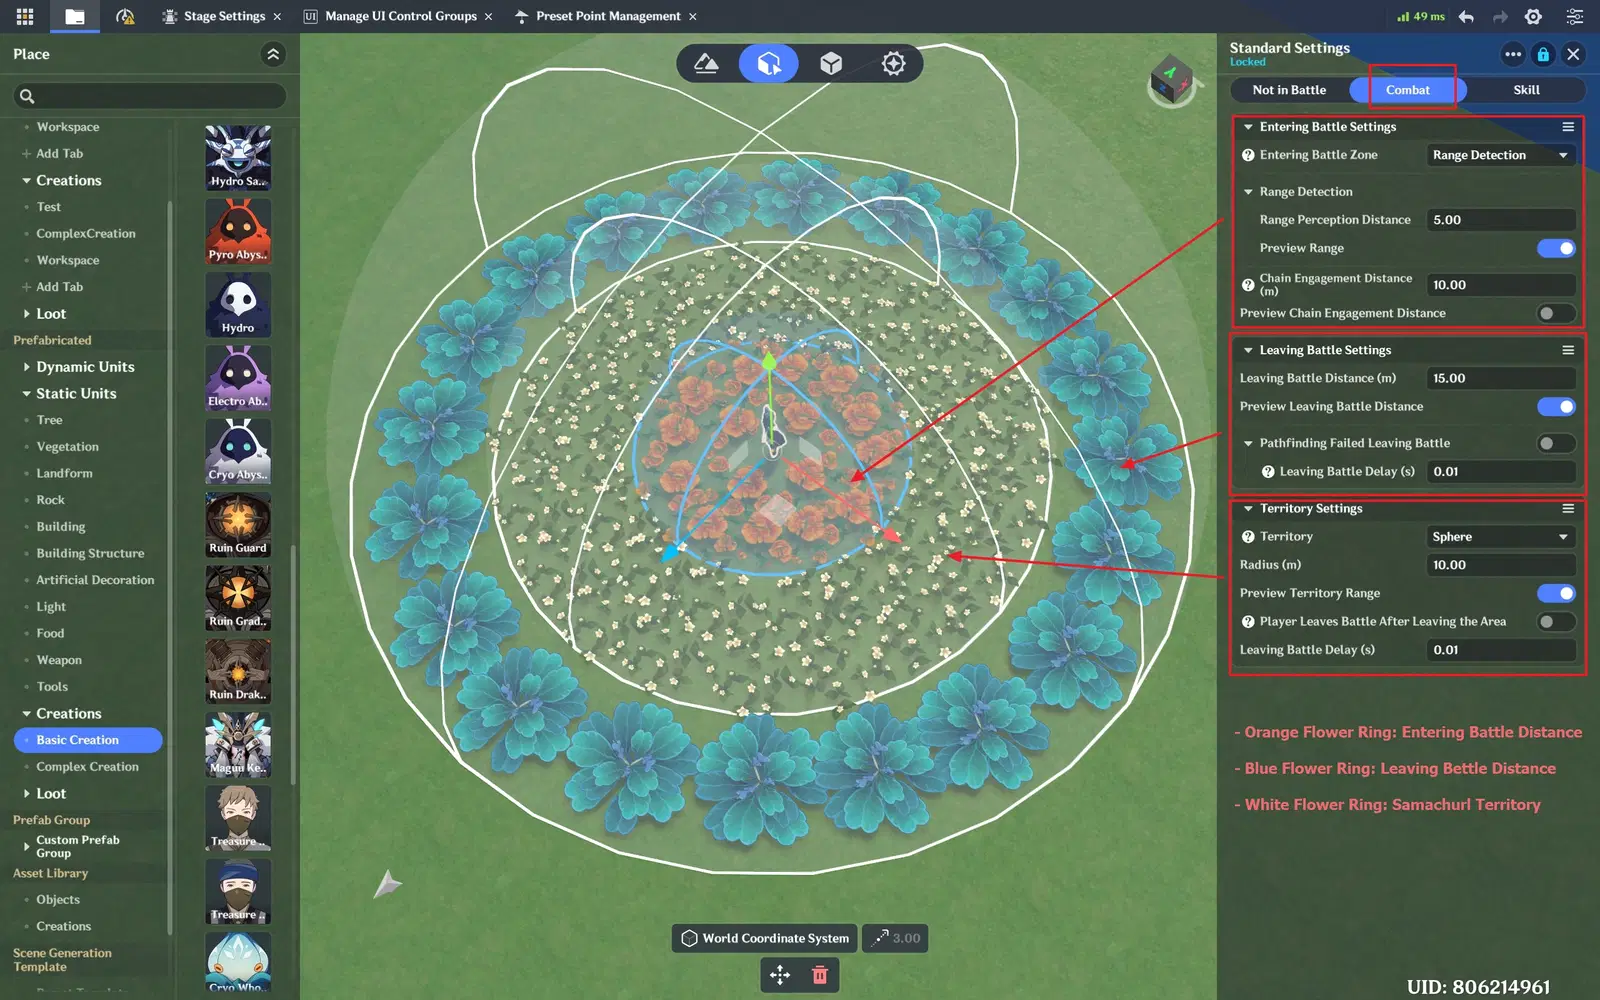
1. Entering Battle (Orange); 2. Leaving Battle (Blue); 3. Territory (White)
Entering Battle Settings (Orange Flower Ring)
— Creation Target Detection Range
When the player enters this area, the monster detects the player and enters combat. The player becomes the target.
- Perception Distance is calculated between the monster and the target.
- Perception methods:
- Range Perception — The monster enters combat when the target is within range.
- FOV Perception — The monster’s vision can be blocked by objects; combat triggers only when the monster can see the target.
- You may choose [Full FOV] or [FOV Cone]
- If [Chain Engagement Distance] is configured, nearby monsters will also enter combat once aggro is triggered.
Note: Chain engagement can chain between multiple enemies.
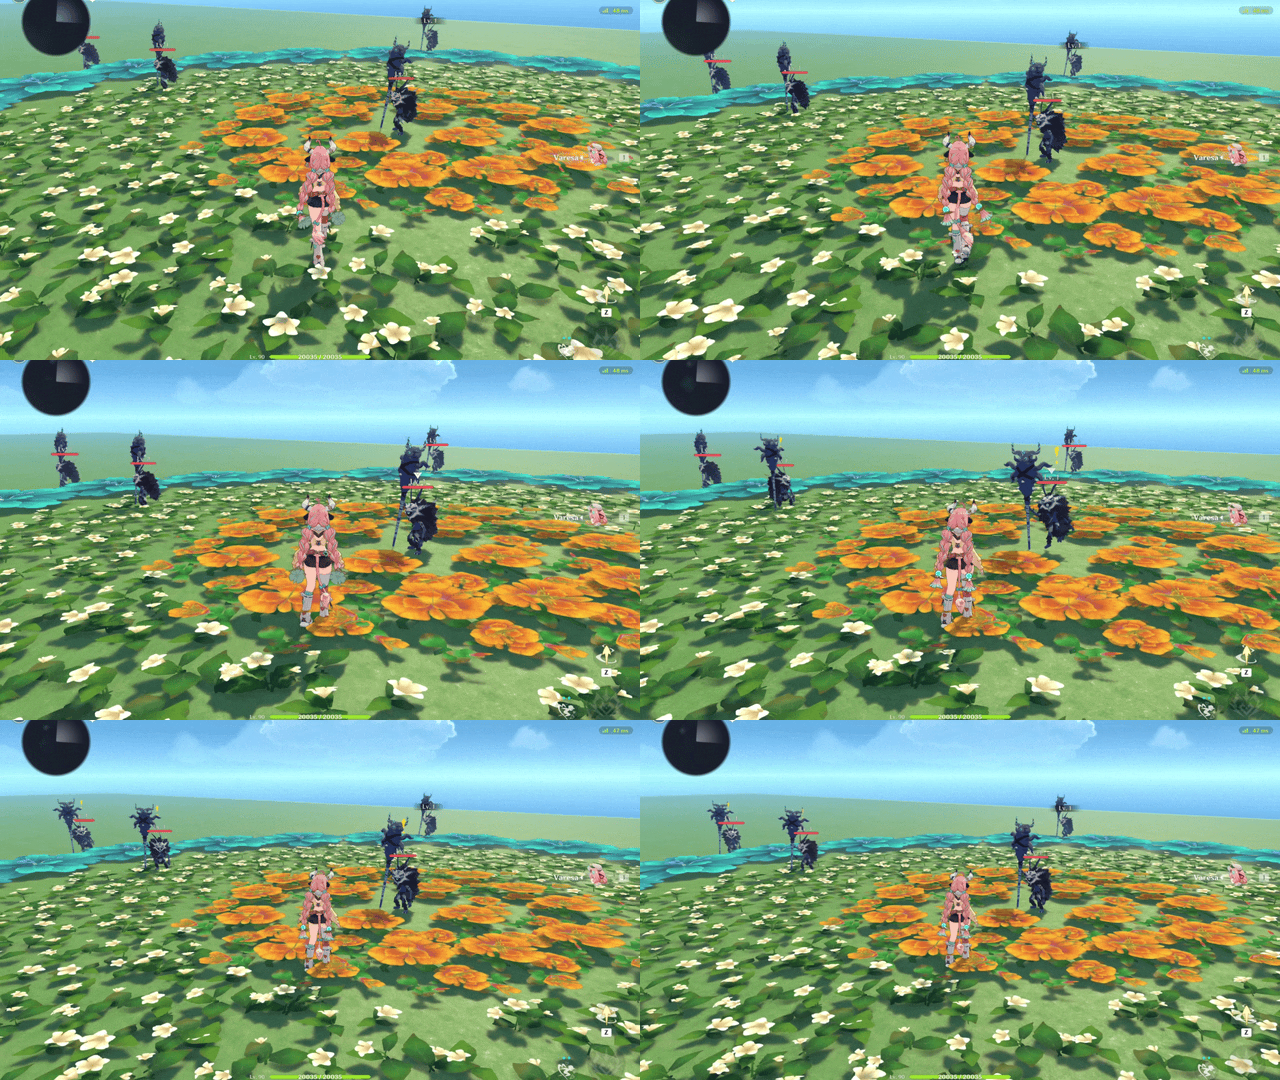
Orange Flower Ring — Entering Battle Settings
Leaving Battle Settings (Blue Flower Ring)
— Creation Leaving Battle
The monster leaves battle when the target moves beyond this distance.
- Leaving Battle Distance is calculated between the Creation and the target.
- If [Pathfinding Failed Leaving Battle] is enabled, the monster leaves battle if it cannot reach the target within a specified time.
Note: Complex Creations do NOT automatically return to their spawn point after leaving battle.
See [Tactics Overview] → [Tactic: Return to spawn point after leaving battle] for methods to return them to their spawn point after leaving battle.
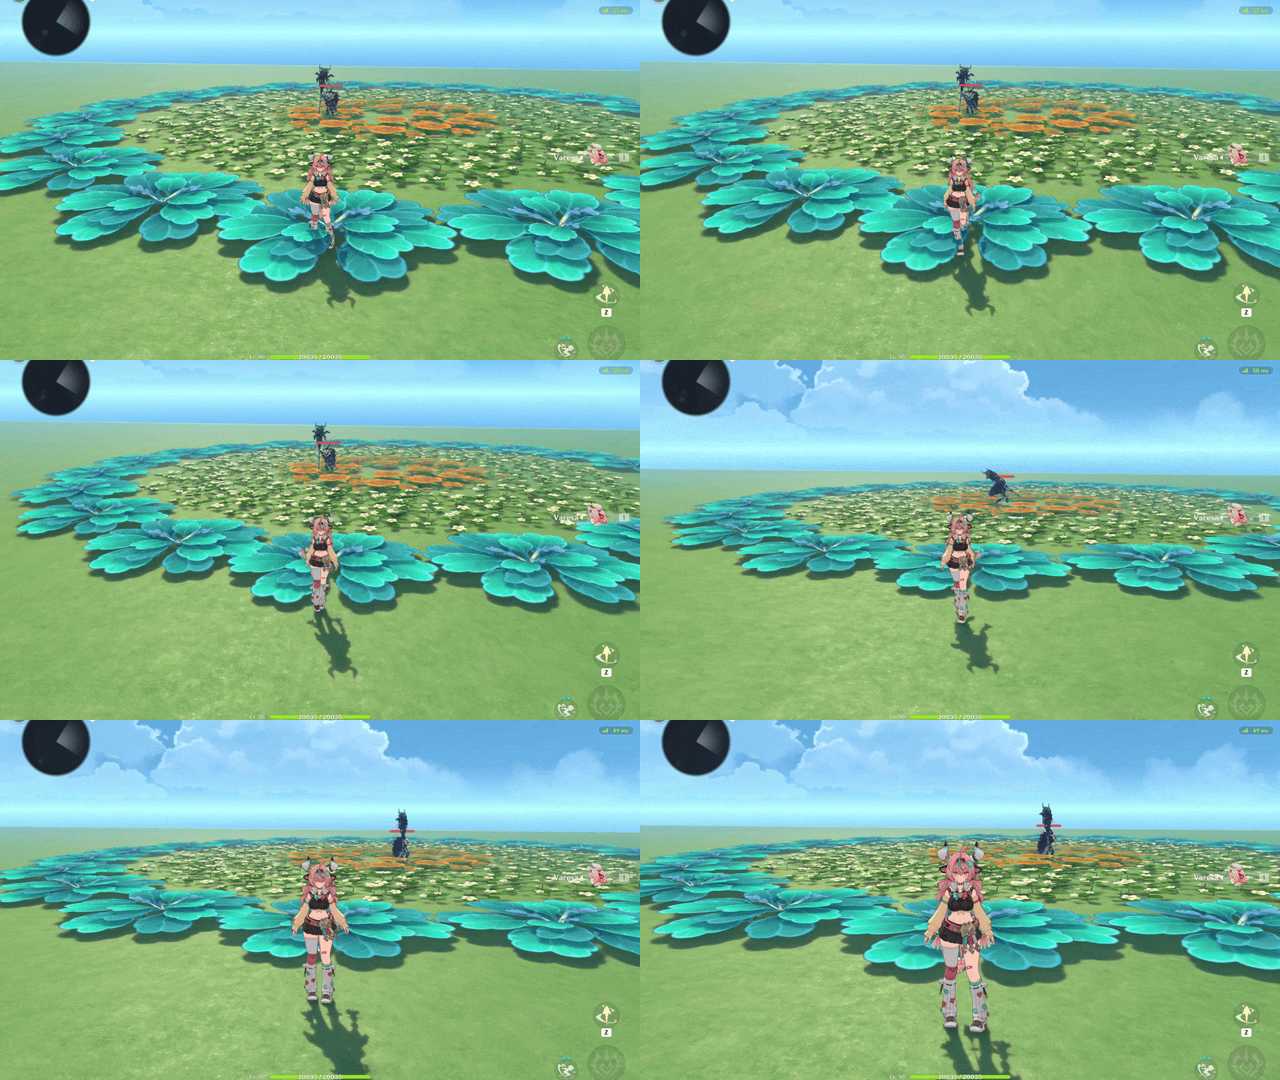
Blue Flower Ring — Leaving Battle Settings
Territory Settings (White Flower Ring) 
— Creation Territory
The monster attempts to remain within its territory. During combat, it may leave battle if it leaves this area.
- Territory radius is measured from the Creation’s spawn point.
- You may choose [Sphere], [Cone], or [None] as the territory shape.
- The Complex Creation tactic [Tactic: Execute Patrol] can adjust its spawn point.
(See [Tactics Overview] → [Tactic: Execute Patrol] for details.)
- If [Player Leaves Battle After Leaving the Area] is enabled, the monster leaves battle when the target exits the territory within a specified time.
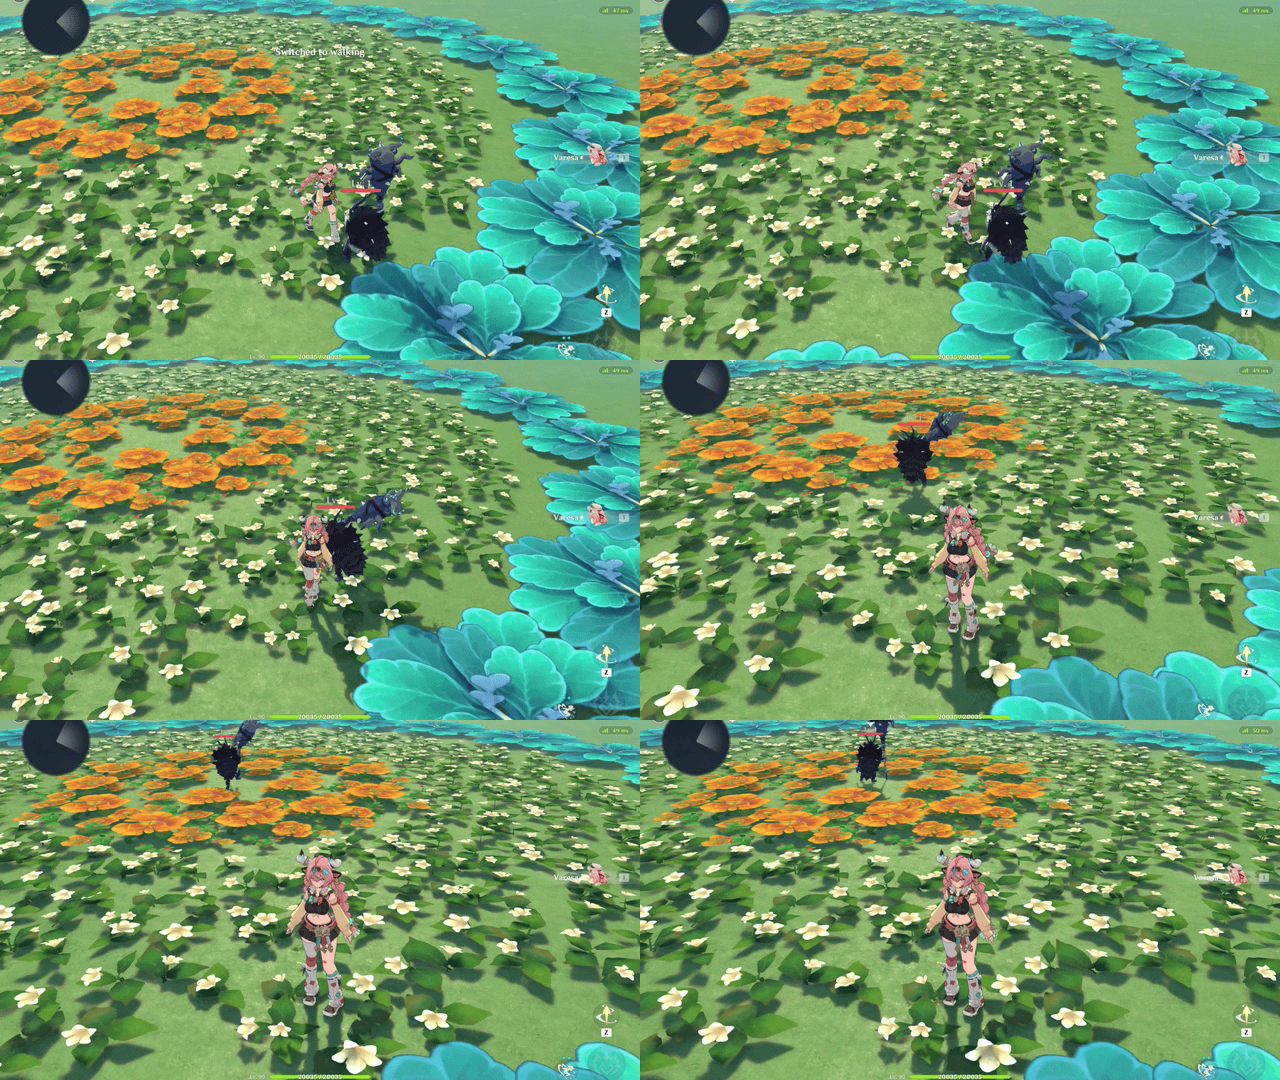
White Flower Ring — Territory Settings
To fine-tune [Autonomous Logic Parameter] values, you can first test numbers on a regular Creation to verify that they meet your expectations.
Then transfer those values into the Complex Creation’s Autonomous Logic Parameter template.
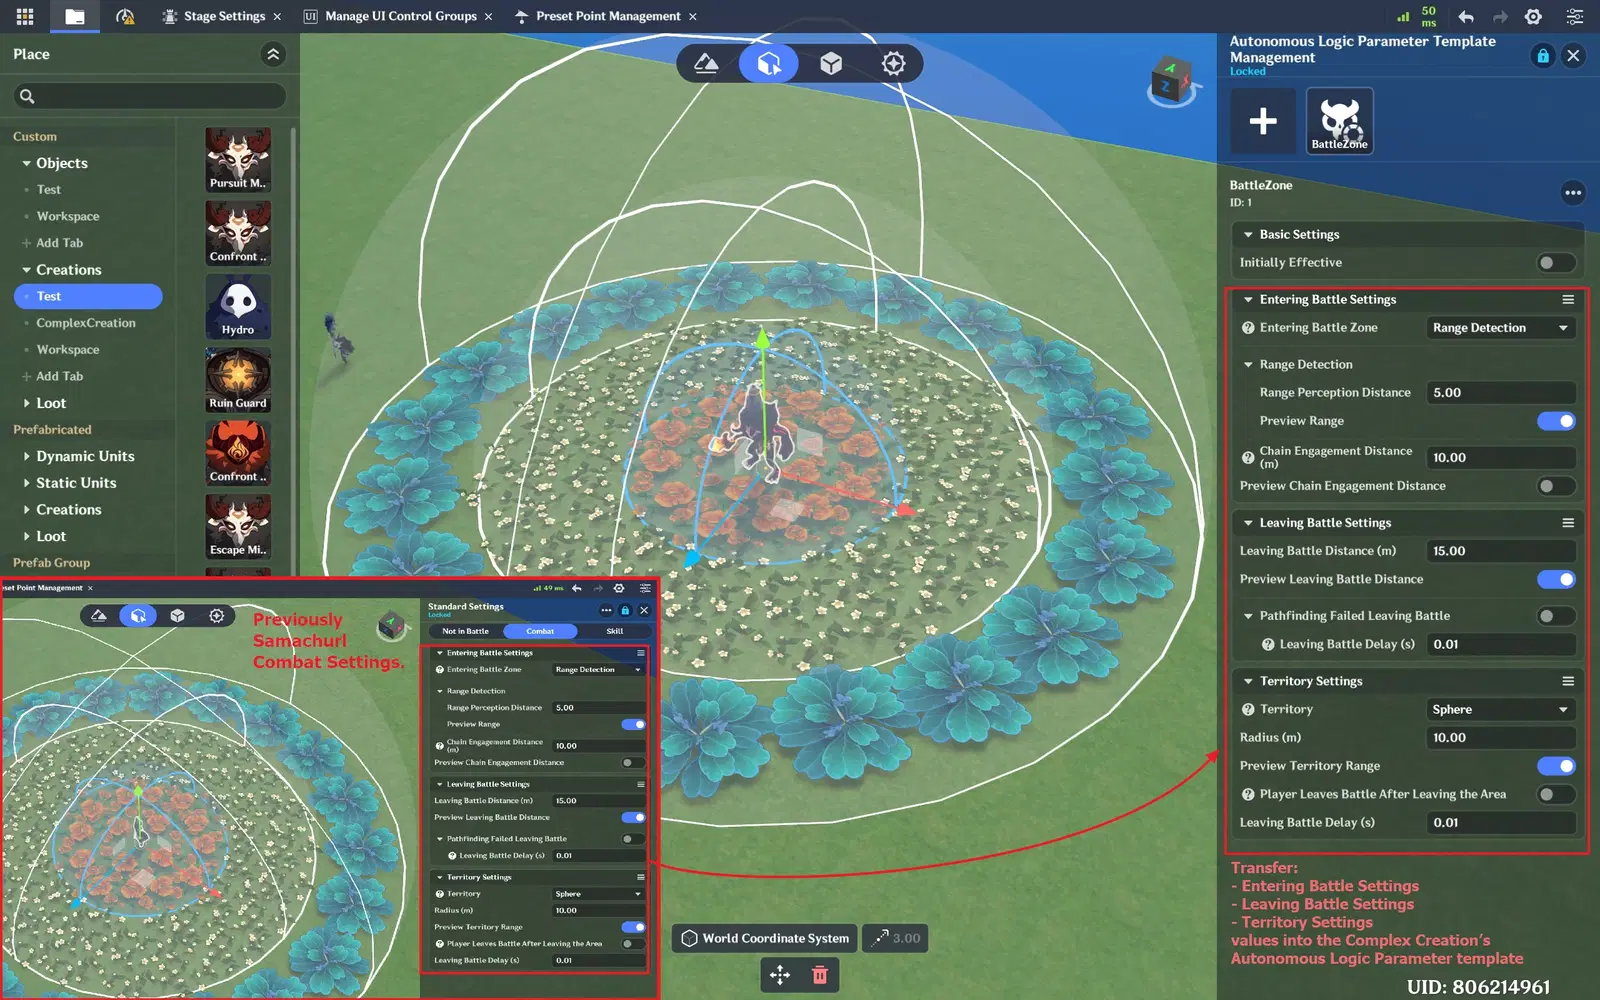
Autonomous Logic Parameter Template — Create New Template (Part 3)
To activate an [Autonomous Logic Parameter] template, there are three ways:
- Under the template settings, enable [Initially Effective].
- Under [Specialized Configuration] → [Autonomous Logic Parameter Settings], select an [Initially Effective Autonomous Logic Parameter Template].
- Use a Creation Status Decision Node Graph to activate a template:
- In the Miliastra Sandbox, go to [Client Node Graph] → [Creation Status Decision Node Graph] and create a new node graph.
- In the node graph editor, use [Switch to self execution status], and set parameter Autonomous Logic Parameter ID to the template ID that we newly created.
- In Complex Creation, under [Specialized Configuration] → [Creation Status Decision Node Graph], select the newly created node graph.
Note: Only one template can be active at a time.
🟆 Chapter 3: Tactics Overview 🟆
This section introduces commonly used movement tactics for Complex Creations.
Movement tactics for Complex Creations are executed within the Creation Status Node Graph.
 To execute movement tactics:
- In the Miliastra Sandbox, go to [Client Node Graph] → [Creation Status Node Graph] and create a new node graph.
- In the creation status node graph editor, use the execution node [Tactic: {Available Tactic}] to run a movement tactic.
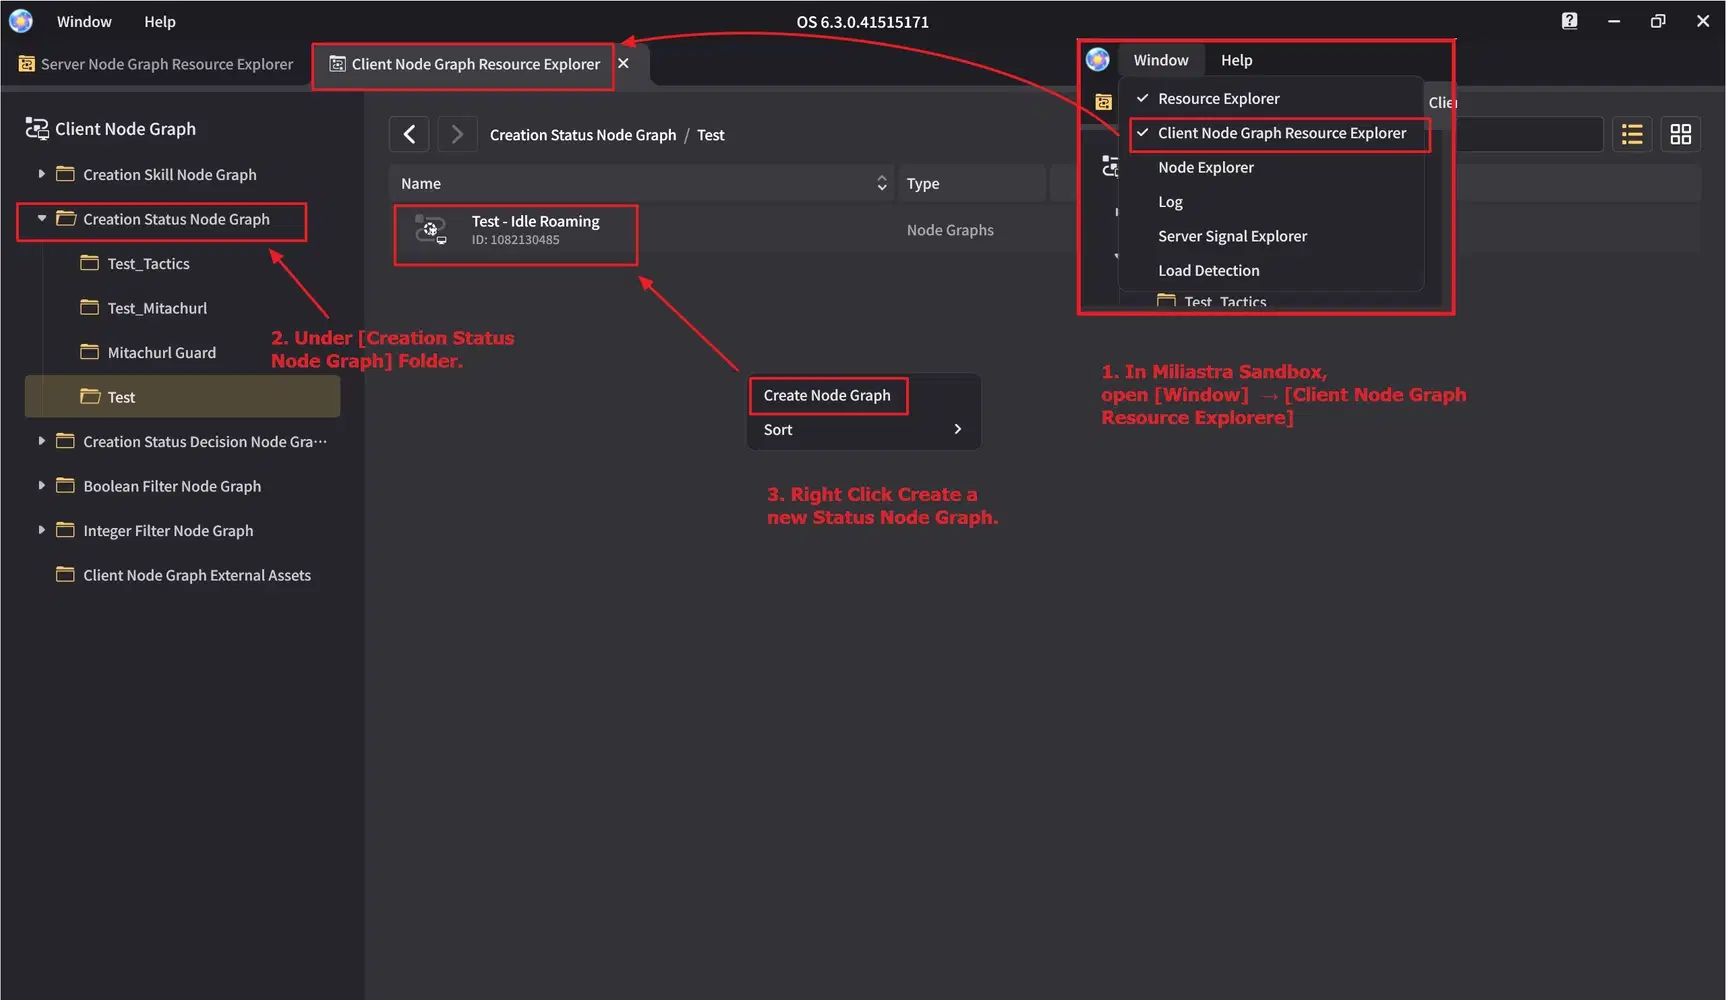
Execute Tactics (Part 1)
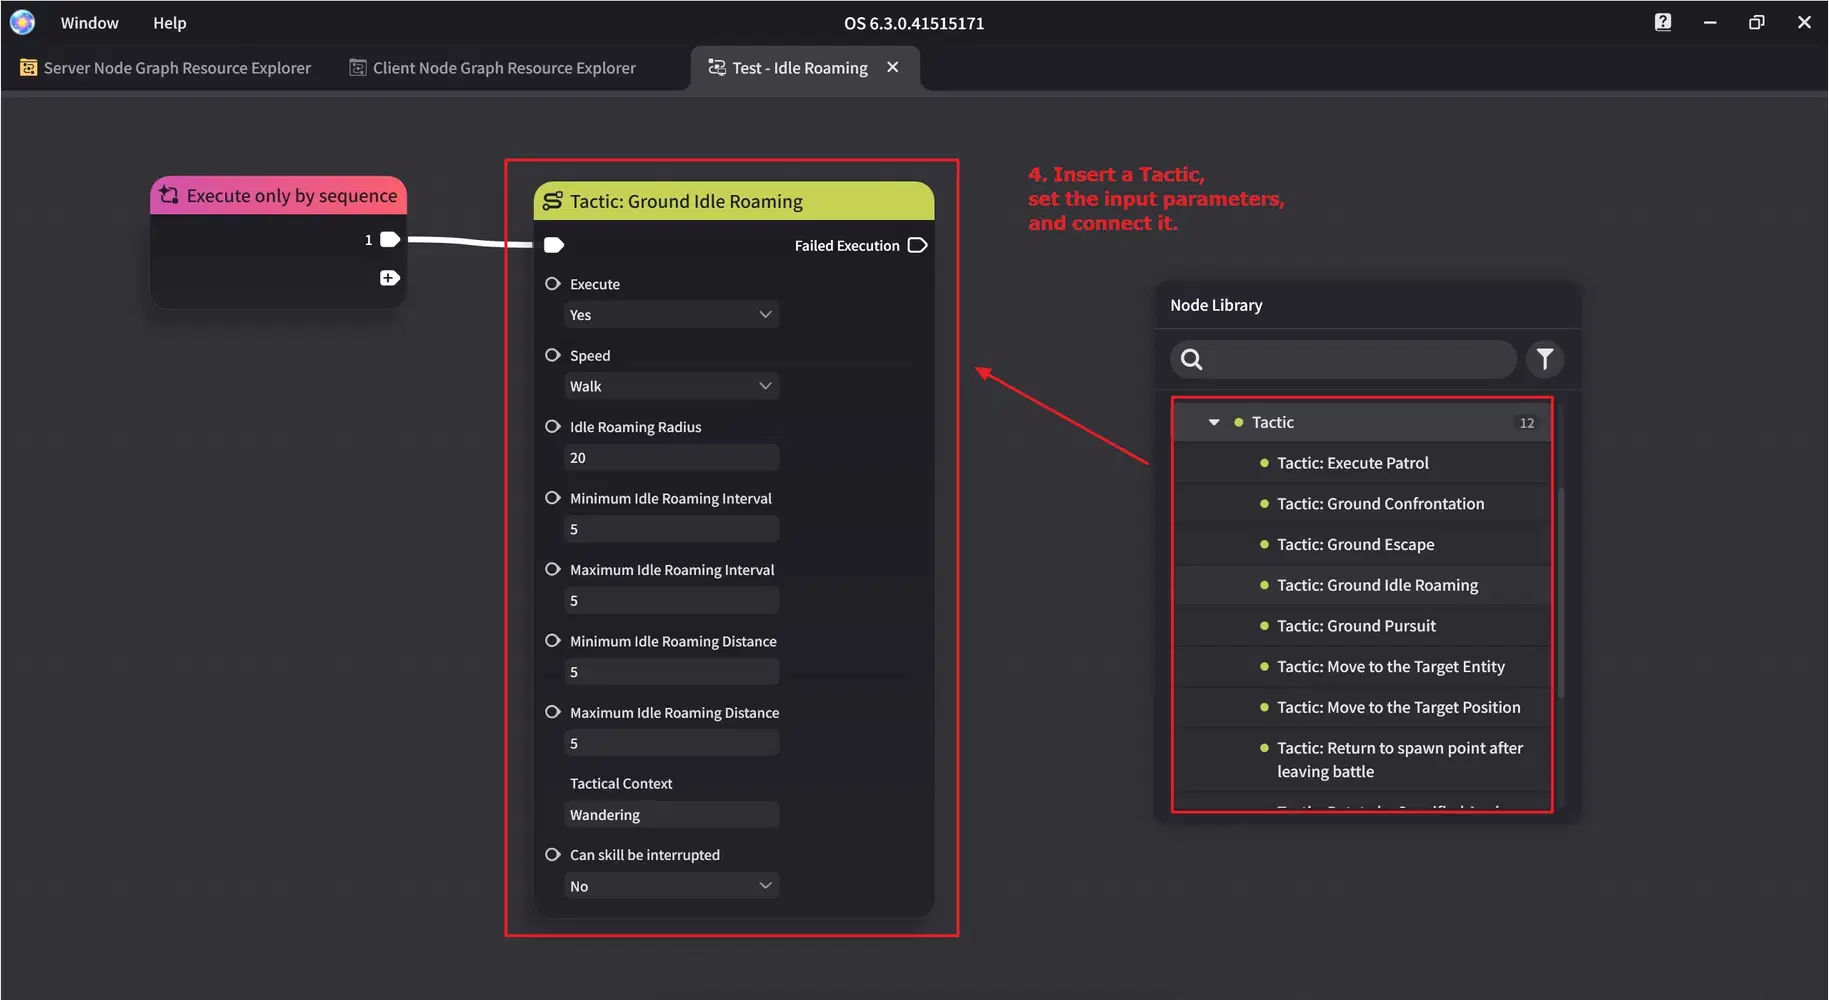
Execute Tactics (Part 2)
And, to allow a Complex Creation to run a Creation Status Node Graph:
- Go to [Client Node Graph] → [Creation Status Decision Node Graph], create a new node graph.
(or use the creation status decision node graph created in the chapter 2: [Understanding Autonomous Logic Parameter Templates])
- In the Decision Node Graph, use [Switch to Self Execution Status], and set Status Node Graph Config ID to the ID of the newly created Status Node Graph.
- In the Complex Creation settings, under [Specialized Configuration] → [Creation Status Decision Node Graph], ensure the selected decision node graph is the one you just created.
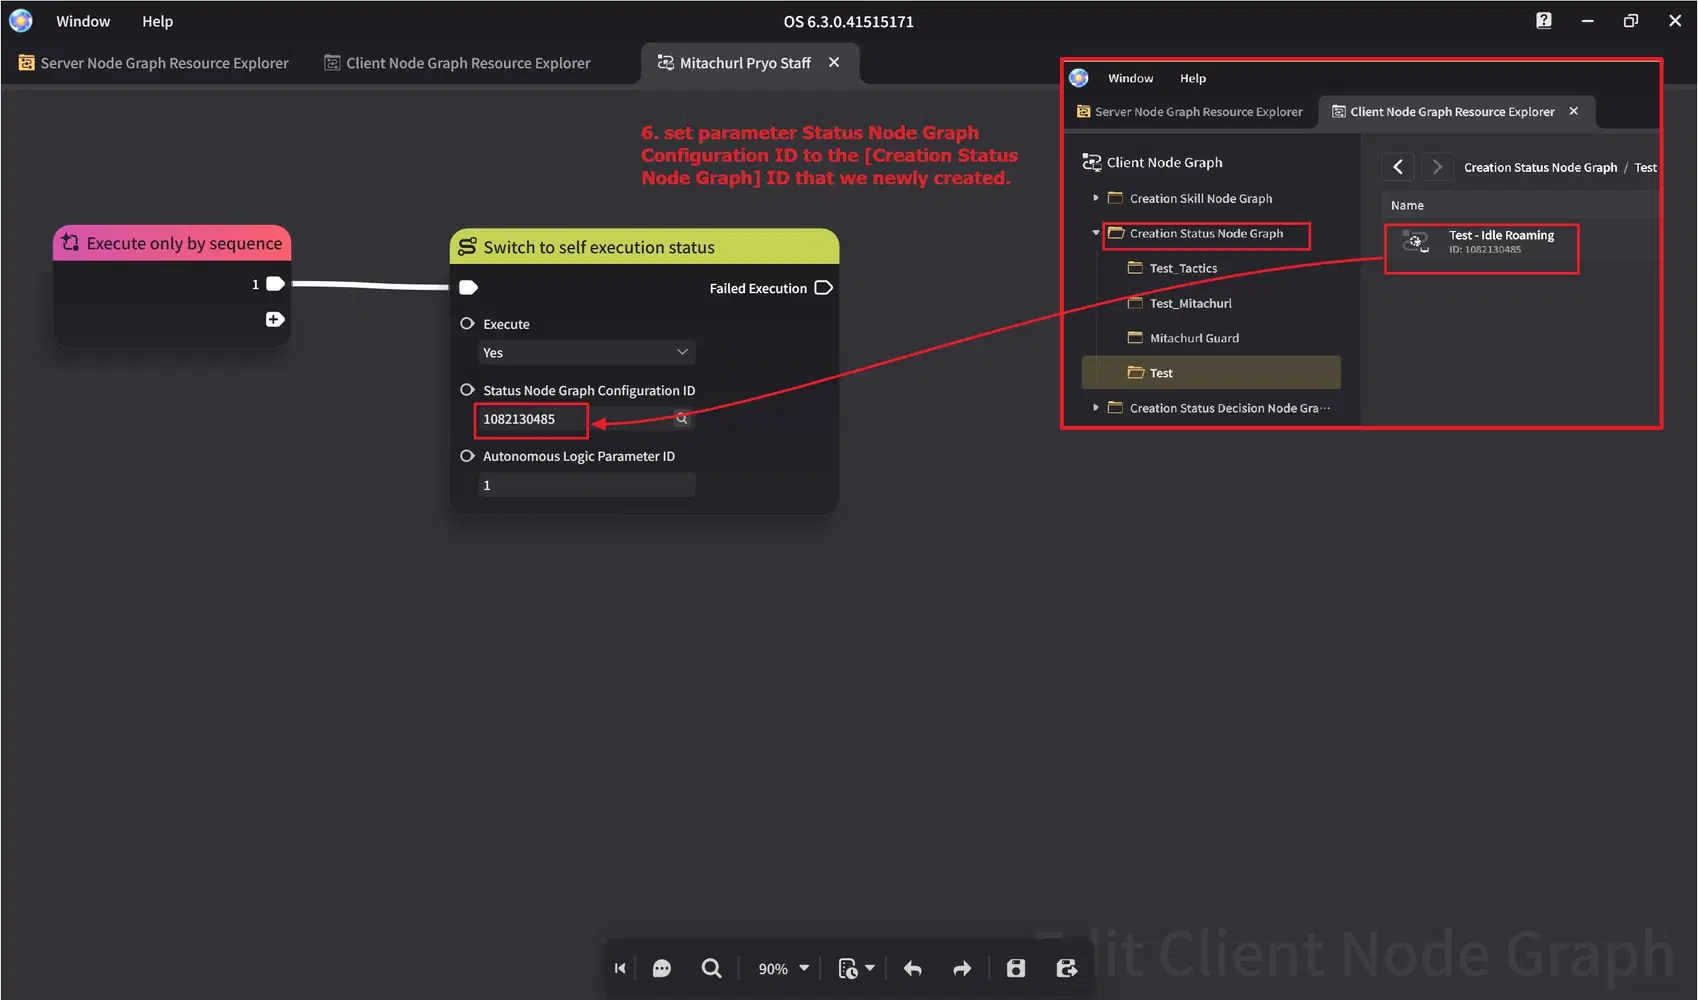
Execute Tactics (Part 3)
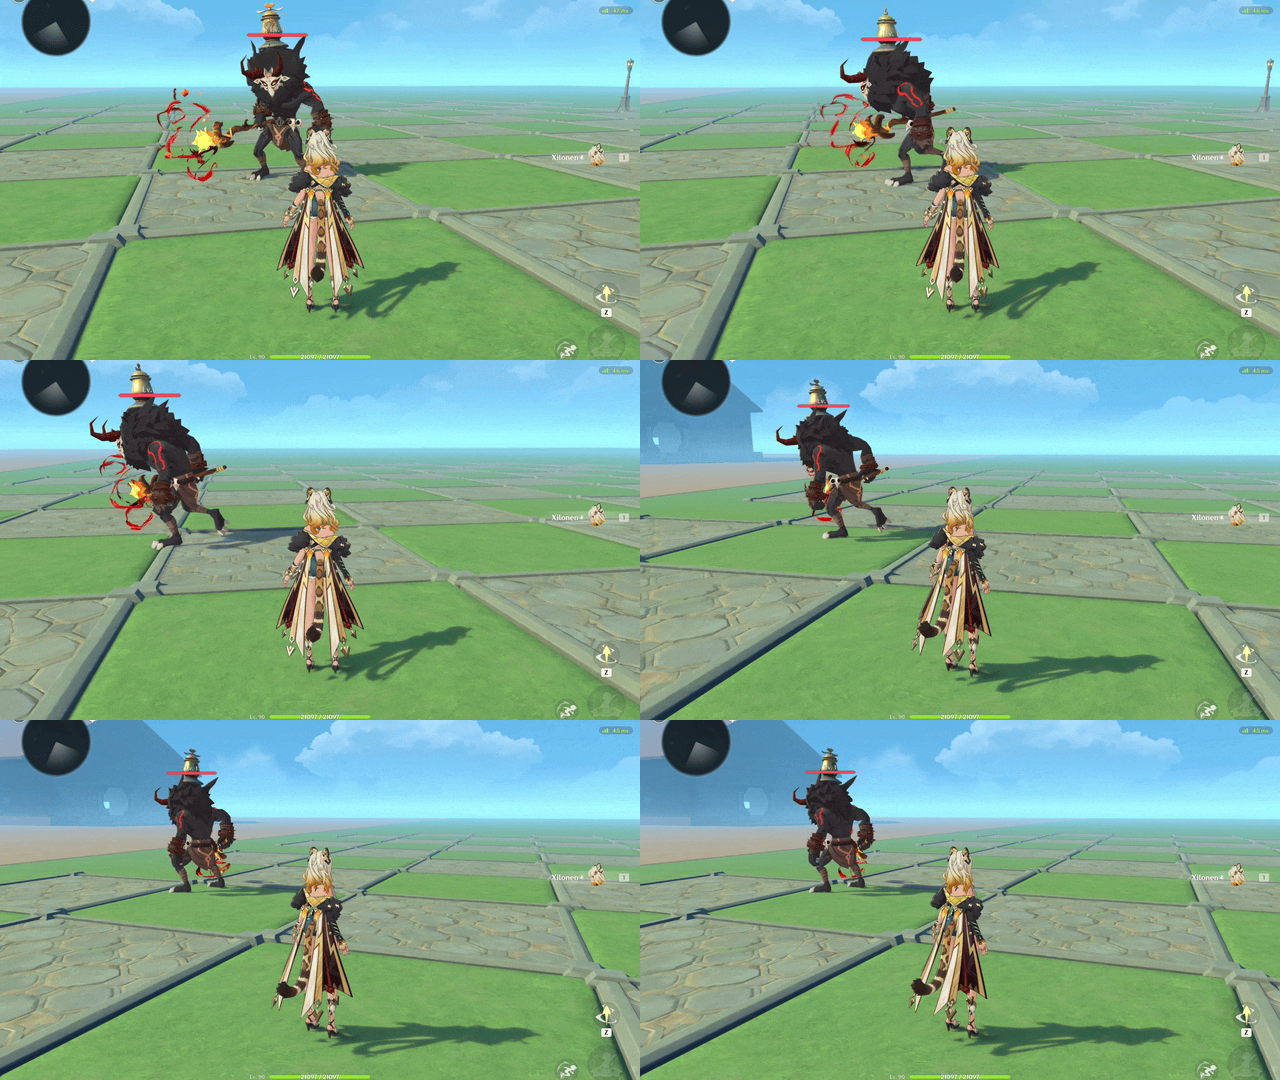
Execute Tactics Example
In this tutorial, we will introduce the following movement tactics: 
- Tactic: Ground Idle Roaming
- Tactic: Execute Patrol
- Move Tactics (Tactic: Move to the Target Position + Tactic: Move to the Target Entity)
- Rotate Tactics (Tactic: Rotate by Specified Angle + Tactic: Rotate to the Specified Direction + Tactic: Rotate to the Target Entity)
- Tactic: Stand Still
- Tactic: Ground Pursuit
- Tactic: Return to spawn point after leaving battle

Before introducing each tactic, here are several common input parameters:
- Execute
- If set to [Yes] and the tactic executes successfully, the [Failed Execution] pin will not trigger.
- If set to [Yes] but the tactic fail to executes, the [Failed Execution] pin will trigger.
- If set to [No], the tactic stops immediately, and execution continues through the [Failed Execution] pin.
- Can Skill be Interrupted
- If set to [Yes] and the tactic executes successfully, it will interrupt any currently executing skills.
- Tactical Context
- You can use the query node [Previous Frame Execution Tactic] to retrieve a tactic’s [Tactics Context], and use it as part of your logic conditions.
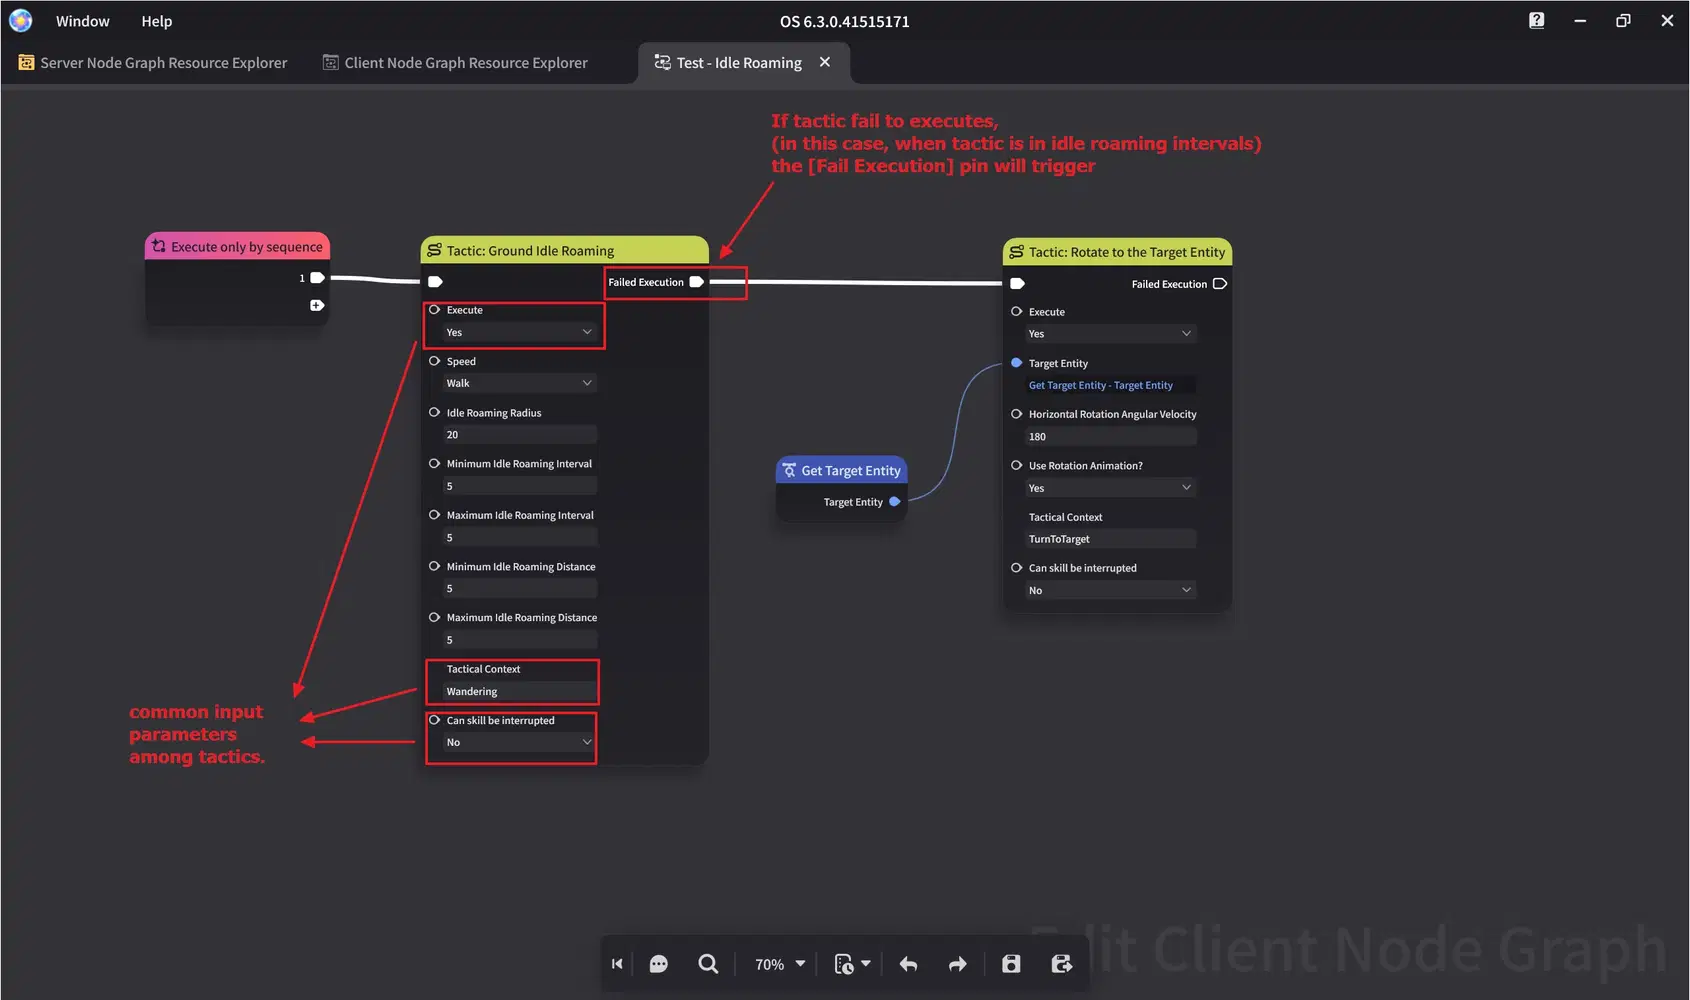
Tactics Overview — common input parameters.
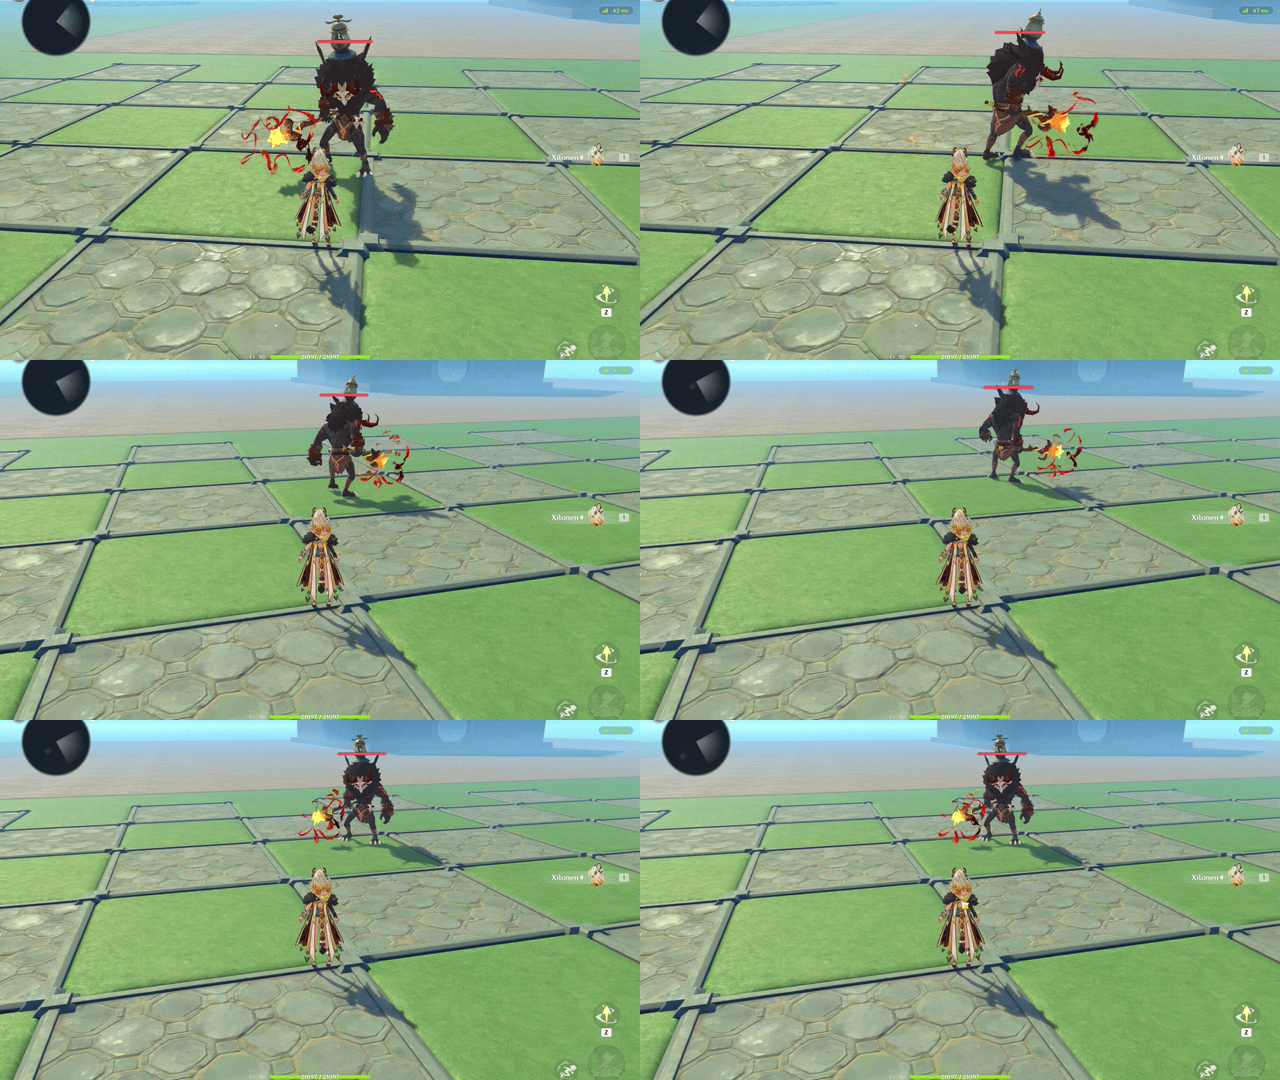
Example — Creation Triggering the [Fail Execution] pin and switches to [Tactics: Rotate].
 Alright, let’s dive into the details.
Tactic: Ground Idle Roaming
Description
The Creation wanders around its spawn point.
Tactic Notable Options
- You can define Idle Roaming Radius:
- The spawn point serves as the center.
- The Creation selects random roaming locations, which may initially exceed the radius.
- If the selected point exceeds the radius, the next point will be chosen in the direction toward the spawn point.
- You can configure Idle Roaming Intervals (Minimum and Maximum)
- Time intervals when the creation is not moving.
- You can configure Idle Roaming Distance (Minimum and Maximum).
- Distance at which the Creation selects a move point and starts moving.
- Movement Speed can be set to [Run] or [Walk].
Note: The spawn point can be modified using [Tactic: Execute Patrol].
Tactic Fail Execution Conditions
- During idle roaming intervals (when not moving), execution routes to [Failed Execution].
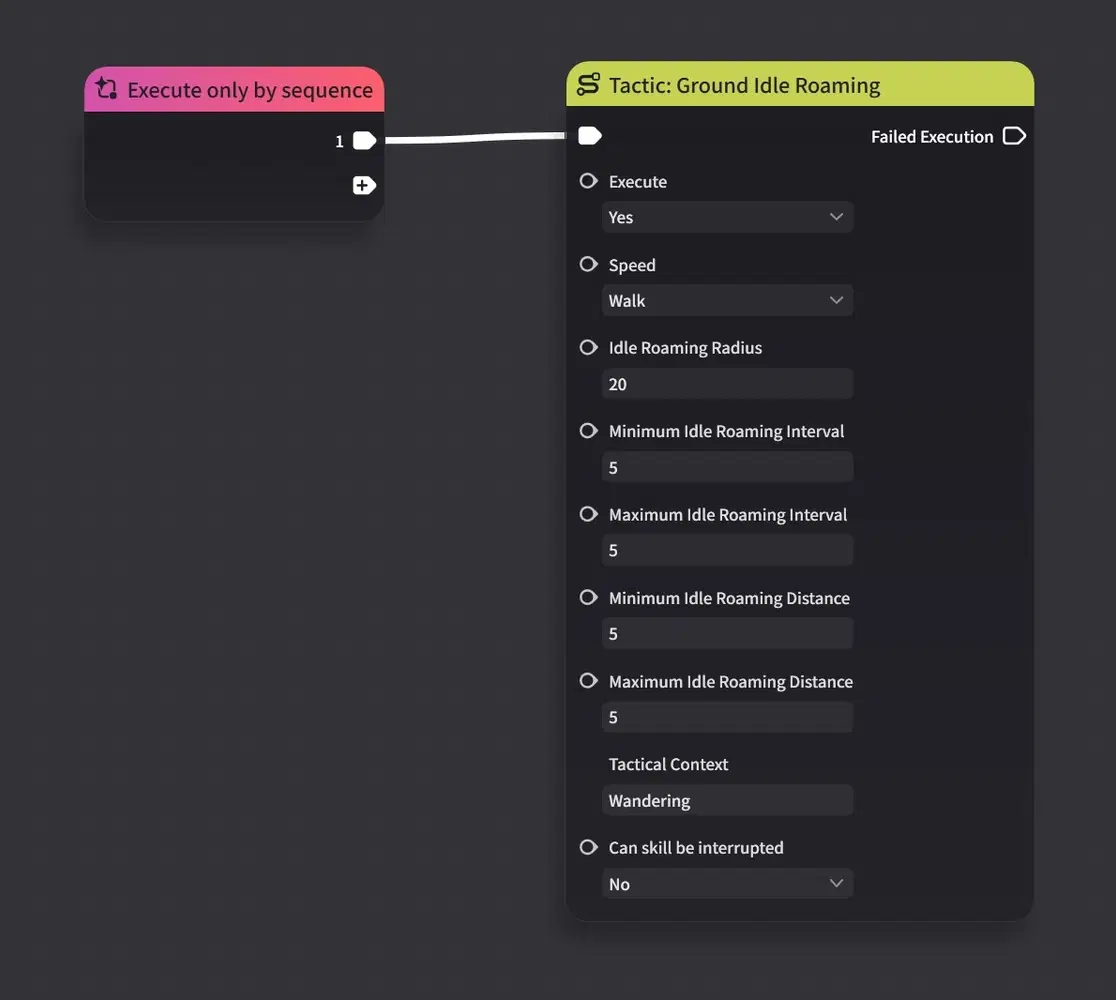
Tactic: Ground Idle Roaming — Parameters
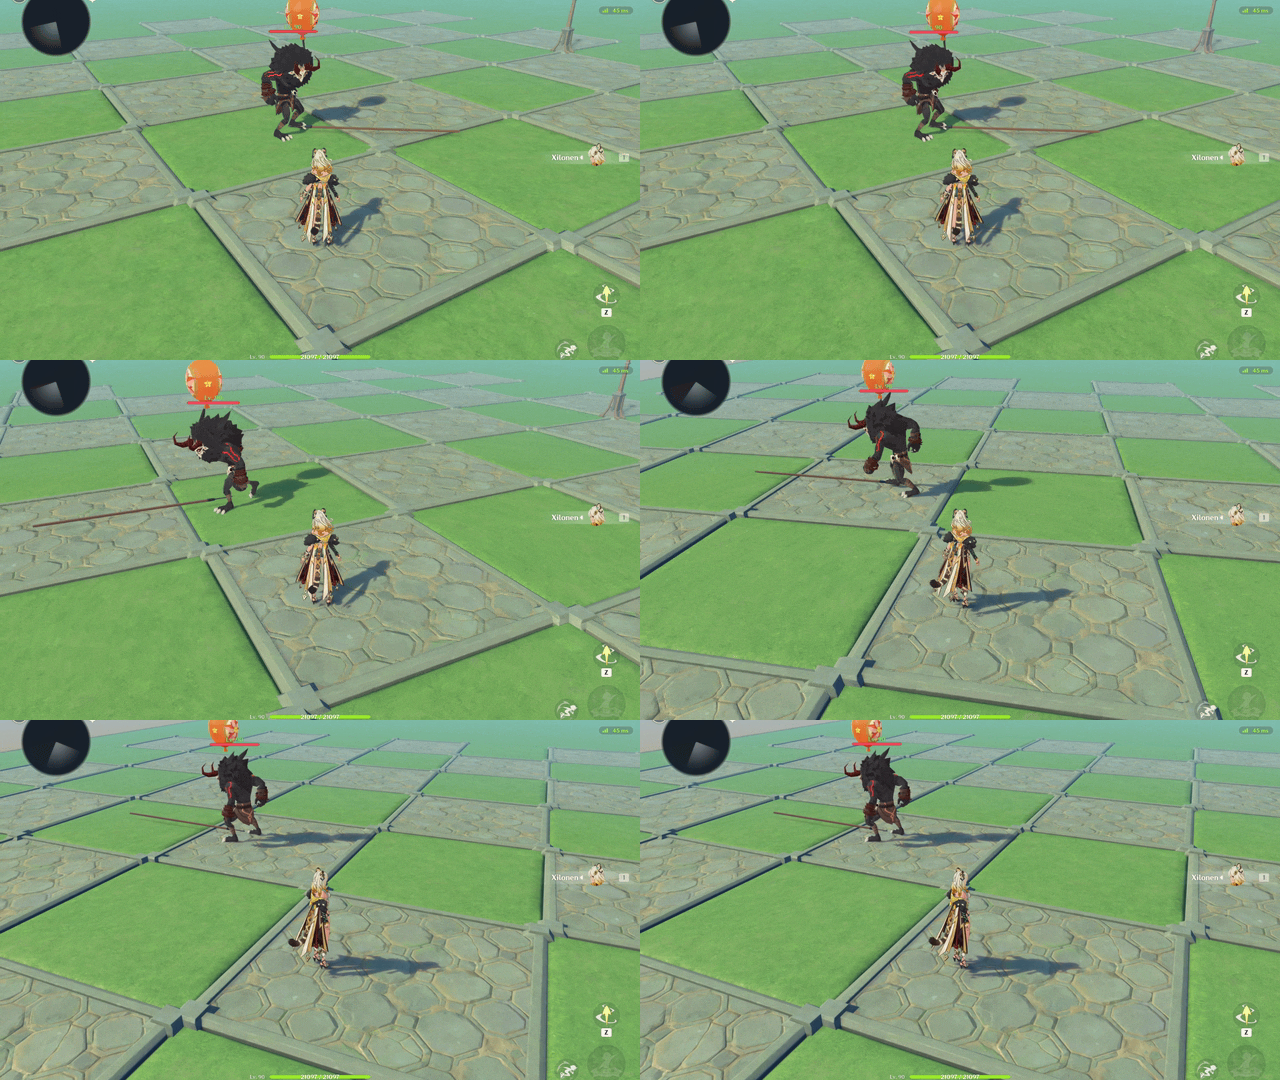
Tactic: Ground Idle Roaming — Example
Tactic: Execute Patrol
Description
The Creation patrols along a path defined by a Patrol Template.
Prerequisite
Before using this tactic, configure a Patrol Path in the scene and assign a Patrol Template to the Complex Creation.
- Go to [Menu] → [Path Management], create a new path, and configure waypoint parameters.
- Under [Specialized Configuration] → [Patrol Settings], add a Patrol Template, assign the path to the template, and configure patrol parameters.
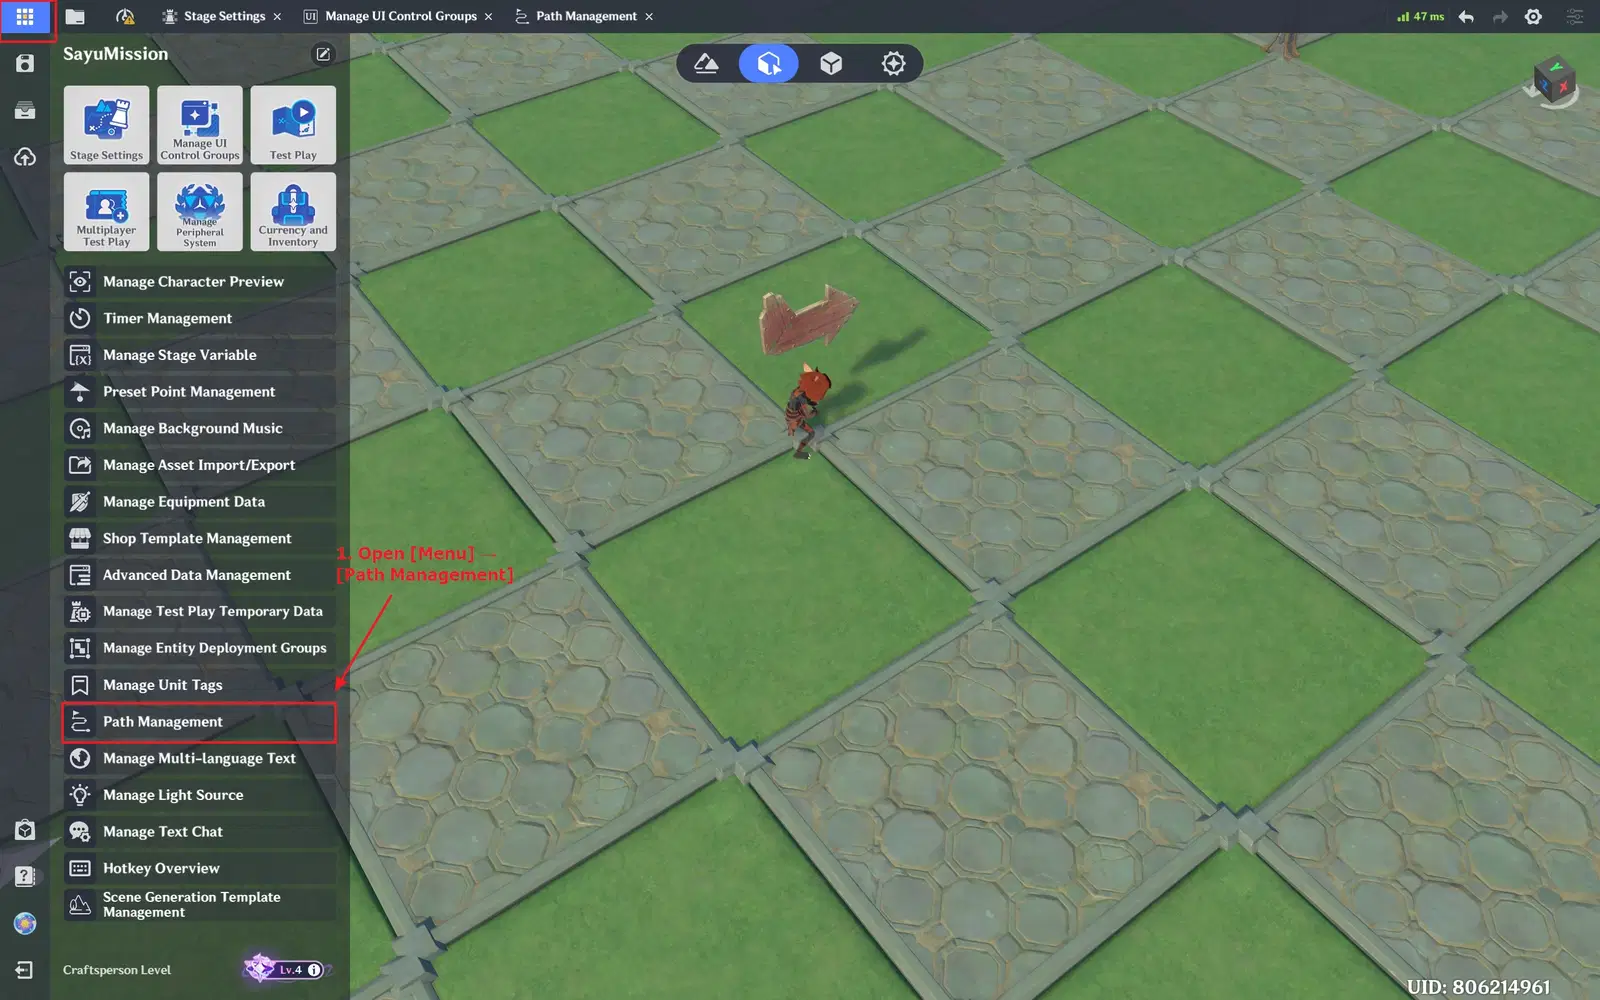
Tactic: Execute Patrol — Create Patrol Template (Part 1)
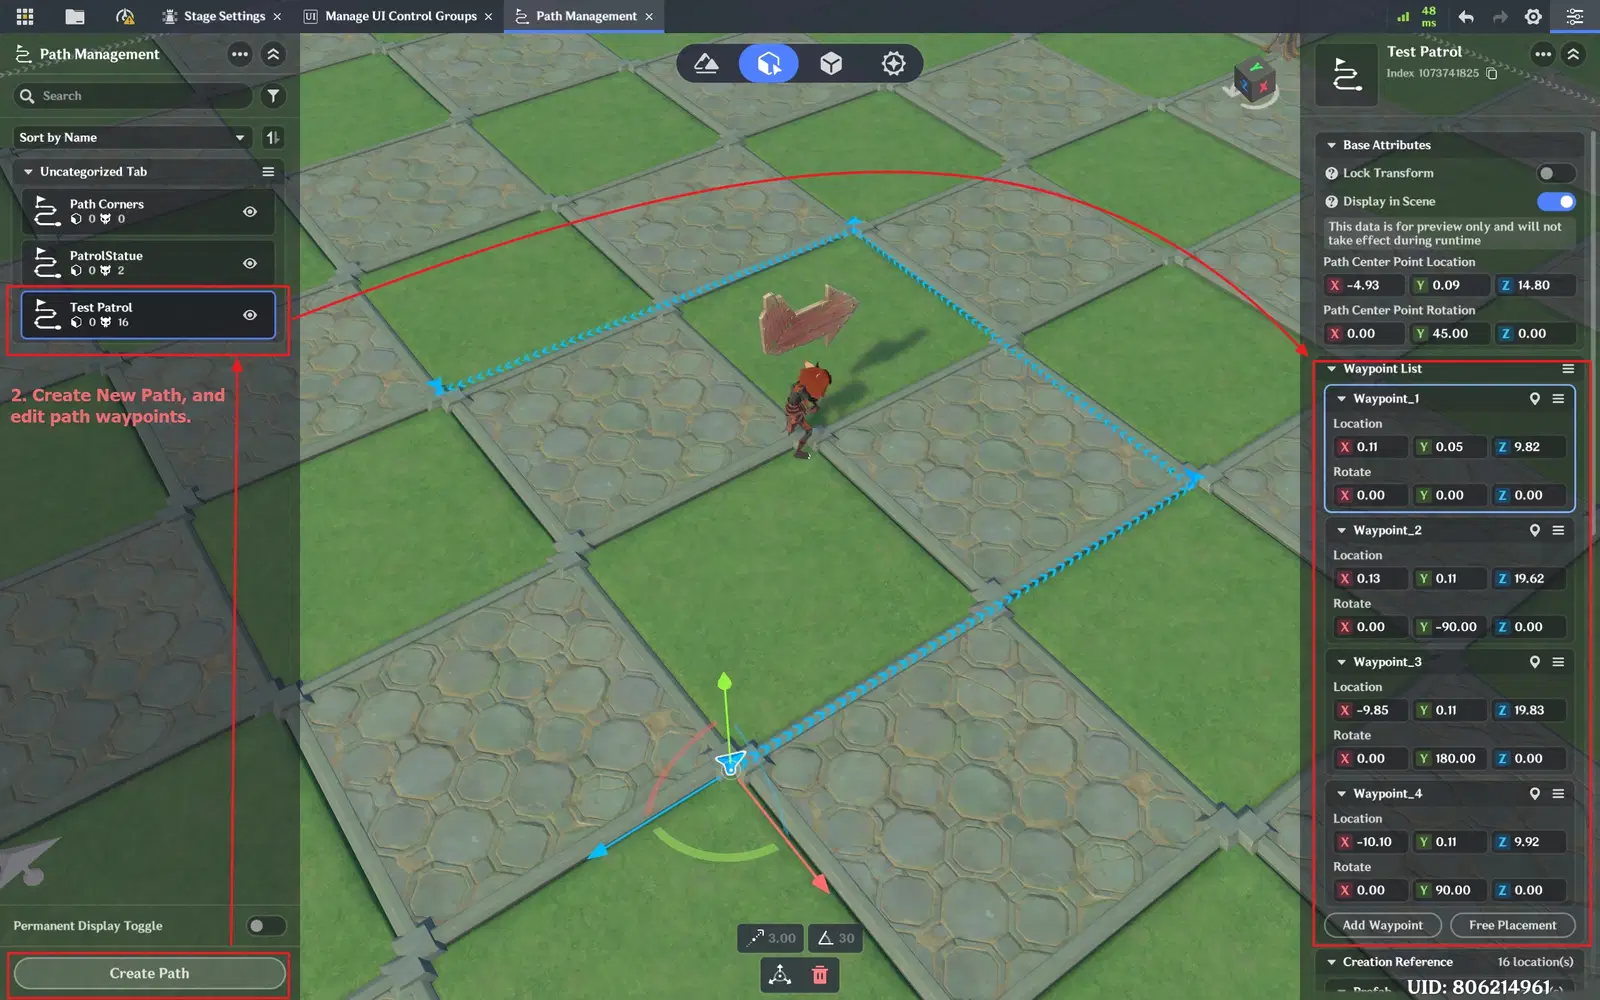
Tactic: Execute Patrol — Create Patrol Template (Part 2)
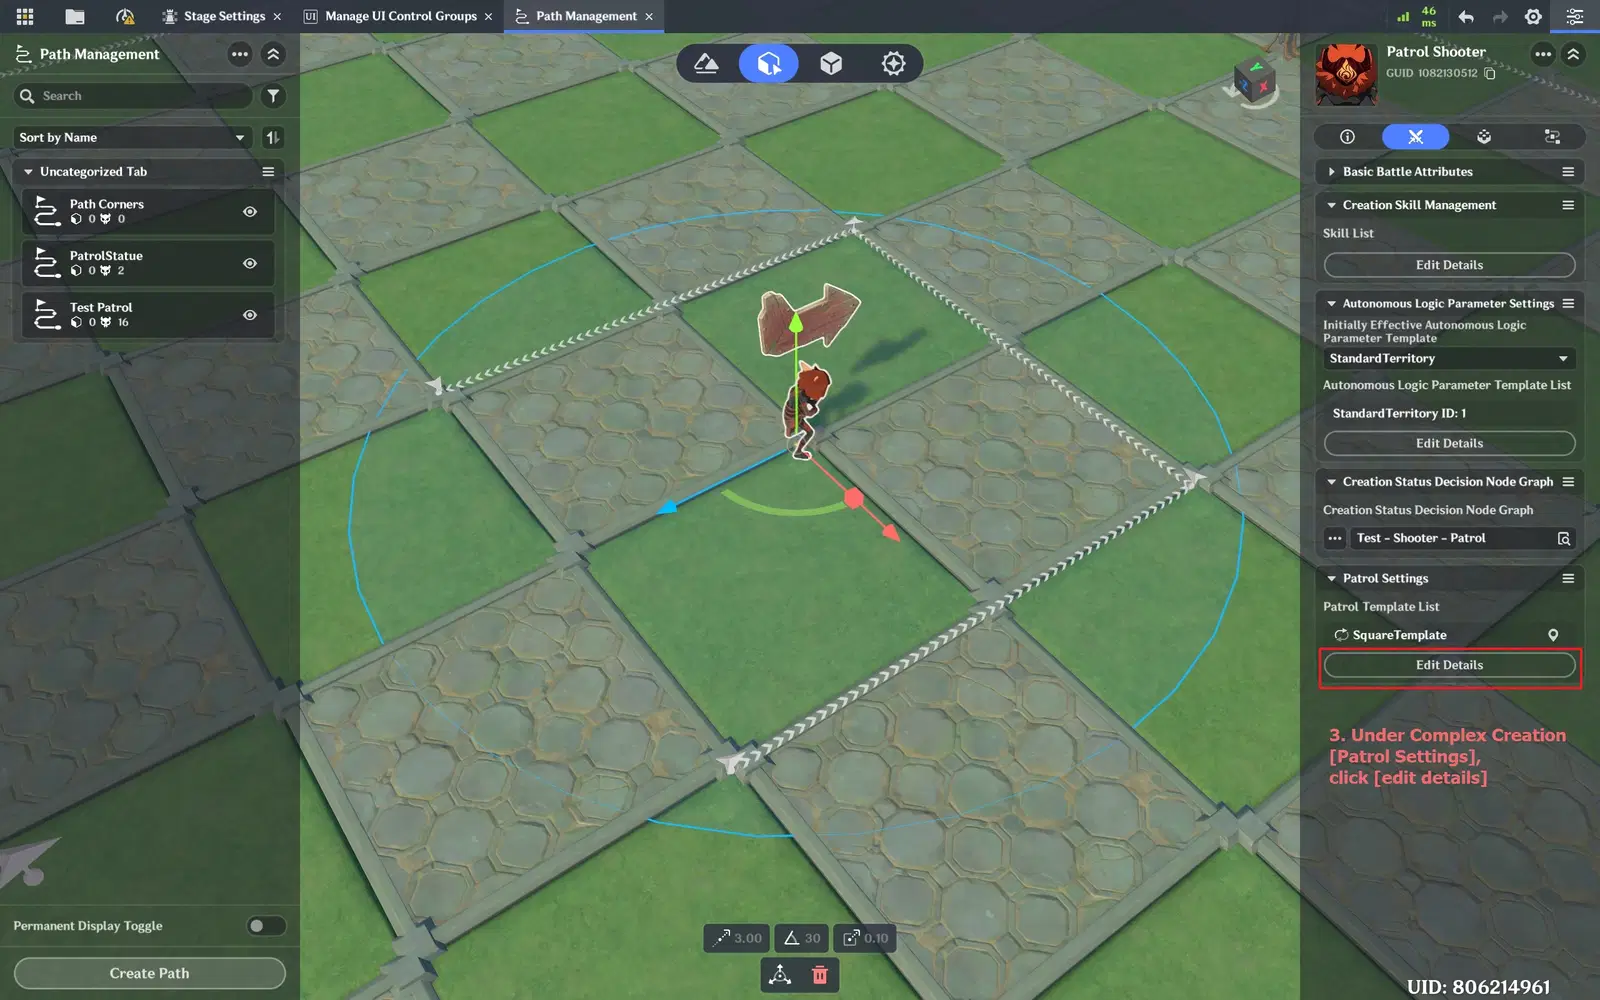
Tactic: Execute Patrol — Create Patrol Template (Part 3)
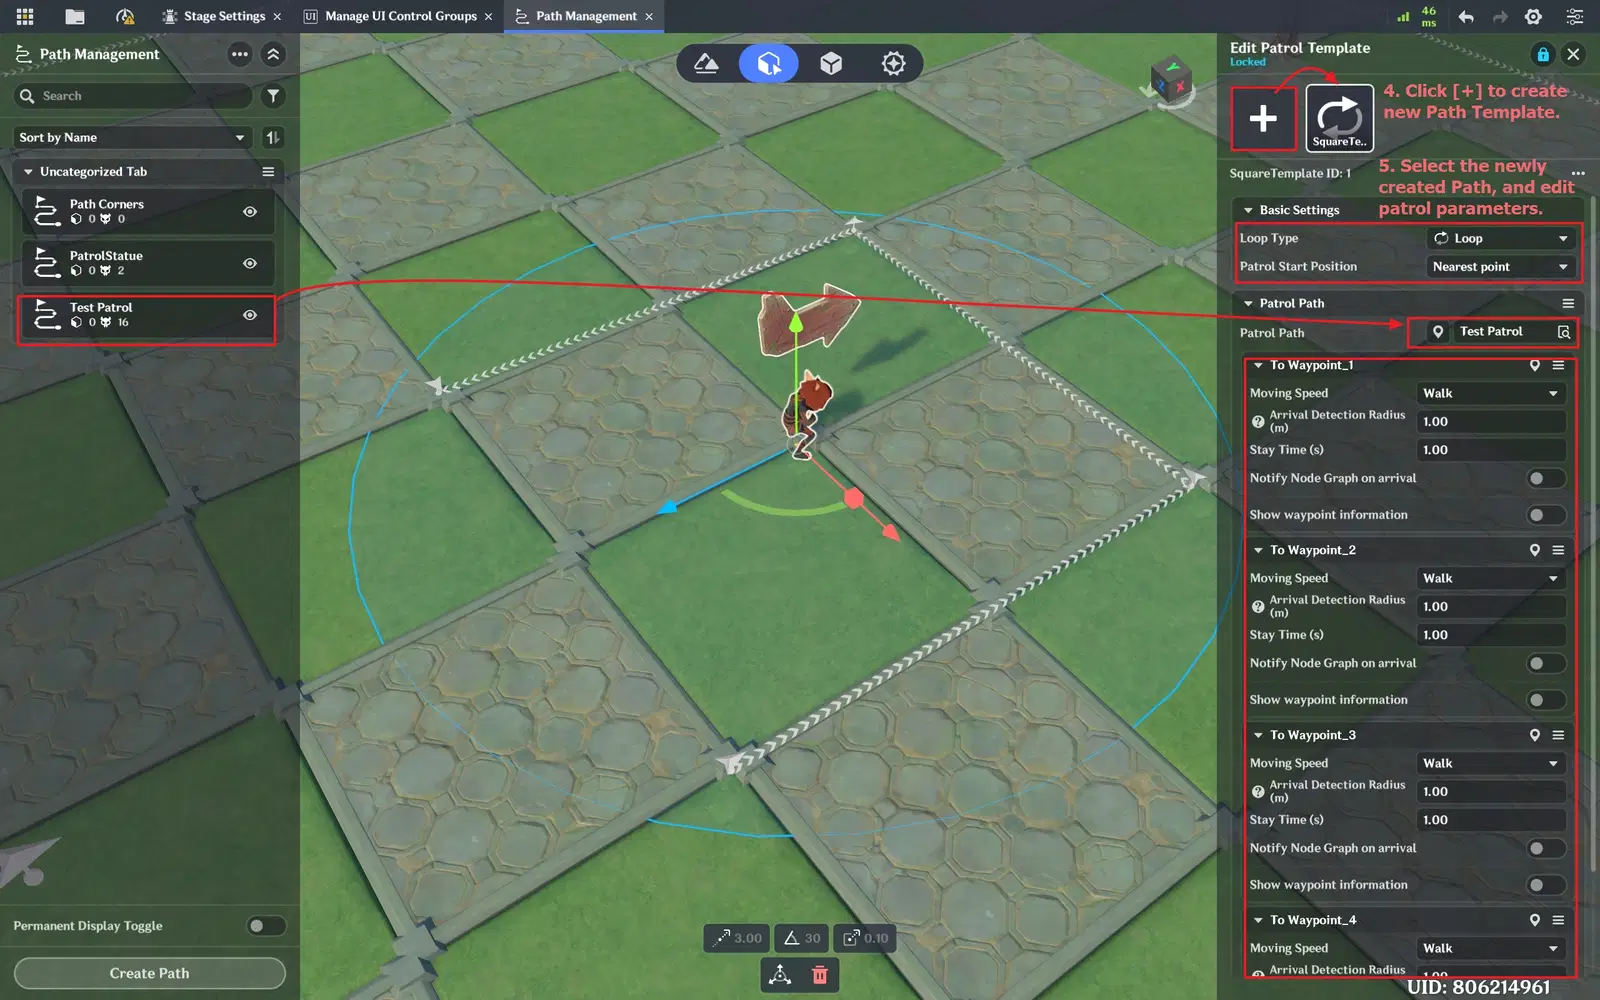
Tactic: Execute Patrol — Create Patrol Template (Part 4)
Tactic Notable Options
- You can Set end point as spawn point.
(This affects the spawn point used by [Tactic: Ground Idle Roaming] and [Tactic: Return to Spawn Point After Leaving Battle]).
Tactic Fail Execution Conditions
- If the Patrol Template is not configured correctly, the tactic may route to [Failed Execution].
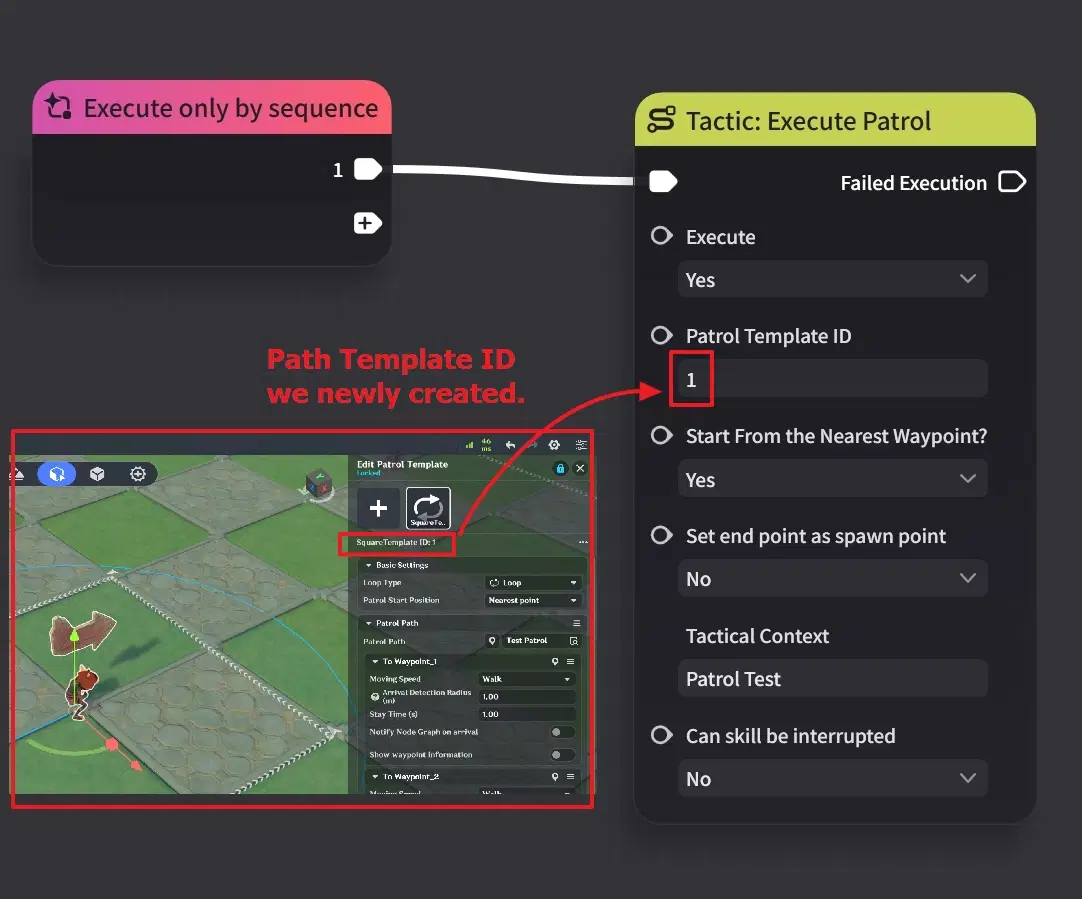
Tactic: Execute Patrol — Parameters
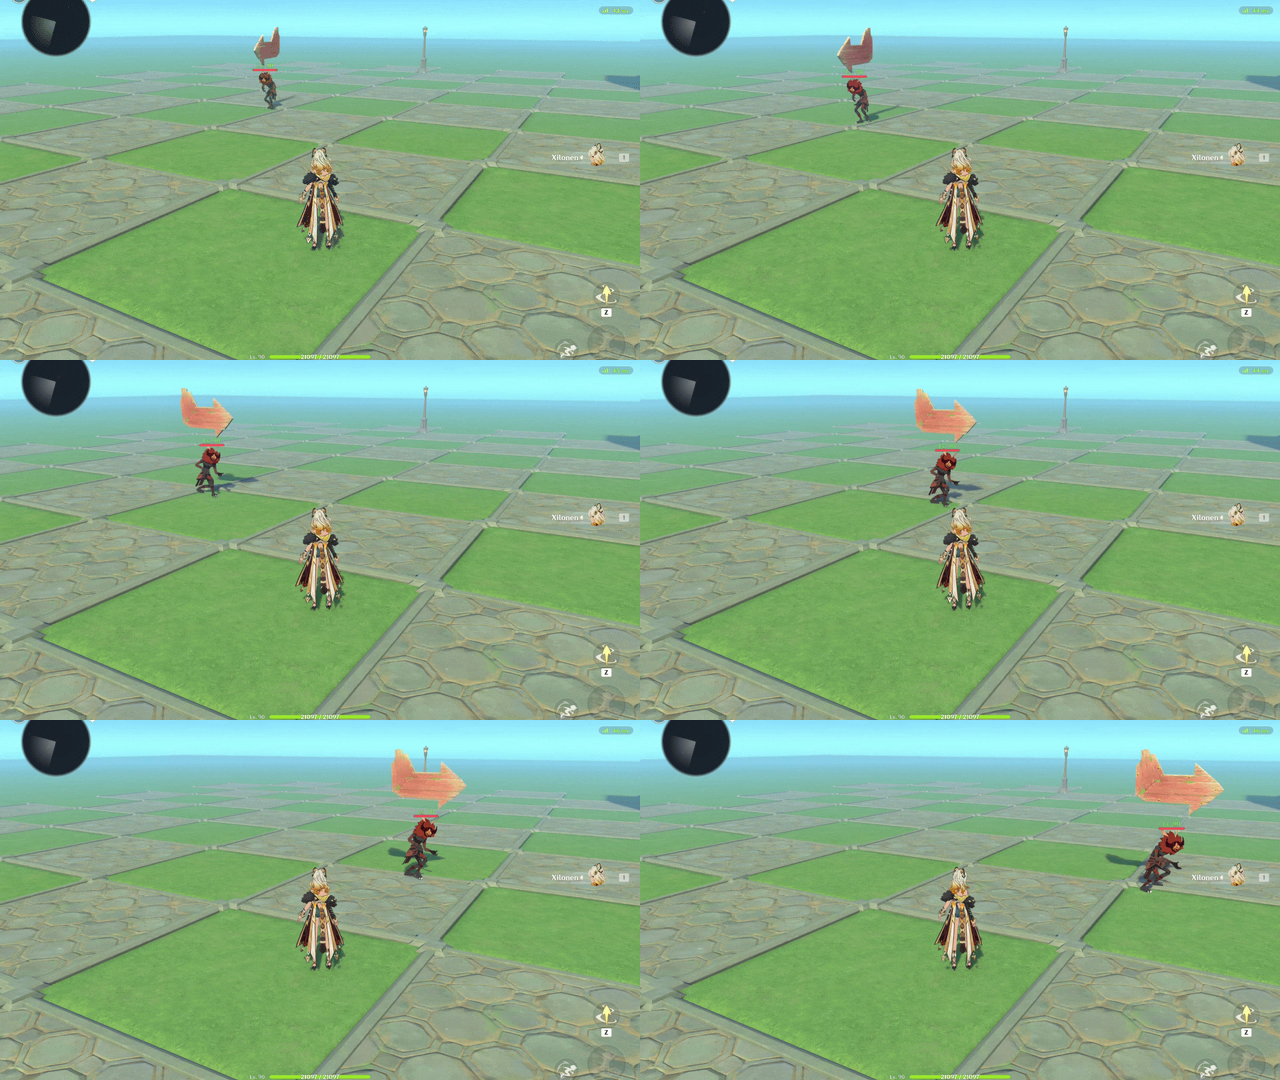
Tactic: Execute Patrol — Example
Move Tactics
(Tactic: Move to the Target Position)
(Tactic: Move to the Target Entity)
Description
The Creation moves toward a specified location or target entity.
Tactic Notable Options
- Movement Speed can be set to [Run] or [Walk].
- You can define an Arrival Detection Range:
- A location is considered successfully reached when the distance between the Creation and the target location is smaller than the Arrival Detection Range.
Note: The Arrival Detection Range is recommended to be greater than 1 (the value depends on the Creation's size and Creation's animation movement distance). Otherwise, the Creation may never successfully reach the target location.
Tactic Fail Execution Conditions
- If the Creation is already within the target range, execution routes to [Failed Execution].
- If the Creation does not have a valid target, execution routes to [Failed Execution].
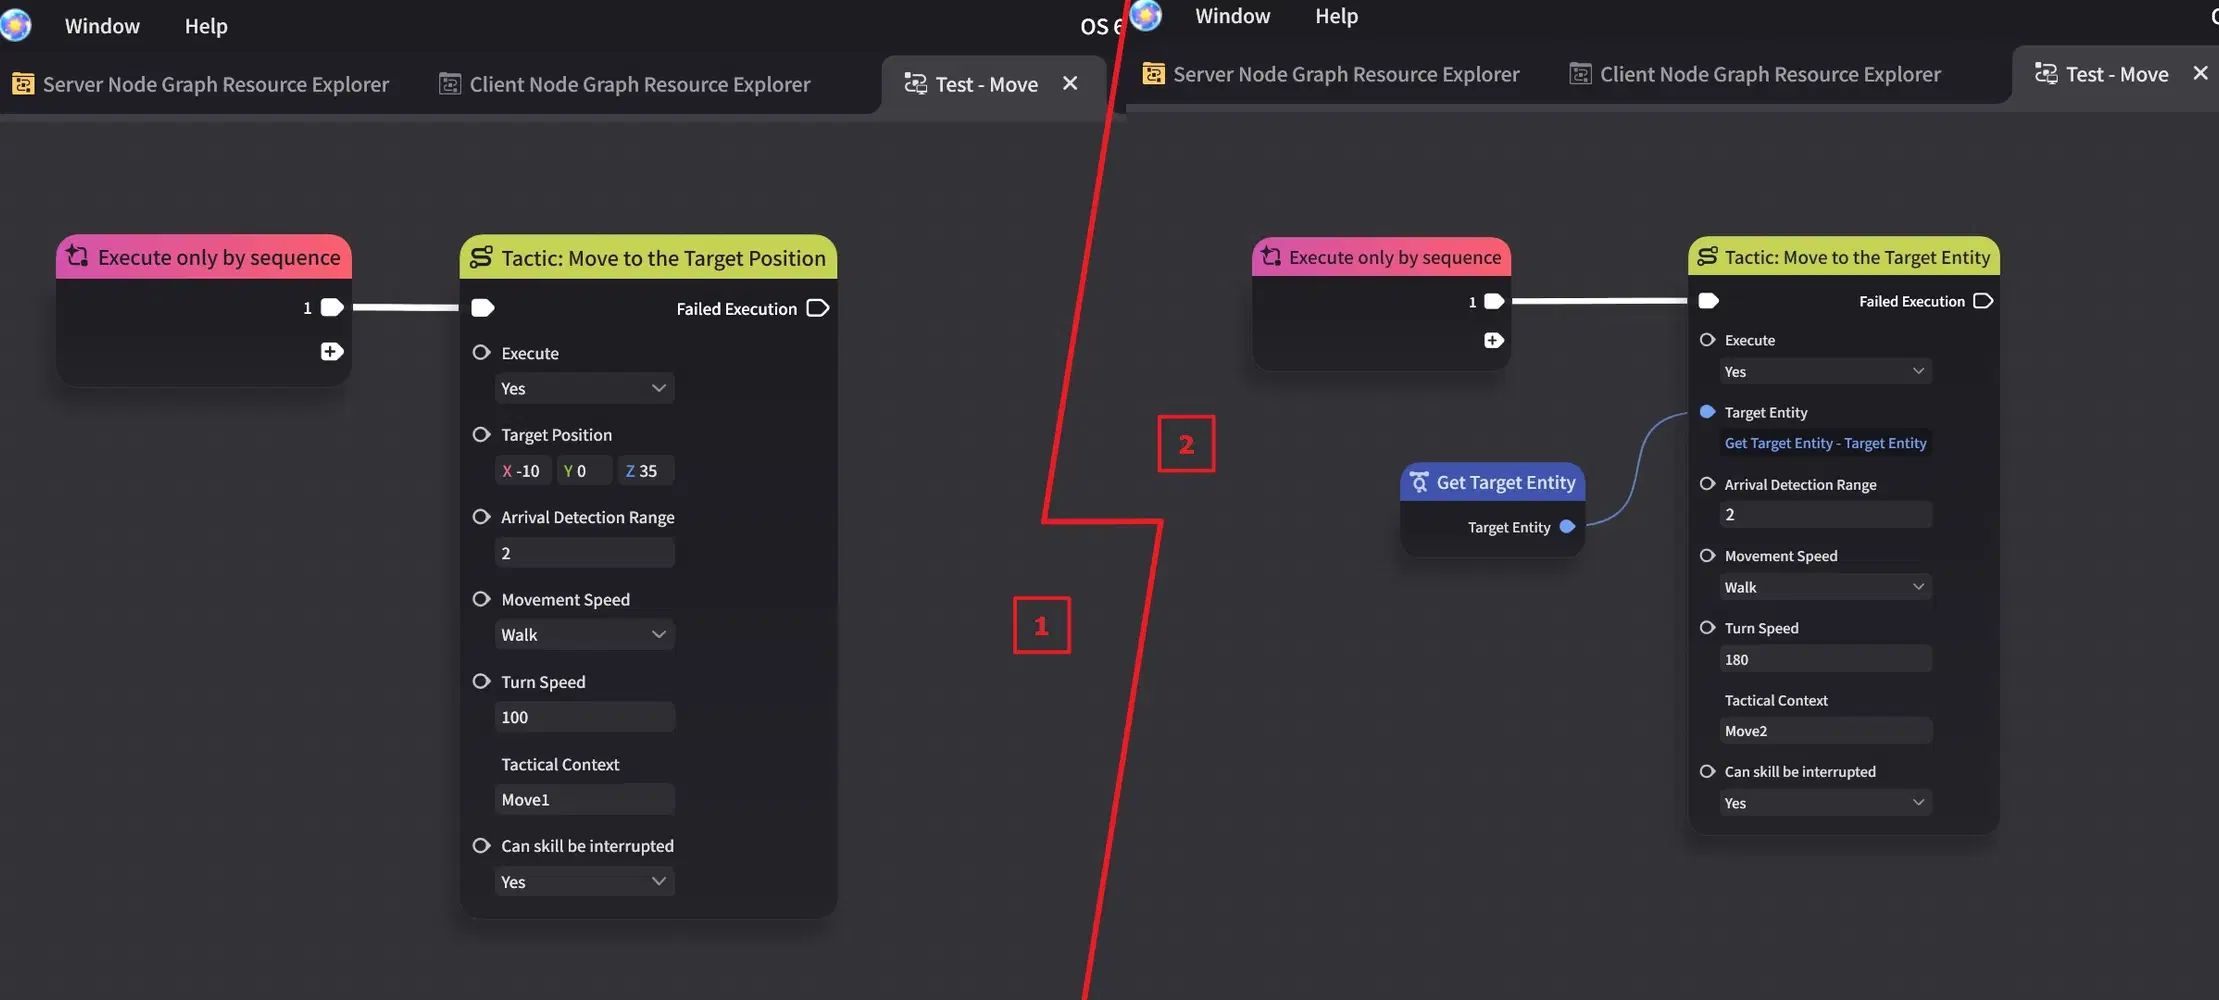
Move Tactics — Parameters
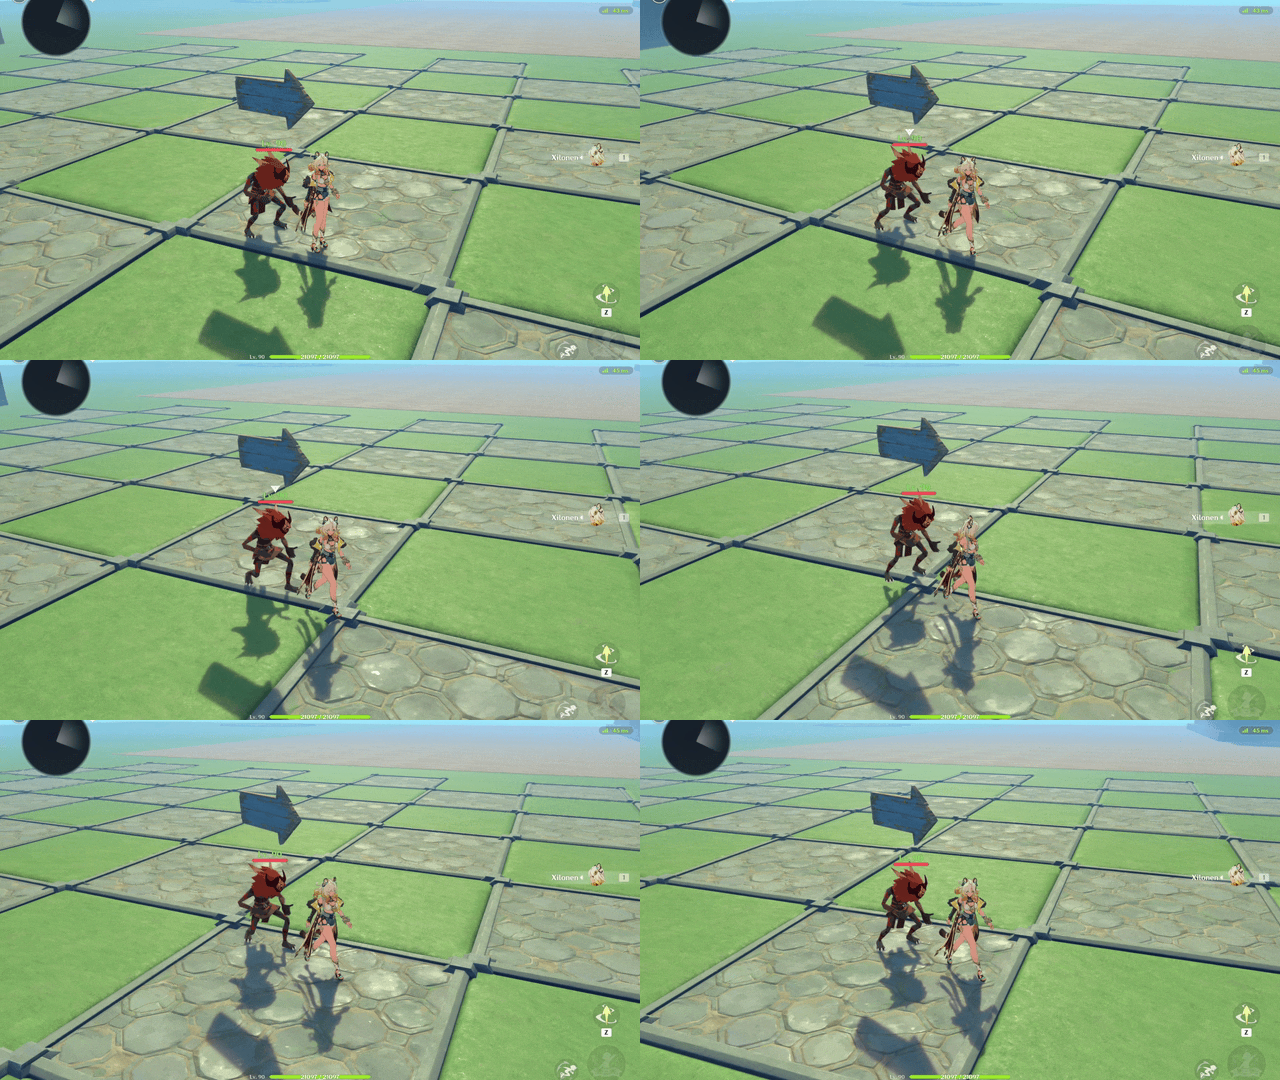
Tactic: Move to the Target Entity — Example
Rotate Tactics
(Tactic: Rotate by Specified Angle)
(Tactic: Rotate to the Specified Direction)
(Tactic: Rotate to the Target Entity)
Description
The Creation rotates by a specified angle, or toward a specified orientation, or toward a target entity.
Tactic Notable Options
- You can enable if Creations Use Rotation Animation.
- You can define Horizontal Rotation Angular Velocity:
- (The unit seems to be measured in degrees per second.)
- If the value is set to 0 or a negative number, the rotation happens instantly.
- For [Tactic: Rotate by Specified Angle], you can define Specified Angle:
- If the value is positive, the Creation rotates clockwise.
- If the value is negative, the Creation rotates counterclockwise.
- 360 is one full circle.
- For [Tactic: Rotate to the Specified Direction], you can define Rotation Direction:
- Direction: [Default], [Clockwise] or [Counterclockwise].
(The [Default] option lets the Creation decide which direction to turn at runtime.)
Tactic Fail Execution Conditions
- If the Creation does not have a valid target, execution routes to [Failed Execution].
- For [Tactic: Rotate to the Specified Direction], if the Creation is already facing toward a specified orientation, execution routes to [Failed Execution].
(For some reason, [Tactic: Rotate by Specified Angle] and [Tactic: Rotate to the Target Entity] do not route to [Failed Execution], even when the Creation completes the tactic actions.)
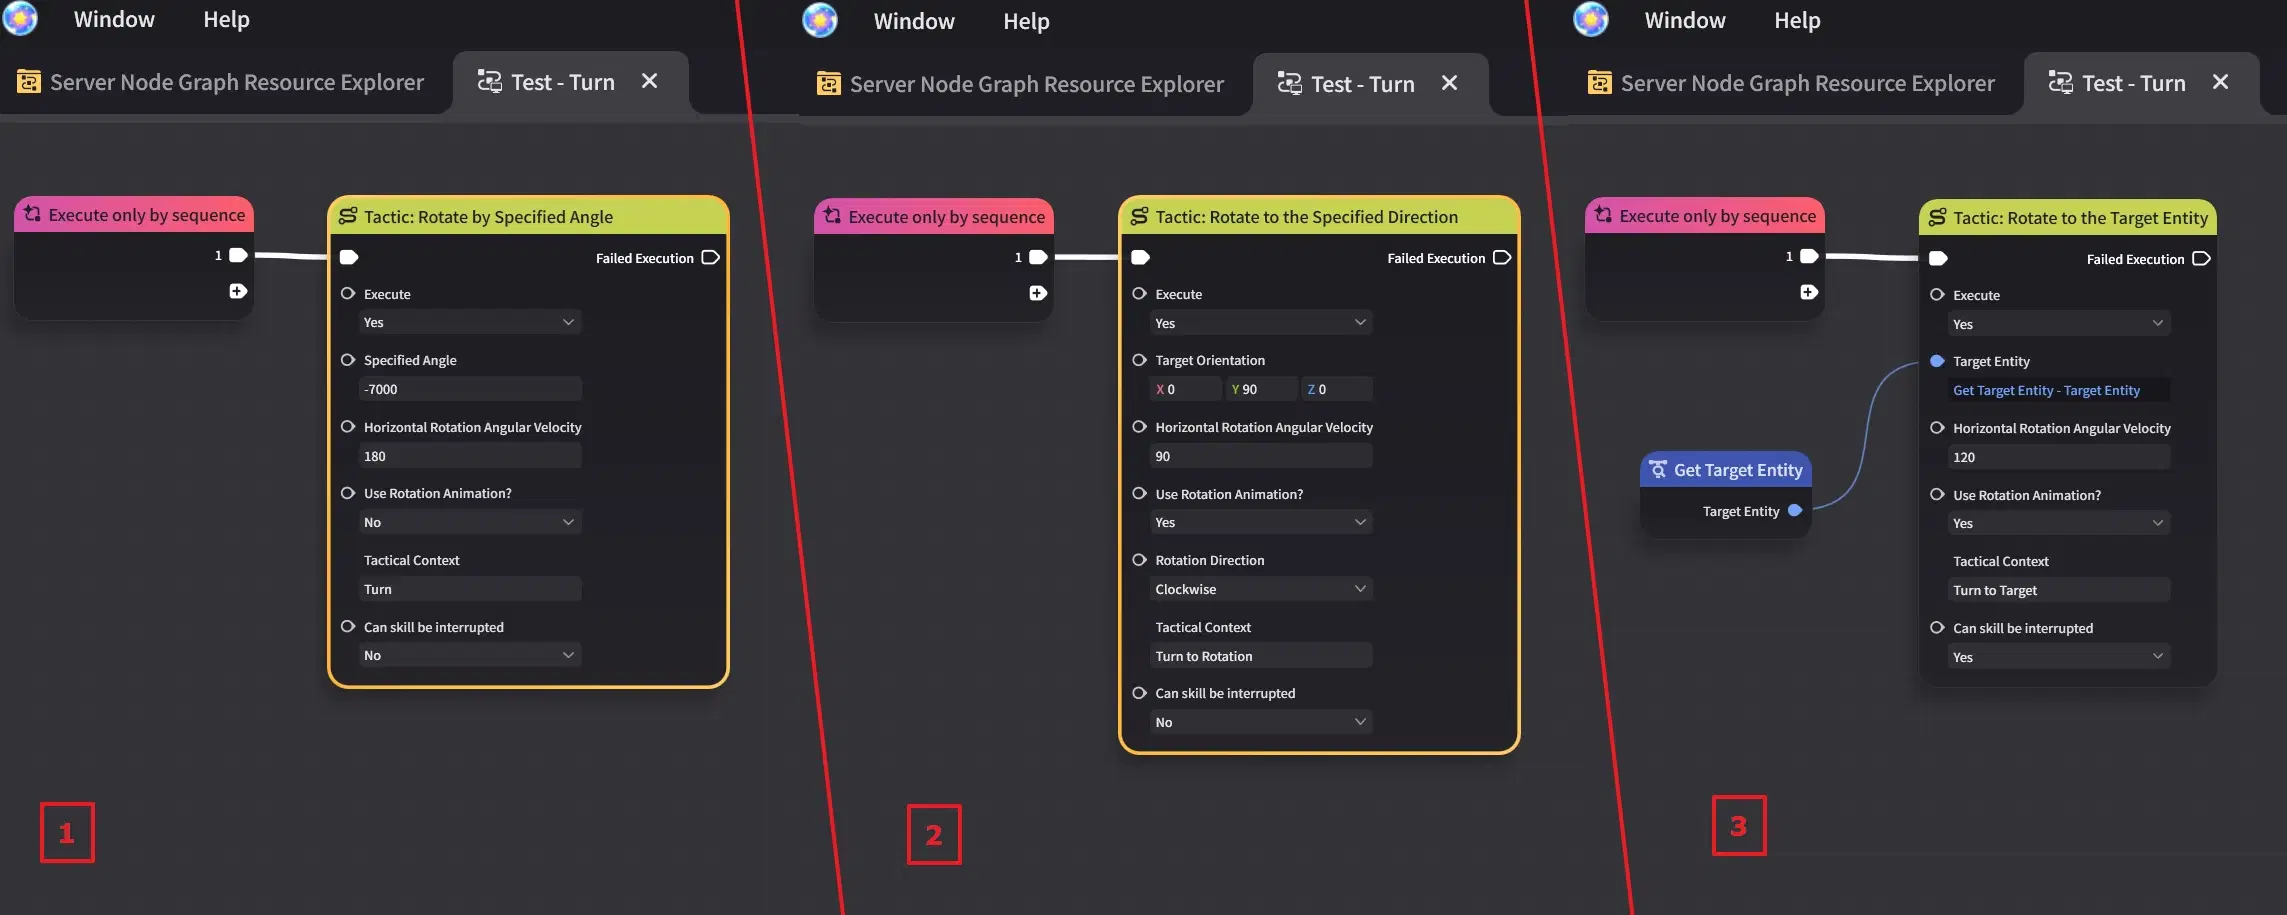
Rotate Tactics — Parameters
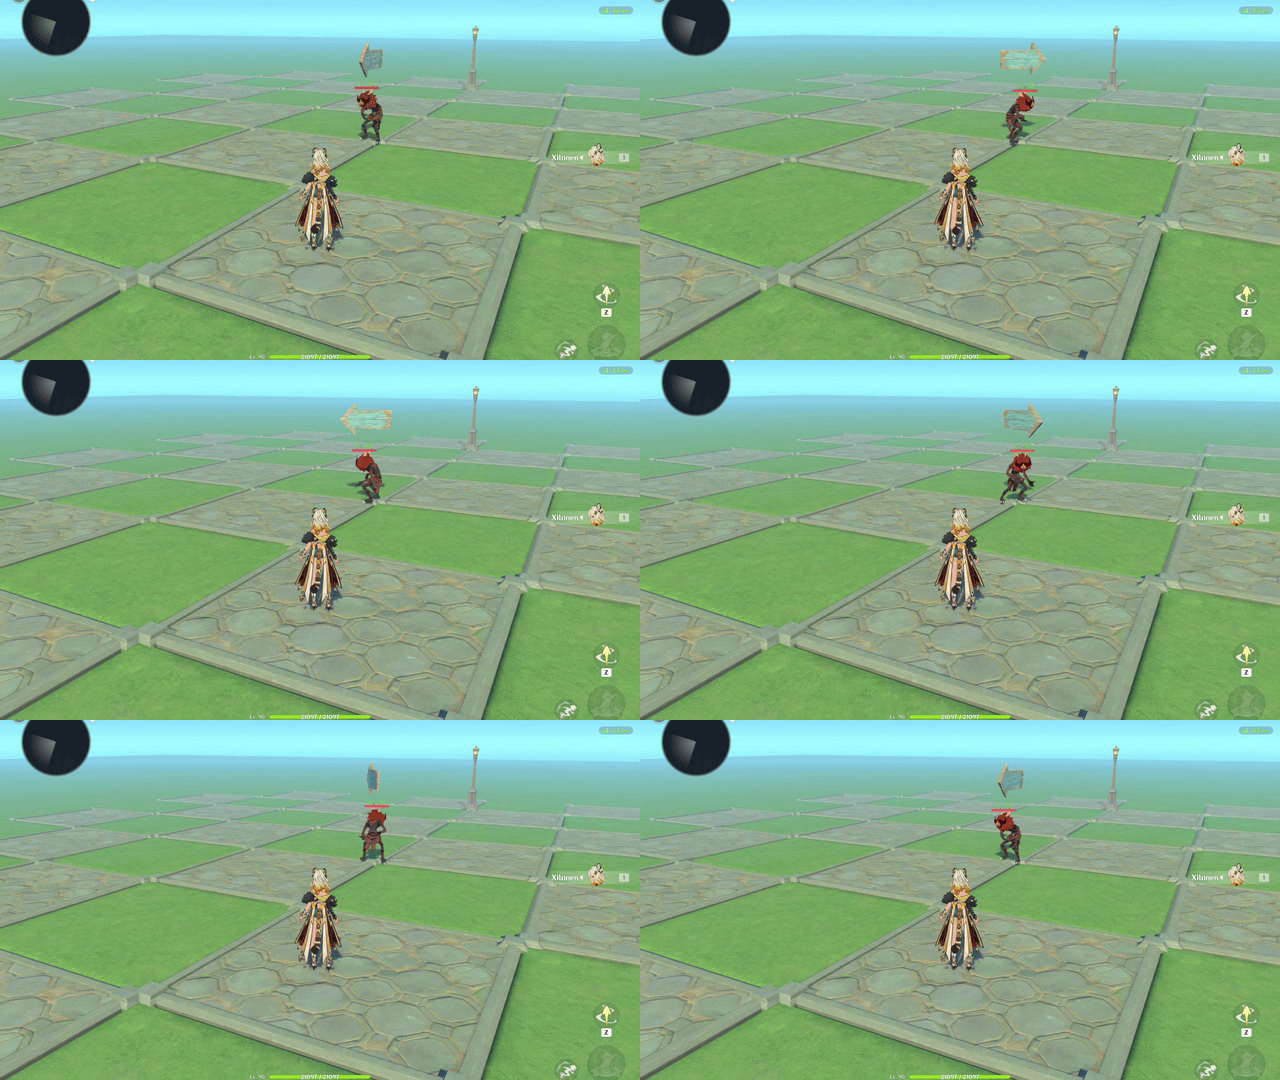
Tactic: Rotate by Specified Angle — Example (Rotate Counterclockwise)
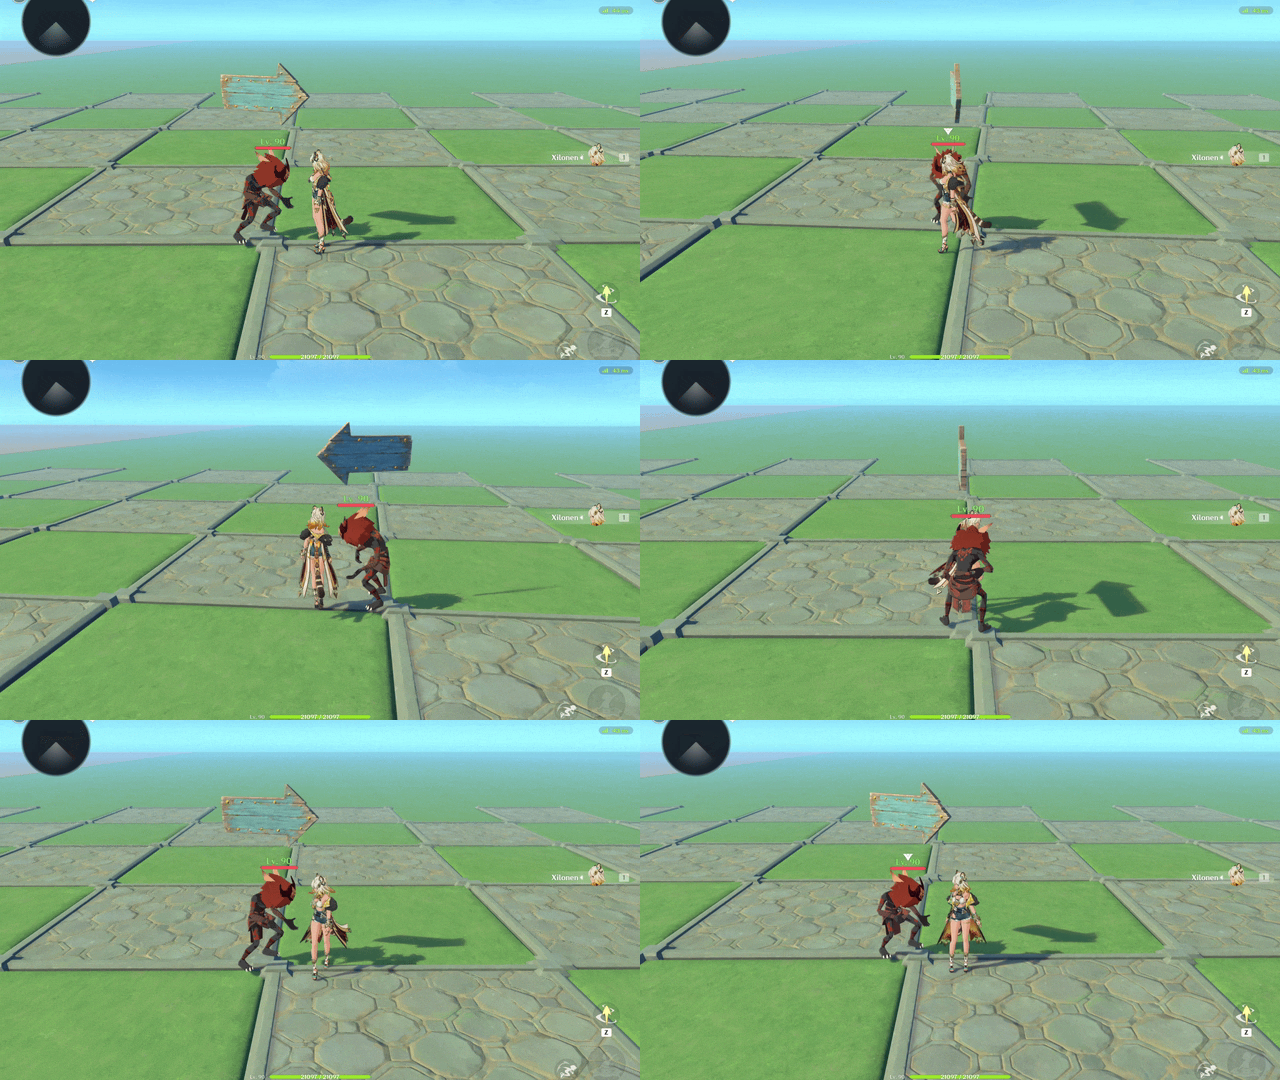
Tactic: Rotate to the Target Entity — Example
Tactic: Stand Still
Description
The Creation remains stationary.
Tactic Notable Options
- (No special options)
Tactic Fail Execution Conditions
- (This tactic should execute successfully under normal conditions)
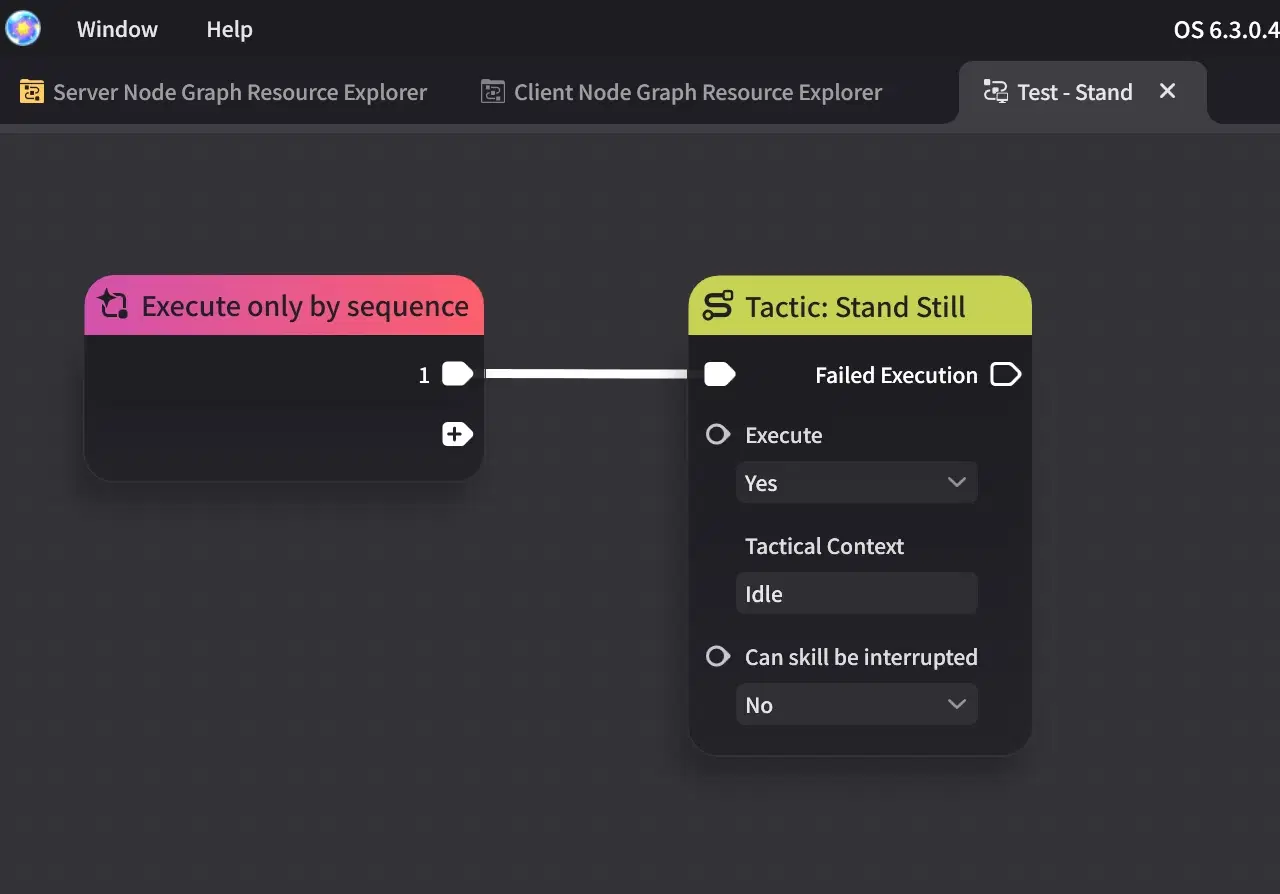
Tactic: Stand Still — Parameters
Tactic: Ground Pursuit
Description
When the Creation has a valid target, it chases the target.
Tactic Notable Options
- You can define Pursuit Trigger Distances:
- Distances are measured between the Creation and the target.
- Define the Minimum Pursuit Trigger Distance and Maximum Pursuit Trigger Distance.
The Creation starts pursuing the target when it is within this range.
- Additionally, you can configure an Inner Ring Radius:
Between [Minimum Pursuit Trigger Distance] and [Inner Ring Radius], the Creation uses Inner Ring Pursuit Speed.
Between [Inner Ring Radius] and [Maximum Pursuit Trigger Distance], the Creation uses Outer Ring Pursuit Speed.
- When the Creation activates this tactic, it continues pursuing the target until reaching it, even outside the range defined by [Minimum Pursuit Trigger Distance] and [Maximum Pursuit Trigger Distance].
- To stop pursuing:
- You can define a Single Pursuit Duration:
- If the value is set to 0 or a negative number, the behavior is the same as continuing to pursue the target.
- If the target remains outside the range defined by [Minimum Pursuit Trigger Distance] and [Maximum Pursuit Trigger Distance] for the duration of [Single Pursuit Duration] or less, the Creation stops pursuing.
- Additionally, you can configure a Stop Pursuit Distance.
- If the Creation comes within this distance of the target, it stops pursuing.
- You can configure a Tactical Instance CD:
- When the Creation stops, the tactic enters a cooldown. After the cooldown period, the tactic can be reactivated.
Tactic Fail Execution Conditions
- If the Creation does not have a valid target, execution routes to [Failed Execution].
- If the tactic stops pursuing, execution is routed to [Failed Execution].
- If the tactic is on CD, execution is routed to [Failed Execution].
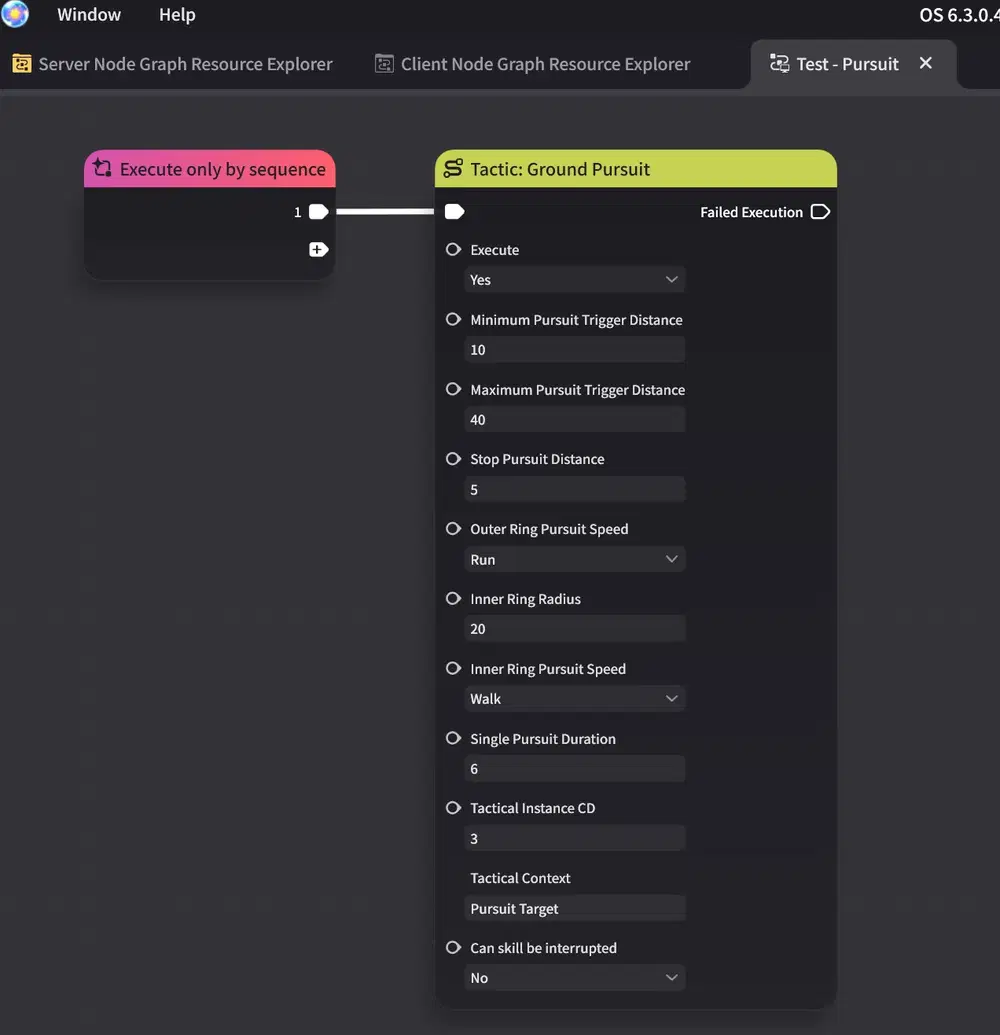
Tactic: Ground Pursuit — Parameters
*In this tactic demos, the Creation's [Autonomous Logic Parameter] has relatively large [Leaving Battle Distance] and [Territory Radius] values.
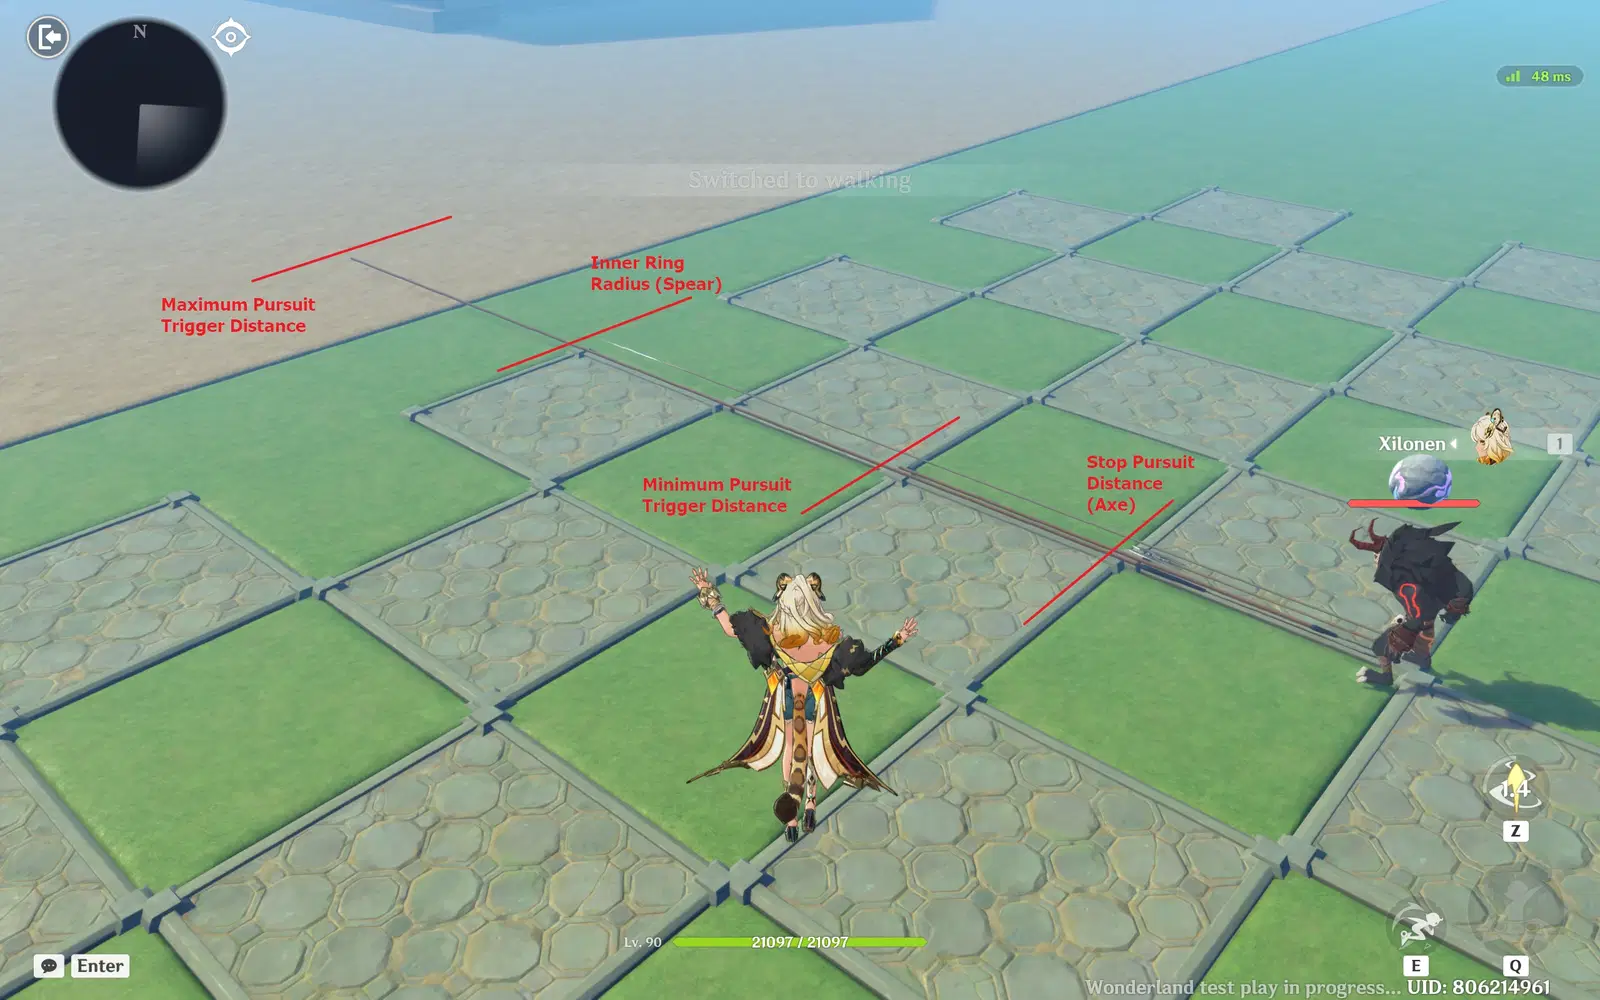
Tactic: Ground Pursuit — Visualizing Parameters Using Decoration Lengths
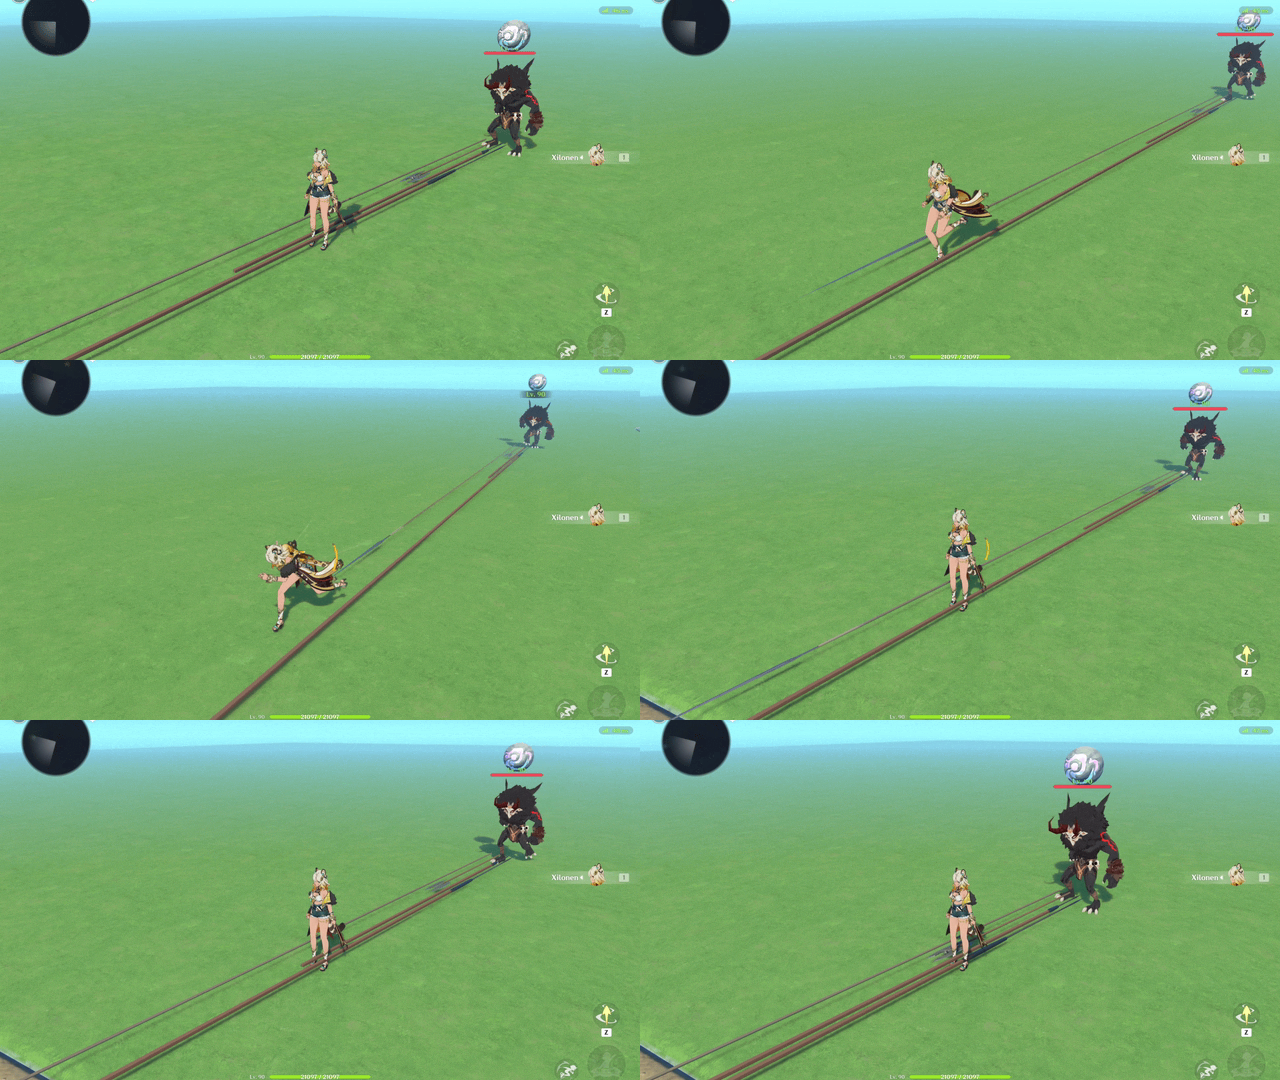
Tactic: Ground Pursuit — Example (Minimum Pursuit Trigger Distance and Inner Ring Radius)
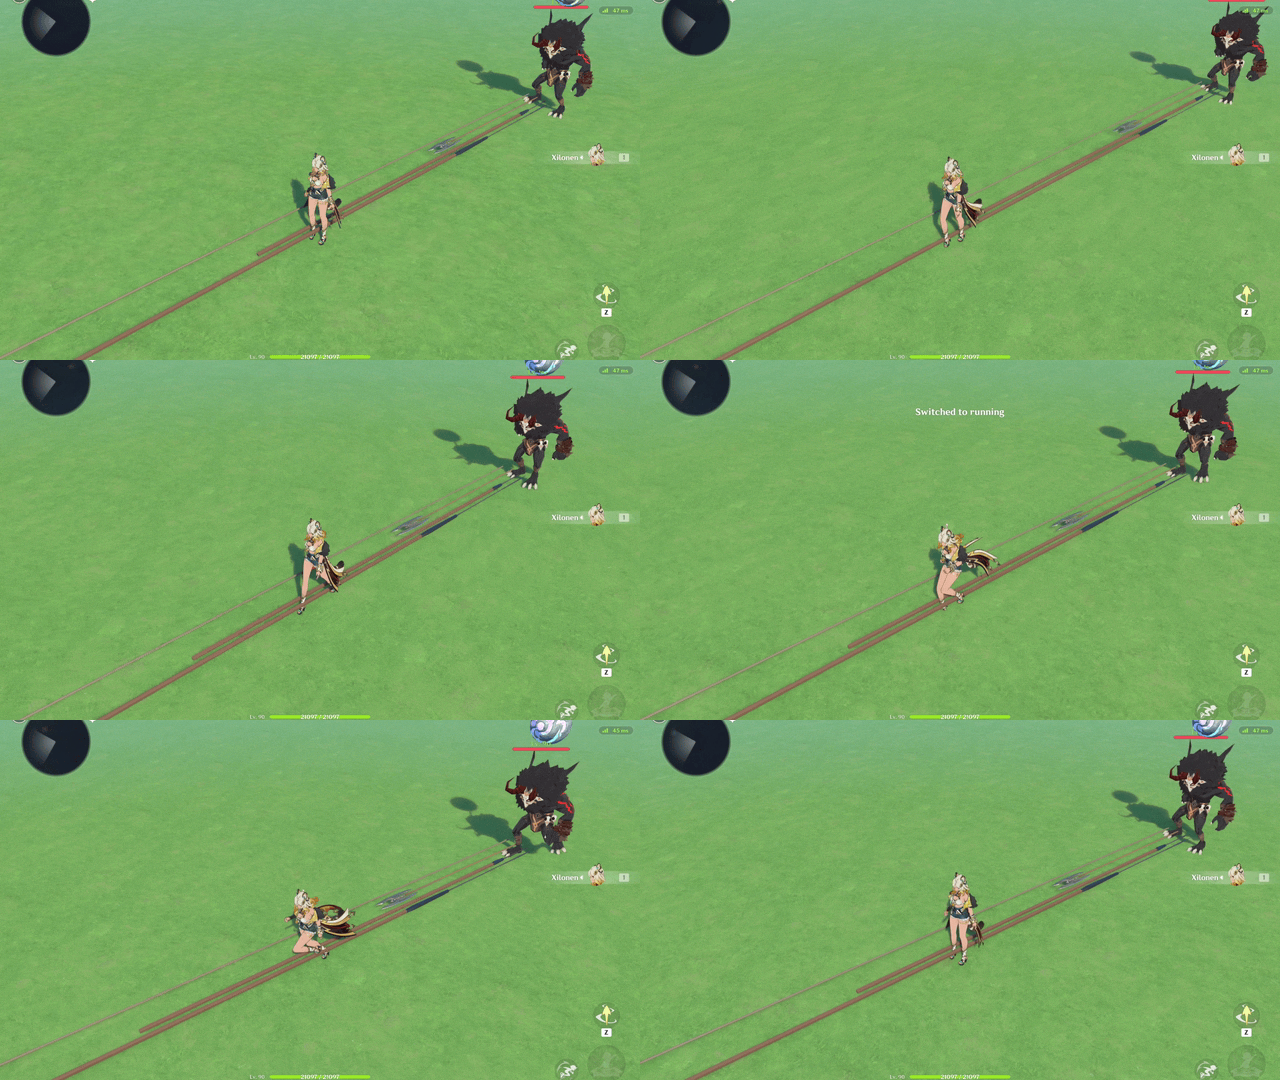
Tactic: Ground Pursuit — Example (Single Pursuit Duration 6s)
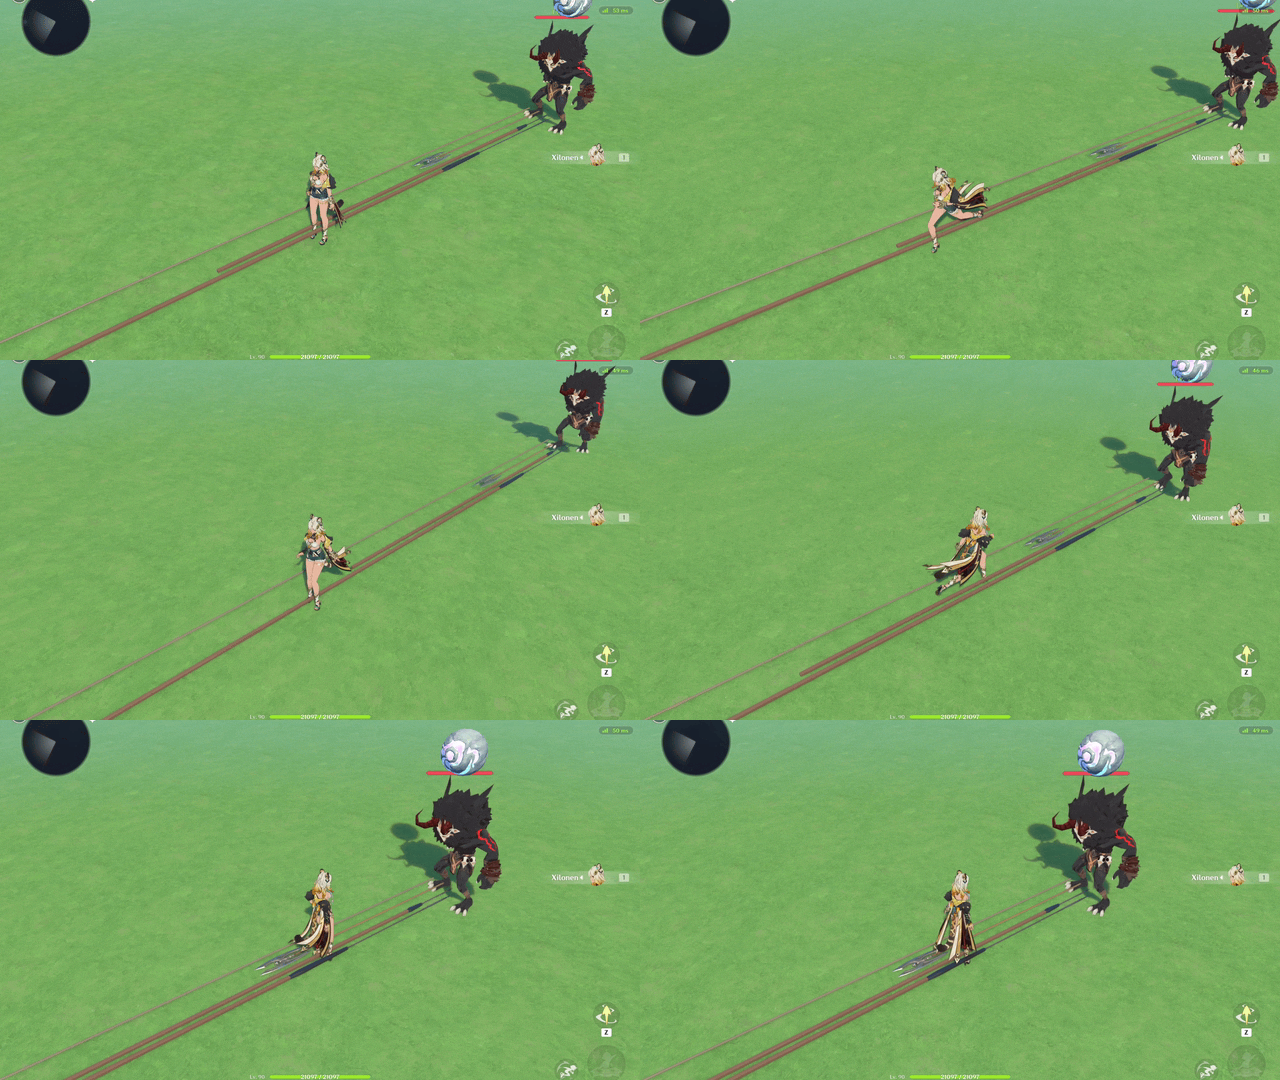
Tactic: Ground Pursuit — Example (Stop Pursuit Distance)
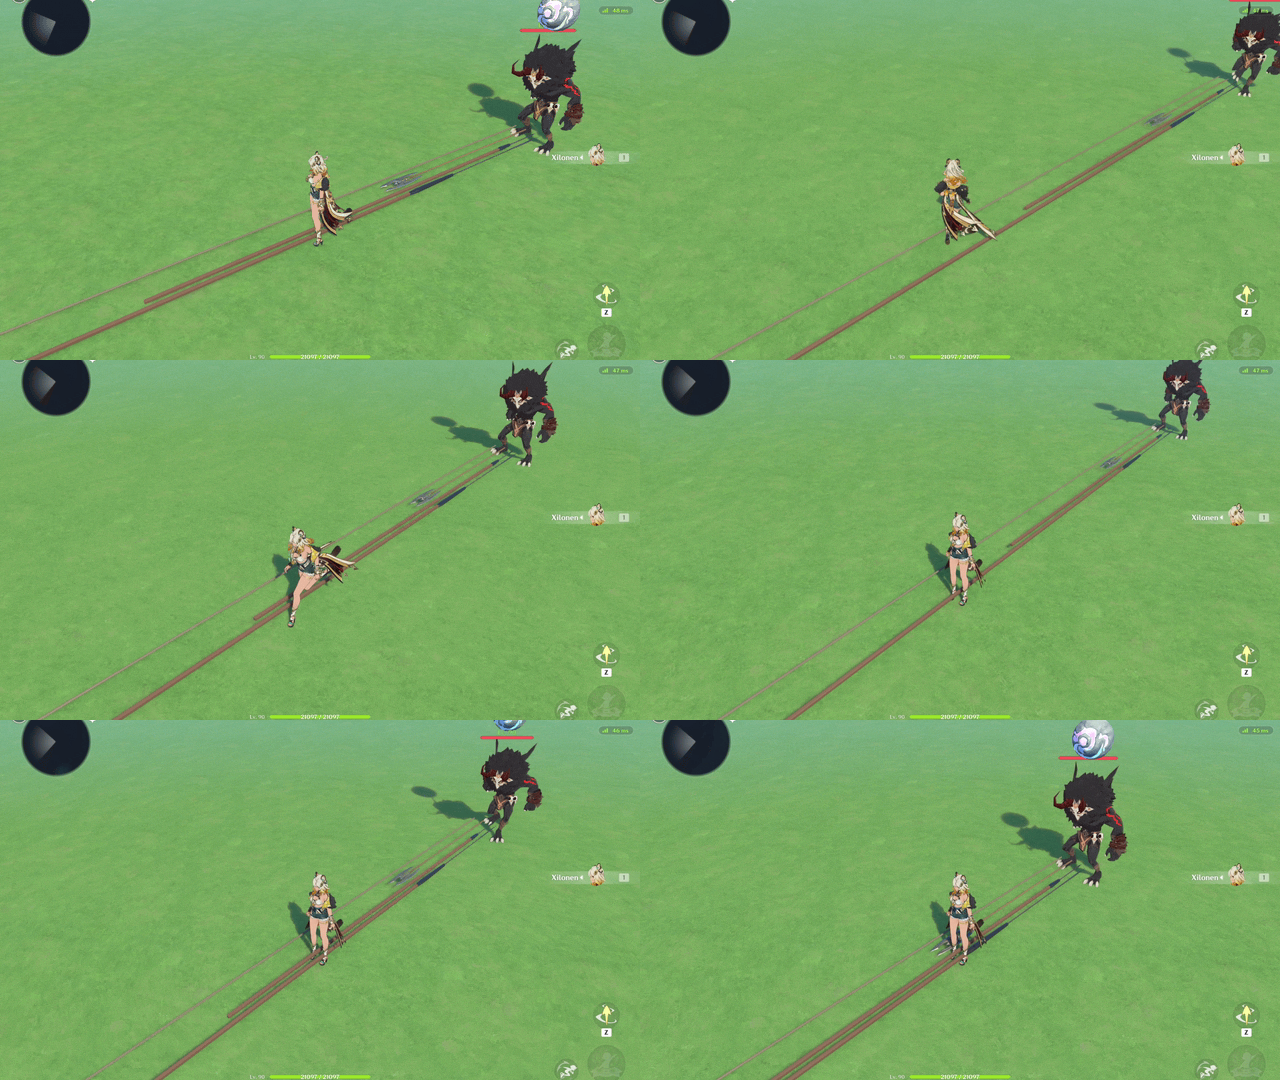
Tactic: Ground Pursuit — Example (Tactical Instance CD 3s)
Tactic: Return to spawn point after leaving battle
Description
When the Creation leaves combat, it will automatically find a path and return to its spawn point.
During this process, the Creation does not accumulate aggro.
Tactic Notable Options
- You can configure Teleport Back to Spawn Point option:
- If the value is [Yes]:
- After leaving combat, if the Creation is farther than Force Teleport Trigger Distance from its spawn point, it is forcibly teleported back.
- After leaving combat, if the Creation does not return within Force Teleport Trigger Time, it is forcibly teleported back.
(Somehow, [Force Teleport Trigger Time] is still effective even when the [Teleport Back to Spawn Point?] option is set to [No])
- You can configure Disable HP recovery after leaving battle:
- If the value is [Yes], the Creation will not restore to full HP upon returning.
- Movement Speed can be set to [Run] or [Walk].
Note: The spawn point can be modified using [Tactic: Execute Patrol].
Tactic Fail Execution Conditions
- The tactic is executed when the Creation leaves combat. In all other cases, execution routes to [Failed Execution].
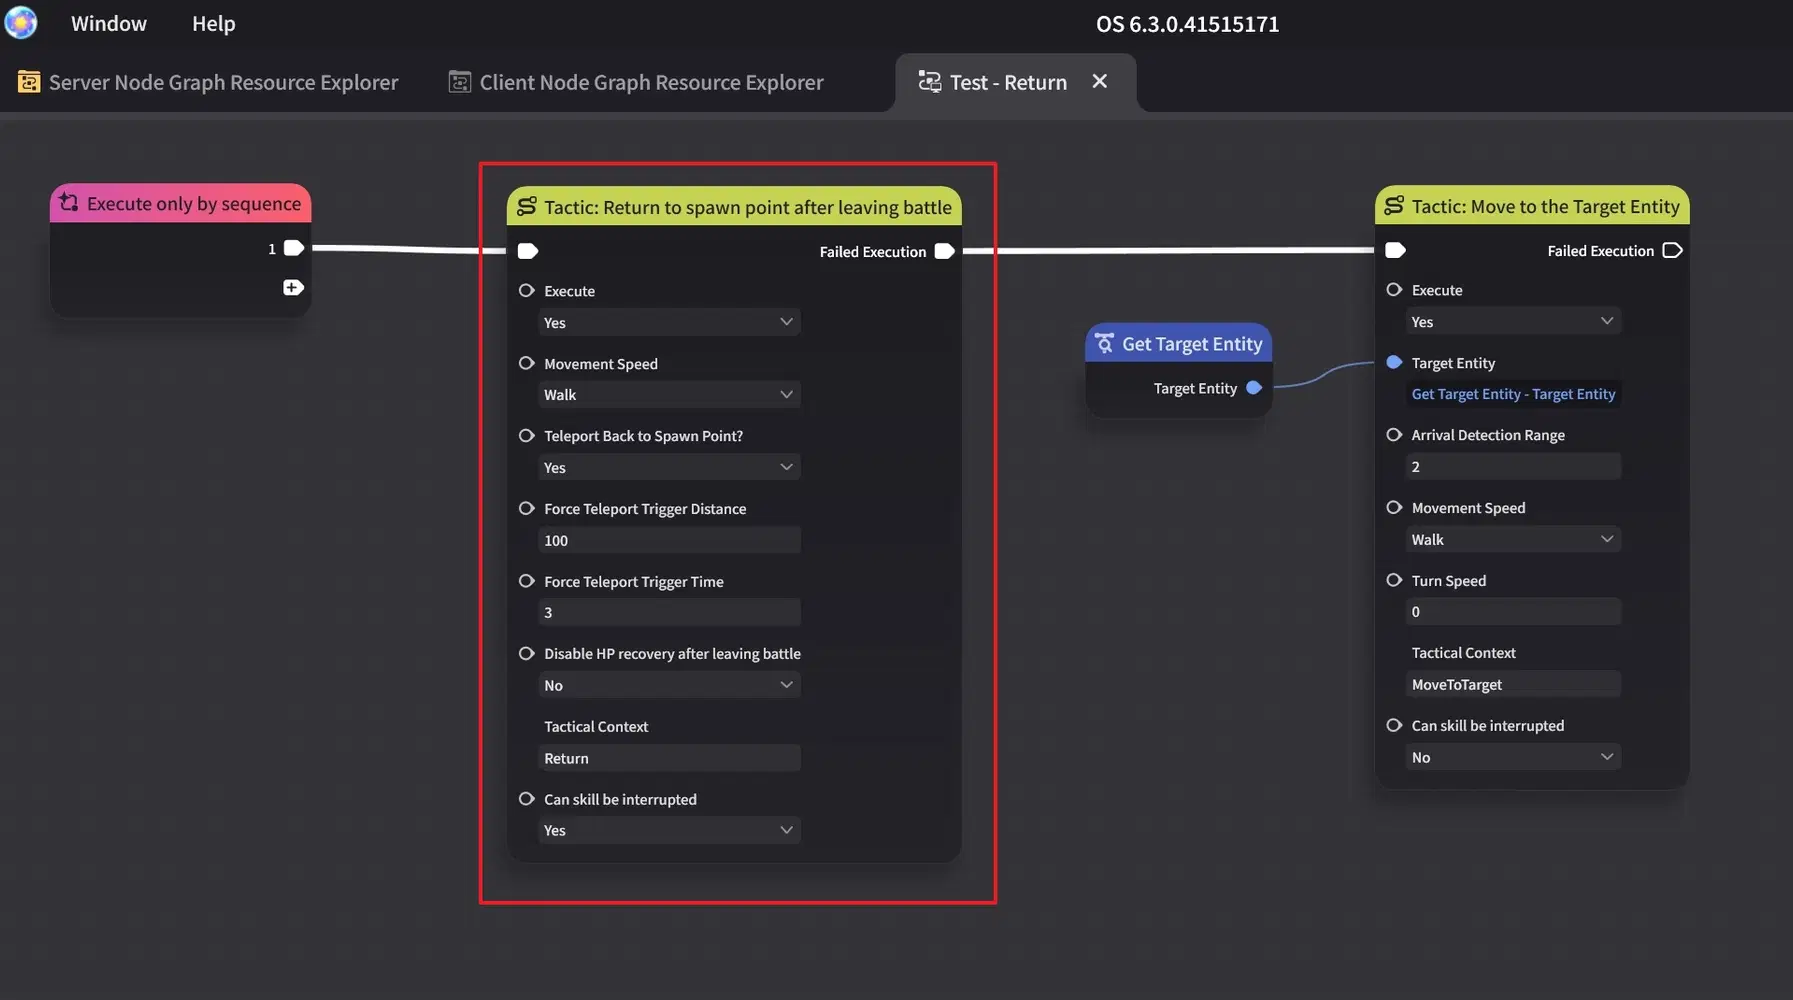
Tactic: Return to spawn point after leaving battle — Parameters
*In this tactic demo, the Creation's [Autonomous Logic Parameter] has a relatively small [Leaving Battle Distance] and a large [Territory Radius] value.
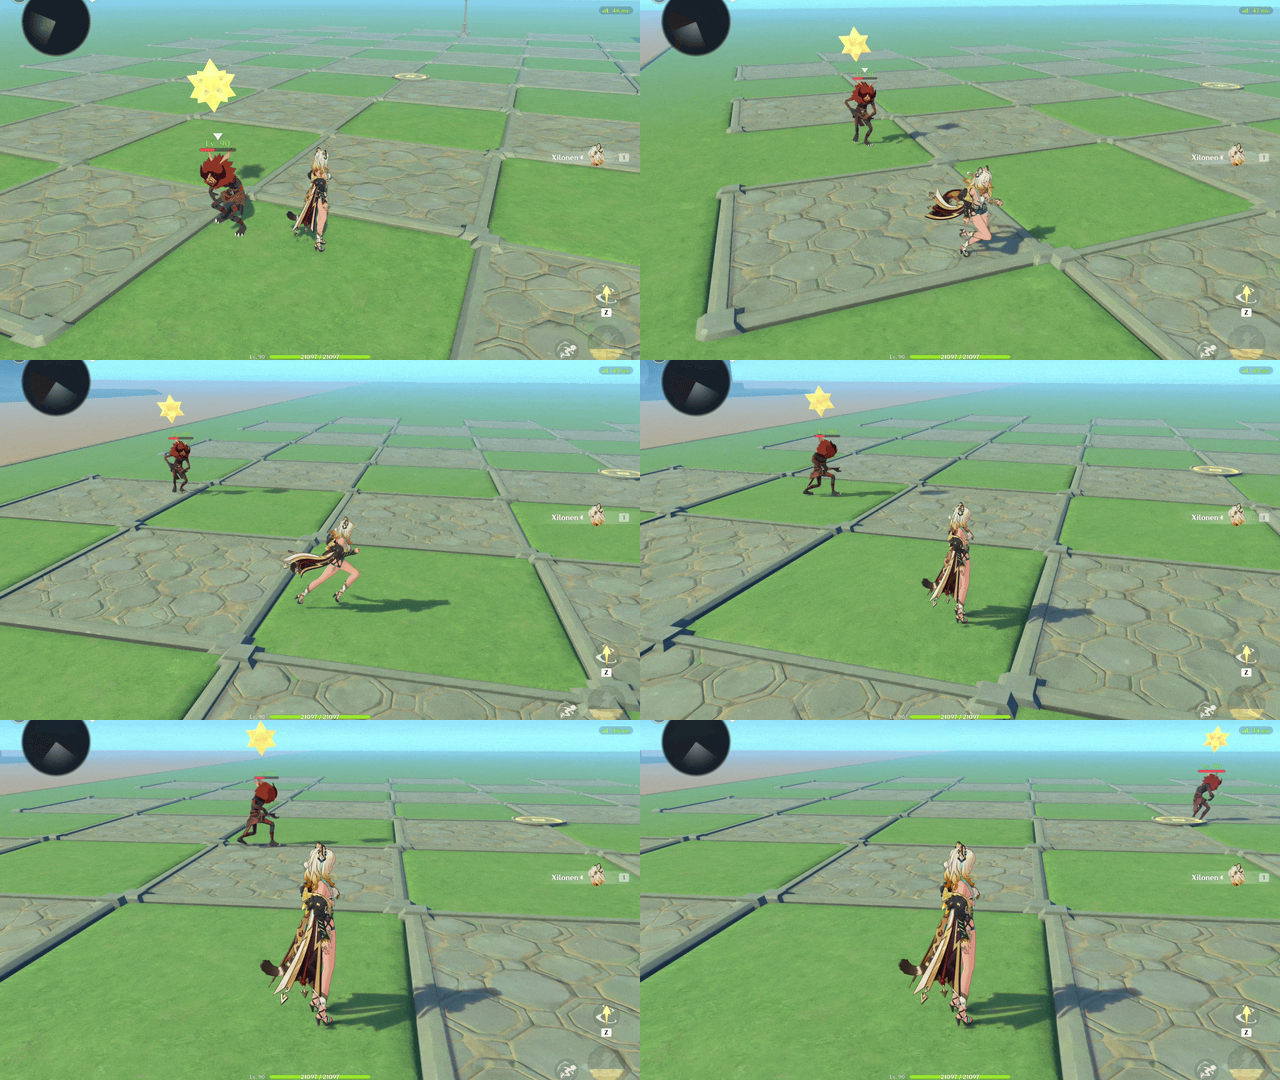
Tactic: Return to spawn point after leaving battle — Example
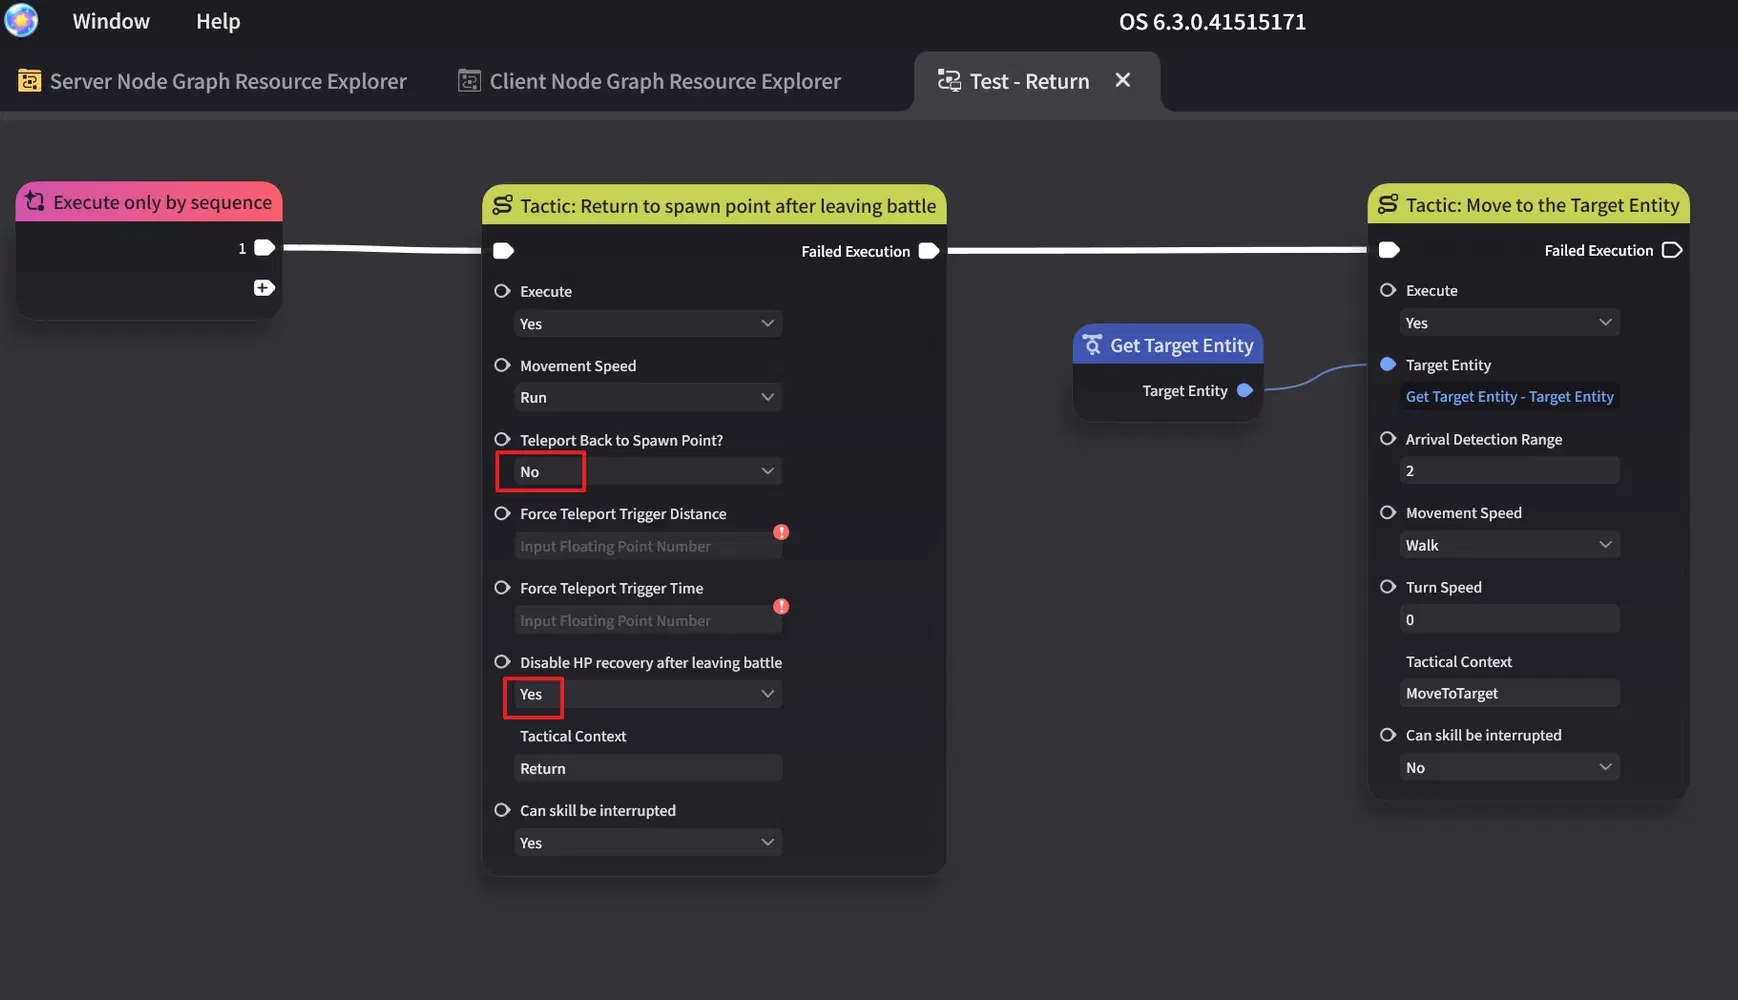
Tactic: Return — Parameter (no [Teleport Back to Spawn Point], and disable [HP recovery])
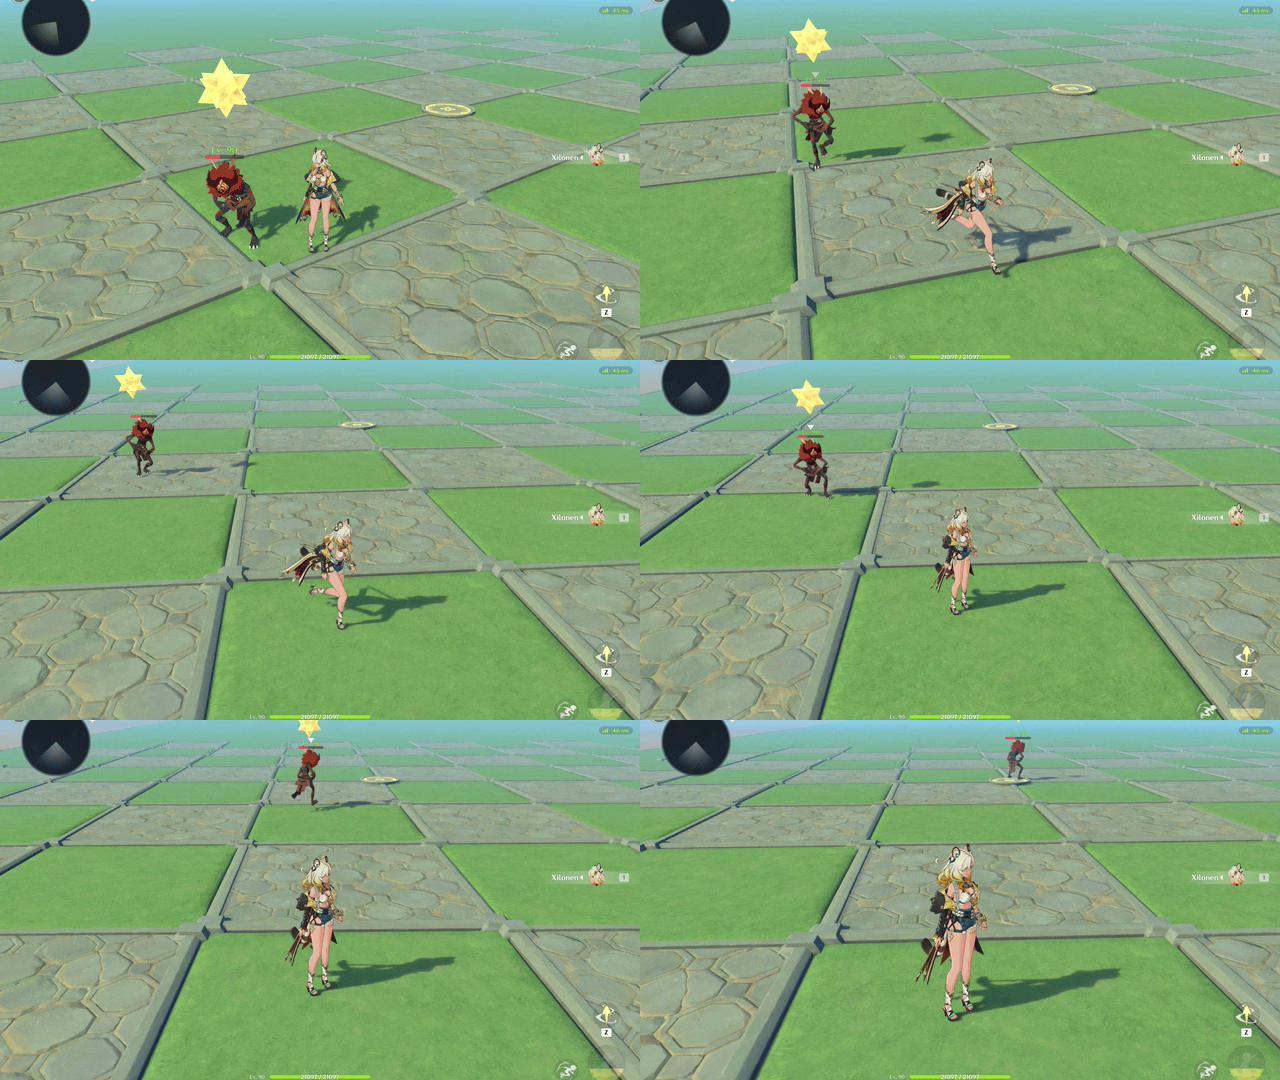
Tactic: Return — Example (no [Teleport Back to Spawn Point], and disable [HP recovery])
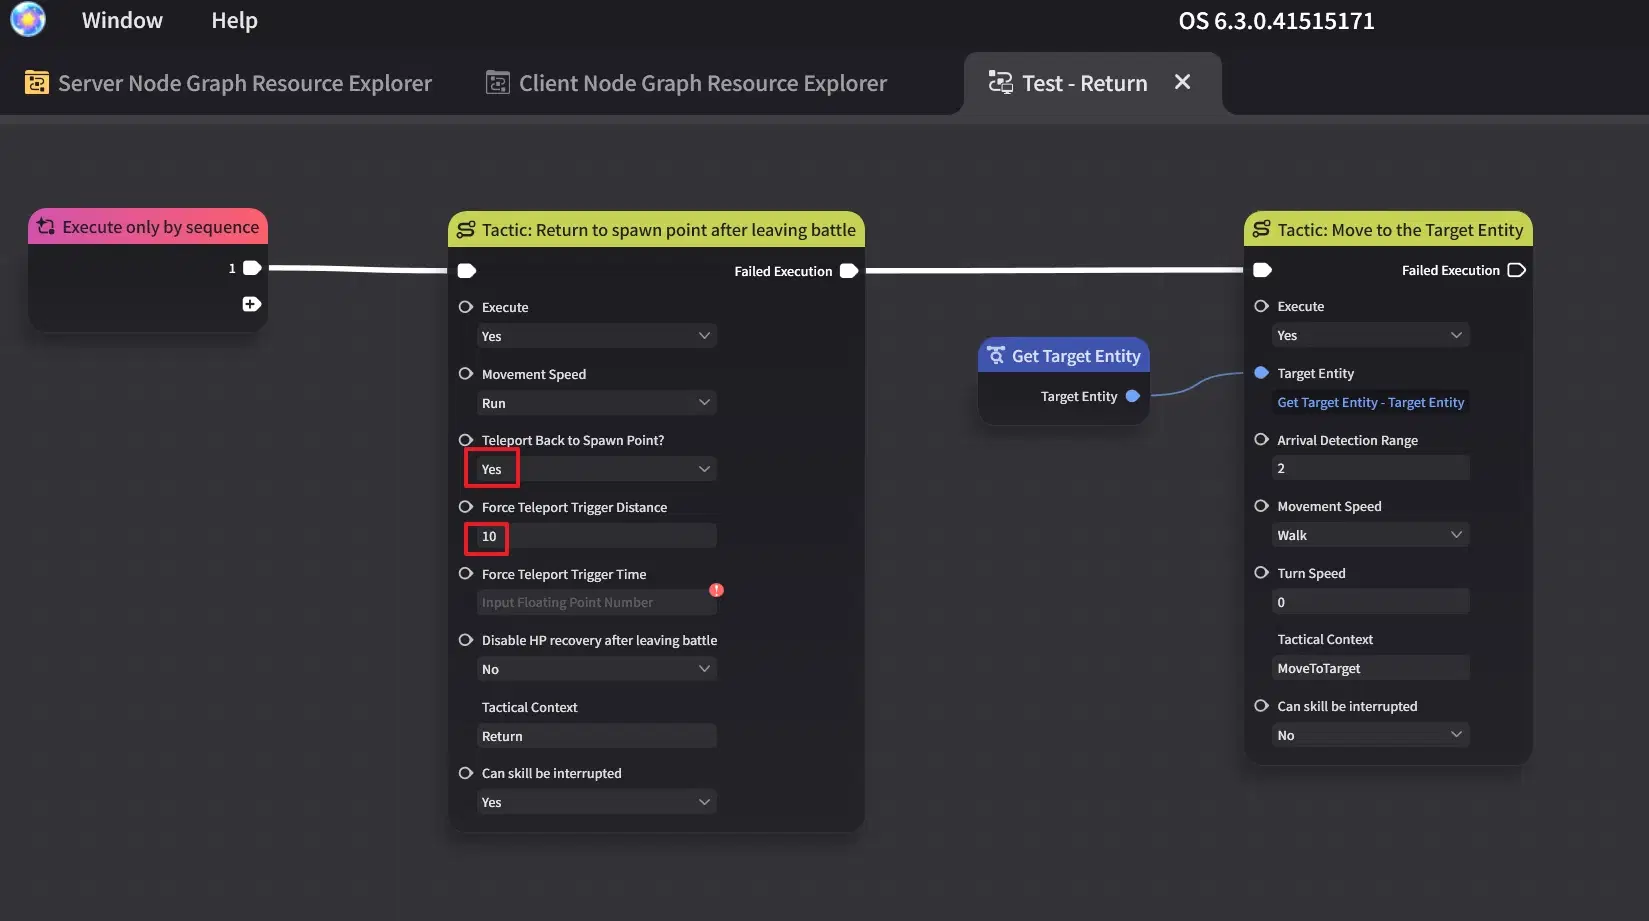
Tactic: Return — Parameters (with [Force Teleport Trigger Distance])
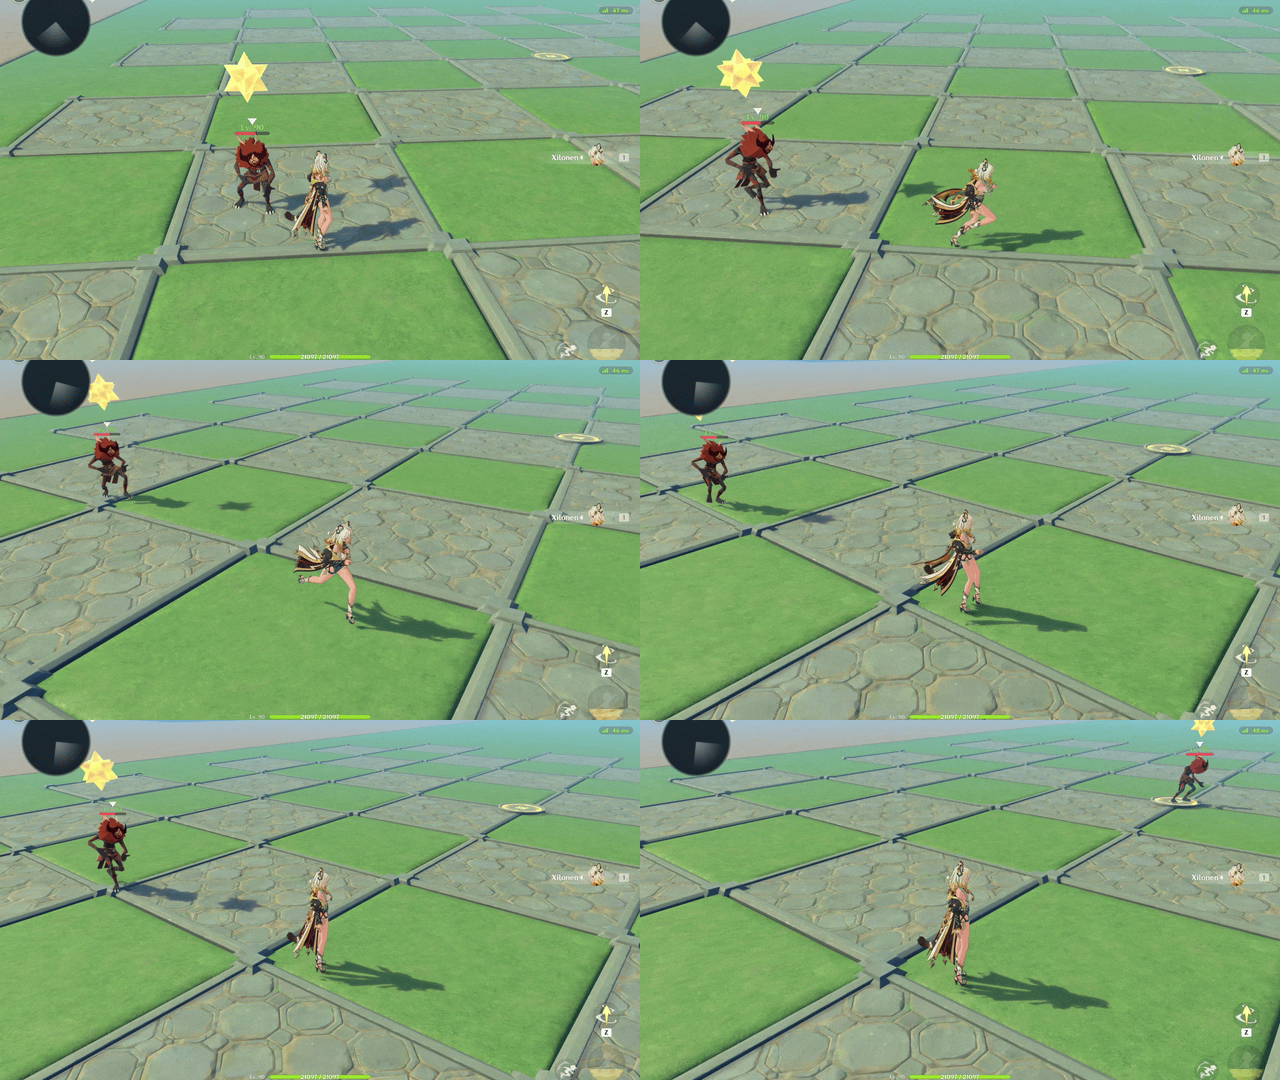
Tactic: Return — Example (with [Force Teleport Trigger Distance])
🟆 Chapter 4: Editing and Managing Complex Creation Skills 🟆
This section explains how to create Complex Creation Skills and attach them to a Complex Creation through Creation Skill Management.
To create a new Complex Creation skill, go to [Combat Preset] → [Skill] → [Creation Custom Skills], then click [+ Skill] to add a new Creation skill.
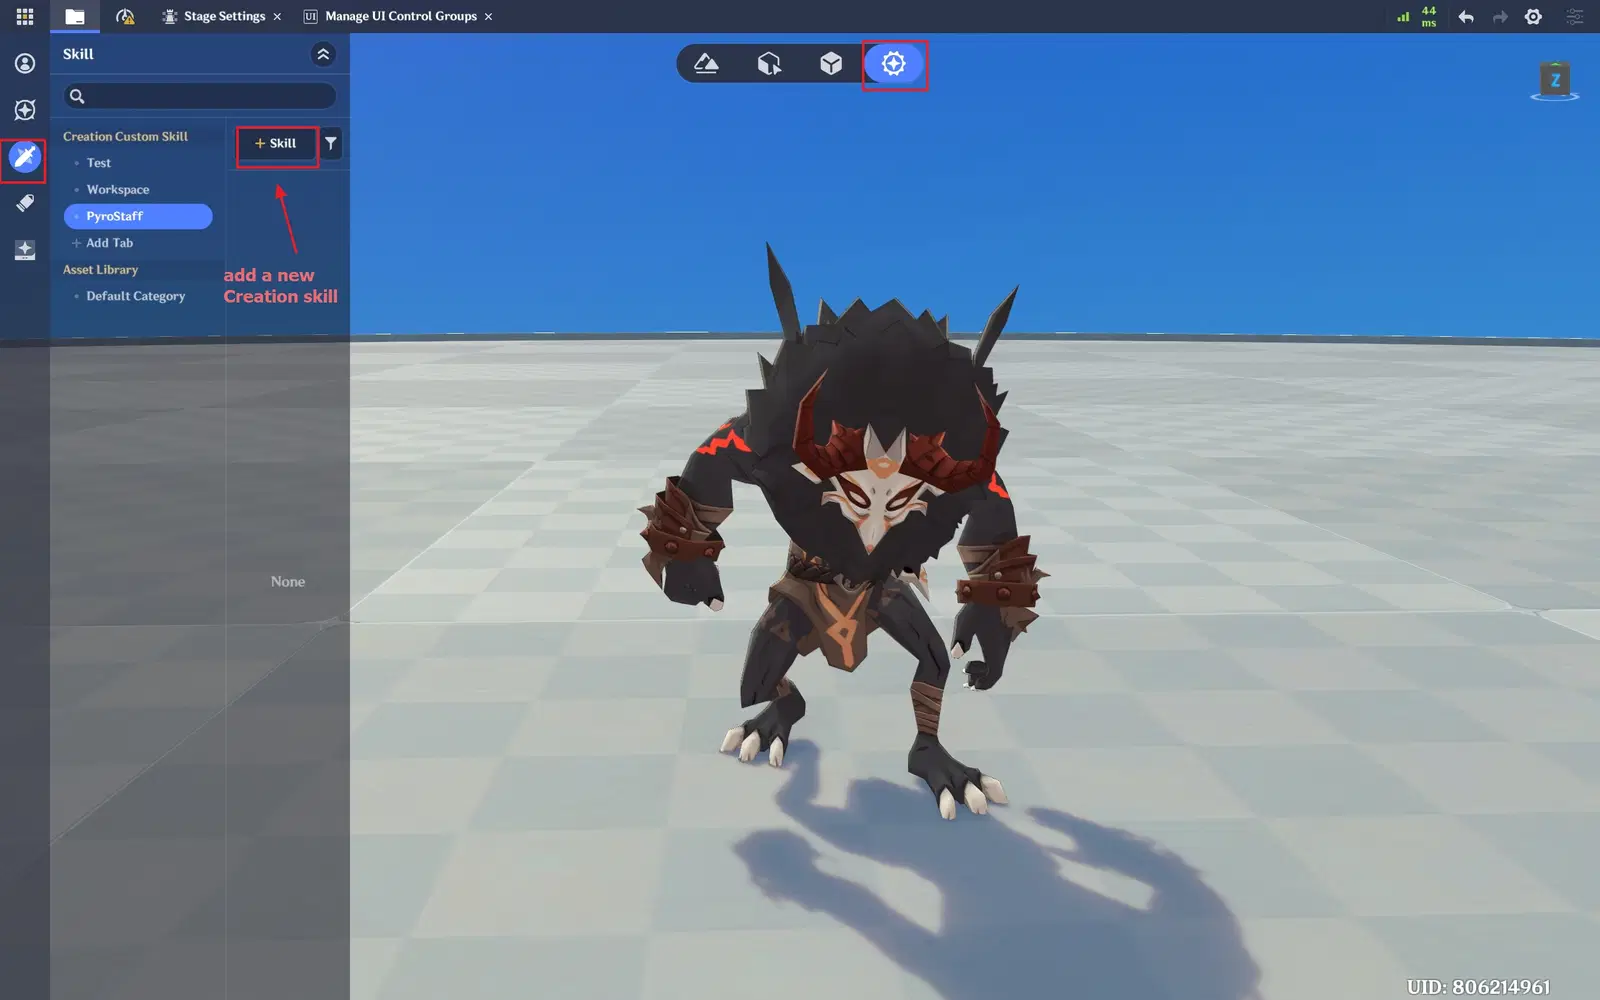
Editing Complex Creation Skills — Creating a new Complex Creation Skill.
Creation skills are divided into two types:
- Creation Normal Skill
- Creation Instant Skill
Creation Normal Skill
A Creation Normal Skill is restricted by its Creation Skill Primary Model template and cannot be used on incompatible Creation types.
(Example: A skill designed for a [Blazing Axe Mitachurl] cannot be used on a [Ruin Guard].)
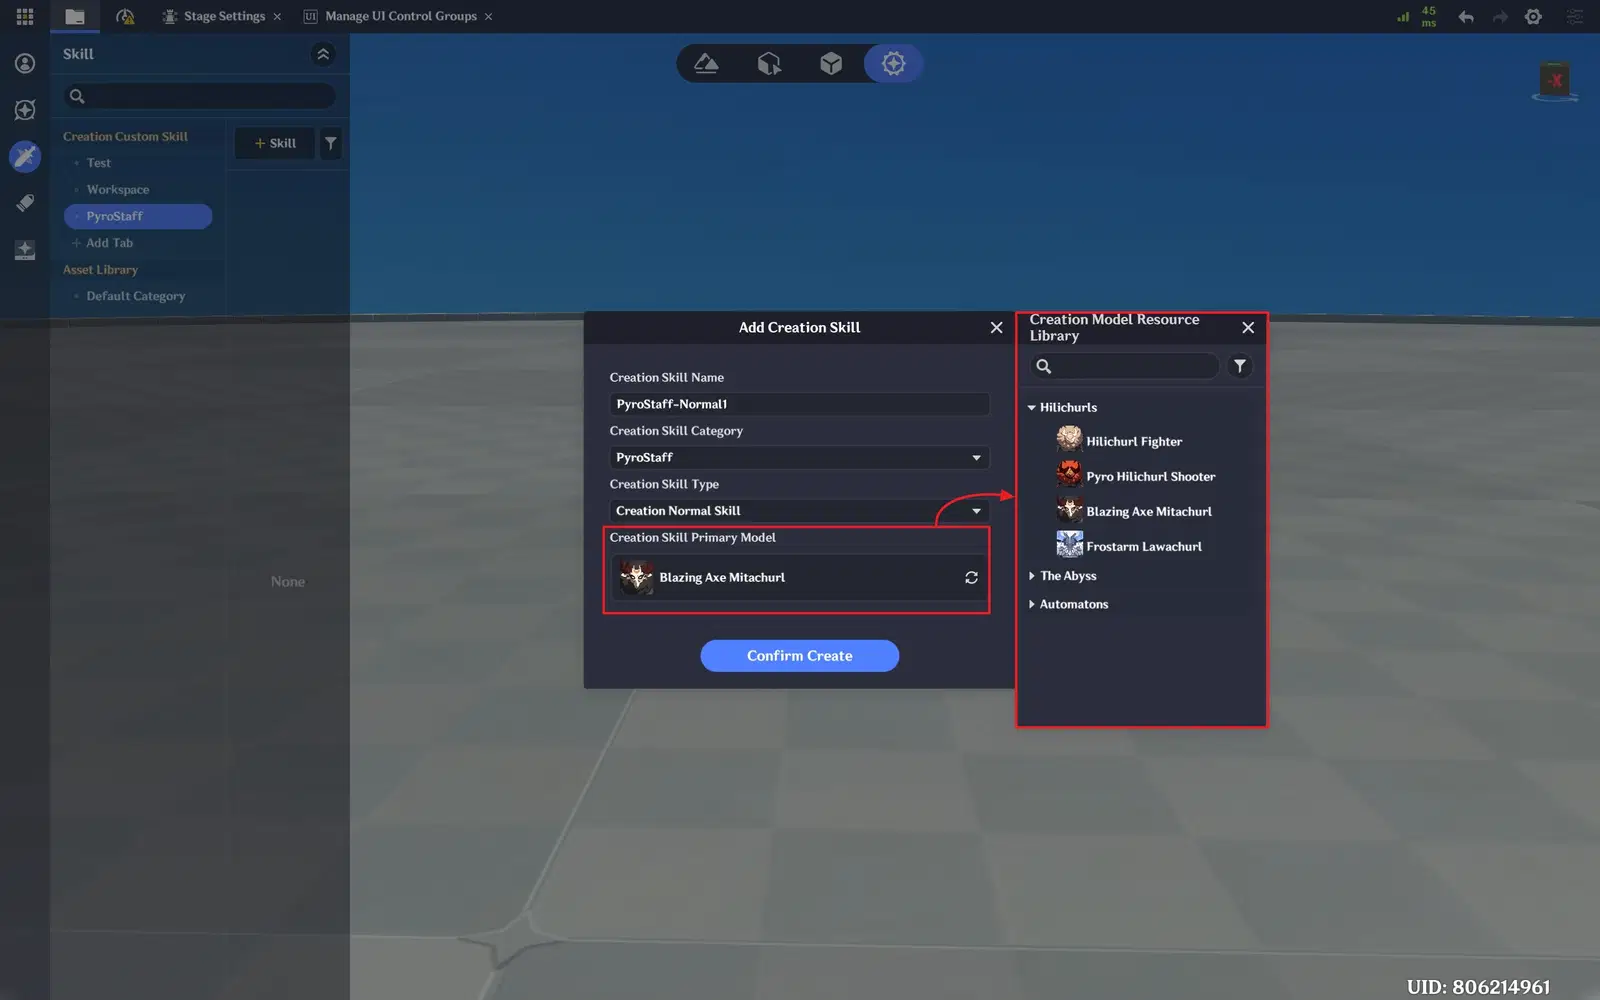
Editing Complex Creation Skills — Add [Creation Normal Skill]
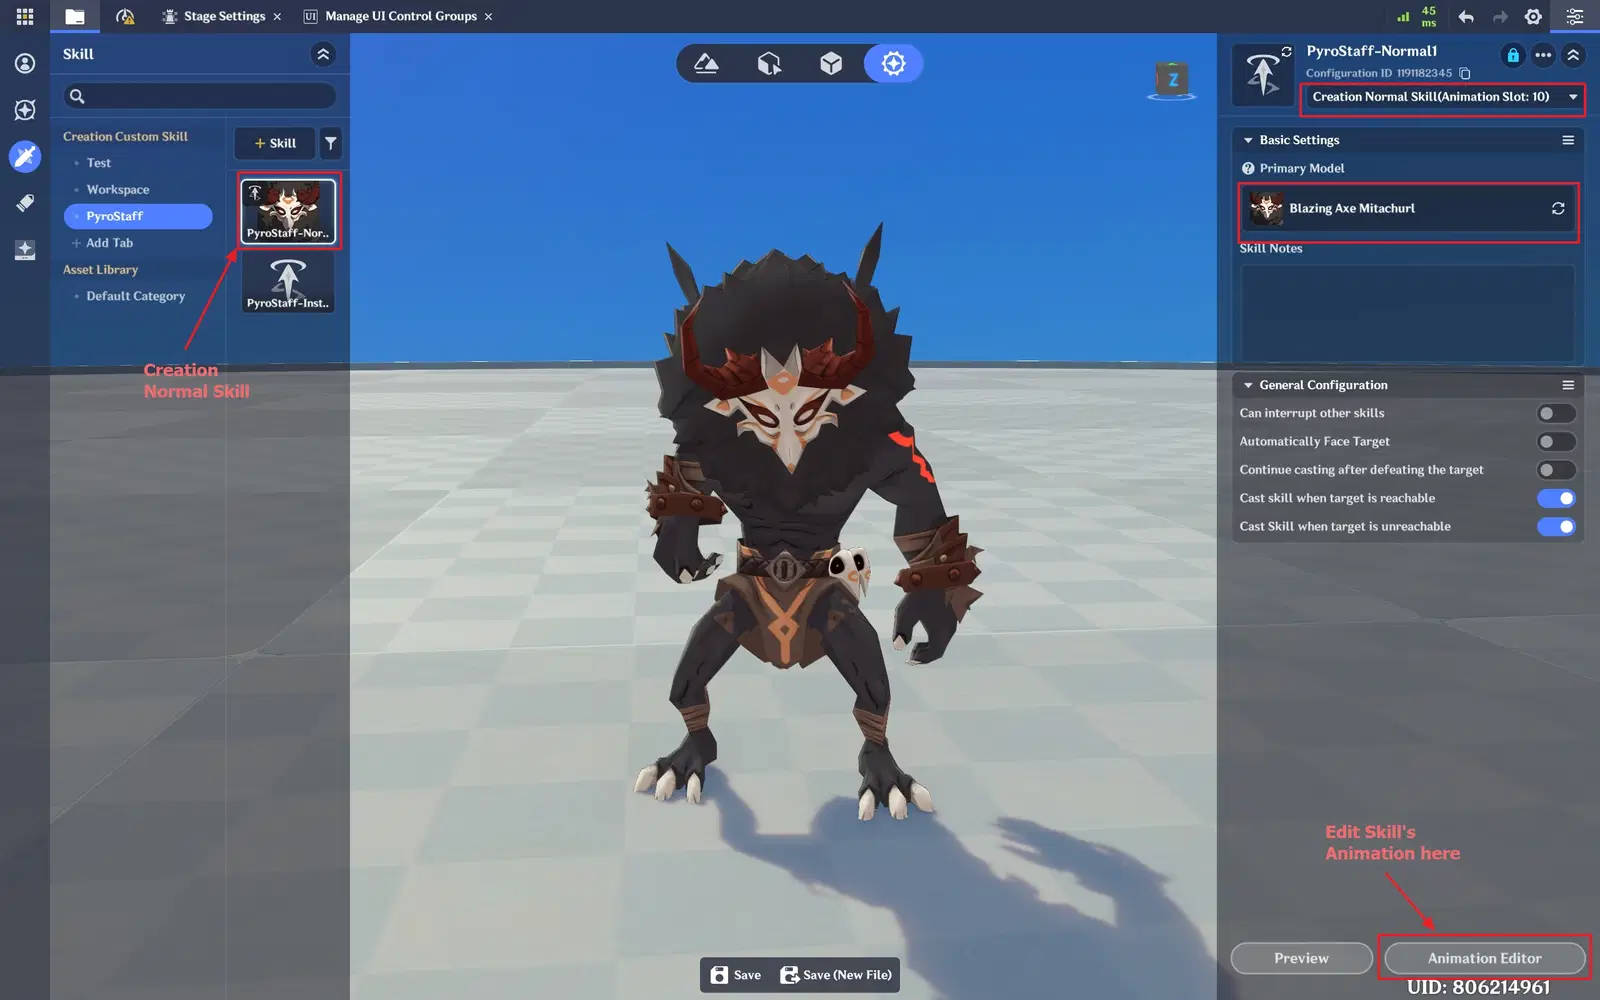
Editing Complex Creation Skills — Creation Normal Skill Settings
Note:
- You can change the [Creation Skill Type] from the top-right panel. However, be aware that changing the [Creation Skill Type] will clear all existing edited animation data and any mounted Creation Skill Node Graph.
- In a [Creation Normal Skill], you can change its [Creation Skill Primary Model]. Doing so will also clear all existing edited animation data and any mounted Creation Skill Node Graph.
- Make sure you are fully committed before making these changes. To be safe, you can back up the skill by selecting [Save (New File)] to create a duplicate before modifying it.
To edit a Creation Normal Skill animation, click [Animation Editor]:
 (The animation editing process is nearly the same as editing a character’s skill animation, so this guide will not cover it in detail.)
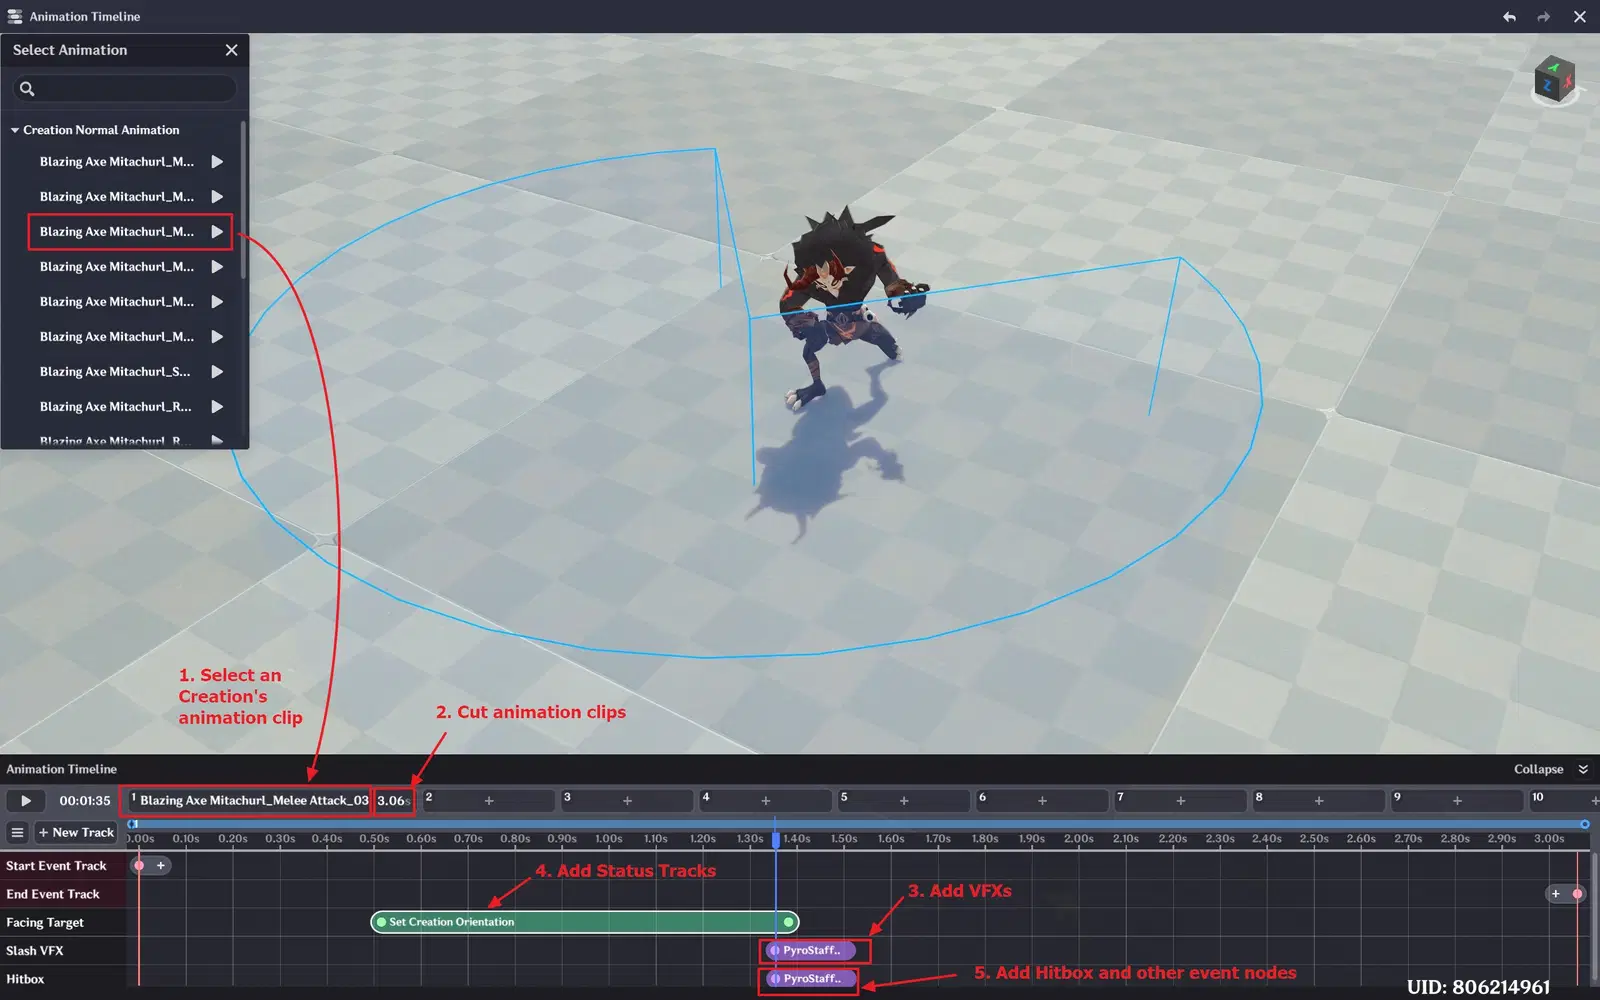
Editing Complex Creation Skills (Normal) — Skill Animation Editing Processes
For Complex Creations, they use the Creation Skill Node Graph:
- In the Miliastra Sandbox, go to [Client Node Graph] → [Creation Skill Node Graph] and create a new node graph.
- In the [Creation Skill Node Graph] editor, the node graph functionality is very similar to a character’s Skill Node Graph
(for example, [Play Timed Effects] and [Trigger Hitbox]).
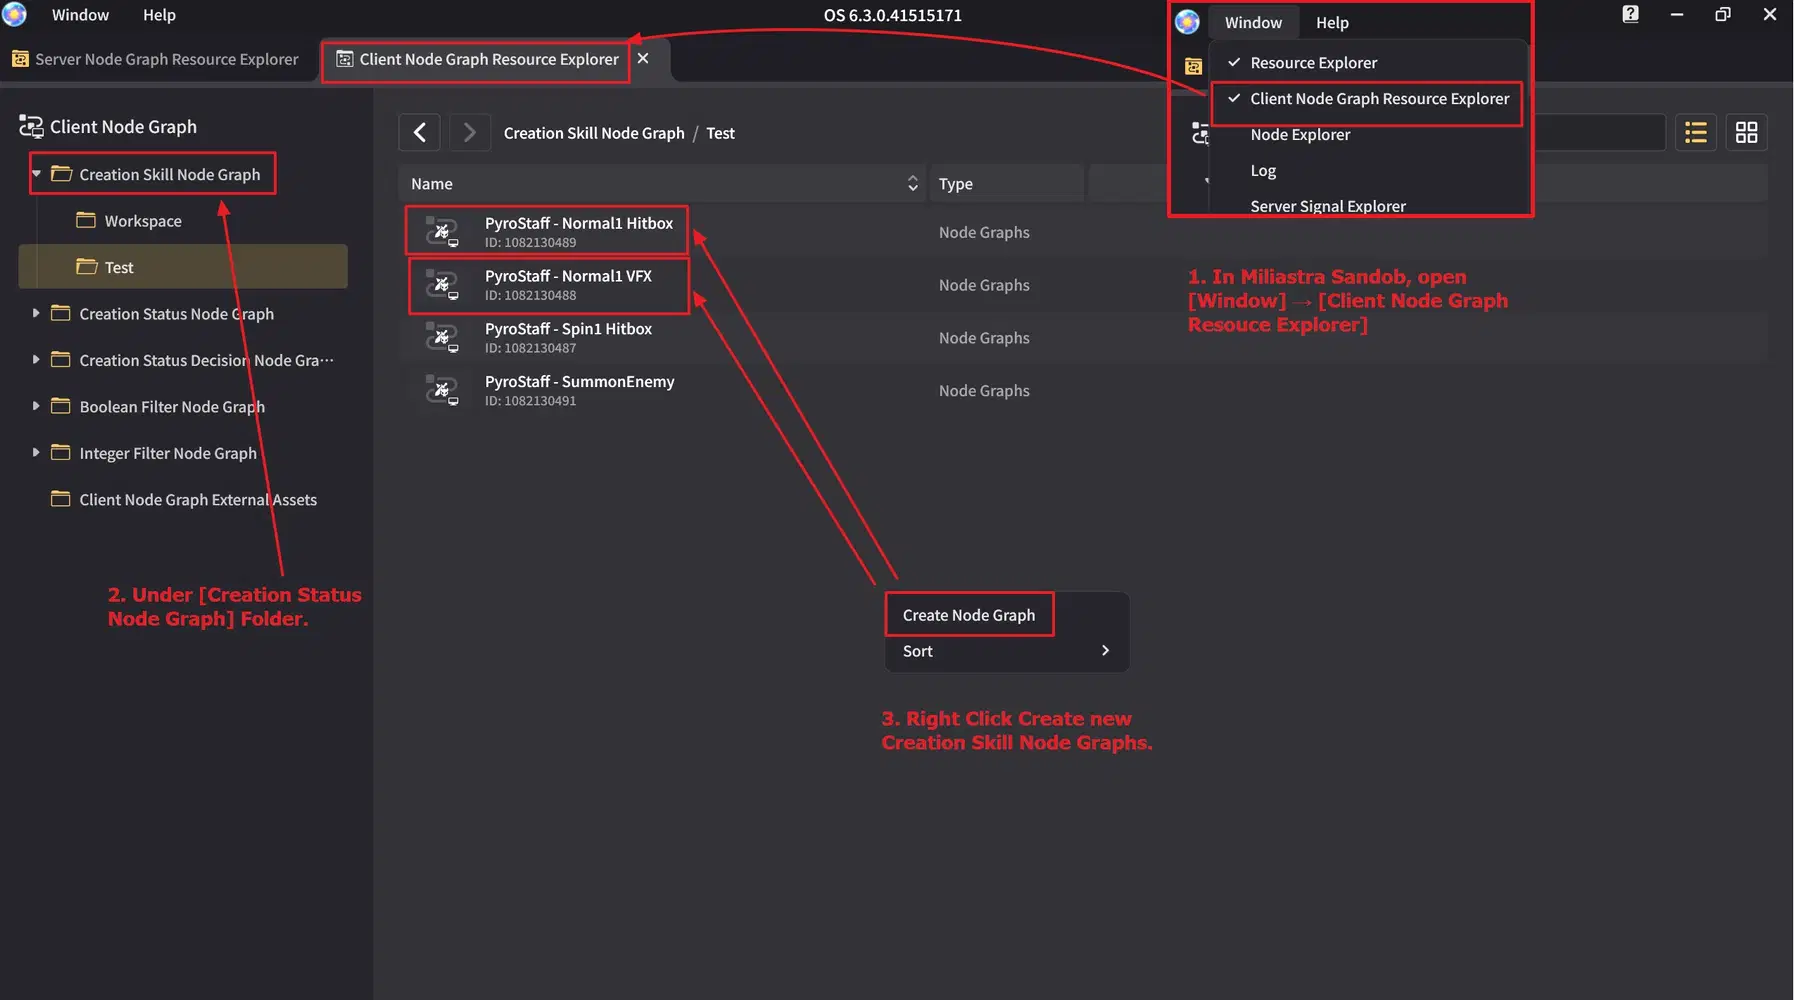
Editing Complex Creation Skills — Create [Creation Skill Node Graph].
Additionally, You can configure the Set Creation Orientation status track:
- The Creation will track and face the target during the specified frame range.
- Only one [Set Creation Orientation] is allowed per skill.
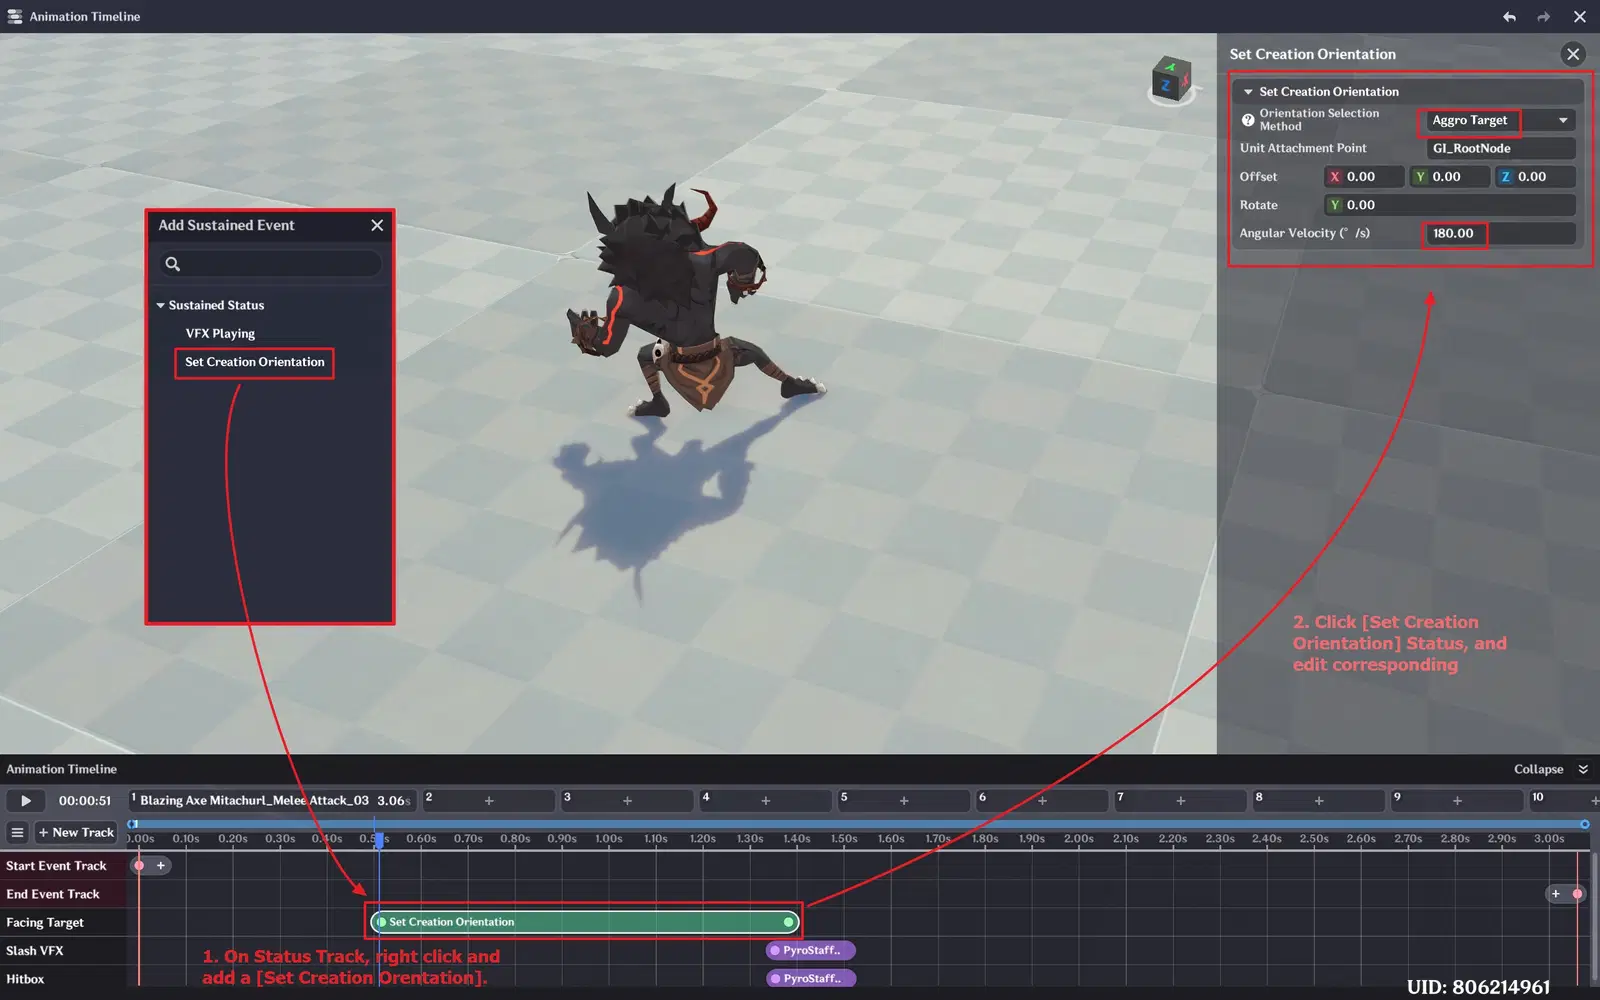
Editing Complex Creation Skills — Add [Set Creation Orientation]
Before a Complex Creation can execute a skill, you must first assign the skill.
Go to [Specialized Configuration] → [Creation Skill Management], then click [Edit Details]:
- Click [+] to add a skill entry, and select an existing Creation Skill that we newly created.
Once selected, the Creation will learn that skill.
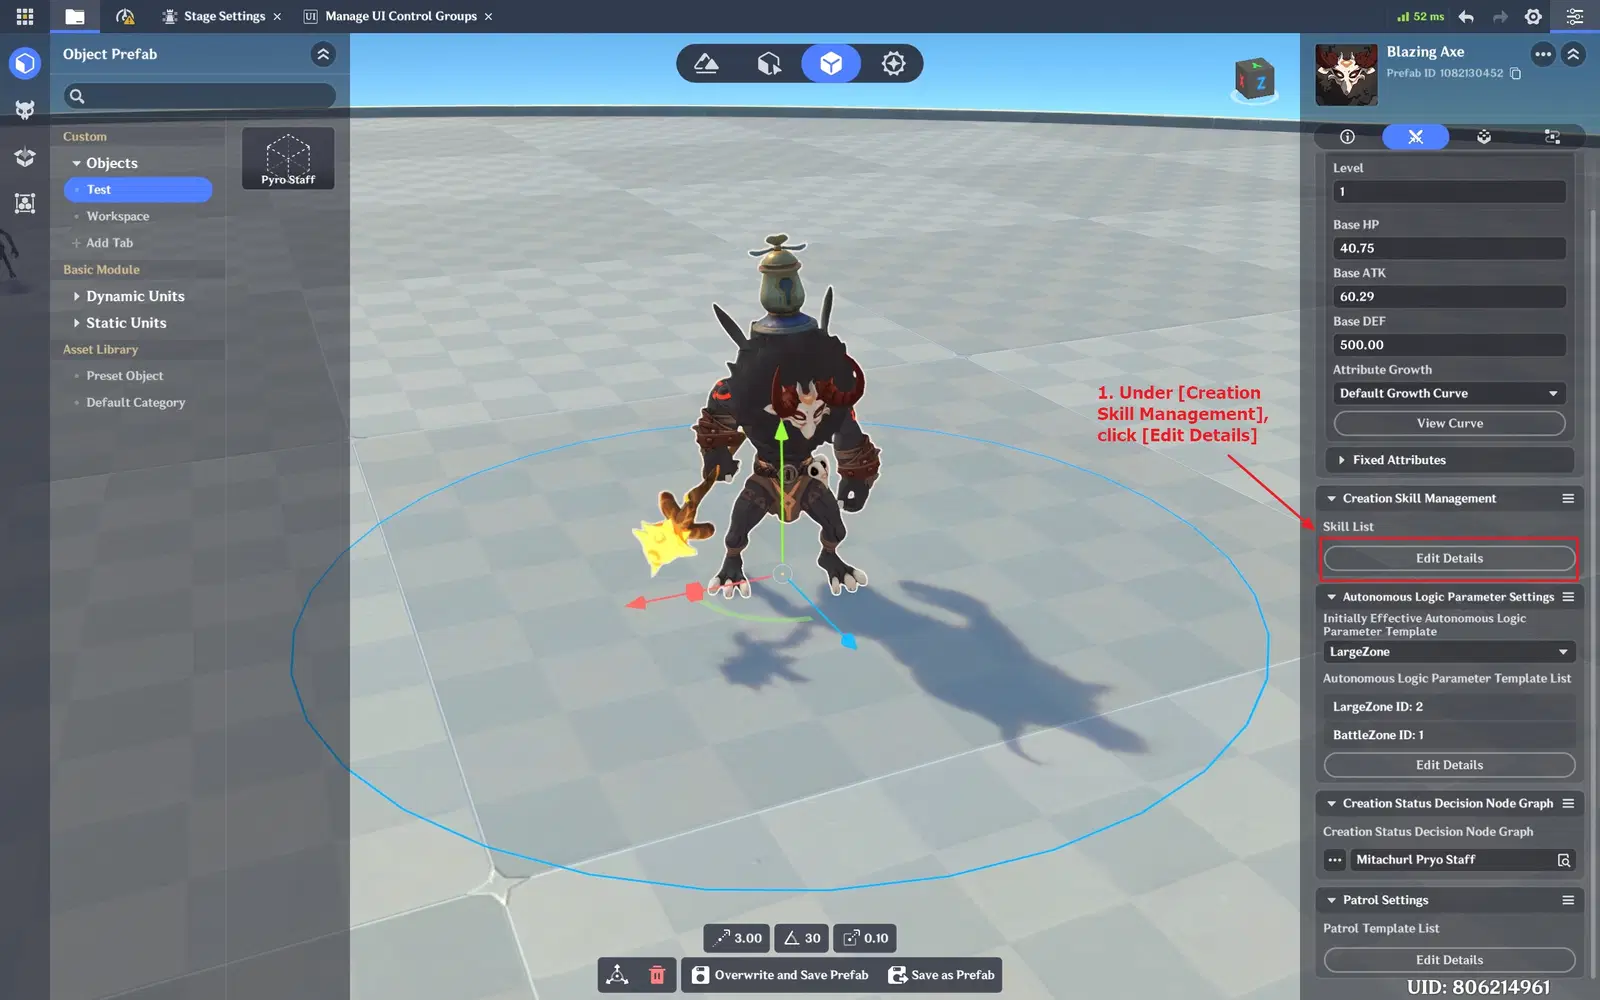
Managing Complex Creation Skills — Add a Skill Entry (Part 1)
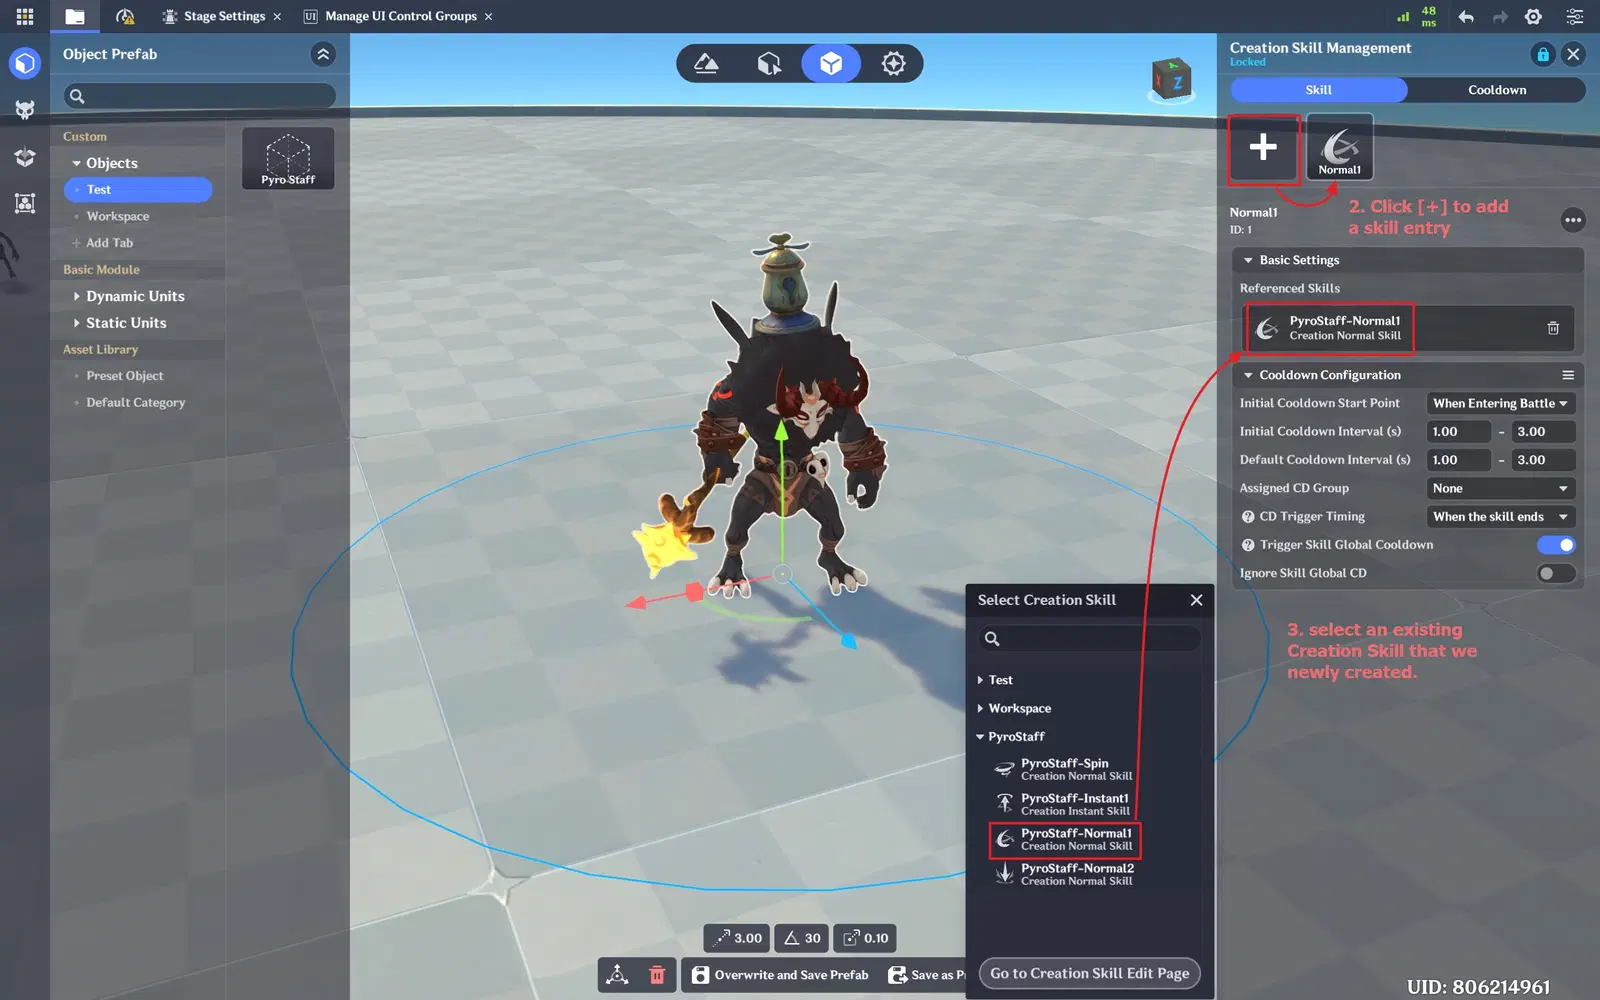
Managing Complex Creation Skills — Add a Skill Entry (Part 2)
 To execute a Complex Creation Skill:
- In the Miliastra Sandbox, go to [Client Node Graph] → [Creation Status Node Graph] and create a new node graph.
- In the creation status node graph editor, use the execution node [Execute Skill], and set the Skill ID to match the corresponding Skill ID listed in [Creation Skill Management].
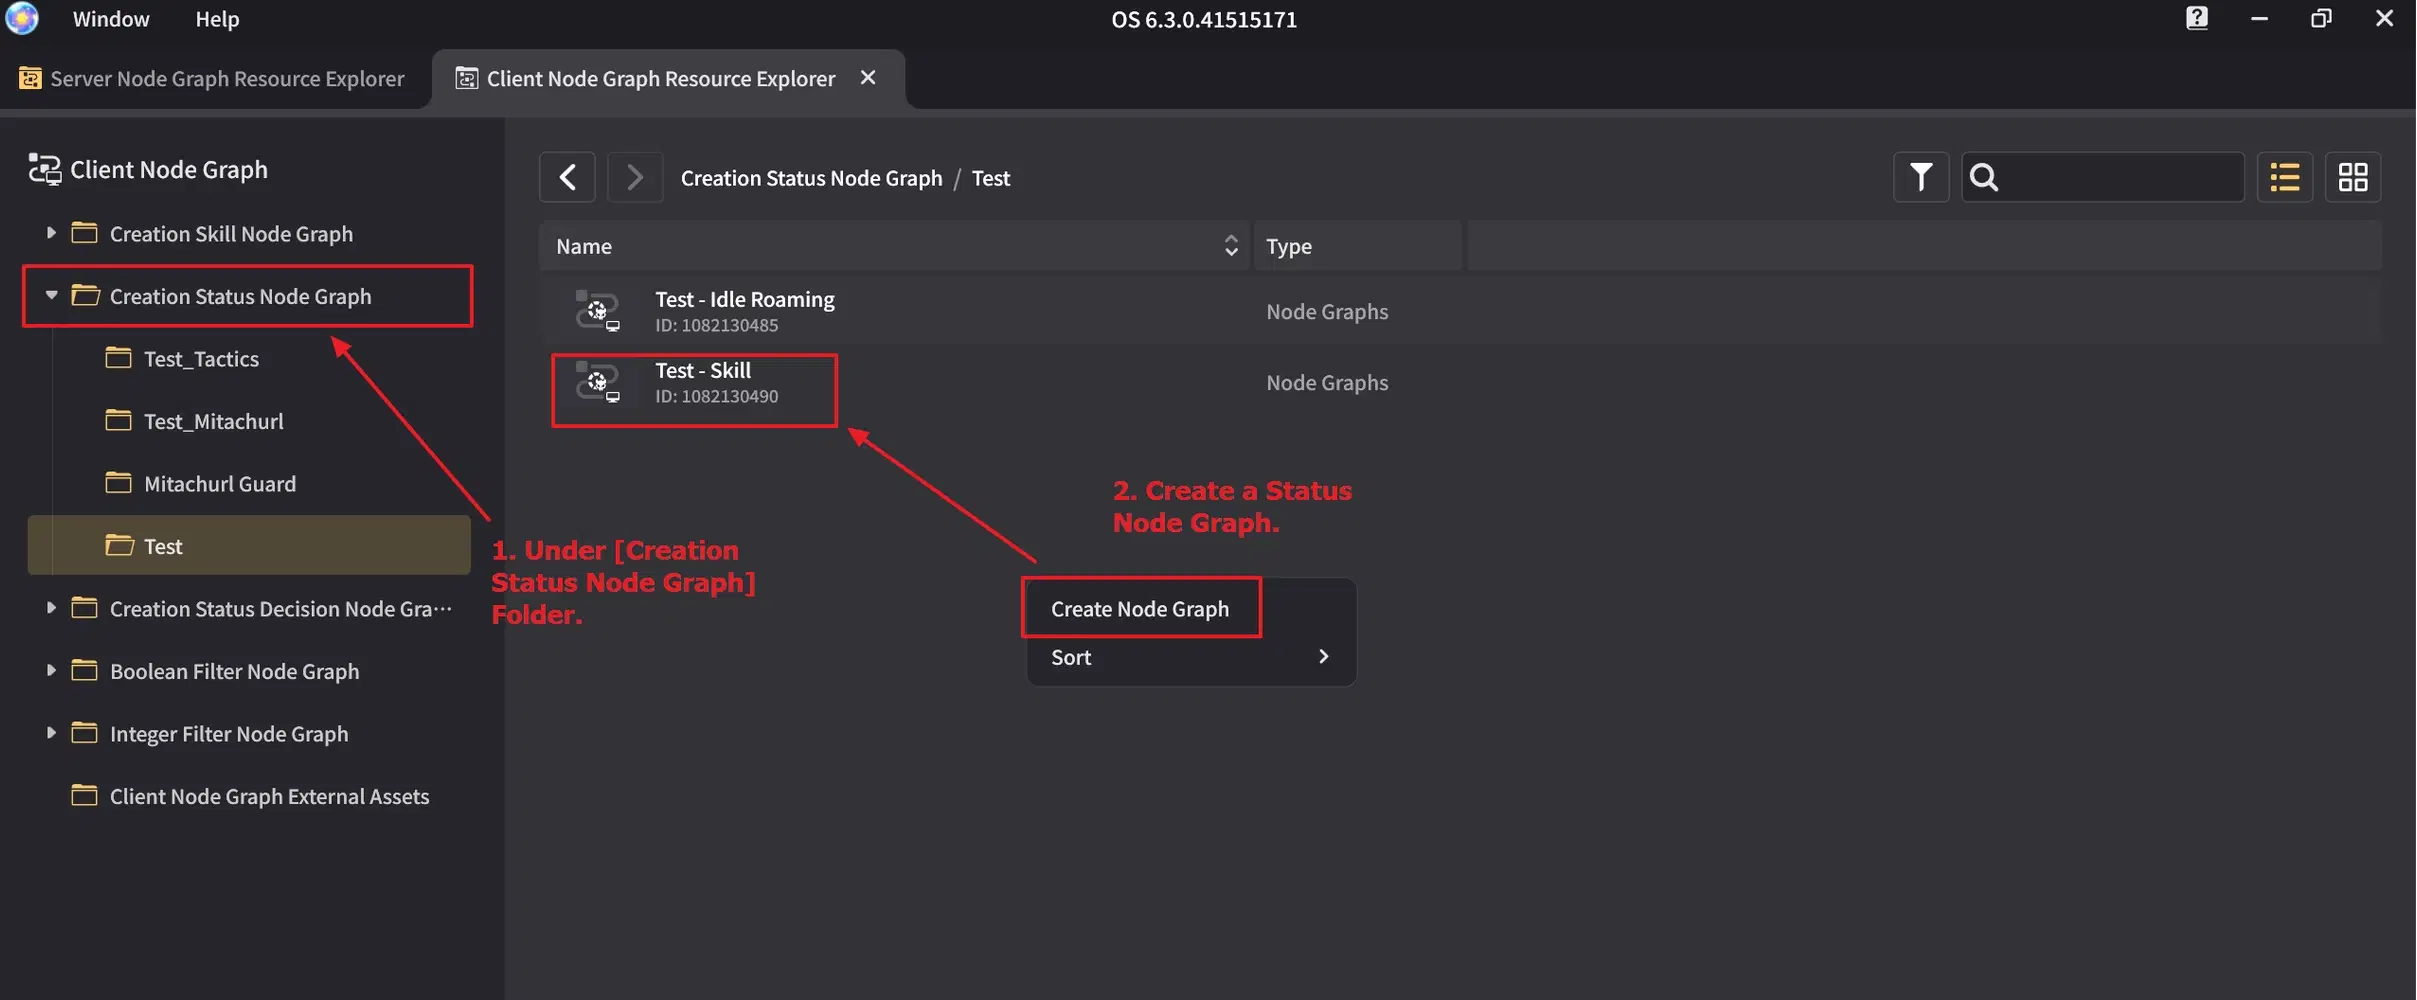
Managing Complex Creation Skills — Execute a Skill (Part 1)
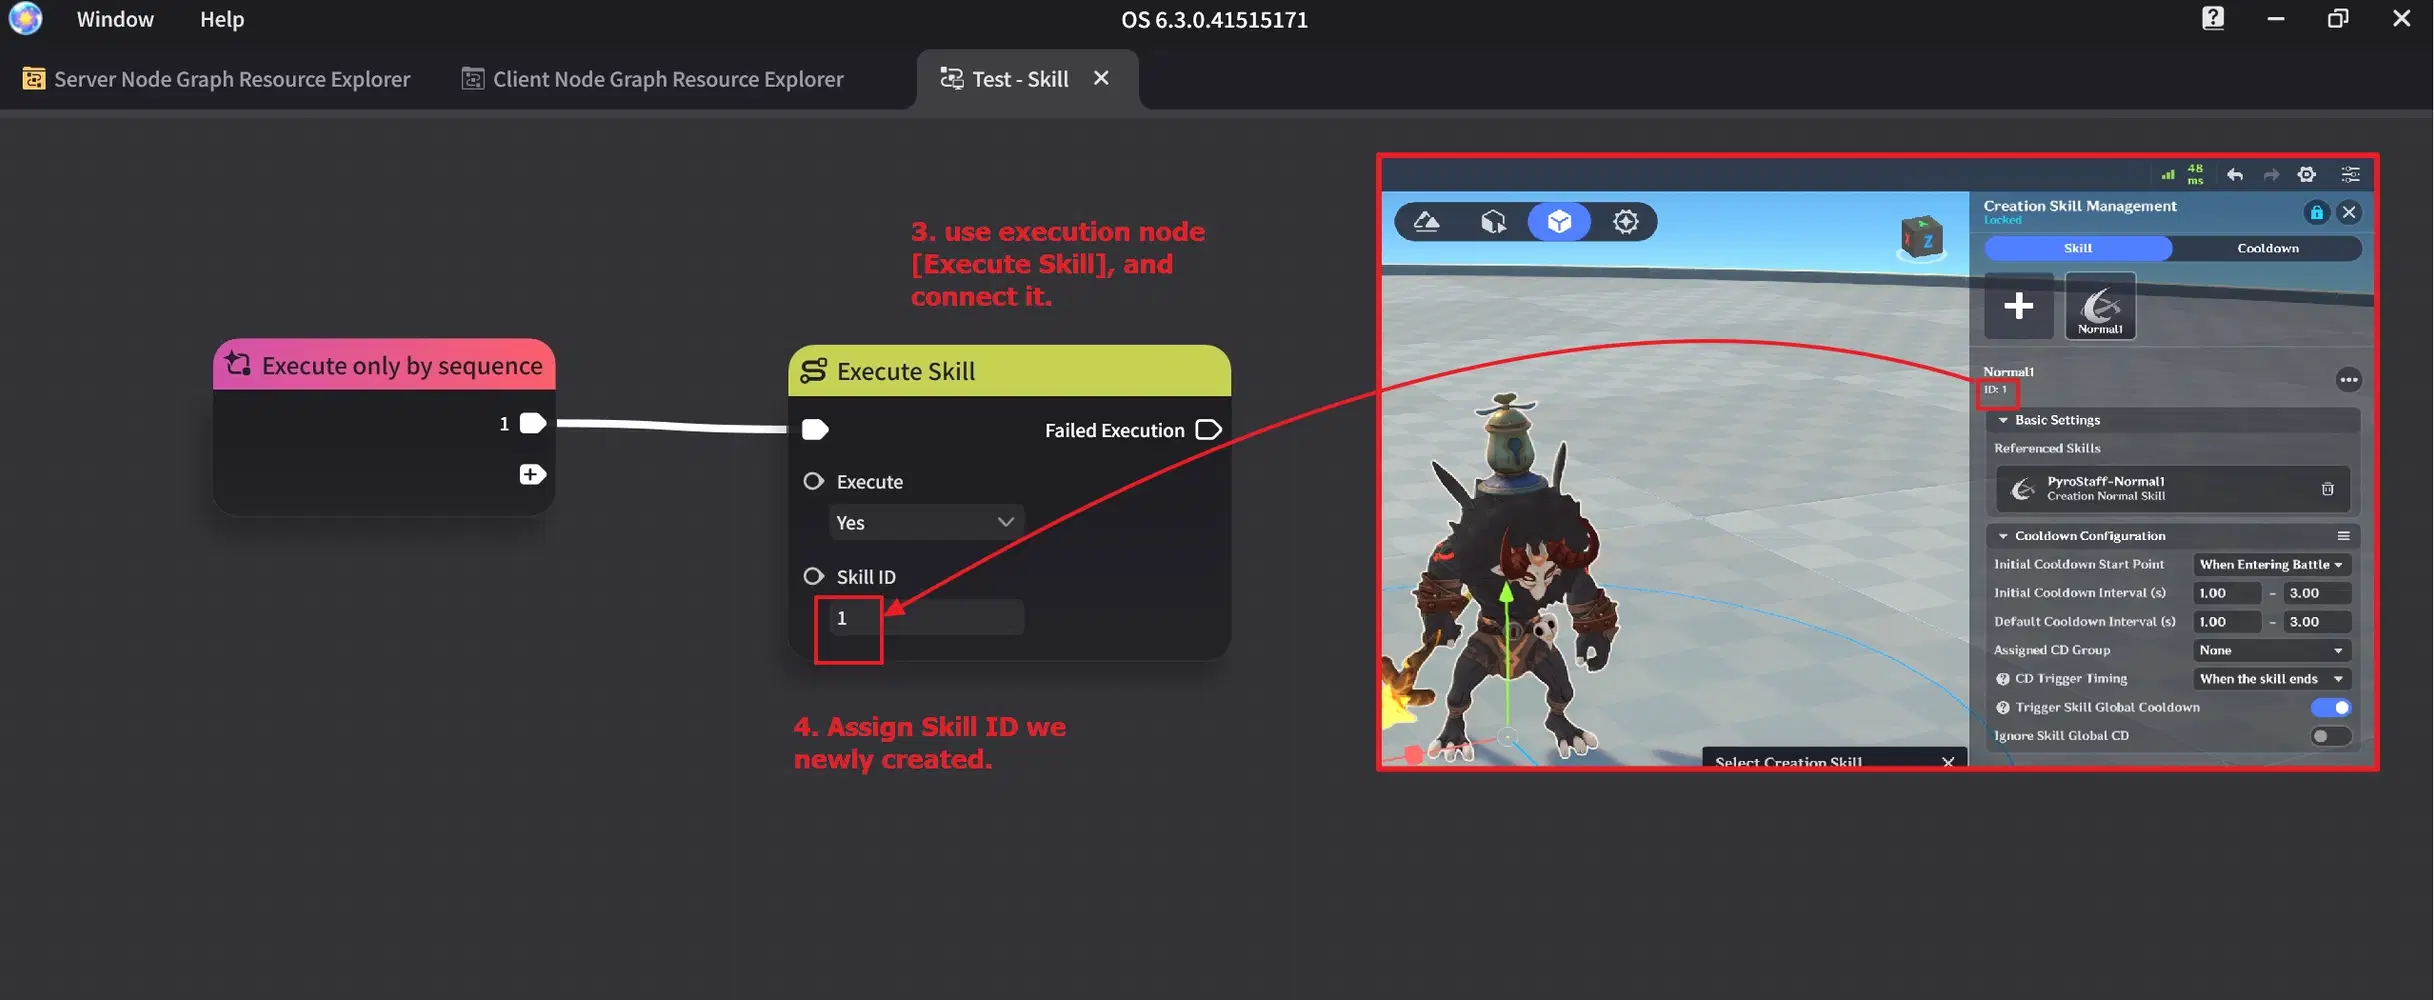
Managing Complex Creation Skills — Execute a Skill (Part 2)
And, to allow a Complex Creation to run a Creation Status Node Graph:
- Go to [Client Node Graph] → [Creation Status Decision Node Graph], create a new node graph.
(or use the creation status decision node graph created in the chapter 2: [Understanding Autonomous Logic Parameter Templates])
- In the Decision Node Graph, use [Switch to Self Execution Status], and set Status Node Graph Config ID to the ID of the newly created Status Node Graph.
- In the Complex Creation settings, under [Specialized Configuration] → [Creation Status Decision Node Graph], ensure the selected decision node graph is the one you just created.
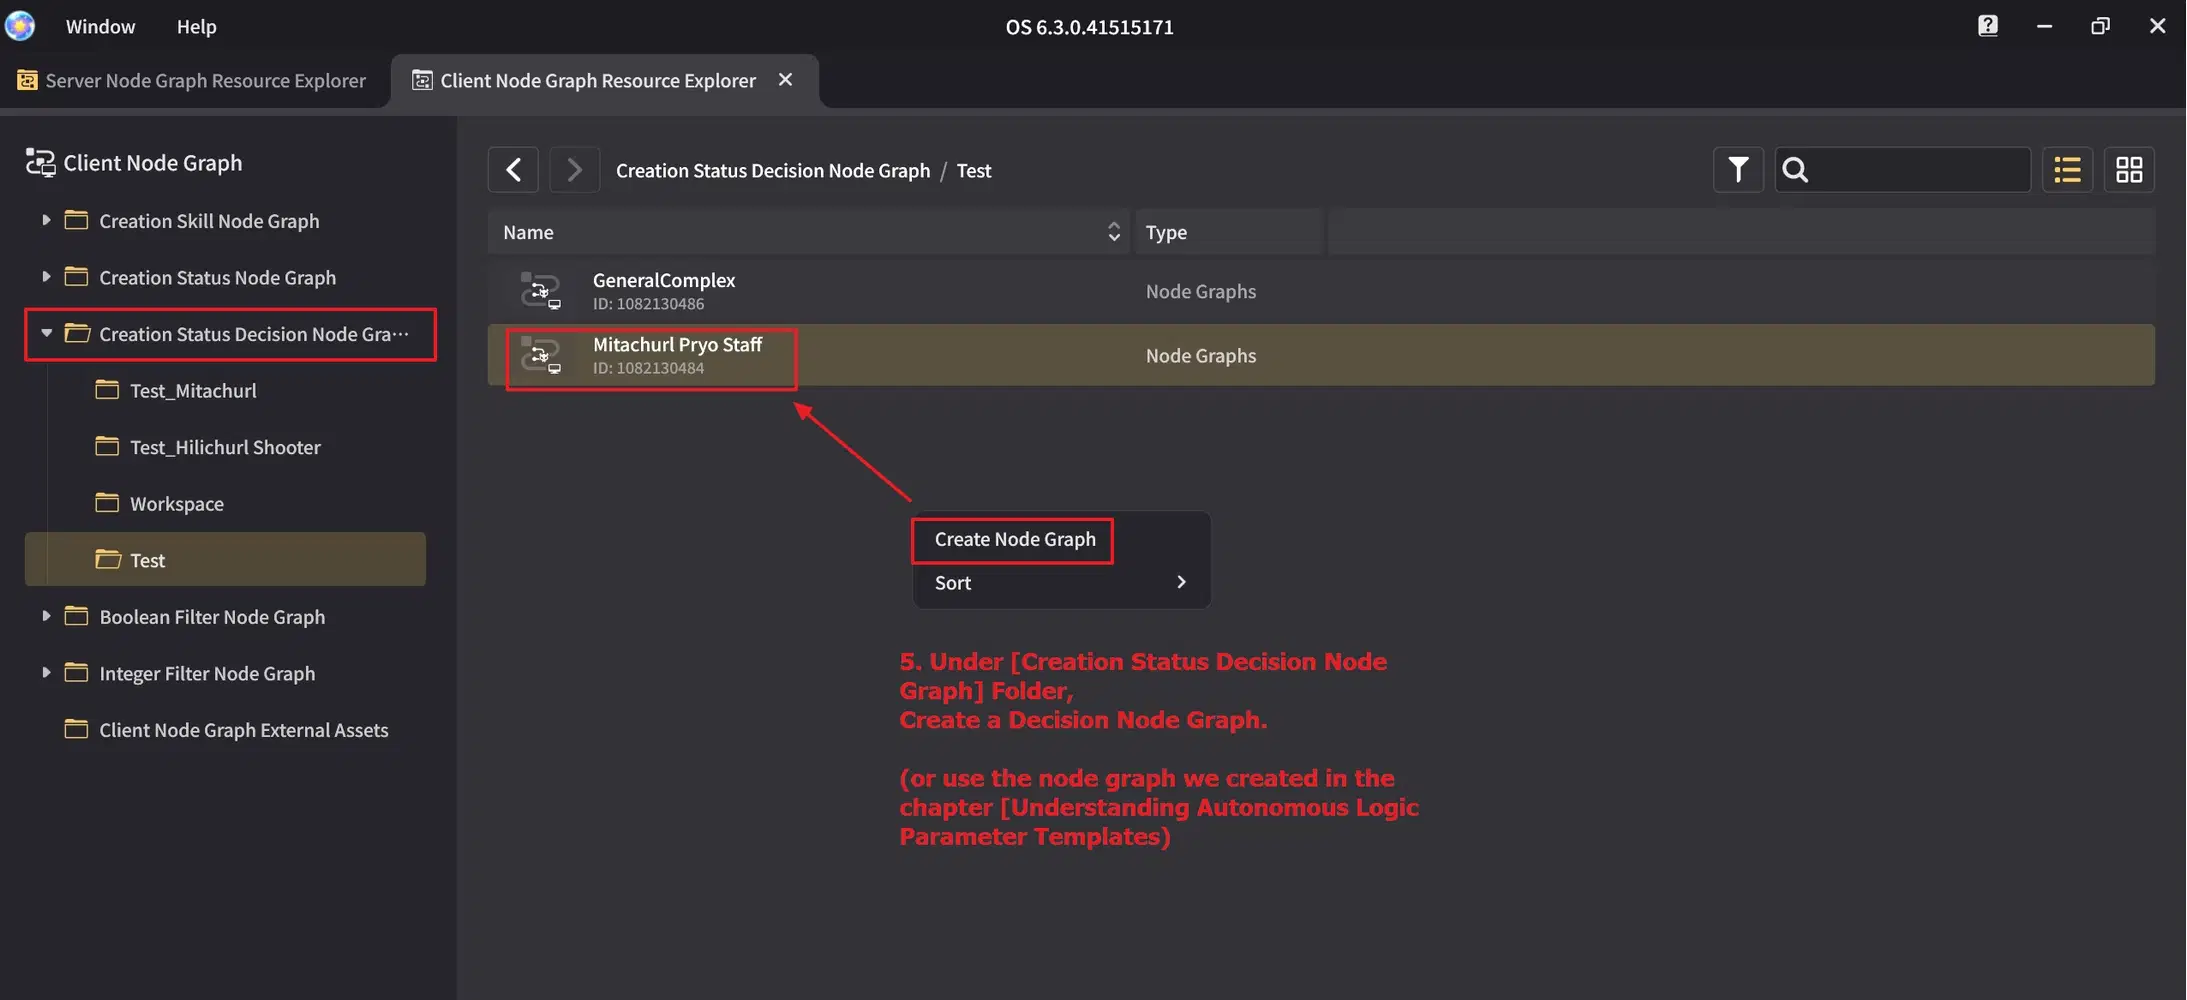
Managing Complex Creation Skills — Execute a Skill (Part 3)
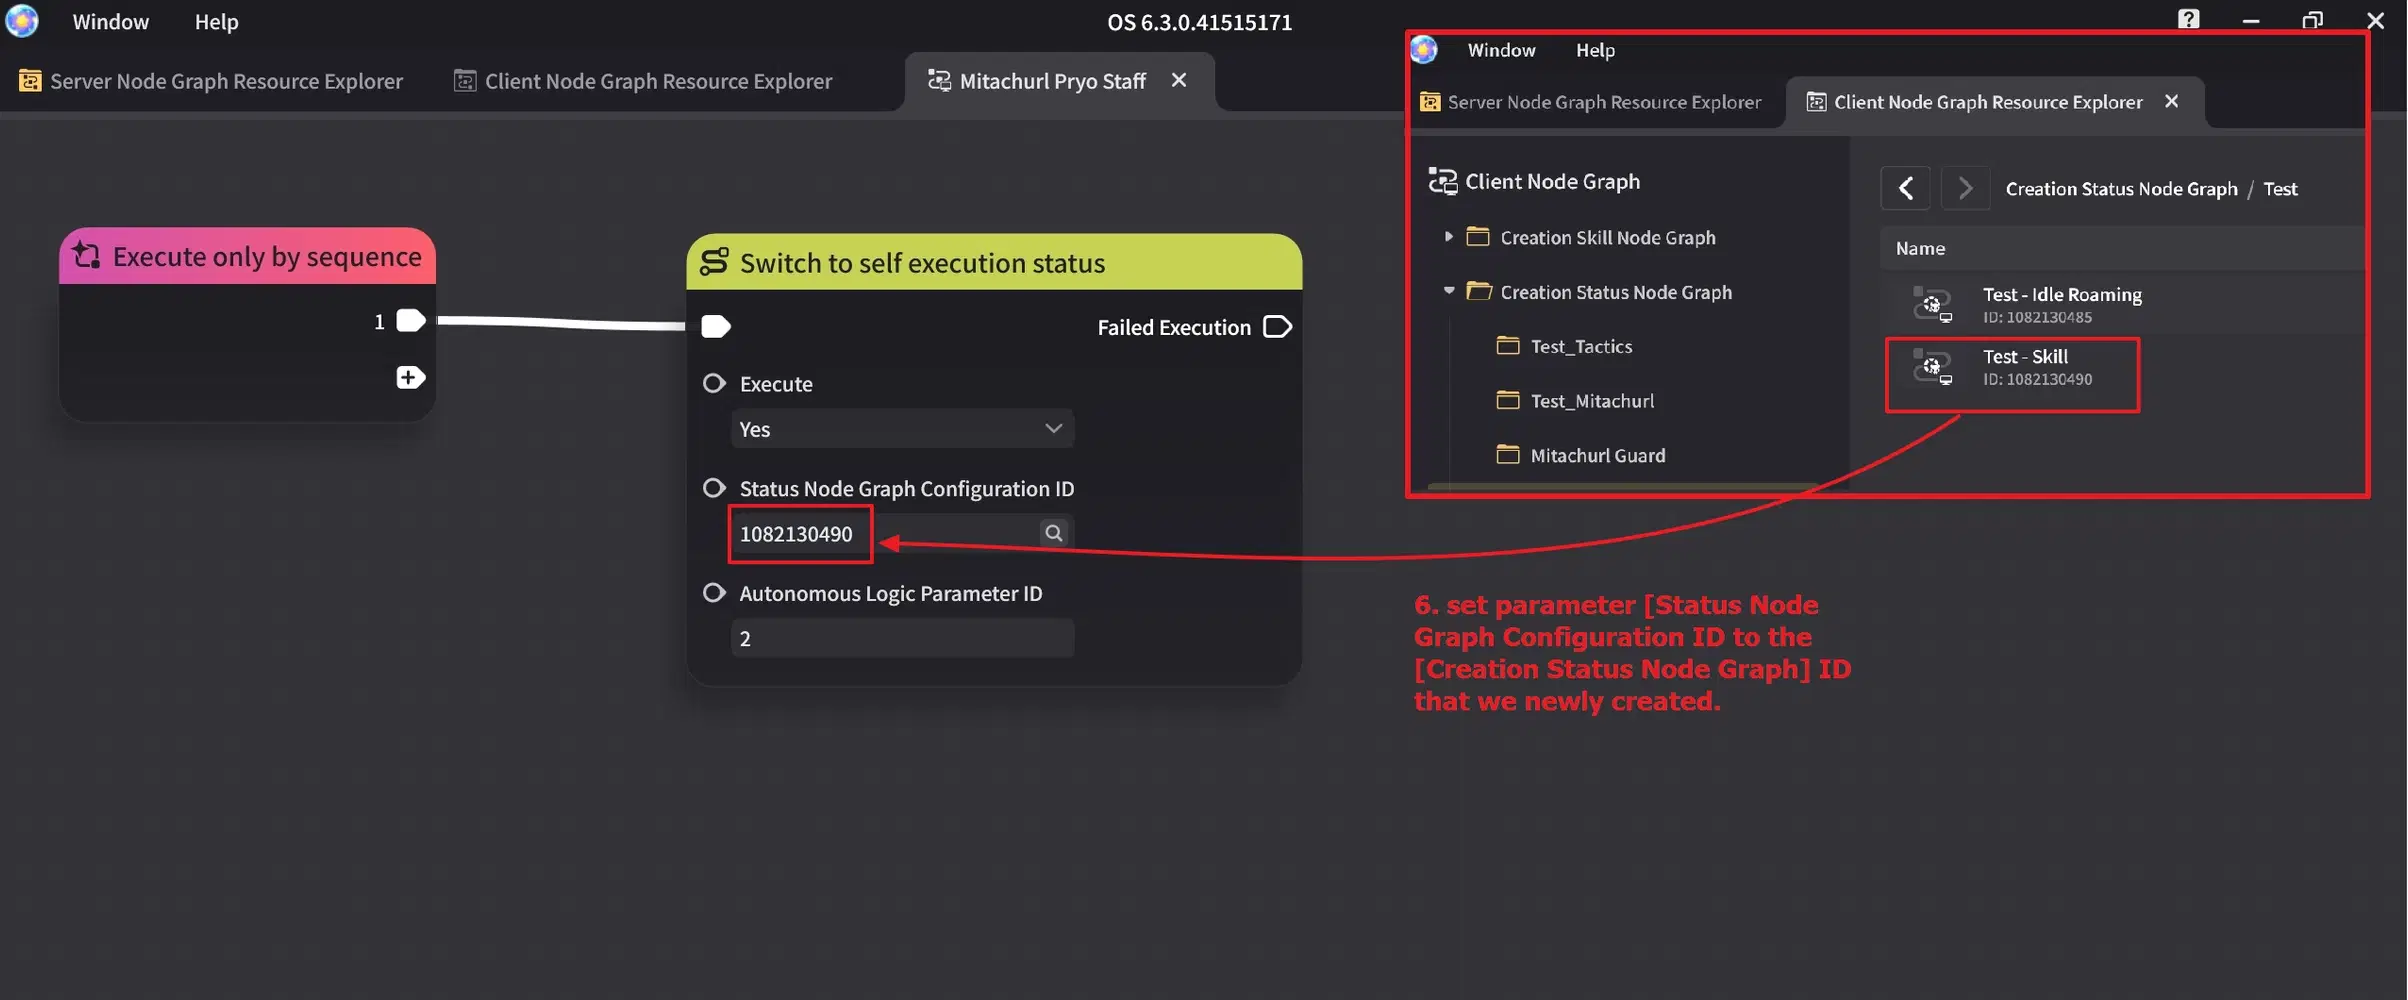
Managing Complex Creation Skills — Execute a Skill (Part 4)
*In this skill demo, the Creation's [Autonomous Logic Parameter] has a relatively large [Leaving Battle Distance] and a large [Territory Radius] value.
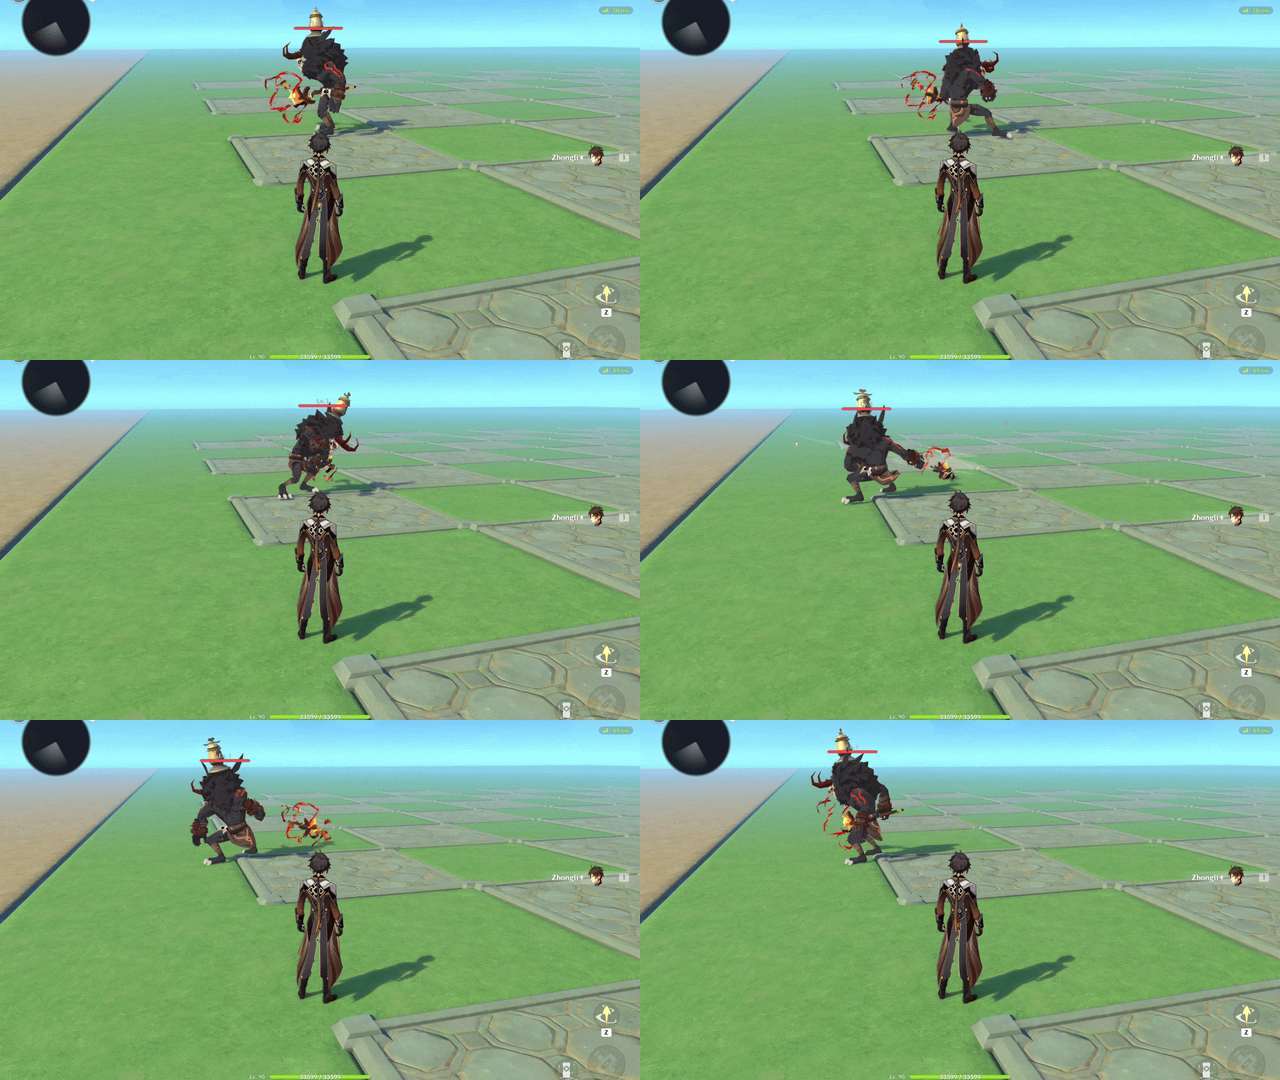
Creation Normal Skill — Example
Note: Under a skill’s [General Configuration], the Automatically Face Target option only turns the Creation toward the target at the start of skill execution, whereas the status track Set Creation Orientation continuously tracks the target during the specified frame range.
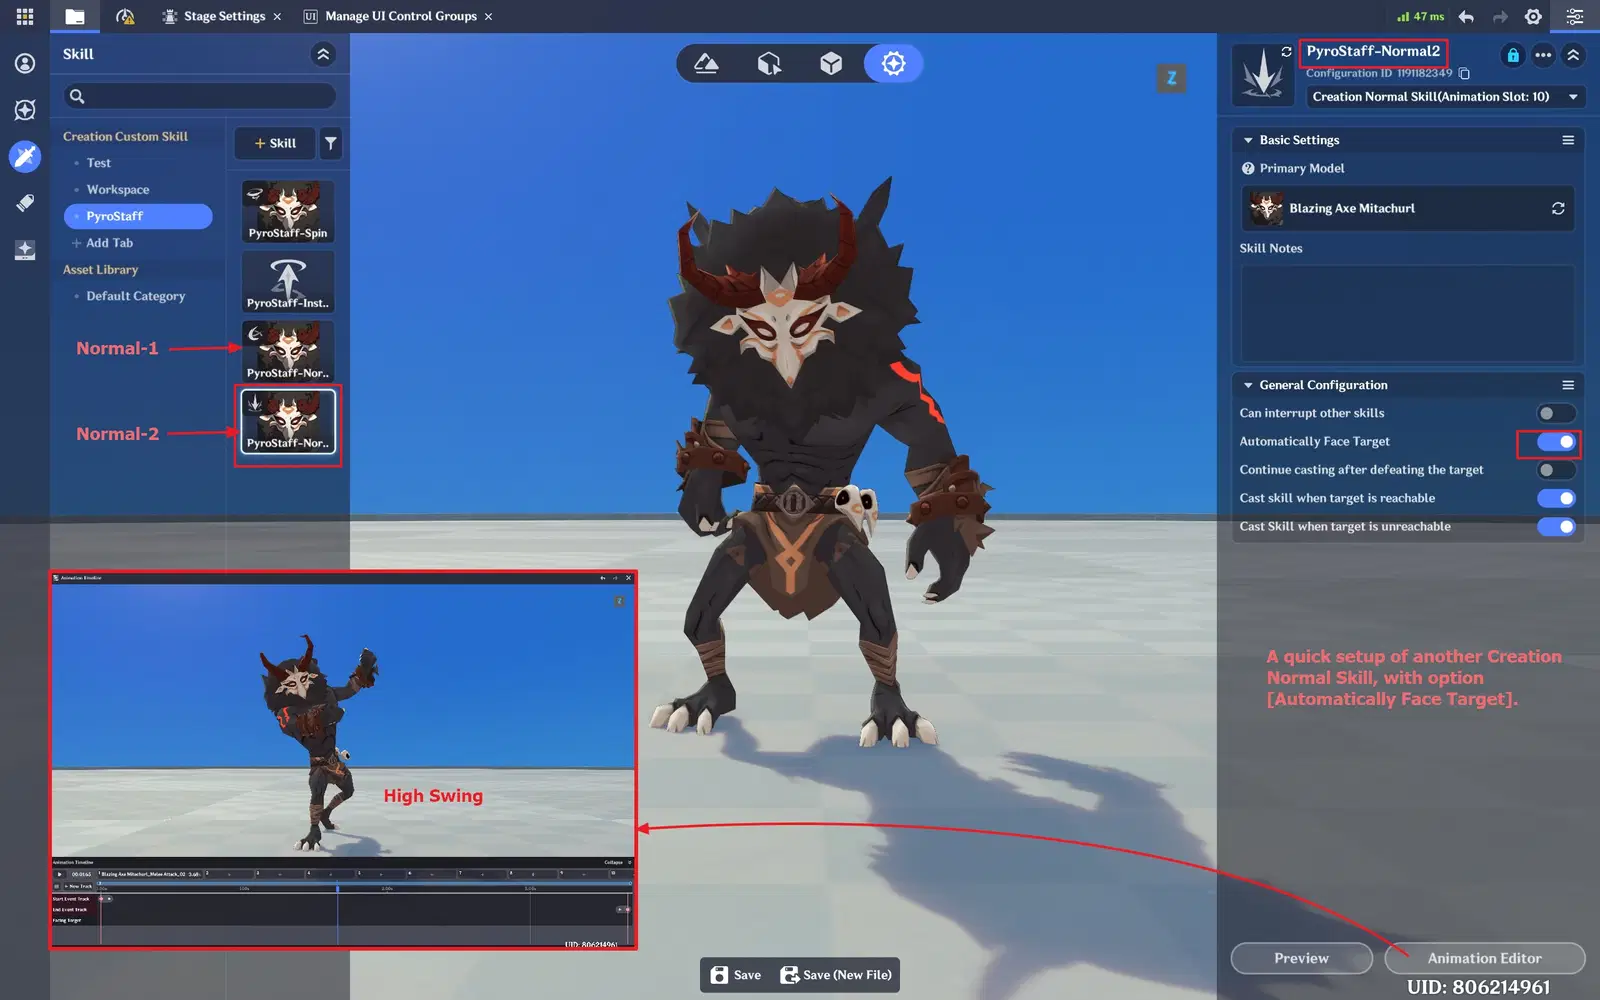
Managing Complex Creation Skills — Normal Skill (with Automatically Face Target)[Part 1]
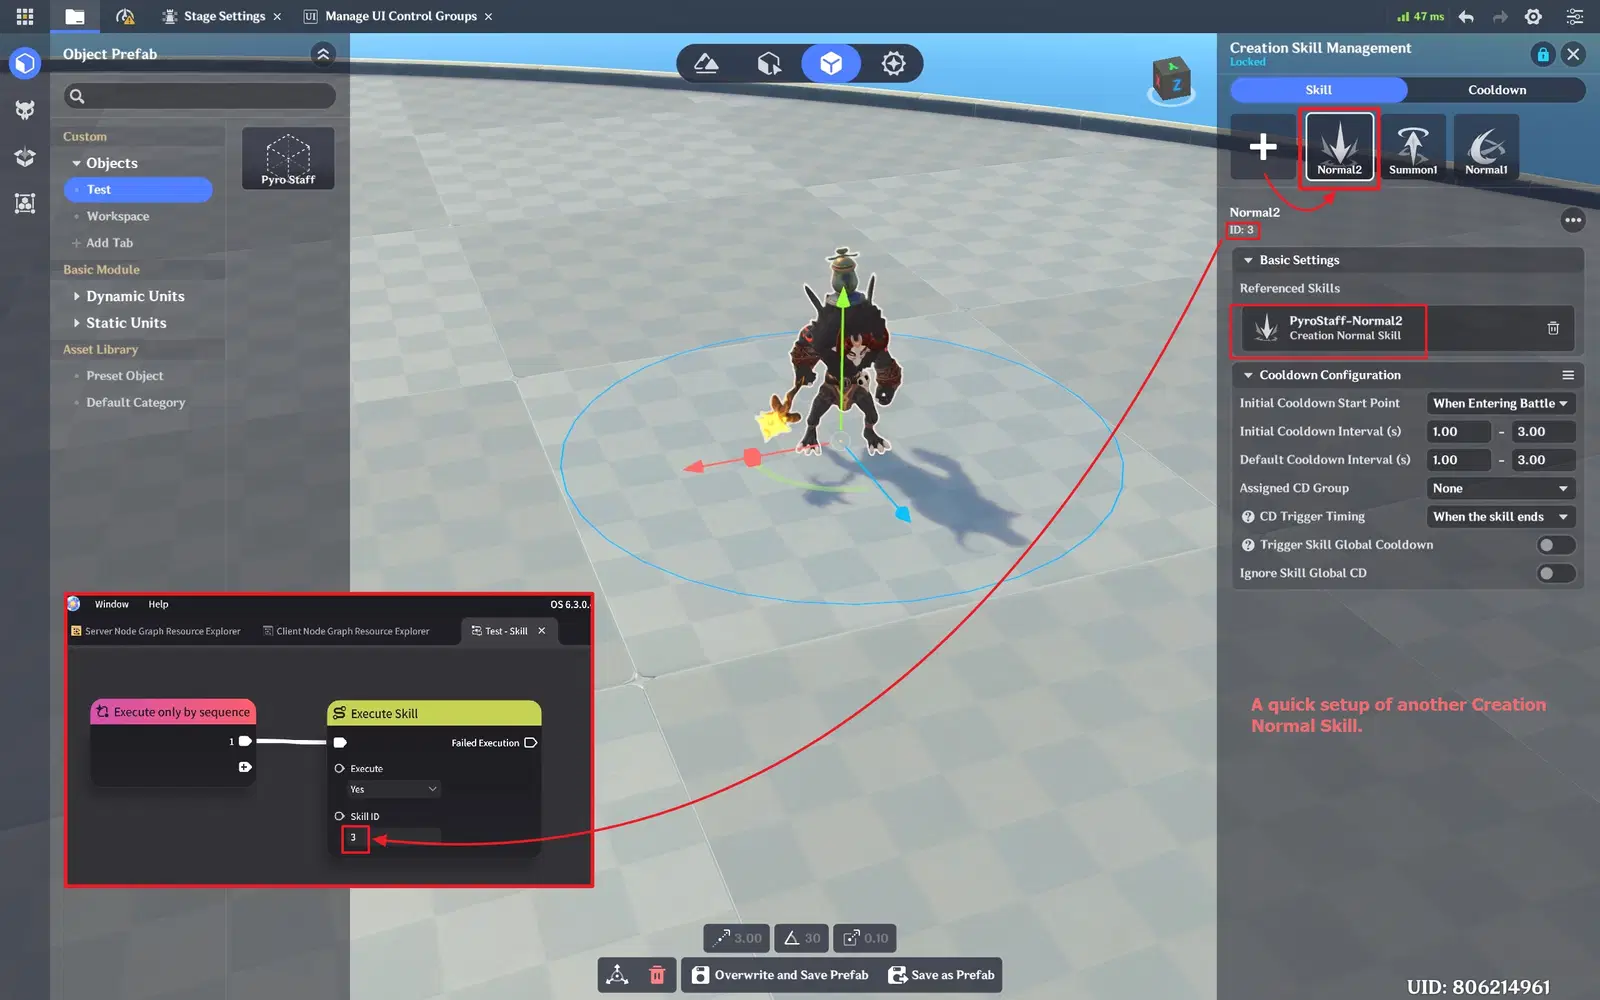
Managing Complex Creation Skills — Normal Skill (with Automatically Face Target)[Part 2]
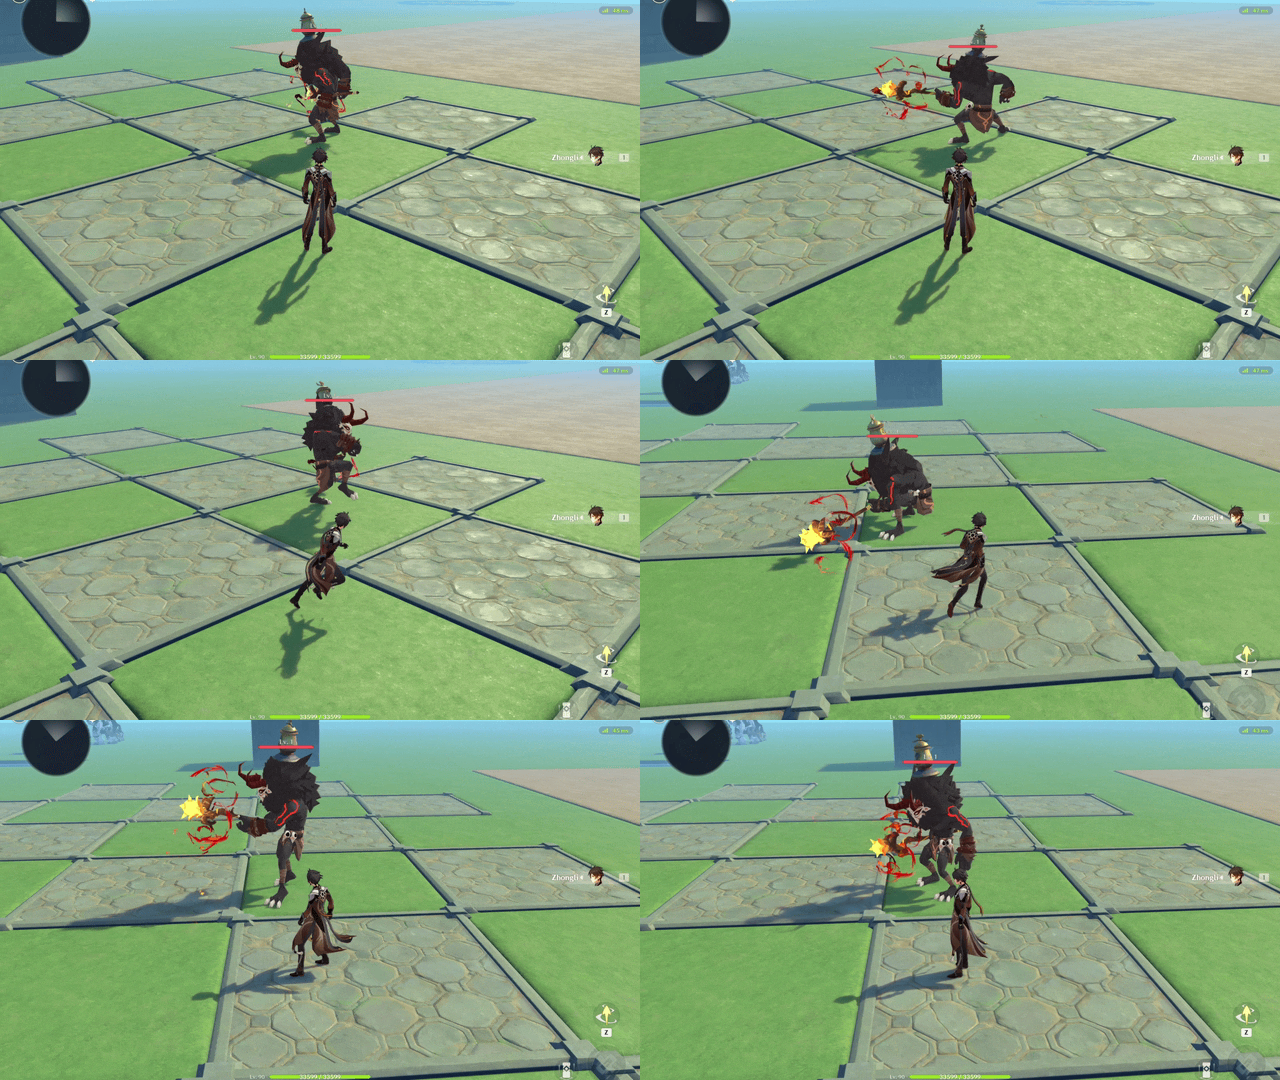
Managing Complex Creation Skills — Normal Skill (with Automatically Face Target) Example
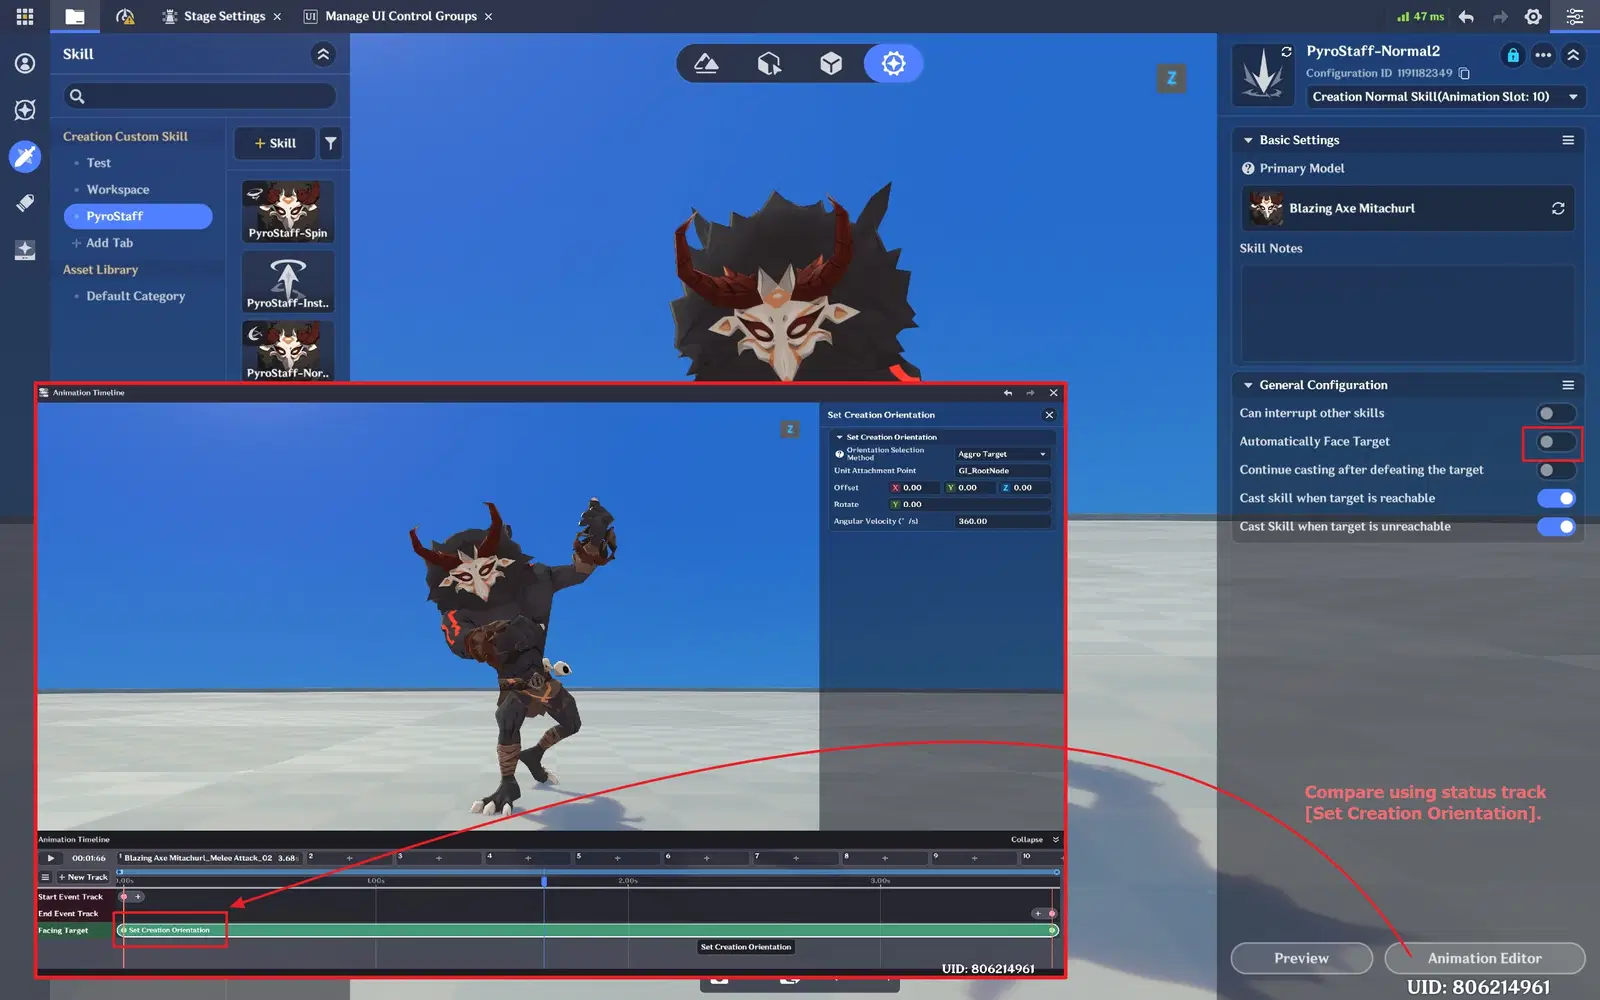
Managing Complex Creation Skills — Normal Skill (with Set Creation Orientation)
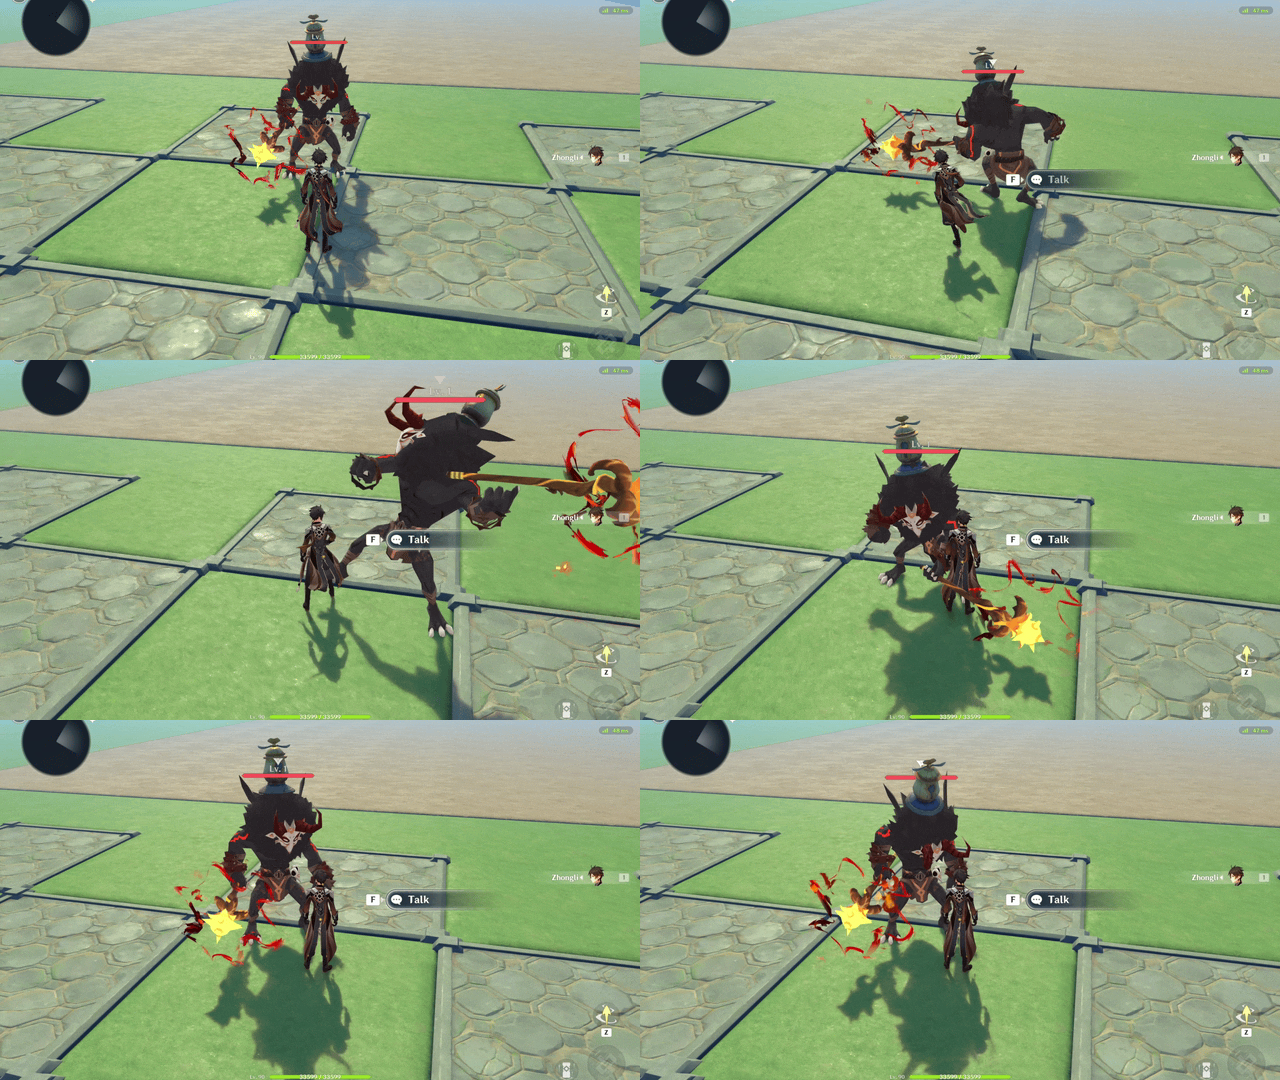
Managing Complex Creation Skills — Normal Skill (with Set Creation Orientation) Example
Creation Instant Skill
A Creation Instant Skill does not have a Creation Skill Primary Model and can be used on any Complex Creation.
In the [Animation Editor], this type of skill can only attach Creation Skill Node Graph.
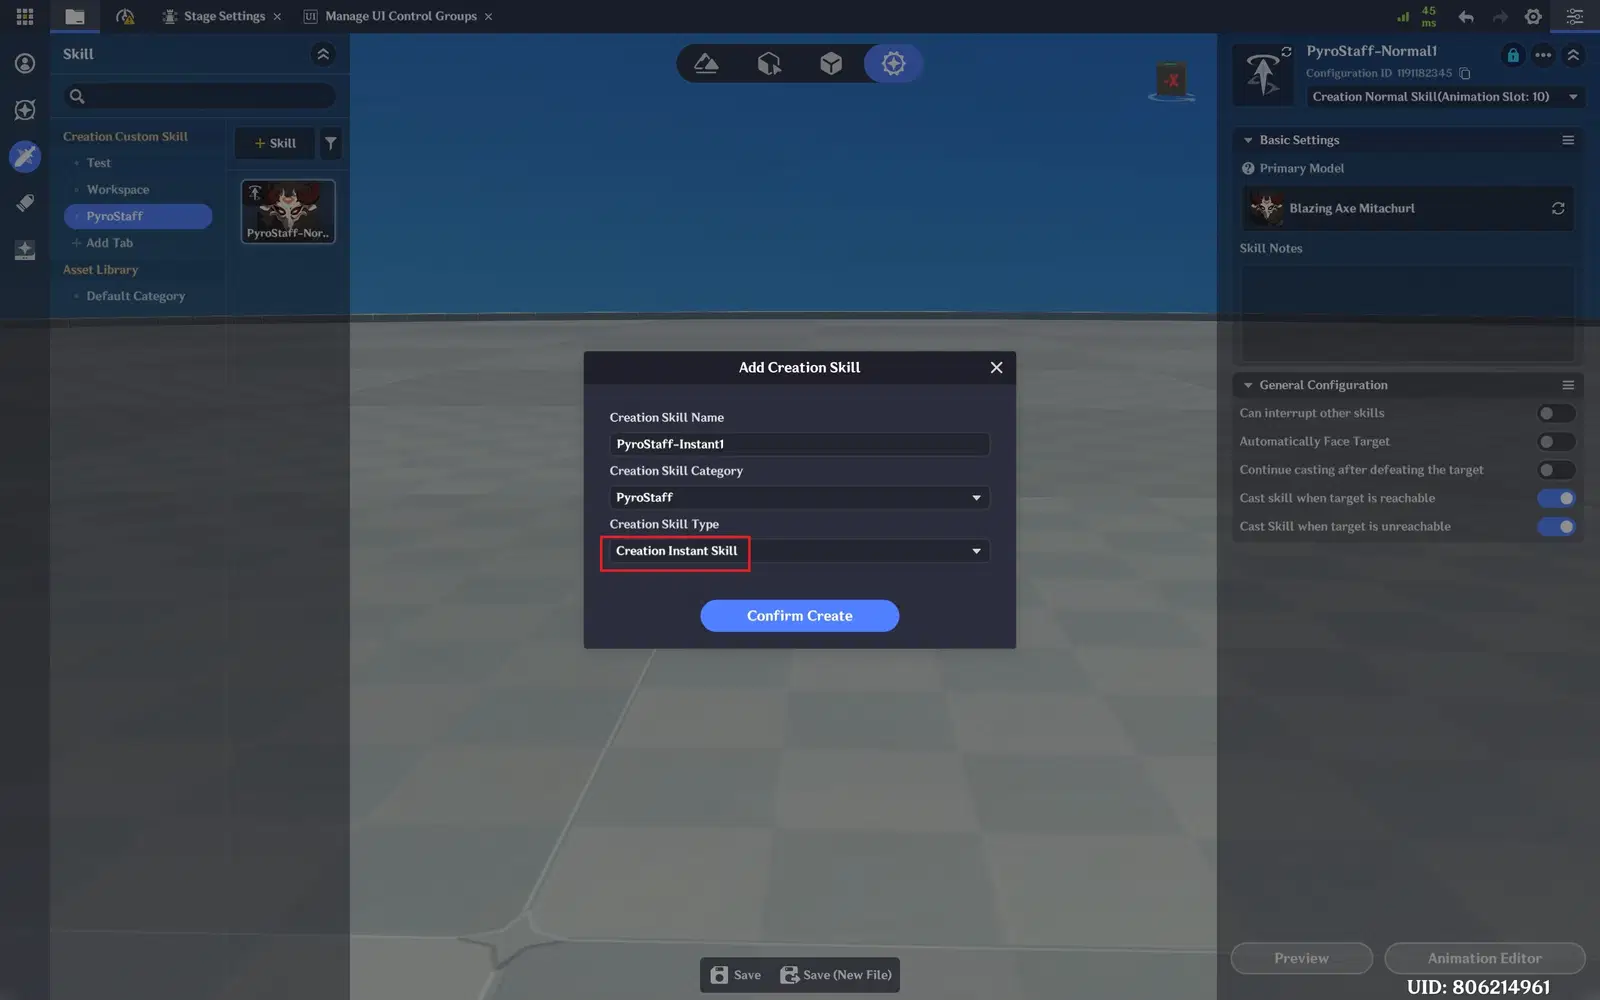
Editing Complex Creation Skills — Add [Creation Instant Skill]
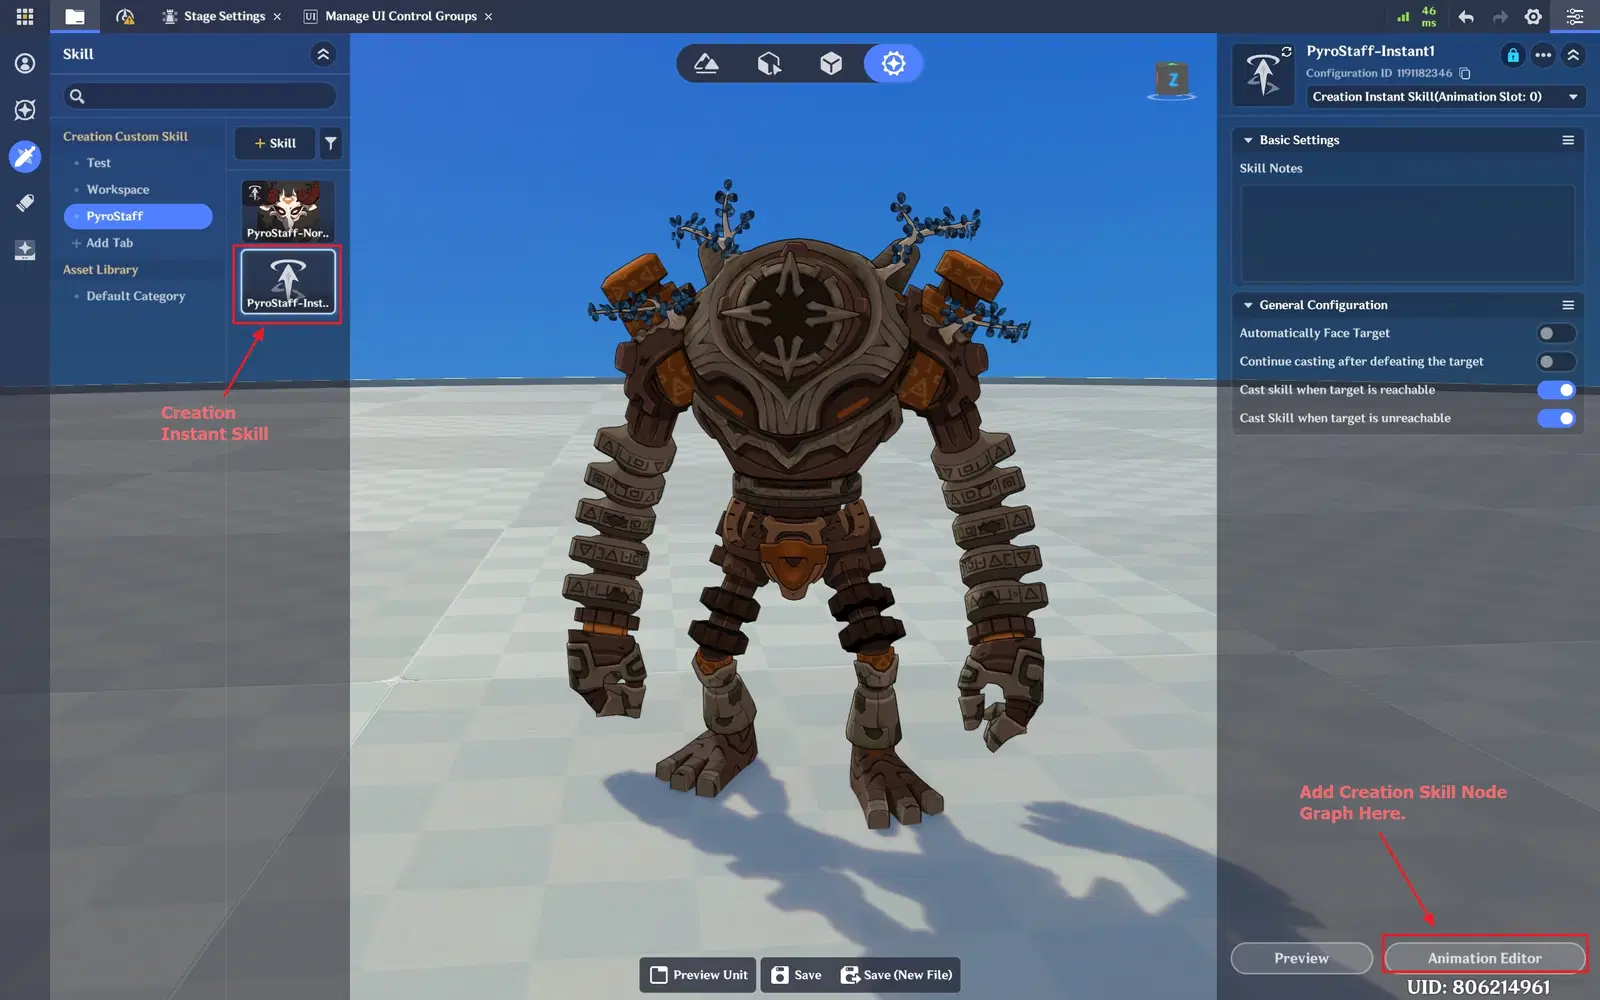
Editing Complex Creation Skills — Creation Instant Skill Settings
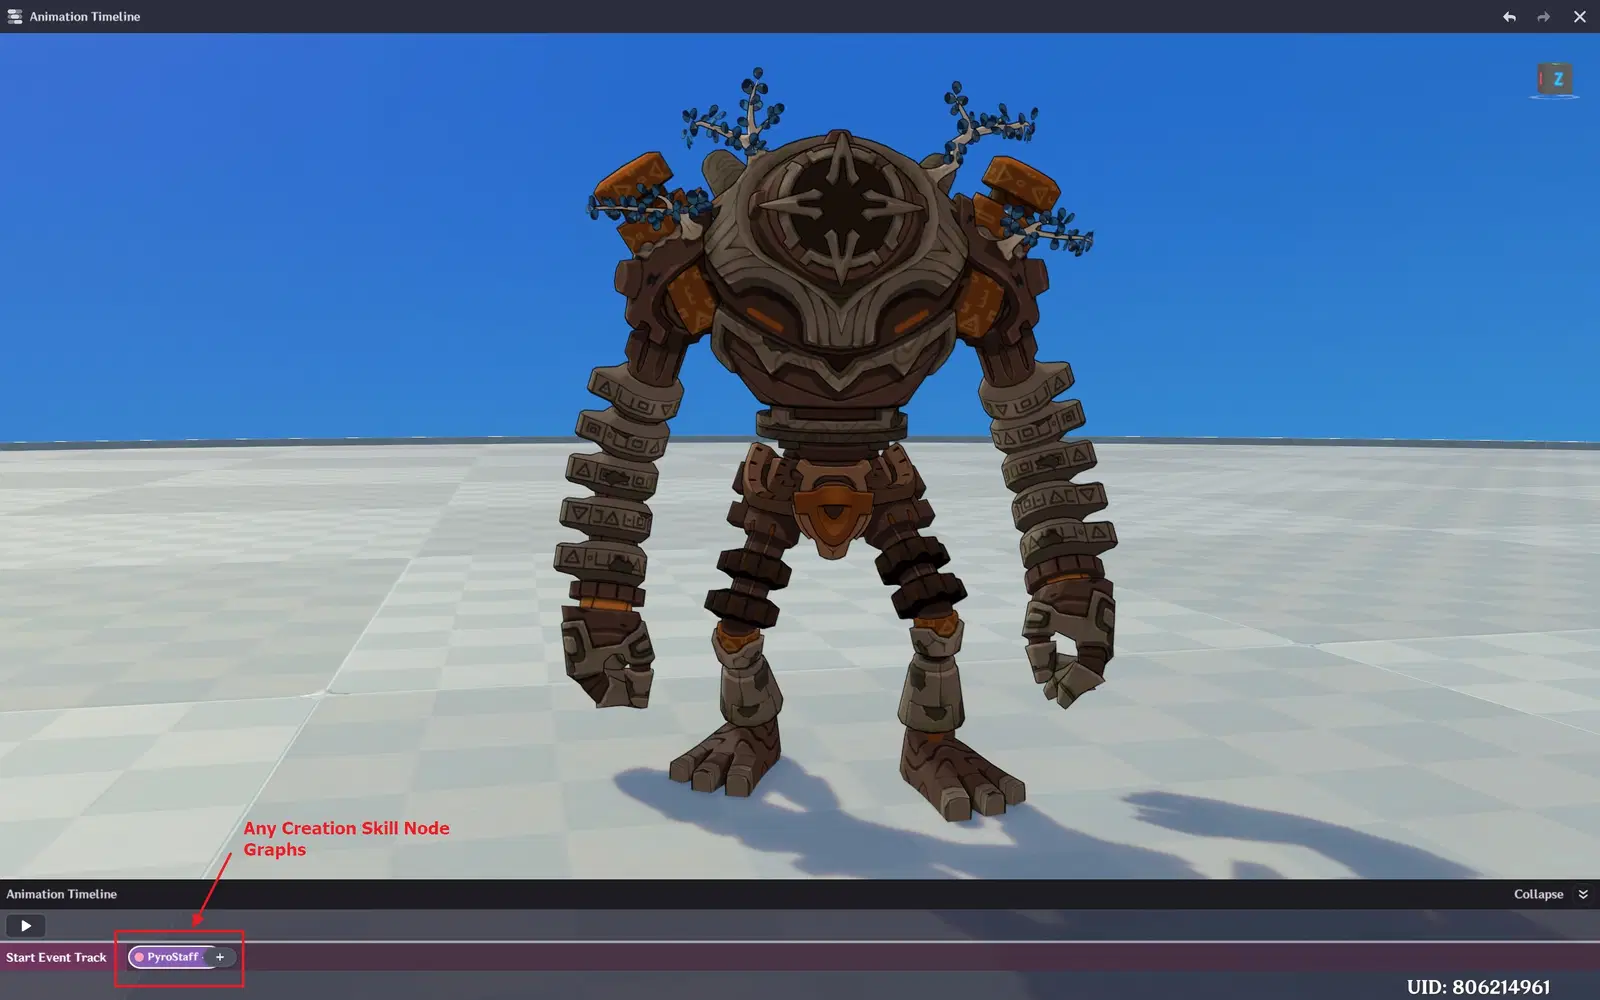
Editing Complex Creation Skills (Instant) — Adding Creation Skill Node Graph.
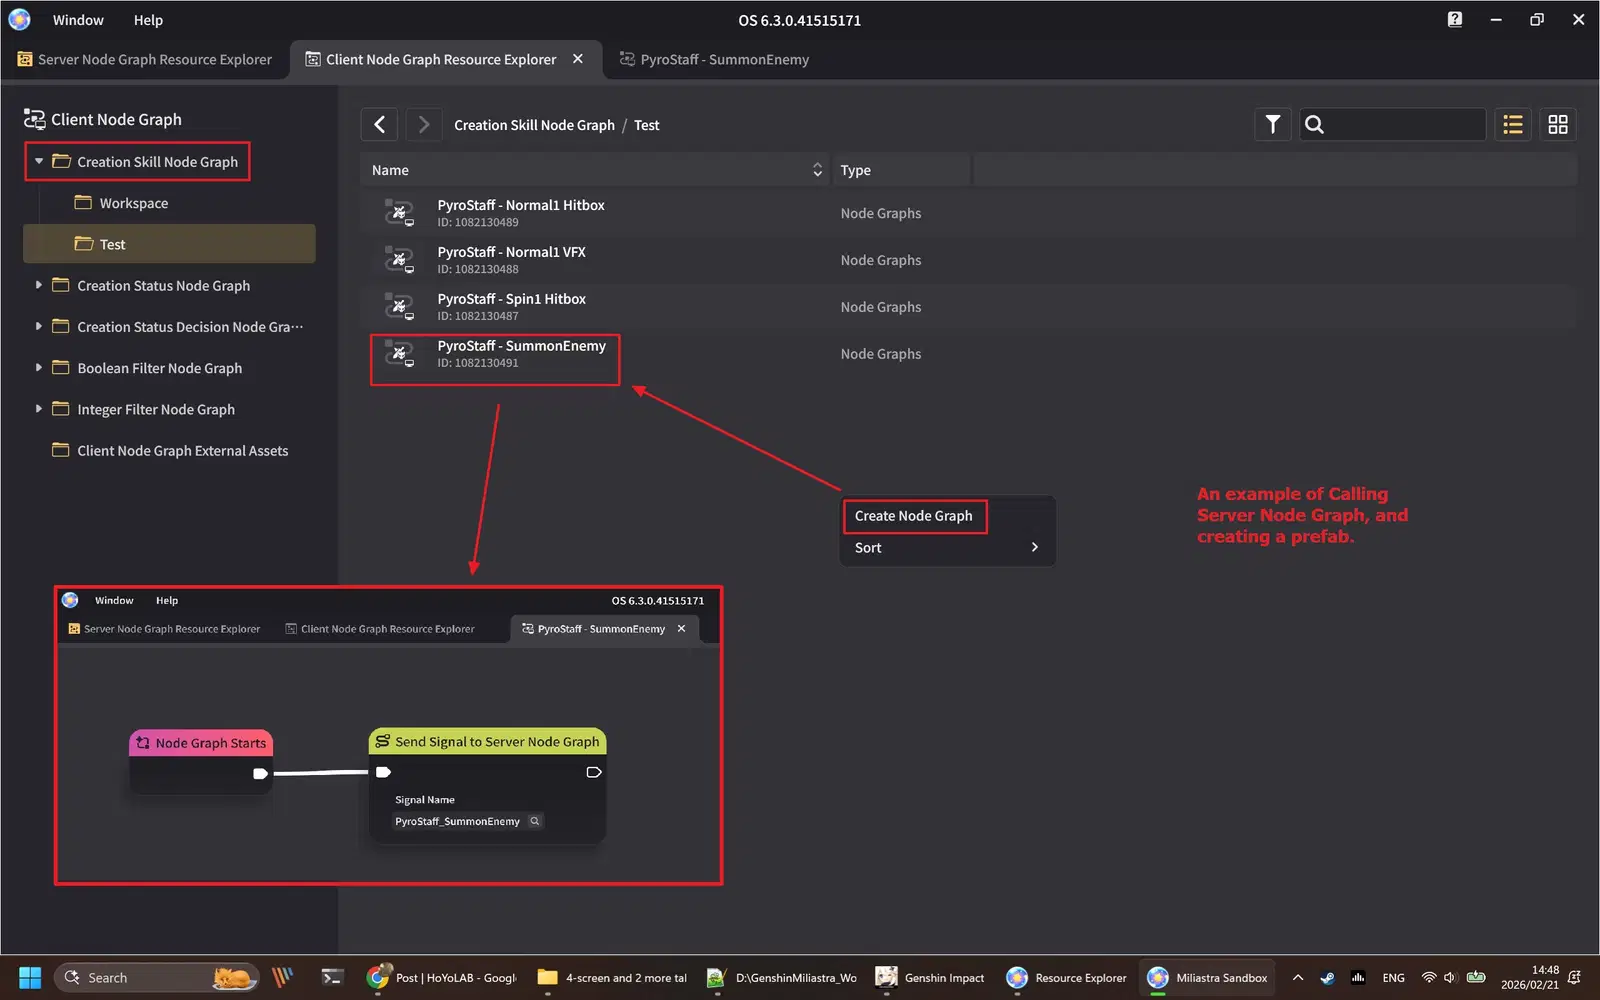
Editing Complex Creation Skills — Creation Skill Node Graph (Calling a Server Node Graph)
To execute an Instant Skill, the process is the same as executing a Creation Normal Skill.
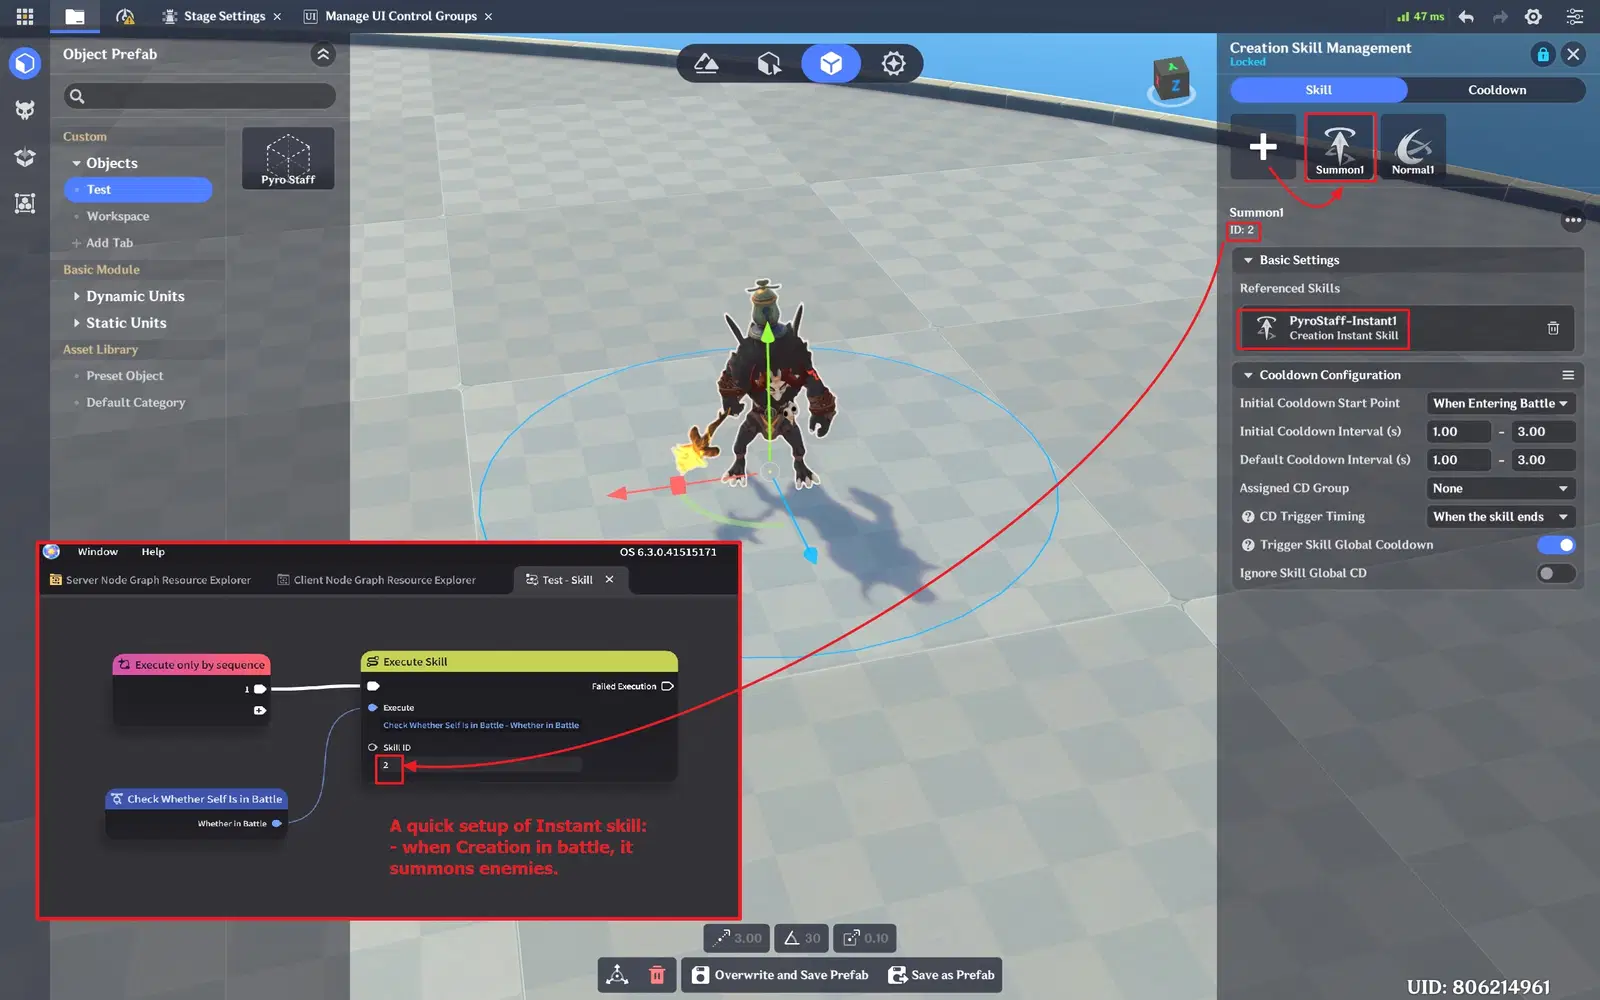
Managing Complex Creation Skills — Execute an Instant Skill
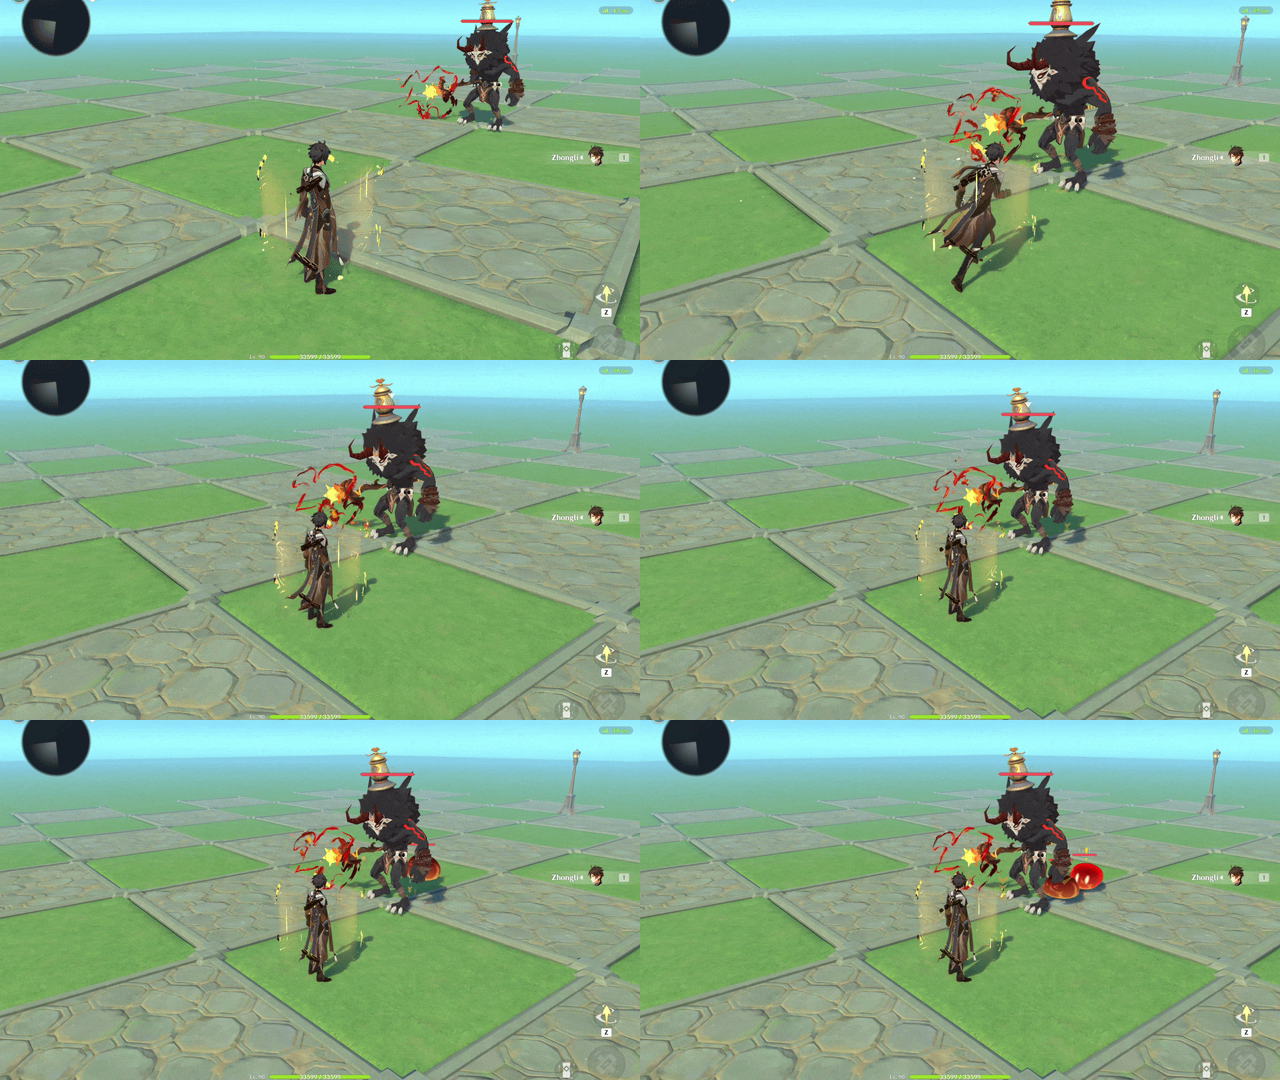
Managing Complex Creation Skills — Execute an Instant Skill Example
Creation Skill Management
The main adjustable settings in Creation Skill Management relate to cooldowns.
There are three counters calculated in parallel:
- Individual Skill [Default CD]
- (Optional) Shared [CD Group]
- (Optional) Shared [Global Skill CD]
A skill can only be executed again when three CDs are complete.
If any CD condition is not met, the [Execute Skill] node will result in [Failed Execution].
Additionally, You can define CD Trigger Timing:
- [When the skill starts] — cooldown countdown begins when the skill is successfully triggered.
- [When the skill ends] — cooldown countdown begins after the skill animation finishes.
If the skill triggers shared [CD Group] or [Global Skill CD], those cooldowns will also begin at the same configured timing.
Individual Skill [Default CD]
Each skill has its own Default Cooldown Interval.
When an [Execute Skill] node is executed, the skill triggers its own cooldown.
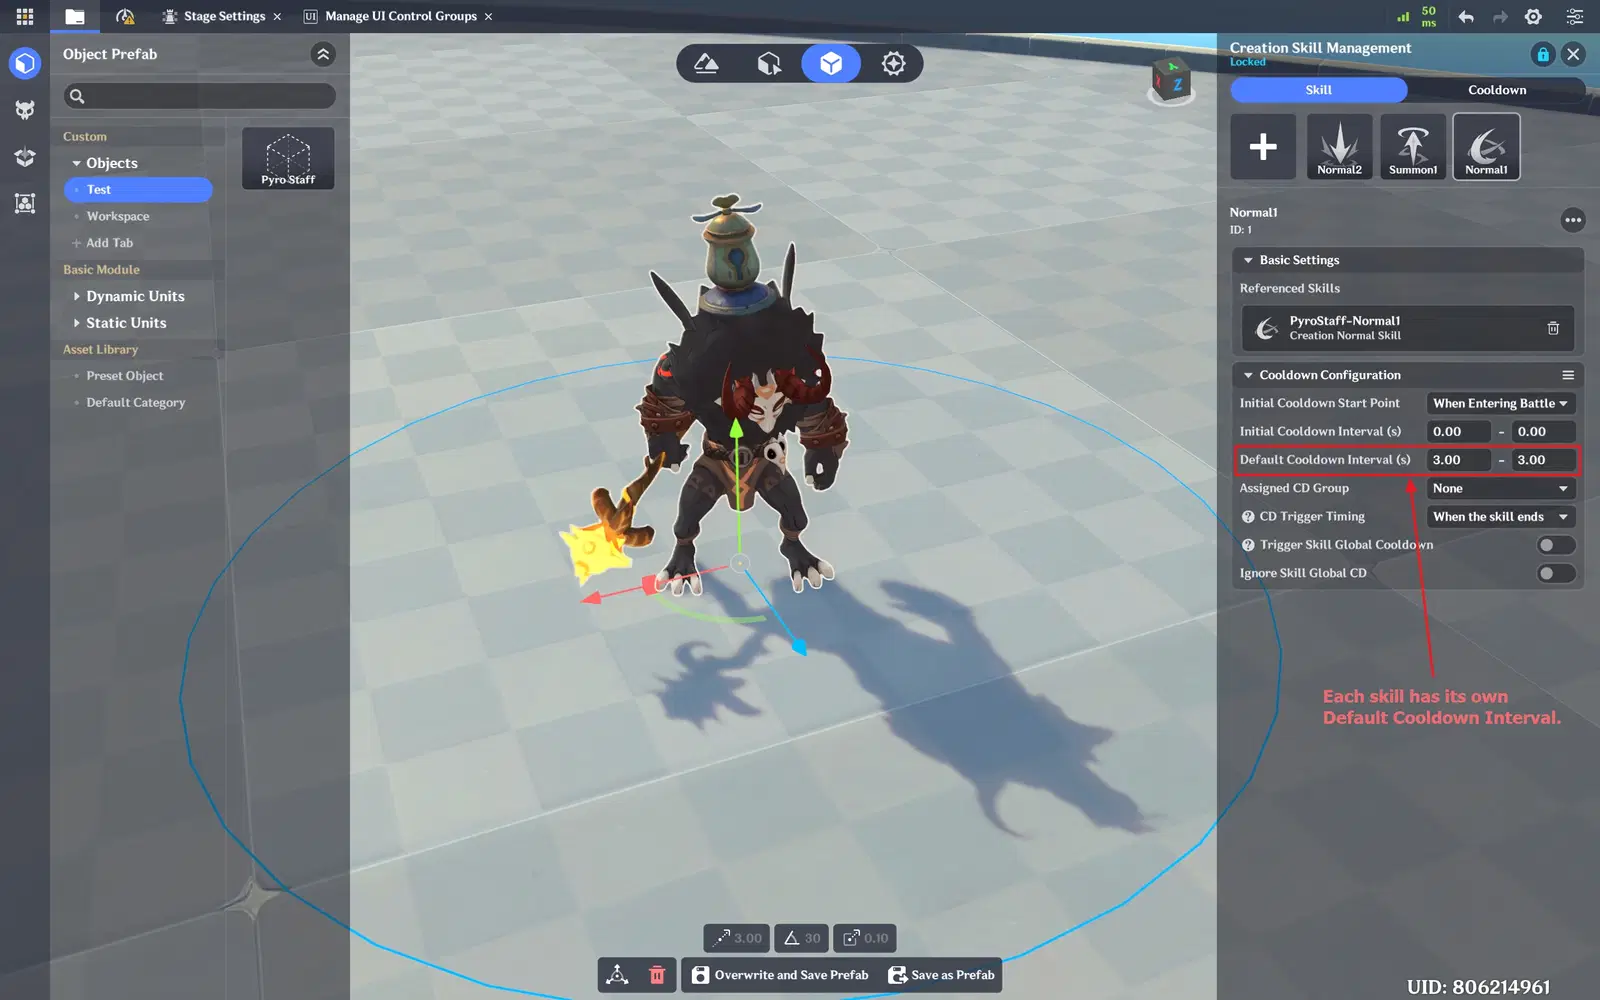
[Default CD] — Defining [Default Cooldown Interval].
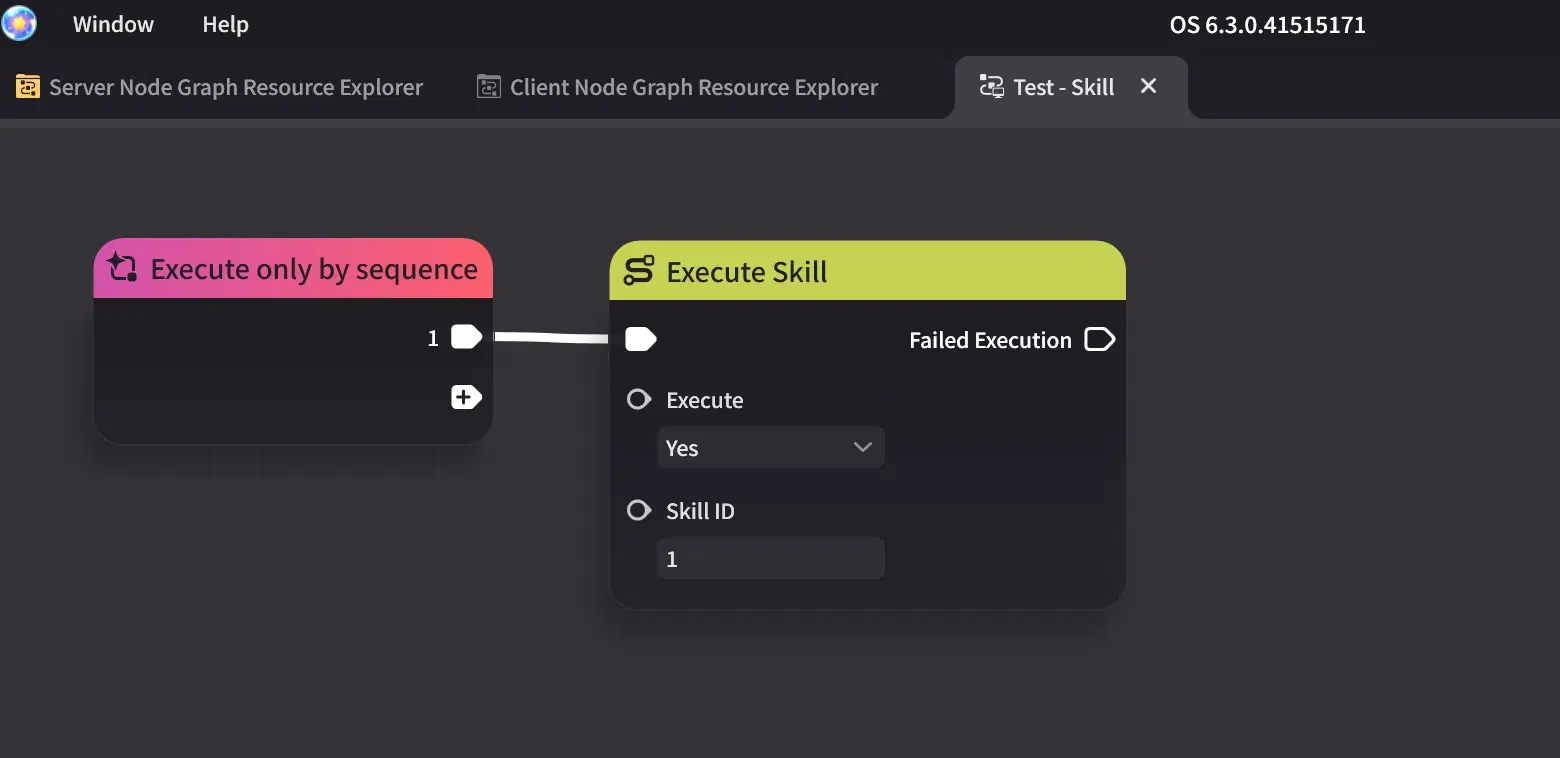
[Default CD] — Configure Creation Status Node Graph.
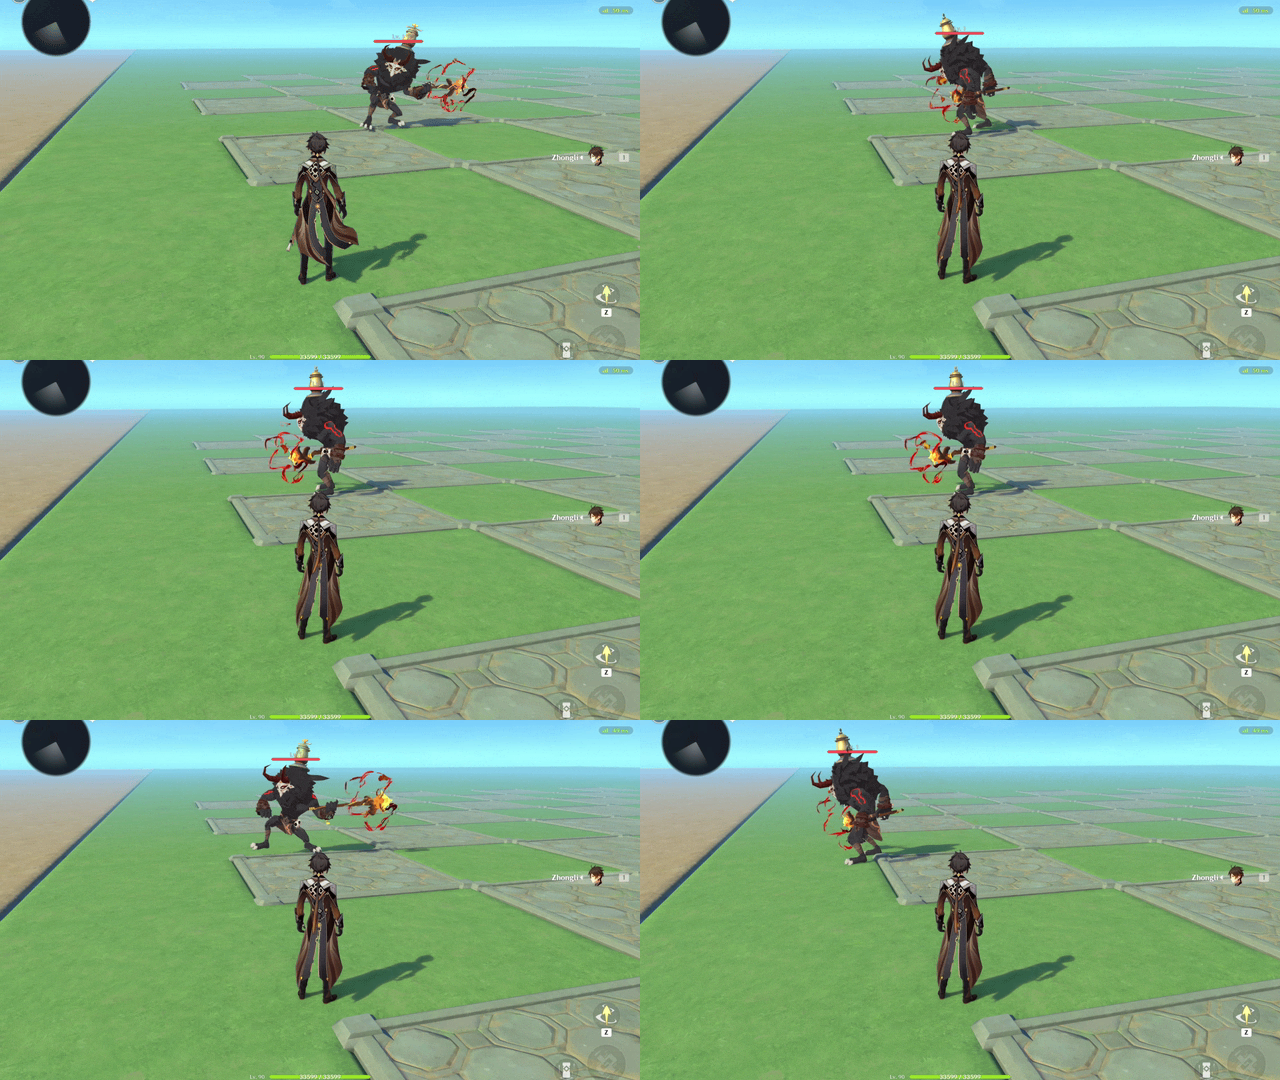
[Default CD] — Example (CD 3s)
And additionally, you can also add an Initial Cooldown Interval when the Creation enters or leaves combat.
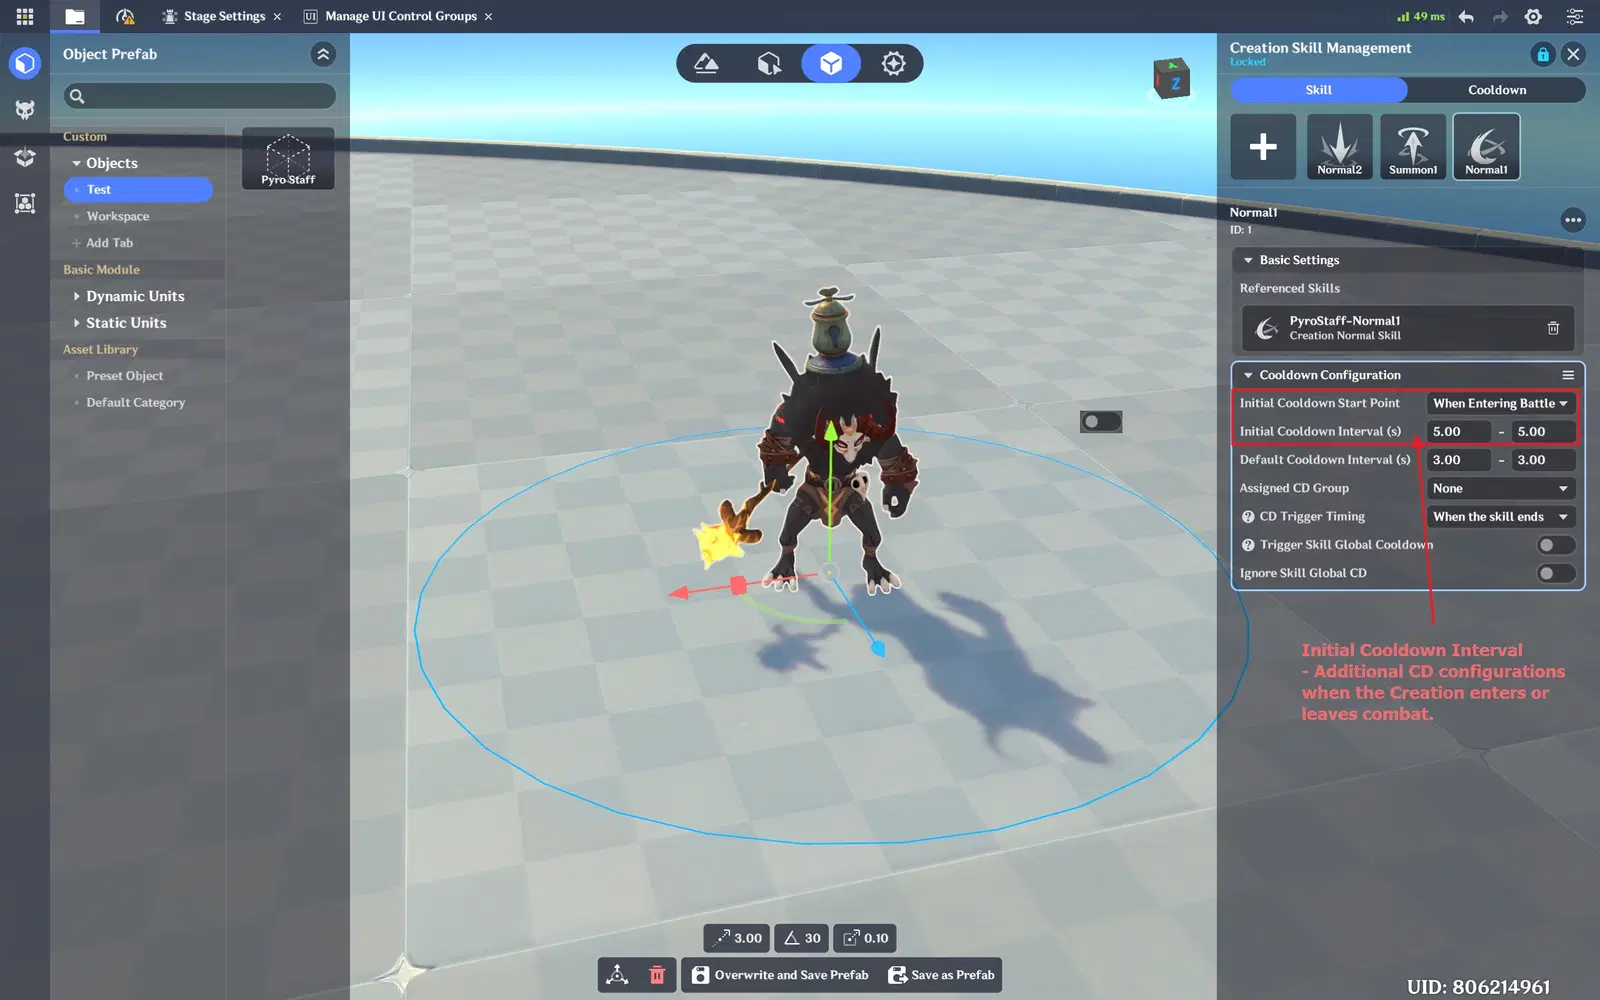
[Default CD] — Defining [Initial Cooldown Interval].
Note: If multiple [Execute Skill] nodes are chained together, once the first skill enters cooldown, the node
routes to the [Failed Execution] pin, causing the second skill to execute immediately.
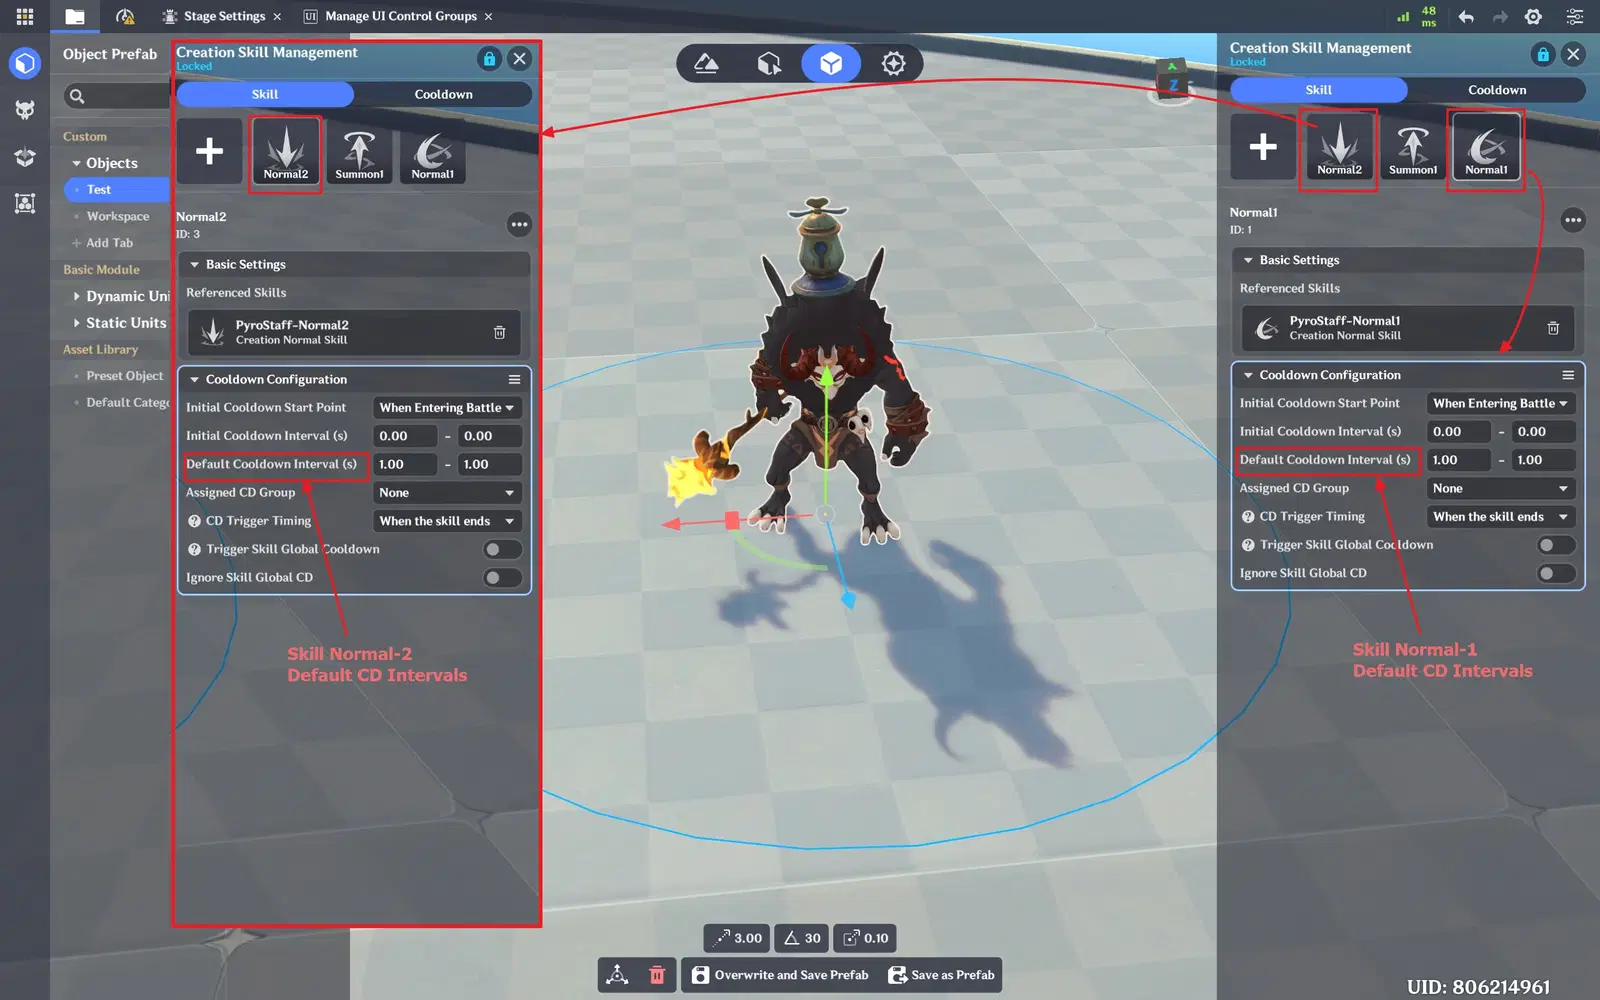
[Default CD] — Defining Multiple Skills.
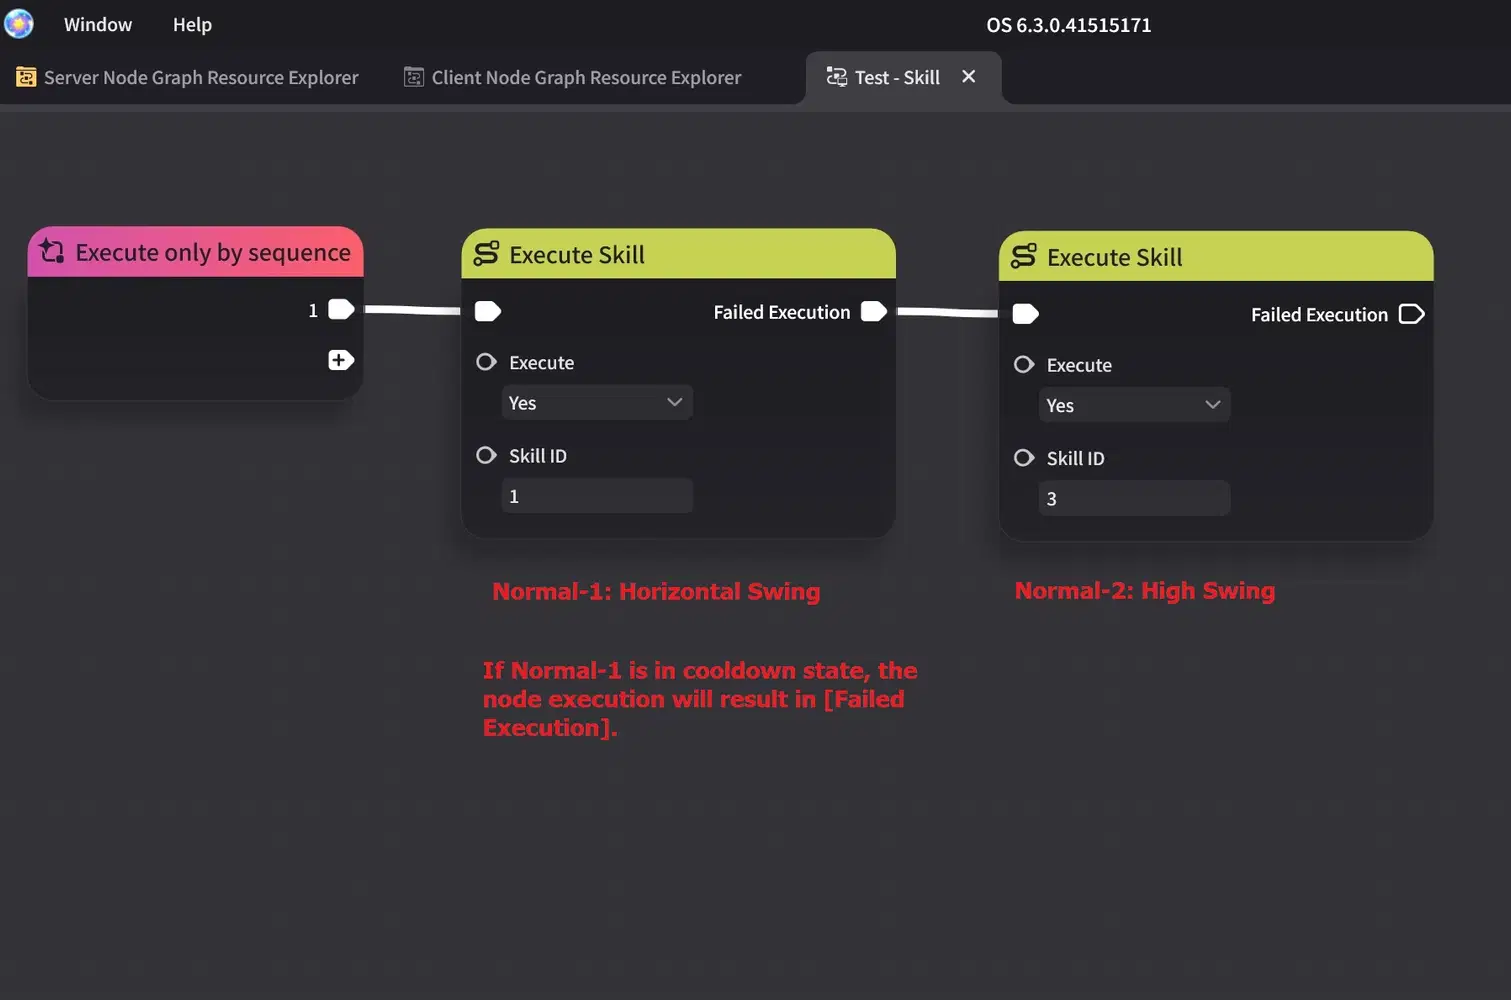
[Default CD] — Chained [Execute Skill] Nodes (Immediate Execution of the Second Skill)
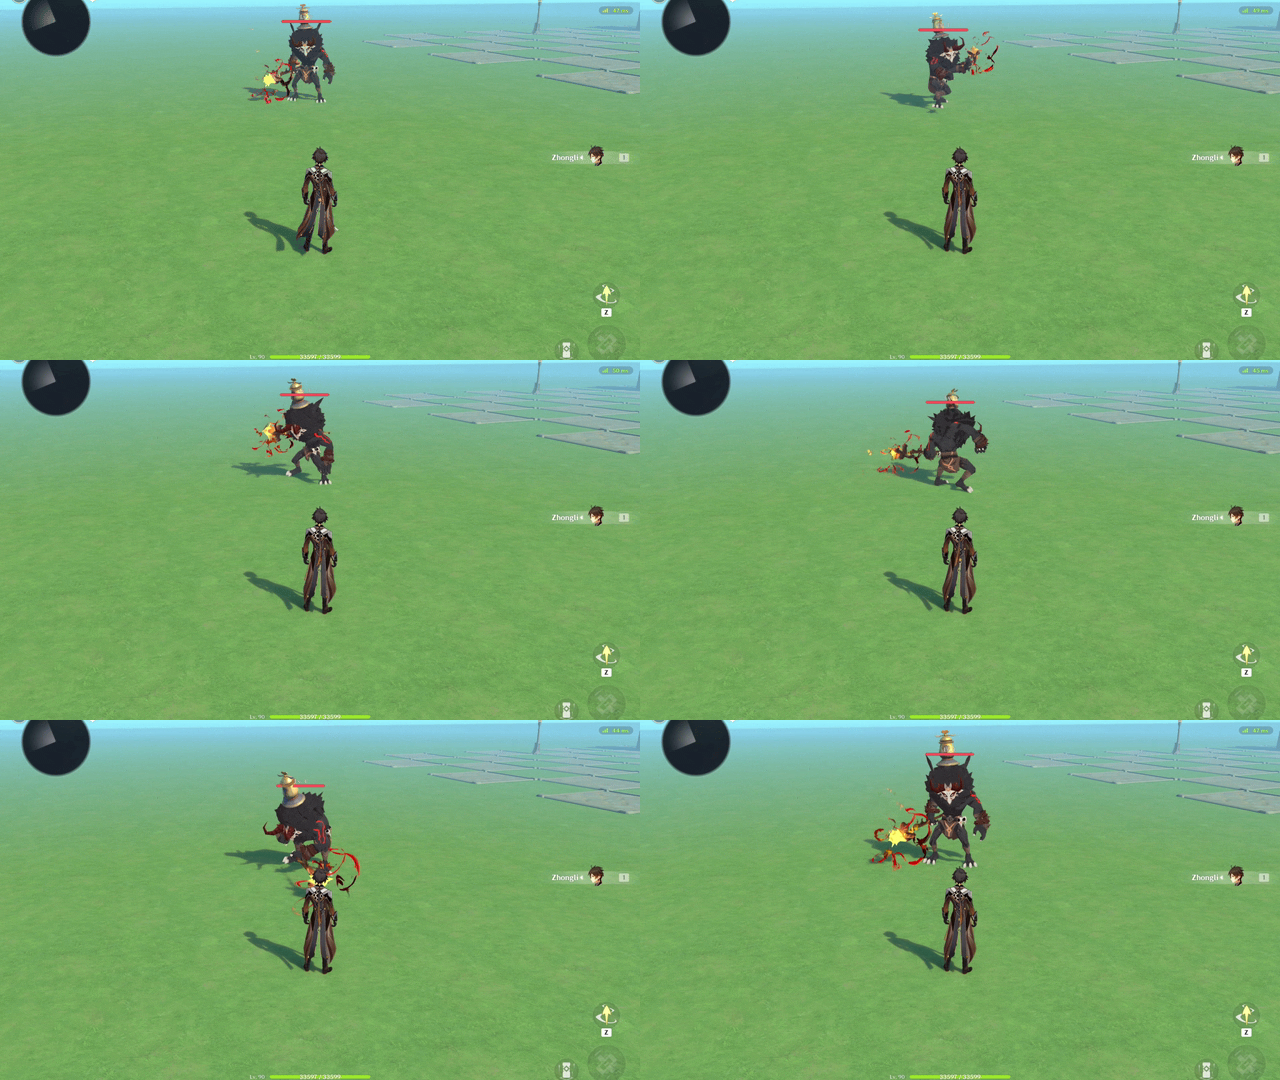
[Default CD] — Chained [Execute Skill] Example (Immediate Execution of the Second Skill)
Shared [CD Group]
Each Skill can be assigned to a shared cooldown group.
To create a CD Group:
- Go to [Cooldown] tab → [Add CD Group].
- Set the CD Group Name and Cooldown Intervals.
And in the [Skill] tab, assign skills to the created shared CD Group.
When an [Execute Skill] node is executed:
- The skill triggers its own cooldown.
- The skill triggers the shared CD Group countdown, and all skills within the CD Group are unable to execute until the CD Group countdown ends.
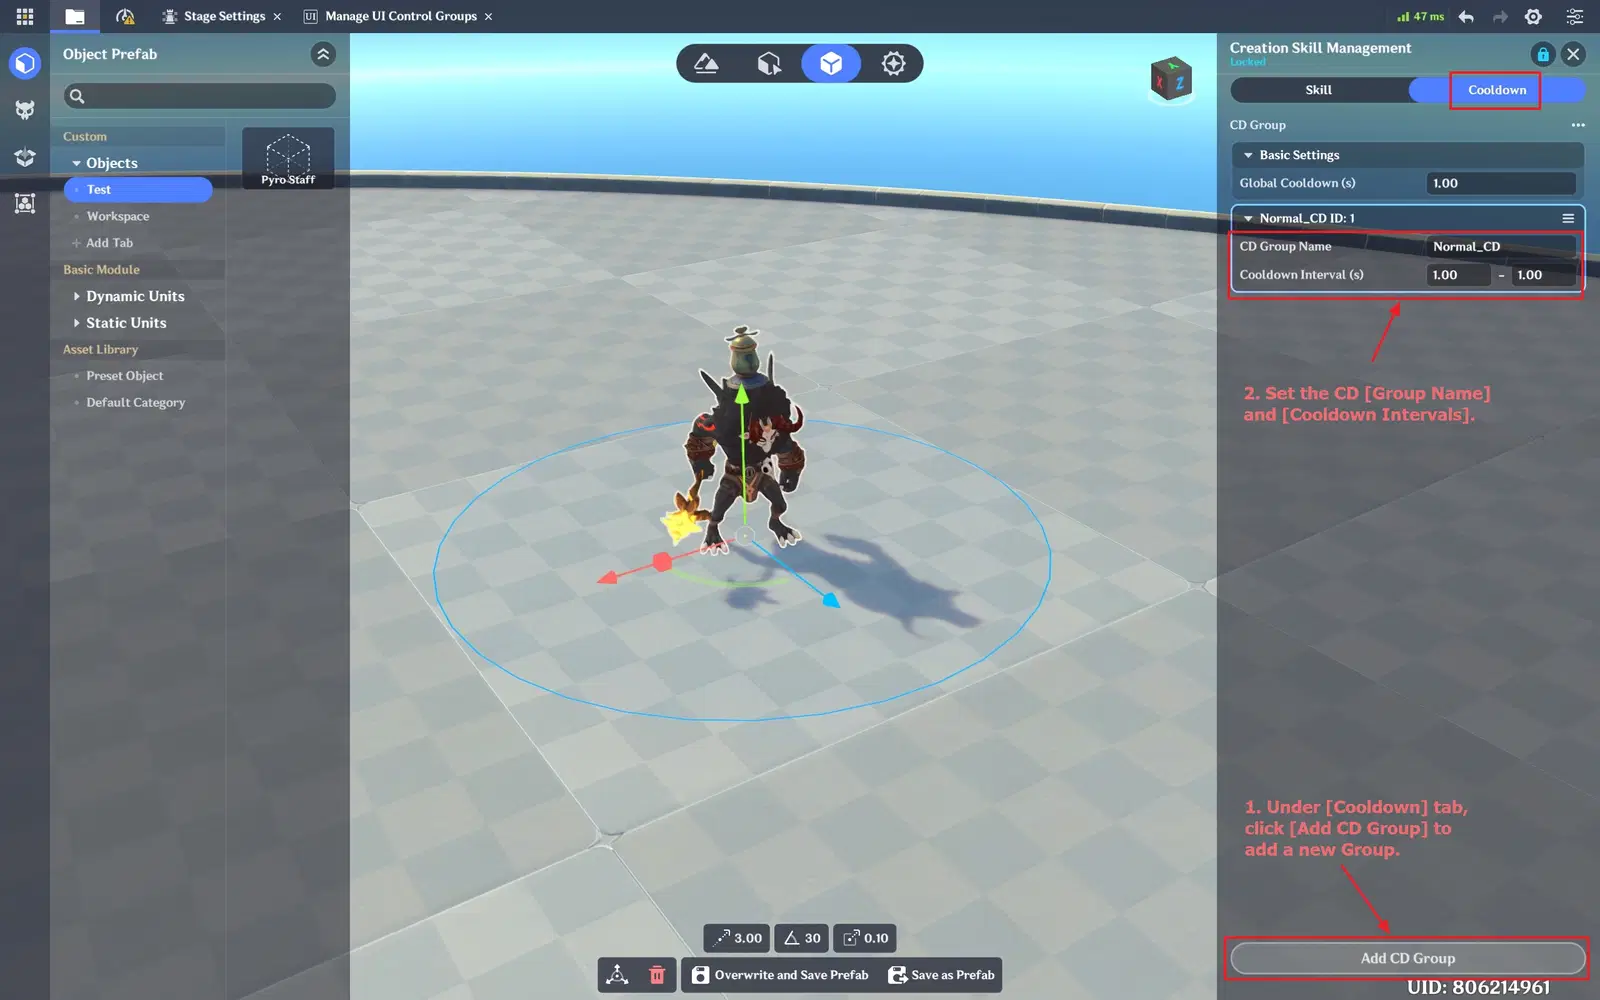
Shared [CD Group] — Creating CD Group
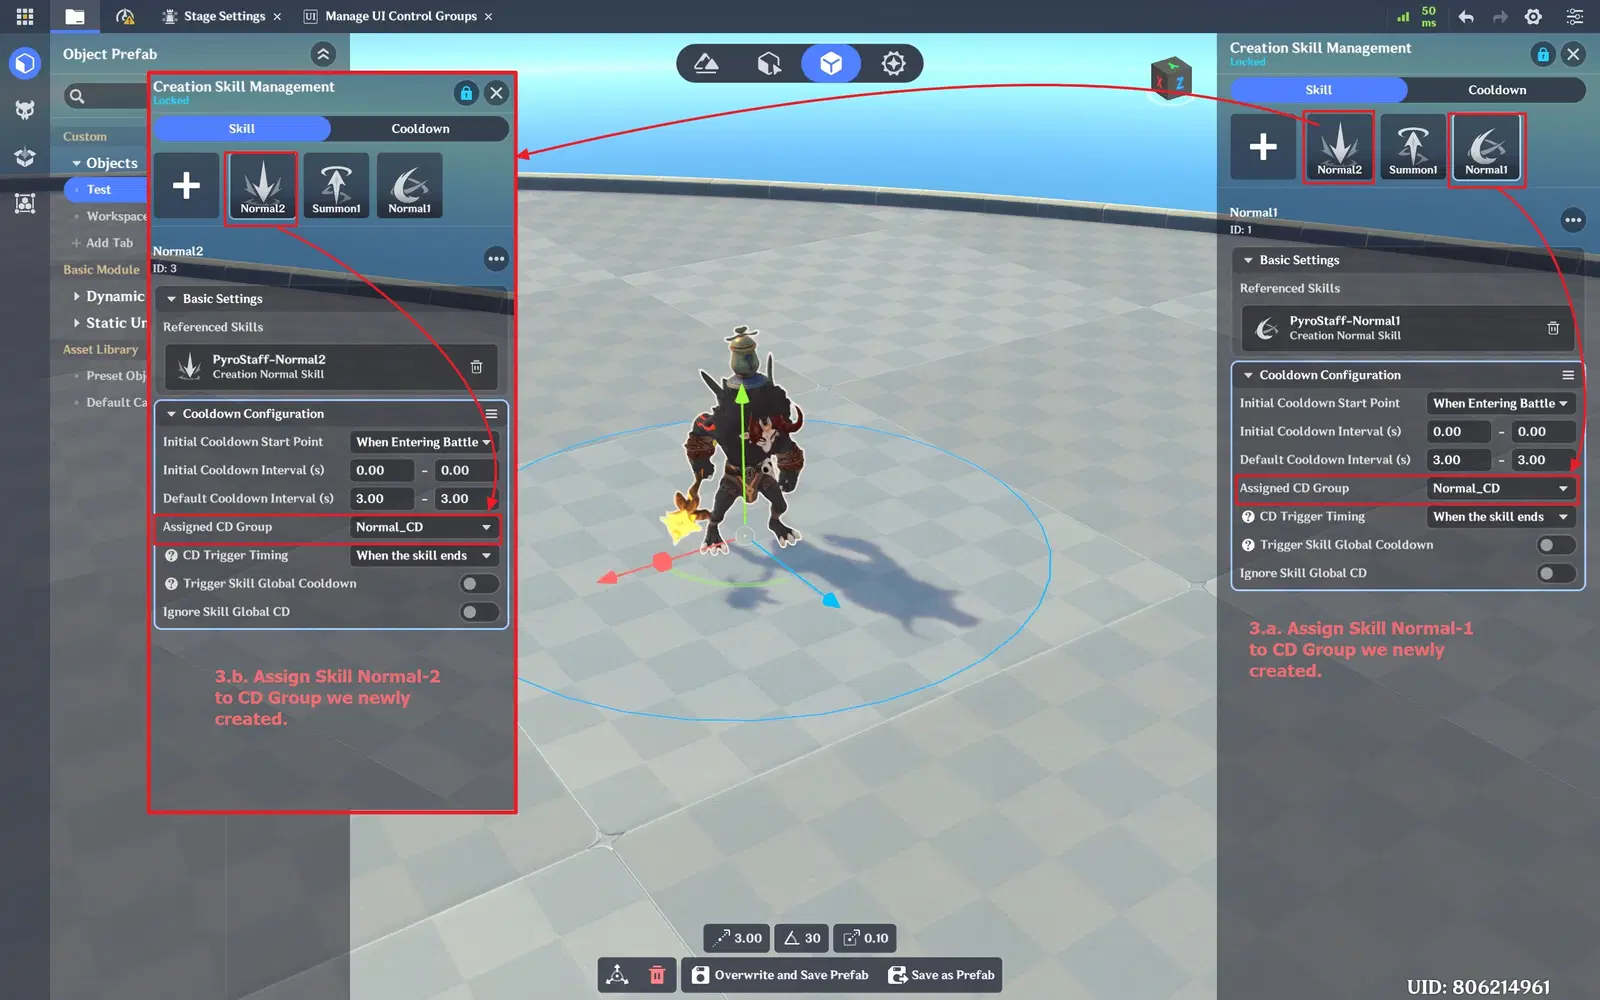
Shared [CD Group] — Assign skills to the shared CD Group.
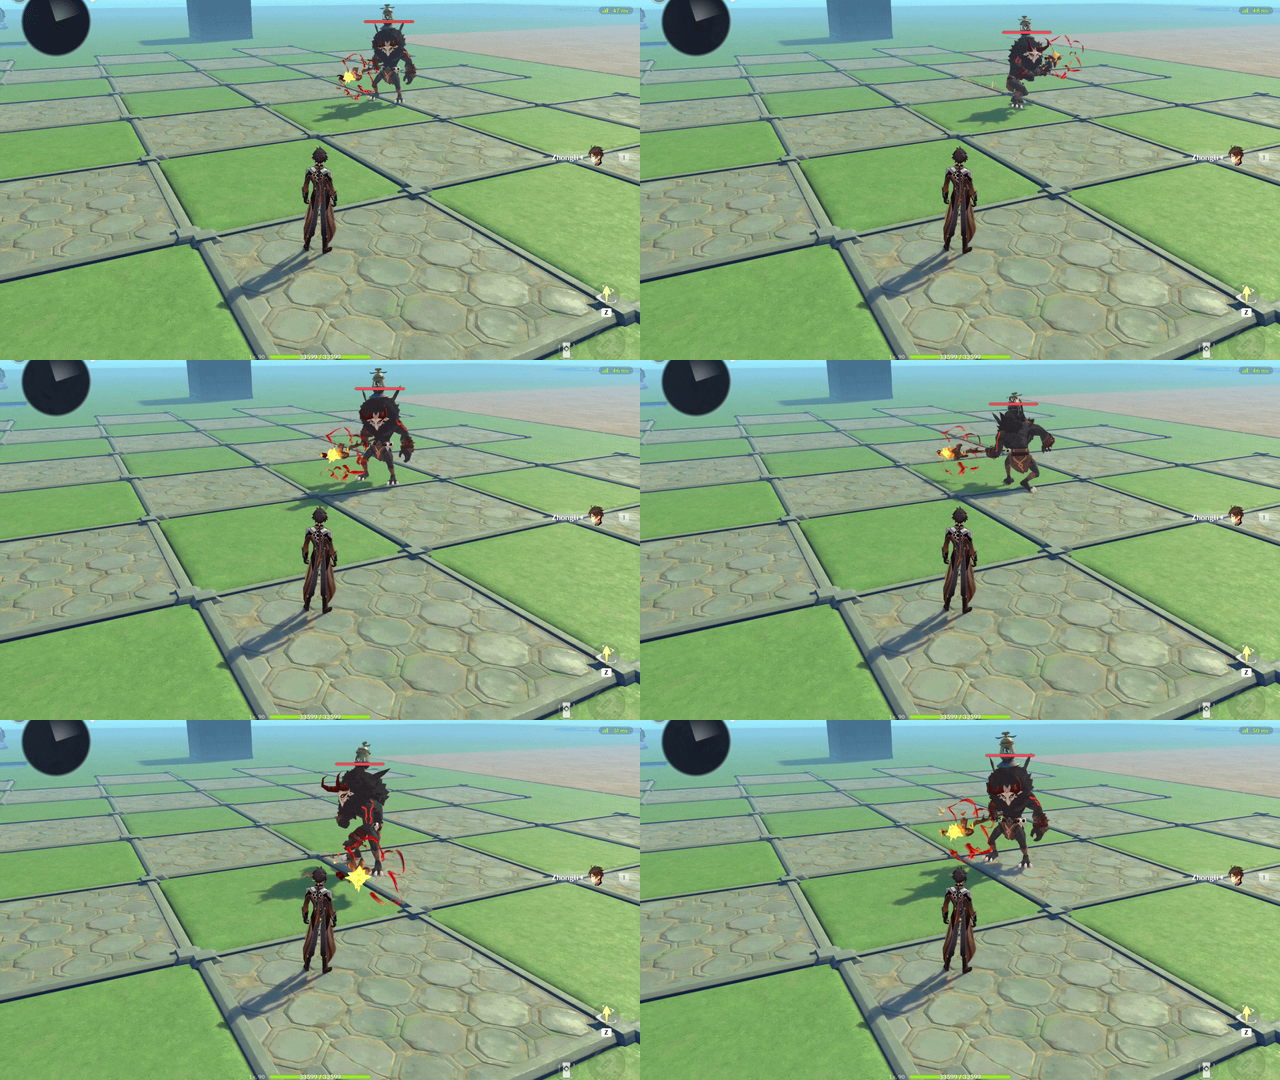
Shared [CD Group] — Chained [Execute Skill] Example (CD Group 1s)
Note: In the above CD Group example, along with creating a new CD Group, each skill’s Default Cooldown Intervals were also increased. This depends on how the status node graph is designed, but the purpose is to allow each skill in the group to have a chance to execute after the shared CD Group countdown ends.
Shared [Global Skill CD]
All skills are assigned to a global cooldown group by default.
- You can configure Ignore Skill Global CD to allow a skill to ignore the global cooldown.
- You can configure Trigger Skill Global Cooldown to allow a skill to trigger the global cooldown.
The [Global Skill CD] value is configured in the [Cooldown] tab → [Global Cooldown].
When an [Execute Skill] node is executed:
- The skill triggers its own cooldown.
- If a skill is configured with [Trigger Skill Global Cooldown], it also triggers the shared Global Skill CD, and all skills (except those configured with [Ignore Skill Global CD]) are unable to execute until the Global Skill CD countdown ends.
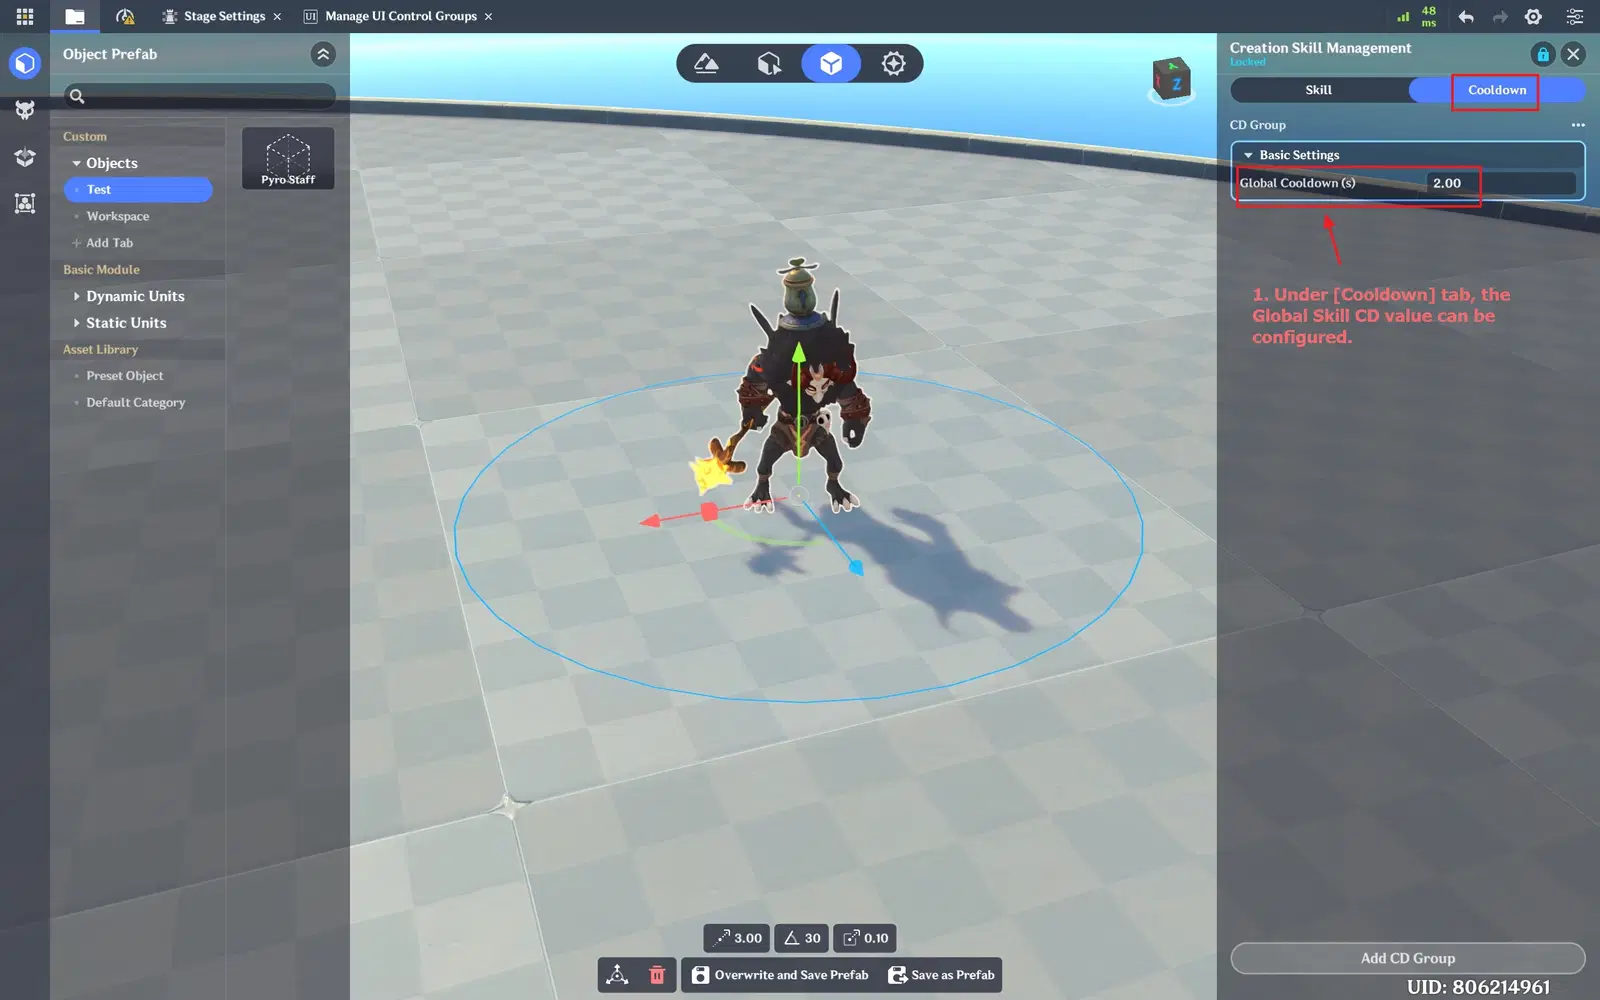
Shared [Global Skill CD] — Configure [Global Skill CD].
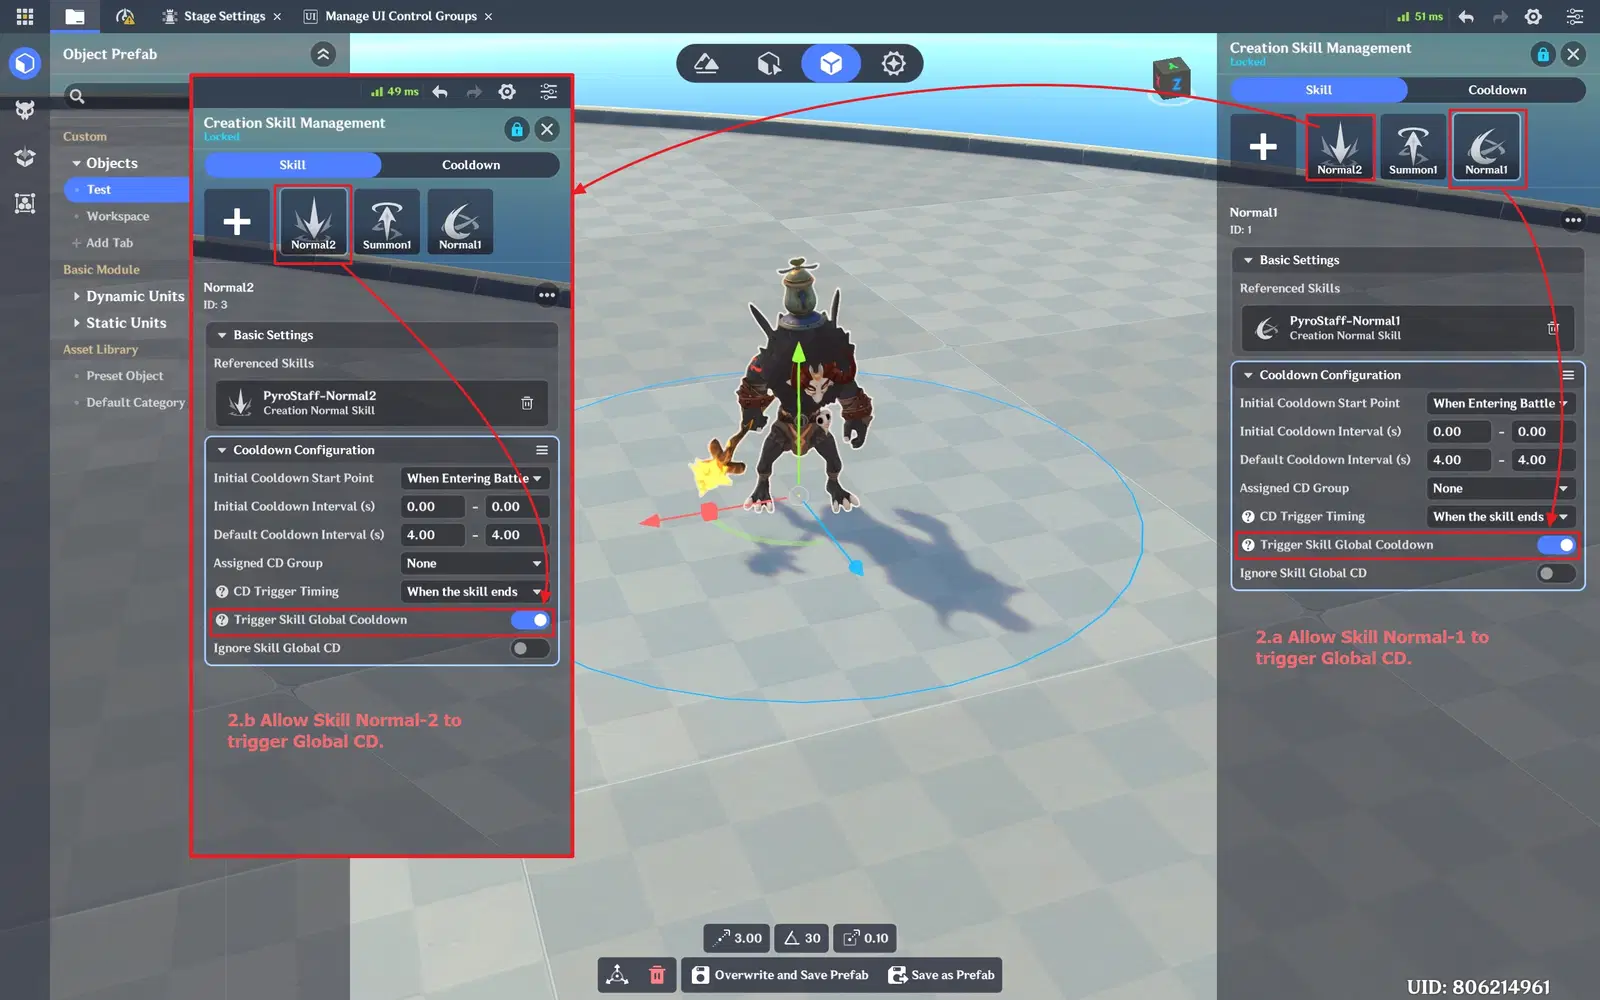
Shared [Global Skill CD] — Allow skills trigger Global Skill CD.
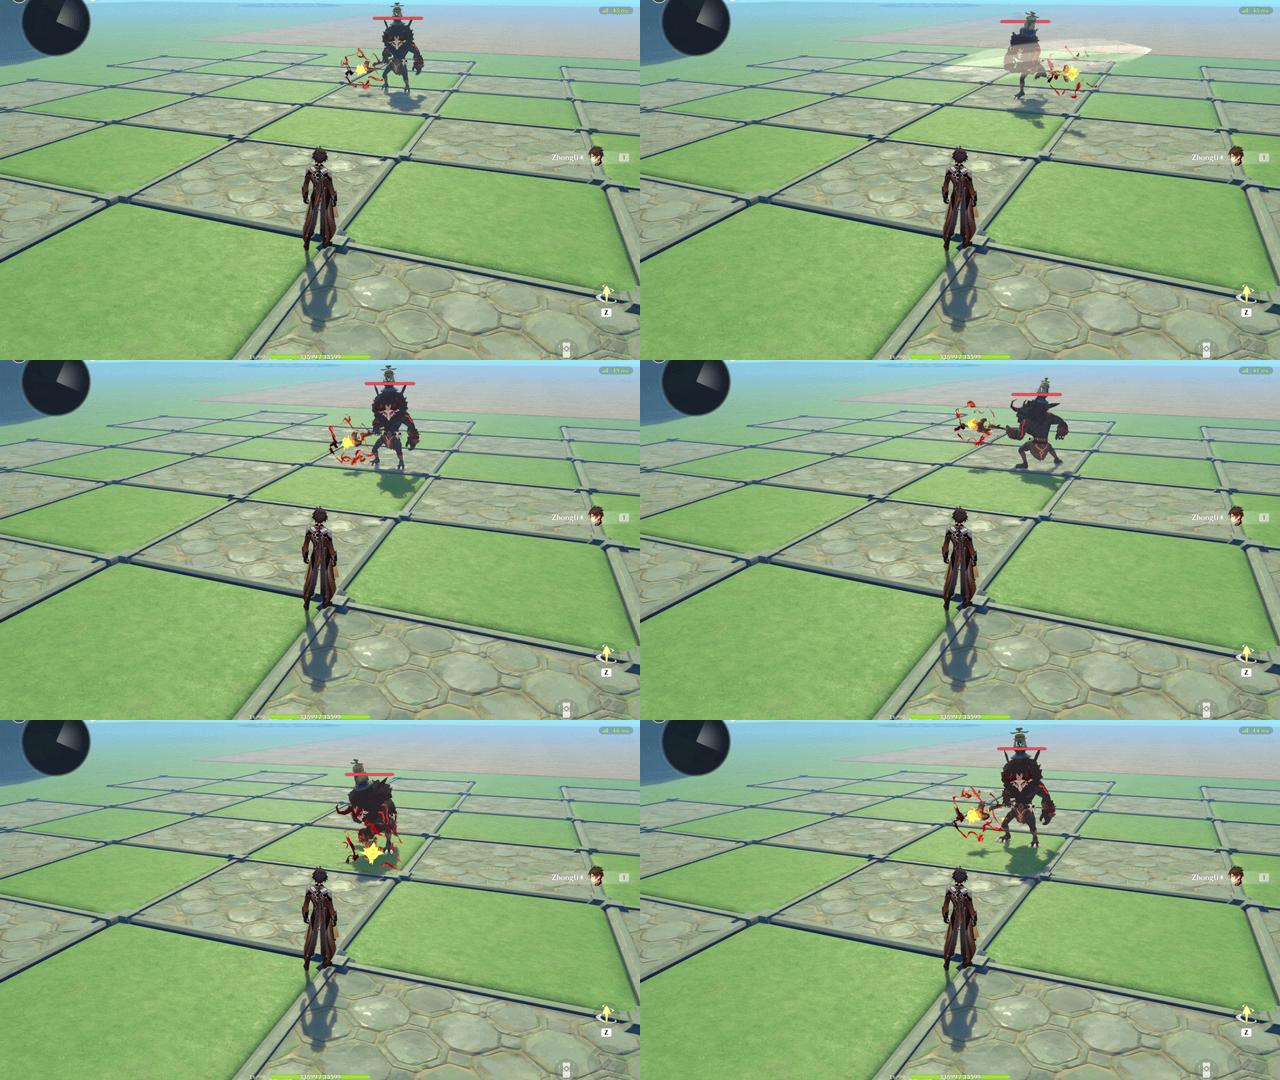
Shared [Global Skill CD] — Chained [Execute Skill] Example (Global Skill CD 2s).
Note: In practice, the Global Skill CD value is typically 1.5 s, but this is not mandatory.
🟆 Chapter 5: Configuring Creation Status Node Graph and Creation Status Decision Node Graph 🟆
In the previous chapters, we briefly discussed how to create a Creation Status Node Graph and a Creation Status Decision Node Graph.
Let’s dive deeper into the details.
Creation Status Node Graph
Let’s merge the Tactic Nodes and Skill Nodes into a single flow:
- In the Miliastra Sandbox, go to [Client Node Graph] → [Creation Status Node Graph] and create a new node graph.
- In the Status Node Graph Editor, chain the tactic nodes and skill nodes together in the following order:
- [Tactic: Return to Spawn Point After Leaving Battle]
This tactic is executed when the Creation leaves combat. In all other cases, execution routes to [Failed Execution].
- [Tactic: Move to the Target Entity]
If the Creation does not have a valid target, execution routes to [Failed Execution].
If the Creation is already within the target range, execution routes to [Failed Execution].
- [Execute Skill] (Normal-1), with Global Skill CD
If Normal-1 cooldown condition is not met, execution routes to [Failed Execution].
- [Execute Skill] (Normal-2), with Global Skill CD
If Normal-2 cooldown condition is not met, execution routes to [Failed Execution].
- [Tactic: Stand Still]
(The Creation executes this node when it has no other actions to perform.)
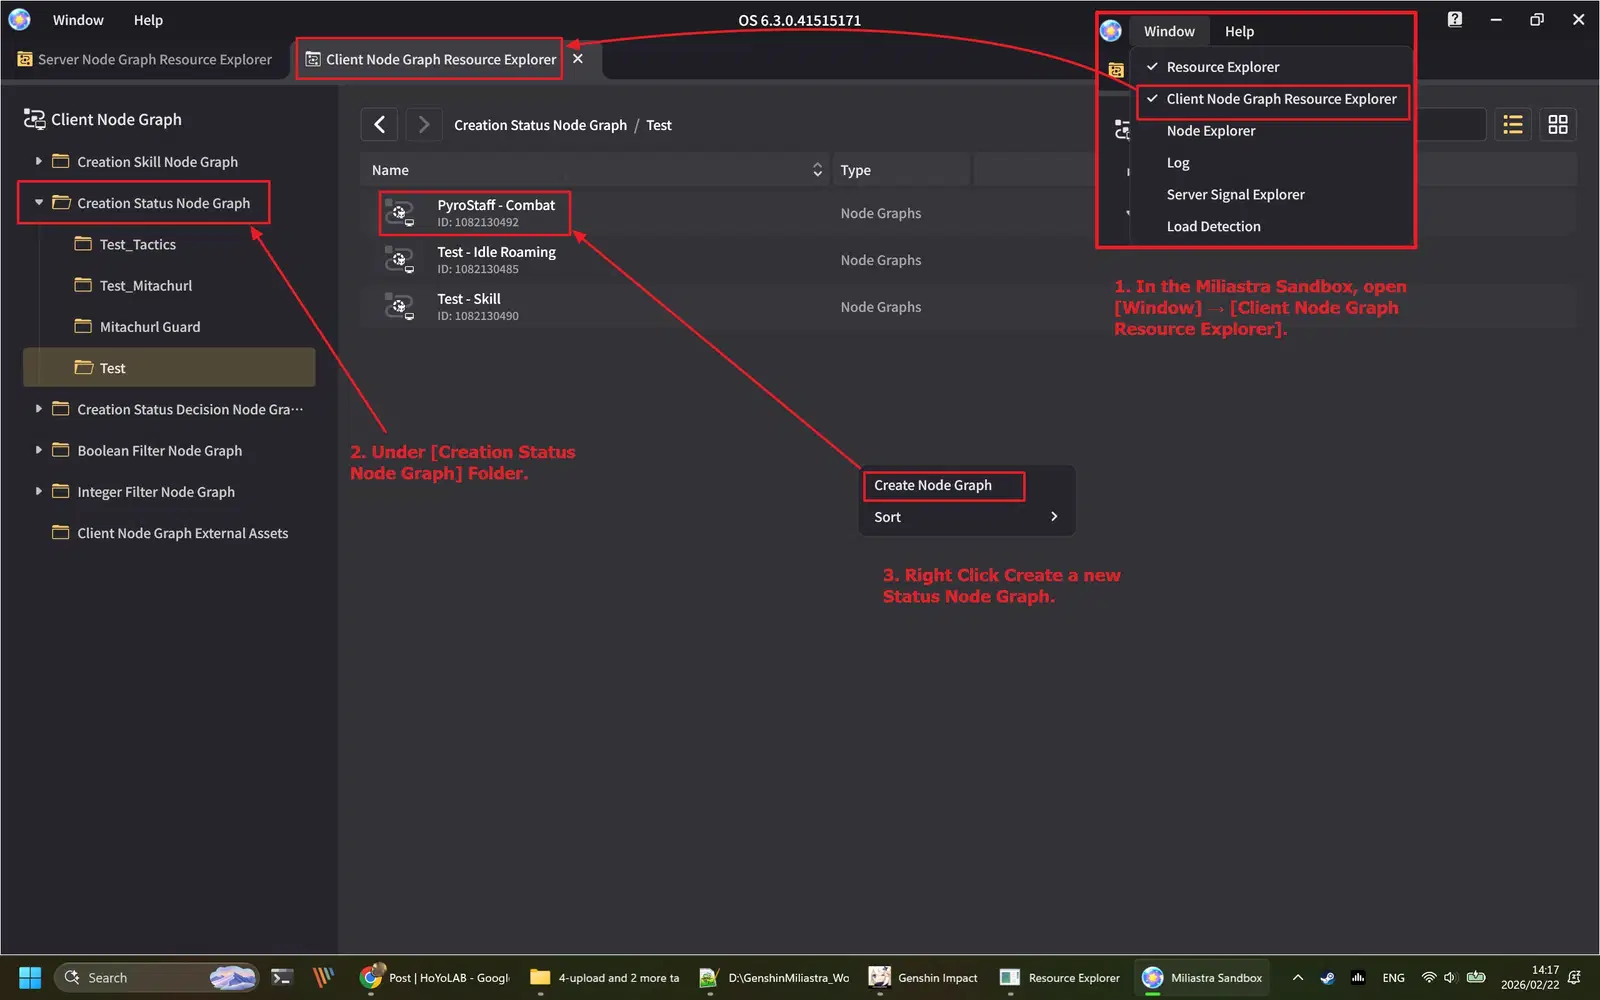
Combat Behavior (Part 1) — Create a [Creation Status Node Graph].
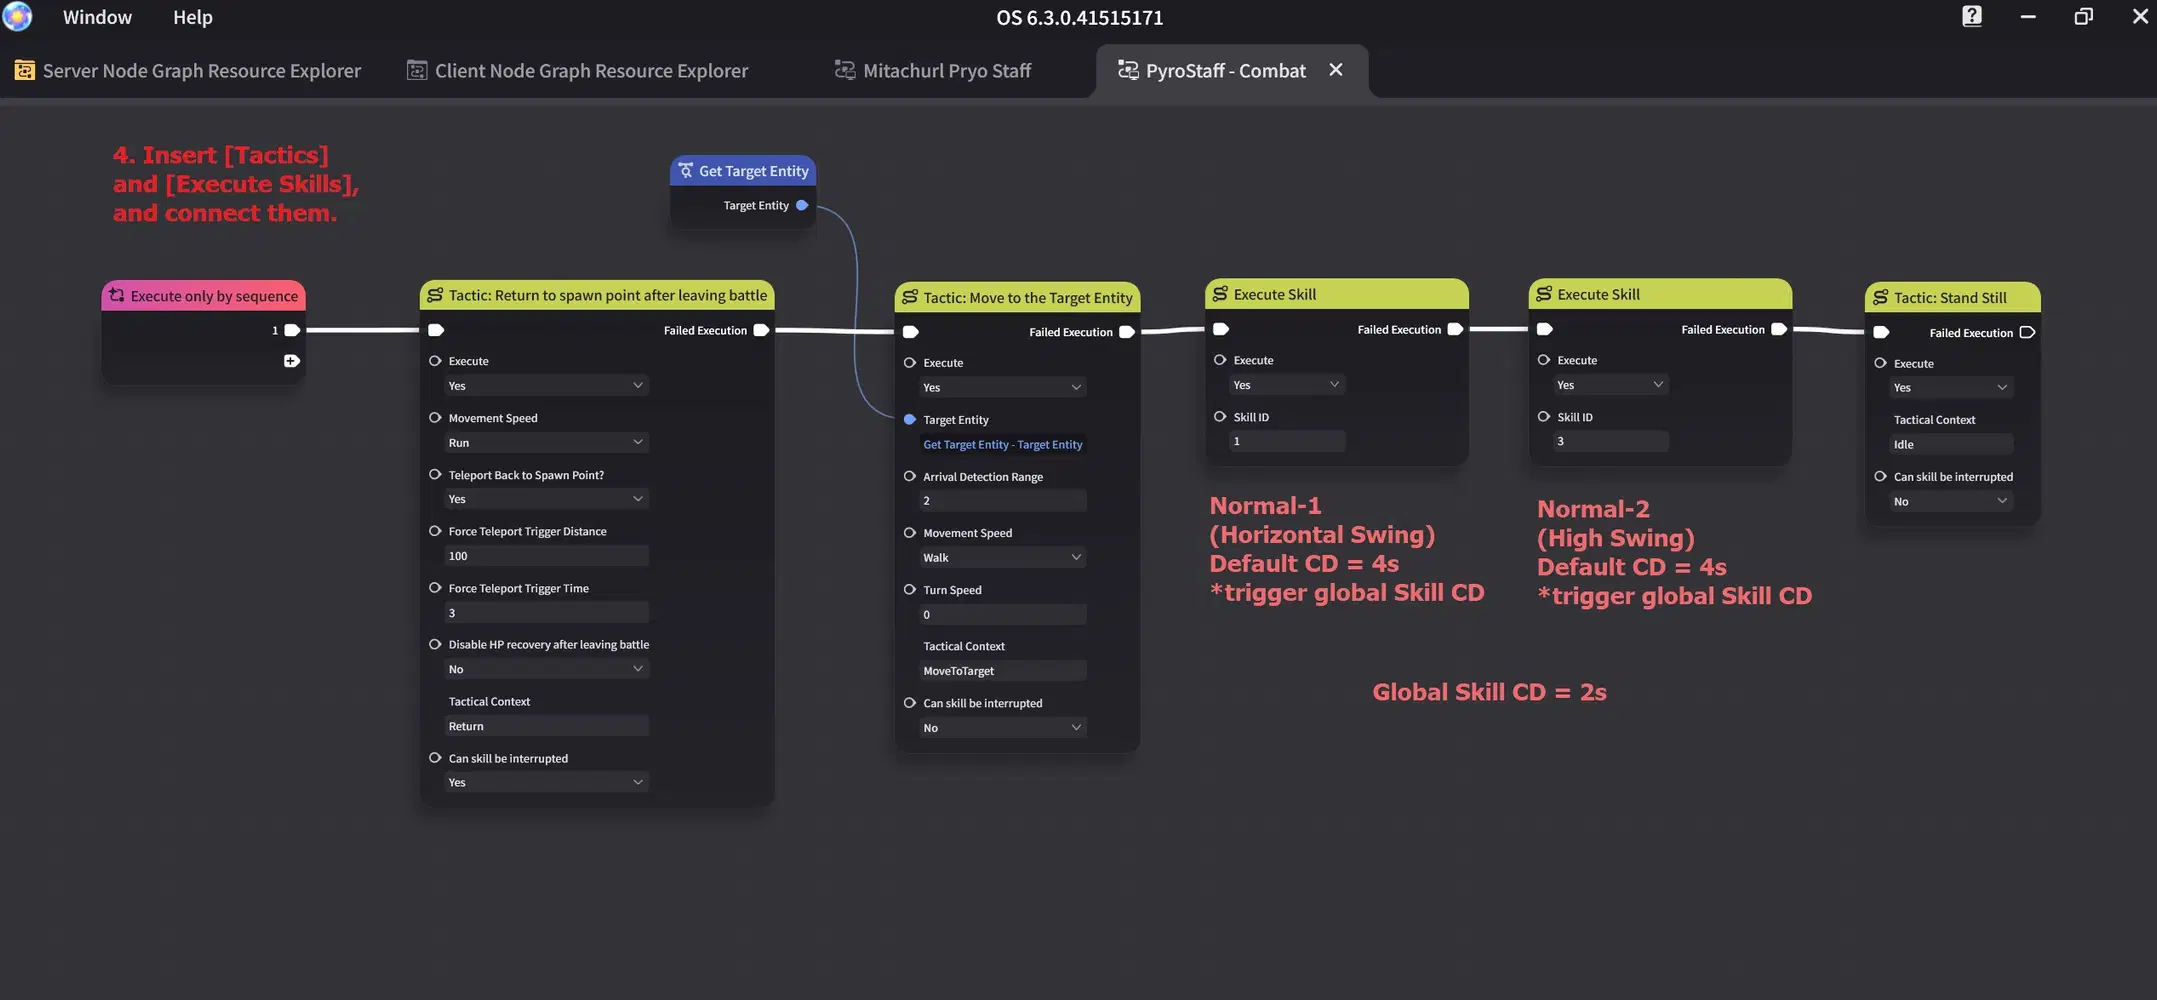
Combat Behavior (Part 2) — In Creation Status Node Graph, insert Tactic and Skill Nodes.
And, to allow a Complex Creation to run a Status Node Graph:
- Go to [Client Node Graph] → [Creation Status Decision Node Graph], create a new node graph
(or use the graph created in the section [Understanding Autonomous Logic Parameter Templates].)
- In the Decision Node Graph, use [Switch to Self Execution Status], and set State Node Graph Config ID to the ID of the newly created Status Node Graph.
- In the Complex Creation settings, under [Specialized Configuration] → [Creation Status Decision Node Graph], ensure the selected decision node graph is the one you just created.
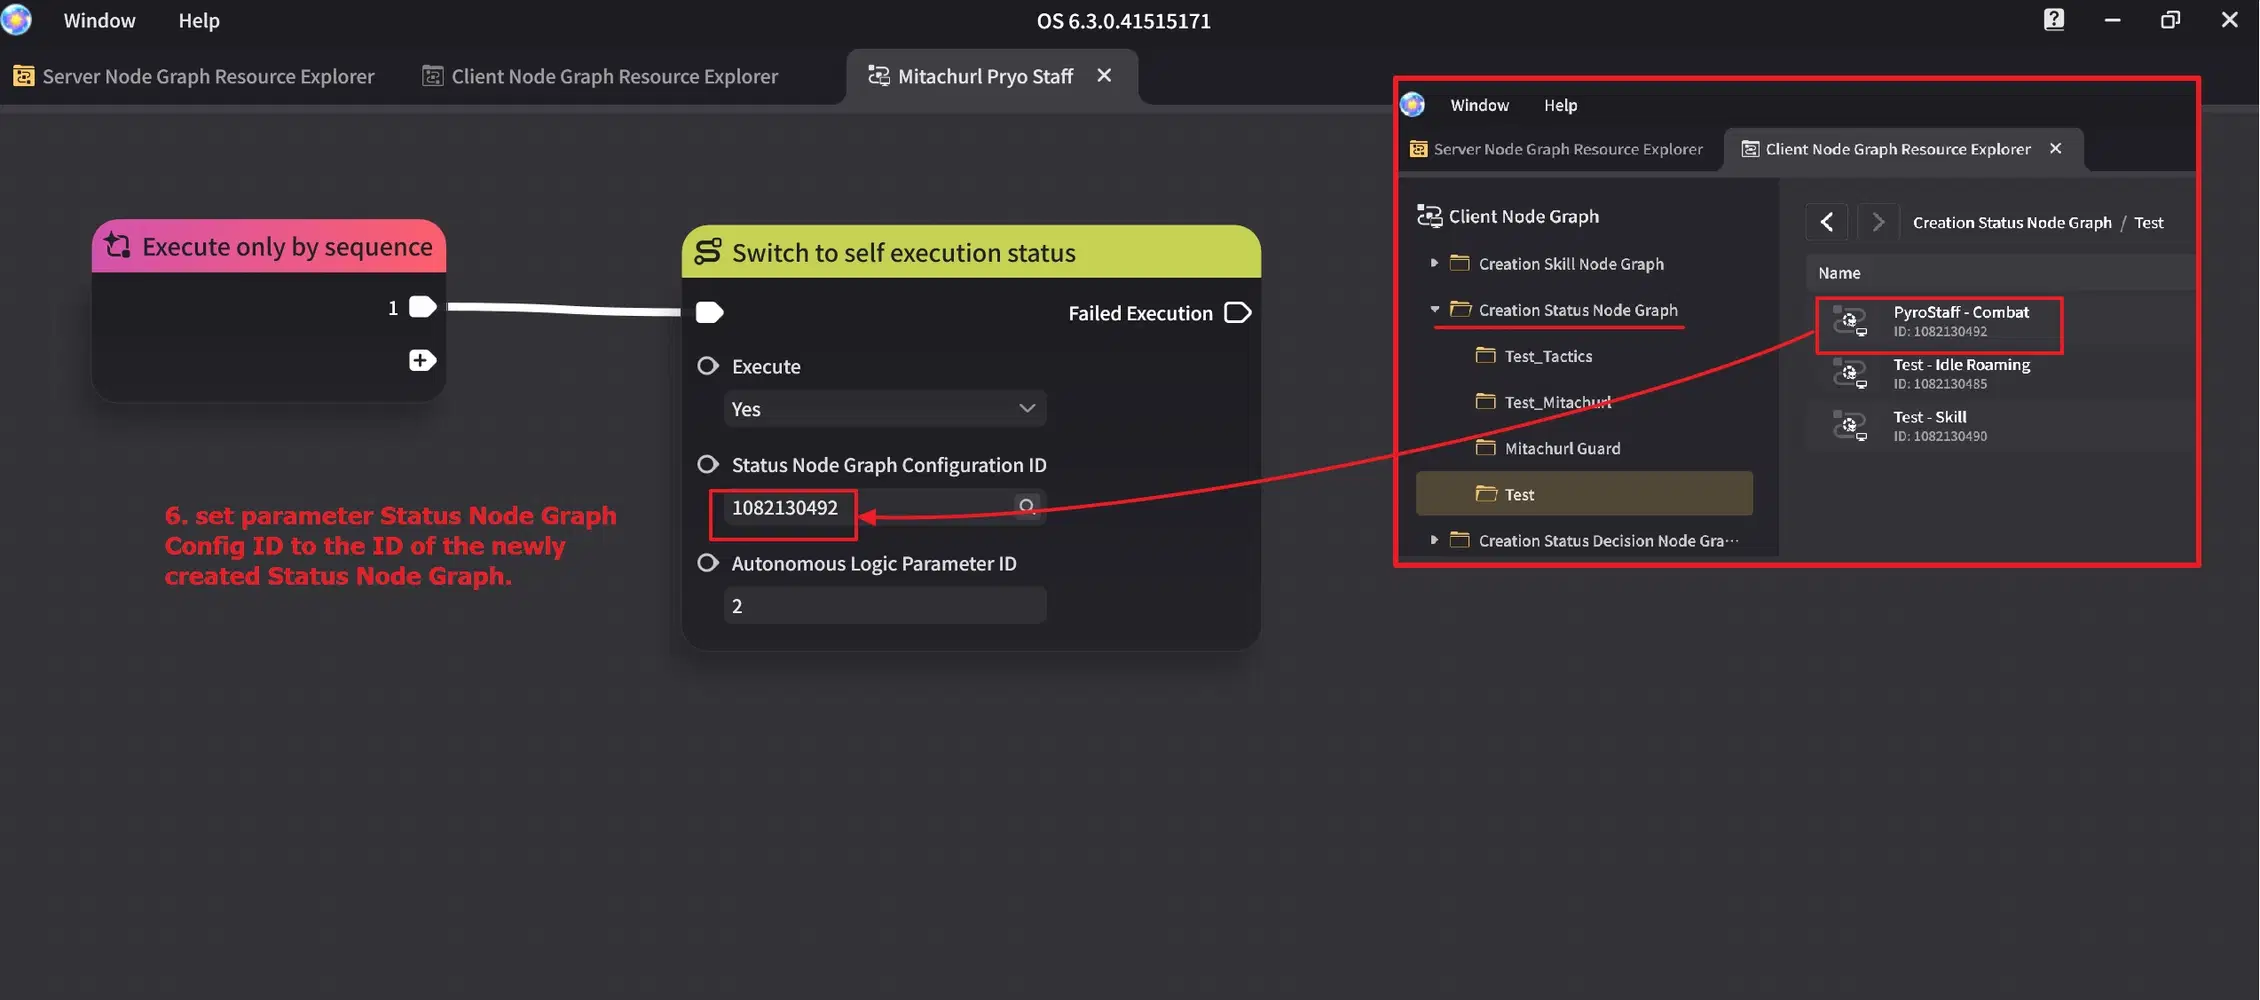
Combat Behavior (Part 3) — In Decision Node Graph, set [Creation Status Node Graph] ID.
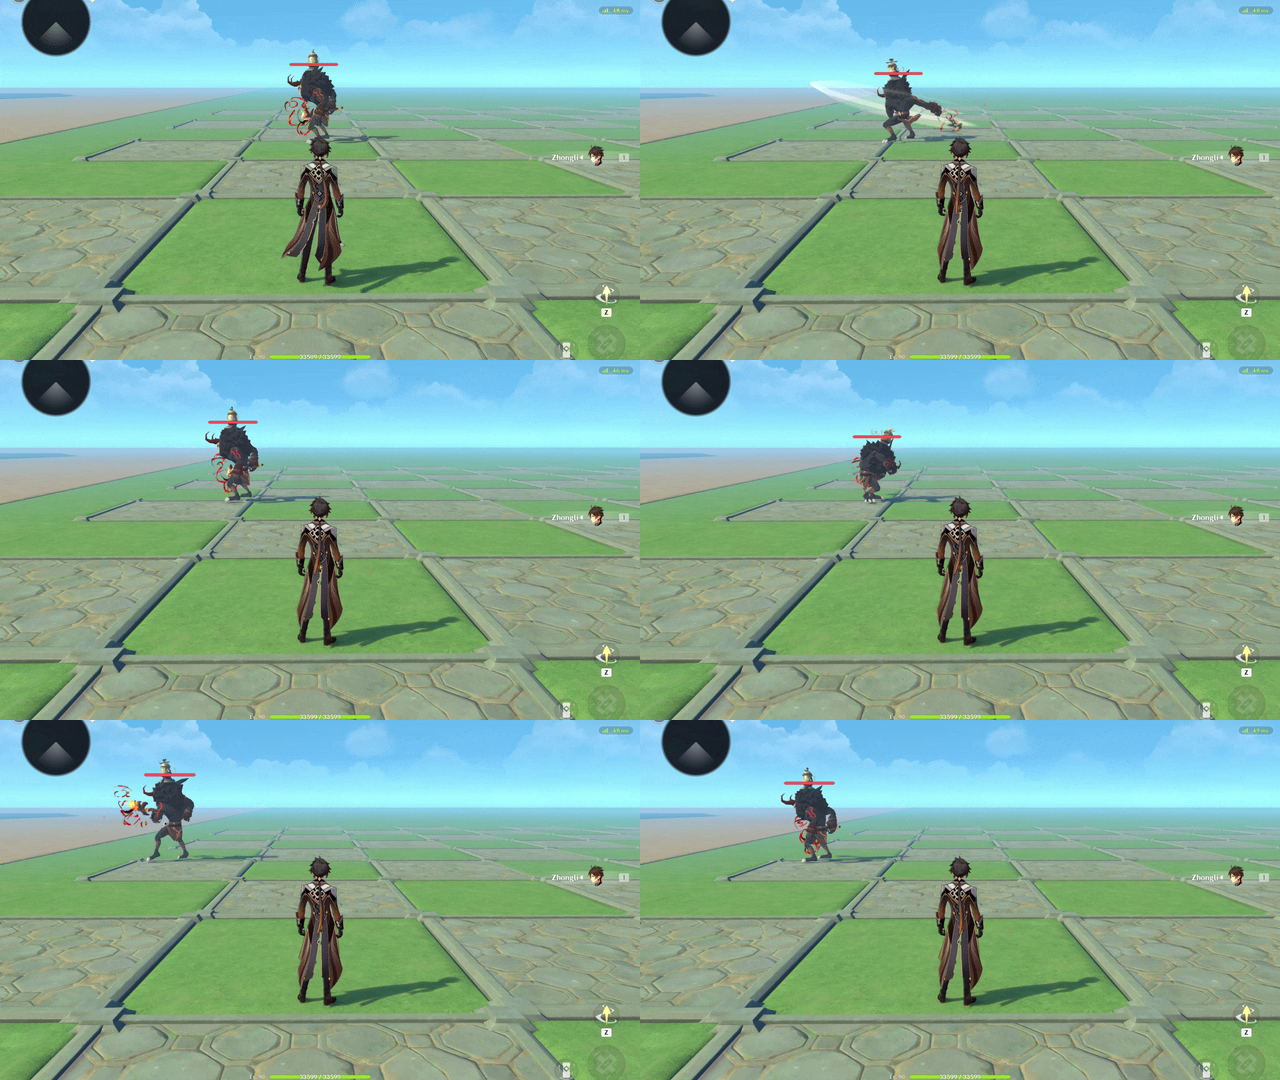
Combat Behavior — Example (Part 1: Creation not in Combat)
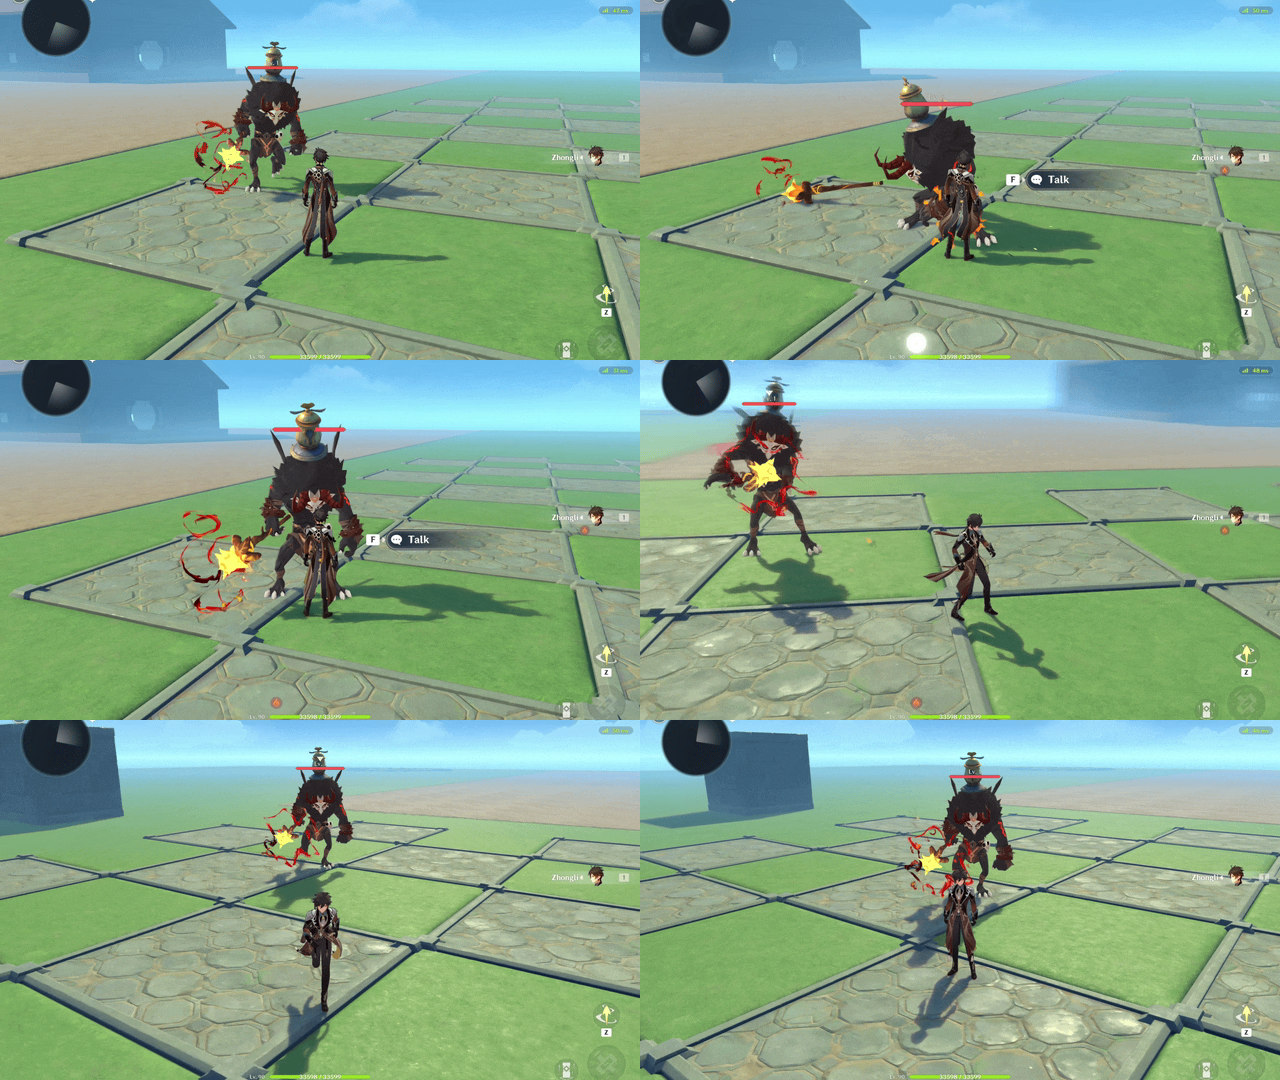
Combat Behavior — Example (Part 2: Creation in Combat, Follows Target and Attacks)
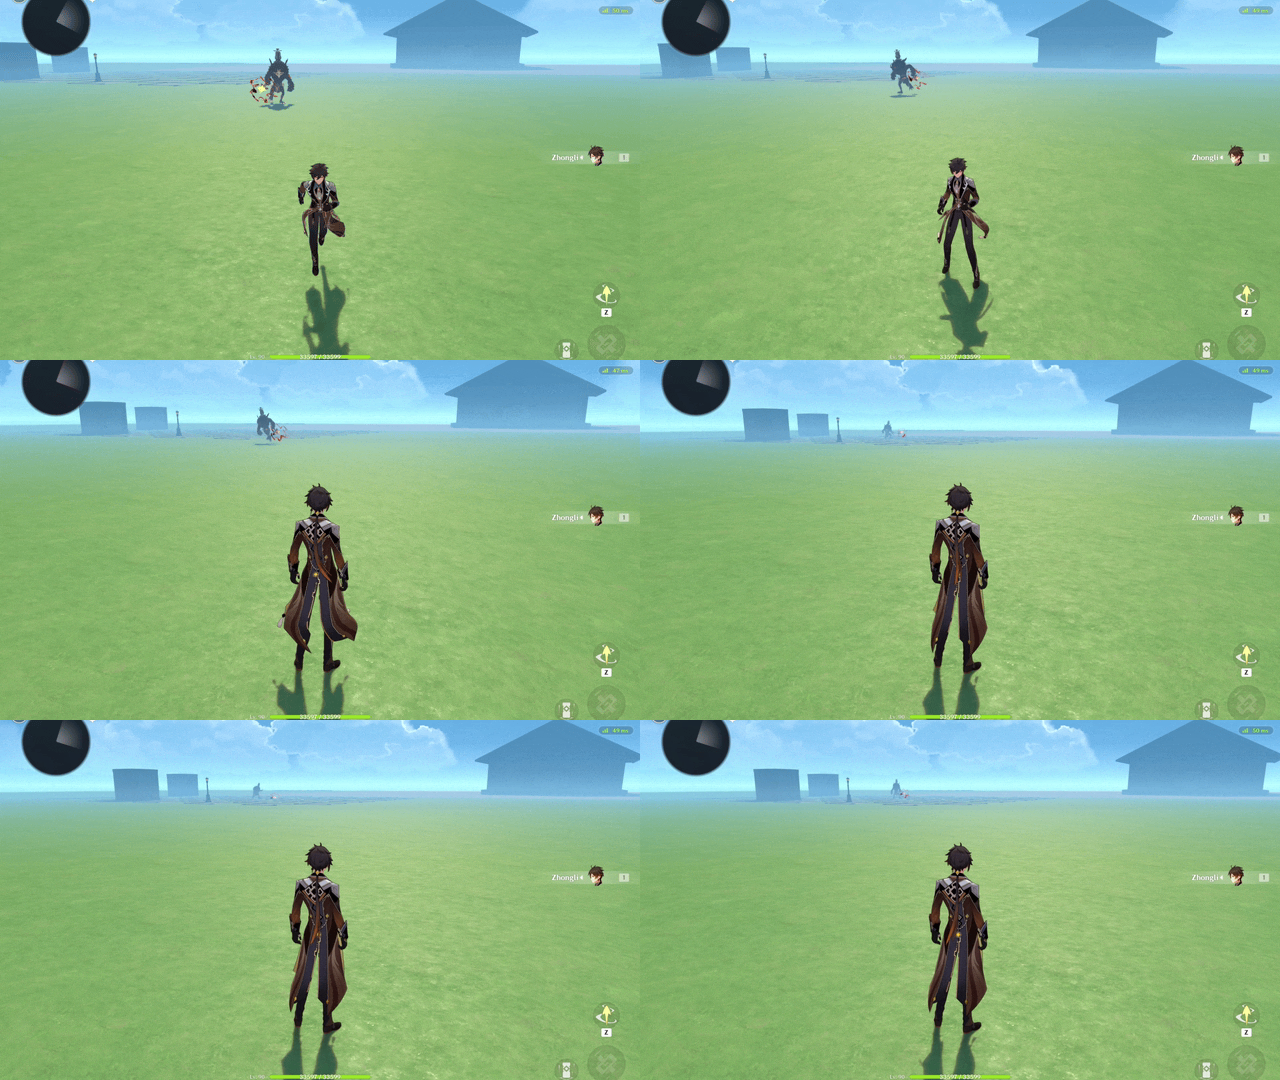
Combat Behavior — Example (Part 3: Creation leaves Combat, Returns to Spawn Point)
 In the above [Creation Status Node Graph] example, you can also arrange the nodes in the following way to achieve the same result:
- Sequence 1:
[Tactic: Return to Spawn Point After Leaving Battle]
(If execution in Sequence 1 routes to [Failed Execution] and there are no remaining nodes in this sequence, execution continues to the next sequence.)
- Sequence 2:
[Tactic: Move to the Target Entity] → [Execute Skill] (Normal-1) → [Execute Skill] (Normal-2)
(If execution in Sequence 2 routes to [Failed Execution] and there are no remaining nodes in this sequence, execution continues to the next sequence.)
- Sequence 3:
[Tactic: Stand Still]
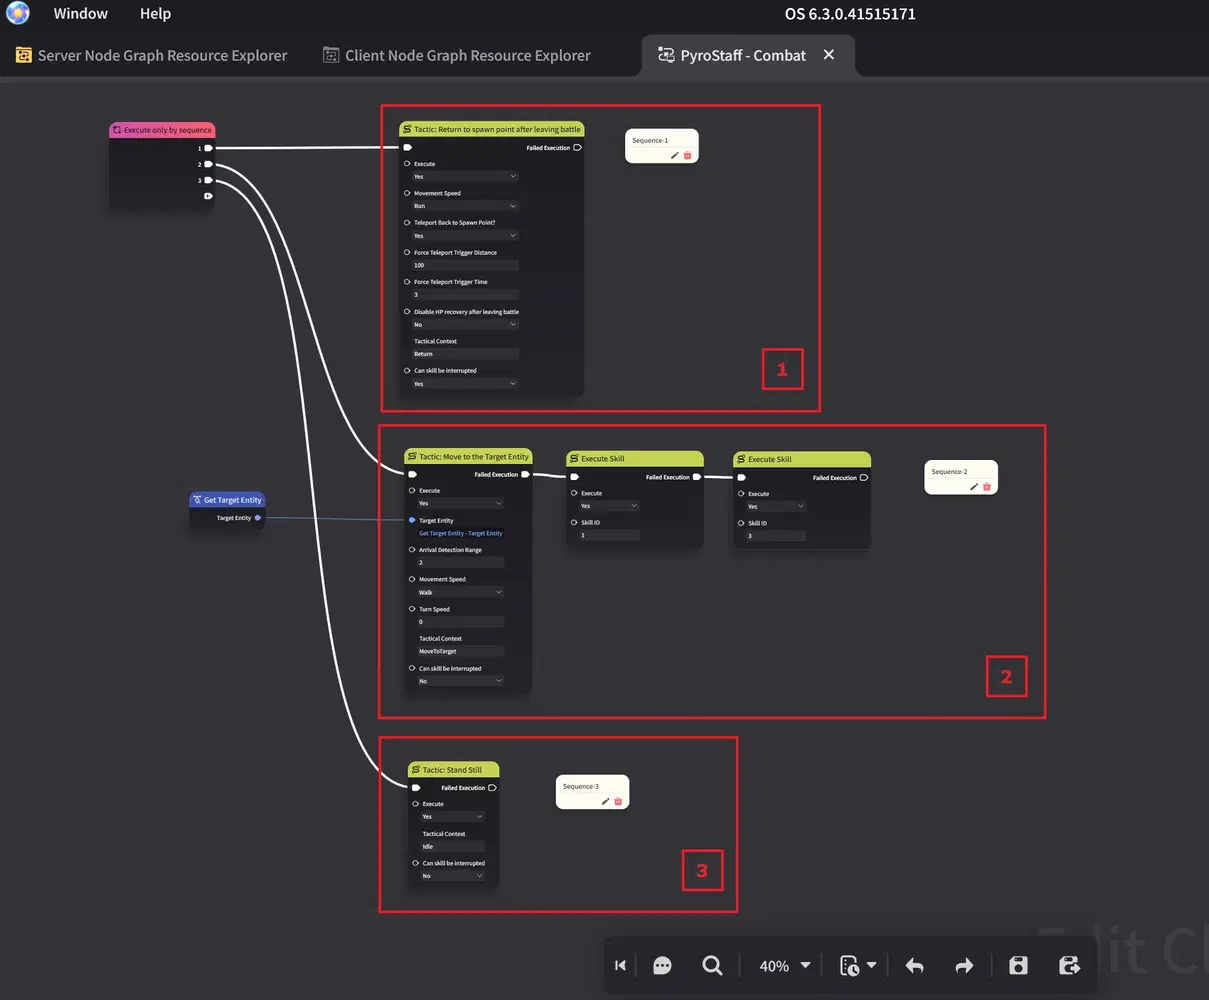
Creation Status Node Graph (Combat Behavior) — Rearranged Tactic and Skill Nodes
This flexible arrangement allows you to group related behavior patterns together, making the logic easier to manage and maintain.
Creation Status Decision Node Graph
Let's create another Creation Status Node Graph with the following patterns:
- Sequence 1:
[Tactic: Return to Spawn Point After Leaving Battle]
This tactic is executed when the Creation leaves combat. In all other cases, execution routes to [Failed Execution].
- Sequence 2:
[Tactic: Ground Idle Roaming]
During idle roaming intervals (when not moving), execution routes to [Failed Execution].
- Sequence 3:
[Tactic: Stand Still]
And, in the Decision Node Graph, use [Switch to Self Execution Status], and set State Node Graph Config ID to the ID of the newly created Status Node Graph.
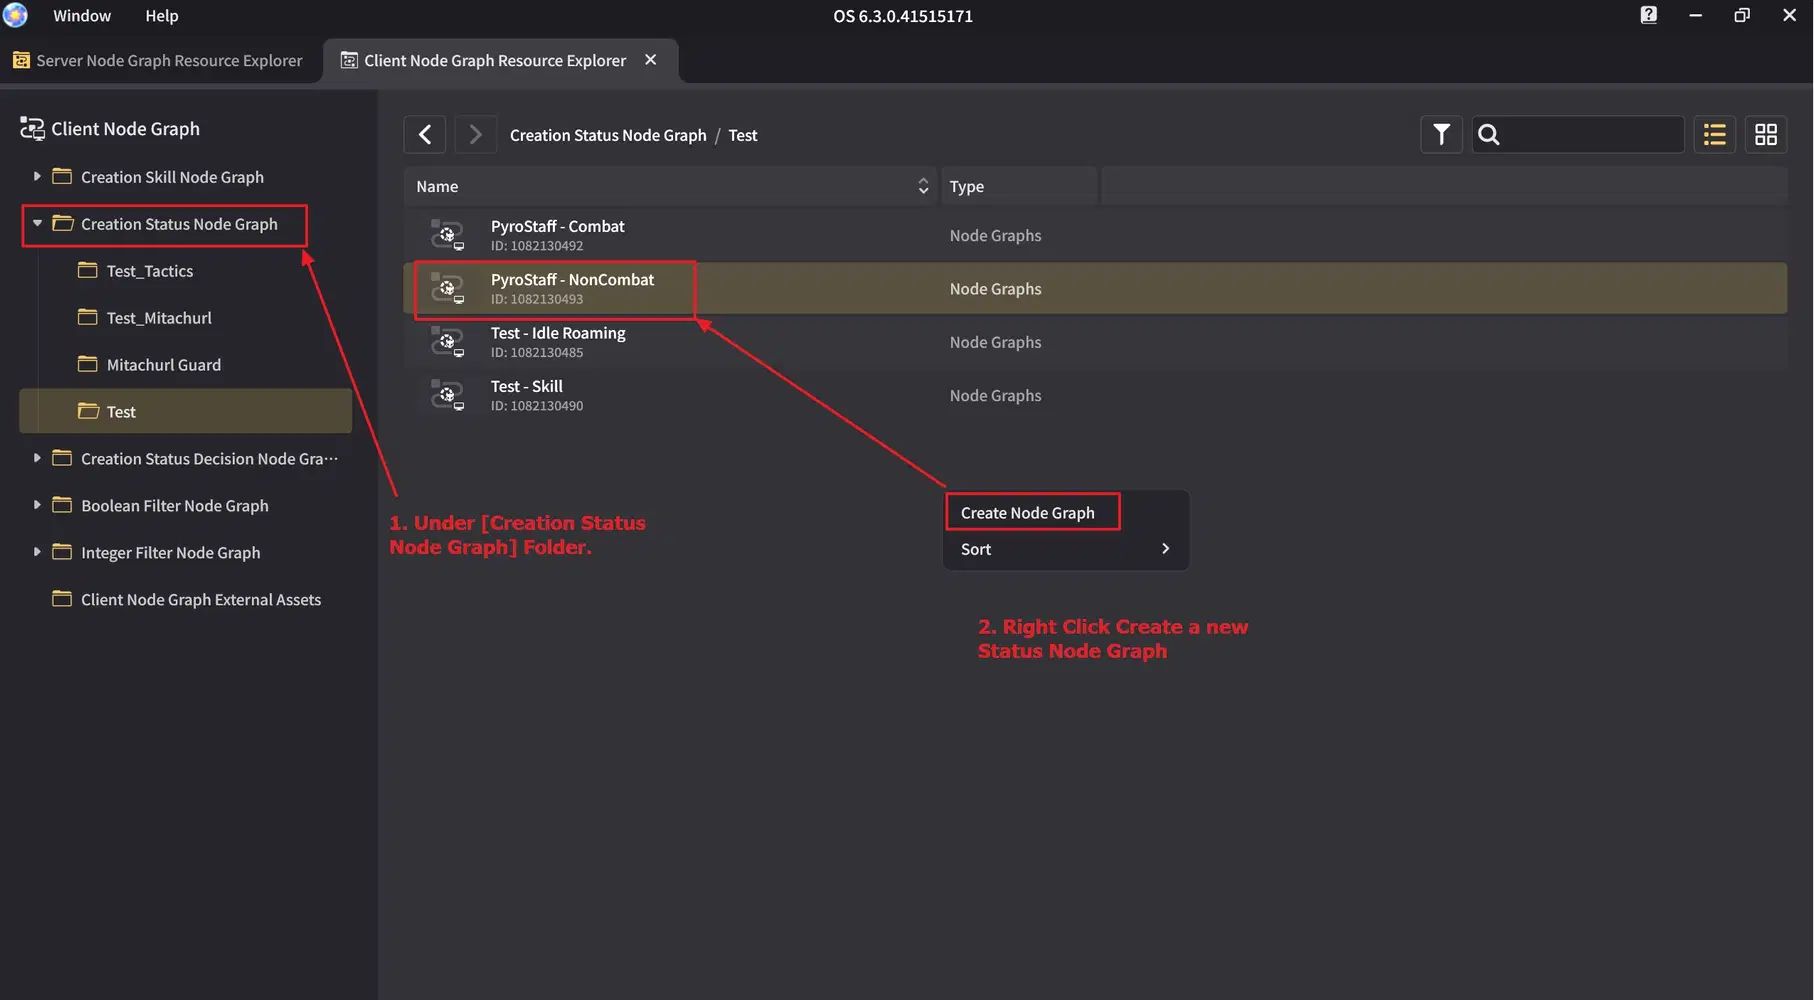
Non-Combat Behavior (Part 1) — Create a [Creation Status Node Graph]
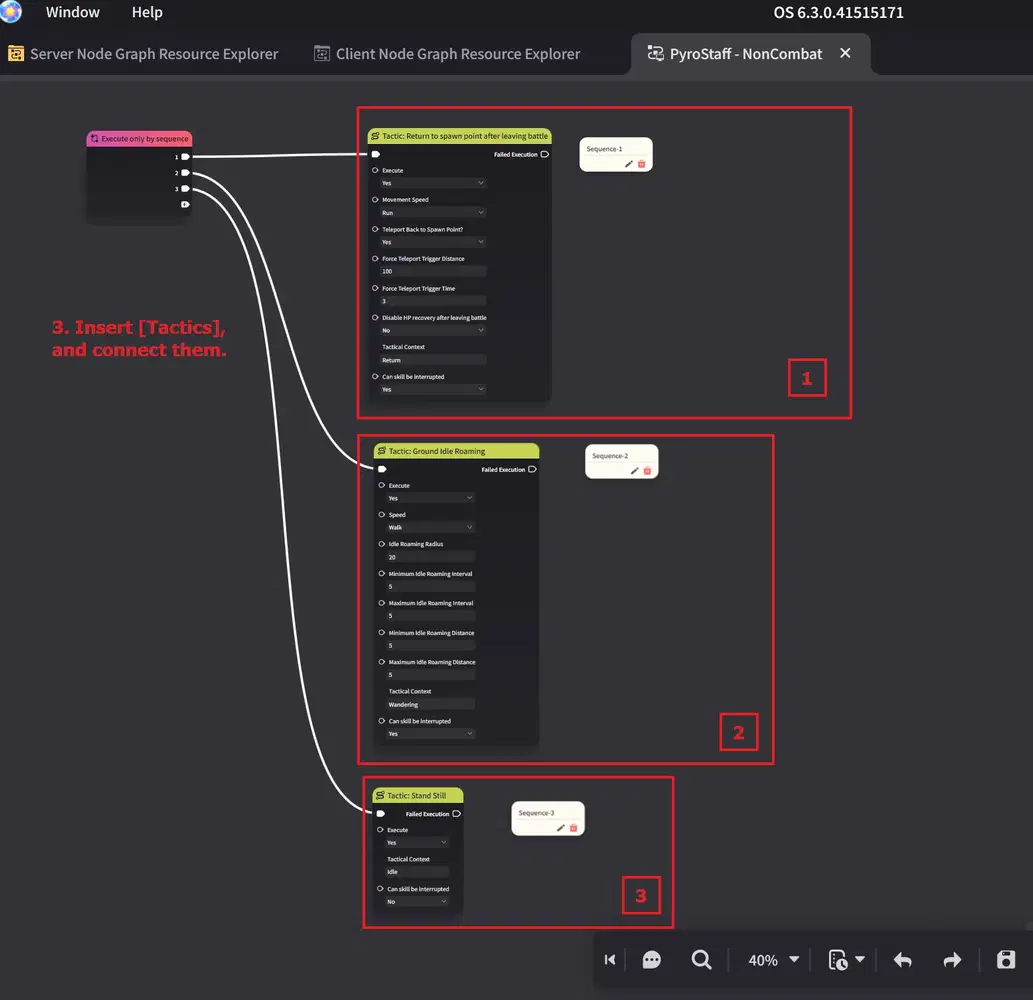
Non-Combat Behavior (Part 2) — In Creation Status Node Graph, insert Tactic Nodes.
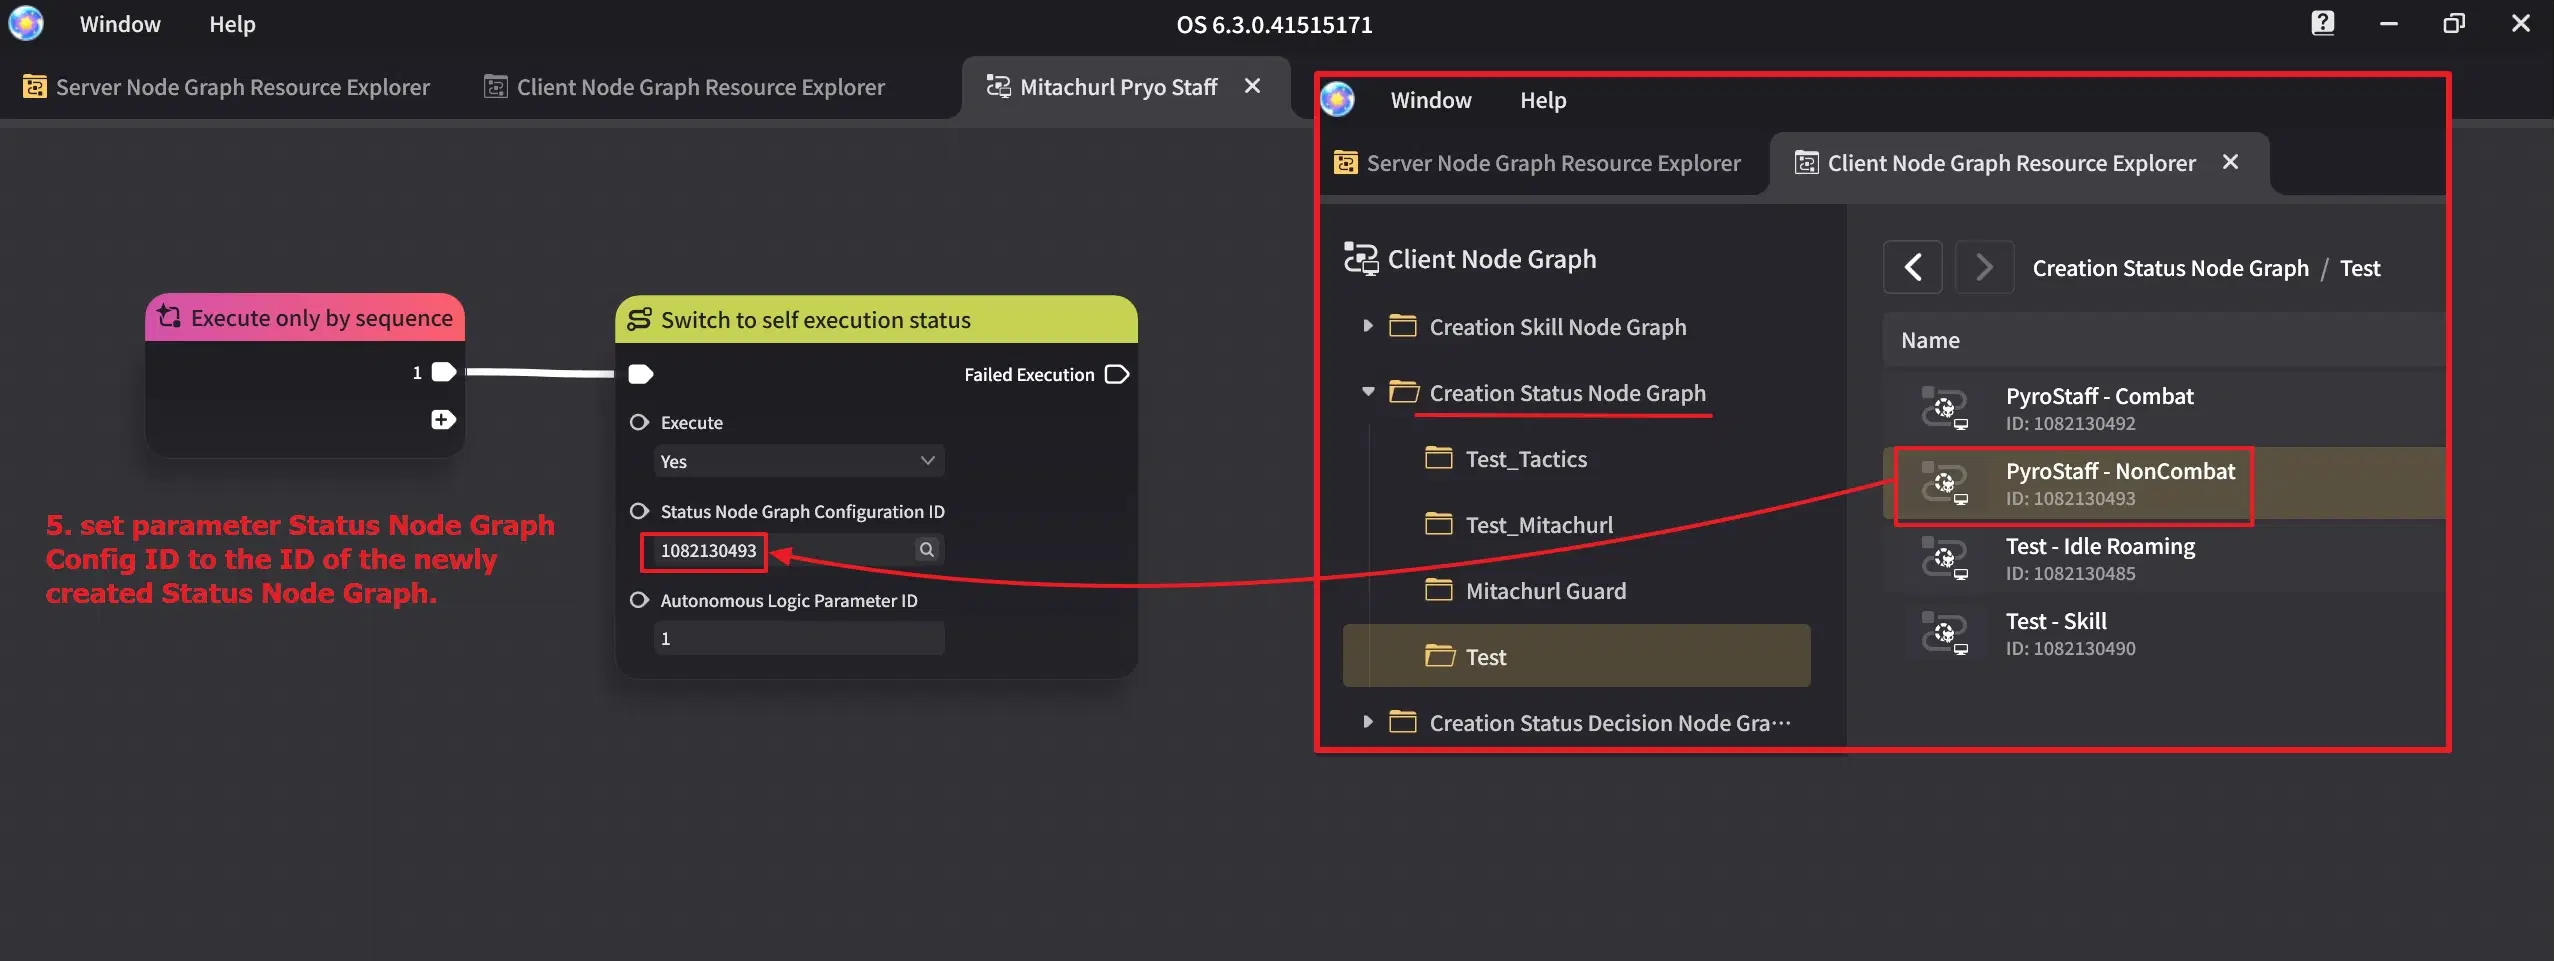
Non-Combat Behavior (Part 3) — In Decision Node Graph, set [Creation Status Node Graph] ID
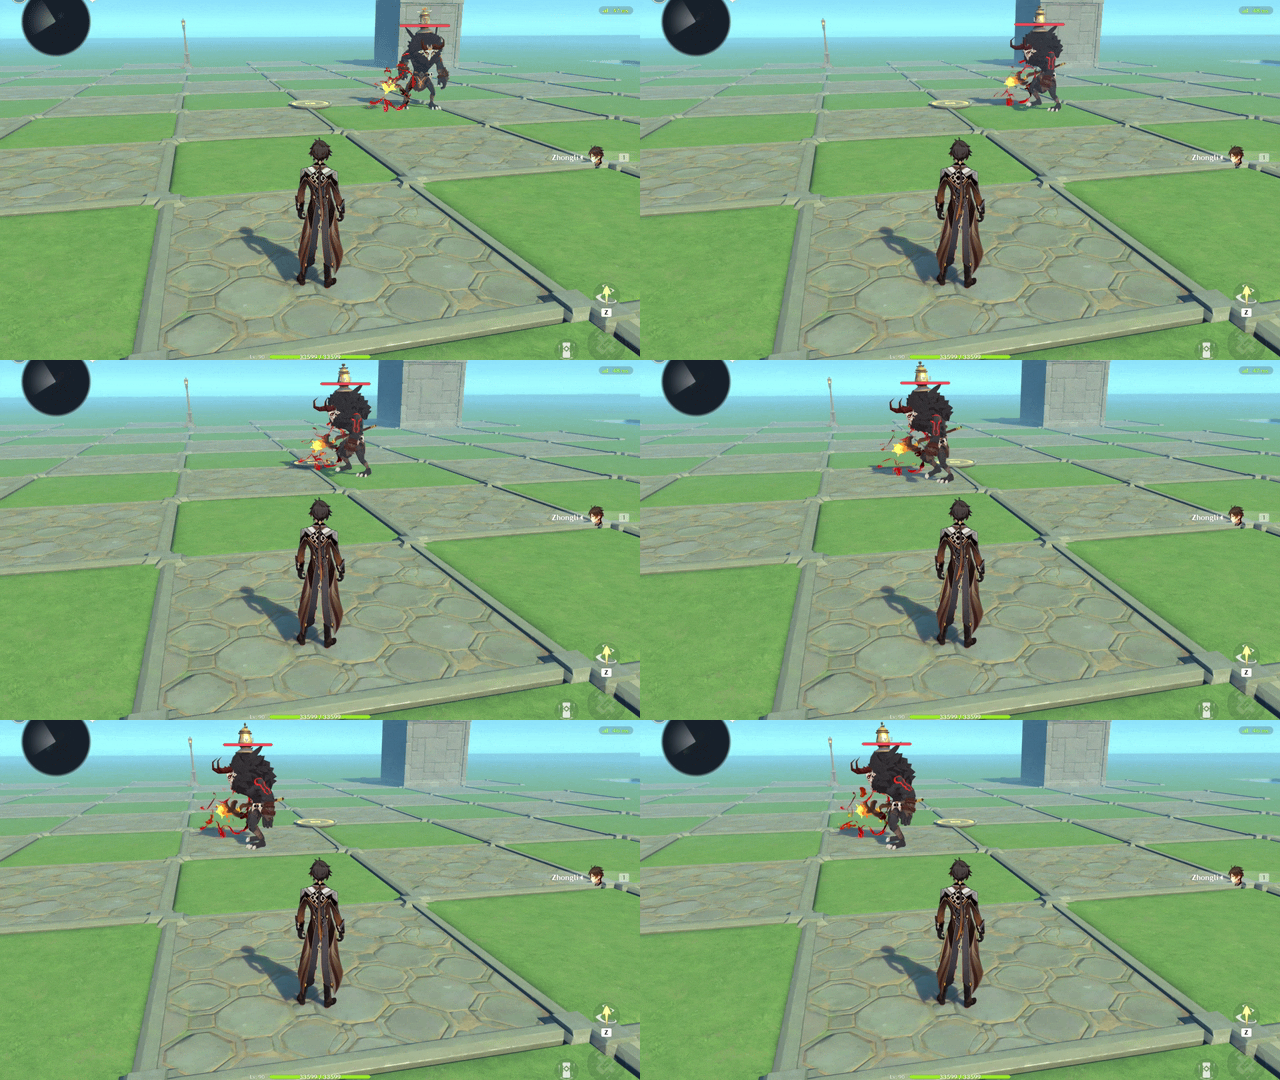
Non-Combat Behavior — Example (Part 1: Creation not in Combat)
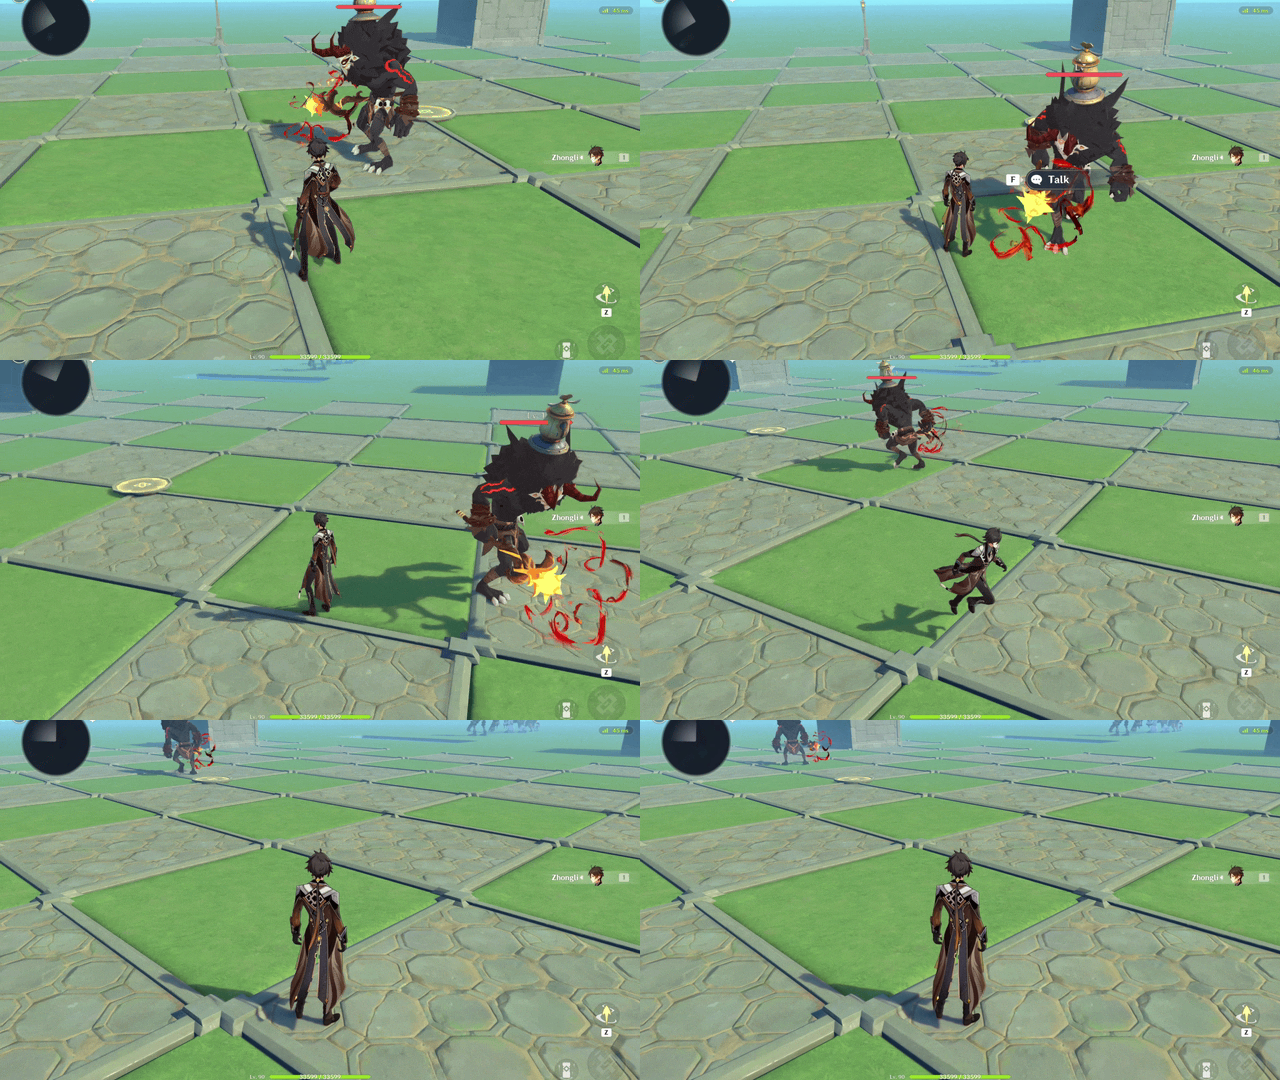
Non-Combat Behavior — Example (Part 2: Creation leaves Combat, Returns to Spawn Point)
 With two Creation Status Node Graph configurations prepared, let’s combine them in the [Creation Status Decision Node Graph]:
- Creation Status Node Graph – 1
Behavior: The Creation wanders around its territory.
- [Execute or Not] = Not in battle
- [Autonomous Logic Parameter Template] = Small territory
- Creation Status Node Graph] – 2
Behavior: The Creation moves toward the target and executes attack skills.
- [Execute or Not] = In battle
- [Autonomous Logic Parameter Template] = Medium leaving battle distance and a large territory
Note:
- Since [Switch to Self Execution Status] does not have built-in failed execution conditions, you must manually configure the [Execute or Not] parameter to force it to route to [Failed Execution] when necessary.
- In [Switch to Self Execution Status], once it is running, setting [Execute or Not] to false does not stop the currently executing [Creation Status Node Graph].
To stop the current [Creation Status Node Graph], you must activate another [Switch to Self Execution Status] node.
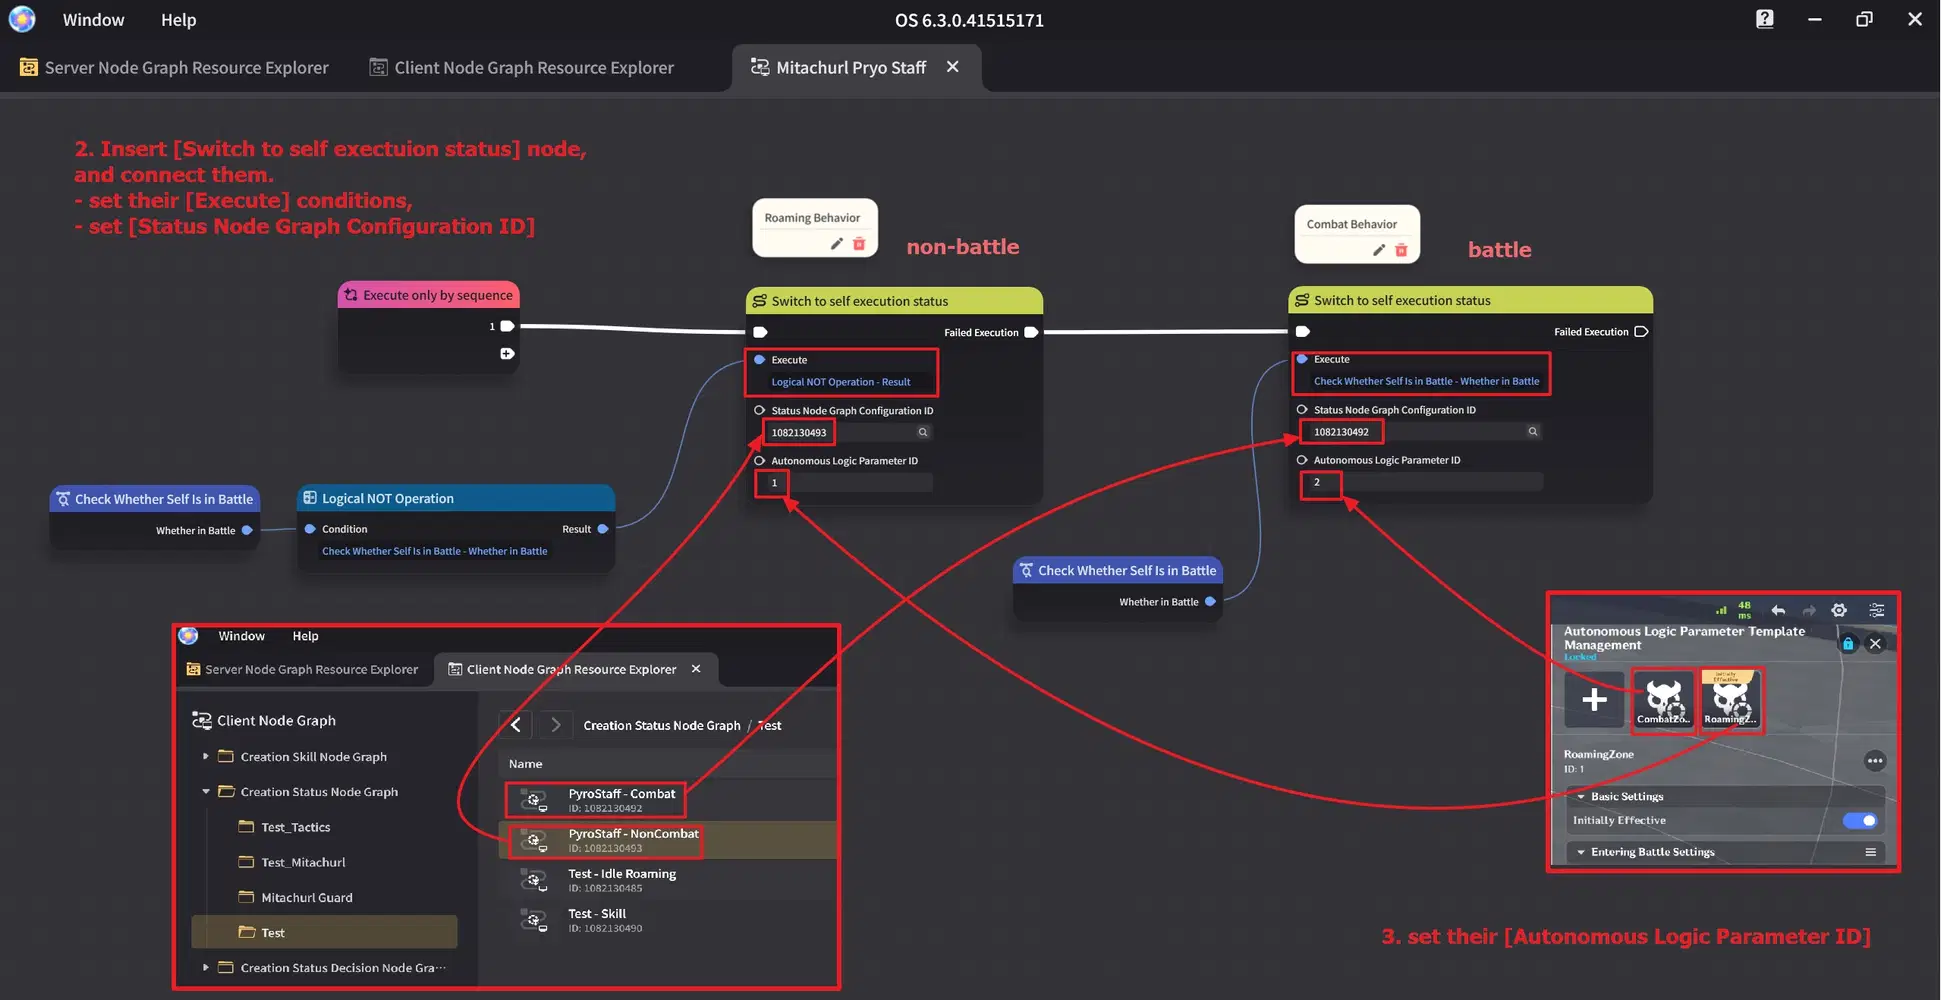
Pyro Staff Complex Creation — Combine Multiple Behaviors.
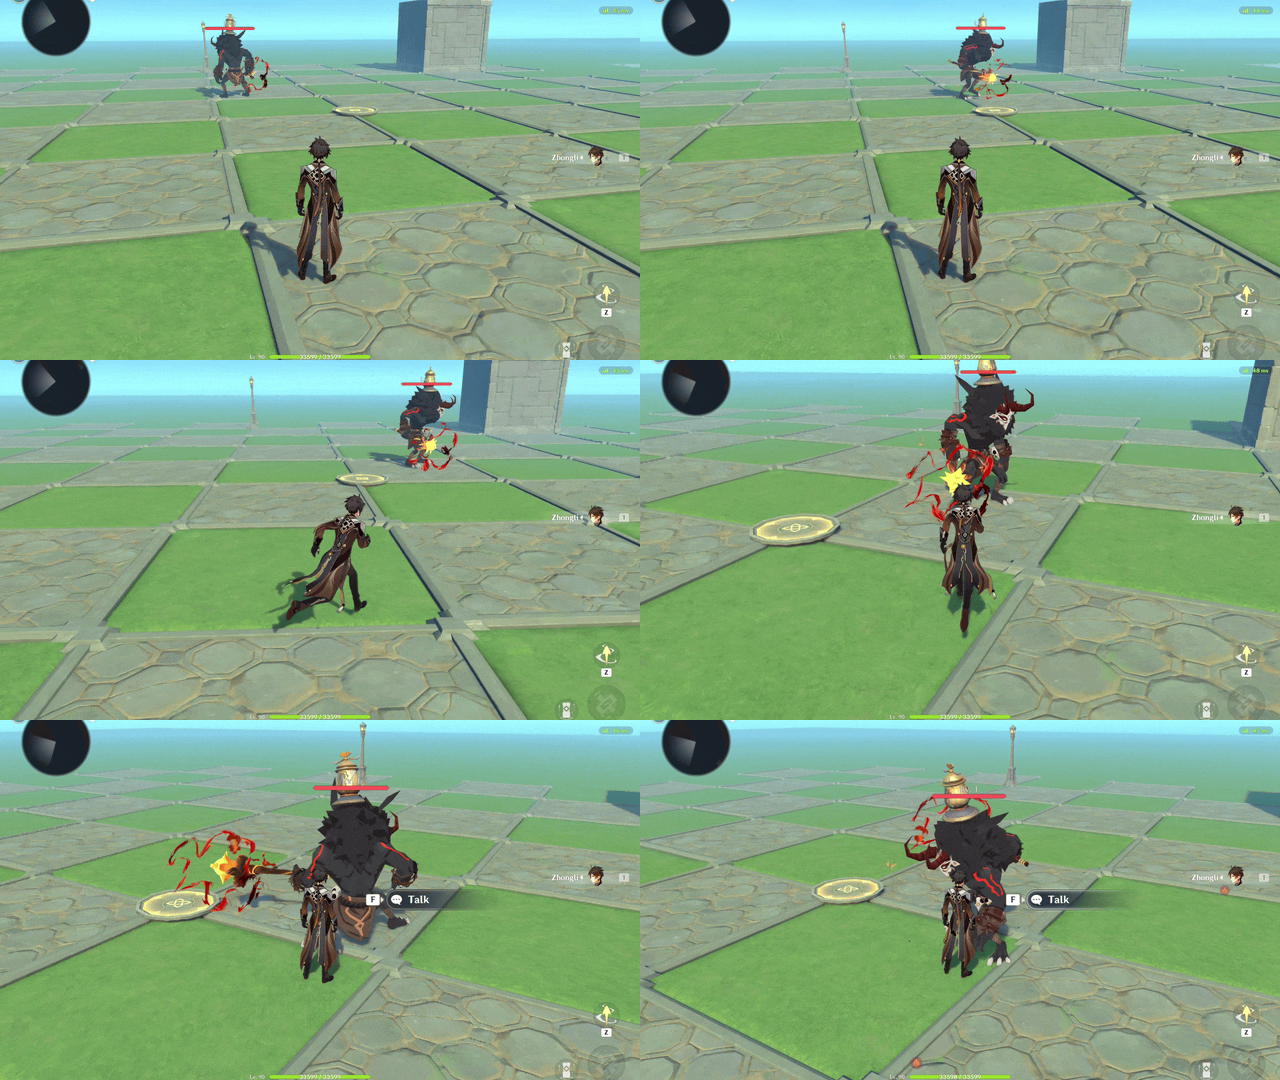
Pyro Staff Complex Creation — Example (Part 1: Non-Combat → Combat)
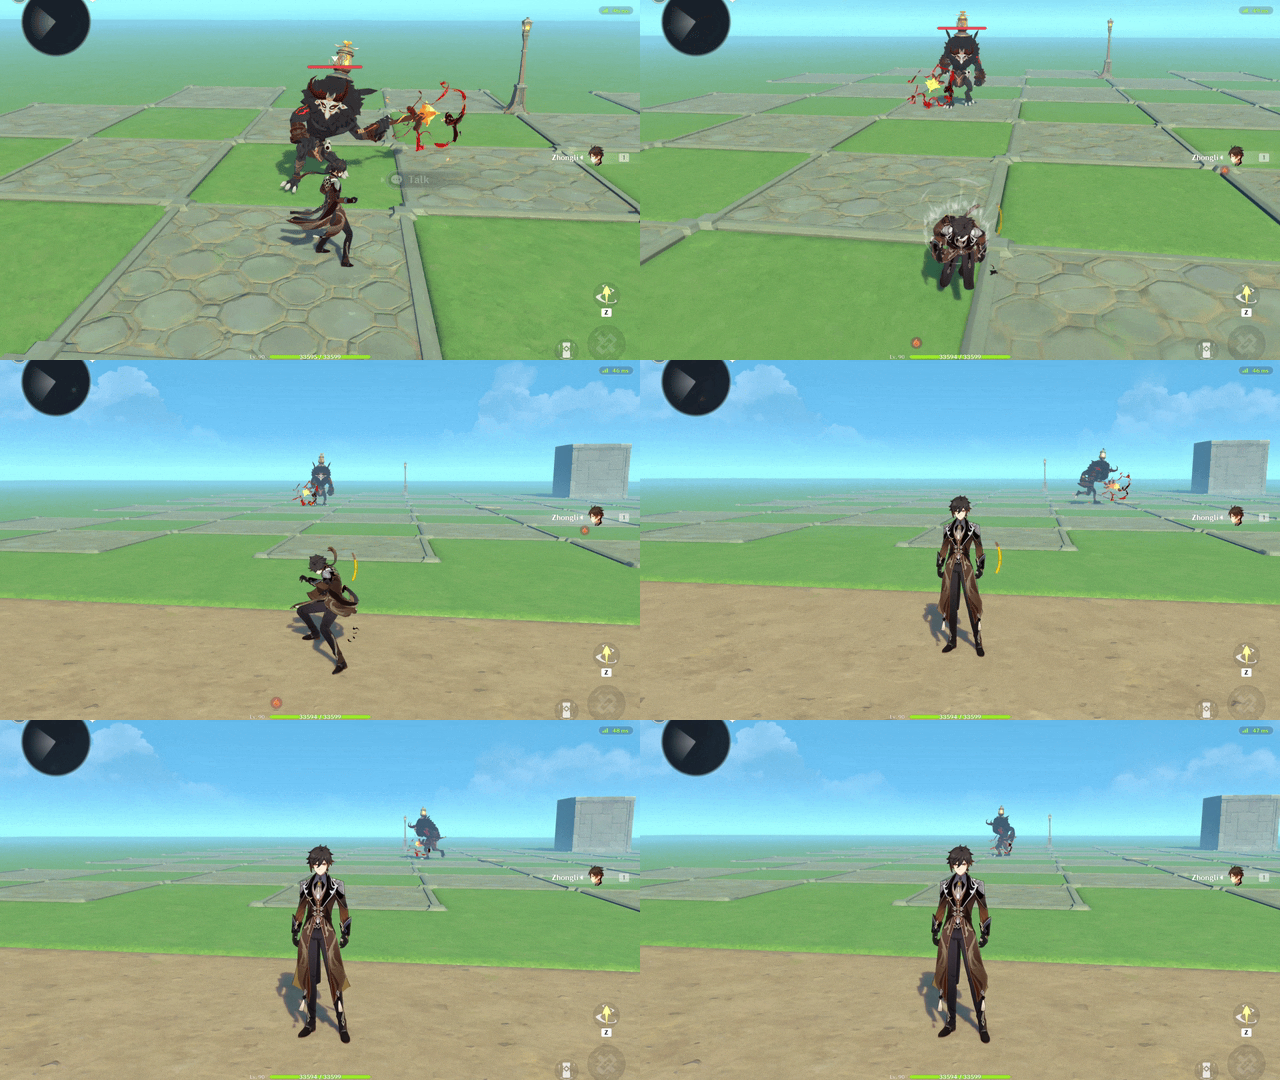
Pyro Staff Complex Creation — Example (Part 2: Combat → Non-Combat)
Similarly, you can also arrange the nodes in the following way to achieve the same result:
- Sequence 1:
Creation Status Node Graph – 1
Non-Combat Behavior: The Creation wanders around its territory.
- Sequence 2:
Creation Status Node Graph] – 2
Behavior: The Creation moves toward the target and executes attack skills.
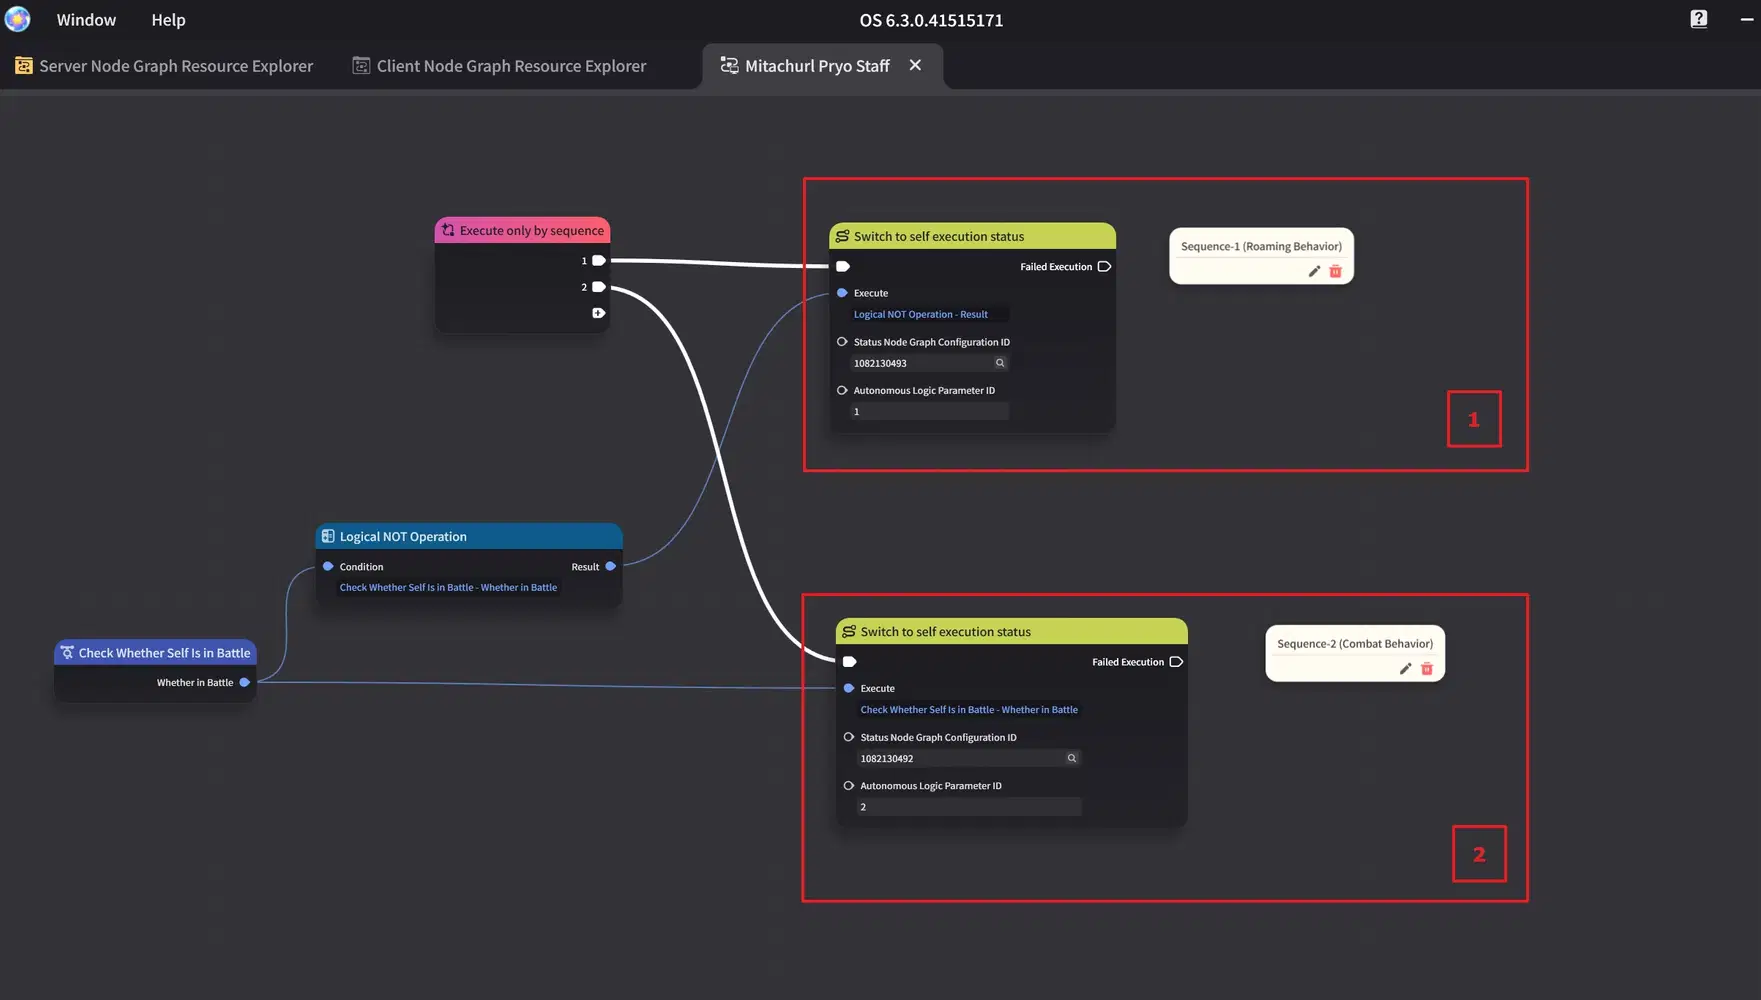
Pyro Staff Complex Creation — Final [Creation Status Decision Node Graph]
That wraps up Complex Creation Feature Basics.
★ Conclusion ★
This concludes a basic walkthrough on how to create and customize a Complex Creation.
Hopefully this article helps understanding how to create Complex Creations in Miliastra Wonderland.
 Now it’s your turn — try building your own Complex Creation variants!



