10 Tips for Creating Artistic Scenes with the Terrain Editor
Introduction
Hi Travelers! 

Welcome back to the Miliastra Wonderland Guide. In this guide, I’d like to share 10 Tips to help you create more artistic and interesting scenes using the Terrain Editor. Sometimes, when building environments, the terrain can look a bit too flat or monotonous, which makes the scene feel less lively for players. But don’t worry! With a few simple techniques like shaping the terrain, placing objects thoughtfully, and adding small environmental details you can transform a simple landscape into a beautiful and immersive world.
In this guide, I’ve also included tips and step-by-step demonstrations that you can easily follow. You can apply these ideas when creating a Main Hall scene or even expand them into a more complex area like a Village, where players can explore, interact, and take on quests.

Terrain Editor Tools
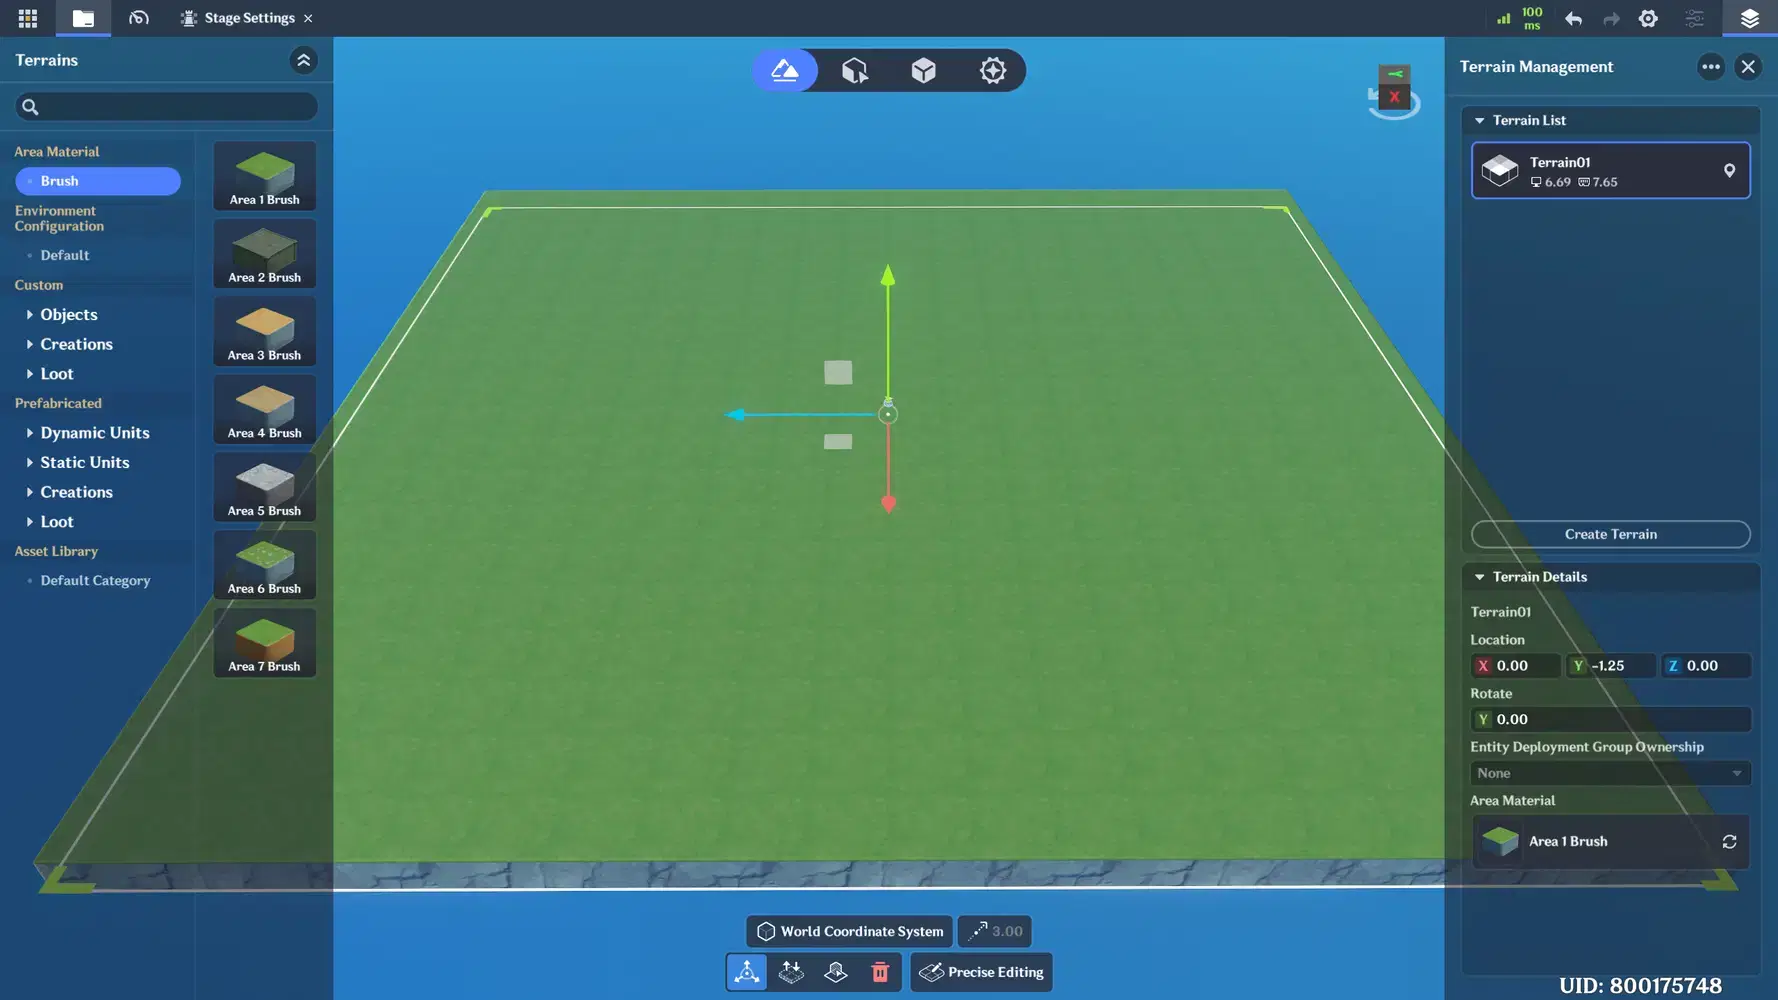
Before we begin, it’s important to first understand the Terrain Editor Tools. When you open Miliastra Editor and start creating a scene, you will see the default workspace interface. The large green field represents the terrain area, which serves as the main space where you can place objects, characters, and build the core environment of your stage. Around this area, you will also find various editor tools on the left and right sides of the screen that help you create and manage your scene.
Below are some of the important tools you should become familiar with before starting to design your environment.
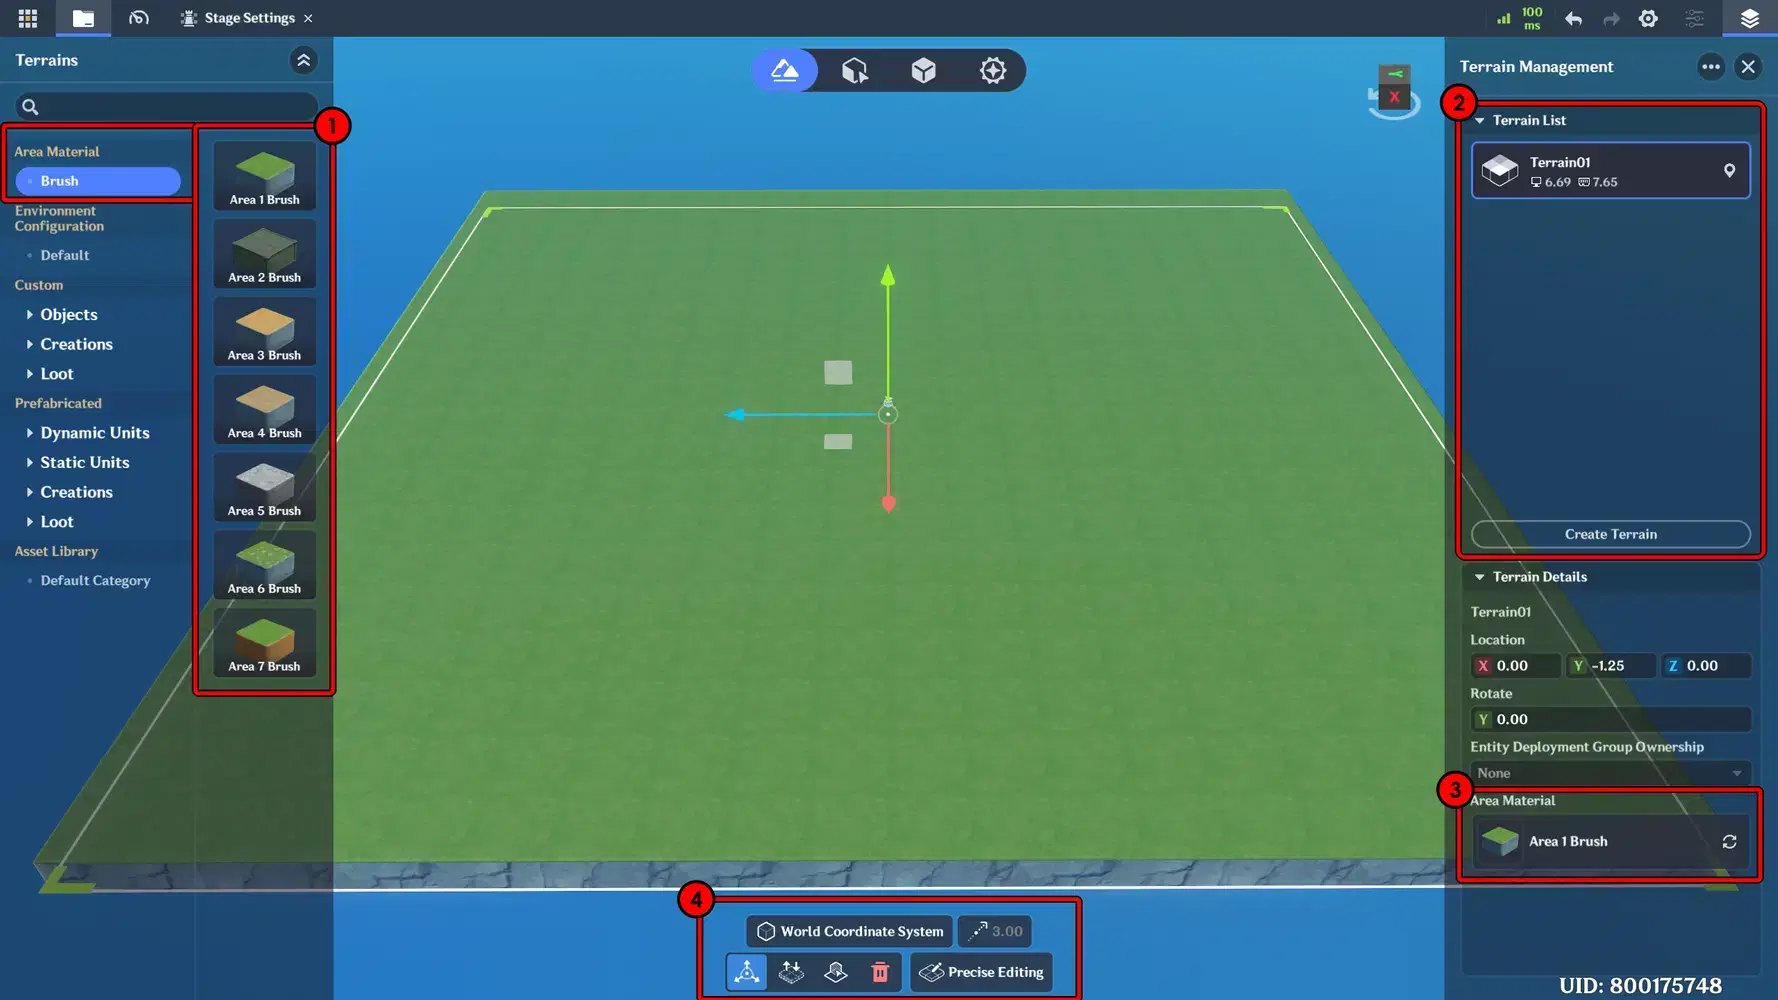
Description
- Brush: This tool is used to draw and create terrain areas based on the selected brush type. Different brush types allow you to paint various terrain surfaces such as grass, roads, sand, and other ground textures. By selecting the appropriate brush, creators can shape the landscape and define different environmental zones within the terrain.
- Terrain List: This section displays the list of terrains you currently have in your project. From here, you can also create new terrains, allowing you to build separate terrain areas that are different from the existing ones. Each terrain can represent a distinct environment or region within your stage, giving you more flexibility when designing large or complex environments.
- Area Material: This option allows you to change the terrain surface based on the selected brush material. By choosing different materials, such as grass, dirt, sand, or road, you can quickly modify the terrain appearance and define different surface types within the environment.
- Terrain Editing Tools: These tools allow creators to modify the terrain structure and adjust environmental elements. With these tools, you can rotate objects, remove elements, raise or lower terrain layers, create slopes, build water areas, and shape pathways to better fit the environment design.
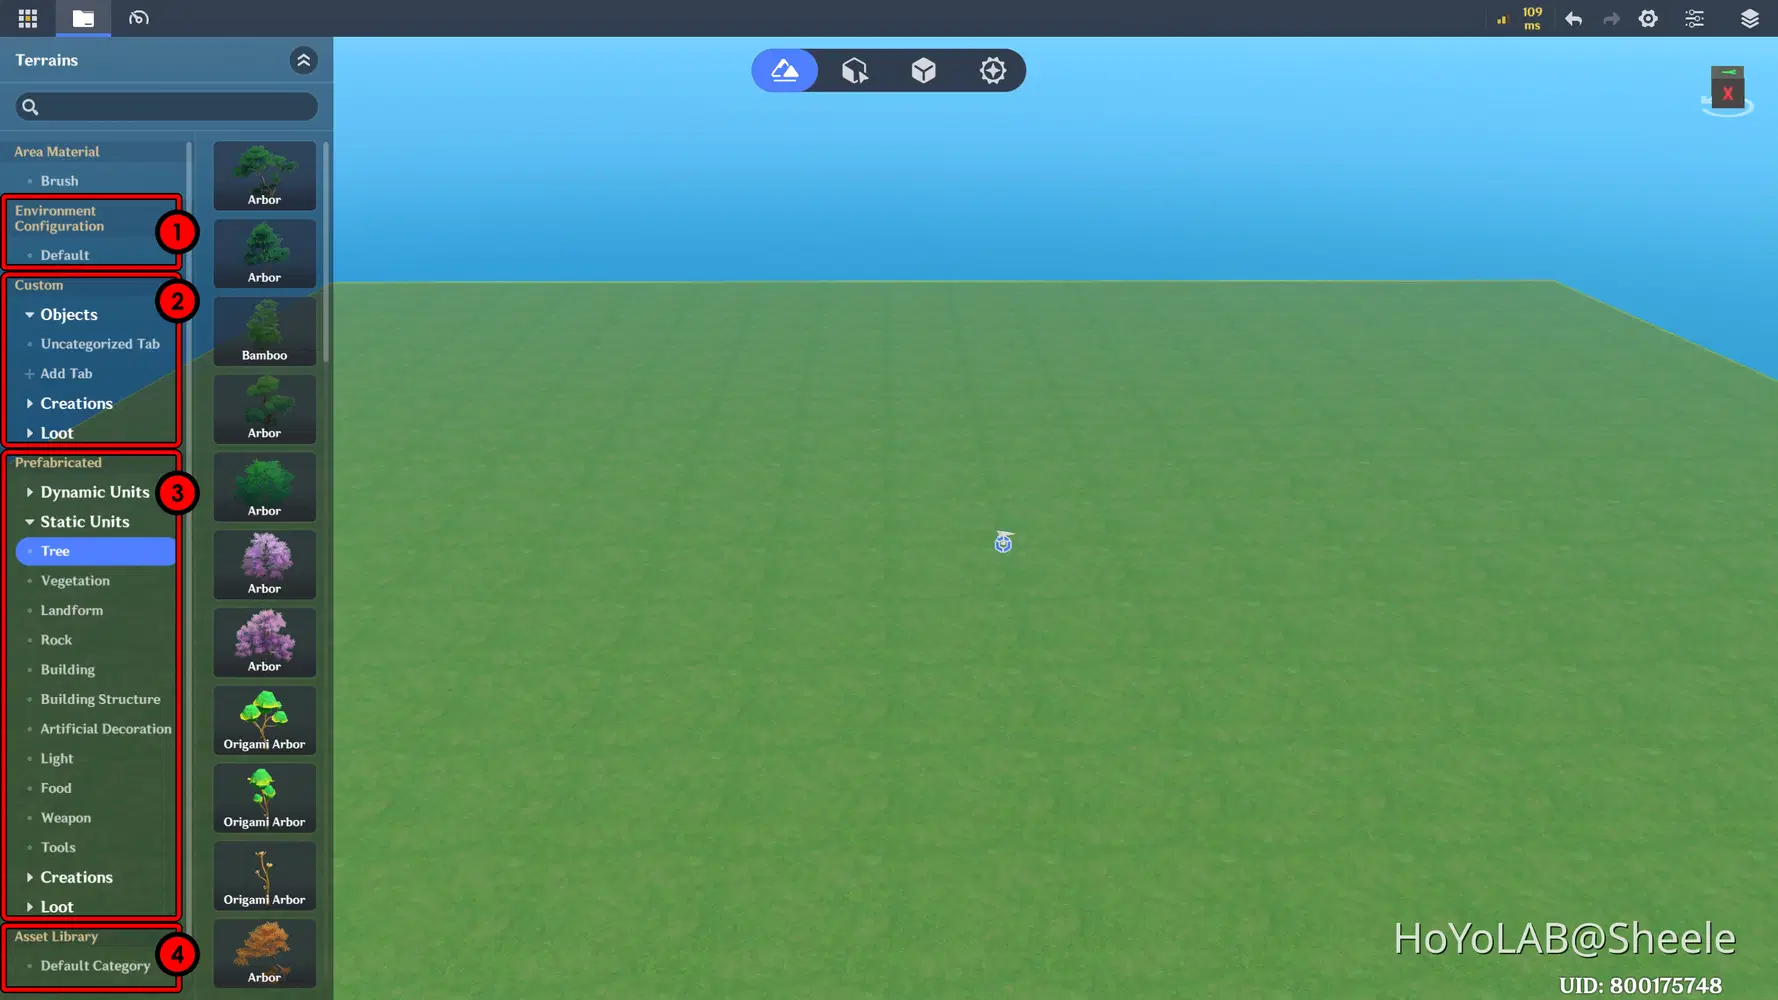
Description
- Environment Configuration: This is where you can adjust the overall look of your scene. You can change the background color, add environment elements like stars and clouds, and control lighting and weather settings.
- Custom: This section stores all the objects or units that you create yourself. It makes it easy to reuse your custom creations in your scene.
- Prefabricated:This is where you can find ready-to-use assets provided by the system. These are basic objects you can use to fill your scene, such as trees, buildings, plants, and other creations.
- Asset Library:This section contains all objects or units that you have imported from external sources..
Tips 1 - Terrain Planning
Before you start building your scene, try creating a simple rough sketch of your stage layout. This sketch helps you plan where important elements will be placed, such as mountains, houses, rivers, bridges, paths, and open areas.
By planning the terrain first, you can easily decide land height, main paths, and key focus points. It doesn’t need to be detailed simple shapes and notes are enough to guide your design. This step helps make your scene more organized and visually balanced.
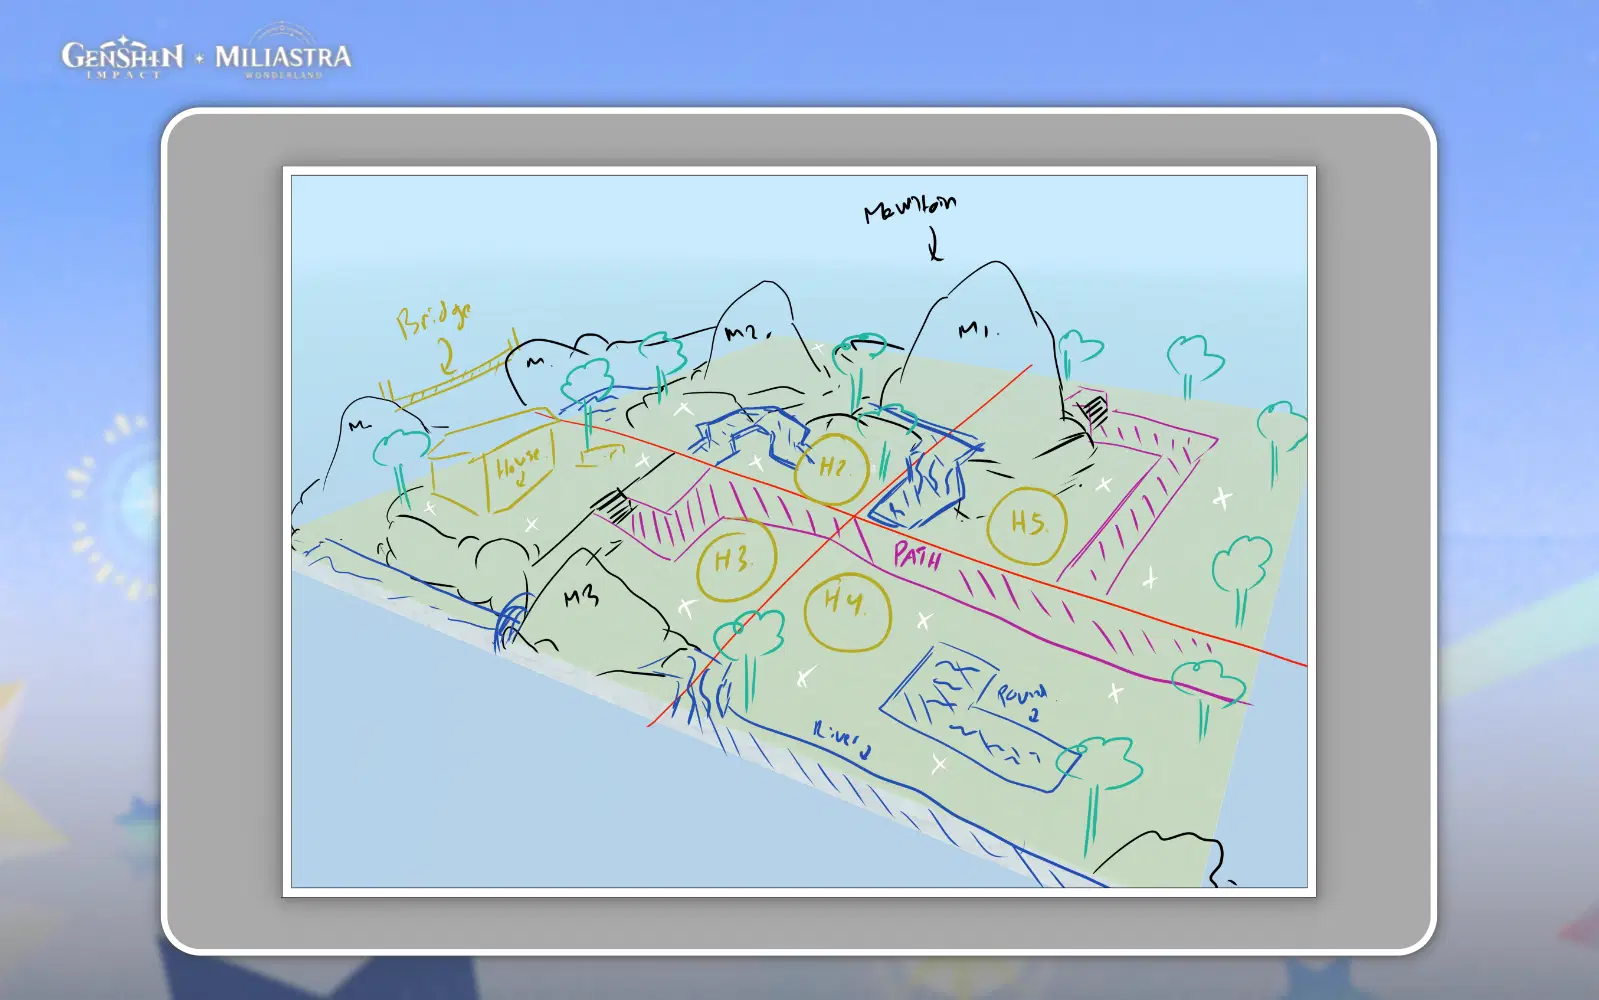
Example of a simple terrain planning sketch with key areas and paths.
Above is an example of a simple rough sketch I created. Having a sketch like this gives you a clear reference when building your scene. It also helps reduce unnecessary changes during terrain sculpting, since the main layout is already planned. With this as a guide, it becomes easier to shape the terrain, place key elements, and keep your design consistent.
Tips 2 - Terrain Sculpting
Shape the terrain to make your scene feel more natural and interesting. Try adding hills or mountains to create height variation and include water elements such as rivers or waterfalls to make the environment livelier.
📝 Wonderland Guide:
✦ Create Elevated Terrain & Water
As the first step in shaping the terrain, use the Brush tool following the design that was created in the planning stage.
In practice, this step can take quite a bit of time especially if you don’t already have a clear sketch or a well-prepared plan for how your terrain should be built, So, make sure you have a solid initial plan before you start.
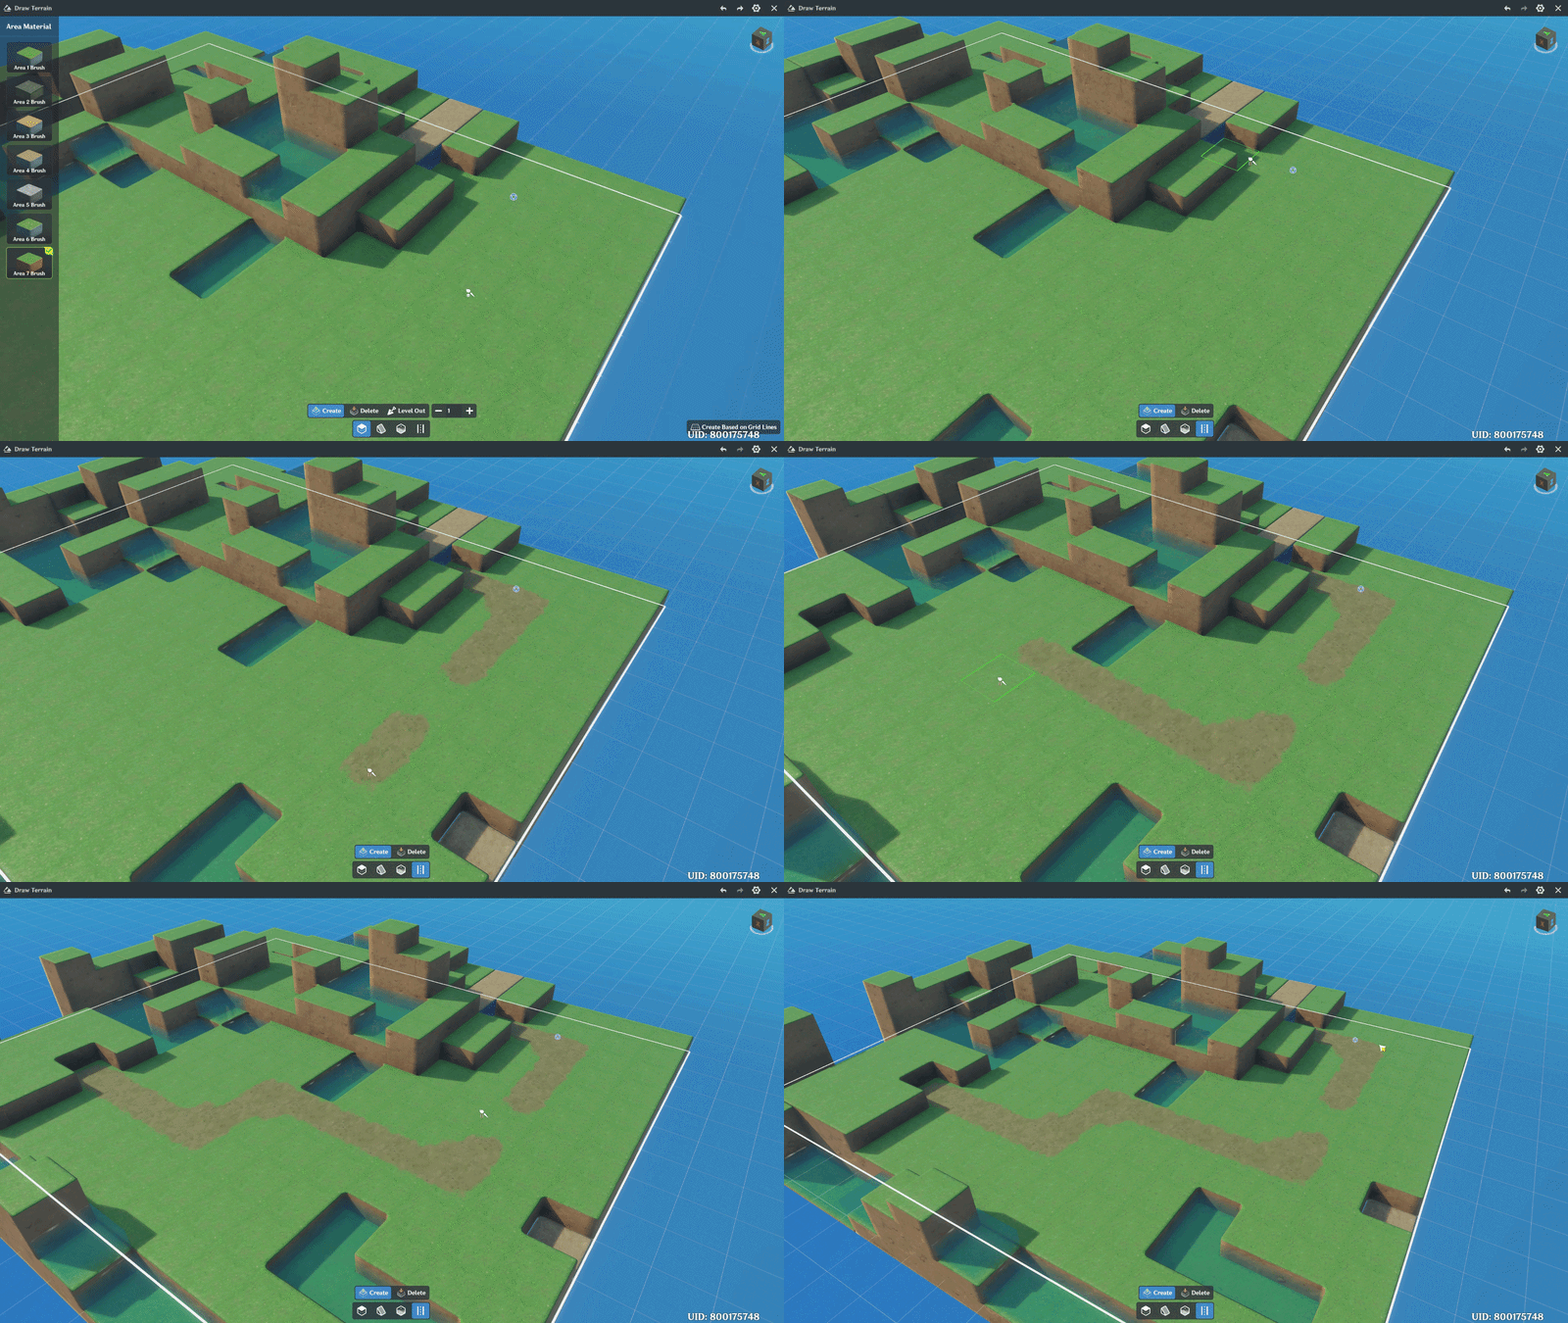
Go to the Terrain Editing menu → select Brush Menu, then choose the type of brush you want to use for building.
In this example, I’m using Brush number 7.
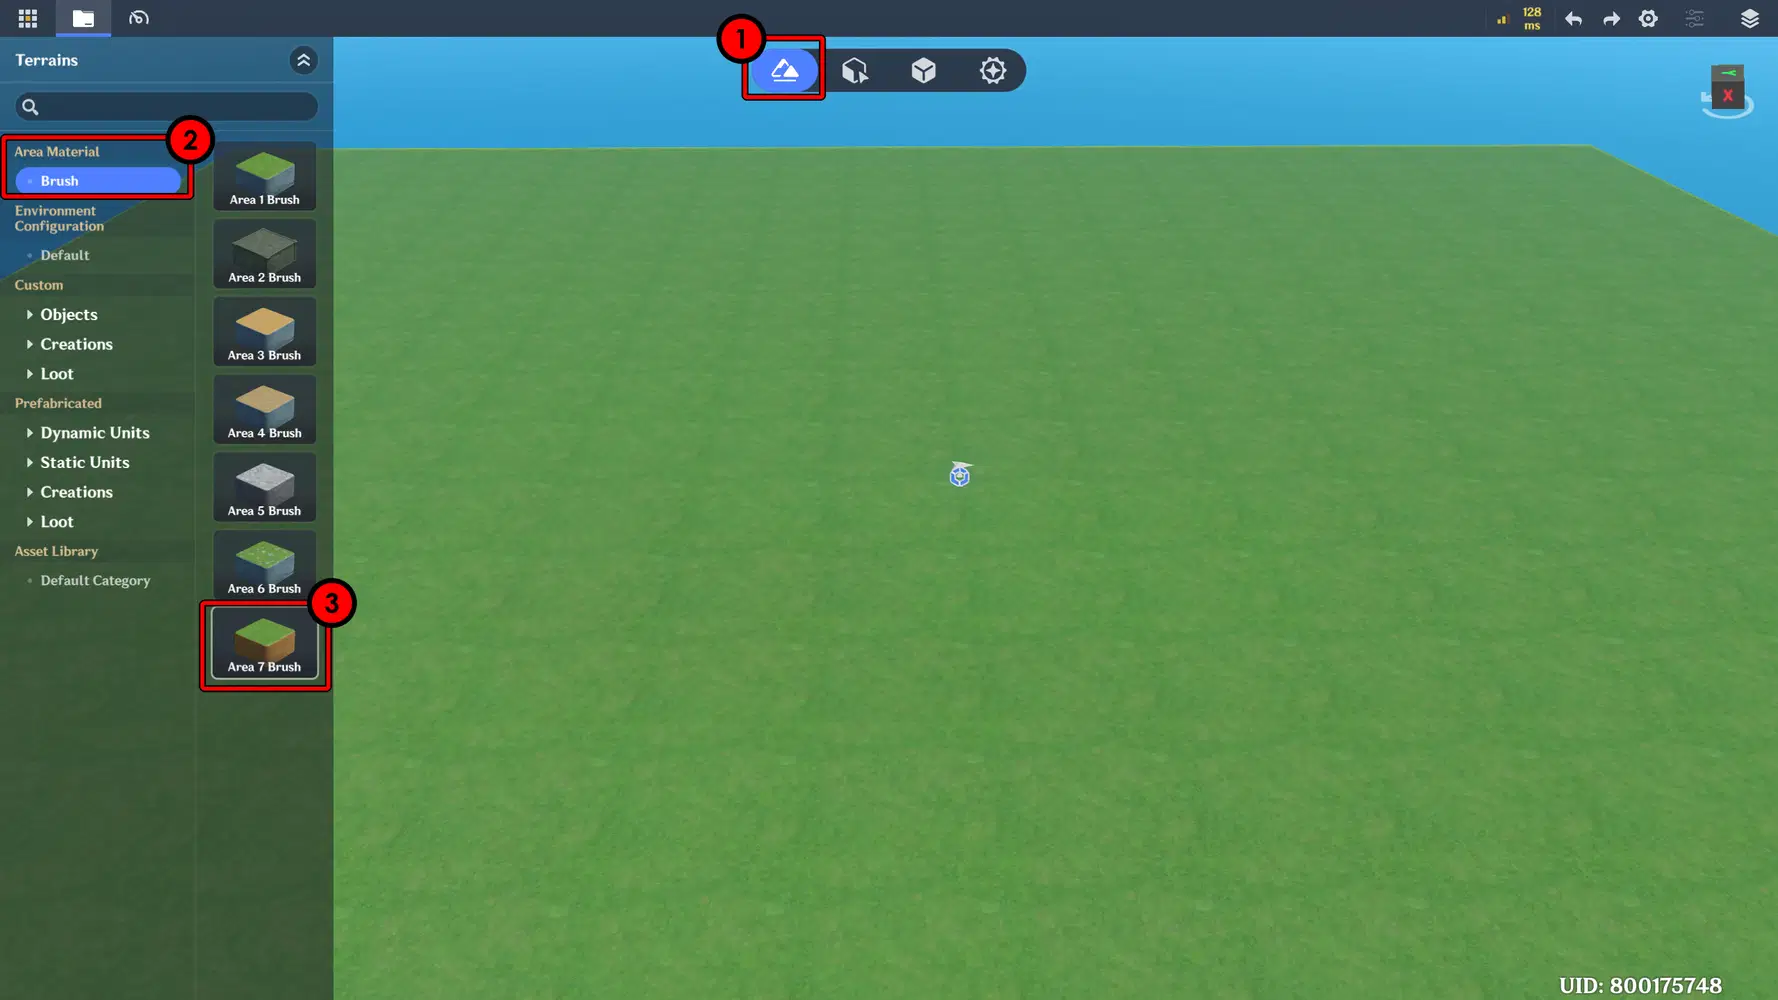
Then, the screen will switch to Terrain Editing mode, with tools available at the bottom.
Select Brush and Create to start building and generate elevated terrain.
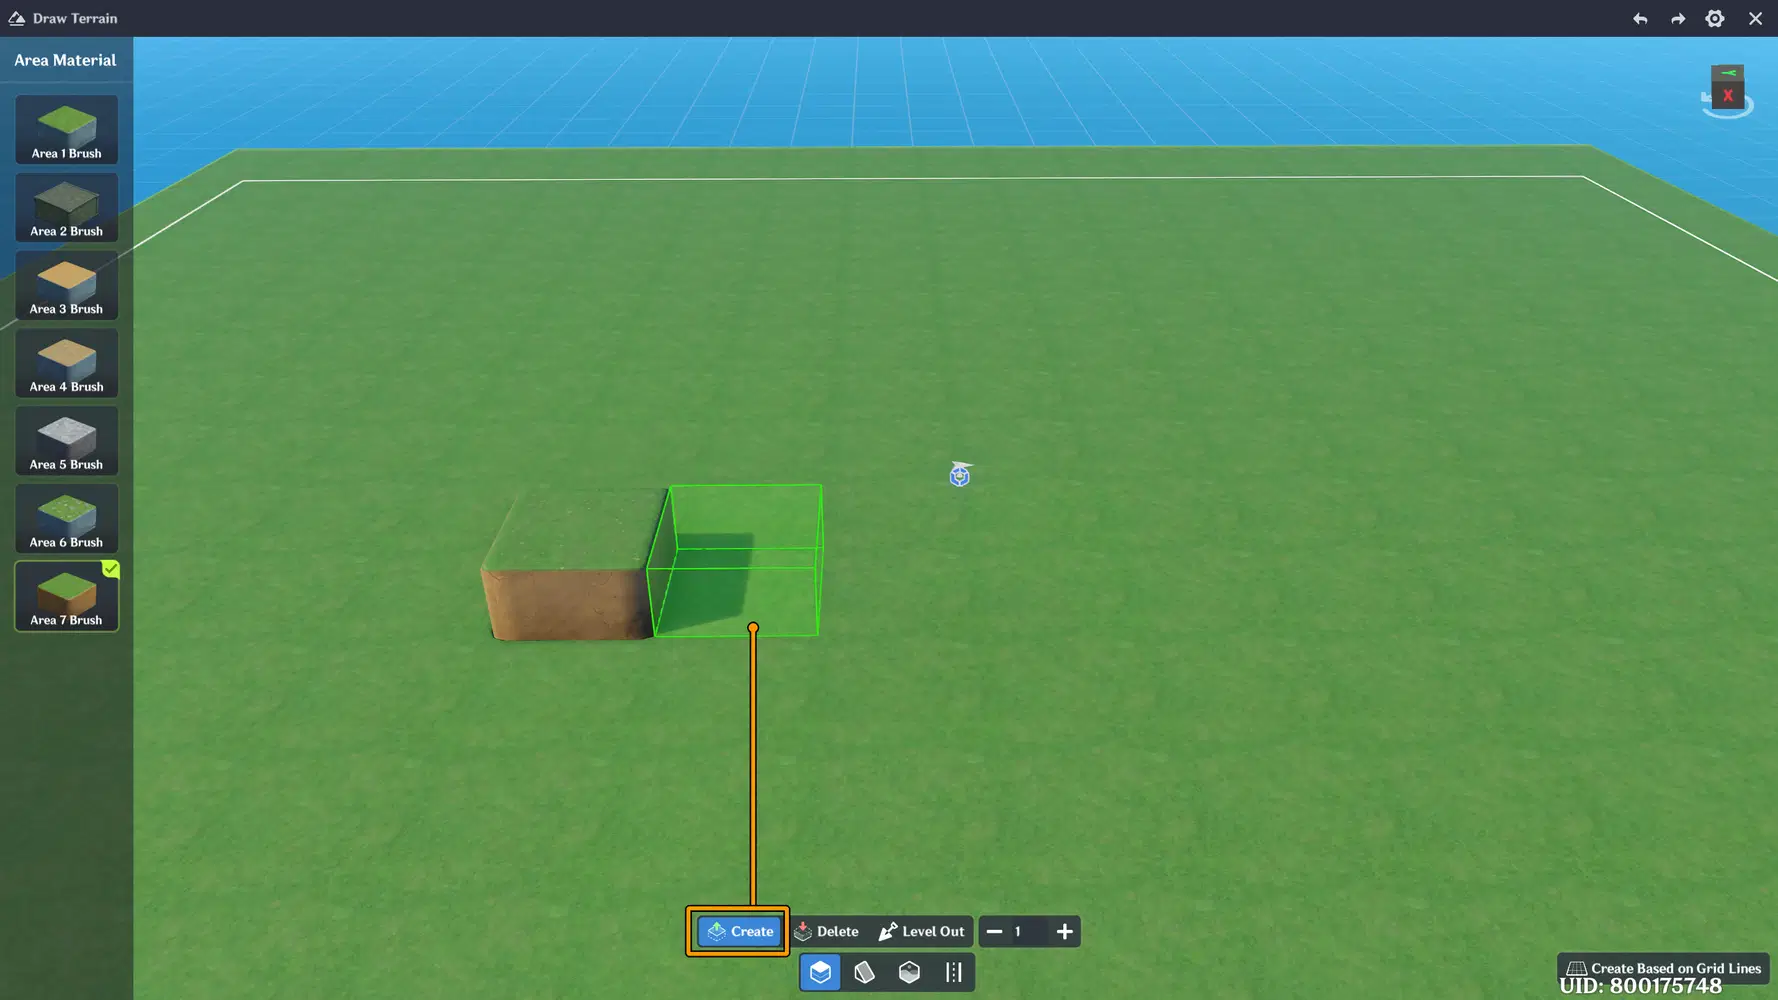
Create Tool
Use Delete to remove elevated terrain. You can also use this tool to create holes in your terrain.
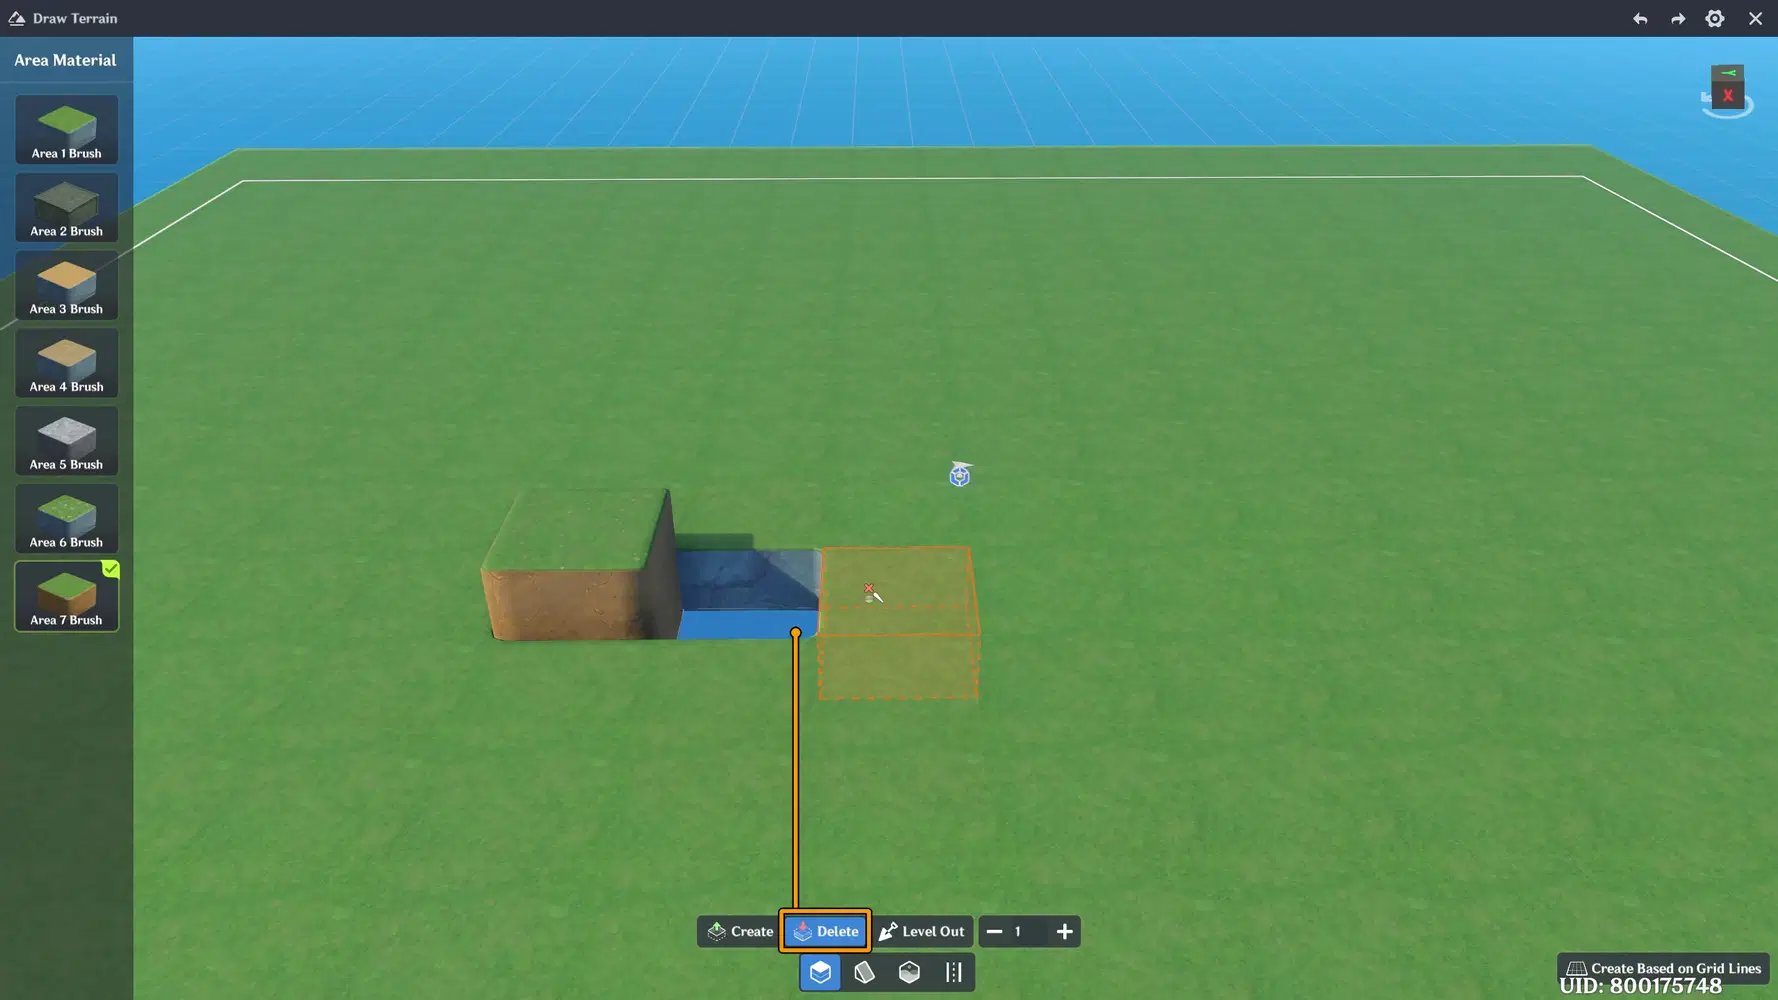
Delete Tool
Use Level Out to overwrite existing terrain shapes/brushes.
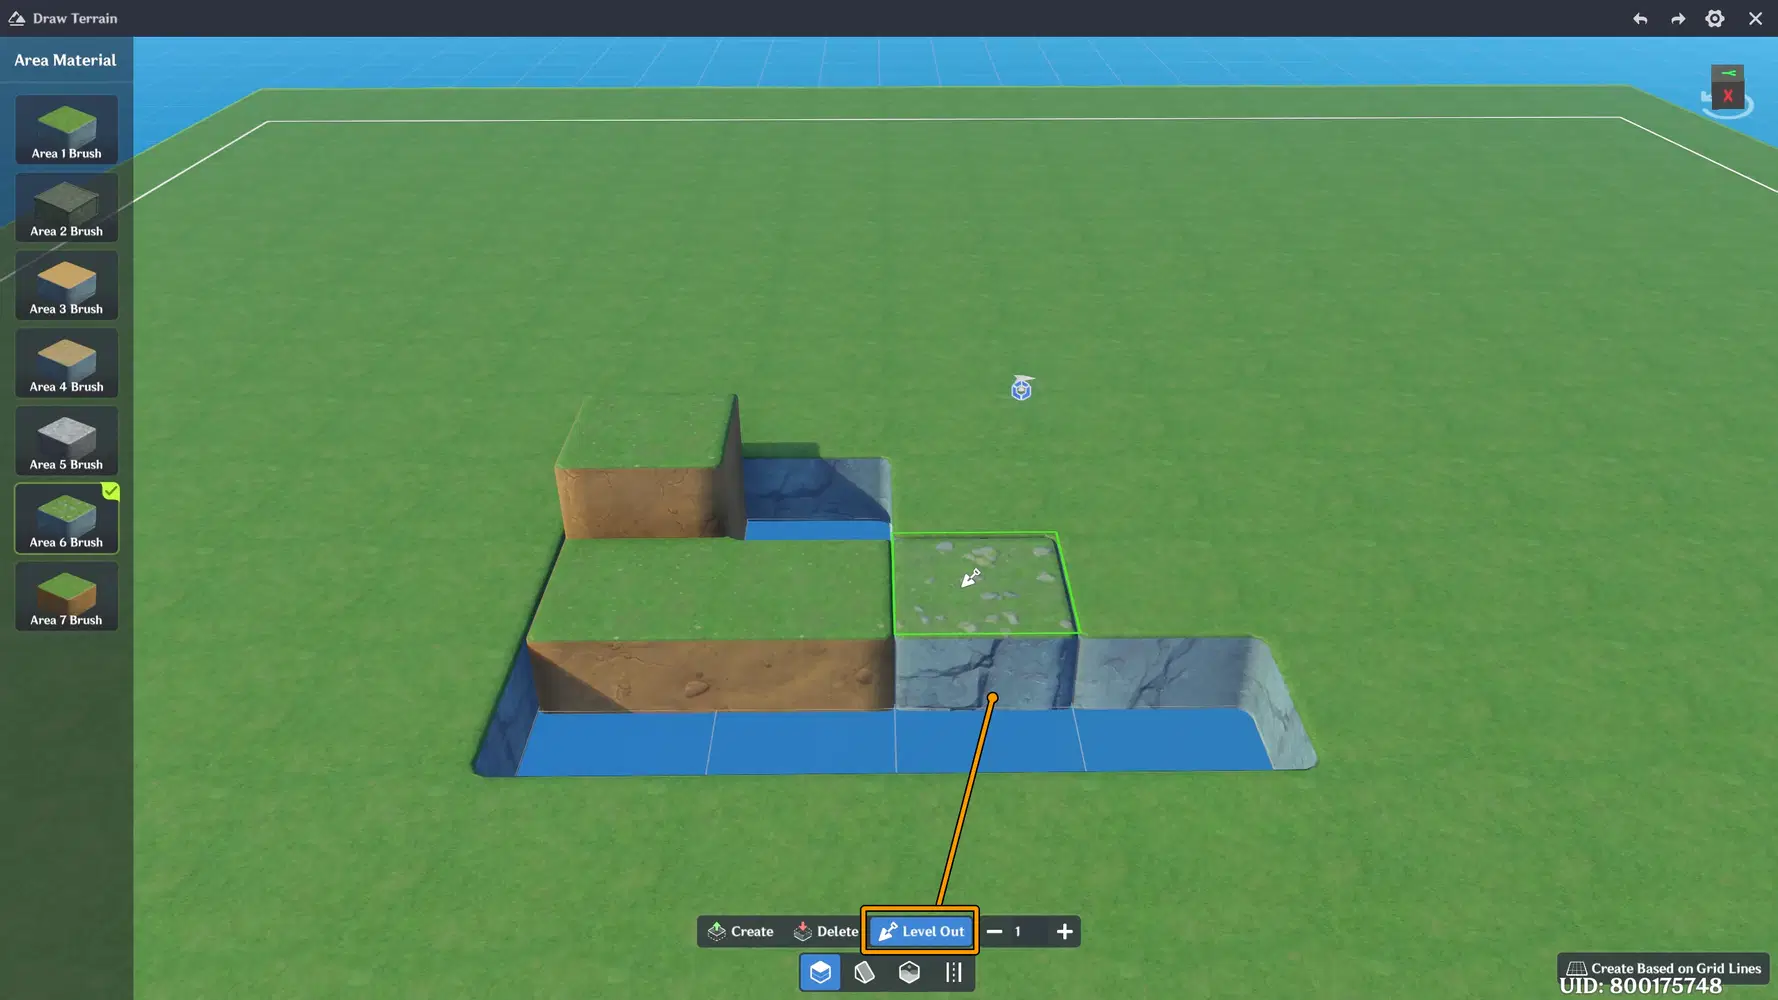
Level Out Tool
Value Control on the right help you adjust the intensity when creating or removing elevated terrain across multiple sections.
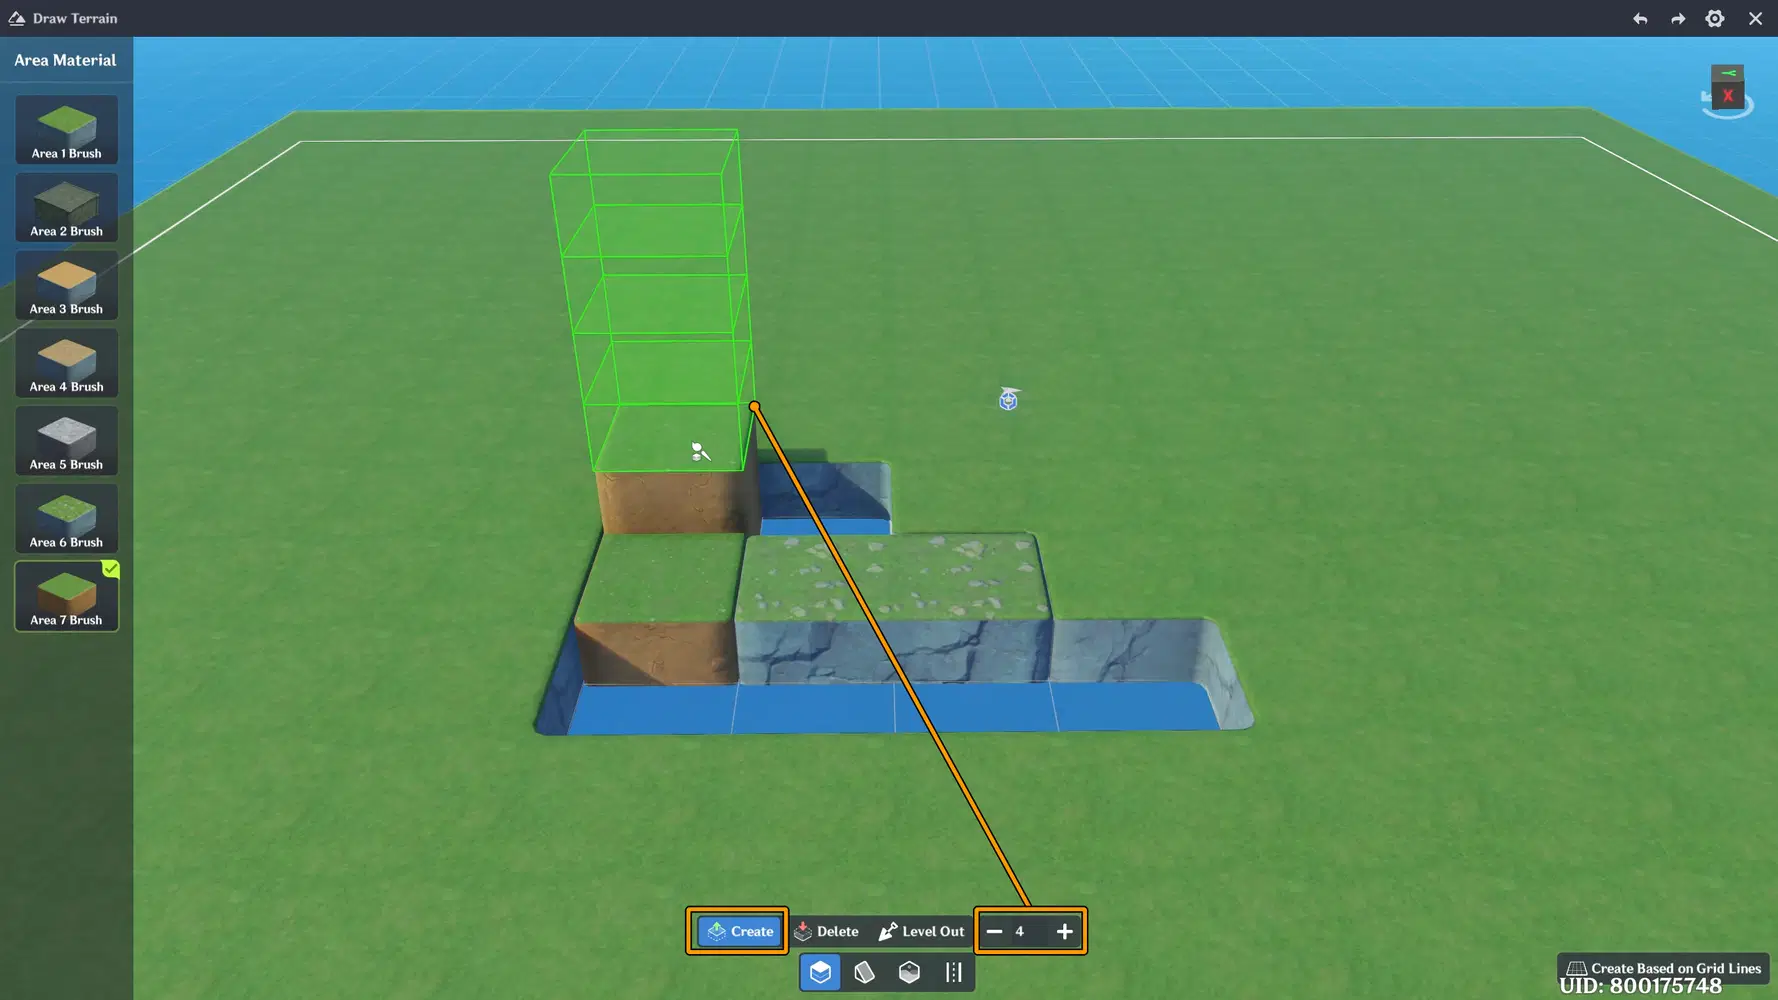
Value Control
To create a Water area, go to the third menu, Water, and select Create. Note that holes or empty terrain cannot be filled with water, you need a solid ground surface first.
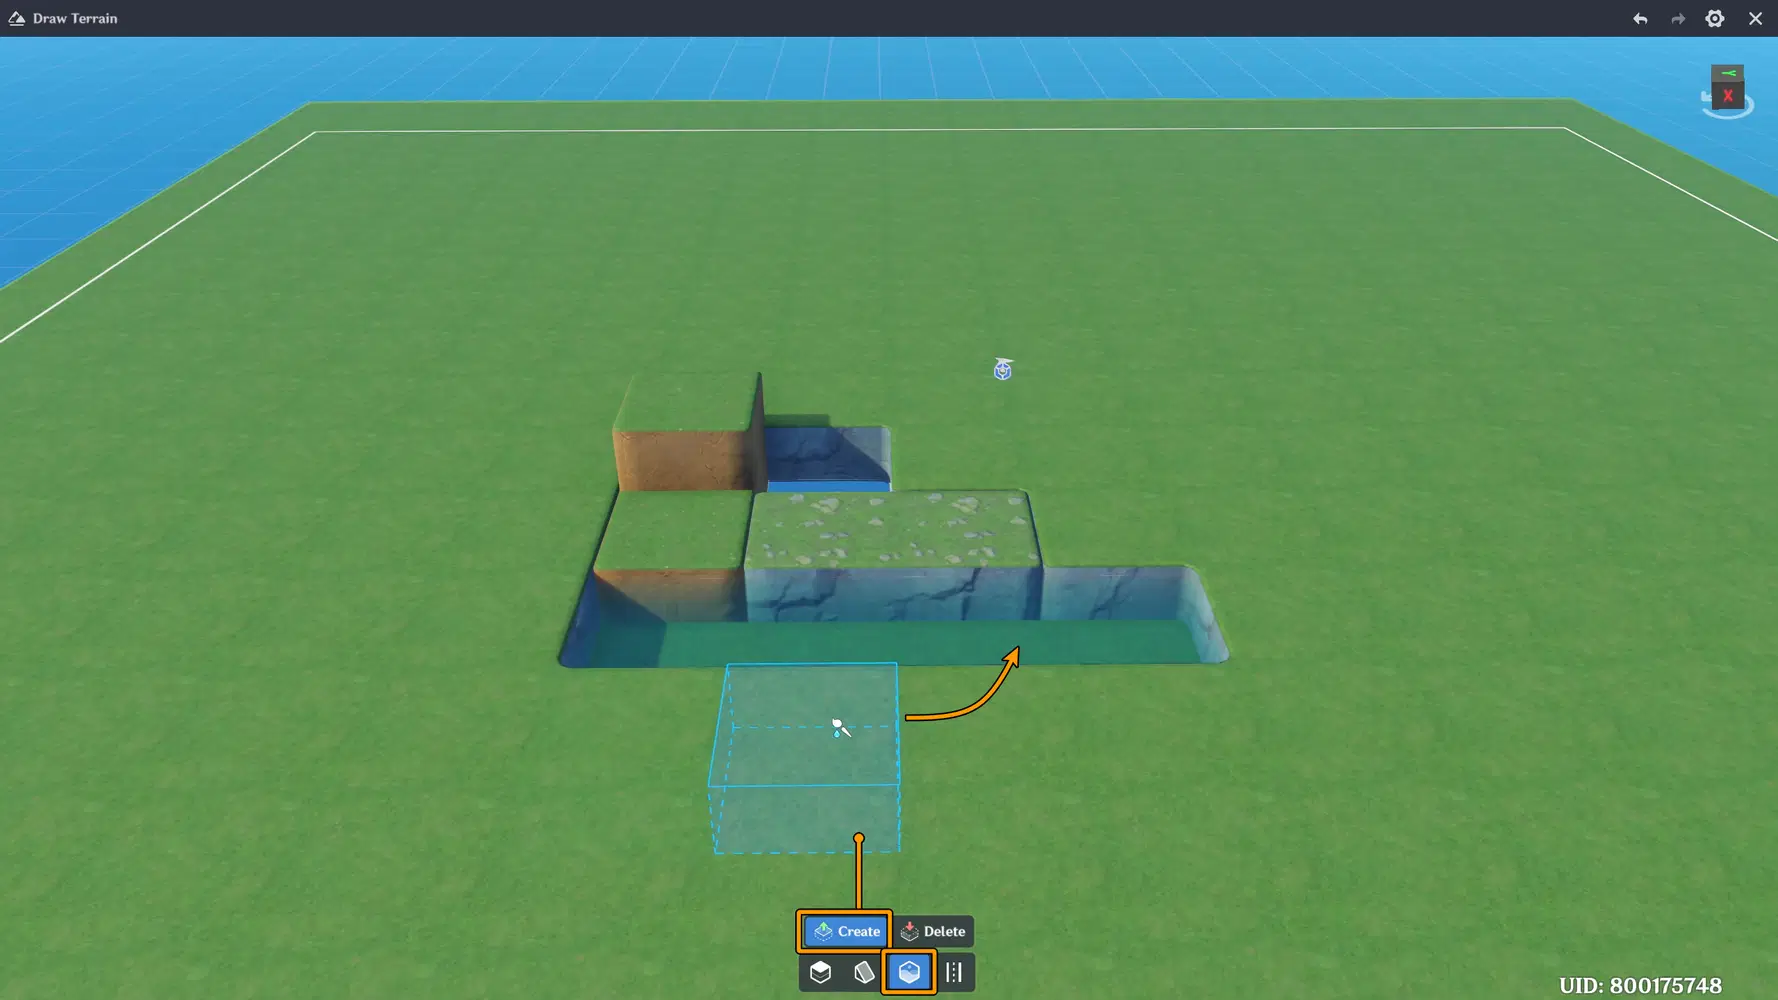
Water Tool
Basic Stairs is a menu used to create simple stair structures. There are three types of stairs available, and you can adjust their direction by pressing the arrow buttons before placing them
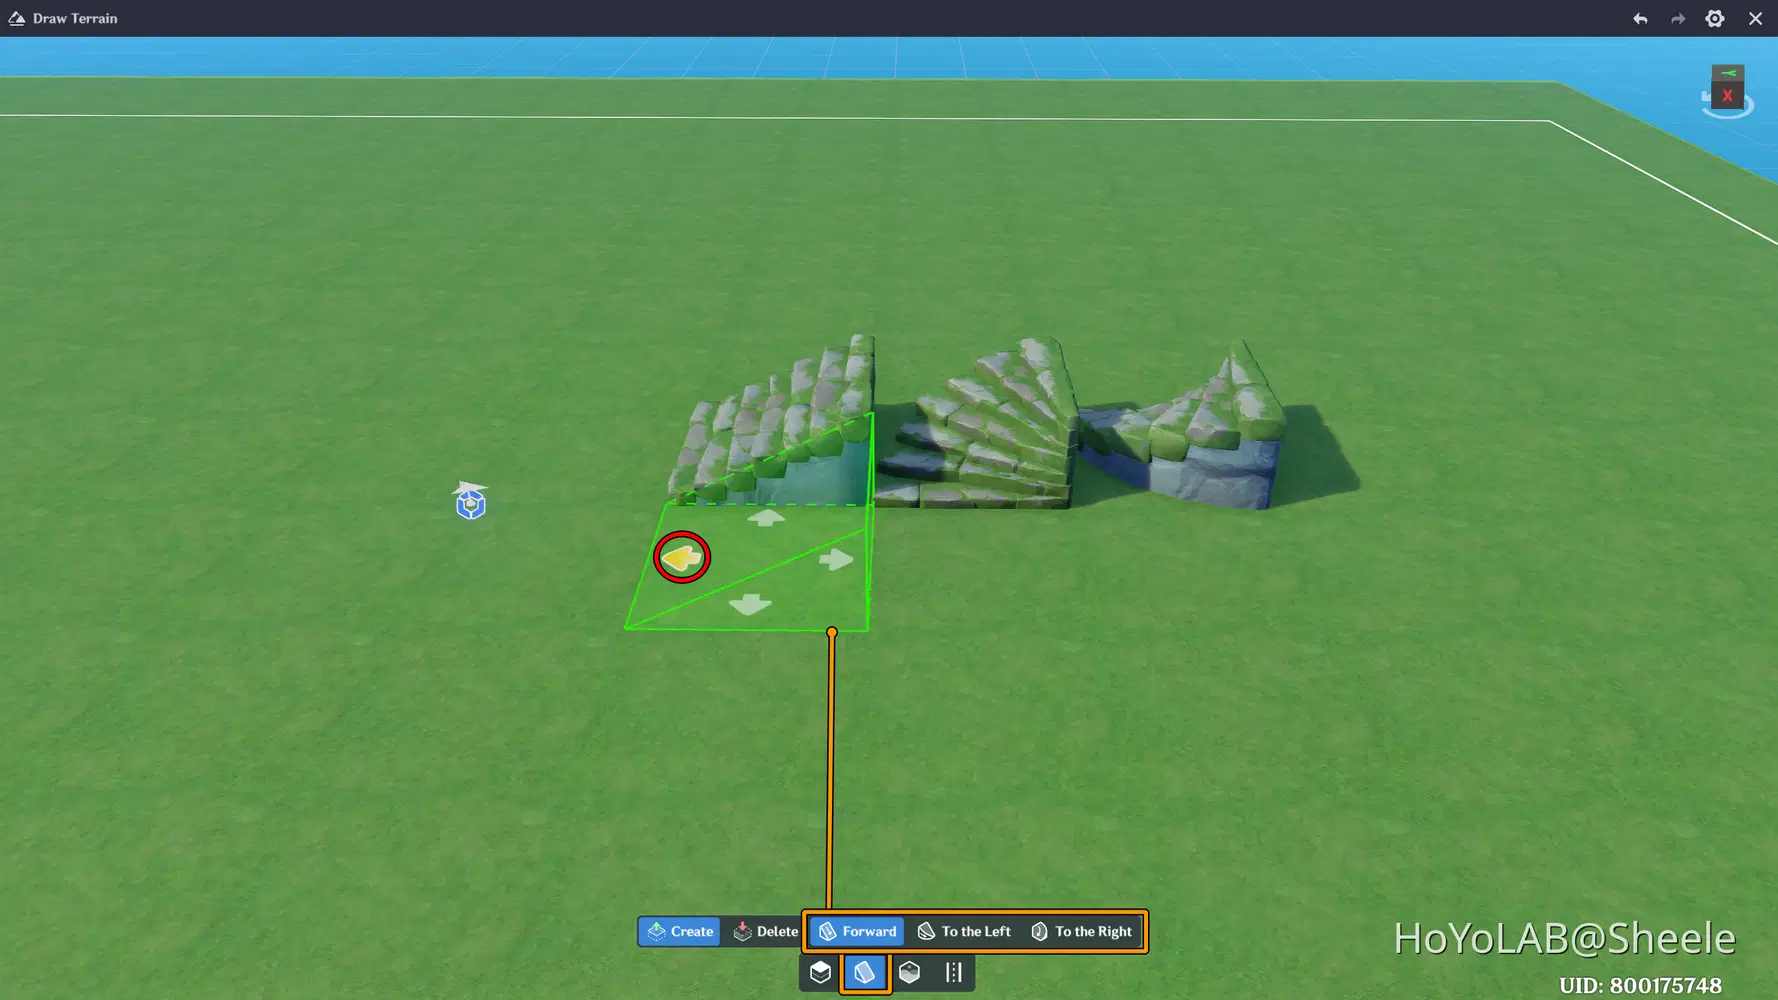
Basic Stairs
Below is an example of how I built my terrain based on the initial plan. This process is shown in a sped-up version so you can get a clearer idea of how the terrain develops from an empty area and gradually takes shape into a basic scene.
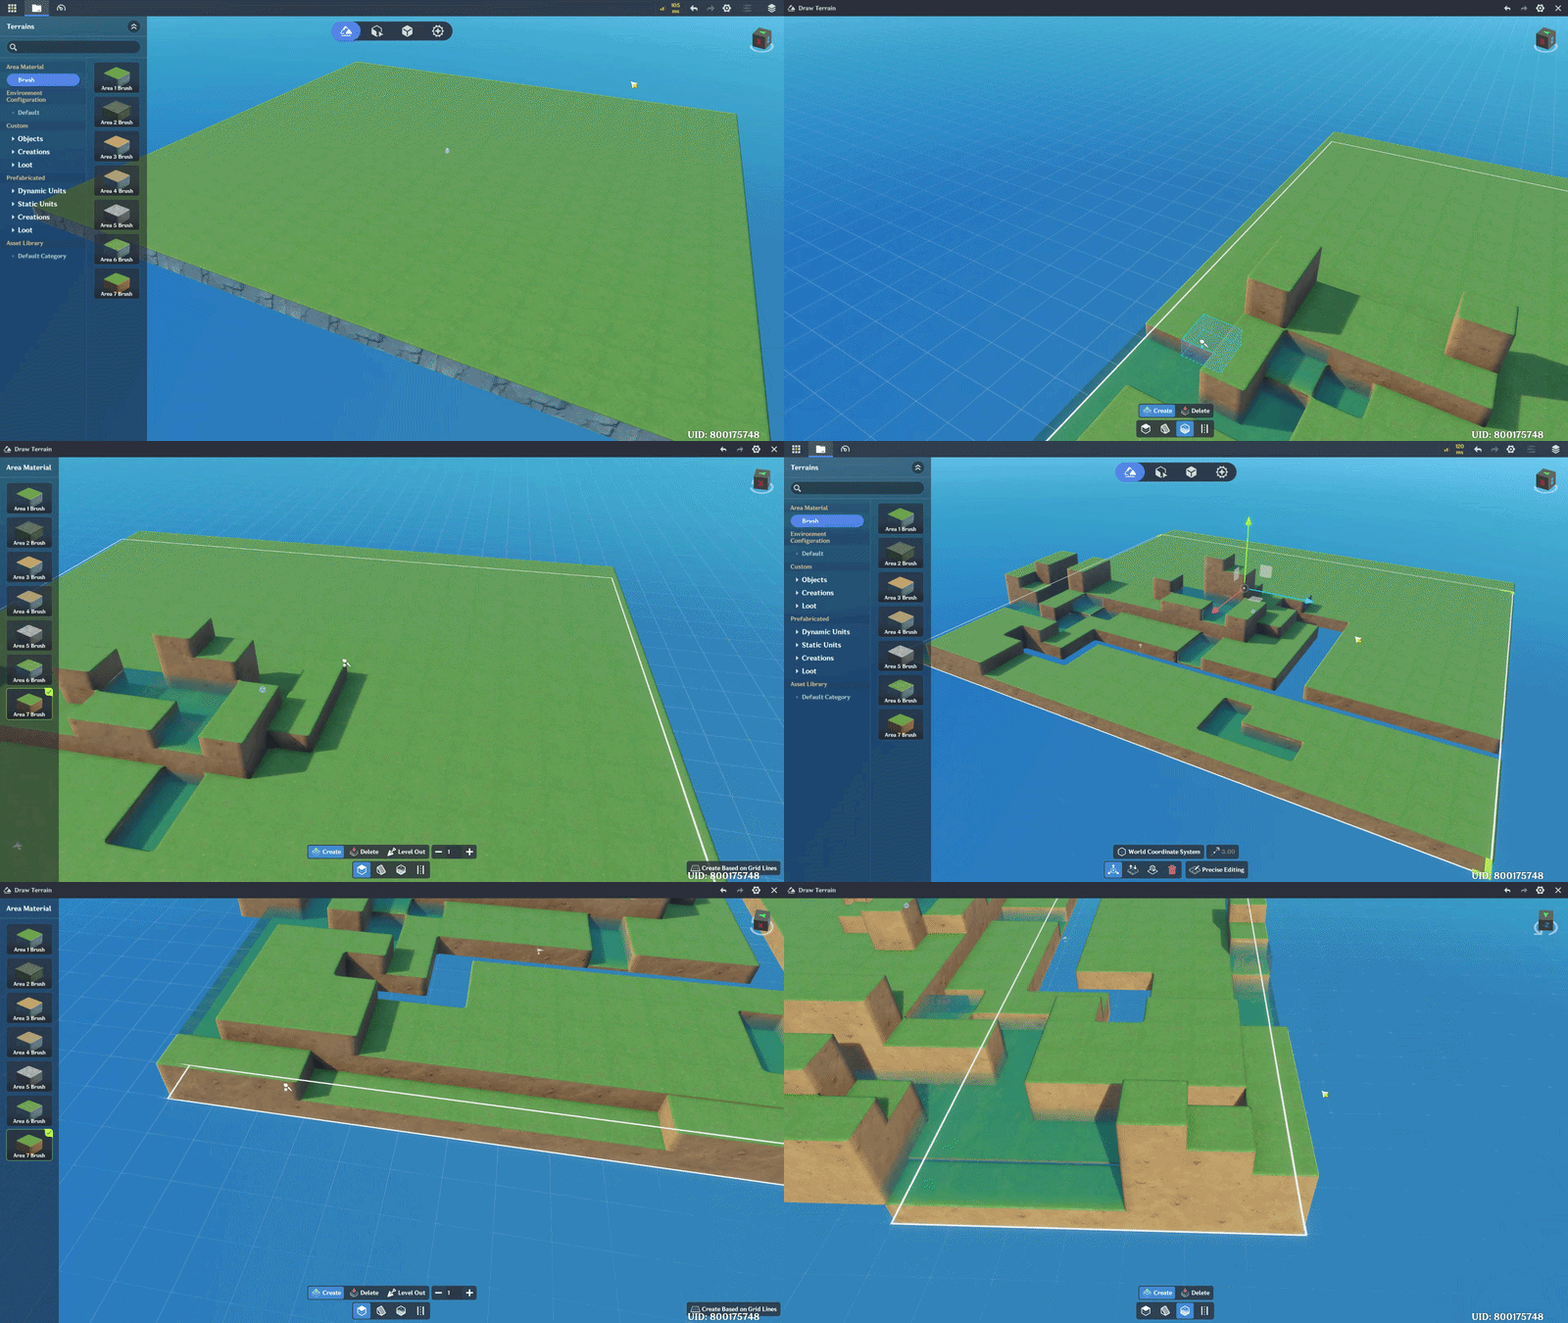
✦ Create Solid Path
Use the Brush tool to create clear and solid paths for your scene. Paths help guide players through the environment.
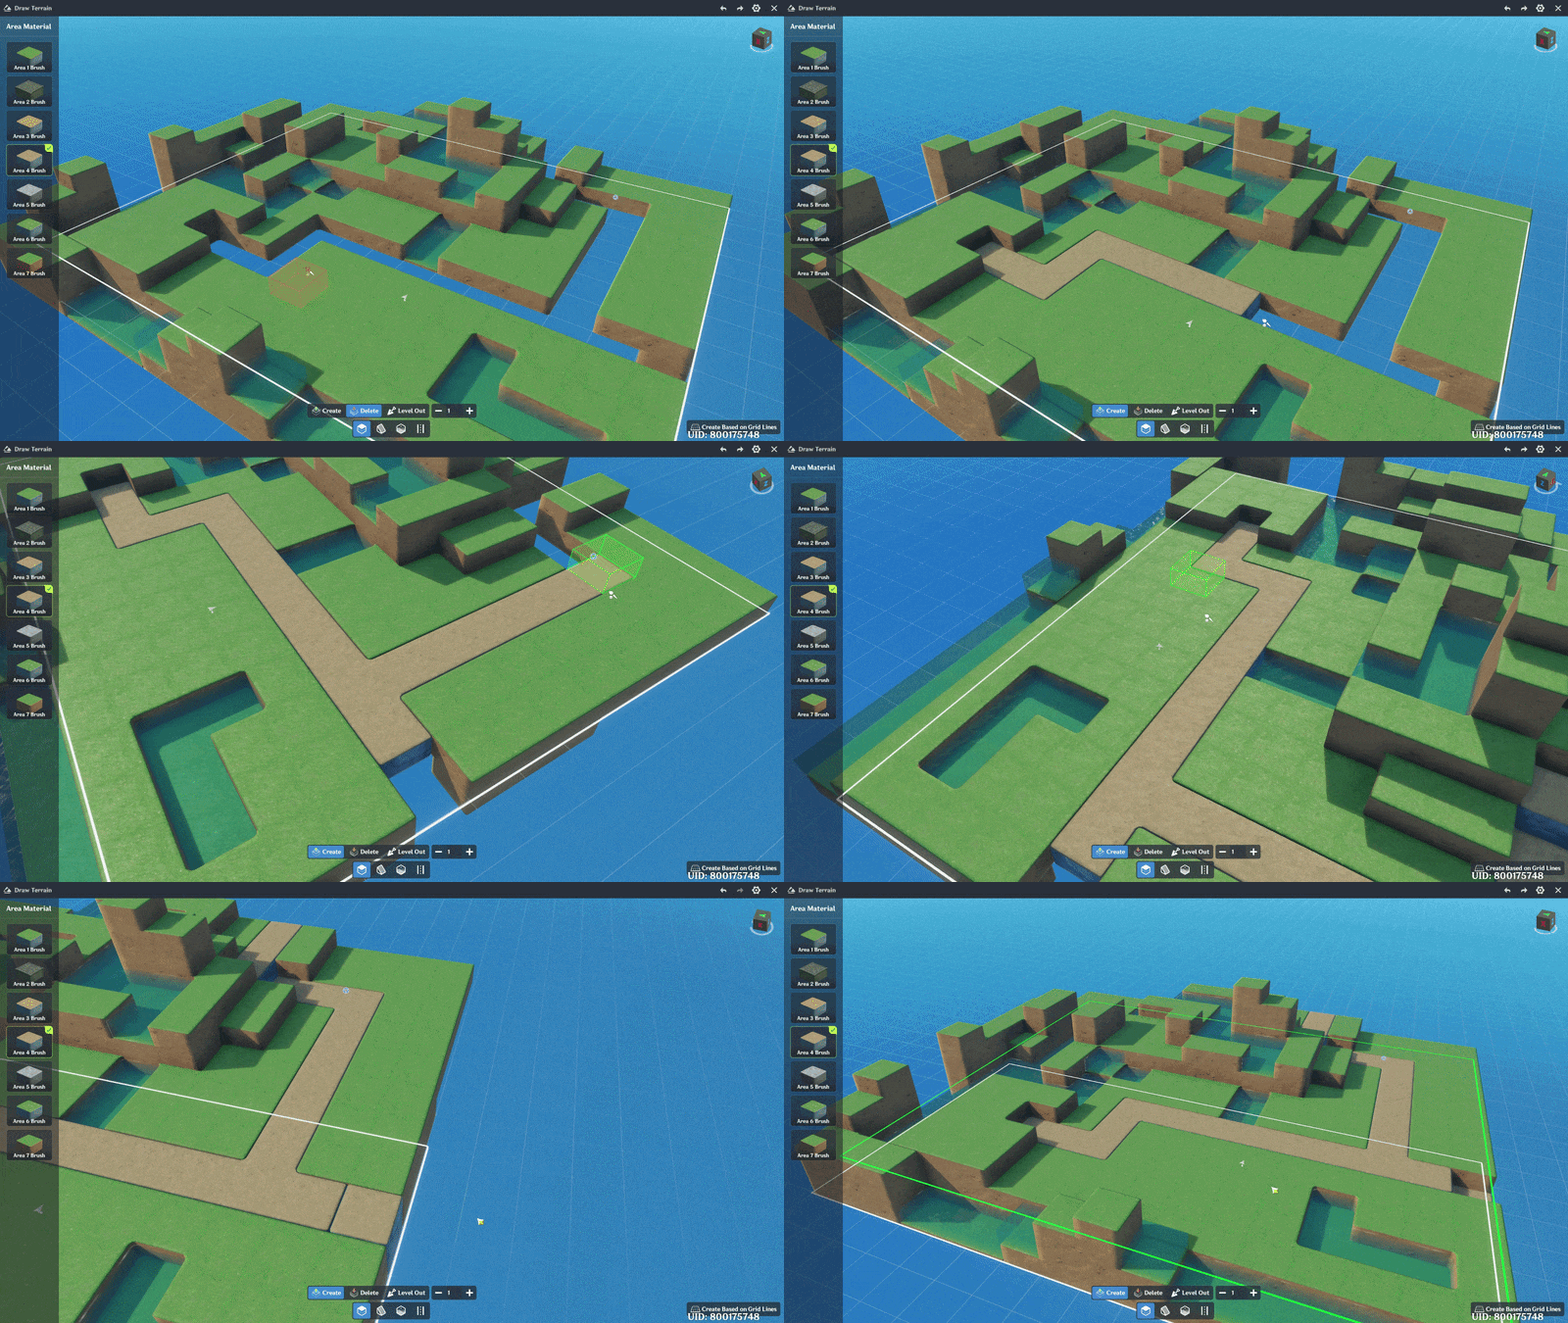
✦ Create Natural Path
Use the Natural Path Tool to create paths that look more organic and natural in your scene.
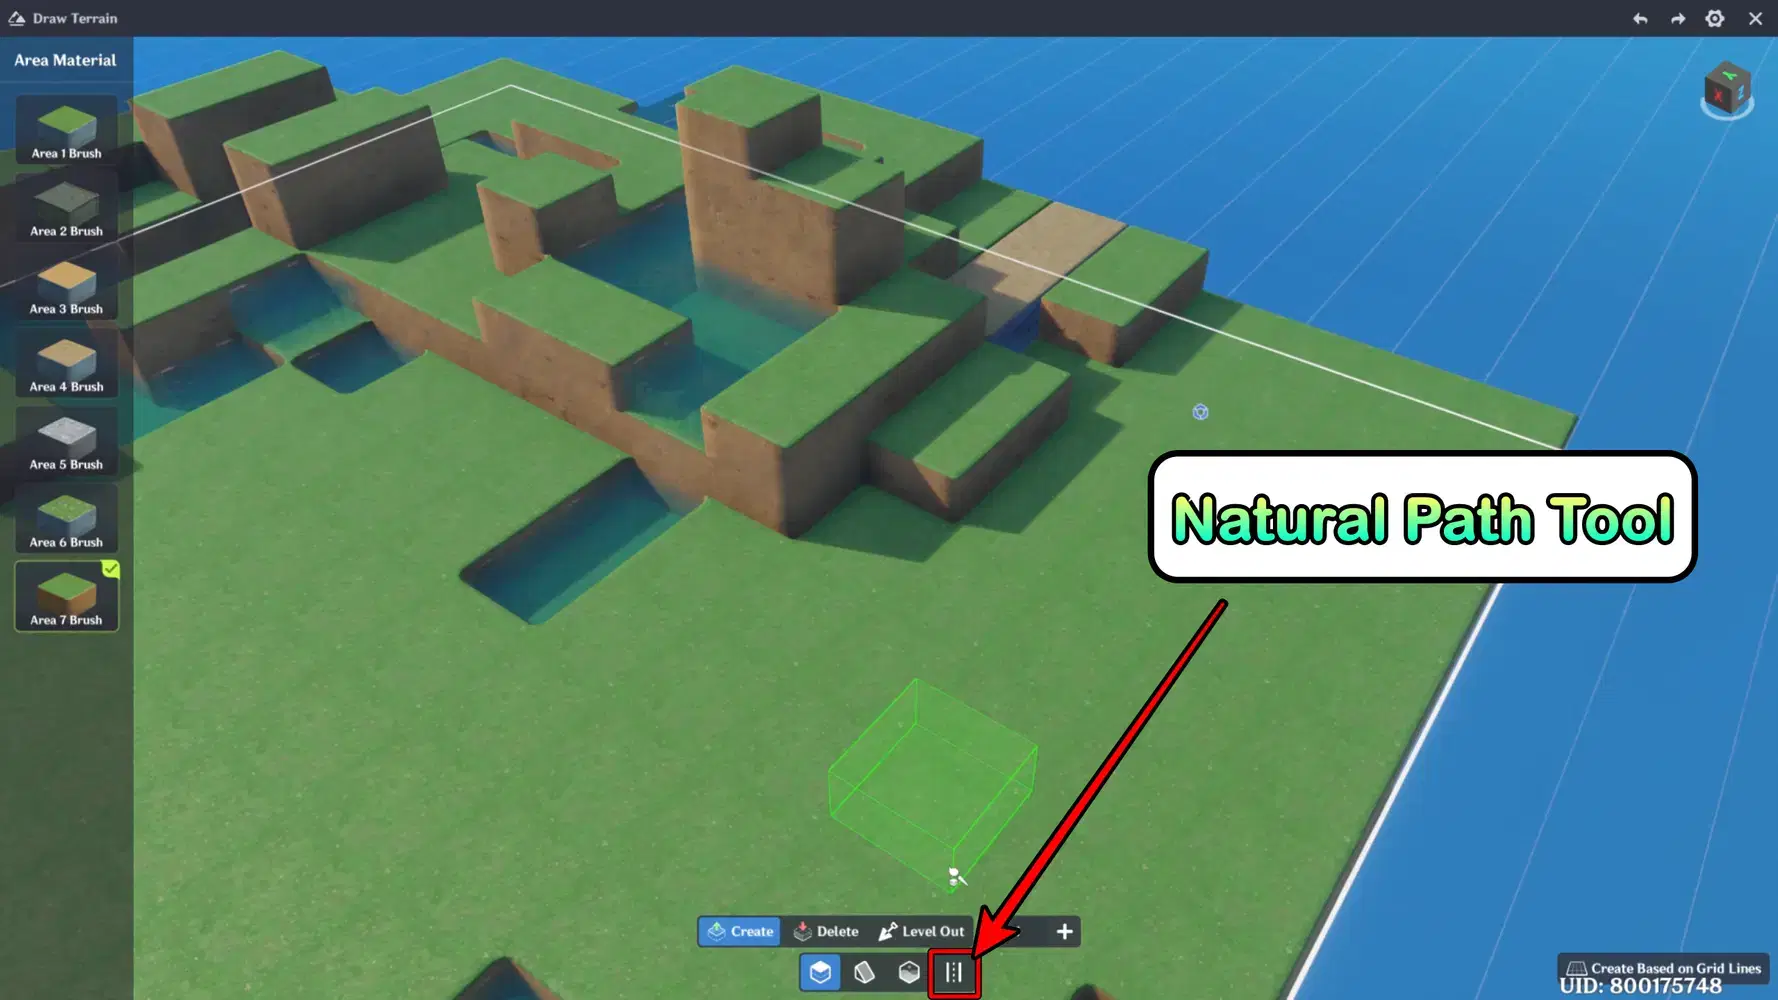
Natural Path Tool
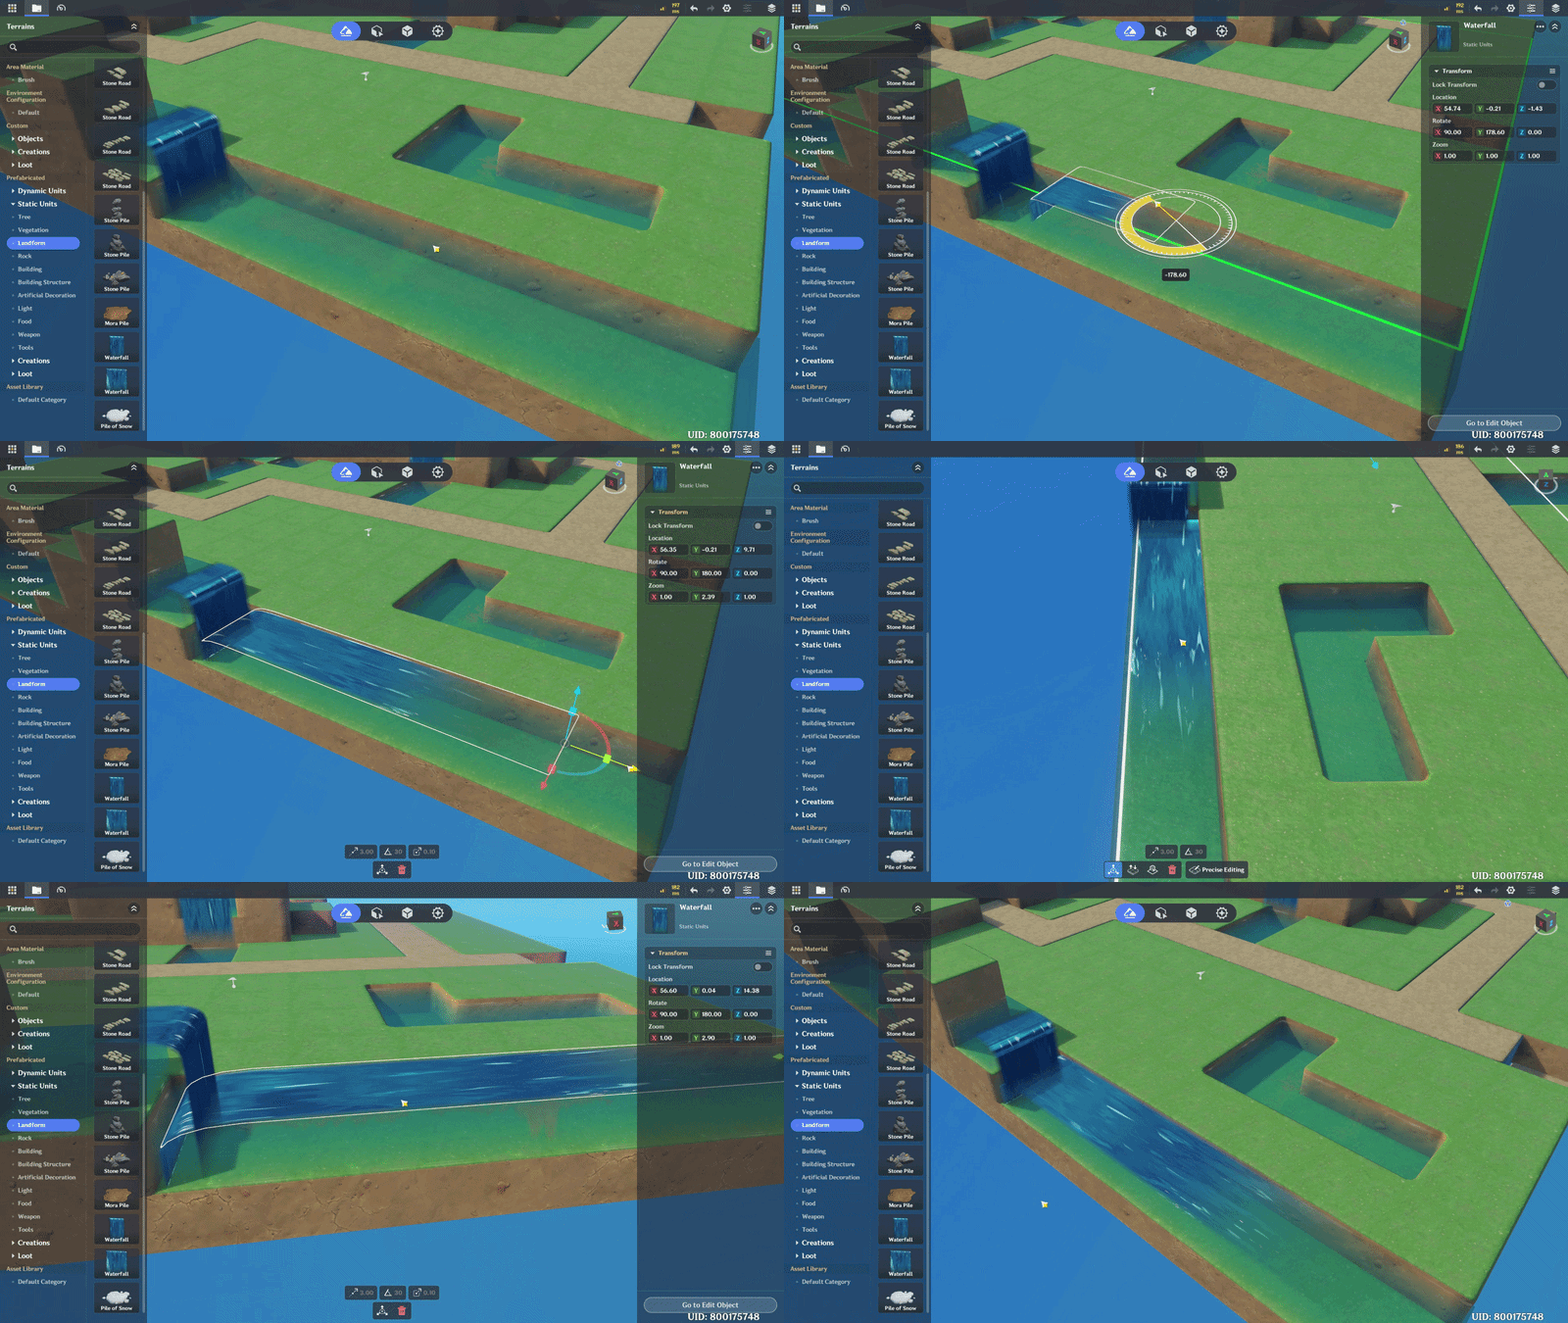
✦ Create Waterfall
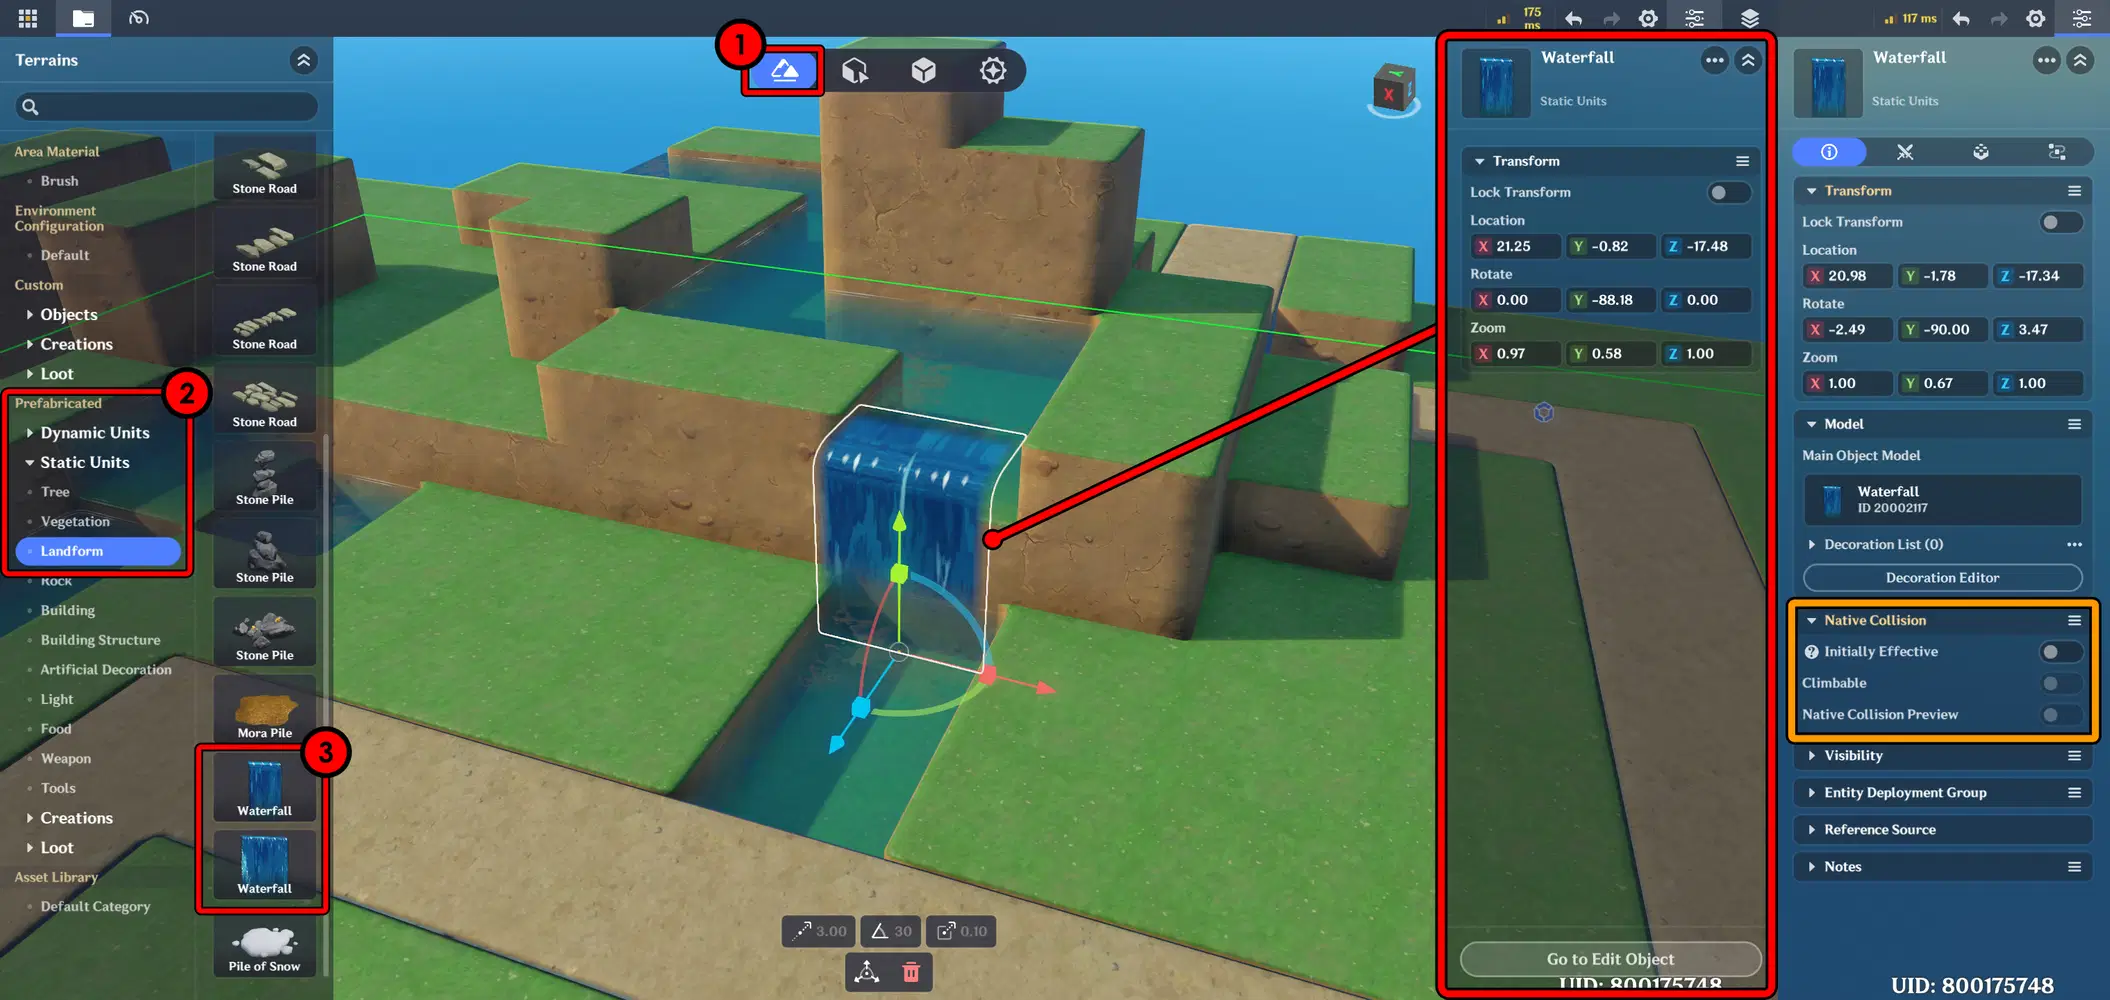
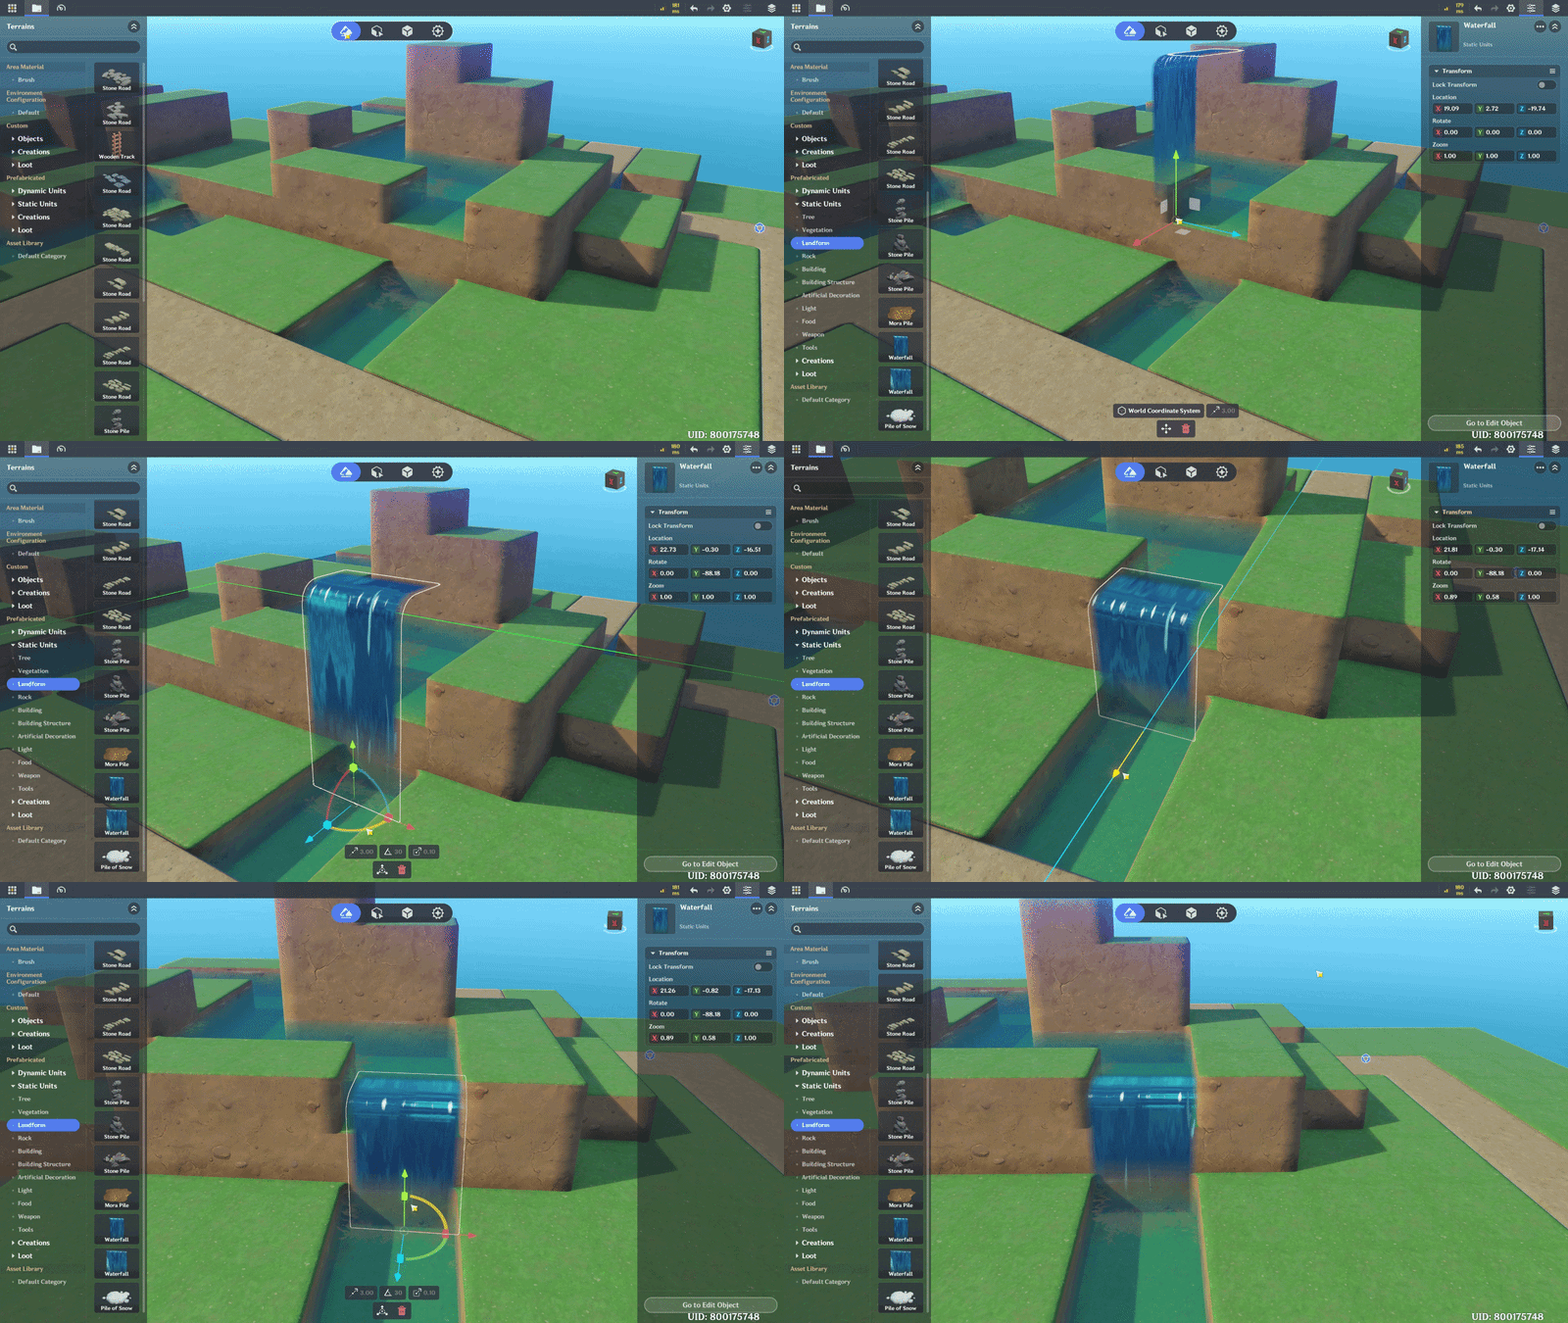
Here is how to add a Waterfall to your scene. A waterfall adds a dynamic and natural feel to your scene, making the environment look more alive and immersive. Place it on elevated terrain so the water flows naturally into lower areas like rivers or ponds.
- In the Asset Bar menu, select Prefabricated → Landform → find Waterfall.
Then place it in your scene and adjust the position to match your layout. Don’t forget to disable Native Collision to make it behave more like real water.
Create Waterfall & Disable Native Collision
✦ Create River
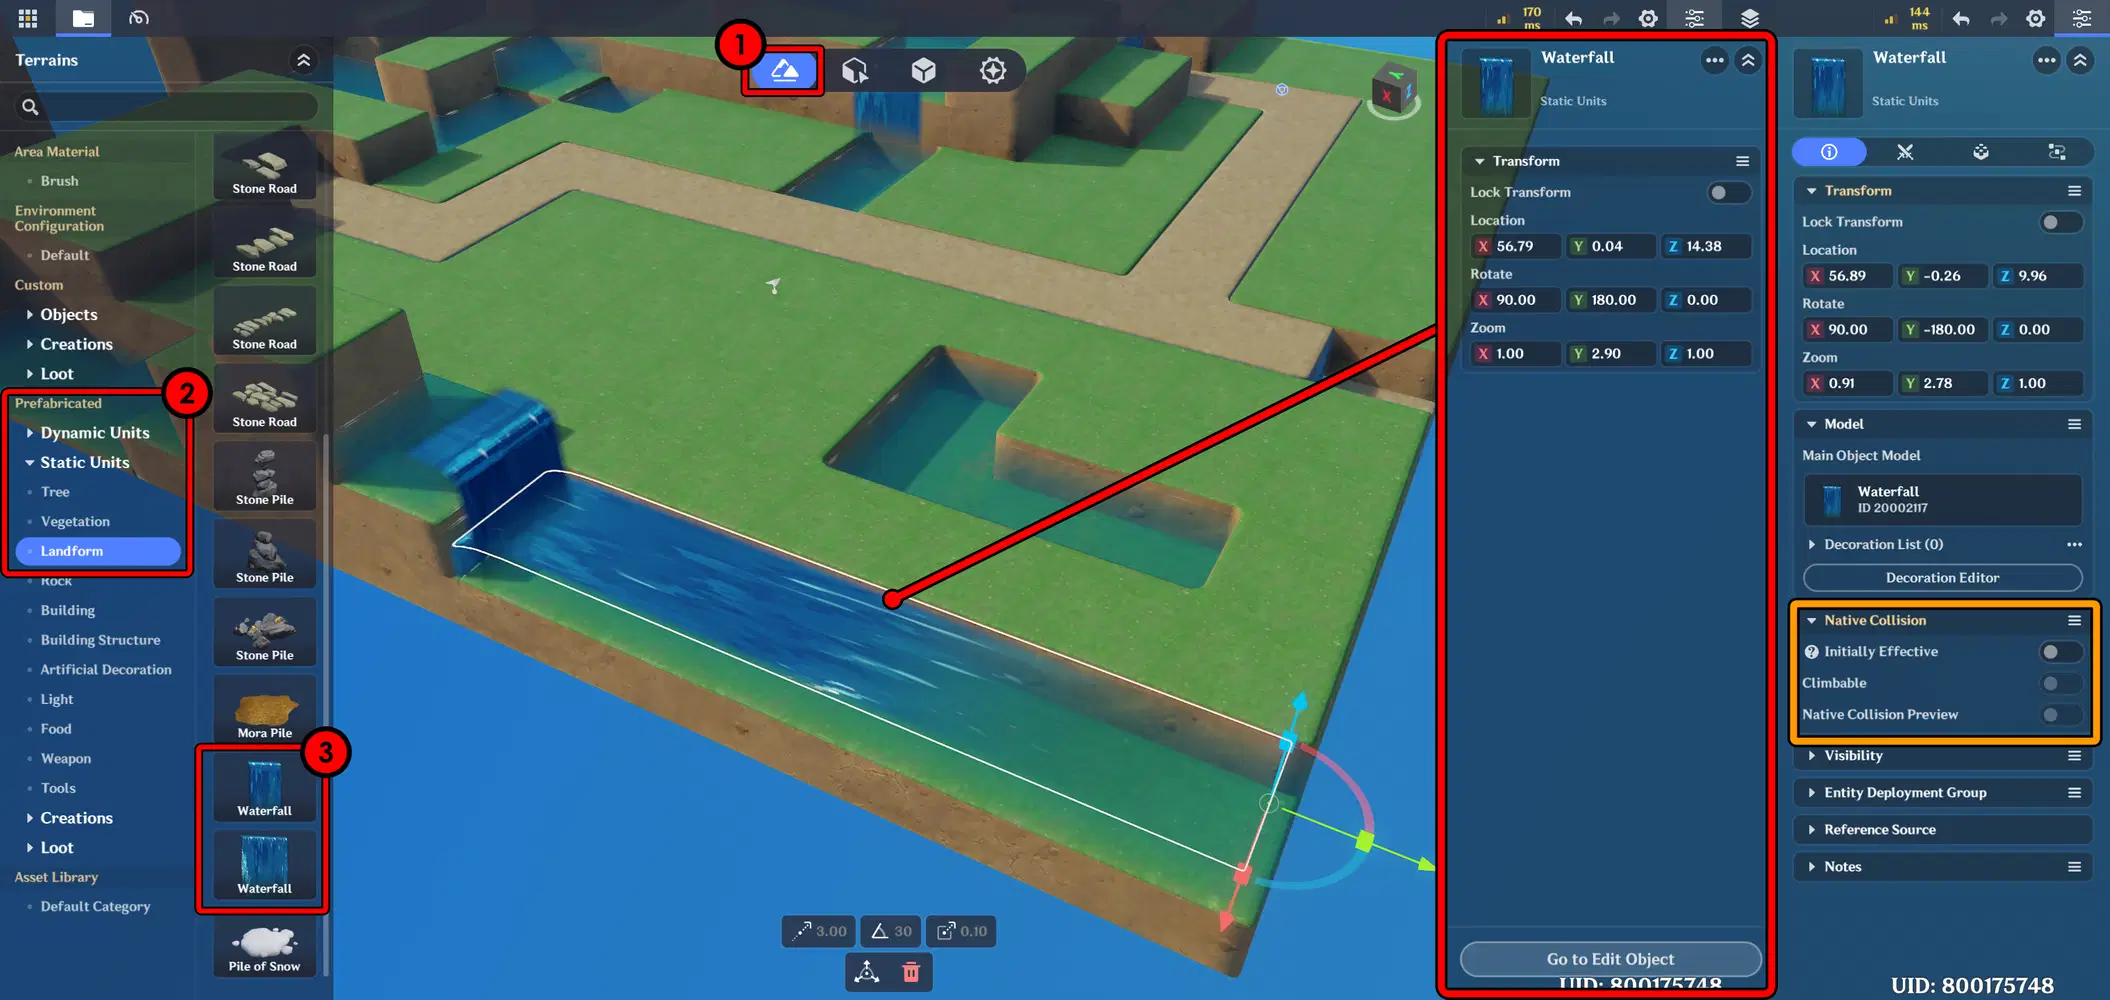
Next is a tip for creating a River. With this method, you can create a water flow that looks more natural and lively compared to using the water brush alone.
- Select Prefabricated → Landform → Waterfall. Then "Rotate the Waterfall Horizontally" so it looks like a fast-flowing river. Don’t forget to disable Native Collision to make it behave more like real water.
Create River & Disable Native Collision
✦ Avoiding Flat Terrain
Avoid making terrain that is too flat or monotonous. You can combine terrain shaping with prefabricated objects to add more detail and texture to the landscape. Use the Decoration Editor to place rocks, plants, and other environmental elements so the terrain looks richer and more visually appealing.
In the Object menu, open the Decoration Editor from the right panel menu. From there, you can add decorations using new assets or objects from the scene.
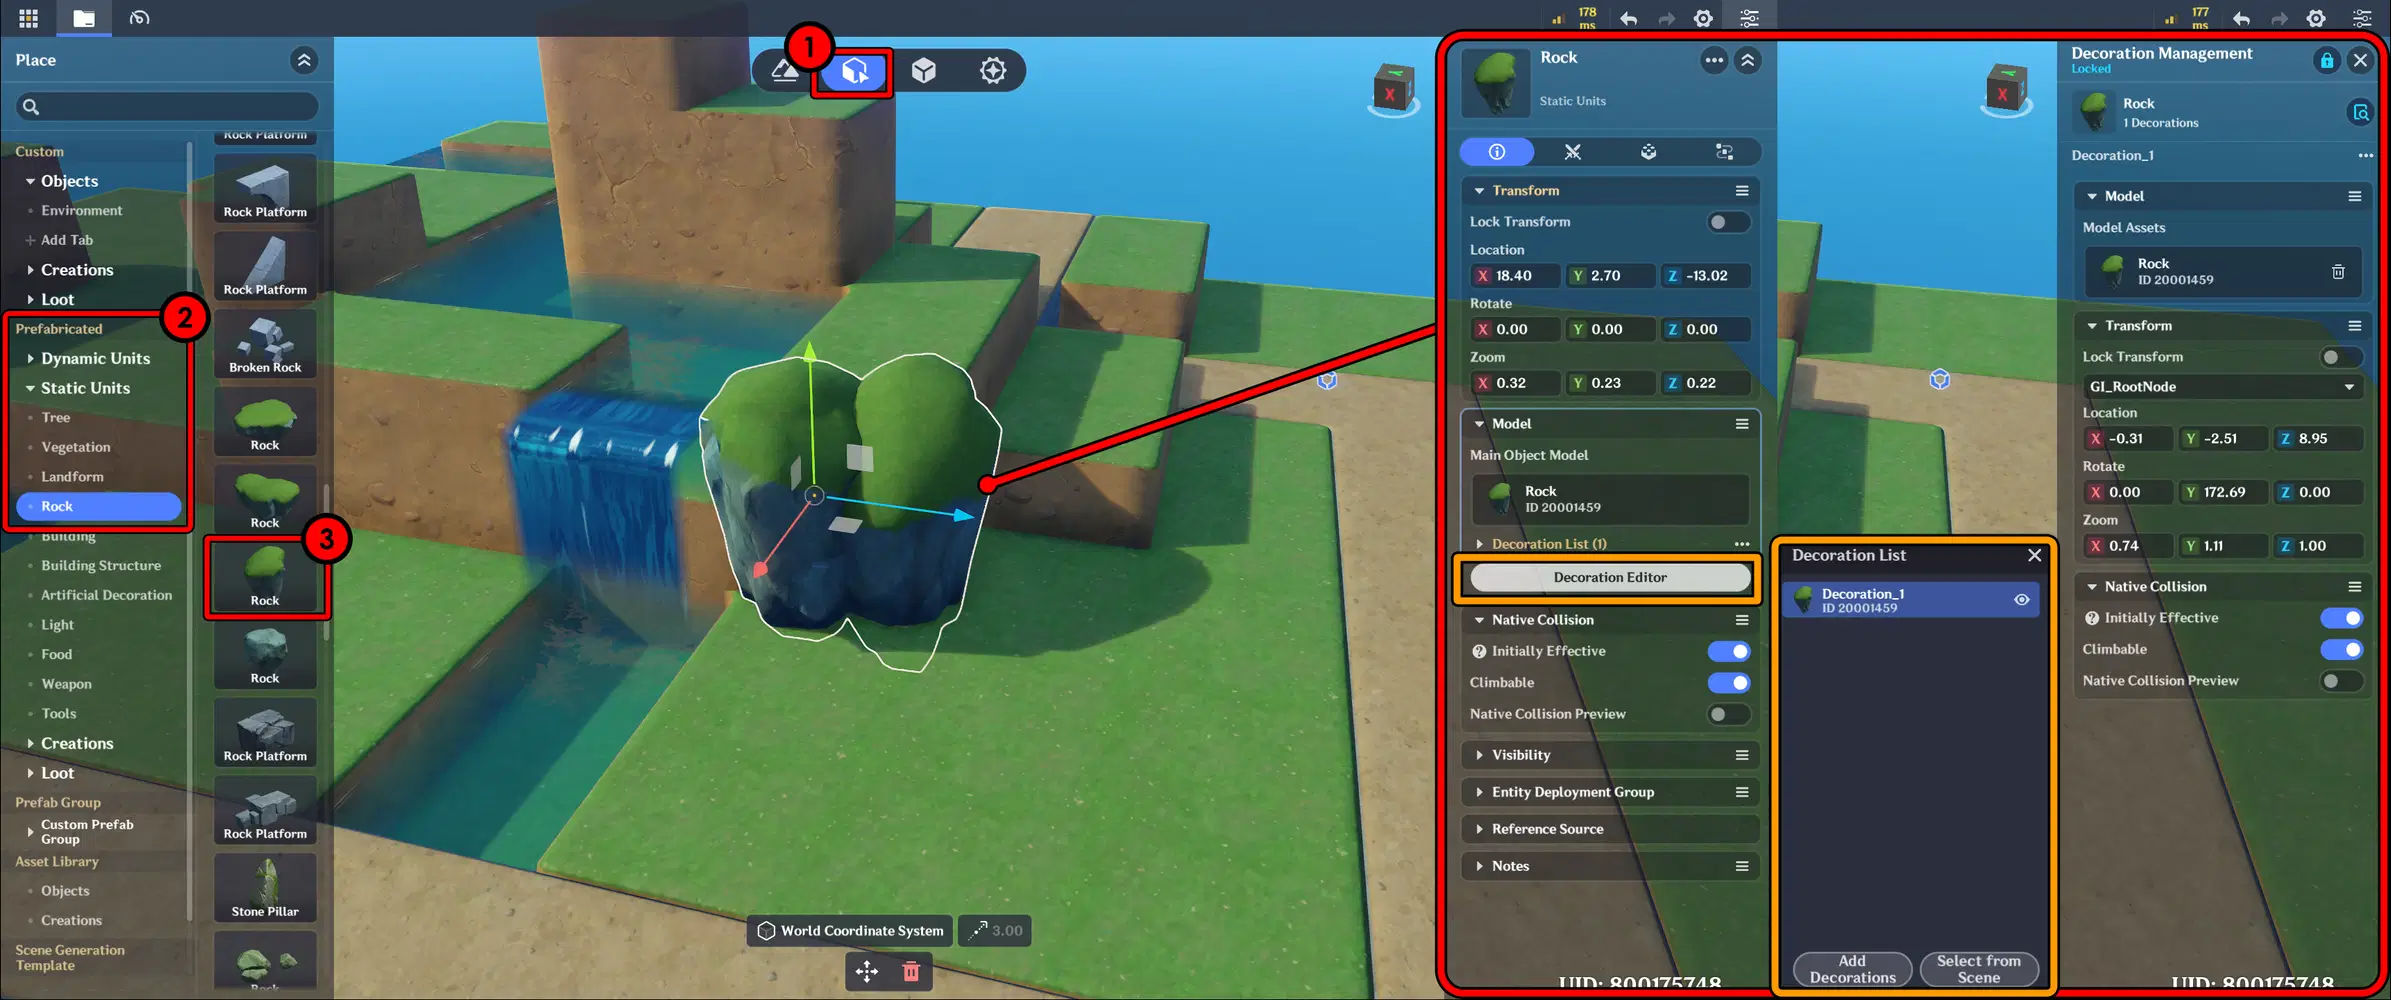
Add Rocks to Cover Flat Section
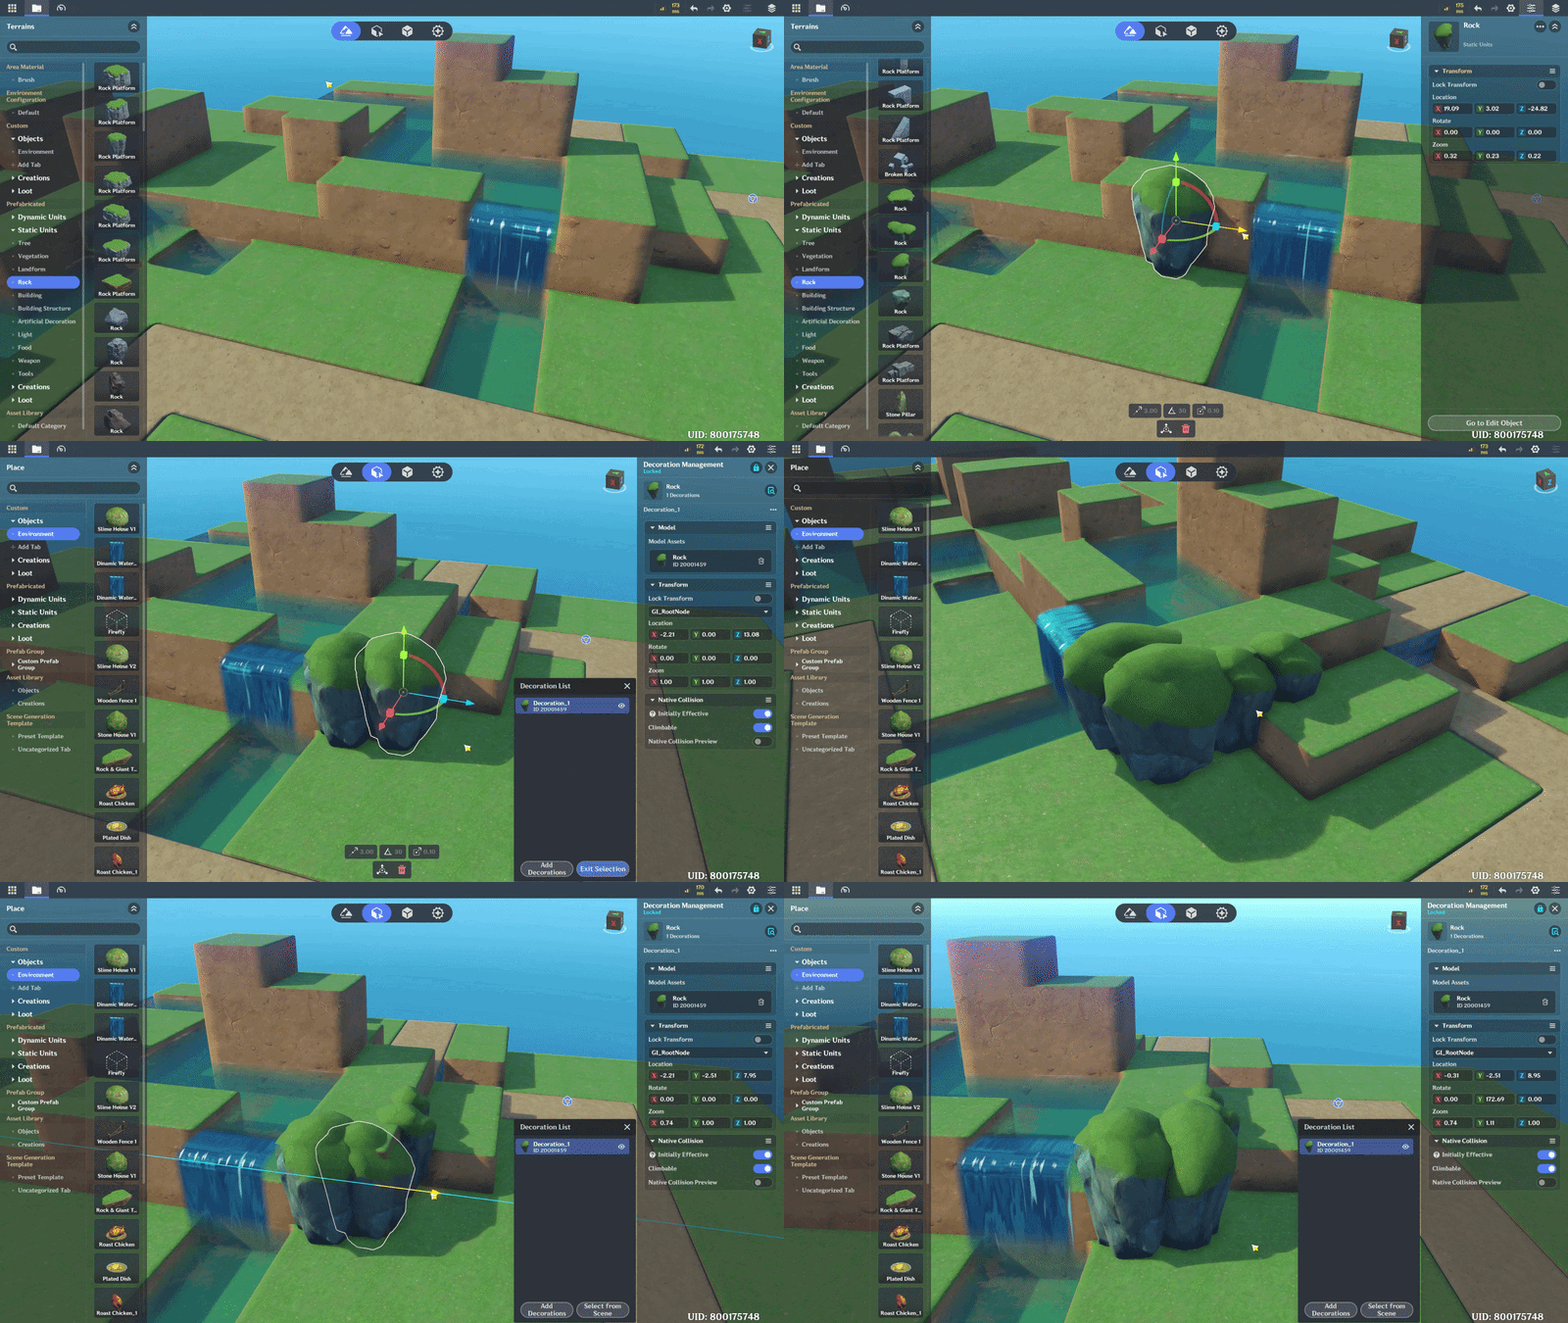
Take Advantage of Decoration tools to speed up your work
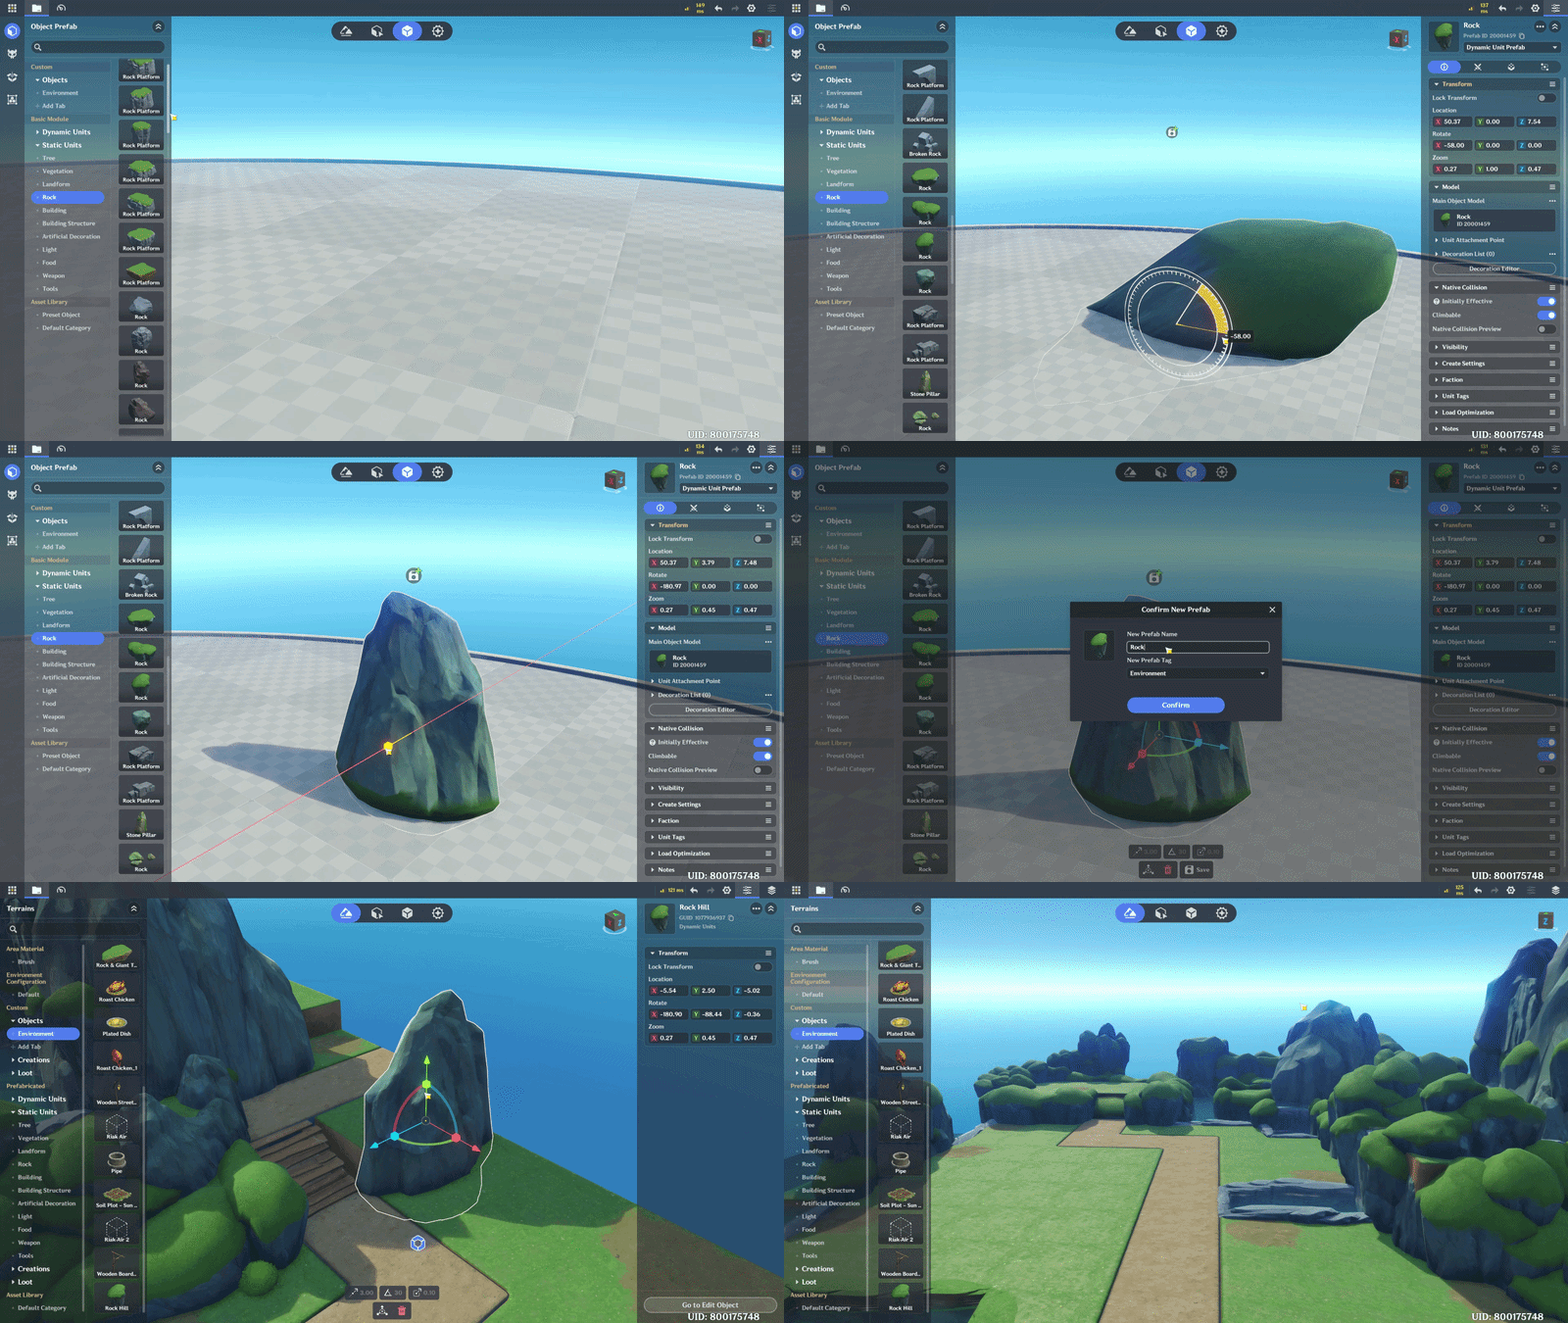
Save Custom Objects to speed up placement
Below is a Comparison of the scene Before and After adding the elements. The original scene looks pretty flat, but after adding rocks and some extra details, it feels more natural and visually appealing.
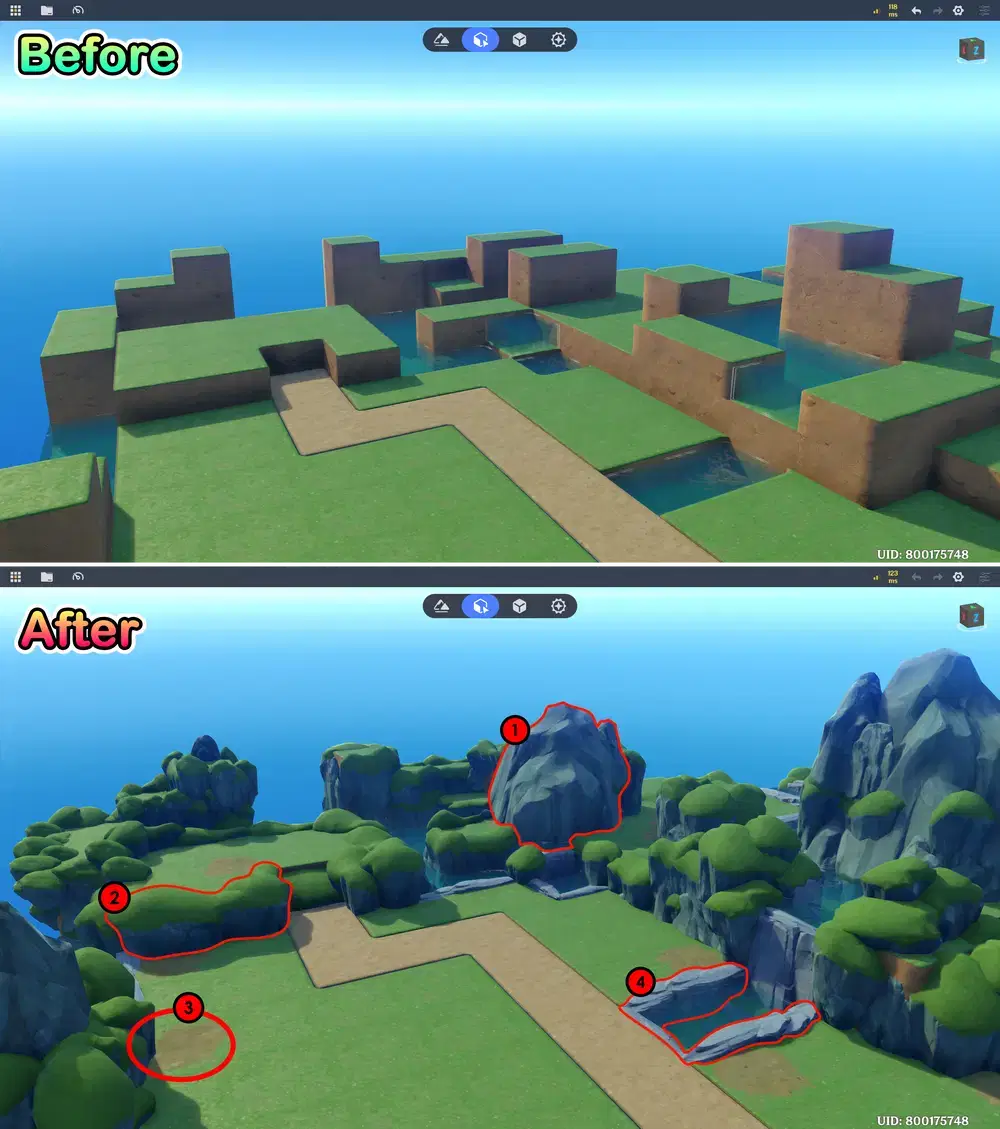
Before and After
Description:
- Create Rocky Mountains by flipping rock objects to form larger stone structures.
- Place Rock objects around the terrain to cover flat areas, so the landscape does not look too plain.
- Use Path tools, to add soil details to give the terrain a more natural appearance.
- Apply Rocky textures near water areas to make the environment look more natural.
Run a Test Play to make sure the objects are placed properly.
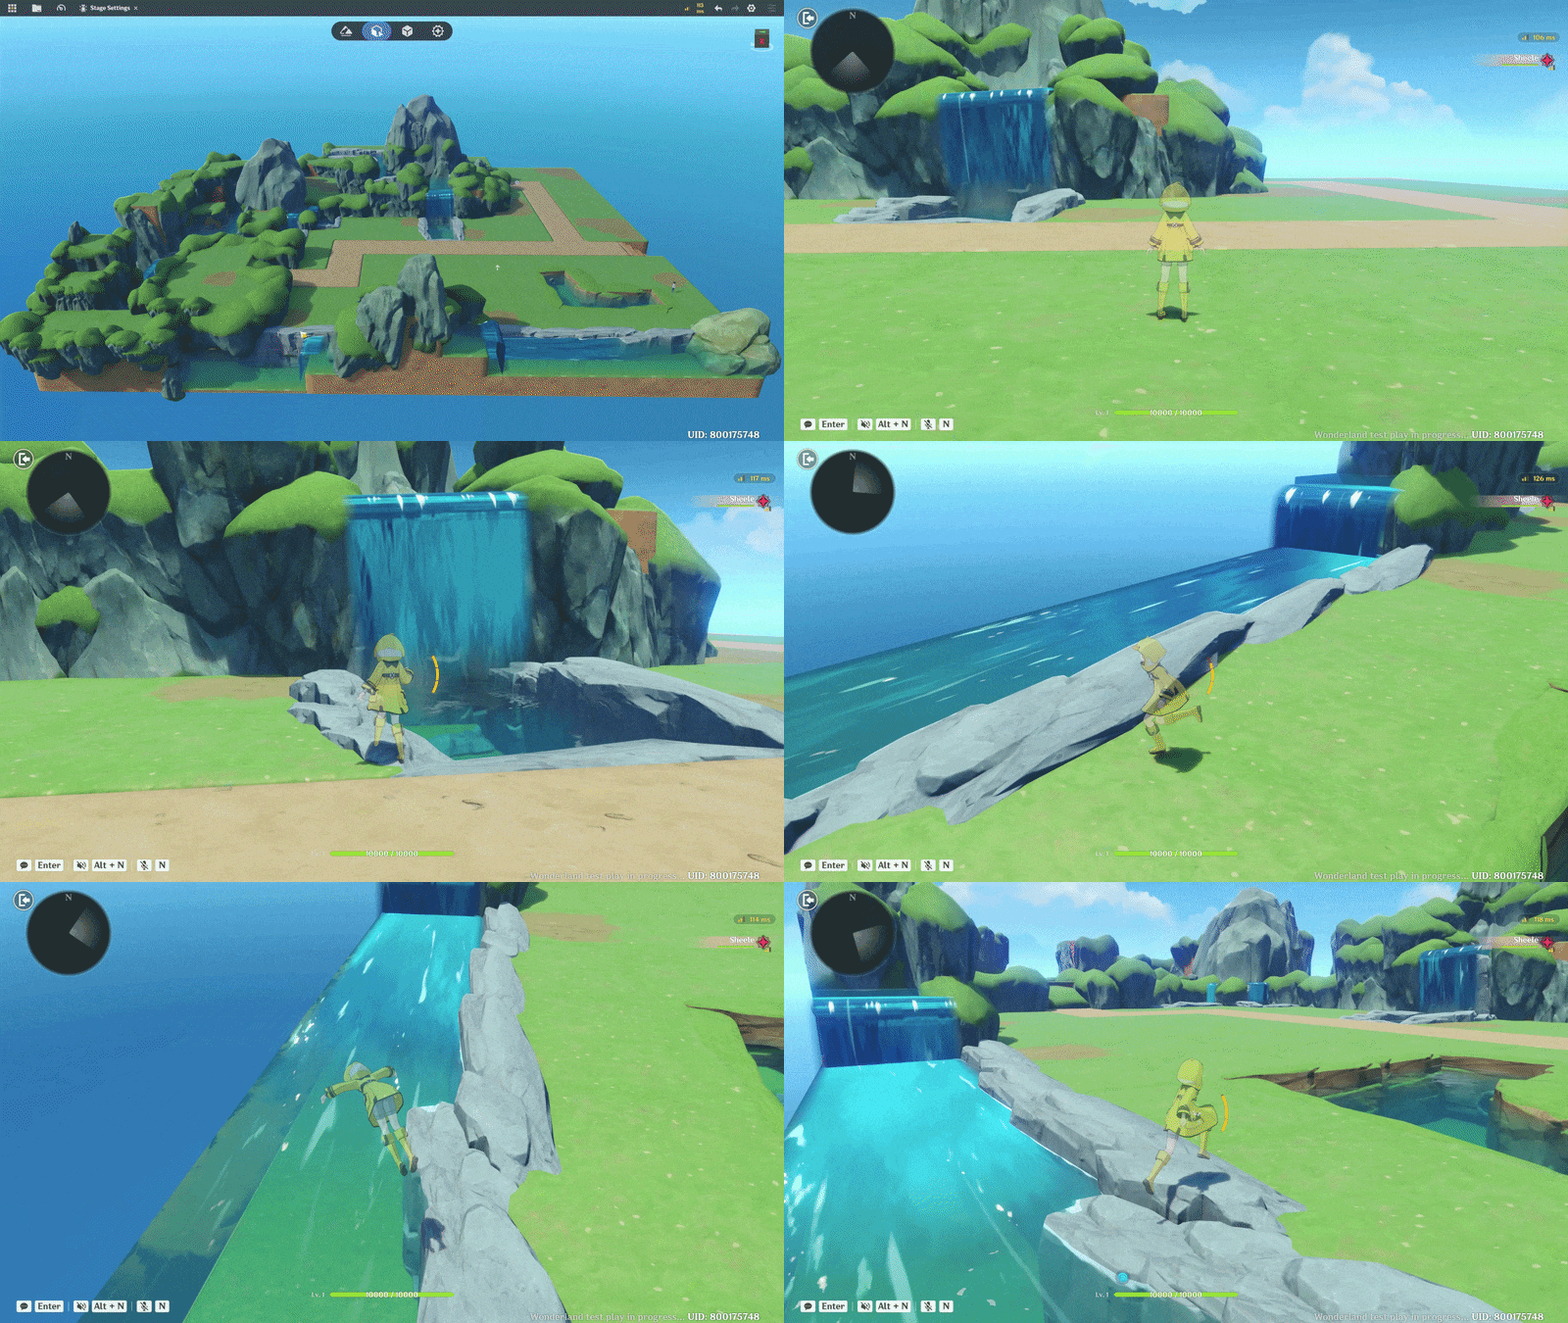
Creating an aesthetic scene can take quite a bit of time, especially when placing objects so everything looks natural. Just be patient and take your time.


Tips 3 - Core Structural Objects
Add strong Structural objects to your scene, such as buildings and bridges, to create the main structure of the environment. You can also place supporting objects like street lamps, tables, and other props to make the area feel realistic.
I added several buildings inspired by the Aranara-style houses from Sumeru. I also placed additional decorations on the rooftops and around the houses to make the area look more interesting. I plan to use this building as a background structure behind an NPC that will later function as a quest giver.
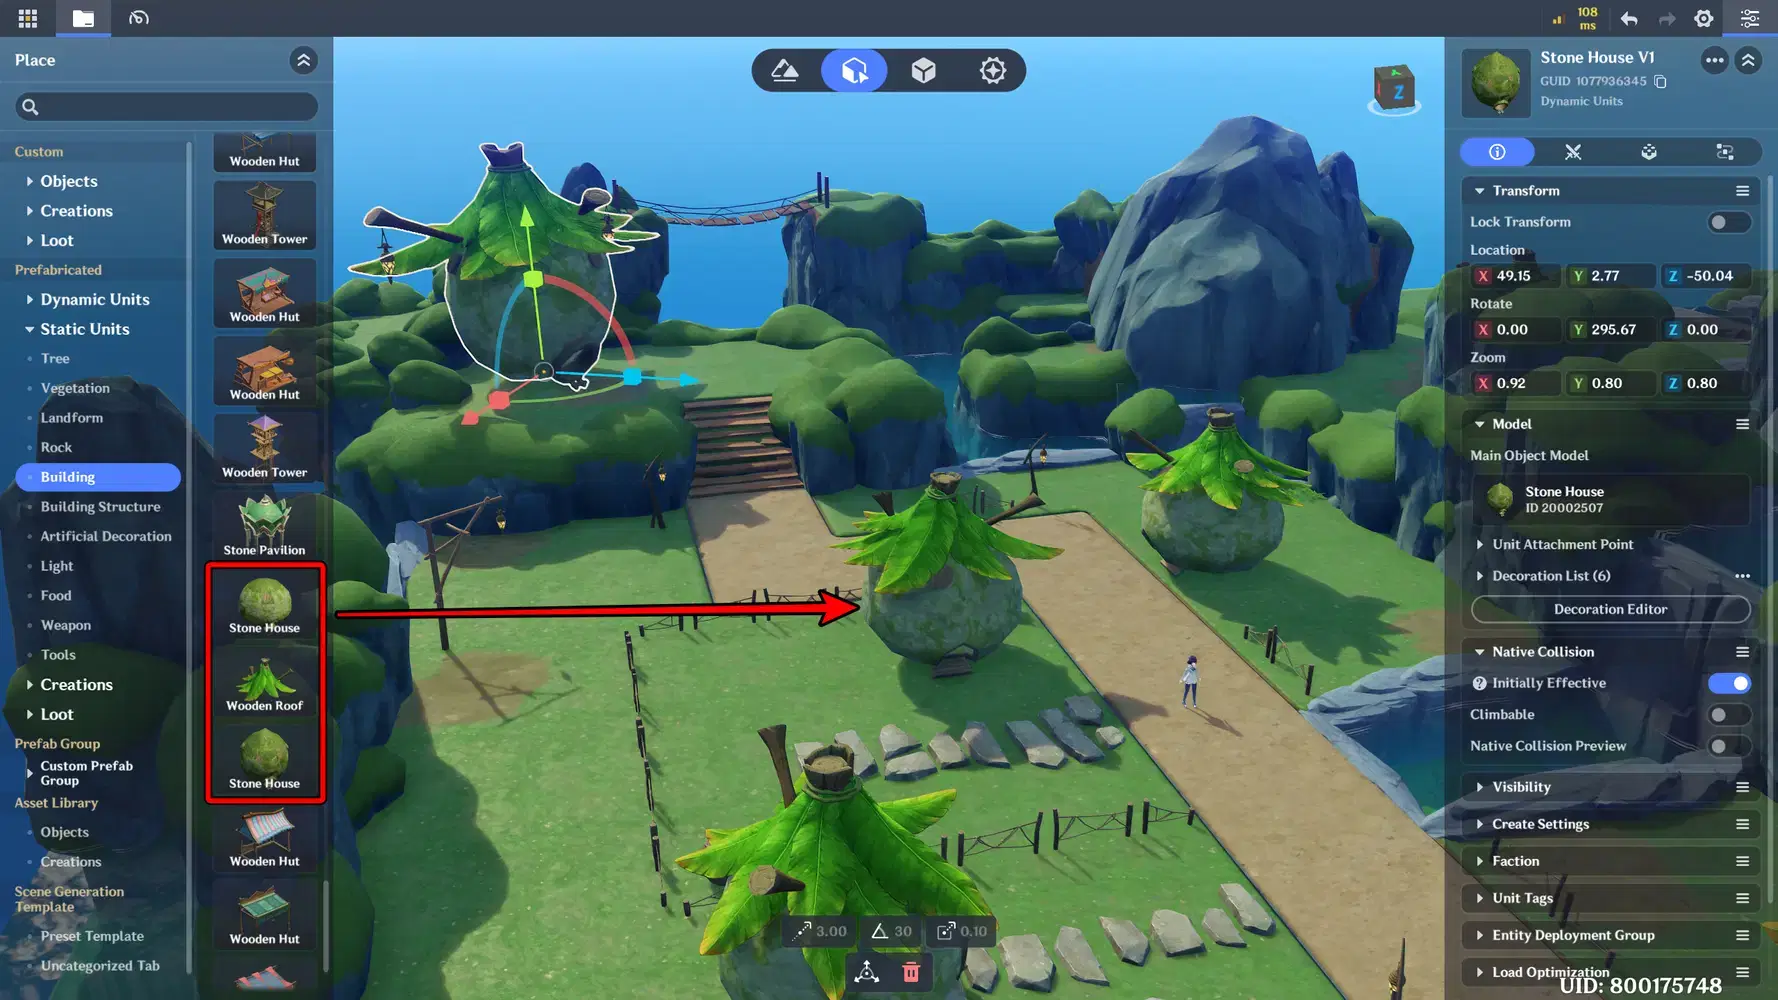
Aranara-style houses
📝 Wonderland Guide:
✦ Custom Building
Use the Decoration Editor menu to combine objects together, making it easier to move them at the same time.
- Click Object → Decoration Editor on the right panel menu.
- From there, you can add decorations by selecting “Select from Scene” to use objects that already exist in your scene or choose “Add Decoration” to add new objects from the Asset List.
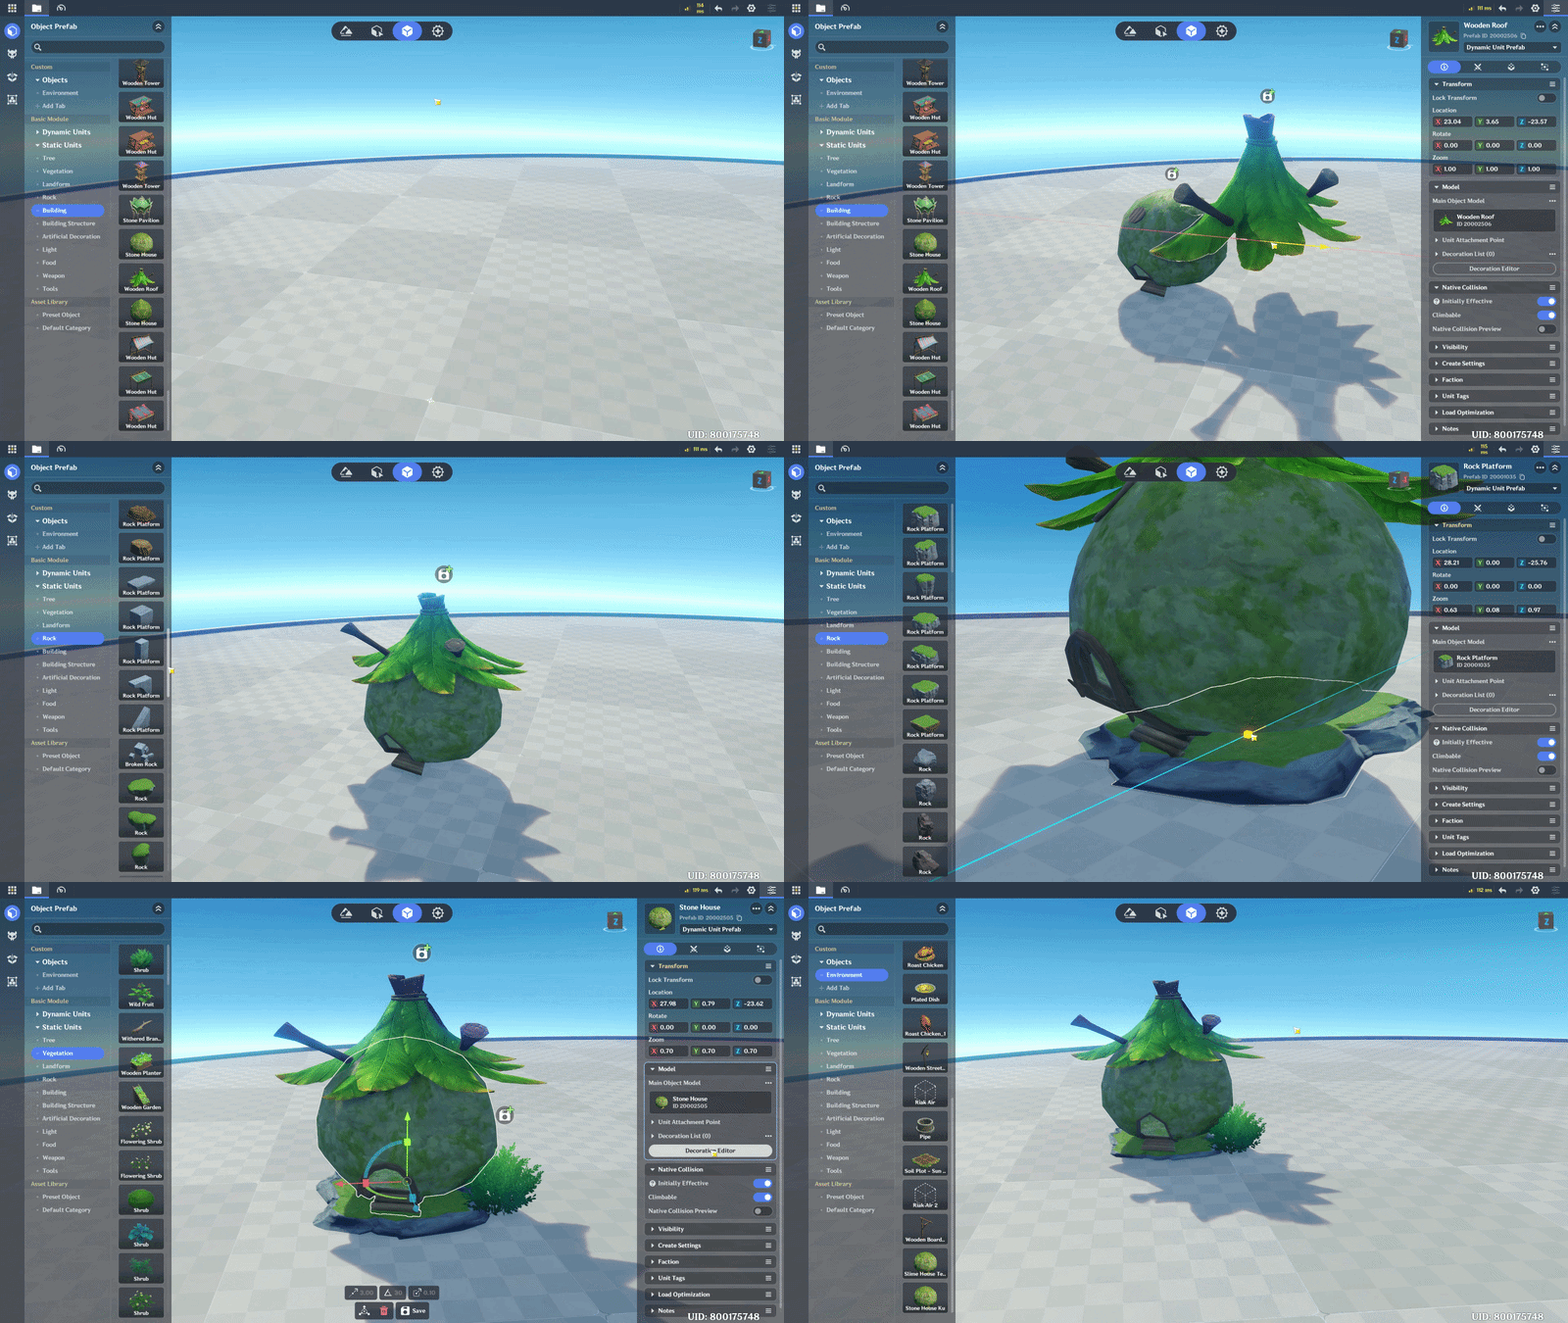
Custom Building with Add Decoration
Tips 4 - Vegetation & Detailing
Try adding Vegetation such as Trees, Grass, and Small Plants to make your environment feel more alive and natural. You can also improve buildings by adding small details like lamps on houses. Don’t forget to decorate the surrounding area, adding climbing plants on stone walls, fruits on trees, rocks near rivers or water areas, wooden logs, and other small props can help make your scene feel richer and more interesting.
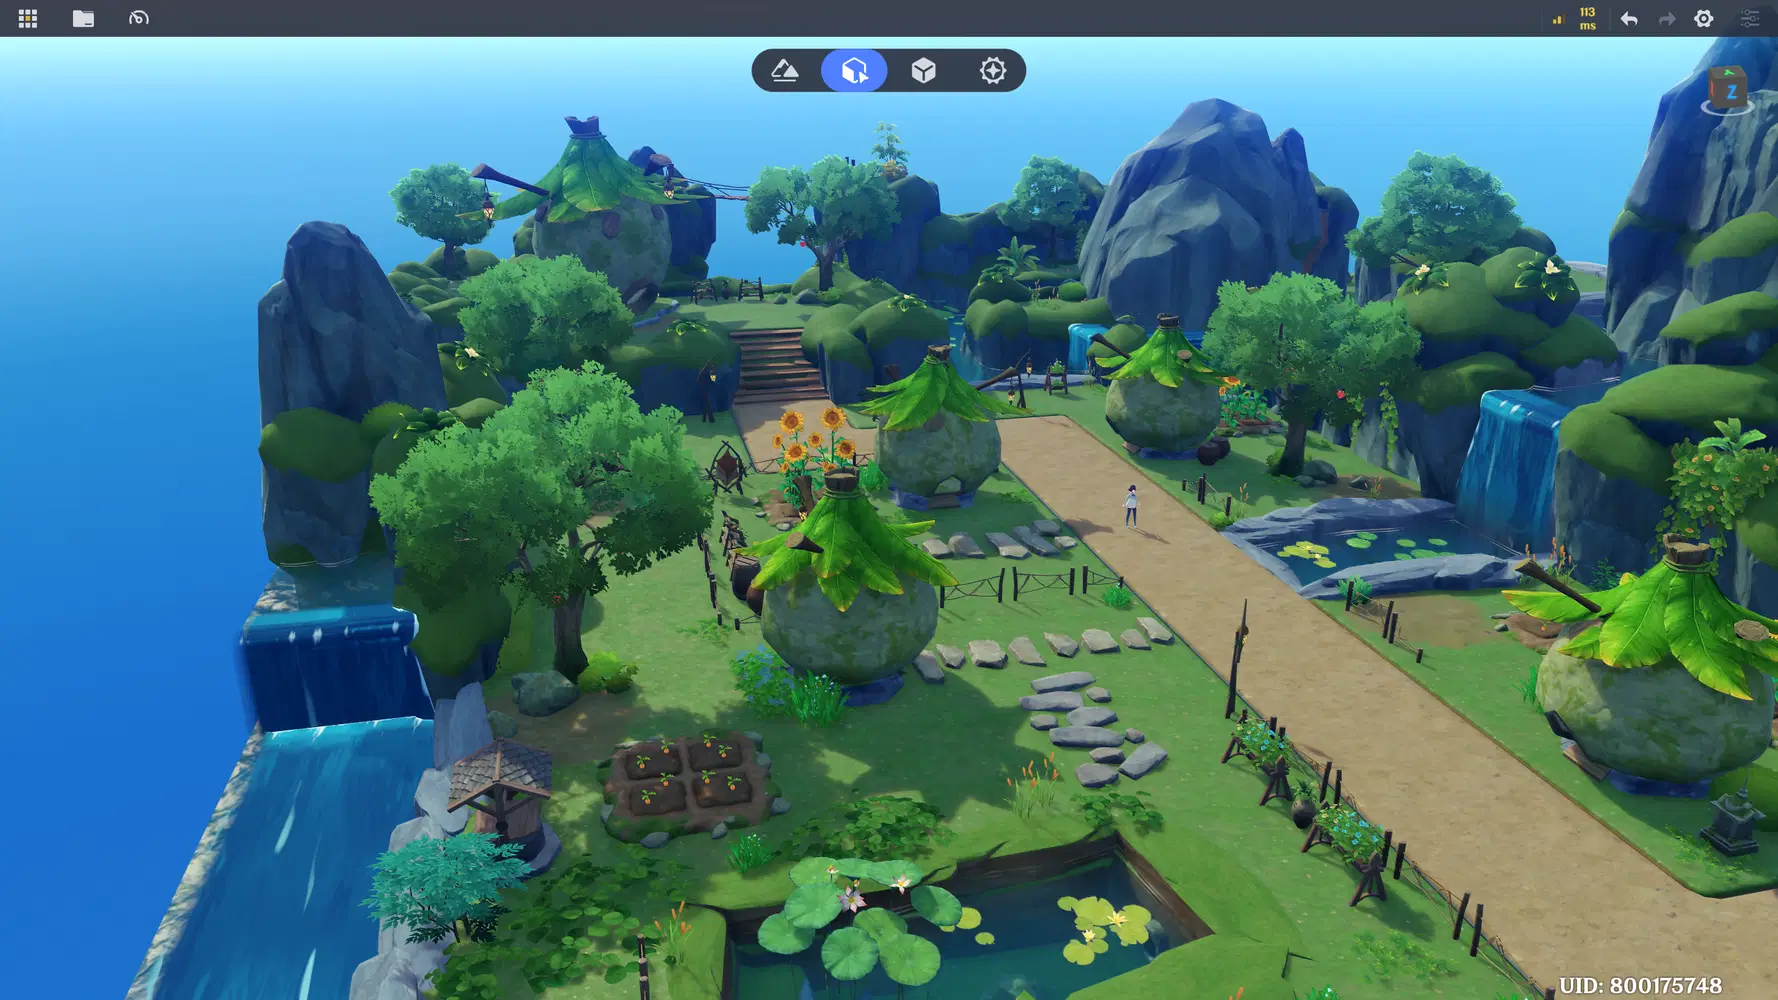
📝 Wonderland Guide:
✦ Add Fruit Details to Trees
This is a simple way to make the trees you create look more unique by adding fruits and other small objects around them.
- First, go to the Prefab Library, then choose the type of tree you want to use and place it in the scene so you can start editing it.
- Next, add Apples to the tree. In the Food menu on the Asset Bar, search for Apple and place it on scene.
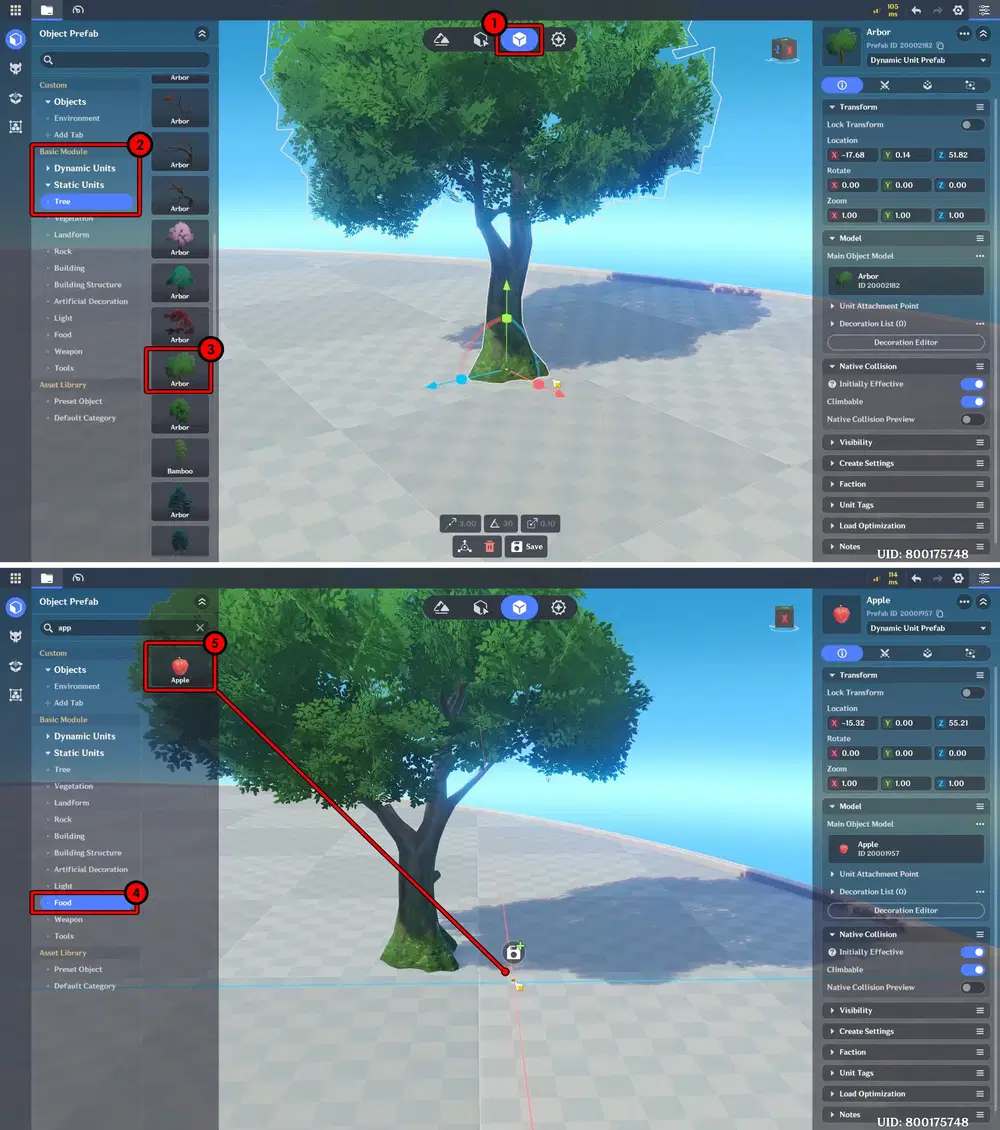
Custom Object
- Adjust the Size of the tree and the Apples so they look balanced and natural.
- Next, place and position the Apples on the tree branches.
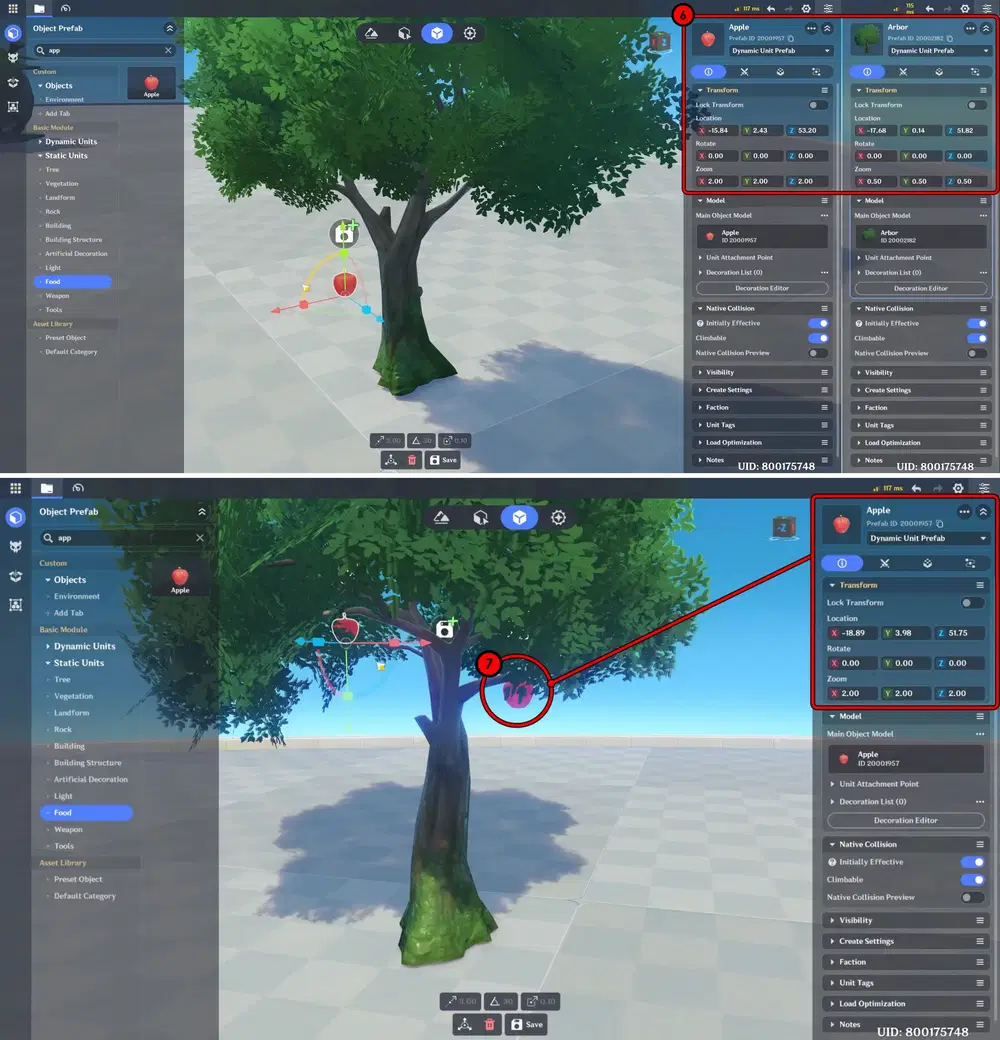
Combine Apple & Tree
- You can also add other Decorations around the tree, such as plants and rocks.
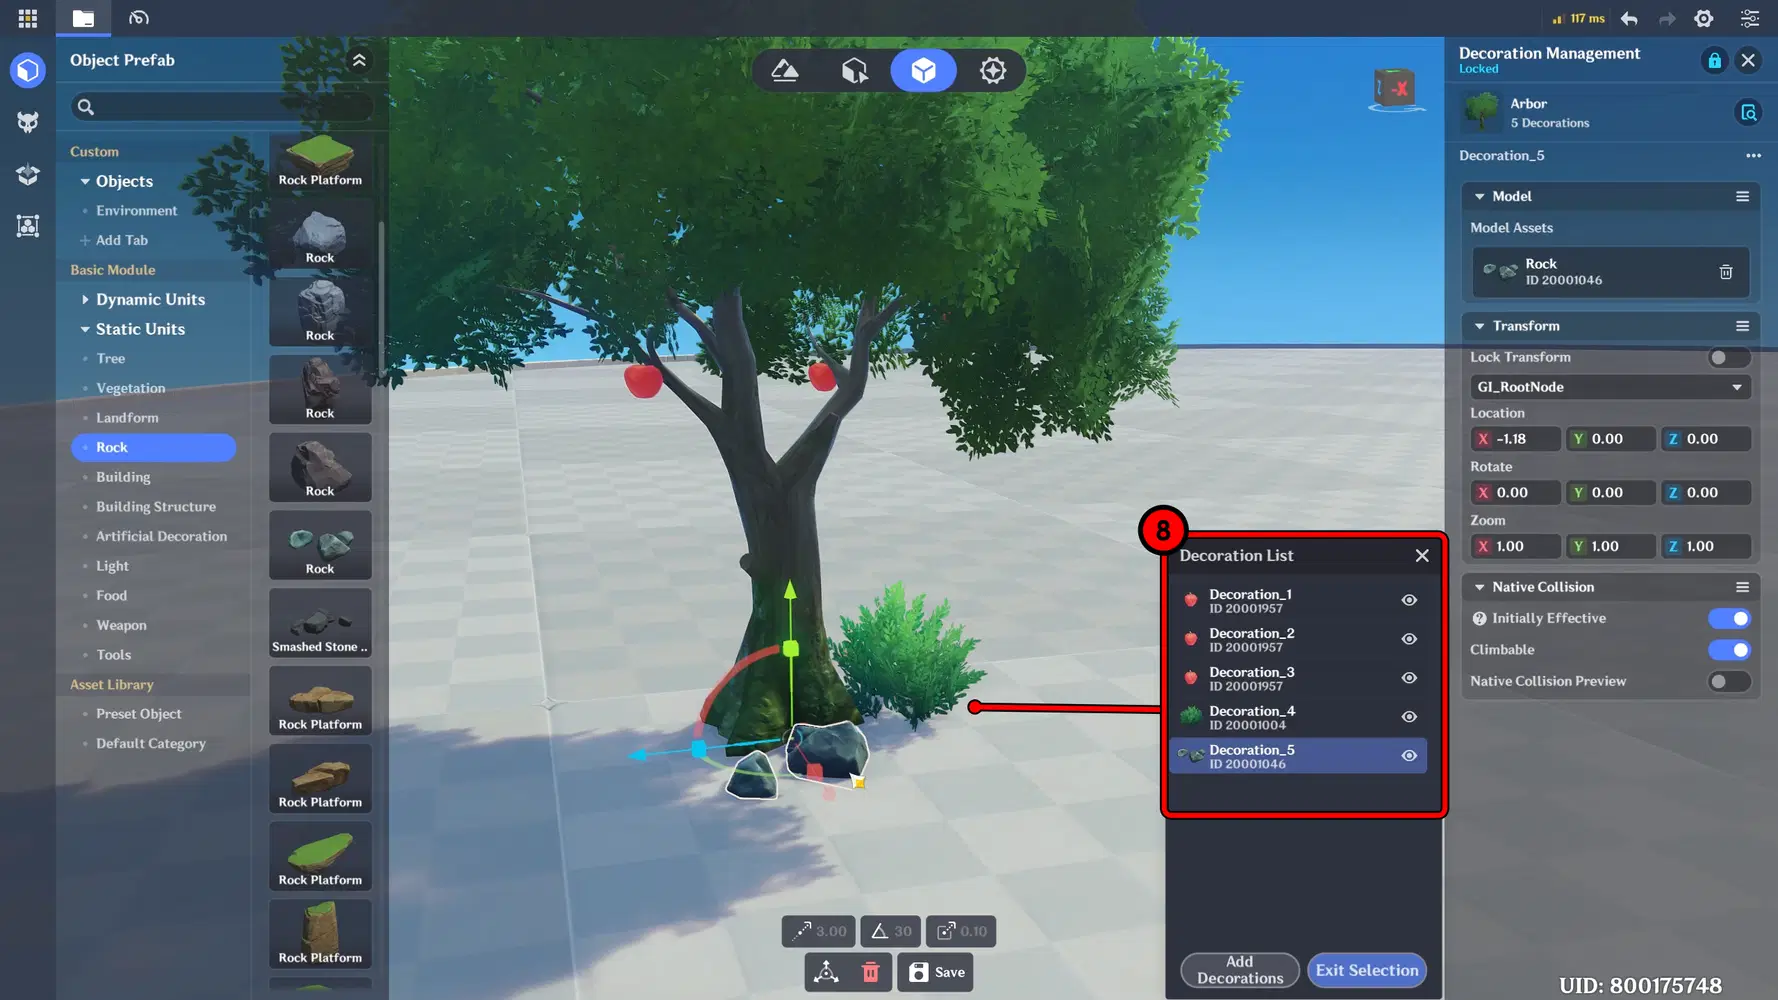
- Last, don’t forget to save it, then place it in your scene
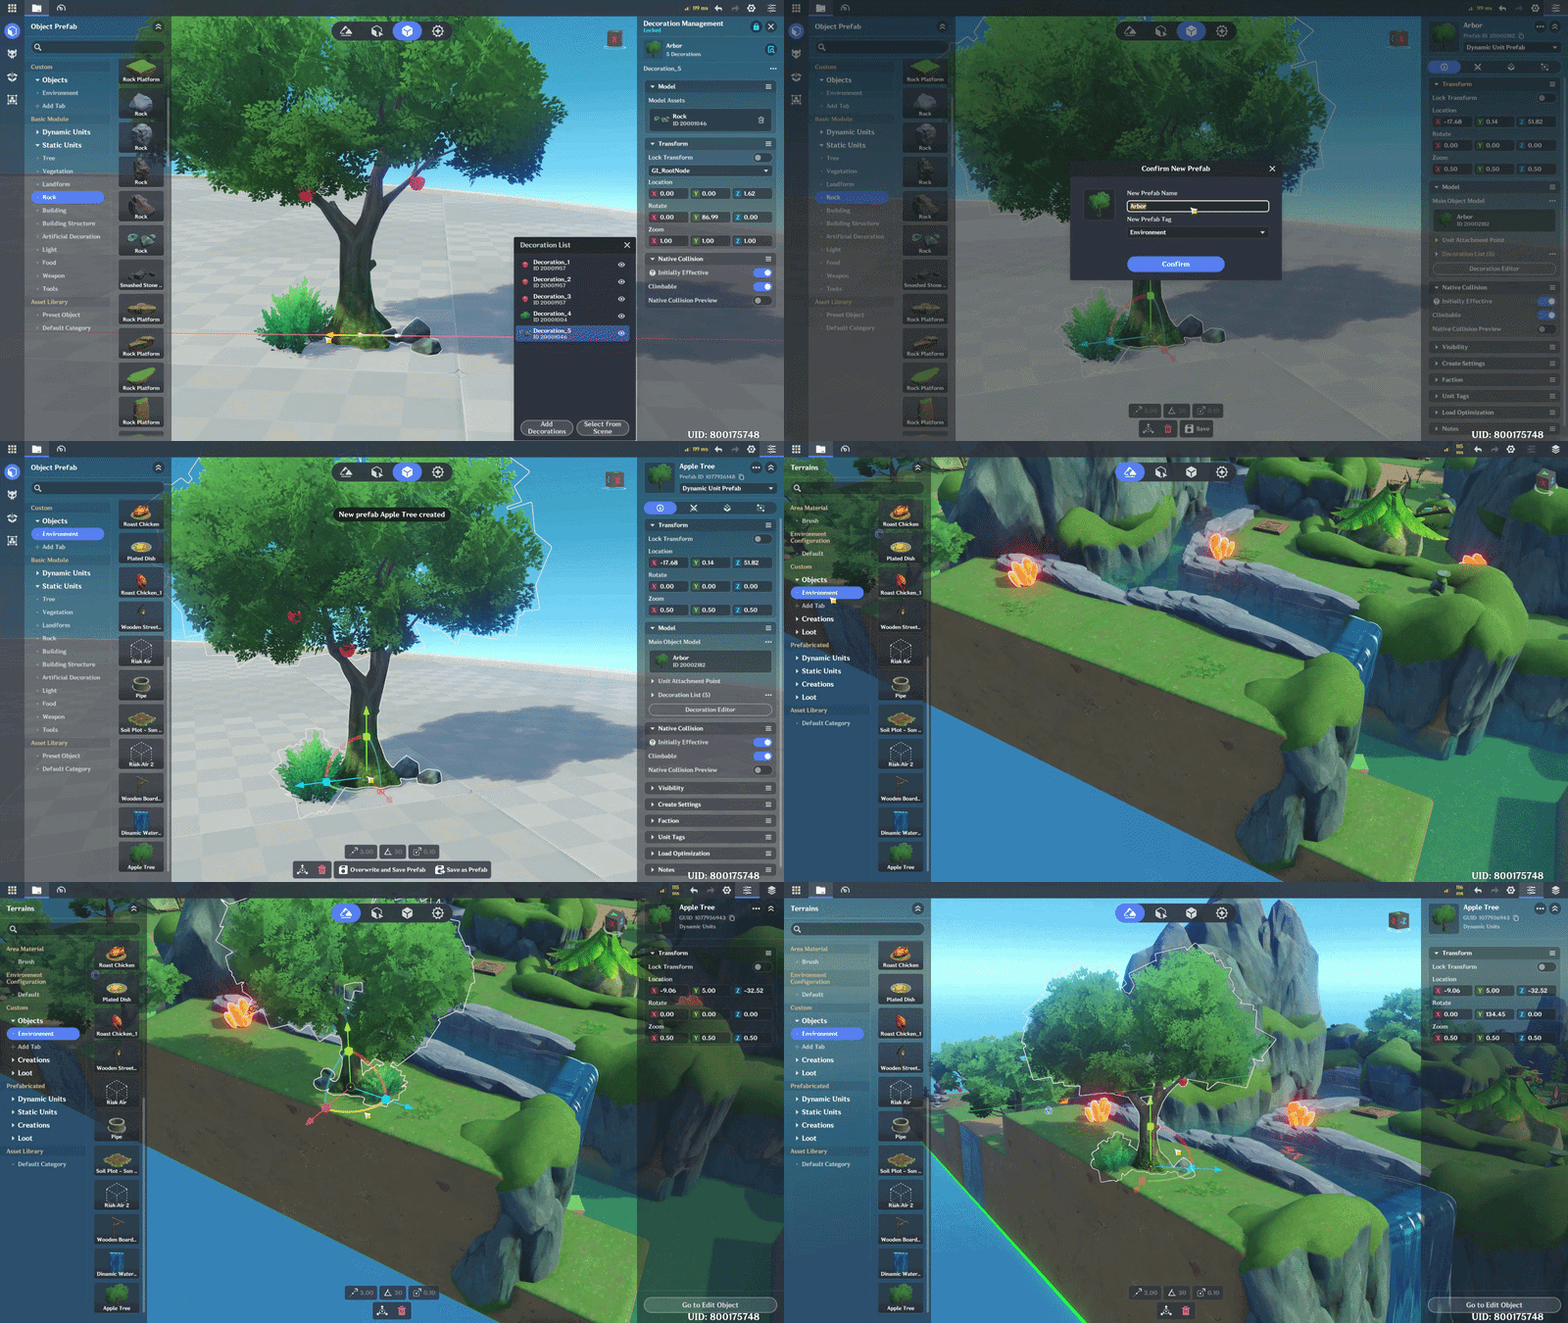
✦ Add Lamps to Buildings
To add Lamps to a building, edit the building you created earlier, then open the Light menu. Choose a lamp you like and place it on the building, adjusting its position as needed
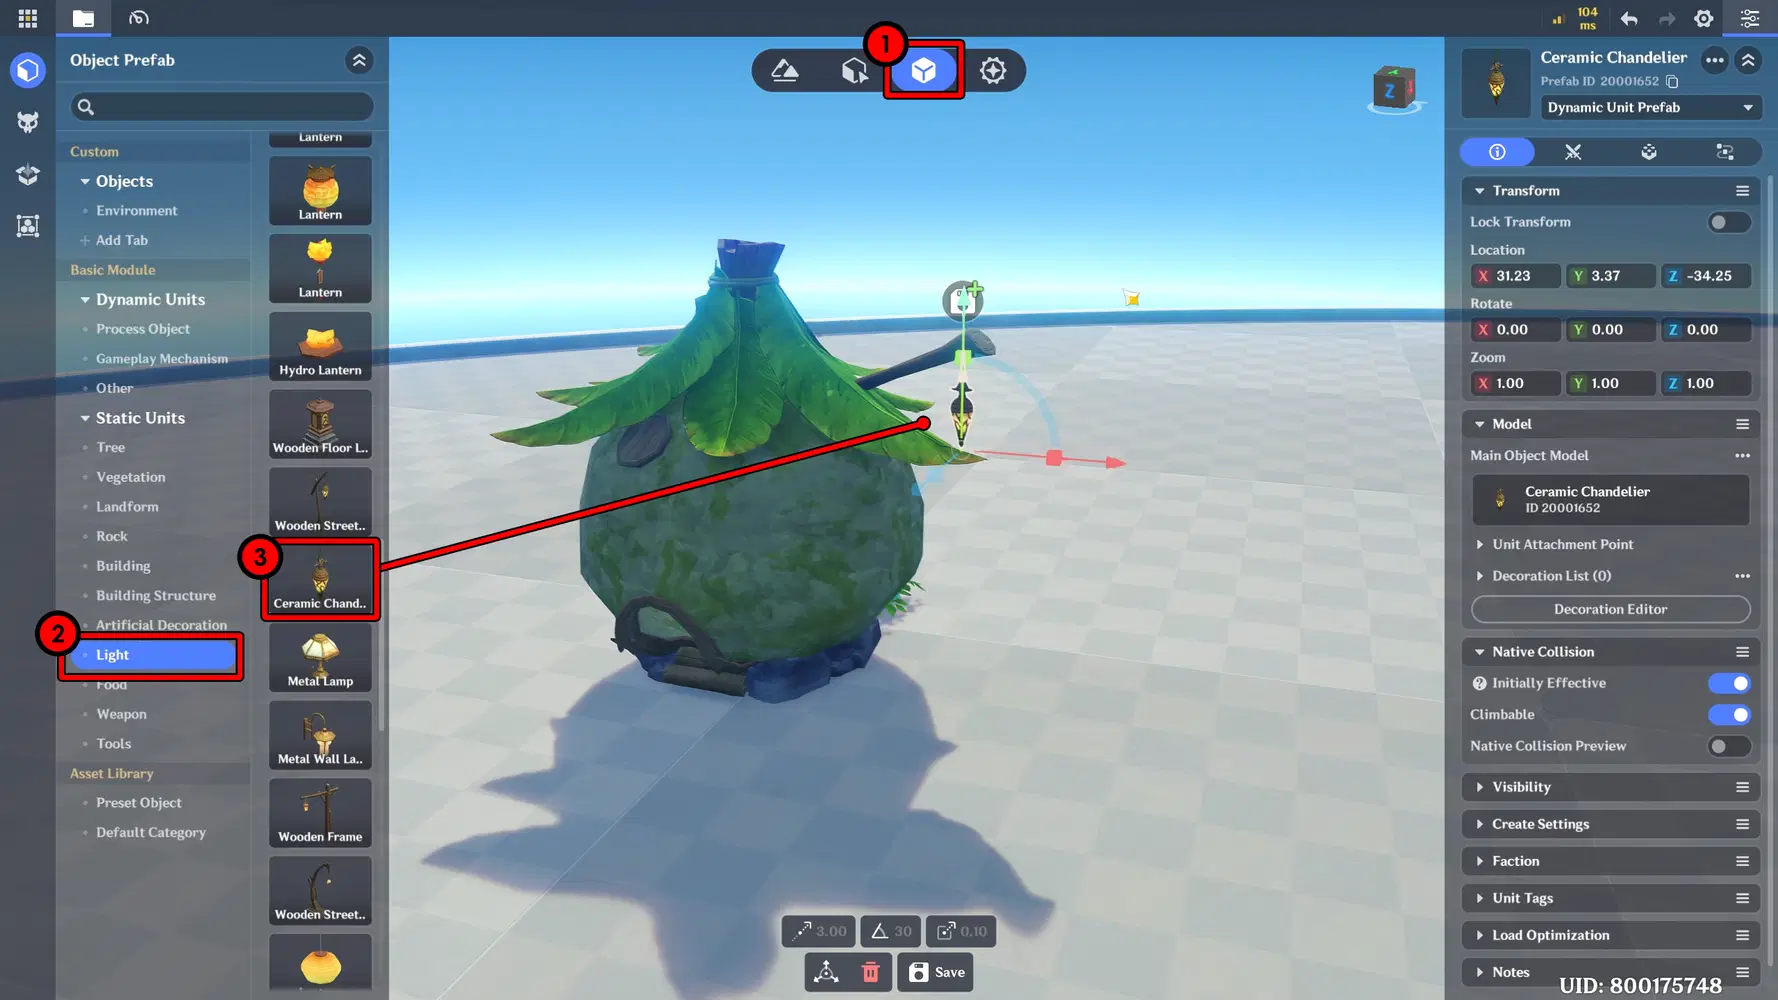
Combine Lamp & Building
On the building, open the Decoration Editor menu and add the lamp as a decoration. This allows the lamp to move together with the building whenever the building is moved.
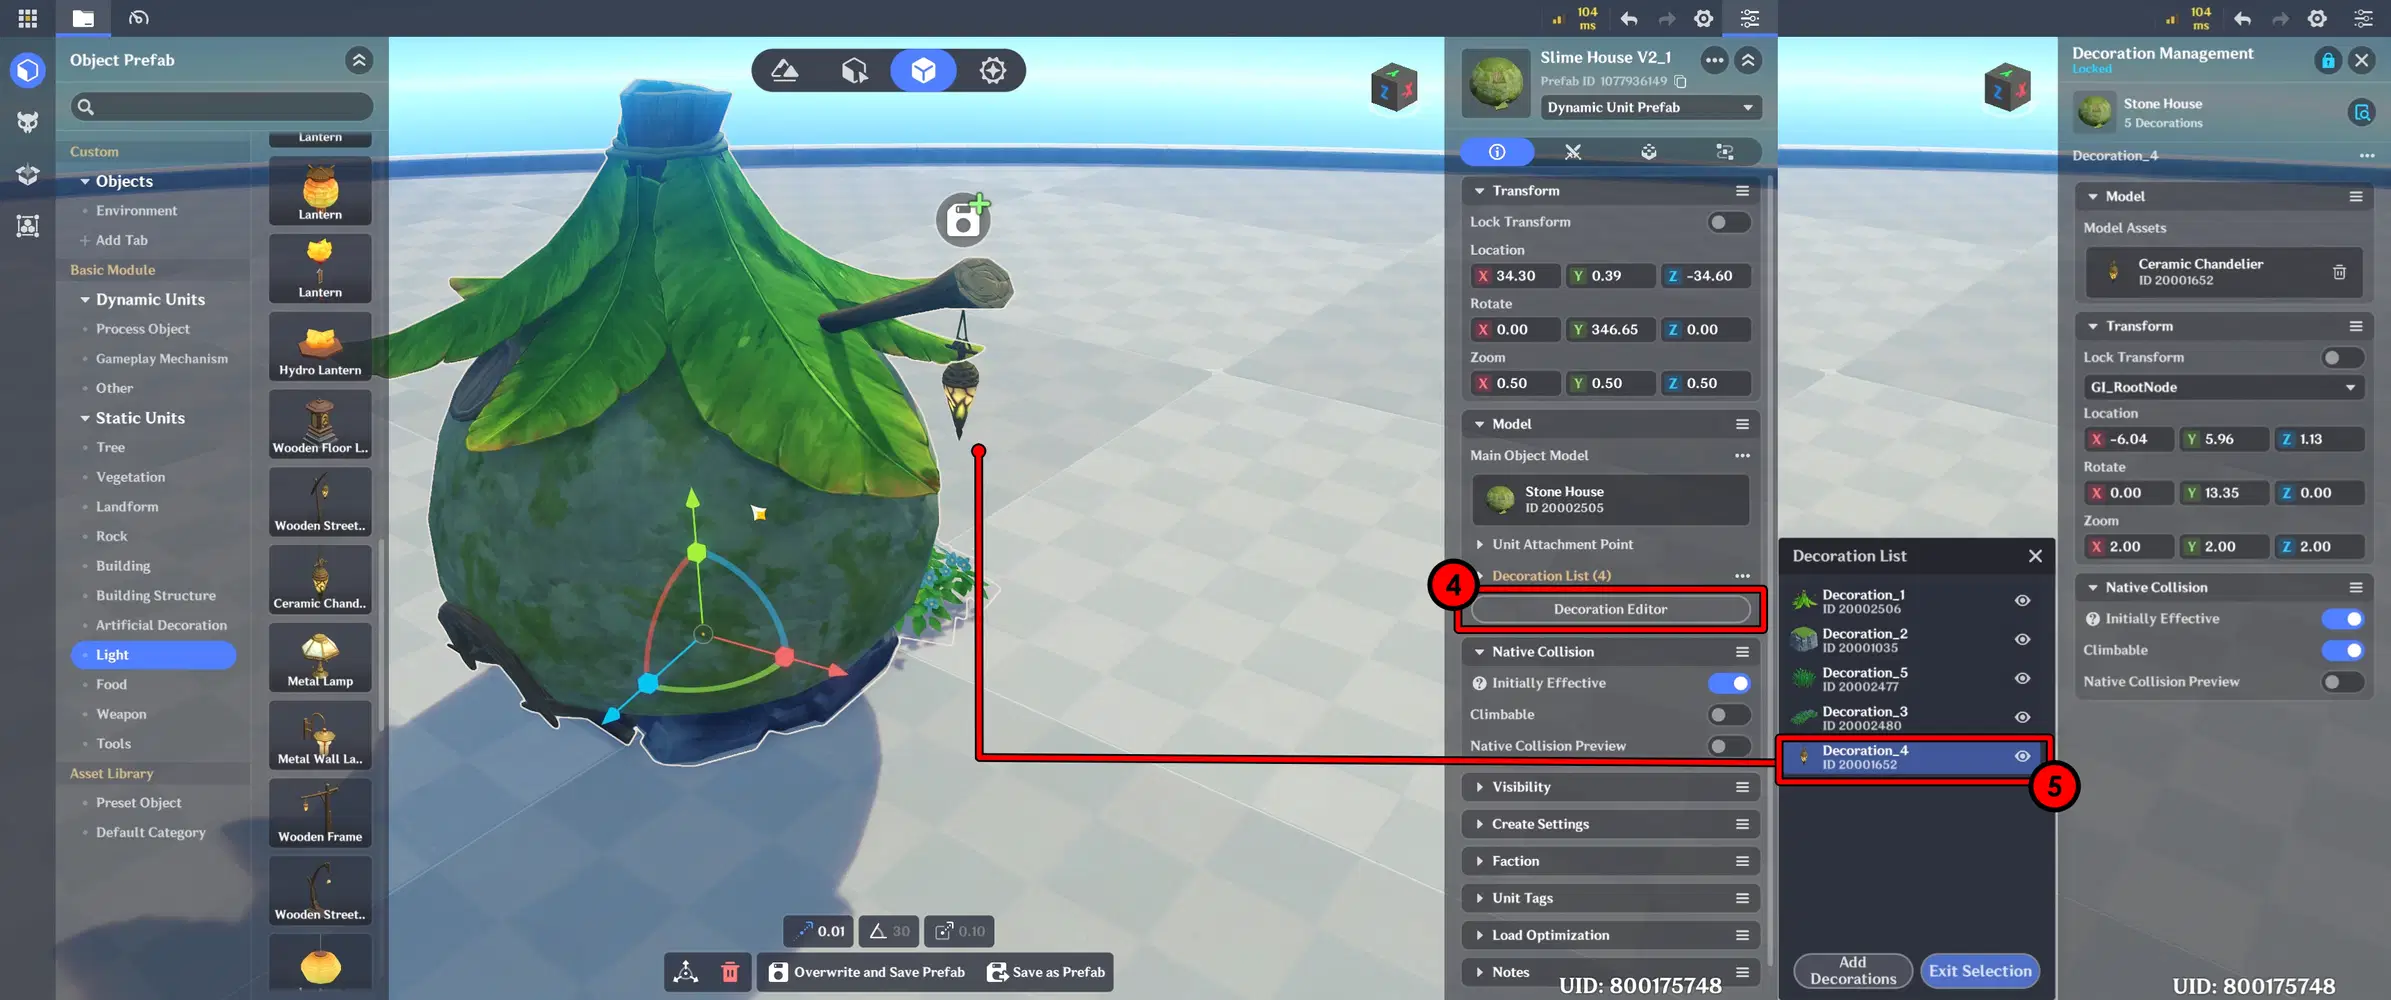
And don’t forget to save the building once the editing process is complete.
Tips 5 - Effects Enhancement (VFX)
Try adding Visual Effects to make your scene feel more alive and dynamic. You can place waterfall effects like water waves, splashes, and mist to make water areas look more natural. Also consider adding glow effects to lamps and using particle effects to create a stronger atmosphere and make the environment more visually interesting.
📝 Wonderland Guide:
✦ Waterfall Effect
Edit the waterfall object, then go to the Components section and add a VFX Playing. After that, open Advanced Editing.
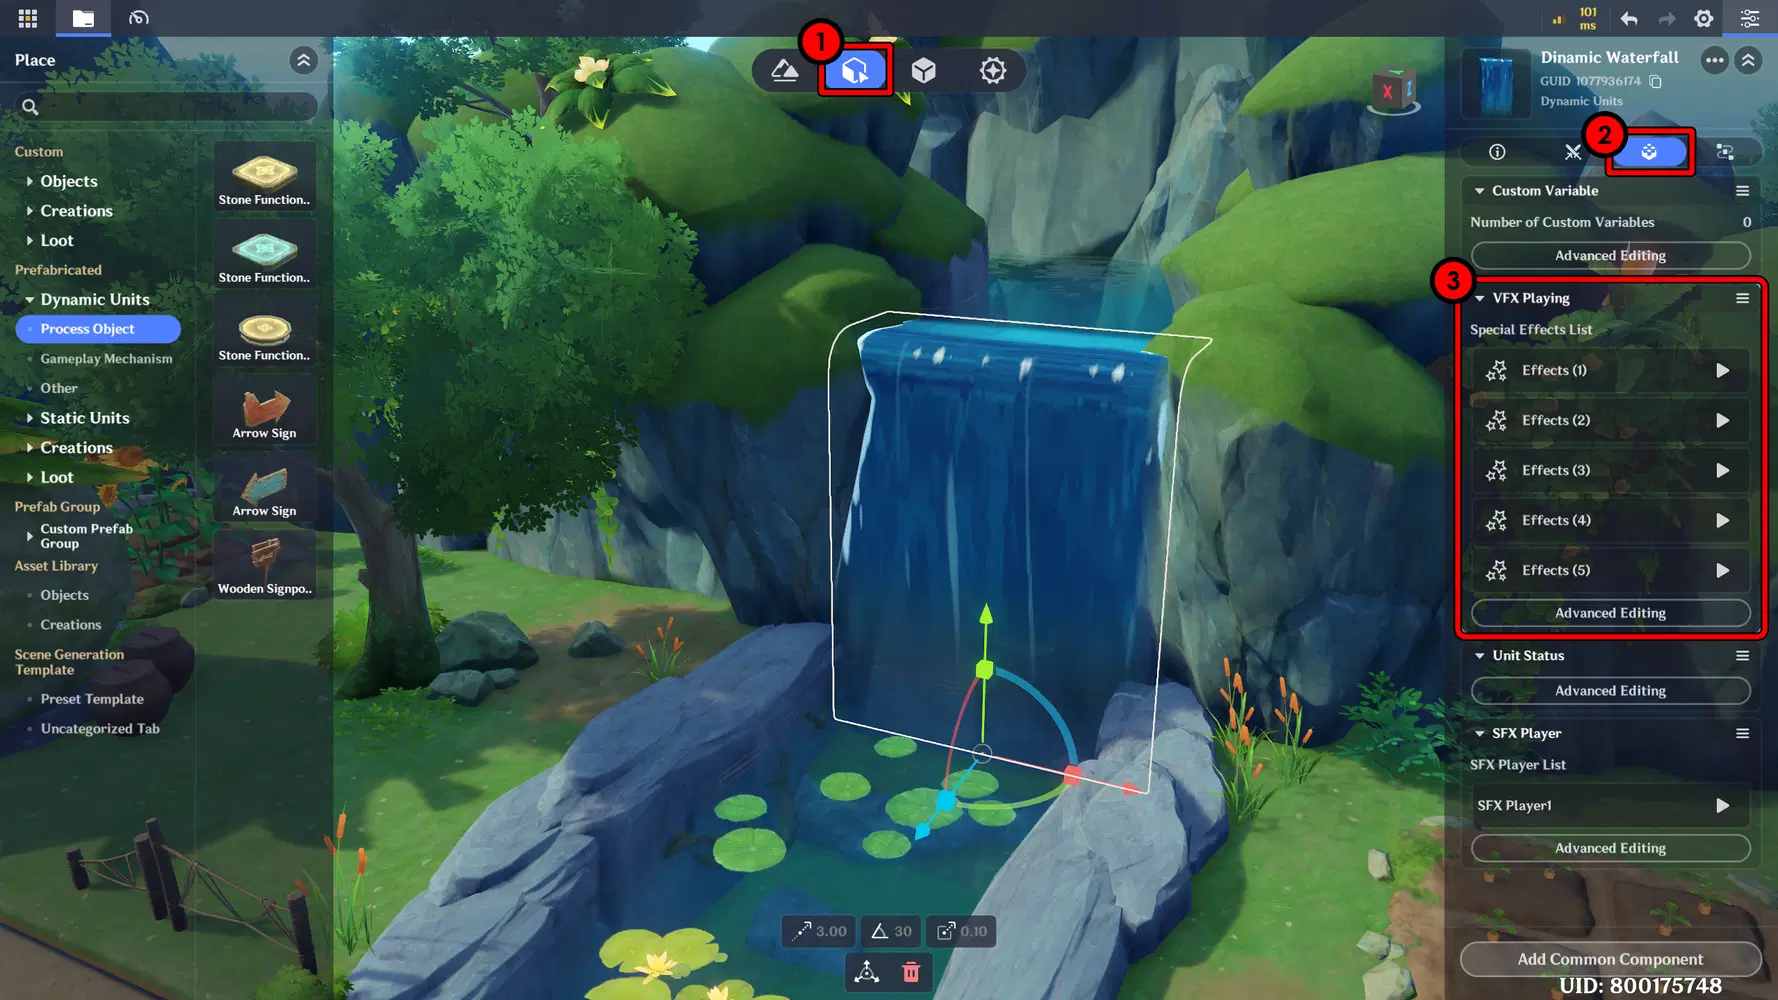
Add VFX Playing to Waterfall
For the waterfall, I added five effects:
3 Water Splash effects and 2 Mist effects around it. Hydro-Hit (ID: 10004025) & Vaporized Dust (ID: 10010167)
Place these effects at the bottom of the waterfall, aligned with the water surface, so the waterfall looks more natural.
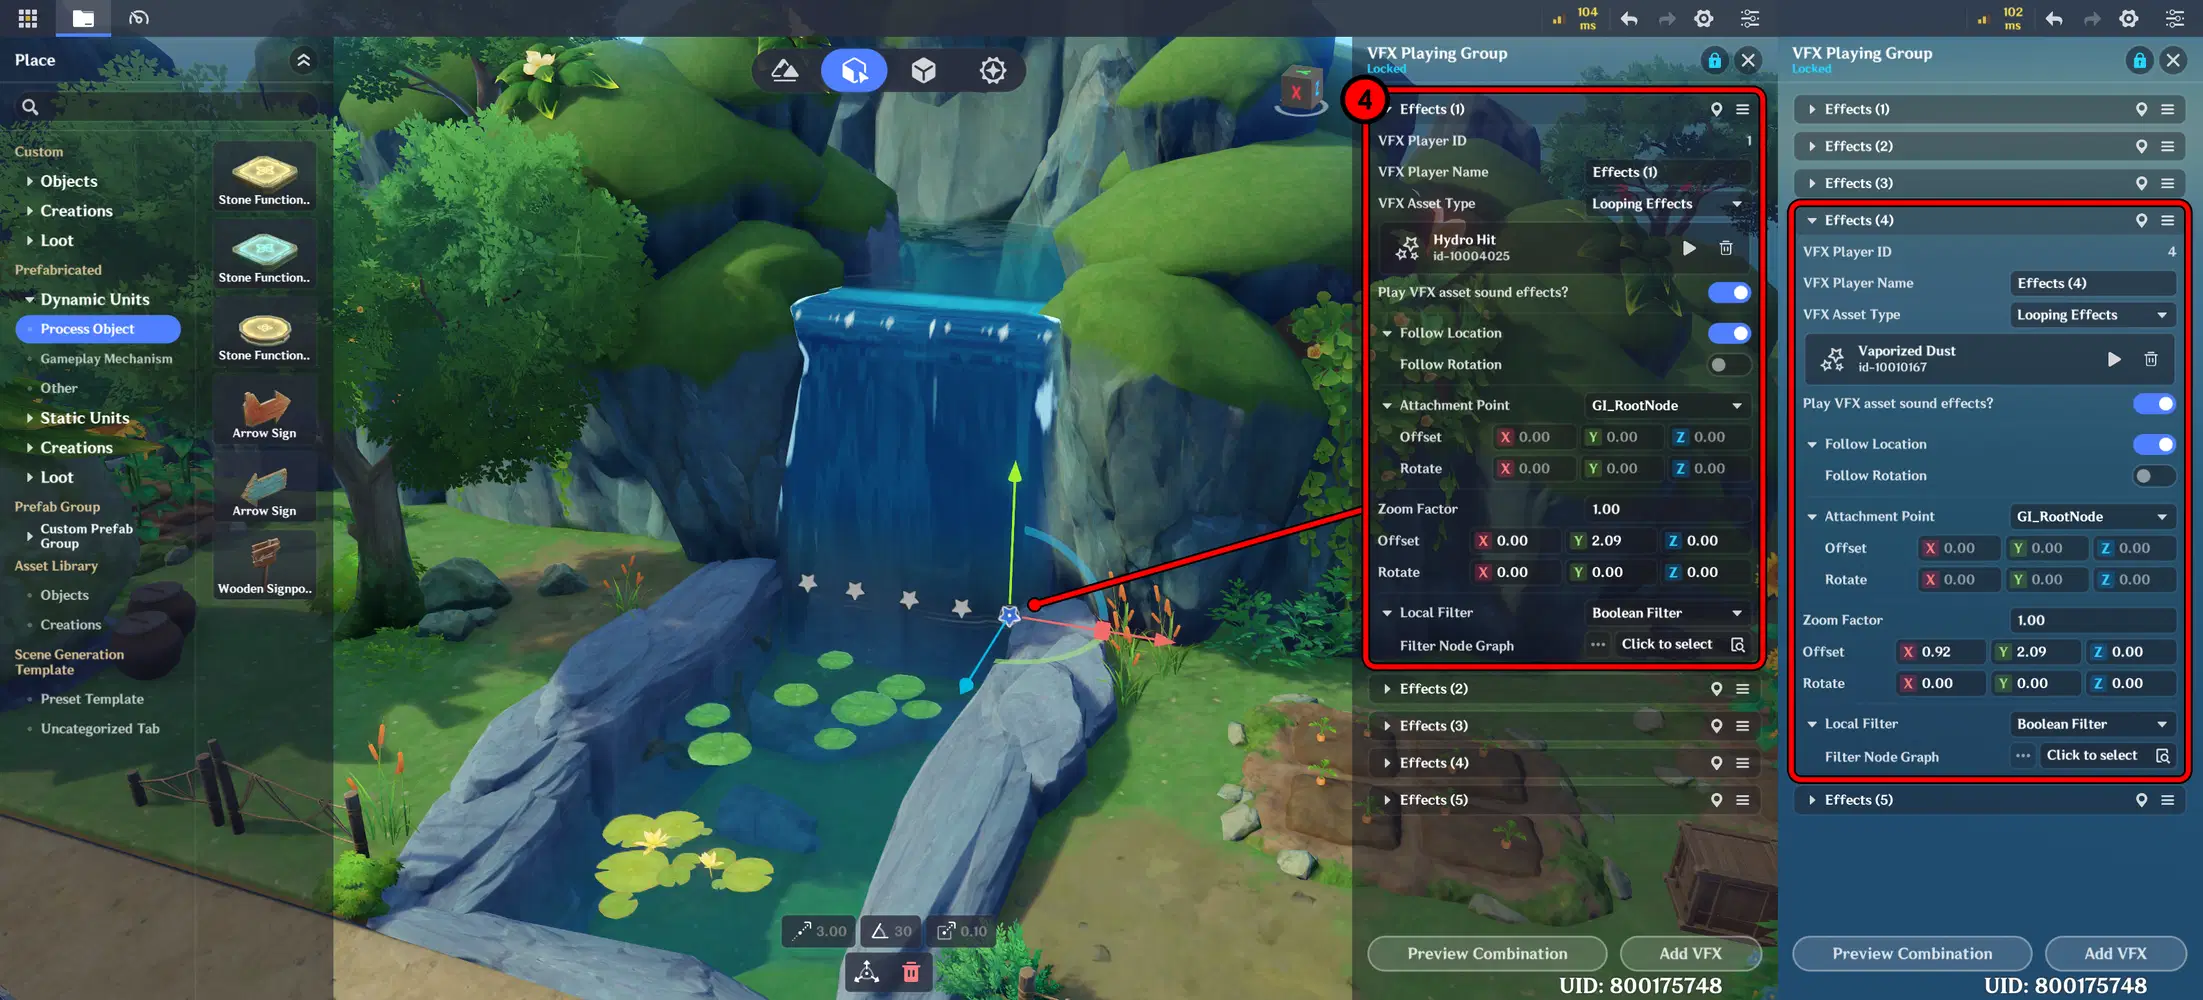
VFX Playing Configuration
Next, create an Empty Model, which will later be used to add the Water Ripple effect.
- In the Dynamic Units menu, select Other, then add an Empty Model to the scene.
- After that, go to the Components section, open Advanced Editing, Add VFX, and select Asset Type: Looping Effect. Last, choose the Blue Ring effect.
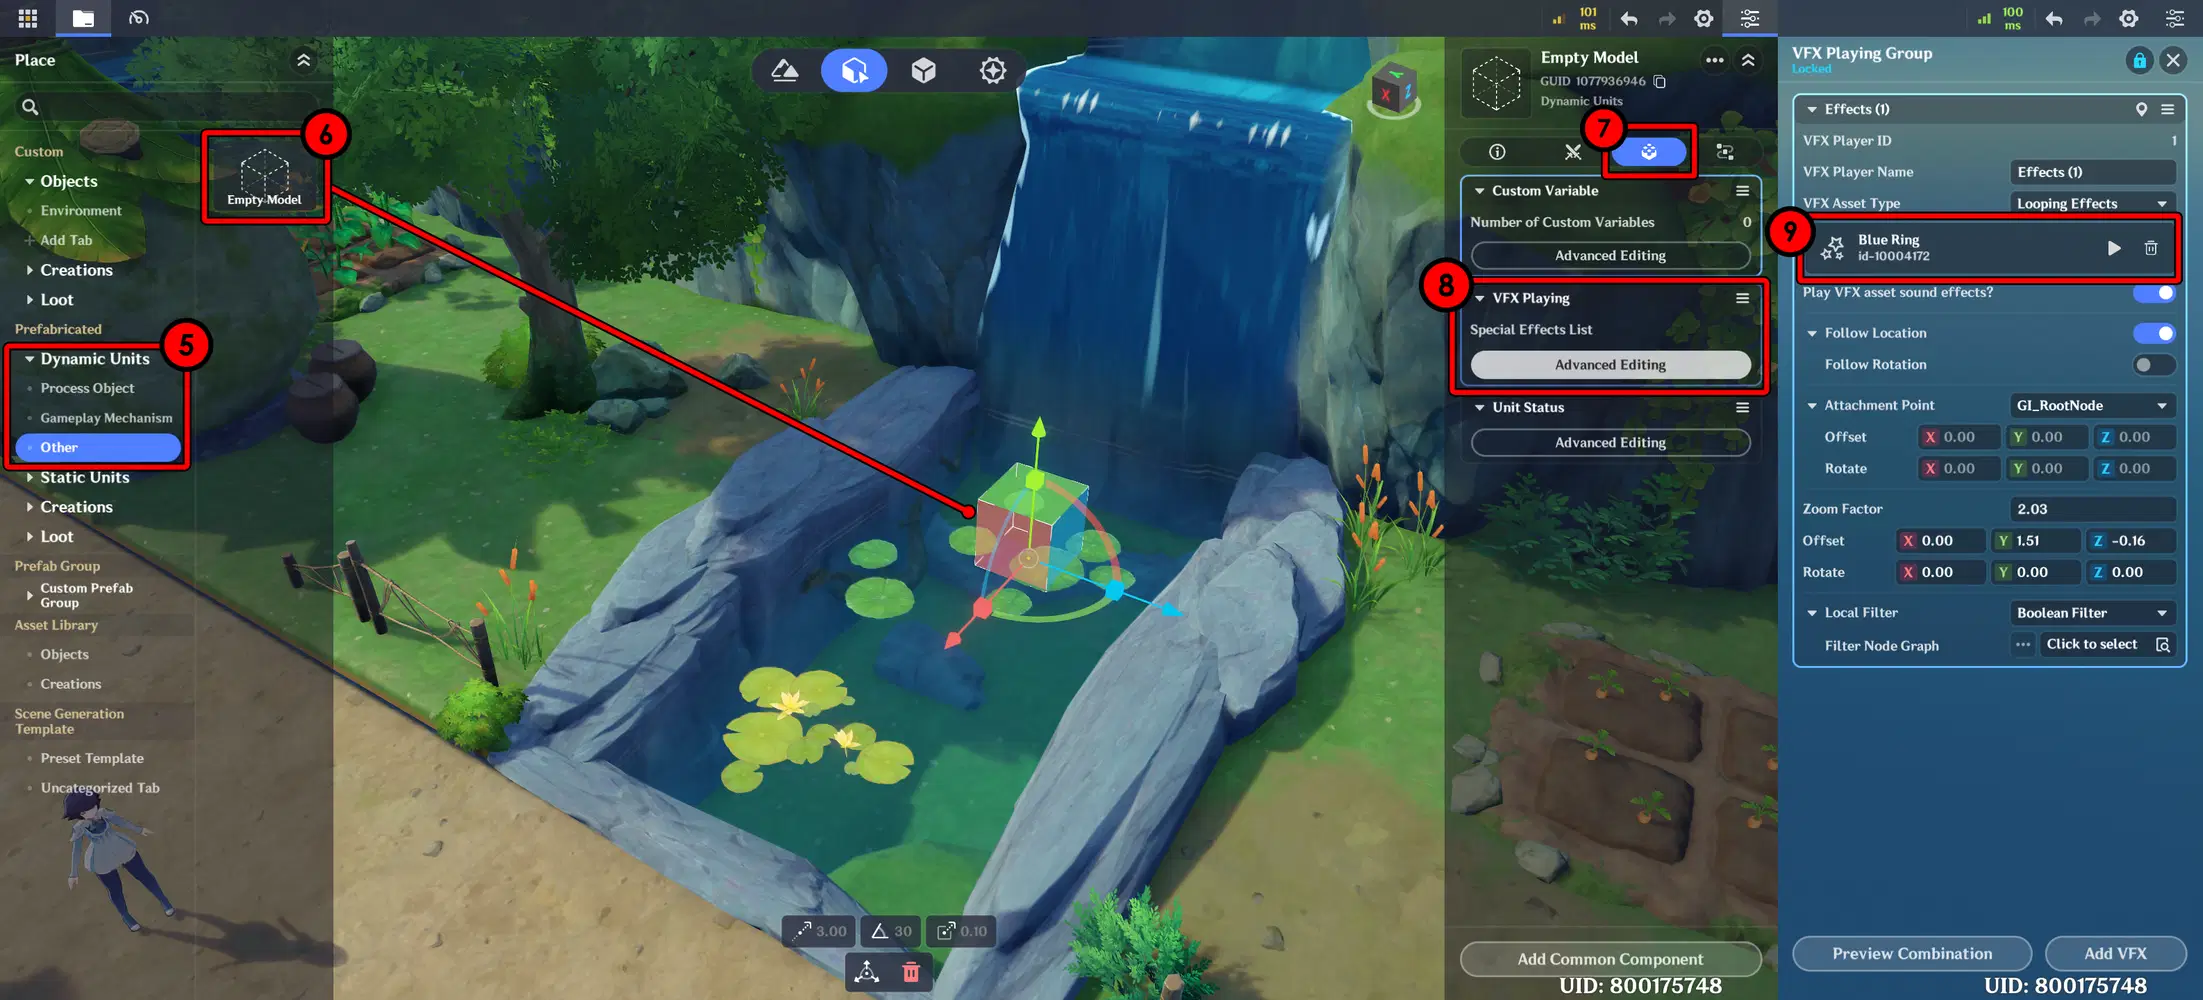
Empty Model Place at Under Waterfall
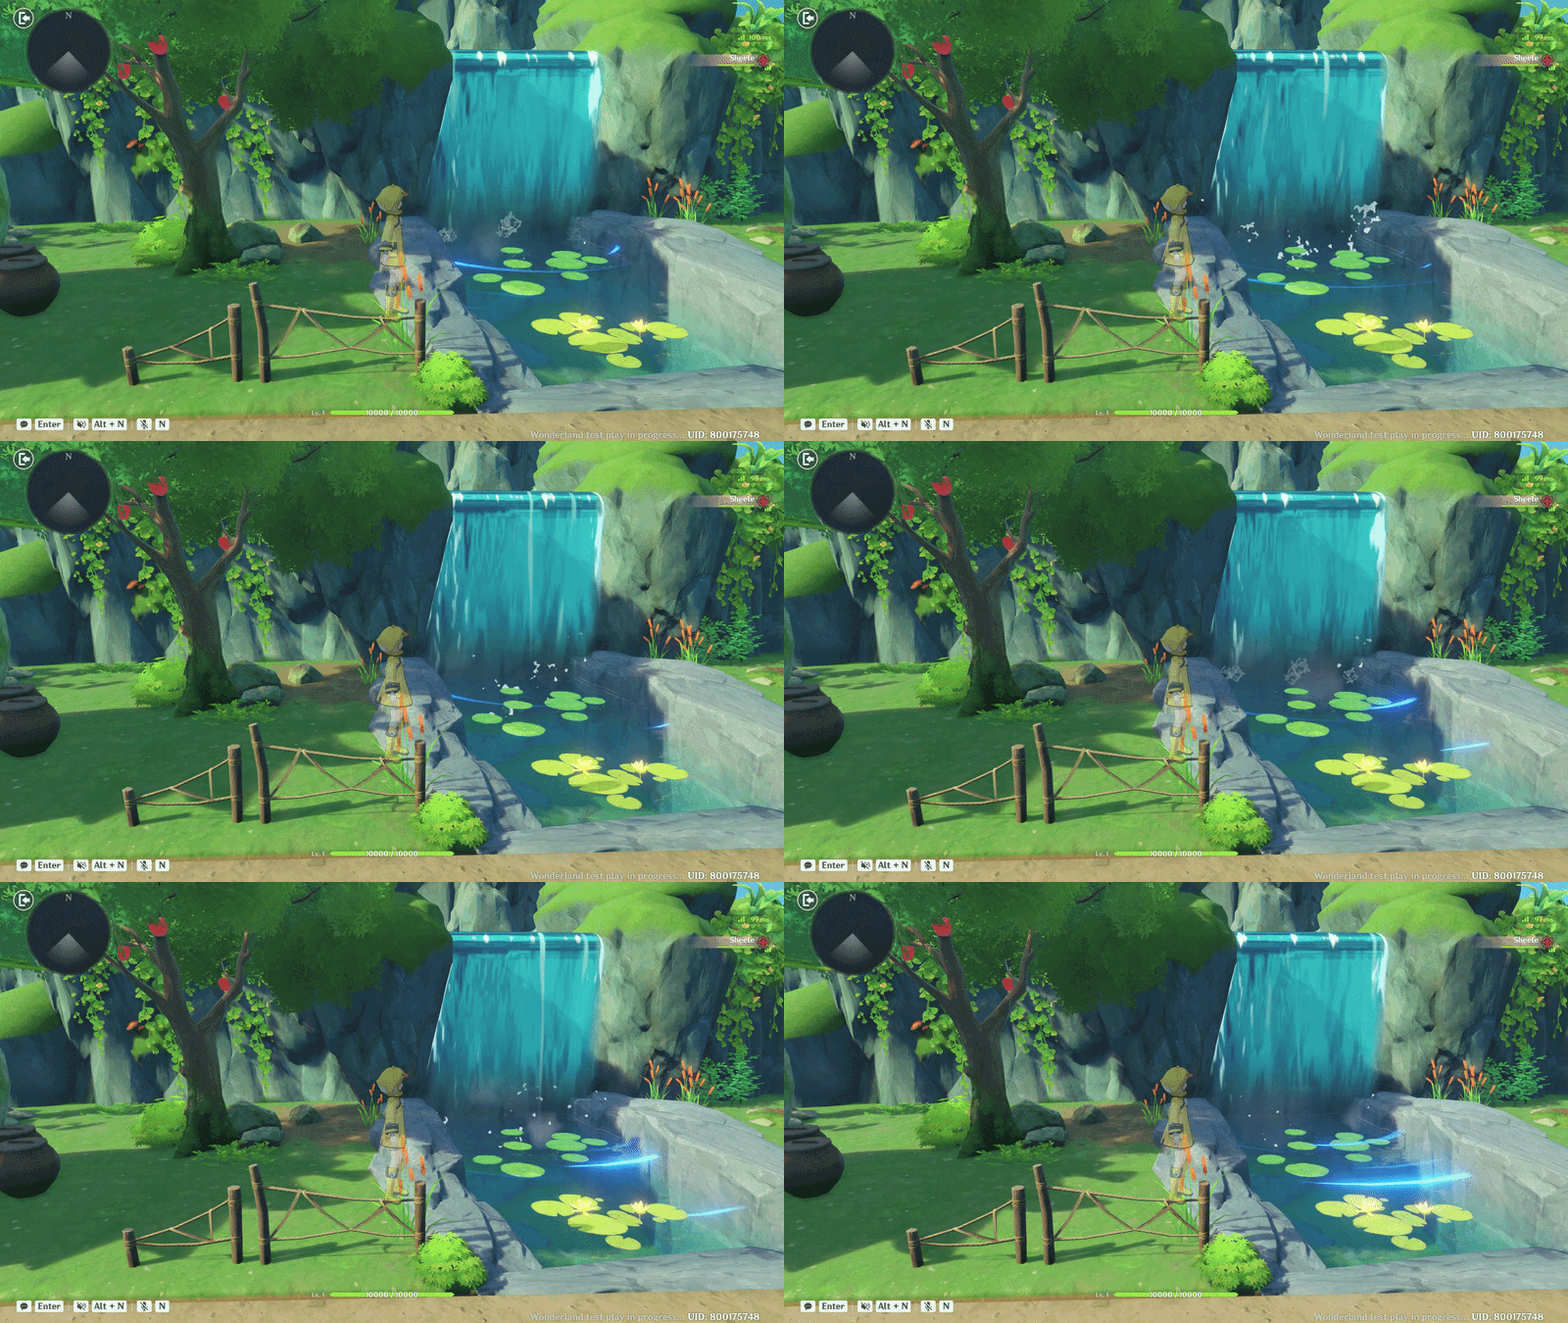
Then place this Empty Model at the bottom of the waterfall so it looks like the ripple created by the falling water. Here is the result.
✦ Light Effect
Add Lighting effects to the lamps in your scene, both on buildings and street lamps.
- First, select the building where you want to add the effect. Then create or add a new Attachment Point and position it on the lamp.
- Next, add the light effect to the lamp. Go to VFX Playing → Advanced Editing, choose a Looping asset, and select the Yellow Flash effect (ID: 185). Don’t forget to set the Attachment Point to the position you created earlier.
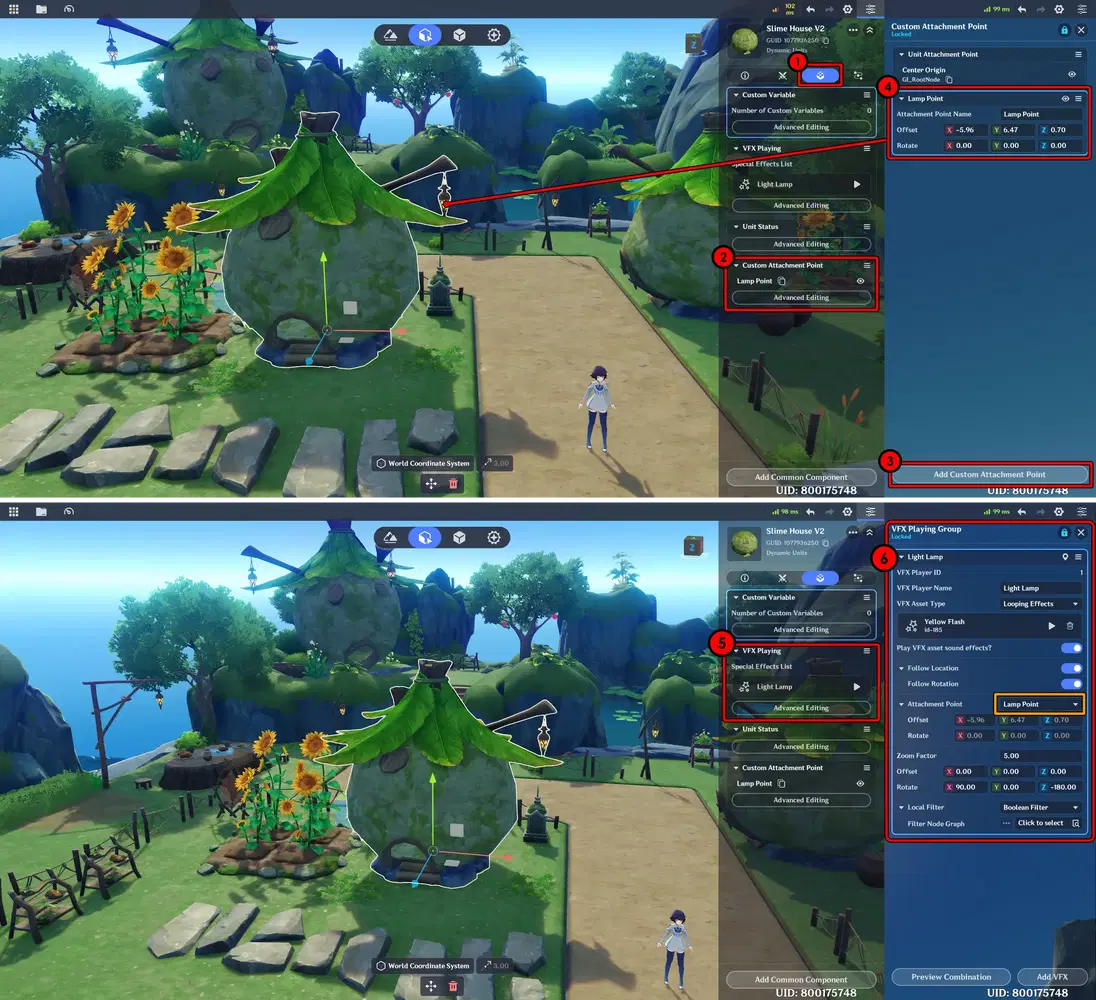
Do the same thing on the other objects, and here are the results.
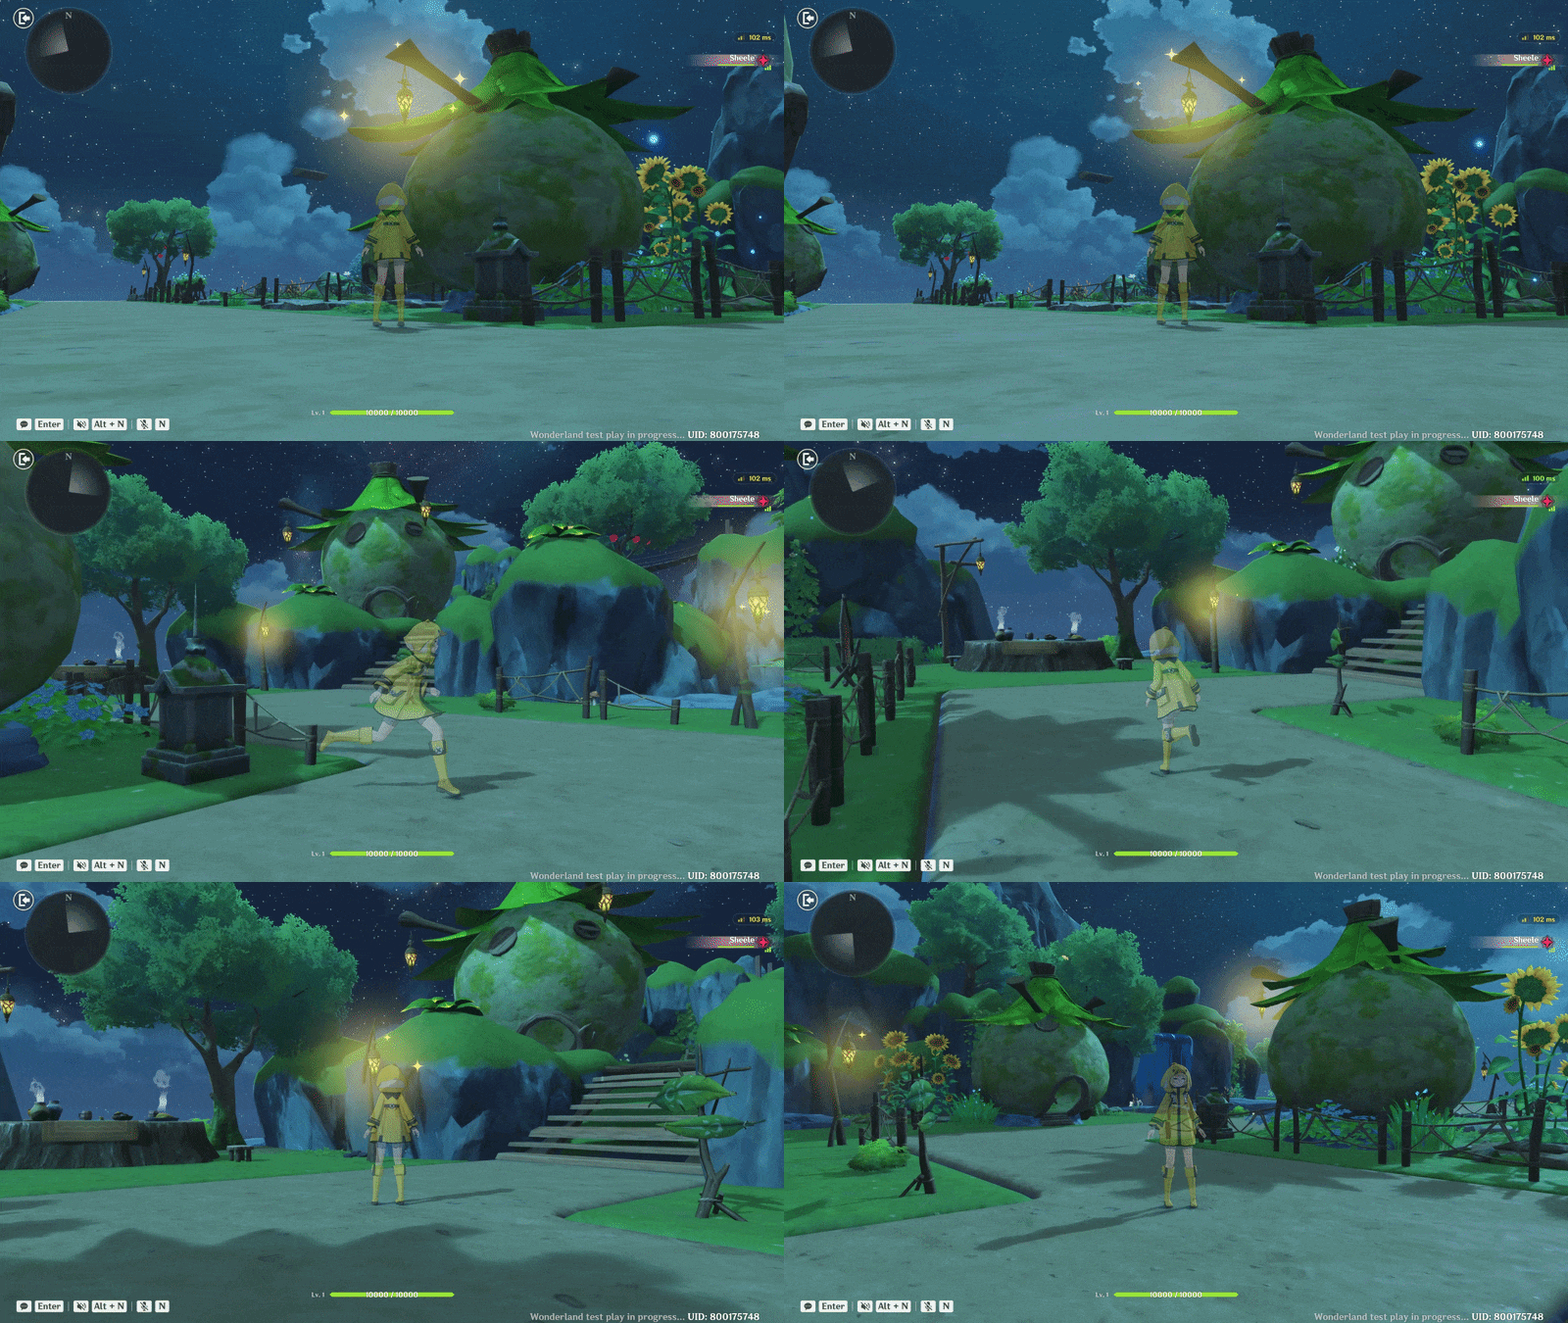
✦ Particle Effects
Next, add Particle effects. Effects like these can enhance the atmosphere and help fill empty areas in the scene, making the environment look more aesthetic and visually appealing.
- First, create a new Empty Model. Go to Prefabricated → Other, select Empty Model, and add it to the scene.
- Then, go to the Object Components menu and add VFX Playing. Here, I use a Looping effect Blue Group (ID: 10004219).
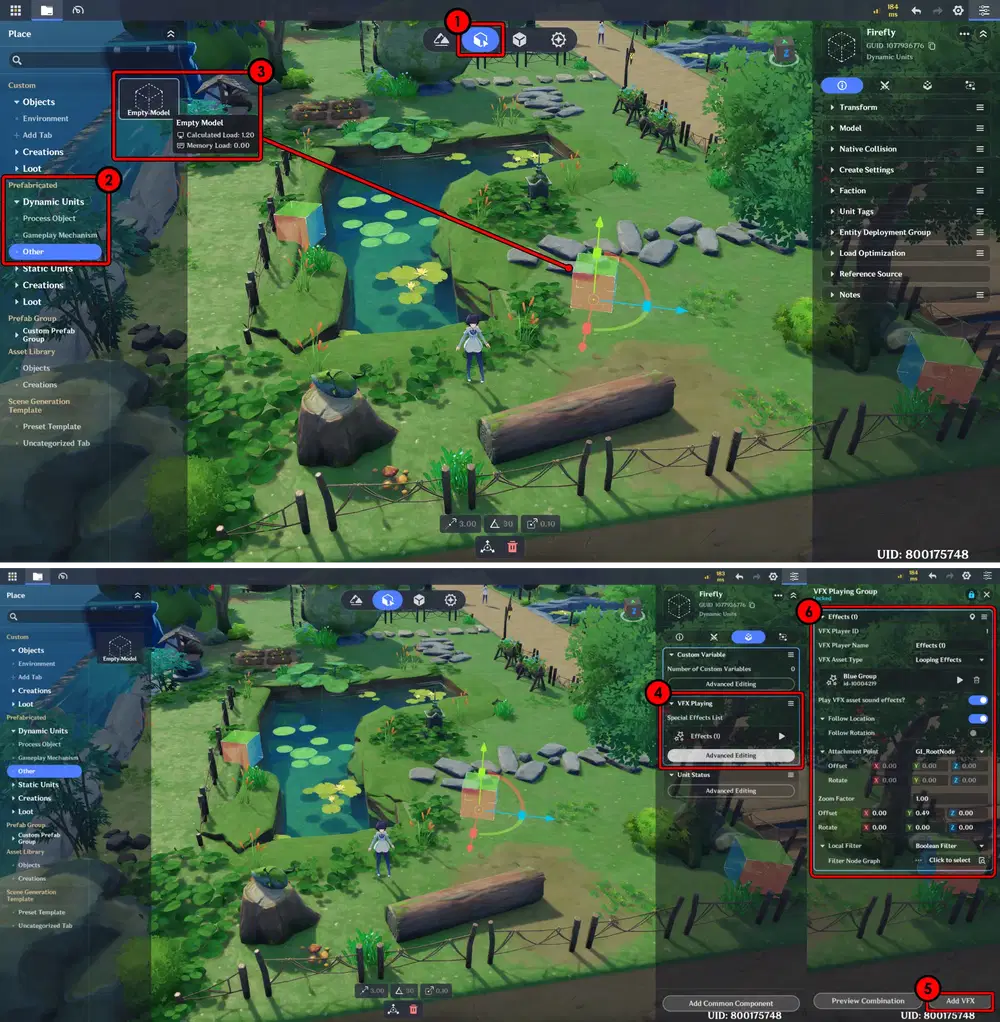
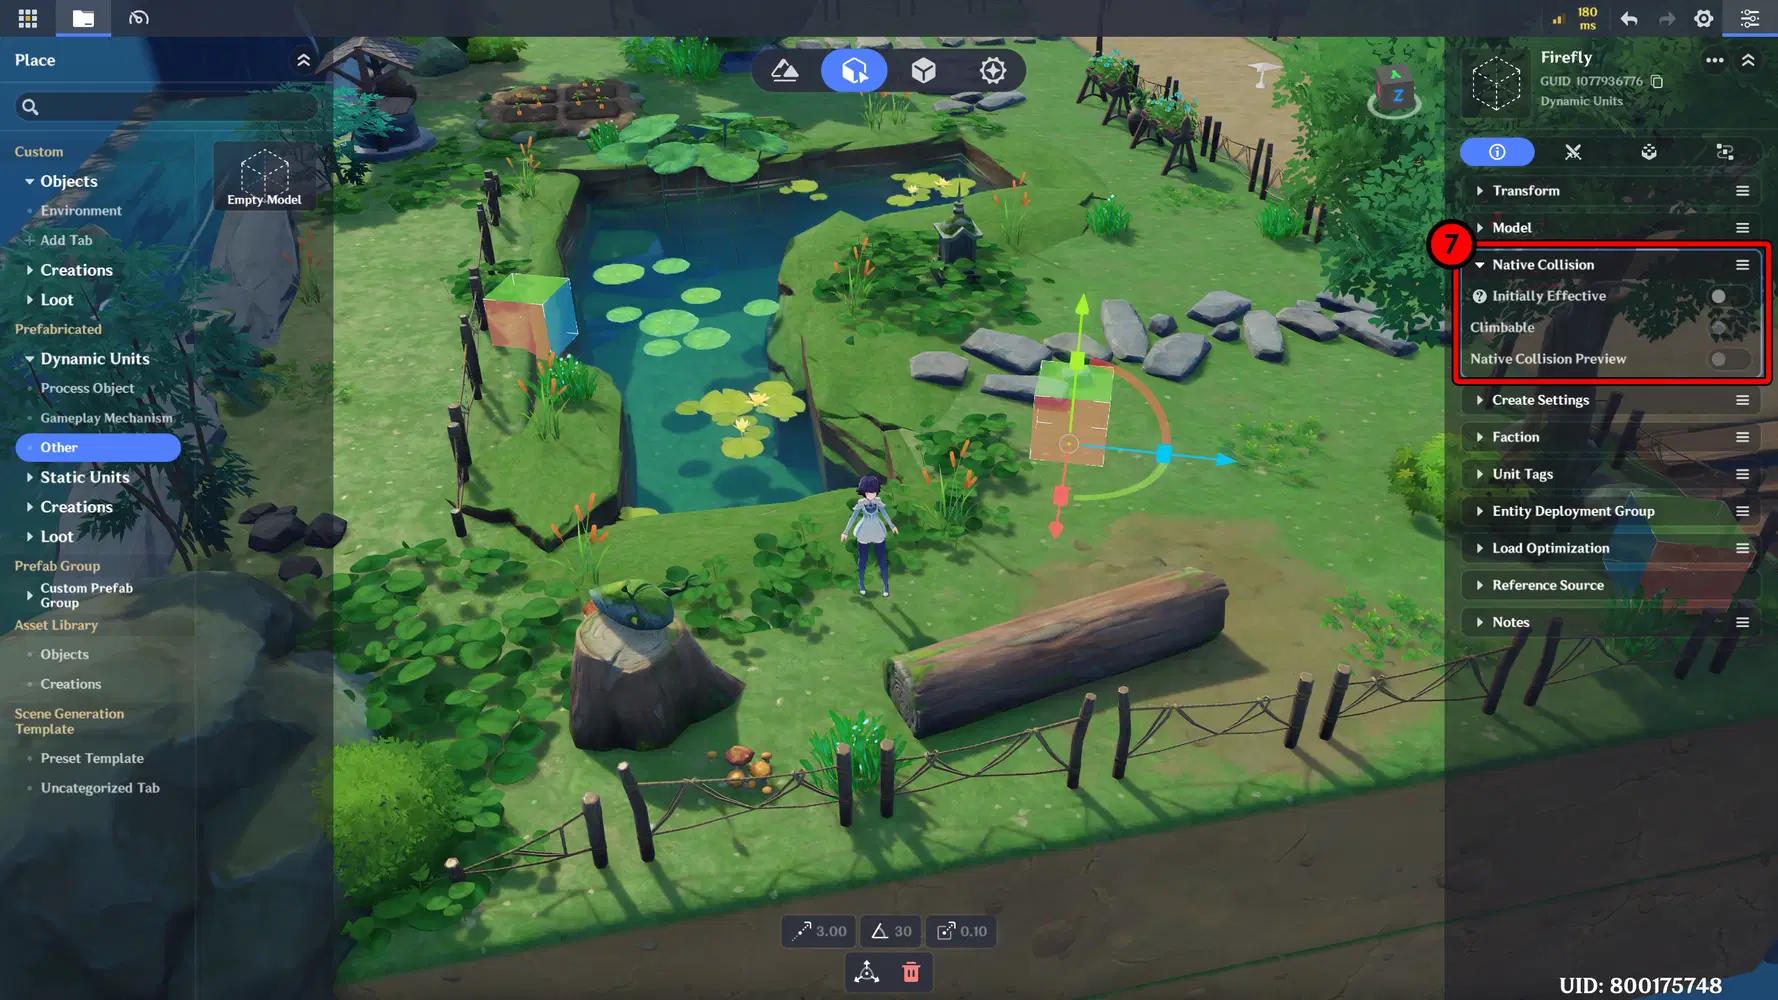
- Also set the Native Collision to Off so your character won’t collide with or step on it when moving nearby. Don’t forget to save it afterward.
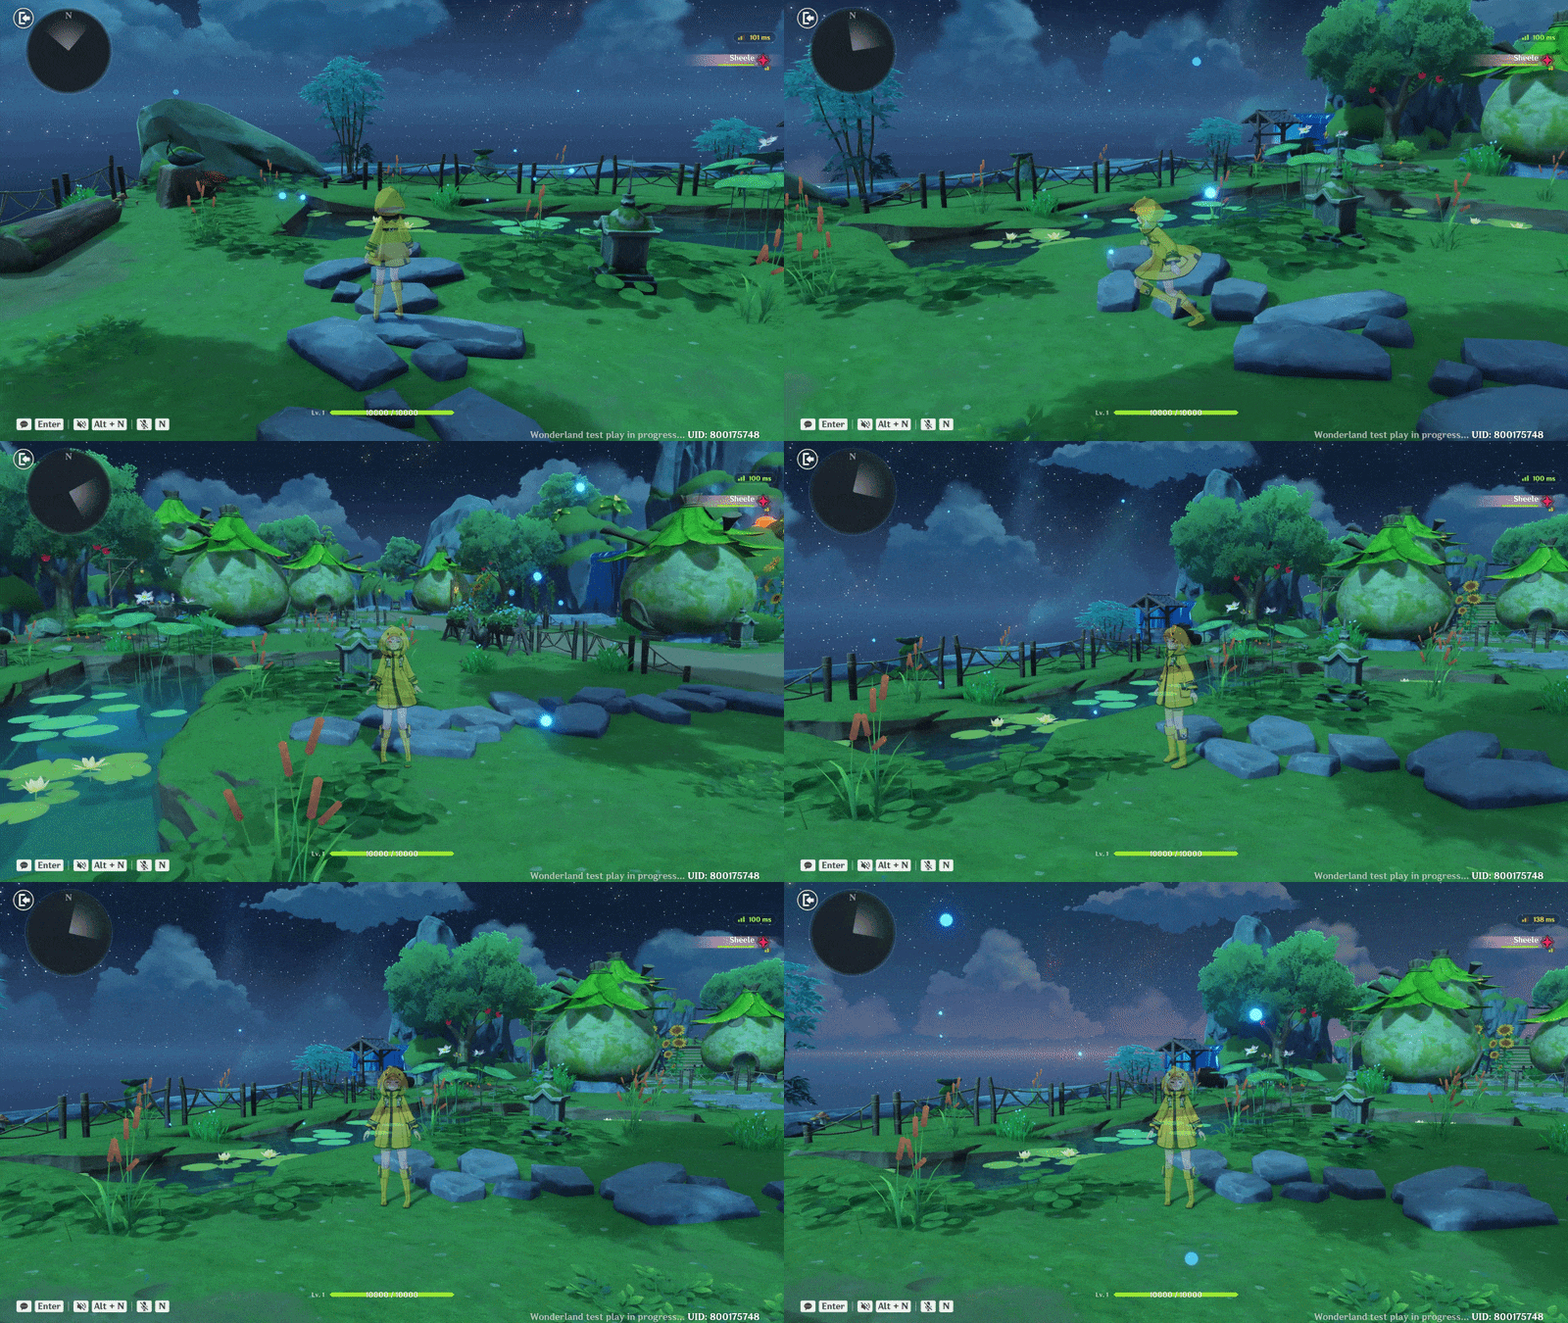
And here is the result. You can see particles moving and rotating around the area. You can think of these as fireflies or simply as light particles that add a magical atmosphere to the scene.
Tips 6 - Ambient Sound Design (SFX)
Try adding Ambient Sounds to make your scene feel more alive. For example, you can add waterfall sound effects to enhance the atmosphere around water areas and make the environment feel more immersive.
📝 Wonderland Guide:
✦ Waterfall Sound Effect
Choose the object where you want to add the sound effect. In this guide, I add it to the waterfall, so you can hear the sound of flowing water when you enter the waterfall’s radius.
- First, select the Waterfall object. Then go to the Components menu on the right panel and add the SFX Player component. After that, open Advanced Editing.
- Add a Sound Effect and choose a Sound Effect Asset. In this example, I use Waterfall Small 01 (Index: 10022).
Then, adjust the range radius, here I set it to 30.00. This means the waterfall sound will be heard when your character enters that radius. For other settings, you can check the options below and adjust them based on your needs.
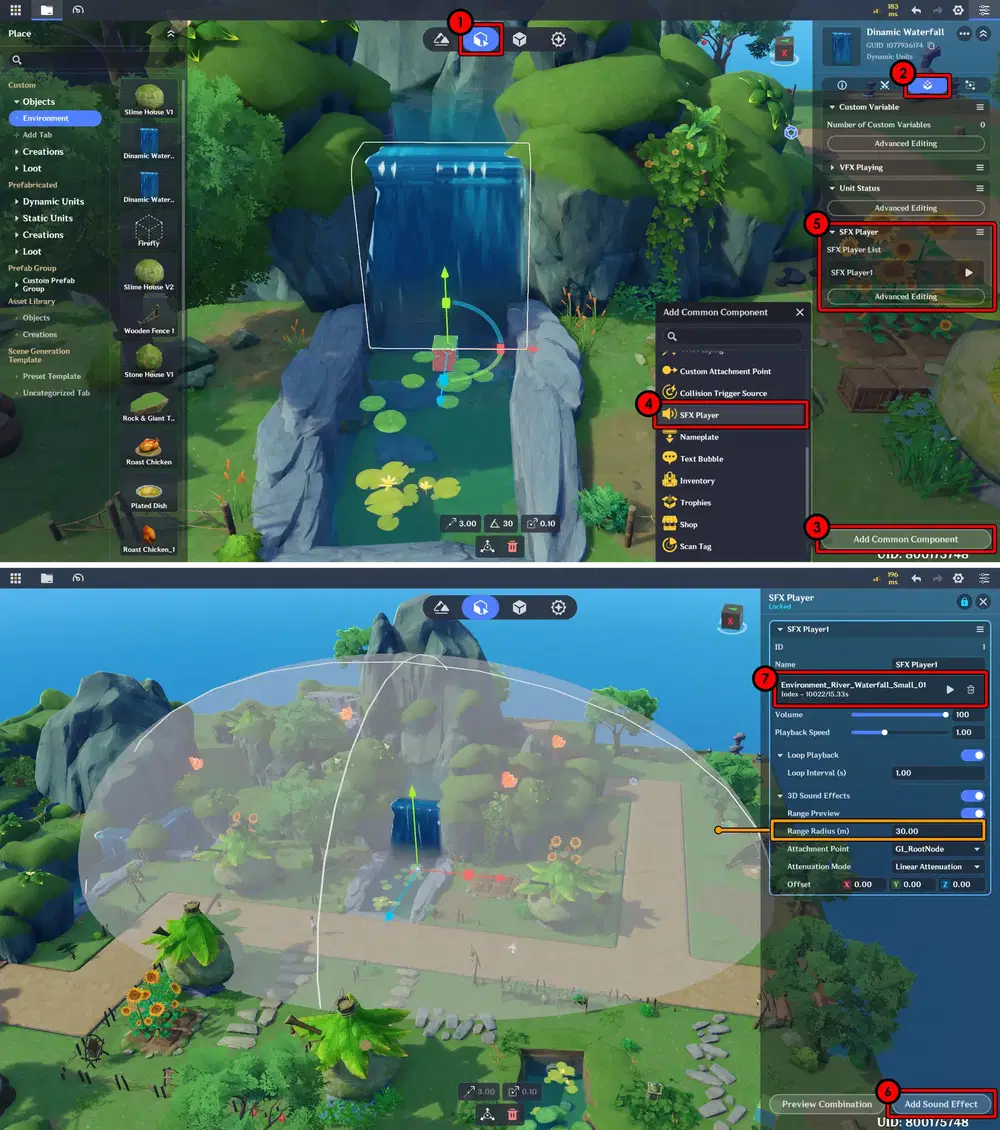
Waterfall Sound Effect
Below is a short video specifically for a guide on adding this SFX.
✦ Animal Sound Effect
In this section, I want to add Bird chirping sounds, so when your character gets close to the tree, you can hear the sound.
First, you need to change the object from Static to Dynamic so you can add components to it.
- Go to the Prefab Library, select the tree object, then on the top panel change Static Unit Prefab to Dynamic Unit Prefab, and Overwrite and Save Prefab.
- Next, place the modified object into the scene, then add the SFX Player component to it.
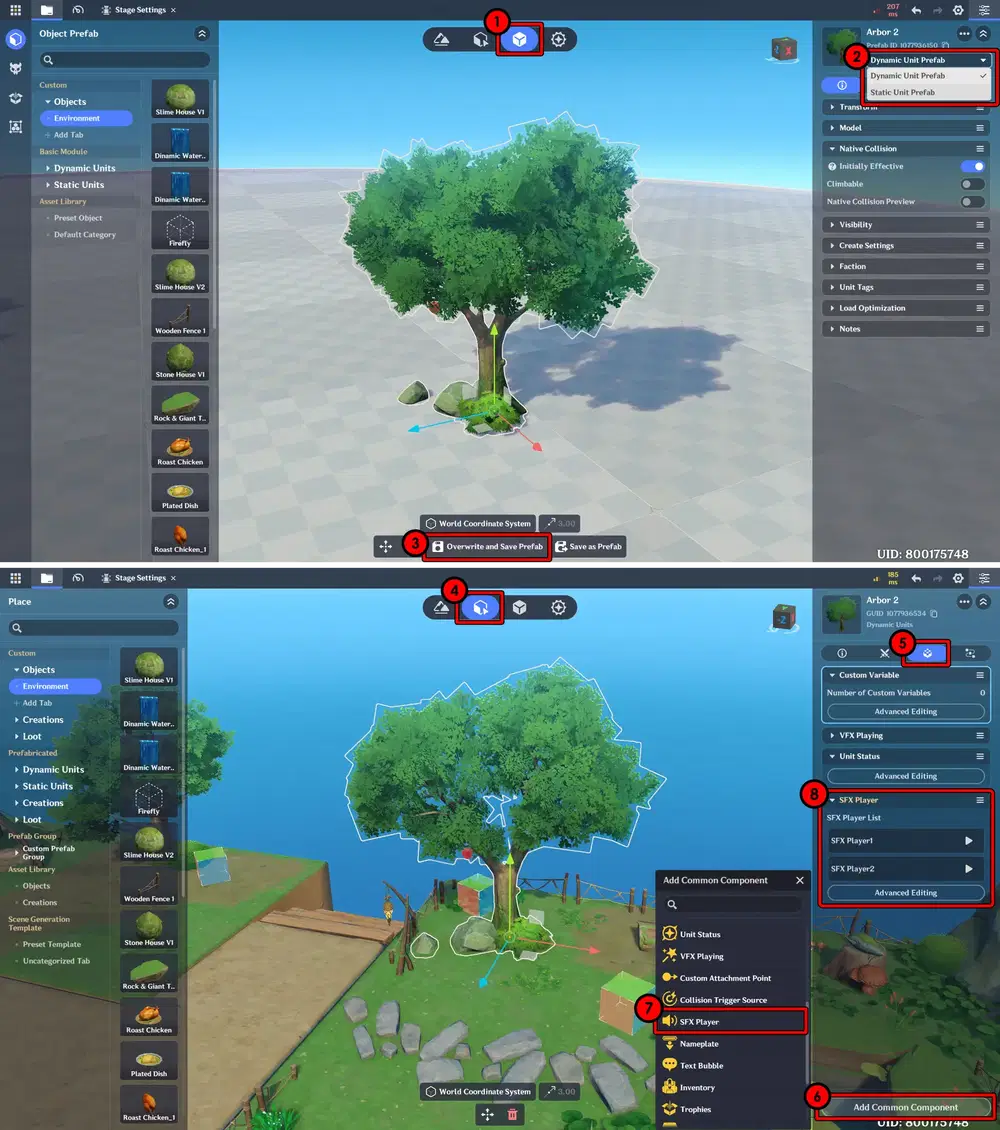
Static Unit Prefab to Dynamic Unit Prefab & Add SFX Player
Here, I use two sound assets: Bird Chirp 16 (Index: 20056) and Bird Chirp 14 (Index: 20054). These two sounds are combined and played together, and you can preview the result in the Preview Combination section. I set the radius to 17.00, so the sound will be heard when your character gets close to the tree.
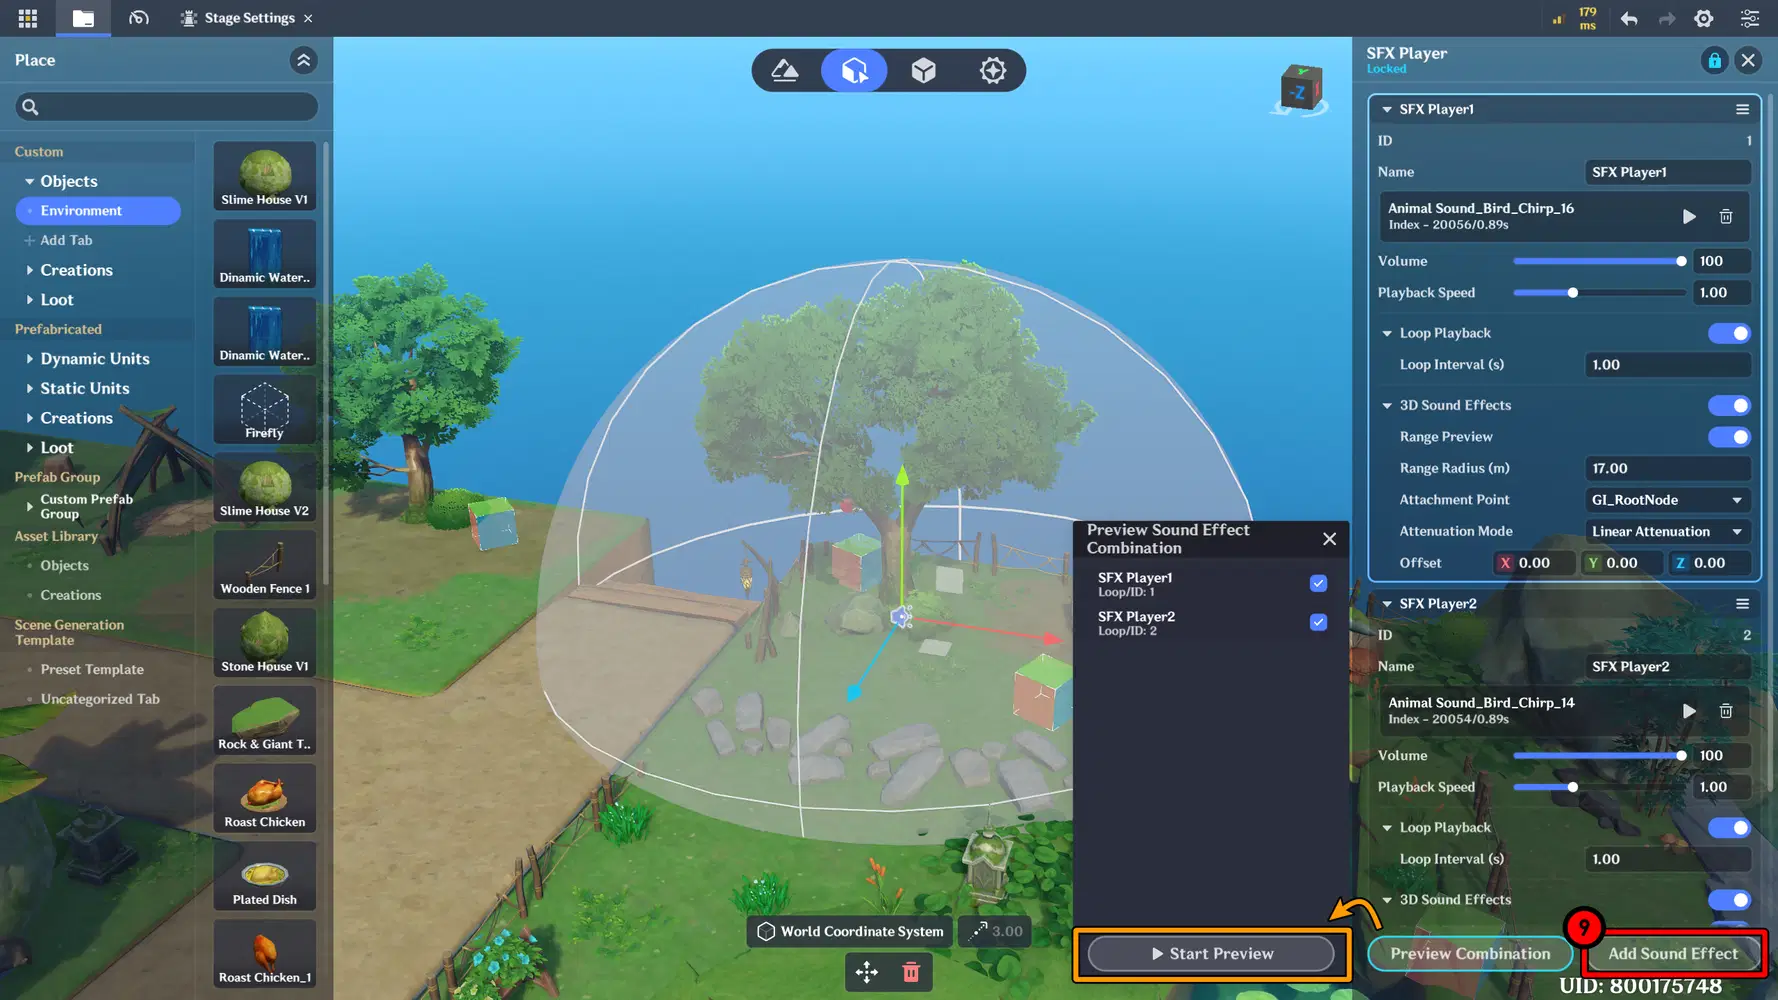
Bird Chirping Radius
Tips 7 - Interactive Objects
Try adding objects that players can interact with to make your scene feel more engaging. For example, you can add NPC that players can talk to or that display simple chat bubbles. You can also place Signs or Notice boards to give directions or small bits of information, helping the environment feel more alive and interactive.
📝 Wonderland Guide:
✦ Interactive NPC
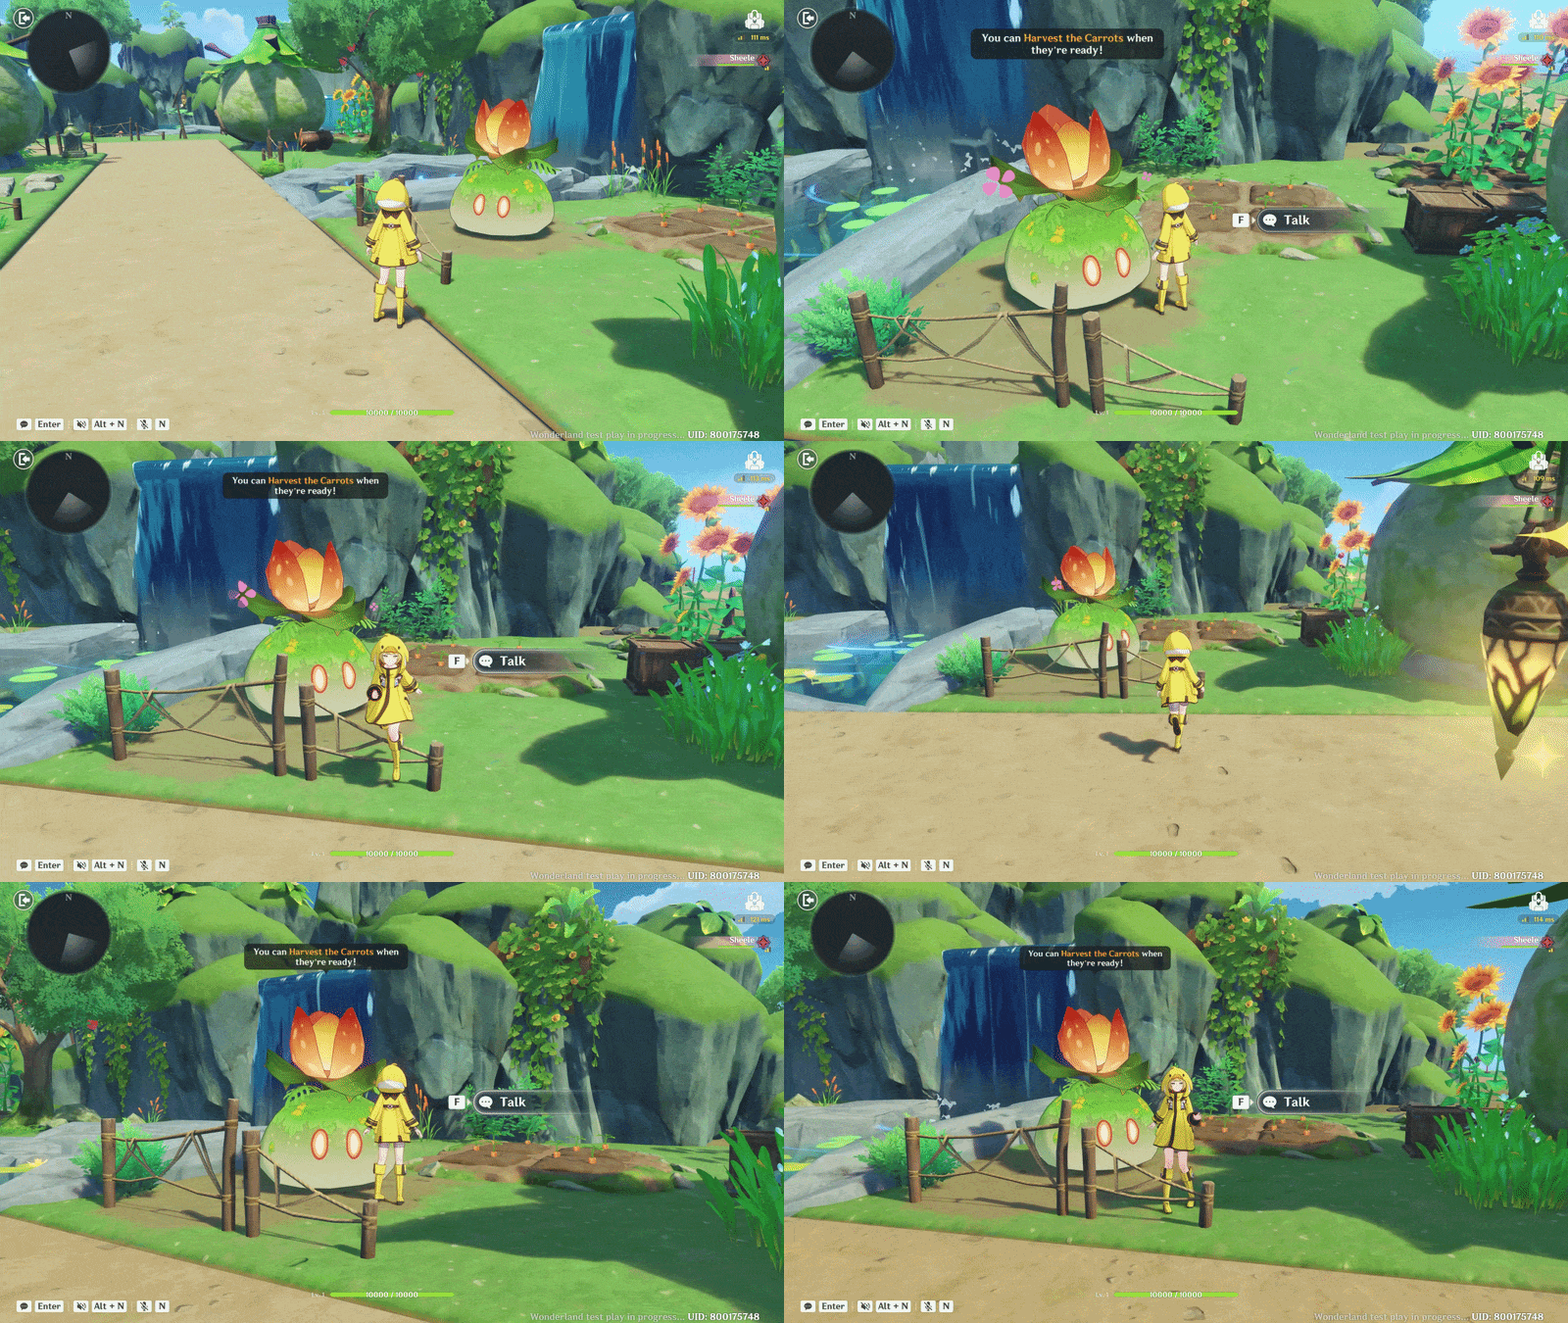
In this section, I created an NPC that players can interact with. The NPC displays a Text Bubble that provides hints or guidance within the scene, depending on your needs. When the player moves away from the NPC, the text bubble will automatically disappear, making the interaction feel more dynamic and natural.
First, select and place the NPC you want to use. In this example, I use a Large Dendro Slime as the NPC.
- Entity Placement → Creations → Basic Creation → Large Dendro Slime.
- Next, you can add the Tab component to enable interaction, allowing players to talk to the NPC and display a Text Bubble.
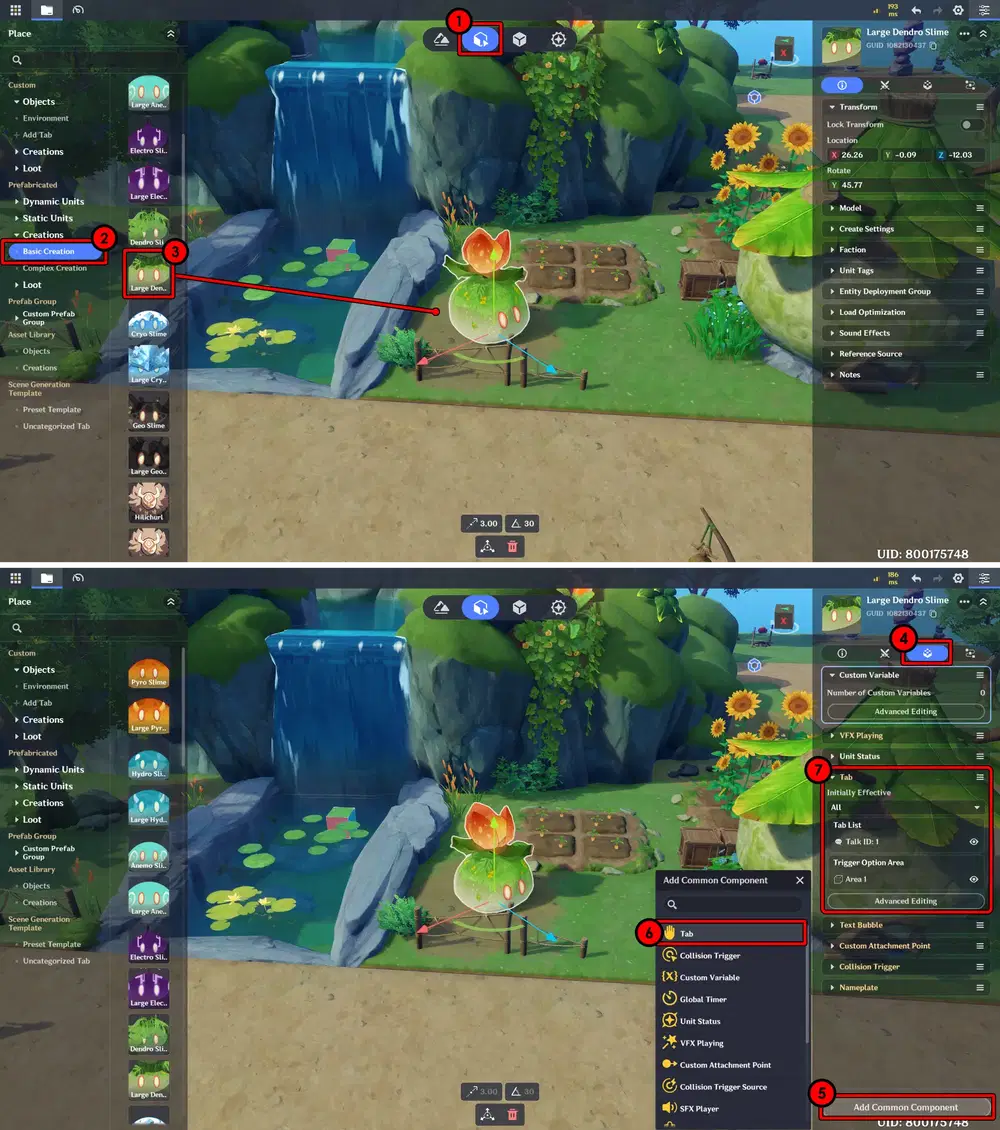
Add NPC at Scene
- Then, customize the Tab Icon and Tab Text, and make sure to adjust the Trigger Option Area width. This area detects when the character enters the range, causing the tab to appear.
- Next, add the Text Bubble component.
- Go to the Components menu, add Text Bubble, then open Advanced Editing in the Text Bubble menu.
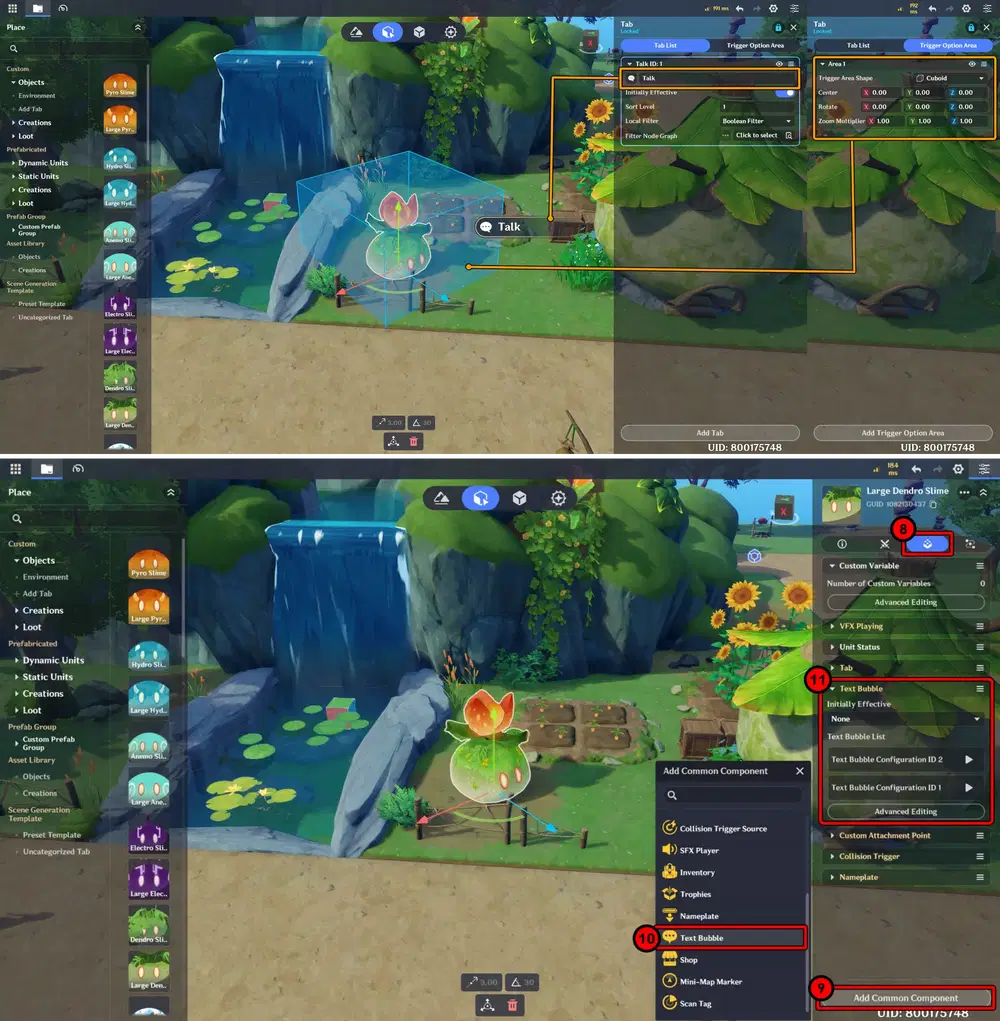
Configure Tab & Add Text Bubble
- Here, I created Two Text Bubbles. The first Text Bubble is used as the active one to Display the NPC message, while the second Text Bubble is used to Hide or clear the first NPC message.
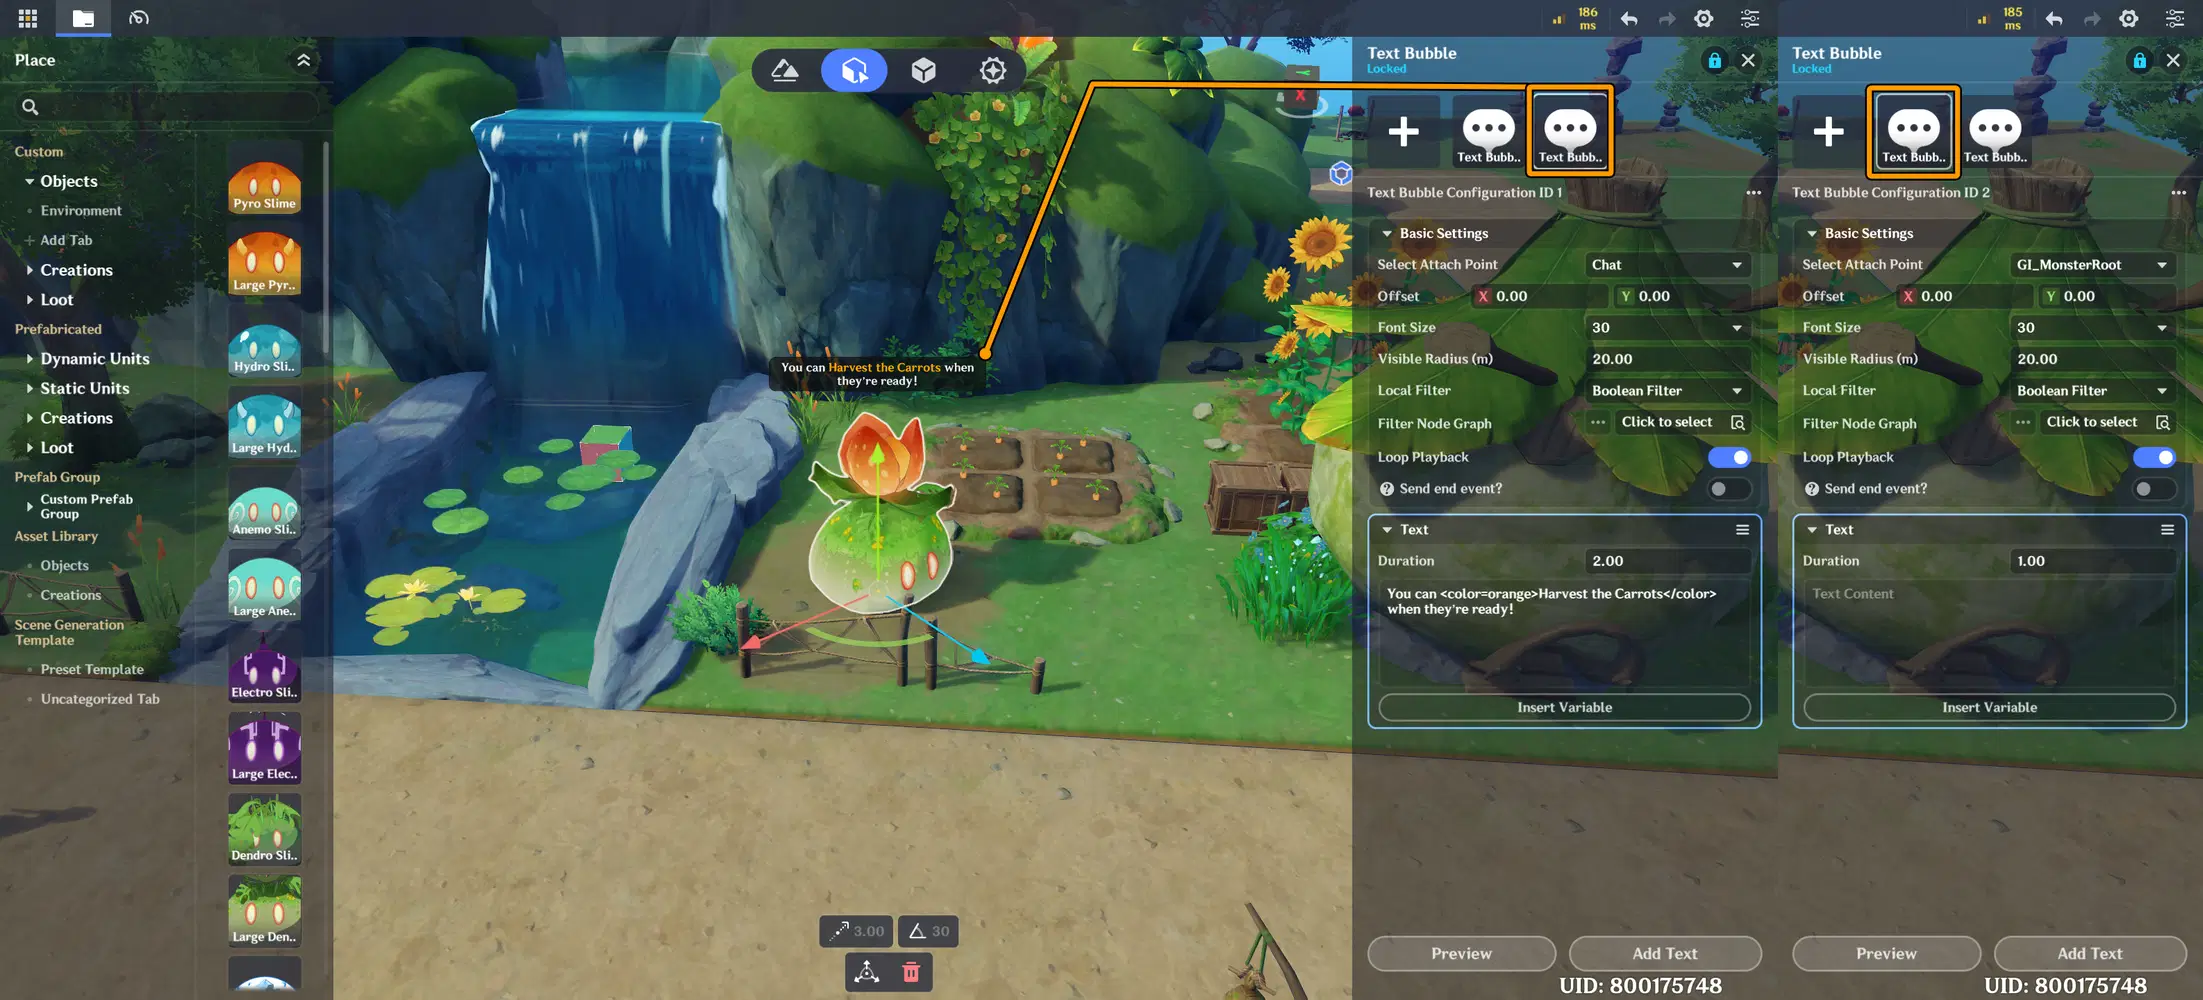
Configure Text Bubble
To position the Text Bubble directly above the NPC, you need to use the Custom Attachment Point component.
- Go to the Components menu → add common component → select Custom Attachment Point → then open Advanced Editing to adjust its position.
- In the Custom Attachment Point, select Add Custom Attachment Point to create a new attachment point, then position it directly above the NPC. Then, set the Attachment Point in the Text Bubble to the point you created earlier.
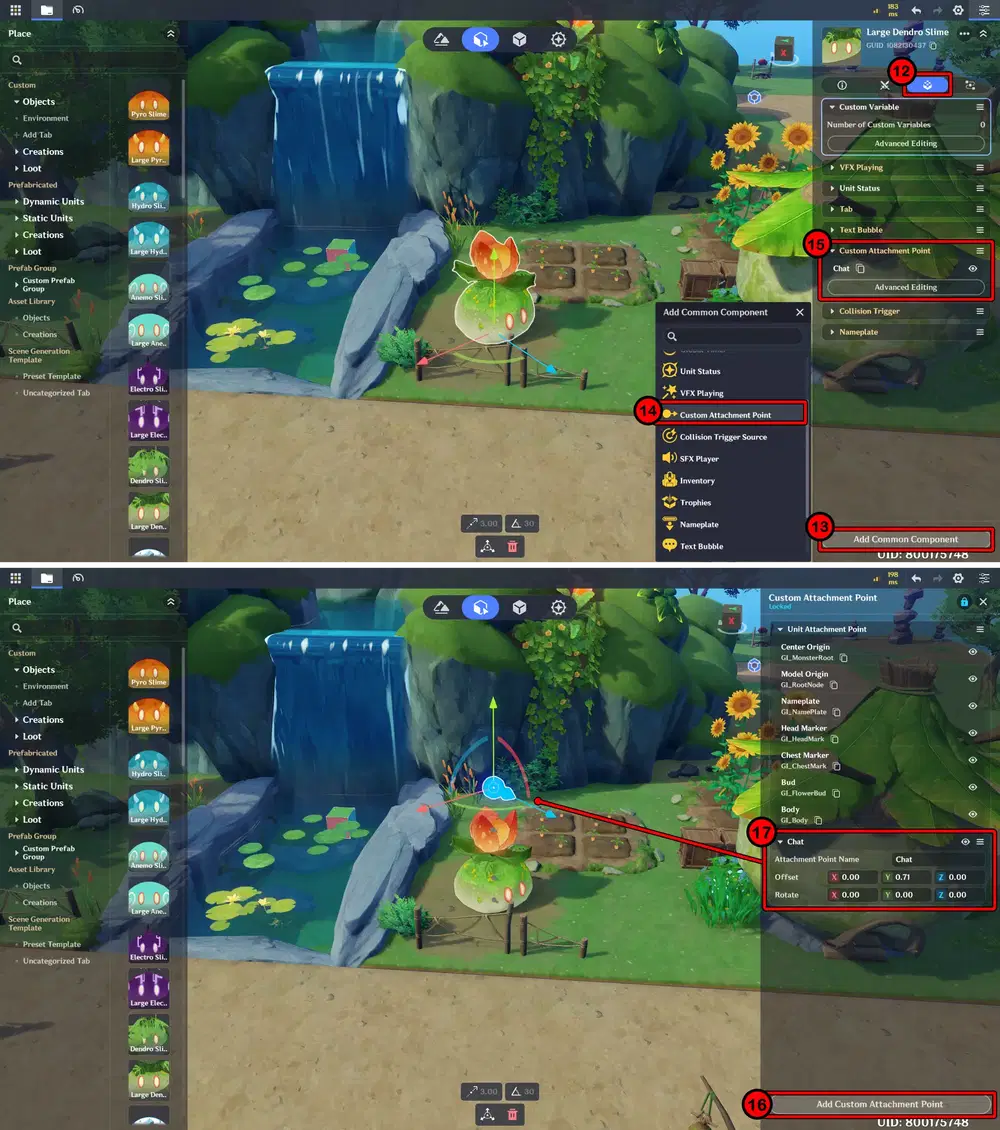
Configure Attachment Point
Next, add a Collision Trigger component. This is used to detect when the player moves away from the NPC so the Text Bubble will be hidden or no longer displayed.
- Go to the Components menu → add common component → select Collision Trigger → then open Advanced Editing.
- In Advanced Editing, add a Trigger Area and adjust its size around the NPC.
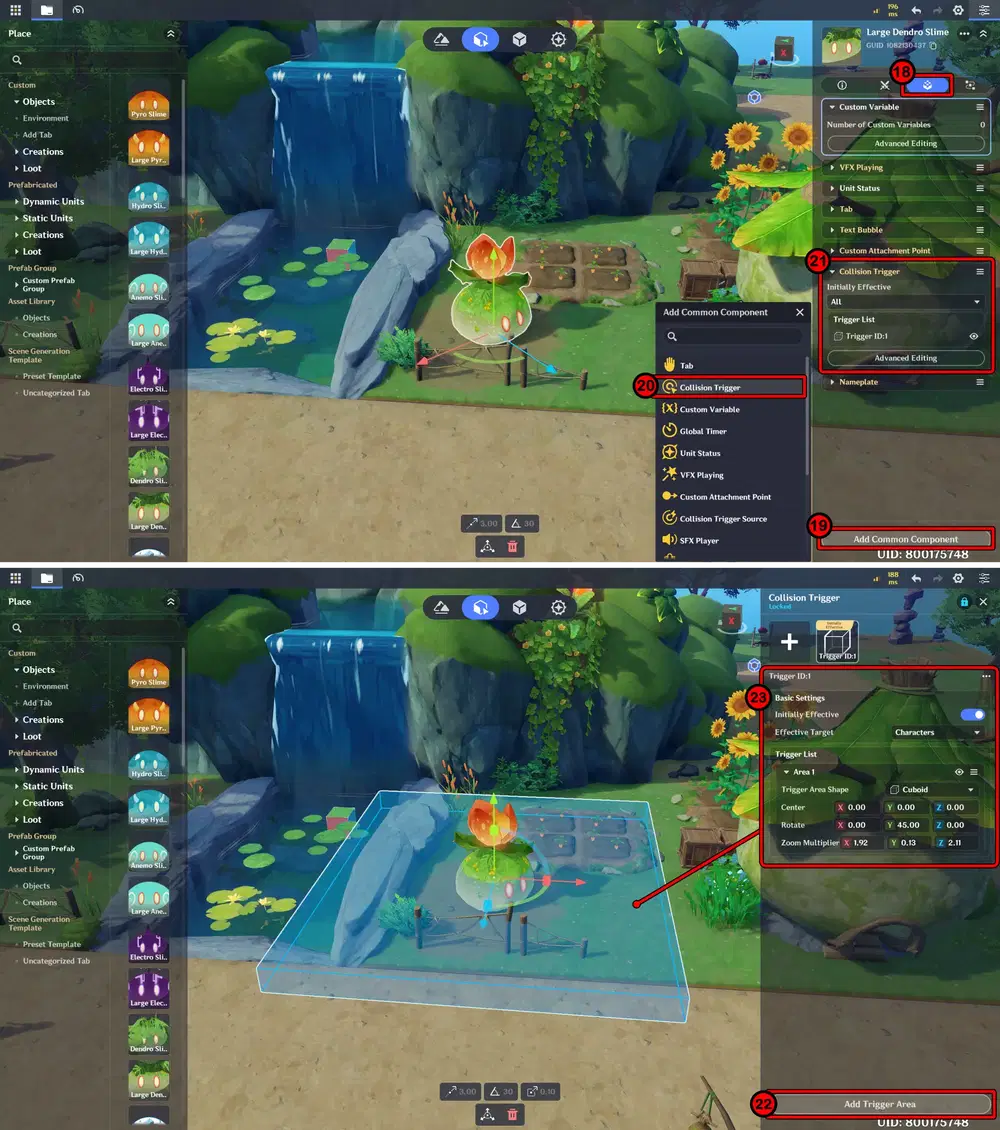
Configure Collision Trigger
Next, add the Nameplate component. This is used to Hide the NPC HP bar, making the scene look cleaner, especially when the Text Bubble appears. You don’t need to adjust any settings here.
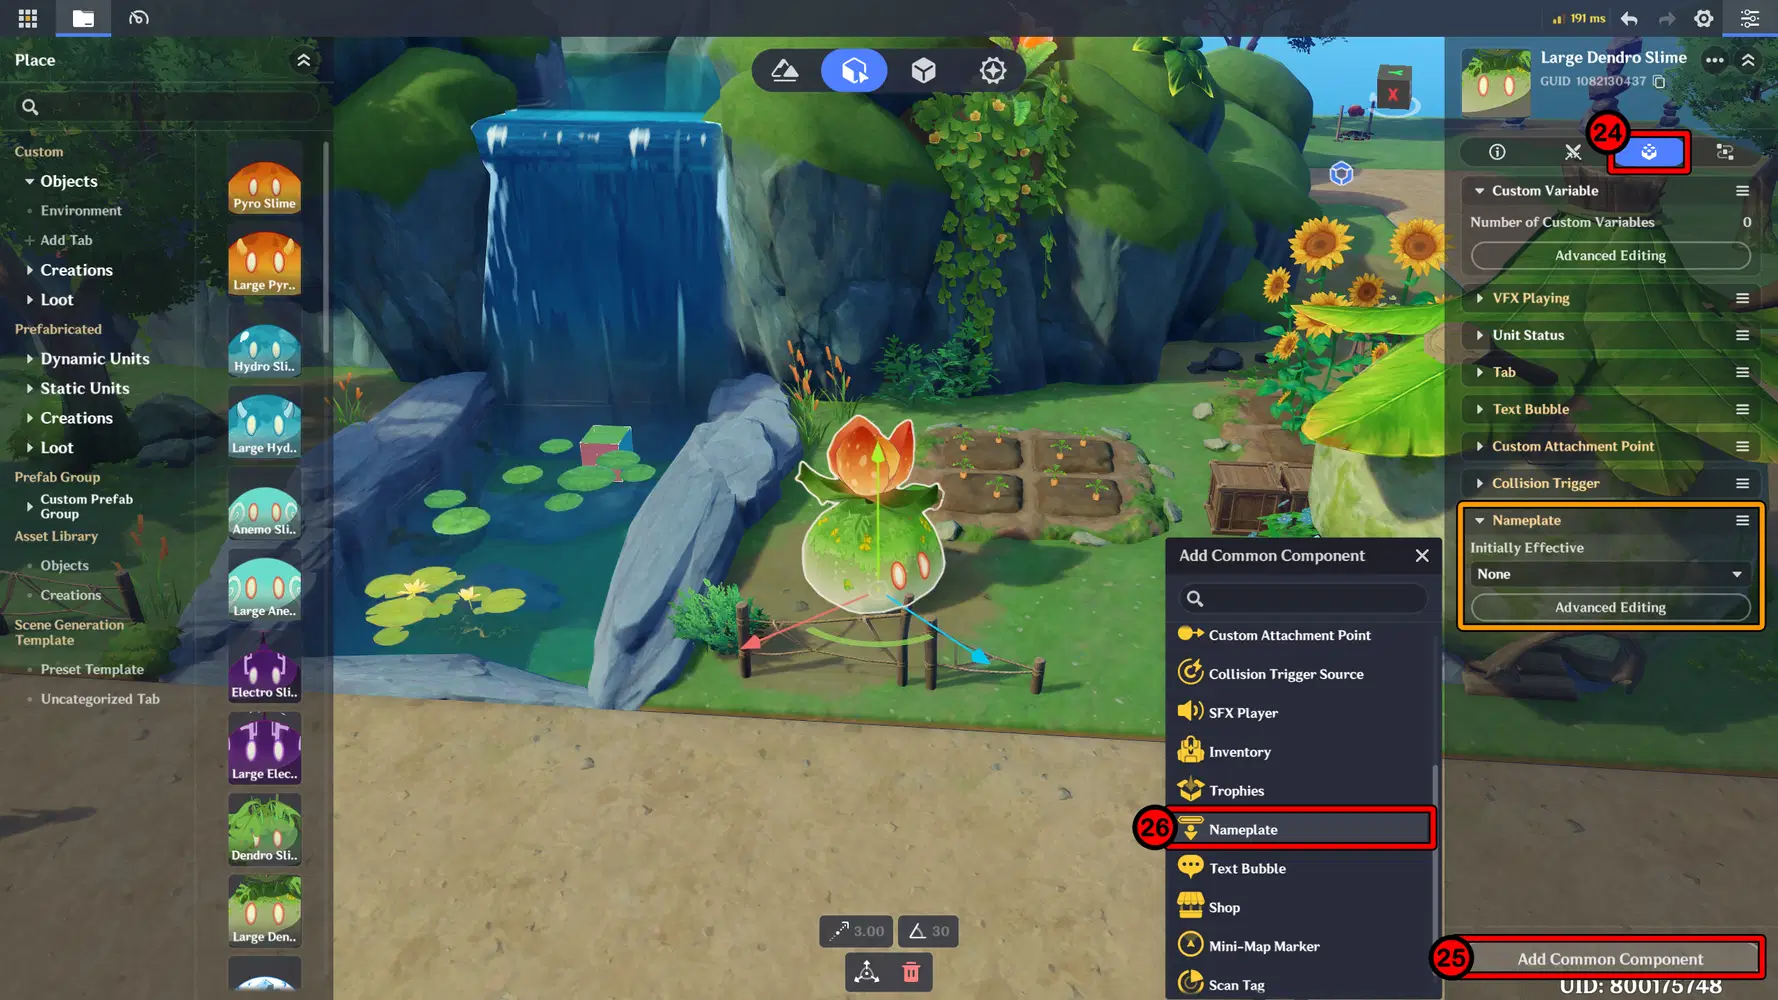
Configure Nameplate
Next, create a Node Graph to handle the tab interaction and the condition for hiding the Text Bubble when the player moves away from the NPC.
- Open the Miliastra Sandbox window, go to Server Node Graph Resource Explorer, then create a new Node Graph by right-clicking on an empty area.
- When the Tab is selected, it will activate Text Bubble 1 to display the message. When the character leaves the Collision Area, it will activate Text Bubble 2 (Empty Text) to hide the message.
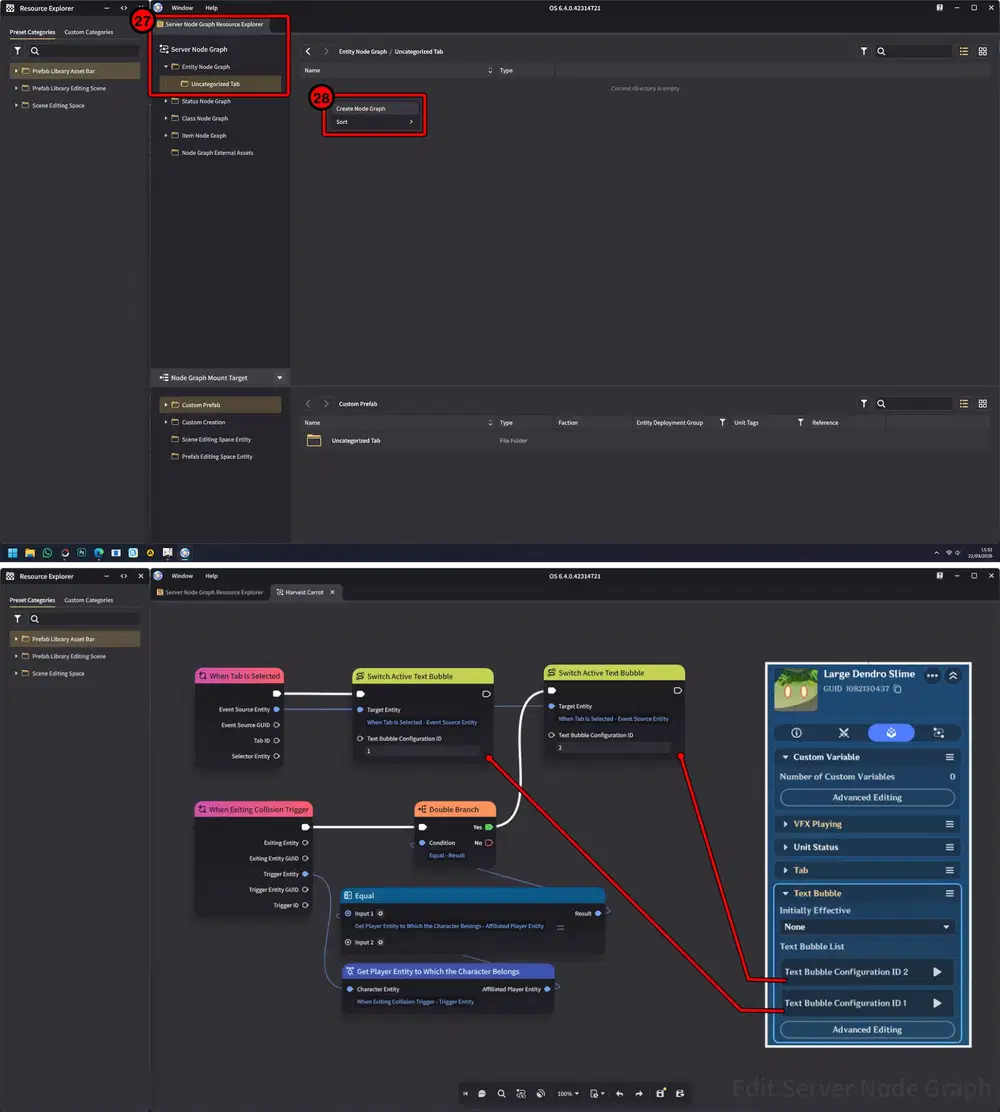
Create Node Graph for NPC Interaction
Last step, attach the Node Graph you created to the NPC.
- Select the Node Graph menu on the NPC → add a Node Graph → then choose the Node Graph you created earlier.
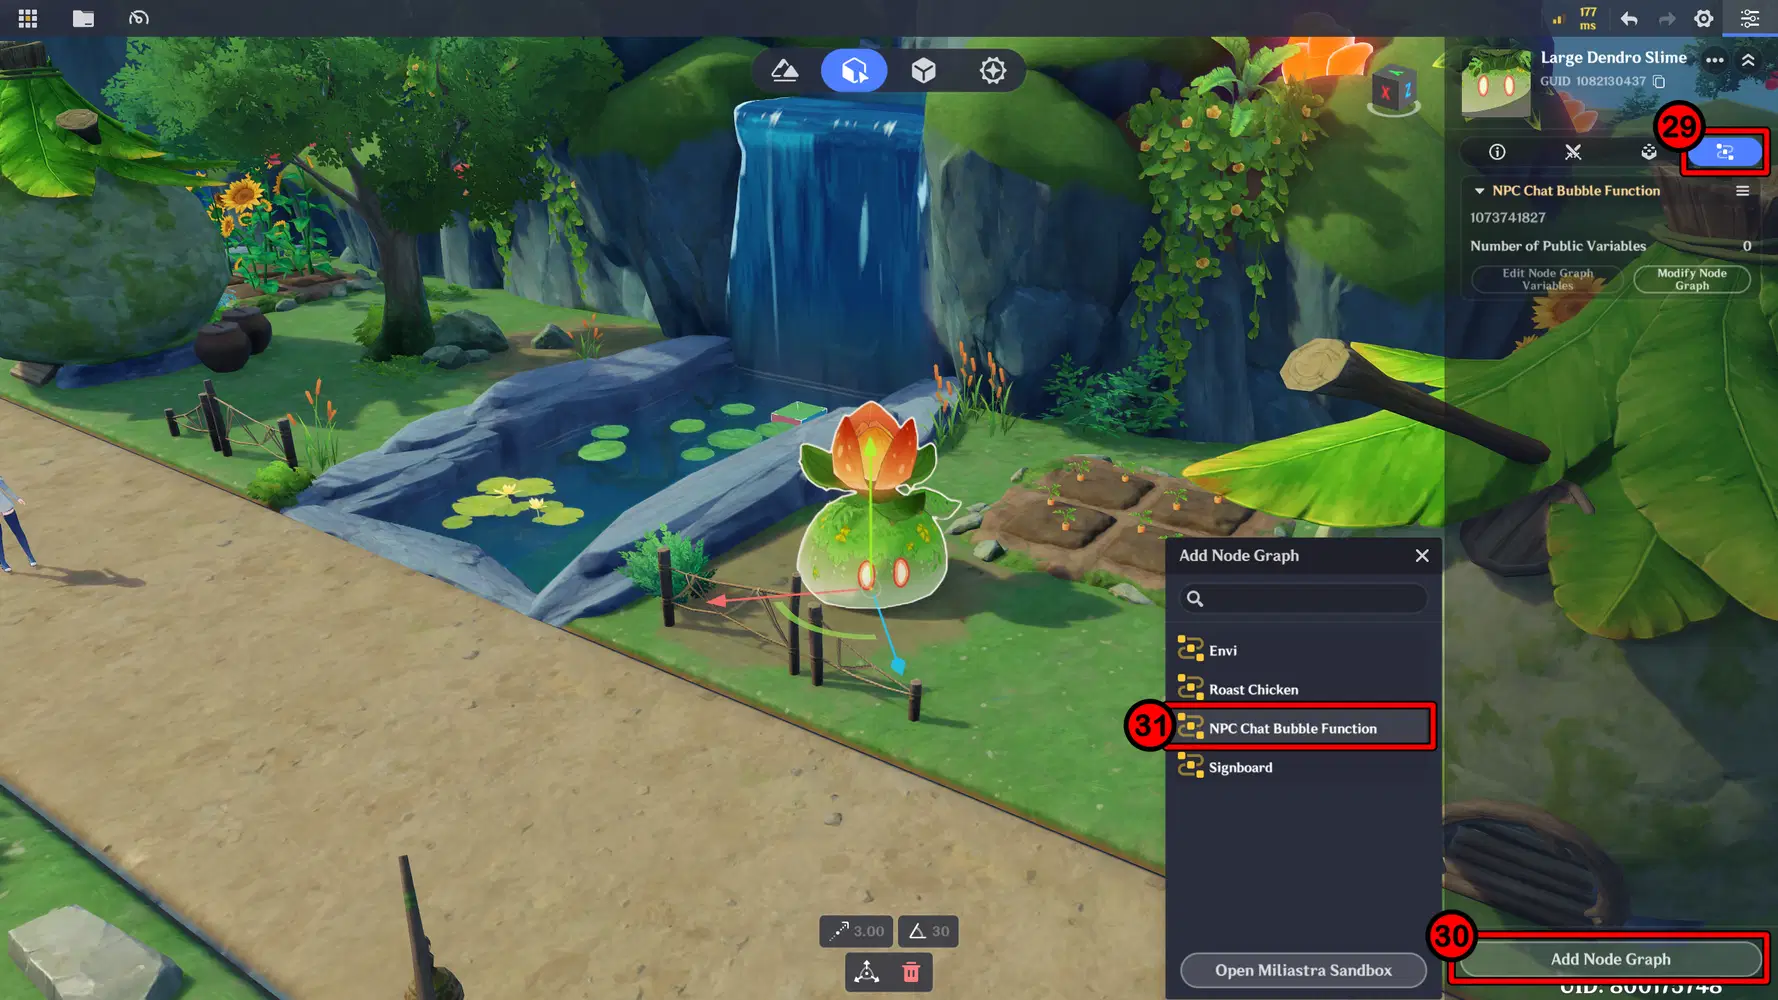
Add Node Graph to NPC
Here is the result. By adding an interactive NPC, you can provide custom messages, whether related to the stage or quests, or simply for interaction, making the scene feel more alive and engaging.
✦ Sign Board
Another type of interactive object is a Sign Board. This object can display hints or longer descriptions about the stage, such as rules and other useful information for players.
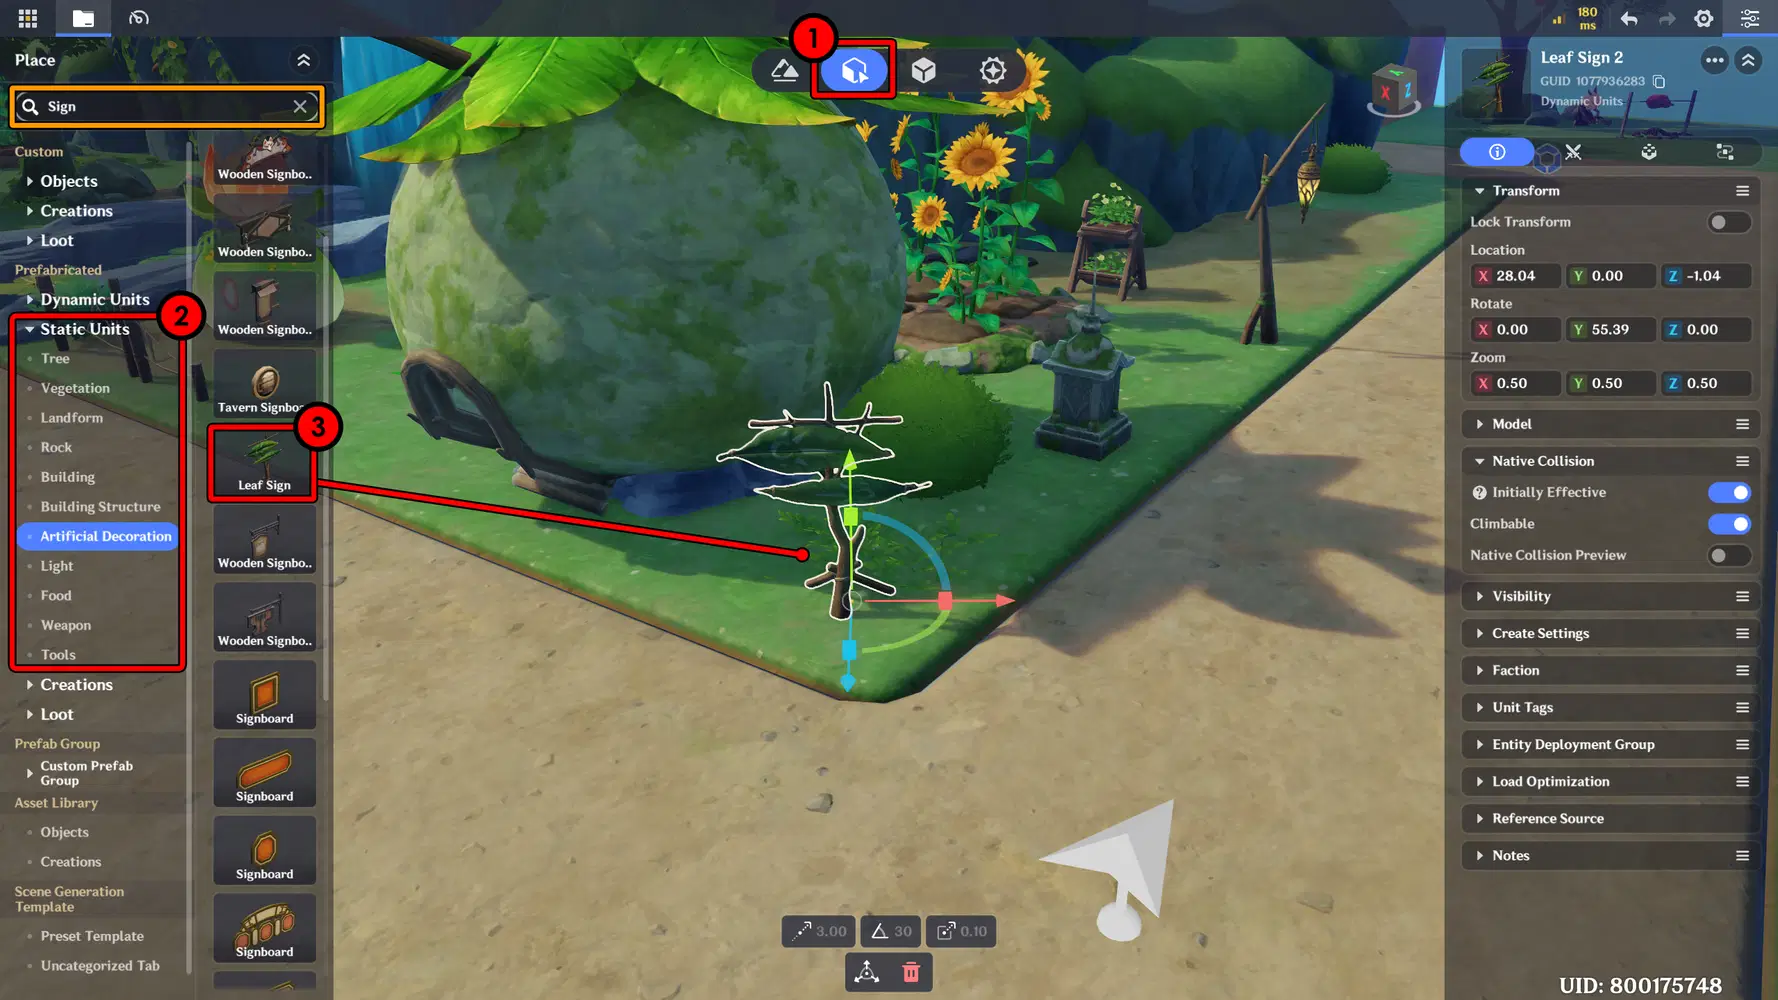
Add Sign Board to Scene
First, you need to change the object status from Static to Dynamic so the object can have components such as Tab, Nameplate, and Attachment Point, which are used to enable object interaction and additional object behavior.
- Go to the Prefab Library, select the object you want to modify, then on the top-right panel change its status from Static to Dynamic, and Overwrite and save the prefab.
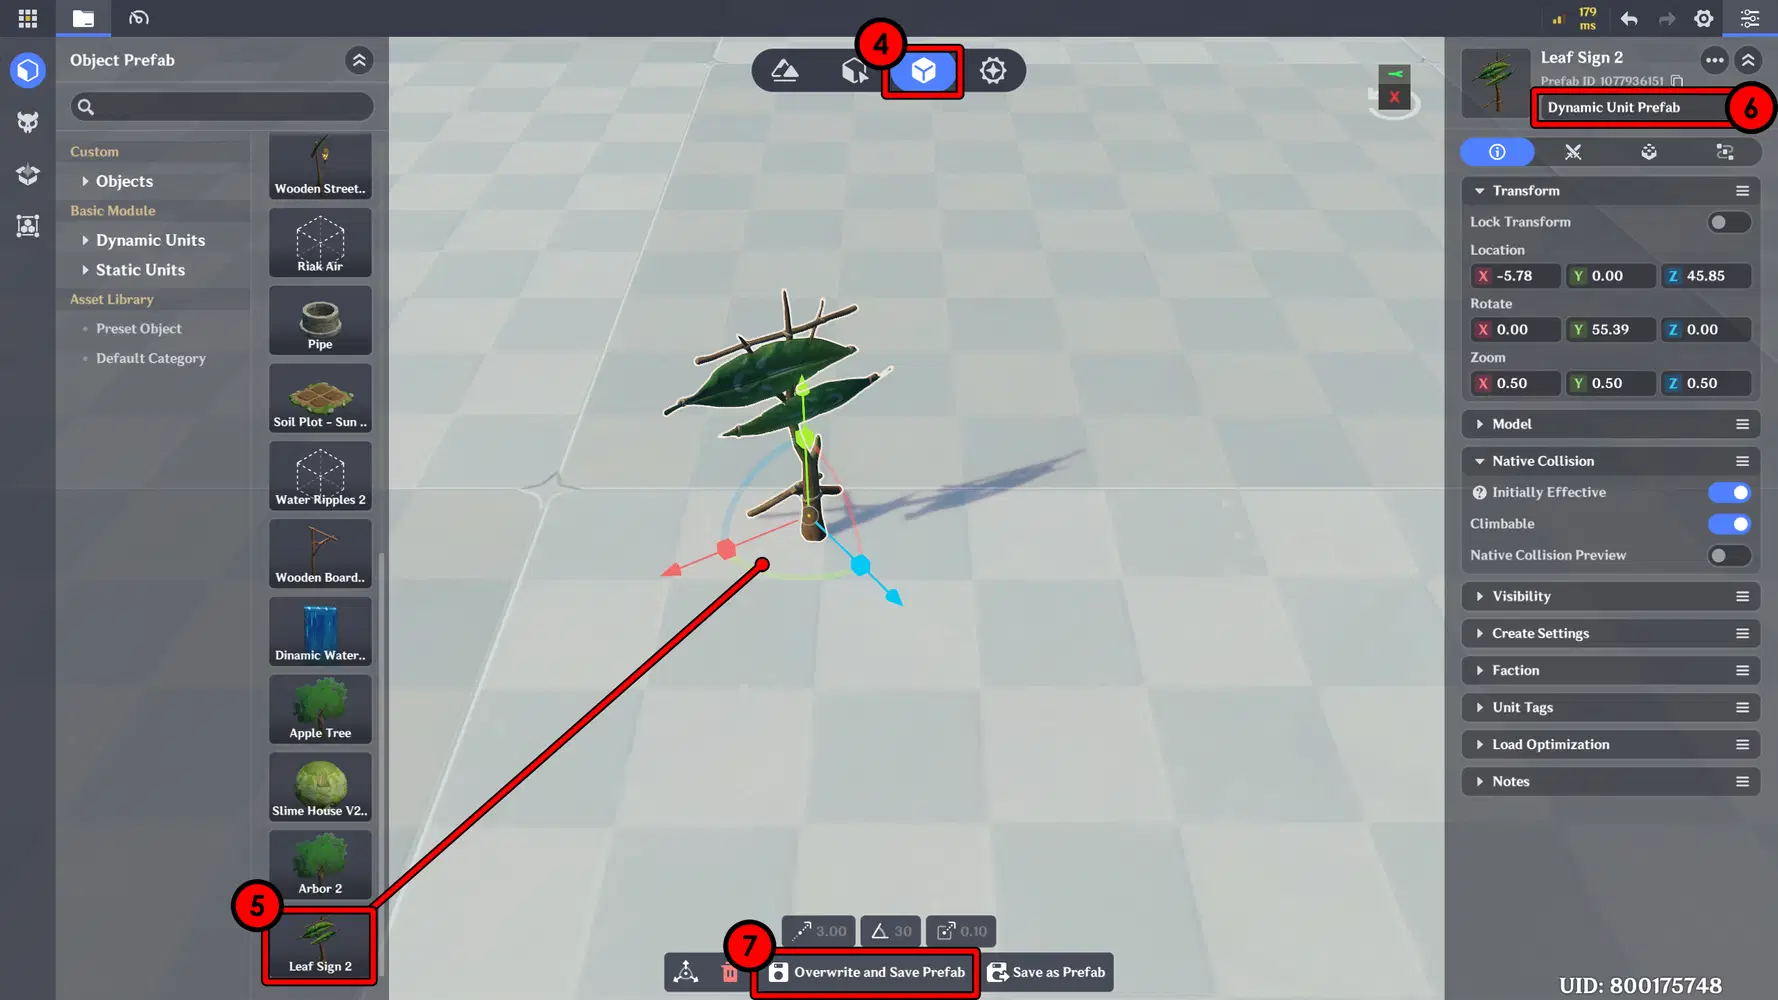
Change Static to Dynamic
Next, add the Nameplate component to give the object an icon. This acts as an indicator that the object is interactive and can provide information.
- Click the Components menu on the object → select Add Common Component → choose Nameplate - select Advanced Editing.
- In Advanced Editing, add content and choose the Icon type. In this example, I use the Text Board icon.
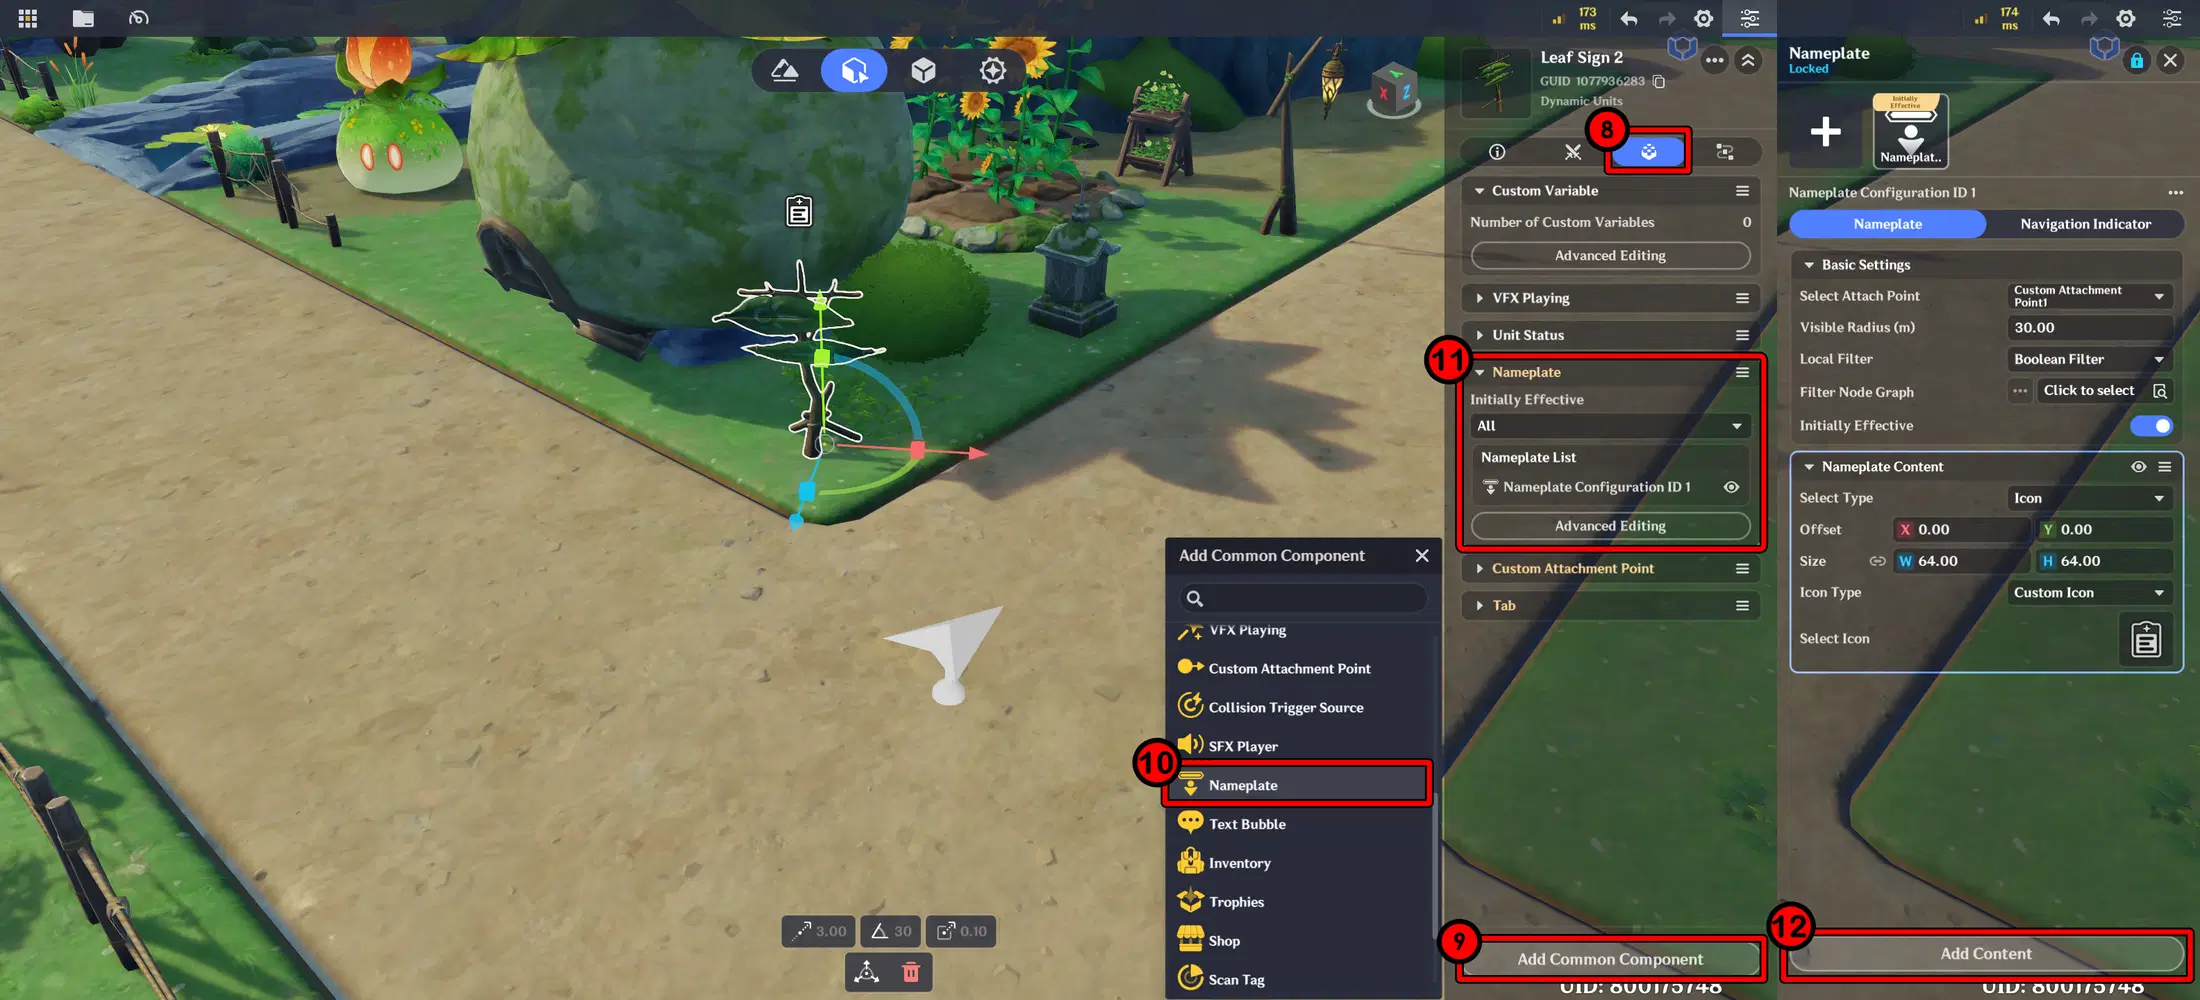
Add Nameplate
Next, add the Custom Attachment Point component. This is used to adjust and position the Nameplate so it appears neatly above the object.
- Go to the Components menu → add common component → select Custom Attachment Point → open Advanced Editing.
- In Advanced Editing, choose Add Custom Attachment Point, then position the point above the object.
Then, go back to the Nameplate settings and assign it to the Attachment Point you created earlier so it appears in the correct position above the object.
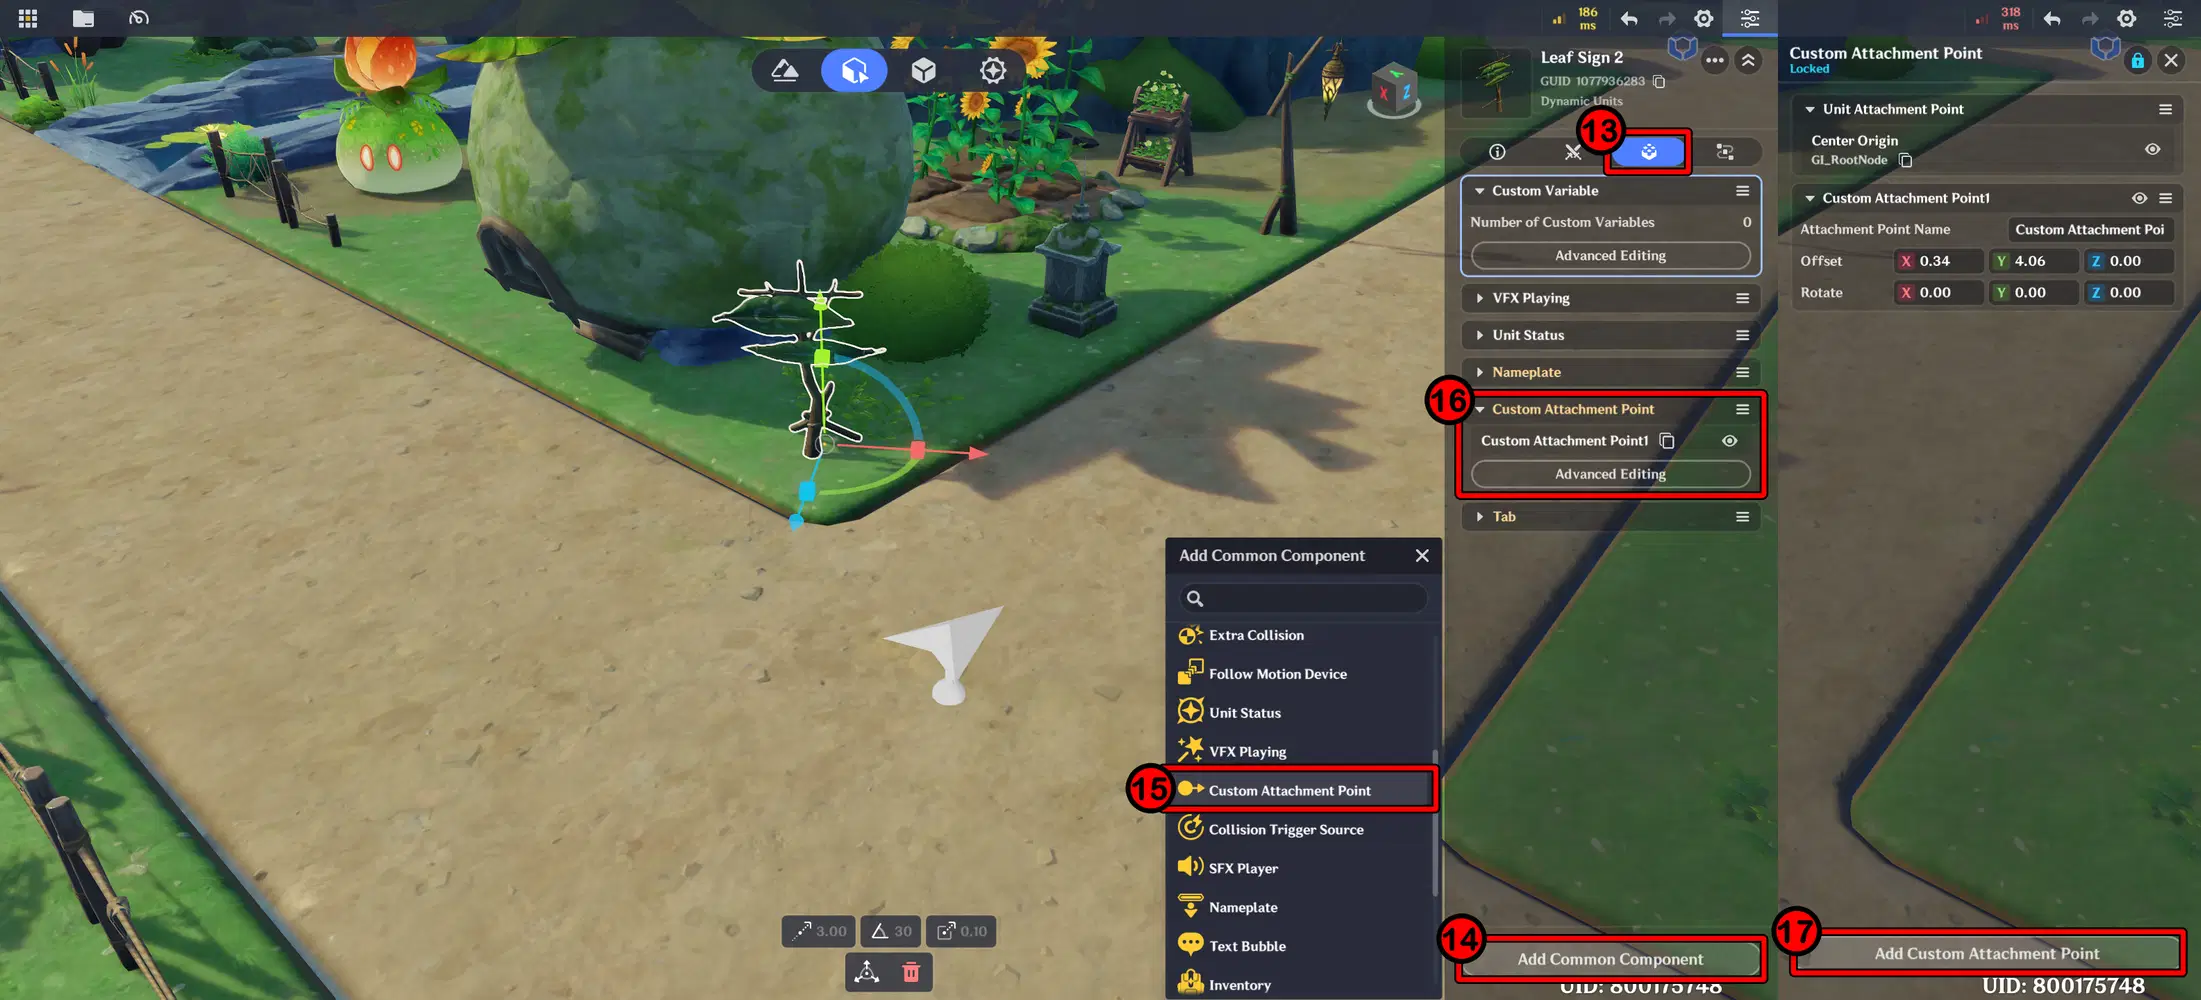
Create Custom Attachment Point
Next, add the Tab component to enable interaction and open a pop-up window.
- Go to the Components menu on the object → add common component → select Tab → then open Advanced Editing.
In the Tab settings, choose an icon and add the text you want to display. Also adjust the Trigger Option Area, which detects when the player enters the object’s range and makes the tab appear.
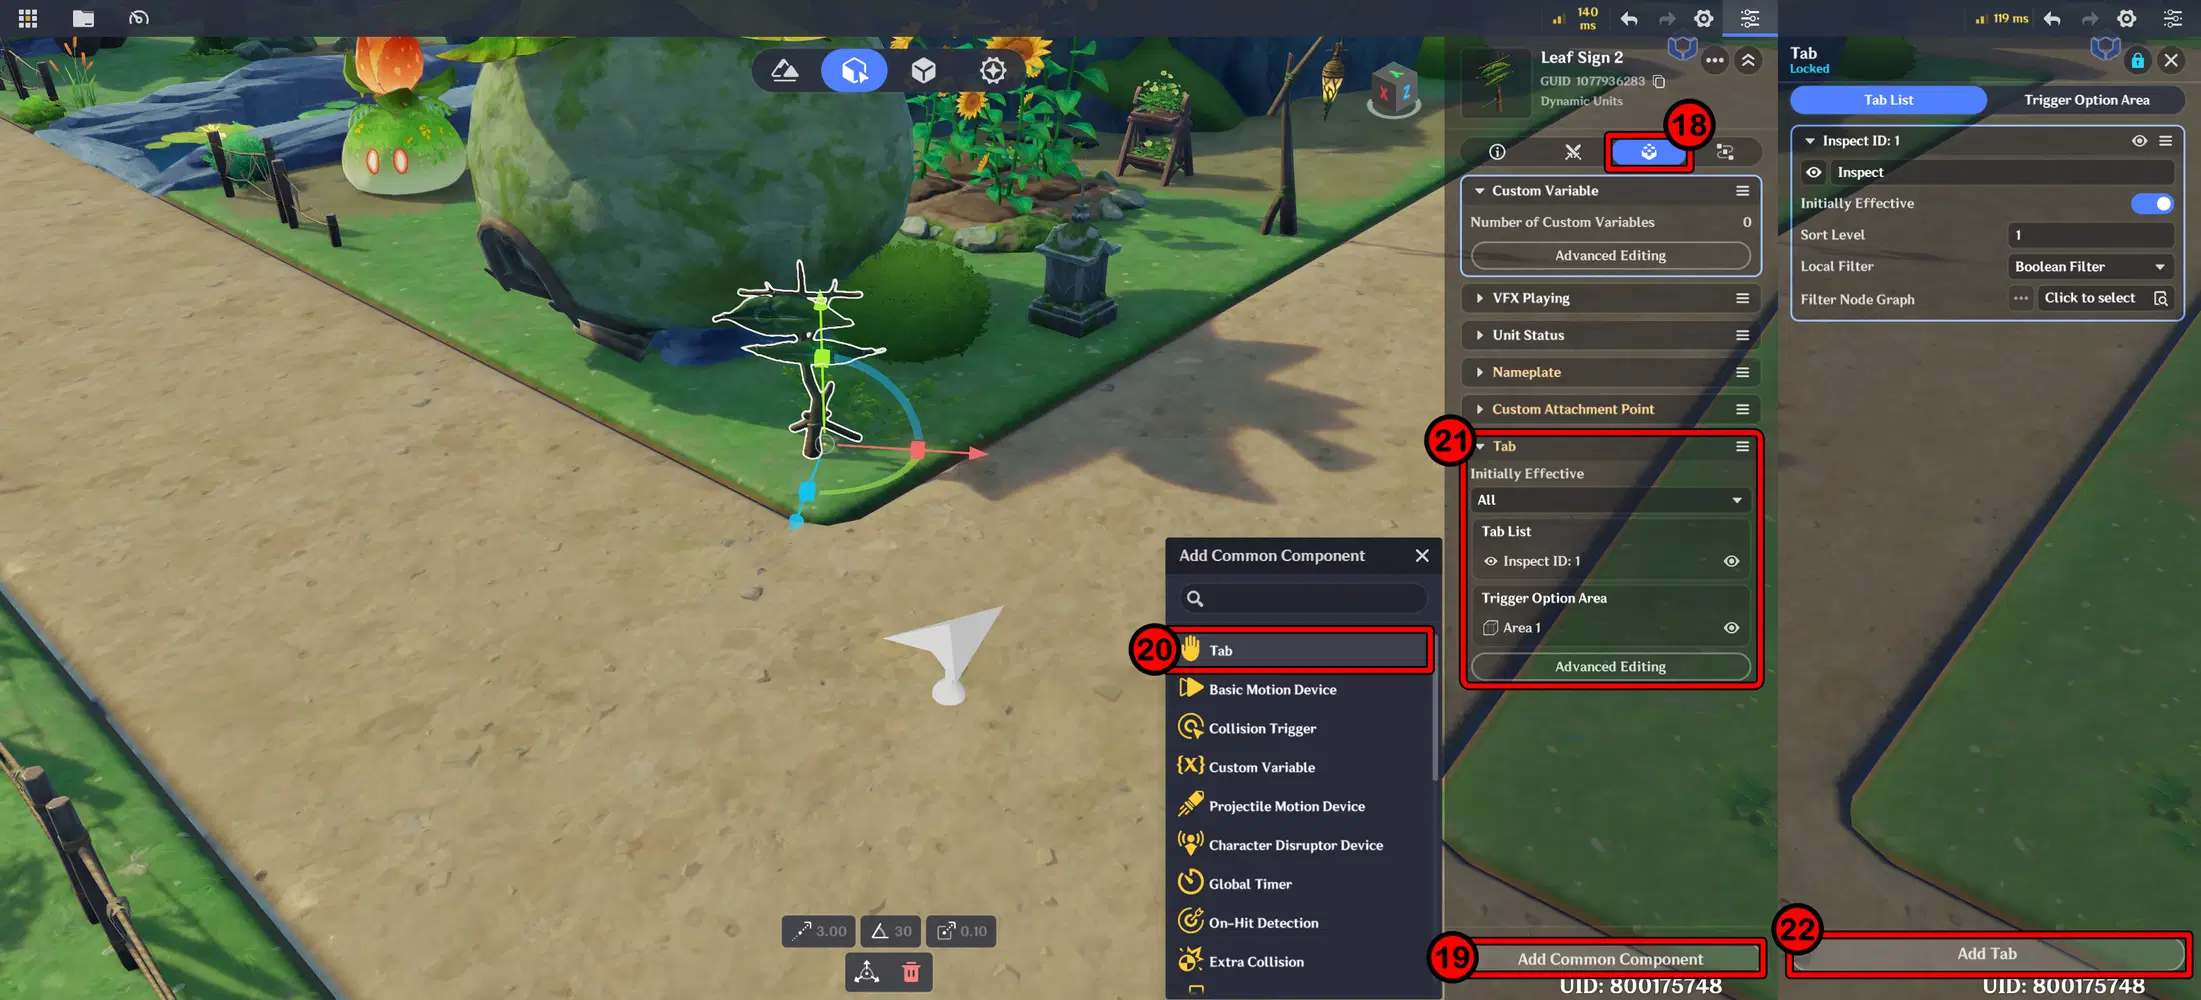
Add Tab for Interaction
Next, create the Pop-Up UI that will appear when the object is selected using the Tab.
- On the main menu, go to Manage UI Control Groups.
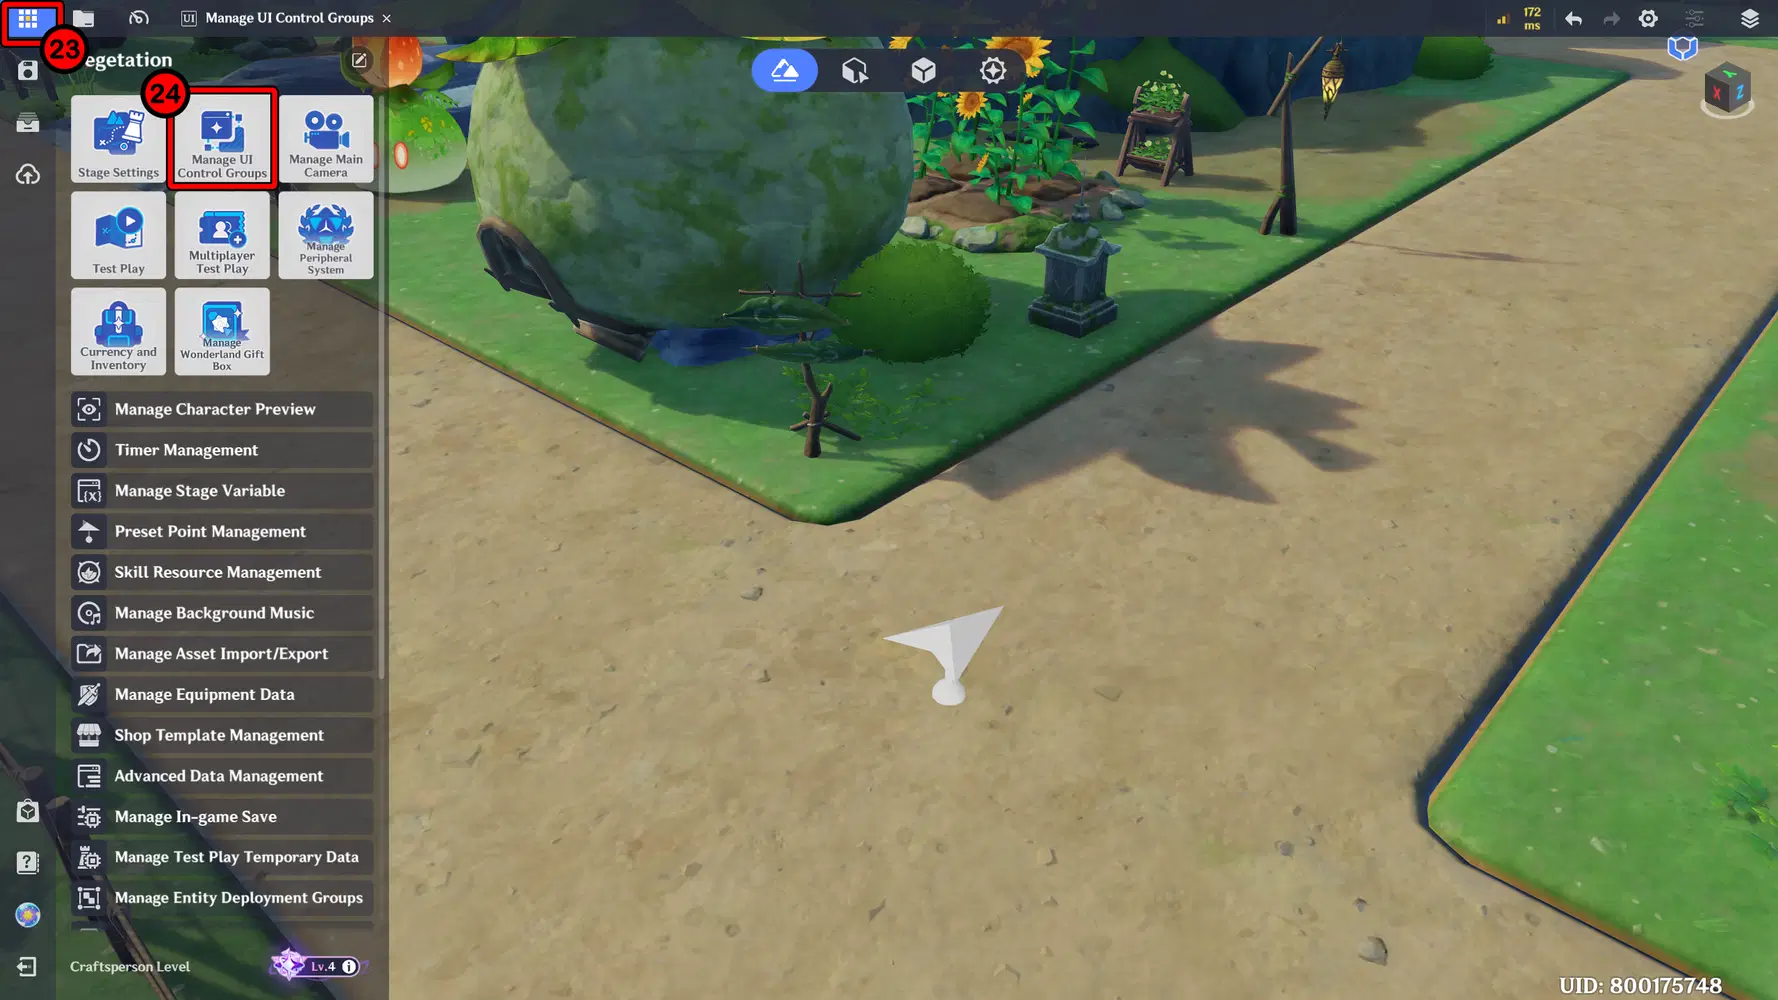
A new window will open. Go to the UI Control Group Library, then select Add UI Control Template and choose Pop-Up. After that, you can enter the title and content text on the right panel. And last, don’t forget to save it.
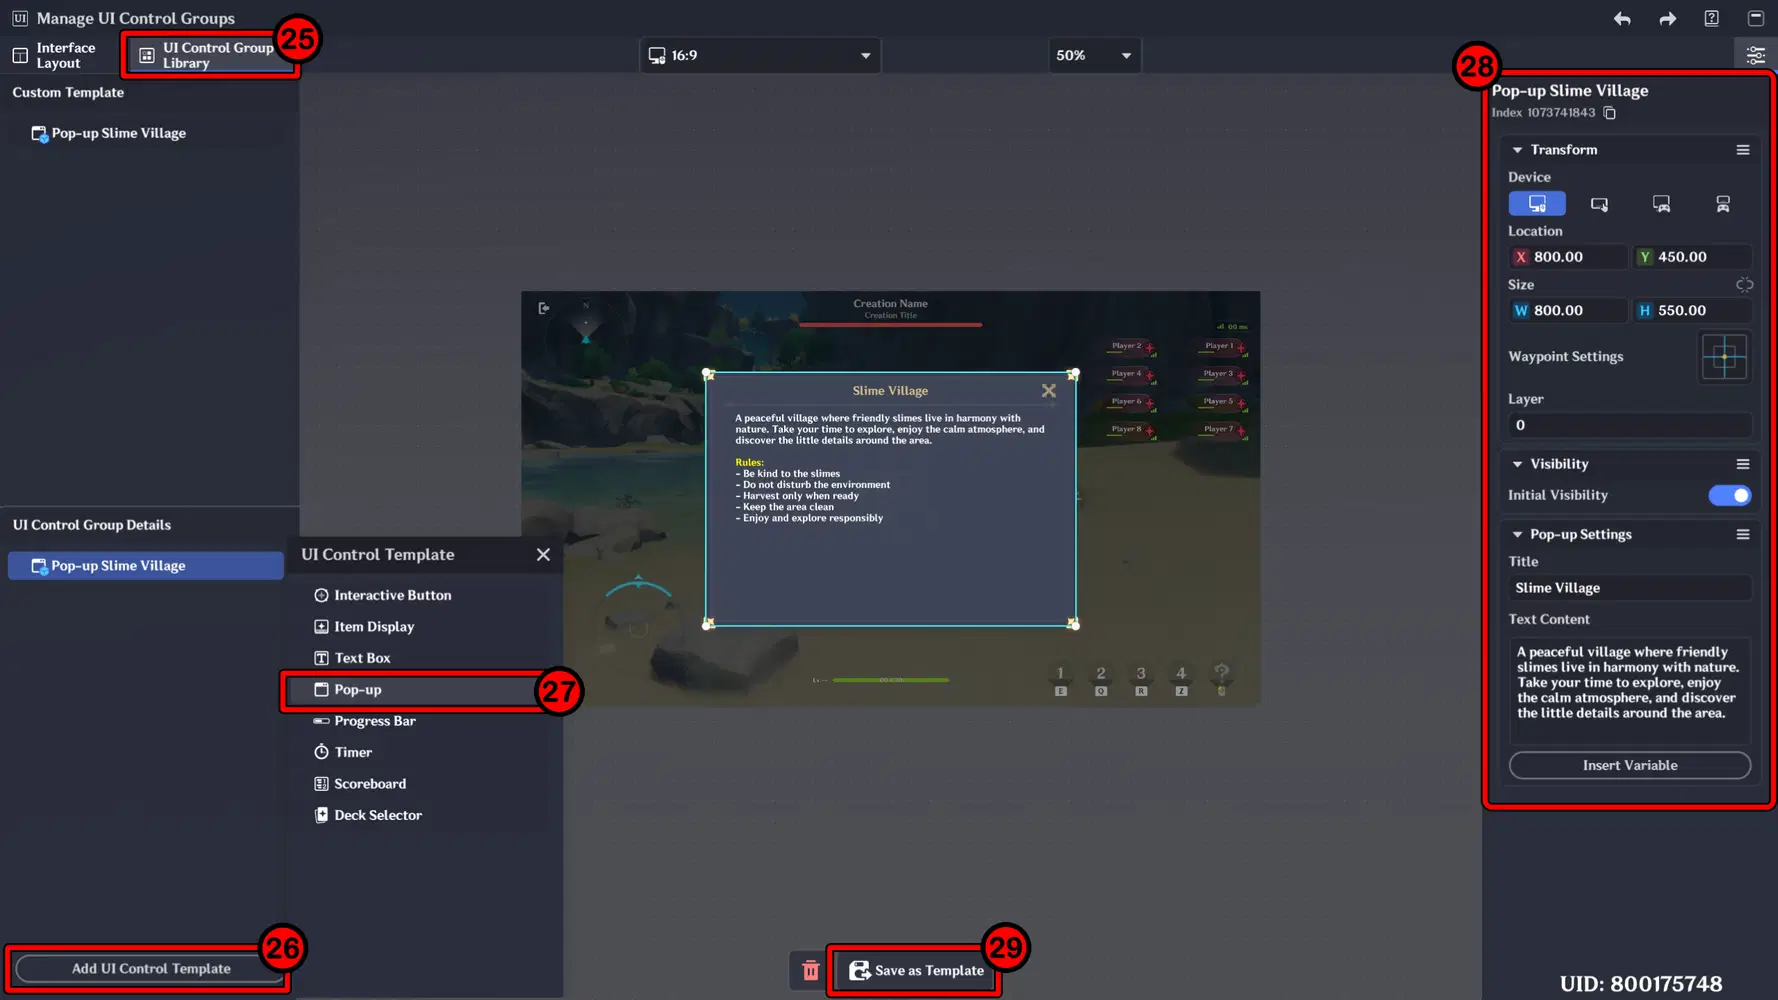
Create Pop-Up Window
The last step is to create a Node Graph and attach it to the object. This is used to handle the interaction and display the Pop-Up.
- Open the Miliastra Sandbox window, go to Server - Node Graph Resource, then create a new node there.
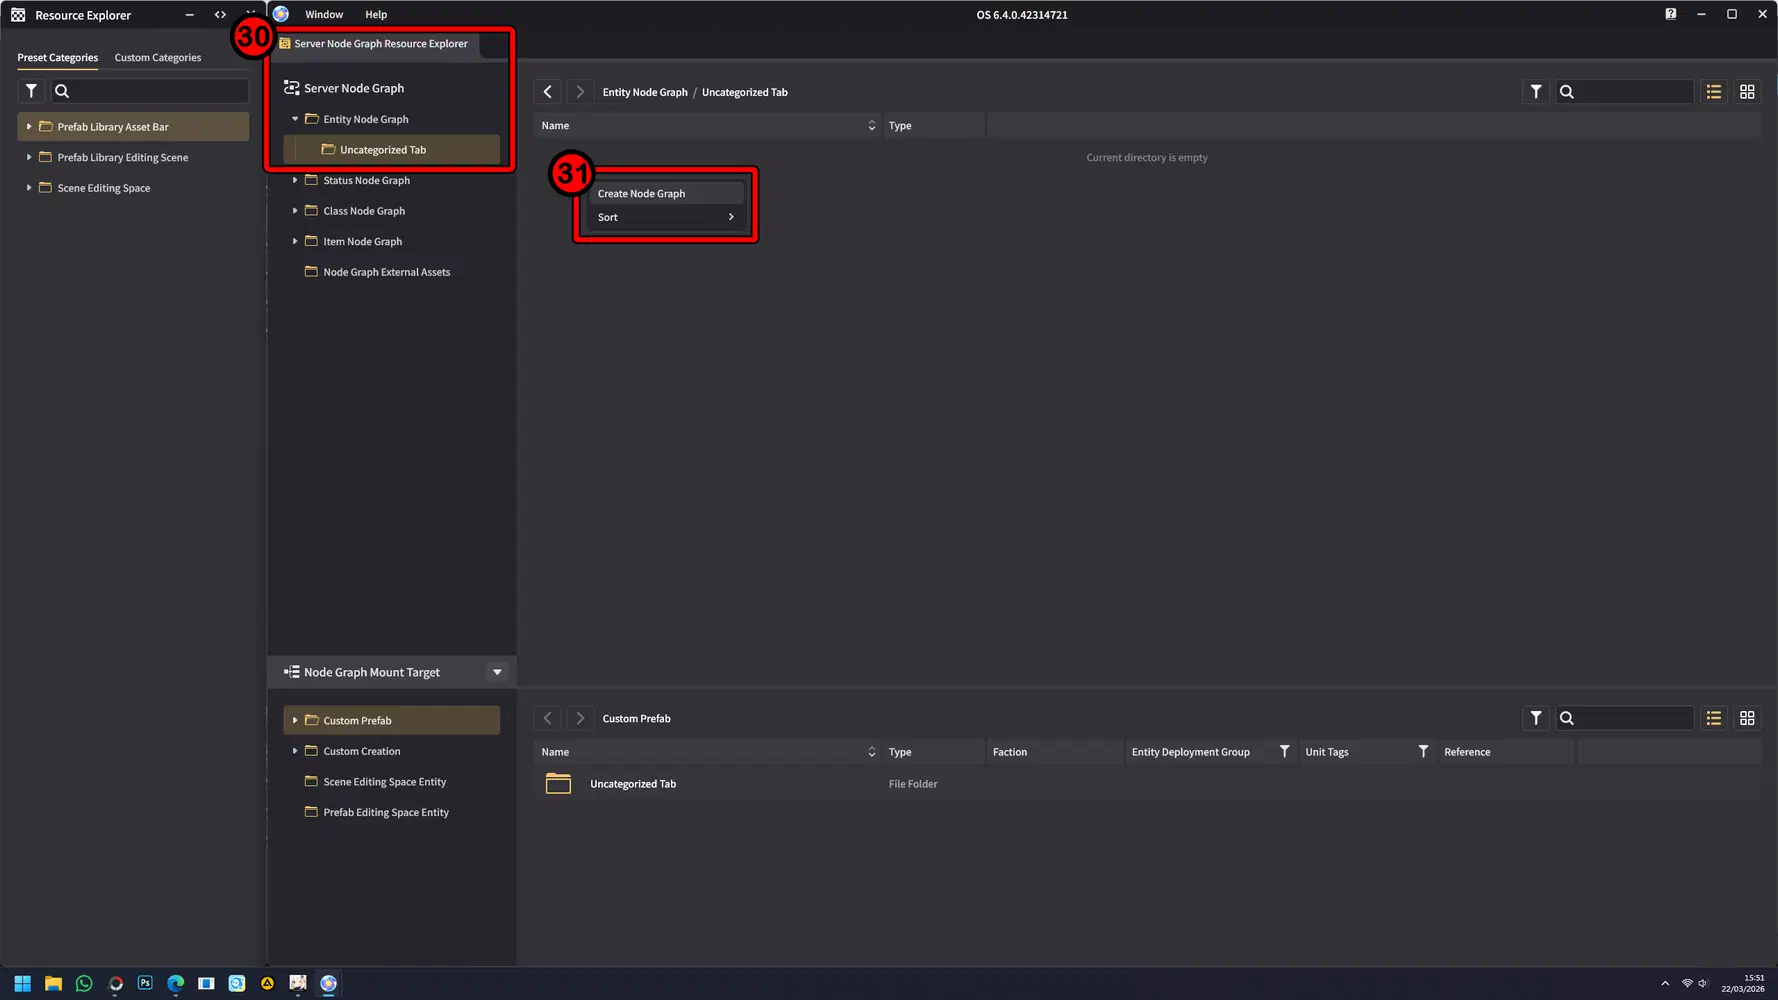
Then, create a Node Graph like the example below. When the Tab is selected, it will activate the UI and display the Pop-Up.
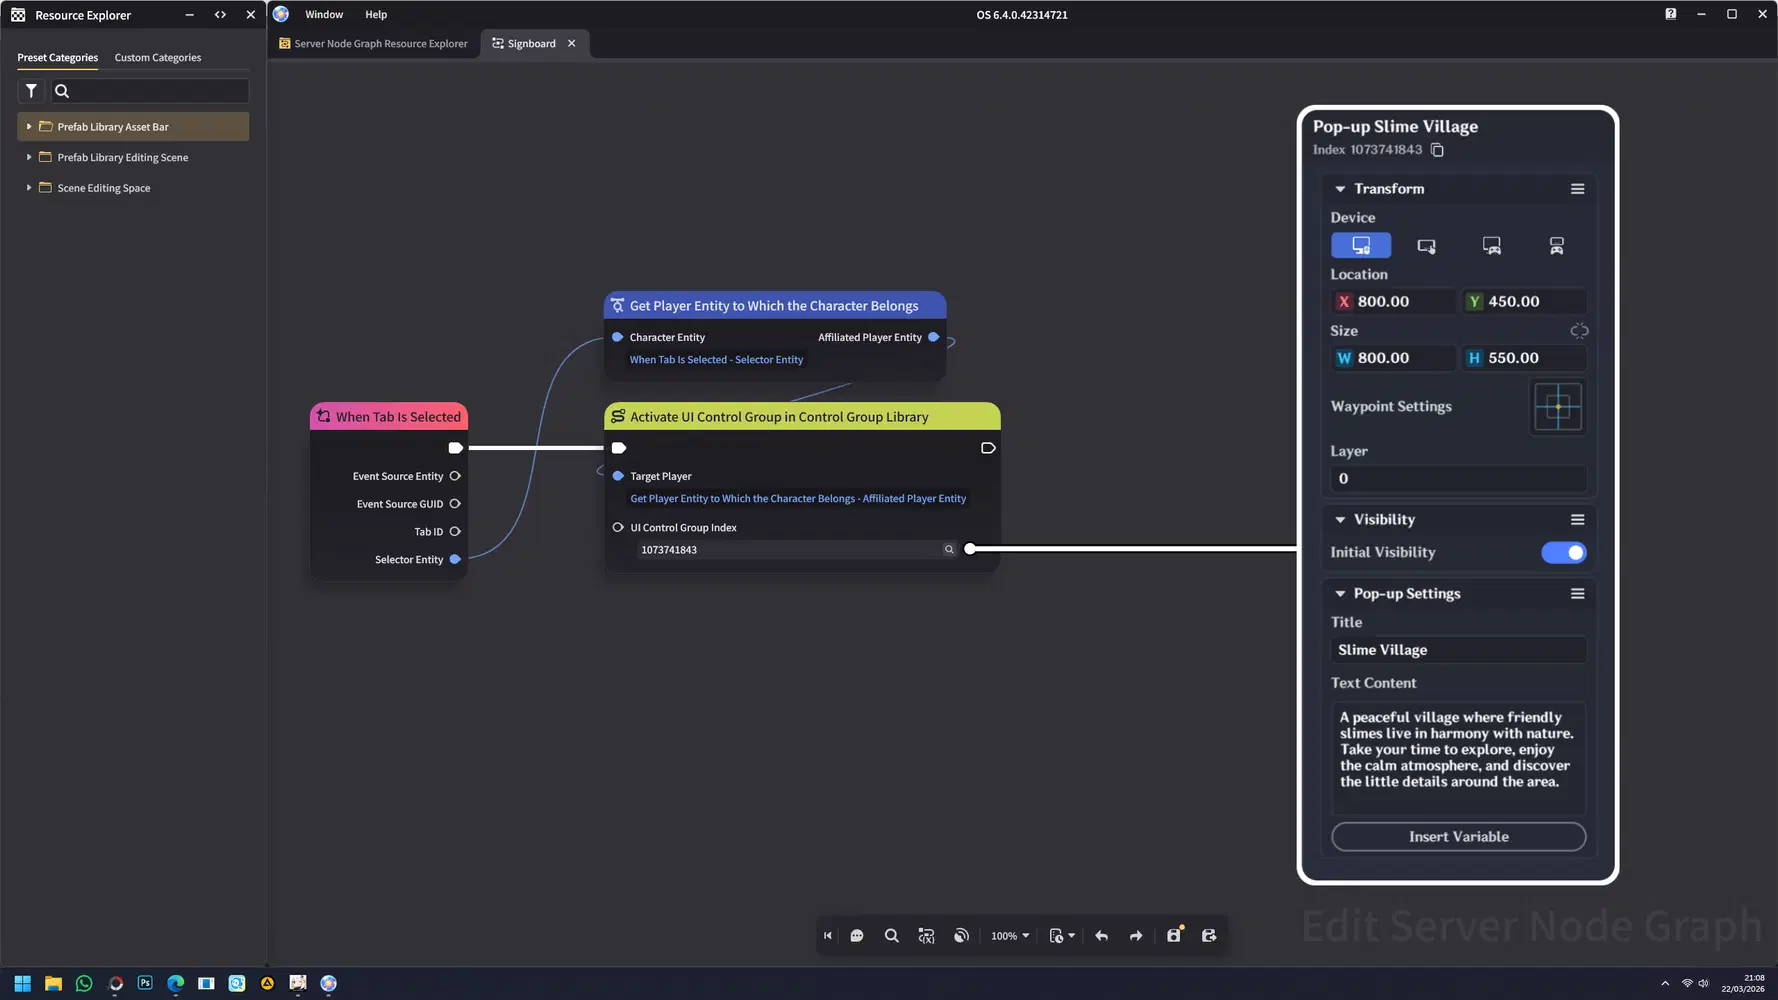
Create Node Graph for Display Pop-Up Window
And don’t forget to attach the Node Graph you created to the object.
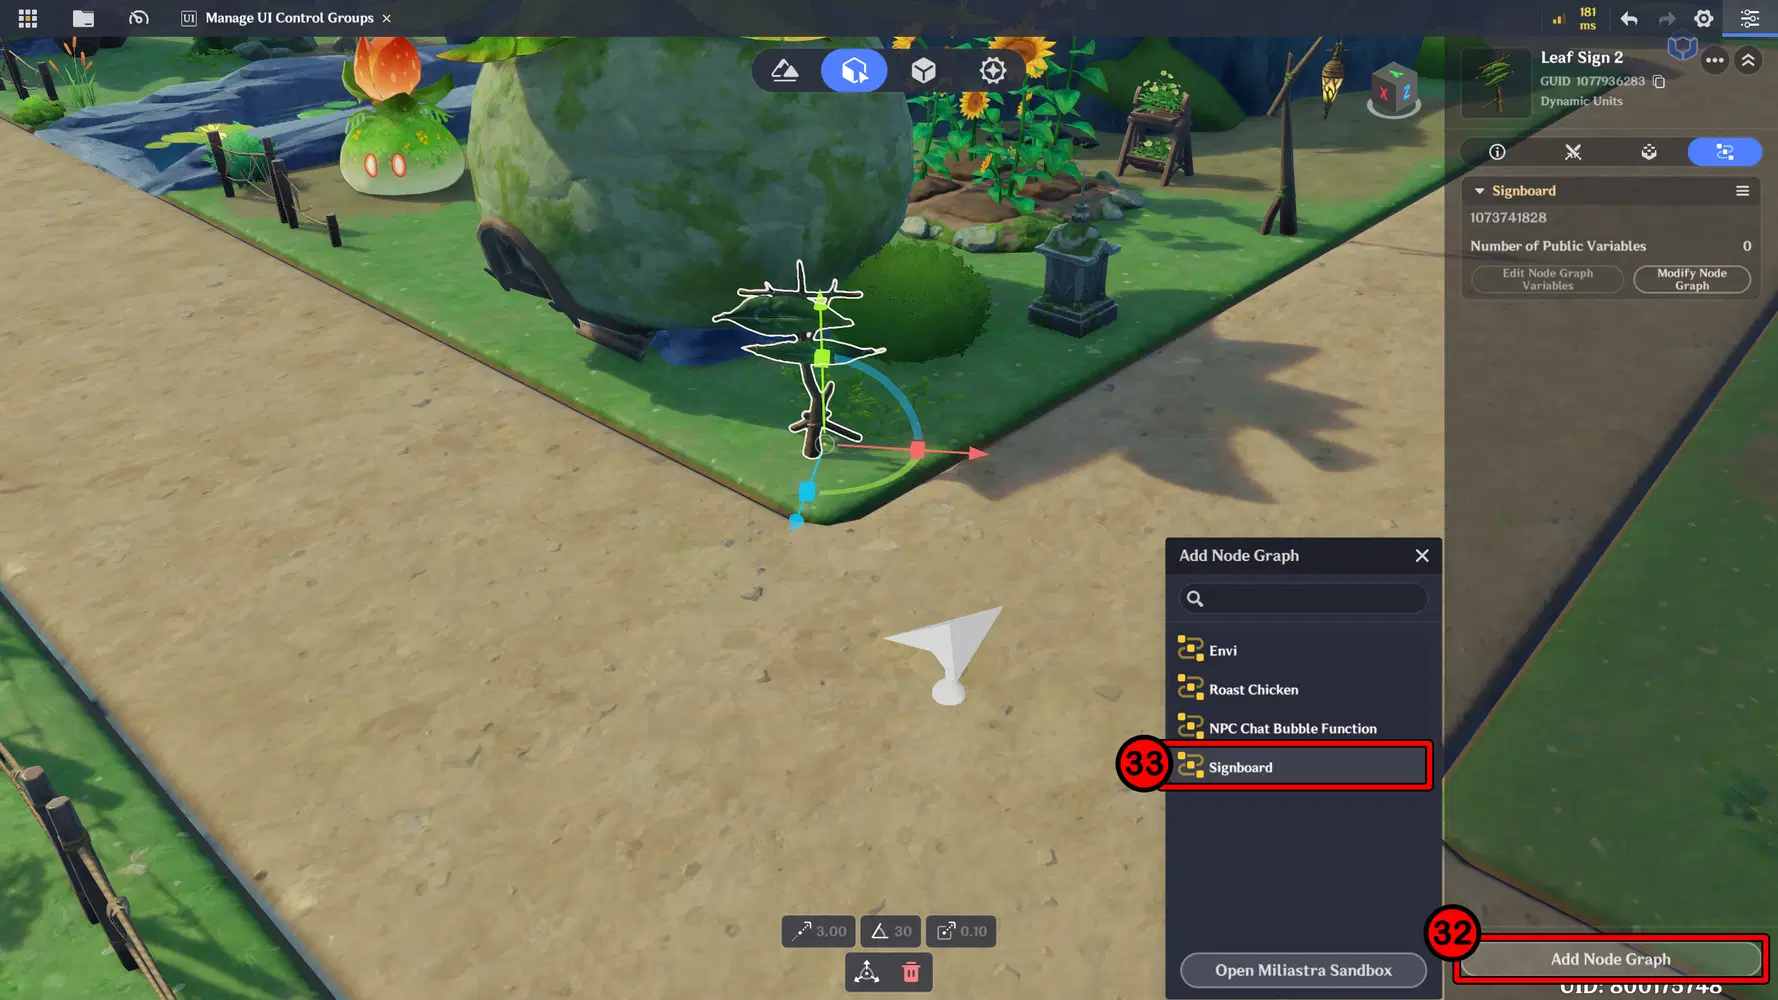
Add Node Graph to Sign Board
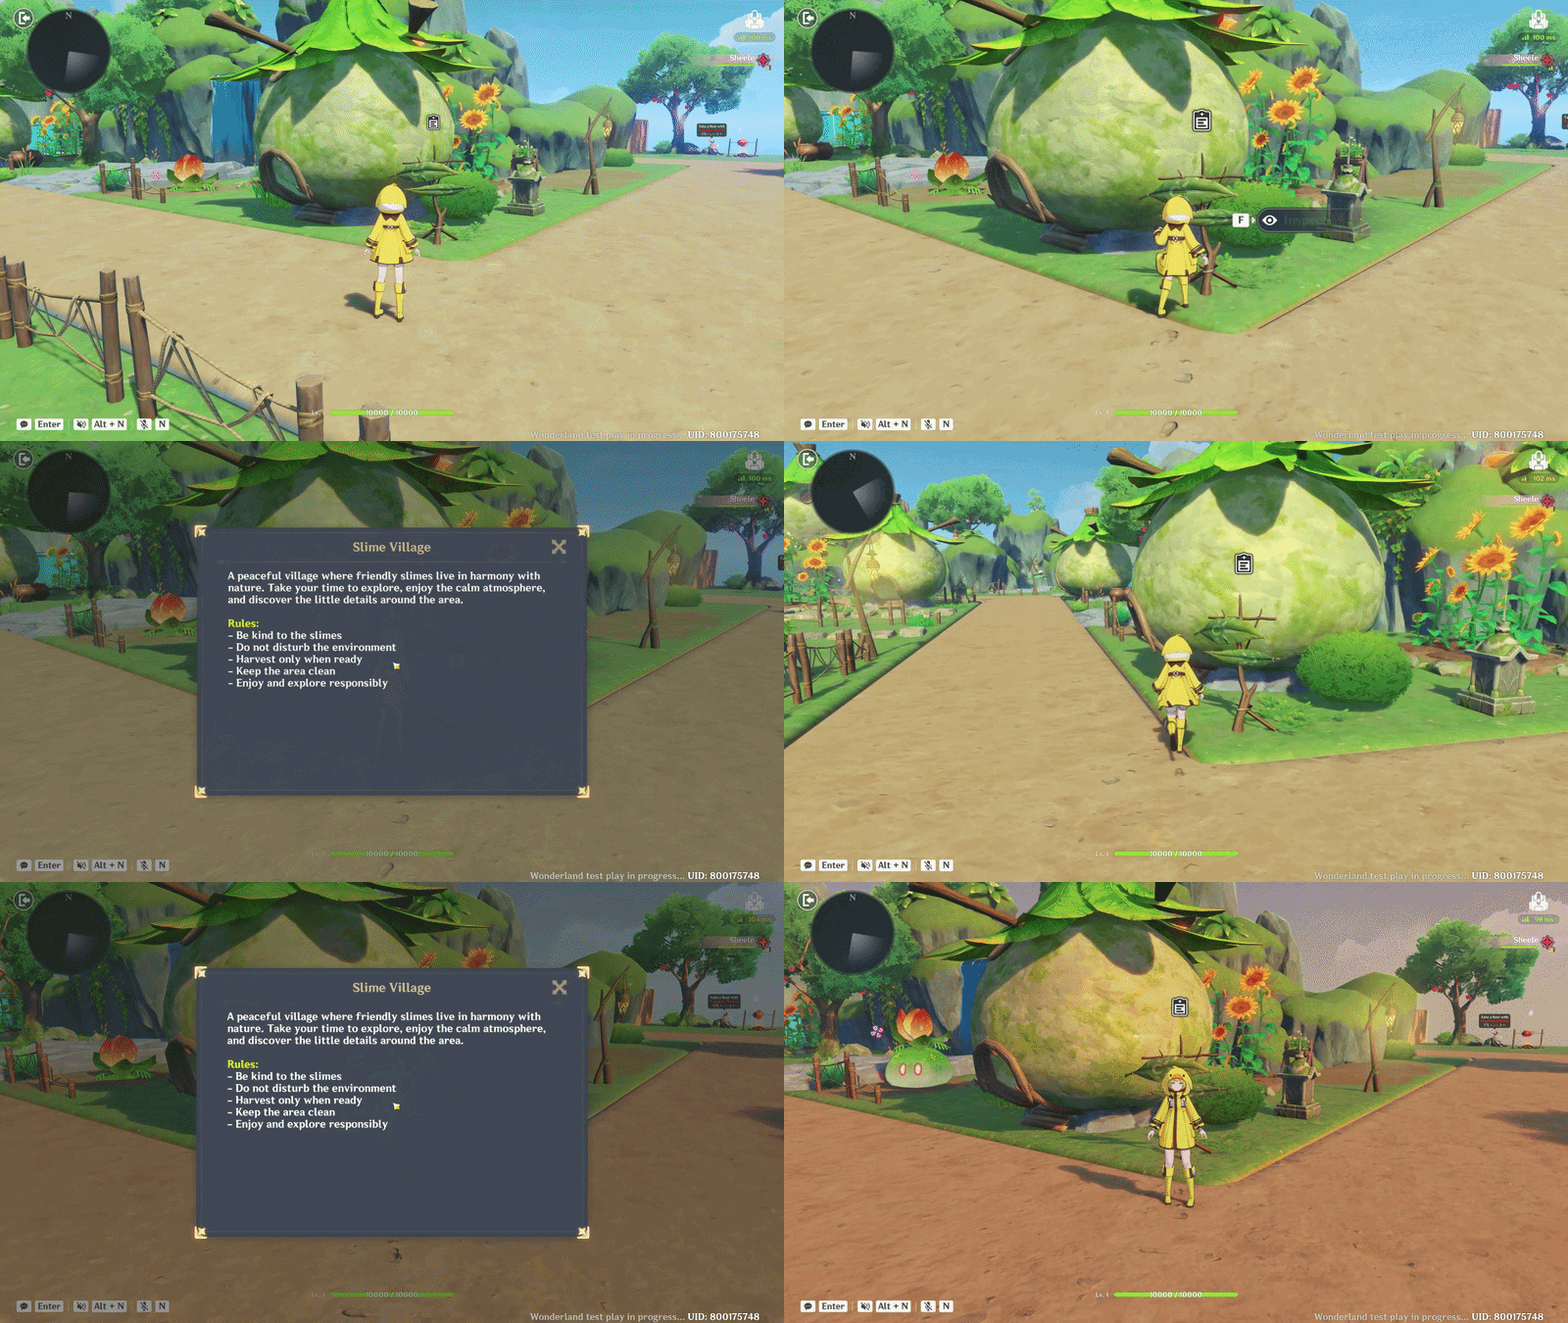
Here is the result. When the player interacts with the object, it will display a Pop-Up containing information about the stage or game you created. Besides improving the visual design, adding interactive objects like this also helps players better understand the content within your game.
Tips 8 - Living Elements
Try adding Living Elements to make your scene feel more alive and dynamic. You can place animals such as Boar, Fish, and other creatures around the environment. You can also add walking NPC to create movement and make the scene feel more active and lively.
📝 Wonderland Guide:
✦ Create Animal
Try adding animals to your scene to make the environment feel more alive and natural. You can place creatures like Wild Boar, fish, or other animals around the area. In this guide, I add a Wild Boar to the scene and adjust its behavior, so it doesn’t attack the player, since it only serves as a background element to make the environment feel more alive.
- Go to Terrain Editing → Asset Bar → Creations, then select Basic Creation. Search for Forest Boar and place it into the scene.
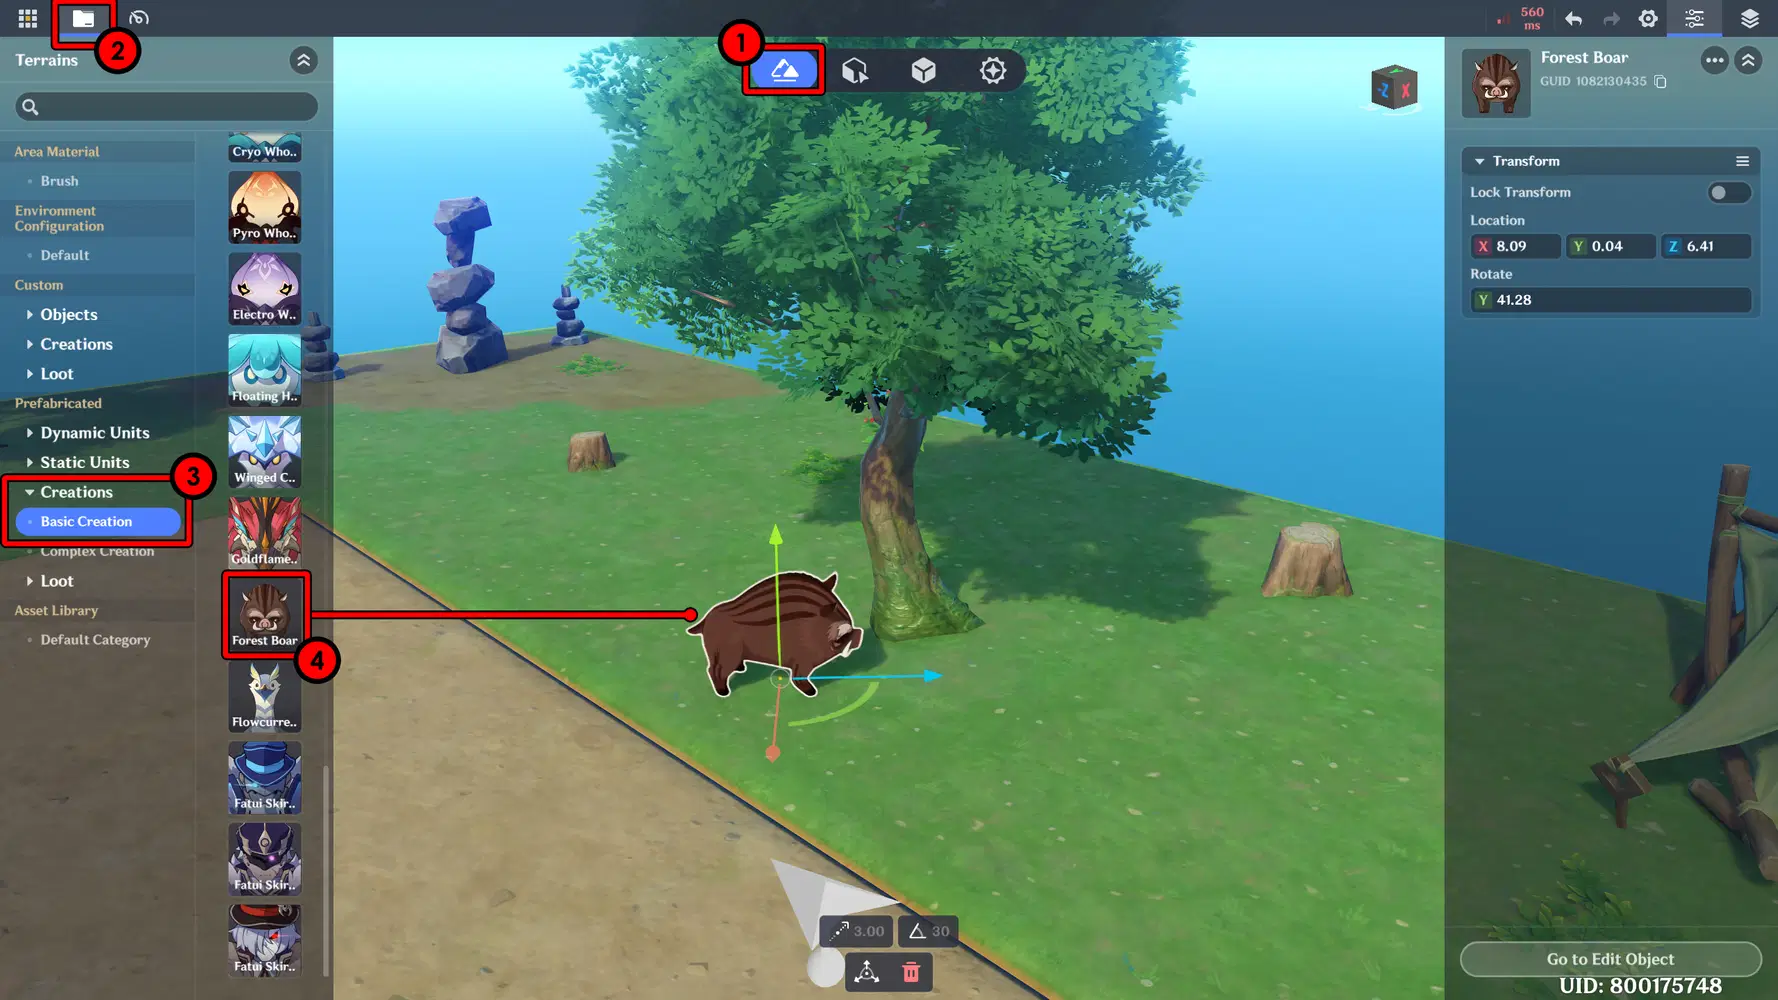
Add Boar at Scene
Disable Attack Behavior:
- Edit the object → go to the Combat section → Standard Settings.
- Set Behavior Mode to Standard, change Not in Battle Behavior to Wandering, and set Entering Battle Zone to None so the boar won’t attack the player.
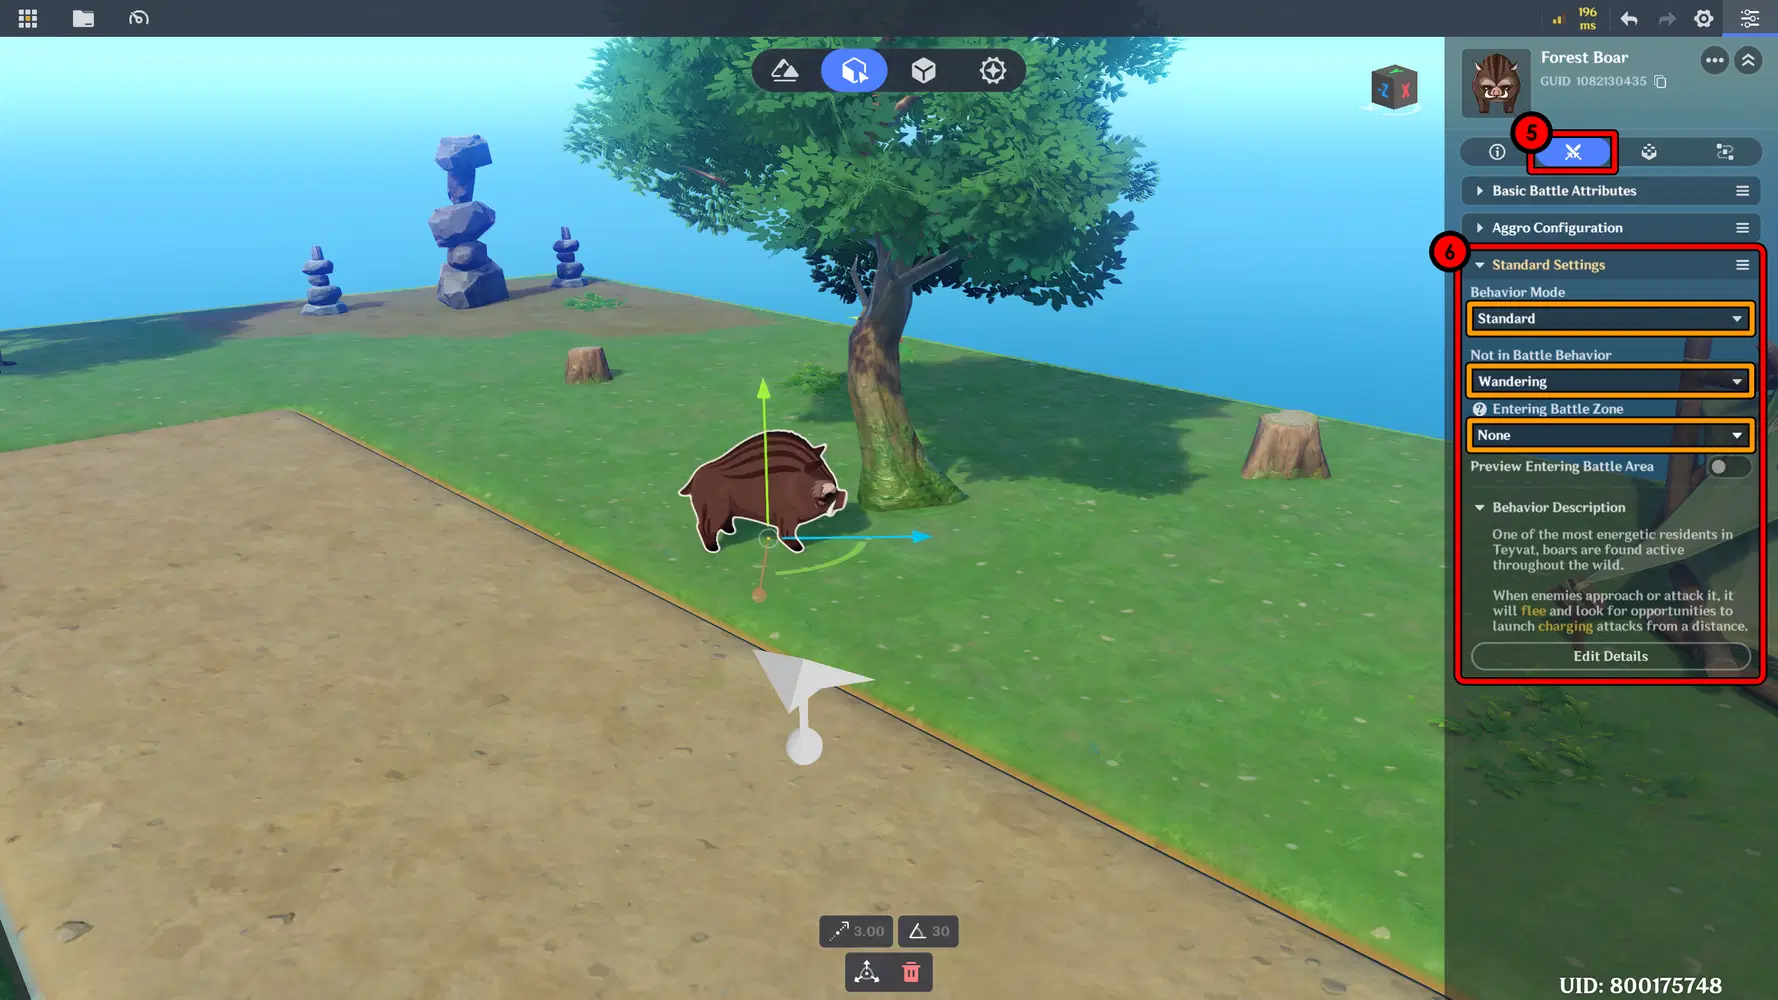
Attack Configuration
Add the Nameplate component with empty settings. This is used to hide the HP bar so the animal looks cleaner in the scene.
- Go to the Components menu on the object → add common component → select Nameplate.
Here is the result. In the scene, the wild boar will move around randomly, and when you get close to it, wild boar will not attack you.
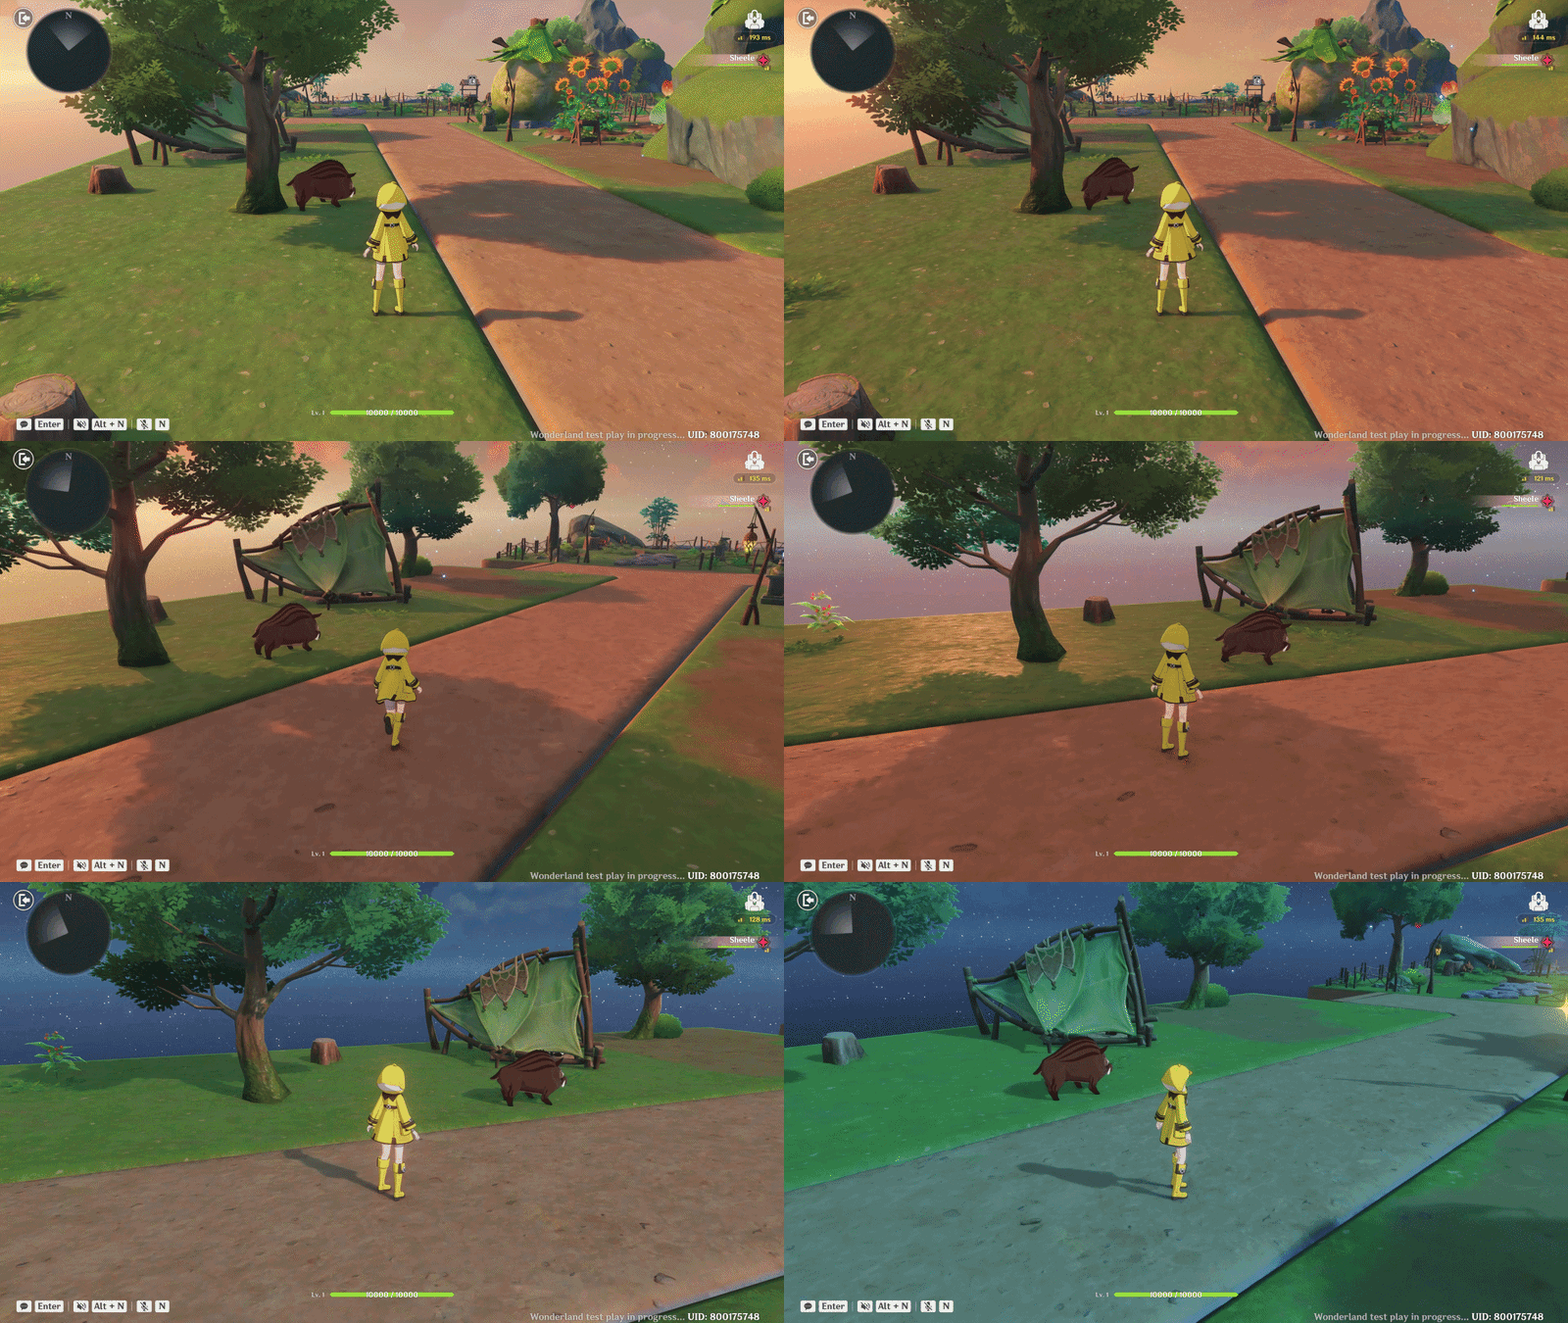
✦ Ambient NPC
Add Walking NPC to create a sense of activity. These characters help make your scene feel more populated and immersive, even without direct interaction.
- First, go to Terrain Editing → Asset Bar → Creations, Basic Creation.
- In this example, I use a Dendro Slime as a patrol NPC in the village / scene.
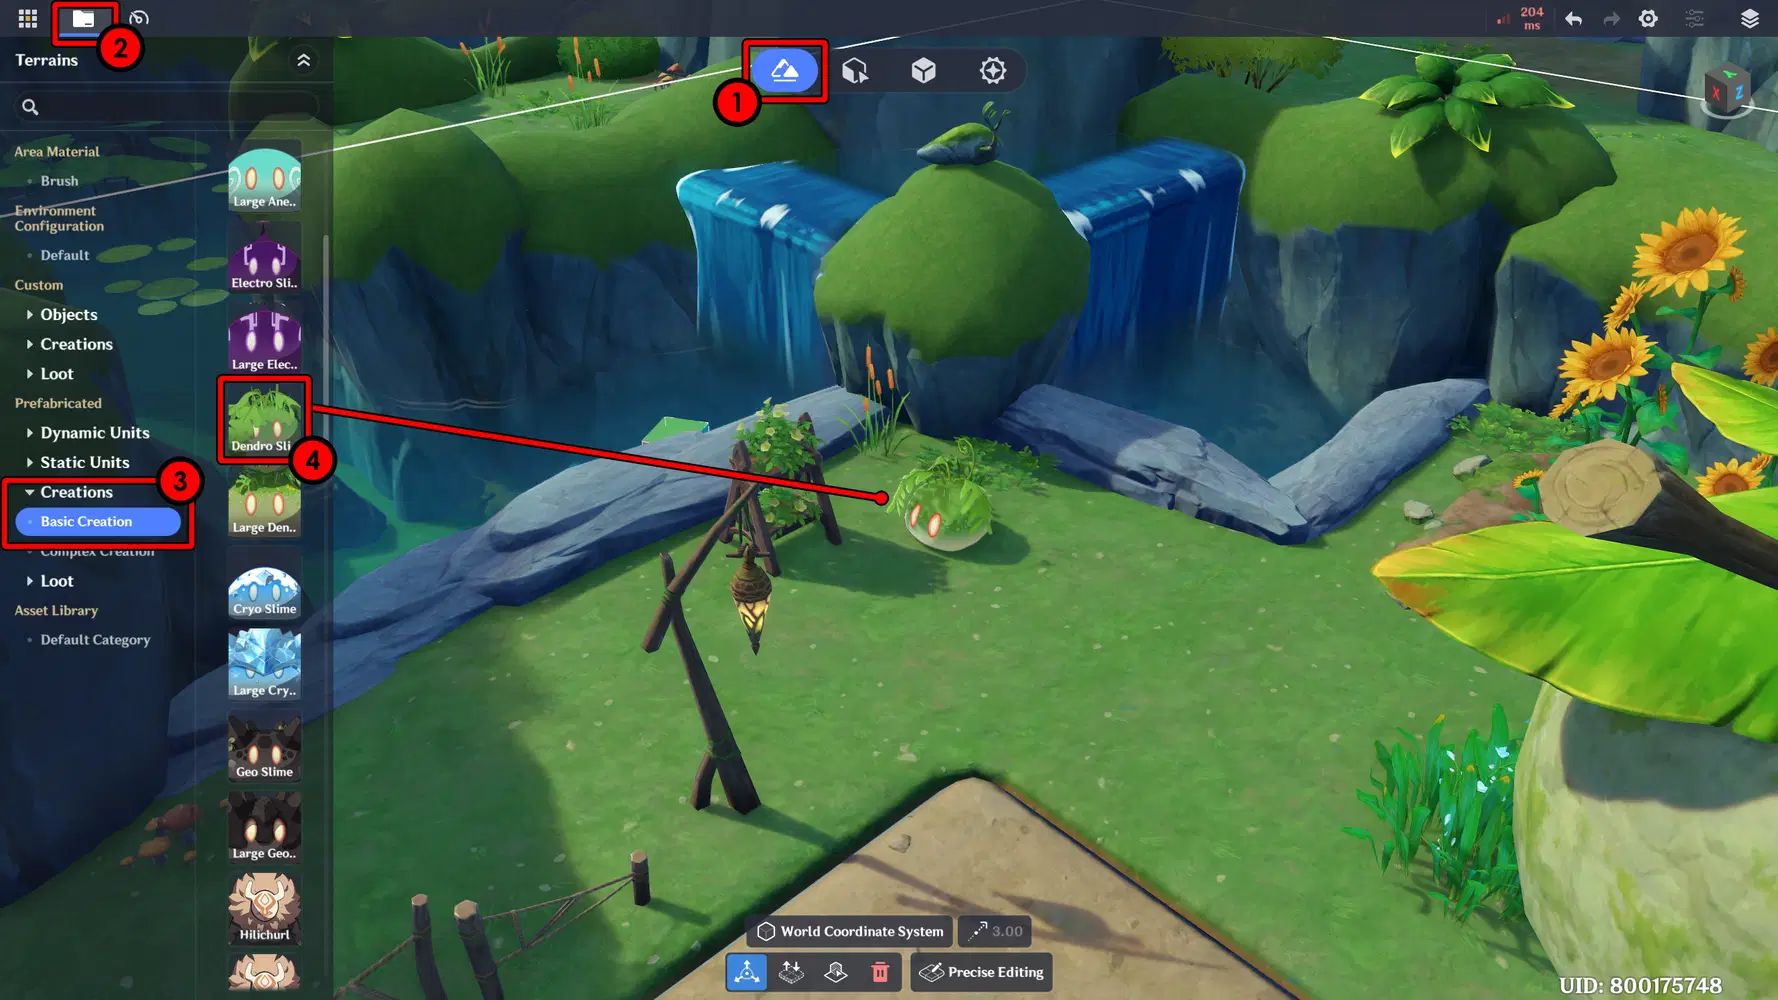
Add NPC at Scene
Since this NPC is only used as a background element, I hide its HP bar by adding the Nameplate component, just like we did with the wild boar.
- Go to the Components menu on the object → add common component → select Nameplate.
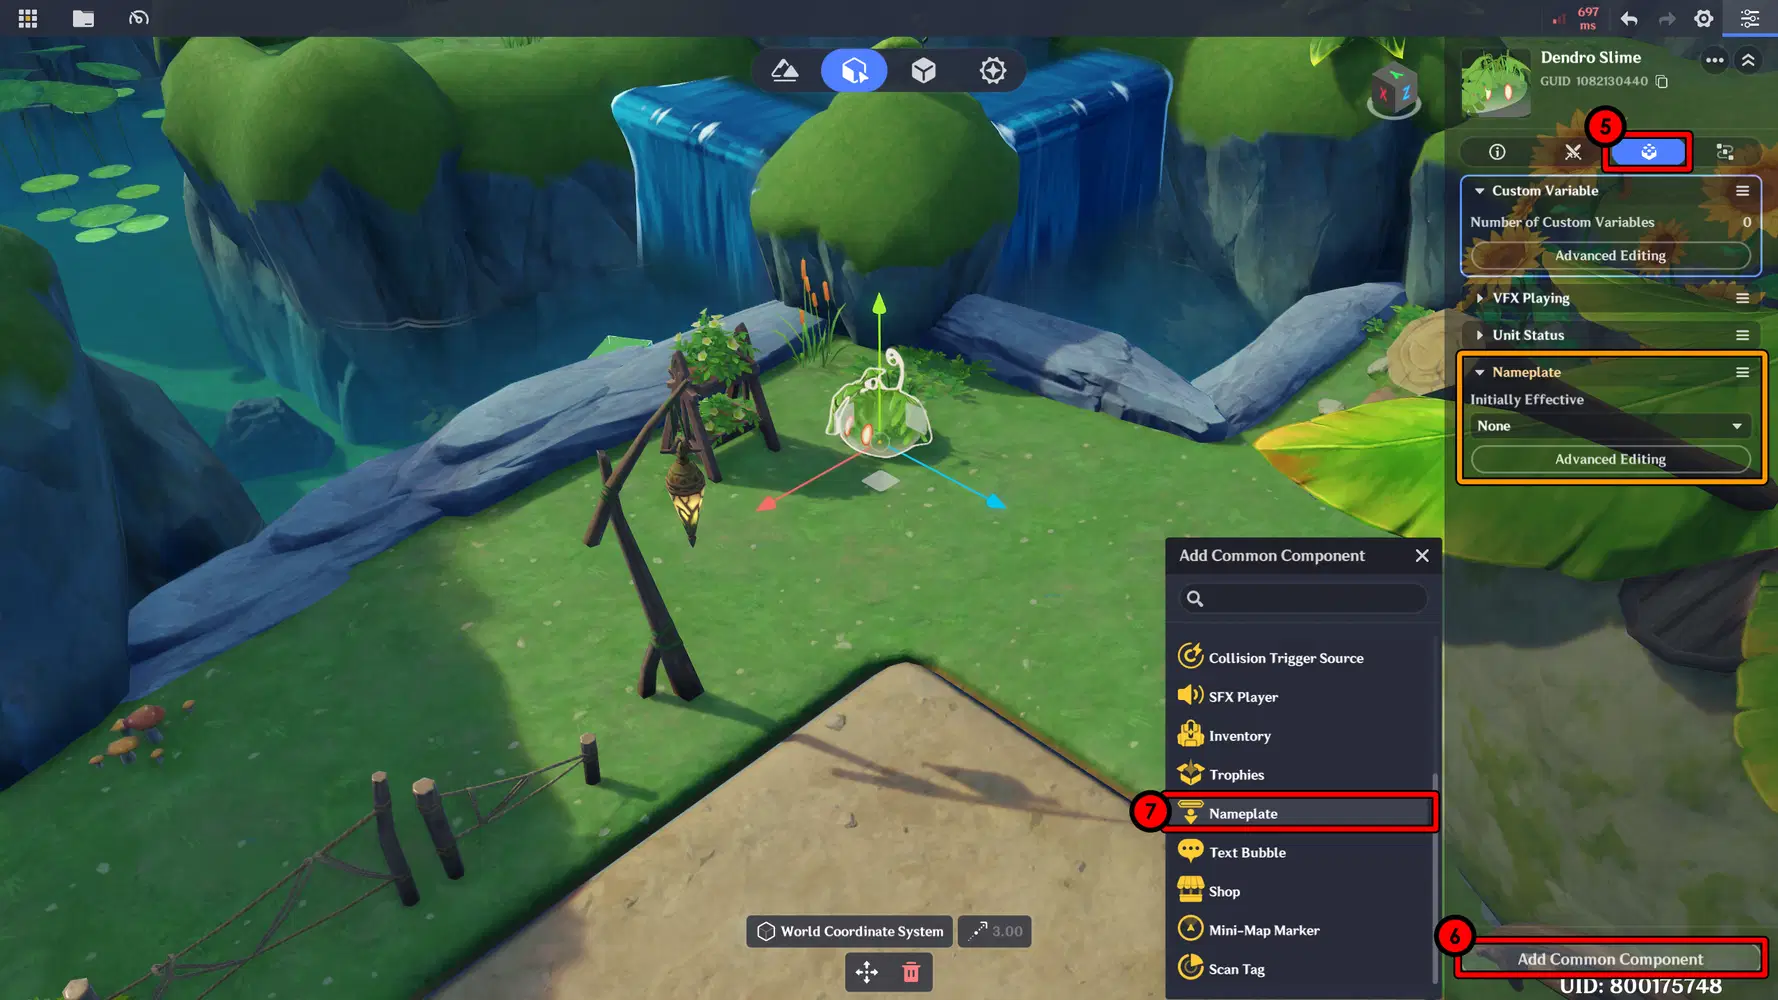
Add Nameplate to Hide HP Bar
Next, create a Path, which will be used as the route for the NPC to walk / move.
- Go to the main menu and select Path Management.
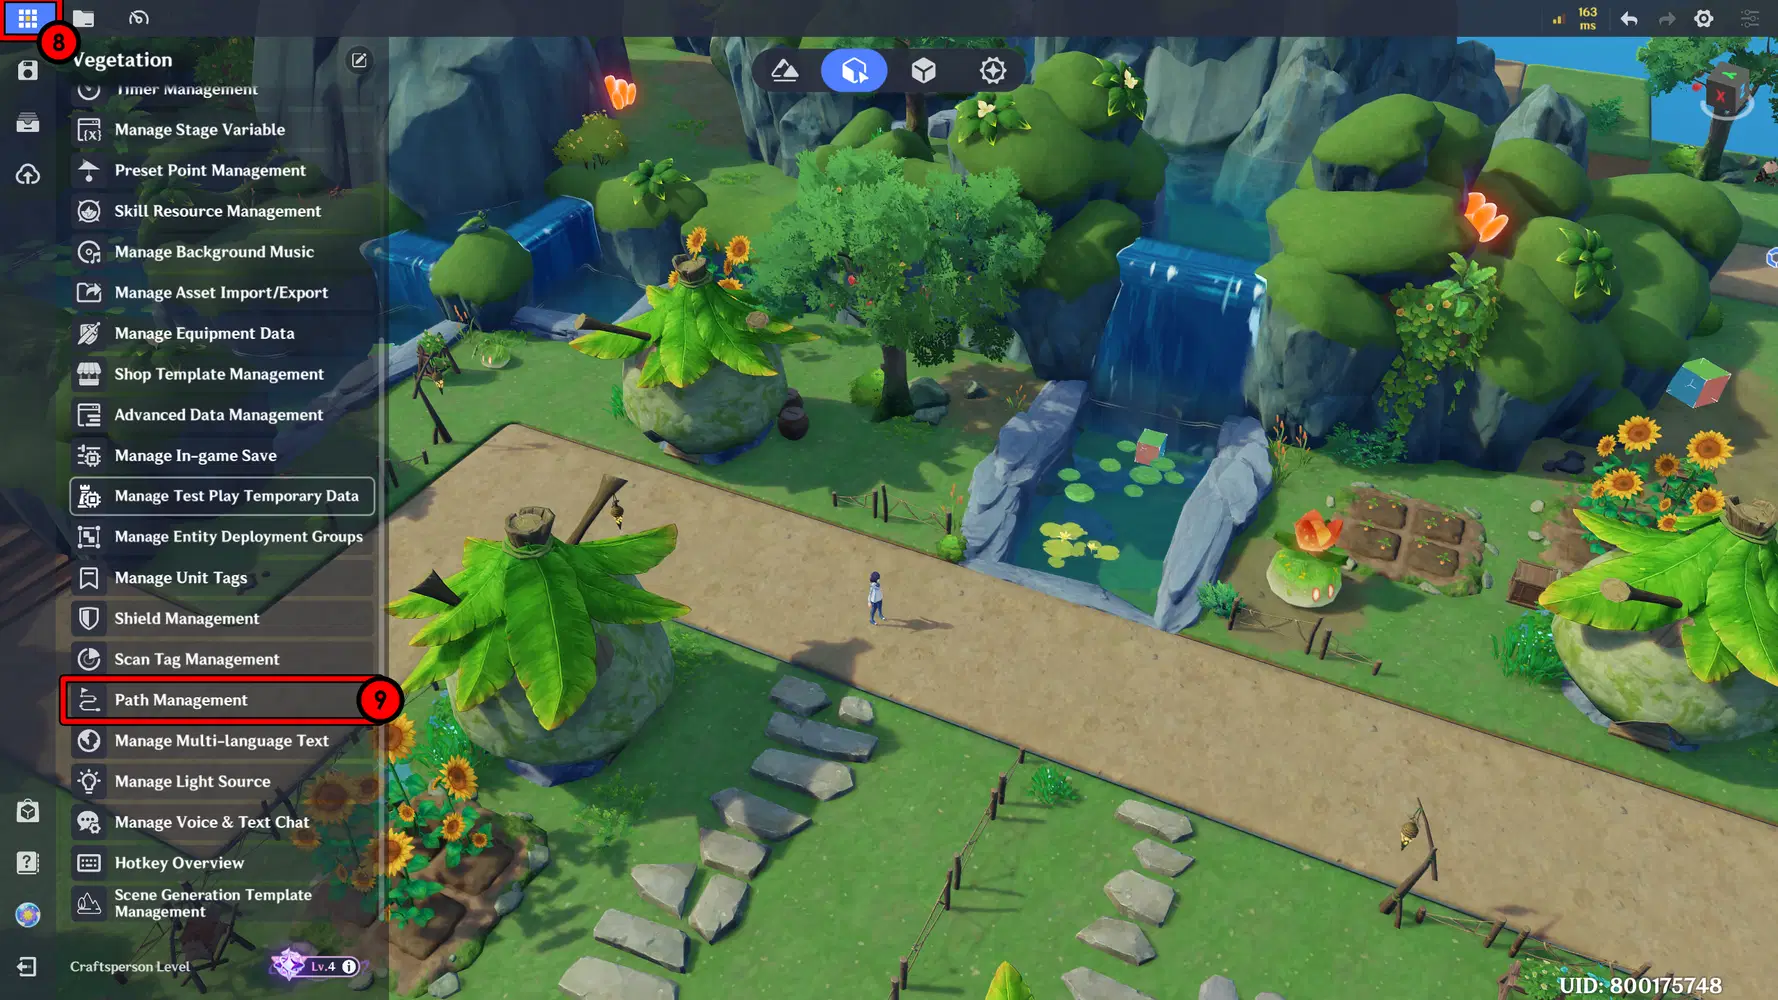
Create Patrol Path
In the Path Management menu, create a new path by clicking Create Path on the left panel.
- Add Waypoints, which act as points that define the route the NPC will follow. In this example, I added 6 connected waypoints to form a path.
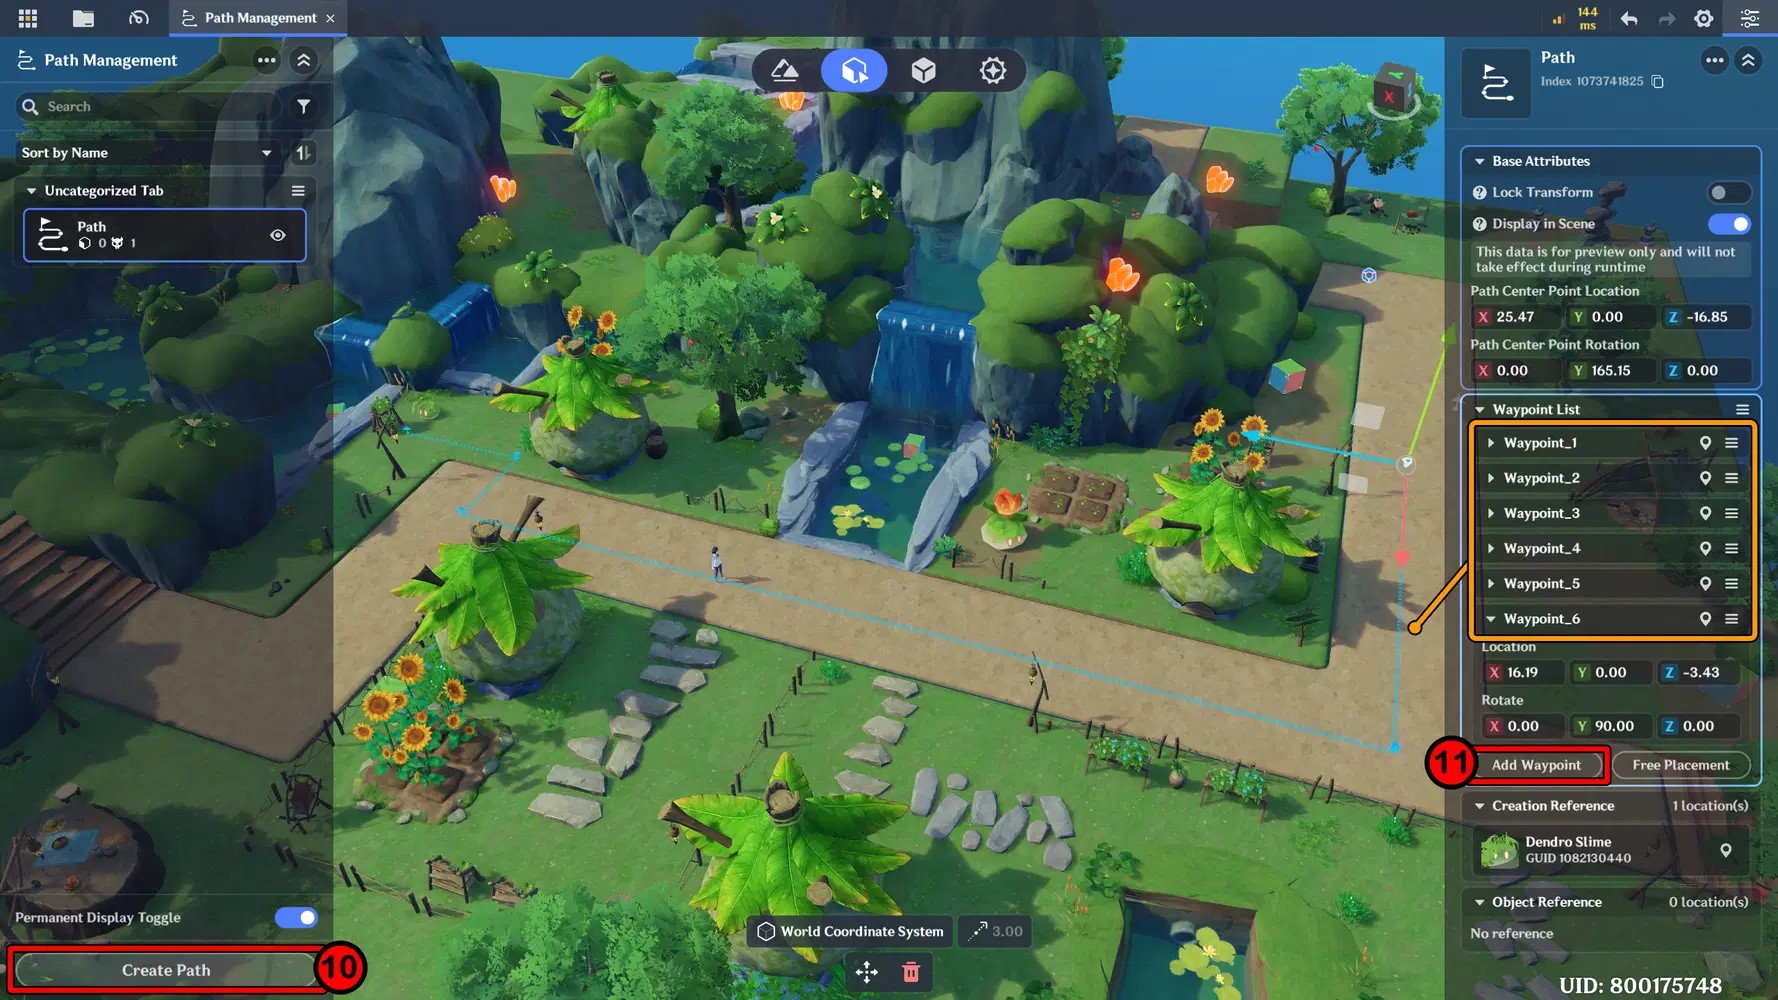
Configure Path
Next, set up the NPC so it can follow the path you created.
- Go to the Combat menu on the NPC, then set Battle Behavior to Patrolling. Also disable Entering Battle Zone so the NPC won’t enter combat mode when the player gets close.
- Then, click Edit Details to set up the patrol path.
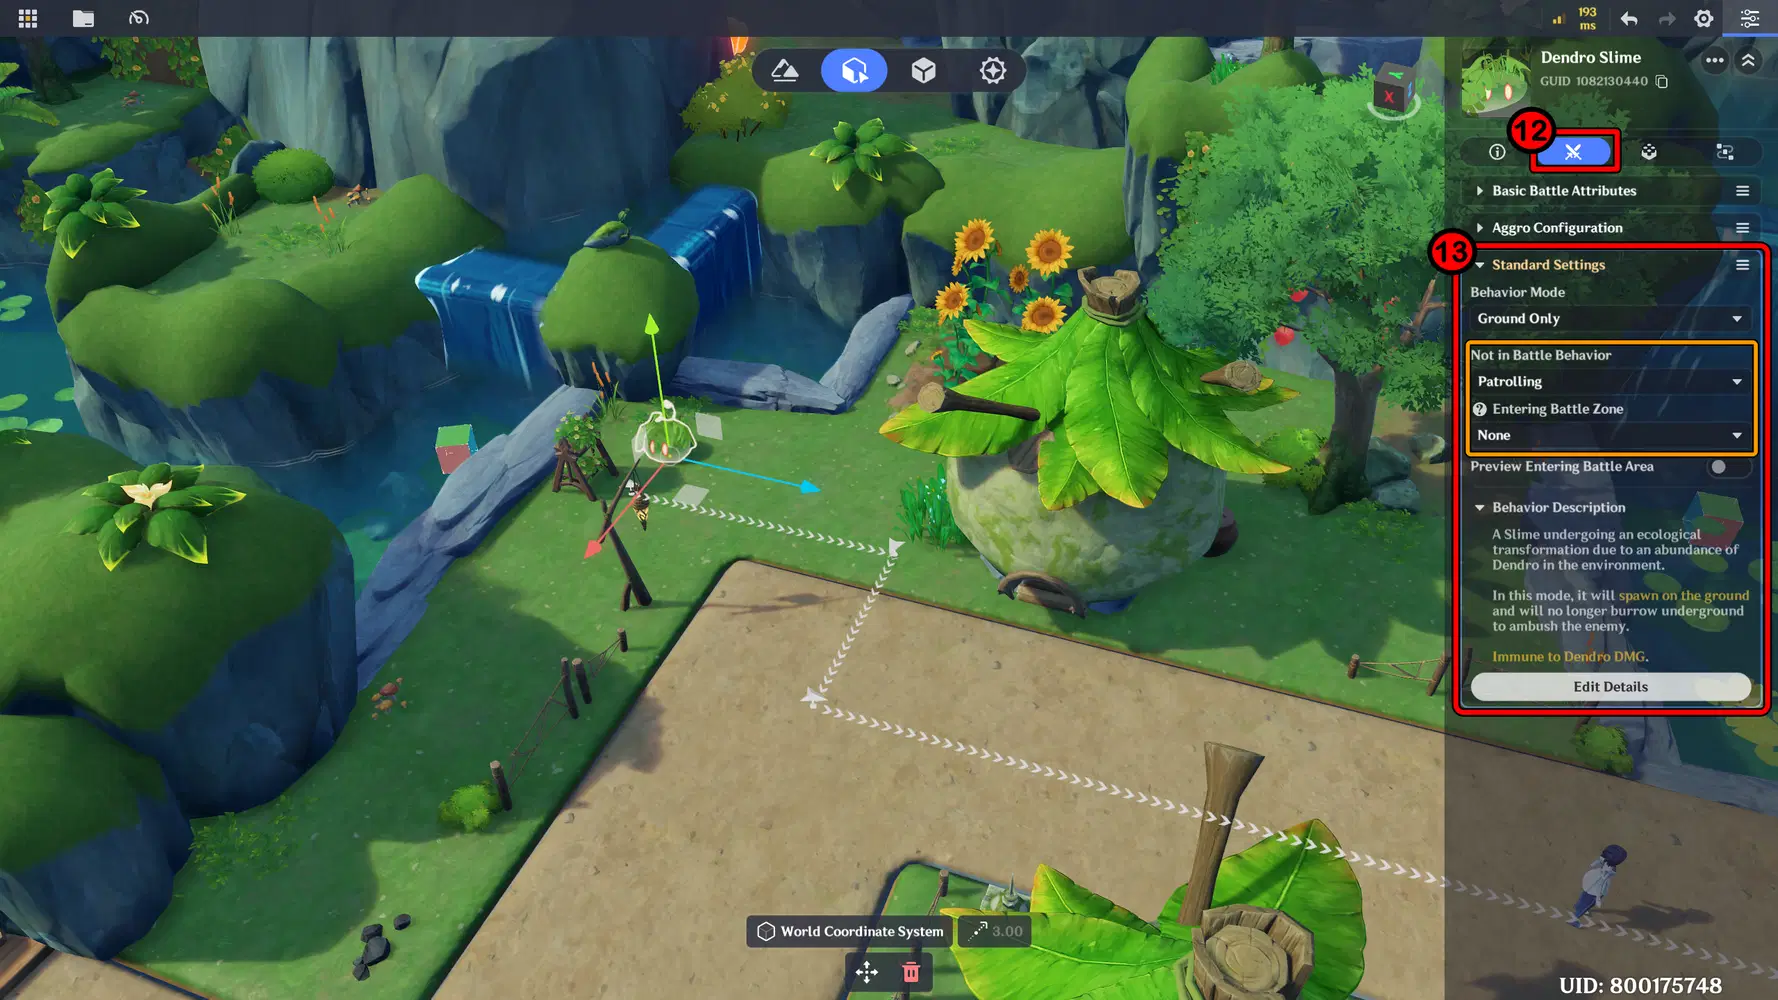
Add Patrol Path
In the Not in Battle section, set Not in Battle Behavior to Patrolling, then click Edit Details to configure it further.
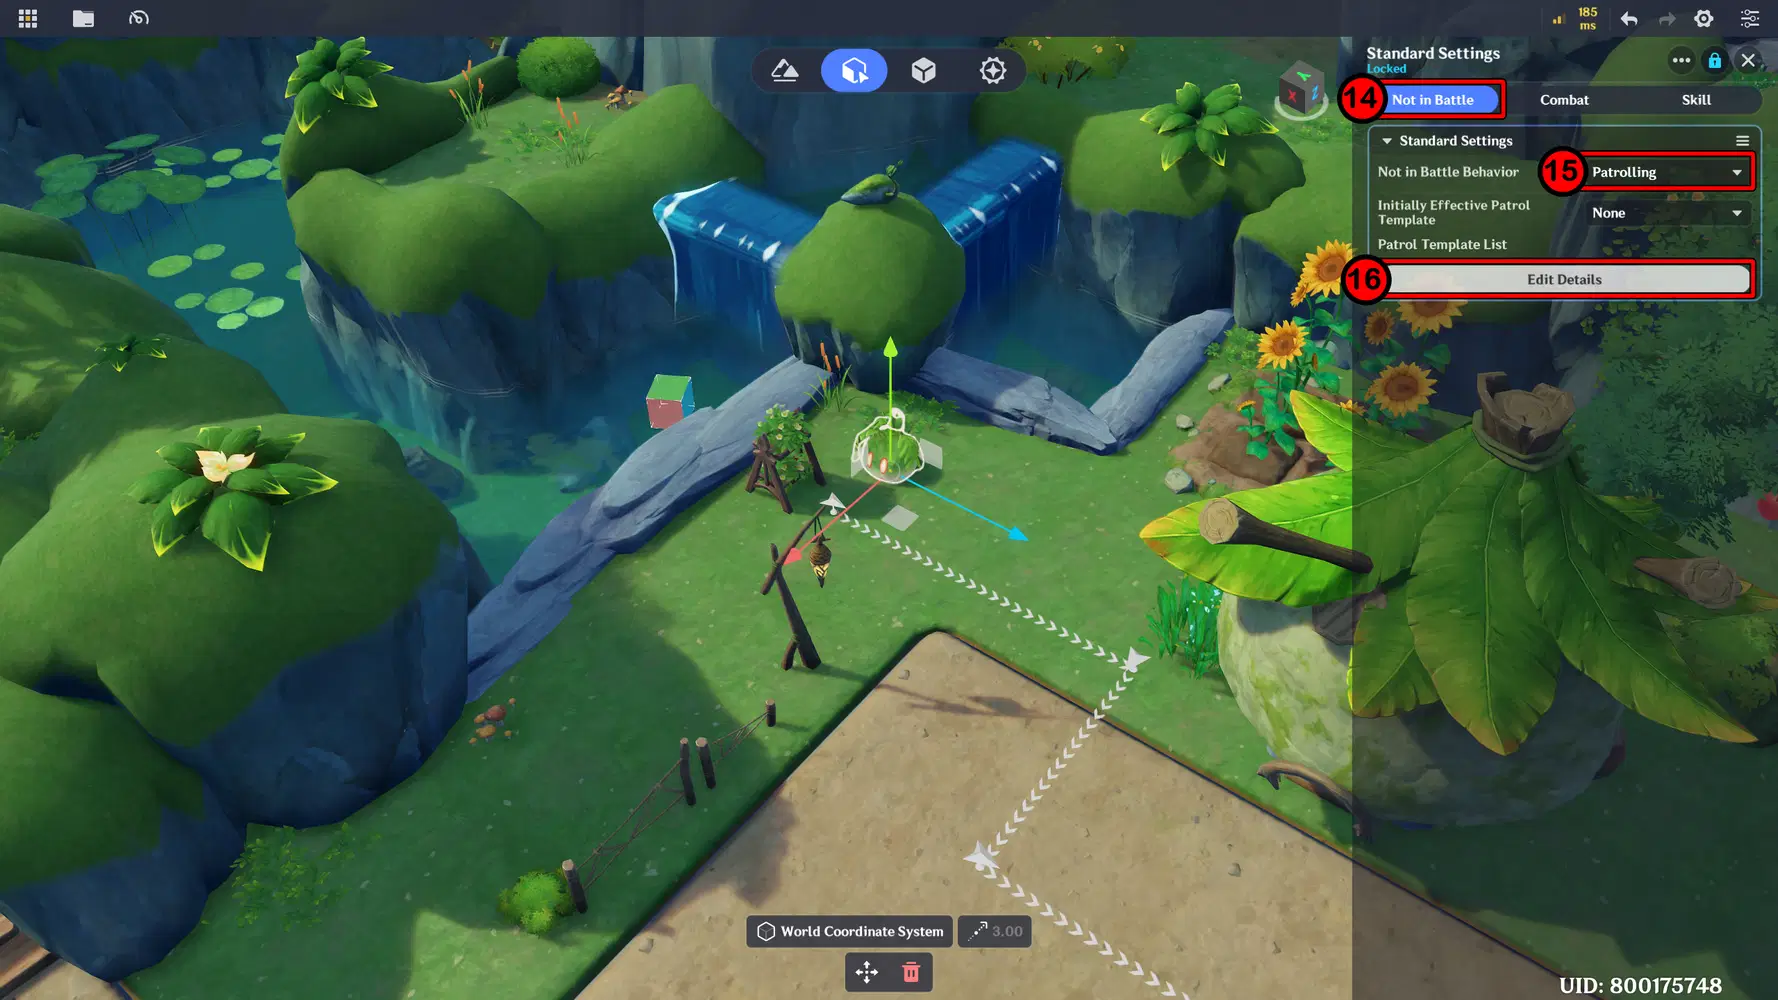
Set Battle Behavior to Patrolling
In the Edit Patrol Template menu, click the plus (+) icon to create a New Template, then configure the following:
- Set Loop Type to Round Trip, so when the NPC reaches the end, it will return to the starting point from the end position and repeat the movement.
- Set Patrol Start Position to Starting Point, so the NPC begins from the first waypoint of the path.
- For Patrol Path, select the path you created earlier in the Path Management menu.
- You can customize the NPC movement at each waypoint. For example, at Waypoint 1, the NPC can stay for 20 seconds before moving to Waypoint 2 by walking.
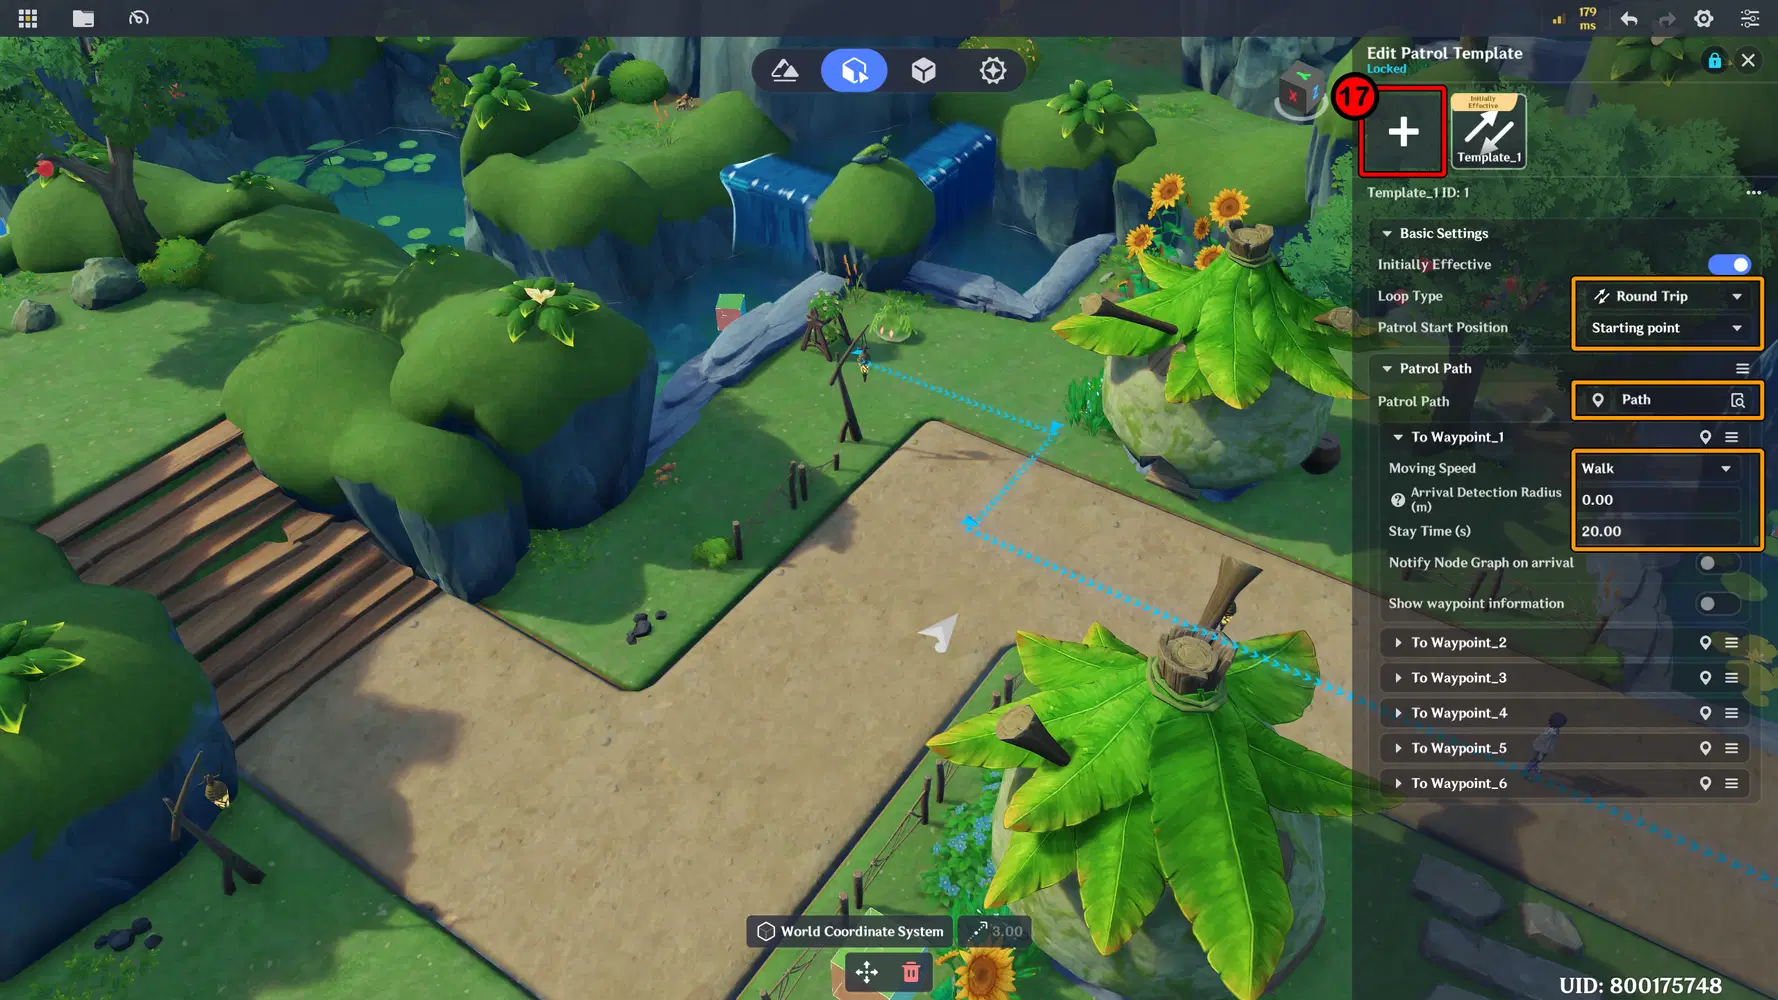
Patrol Configuration
Finally, don’t forget to set the Initially Effective Patrol Template to the template you just created.
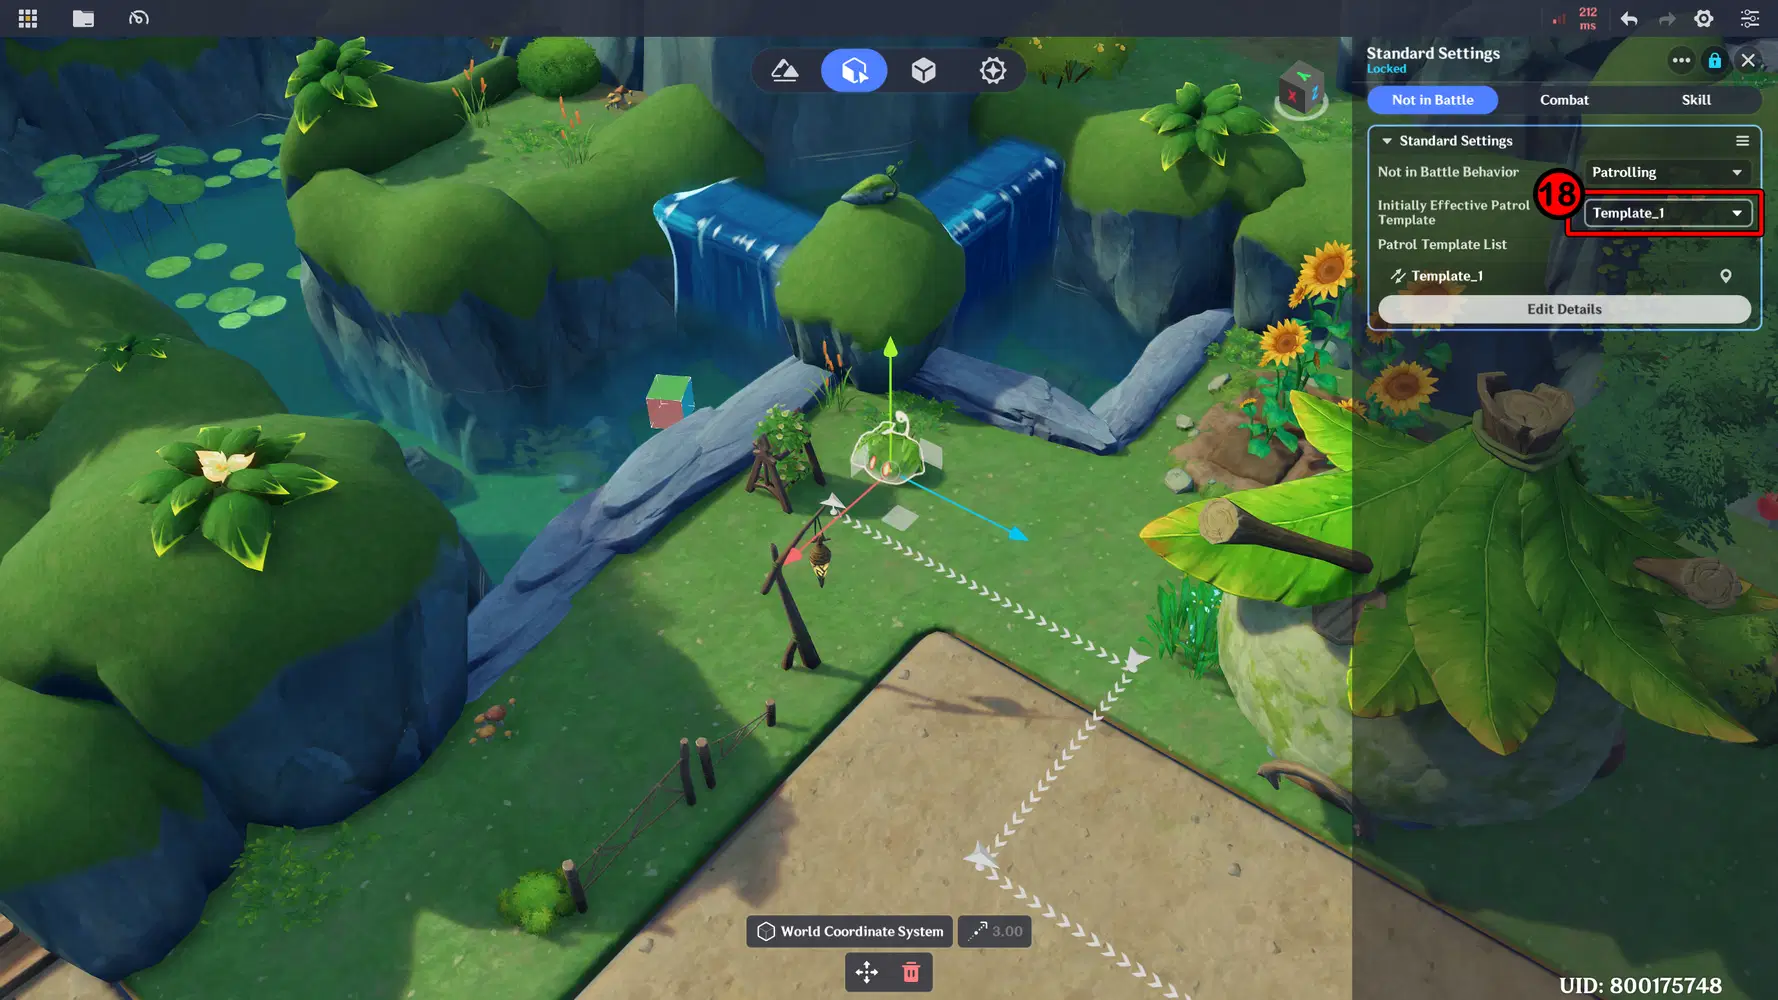
Set the Initially Effective Patrol Template
Once you’re done, you can run a Test Play to see how the NPC moves along the path you created. And here my result.
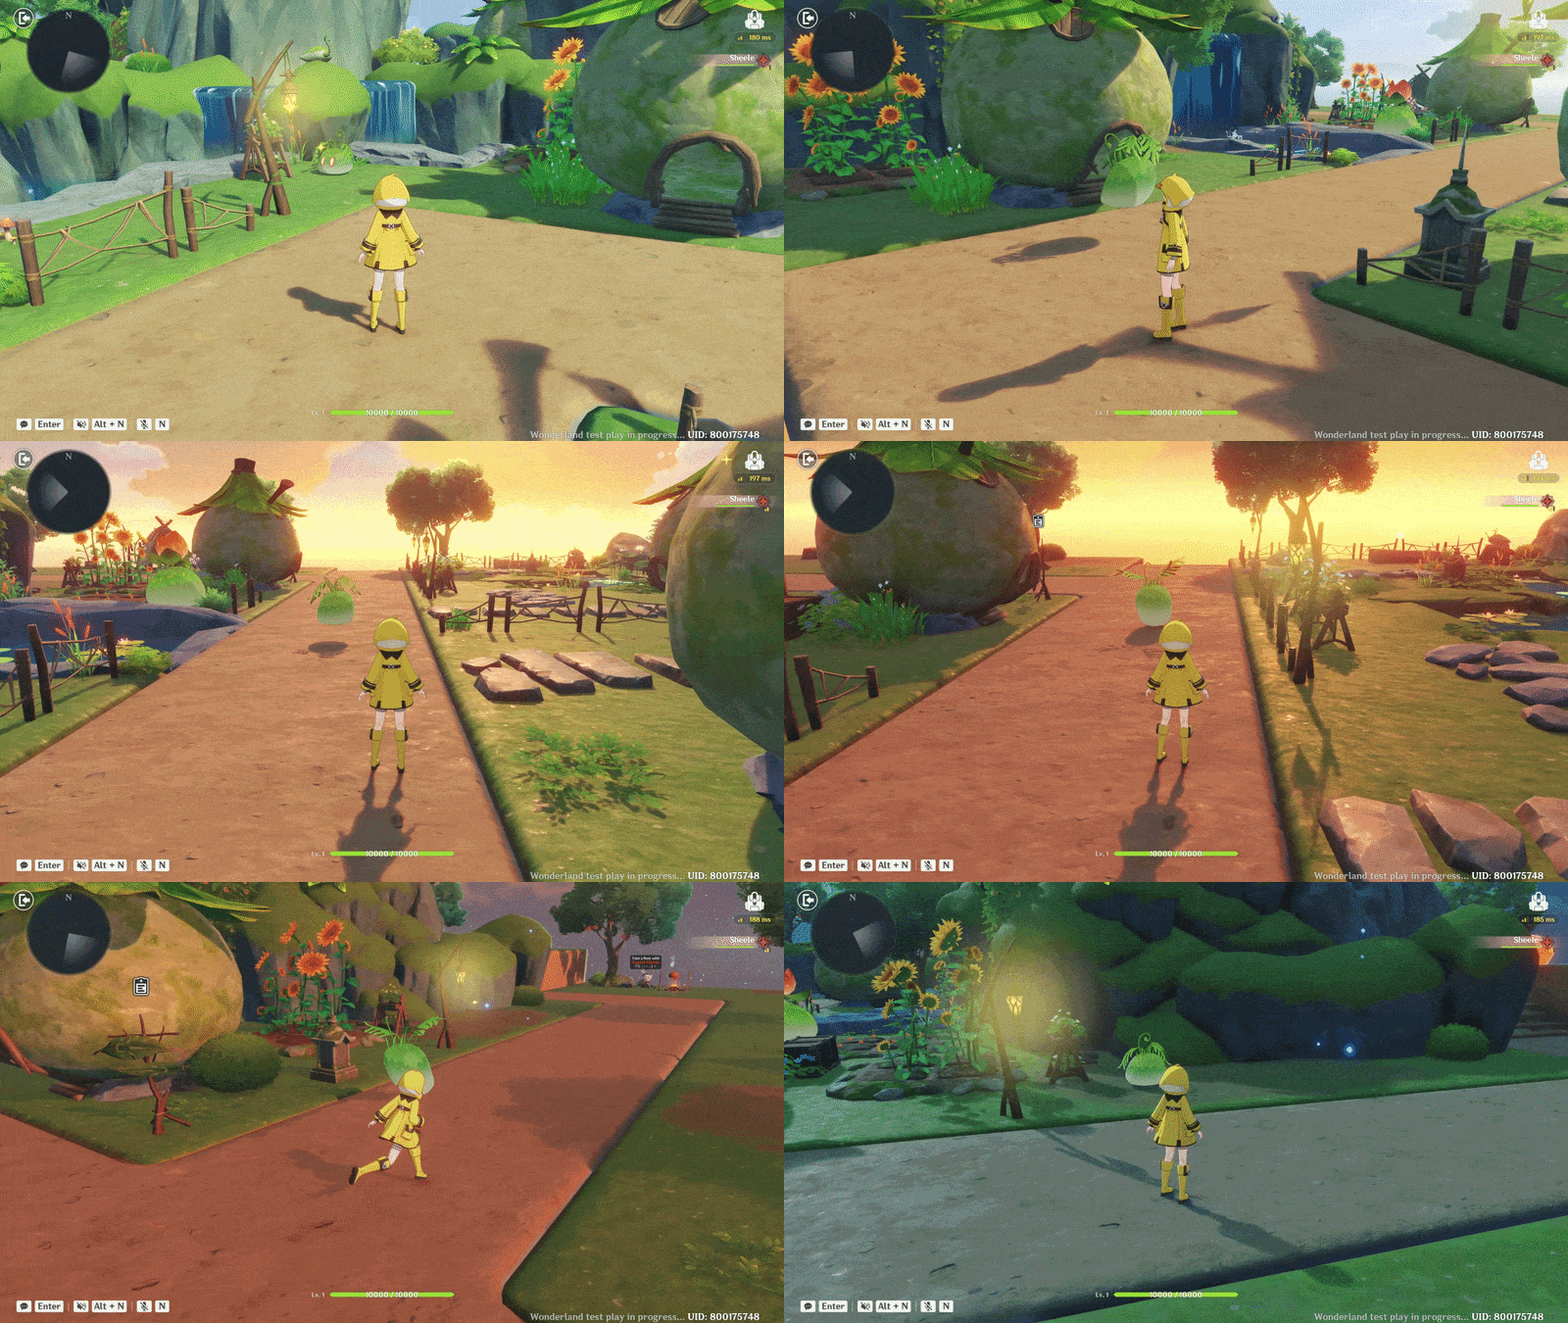
Tips 9 - Set Time & Weather
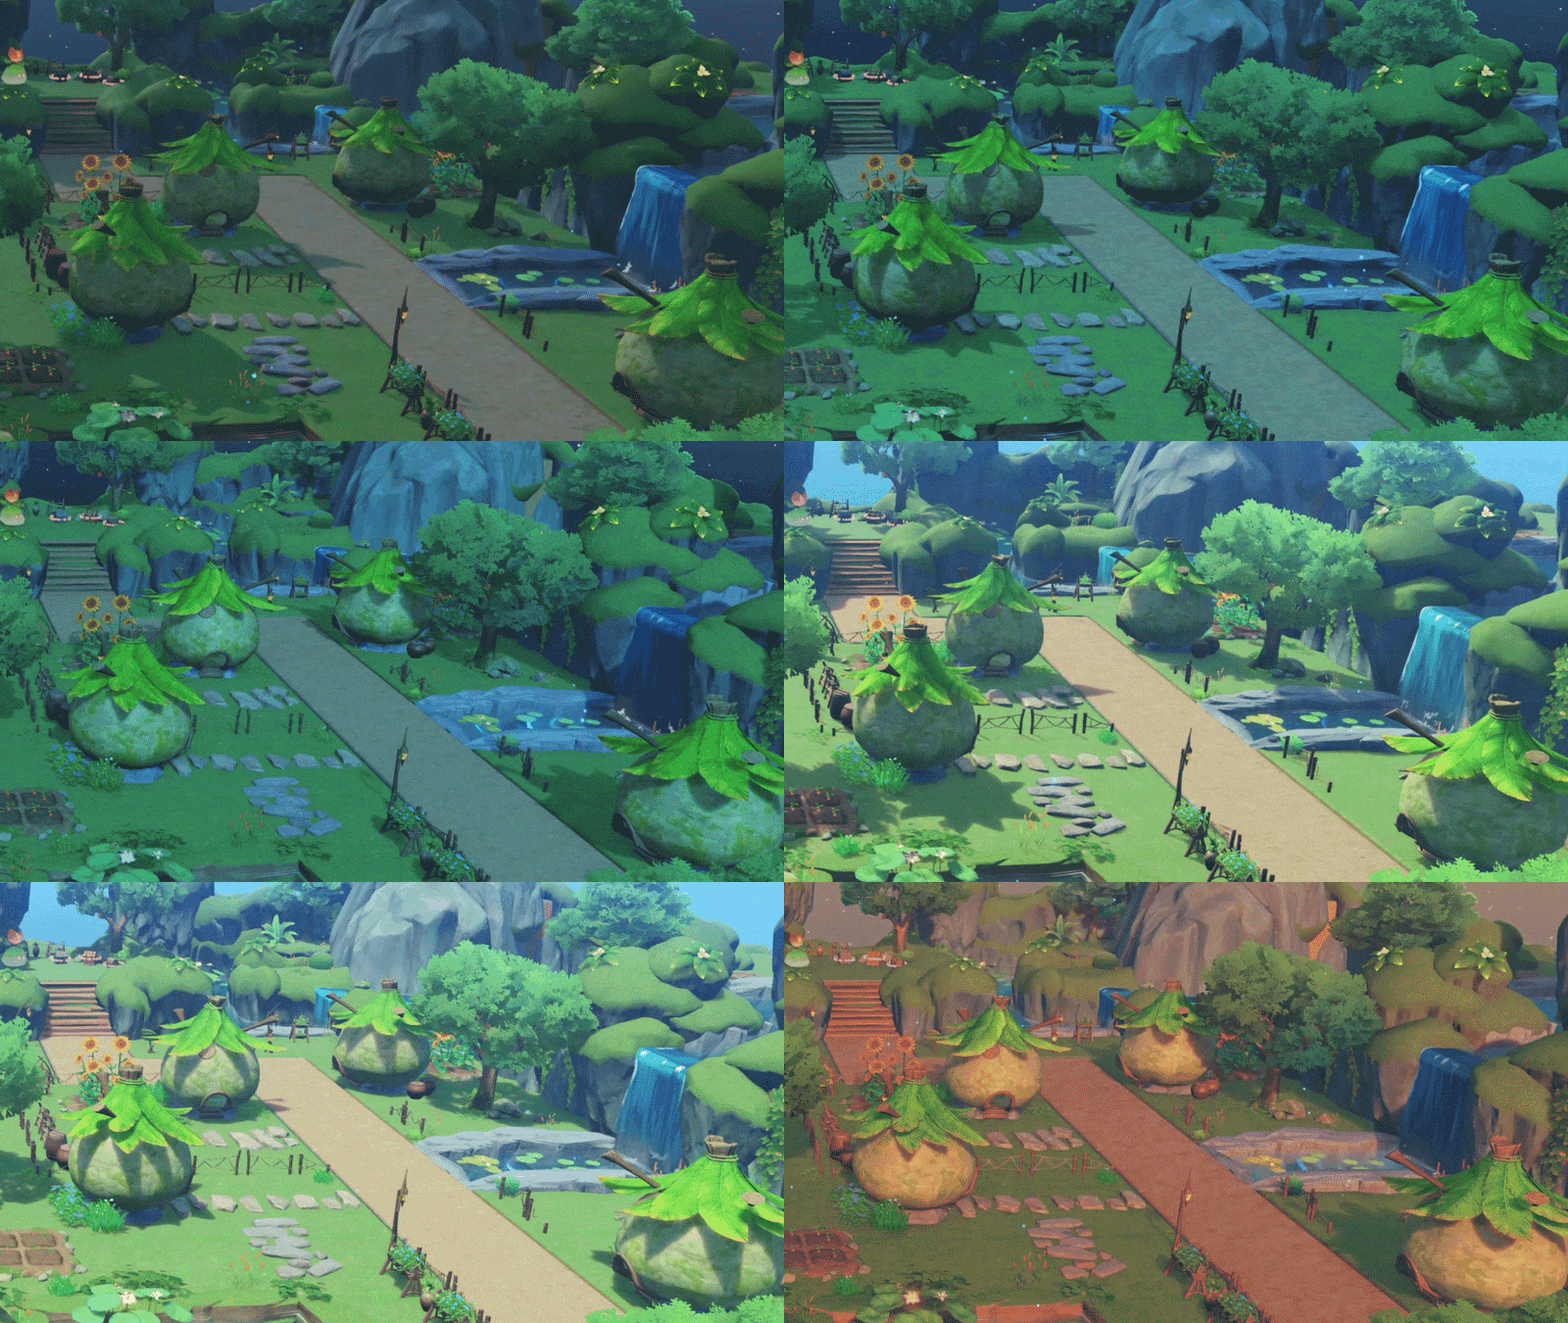
Try adding a Time System to your scene to create different moods, such as day, sunset, or night. You can also add weather effects like fog or rain in certain areas to make the environment feel more dynamic and immersive.
📝 Wonderland Guide:
✦ Time System
Try different times of day to change the mood of your scene, from bright daytime to a calm night atmosphere. To change the time, you can adjust it in the Stage Settings.
- Open the Main Menu and select Stage Settings.
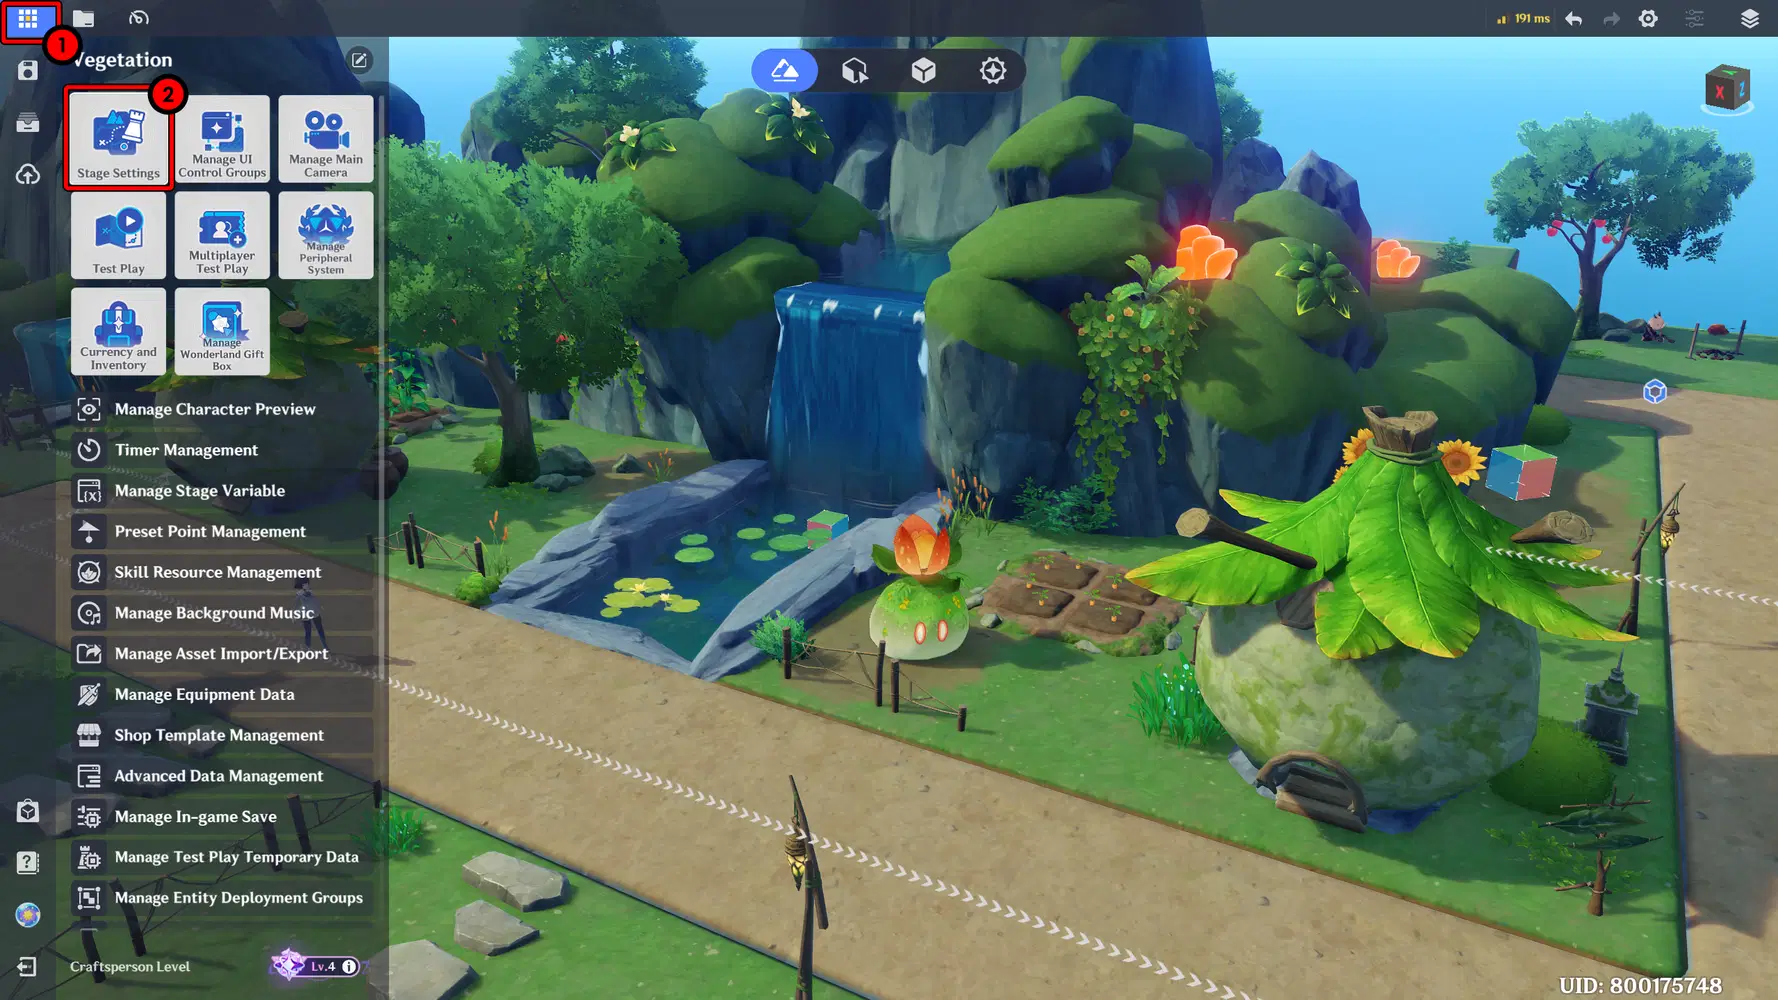
Stage Settings Menu
In the Stage Settings menu, go to the Basic section and scroll down. You’ll find a time bar with icons representing the sun and moon, showing the cycle from morning, day, evening, to night.
- Stage Initial Time Point is used to set the starting time when the game begins.
- Time Elapsed Per Second controls how fast time passes in the game.
Adjust these two settings to define the time flow and overall day–night cycle in your scene.
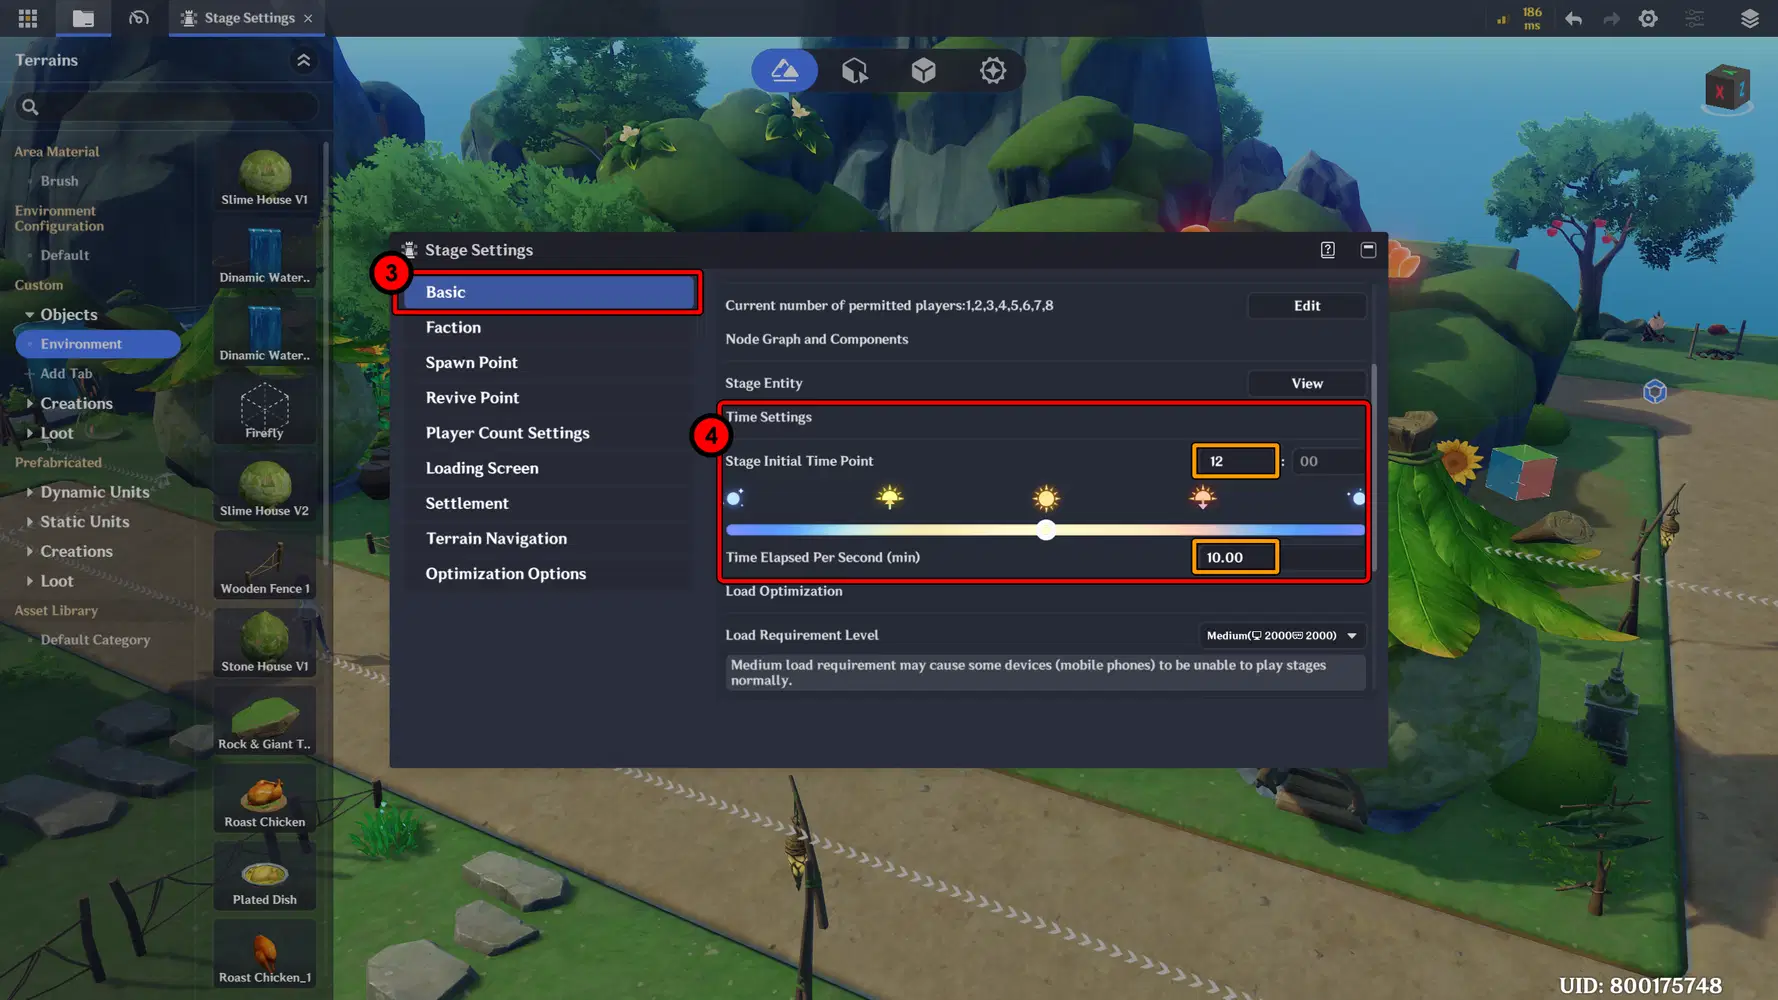
Configure Time System
Here is the result. The time will continuously change as the game progresses.
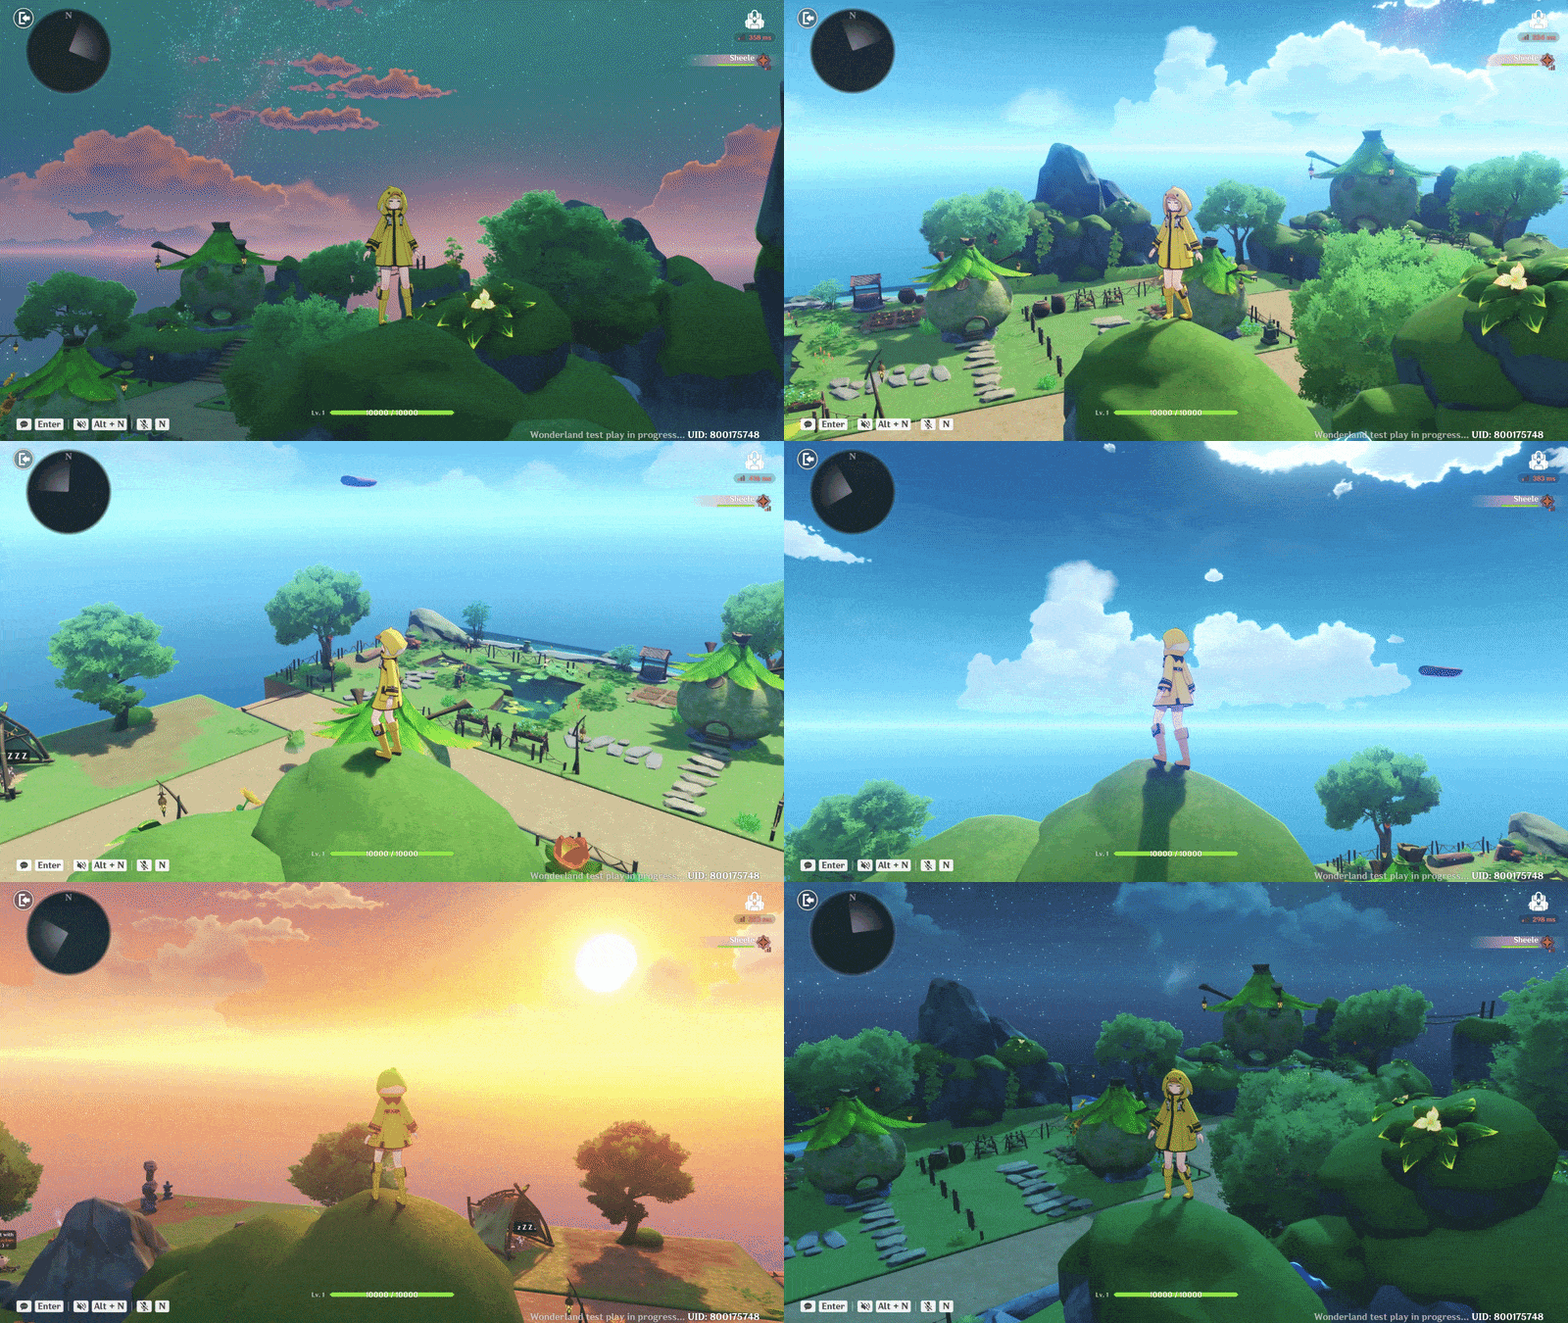
✦ Weather (Optional)
Add Weather effects like Rain or Fog to create atmosphere and make certain areas feel more unique and alive.
a. Create Rain
To create a Rain effect, I use a VFX Playing component added to an Empty Model.
- First, create and place an Empty Model in the scene or the area where you want the weather effect to appear. In this example, I place it above the pond to create a rain effect.
- In the Asset Bar, go to Dynamic Units → Other → Empty Model.
Then, in the Native Collision settings, turn off all options. So that your character doesn't hit this transparent model when passing through it.
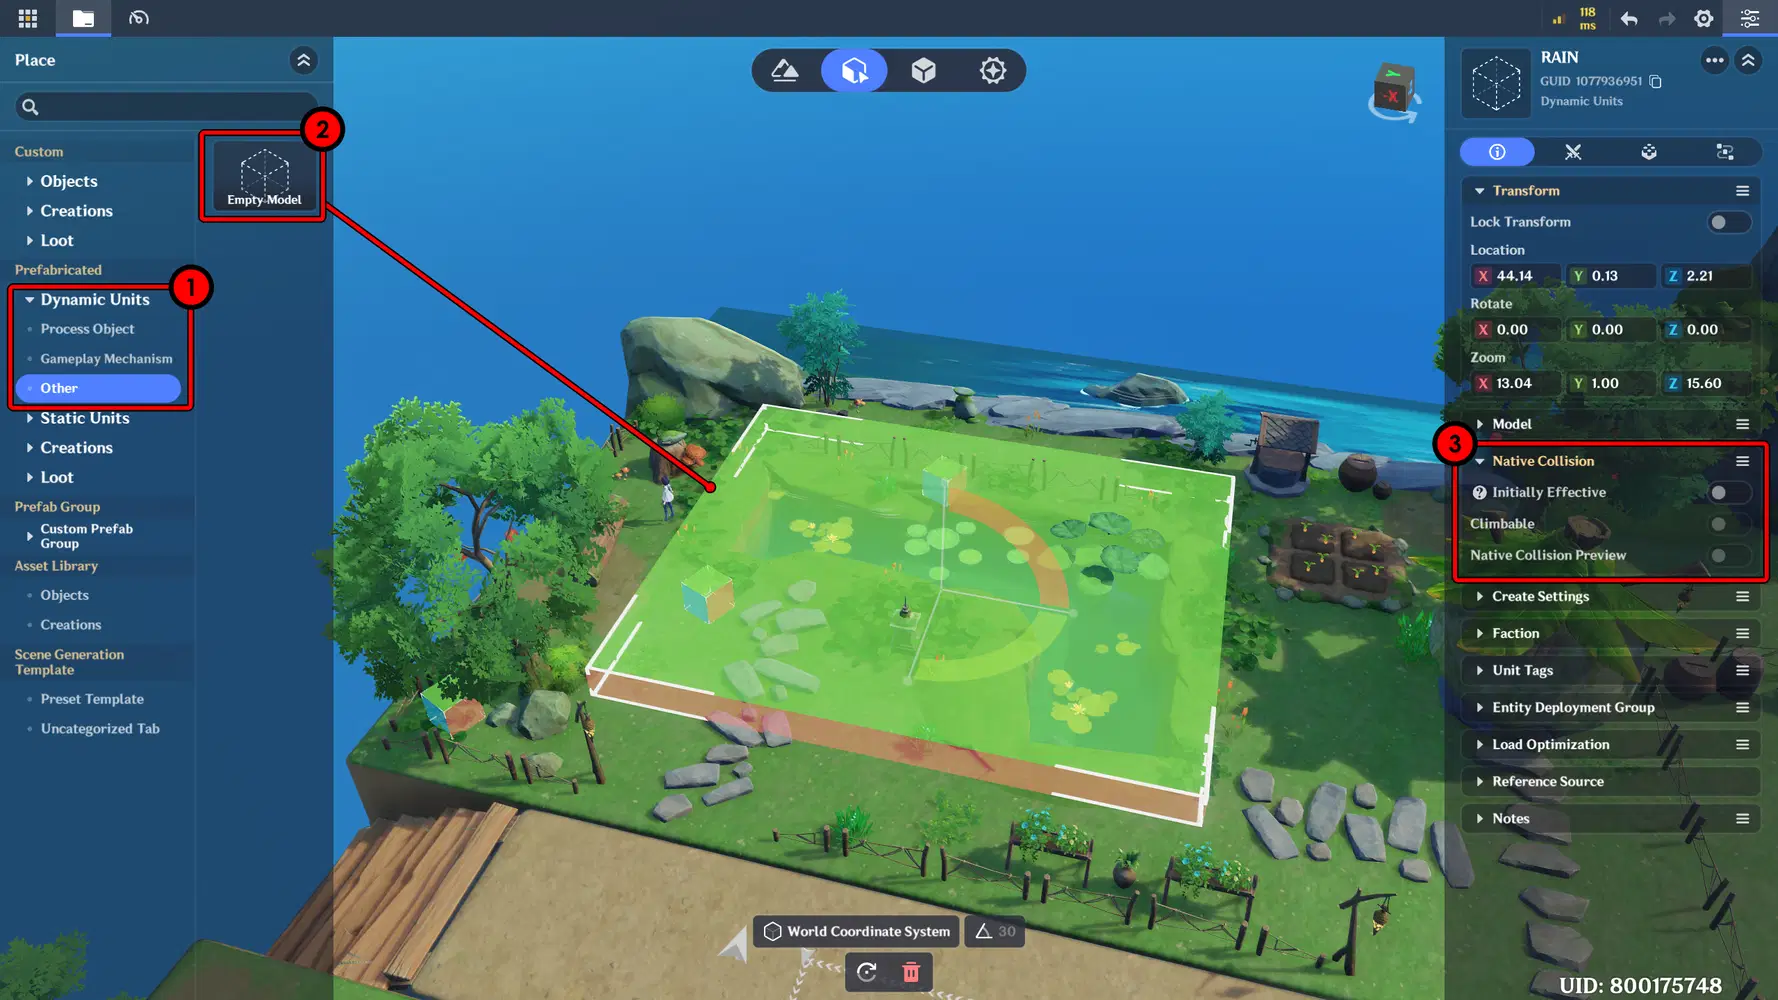
Create an Empty Model and add it to the Scene
Next, add the Rain Effect.
- Go to the Components menu → add common component → select VFX Playing, then open Advanced Editing.
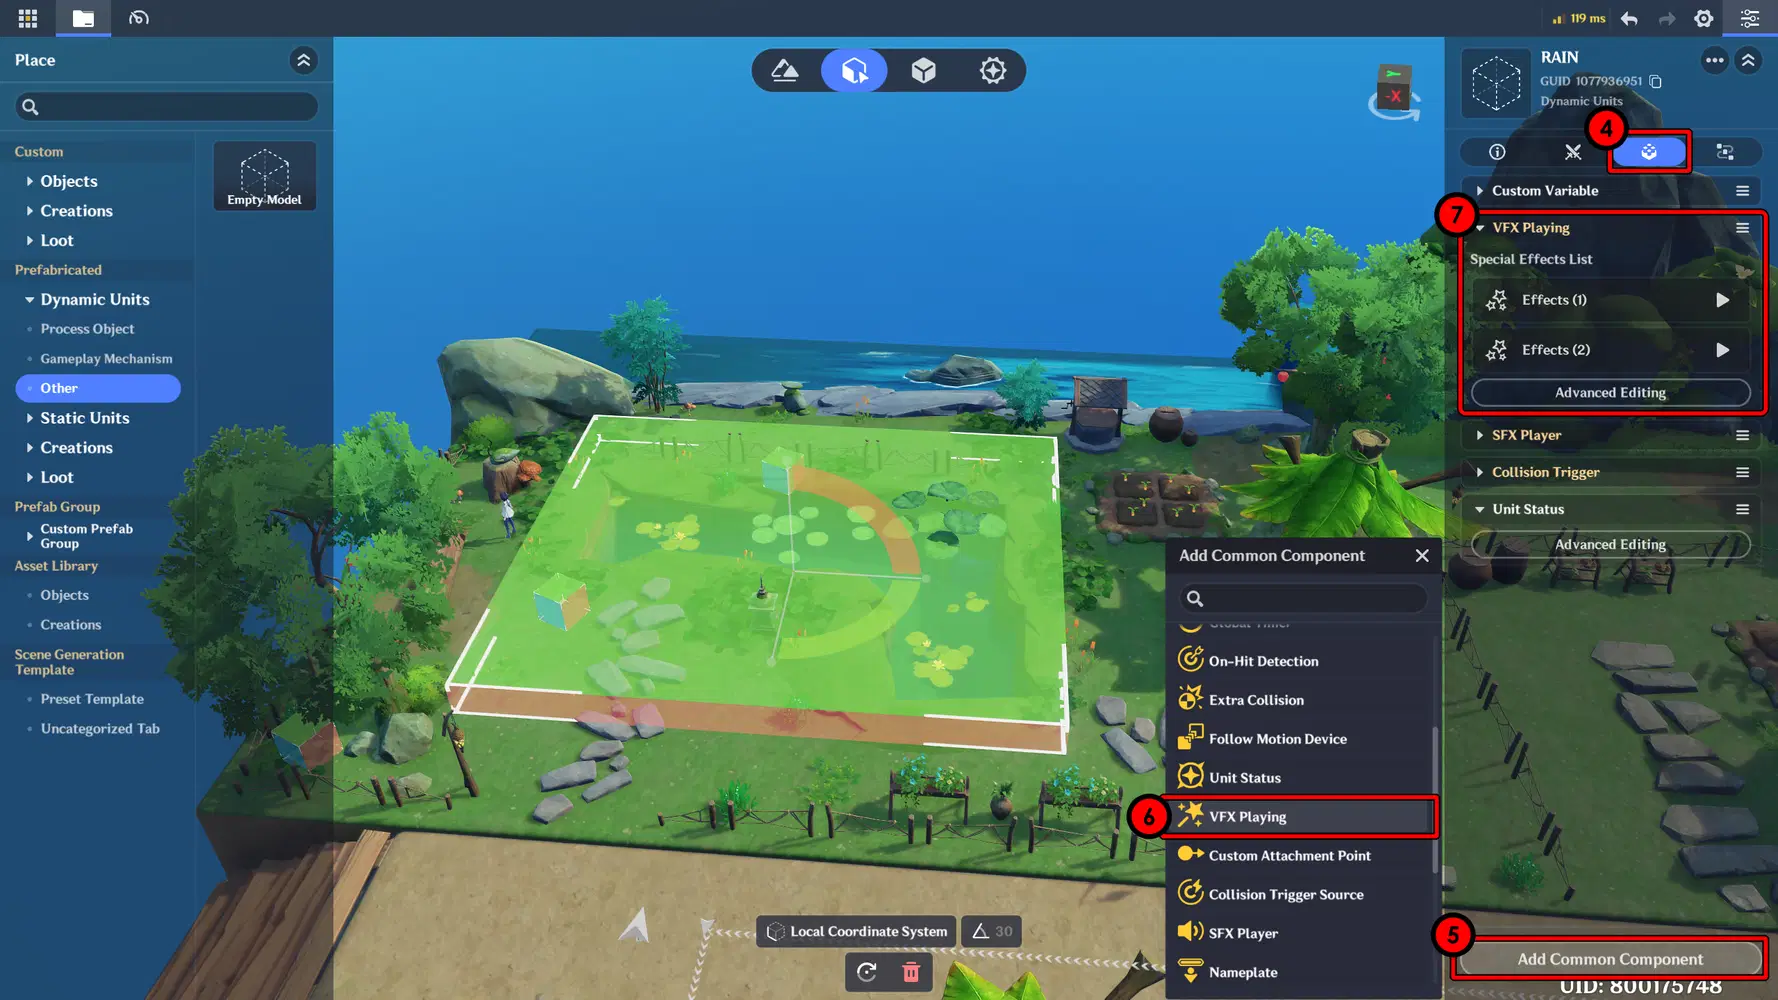
Add VFX Playing
- In this menu, click Add VFX to add a new effect. I added two effects on the left and right sides.
- For the VFX Asset Type, use Looping Effect, and for the asset, I use Samachurl Hydro Support Attack Healing Rain (ID: 10003201).
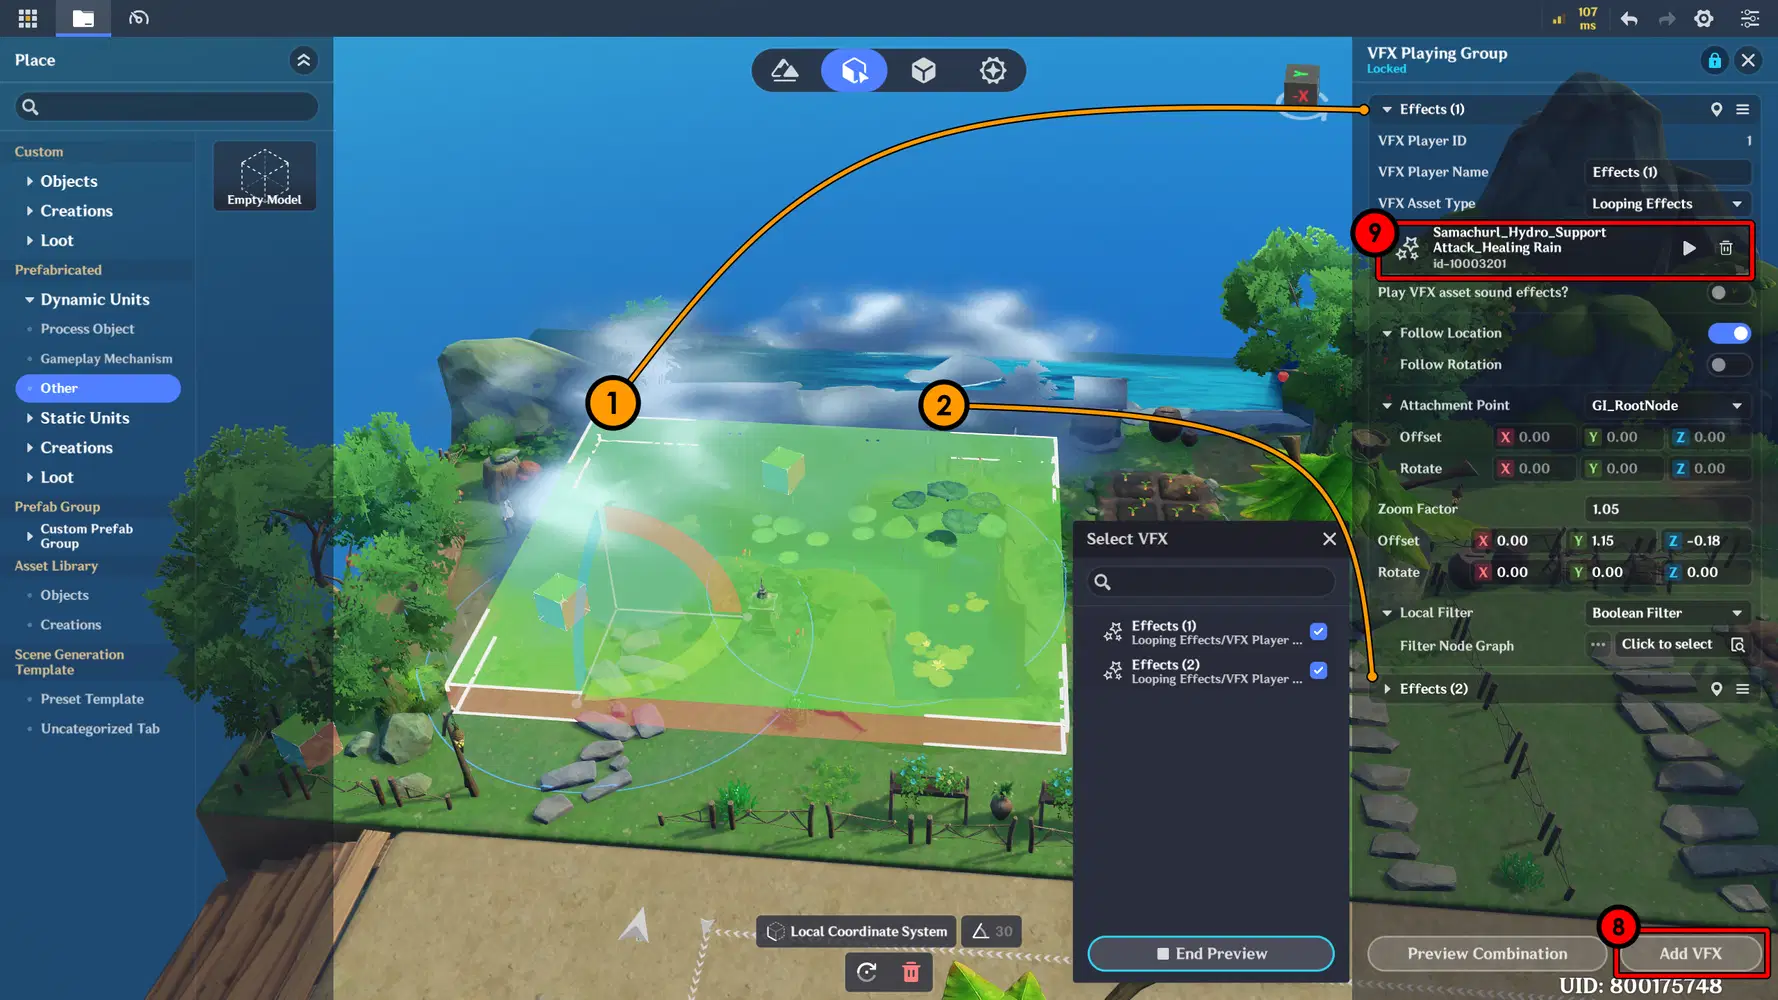
Add Rain Effect
Then, add a Rain Sound Effect by using the SFX Player component.
- Go to the Components menu → add common component → select SFX Player → then open Advanced Editing.
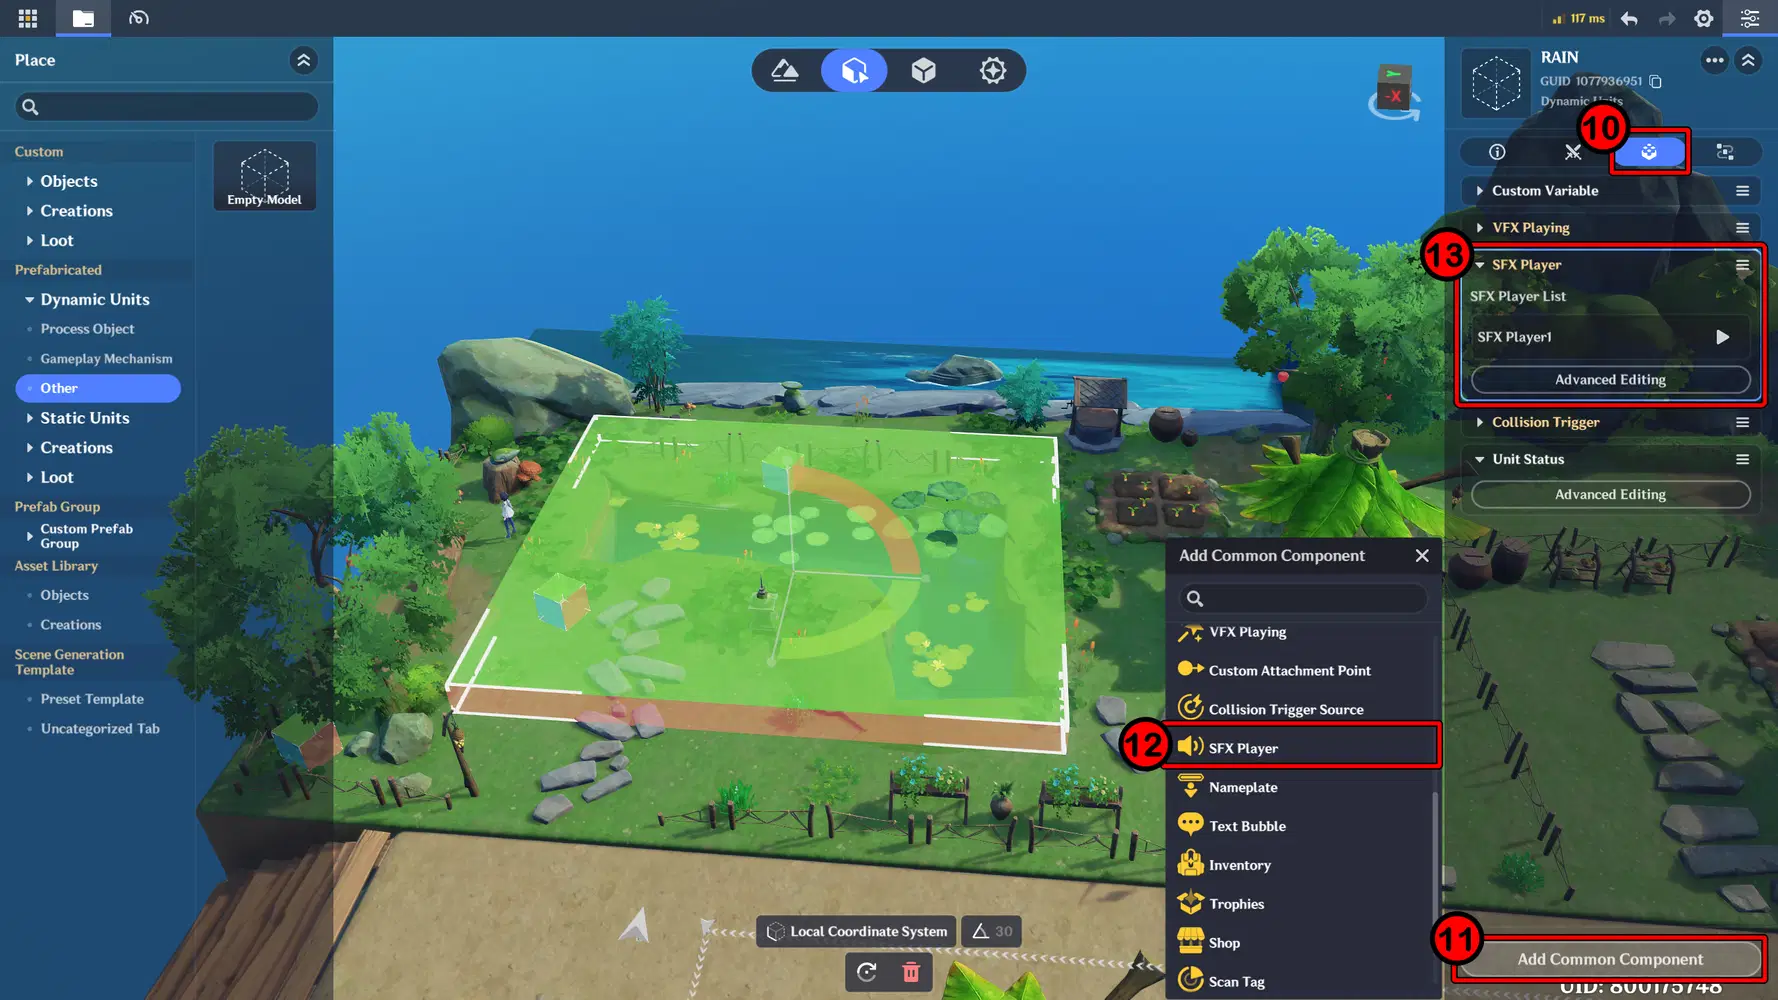
Add SFX Playing
Add a Sound Effect, and for the rain sound I use Environment Rain 02 (ID: 10047 / 3.00s).
- Then enable Looping Playback and set the loop interval to 1 so the sound plays continuously.
- For Raidus you can adjust it to the area of rain.
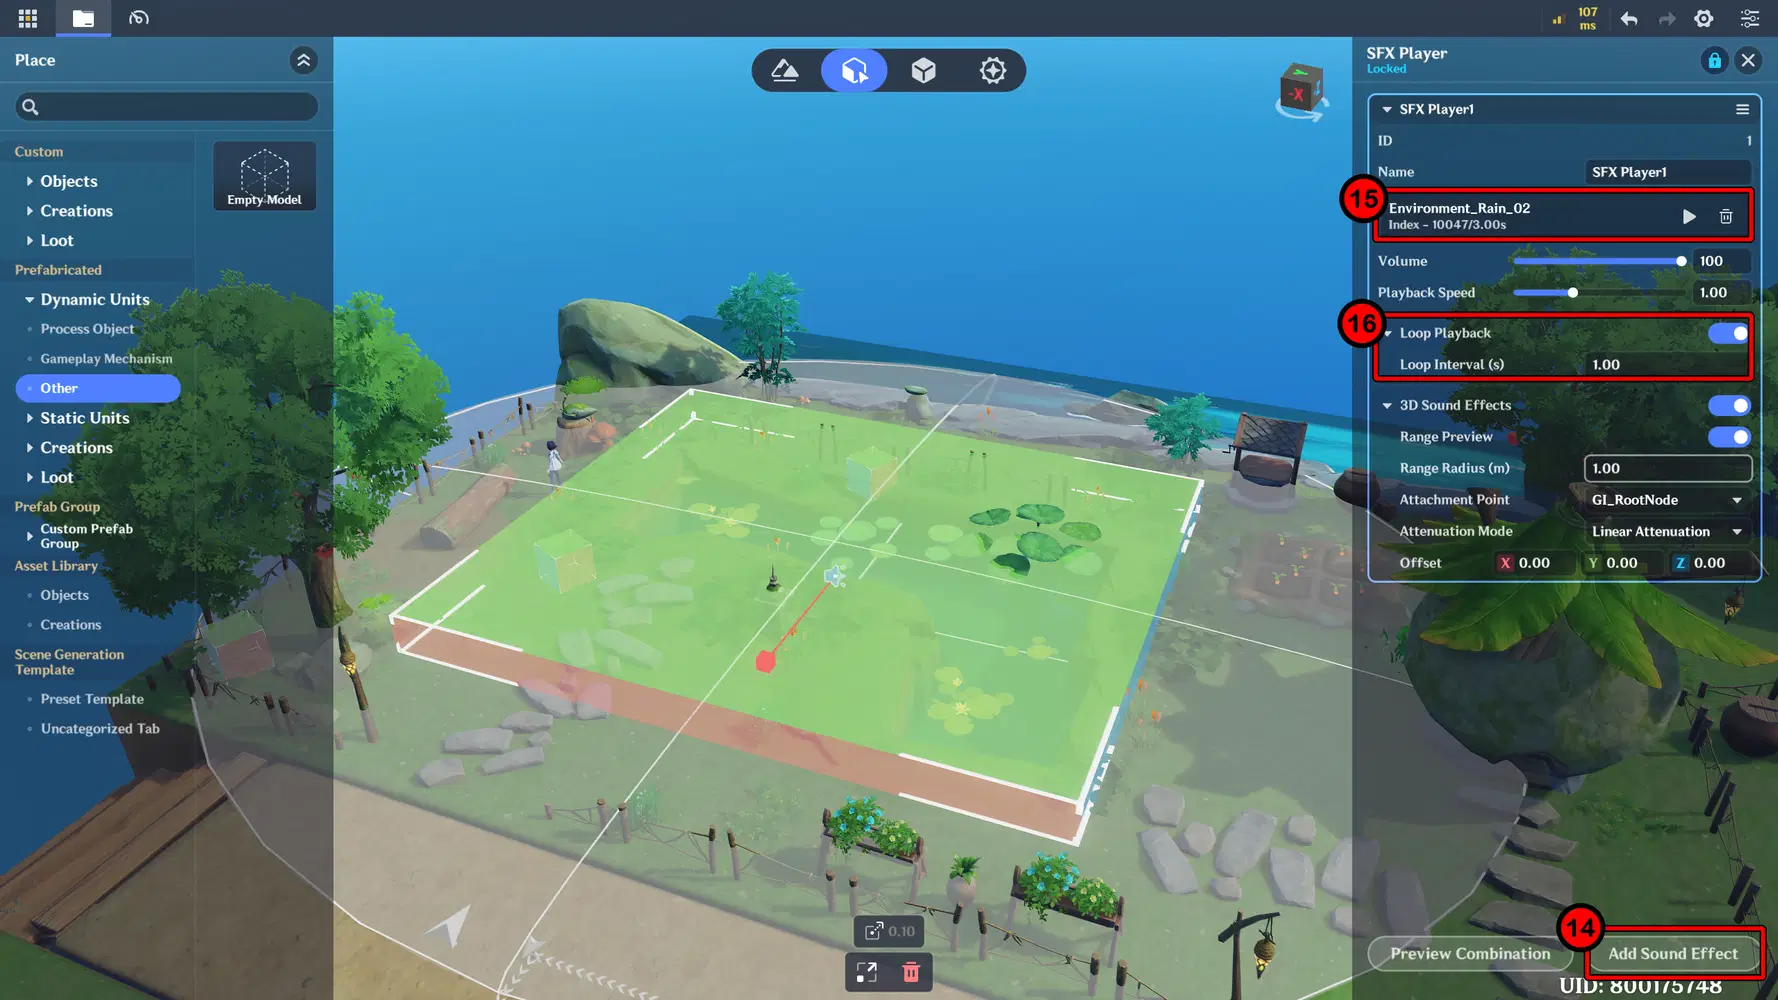
Configure Rain SFX
Finally, to make the Rain Feel more Realistic and affect the character, add a Hydro (wet) effect.
- Go to the Components menu → add common component → select Collision Trigger → then open Advanced Trigger.
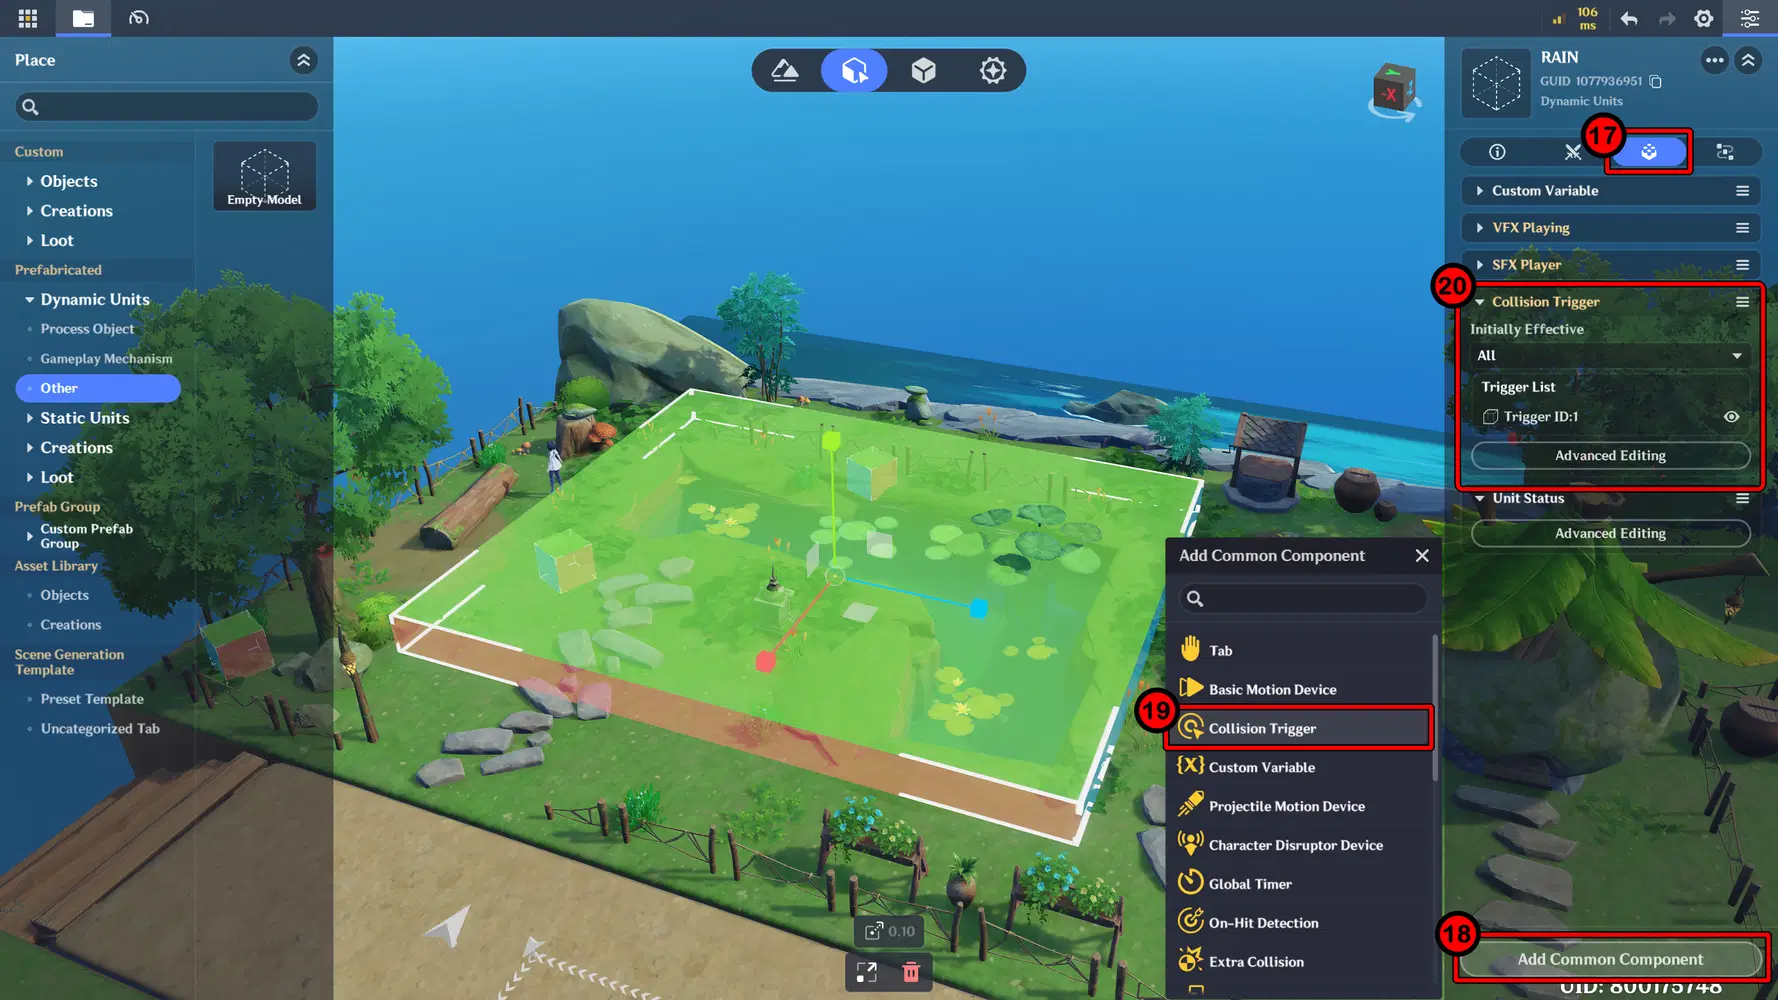
Add Collision Trigger
- Add a Trigger Area and adjust its size to match the area of the object.
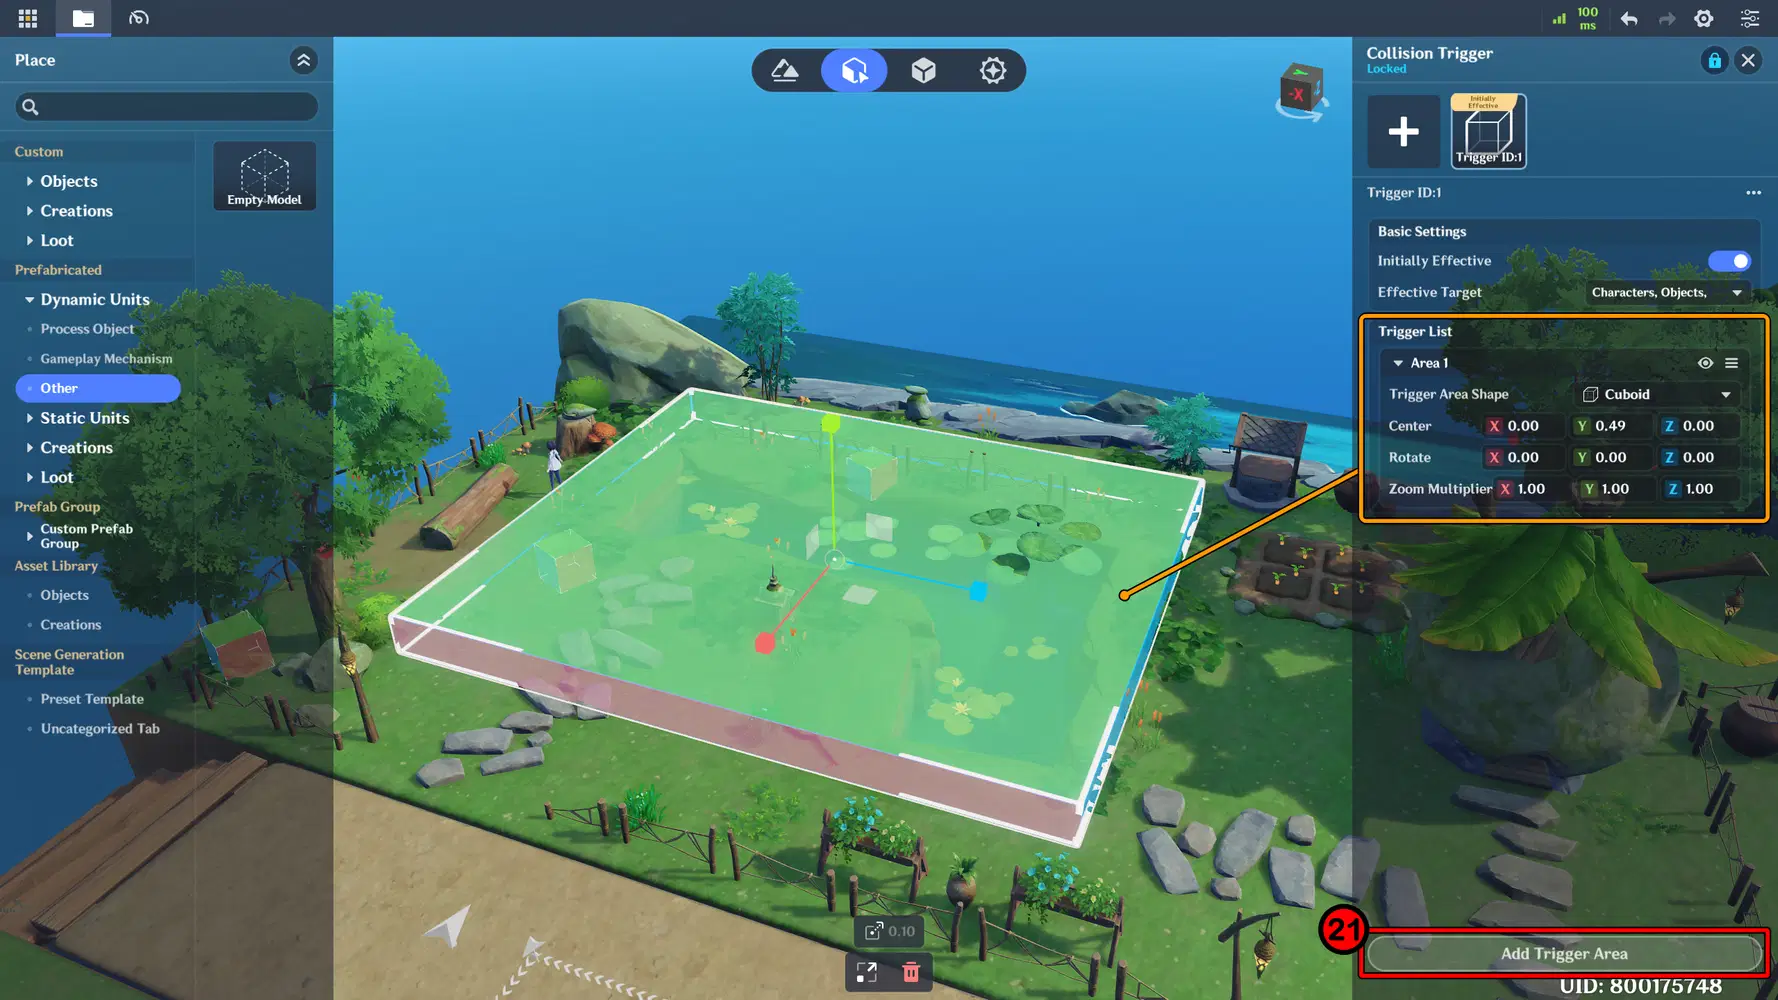
Configure Trigger Area
Next, create a Node Graph for the function.
- Open the Miliastra Sandbox window → go to Server Node Graph Resource → Entity Node Graph, then create a new Node Graph.
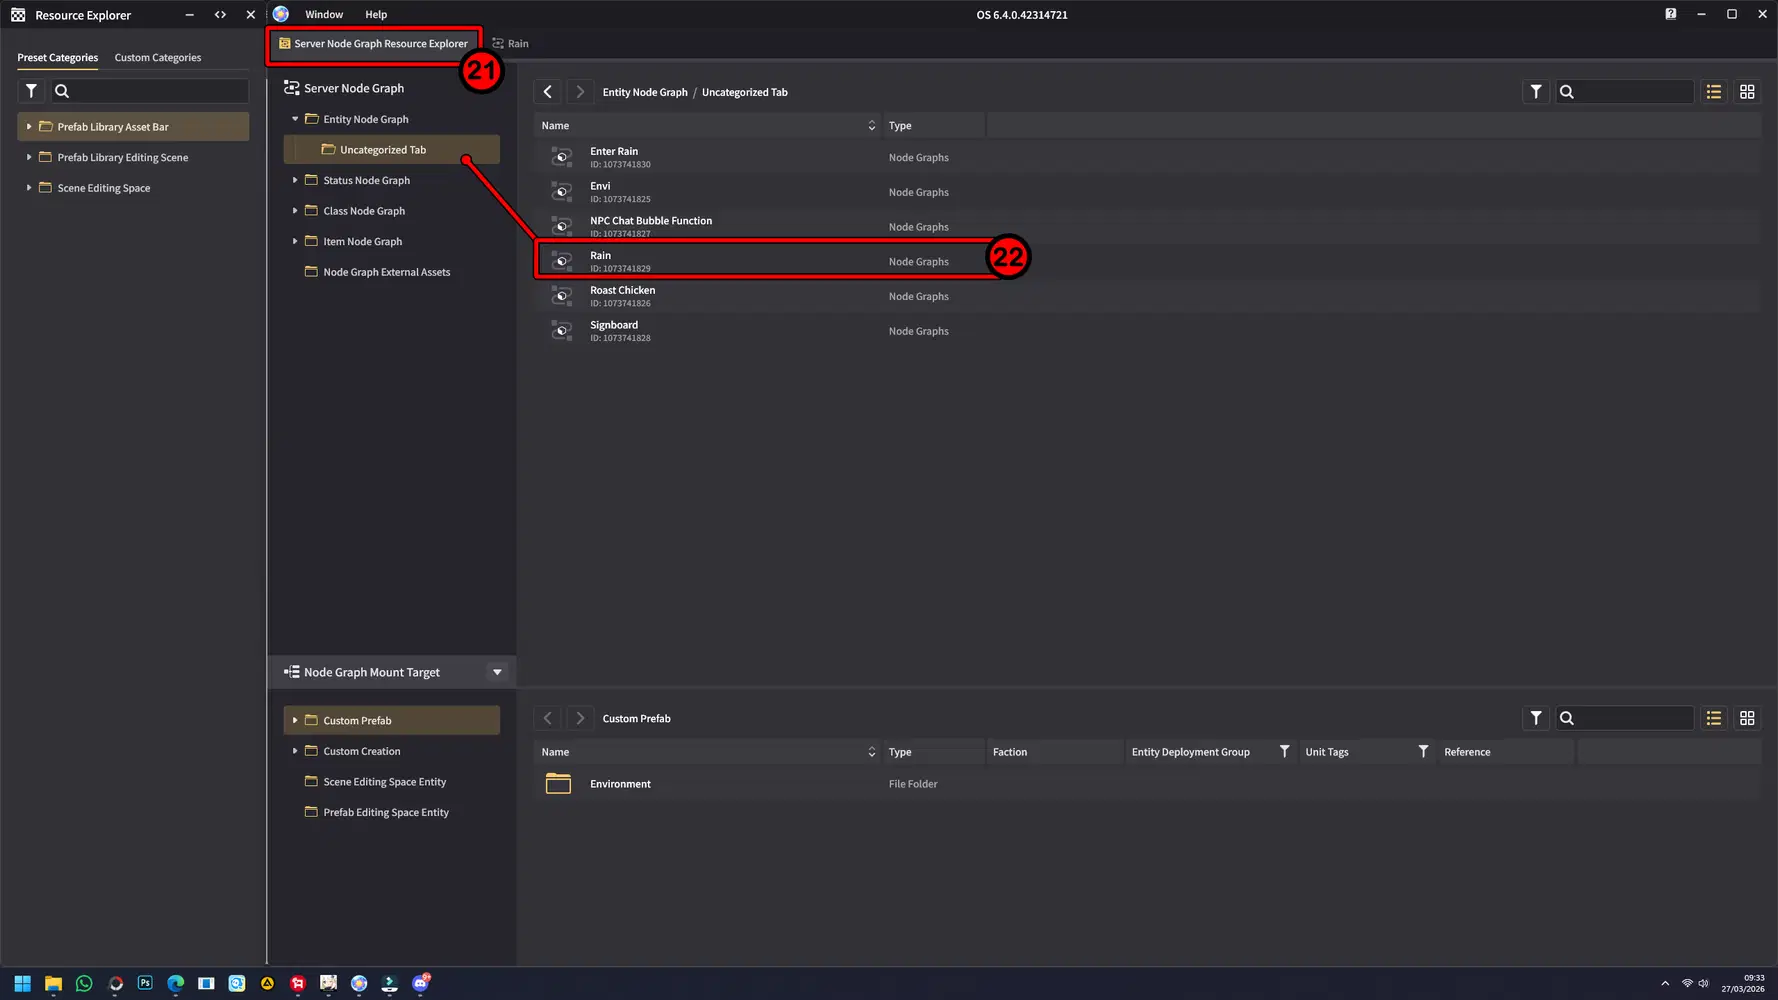
Create Node Graph
Create and add a Node so that when the player enters the Collision Trigger, they receive a Unit Status.
- This Unit Status applies a Hydro effect. To find the Unit Status ID, go to Combat Preset → Unit Status → Status Category. These statuses are already provided by the developer, so you can simply select and use them.
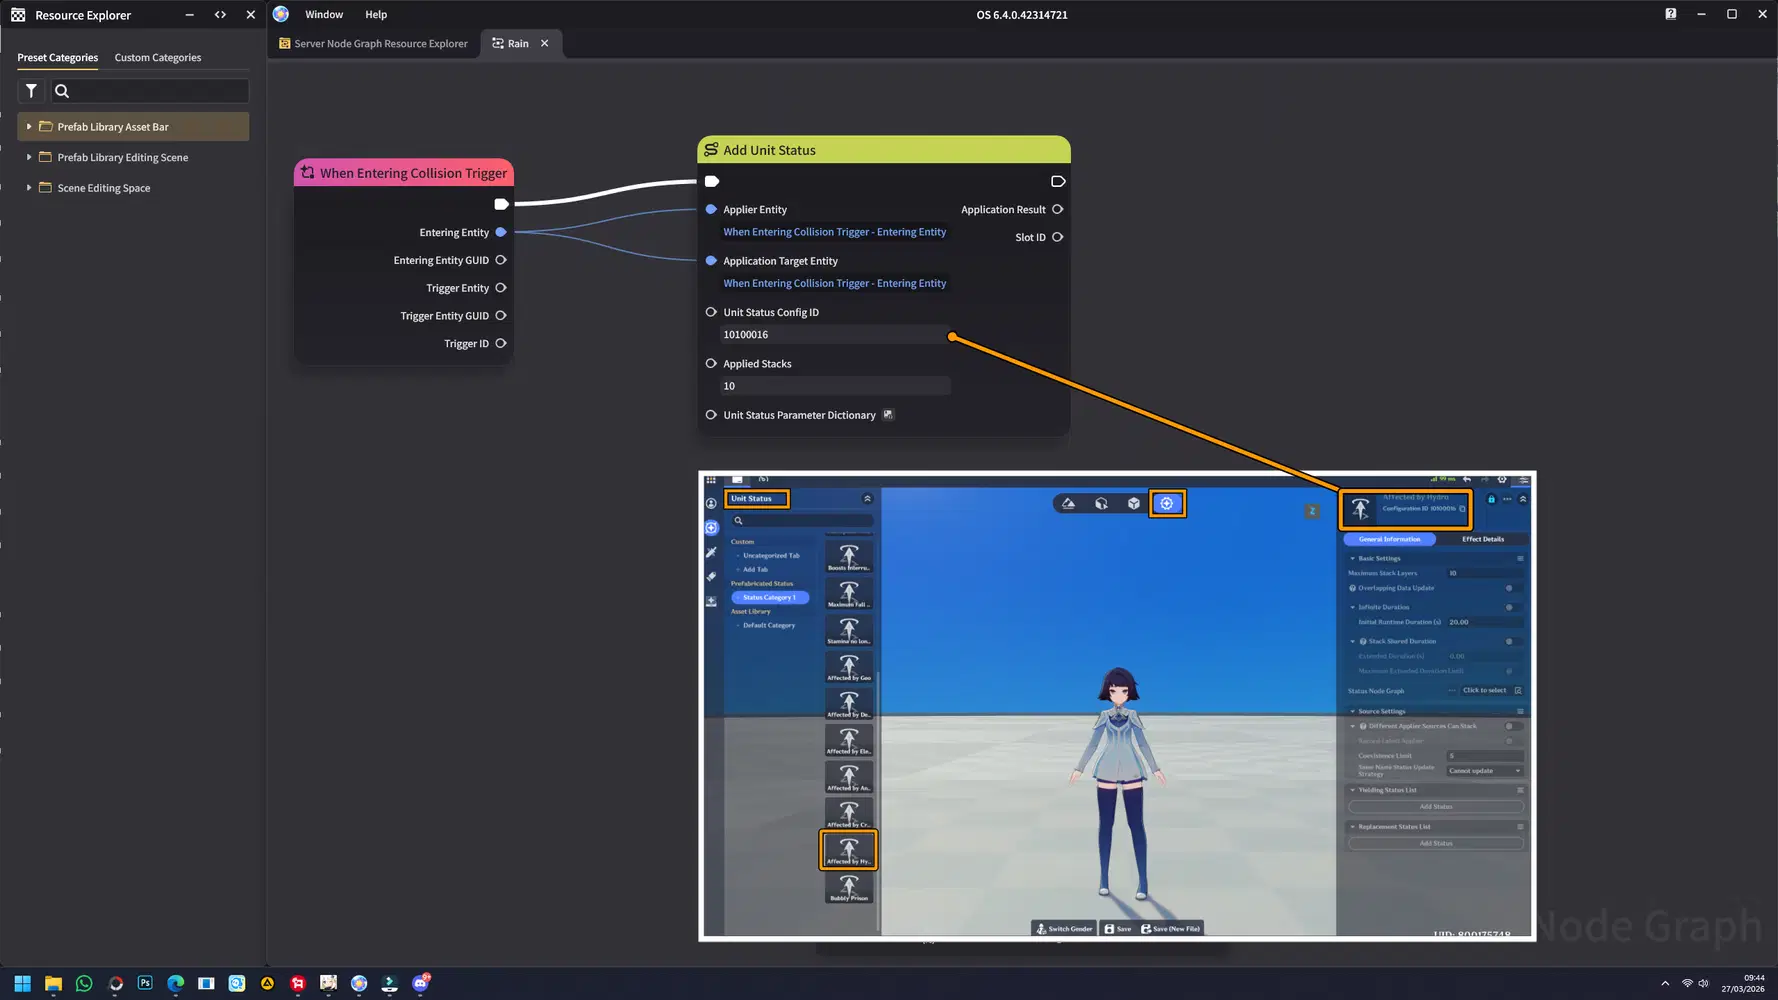
Node Graph for Hydro Effect (Wet)
- Then, save the Node Graph you created and assign it to the Empty Model (Rain) in your scene.
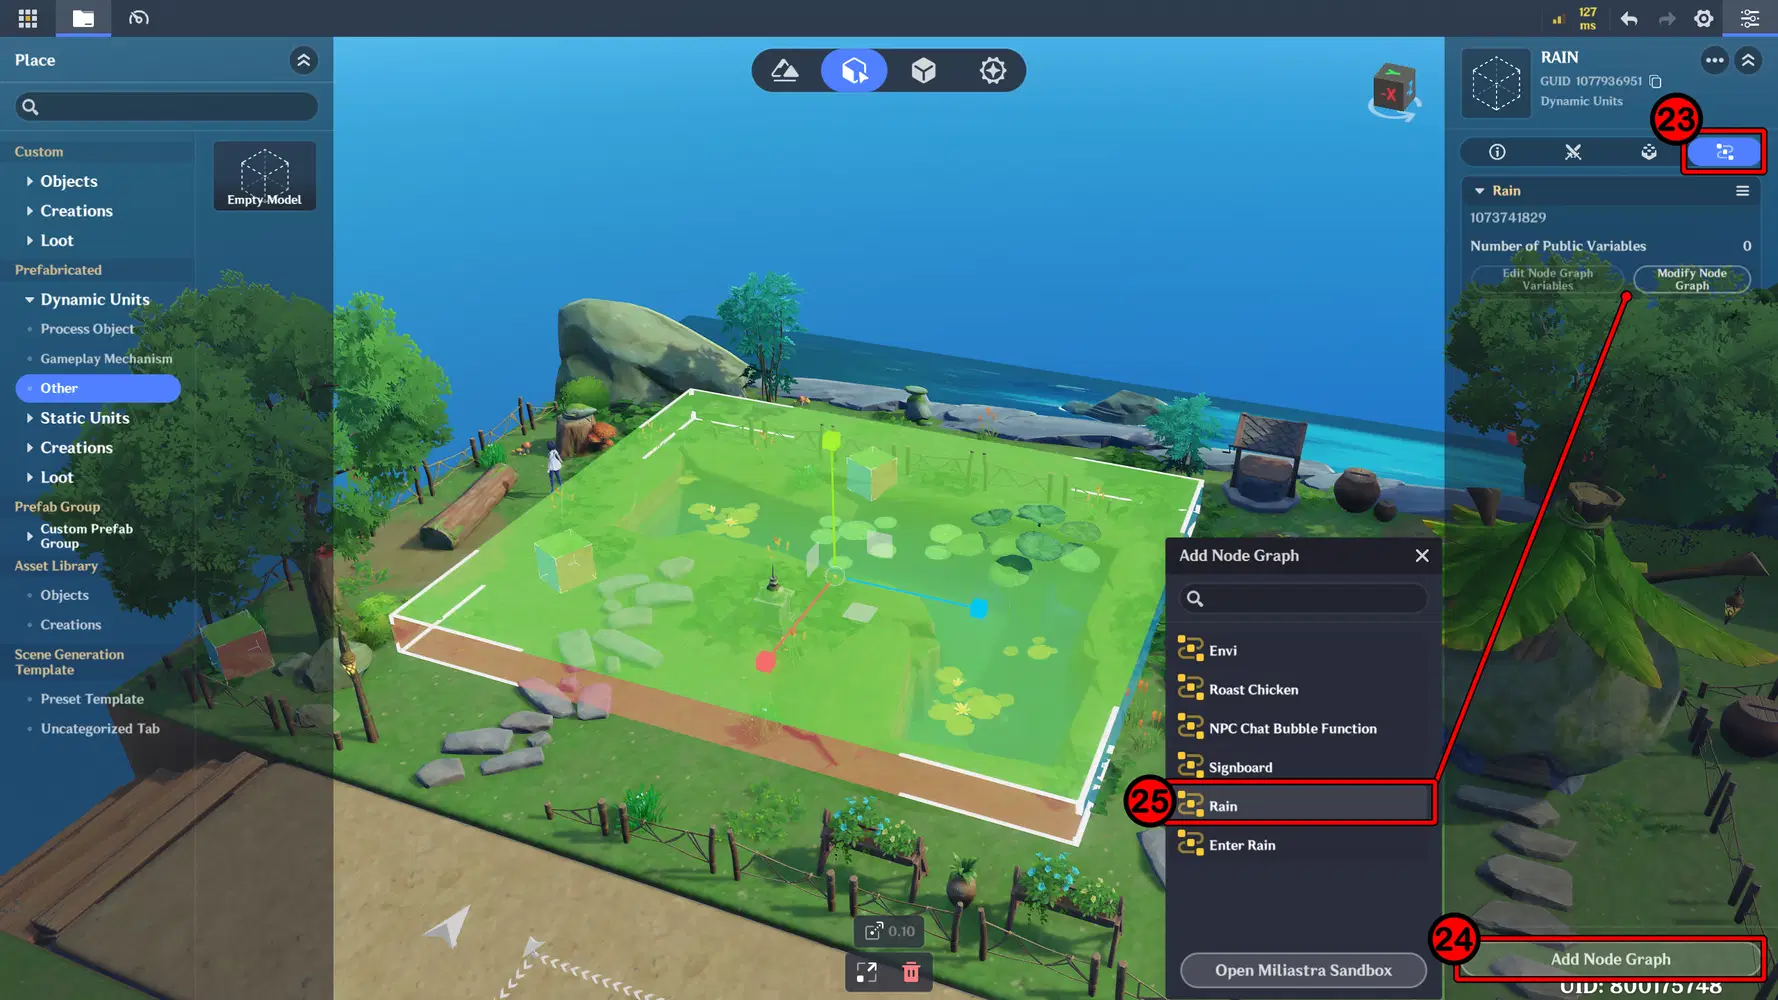
Once everything is set, you can run a test play to see if it works properly. Here is the result: rain will fall in the area, and when the character enters it, they will get the wet (Hydro) effect.
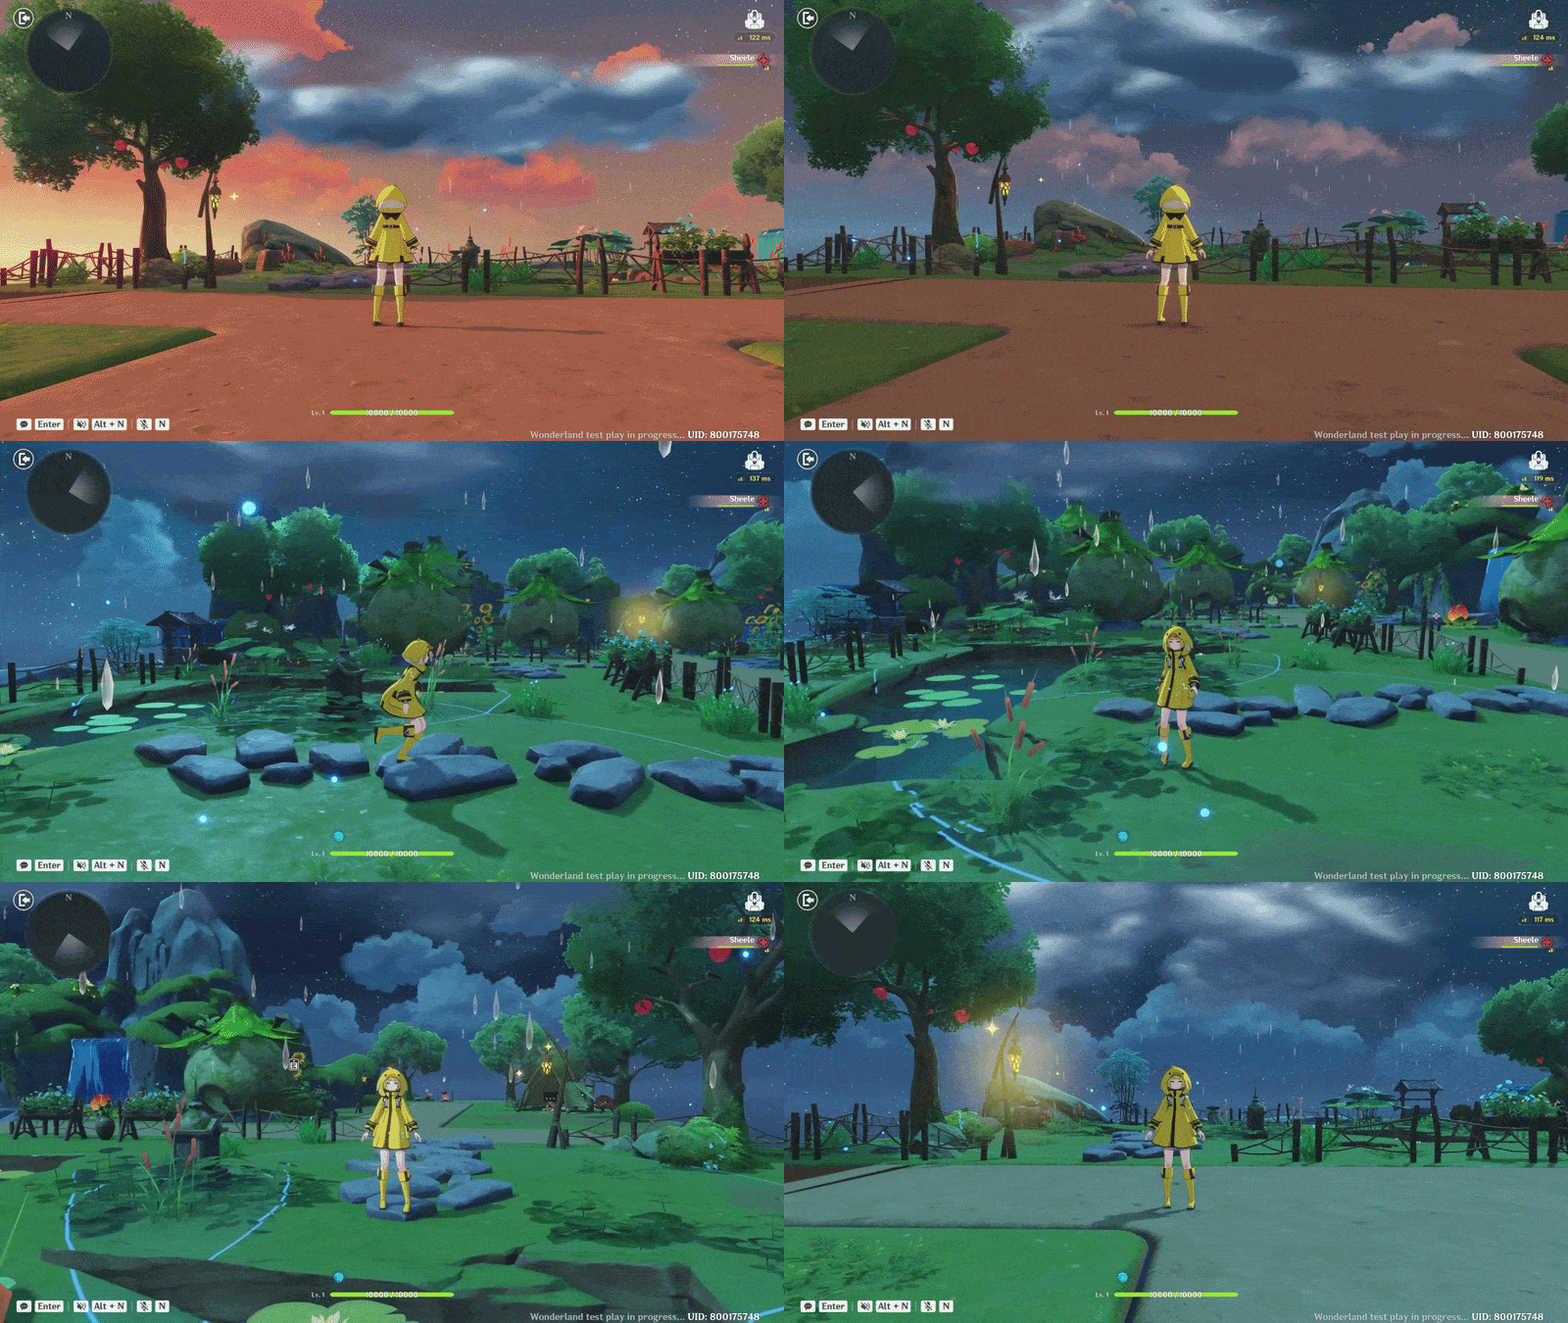
Note. This method has a disadvantage: a blue circular indicator appears on the ground due to the VFX. So, I hope the developers will add more environment weather options besides fog. 
b. Create Fog
Another weather effect you can add to your scene is Fog. Adding fog can create a mysterious atmosphere and enhance the depth and mood of the environment. Here’s how to add it to your scene:
- Go to Terrain Editing → Asset Bar → Environment Configuration, then edit the Environment there or create a new one. A panel will appear on the right side.
In the right-side panel menu, you can also adjust the Sky conditions, including Clouds, Stars, and even the Galaxy.
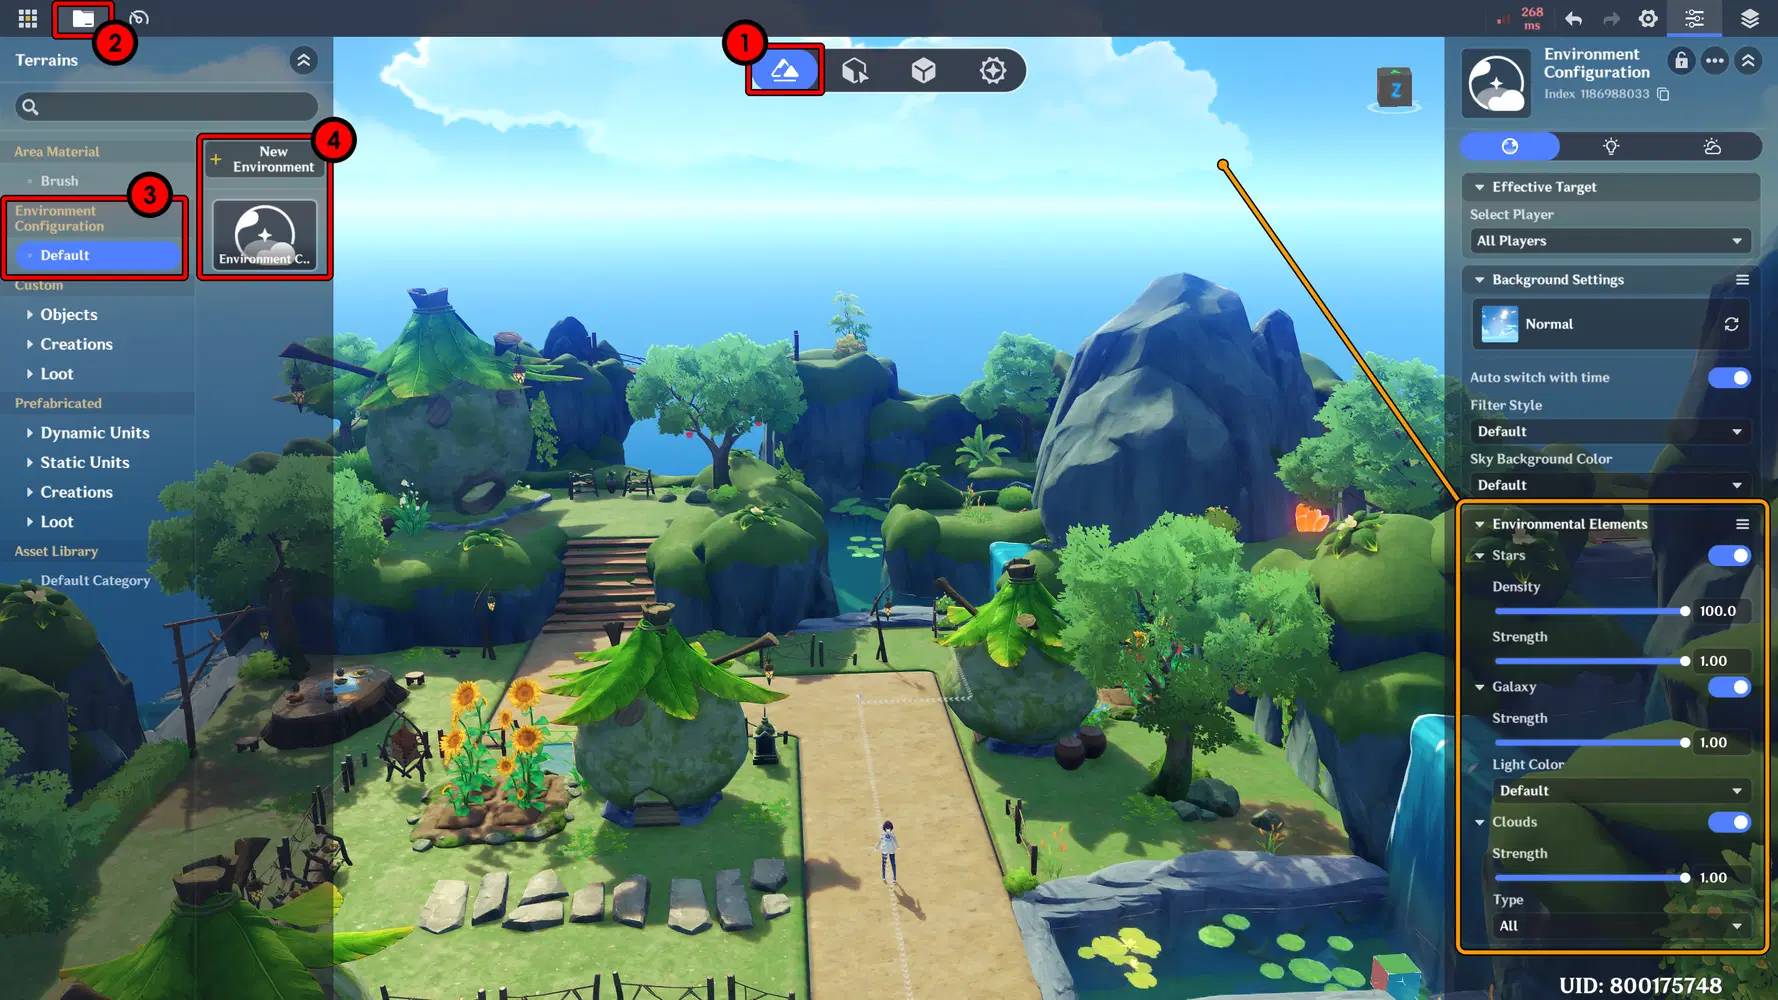
- Go to the Weather menu on the right side, then select Edit Details.
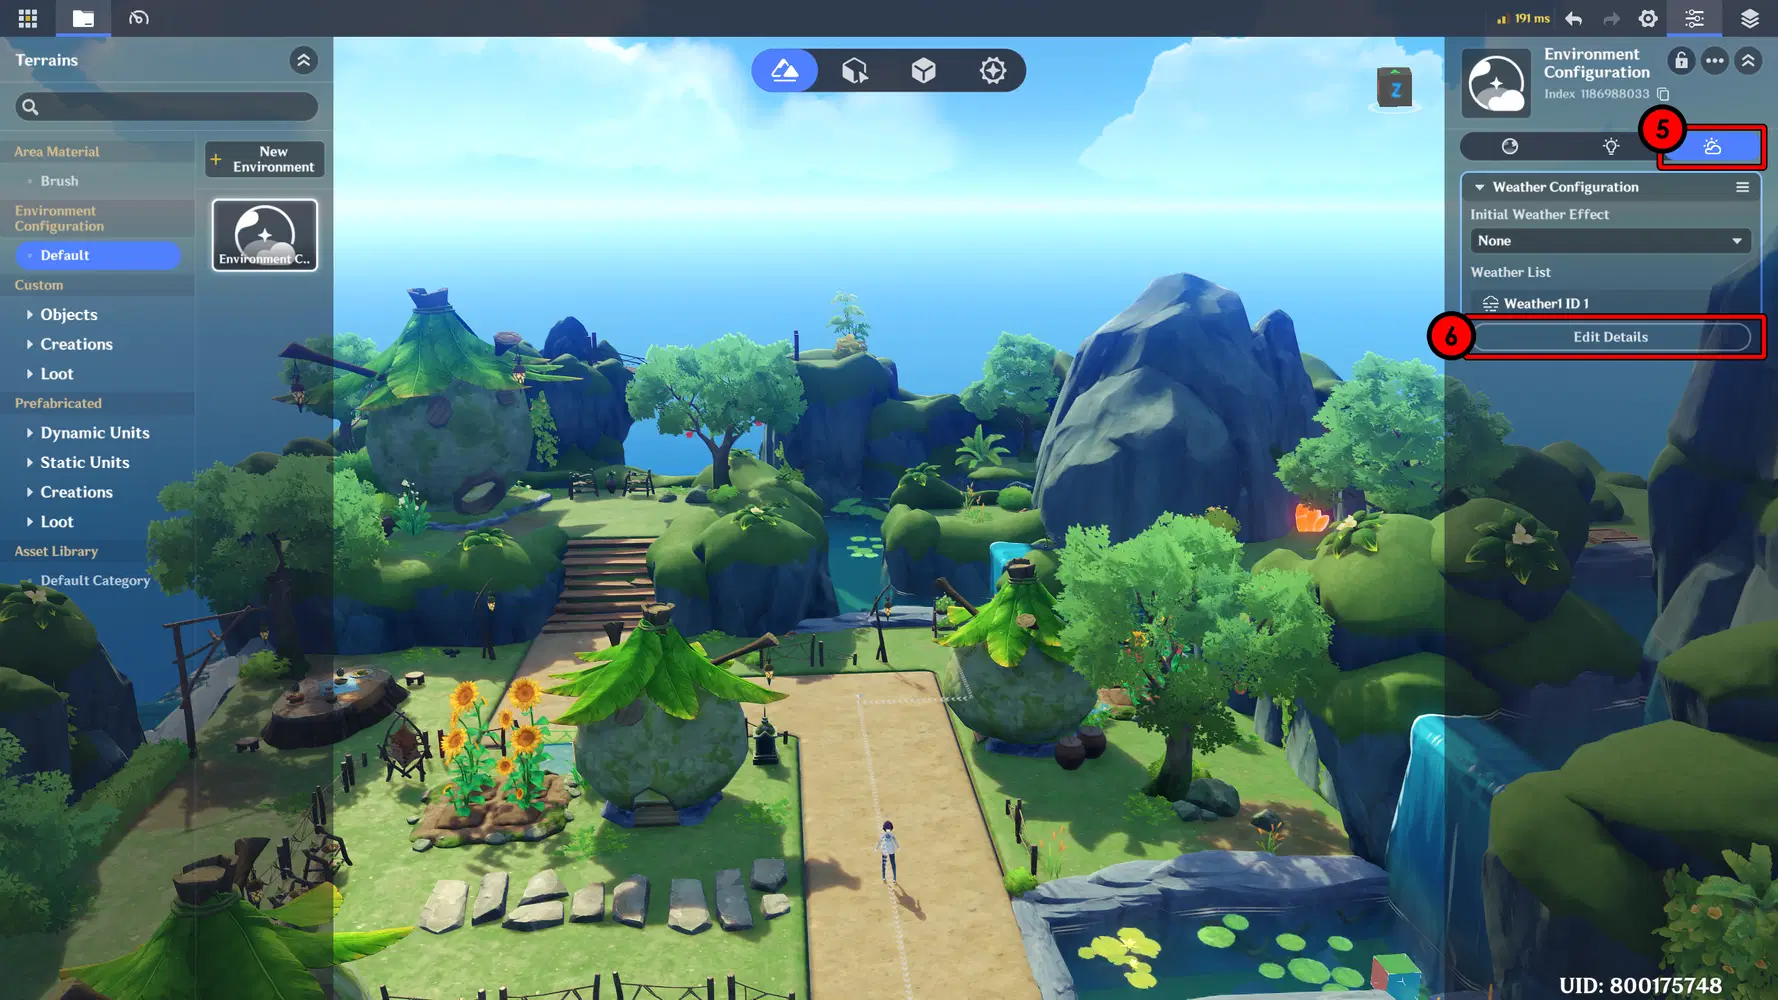
- Next, click the plus (+) to add a New Weather effect, then select Fog (since it’s the available option for now).
Here, you can adjust the fog height, color, and other settings. You can follow my setup below as a reference.
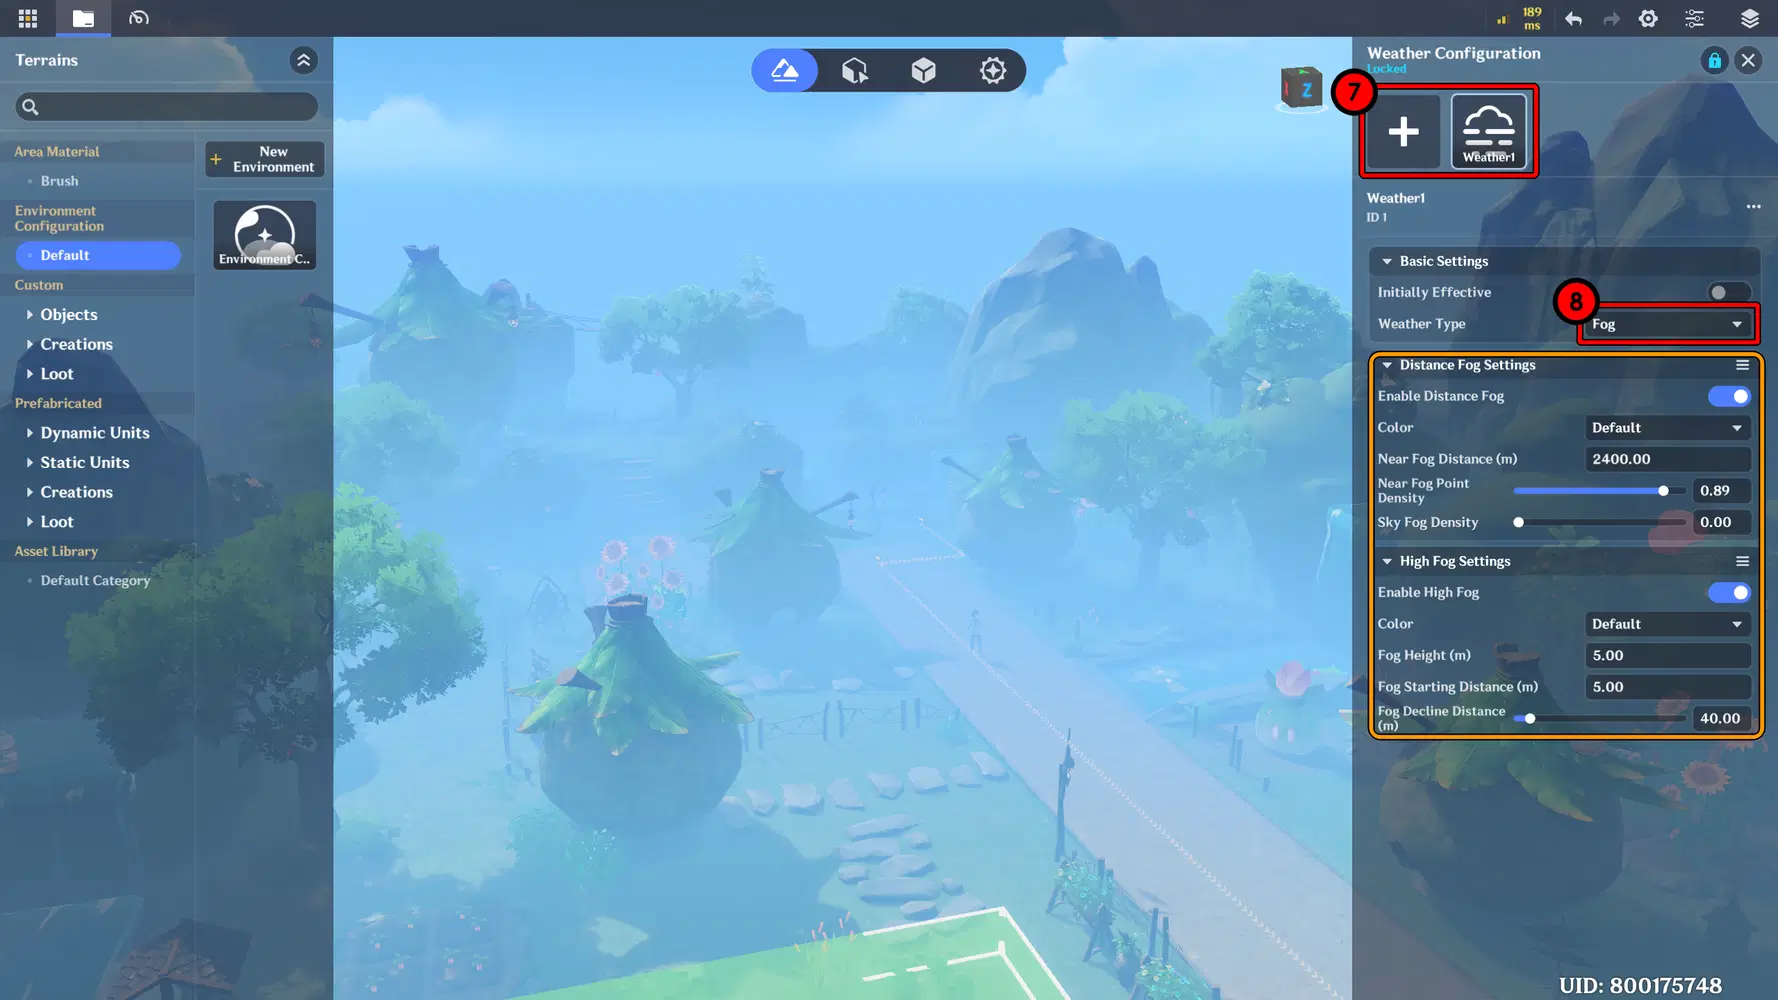
Fog Configuration
Return to the previous menu, and don't forget to change the Initial Weather Effect to the Weather you created earlier. None to Weather1.
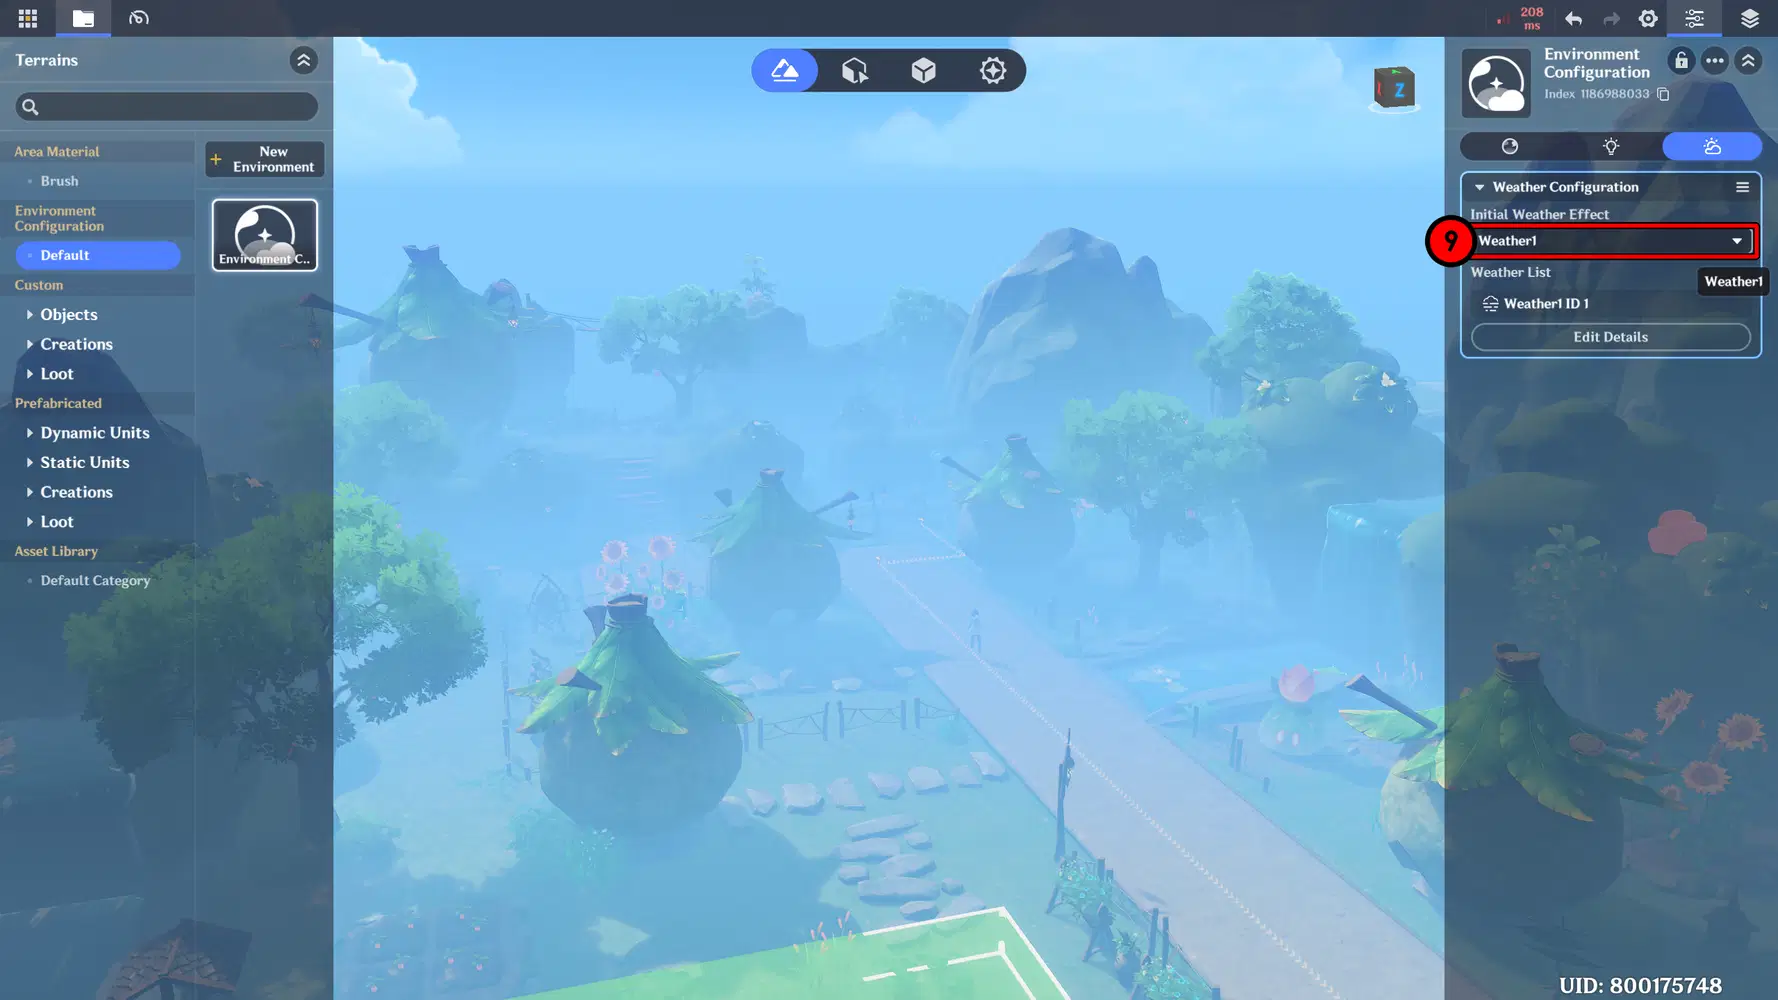
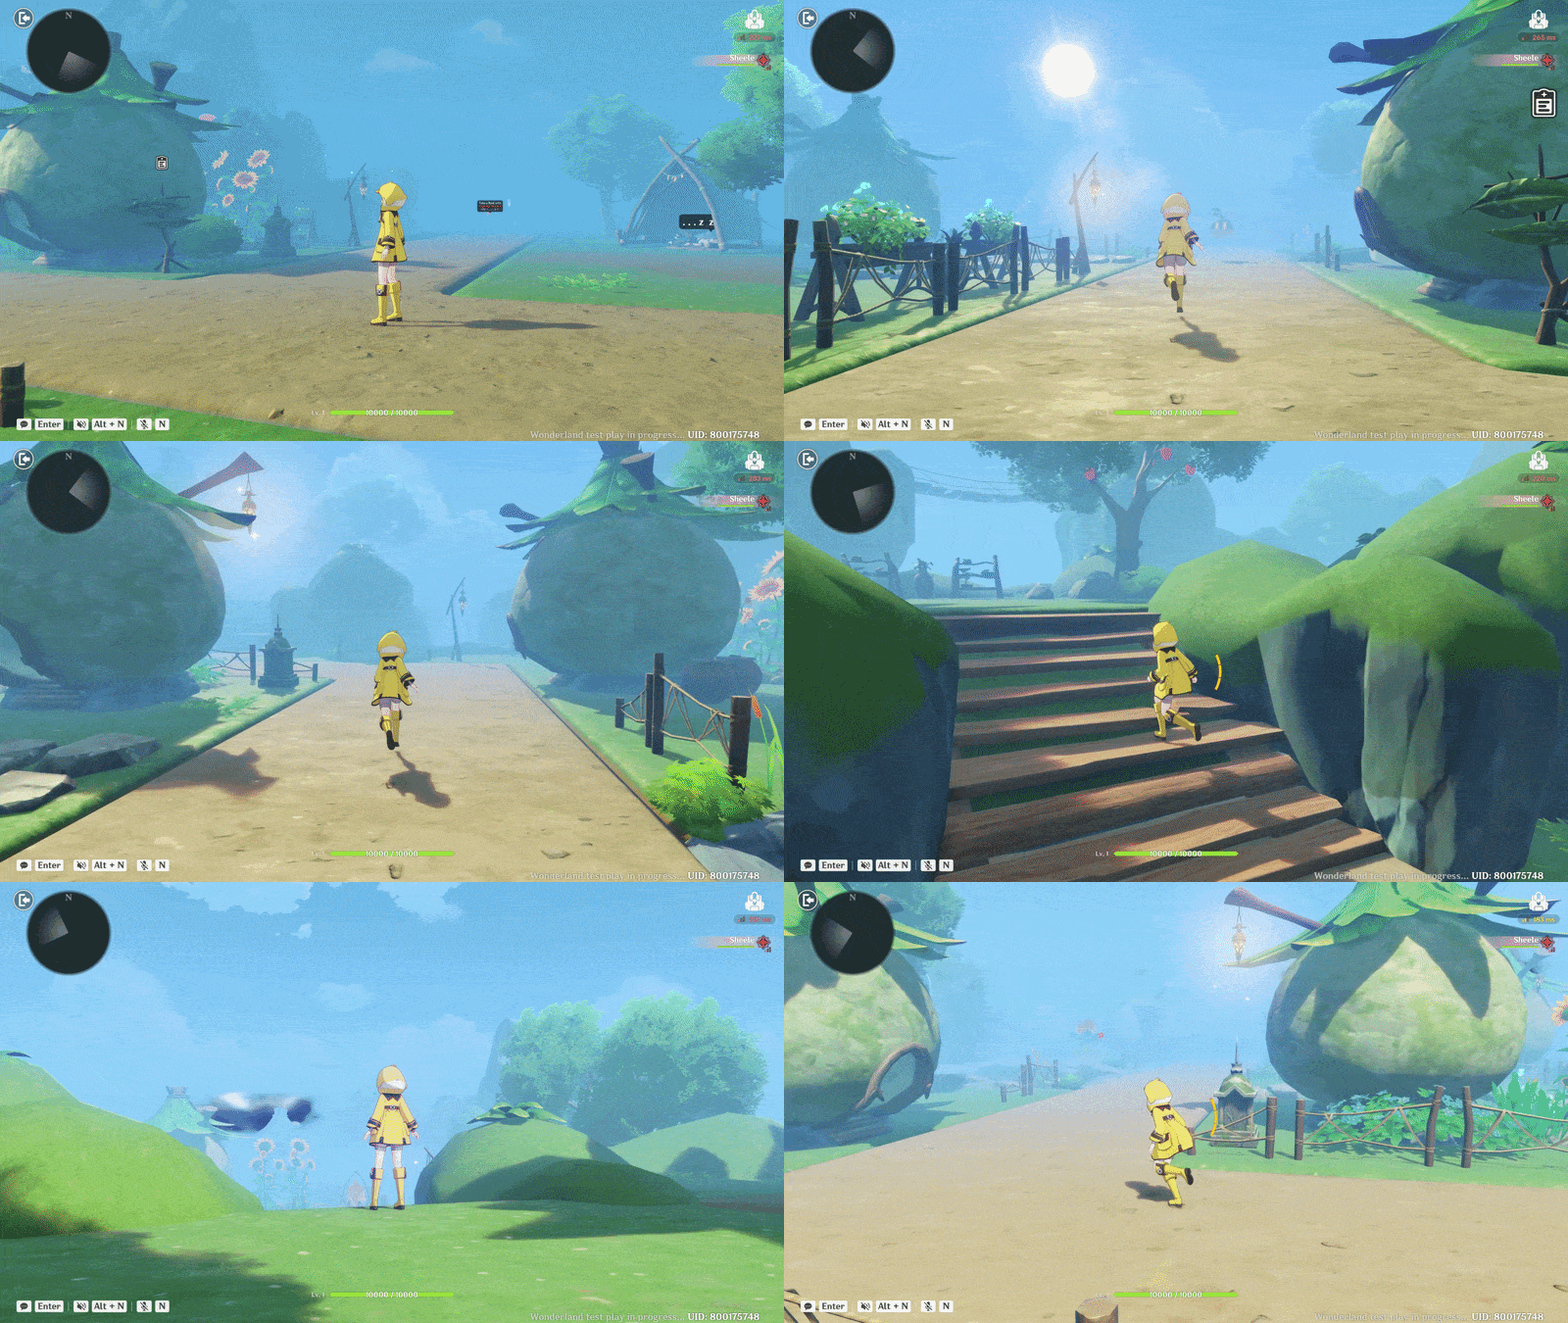
Then, run a Test Play. Here is the result: your scene will be filled with fog, creating a mysterious and immersive atmosphere-perfect for scenes with a sense of mystery and intrigue.
Tips 10 - Background Music
Try adding Background Music to your scene to enhance the overall mood and atmosphere. A good BGM can make your environment feel more immersive and emotionally engaging for players.
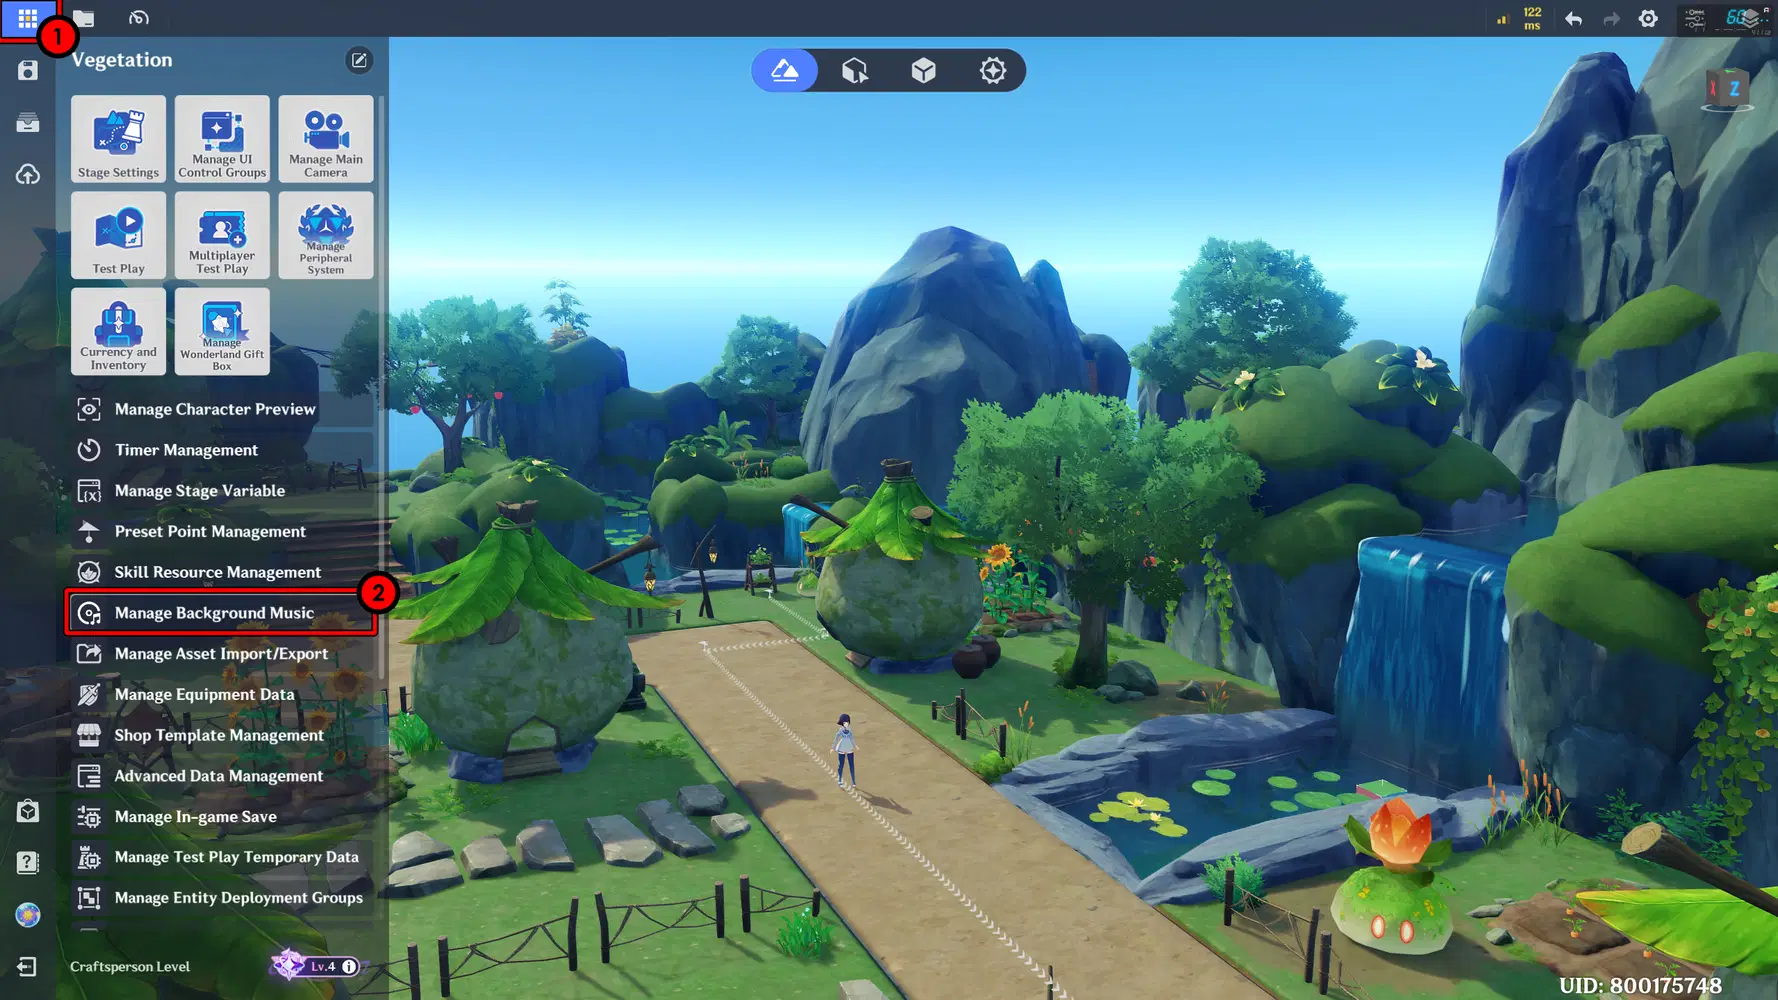
To add BGM, on the main menu, go to the Manage Background Music menu.
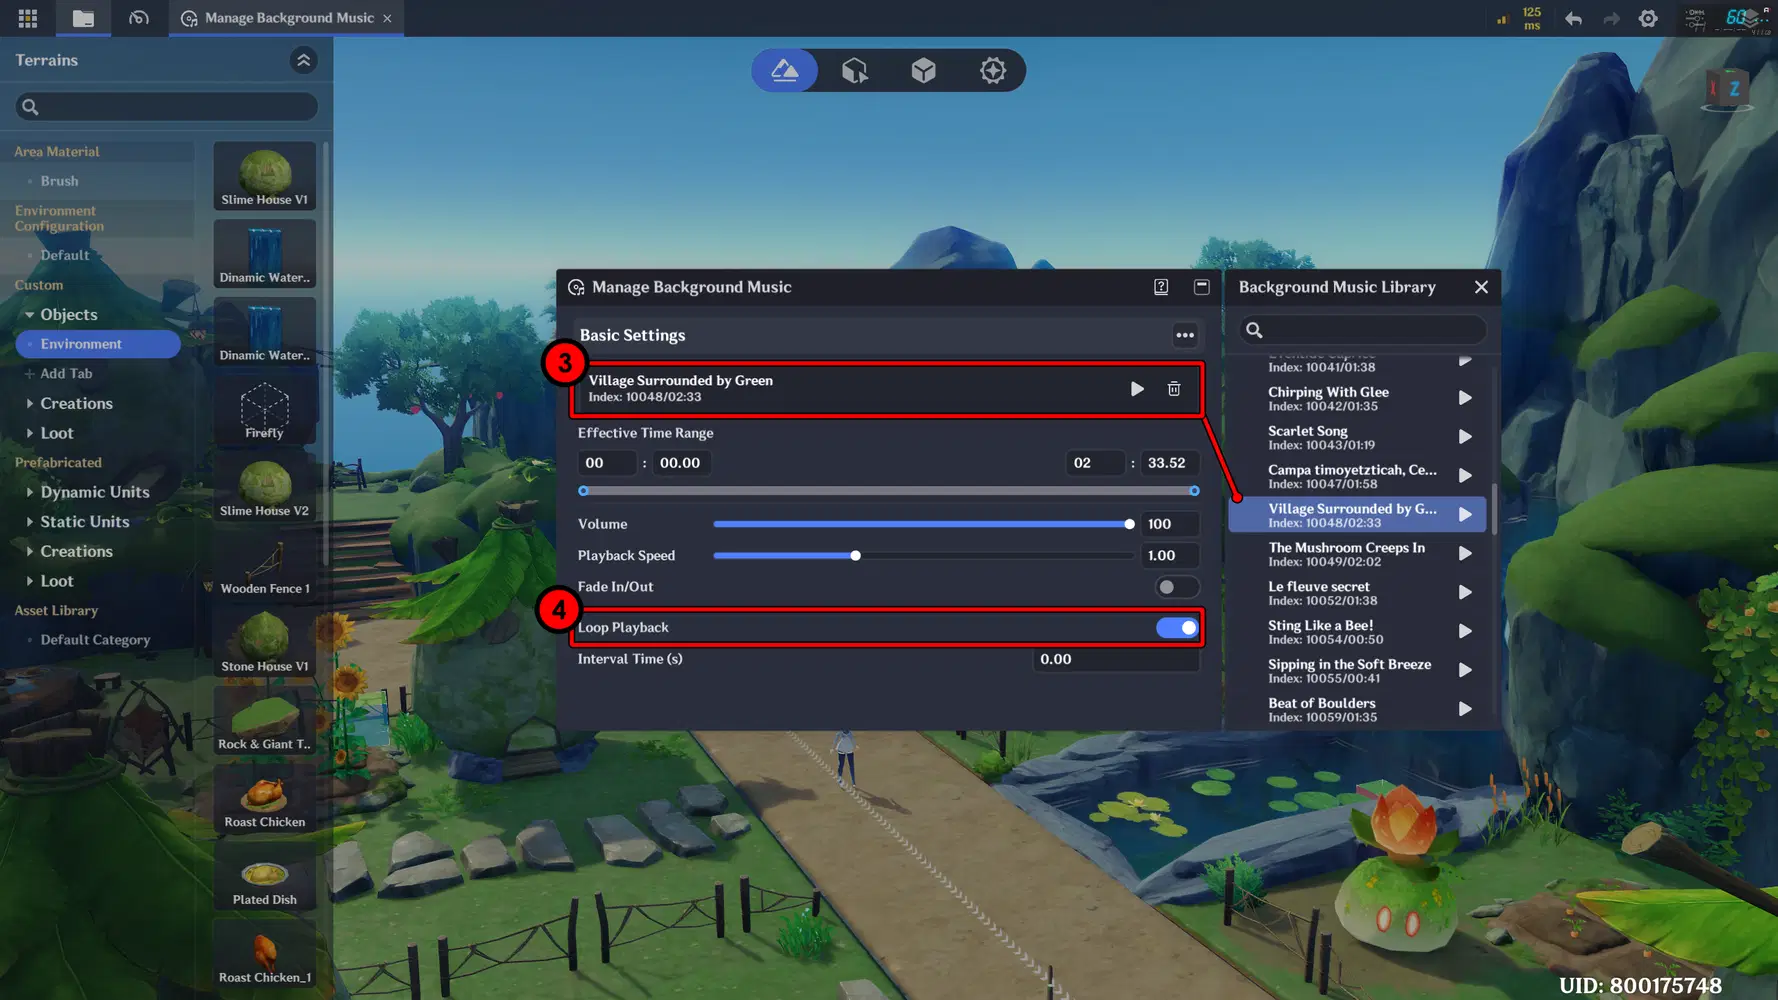
Then, a new window will appear where you can choose the type of music to use. Make sure the music matches the theme or scene you’ve created. Also, enable Loop Playback so the BGM continues playing.
Video Guide
Here is a guide in video format that you can follow
Download Slime Village Resource
Wonderland Resource Center: Slime Village #GoCreation

Wonderland Stage Showcase
Here are a few stages I’ve created that might inspire you in developing your own stages. 
Escape or Conquer Stage GUID: 16305205759 [Asia]
Slime & Dragon Stage GUID: 29190107647 [Asia]
Treasure Dash Stage GUID: 20600173055 [Asia]
Miliastra Wonderland Guide Collection


Reference Guide
As another source of guidance, you can visit the guide provided by the Official Genshin Impact x Miliastra Wonderland
Miliastra Wonderland - General Guide
Miliastra Wonderland - Tutorial