


Vehicle Gameplay

Who this guide is for?
Anyone looking to implement a land-based vehicle gameplay, or get ideas on how to move faster. I showcase two different kinds of vehicle gameplay you can implement. They aren't the only ways one can implement vehicle gameplay, but should give you a good idea from a basic simple version to a more complex one.
Important to note that the official documentation does say that "Vehicle" is going to be added in Miliastra Wonderland, so part of this may become irrelevant in the future depending on how it's implemented, but some of it should still be relevant. It's possible that the official "Vehicle" that will be in Miliastra Wonderland will be similar to the boat controls that we have currently in Genshin Impact.
Note: This guide is written during version Luna V.
The Tutorial

Basic Version
Starting off, we'll first create the necessary prefabs.
Creating VehicleMotion Prefab
The first prefab we'll create will be responsible for pulling the player's character, which we will name VehicleMotion. It will be following the player's character by the means of a Follow Motion Device component with an offset. And it will pull the player with a Force Field that is oriented to pull players towards the center of the entity.
- In the Prefab Tab, create a Prefab with an Empty Model (you can find it under Dynamic Units, Others)
- Name it "VehicleMotion"
- Turn off it's Native Collision
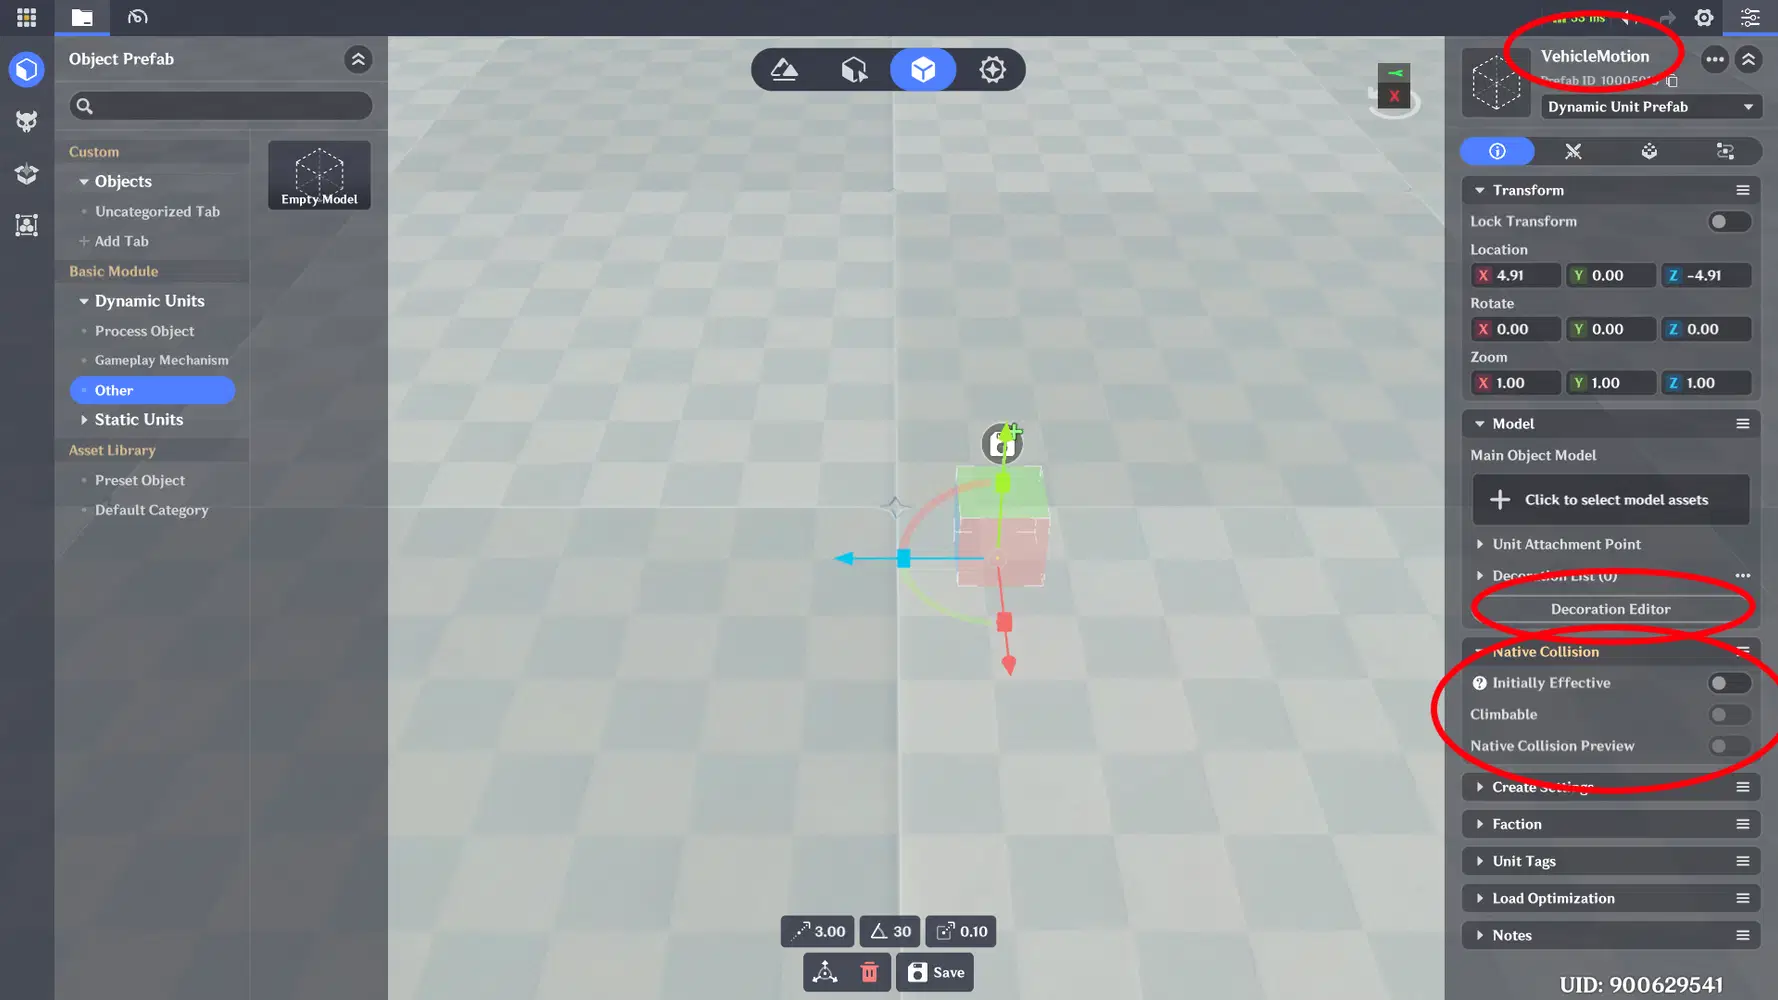
(Optional, this is to give the entity a visual appearance so you see where it is in development. You'll most likely remove or turn this off for an actual game)
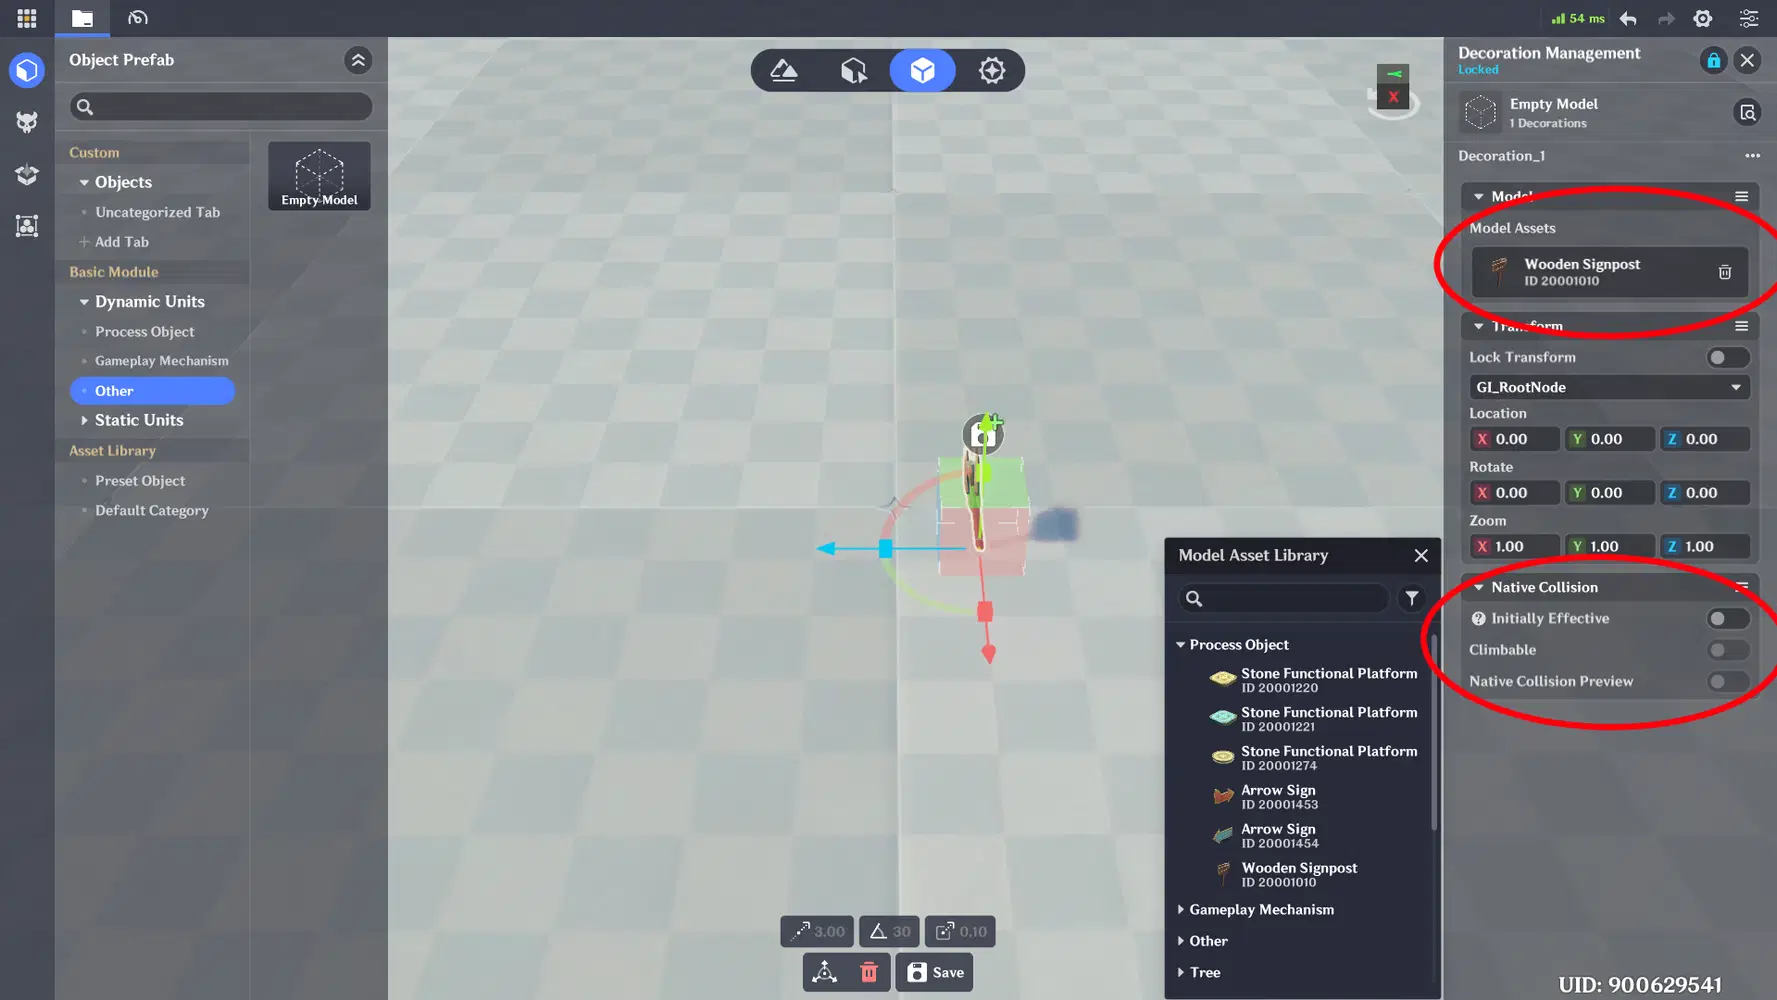
- Go to the Decoration List and add in a Model, for this example we'll use a Wooden Signpost
- Turn off the decoration's Native Collision
- Go to the components tab, and add a Follow Motion Device component
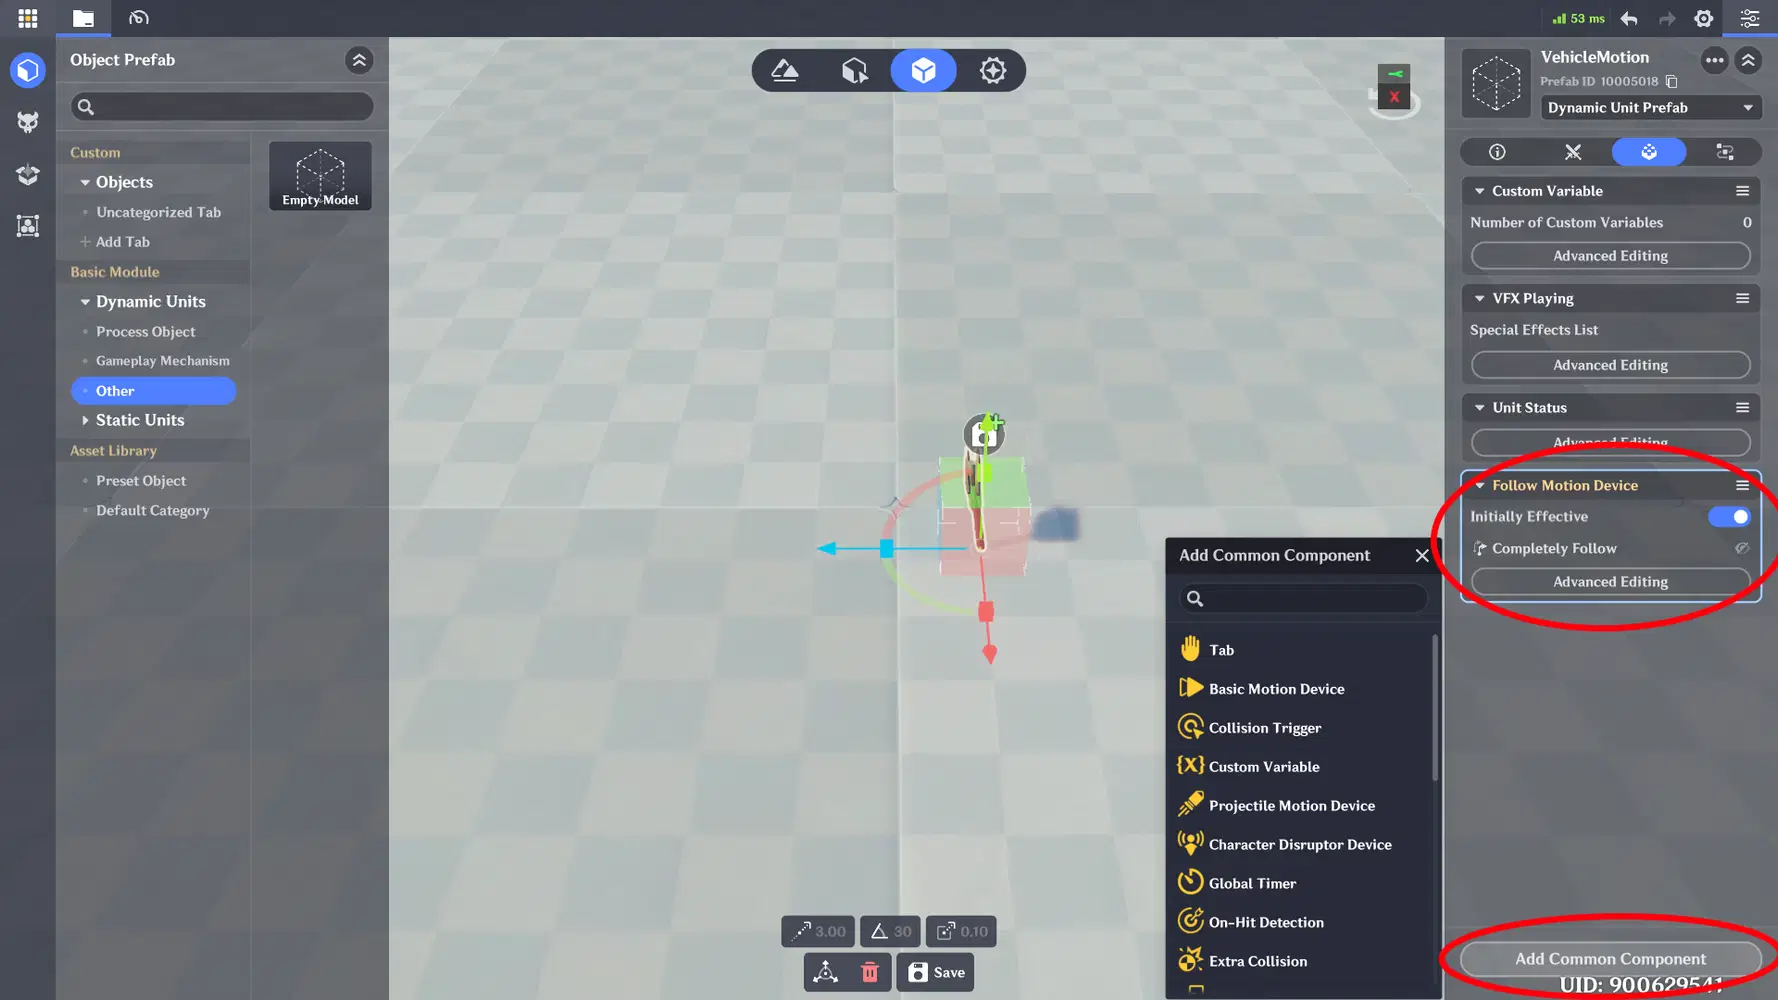
We don't need to edit anything for the Follow Motion Device component here, as we will setting in a node graph. Just need to make sure the entity has a Follow Motion Device component in order for us to configure it in node graphs.
- And then also add in a Character Disruptor Device component
- Go to Advanced Editing for the Character Disruptor Device component
- Change the Device type to Force Field
- Set both the Inner and Outer Sphere Radius both to 2.00
- Set the Disturbance Direction to "Line Connecting Sphere Center and the Trigger Area"
- Set both Inner Diameter Orientation and Orientated Outward from the Outer Diameter to "Towards Sphere Center"
- Set both the Inner and Outer Diameter Velocity to 5.00
This allows the Force Field to pull the Character towards the sphere center.
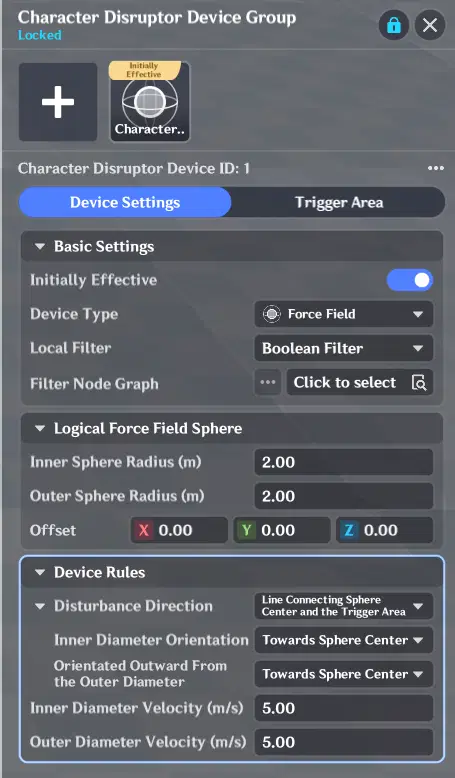
- Go to the Trigger Area tab
- Set the Trigger Area Shape to Sphere
- Set the Radius to 2.00
This just makes it so the Trigger Area is the same as the Force Field Sphere's 2m radius.
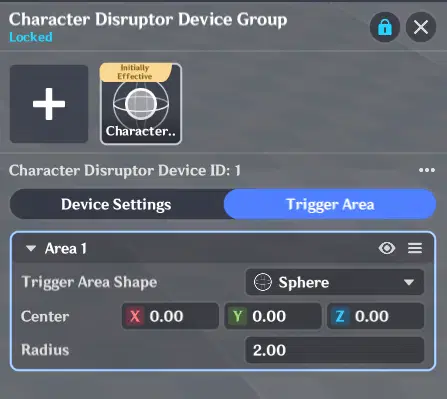
Make sure you save the Prefab.
Creating VehicleModel Prefab
Next we'll need to create a Prefab that gives the visual appearance of the vehicle. It will allow the player to know which way the Vehicle is going, additionally we will be turning it to create a "Car Drifting" effect in a later section of this guide.
- In the Prefab Tab, create a Prefab with a Toy Cart Model (Type in "Toy Cart" in the search bar, while in "Gameplay Mechanism")
- Name it "VehicleModel"
- Set the Zoom to, (0.3, 0.3, 0.3)
- Turn off it's Native Collision
For the purpose of this guide, we will just be using this simple model. You can create your own model with all sorts of decorations if you desire, just make sure to turn off it's Native Collision.
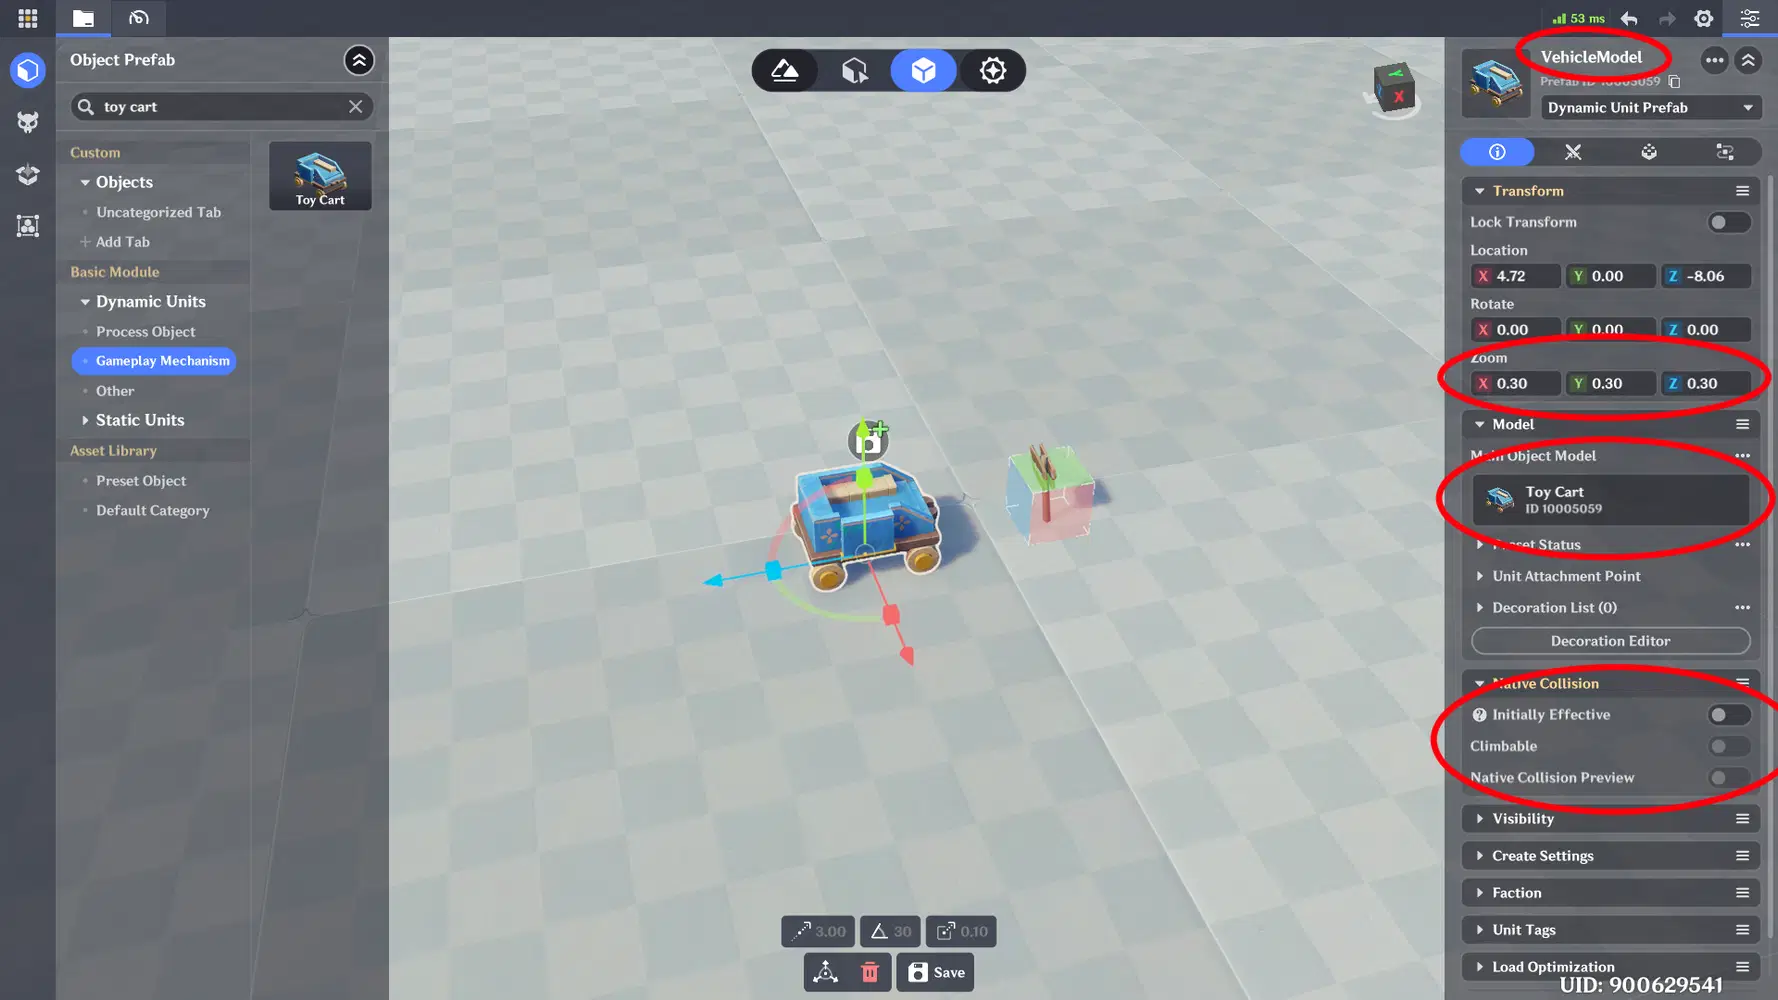
- Go to the Components Tab, and add a Follow Motion Device component
Same thing with the VehicleMotion prefab, we'll be setting the Follow Motion Device details in a node graph, so we won't have to do anything extra here.
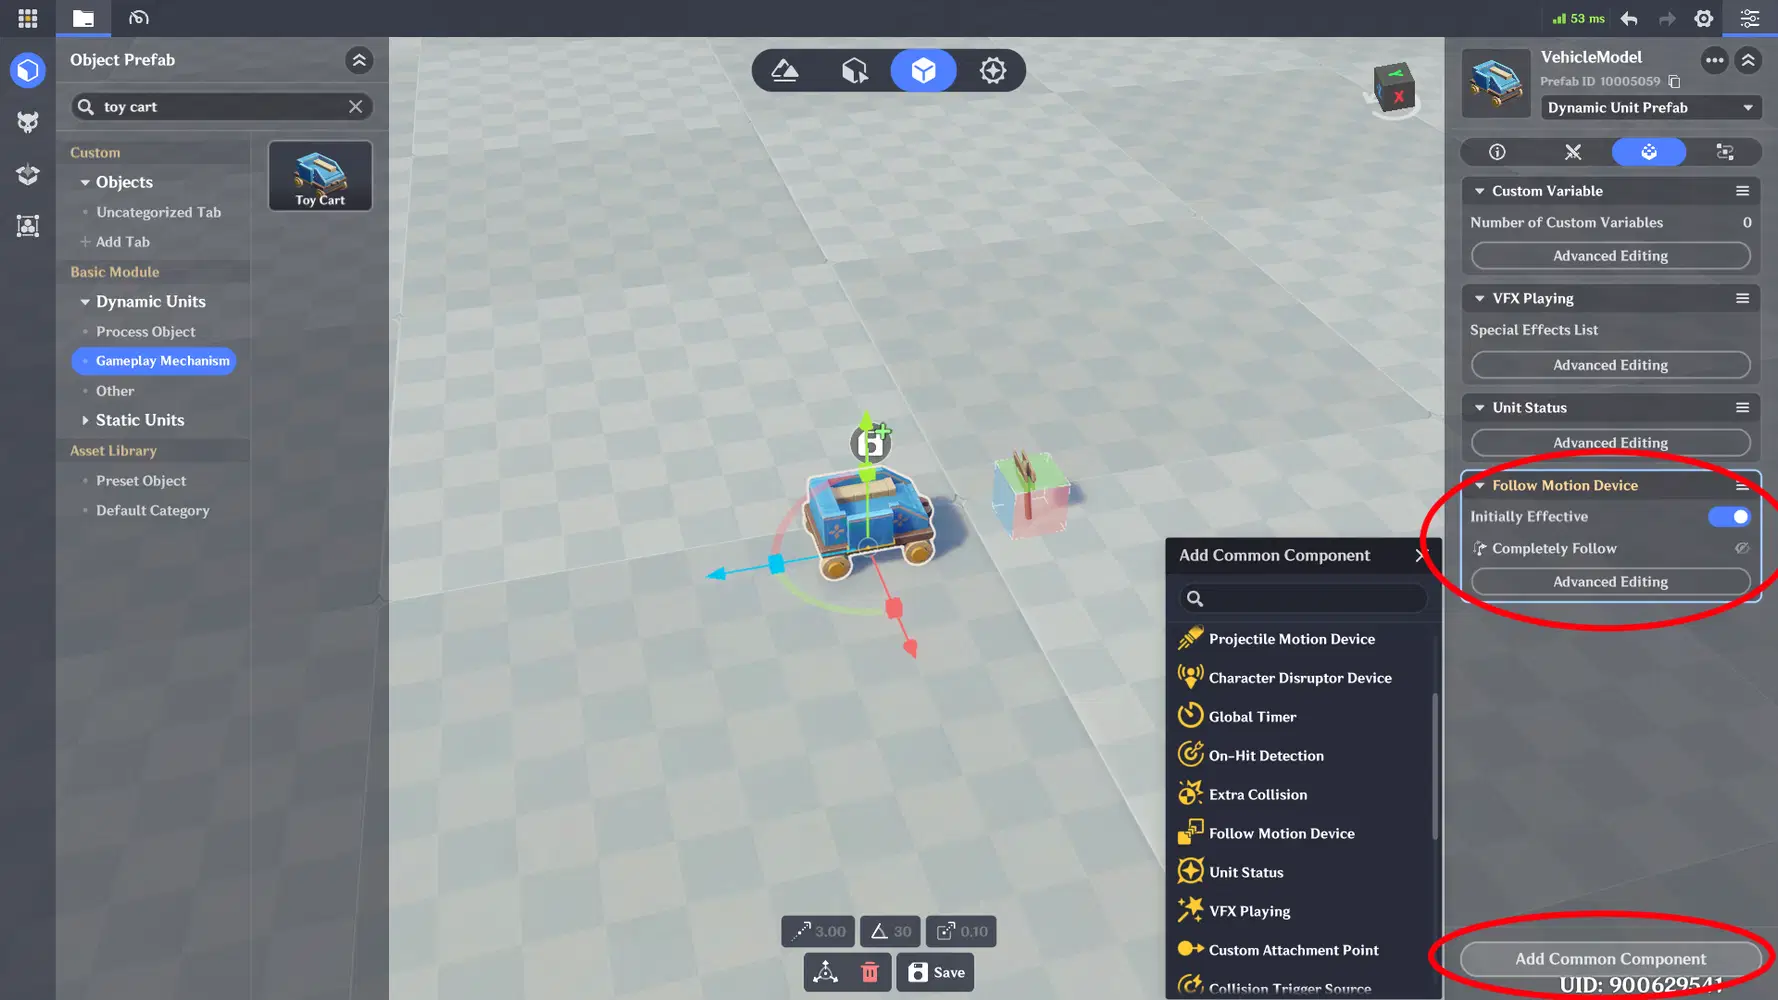
Make sure you save the Prefab.
Creating entities based on the prefabs in node graph
Next we'll be utilizing a node graph to create the entities correlated to the VehicleMotion and VehicleModel prefabs.
- In Miliastra Sandbox window, go to your Server Node Graph, Entity Node Graph, open up the default tab, and create a node graph.
- Name it CharacterOnCreate
We'll be putting this on the Character. It will be responsible for creating the vehicle related entities and having them follow the Character.
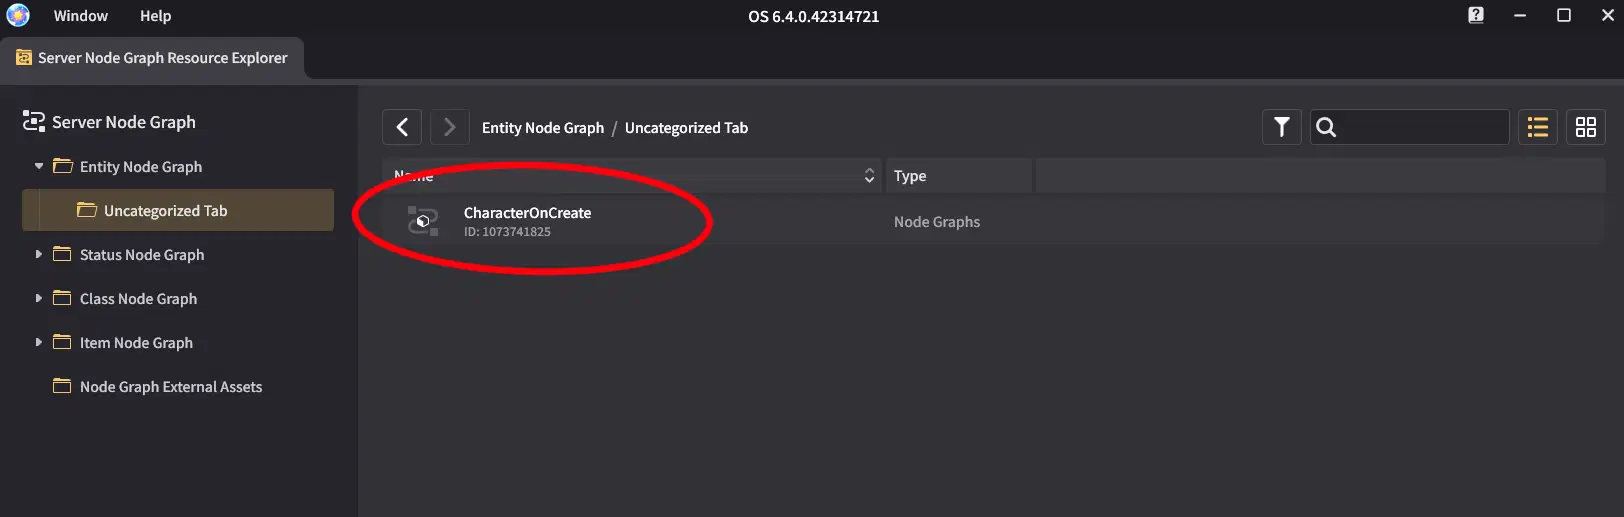
- Open up the node graph, CharacterOnCreate
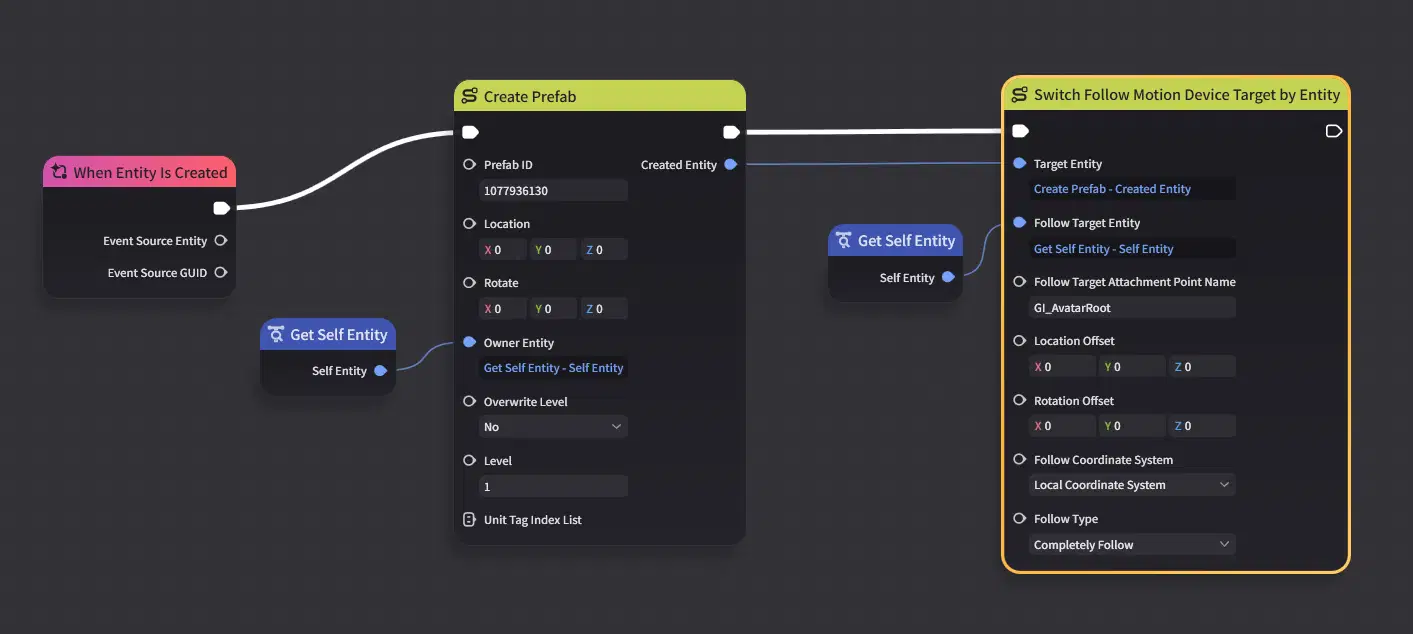
- Add in the node "When Entity is Created"
- Add in the node "Create Prefab"
- Set it as follows
- Prefab ID: Copy the prefab ID from your VehicleModel's Prefab ID (You can find the Prefab ID on the top right of the screen when the prefab is selected, under the Prefab's name)
- Location: 0, 0, 0
- Rotate: 0, 0, 0
- Owner Entity: Get Self Entity
- Overwrite Level: No
- Level: 1
- Unit Tag Index List: ignore it, just leave it as is.
- Plug in the execution flow from "When Entity is Created" node to the "Create Prefab" node.
This creates a VehicleModel entity at Location 0,0,0
- Add in the node "Switch Follow Motion Device Target by Entity
- Set it as follows
- Target Entity: Created Entity output from the "Create Prefab" node
- Follow Target Entity: Get Self Entity
- Follow Target Entity Parameter: "GI_AvatarRoot"
- Location Offset: 0, 0, 0
- Rotation Offset: 0, 0, 0
- Set Follow Coordinate System: "Local Coordinate System"
- Set Follow Type: "Completely Follow"
- Plug in the execution flow from "Create Prefab" node to the "Switch Follow Motion Device Target by Entity" node.
This makes the VehicleModel follow Self Entity, in this case it will be the Character, as we will mount this node graph onto the Character. Note that because we have Follow Type as "Completely Follow" when the Character rotates, the VehicleModel will rotate along with it.
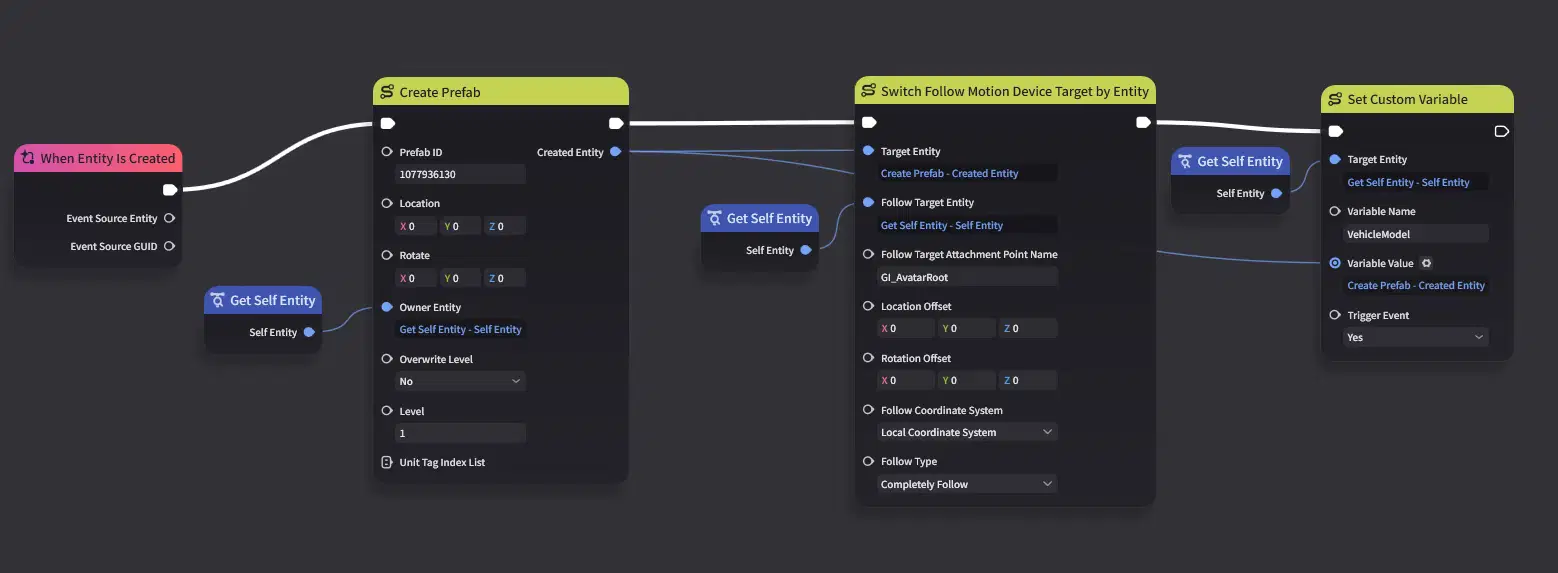
- Add in the node "Set Custom Variable"
- Set as follows:
- Target Entity: Get Self Entity
- Variable Name: "VehicleModel"
- Variable Value: Plug in the Created Entity output from the previous "Create Prefab" node.
- Trigger Event: No
- Plug in the execution flow from "Switch Follow Motion Device Target by Entity" node to "Set Custom Variable" node.
This allows us to reference the VehicleModel entity in the node graph for future uses.
Next we'll be doing a similar thing but for the VehicleMotion prefab, but with a key difference in the Follow Motion Device's location offset.
- Add in the node "Create Prefab"
- Set as follows:
- Prefab ID: Copy the prefab ID from your VehicleMotion's Prefab ID (You can find the Prefab ID on the top right of the screen when the prefab is selected in the Prefab Library module, under the Prefab's name)
- Location: 0, 0, 0
- Rotate: 0, 0, 0
- Owner Entity: Get Self Entity
- Overwrite Level: No
- Level: 1
- Unit Tag Index List: ignore it, just leave it as is.
- Plug in the execution flow from "Set Custom Variable" node to the "Create Prefab" node.
(You could also just plug the execution flow from the "When Entity is Created" to the "Create Prefab" node that creates the VehicleMotion entity, the two Create Prefabs do not need to be executed in sequential order.)
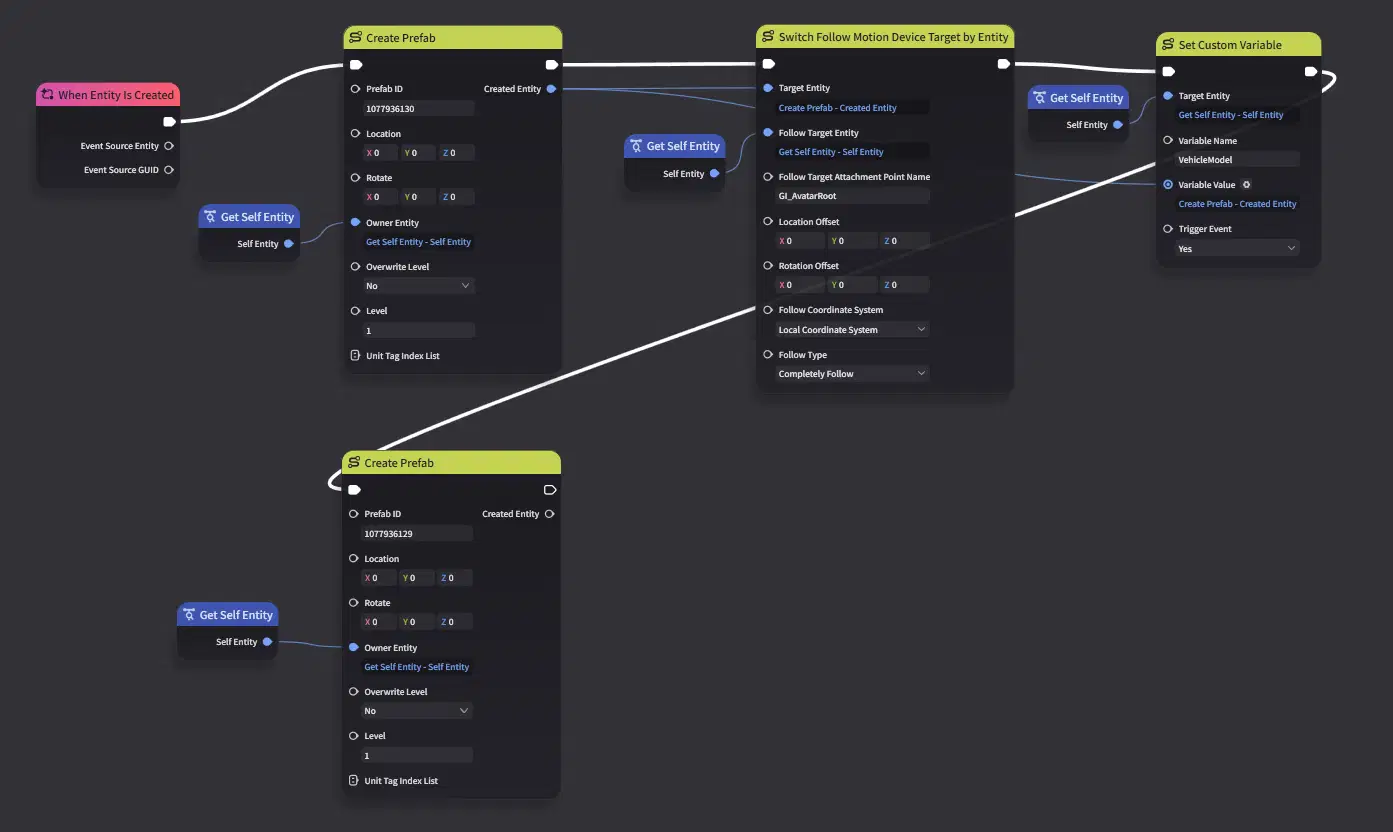
- Add in the node "Switch Follow Motion Device Target by Entity
- Set it as follows:
- Target Entity: Created Entity output from the "Create Prefab" node corresponding to VehicleMotion prefab.
- Follow Target Entity: Get Self Entity
- Follow Target Attachment Point Name: "GI_AvatarRoot"
- Location Offset: 0, 0, 1
- Rotation Offset: 0, 0, 0
- Follow Coordinate System: Local Coordinate System
- Follow Type: Completely Follow
- Plug in the execution flow from "Create Prefab" node to the "Switch Follow Motion Device Target by Entity" node.
Note the important difference in this, the Location Offset needs to be at 0,0,1. With Z being greater than 0. Because the Follow Type is "Completely Follow" when the Character rotates, the VehicleMotion rotates with this offset, resulting in the VehicleMotion entity being in front of the Character at all times. Allowing it to pull the Character to wherever it's facing.
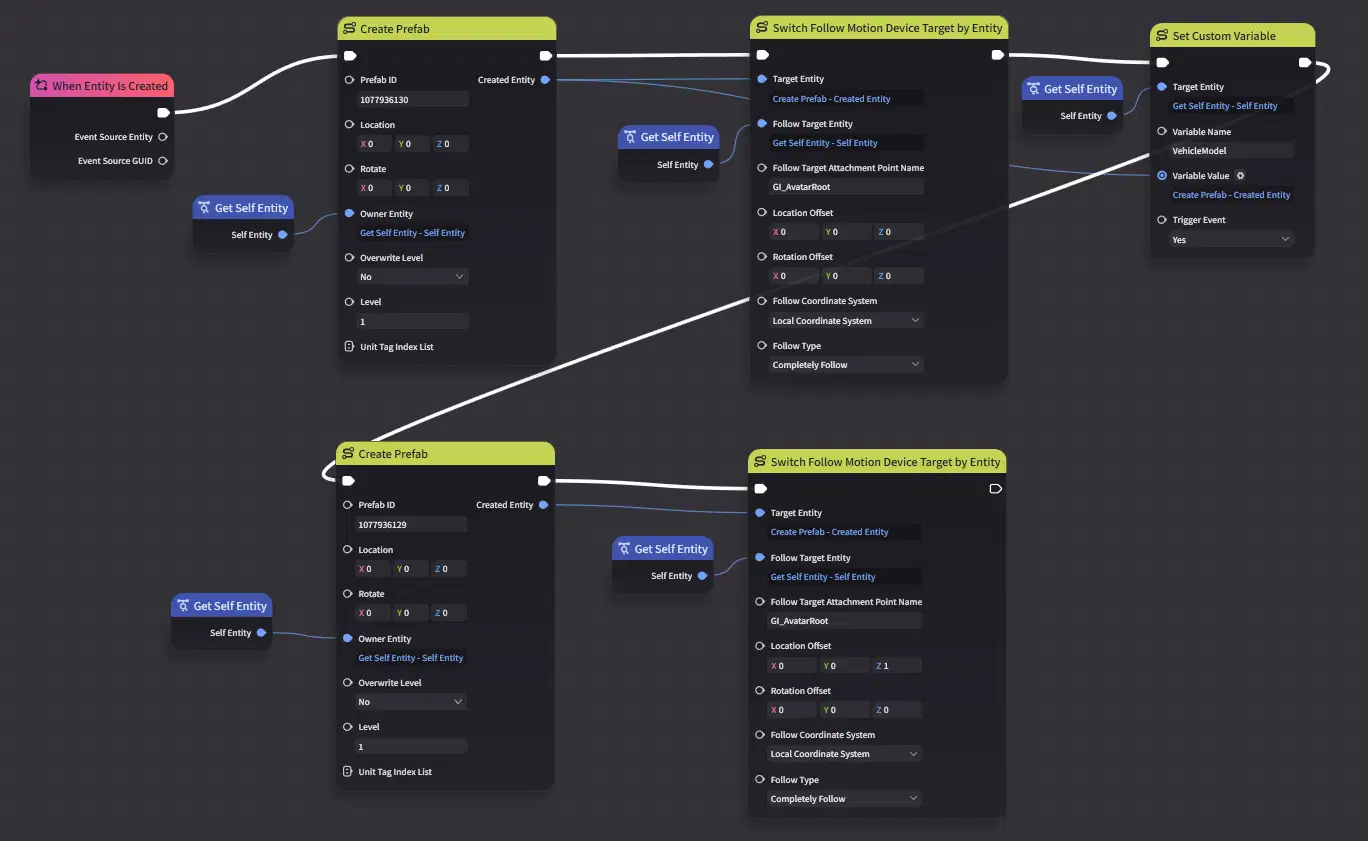
We also aren't setting a custom variable for the VehicleMotion at this portion of the guide, but will be in the later parts. Which we will do so when we need to.
Make sure to save the node graph.
Mount the node graph
Next we just need to mount the node graph.
- Go to the Combat Preset Module in the Genshin Impact window
- Select Edit Character
- Go to the Node Graph section, and add in the "CharacterOnCreate" node.
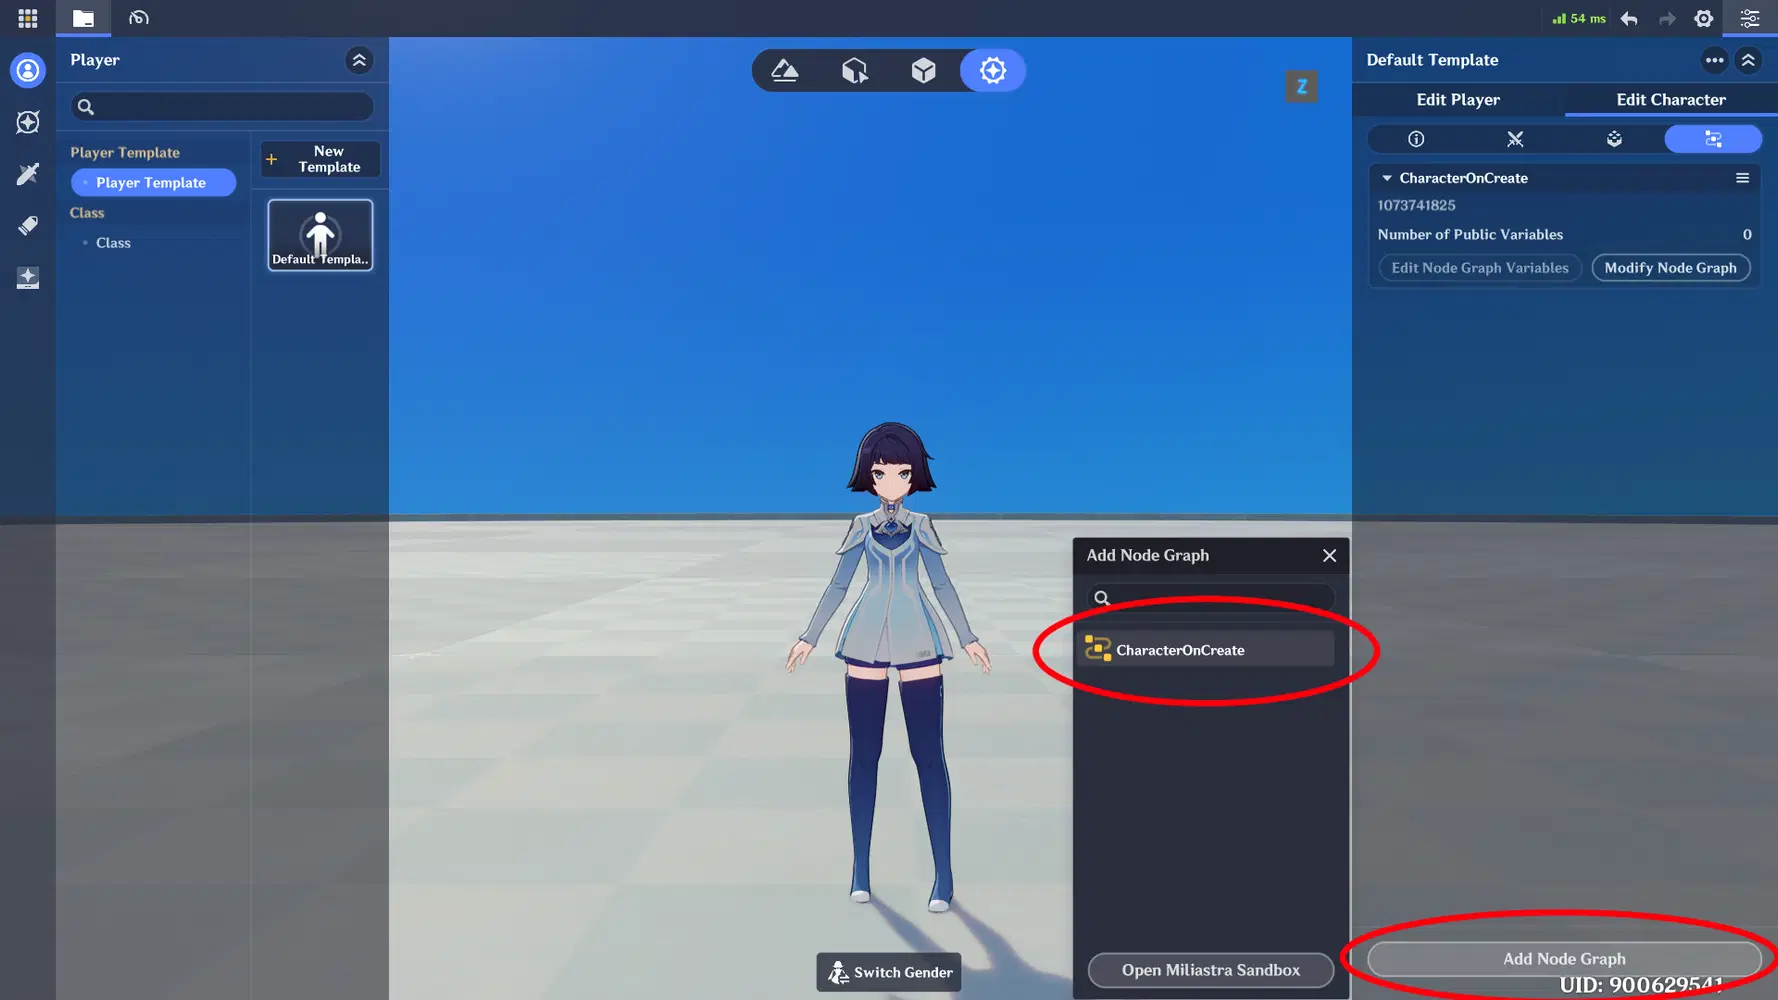
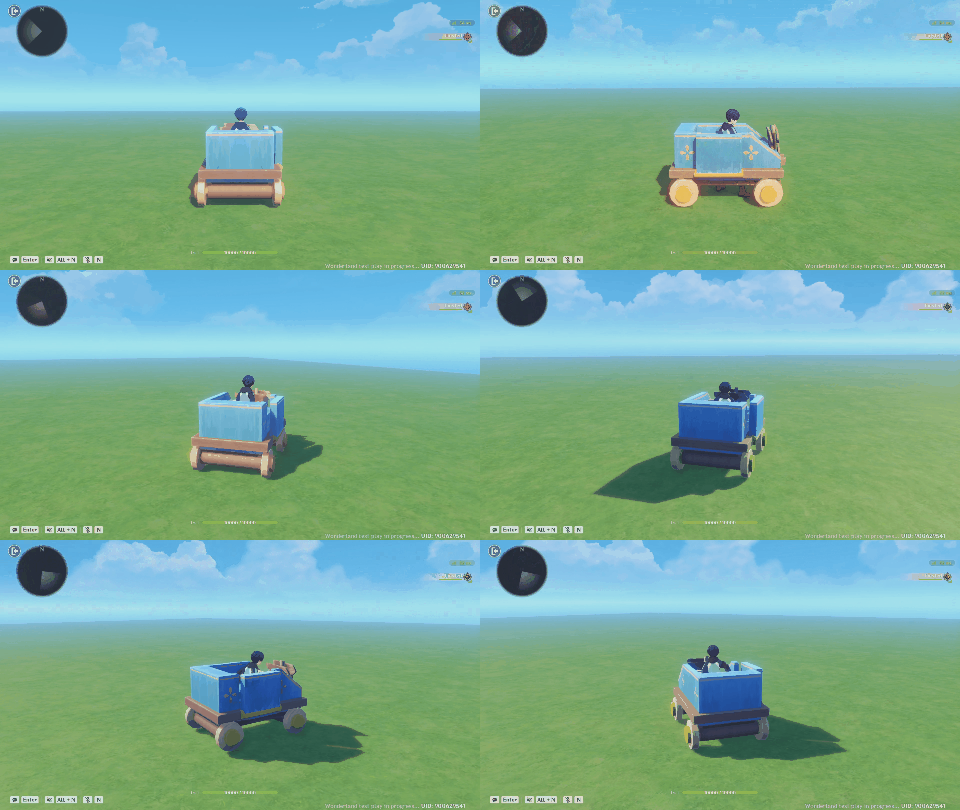
Time to test it!
If all goes well, your Character should naturally move towards wherever they face. A way for it to have it act like a vehicle is holding W key and rotating the camera. For this demonstration we didn't hide the Character model, so that you can see what is actually happening. In a later section we'll cover how to hide the Character model.

Basic Version with Drifting Visuals
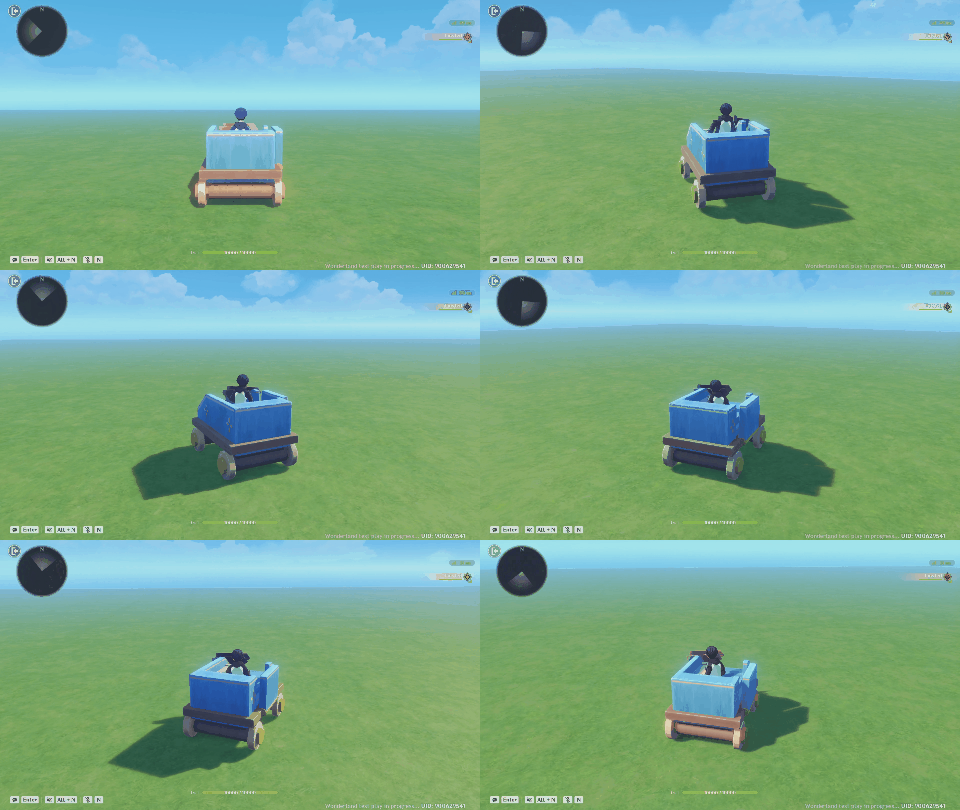
Now in this part, we'll be adding a bit more flair to this version, and that is making it look like the vehicle is doing a car drift.
In order to do so, we'll be utilizing a looping timer, that checks the current direction from the direction last recorded. If that difference in direction is greater or less than a certain amount, we'll add a rotation offset to the Follow Motion Device of the VehicleModel, clockwise or anticlockwise depending on the difference.
Creating Timer for Polling Loop
- In Miliastra Sandbox window, open up the "CharacterOnCreate" node graph in the Server Node Graph, Entity Node Graph.
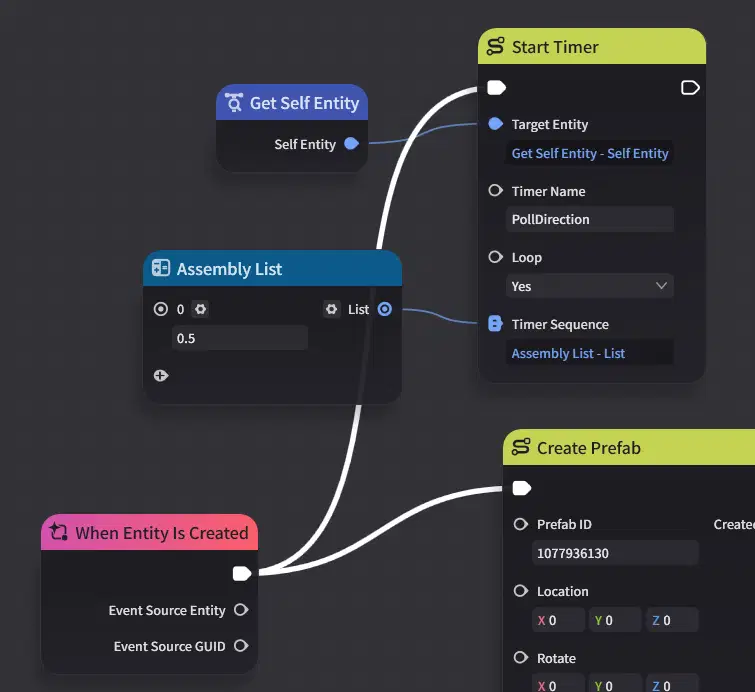
- Add a node "Start Timer"
- Set it as follows
- Target Entity: Get Self Entity
- Timer Name: "PollDirection"
- Loop: Yes
- Timer Sequence: Assembly List with 0th index as 0.5
- Plug in the execution flow from "When Entity is Created" node to "Start Timer" node.
This creates a looping timer, that will run every 0.5 seconds, named "PollDirection" that can be listened to by "Self Entity" in this case, any node graphs mounted on the Character.
The execution flow order doesn't matter so plugging it in direction from "When Entity is Created" should be fine. You can plug it in from the end of the last node that we've made earlier if you like to see everything happen in sequence.
Node graph to check for drift conditions
Now we need to handle what happens when the timer is fired.
- Under Server Node Graph, Entity Node Graph, create a new node graph, name it "PollForDirection"
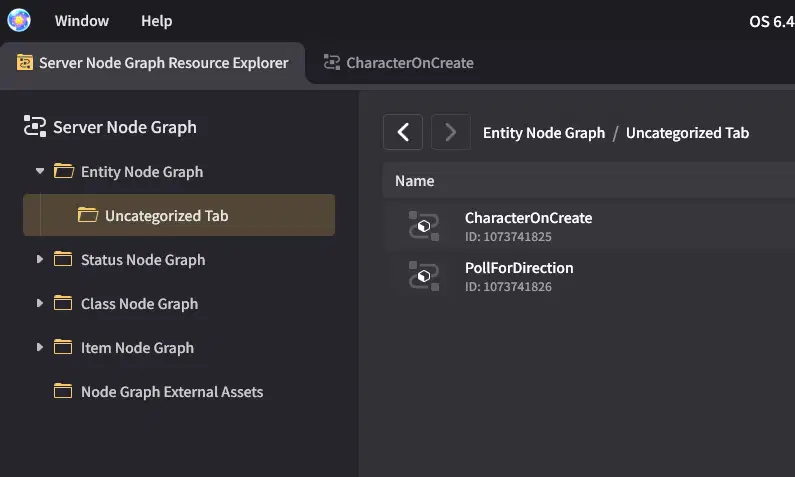
This is going to get very wordy if I start listing out every detail, so please refer to the images provided if it gets confusing.
First we'll need to compare the current direction of the character, to the previous direction. In order to do so, we'll need to store the previous direction somewhere. (Note: in this section, what I refer as "direction" might be more accurately interpreted as "rotation" instead, keep in mind that it's a rotational value, and not a directional vector)
- Open up "PollForDirection" node graph.
- Open up the "Node Graph Variable" sub window thing.
- Add in a new 3D Vector
- Name it "LastDirection"
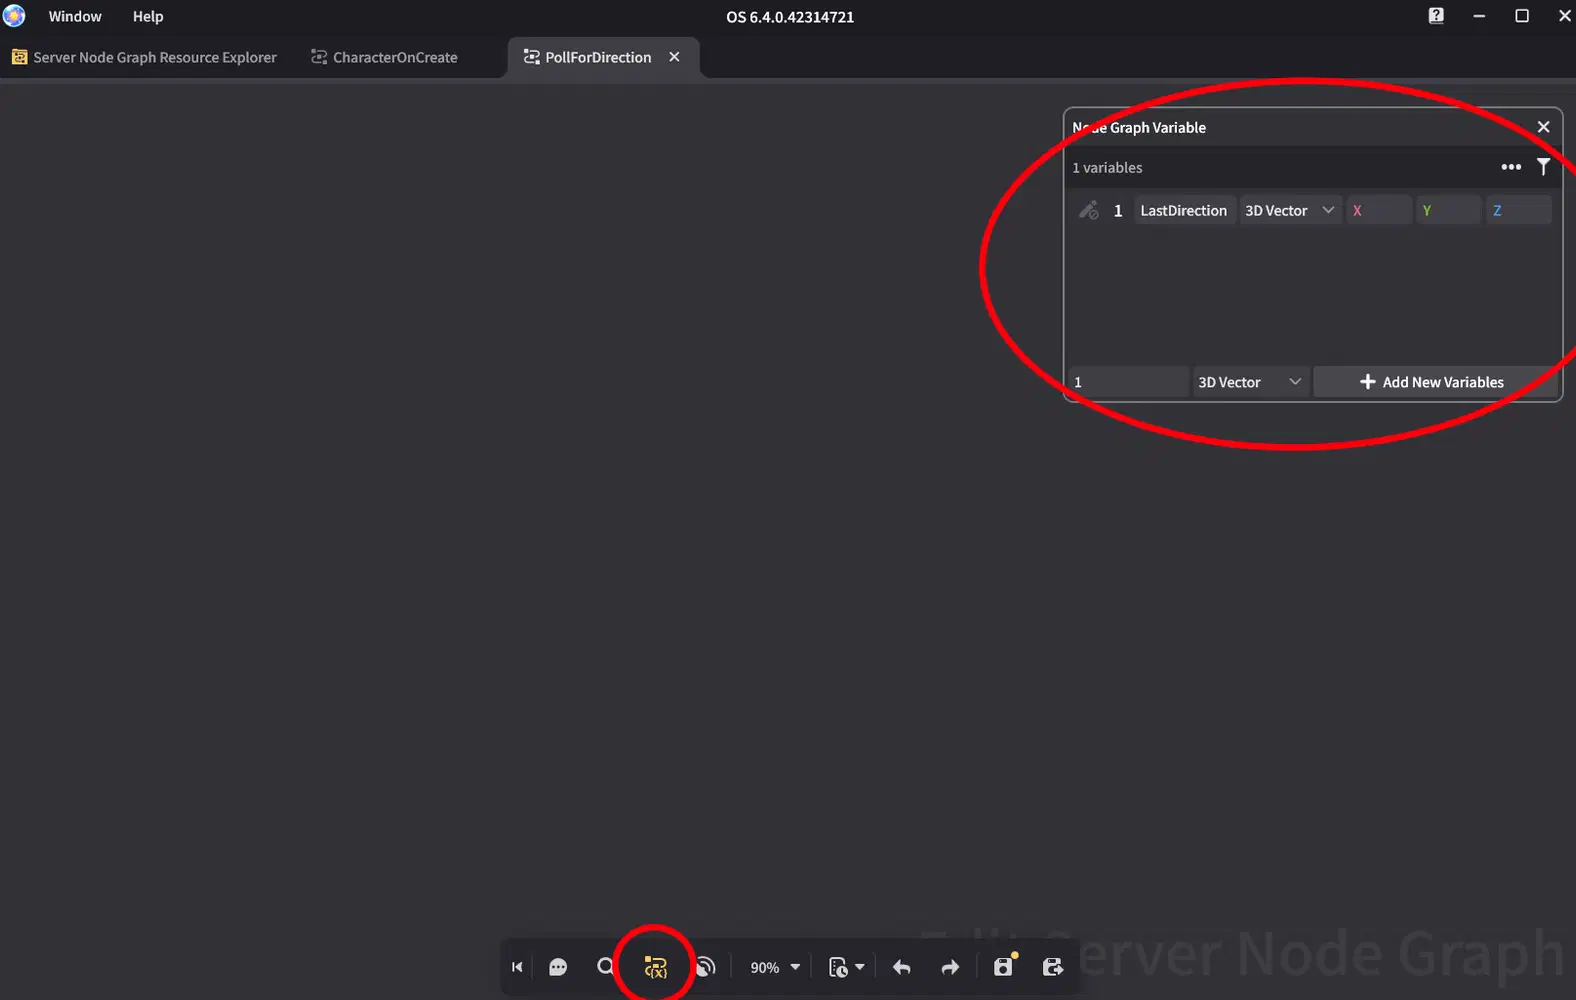
Next we'll be comparing current direction of the Character to this "LastDirection", and utilizing the Y component. This is the only rotational value we care about.
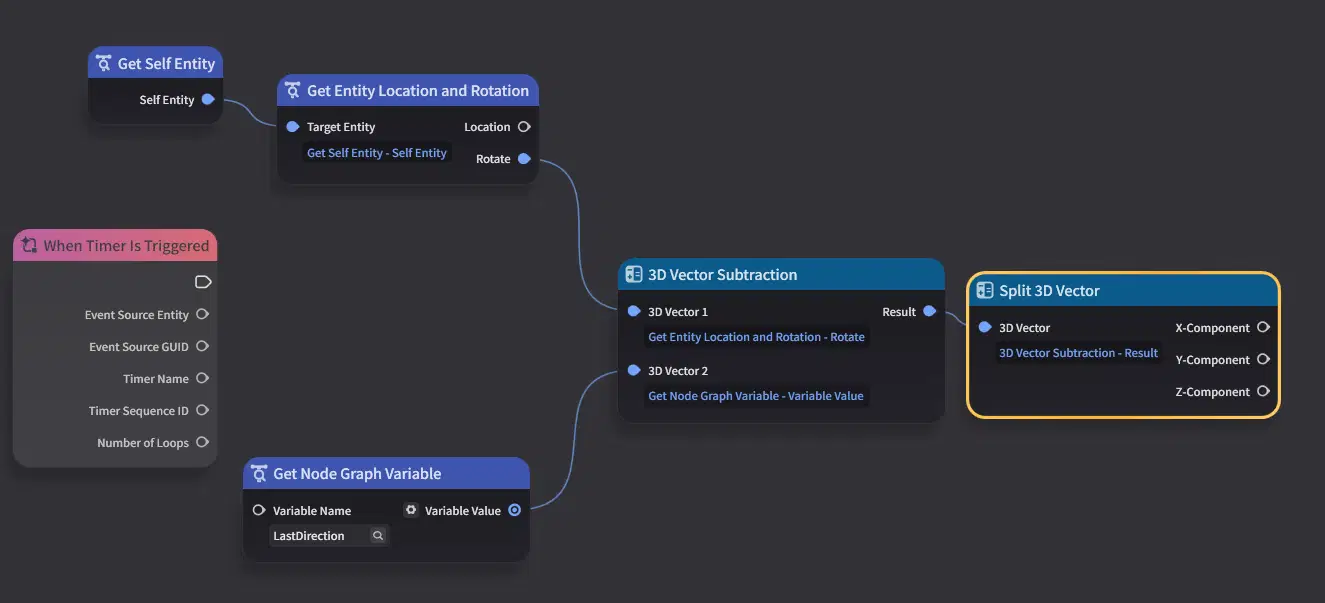
Accounting for 360 degree issue
Because the rotational values goes from 0 to 359.99999, we need to account for the sort of "jump" in value when comparing the values. For example, if current rotation is 90 degrees is to the east, when compared it a previous rotation of 358 which is slightly left of north. It becomes 90 - 358 resulting in -268, meaning it thinks it has turned anti-clockwise 268 degrees. When in reality it is more likely to be 92 degrees clockwise.
To compensate for that, any value that is greater than 180 or lower than -180, needs to be subtracted by 360, or added by 360 respectively. (-268 from the previous example becomes 92)
Thus we will be checking for three possibilities.
- Y-component being greater than 180
- Y-component being less than -180
- Neither
We will then subtract, or add to it, or do nothing to it, and store it as a Local Variable.
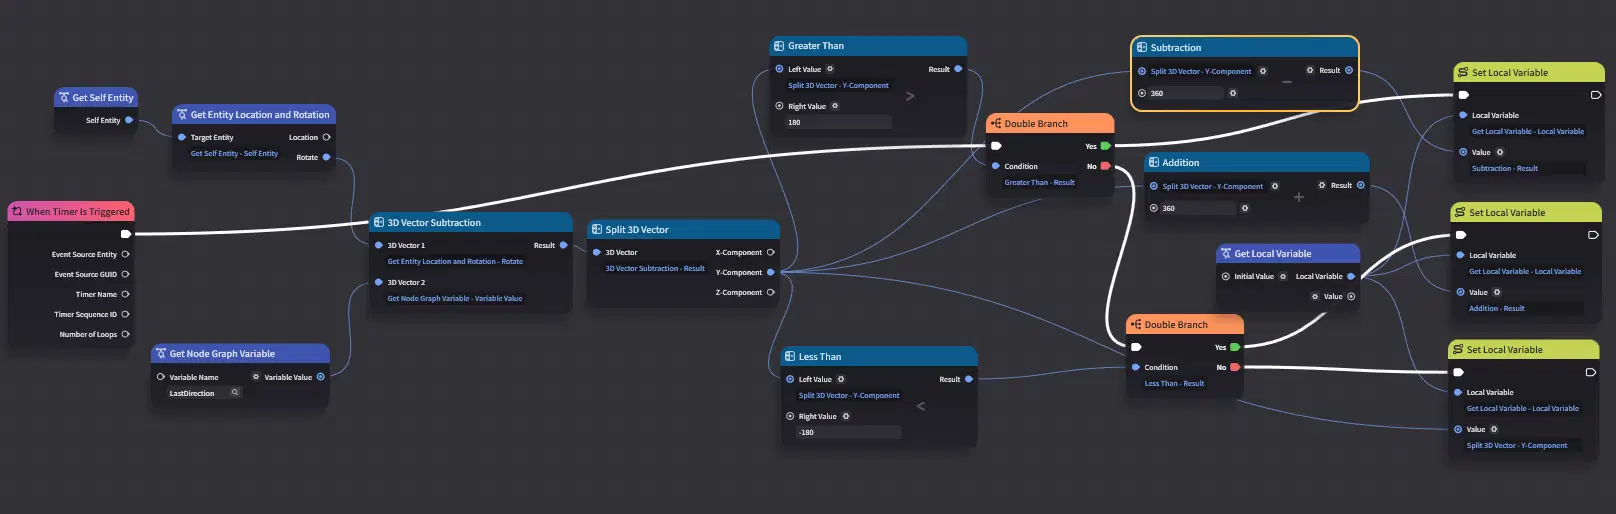
Checking for drift conditions
Next we take that Local Variable value, and we'll be checking for another three possibilities.
- Is the rotational difference(the value) greater than 15
- Is the rotational difference(the value) less than -15
- Neither
15 is just a degree threshold I decided on whether or not the "drift" effect should take place. Feel free to increase or decrease it as you see fit, just make sure its in reasonable range.
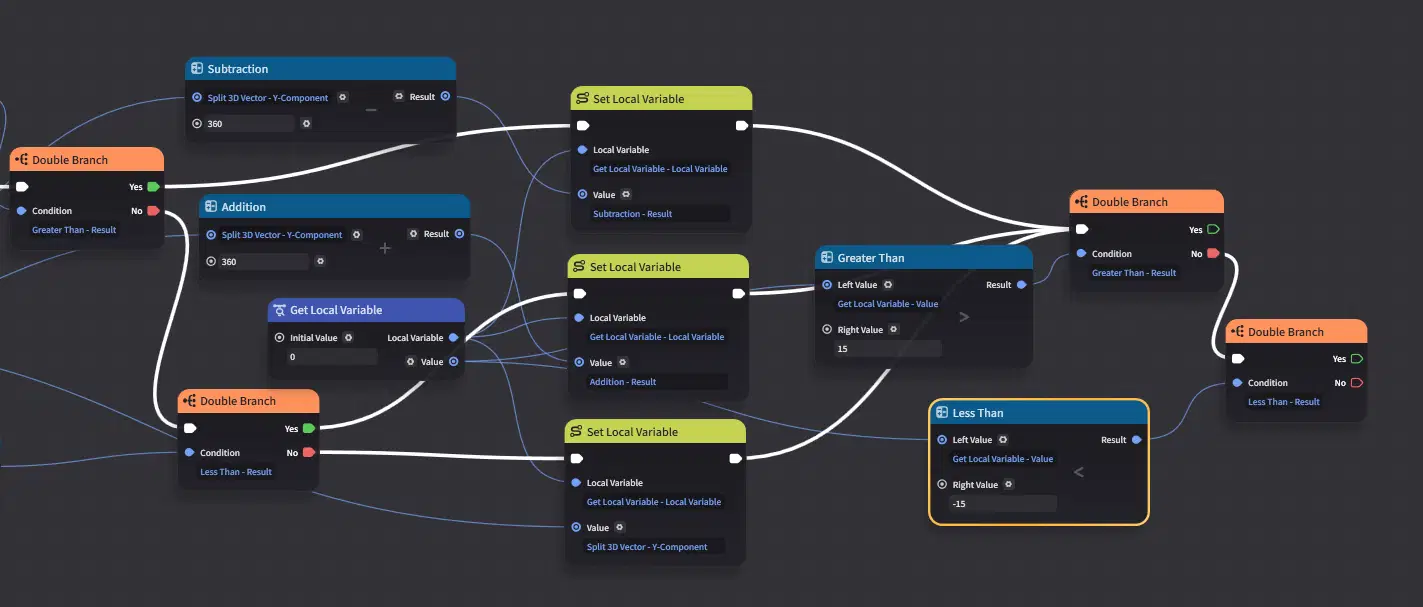
Make sure the "Get Local Variable" node is set as a Floating Point Number
Creating the drift effect
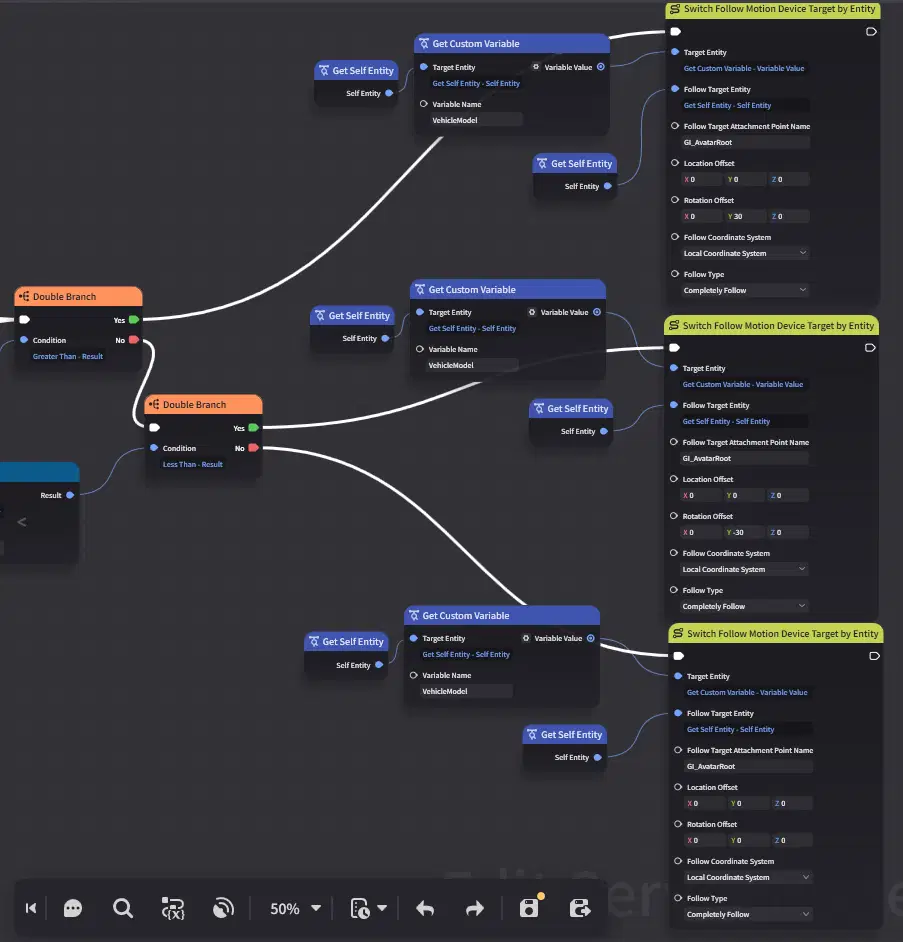
Now with these three possibilities, we all do the same thing just with different values.
- Rotation offset of Y 30
- Rotation offset of Y -30
- Rotation offset of Y 0
The 30 degrees is also another number I decided on how much visual "Drift" should occur. Feel free to change it as you like within reasonable means.
Update for next loop, mounting node graph, and test run
Finally we need to update the "LastDirection" for the next timer run.
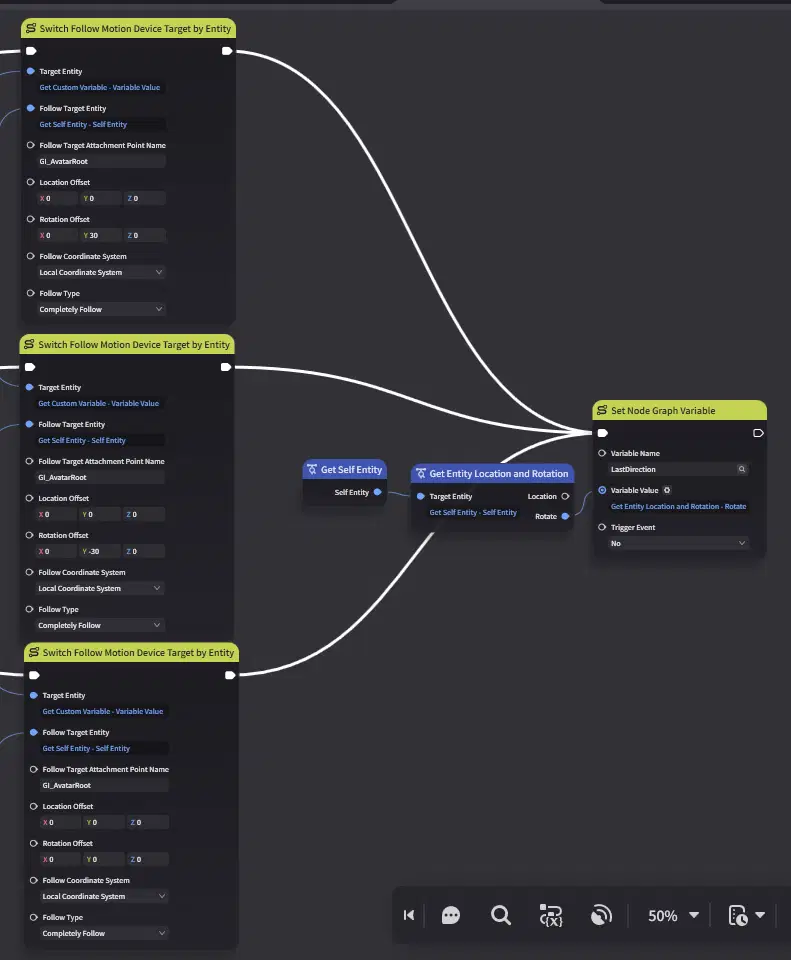
Save the node graph.
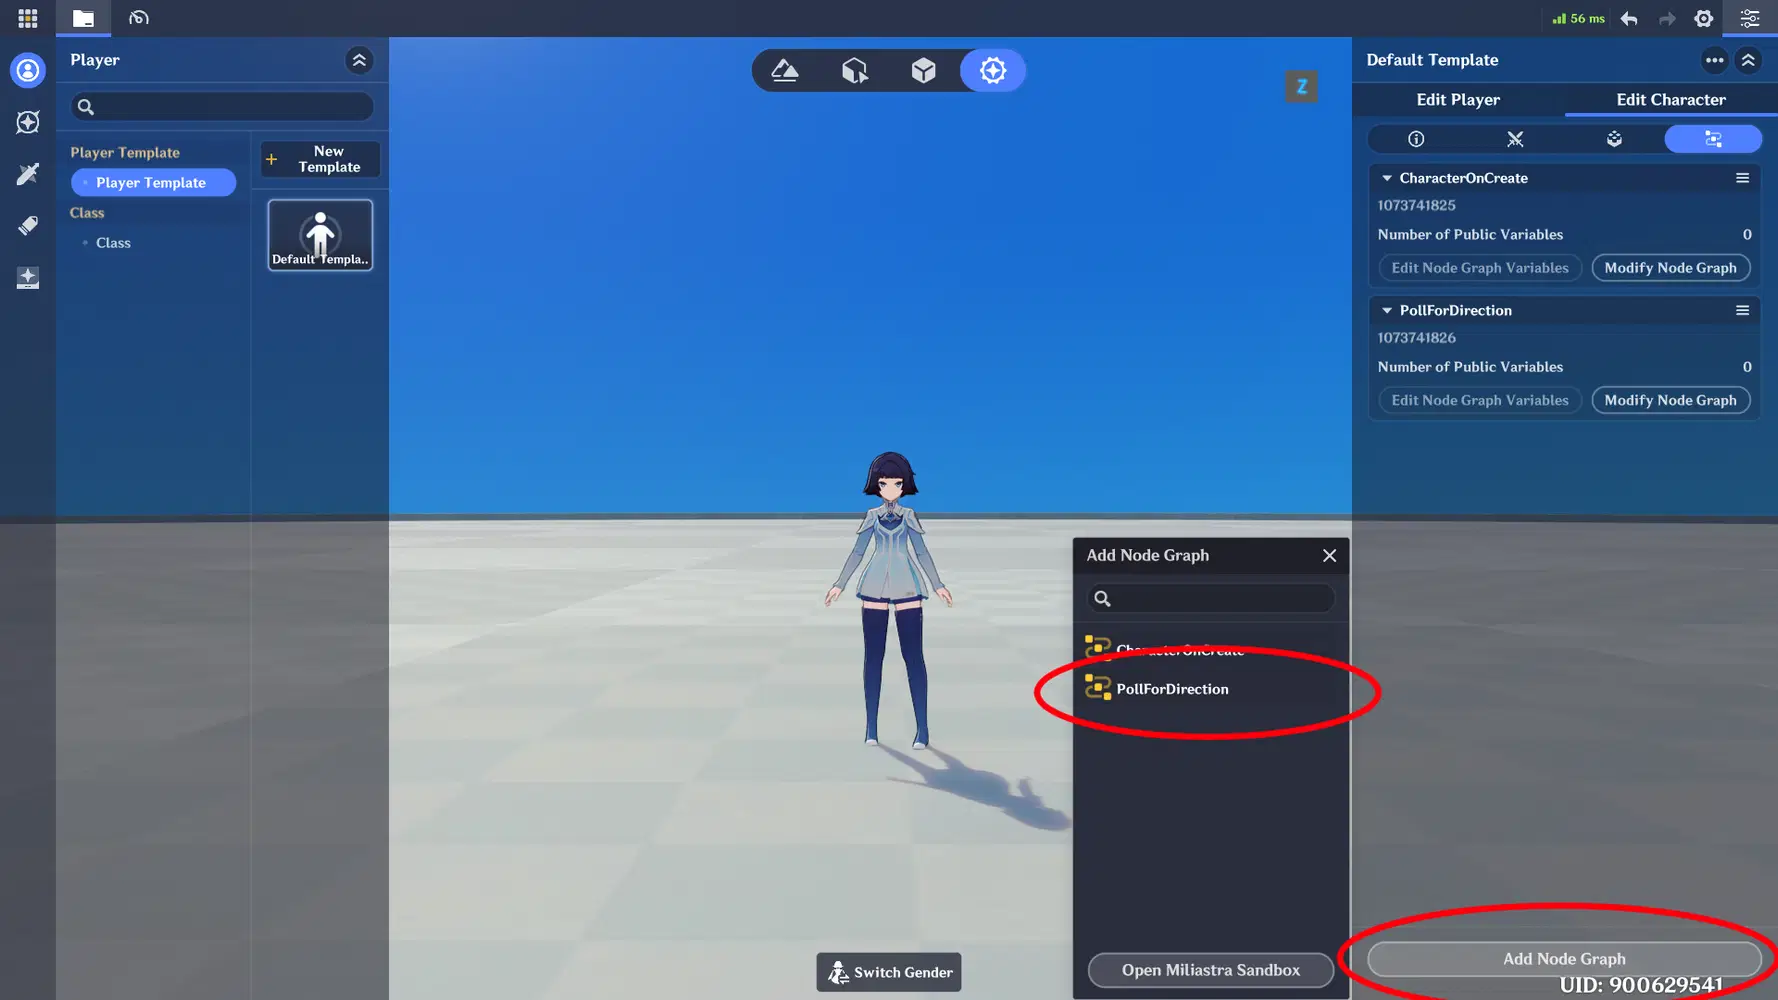
Now we need to mount this node graph onto the Character.
- Open up Creation Preset on Genshin Impact
- Edit Character
- Go to the node graph section, and add in the "PollForDirection" node graph we just created.
Time to test it!
Turning Vehicle Off (Optional)
I'll also briefly demonstrate how you can turn the vehicle's motion off. The same principles is used for speeding it up, or decreasing it. By changing the Character Disruptor Device setting on the VehicleMotion entity, we can change the behavior.
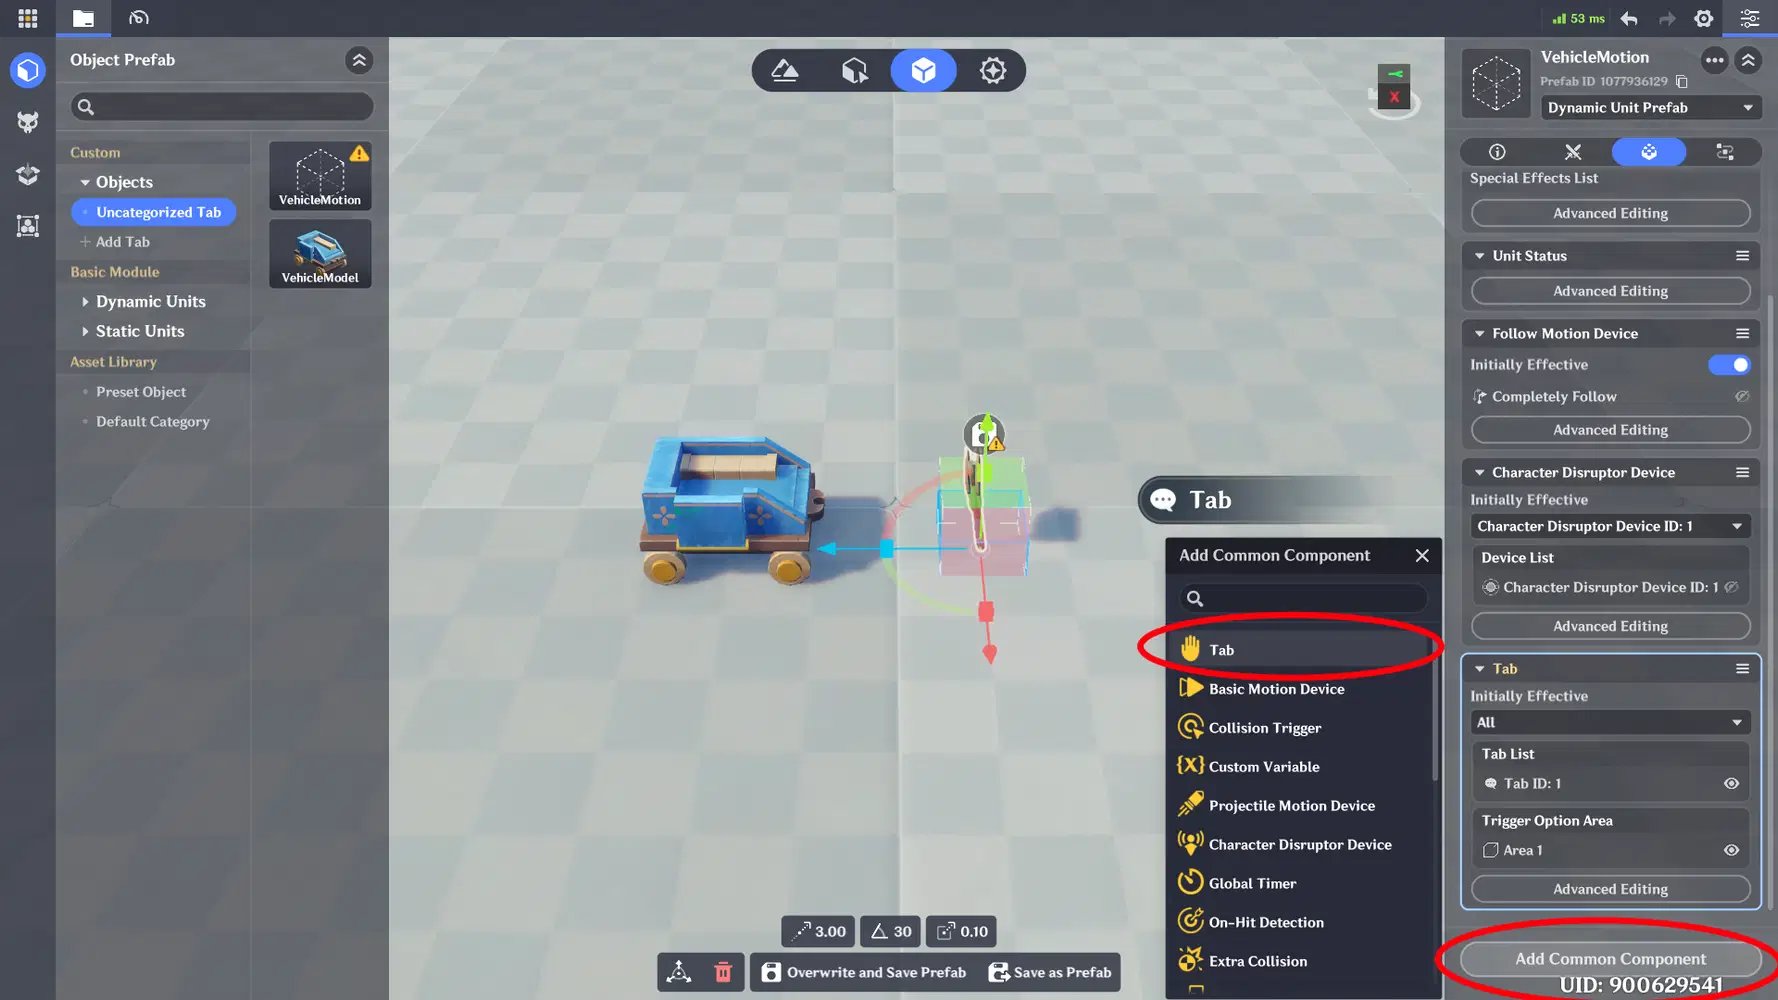
Creating Tab Component
- Go to the Prefab Library, and select your VehicleMotion prefab.
- Under components, add in a new Tab component.
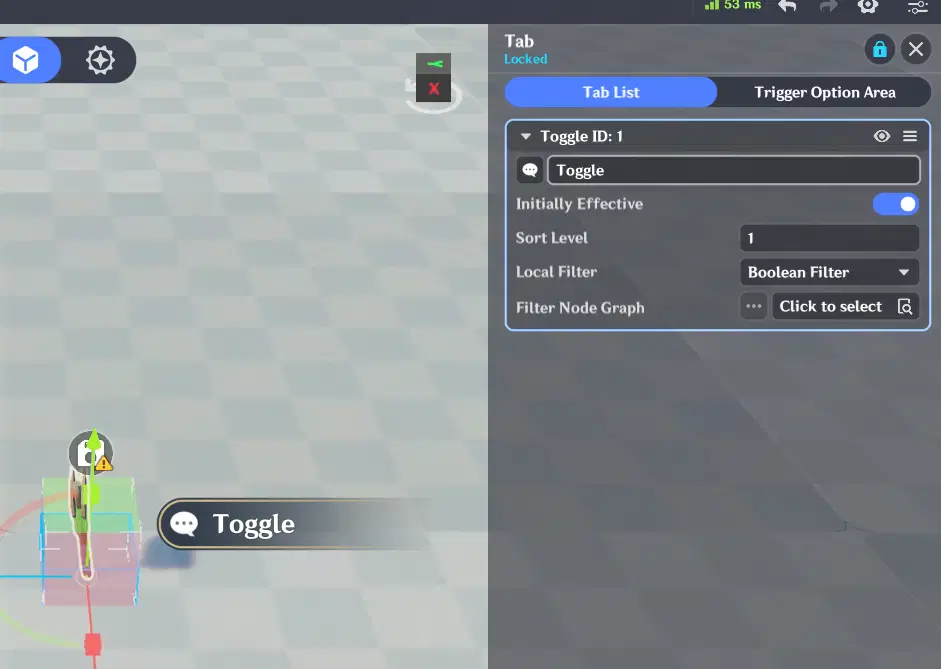
- Go to Advanced Editing under the Tab component.
- Change the tab prompt text to "Toggle" (Note: You need to be at least Craftsmen Level 2 to see the actual text in game)
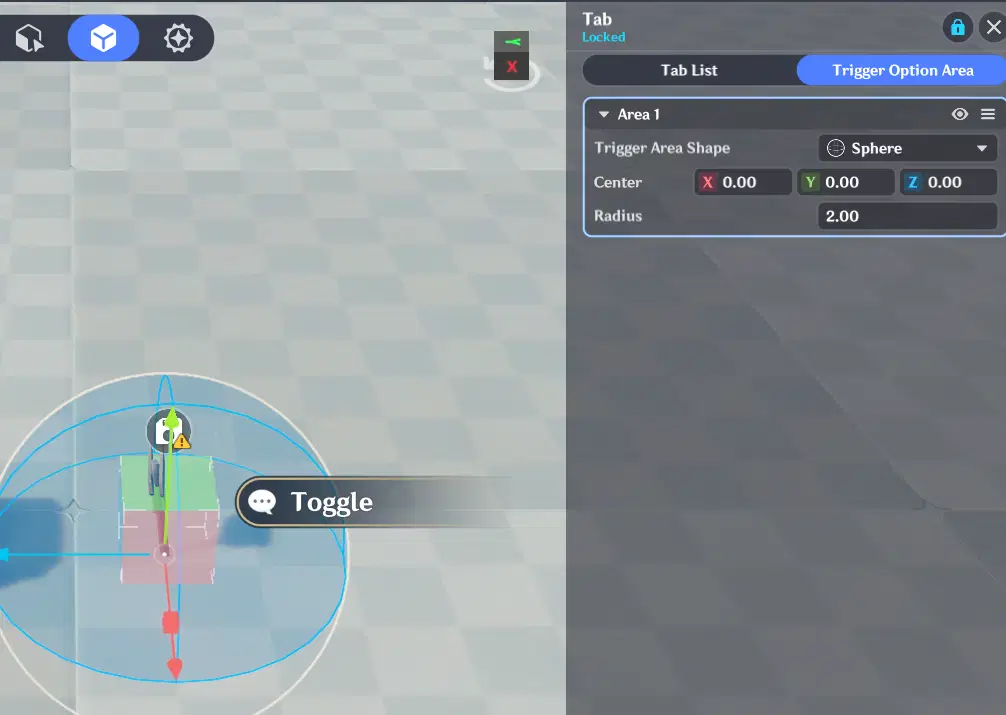
- In Trigger Option Area, change it to Trigger Area Shape of "Sphere" and a Radius of "2.00"
- Remember to overwrite and save the prefab
This creates a Tab option around the VehicleMotion, that the Character can press for us to interact with it.
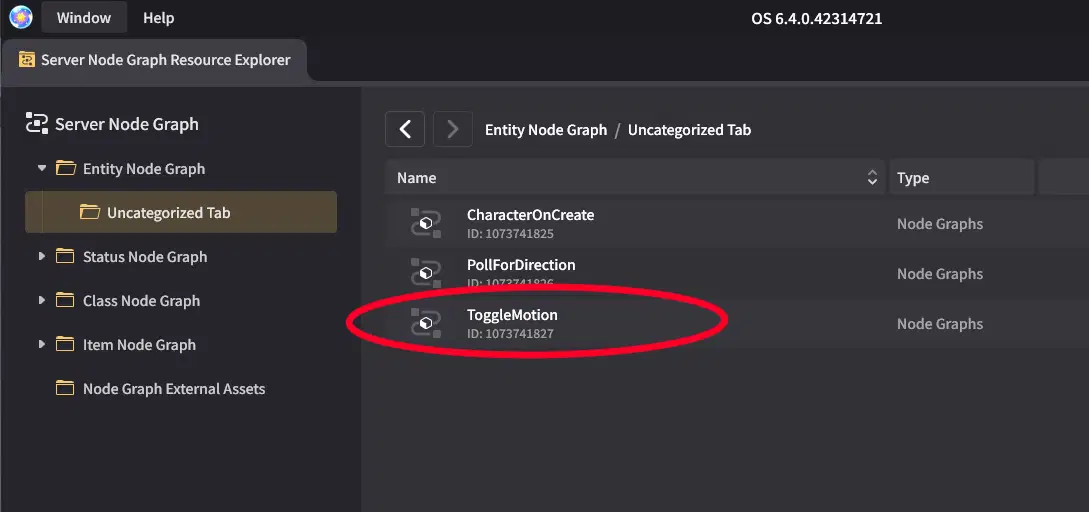
Creating Node Graph for Toggle
- Now in Miliastra Sandbox window, under Server Node Graph, Entity Node Graph, create a new node graph.
- Name it "ToggleMotion"
- Open up the "ToggleMotion" node graph.
Storing Toggle State
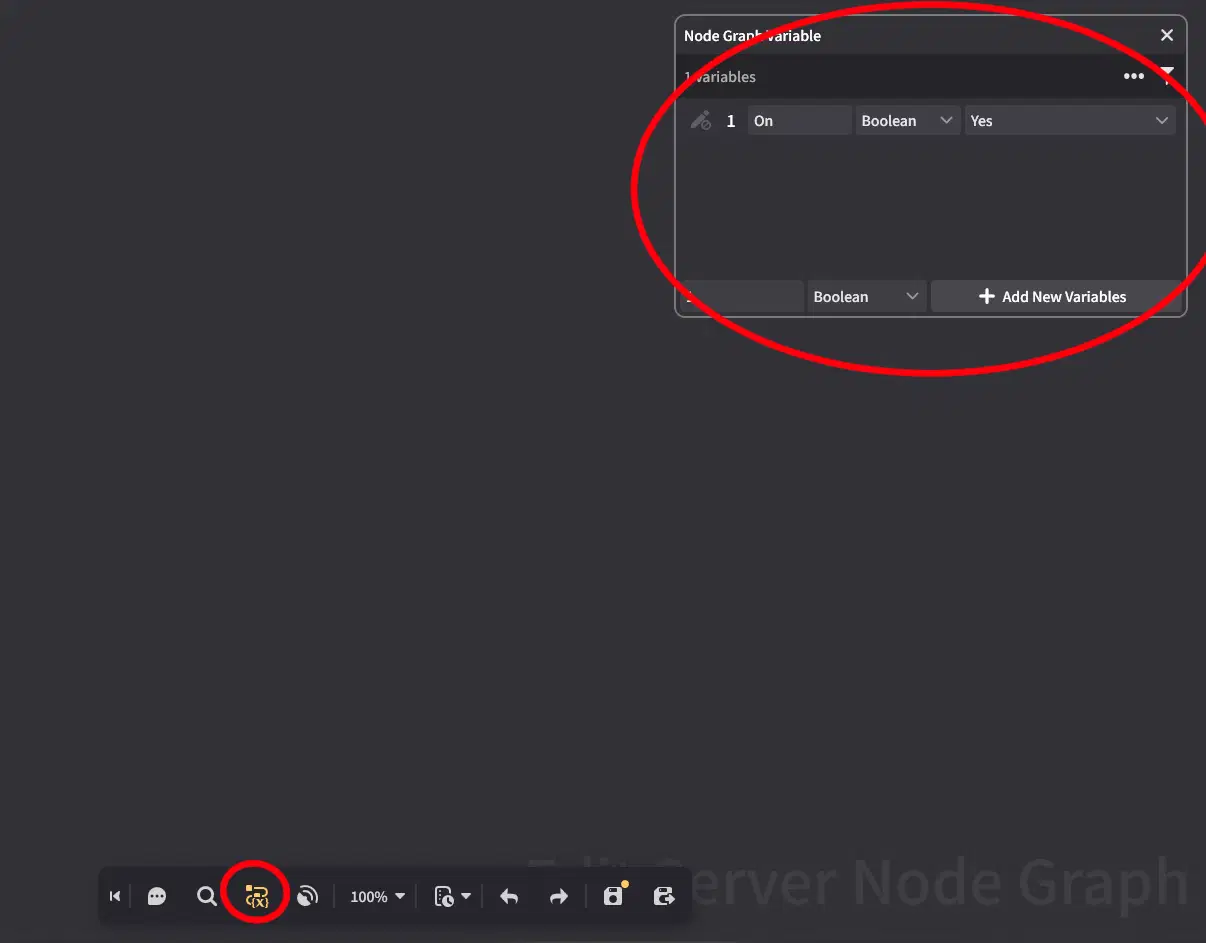
We'll be making a toggle that turns the vehicle's motion on and off. To do so, we'll need a variable to remember the state of the motion, as we cannot retrieve what Device ID the Character Disruptor Device is set to.
- Open up the Node Graph Variable subwindow thing.
- Add in a boolean, name it "On".
- Set its default value to "Yes"
Toggling Force Field
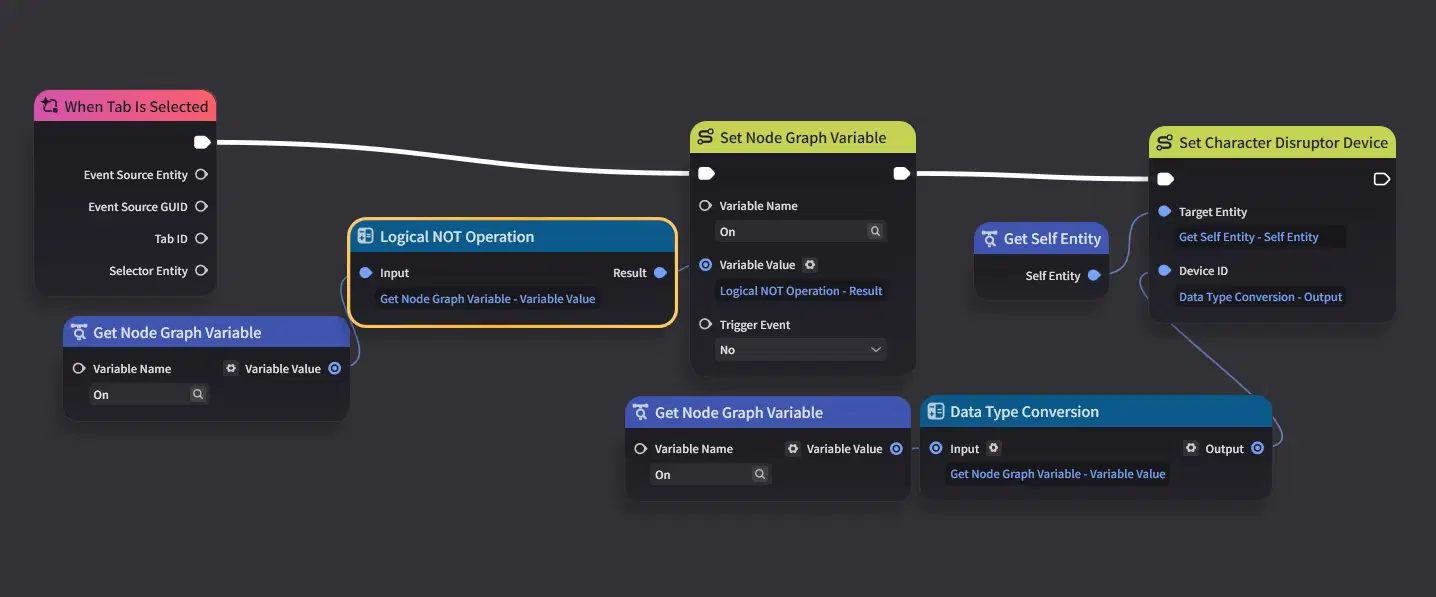
Now we just need to change the Character Disruptor Device's Device ID from either 0 (which is nothing) or 1 (the one force field we put into the component)
- Add in the node "When Tab is Selected"
- Add in the node "Set Node Graph Variable"
- Set it as follows
- Variable Name: Select the variable, "On"
- Variable Value: Get Node Graph Variable (On) -> Logical NOT Operation Node
- Trigger Event: No
- Connect execution flow from "When Tab is Selected" to "Set Node Graph Variable"
- Add in the node "Set Character Disruptor Device"
- Set it as follows
- Target Entity: Get Self Entity
- Device ID: Get Node Graph Variable (On) -> Data Type Conversion
- Plug the output of that into "Device ID" of "Set Character Disruptor Device"
If you have more device's under your VehicleMotion's Character Disruptor Device component, you will need to do the appropriate handling, but the principle is the same in using the same "Set Character Disruptor Device" node to change it.
Make sure to save the node graph.
Mount node graph and test run
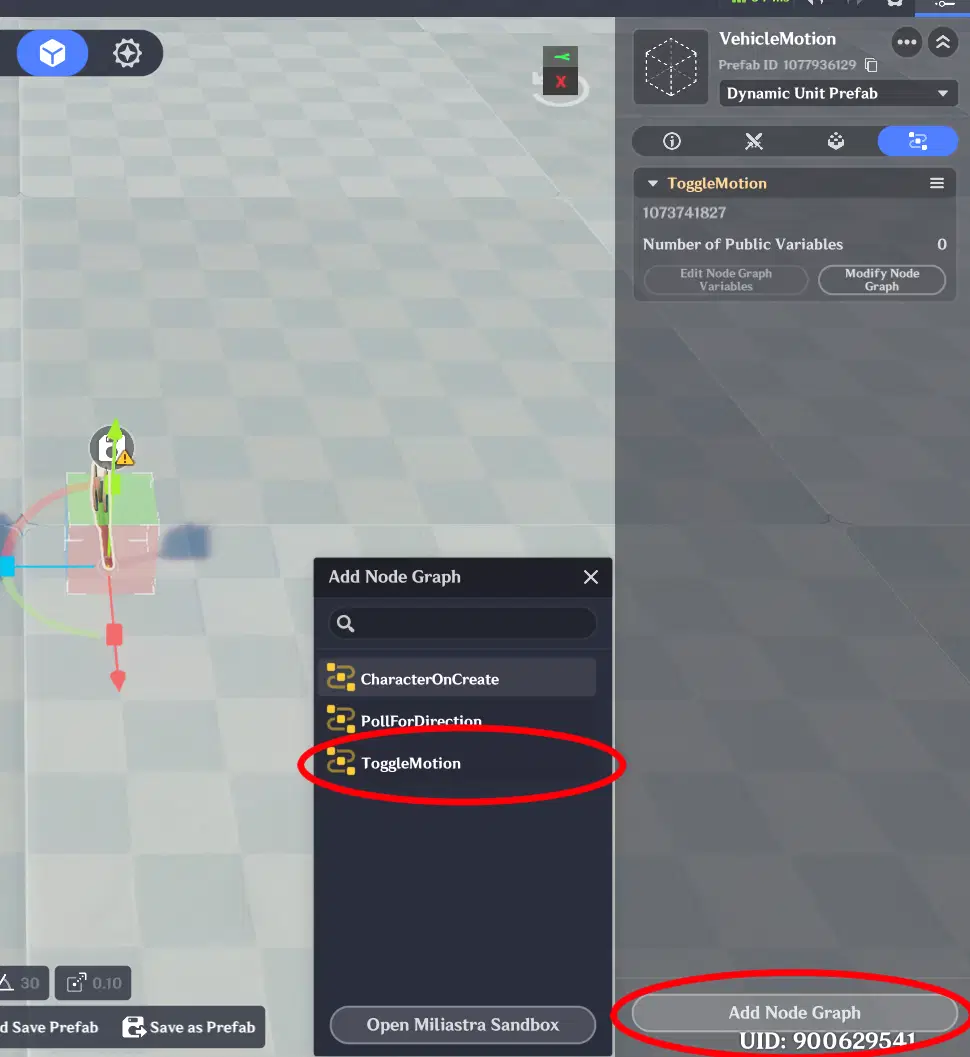
Now we just need to mount it.
- In Genshin Impact, go to the Prefab Library.
- Select your VehicleMotion prefab.
- Under the node graph section, add in the node graph "ToggleMotion"
- Remember to overwrite and save the prefab
Now we can go and test run.
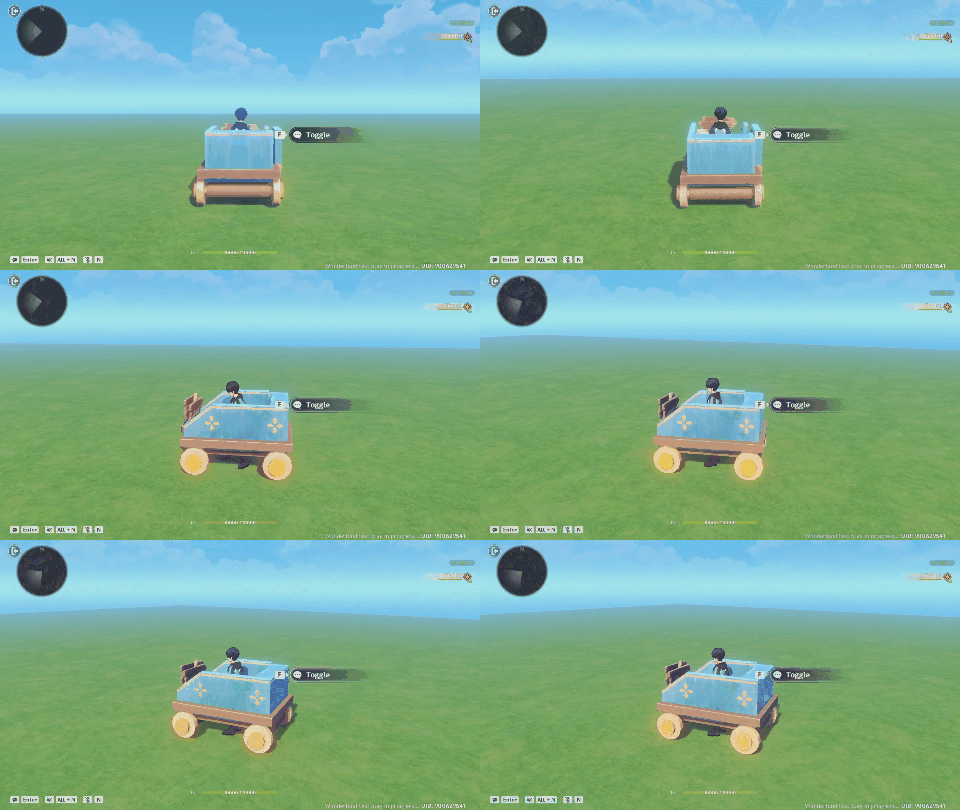
For your own future purposes, you can even choose to have multiple VehicleMotion entities following the Character. Because multiple Force Field's can apply their influence to the Character at the same time. Allowing you to speed up or slow down in difference increments. Keep in mind there is a speed limit that still cannot be bypassed with multiple Force Fields. Refer to my previous guide for said speed limit and more details.
Hiding Character Model (Optional)
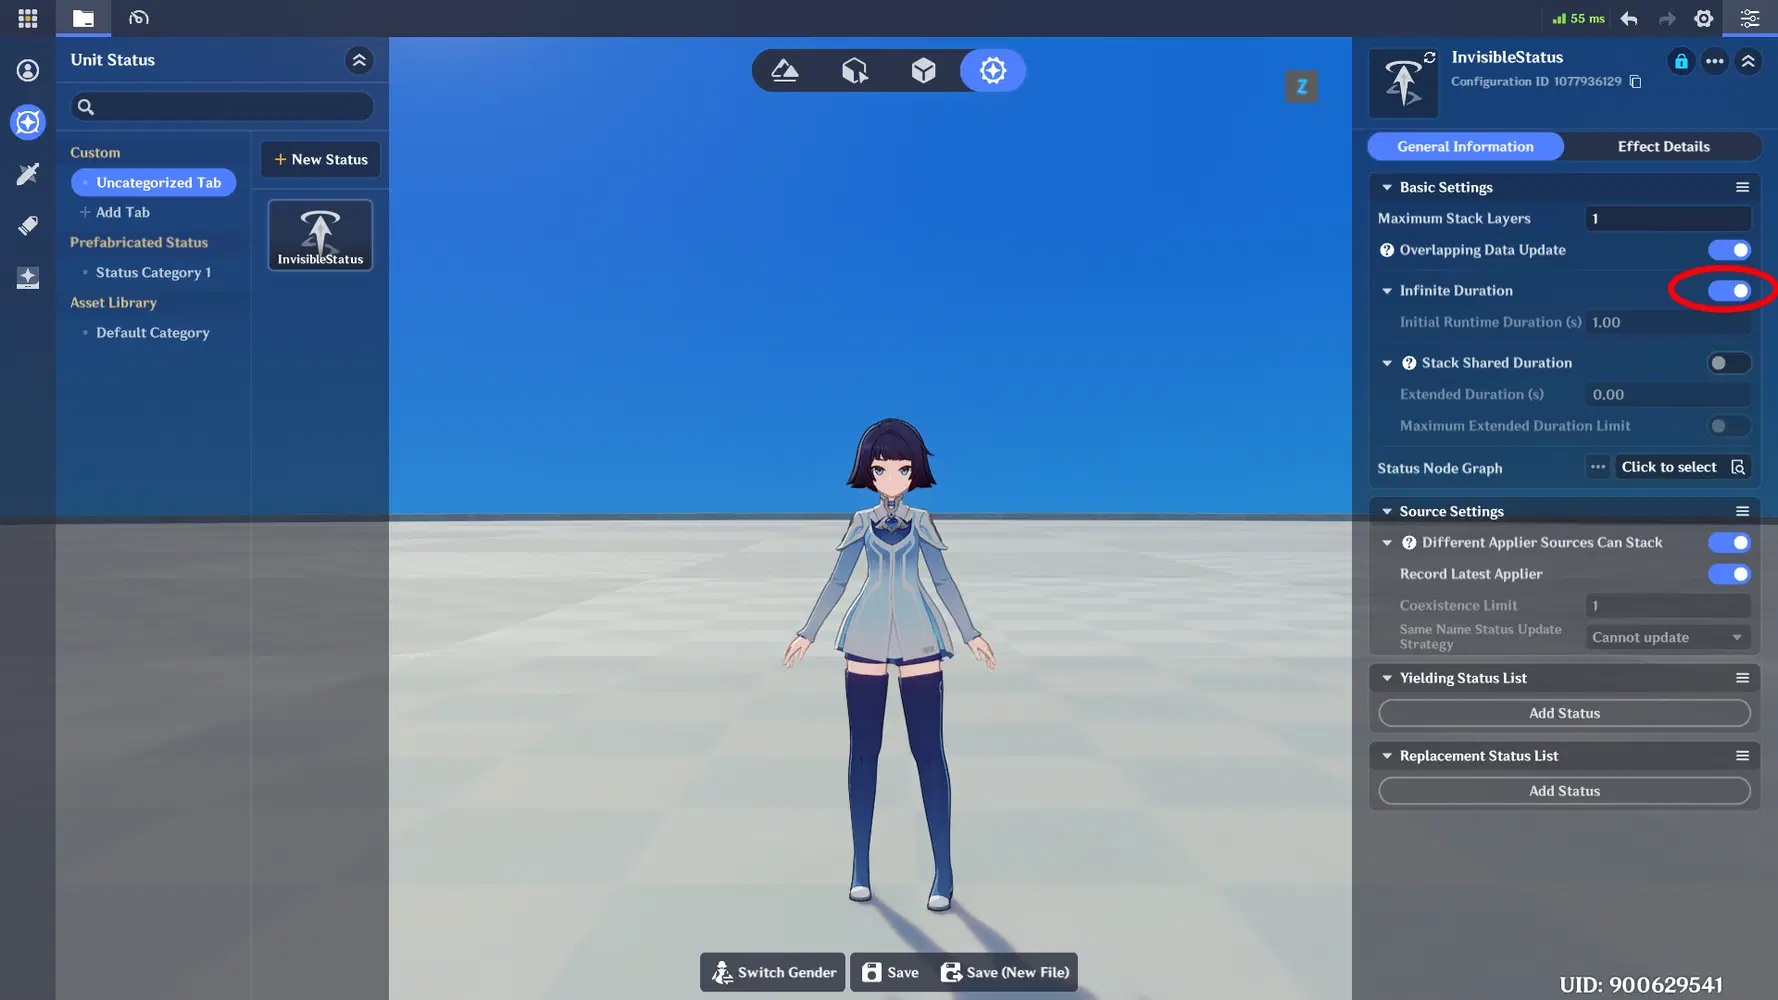
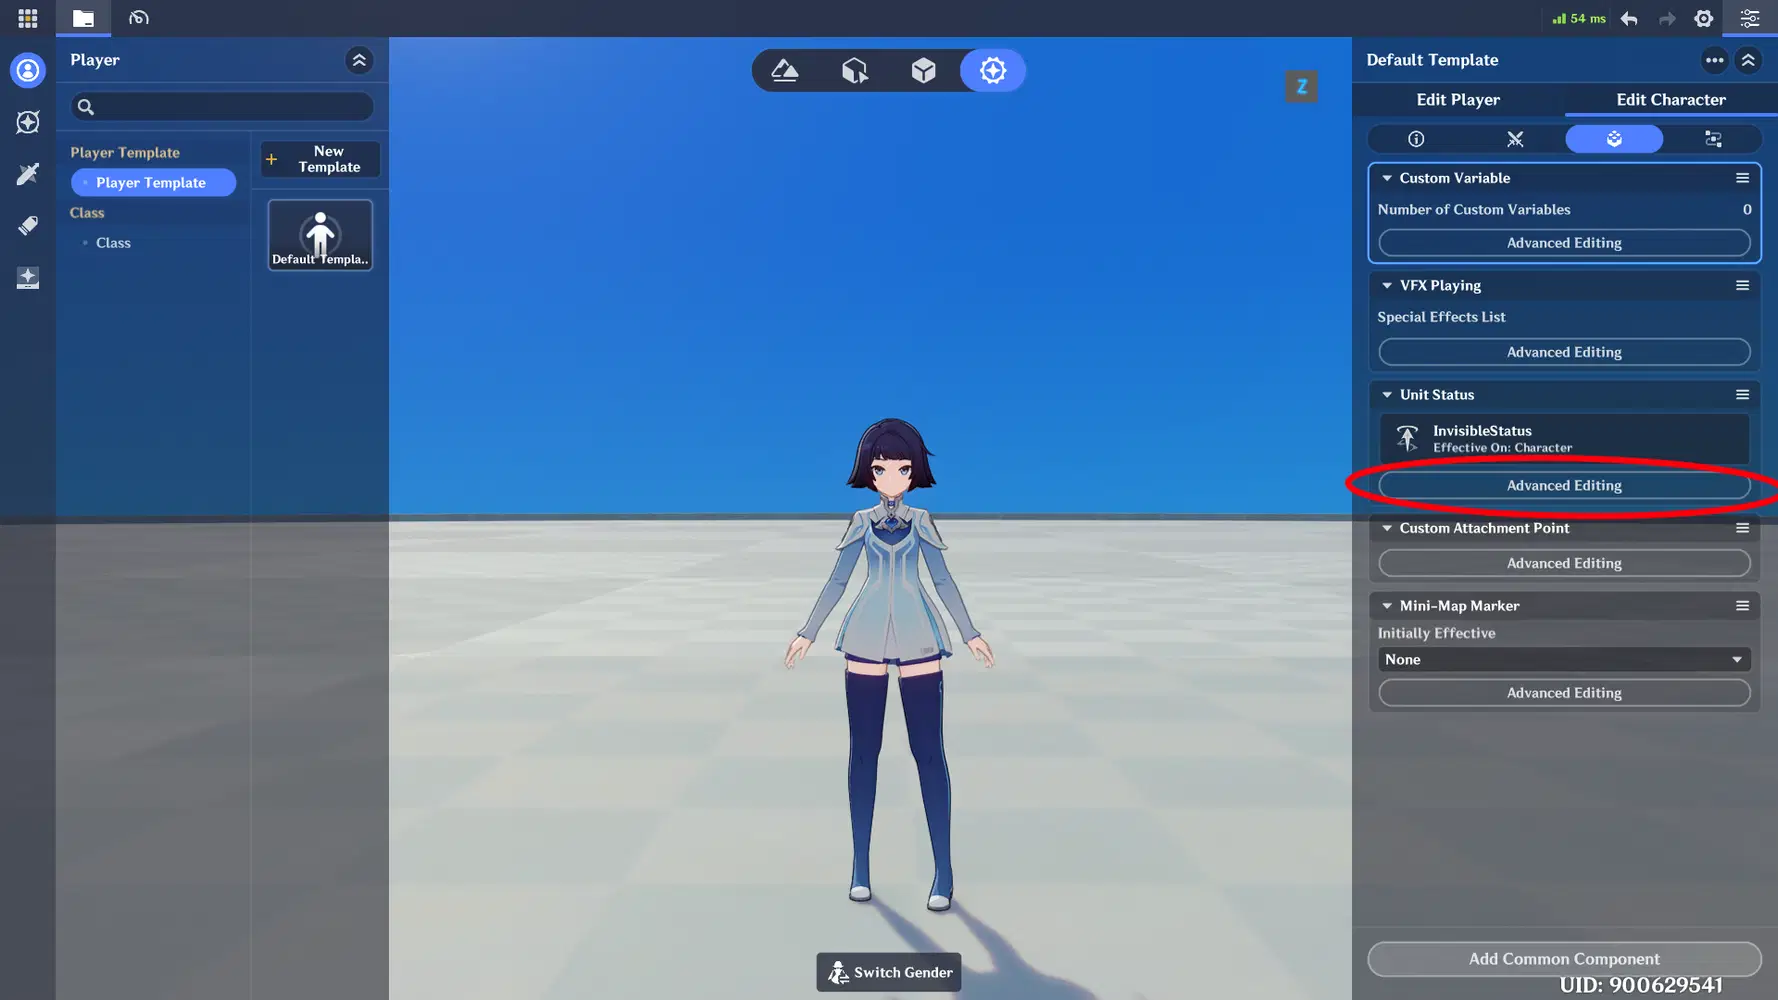
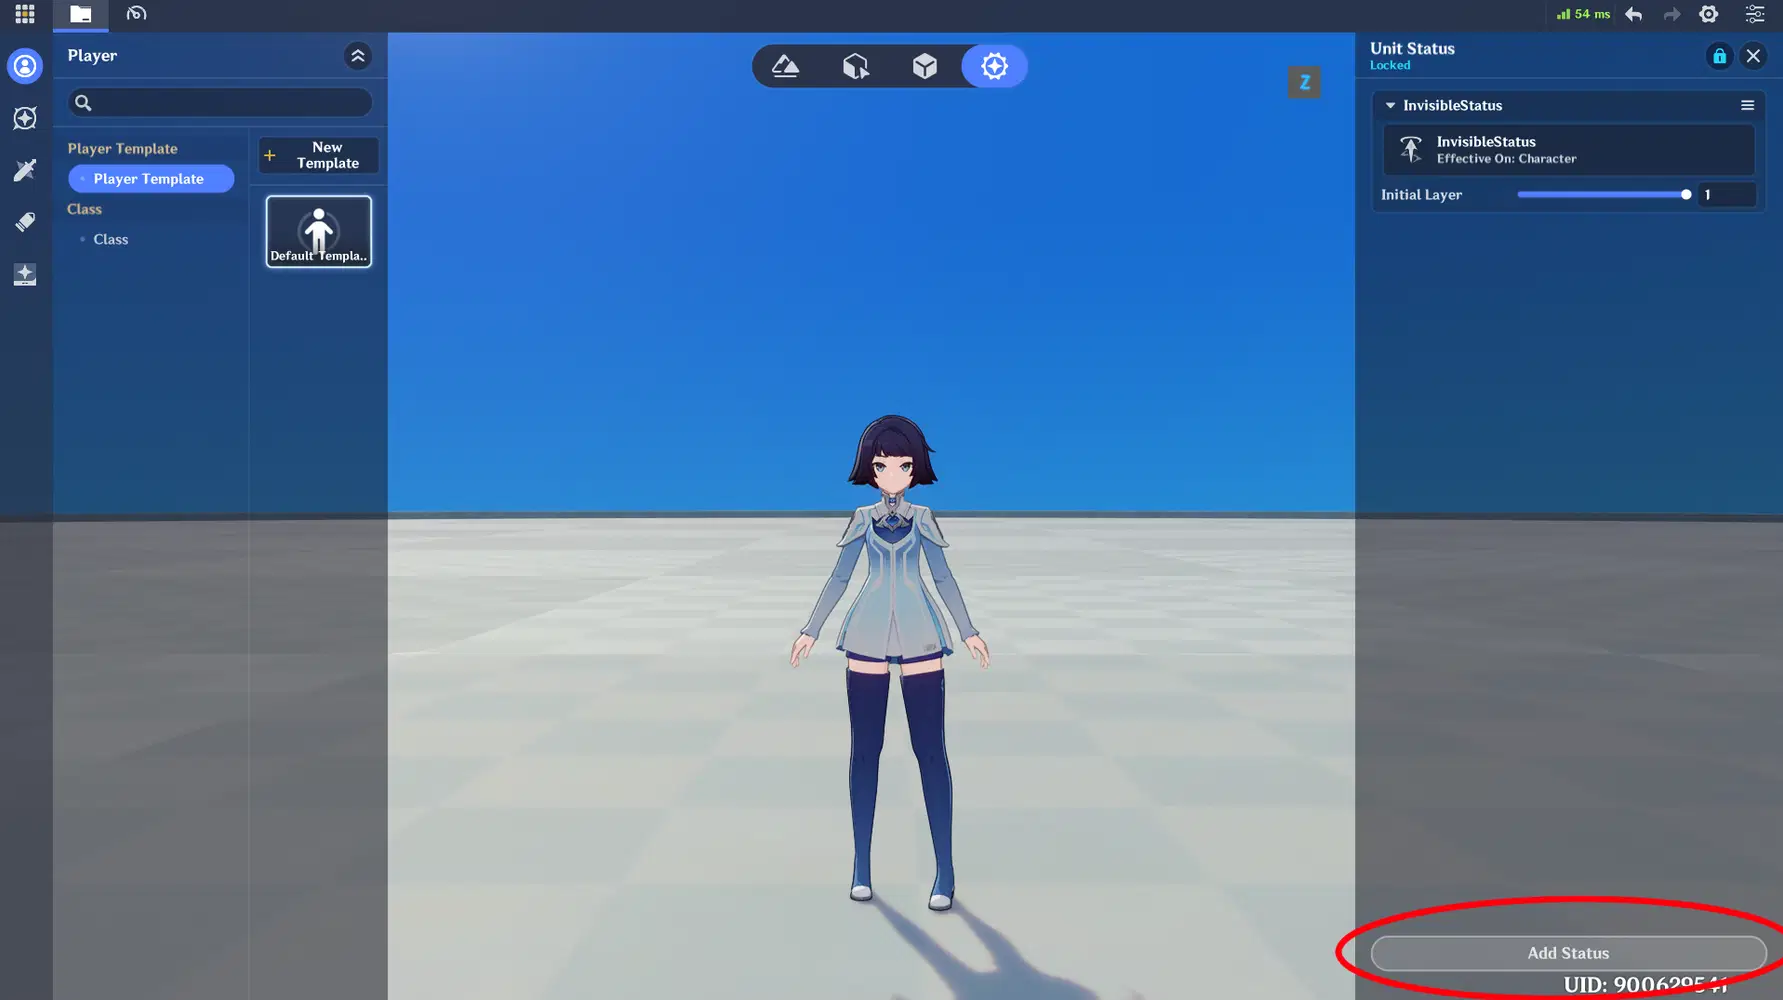
If you want to hide your Character Model, so that it's only the vehicle showing. You can do so by creating a unit status, set its Infinite Duration to on. And add in the Effect "Character Hidden".
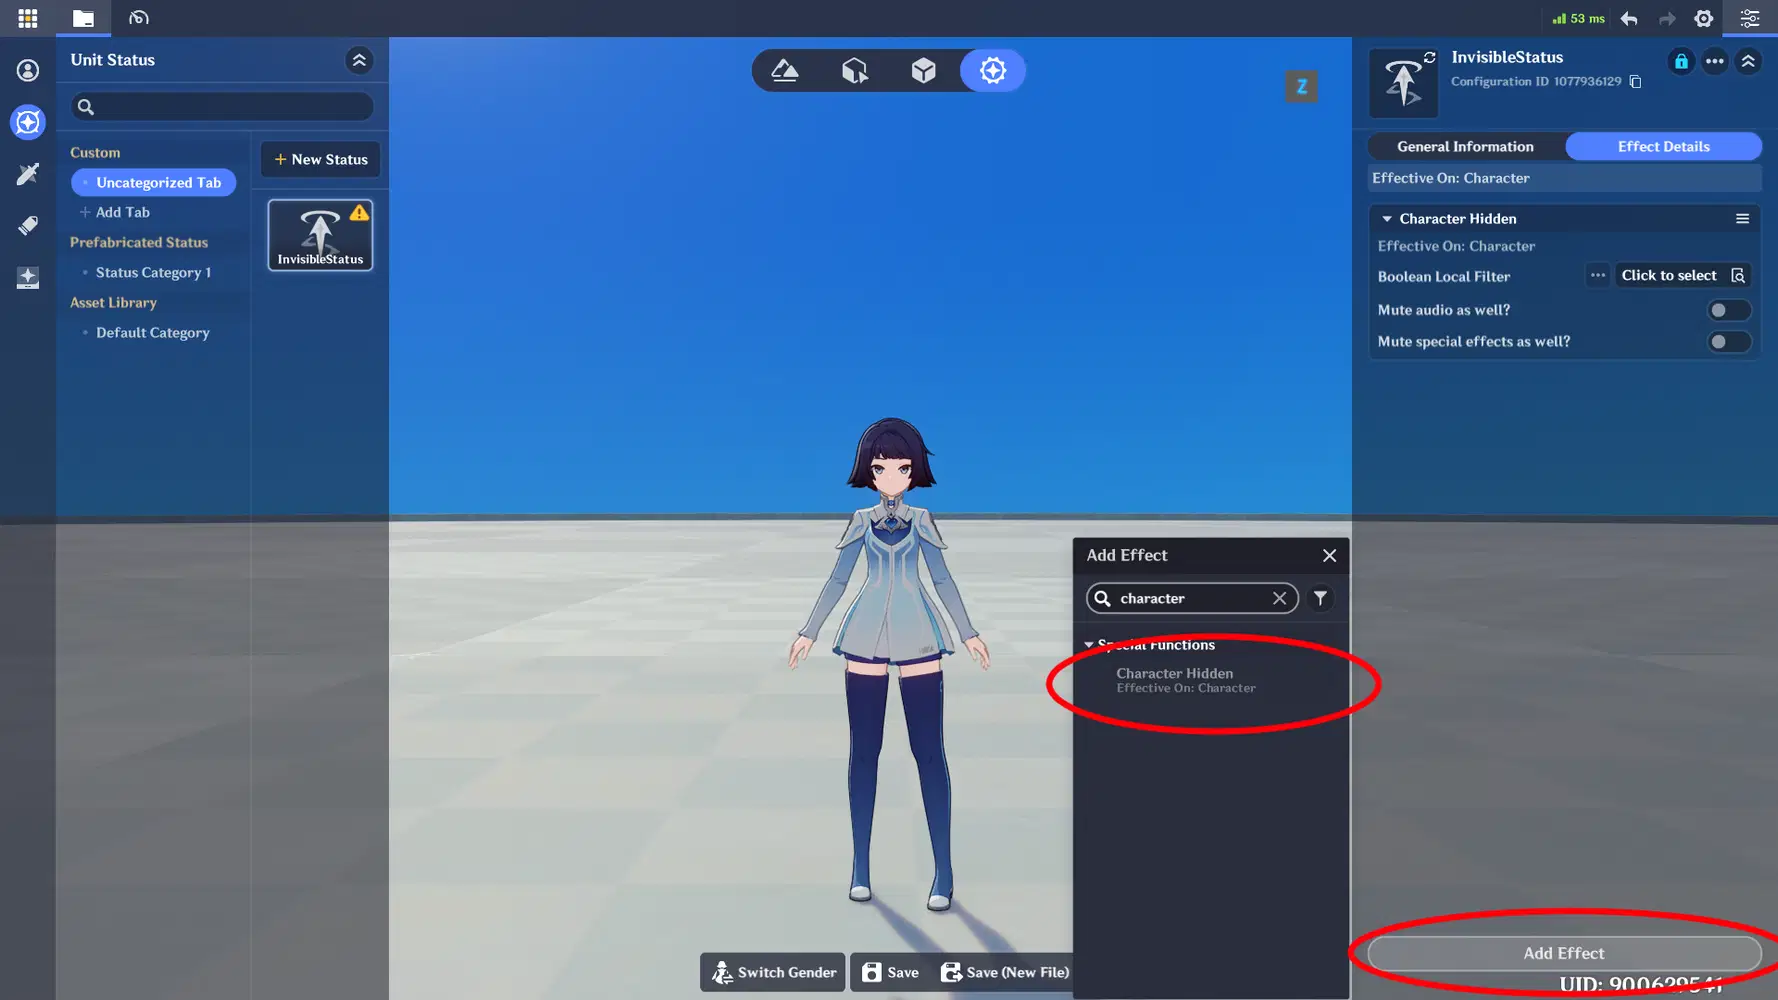
Note that the boolean local filter when returning an output of false, results in the character being fully hidden. And on the output of true, results in the character being partially hidden.
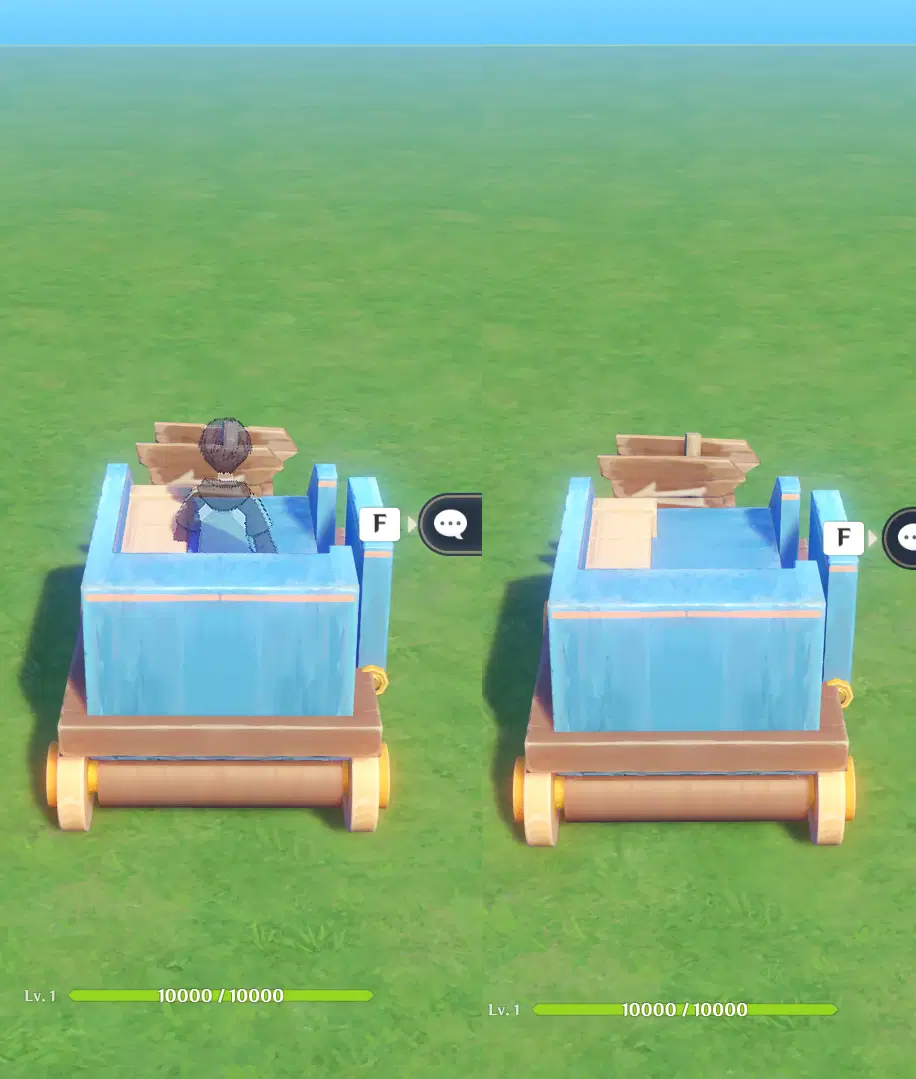
Left is the boolean filter returning "True". Right is the boolean filter returning "False"
Make sure to add the status under "Edit Character", "Unit Status -> Advanced Editing". Or apply the status in a node graph.
Turning Controls Version
So the basic version of in this Vehicle guide, has some downsides. For starters, you can turn 180 degrees instantly and the "Vehicle" does a 180 degree turn. Hardly realistic of a locomotion vehicle. In this "Turning Controls" version, we will be utilizing the "Allow Input Steering" in a skill's status track. Particularly of a Hold Skill. This will allow the player to hold a skill down, and turn.
The "Allow Input Steering" essentially makes it so instead of instantly turning whenever the player presses a directional input, it gradually turns towards that direction. The speed in which it turns is configurable in the skill's Animation Editor.
Let's begin.
Vehicle Prefab
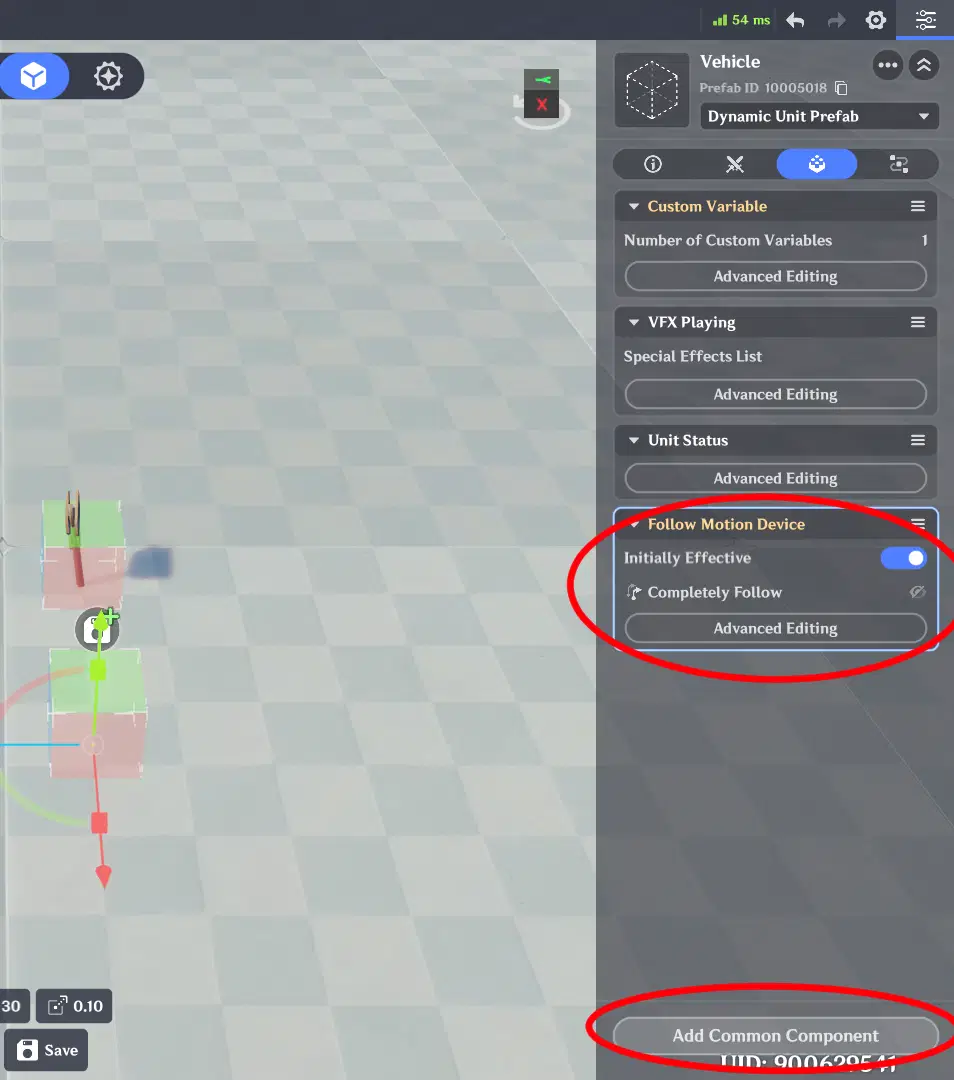
First of we'll be creating a new Prefab, named "Vehicle" as more complex logic is added, it may become handy and more organized to have an entity that handles all the turning logic related to a vehicle gameplay. It's also necessary in so that the VehicleModel has something to follow that has a fixed rotation.
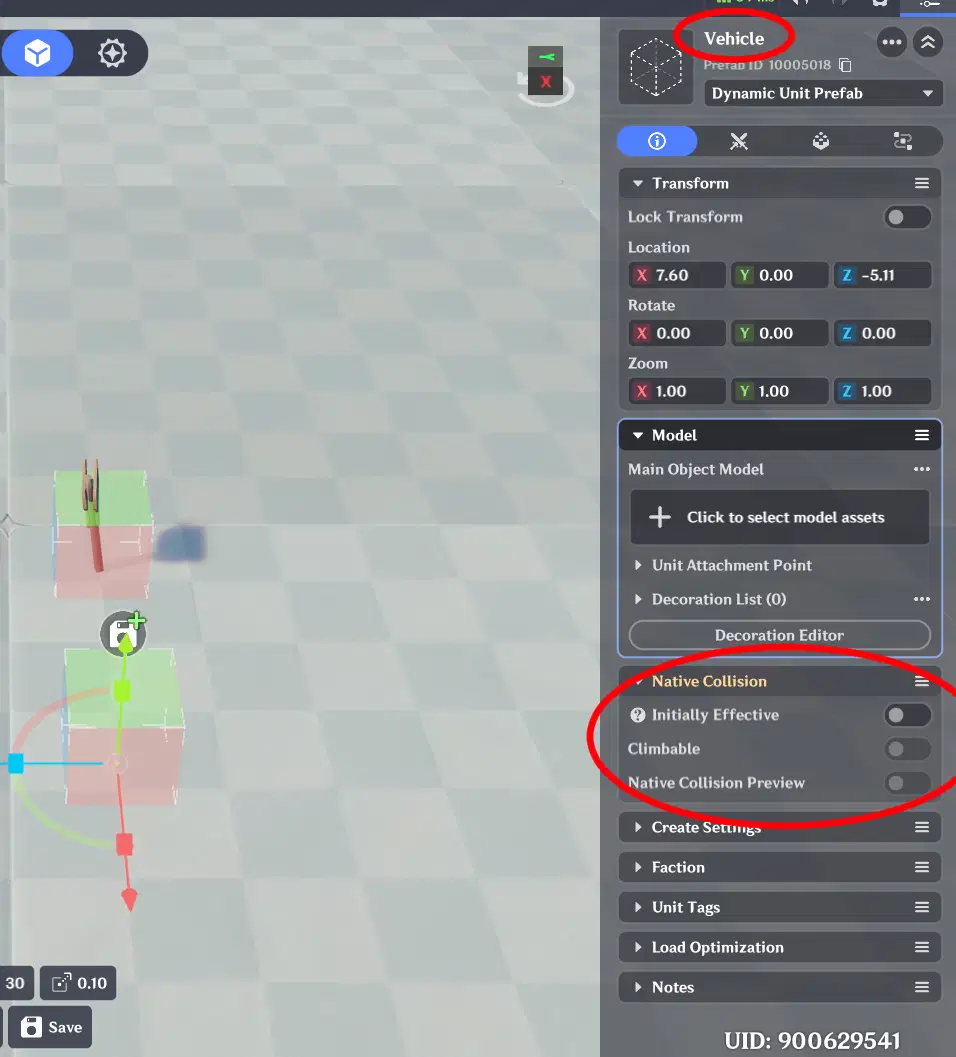
- In Genshin Impact, in the Prefab Library, create a new empty Prefab, name it "Vehicle"
- Set its Native Collision to Off
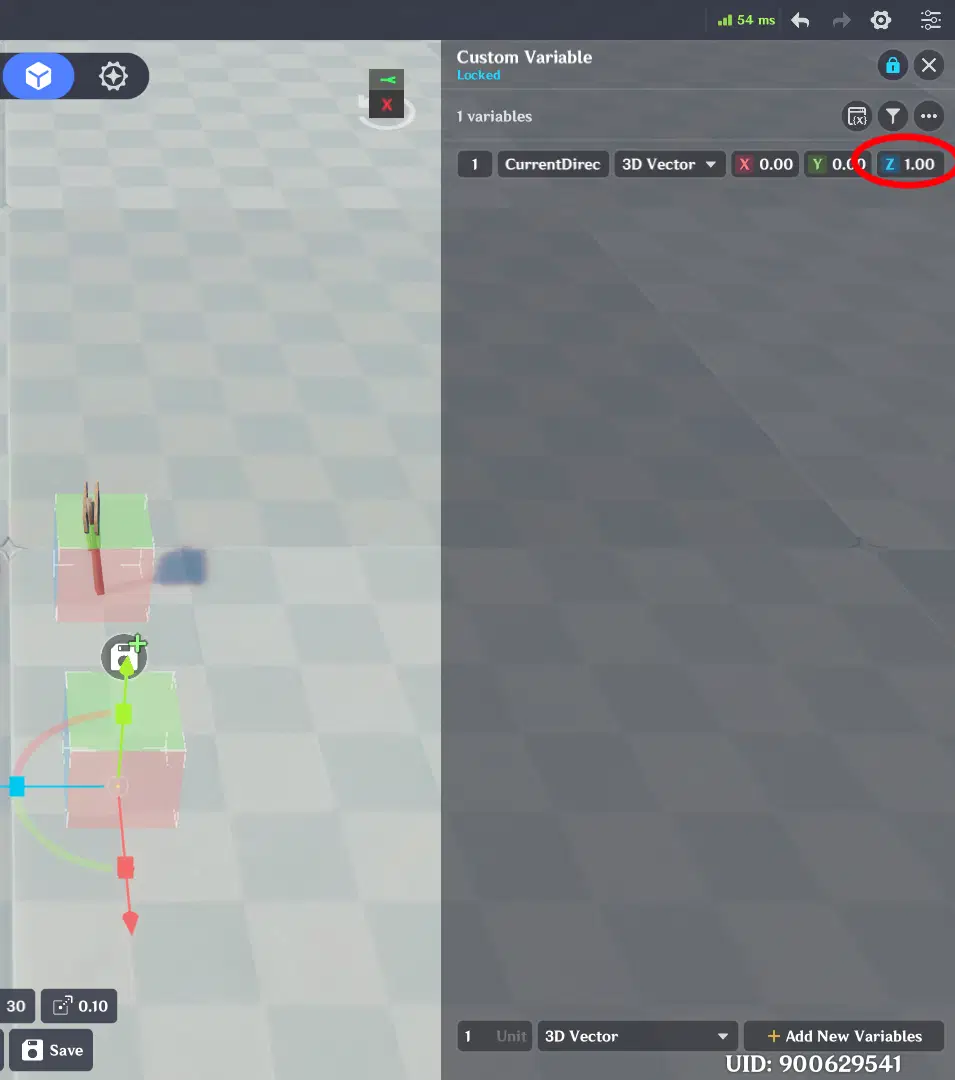
- Under the components tab, go to "Advanced Editing" under "Custom Variable"
- Add in a 3D vector.
- Name it "CurrentDirection".
- Set the default values to 0,0,1.
We set it here instead of a node graph, so that we can have customizable starting value that faces north. This will be handy as our vehicle spawns facing north in this guide, and thus the force field is pulling them north.
In your own game, you may need to customize this variable's starting value as something else, depending on your needs, either in the prefab library or in a node graph.
Next we need to make the "Vehicle" follow the Character.
- Under the components tab, add in a "Follow Motion Device" component.
Same thing as before, we customize this in a node graph.
Make sure to save the prefab.
Adding Vehicle as a Variable
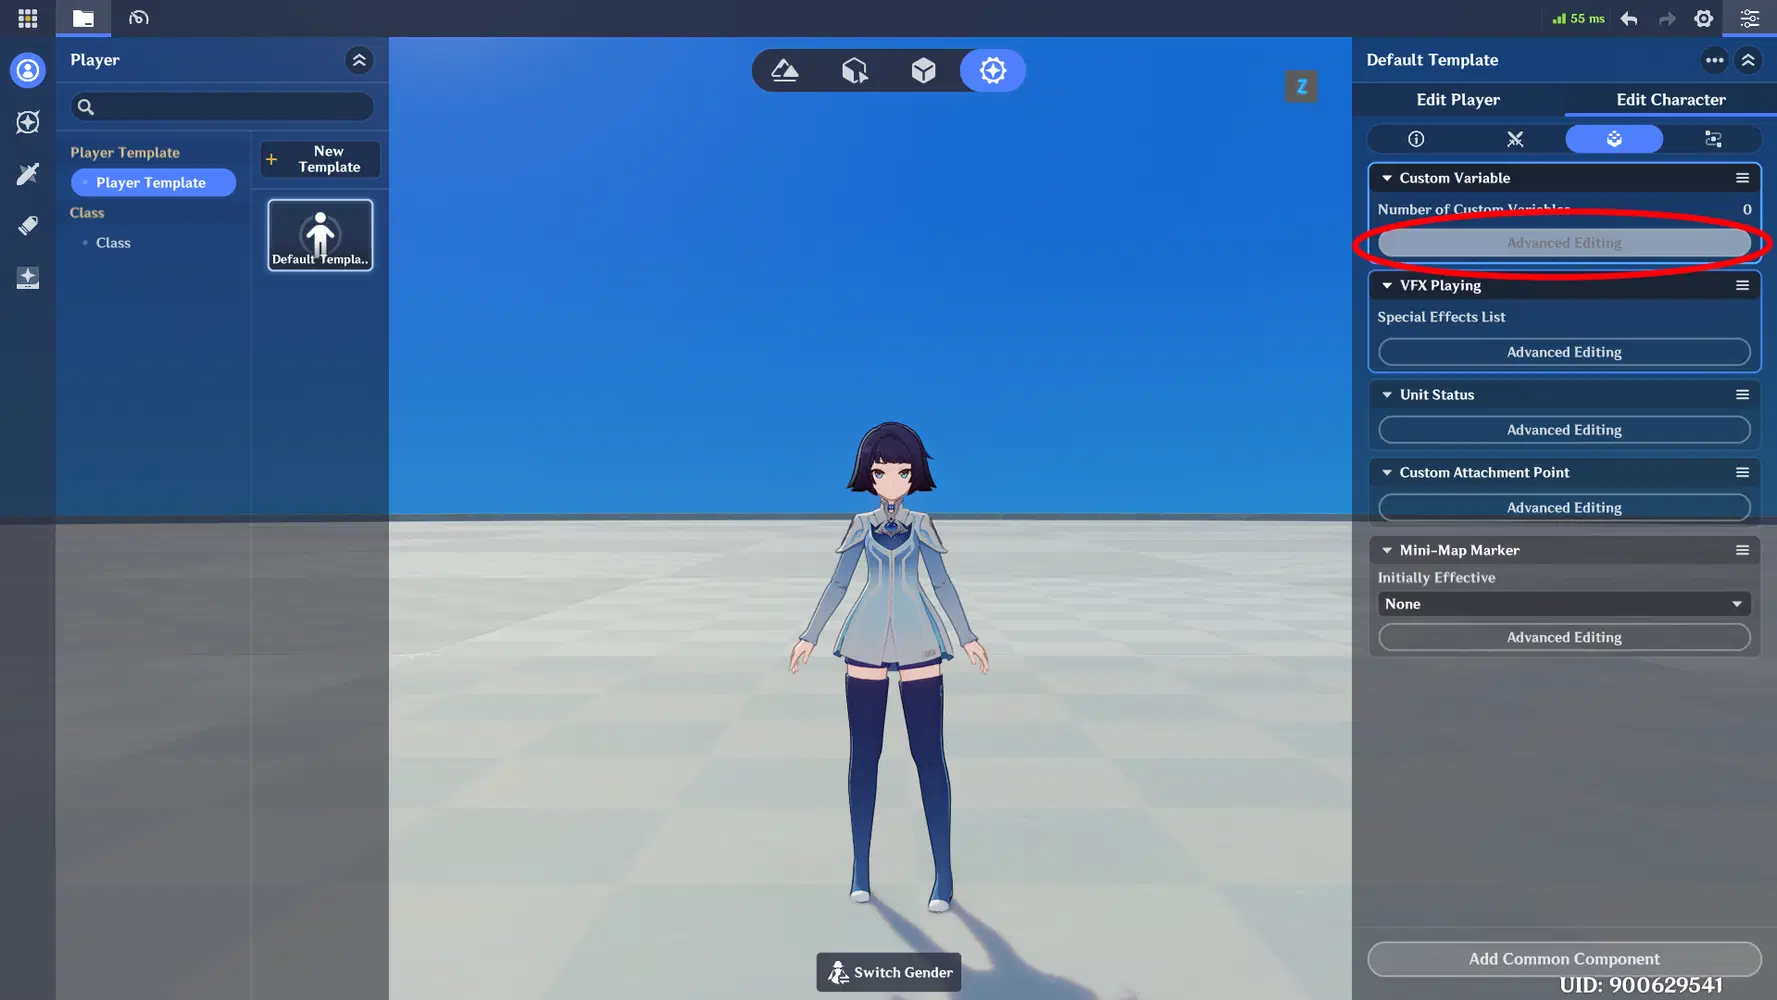
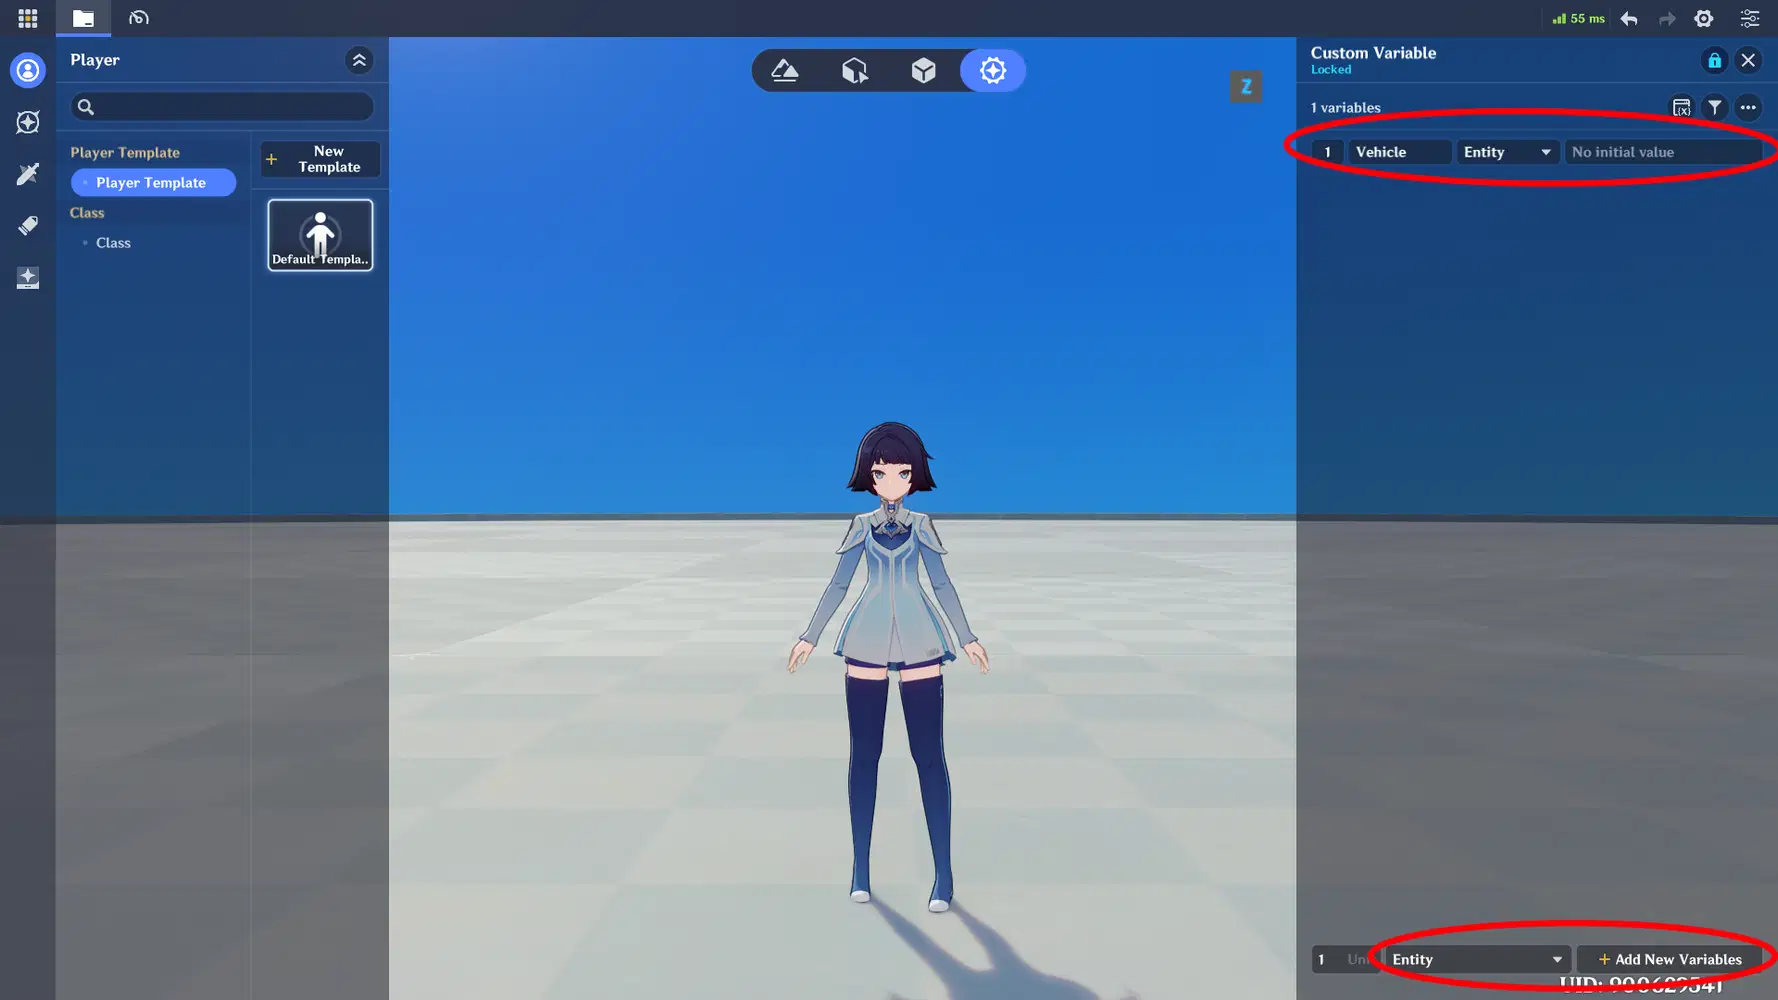
So normally, this step wouldn't be necessary, and its a bit weird. But without it things might not work. In particular we need to add in a custom variable in the Character named "Vehicle" of type Entity. You might say, [we don't even have a default value for it, why don't we just set it in the node graph?] I'm suspecting that because we will be needing to call this variable in a Client Node Graph, and because we only set it in a Server Node Graph (CharacterOnCreate), the client side node graph never realizes this variable exists. Thus setting it in the Genshin Impact editor under the Character's Custom Variable fixes an issue where the client side node graph can't find the variable.
- In the Combat Preset, Click Player on the top left.
- Select Edit Character (assuming you just have one default player template)
- Under the components tab, go to Advanced Editing for Custom Variable
- Add in a variable of type "Entity"
- Name it "Vehicle".
Refactoring CharacterOnCreate for the new changes
We'll be changing a couple of things about how things are handle in "CharacterOnCreate" , these are the notable things we'll be doing.
- The first being that since we're having a "Vehicle" entity handle things, we will be moving references to the "VehicleModel" to be stored in the "Vehicle".
- We will also remove the timer, as the way we turn makes it not the best option to create a "Drift" effect that way. We'll be using a difference technique for the "Drift" effect in this version.
- We need to have the VehicleModel and VehicleMotion follow the Vehicle instead of the Character.
- The last and most notable part, is that the Vehicle has a follow type of "Follow Location" making it not turn regardless of where the character faces.
- In Miliastra Sandbox window, open up your "CharacterOnCreate" node graph.
- Let's first delete the "Start Timer Node" and its related inputs.
- Next, unhook the execution flow from the "When Entity is Created" node to the "Create Prefab" node
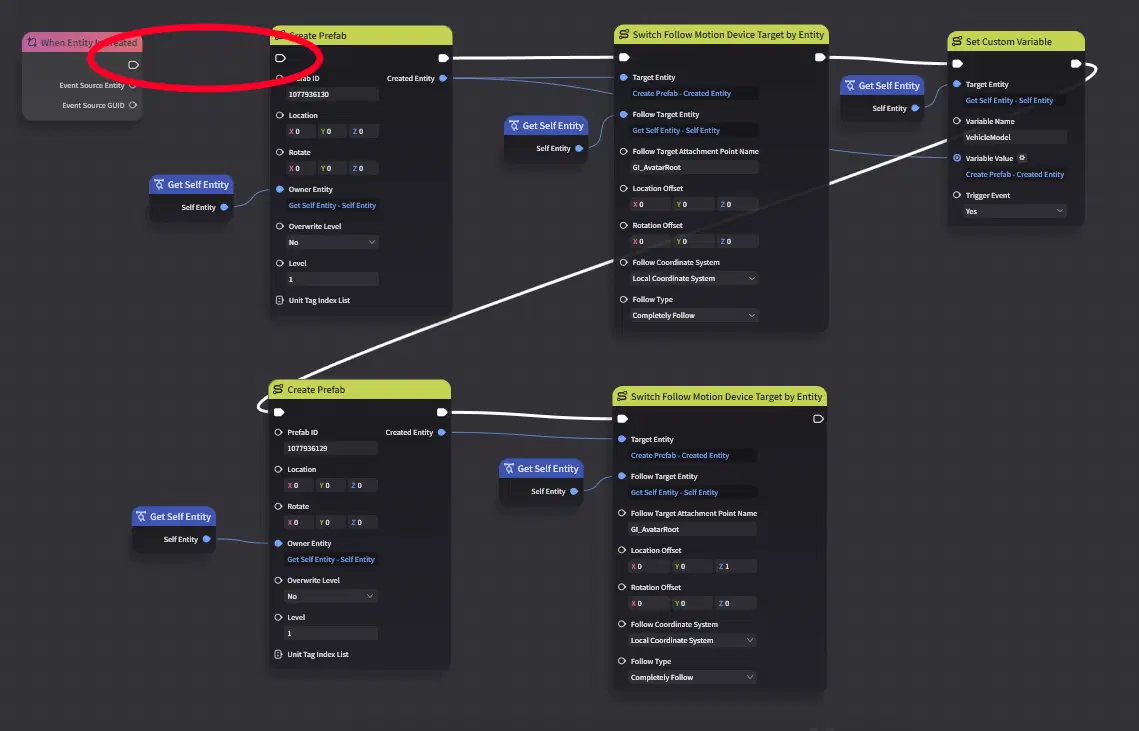
We'll be creating the Entity from the Vehicle Prefab, and set the Follow Motion Device for it, similar stuff as before.
- Add a "Create Prefab" node
- Set it as follows:
- Prefab ID: copy the Prefab ID of the Vehicle Prefab
- Location: 0, 0, 0
- Rotate: 0, 0, 0
- Owner Entity: Get Self Entity
- Overwrite Level: No
- Level: 1
- Unit Tag Index list: ignore it, don't need to set it.
- Connect the execution Flow from "When Entity is Created" node to this "Create Prefab" node.
- Add a "Switch Follow Motion Device Target by Entity"
- Set it as follows:
- Target Entity: Created Entity from the Create Prefab node corresponding the Vehicle prefab we just made.
- Follow Target Entity: Get Self Entity
- Follow Target Attachment Point Name: "GI_AvatarRoot"
- Location Offset: 0, 0, 0
- Rotation Offset: 0, 0, 0
- Follow Coordinate System: Local Coordinate System
- Follow Type: Follow Location (this is critical, and different from the others we've done)
- Connect the execution flow from "Create Prefab" node to "Switch Follow Motion Device Target by Entity"
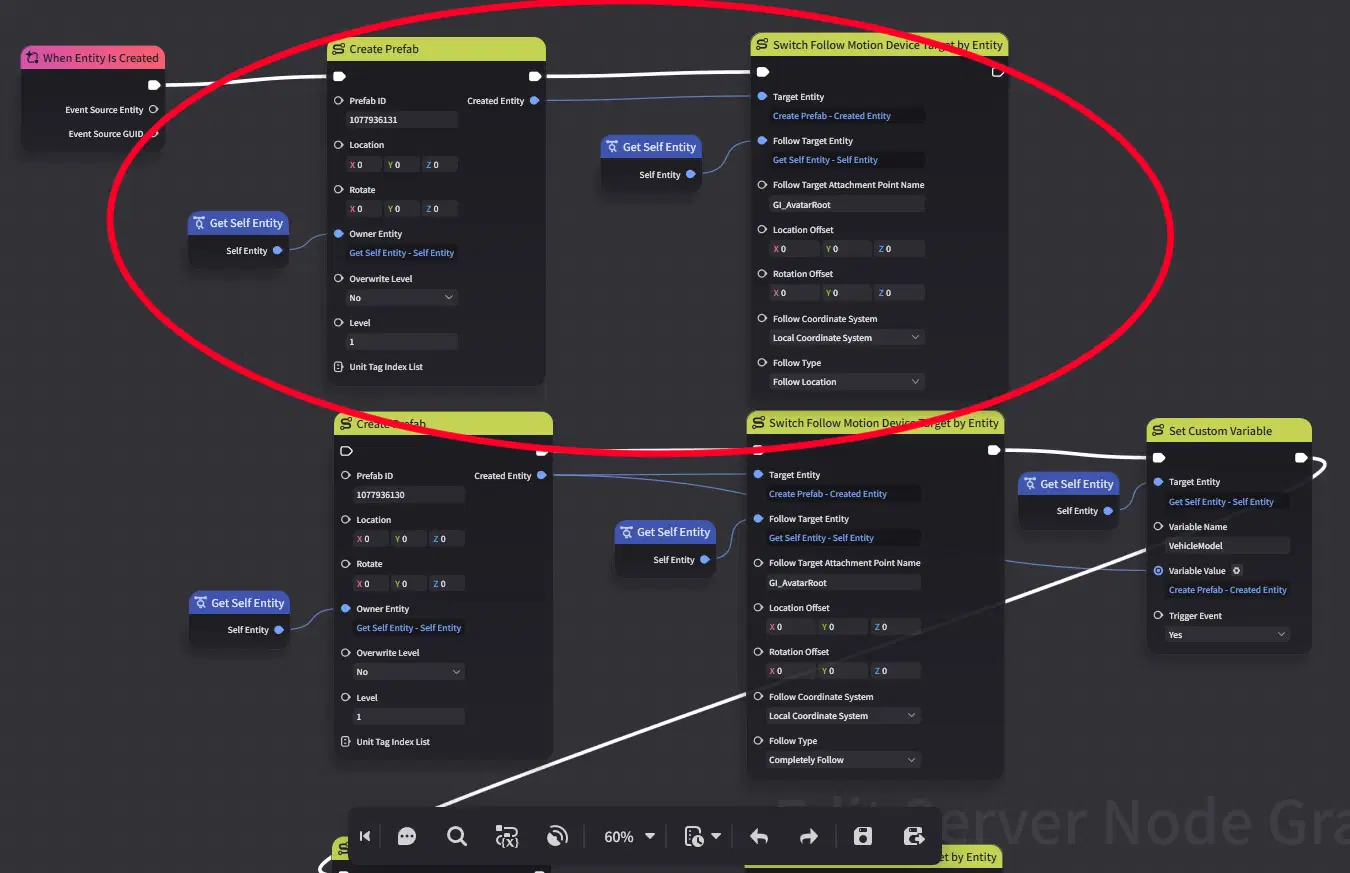
Next we need to store a reference to the Vehicle.
- Add Set Custom Variable node
- Set it as follows:
- Target Entity: Get Self Entity
- Variable Name: "Vehicle"
- Variable Value: Created Entity from the Create Prefab node corresponding to the Vehicle prefab.
- Trigger Event: No
- Connect the execution flow from "Switch Follow Motion Device Target by Entity" to this "Set Custom Variable" node.
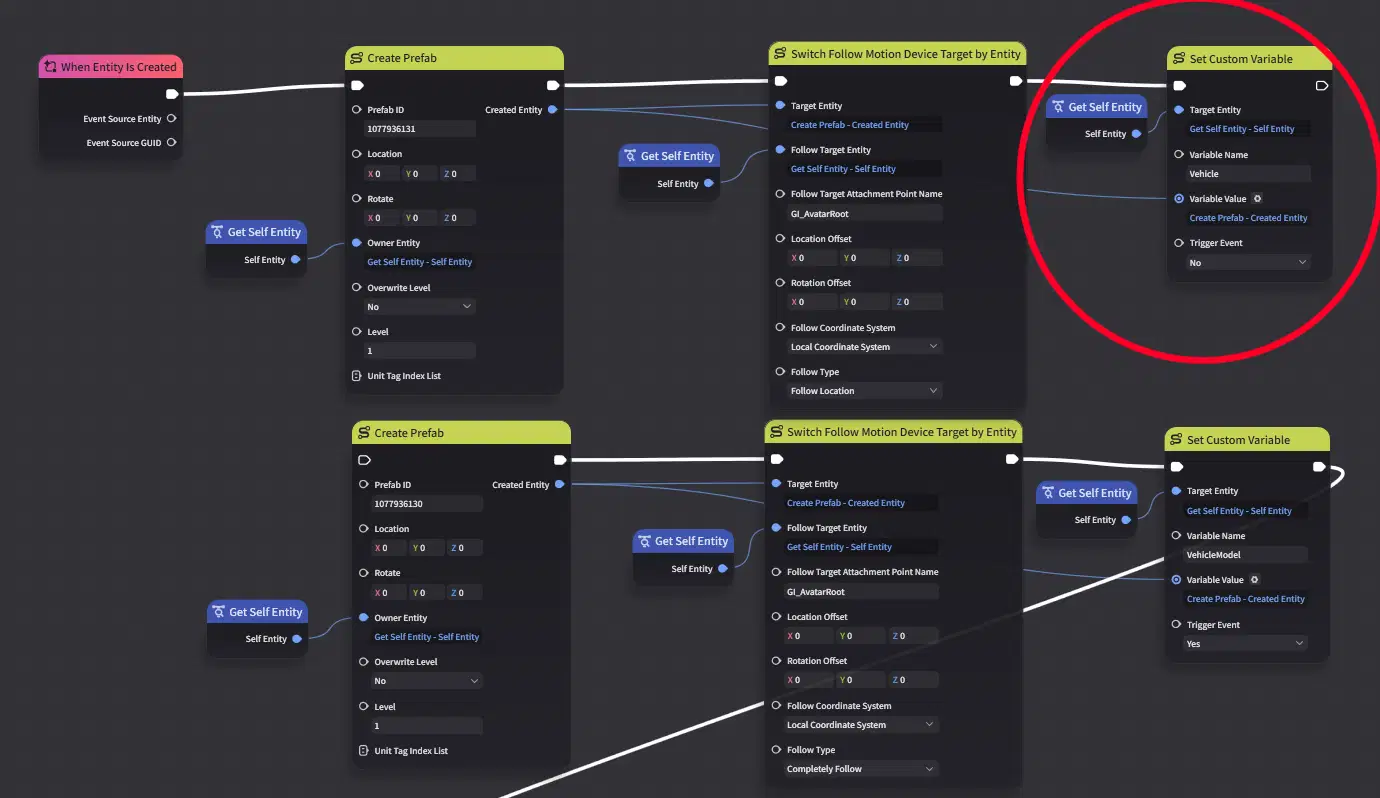
Connect these nodes to the existing nodes.
- Connect the Switch Follow Motion Device by Entity pertaining to the Vehicle, to the Create Prefab node pertaining "VehicleModel".
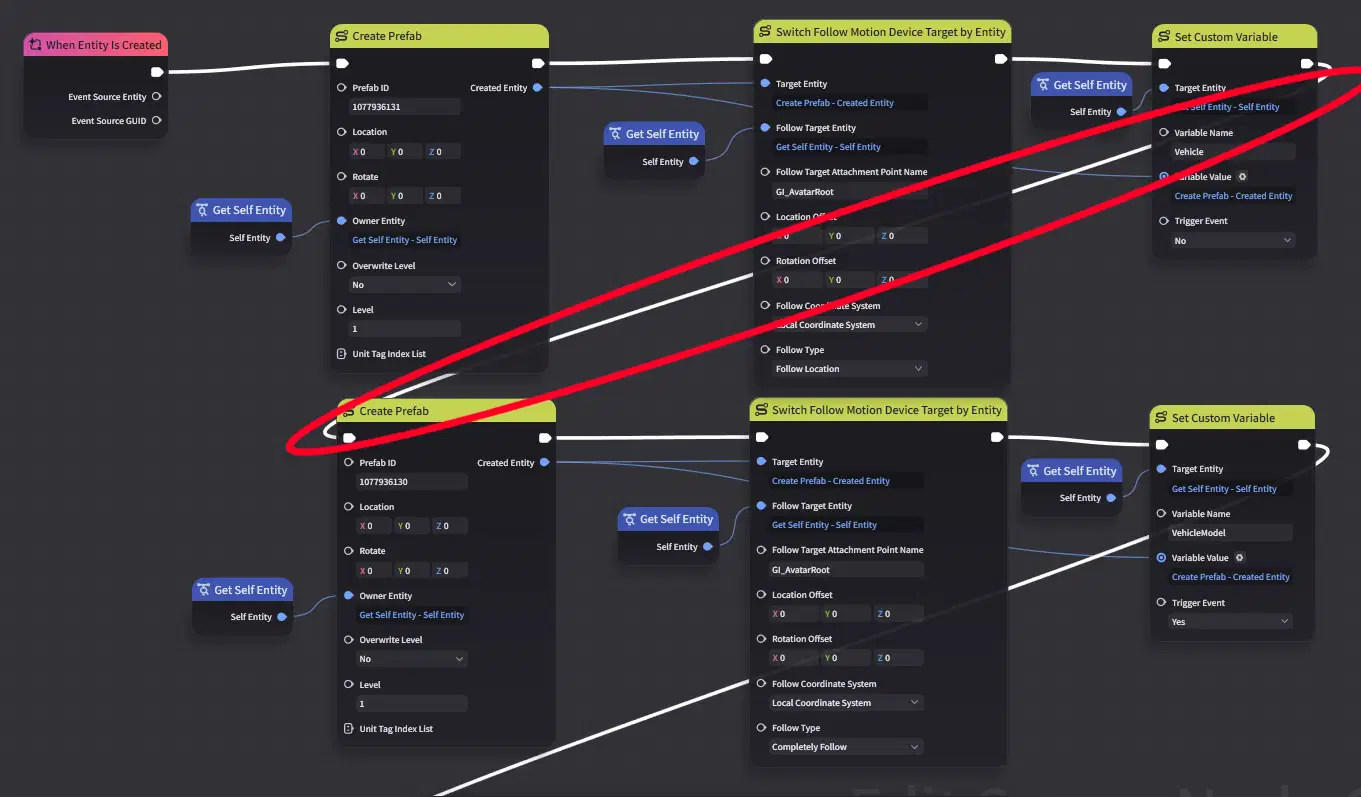
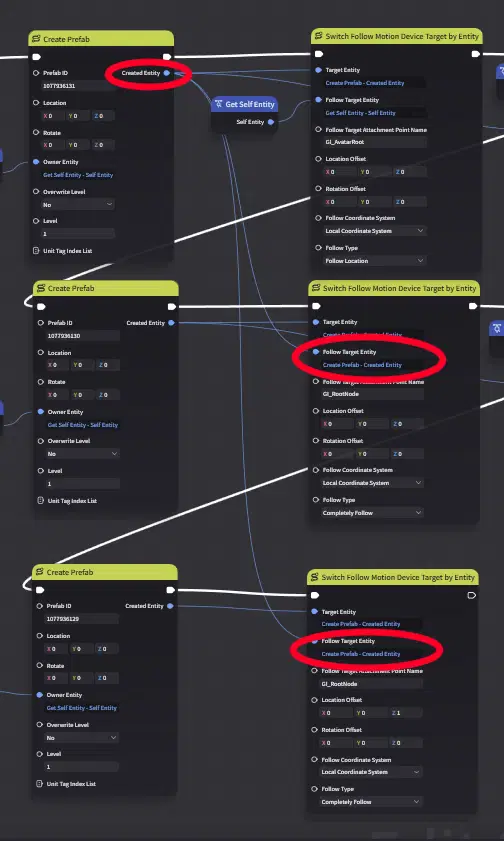
Next we need to change both VehicleModel and VehicleMotion entities to follow the Vehicle instead of the Character.
- Unplug the "Follow Target Entity" for the "Switch Follow Motion Device Target by Entity" pertaining to BOTH "VehicleModel" and "VehicleMotion" entities.
- Plug in the Created Entity for the "Vehicle" into the "Follow Target Entity" you just unplugged.
- Change both of the "Switch Follow Motion Device Target by Entity" node's "Follow Target Attachment Point Name" to "GI_RootNode"
Now we just need to change where the VehicleModel reference is stored.
- Unplug the Target Entity for "Set Custom Variable" pertaining to the Variable Name "VehicleModel"
- Plug in the Created Entity for the "Vehicle" into the Target Entity for that "Set Custom Variable" node.
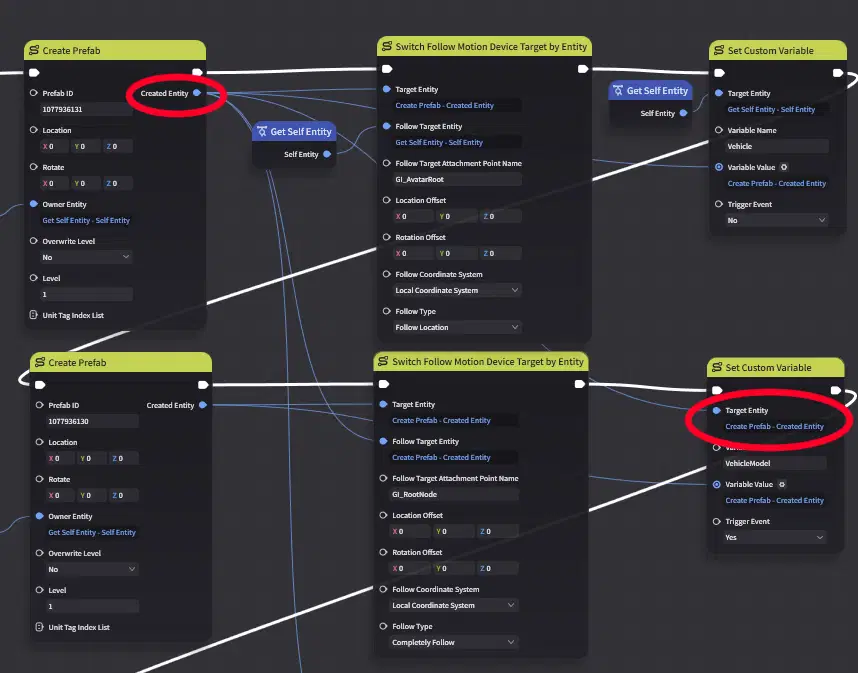
Next we need to also store a reference to the VehicleMotion, which we previously did not need to do.
- Add a Set Custom Variable Node
- Set it as follows:
- Target Entity: "Created Entity" from "Create Prefab" pertaining the "Vehicle"
- Variable Name: "ForwardForceField"
- Variable Value: "Created Entity" from "Create Prefab" pertaining the "VehicleMotion"
- Trigger Event: No
- Connect the execution flow from "Switch Follow Motion Device Target by Entity" pertaining to "VehicleMotion" to this "Set Custom Variable"
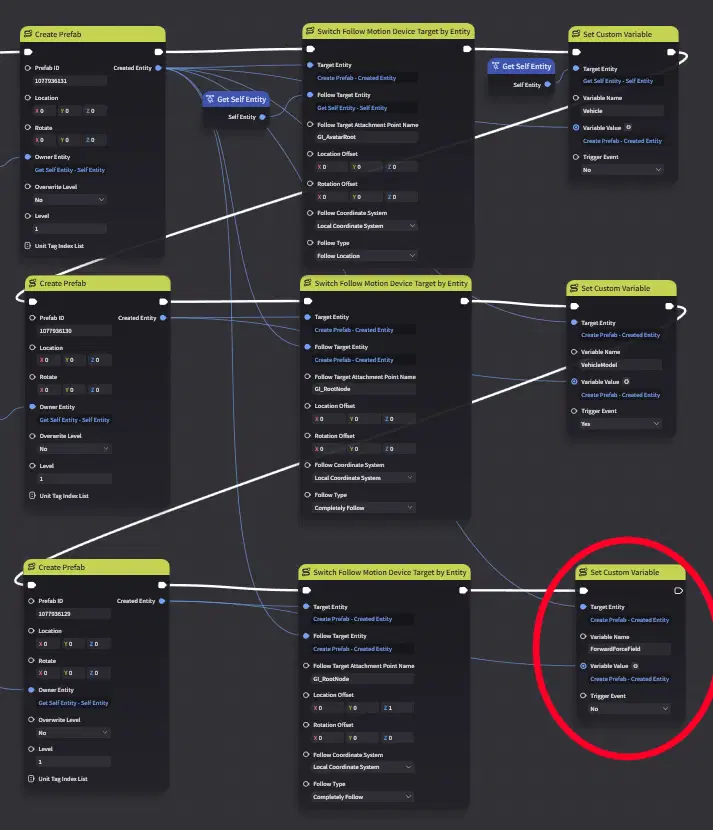
And we are done updating this node graph. Make sure to save the node graph.
There's only some order of execution sequence that must be followed.
- The Vehicle Prefab must be created before the other two prefabs.
- Each of the "Switch Follow Motion Device Target by Entity" must be called after the corresponding prefabs are created.
- Each of the "Set Custom Variable" must be called after the corresponding prefabs are created.
Creating Client Node Graphs for Turn Skill
In order for us to do stuff with a Hold Skill, we need client side node graphs, we'll first be making two client side node graphs, one for when the player starts pressing the skill, and one when they release the skill.
- In Miliastra Sandbox window, press the window tab on the top left.
- Select Client Node Graph Resource Explorer.
- In Character Skill Node Graph's default tab, create two skill node graphs.
- Name them, "TurnStart" and "TurnEnd"
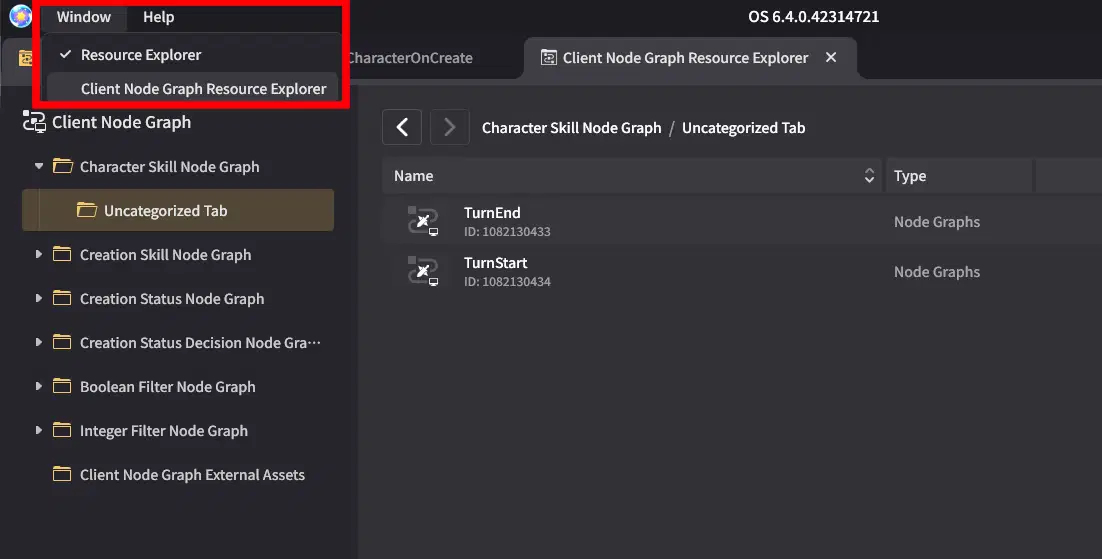
Creating Turn Skill
Now we go back to the Genshin Impact window and configure the skill.
- In Genshin Impact, go to the Combat Preset module.
- And go to the Skill section on the left.
- Add a New Skill
- Name it "Turn"
- Choose a skill icon of your choosing
- Change the Skill type on the top right, from "Normal Skill" to "Hold Skill"
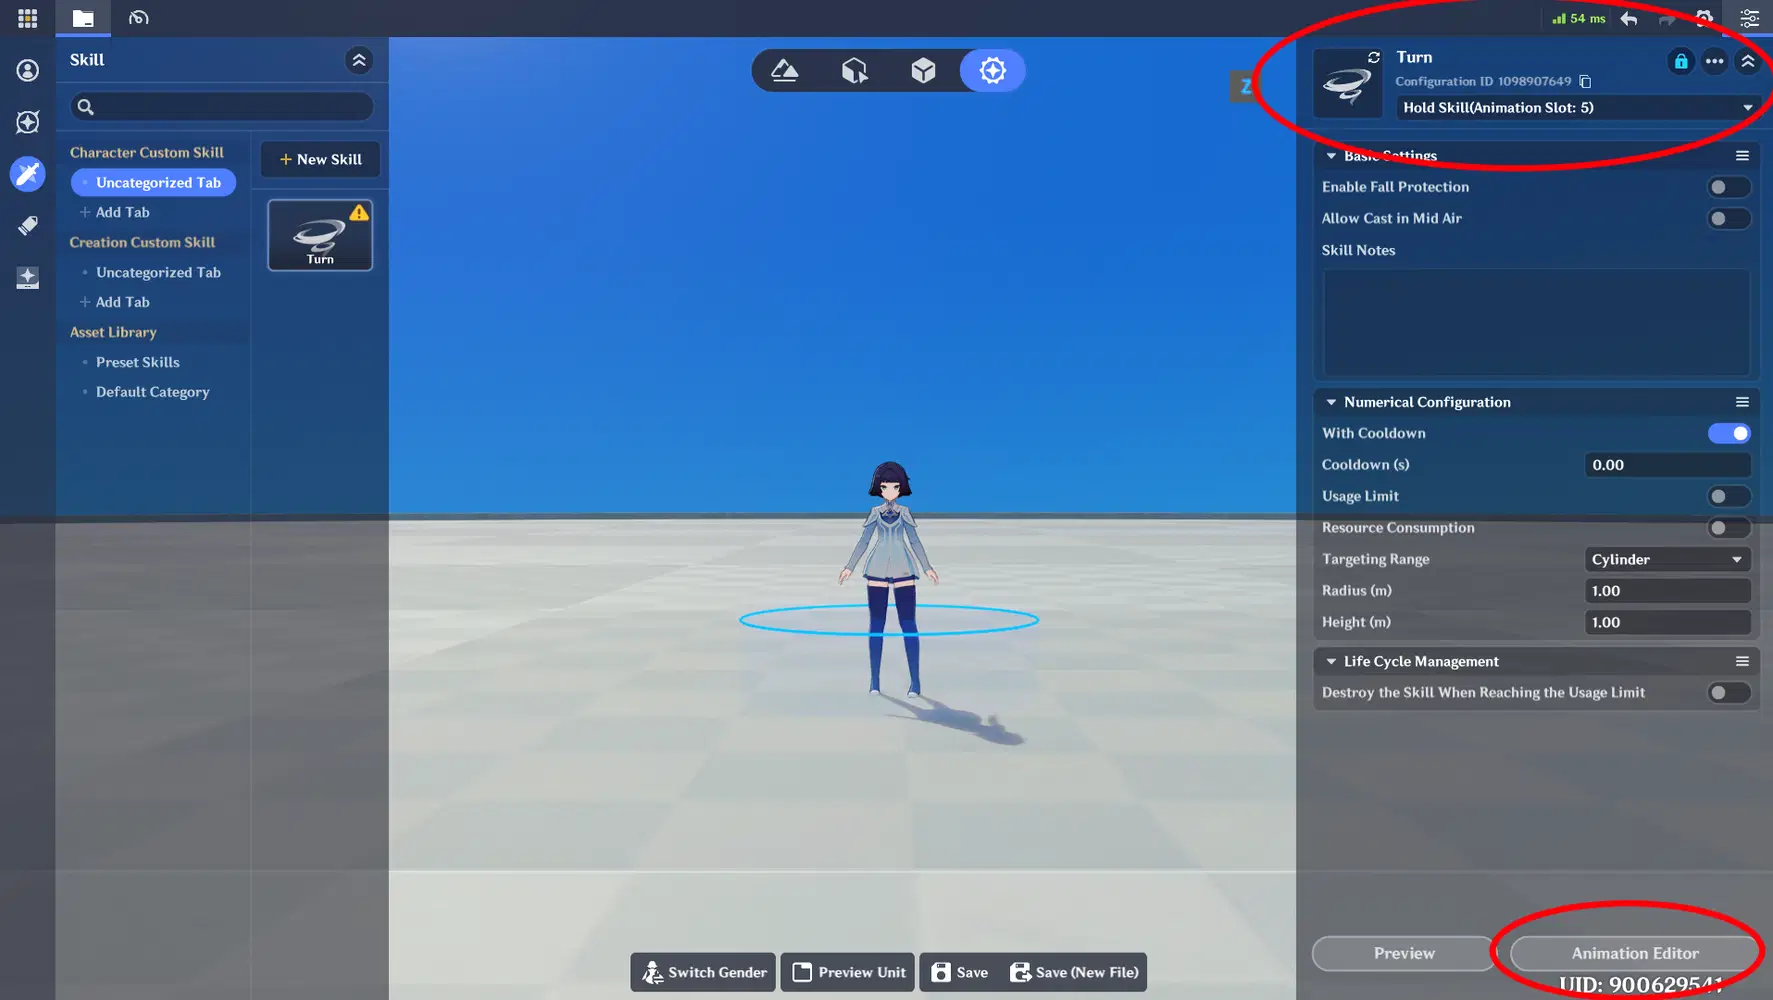
Configuring Turn Skill's Visuals
Next, we'll need to configure the skill.
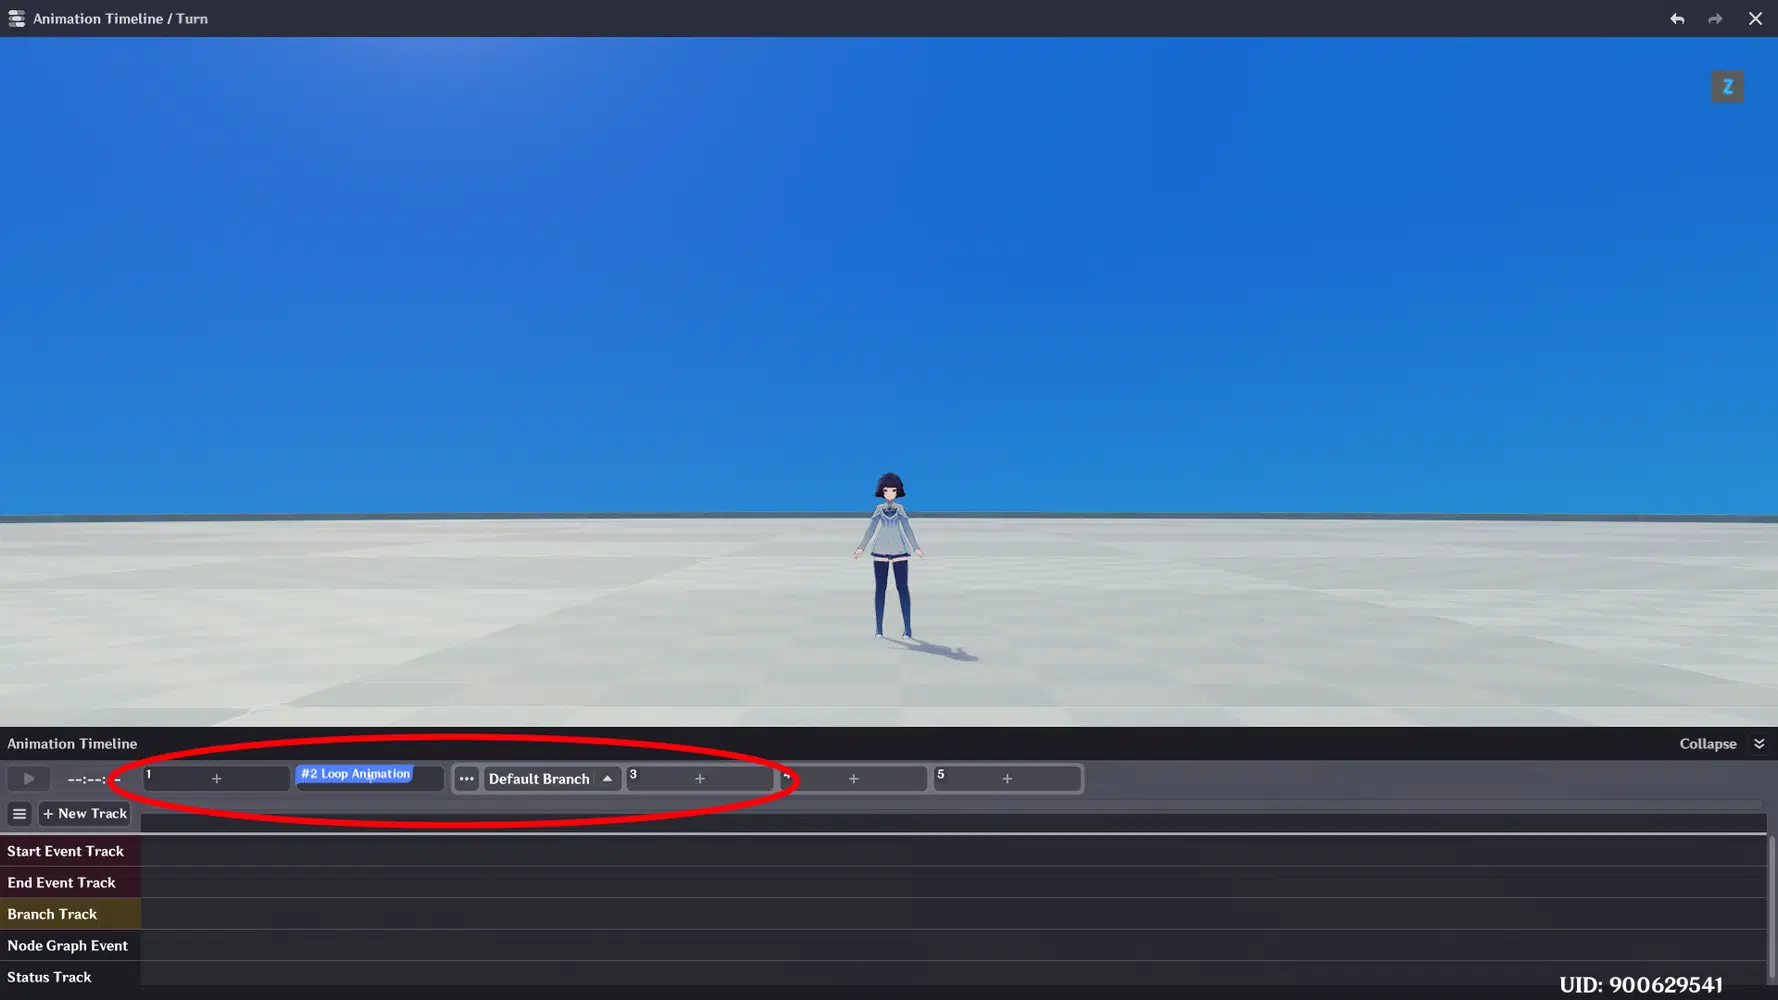
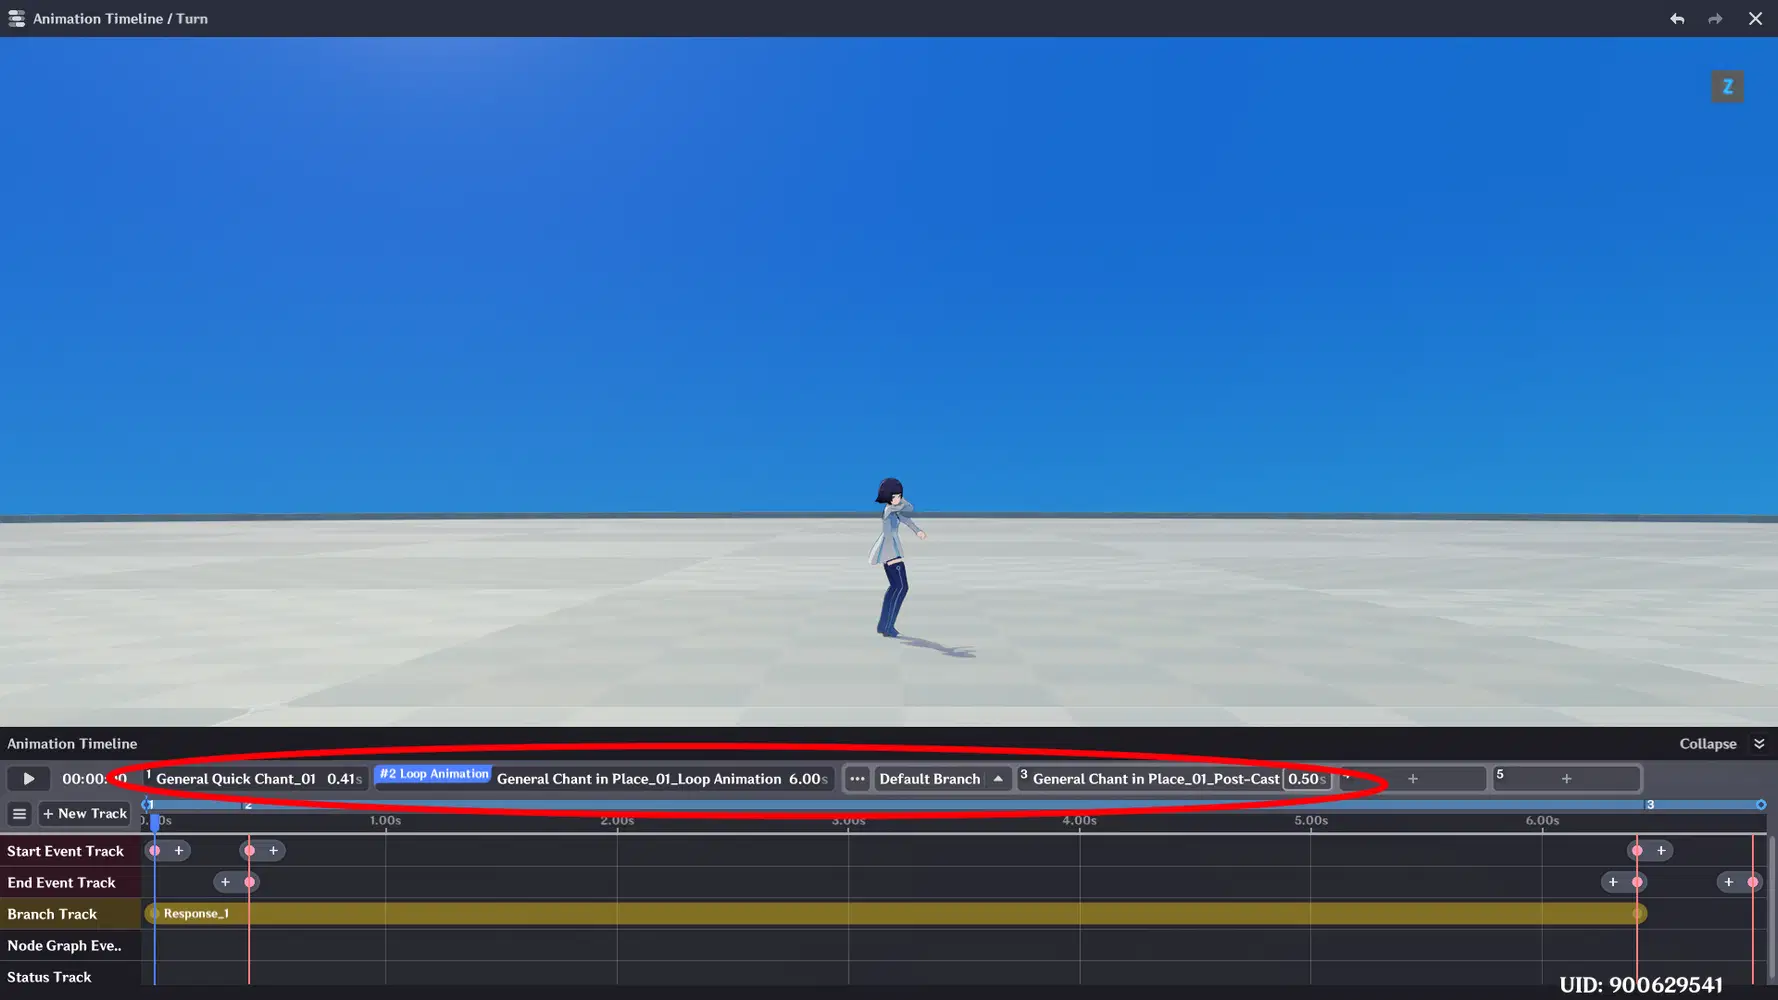
- Open up the Animation Editor
- Select "General Quick Chant_01" for the start of the animation.
- Select "General Chant in Place _01_Loop Animation" for the loop part of the animation
- Configure the loop part of the animation to be 6.00s (Optional, up to your preference)
- In the Default Branch, Select "General Chant in Place_01_Post-Cast".
- Configure the Default Branch animation time to 0.5 sec (Optional, up to your preference)
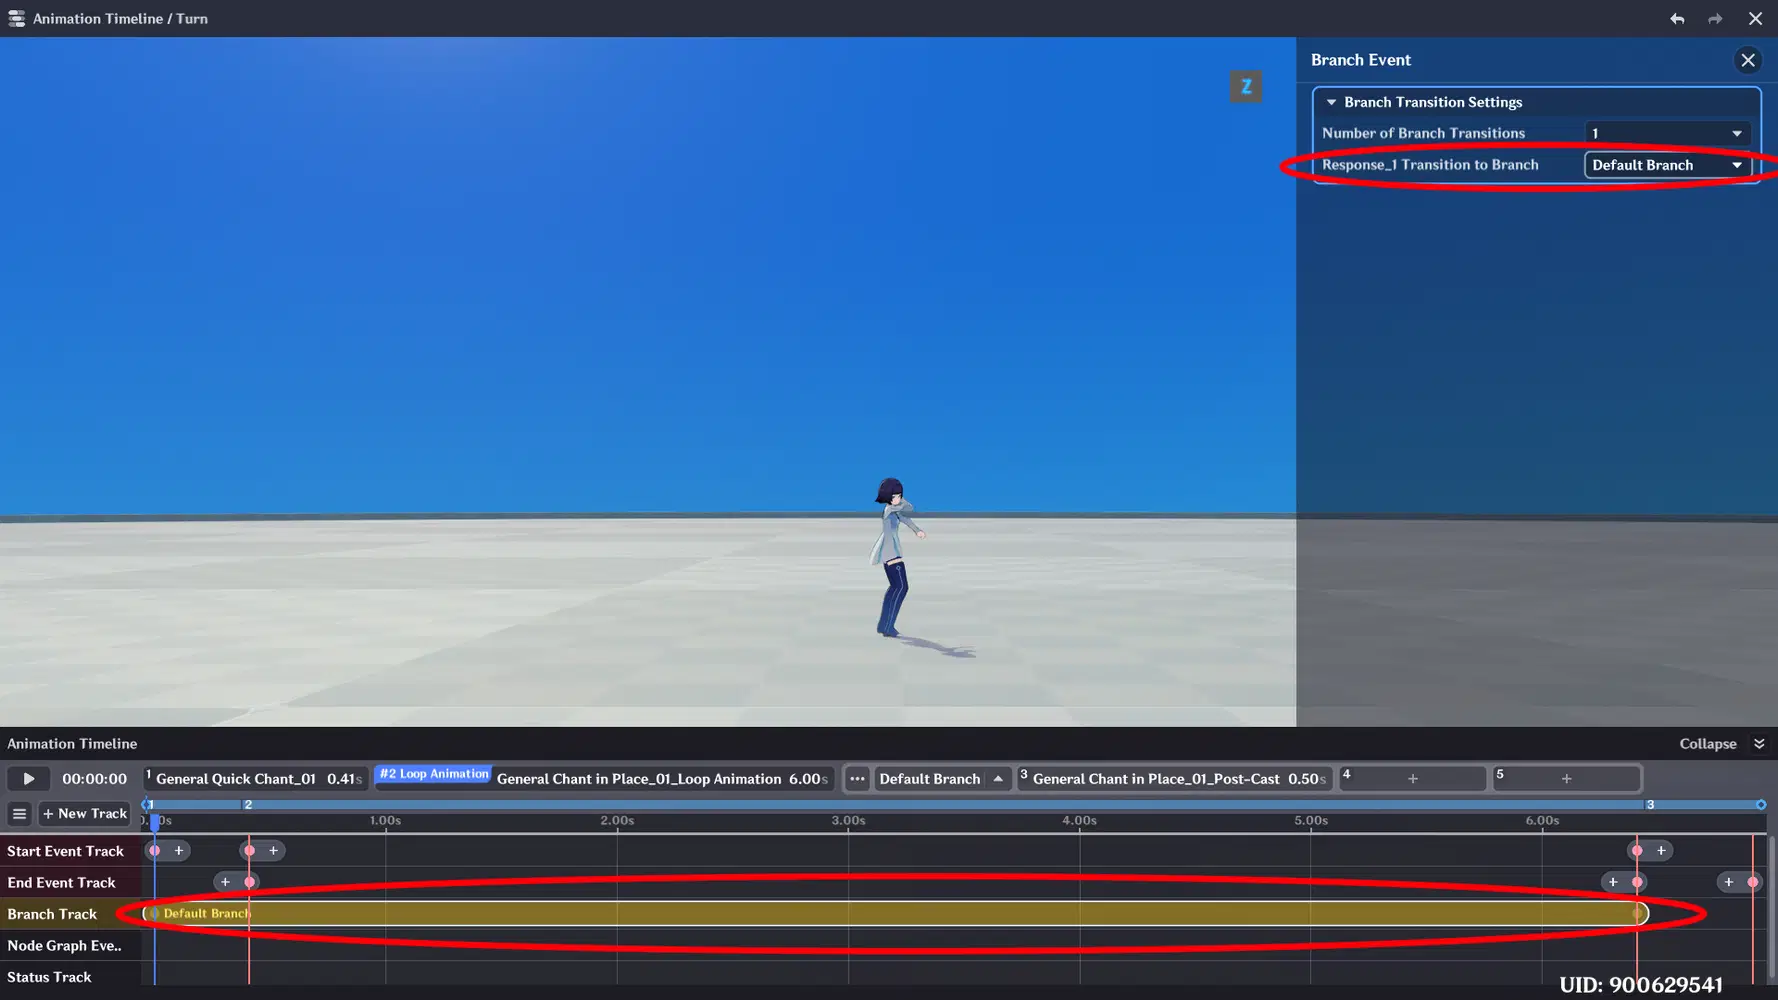
- Click the Response_1 in the Branch Track, and configure the "Response_1 Transition to Branch" to "Default Branch"
Step 7 is important, as it allows it to transition into the Post Cast part of the animation timeline.
Configure Turn Skill's node graph execution
Next we'll add in where the node graph occurs.
- In the First (+) area for the Start Event Track, click it and select the "TurnStart" node graph you created.
- In the (+) area right after the Default Branch ends, for the Start Event Track, click it and select the "TurnEnd" node graph you created.

Configure Turn Skill to "Allow Input Steering"
Finally we need to add in the "Allow Input Steering" status.
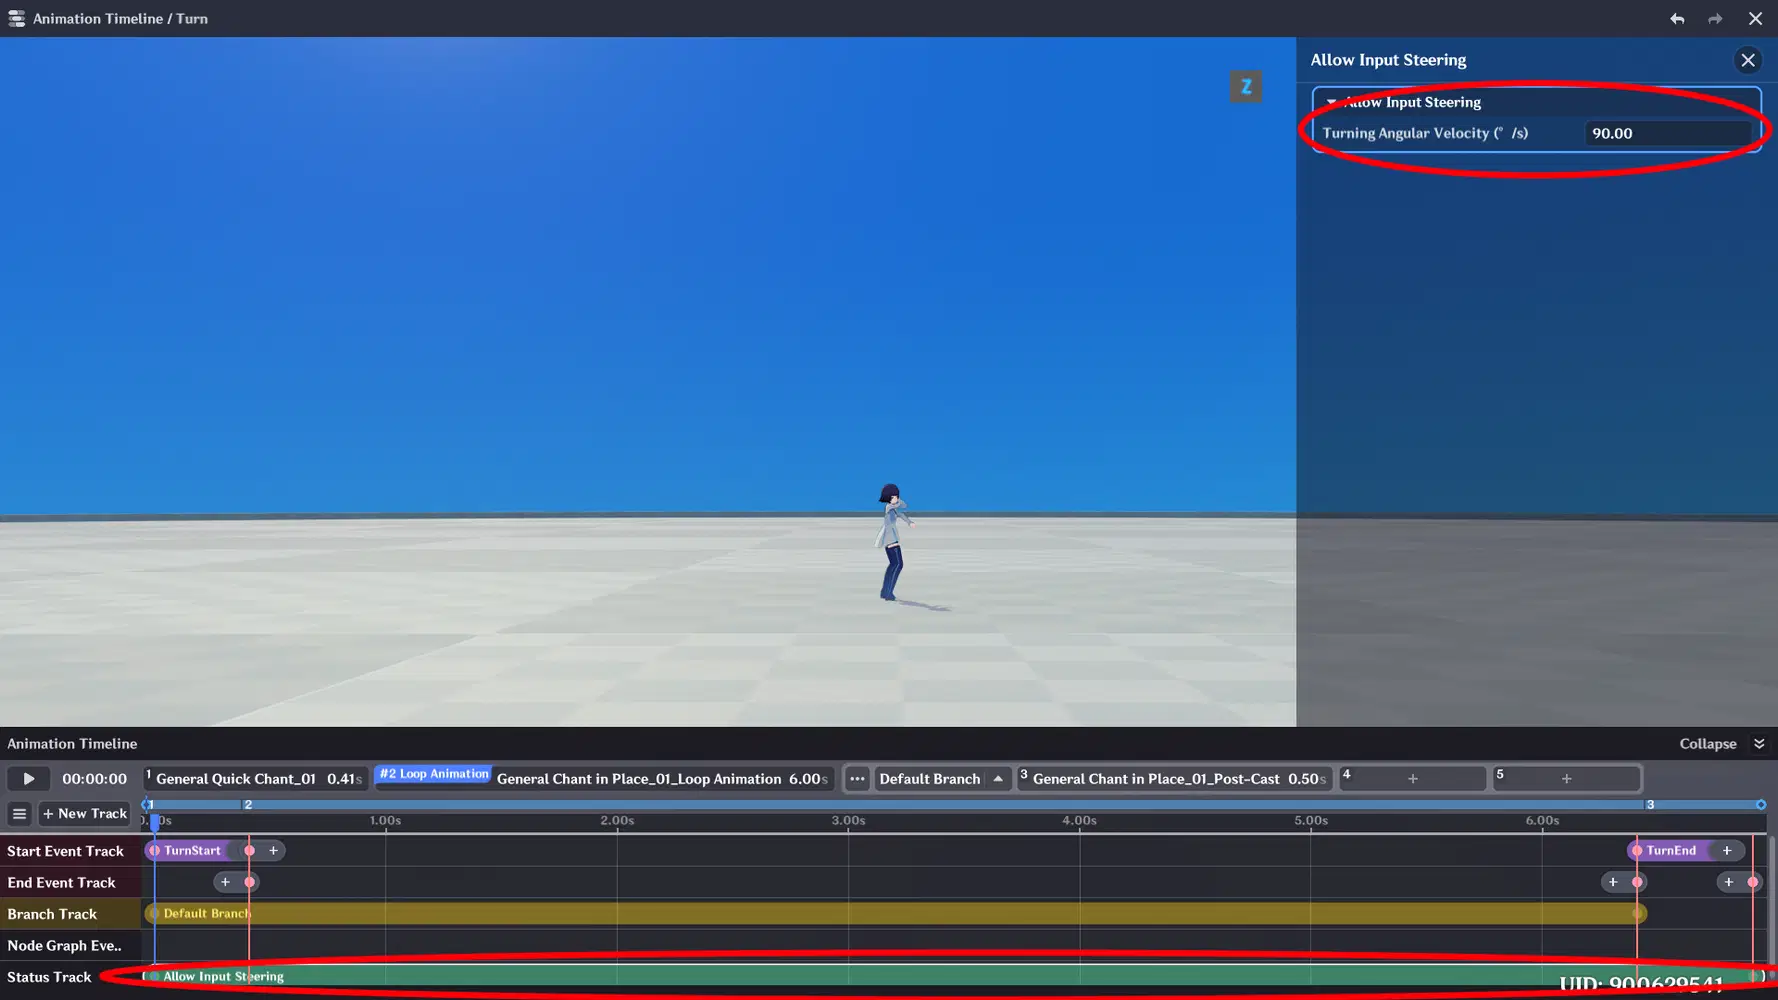
- Right click the timeline to the right of "Status Track", select "Add Event" and select "Allow Input Steering" (If for some reason you don't see the "Status Track" you may need to scroll down, if it's still not there, right click the left side of the timeline, and add a New Track -> New Status Track)
- Click the "Allow Input Steering" block in the timeline, and change the "Turning Angular Velocity" to 90.00 (Value is up to your preference, just don't set it as 0)
The Turning Angular Velocity is what determines the rotational speed in which the player can turn towards the directional input.
You can now exit the Animation Editor, and remember to save the skill.
Adding Turn Skill to Class
Now with the Turn Skill created, we need to have it be added to the Class that the Player belongs to.
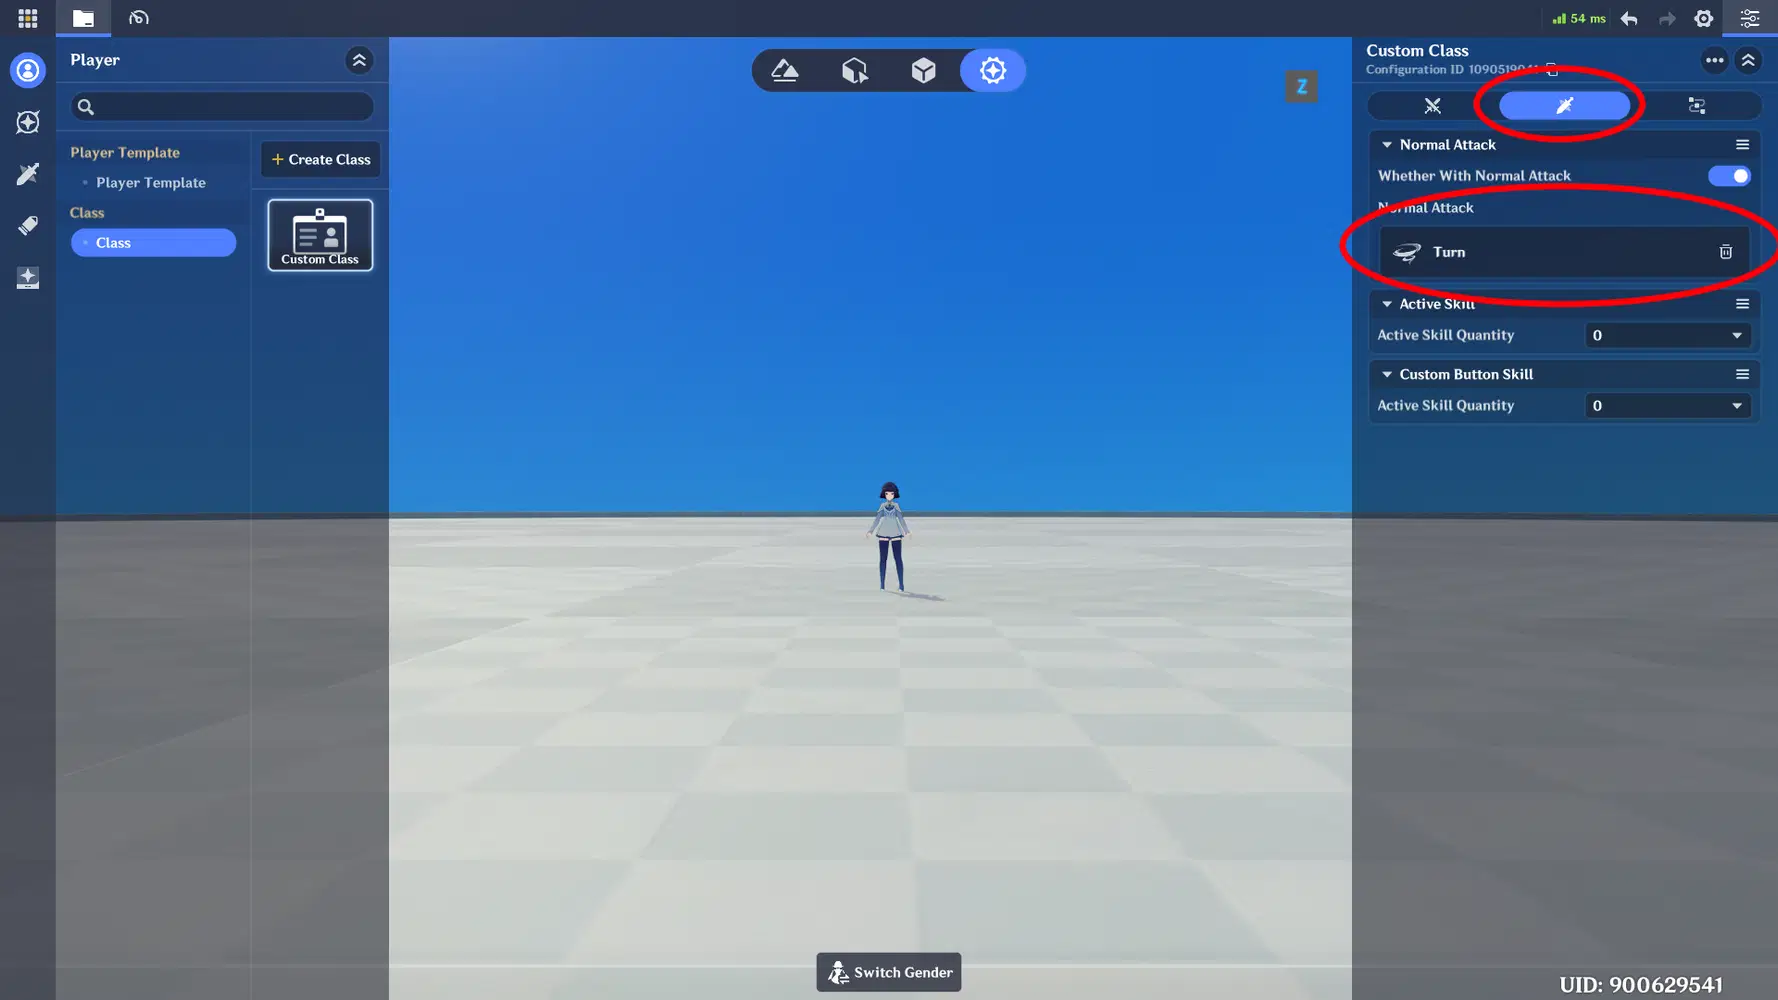
- In the Combat Preset module, go to the Player Tab on the top left.
- Select Class, and Custom Class (in my case, I only have the default class, choose your corresponding class if you have more)
- Switch to the middle skill tab on the right side of the screen.
- Click + under Normal Attack and select "Turn" skill that you created.
- (Optionally) You could also change the Active Skill Quantity to more than 0, and set the skill there, or utilize the custom button skills.
I found it easier to WASD to turn and just hold the left mouse button to initiate the turn.
Configuring Turn Skill Node Graphs
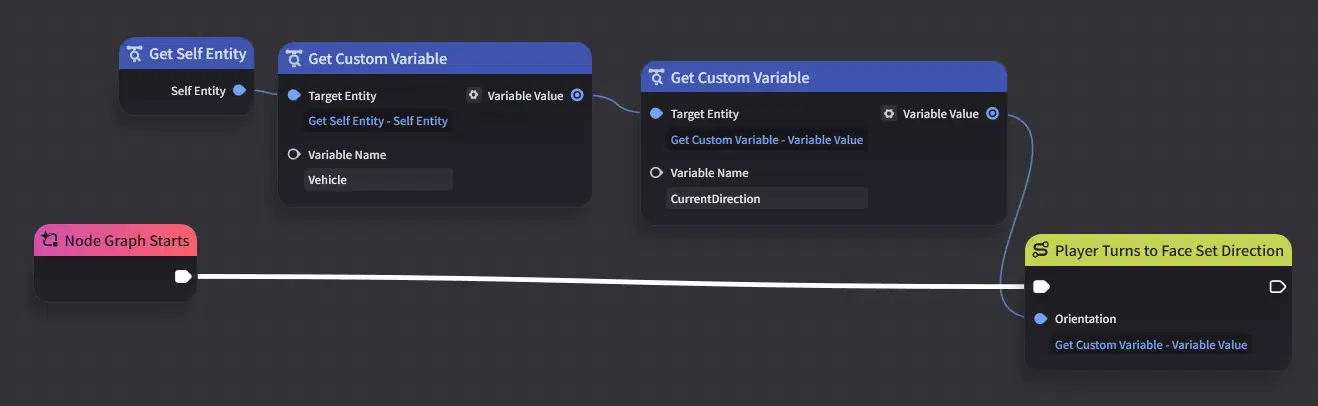
Now we need to configure the TurnStart and TurnEnd skill node graphs. We need the player to face the direction of the Vehicle to prevent it from getting to go wherever it wants when the Turn Skill starts.
First we need to make the player face the direction of where the vehicle is going.
- In Miliastra Sandbox window, go to Client node Graph Resource Explorer (If you can't find it, click the Window on the top left)
- Open up the TurnStart node graph you created earlier under Character Skill Node Graph
- Add in a "Player Turns to Face Set Direction" node.
- Add in the following
- Get Self Entity
- Get Custom Variable with Variable Name "Vehicle"
- Get Custom Variable with Variable Name "Current Direction"
- Then plug the resulting variable into the Orientation input of "Player Turns to Face Set Direction"
- Connect the execution flow from "Node Graph Starts" to "Player Turns to Face Set Direction"
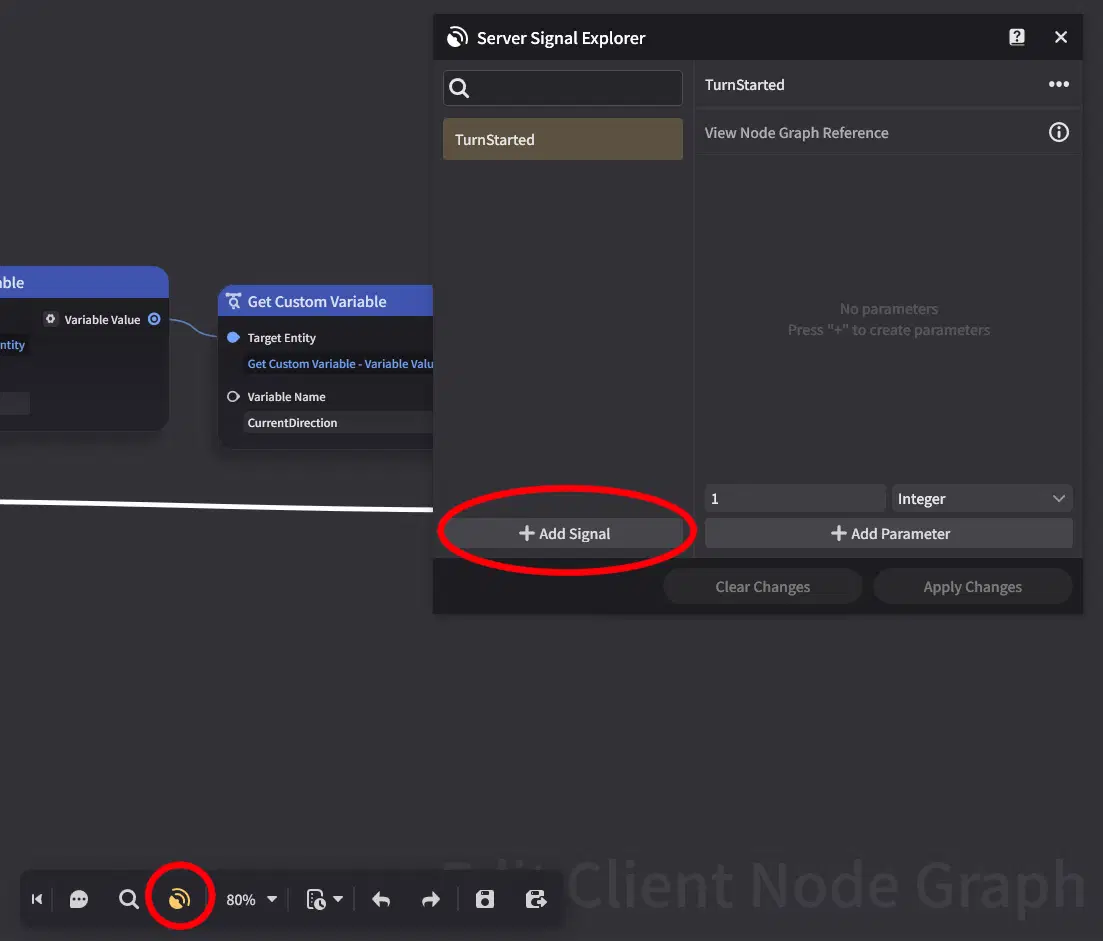
Next we need to let the server side know that the player has pressed the Turn skill. We'll utilize signals.
- At the bottom of the node graph, select the Server Signal Explorer button.
- Add a new Signal
- Name it "TurnStarted"
- Apply Changes
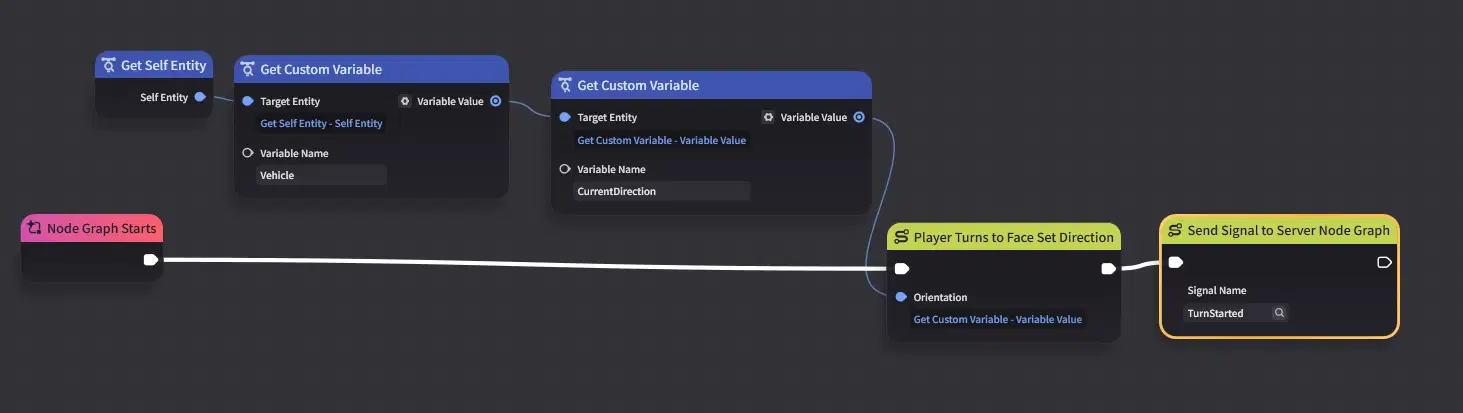
- Next in the node graph, add in the "Send Signal to Server Node Graph"
- Press the magnifying glass in "Signal Name" and select "TurnStarted"
- Connect the execution flow from "Player Turns to Face Set Direction" to "Send Signal to Server Node Graph"
Remember to save the node graph.
Next we'll need to configure the TurnEnd node graph.
- Open up the TurnEnd node graph you created earlier under Character Skill Node Graph.
- At the bottom of the node graph, select the Server Signal Explorer button.
- Add a new Signal
- Name it "TurnEnded"
- Give it two parameters of type "3D Vector"
- Name one, "ForceFieldOffsetVector" the other "VehicleRotation"
- Apply Changes.
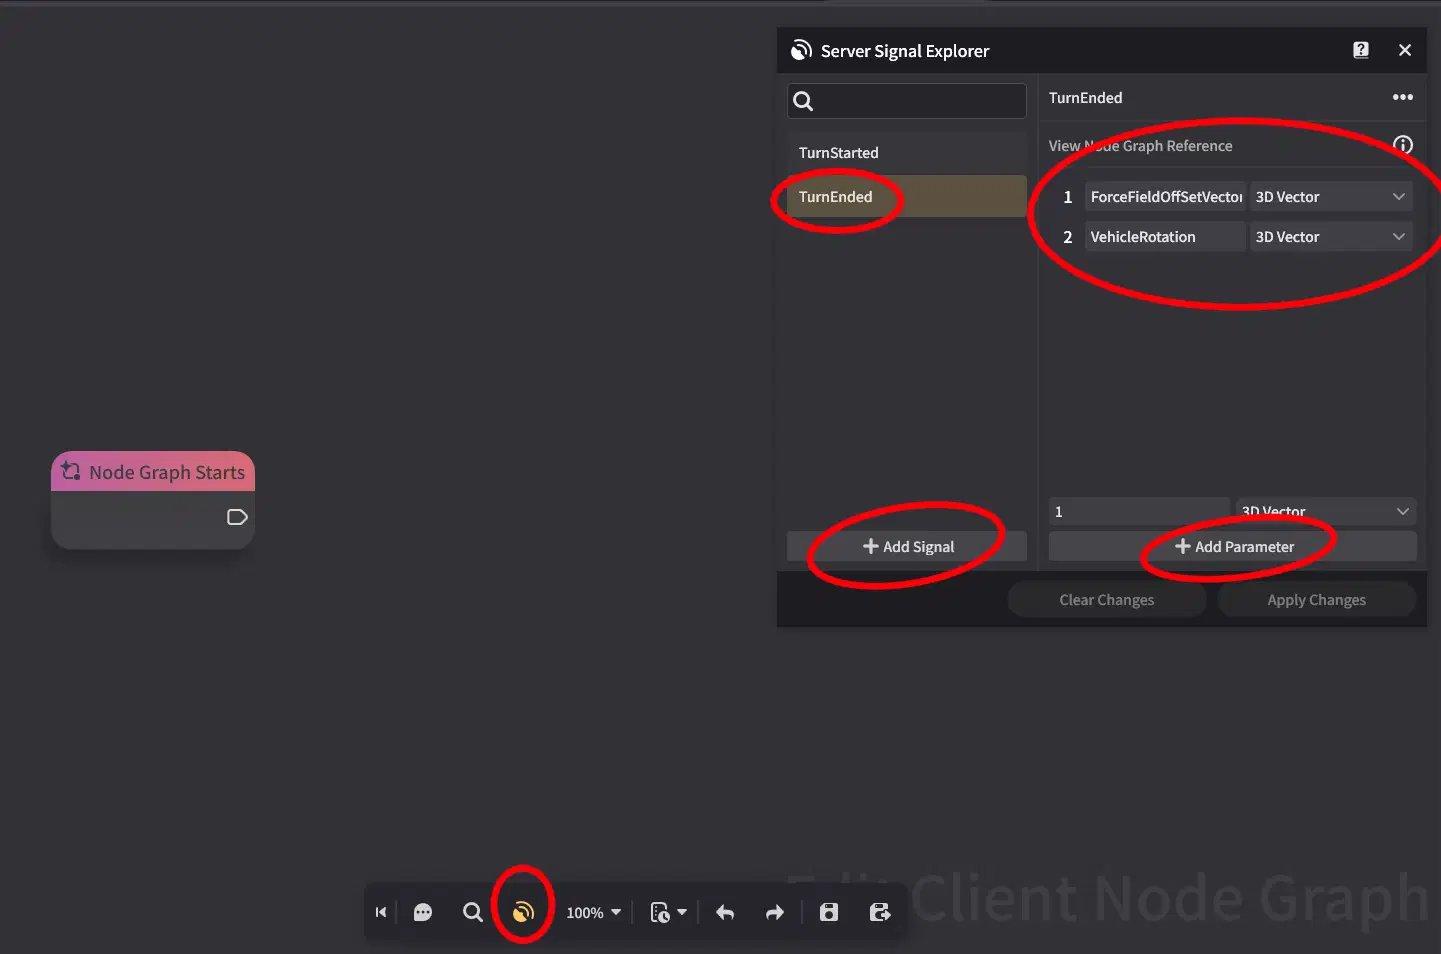
- Next in the node graph, add in the "Send Signal to Server Node Graph"
- Press the magnifying glass in "Signal Name" and select "TurnEnded"
- Plop in a "Get Self Entity"
- Connect that to a "Get Entity Rotation"
- Plug in the "Rotate" output value into "VehicleRotation" for the "Send Signal to Server Node Graph"
- Put down a "3D Vector Rotation" node
- And put in 0, 0, 1 for the Rotated 3D Vector
- Plug in the "Rotate" output value into the "Rotate" input of "3D Vector Rotation" node.
- Plug in the "Result" from the "3D Vector Rotation" node into the "ForceFieldOffsetVector" for the "Send Signal to Server Node Graph"
- Finally, connect the execution flow from "Node Graph Starts" to "Send Signal to Server Node Graph".
Remember to save the node graph.
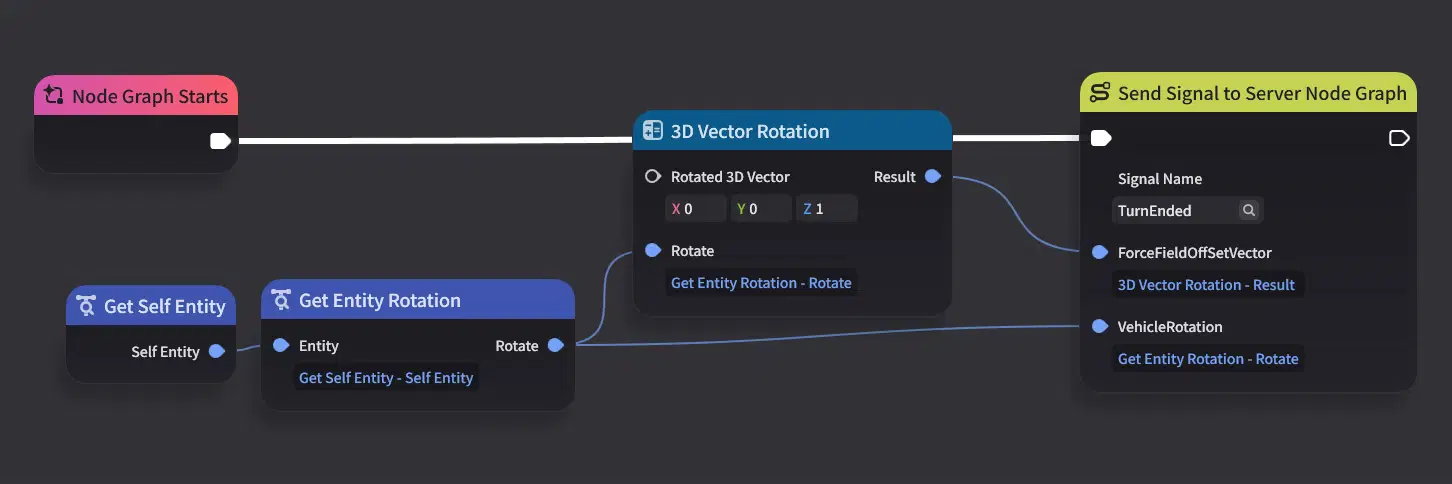
Handling Turning on Server Side
Now that we have those setup, we need to handle the server side of when these signals are fired.
To keep things organized, we'll be utilizing a separate node graph to handle everything that correlates to turning.
- In Miliastra Sandbox window, go to Server Node Graph Resource Explorer
- Under Server Node Graph, Entity Node Graph, create a new node graph.
- Name it "HandleTurn" and open it.
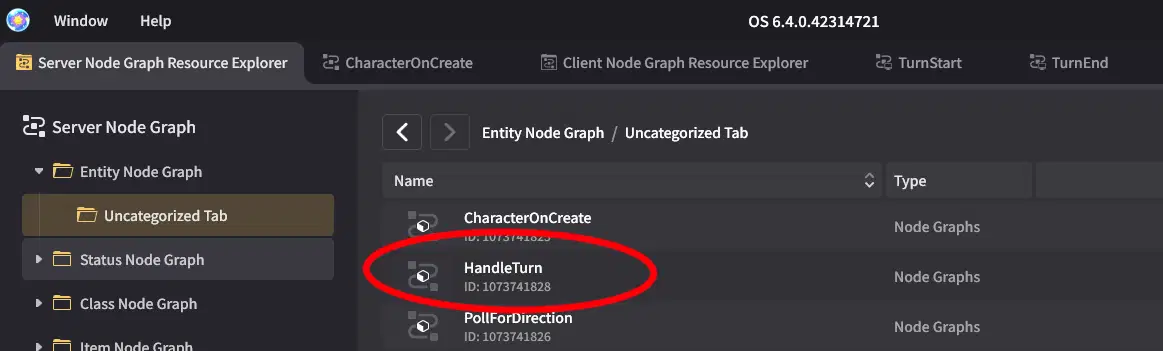
First, to handle when turn starts. Remember that we would have turned the Character to face the Vehicle's direction, thus we can now change the VehicleModel and VehicleMotion to follow the Character.
- Add the node "Monitor Signal" and select "TurnStarted" under the signal name.
- Add in two "Switch Follow Motion Device Target by Entity" nodes, and connect them in sequence to the "Monitor Signal node."
- For the first one the inputs should be the following
- Target Entity: Get Self Entity -> Get Custom Variable (VehicleModel)
- Follow Target Entity: Get Self Entity -> Get Owner Entity
- Follow Target Attachemnt Point Name: "GI_AvatarRoot"
- Location and Rotation Offset: 0, 0, 0
- Follow Coordinate System: Local Coordinate System
- Follow Type: Completely Follow
- For the second one the inputs should be the following
- Target Entity: Get Self Entity -> Get Custom Variable (ForwardForceField)
- Follow Target Entity: Get Self Entity -> Get Owner Entity
- Follow Target Attachemnt Point Name: "GI_AvatarRoot"
- Location Offset: 0, 0, 1
- Rotation Offset, 0, 0, 0
- Follow Coordinate System: Local Coordinate System
- Follow Type: Completely Follow
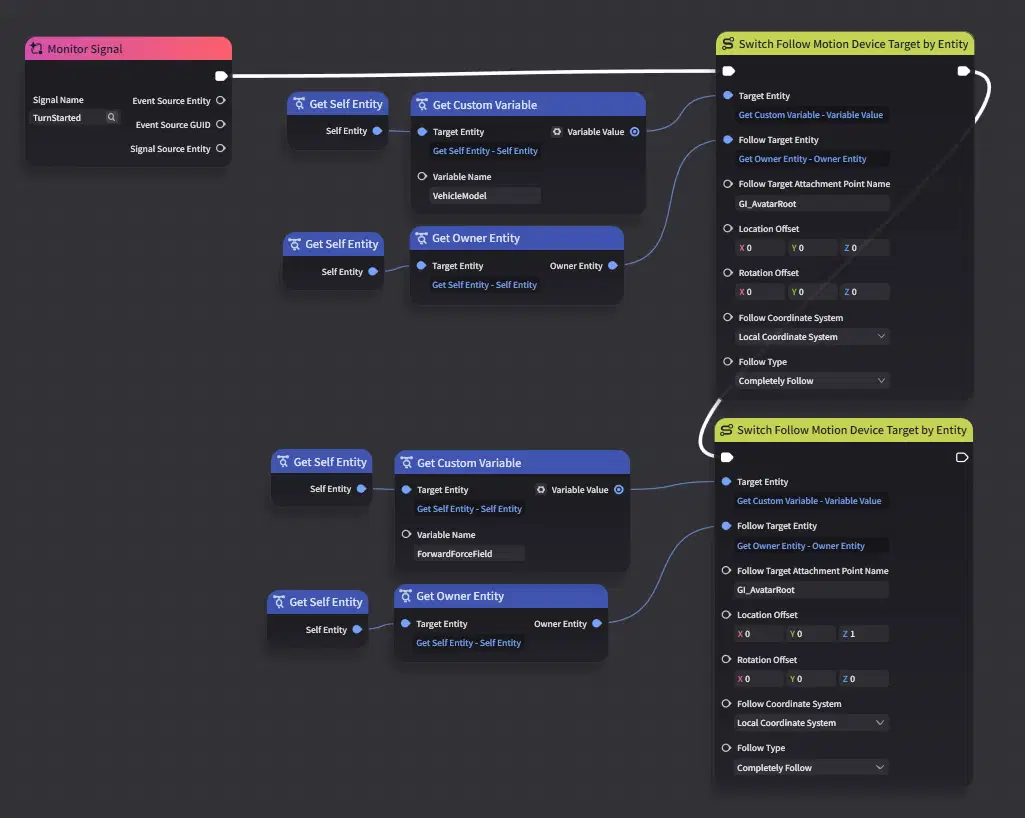
Now when the player presses the skill, everything changes to the basic version, except they are stuck in "Input Steering Mode" when they are holding on to it. We now need to configure the following when they release the skill which is when "TurnEnded" is called.
- We need to update the direction of the vehicle, because the Character may have turned
- And the "VehicleModel" and "VehicleMotion" needs to revert back to following the "Vehicle"
- Add the node "Monitor Signal" and select "TurnEnded" under the signal name.
- Add in the node "Set Custom Variable" and configure as follows
- Target Entity: Get Self Entity
- Variable Name: "CurrentDirection"
- Variable Value: Plug in the output from the Monitor Signal node named "ForceFieldOffsetVector"
- Trigger Event: No
- Connect the execution flow from Monitor Signal node to the Set Custom Variable node.
- Add two nodes of "Switch Follow Motion Device Target by Entity" and connect the execution flow in sequence to the "Set Custom Variable" node.
- Set the first one as follows
- Target Entity: Get Self Entity -> Get Custom Variable (VehicleModel)
- Follow Target Entity: Get Self Entity
- Follow Target Attachment Point Name: "GI_RootNode"
- Location Offset: 0, 0, 0
- Rotation Offset: Plug in the output from the Monitor Signal node named "VehicleRotation"
- Follow Coordinate System: Local Coordinate System
- Follow Type: Completely Follow
- For the second one, set it as so
- Target Entity: Get Self Entity -> Get Custom Variable (ForwardForceField)
- Follow Target Entity: Get Self Entity
- Follow Target Attachment Point Name: "GI_RootNode"
- Location Offset: Plug in the output from the Monitor Signal node named "ForceFieldOffsetVector"
- Rotation Offset: 0, 0, 0
- Follow Coordinate System: Local Coordinate System
- Follow Type: Completely Follow
And that's it for handling TurnEnded.
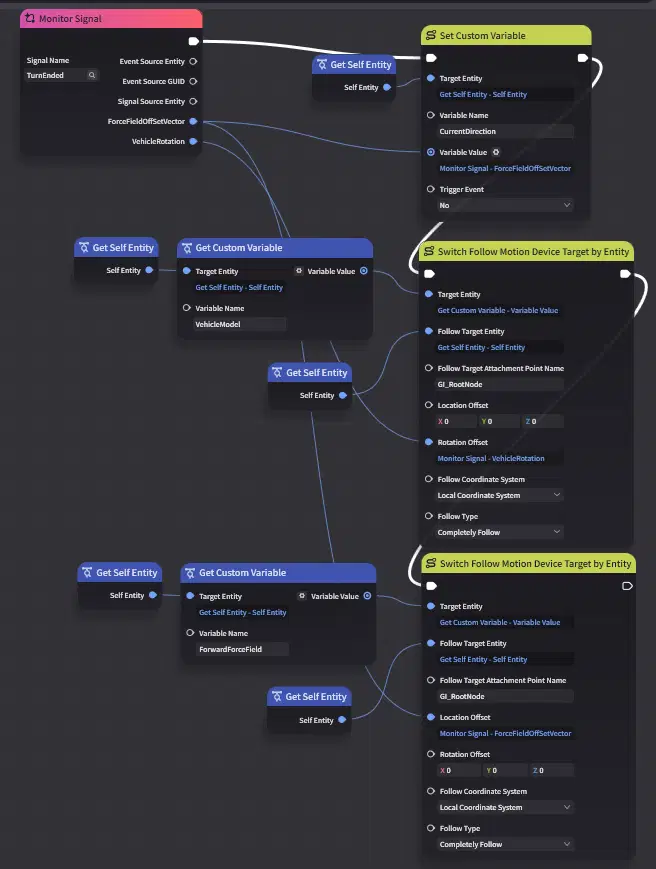
Notice that when reverting back to having "VehicleModel" and "VehicleMotion" we configure the rotation offset and location offset respectively differently? Recall that the "Vehicle" never rotates, it is always facing the same direction. Thus we need to have the "VehicleModel" and "VehicleMotion" be rotated on the offset, with one needing to turn by rotation, the other is positioned at a different offset so it matches the rotation.
Finally mount the HandleTurn node graph to the Character.
- In Genshin Impact, go to the Prefab Library
- Select the Vehicle Prefab, and go to the node graph Tab
- Add HandleTurn node graph
Remember to overwrite and save the prefab.
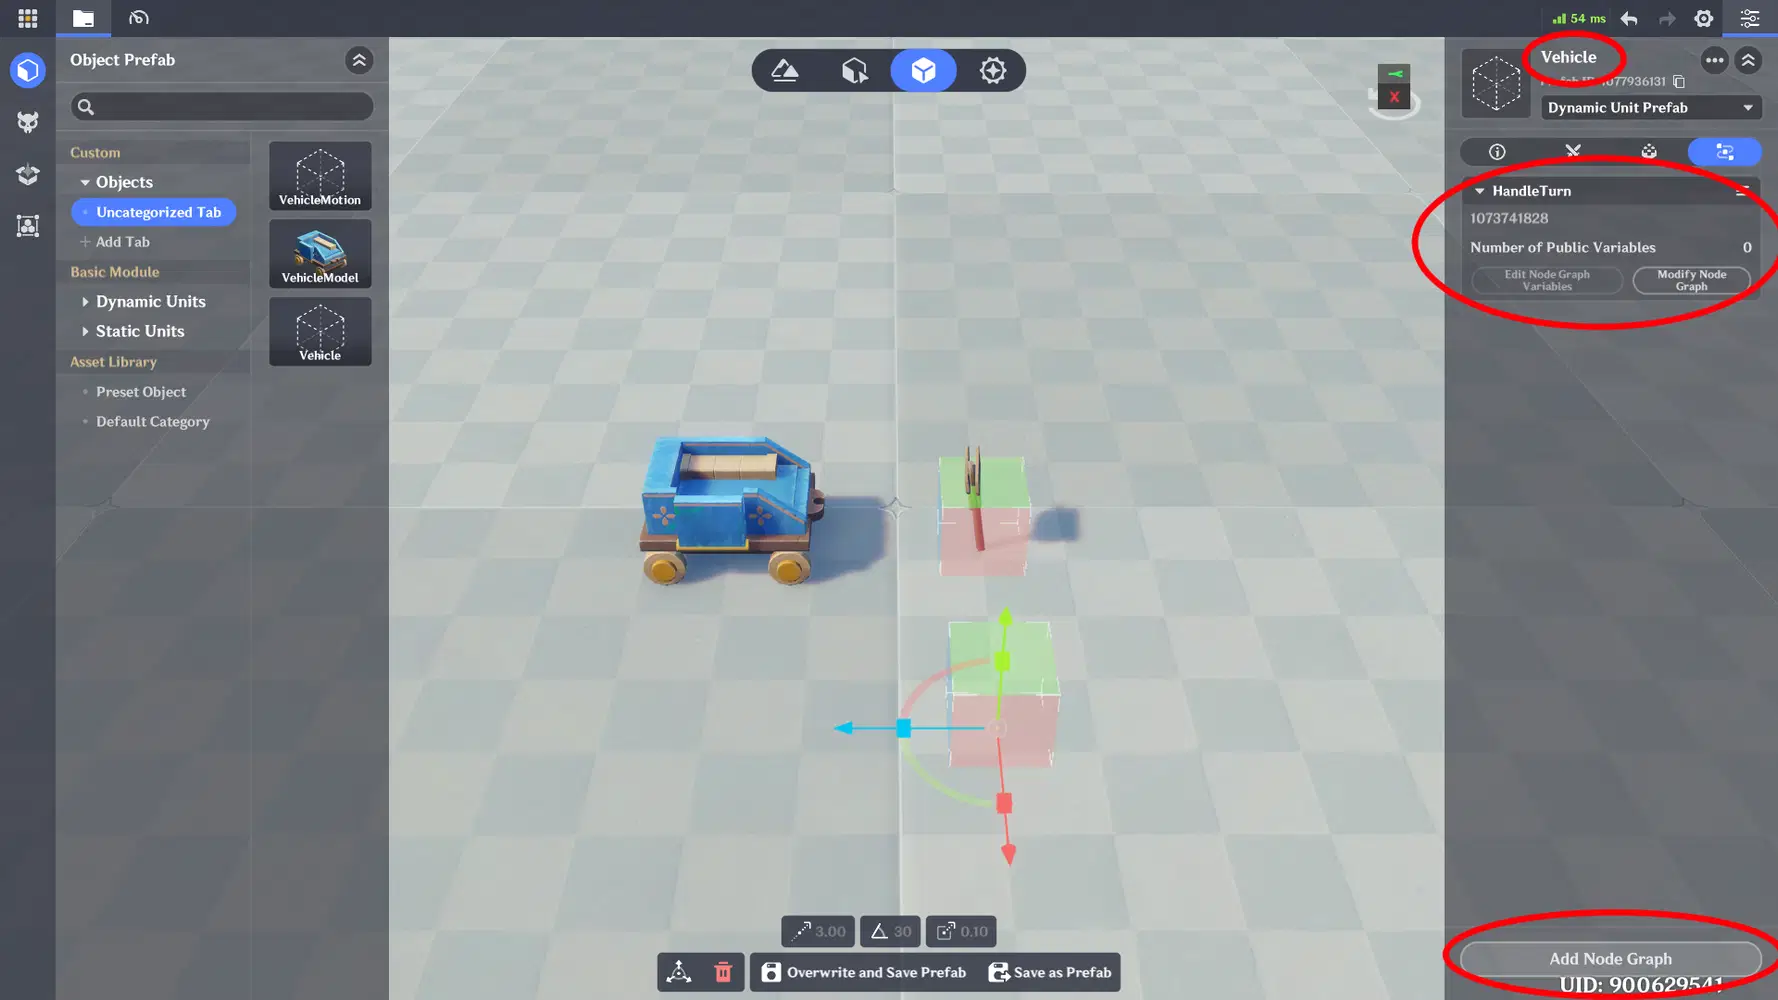
You can now test play it.
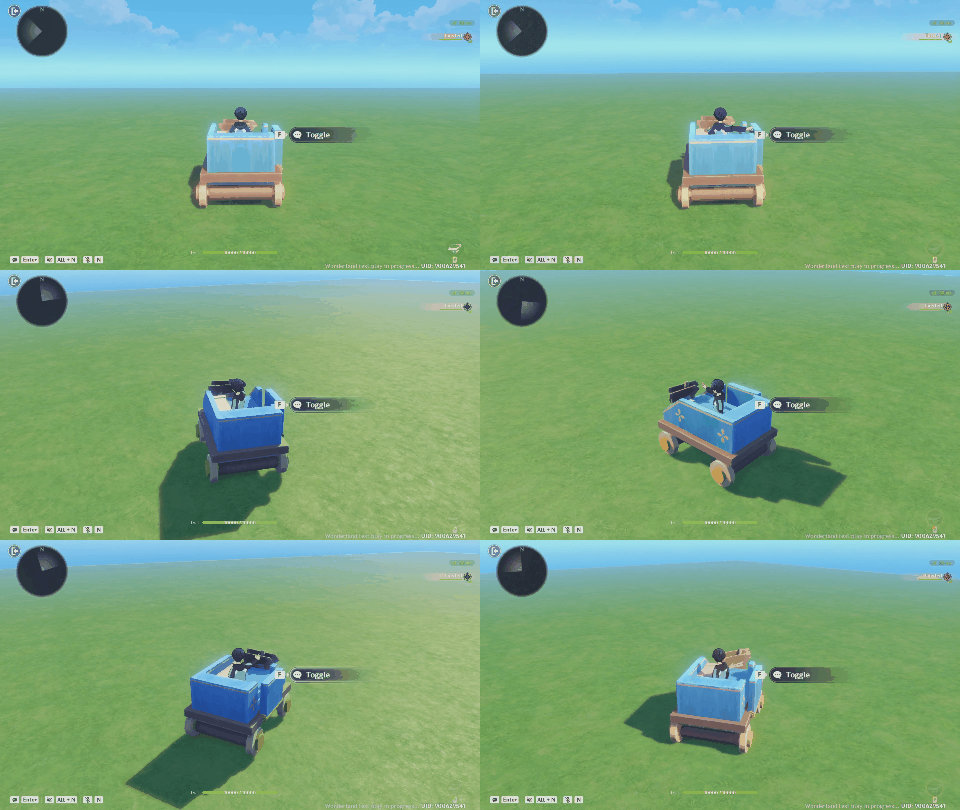
Turning Controls with Drifting Visuals
Now I personally prefer this turning controls version, and we definitely need to get in those "Drift" effect back in. In this section we'll do just that.
Instead of a timer, we'll be adding multiple client side node graph calls to the Turn skill's animation timeline, from the moment it presses hold, till right before it releases. This way we can create the same effect as a timer. We'll then handle the same logic in a client side node graph, instead of the server side node graph with the timer.
Let's begin.
First we need to create the client side node graph that we call when we are turning.
- Go to Miliastra Sandbox, Client Node Graph Resource Explorer
- Create a Character Skill Node Graph, and name it "TurnHold"
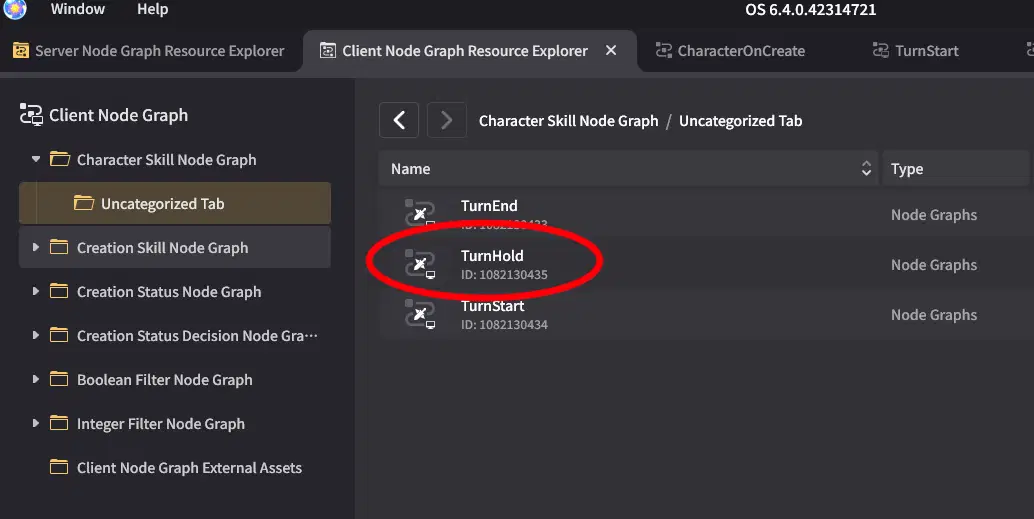
Next we'll need to set it so that it's triggered in the Skill Animation Editor.
- In Genshin Impact, go to Combat Preset module, Skills.
- Open up the Animation Editor for the Turn Skill you created.
- In the Node Graph Event Track, select the point at 0.5 seconds,
- Right click the track, and select "Add Event", select "TurnHold"
- Do the same thing for every 0.5 seconds for the duration of the Loop Animation. (So before "TurnEnd" occurs)
Close the Animation Editor and remember to save the updated Skill.

Next we go back to the Miliastra Sandbox to configure the TurnHold node graph.The logic is identical, except we are using client side nodes, so some differences may occur in what nodes we use. You cannot just copy and paste, since server nodes are not client nodes.
Instead of going through every step again, I'll list out the differences, and you can just compare with the images provided.
- At the start, we need to convert the "CurrentDirection" variable we are storing in the Vehicle, to a rotational variable, because it is a Directional Vector.
- Setting and Getting Local Variable is different in Client Side. We actually get to name the variable name, so you can just name it "turn_angle".
- The three possiblities, Drift clockwise, drift anti-clockwise, no drift. We will let a server node graph handle, by sending a signal.
- We also let a server node graph handle updating the direction.
- Thus we'll be creating two new signals, "Update Direction" and "TurnDrift" see the images for the parameters necessary for them.
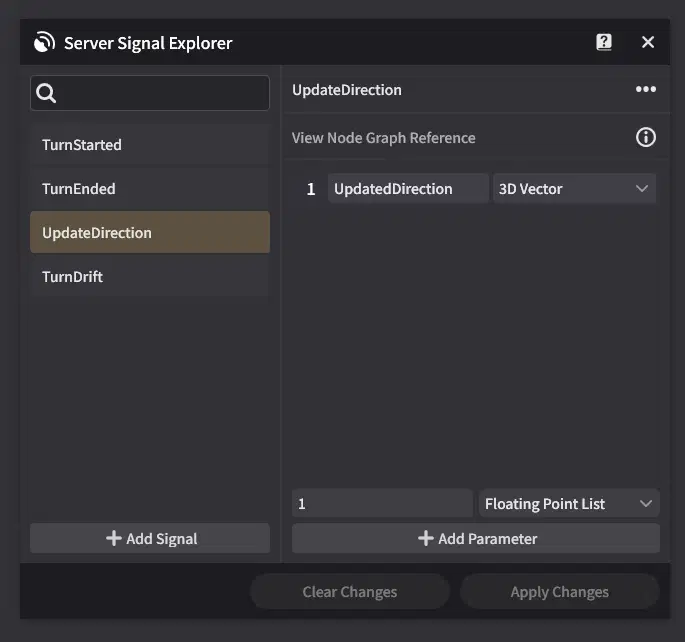
UpdateDirection signal with its parameter
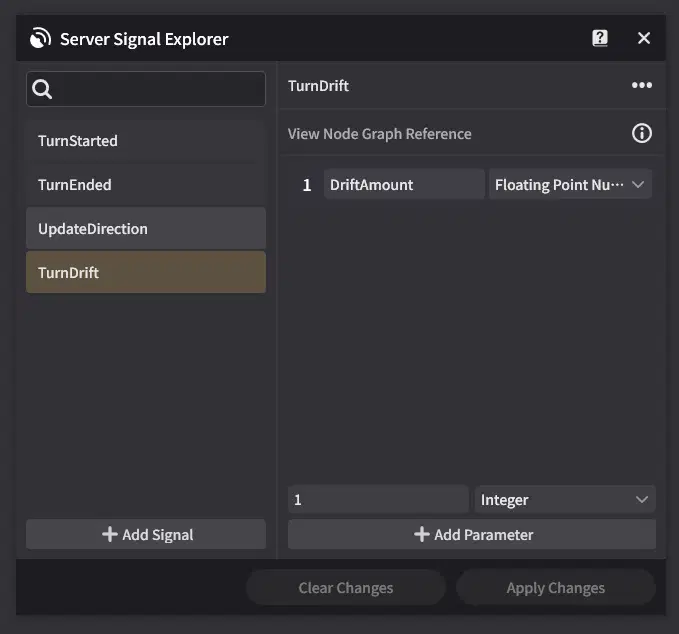
TurnDrift signal with its parameter
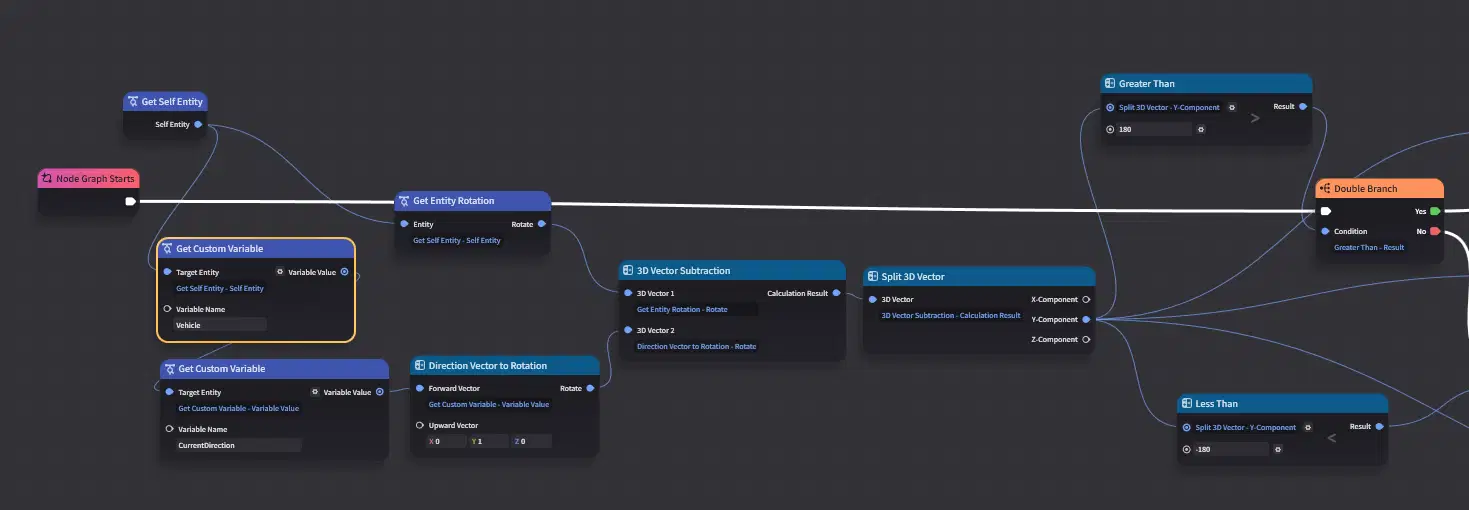
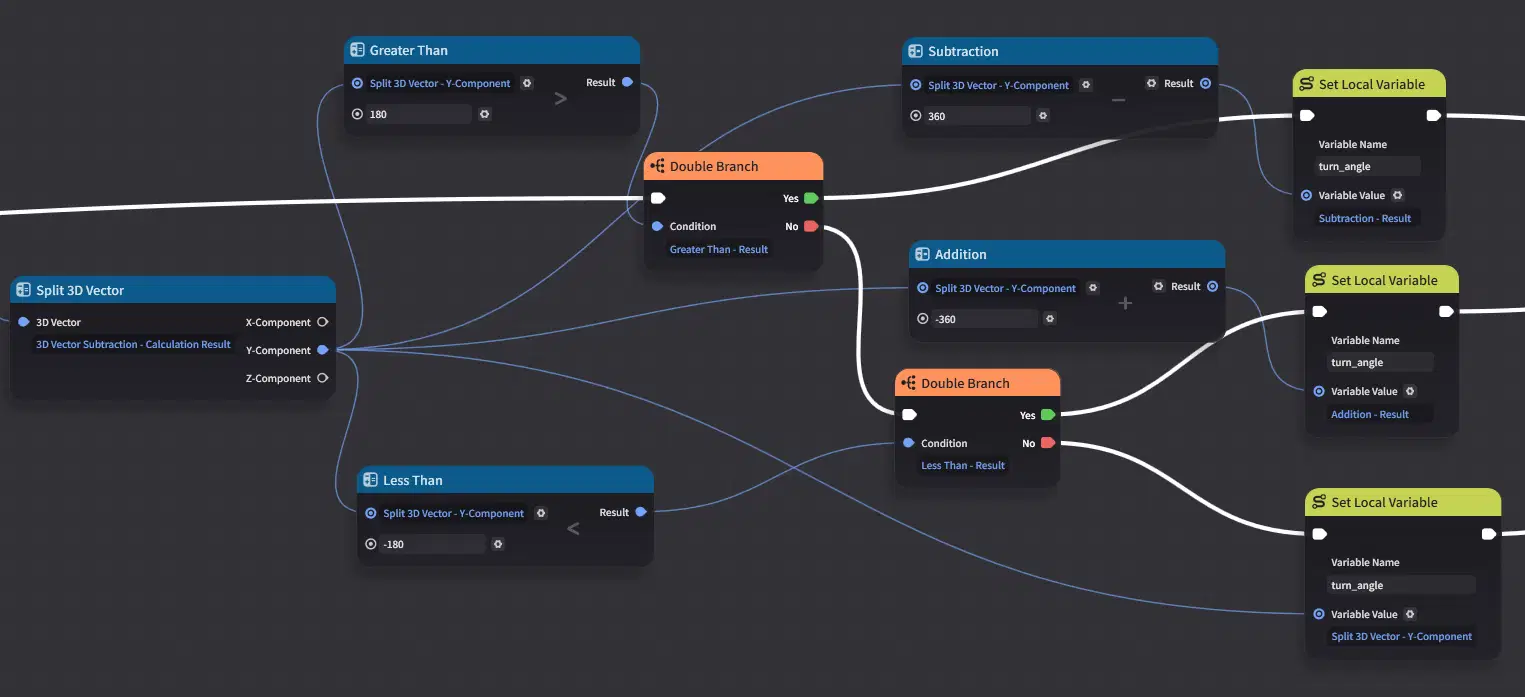
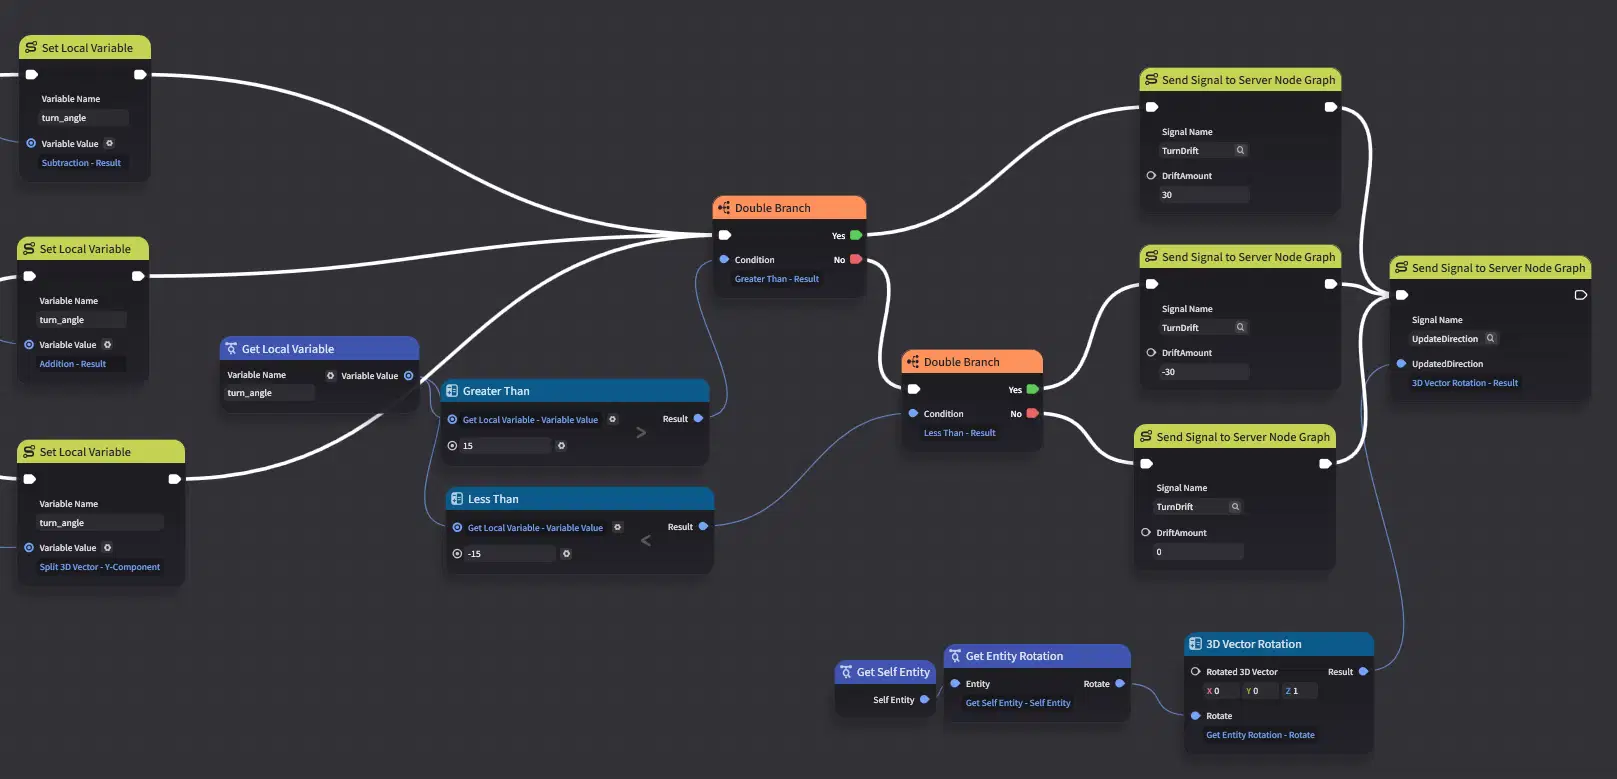
Make sure the Get Local Variable is set to Float type and not Integer
Now with that set, we need to do the server side handling.
- In Miliastra Sandbox, Server Node Graph Resource Explorer, Entity Node Graph, open up the HandleTurn node graph.
- Add in a Monitor Signal Node, set the signal to "Update Direction"
- Add in a "Set Custom Variable" node
- Set it as the following:
- Target Entity: Get Self Entity
- Variable Name: "CurrentDirection"
- Variable Value: Plug in the "UpdatedDirection" output from Monitor Signal node.
- Trigger Event: No
- Next add in a Monitor Signal Node, set the signal to "TurnDrift"
- Add in a "Switch Follow Motion Device Target by Entity" node
- Set it as the following:
- Target Entity: Get Self Entity -> Get Custom Variable (VehicleModel)
- Follow Target Entity: Get Self Entity -> Get Owner Entity
- Follow Target Attachment Point Name: "GI_AvatarRoot"
- Location Offset: 0, 0, 0
- Rotation Offset: Plug in "DriftAmount" output from Monitor Signal node to "Create 3D Vector" node's Y-Component, plug the 3D Vector into Rotation Offset.
- Follow Coordinate System: Local Coordinate System
- Follow Type: Completely Follow
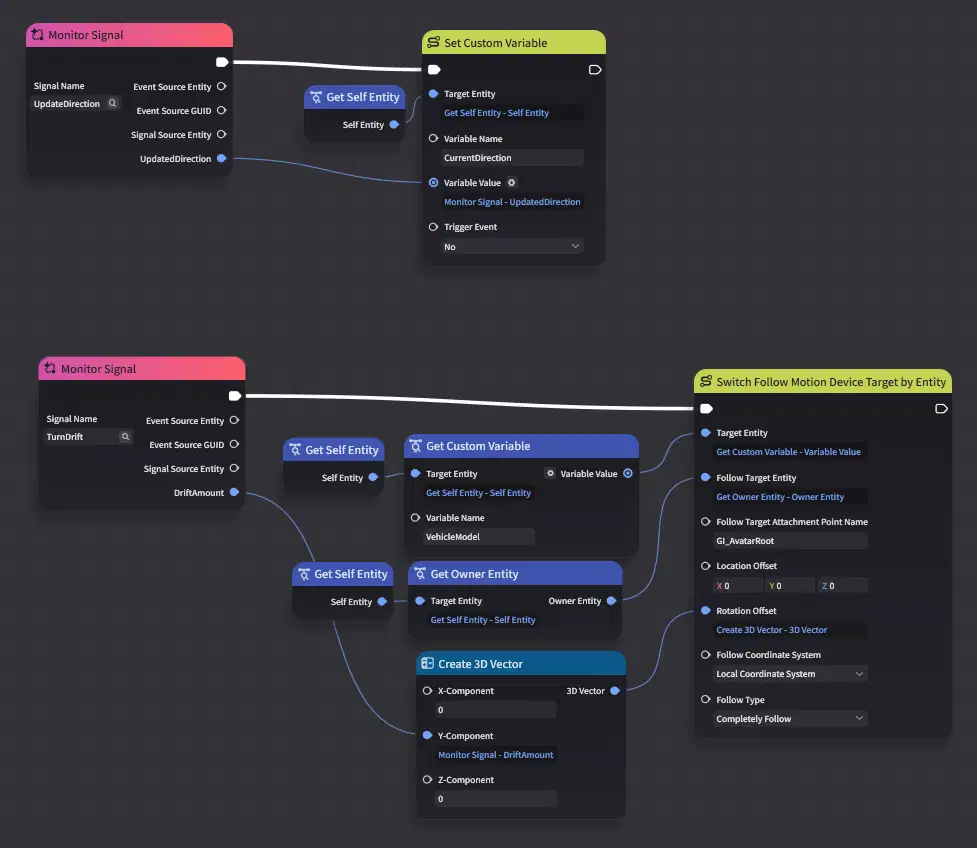
And that's it! Make sure to save the node graph, and go and test run it.
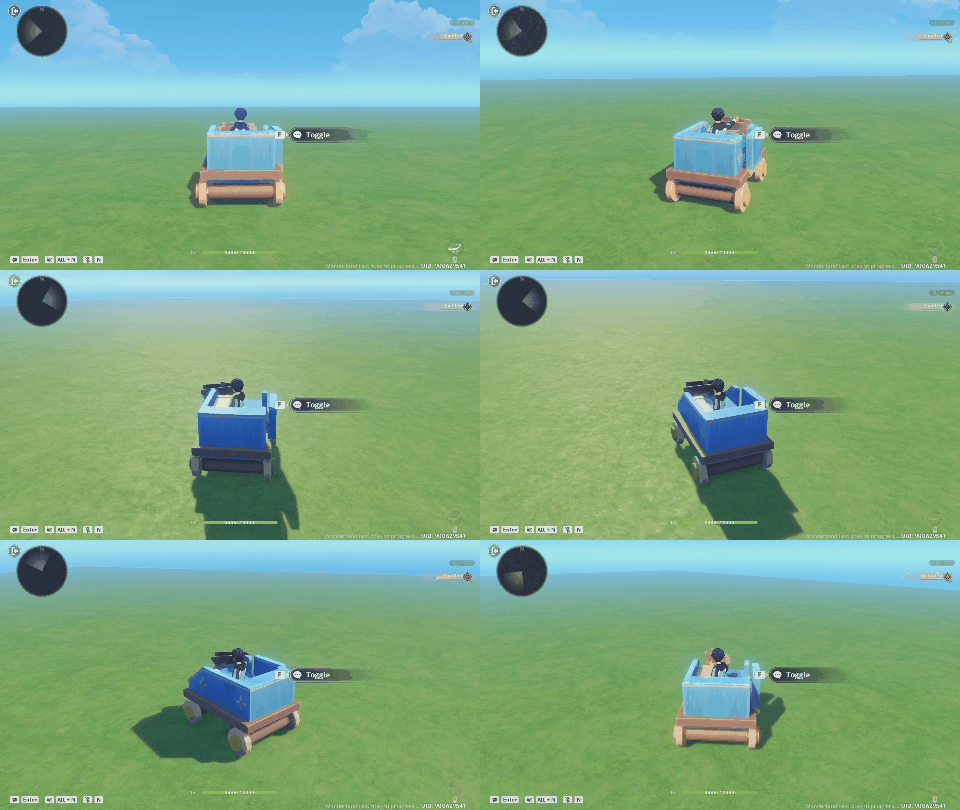
Turning Controls with Restricting player movement
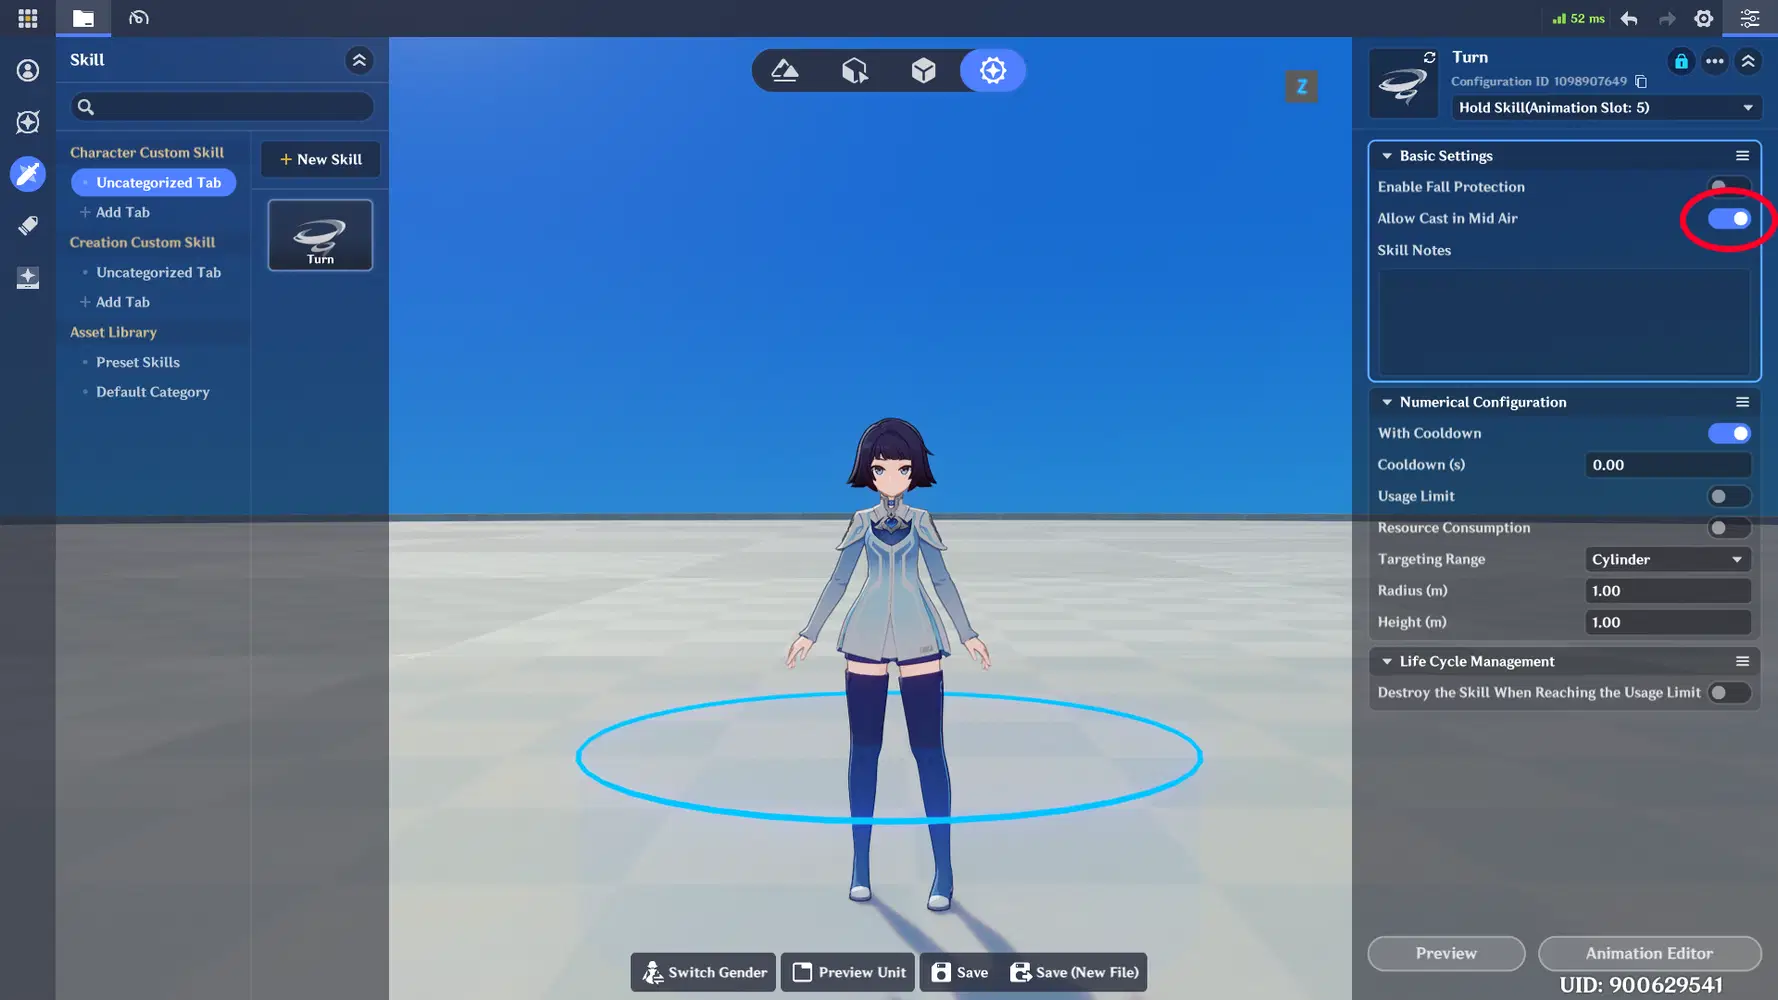
Now this version so far is decent, the vehicle cannot do an instant 180, but the player can still move around. A quick trick to restrict the player movement we can do is to give the player essentially a no gravity status. Float them in the air, enable "Allow Cast in Mid AIr" for the Turn Skill. And finally moving the vehicle model's offset everywhere to compensate for the fact that we are floating the player.
First to give the player a "no gravity" status.
- In Genshin Impact, go to the Combat Preset module, select the Status tab on the most left.
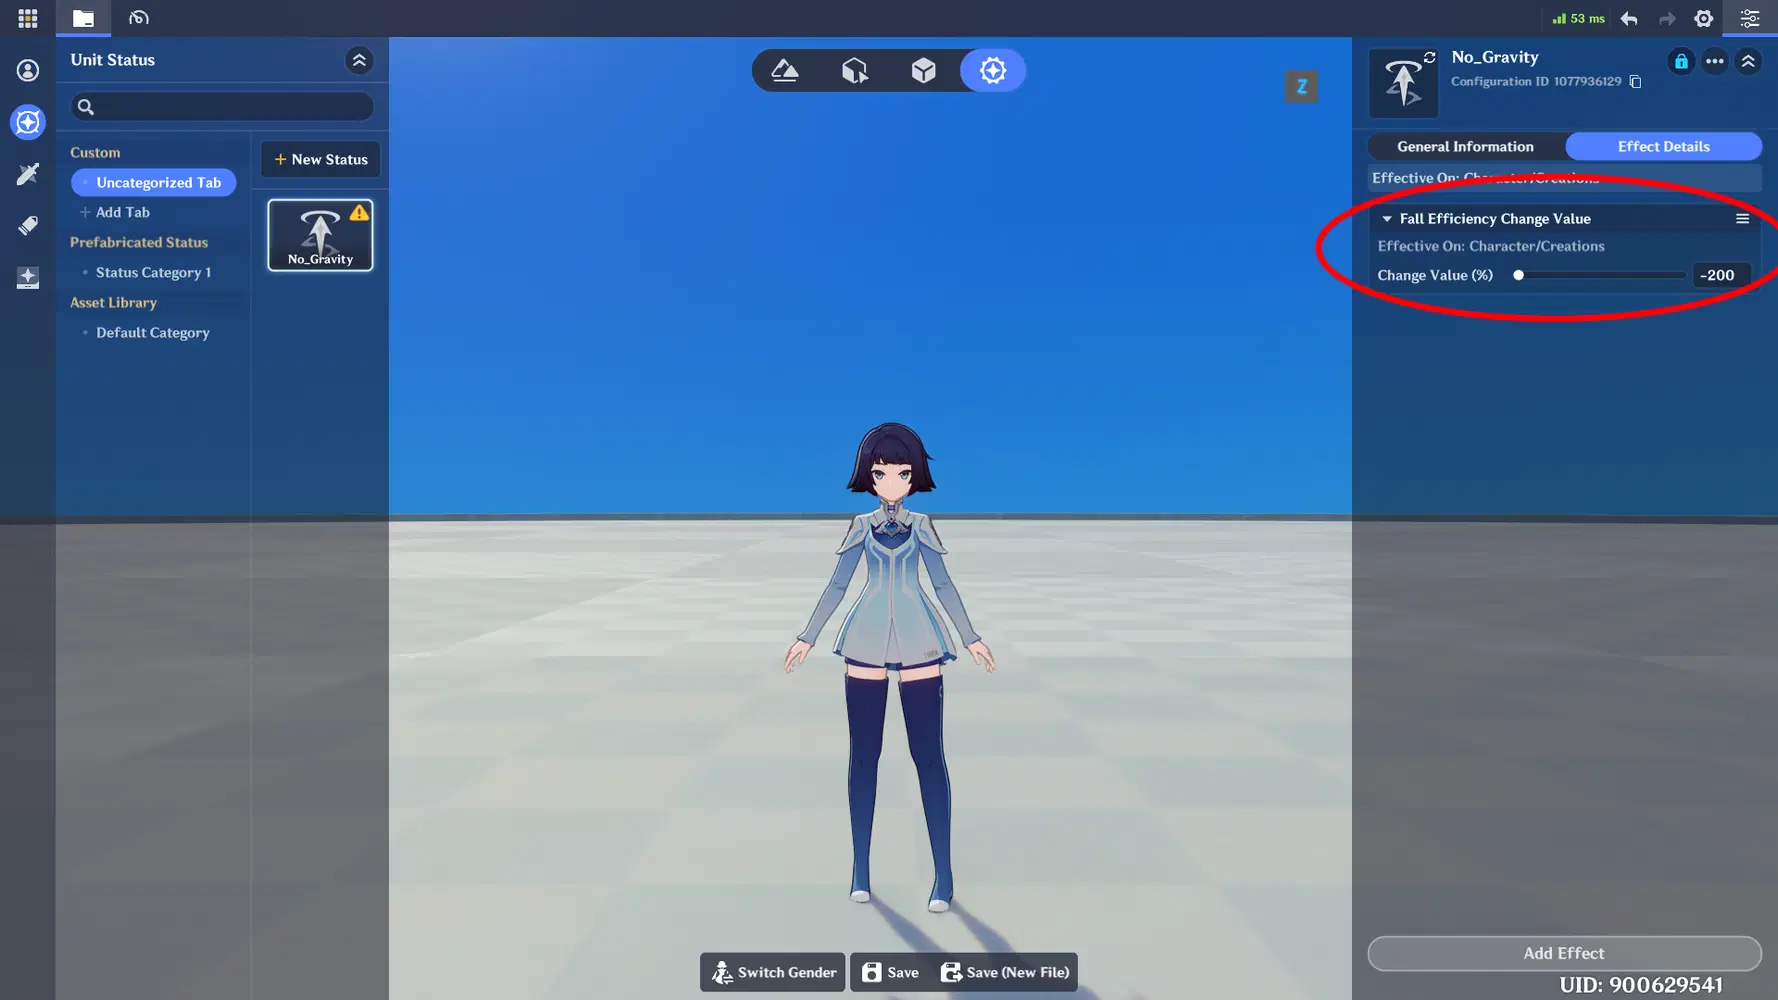
- Create a new status. We'll name it "No_Gravity"
- Set the Infinite Duration to On
- Go to the Effect Details
- Add Effect, and add in the effect named "Fall Efficiency Change Value"
- Set the Change Value (%) to -200
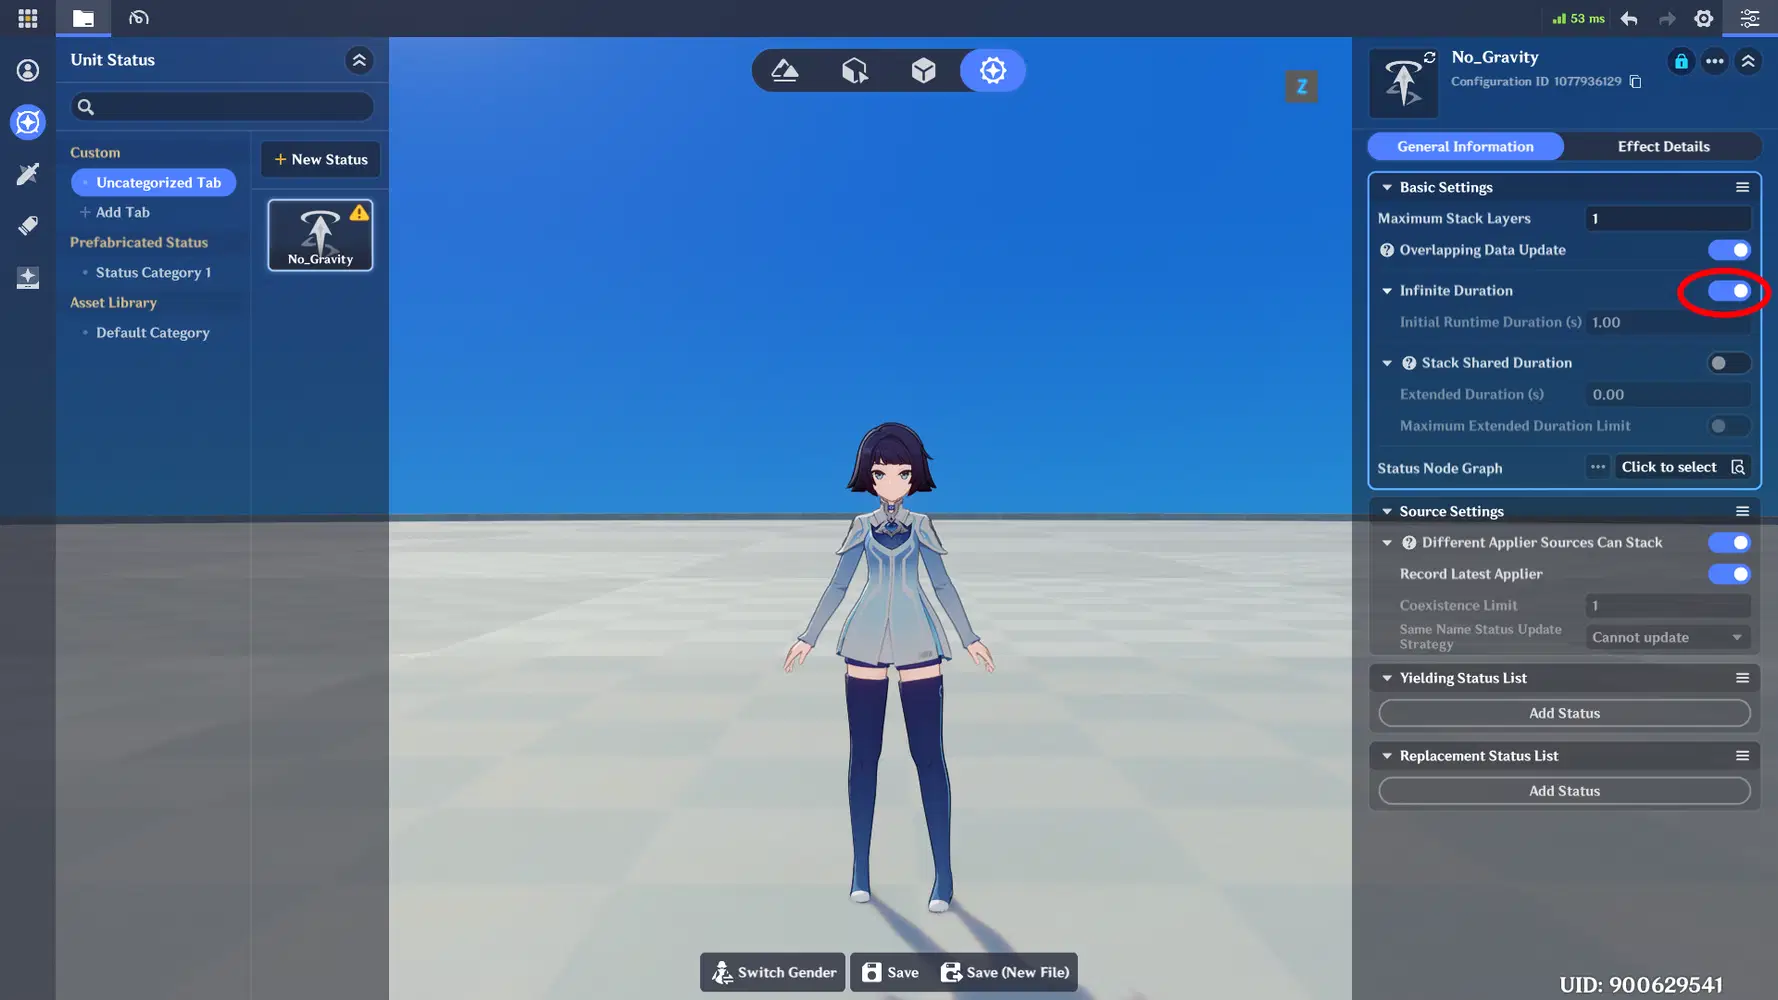
Next we need to apply it to the Character
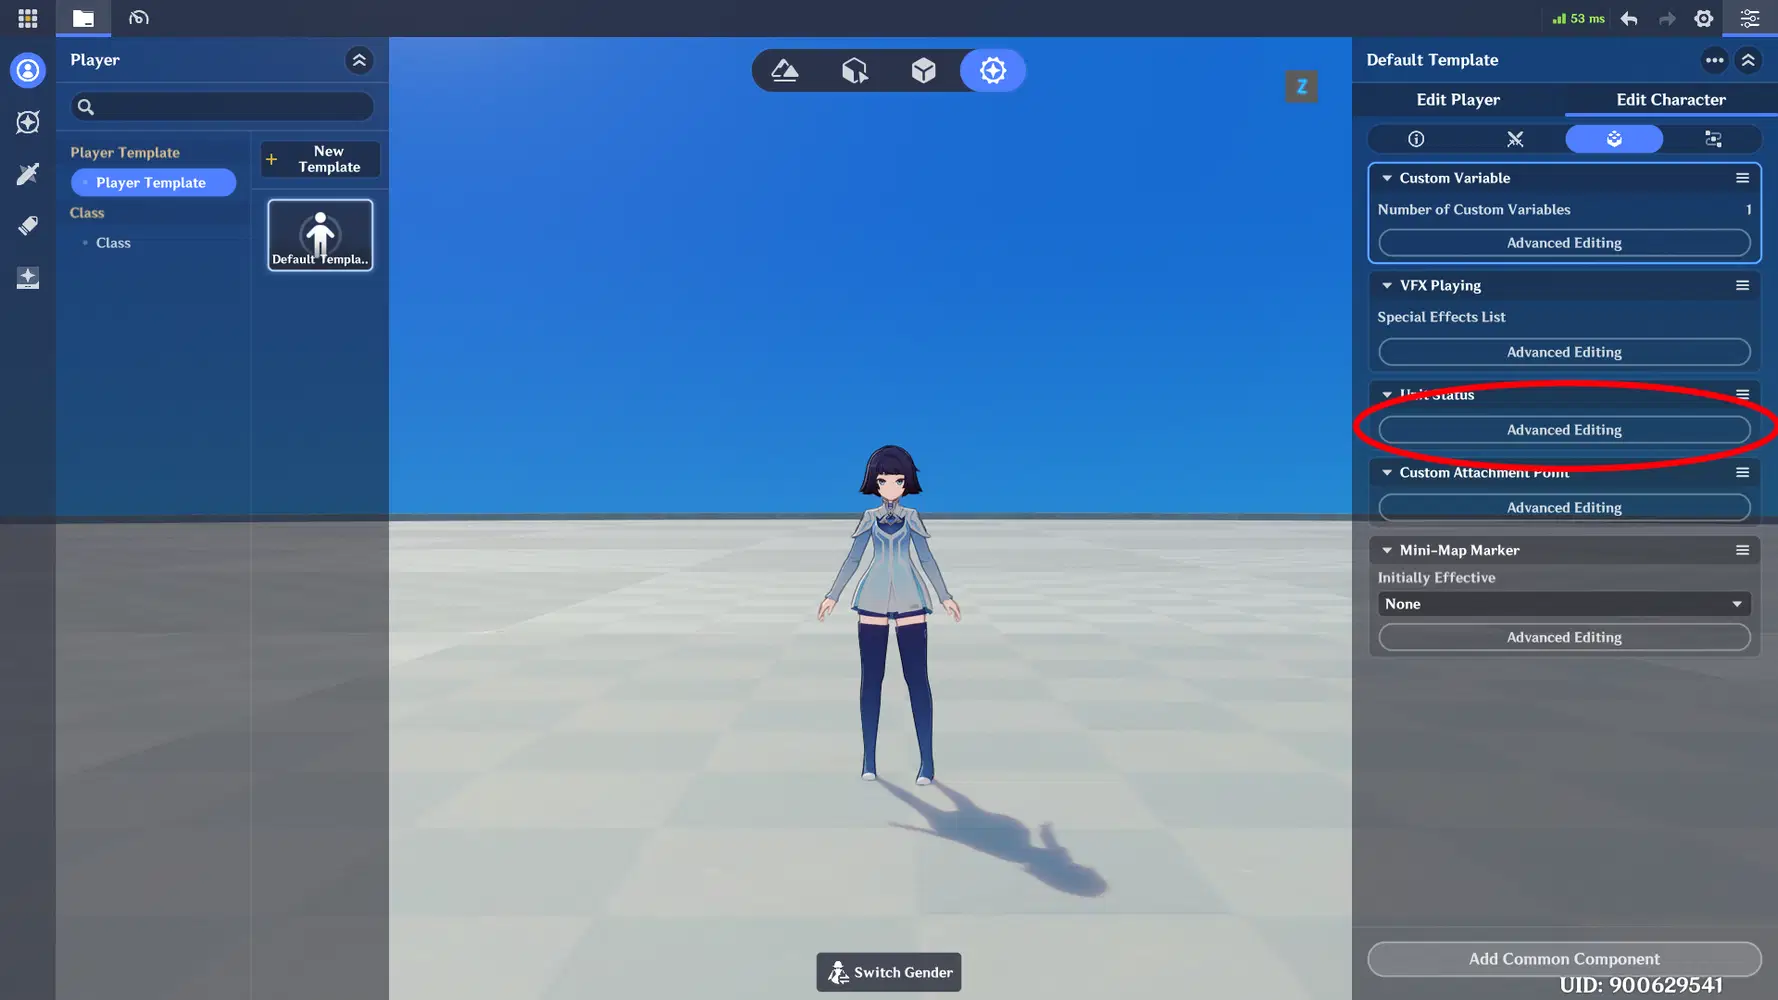
- Go to the Player Template, and Edit Character
- Select the Components Tab on the right side of the screen.
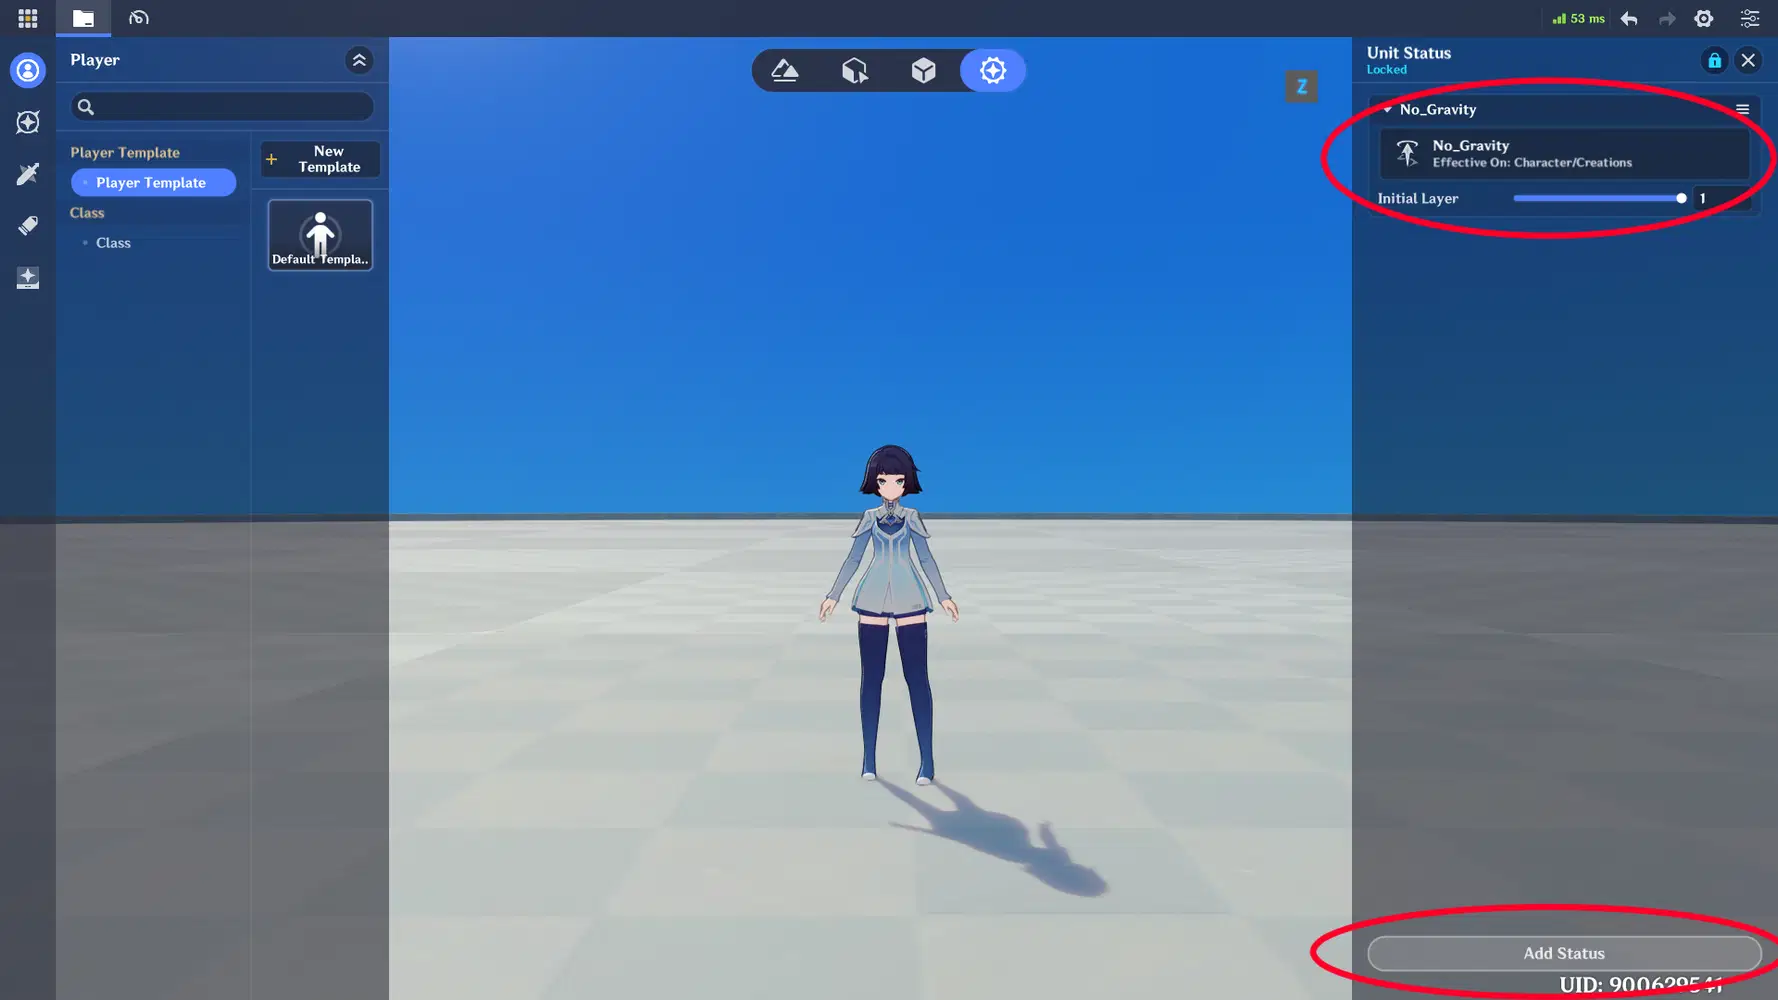
- Click "Advanced Editing" under Unit Status. (If you don't see Unit Status, you can add it as a component)
- Add Status, and select the "No_Gravity" status
Next we need to float the player, we'll do it by simply raising the spawn point up.
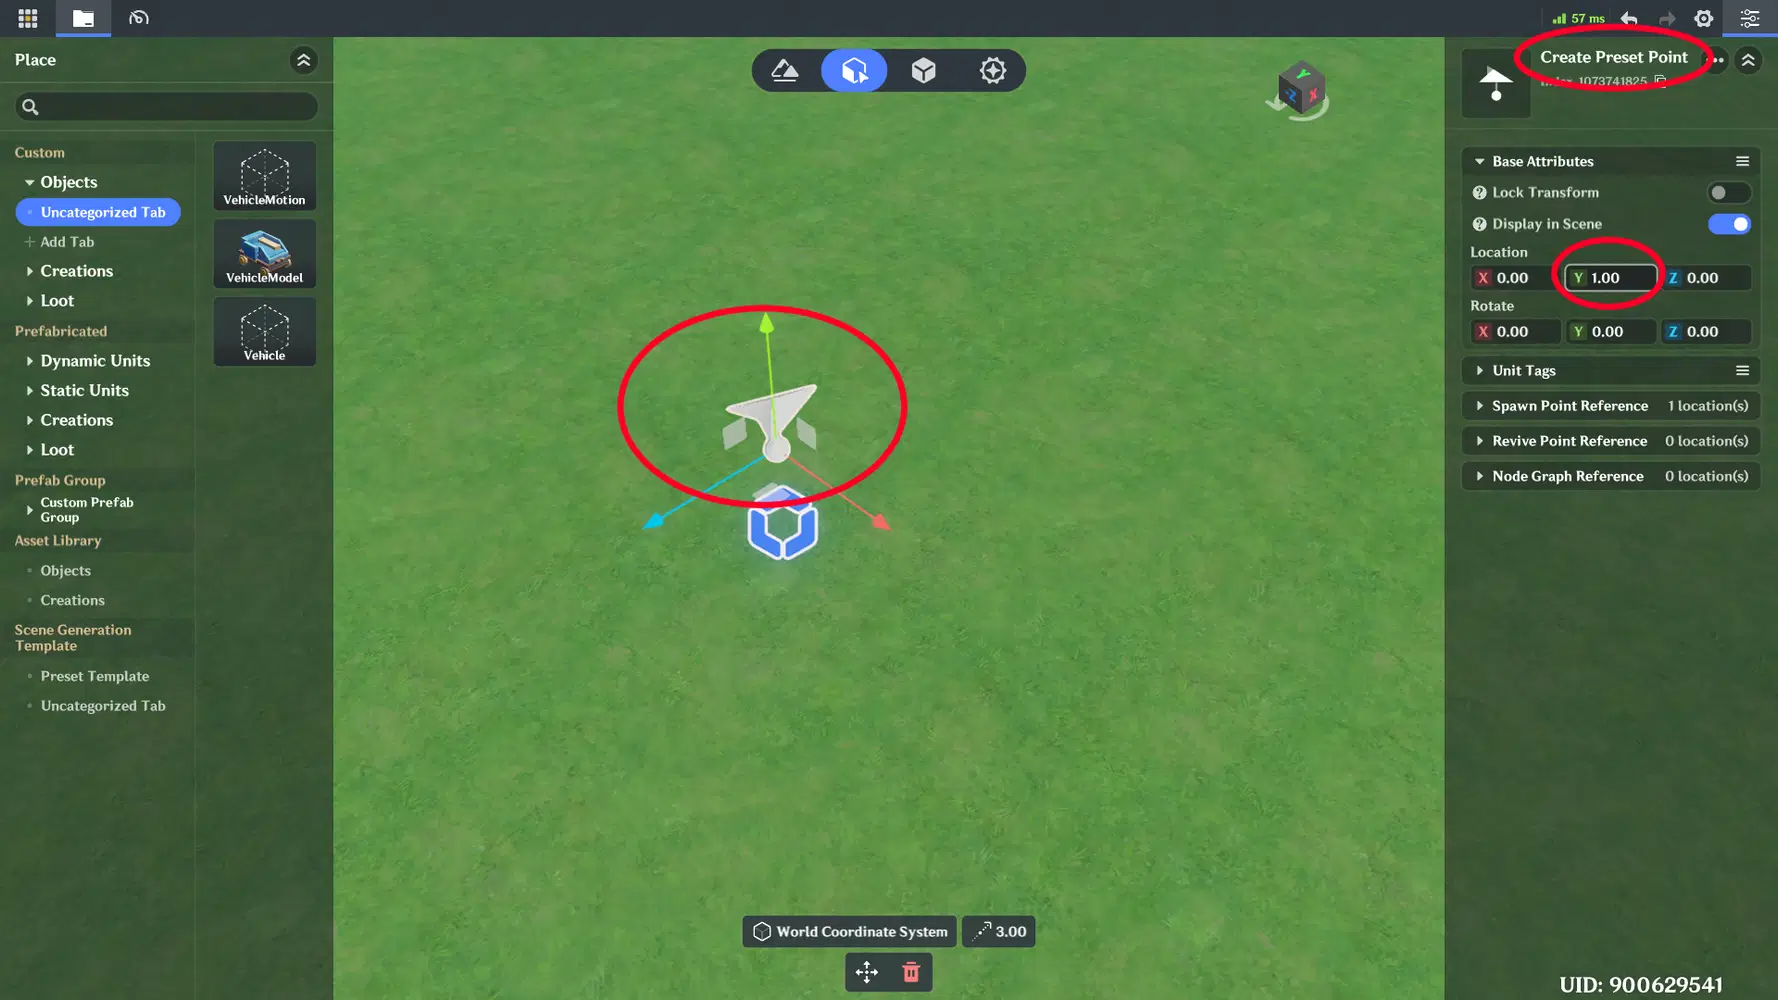
- Go to the Entity Placement Module
- Select the Create Preset Point that determines where the player spawns
- Change it's Y location to 1.00
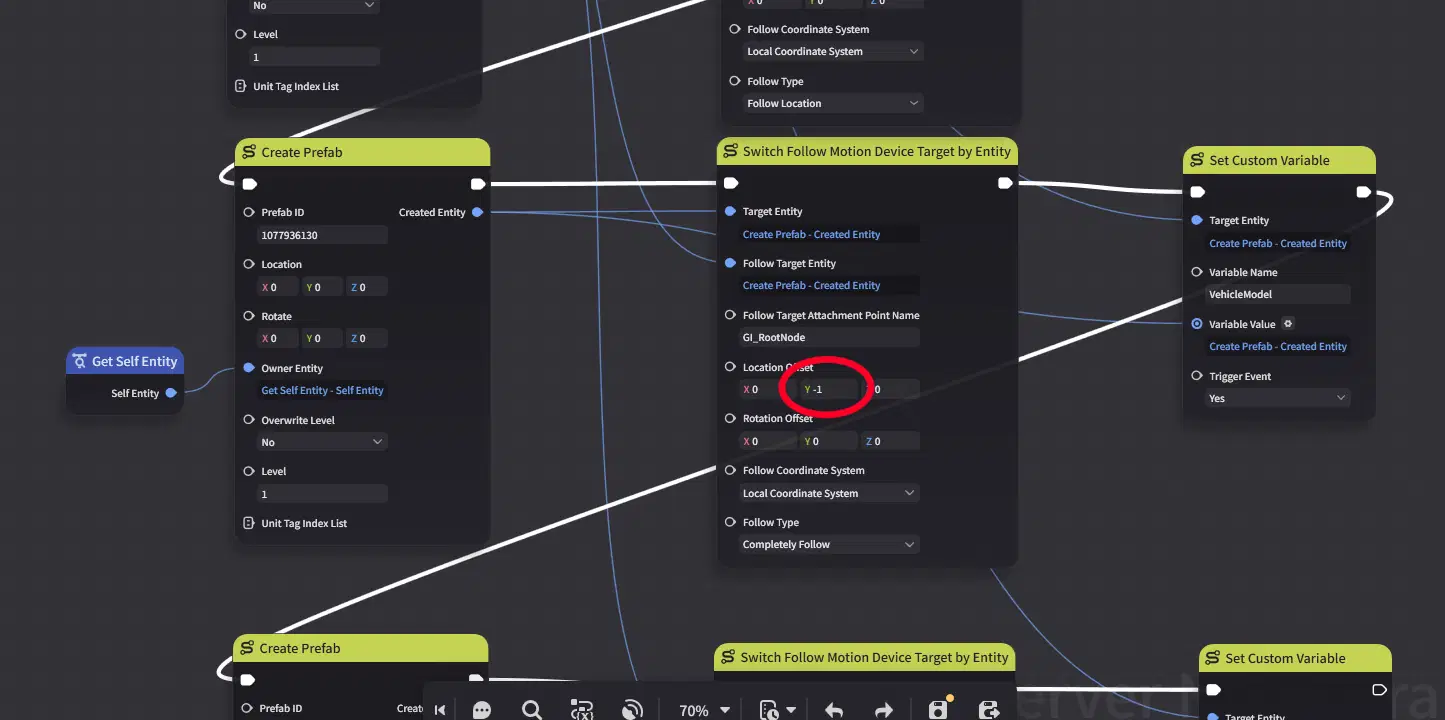
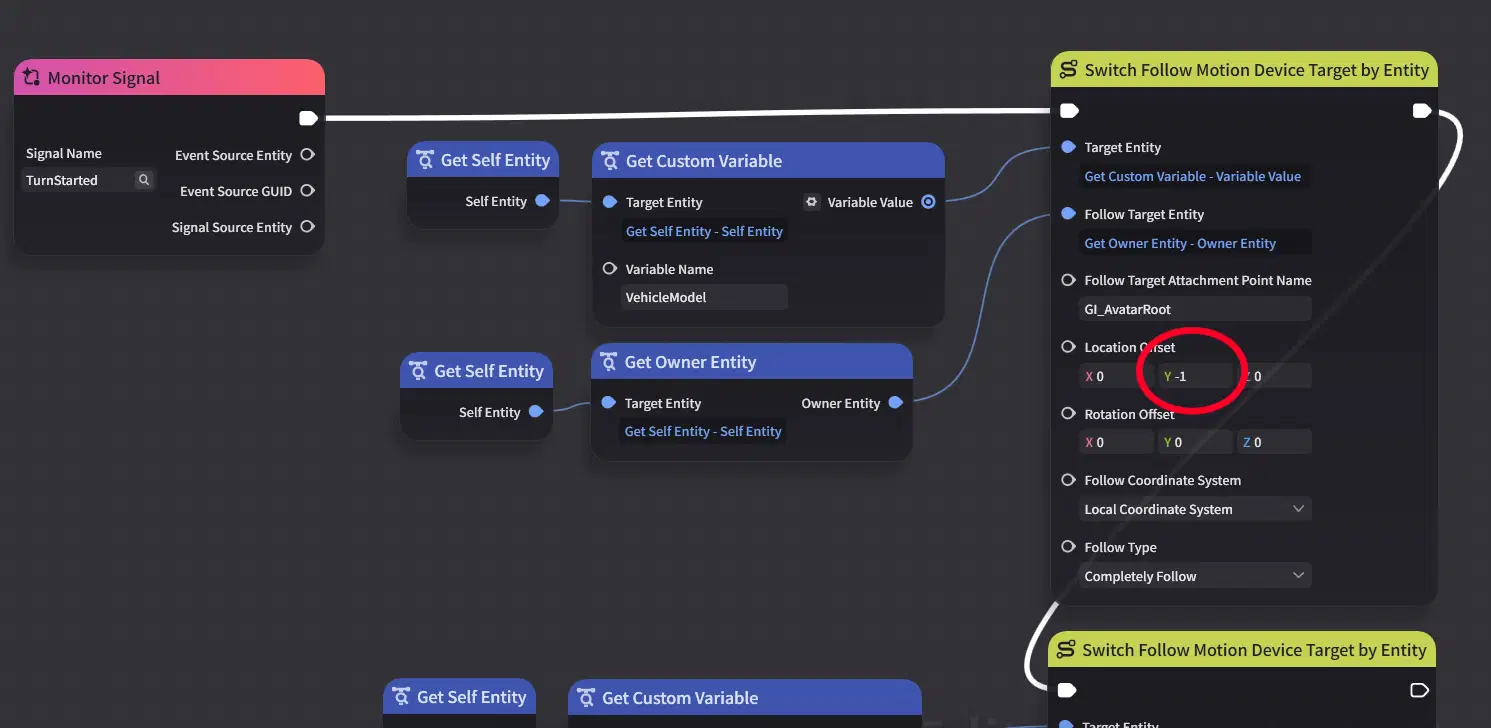
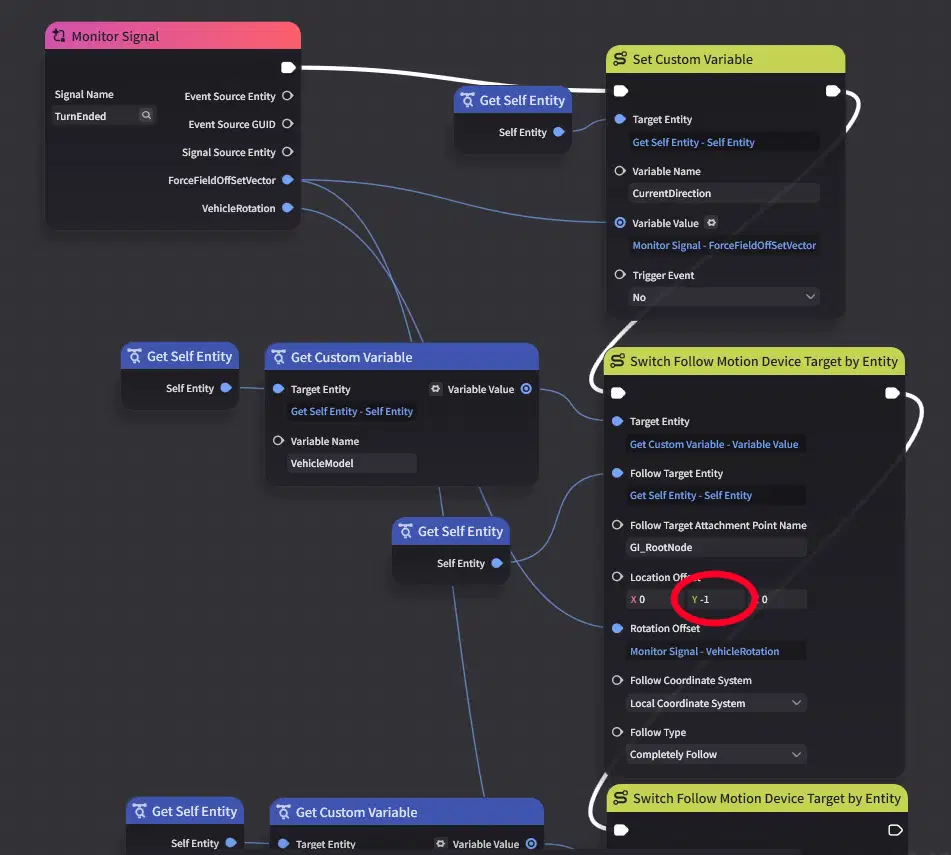
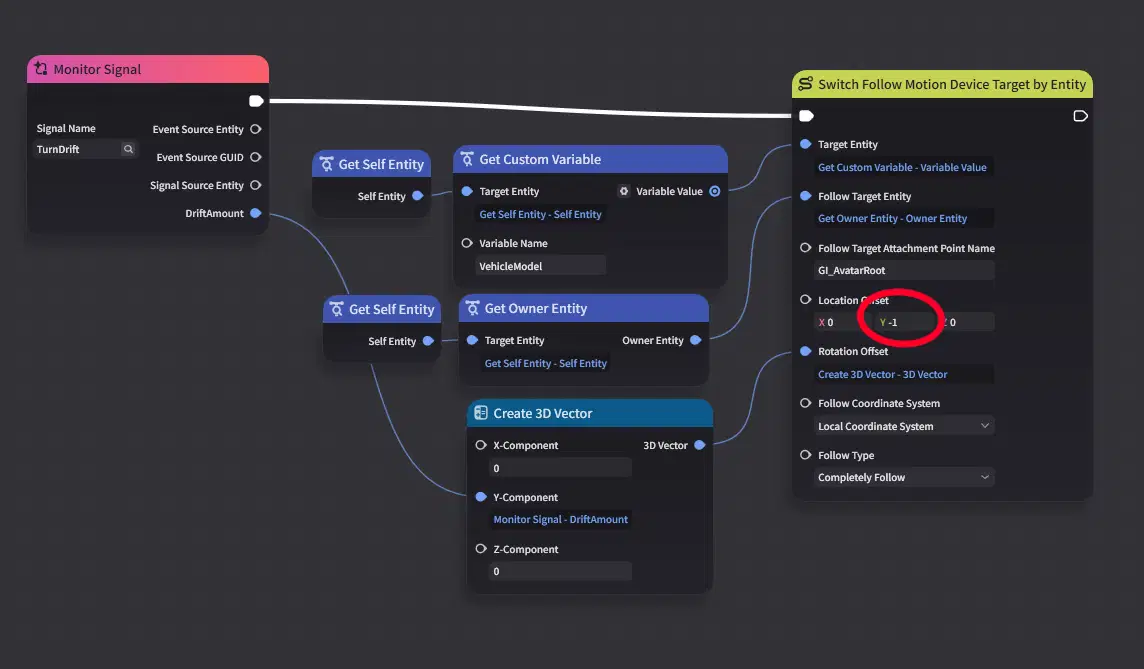
Finally we need to change the Location Offset's Y value for VehicleModel everywhere to compensate for that.
You'll find those in the following places, set the Location Offset to 0, -1, 0 for all of them.
- in the CharacterOnCreate node graph.
- in the HandleTurn node graph.
- For TurnStarted signal
- For TurnEnded signal
- For TurnDrift signal
Remember to change the Turn Skill to "Allow Cast in Mid Air"
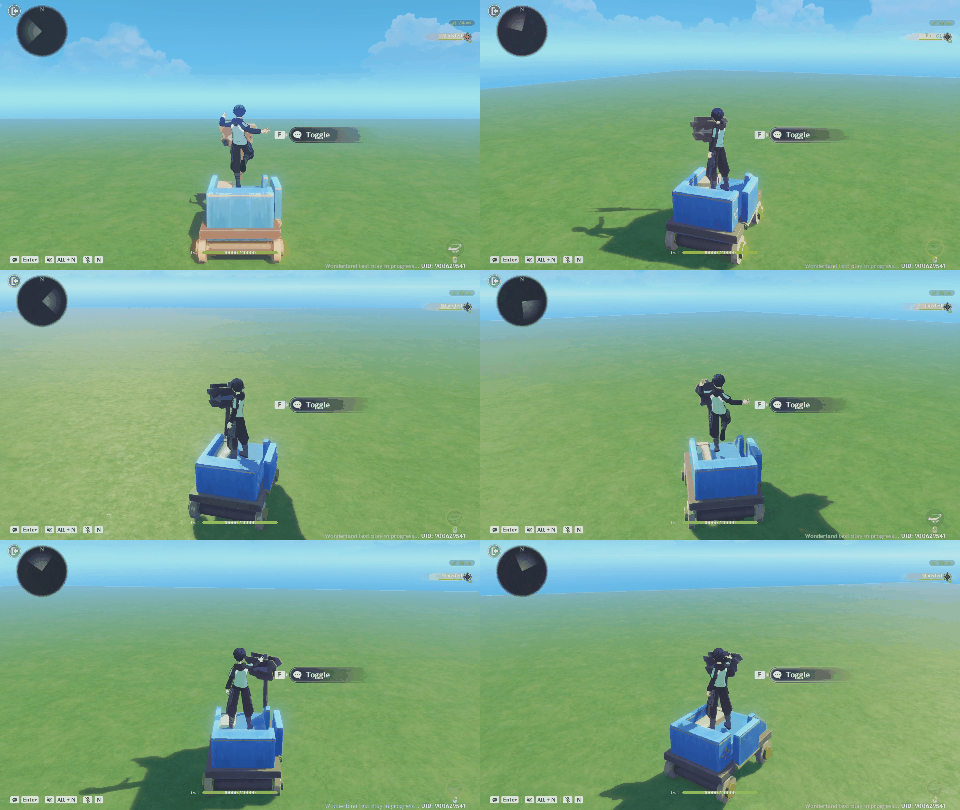
Now you can test play, it should look like this.
Final notes
If you are planning to make your game support multiplayer, you will need to configure Filter Node Graphs for your Force Fields to only work on the corresponding player.
Afterword
This guide took more time than I expected. But it's not the only ways to do vehicle, I'm still experimenting with other ways, but these are the more straight forward ways I've found. There's a lot of interesting things you can do, such as adding an entity
much like "VehicleMotion" but it has an Ejector, which allows you to have a temporary speed boost mechanic. I didn't cover any of that, because this guide definitely took a long of time to cover already. But I may cover more additional things one can do in a future guide.
I hope the guide has been beneficial for you to understand how different ways of vehicle can be implemented. That is until they straight up add a native Vehicle mode to Miliastra Wonderland. (I swear... if it somehow is in Luna VI or something...) But until that time comes, these are a few ways you can implement a vehicle gameplay in your games.
Feel free to leave any questions you like.



