Let’s Make a Game in Miliastra Wonderland:
Designing a Simple Coin Collecting Game Using Timer and Node Graphs
Introduction
Hello Travelers! 
In this guide, I’ll show you how to create a simple game where players Collect Coins within a Time Limit. This tutorial is designed to be beginner-friendly, making it perfect for those who are just starting their journey in game development using Miliastra Wonderland. The steps are organized in a clear and easy-to-follow order, starting from planning and creating the terrain, to using a simple node graph for game mechanics, all the way to publishing your game.
By following this guide, you’ll gain a better understanding of the basic concepts of building a simple game with node graphs, and feel more confident to start creating your own projects.

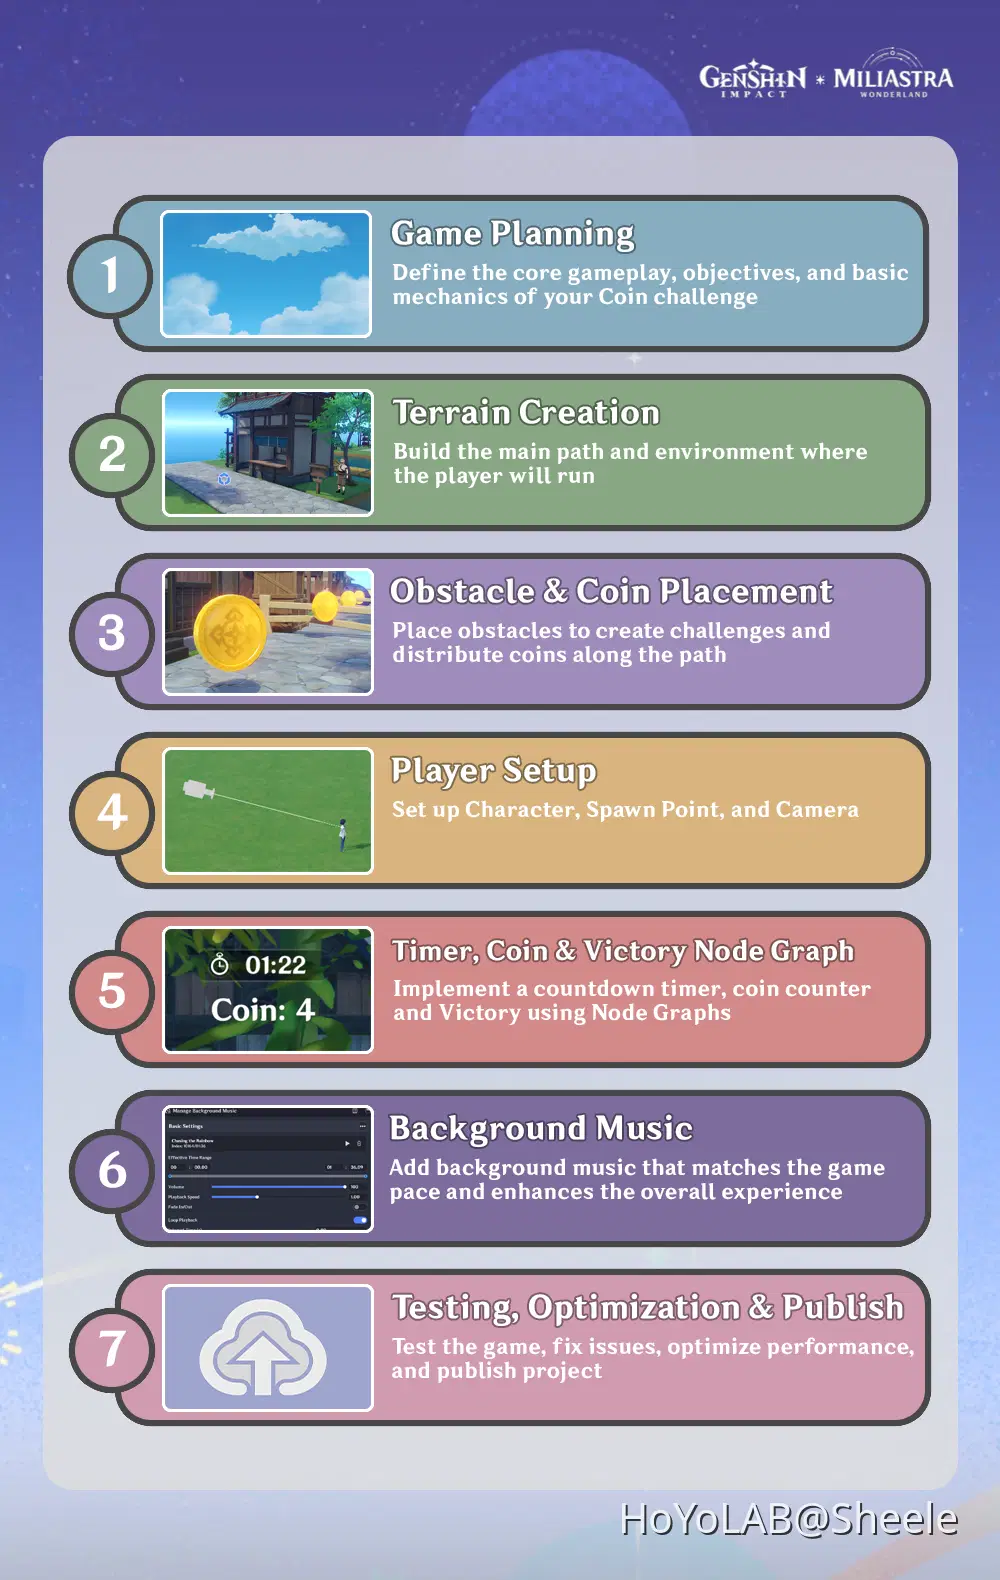
Game Development Workflow
This is the workflow for developing a simple Coin Collecting game. By following this process, you’ll be guided step by step from planning, terrain creation, obstacles and coin placement, to setting up the player and camera, implementing game mechanics and UI, adding BGM, and finally testing and publishing your game.
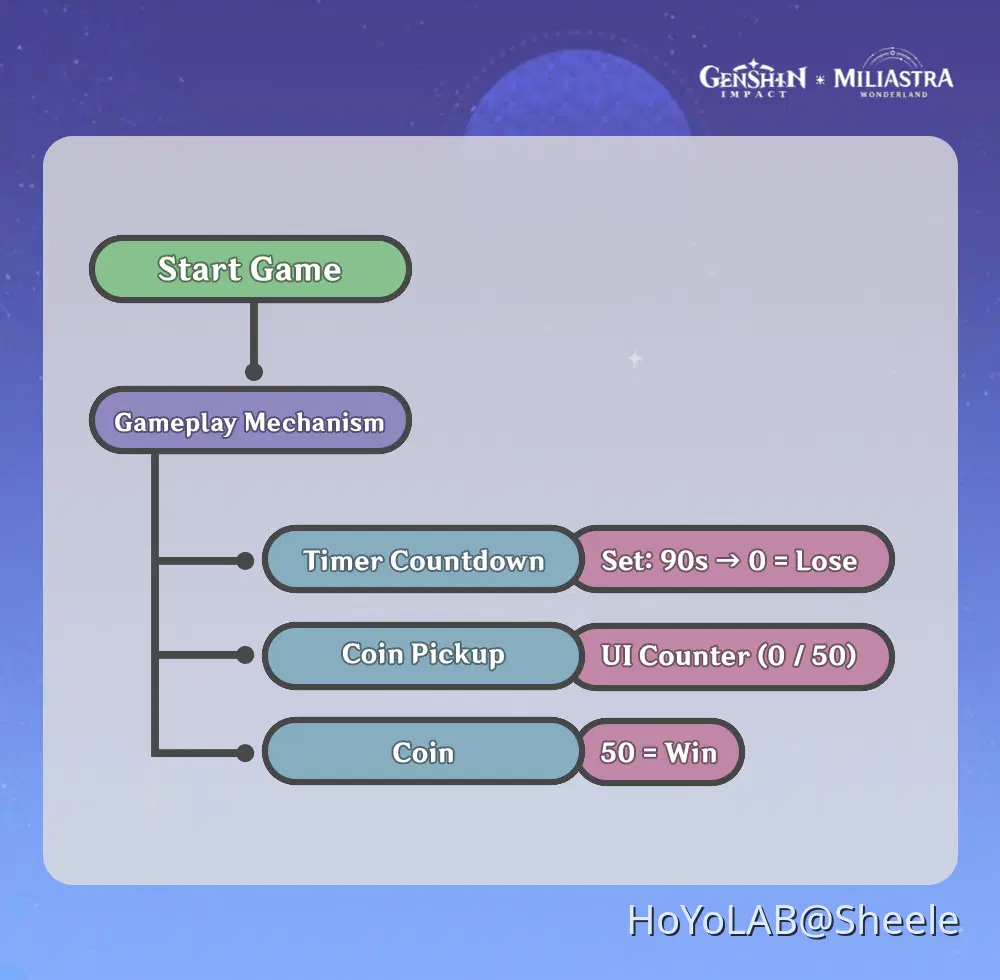
Node Graph Flow
The following Node Graph Flow outlines the core gameplay logic, detailing the relationship between the game start, the countdown timer, and the win/loss conditions
Chapter 1: Game Planning
The first step in creating your game is Planning. At this stage, you will define the core concept of your game, its objectives, and the overall flow. For this guide, the game is a Coin Collecting challenge where players must gather coins within a time limit and reach the finish line.
During planning, consider the following:
- Game Objective : Collect all Coins and reach the finish line before time runs out.
- Terrain Layout : Decide on zones, paths, and turns.
- Obstacles & Challenges : Plan what kind of obstacles the player will face and how they will affect gameplay.
- Player Mechanics : Define how the player will move, interact with coins, etc.
- UI & Feedback : Decide how to display important information like Timer, Coin Count, and Victory Condition.
Proper planning will make the following steps, terrain creation, obstacle placement, and Node Graph setup, much smoother and more organized.

Chapter 2: Terrain Creation
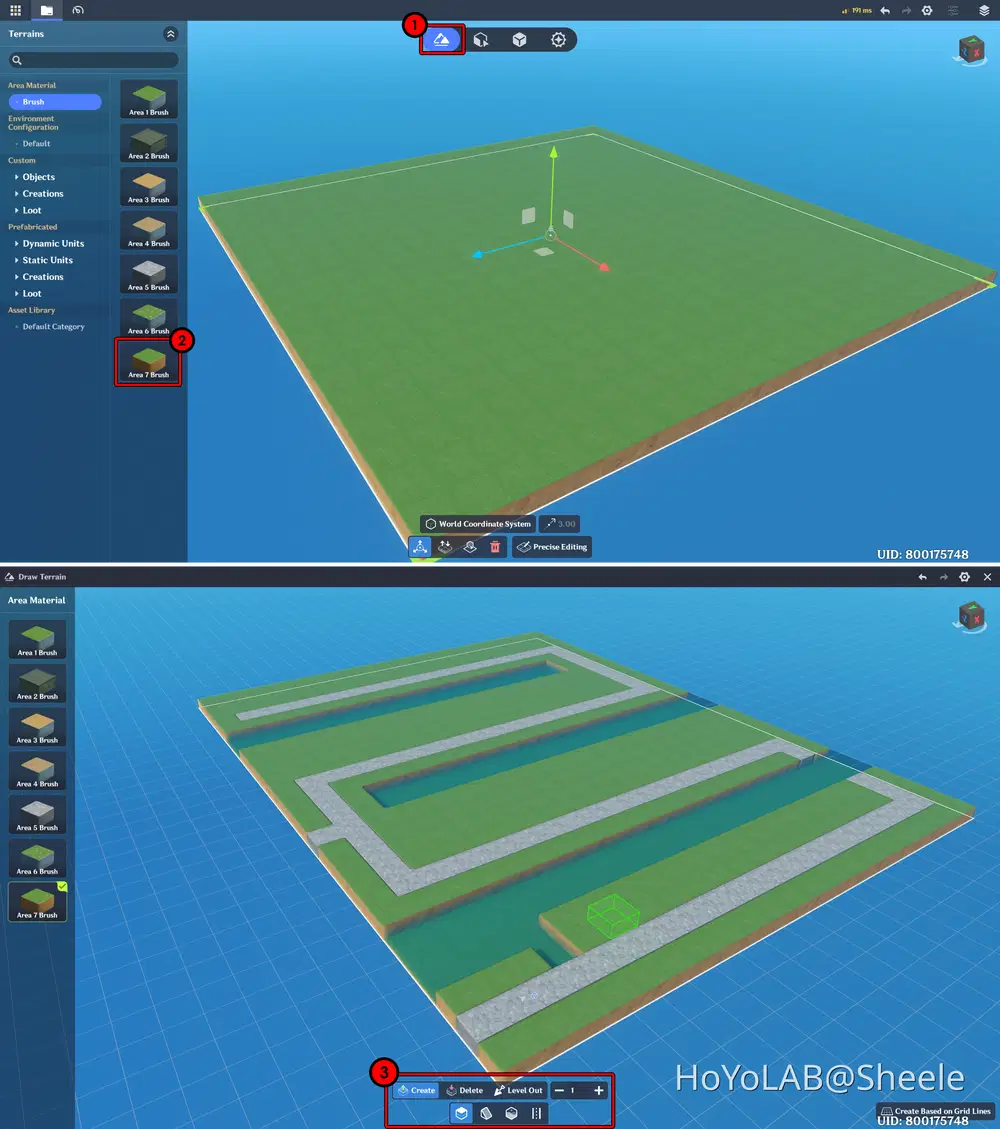
At this stage, you will begin creating a simple terrain based on the plan you’ve prepared. In this example, the track is designed with a simple layout, divided into four zones. It features a main area with a straight path, along with several turns that connect each zone. Additionally, a water area is added to make the environment more visually interesting.
- To start building, Go to Terrain Editing → Choose the Brush you want to use → Start designing your terrain.
Next, you need to set up the Active Area and Stage Time.
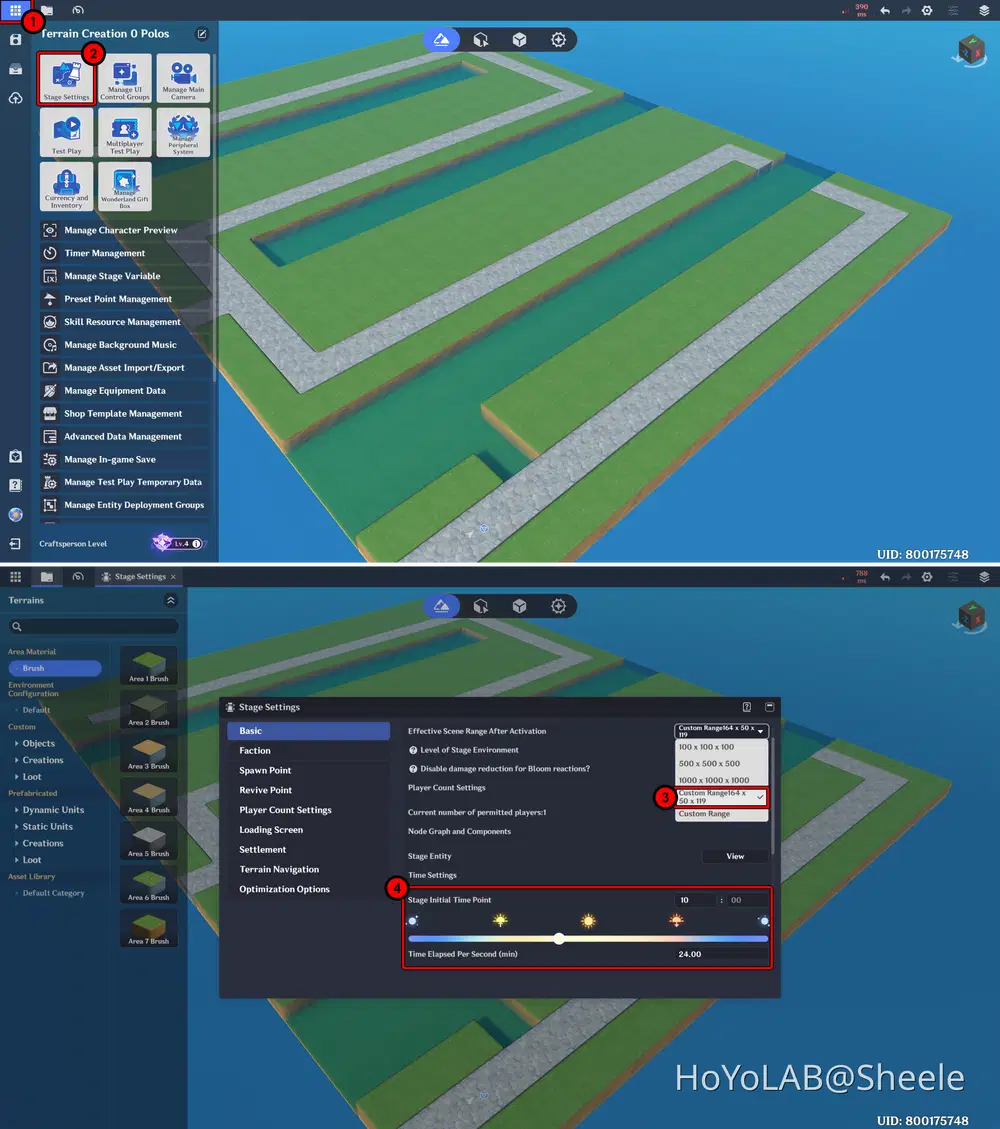
For the Active Area, I’m using a custom size of 164 x 50 x 119. Make sure your terrain stays within this range, otherwise you may encounter a warning when you start a Test Play later. Stage Time is used to create a day–night cycle effect, helping to enhance the overall atmosphere of your game.
- Open Stage Settings from Main menu → Go to the Basic tab → Adjust the Effective Scene Range and Stage Initial Time.
The next step is to enhance your terrain by adding Various Decorative elements such as Buildings, Trees, and other environmental objects to make the scene more visually appealing.
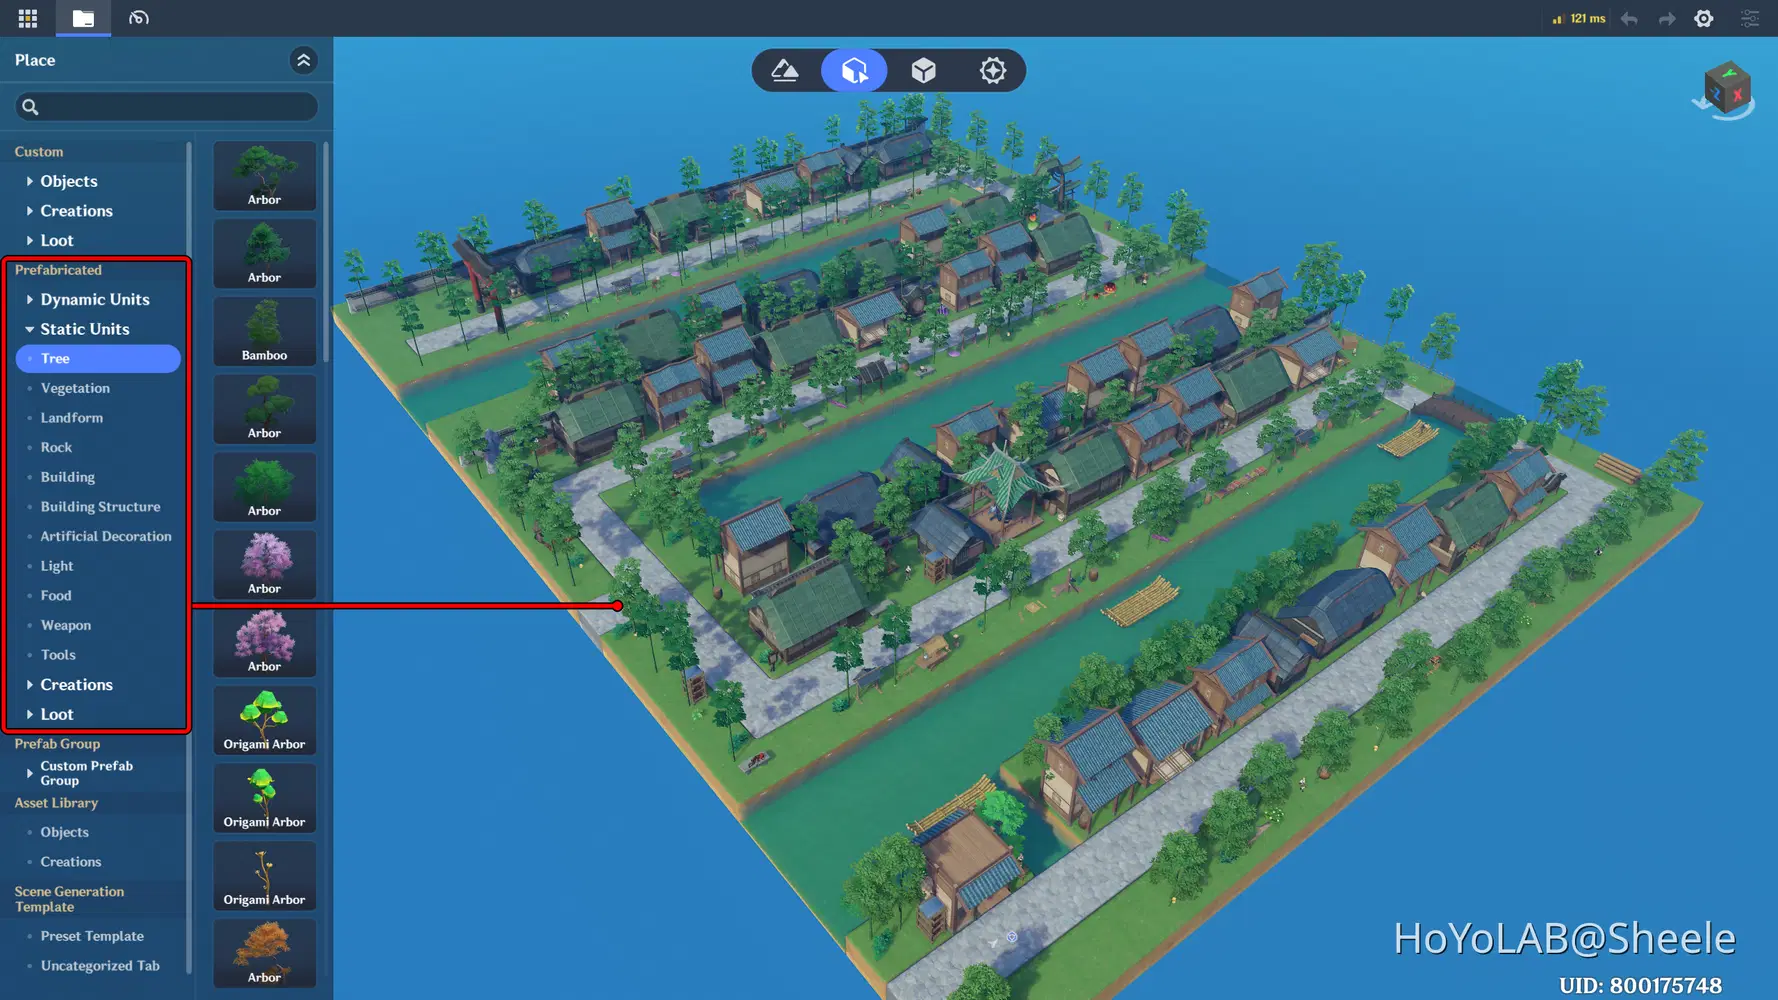
Here are some tips to speed up object placement:
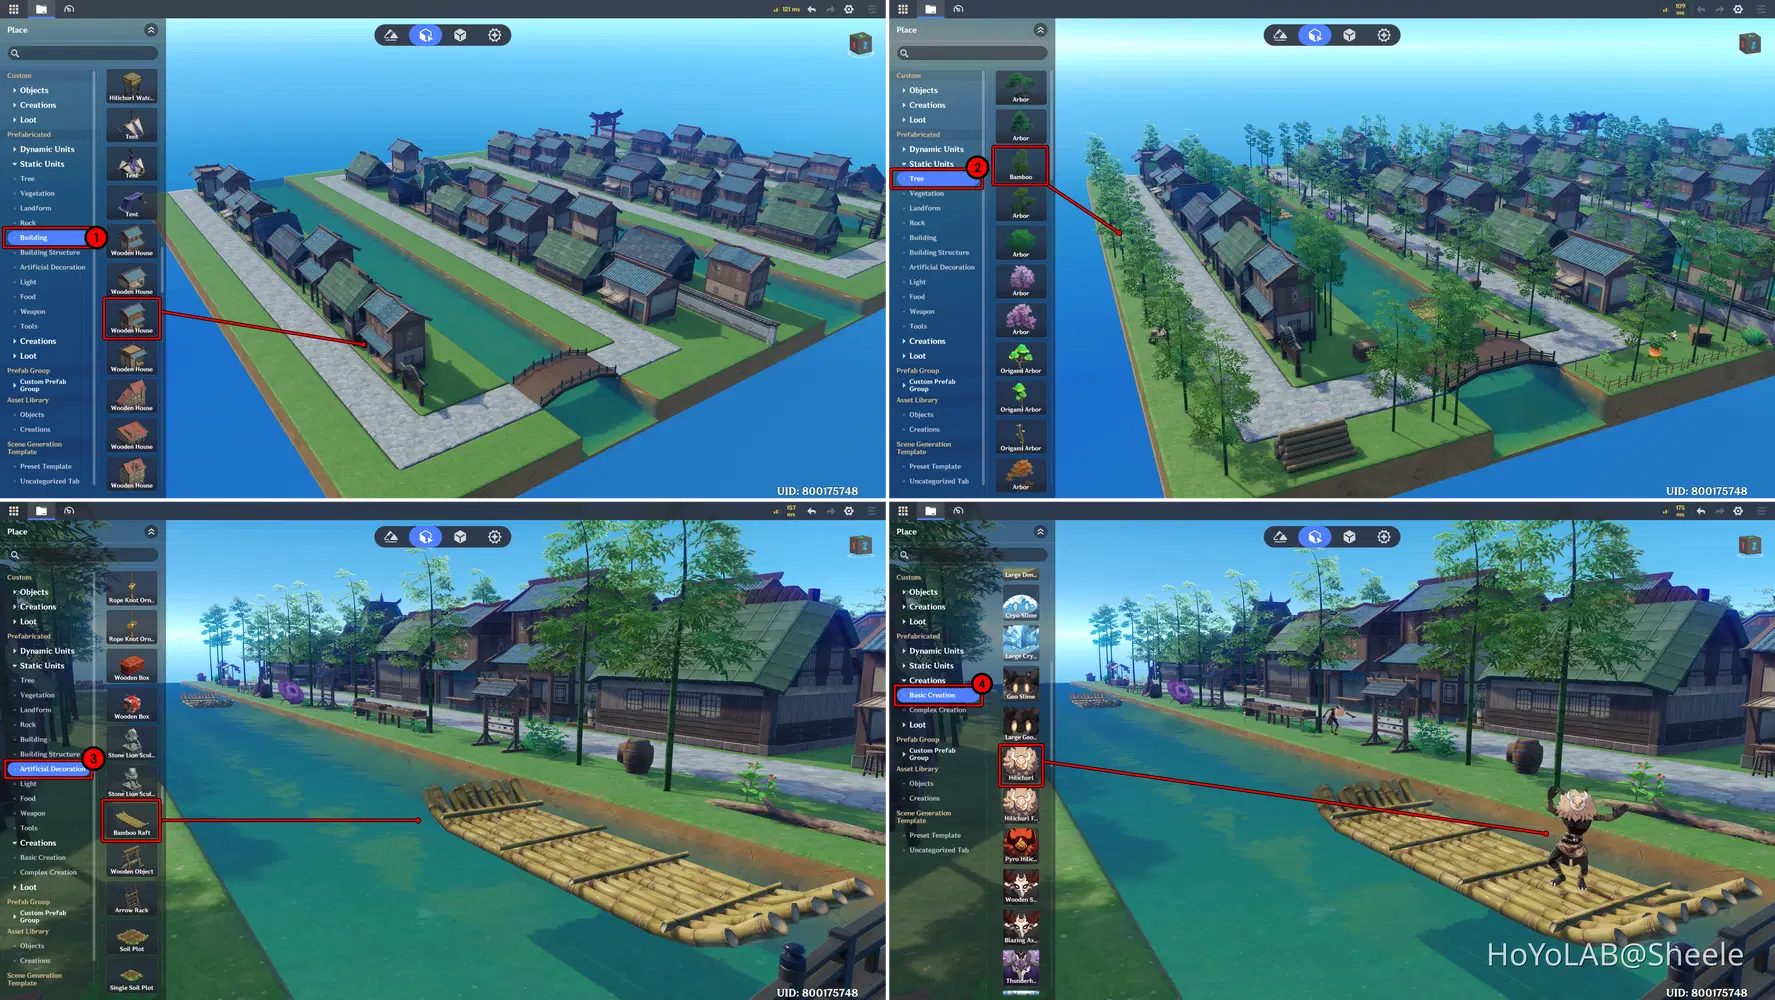
- First, I recommend placing the Main Structures first, such as houses, bridges, walls, and other important buildings in your scene. It’s also a good idea to use a consistent building style so it matches the theme of your game, unless your stage is designed with different levels or themes.
- Second, you can start adding Trees. In this case, I used bamboo trees and arranged them carefully to avoid overcrowding while also making sure there are no empty-looking areas.
- Next, add Decorative Elements to enrich the scene. You can place objects like tables, chairs, barrels, or even boats in water areas to create more detailed environments.
- Finally, add some Creations with different animation. These can act as moving decorations to make your scene feel more alive. You can also use text bubbles to include fun or playful messages throughout the scene.
To Disable battle behavior from a Creation and use it as a background decoration:
- Select the Creation object → Go to the Combat section → Choose Not in Battle Behavior (in this case, Dancing) → Set Entering Battle Zone to None
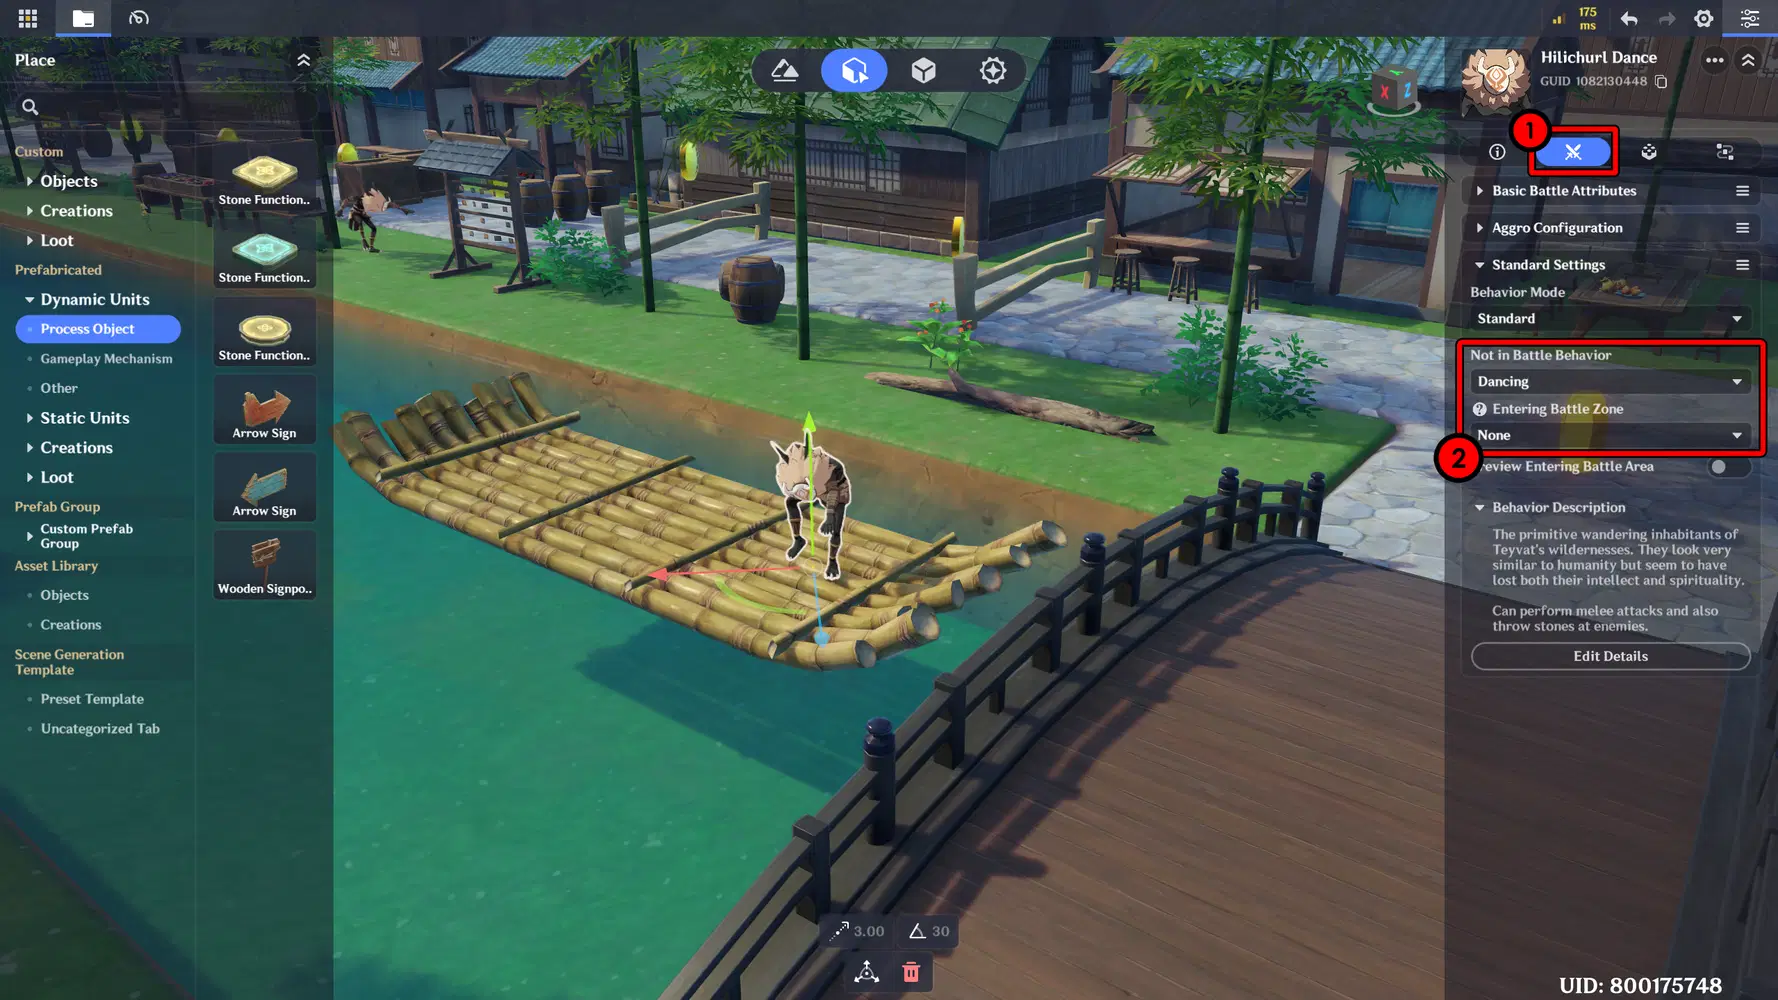
Lastly, to create a cleaner look by hiding the HP bar:
- Open the Component menu → Add a Common Component → Choose Nameplate (no Setting)
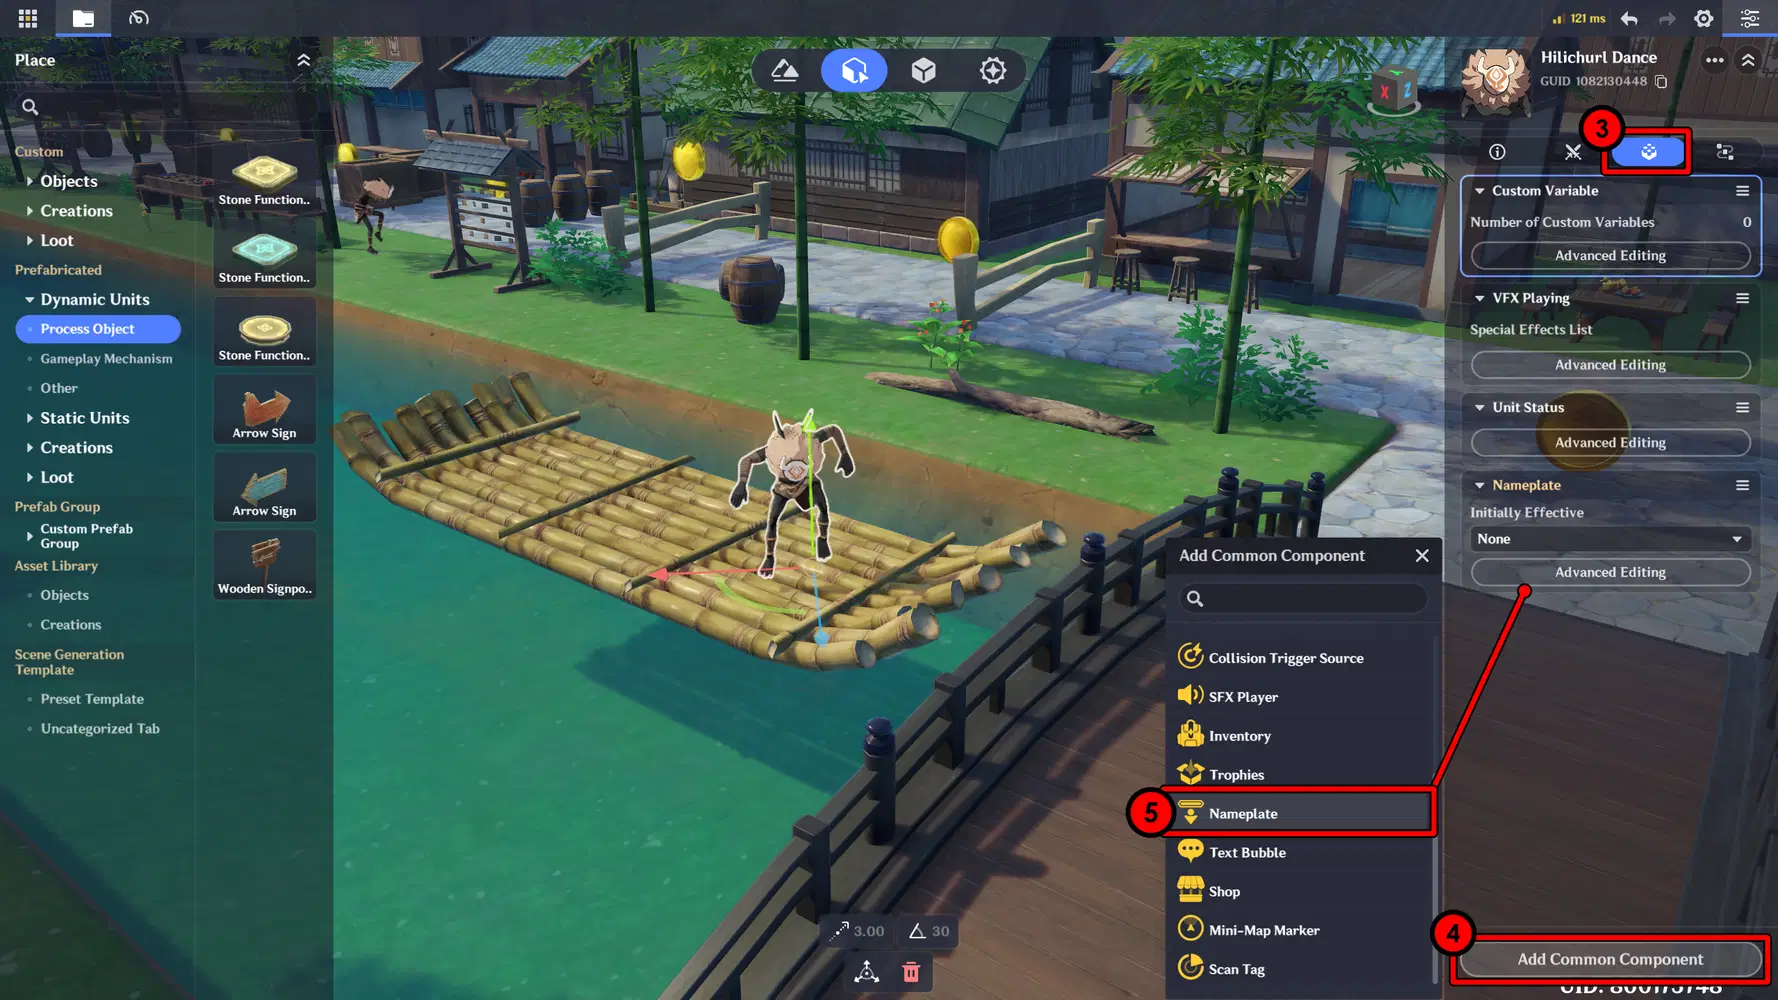
With this setup, the Creation becomes passive, performs its behavior, and has a clean appearance.
Chapter 3: Obstacle & Coin Placement
✦ Obstacle
In this section, you will add Obstacles along the path. In this guide, I use simple obstacles such as objects that block the player movement. However, you can also create more complex challenges, like explosive barrels, animals that can knock the player back, or other elements that make it harder to collect coins and reach the finish line.
In this example, I use decorative objects as obstacles, such as logs, wooden crates, umbrellas, and other similar items.
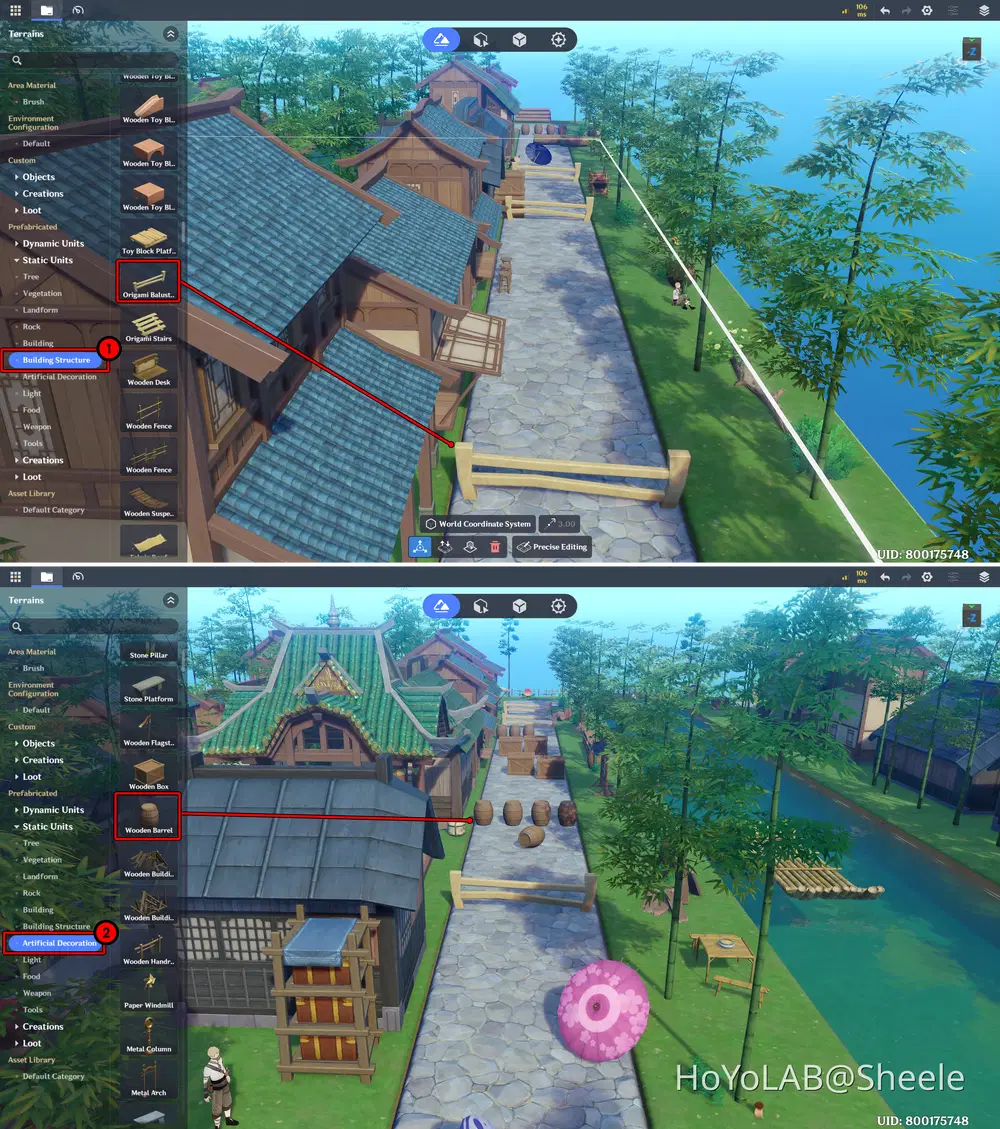
Place Obstacles all the way to the finish line, and make sure their placement is not excessive. Keep the path still possible to pass through to maintain a good balance in gameplay.
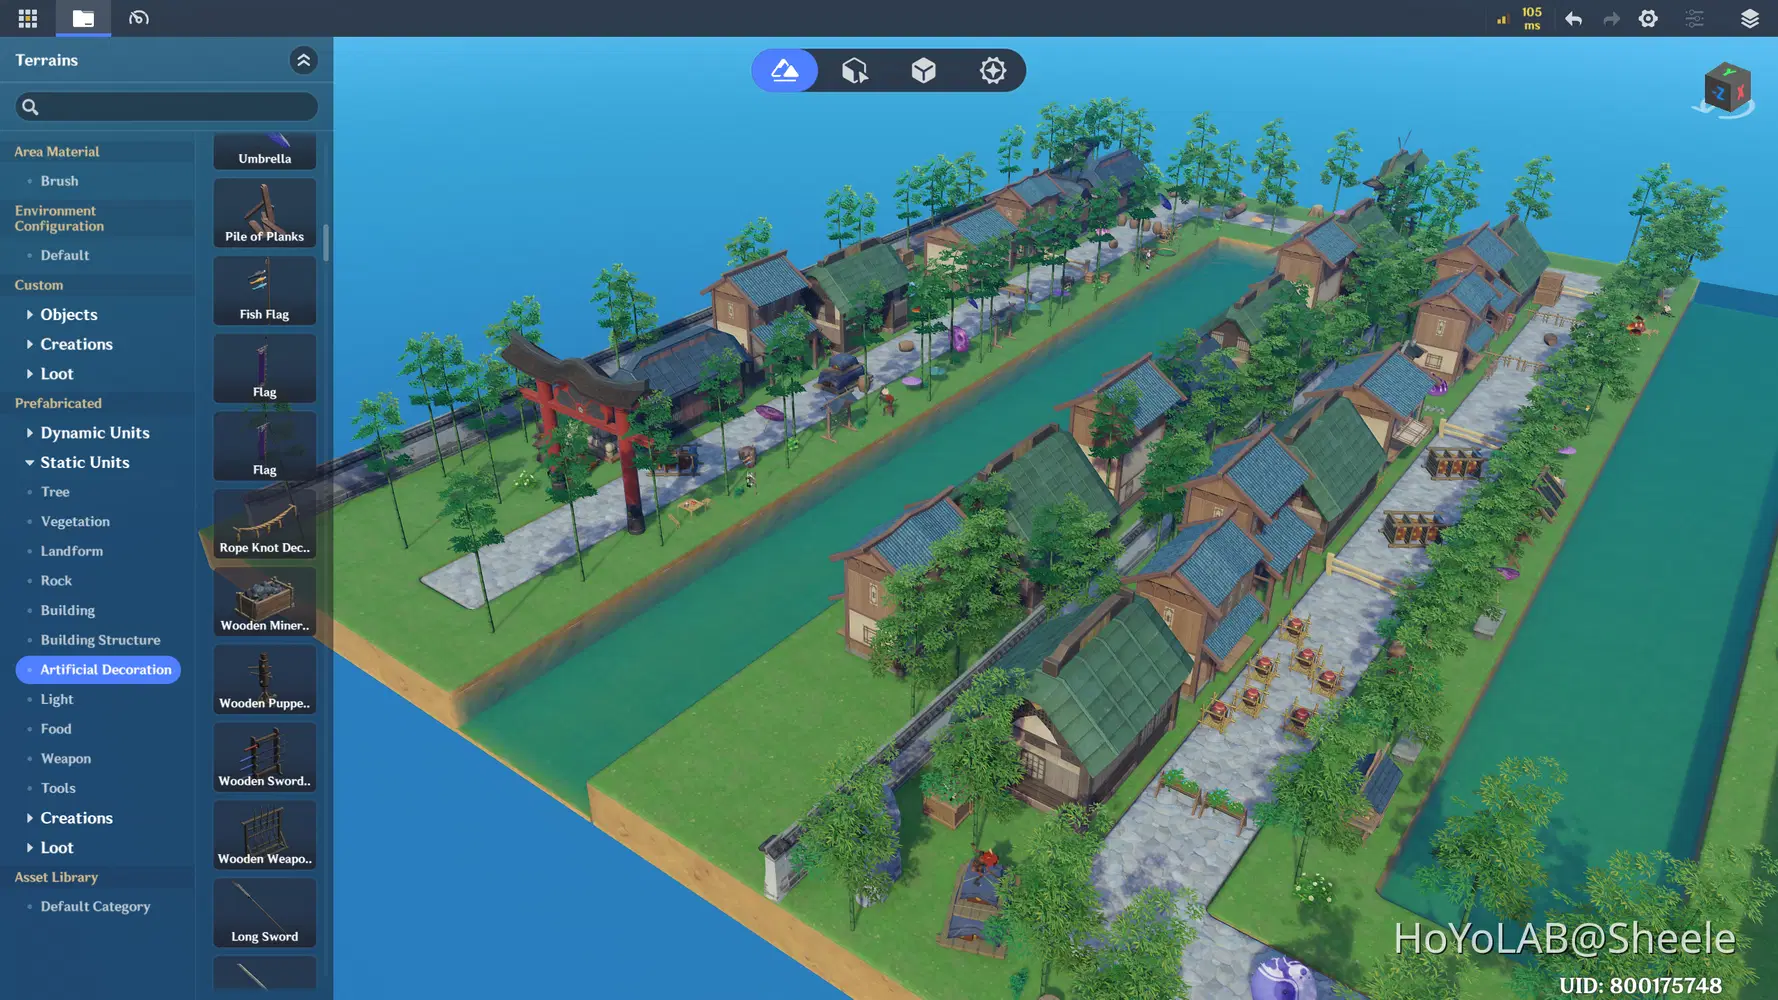
✦ Create Coin
Create a coin using an Empty Model, then customize it by adding the necessary components so it can function as a collectible item in your game.
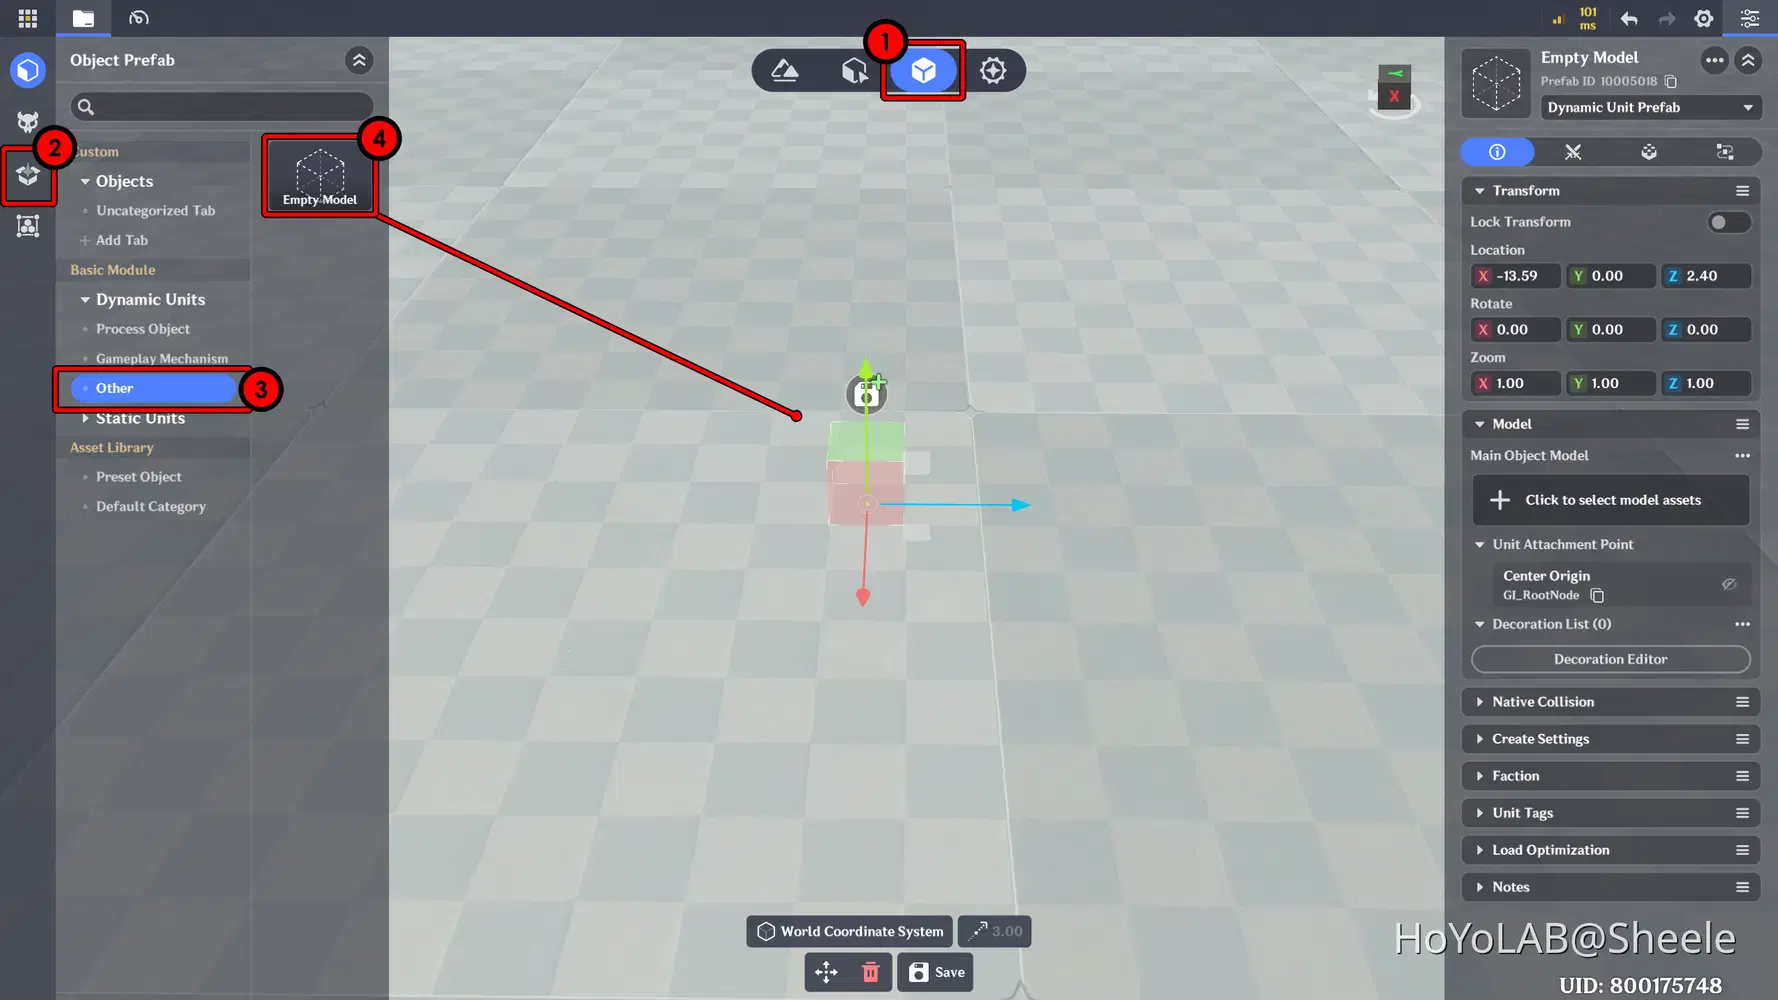
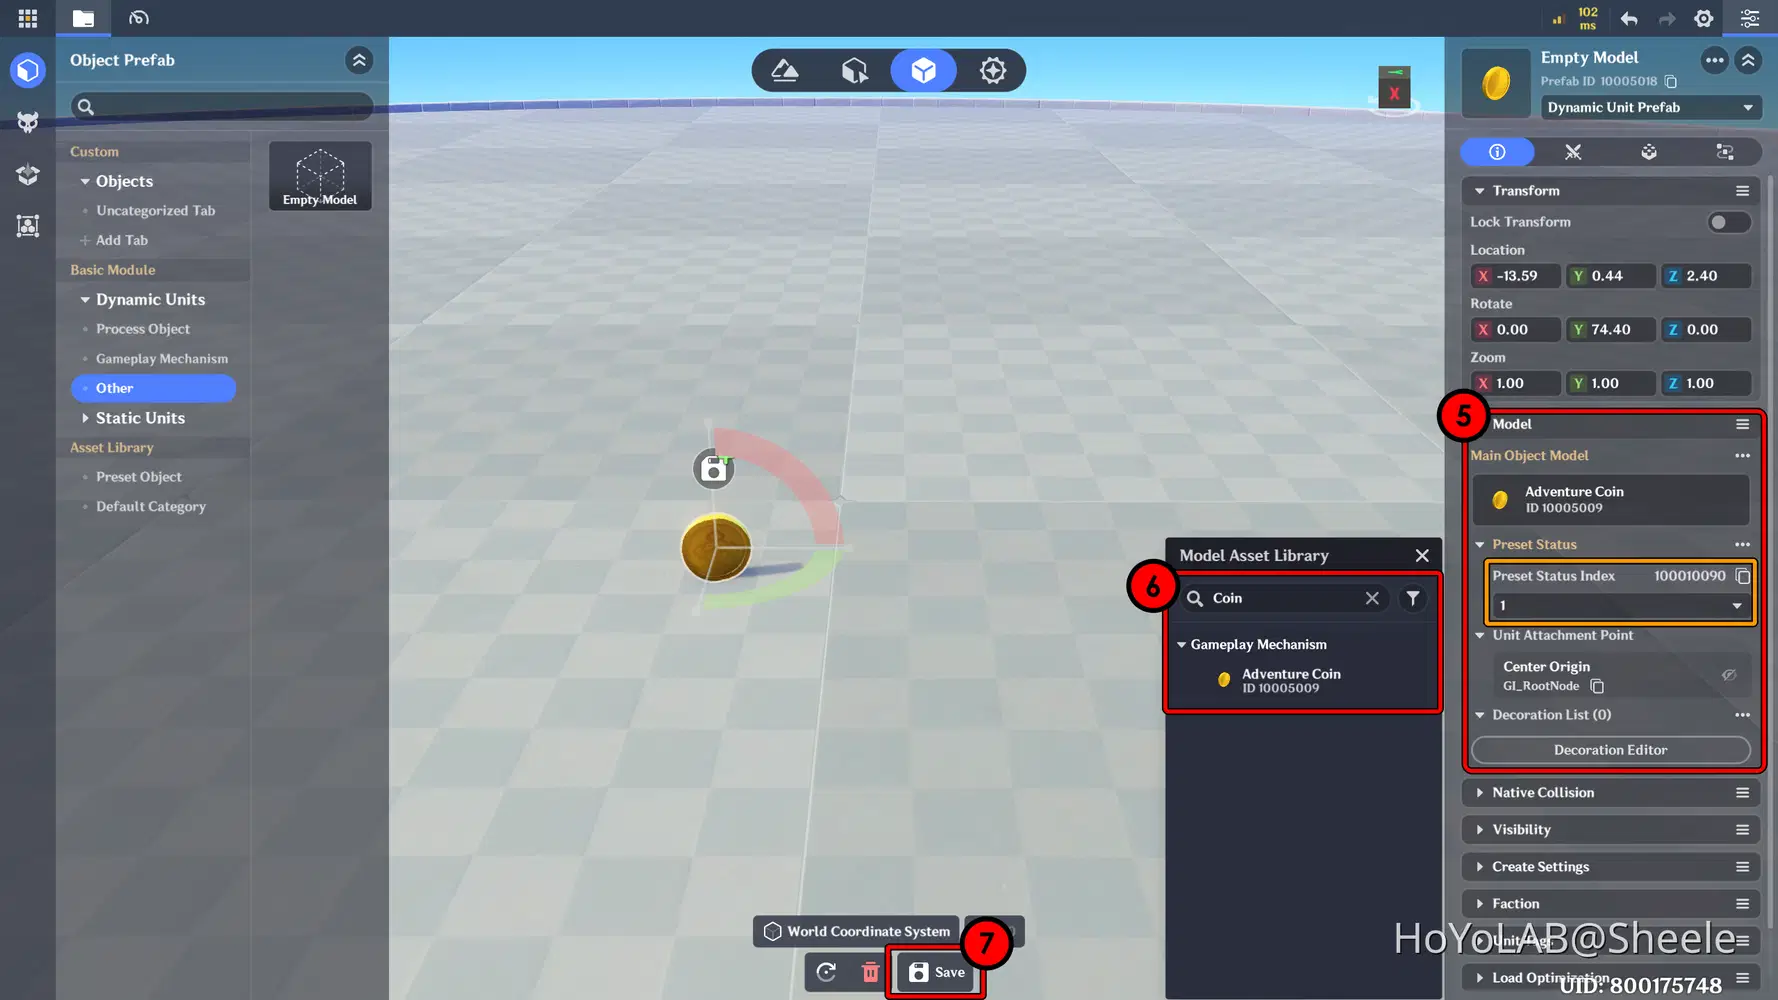
Adjust the model and set the Preset Status Index 1 to enable animation on the object. Don’t forget to save it and give it a name that you prefer.
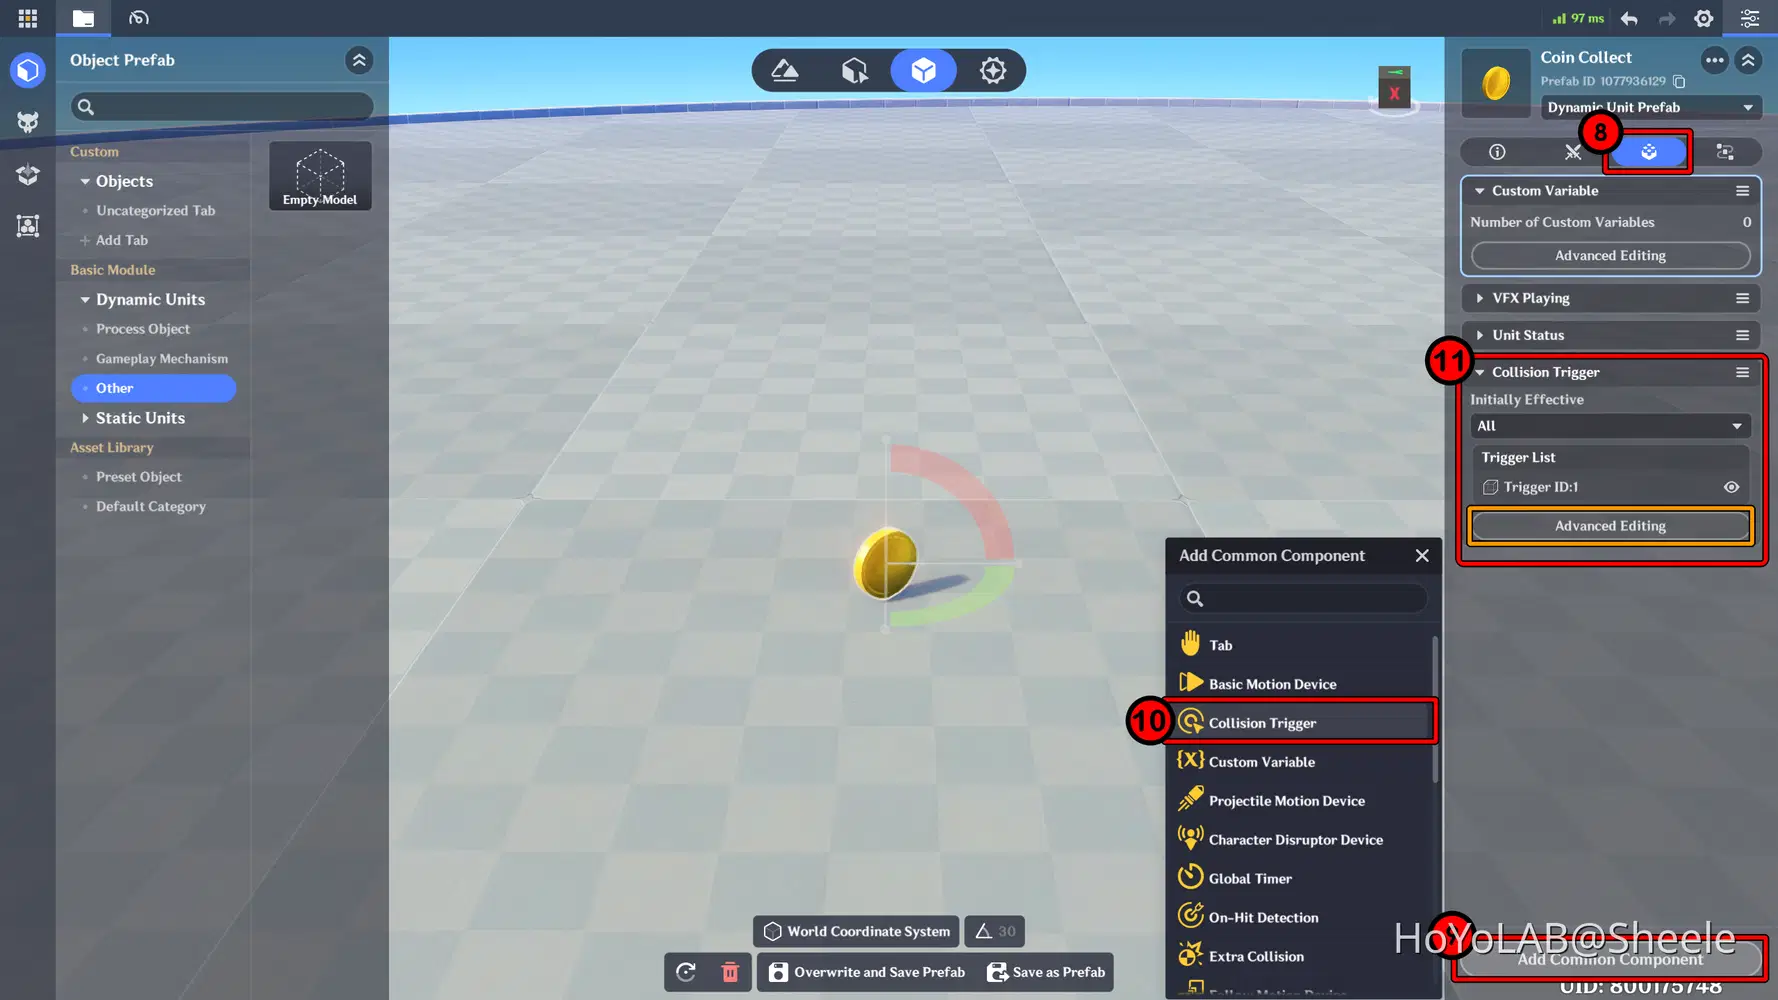
Next, add a Collision Trigger component. This is used to detect when the player gets close to and collects the coin.
- Open the object Component menu → Select Add Common Component → Choose Collision Trigger.
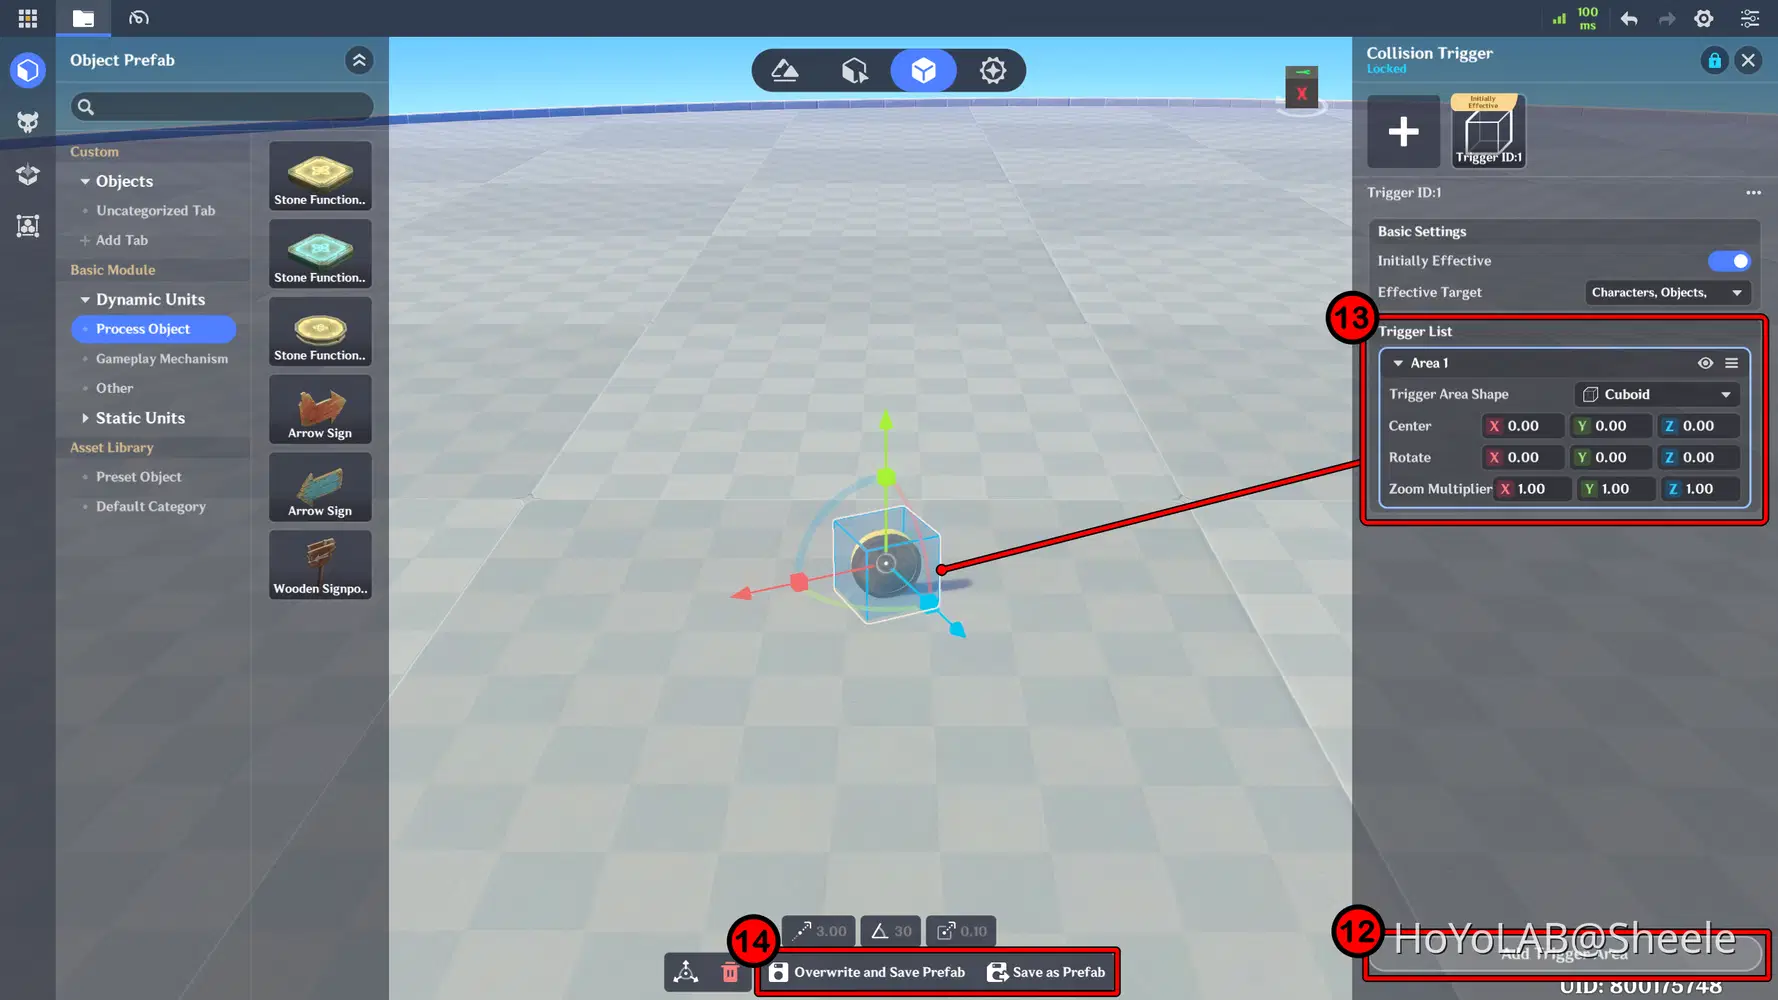
In the Collision Trigger menu, select Add Trigger Area, then adjust the coin detection area. Make sure the area is slightly larger than the object so it can be detected easily, then save it.
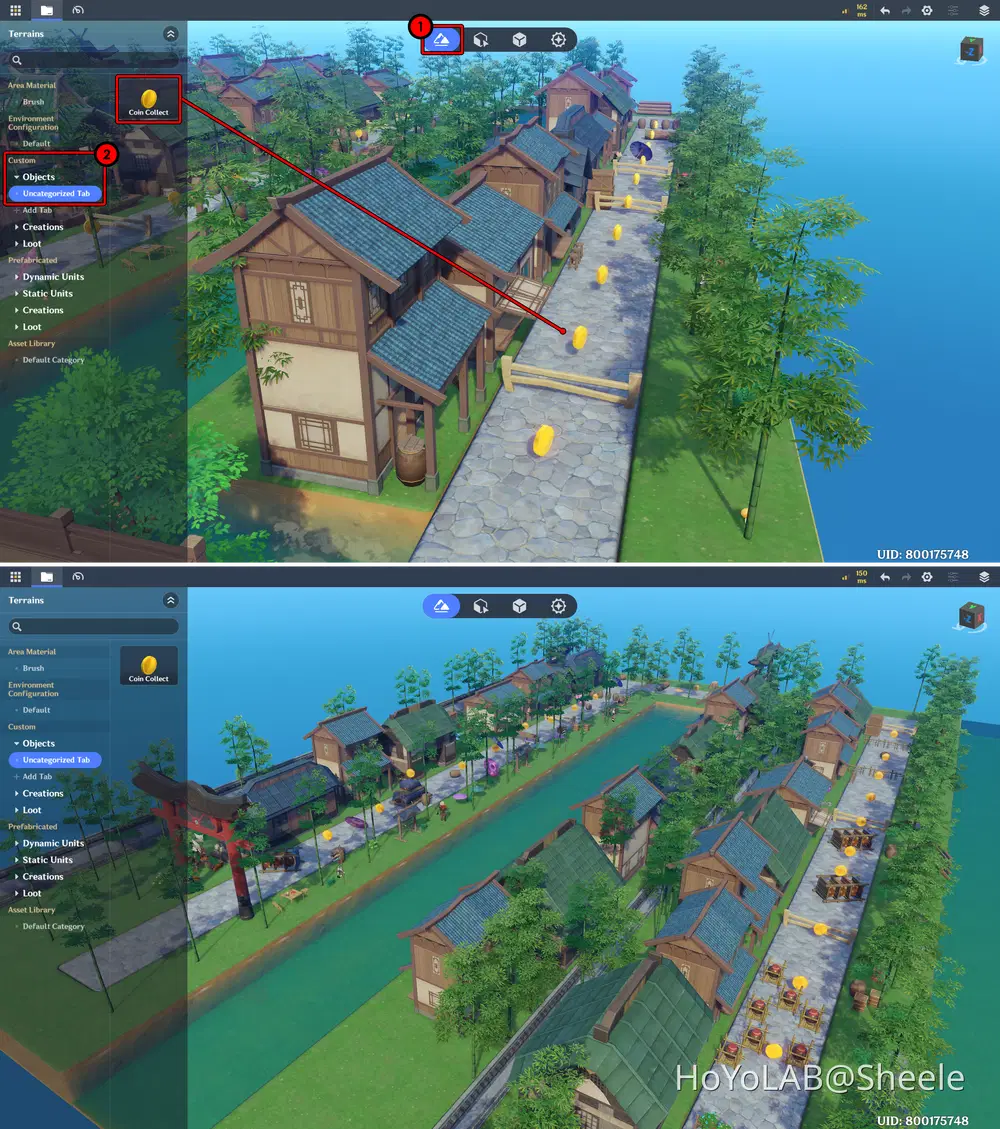
After creating the coin object, the next step is placing it into the scene. Arrange and distribute the Coins carefully, making sure the distance between each coin is not too far or too close, all the way toward the finish line. In this example, I placed a total of 50 Coins.
- Open the Terrain Editor → Select Custom Object from the Asset Bar → Place and arrange the coins in your scene.
Chapter 4: Player Setup
✦ Spawn Point
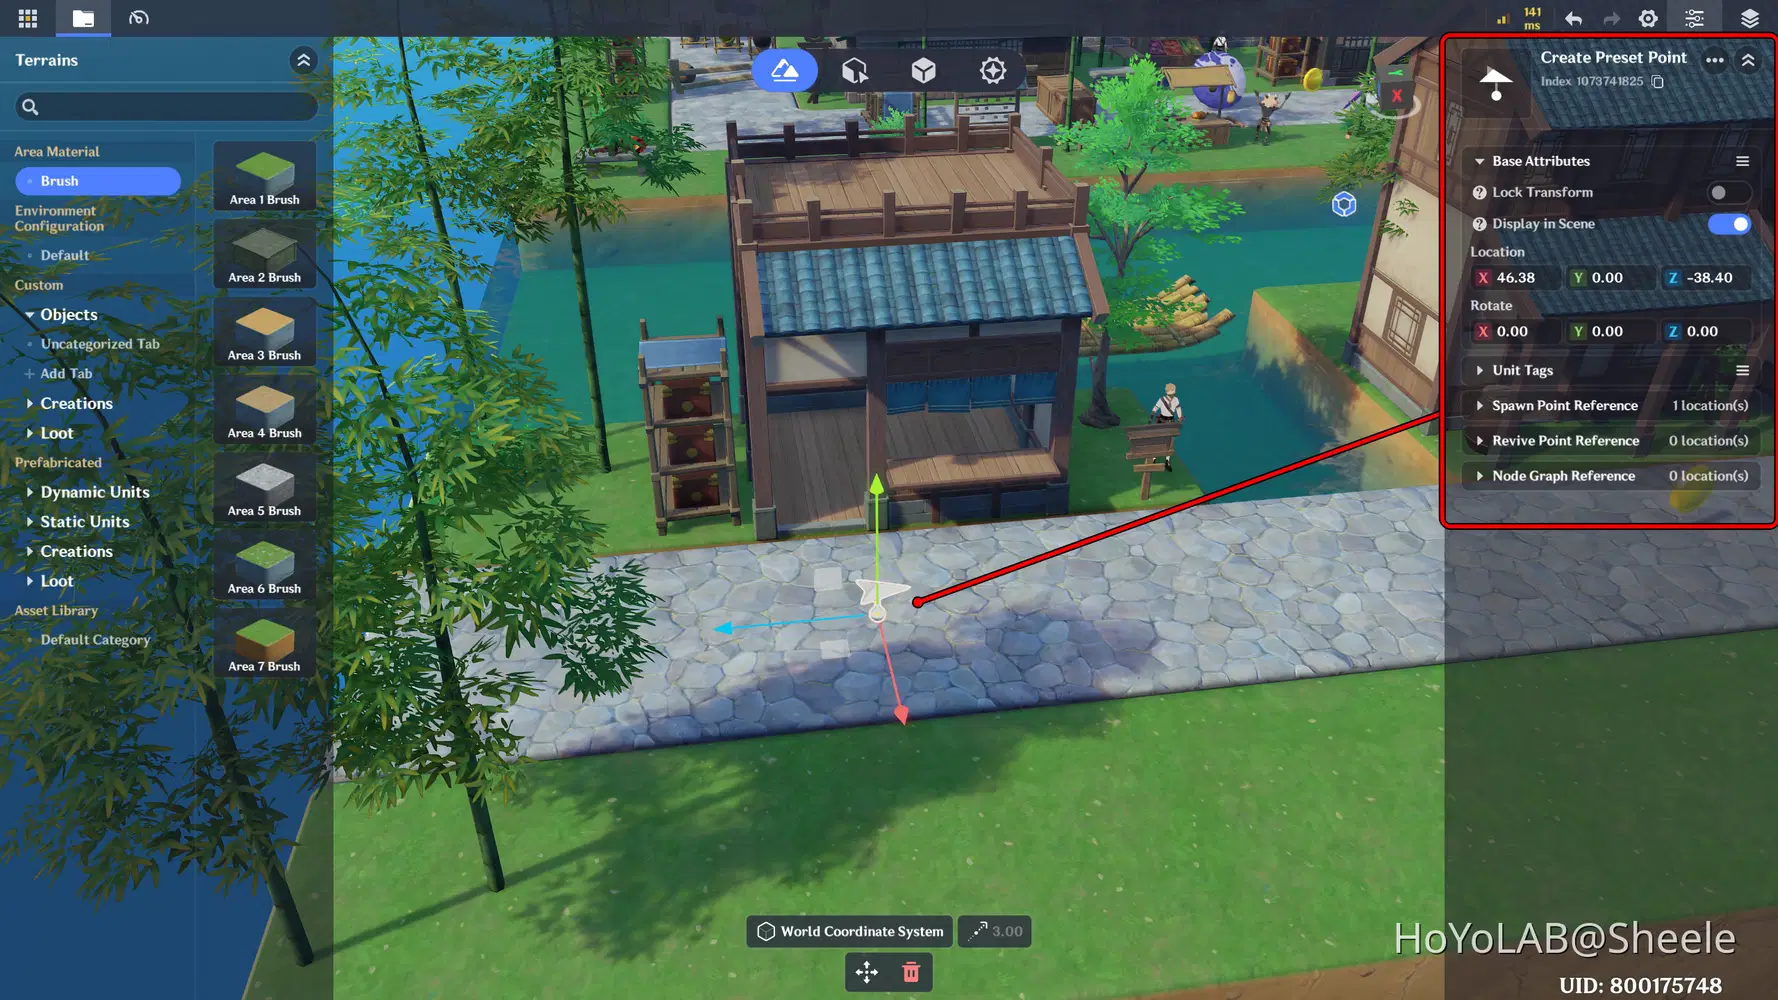
The next step is setting up the Spawn Point. This is where the player character will appear when the game starts. To do this, simply move the Preset Point in the scene to the starting area.
✦ Camera Setup
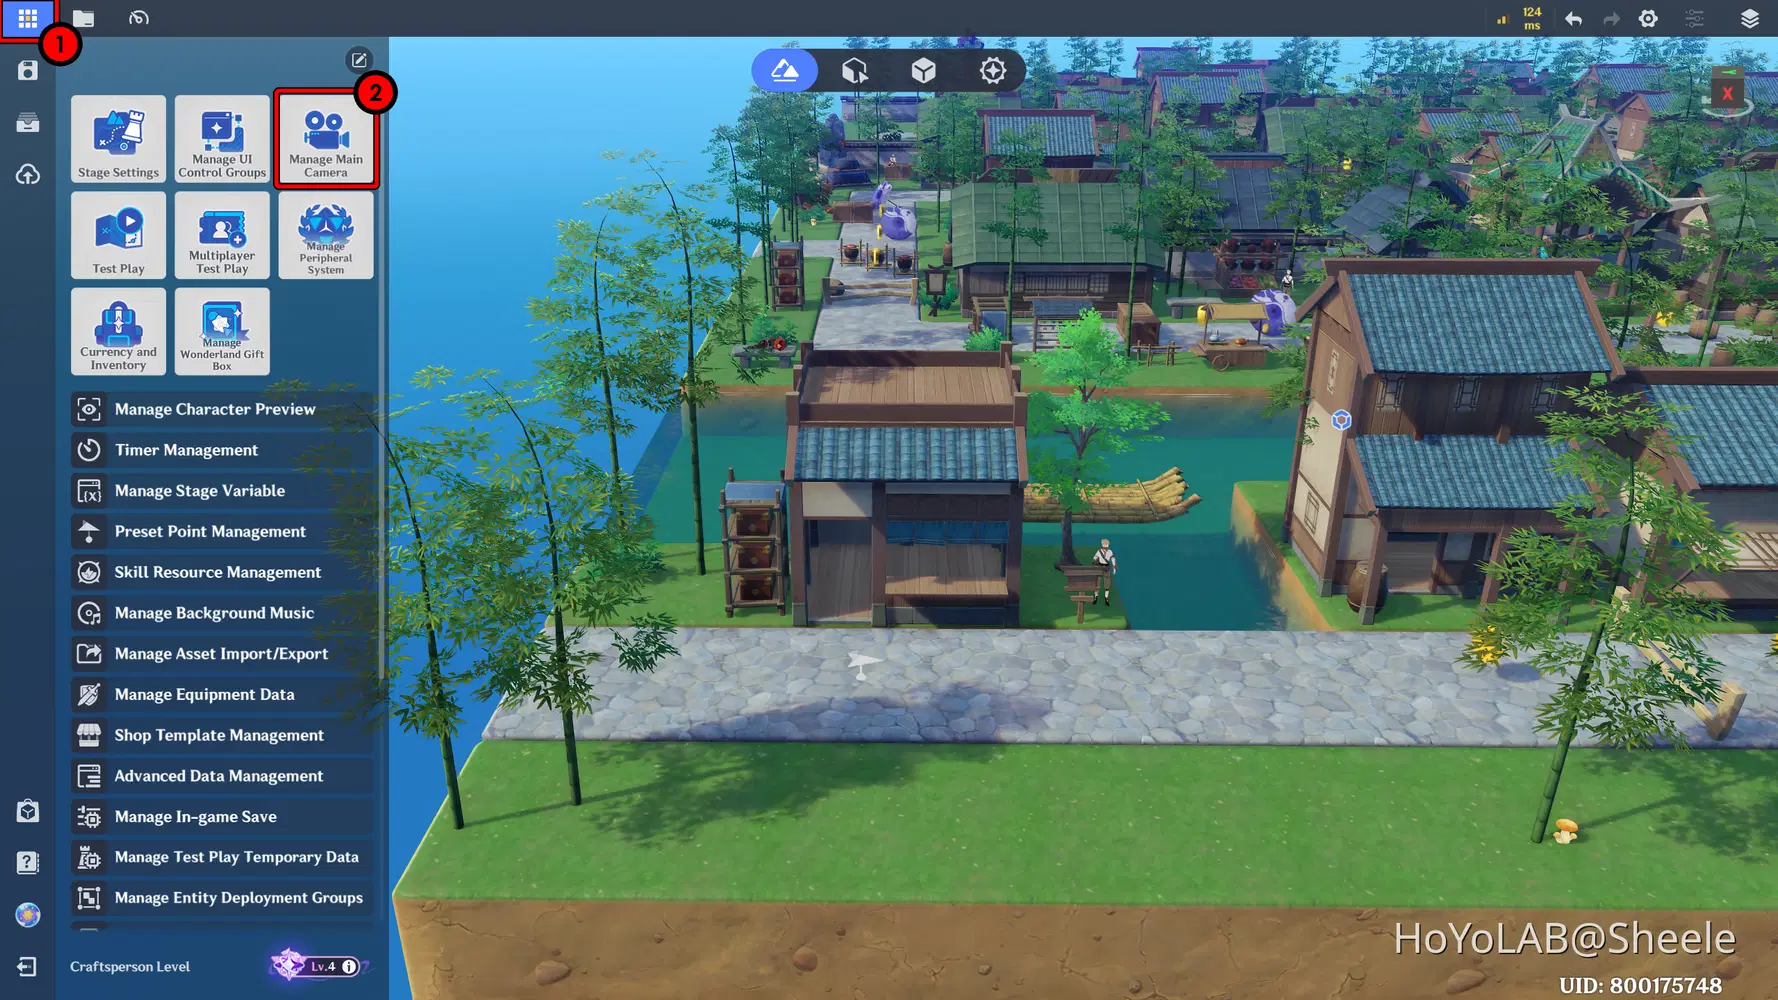
The next step is Setting up the Camera for when the game is played. This is an important part, as the camera determines how players will view and experience your game. In this example, I’m using a side-view camera to follow the player, allowing for a clearer view of the path, obstacles, and coins ahead.
- Open the Main Menu → Select Manage Main Camera.
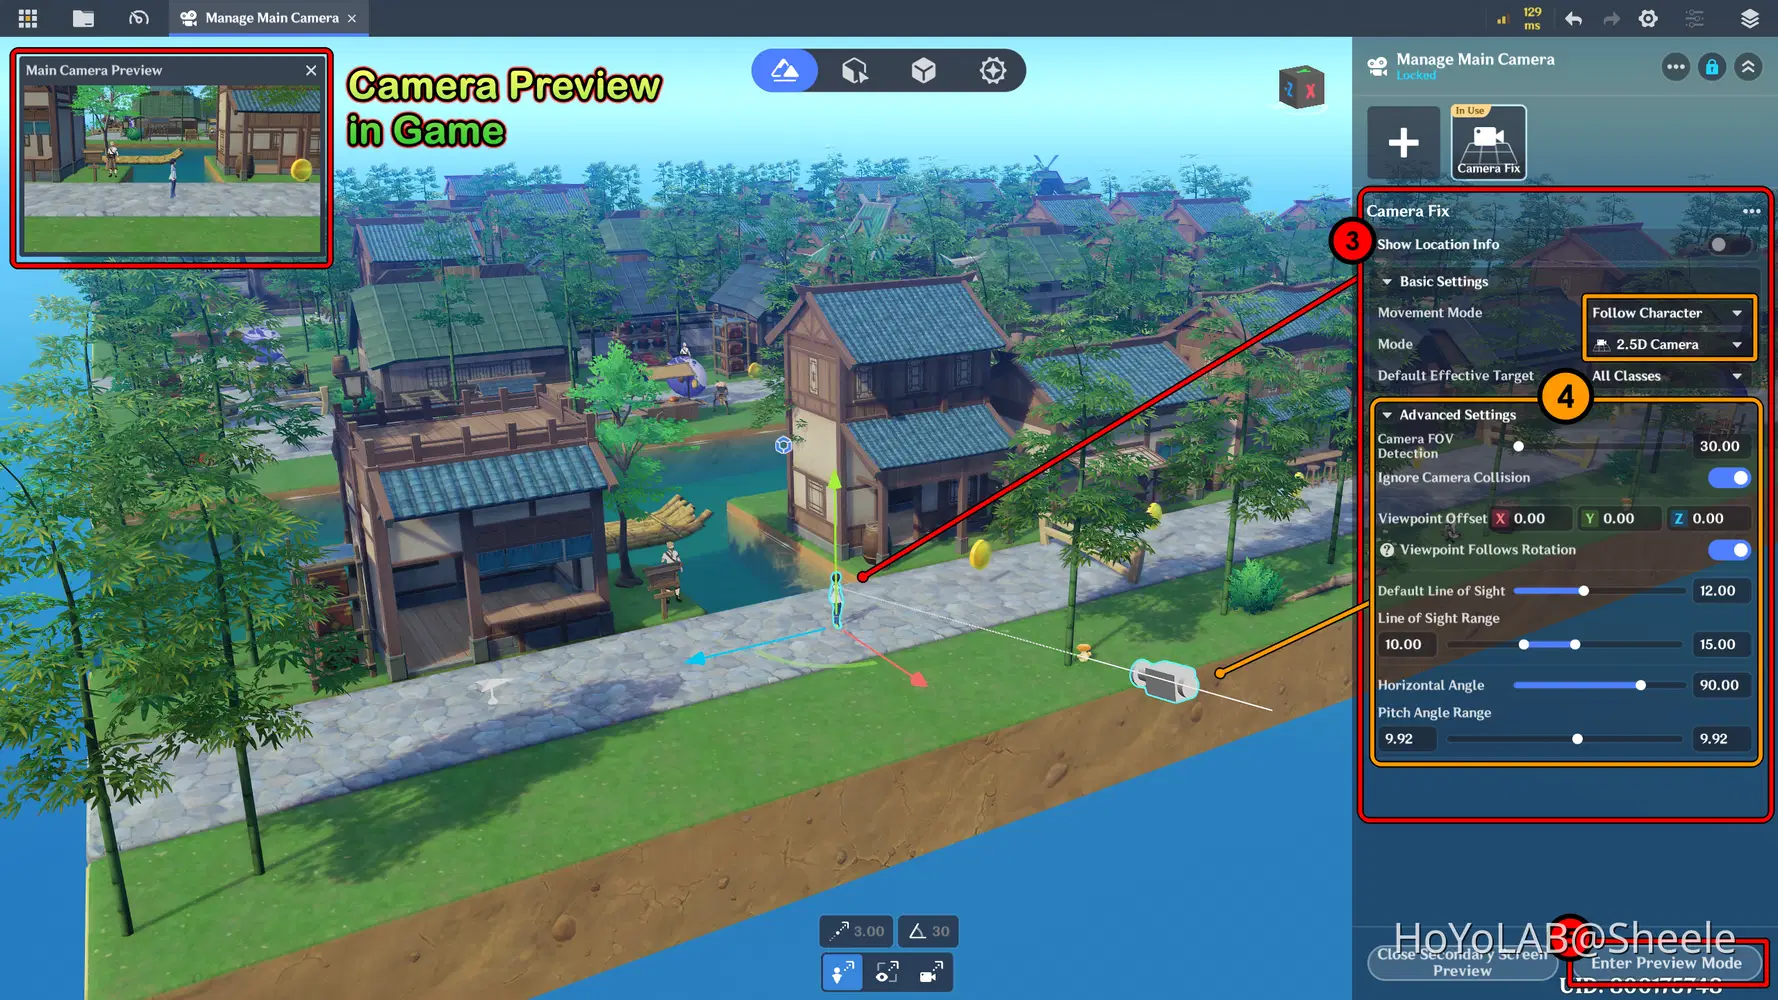
You will then enter Camera Editor mode, where an additional small window will appear at the top-left of the screen. This window functions as a preview, showing how the camera will look when the game is running. On the right side, a panel will open with various camera settings, allowing you to adjust the camera mode, distance, angle, and other parameters.
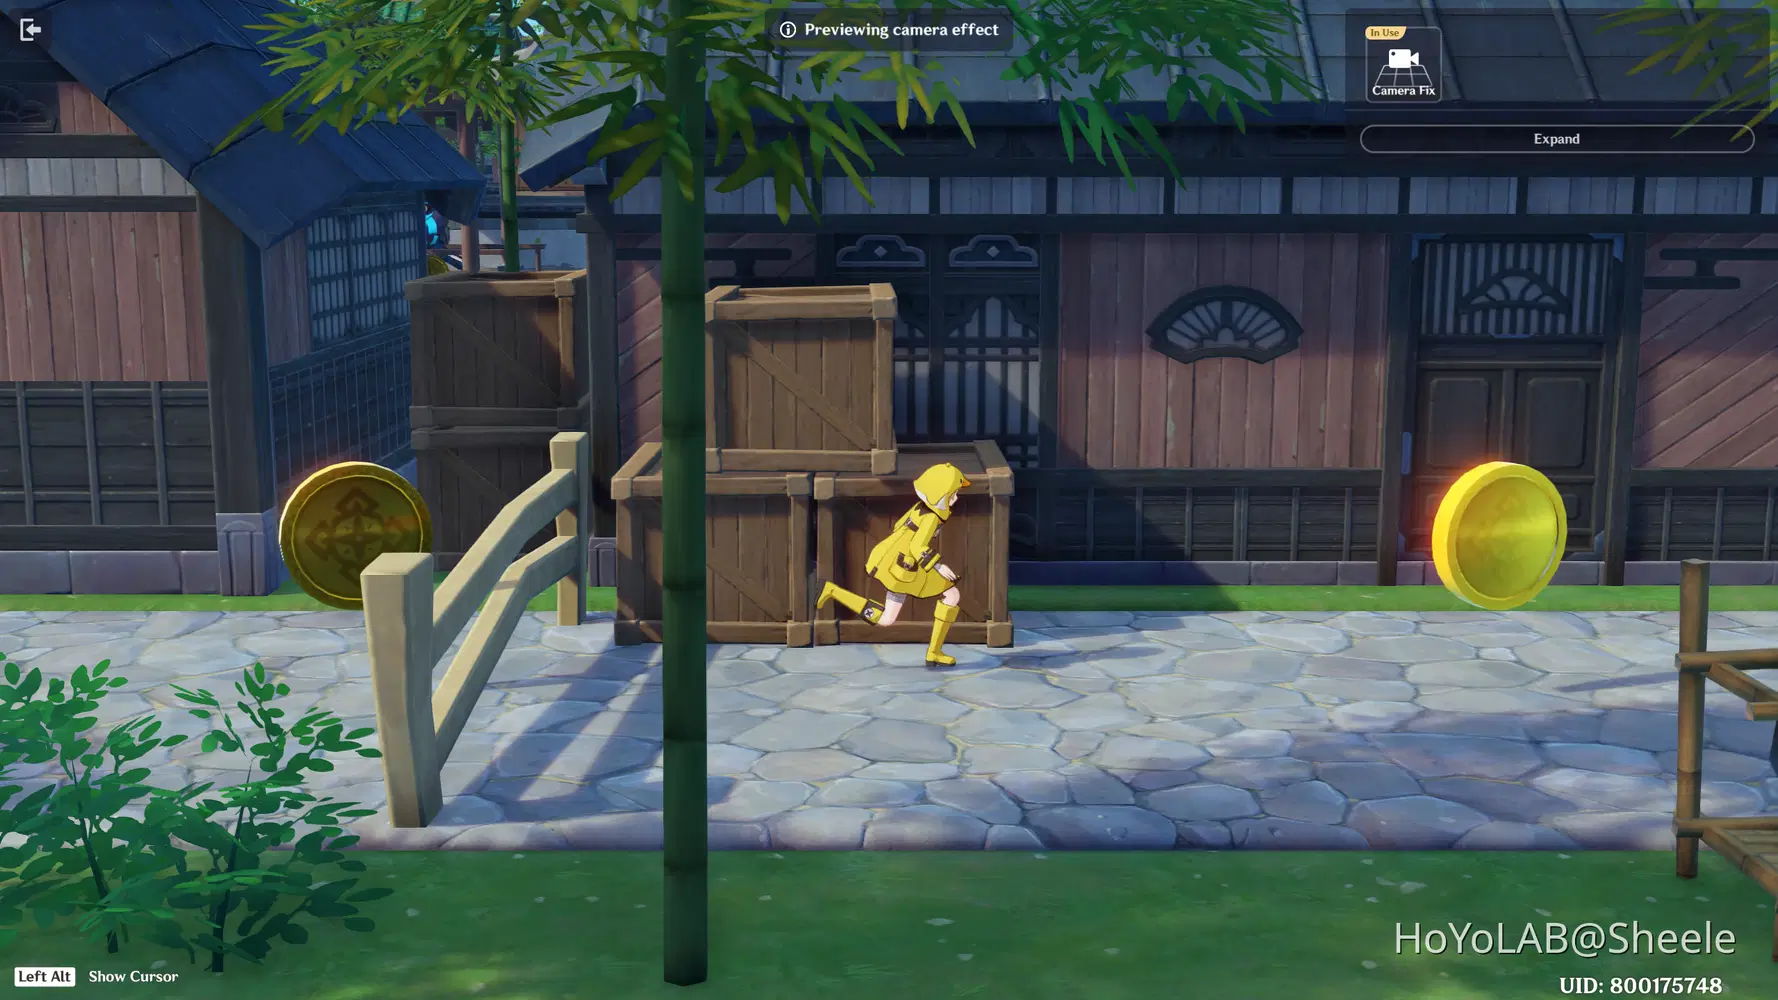
For this game, I use the 2.5D Camera mode. You can also select Enter Preview Mode to see the full camera view as it will appear during gameplay.
Here is the Camera view that will be used during gameplay. The camera is positioned from a side perspective, allowing it to follow and highlight the player’s movement along the path.
Chapter 5: Timer, Coin & Victory Node Graph
✦ Timer
In this step, you will add a Timer function. The timer acts as a time limit for the game and serves as a reference for players to complete the challenge within the given duration.
- Open the Main Menu → Select Timer Management.
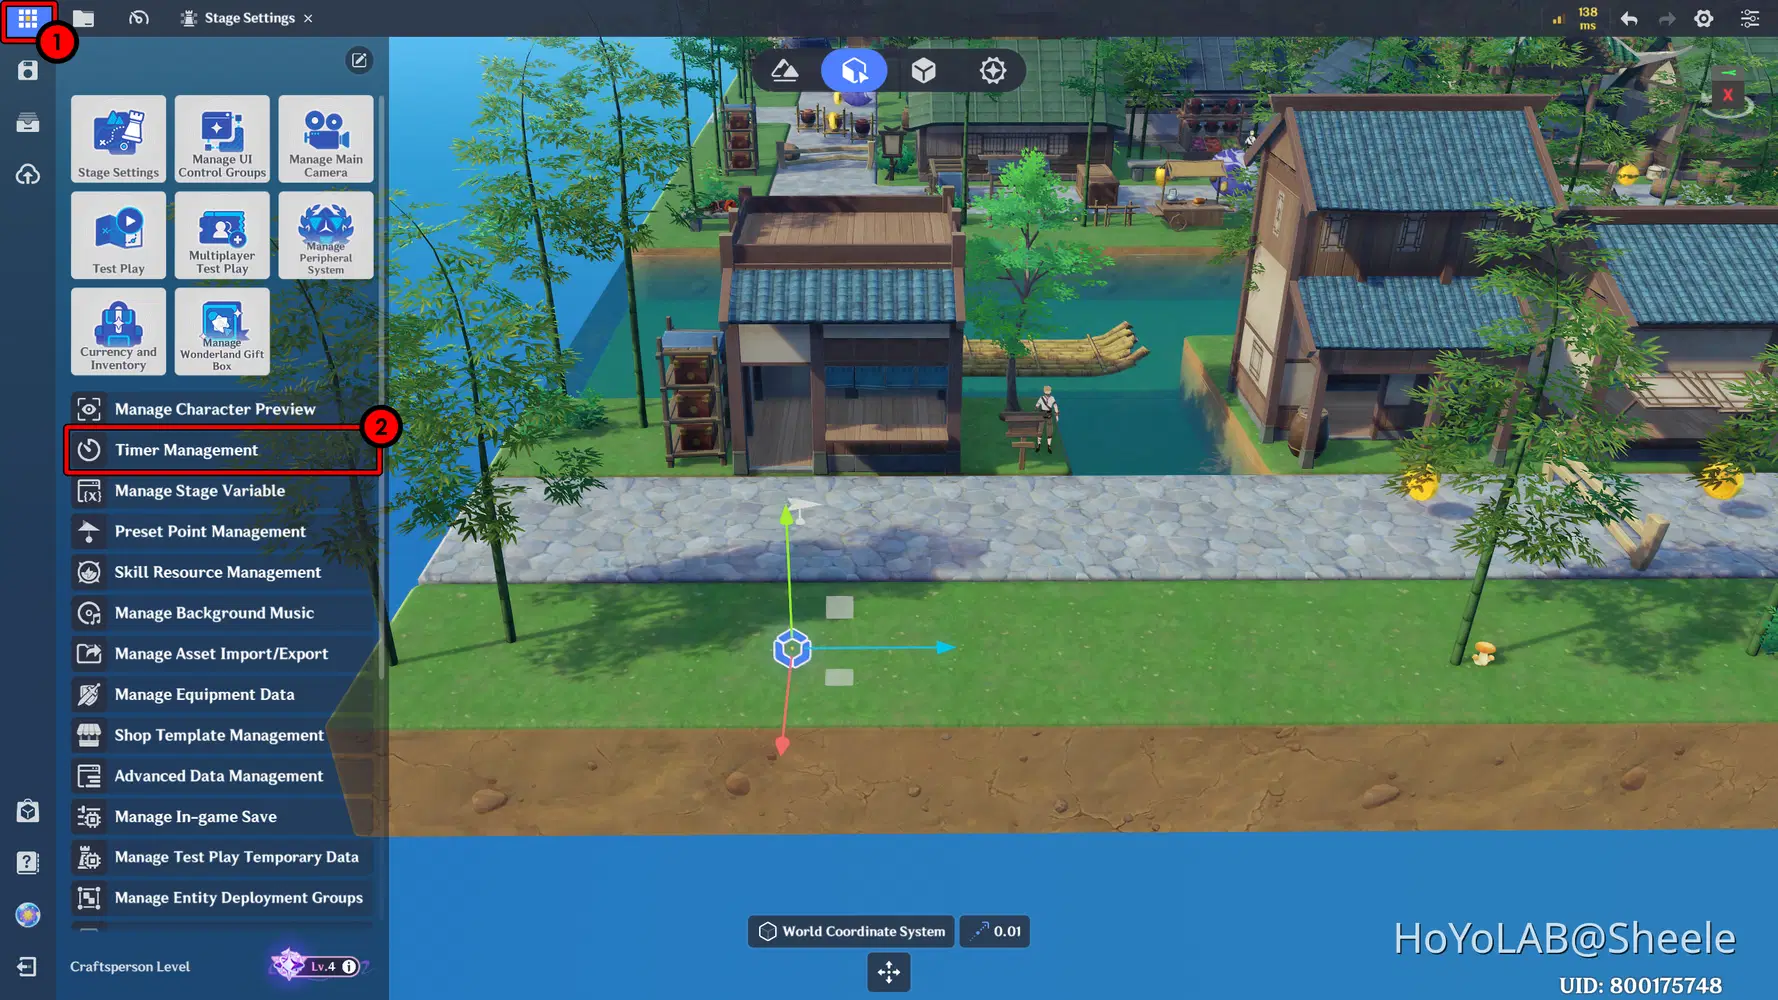
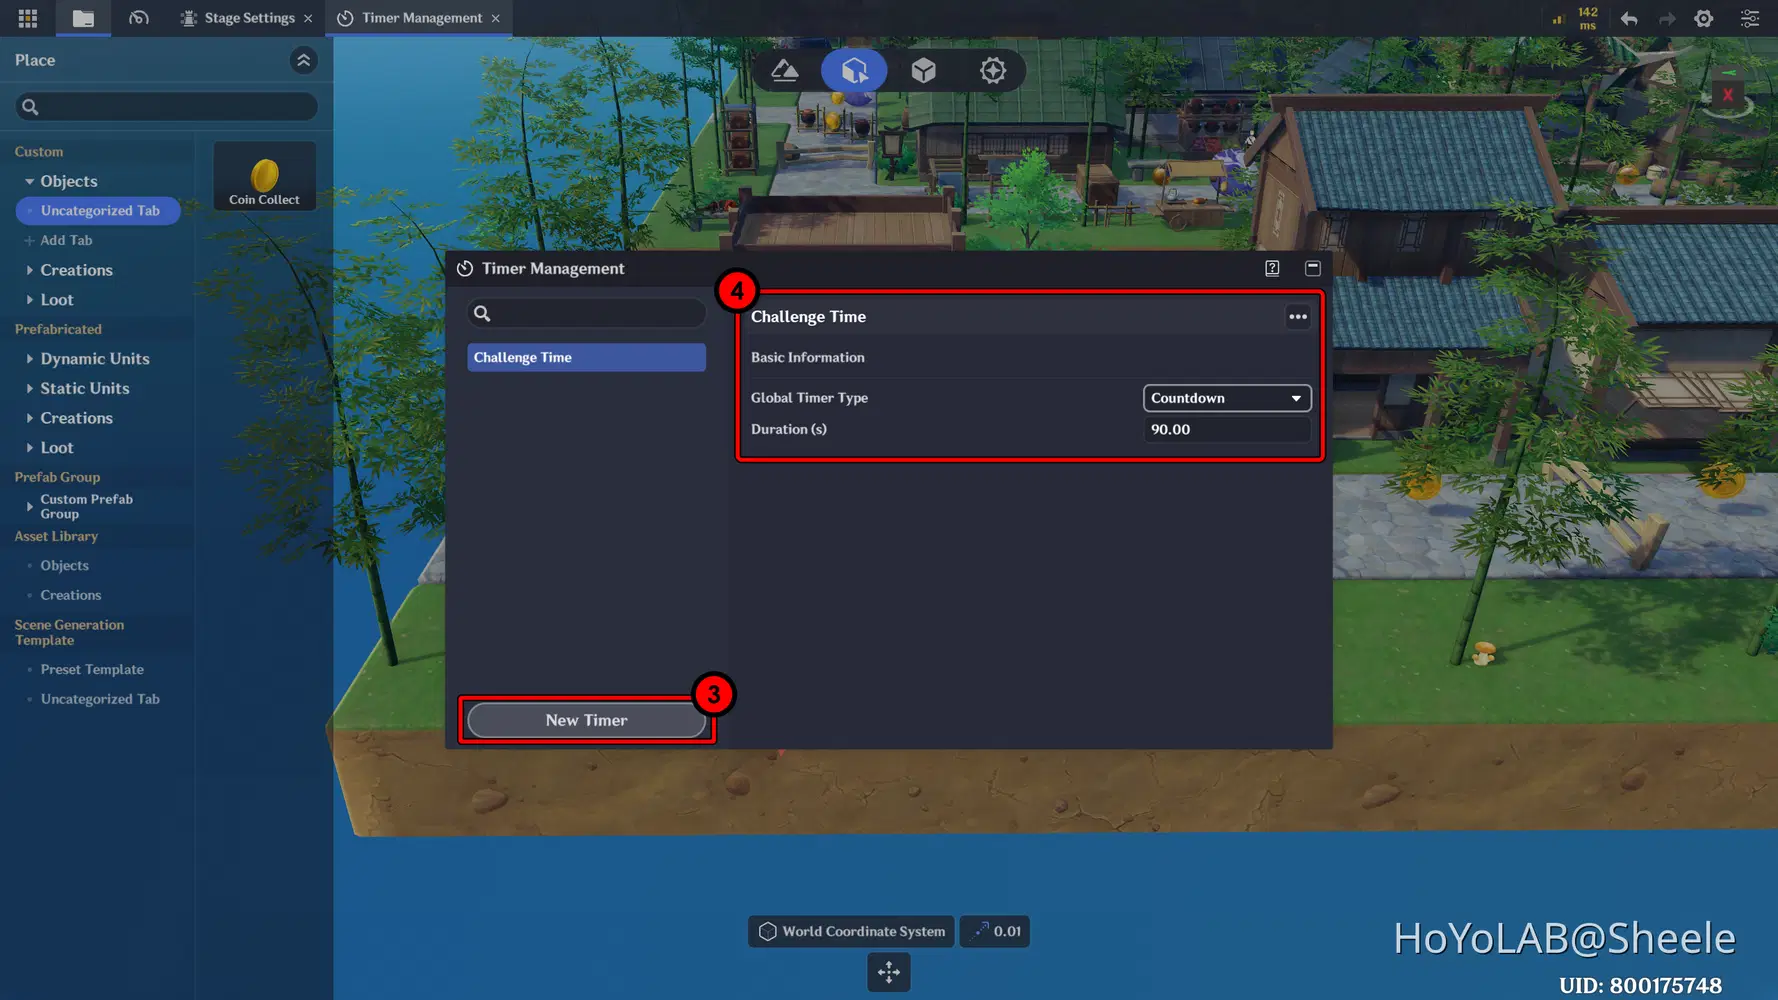
A new window will appear, then click Add Timer. Give your timer a name-here, I renamed it to Challenge Time. Set the Timer Type to Countdown, which will count down the time for the challenge, and set the duration to 90 seconds (1 minute 30 seconds).
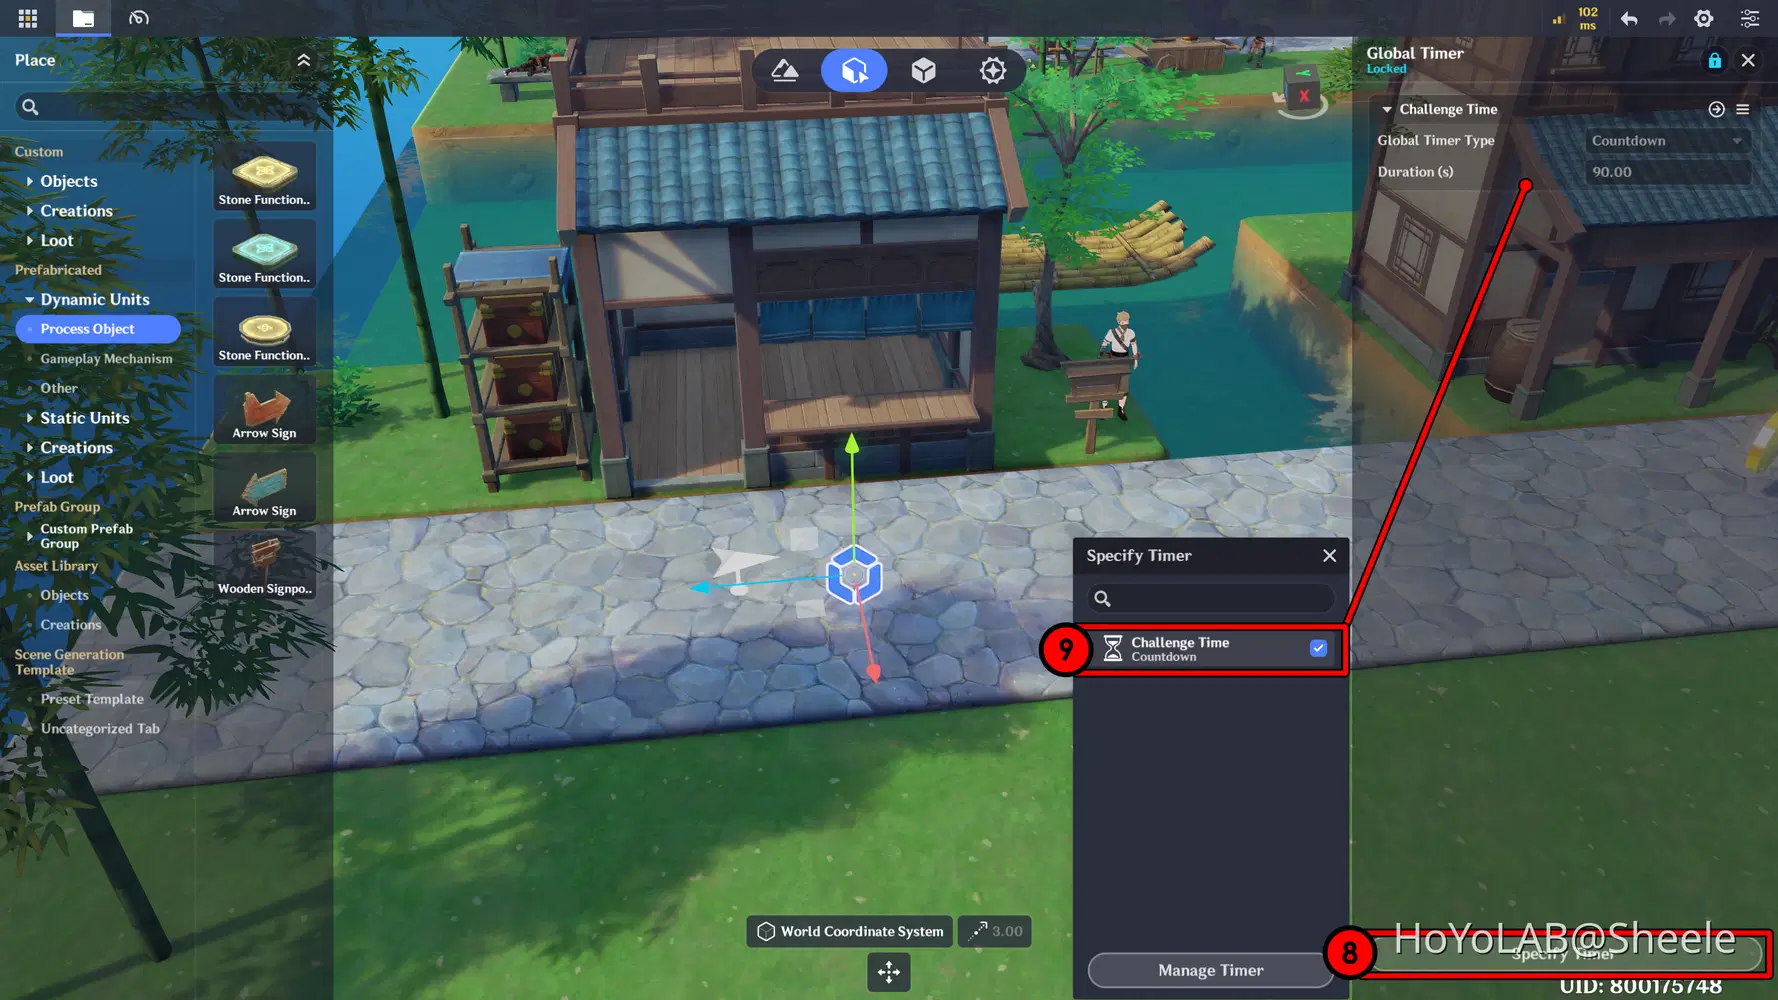
- Next, add the Global Timer component to the Stage Entity. You can find the Stage Entity in the scene, represented by a hexagon-shaped icon.
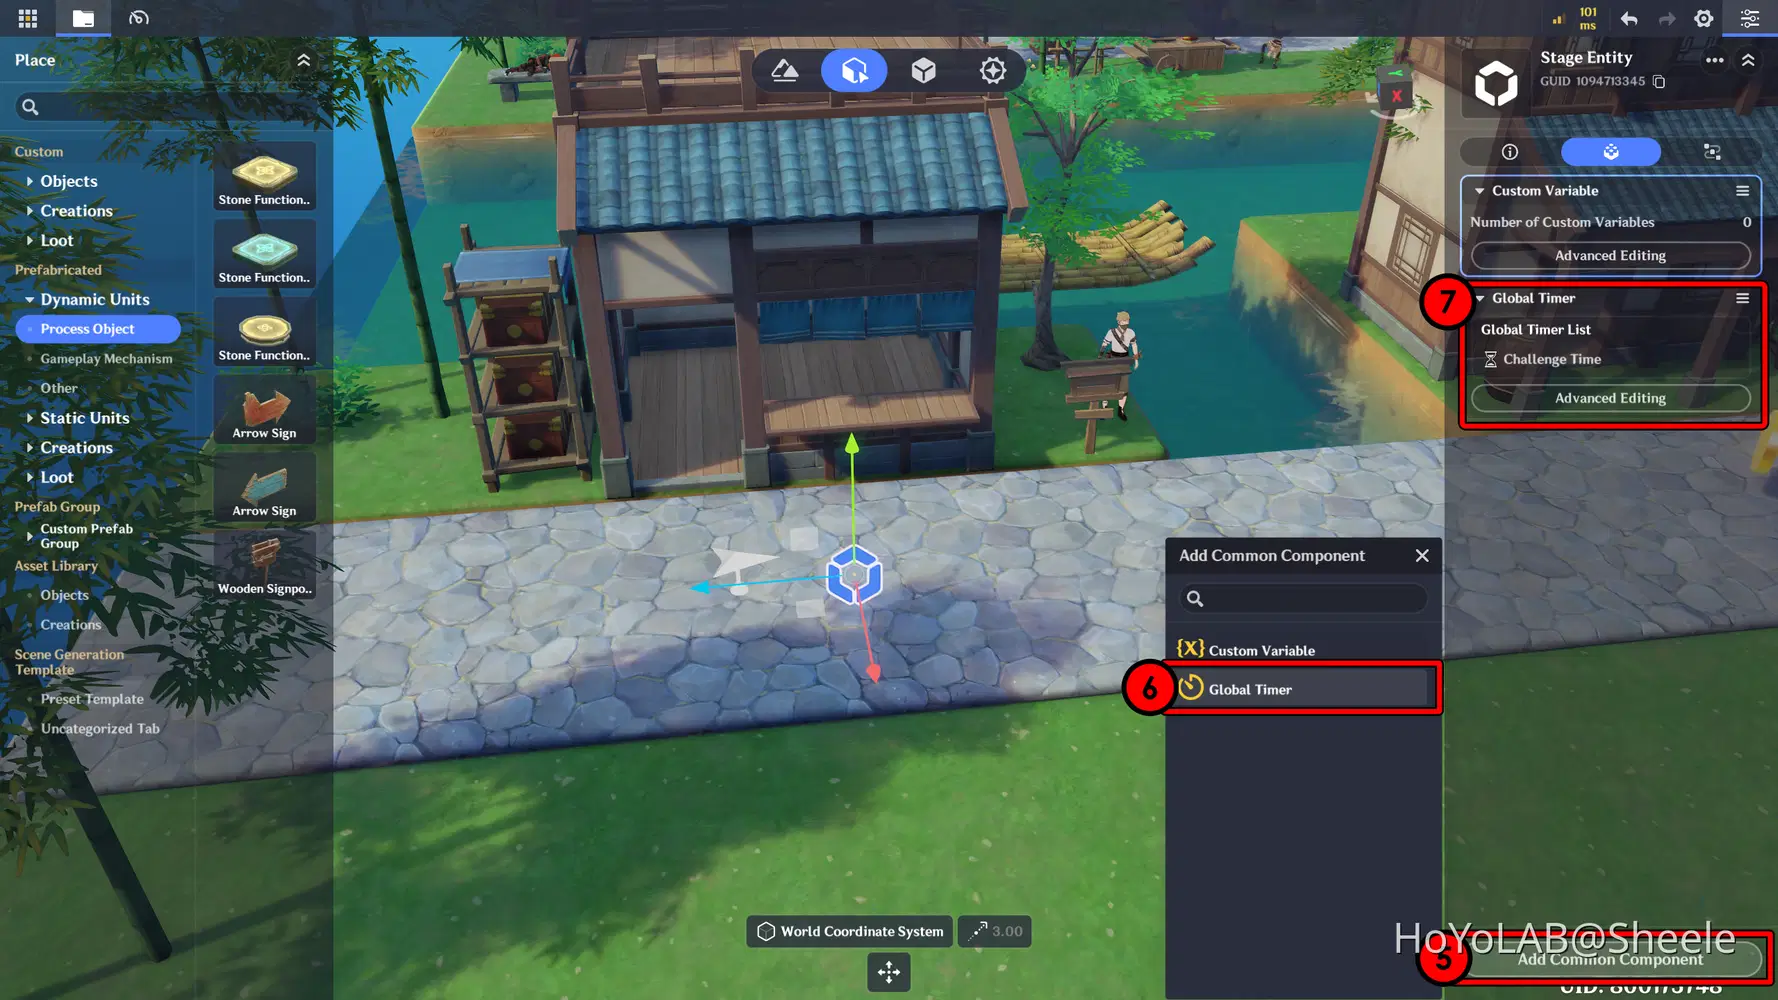
- In the Global Timer menu, select Specify Timer and choose the timer you created earlier in the Timer Management menu.
The next step is to add and Display the Timer on the Screen when the game starts, so players can easily track the remaining time during gameplay.
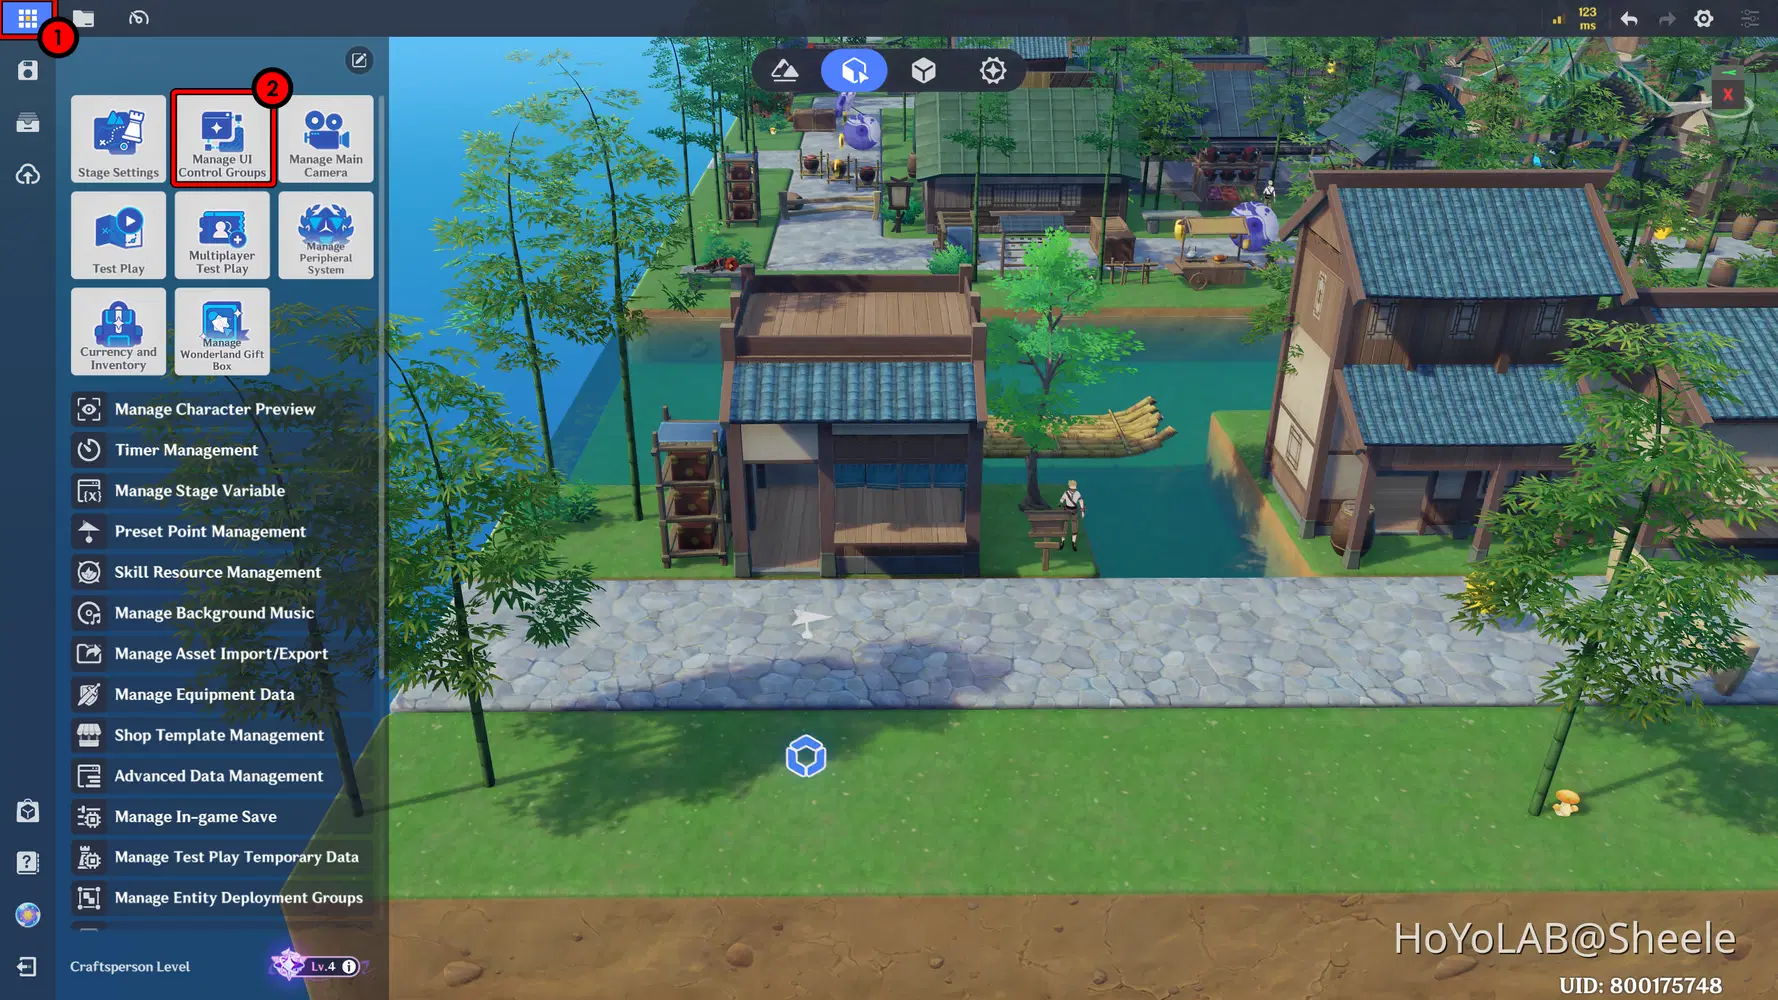
- Open the Main Menu → Select and open Manage UI Control Groups.
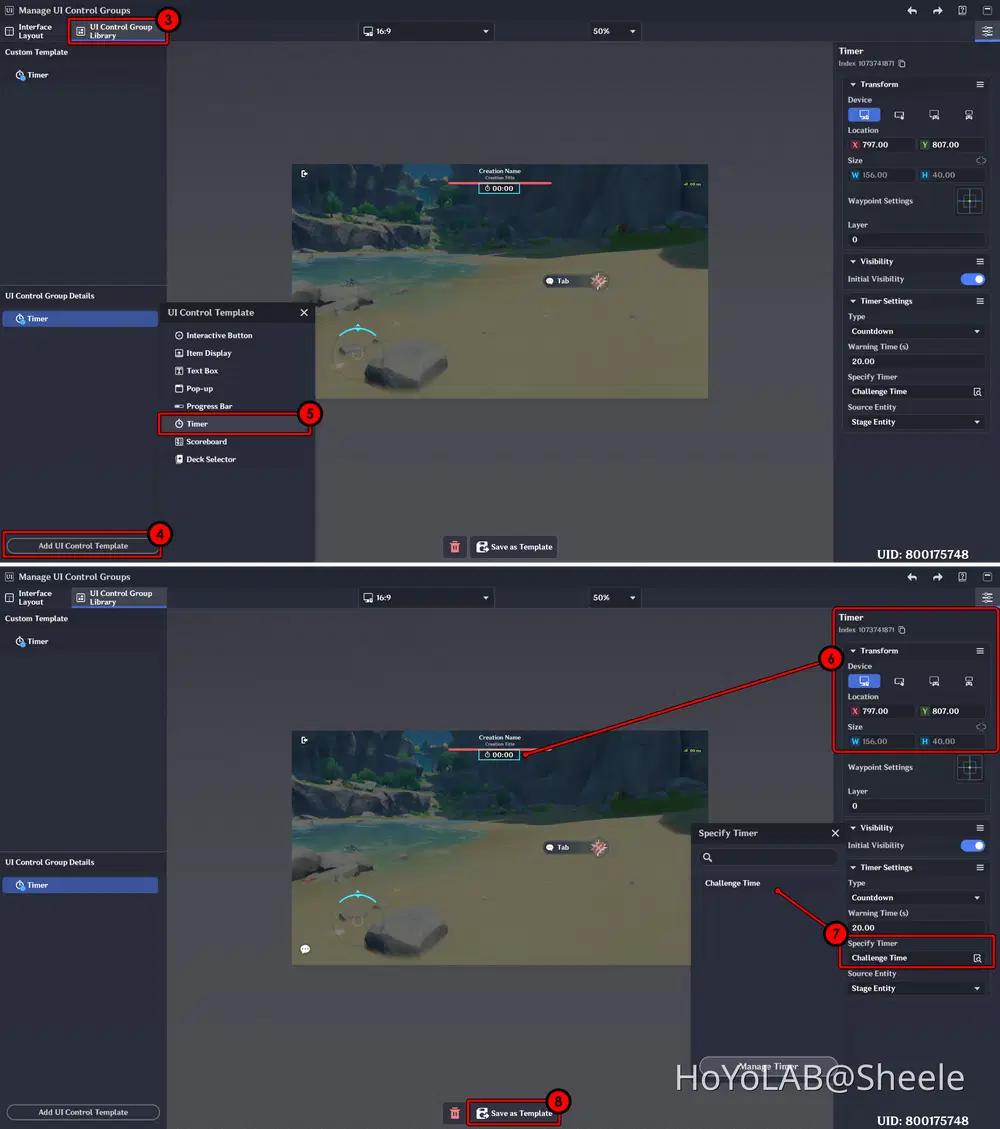
- A new window will appear. Go to the UI Control Group Library → Add a UI Control Group Template → Select Timer.
Then, position the timer in the center of the screen. After that, set Specify Timer to the timer you created earlier in the Timer Management menu. Don’t forget to save it as a template.
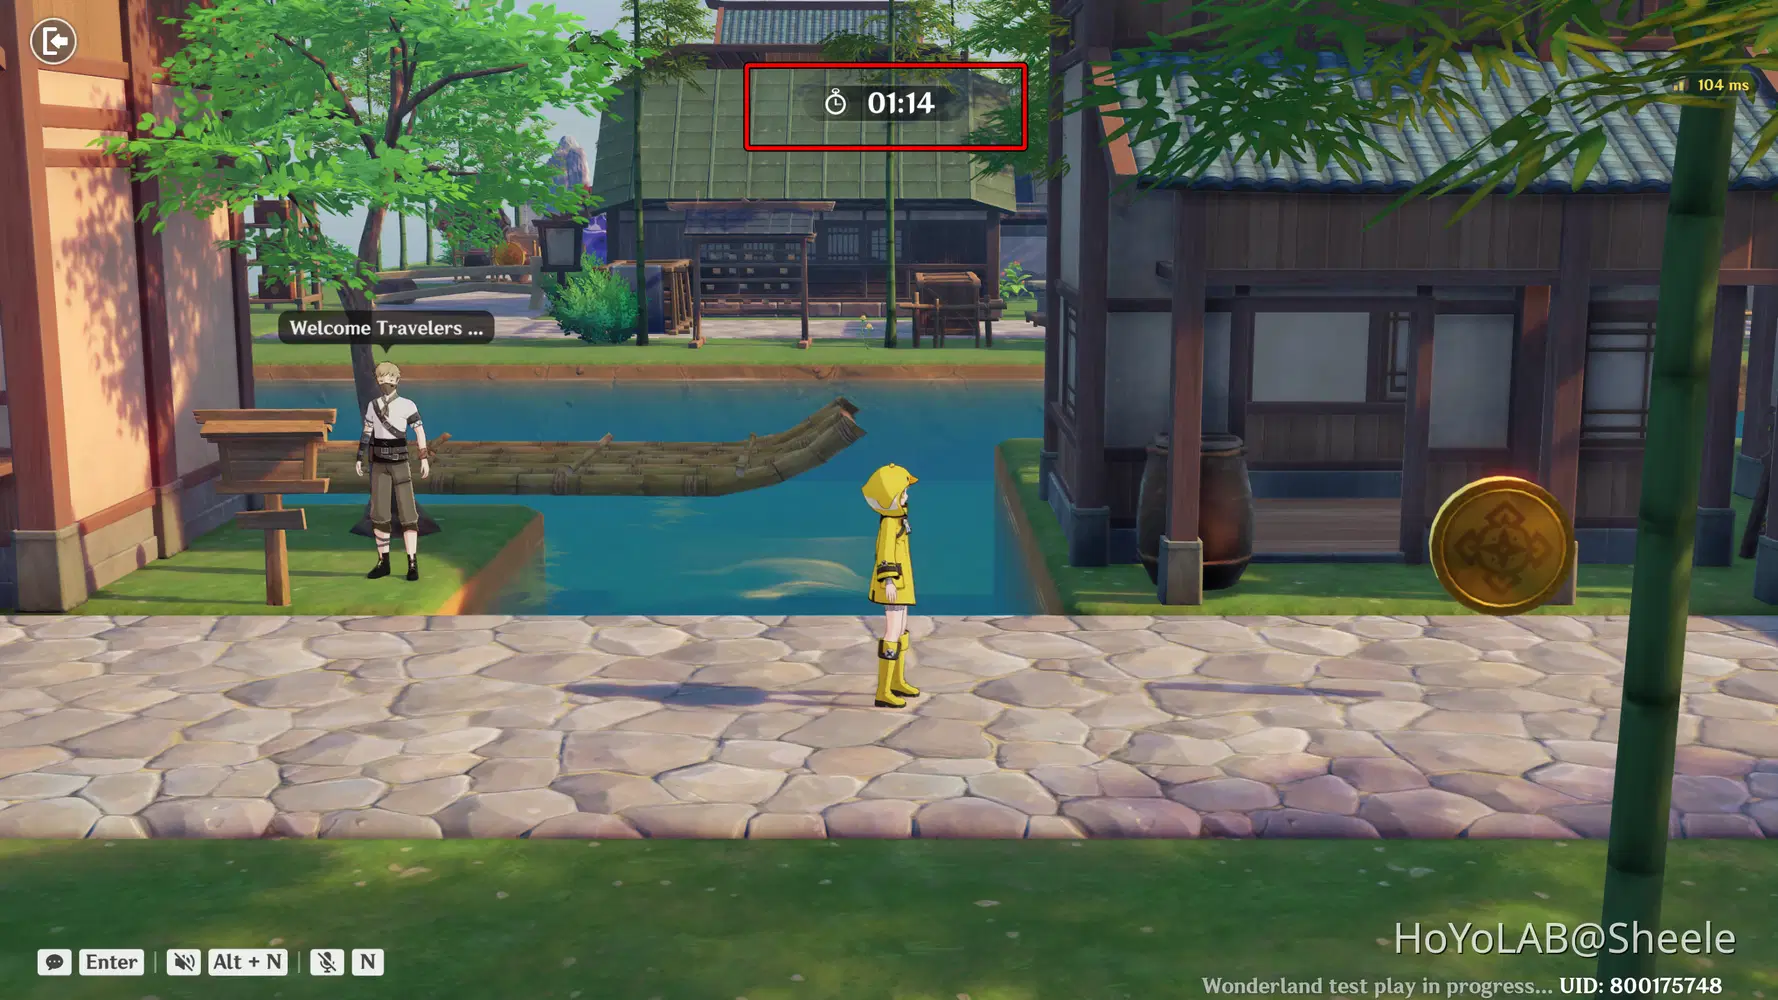
Here is how it will look when the game is running. A countdown timer will appear at the center of the screen, and when the remaining time reaches 20 seconds, a warning will be displayed.
Next, you will create a new Node with the function that triggers when the timer runs out, which means the player loses the game.
- Open Miliastra Sandbox → Create a new node in the Server Node Graph.
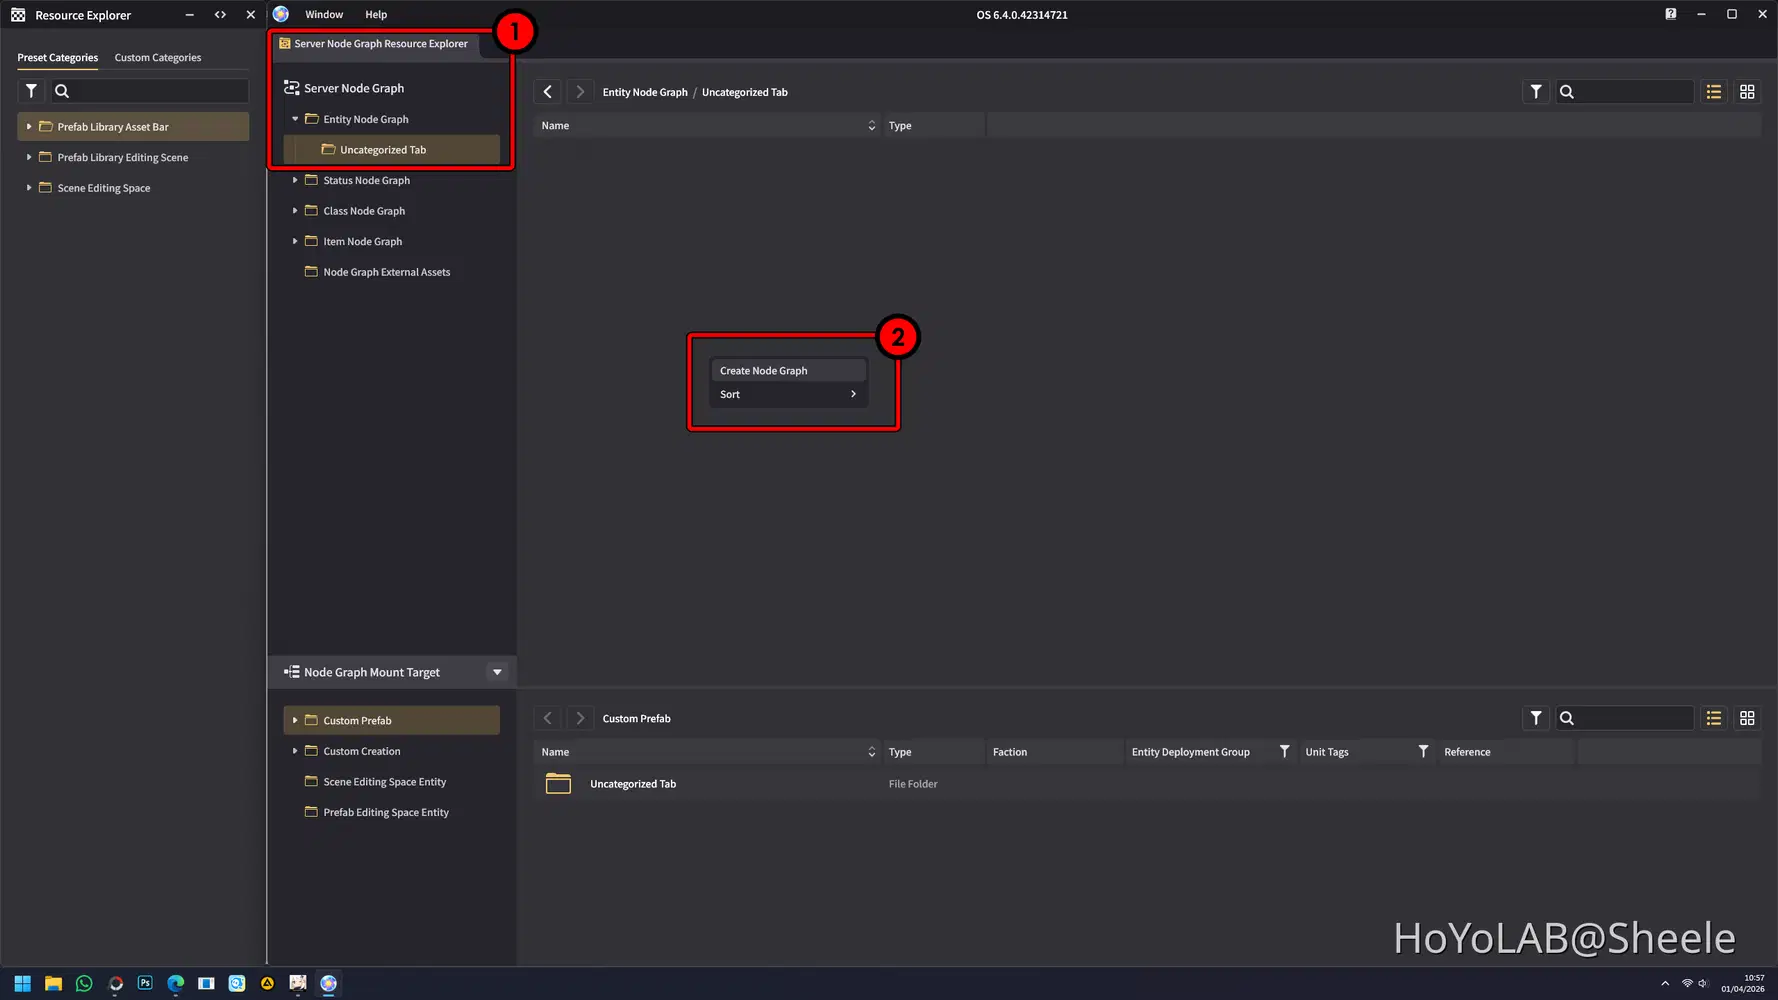
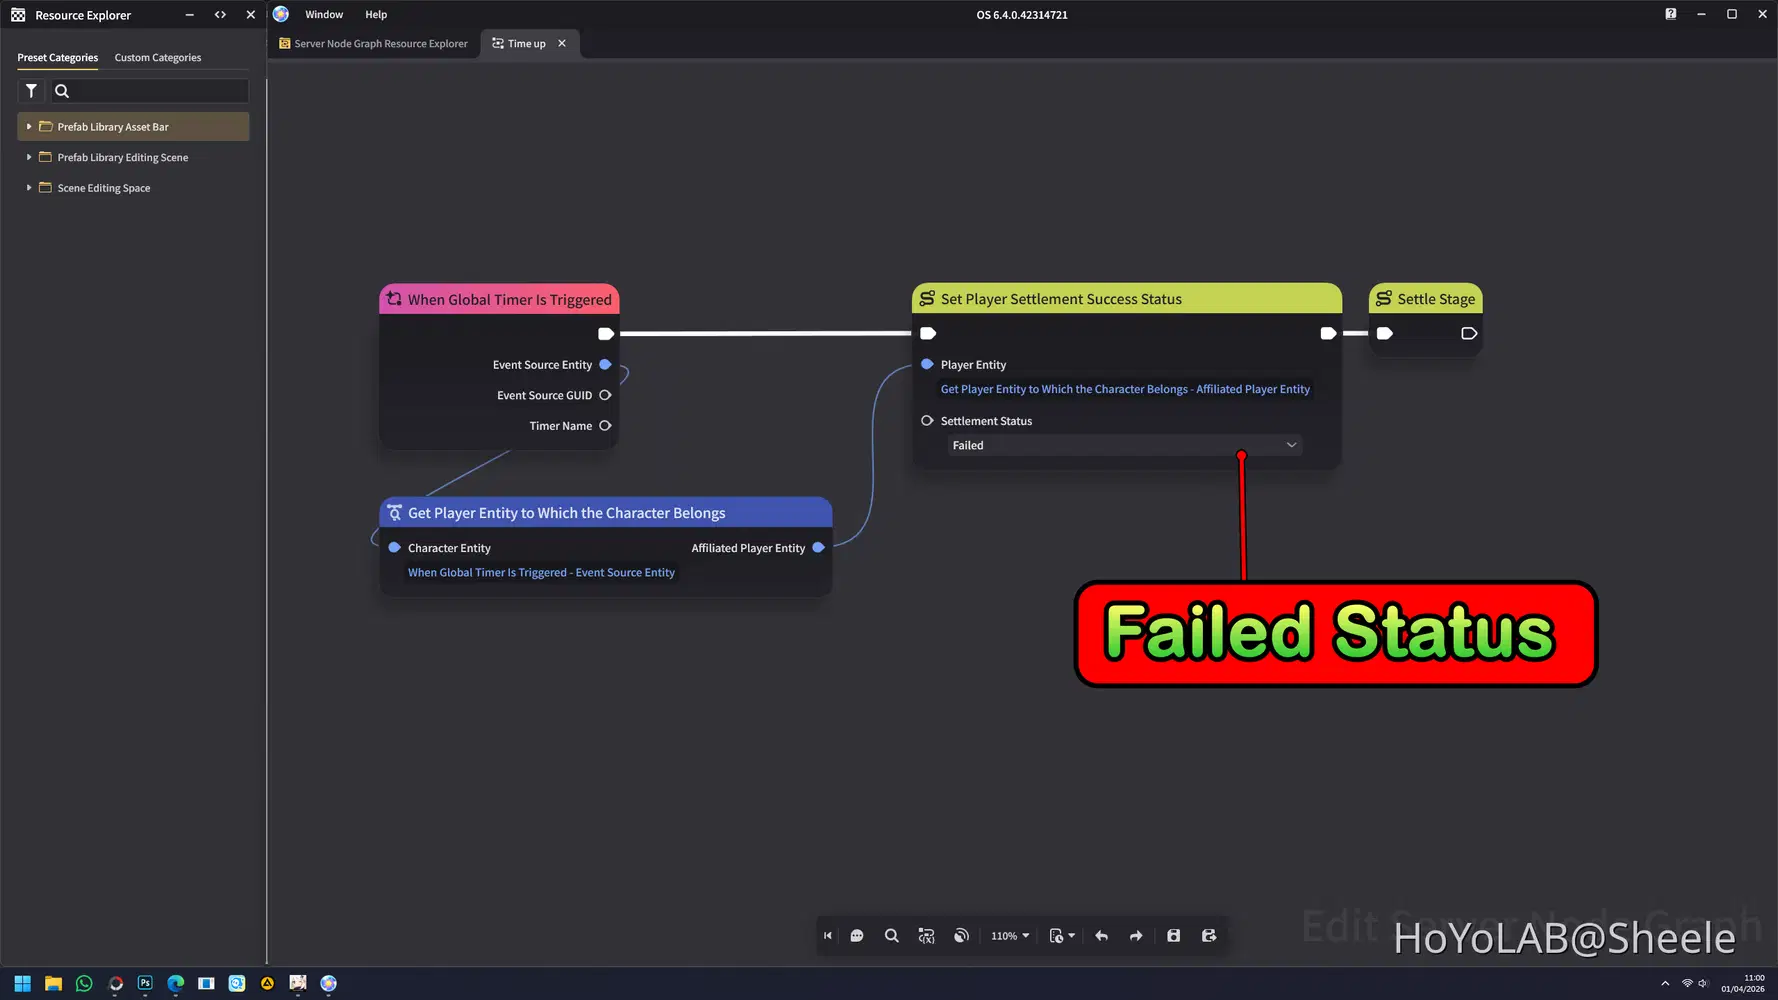
Here is the Node Graph used: when the Global Timer reaches the end of its duration, the player’s completion status will be set to Failed, meaning they lose the game.
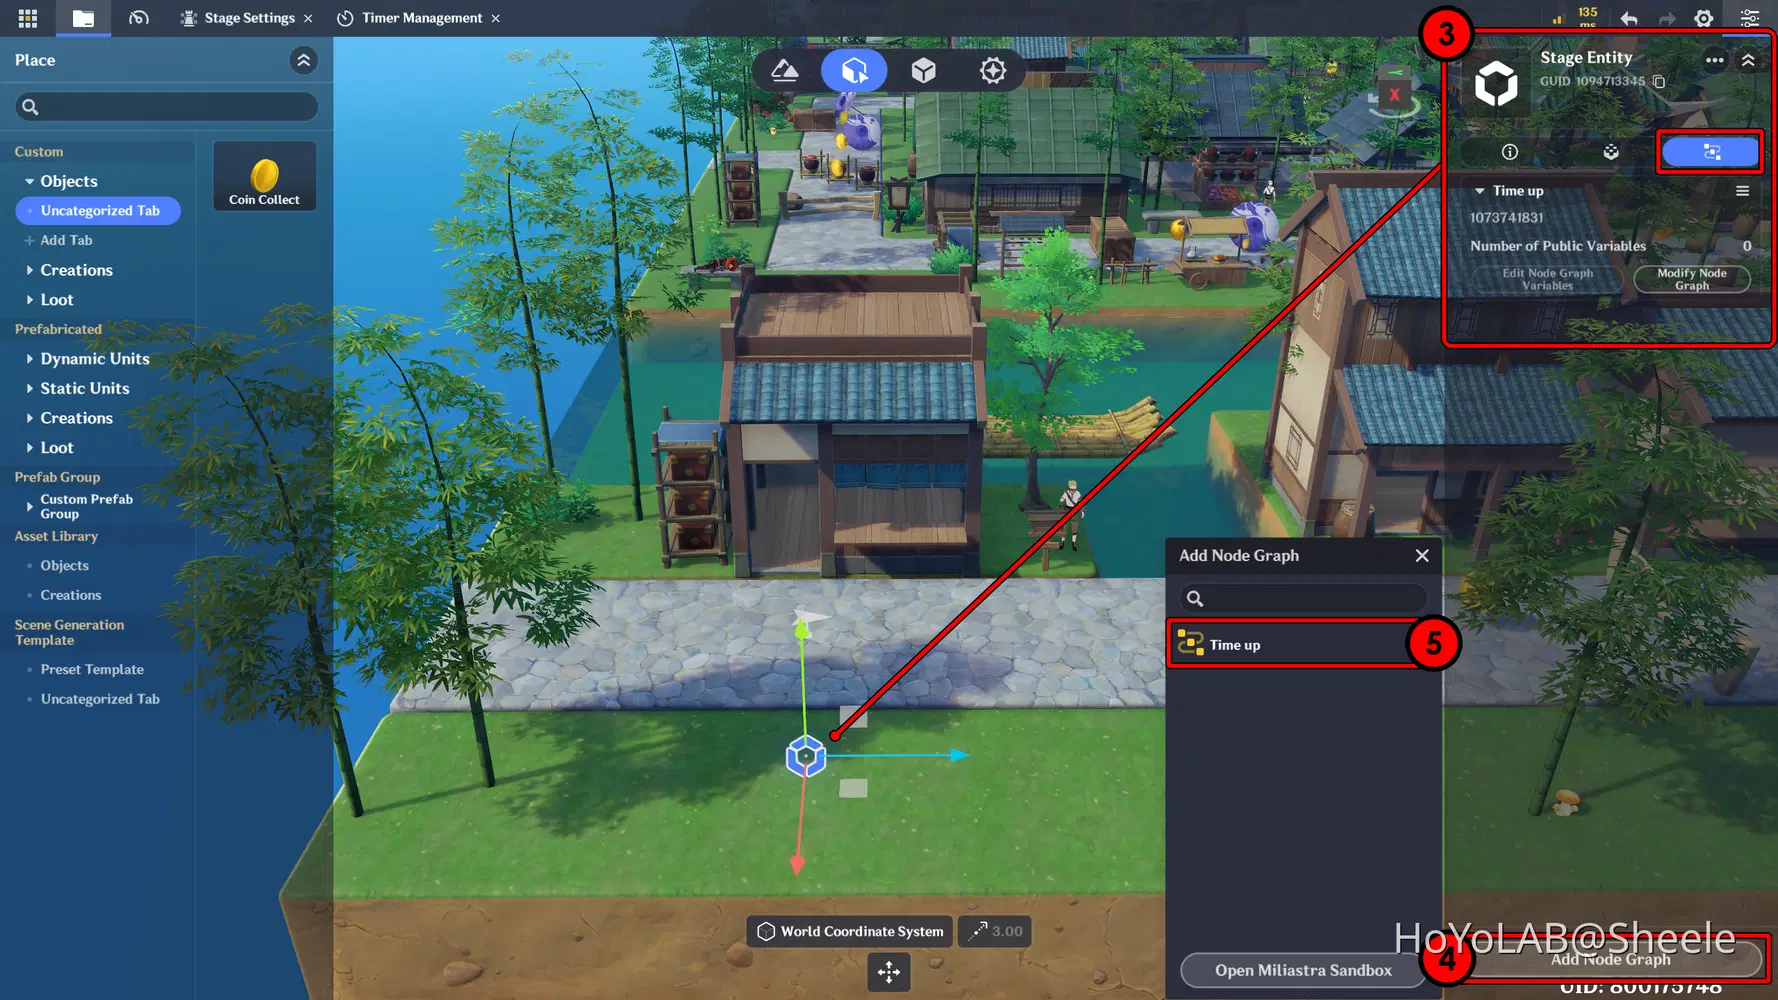
Then, assign the Node Graph you’ve created to the Stage Entity. You can find the Stage Entity in the center of the scene, represented by a hexagon-shaped icon as shown below.
✦ Coin Node Graph
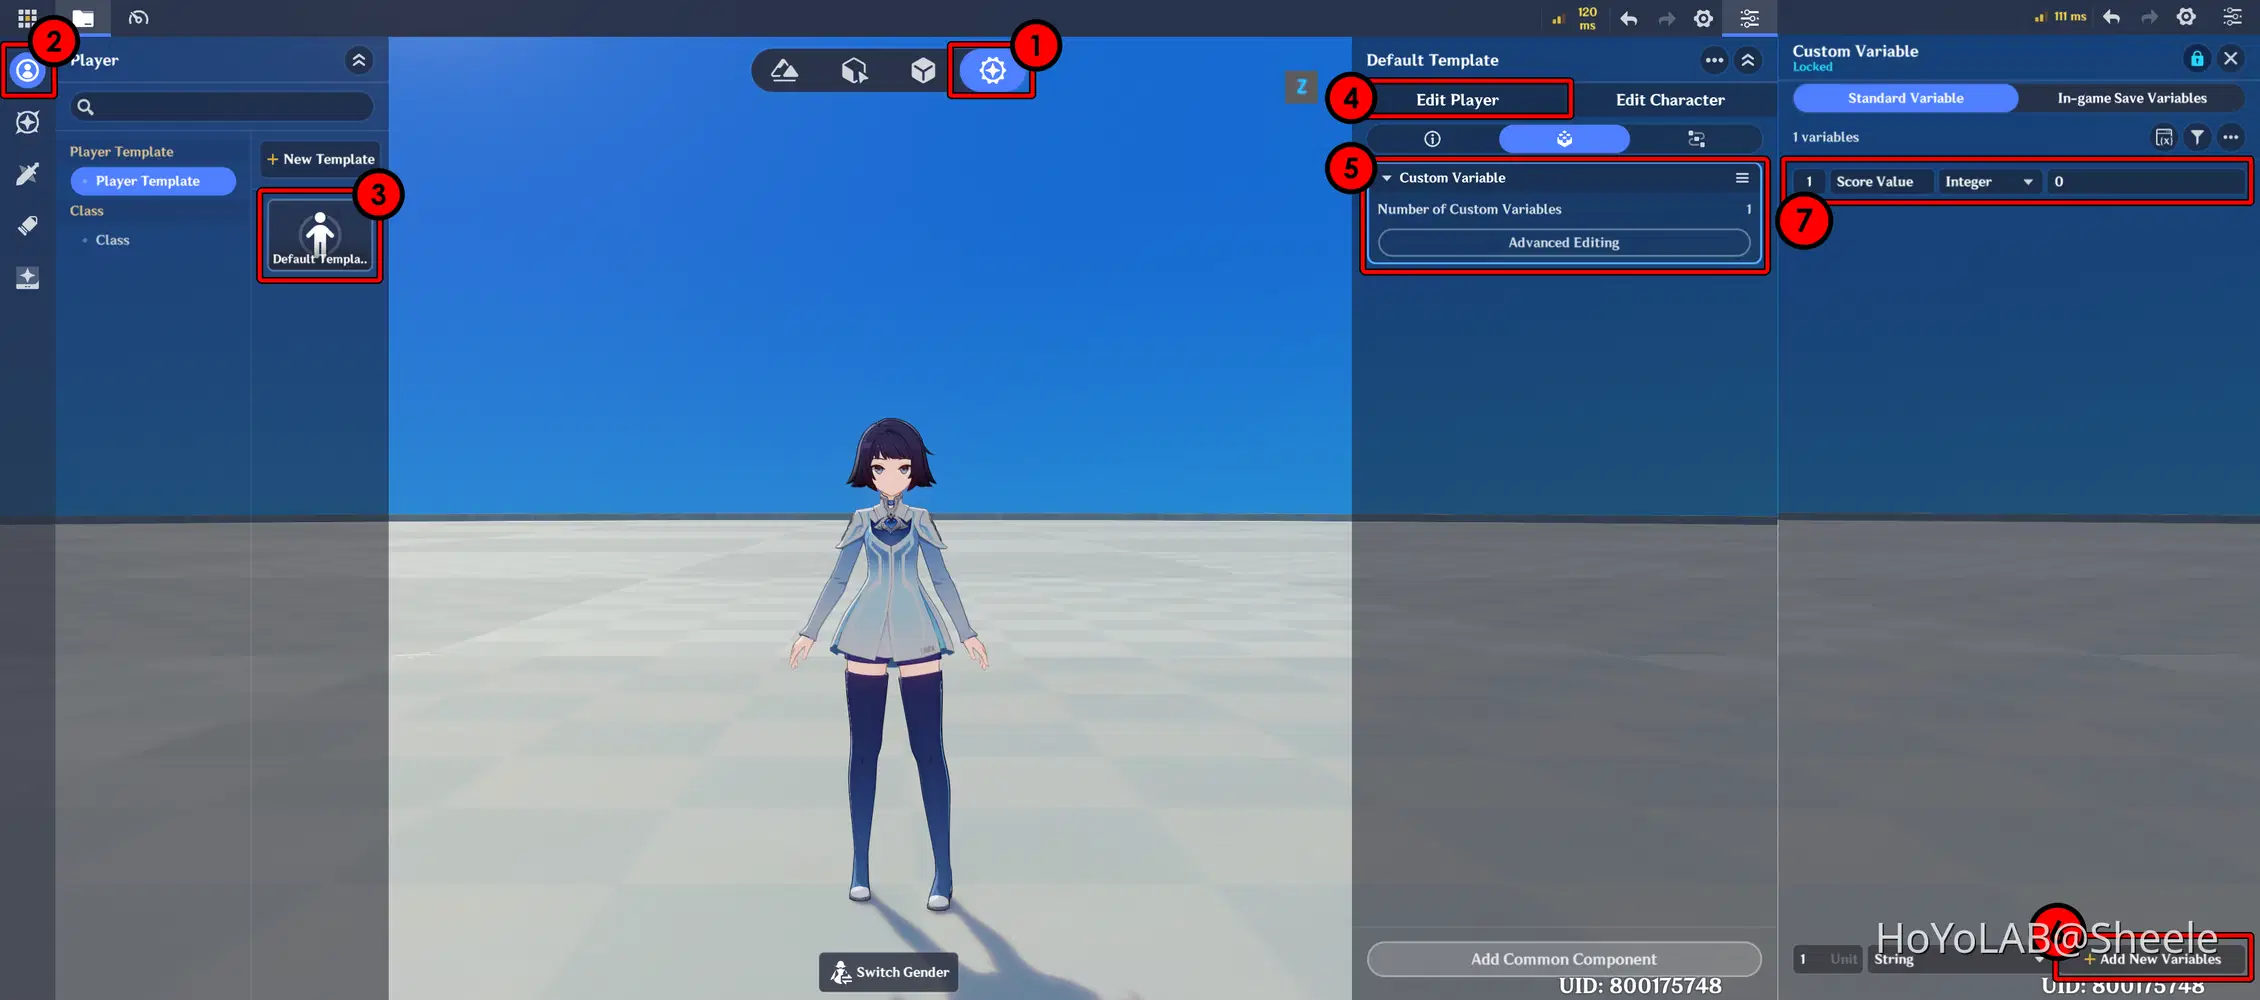
First, create a new Variable for the Player. This variable will be used to store the total number of coins collected during game.
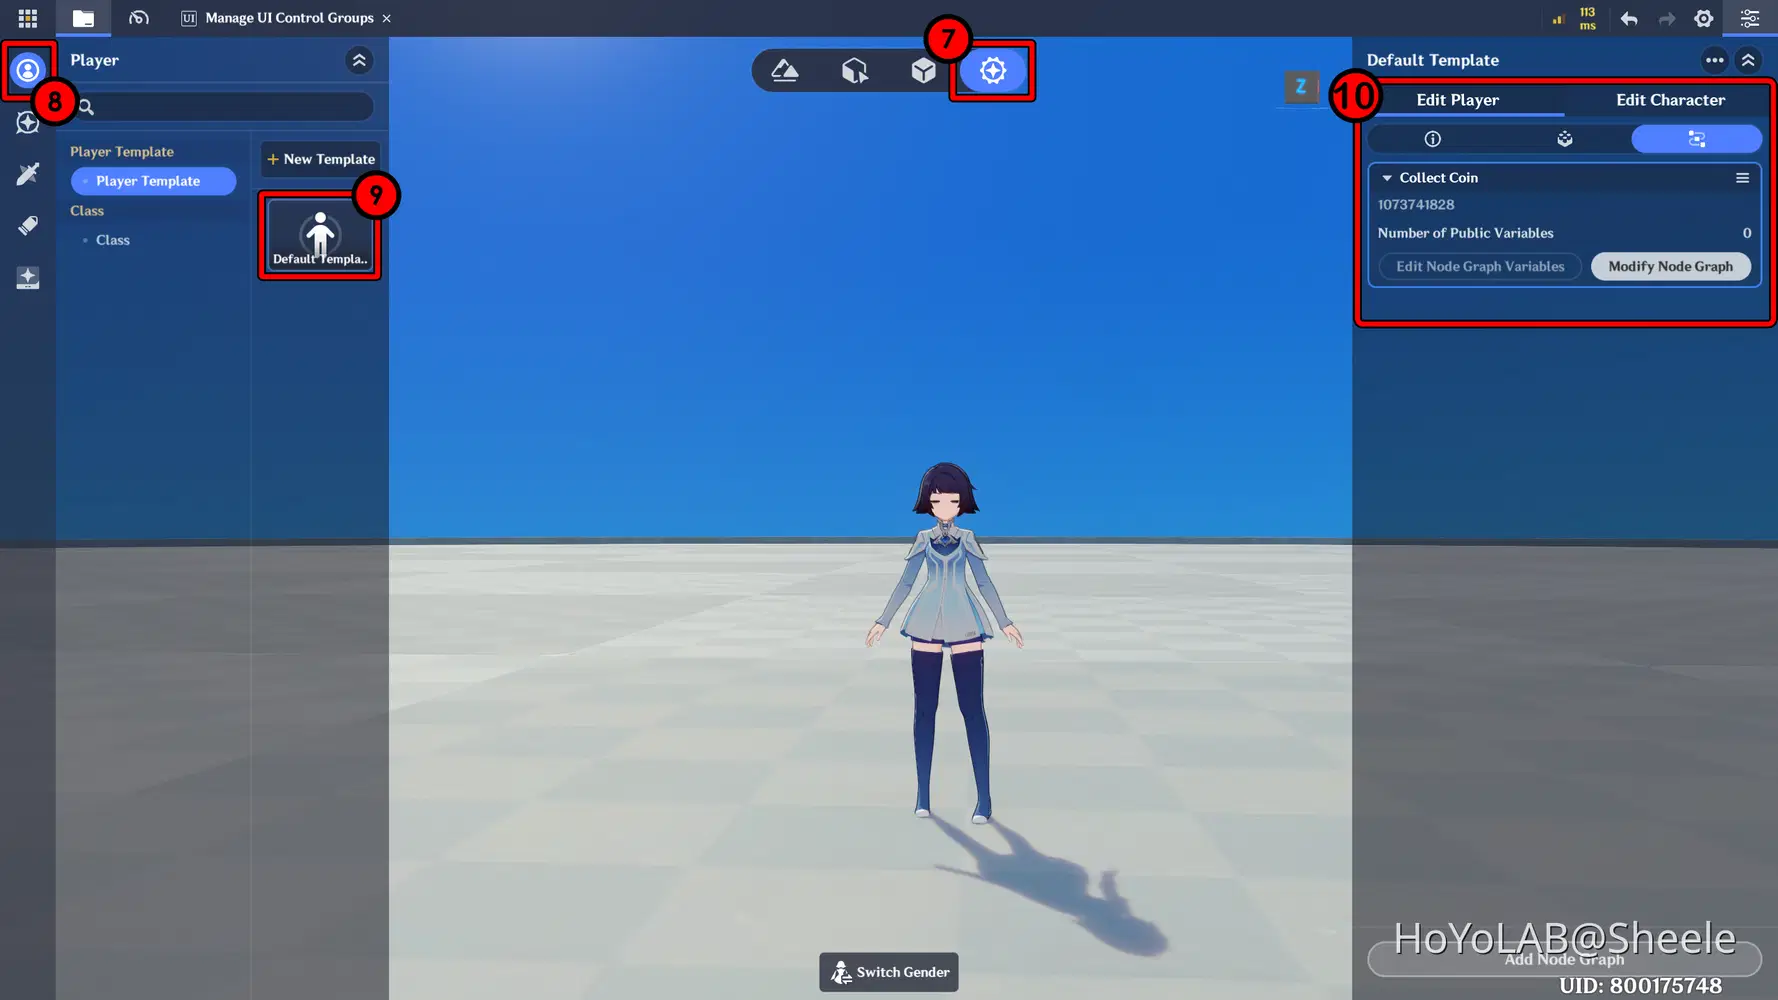
- Go to the Combat Preset menu → Select Player → Choose Default Template → On the right panel, click Edit Player → Go to the Component menu → Select Advanced Editing in the Custom Variable section.
- In the Custom Variable menu → Click Add New Variable → Give it a name → Set the type to Integer with a value of 0.
Next, open the Miliastra Sandbox window to create a Node Graph that will later be attached to the coin.
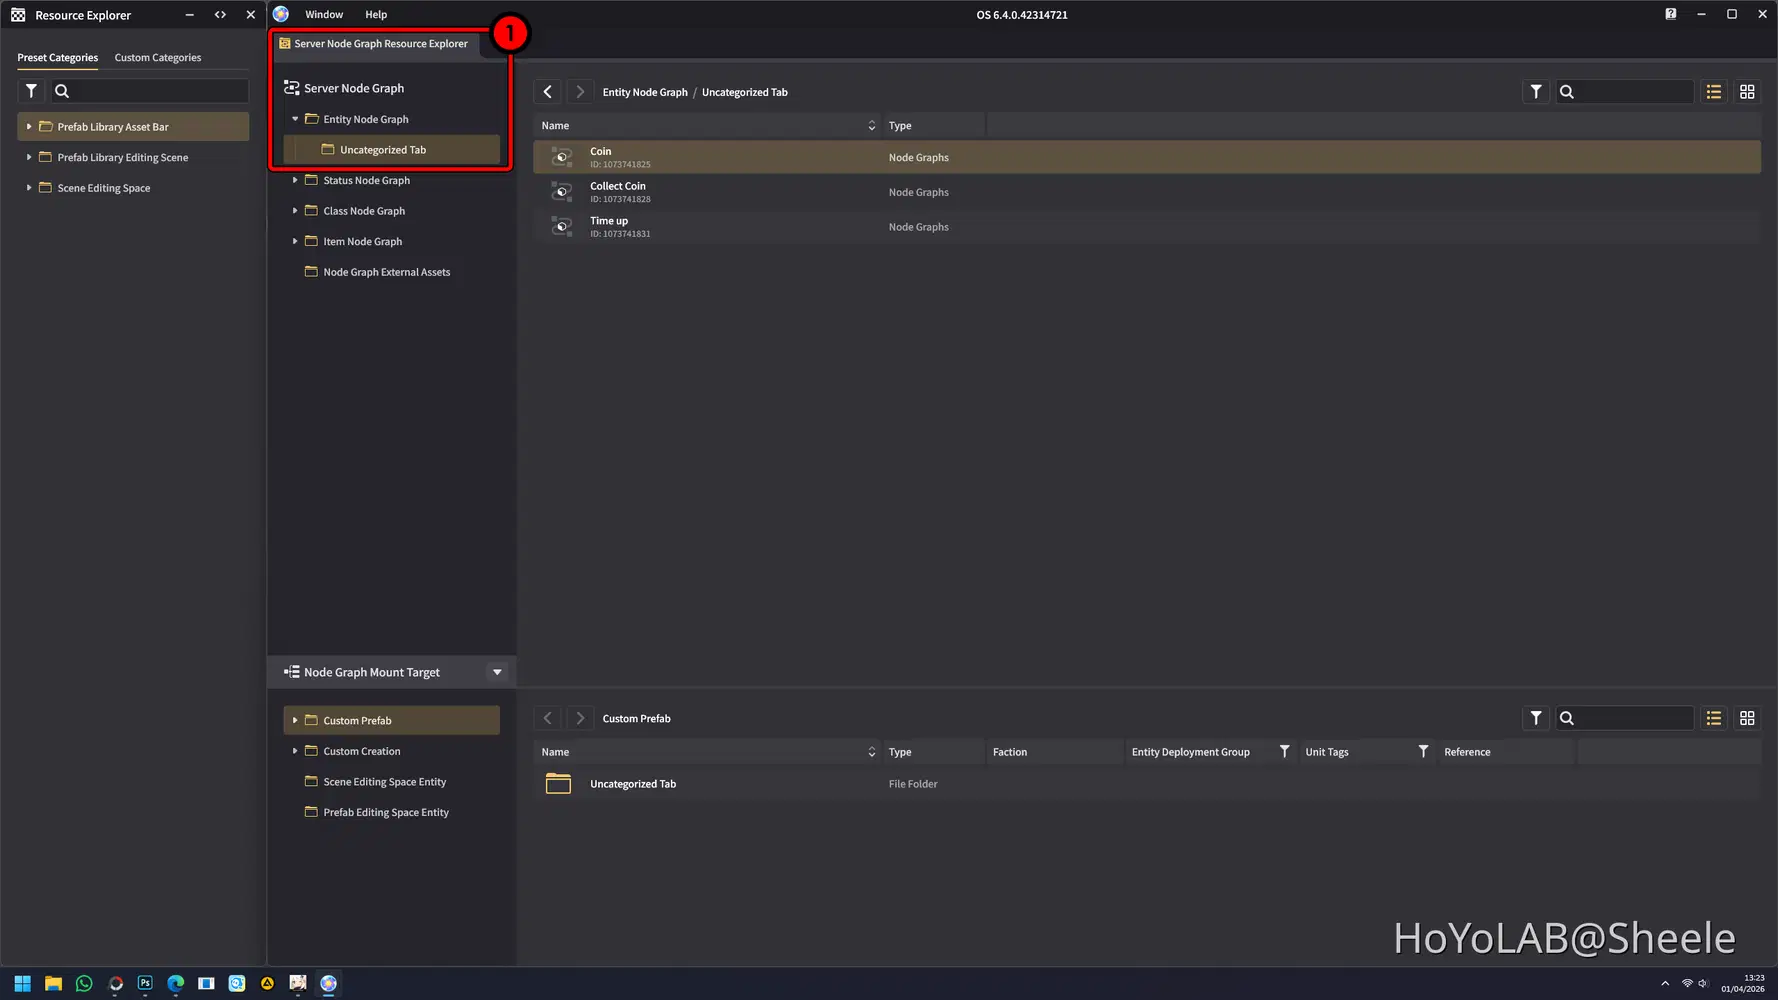
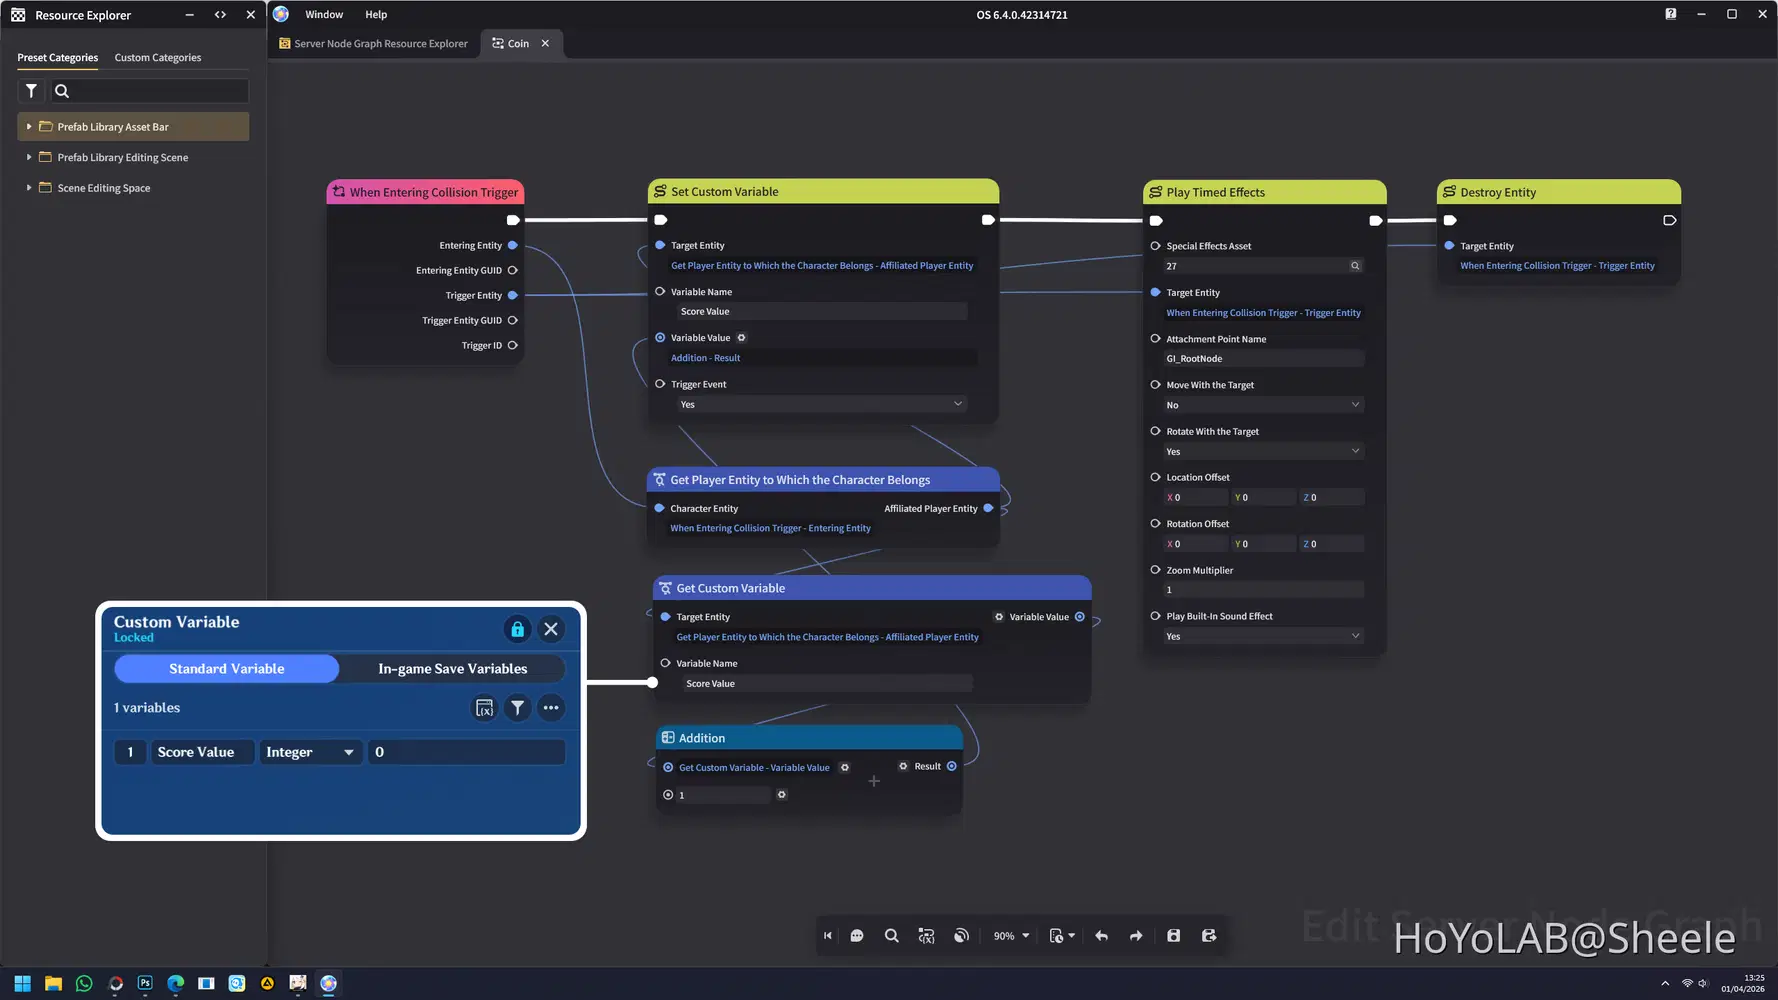
When the player enters the Coins area, the score will increase by 1. Then, an effect will appear when the coin is collected, and the coin will disappear or be destroyed once the process is complete.
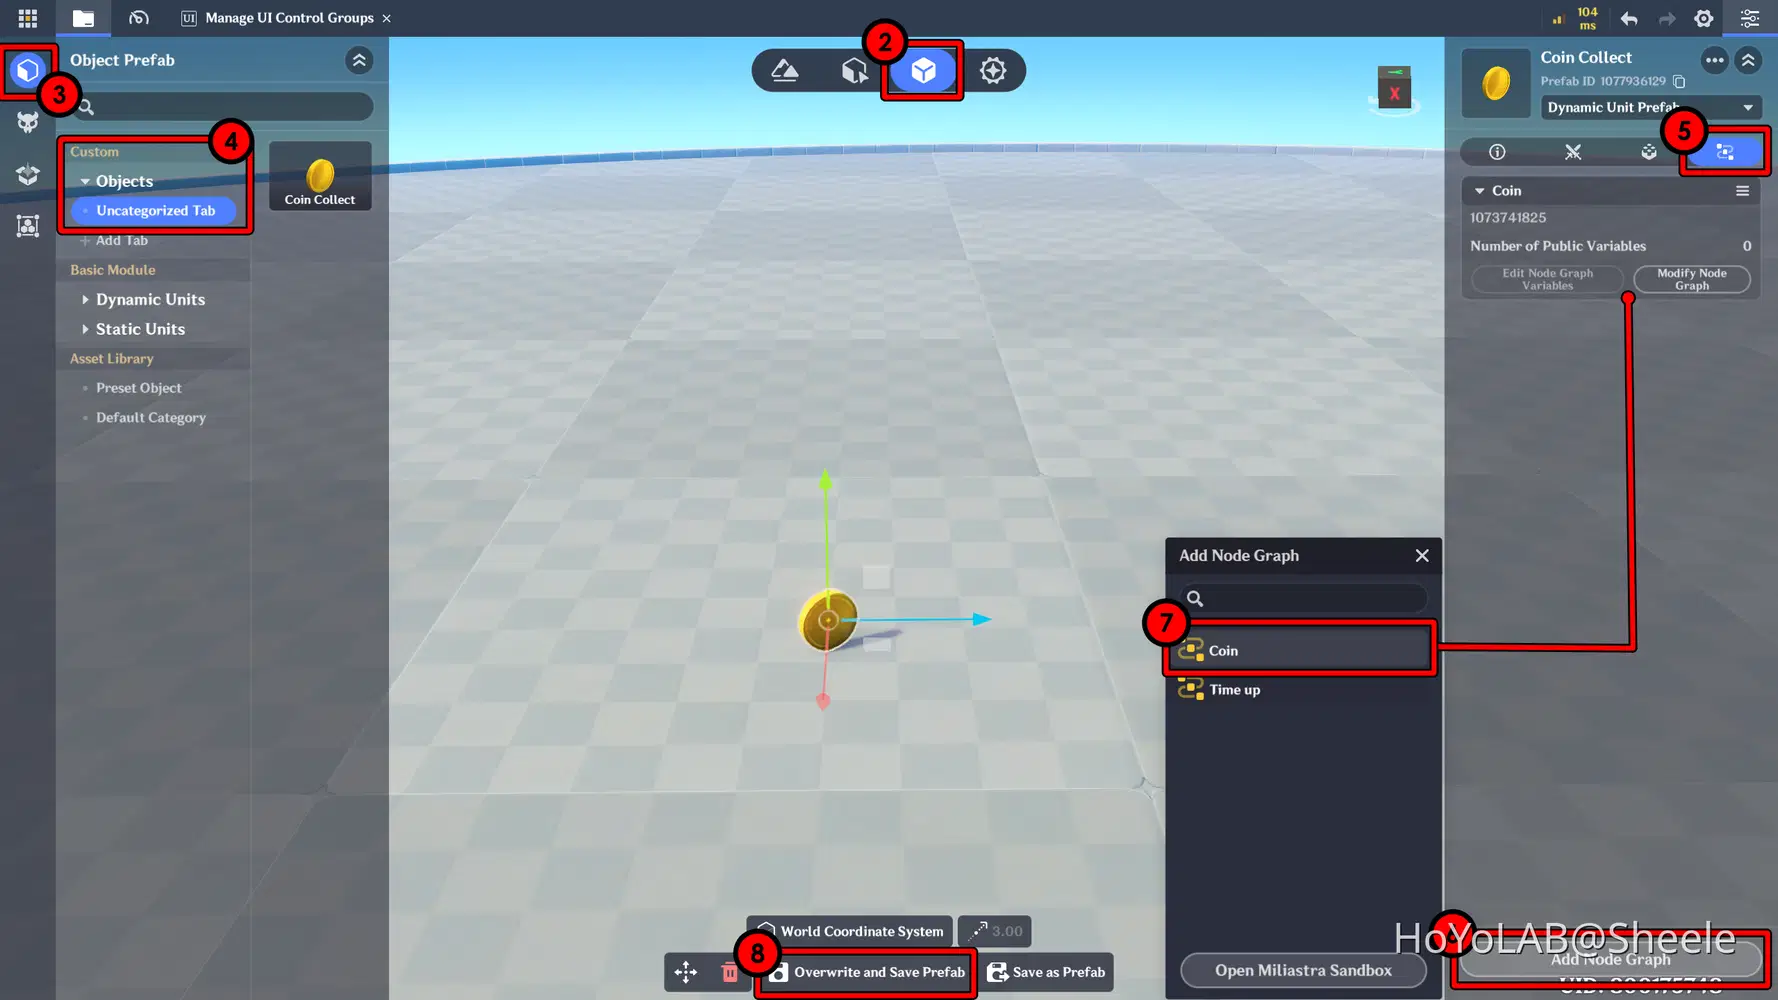
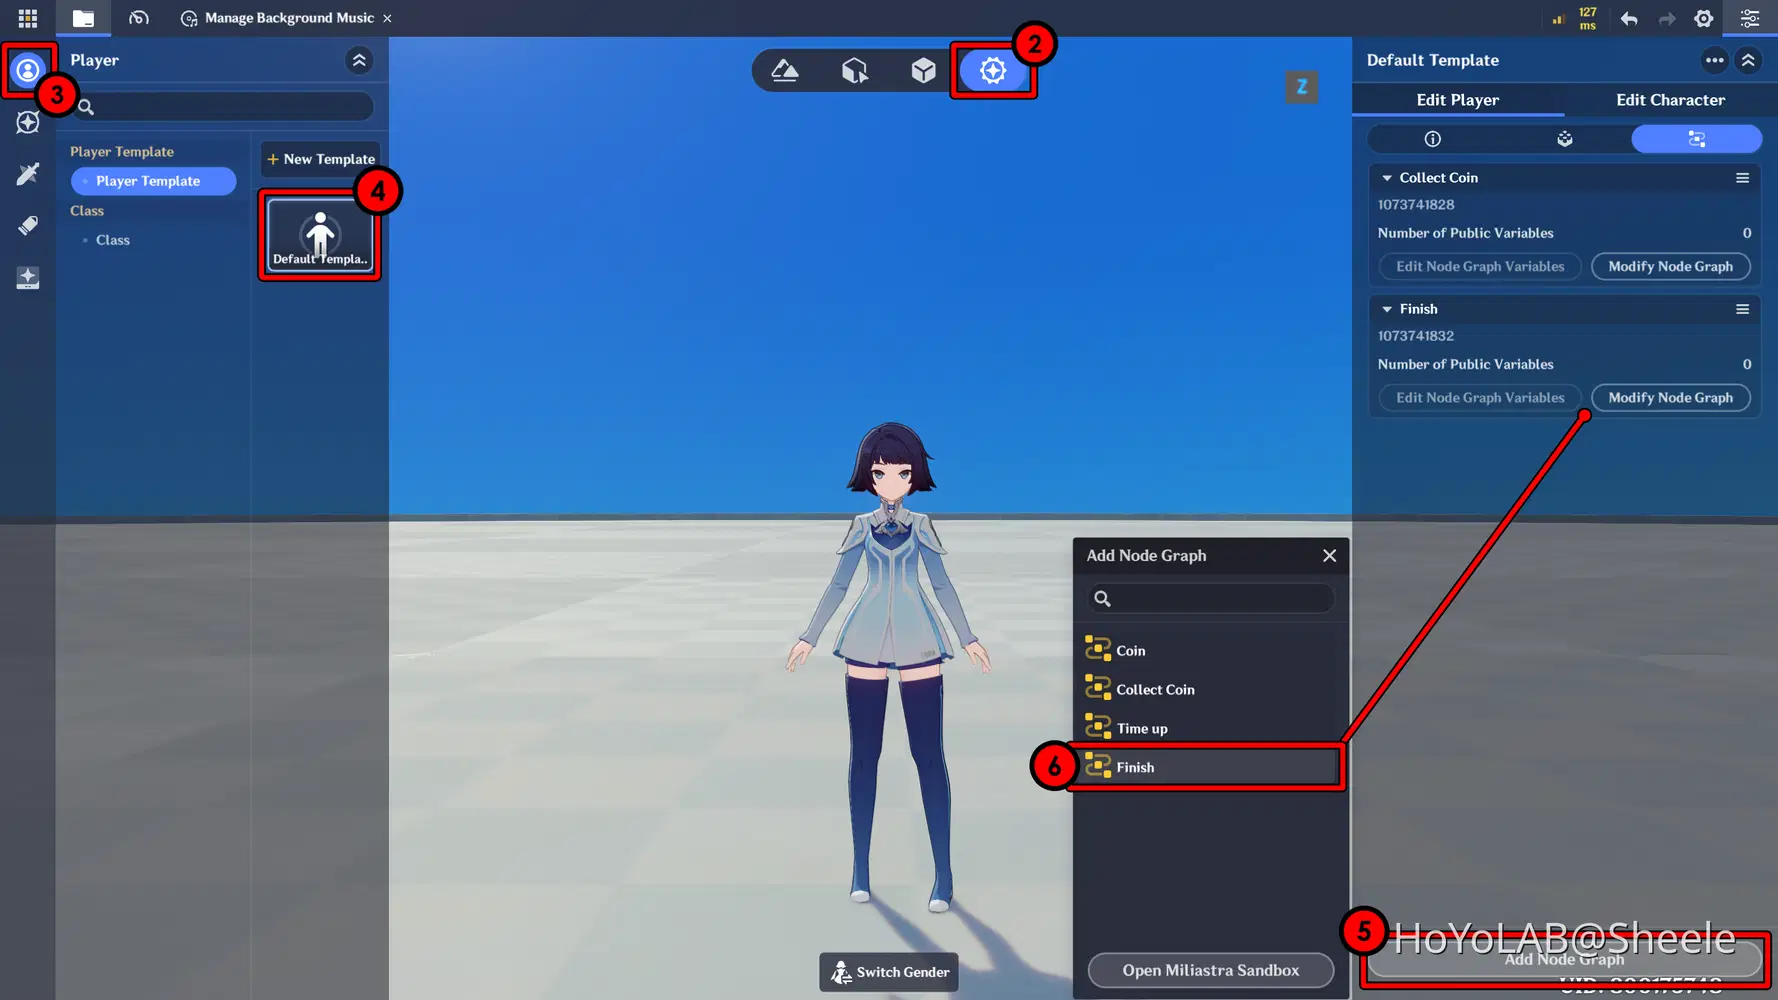
- After creating the Node Graph, open the Prefab Library → Go to the Custom Object section where you previously created and saved the Coin → Then attach the Node Graph to that Coin.
- Don’t forget to Overwrite and Save Prefab to apply the changes.
✦ Coin Counter
Next, you will Create a Display to show the number of coins collected on the game UI.
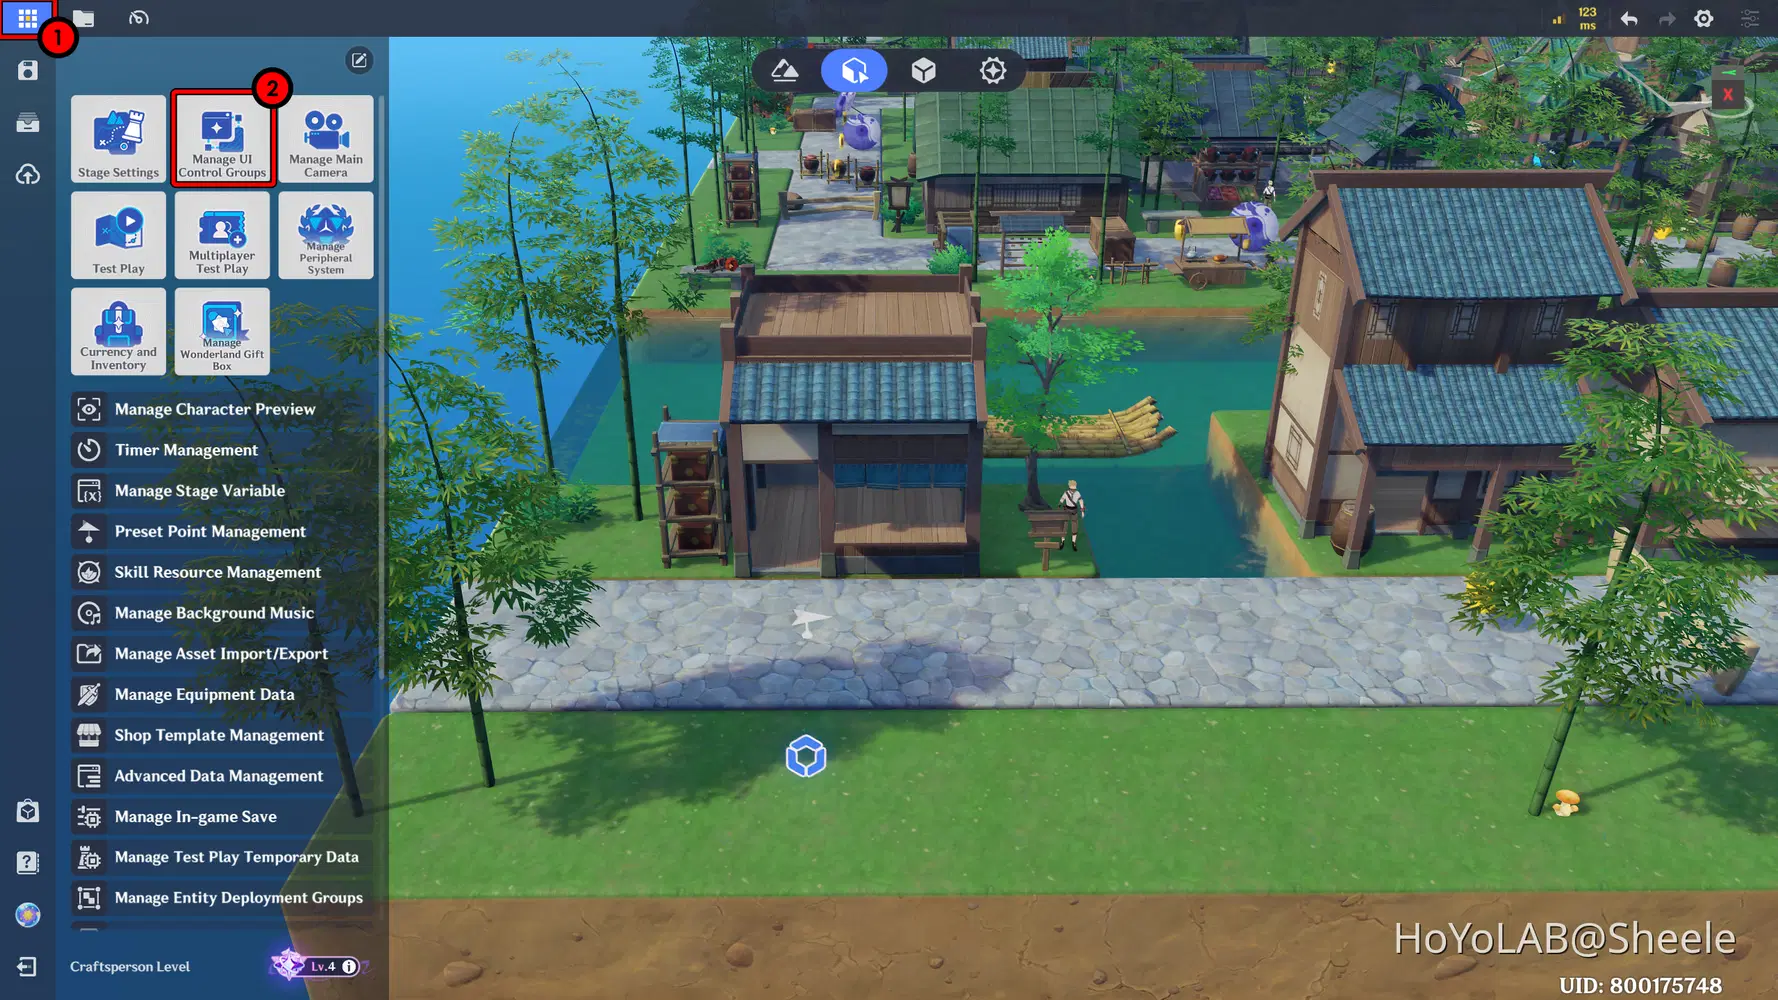
- Open the Main Menu → Go to Manage UI Control Groups.
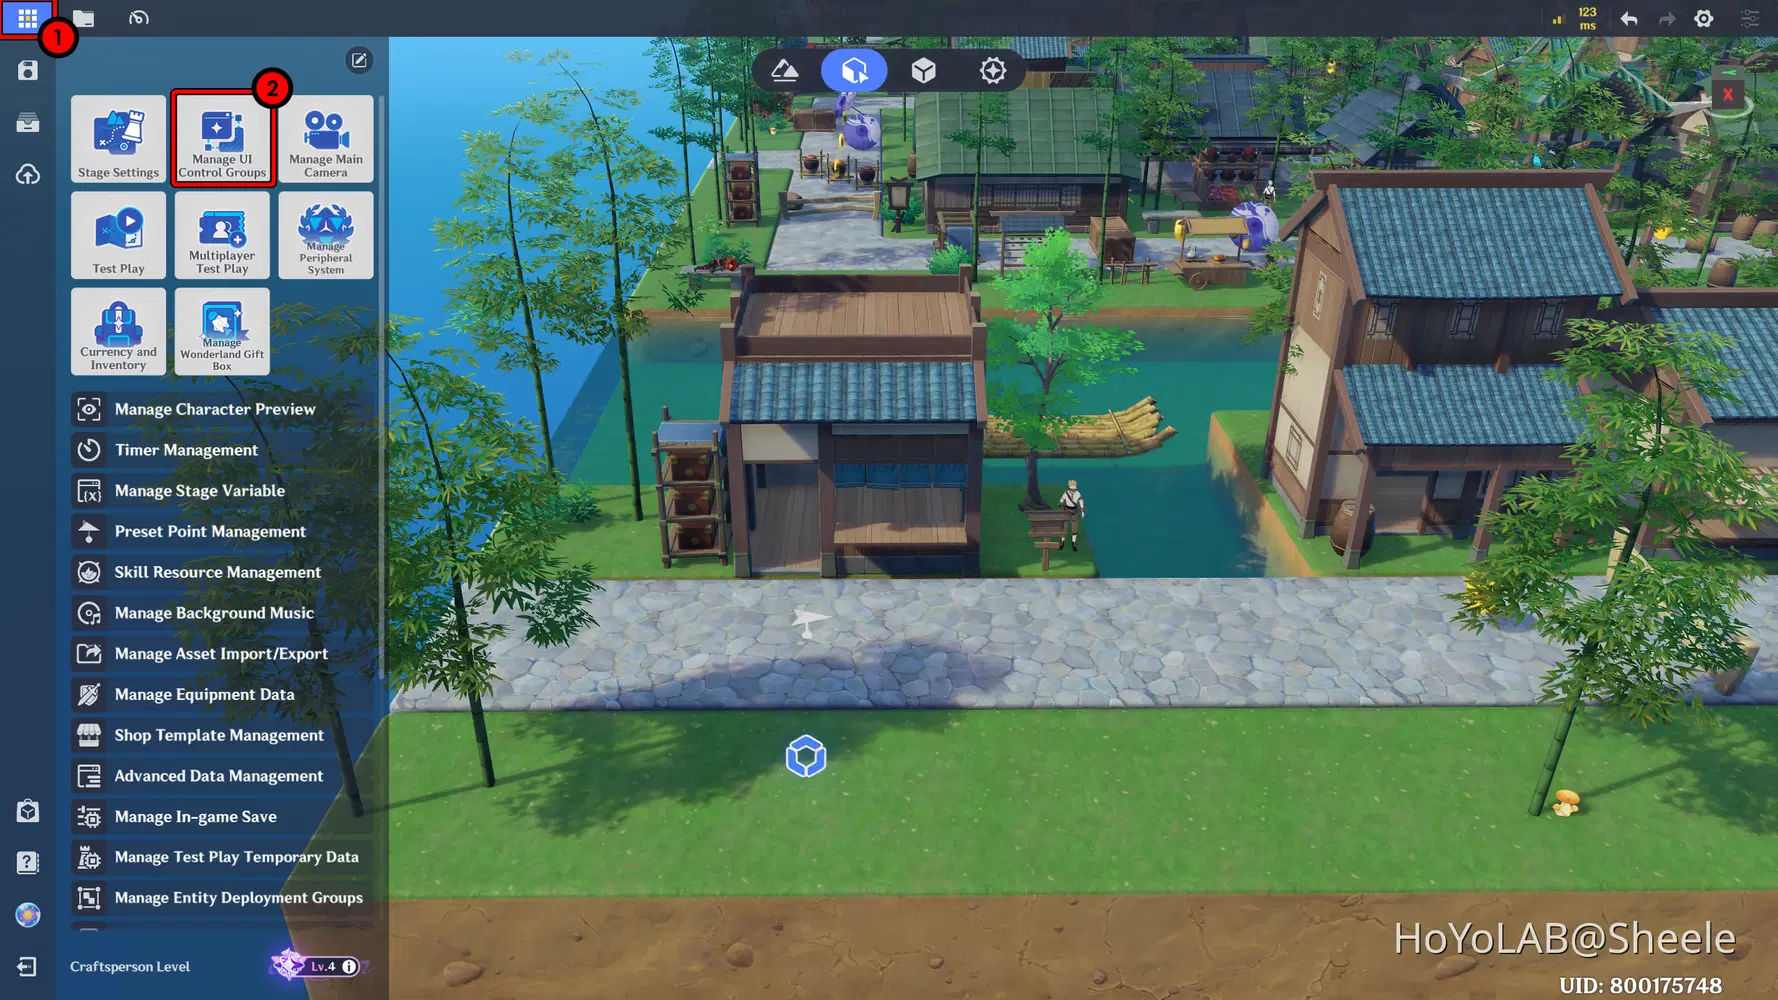
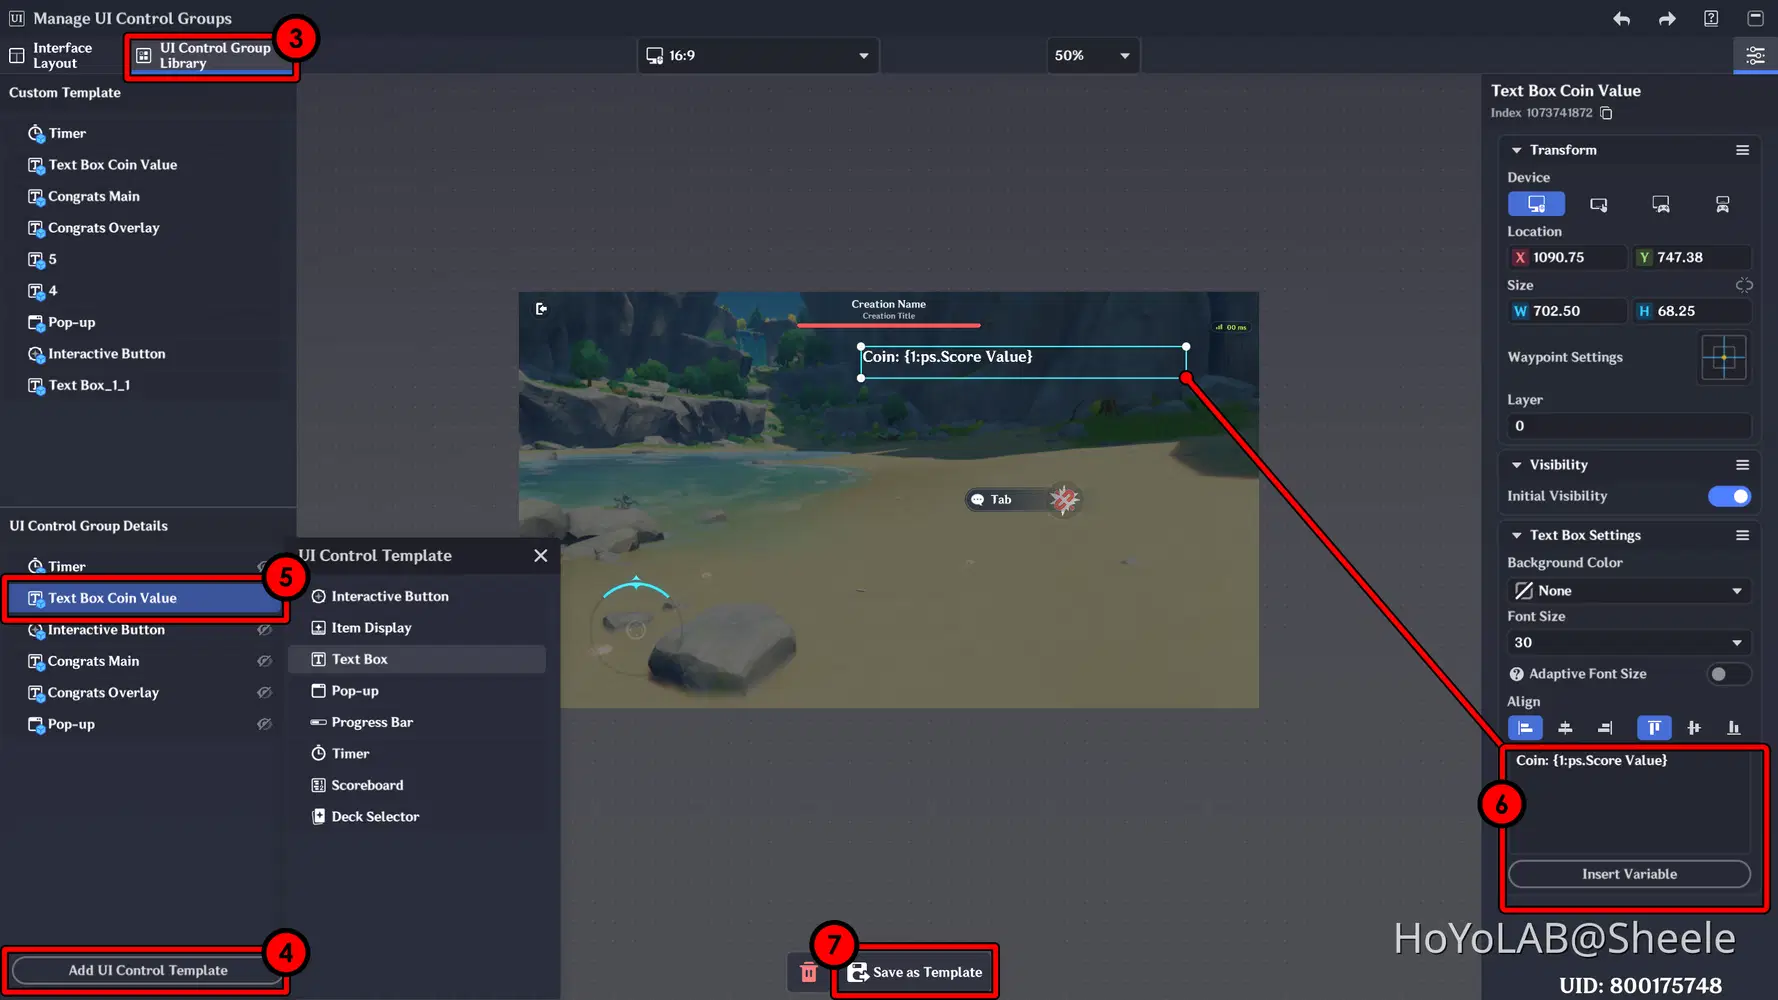
- Go to the UI Control Group Library → Add a UI Control Template → Choose Text Box
Then enter the following text in the input field on the right, Coin: {1:ps.Score Value}
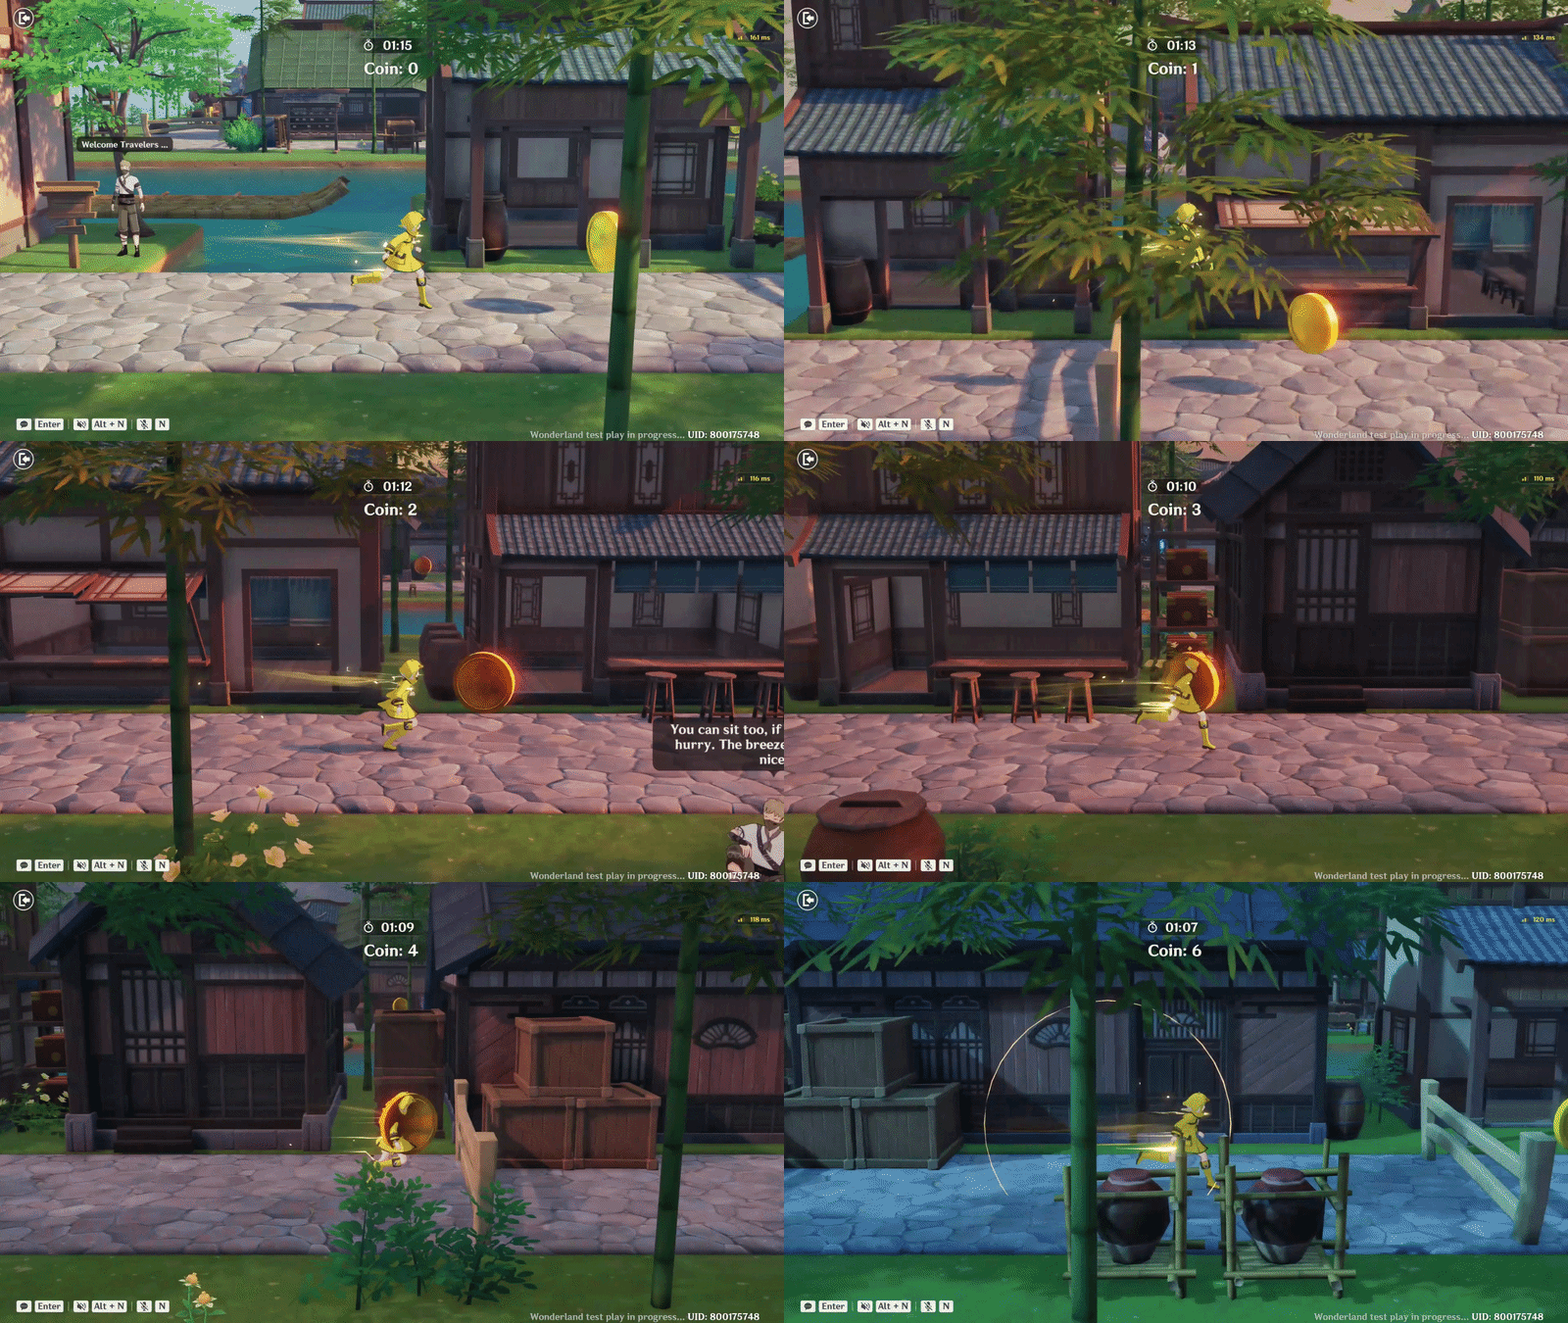
And here is the result: When you successfully Collect Coins, the information will be displayed at the center of the screen and will continuously update as you gather more coins.
✦ Victory
Next, create a Node Graph for the condition where all coins (50) have been collected. When this happens, a “Congratulations” message will appear and the challenge timer will stop.
First, create the UI to display the message after collecting all 50 coins.
- Open the Main Menu → Select Manage UI Control Groups.
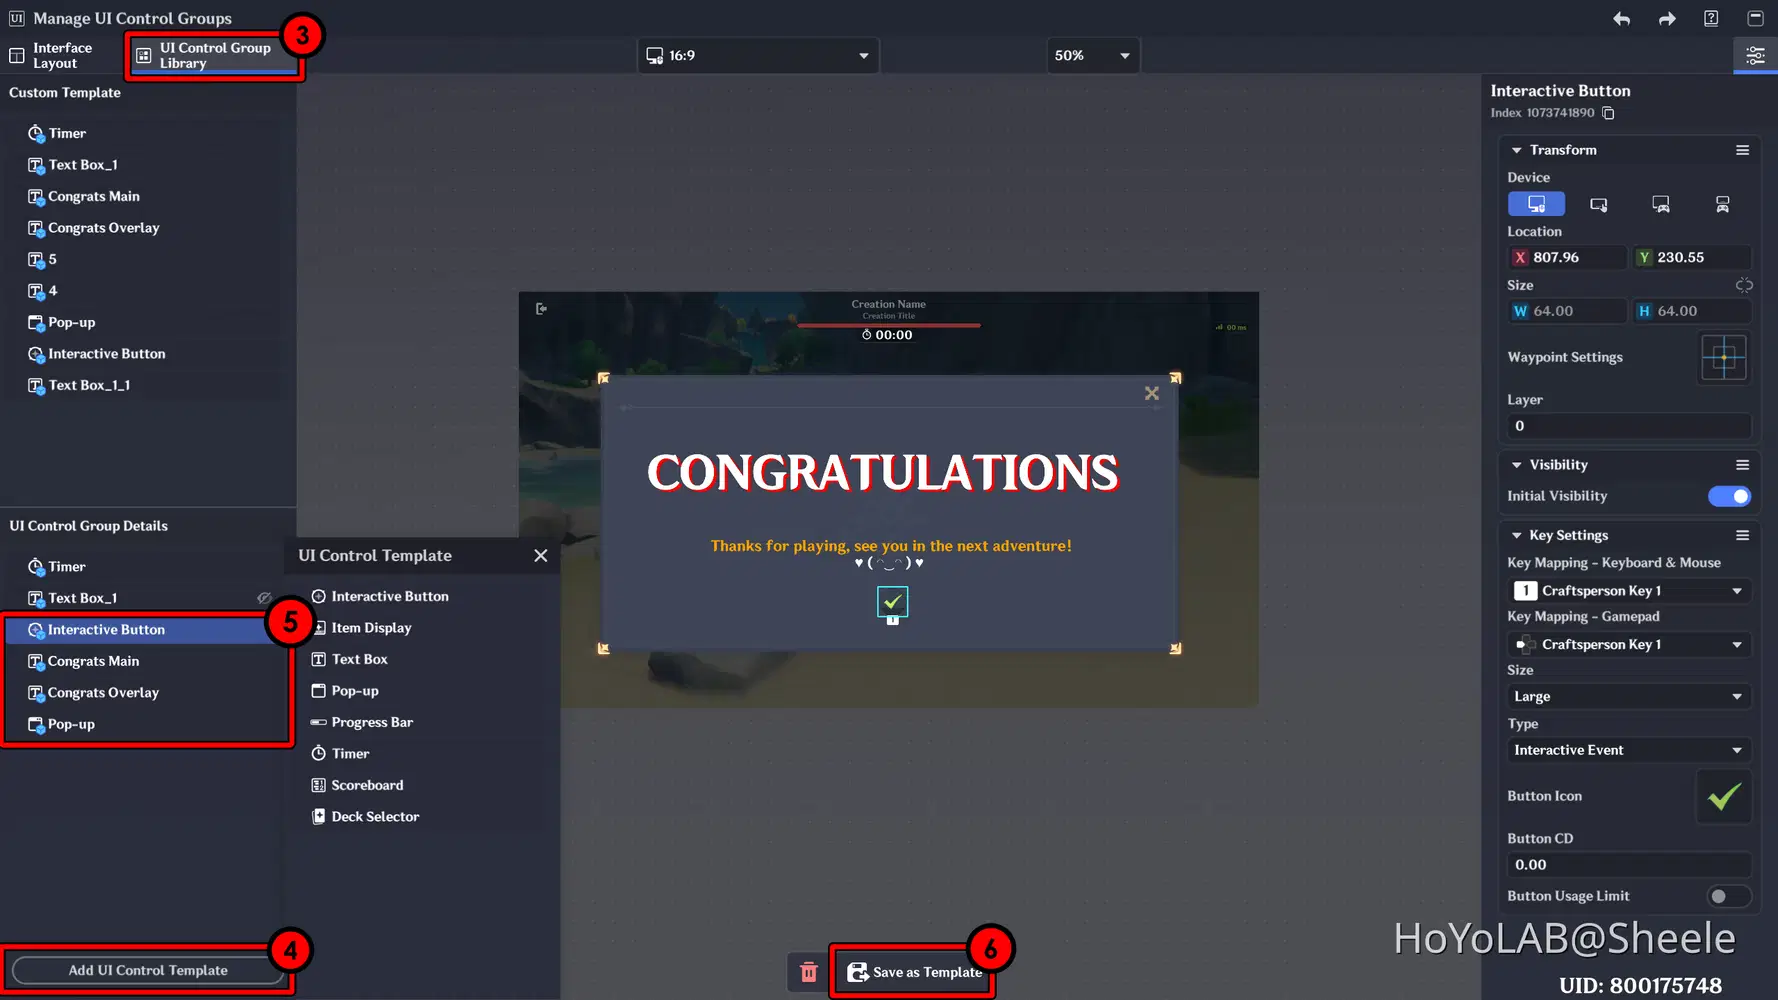
- Go to the UI Control Group Library → Add a UI Control Template.
Here, I combine Interactive Button, Text Button, and Pop-Up to create the interface shown below. The Interactive Button is used as the button to finish the game.
Next, go to the Miliastra Sandbox and create a new Node Graph in the Server Node Graph. This Node Graph will detect the value of the variable, and when it reaches 50, it will display the UI you created earlier and stop the Global Timer at the same time.
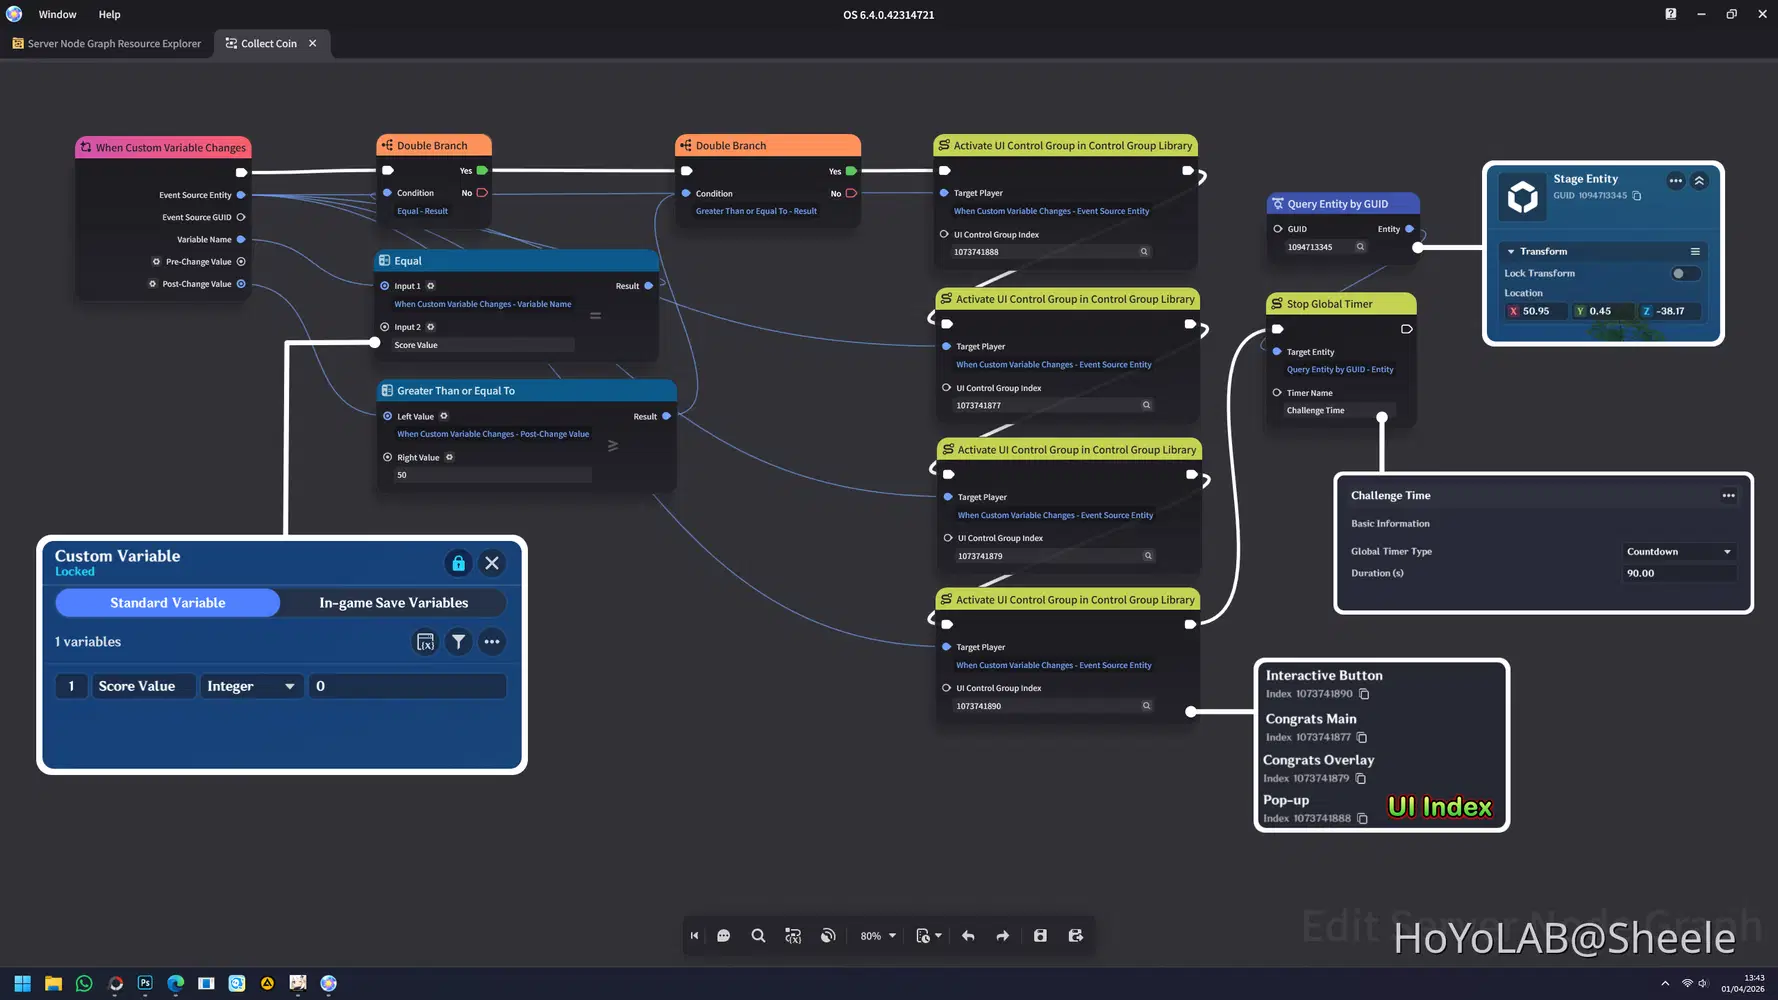
- Then, go to the Combat Preset → Select Player, and attach this Node Graph to the Player.
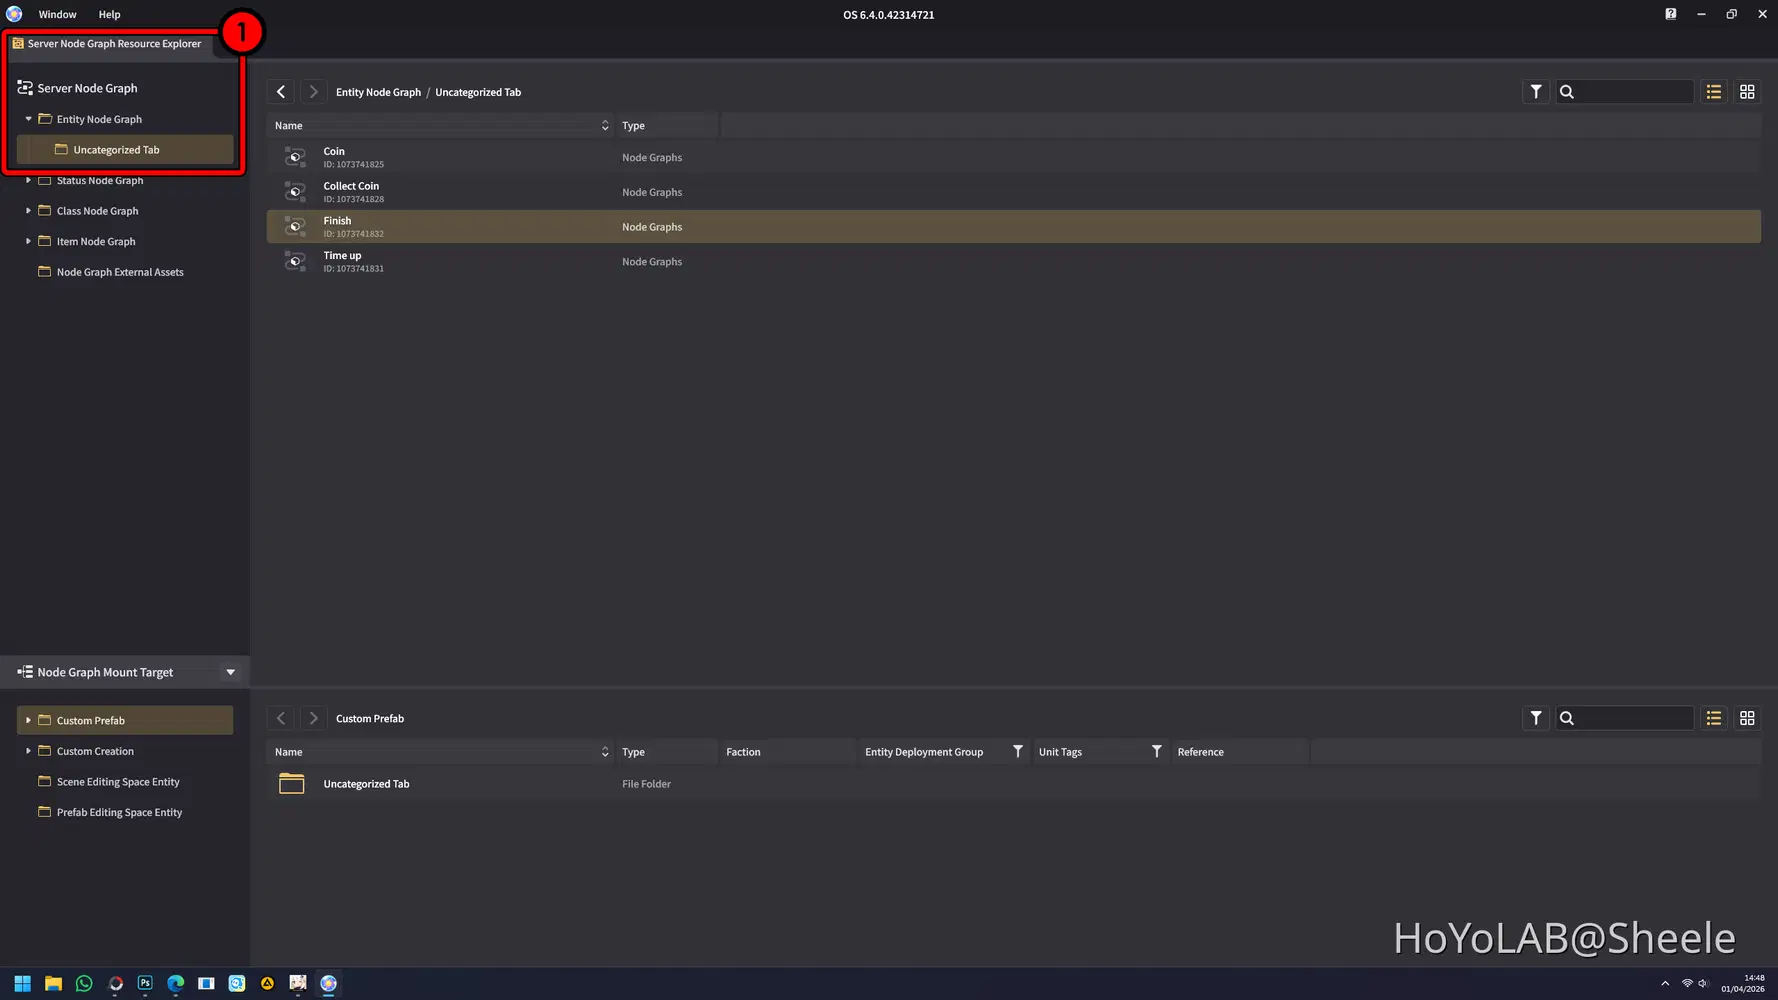
Next, create a Node Graph to handle finishing the game once all conditions have been met.
- Open Miliastra Sandbox → Create a new Node Graph in the Server Node Graph.
Then, create a Node Graph like this: When the UI Control Group is triggered, which means when the Interactive Button is pressed, it will trigger the Victory status for the player.
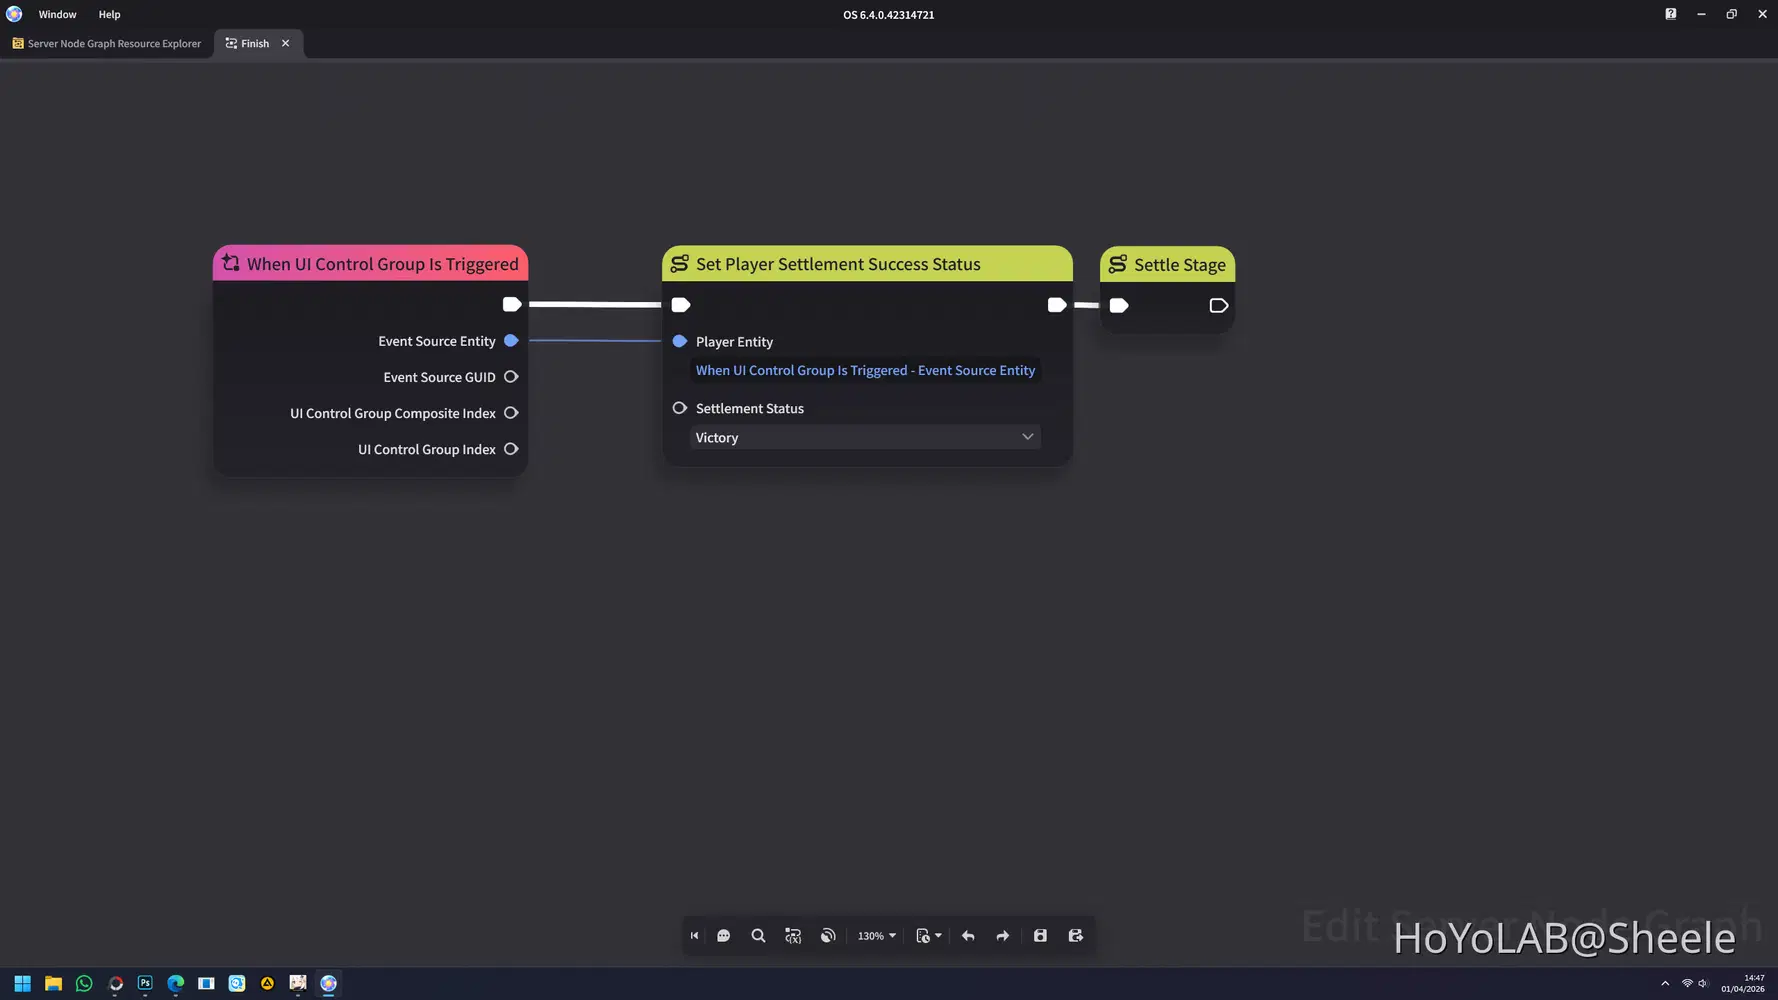
- Then, go to Combat Preset → Select Player, and attach this Node Graph there.
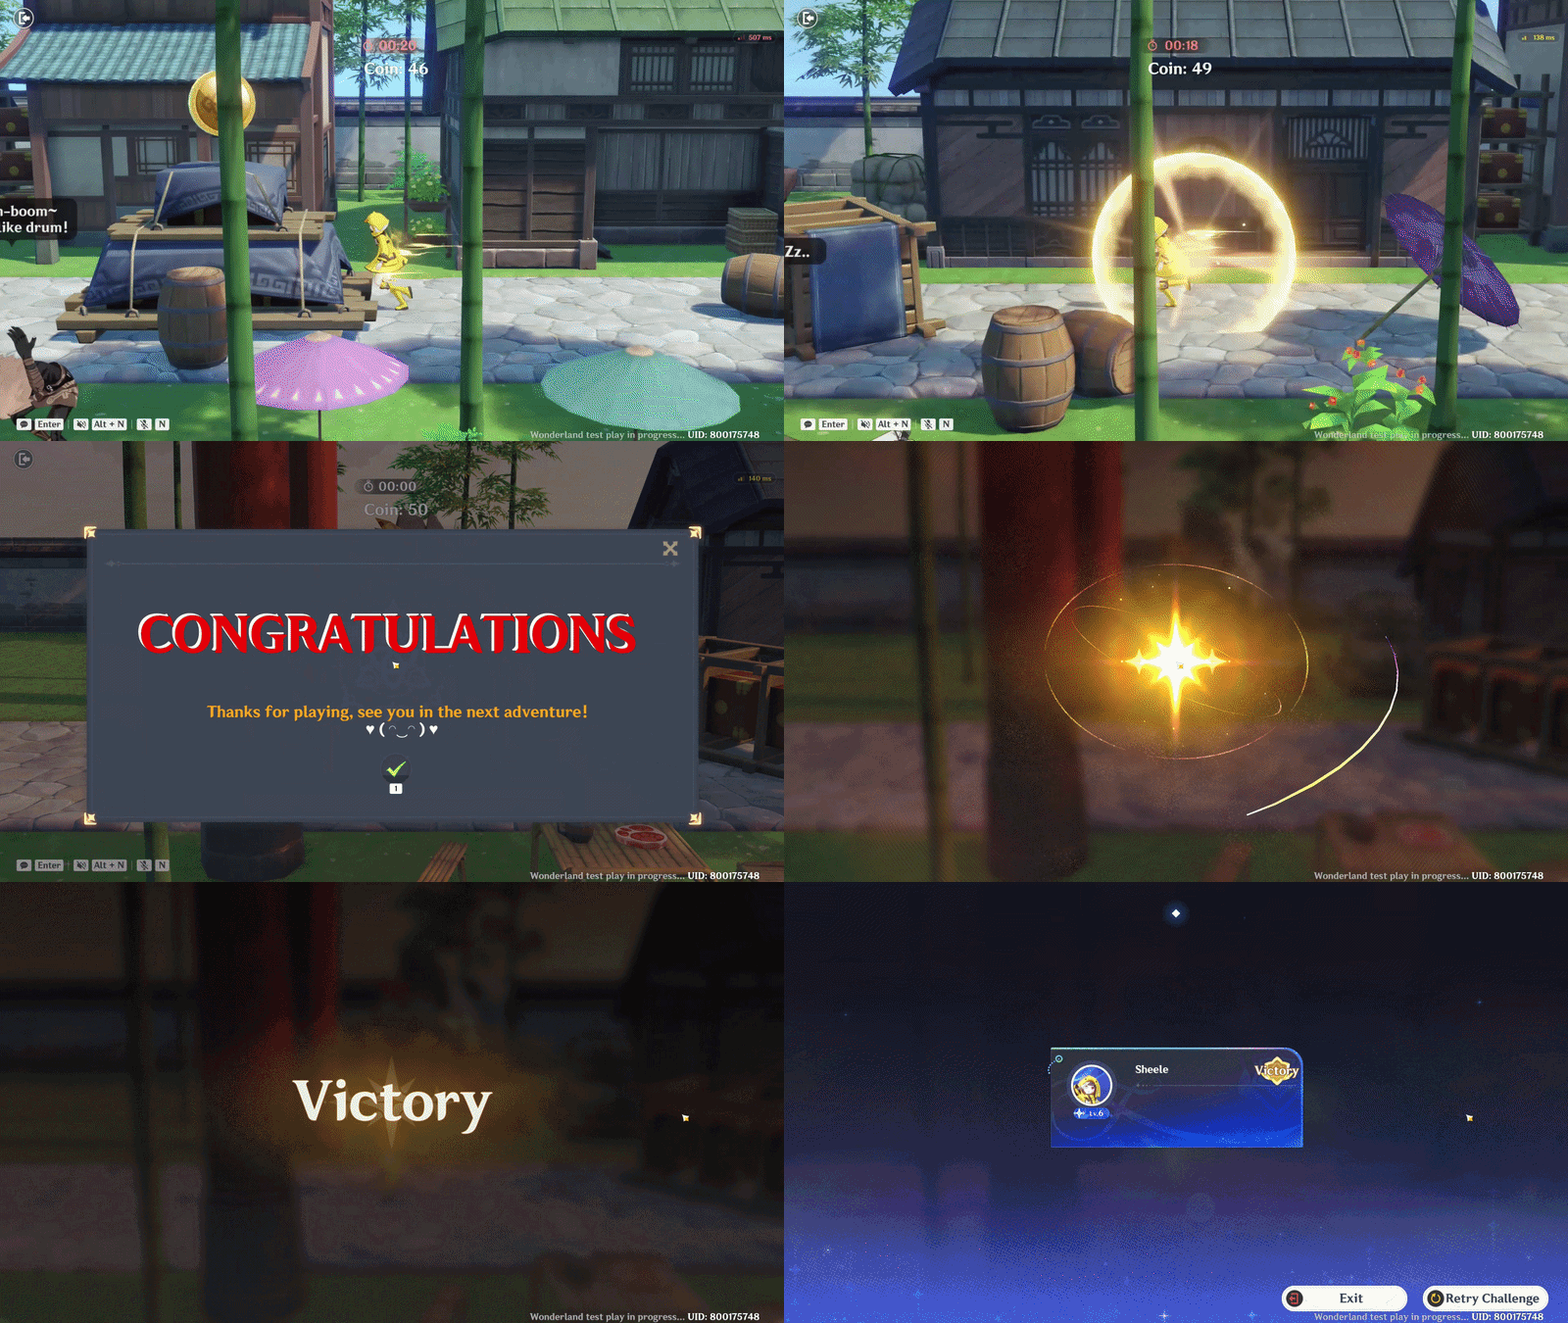
And here is the final result: When you successfully collect all 50 coins before the timer runs out, a “Congratulations” pop-up will appear, indicating that you have completed the game, and the game will then end.
Chapter 6: Background Music
✦ BGM
This step is about adding Background Music to make the game feel more engaging and less empty. Adding BGM can greatly enhance the overall atmosphere and player experience.
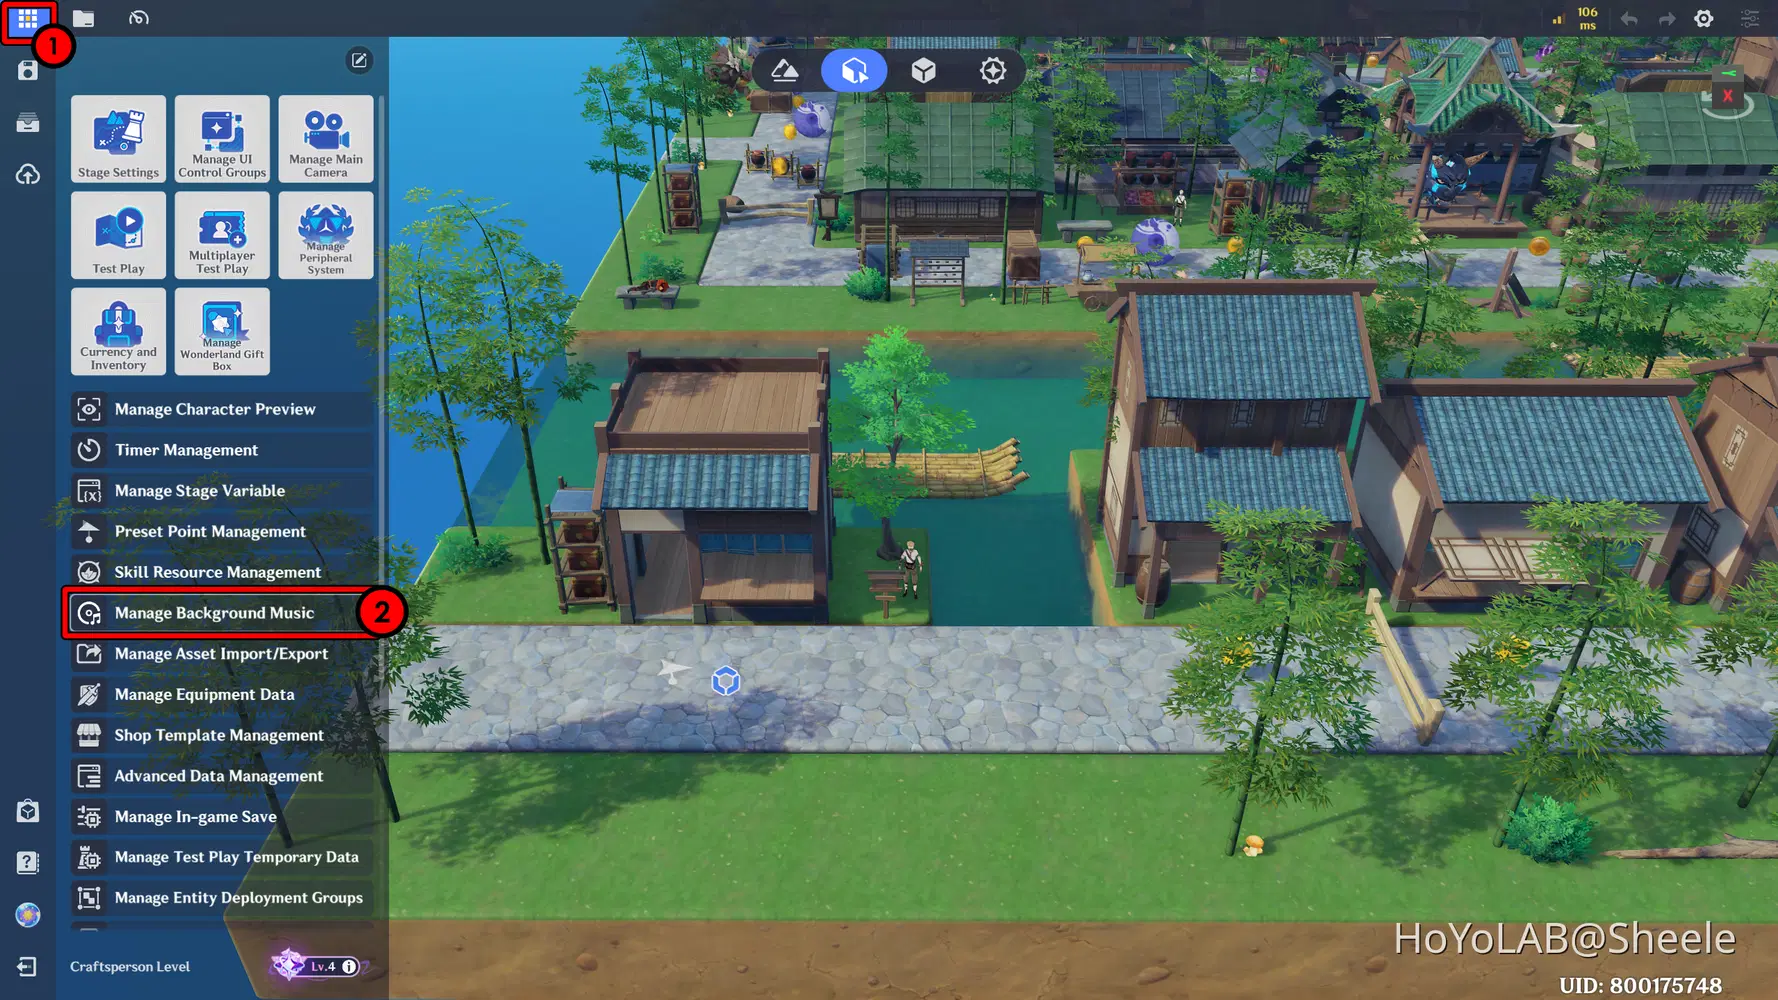
- Open the Main Menu → Go to Manage Background Music.
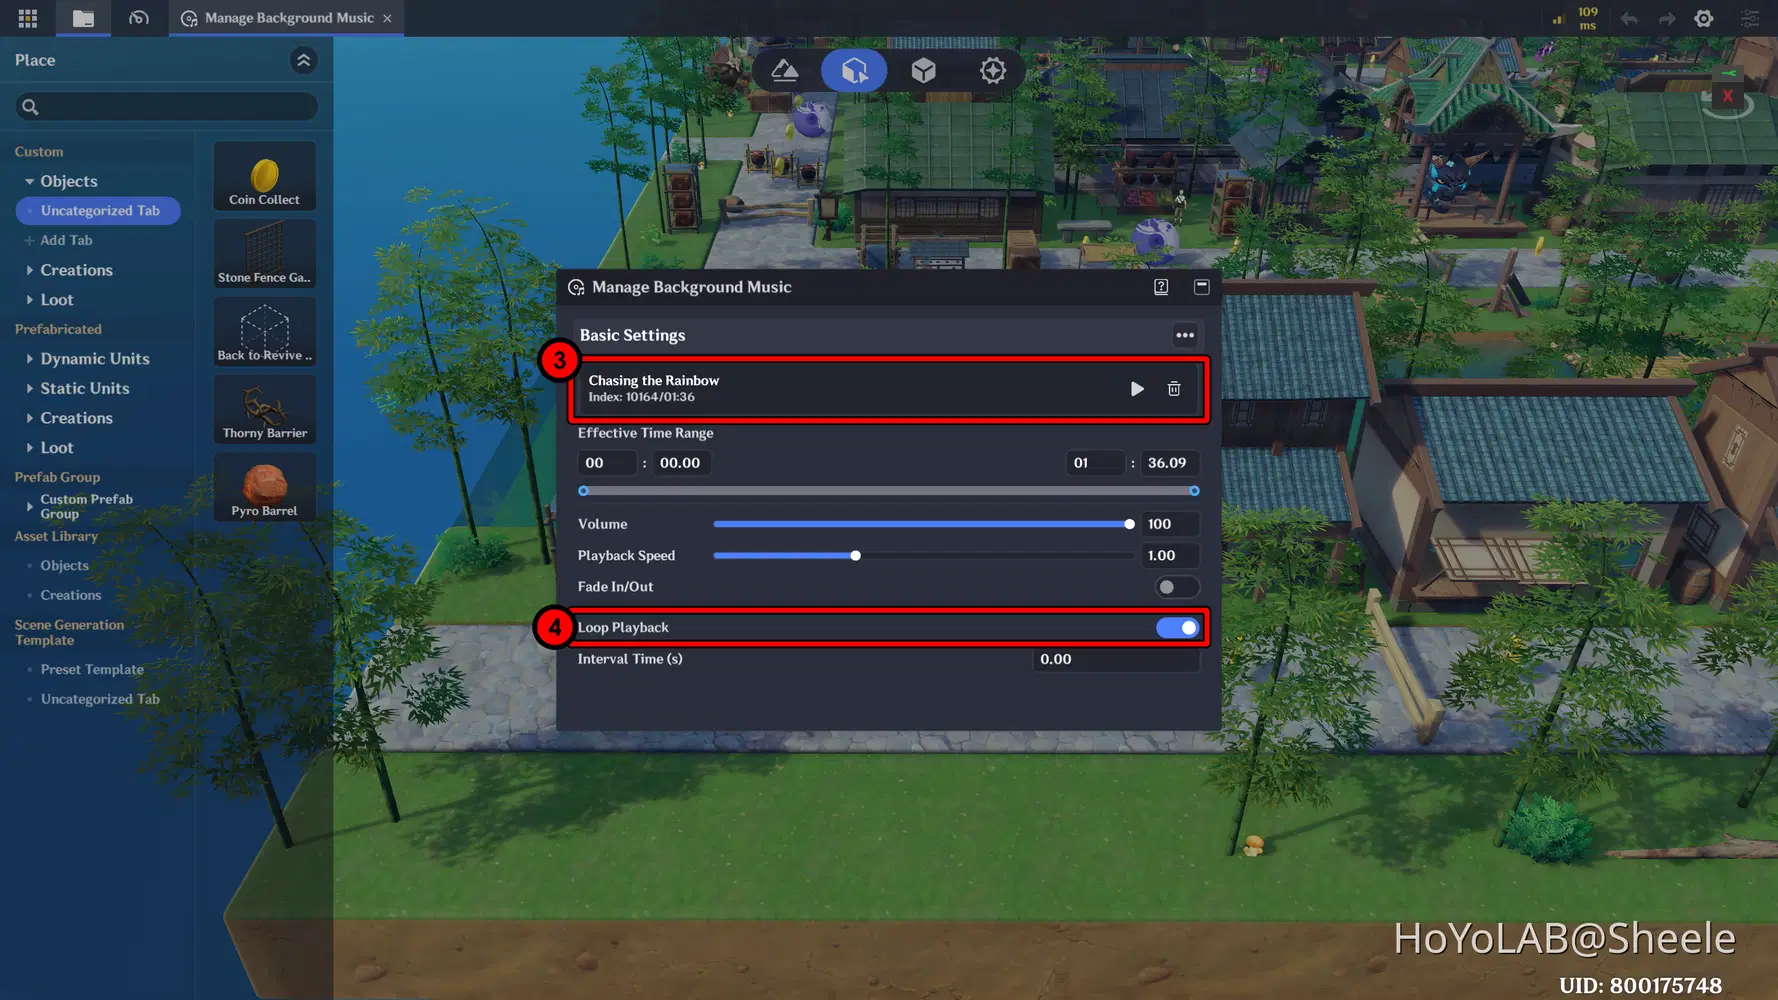
A new window will appear. Choose the music asset you want, and make sure it matches the theme of your game. You can also enable Loop Playback so the music will play continuously.
Chapter 7: Testing, Optimization & Publish
The final step is performing a thorough test to make sure the game runs smoothly. Check everything, from the execution of Node Graphs to the terrain setup to ensure there are no errors.
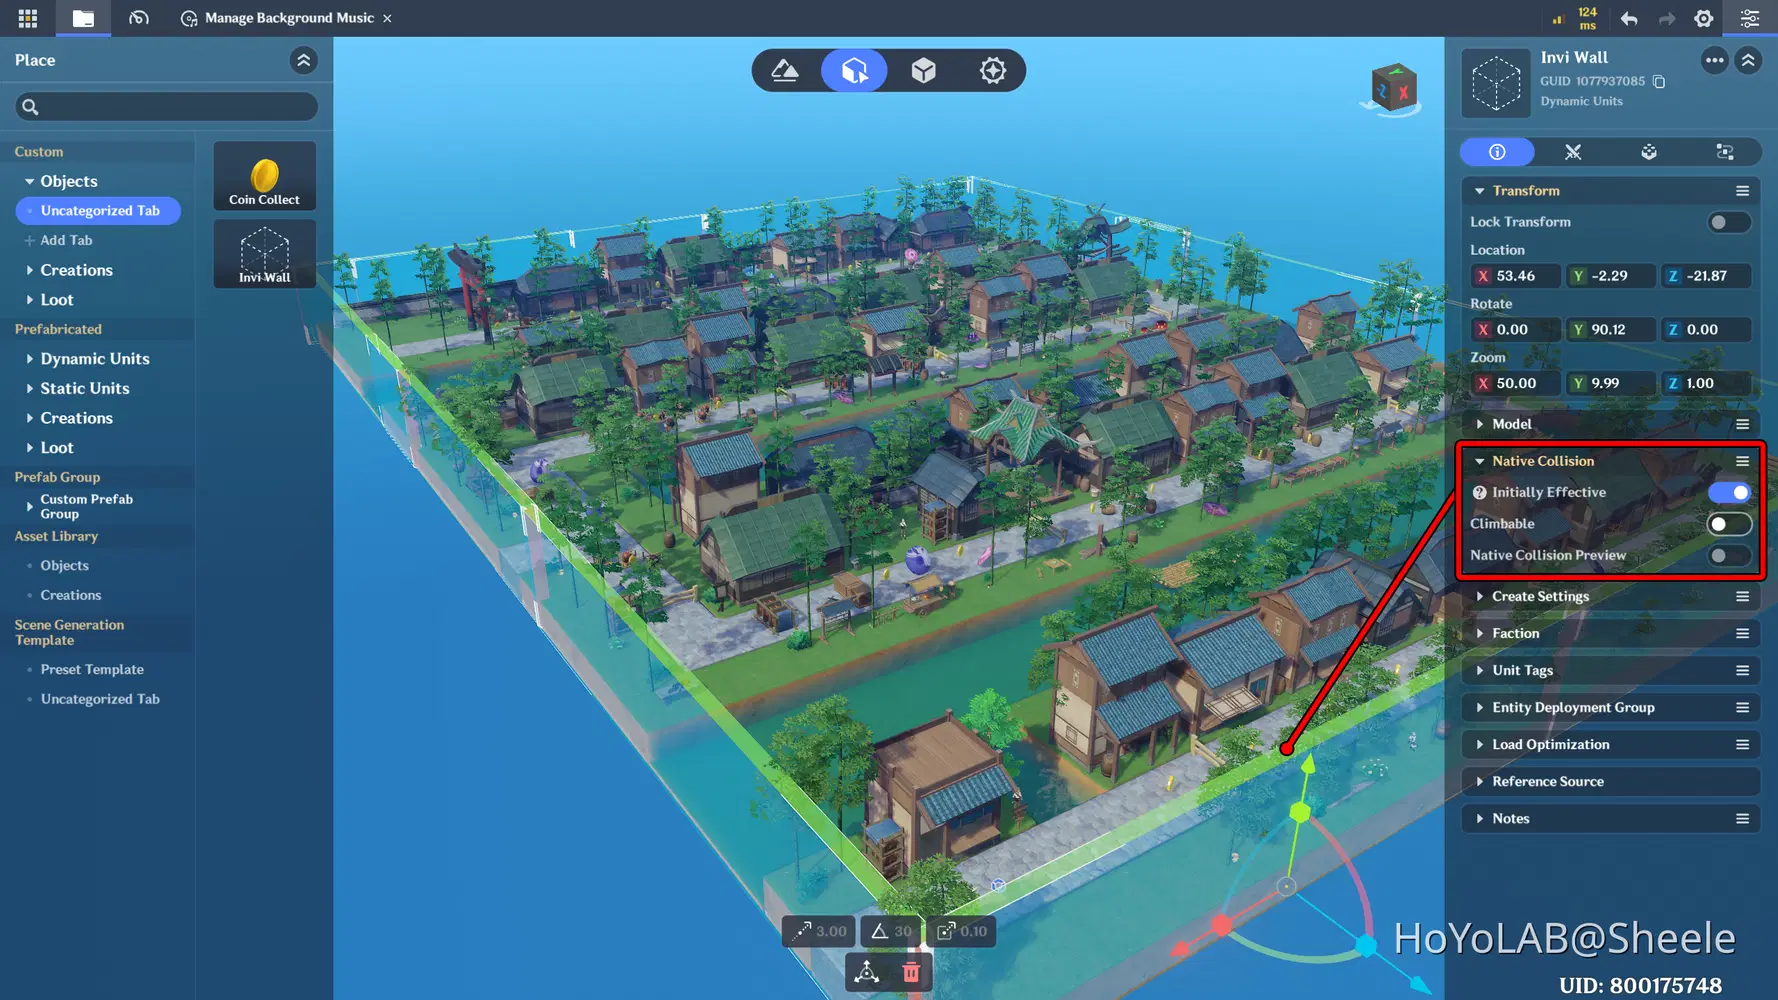
Finally, I add Invisible Walls to the terrain. This prevents players from moving outside the playable area, keeping them within the boundaries of your game world.
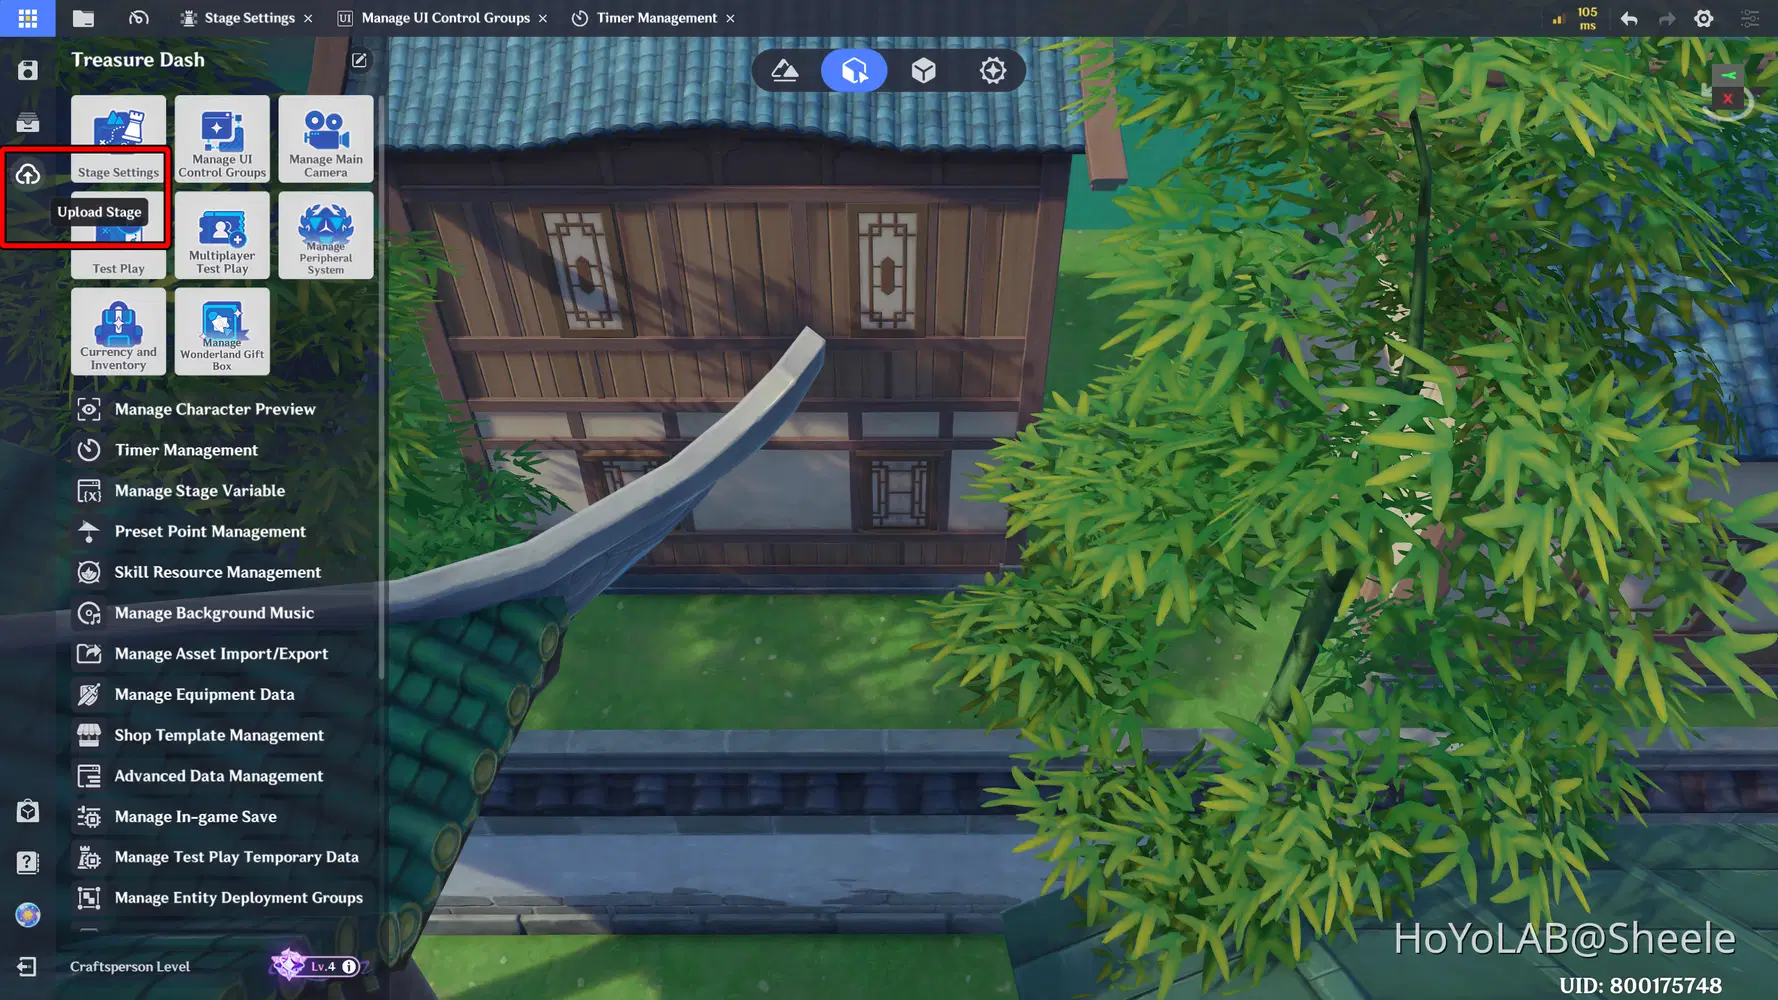
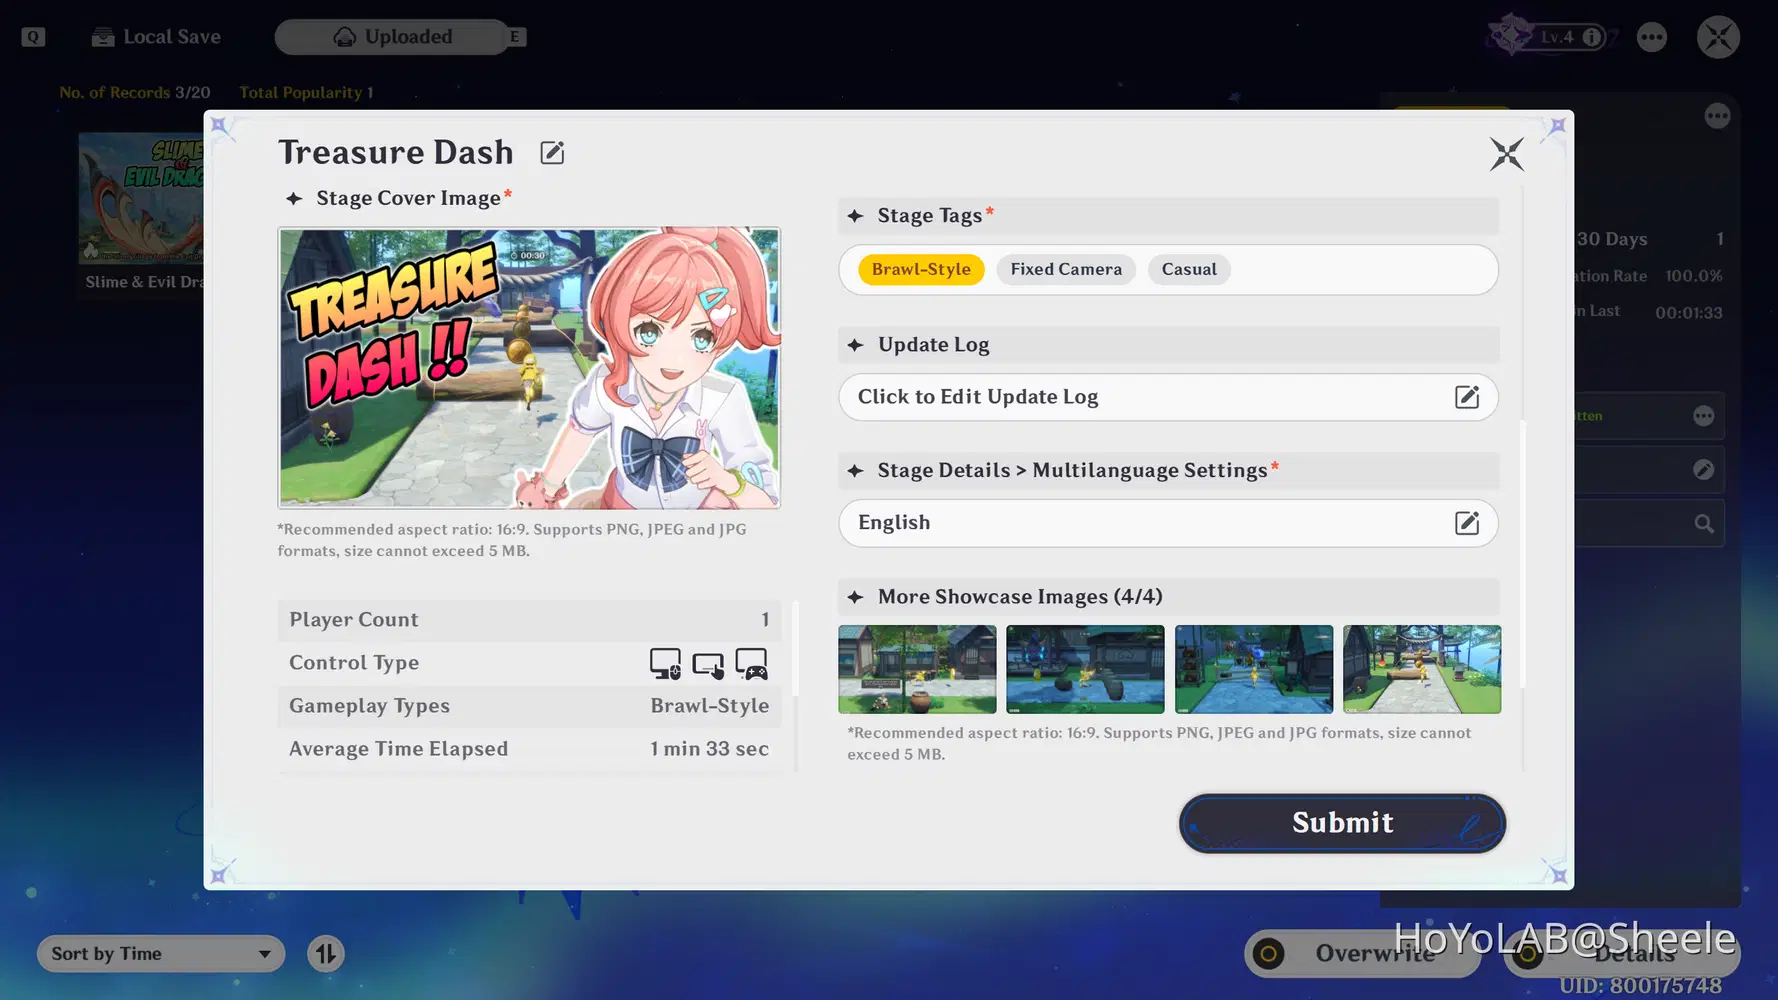
After testing and optimization are complete, your game is ready to be published. Prepare a game description and take several screenshots to showcase details of your game. Once everything is ready, proceed with publishing and wait for your game to be approved.
- To publish your game, Open the Main Menu → Select Upload Stage.
- Fill in all the required sections and Select Submit.
Wonderland Stage Showcase
This is an example of a game that I made based on this guide, this game is still simple and can still be developed further to become a more complex and interesting game. 

Treasure Dash Stage GUID: 20600173055 [Asia]
Miliastra Wonderland Guide Collection
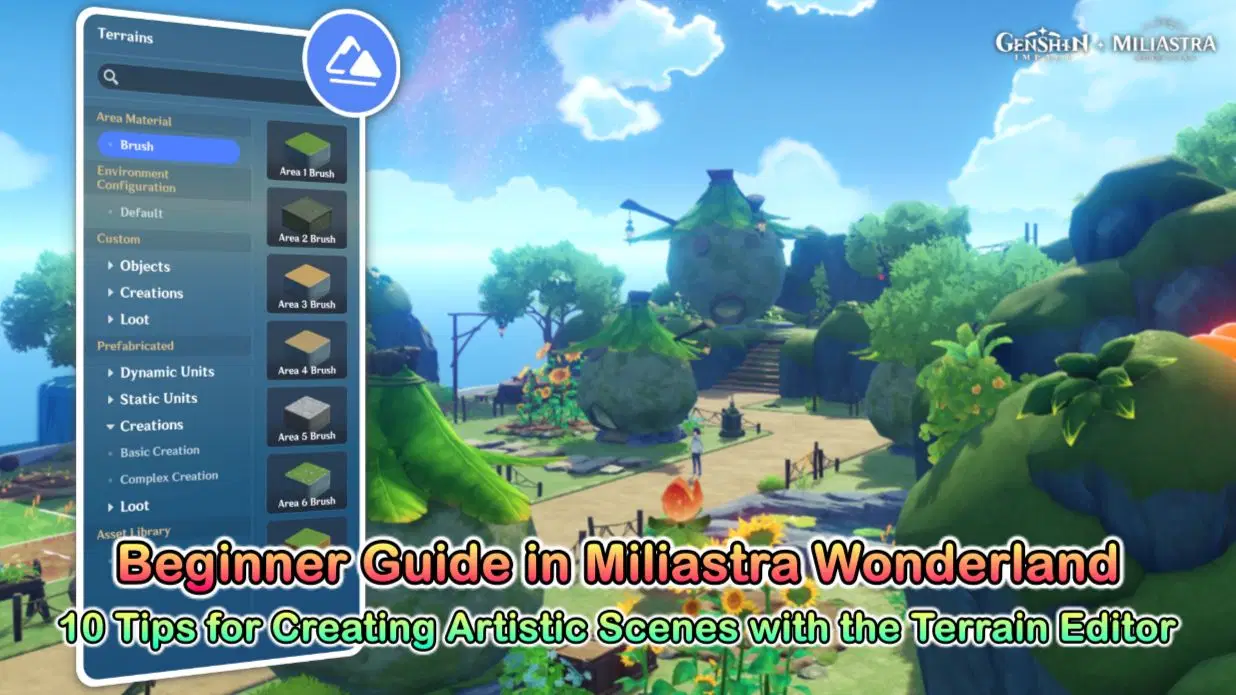
Reference Guide
As another source of guidance, you can visit the guide provided by the Official Genshin Impact x Miliastra Wonderland
Miliastra Wonderland - General Guide
Miliastra Wonderland - Tutorial