This guide will teach you how to create custom skills for players using Skill Editor
This guide will teach you how to design and implement custom player skills using the Skill Editor.
You will learn how to sync animations with Node Graphs and Status Tracks to build a responsive and skills.

1. Introduction to Skill Editor
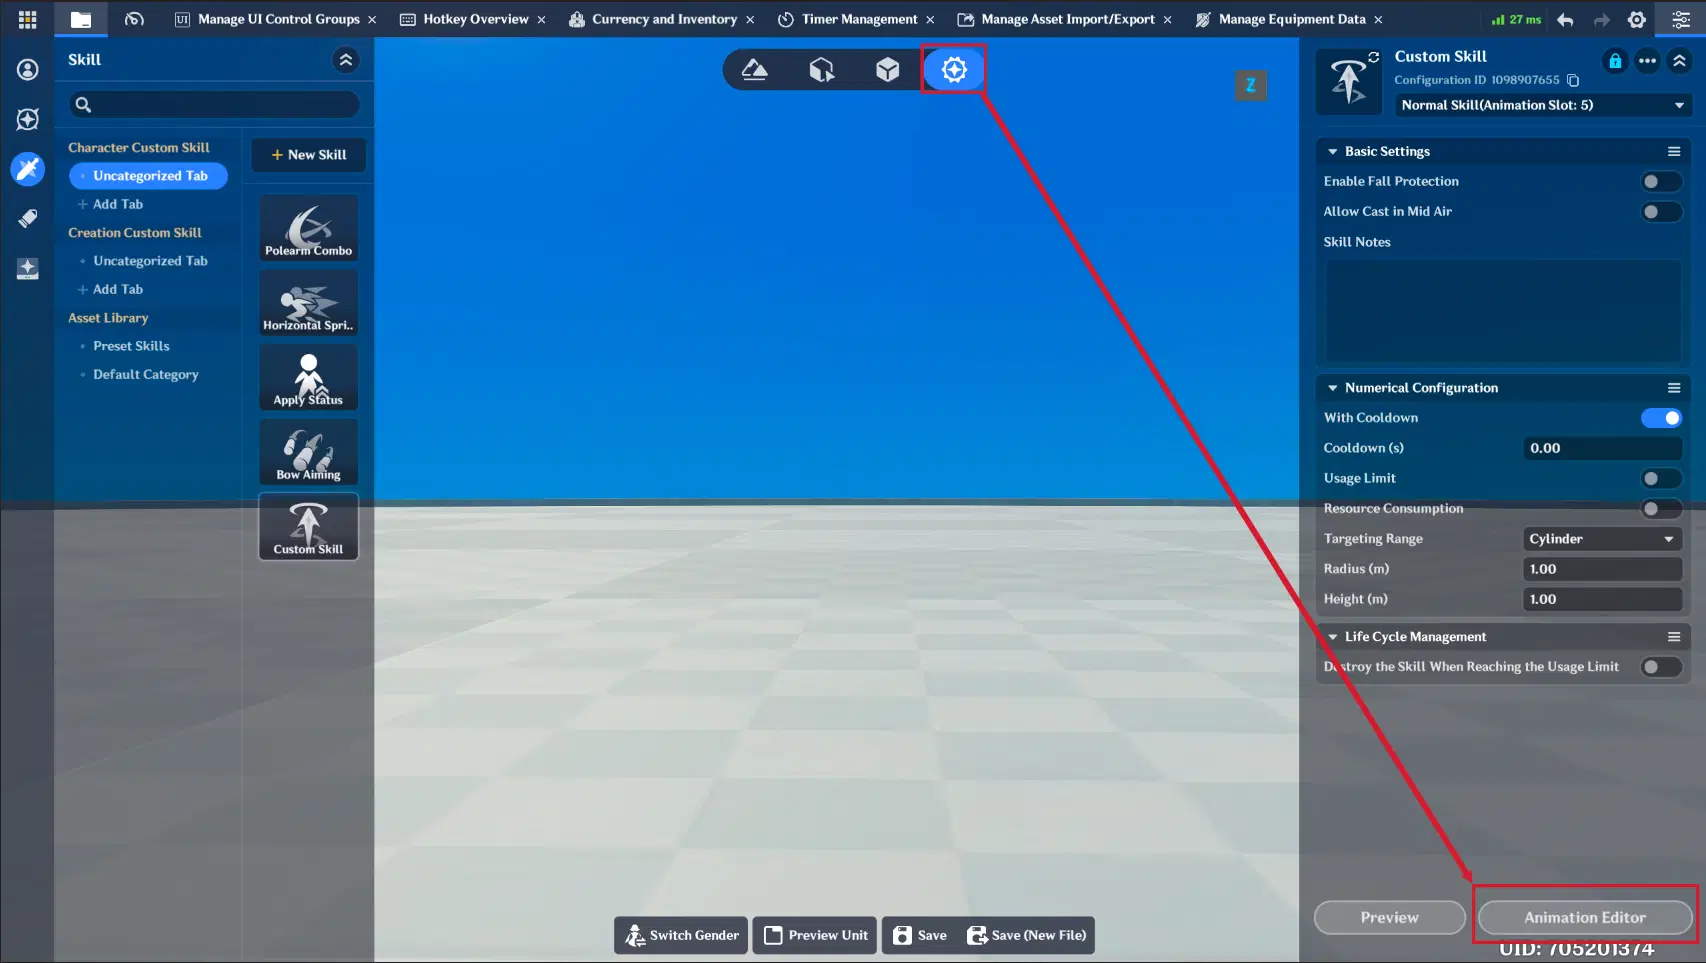
Skill Editor
The Skill Editor allows you to build complex combat mechanics. All skill types (except Instant Skill) support the following core tracks and features:
Skill Timeline: Supports up to 5 animations per skill. You can set the animation duration for each animation, but it cannot exceed the maximum value.
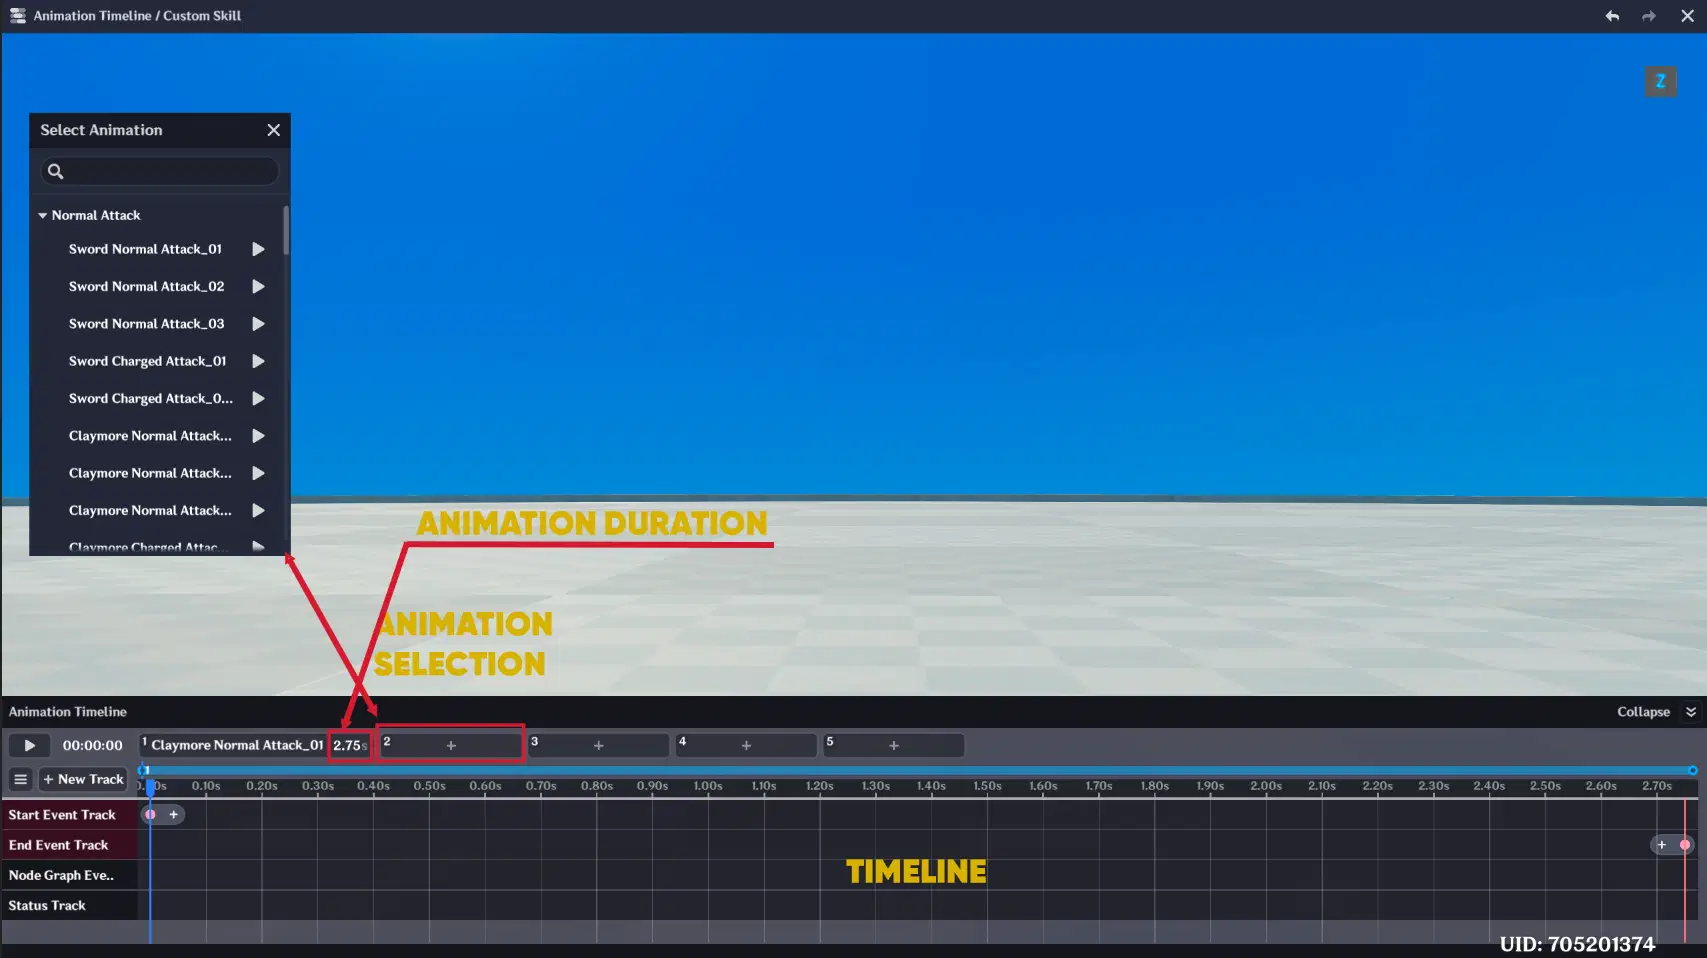
Skill Timeline
Start Event Track
Trigger specific Node Graphs exactly when an animation starts.
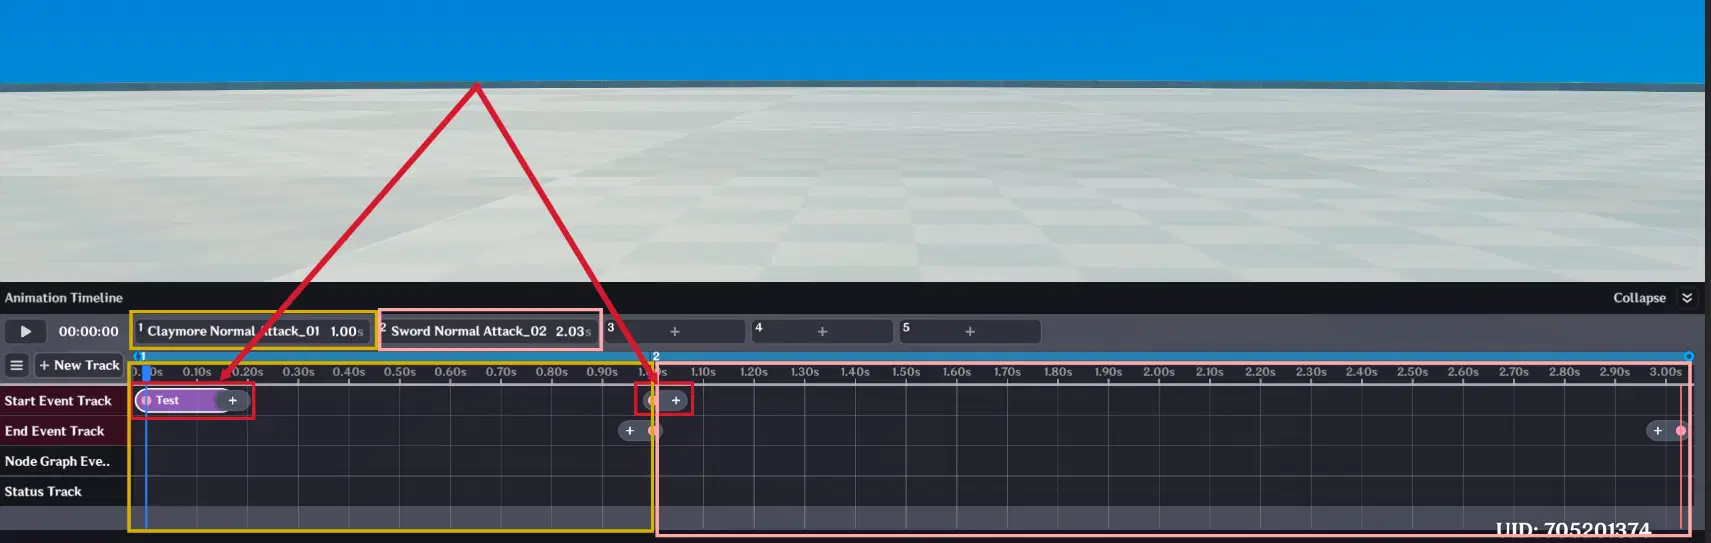
Start Event Track
End Event Track
Trigger specific Node Graphs exactly when an animation ends.

End Event Track
Combo Track(For Combo Skill)/Branch Track(For Aiming and Hold Skill)

Combo Track
Combo/Branch Track:
It manages how different animations transition into one another to create seamless attack sequences.
- Pre-input Windows: These yellow blocks define the specific time frames when the game "listens" for player input. If the player clicks during this window, the character transitions to the next phase of the combo.
- Animation Branching: It allows a skill to branch into different paths. For example, a quick tap can trigger a standard follow-up, while a long press (Charge) can transition the skill into a Charging Branch.
- Phase Management: Each segment on this track links a specific animation (e.g., Normal Attack 01) to the next logical move, ensuring the combo feels fluid and responsive.
- Transition Settings: In the Combo Response Event panel, you can configure how many response phases the skill has and exactly which animation should play next upon a successful trigger.
Node Graph Events
These trigger events at any specific timestamp on the timeline, regardless of animation changes.

Node Graph Events
Status tracks
Used to toggle specific states during a skill’s duration. You can modify track duration by dragging the "illuminated dots" on the timeline and add:
- VFX Playing: Timing for visual effects.
- Skill Interruption: When a player can cancel the skill by moving or dodging.
- Aiming/Crosshair: When to enter aiming mode and show the UI.
- and more

Status tracks
2. Skill Types
At the moment 5 Skill types are supported:
- Instant Skill
- Hold Skill
- Normal Skill
- Combo Skill
- Aiming Skill
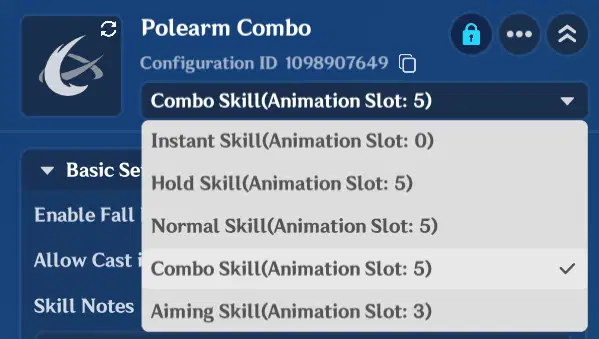
Skill Types
Skill Configurations
Each skill type supports the following core settings to control balance and targeting:
- Usage & Economy: Configure Cooldown timers, Usage Limits, and Resource Consumption (e.g., MP or Energy).
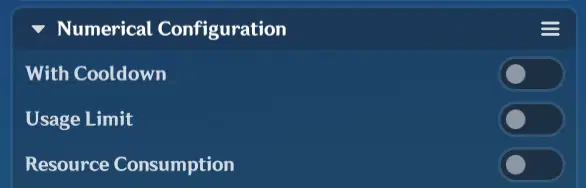
Skill configuration
If Resource consumption is enabled, you need to create Skill Resource in Skill Resource Management:
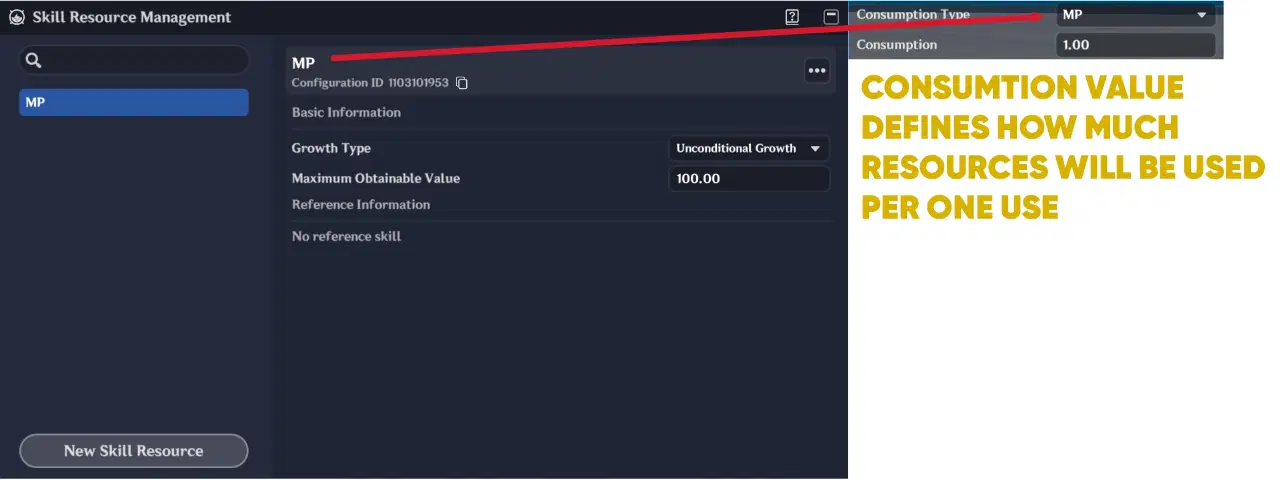
Skill Resources
- Targeting Area: Choose between Cylinder or Sector shapes. You can manually adjust the Radius (m) and Height (m).
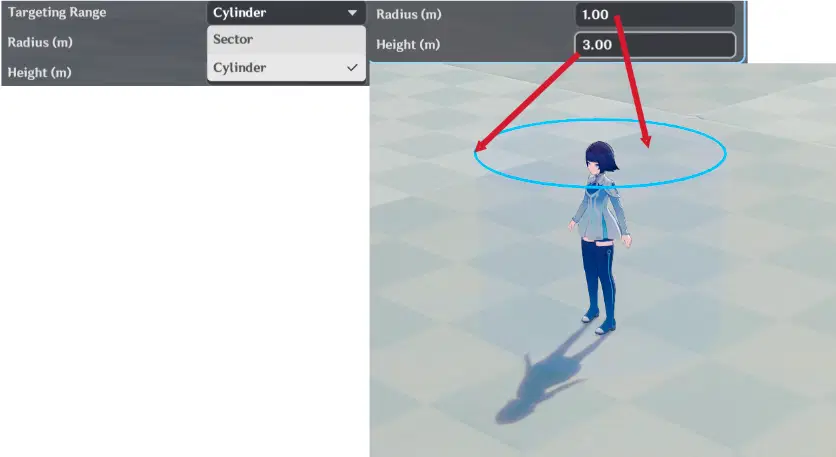
Skill targeting Area
- Auto-Cleanup: Use the "Skill destroy when reaching the Usage Limit" toggle to automatically remove the skill from the player once charges are empty.

Life Cycle Management
Specialized Skill Toggles:
- Combo Skill: Includes an "Enable Charging Branch" toggle to allow transitions from normal taps to charged attacks.

Combo Settings
- Aiming Skill:
- Aiming State Activation: Choose between Hold (Skill activates if you hold button) or Toggle (Skill activates after button is pressed) to enter aim mode.
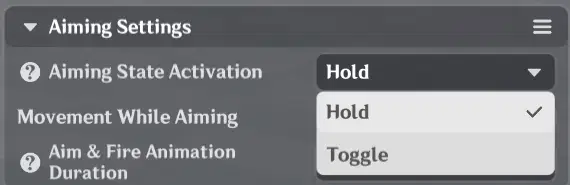
Aiming State Activation
- Movement: Toggle "Movement While Aiming" to allow/restrict player positioning.

Aiming Settings
- Animations: Set "Aim & Fire Animation Duration" to Default or Custom for precise timing.
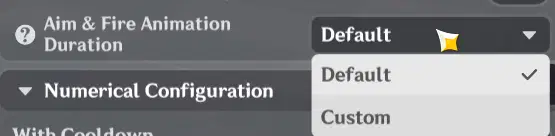
Aiming Settings
- Default duration:
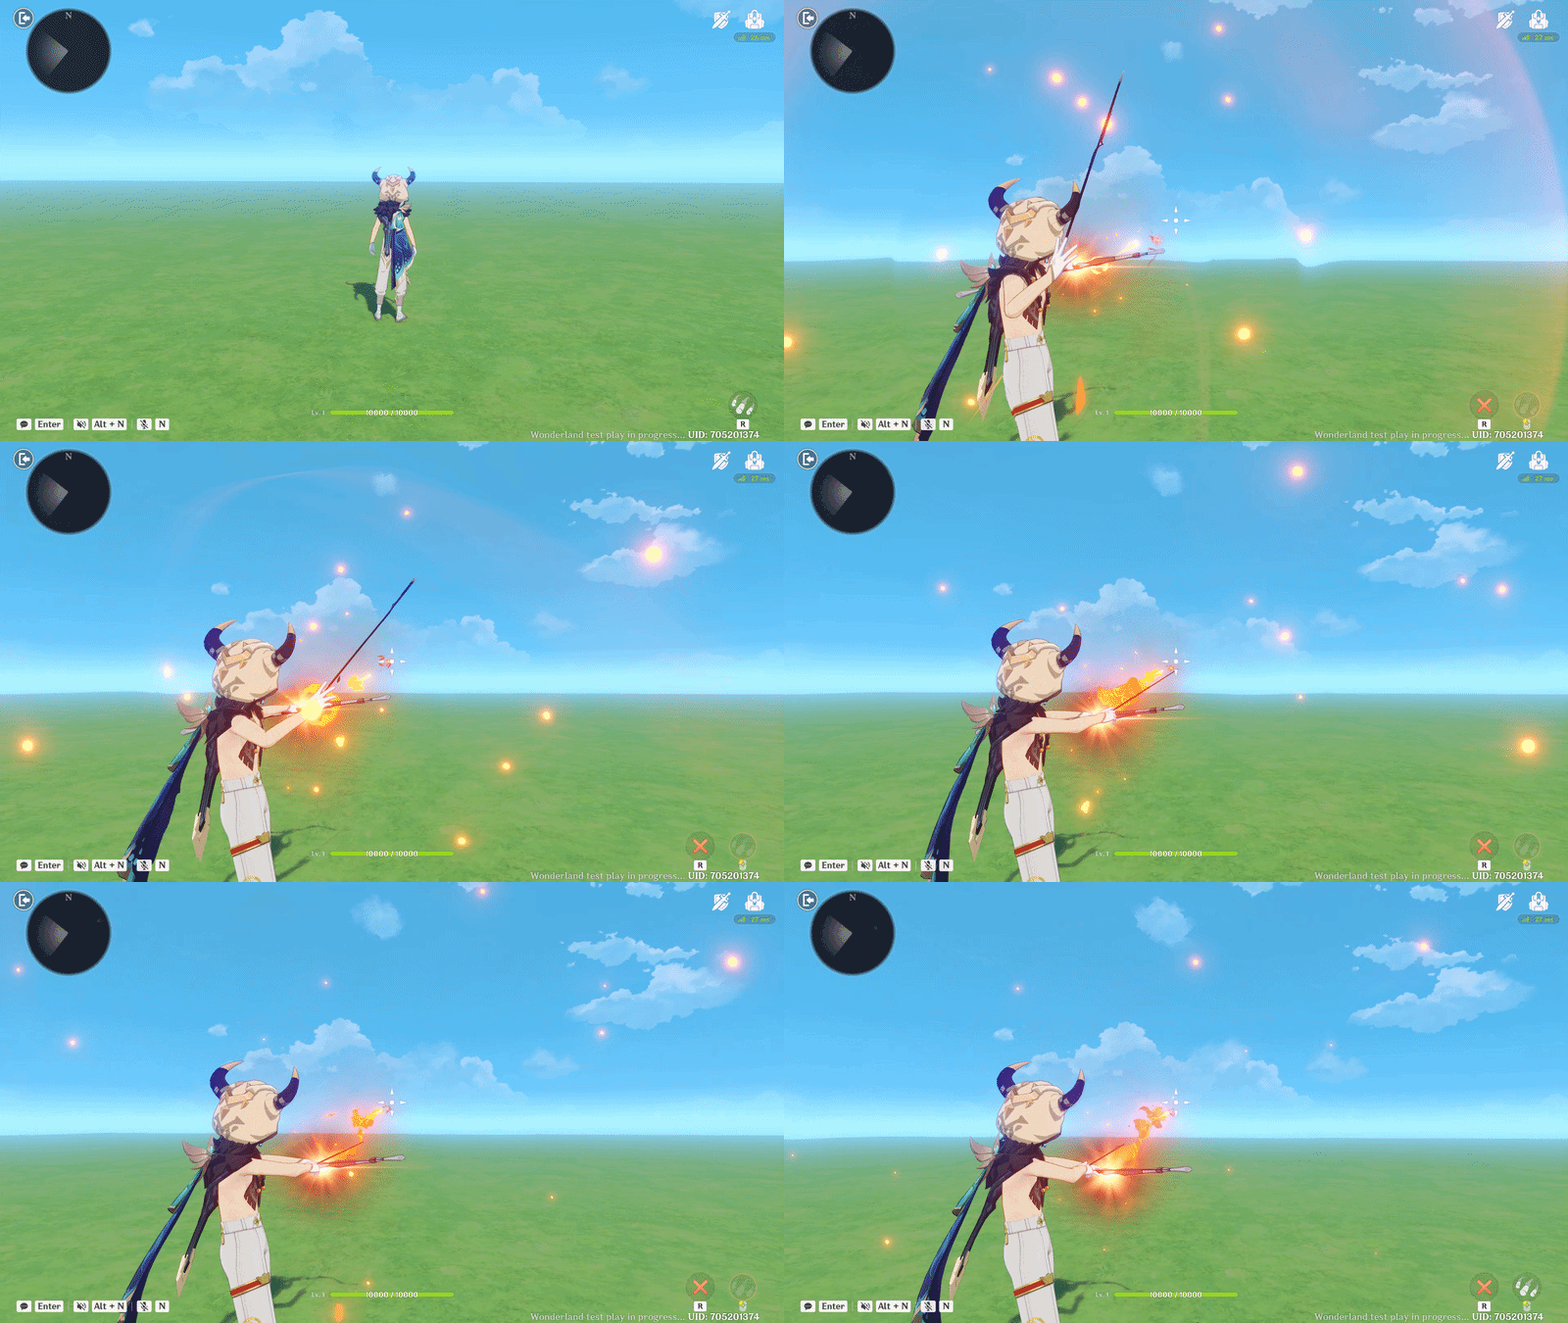
Default duration
- Custom duration with 0.1 seconds Launch Animation Duration:
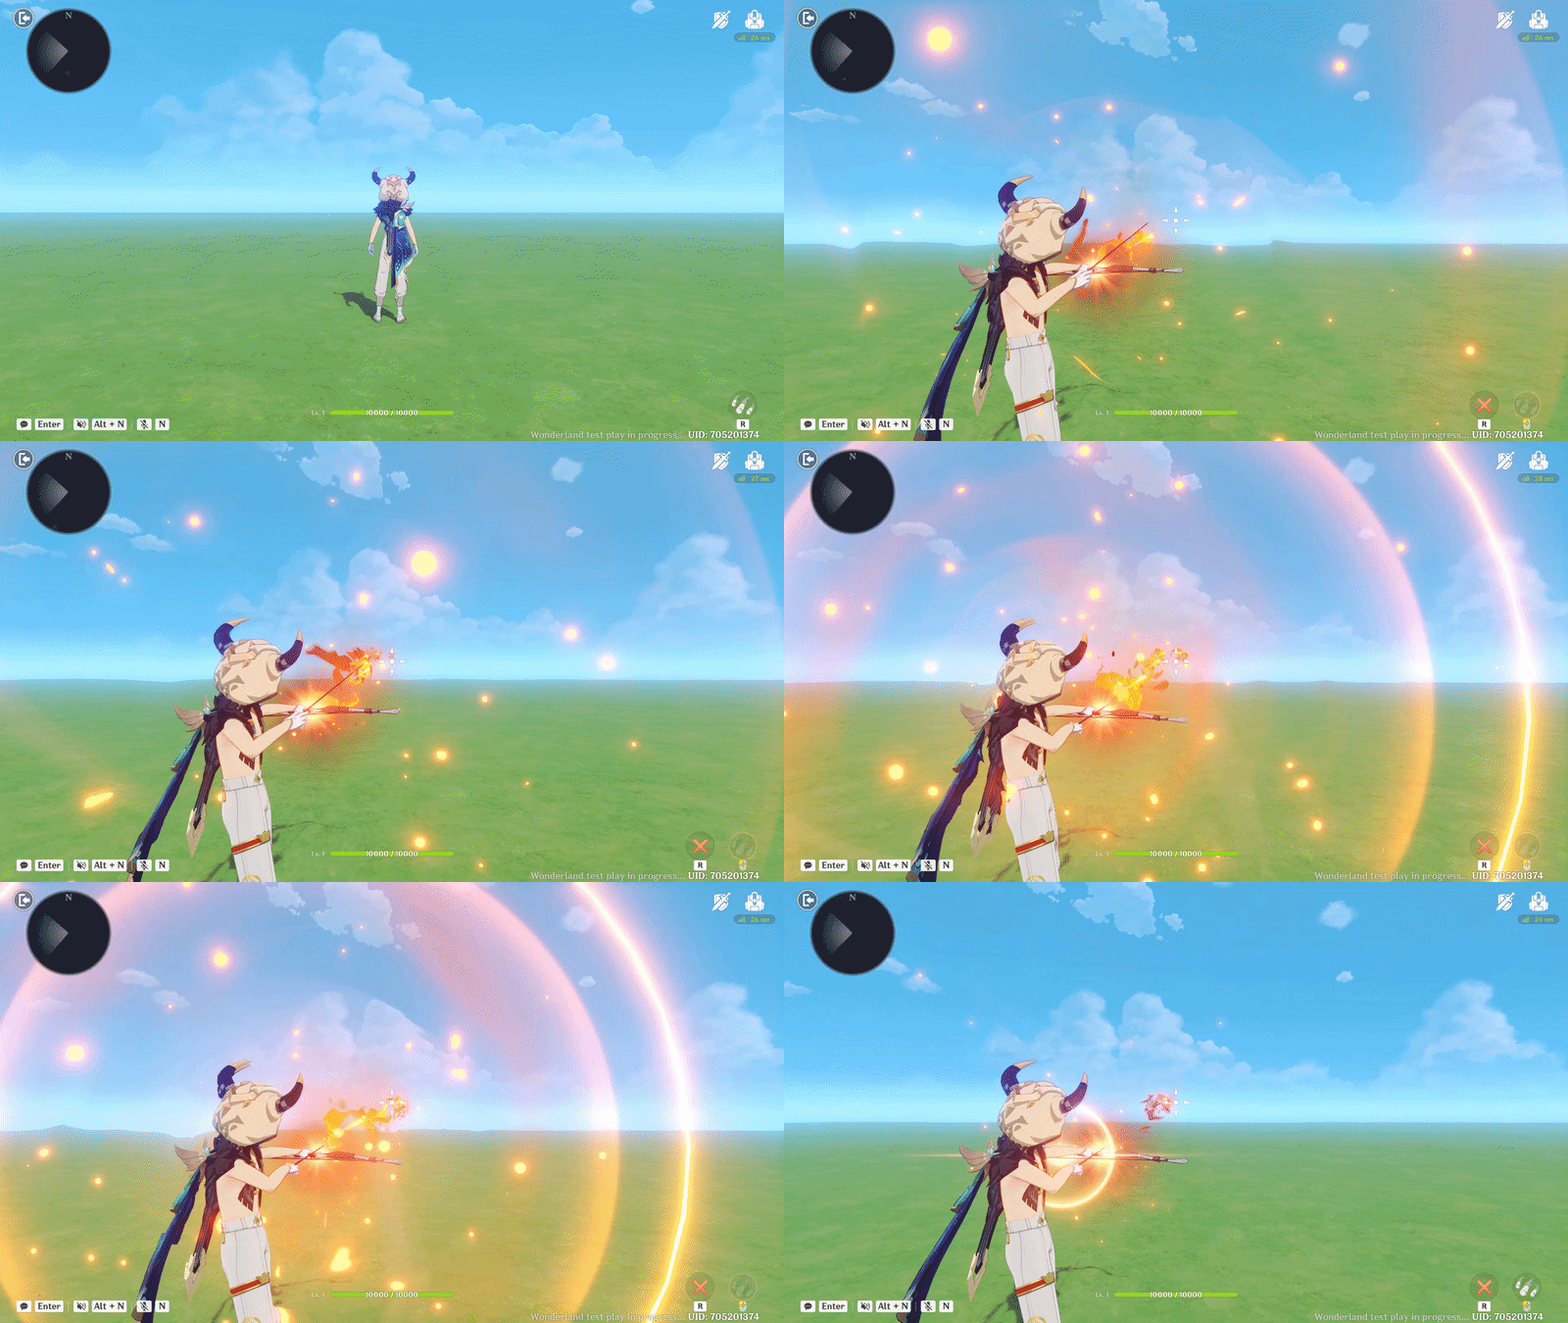
Custom duration

2.1. Instant Skill
Executes immediately upon clicking. It only features the Start Event Track and lacks animation and other tracks, making it ideal for simple logic like healing or instant buffs.

Instant Skill's editor
2.2. Hold Skill
Designed for skills that change behavior when the button is held. It includes a Branch Track to manage the transition from a "Tap" to a "Charge" or "Held" state.
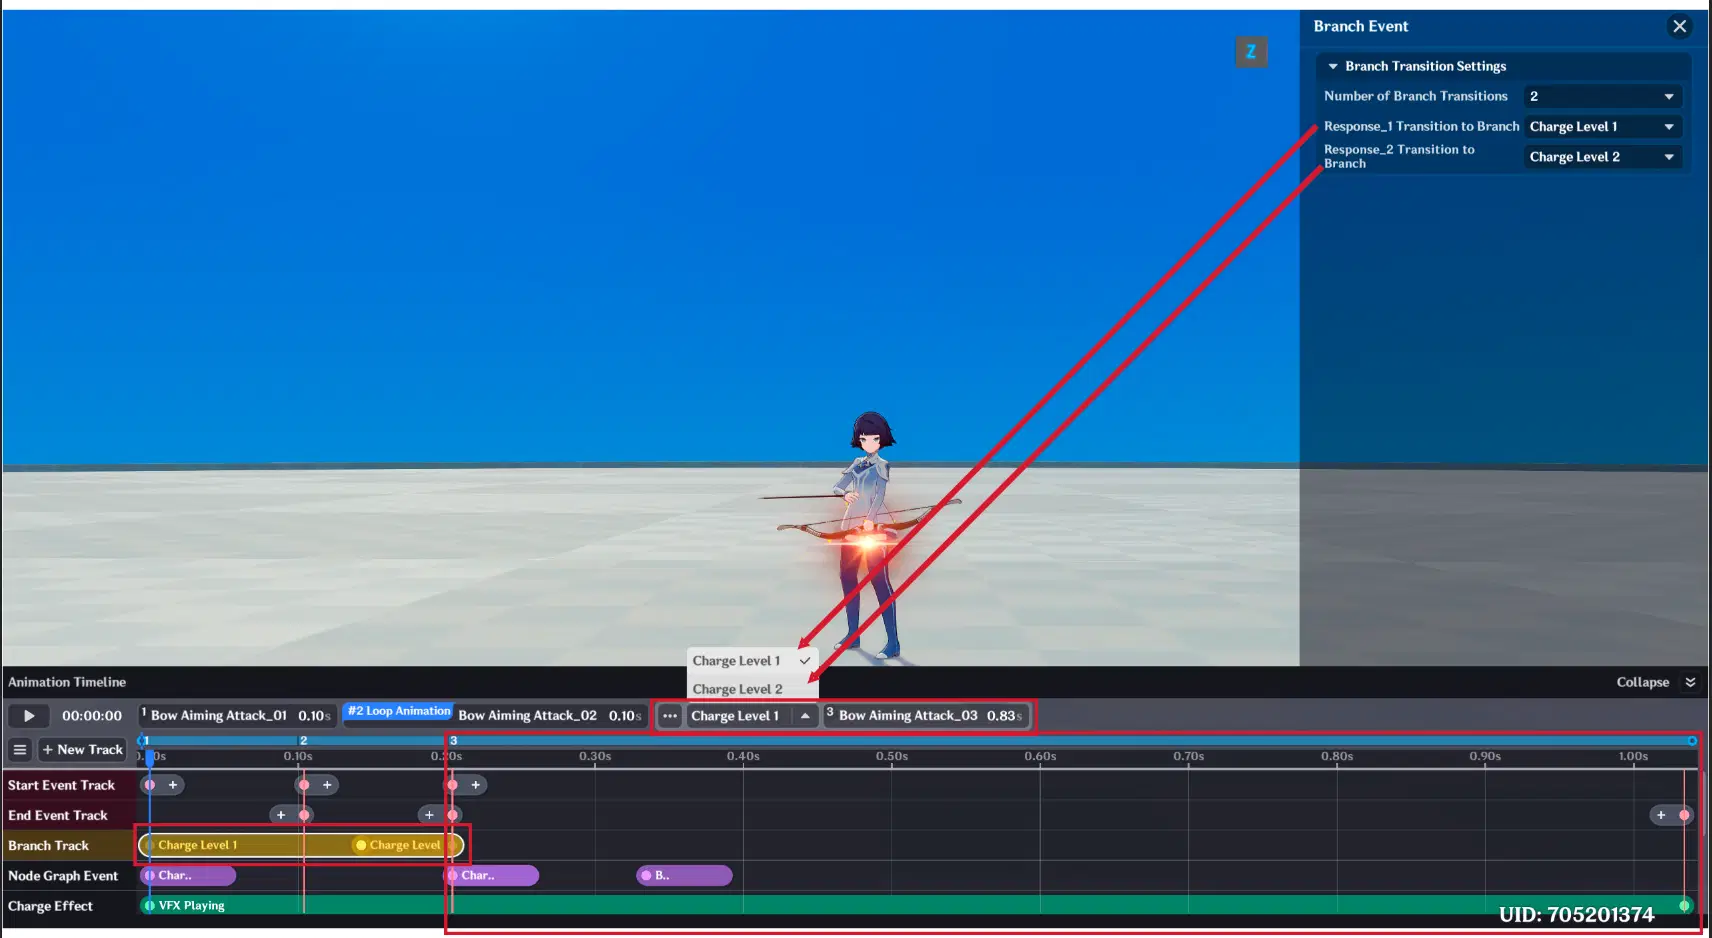
Hold Skill's editor
2.3. Normal Skill
The standard skill type. It includes all basic tracks (Animation, VFX, etc) for a single, complete action.

Normal Skill's editor
2.4. Combo Skill
Used for multi-stage attacks. It features a Combo Track, which allows you to set "Pre-in***&#*4; windows for the player to click and transition into the next animations.
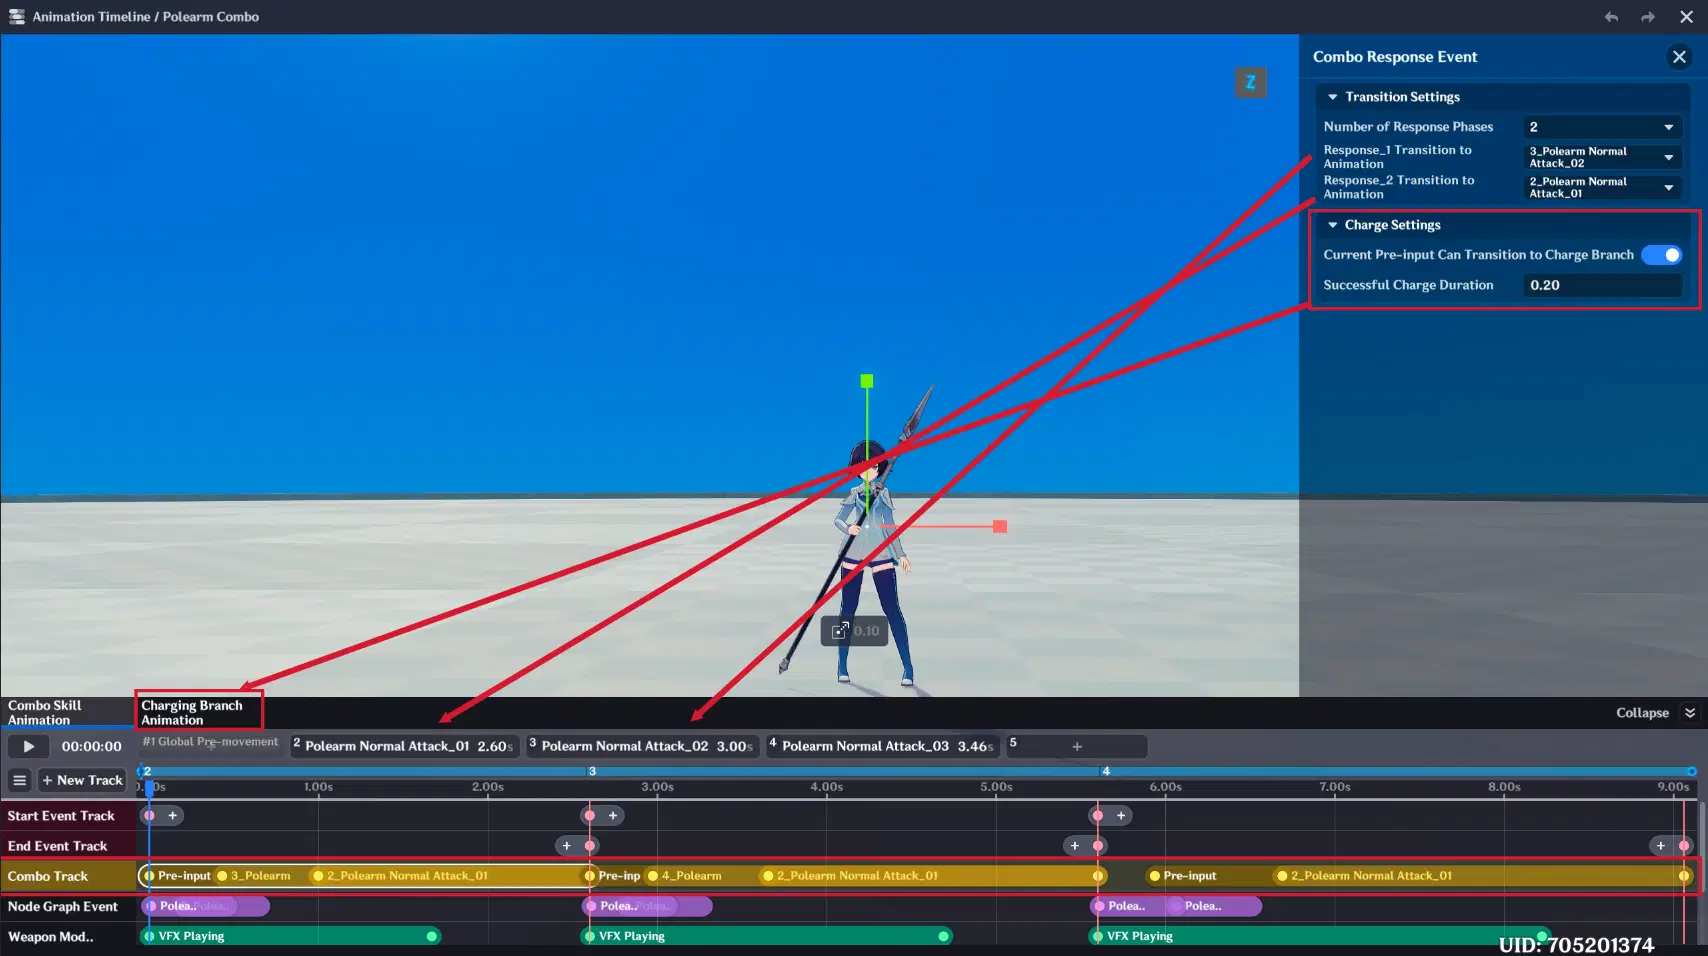
Combo Skill's editor
2.5. Aiming Skill
Specifically for skills that require directional input (like a bow). It includes a Branch Track to handle the transition between pre-defined Charge Levels. Branch Track is same as for Hold Skill.
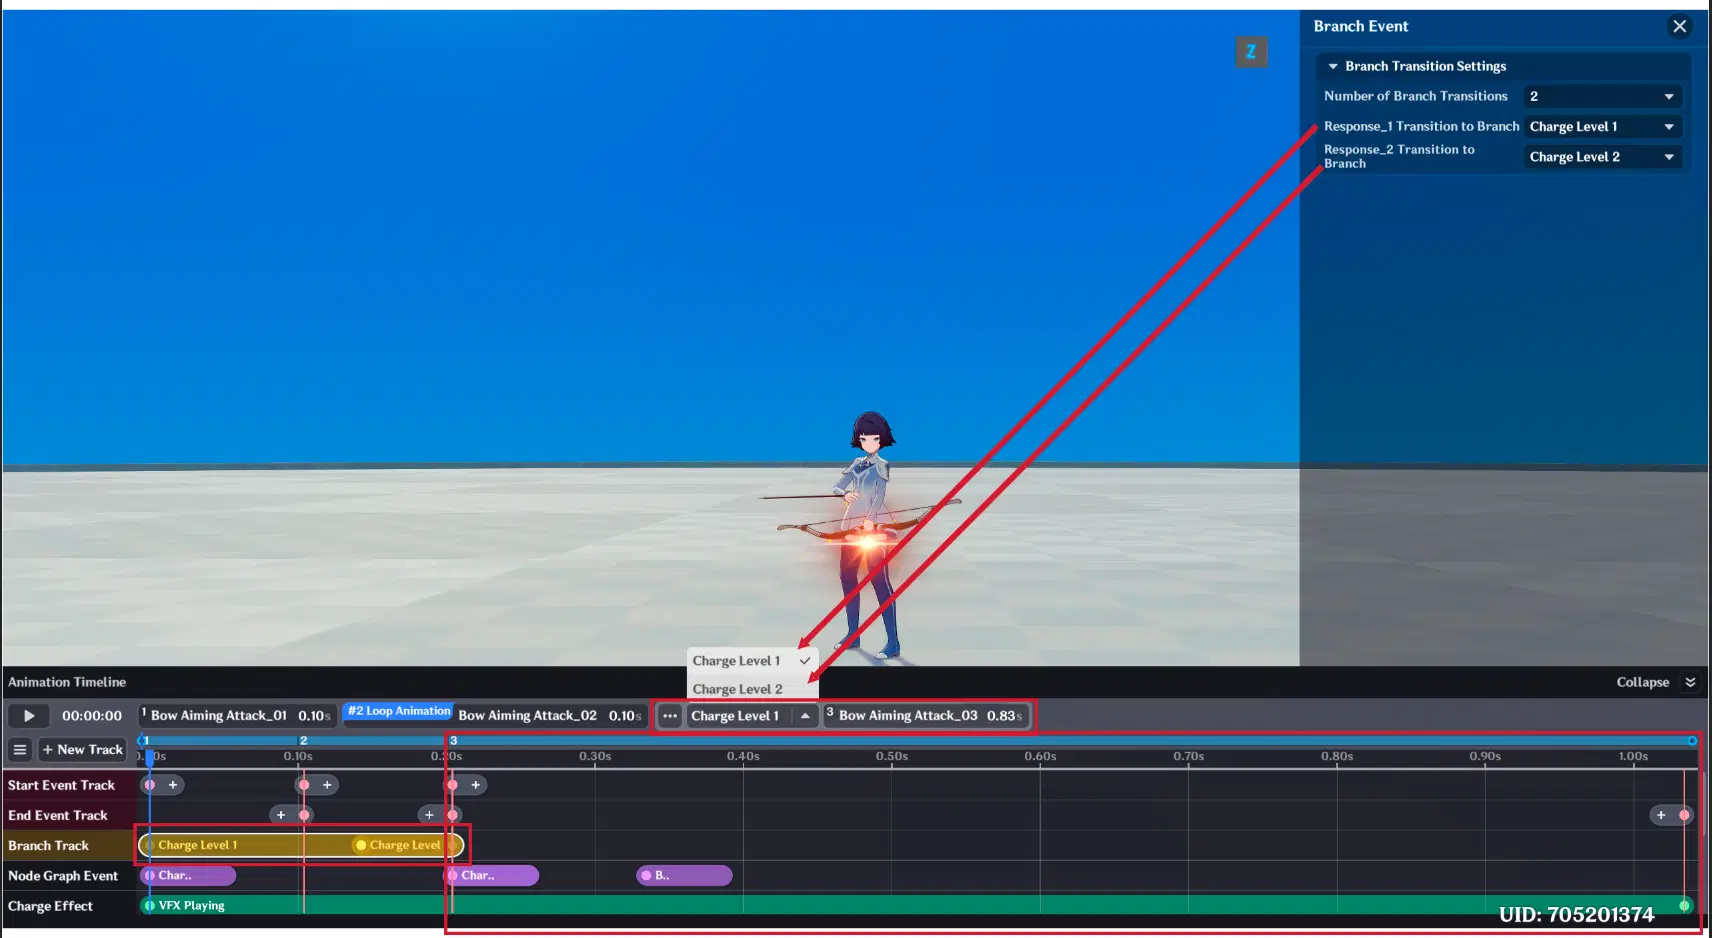
Aiming Skill's editor
3. Player's Skill creation examples using Skill Editor
3.1. Aiming skill examples
3.1.1. Gun Skill example
This example demonstrates how to create a functional weapon using the Aiming Skill type.
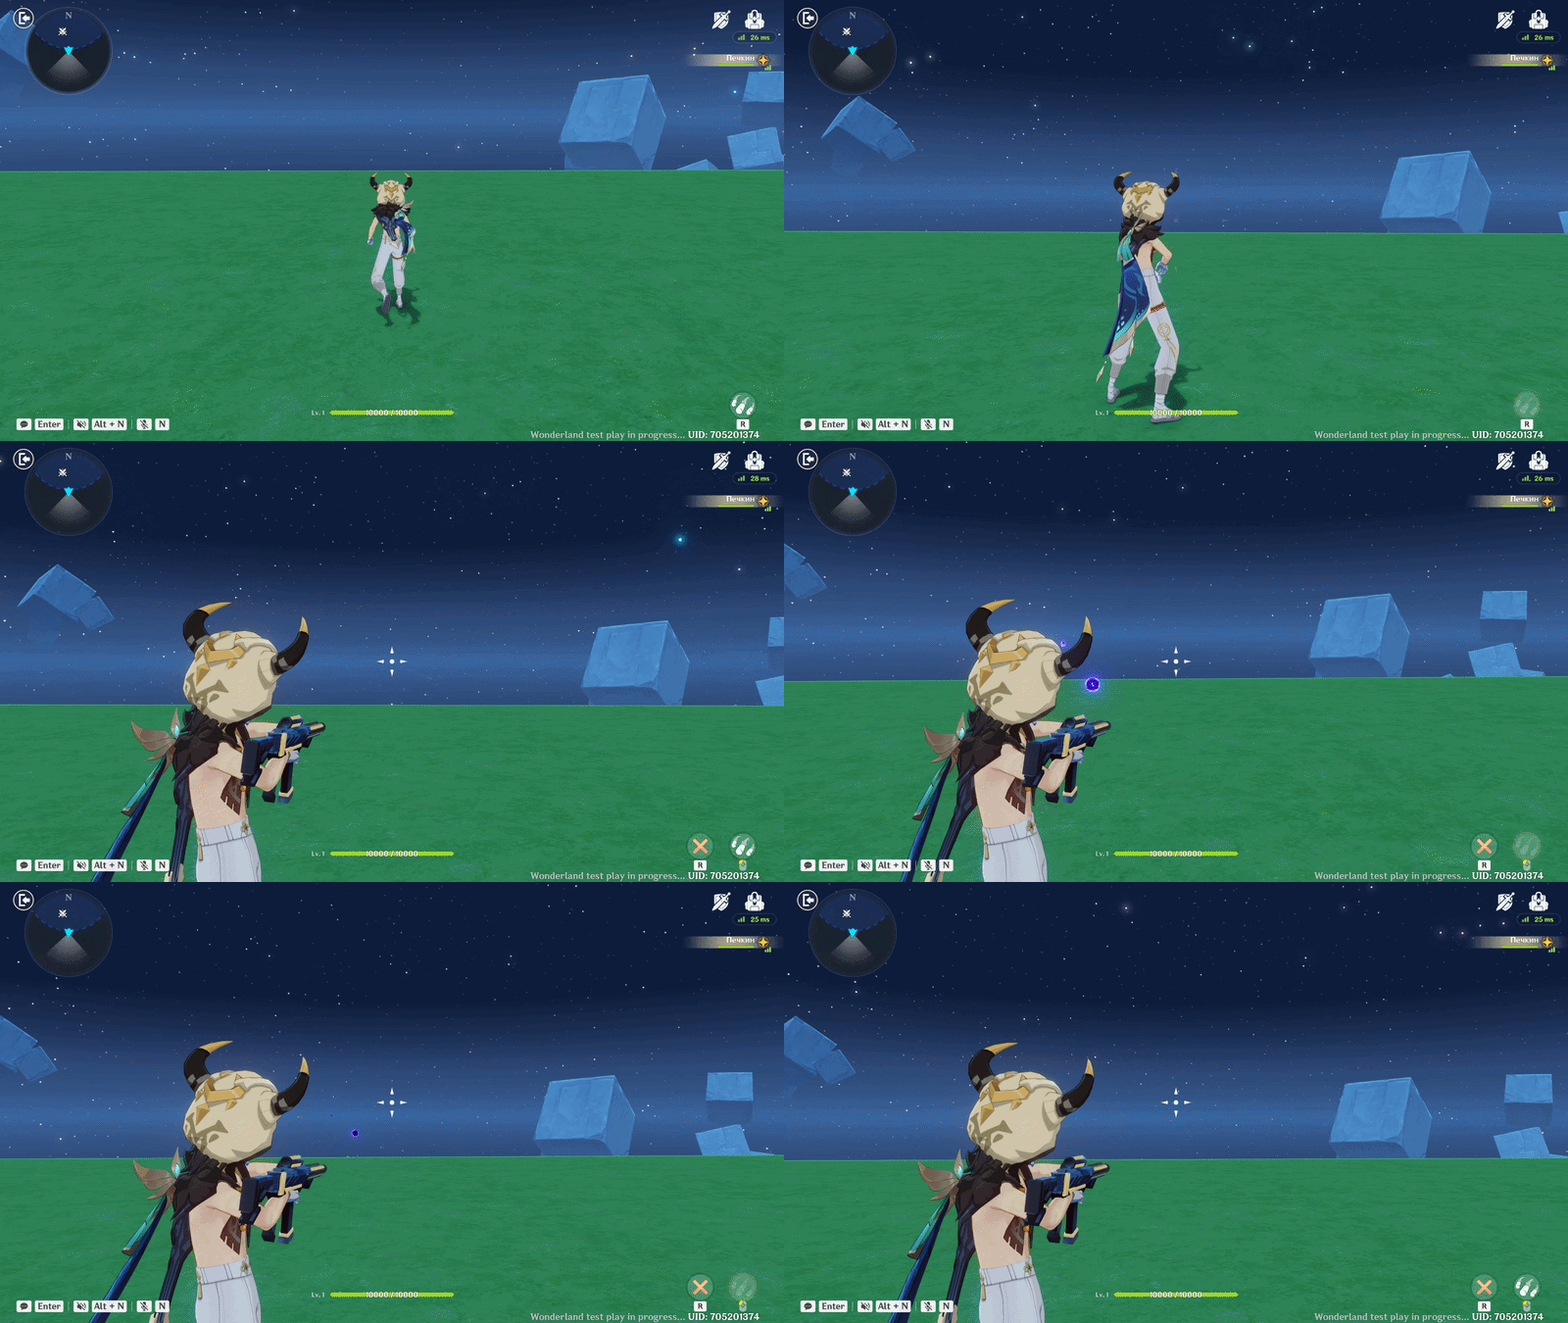
Gun Skill showcase
Step 1: Skill Creation & Setup
- Type: Select Aiming Skill.
- Configuration: Set your Cooldown, Resource Consumption, and Usage Limit.
- Aiming Settings: Enable Movement While Aiming and choose between Hold or Toggle activation.
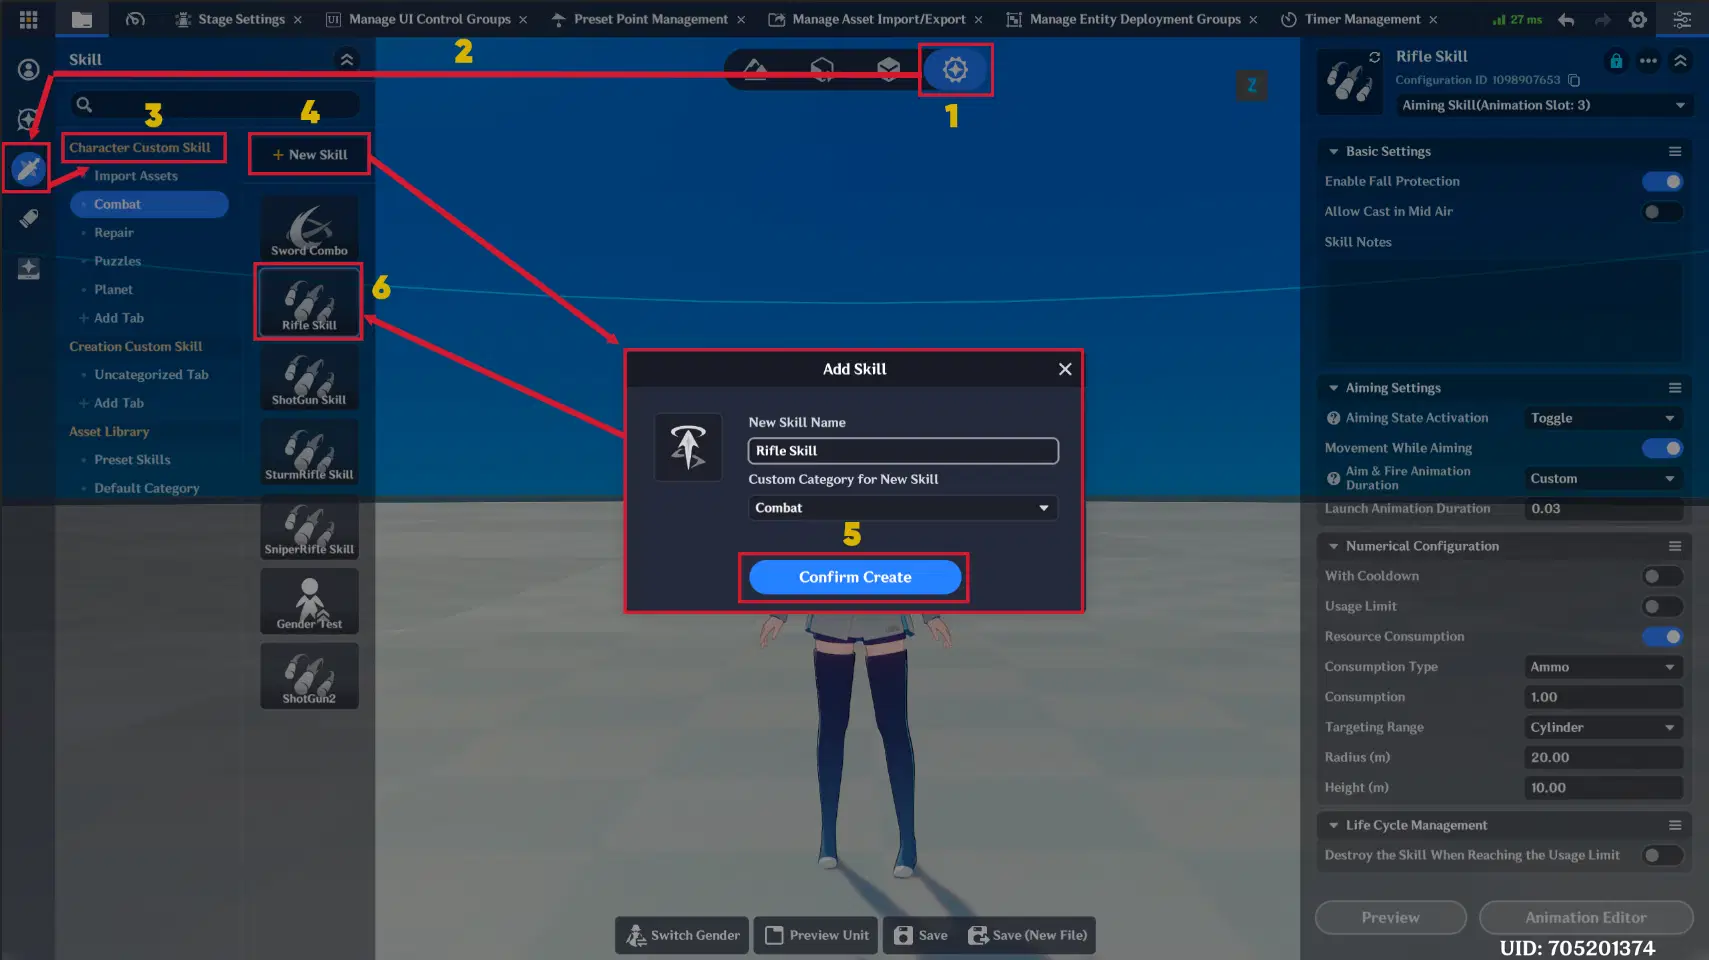
Skill creation
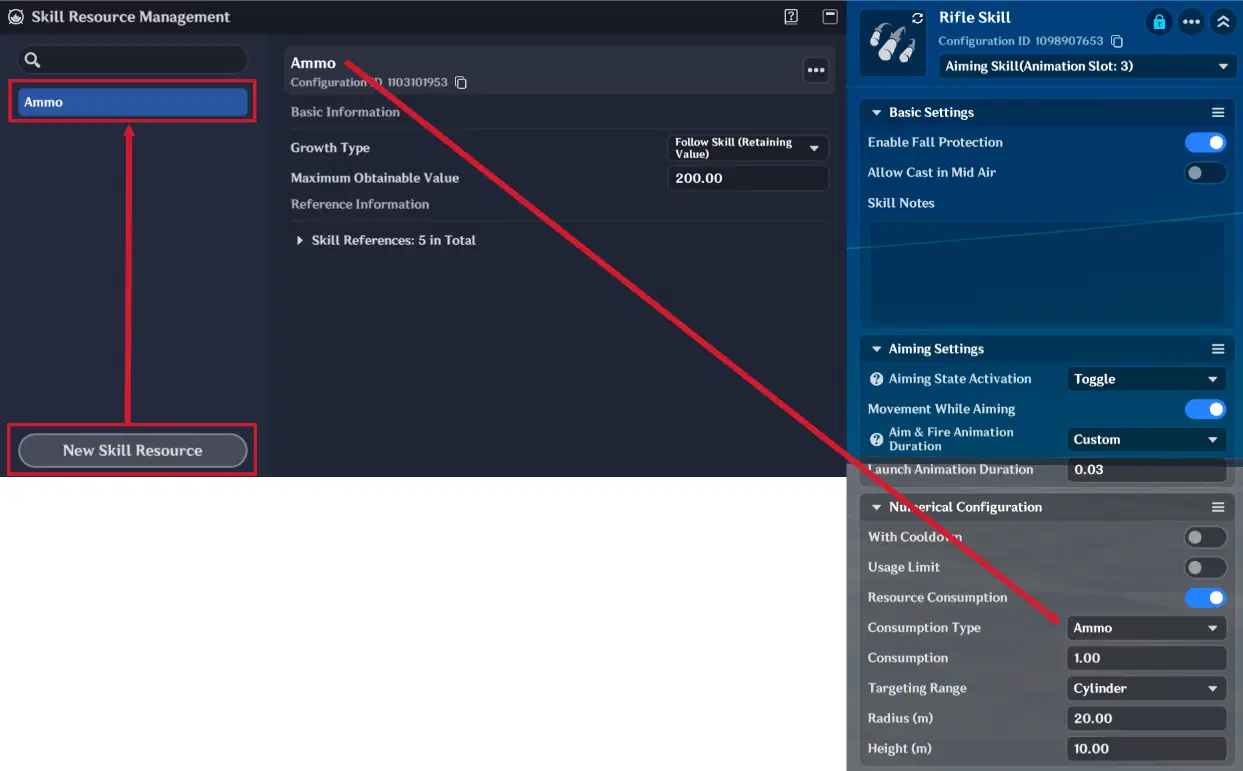
Skill settings
Step 2: Skill Editor Timeline
Your timeline should look like this:
- Start Event Track: Triggers the Gun Model Node Graph to spawn the weapon in the player's hand.
- Status Tracks: Configure the Aiming State and Crosshair visibility during the branch.
- End Event Track: Triggers the Gun End Node Graph to remove the model when the skill finishes.
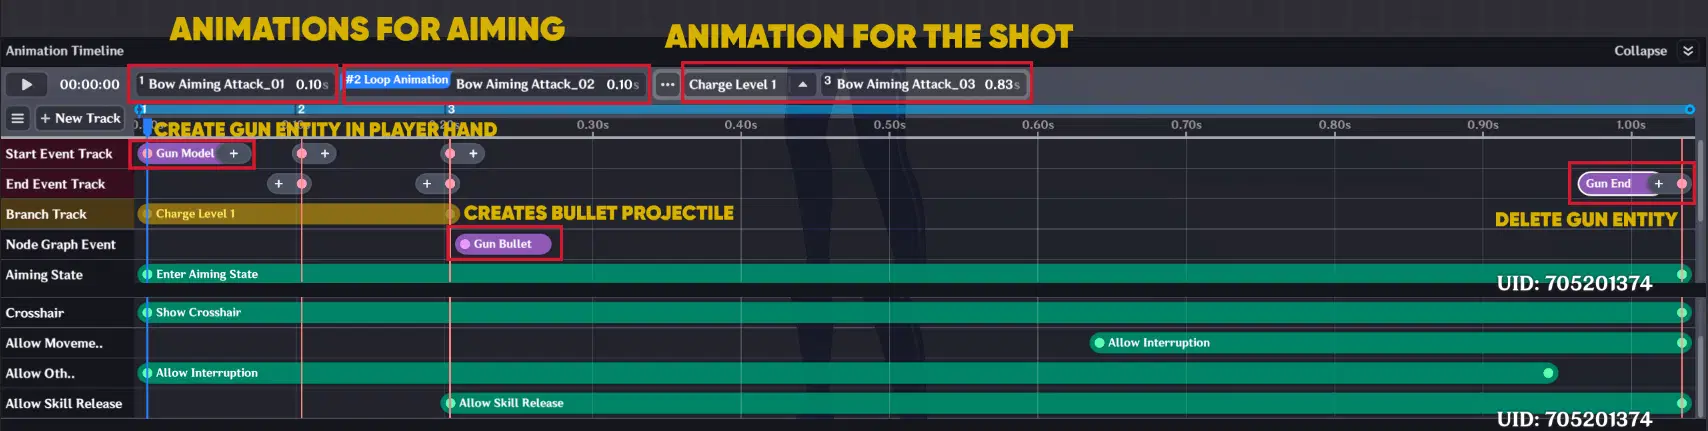
Skill Editor
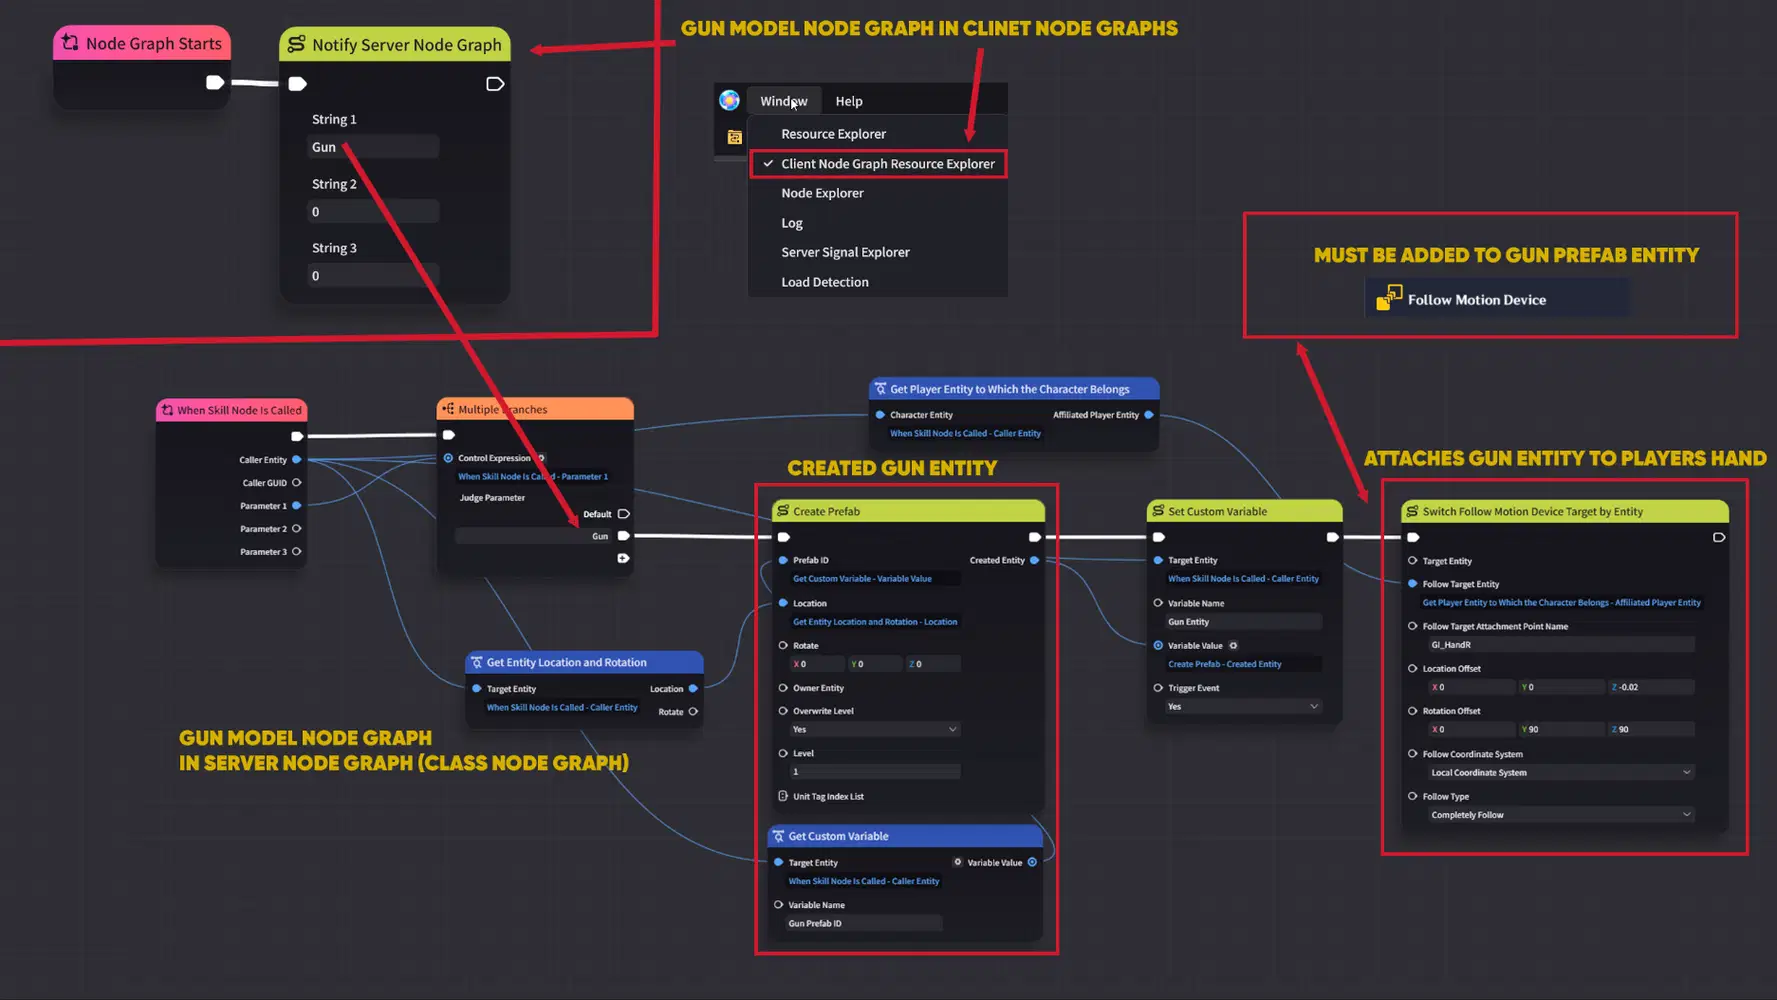
Node Graph logic (Part 1)
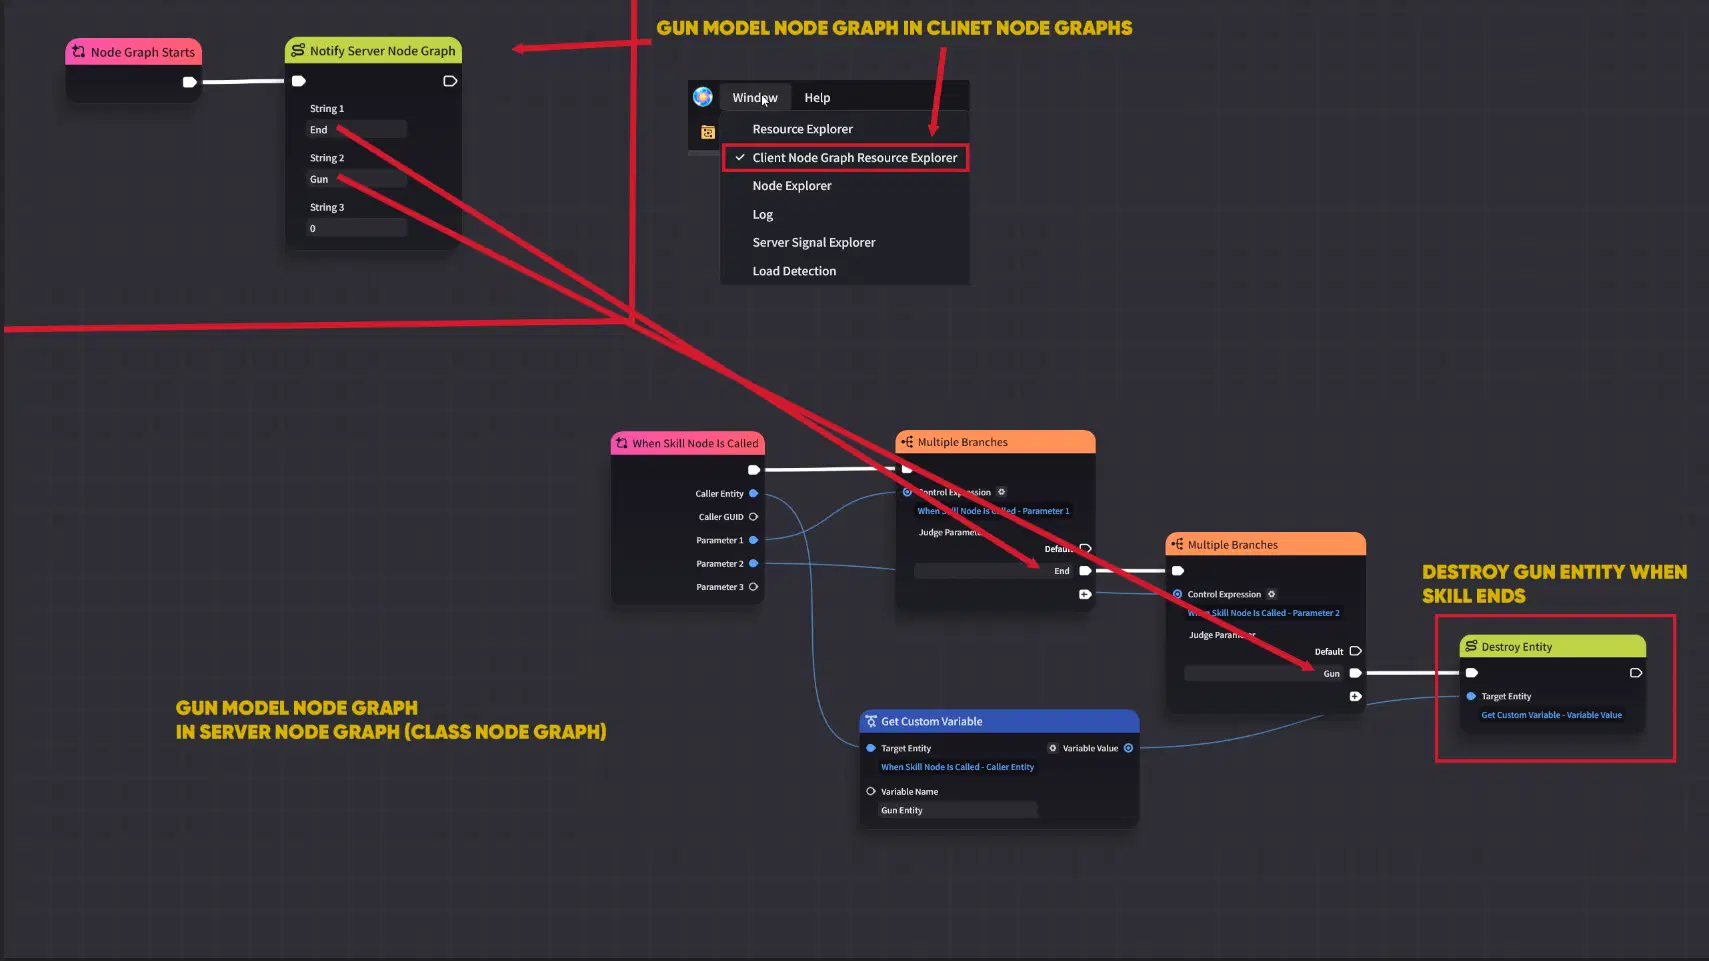
Node Graph logic (Part 2)
Server Node Graph needs to be attached to Player Class
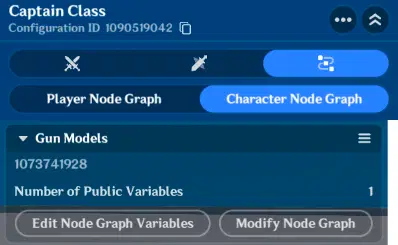
Node Graph Attachment
Step 3: Fire logic
To make the gun fire, you need:
- Gun Bullet Node Graph: Handles the "Fire" logic, triggering the projectile spawn.
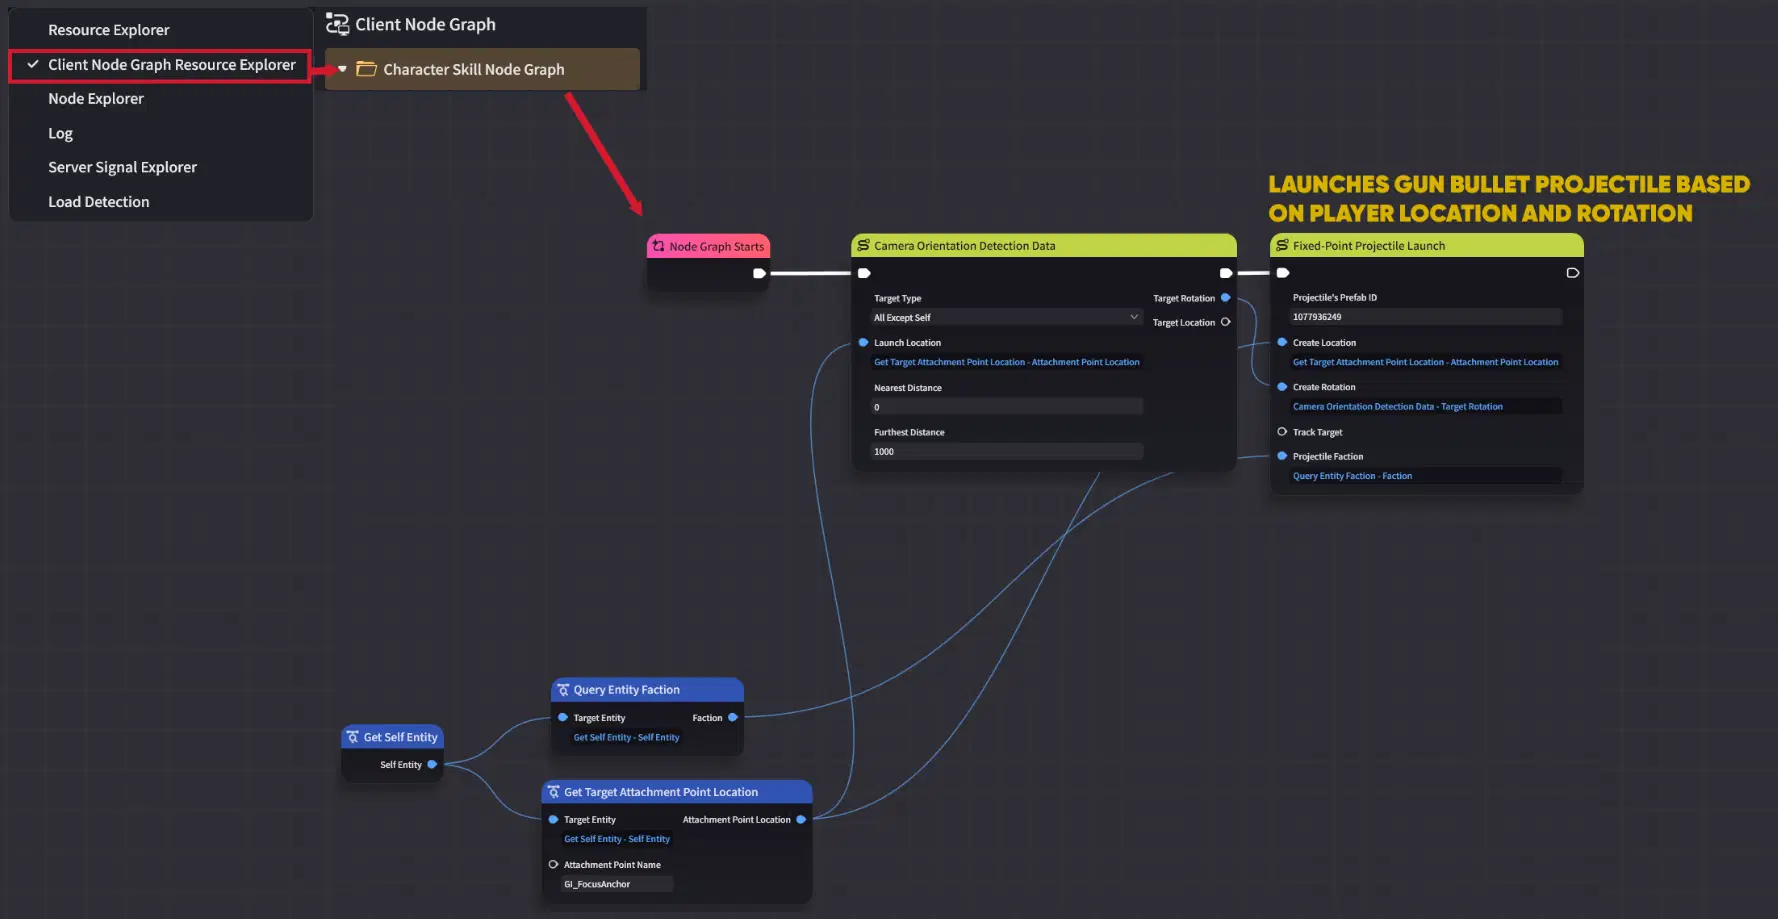
Node Graph logic (Part 3)
Step 4: Projectile Configuration
Create the bullet under Combat Preset → Local Projectile → + New Projectile.
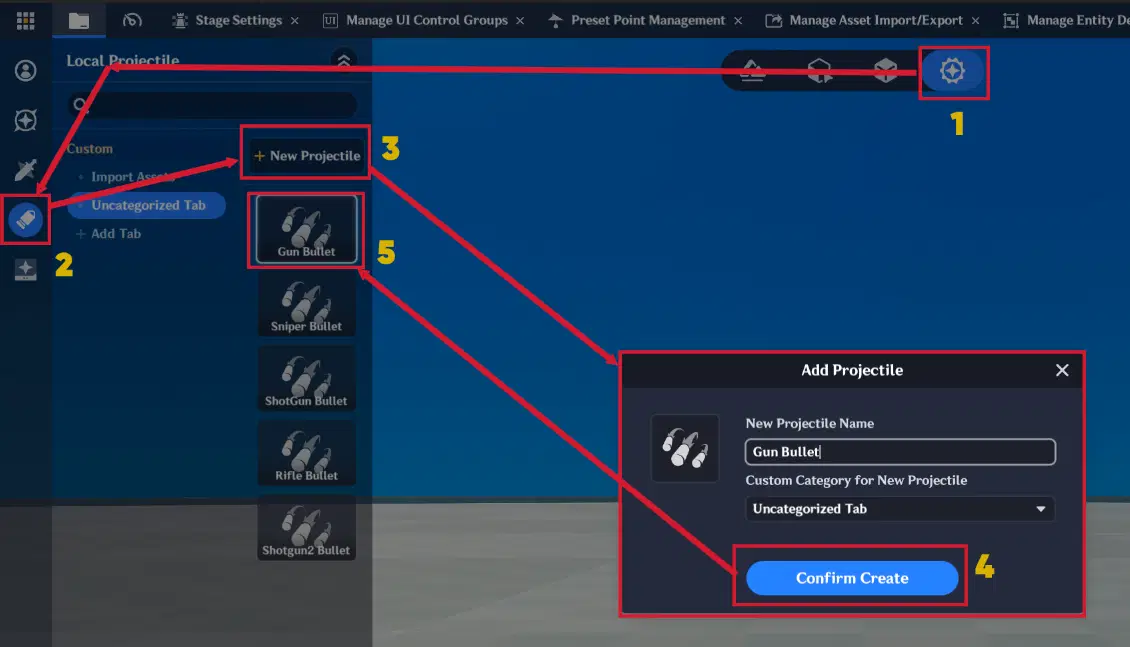
Local Projectile creation
Projectiles main configuration:
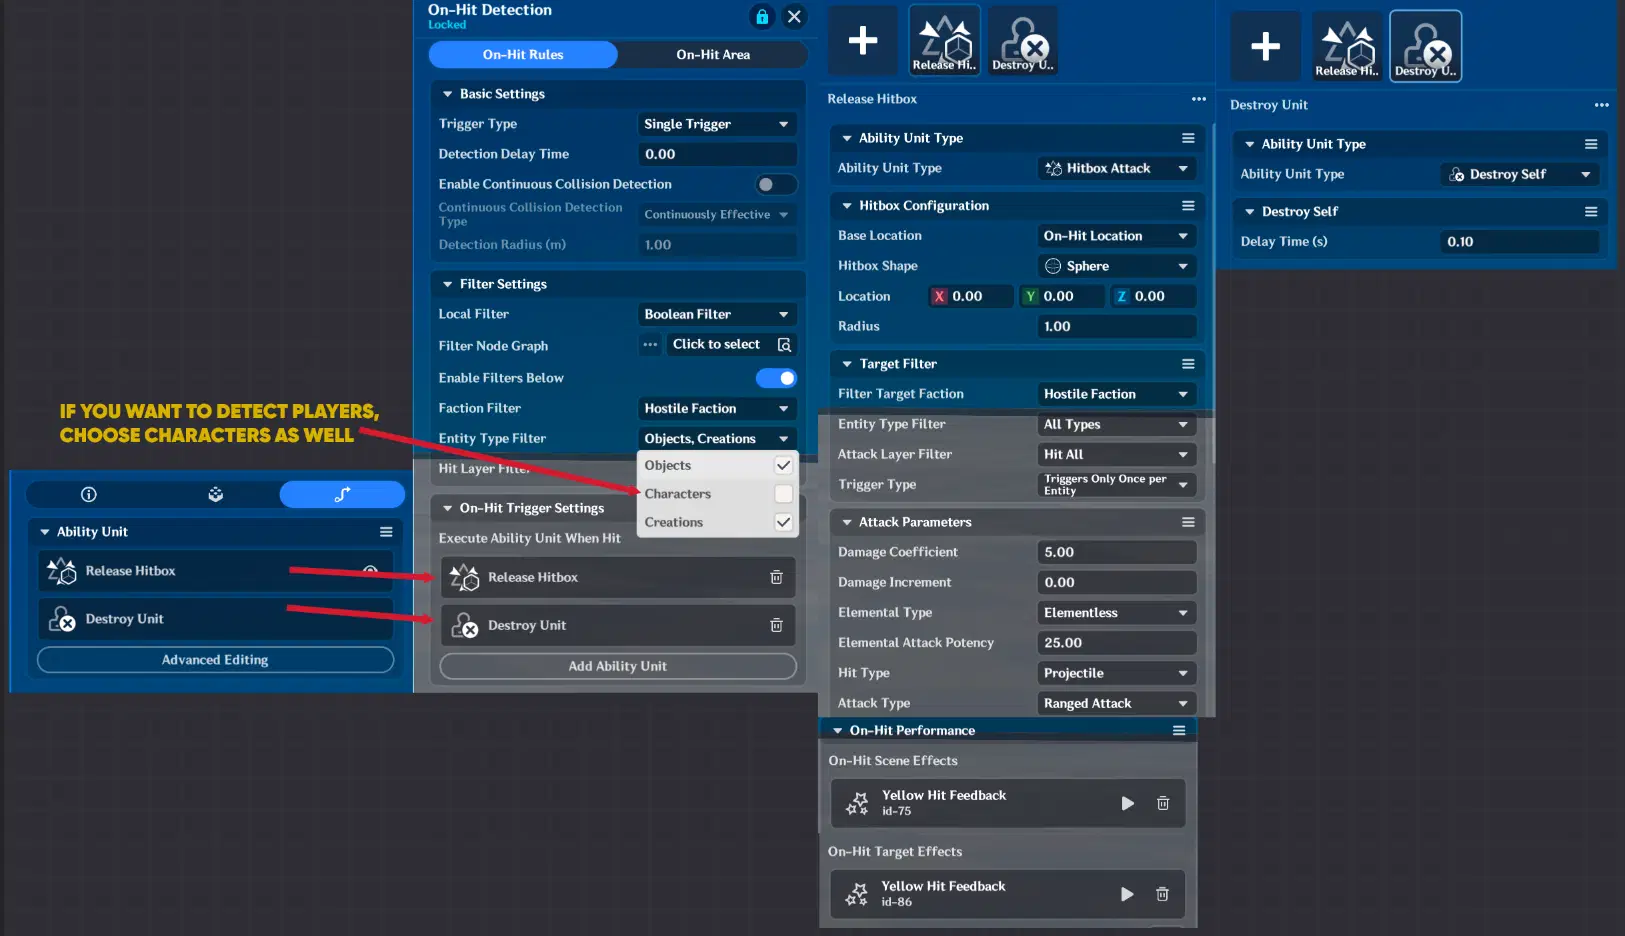
Projectile main configuration
3.1.2. Grenade Skill example
This example shows how to create a throwable utility item using the Aiming Skill type with a Hold activation.
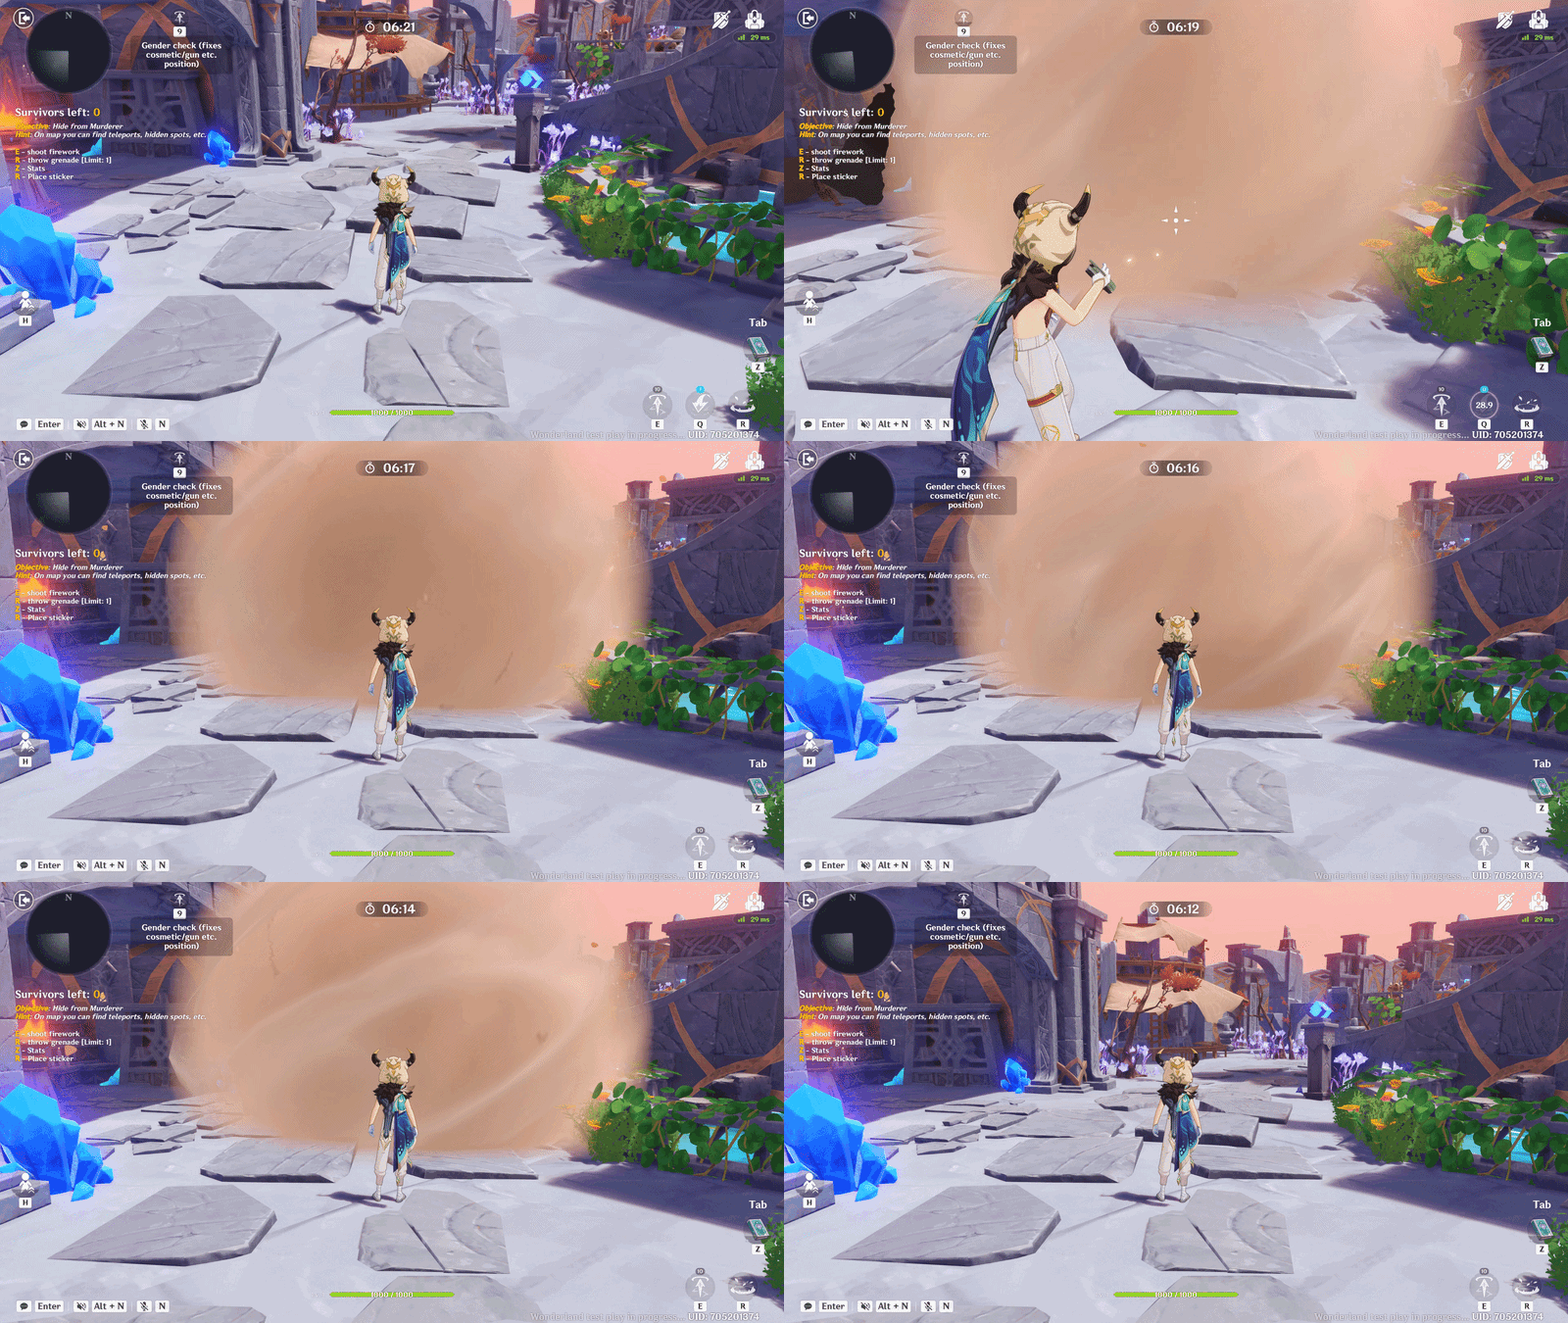
Smoke grenade showcase
Step 1: Skill Setup
- Type: Select Aiming Skill.
- Activation: Set Aiming State Activation to Hold. This allows the player to cook the grenade or aim the trajectory while holding the button.
- Configuration: Set the Cooldown according to your balance needs.
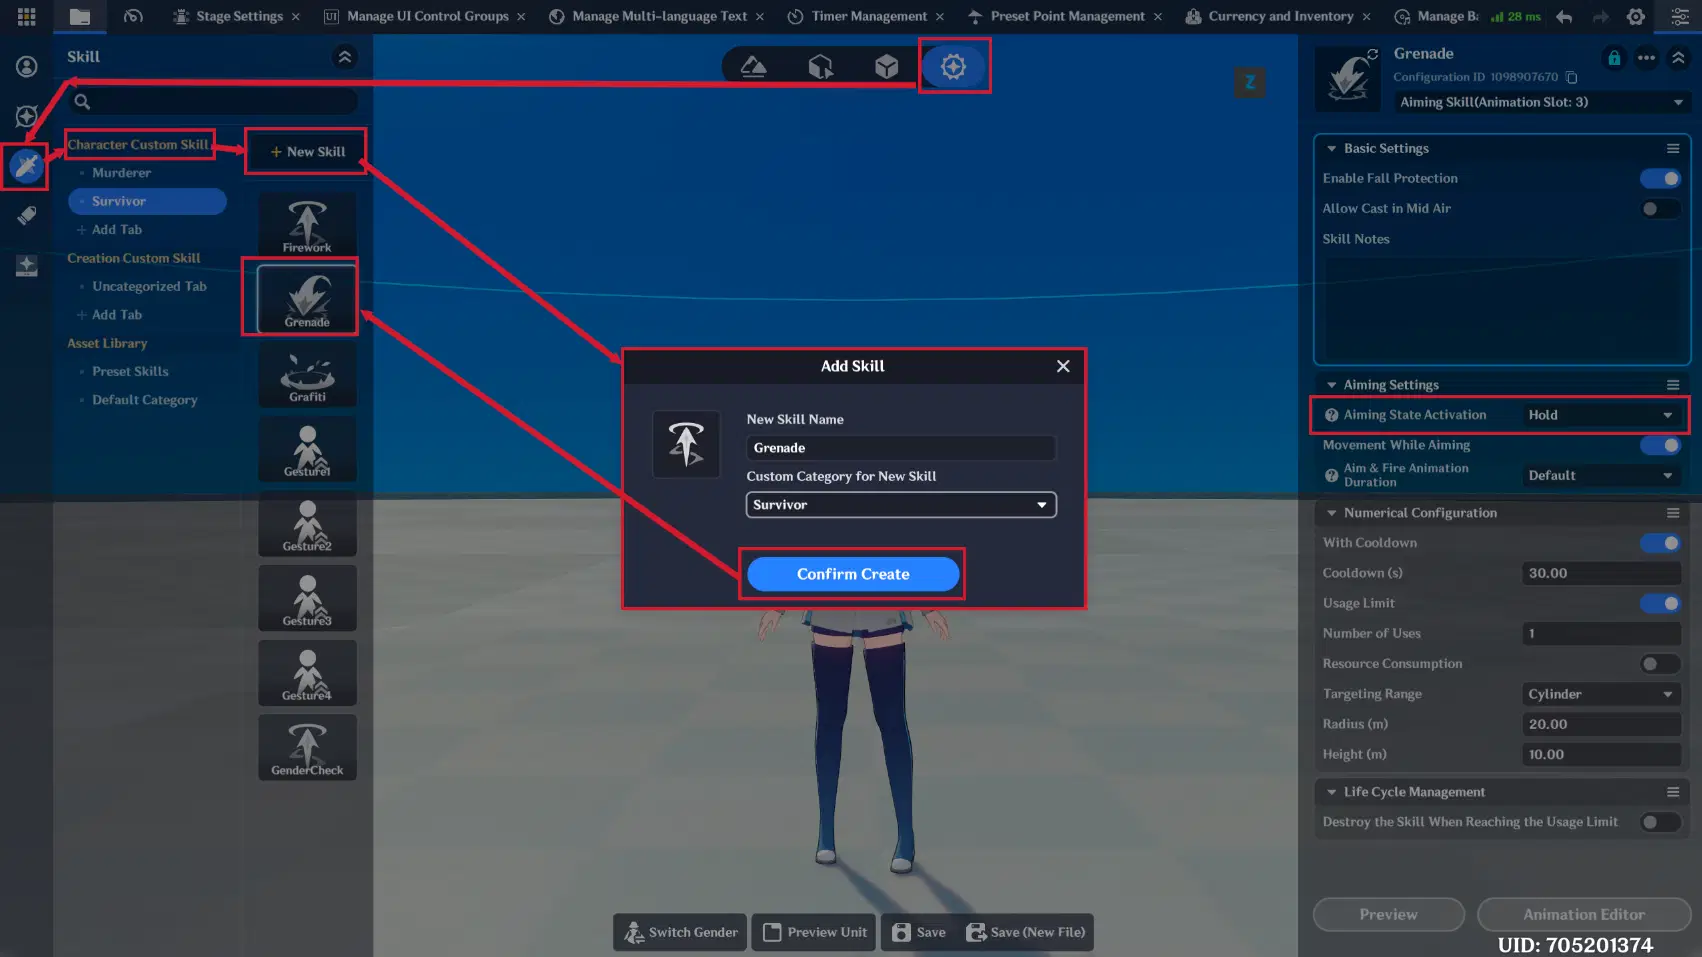
Skill creation
Step 2: Timeline & Status Tracks
The Skill Editor timeline manages the transition from pulling the pin to throwing:
- Branch Track: Handles the aiming arc and the release moment.
- Status Tracks: Enable the Crosshair and Aiming State.
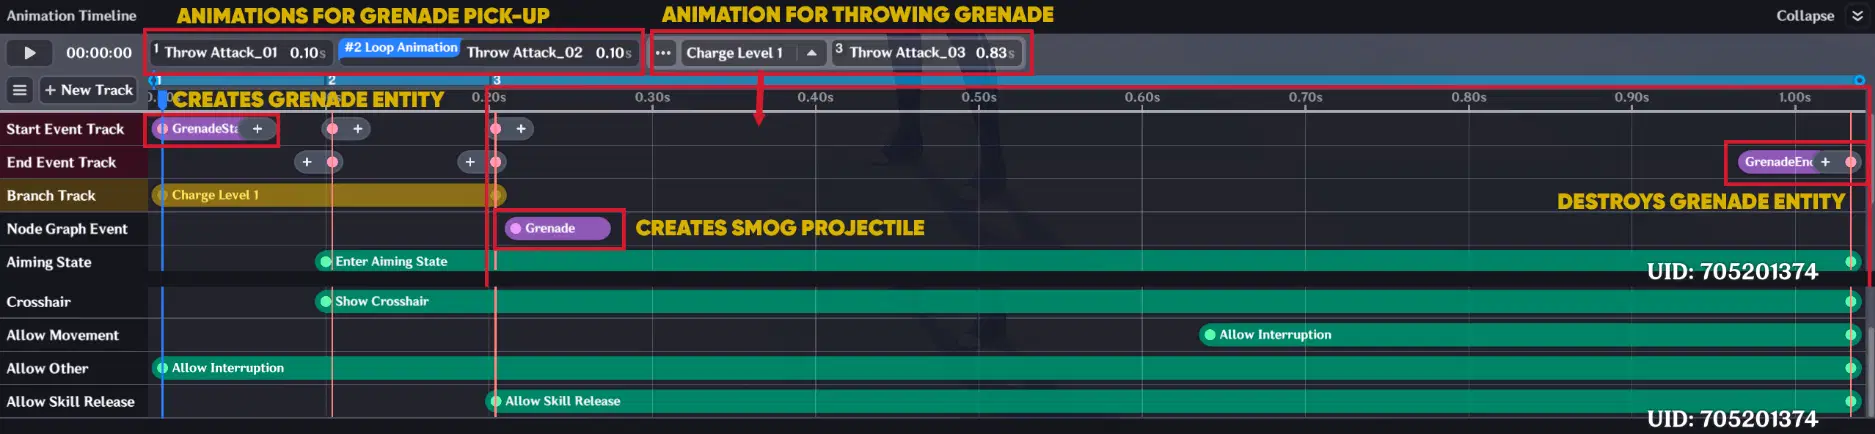
Skill editor configuration
Step 3: Logic Implementation
The grenade's functionality is split into three main Node Graphs:
- GrenadeStart (Client): Triggers when aiming begins to show the grenade model in the player's hand.
- Grenade (Client): Executes upon release. This spawns the projectile and calculates its land position to spawn VFX.
- GrenadeEnd (Client): Removes grenade entity.
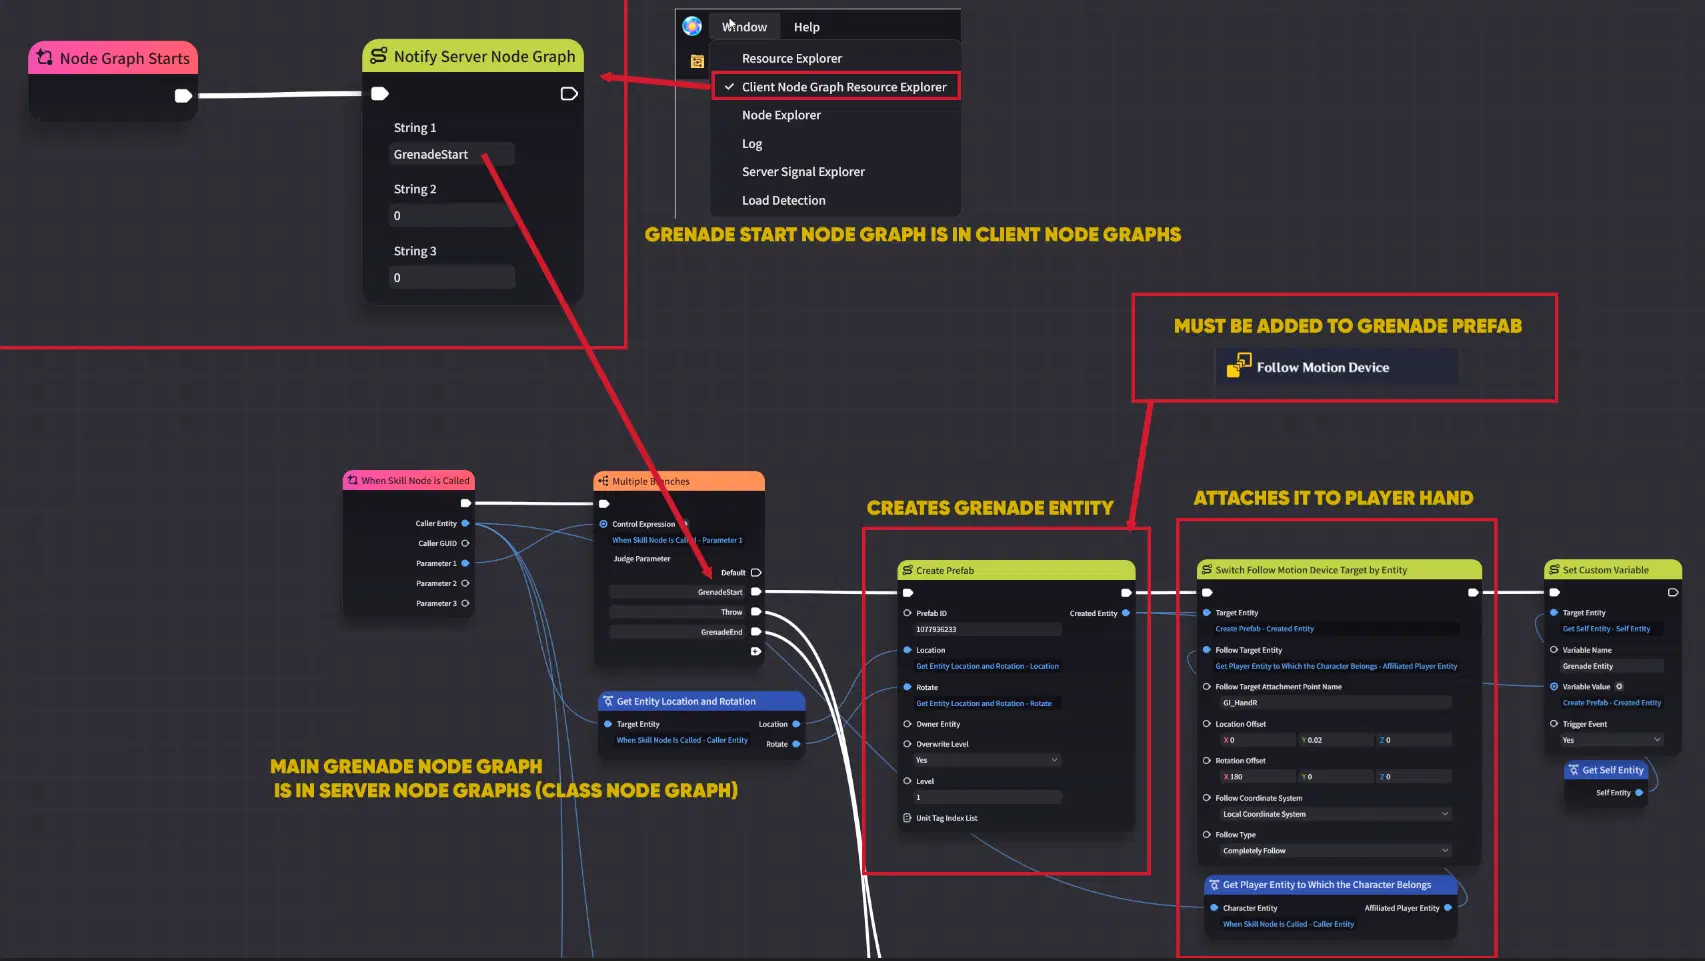
Node Graph logic (Part 1)
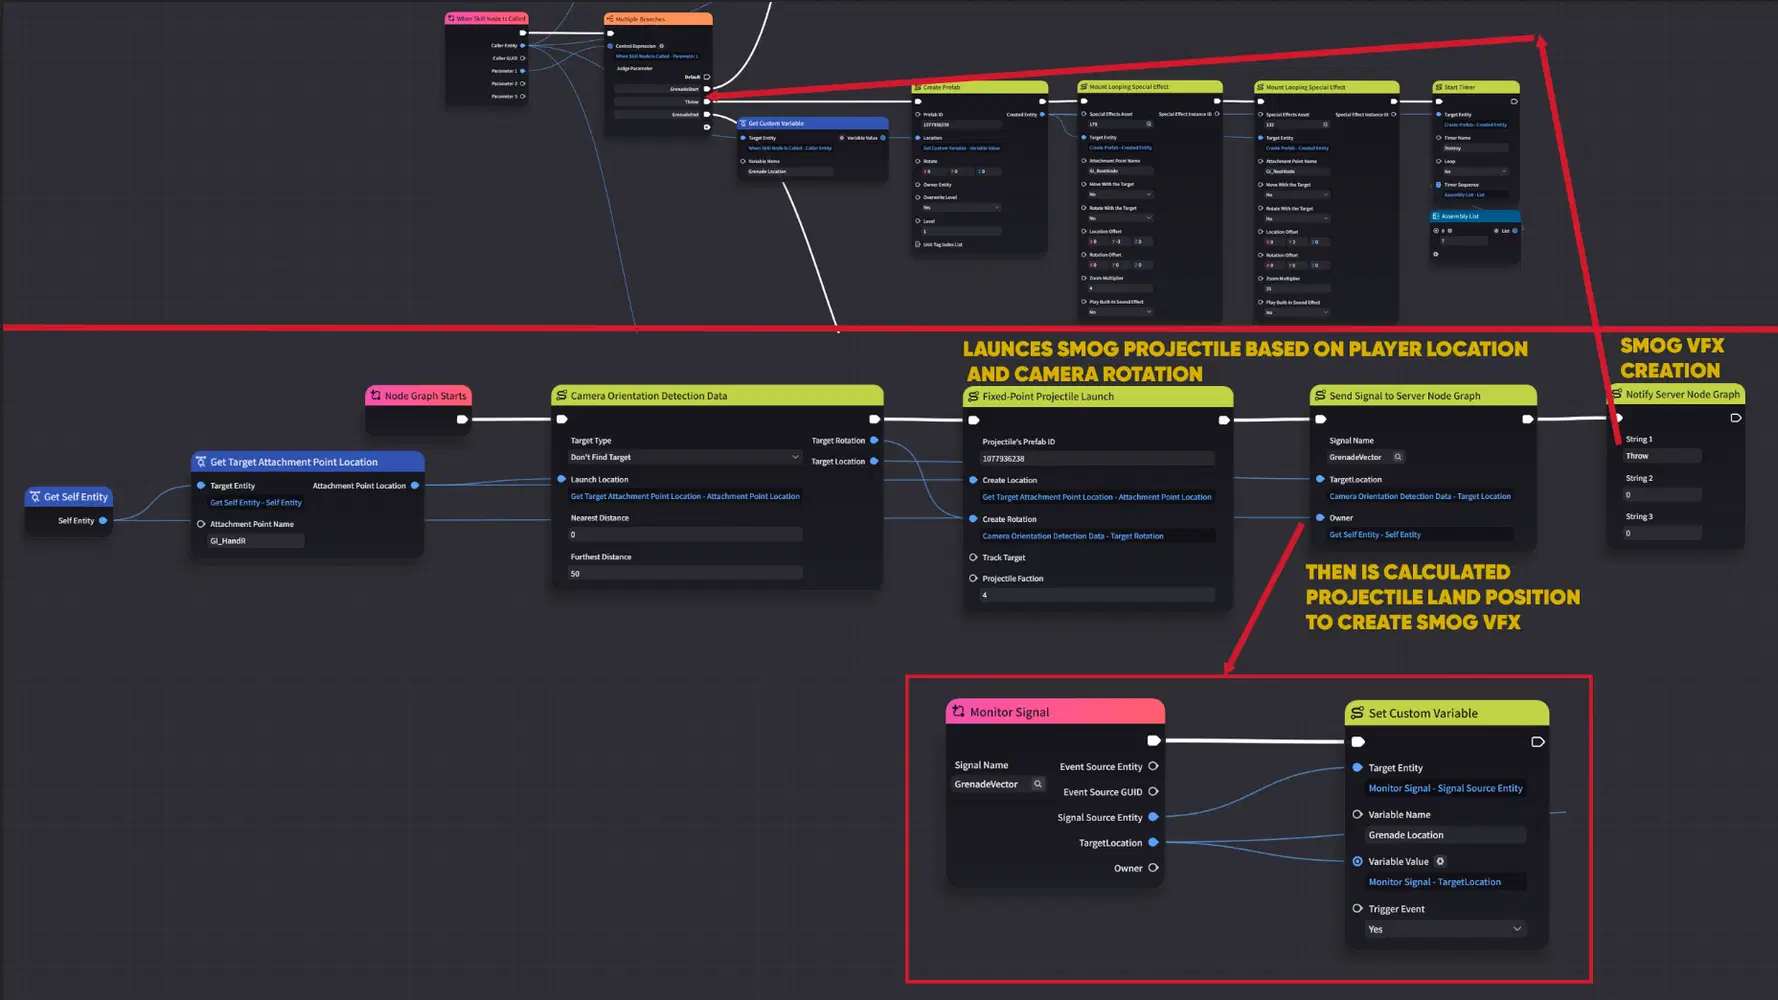
Node Graph logic (Part 2)
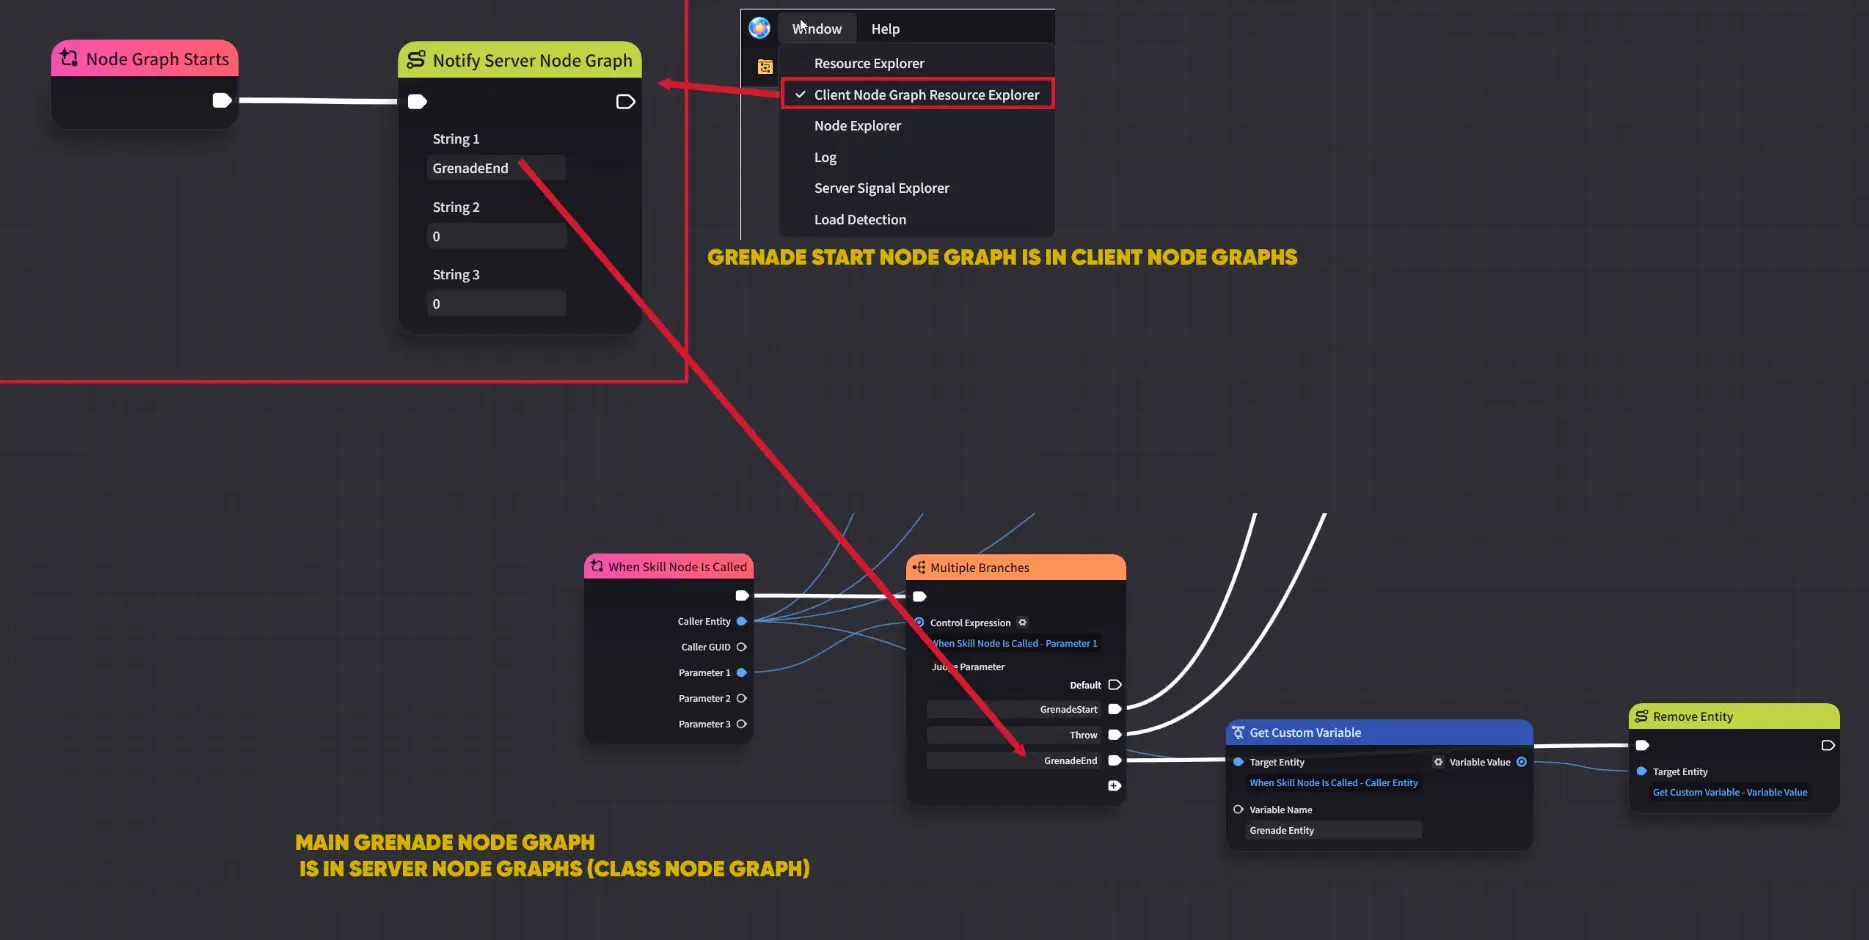
Node Graph logic (Part 3)
Step 4: Projectile & VFX
The projectile configuration is similar to a bullet, but with one key difference:
- Smoke Effect: Instead of damage, the Projectile event triggers a VFX Play Node. Also projectile is without any on-hit VFX/Looping VFX.
3.2. Normal skill examples
3.2.1. Mining Skill
This example shows how to create a non-combat skill used for gathering resources, such as mining ores.
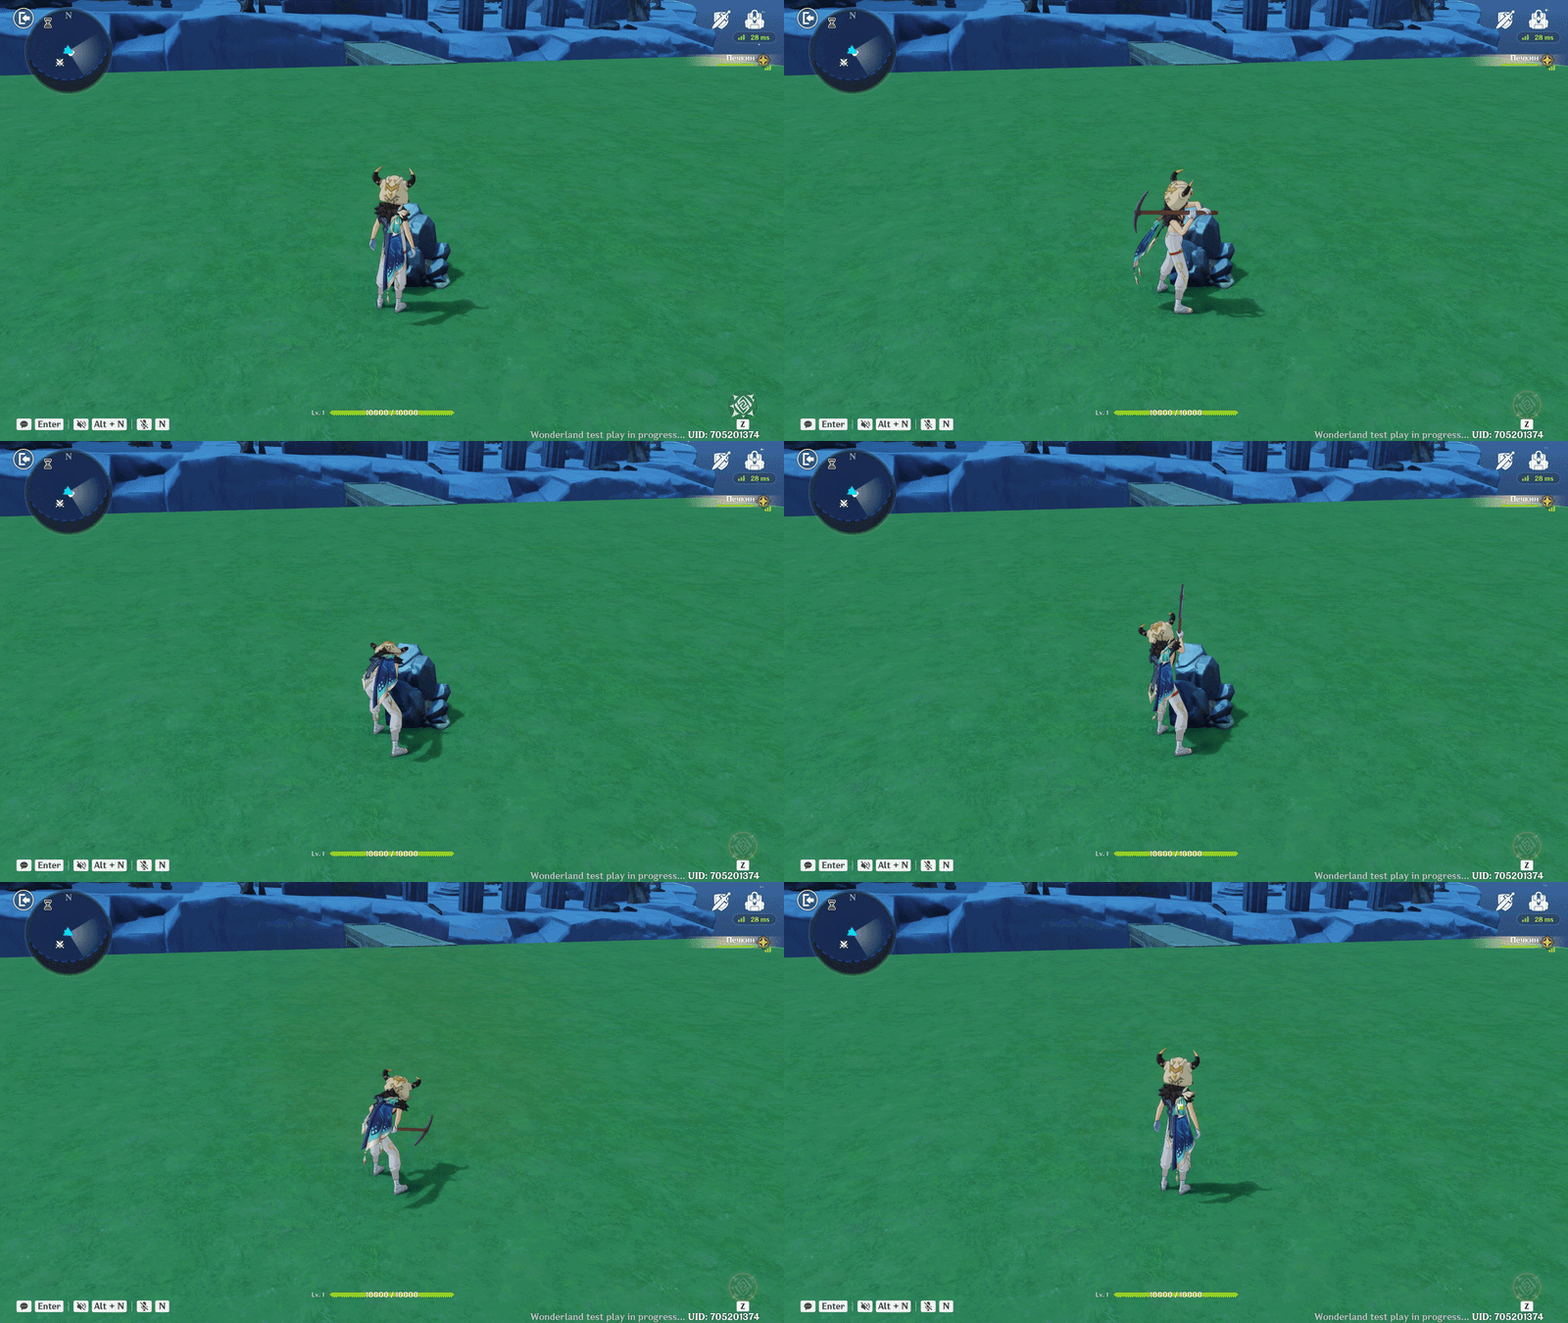
Mining Skill showcase
Step 1: Skill Setup
- Type: Select Normal Skill.
- Configuration: Use the Default settings.
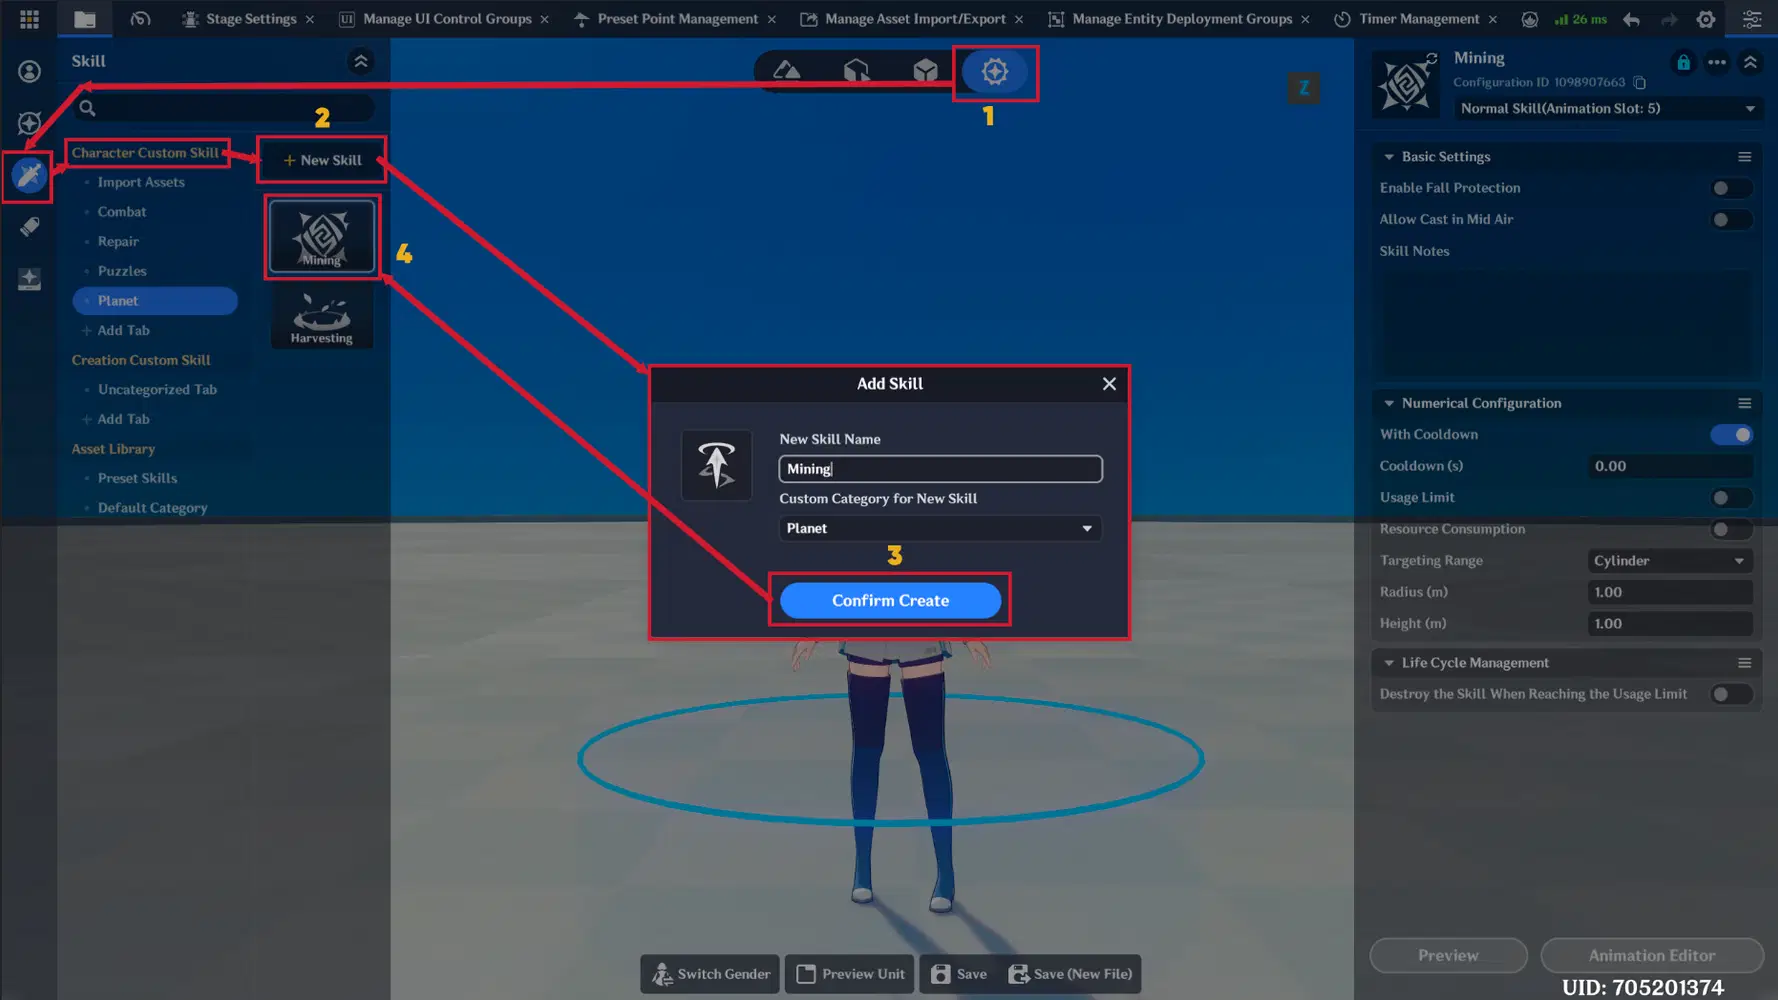
Step 2: Skill Editor Timeline
- Animations: Choose a mining related animations.
- Status Tracks: Use VFX Playing to play Pickaxe VFX in players hand.
- Node Graph Event: Destroys ore and plays VFX.

Skill editor configuration
Step 3: Logic Implementation
The core functionality is handled by the "Mining End" Node Graph:
- Trigger: Attach the graph to the Node Graph Event.
- Action: Once the animation reached specific time, Node Graph will remove ore entity and play VFX.
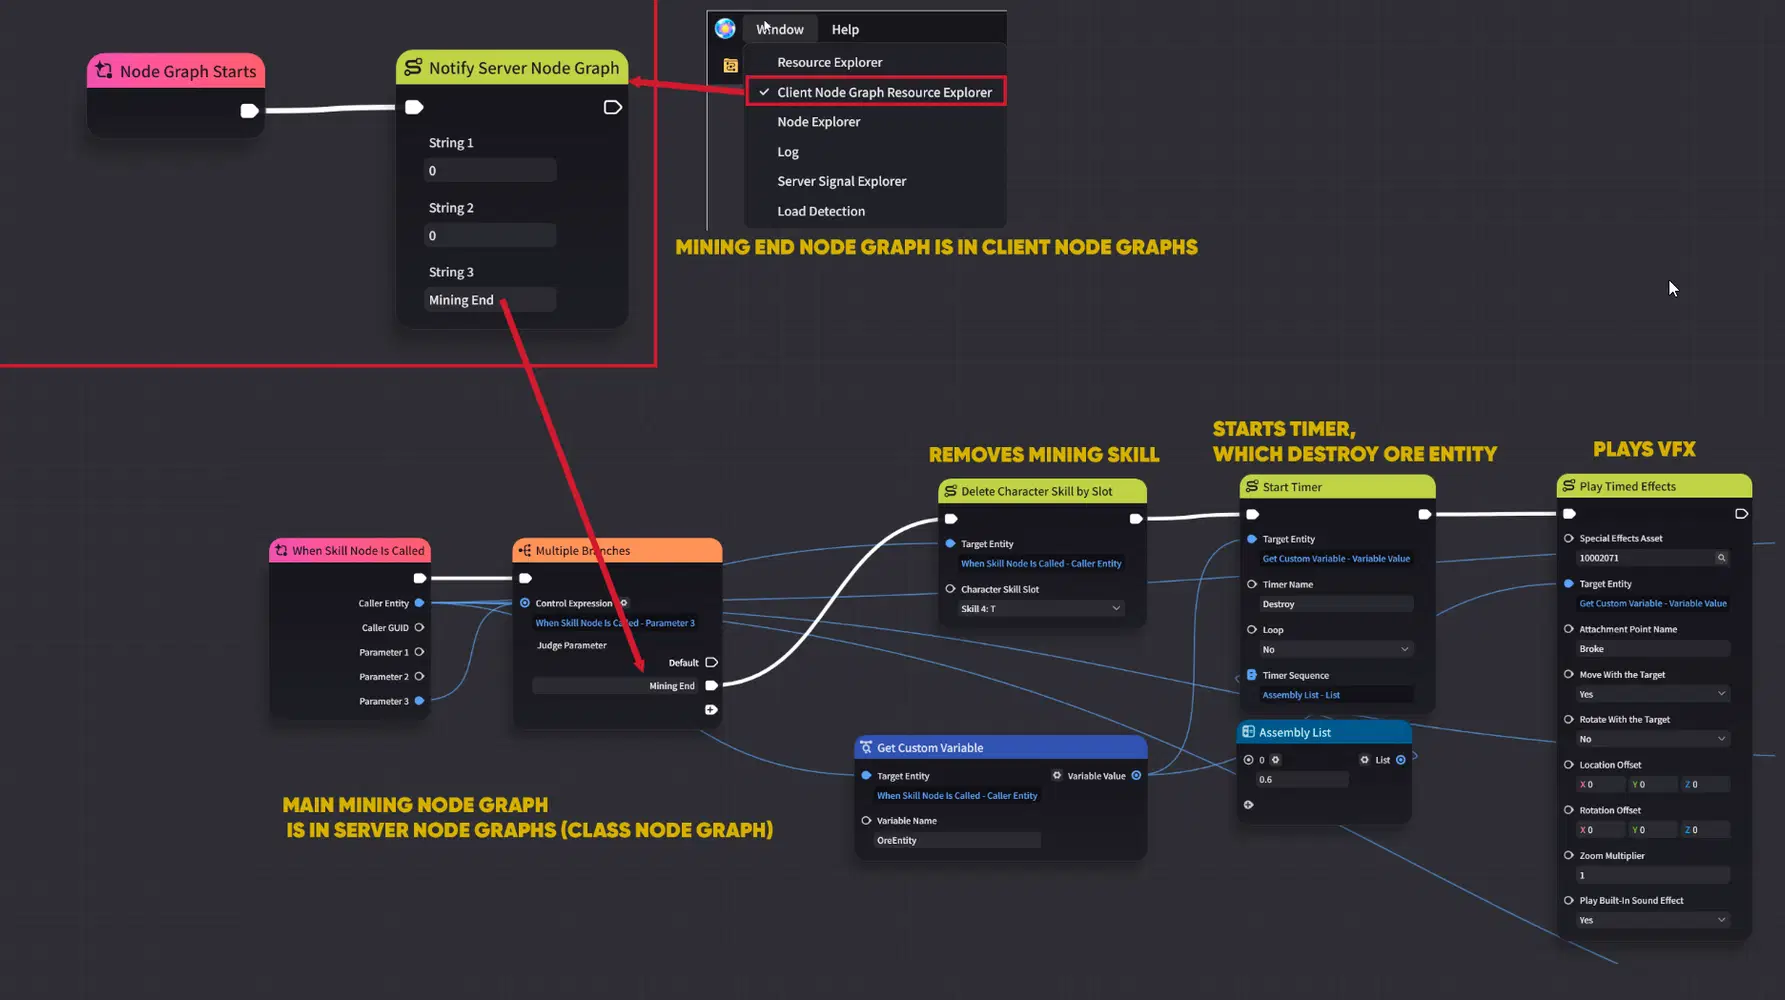
Node Graph logic
3.2.2. Harvesting Skill
This example demonstrates how to create a gathering skill, ideal for picking plants or harvesting crops.
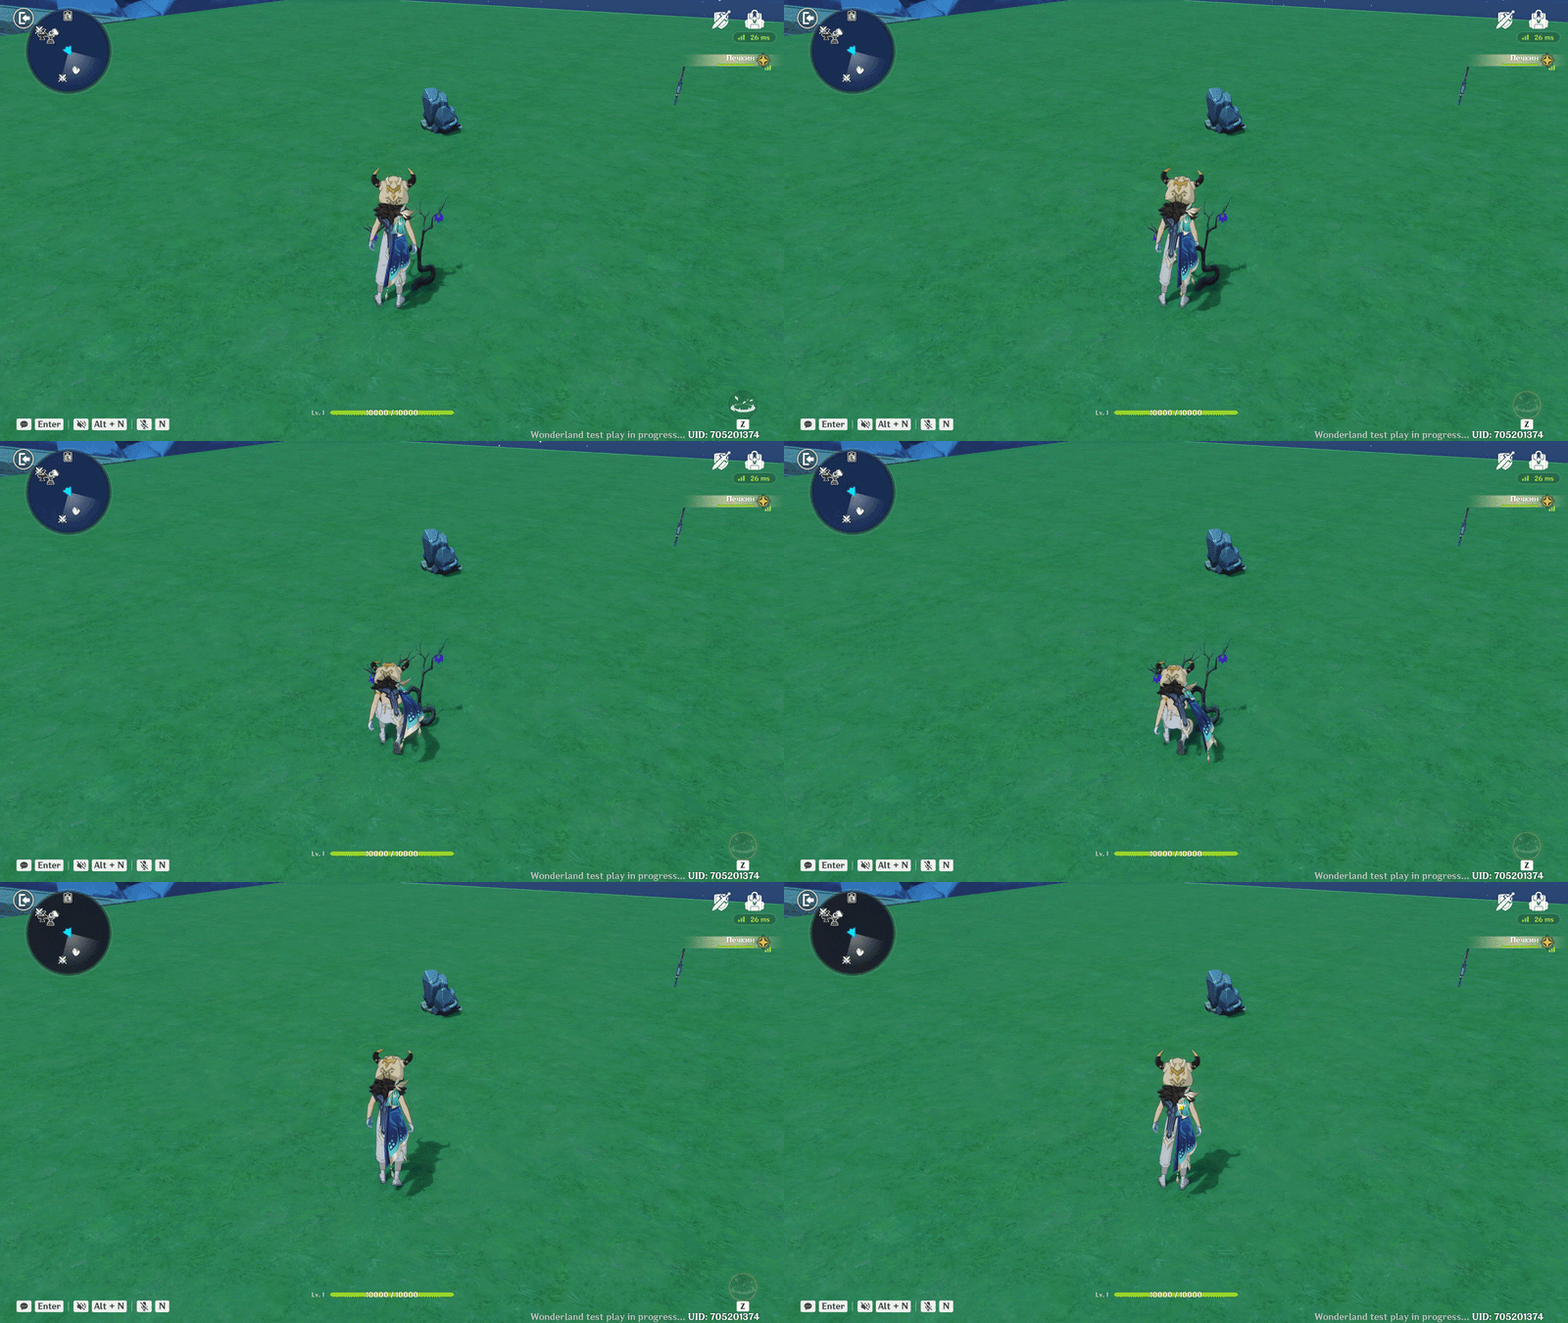
Harvesting skill showcase
Step 1: Skill Setup
- Type: Select Normal Skill.
- Configuration: Use the Default settings.
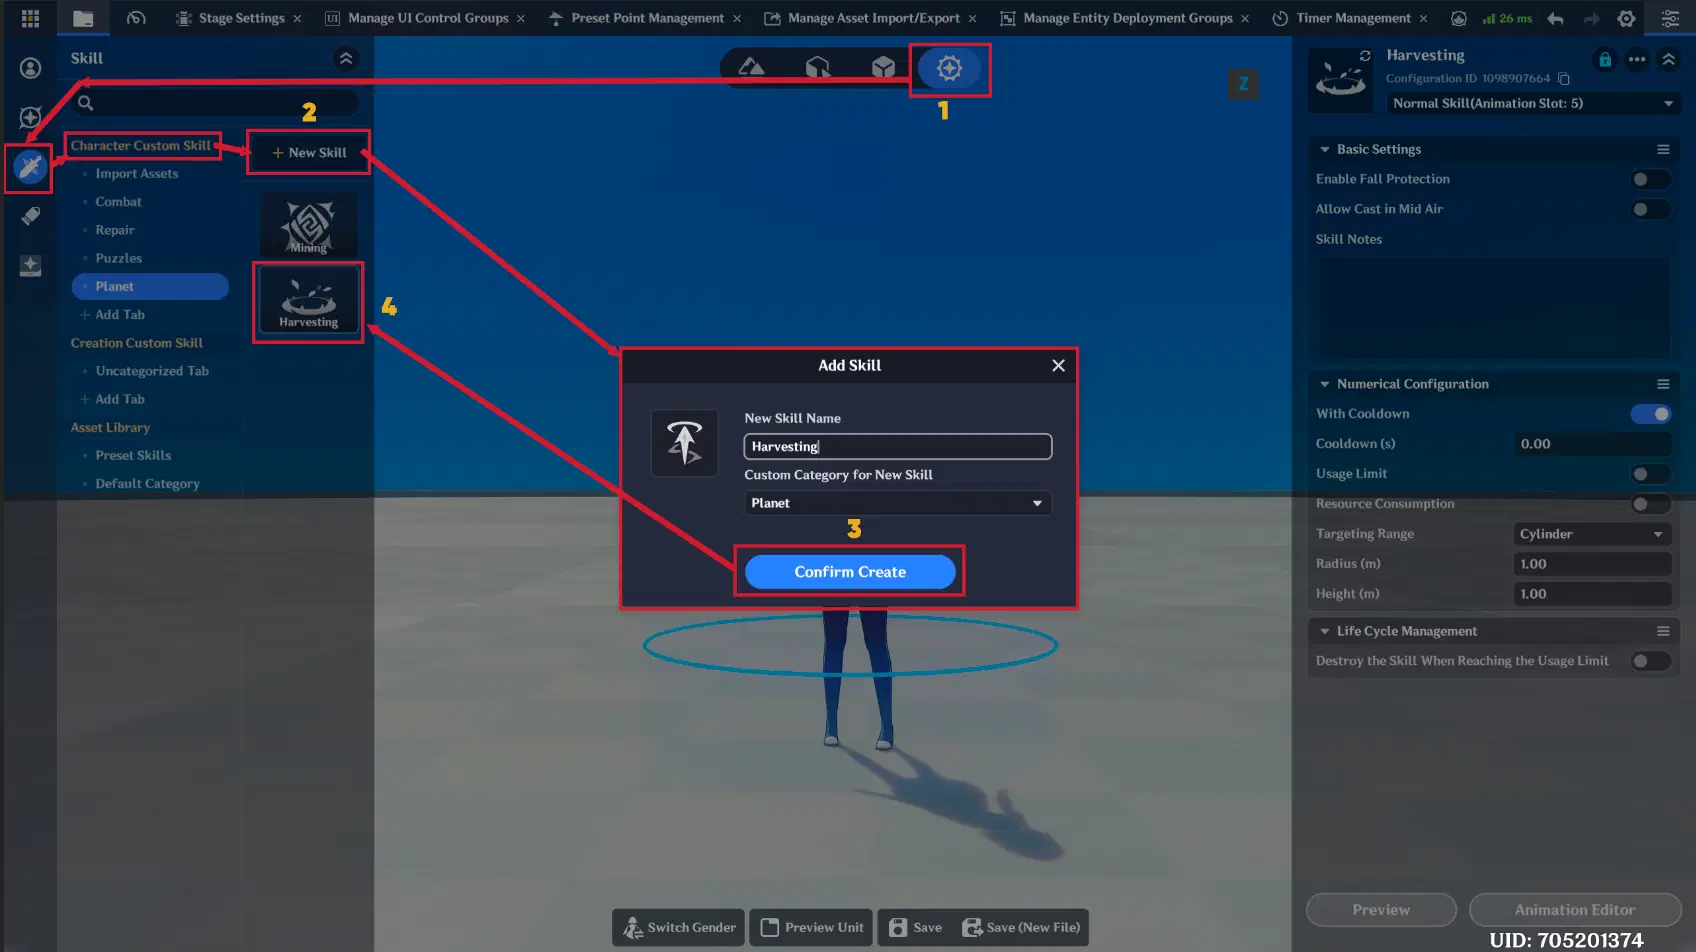
Skill creation
Step 2: Skill Editor Timeline
- Animations: Choose a gathering related animations.
- Status Tracks: Use Allow Interruption track to decide when player can end skill.
- Node Graph Event: Destroys plant and plays VFX & SFX.

Skill editor configuration
Step 3: Logic Implementation
- Trigger: Attach the graph to the Node Graph Event.
- Action: Once the animation reached specific time, Node Graph will remove plant entity and play VFX & SFX.
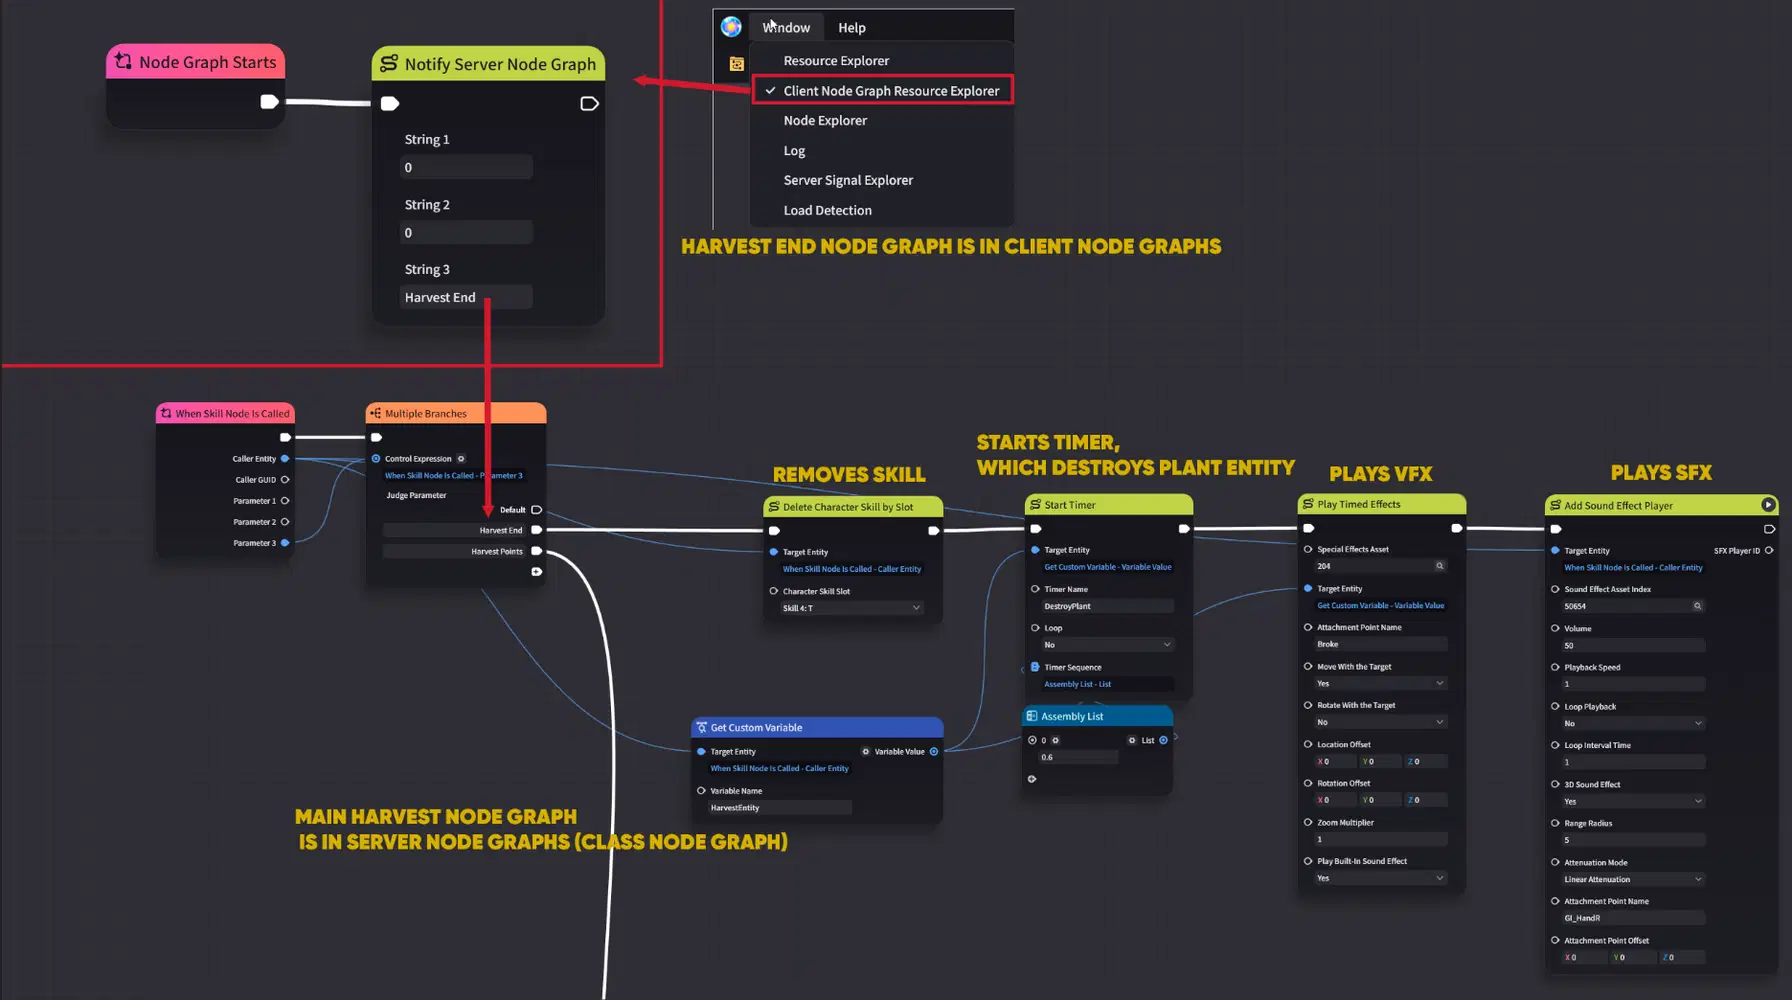
Node Graph logic
3.3. Instant Skill example
This example demonstrates how to use the Instant Skill type to create a "Spotting" or "Scan" mechanic that highlights other players in the arena.
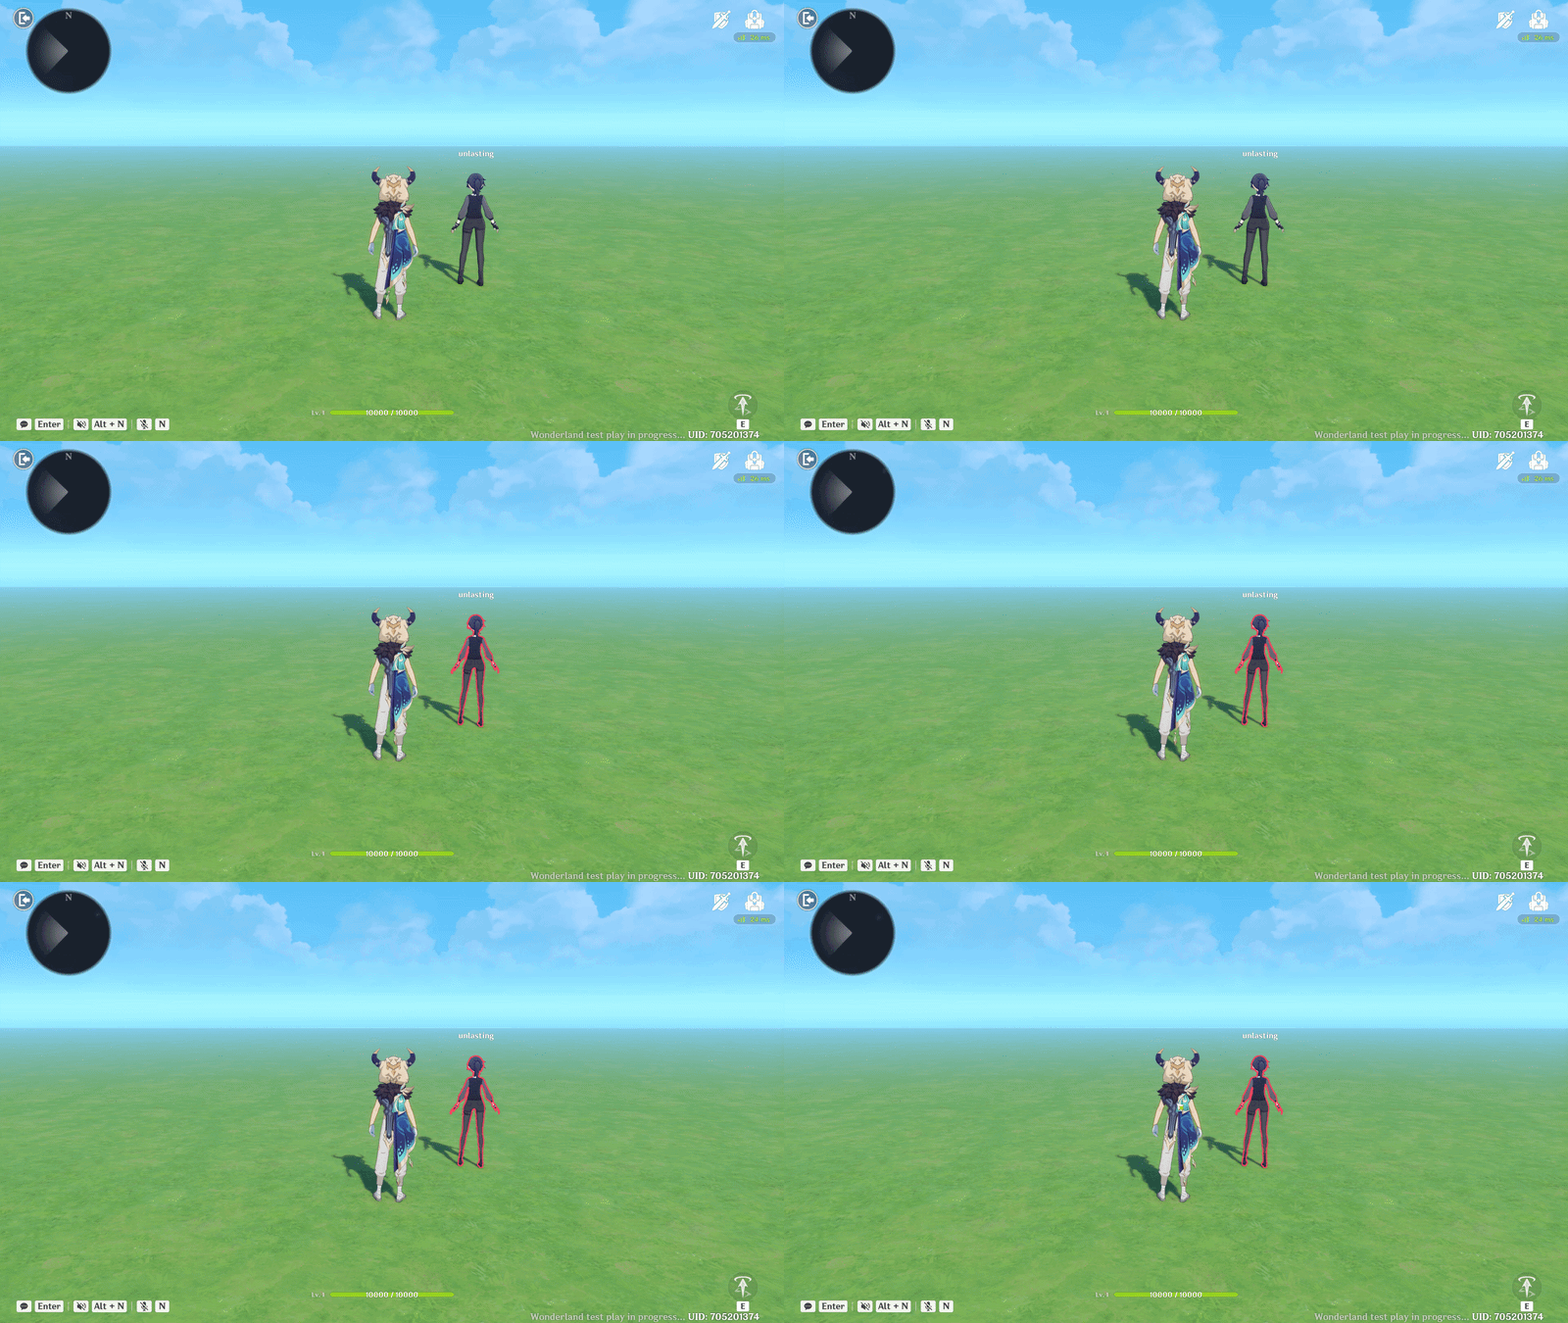
Skill showcase
Step 1: Skill Setup
- Type: Select Instant Skill.
- Key Feature: Unlike other types, this skill has no tracks except Start Event Track. It is designed for logic that should trigger the moment the button is pressed.
- Configuration: Use the Default settings.
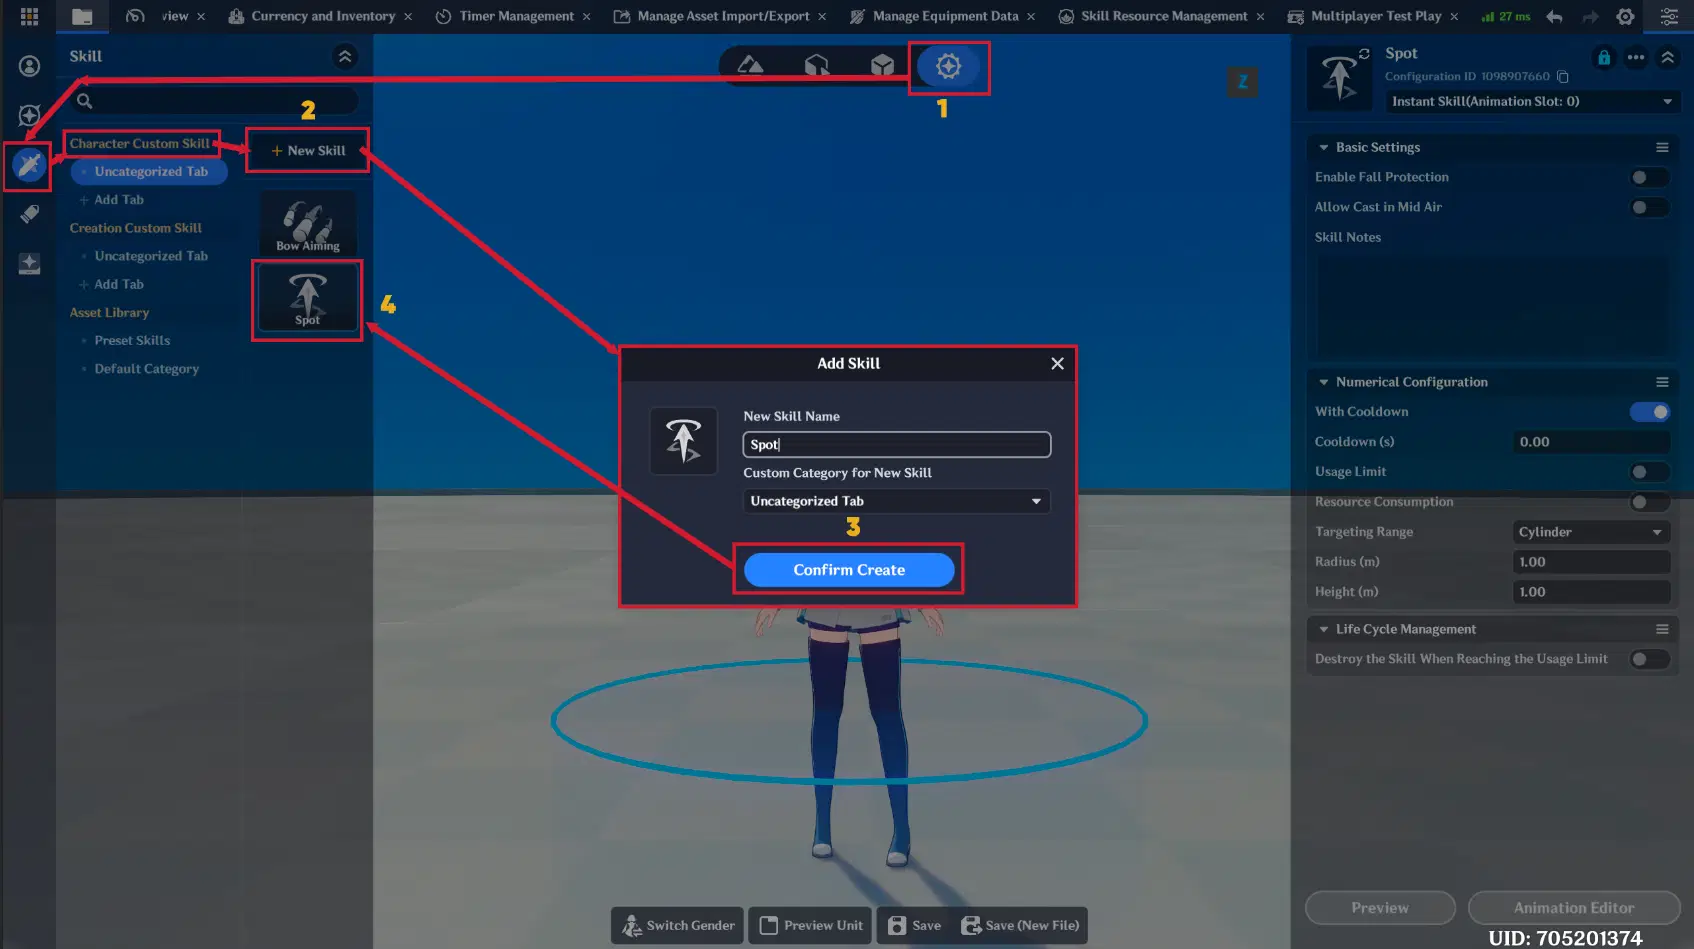
Skill creation
Step 2: Skill Editor Timeline
The timeline for an Instant Skill is very simple:
- Start Event Track: This is the only track you need. It triggers the logic at the exact millisecond of activation.
- Duration: Since there is no animation to wait for, the skill completes its cycle instantly.

Skill editor configuration
Step 3: Logic Implementation
The core functionality is handled by the "Spot Players" Node Graph:
- Trigger: Attach the graph to the Start Event Track.
- Action: The logic iterates through all players and highlight them except self Player.
- Effect: It applies a temporary Outline effect to the players, making them visible through walls.
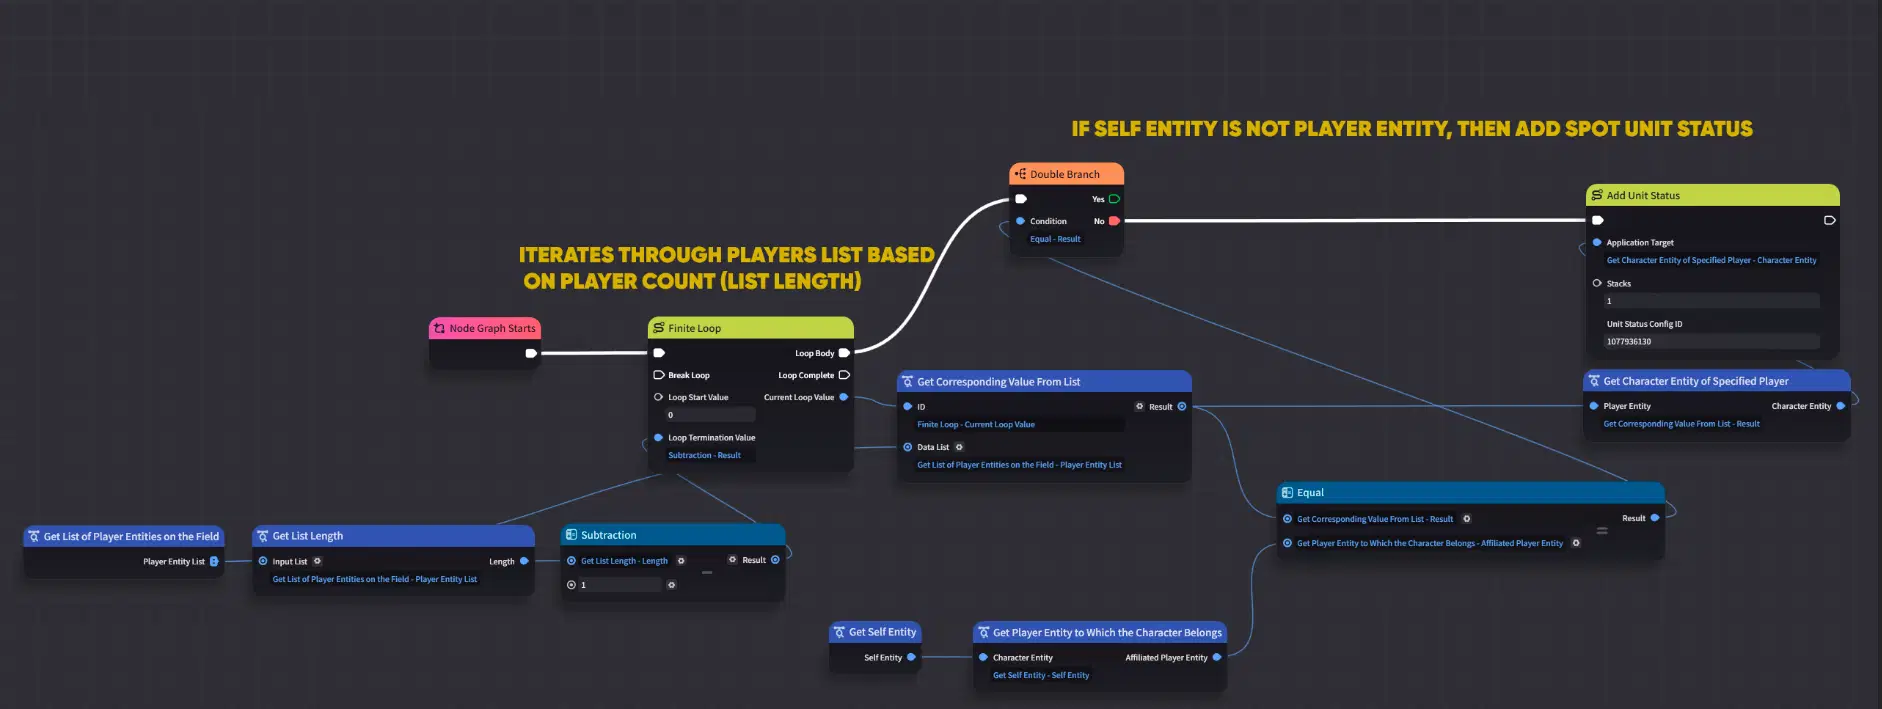
Node Graph logic
I hope this guide helps you better understand how to create different types of skills and implement them in your stages.