


Heading: How to Upgrade Equipment in Your RPG
This is a comprehensive guide where you’ll master the complete workflow for complex equipment creation and its corresponding Save System. By the end of this tutorial, your proficiency in Logic Node orchestration will reach a whole new level!
1. Overview
1.1 What It Looks Like
What we are building: Equipment that features Levels, Affixes, and other flashy visual effects. It will include randomized stats, support for enhancement (leveling up), and most importantly, it will be fully compatible with the Save System!
1.2 Prerequisites
Before we dive in, here is what you’ll need:
- Fundamental Node Skills: You should be familiar with the basics of Logic Nodes (this isn't for absolute day-one beginners).
- Data Structures: A basic understanding of Structs, Lists, and Dictionaries.
- A Sharp Mind & Passion: A bit of logical thinking and a lot of enthusiasm for creating!
Note to Beginners: Don't worry if you're new! I will explain everything in as much detail as possible, covering plenty of foundational concepts.
Note to Veterans: If you are already familiar with the basics, feel free to skip the foundational setup and jump straight to Section III: Randomized Affixes.
1.3 Resources
The final project file will be uploaded to the Resource Center. You can download it as a reference or follow along with me step-by-step until the project is complete.
2.Preparation
Before we get into the complex logic, we need to set up the "playground." This involves creating the basic infrastructure for our equipment to function.
What we need to prepare:
- An Equipment Item: A base entity to represent your gear.
- The Inventory & Gear Slots: A system to store items and a specific slot to "wear" them.
- Equipment Categories: Defining types (e.g., One-handed Sword, Claymore, or Artifact) to ensure items go into the right slots.
- Basic Combat: A simple Normal Attack for your character.
- The "Victim": A poor Hilichurl to test your new equipment's power on.
Note: These are fundamental elements. You can configure them yourself, or simply download my sample archive to skip this part and jump straight into the advanced logic. If you prefer to build from scratch, follow along!
2.1 Level Configuration: Faction Settings
First, modify the Faction Relationships. Set the Hilichurl’s faction to a neutral or passive state so it remains a stationary target for testing.
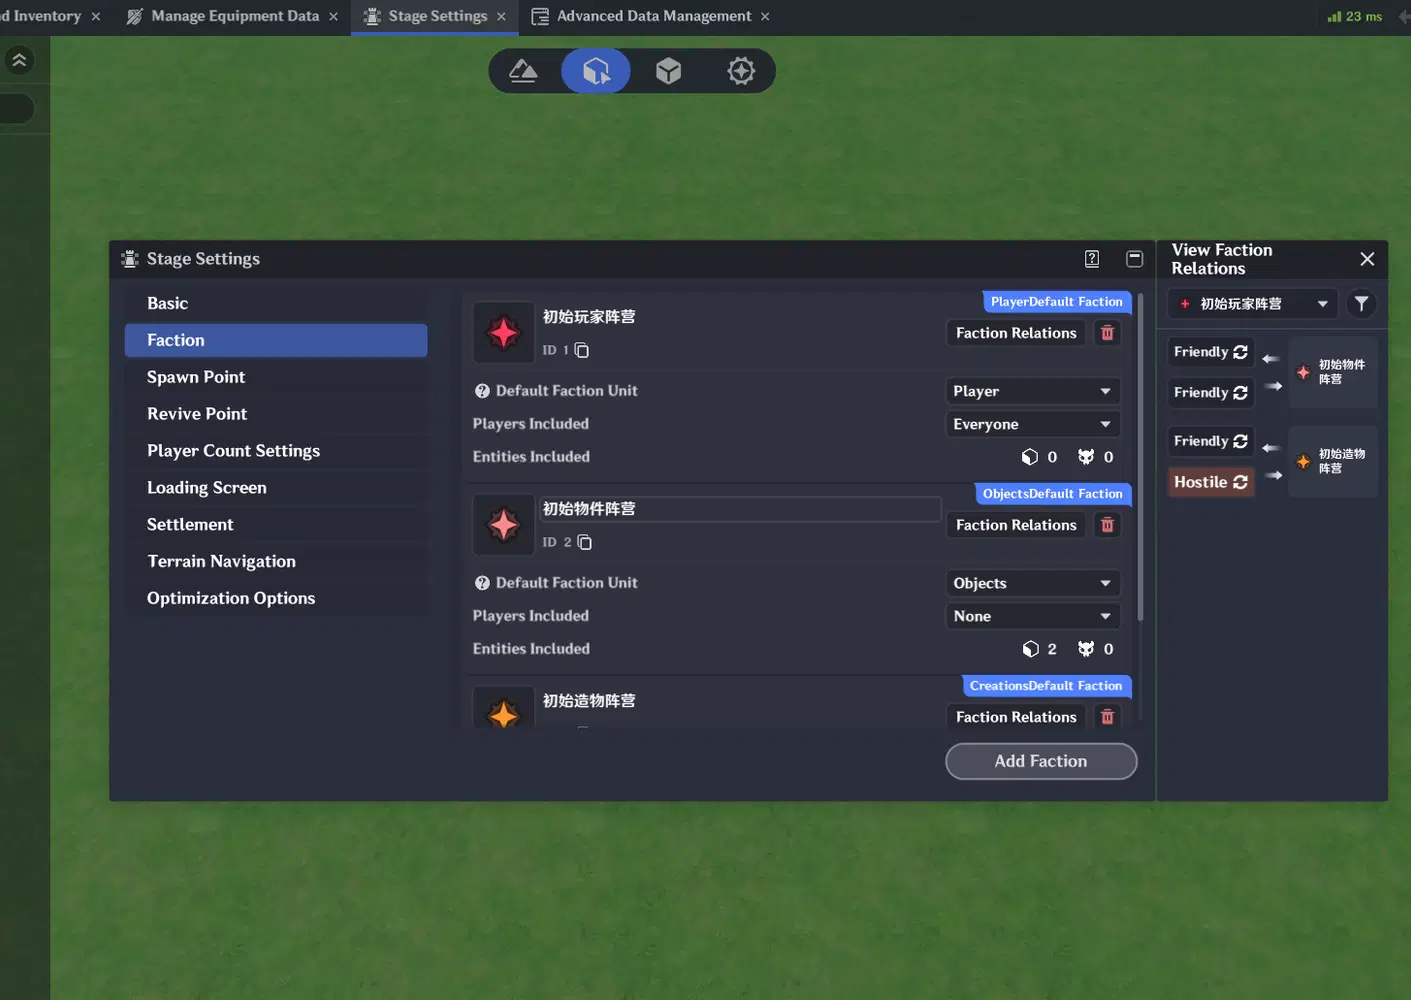
2.2 Basic Entities & Interaction Setup
- The Torch: Place a Torch entity as a placeholder for future interactions.
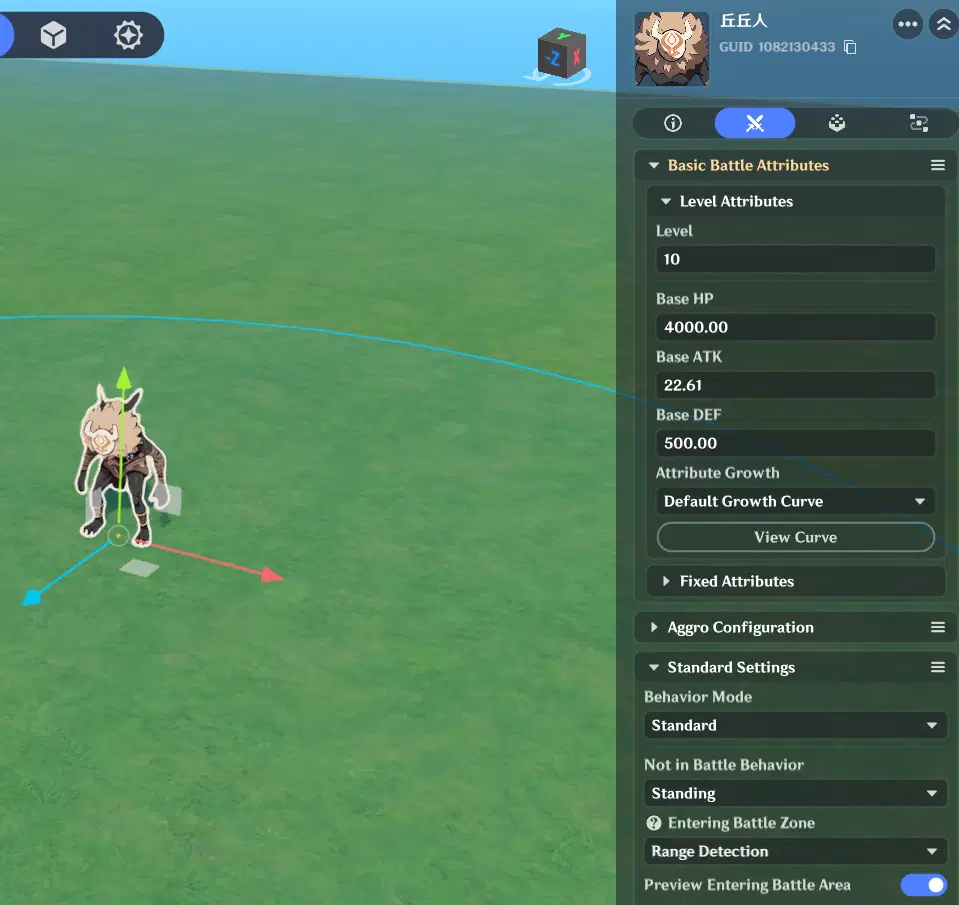
- The Target: Spawn a Hilichurl nearby. Set its faction accordingly and maximize its HP to ensure it survives prolonged combat testing.

2.3 Inventory, Attributes, & Equipment Types
- Inventory: Use the default inventory template for now.
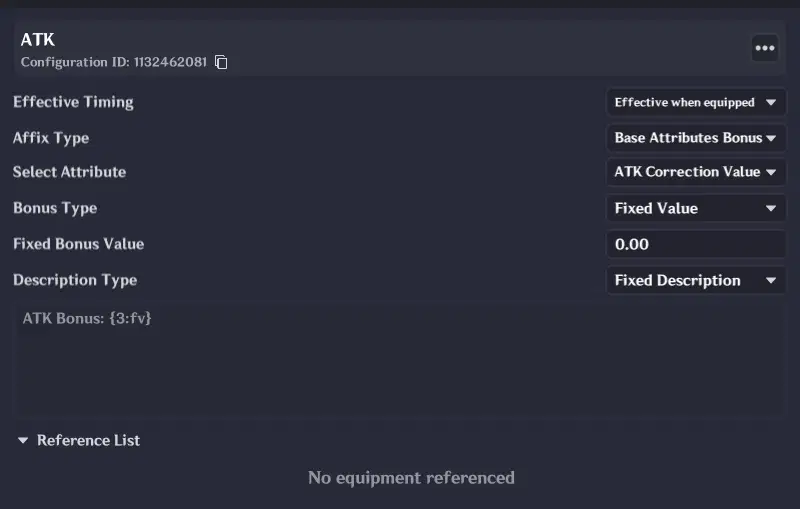
- Attribute Management: Create three core attributes: ATK, DEF, and HP. Assign them any placeholder values you like.
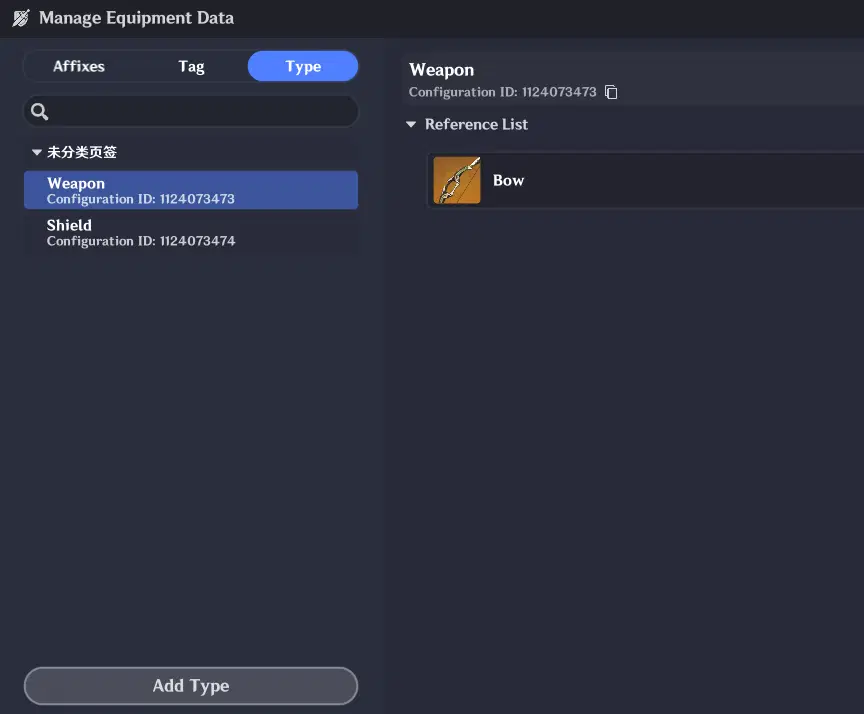
- Equipment Types: Define two categories—Weapon and Shield. These will correspond to our two equipment slots later.
2.4 Slot Configuration
Within the Inventory settings, create the Equipment Slots. Use the "Weapon" and "Shield" types defined previously to configure two distinct slots for the character.
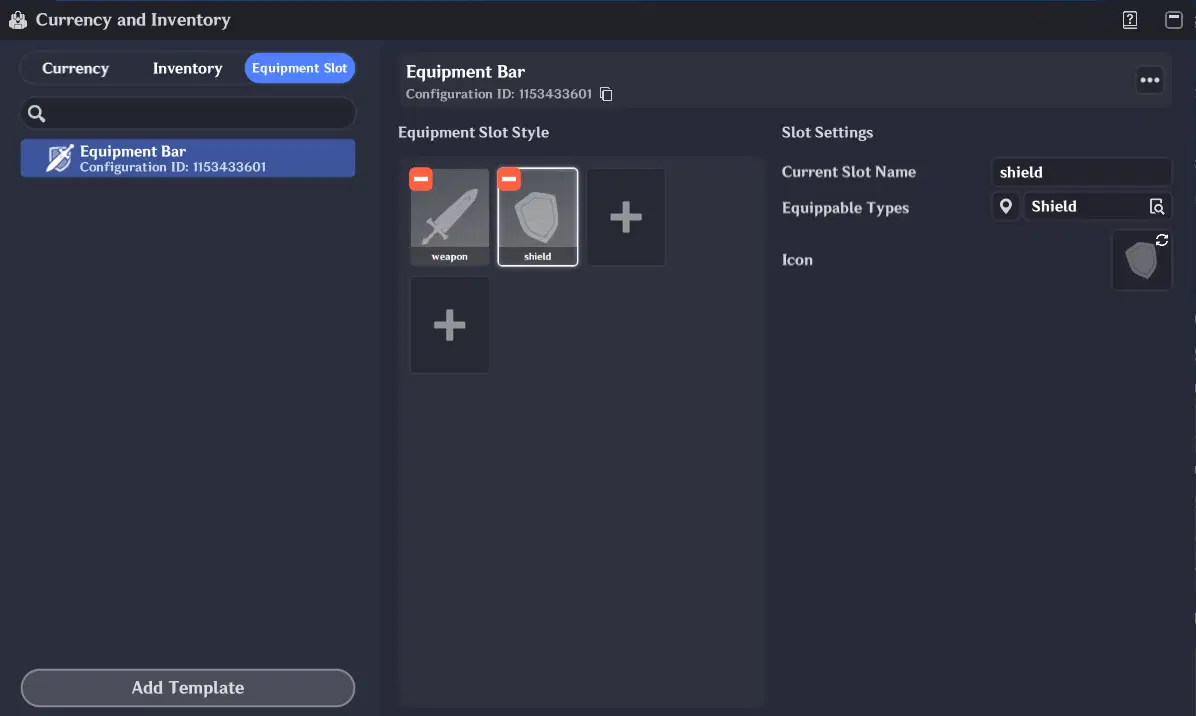
2.5 Combat Ability: Normal Attack
The character needs an offensive capability. Select a 1-Handed Sword Normal Attack from the presets and add it to the default Character Class.
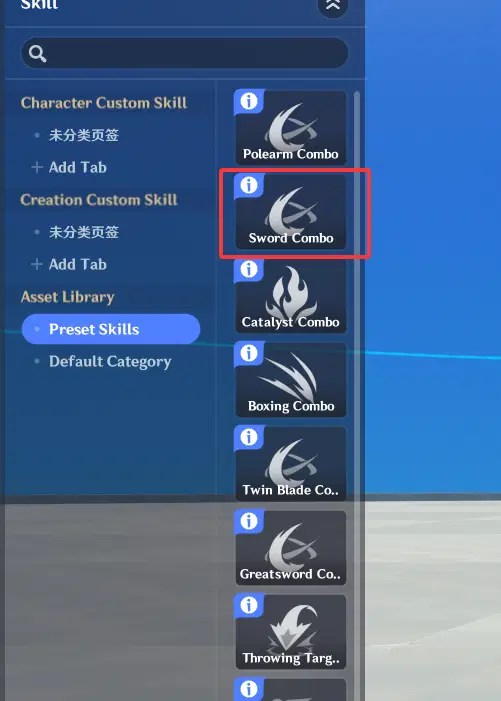
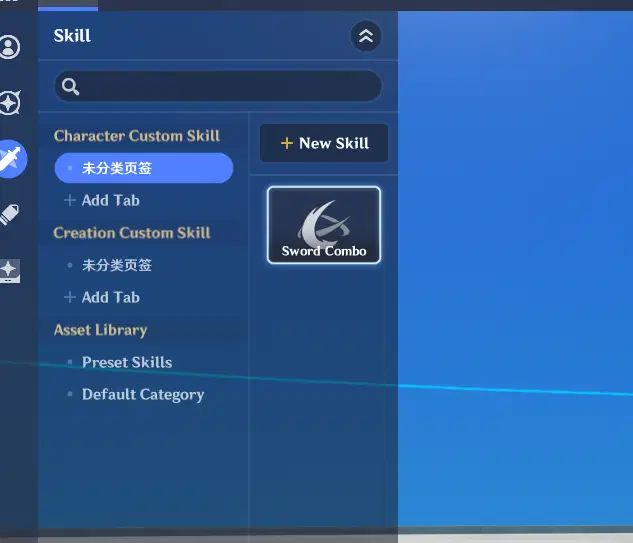
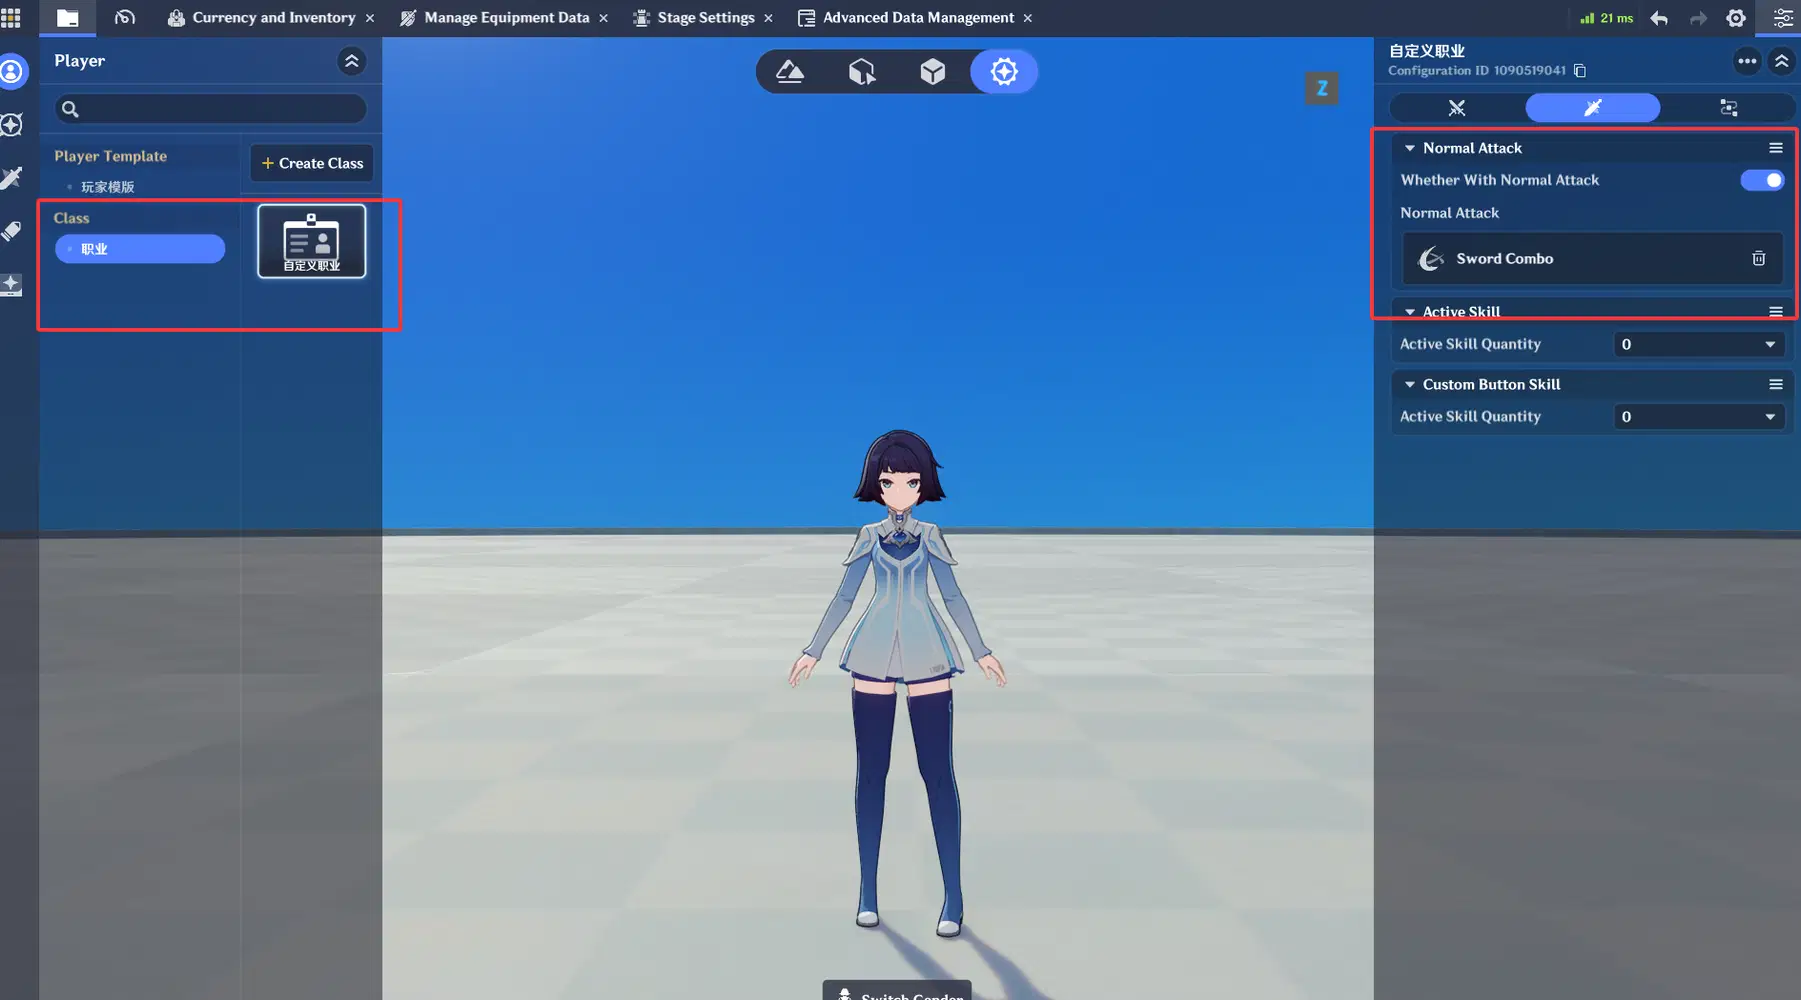
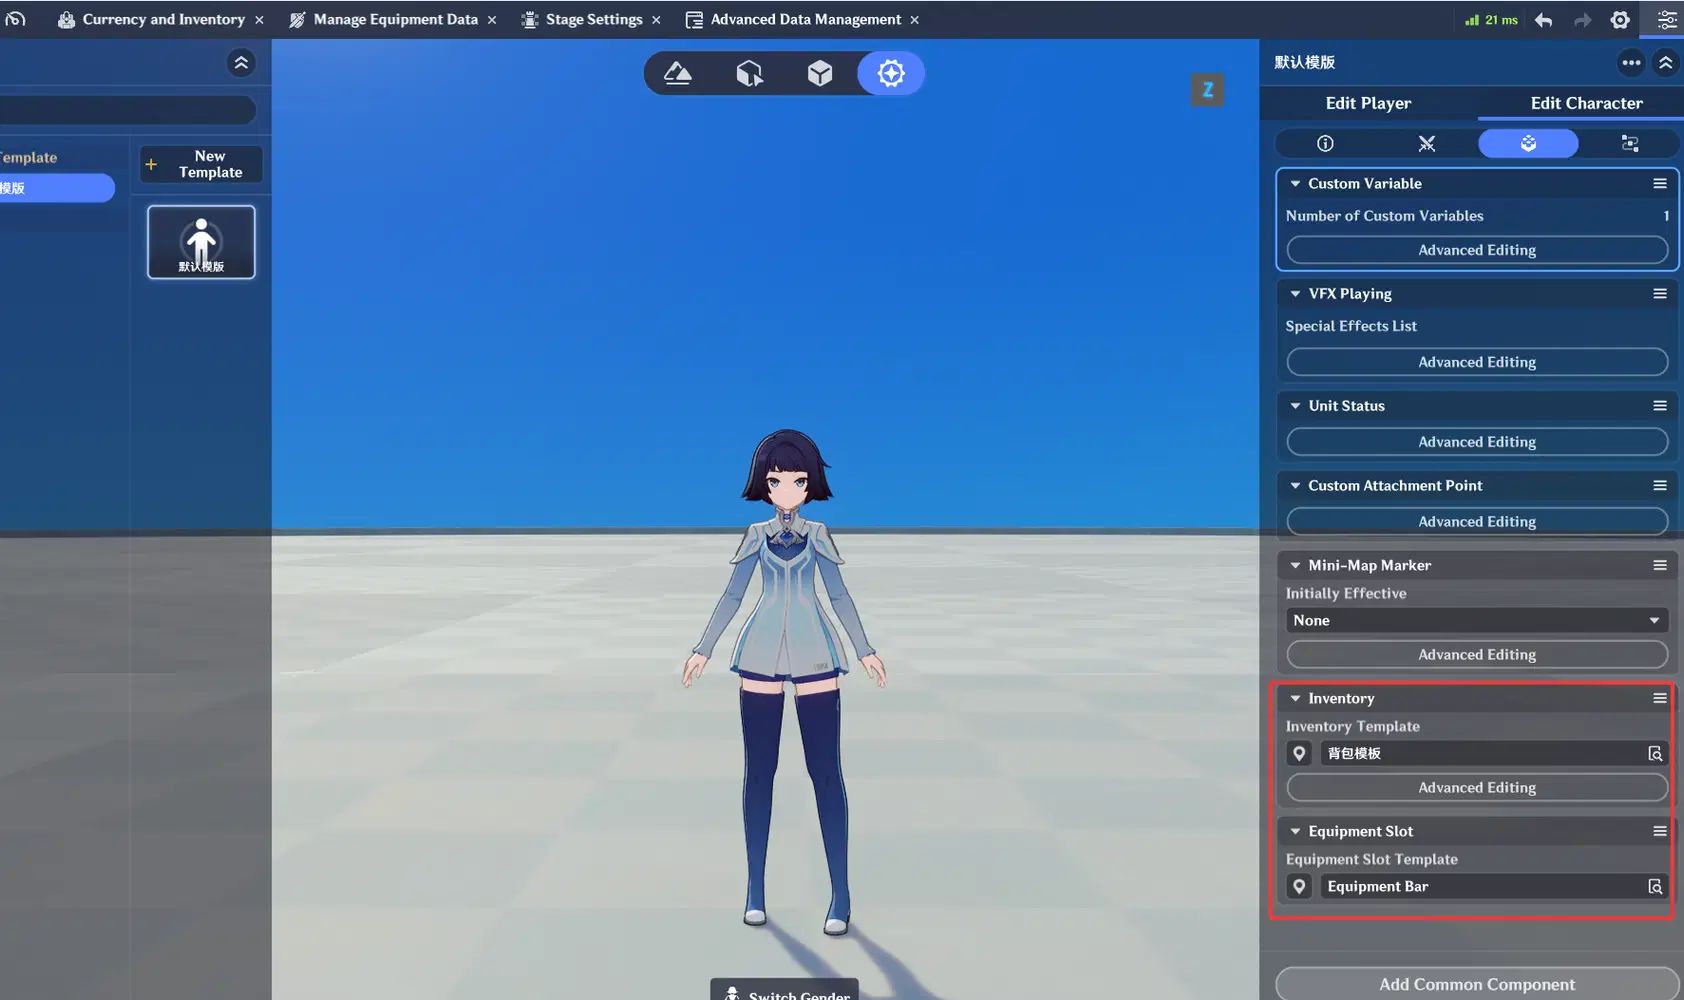
2.6 Character Component Setup
- Inventory Component: Add the Inventory component to your character and select the default template.
- Equipment Component: Ensure this component is added; it is required for the character to successfully "wear" and benefit from equipment stats.
2.7 Creating the Base Item
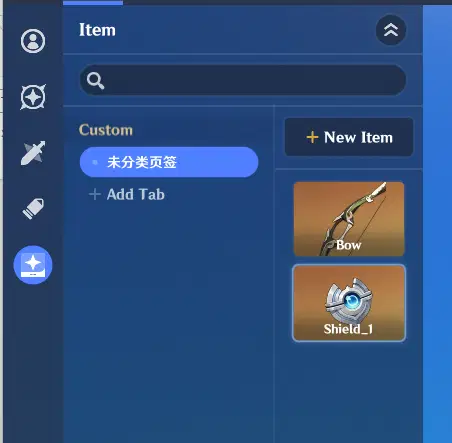
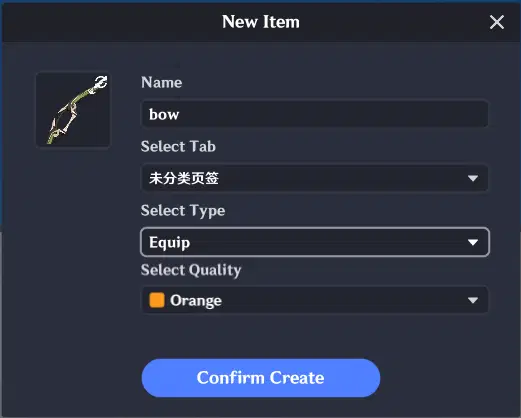
Create a new Equipment item with a custom name and icon.
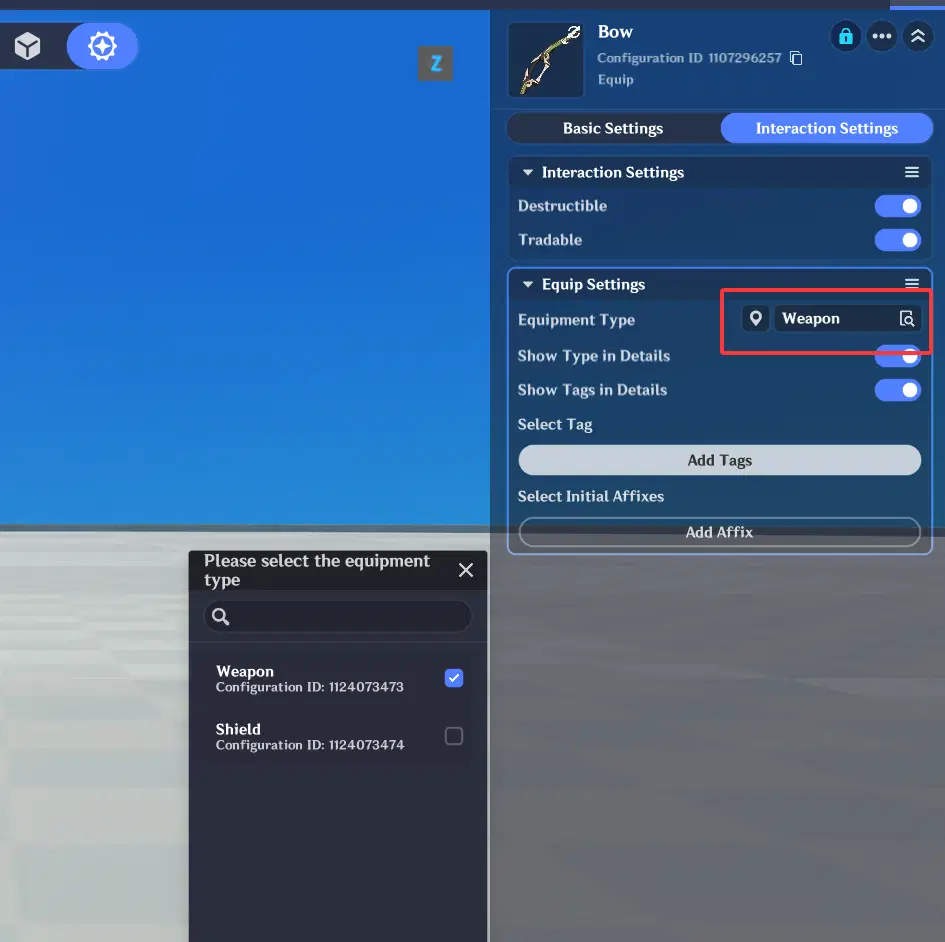
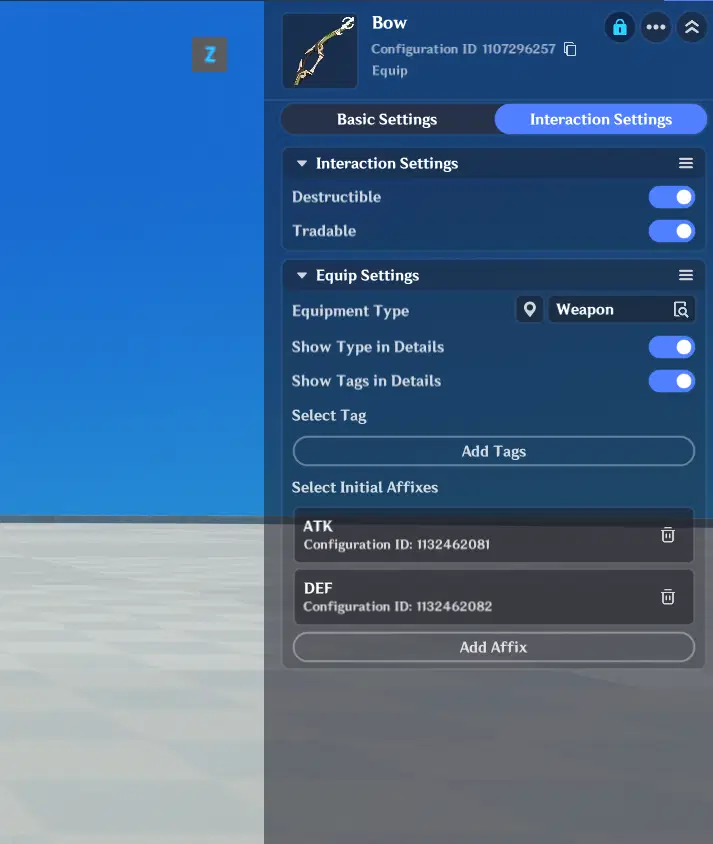
- Settings: Set the Equipment Type to either "Weapon" or "Shield"—this determines which slot it occupies.
- Initial Stats: Add one starting attribute to the item.
- Distribution: Do not forget to add this item into the character's starting inventory.
2.8 Playtest & Validation
We have completed the baseline setup. Enter Playtest Mode to verify that every module is working as intended. Ensure the item can be equipped and the attack animations trigger correctly.
In the next chapter, we dive into the core logic.
3.Randomized Affixes
What kind of randomized affixes are we building? Should we use the system's default range, fixed attributes with random values, or something sophisticated like the Artifact System in Genshin Impact?
The editor provides a built-in method for generating random affixes—you simply specify a value range, and the system handles the rest. But isn't that a bit... boring?
The Limitations of the Default System:
- Lack of Elegance: Different equipment requires different value ranges. Creating a unique affix for every single item is inefficient and cluttered.
- Precision Issues: Most players don't care about "12.34 Attack Power." A clean "12" is much better. While we could manually correct these floats after the item is generated, it’s an extra, unnecessary step.
- Complexity: If you want to implement stackable attributes (like Artifact sub-stats), a simple "random range" won't cut it.
The Verdict:
We are going to move away from the system’s default random attributes. To achieve true mastery over your RPG, every value should be under your total control.
Our final choice is a hybrid system: Fixed Base Stats + Cumulative Randomized Sub-stats (similar to the Artifact system). This approach is slightly more complex, but once you master it, you will be able to create any type of randomized gear or unique equipment imagineable.
Let’s dive in!
3.1 Initializing a Simple Equipment via Node Graph
Basic Concepts: Equipment Initialization
When you create a piece of equipment in the editor, it doesn't exist as a "real" individual entity yet. Instead, think of it as a Template. Once a player acquires this equipment, the system uses this template to instantiate (create) the actual item.
While they share identical configurations, every piece of equipment is unique within the system. Each has its own specific ID, known as the Equipment Index.
- Equipment Config ID: Identifies what kind of item it is (e.g., a "Steel Sword").
- Equipment Index: Used to locate and target that specific, unique instance of the item.
Our Goal: Creating a Custom Item
In this section, we will implement a piece of equipment with the following properties:
- Base Stat: 15 Attack Power.
- Random Sub-stat: Either Defense or HP (randomly selected upon creation) with a specific value.
By building this, we are not only creating a functional item but also laying the groundwork for more advanced systems. Later, we will discuss the architecture behind this equipment system and why it’s designed this way.
let`s Go
3.1.1 Create a Blank Equipment Item
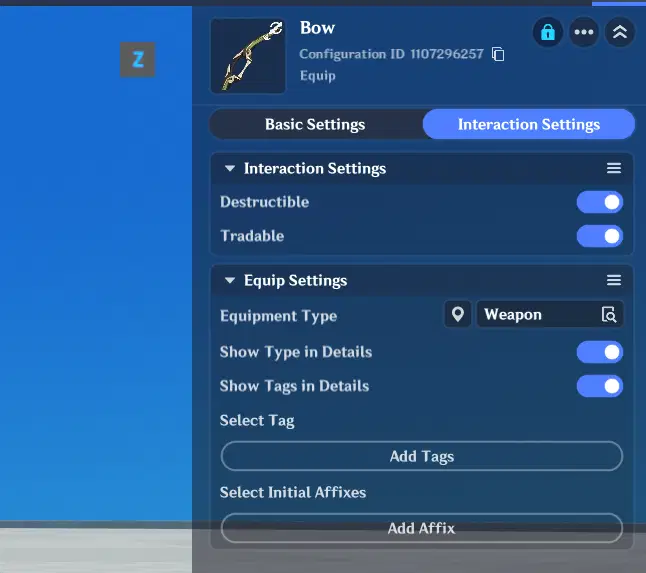
Create a new equipment item in the editor. This time, do not assign any initial stats or sub-stats. If you have already created the item, simply delete any existing stats to ensure it is completely blank.
3.1.2 Initialize the Logic Node Graph
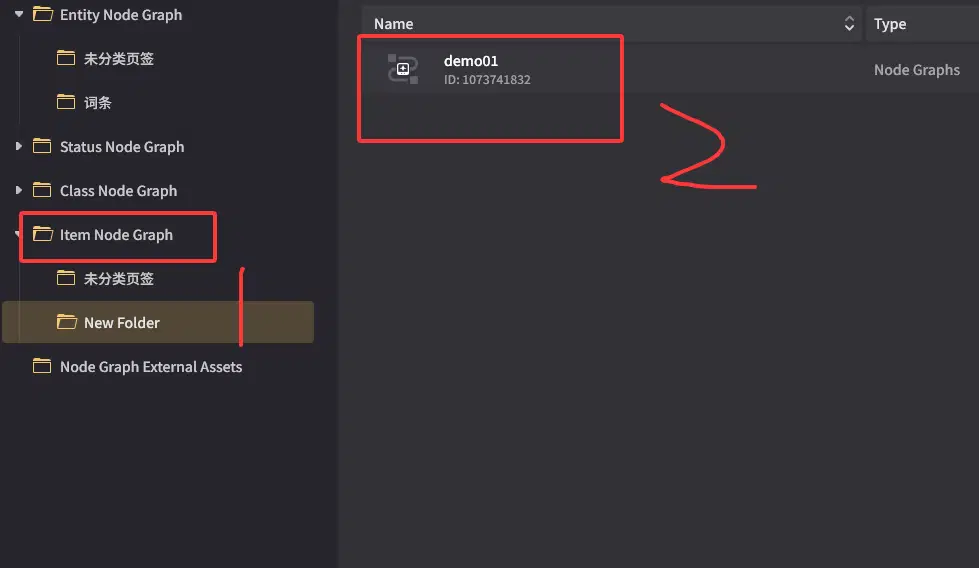
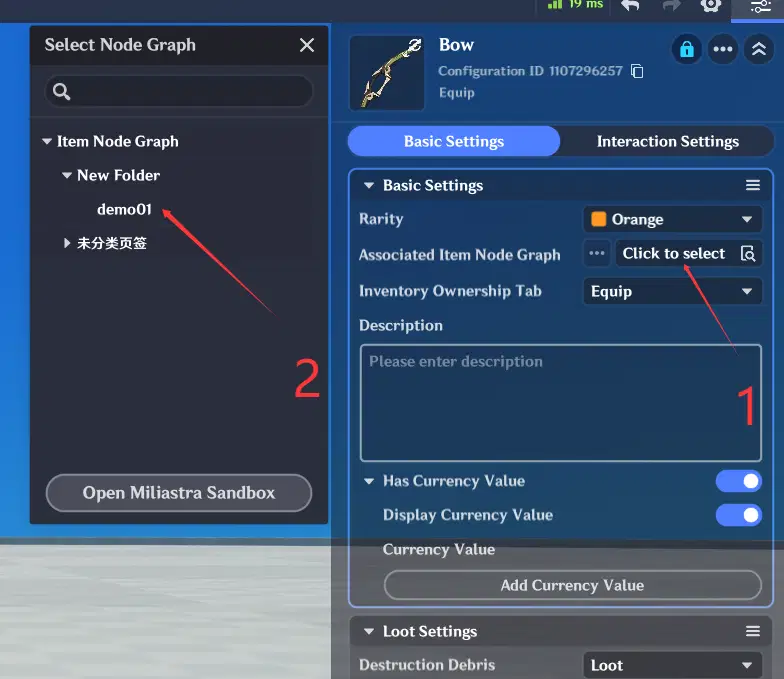
Open the Starry Sandbox and create a new Item Node Graph. Once created, bind this node graph to the equipment item you just made.
3.1.3 Now, let's dive into the implementation of the logic.
Start with [When Equipment Initialized]
Use the [When Equipment Initialized] event as your starting trigger. When the equipment is first created, we will dynamically add a sub-stat. The node graph allows us to input custom values manually to override any default configuration.
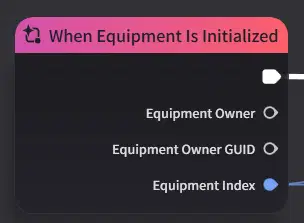
Configure Sub-stat Data
Our candidate stats are Defense (DEF) and Health (HP). Since adding a stat requires both a Config ID and a Value, a Dictionary [Config ID, Float] is the most efficient structure for this. Construct a dictionary and populate it with the specific IDs and corresponding values for both Defense and HP.
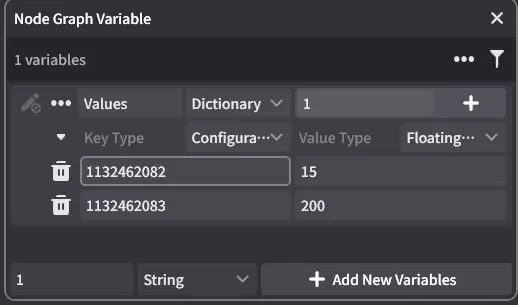
c) Random Selection and Variable Storage
Since there are only two sub-stats to choose from, use a Random Integer to determine the outcome. Crucial: Because this node generates a new value every time it is referenced, you must store the result in a Local Variable first to ensure consistency throughout the logic flow.
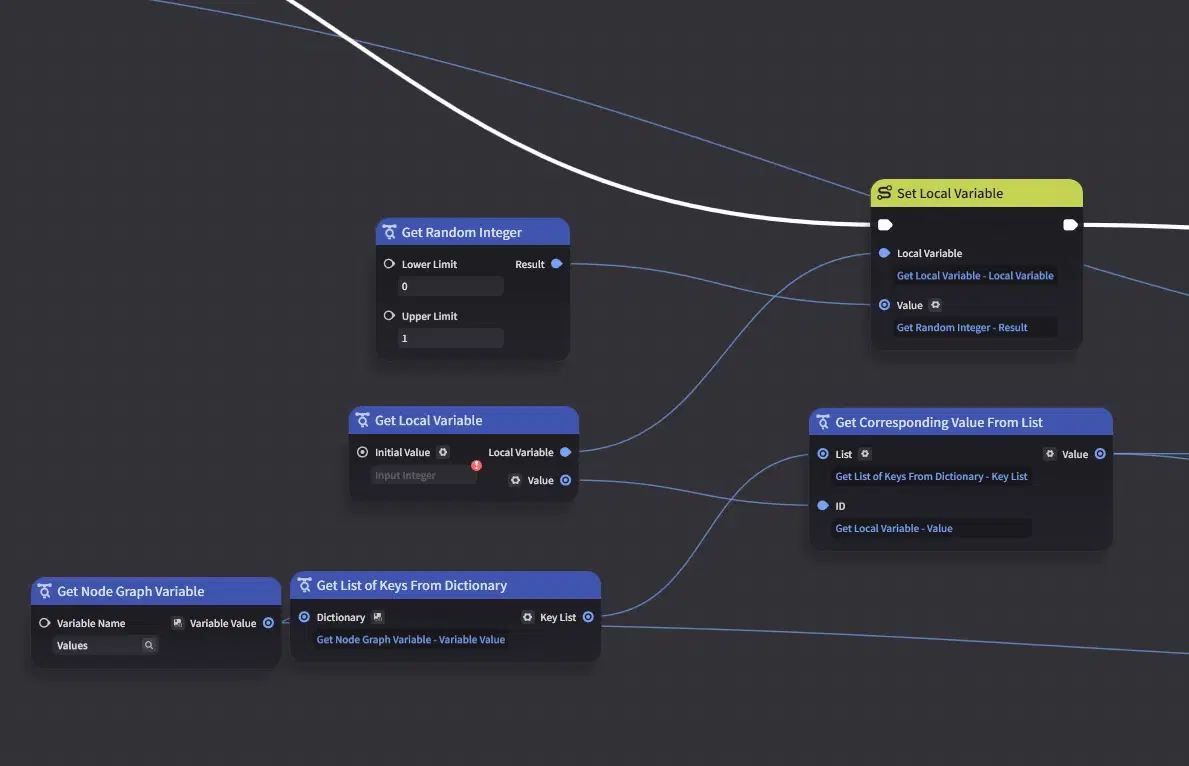
Final Execution
The final steps are straightforward: use your stored random value to select the target stat from the configured dictionary. Finally, use the [Add Affix to Equipment] node to apply the retrieved ID and value to the equipment.
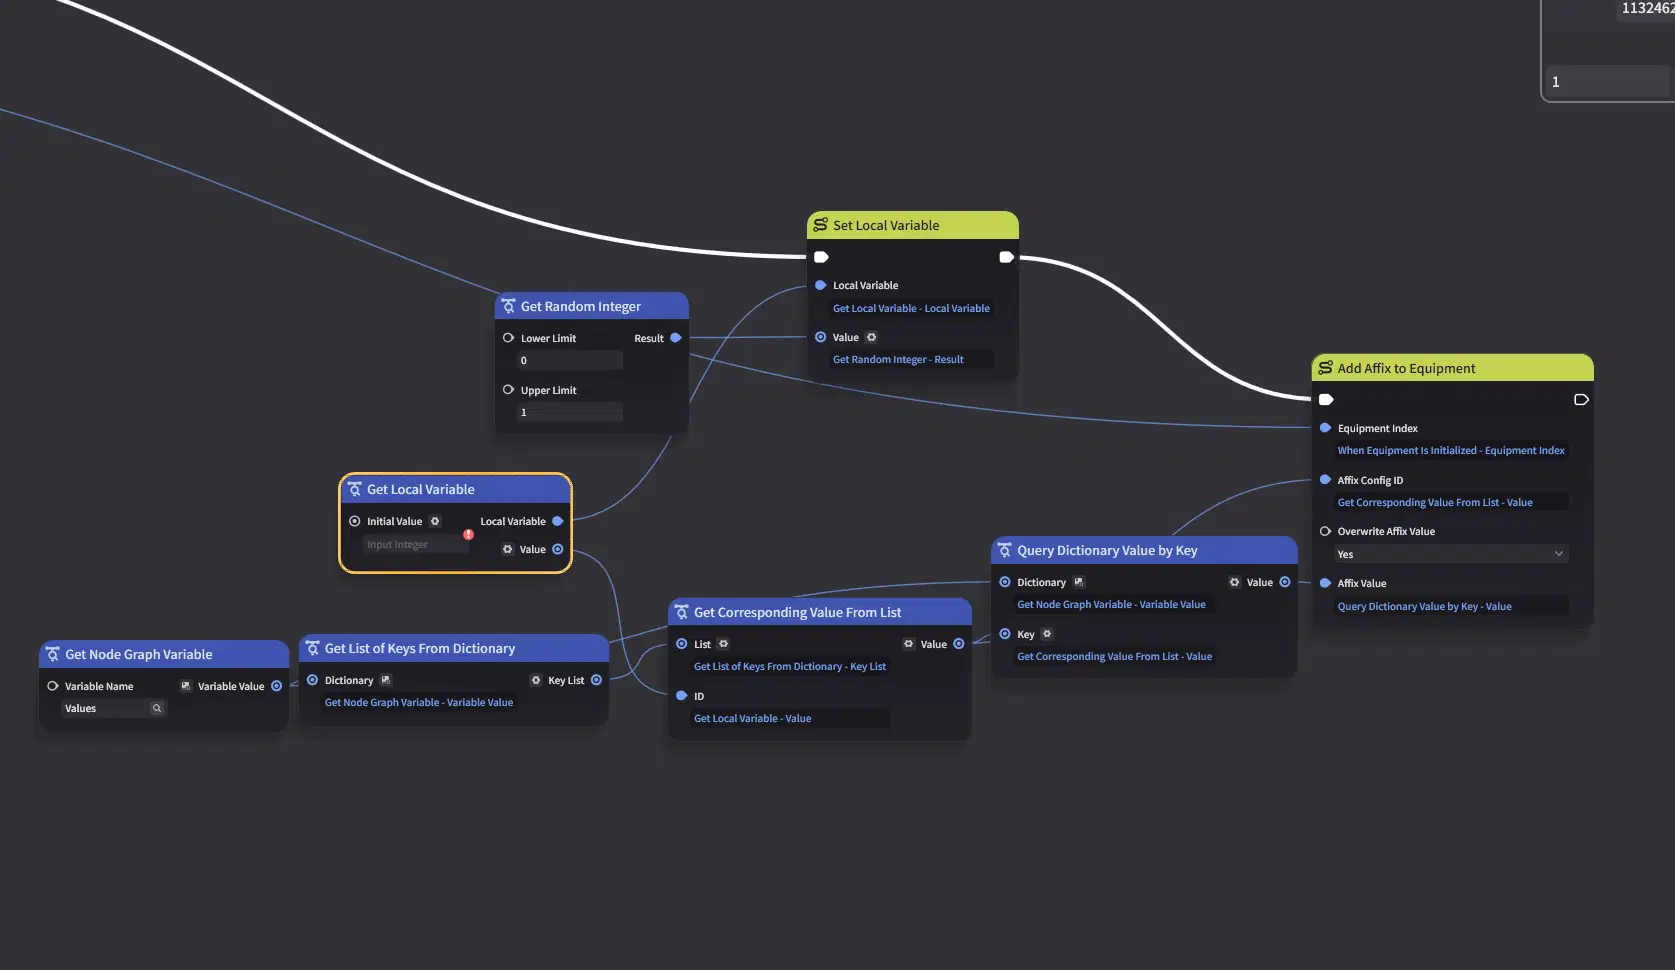
Save and Verify
Save the node graph and add three of these weapons to your inventory. Observe the results: you will see that while each weapon is based on the same template, their sub-stats have been randomized independently upon creation.
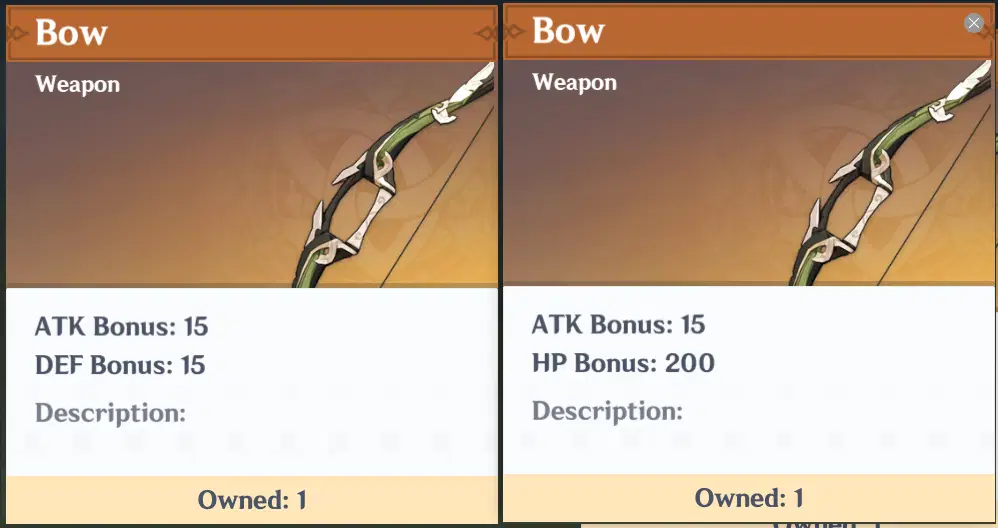
3.2 Random Sub-stat Implementation Logic
ou have now successfully implemented the basic version of randomized sub-stats. The workflow is simple and intuitive: Start at Initialization → Add Preset Stats/Values → Generate and Add Random Sub-stats.
This foundational logic is already powerful enough for most equipment types. By adjusting the randomization ranges or expanding the lists of preset and potential sub-stats, you gain significant flexibility.
Moving forward, we will focus on expanding and optimizing this core system. However, keep in mind that the underlying principles and workflow remain exactly the same. Remembering this will make the upcoming advanced concepts much easier to grasp.
3.3 How to Manage and Add Preset Equipment Values
3.3.1 Component Analysis: Standard Equipment
Let’s break down the composition of a basic piece of equipment.
Example: Common Sword
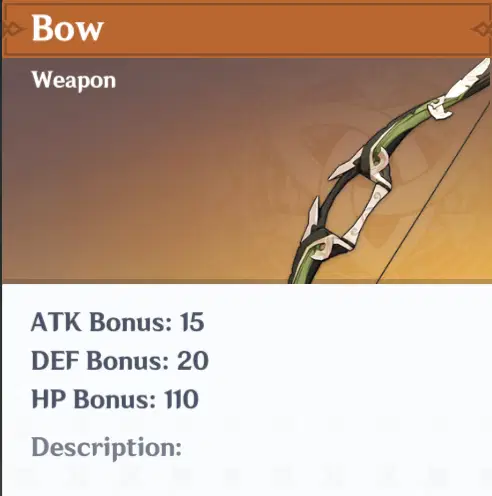
- Attack (ATK): 15
- Defense (DEF): 20
A "Common Sword" (which possesses a unique Configuration ID) is composed of two sets of identical data structures. Each data set consists of an Affix Config ID and its corresponding Floating-Point Value (Float).
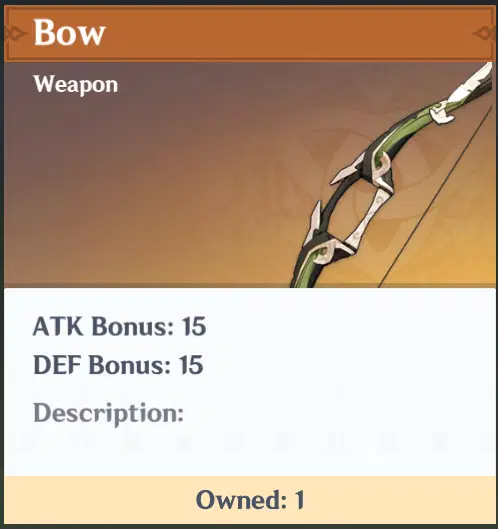
3.3.2 Logical Implementation: Dictionaries & Structs
By deconstructing the equipment, we can determine that a piece of equipment’s Initial Values should use the Configuration ID as a Key. Through this Key, we can retrieve its multiple sets of attribute data.
The Dictionary Approach
A Dictionary is an ideal data structure for storing this information, as it allows us to manage values for multiple pieces of equipment simultaneously. However, since the editor does not support Nested Dictionaries (using a Dictionary as a value within another Dictionary), we need to introduce an advanced data structure to handle the complexity.
The Struct Solution
To solve this, we can use a Struct.
- Create a new Struct named "Base_Affix".
- It should contain two primary members:
- Configuration ID: To identify the attribute type.
- Value (Float): To store the numerical data.
Optional: You can add a String member for the Affix Name. While this makes the data much easier to read and debug during the editing process, keep in mind that it will introduce a slight performance overhead (Load).
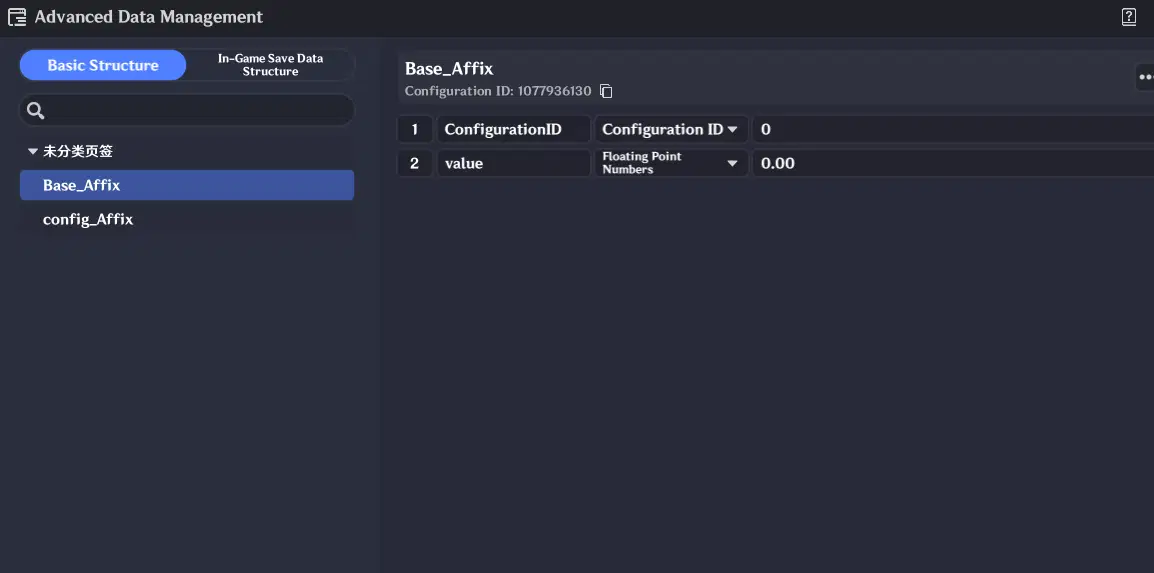
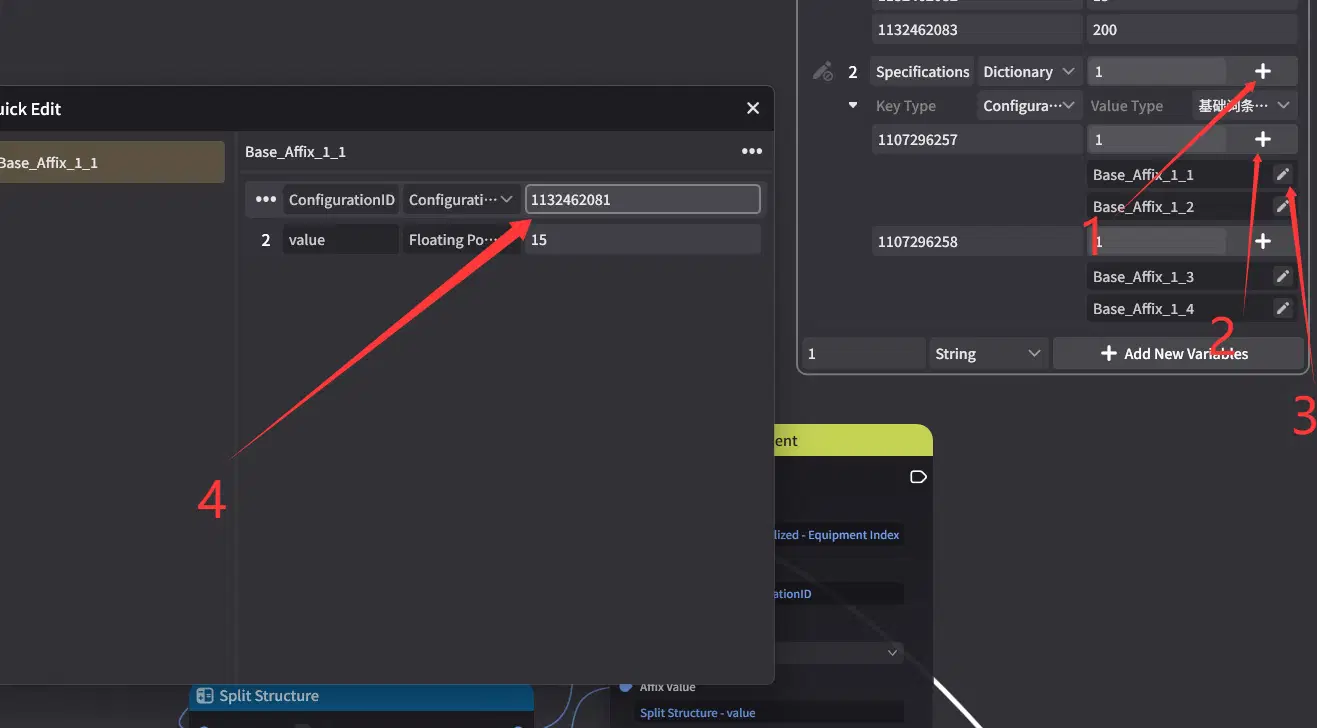
We have now finalized the data structure for storing equipment information:
- Storage Type: A Dictionary.
- Key: The Configuration ID.
- Value: A List of Structs (specifically, a List of "Base_Affix").
The Initialization Workflow
When initializing a piece of equipment, the logic process is straightforward:
- Fetch Data: Use the Configuration ID as the key to retrieve the corresponding Base_Affix List from the dictionary.
- Loop & Assign: Run a loop through the list and sequentially add each attribute to the equipment instance.
This systematic approach allows you to spawn any predefined item simply by calling its Configuration ID, making your equipment system both organized and easy to scale.
3.3.3 Implementation Steps
Follow these steps to implement the logic:
- Duplicate the Demo: Create a copy of your current demo and clear out the previous nodes to start fresh.
- Retrieve IDs: Obtain the Configuration ID of the equipment using its Equipment Index.
- Query the Dictionary: Use the Configuration ID to look up the specific Base_Affix List within your dictionary.
- Iterate & Add: Run an iteration through the list and add every affix configuration into the equipment.
- Finalize: Once the loop is complete, the process is finished!
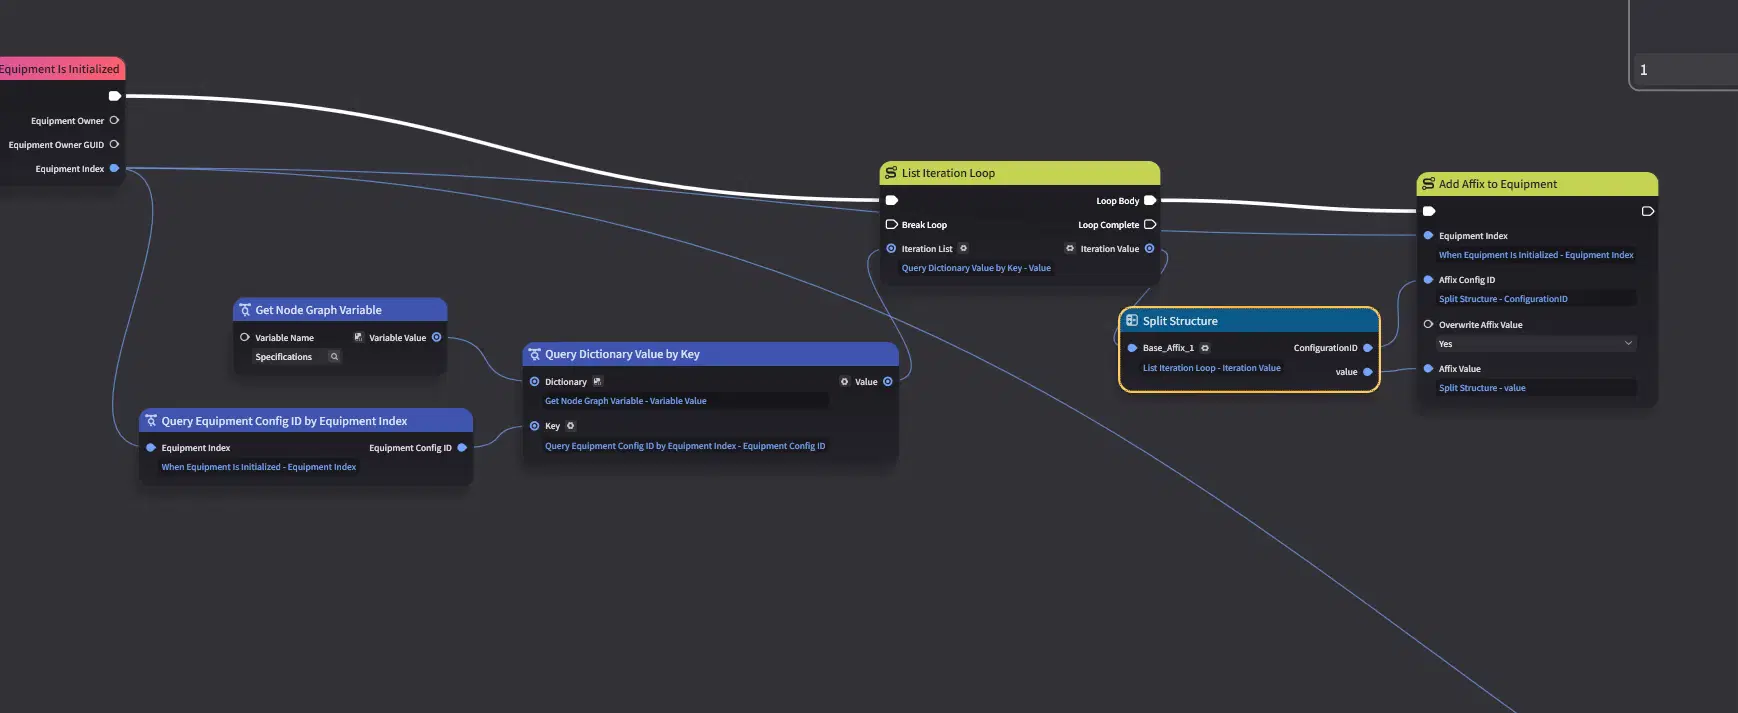
Now, go ahead and run a test to see it in action!
3.3.4 The Rationale: Why follow this approach?
Reflecting on the Evolution: The Path to Efficiency
Let’s look back at how our system has evolved from manual setup to a professional architecture.
Stage 1: The Manual Approach
Initially, we created individual affixes, assigned them initial values, and manually attached them to each piece of equipment.
- The Problem: To modify an item, you had to handle every affix one by one. If different items shared the same affix, changing one would accidentally break the others. Manually creating unique affixes for every single item quickly became a maintenance nightmare.
Stage 2: Node-Based Overrides
Next, we moved to using Node Graphs to inject values and override the default affix data.
- The Progress: This successfully decoupled the equipment and affixes from their original static configurations. You no longer had to touch the base equipment or affix settings just to tweak a few numbers.
Stage 3: Full Data-Driven Configuration
Now, we have achieved Full Configuration. By externalizing the equipment’s numerical data, the Node Graph acts as an automated "Builder."
- The Breakthrough: The logic is now universal. It doesn’t just serve one specific item—it’s a template. Try configuring the stats for a completely different weapon and pass it through the same Node Graph; it will "construct" the item perfectly every time.
The Long-Term Benefit
As your Wonderland grows and you find yourself managing dozens or even hundreds of items, the advantages of this "Configuration-First" approach will become undeniable. You’ve moved from building individual items to building a Scalable System.
3.4 Implementing Randomized Affixes and Attribute Stacking
I hope you have finished warming up, as the difficulty will increase slightly from here. Do you still remember our initial goal? It is to create a random piece of equipment similar to an Artifact. In the design, it should have two fixed entries, and then about 3-6 random entries added to the equipment.
Previous chapters have already analyzed that this is nothing more than adding preset values during initialization, and then obtaining random entries to add to the equipment. Don't worry, we are still using this approach; we just need to resolve a few additional issues: how much value should be given to each entry, how to handle accumulation when one piece of equipment accumulates multiple entries, and ensuring the number of equipment entries is no more than 4. Next, we will resolve these small issues step by step.
3.4.1 Entry Configuration
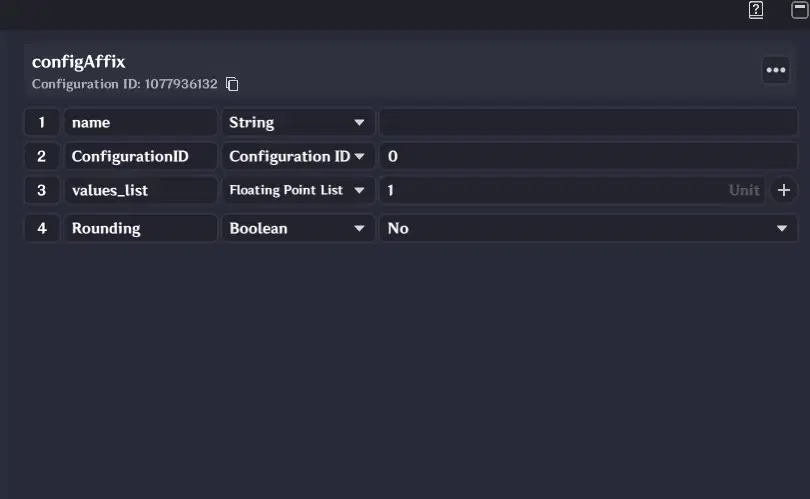
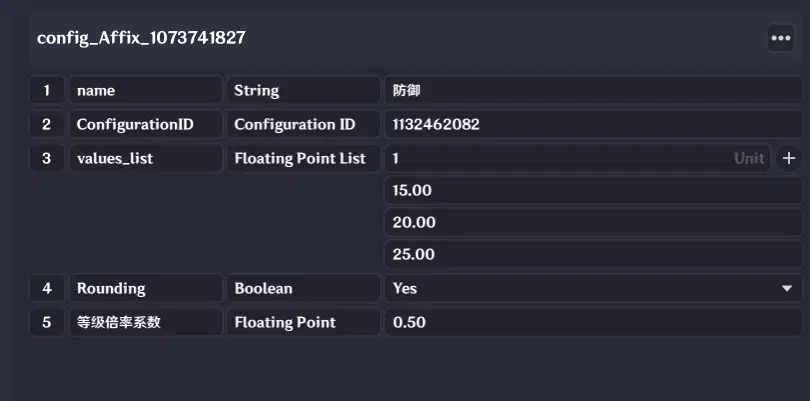
Now we will address these additional issues one by one: we can configure all entries and control whether their numerical range is random or fixed. Remember how we mentioned initially that we didn't want to see "12.34" Attack Power? This handling is also configured here. Each entry requires multiple different configuration parameters, which can be carried by a struct. Then, using a dictionary [ConfigurationID, Entry Configuration Struct] makes it very convenient to obtain the preset configuration of an entry.
Now, let's plan the parameters included in this struct:
- Entry Name: This may not necessarily be used in calculations, but it is for readability.
- ConfigurationID: This parameter is needed to tell the system what this entry is.
- We assume the entry will have n possible values, so we will use a float list to store them.
Once you have completed the configuration, it should look like this.
3.4.2 Configuring entries
We have already planned the data structure for it. This time, we will not place it in the graph variables, but in the entity variables instead. The reason: Don't forget, it's not just this graph that needs to access it; we still have enhancements to implement later.
Create an empty model and name it something like Entry Configuration. Disable its collision so that it remains completely imperceptible during actual gameplay.
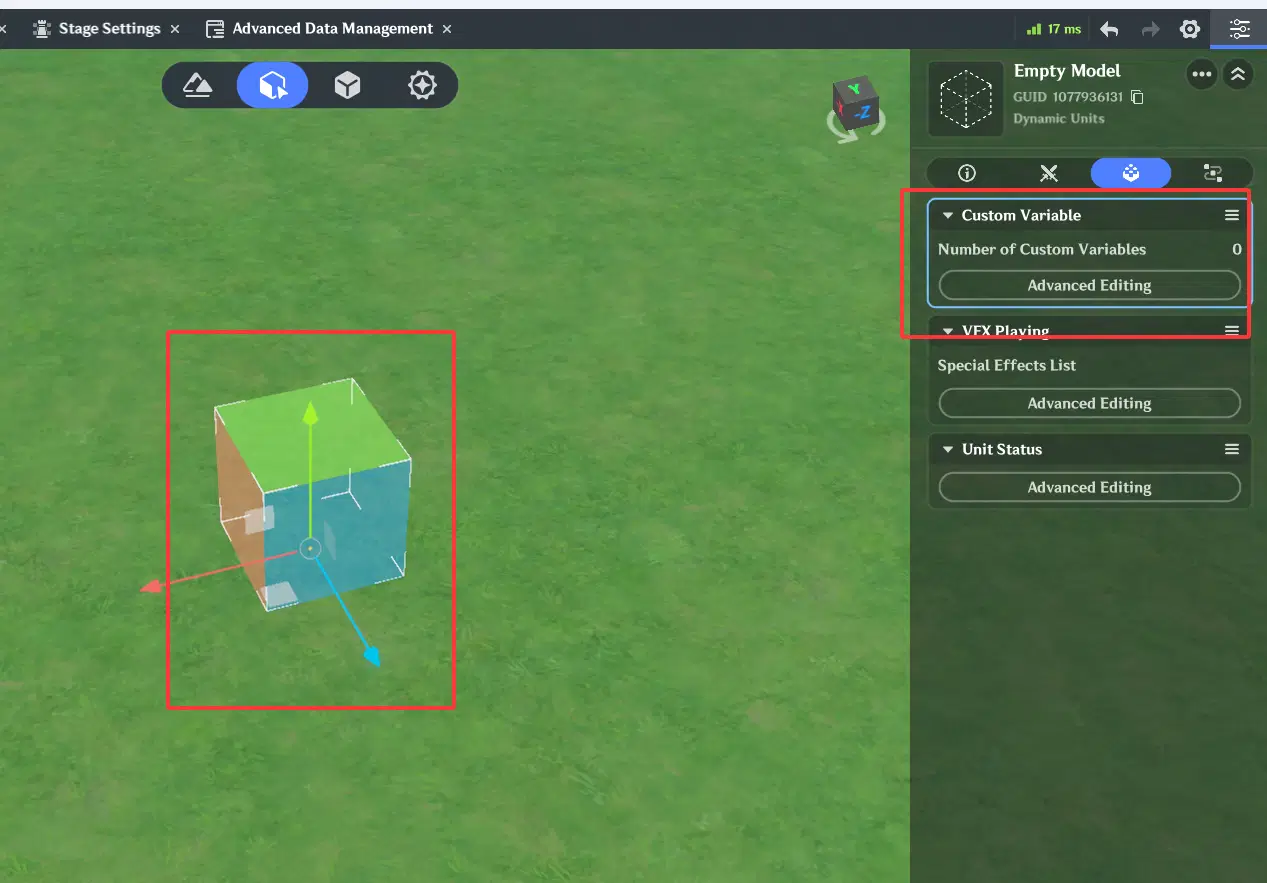
Add a dictionary to the custom variables, with the data mapped as [ConfigurationID, Entry Configuration].
Configure these for HP, Defense, and CRIT Rate respectively. Note: in the system, 100% CRIT Rate/CRIT DMG is represented as 1. If you are setting a 5% CRIT Rate, it should be entered as 0.05.
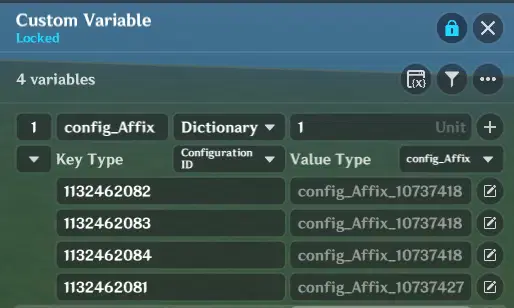
3.4.3 Implementation:
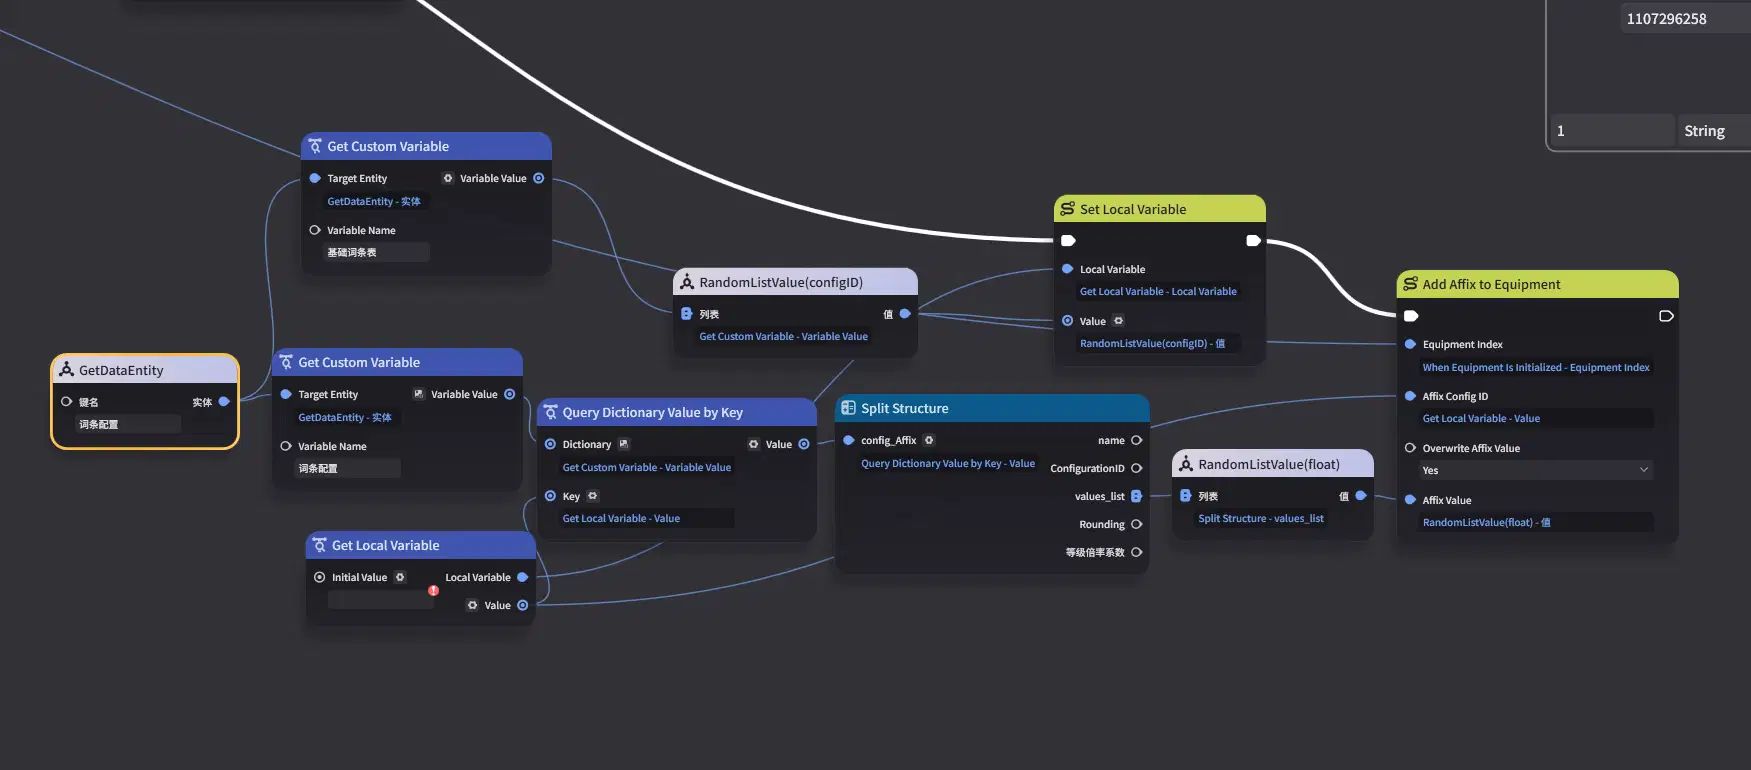
Now, let's begin the implementation. Continuing from our previous graph, once the loop is complete (meaning the default entries have been added), we start adding random entries.
Fetch the custom variables from the entity to obtain the random values we configured.
Ps: For nodes that are commonly used and have high reusability, you can merge them into a composite node for convenience.
Note that you must store the randomized ConfigurationID in a local variable, because it needs to be used multiple times, while the random node will change its output every time it is called.
After obtaining the ConfigurationID, query the entry configuration and randomly select one value from the preset candidate values we just set to add to the equipment.
3.4.4 Entry Quantity Limit and Entry Accumulation
3.4.4.1 Logic and Approach
Regarding the complex situation where multiple entry values and preset/random values interact, we do not recommend operating directly on the equipment entries. On one hand, this would significantly increase code complexity, and on the other, it would cause unnecessary performance waste.
As mentioned earlier, we use N pairs of key-value pairs to represent the numerical values of a piece of equipment, and the same applies here. We will create a graph variable of type Dictionary [ConfigurationID, Float] within the node graph to temporarily store the equipment's values. The maximum number of entries can be easily controlled through the dictionary length. By checking if a key (Entry ConfigurationID) already exists in the dictionary, we can decide whether to perform accumulation or add a new entry.
Furthermore, we will prioritize obtaining entries from the entry table. Once the four-entry limit is met, no new entries will be generated; instead, entries will be drawn from the dictionary’s existing key list, as any "new" stats can now only be born from these four existing types.
When all entries have been added, we will begin our next step: integerization and adding the entries to the equipment. This step is very simple and can be easily achieved using a rounding node.
3.4.4.2 Implementation: Following our logic, we will complete it step by step
Duplicate the node graph to serve as the third demo. We will modify it based on demo2.
First, create a temporary value dictionary; there is no need to add anything to it yet.
In the iteration of demo02, we added entries to the equipment one by one. Now, change this to adding them into the temporary value dictionary.
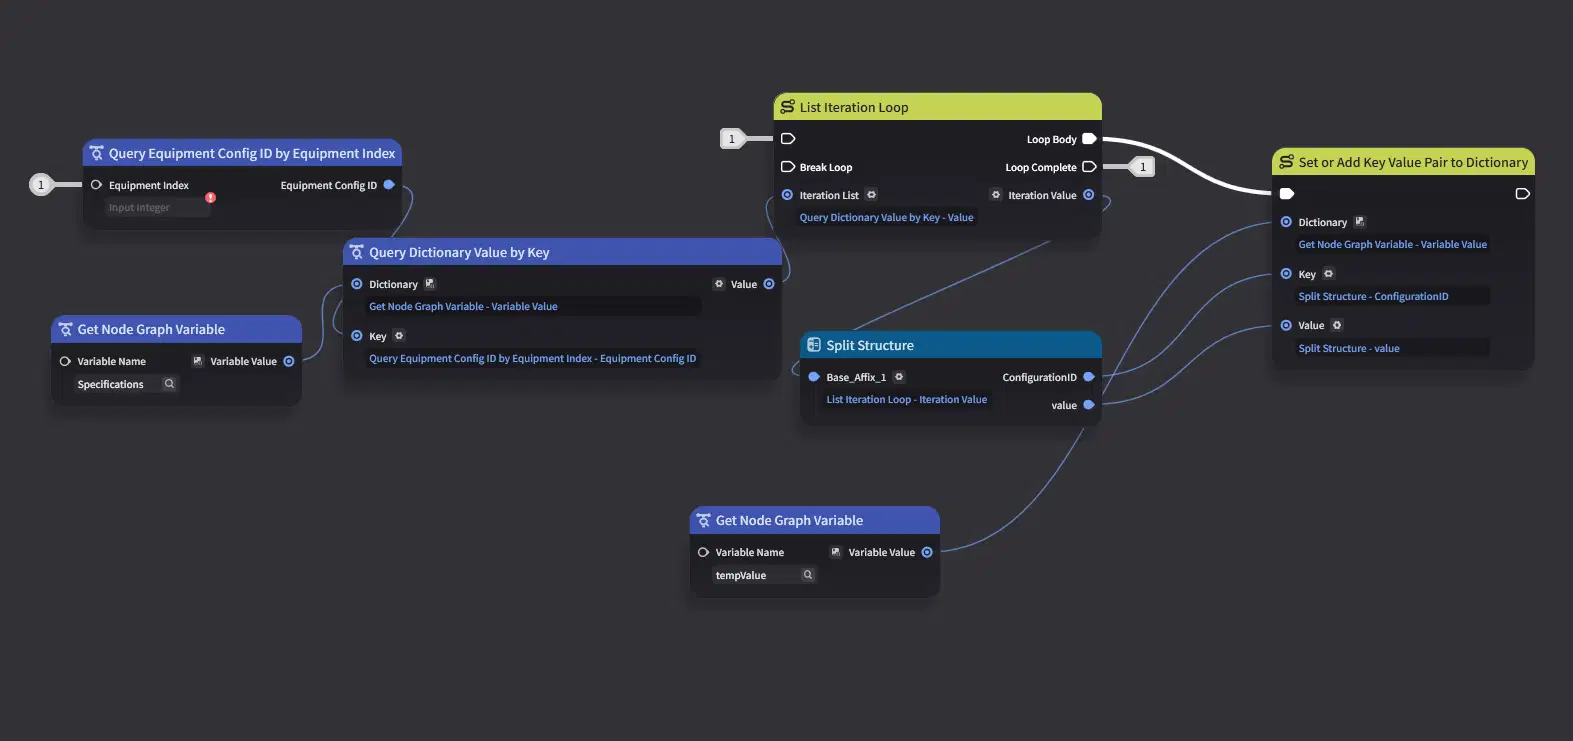
Begin Accumulating Random Values
First, you need to check the length of the temporary value dictionary (whether it has reached 4 entries), which will determine where the random entry is fetched from.
If the answer is No, it will be fetched from the Entry Table; if it is Yes, it will be fetched from the Key List of the temporary value dictionary. When the answer is No, you can directly use the code from demo02.
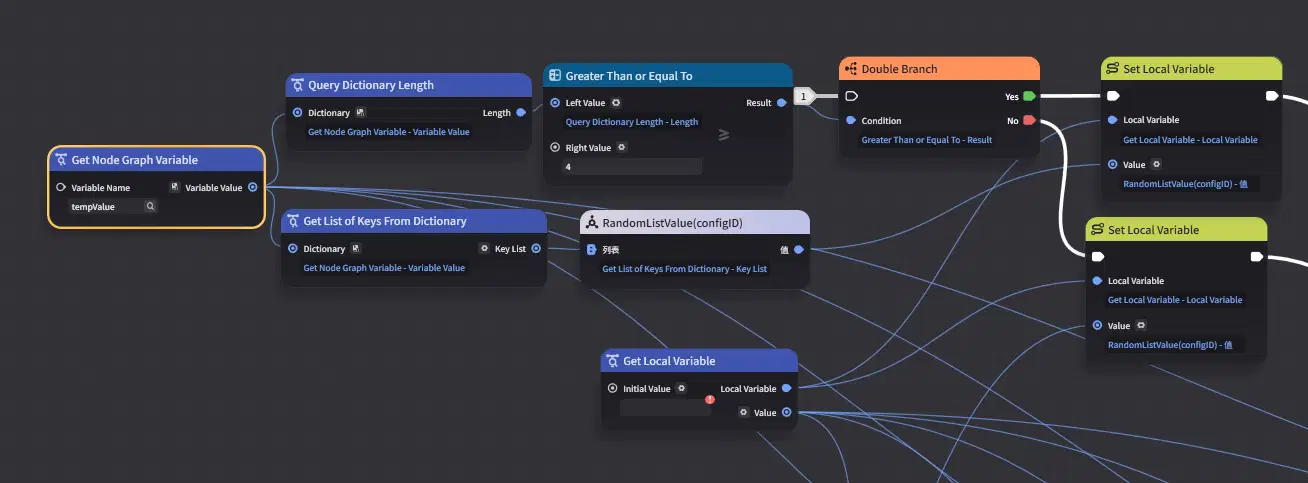
In demo02, we added entries and values directly to the equipment. As you likely discovered in the previous stage, this can result in the equipment having two identical entries. While this works, it is not elegant.
The current approach is to add them to the temporary values, which requires a pre-condition check: whether the same ConfigurationID already exists. This will determine whether we perform accumulation or add a new entry.
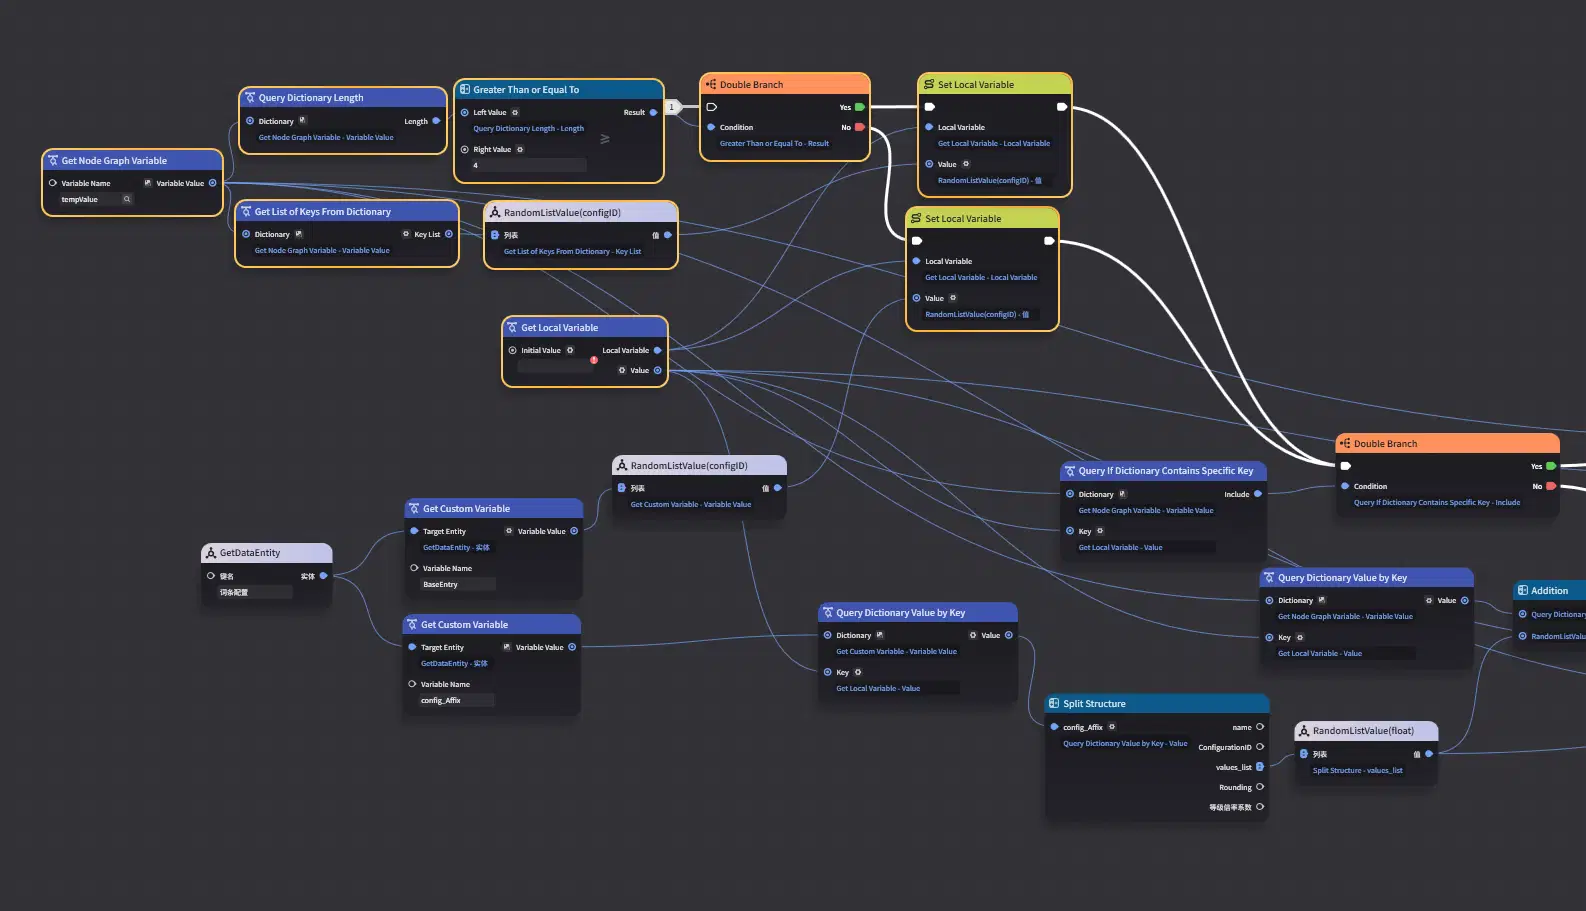
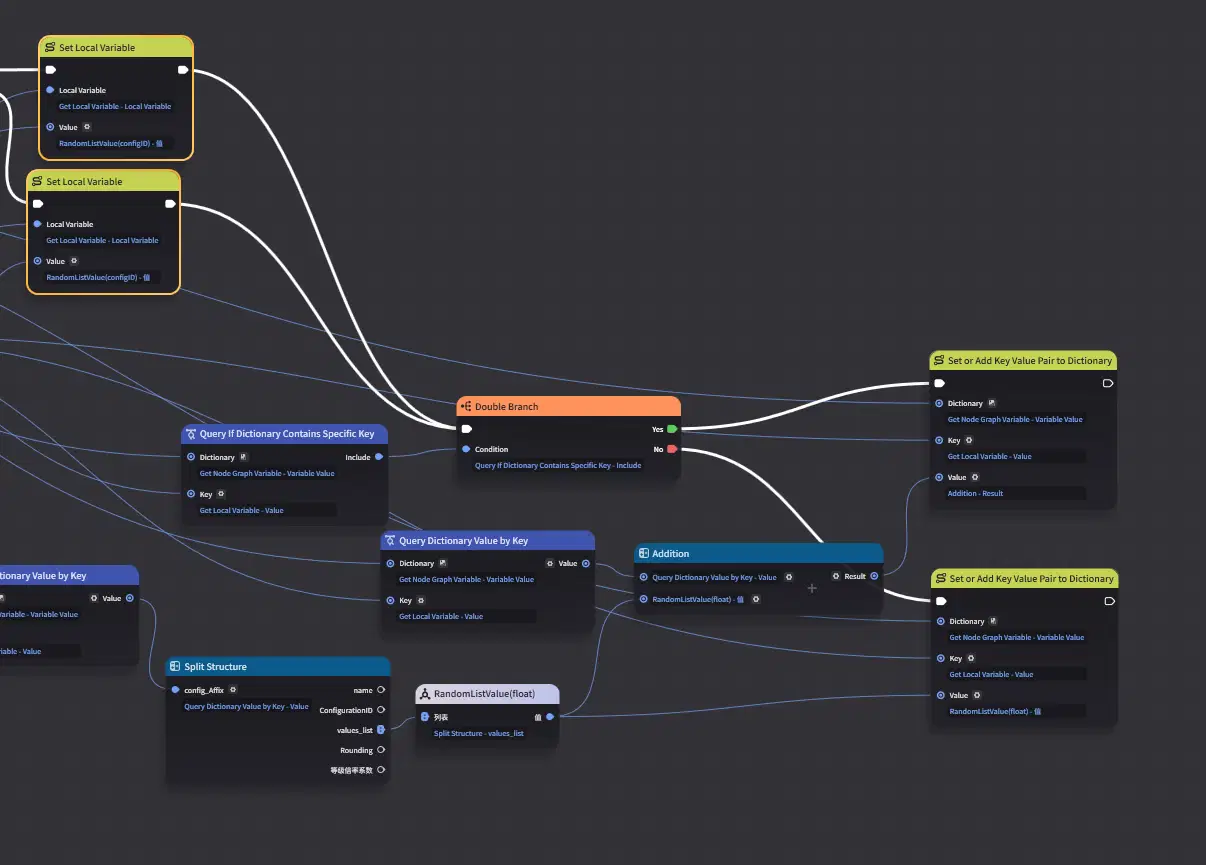
All right, you have now completed the accumulation of random entries. However, random entries aren't necessarily limited to a single one. We will now decouple these two parts of the code (Adding Preset Values and Adding Random Values). Select the random value section and merge it into a Composite Node.
Ps: Composite nodes are not only for common, reusable operations; they can also be used for code modularization, which makes your logic much easier to read.
To handle multiple random entries, add a Finite Loop and set the desired number of iterations. Insert the "Add Random Entry" logic as the Loop Body.
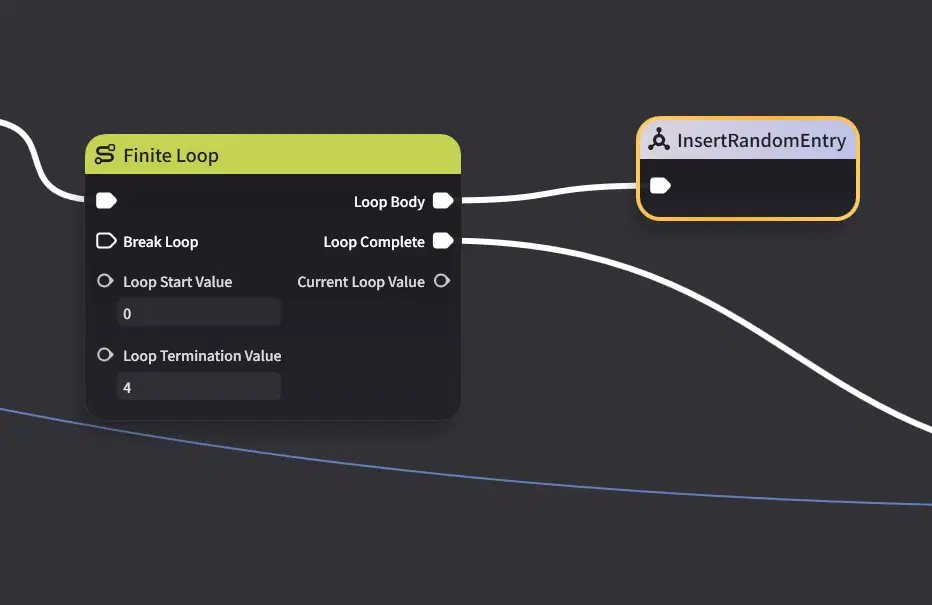
Writing to Equipment
Now that all the required values are stored in the temporary value dictionary, the final step is to iterate through them and add them to the equipment.
Note that we will query the entry configuration once more here to determine whether the value needs to be rounded to an integer.
Also, ensure that you clear the temporary values after the writing process is complete; otherwise, subsequent pieces of equipment will become unintentionally overpowered!
With this, a piece of equipment with random entries is complete. You can now modify the initial equipment stats or add more entry configurations to your project to enrich the gear system.
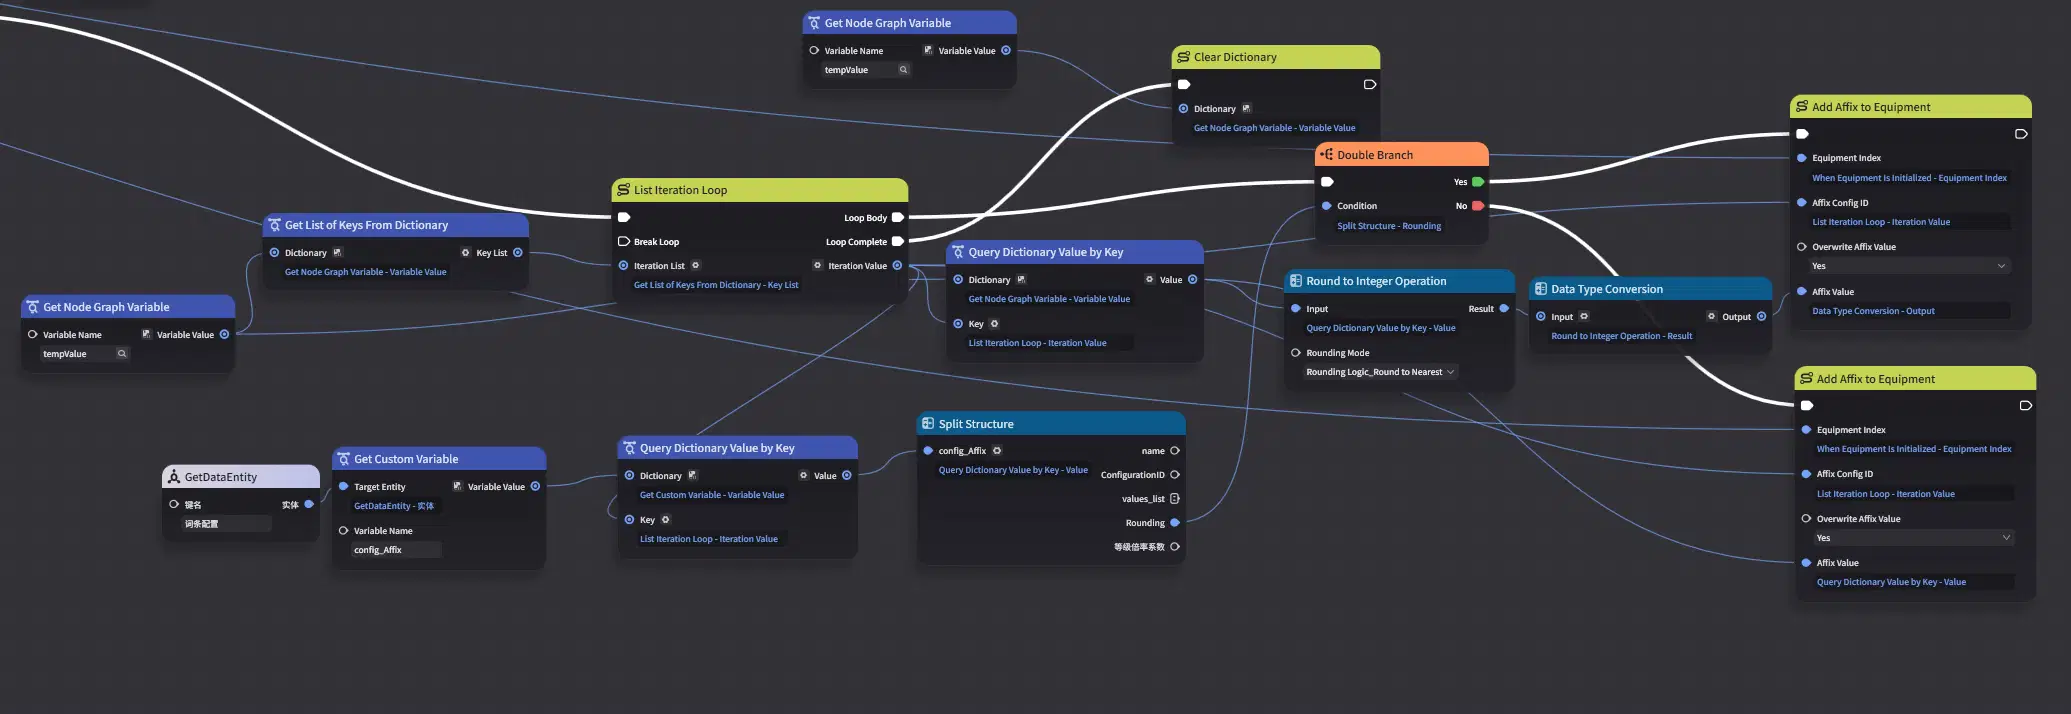
Launch Wonderland, test your random entry equipment, and try configuring several pieces of equipment and entries.
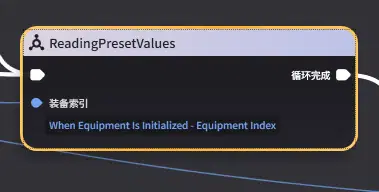
Now, our node graph primarily performs three operations: reading preset values into the dictionary, obtaining multiple random values and adding them to the dictionary, and writing the dictionary values to the equipment. By turning each of these into a Composite Node, notice how the logic becomes instantly understandable at a glance.
Ps: This is the greatest advantage of using composite nodes to modularize your code: maintainability, debugging, and readability are all significantly improved. Each section only needs to be responsible for its own specific task.



