


Today I'll be introducing some physics into Miliastra Wonderland, and going through a step-by-step guide on how I've built a rolling ball. If you're a creator, hopefully you'll be able to use this knowledge to create your own - possibly sports-related - games.
This demo stage is downloadable on theWonderland Resource Center.
The Essential Components
A Choice of Ball
As a first step (that you can also revisit later), we need to find an appropriate prefab as the basis for our ball. The two essential requirements are:
- Its origin point must be at the very centre, as the origin point (formally known as GI_RootNode) forms the basis for all rotation.
- It's spherical enough to look like it should roll properly.

Snowball & Large Rolling Boulder
A particularly good candidate in the prefab library (as of 6.5) is the Large Rolling Boulder. Whilst the snowball is an aesthetic match, you'd have to create a new origin point with an Empty Object and utilise Decorations to if you want to use that, as its origin point is at ground level.
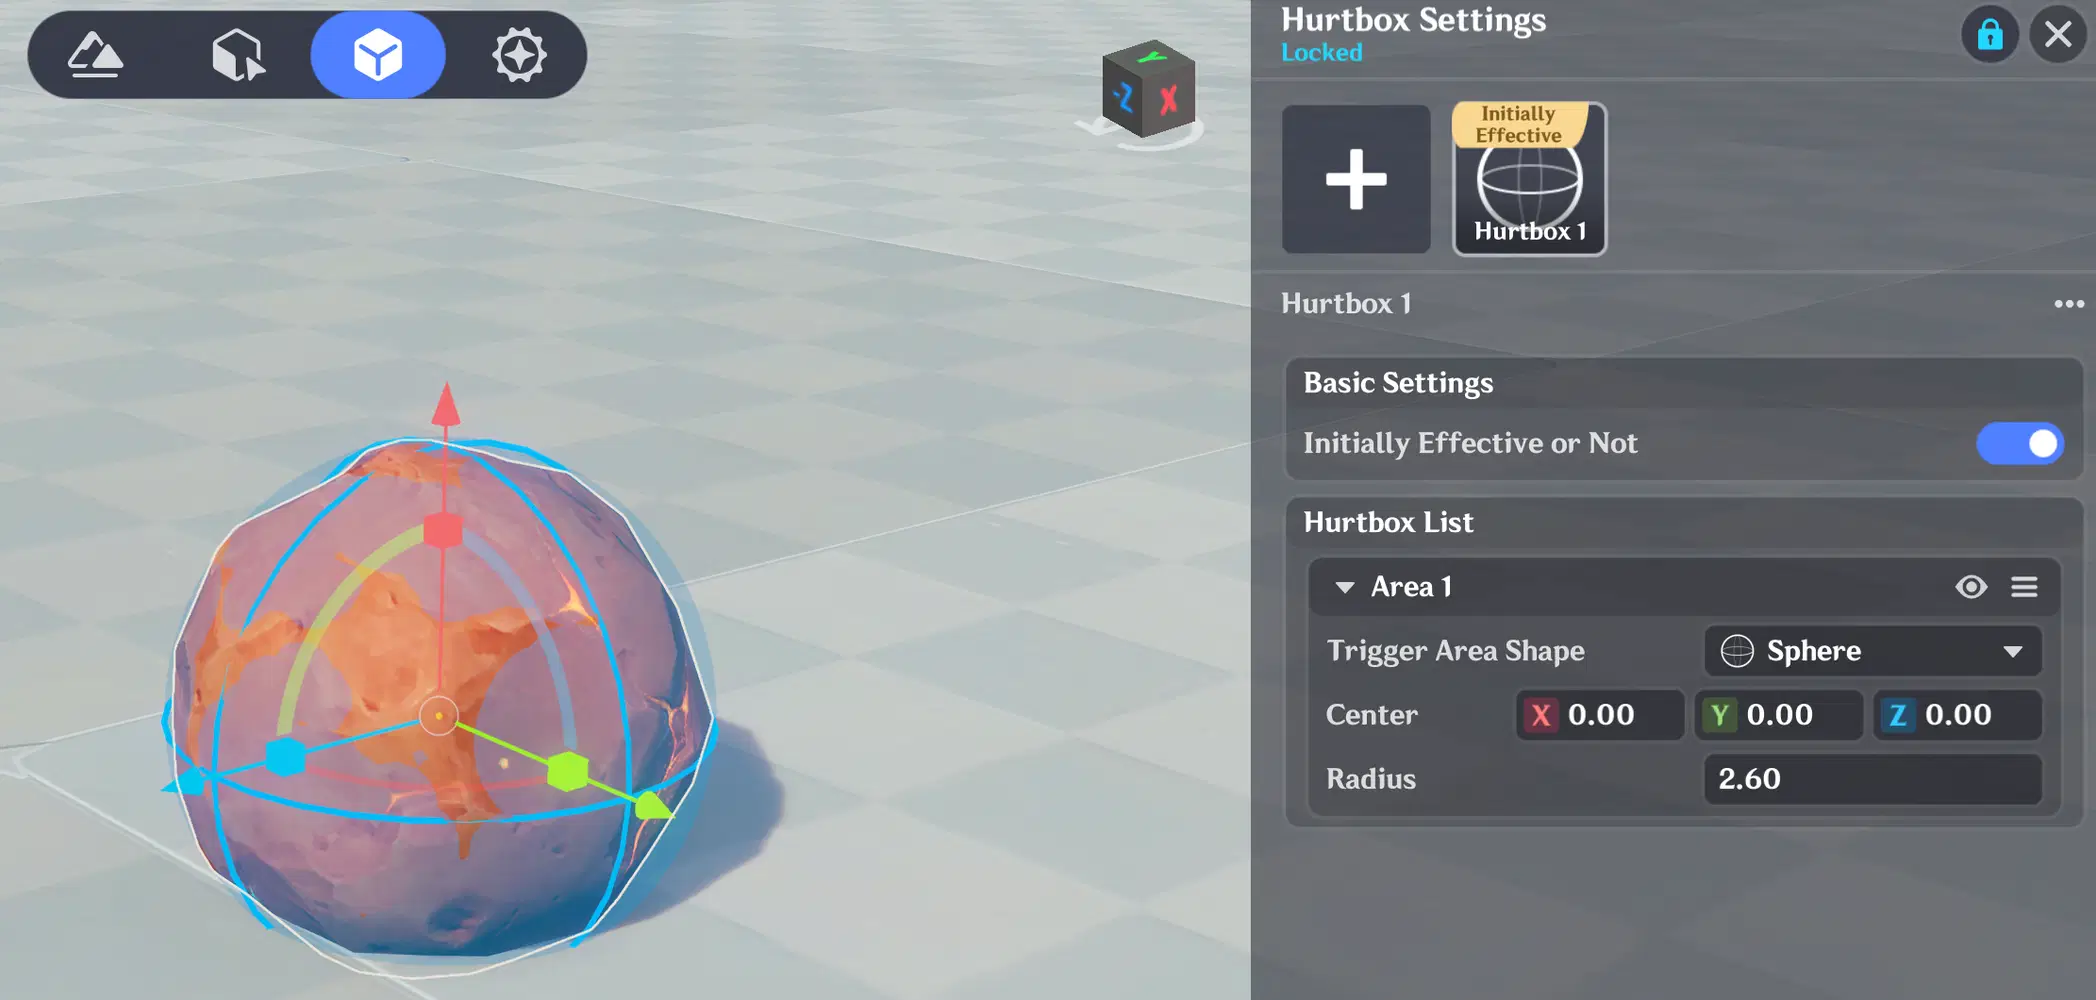
A Hurtbox
The hurtbox can be configured on any dynamic object prefab, and it allows abilities to hit it (and optionally cause damage). Node graphs can make use of events caused by this interaction, which I'll be covering a bit later. In my demonstration, I'll be setting it up to cover the entire ball.
Hurtbox Configuration
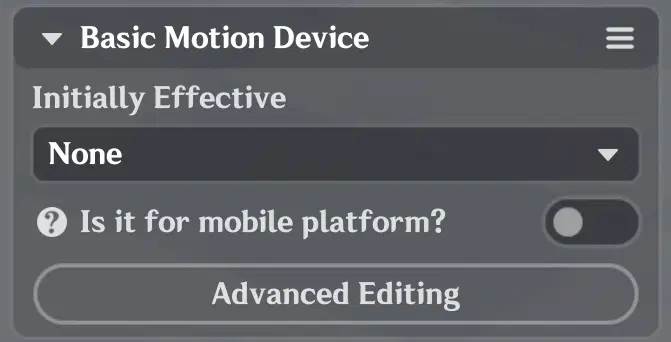
Basic Motion Device
Basic Motion Device
To move any object you need a motion device. There are three kinds; basic, follow and projectile. As we'll be running our own physics calculations, we need the Basic Motion Device. However, you want it empty - it just needs to exist on the prefab, and then we can use node graphs to apply motion.
On-Hit Detection
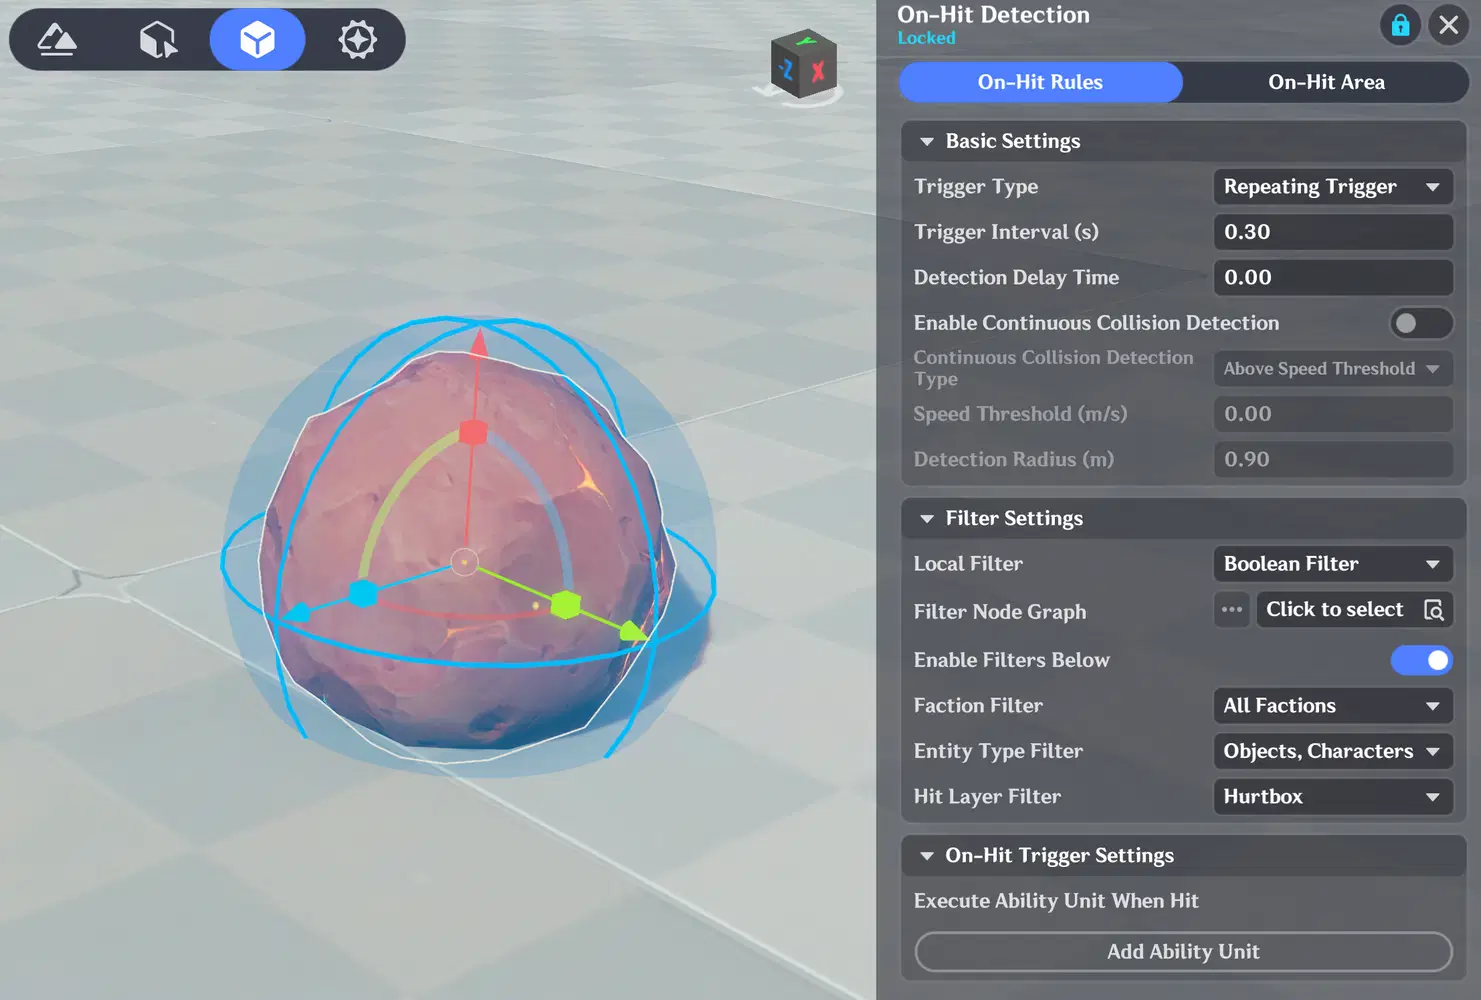
This component allows us to detect collisions with the environment and characters, so that we can have our ball react to it - bouncing off surfaces or knocking the player back.
On-Hit Detection Configuration
I've set this up to only collide with hurtboxes on objects and characters, this is so that we always know we're interacting with another entity. There's another use case for scene collisions (static prefabs & terrain), but we're going to avoid that in this tutorial.
Global Timer
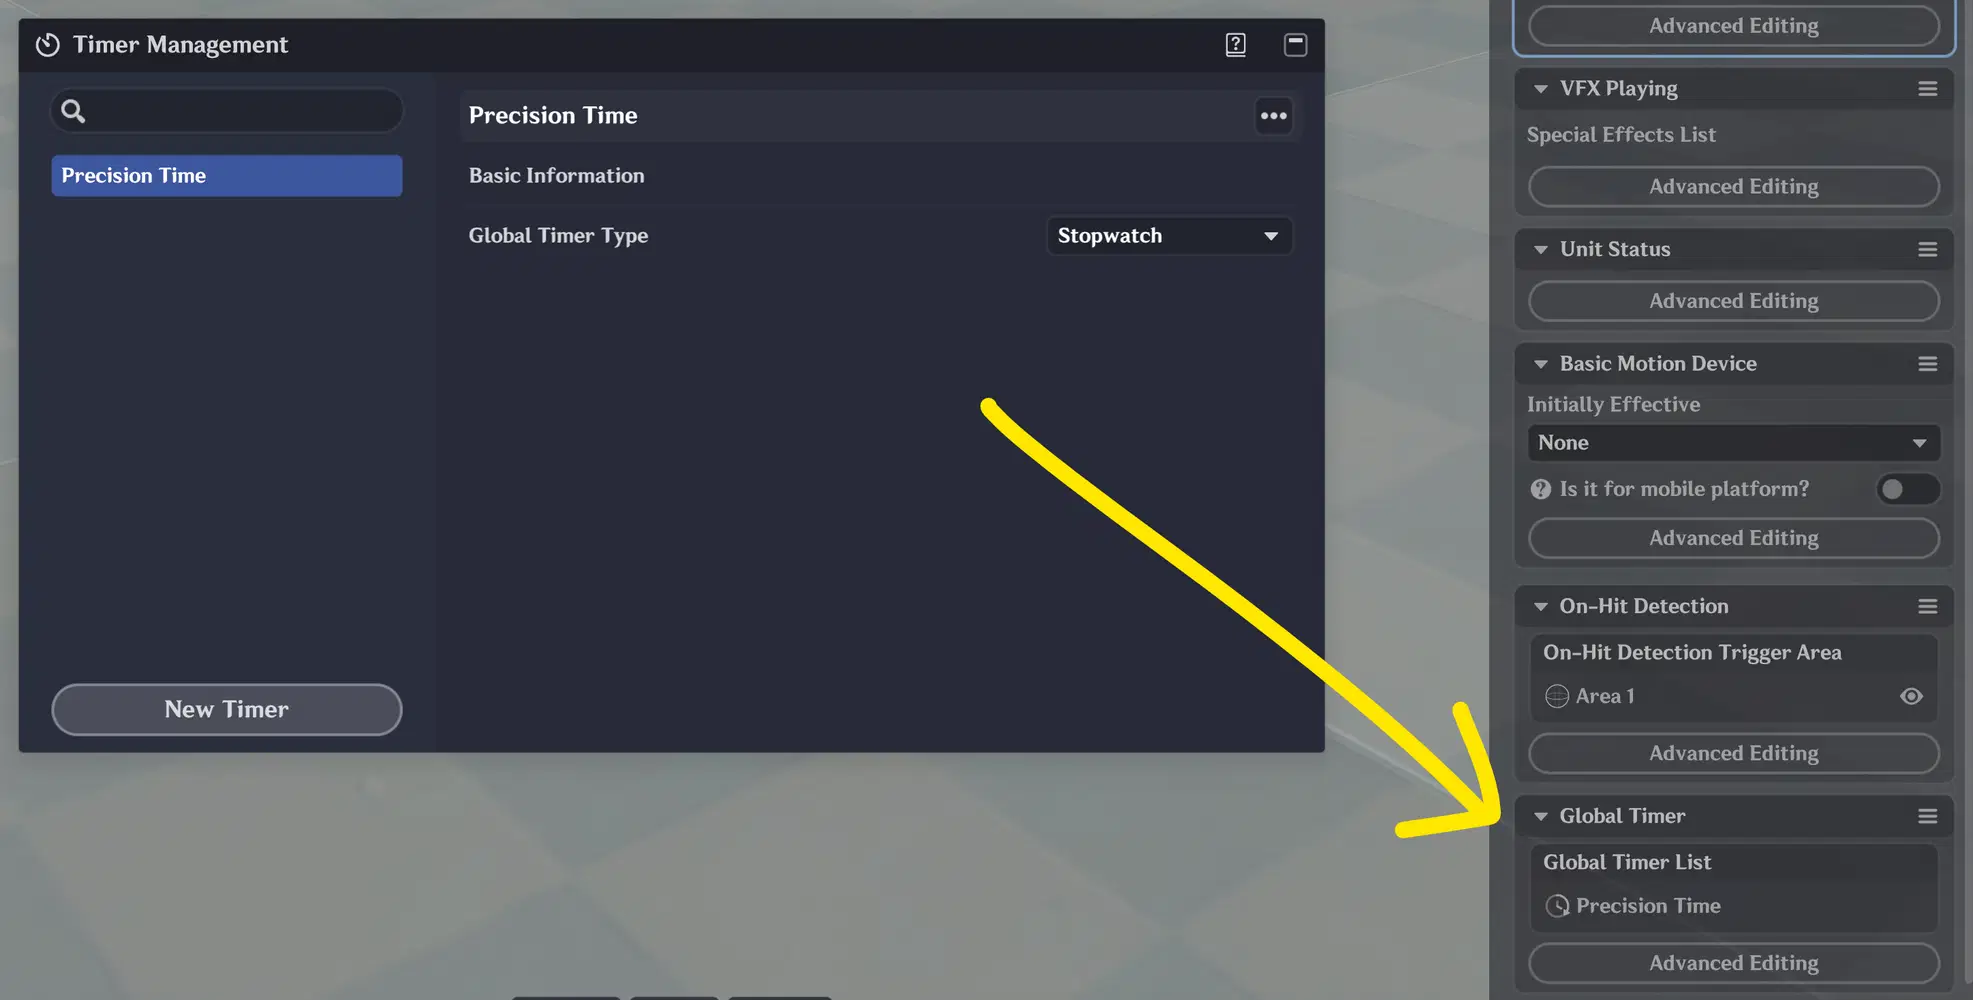
Global Timer Configuration
I've also created a new Global Timer as a Stopwatch. Any kind of physics calculations need precision, and the node graphs only natively have access to an integer timestamp (the nearest second). However, by defining a global stopwatch, we can access the current time as a floating point, giving us access to fractional seconds. This is more accurate than just using Start Timer in node graphs on its own.
Basic Movement
Before we get the ball rolling, we ought to get it moving across the ground. We'll create a node graph - don't forget to attach it to the ball prefab!
Node Graph Variables
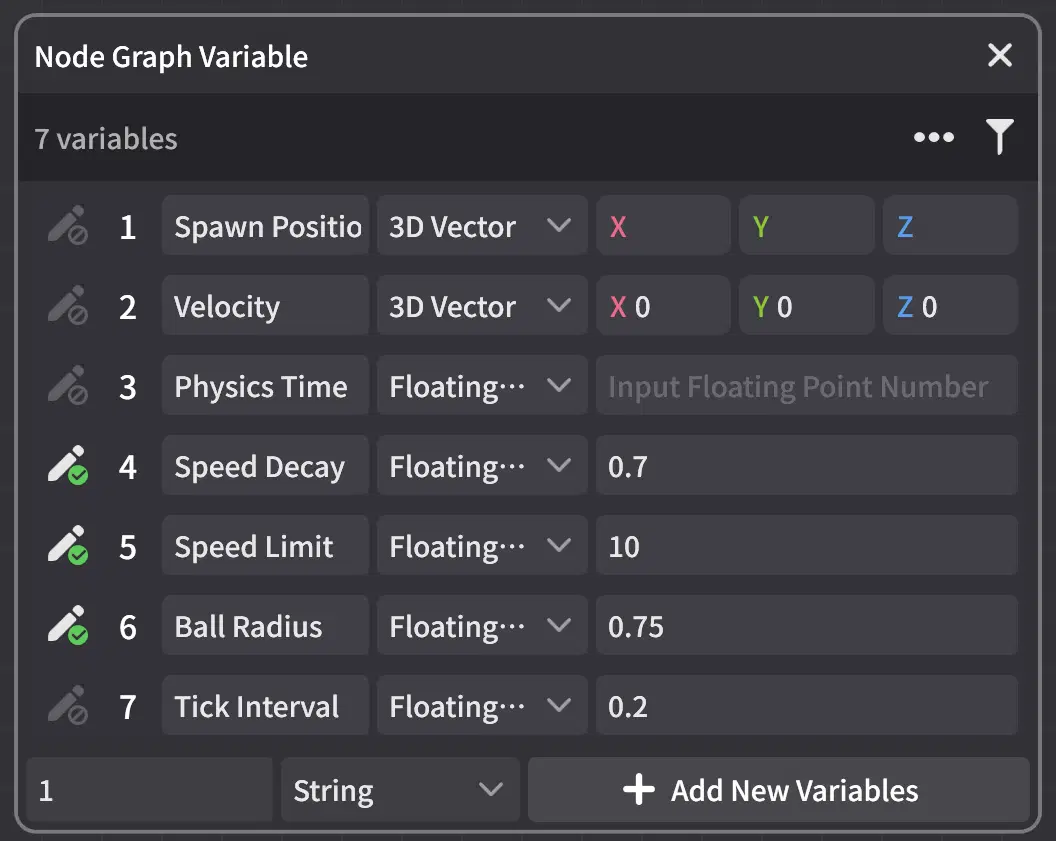
Node Graph Variable Configuration
I've created some variables, and here's the intention behind each one:
- Spawn Position: Useful to have, stores the position of where the prefab was first created.
- Velocity: Essential for our physics calculations, stores the current speed and direction of the ball.
- Physics Time: On each physics tick, we need to store the current time so that we can compute a time delta - this is used to scale calculations such that heavy server load doesn't cause fluctuations in object motion.
- Speed Decay: This is how we're going to emulate friction to slow the ball down. It's not perfect, but it's good enough for our purposes.
- Speed Limit: We don't want the ball getting too fast, this can cause a bad experience for players, so we can cap it.
- Ball Radius: We're going to need this to calculate rotation later. Measure this value after placing the ball on the terrain.
- Tick Interval: How frequently we want our physics recalculations to occur.
On Creation
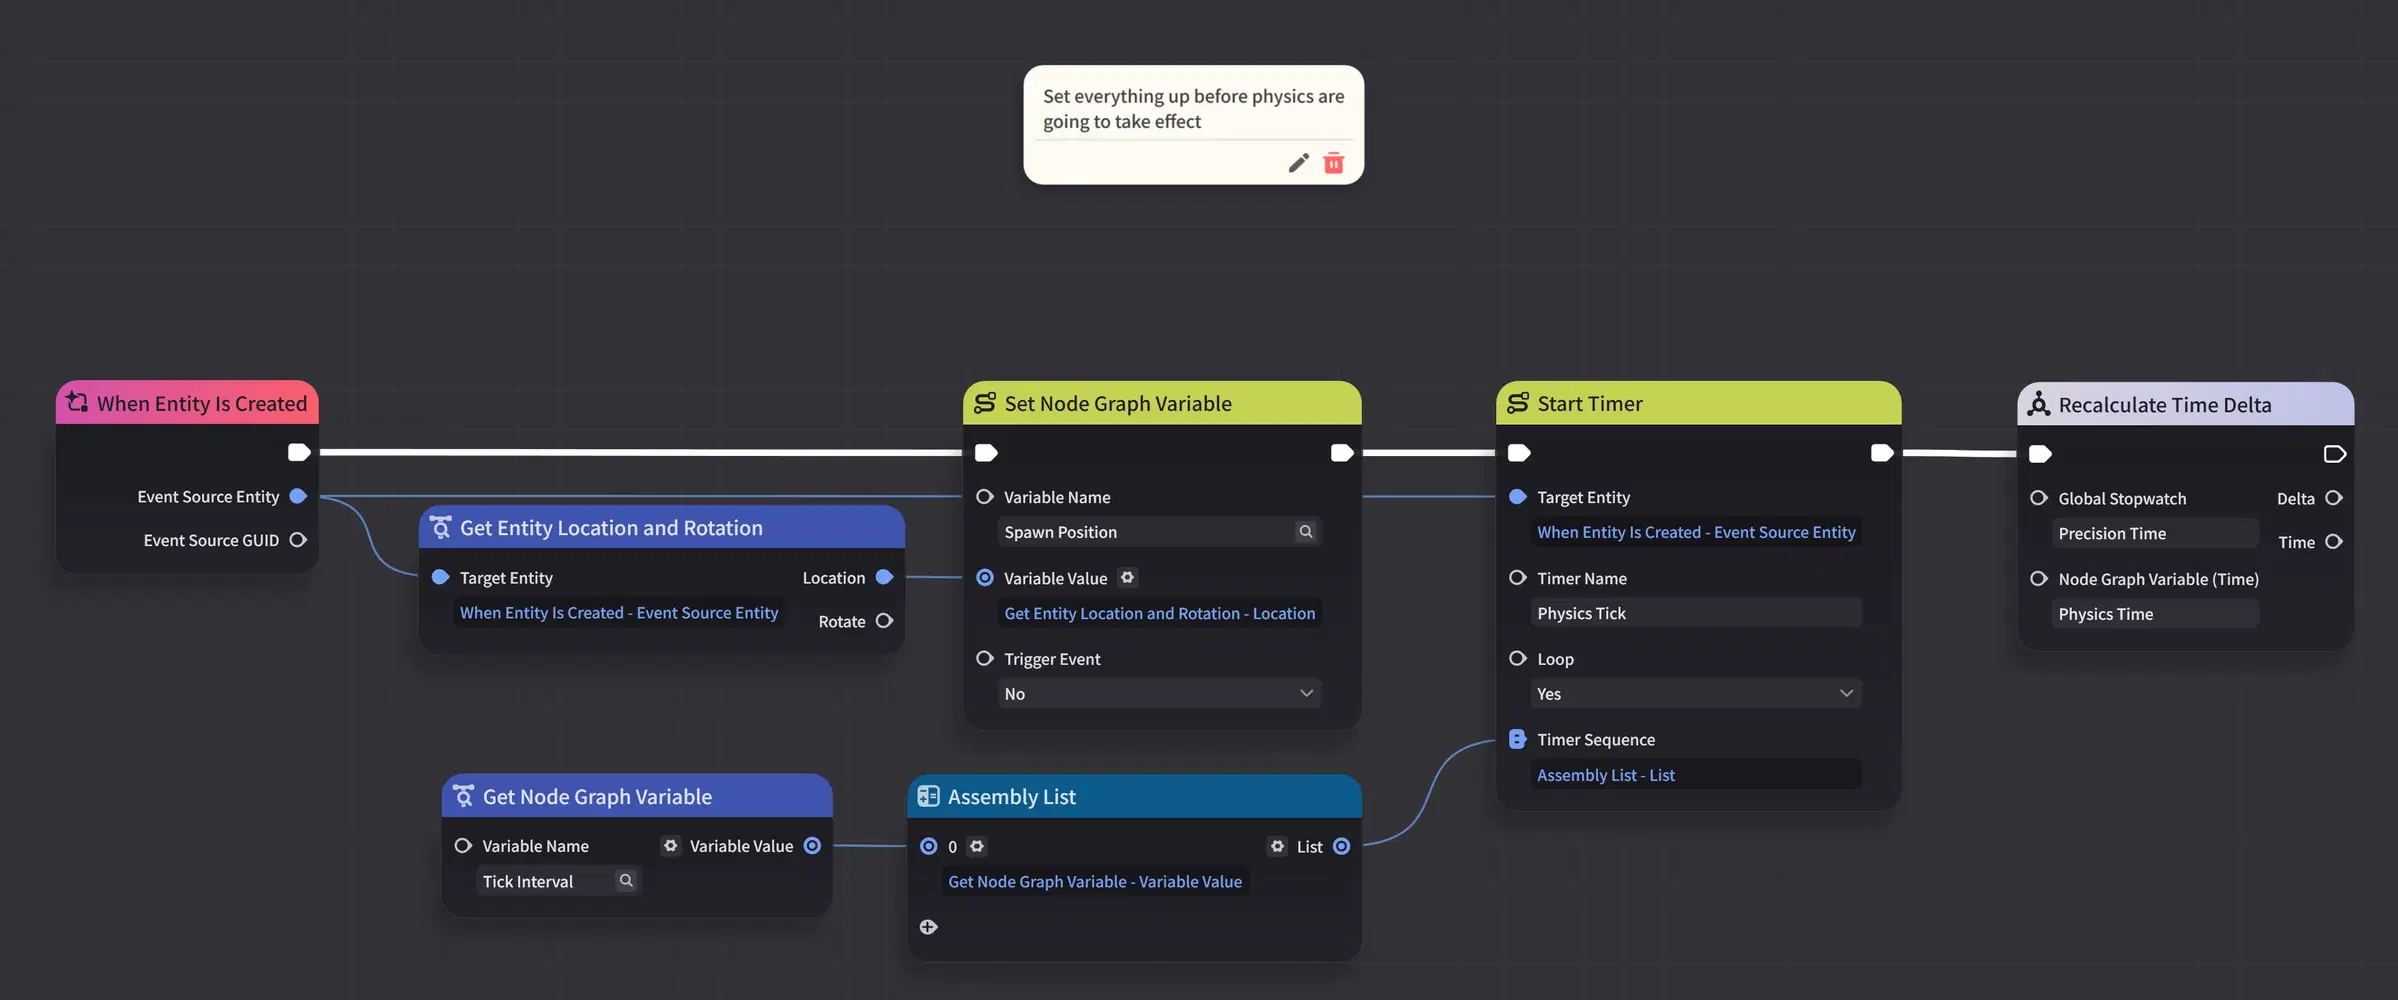
Node Graph: When Entity is Created
When the entity is created, we're going to set the spawn position and start the physics timer. As we also don't want to mess up the very first tick from the timer itself, I'll be resetting the time delta as well. I've used a composite node for this:
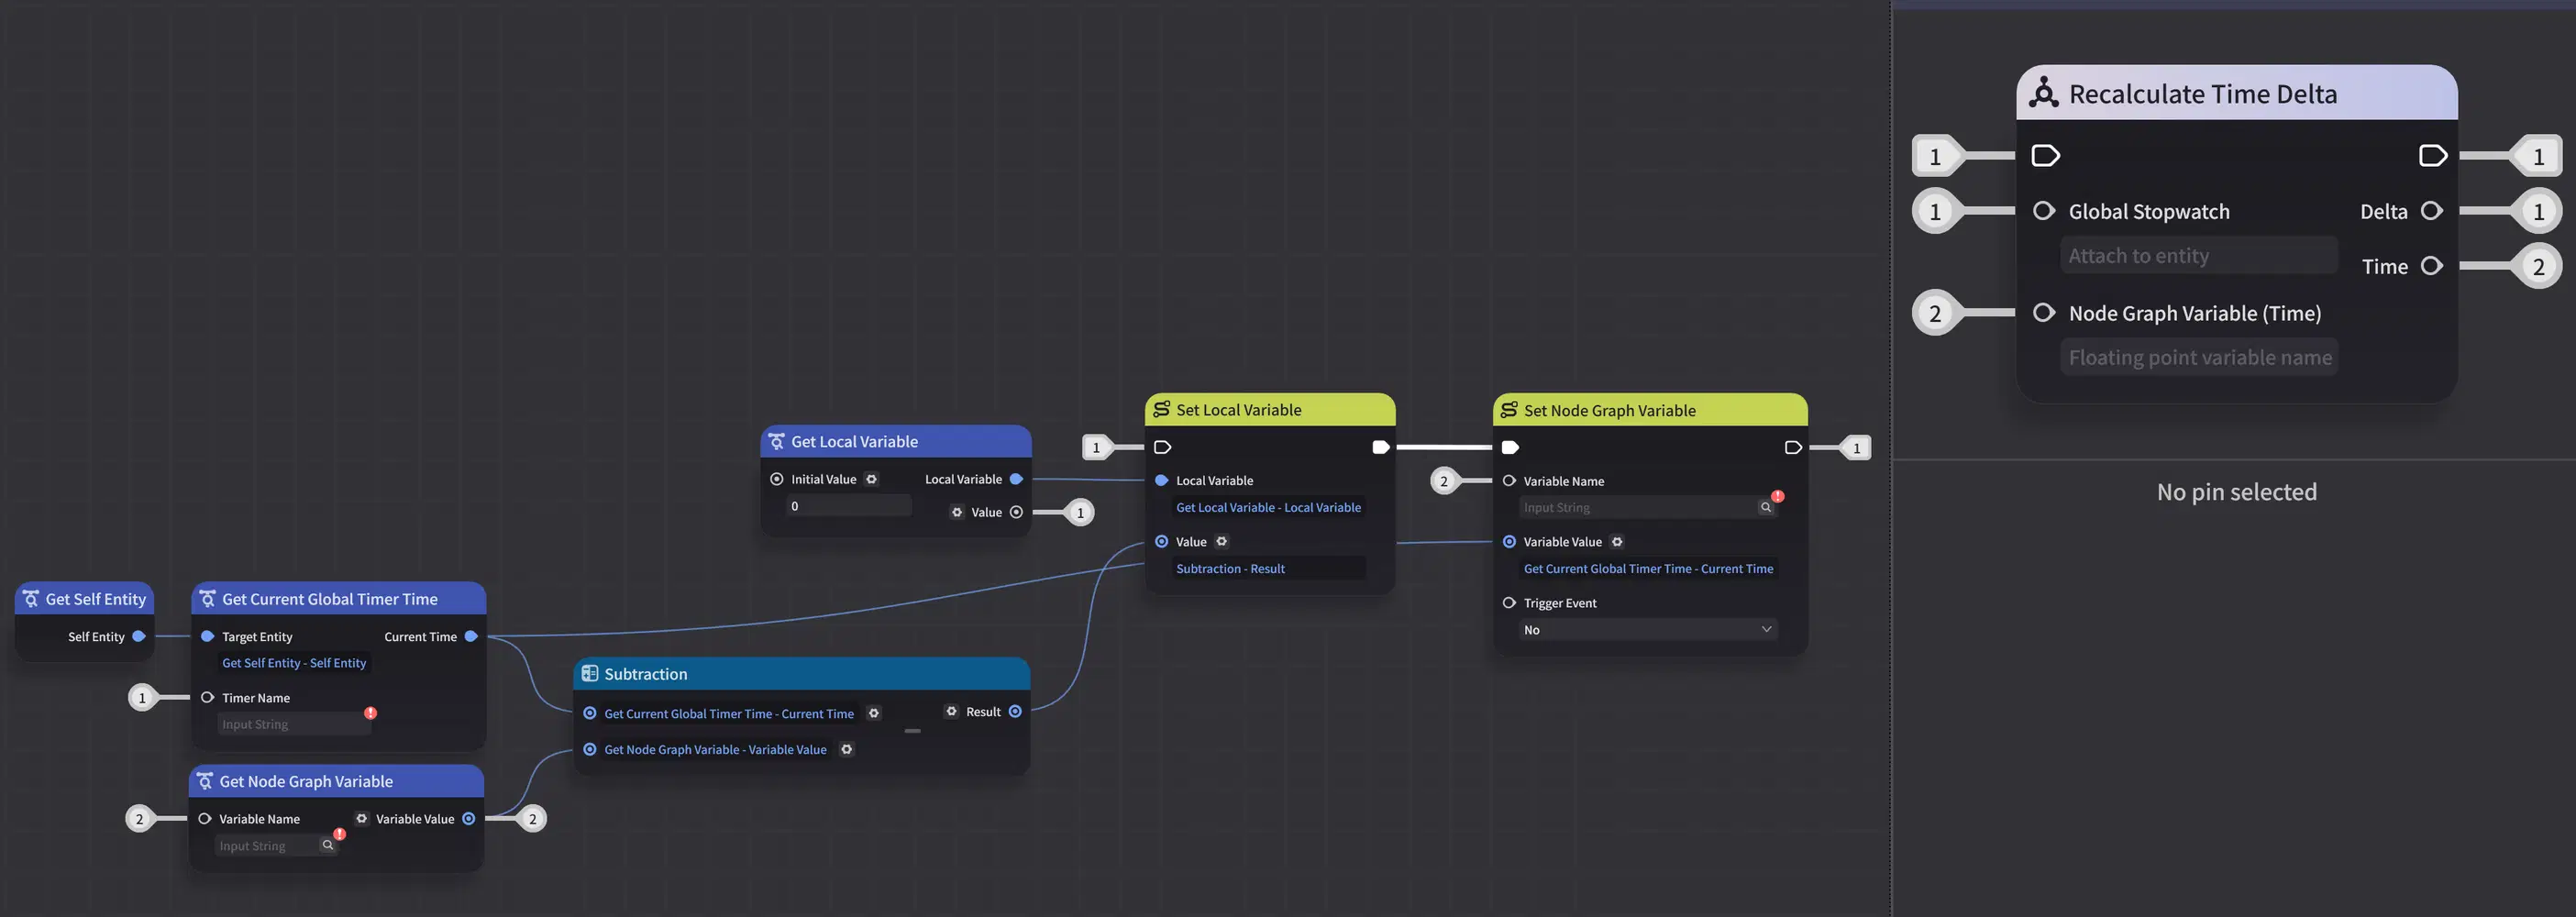
Recalculate Time Delta Composite Node
On Physics Tick

Node Graph: When Timer is Triggered
It may seem counter-intuitive at first, but the only thing I'm actually going to be doing on each physics tick is apply the decay rate to the velocity. We use an exponent to scale the decay based on time elapsed.
The reason why this part of the node graph is so light-weight is two-fold:
- We're hiding most of the heavy-lifting behind an event. Note how I'm triggering an event when the Velocity variable changes - this will become clearer in a moment.
- Motion is going to be handled with basic motion that exceeds the physics tick timer interval, and we'll be abusing the ability to overwrite motion that's already in-progress. This means that we can simply use the resulting velocity directly.
When Velocity Changes
When we get the event for velocity changing, we're going to immediately start a new basic motion. As I just touched upon, we're using a duration longer than our tick interval. Each time we add a new motion device with the same name as another (on the same entity), it will automatically stop it and start a new one, maintaining any motion that was already applied up until that point.
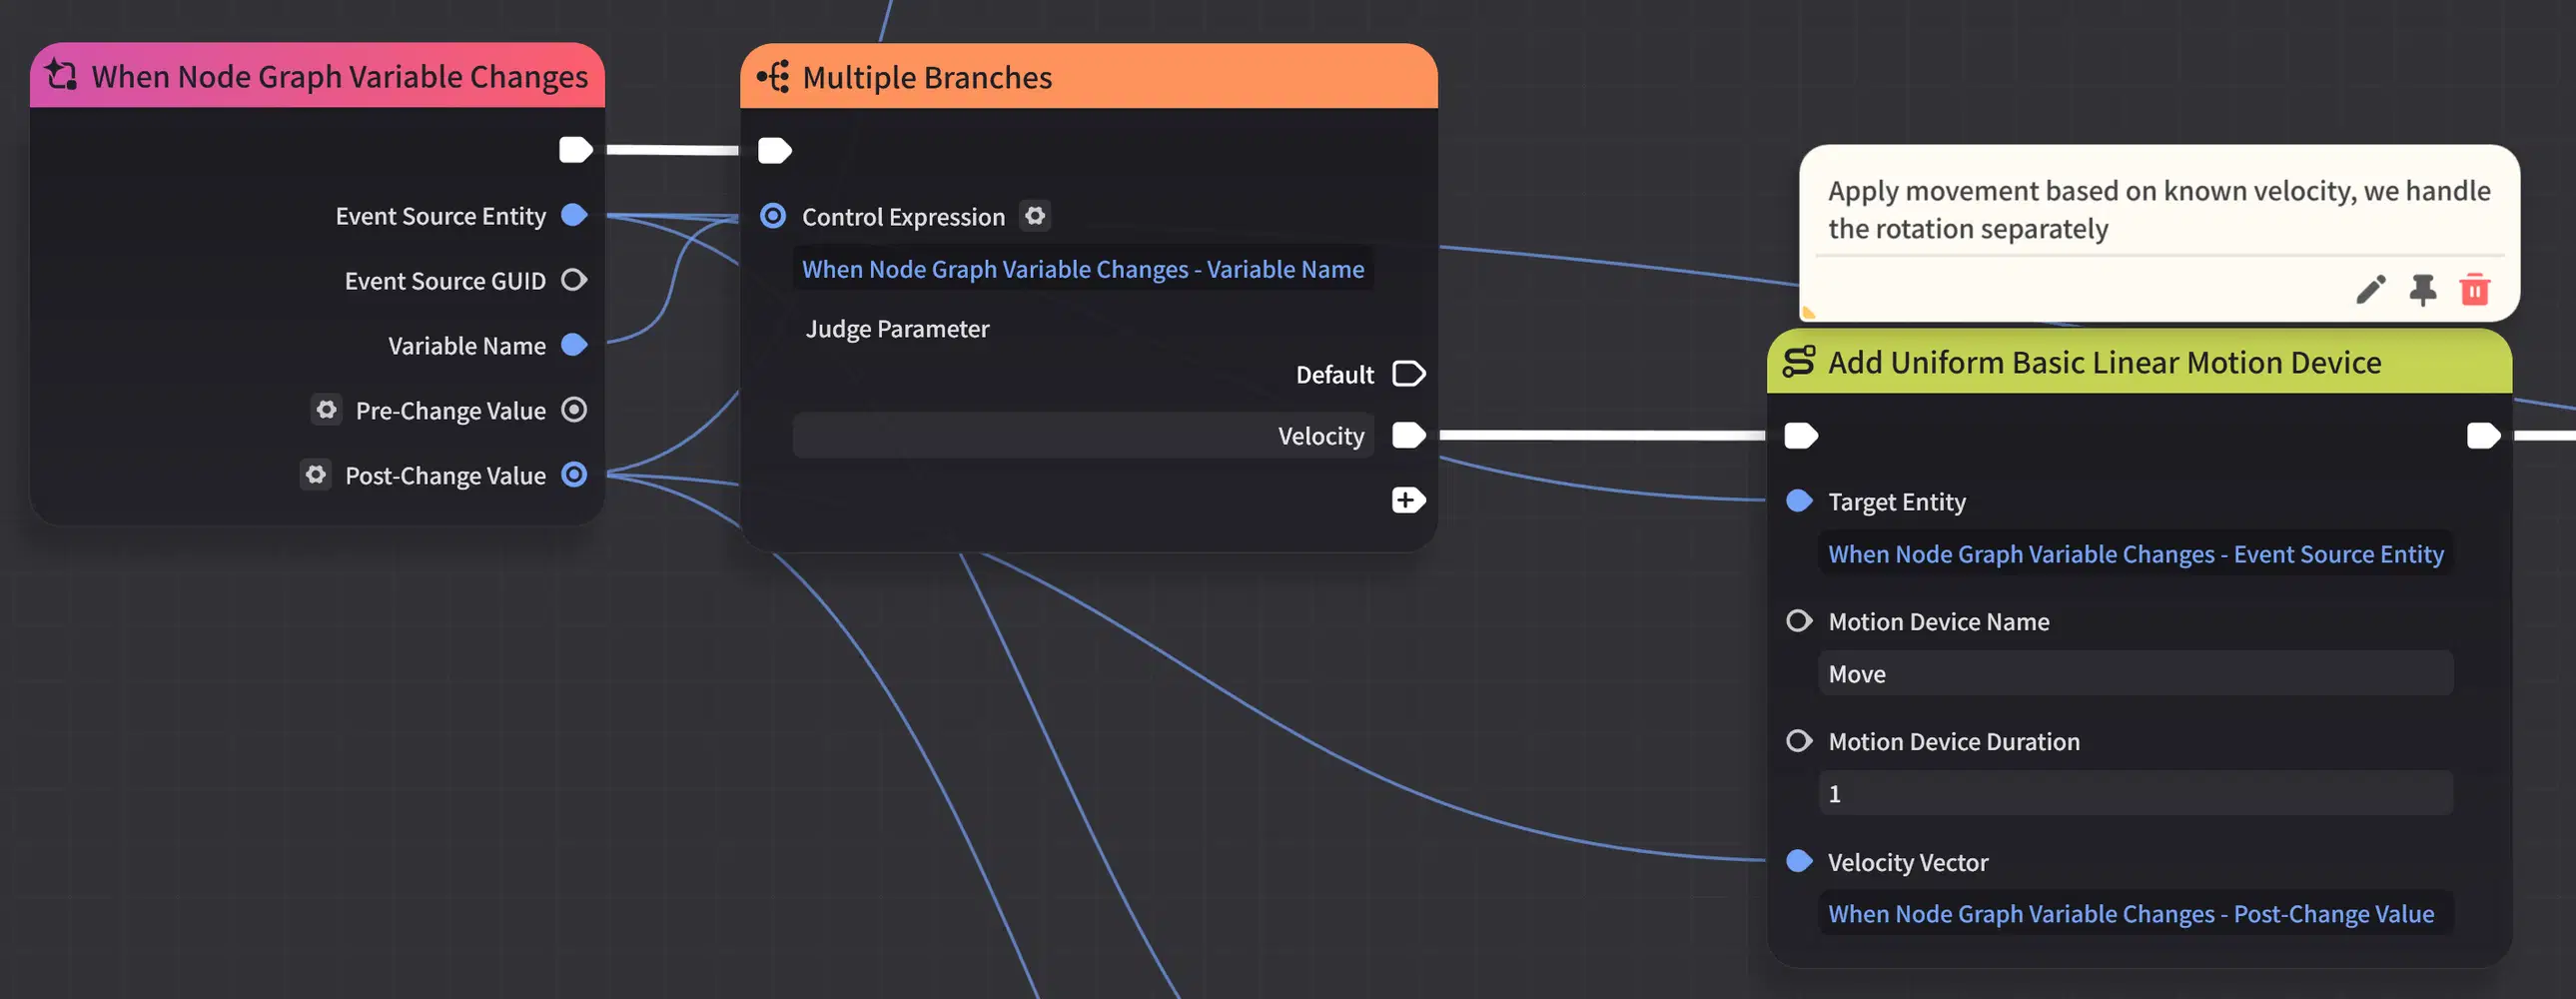
Node Graph: When Node Graph Variable Changes
For now, ignore the extra connections and just focus on what's on display - the rest handles rotation, and I'll get to that later in this guide.
Hitting the Ball

Node Graph: When Attacked (Part 1)
To get a reaction out of the ball from the player, we need to ensure that it moves when the player attacks it. I'm calculating the vector between the player and the ball itself, as when I do apply instant acceleration, I need to do it in the right direction. It's important to note that I'm rolling the ball without any gravity simulation. This is intended not only for simplicity, but also gameplay style.
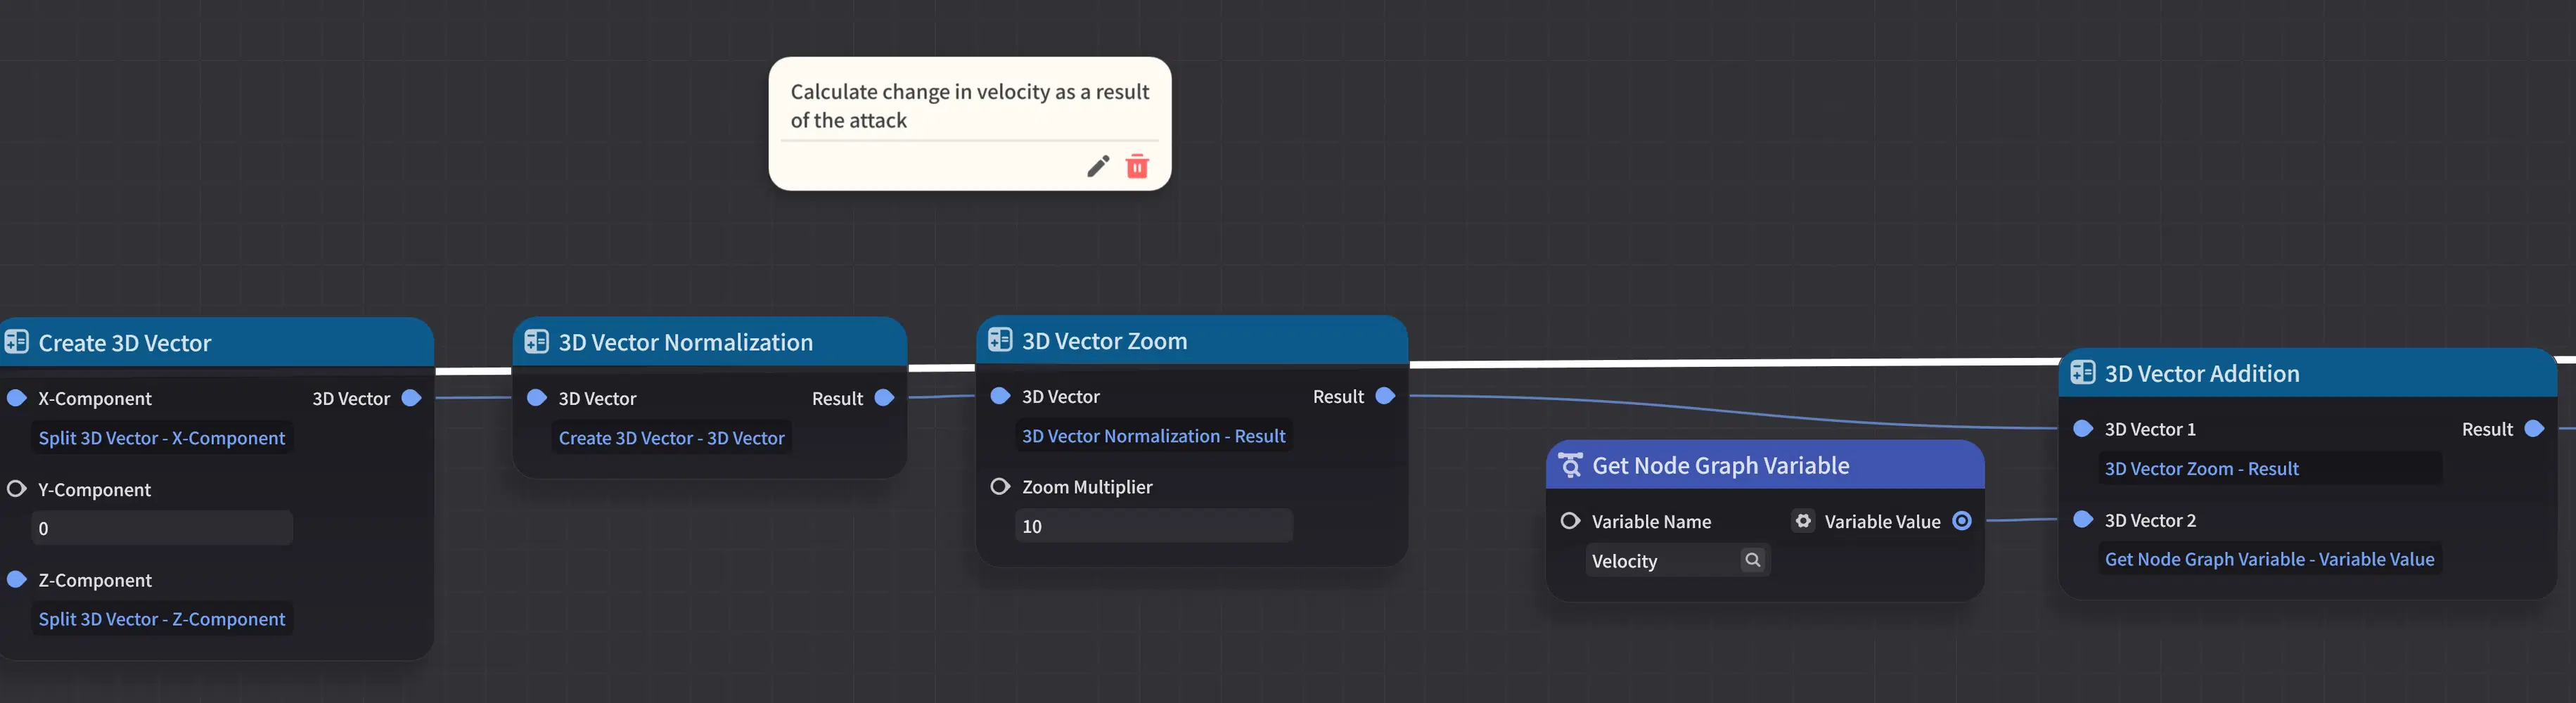
Node Graph: When Attacked (Part 2)
To apply our instant acceleration, we're adding our new velocity to the current velocity. This can be fine-tuned to suit the needs of your game.
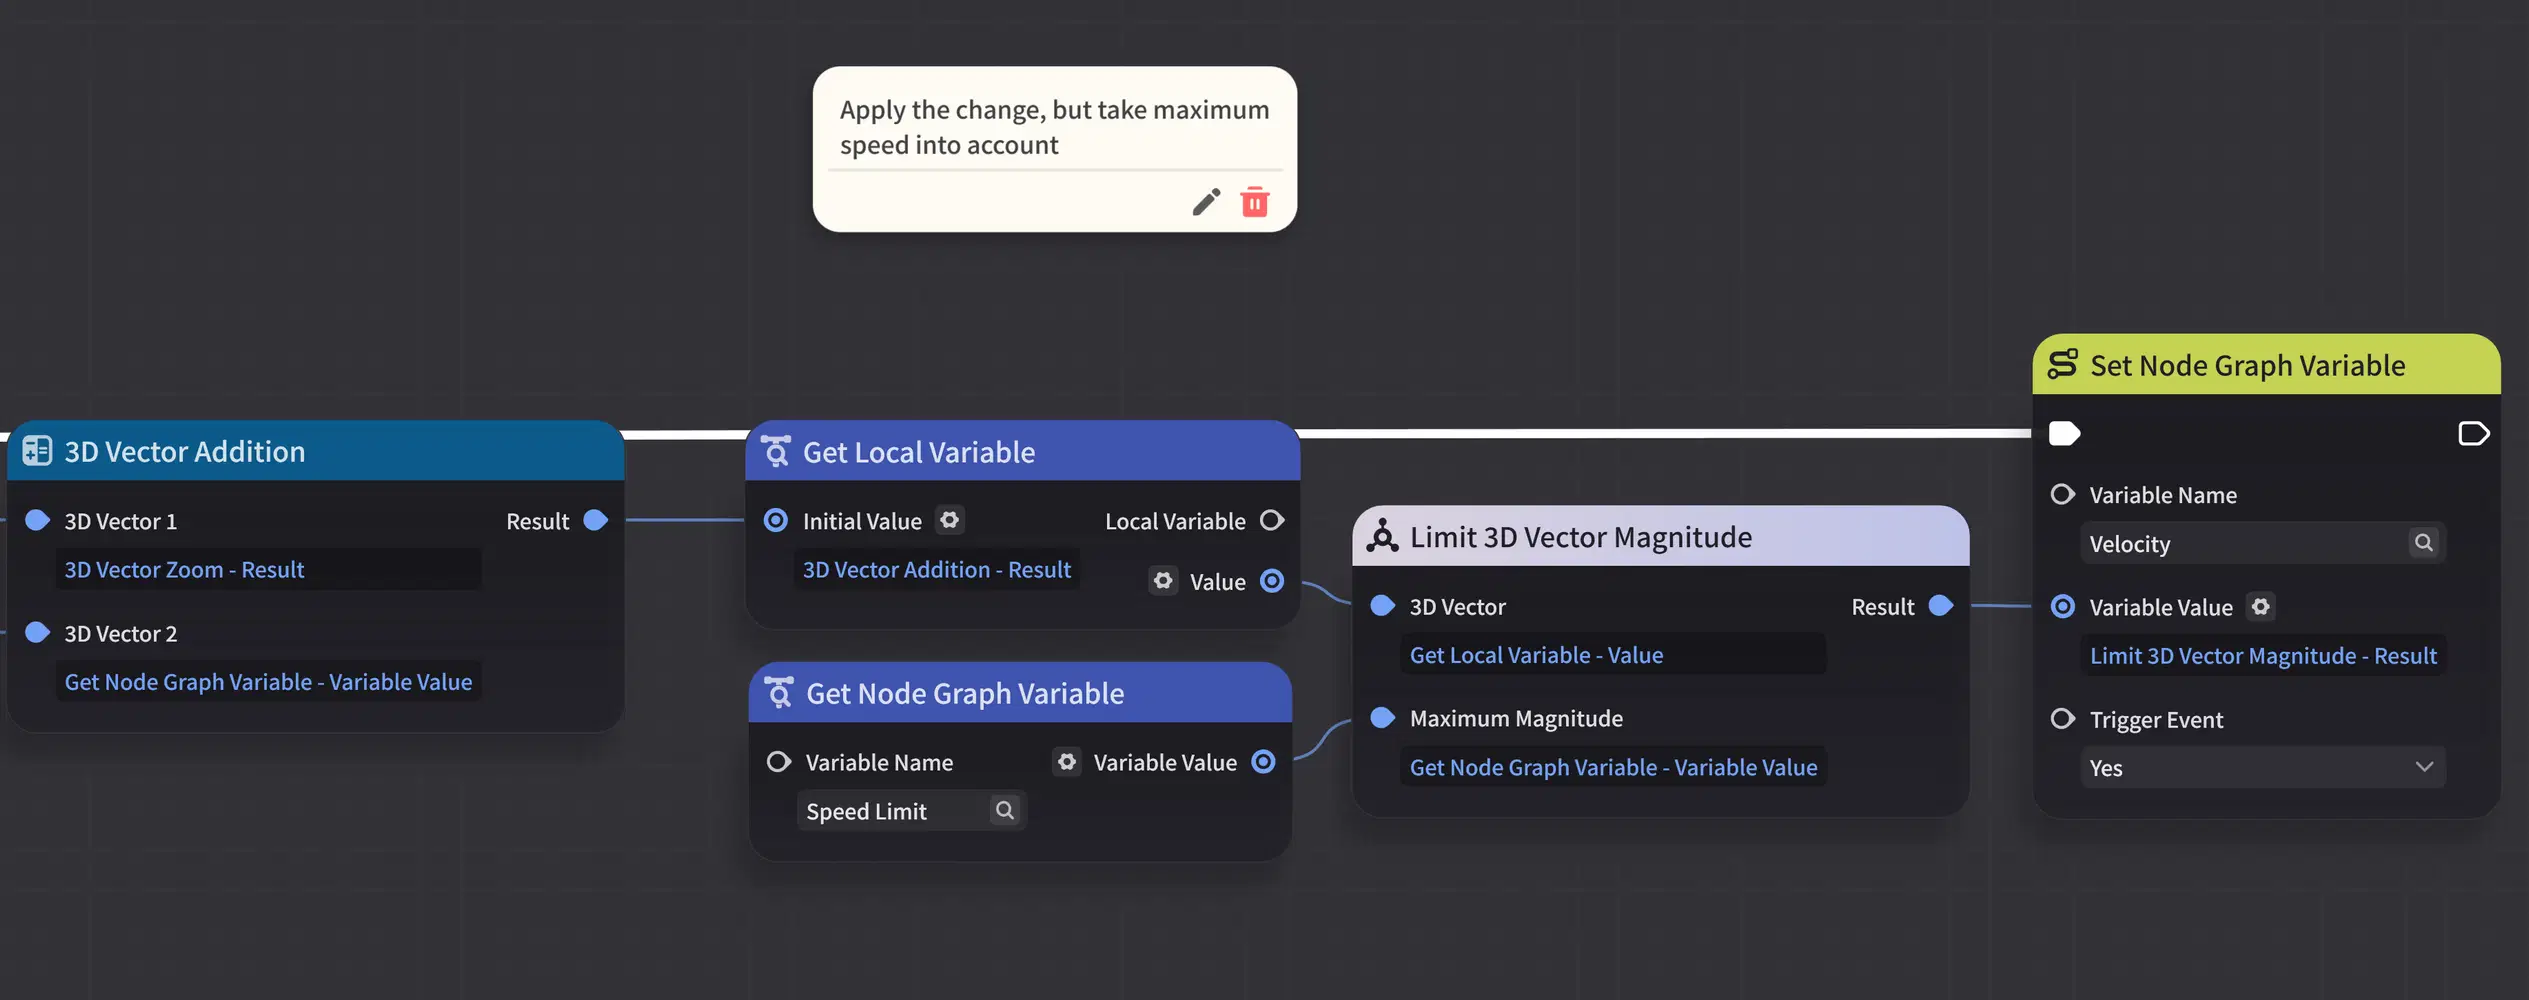
Node Graph: When Attacked (Part 3)
After we've done the vector addition, this is where we'll apply the speed limit. Attacks from players are the only way that the ball can increase its speed, so it's sufficient to only do this calculation here. I've included a new composite node for that, as it makes things more readable. Once again, we're also raising an event when the velocity changes as a result of this attack. This applies before the next physics tick.

Limit 3D Vector Magnitude Composite Node
Player Skill & Play Test
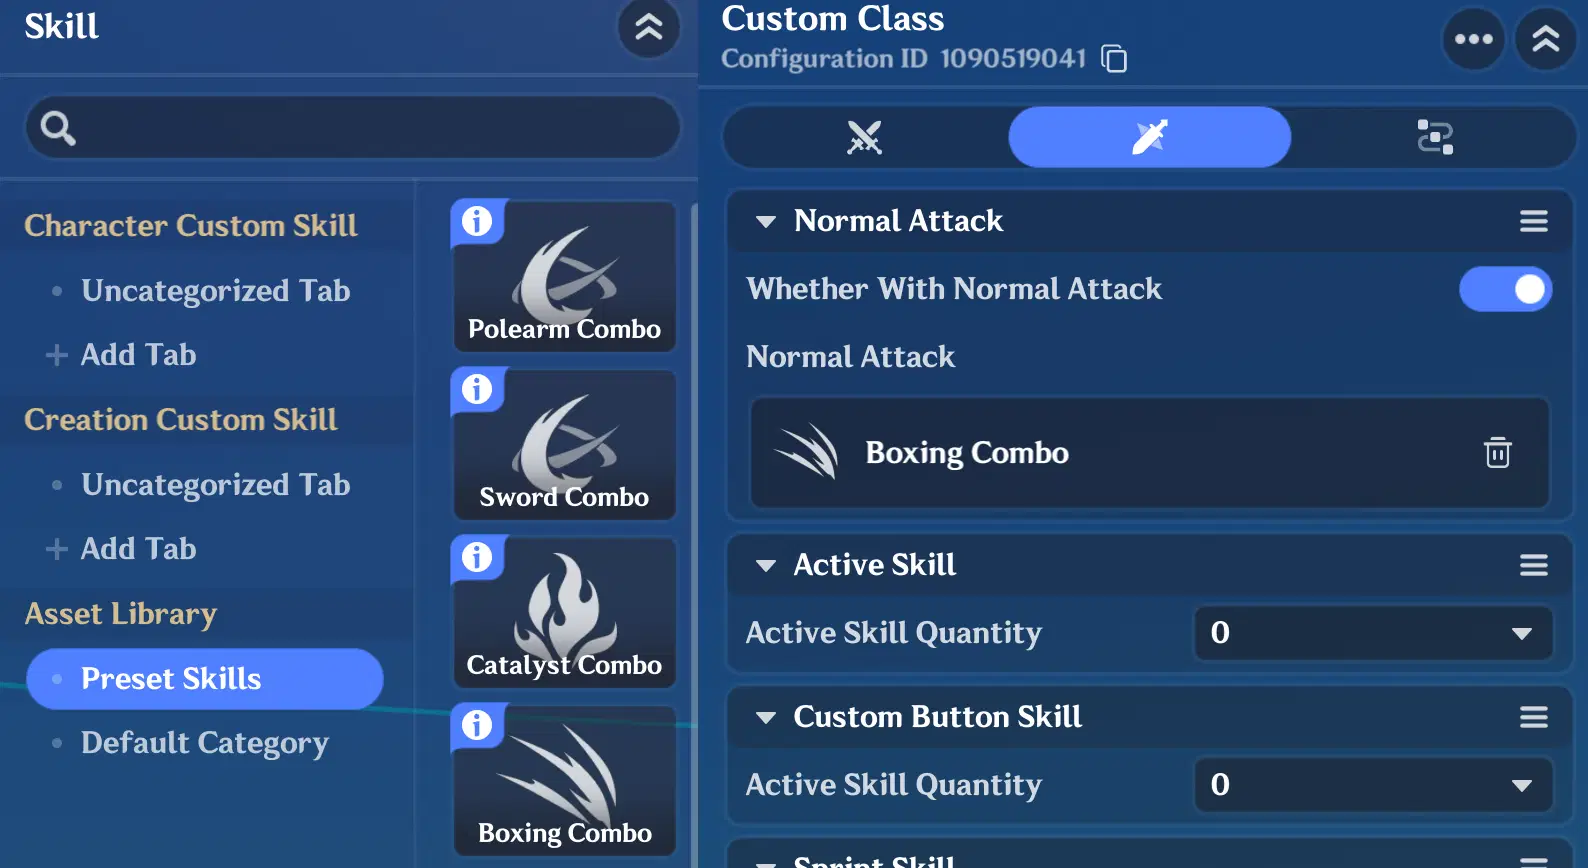
Using Preset Skills
For a quick test, set up the player with a preset skill, place the ball prefab in the scene, and if all is well it should start moving when you hit it! Of course, it won't roll just yet, but we'll get to that.

First Play Test
Bouncing Off Walls
Creating the Bounce Surface
We're only going to be reflecting motion on collisions with specific entities - in this case, flat specially-crafted invisible walls.
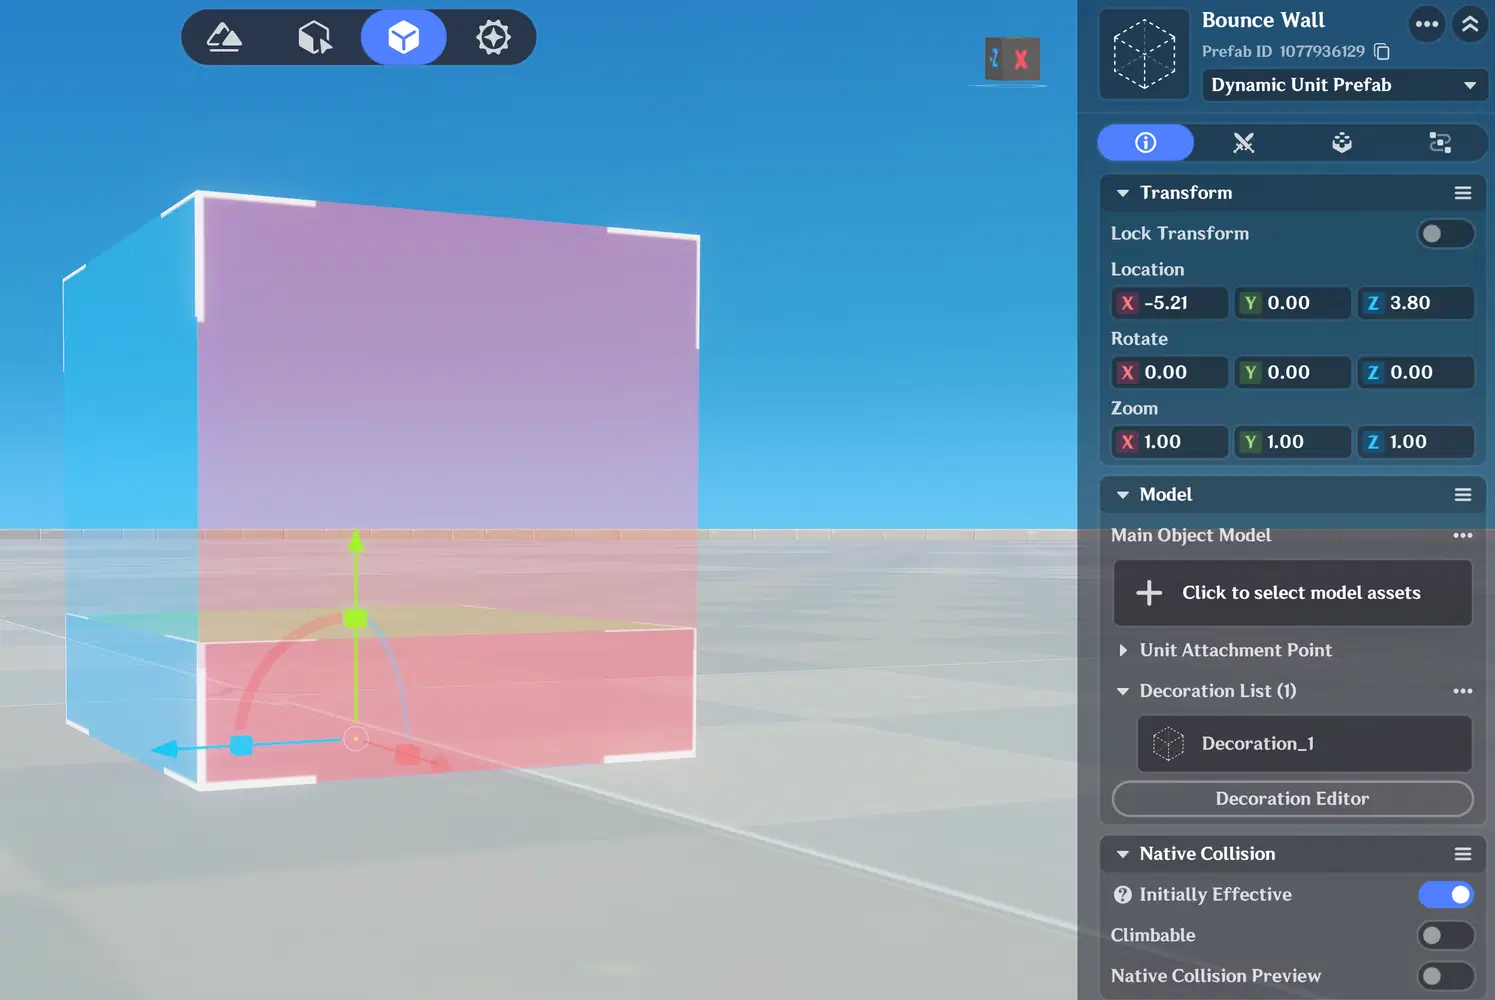
Bounce Wall Prefab
To this end, I created two new empty objects, and nested one within the other as a decoration. This only has visual significance, as it allows me to see which is the "reflective" side of the wall.
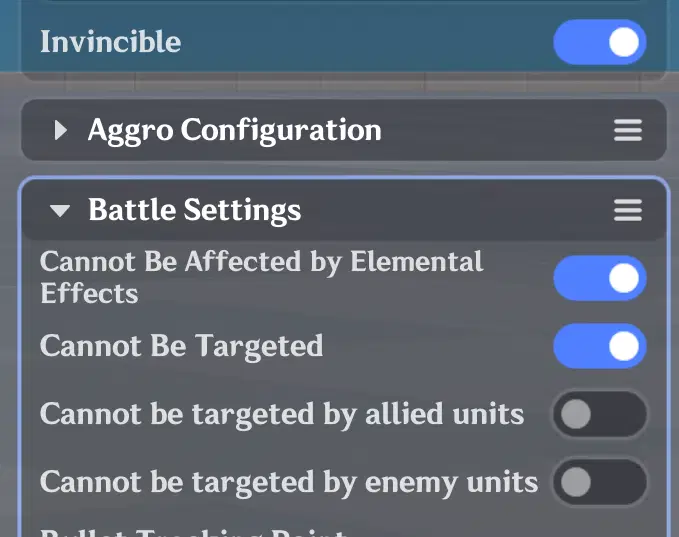
Bounce Wall Battle Settings
Just like the ball itself, it also needs a hurtbox so that the on-hit detection works. However, to prevent players from facing it when attacking, we can turn on the "Cannot be Targeted" toggle. Make sure that the hurtbox is adjusted to cover the object.
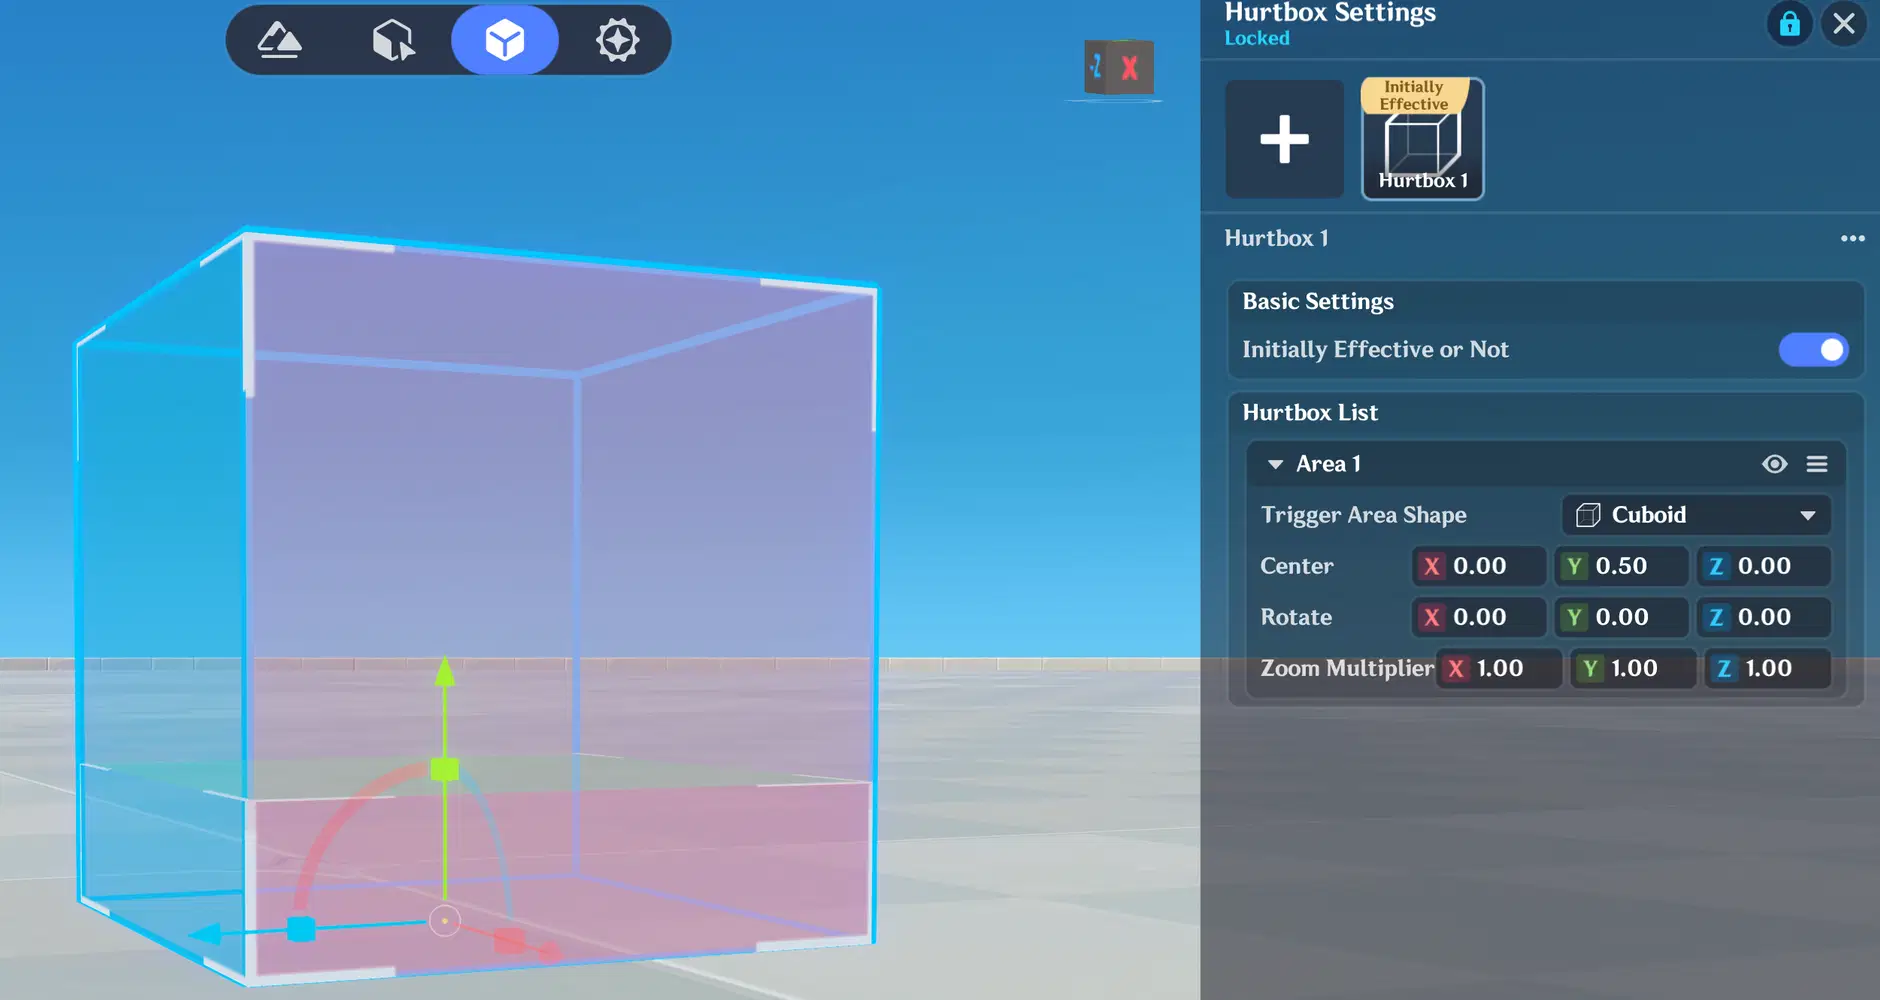
Bounce Wall Hurtbox Configuration
Wall Variables and Node Graph

Bounce Wall Custom Variables
We're defining two custom variables on the wall, so that the ball can use them to interact with them as a reflective surface:
- Bounce Normal: A normal vector represents the facing direction of a flat surface. We'll be calculating this value in a small node graph.
- Bounce Coefficient: This serves as an instant velocity decay when the ball collides with the wall. As is normal with collisions, the surface absorbs some of the energy, resulting in a lower reflective velocity.
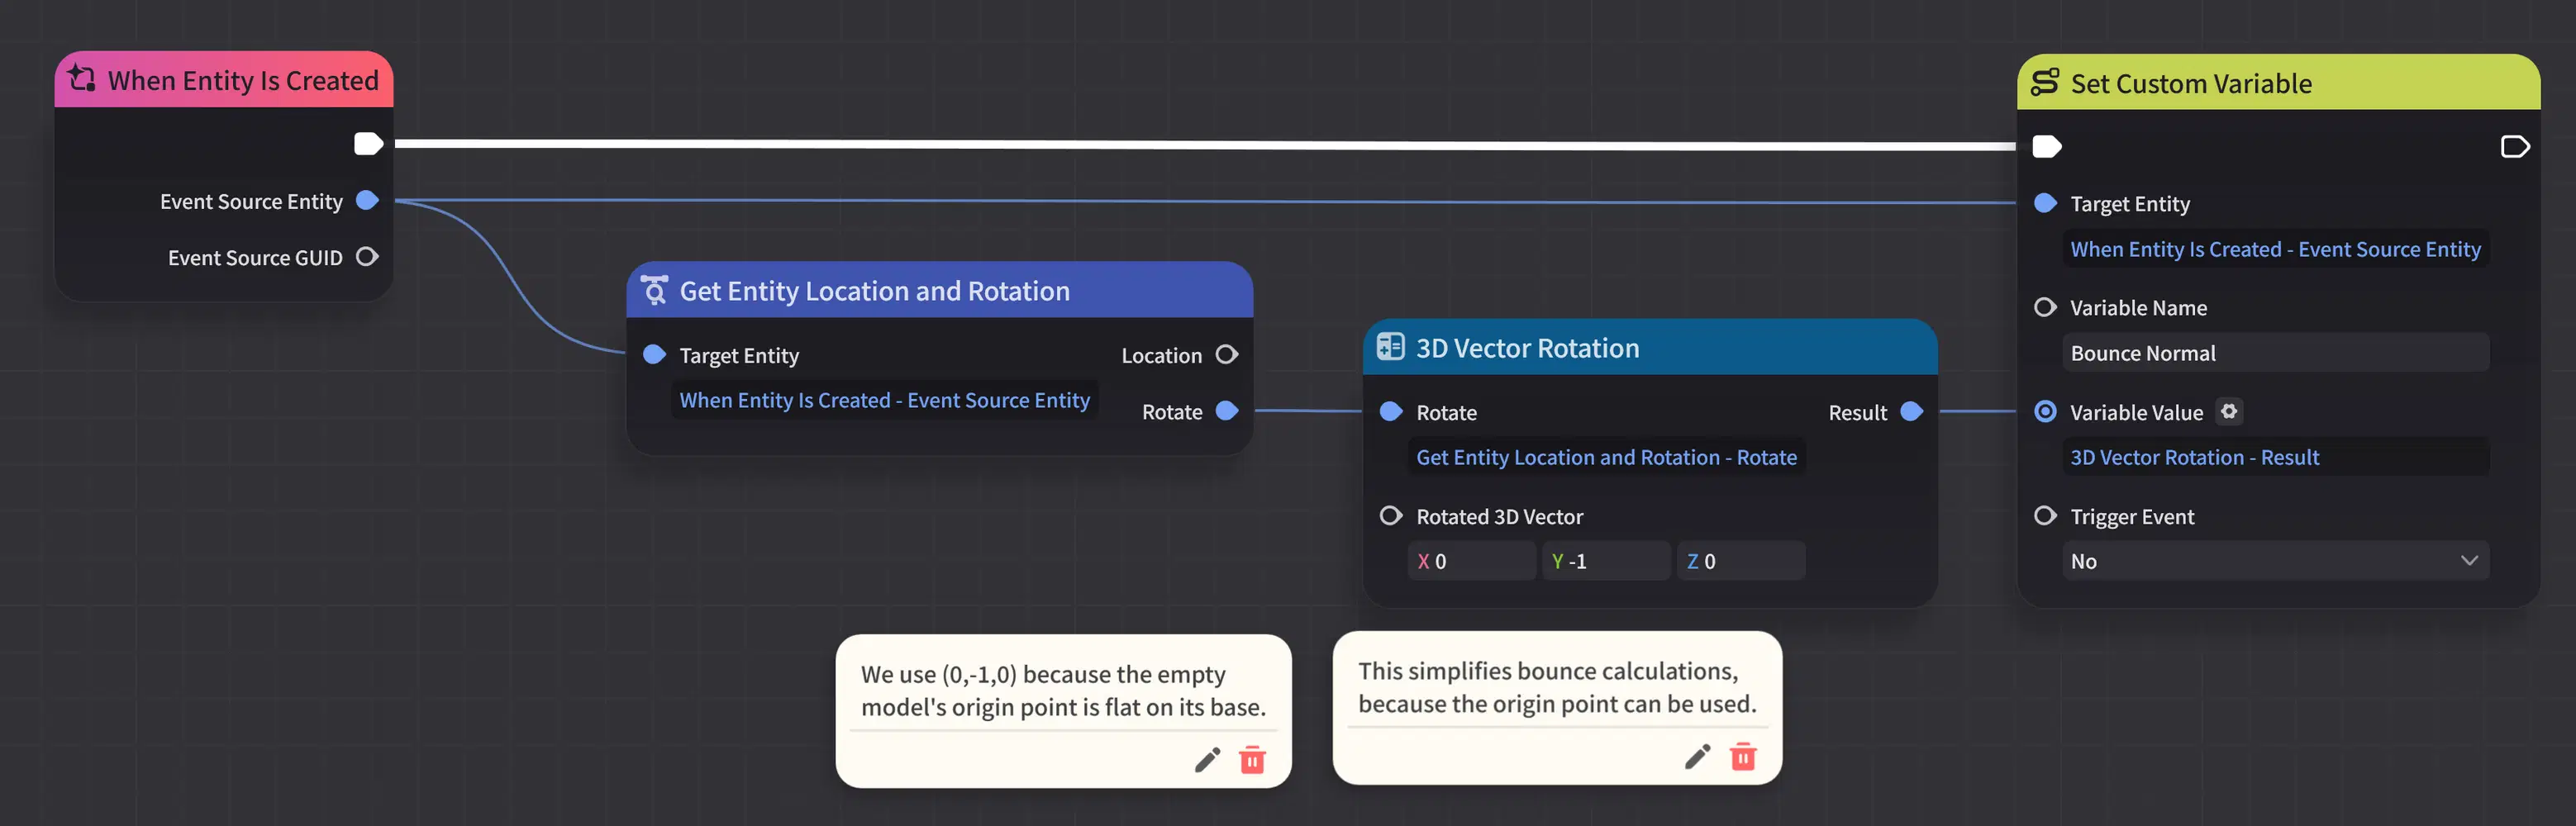
Bounce Wall Node Graph
We create a new node graph on the wall, and it is used solely to set the normal vector. As you may have noticed in my prefab example earlier, the visually-distinct / reflective side the downward facing one. We're providing that side as the normal vector (0,-1,0). As that's a world-space definition, we need to rotate this normal by the object's initial rotation for it to make sense.
Reflection
To make our ball reflect off the surface, we're going back to our ball node graph to add a new event.

Node Graph: When On-Hit Detection is Triggered
Remember that we added the Bounce Normal and Bounce Coefficient custom variables earlier? Now we're going to put them to work - time for some maths!
Checking for Potential Collisions
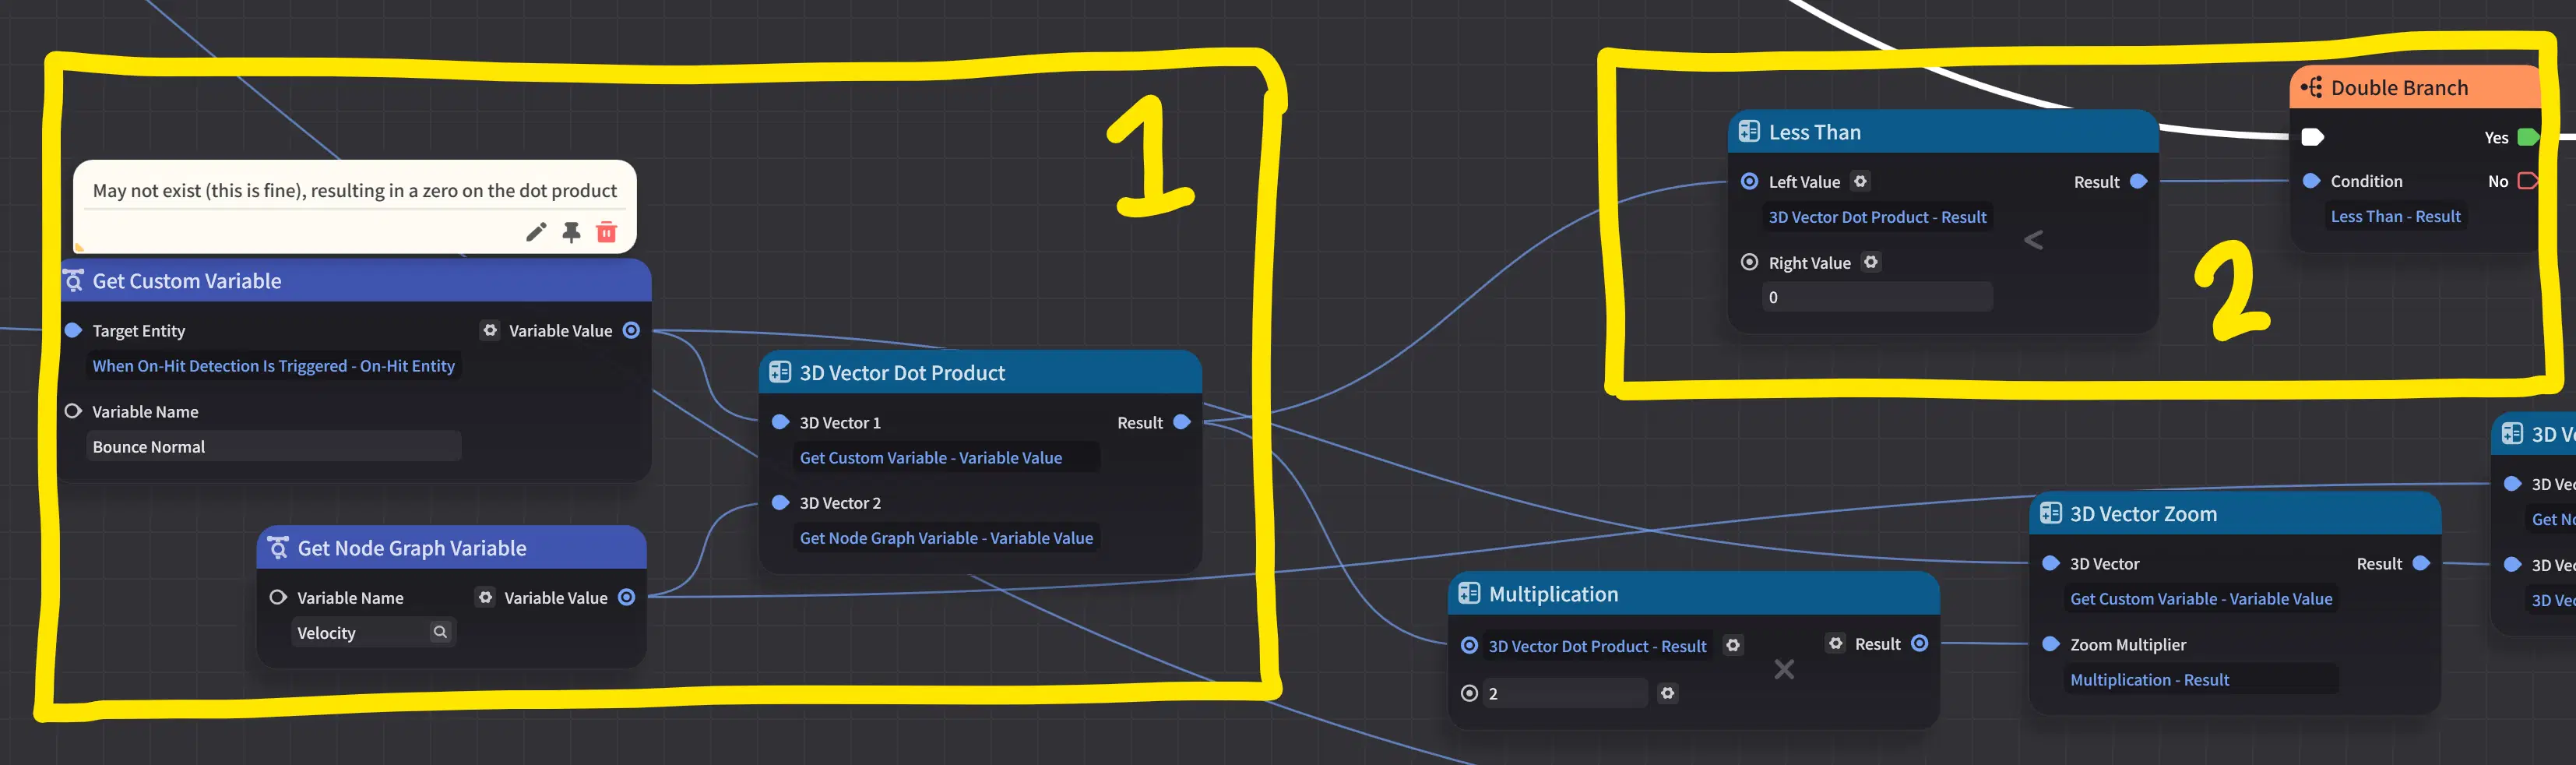
First we need to find out whether we actually want to reflect the ball or not. Collisions may happen many times in a single second, and we only care about it if the ball is actually travelling towards the wall. After we've confirmed this, we can apply the reflection formula and our coefficient to dampen it afterwards.
- Take the dot product of the surface normal and the velocity as our two important variables.
- If the result of this is negative, that means that both vectors are at least roughly facing eachother. This is the scenario where we'd want to bounce the ball off the wall.
- We apply the reflection formula r = v - 2(n⋅v)n to get our surface plane reflection.
- Apply our bounce coefficient to emulate the energy absorption by the wall.
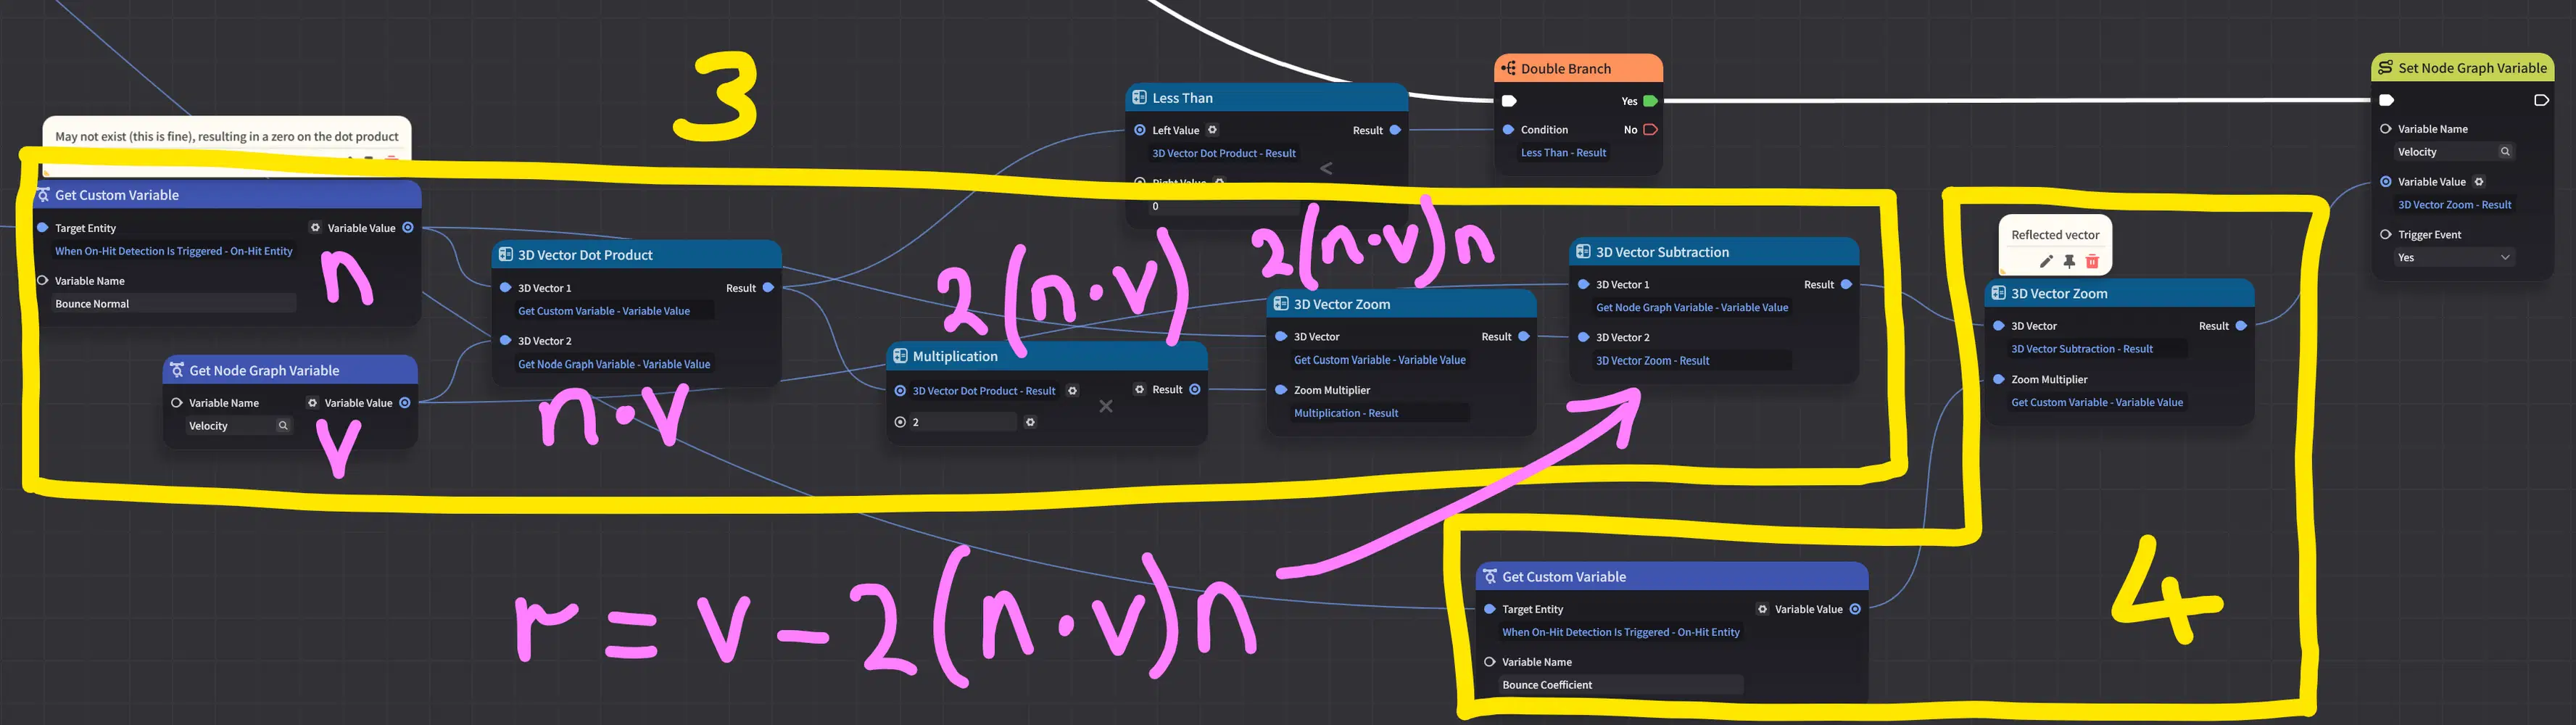
Reflection Formula
Smooth Rolling
Everything up until now has been about moving the ball across the scene. It's now time to break out the Add Uniform Basic Rotation-Based Motion Device node (what a mouthful).
Slice of Pi
When we rotate something, we either need to know how much to rotate it by, or how fast to rotate it. The aforementioned node takes the angular velocity (i.e. how fast) as one of its parameters. We know the ball's velocity, and we also know its radius - if you don't have that yet, now's the time to measure it.

Angular Velocity and Radius
The equation for calculating angular velocity from distance travelled and a radius is really simple, but first we must use the 3D Vector Modulo Operation node to convert our velocity into speed (m/s). Then we simply divide it by the radius to give us radians per second. The basic motion device node utilises degrees though, so an additional conversion step is required.
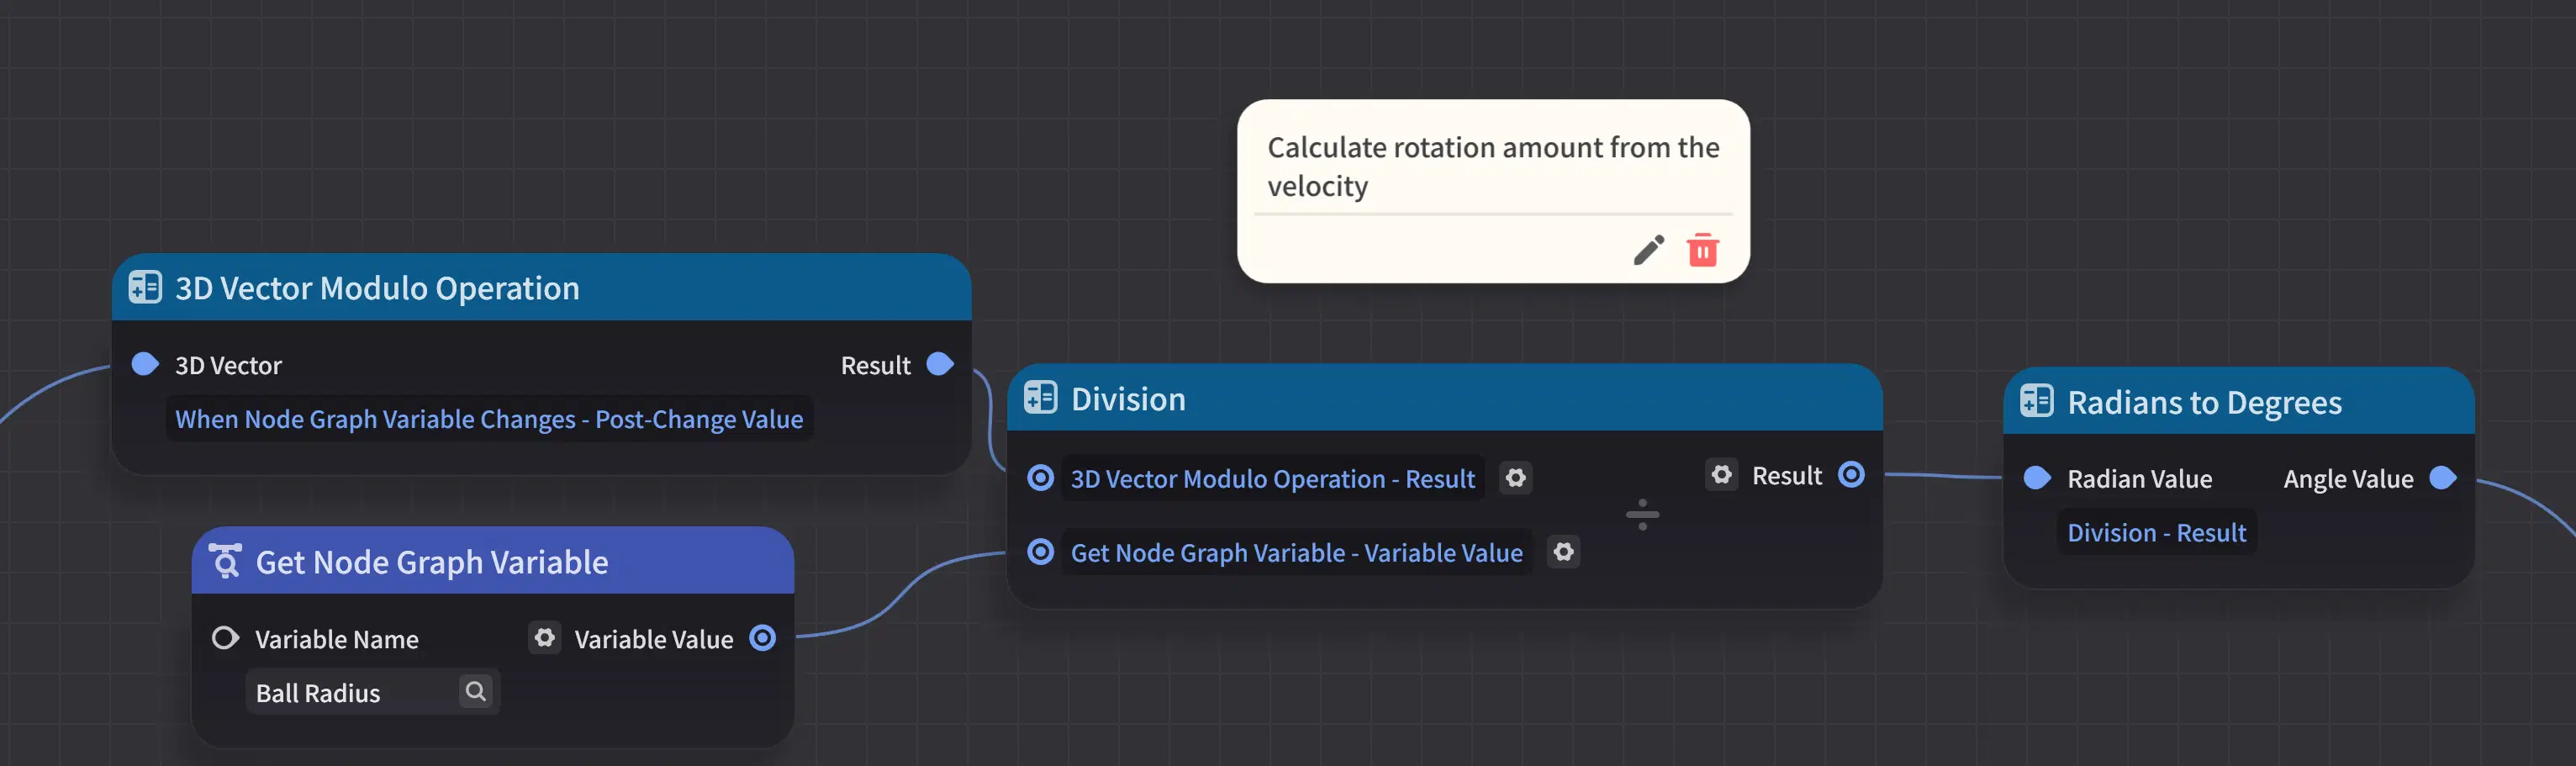
Calculating Angular Velocity
Axis of Rotation
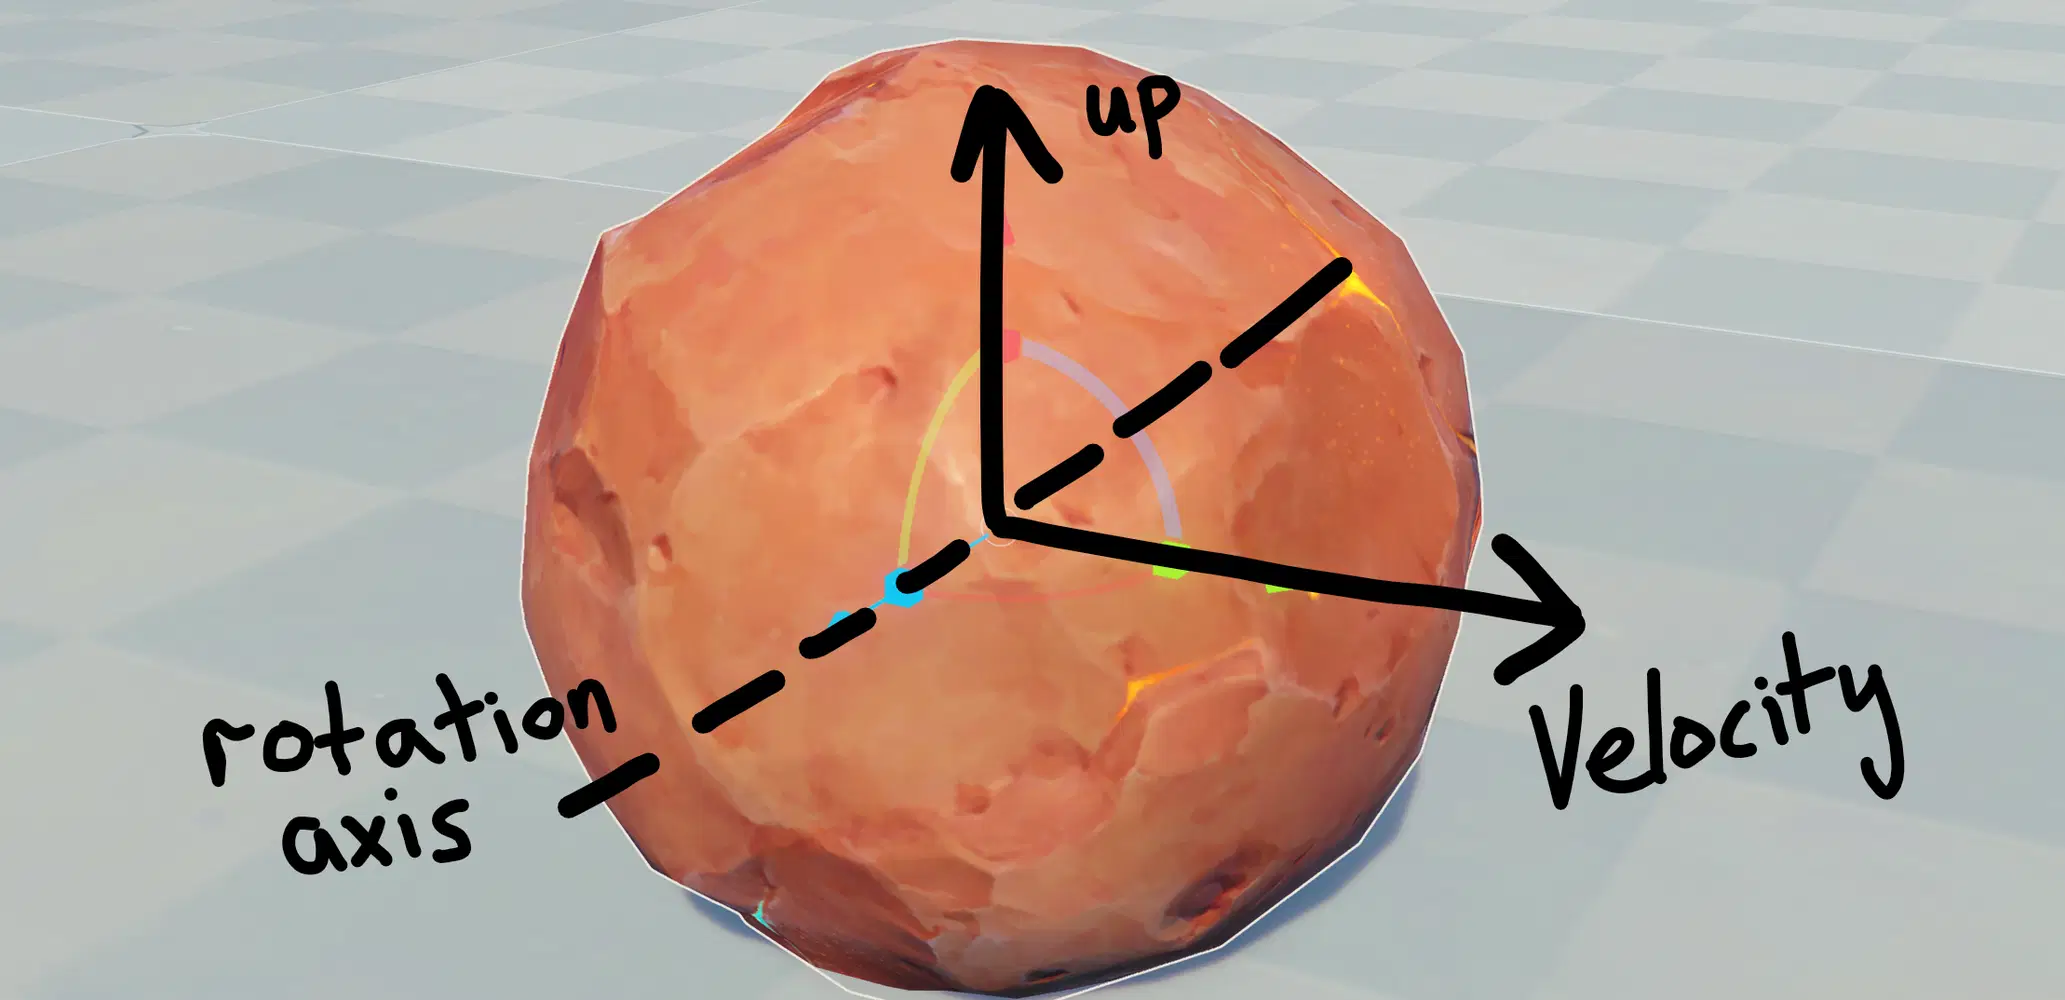
Axis of Rotation for a Rolling Ball
When a (perfectly smooth) ball is rolling, its rotation axis is perpendicular to both the velocity and its upwards vector. In vector mathematics, this is the cross product. Since the ball will be moving about all the time, we have to continuously recalculate it. However, it's unfortunately not quite as simple as that...

Axis of Rotation: Cross Product
World Space and Local Space
There's a node called Add Uniform Basic Rotation-Based Motion Device (what a mouthful), and it allows you to specify the rotation axis. Great! But once you hook that up, you'll soon realise that all of the animations are not quite right. Our calculations thus far have been in world space - that is, a fixed axis where Y is up. This node is expecting a local space axis, which is relative to the object's current rotation.
Fortunately, converting between the two is easy enough when you know how, and I've a new composite node to rescue us from the predicament. As the game's Euler angles are applied in ZXY order, we just need to extract the components of the rotation and apply their negations in reverse order.

Inverse 3D Vector Rotation Composite Node
Make it Spin
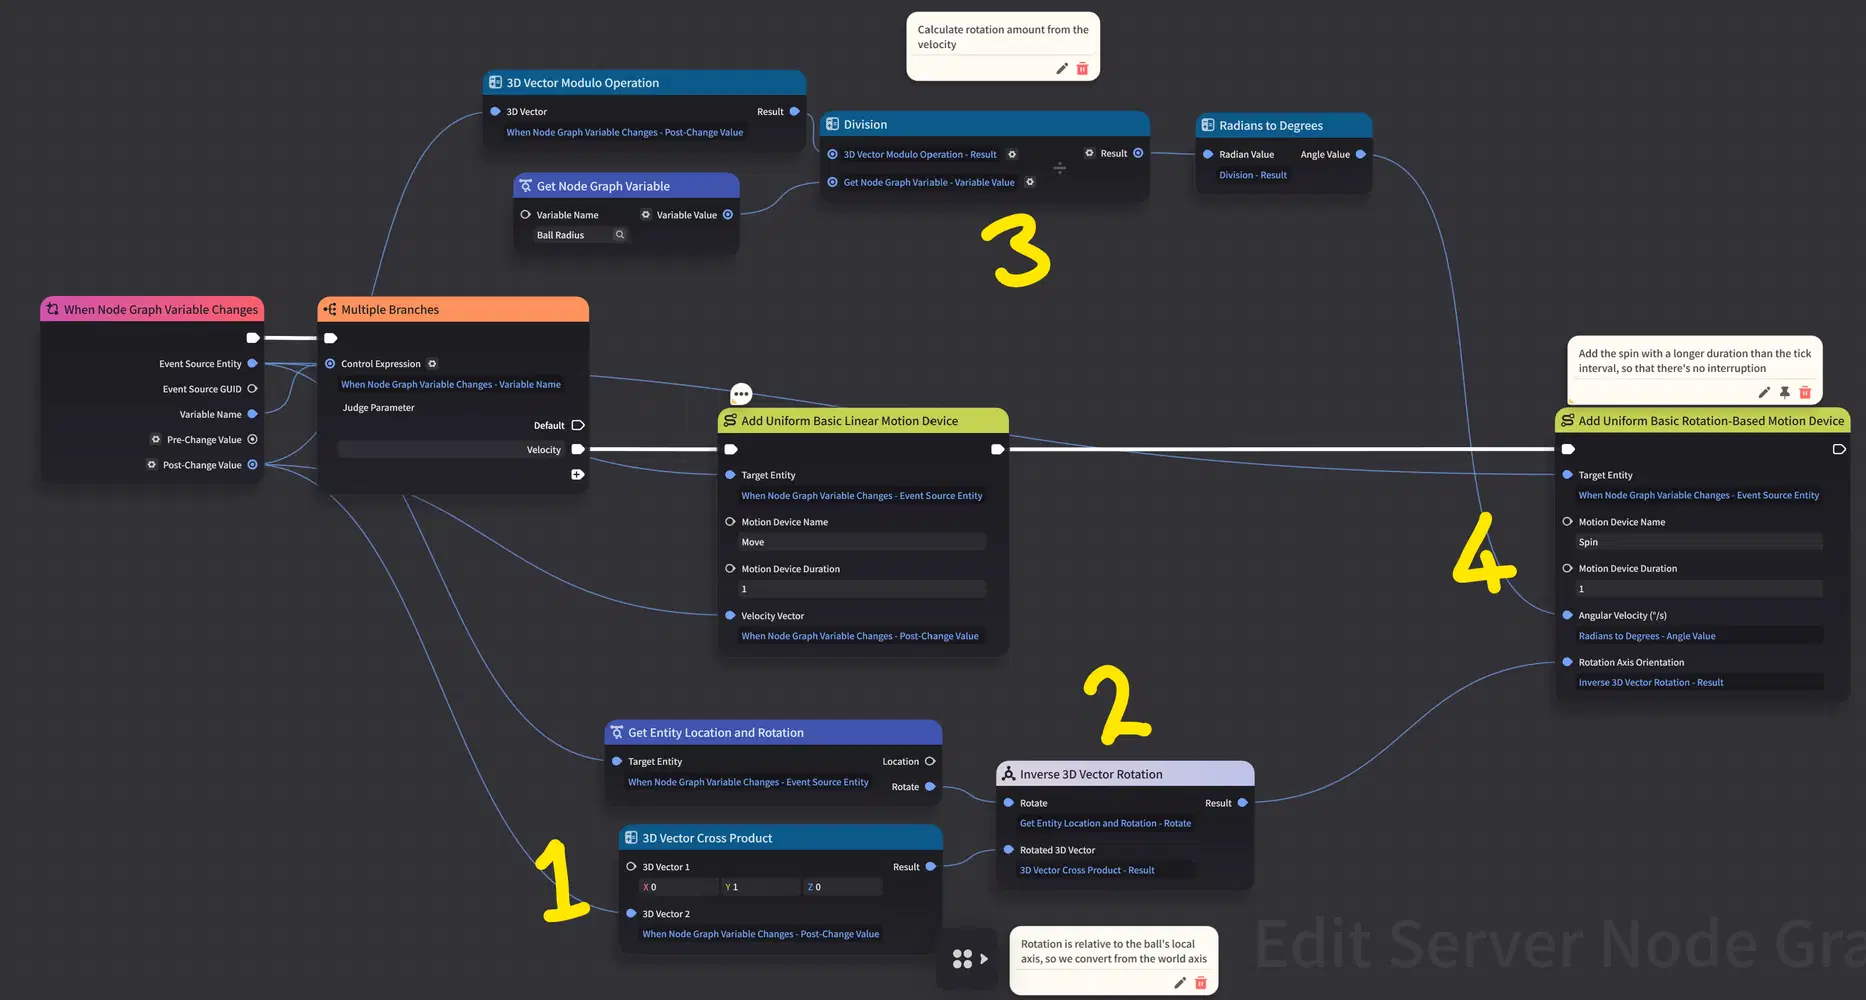
Node Graph: When Node Graph Variable Changes (with Rotation)
We're now able to hook up the rotation nodes, and - just like with velocity - give it ample time before the next physics tick. To recap:
- Take the cross product of the velocity and upwards vector to get our rotation axis.
- Inverse the ball's current rotation to allow us to convert between world and local space, and apply it to the rotation axis we calculated.
- Calculate the angular velocity using the ball's speed and radius.
- Invoke the Add Uniform Basic Rotation-Based Motion Device node to start the ball rolling.
Dodge Ball
We're almost done, but it'd be nice to get some painful feedback if the ball hits the character. To that end...
Ability Units
The ball can travel at varying speeds, so I've defined two different ability units on the ball itself.
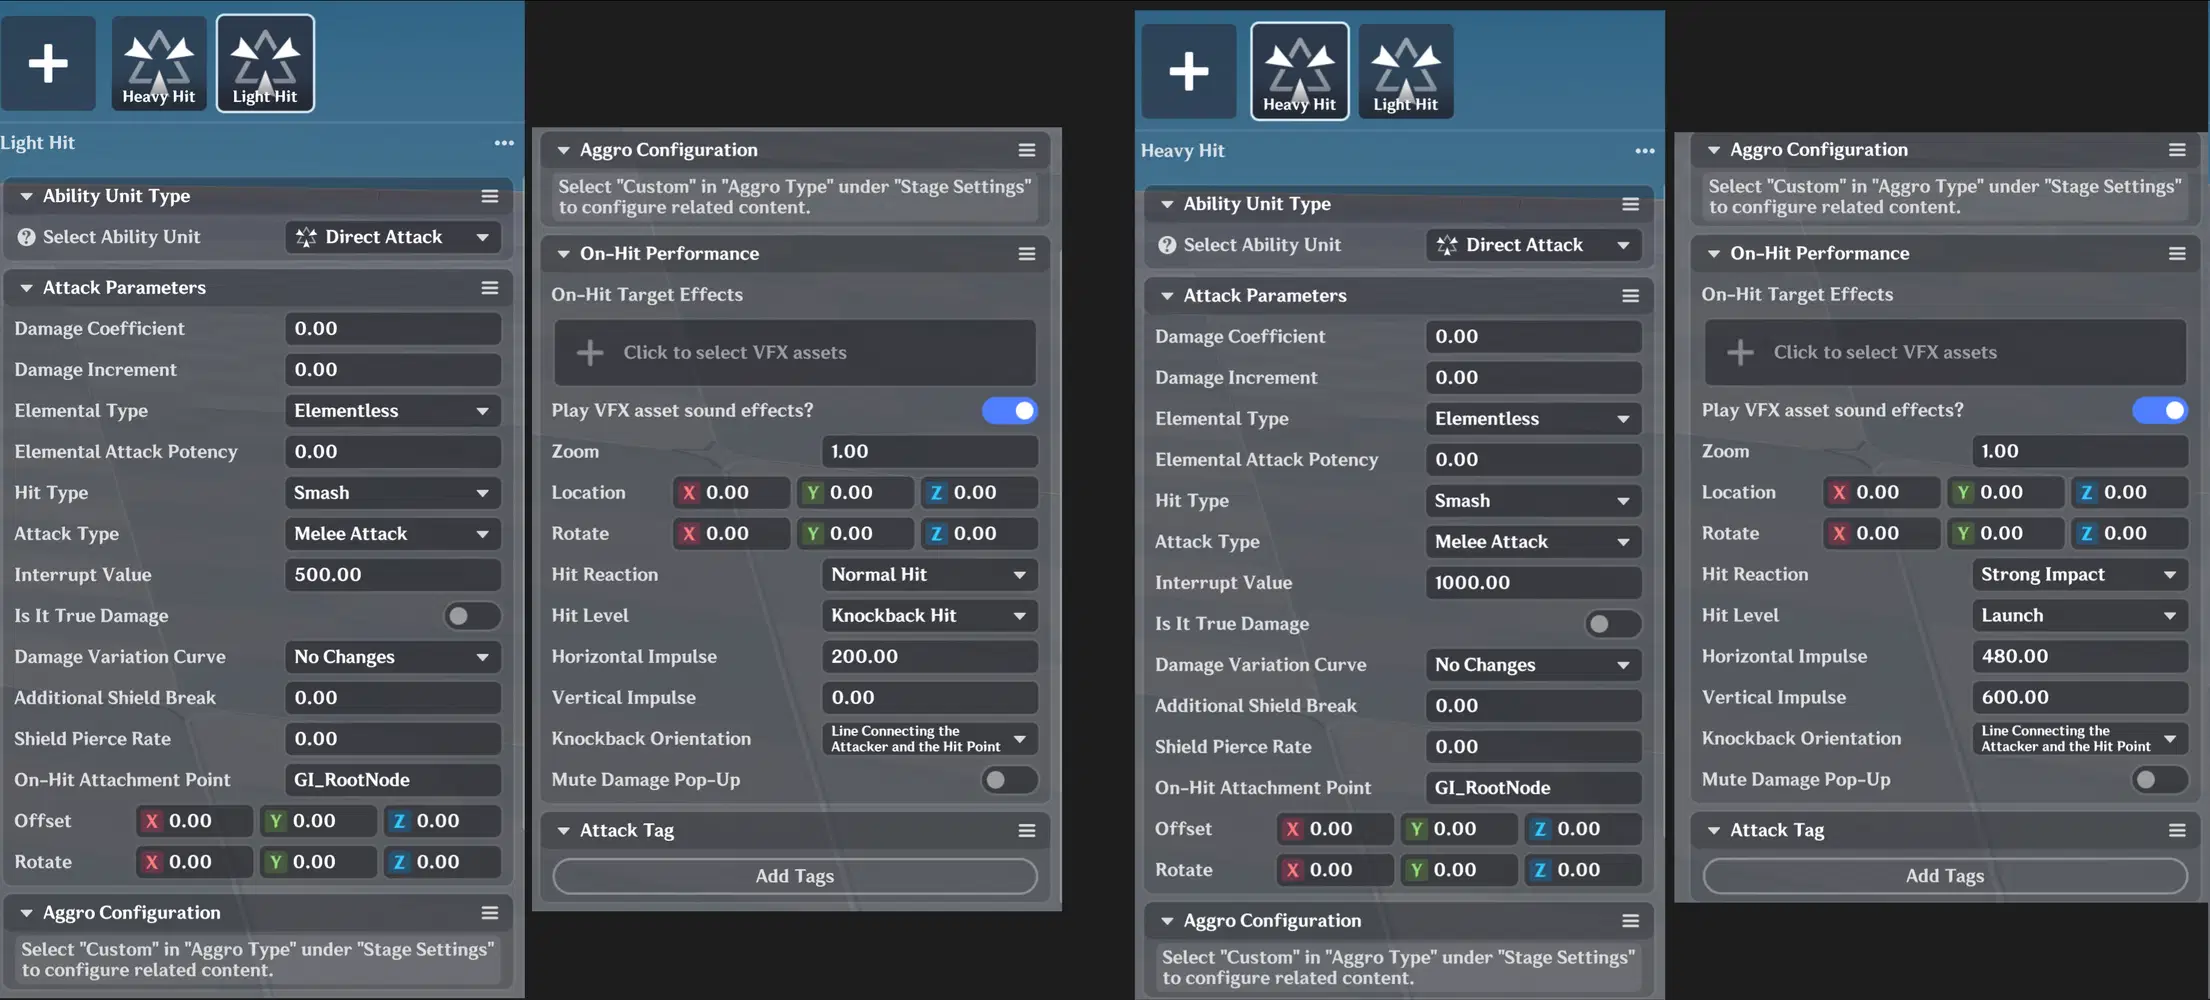
Ability Units
The details on these can really be tuned to your personal preferences, and won't make any difference to the rest of the tutorial - the names of them are important though, so make note of what you call them.
Hit or No Hit?
We will be hooking up more logic to the When On-Hit Detection Is Triggered event, but the player is going to be touching the ball every time they attack it. It'd be pretty bad if every hit triggered a knockback, so we're going to use a similar approach to how we dealt with wall collisions earlier.
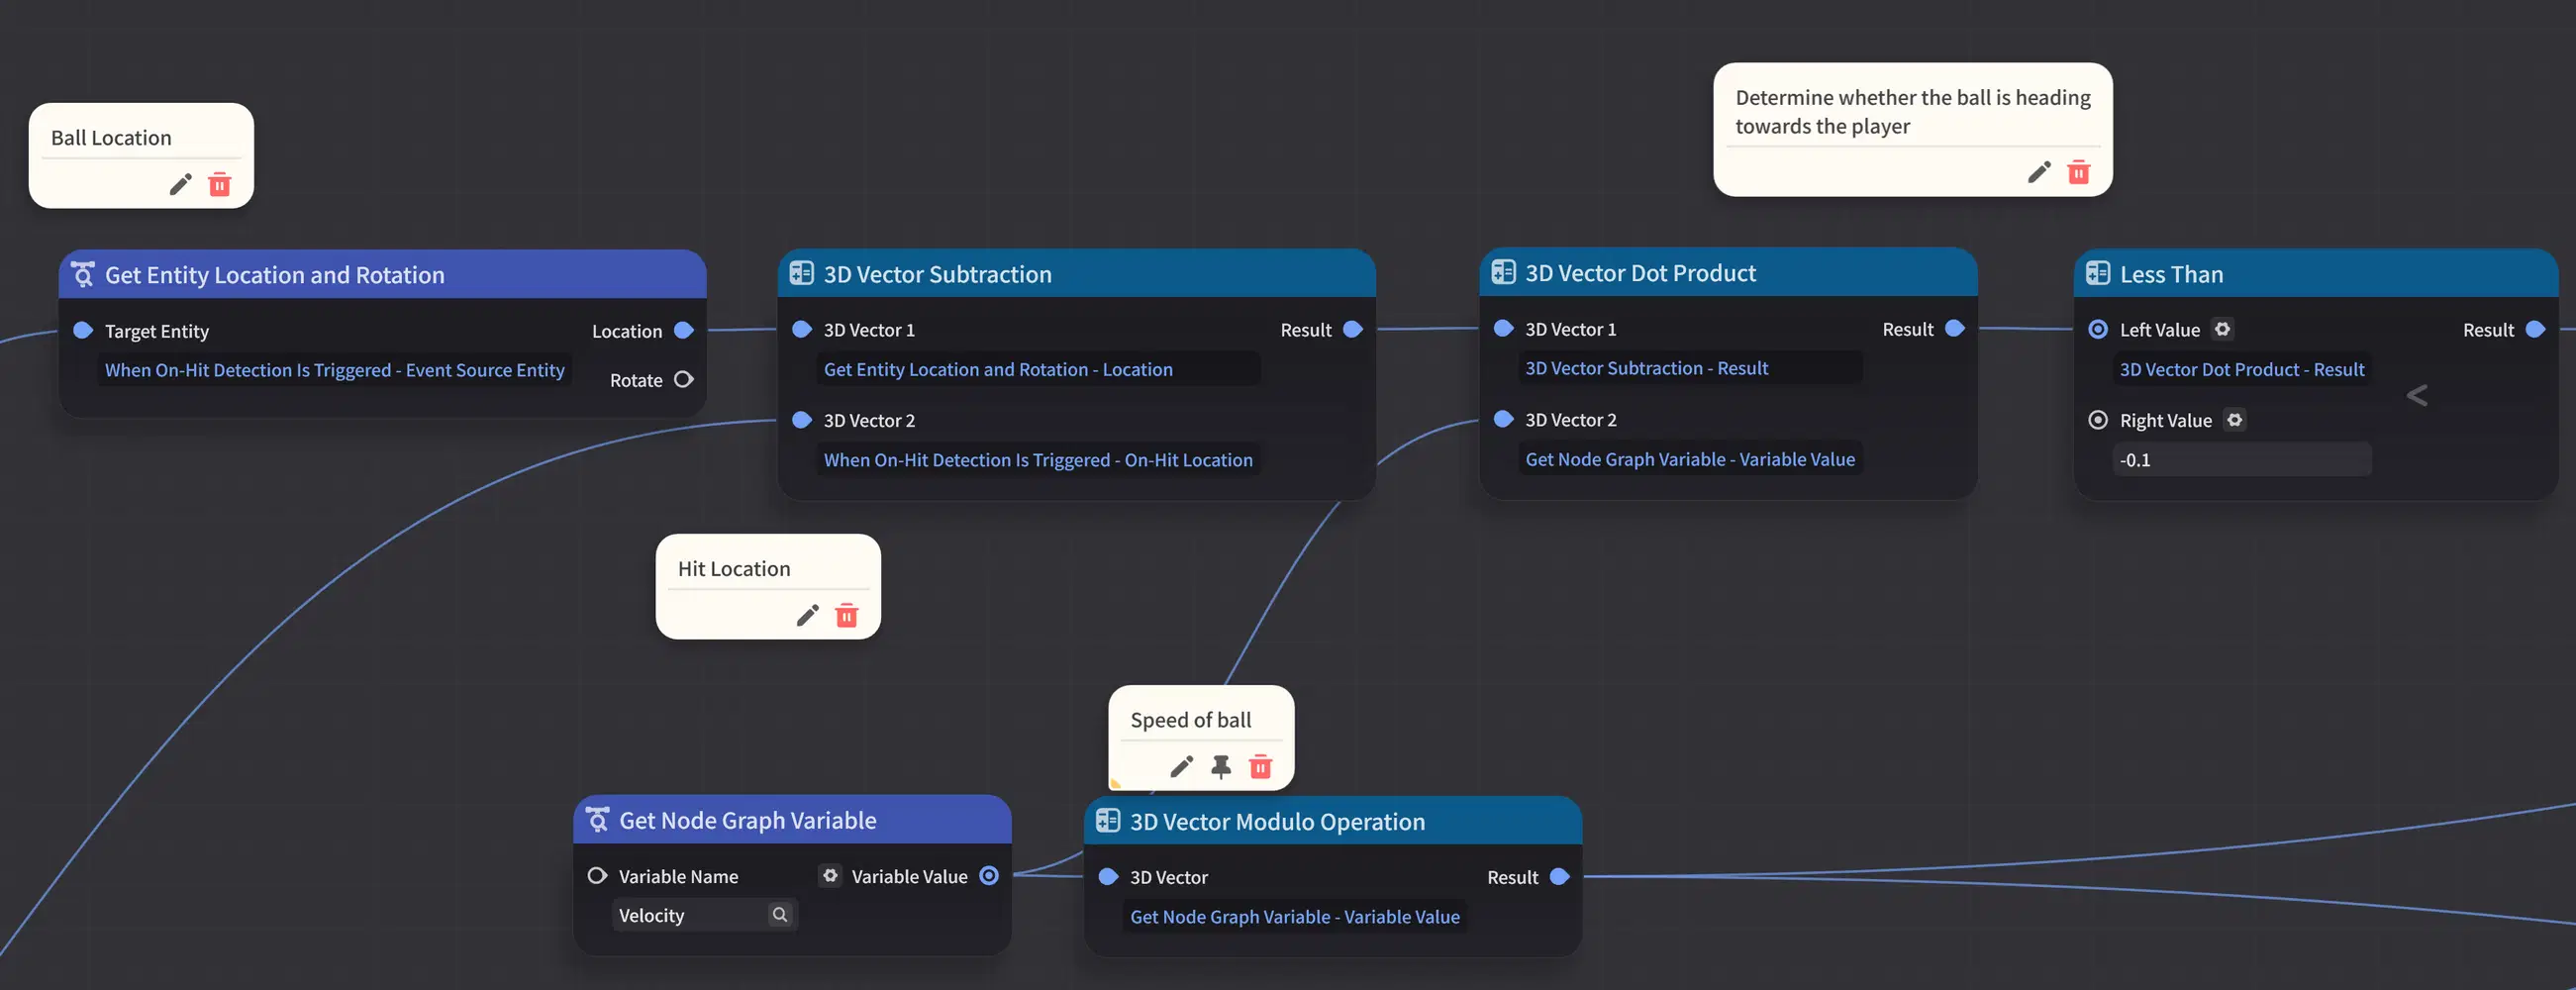
Character Hit Test
We convert the pair of ball location and hit location into a directional vector, and then use the dot product again to determine if the ball is approaching it. Instead of a threshold of 0 this time though, I've given it a bit more leeway and allowed a slight graze to go unnoticed.
Ouch
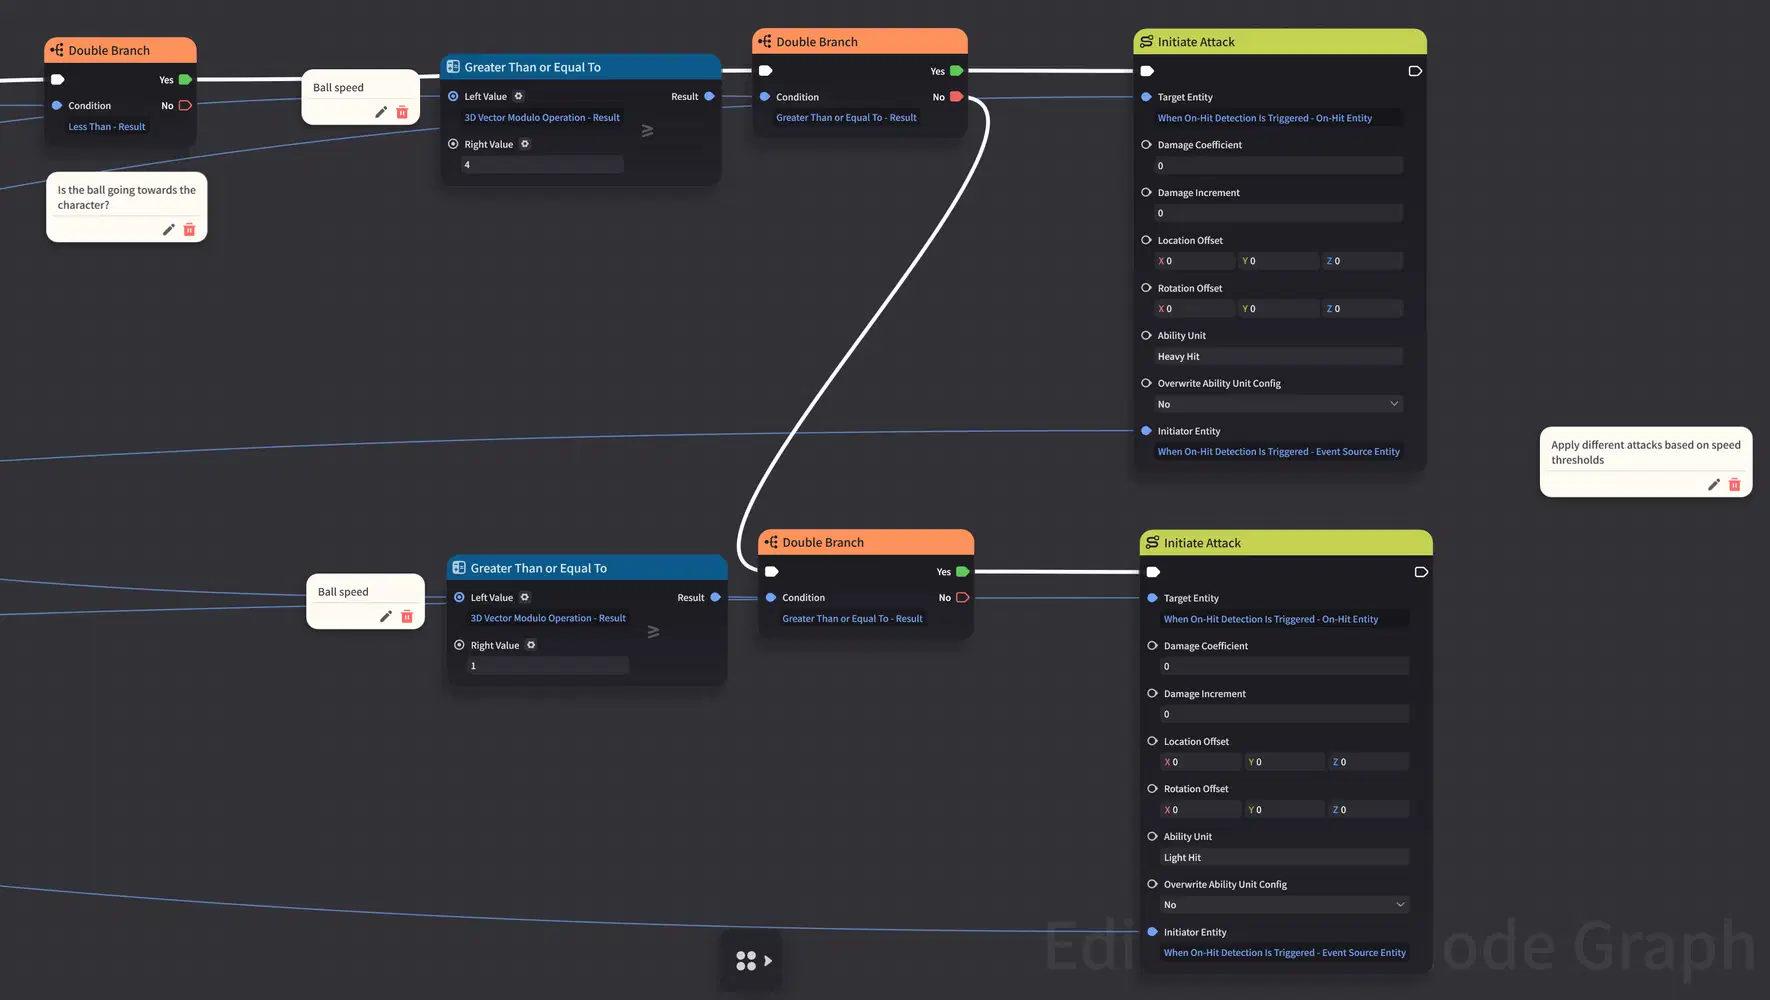
Initiating the Attack
We'll take the ball's speed into account when choosing our attack. As there's no node to multi-branch on number ranges, we just have to construct a sequence of checks instead:
- For high speeds, initiate the heavy hit.
- For medium speeds, initiate the light hit.
- For slow speeds, don't do anything at all.
Conclusion
And... that's it! You're done, and hopefully it all works. If not, grab the demo stage and see if you've missed anything!
I hope that this guide has proved useful, and if you end up making something new from it, feel free to share. Until next time, happy creating!

Admiring the New Outfit



