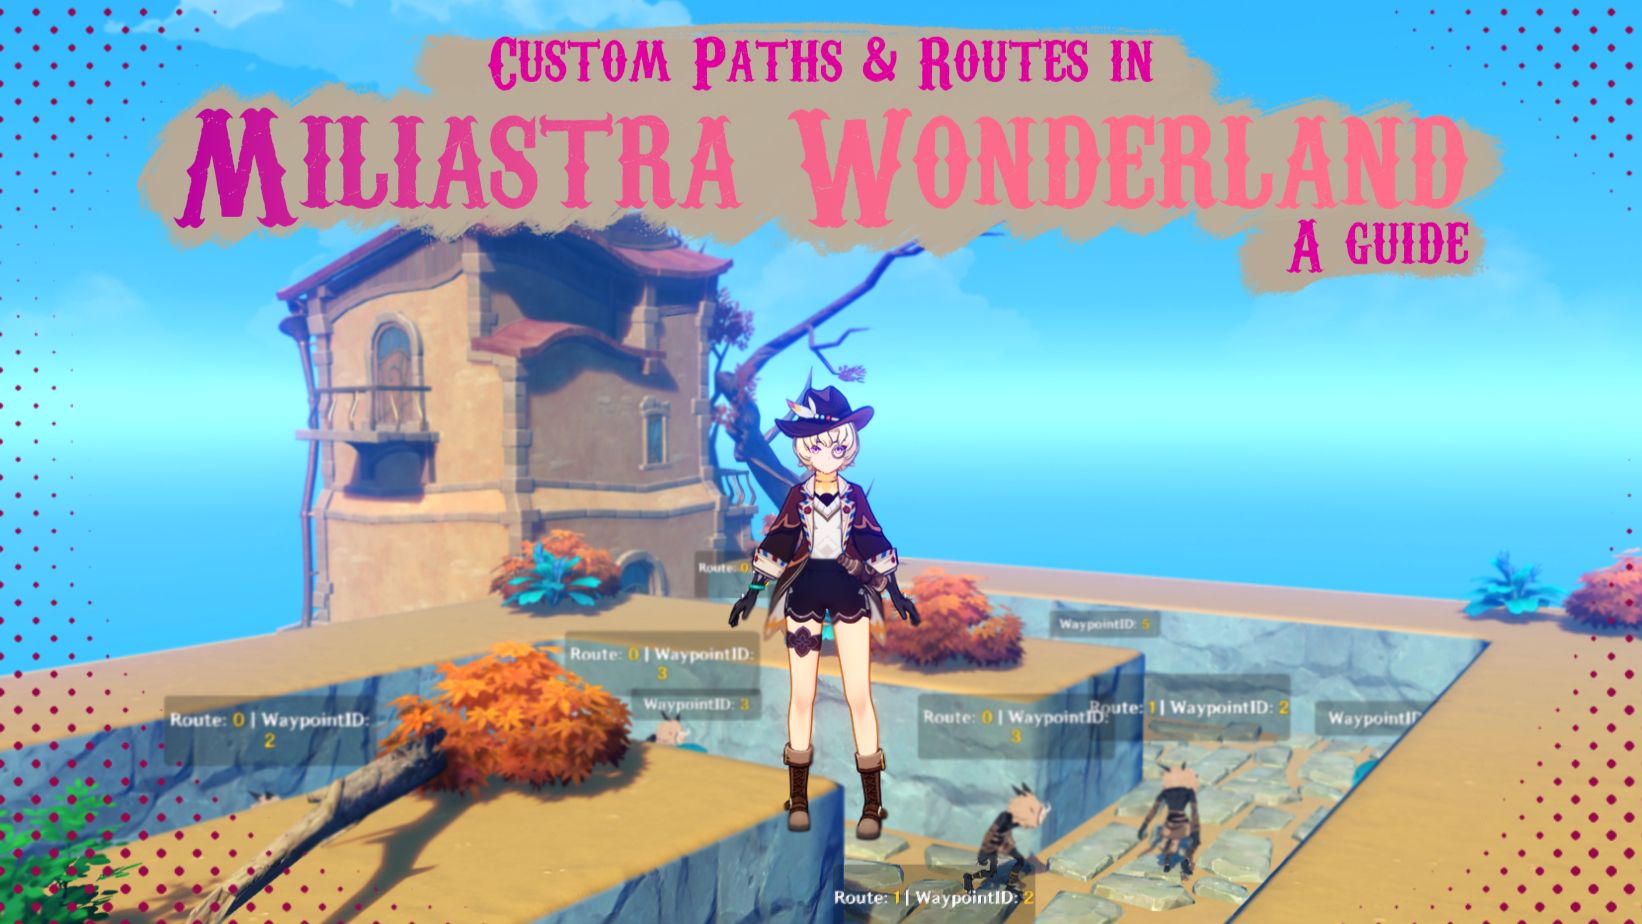
A Guide to Custom & Dynamic Paths/Routes in Miliastra Wonderland!
Are you tired of adding lots and lots of Static Paths on your map? Do you want to have routes that can change alongside your map without having to set lots of paths and patroling templates each time? Did your creations need to change routes dynamically? Do you use multiple maps that requiere different paths and don't want to have a lot of them around? Or do you want that your creation can walk or run at different speeds through different waypoints in a route?
Wait no more!
In this guide you will learn how to have multiple custom paths to solve some of these problems.
We will be covering two distinct ways to do it for each one of the Creation variants:
- Complex Creations
- Basic Creations
Custom Paths for Complex Creations
Let's start with Complex Creations! With these new additions, you can customize the way in which your creation will act. And this is a really powerful tool that will help us to accomplish our goal of giving them custom paths.
Note: The only downside of this method, is that you can only use the current limited set of Complex Creations. But don't worry, because we also have a solution for the Basic Creations if you want to use some of them.
Our First Step will be to create our Complex Creation. In this case, we have this Hilichurl.
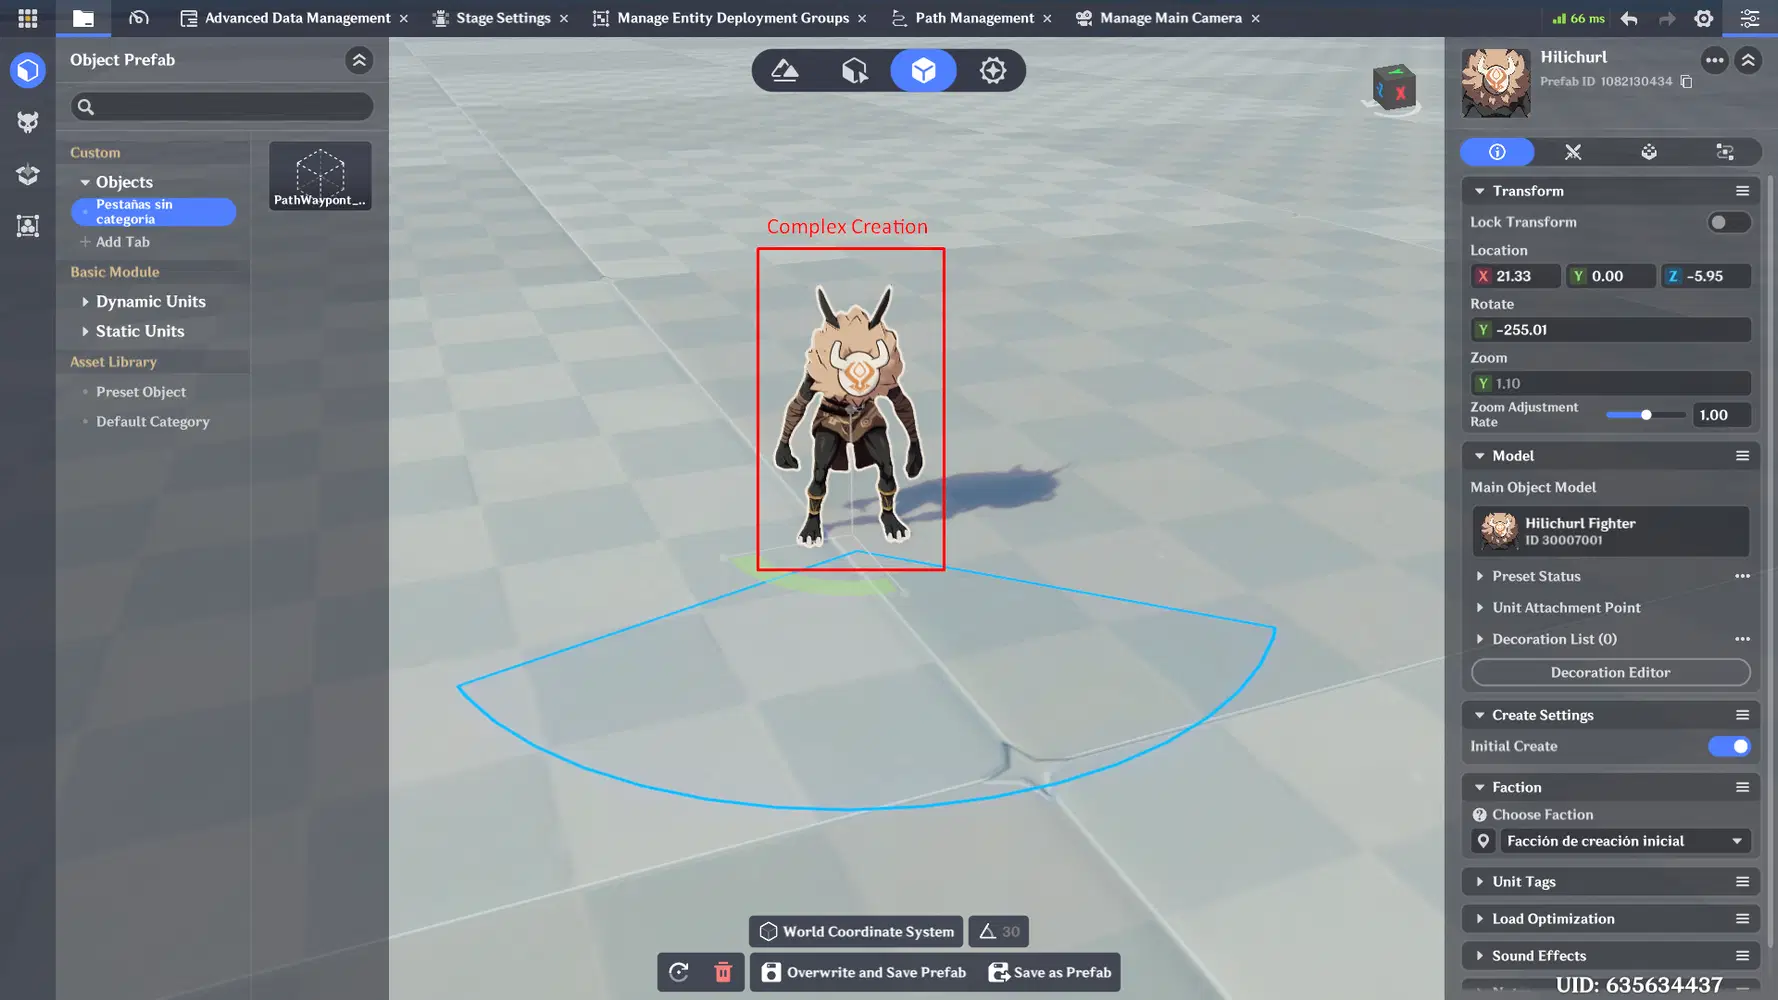
You can use the one you like the most!
Custom Variables
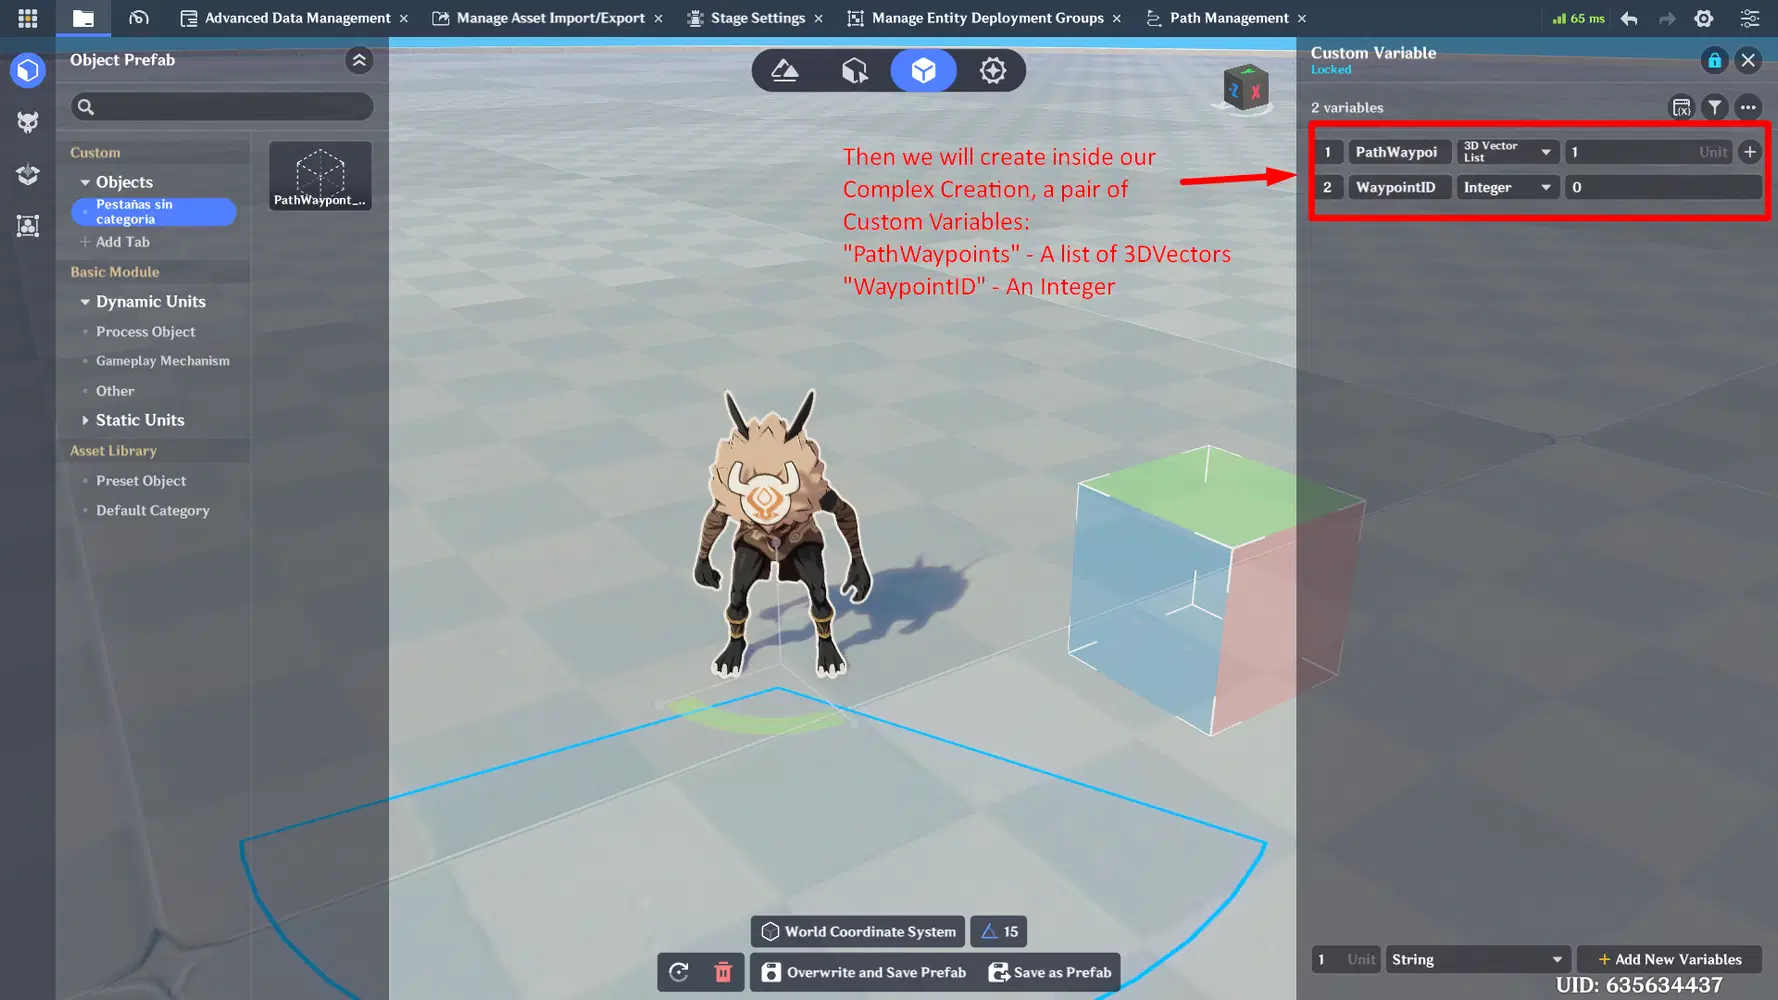
Then we will create two Custom Variables that will help us to set the Path:
- A "PathWaypoints" 3DVector List that will store the Path Waypoints.
- And a "WaypointID" Integer that will indicate the Current Waypoint to follow.
Client Nodegraphs
Having our Creation and its variables prepared, we will going to create the Client Nodegraphs.
The first one, will be the Creation Status Decision Node Graph. This will contain the main logic of our complex creation.
In this example, we call it "StandardEnemy_Logic" and will be important later in our "StandardEnemy_Logic" section.
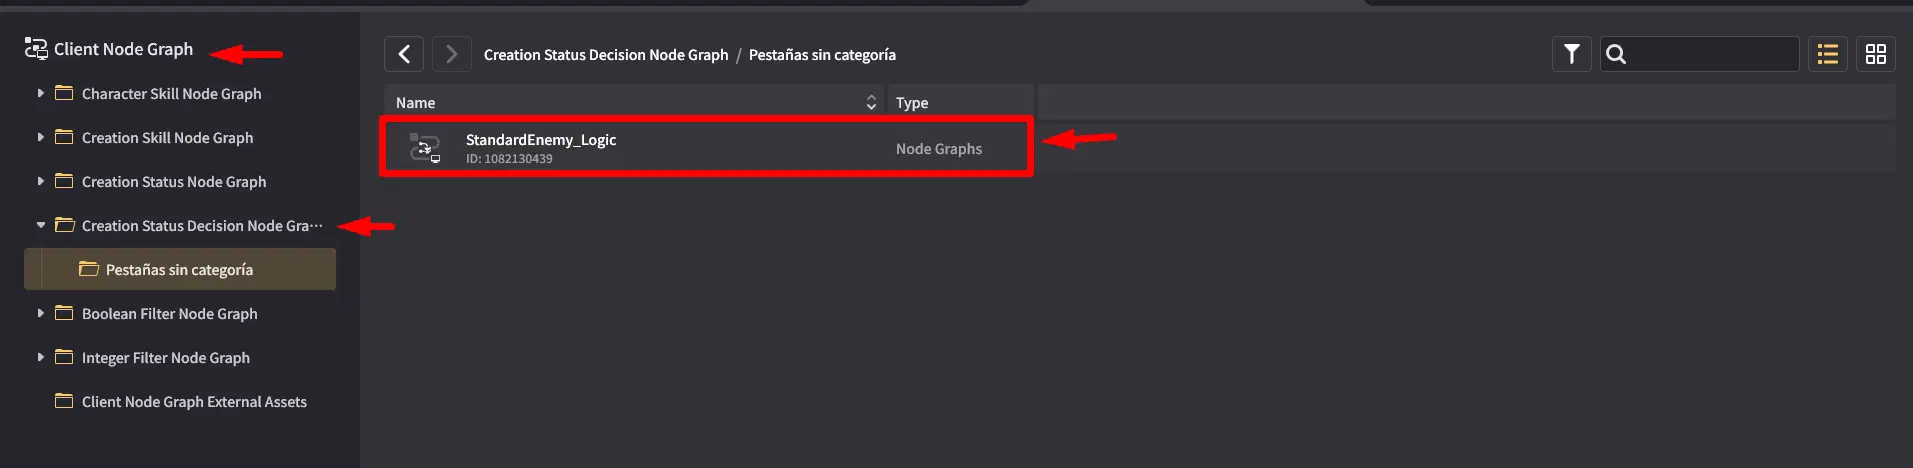
After this node is created, don't forget to set it in the Complex Creation configuration of our creature.
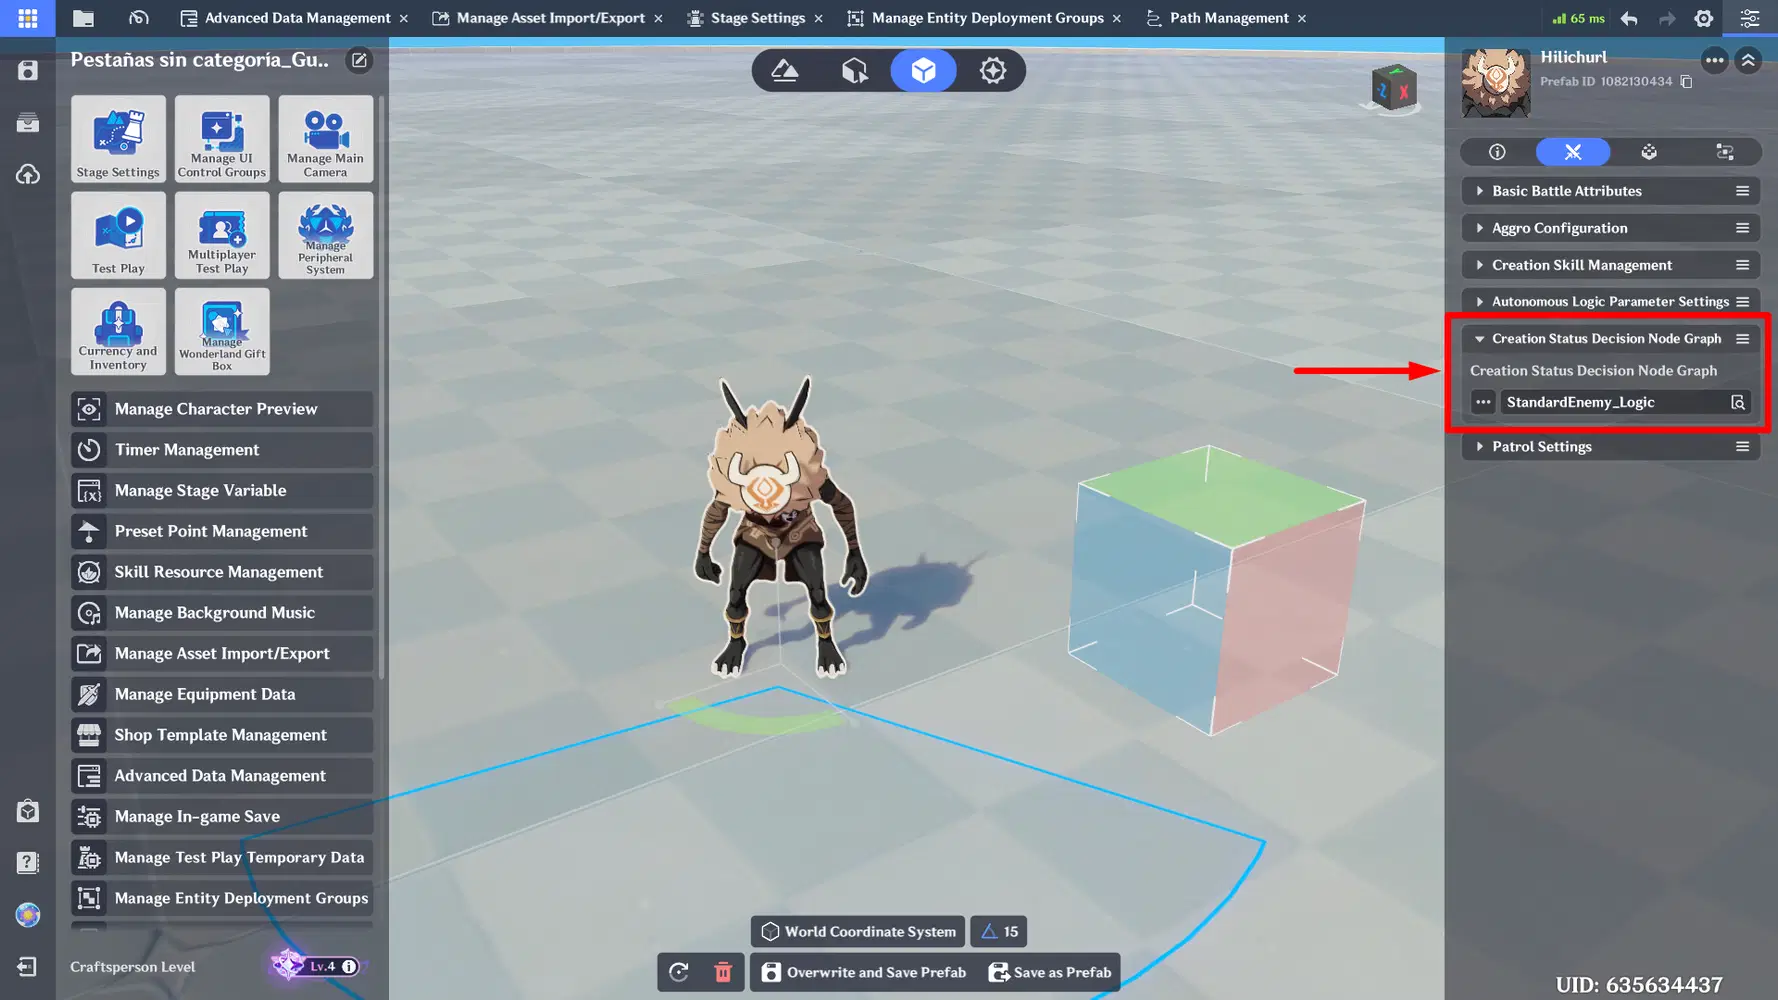
After the Logic Node is created, we will going to create a pair of Creation Status Node Graph Client Nodes. In this example we create:
- MoveToWaypoint
- ArrivedToWaypoint
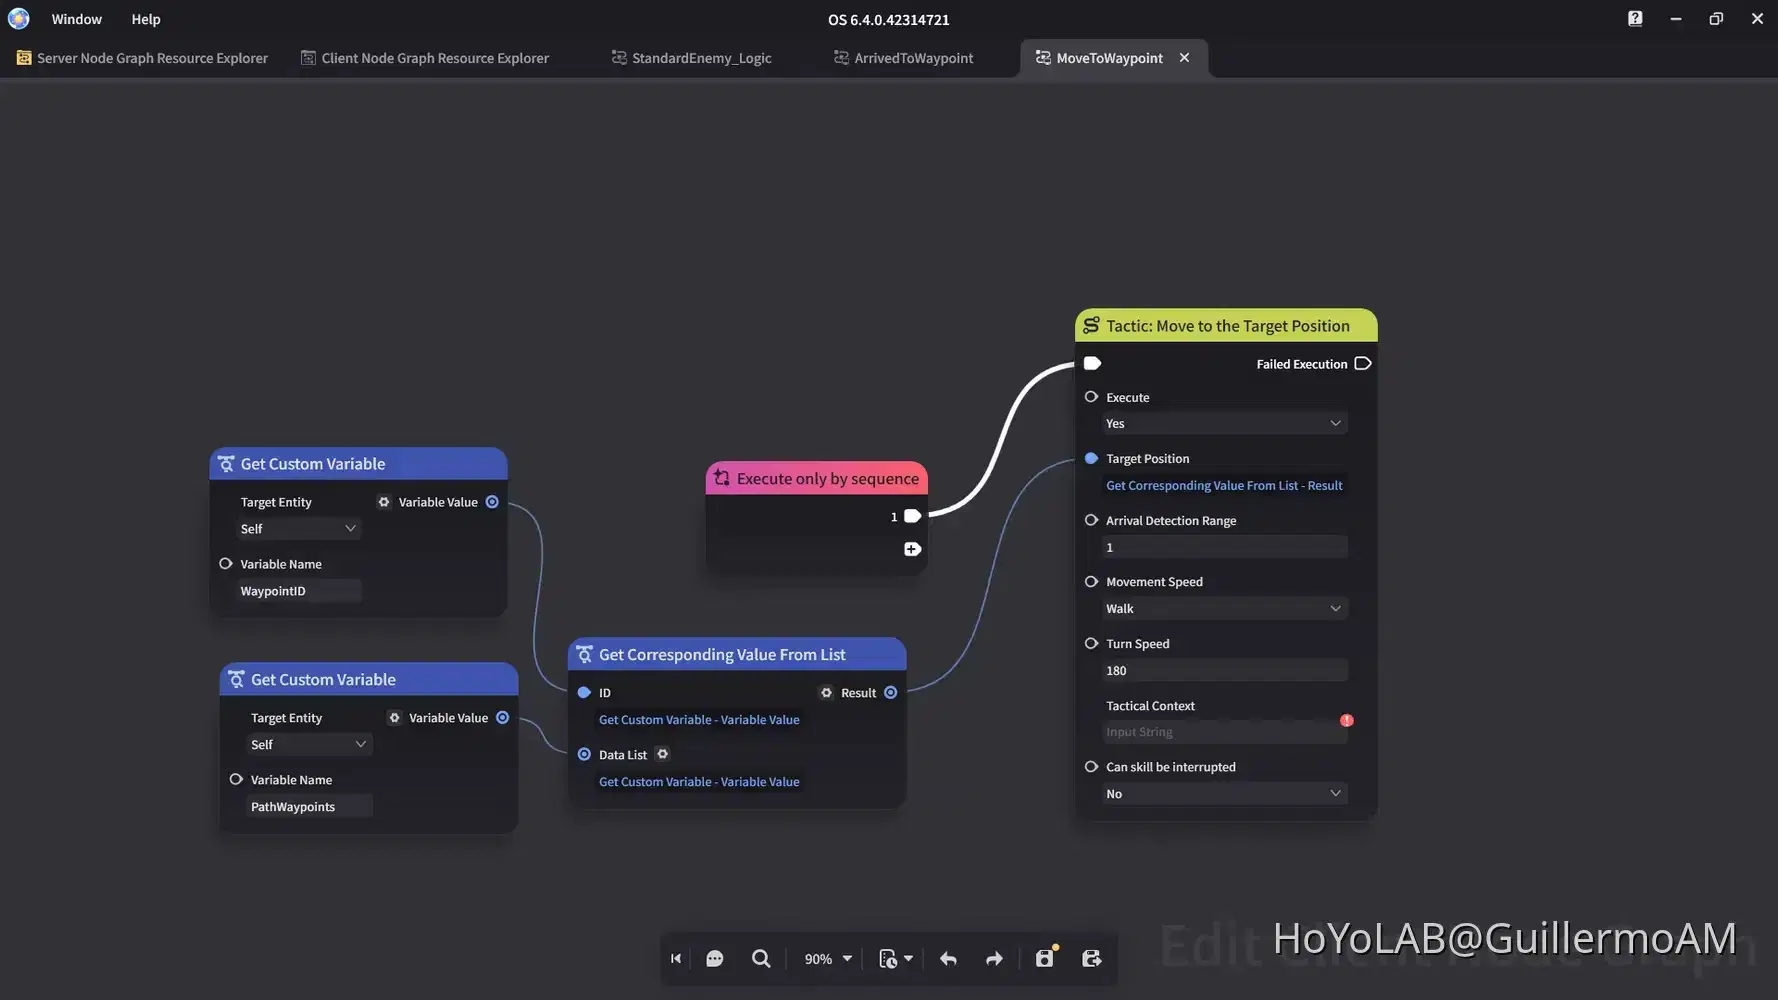
MoveToWaypoint
MoveToWaypoint Node, will be in charge of making that our Complex Creaton moves towards the current Waypoint Objective. We use The current WaypointID to get the current coordinates in the list "PathWaypoints". This is the information that will feed our Tactic: Move to the Target Position node.
ArrivedToWaypoint
To setup "ArrivedToWaypoint", we will adjust it like it's shown in the following image. The Node is simple, it will execute our Skill 1 [ID 1]
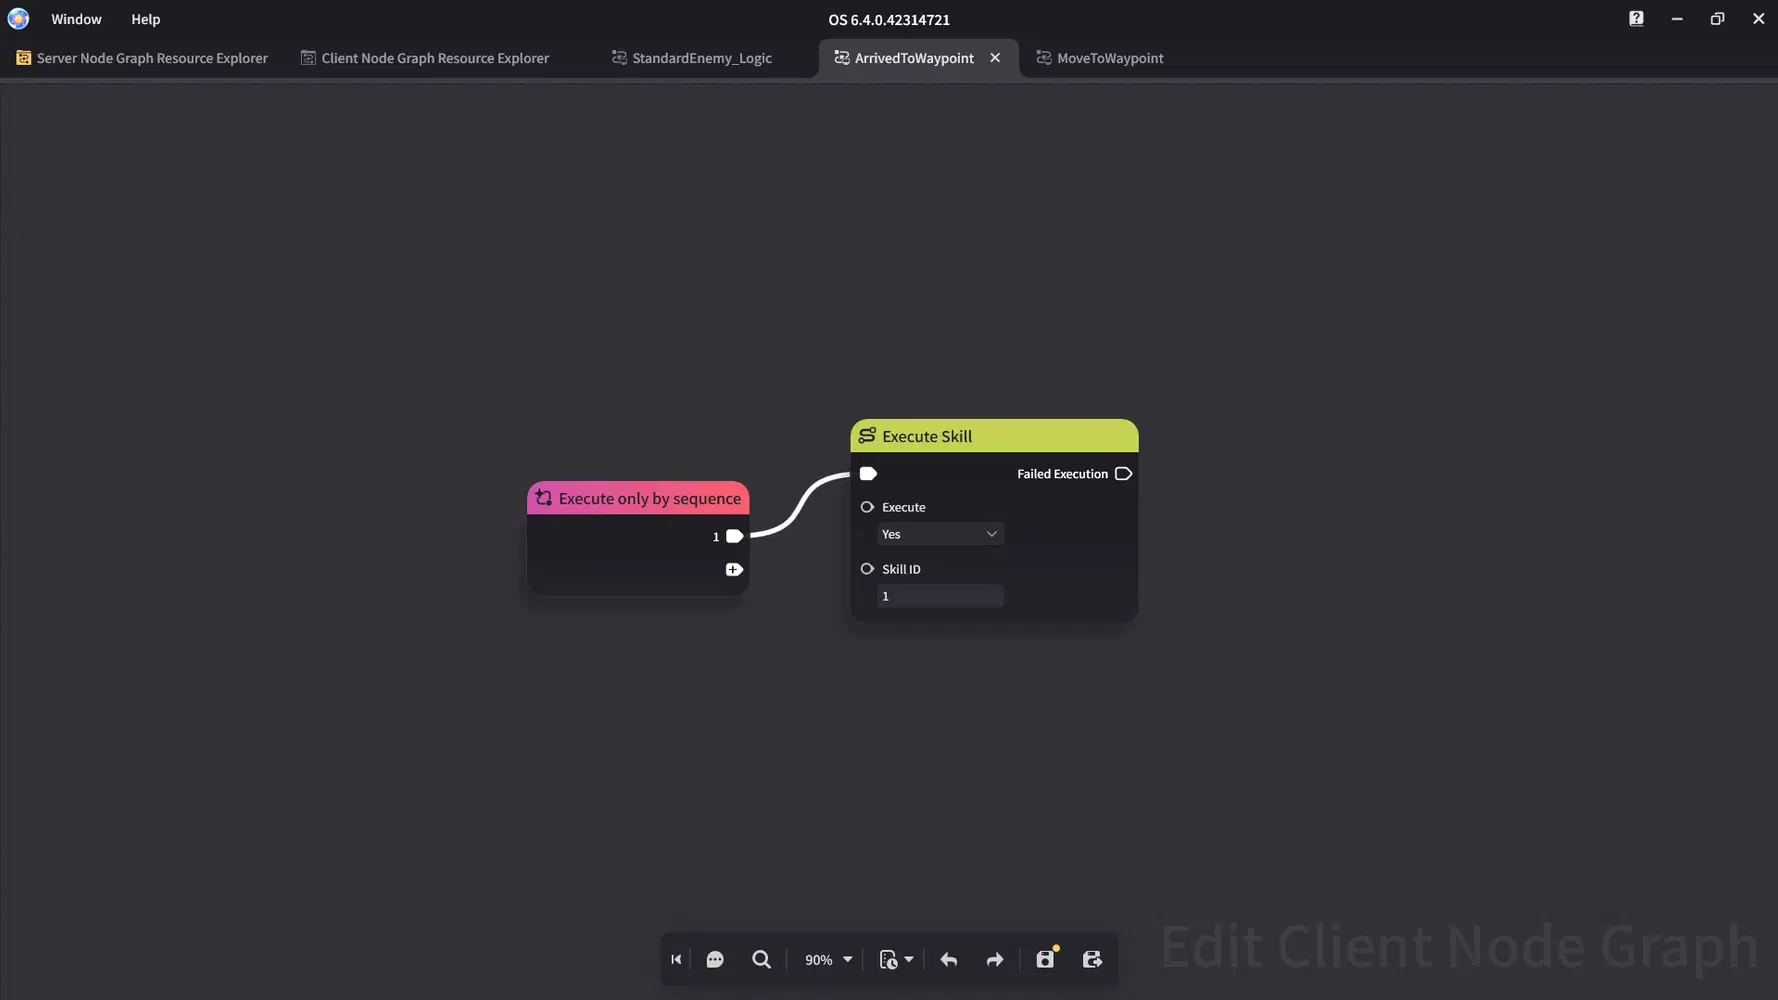
Now, to Make our "ArrivedToWaypoint" Node to work correctly, we need to set up two additional elements: A Creation Skill Node Graph & a Complex Creation Skill.
Creation Skill Node Graph
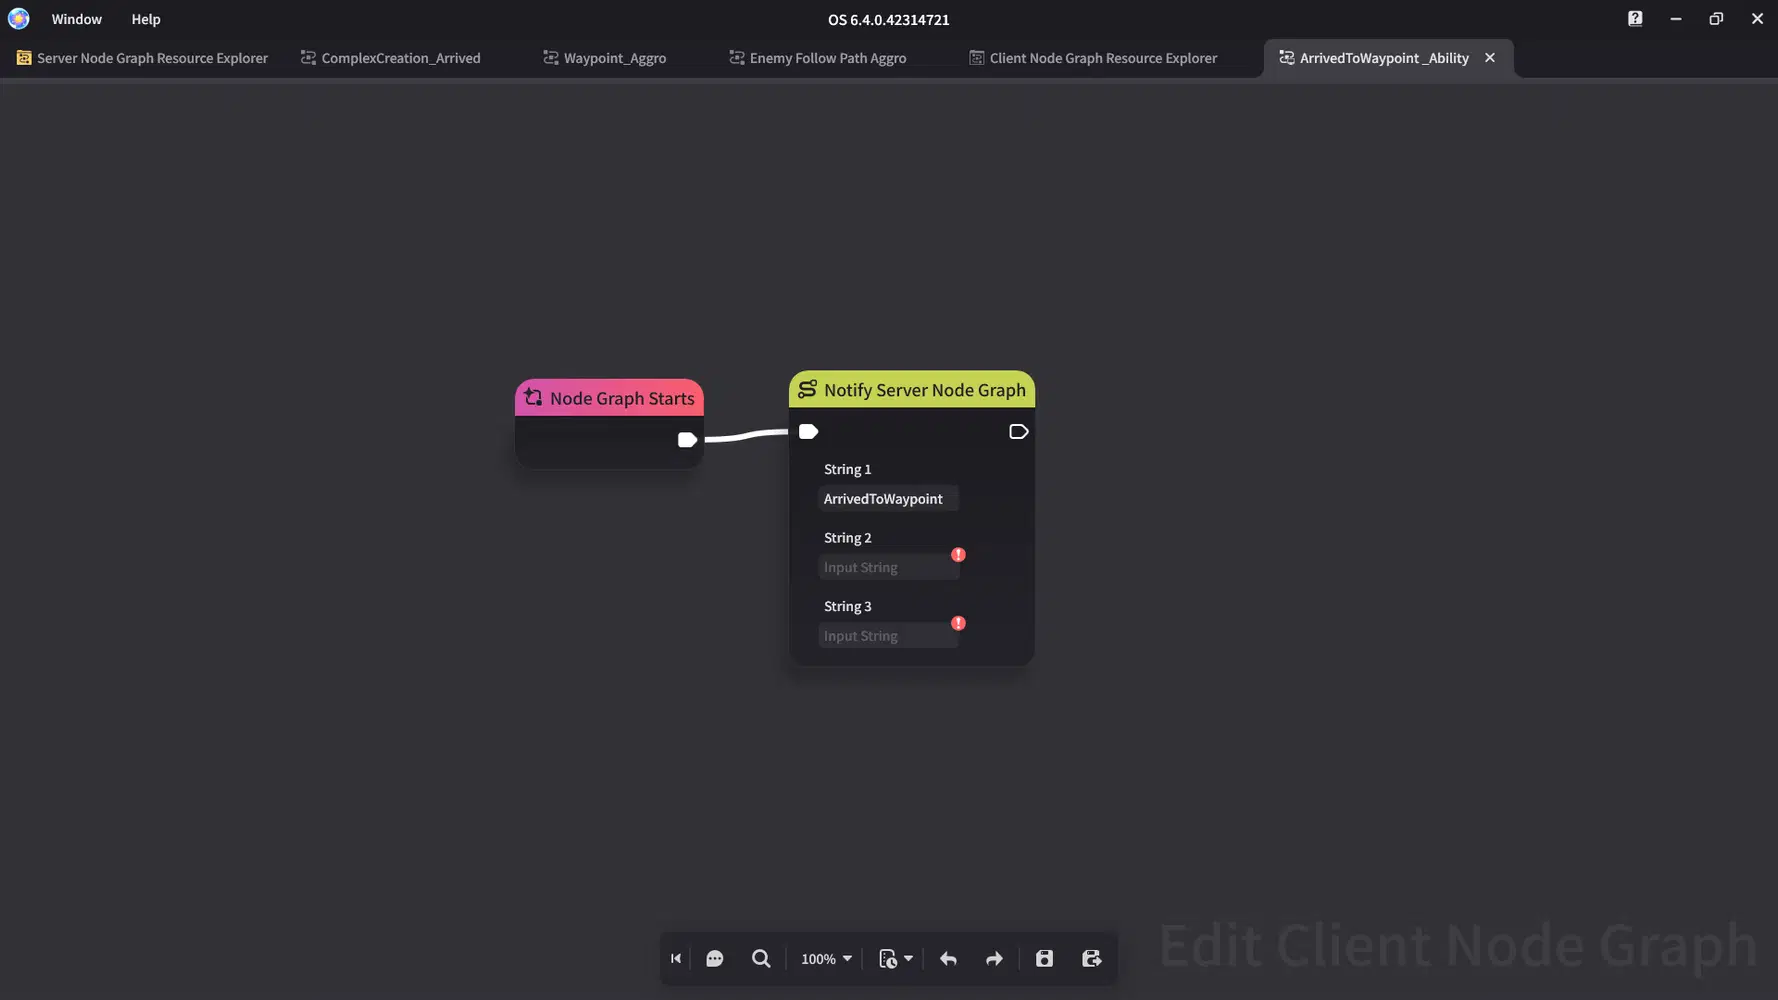
In this case, we create a Creation Skill Node Graph named "ArrivedToWaypoint_Ability".
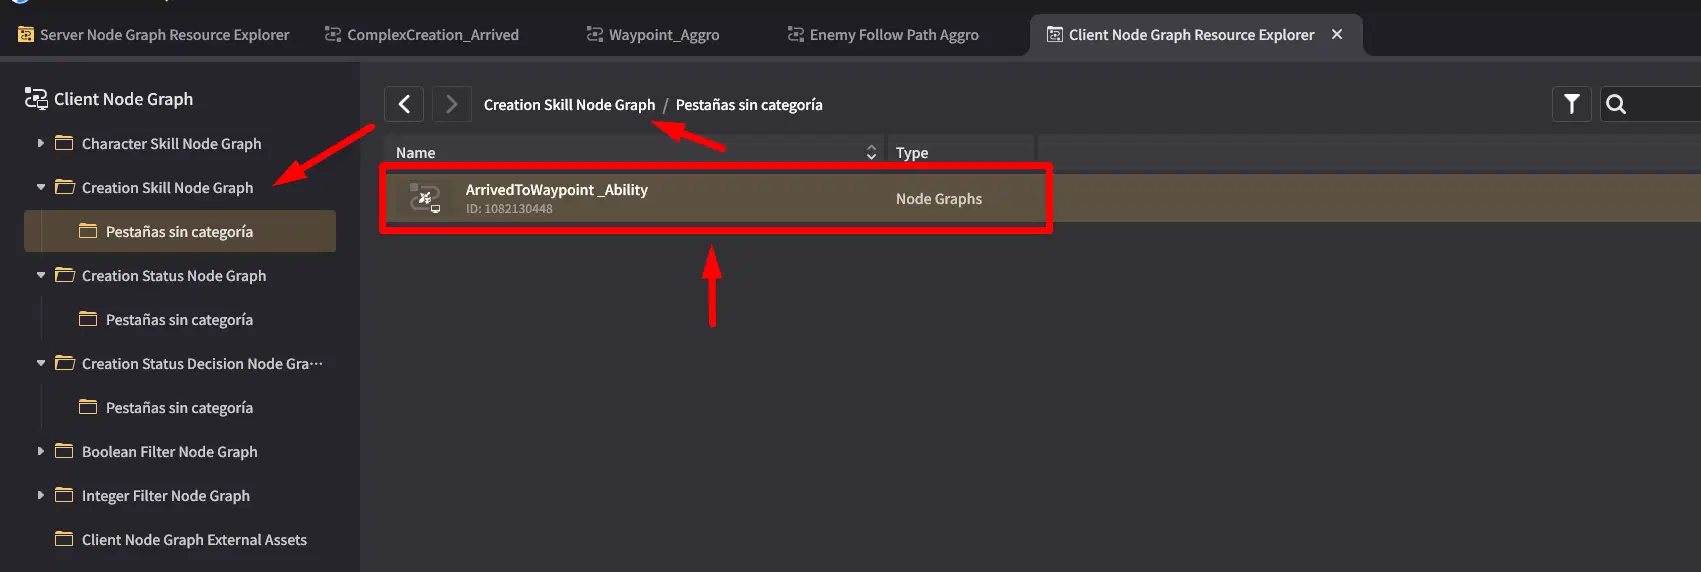
This is where you set it up.
This is how our Creation Skill Node Graph should look. It will work as our bridge to communicate with the Server Node everytime the Creation Arrives to the waypoint.
Complex Creation Skill
This Skill will be used to execute our previous Creation Skill Node Graph. For this, you should go to Combat Preset > Skill > Creation Custom Skill; and create a New One [+Skill]. In this case we created a new Creation Skill named "ArrivedWaypoint_Signal".
After the new skill is created we should go to the Animation Editor of the Skill and add our previous "ArrivedToWaypoint_Ability" Creation Skill Node Graph it in the timeline.
Don't forget to configure the skill as Creation Instant Skill; so it can be reused with all types of Complex Creations; it will also be executed instantly.
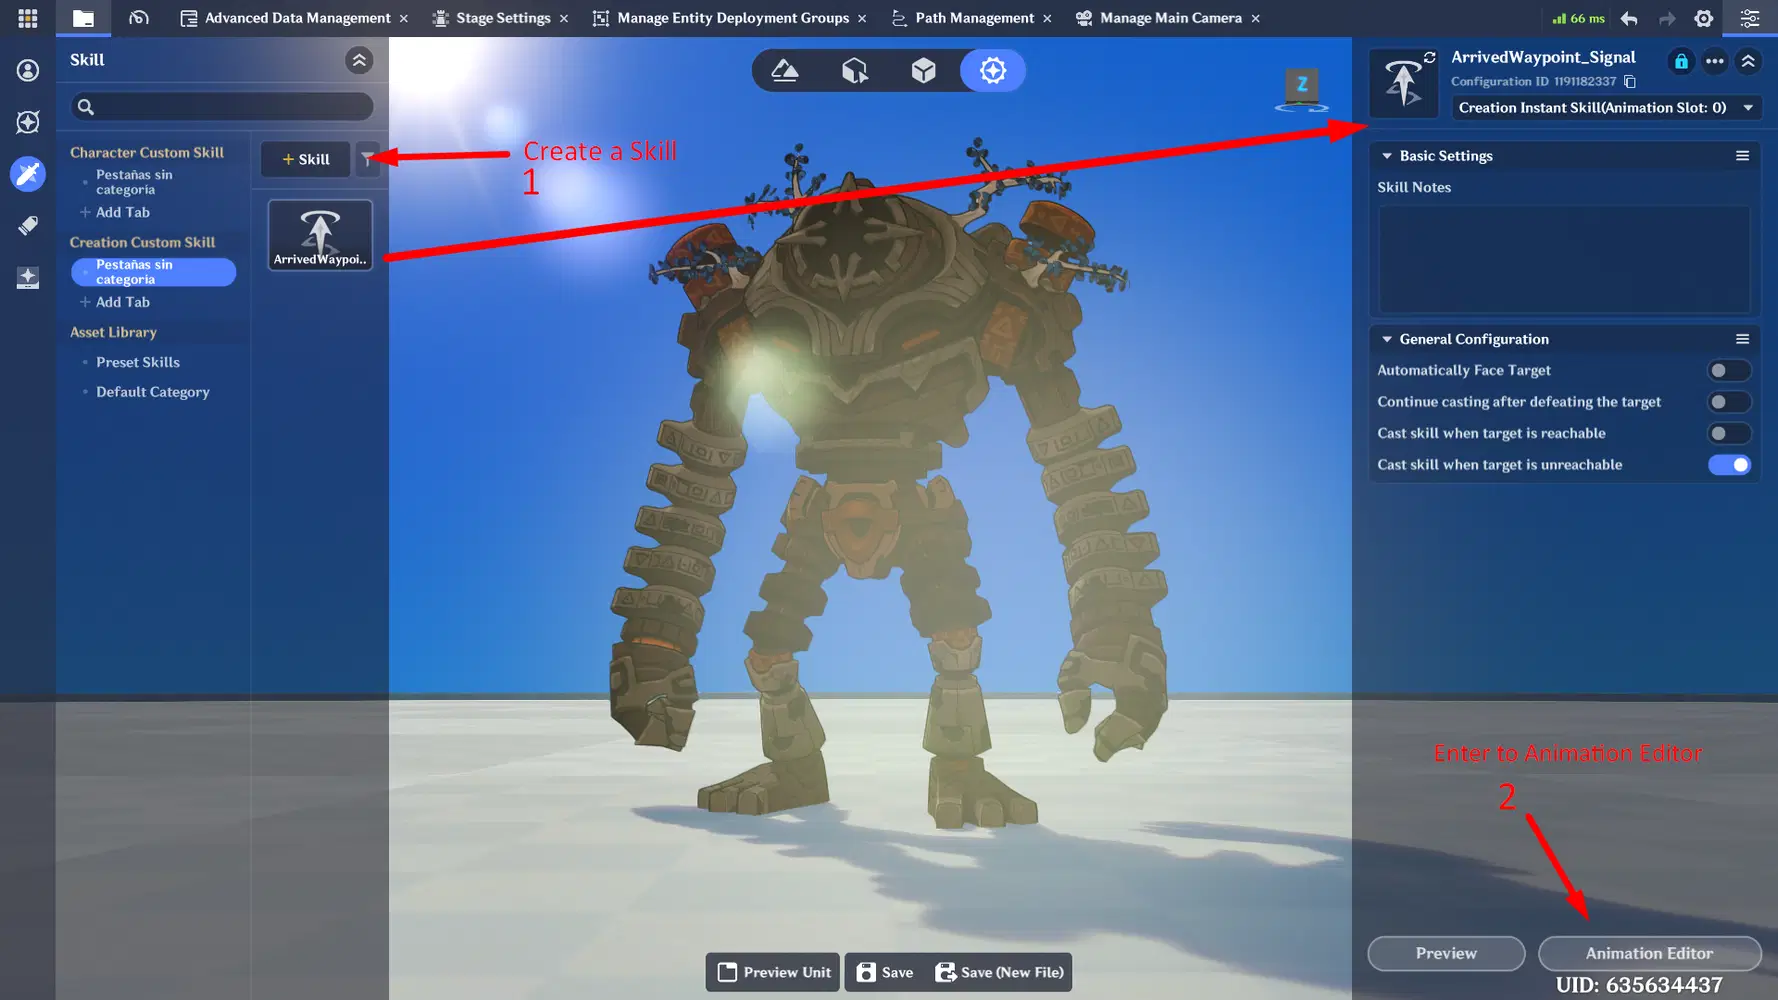
This is how you create the new skill
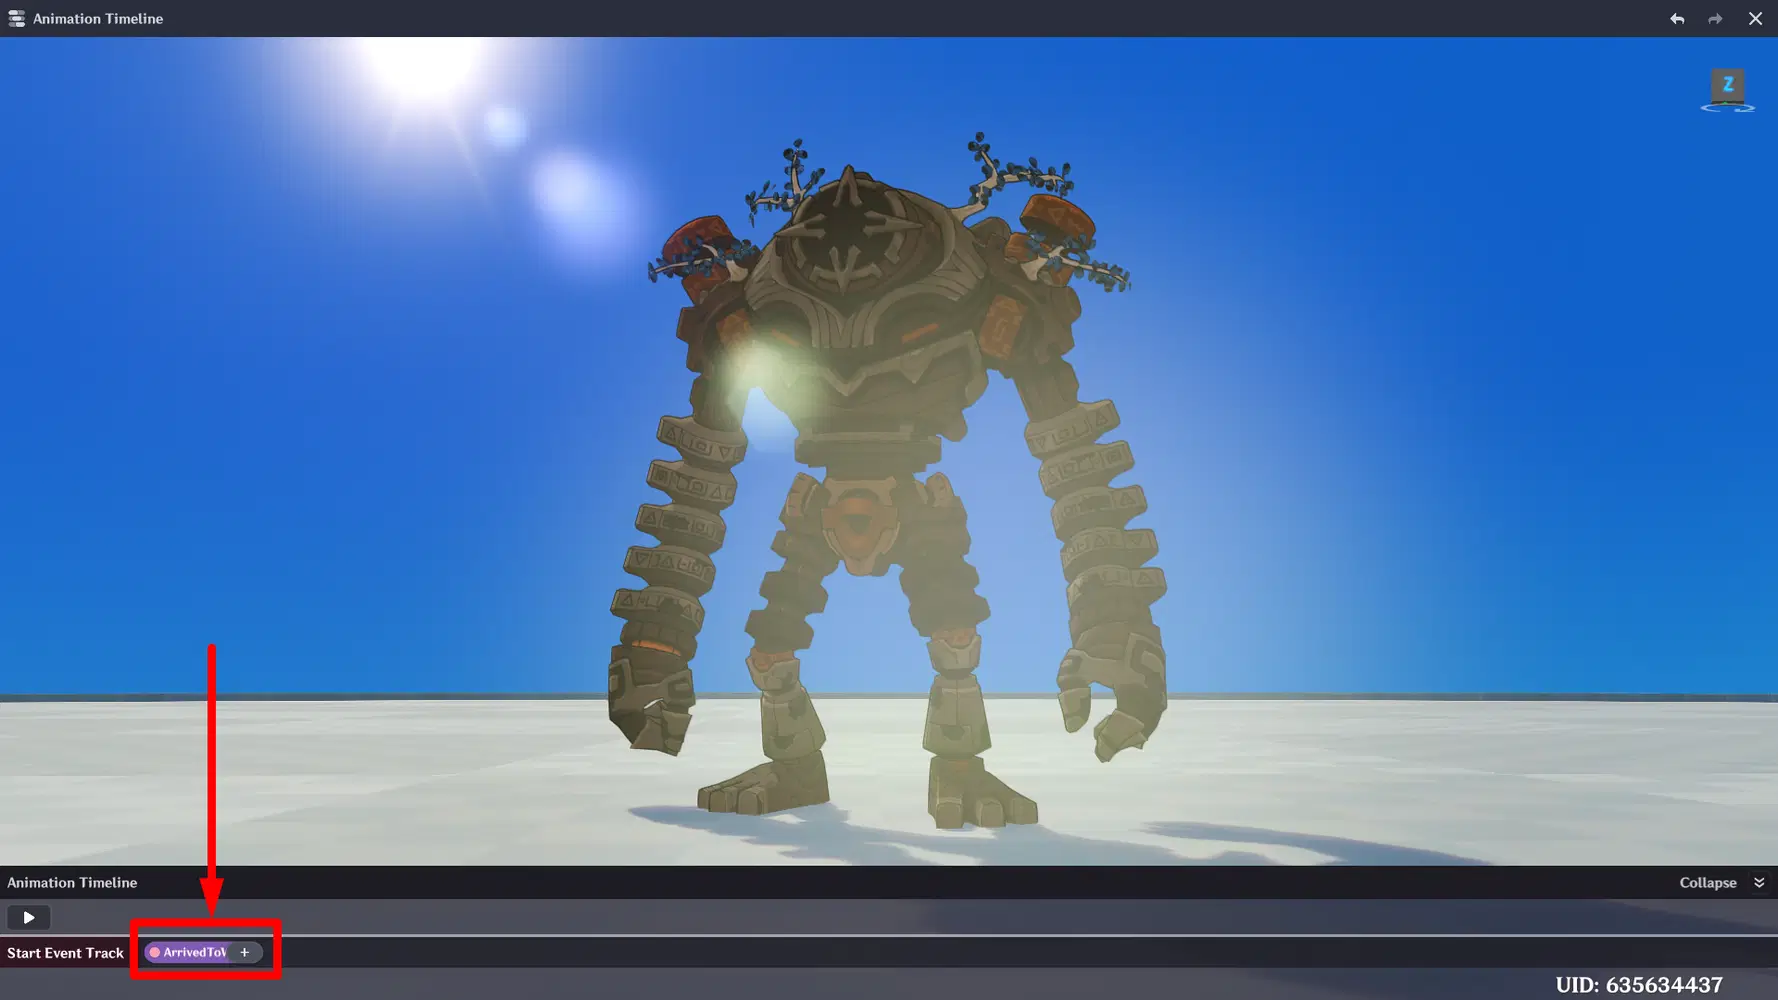
This is where you add our Creation Skill Node Graph "ArrivedToWaypoint_Ability"
StandardEnemy_Logic
Once we prepared this Nodegraphs, we will add them into the "StandardEnemy_Logic" Creation Status Decision Node Graph we prepared before. It should look like this:
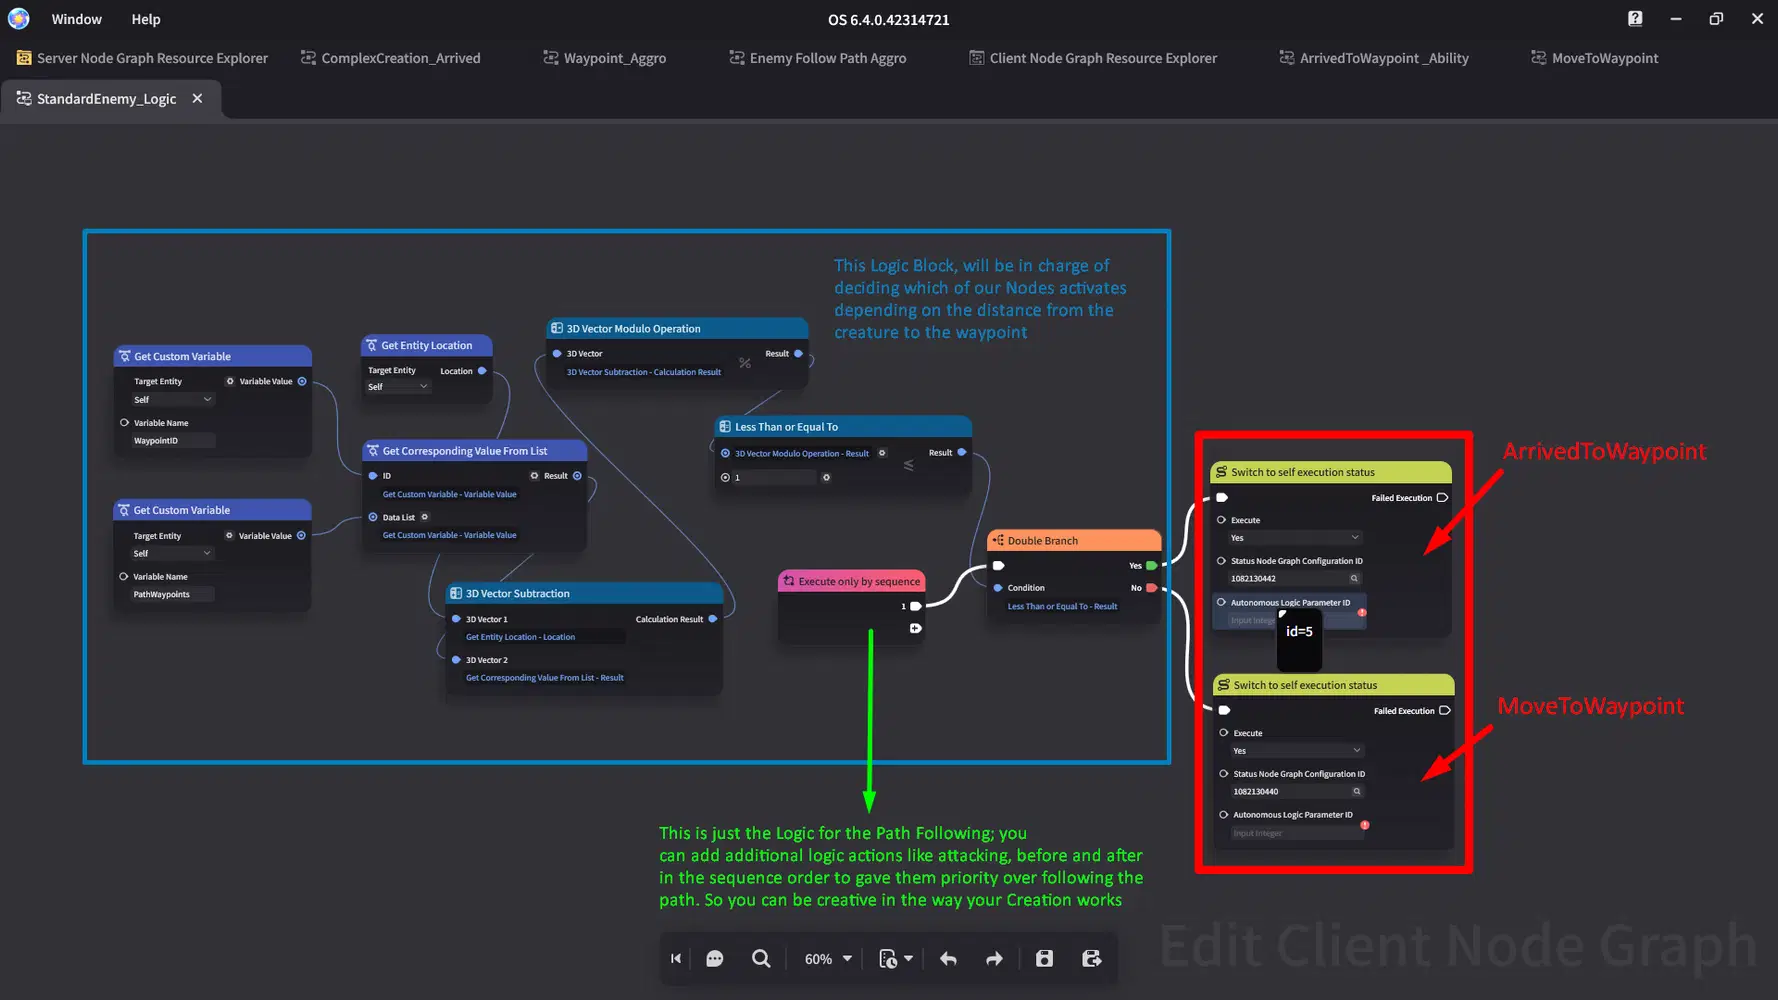
This will make the creation to follow the path as we want. You can compliment the Logic of your creature by adding more steps, like an attack with higher priority. For example, you can move our Double Decision Branch to Slot 2 and slot an attack execution in the Slot 1. So the creature prioritices attacking, and only walks when the attack node can't be executed. You can be creative with how it works!
Server Nodegraph
ComplexCreation_Arrived
Finally, although our Logic in the Client Nodegraph is done; we still need to finish a last step for the creature to work properly. This step will consist in creating an Entity Nodegraph in the Server Node Graph. In this case it is named "ComplexCreation_Arrived".
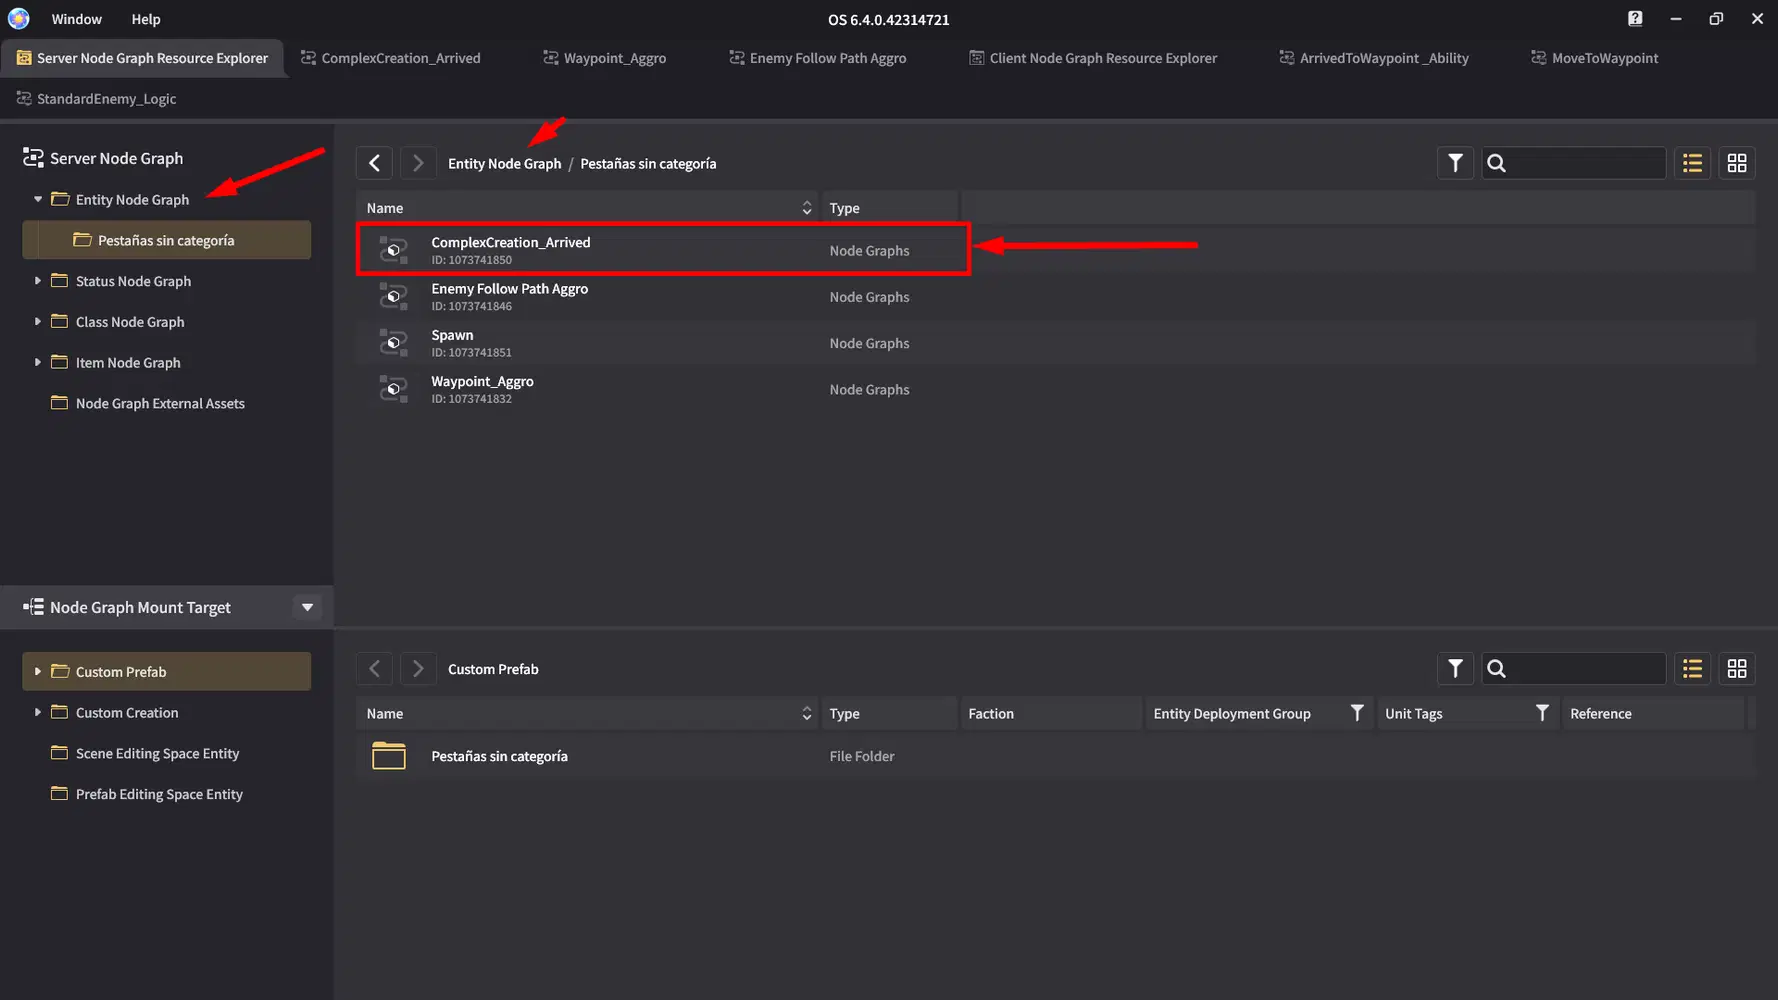
After it's created, you should configure it to look like this
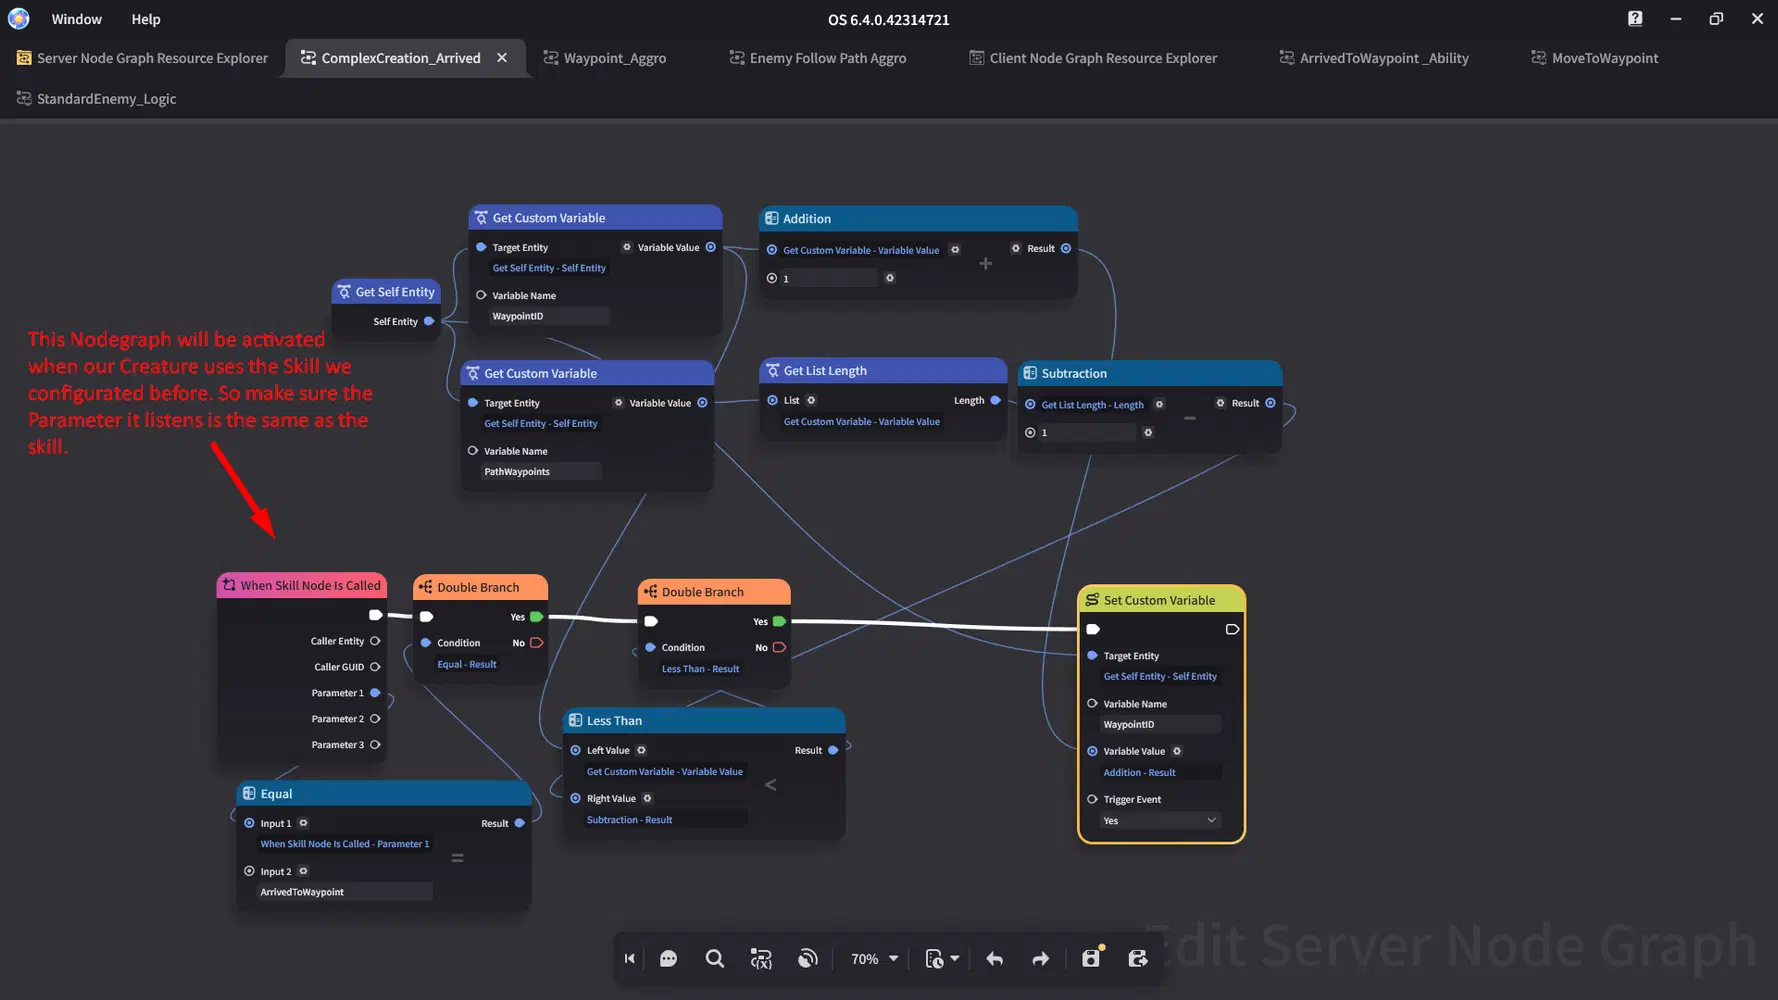
The skill will call this Nodegraph everytime the creation reaches its current Waypoint target.
So this node will update the current WaypointID target to the next, everytime the skill is used.
When it's done, you should add it directly into our Complex Creation Nodes.
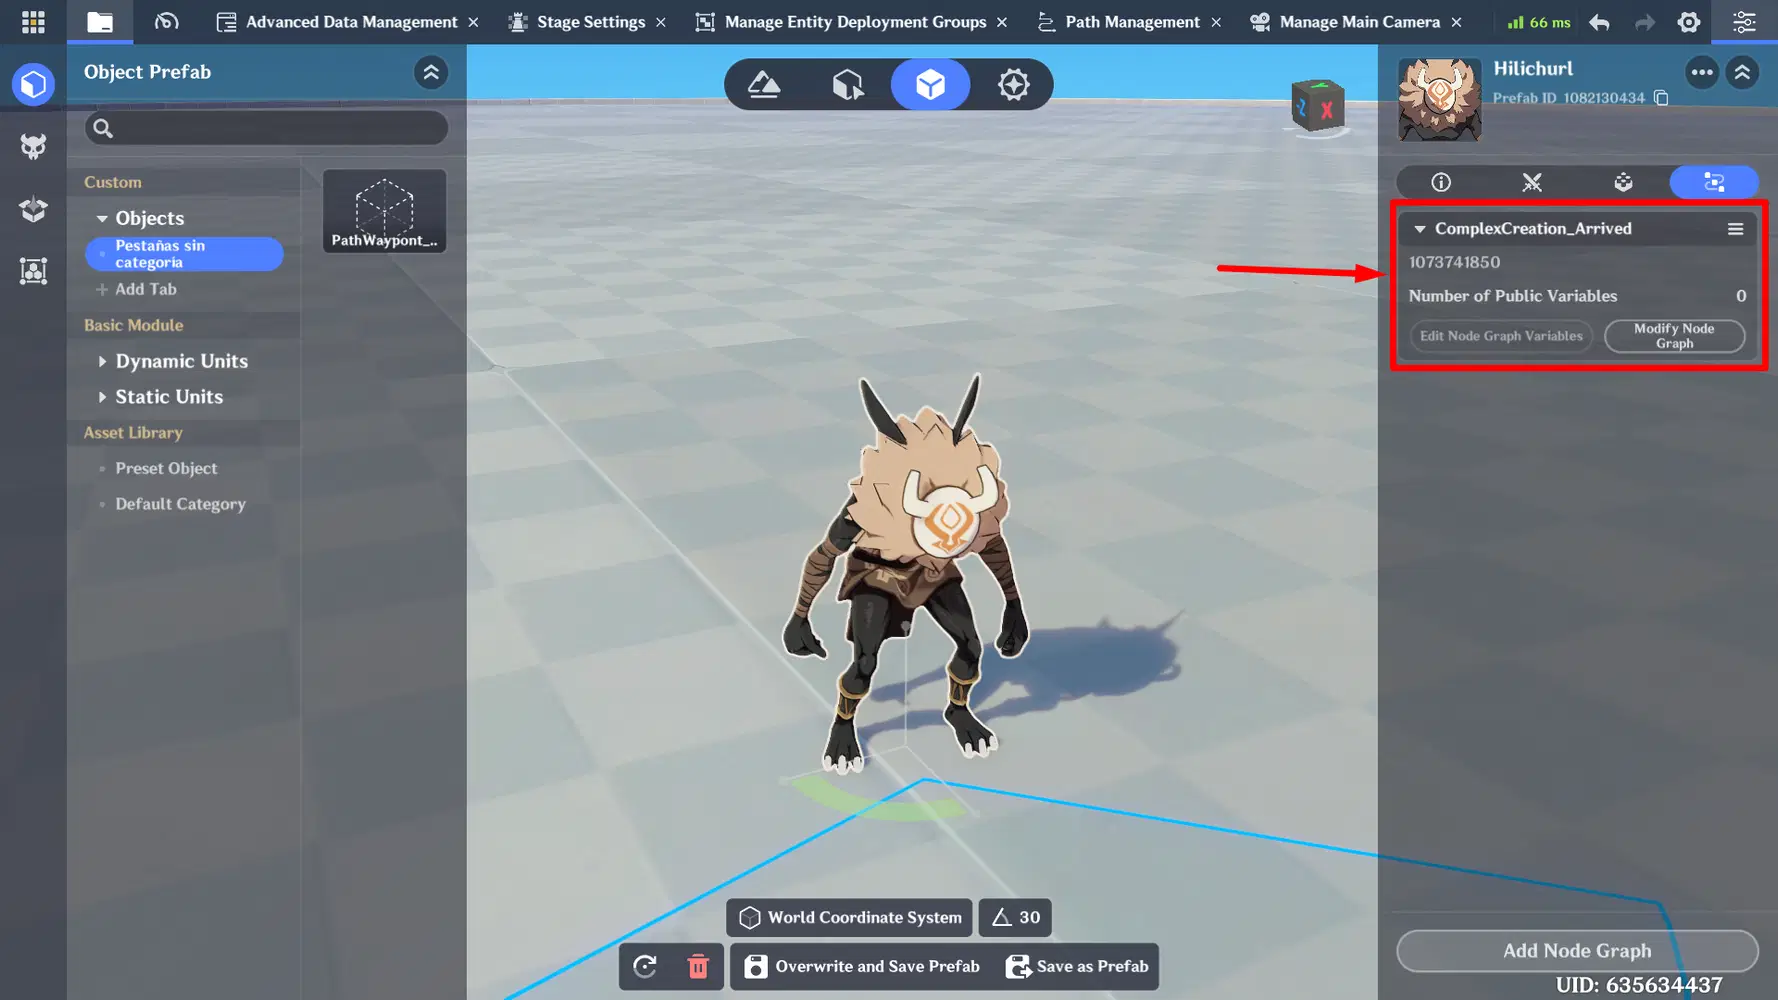
And It should be working now!
Final Setup
Now, how we use it?
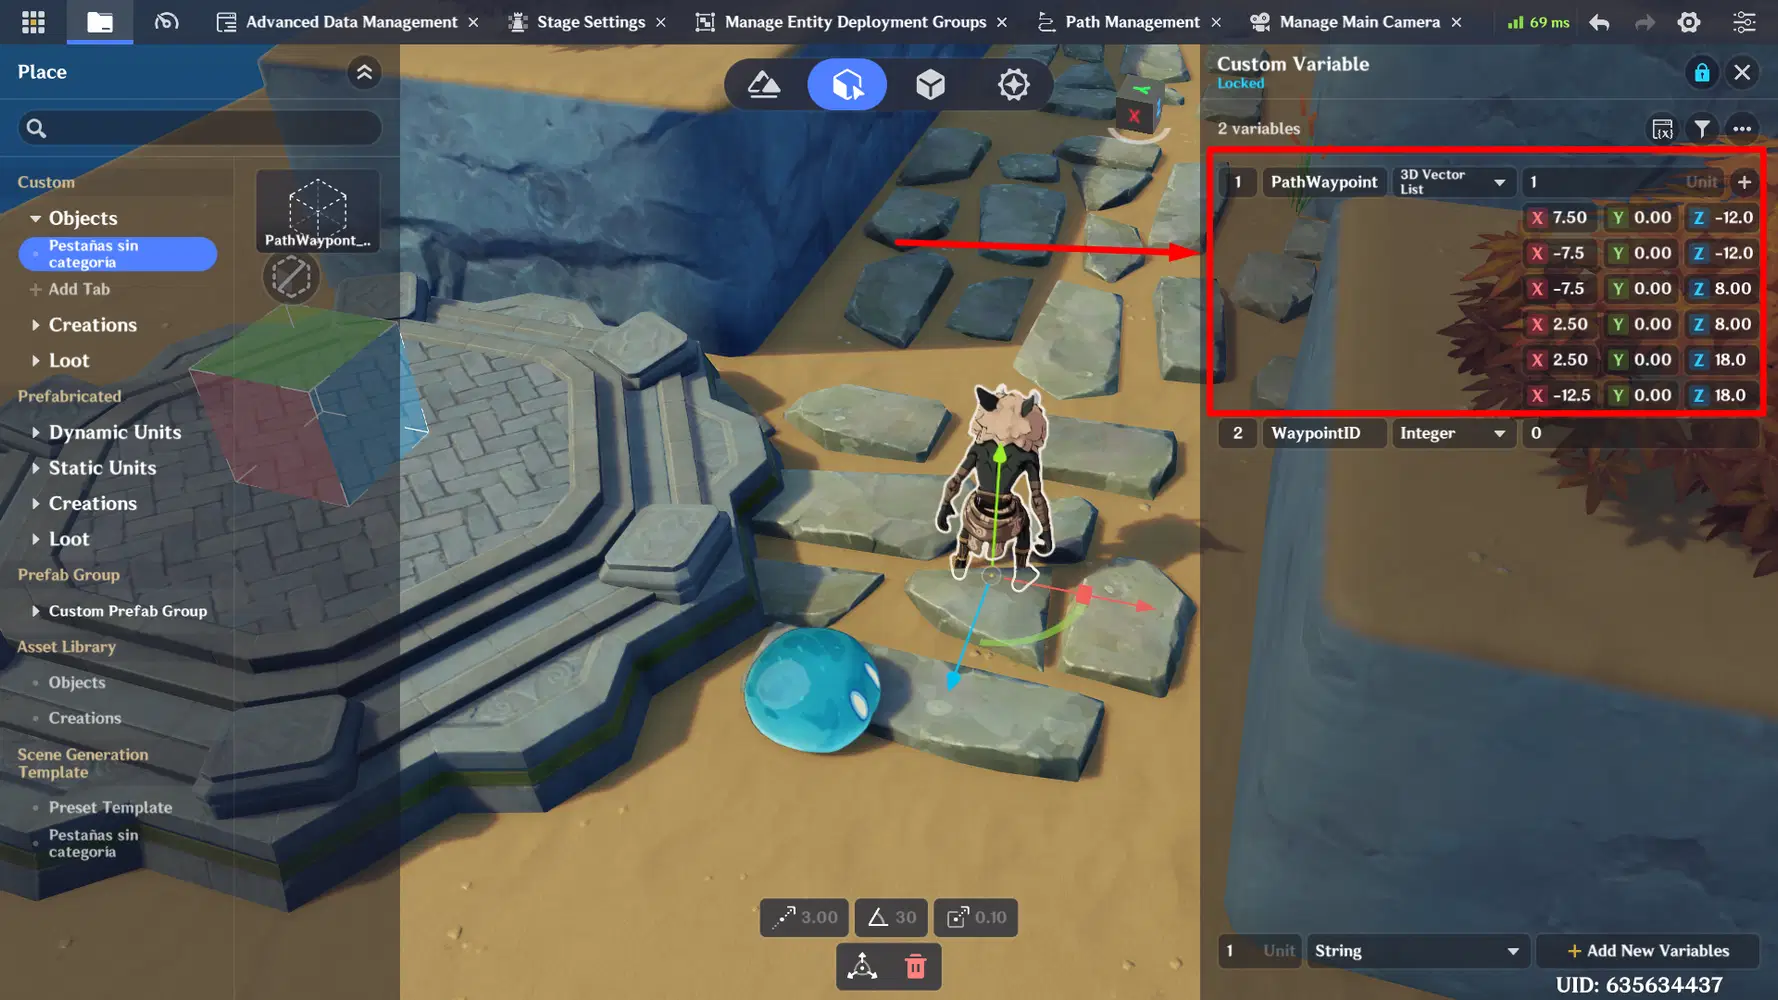
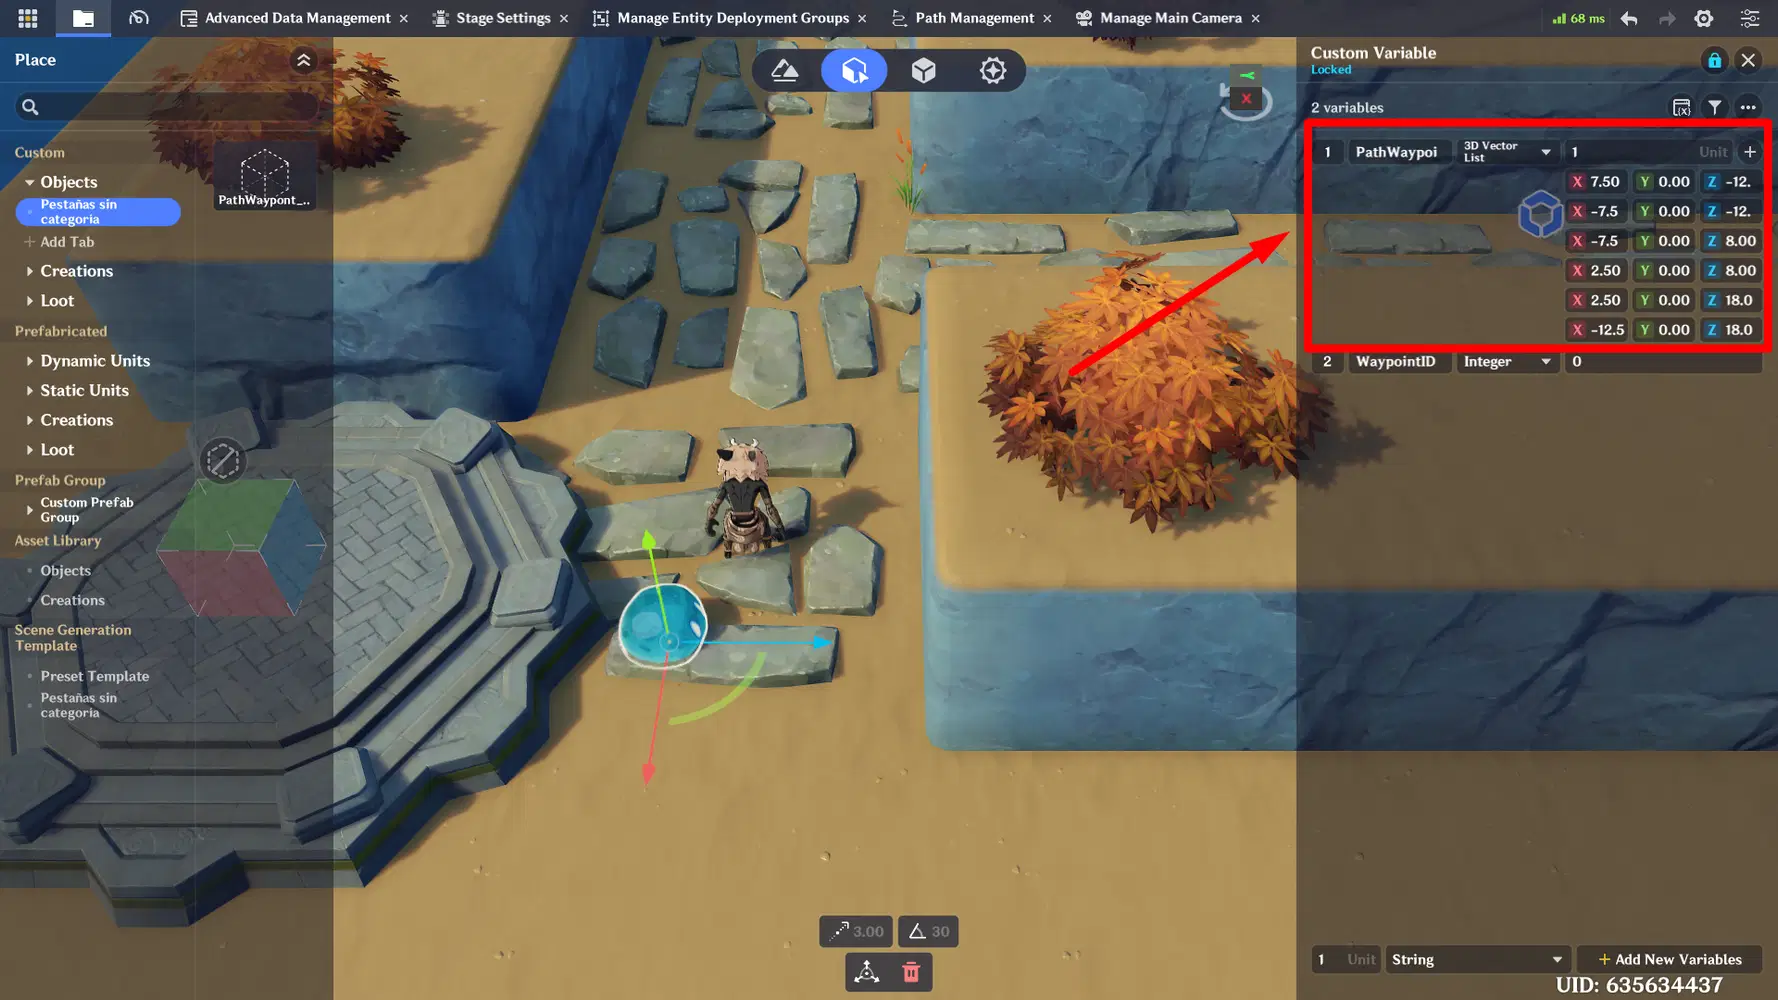
It's simple; you just need to fill the Custom Variable List PathWaypoints we made before.
To do this you can set it the way it suits your needs best.
It can be manually, or you can have your Custom Paths stored in Data Structures, Lists or Dictionaries, And set them up dynamically or logically through a Node Graph when your creations are created. So you can have full control and customization of this paths!
You can even randomize the routes they will follow thanks to this, or set a different one everytime the map changes.
Custom Paths for Basic Creations
Now, regarding the Basic Creations, how can we make them follow this paths?
Although it may be a little tricky, is still possible. So let's get to it!
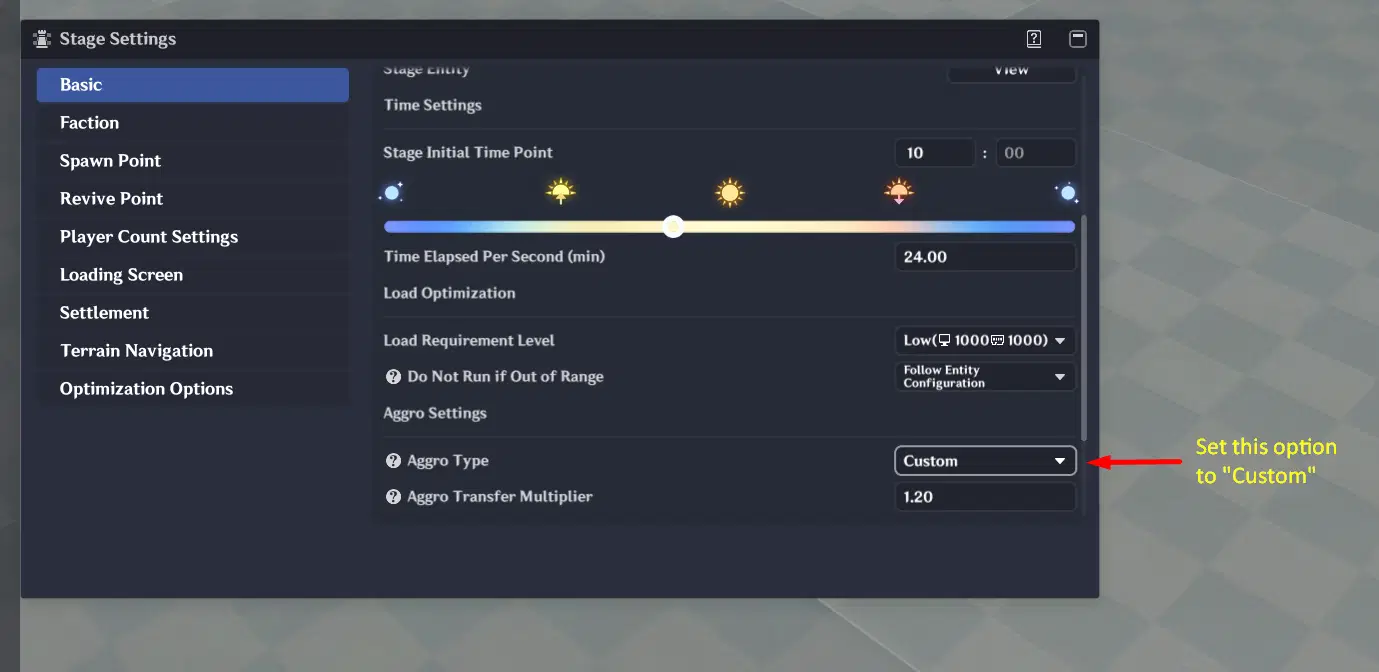
Important note: Before we start is important that we go to Stage Settings > Basic and we switch the Aggro option to "Custom". This will let us be able to set our custom rules for the Aggro of creations.
Custom Variables
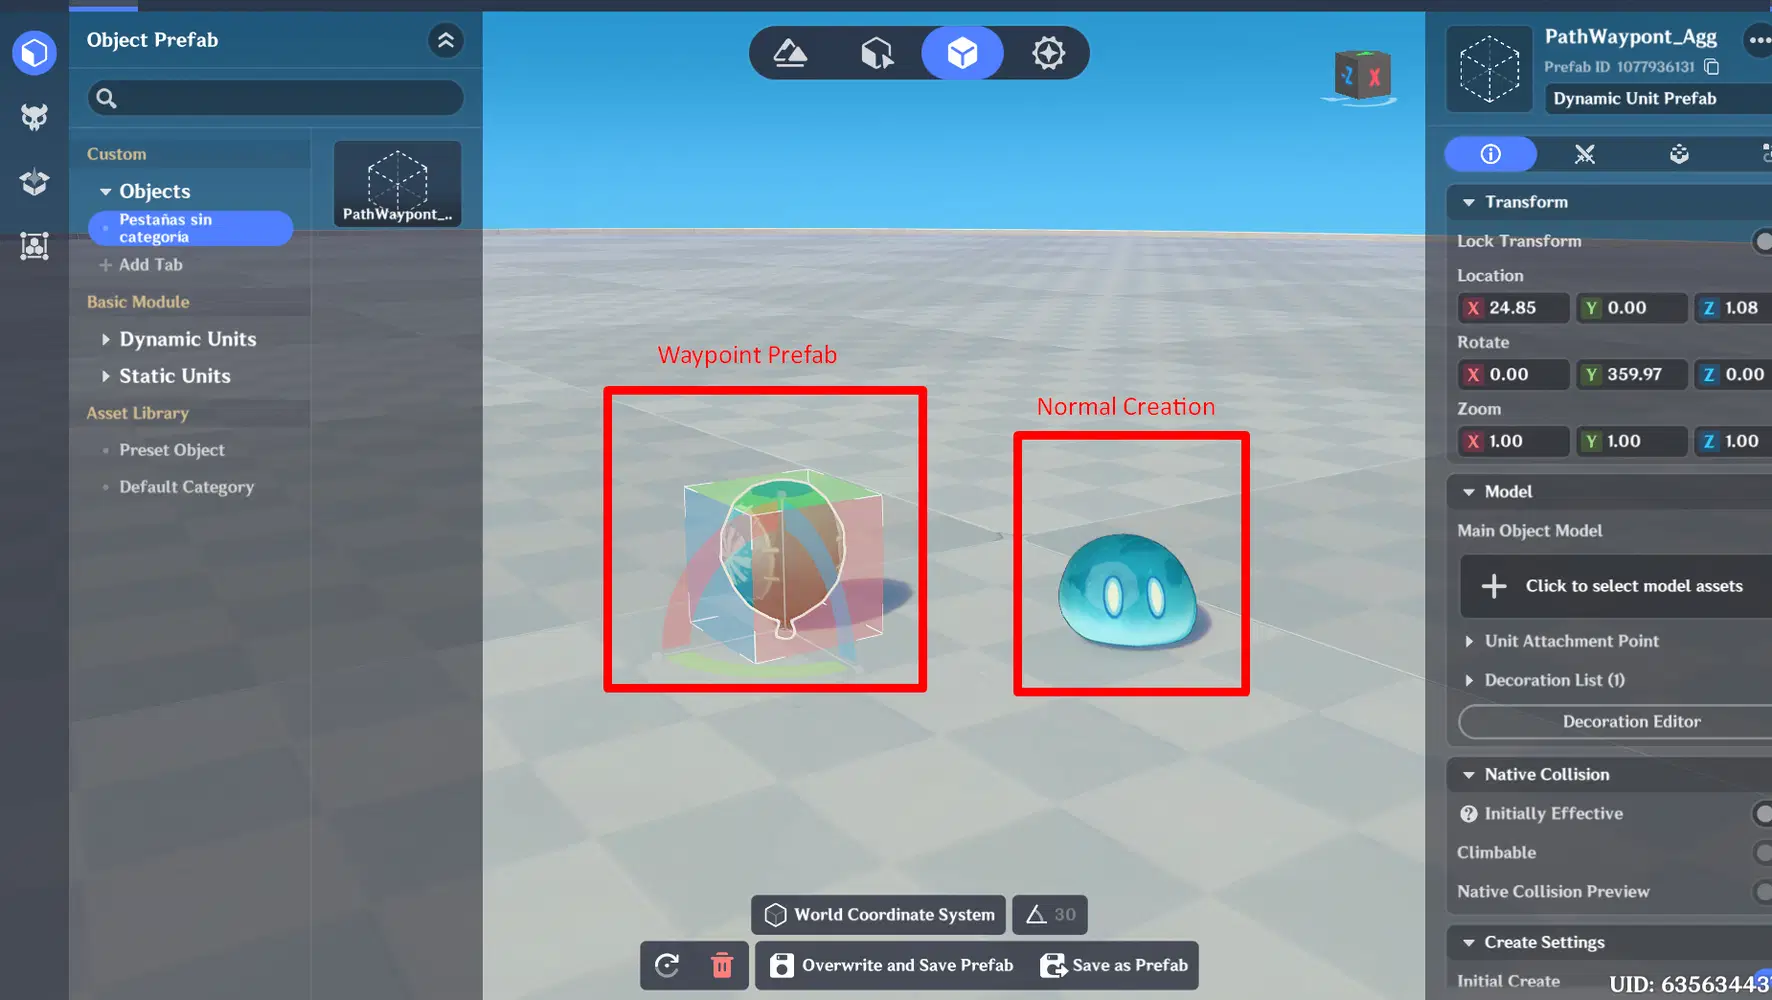
As our first step, you need to create a Custom Prefab that will work as our Waypoint in the path. It's job is easy, your creation will follow it.
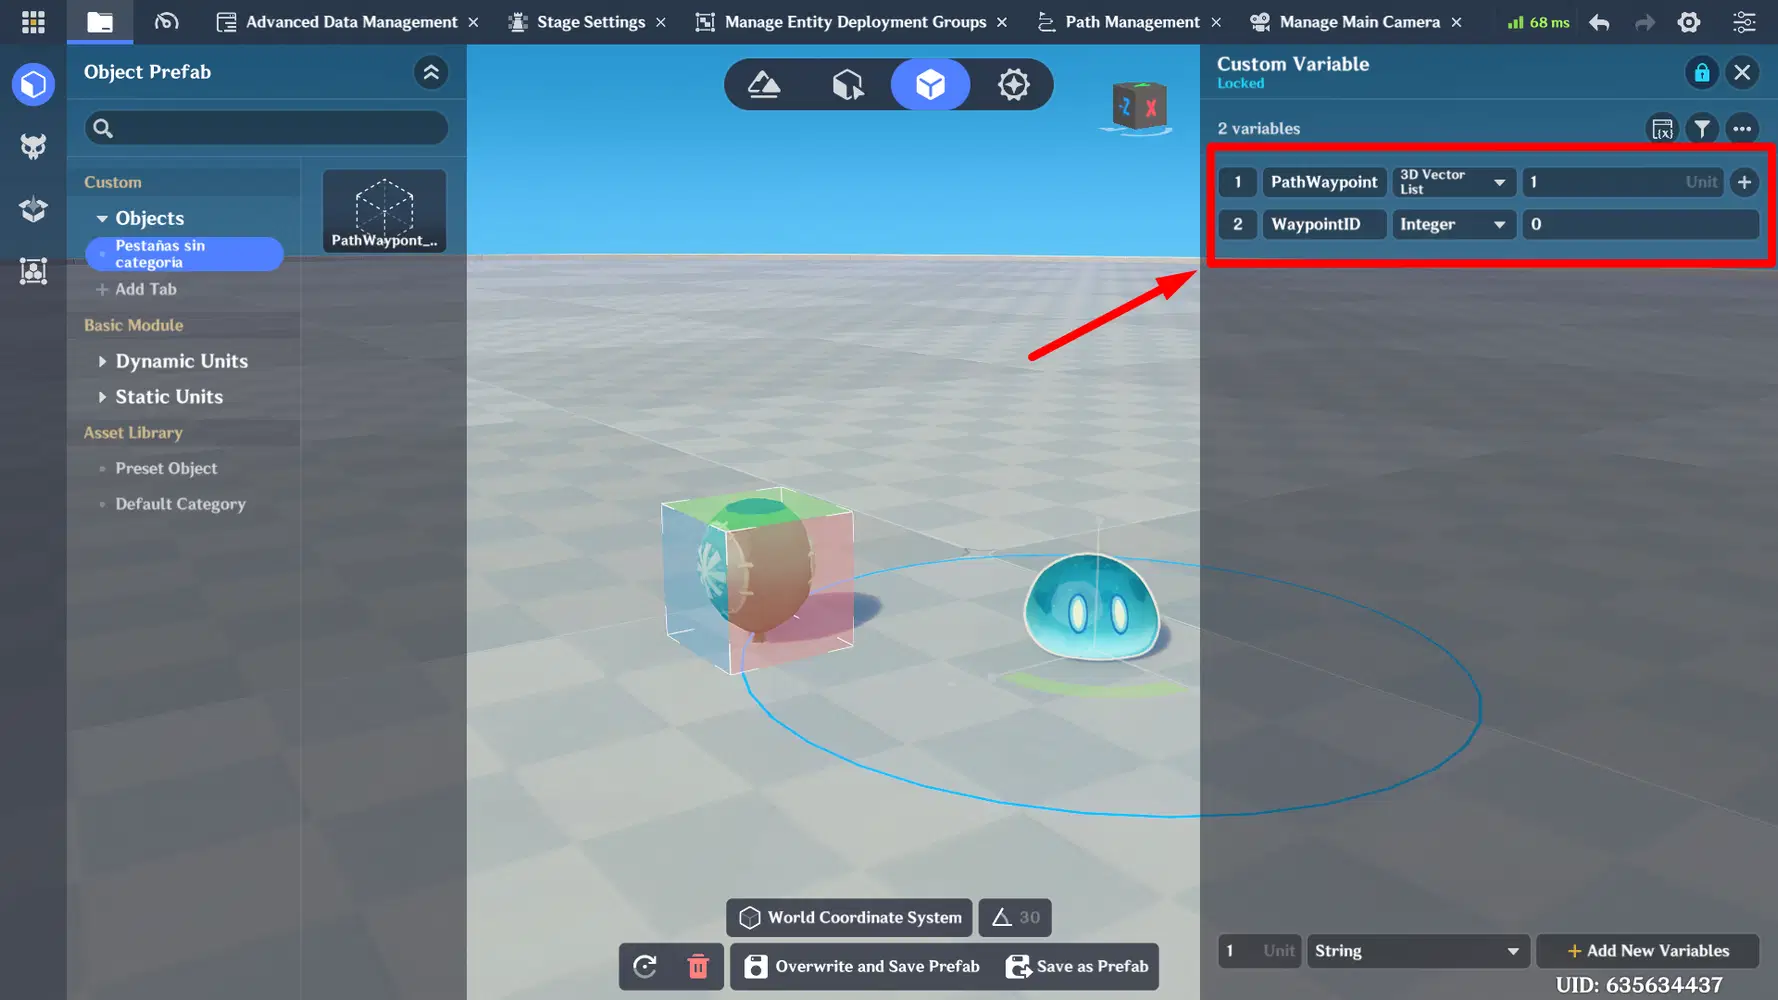
Then, we will add the same variables we used with the Complex Creation. A 3DVector List "PathWaypoints" and an Integer "WaypointID".
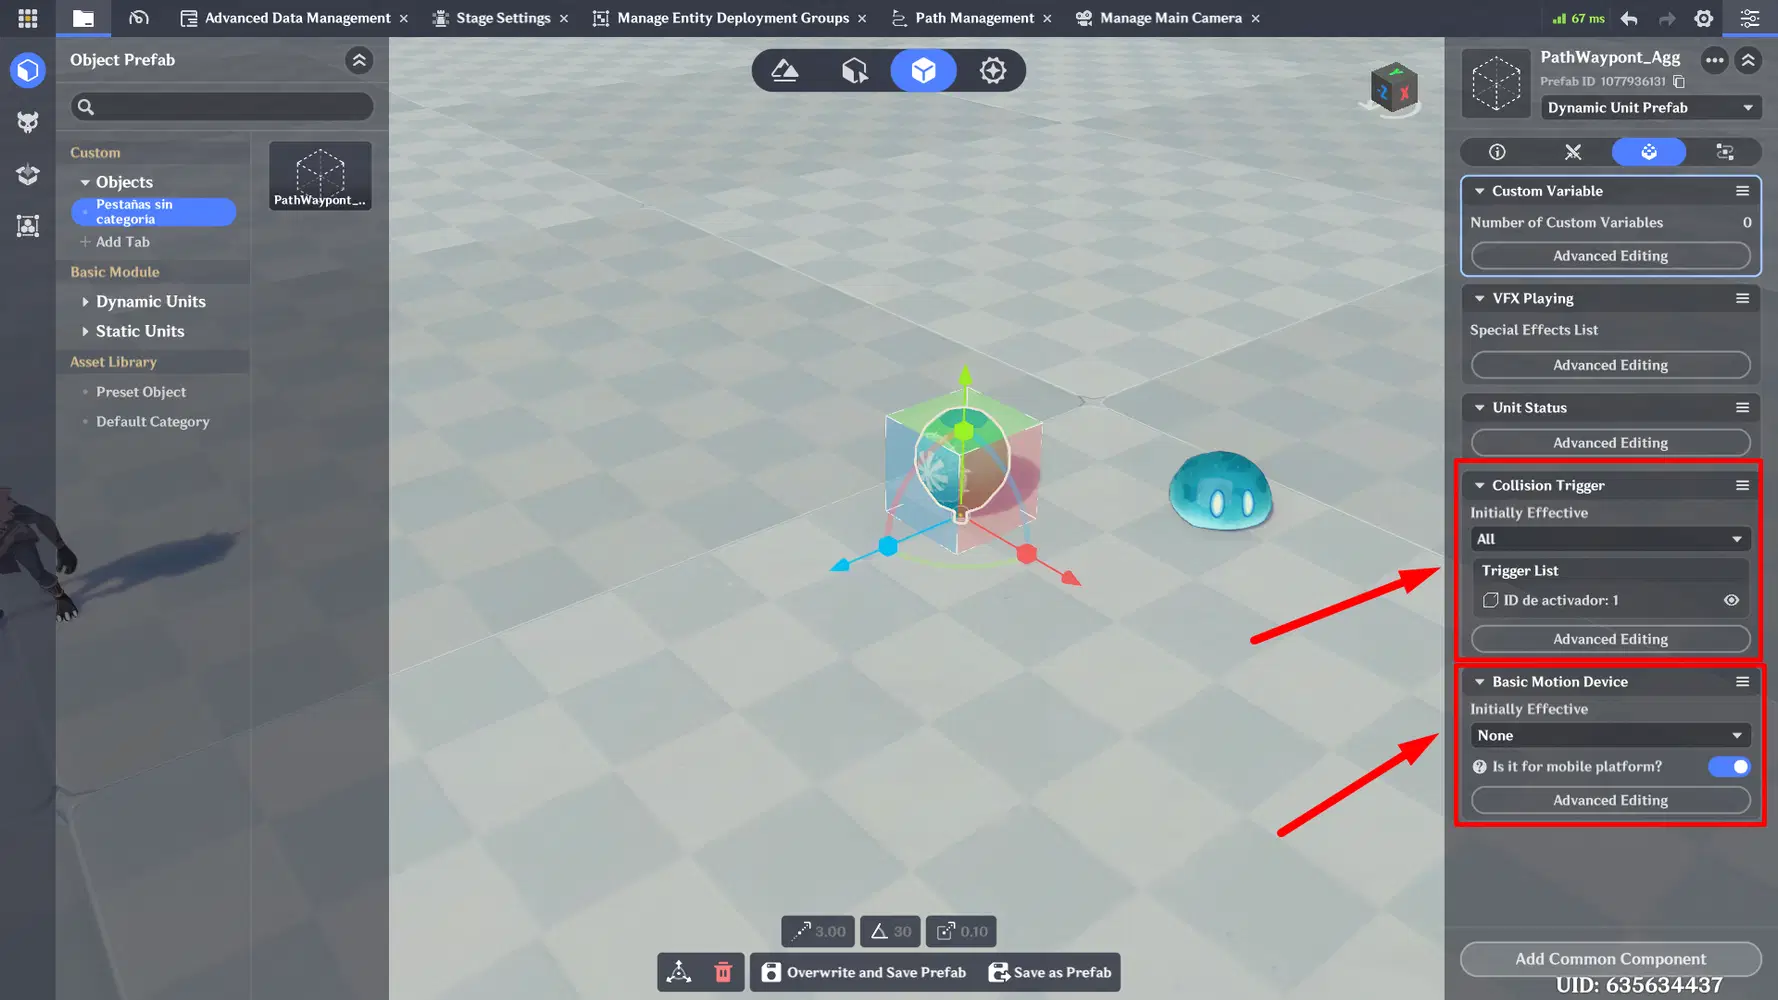
Important: The Waypoint Prefab ID should also have a Collision Trigger component that reaches the ground to detect everytime the Creation reaches the Waypoint.
Creation Standard Settings
Then we will set the Creation Standard Settings in their combat tab as we've seen here:
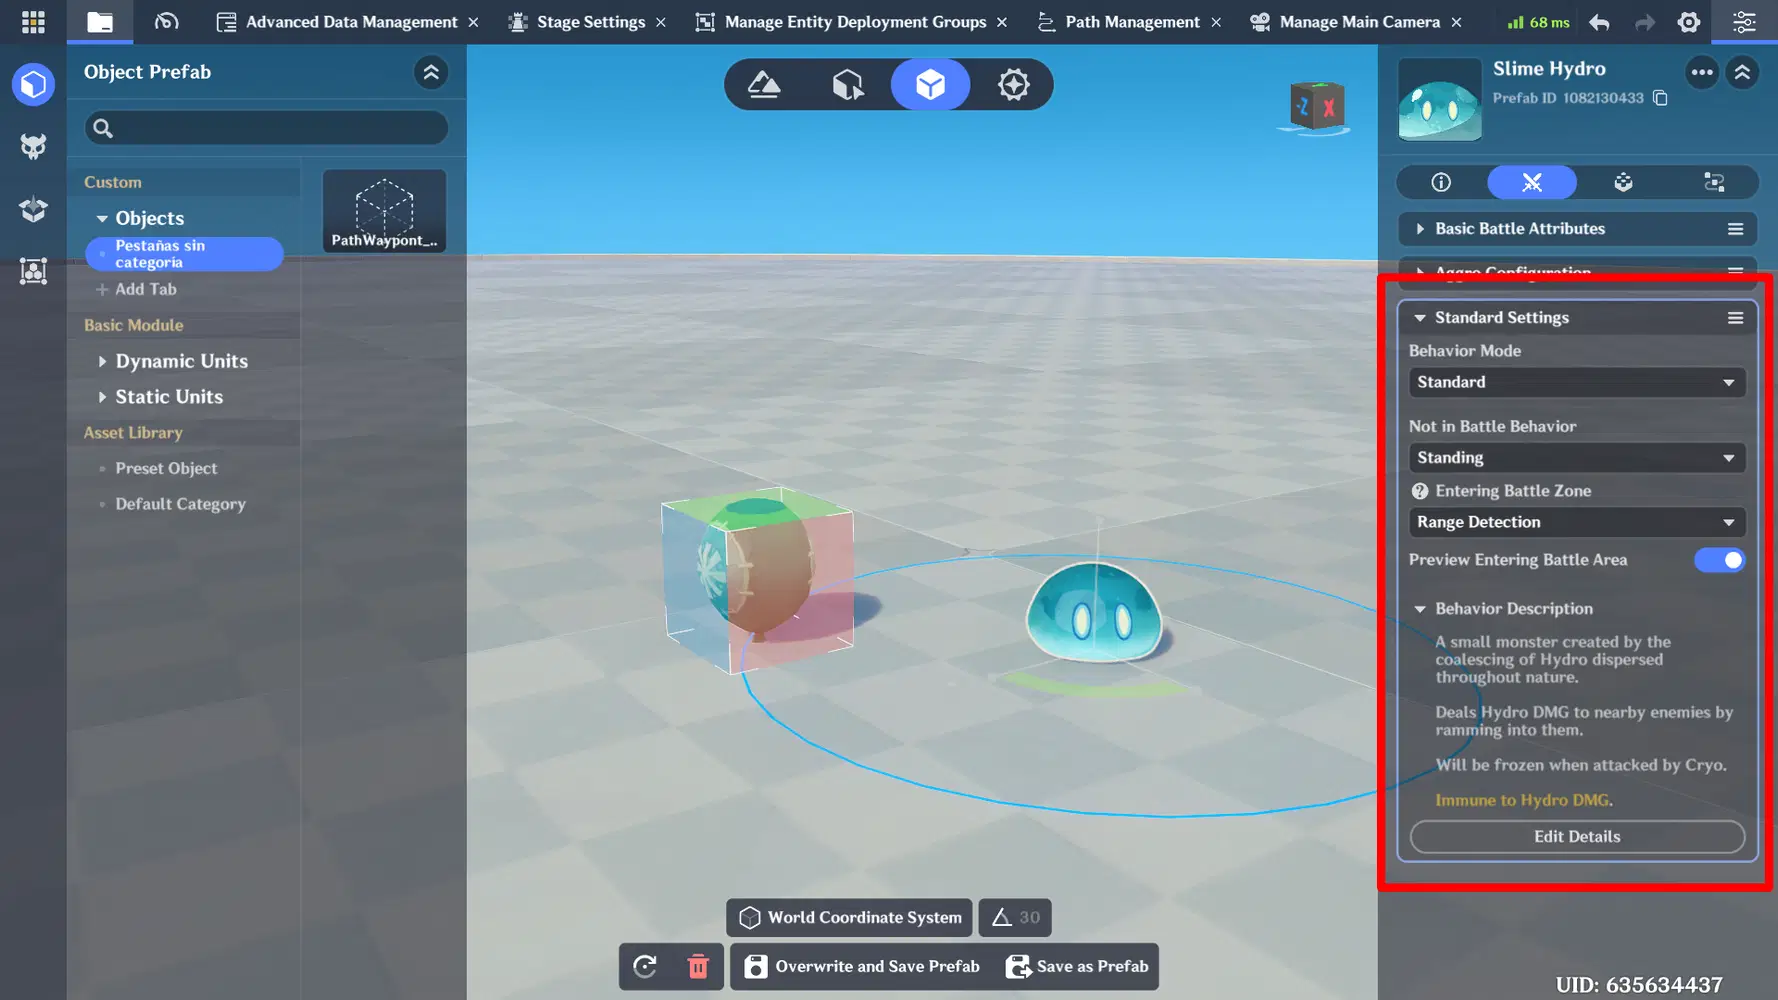
You must go to Edit Details and set it as shown below
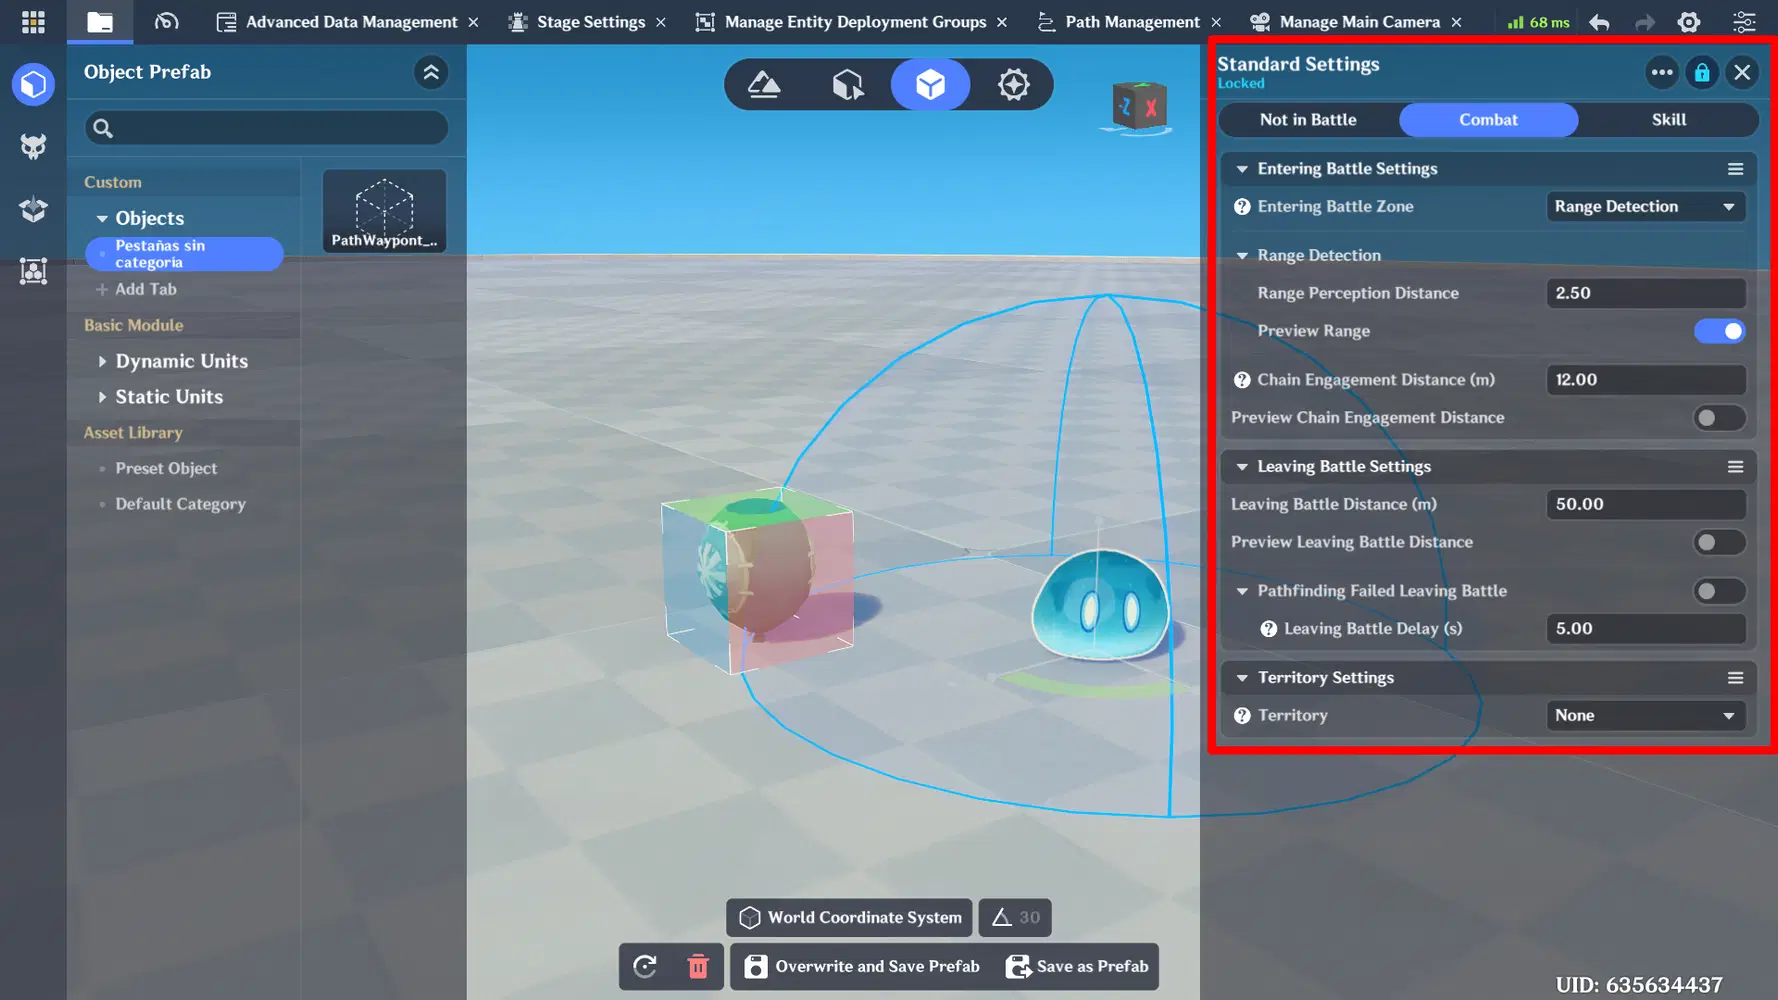
This is how the settings should look.
It's important to disable the Territory!
Server Nodegraphs
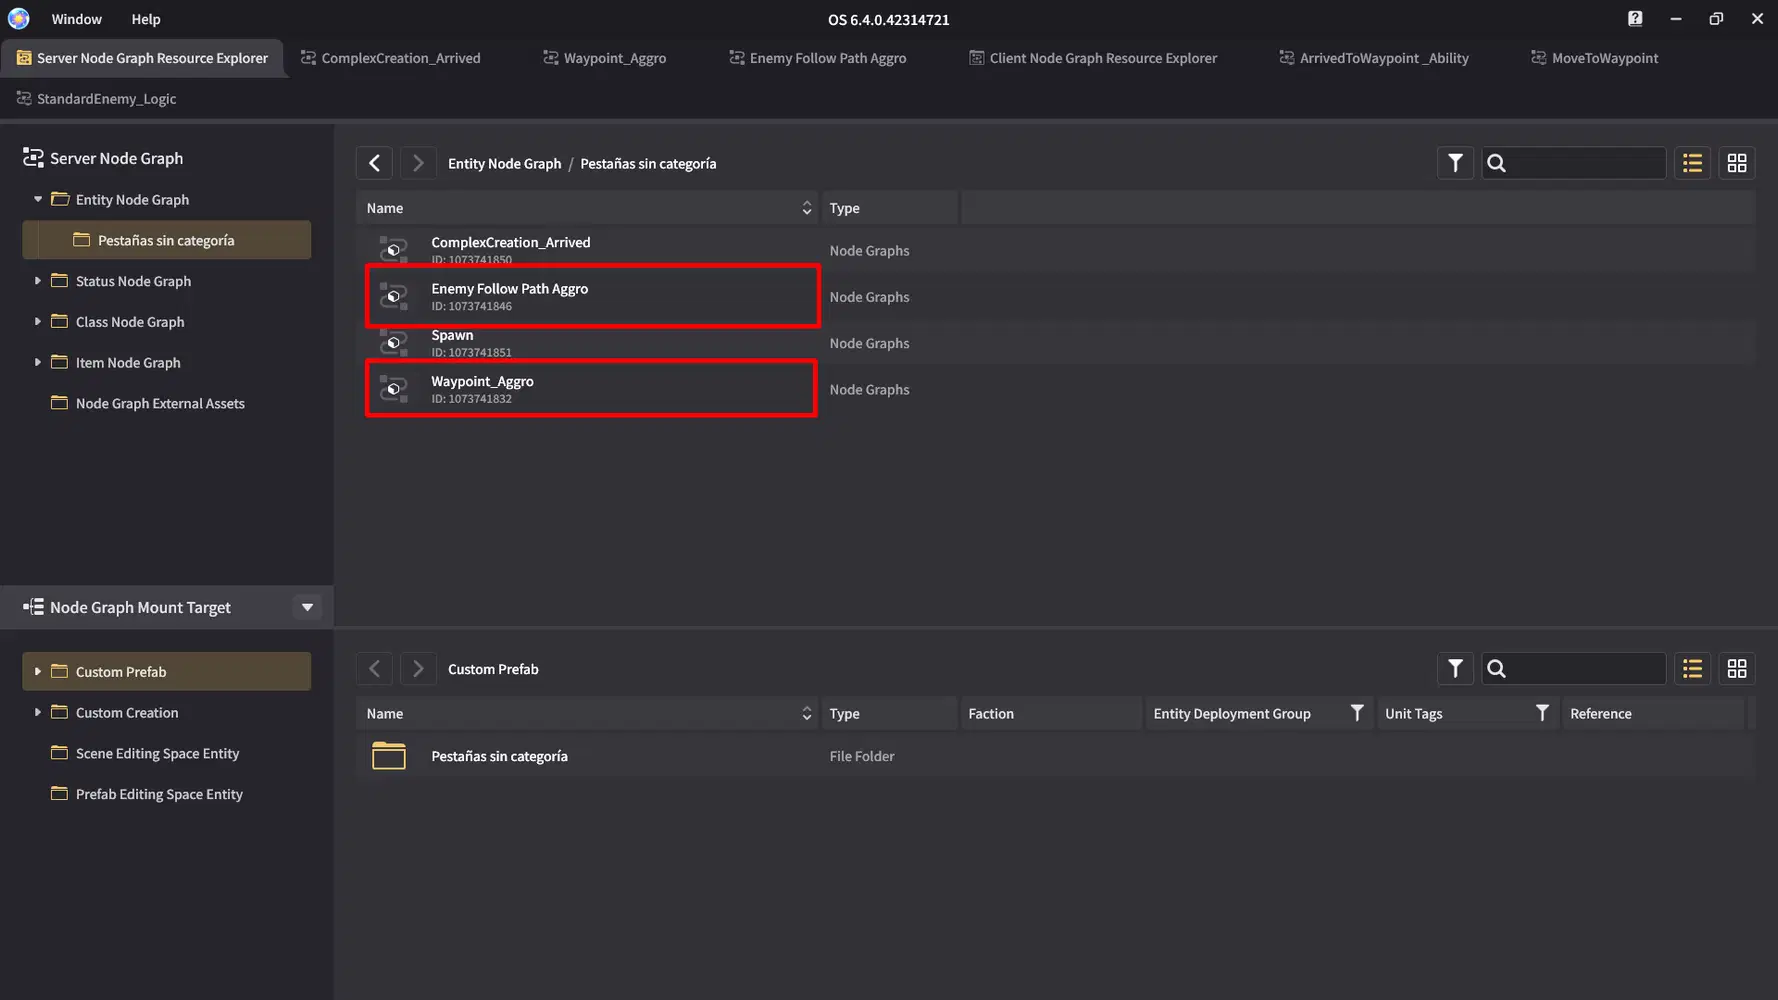
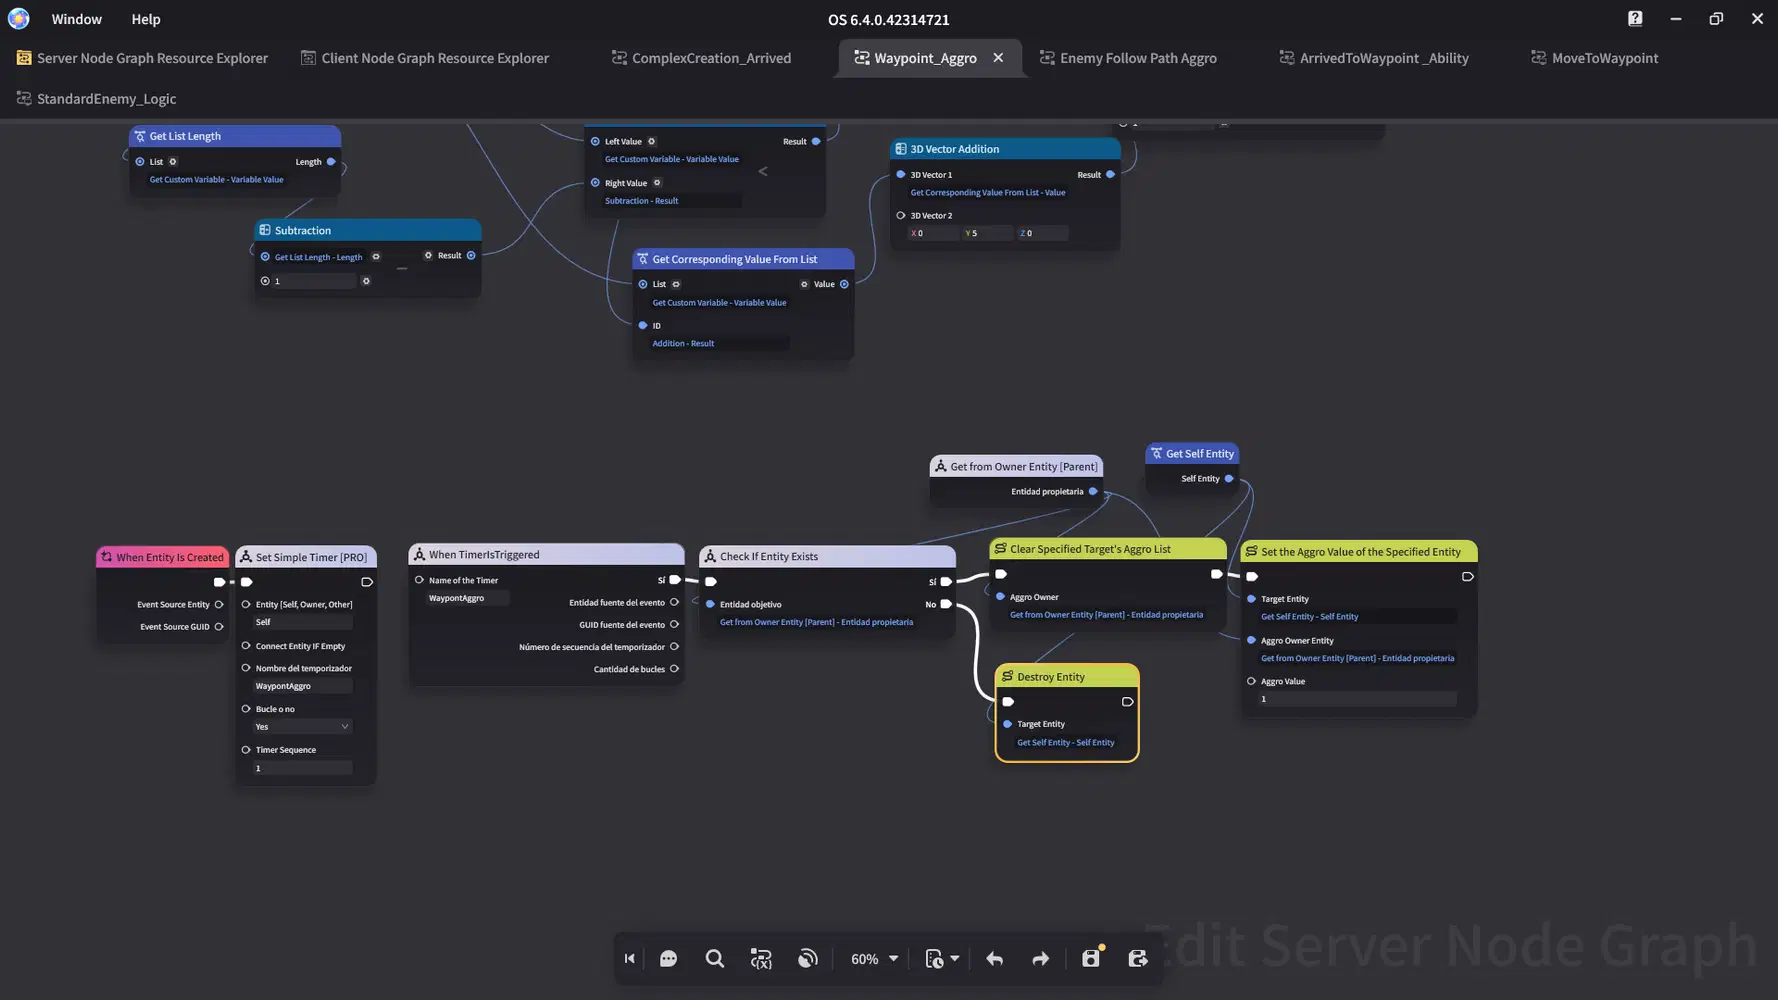
After that, we just need to create two Server Entity Nodegraphs. "Enemy Follow Path Aggro", that will be the Creation Node that goes into our creation; and "Waypoint_Aggro" that will be into the Waypoint Prefab we made.
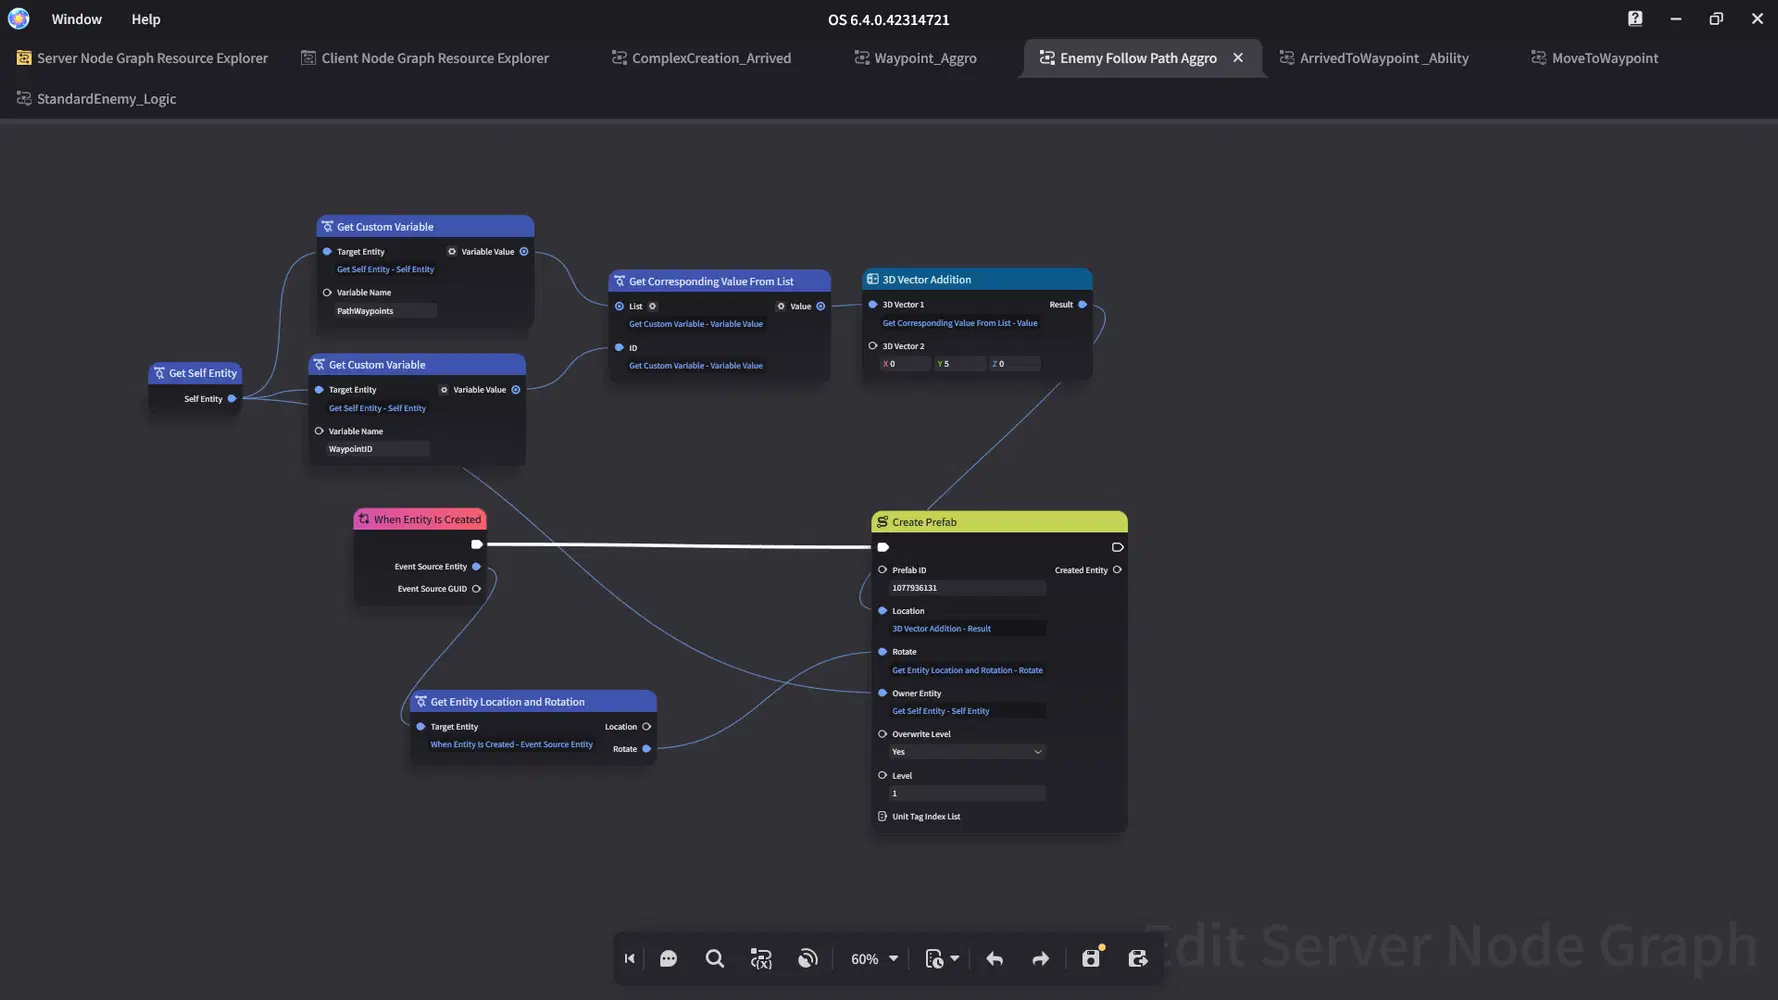
Enemy Follow Path Aggro
Enemy Follow Path Aggro is simple; it will create the Waypoint Prefab we made at the first Waypoint location. Note: Is really important that the Owner Entity of the Waypoint, is our Creation that creates it.
Waypoint Aggro
Waypoint Aggro, is a bit more complex, as it will control the waypoint and the aggro of our creation. it should look like this:
First Part: This part is in charge of the Waypoint Logic, when the Creation enters it's collision range, it adds +1 to the WaypointID; and teleports to the next waypoint, making the Creation to continue following it to the next location.
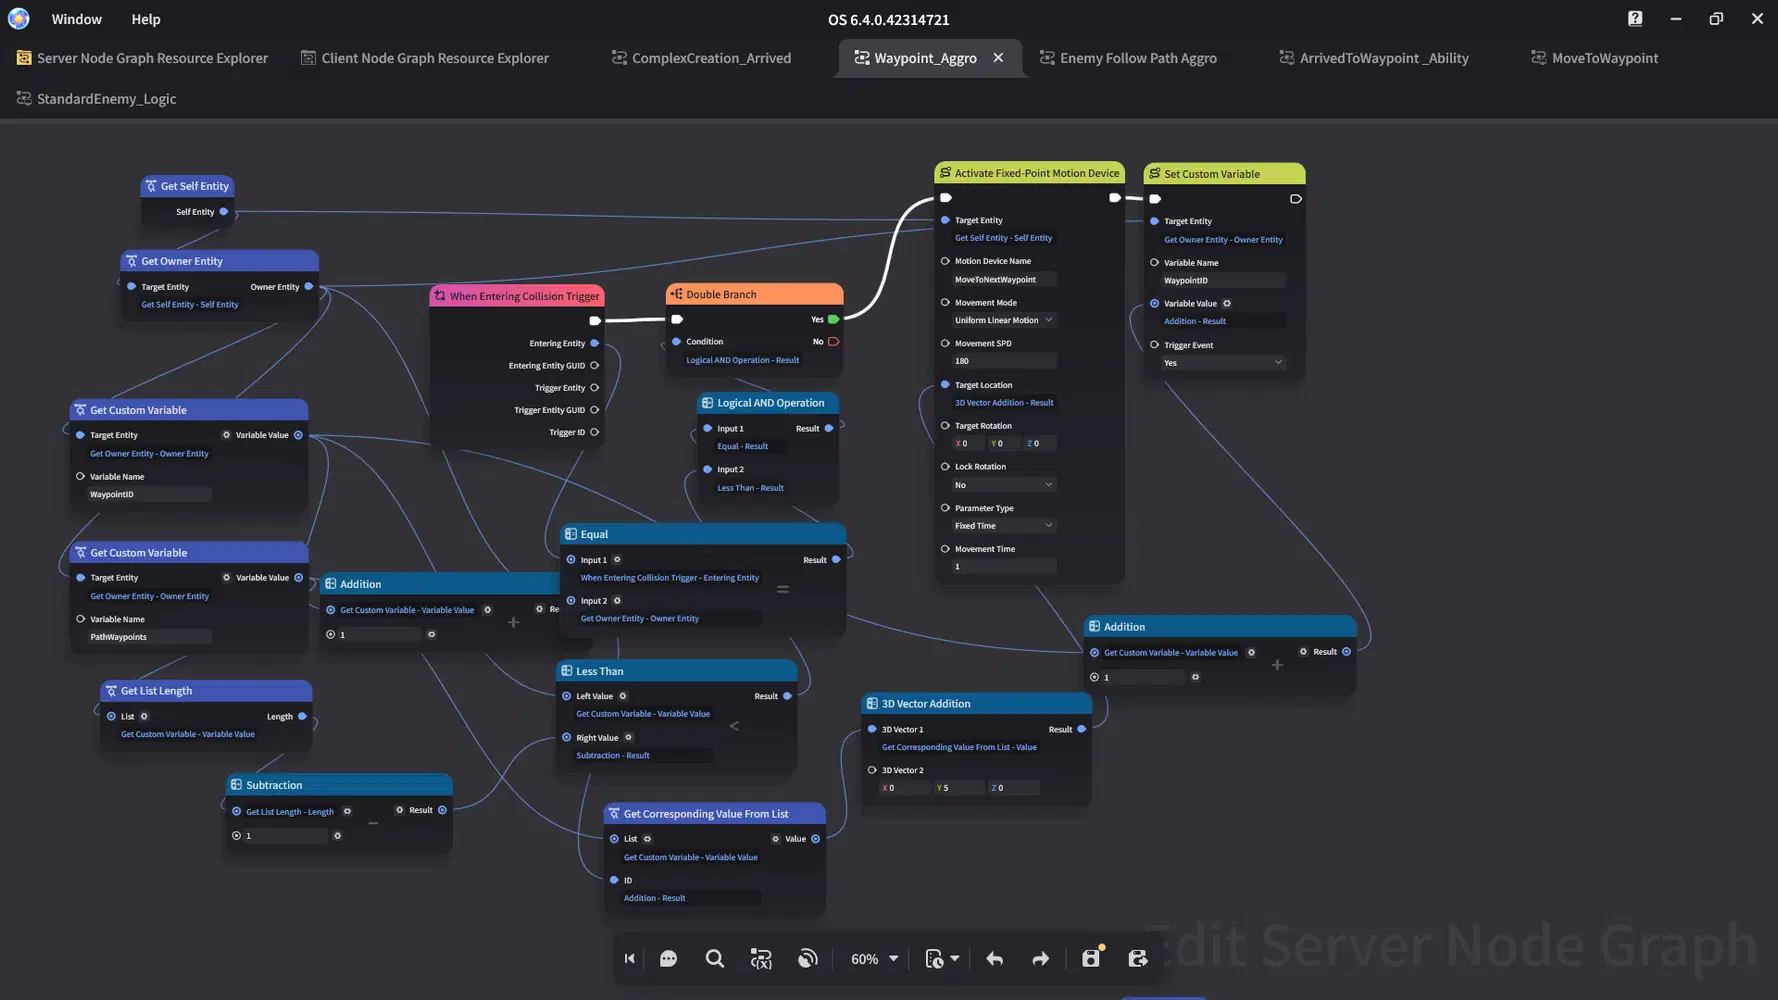
Second Part: This second part of the nodegraph, is in charge of refreshing the Aggro of the entity, so it continues to follow the path.
Note: Clear Specified Target's Aggro List could also be replaced by Remove Target Entity From Aggro List or Taunt depending of your needs or if the Aggro isn't working as you want. The later 2 could also work better depending in the situation.
Prefab Components
Finally, is important to add two components into the Waypoint Prefab:
- A Collision trigger: with the height enought to reach the floor or the creation that will follow it
- A Basic Motion Device: without it, the node won't work properly and the Waypoint will not move.
And, just like the Complex Creation one, add the Waypoints to the list and it should be working now!
Everytime the Creation spawns, it will create it's own Waypoint to follow!
Video Tutorial
Conclusion
We reached the end and now you have another way to implement Paths and Routes to your creations.
Remember that this only helps you to set the basics of a Custom Pathing system, but your creativity can let you to build much more complex ideas and logic to your creations. Have fun experimenting with extra skills or actions for your creations!
Finally, here's a finalized version of this system if you want to try: https://act.hoyoverse.com/ys/prod/ugc/component-store/index.html#/item/2041480458427998208.
Hope this guide could be of help! Thank you for reading!