


Content Overview
Welcome, Creators! 
In this guide, we'll explore several editor features that can help you build, organize, and manage larger scenes in Miliastra Wonderland.
Although some of these features are often overlooked by many creators, these features can actually become increasingly important as a stage grows in size and complexity, especially for scene designers working on large environments and multi-map projects.
So we'll take a closer look at these systems, such as:
- Entity Deployment Groups: for managing large numbers of entities as groups that can be activated or deactivated during runtime.
- Environment Configs: for creating atmosphere, lighting, and visual variations.
- Manage Light Source: for creating and managing environmental lighting.
- Resource Explorer: for finding and organizing entities in large projects.
- Prefab Groups: for creating reusable entity group, reusable scene layouts, and dynamic gameplay content.
1. Entity Deployment Group
Entity Deployment Group is used to organize entities into a group that can be activated or deactivated during runtime. This allows creators to load or unload specific sections of a stage as needed.
When a Deployment Group is deactivated, the entities within it are removed from runtime entirely. When activated again, they are recreated using the same Entity GUID shown in the editor.
One common use of Entity Deployment Group is switching between different versions of a map.
For example, a creator could build three different town variation for hide-and-seek game:
- Pink Town
- Green Town
- Brown Town
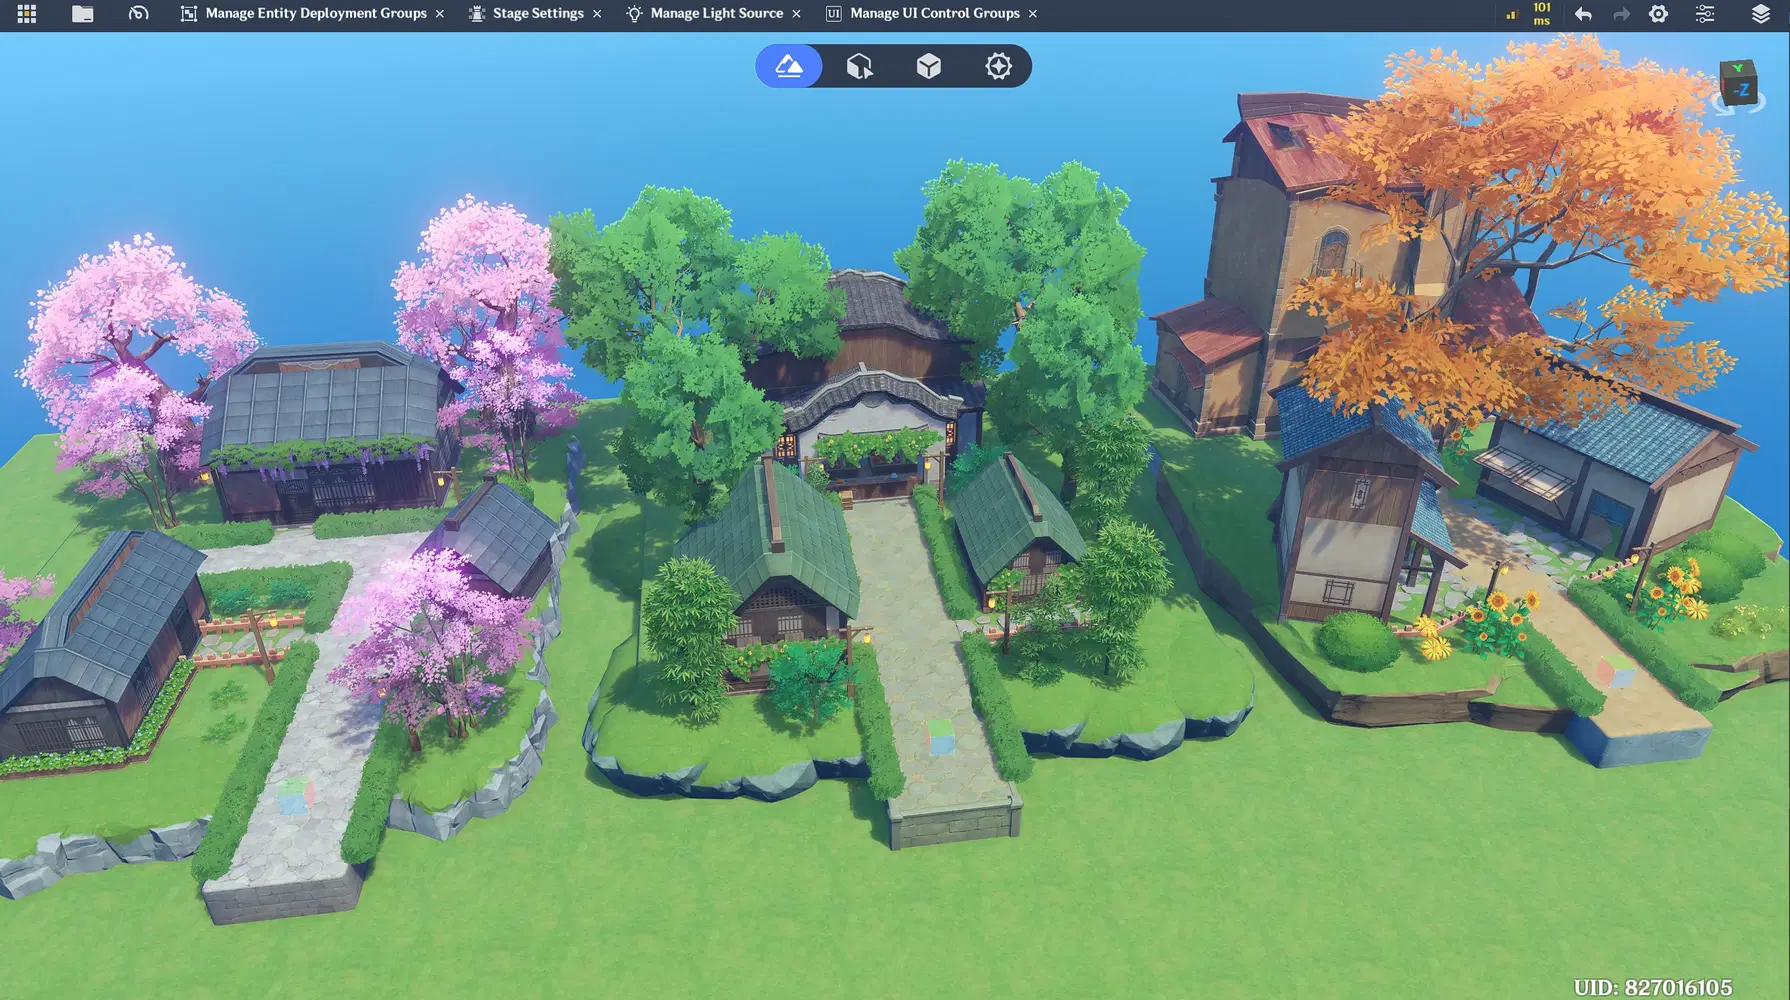
3 Town Map Example
Image above is just an simple illustration, and your actual project may be much larger
But rather than having all three areas loaded simultaneously, each area can be placed in a separate Entity Deployment Group and activated only when needed. This helps reduce unnecessary runtime load while keeping the project easier to manage.
Another advantage is, it can becomes easier to separate content into distinct areas, gameplay states, or progression stages that can be activated independently. For example, in a story-driven stage, certain entities may only need to exist during specific parts of a quest. Entity Deployment Group make it easier to load or remove those entities as a group as the story progresses, helping large projects keep organized and easier to maintain.
✦ Create Deployment Group
Let's try creating and adding entities into an Entity Deployment Group. Practicing directly usually helps you understand how to use this feature more quickly in the future. 
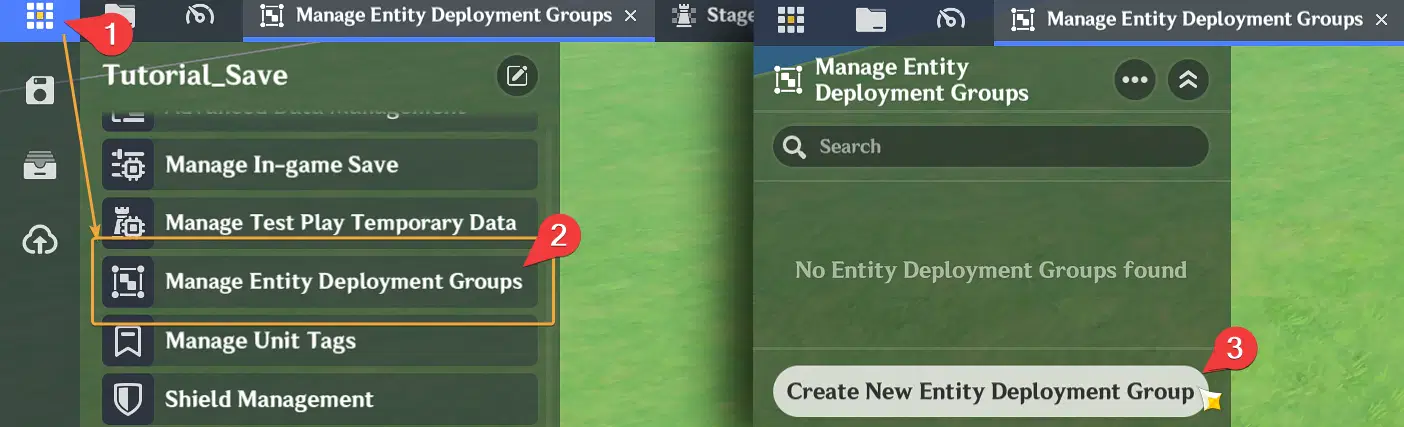
- Open the menu from top-left button, scroll down and click Manage Entity Deployment Groups. Then click Create New Entity Deployment Group.
- Right-click the newly created Entity Deployment Group and give it a name of your choice.
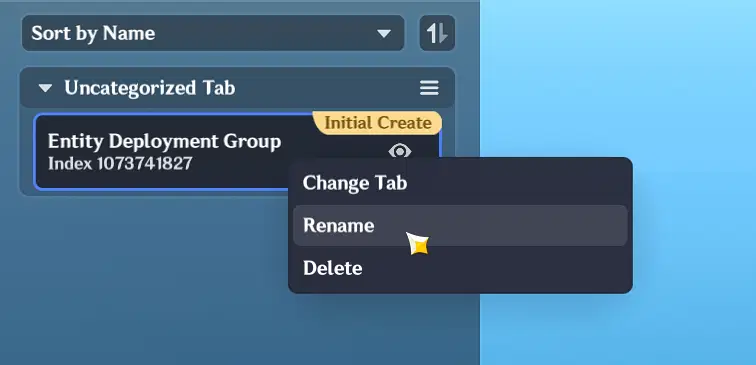
- For this example I have created 3 Entity Deployment Group for each town style.
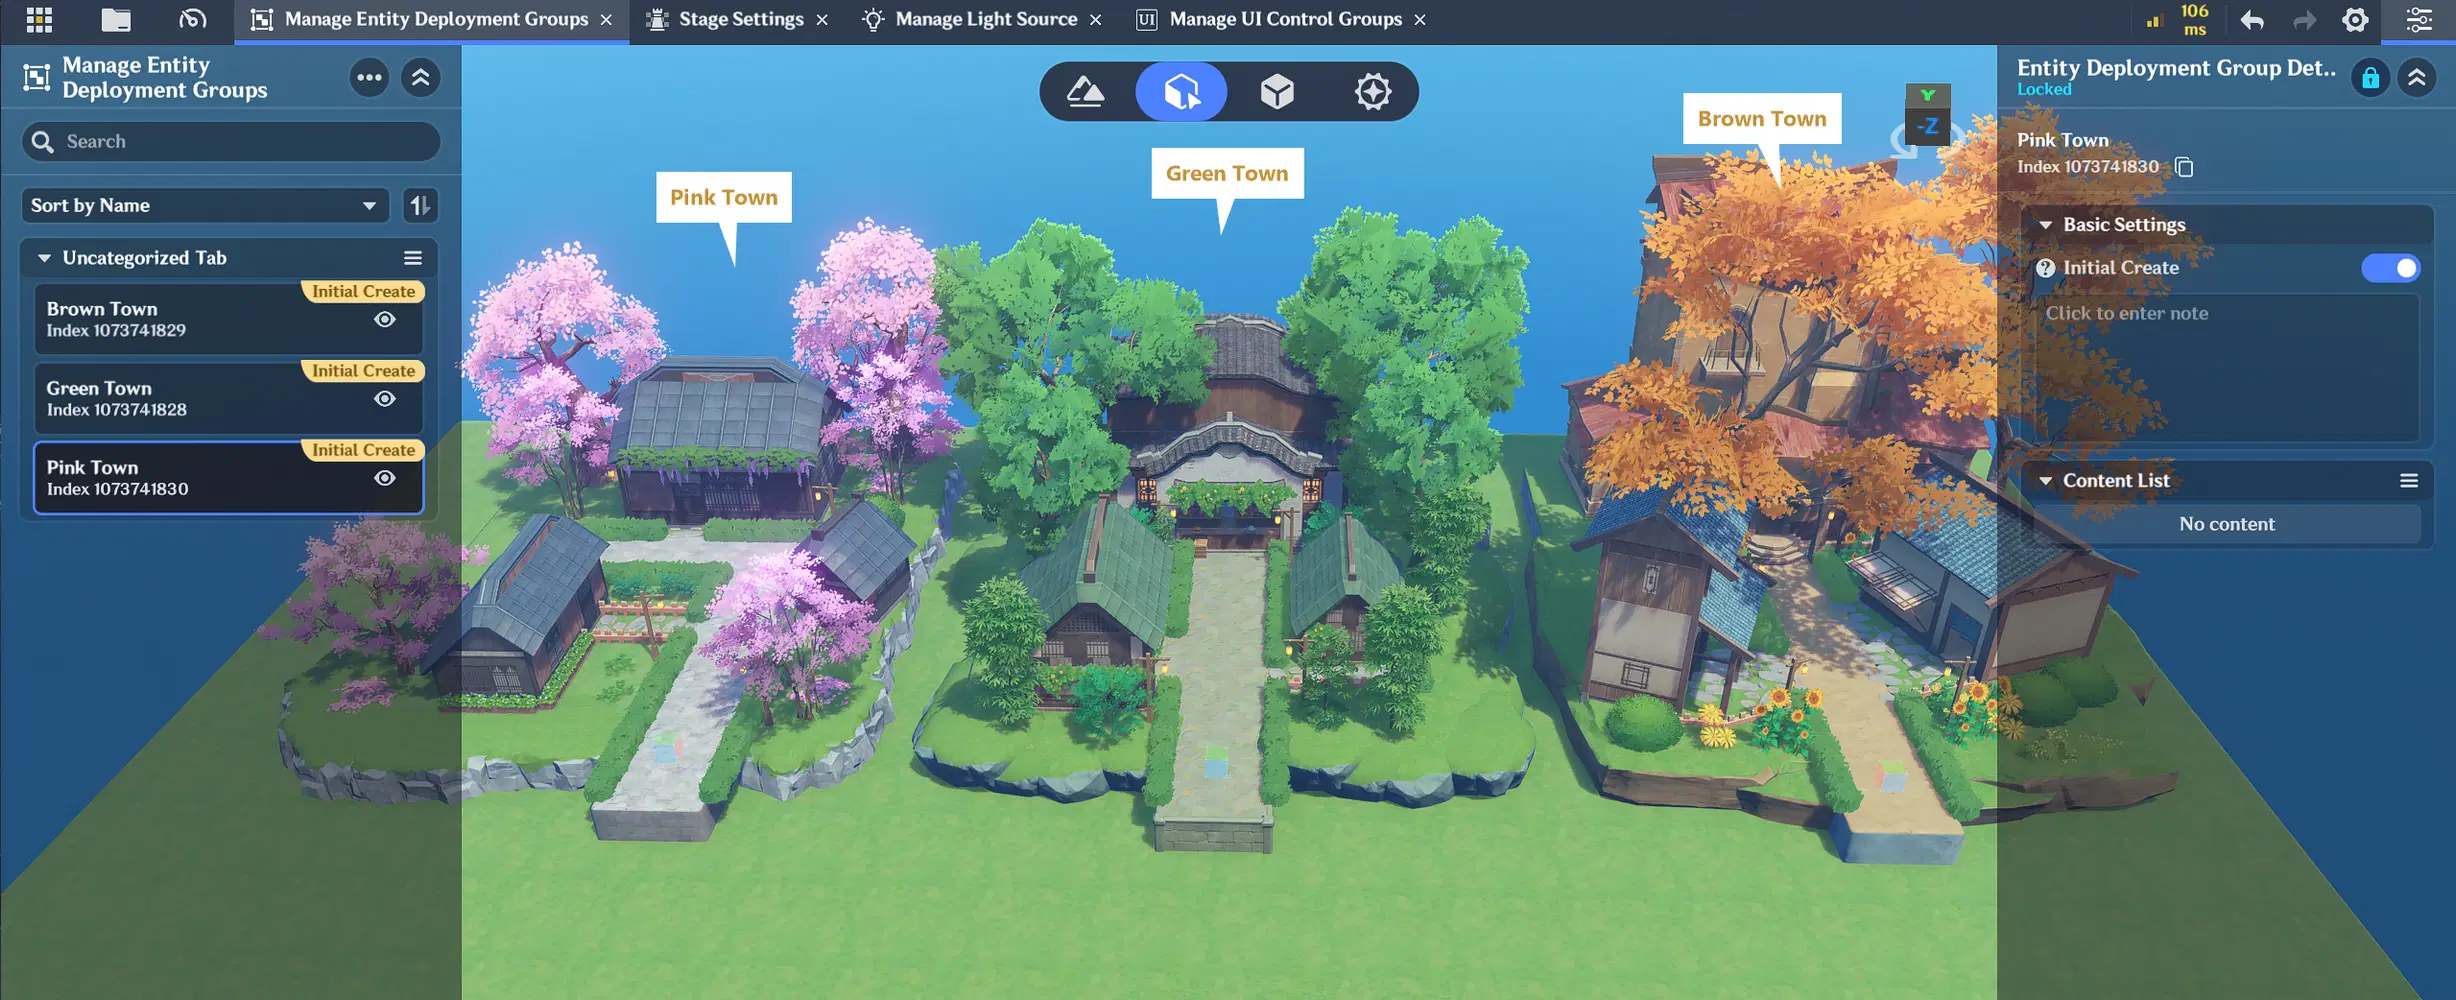
- Select all entities that you want to add to the Entity Deployment Group. You can also select terrain objects from the Terrain editing tab. Once everything is selected, right-click any selected entity and click Add to Entity Deployment Group.
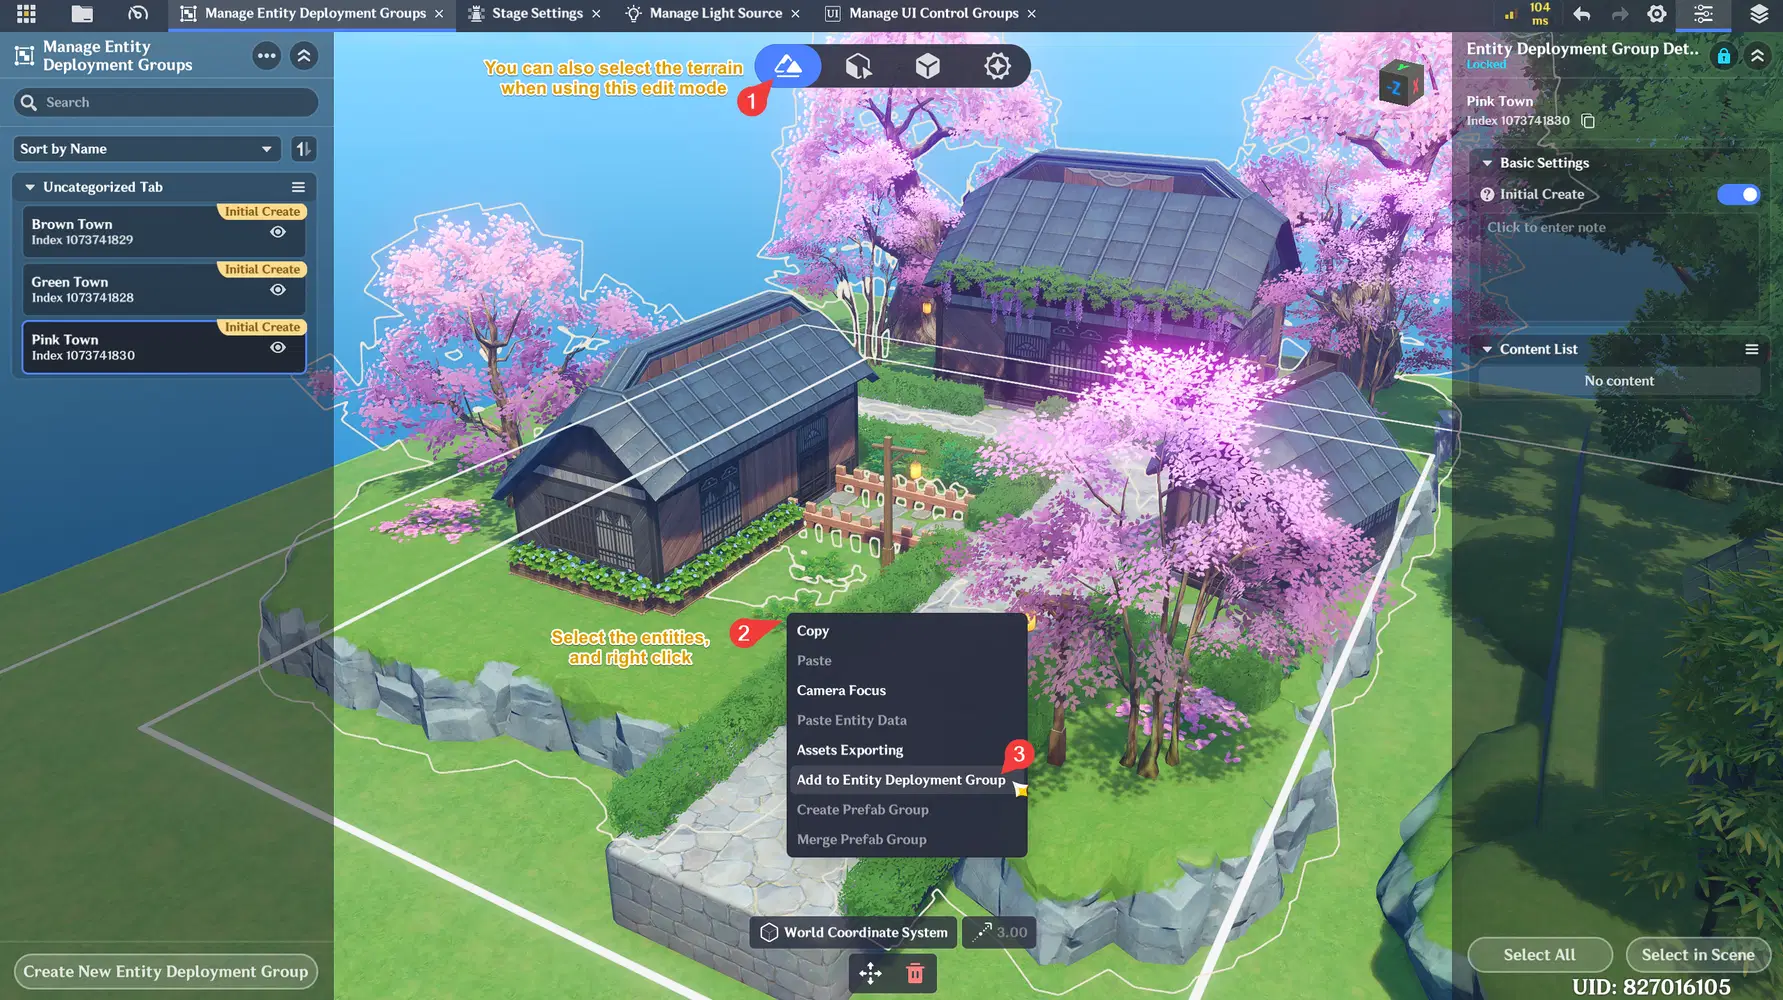
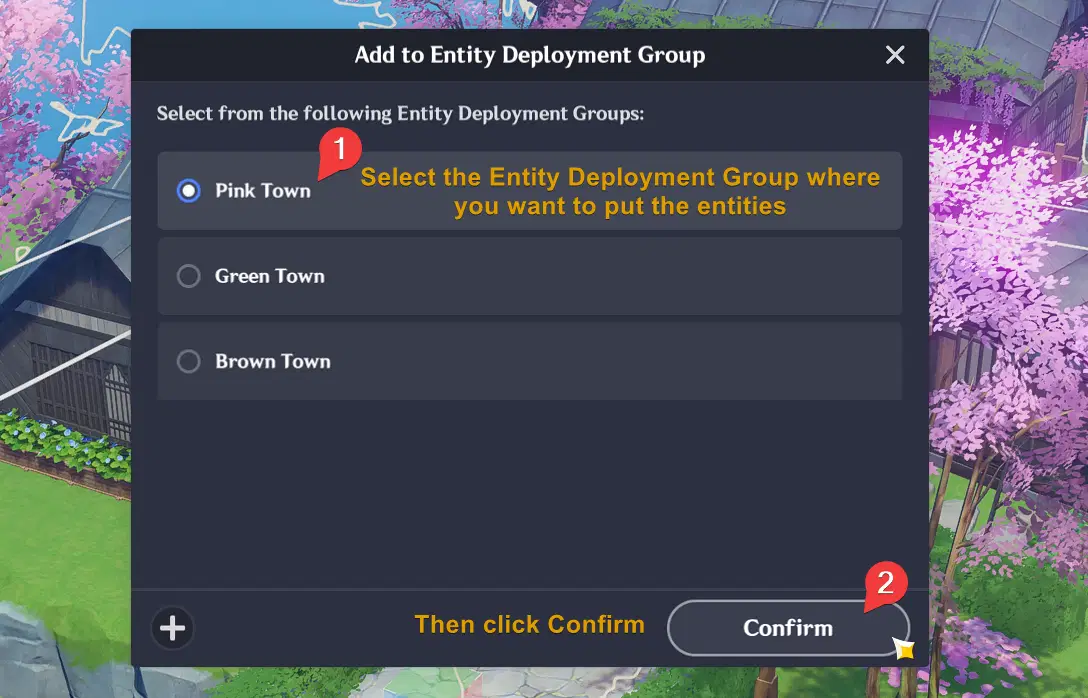
- A window will pop up where you can choose which Deployment Group to add the entities to.
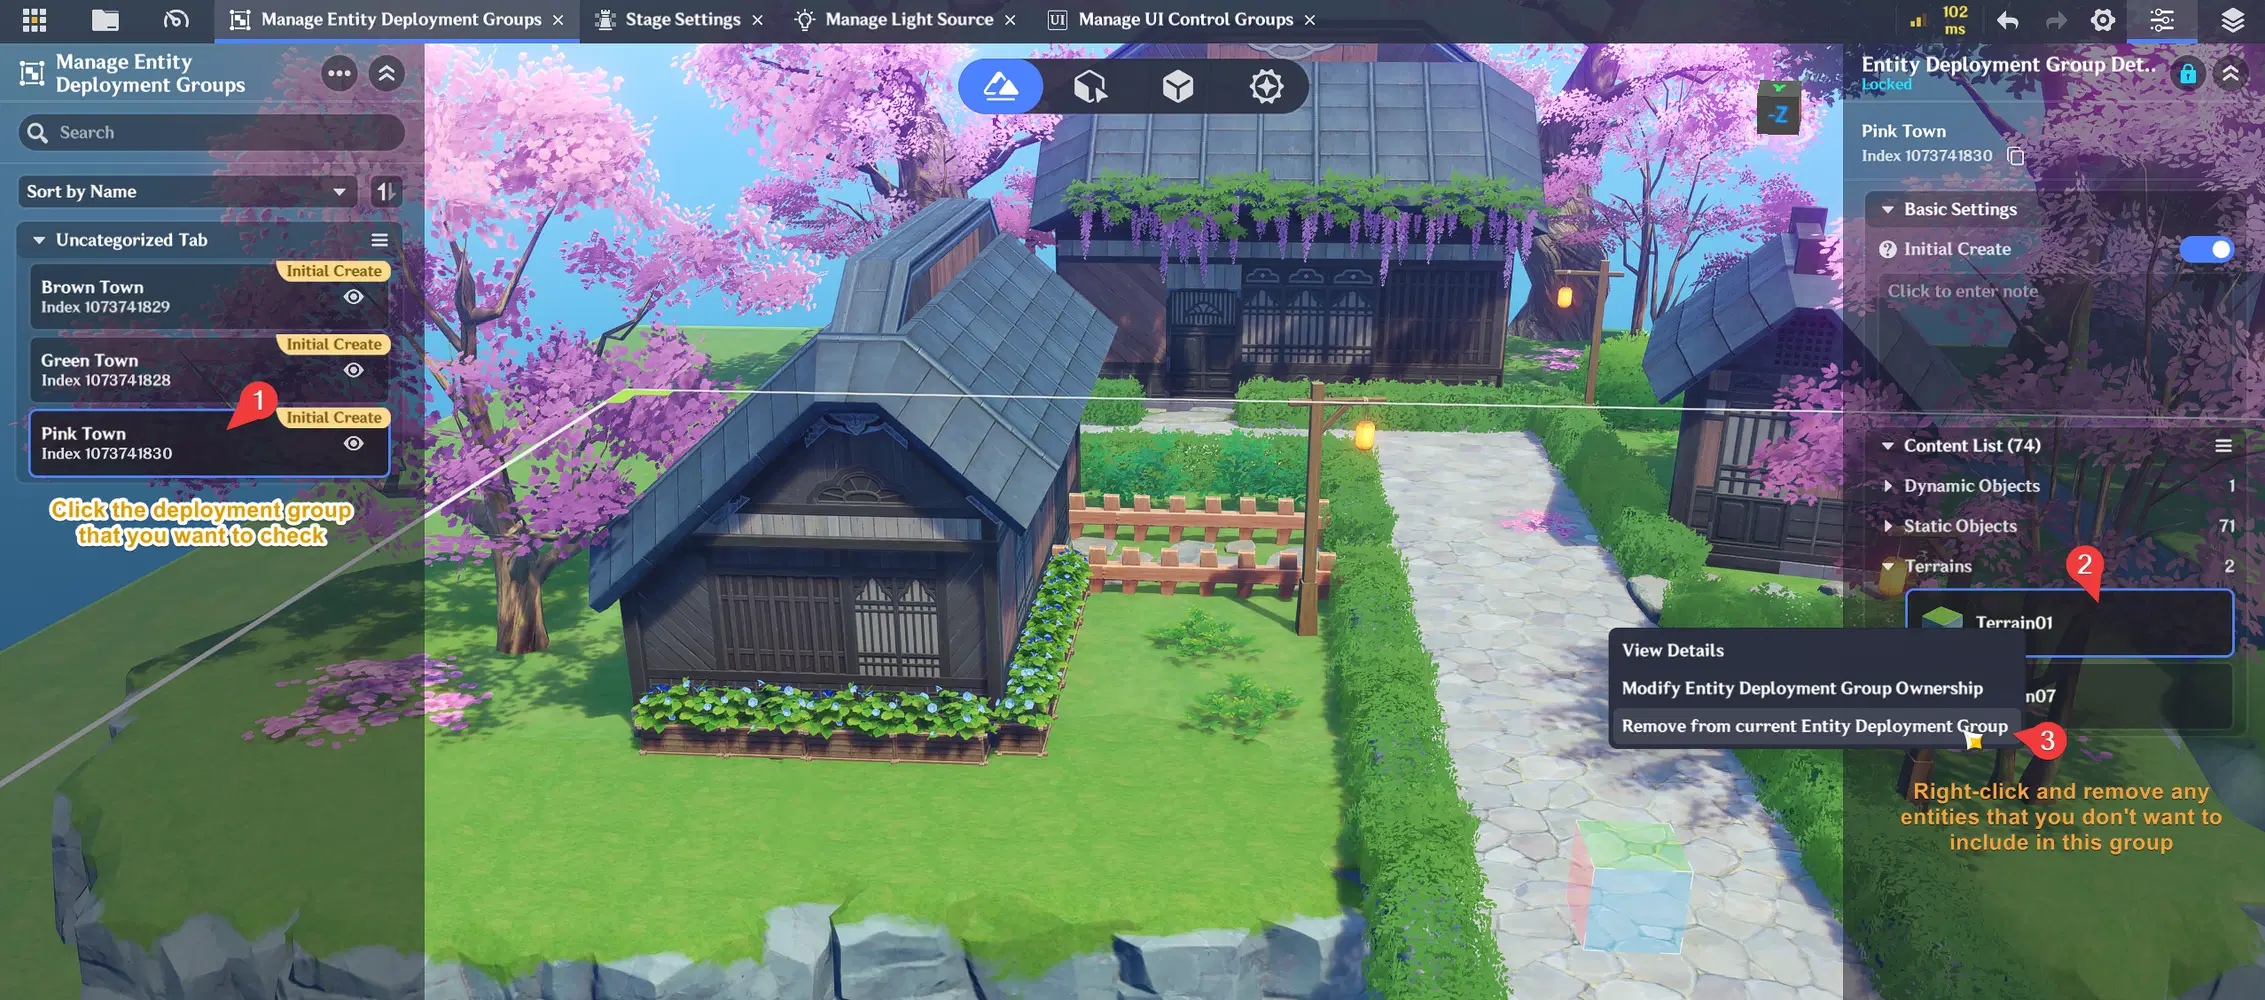
- If you notice that an entity was added by mistake, such as a terrain object that shouldn't be part of the group, you can remove it as shown below.
- That was an example of assigning entities to an Entity Deployment Group. You can repeat the same process to add other entities to whichever Deployment Group they belong to.

✦ Control the group with Node Graph
After creating an Entity Deployment Group, let’s try controlling its activation and deactivation in runtime or play mode.
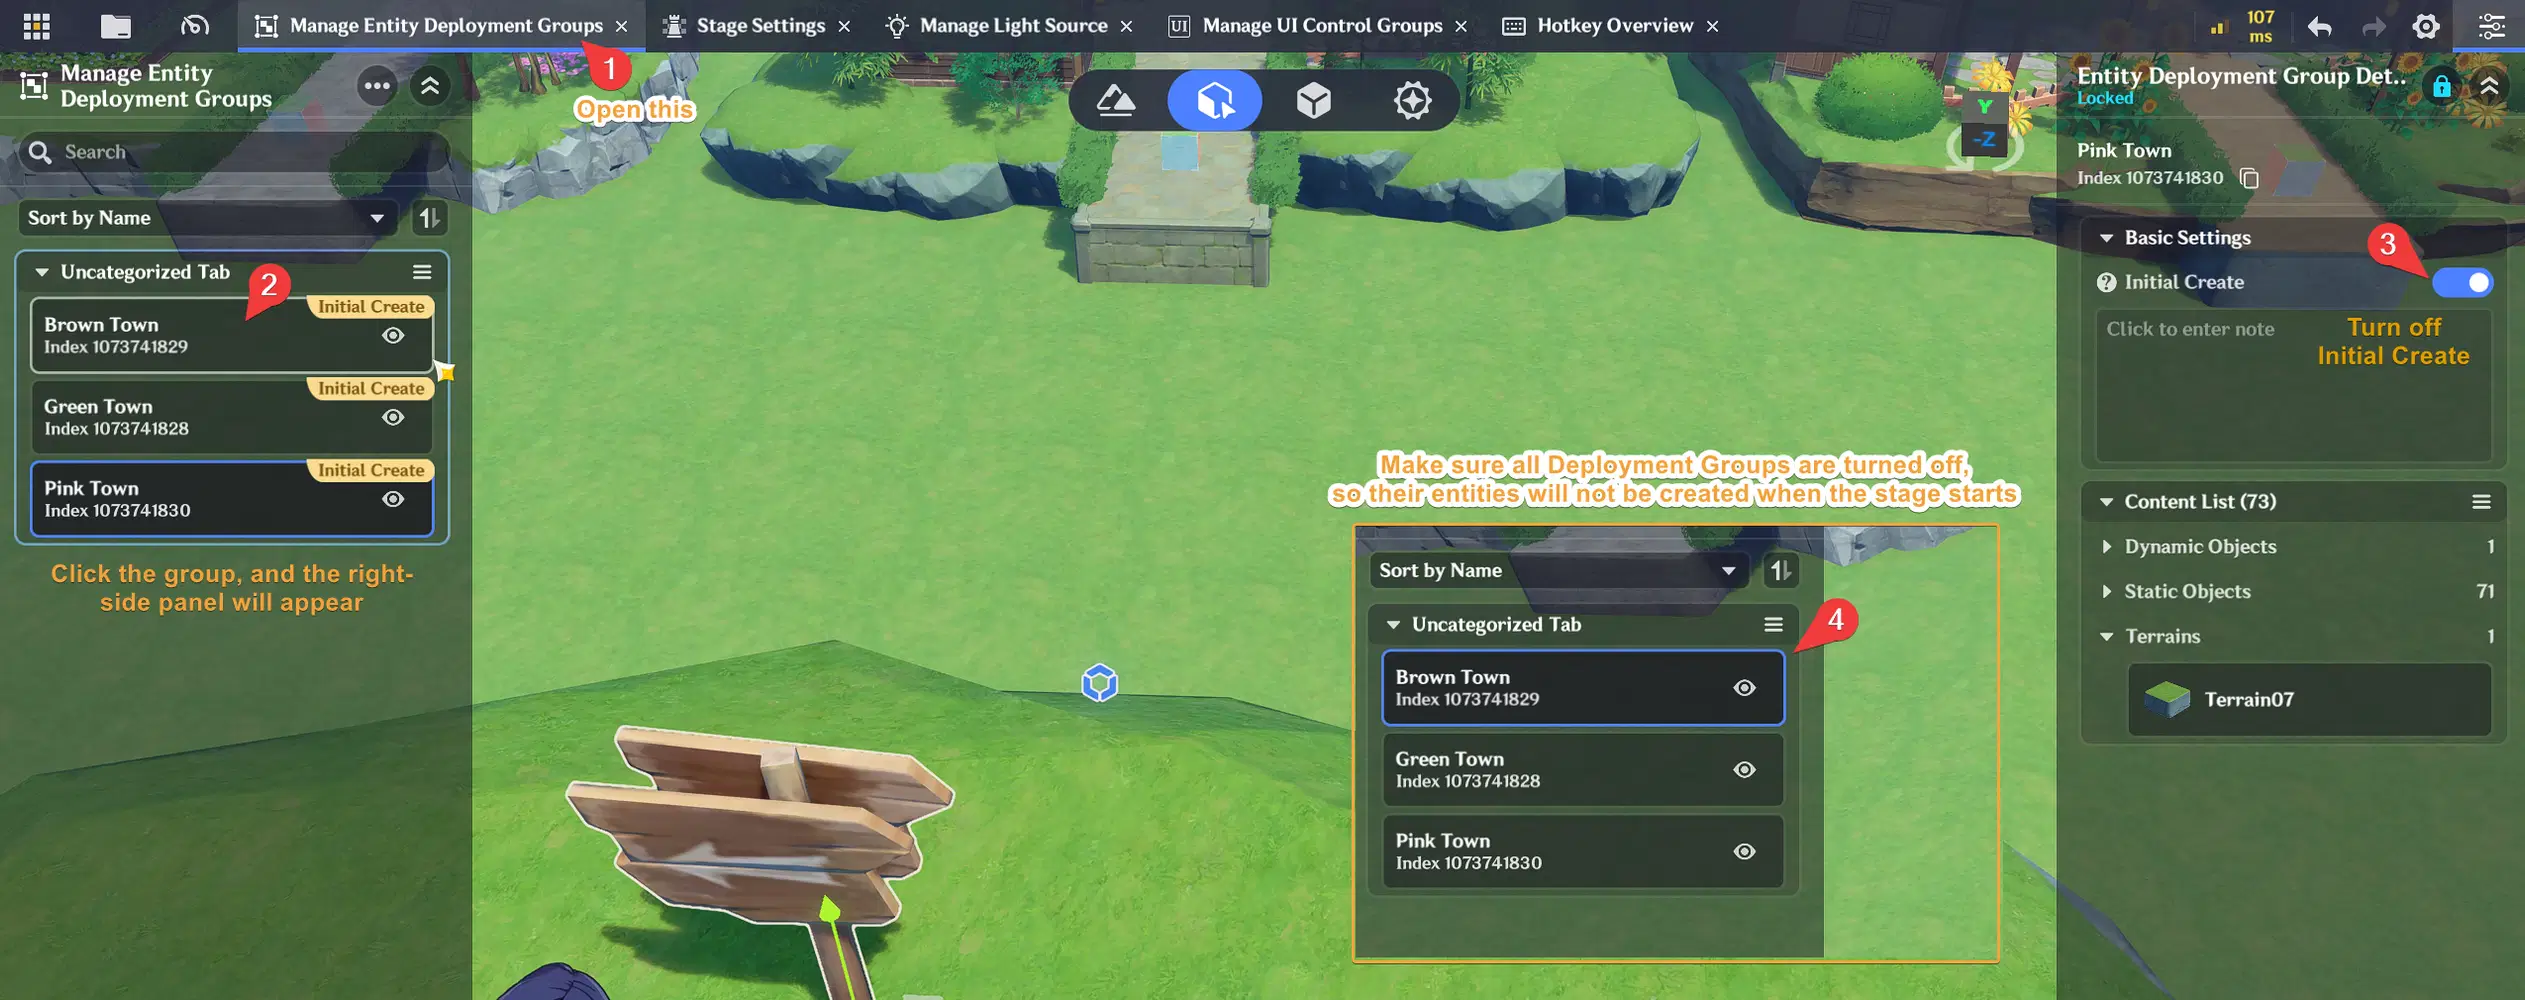
- Before getting started, make sure all Entity Deployment Group in all maps are deactivated. This prevents them from being created at game start, so they can only be activated later using a Node Graph.
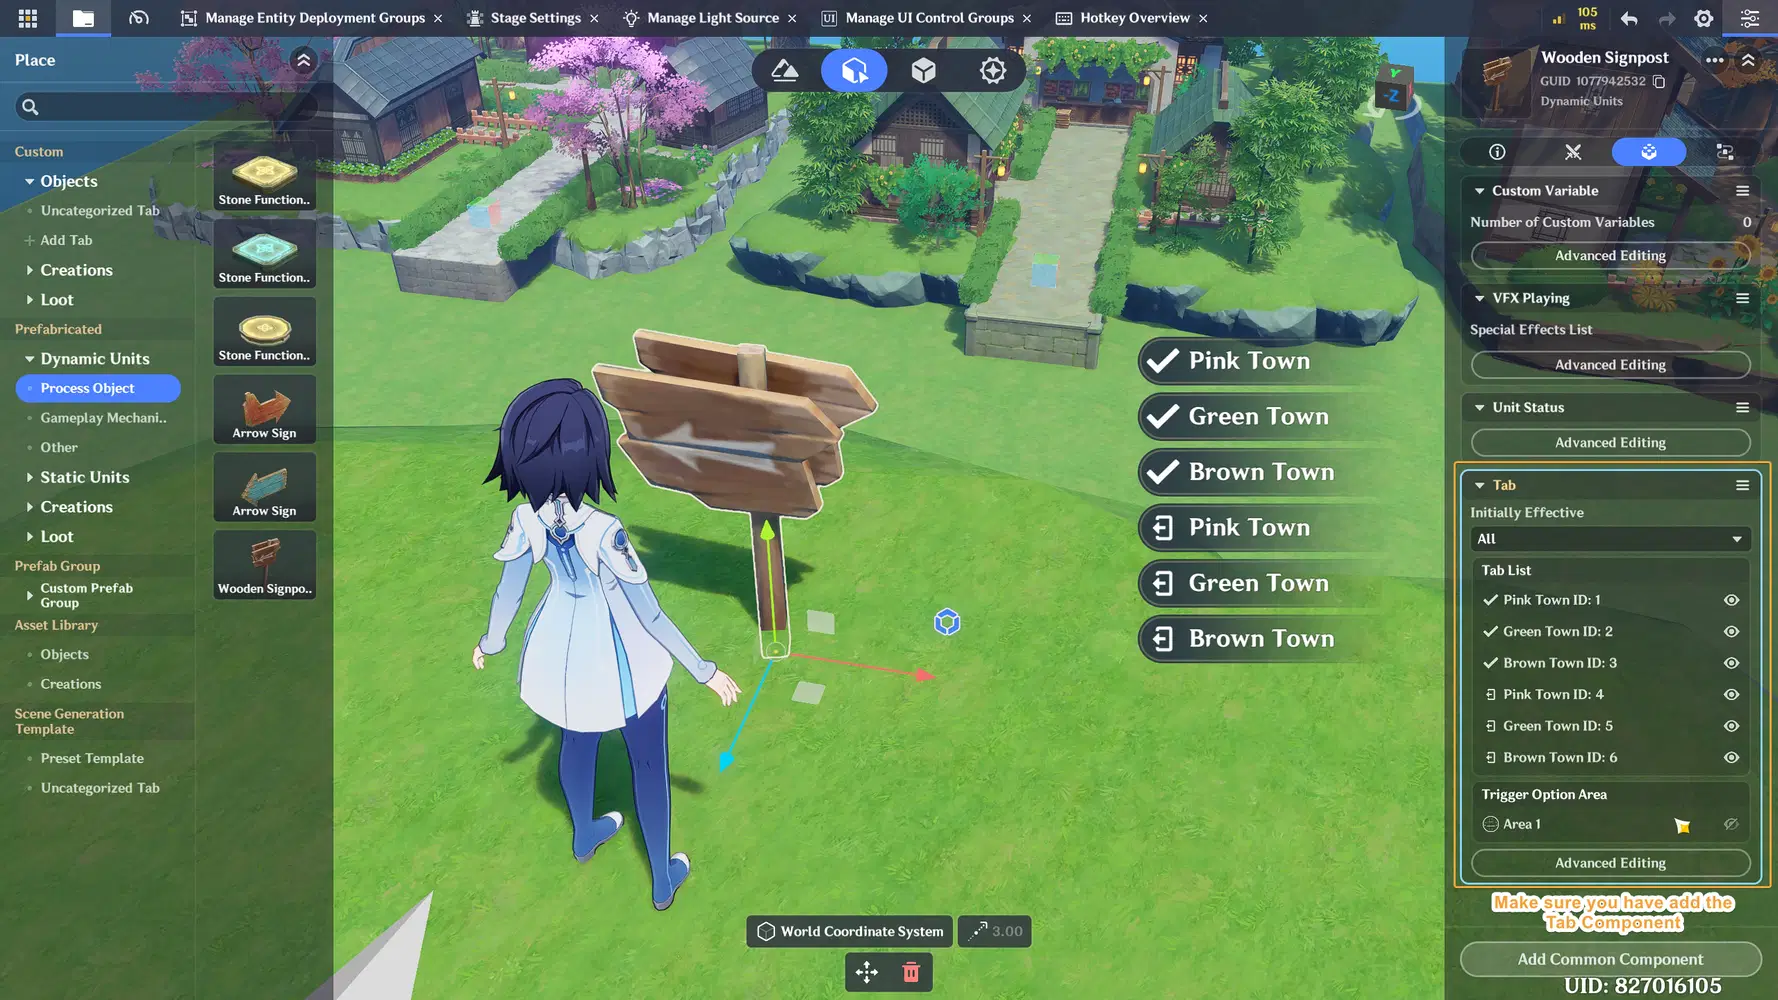
- In this example, we will use an entity with a 6 Tab Component to control the activation and deactivation of each Entity Deployment Group.
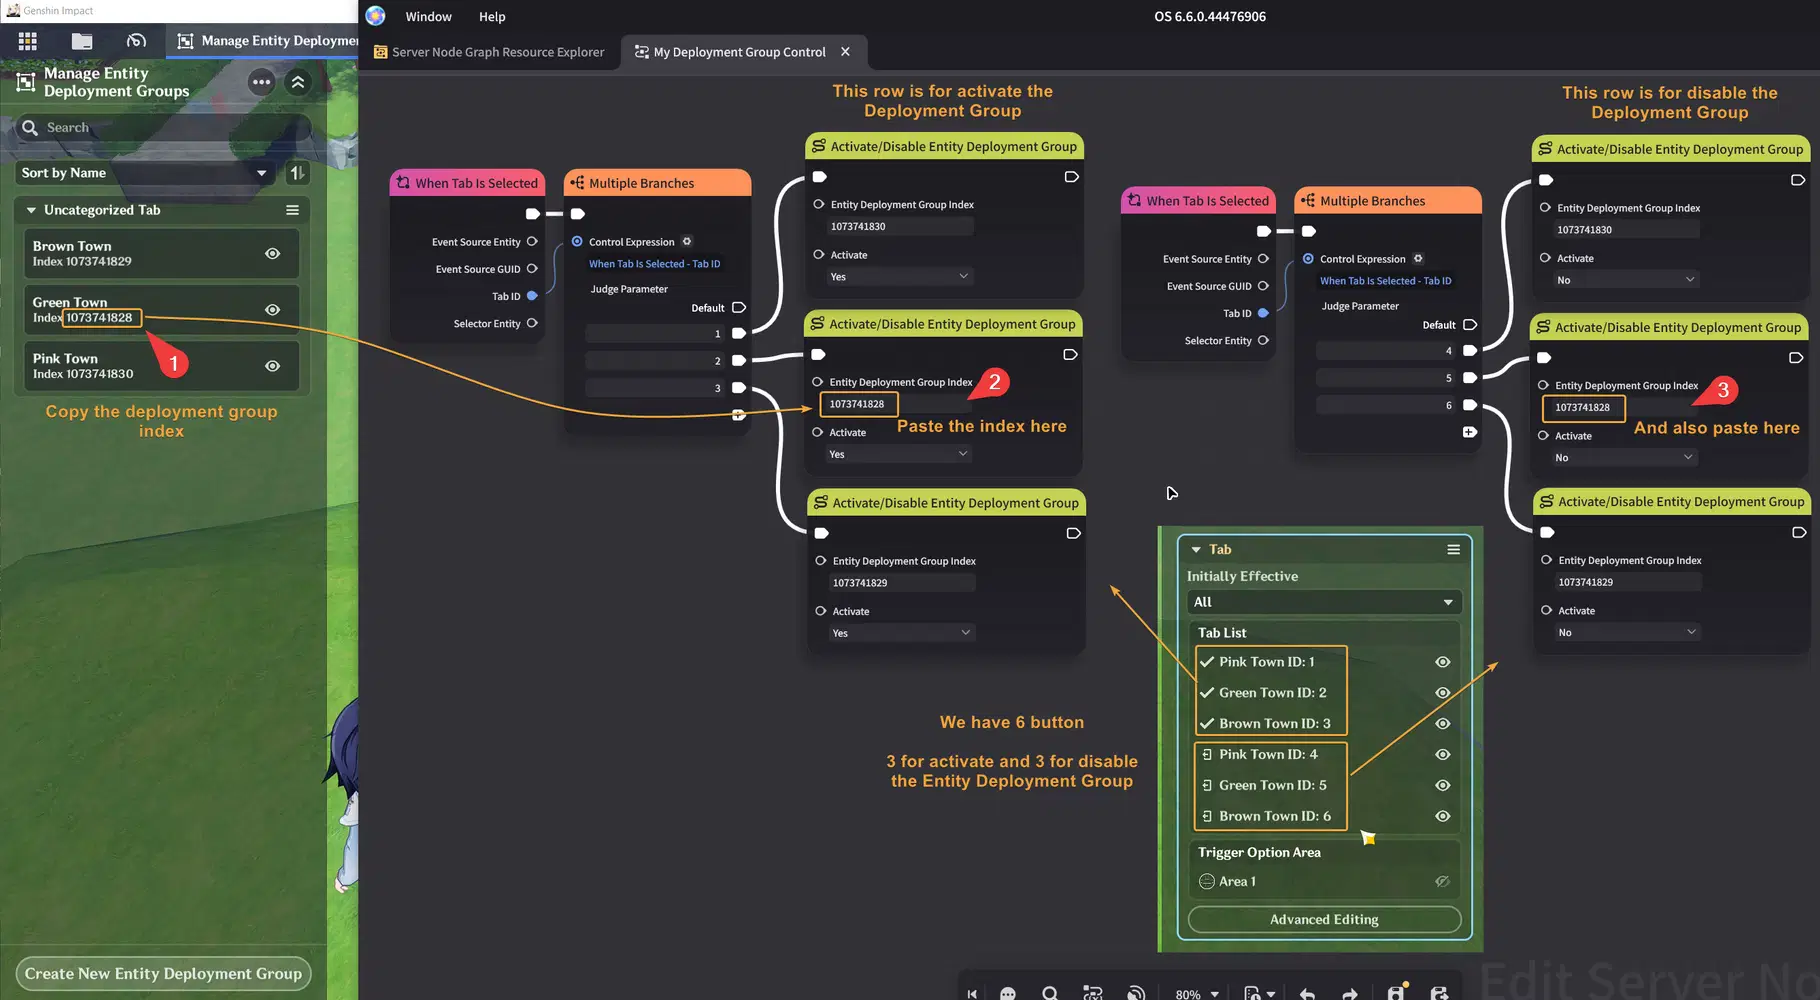
- Create a Node Graph as shown below.
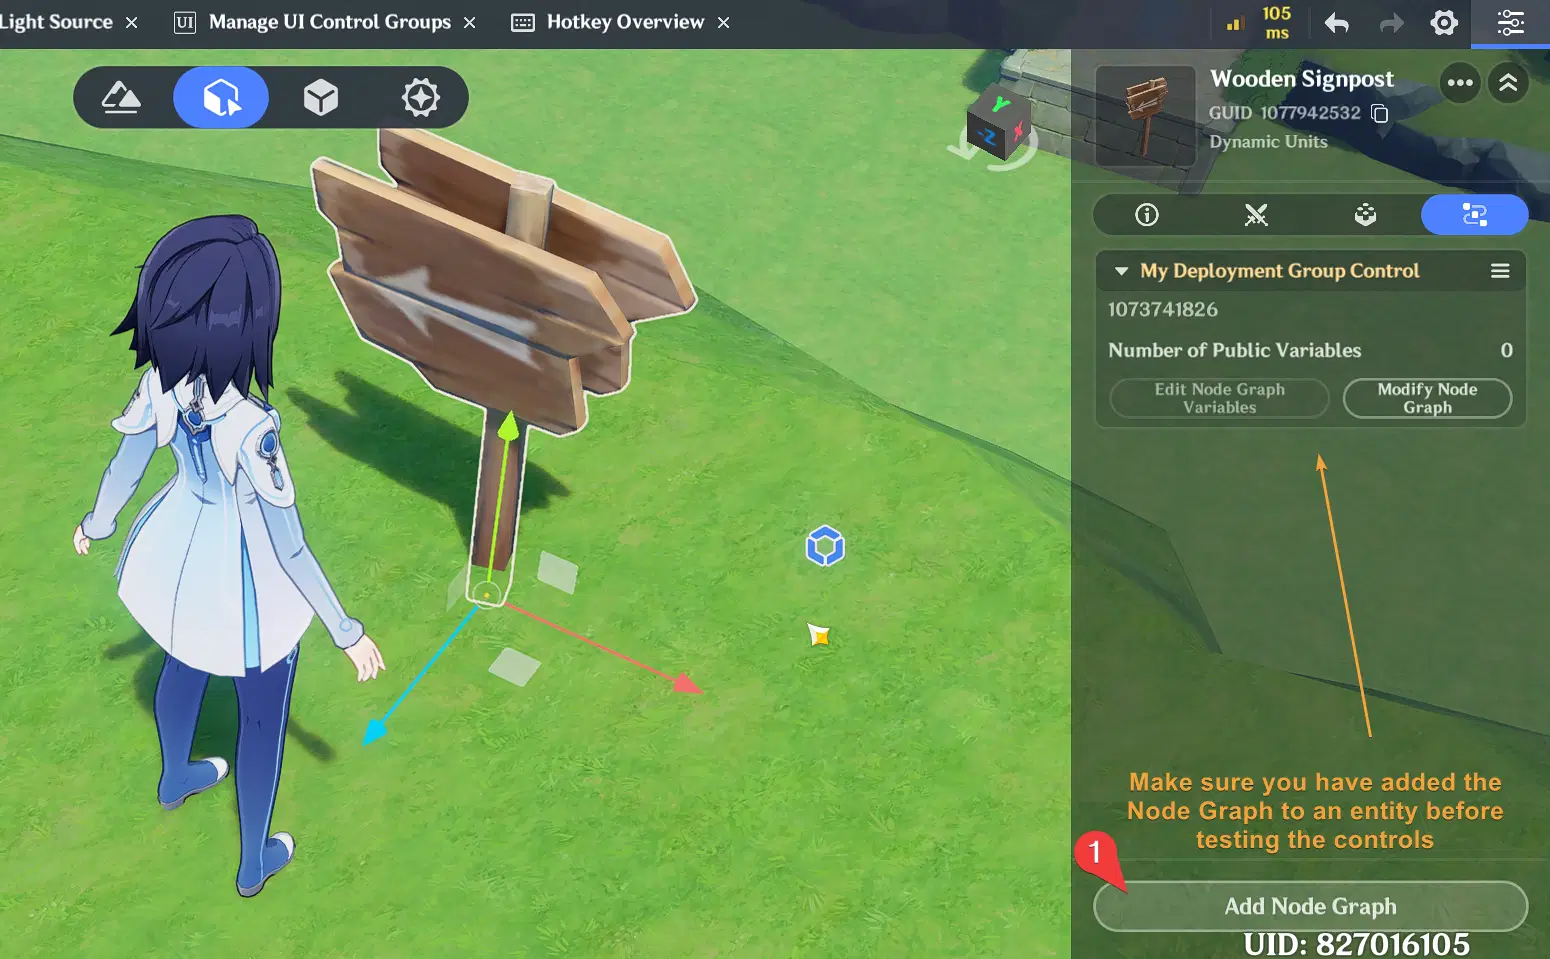
- Make sure the Node Graph is added to the entity for testing.
- After that, run the play test to see the result. You should now be able to control Entity Deployment Group at runtime.
If you want to teleport players to one of the maps, make sure you activate that map's Entity Deployment Group first before teleporting the players via node graph. 
✦ Entity Deployment Group Limits
When planning large projects, it is helpful to keep the following limits in mind:
- Maximum Entity Deployment Groups: 500
- Static Entities: Currently no upper limit
- Dynamic Entities: 100 entity per group
If you try to place dynamic entities more than the allowed limit, the editor may not show any warning or error message right away. Instead, you may encounter a verification failed when attempting to test play your stage.
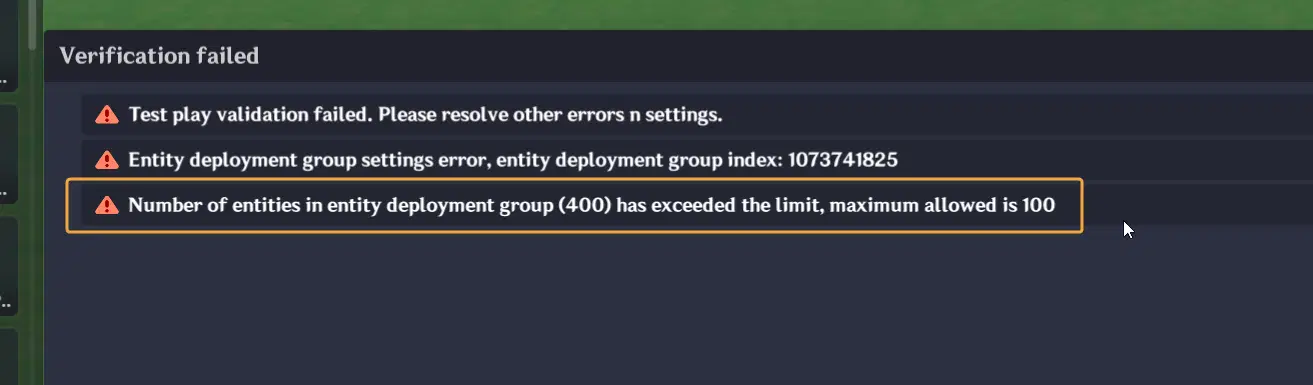
Also, based on my personal experience, the editor may start to feel laggy once an Entity Deployment Group contains around 400 Dynamic Entities.
These limit may change anytime when Miliastra Wonderland is updated in the future, so make sure to follow the update from theofficial docs.

2. Environment Configuration
Environment Configuration is the primary tool for controlling the atmosphere of your scene. It can also be switched during runtime through Node Graph, making it useful for creating different environmental variations.
While creators usually focus heavily on terrain and decoration, environmental settings often have an equally large impact on the final result. A scene can feel completely different simply by changing the lighting, sky appearance, or time of day.
Environment Config allow creators to control elements such as:
- Sunlight intensity and direction
- Cloud and star visibility
- Moon size and appearance
- Lighting or shadow color
A project can contain up to 50 Environment Configs, making it possible to create multiple environmental presets for a single stage. But this limit may also change in the future, so make sure to check the official documentation too.
✦ Example: Dark Environment
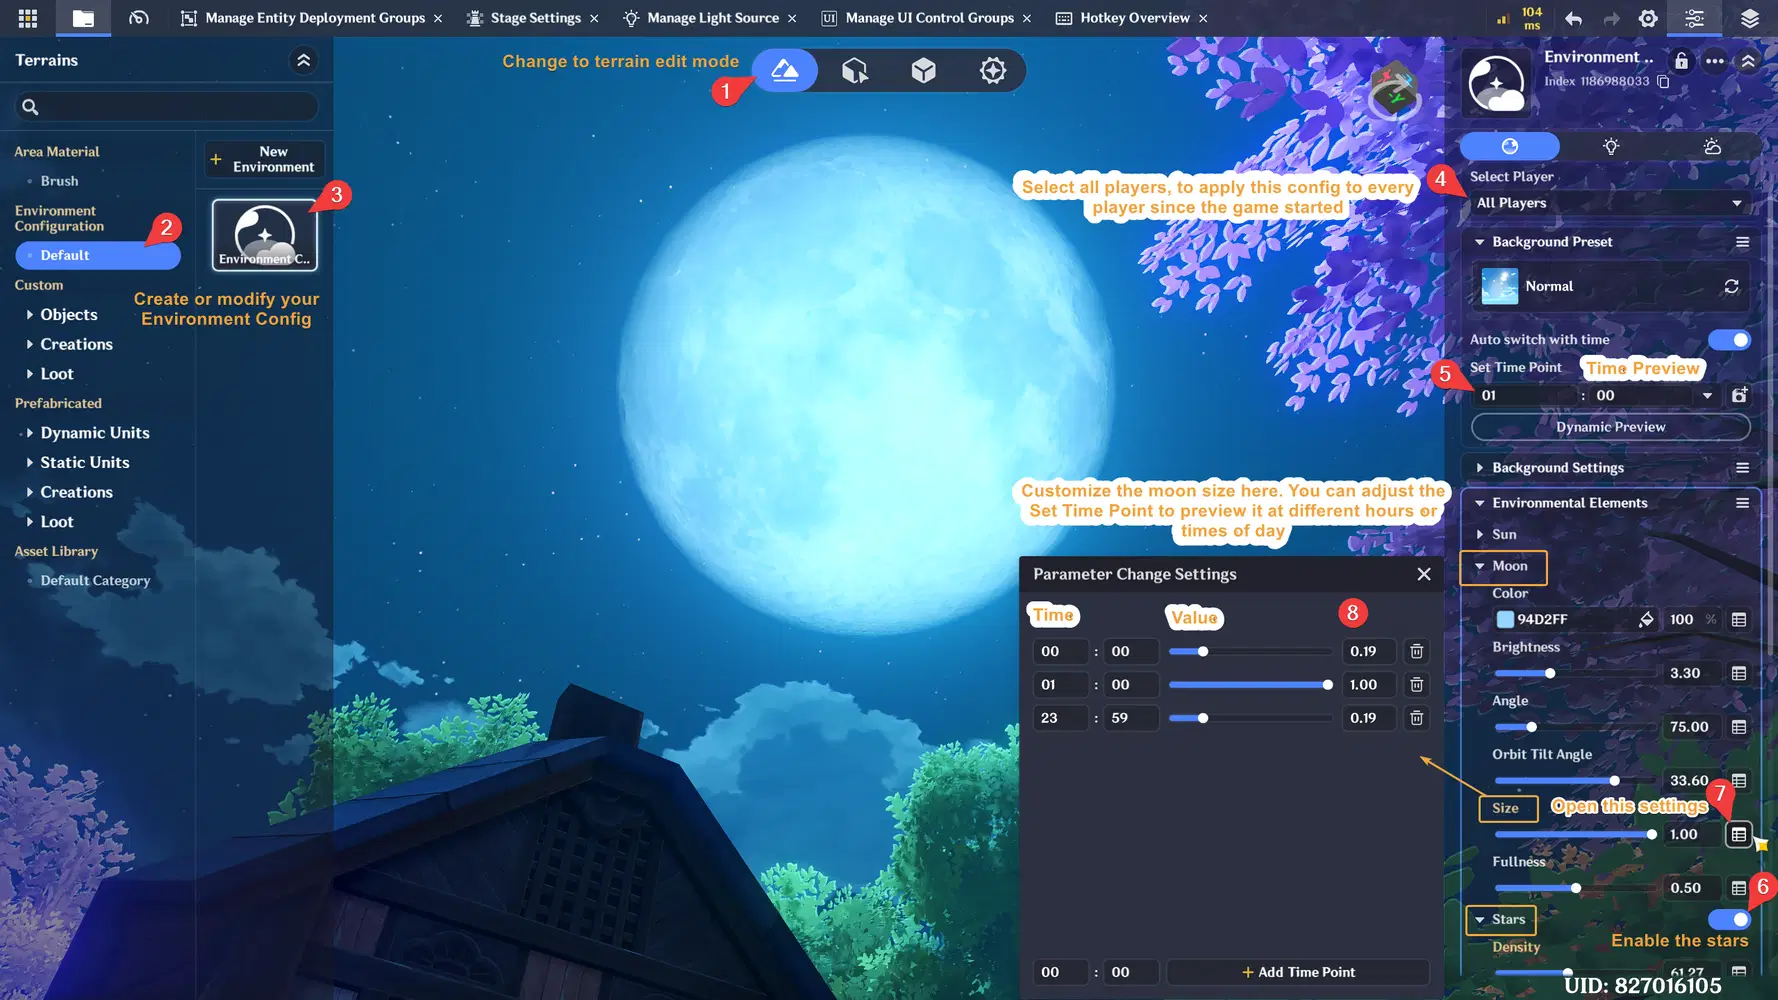
Let's start by creating or modifying an Environment Config. There are many settings you can experiment with, and you can adjust them to find the best setup for your stage lighting.
- For example, the setting below can controls the moon size. You can open then image below and follow the numbered step.
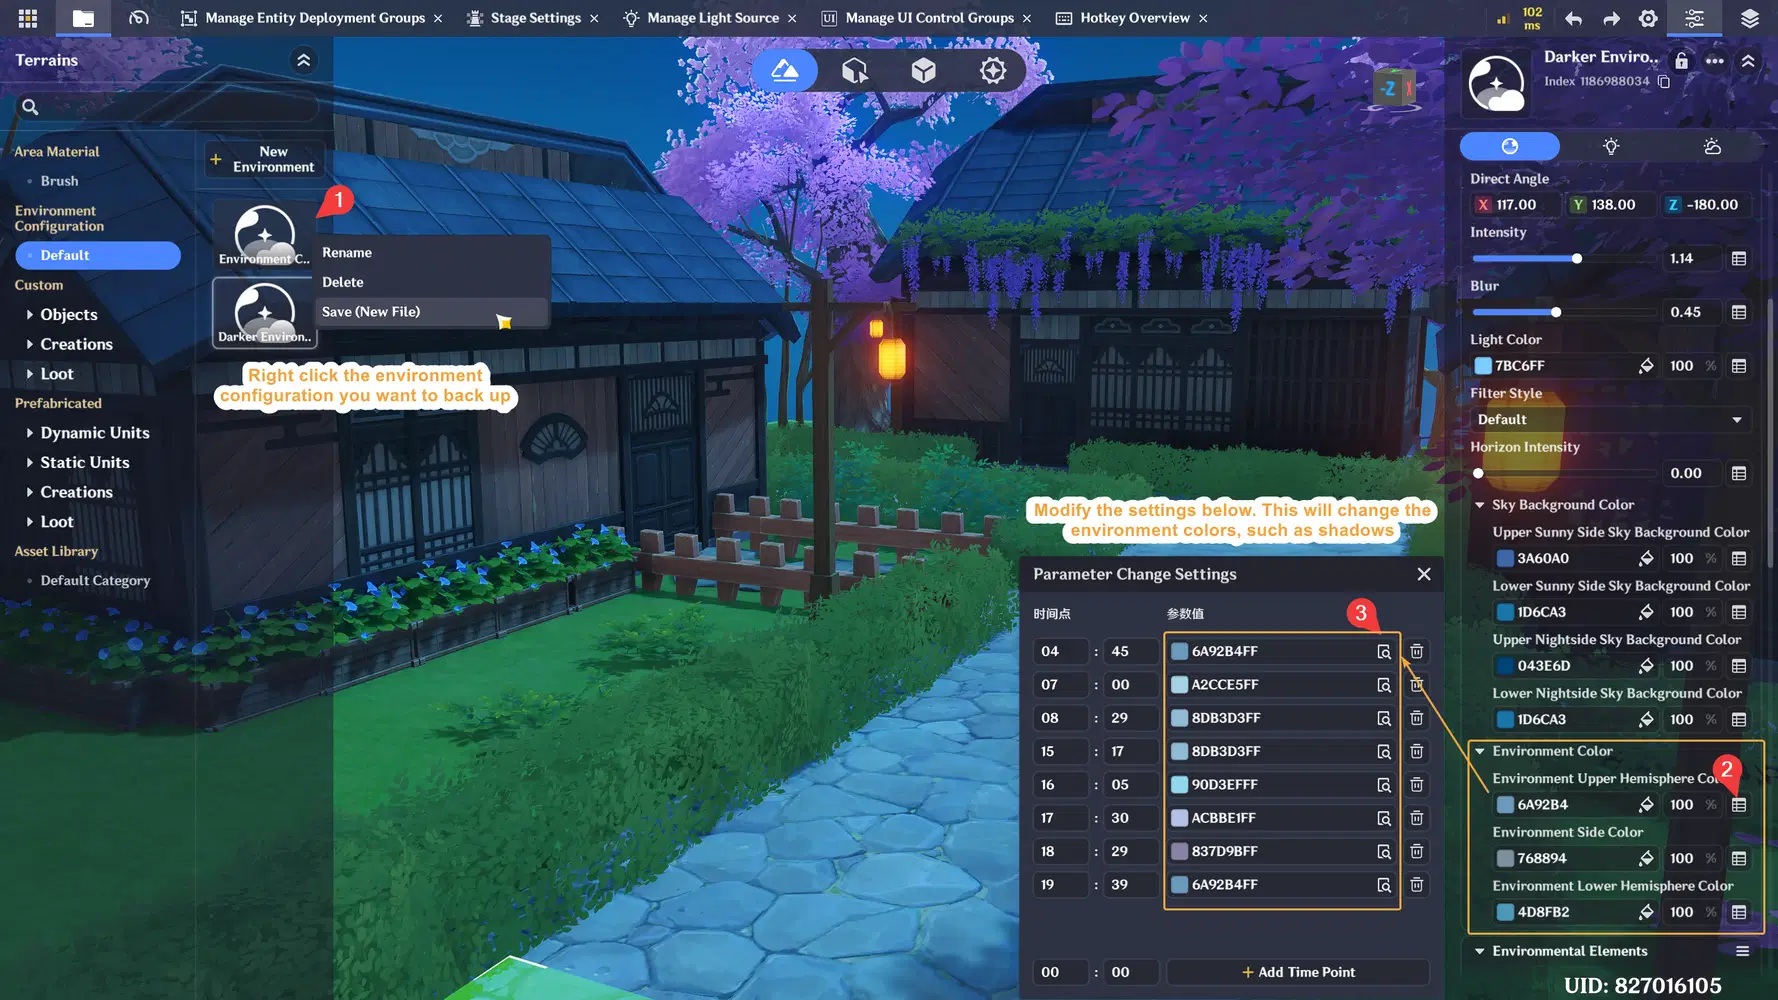
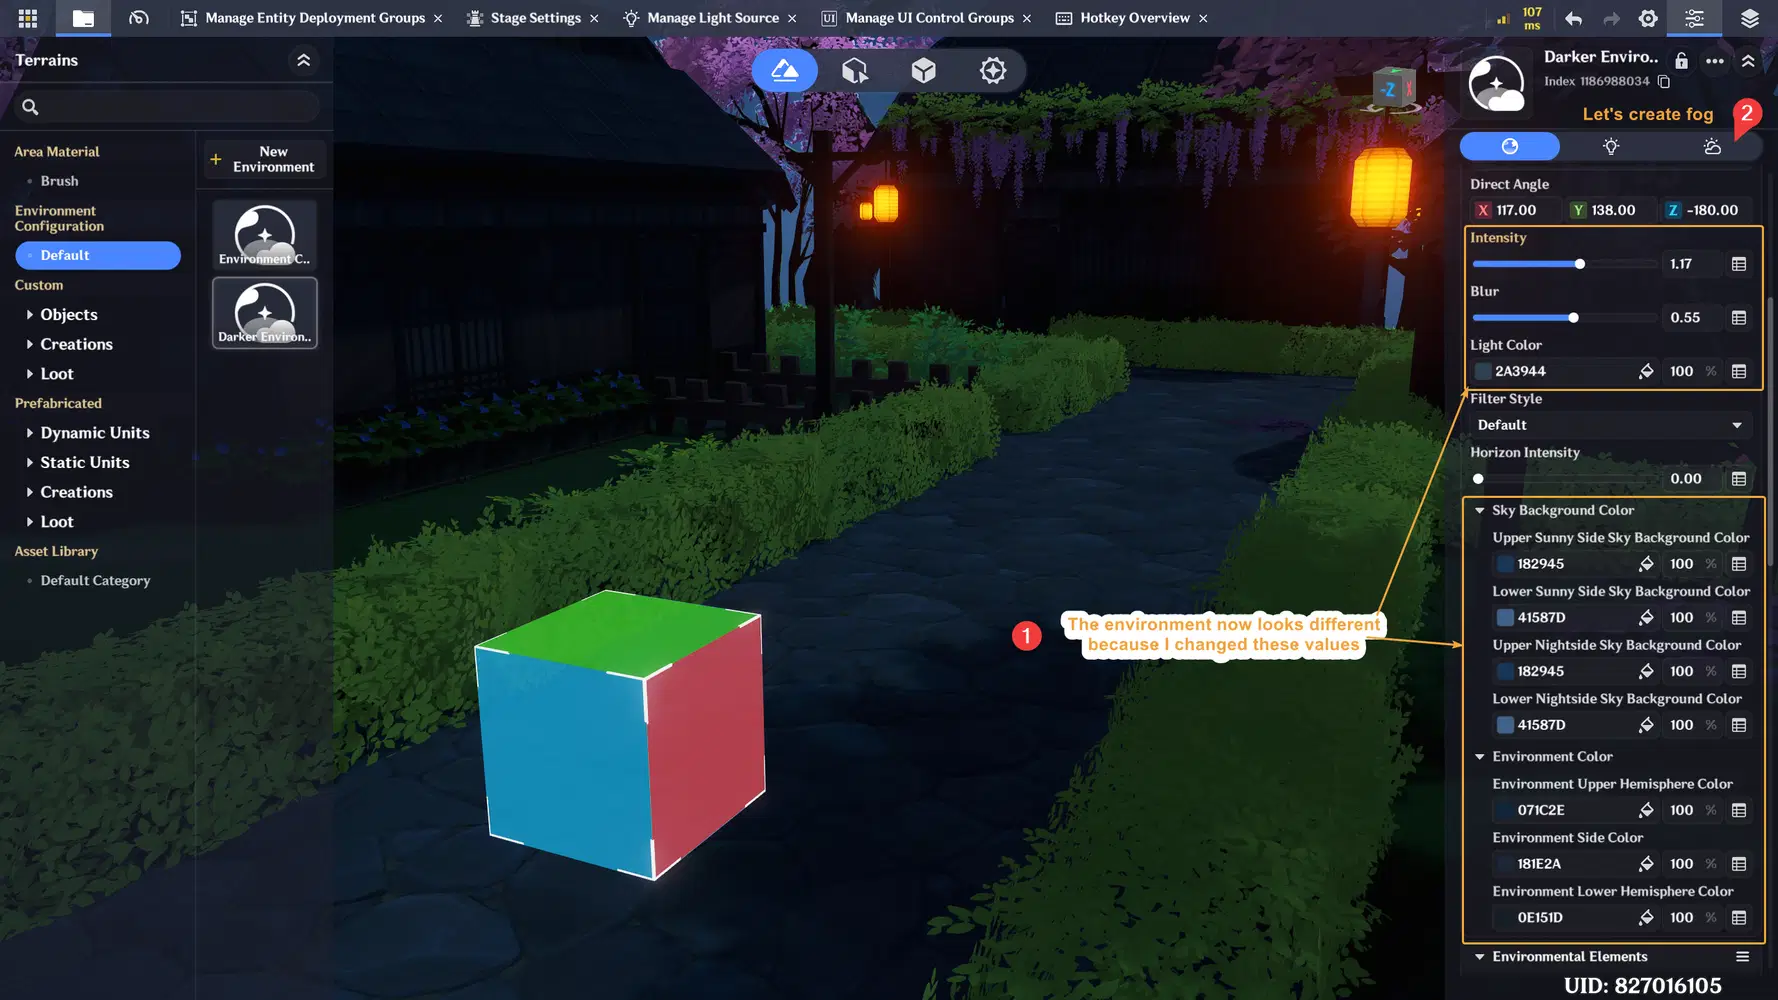
- You can also make your scene darker by modifying the Environment Color. However, before making further changes, it’s recommended to create a backup copy for safety
- After modifying the color, you will get a darker environment as shown below.
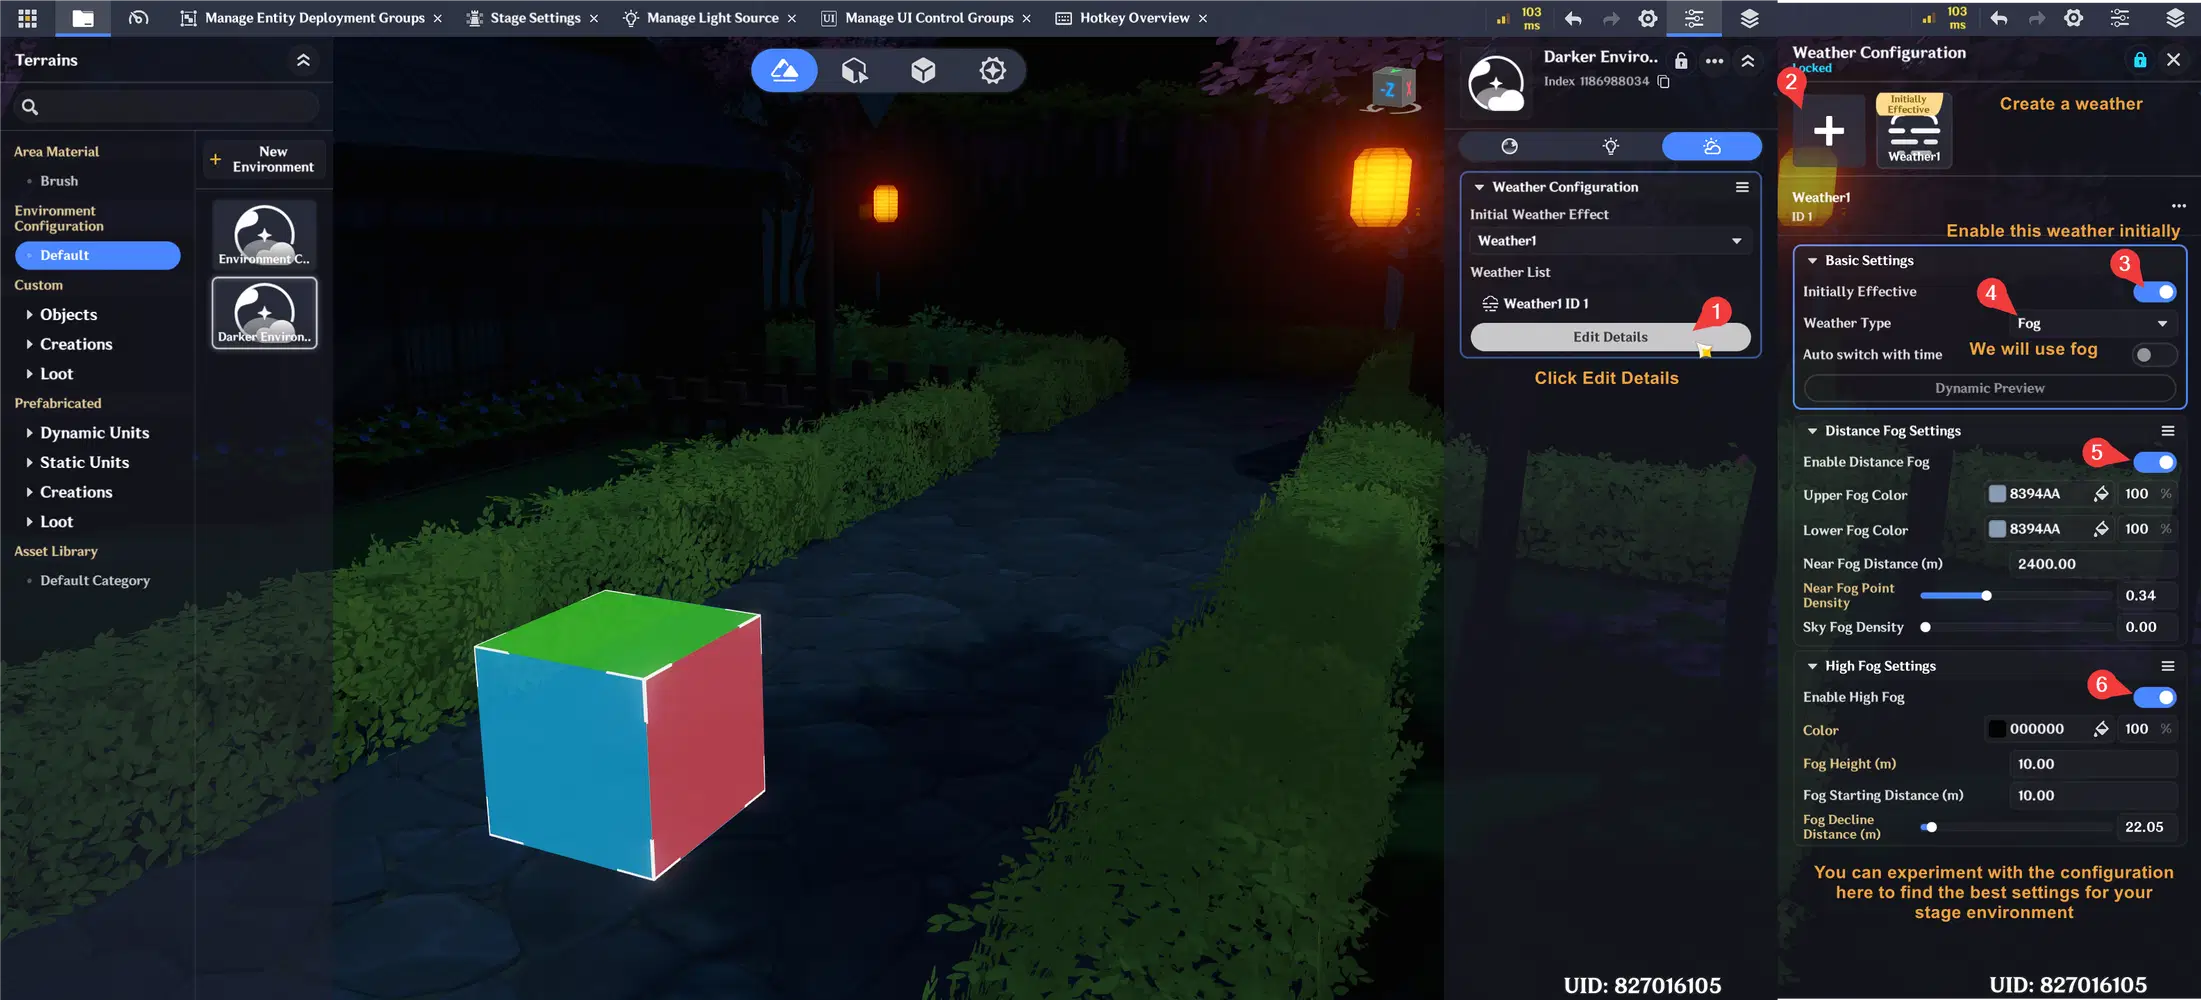
- If you want distant areas to appear darker or harder to see, you can also add fog as shown in the image below.
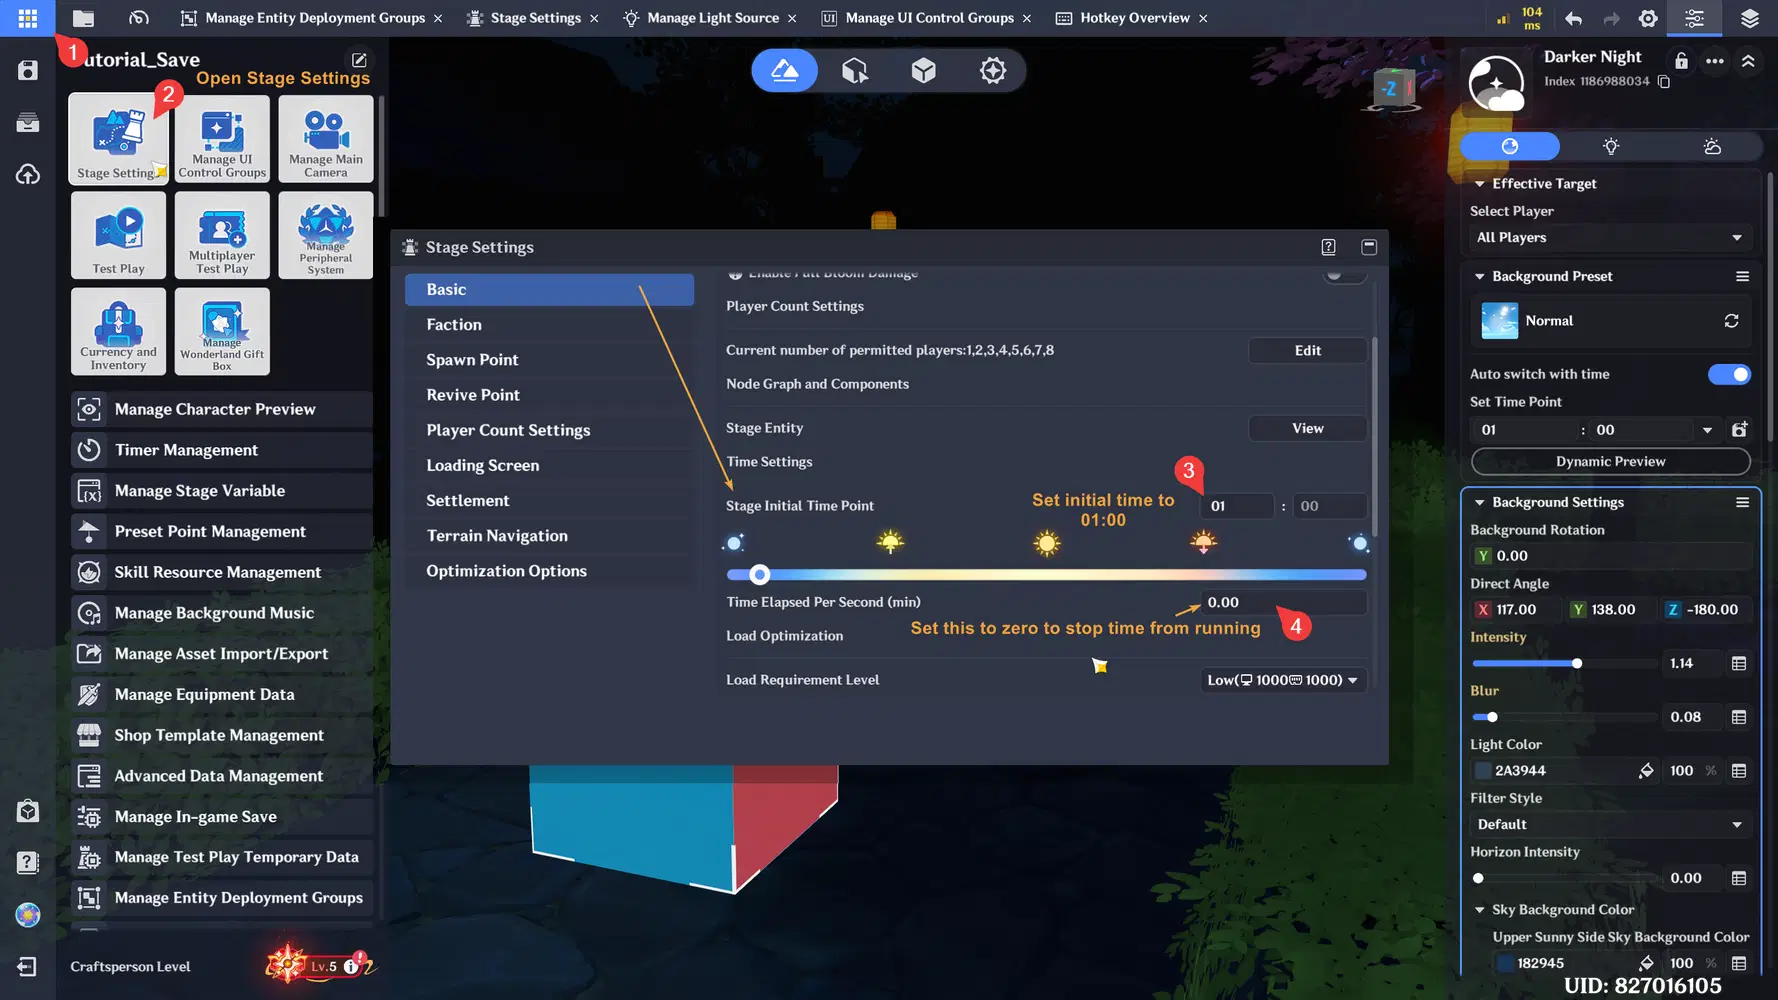
- After you're done and ready to test, make sure to adjust the time in the Stage Settings so that the initial time in-game matches your configuration.
- Don't forget to save after you're done customizing. You can also create additional Environment Config variations if you like.
✦ Keeping Environment Preview Active
After modifying an Environment Config, the editor will usually switch back to its default environment preview when you change the editor modes. I actually ran into this issue when I was new to the editor because I didn't know how to keep my Environment Config active while editing. So if you've experienced this too, you're not alone 
To keep your Environment Config preview active, you can change from this editor settings:
- Save your Environment Config
- Open the editor settings in top-right corner
- Find Environment Settings, then select the Environment Config you want to keep active in the editor preview
- You can also follow the instructions shown in the image below
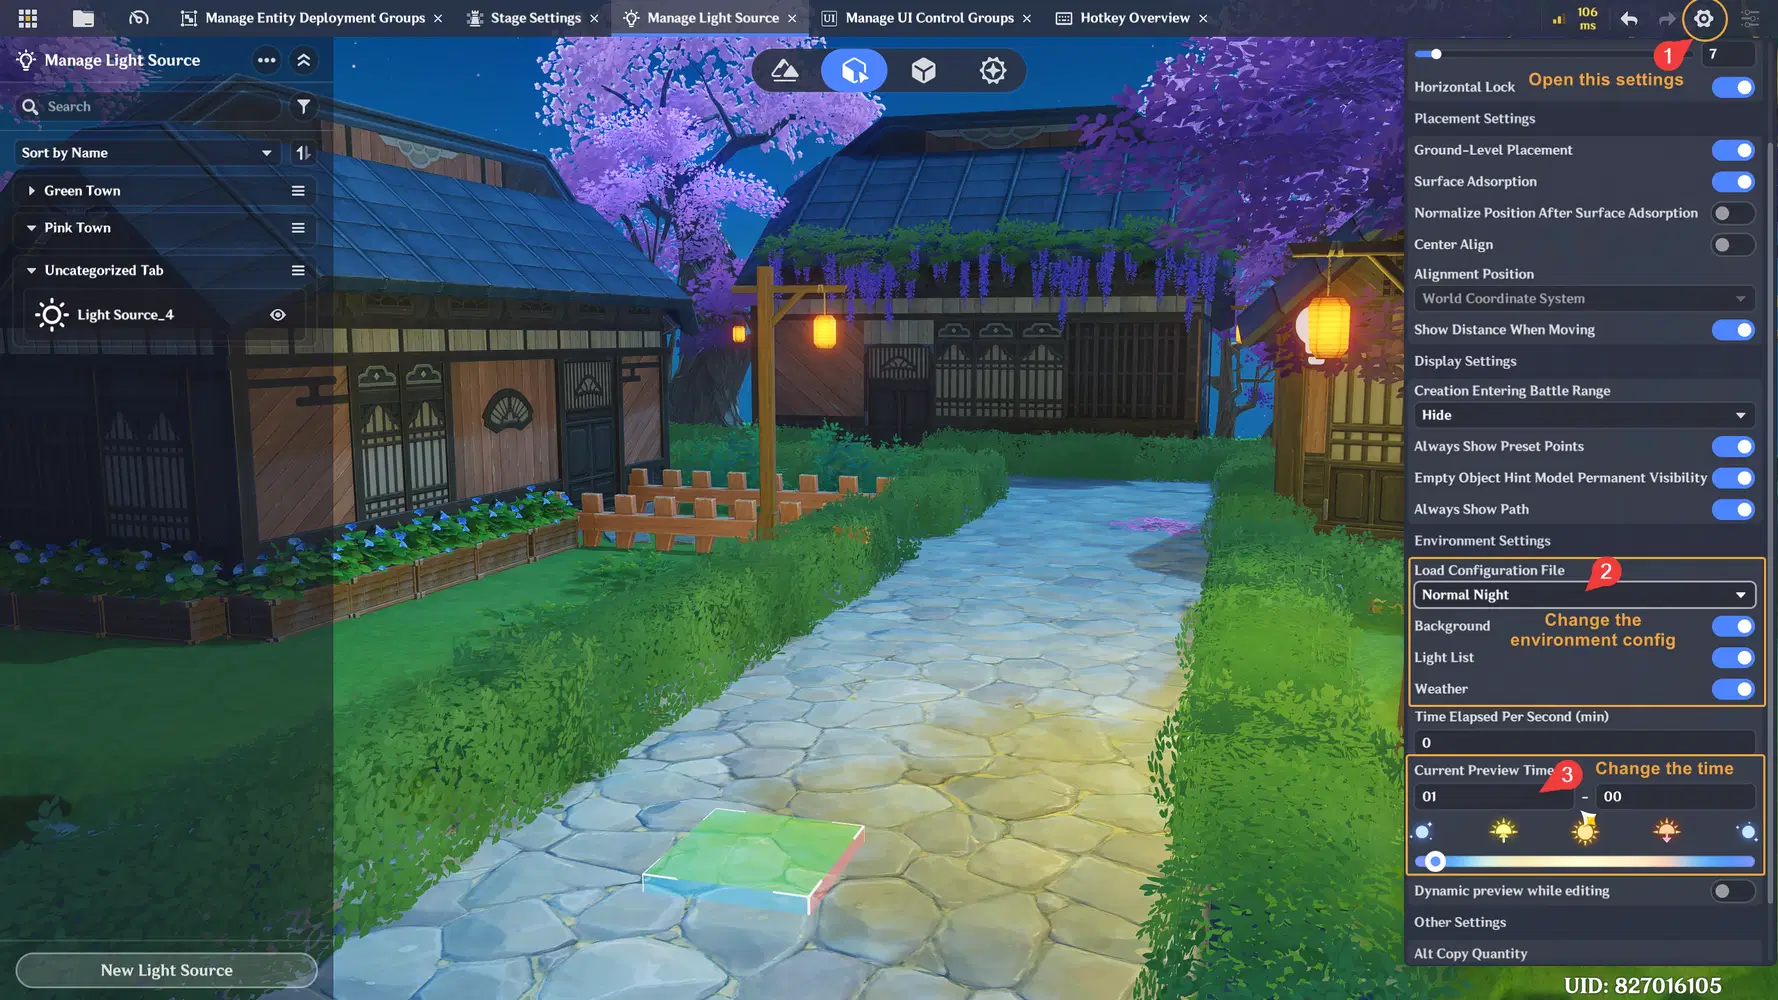
This allows you to continue building while viewing the actual lighting and atmosphere that players will see. This is particularly useful when placing lights or decorating night time scenes.
✦ Switch Config with Node Graph
While you can set the default environment configuration in the editor, you can also switch between different environment configurations through the node graph. This helps create a more dynamic atmosphere, especially during specific events or scenarios.
- For this example, we will use an entity with a 6 Tab Component to control multiple Entity Deployment Groups.
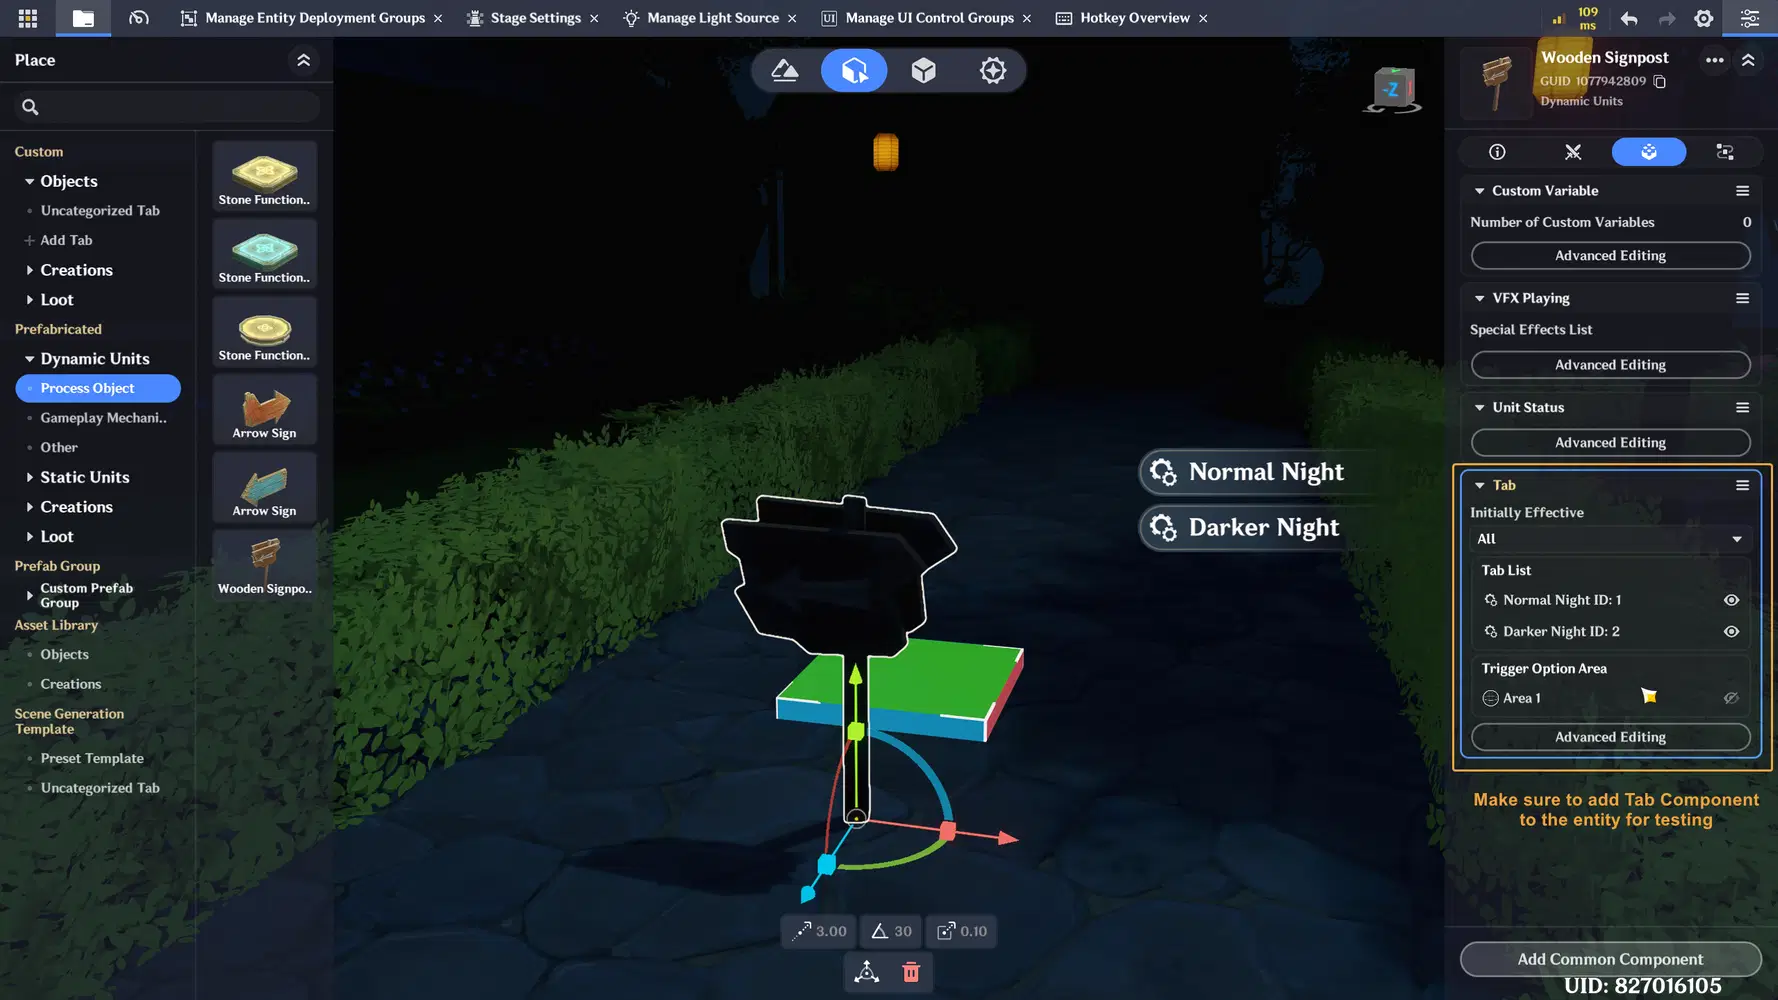
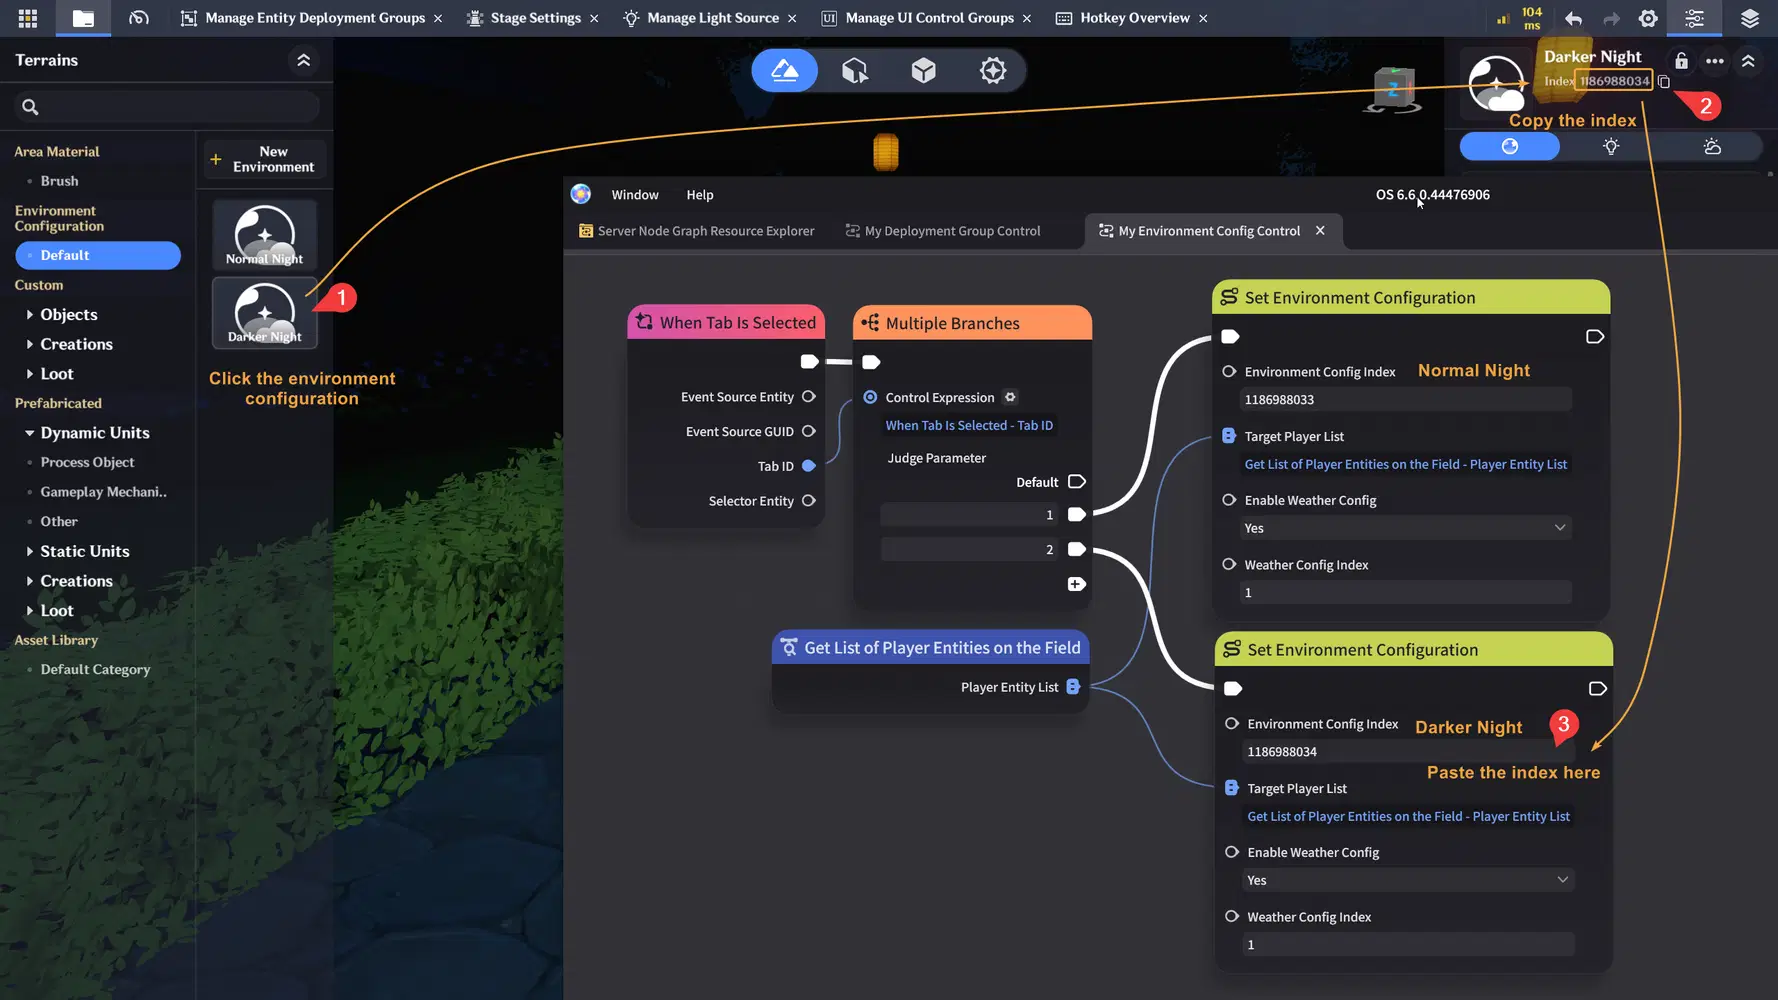
- Create a Node Graph as shown below, and copy the Environment Config index into the node input field.
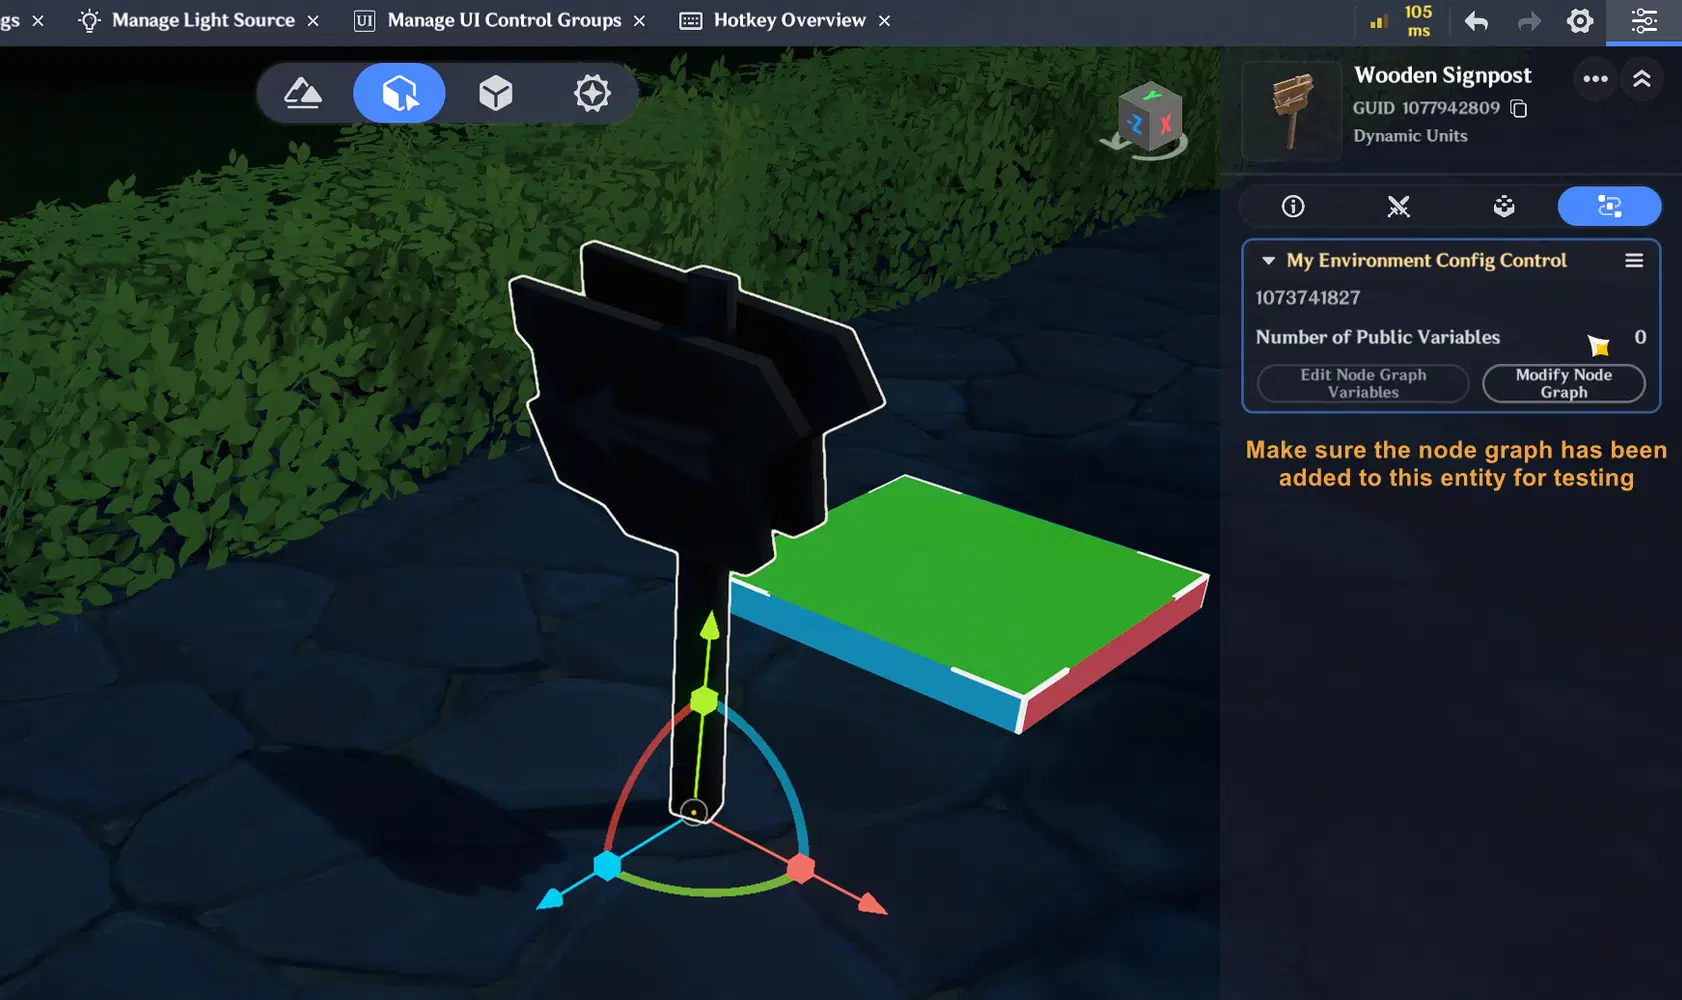
- Make sure the Node Graph is added to the entity for testing.
- The result will look like the example below. You can now switch Environment Configs in the game or test play mode.
3. Manage Light Source
As you can see, when we previously explored the Environment Configuration, there was no light coming from any lamp entity.
No environmental lighting
Proper lighting is also the important elements of scene design. Even a highly detailed environment can feel flat without good lighting, especially in night time or low-light scenes. On the other hand, a relatively simple environment can feel much more immersive with well-placed light sources.
After adding environmental lighting
Well, I think I still need to make many adjustments to make the preview more perfect
But anyway....
There are two ways to add light sources to your stage:
- Manage Light Source
- Light Component on a Dynamic Entity
For environmental lighting such as street lights and other static scene lighting that doesn’t need to move, I recommend using Manage Light Source. Light sources created using Manage Light Source are controlled through Environment Configs. By switching between Environment Configs, you can enable or disable predefined lighting setups without manually managing each light.
For example we can make 2 environment config:
- Normal Day Environment Config → Street Lights OFF
- Normal Night Environment Config → Street Lights ON
But if the light needs to move during gameplay, such as for characters carrying lanterns, vehicles, or other moving objects, you can use an Entity's Light Component. Just be careful not to use too many of them, as your stage can reach its load limit more quickly.
In this guide, we focus on scene/environment lighting only, so we will skip Light Source Component for Dynamic Entity as it typically used for gameplay or moving entities.
✦ Create environment lights
Now that you’ve reviewed the previous section, let’s add a new Light Source for our environment.
- Open the top-left menu and follow the steps shown below.
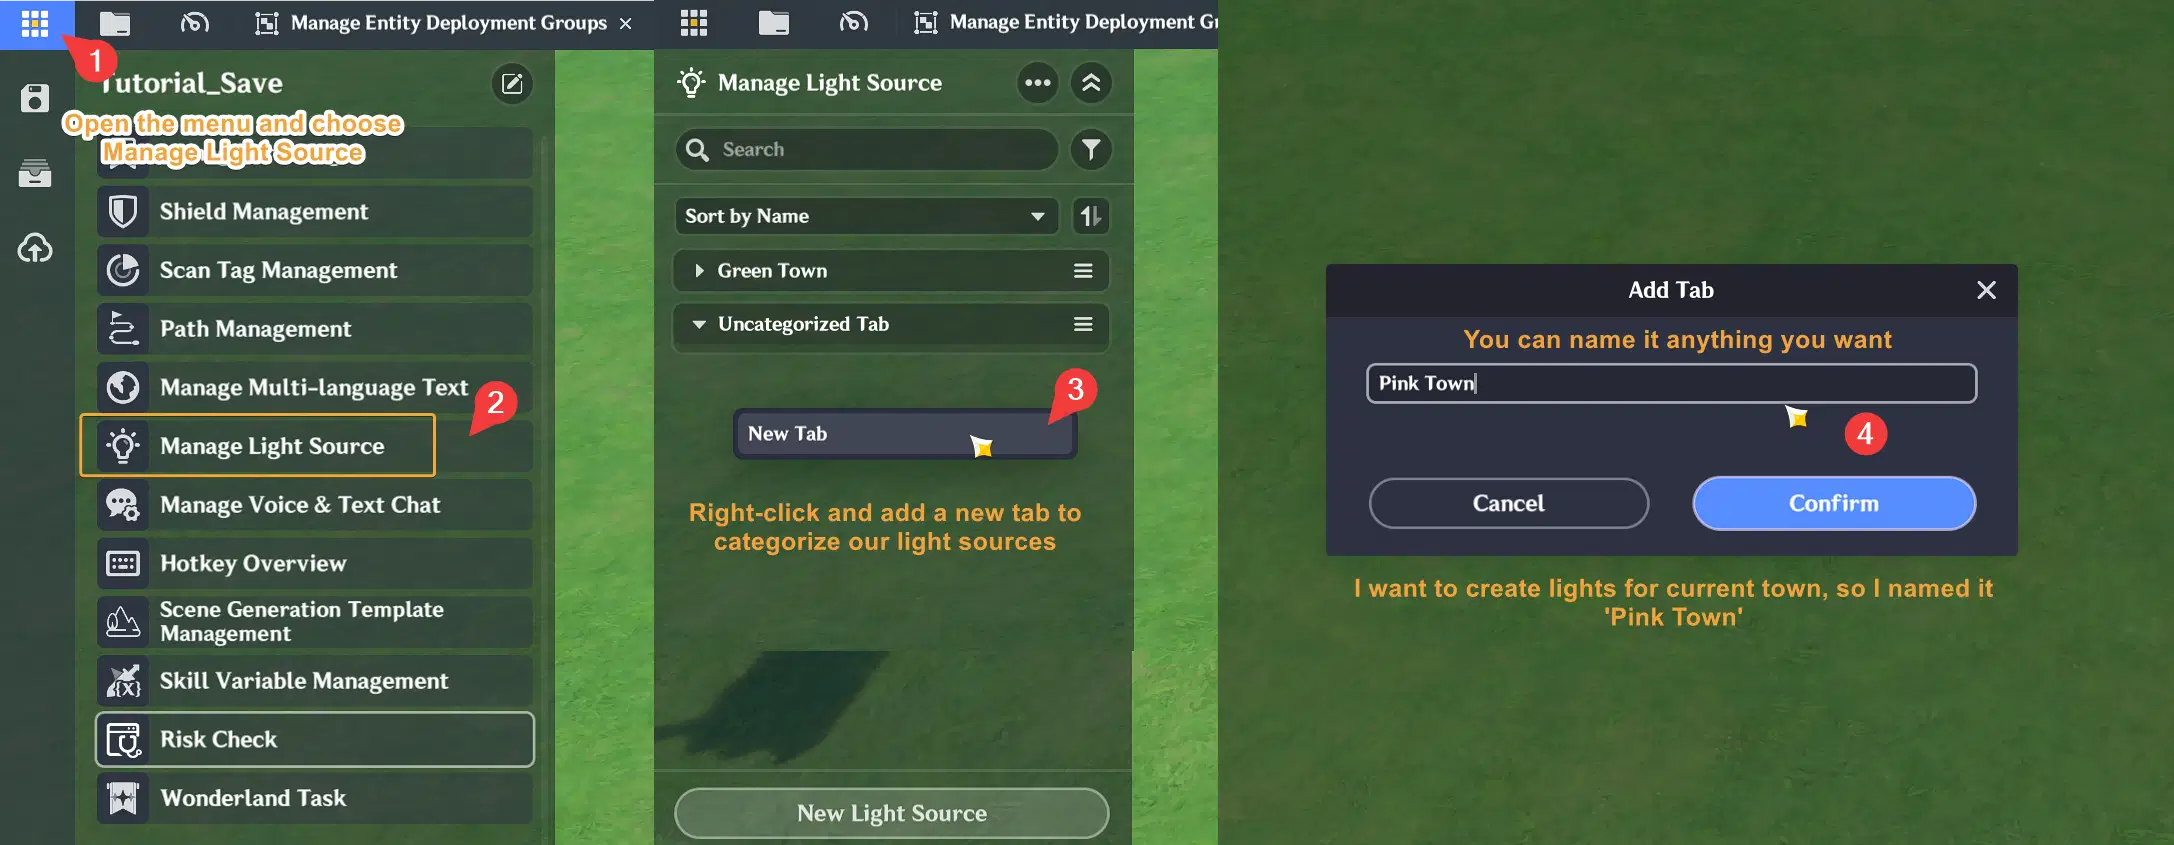
- Create a new Light Source, then adjust its position (X, Y, Z) and lighting settings.
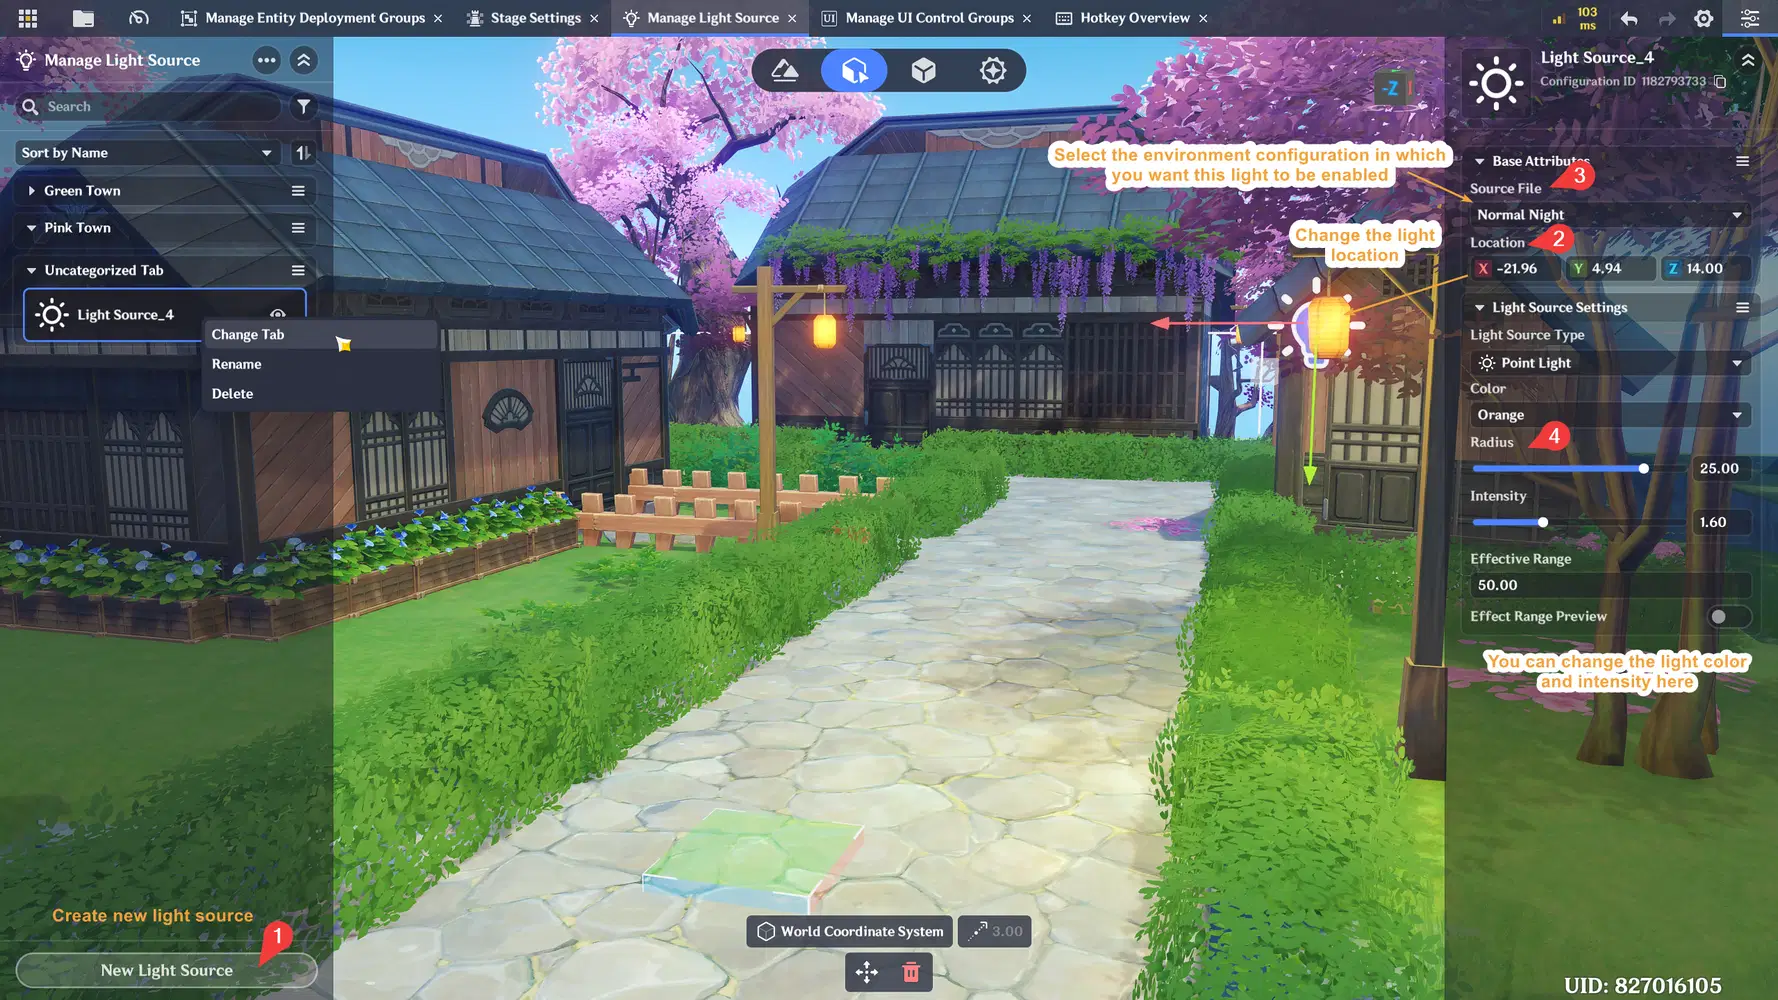
- To preview the result properly, make sure you select the correct Environment Configuration and set the Current Preview Time to a night time value.
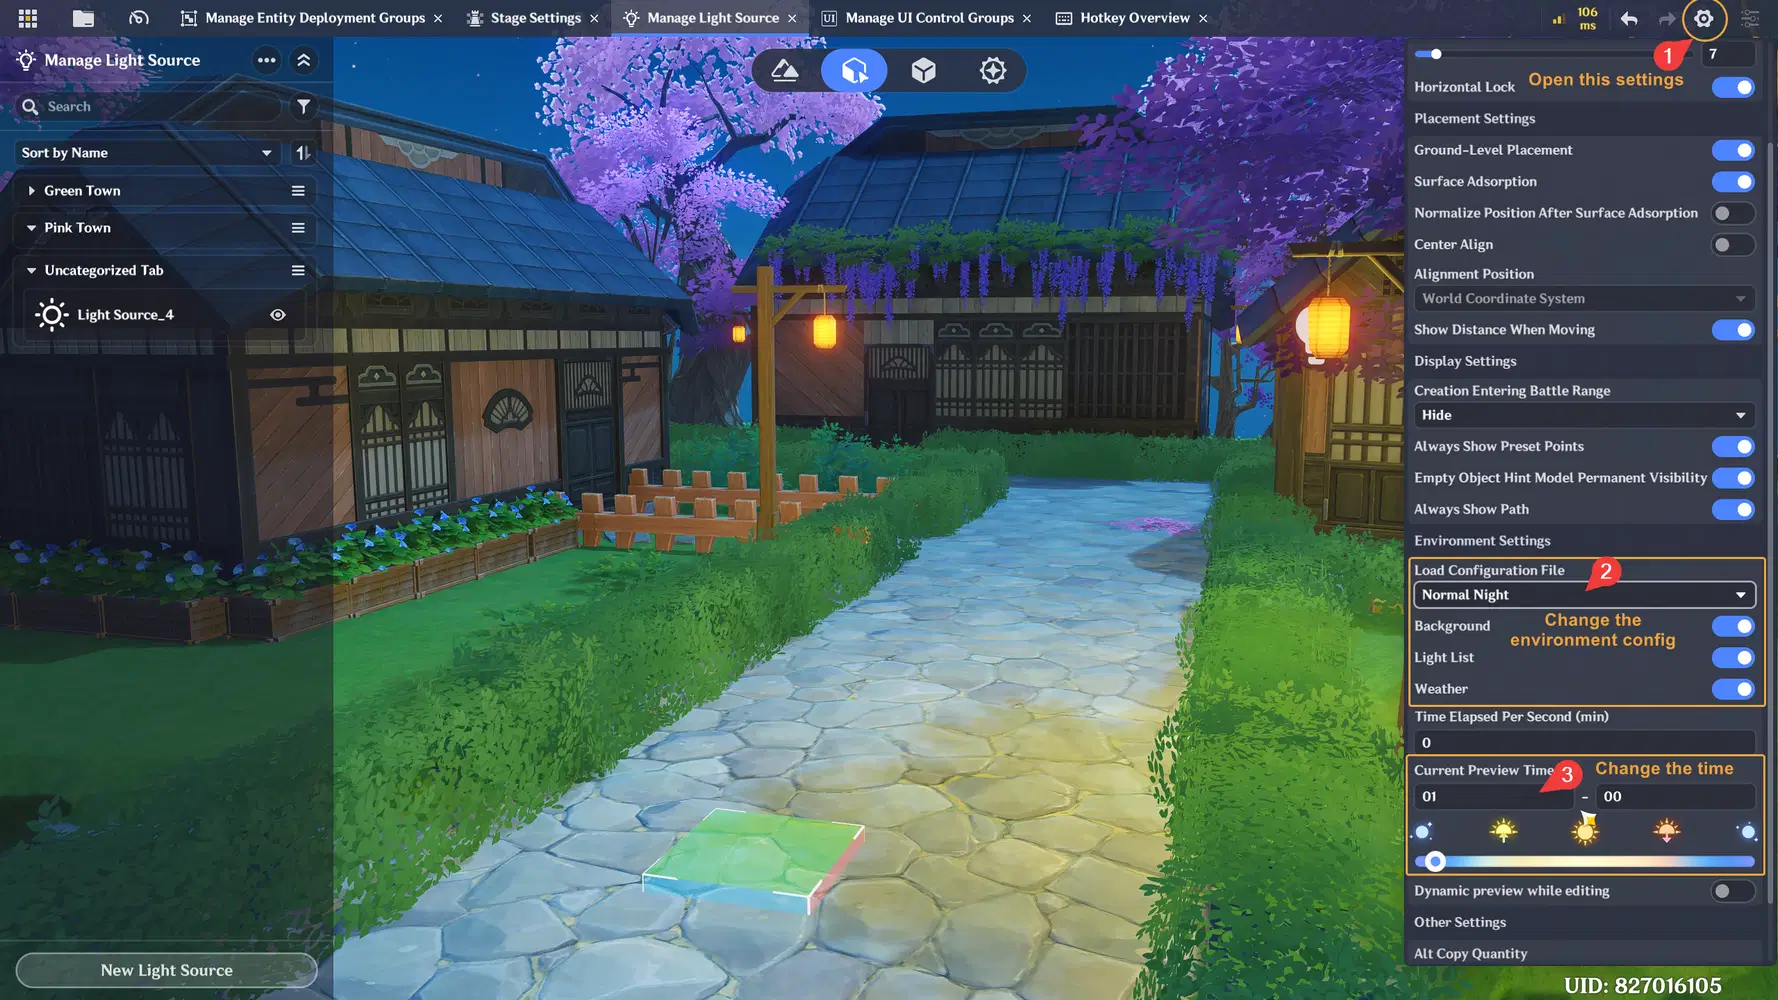
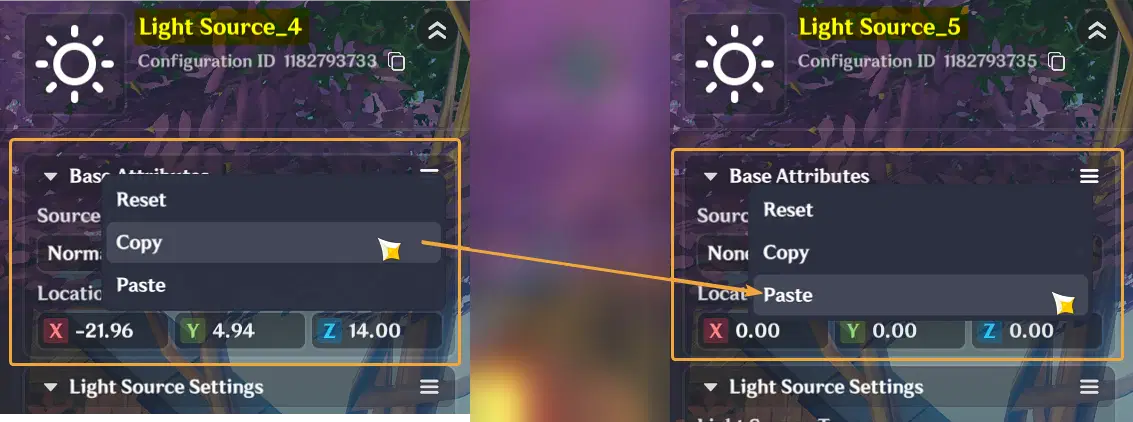
- When creating additional light sources, you can simply copy settings from an existing light to speed up the process.
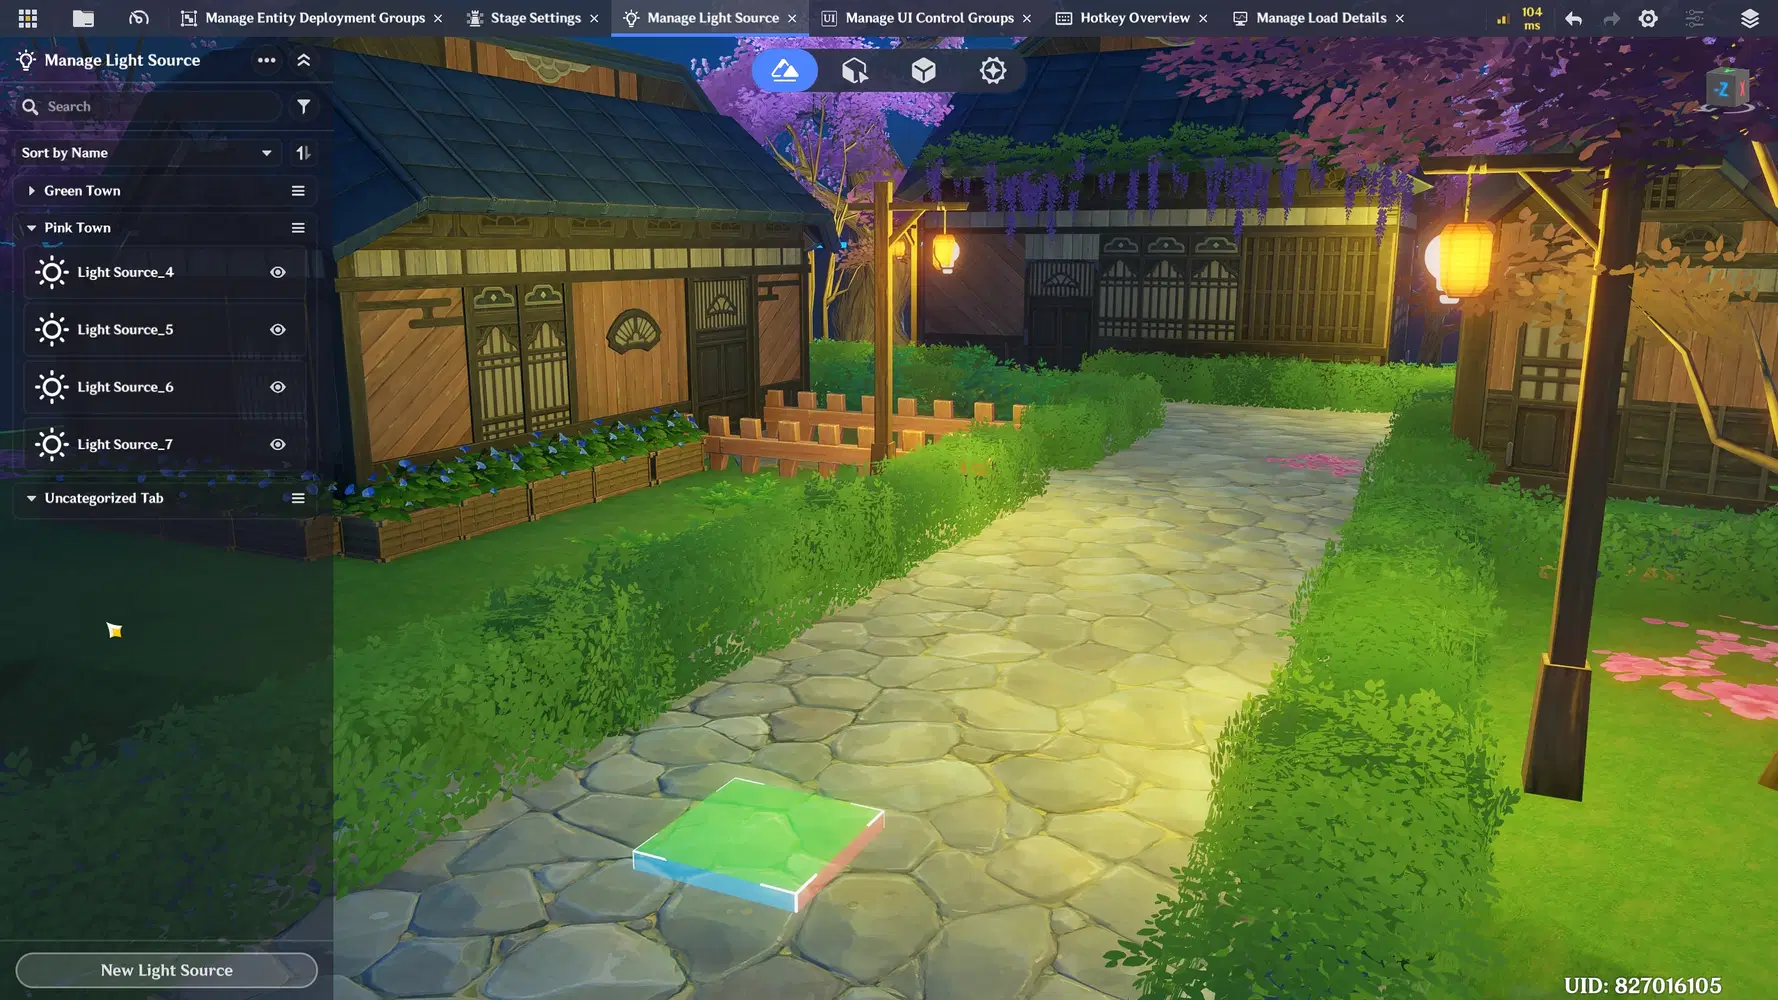
- Below is the result after I add another light source and slightly modifying the environment configuration.
- For performance optimization, reduce light intensity, radius, and effective radius whenever possible to maintain lower device load and avoid excessive lag.
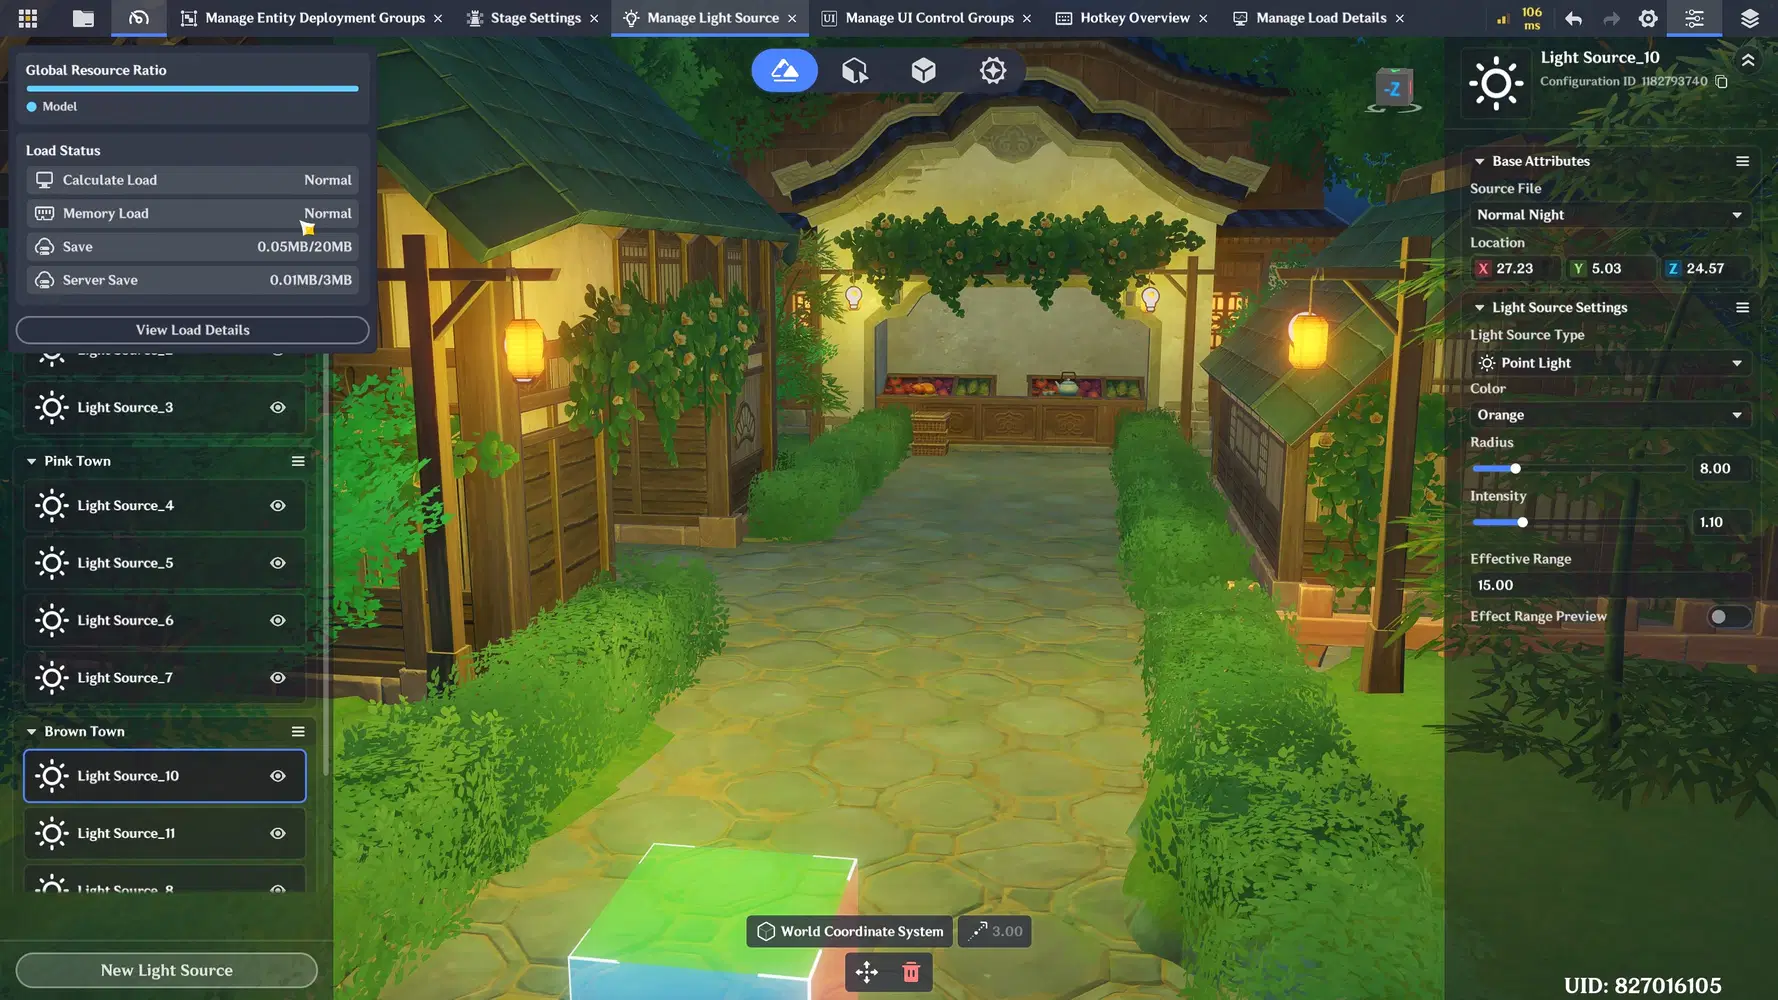
- You can also enable or disable individual light sources within an Environment Configuration, as shown below.
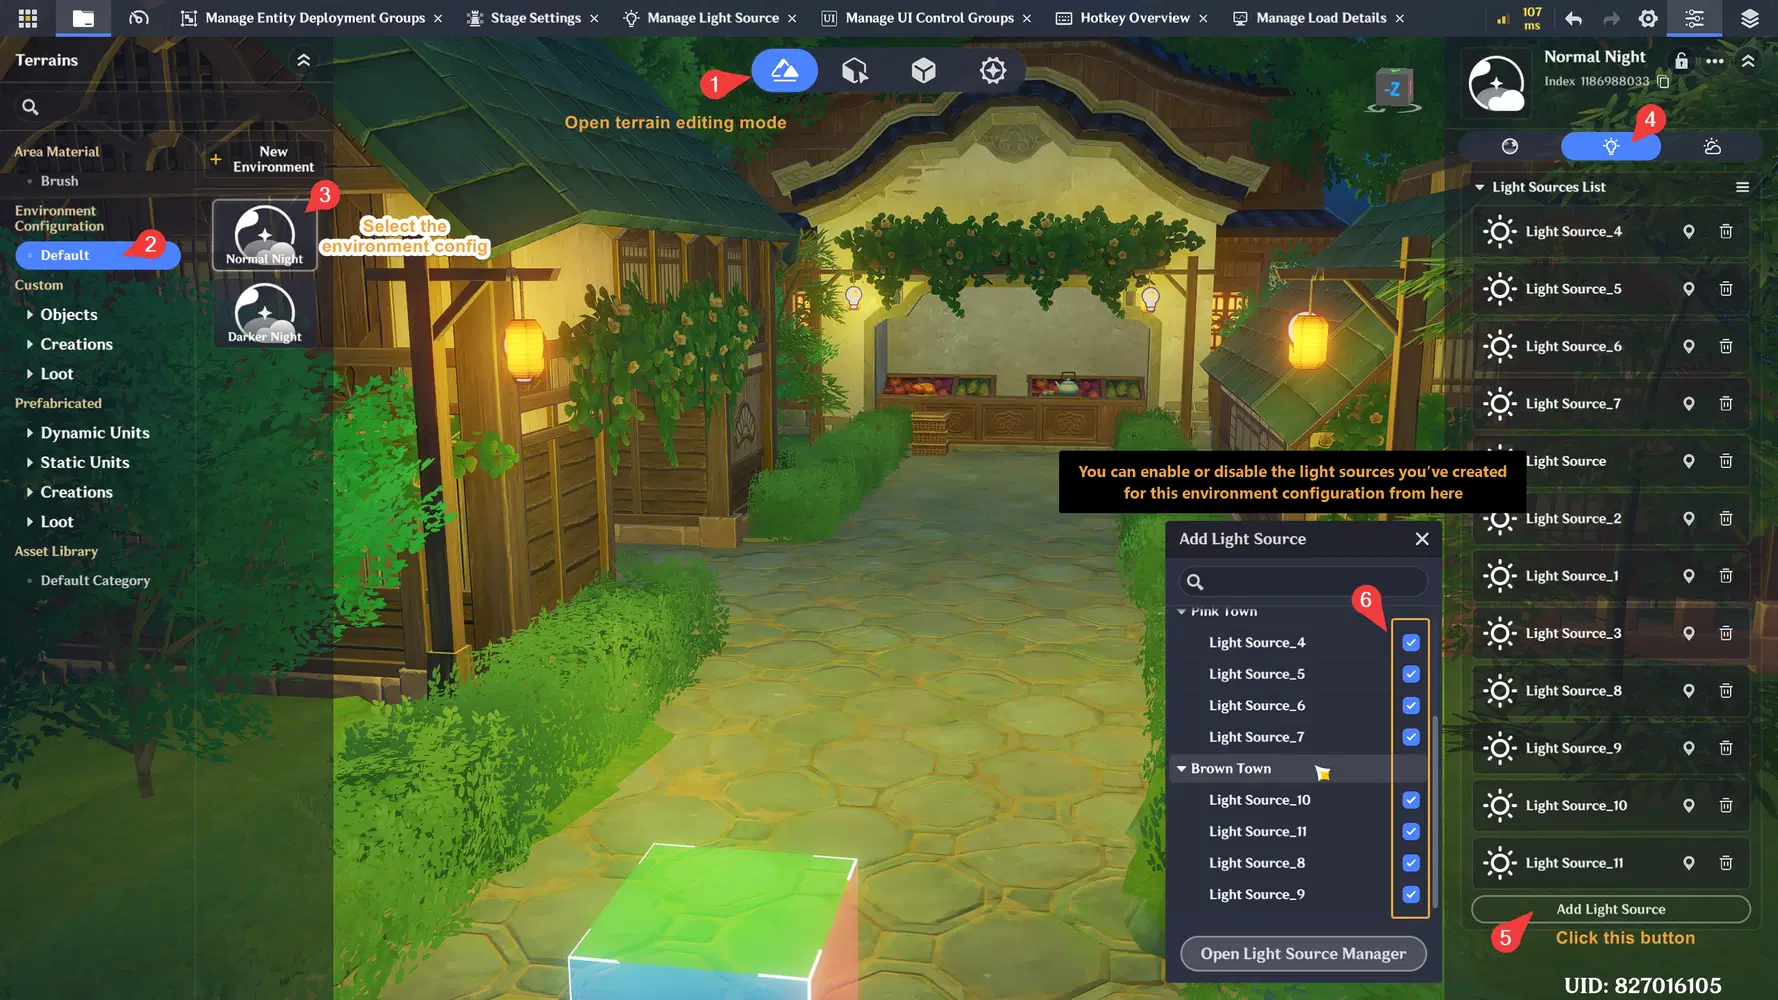
If your stage has a day and night cycle, you can create two configs and disable lights during the day time, then switch environment configs based on the current game time using a node graph, as shown earlier (2. Environment Configuration → Switch Config with Node Graph).
4. Resource Explorer
Resource Explorer provides a searchable list of entities in your stage. While some creators prefer navigating manually through the scene, others may find it faster to search for an entity by name and jump directly to it from the list.
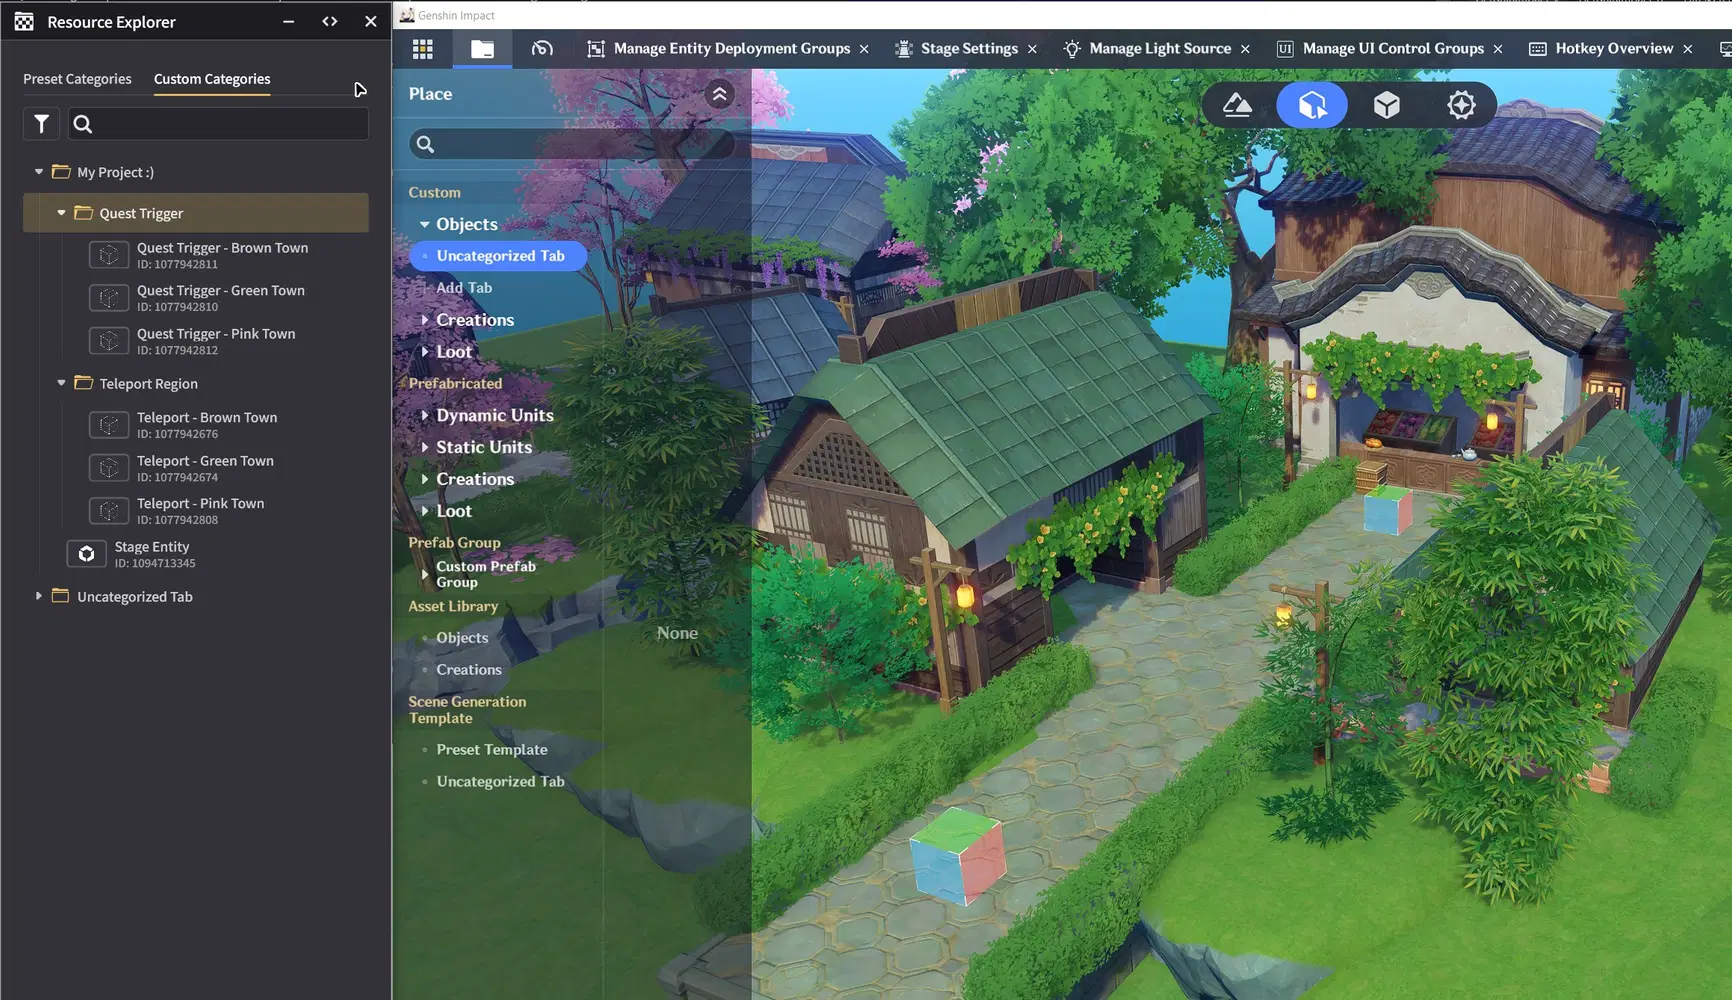
This feature is often overlooked by new creators, especially when working on smaller projects. At first, you may not need it often, but as your stage grows larger and contains more entities, it becomes a very convenient way to navigate and organize your project.
Whether used occasionally or as part of your regular workflow, it is a feature worth knowing when working on larger project.
✦ Finding Entities Instantly
The most obvious advantage is search 
For example, imagine you need to edit a quest trigger area that contains custom variable data and a collision trigger zone. Instead of manually navigating across your large map to find it again, you can simply:
- Search for the entity by name
- Double-click the result
- The editor will immediately focuses on the selected entity
✦ Organizing Large Projects
Resource Explorer also supports custom categories, allowing creators to build their own organized directories for entities.
You can organize entities in whatever way best fits your project. Some creators may group entities by quests, while others may organize them by map, scene, or development status. As projects grow larger, organization can become just as important as placement itself, making the project easier to maintain and expand in the future.
The video below shows how I organize quest trigger entities into a custom category. Since the entity doesn’t appear at the top of the list, I temporarily rename it using an underscore "_" prefix so it can appear at the top, making it easier to drag and drop into the category.
The example above is just one way to organize entities. In this case, I grouped quest triggers and teleport zones into their own category folders.
You can also create any category structure that fits your project, for the example like:
- Favorites (commonly accessed entities)
- To Do (entities that still require work)
- Main Quest 1 (store related entities)
- Main Quest 2
- Side Quest 1
It's up to you on how you use Resource Explorer.
I just want to make sure you don't miss this useful feature.
5. Prefab Group
A Prefab Group is a collection of prefabs bundled together into a reusable group. It can be used to create decoration sets, house modules, enemy encounter variations, or even complete scene layouts that can be exported between projects.
While Prefab Group and Entity Deployment Group may appear similar at first, they serve different purposes:
- Entity Deployment Group can be used to easily activate or deactivate predefined groups of entities that already placed in your editor.
- Prefab Group act more like reusable templates. You can spawn predefined entities multiple times, reuse them in different locations, and create more dynamic gameplay content such as random enemy encounters.
For scene creation, Prefab Group are especially useful when building content that will appear in multiple locations. Instead of rebuilding the same arrangement repeatedly, you can prepare it once as a Prefab Group and place or spawn it whenever needed.
If you ever need to modify custom variable data, component or add new entities, you can modify the Prefab Group. Any instances that use the same Prefab Group will automatically inherit those changes. 

However, keep in mind that Prefab Group currently do not support Static Units entity. If you want to include them in a Prefab Group, you will need to merge those Static Units into decorations attached to a Dynamic Unit first.
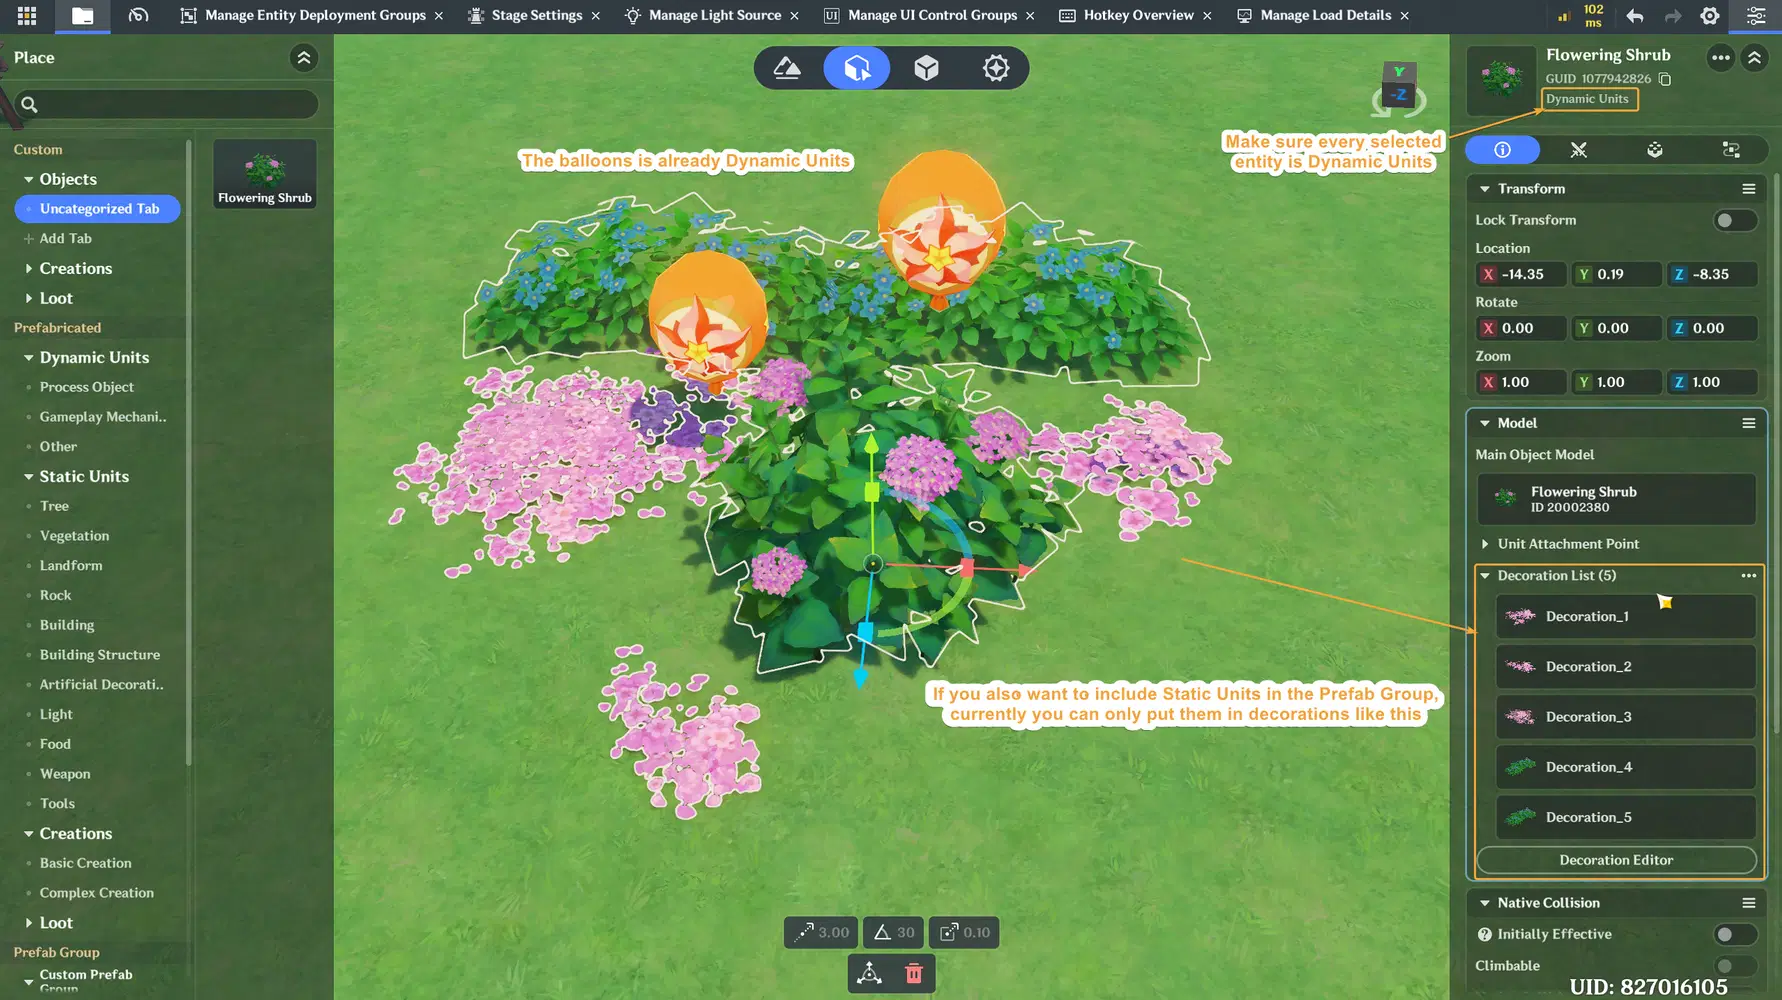
✦ Create a Prefab Group
Creating a Prefab Group is quite easy if all of the entities are already Dynamic Units.
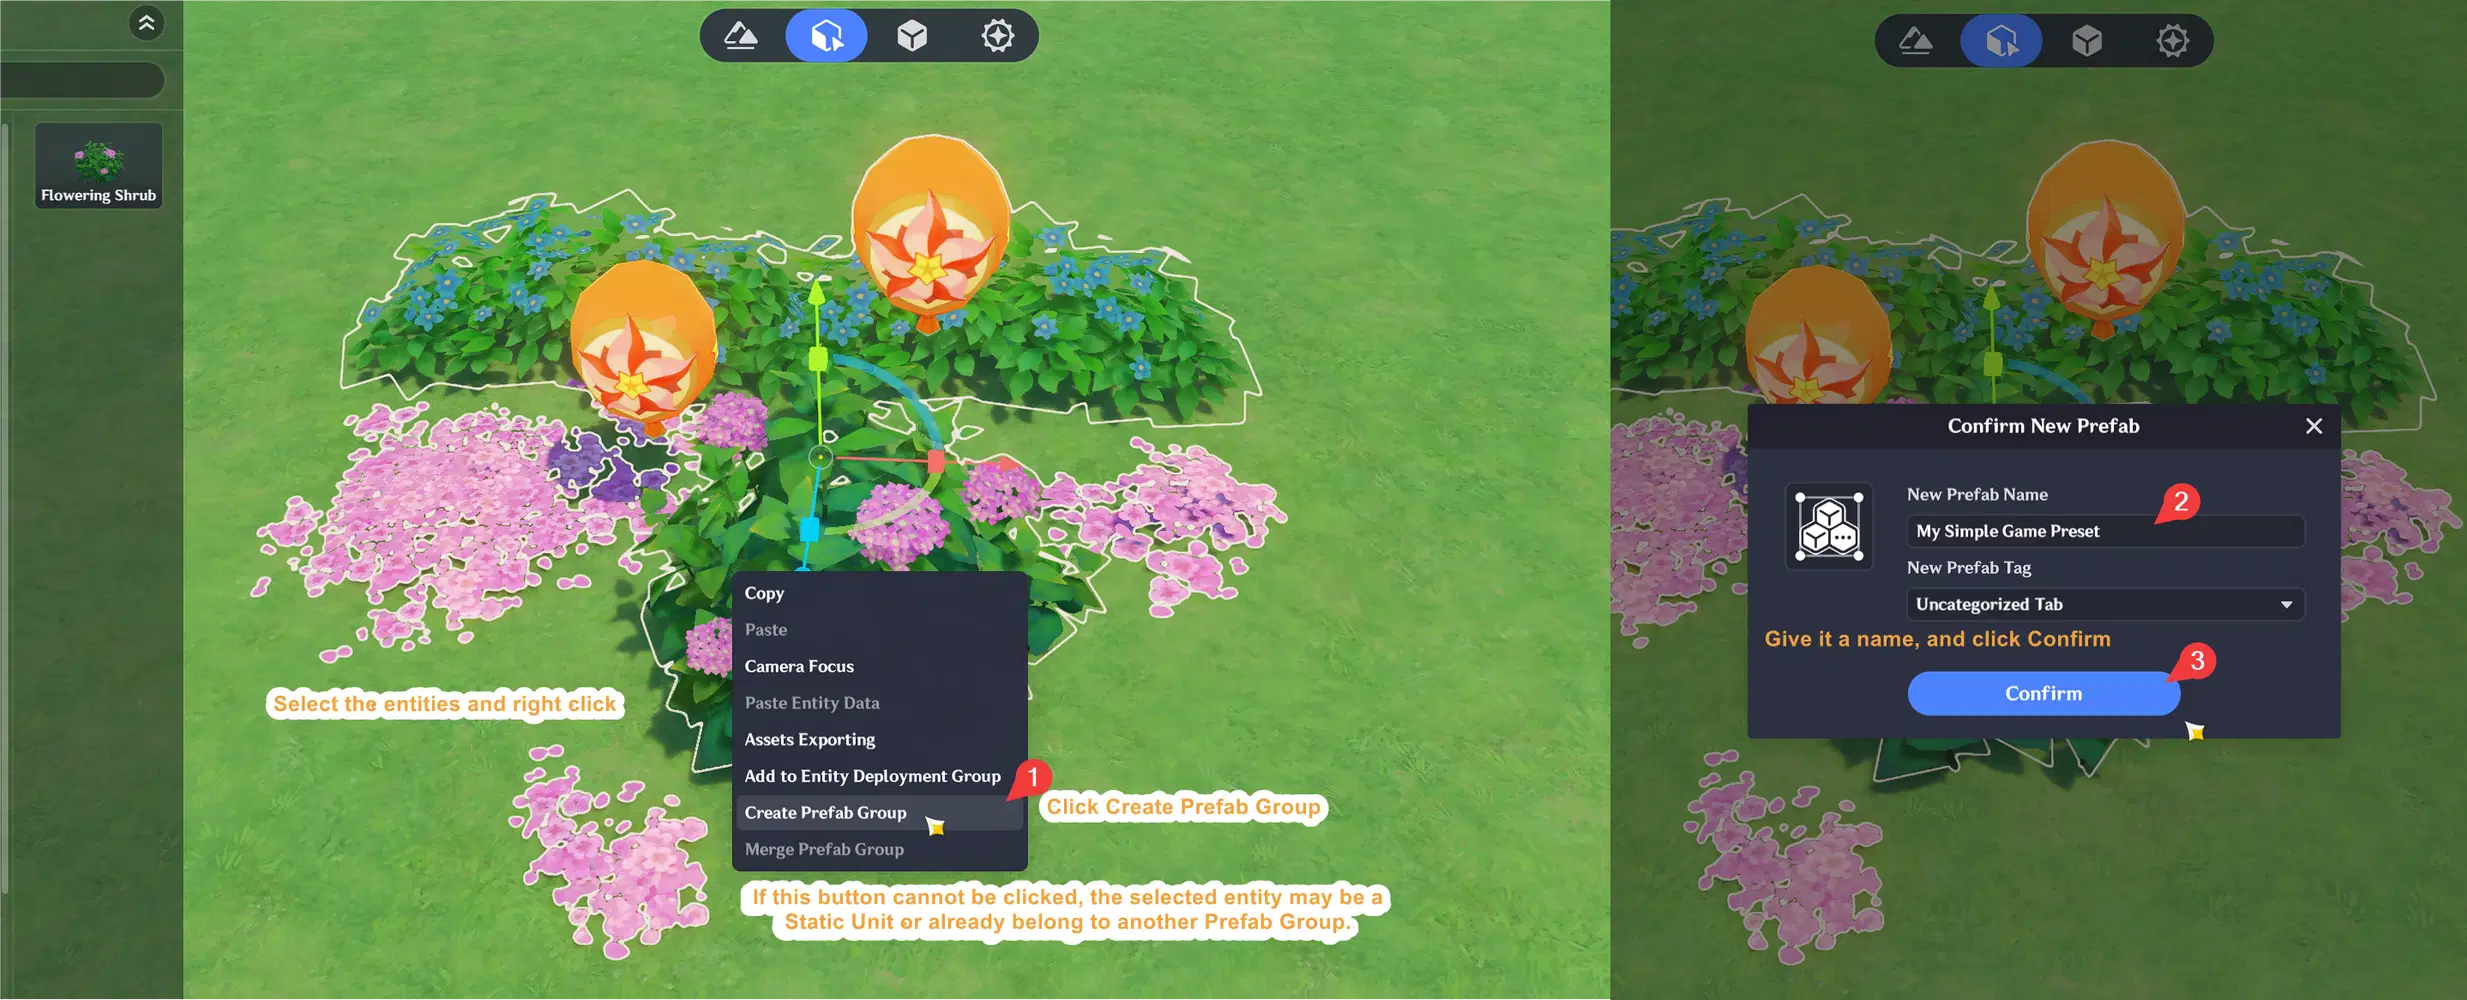
- Simply drag your prefabs or any Dynamic Units into the scene, select them, right-click, and choose Create Prefab Group.
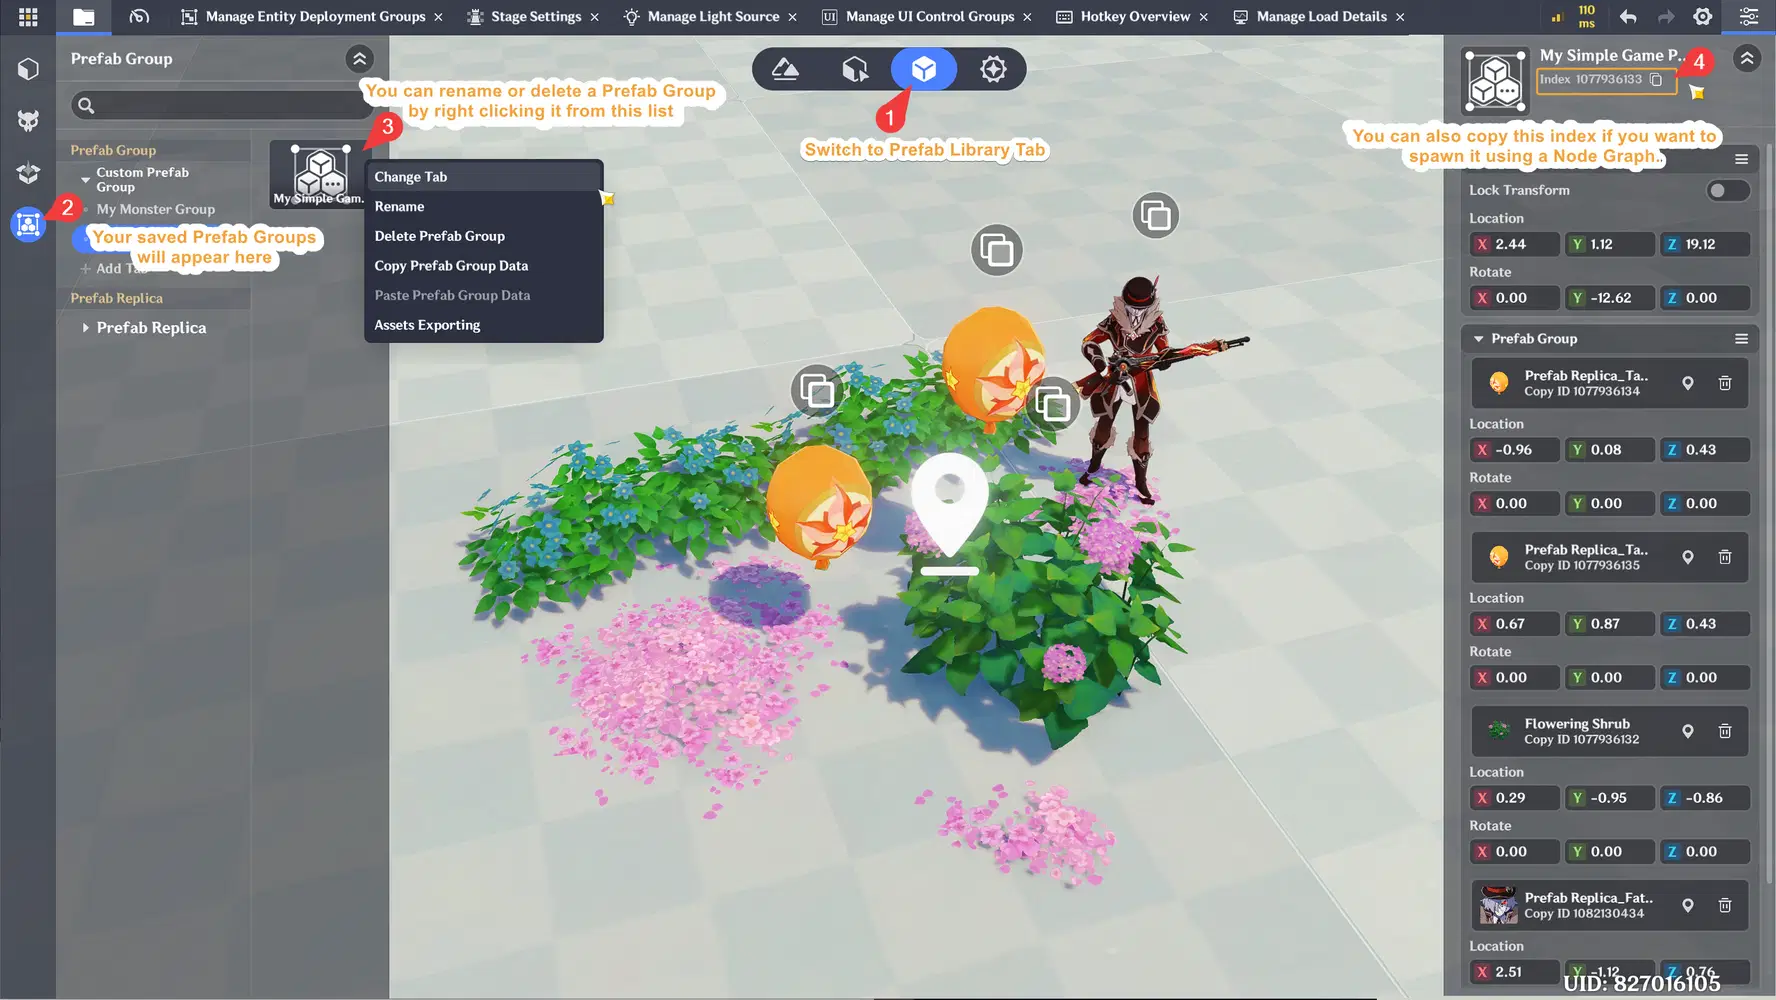
- After you create the Prefab Group, you can find it here in case you want to modify its category, delete it, or also copy the index for spawning it from a Node Graph later.
✦ Dynamic Spawning
When a Prefab Group is spawned through a Node Graph, we can obtain a list of the entities that were created. This allows spawned entities to be managed after creation.
As a bonus for reaching this point of this guide, let me show a simple example of how to randomly spawn a slime group. Prefab Group are not only useful for decoration, but can also help you design gameplay more easily. 
- Before we get started with the example, make sure you have prepared some monster Prefab Groups as well. Then copy the Prefab Group index by following the image below.
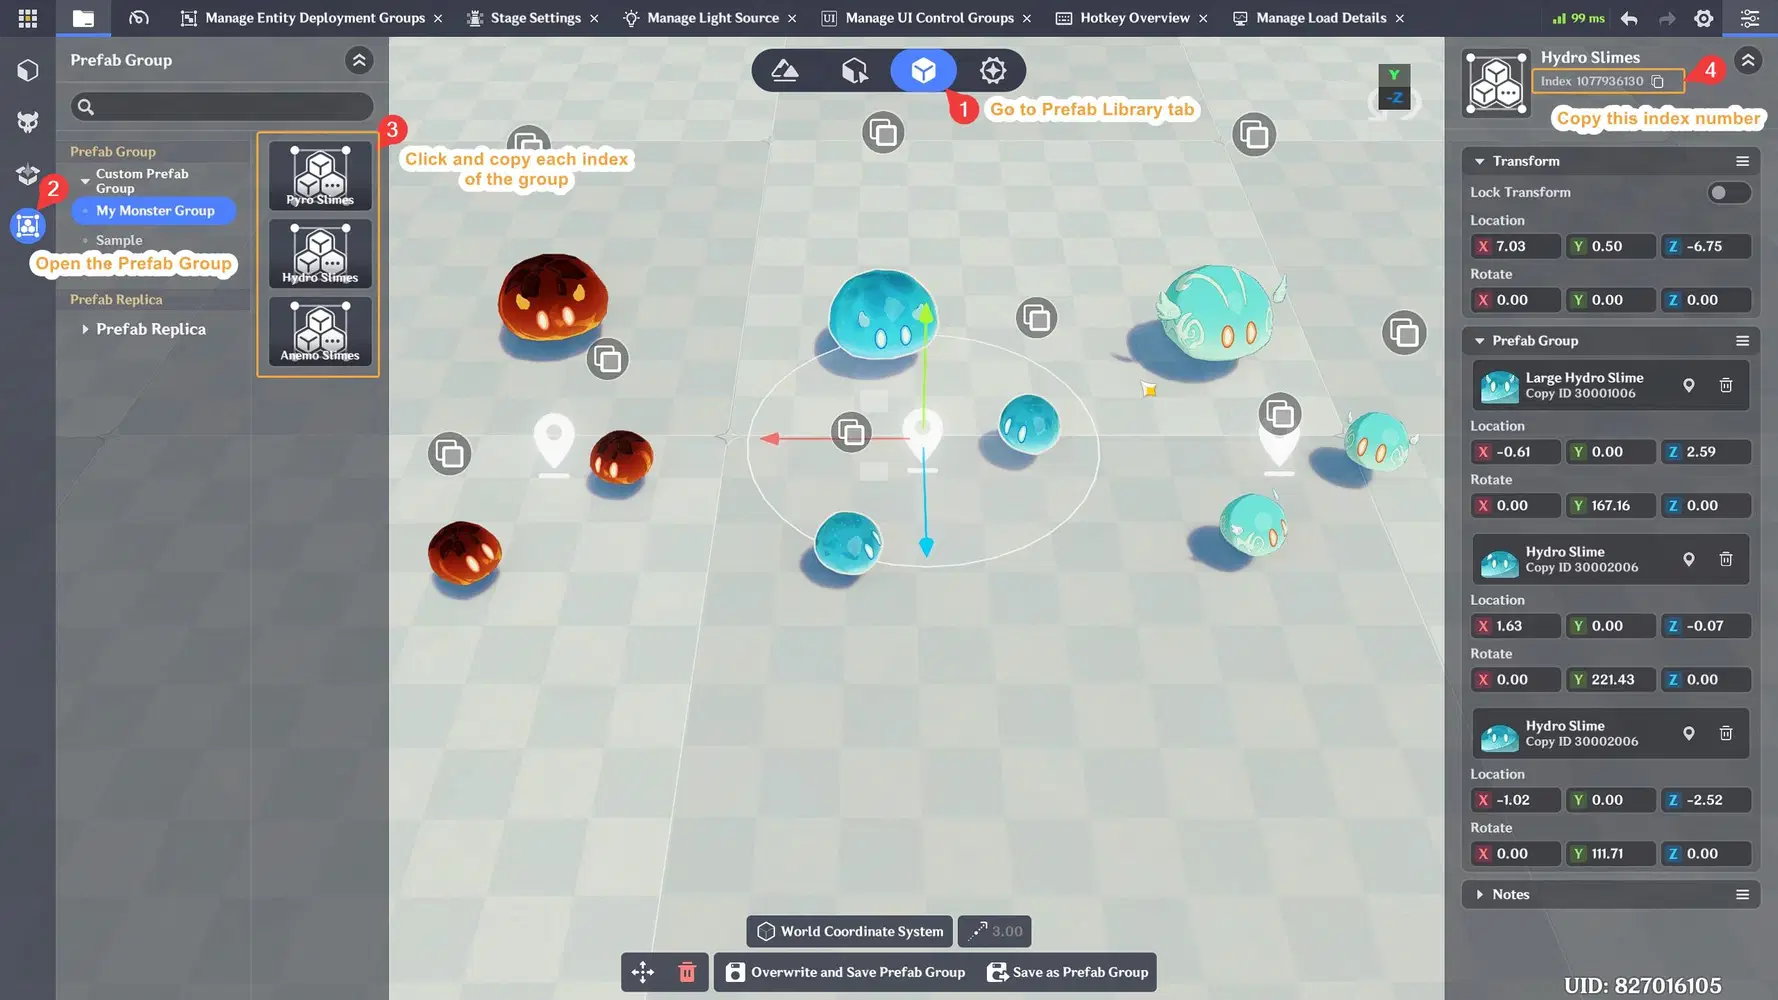
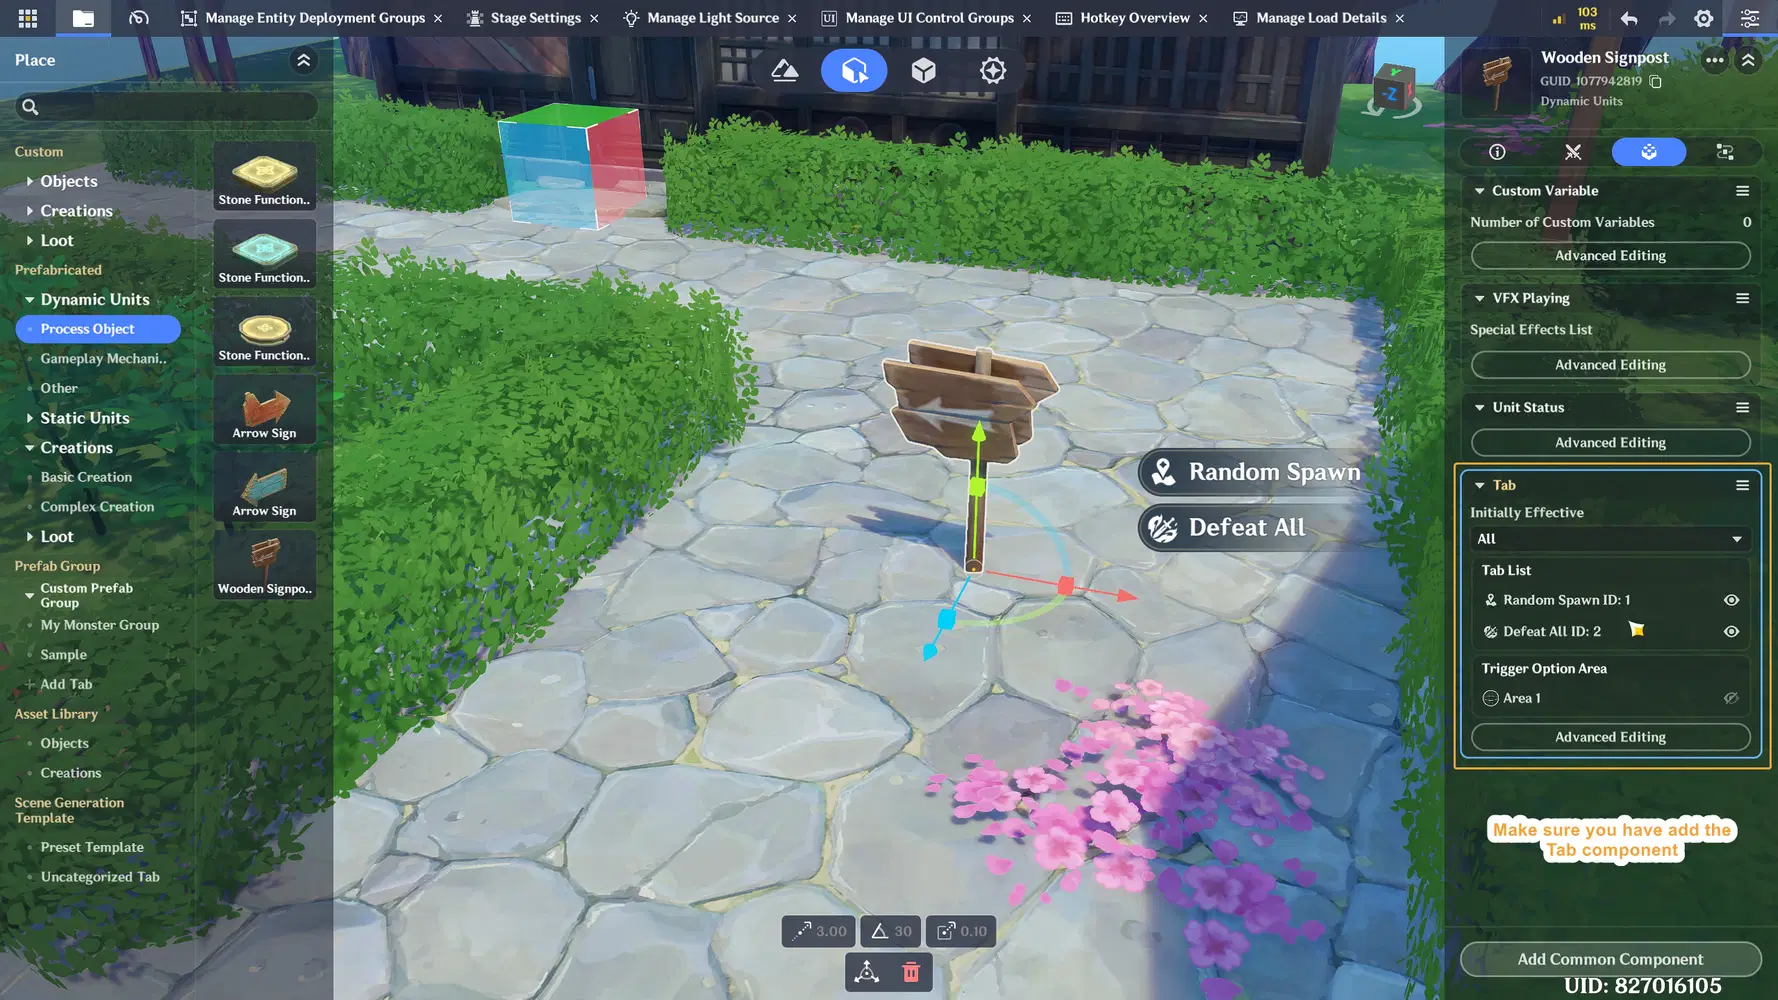
- As usual, I’ll use this entity for testing. You can also use other models, but just make sure to add the Tab Component as well.
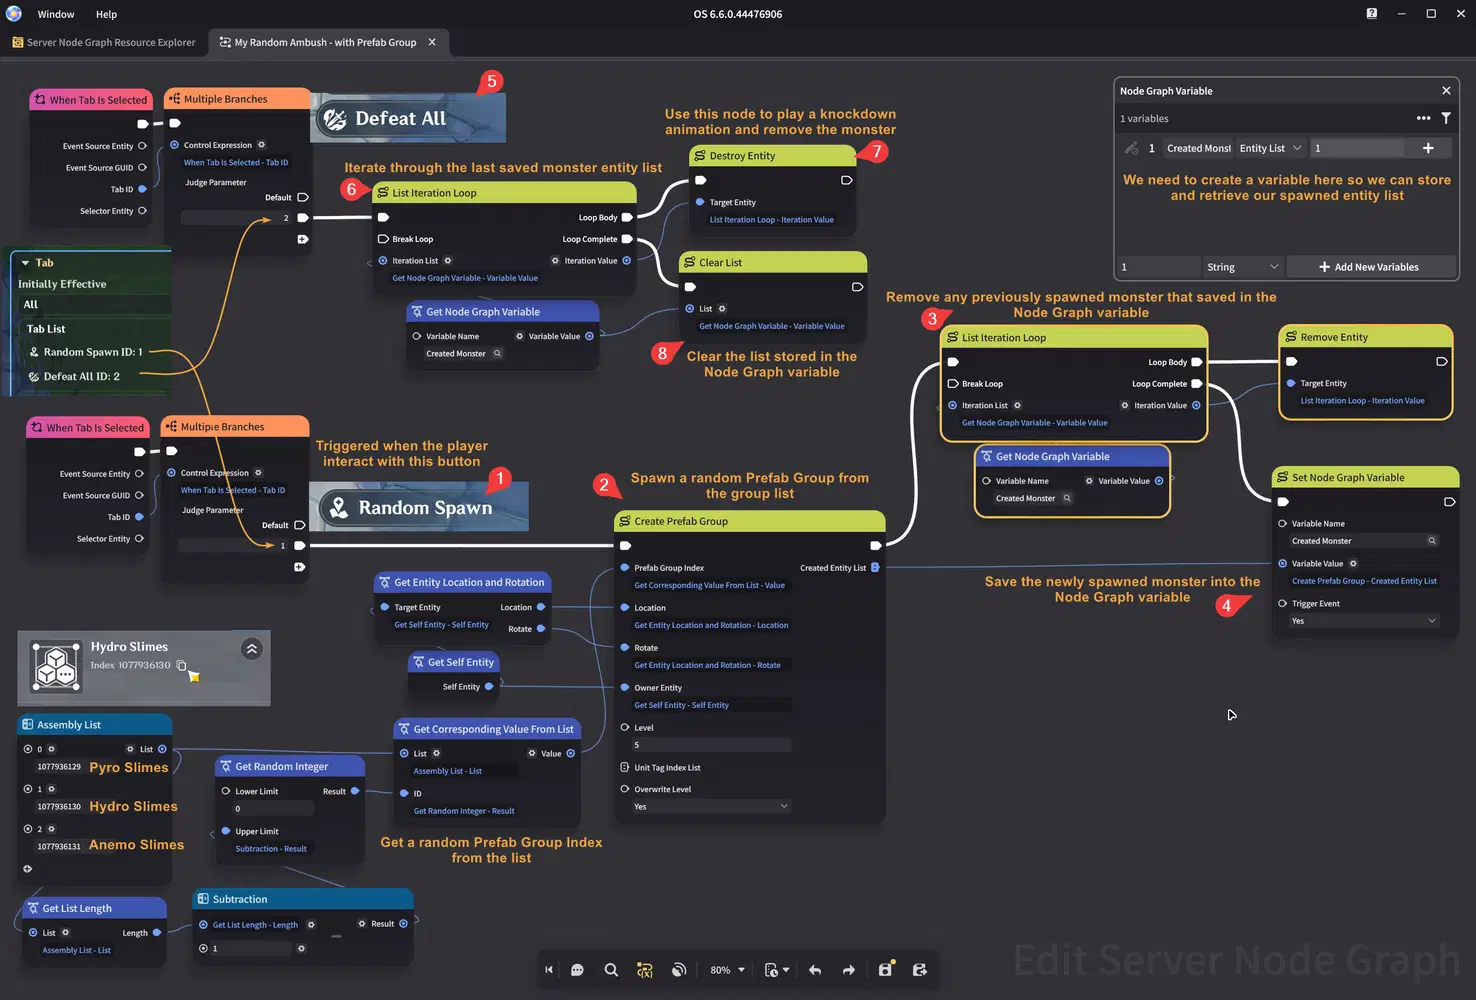
- Next, create a Node Graph as shown below. I've tried to keep it as simple as possible, but if it still looks complex, I've included numbered steps and descriptions to help clarify it.
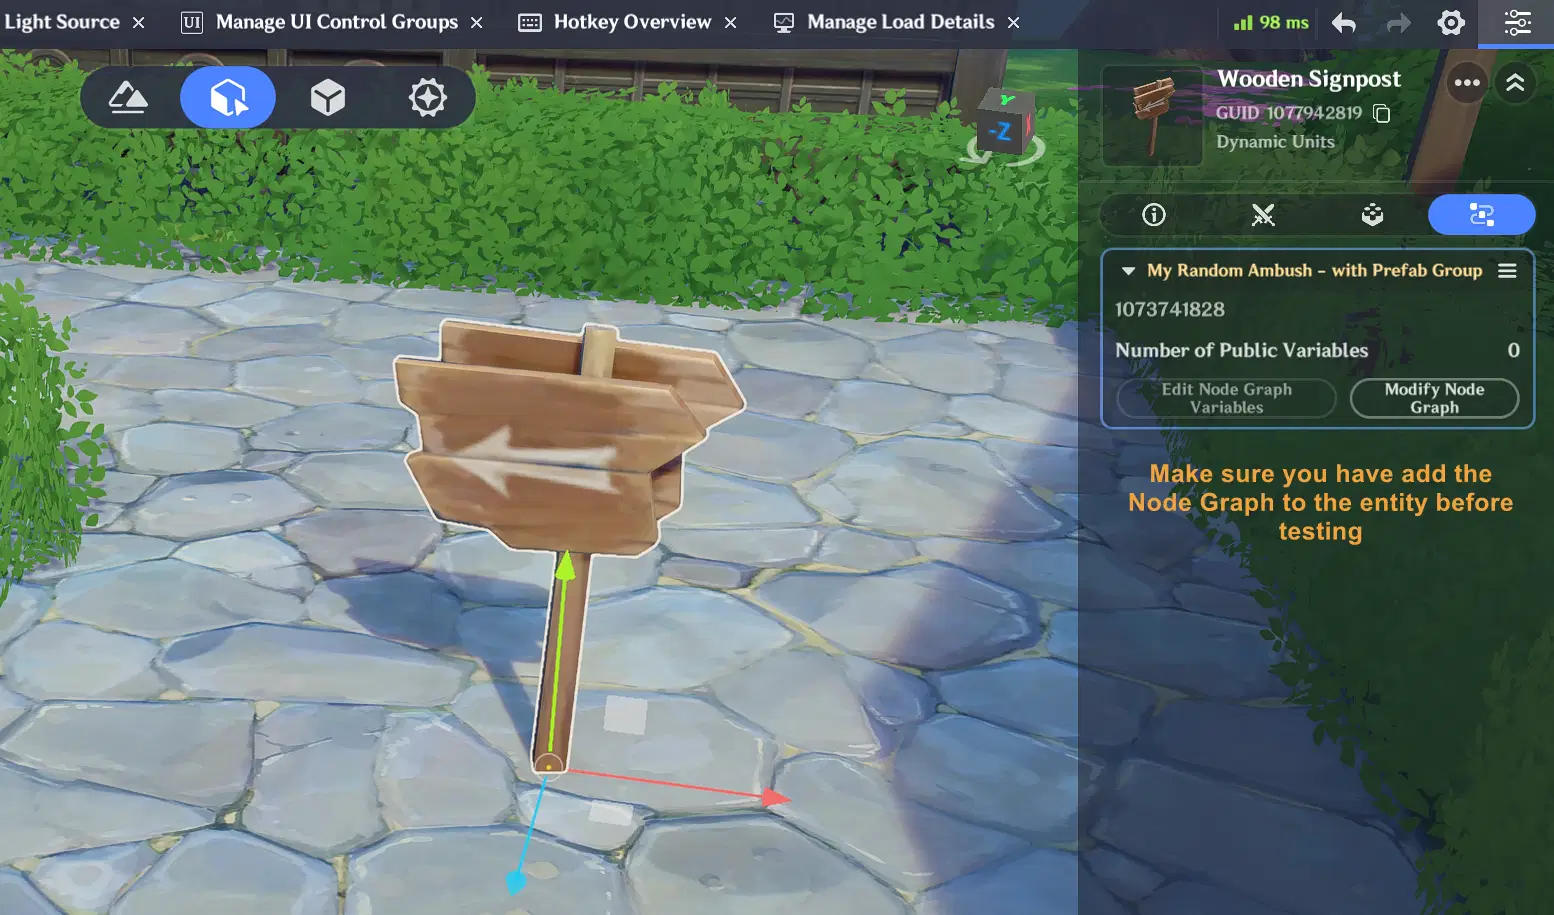
- Alright, let's begin testing. But make sure you have added the Node Graph to the entity we are using for testing.
- The final result should look like below. We can randomly spawn monsters from our Prefab Group list.
In actual gameplay systems, you could replace the Tab Component with a Collision Trigger instead. So when the player enters a specific area, a random monster ambush can be triggered.

Congratulations for following this guide until the end! Hopefully this guide helps you better understand the useful features in the Miliastra Wonderland editor and gives you ideas for creating your own scenes or development strategies in future projects.
Thank you for reading, and happy creating!




