


When designing a save system alongside an equipment system, many beginners eventually find that their save data cannot support more advanced equipment mechanics.
This tutorial demonstrates a save solution for procedurally generated equipment with random affixes, random affix values, and levels. It also provides a brief introduction to binary save compression, which can significantly increase save capacity for larger-scale save data.
Overview
- You need to reach Level 4 to enable In-Game Save Data before this tutorial can be followed effectively.
- The advanced section on binary operations can be skipped unless you really need it. It is only recommended when your save space is completely insufficient.
- The basic binary operation tools have already been encapsulated into Composite Nodes and published in the Asset Center. With only a basic understanding of bitwise operations, you can create your own bit-packed save data without needing to understand the implementation details.
- Asset Center: https://act.hoyoverse.com/ys/prod/ugc/component-store/index.html#/item/2071037500729618432
- This tutorial does not start entirely from scratch. Please download the Random Affix Demo from the Asset Center before proceeding.
- Asset Center: https://act.hoyoverse.com/ys/prod/ugc/component-store/index.html#/item/2040814657148588032
- This tutorial uses full snapshot saves instead of real-time incremental saves. Since random equipment is frequently obtained, discarded, and reforged, writing the save data after every change would result in excessive write operations and reduced performance.
Now, let's get started!
1. Tutorial Overview and Principles
This tutorial is divided into three parts: Saving, Loading, and Binary Optimization.
Saving:
Equipment data is divided into five parts: Equipment Config ID, Level, Affix Count, Affix, and Affix Value. Each type of data is stored sequentially in its own list, ensuring ordered access.
Loading:
The core of the loading process is obtaining the equipment index and restoring the equipment by adding its affixes. Since the corresponding equipment index cannot be obtained directly during loading, the process is divided into two stages:
- Equipment Restoration
- Enable a reading flag before restoration begins. While this flag is active, the equipment initialization process collects the equipment indices. Since the Node Graph executes in logical order, the collected index list will match the order of the saved data.
- Affix and Value Restoration
- Maintain a list access index to read the saved data sequentially and restore the affixes and their values for each piece of equipment.
Binary Optimization:
Data such as Level, Equipment Config ID, and Affix Count all have well-defined value ranges. For example, the level will never exceed 256, the number of equipment configurations is usually fixed, and the affix count is typically less than 8. Storing these values as full integers or full Config IDs wastes a significant amount of save space. Packing all three values into a single 32-bit integer is more than sufficient.
Next, we'll move on to the implementation with step-by-step explanations.
2. Prerequisites
Download the Random Affix Demo save, or create a similar demo yourself as the starting point.
Each piece of equipment contains one Level Affix, one Special Affix, two Fixed Affixes (defined in the configuration), and two Random Affixes. Verify that the demo runs correctly in your editor.
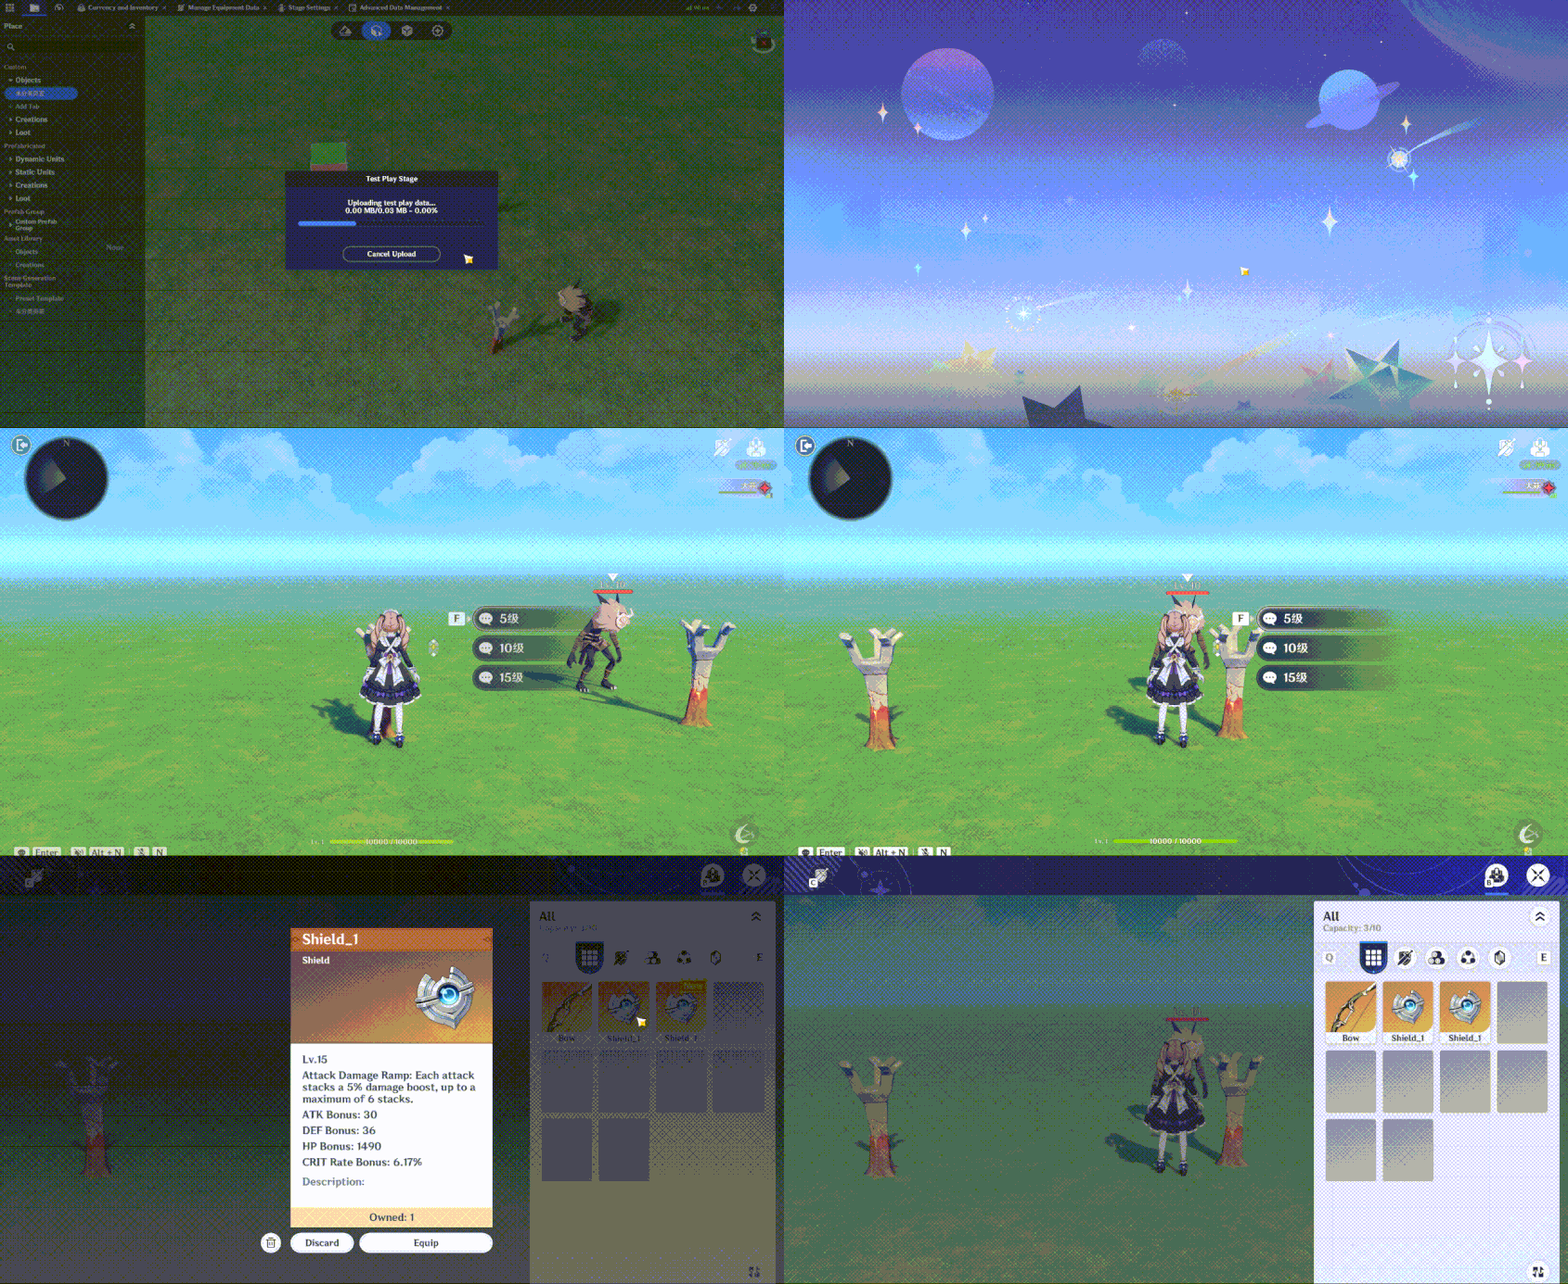
After importing the demo, run a test and make sure the equipment is generated correctly. If everything works as expected, you're ready for the next step!
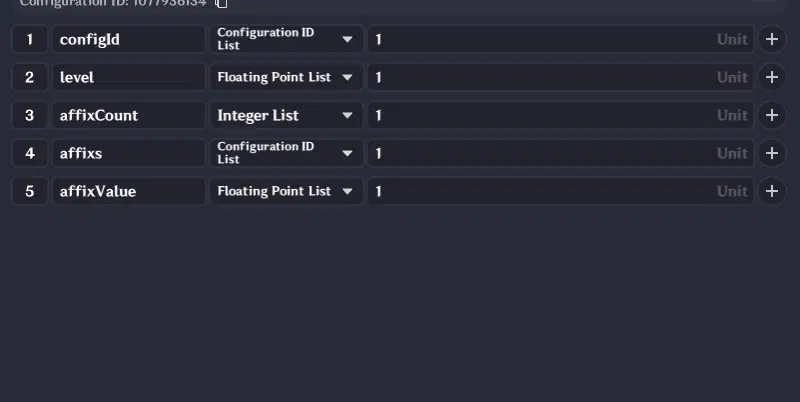
In-Game Save Data Structure
As mentioned earlier, the equipment data is divided into five parts: Equipment Config ID, Level, Affix Count, Affix, and Affix Value.
Accordingly, we'll define the In-Game Save Data structure to include these five parts as well.
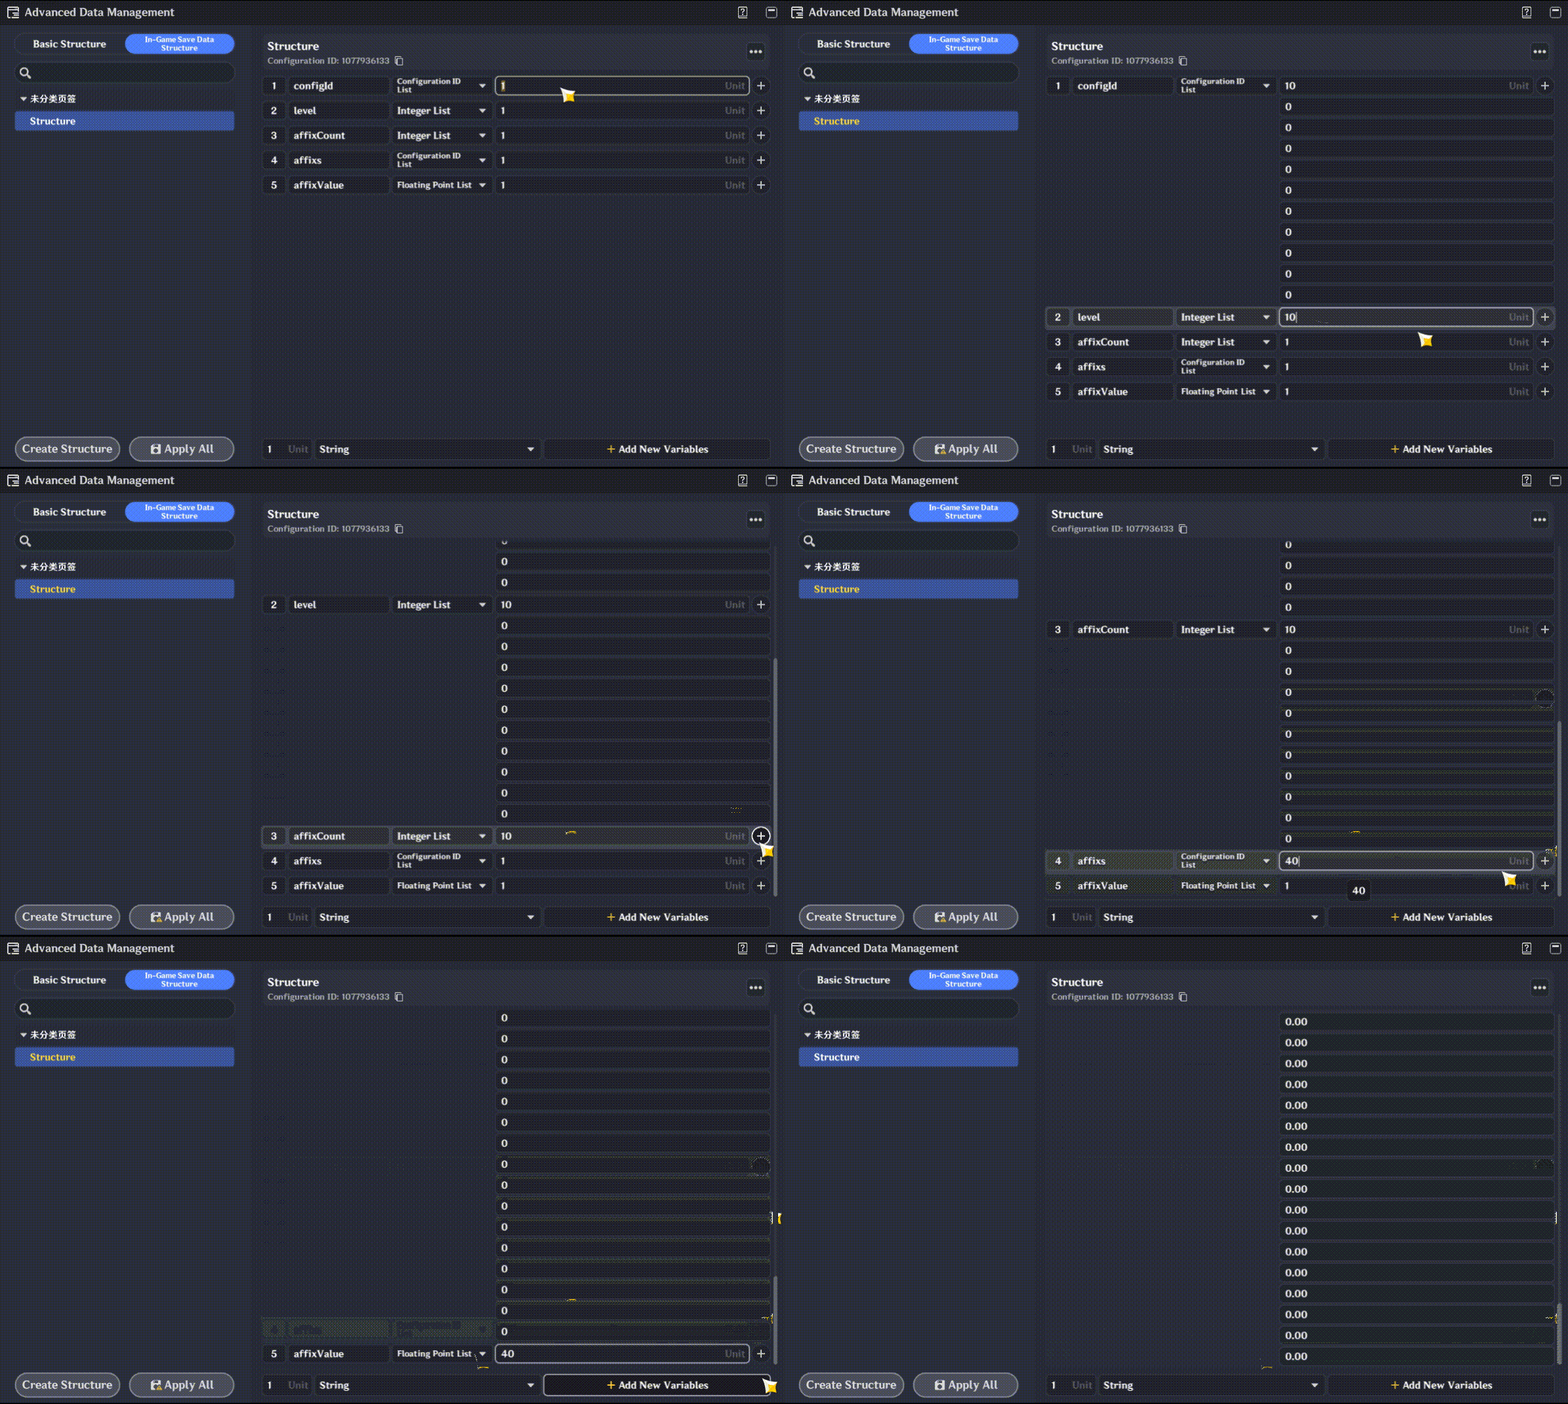
The In-Game Save Data uses preallocated storage. Since this is a demo, we'll allocate space for 10 pieces of equipment.
Allocate 10 entries each for Equipment Config ID, Level, and Affix Count. For Affixes, since each piece of equipment may have 2–4 affixes, preallocate 40 entries (10 × 4). Do the same for Affix Values.
Next, enable In-Game Save Data. Locate In-Game Save and assign the data structure you just created to the In-Game Save Data field.
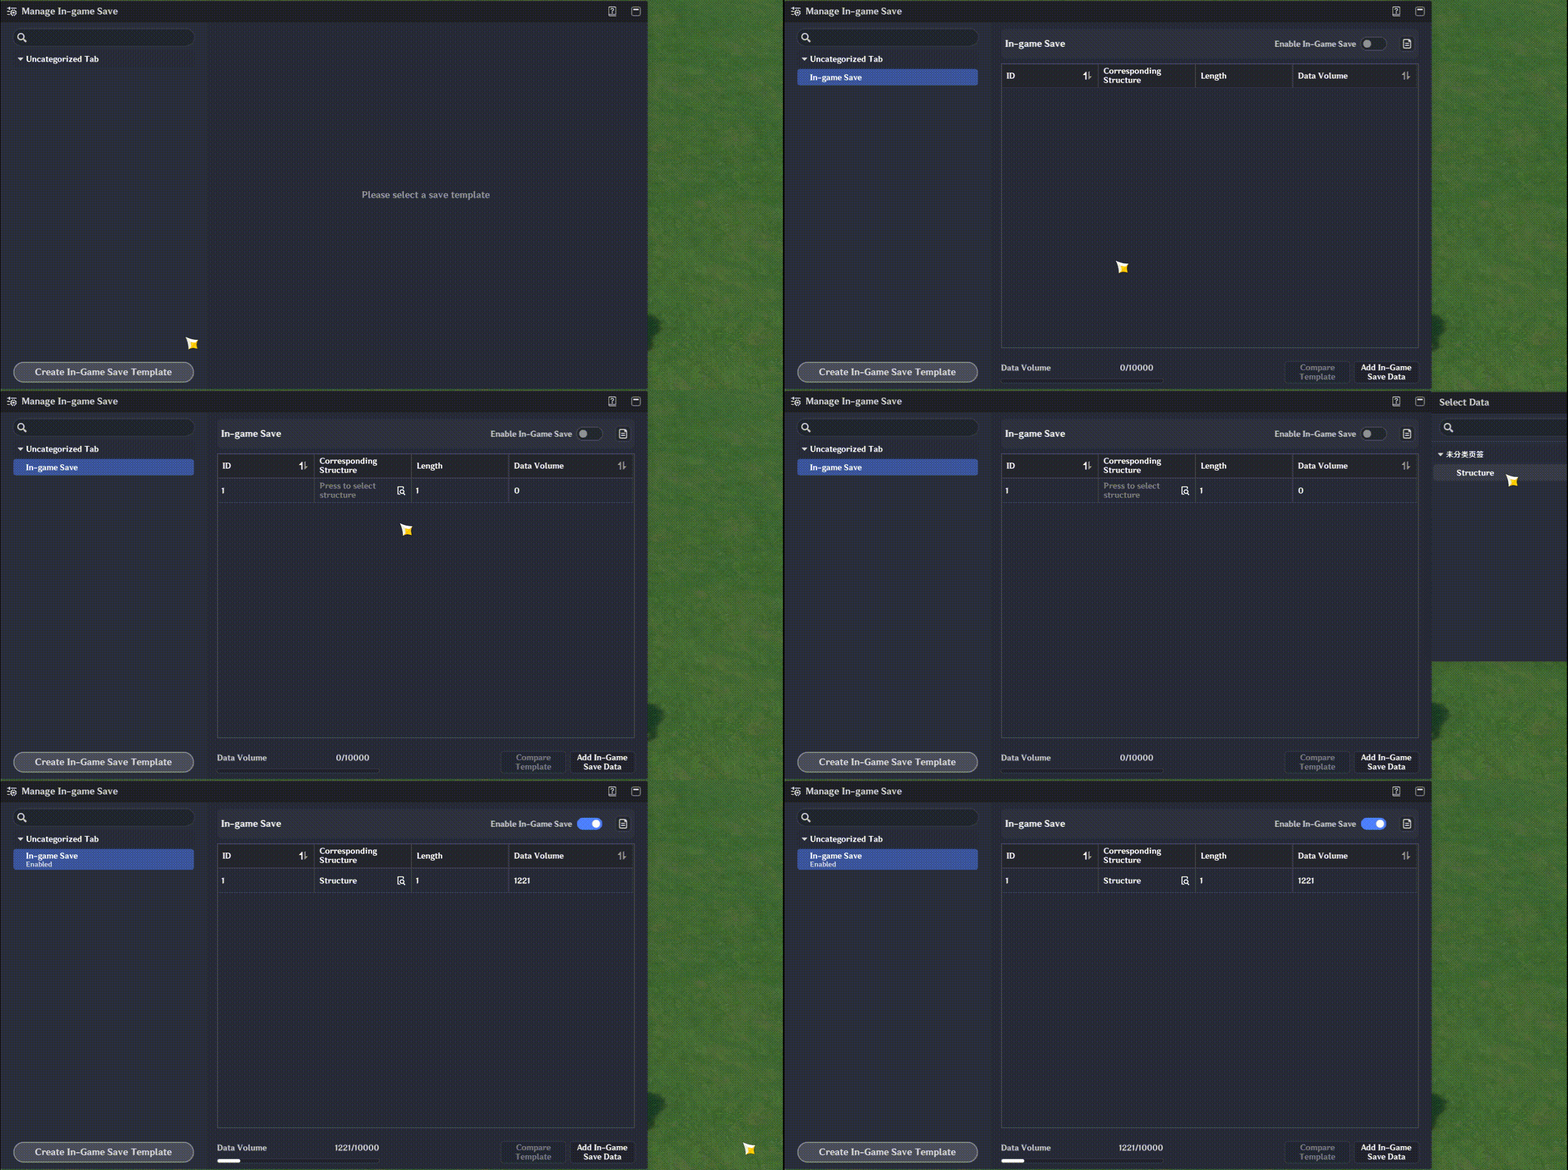
With the preparation complete, we can now begin implementing the save system.
3. Saving
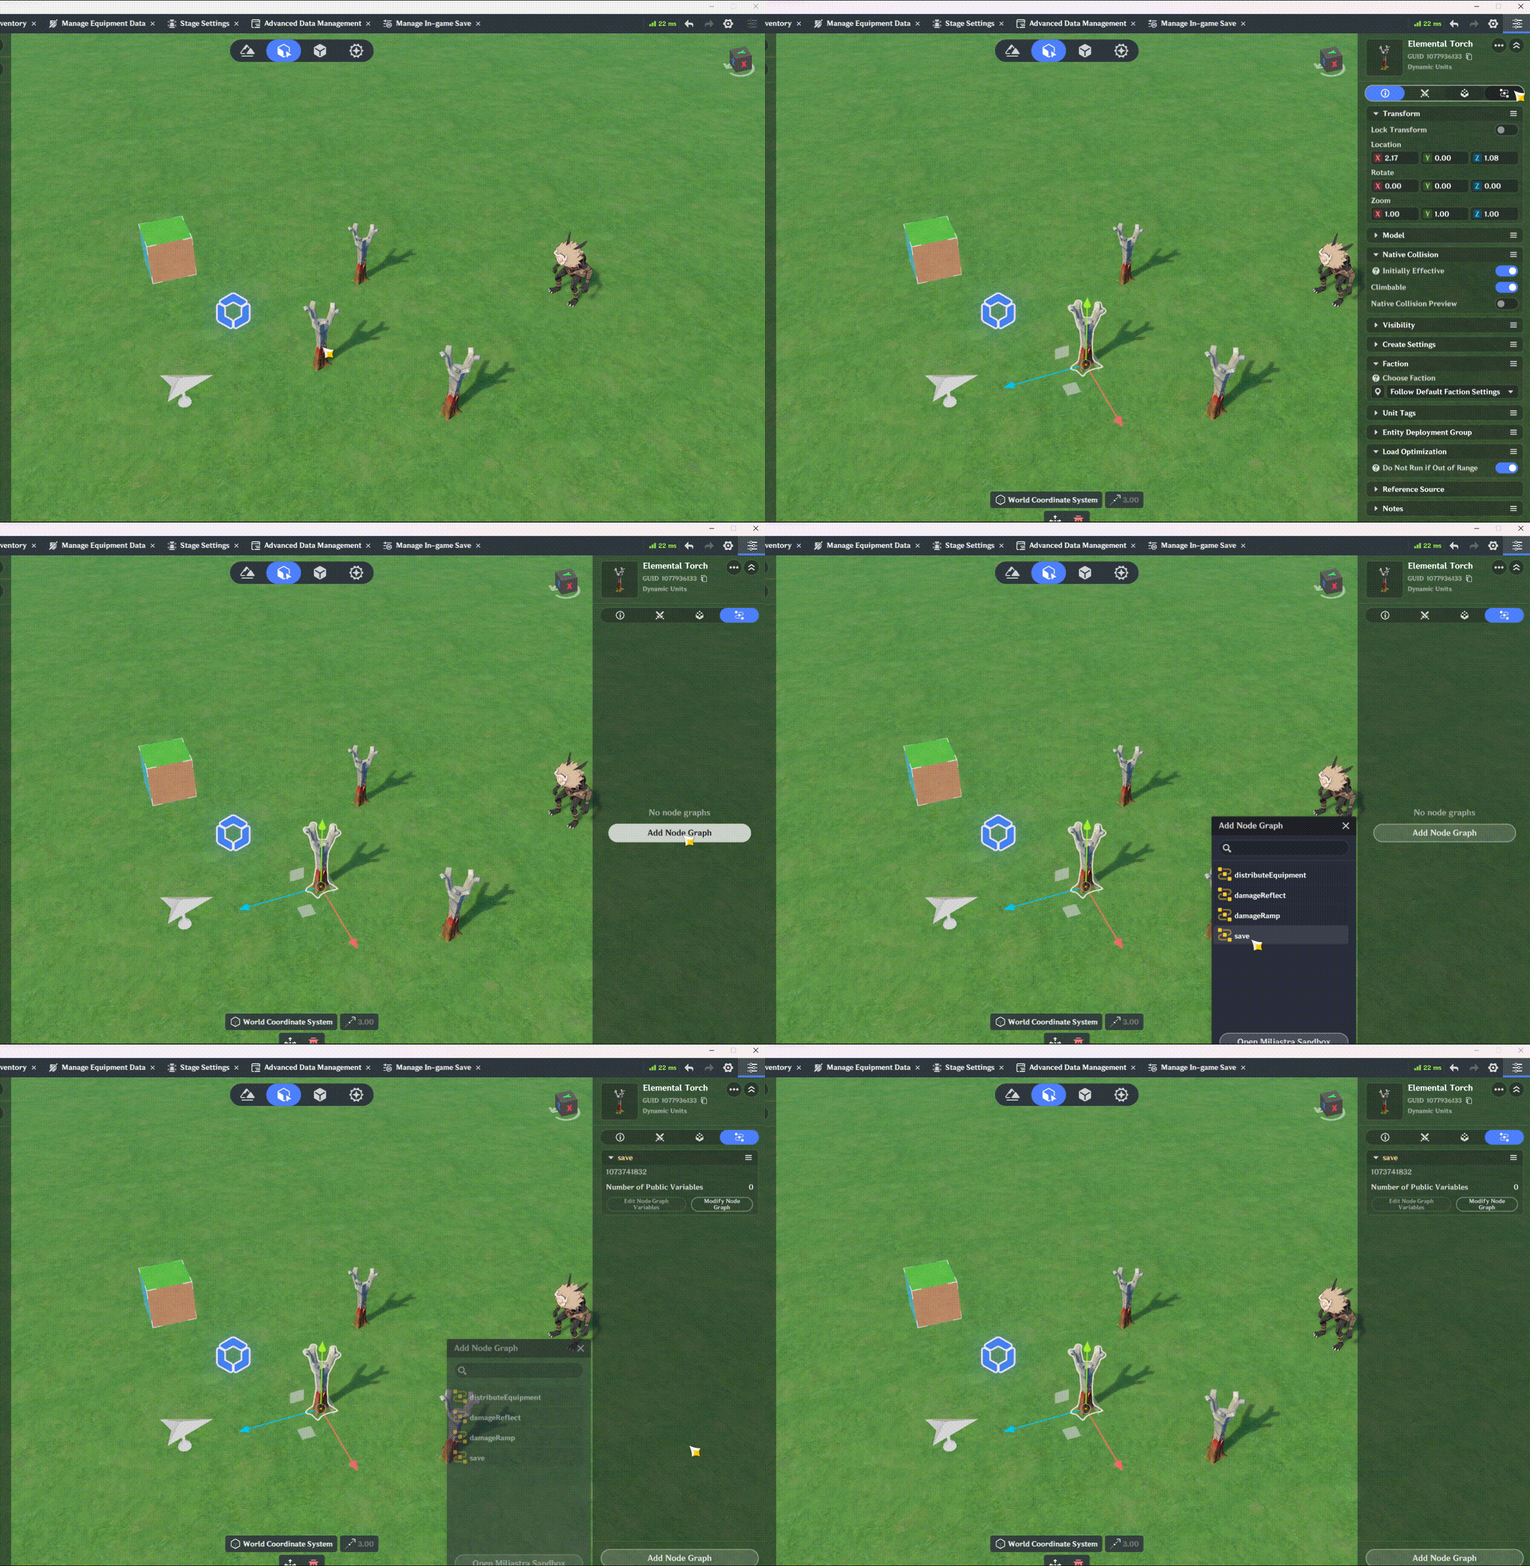
In this tutorial, the save process will be triggered using a Tab.
First, create a Torch and add a Tab to it.
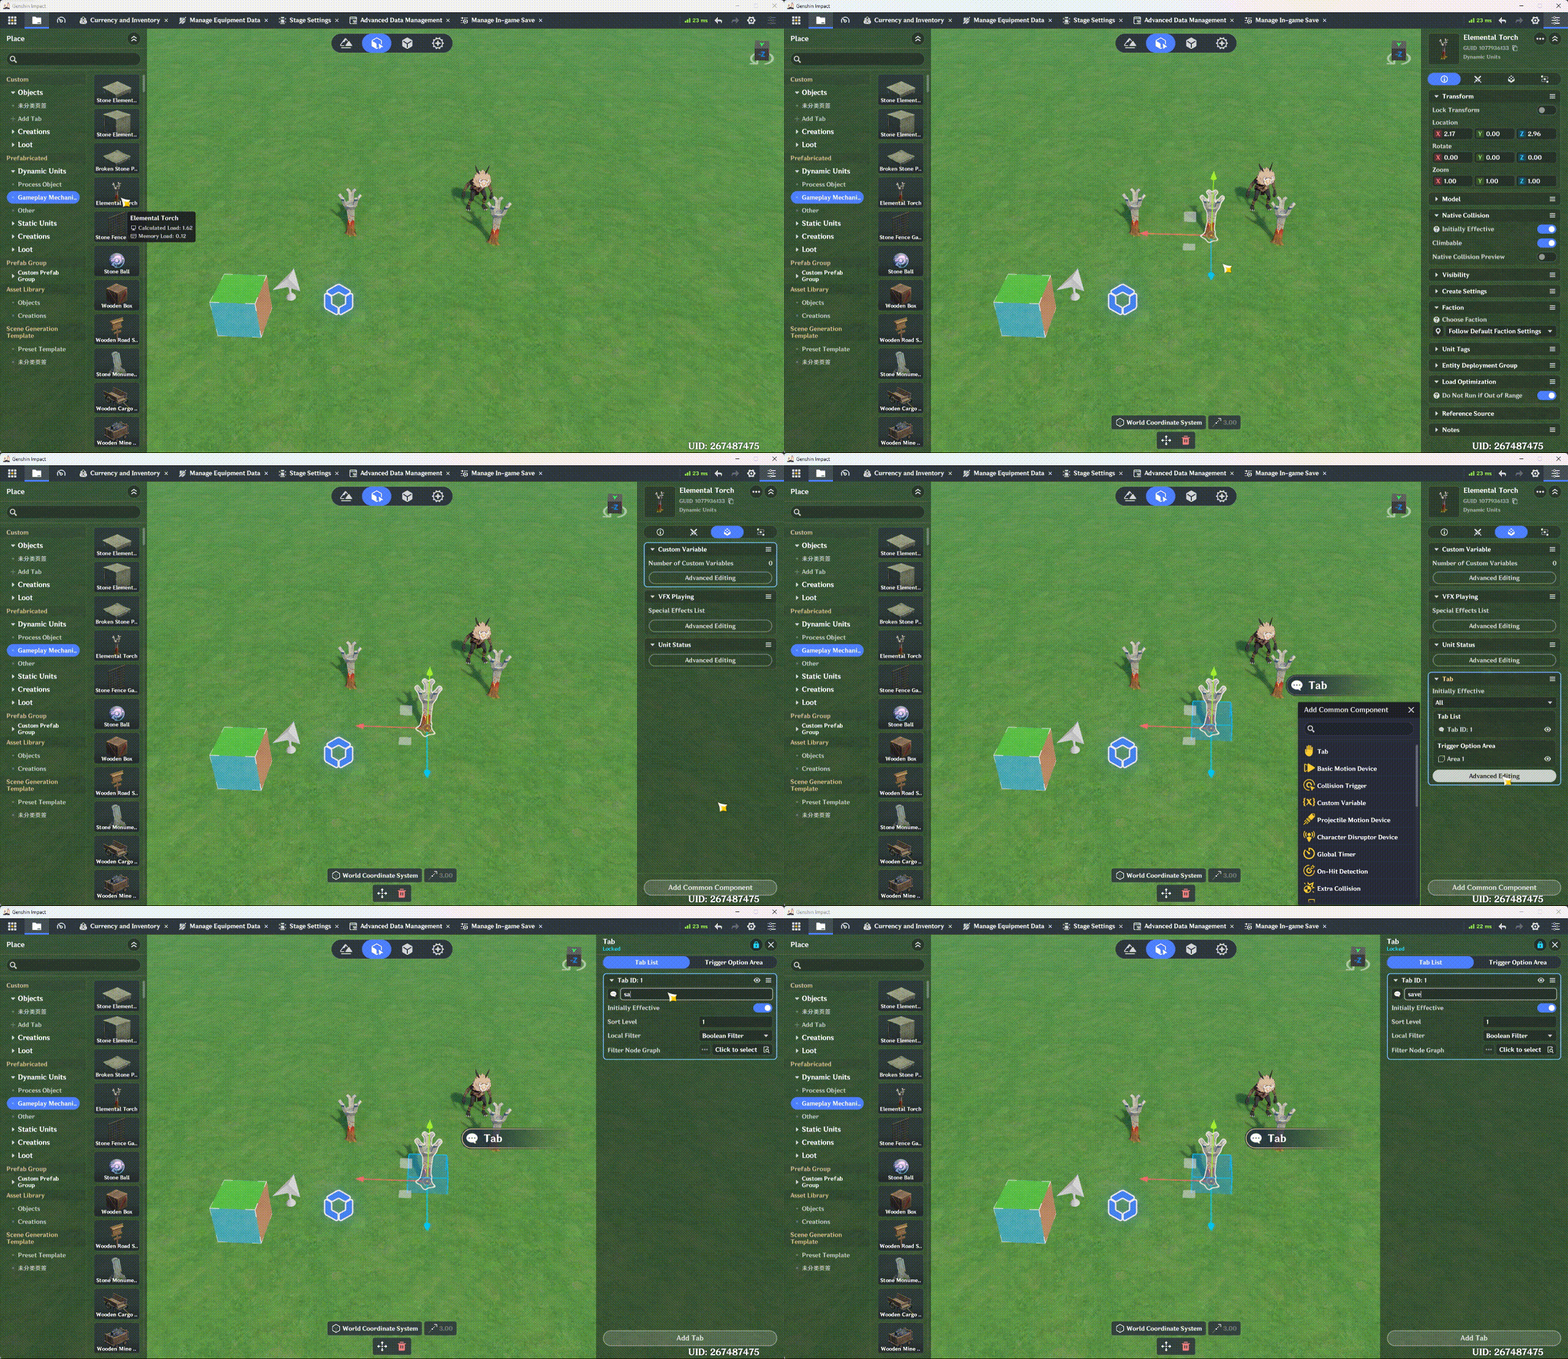
Next, we'll build the Node Graph and go through the underlying logic.
3.1 Logic
The save logic is straightforward. As discussed earlier, we simply extract each part of the equipment data in sequence and store it in the corresponding list.
- Config ID: Retrieve it using the equipment index.
- Level: The first fixed affix of the equipment. Get the affix ID first, then retrieve its value.
- Affix Count: Total affix count minus the two fixed affixes. This is the number of affixes that need to be saved.
- Affixes and Affix Values: Retrieve and store them sequentially using the same approach.
When saving, we do not write directly to the lists in the save data. Instead, all data is first written to Node Graph Variables as temporary storage. Once everything has been written successfully, all data is committed to the save data in a single atomic operation. This improves the robustness of the save system and helps prevent accidental save corruption.
3.2 Node Graph Implementation
3.2.1 Initialize the Save Data
Start with the Tab event and retrieve the player's In-Game Save Data.
There are two things to note:
- The entity selected by the Tab is the Character Entity, so you need to obtain the Player Entity from it.
- The In-Game Save Data is initialized as a Struct List with a default length of 0.
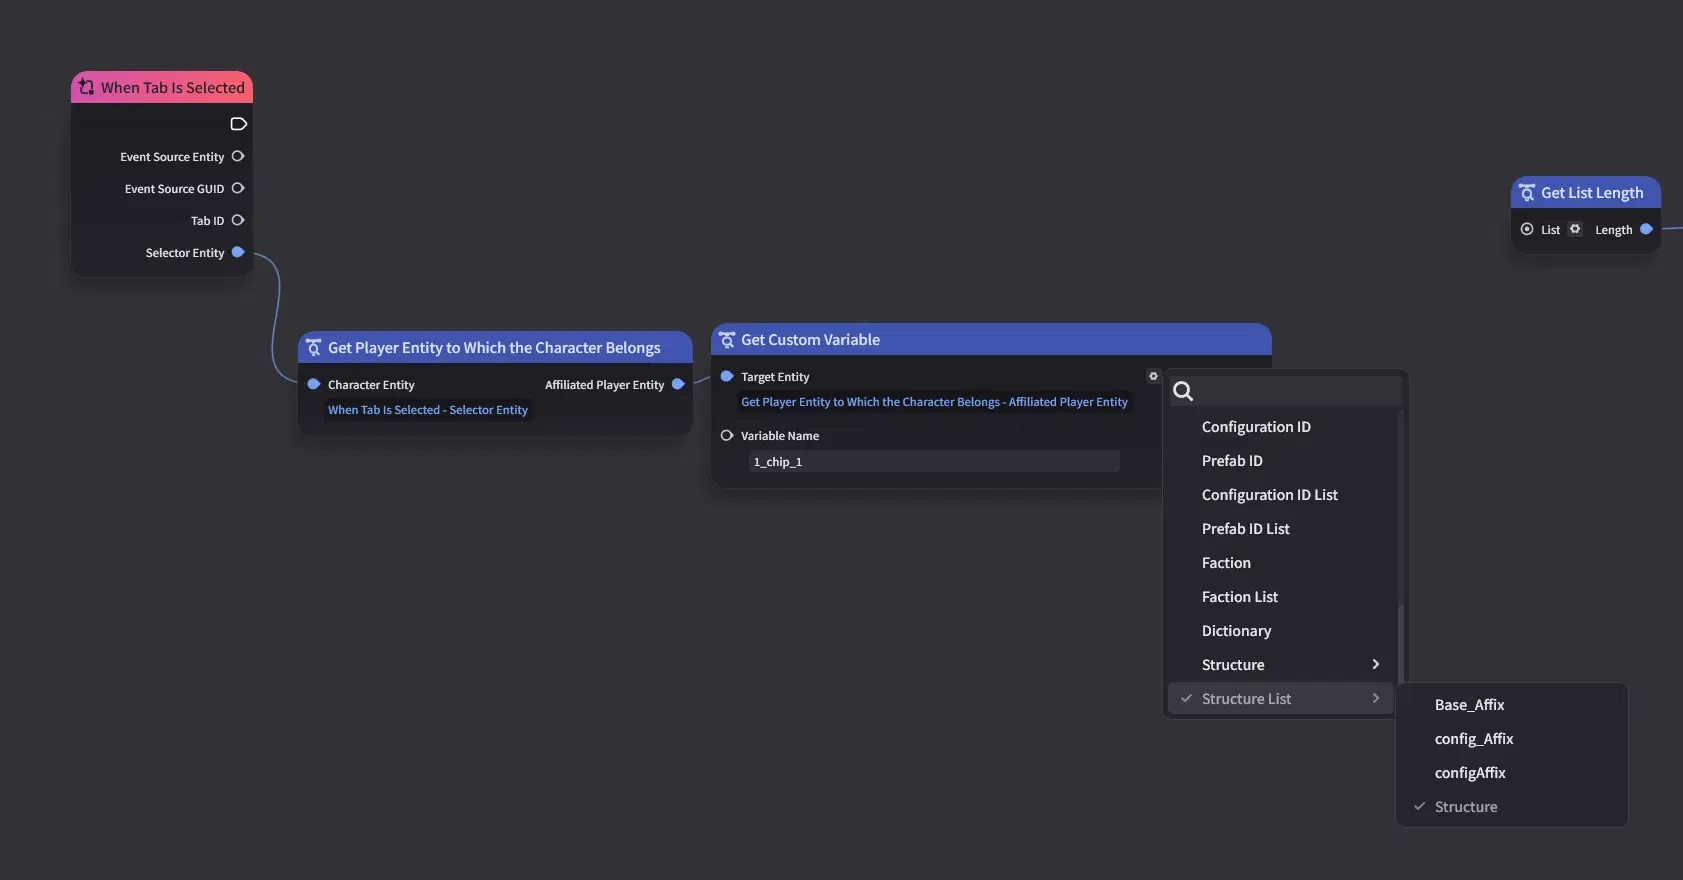
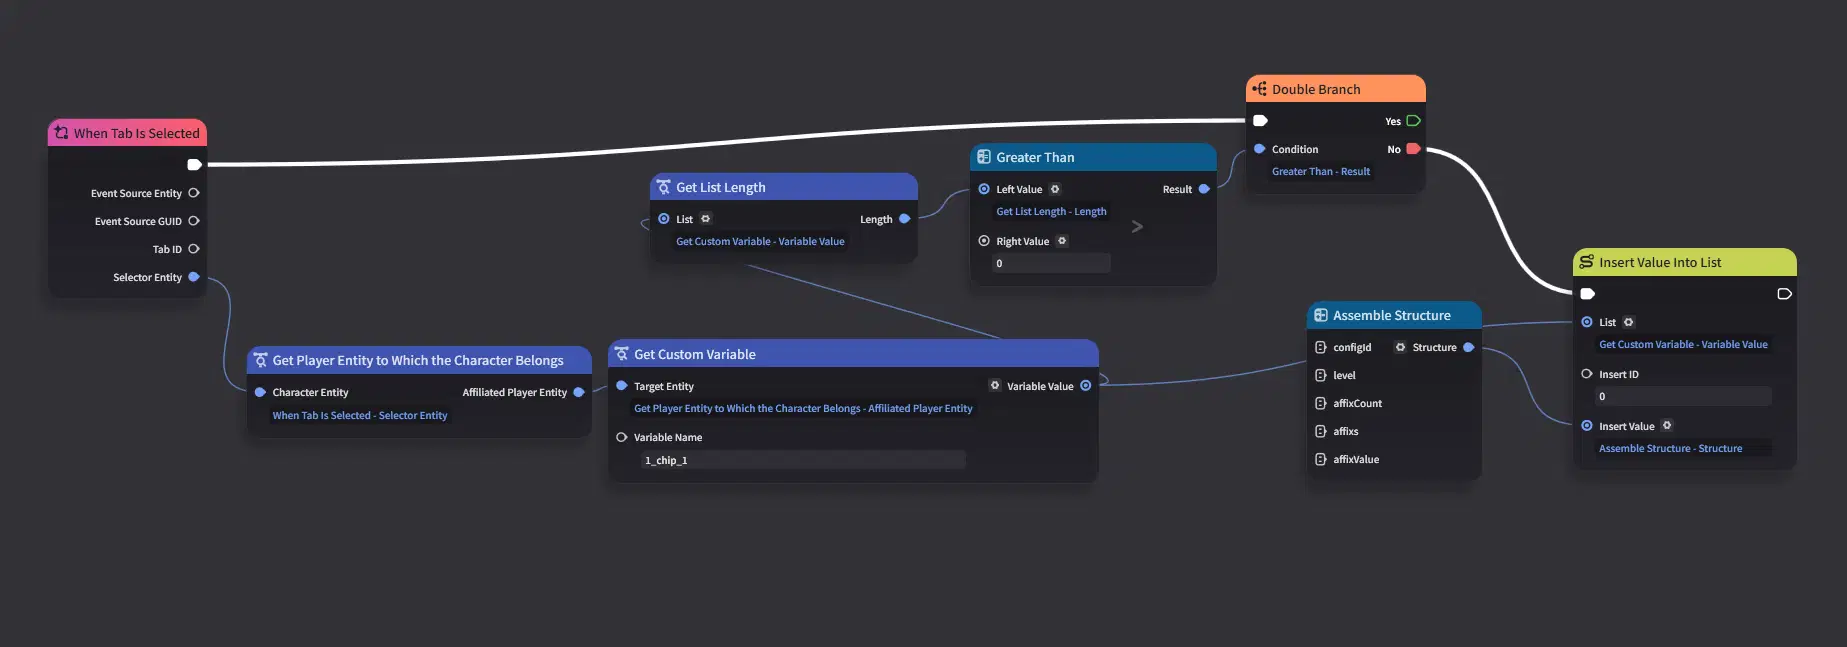
By checking the length of the Struct List, we can determine whether the save data has already been initialized. If it hasn't, initialize it by inserting an empty Struct into the list.
3.2.2 Retrieve and Iterate Through All Equipment
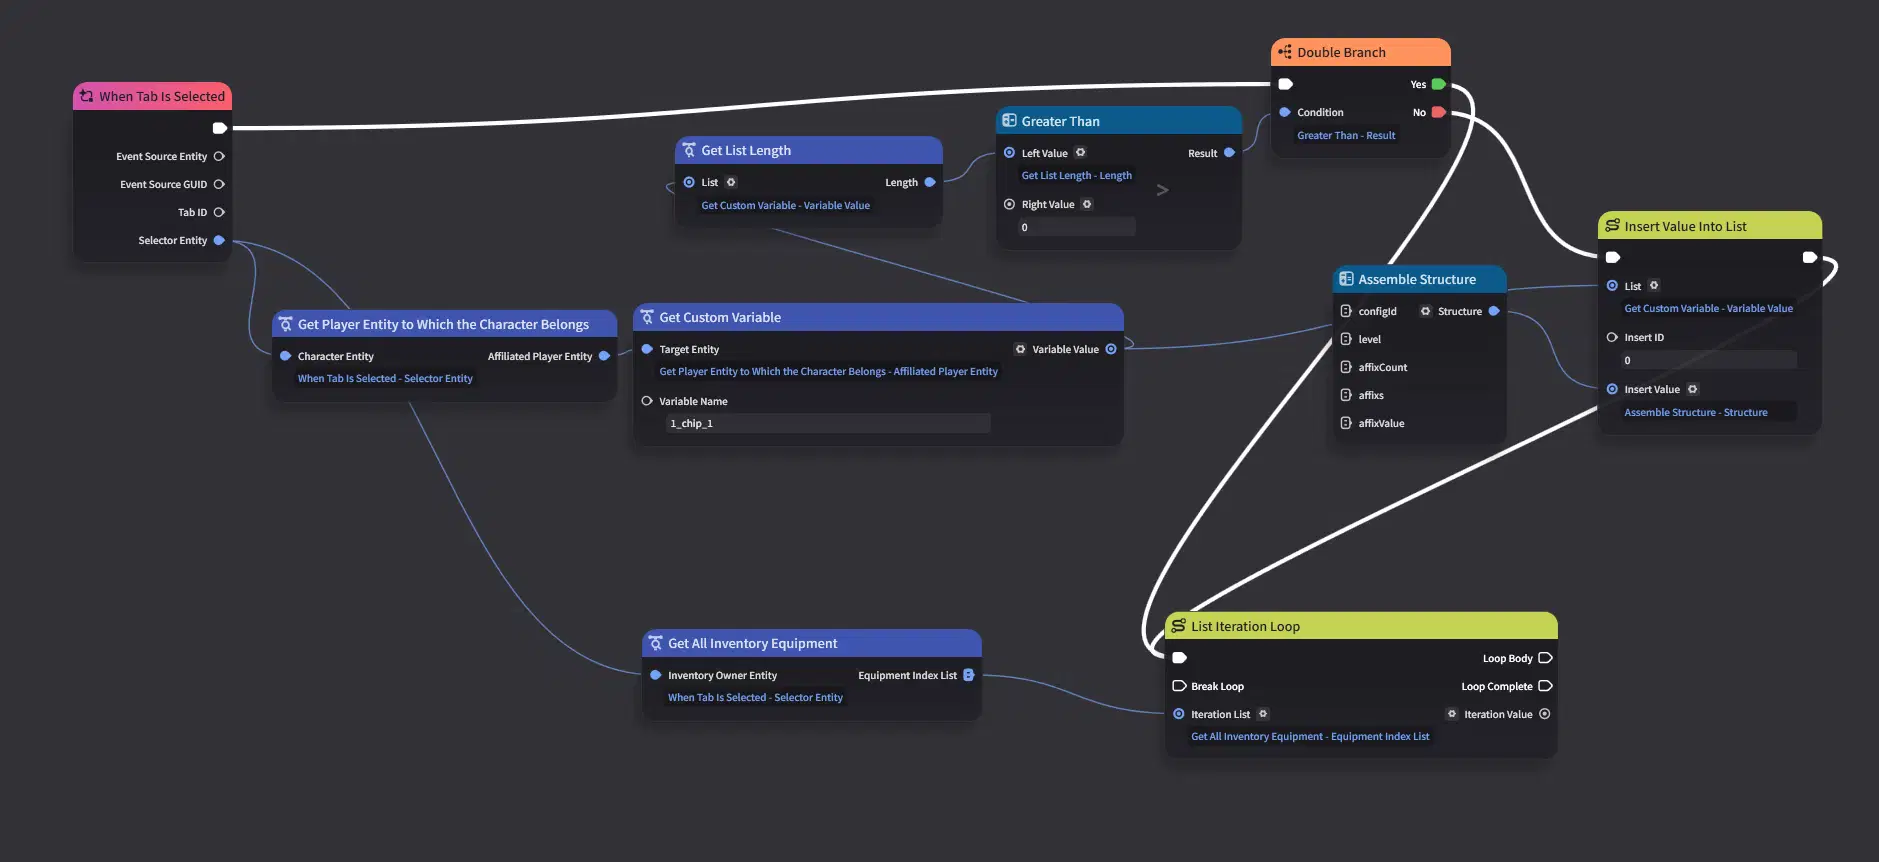
Next, use Get All Inventory Equipment to retrieve all equipment, then iterate through the list to prepare the save data.
There are still a few important points to note. To keep this tutorial focused on the core concepts, some logic has been simplified.
- Get All Inventory Equipment returns the equipment indices, which are required for all subsequent operations.
- Directly iterating through a large number of equipment items may cause performance issues. In practice, you should first store the equipment indices in a Node Graph Variable and process them one by one using a Timer. For simplicity, this tutorial skips that optimization.
- When saving both stackable items (whose data is always identical for the same Config ID) and equipment, save the equipment first, then filter out the equipment when saving the stackable items.
Finally, connect both execution paths of the Branch to the equipment list iteration.
3.2.3 Saving the Equipment Config ID
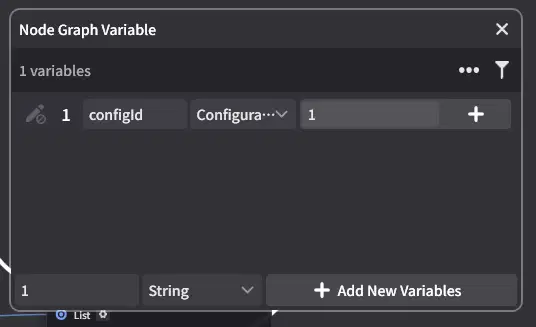
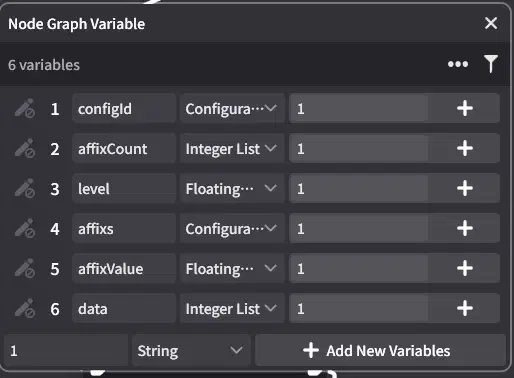
Create a Node Graph Variable named configId as temporary storage. Set its data type to Configuration List.
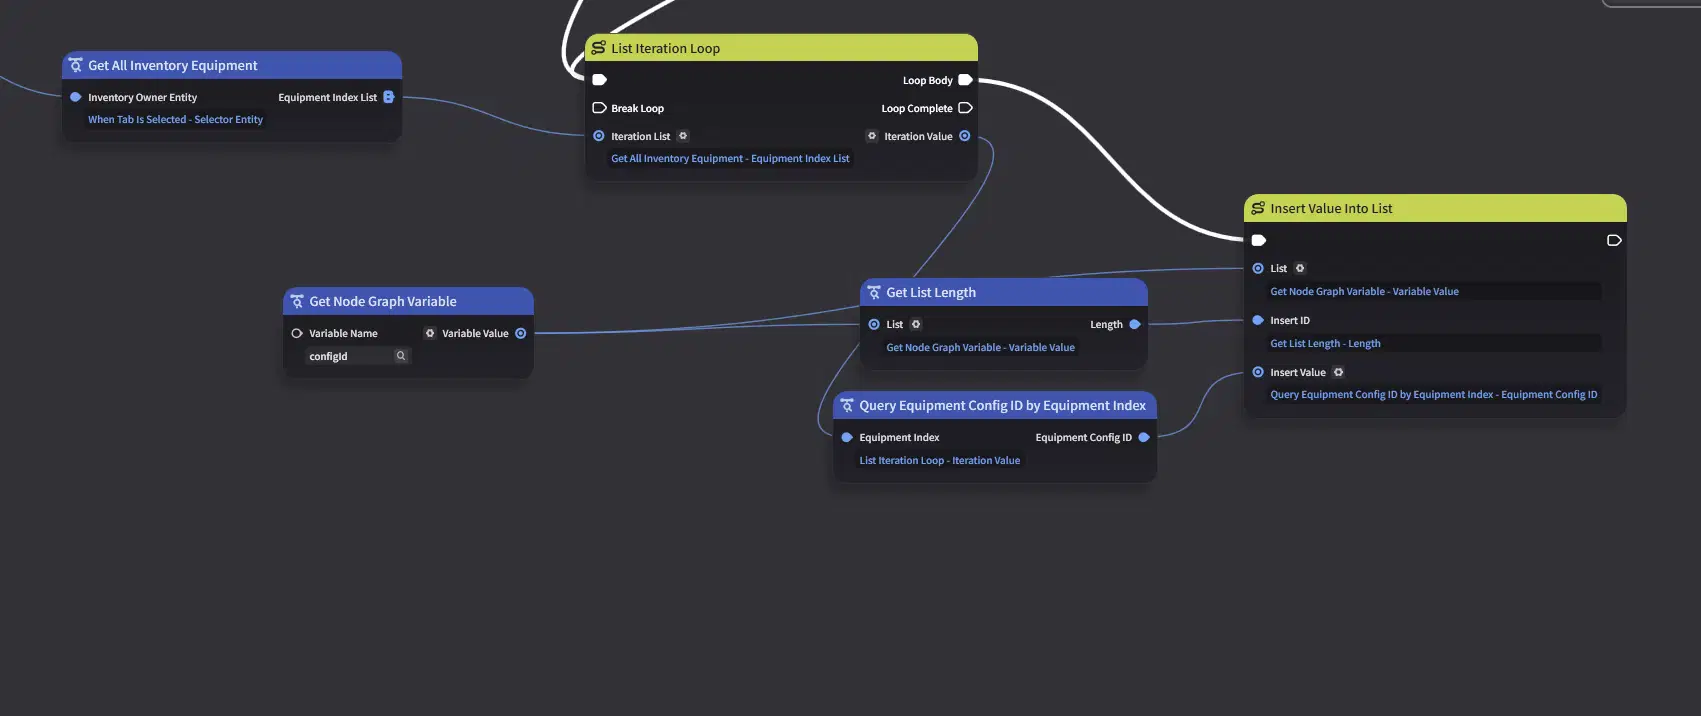
Retrieve the Config ID directly using the equipment index, then append it to the end of the Configuration List by setting the insertion index to the current list length.
3.2.4 Saving the Affix Count and Level
As in the previous section, first create Node Graph Variables for temporary storage.
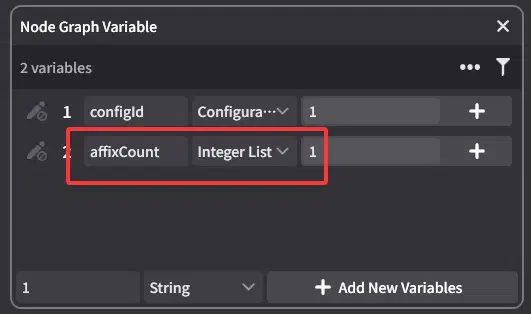
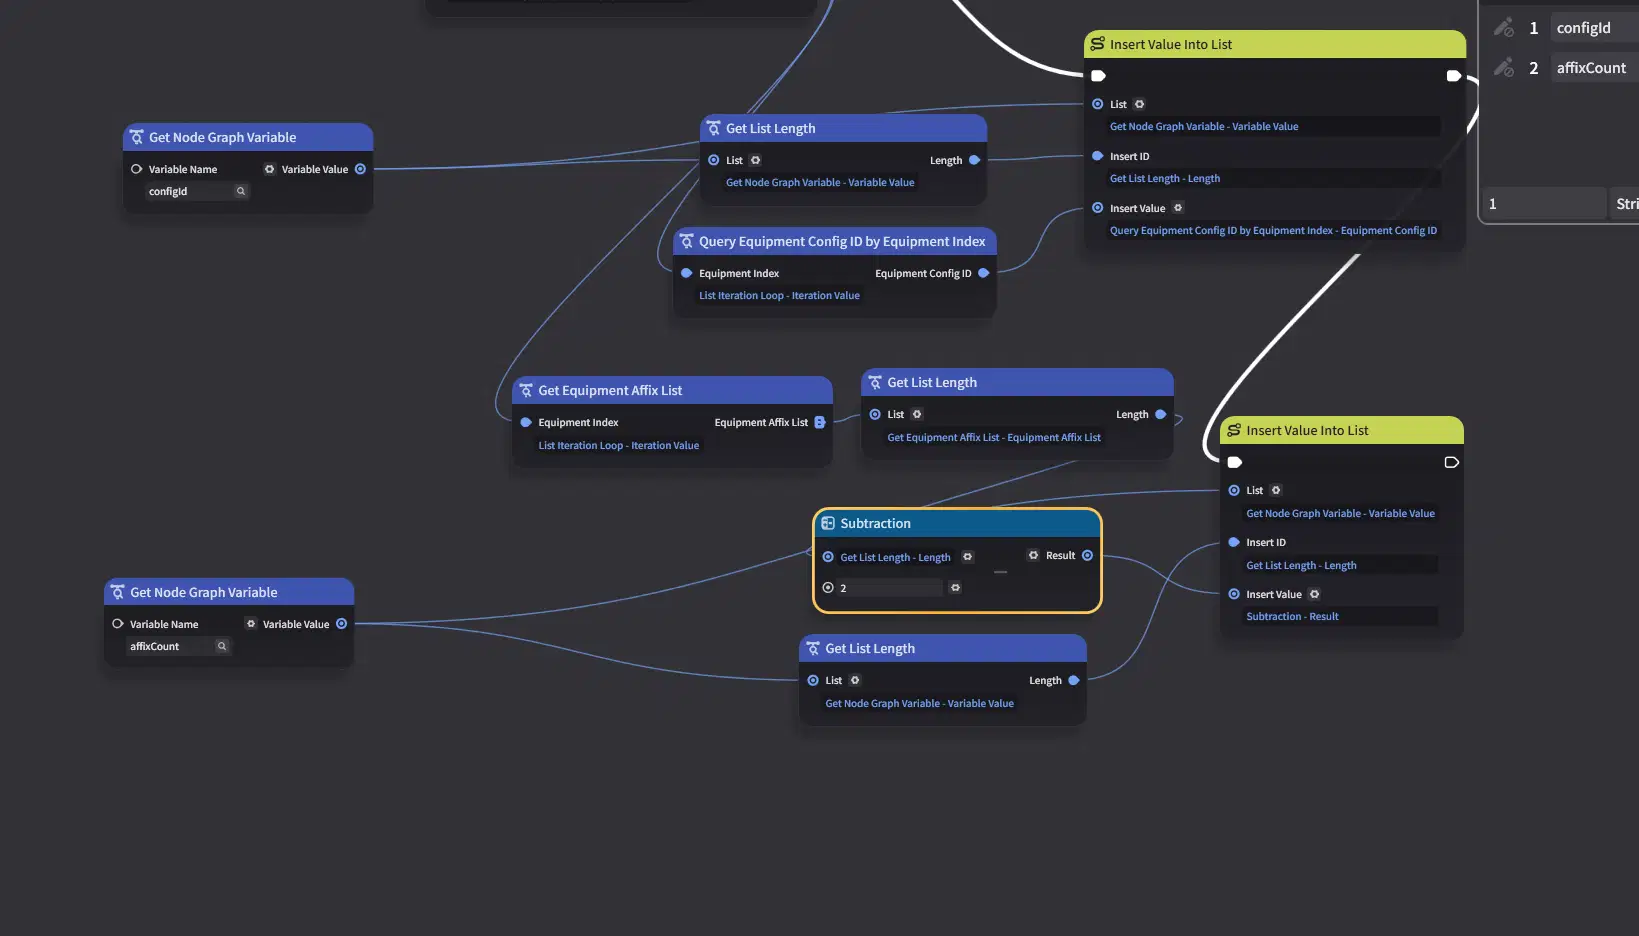
As described earlier, the Affix Count is obtained by taking the total number of affixes and subtracting the two fixed affixes.
Store the resulting value in the temporary list using the same approach as in the previous section.
Next, use a similar process to save the Level. In this equipment system, the Level is always stored as the first affix of every piece of equipment, so you only need to retrieve the value of the first affix.
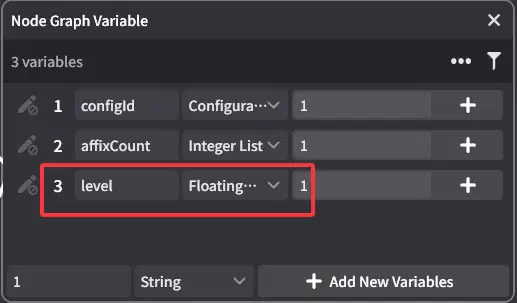
Create another Node Graph Variable for temporary storage, then retrieve the value and write it to the list.
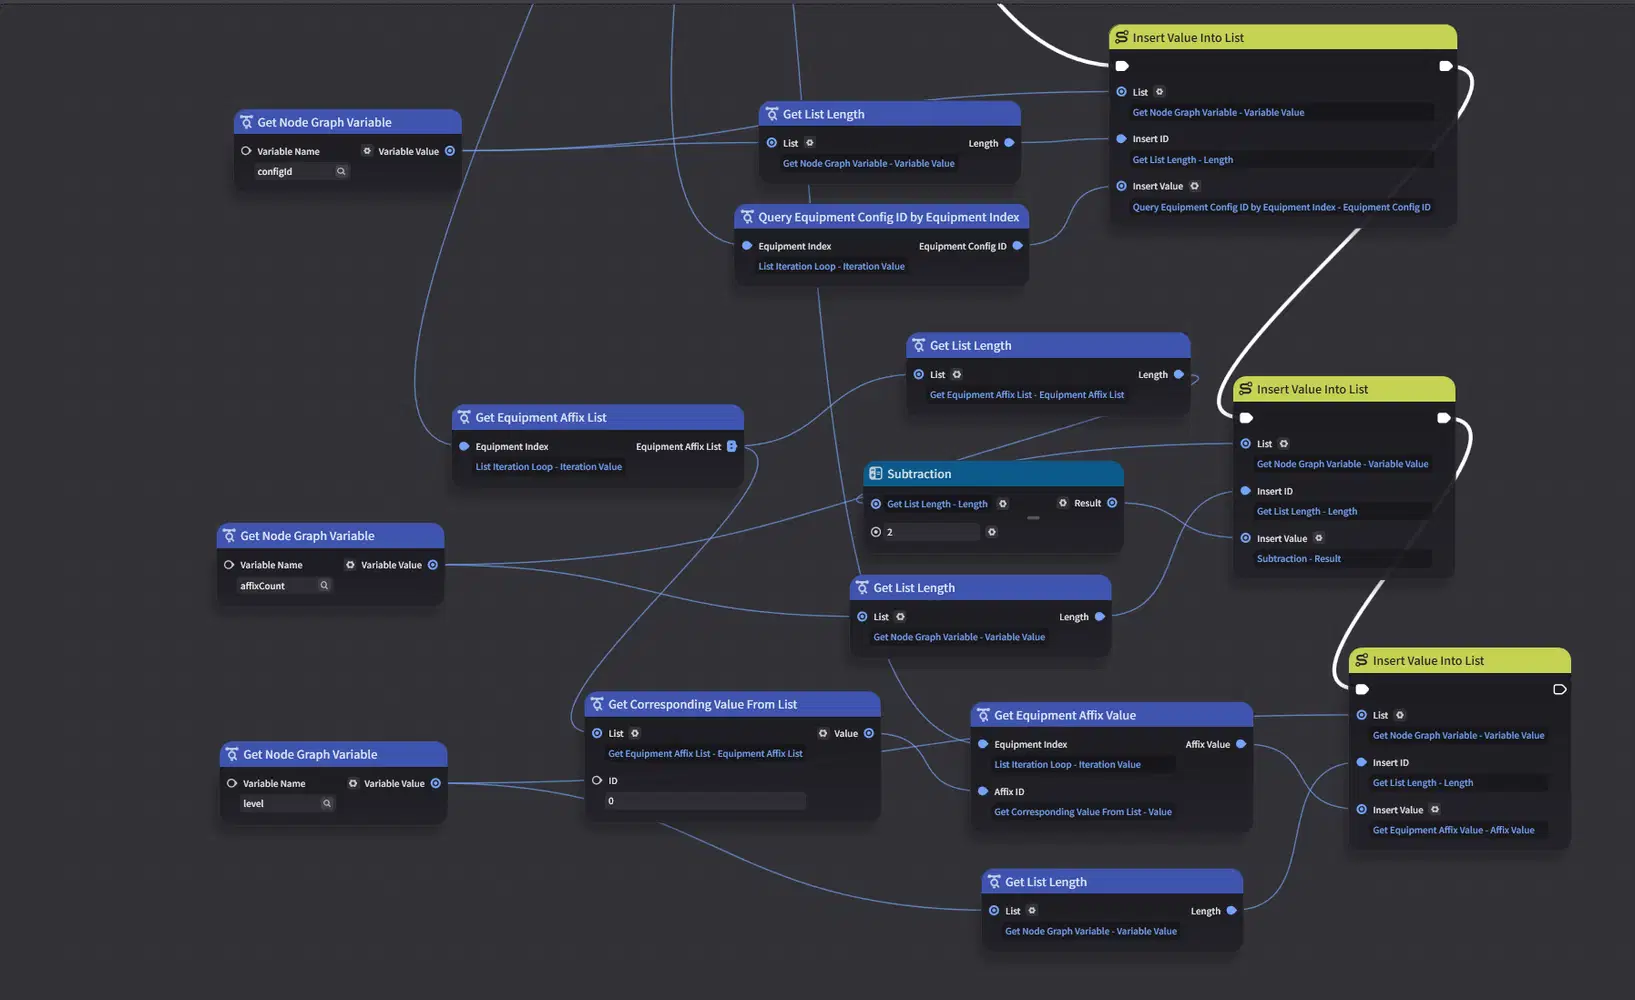
3.2.5 Saving Affixes and Affix Values
Iterate through the affix list (skipping the two fixed affixes), retrieve each affix and its corresponding value, and write them to Node Graph Variables, following the same approach as in the previous sections.
Note:
- The Affix ID is globally unique and auto-incremented. To retrieve an equipment's Affix ID, you must first obtain the complete affix list, then access the corresponding affix by its position in the list.
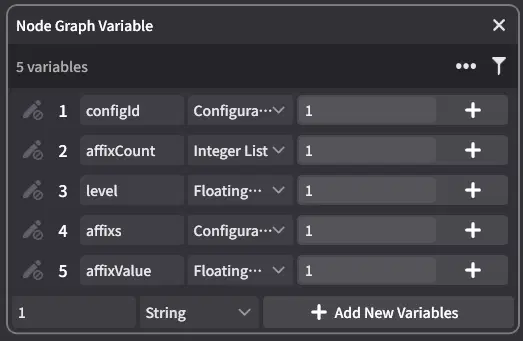
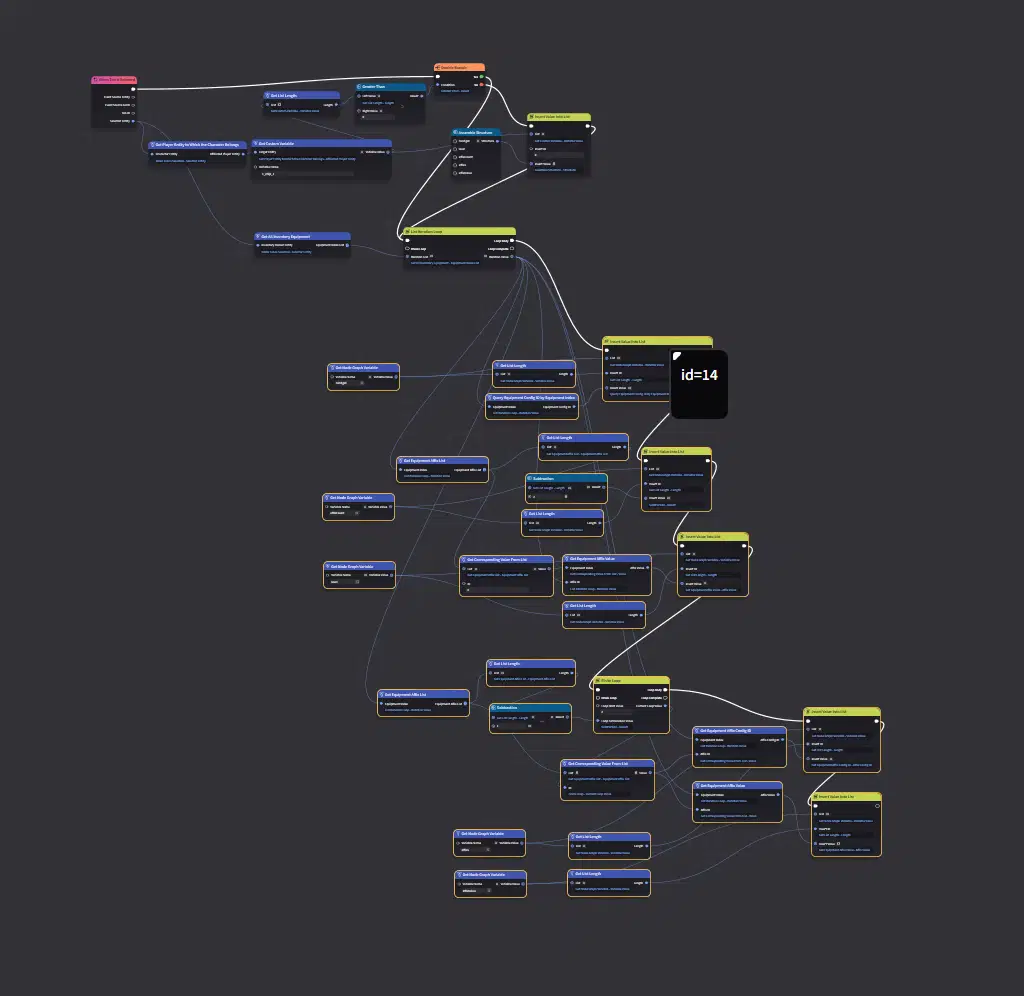
Note: All connections for the Equipment Index are linked to the loop's Iteration Value. They become too small to capture clearly when zoomed out, so they are not fully shown in the screenshots.
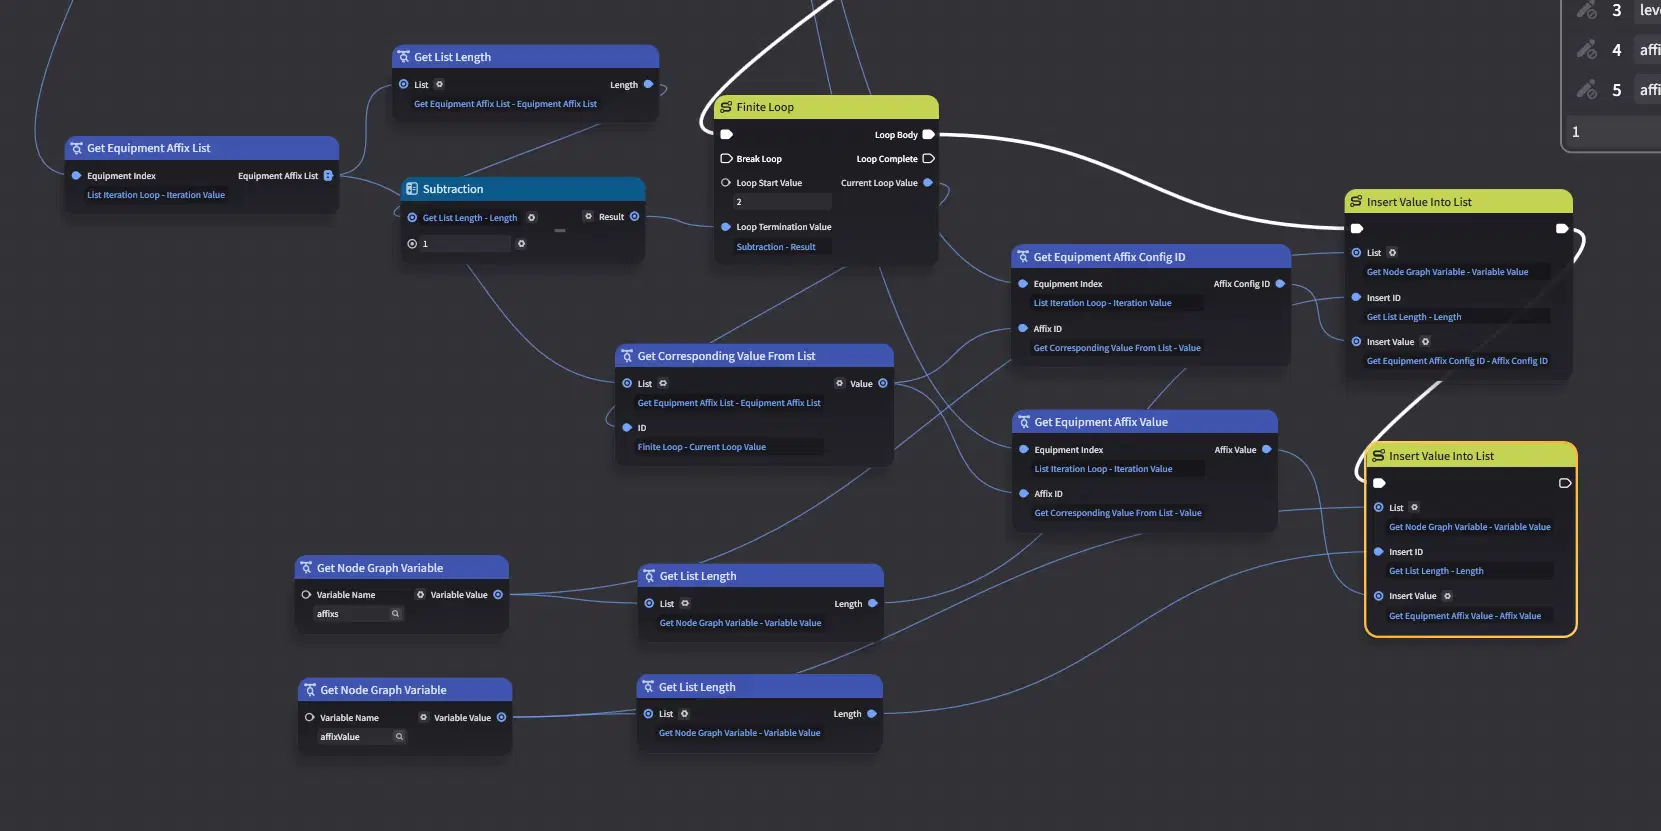
At this point, all equipment data has been written to the Node Graph Variables.
3.2.6 Write to Save Data and Clean Up
Before proceeding, I recommend encapsulating the large block of loop logic into a Composite Node. This makes the Node Graph much easier to read and maintain.
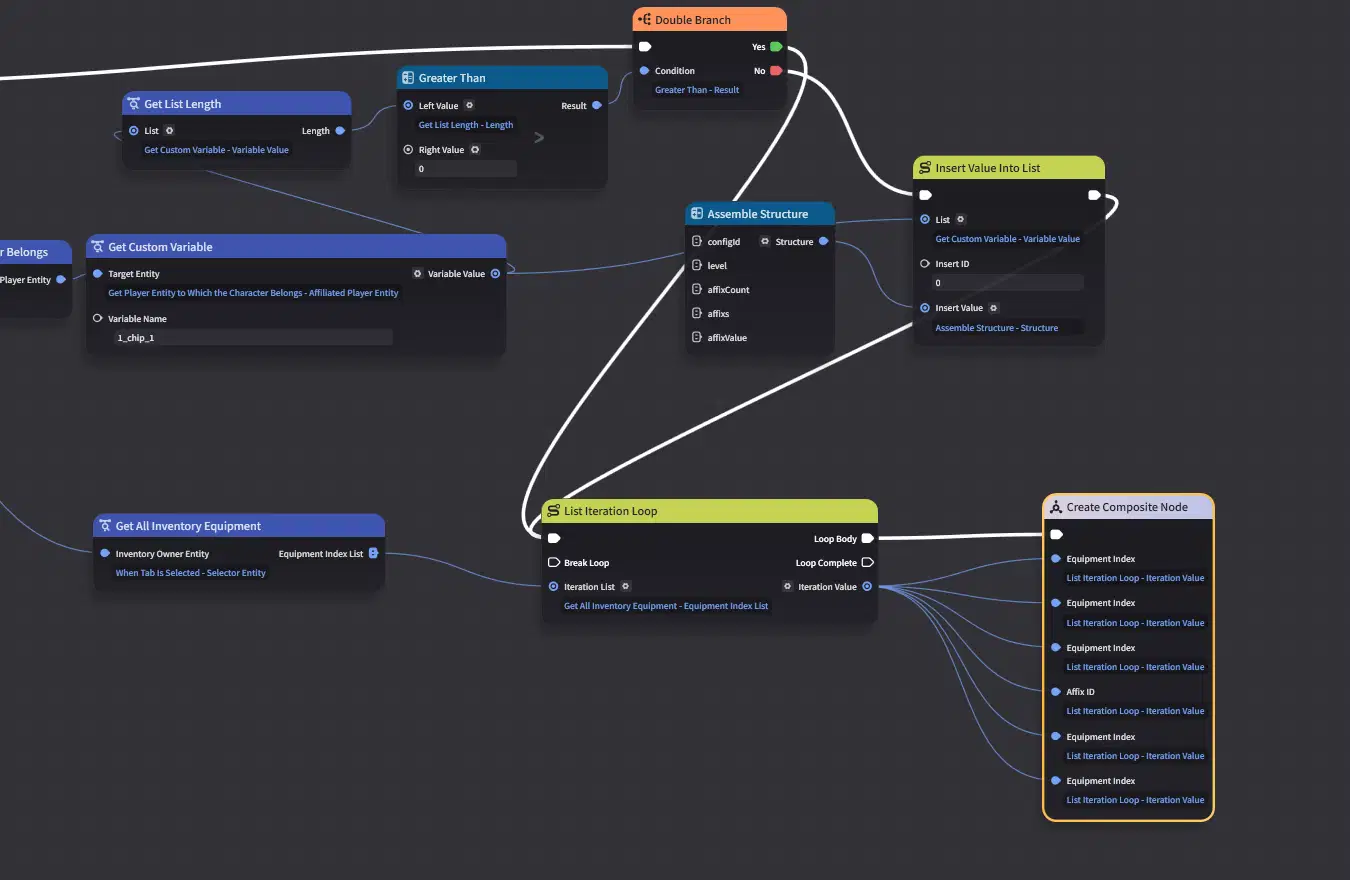
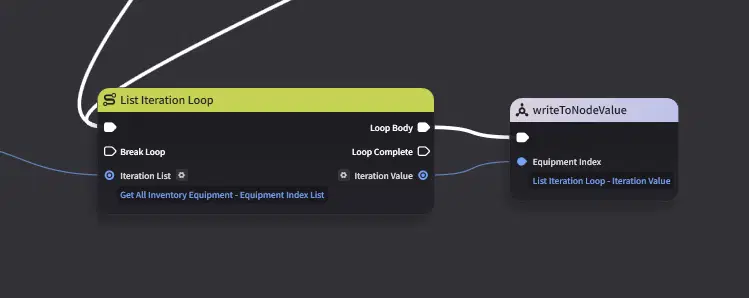
Rename the Composite Node and merge its pins.
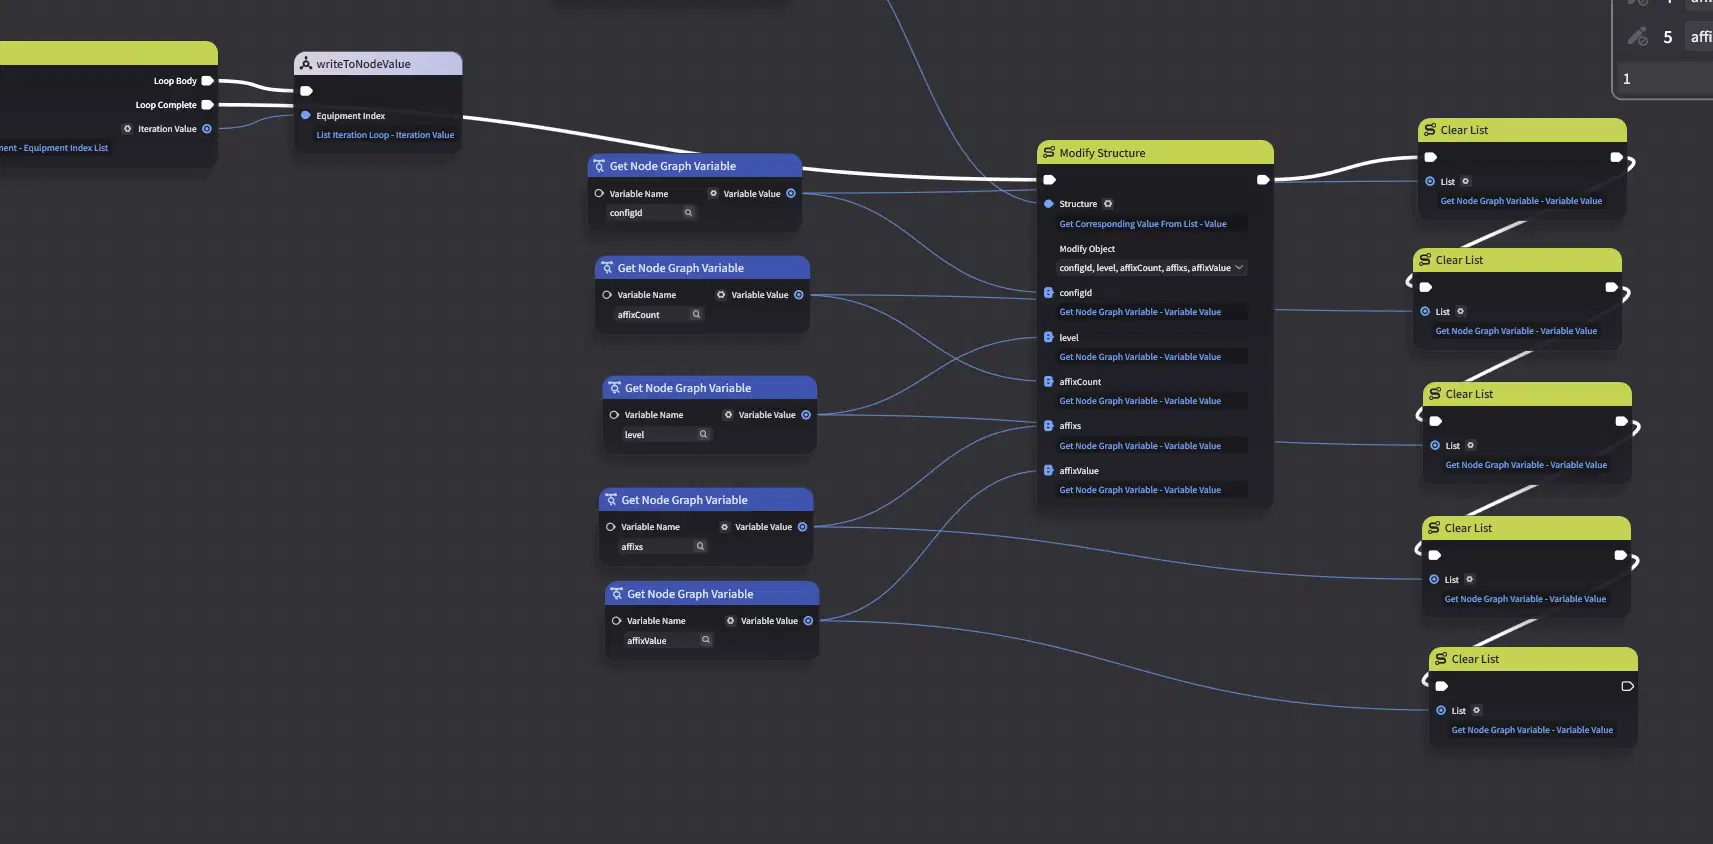
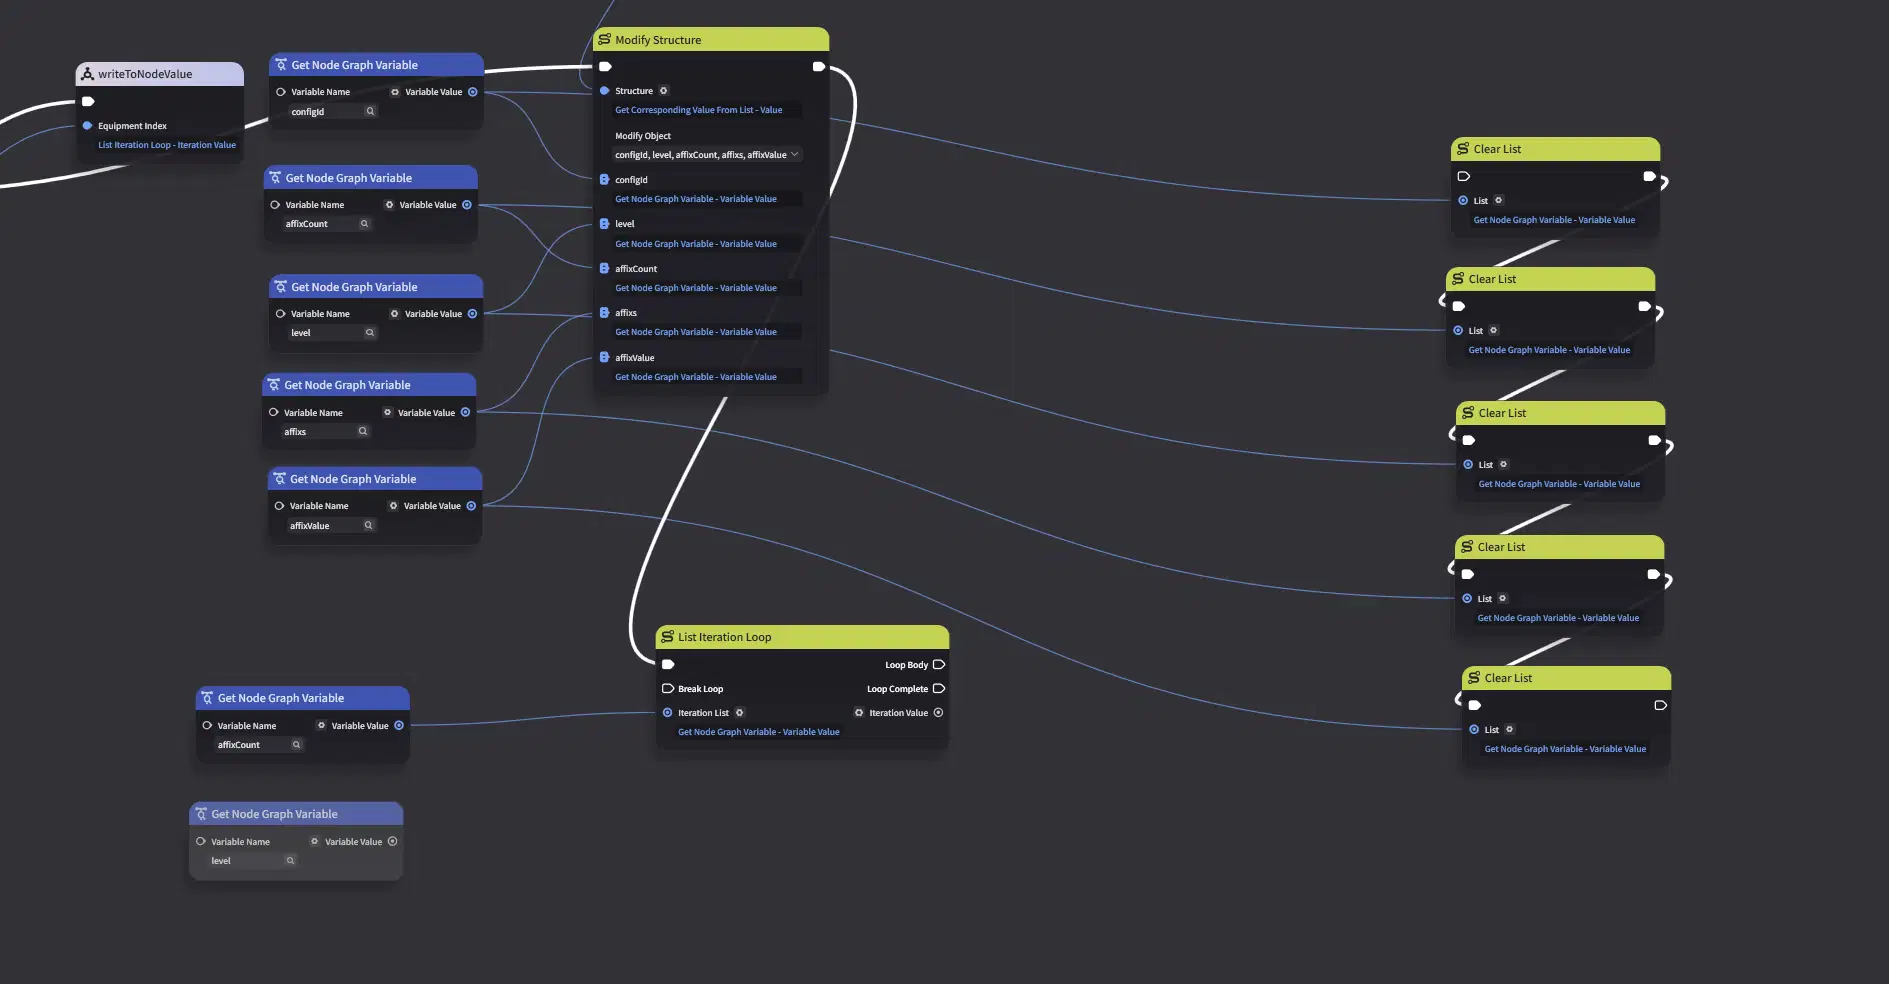
Next, after the loop has finished, write all the data to the In-Game Save Data, then perform the cleanup.
3.3 Attach the Node Graph and Test
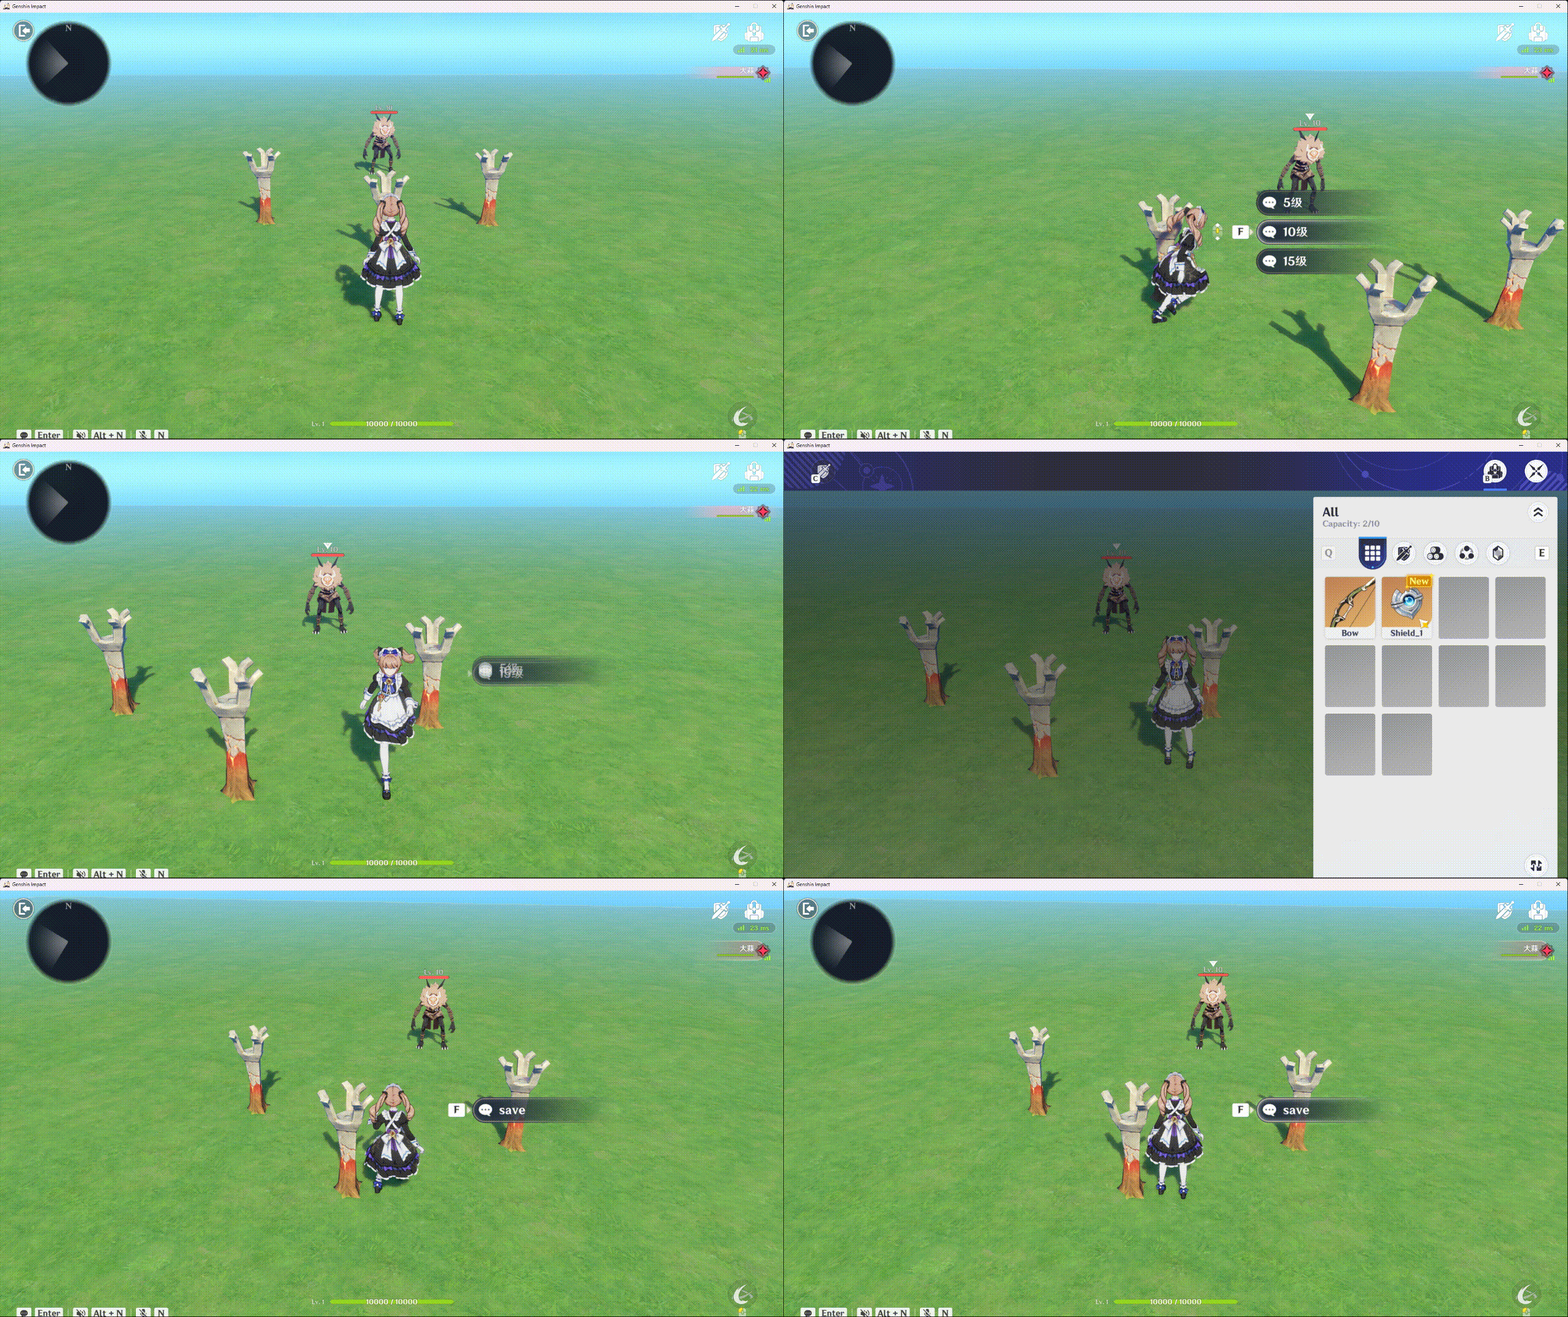
Run a test. Since the loading functionality has not been implemented yet, you'll need to verify the results by checking the Temporary Play Data.
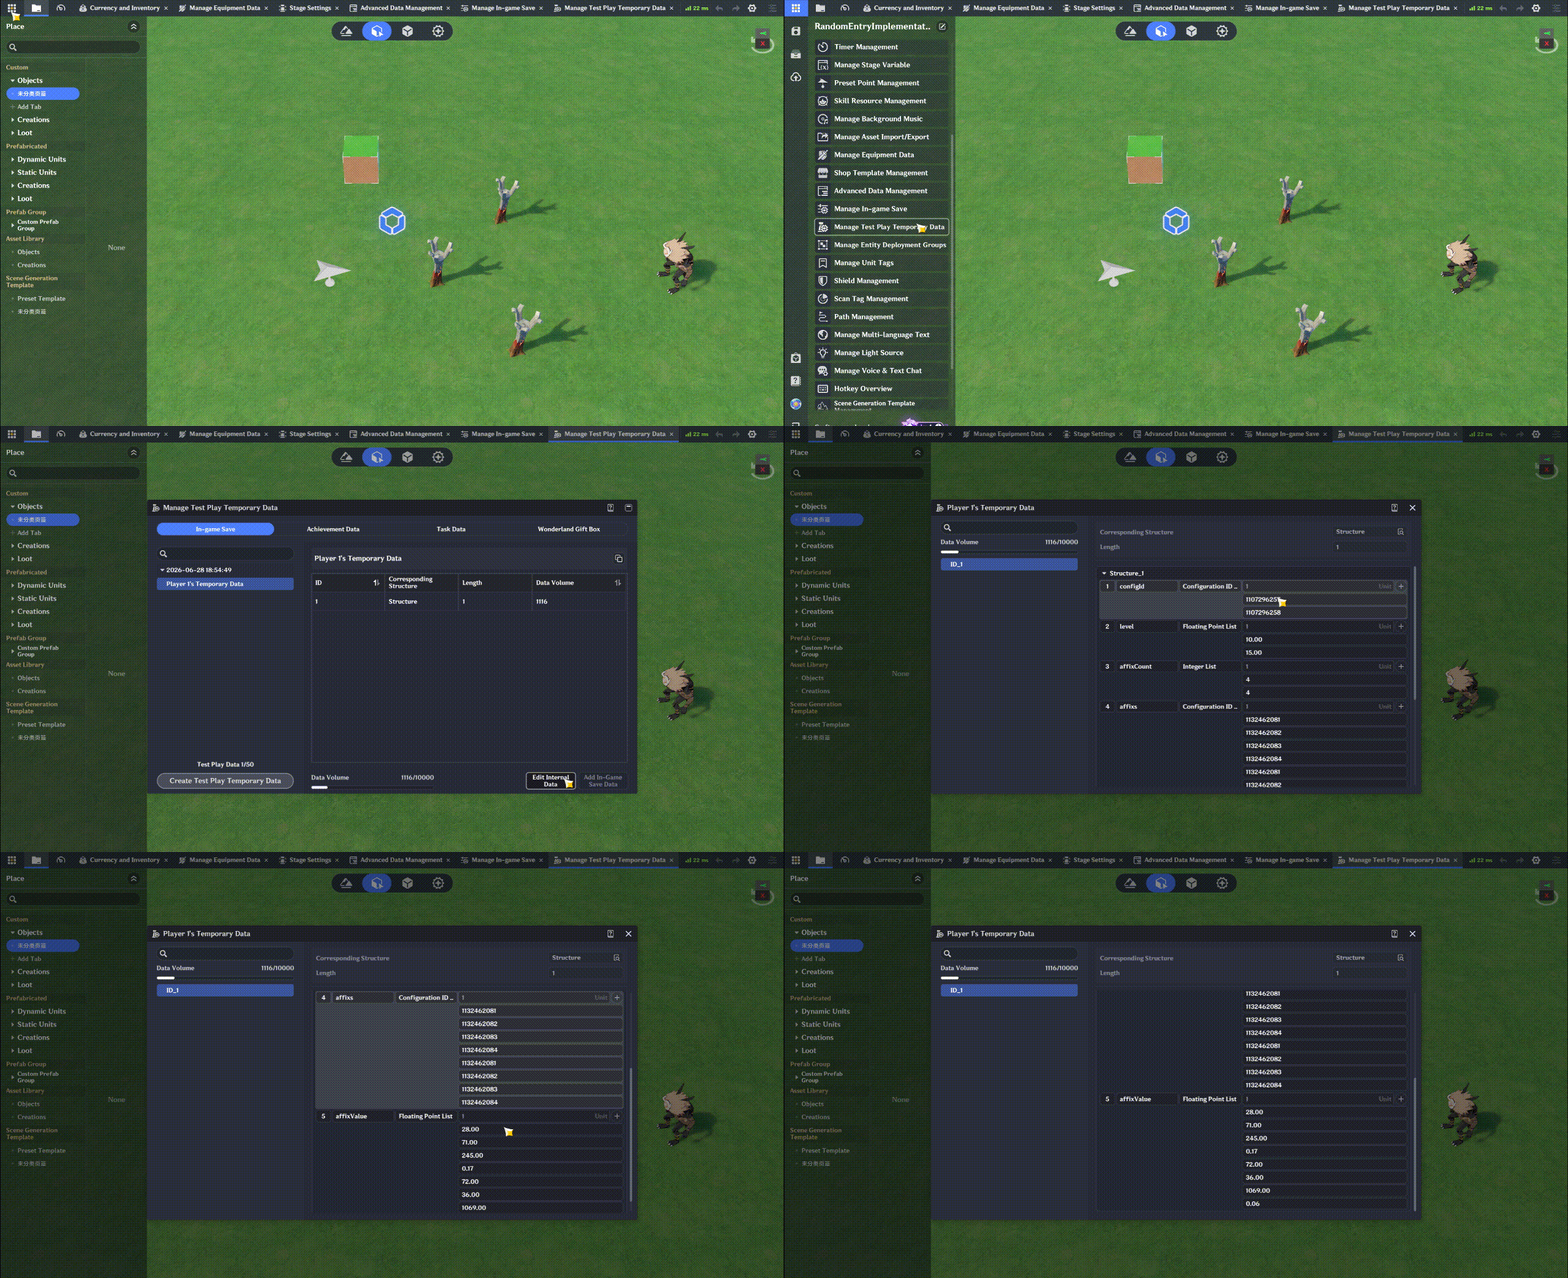
Exit Playtest and check the Temporary Play Data to verify that the saved values are correct.
At this point, the saving system is complete.
4. Loading
4.1 Logic
The loading process consists of several essential steps:
- Modify the equipment initialization flow: Equipment loaded from save data should bypass the normal initialization process and enter the loading process instead.
- Add equipment to the inventory using the Config ID: When each piece of equipment is added, record its equipment index in the initialization event.
- Restore affixes for each equipment item: Maintain a cursor for the index list, then restore the equipment by reading the corresponding affixes and affix values sequentially.
The core principles have already been explained in the previous sections, so let's move on to the implementation.
4.2 Node Graph Implementation
4.2.1 Preparation and Adding Equipment
The loading process is triggered when the Player Entity is created, which is at the start of the game.
As before, first check whether the save data is empty. If it is, no further action is required.
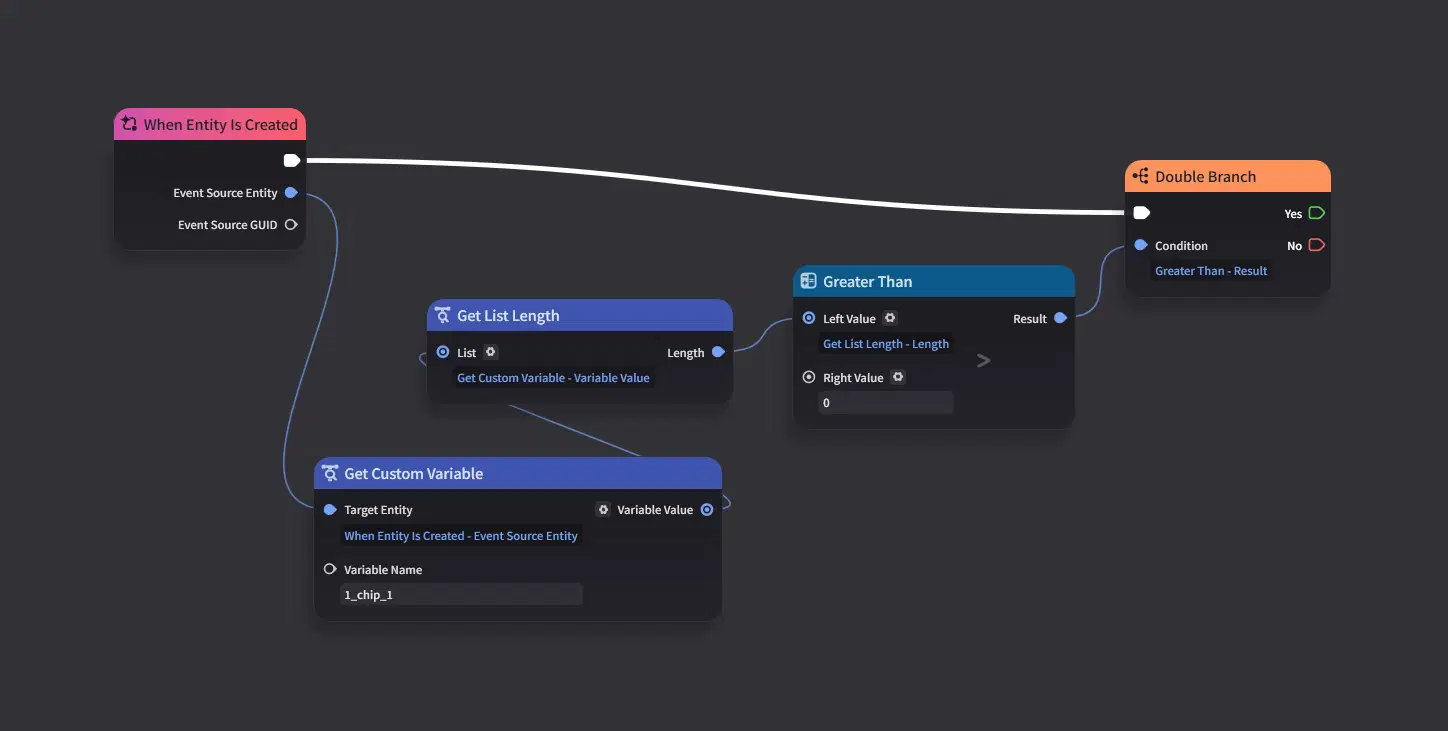
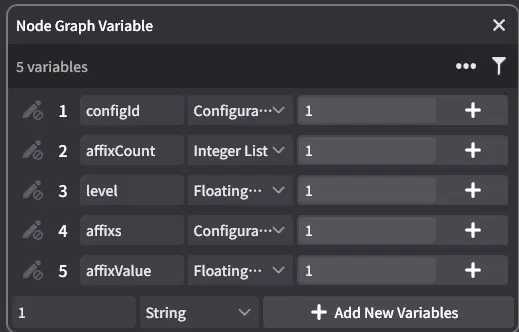
Create the same Node Graph Variables as before. Although this is not strictly required, it significantly reduces frequent reads from the Struct, which can greatly improve the performance of the Node Graph.
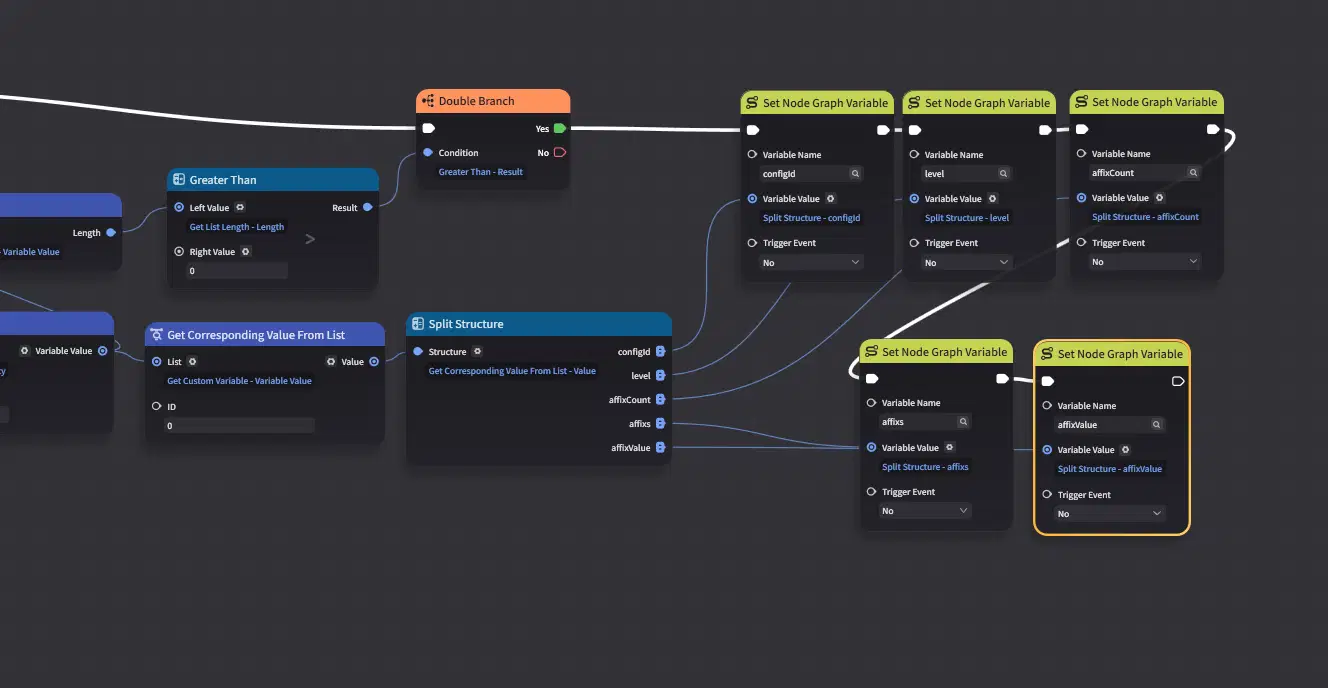
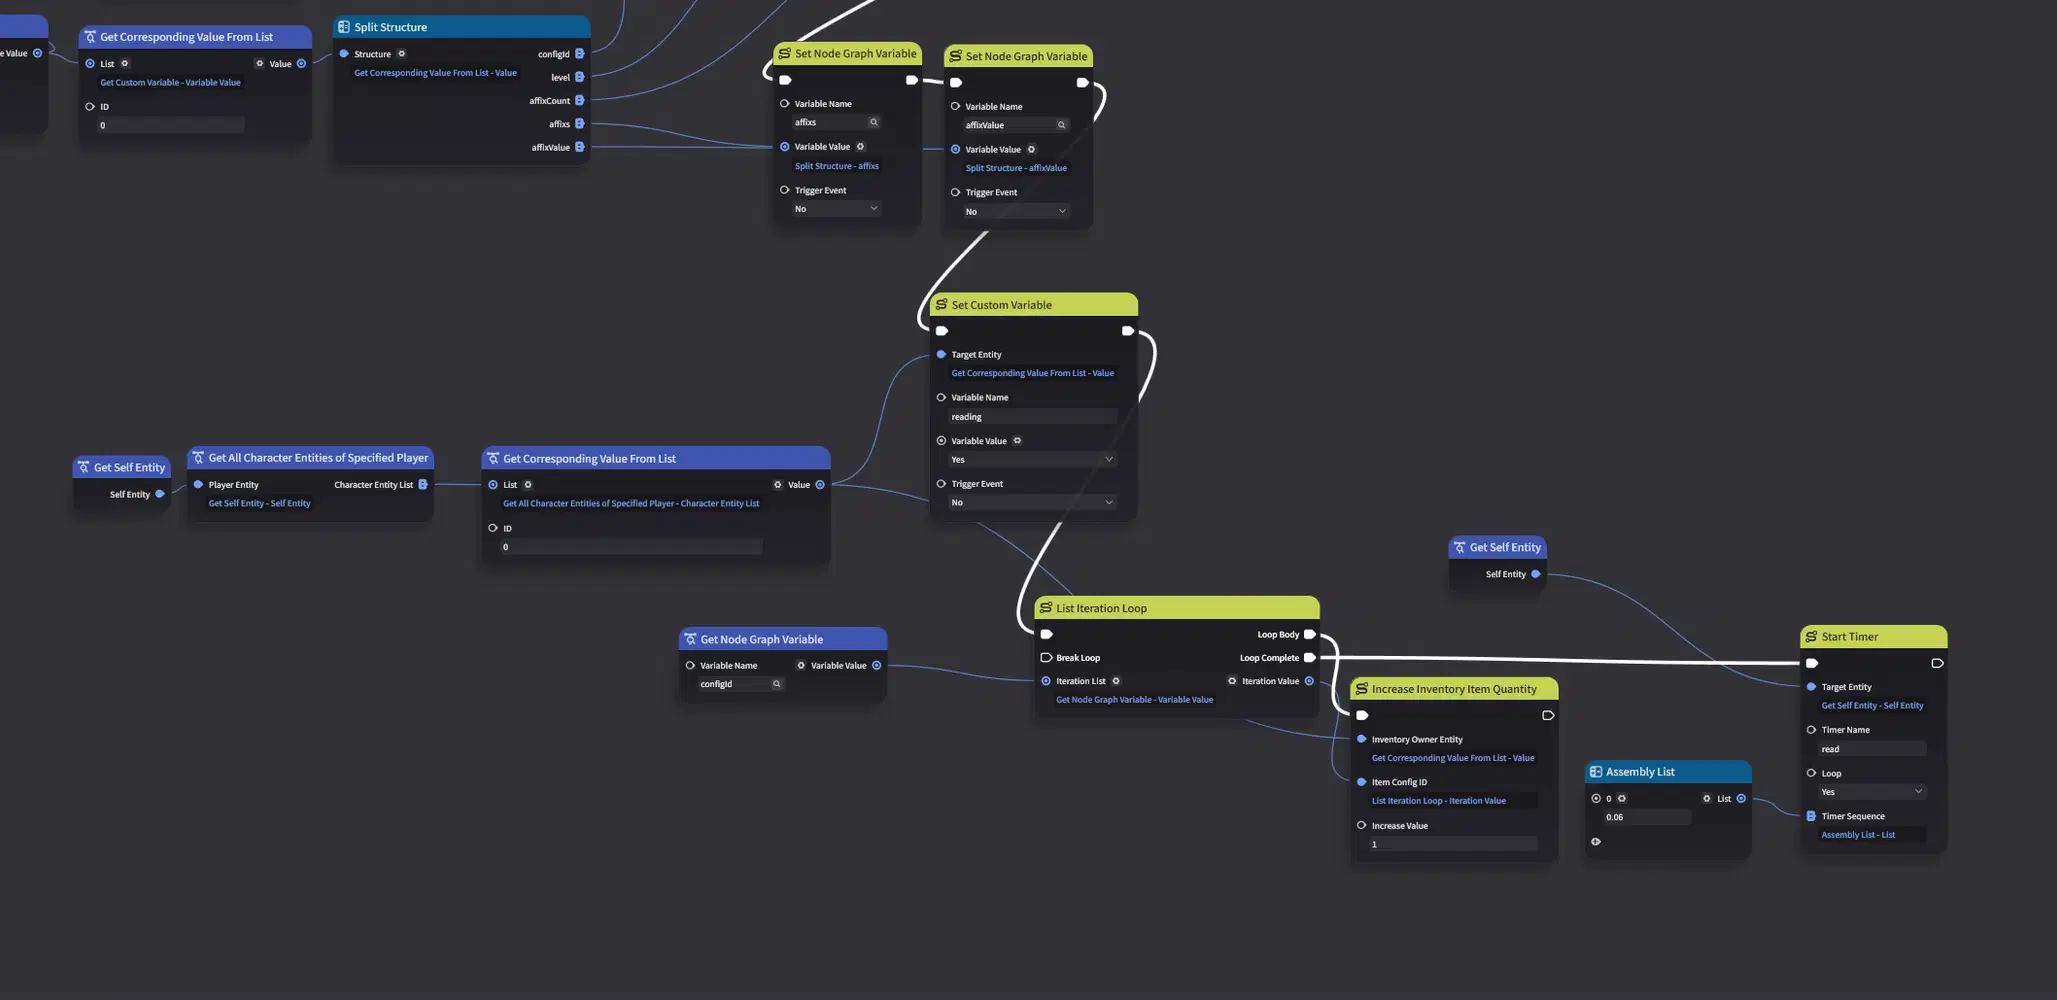
Read the data from the Struct and store it in the corresponding Node Graph Variables.
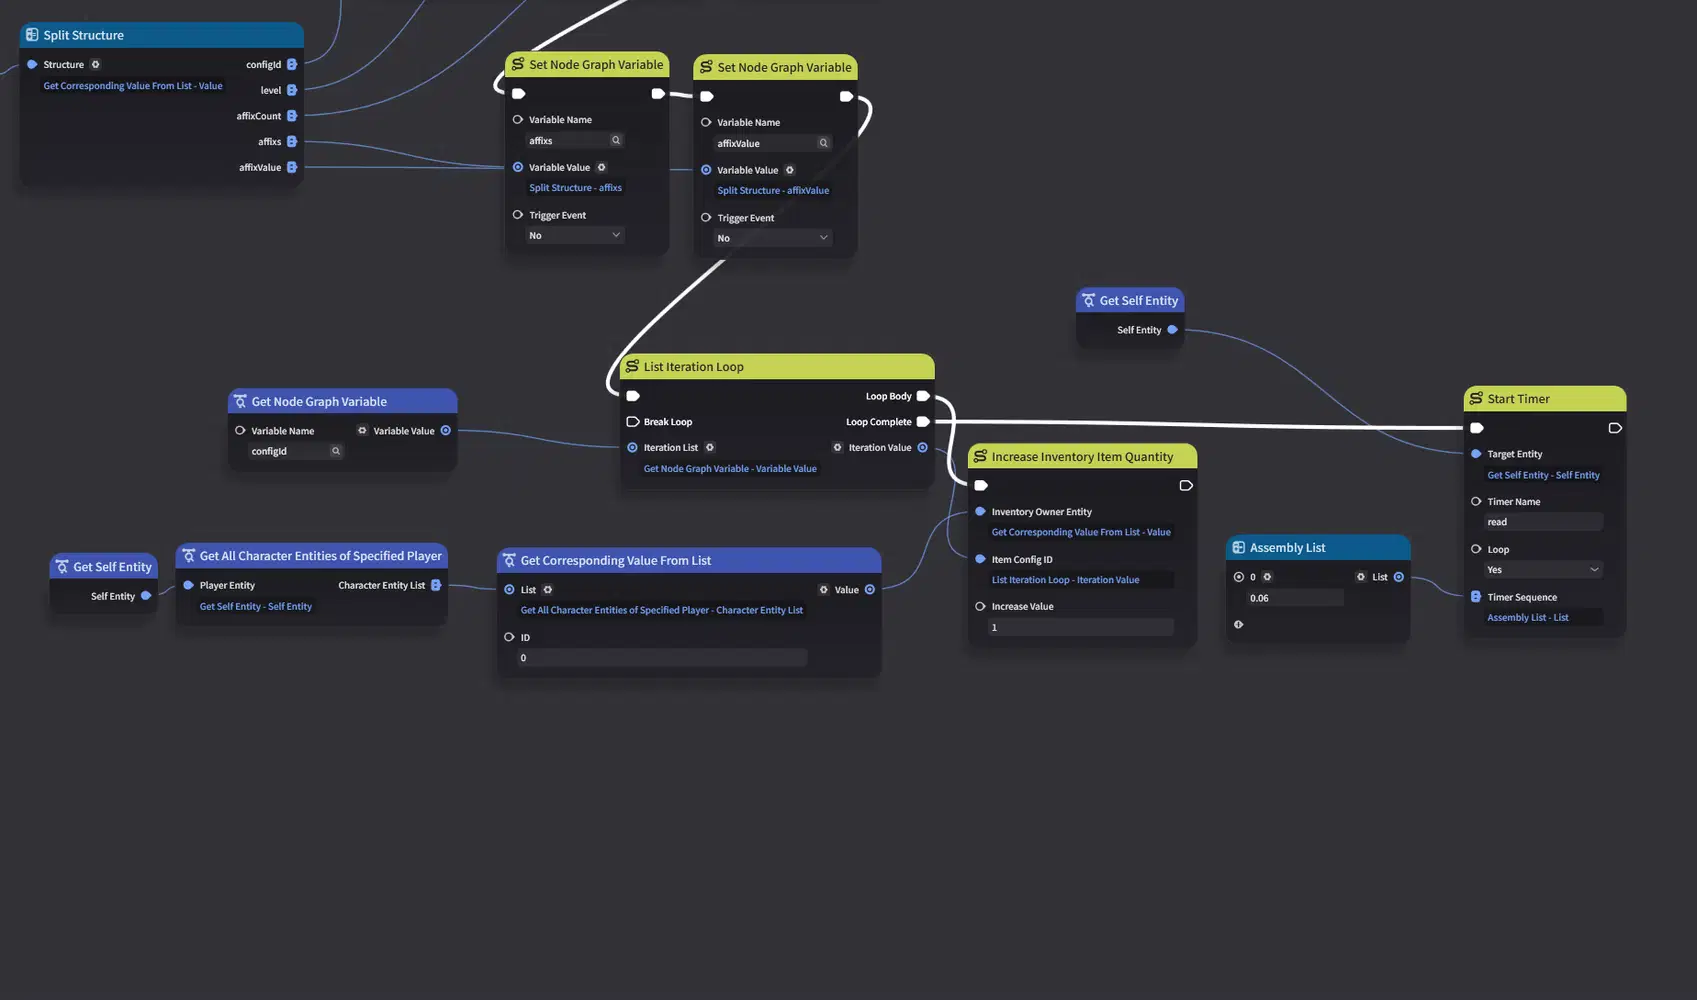
Iterate through the Config ID list and add each piece of equipment to the inventory.
4.2.2 Modifying the Equipment Node Graph and the reading Flag
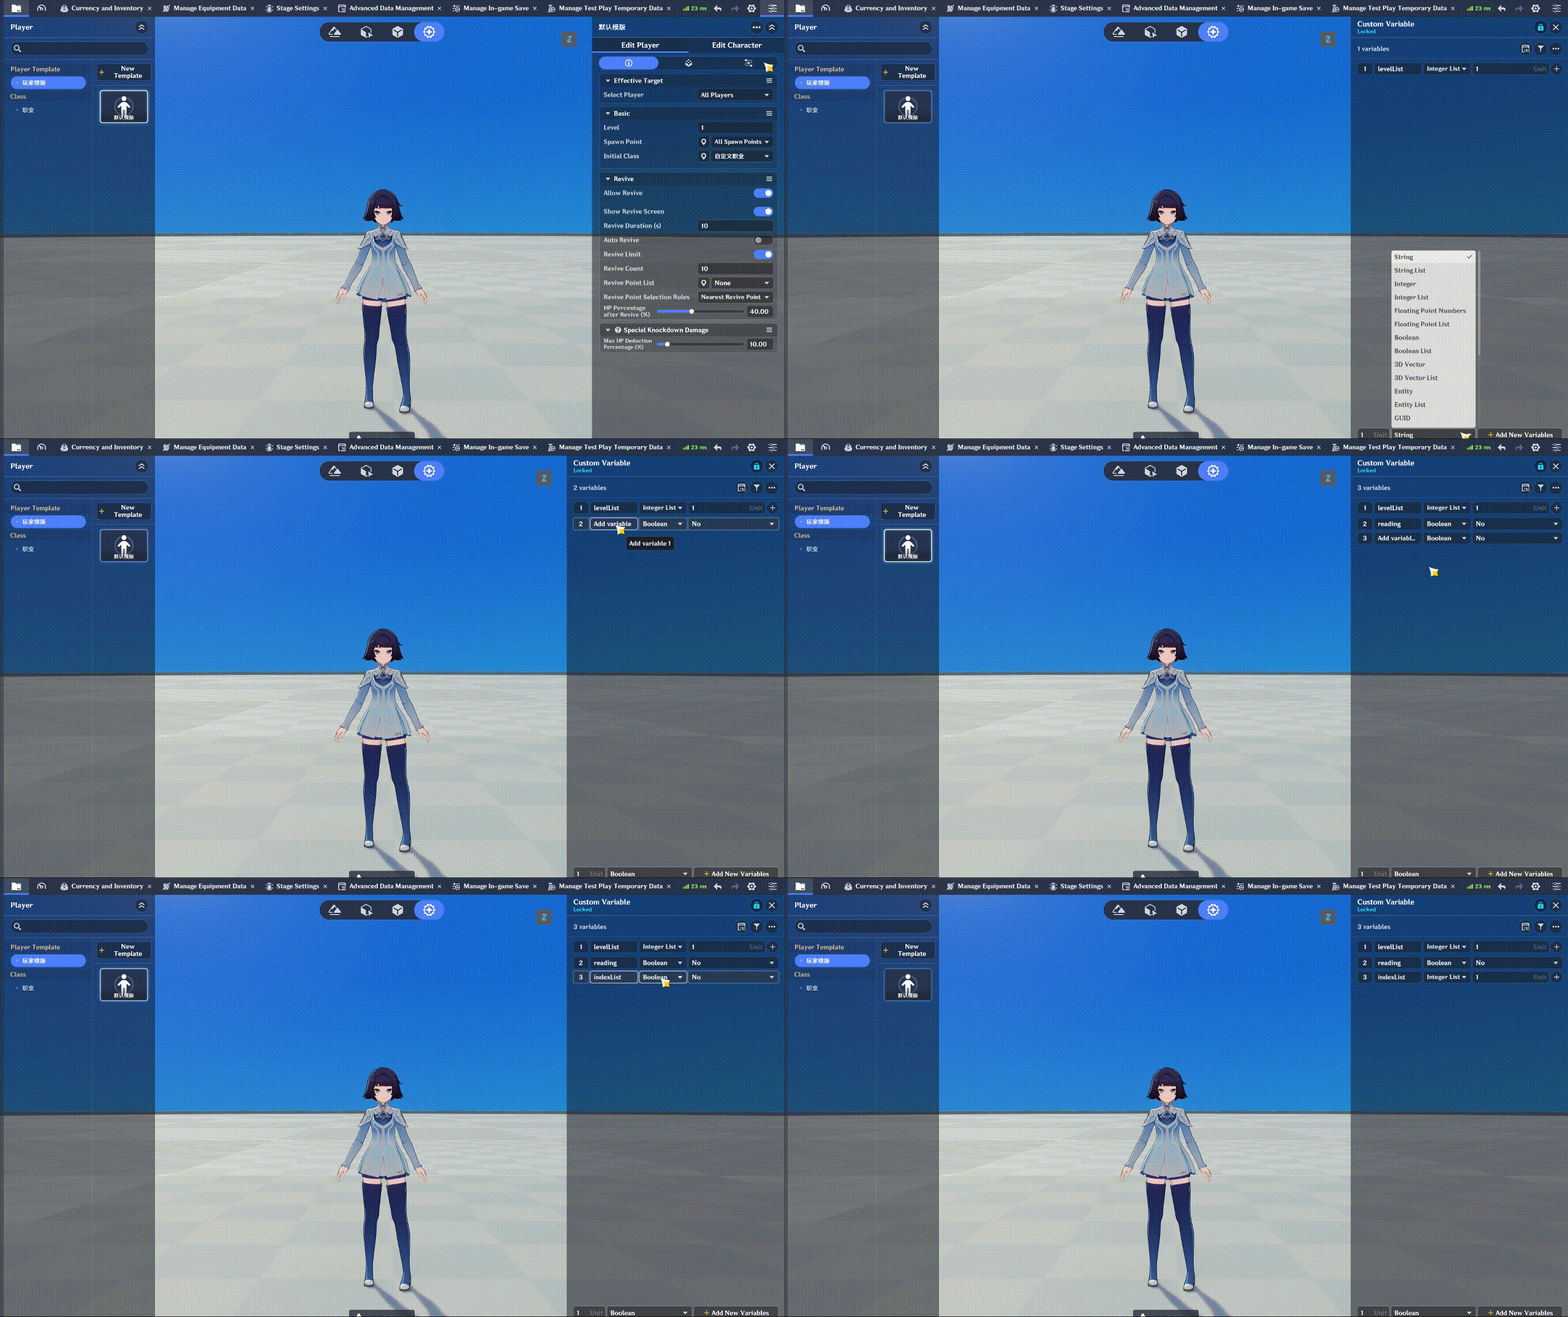
To make the equipment Node Graph follow a different workflow during loading, we need to add a variable to the Character Entity as a reading flag.
Also create an Integer List, which will store the equipment indices generated during the loading process.
Next, make the following two changes:
- Enable the reading flag before adding equipment, so the equipment bypasses the normal initialization process.
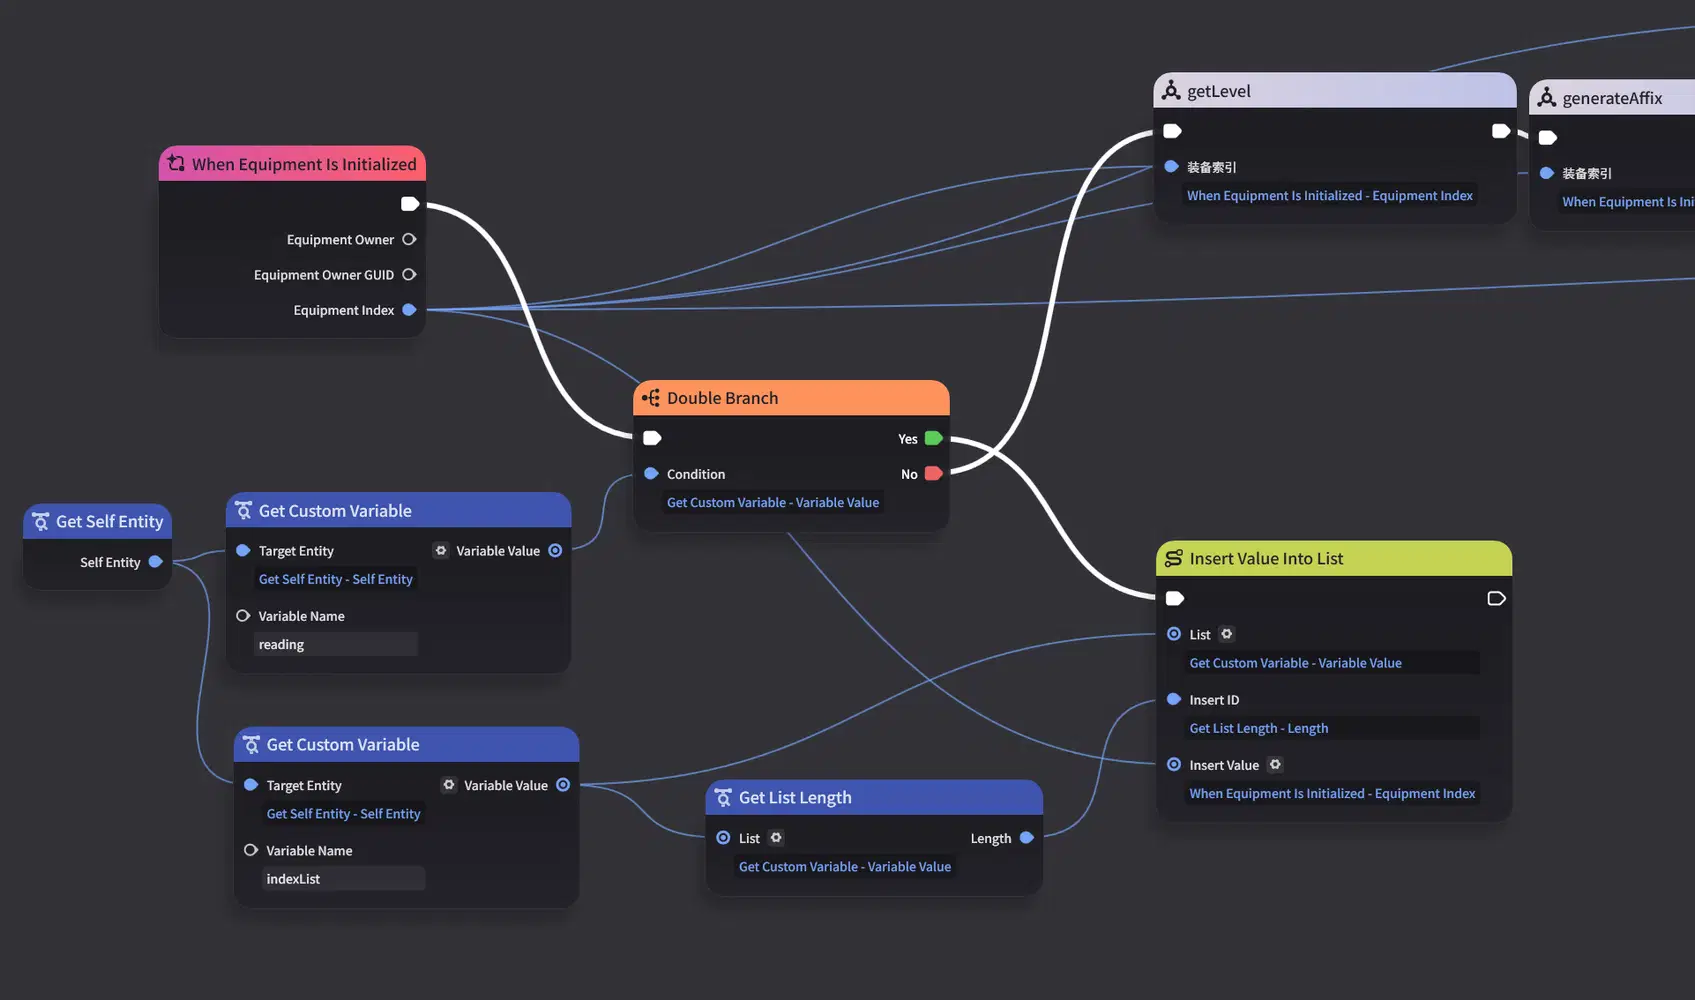
- Add a new Branch to the equipment initialization logic to handle the loading process.
Open the equipment Node Graph and add a Branch using the reading flag as the condition.
If the reading flag is enabled, add the equipment index to the index list.
The resulting index order will exactly match the order in which the equipment was added to the inventory (that is, the order of the saved lists). This is the prerequisite for correctly restoring the save data.
4.2.3 Timer and Termination Condition
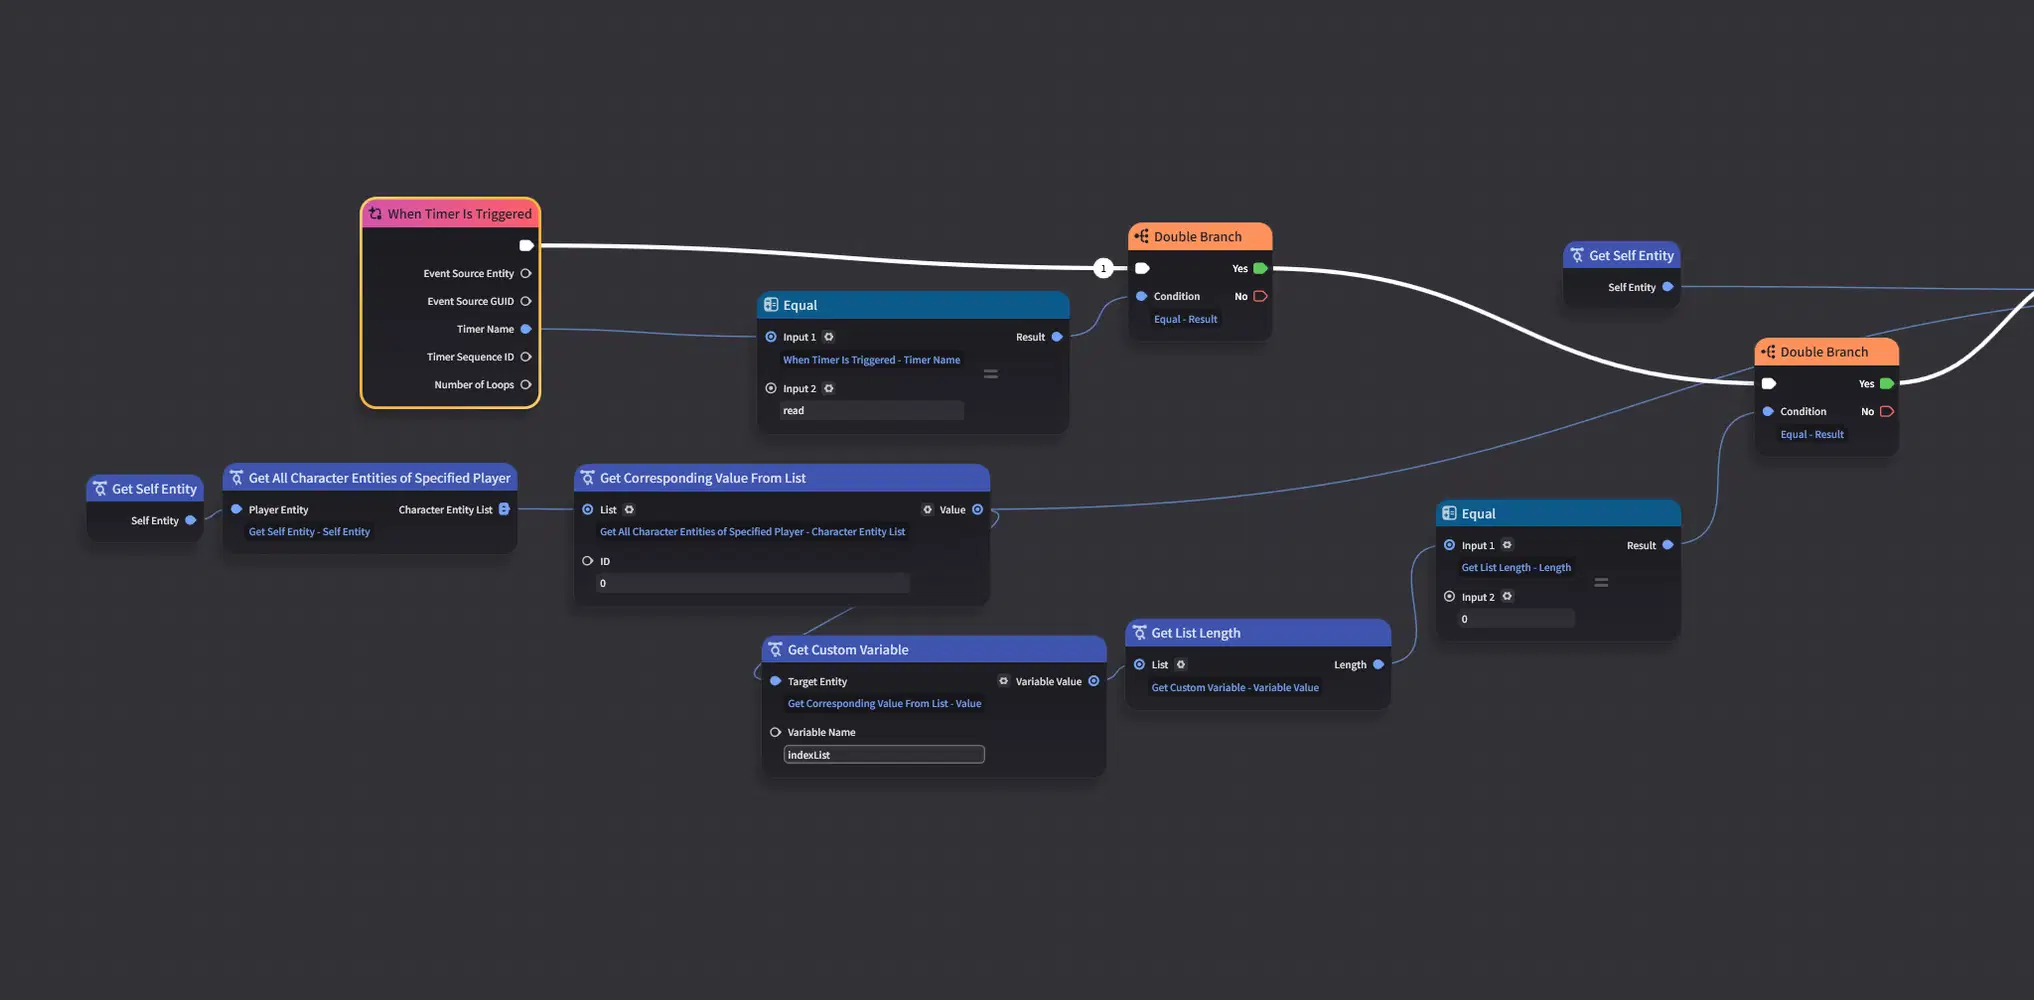
In the previous section, we created a looping Timer after the iteration finished.
The equipment restoration logic will be executed each time the Timer is triggered.
Before implementing the restoration logic, let's first define the termination condition.
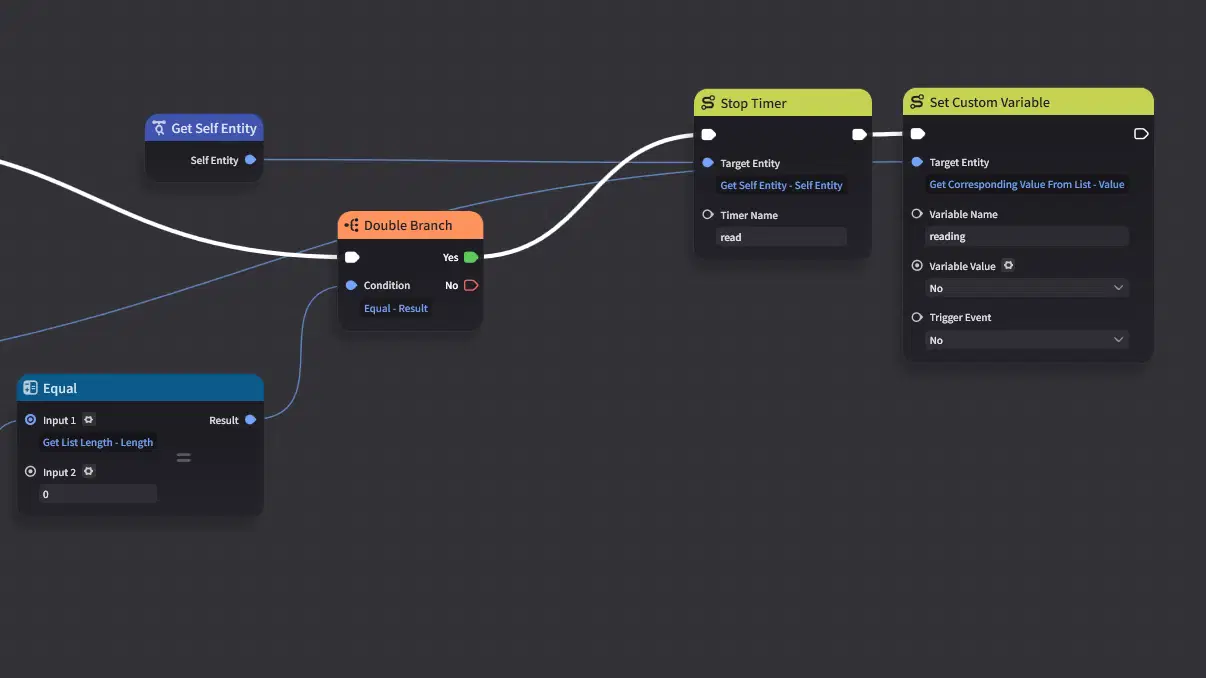
When should the process stop? The answer is when all equipment has been restored. During each iteration, we always process the first equipment index in the list and remove it afterward. Therefore, when the length of indexList becomes 0, it means that all equipment has been processed.
At that point, stop the Timer and disable the reading flag.
4.2.4 Restoring the Level and Special Affix
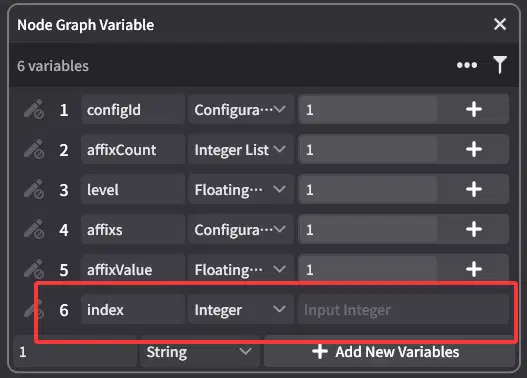
Next, we'll begin implementing the restoration logic. To read the saved data in an orderly and convenient manner, create a Node Graph Variable to store the current Equipment Index.
This variable will allow us to read the corresponding data directly from the correct position.
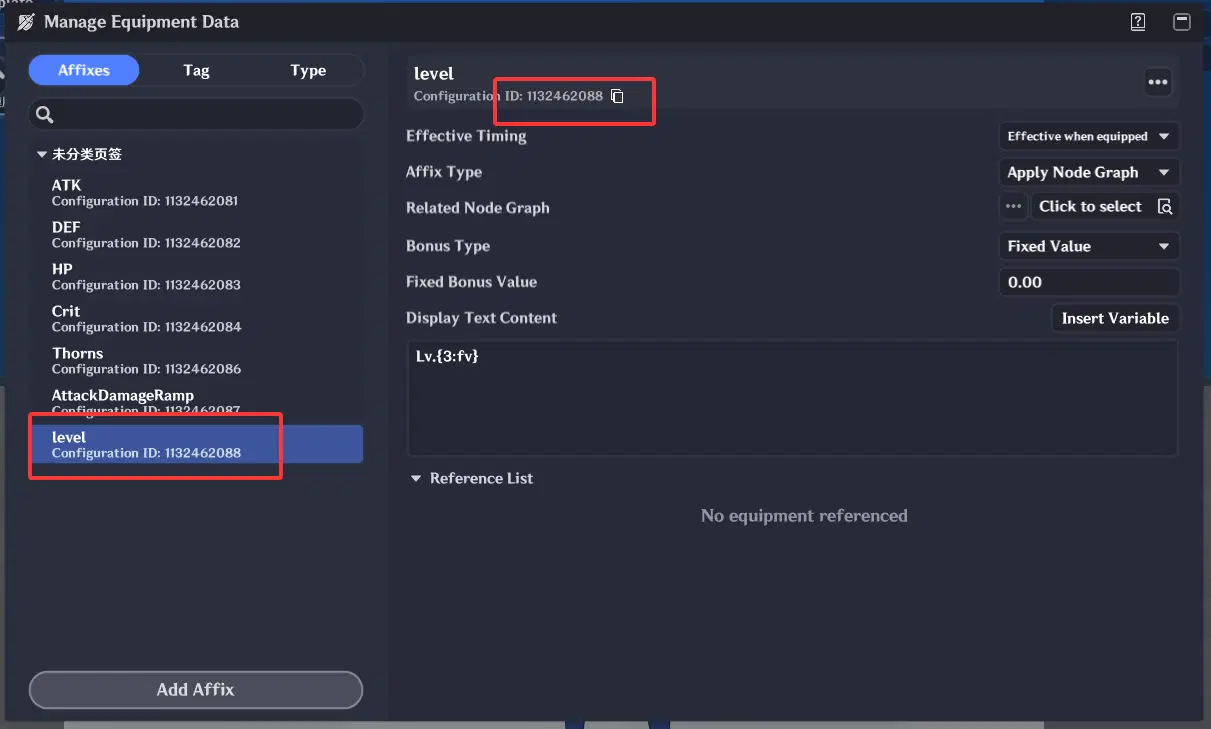
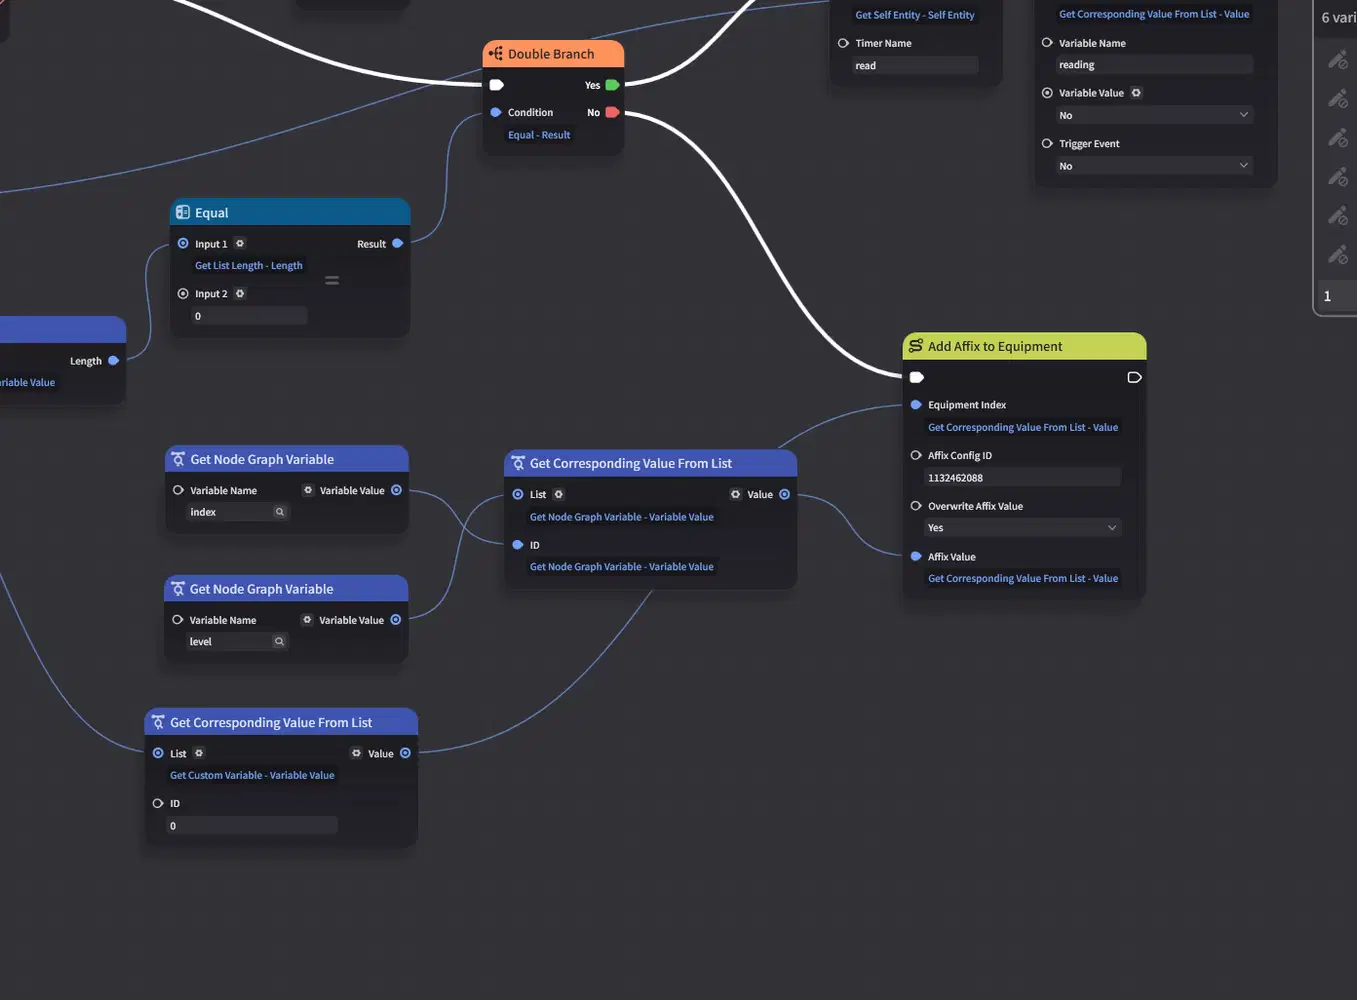
Next, we'll restore the Level Affix. Since the Config ID of the Level Affix is fixed, simply read the corresponding value from the Level List using the current index, then add the affix directly.
Since the processed equipment index is removed after each iteration, the element at index 0 is always the next piece of equipment to be restored.
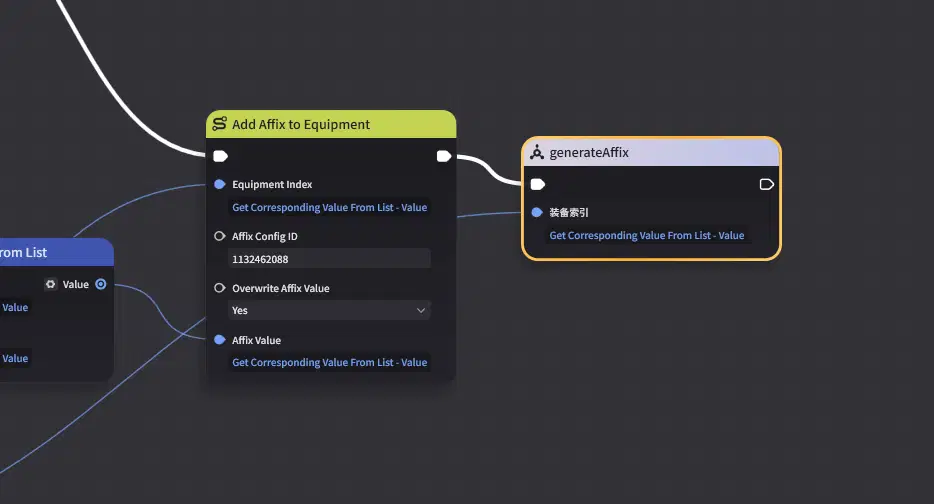
As for the Special Affix, we can simply reuse the Composite Node from the equipment initialization process.
Note:
- For simplicity, this tutorial treats the Special Affix as a fixed value. This is sufficient for most use cases. However, for more complex affixes—such as buffs that scale with the number of enemies defeated, or completely random special affixes—you'll need to save and restore them as separate special value affixes. While this approach is more complex, the underlying principle remains the same.
4.2.5 Restoring Affixes and Affix Values
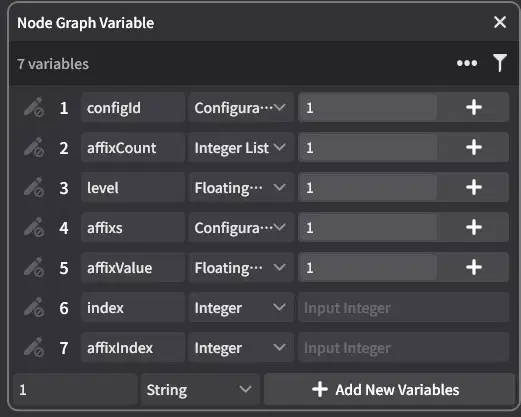
The Equipment Index we created earlier is not sufficient for reading the affix list. Create another Node Graph Variable named affixIndex, which will be used to access the affix data.
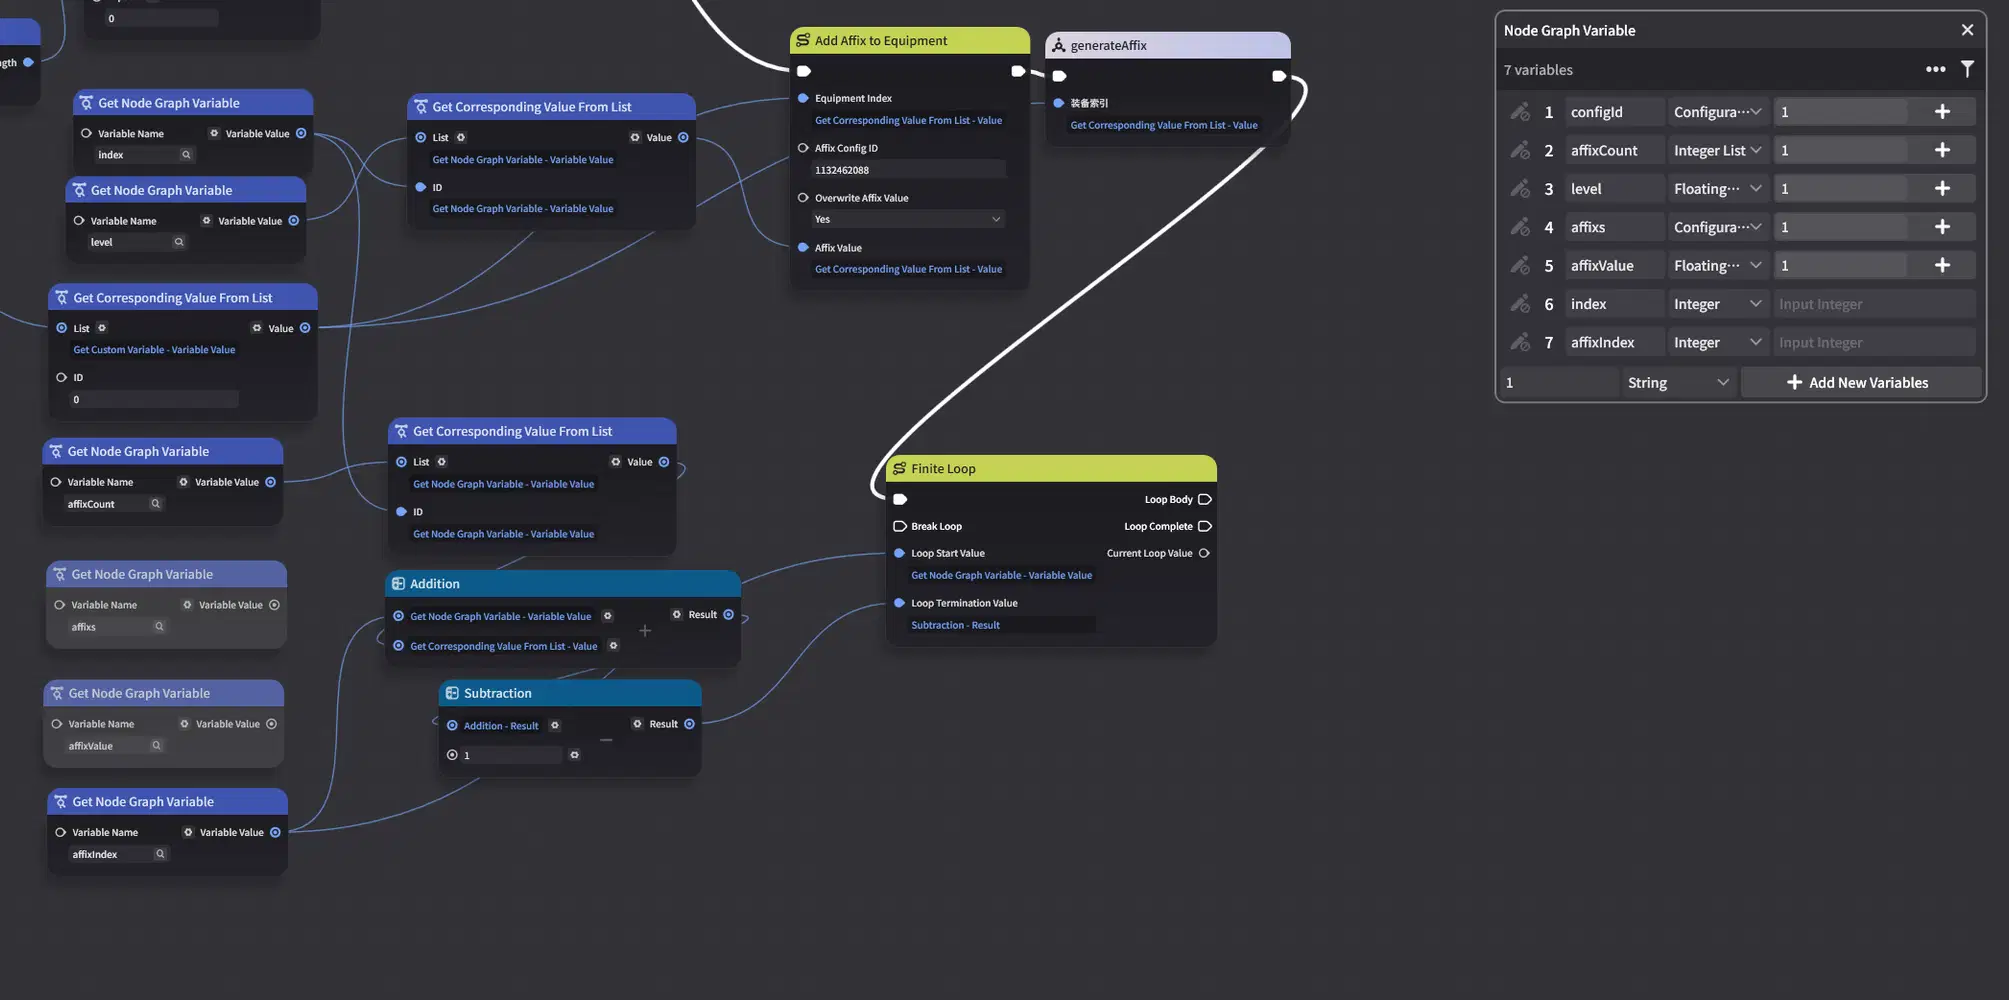
Use a For Loop to read the affixes. Set the start index to affixIndex and the end index to affixIndex + (affixCount - 1). This range will read exactly the affixes that need to be restored.
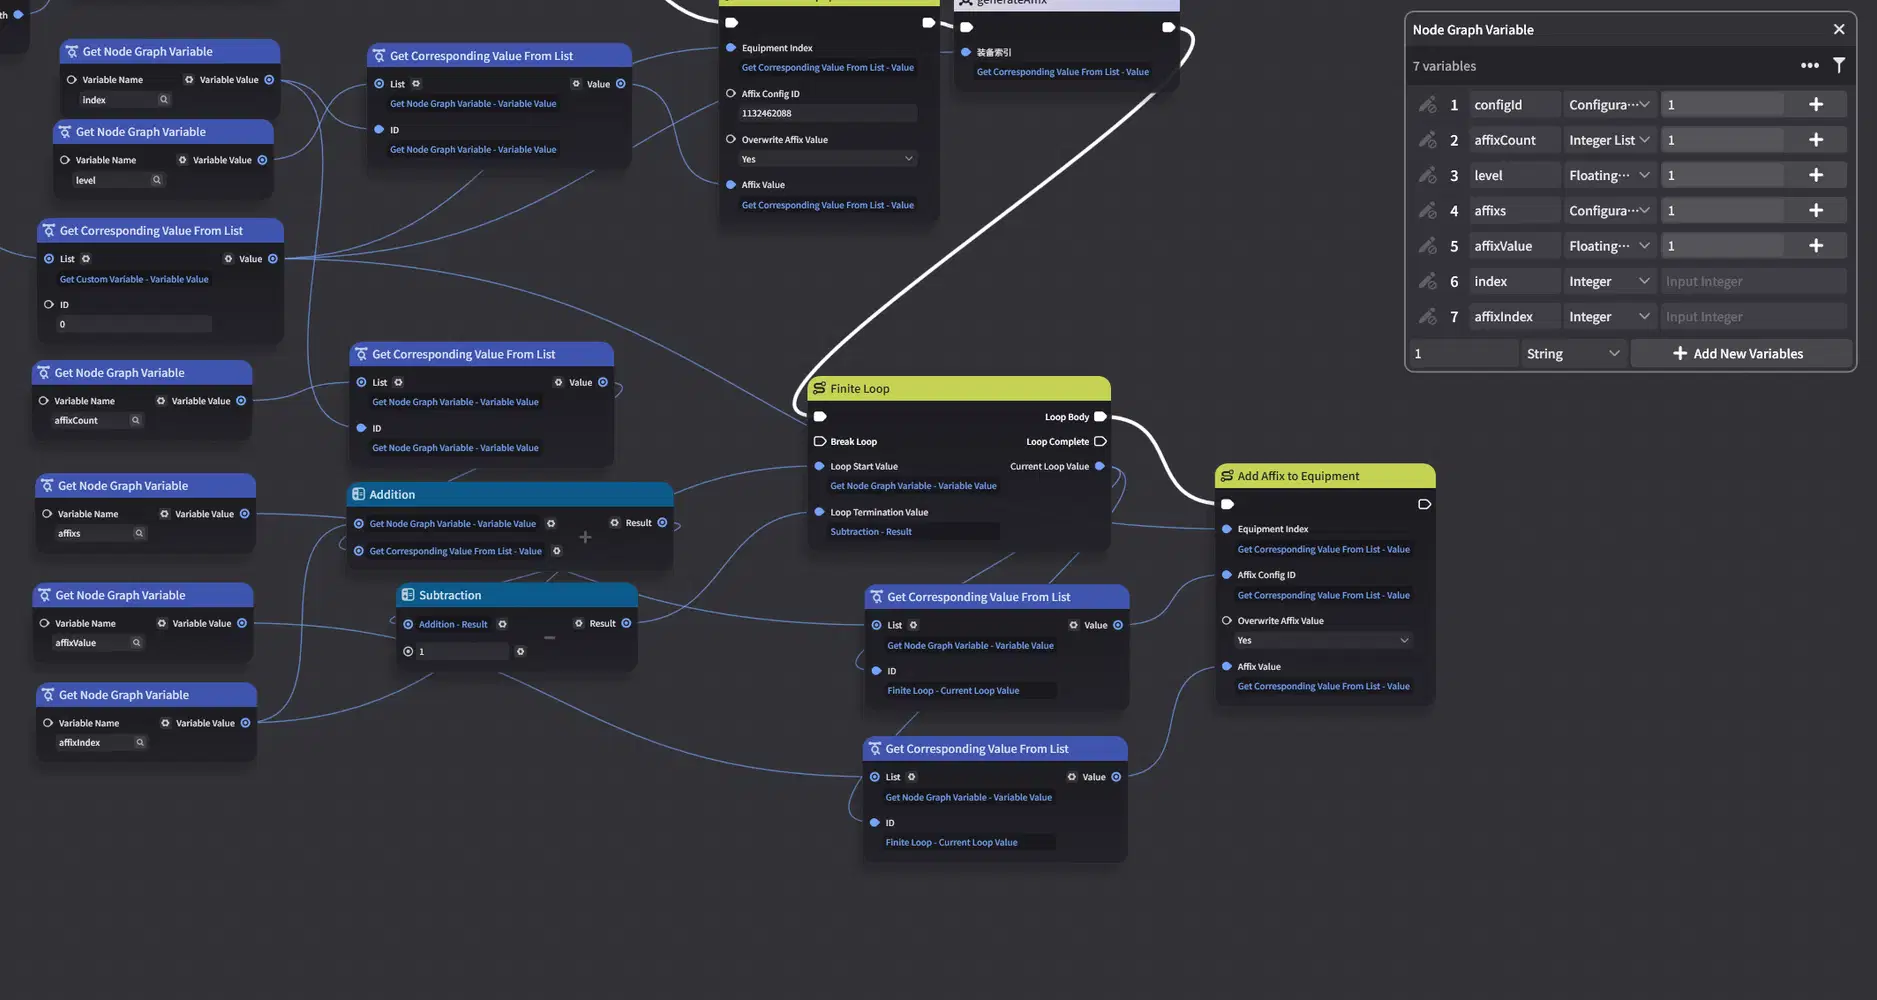
Next, restore the affixes by reading them from the saved data and adding them back to the equipment. At this point, the current Loop Value is already the corresponding affixIndex for the equipment being restored, so simply use the Loop Value to read the affix and affix value from their respective lists and add them to the equipment.
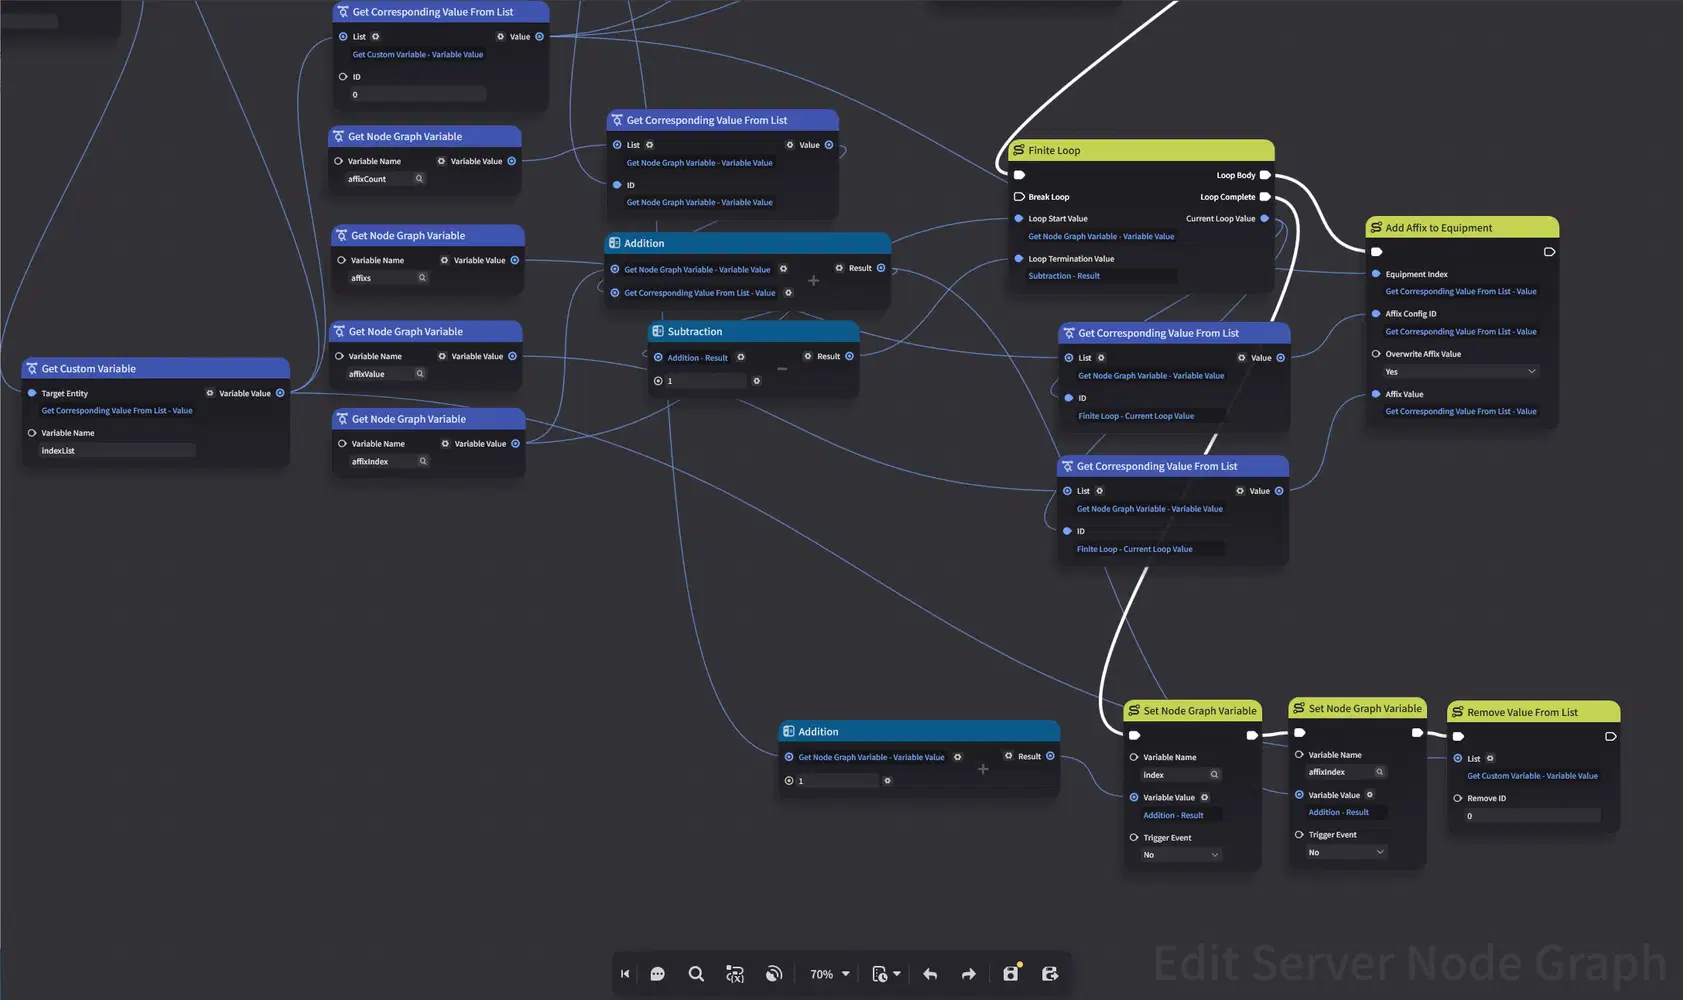
4.2.6 Advance the Indexes and Remove the Equipment Index
4.3 Testing
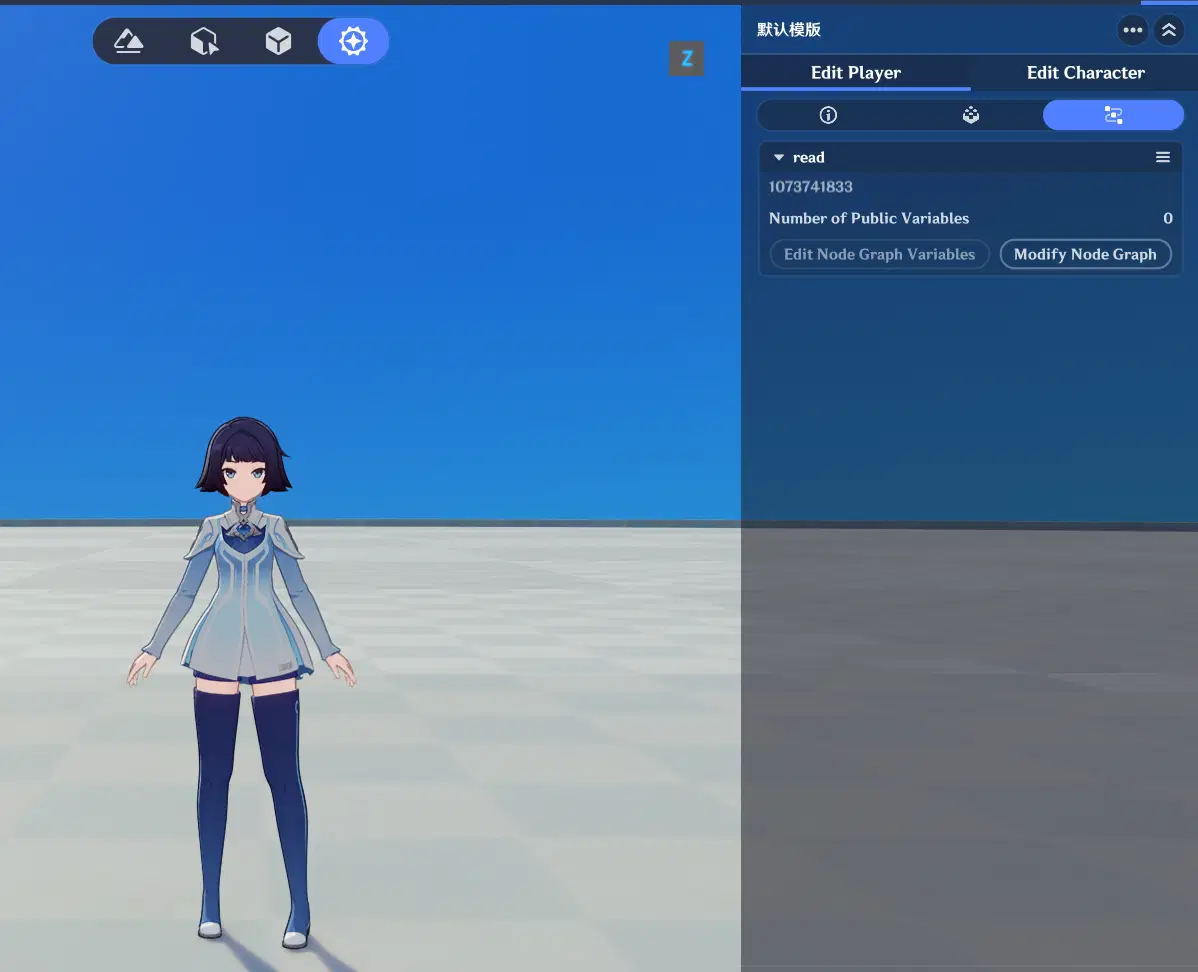
Attach the Node Graph to the Player Entity.
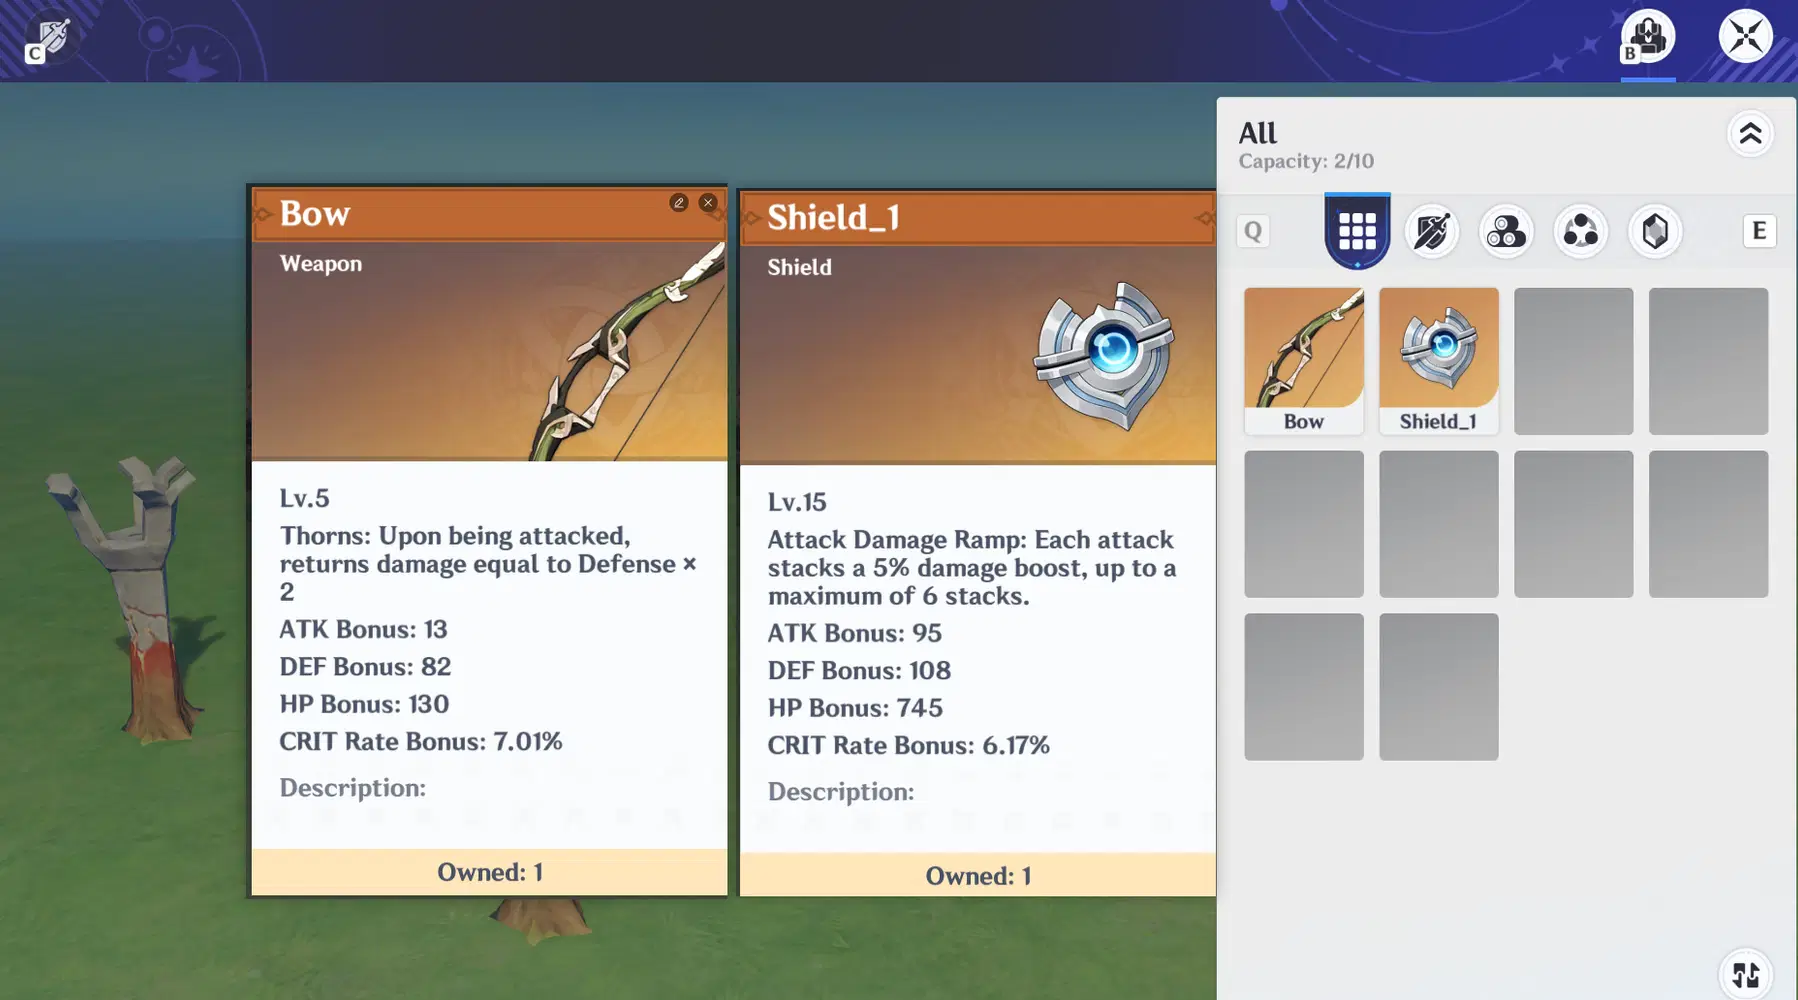
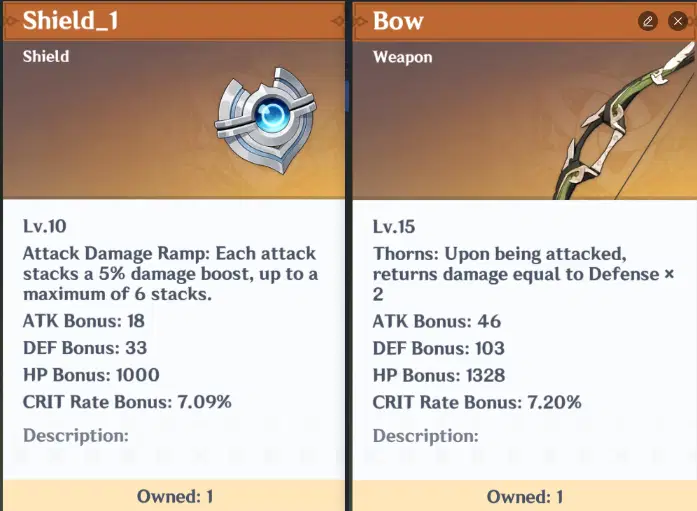
Start a playtest and create a save. For this example, create a Level 5 Bow and a Level 15 Shield, then save the game for later testing.
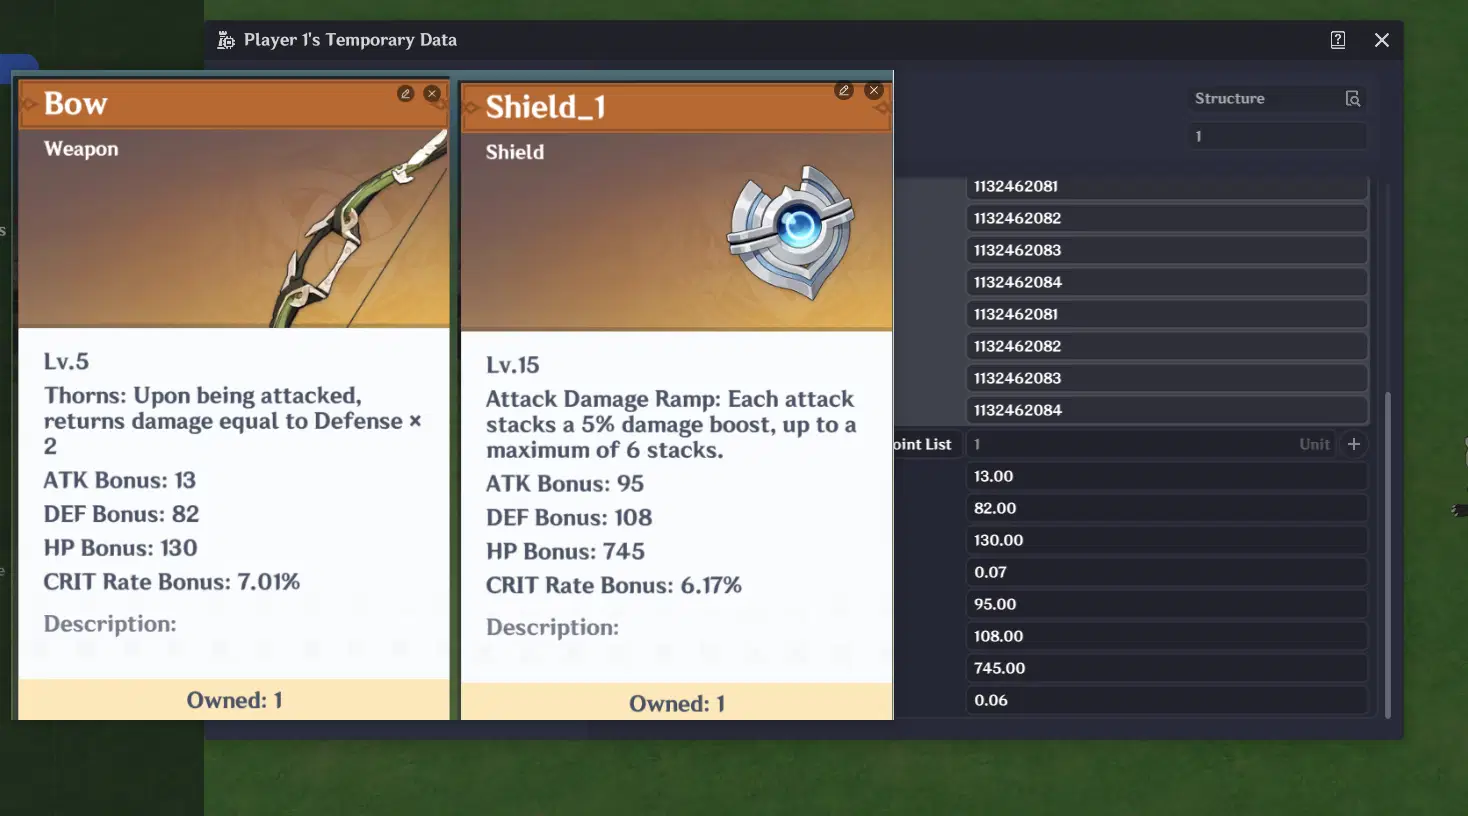
Compare the Temporary Play Data with the expected values.
Verify the loading process.
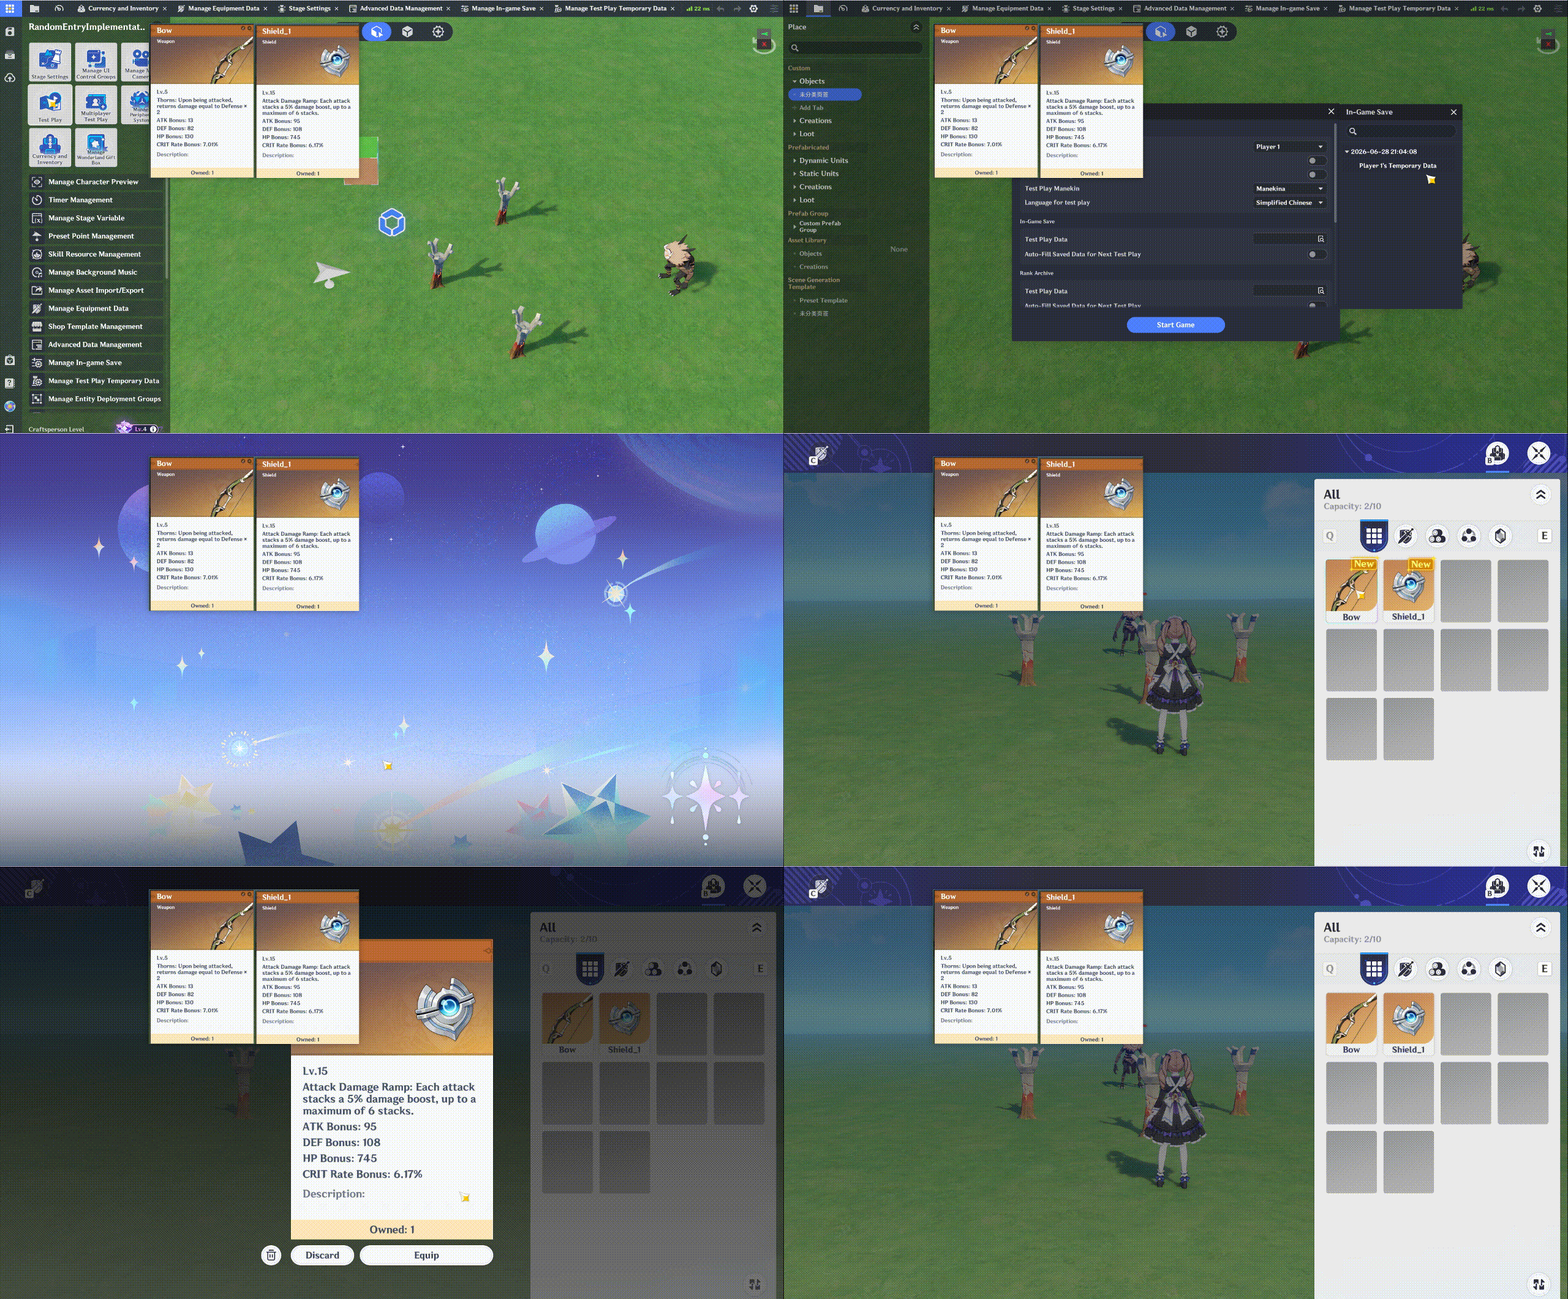
The save data has been restored successfully! This completes the implementation of the basic save and load system.
5. Binary Save Data
5.1 Preparation
Before getting started, download and import the Binary Utility Node package from the Asset Center:
https://act.hoyoverse.com/ys/prod/ugc/component-store/index.html#/item/2071037500729618432
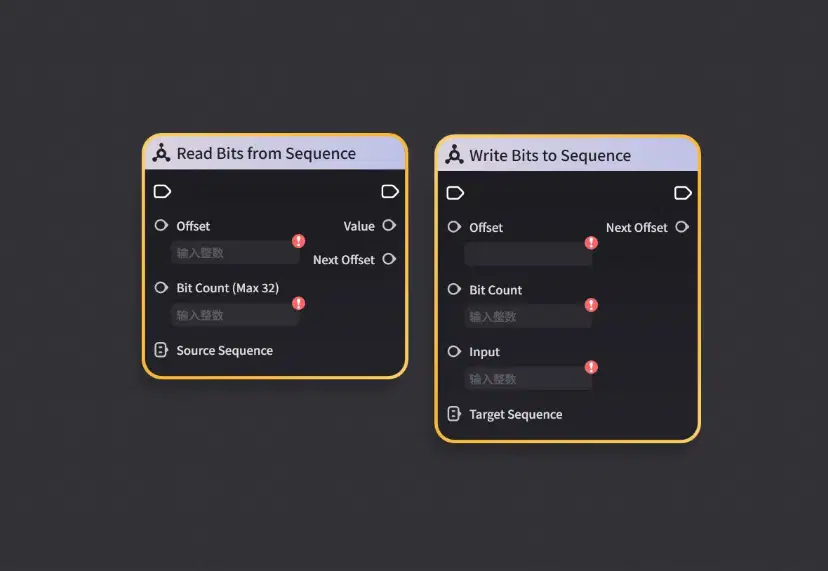
Again, to keep the tutorial simple, we'll only compress the Level and Affix Count into a single value. This is purely to demonstrate the implementation.
We'll pack two 16-bit integers into a single 32-bit integer, storing the Level and Affix Count respectively. A 16-bit integer is more than sufficient for both values.
Now, add a new Integer List with a length of 10 to the In-Game Save Data.
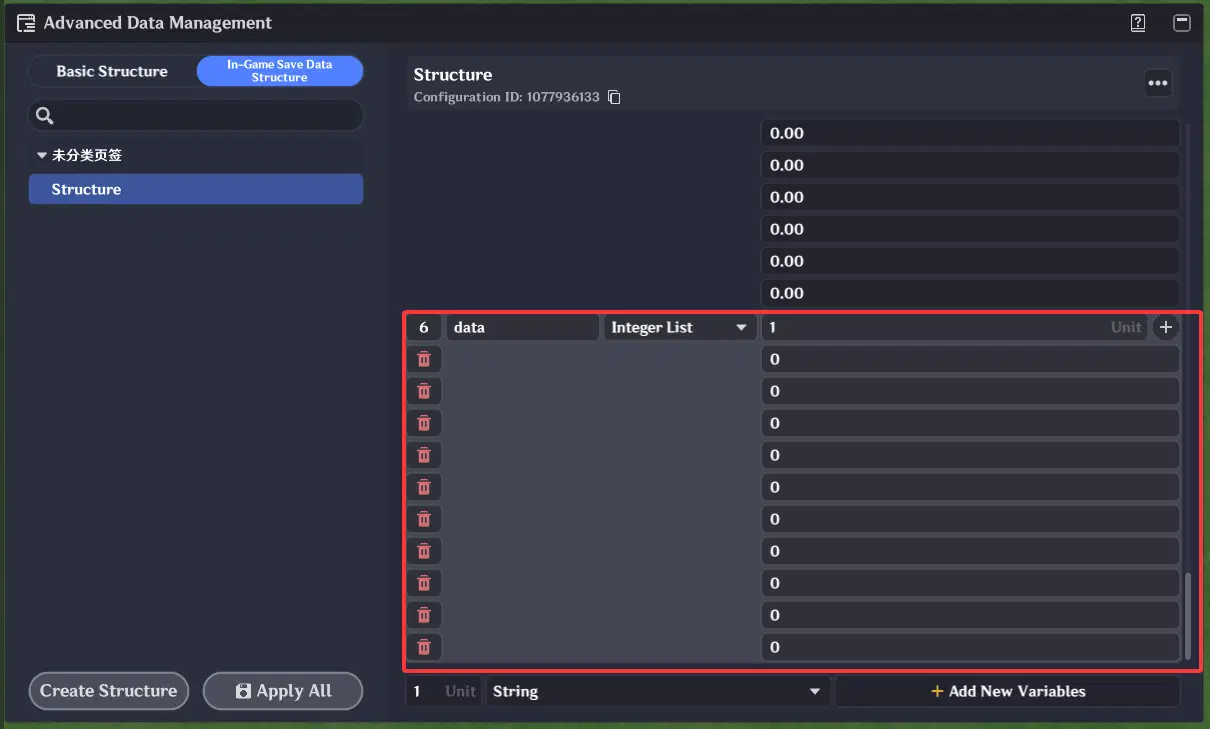
5.2 Save Processing
Copy the existing Load/Save Node Graph and edit the duplicate. Do not modify or break the structure that has already been completed.
First, disconnect the data cleanup logic, and iterate over affixCount.
Create an Integer List to serve as temporary storage.
Start reading the Level and Affix Count, then encode them into 16-bit values for writing.
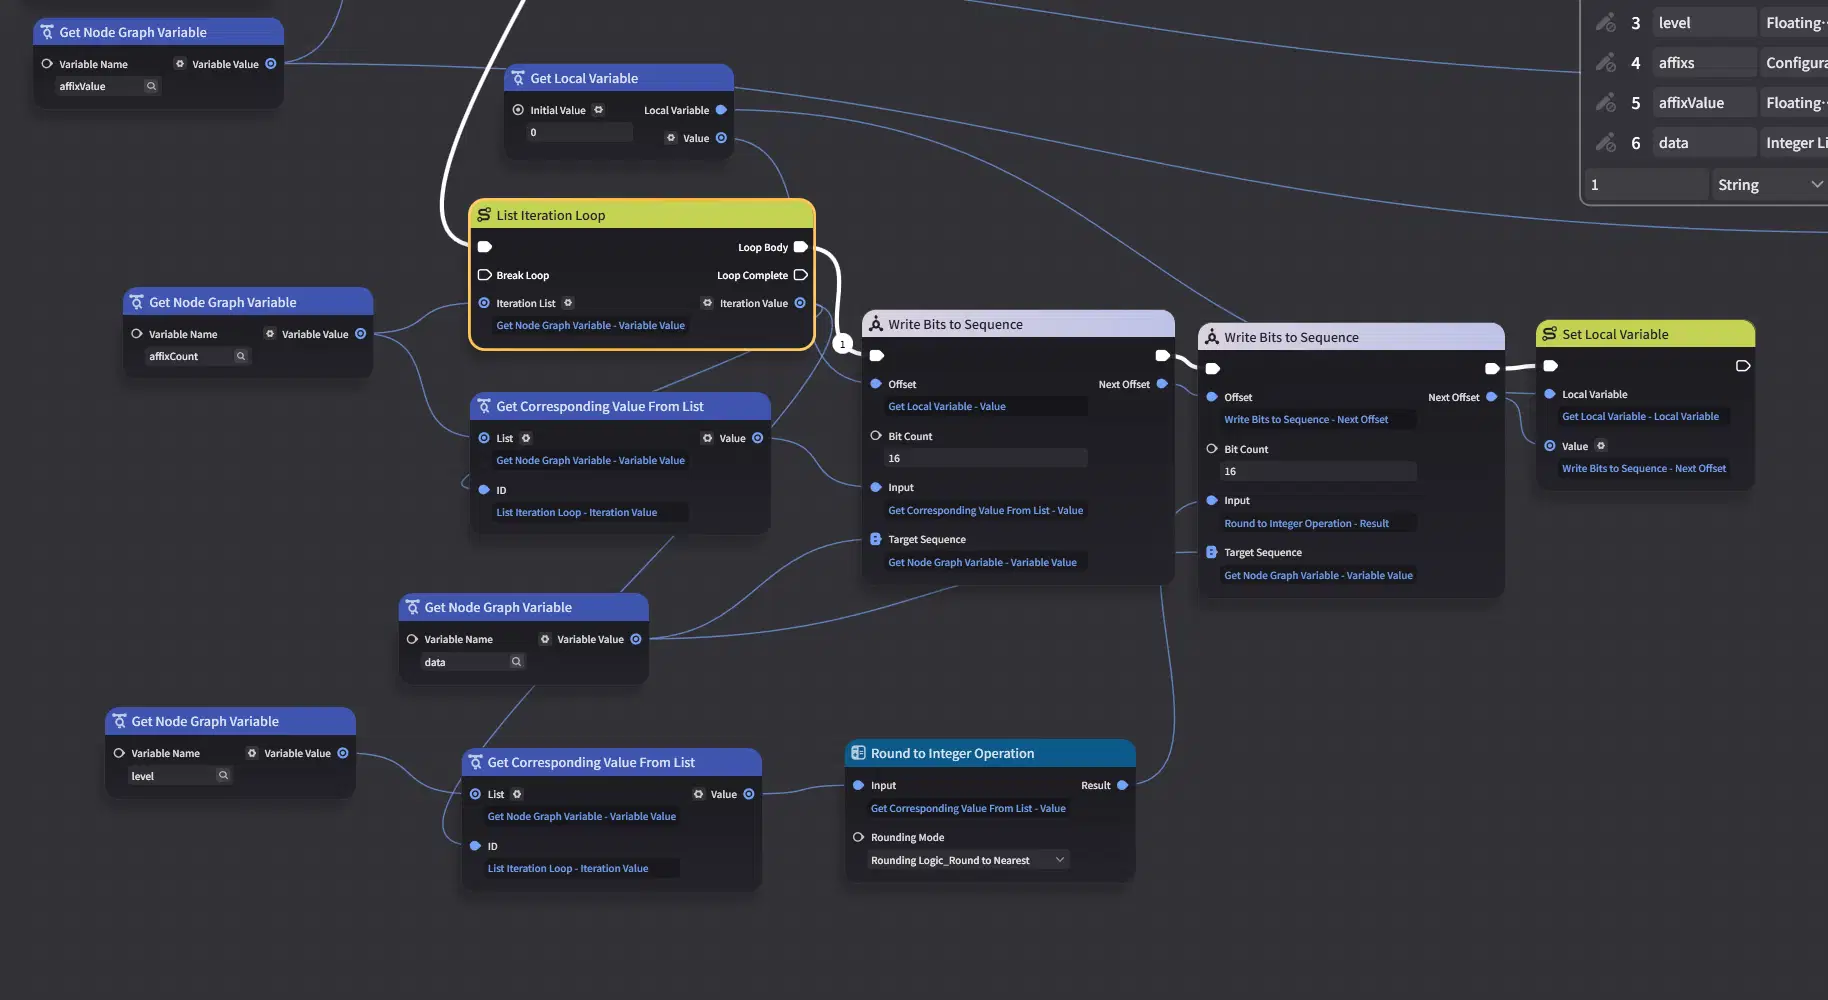
The most important part of bit-packing is maintaining the offset.
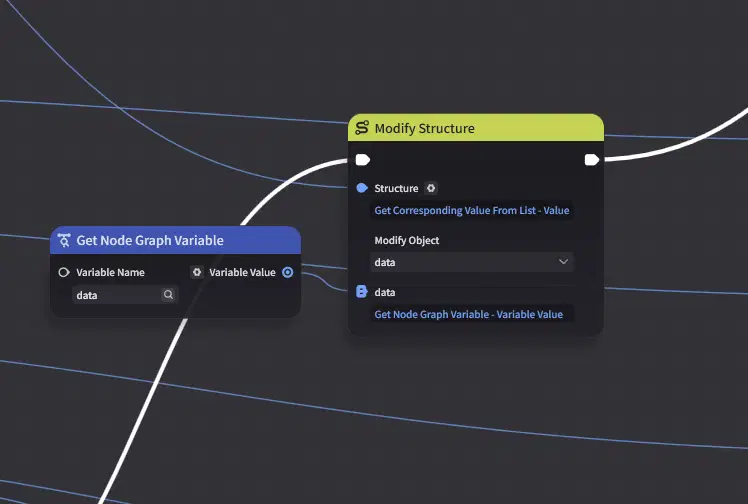
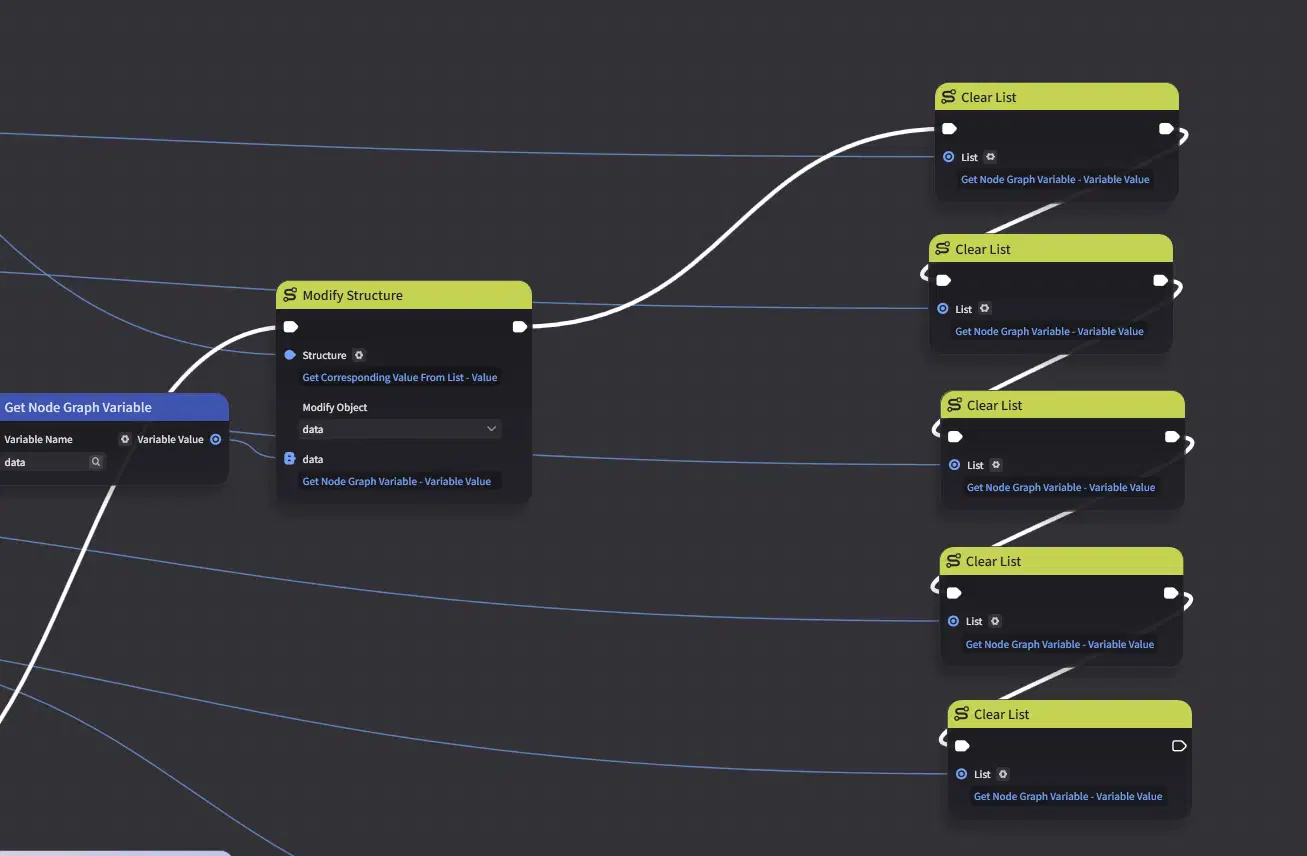
Next, store the encoded data into the In-Game Save Data, and continue with the cleanup process.
5.3 Save Verification
Modify the save Node Graph to the bit-operation version, then start a playtest and verify the temporary data.
To verify the results, you will need to use a base conversion calculator.
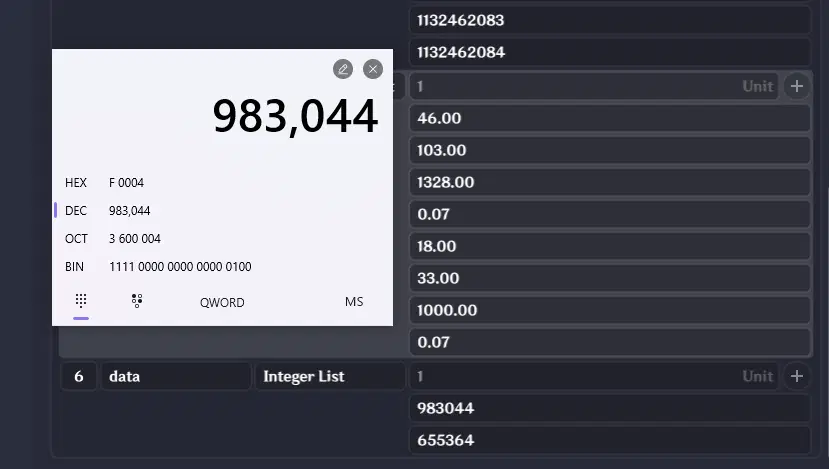
As shown in the figure, the high 16 bits are 0000 0000 0000 1111, which converts to 15 in decimal. The low 16 bits are 0000 0000 0000 0100, which converts to 4 in decimal.
These correspond to our equipment values: Level = 15, Affix Count = 4.
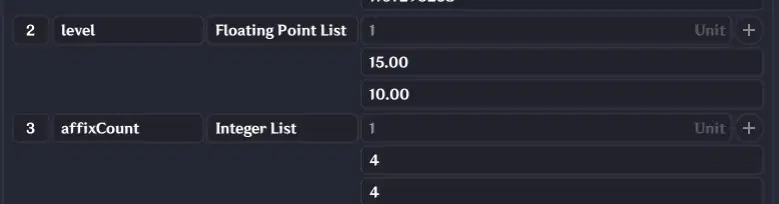
The data is correct!
5.4 Load Processing
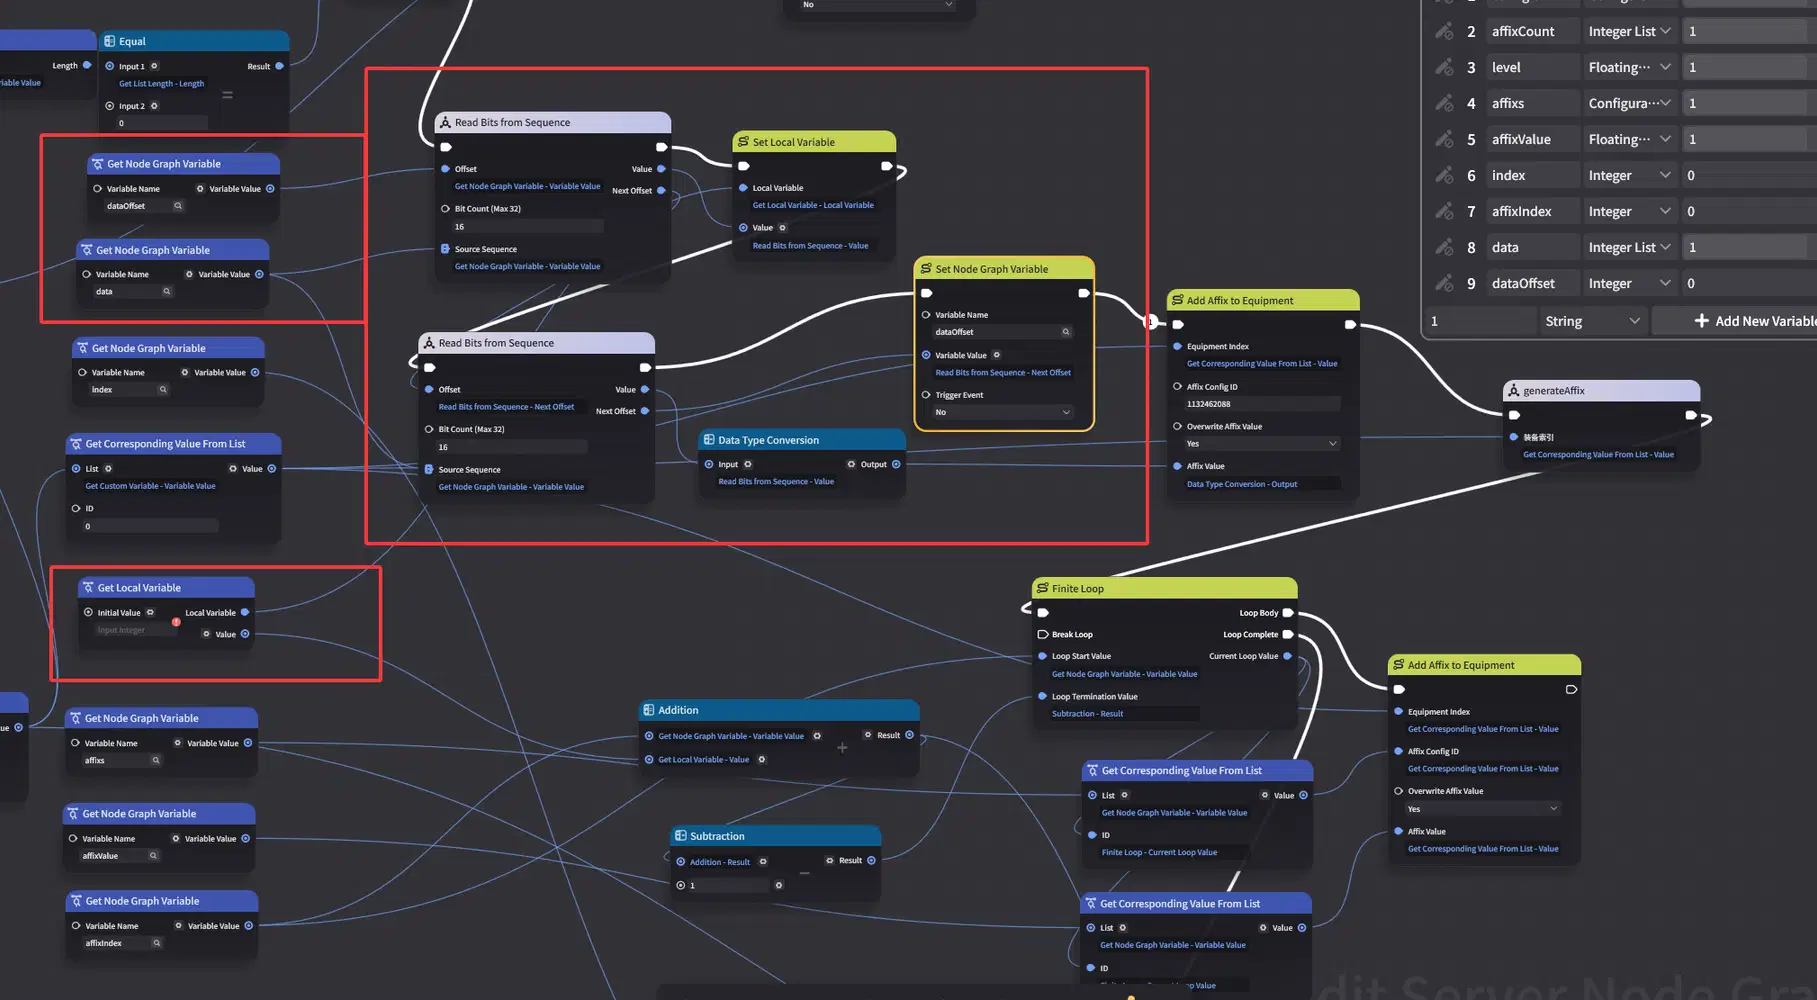
The binary utility package also provides nodes that make reading data easier.
Similarly, create a Node Graph Variable as a temporary variable, and duplicate the existing Load Node Graph for modification.
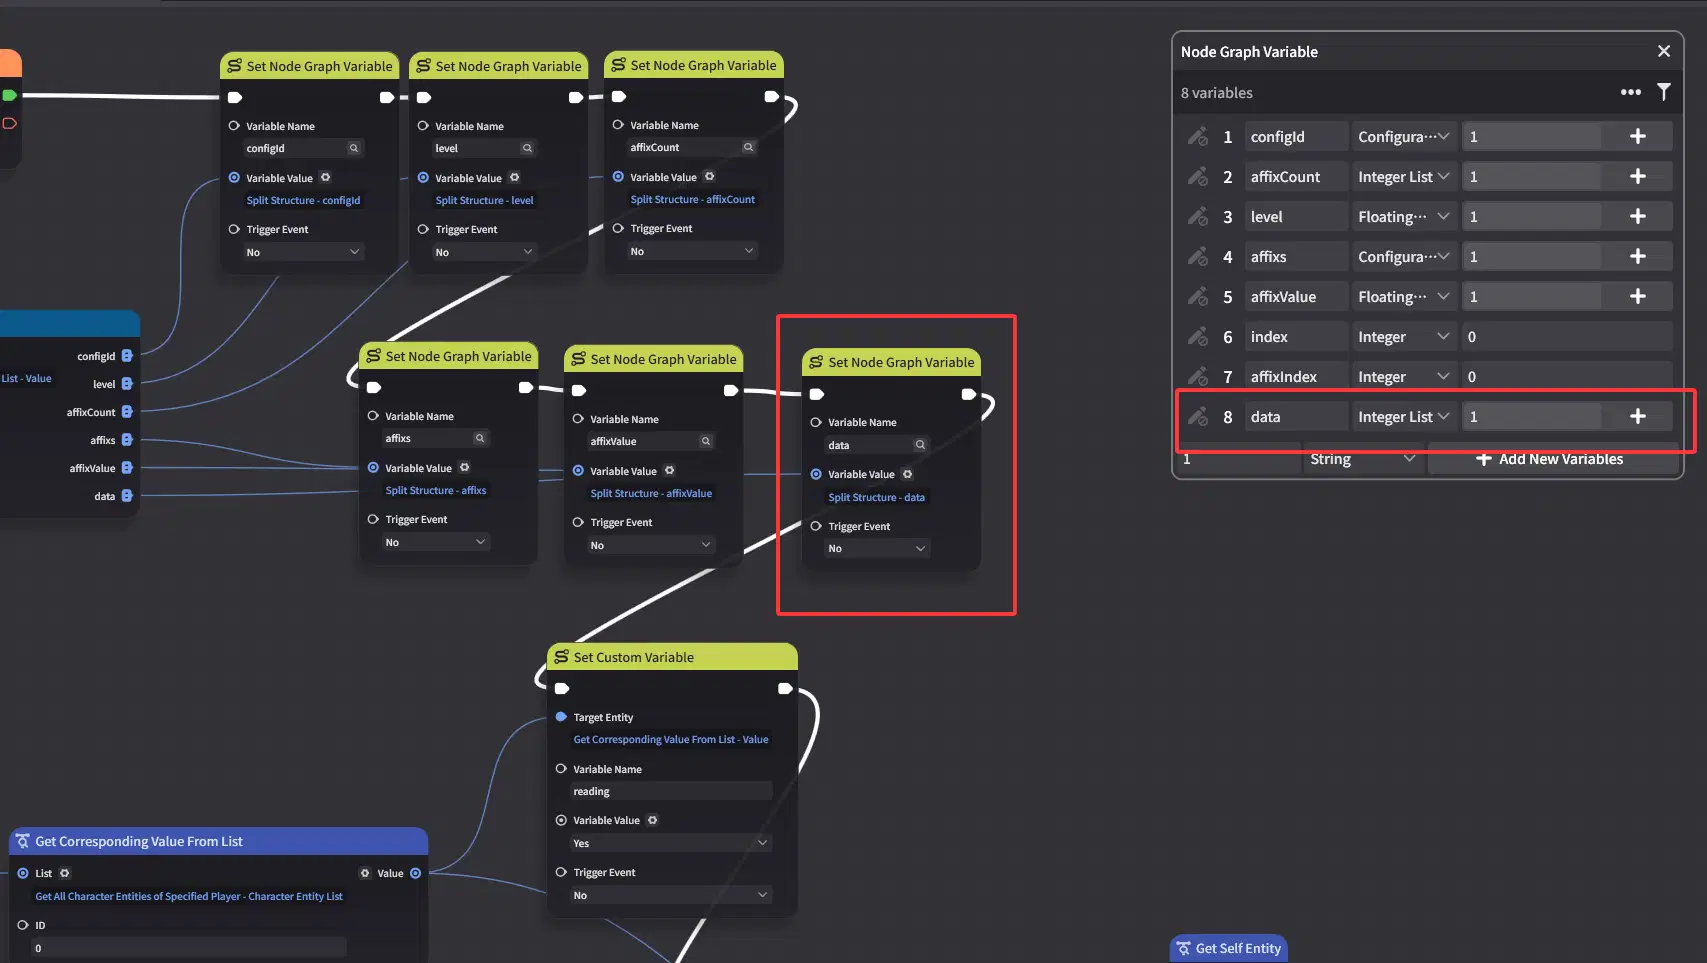
Similarly, for bit reading, the offset is essential.
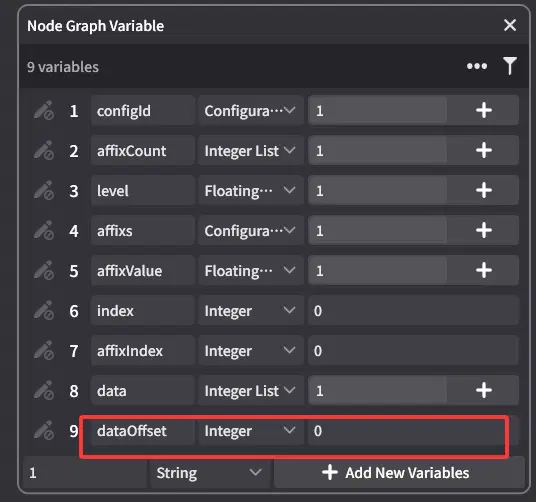
Remove the original logic for retrieving Level and Affix Count, and instead read them directly from data.
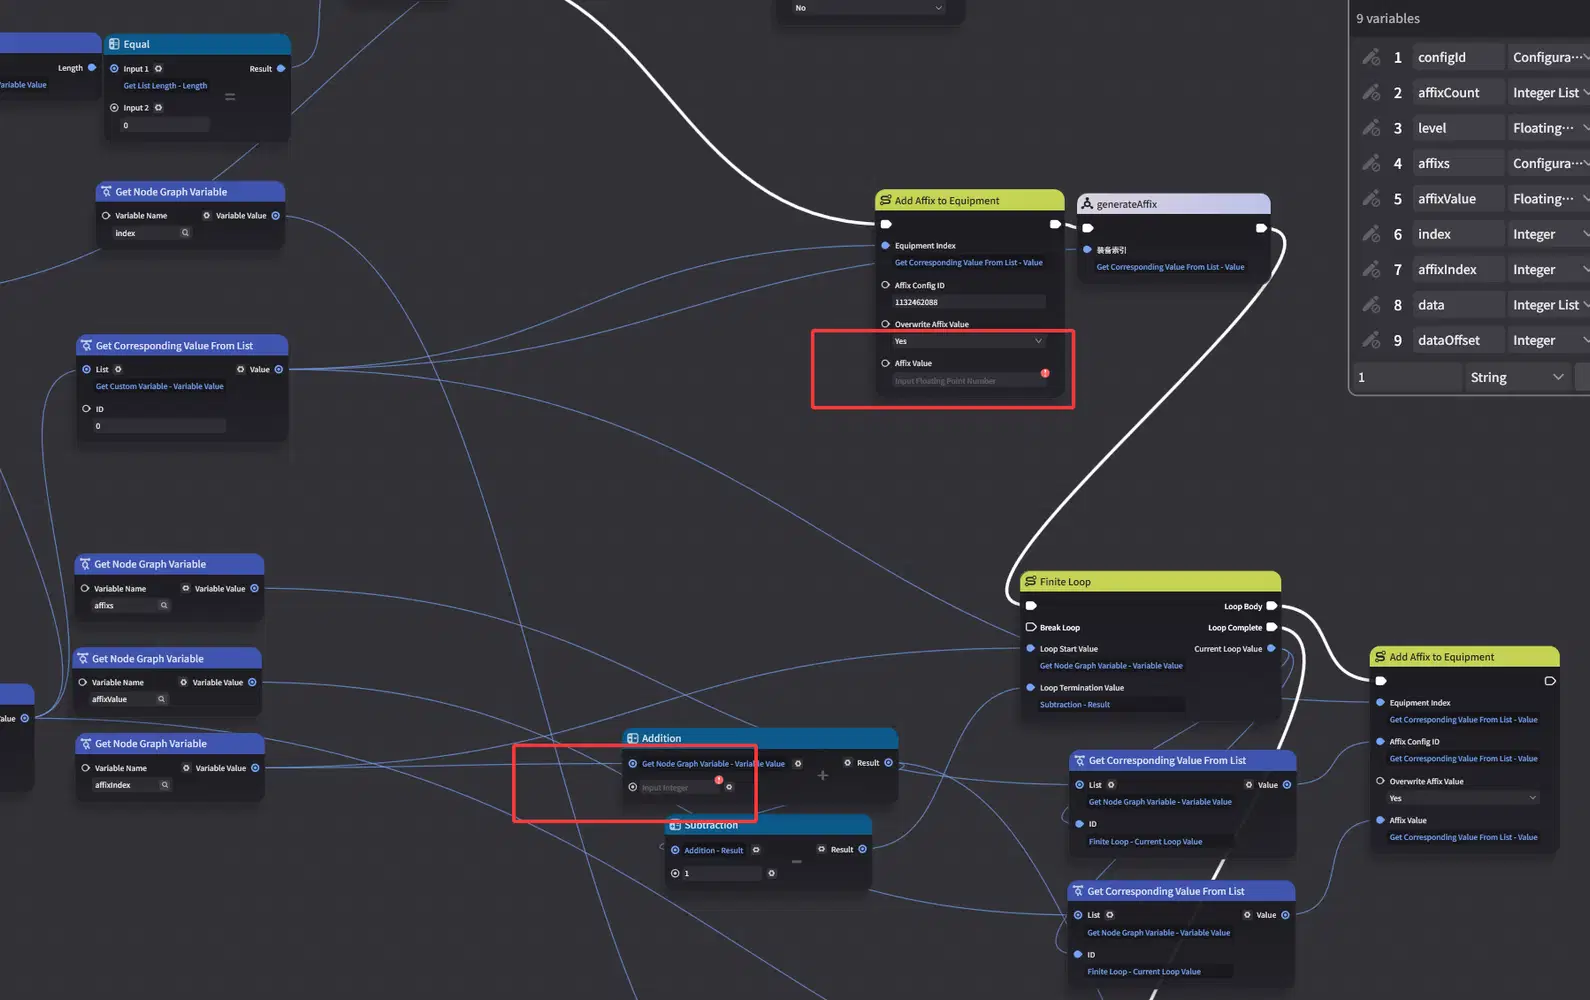
The reading order must match the writing order: first read the Affix Count, then read the Level.
Be sure to properly maintain the offset during the process.
5.5 Load Verification
Replace the Node Graph with the binary compression version.
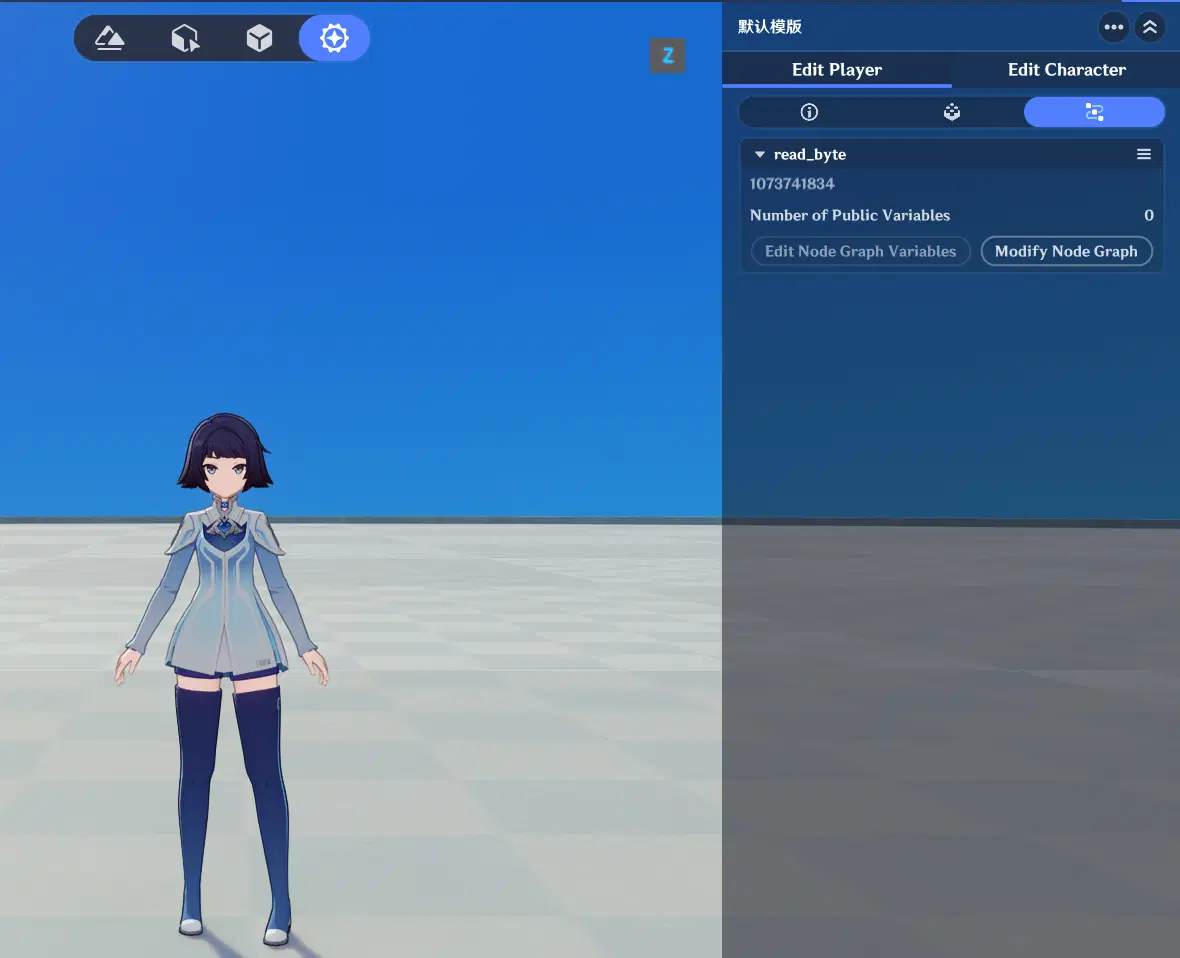
Start a playtest. The data is successfully restored.
6. Conclusion
This concludes the tutorial. The complete save system will be uploaded to the resource center.
https://act.hoyoverse.com/ys/prod/ugc/component-store/index.html#/item/2071247563662585856
This tutorial focused on implementing a save system for equipment with fully random affixes.
The introduction of binary data saving significantly increases system complexity and requires a certain level of programming experience. It is not recommended unless necessary.
The example of packing Level and Affix Count is relatively limited in practical value. It was primarily used to demonstrate how bit-level storage works.
In practice, the main gains in storage efficiency come from further compressing Affix IDs, Affix values, and Configuration IDs, which occupy much larger space. With proper design, overall save size can typically be reduced by around 3×, though the implementation complexity increases significantly.



