Introduction
In this guide we will go through some ways in which you can use the following Client side Character Skill tools: Key Behaviors, Skill Variables, Instances and the Unit Status: Trigger Skill on Timer.
This guide is divided in two Main Sections, the Core Concepts, which is an introduction for those unfamiliar with the tools we're going to use. [Key Behaviors, Skill Variables, Instances and the Unit Status: Trigger Skill on Timer]
And the Example Projects, in which we will cover some practical projects to use this tools.
So let's get started with a concept introduction!
Core Concepts
Skill Instances
This feature is an awesome tool; it let us to manage skills directly on the node graphs without the need of pre-setting them on a Character Class.
Nodes
Through the Skill Instance nodes we can find what I consider the three most important on the toolkit:
Create Custom Skill Instance
Which is the most important node in the toolkit; it let us create Custom Skill Instances in a specific Character. To use it you need to link your Character Entity [This is important, the Character, not the Player]; & your Skill Config ID [The "Configuration ID" under your Skill Name in the Skills Tab]. After setting this Inputs, it will create a Custom Skill Instance and the output will be a Skill Instance ID, make sure to have a way to reference it, like saving it in a Custom Variable, you will need this Skill Instance ID to manage the skill through the other nodes.
Cast Specified Skill Instance
This one let us to Cast the previously created Custom Skill Instance through the Skill Instance ID we've gotten as output. As the previous one, you need to input the Character Entity, the Skill Instance ID and to set the Check Key Availability as you need. If you set this last parameter as YES it will only cast the skill if it's available (Outside cooldown, etc); If you set is as NO it will ignore it's availability to be cast it without restrictions.
Destroy Custom Skill Instance
Just as it's name says, it will let you to destroy the Skill Instance by in*****g the Character Entity and the previous Skill Instance ID.
Other related nodes are Bind Custom Skill Instance to Specified Slot (Let's you to bind the Skill Instance into a Character Skill Slot), Unbind Skill Instance and Unbind all Skill Instances on the Slot (Let's you to unbind the Custom Skill Instance from the slot/slots if you binded it with the previous node)
Additional Notes
- It seems that the Custom Skill Instances persist even after the character dies.
- When you Change Character Class, take into account that if you set Existing Skill Handling as "Clear All" instead of "Preserve Unrelated Skills" the Custom Skill Instances will get destroyed, so It's important to re-create them after if you use that parameter.
- In the case of binded skills, if you add a Character Skill in a binded slot, make sure to set Original Slot Skill Handling according to your needs:
- Destroy - Will remove totally your Binded Skill from the slot.
- Preserve Slot Binding: Will bind the new skill to that slot. More than one skill can be binded into a single slot.
- Remove Slot Binding will unbind it from the slot, but the Skill Instance will still remain in your character, so you can rebind it or destroy it later.
- You can also use query nodes to search for specific skill instances, by their Skill Instance ID, Skill Config ID or their binded Slot.
Unit Status Effect - Trigger Skill on Timer
The new Unit Status Effect: Trigger Skill on Timer is also an amazing addition. It lets you to Auto-Cast specific skills automatically.
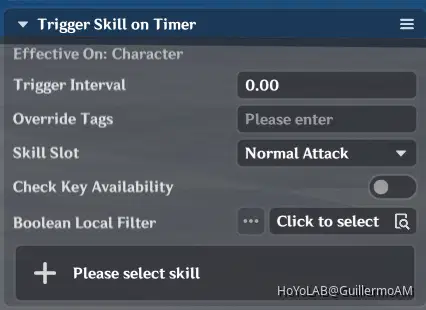
Among it's parameters, you need to define:
- Trigger Interval: The interval in wich the skill will be casted.
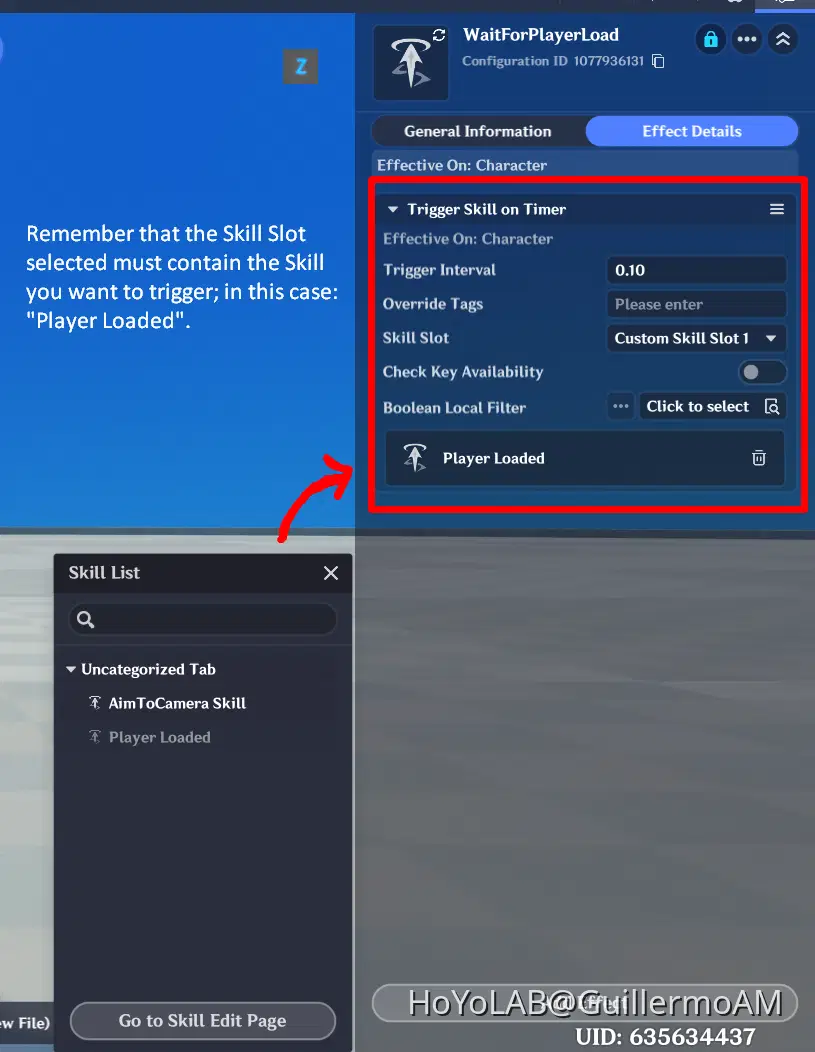
- Skill Slot: The Skill slot in which the skill you want to cast is binded. Important: It needs to have the Skill to cast binded in one of the Character Skill Slots. You can set them up in the Character Class Skills Tab or Binding it through one of the Add Character Skill or Binding Skill nodes in the Entity Node Graphs.
- Check Key Availability: If disabled, it will ignore restrictions like the Skill Cooldown.
- Boolean Local Filter: You can set a Boolean Local Filter to control when this Unit Status Effect will be able to trigger.
- Finally, you have to select which Skill will be casted. Reminder: It has to be binded in the Skill Slot selected, and there could be more than one skill binded into the same slot, so it's important to consider that aspects.
Additional Notes
You can have more than one "Trigger Skill on Timer" effect into the same unit status.
It can support a trigger interval of 0, which can led to some interesting effects. Although you must consider the performance impact with complex skill logic.
Skill Key Behaviors
This toolkit is another powerful tool that will let you to set more complex logic with your Character Skill Nodegraphs. This basically let's you to record special Keys that consist in an Integer that defines an specific ID you can set alongside it's Entry Time in which the Key Behavior was added.
Nodes
The main two nodes to manage them are:
Add Key Behavior
Lets you to add one Key to the log lists. It will record it's ID into a Behavior ID List and it's respective Entry Time List into it.
Clear Key Behavior Log Panel
This one clears the lists previously recorded by the "Add Key Behaviors".
From the Query Nodes, you have the Get Current Key Behavior, which will output a Behavior ID List and an Entry Time List from which you can retrieve the desired Key Behavior through nodes like "Get Corresponding Value from List". There's also a Get Current Key Behavior (High Precision) that will additionally generate an Entry Time List (ms), with a more precise timestamp (in miliseconds) of when the key was added.
Additional Notes
The Key Behaviors ID are recorded in an Integer format, while their respective timestamp is recorded in a Floating Point Number like other time instances.
It also seems to be the only way to manage an Integer list inside the Client Server as of the writing of this guide.
Thanks to it's integer system, it can be used in Logic that requires the precision of Integers instead of Floating Point Numbers, offering an alternative to the use of Skill Variables.
Key Behavior Log seem to be persistent in the character until you clear it, so it's important to take this into account.
The Key Behavior Log can hold up to 20 integers in it's lists.
Skill Variables
This is another useful tool, that let's you to use your own Variables into the Server Skill Nodes. They're a bit similar to Custom Variables, but have their own system and limitations.
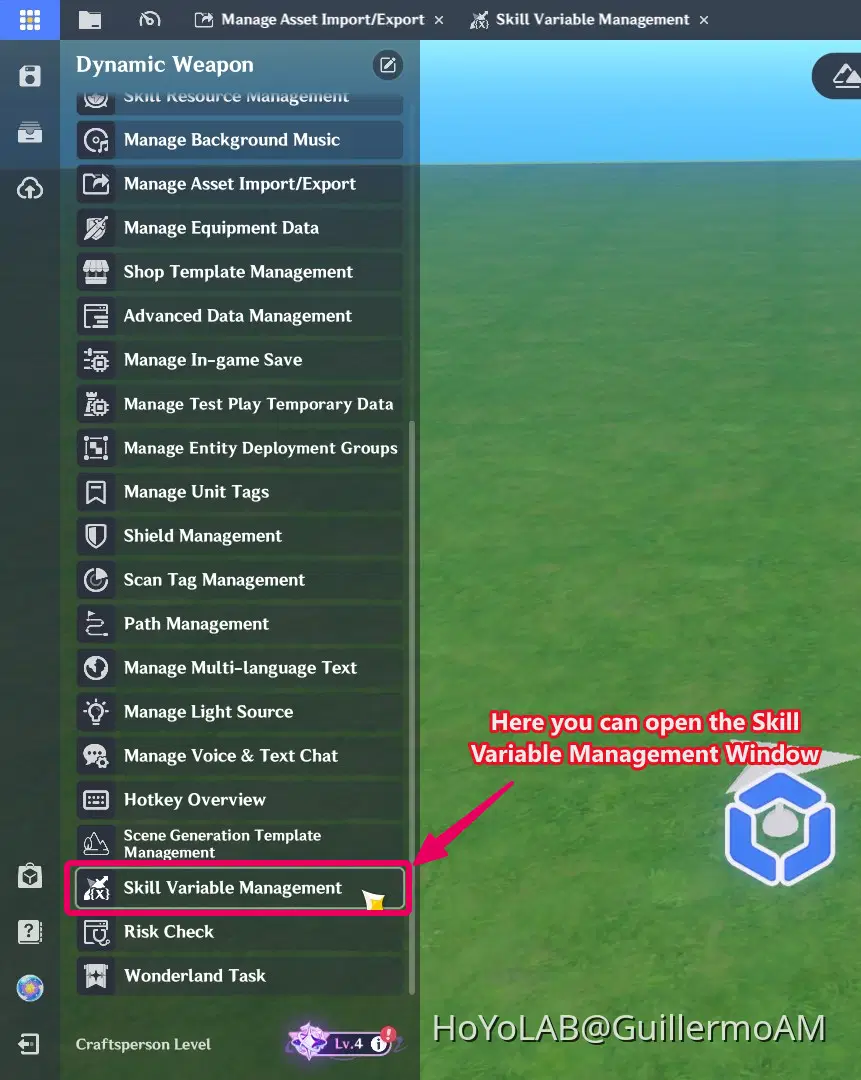
To use Skill Variables, you first need to set them in the Skill Variable Management.
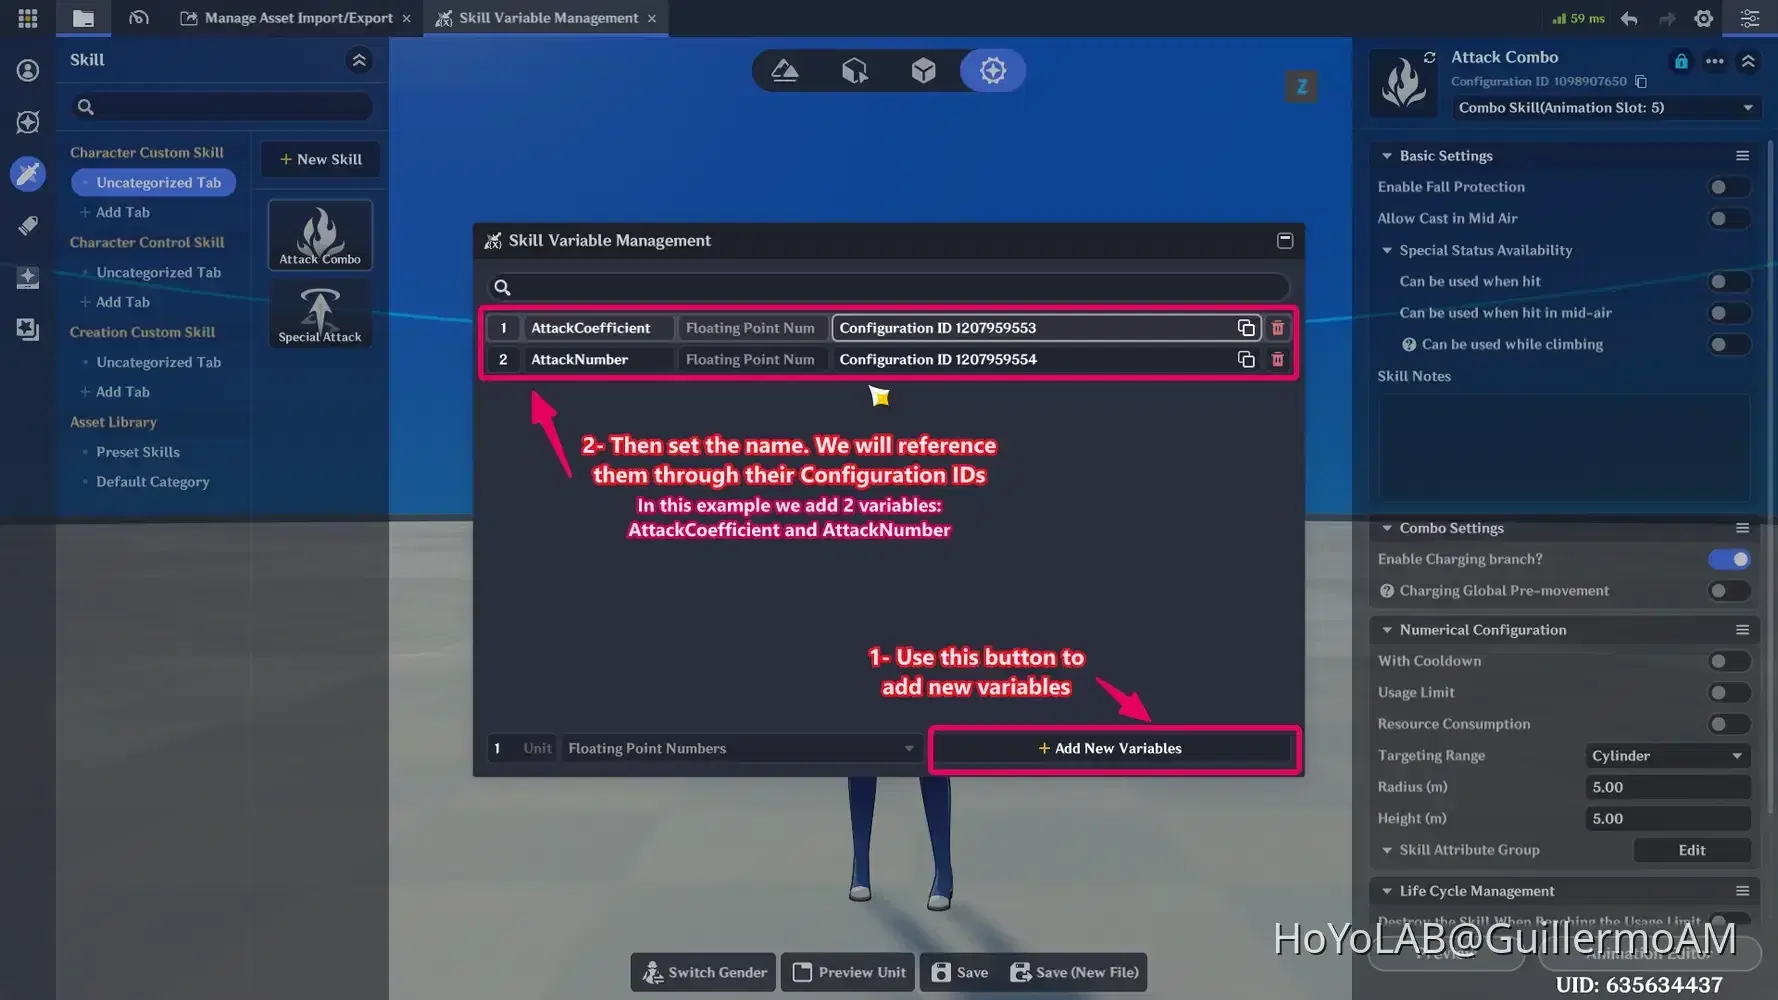
Then click into "Add New Variables", an then you can change their name and get the Configuration ID which you will need to reference it into the Skill Nodegraphs. Important: At the moment, this type of Variable can only be Floating Point Numbers.
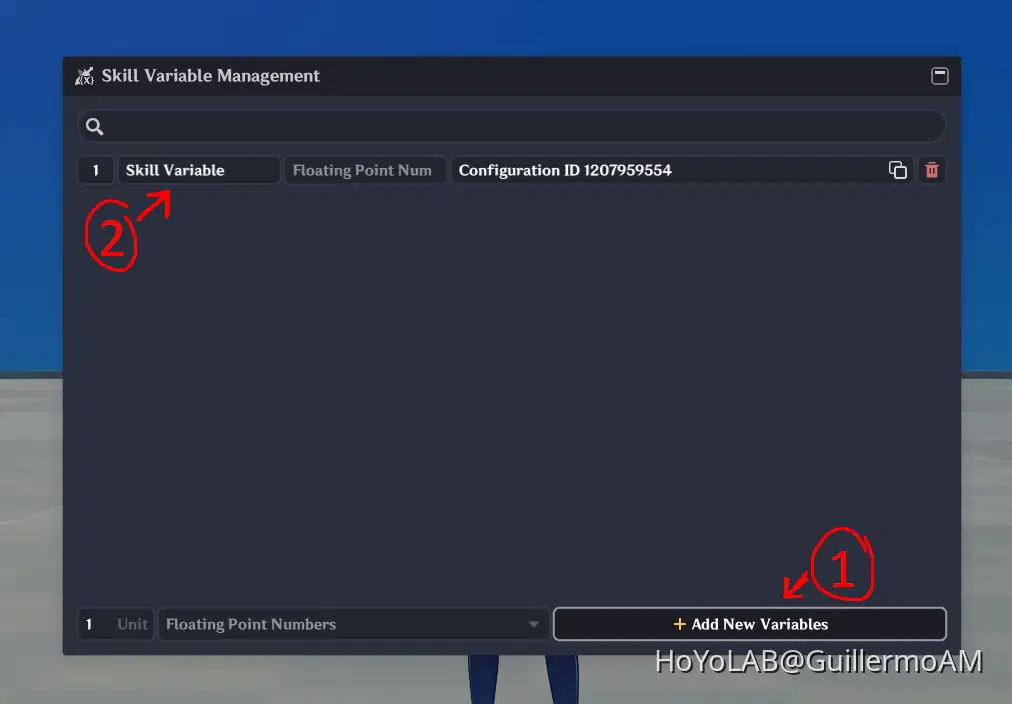
Window to set-up your Skill Variables. The Configuration ID is important to reference them
Nodes
To manage them, we have the next Skill Nodes:
Set Skill Variable
Lets you to set a specific Value into the Skill Variable of your election. You need to input: Skill Variable Config ID [The one appears next to your Skill Variable name in the Skill Variable Management window. [Just like with signals, you can click on the magnifying glass to find the Variables by their name] and the desired Value [Floating Point Number]. This one works in a similar way to Set Custom Variable, in which changes the old Value for a new one.
Increase Skill Variable Value
This node, acts as an addition node, letting you to increase the Value of the Skill Variable. Works similar to a Set Custom Variable + an addition node. For example, if the current value of your Skill variable is 3 and you set an Increase Value of 7.5, the resulting value will be 10.5. As inputs, you need your Skill Variable Config ID and the corresponding Increase Value.
Query Skill Variable Value
This one outputs the current value of your Skiill Variable, it just nees the Skill Variable Config ID as input. Works in a similar way to the Get Custom Variable node.
Example Projects
Let's start with some use cases of this new tools.
Dynamic Attack Scaling Skill System [Key Behaviors and Skill Variables]
Now, to learn about Key Behaviors and Skill variables, our example will consist in making a Skill that:
Increases it's damage while the combo chain is mantained.
Stores and resets the combo according to how much time has passed.
Additionally, we will create a companion Skill that can only be triggered after 5 or more hits are done in the combo window.
Note: You can find the Video Tutorial of this project at the end of the Guide, in the Video Tutorial Section.
Setting up the Variables
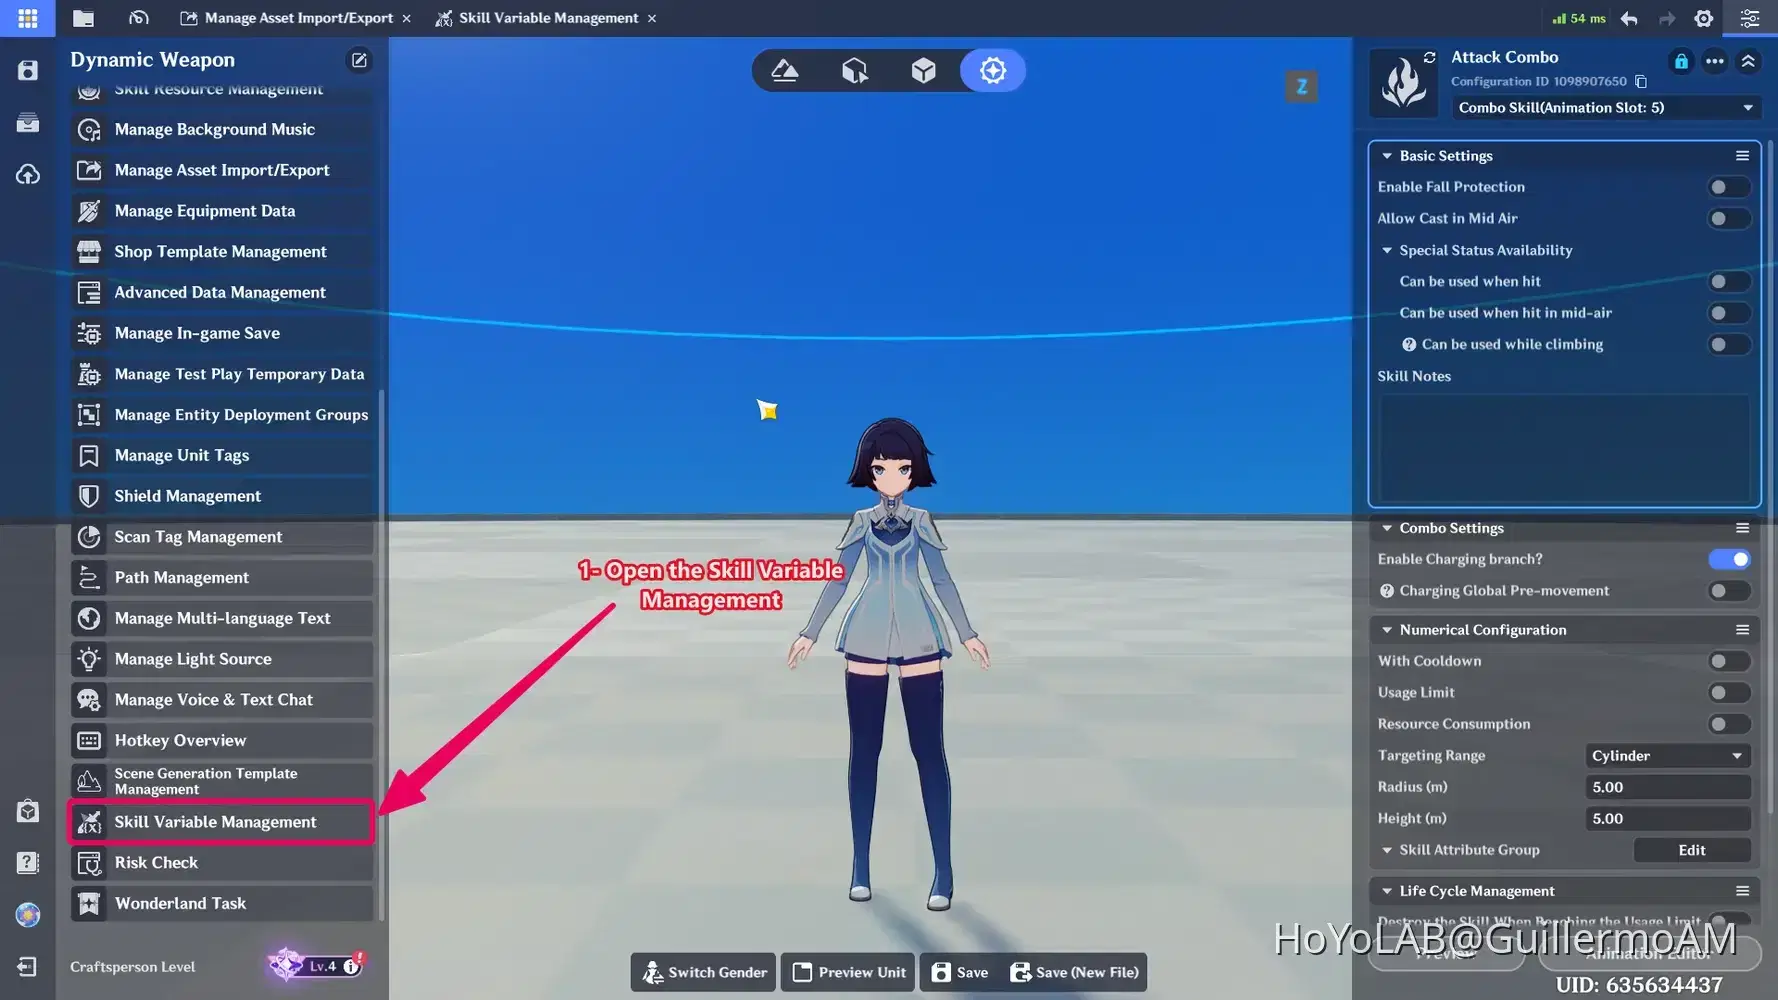
To do this, we need to prepare our Variables. So first, we will open the Skill Variable Management in the interface shown below:
In the Skill Variable Management, we will add two new variables, which in this example will be called AttackCoefficient and AttackNumber.
With this step done, we are prepared to create the logic. So as in previous steps, we Create a new Character Skill Node Graph in the Client Nodes. In this example it will be called Attack Combo.
The Skill Node Graph
In this Nodegraph, we will use our Skill Variables created previously, alongside the Key Behaviors.
For our skill to work correctly, the node graph should look like this:
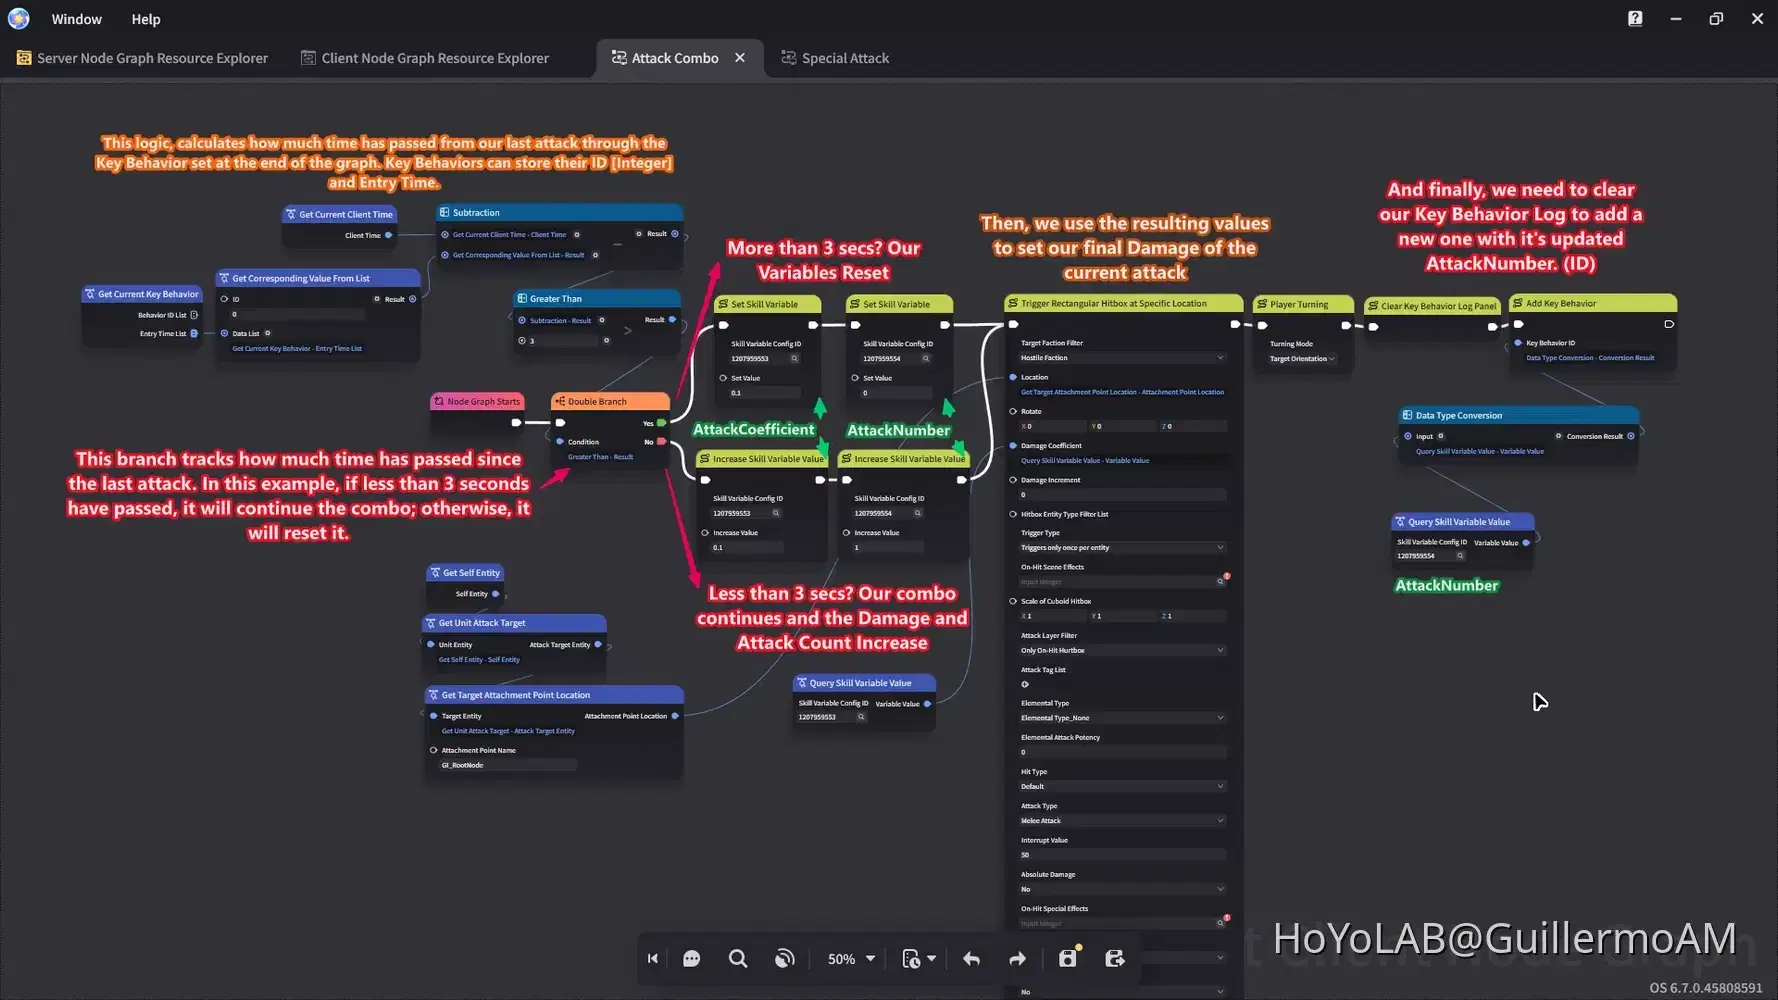
How does it work?
As mentioned in our concept introduction, Skill Behaviors can store in a list, their respective IDs (Integer) and the time they were set/added to the log. With this in mind, we could track a unique Skill Behavior in the list, that help us to store the time from the last attack and it's ID that stores it's number in relation to the combo.
To do this, we will keep just one Key in the list, that is cleared at the end of each time the skill is used; then we set a new one to be ready to be read the next time the skill is used. At the start we read it's time, to calculate the time that has passed since the last skill use; according to that, we determine if the combo goes or resets. Then we update our variables according to the branch taken, and we execute the corresponding attack with the updated values. Finally, we clear our Key, and add a new and updated one to the same slot in the log. It's important to clear before adding the updated one, because in this example, we always read the slot in the position 0 of the list.
The Skill
Once we have our Logic ready, just as in the previous examples, we create our skill as shown below:
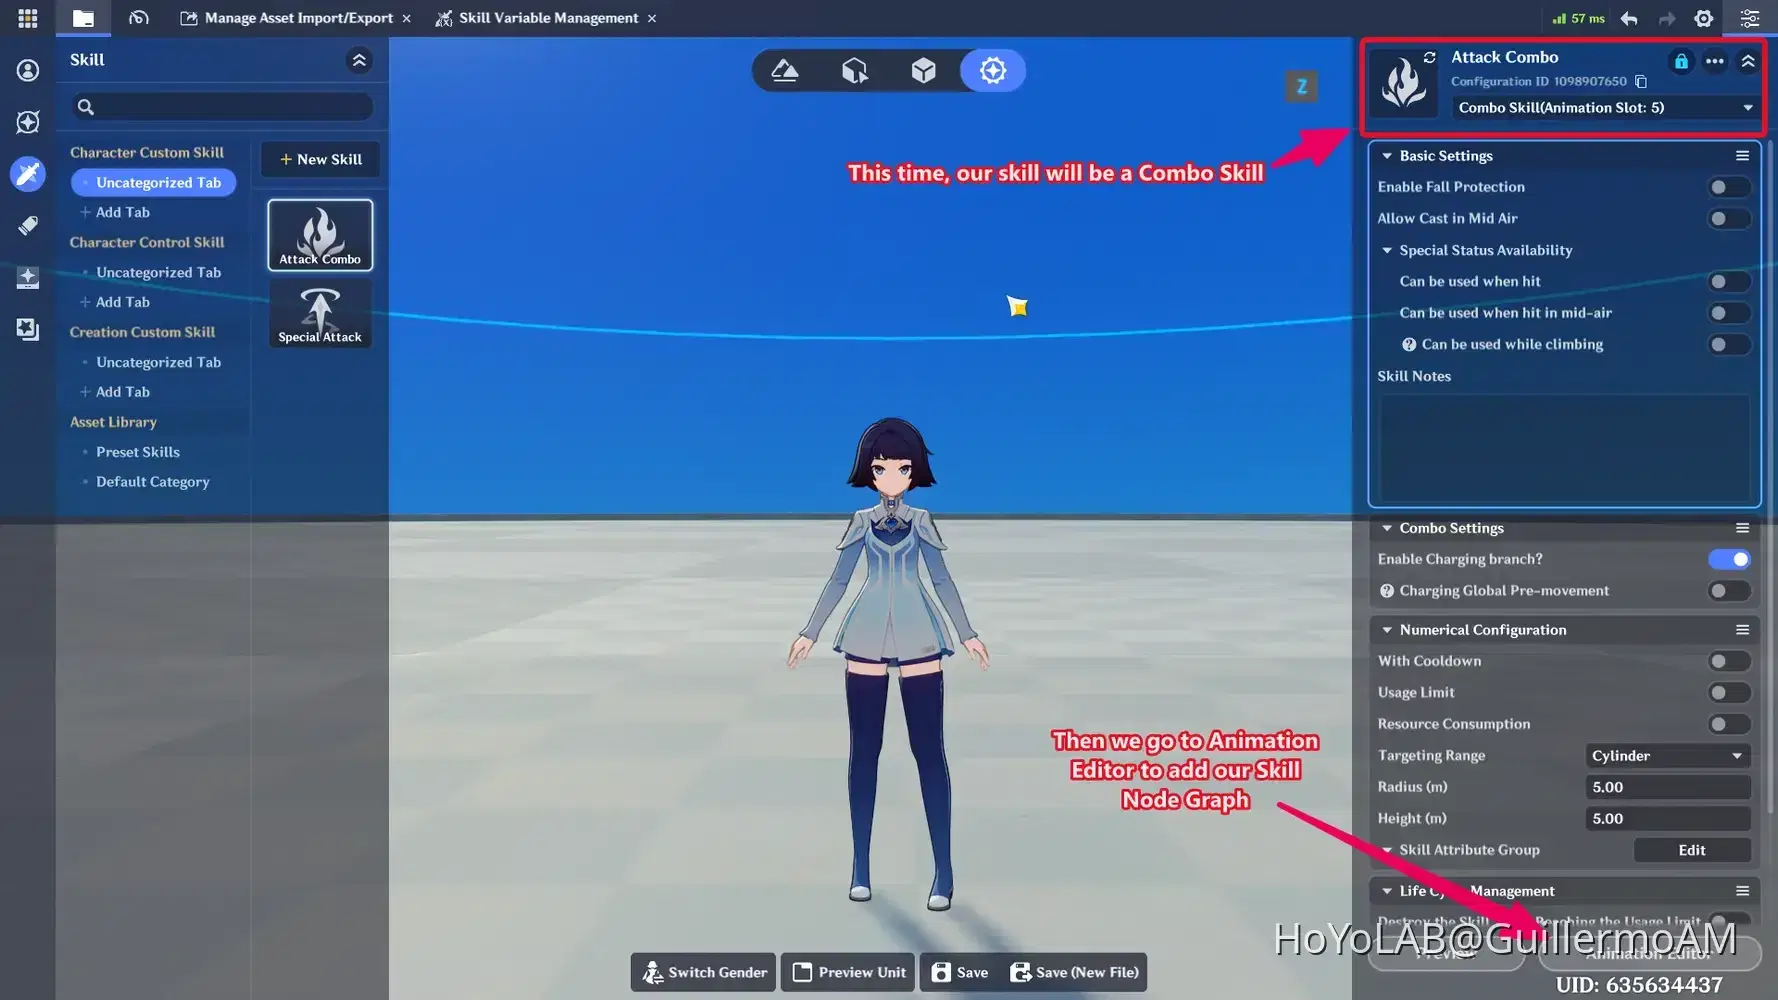
Then we set our logic in the Timeline synchronized with our animation attacks. In this example we decided to use 2 Boxing animations.
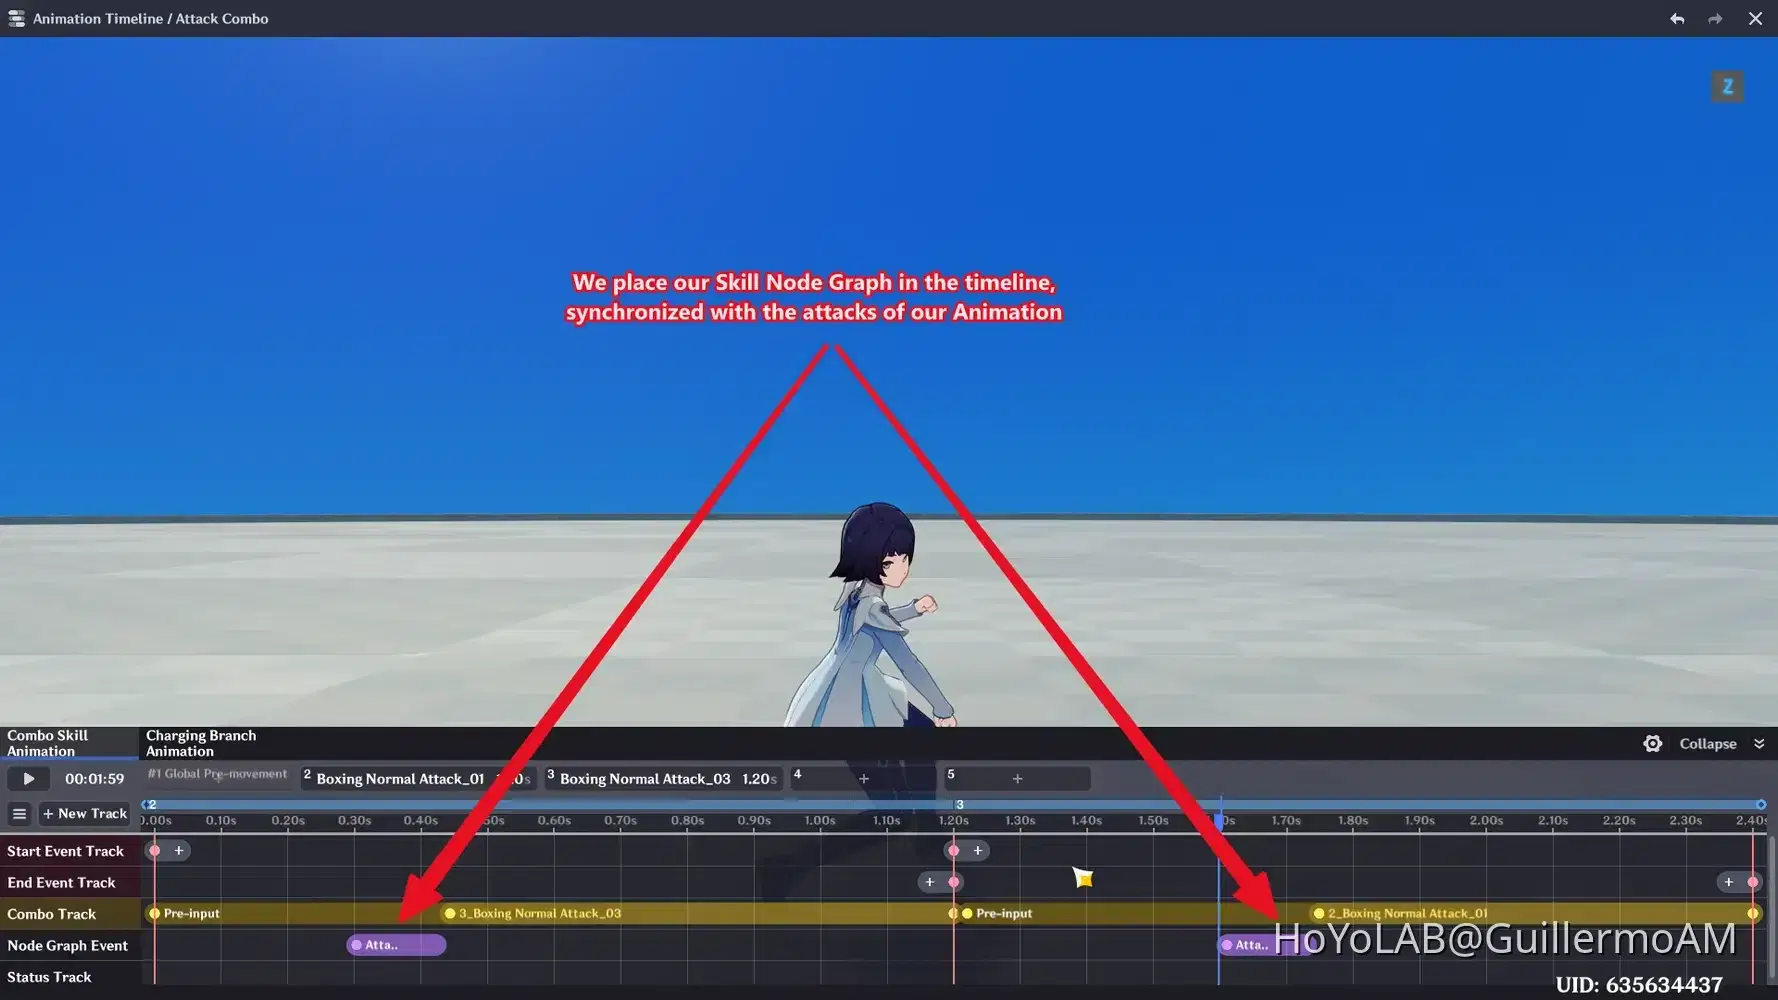
Then it should be ready! The attack now will have a Dynamic Attack Coefficient that will increase the damage each time the combo attack continues, and will reset it's damage after 3 seconds.
Adding a Special Attack that uses the Attack Count of our combo.
As you noticed, the ID and AttackNumber we prepared haven't been used for our main combo. But we can use them for many logic elements, like adding charges or energy to a skill, adding special effects, along many other things. To close our guide of today, we will showcase a use case for this elements on our Combo Skill.
We will create a new Special Attack that can be used after the combo reaches 5 or more hits. For this we create a new Character Skill Node Graph for our new skill. For this example it was named Special Combo Skill and look like this:
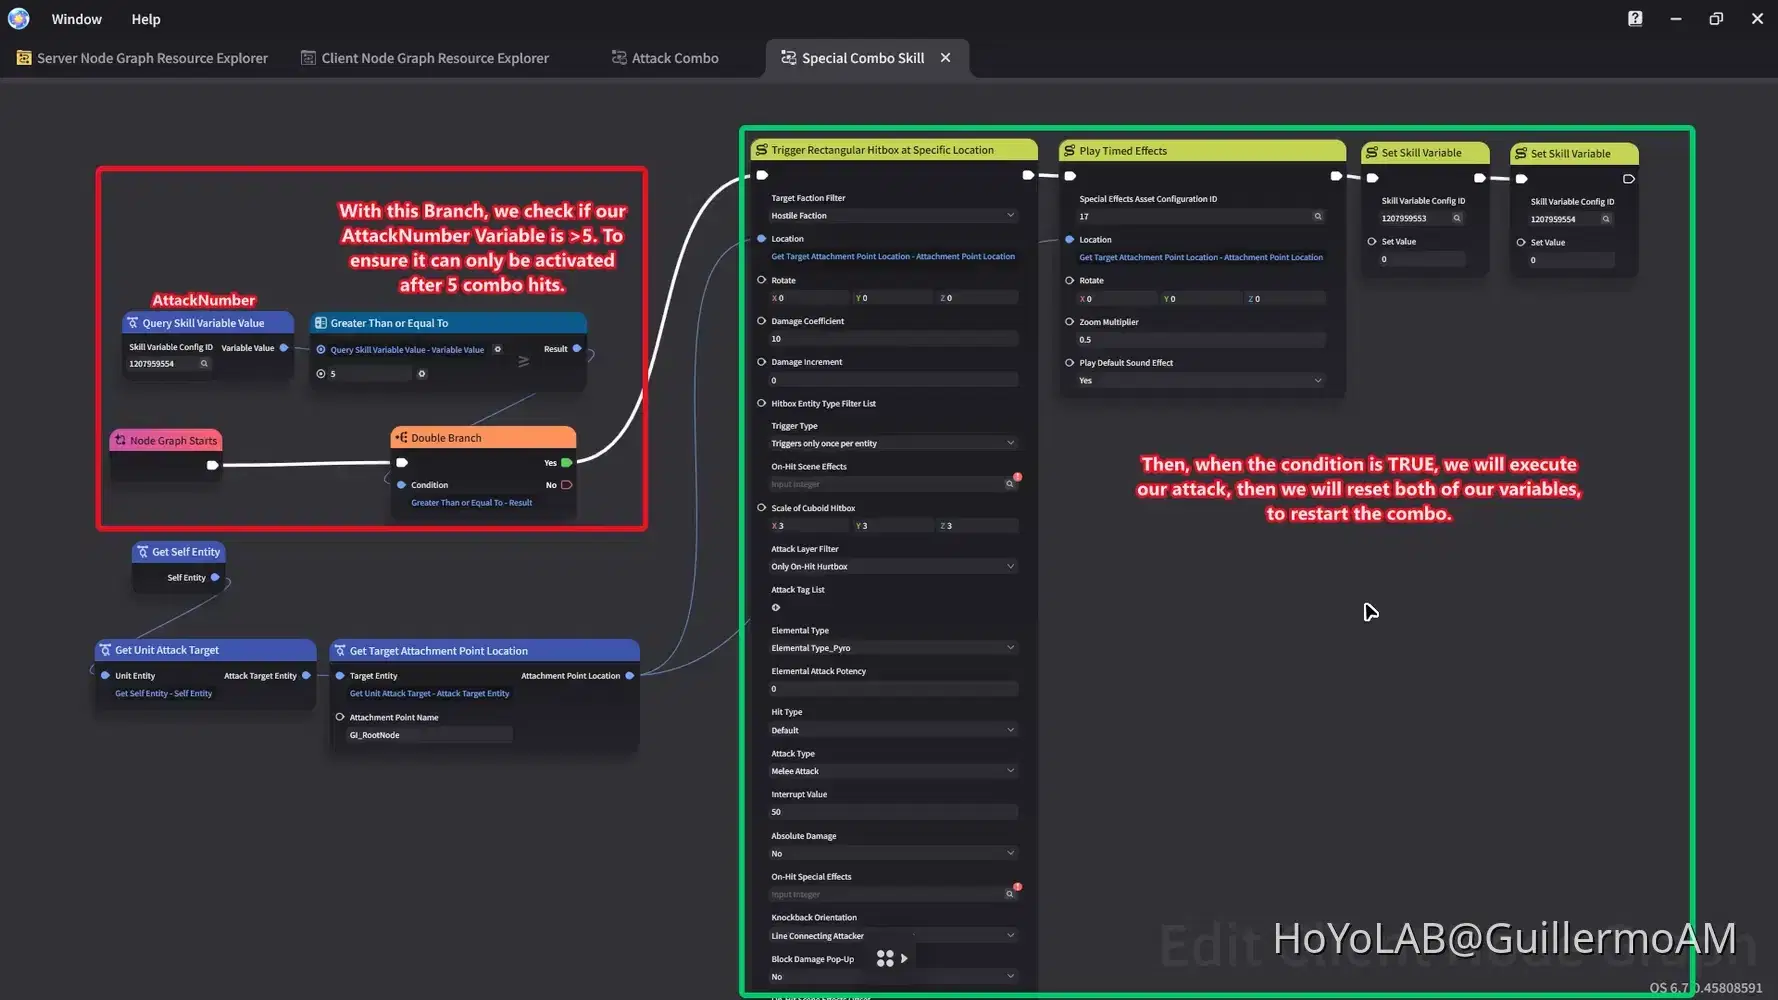
With this logic ready, we ensure we will be able to execute an Special Attack every time we reach 5 hits or higher with our combo; then after it's use, we will reset it to start increasing the combo again. In this example we use the AttackNumber variable, but you can also use the ID from the Key Behavior.
You can now place it in a new Skill and take to the test our new pair of abilities to get started with custom Combo making for your Wonderlands!
Asset Resource Download
You can find the functional asset for this project in this link of the Resource Center: Dynamic Attack Scaling Skill
Detect When Player has Fully Loaded [Trigger Skill on Timer]
Thanks to Characters being unable to use a Skill until it's fully loaded; we can find one of the best use cases for the "Unit Status Effect - Trigger Skill on Timer" to detect when the player is fully loaded. For this you will require a Unit Status with a Trigger Skill on Timer mounted.
To set up a system like this, first, you need to create a Skill that will be casted by this Unit Status.
To start, we go to the Client Node Graph Resource Explorer > Character Skill Node Graph, then we set up a new Character Skill Node Graph, which in this case we named "Player Loaded Logic". As you can see in the screenshot, the logic is really simple, you just need to send a signal with the Player Entity that was loaded.
Note: Don't forget to use a "Get Player Entity to Which the Character Belongs" to get the Player entity, because skill nodes run on the Character side.
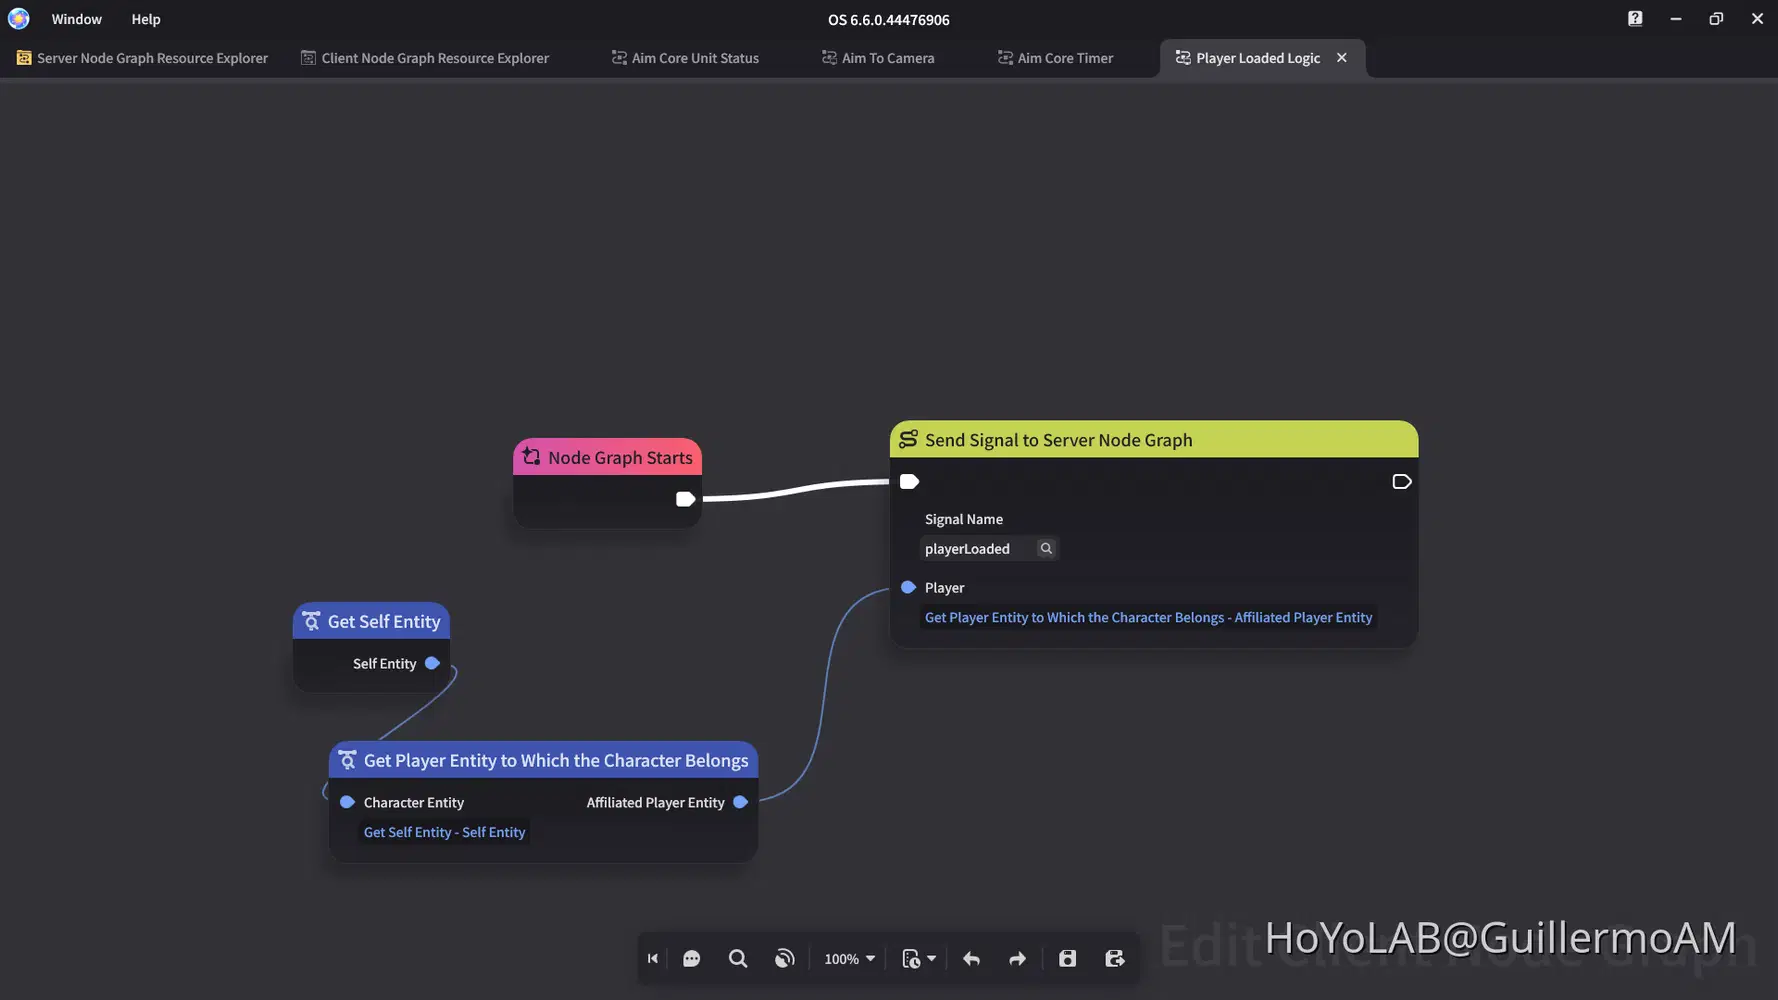
Example of how you can configure the logic.
Then we go to the Skills tab in the editor, to create a New Skill. In this case we named it "Player Loaded". You must set it as an Instant Skill, After that, we open the animation editor.
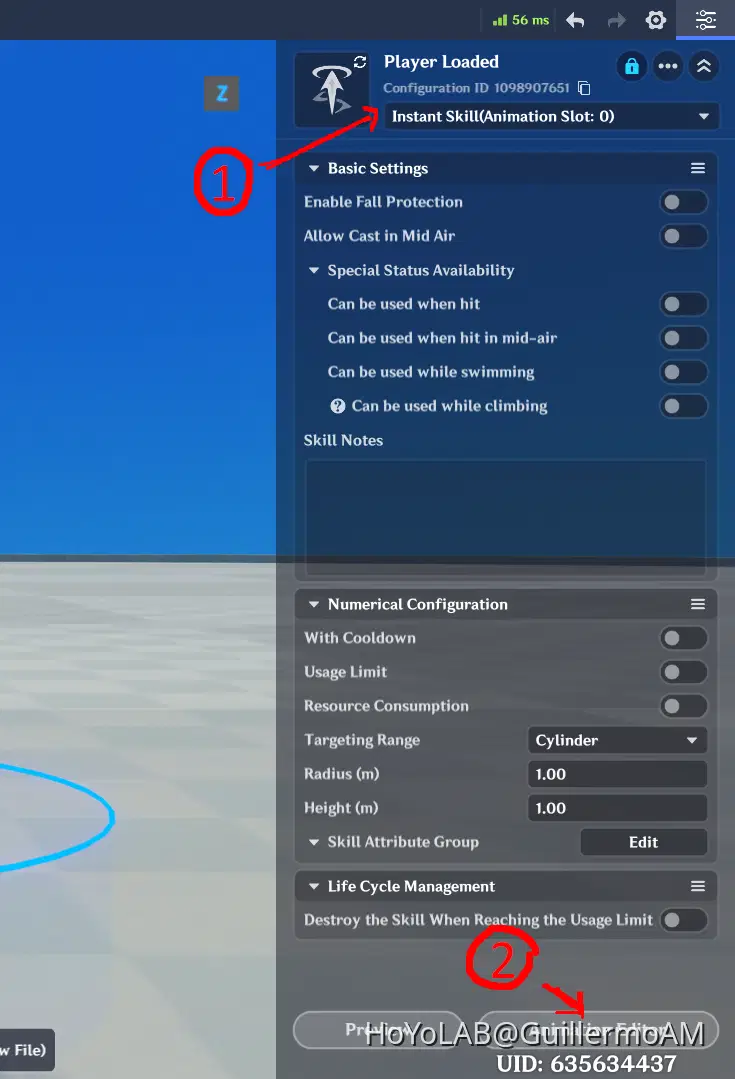
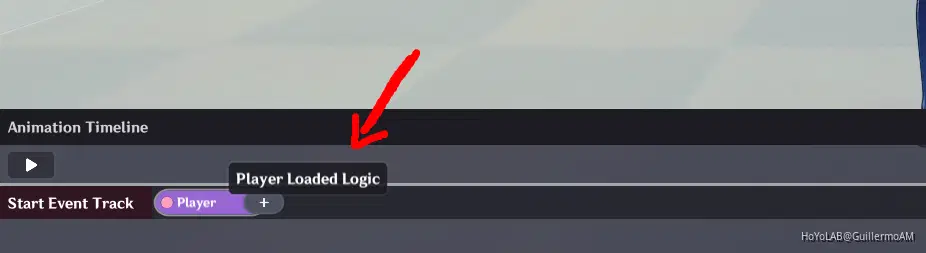
Then in the Animation Timeline we add our Character Skill Nodegraph "Player Loaded Logic".
With the Skill ready, we can now configure our Unit Status. First, we create it in the Unit Status Tab, then we go to the Effect Details to set up a "Trigger Skill on Timer" Effect. We set a low Trigger Interval, the Skill Slot in which we binded our Skill, then we select the skill we created from the Skill List.
Setting Up the Skill
I present you two different methods:
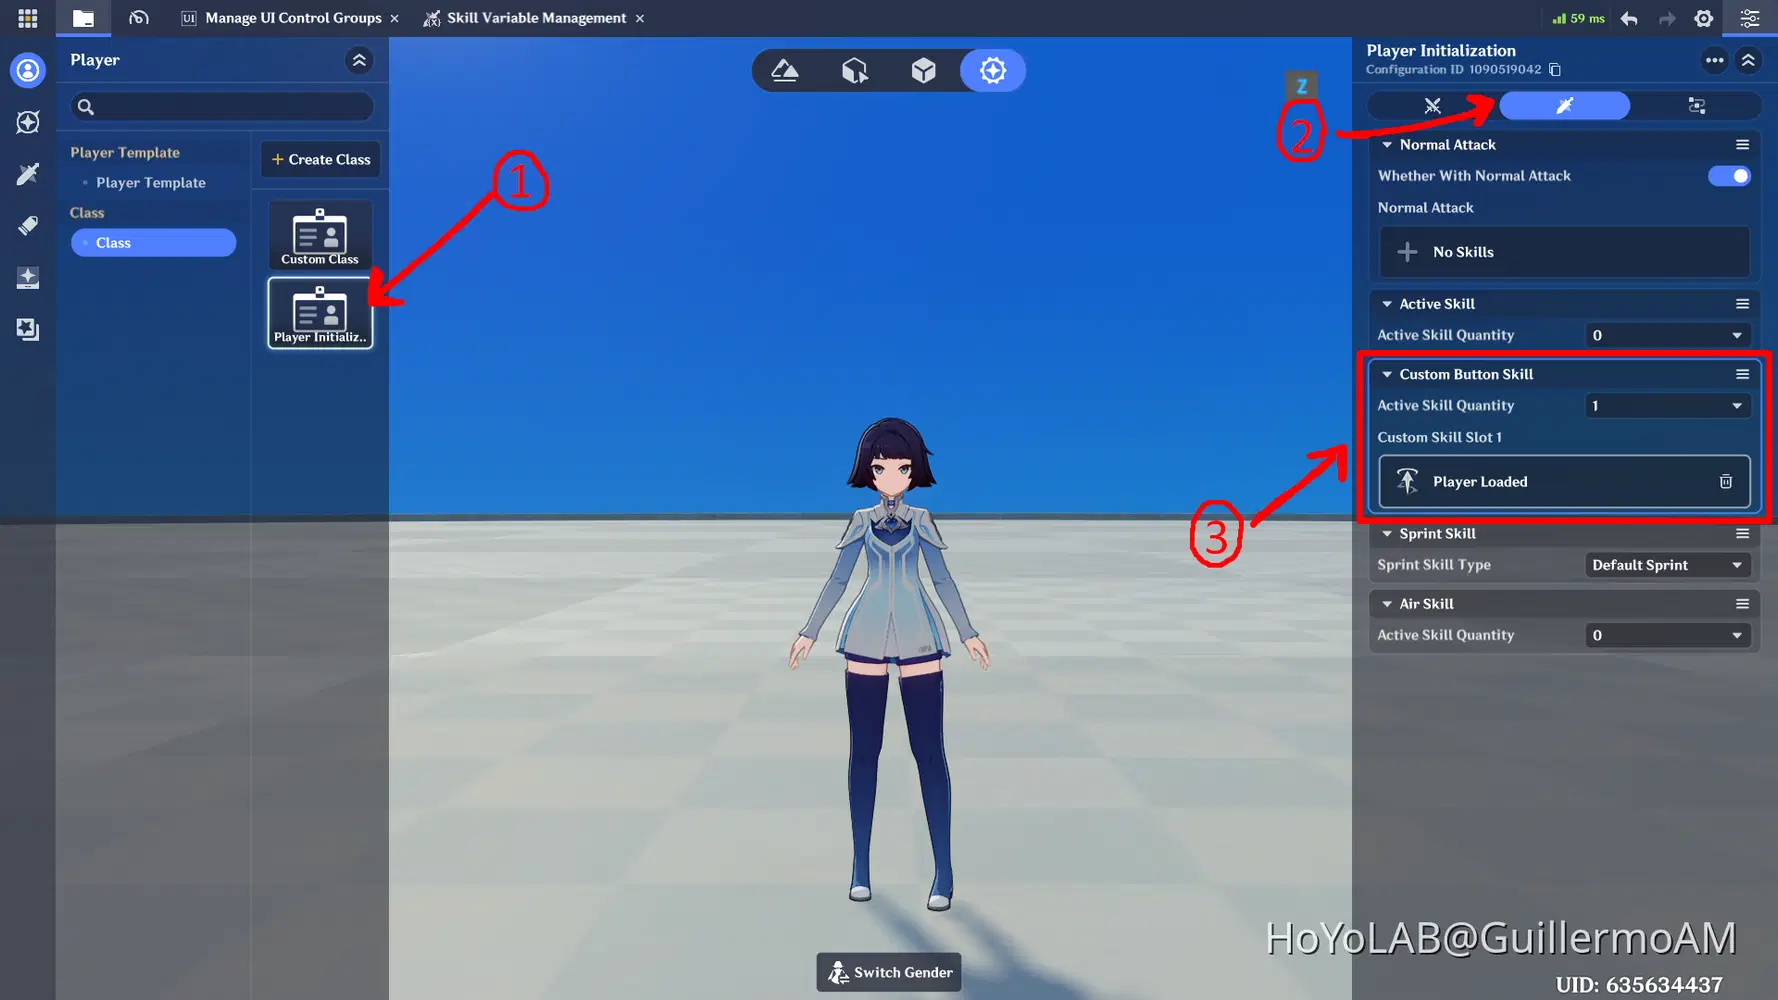
1 - You can set an Initial Class for your Player Template that works as the Initializator. We select our class,> Go to the Skill Section and we set our skill there. In this example, we can observe our "Player Initialization" class in which we place our Skill "Player Loaded"into the Custom Button Skill 1 we defined as our Custom Skill Slot in the Unit Status - Trigger Skill on Timer.
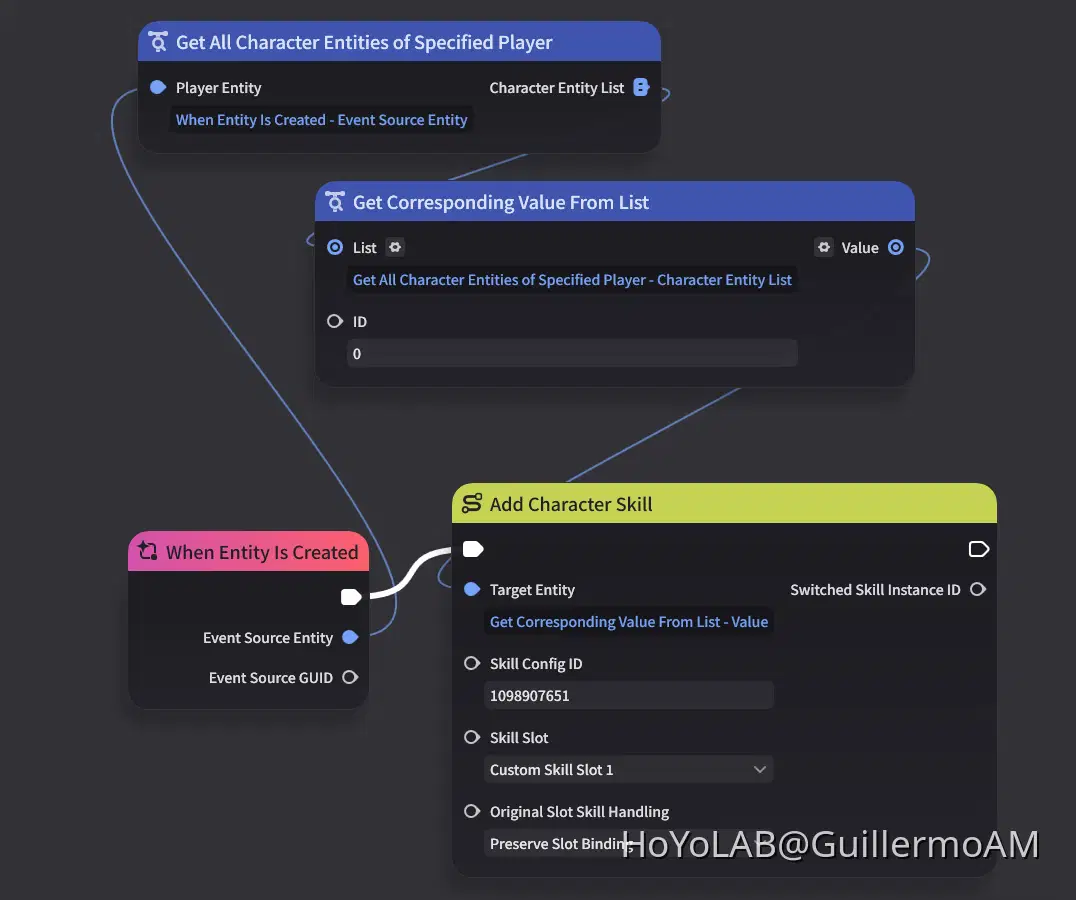
2 - If you don't want it to be linked to the Initial Class, you can create the skill within the Nodegraph. For example, you can set it up when the character is created in a similar way to this:
Setting Up the Unit Status
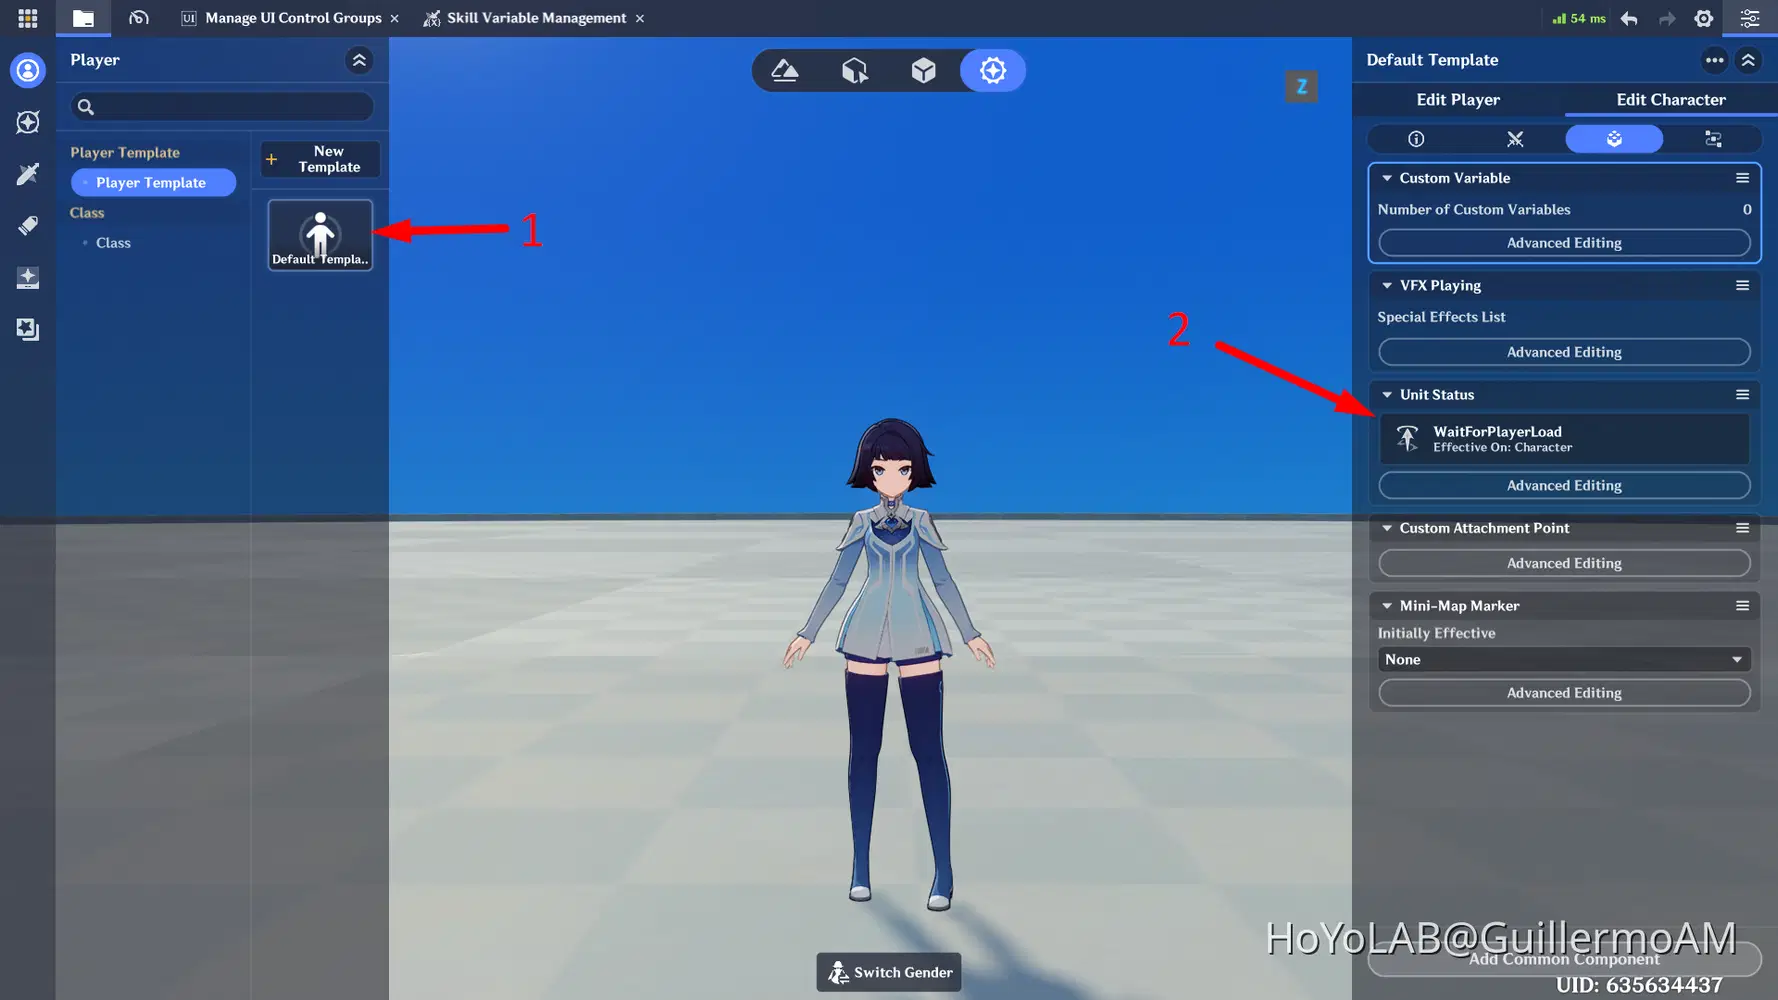
The easiest way in which can apply it, is directly in the player Template. We can set the Unit Status in the Components of the Character in the Edit Character Tab.
The Player Node Graph
We've almost finished; the last step is to add the "Player Loaded" Logic into the Main Node of the player. When the Skill is casted for the first time, it means our character has been fully loaded; so we will be monitoring the signal we sent with the Skill to know when this happens. When the signal is registered, we will remove the Unit Status (And optionally, the skill) to stop the Auto Cast from repeating.
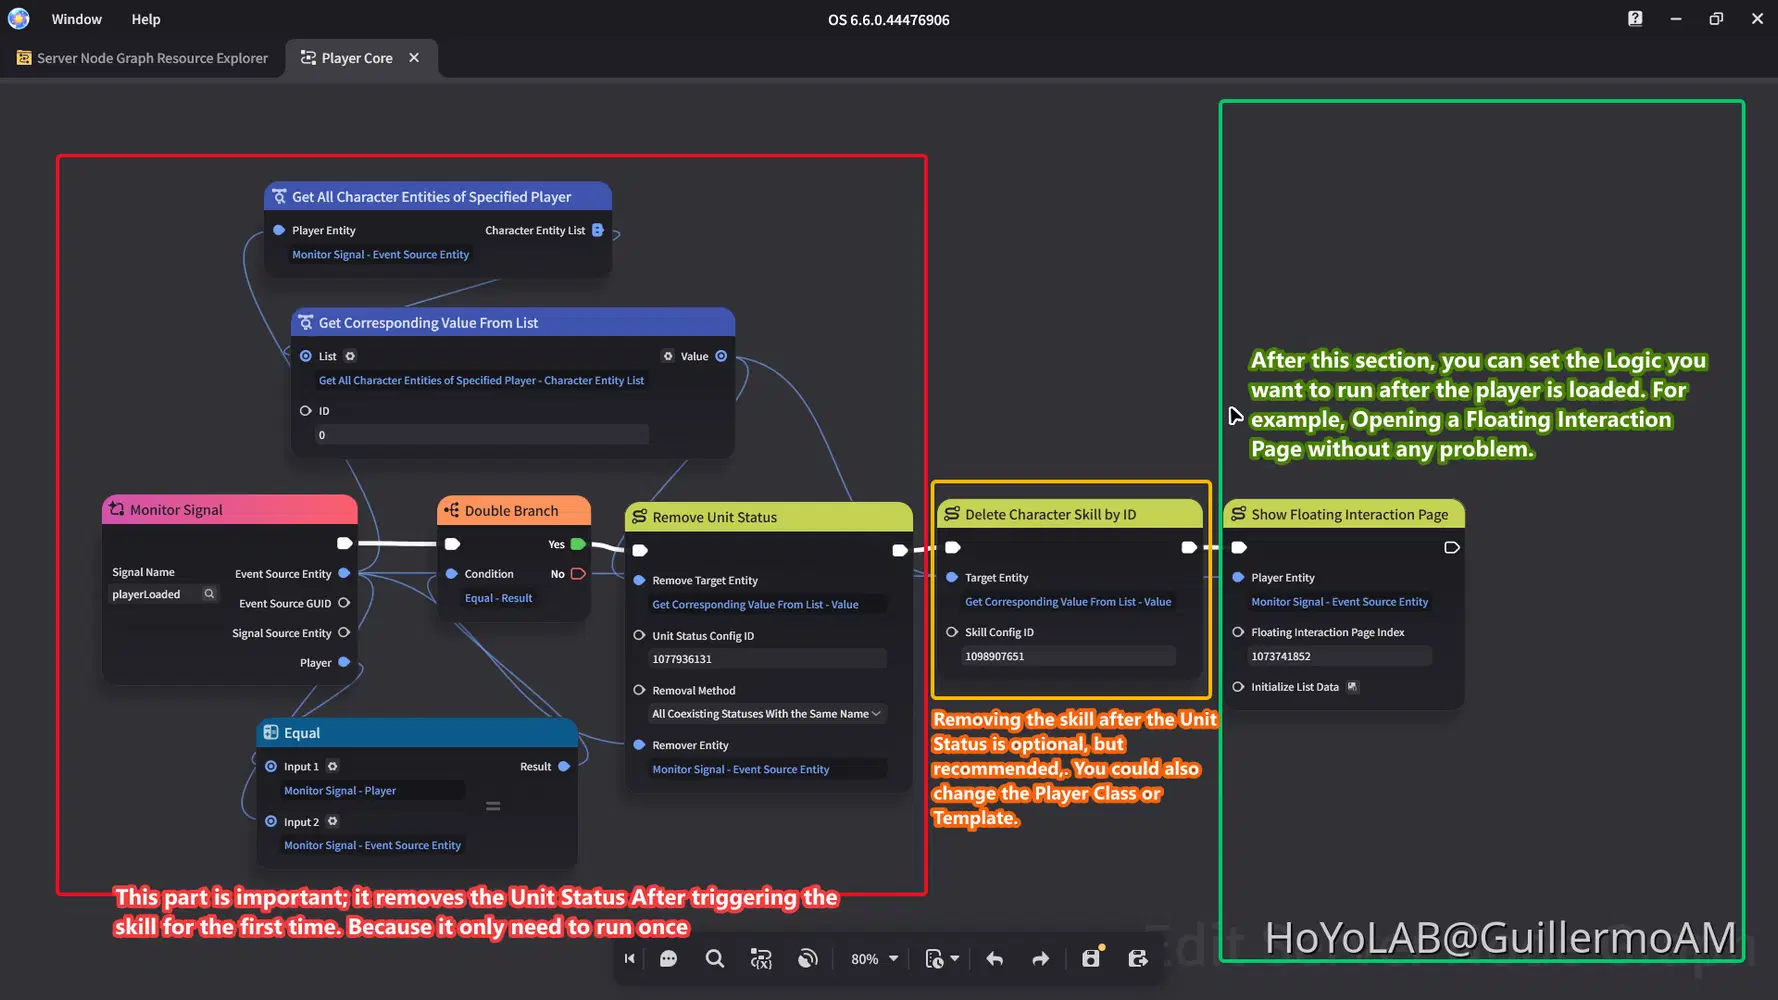
After that, you can set up the logic you want to run when the Player loads into your stage. A good example for the use of this would be opening a Floating Interaction Page when the player Loads in the game. Here's an example of our Load Skill in action:

Floating Interaction Page opening when the player loads with our Auto Trigger Skill.
Additional Example: Implementing MyPing0 Gender Detection into our project.
Other really good use case, would be to detect the Gender of the Manekin to adapt your logic in the case is needed. Like adjusting the Weapons position according to their genders.
For this function, we will be using MyPing0 amazing asset "Automatic Gender Detection (Manekin/Manekina) | No In***&#*4; [Download Link: https://act.hoyoverse.com/ys/prod/ugc/component-store/index.html#/item/2009853092530515968].
To adapt this Gender Detector to get the correct gender the moment in which the Player Loads, we just need to do a little adjustement to our "Player Loaded Logic" used by our "Player Loaded" Skill we did in the last section.
The set-up is easy; we add a new String parameter called "Gender" into our "playerLoaded" signal, which uses myPing0 detector to get the correct gender just like the example below. Then we add the calculation used by the asset into the nodegraph. With it should be working now!
Note: As you can observe in the parts we took from the asset, when the player loads, it compares the distance between the GI_FocusAnchor and GI_Chest Attachment Points to determine the gender of the Manekin.
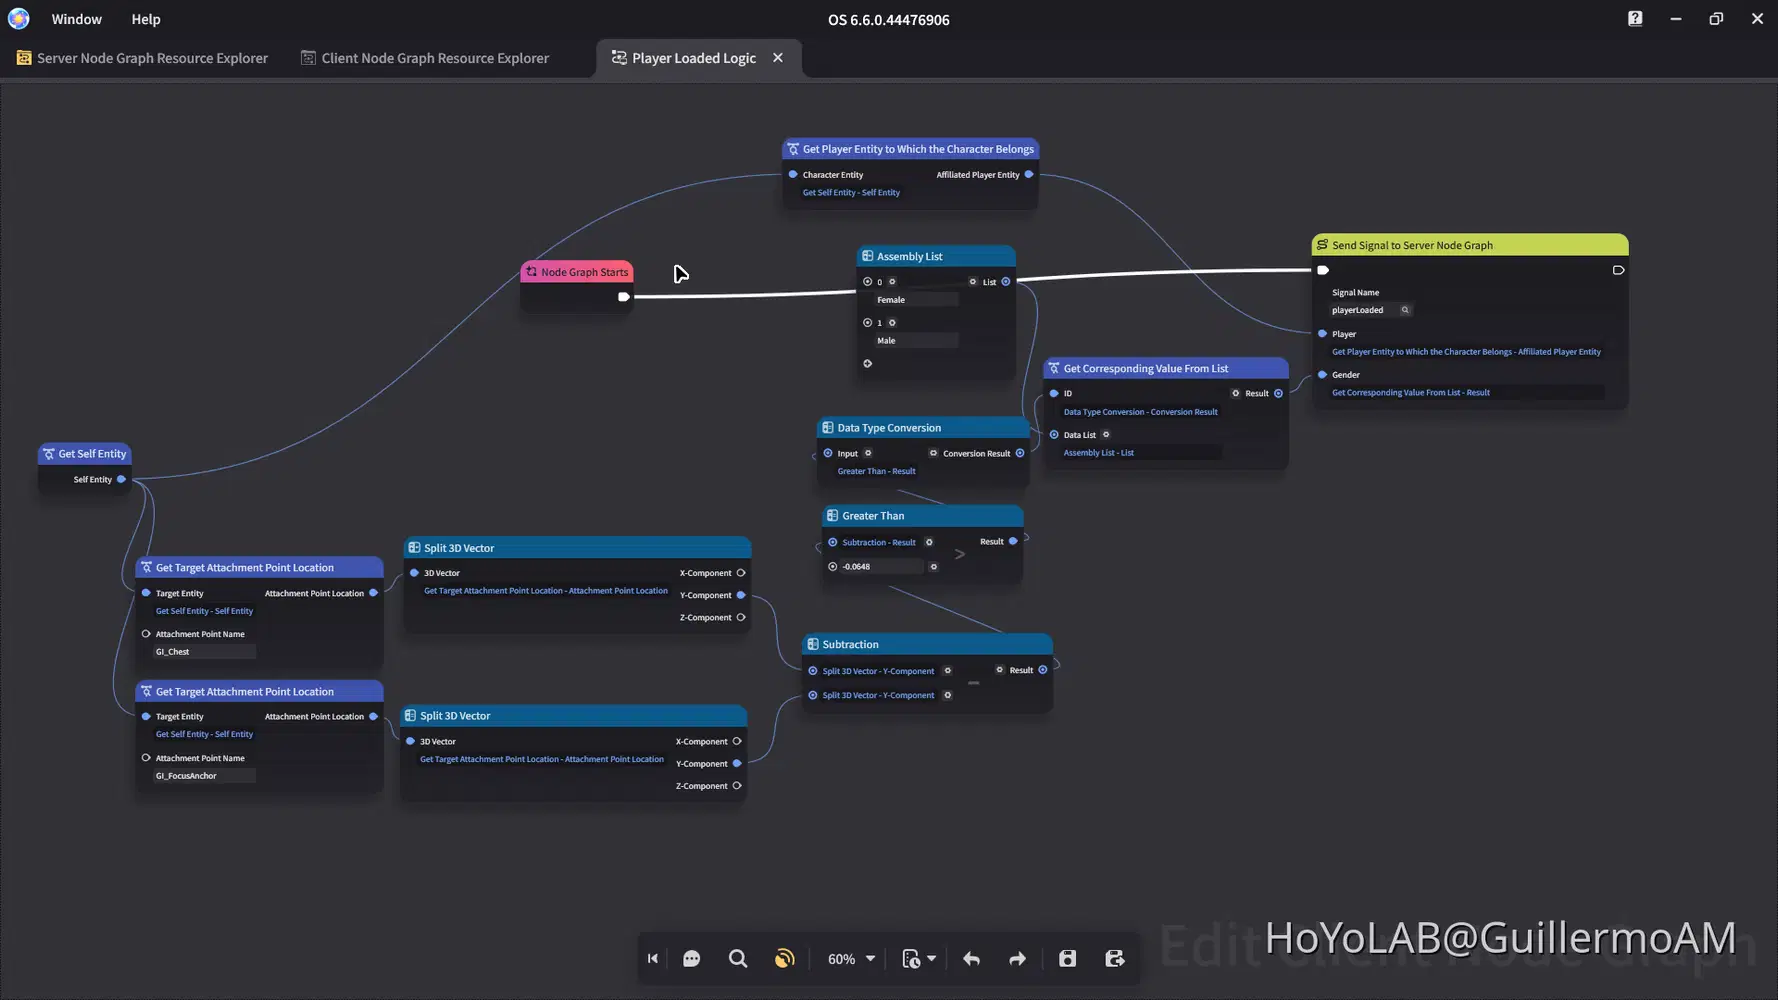
It should look like this!
Aim to Camera Position in Third Person games. [Trigger Skill on Timer]
Another use case of the Unit Status Effect "Trigger Skill on Timer" could be used in the case of trying to make our Character Aim to the current camera position in 3rd person cameras, just like in the aiming mode of the skills, even if they're standing. For this we will be using a Unit Status again.
Character Skill Logic
To create a system like this, first, we must create the skill logic. So we go to the Client Node Graphs and create a new Character Skill Node Graph; in this example it will be called "Aim To Camera" and this is how it should look:
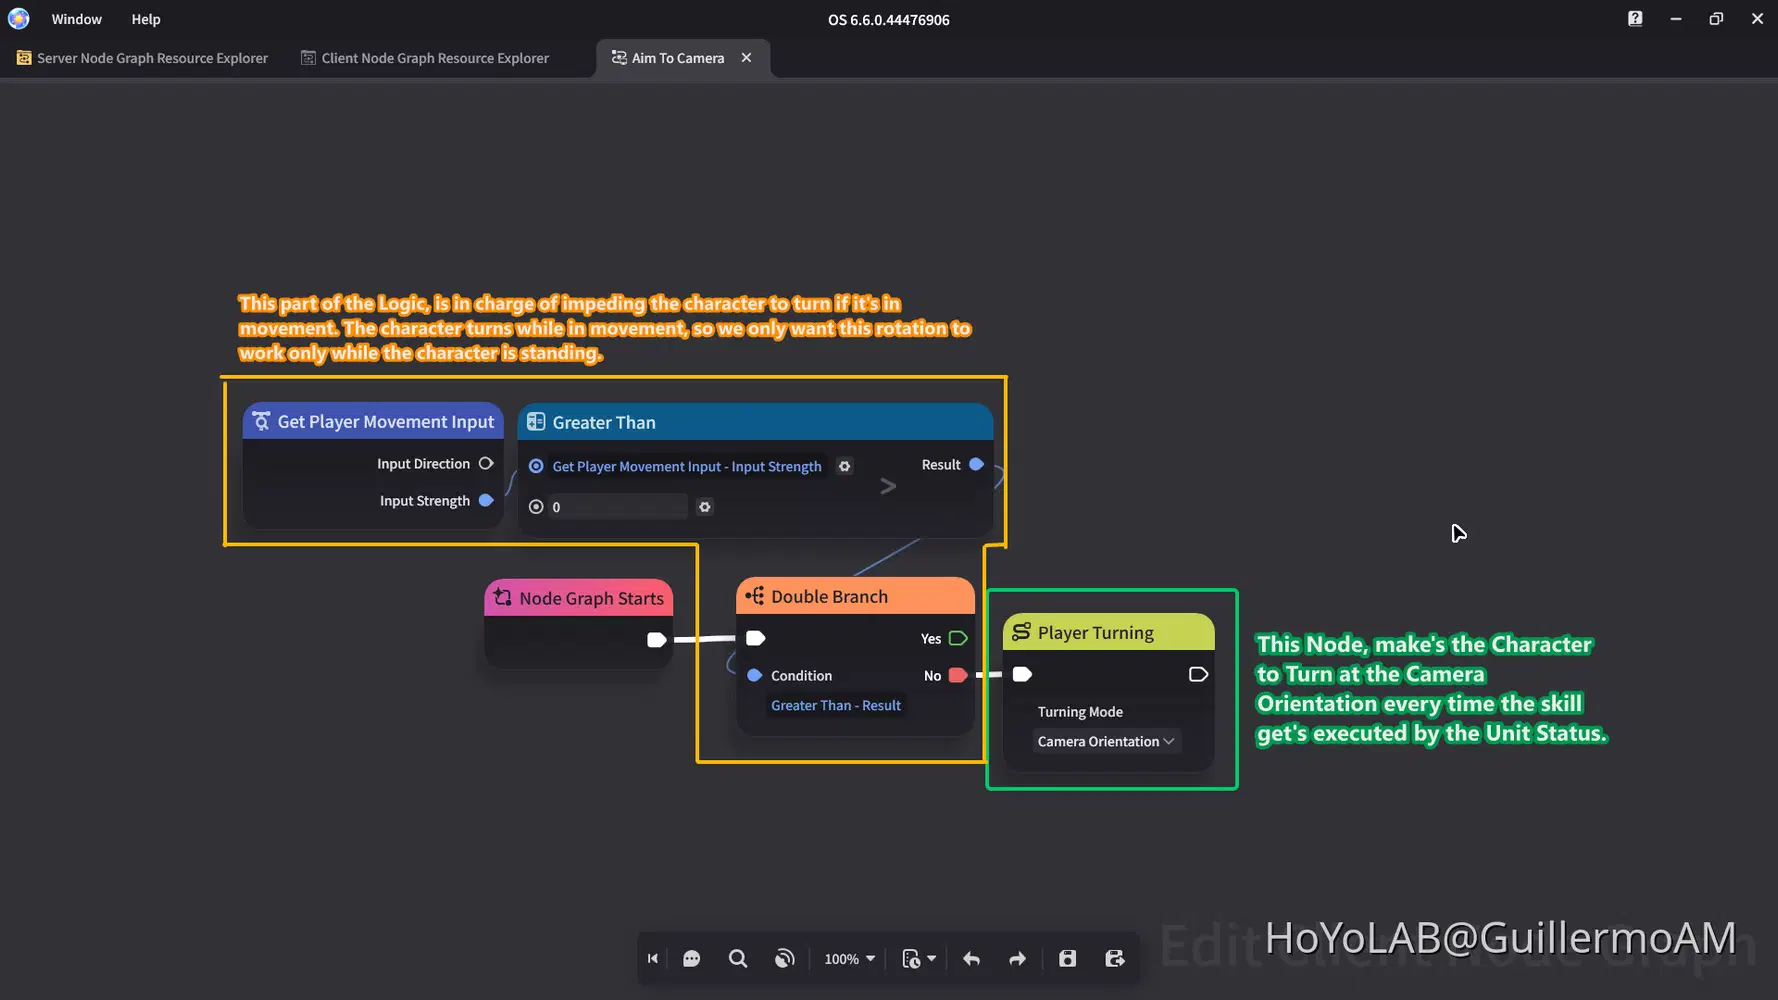
Skill "AimToCamera Skill"
After our Character Skill Node Graph is ready, we need to create a skill to hold the logic. In this example it will be called "AimToCamera Skill"
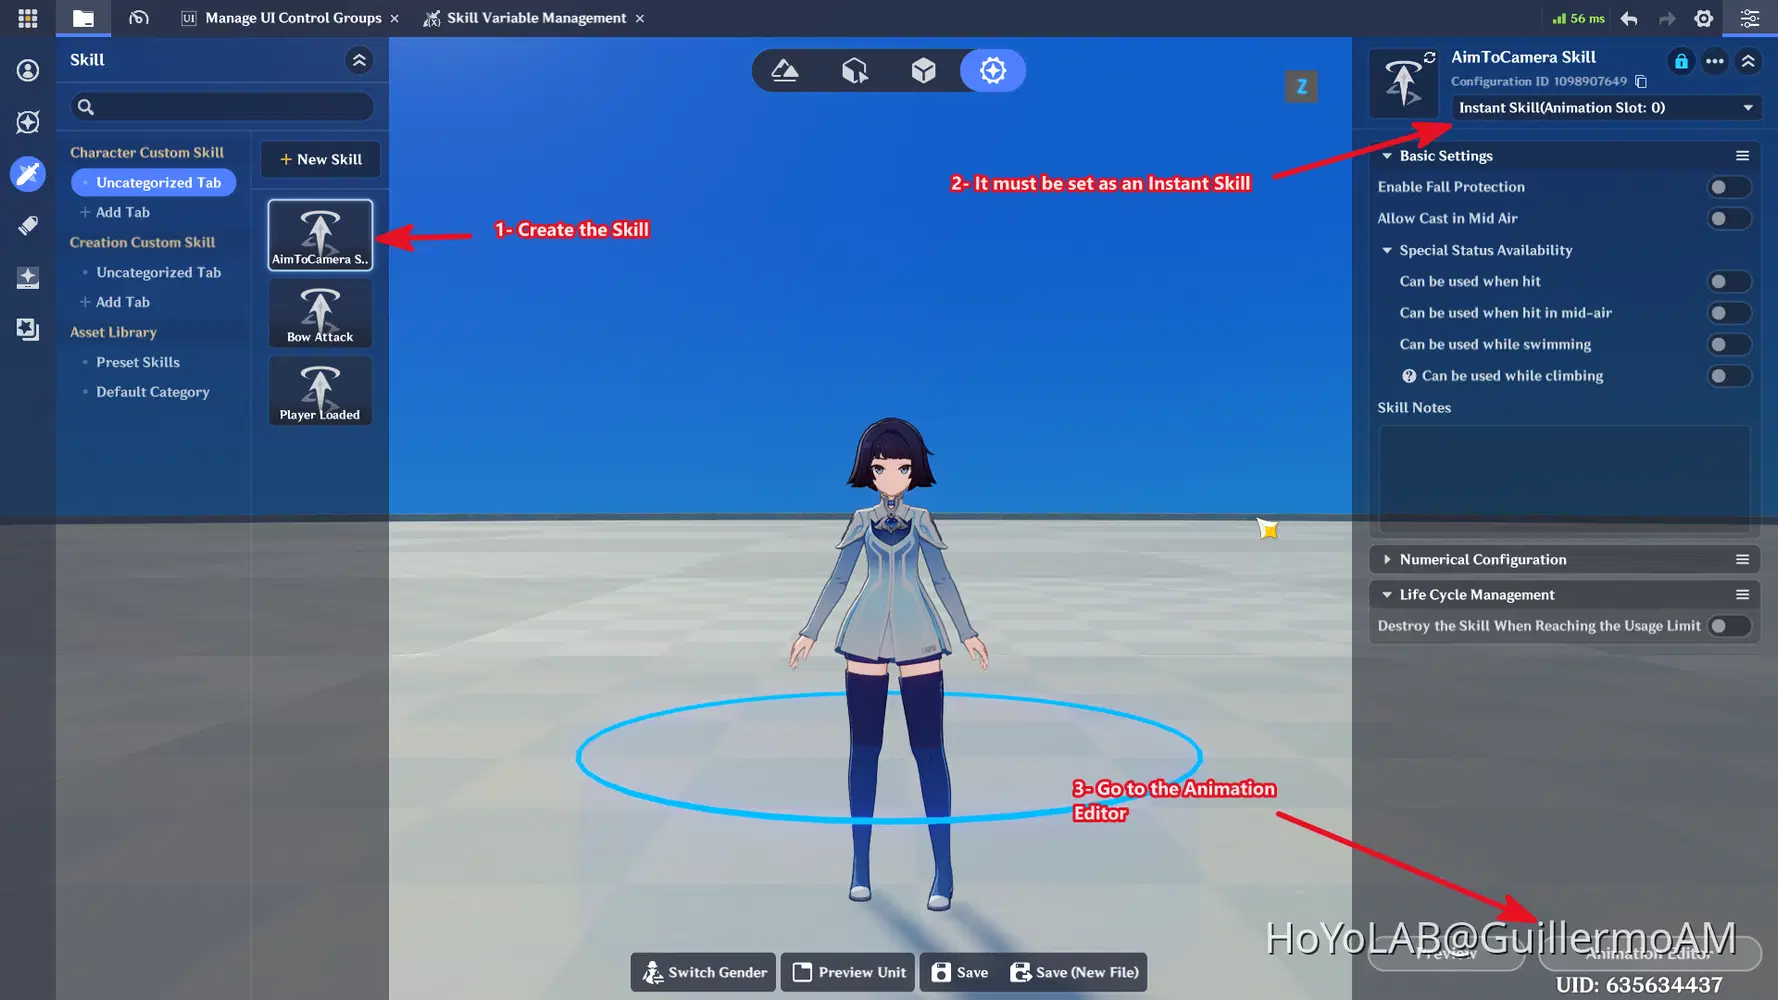
When it's created, we add our previously created logic into it to finalize our skill.
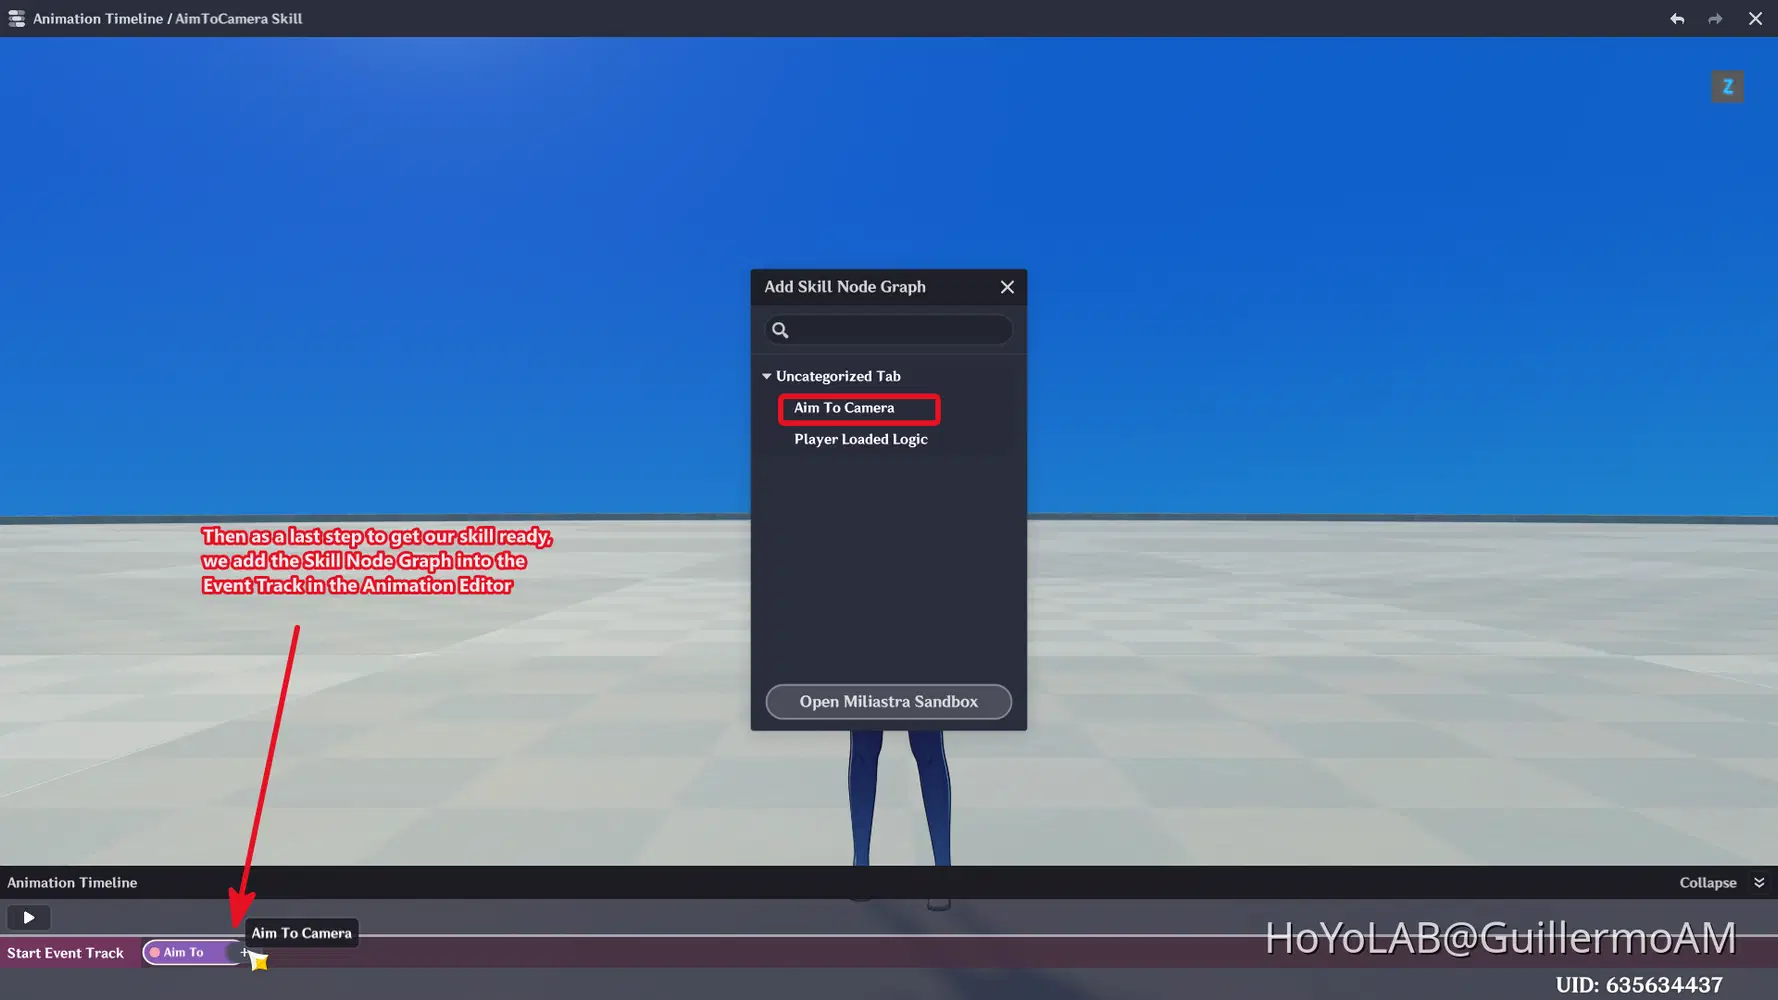
Unit Status "AimingStatus"
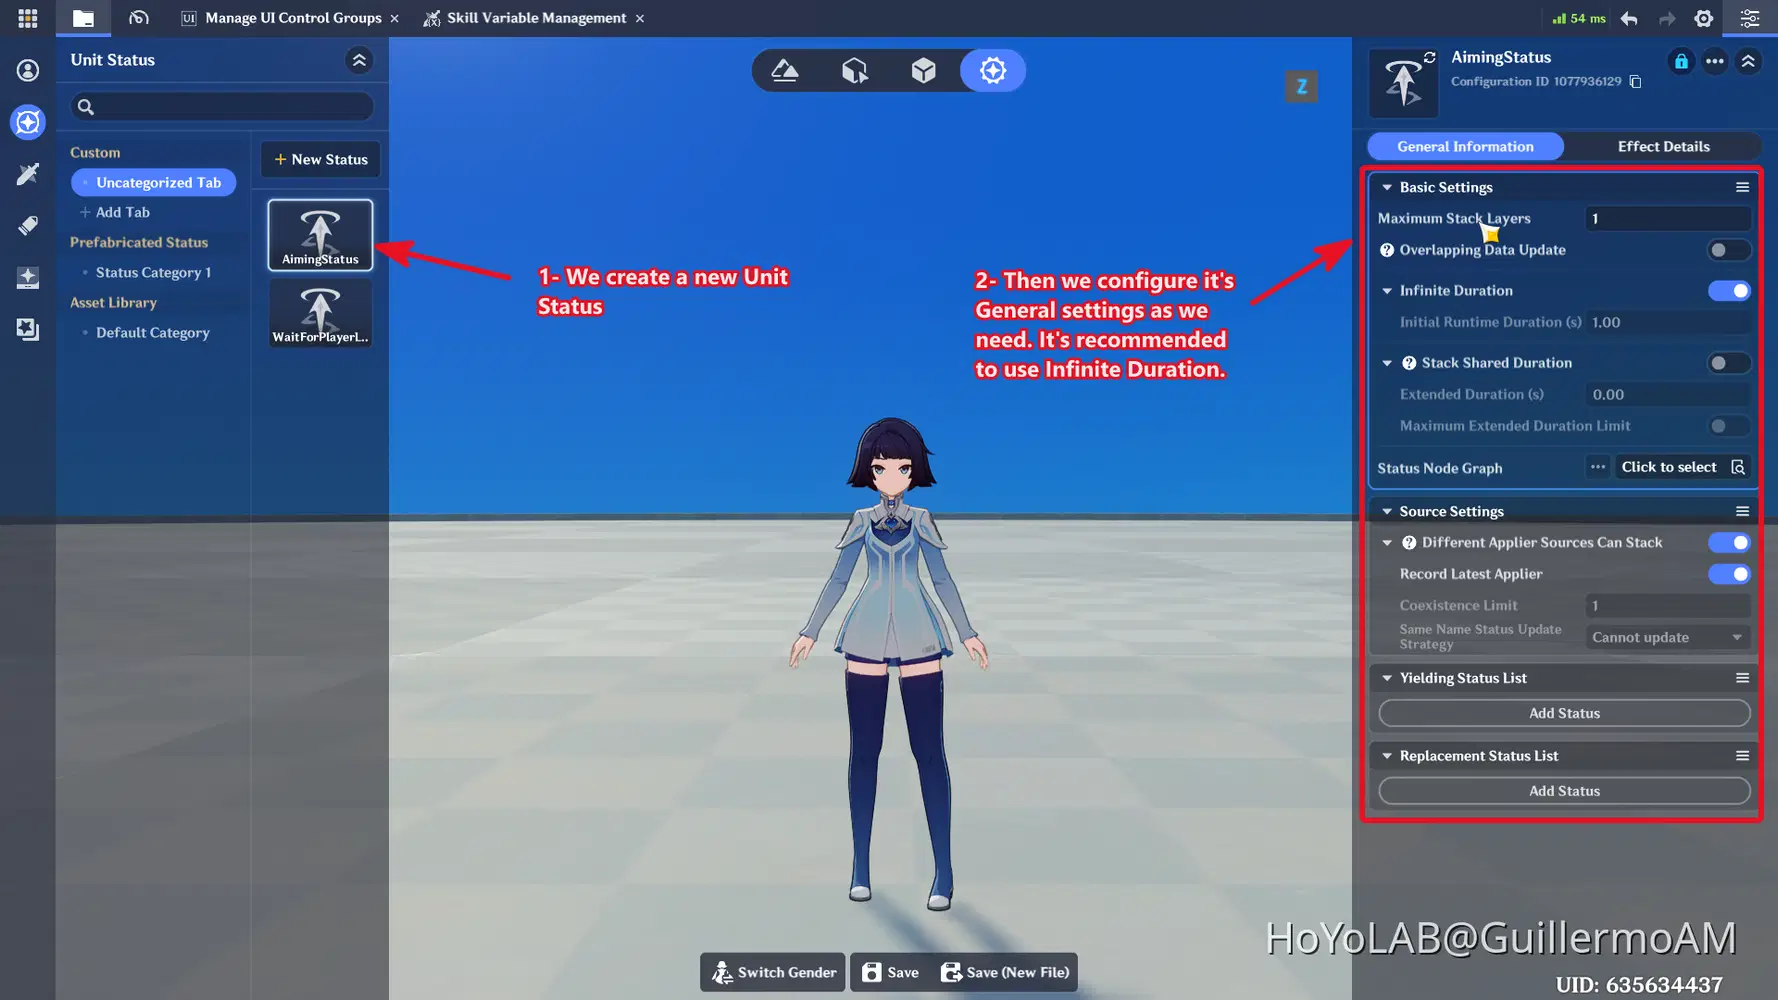
Then we create a new Unit Status. This time, it will be named "AimingStatus".
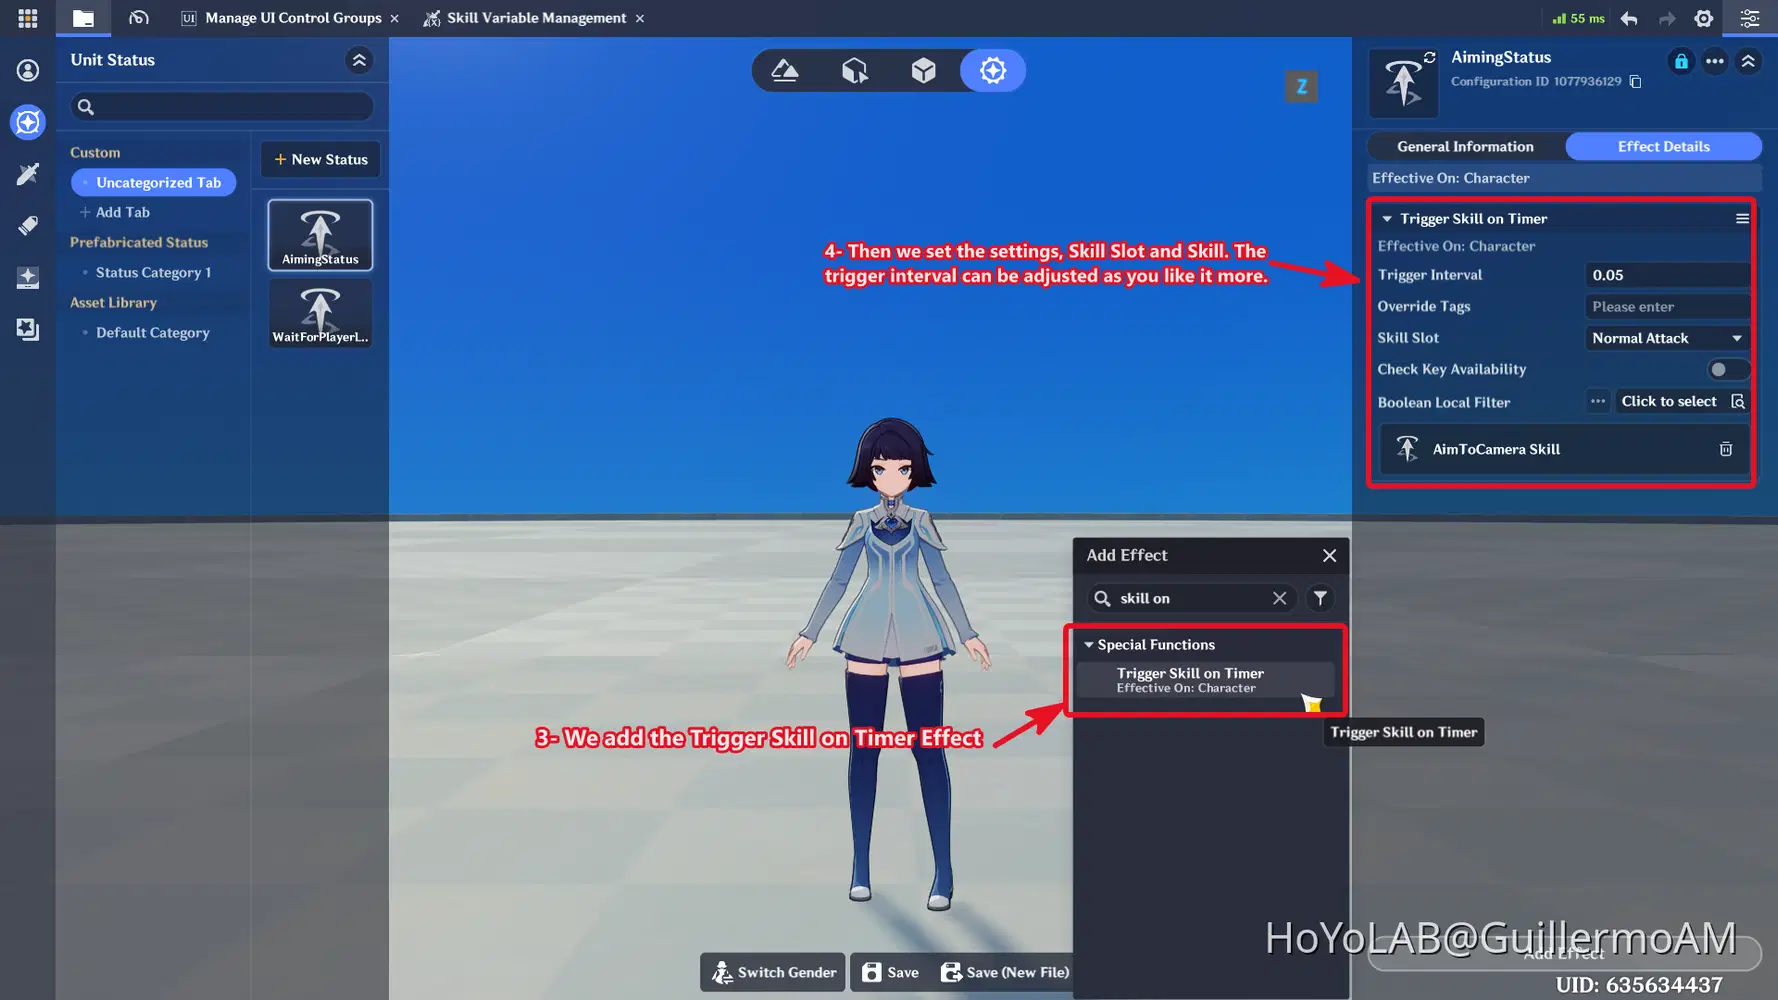
After that, just as we learned, we add the Trigger Skill on Timer and set the Interval (Lower update intervals works better), the Skill slot in which we placed the skill and the skill we created (AimToCamera Skill) to be executed.
Asset Resource Download
You can find a working example here: Auto AimToCamera
Additional Example [Using Skill Instance]
Using the Unit Status - Trigger Skill on Timer isn't the only way to use our skills on timed intervals; we can also make use of the Skill Instances, to create an instance of the skill on our Character without the need for it to be binded to any slot. Then we can execute that Skill Instance through the "Cast Specified Skill Instance" Node, helping us to expand the way in which we can implement this kind of logic into our Wonderlands.
Remeber that is important that the Skill Instances and Executions are done on the Character Entity and Not on the Player Entity.
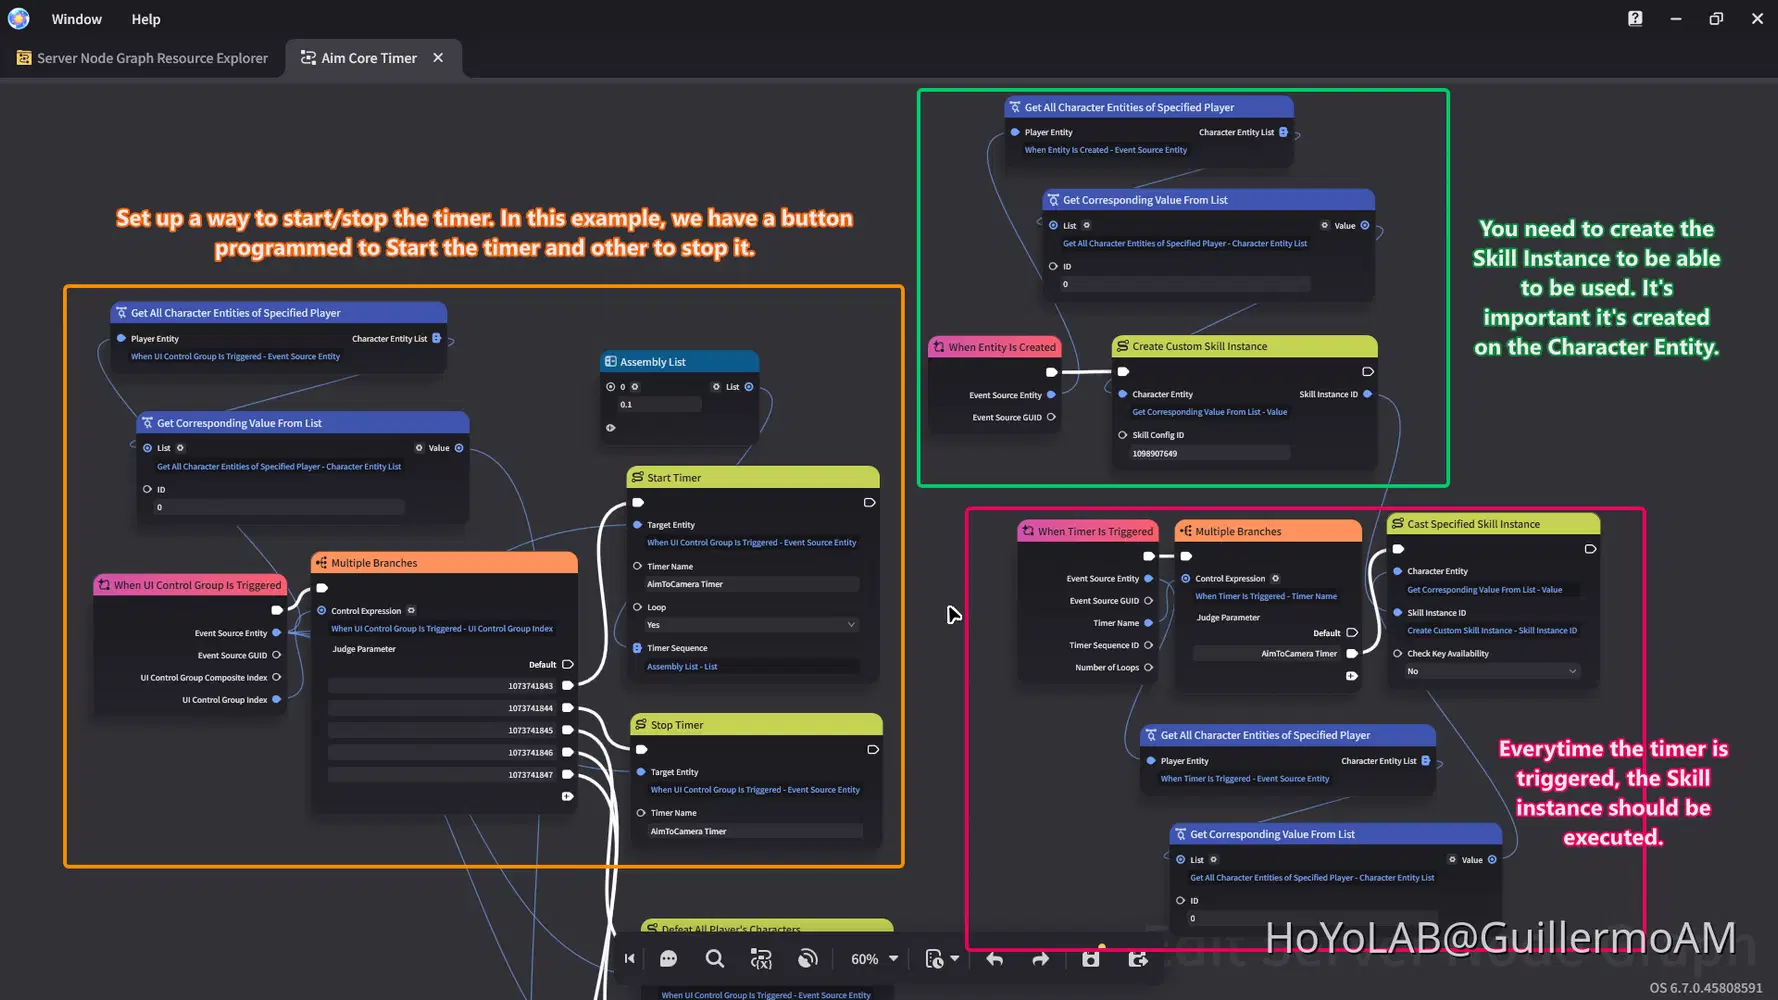
Showcase
Here we can observe an example of our example using Skill Instances to turn the rotation of the character just as we set it before:
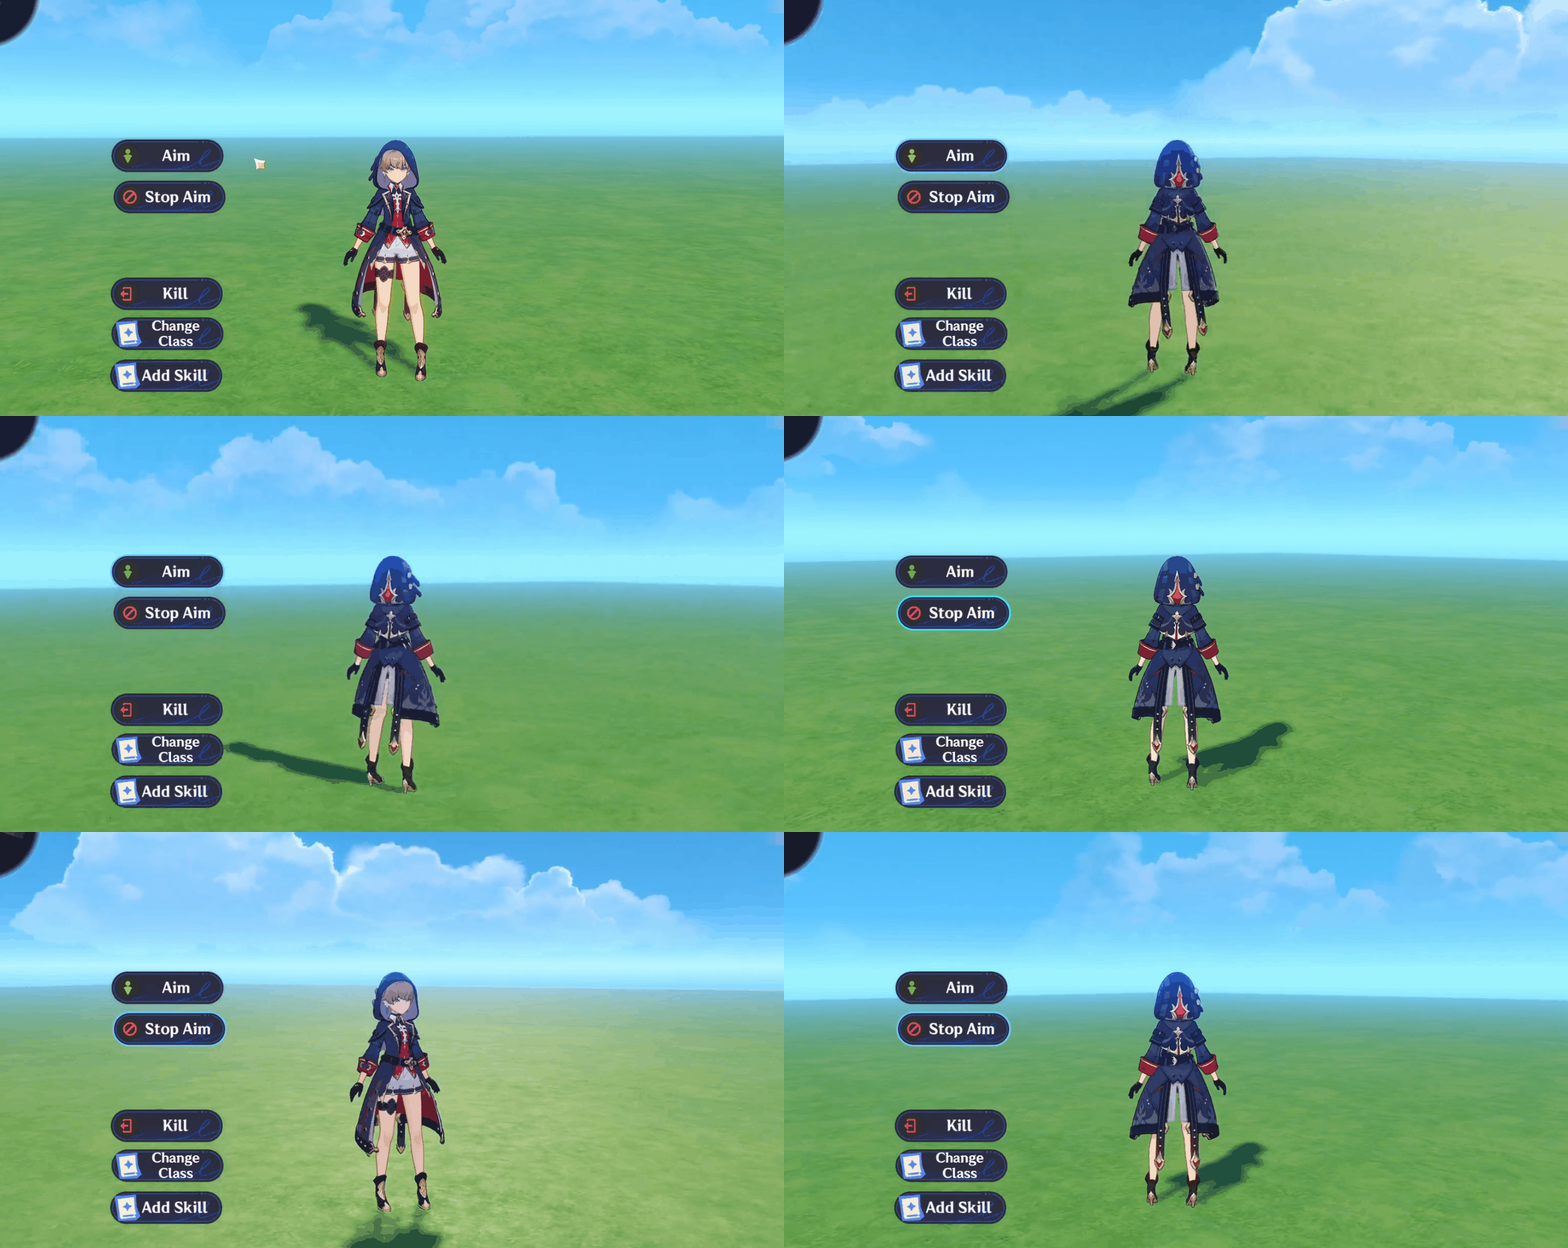
Tip
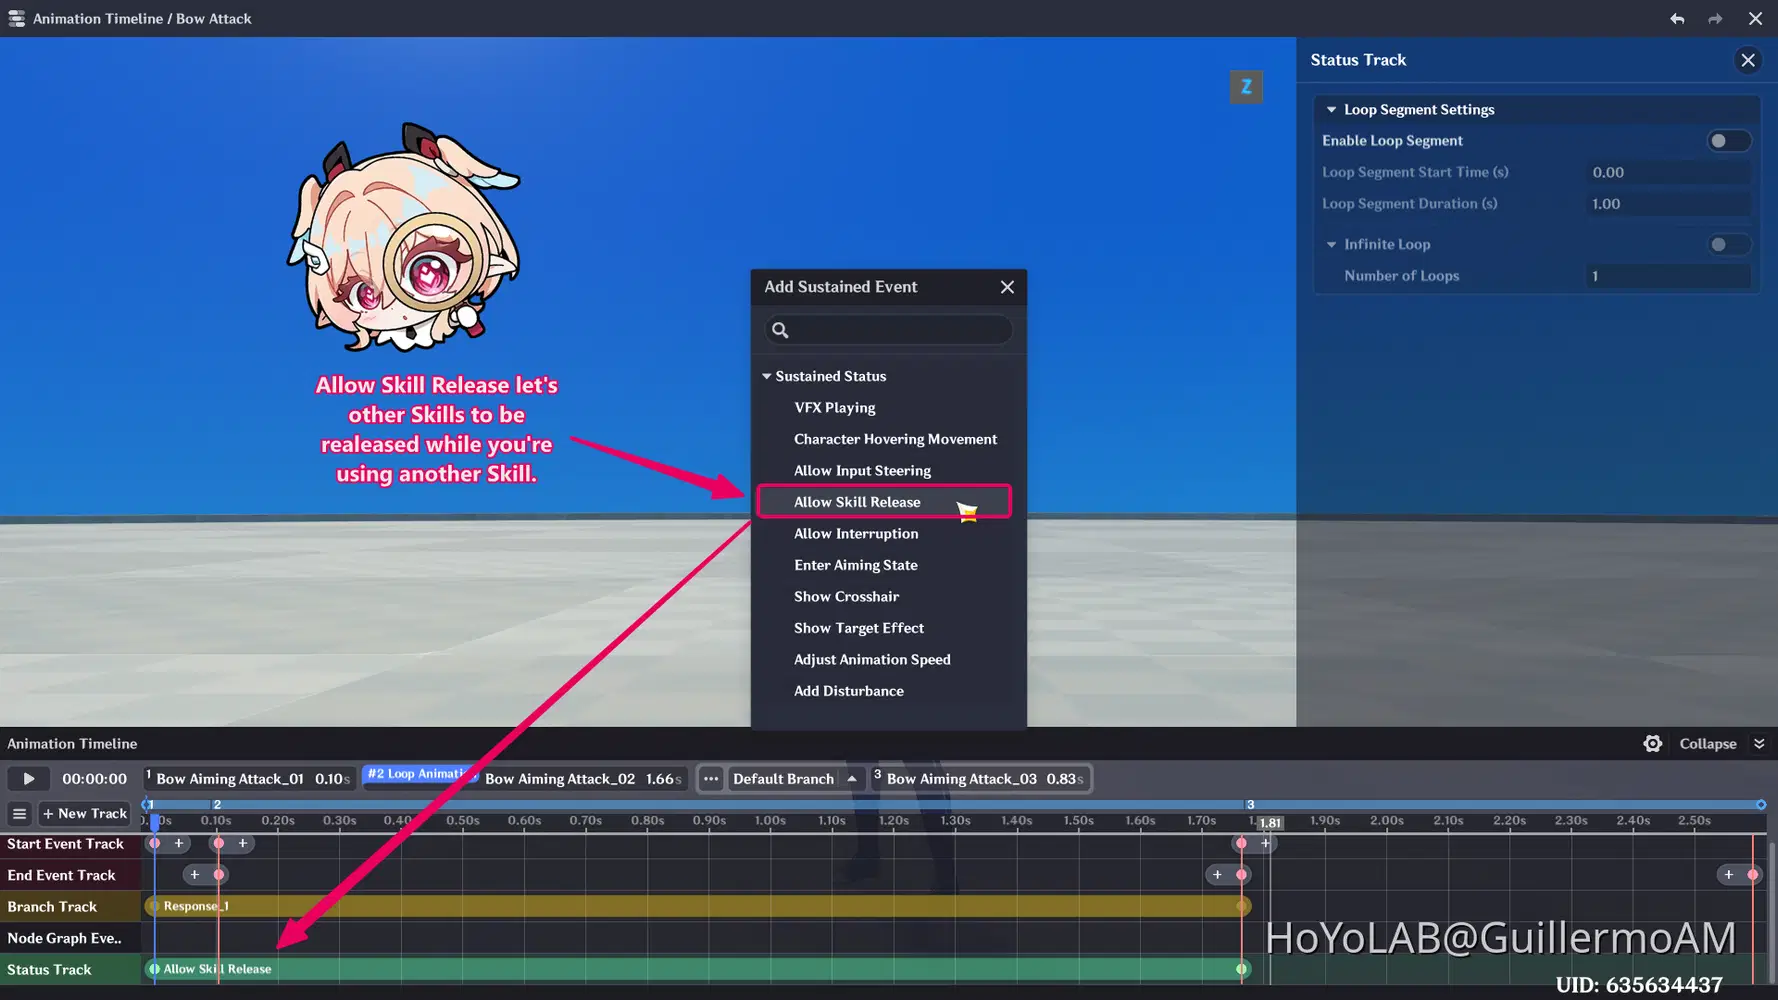
Skills wont' be executed if you're using another skill. So if you're in the middle of an animation, or aiming a Skill, the timed skills won't usually work.
But there's a way in which you can make them work even with other Skills. You just need to Add the "Allow Skill Release" into the Status Track of your Skill Animations, and the problem will be solved.
This Status Track let's for other skills to be released during the Timeframe is covered in the timeline by that Status.
Video Tutorial
Conclusion
Hope this guide helped you to discover new ways in which you can develop your skills for your future Miliastra Wonderlands! The tools keep growing with the Miliastra Wonderland development, so this brings to us new ways to implement mechanics into our projects.