
This is the second part of "Complex Creations: Building Custom Enemy Skills and Behaviour" guide. You can find the first part of the guide here:


5. Example 1: Electro Mage
A ranged enemy that shoots electro projectiles, backs away when the player closes in, and re-engages when the player retreats. This is the classic kiting pattern.
5.1 Electro Mage Skill
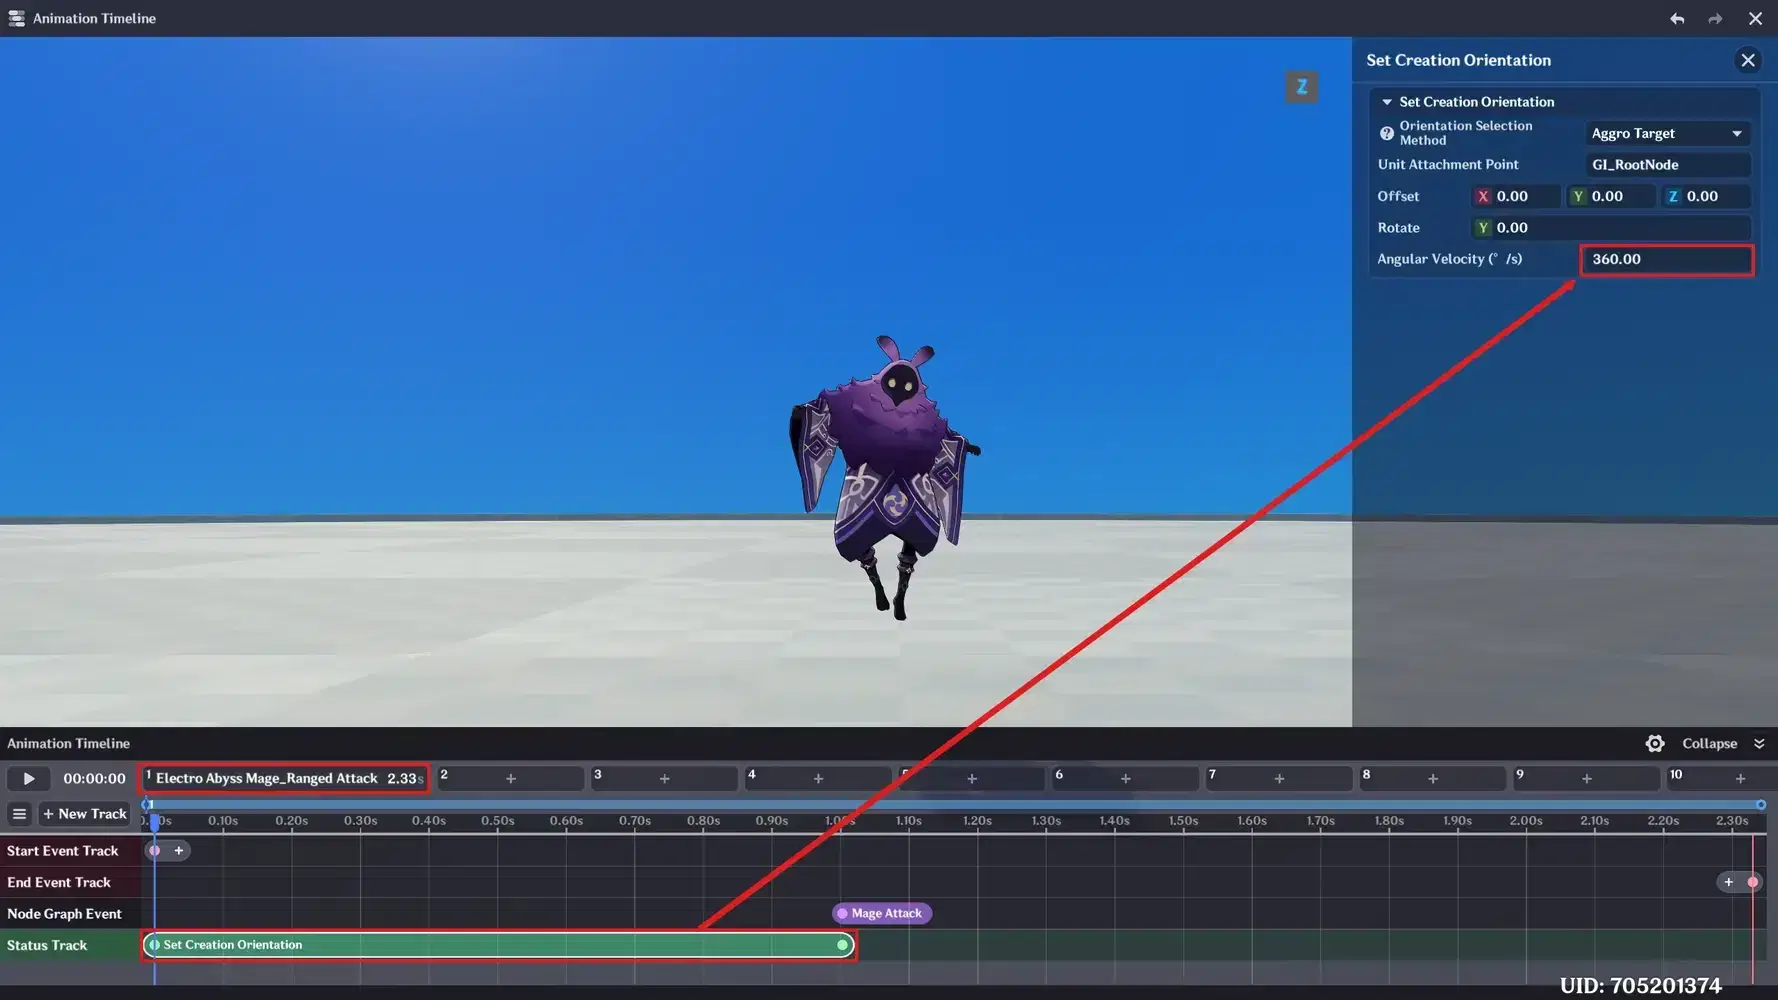
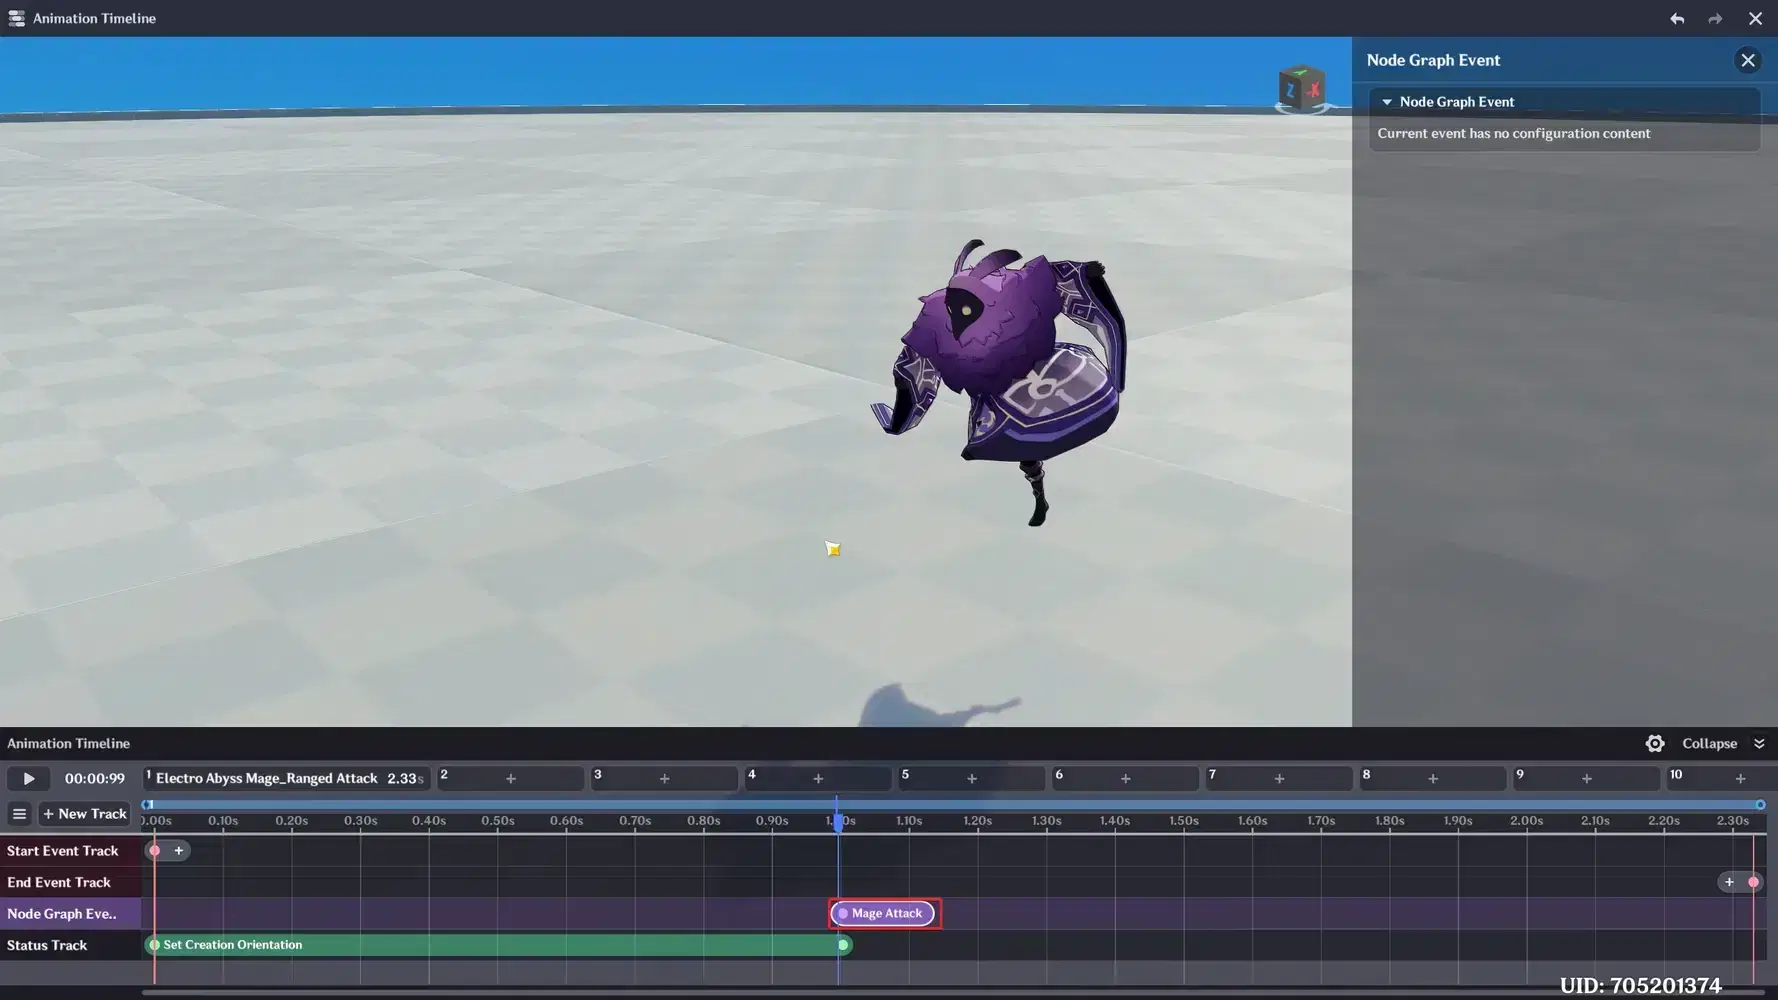
Select the Electro Mage Ranged Attack animation. Add a Set Creation Orientation status running from the start of the animation to the moment the projectile will be created, so the shot is aimed.
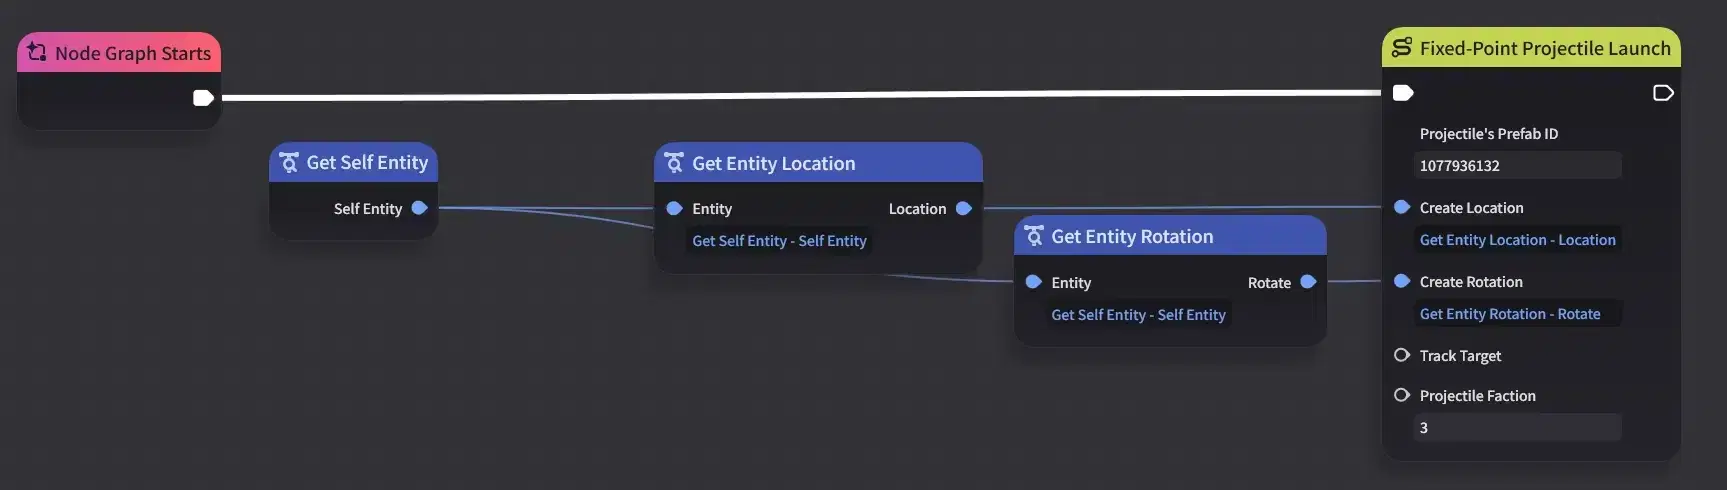
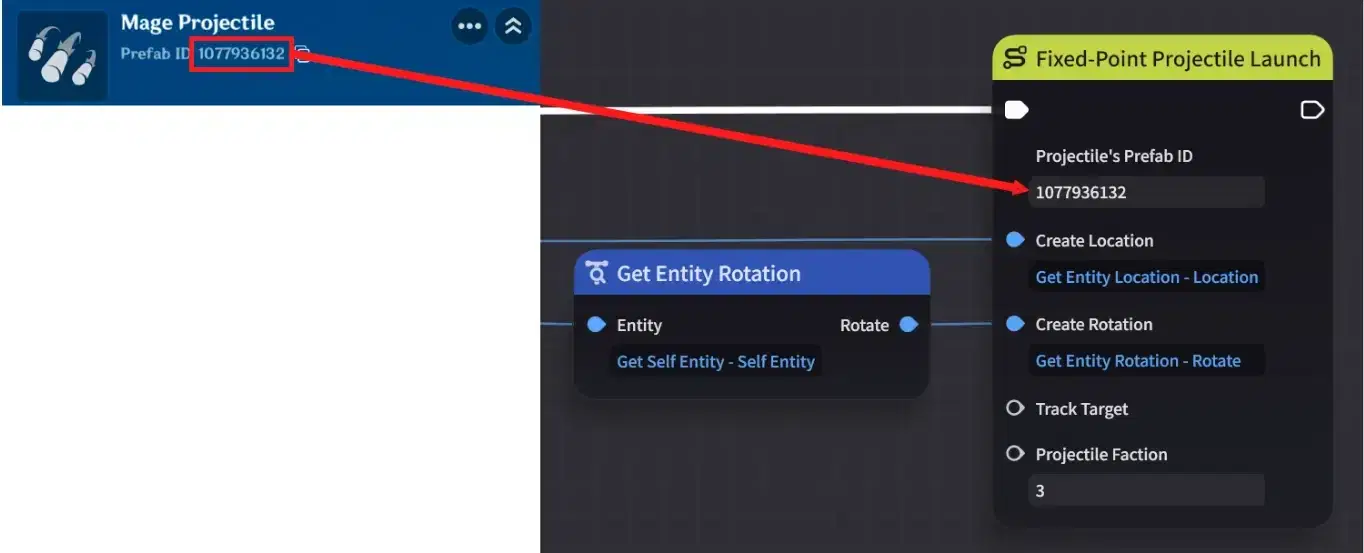
Create a Creation Skill Node Graph and add Fixed-Point Projectile Launch. Put its location and rotation from Get Self Entity → Get Entity Location / Get Entity Rotation so the projectile leaves the mage pointing wherever the mage is facing.
Building the projectile
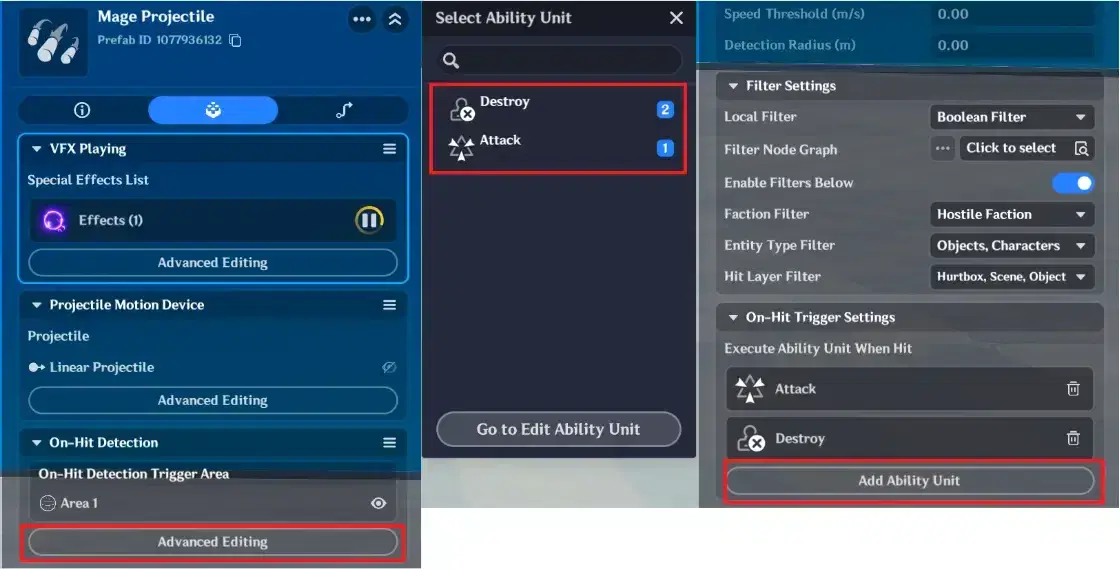
Go to Combat Preset → Local Projectile → New Projectile.
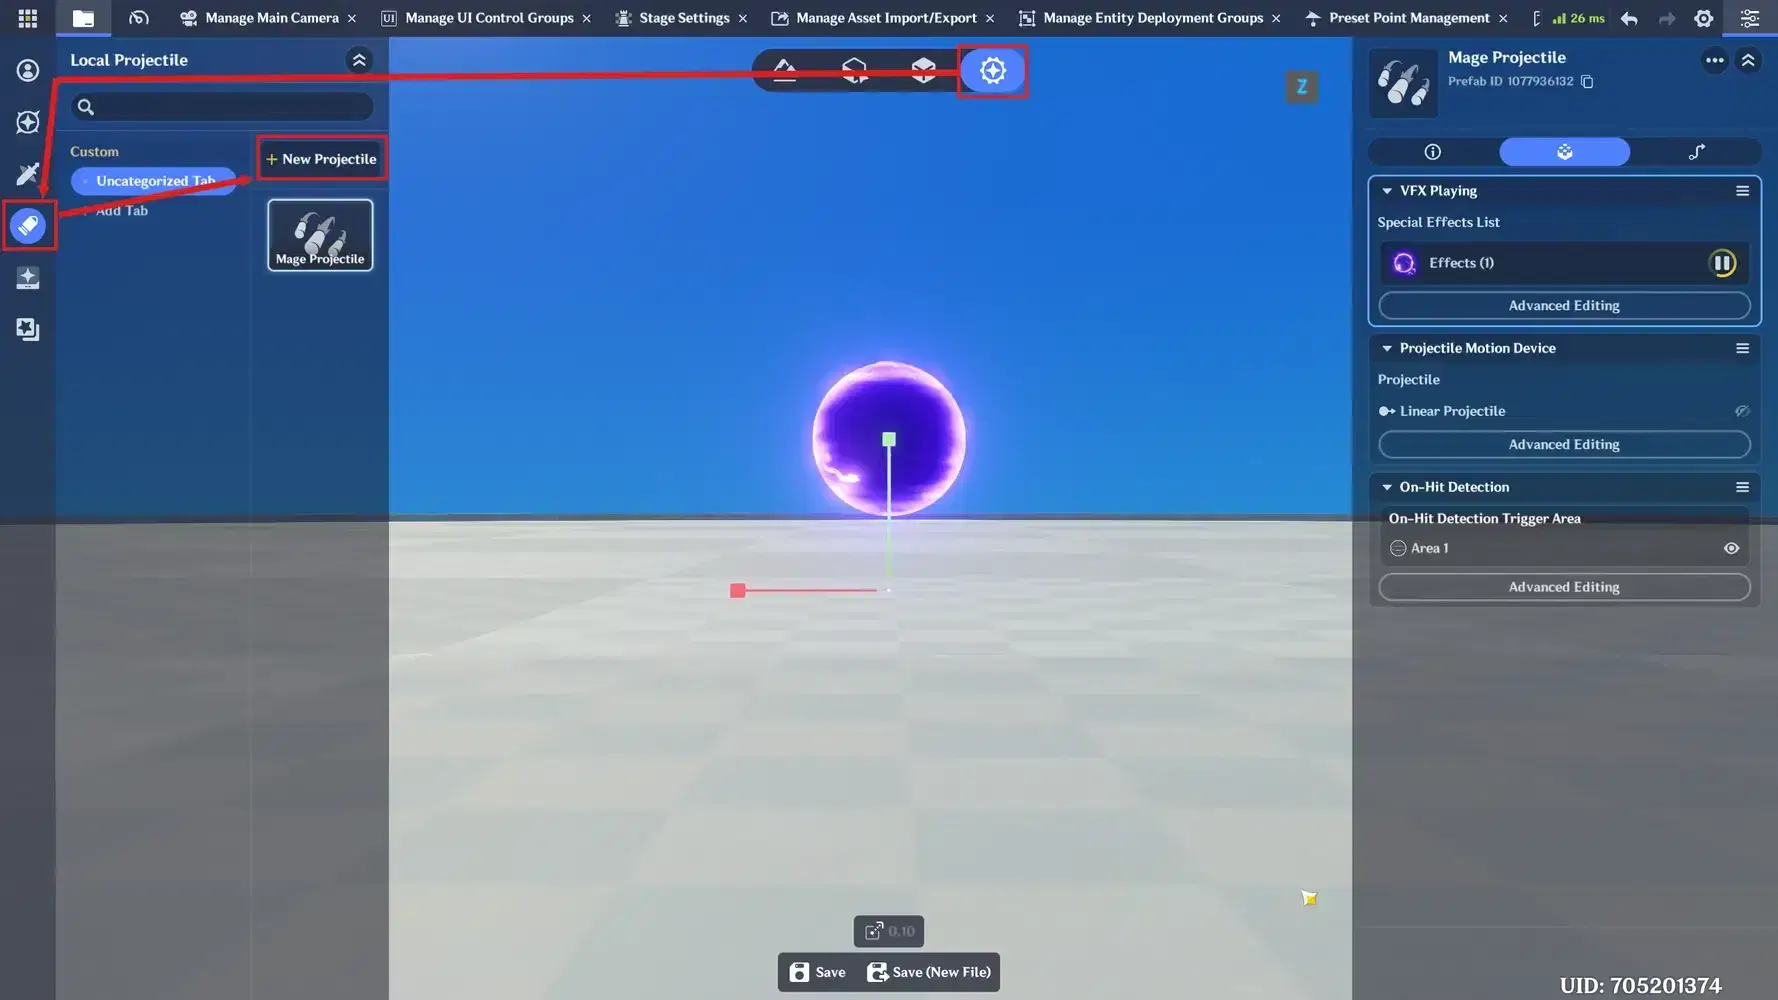
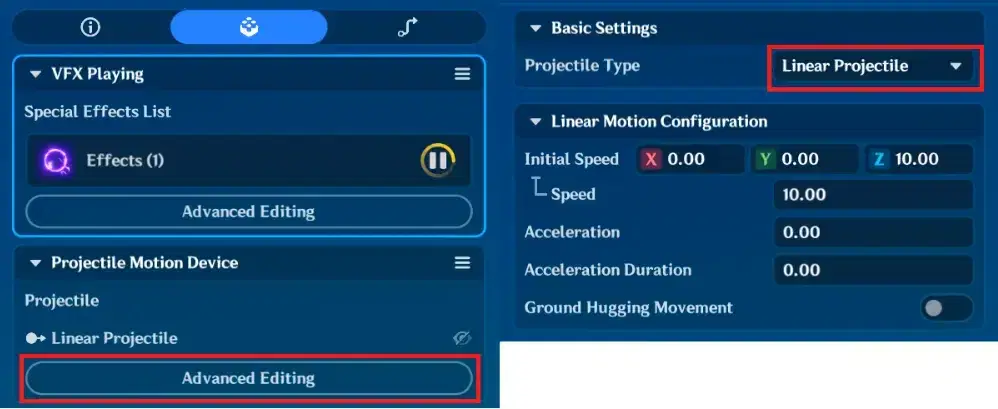
Component tab: select the electro orb VFX and choose Linear Projectile for a straight-line shot.
On-Hit Detection component: set Detection Delay Time to 0 if the projectile should be able to be trigger immediately on spawn. A non-zero delay is useful when a projectile spawns inside something and you don''t want it colliding with them.
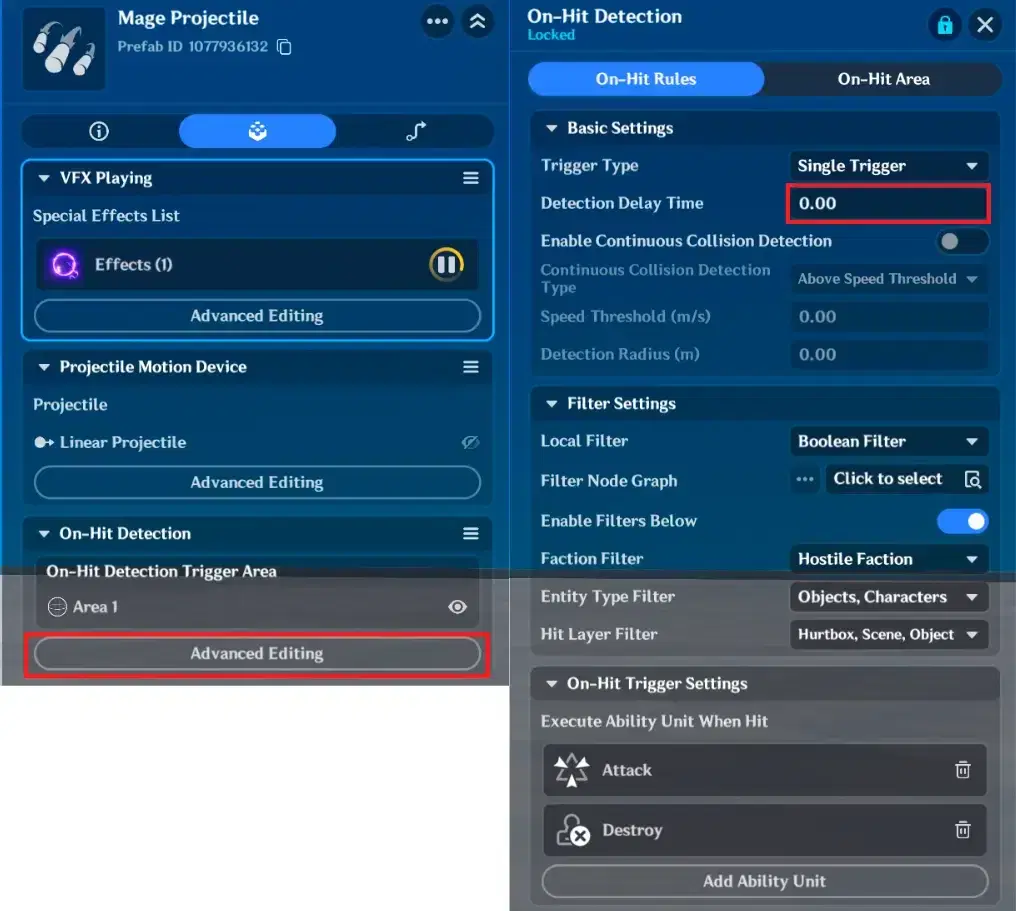
Filter settings:
- Faction Filter — Hostile Faction
- Entity Type Filter — Objects and Character*
- *** Layer Filter — Hurtbox, Scene, Object
Including Scene and Object means the projectile collides with objects instead of sailing through walls. Leave them out and your mage will shoot the player through objects.
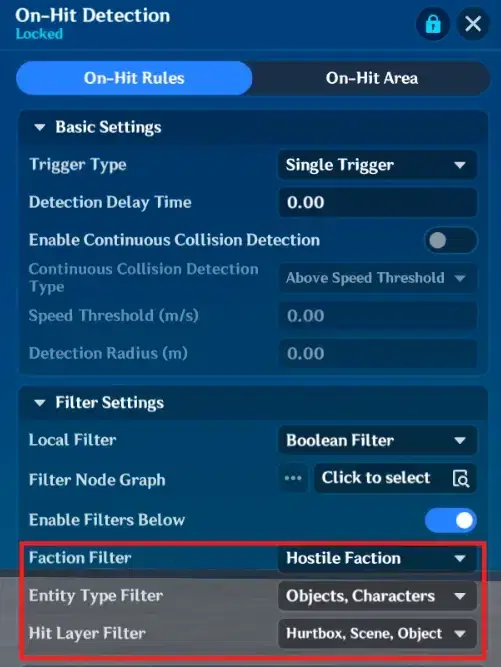
On-hit area: size it to match the visual. A hit radius much larger than the orb feels unfair, much smaller feels broken.
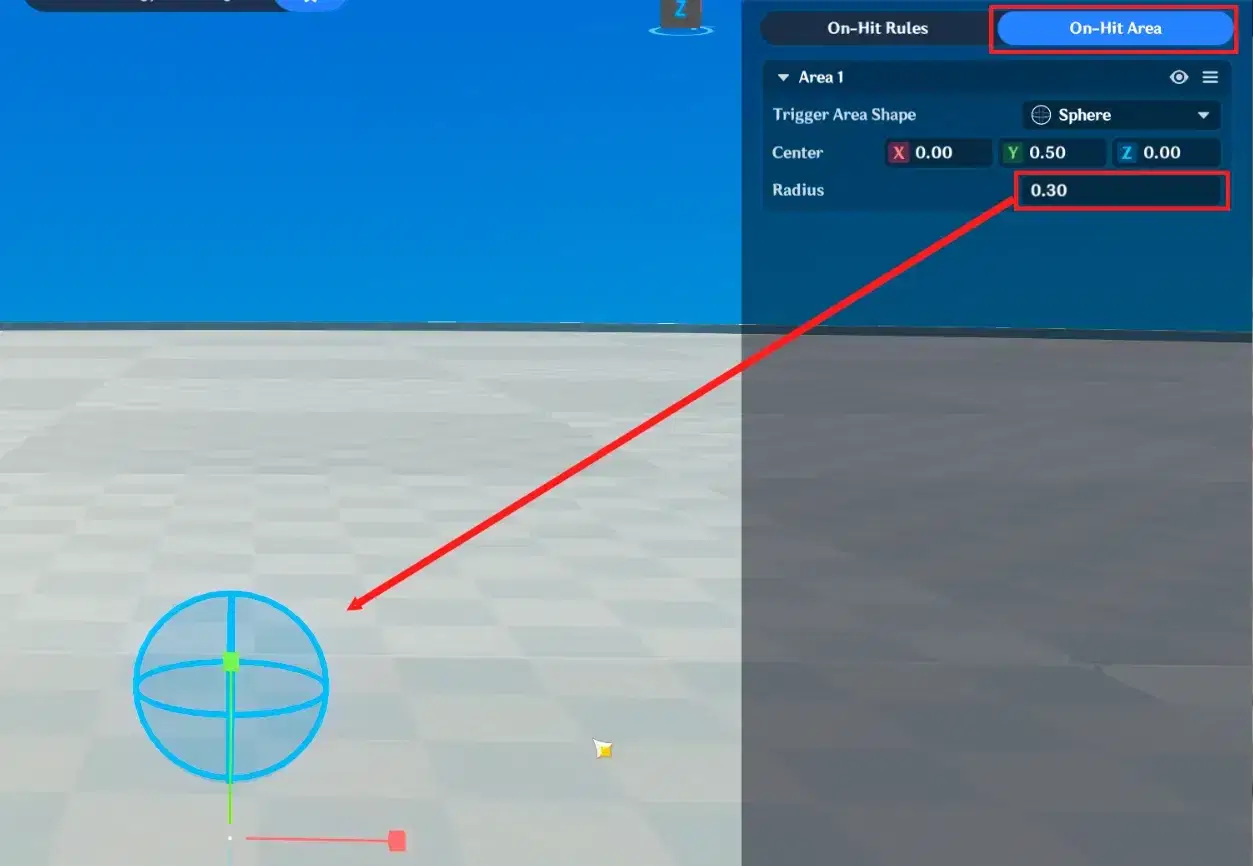
Ability Units
Open the Ability Unit tab and create two:
- Direct Attack - damages the player's hitbox directly. This differs from Hitbox Attack, which spawns an area (hitbox) and damages whatever is inside it. For a small fast projectile, Direct Attack is the right choice: it hits what the projectile touched, nothing more.
- Destroy self - removes the projectile 0.1 s after on-hit detection triggers. Without this the projectile will keep flying.
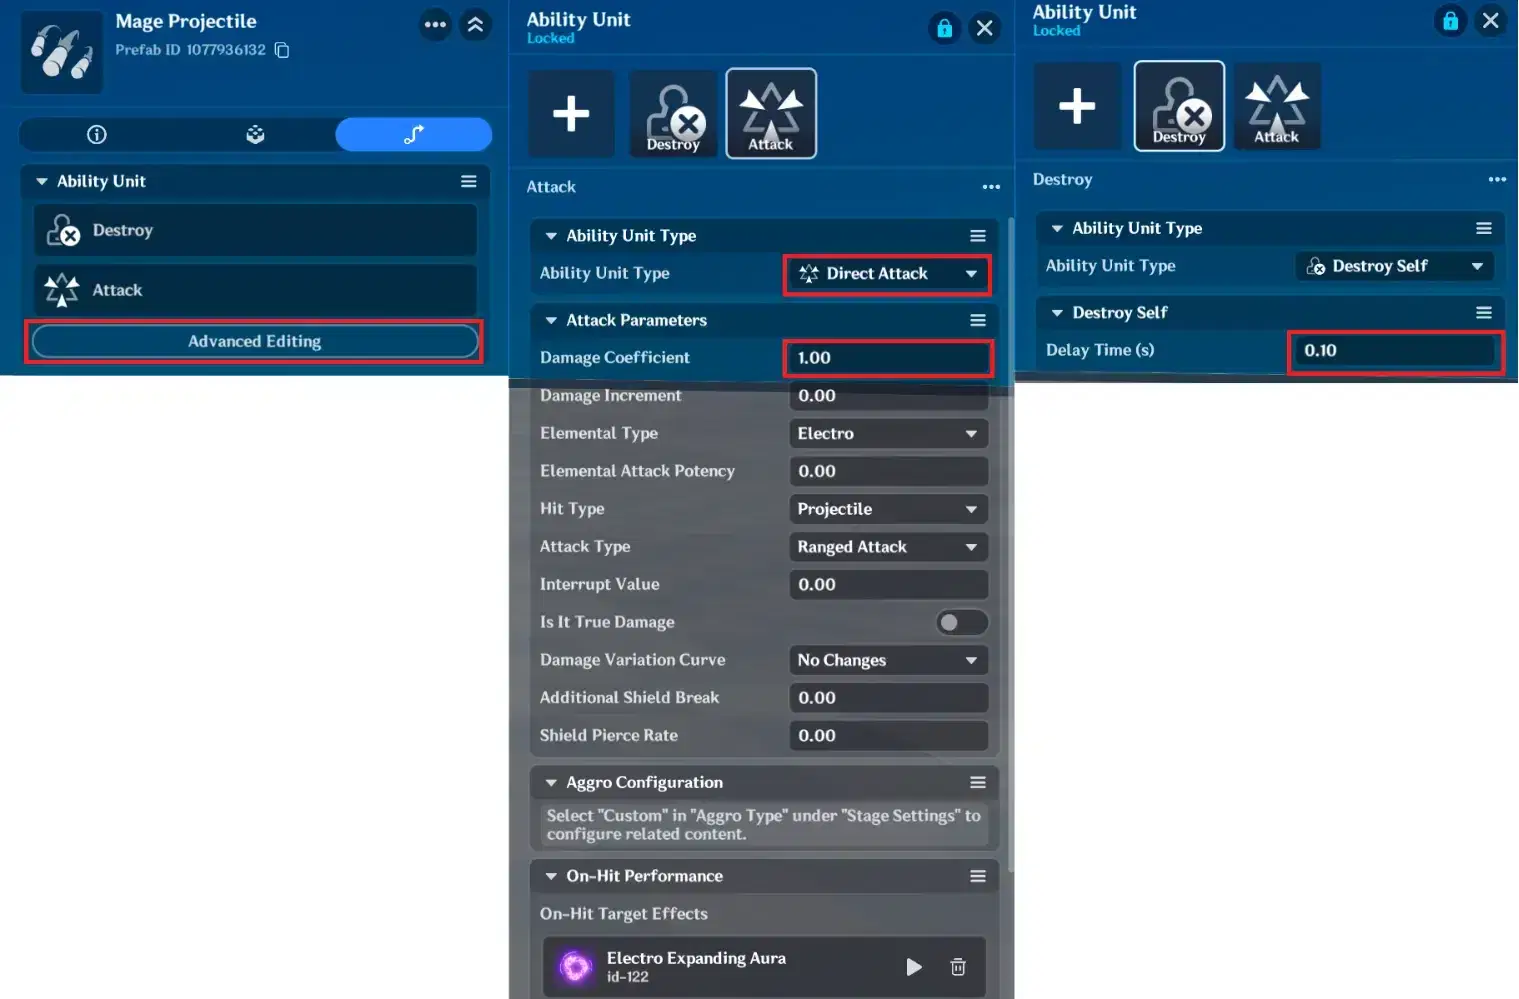
Both Ability Units must be assigned inside the On-Hit Detection component or neither will run.
Save, copy the prefab ID, and paste it into the Fixed-Point Projectile Launch node.
Connecting everything
Place the skill node graph on the timeline at the frame the animation releases the projectile.
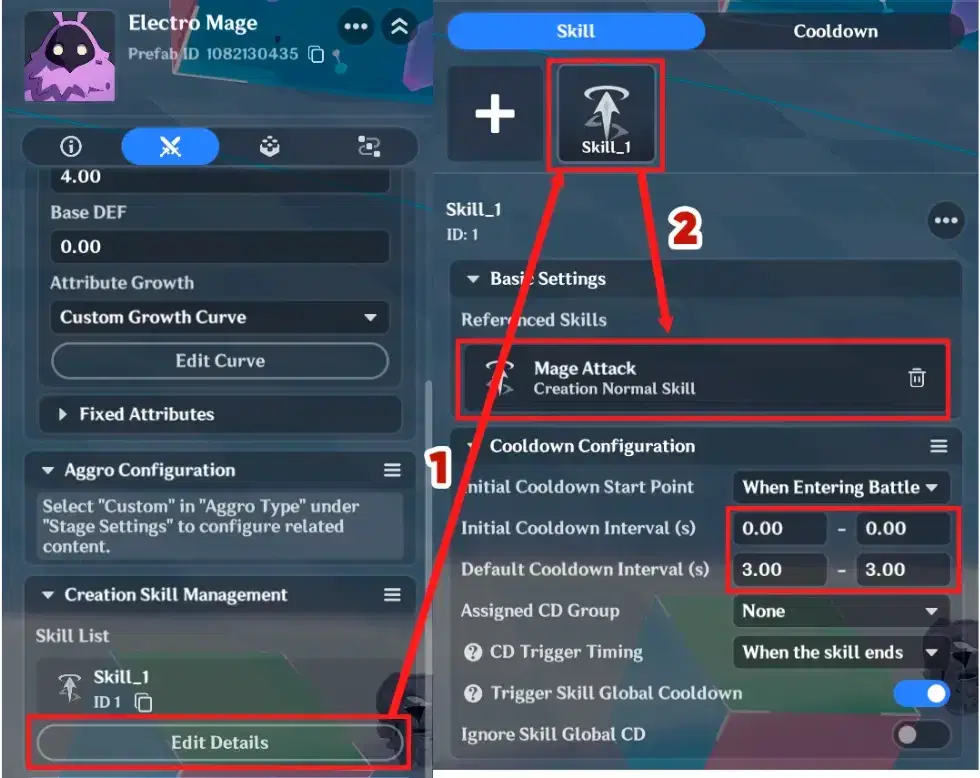
Then assign the skill in Combat Tab → Creation Skill Management as described in section 3. Initial CD 0 for an immediate first cast; default CD to taste.
Also add an Autonomous Logic Parameter Template.
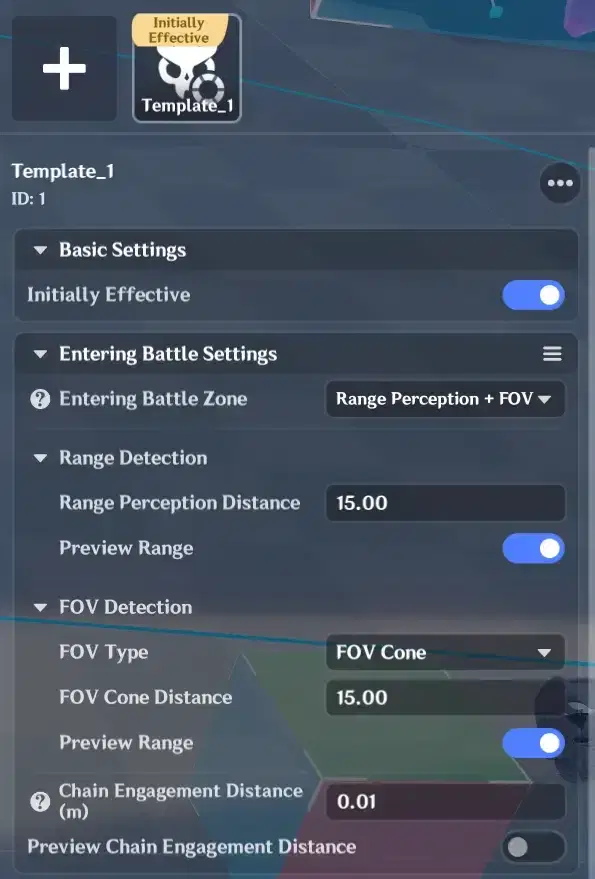
5.2 Decision Node Graph
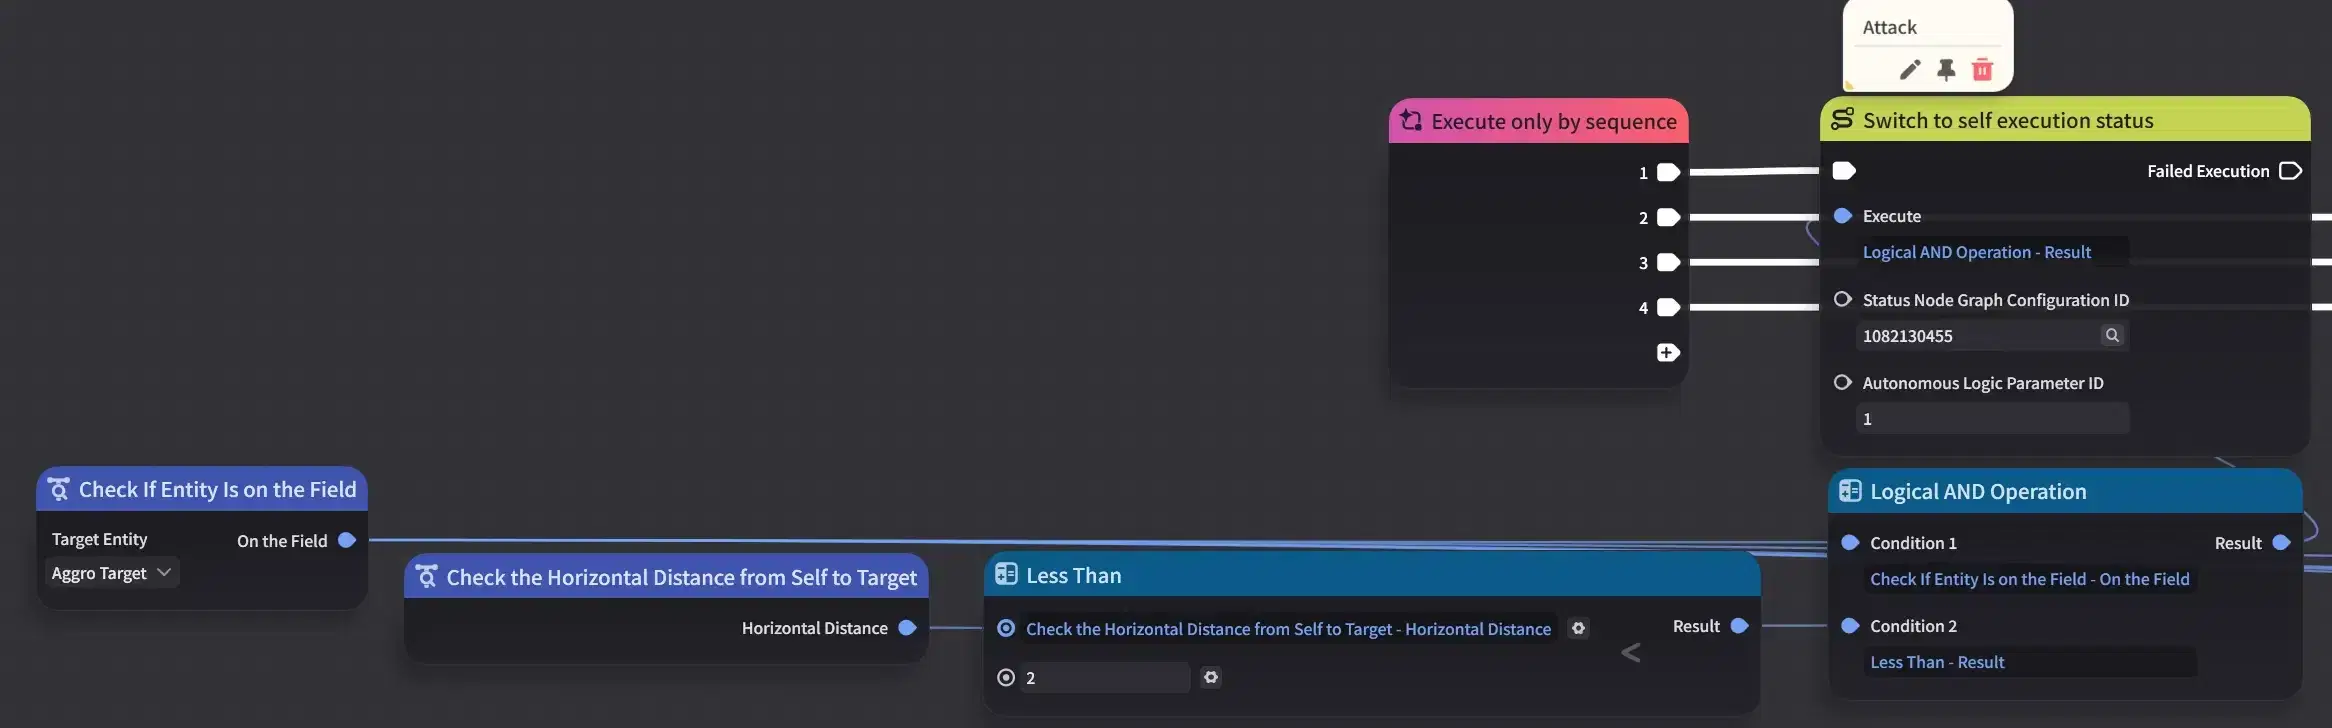
Four branches, evaluated in order:
First branch: Target on field and distance < 2 m → Cast projectile; if the skill is on CD, escape instead
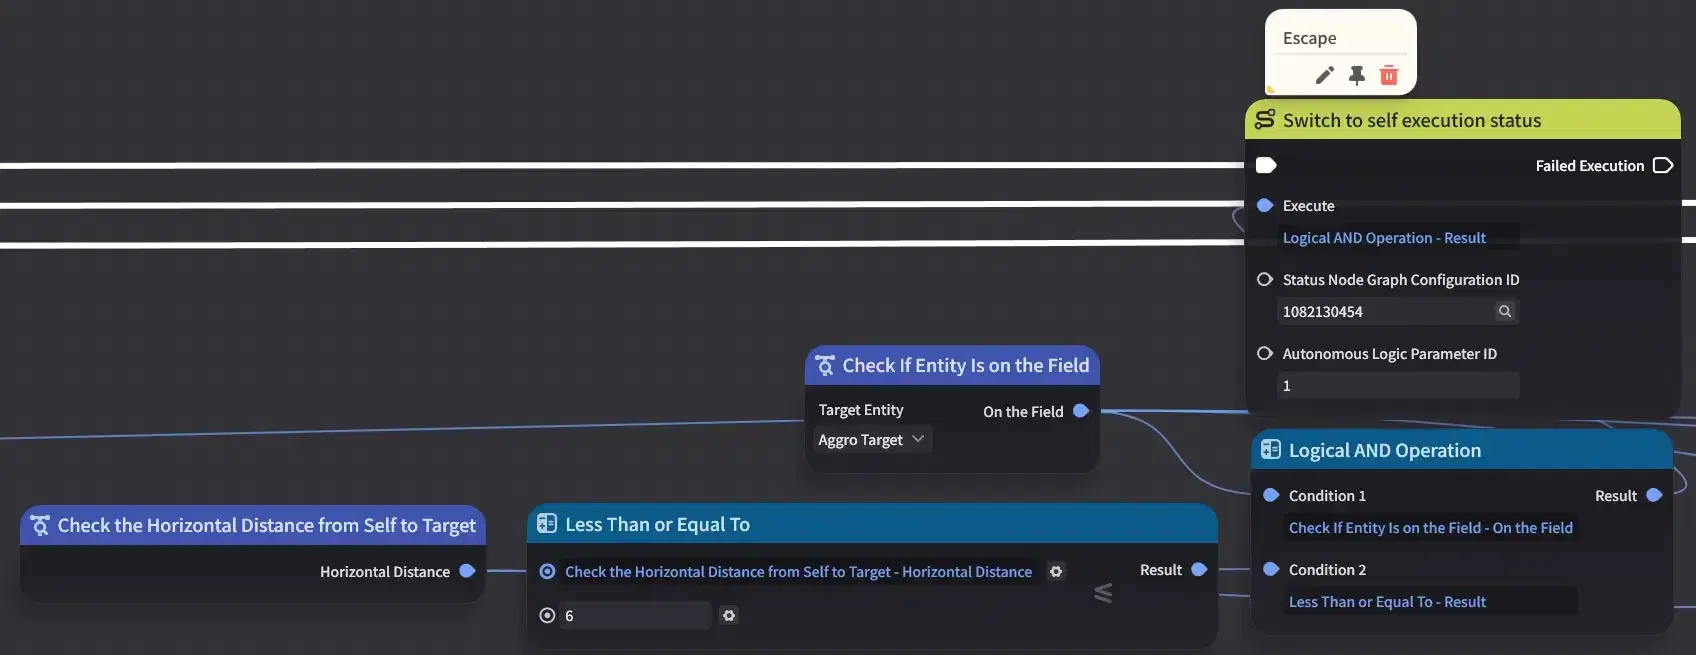
Second branch:Target on field and distance ≤ 6 m → Escape
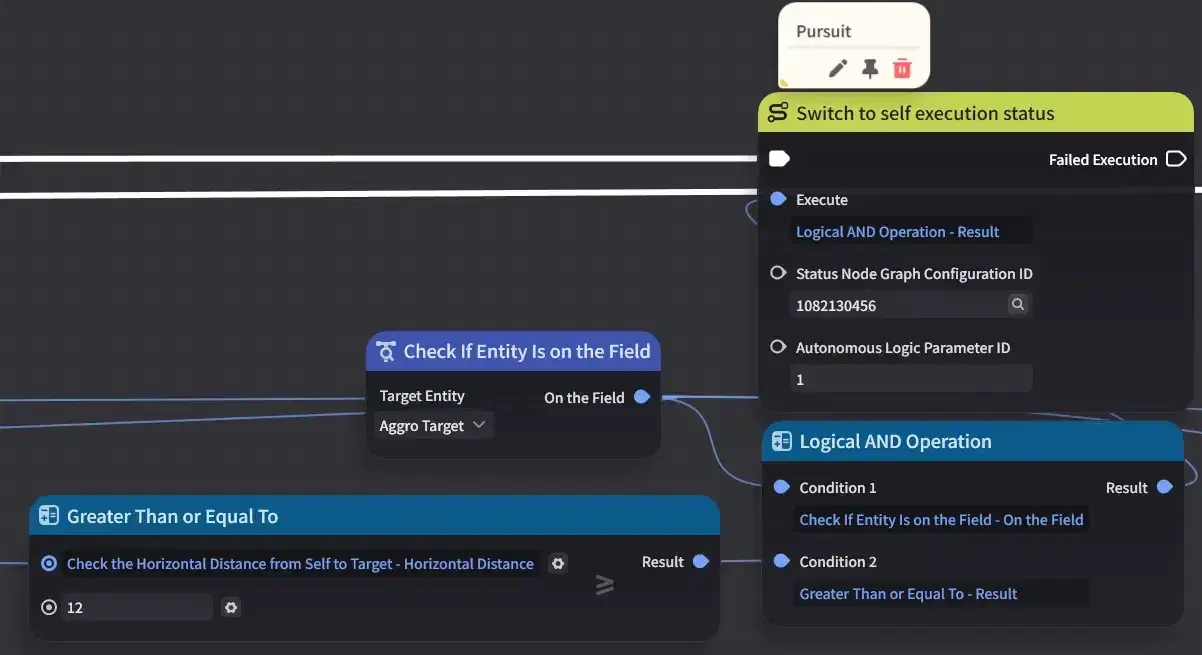
Third branch: Target on field and distance ≥ 12 m → Pursue
Fourth branch: Target on field and not currently casting → Cast projectile; if the skill is on CD, escape instead
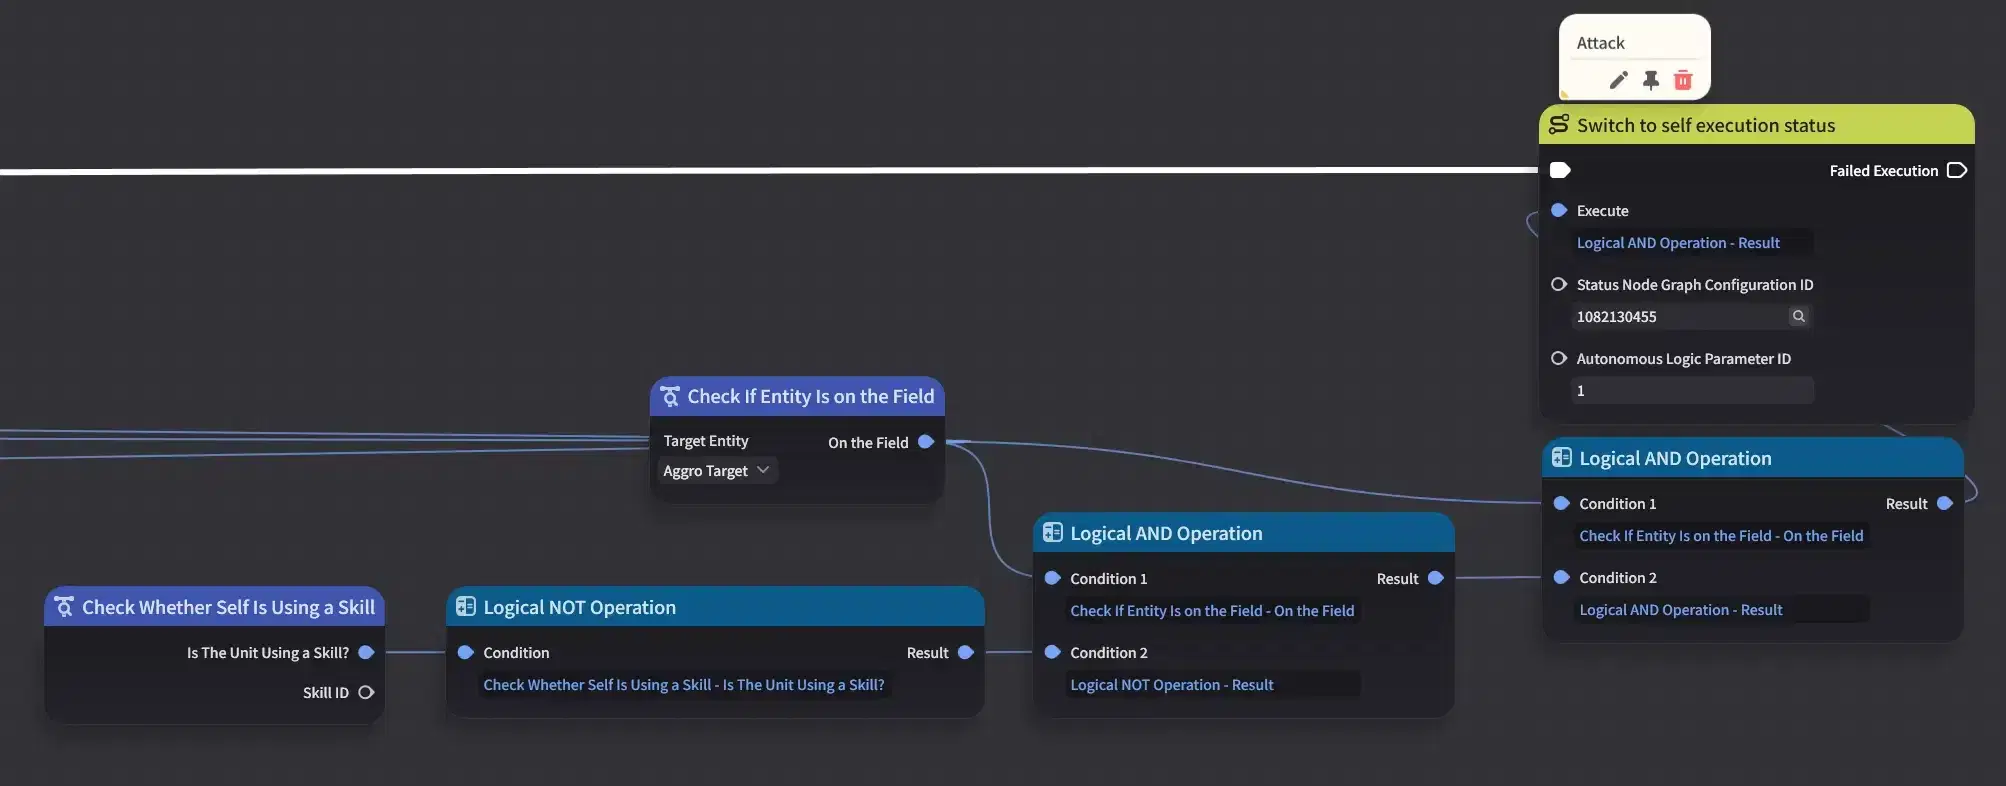
The shape to notice: branch 1 handles the panic case where the player is right on top of the mage, branch 2 is the normal kiting range, branch 3 stops the mage drifting out of the fight, and branch 4 keeps mage to attack when nothing else applies.
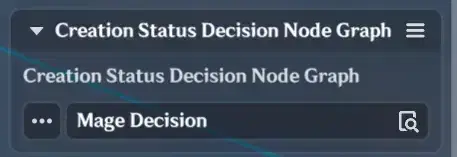
Remember to select the Decision graph in the mage's Combat Tab.
5.3 Status Node Graphs
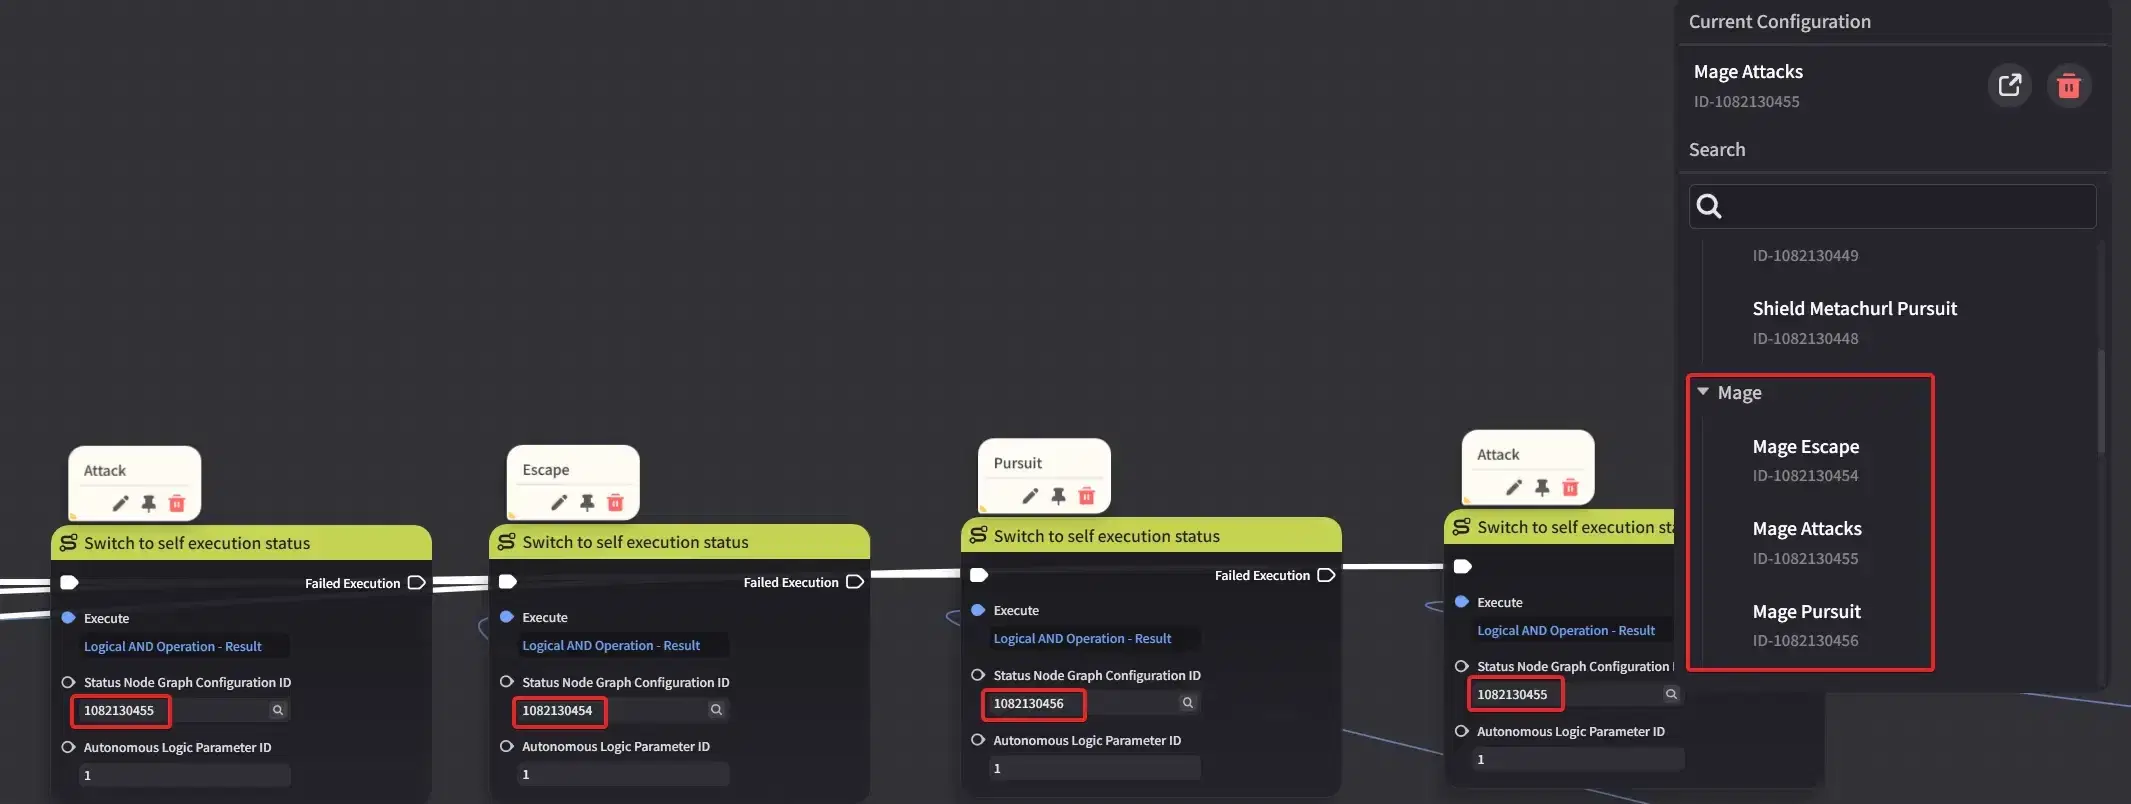
Three Status Node Graphs: cast, pursue, escape.
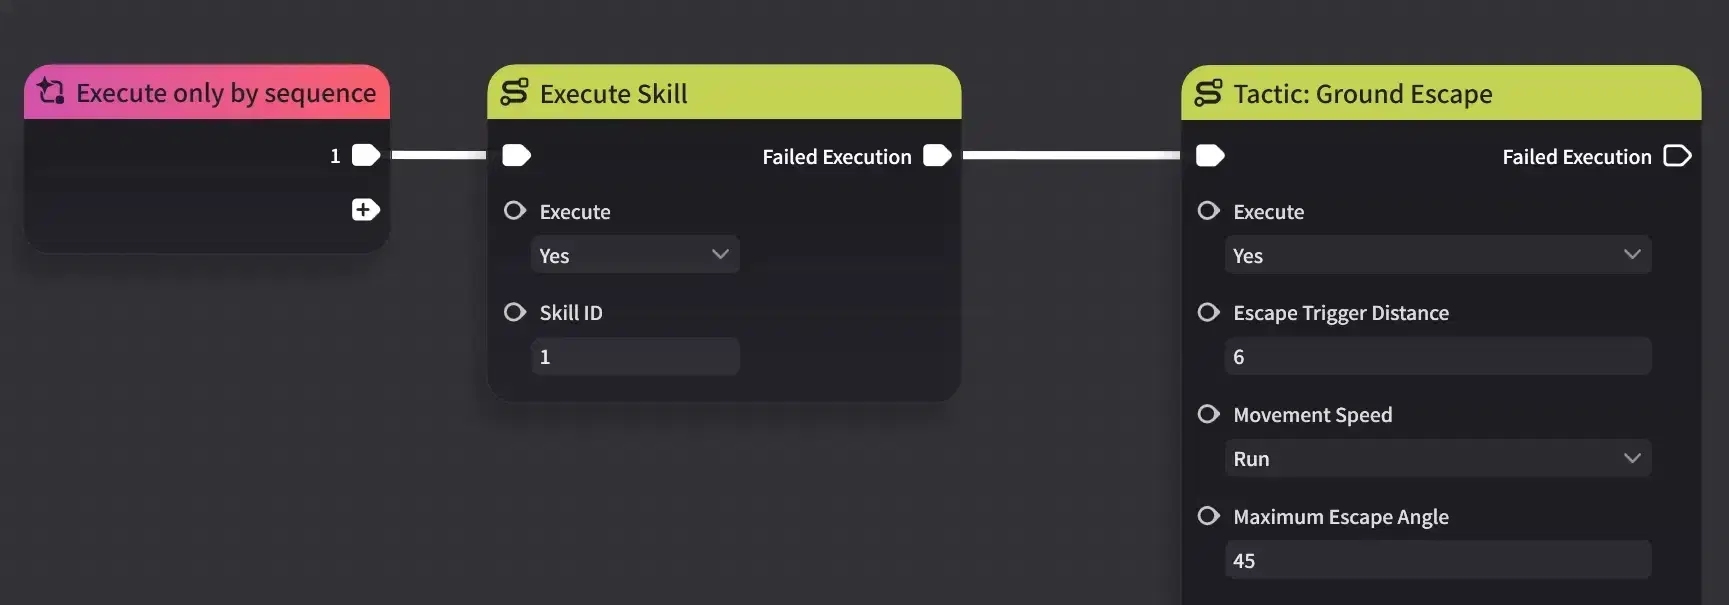
Status Node Graph 1 - cast. An Execute Skill node. If the skill is on cooldown this node simply fails, so add a Tactic: Ground Escape node alongside it. The result is that a mage on cooldown retreats instead of standing still and taking hits.
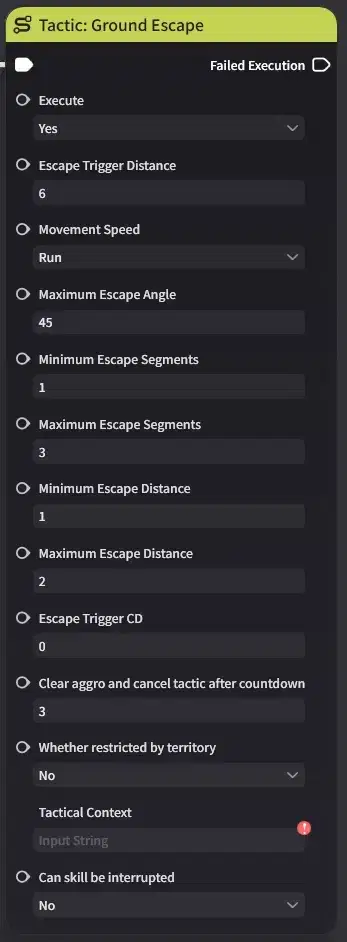
Ground Escape parameters:
Escape Trigger Distance - Distance at which escape begins
Maximum Escape Angle - The spread of escape directions. Set 45 and you get 45° to each side, 90° total
Min / Max Escape Segments - How many waypoints are generated per execution
Min / Max Escape Distance - How far the creation travels per segment
Escape Trigger CD - Cooldown before the tactic may run again
Clear aggro and cancel tactic after countdown - After this many seconds the creation exit battle entirely. Set to 0 and the tactic will not run
Whether restricted by territory - If true, the tactic ends when no valid escape point exists inside the creation's territory
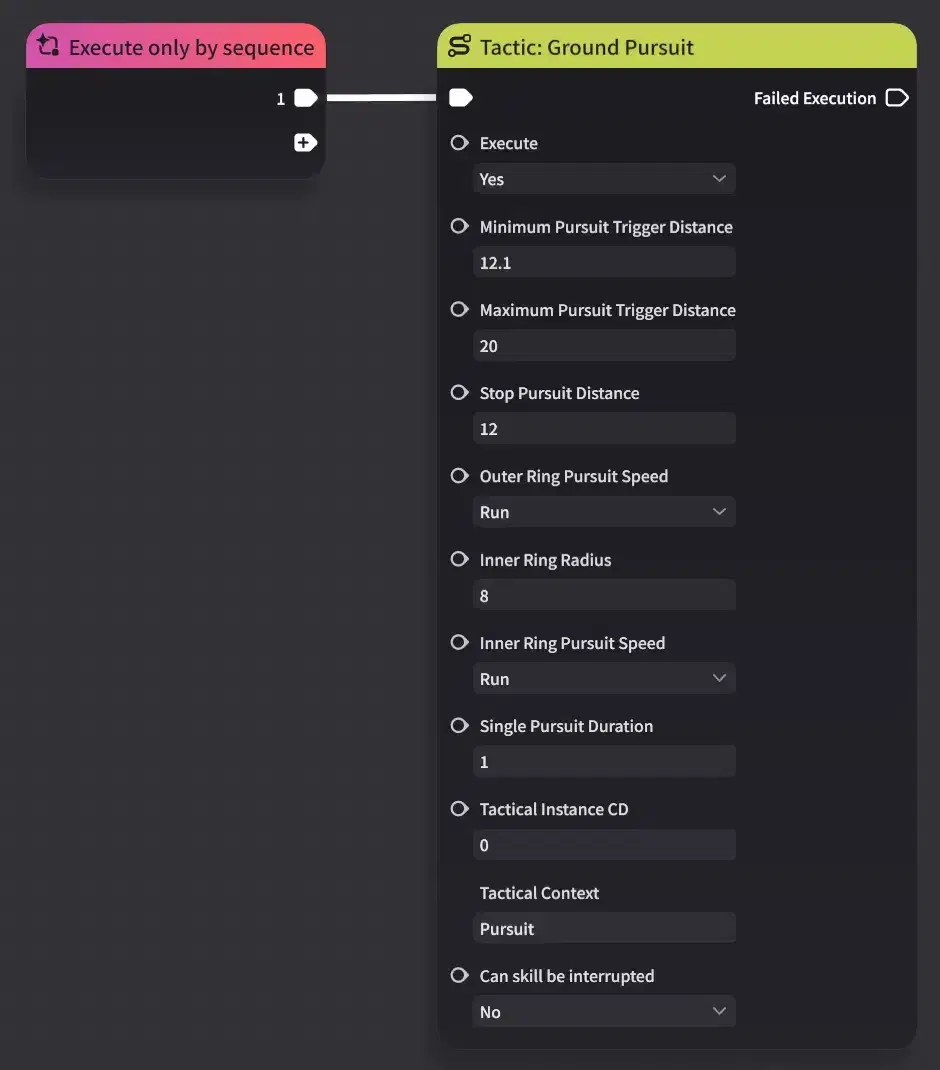
Status Node Graph 2 - pursue. Tactic: Ground Pursuit, with values matching branch 3 of the Decision graph:
- Minimum Pursuit Distance - 12.1 (above stop distance, per the conflict rule in 4.3)
- Maximum Pursuit Distance - 20
- Stop Pursuit Distance - 12
- Can skill be interrupted - No
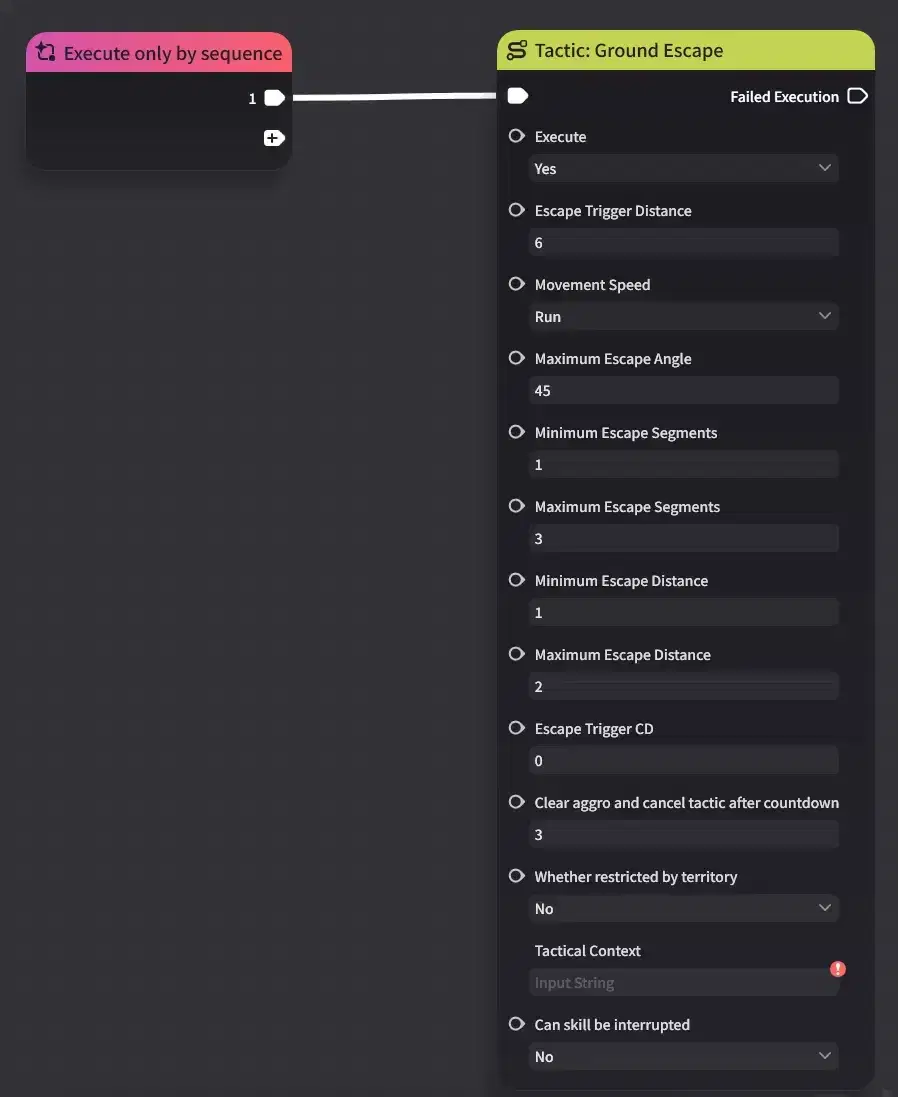
Status Node Graph 3 - escape. Tactic: Ground Escape, matching branch 2:
- Escape Trigger Distance - 6
- Can skill be interrupted - No
- 1–3 escape segments, 1-2 m each
- Escape Trigger CD - 0
- Clear aggro after 3 s
Link all three into the Decision graph.
5.4 Showcase
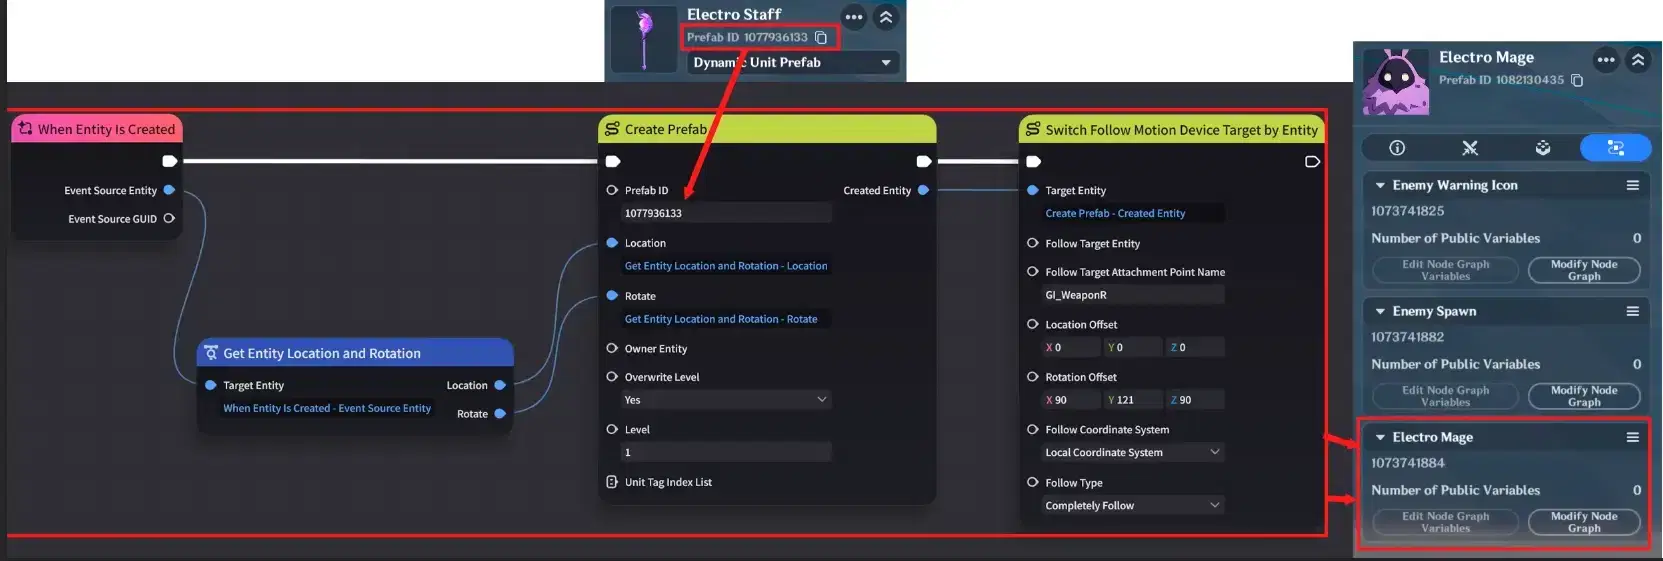
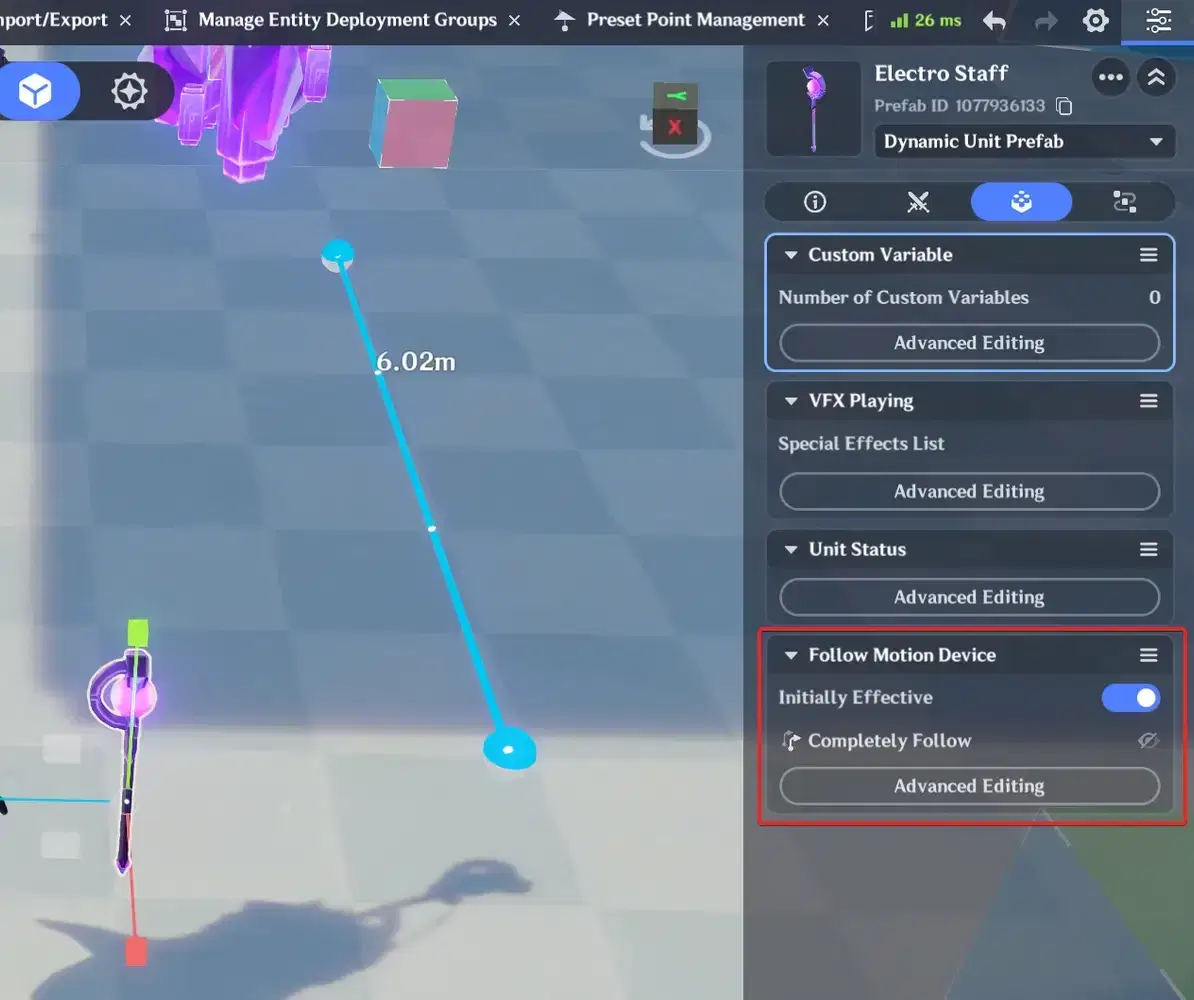
For a finishing touch, build an Electro Staff prefab and attach it to the mage with a Follow Motion Device. A small node graph on the mage spawns and attaches the staff when the mage is created.
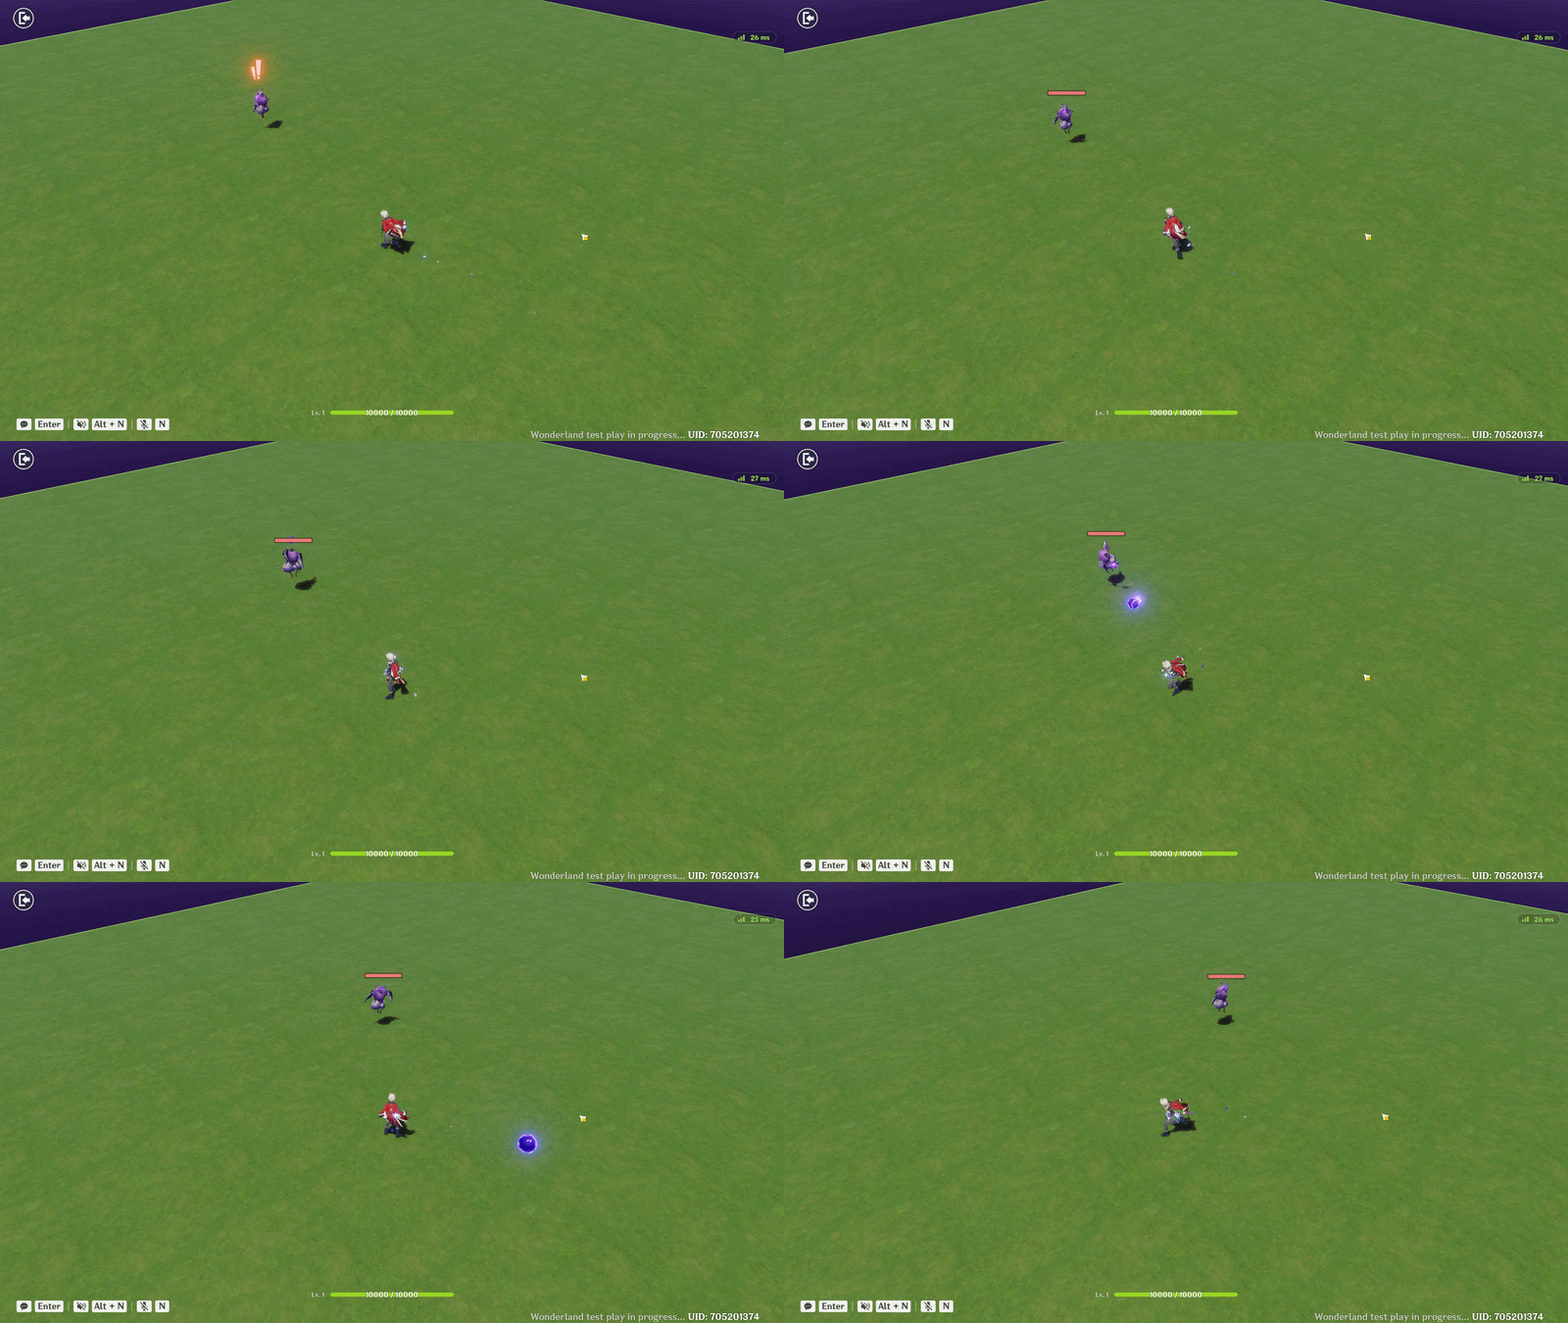
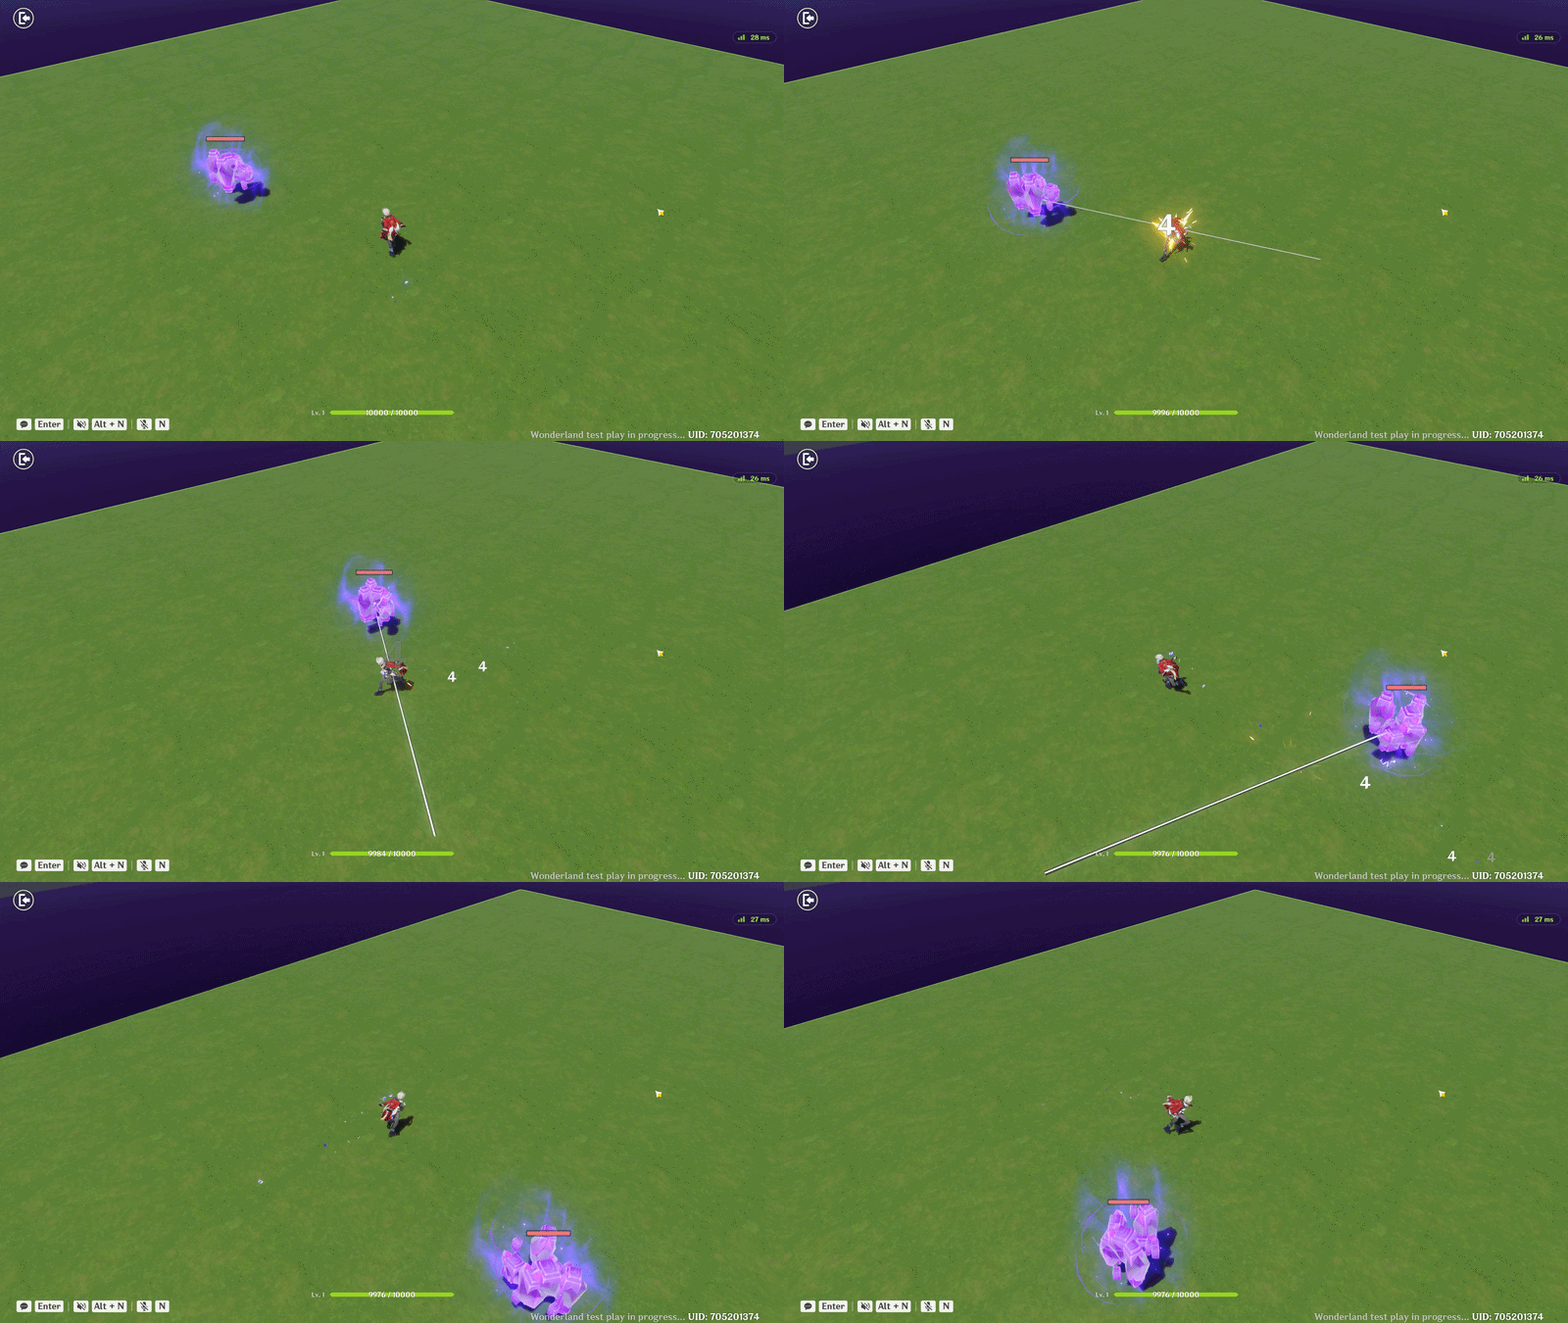
Electro Mage Attack
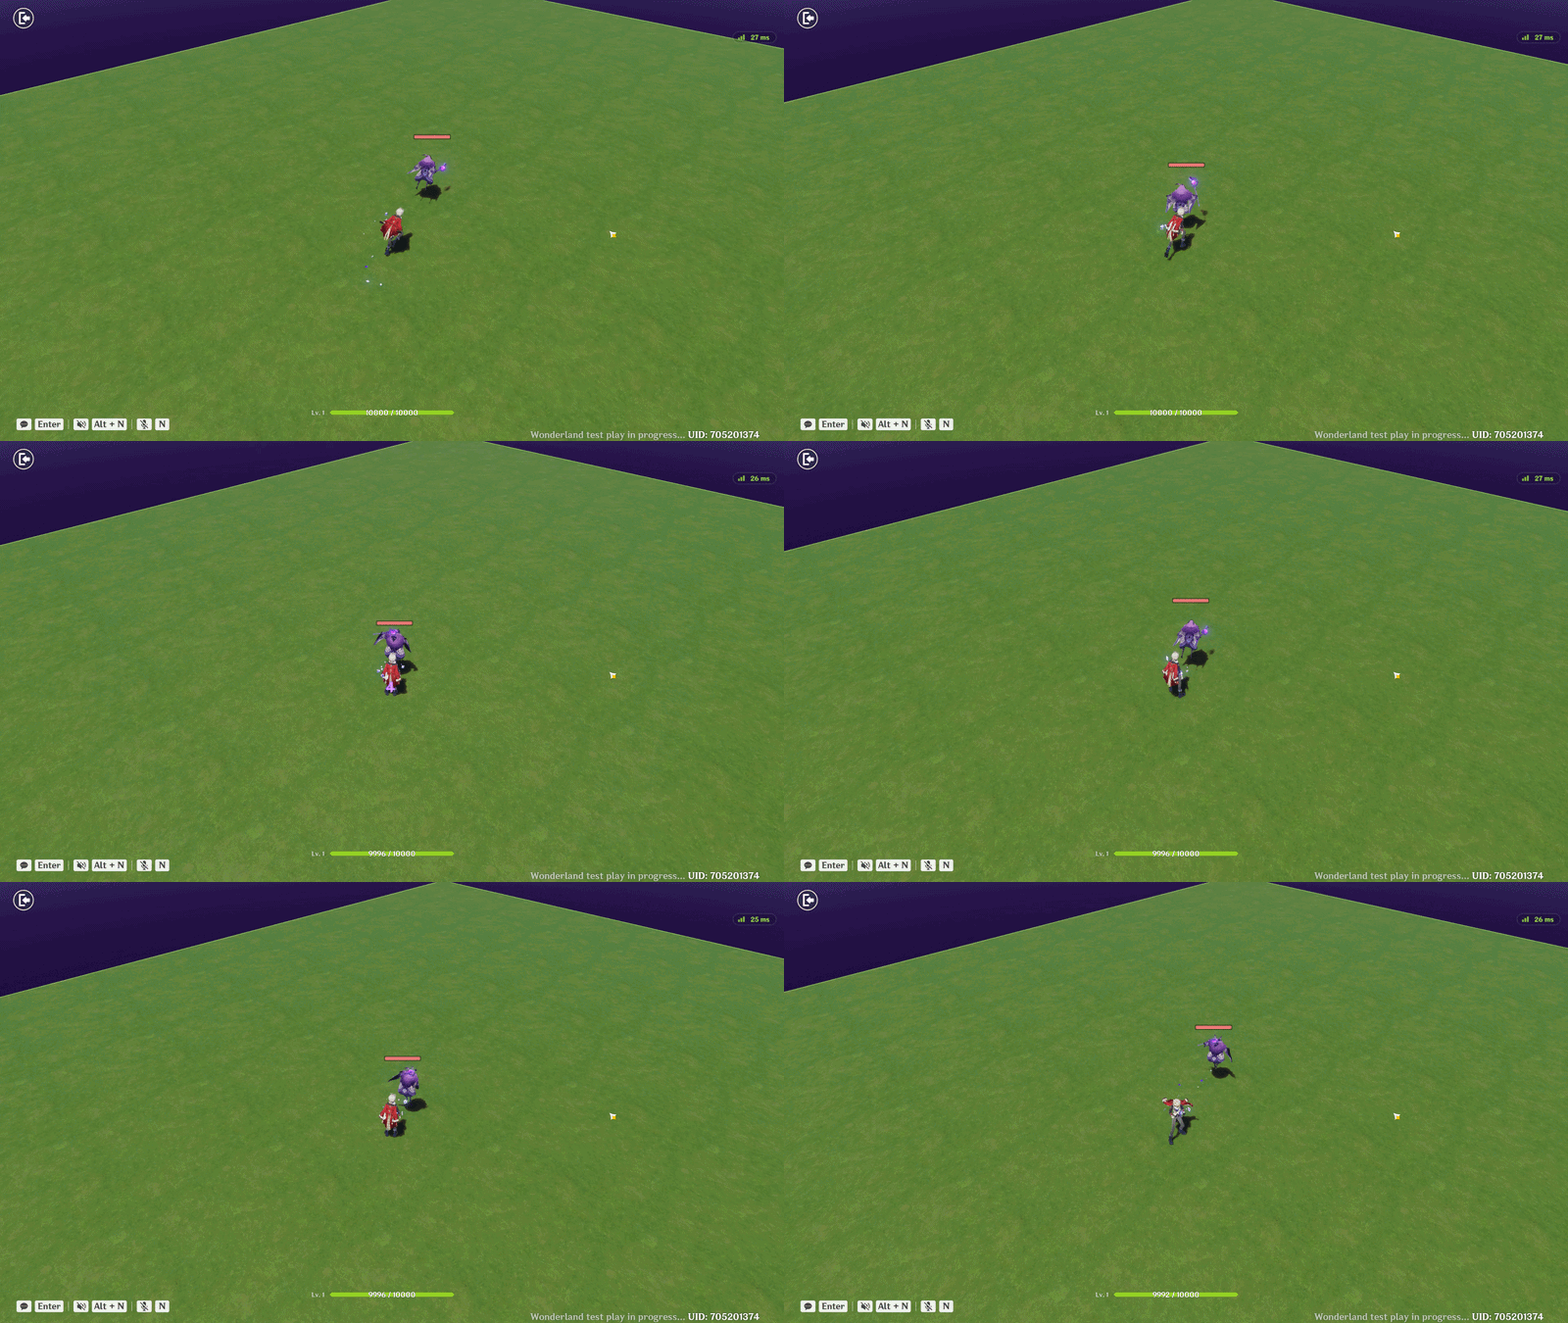
Electro Mage Escape
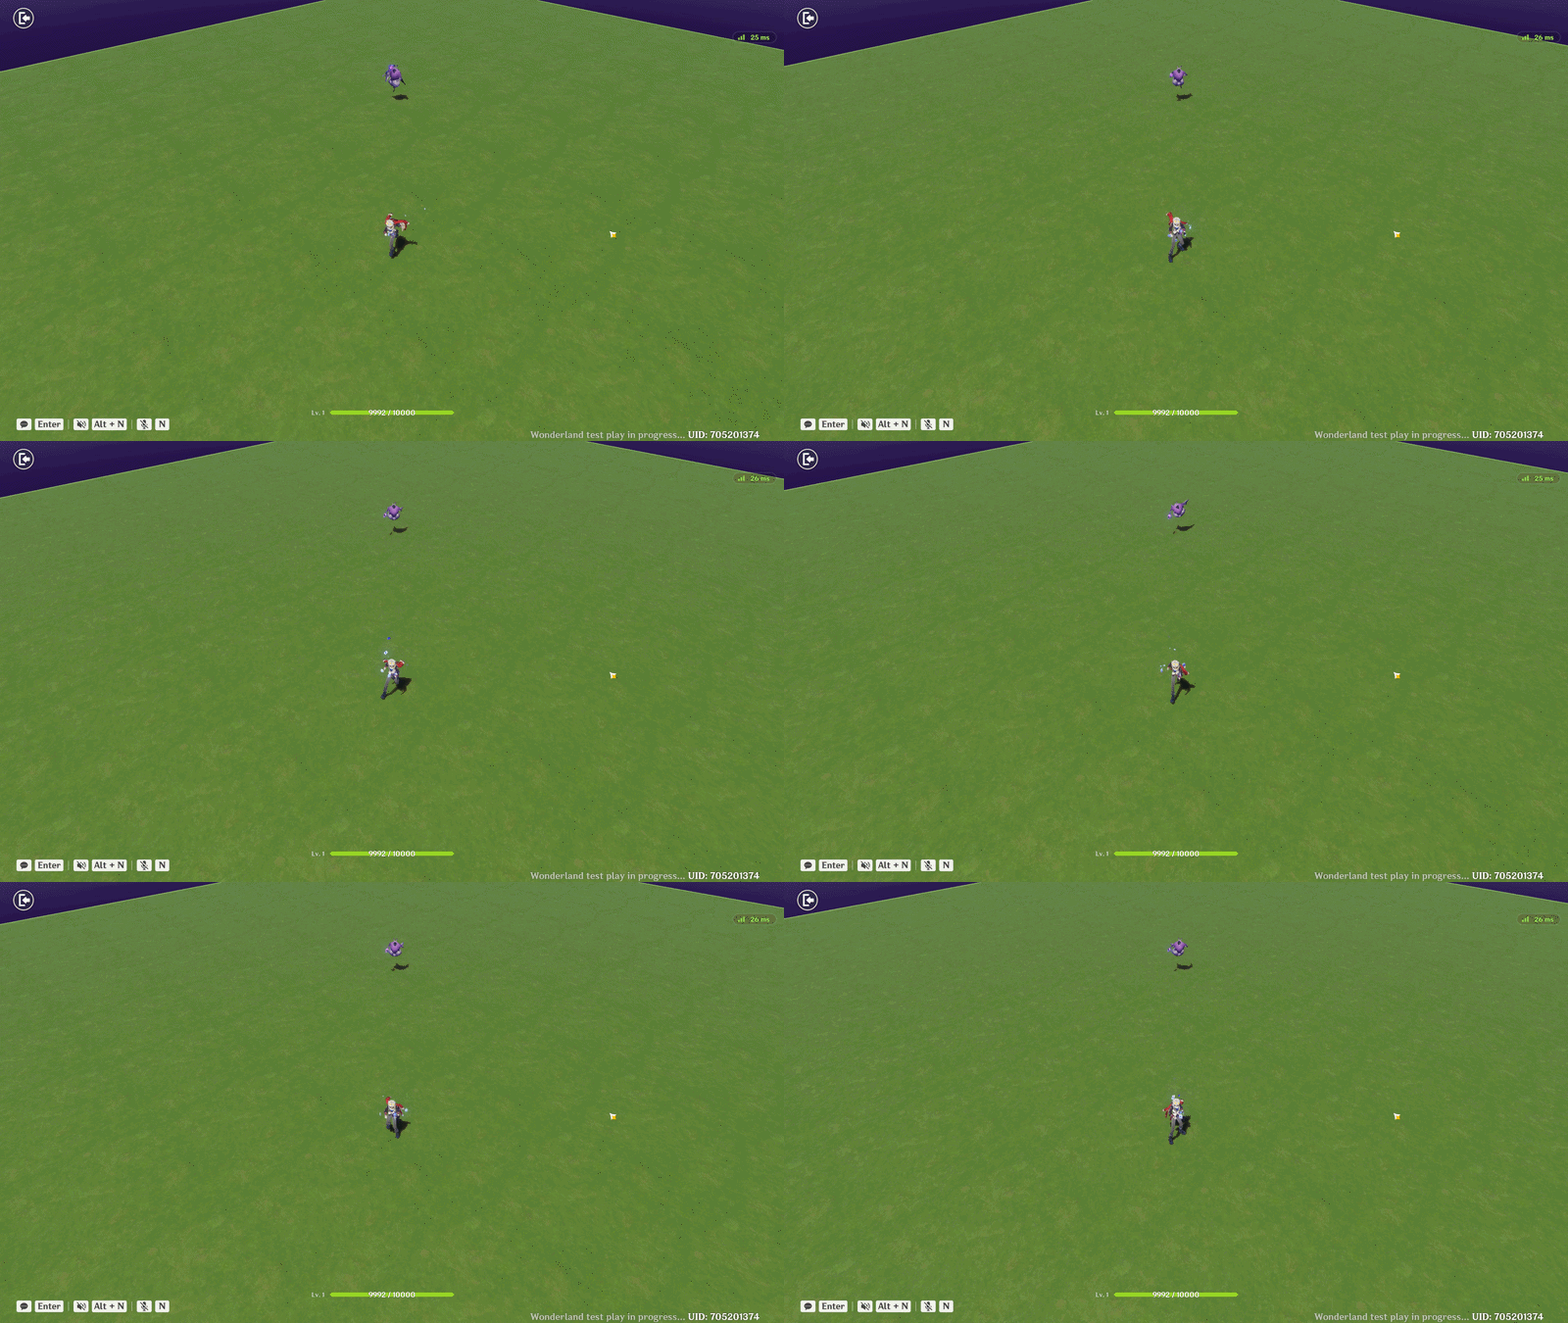
Electro Mage Pursuit
6. Example 2: Electro Mage with a Custom Model
Same skeleton, different presentation: a custom modelled enemy that shoots a beam at the player. This example shows how to put your own model on a Complex Creation.
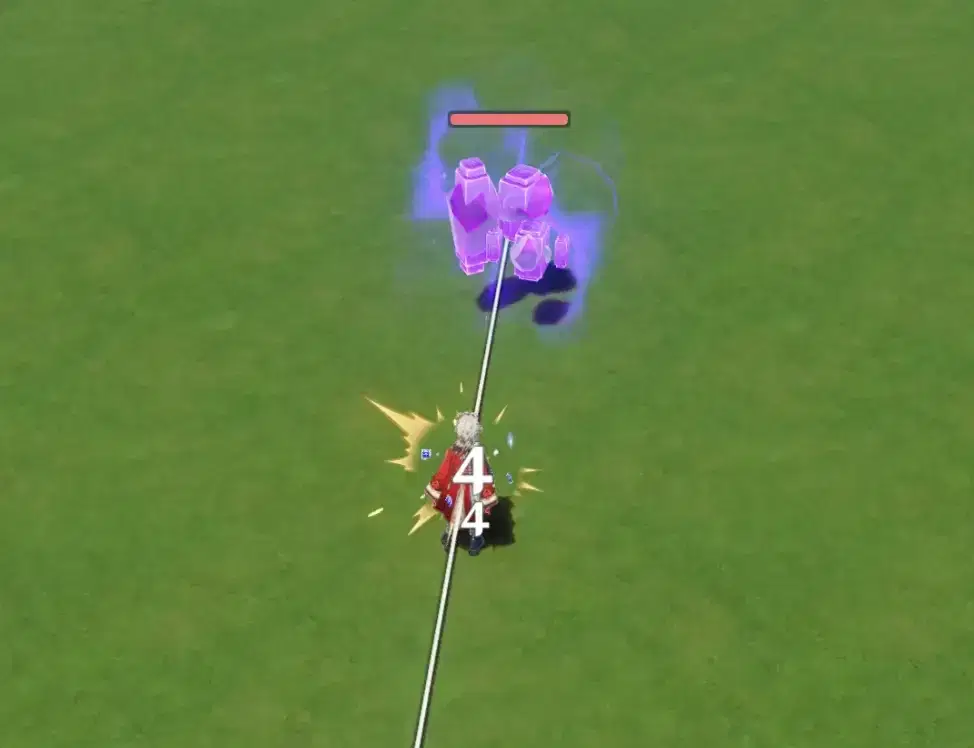
6.1 Replacing the Model
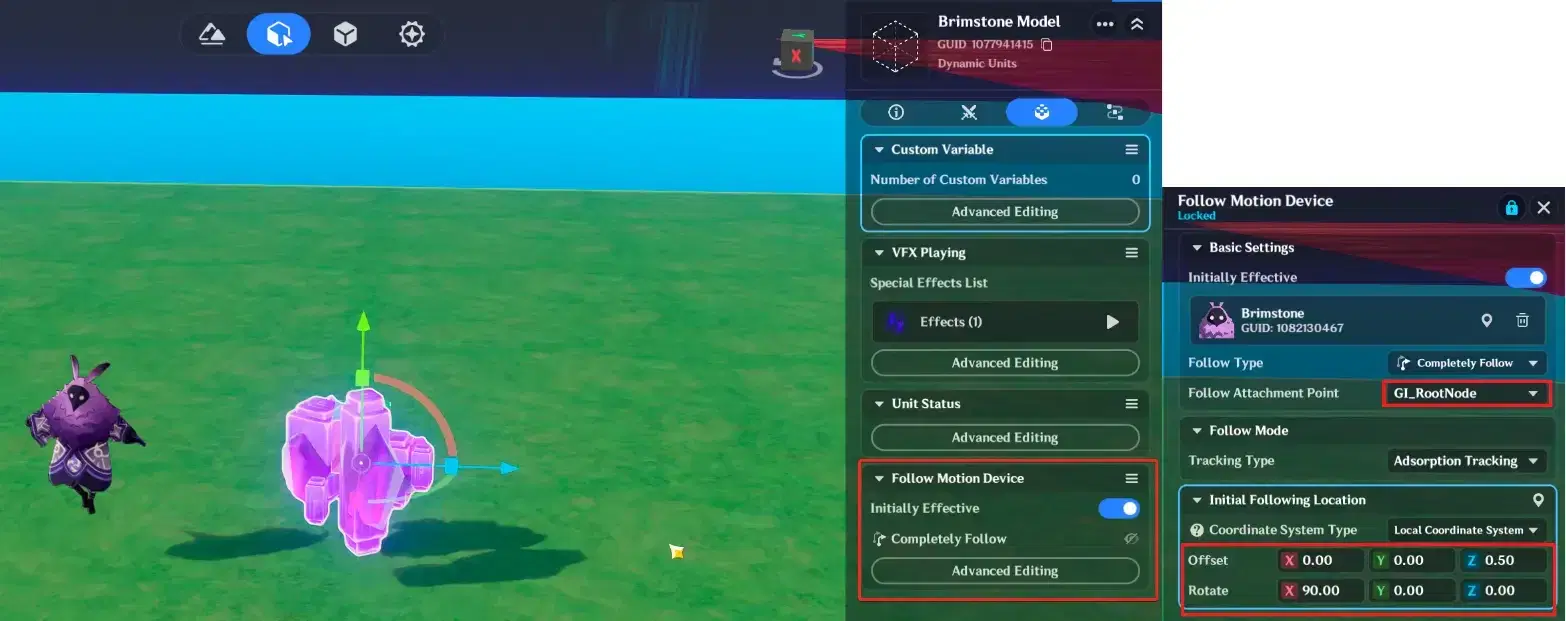
Add a Follow Motion Device component to your model - the model must be a Dynamic Unit. Point it at one of the creation's attachment points, or make your own. You will need to tune Following Location offset / rotate by hand; the correct values differ for every complex creation.
Then hide the original mage model. Go to Combat Preset → Unit Status → New Status, enable Infinite Duration, and add the Creation Invisible effect under Effect Details.
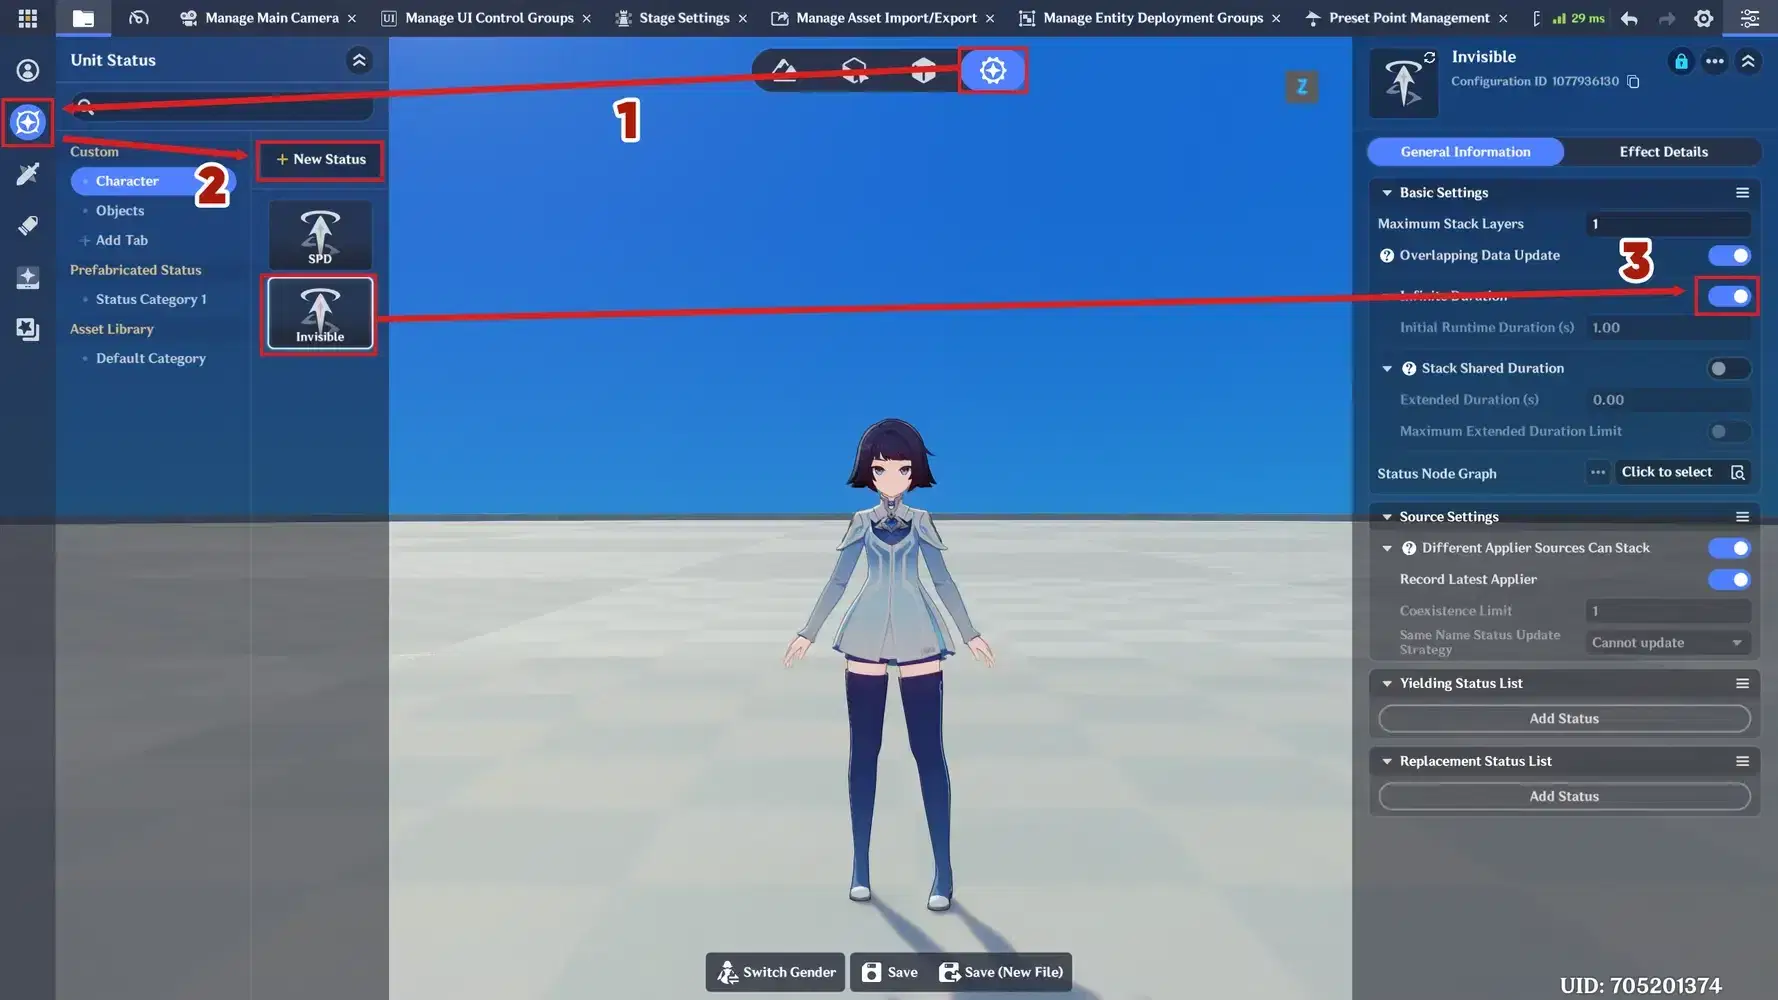
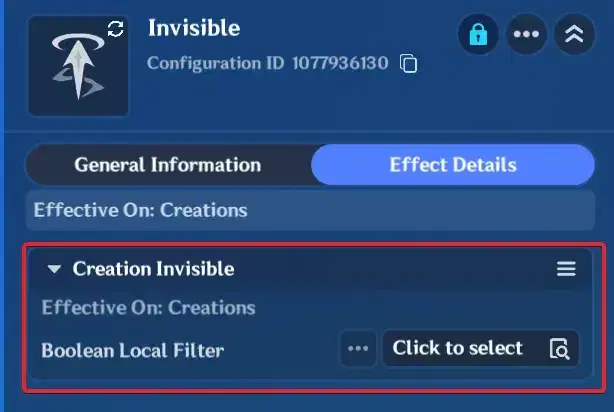
Attach that status to the mage in the Unit Status component. Initial Layer 1 means the effect is on, 0 means off.
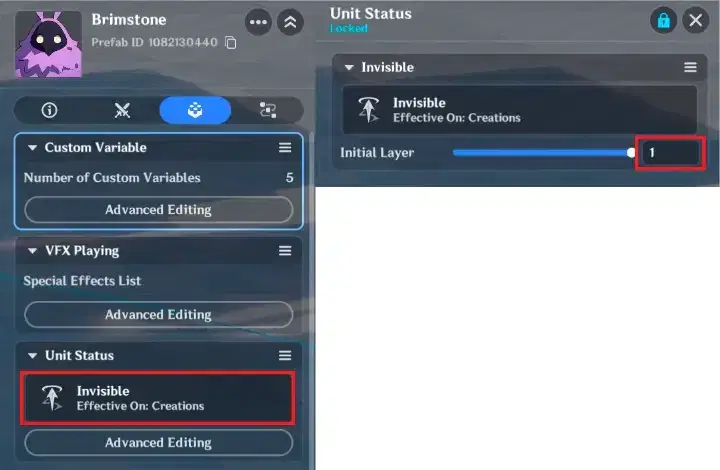
The original creation is still there doing all the work - pathing, aggro, skills. You have only made it invisible.
6.2 The Ray Skill
Create a Skill Node Graph with one node: Trigger Rectangular Hitbox at Specific Location.
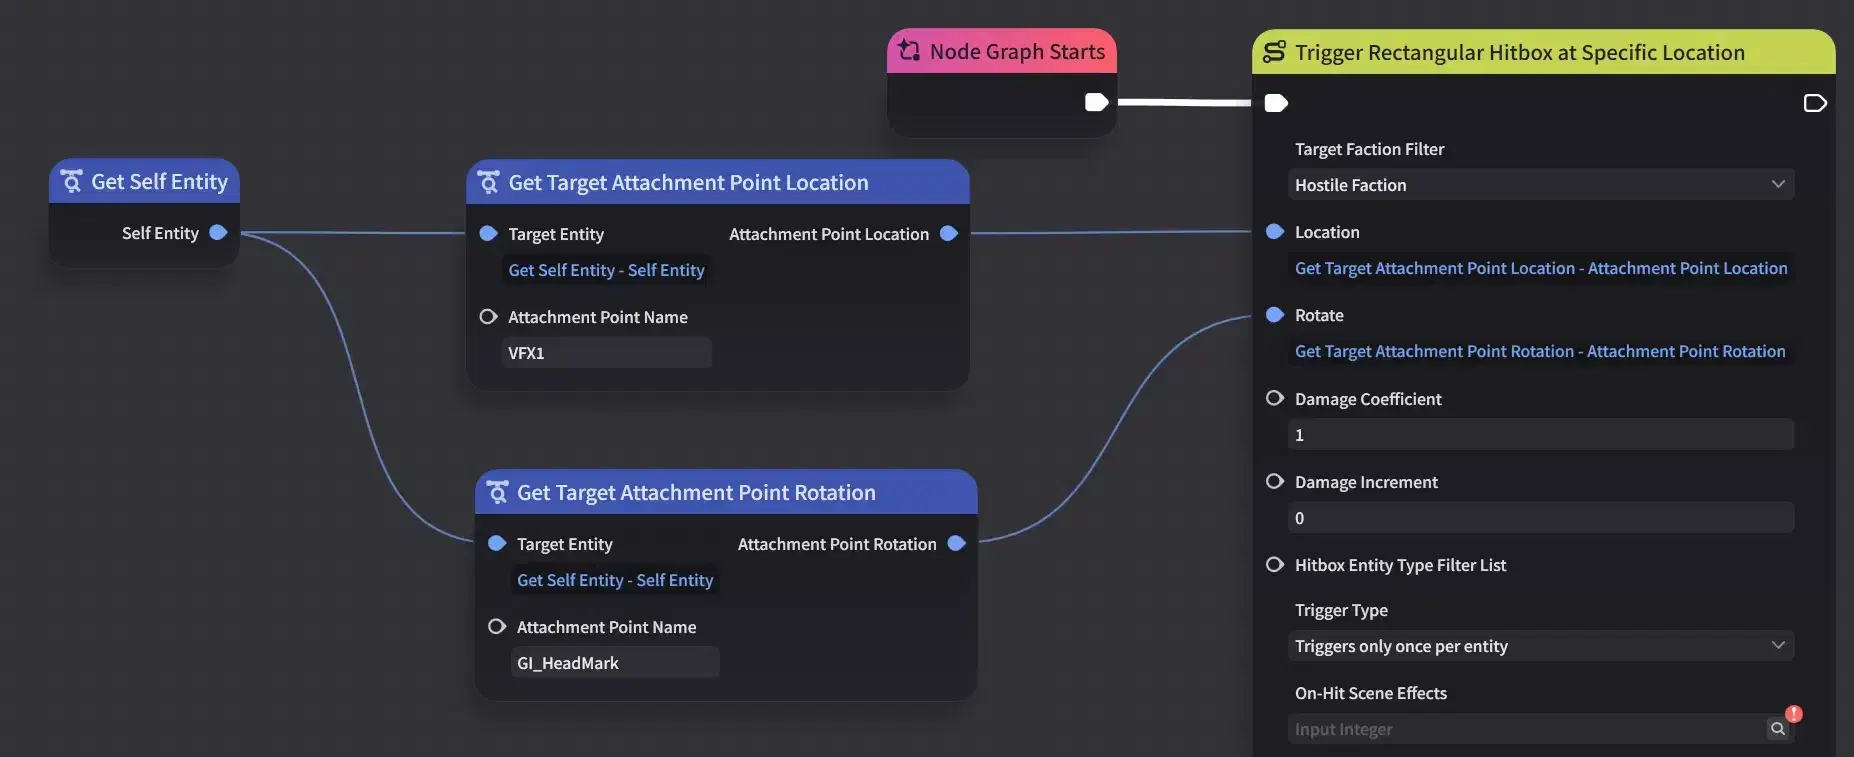
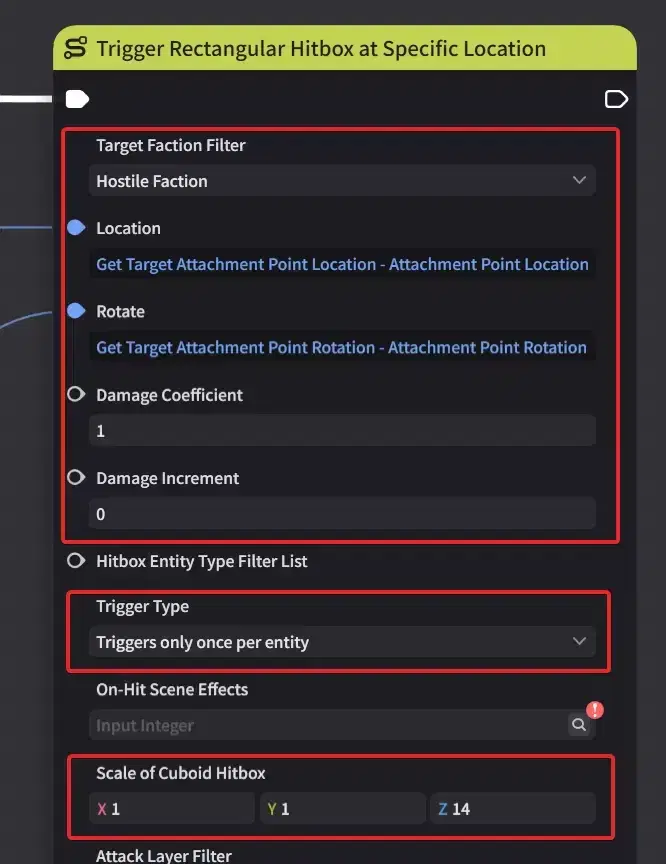
Target Faction Filter - Hostile Faction, as always.
Location - take it from a custom attachment point placed well in front of the mage. This matters because a rectangular hitbox extends equally in both directions from its origin.
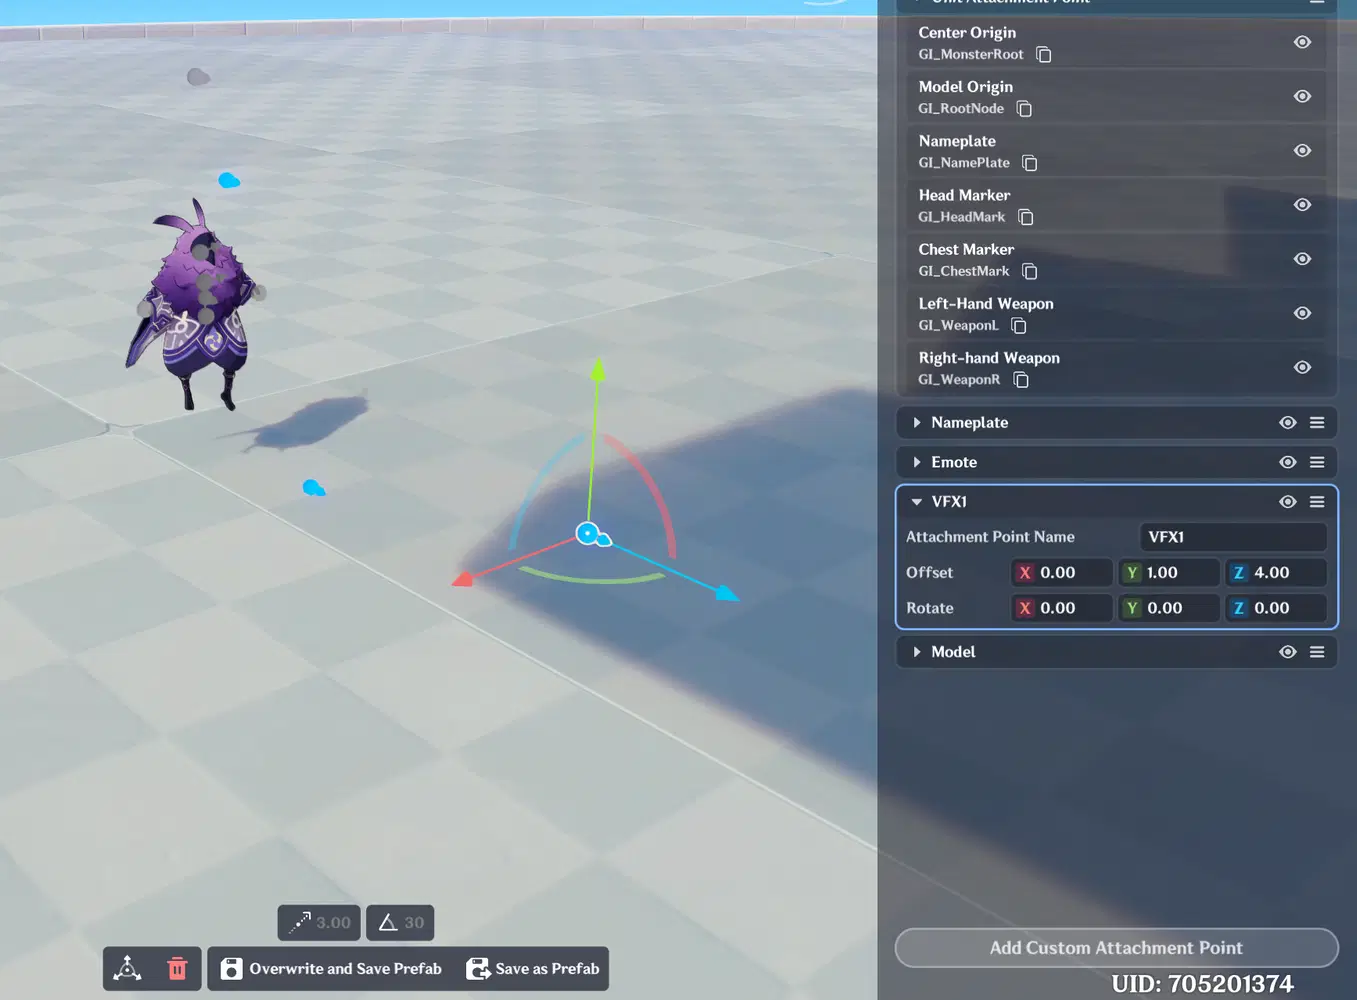
Rotation - take it from the default attachment point GI_HeadMark. That point rotates with the creation, so it gives correct orientation values, which a static custom point won't.
Damage Coefficient - 1, meaning damage equals Base ATK.
Trigger Type - once per entity.
Scale of Cuboid Hitbox - 1 m wide, 1 m high, 14 m long for a beam of this length.
The skill timeline
Create the skill under Combat Preset → Skills → New Skill and pick a suitable animation - Mage Random Behaviour 3 works well here.
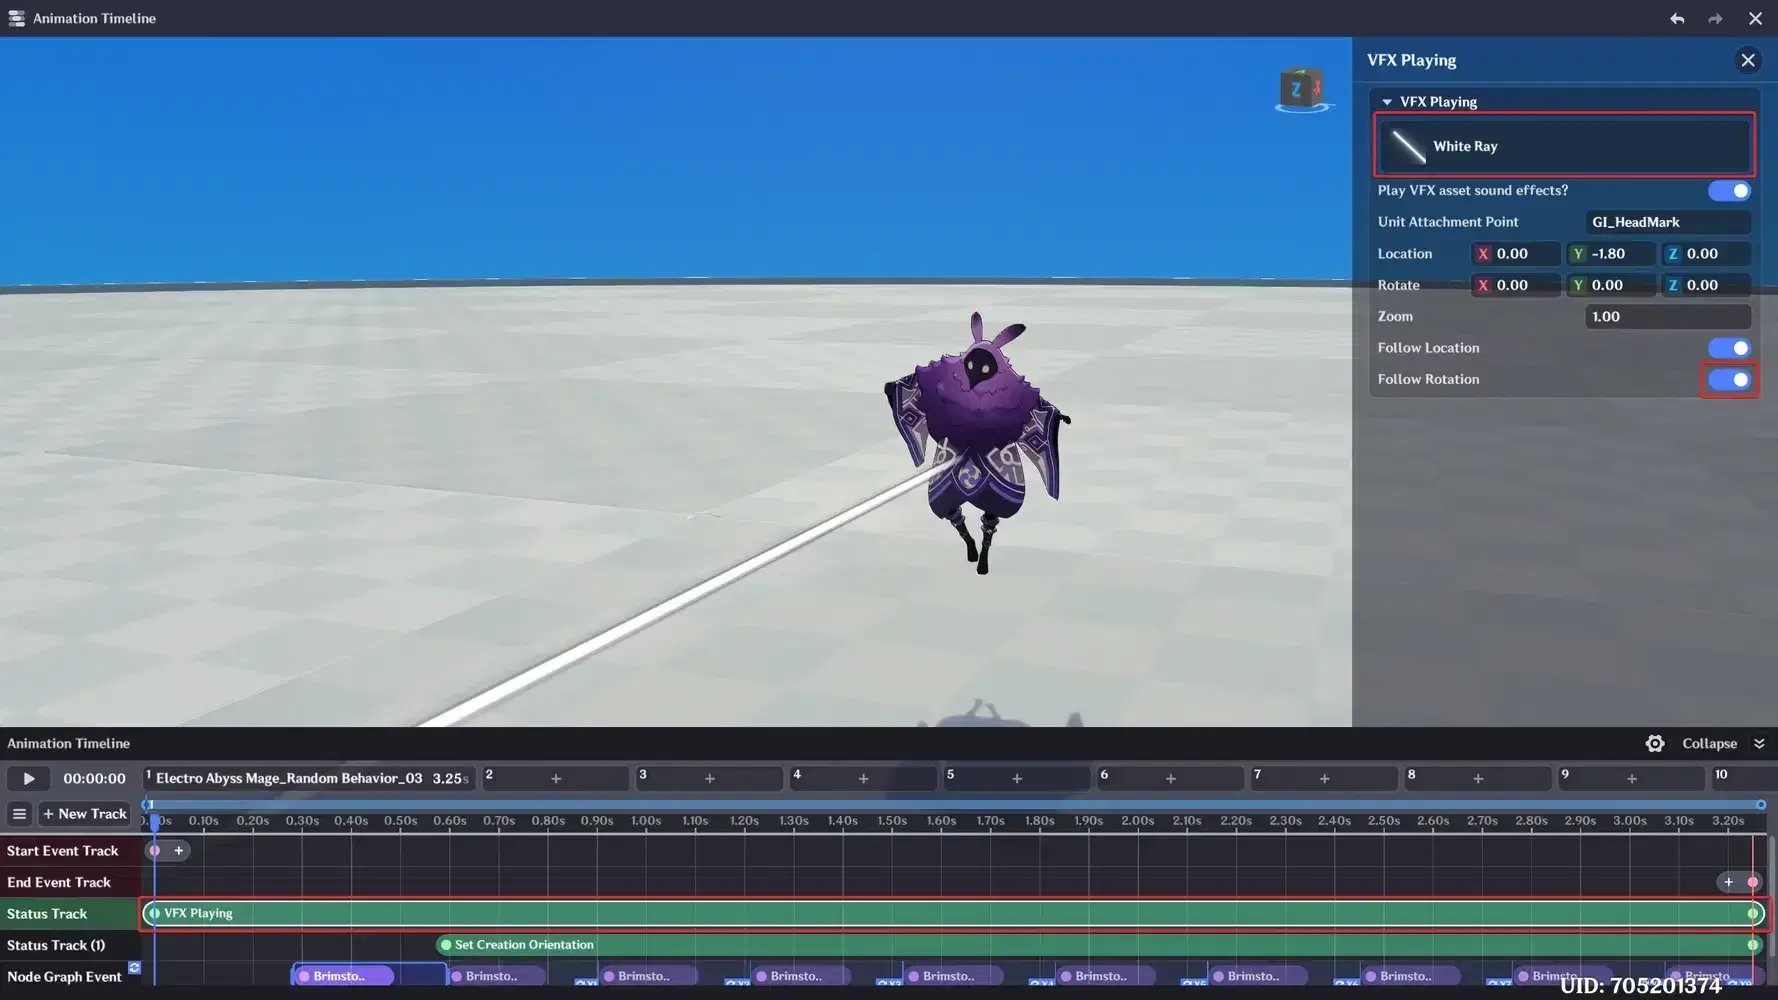
Add a VFX Playing status with the White Ray looping VFX, and confirm Follow Rotation is enabled so the beam turns with the caster.
Now add two more status tracks via New Track → New Status Track, each with a Set Creation Orientation status:
- First track, angular velocity 270 — the mage snaps onto the player as the cast begins, so the beam starts aimed.
- Second track, angular velocity 90 — during the sweep the mage tracks slowly, and the player can escape the beam by sprinting around it.
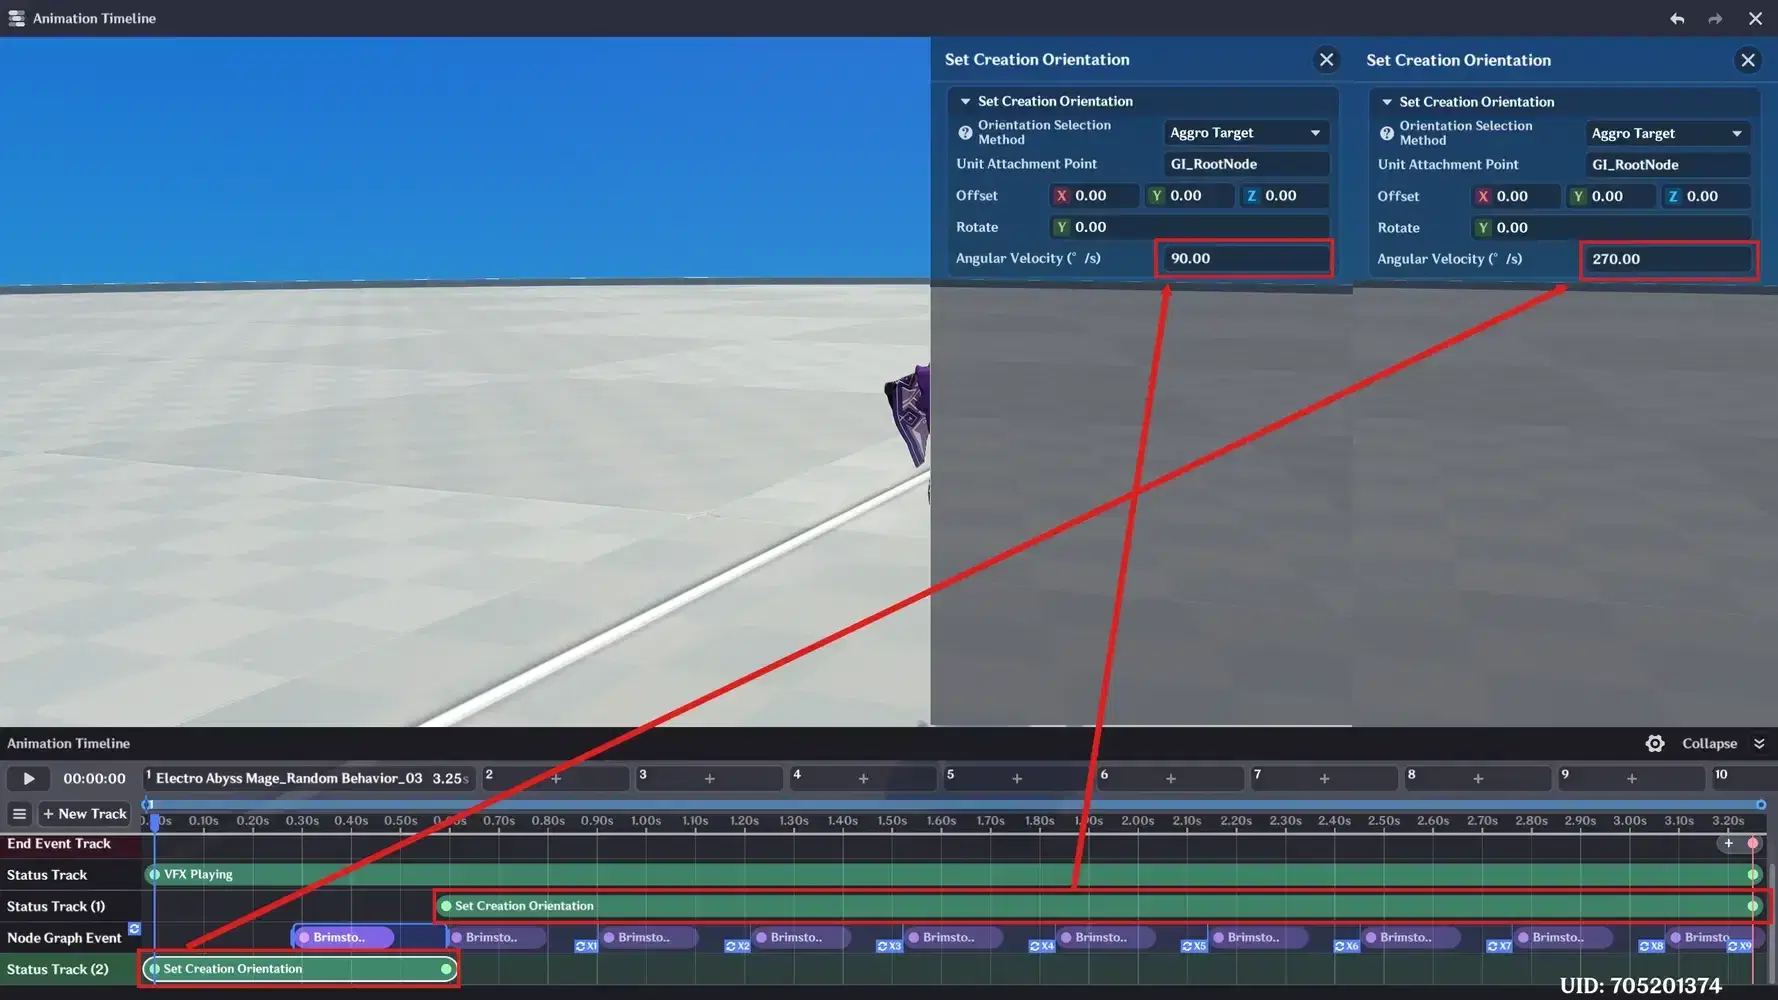
This two-stage turn is the whole design of the attack. Fast lock-on makes it threatening; slow tracking makes it fair.
For damage, click empty space on the Node Graph Event Track and enable loop segment. Place your hitbox node graph inside the resulting blue box and enable Infinite Loop. The box length controls the interval - as configured here the hitbox triggers every 0.3 s for as long as the skill runs. Shorten the box for faster ticks.
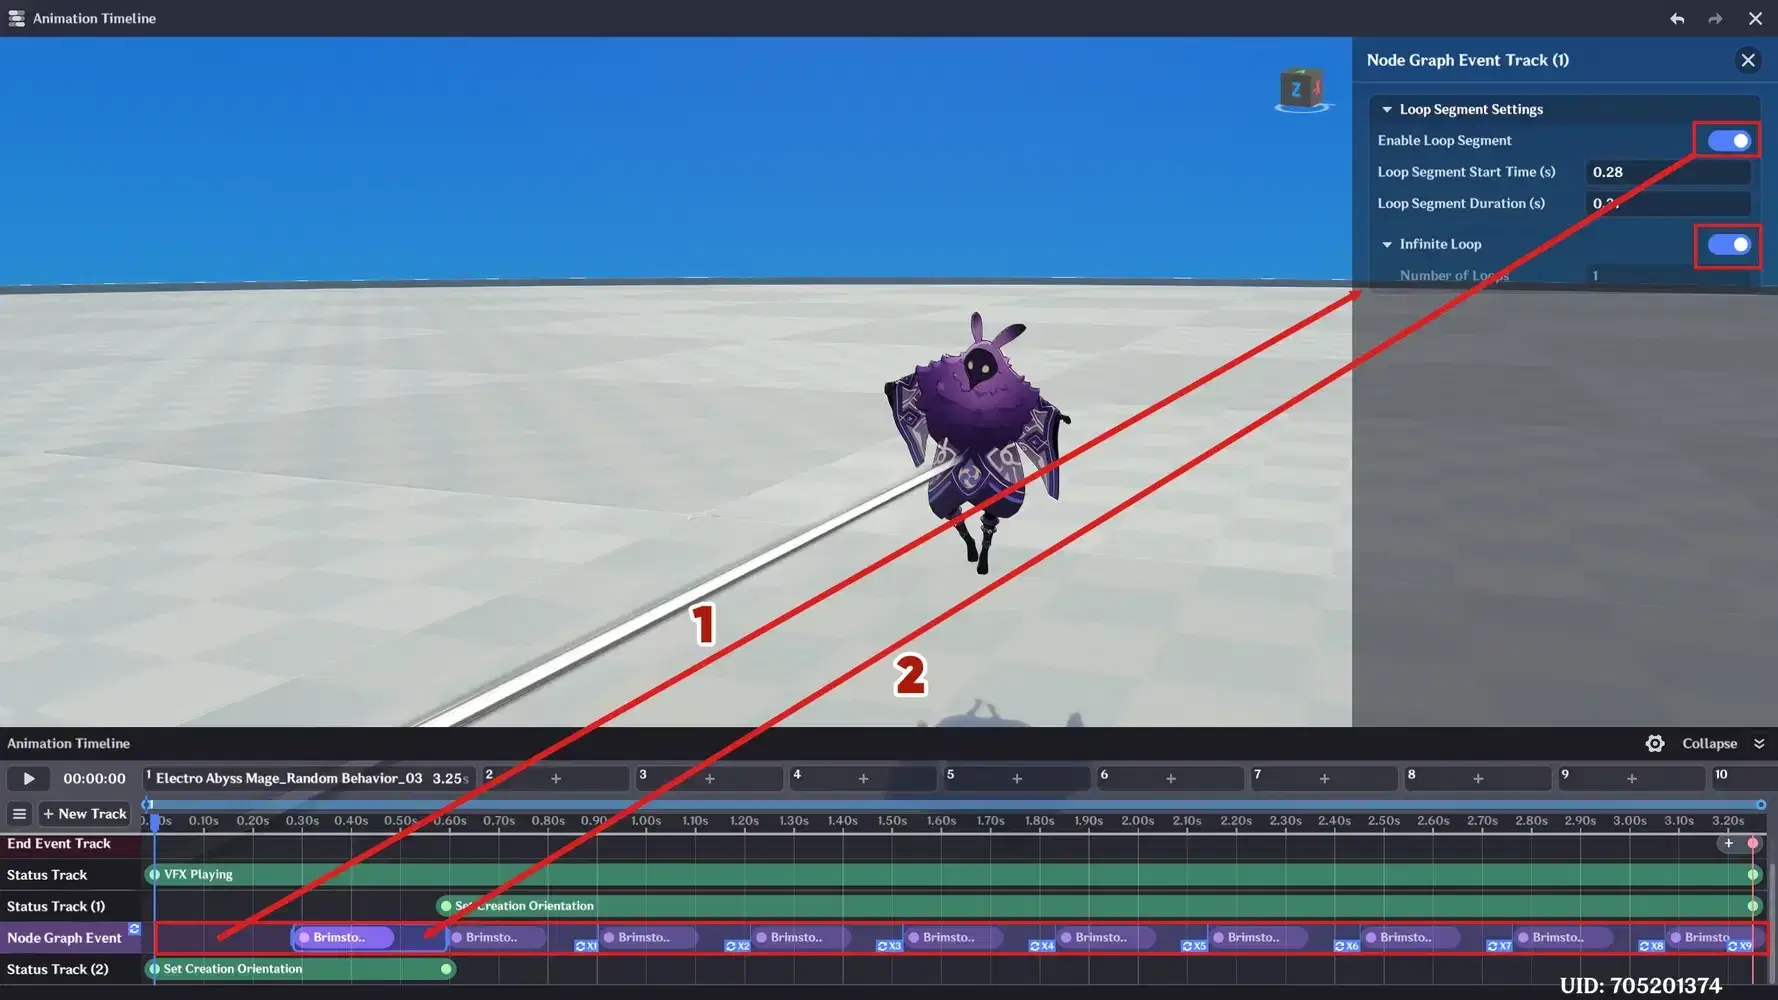
Infinite Loop will fill in the additional events automatically.
Assign the skill in Creation Skill Management as before.
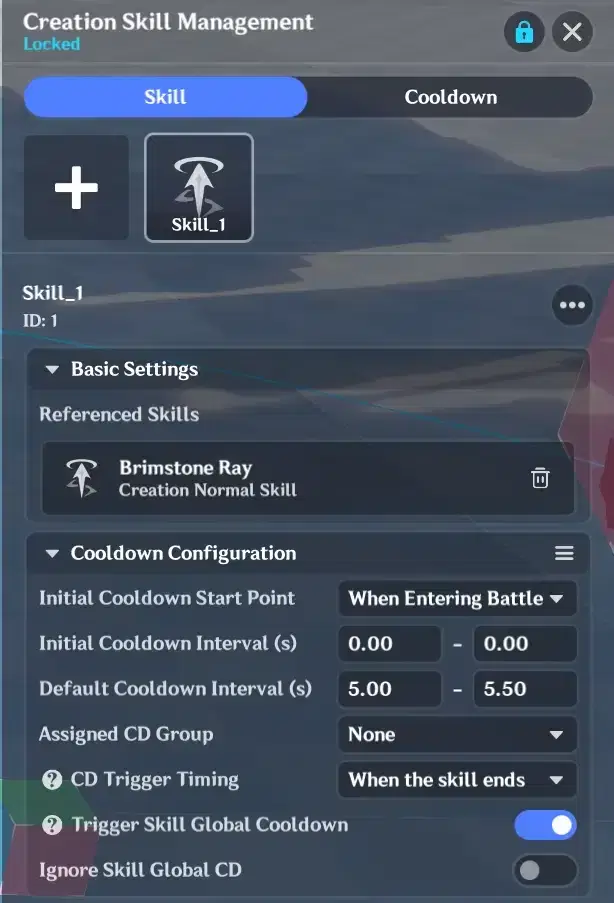
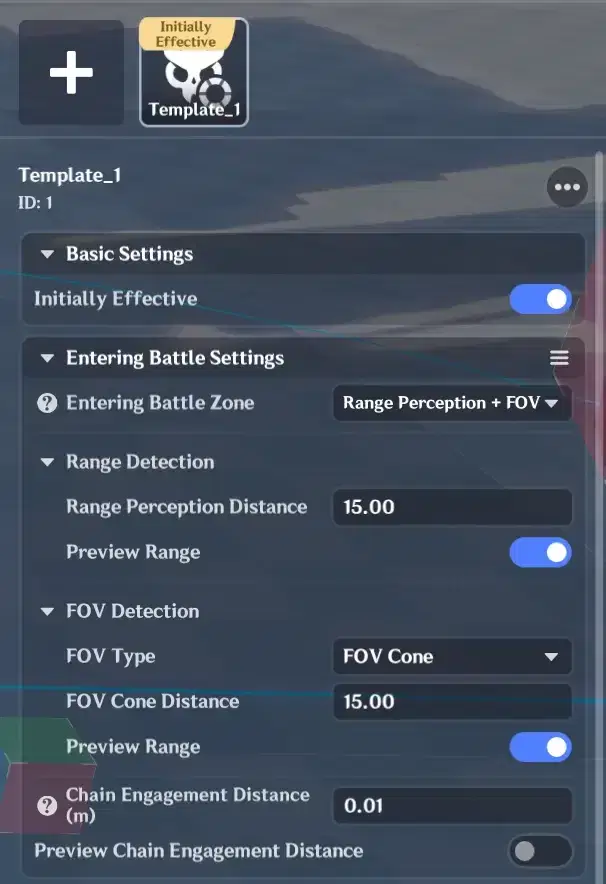
Before testing, add an Autonomous Logic Parameter Template.
6.3 Decision Node Graph
Same four-branch structure as the projectile mage, tightened for a shorter-range attack:
First branch: Target on field and distance < 1.5 m → Cast ray; if the skill is on CD, escape instead
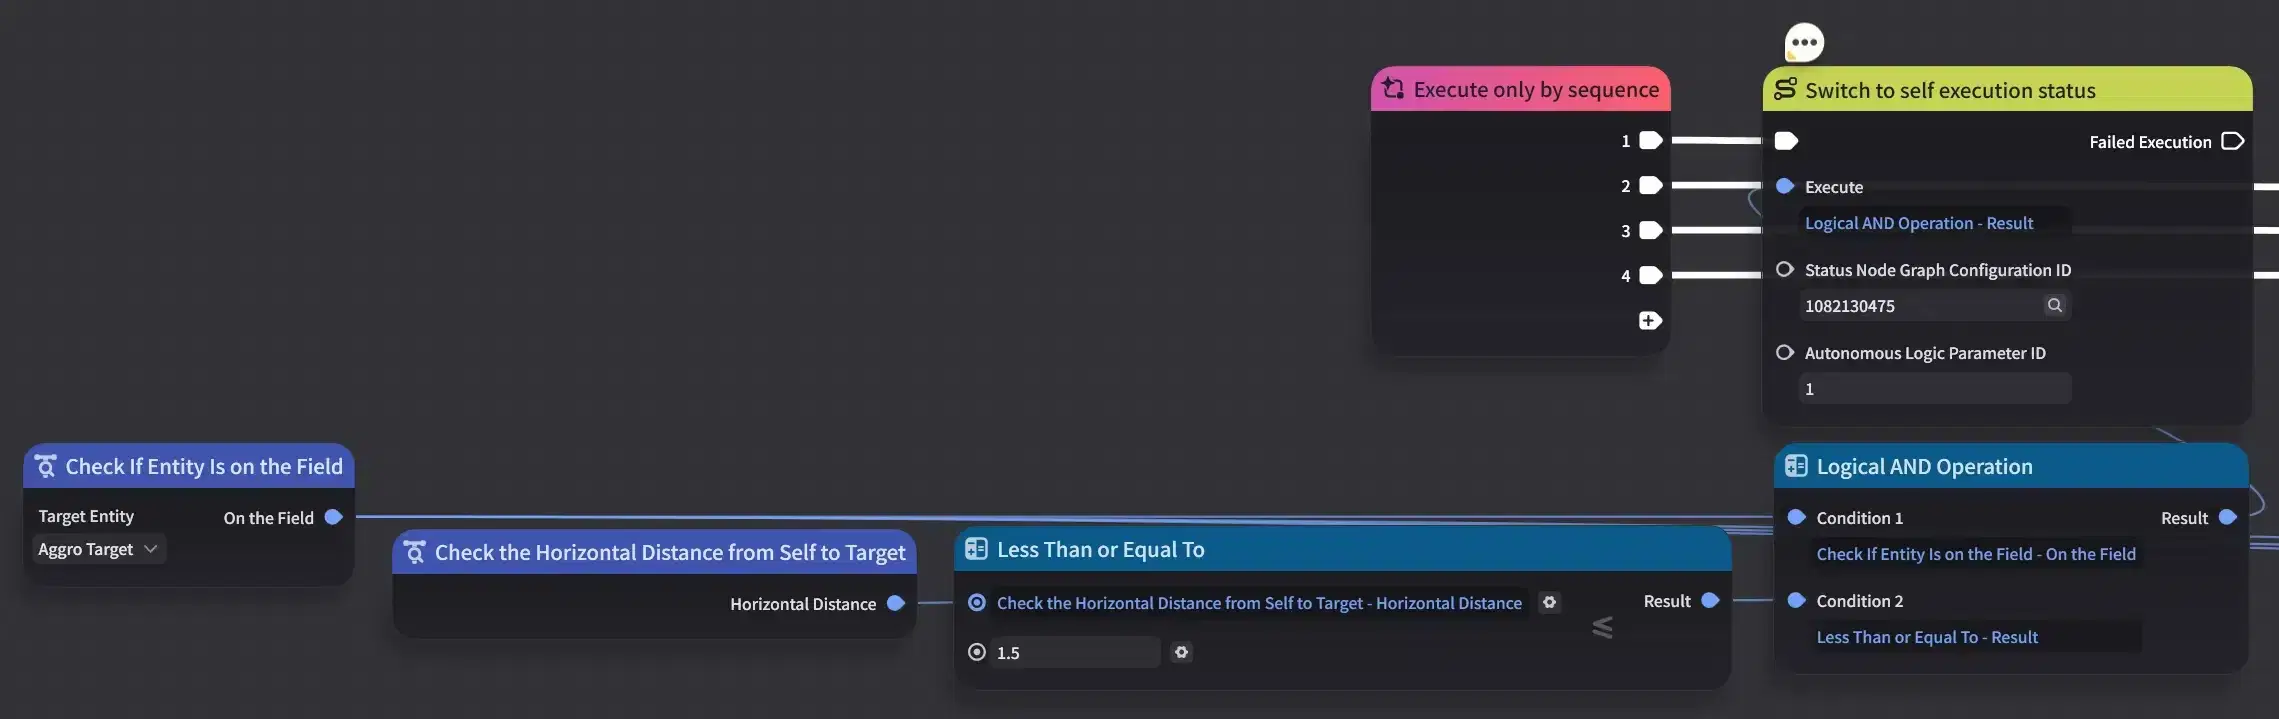
Second branch:Target on field and distance ≤ 4 m → Escape
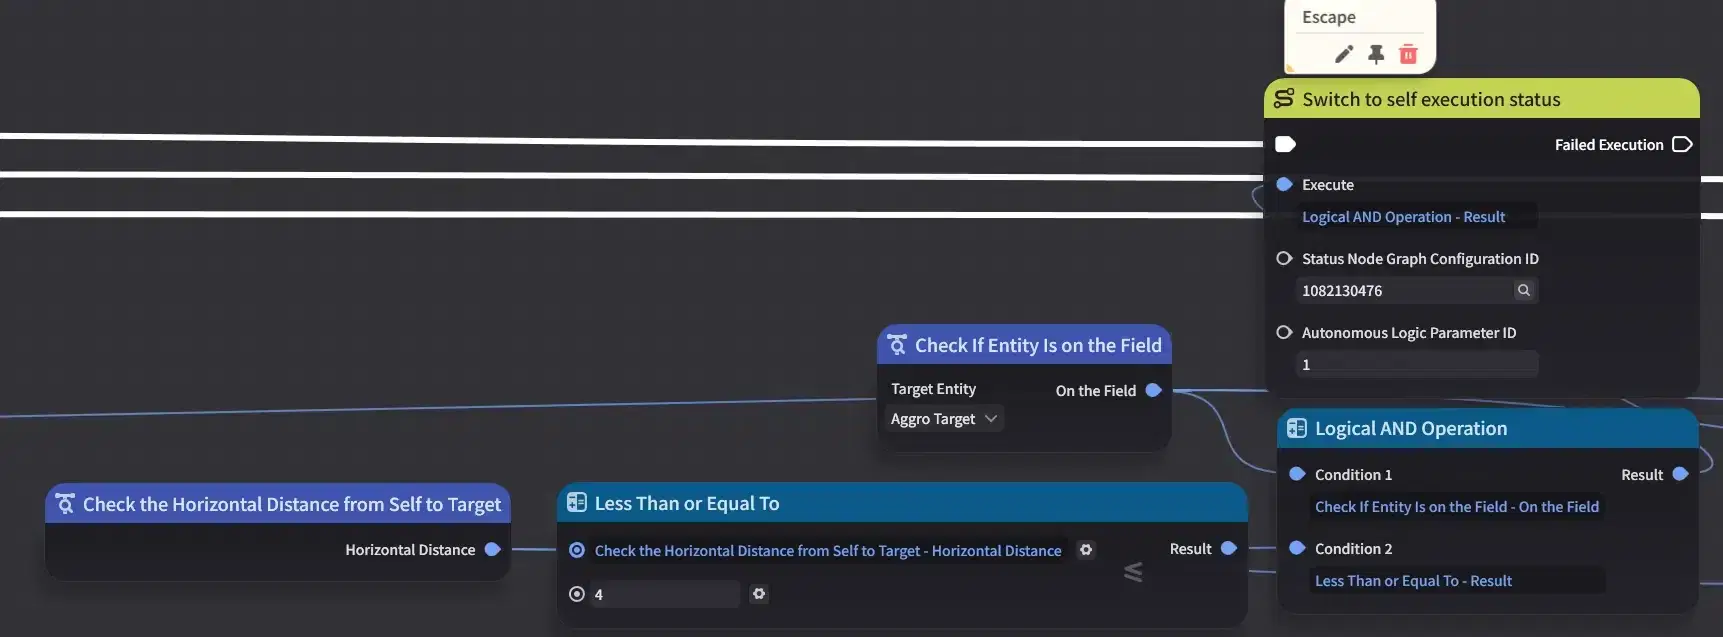
Third branch: Target on field and distance ≥ 6 m → Pursue
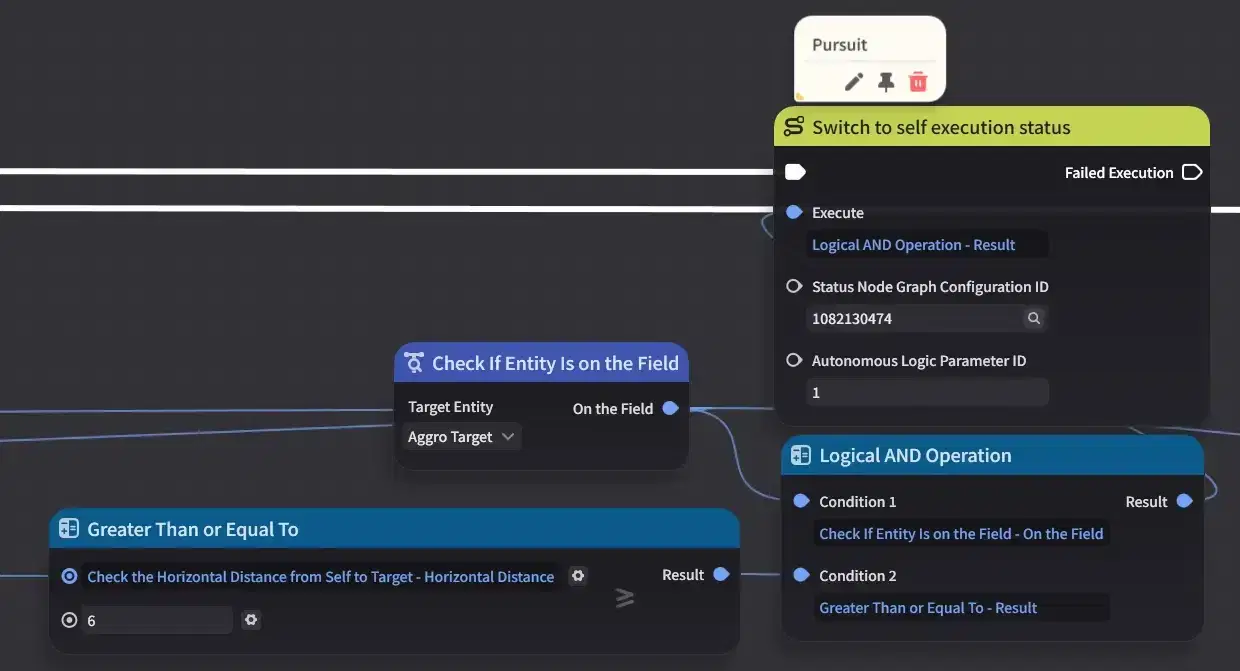
Fourth branch: Target on field and not currently casting → Cast ray; if the skill is on CD, escape instead
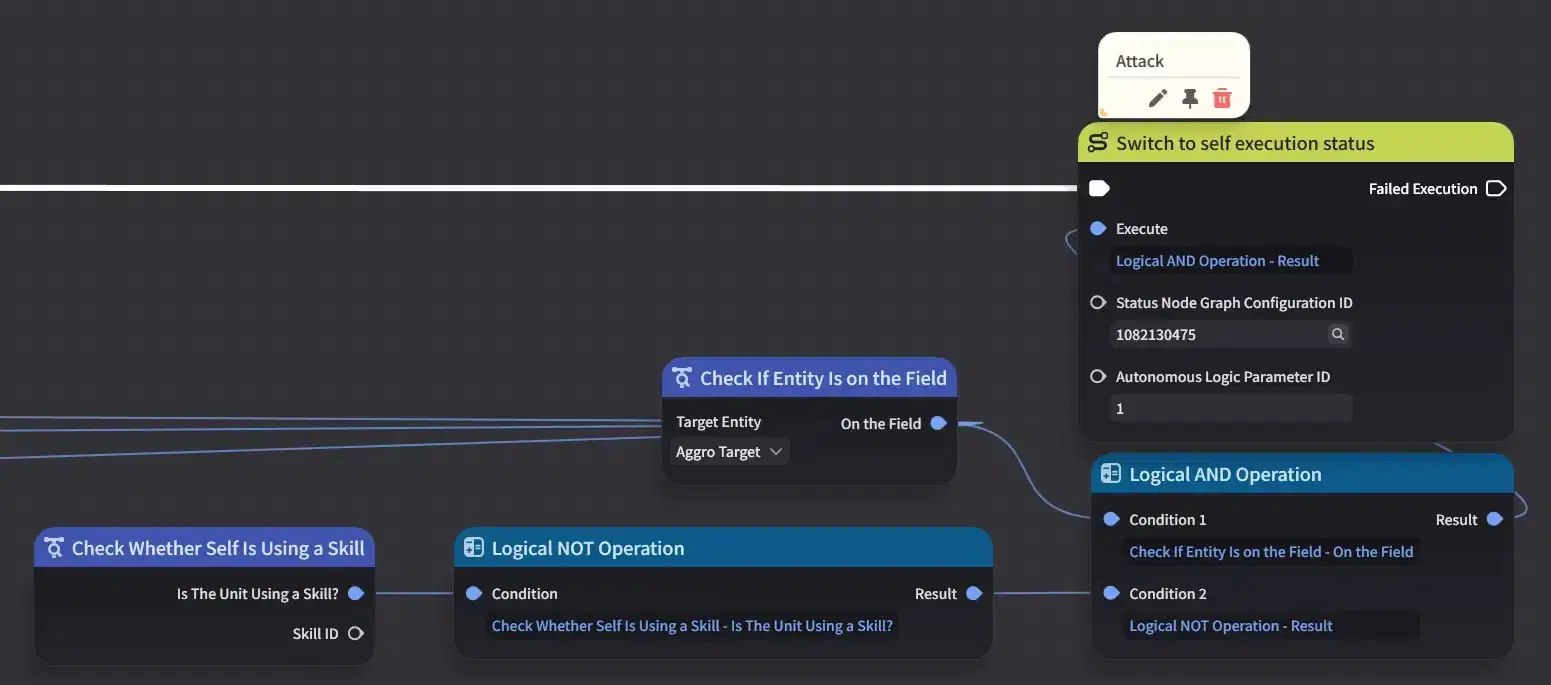
The shape to notice: branch 1 handles the panic case where the player is right on top of the mage, branch 2 is the normal kiting range, branch 3 stops the mage drifting out of the fight, and branch 4 keeps mage to attack when nothing else applies.
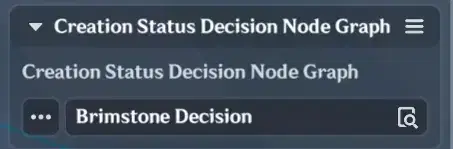
Remember to select the Decision graph in the mage's Combat Tab.
6.4 Status Node Graphs
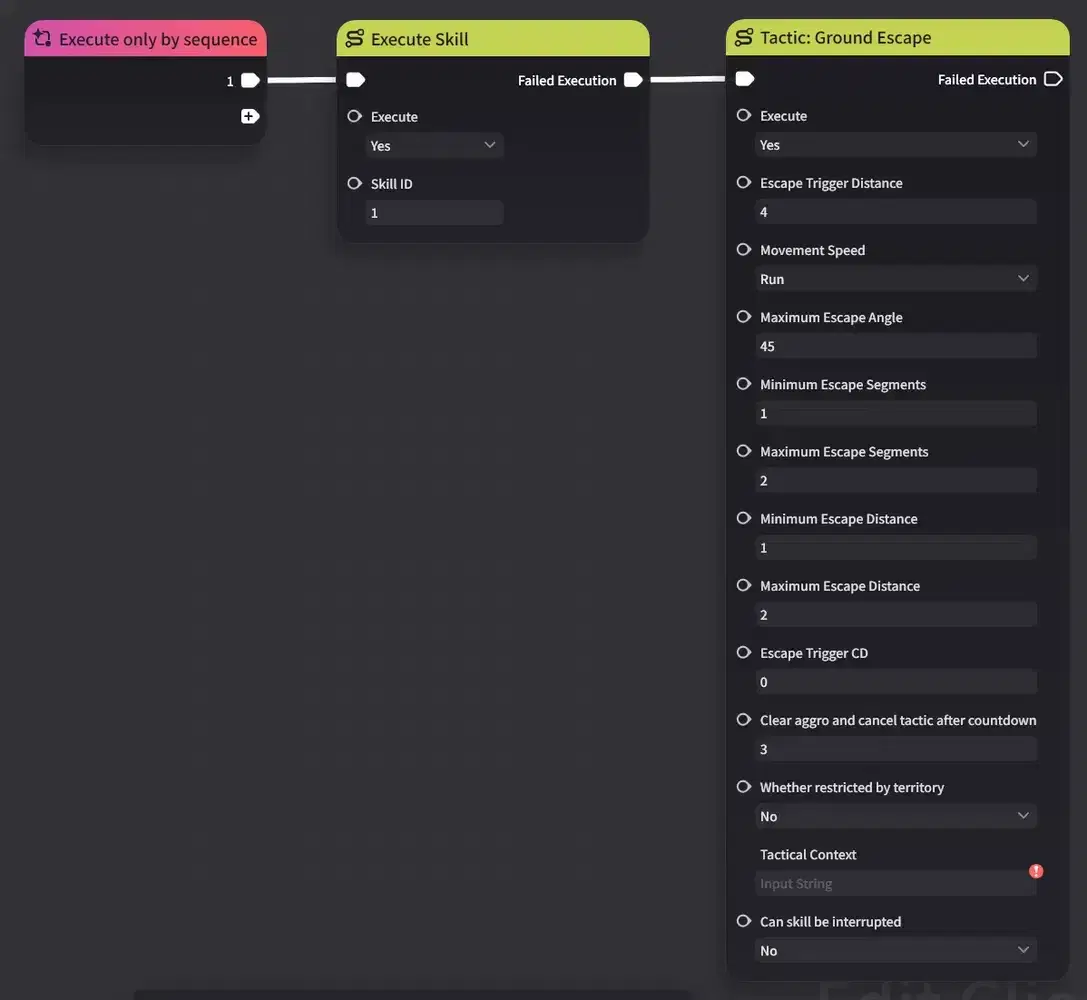
Status Node Graph 1 - cast. Execute Skill plus Ground Escape, exactly as in 5.3. Escape Trigger Distance 4, Can skill be interrupted No (based on Status Decision Conditions).
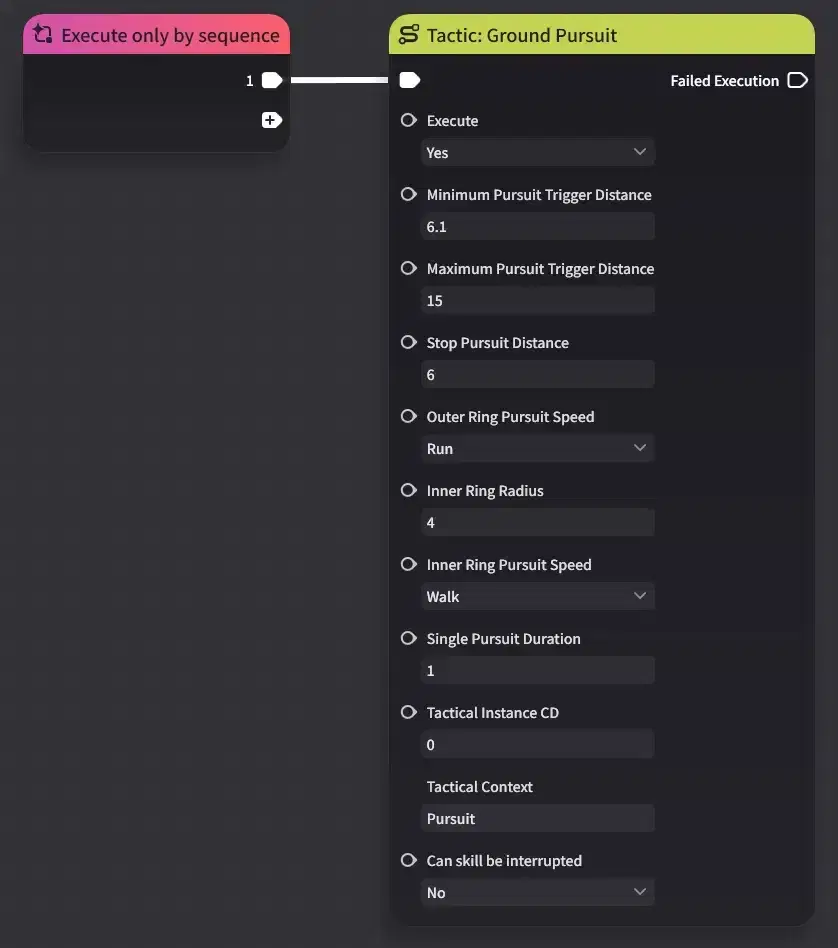
Status Node Graph 2 - pursue. Ground Pursuit: minimum 6.1, maximum 15, stop 6, Can skill be interrupted No (based on Status Decision Conditions).
Status Node Graph 3 - escape. Ground Escape: Escape Trigger Distance 4, Can skill be interrupted No, 1-2 segments of 1-2 m, Escape Trigger CD 0, clear aggro after 3 s (based on Status Decision Conditions)
.
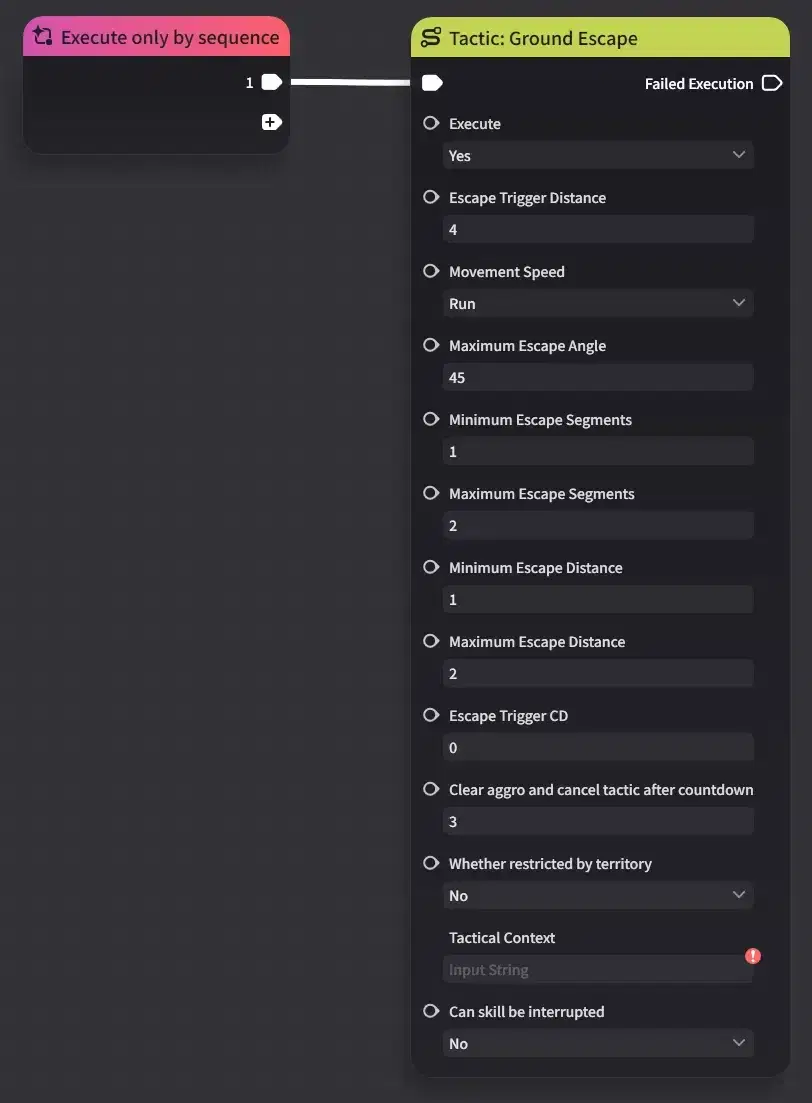
Any parameter not listed can be copied from the previous example.
6.4 Showcase
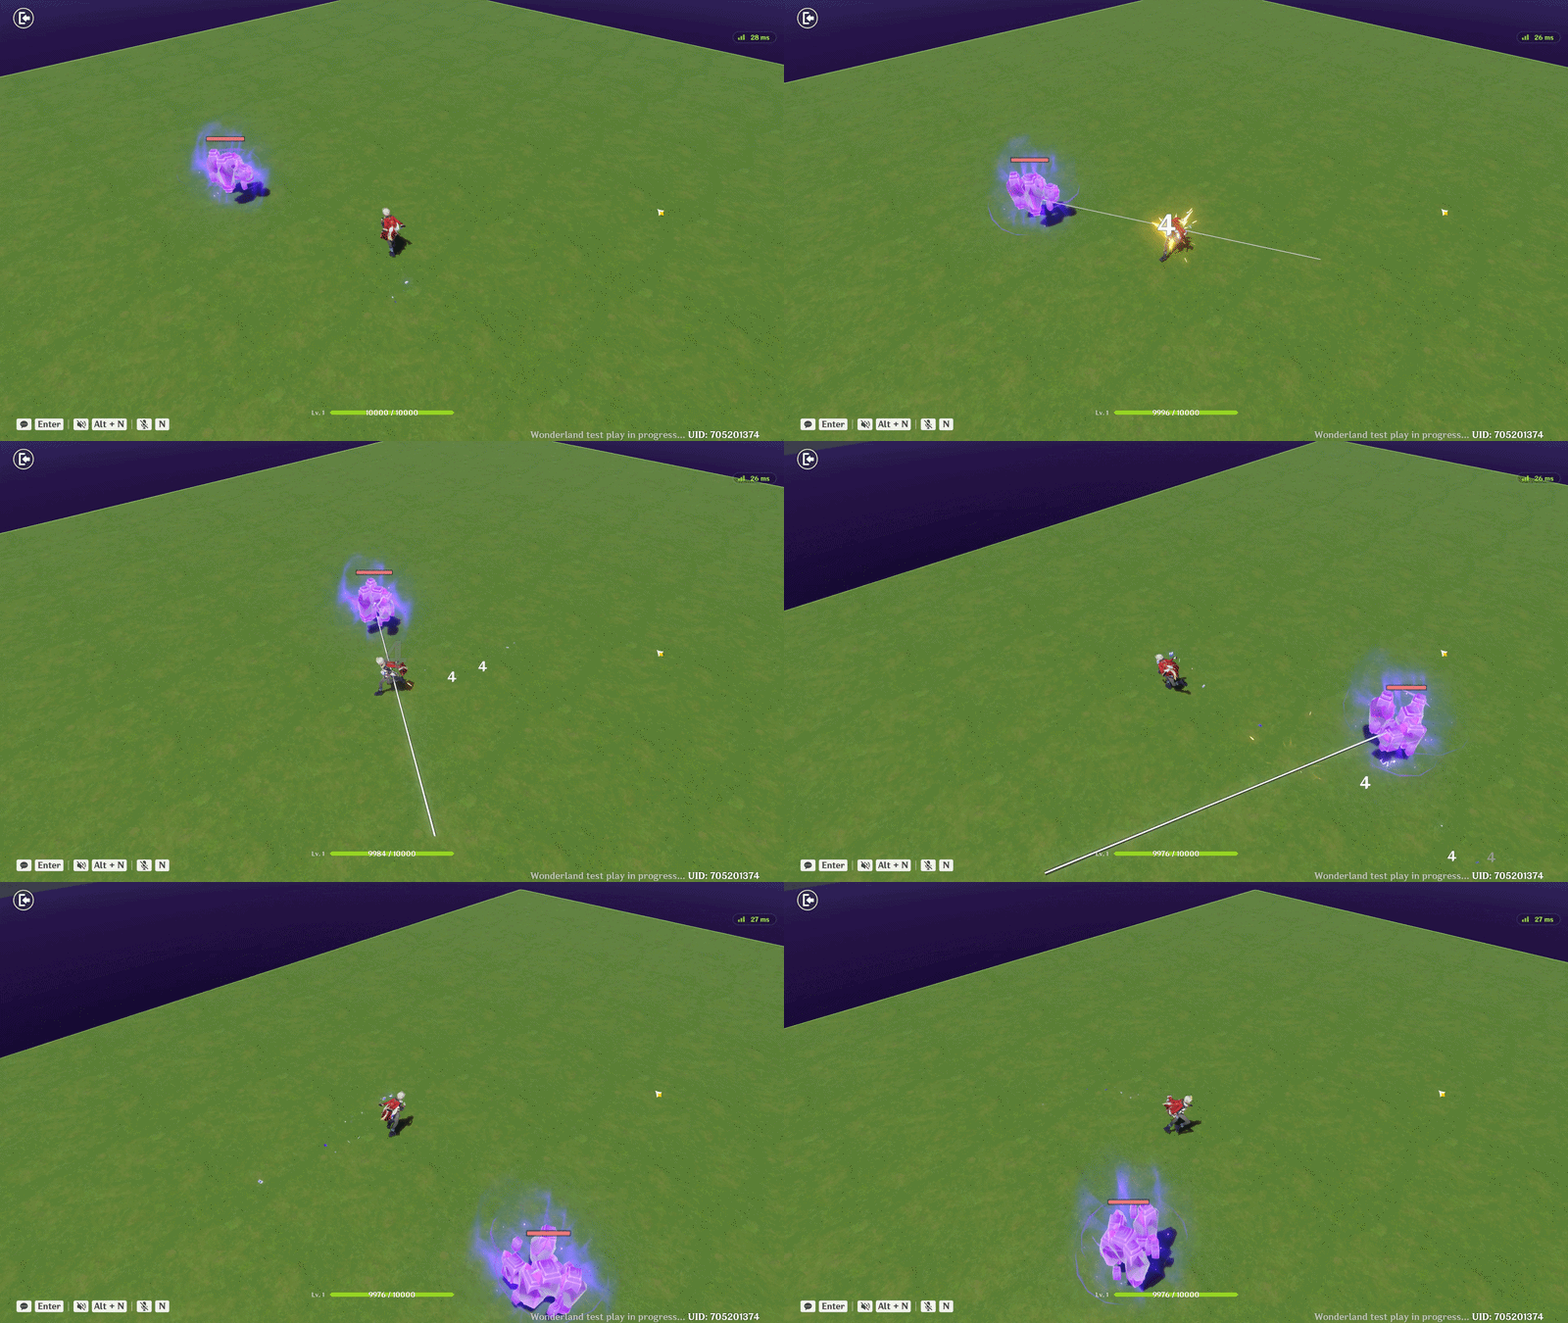
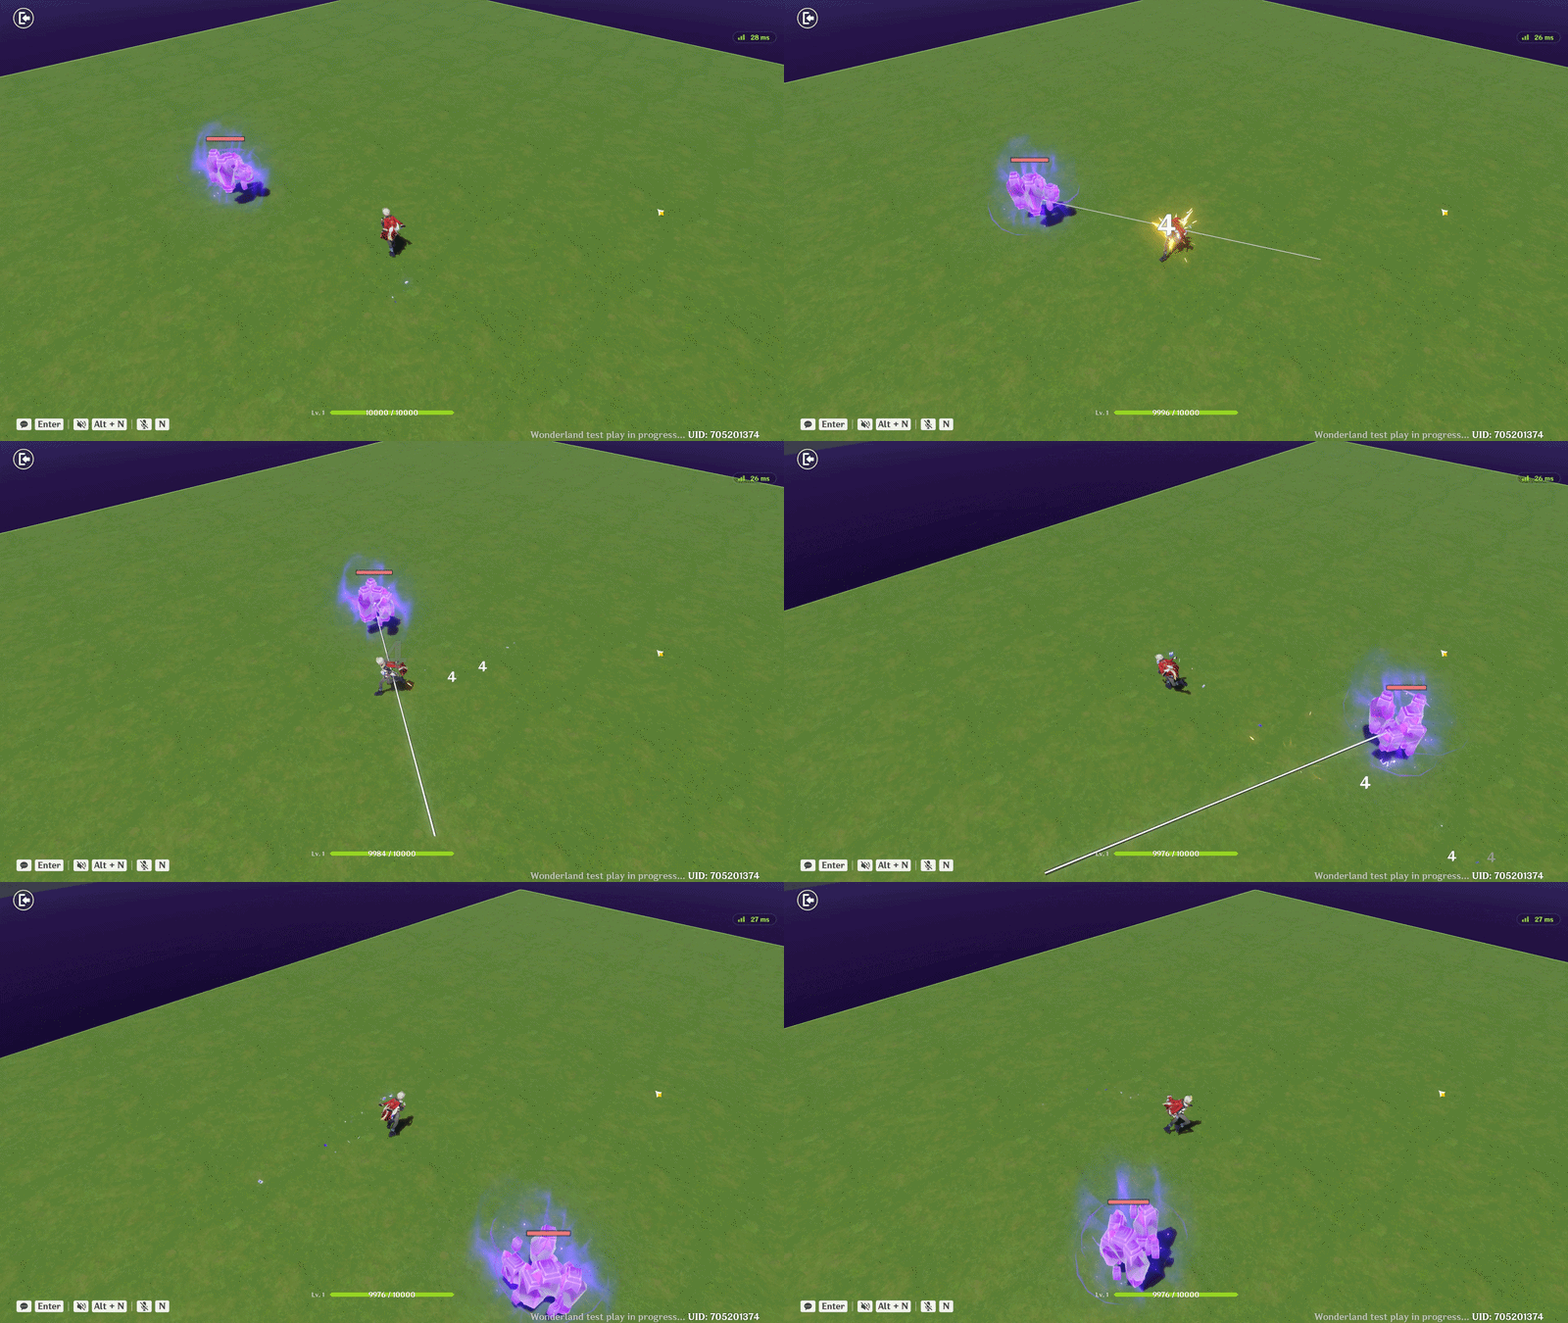
Custom electro mage ray attack
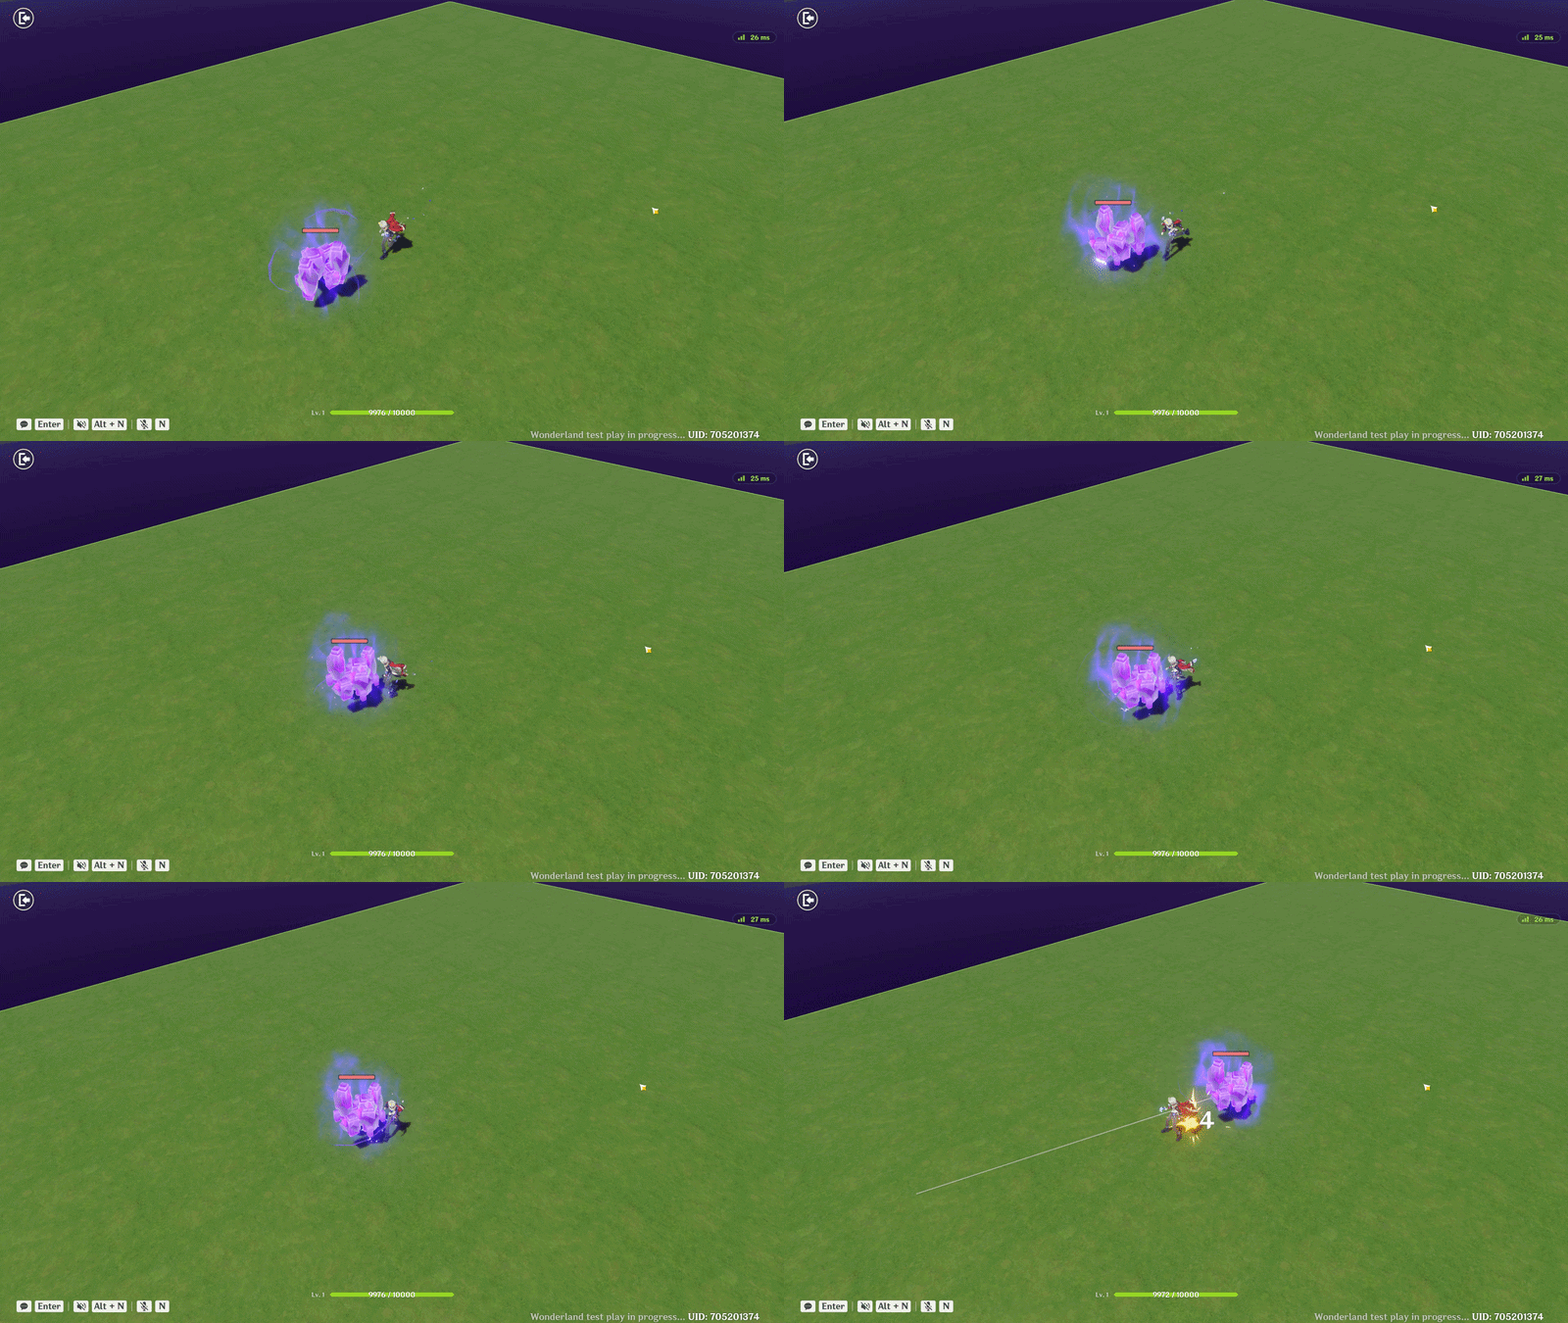
Custom electro mage escape
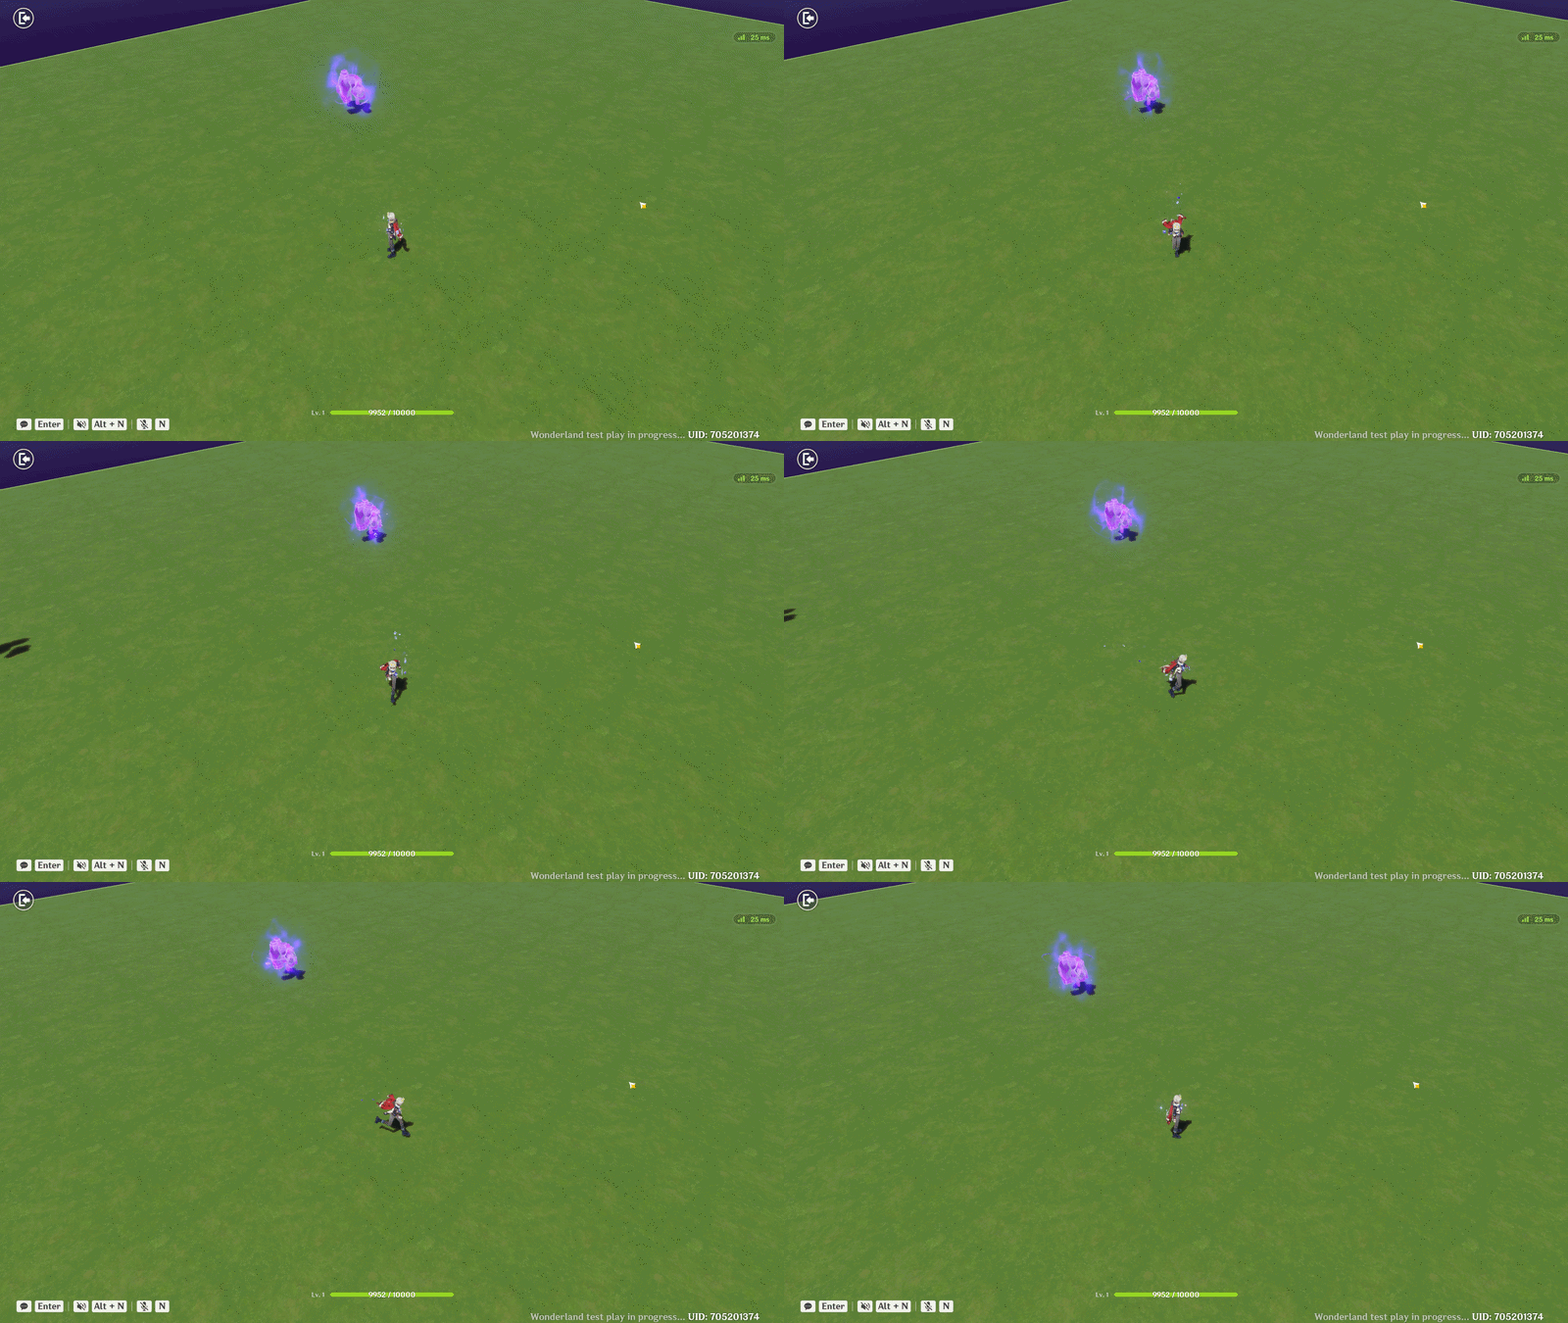
Custom electro mage pursuit
7. Example 3: Ruin Guard
The most involved example. This Ruin Guard throws a grenade at the player's position, backsteps after throwing, and drops a grenade when it dies. Along the way it covers prefab spawning, parabolic projectiles, and passing data from client to server.
7.1 Grenade Prefabs
You need two prefabs, because a thrown object and an exploding object want different components.
Prefab 1 - the thrown grenade. Pick a model and add a Projectile Motion Device set to Parabolic Projectile, so it arcs up
and then down like something thrown rather than fired. Configure the motion to travel about 2 m out from the Ruin Guard.
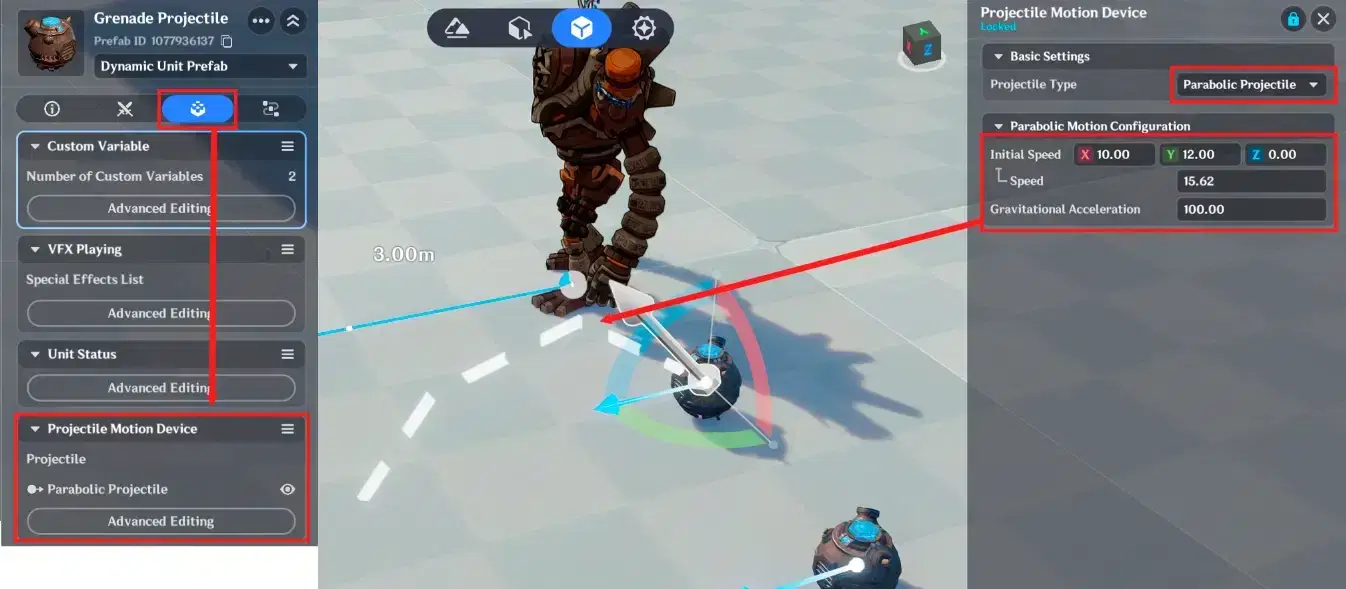
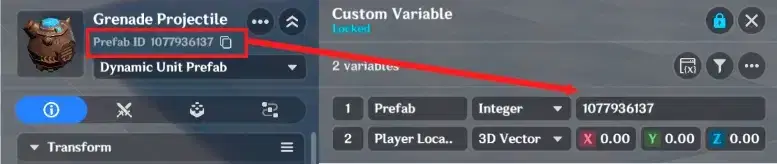
Add two custom variables:
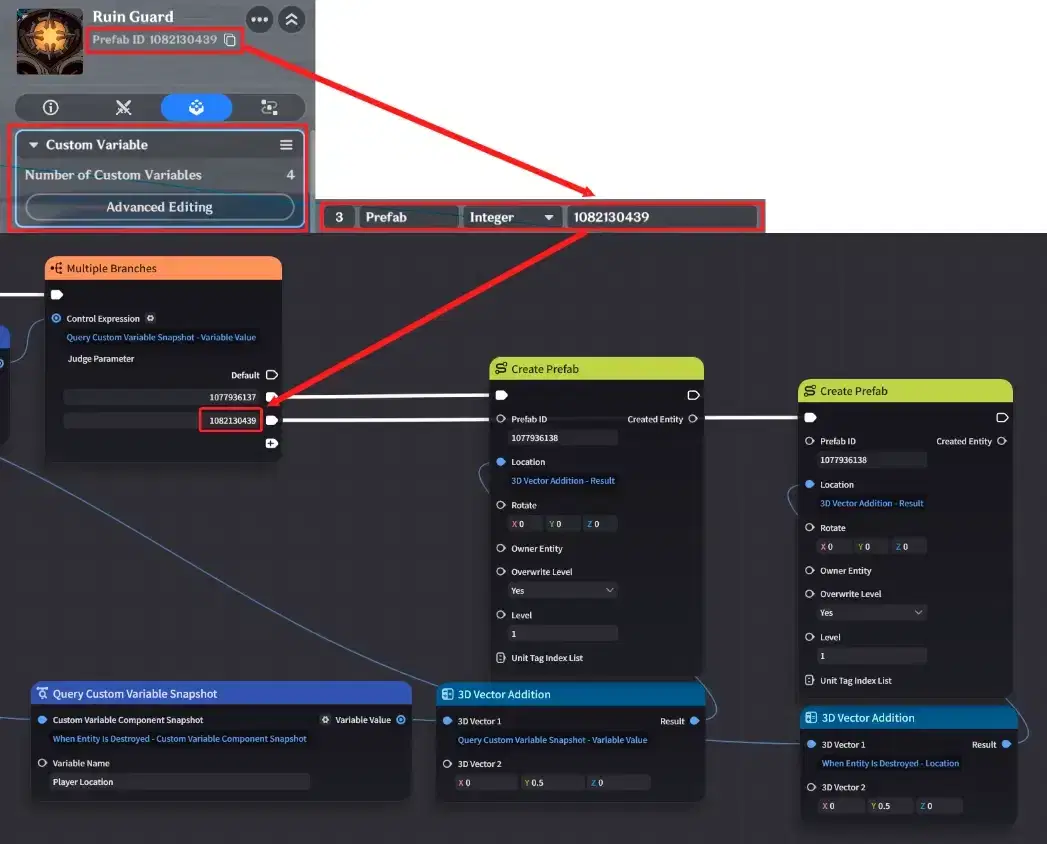
- Prefab (Integer) - paste the prefab ID here. This is how the Stage Entity node graph will later identify what was destroyed.
- Player Location (3D Vector) - stores where the player was at the moment of the throw, so the explosion lands there.
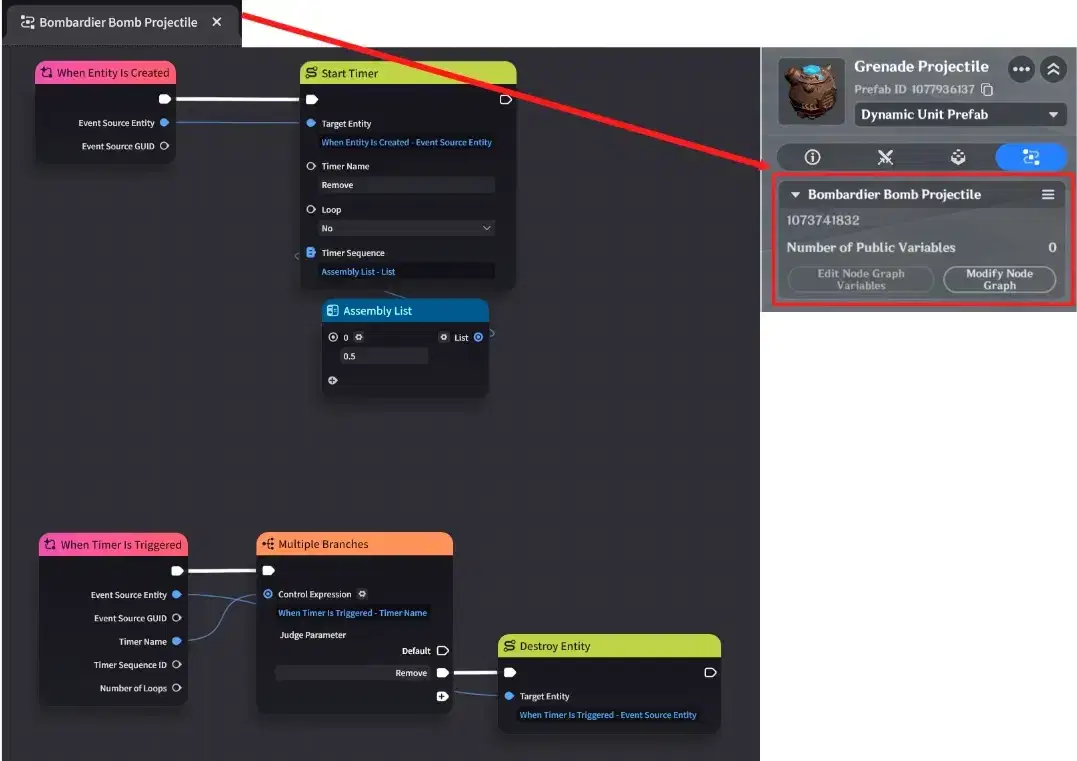
Attach a small node graph that destroys this entity 2 seconds after creation. That destruction is the trigger for the explosion, so the 2 s is effectively the grenade's flight time.
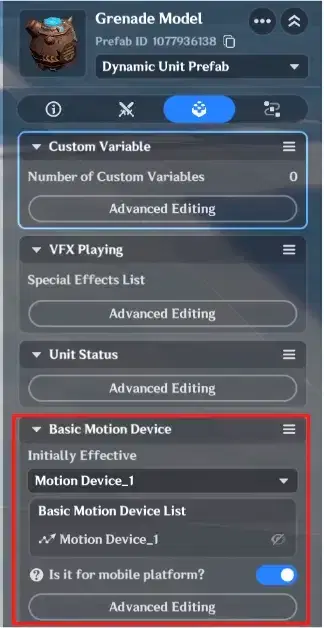
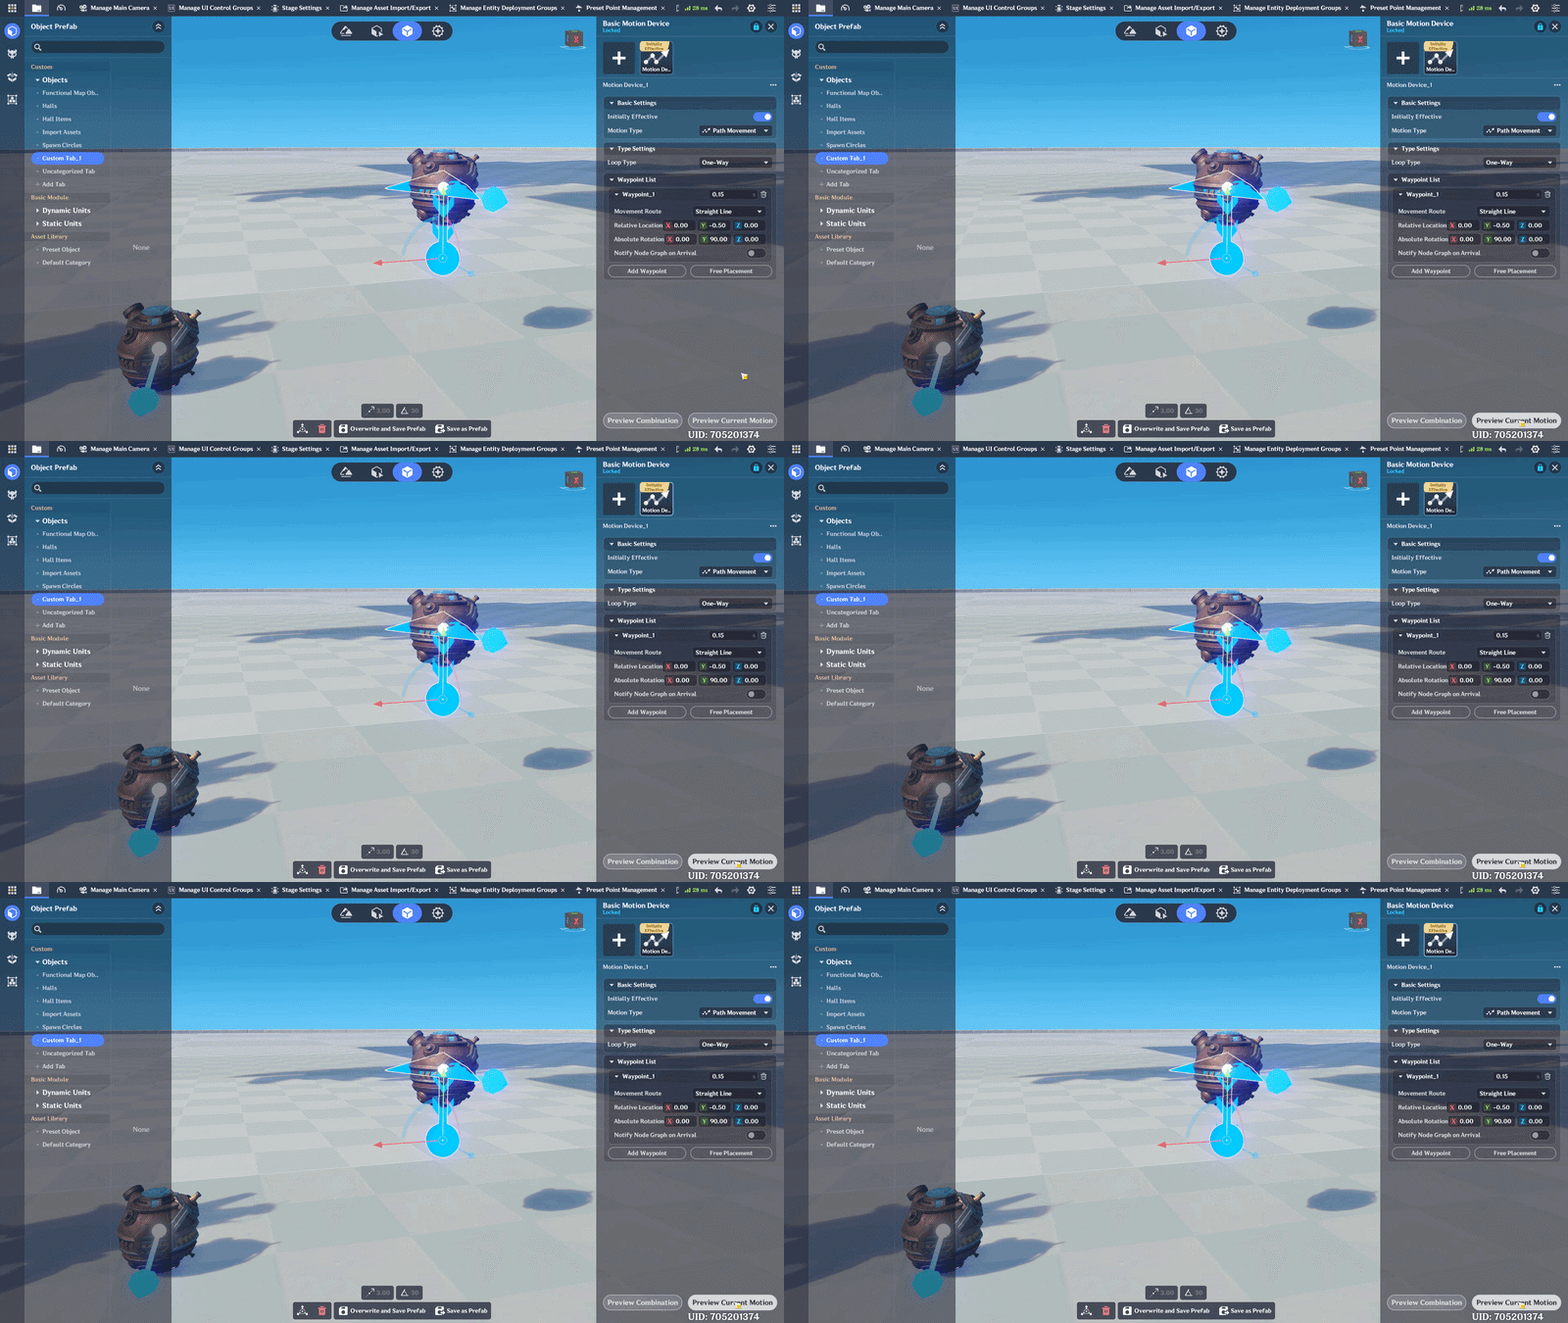
Prefab 2 - the exploding grenade. Same model. Add a Basic Motion Device that lowers the grenade slightly, so it reads as falling into place rather than appearing from nothing.
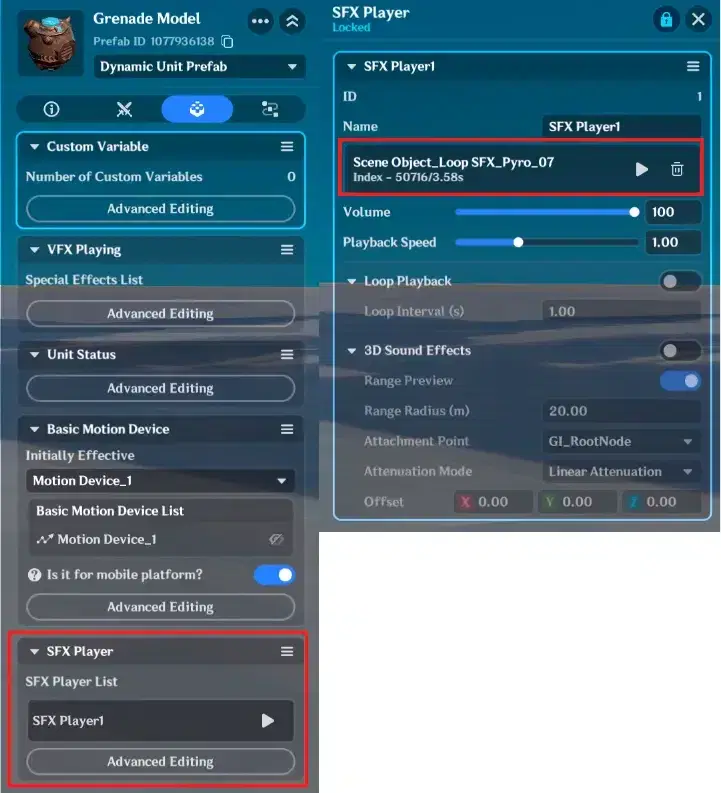
Add an SFX Player component with a sparking or fuse sound. This is the player's only warning that a grenade is live, and it is worth the extra minute.
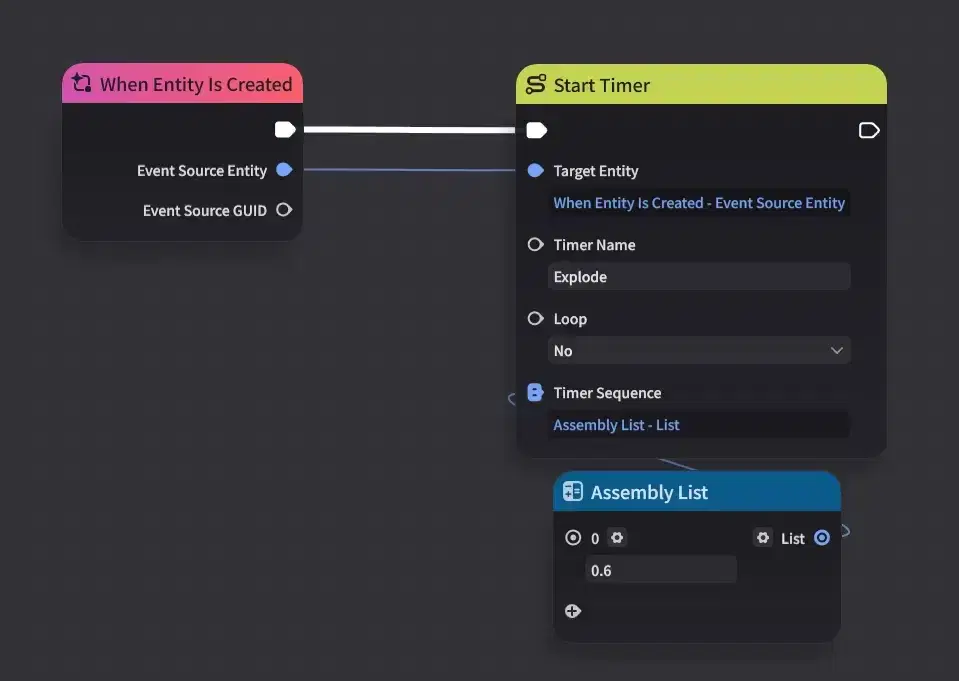
Give this prefab a node graph for the explosion:
- Start a non-looping timer when the grenade is created.
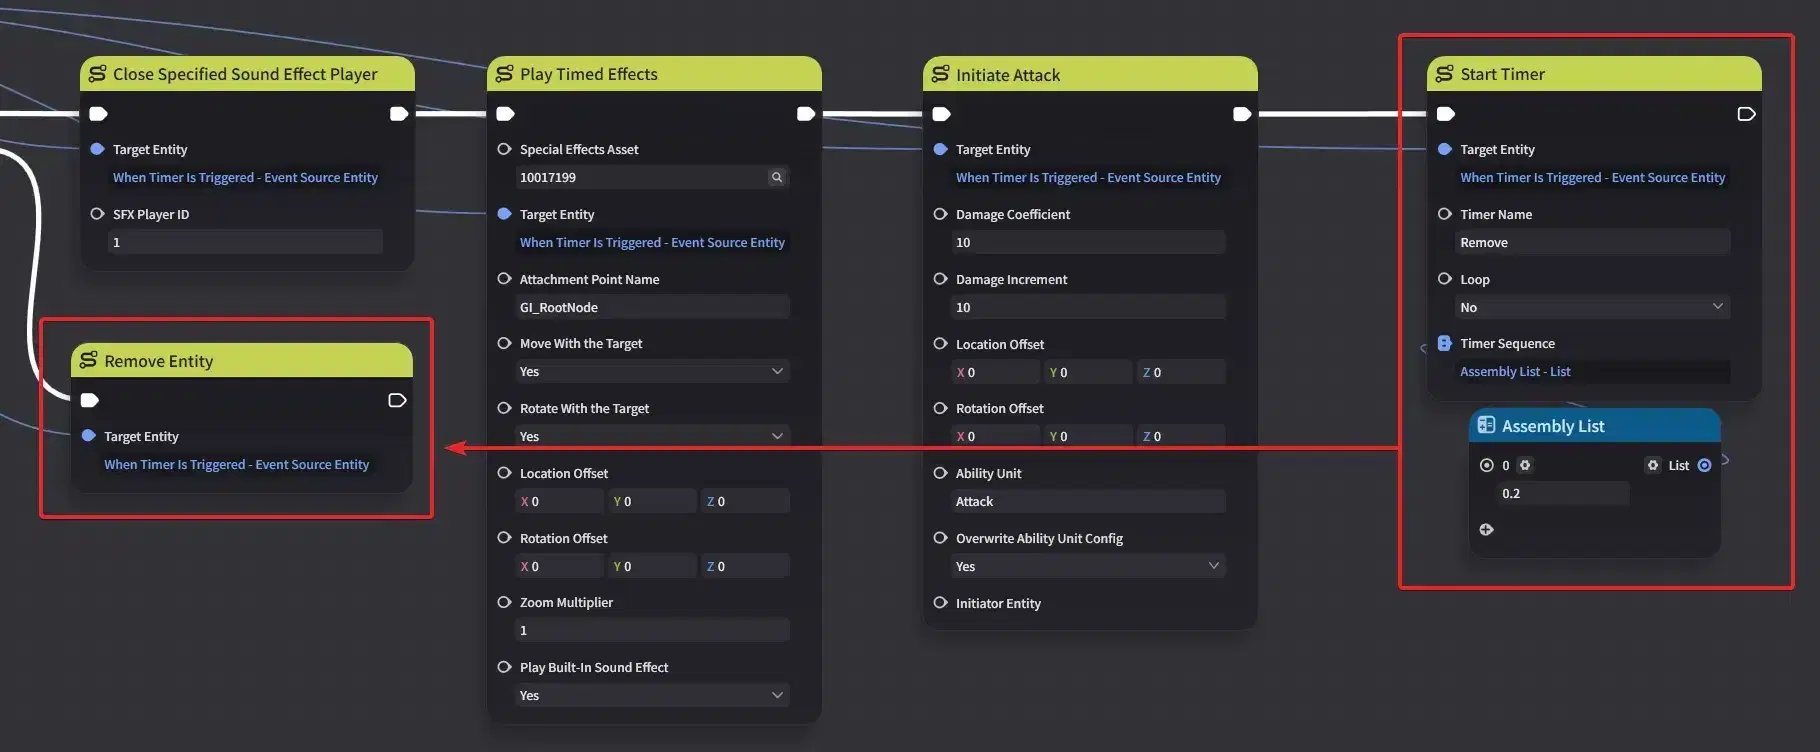
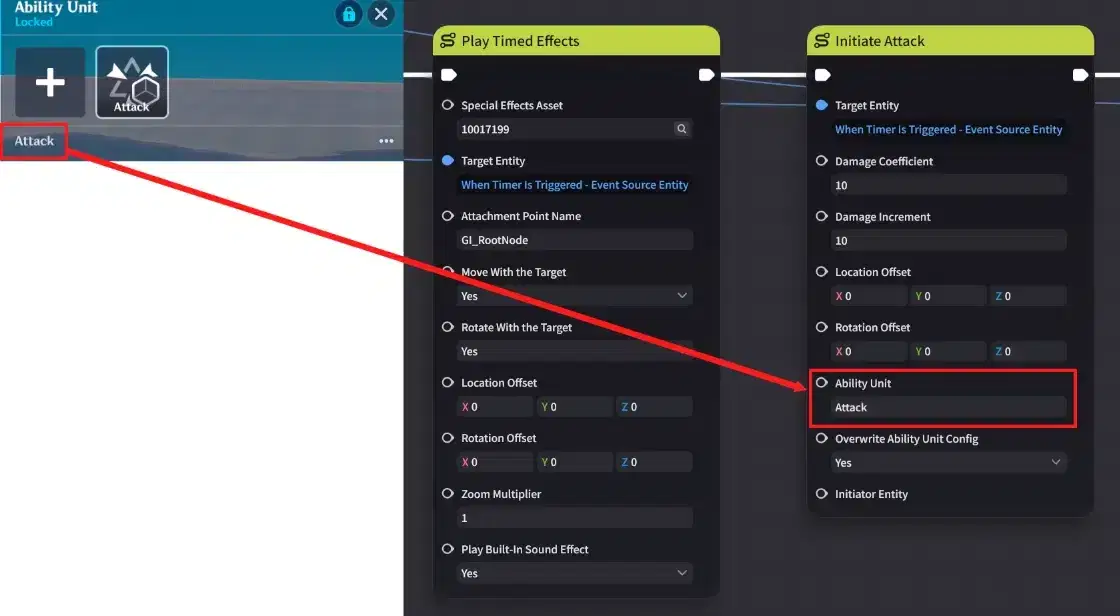
- When time triggers: stop the sparking SFX, play the explosion timed effect, run Initiate Attack (which enables the damaging Ability Unit), and start a second timer to remove the grenade.
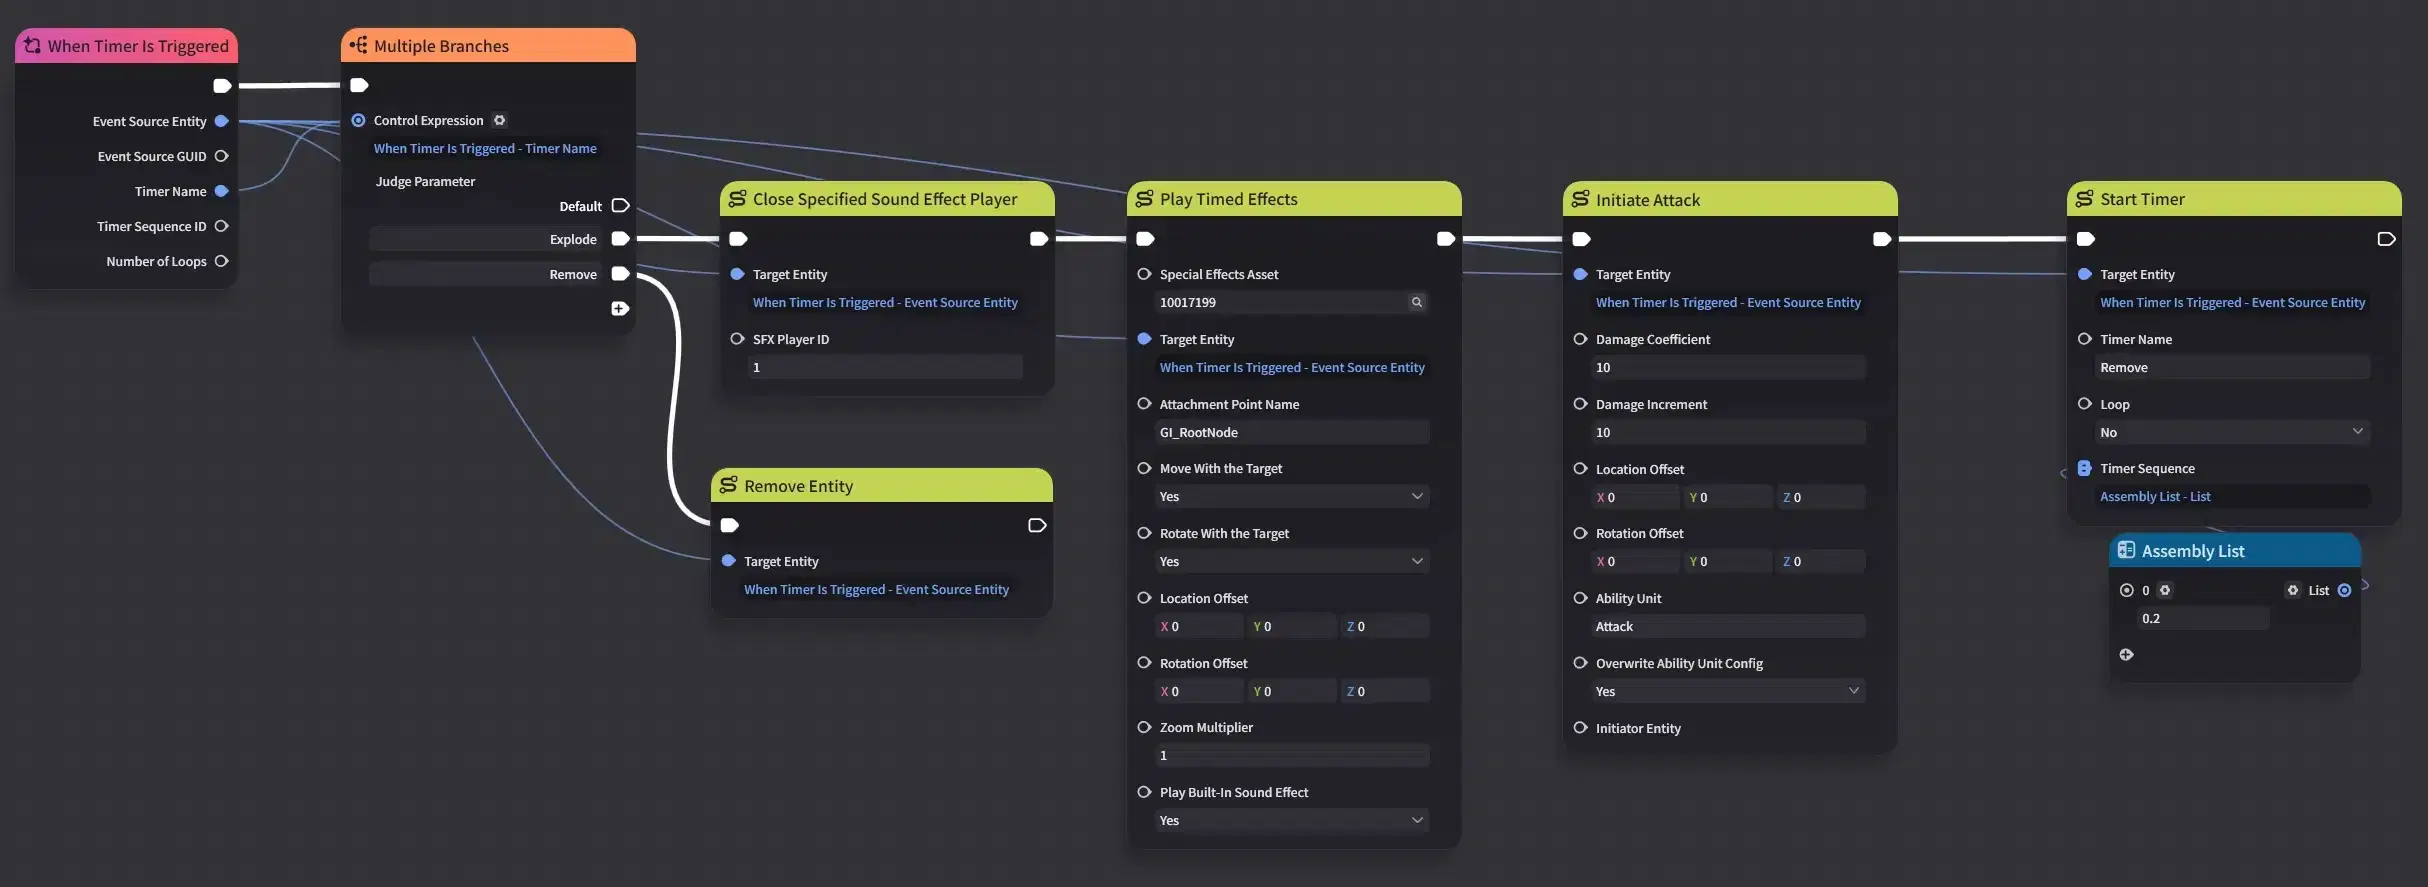
The second timer exists so the explosion VFX has time to play and the Ability Unit has time to register a hit. Delete the entity immediately and the player sees nothing and takes nothing.
The damage Ability Unit
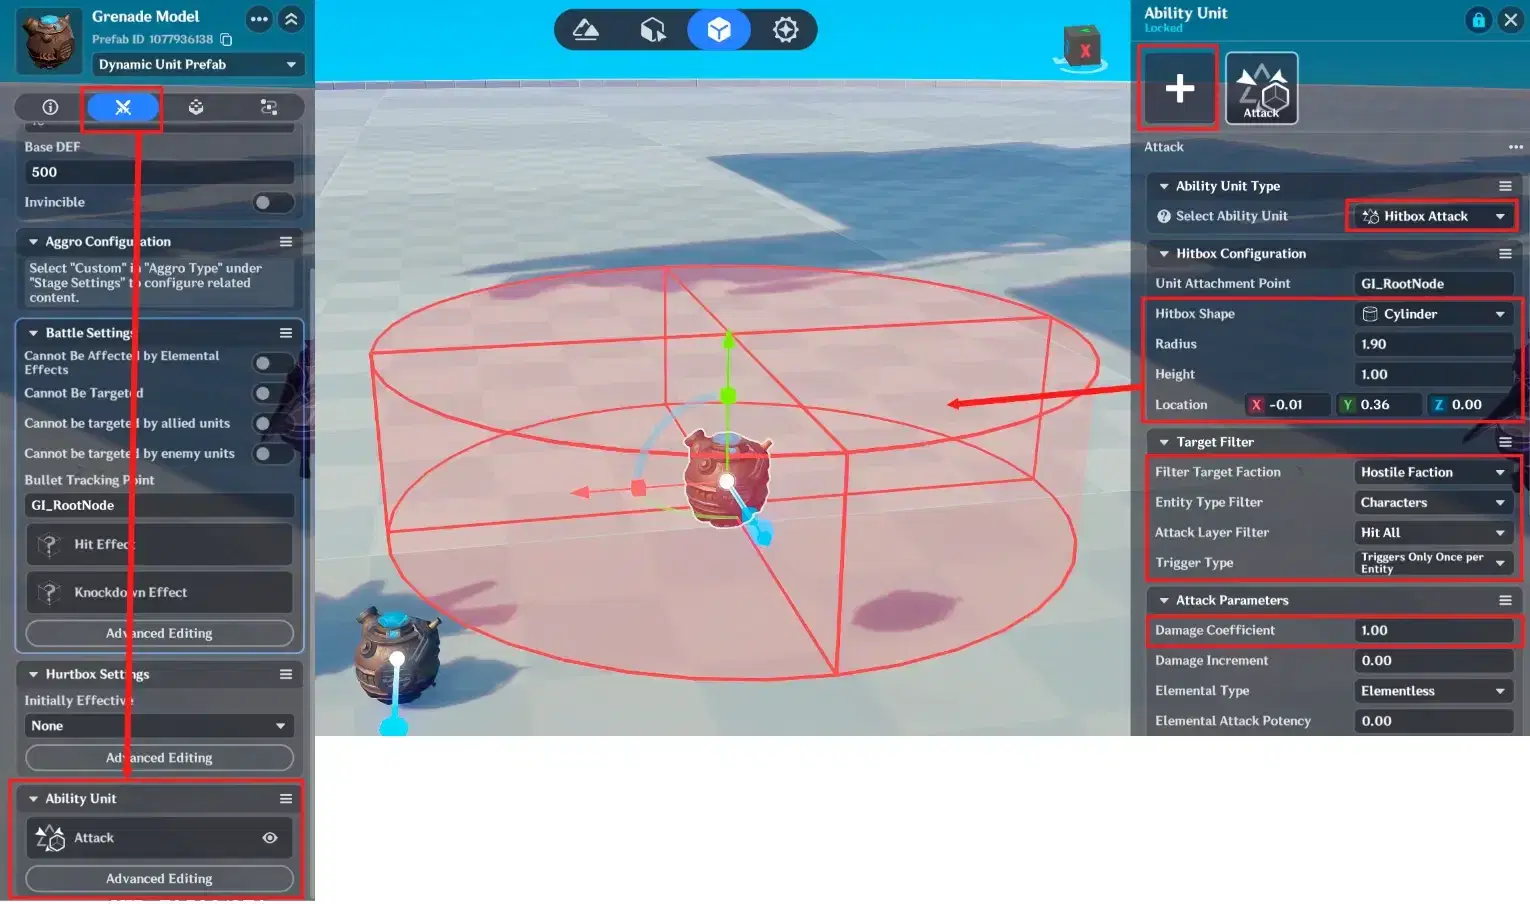
In the Combat Tab, open the Ability Unit component, press +, and create a unit type to Hitbox Attack.
Use Hitbox Attack, not Direct Attack. Direct Attack only connects with what the entity is physically touching, so it would only damage a player standing on top of the grenade. An explosion needs an area.
Set Target Filter to Characters, size the hitbox to your blast radius, and set Damage Coefficient to at least 1 - leave it at 0 and the explosion does nothing.
Enter this Ability Unit's name into the Initiate Attack node.
7.2 Skill Node Graphs
Two graphs: one for the throw, one for the backstep.
Skill Node Graph 1 - throwing the grenade
The Ruin Guard must face the player at the instant of the throw. Here we use the Creation Turns to Face Set Direction execution node rather than a Set Creation Orientation status, because we want the turn to happen at one exact frame rather than across a window.

That node needs a direction vector:
- Get Entity Location for the Ruin Guard, and for the player.
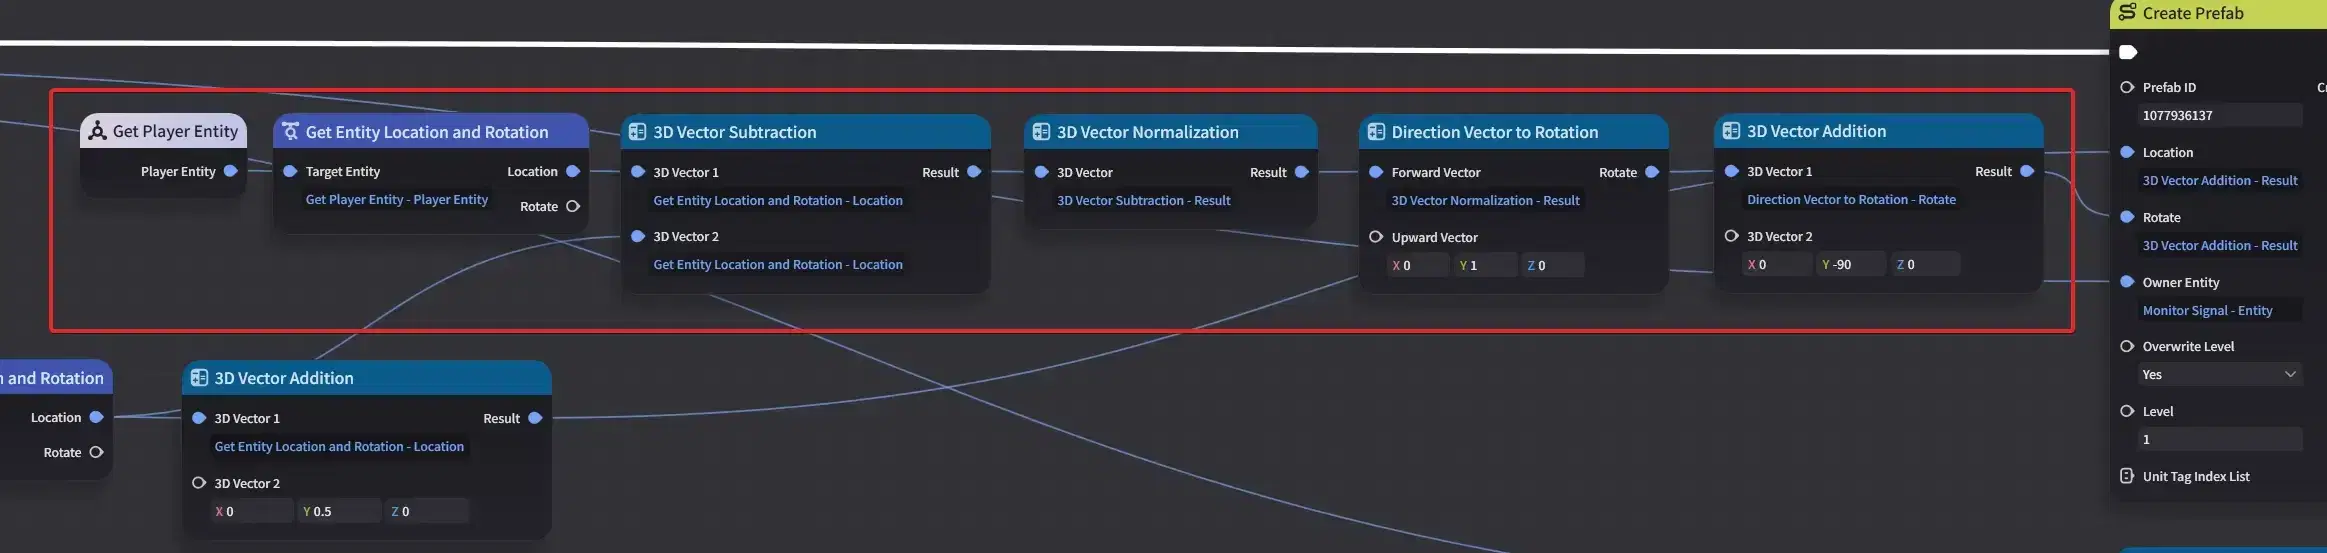
- 3D Vector Subtraction - player location minus Ruin Guard location. The result points from the guard to the player. Getting this order backwards makes the guard turn its back on the target.
- 3D Vector Normalization - scale it to length 1. The Orientation pin wants a pure direction; an un-normalized vector carries the distance to the player in its length, which is meaningless as an orientation and can produce unstable results.
- Pass the result into the Orientation pin.

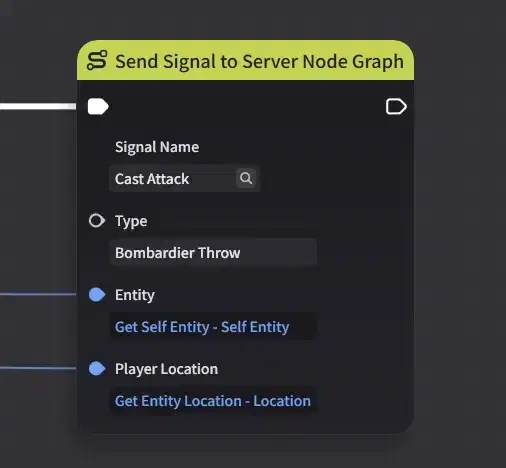
Then add Send Signal to Server Node Graph node, passing the entity and the player's location at that moment. Everything after this happens on the server, because prefab spawning can't be done from a client node graph.
Server side: spawning the projectile
Build this in the Stage Entity Node Graph, which guarantees the signal is handled once rather than once per complex creation.
On receiving the signal, spawn the projectile with Create Prefab.
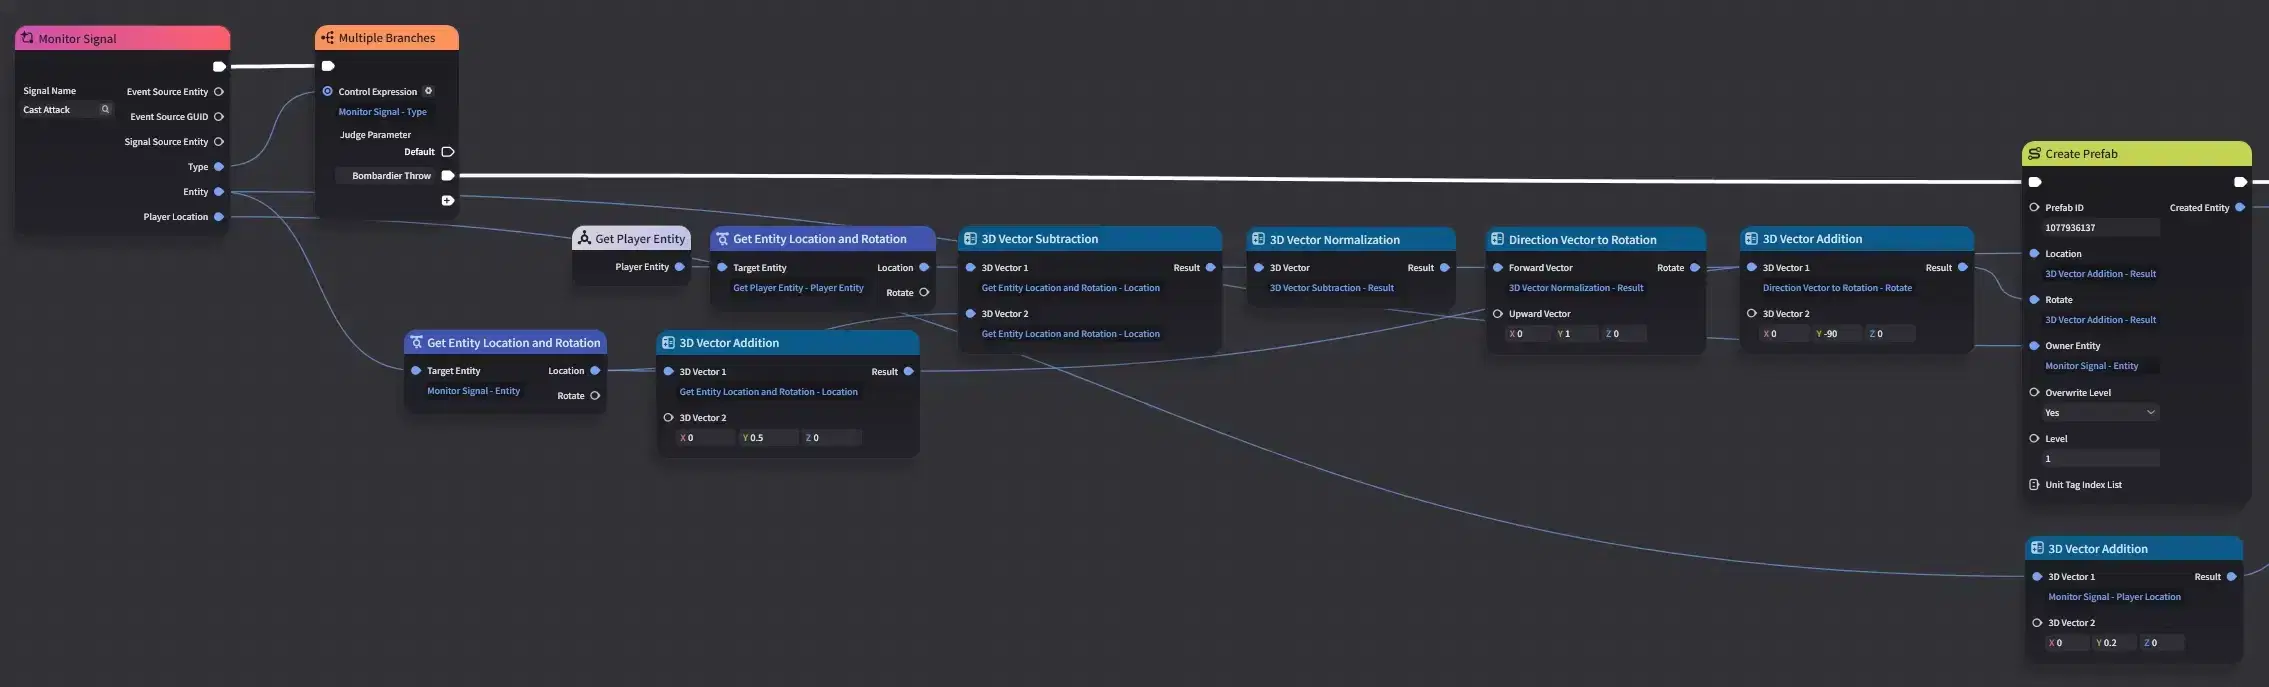
Location - Ruin Guard location plus 0.5 on Y. Get Entity Location returns a point at the creation's feet, so without this offset the grenade spawns out of the ground.
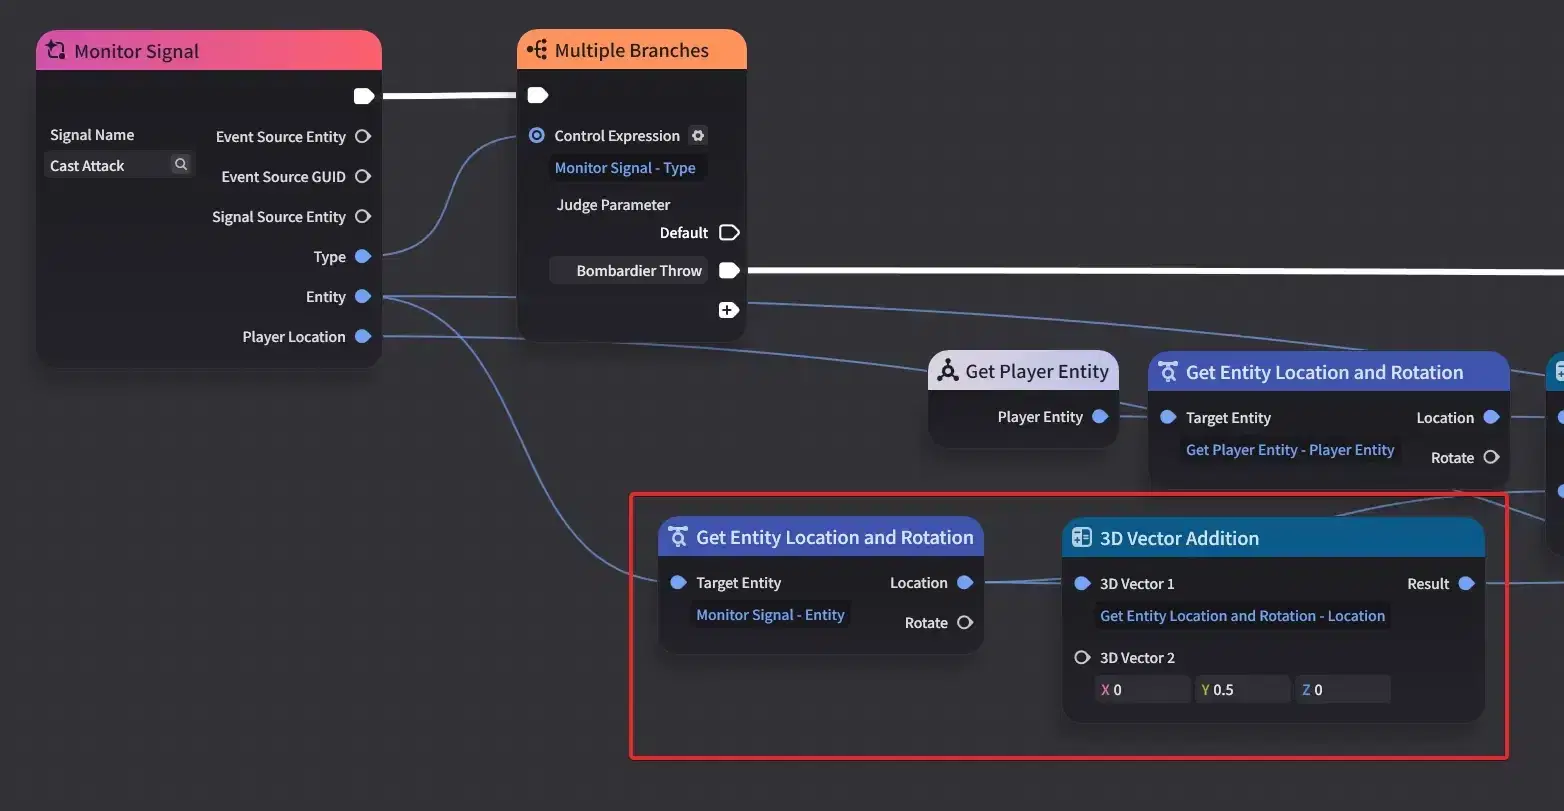
Rotation - same subtract-and-normalize as above, then Direction Vector to Rotation with an Upward Vector of (0, 1, 0) to convert the direction into a rotation.
In this case the resulting rotation comes out 90° off. Correct it with a 3D Vector Addition of (0, -90, 0).
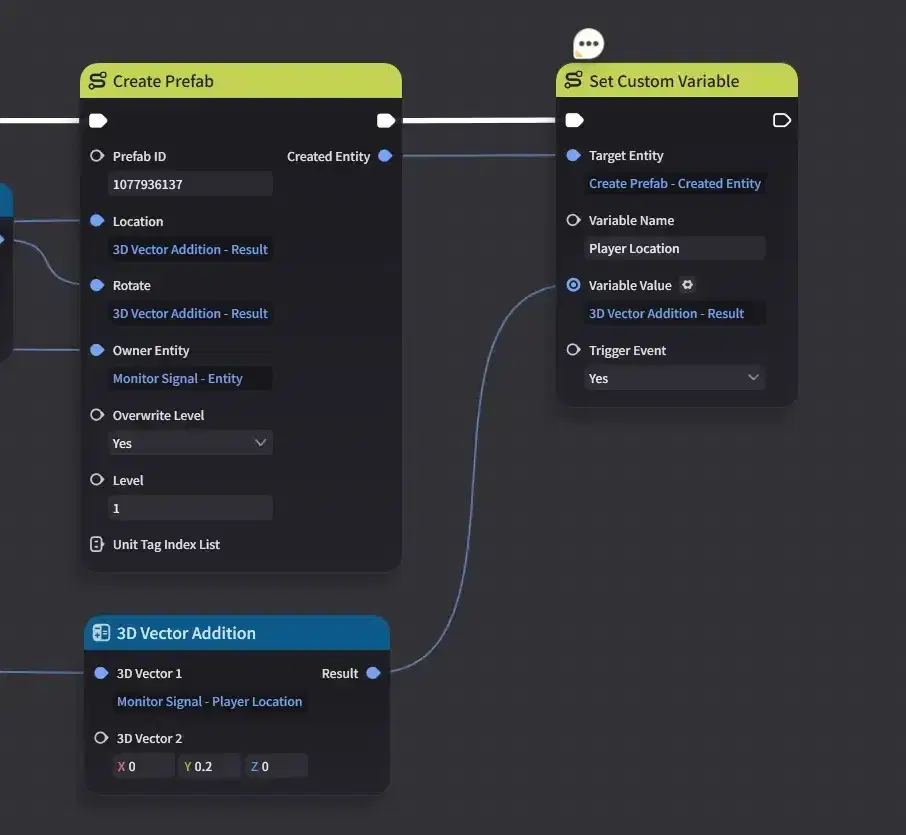
After spawning, set the Player Location custom variable on the new projectile: the player location from the signal, plus 0.2 as a spawn correction.
Server side: the explosion
The projectile destroys itself after 2 seconds, and that is what we hook.
Use the When Entity is Destroyed event node. This event only triggers on the Stage Entity, which is why all of this lives there.
Because every destroyed entity passes through this node, filter by the Prefab variable you set earlier. Get it with Query Custom Variable Snapshot - not Get Custom Variable. The entity is already destroyed by the time the event runs, so a normal variable read returns nothing; the snapshot node reads the values as they were at the moment of destruction.
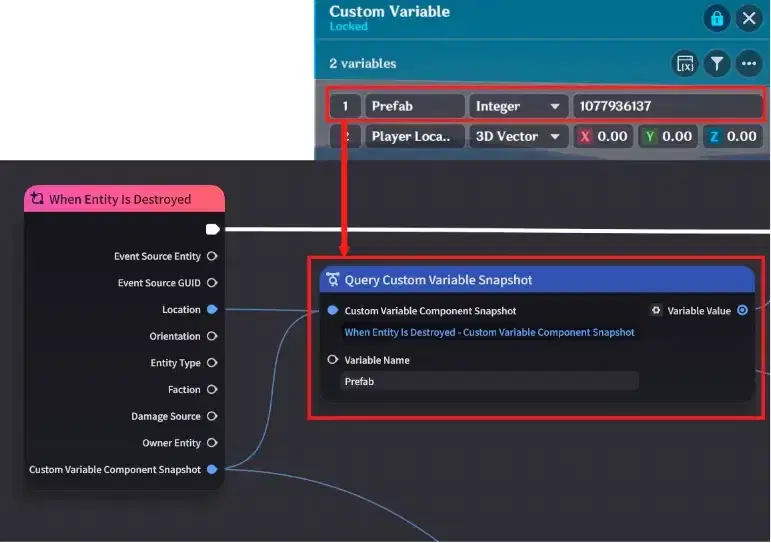
Route the value into a Multiple Branch. When it matches the projectile's prefab ID, spawn the exploding grenade at the stored Player Location plus 0.5 - the same offset used by the Basic Motion Device so the grenade falls into place correctly.
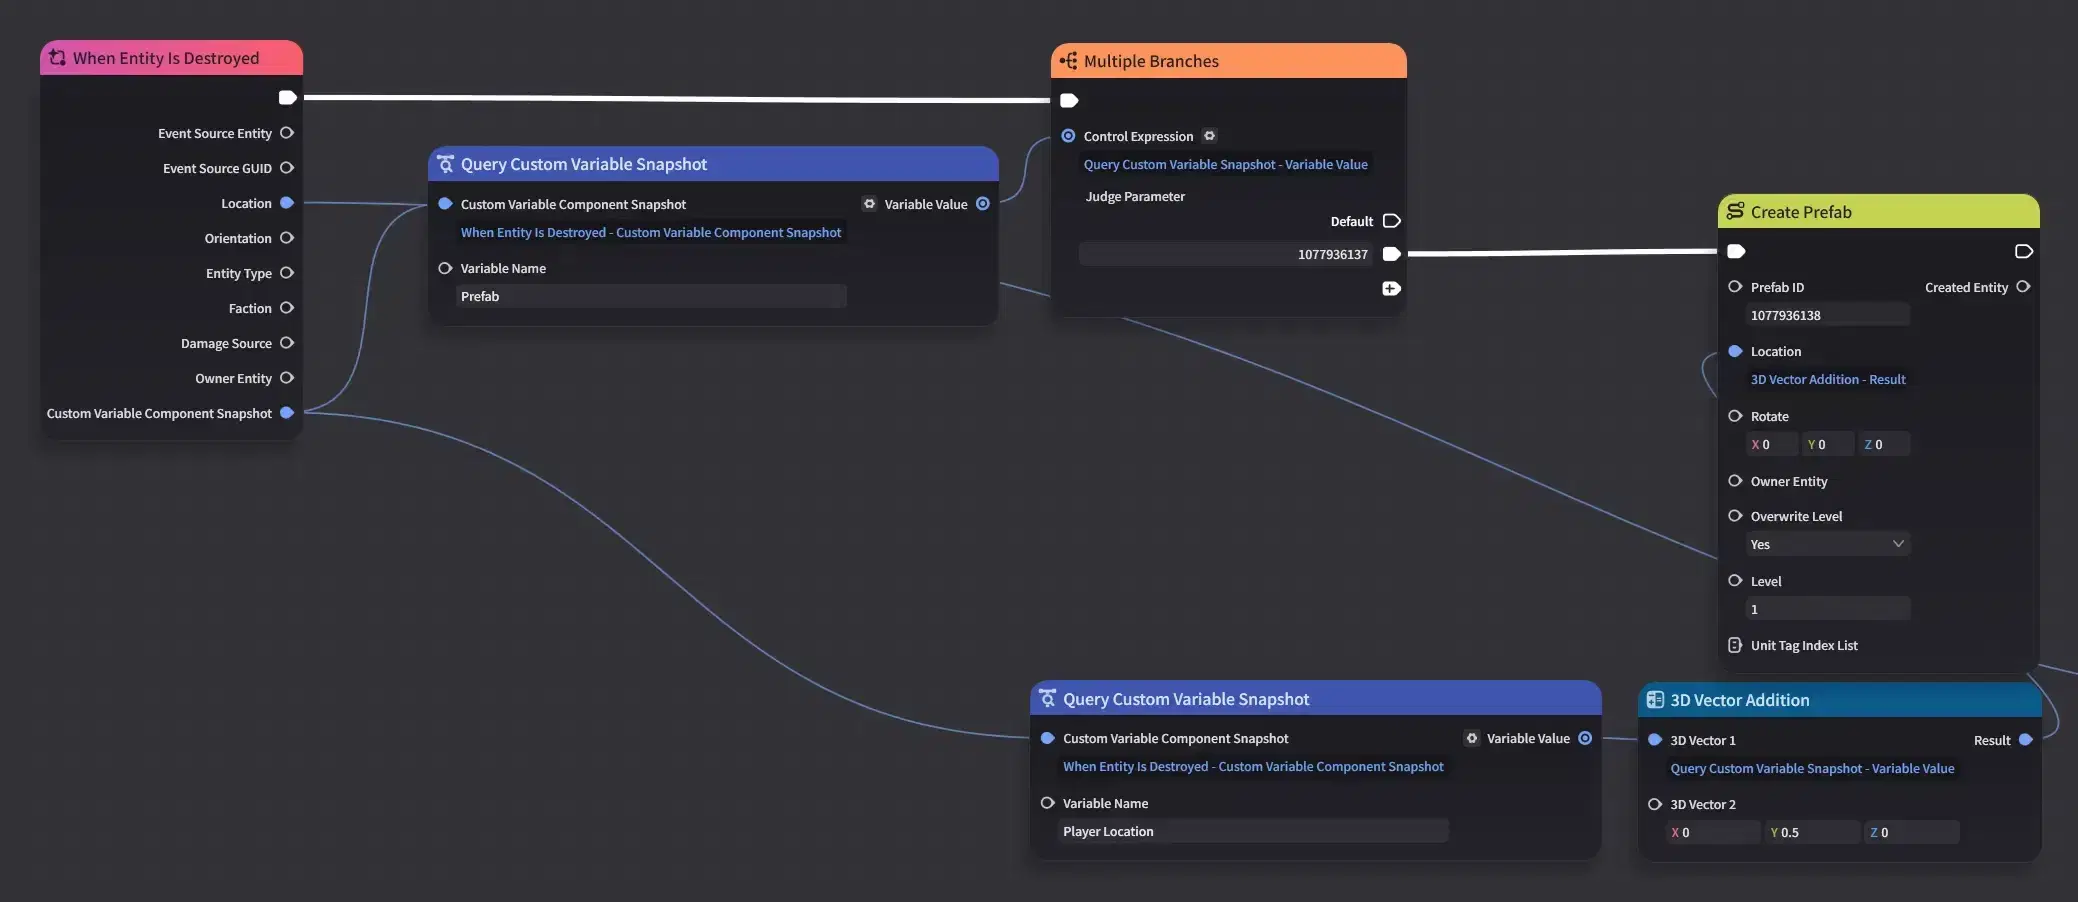
You can extend this: give the Ruin Guard itself a Prefab variable and spawn a grenade when it dies, using the Location output of the When Entity is Destroyed node plus the same 0.5. A death that leaves one last hazard on the floor makes the fight more interesting.
Skill Node Graph 2 - the backstep
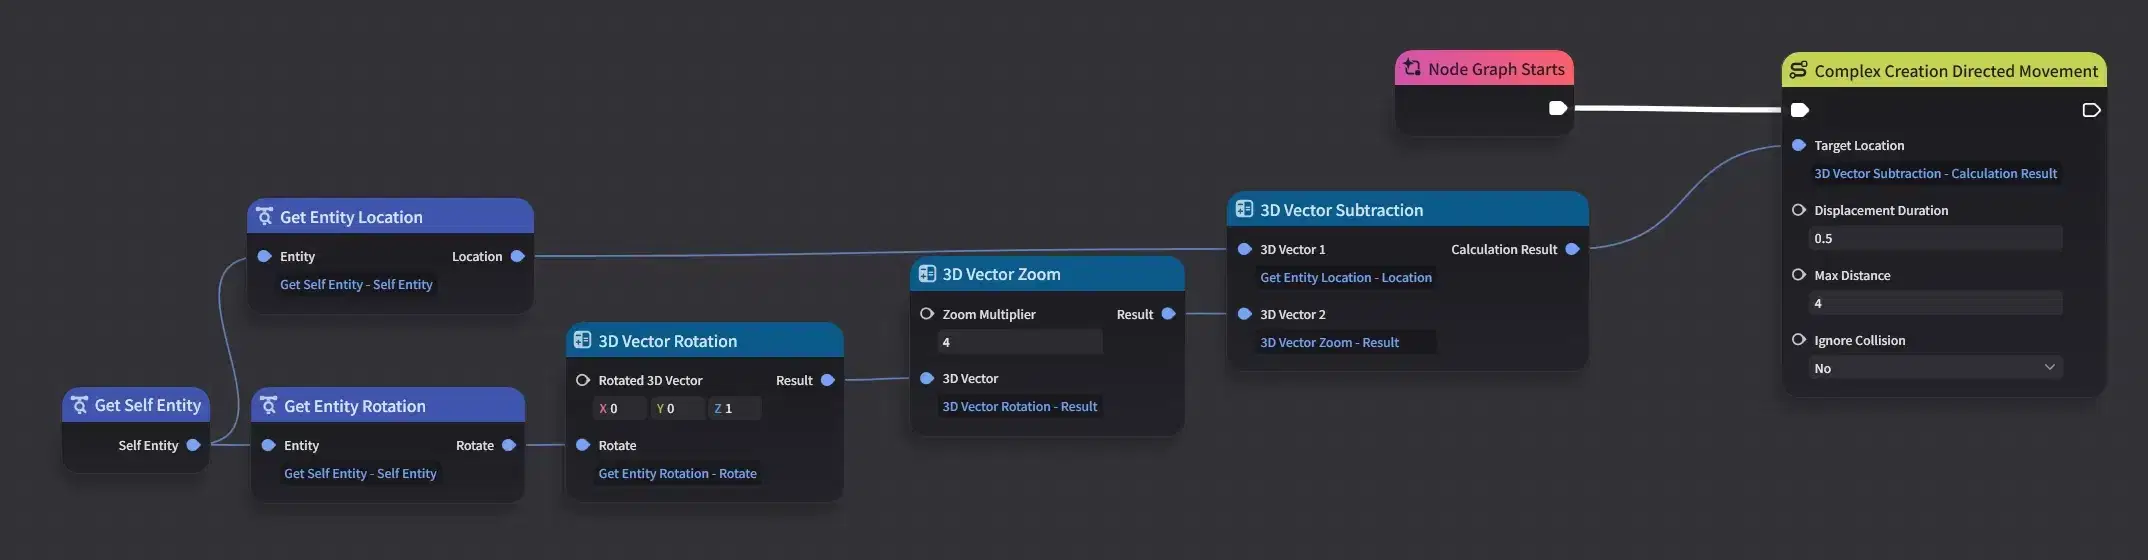
After throwing, the Ruin Guard retreats. Add Complex Creation Directed Movement.
The maths mirrors the forward lunge in 4.5 section, with one sign flipped:
- Create 3D Vector (0, 0, 1).
- 3D Vector Rotation by the Ruin Guard's rotation - gives world-space forward.
- 3D Vector Zoom by 4 - how far back it steps.
- 3D Vector Subtraction - Ruin Guard location minus that vector. Subtracting is what makes this a backstep; adding would lunge forward.
Connect the result to Target Location and set Max Distance to the same value used in Zoom.
7.3 Assembling the Skill
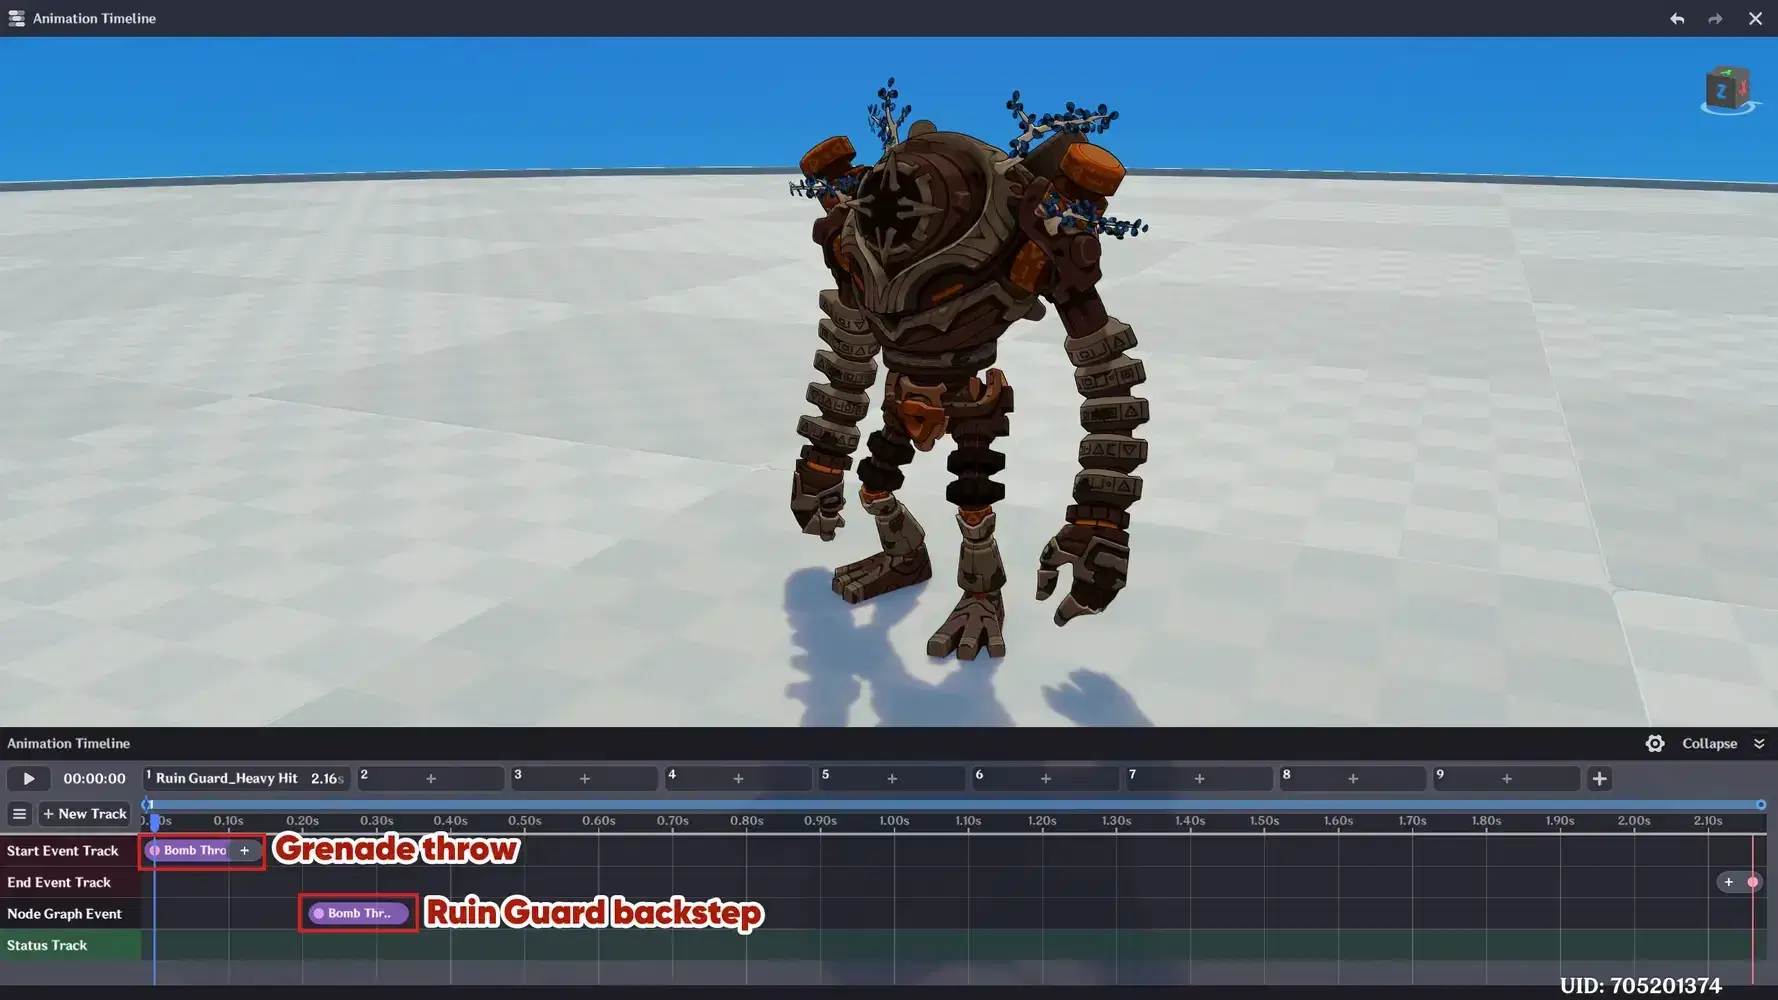
Create a new skill under Combat Preset → Skills → + Skill and select an animation - Ruin Guard Heavy Hit works well as a throwing animation.
On the Node Graph Event Track, place the grenade throw event at the release frame, and the backstep event shortly after. No Set Creation Orientation status is needed here, because the turn is already handled inside the throw Skill Node Graph.
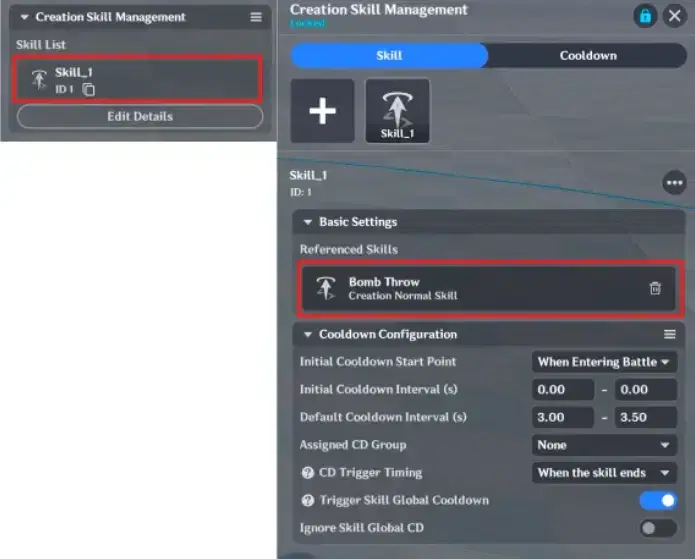
Assign the skill in Combat Tab → Creation Skill Management. Initial CD 0 for an immediate first throw; default CD to taste.
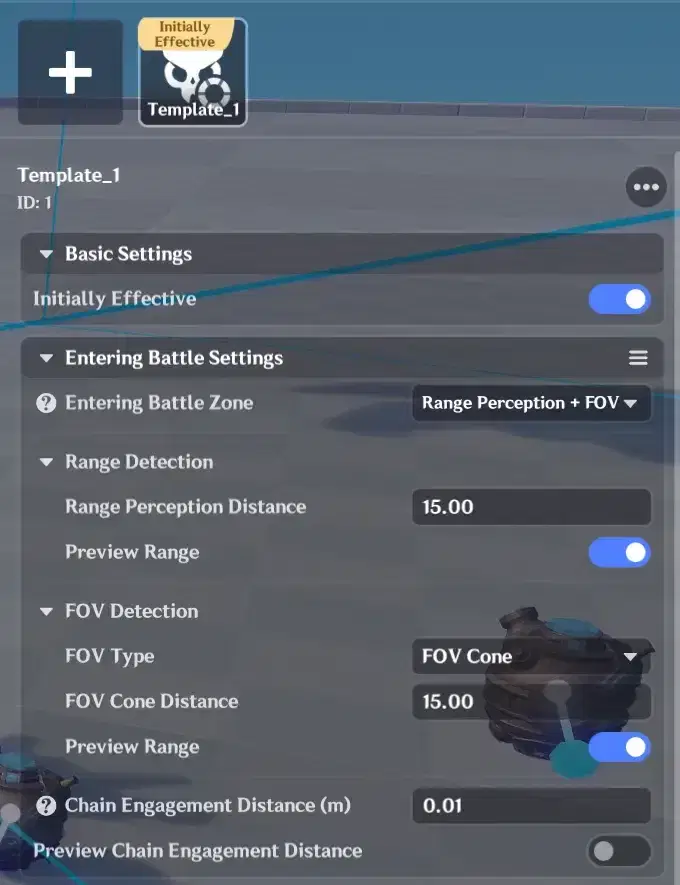
Don't forget to add an Autonomous Logic Parameter Template.
7.4 Decision Node Graph
Only two branches this time:
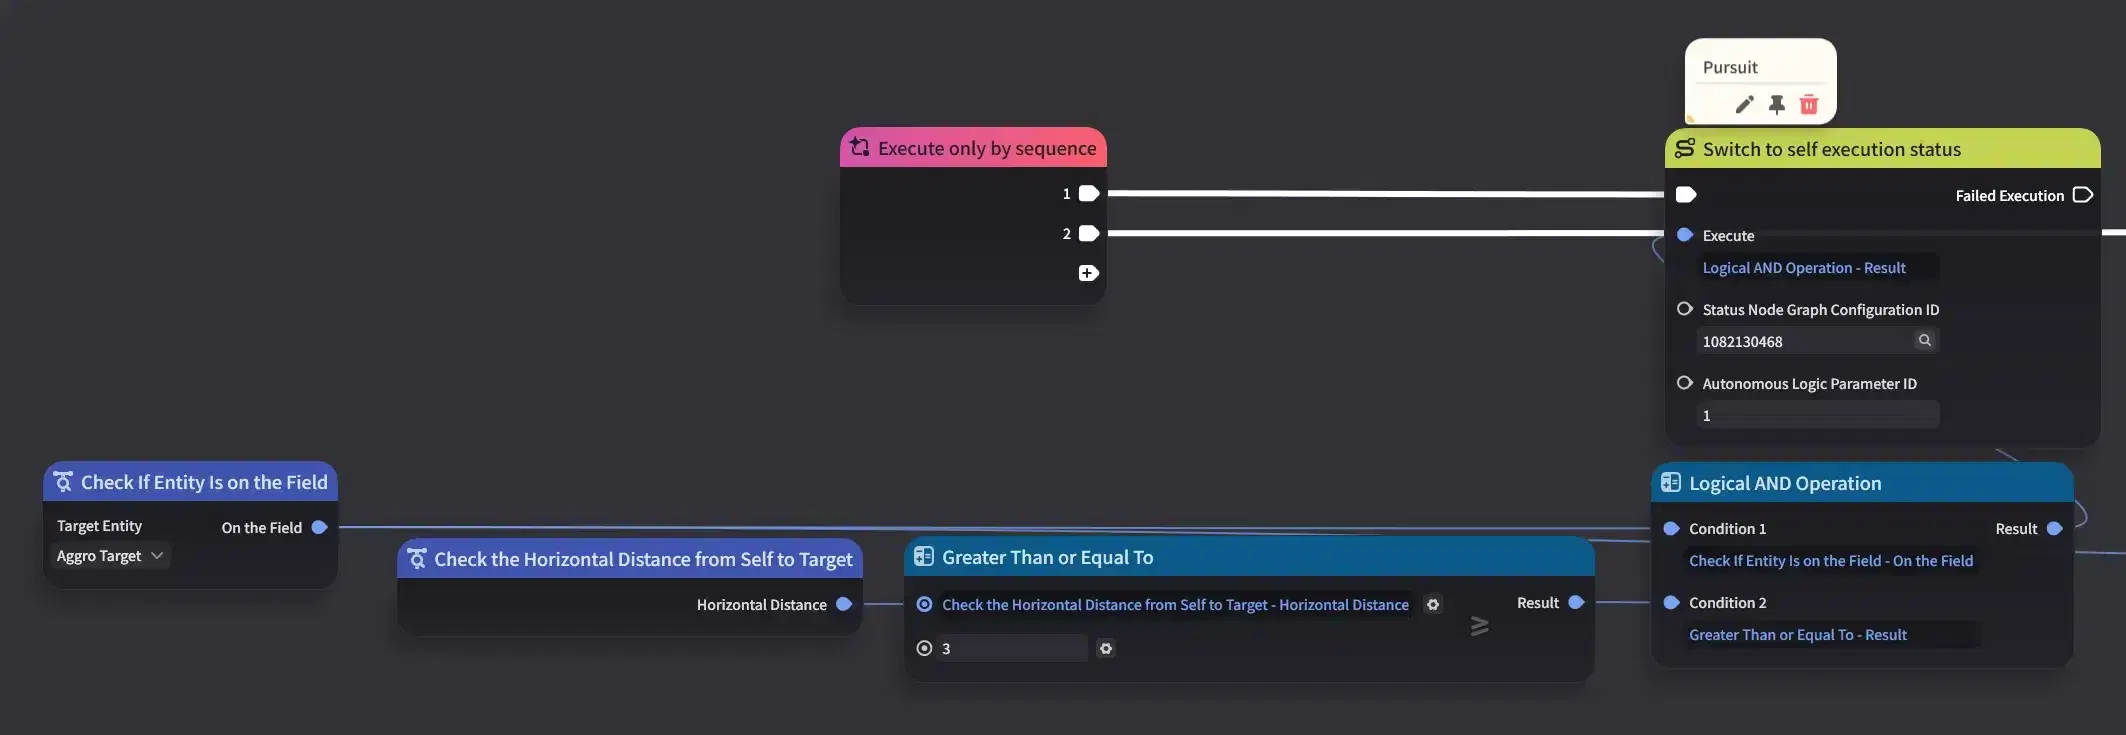
First branch: Target on field and distance ≥ 3 m → Pursue the player
Second branch: Target on field and not currently casting → Throw a grenade
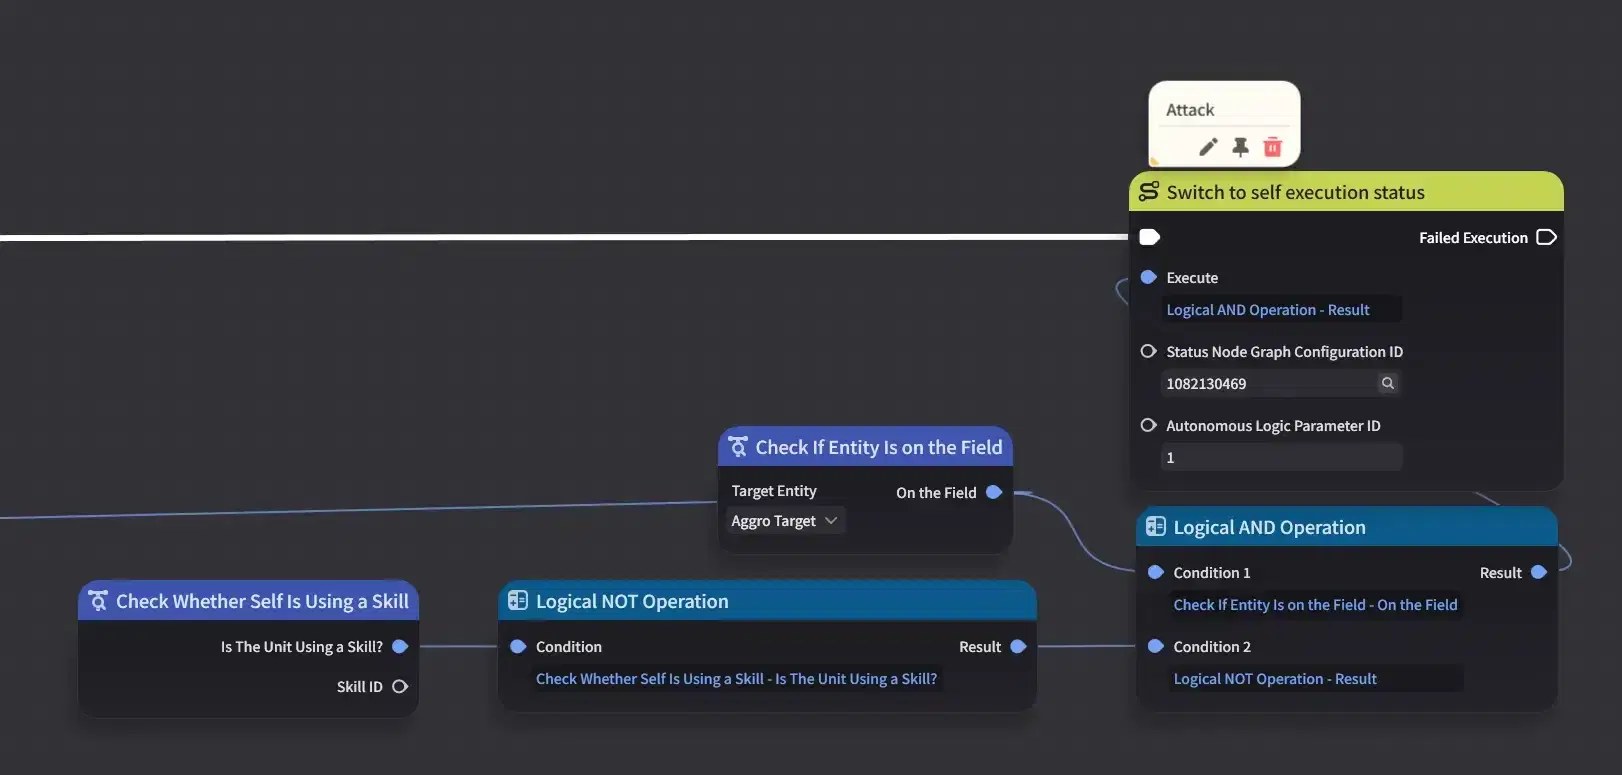
Note the inversion compared to the mage: the Ruin Guard prefers to close distance and only throws once it is near. Select the Decision graph in the Ruin Guard's Combat Tab.
7.5 Status Node Graphs
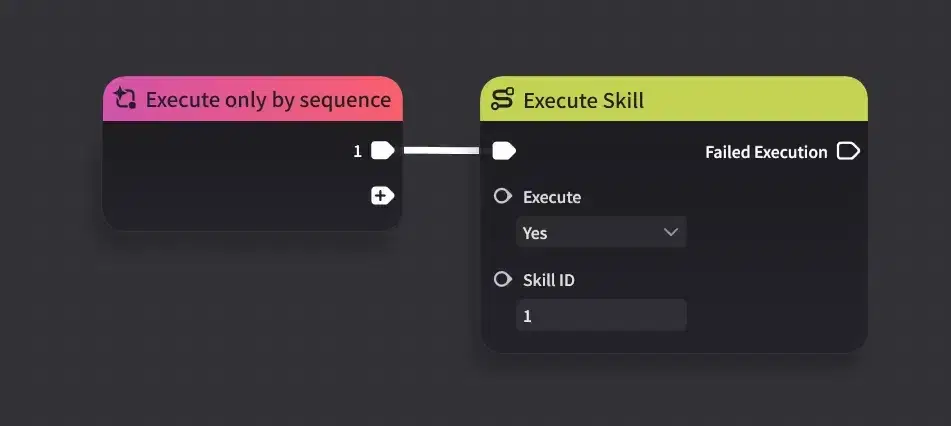
Status Node Graph 1 - throw. A single Execute Skill node. If the skill is on cooldown the node fails and the Decision graph moves on.
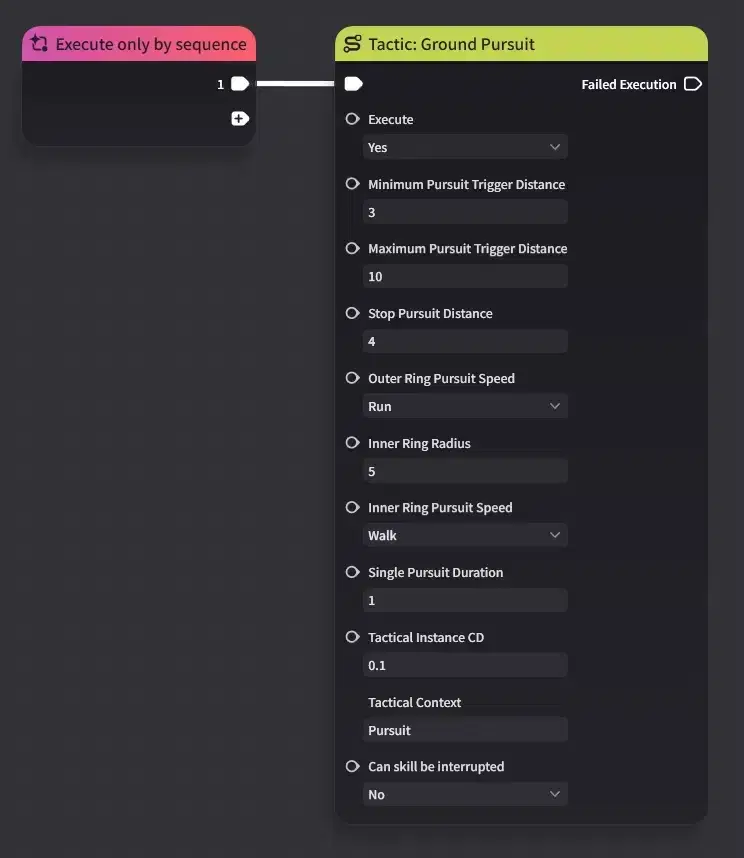
Status Node Graph 2 - pursue. Tactic: Ground Pursuit:
- Minimum Pursuit Distance — 3.1
- Maximum Pursuit Distance — 8
- Stop Pursuit Distance — 3
- Can skill be interrupted — No
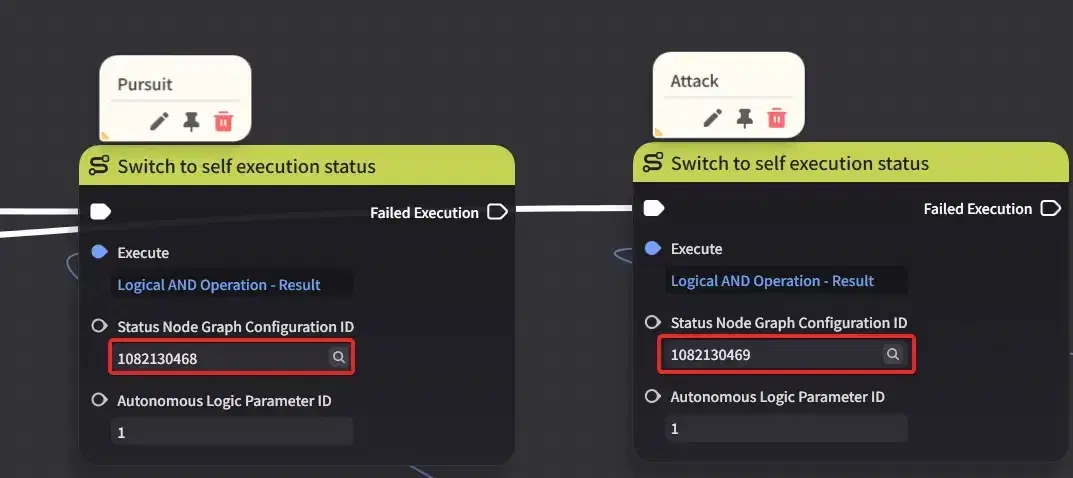
Link both into the Decision graph.
7.5 Showcase
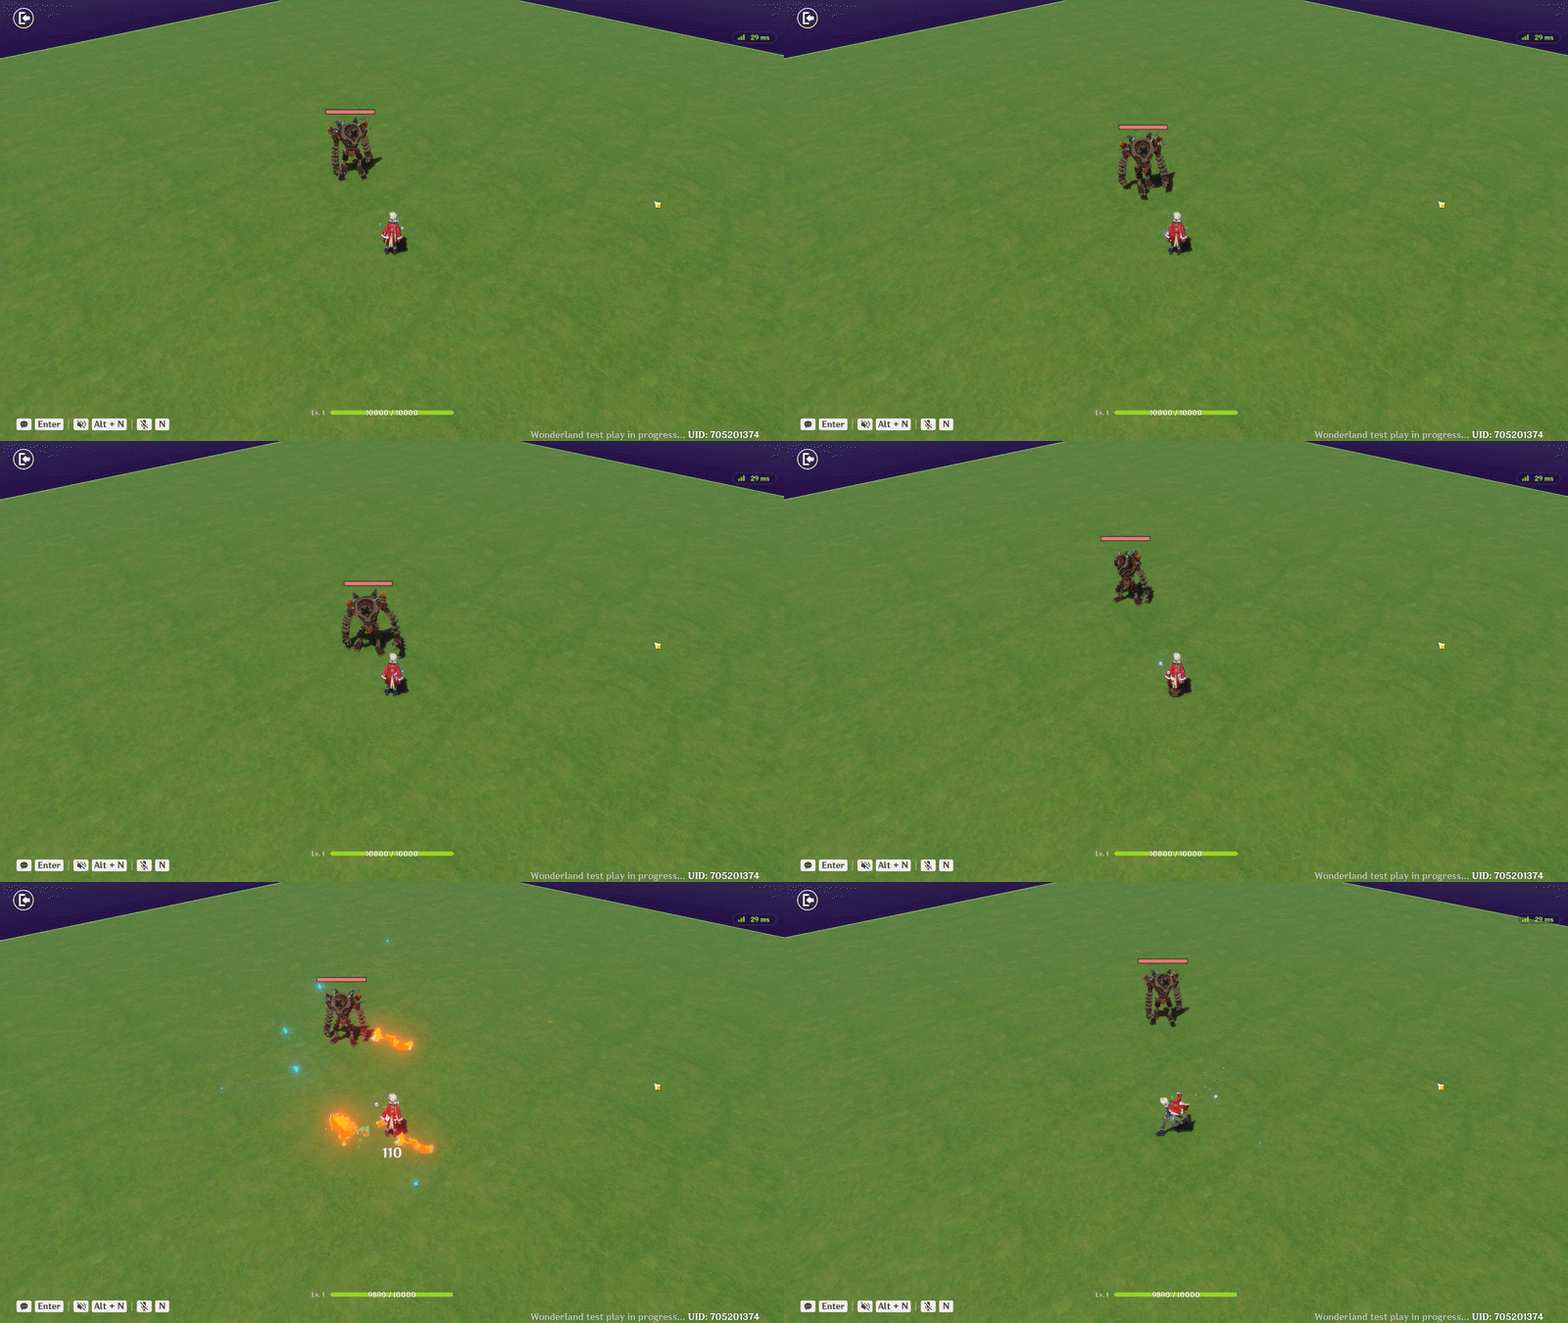
Ruin Guard pursuit and attack
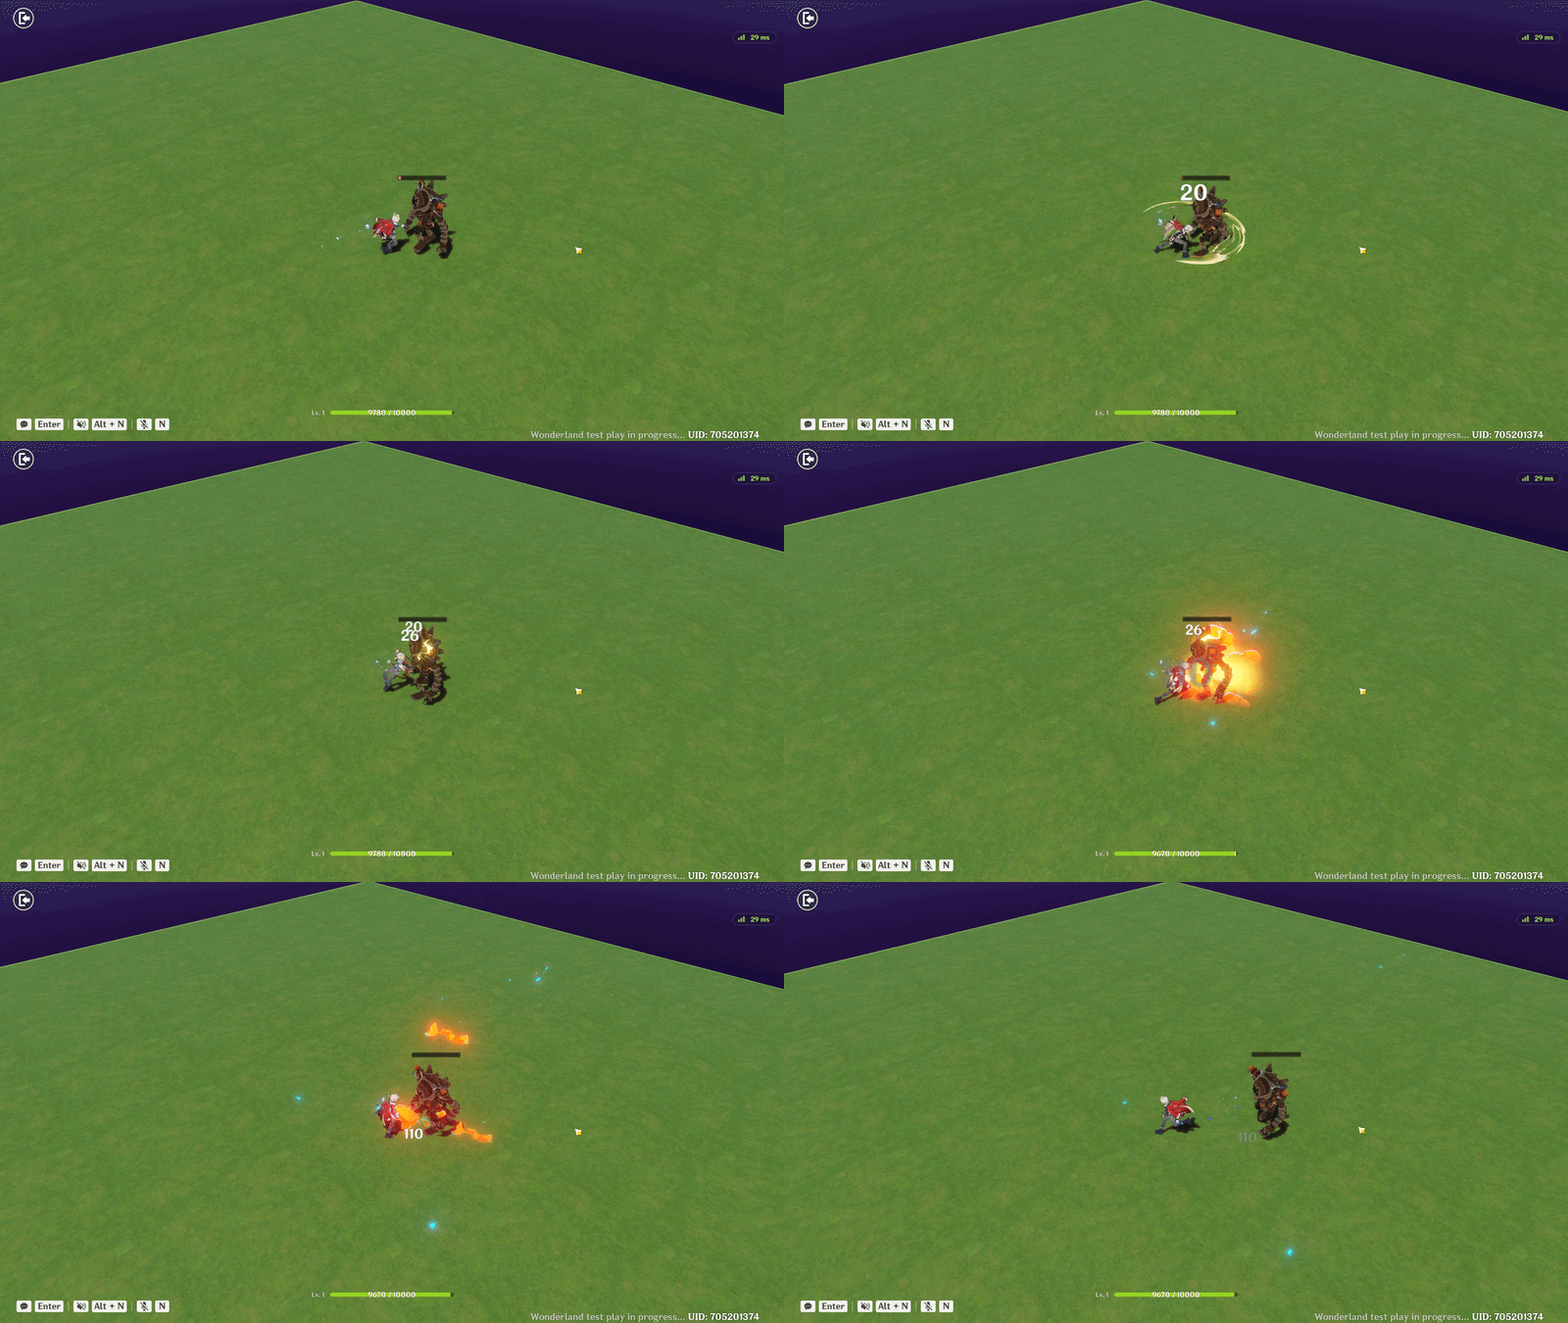
Grenade spawn after death

I hope this guide helps you better understand how to design and implement complex creation behaviour and skills.