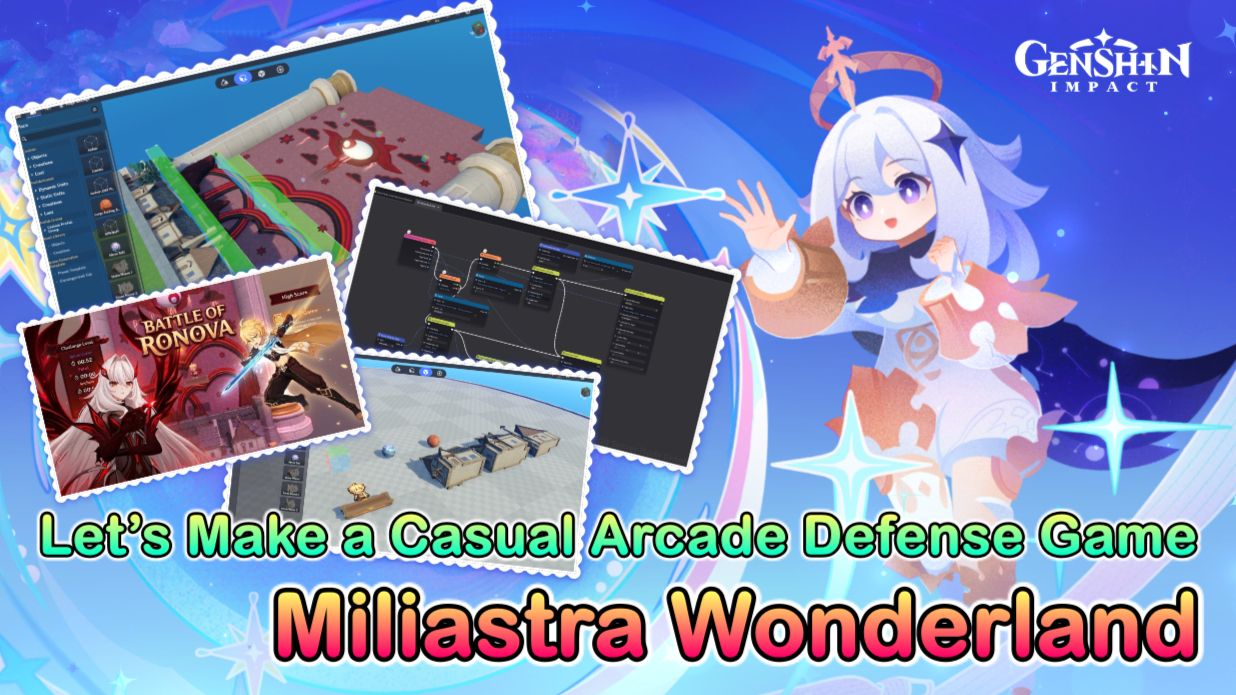
Let’s Make a Casual Arcade Defense Game in Miliastra Wonderland
Introduction
Hi Travelers, welcome back to Miliastra Wonderland Guide, in this guide we will learn how to create a Casual Arcade Defense Game in Miliastra Wonderland. The main objective is simple: protect the city from falling objects by moving your character and intercepting them before they reach the city.
We will build the game step by step, starting from the basic arena and player movement, then adding falling objects, defense mechanics, City HP, Score, random spawning, and increasing difficulty. Last, we will add UI, and Achievement to make the game feel more complete and enjoyable to play. By the end of this guide, you will have a simple arcade-style defense game that can be expanded with new mechanics, different enemies, power-ups, and additional game modes.
I’m also providing the save file for the game I’ve published, so you can study it.
 ,
Download Battle of Ronova Save File:

10 Steps to Create a Casual Arcade Defense Game
Chapter 1: Game Concept & Planning
Before starting the game development process, it is important to decide on the concept and the type of gameplay. For Battle of Ronova, the idea is based on a casual arcade defense game that is simple and easy to understand. The player’s main task is to protect the city from falling rocks and meteors while reacting quickly to incoming attacks.
This type of game was chosen because it offers simple controls, fast-paced gameplay, and a focus on quick reactions. The difficulty can gradually increase as more attacks appear, making the game more challenging as the player progresses. This makes Battle of Ronova suitable as a short and accessible game while still providing an exciting challenge.
In the planning stage, several core elements of the game are defined before moving into the creation process:
- Game Objective : Protect the city from falling rocks or meteors.
- Gameplay Flow : Start the game → incoming object/attacks appear → move and block the attacks → increase the score → survive until the challenge is completed.
- Arena : A simple 2D arena with the city placed at the bottom and the player moving above it.
- Player : The player can move left and right to block incoming attacks and use a Dash Skill for quick movement.
- Falling Objects : Different types of rocks or meteors fall from random positions, with some attacks being faster or dealing more damage.
- City HP : The city has limited HP. Each attack that reaches the city reduces its HP.
- Score : Successfully blocking falling objects increases the player's score.
- Win Condition : Reach the required score or successfully survive the designated challenge.
- Lose Condition : The game ends when the city's HP reaches zero.
With these elements planned from the beginning, the overall gameplay structure becomes easier to build and balance in the following chapters.
Create New Project
After finalizing the game concept and planning, the next step is to create a new project in Miliastra Wonderland. Follow these steps to get started:
- Open the Paimon Menu and select My Miliastra Wonderland.
- Select Create New Save to create a new project.
- Choose Beyond Mode. This mode provides more freedom and flexibility when creating and managing your project.
- Select Edit to enter the editor and start managing your new project.
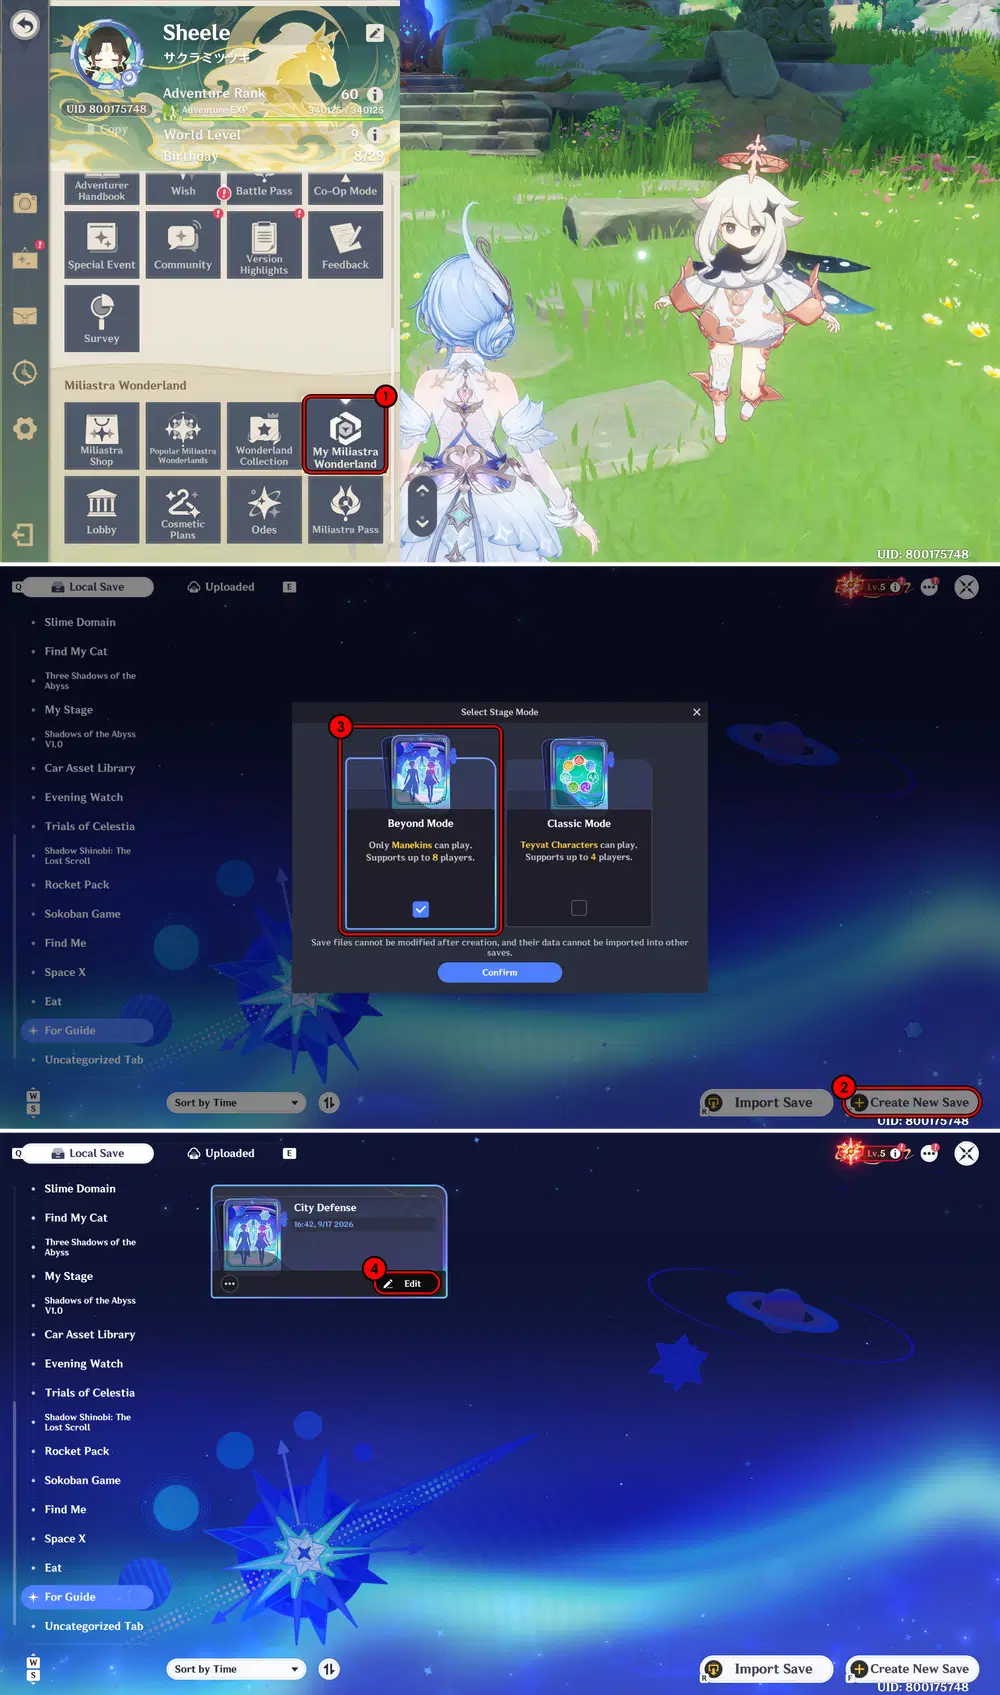
Create New Project
Stage Settings
Next, we need to configure the basic Stage Settings. Setting the Load Requirement Level to Medium helps prevent warnings when placing a large number of assets, while the Player Count Settings determine how many players can play the game.
- Open the Main Menu and select Stage Settings.
- In Stage Settings, select Basic.
- Find Load Requirement Level and set it to Medium.
- Next, open Player Count Settings.
- Under Game Settings, set the Player Count to 1, since this game is designed as a single-player experience.
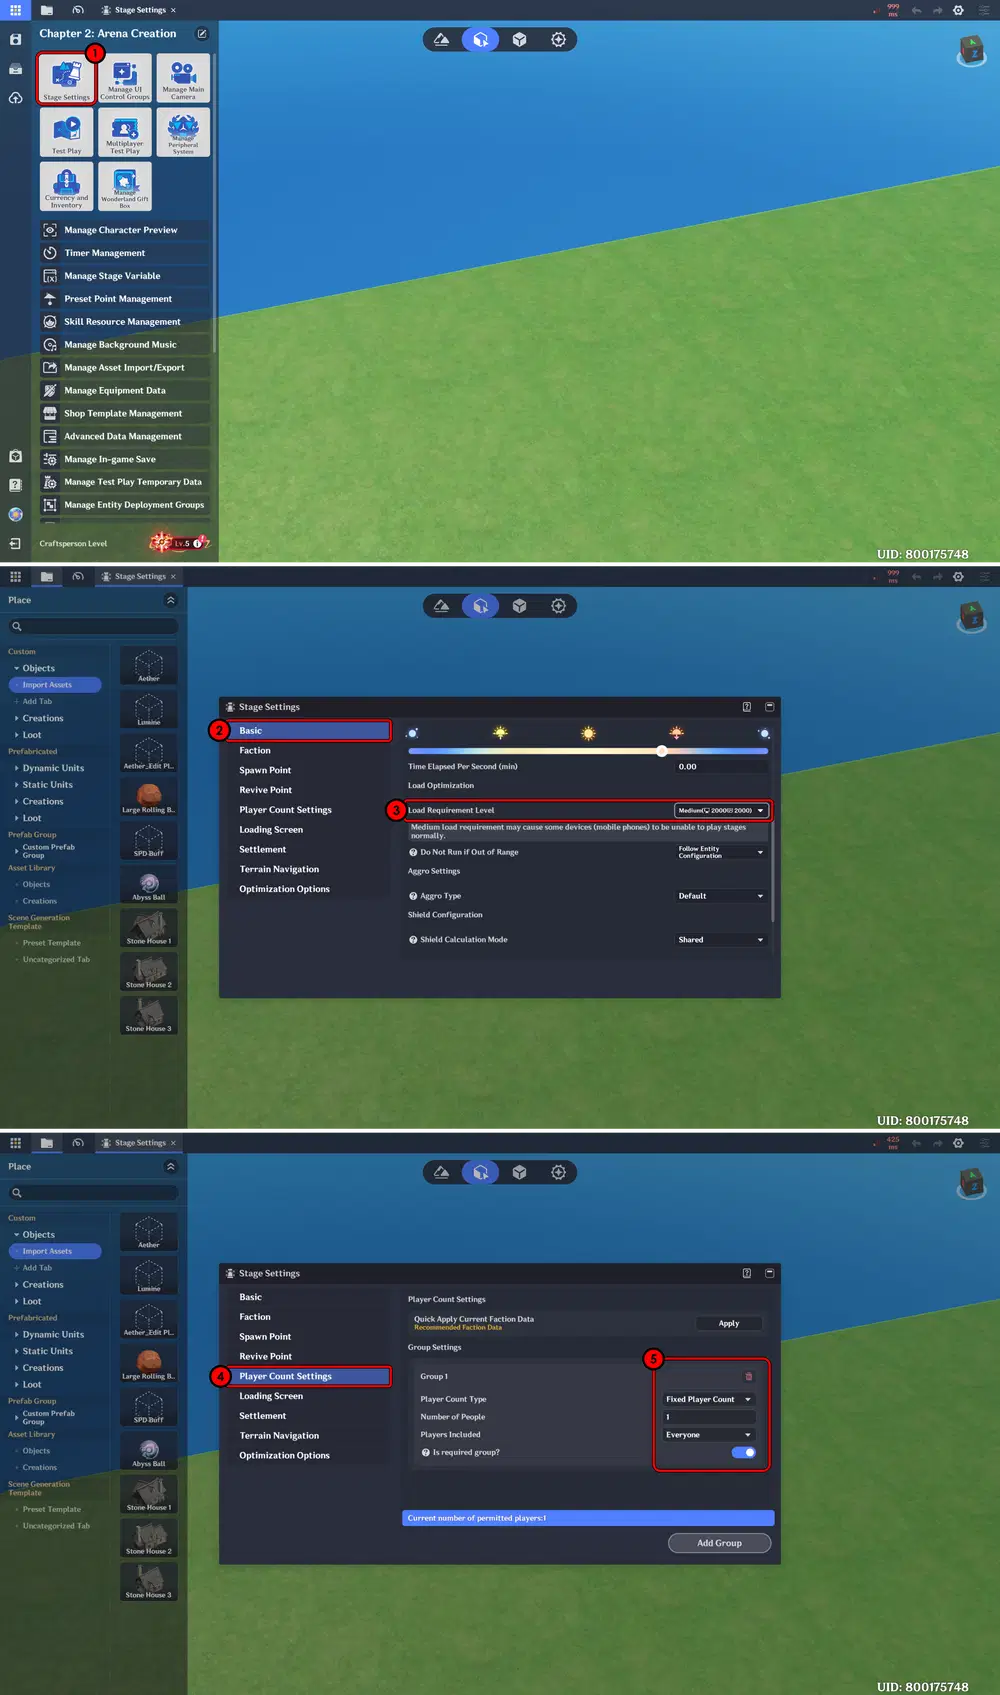
Stage Settings, Load Requirement Level & Player Count
Chapter 2: Arena Creation
In this chapter, we will create the main arena where the gameplay takes place. We will shape the terrain, set the playable area, and prepare the environment for the game's mechanics.
Terrain Creation
In this section, we will create the Arena, which will serve as the main area where the gameplay takes place. The arena should provide enough space for the player, falling objects, and other gameplay elements.
- Open the Brush section and start shaping the area for your game.
- You can also create new Terrain to build a custom environment that fits the theme and gameplay of your project.
Adjust the size and shape of the terrain to make sure there is enough space for the player to move and interact with the falling objects.
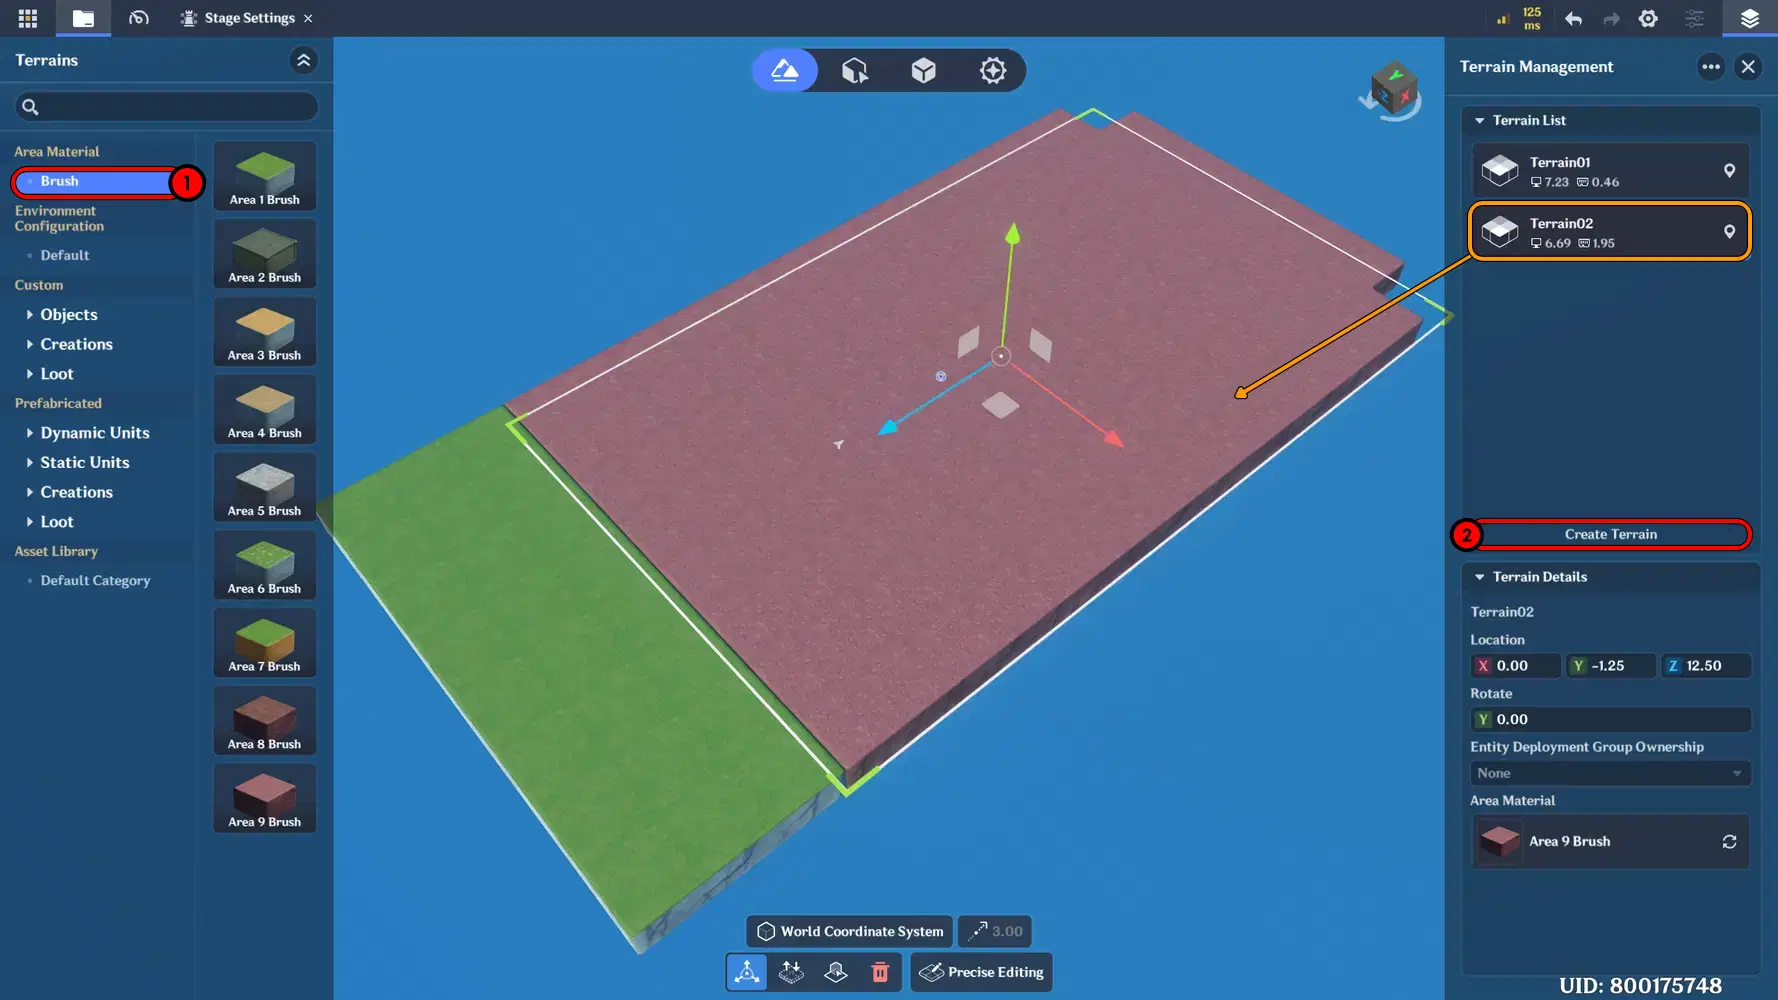
Terrain
Arrange and design the arena according to the theme you want. Place different assets and objects across the terrain to create the environment for your game.
For this project, I designed the arena to closely match Ronova's theme from Genshin Impact, featuring her distinctive red eye as the main visual element. At the bottom of the arena, I also placed several houses that the player must protect from the falling objects.
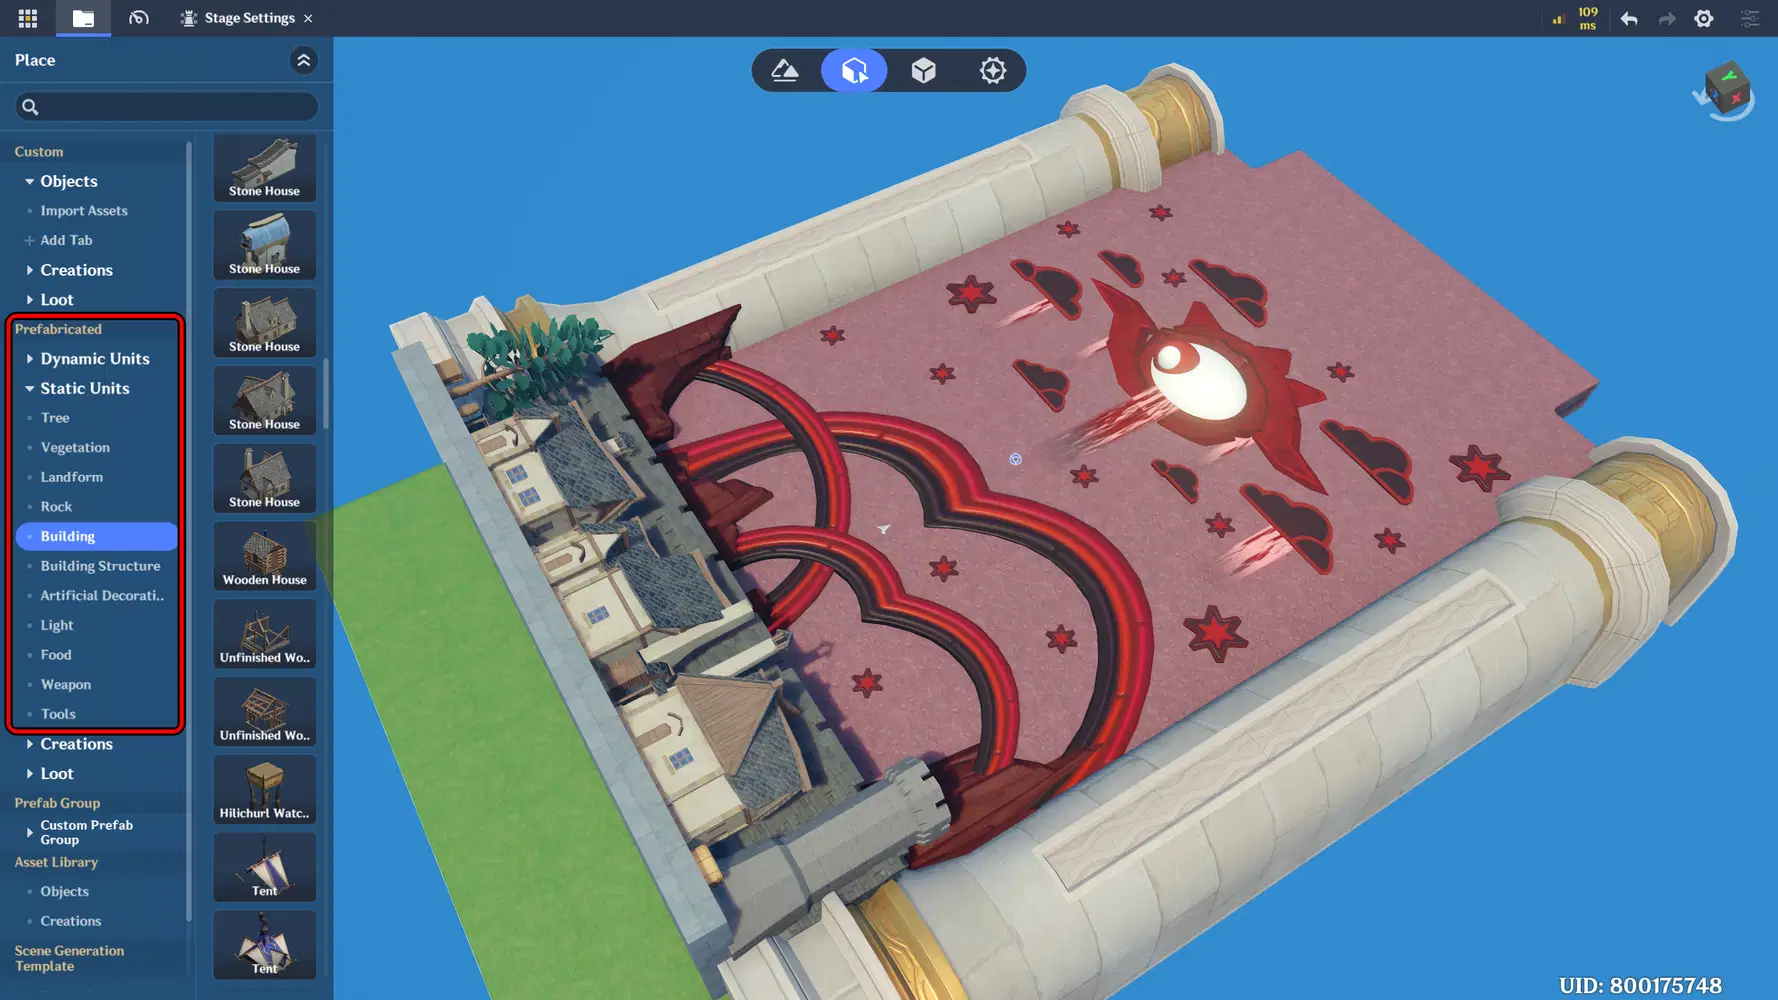
Object Placement
Since the objects are displayed from a top-down view, use the Rotate feature on each object to adjust its orientation. Rotate the objects so their important details can be clearly seen from above and match the overall design of the arena.
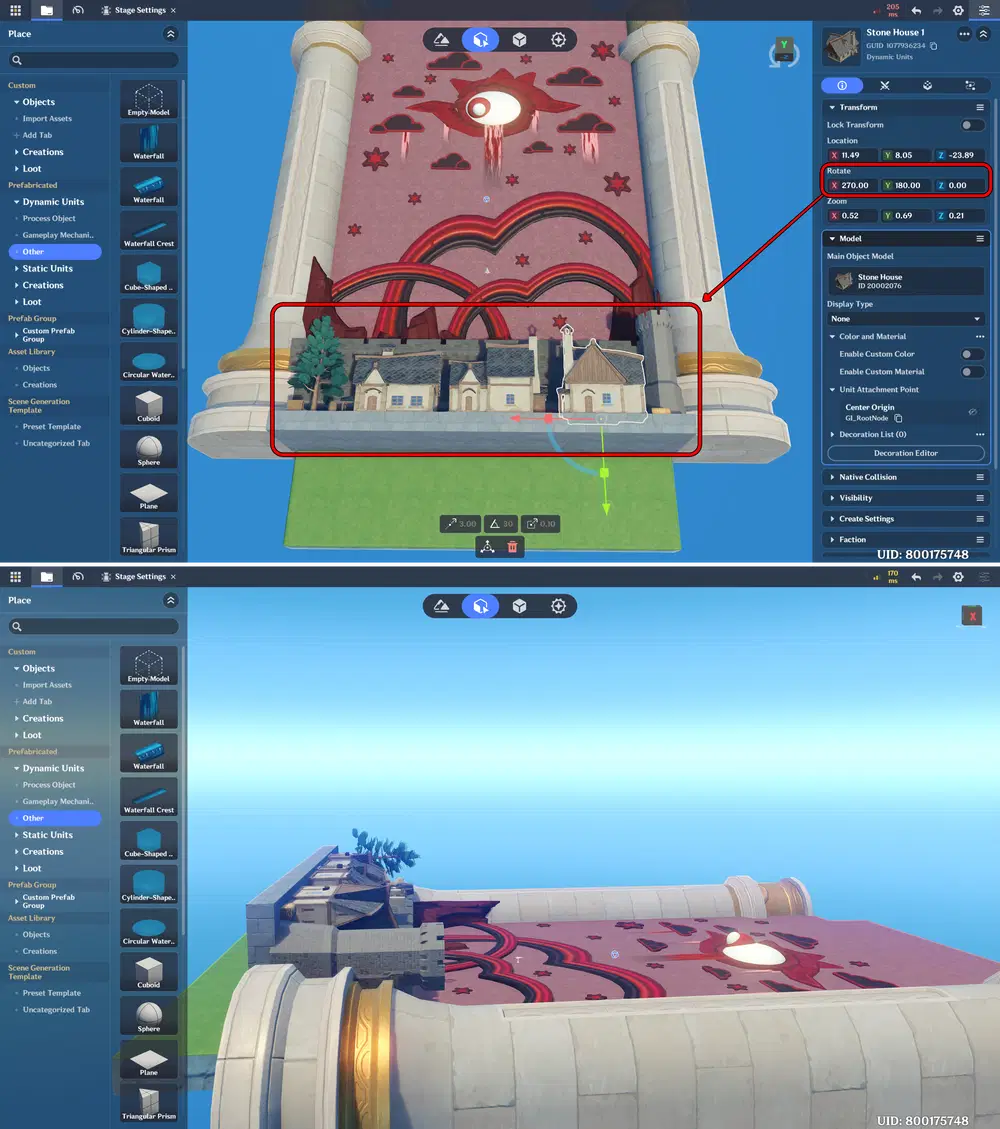
Top and Side Views
Color and Material
In this section, we will customize the color of objects to give you more freedom when designing your arena and creating a theme that matches your game.
- Select the object you want to customize.
- For this example, I will use Phlogiston.
- Open the object's Details panel.
- Under Model, enable Enable Custom Color.
- In the Color section, choose the color you want from the available color palette.
For this project, I changed the default Phlogiston color to Red to match Ronova's red eye and make the arena design fit the theme better.
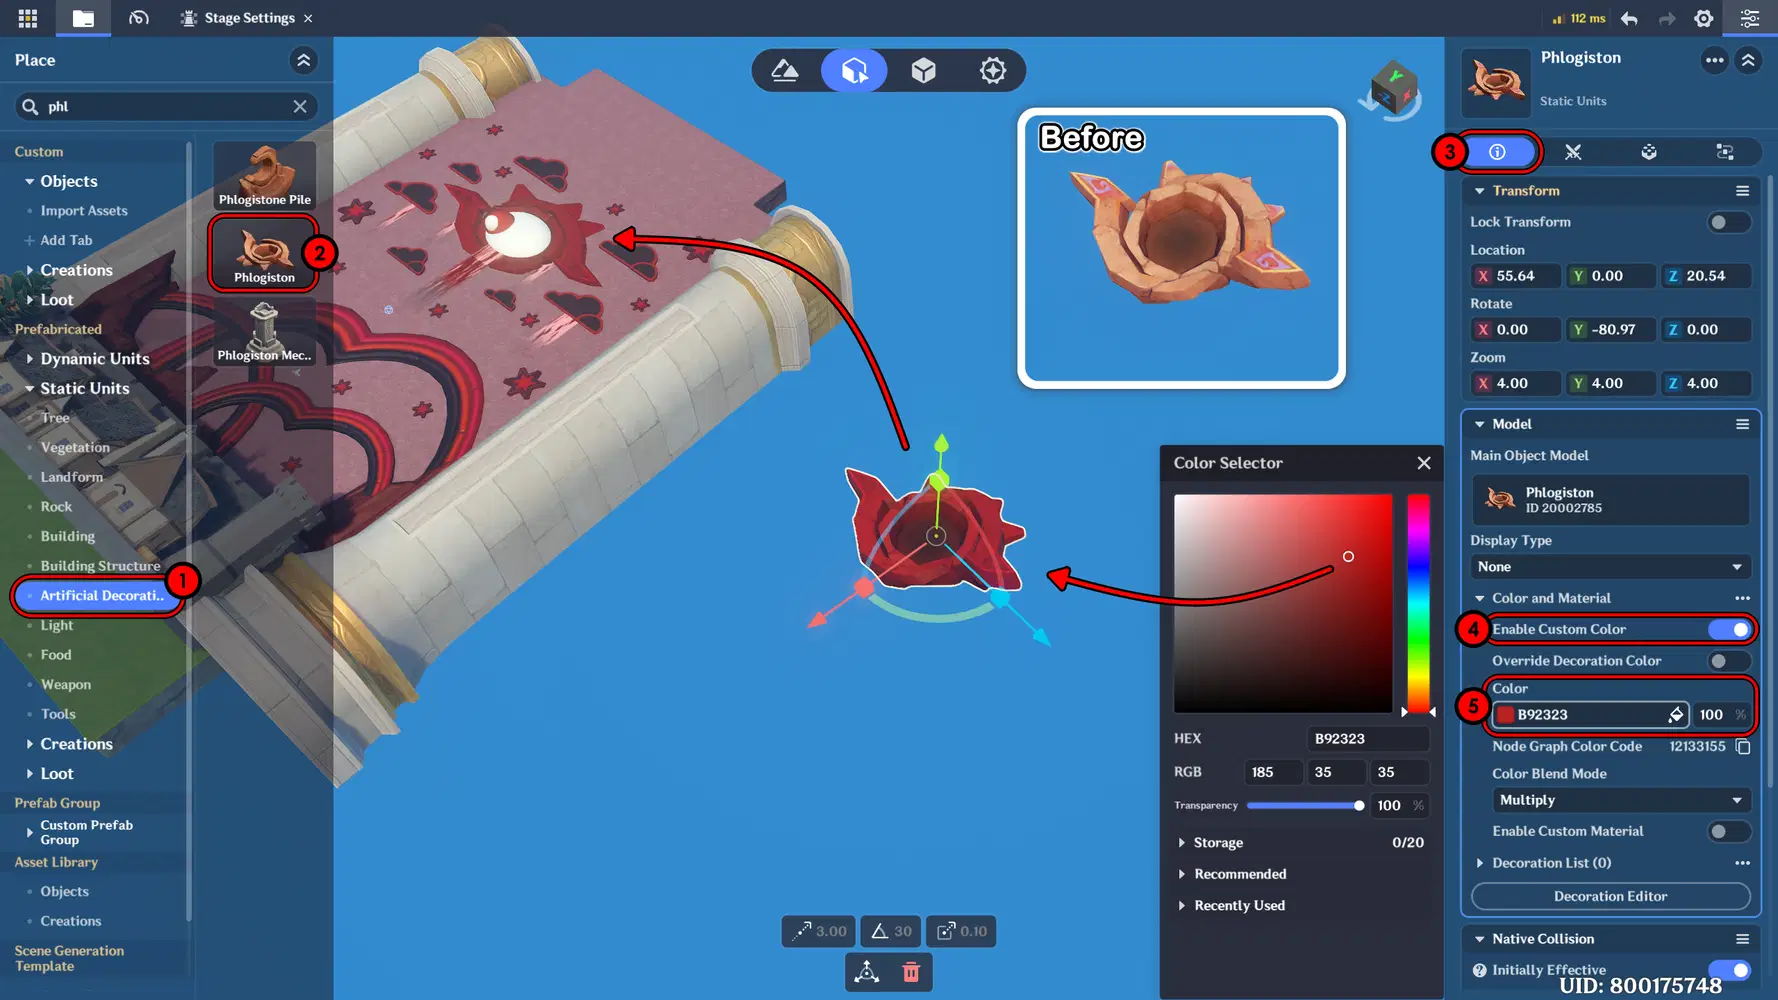
Custom Color to Create Ronova Eyelid
Creating an Animated Background
To make the background feel more alive and dynamic, we will add an eye movement animation to Ronova. This simple animation makes the giant eye look like it is watching the player during the game.
- In the Prefabricated section, select Other to display the available basic shape objects.
- Select Sphere to create the main eyeball.
- Add another decorative object using Sphere for the eye's pupil.
- Select the main Sphere and add a new component. This component will be used to control the pupil's movement.
- Select the Basic Motion Device component.
- Open Advanced Editing for this component.
- Click the + button to add a new Basic Motion.
- Set the Motion Type to Path Movement. This allows the pupil to move along a predefined path.
- Add Waypoints to define the direction and positions that the pupil will move through.
You can check the animation by clicking Preview and see how the pupil moves along the path.
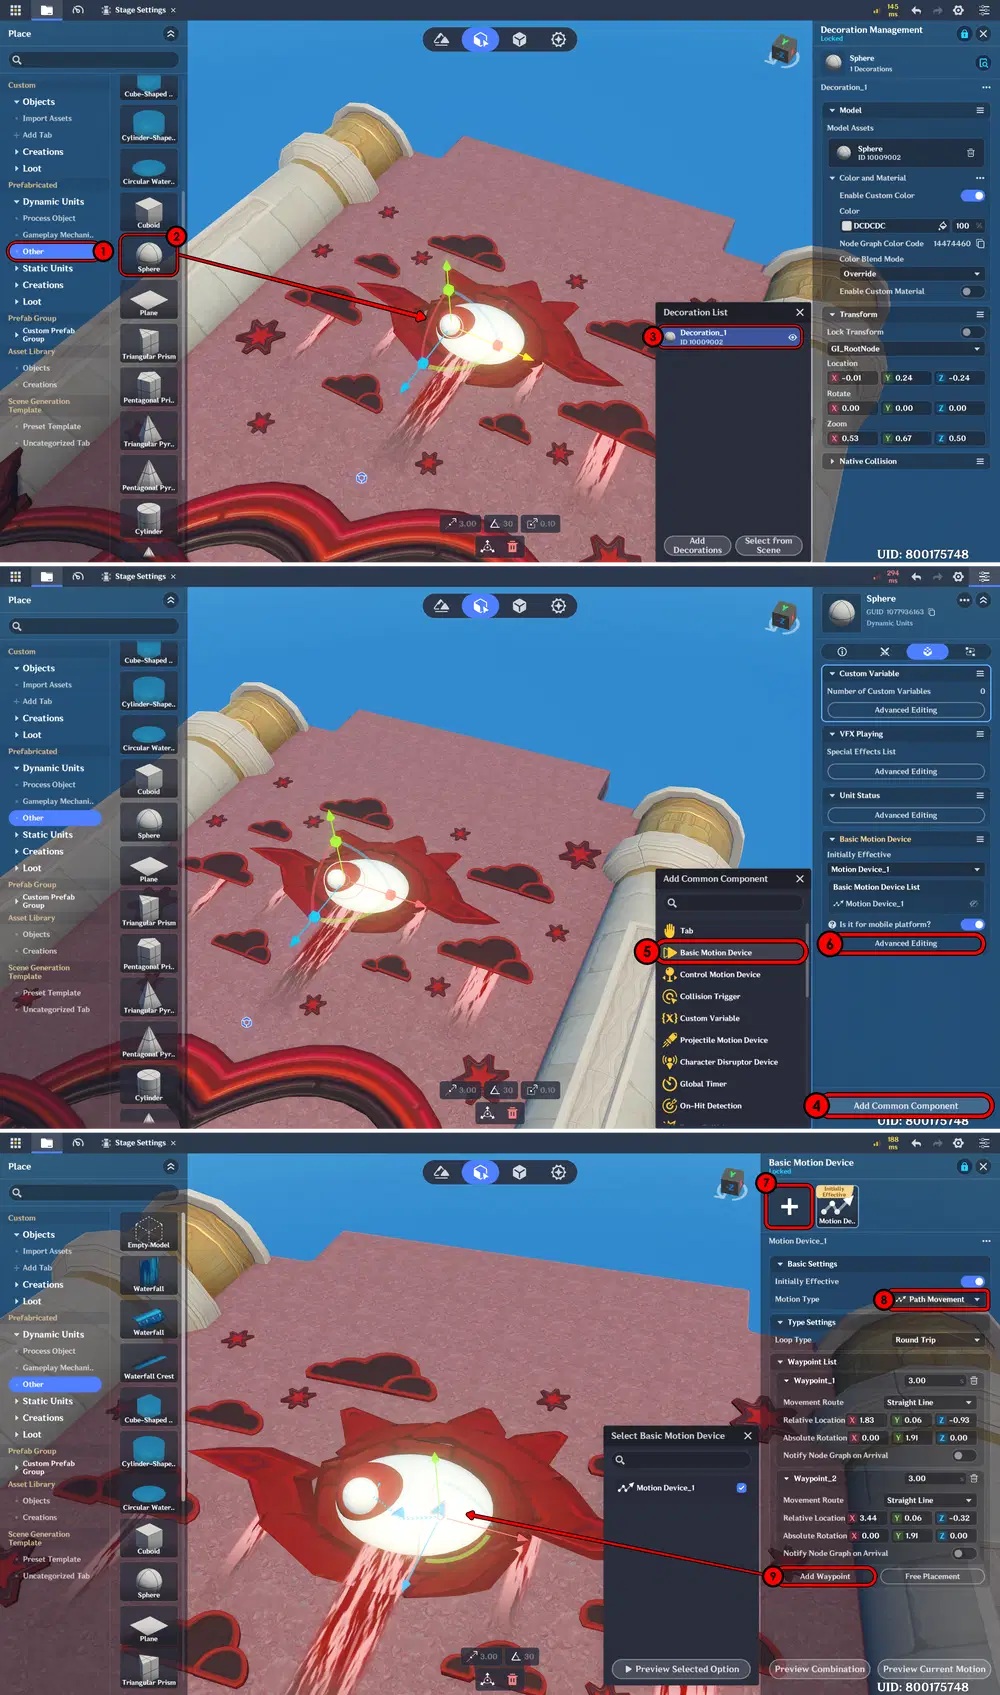
Create Ronova Eye Animation
Player Movement Boundaries
Next, we will create boundaries to keep the player within the intended playable area and prevent them from moving outside the arena.
- Go to Other under the Prefabricated section.
- Select Empty Object and adjust its length and thickness to create a boundary. You can also disable Native Collision to prevent the player from climbing over it.
- Add more Empty Objects as decorative boundaries. Arrange them like walls around the playable area to limit the player's movement.
- For this arena, I used four additional Empty Objects to create boundaries on each side of the player area.
Position the Spawn Point, represented by the white arrow on the terrain, at the center of the arena within the boundaries. This will determine where the player spawns when the game begins
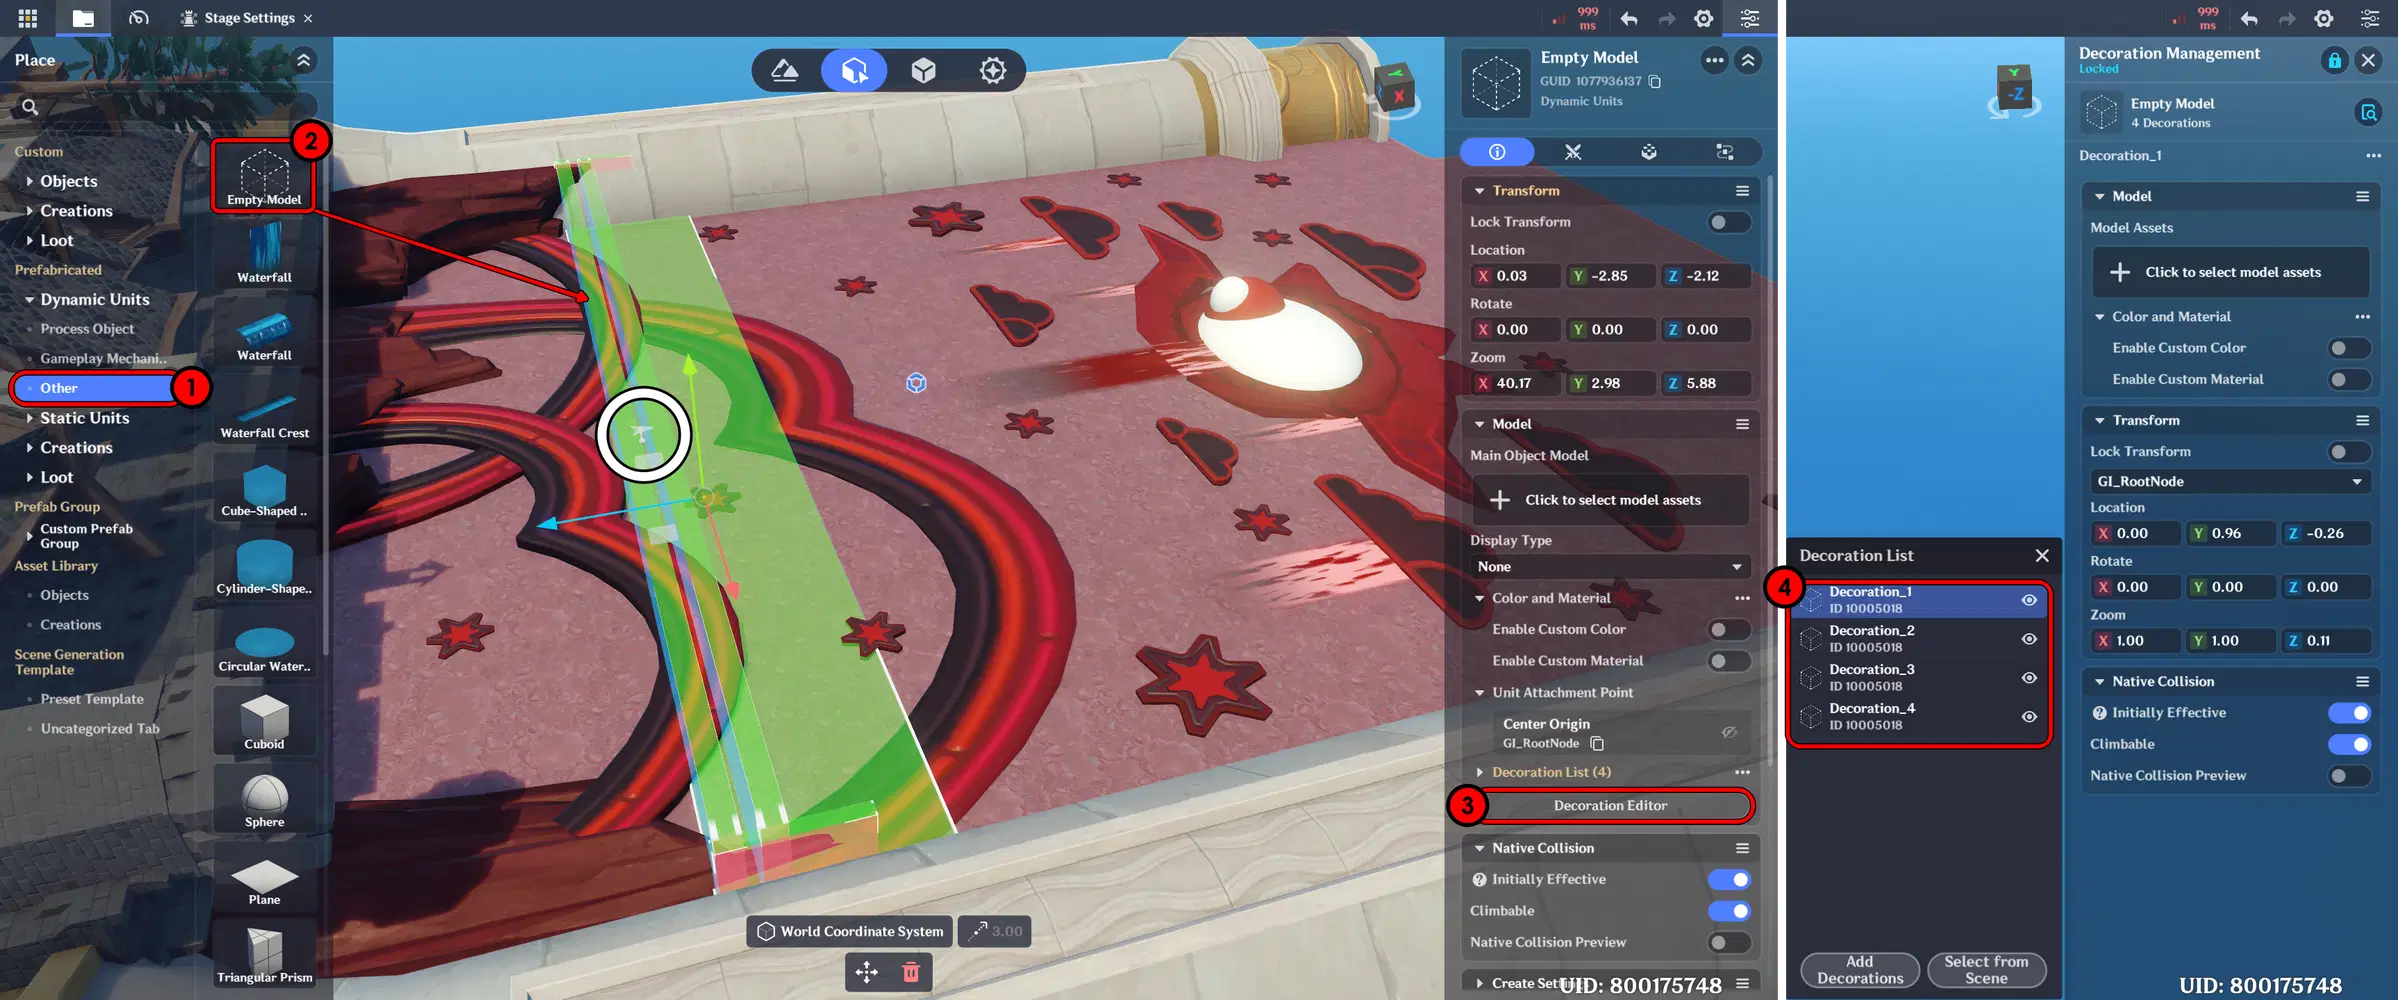
Empty Object as Boundaries
And the following is an example of a gameplay test.
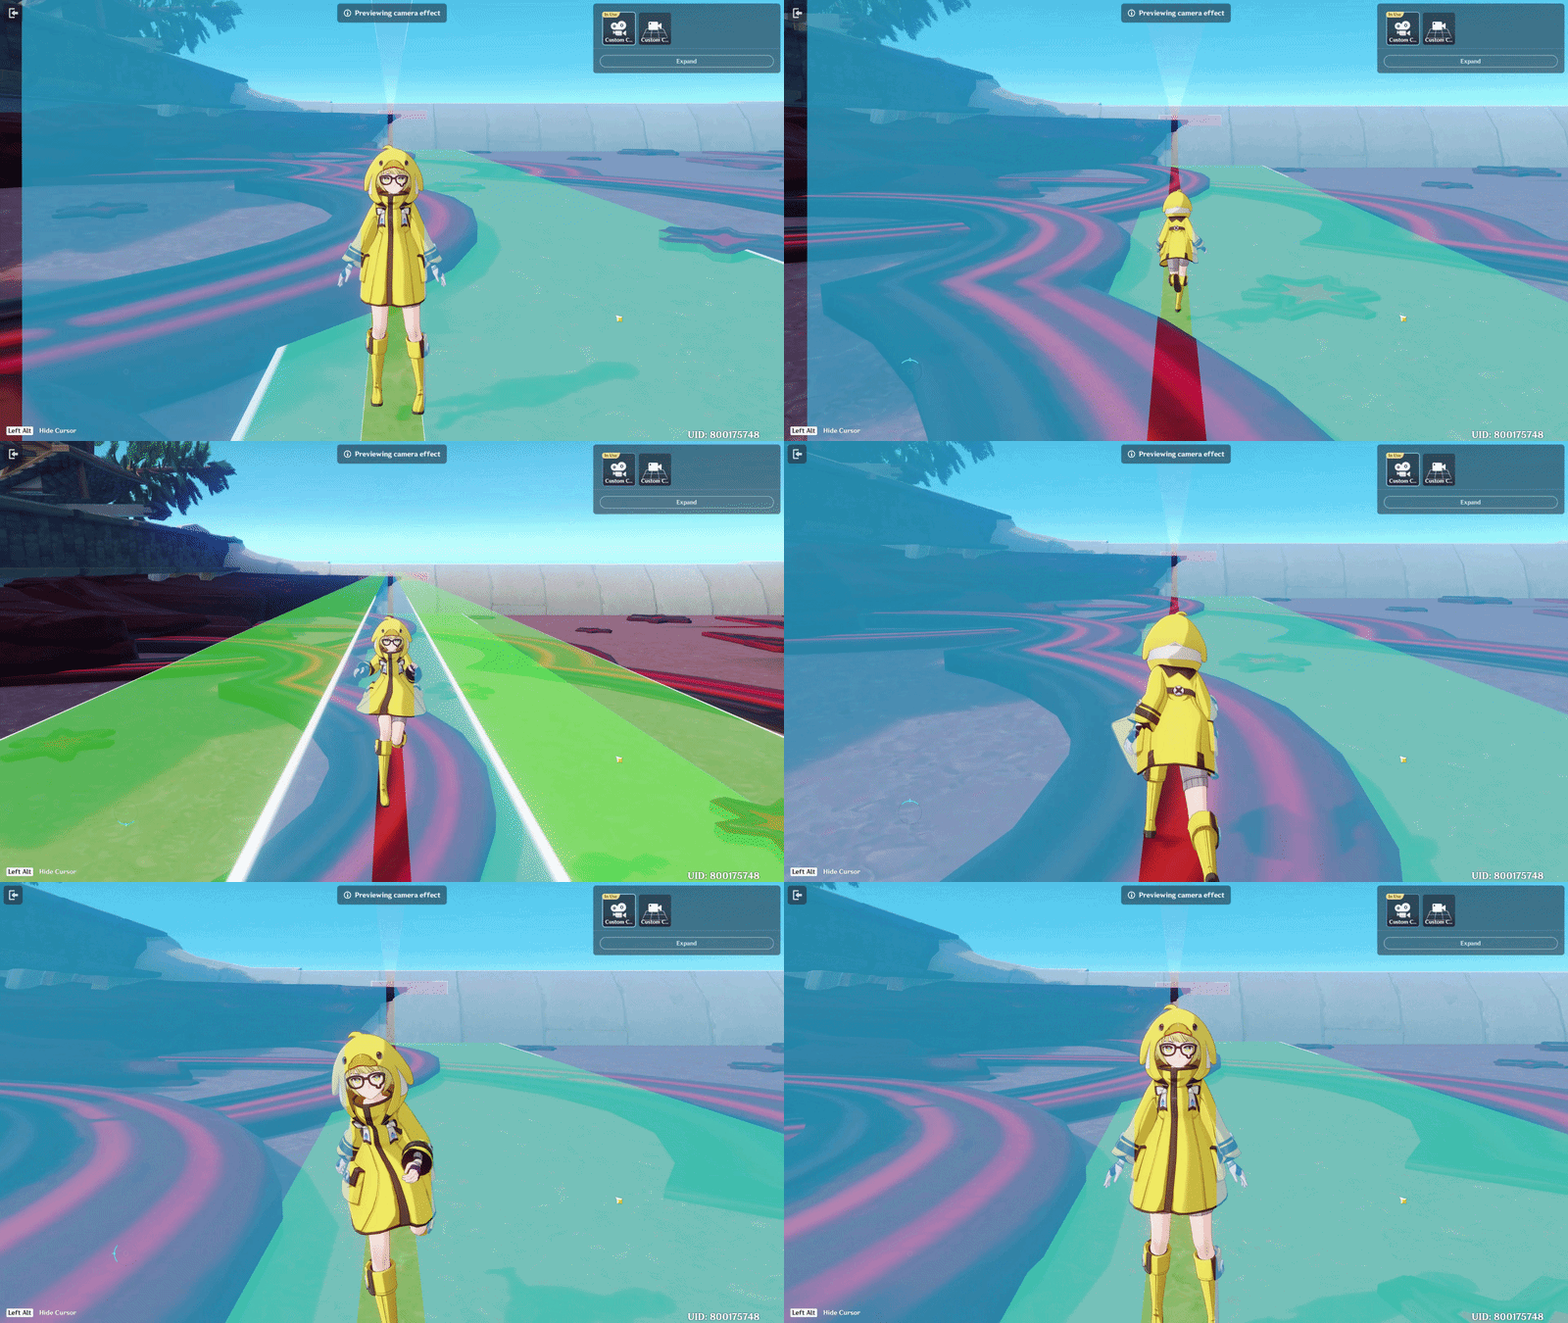
This Keeps the Player's Movement Within the Playable Area
Chapter 3: Custom Player & Defense Mechanic
In this chapter, we will set up the camera to create the desired gameplay view and configure the player for the game. We will customize the player's model and movement, create a skill for the main defense mechanic, and set up a detection system to identify incoming falling objects. These systems will work together to allow the player to move around the arena and defend the city from incoming threats.
Camera Setup
The first step is setting up the camera. This is especially important for this type of game because the gameplay is designed to be viewed from above. A properly positioned camera makes it easier to see the player, falling objects, and the entire arena.
- Open the Main Menu and select Manage Main Camera.
- In the camera settings panel on the right, select 2.5D Camera. Adjust the camera angle and position so it provides a clear top-down view and captures the entire playable area.
- You can use Preview Mode to make it easier to adjust and test the camera position.
- Open the Combat Preset section.
- Select Class.
- Make sure the Camera assigned to the player is the same camera you configured earlier.
With this setup, the player will use the custom camera when entering the game, providing a clear view of the entire arena.
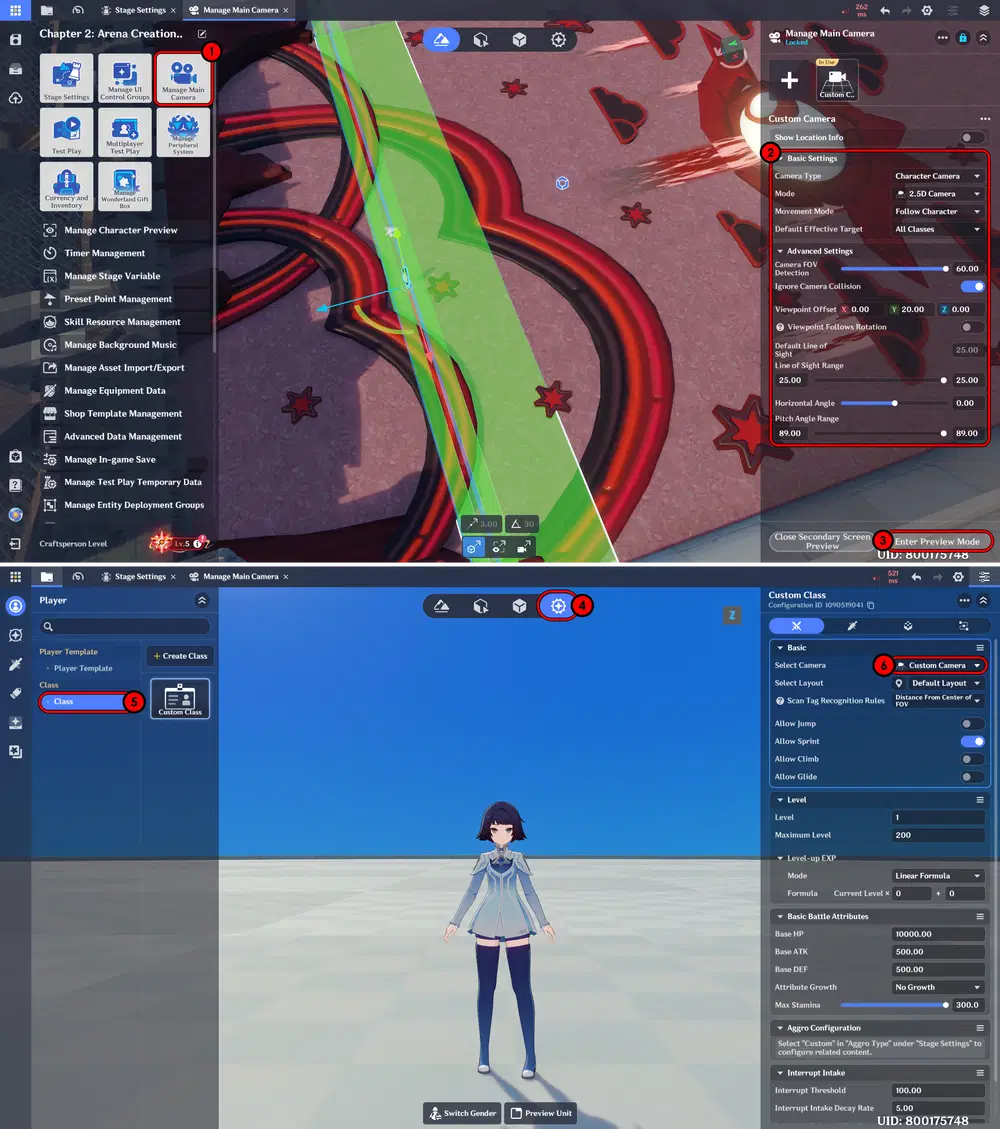
Camera Setup
And this is the expected result when you successfully complete the camera setup.
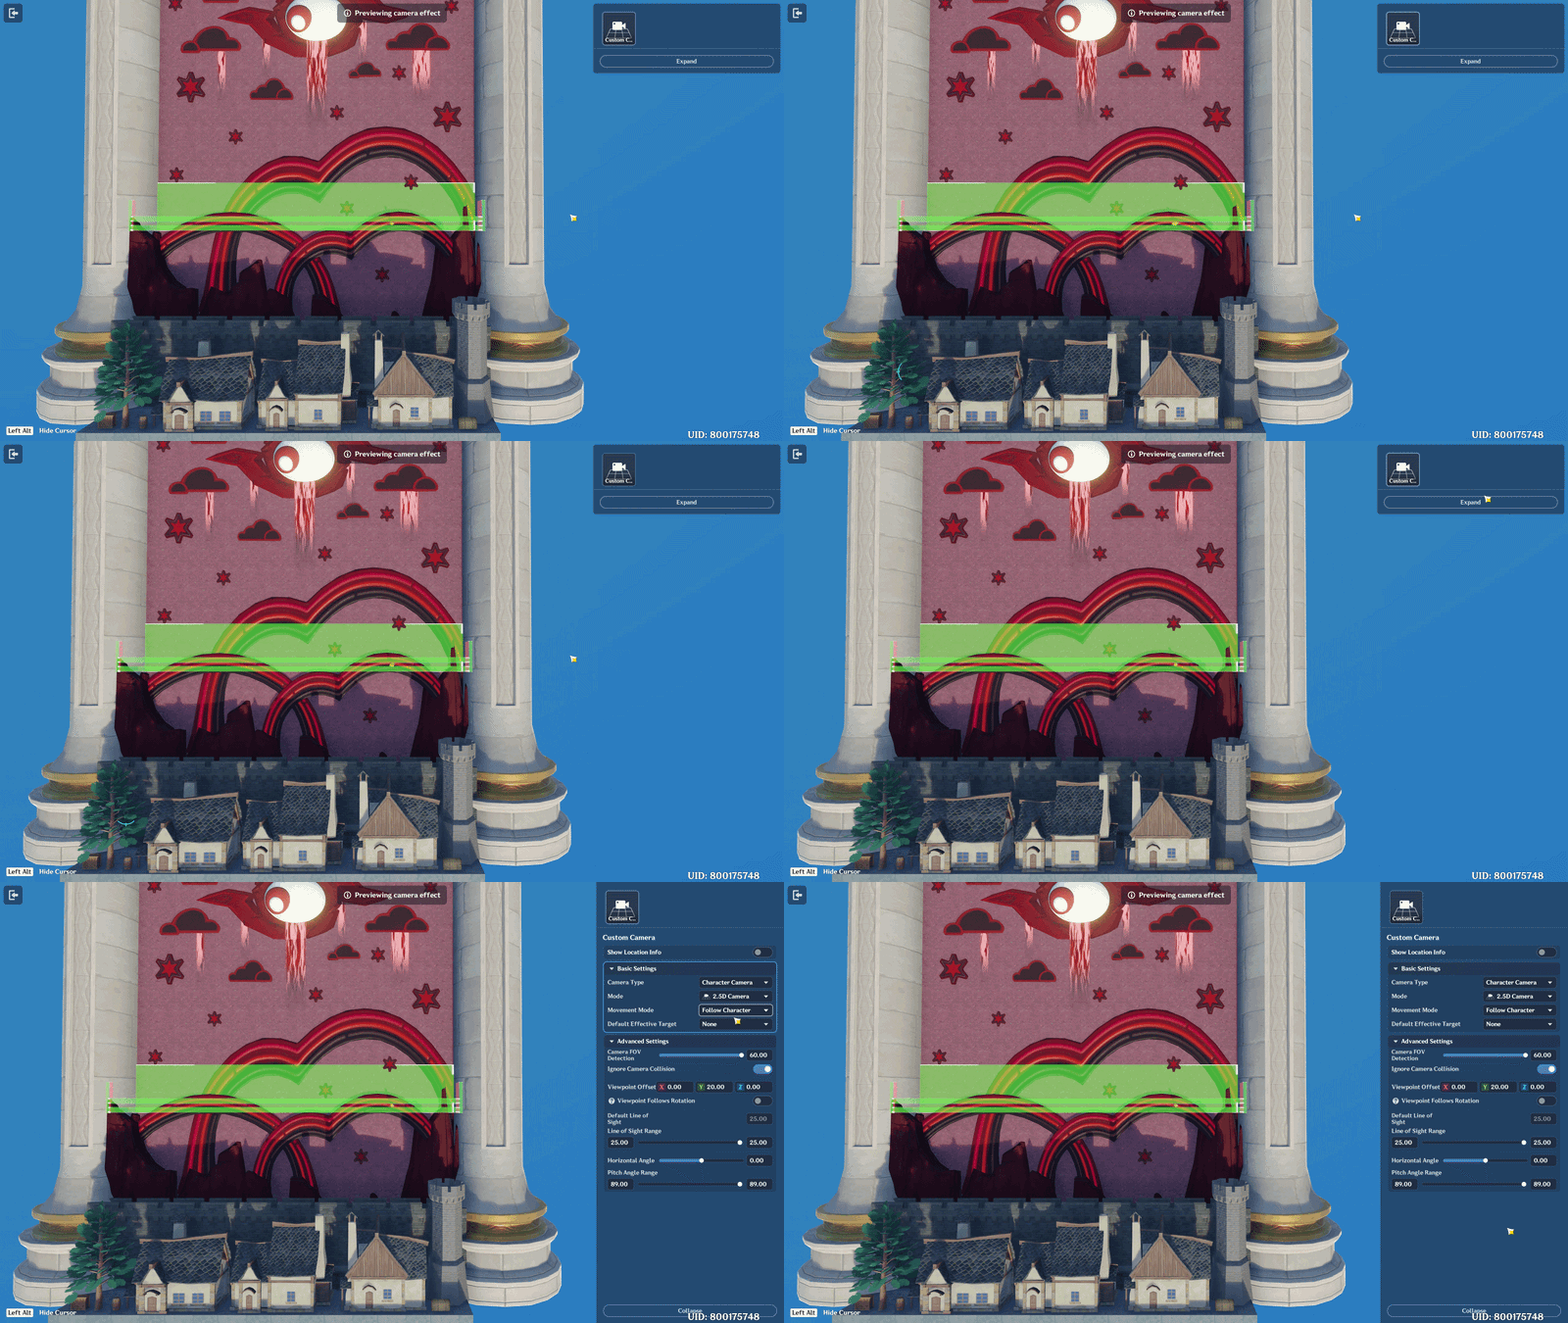
Top-down Game View
Character Model Setup
Next, we will customize the default player model to make the character's appearance more unique and better match the theme of the game. For this project, I used an asset available for download from the Miliastra Wonderland Resource Center. Special thanks to 9o_o6 for providing this asset and making it available for other creators to use. You can also download and use this asset in your own projects to create a more interesting player character.
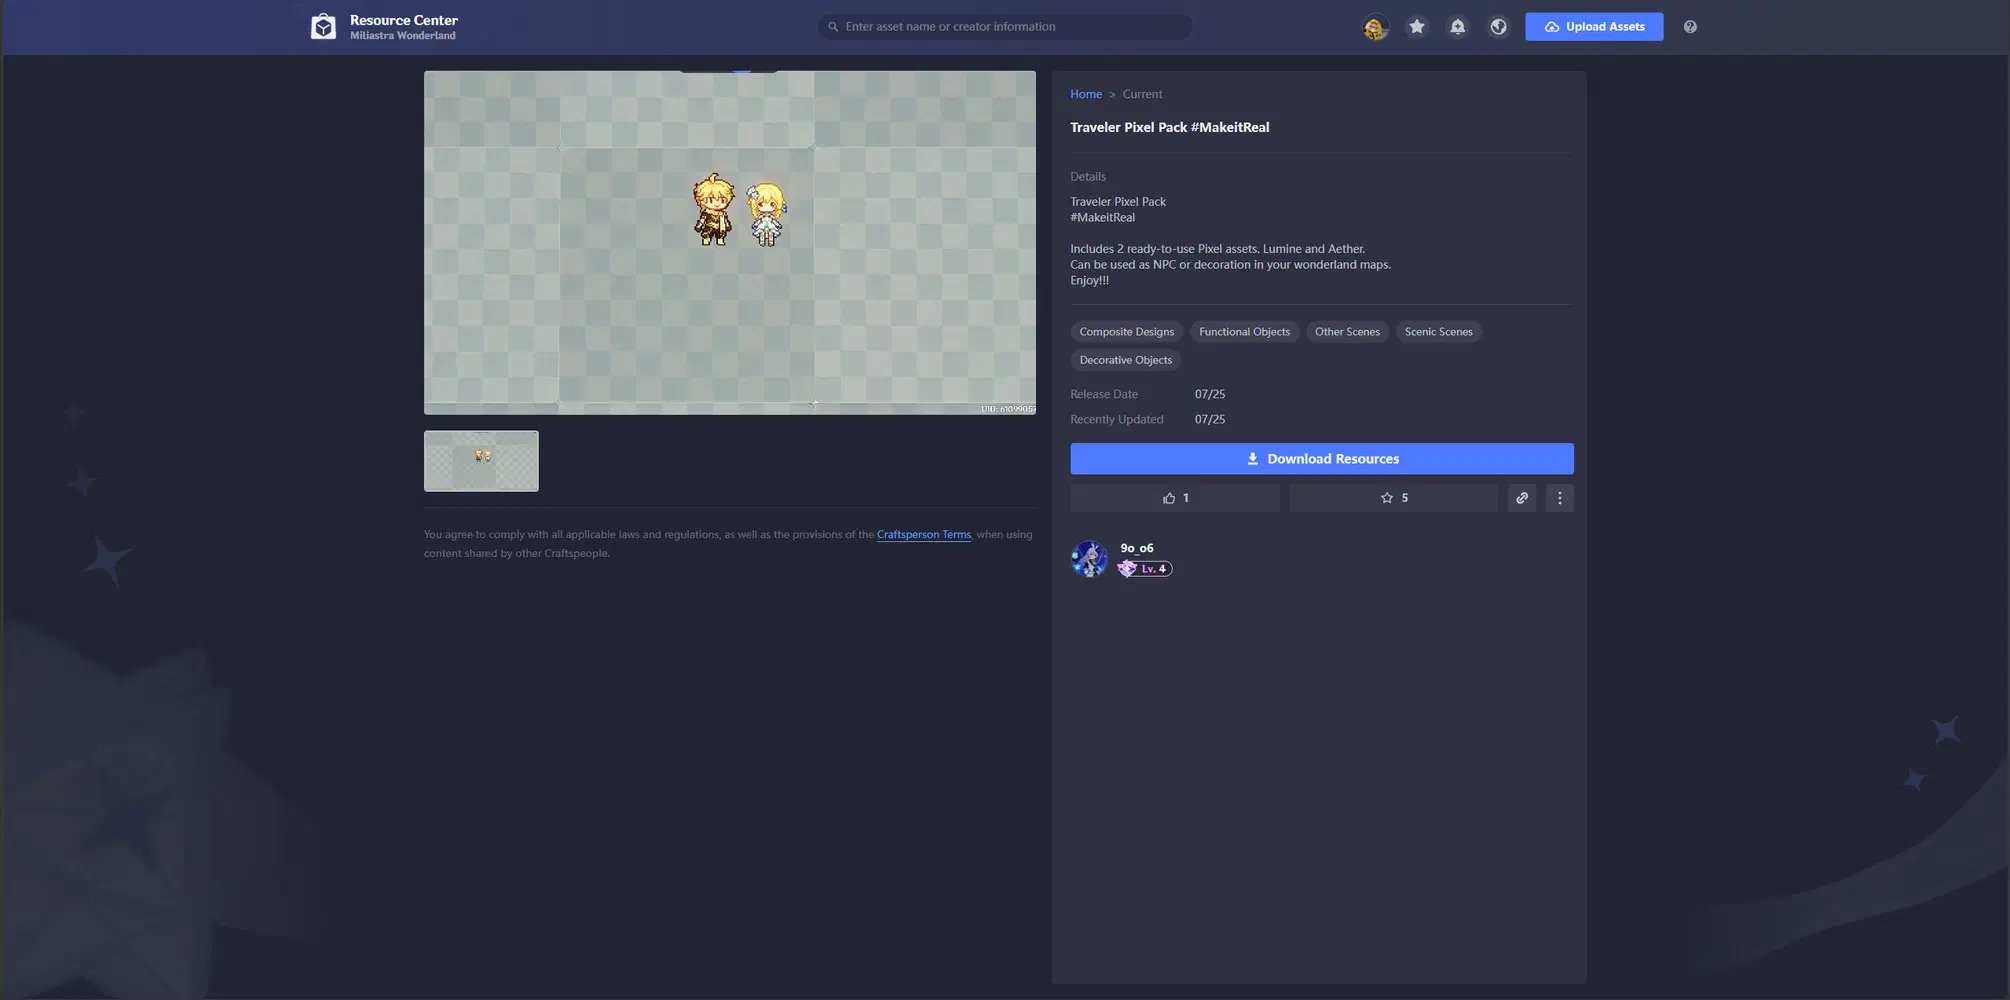
I have also included a link for those of you who would like to use this asset as well.
Download Traveler Pixel Pack
Traveler Pixel Pack #MakeitReal by. 9o_o6
After downloading the asset file, return to the Miliastra Editor and follow these steps to import it into your project:
- Open the Main Menu, select Manage Asset Import/Export, and choose Load External Asset. Copy and paste the downloaded asset file into the Miliastra Wonderland asset storage directory. Then select the asset you placed there and choose Transfer Selected Assets to import it into the Miliastra Editor.
- A new folder named Import Asset will appear. This folder is specifically used to store assets that have been imported into Miliastra Wonderland.
- For this project, I also added an extra wooden board to Aether using the Decoration feature to make the custom player model look more unique and better match the game's theme.
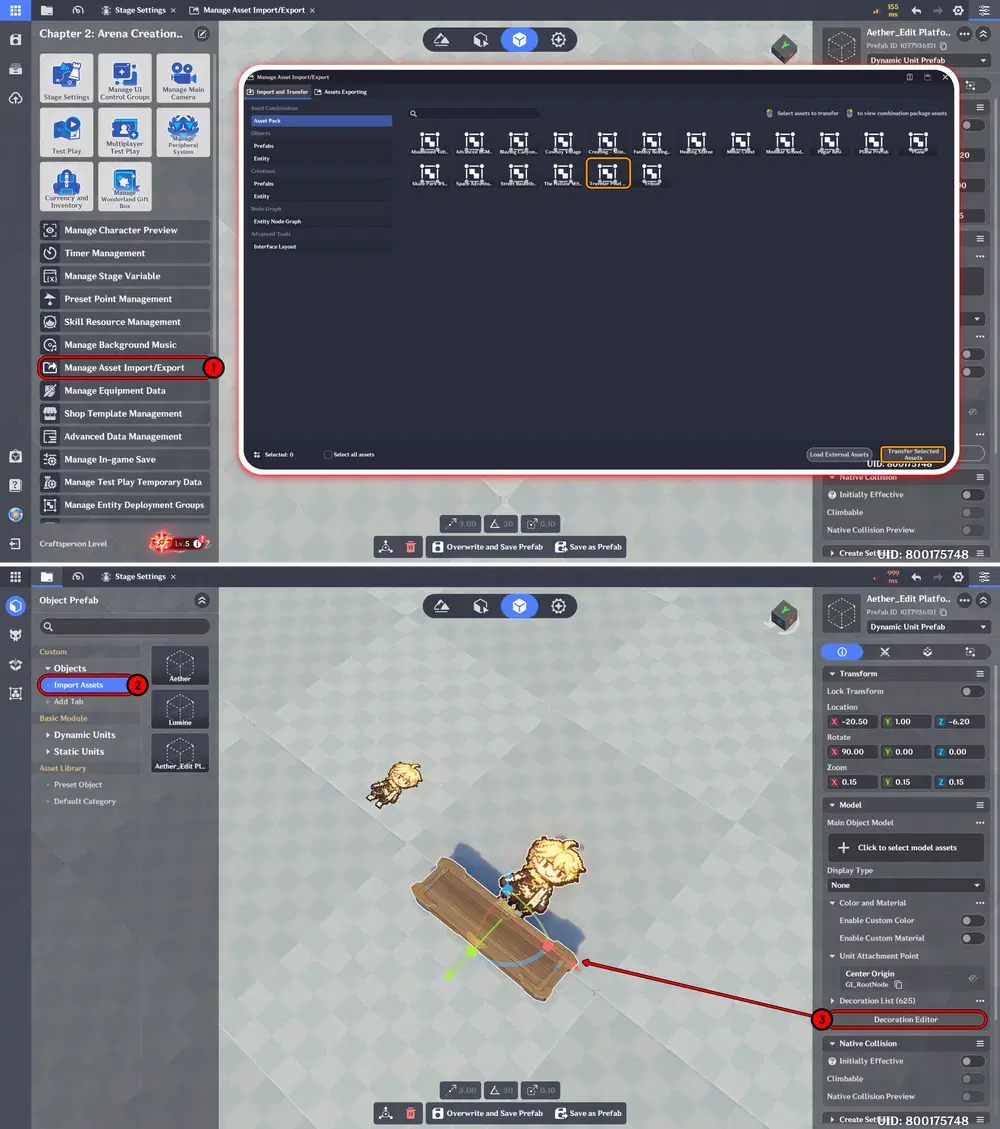
Import Model
Next, we will use the Miliastra Sandbox to create a new Node Graph on the Server side. The purpose of this Node Graph is to replace the player's default character model with the custom model we imported earlier.
Create a new Node Graph and set up the logic so that when the Entity is Created, the default character model is disabled and a new object is created in its place. This new object will serve as the player's custom appearance, effectively replacing the default character model while keeping the original player entity for gameplay and other mechanics. Don't forget to place this node graph on the character and player side.
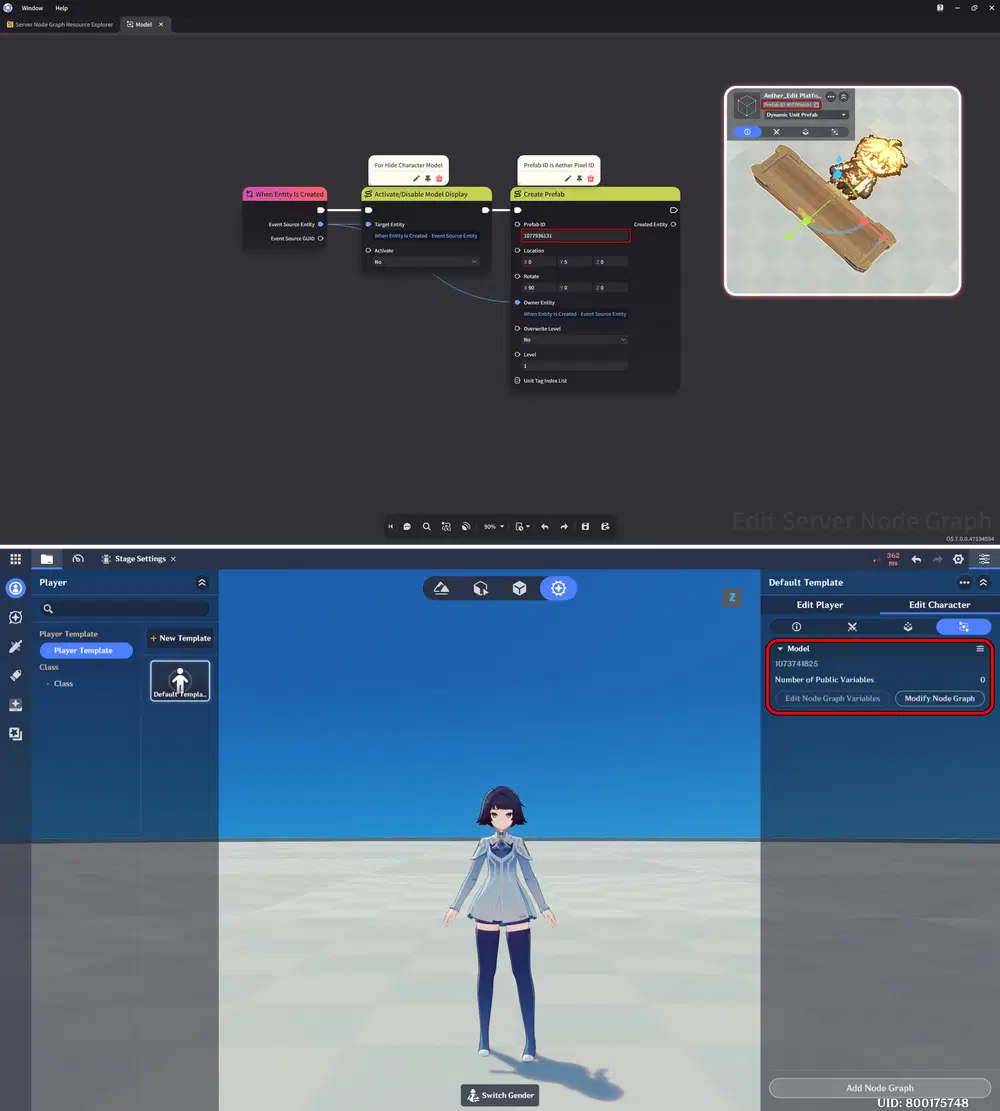
Model Logic
The result should look like this after successfully replacing the default model. The character will still function normally and retain the default character movement settings. The only change is the character's appearance, which is now replaced with the imported custom model.
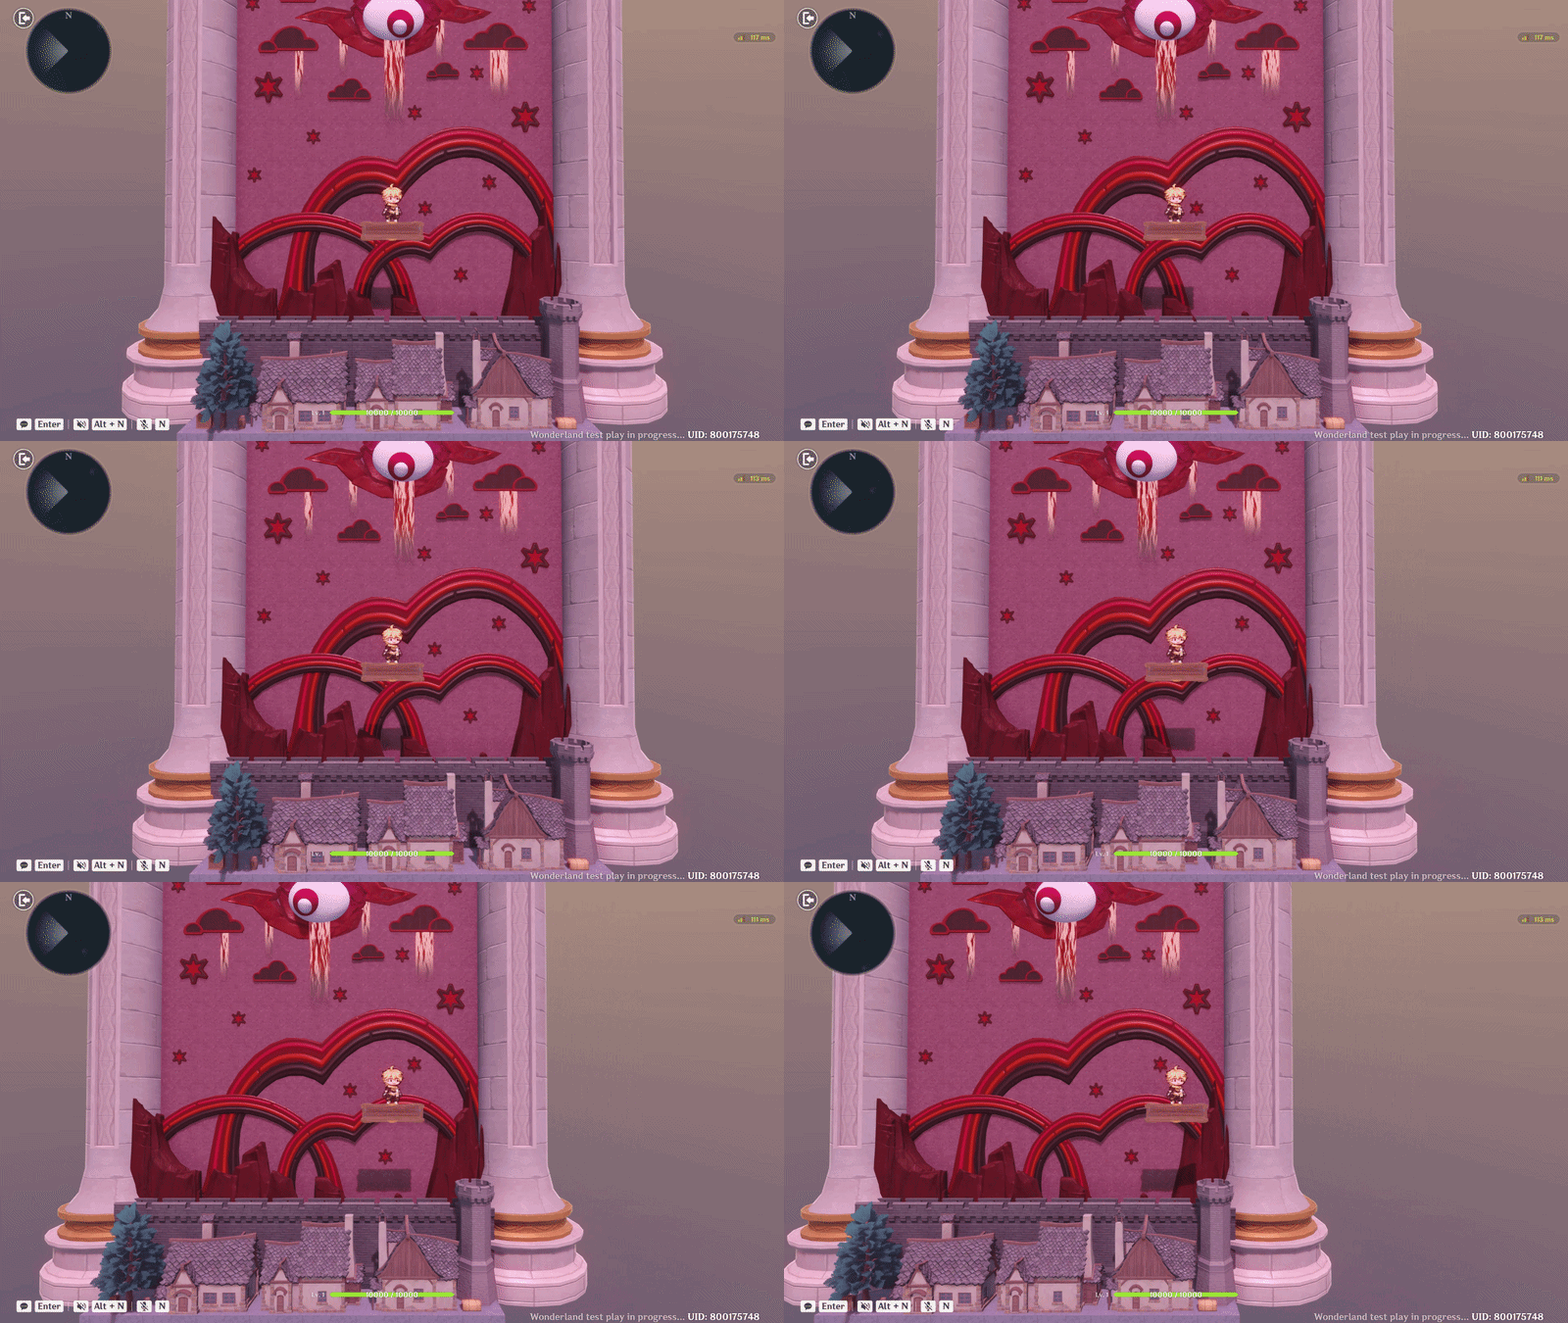
Implementation of Character Model Replacement
Creating the Skill Mechanic
Next, we will create a skill that temporarily increases the player's movement speed. This skill gives the player more control and makes the gameplay feel more dynamic and interactive. It can also help the player quickly reach different areas of the arena and defend the city from incoming falling objects.
- Go to Combat Preset, select Skill, and create a New Skill. Alternatively, you can use one of the available skills from Preset Skill.
- Set the skill's Cooldown (CD) to 5 seconds. This prevents the skill from being spammed and encourages the player to use it more carefully.
- Open the Animation Editor to customize the skill's animation.
- Choose the animation type you want for the skill. For this project, I use the Activate animation.
- Add a Status Track with the Allow Interruption function. This allows the player to interrupt the skill animation and move immediately without having to wait for the animation to finish completely. This also makes the character feel more responsive after casting the skill. You can adjust this setting according to the needs of your game.
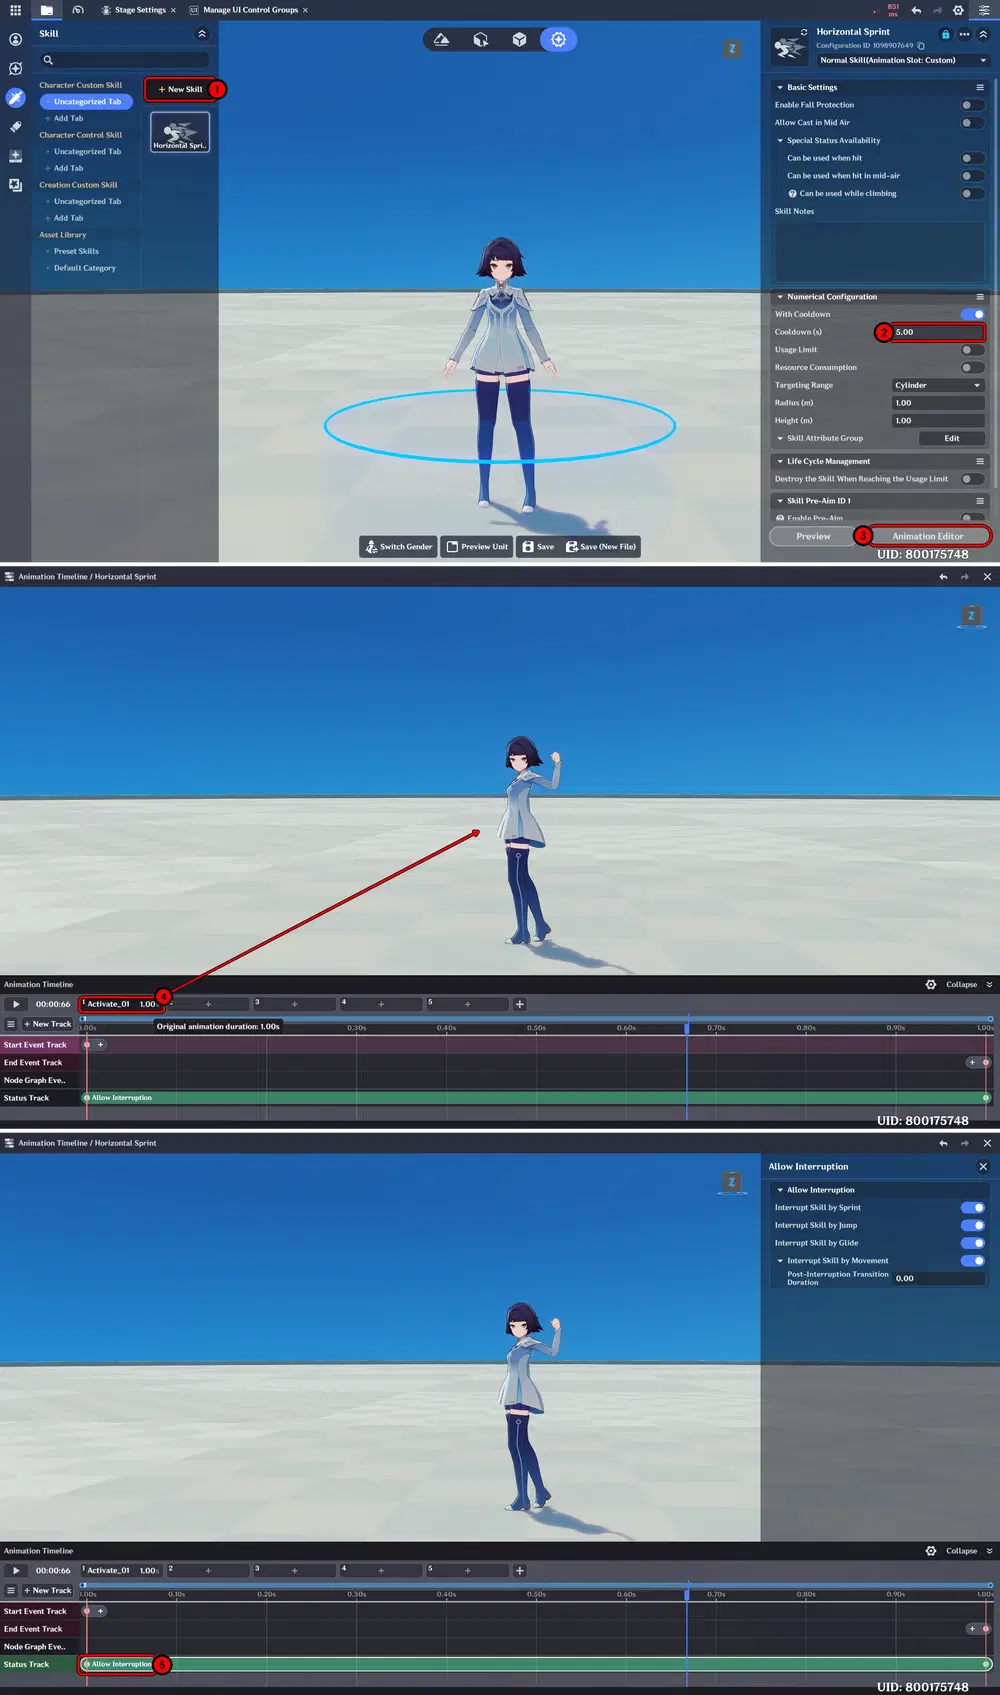
Create New Skill
Next, create a new Node Graph on the Client side and place it inside the Character Skill folder. This Node Graph will handle the skill's position, visual effects, and the status applied to the player when the skill is activated.
The creation and configuration of the Unit Status will be explained in more detail later in the Object Creation section, as it will be connected to the falling object mechanics and other gameplay systems.
After creating the Node Graph, return to the Skill Editor and add the Node Graph you created earlier to the Node Graph section. This allows the skill to execute the functions and effects defined in the Node Graph when the skill is activated.
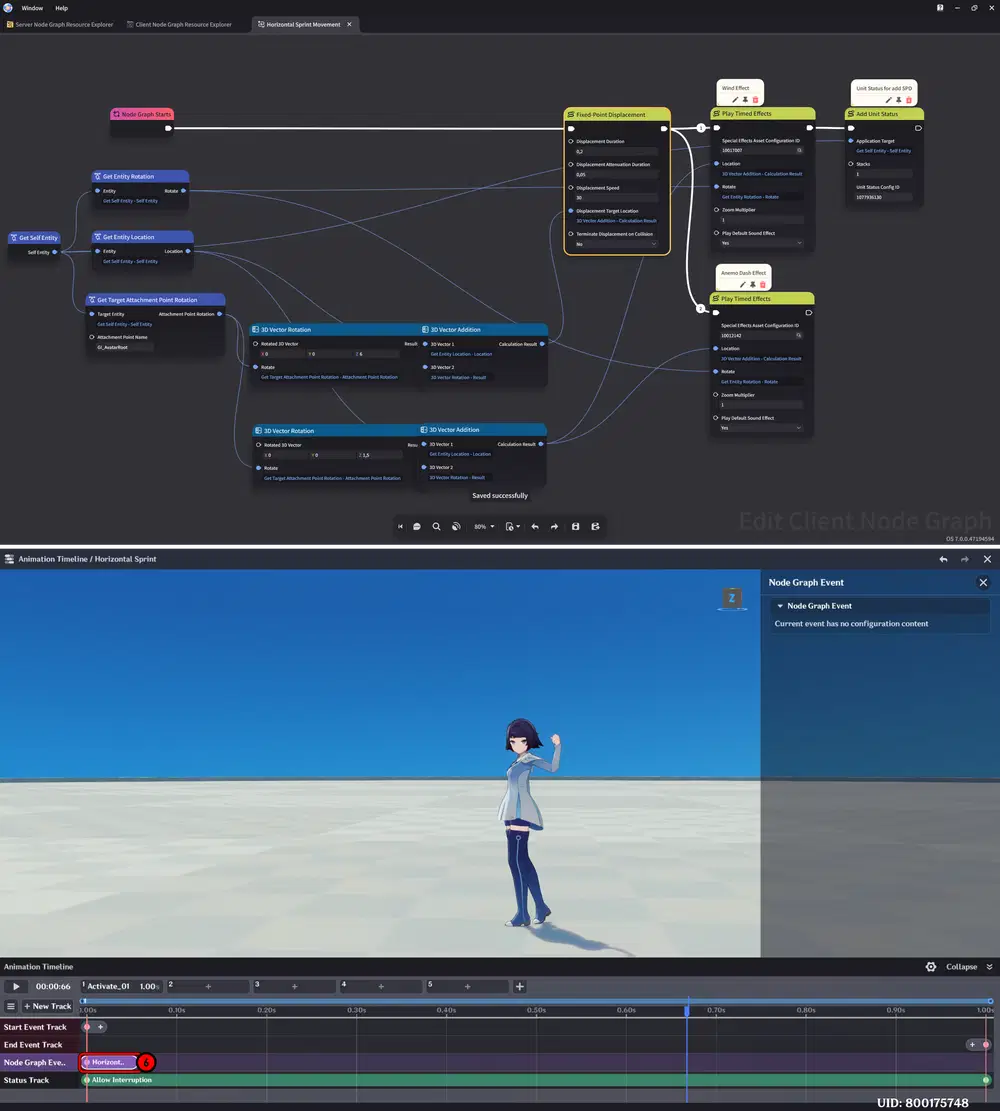
Skill Node Graph
Before finishing this section, we need to assign the skill to the player's Class so it can be used in-game.
- Go to Combat Preset and select Class.
- Open the Skill section, then find Active Skill and select the skill you created earlier.
Once assigned, the skill will be available to the character and can be cast during gameplay.
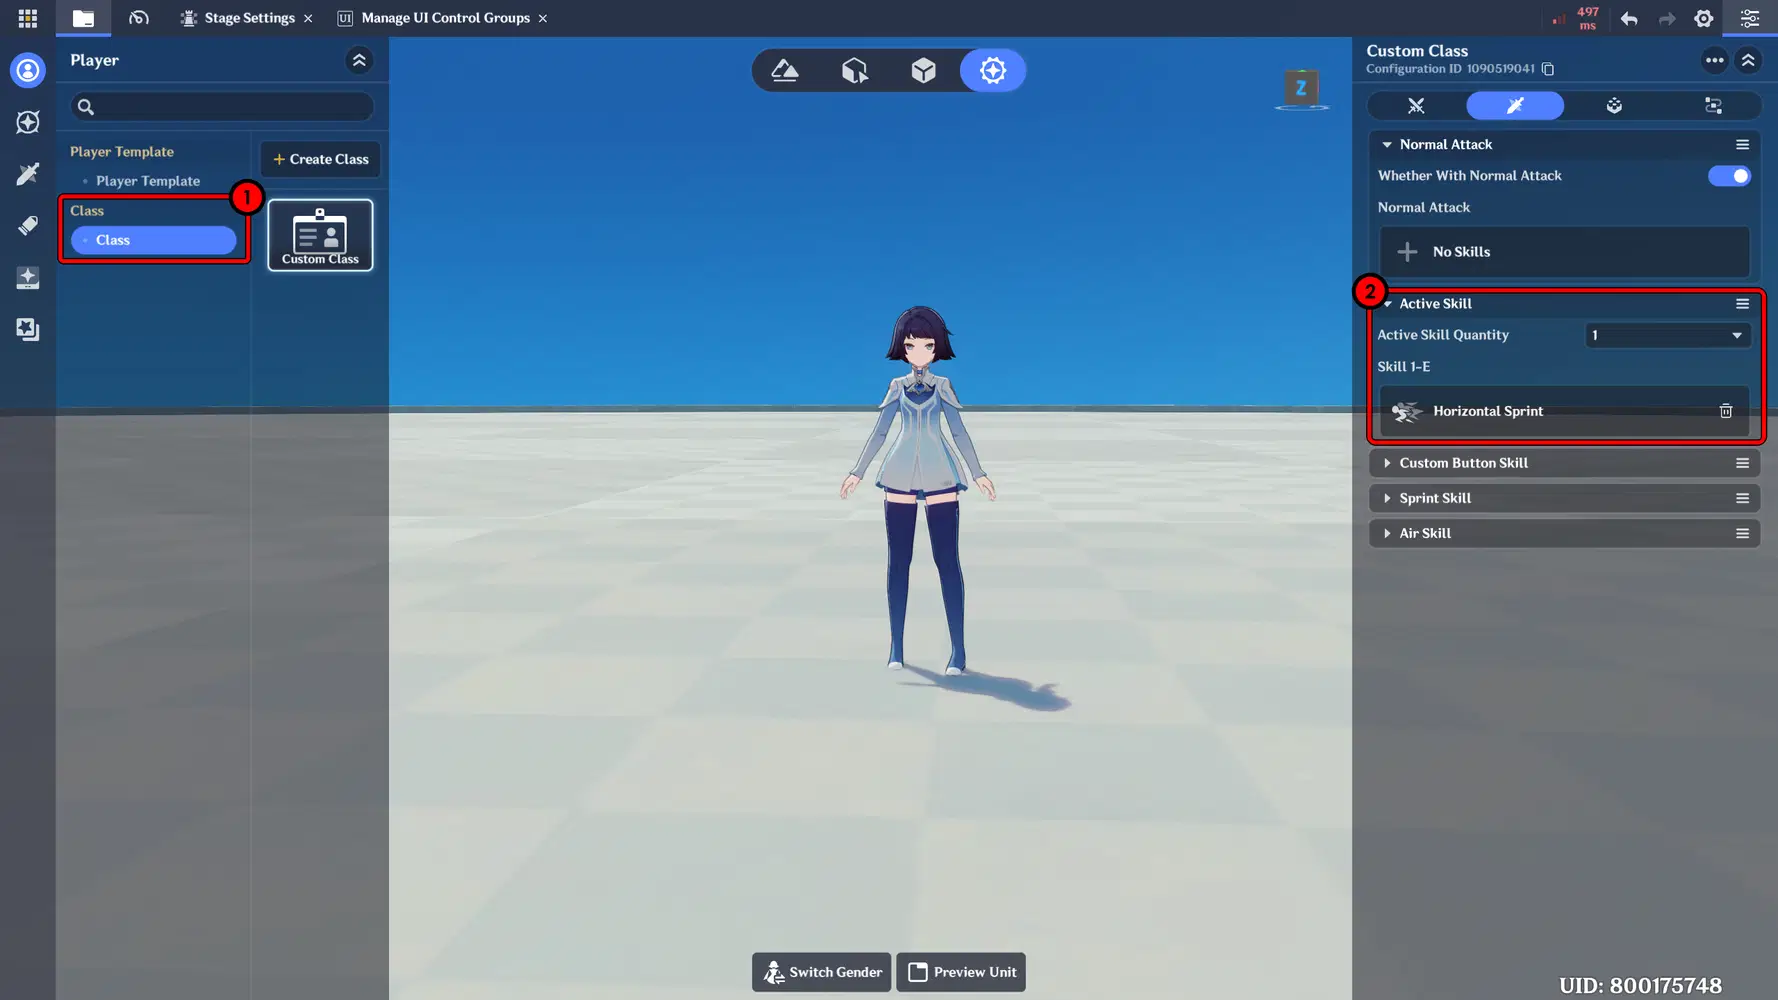
Activated Skill
Creating the Detection Mechanic
Next, we will create a detection area that detects falling objects when they reach the bottom of the arena. When an object enters this area, it will trigger the mechanic that reduces the city's HP. The setup is quite simple:
- Create and add an Empty Object, then adjust its size so it covers the entire area where the falling objects can land.
- In the object's Details panel, add a new Collision Trigger component.
- Open Advanced Editing to access the collision settings.
- Adjust the Collision size and position to match the detection area. Make sure it covers the entire area where the falling objects can reach.
This Collision Trigger will later be connected to the Node Graph to detect when a falling object enters the area and trigger the city's HP reduction.
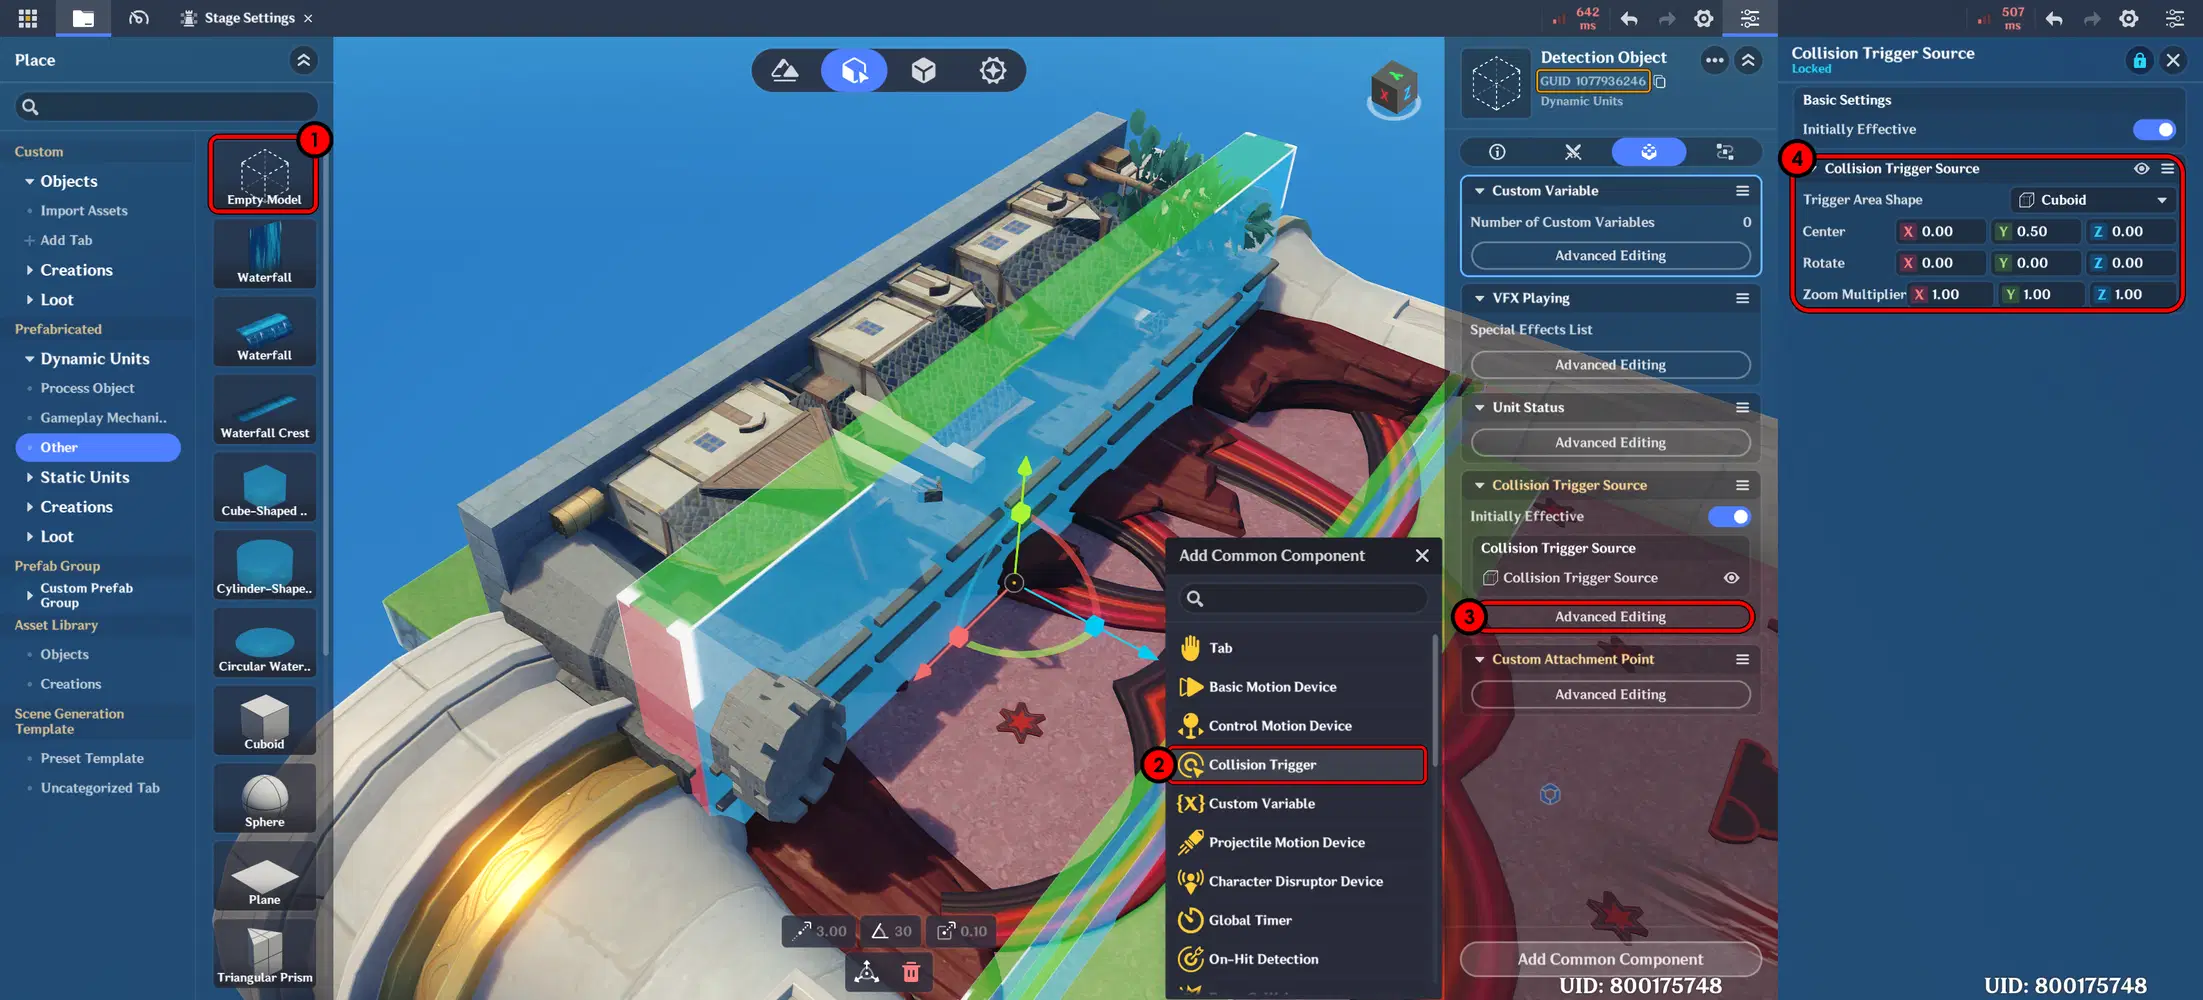
Collision Detection
Chapter 4: Creating the Falling Objects
In this chapter, we will create the falling objects that act as the main threats in the game. We will set up their movement, damage, and different object variations to make the gameplay more challenging and dynamic.
For the falling objects, I created three different types: Meteor, Abyss Rock, and SPD Buff. The Meteor and Abyss Rock use a similar setup, with the main differences being their appearance and effects. The SPD Buff, meanwhile, will use an Empty Model with a customized appearance.
- Go to the Gameplay Mechanic section.
- Select the object you want to use. For example, I use Large Rolling Boulder as the base object for the Meteor.
Once the objects are created, we can configure their movement, speed, damage, and other properties based on their individual functions.
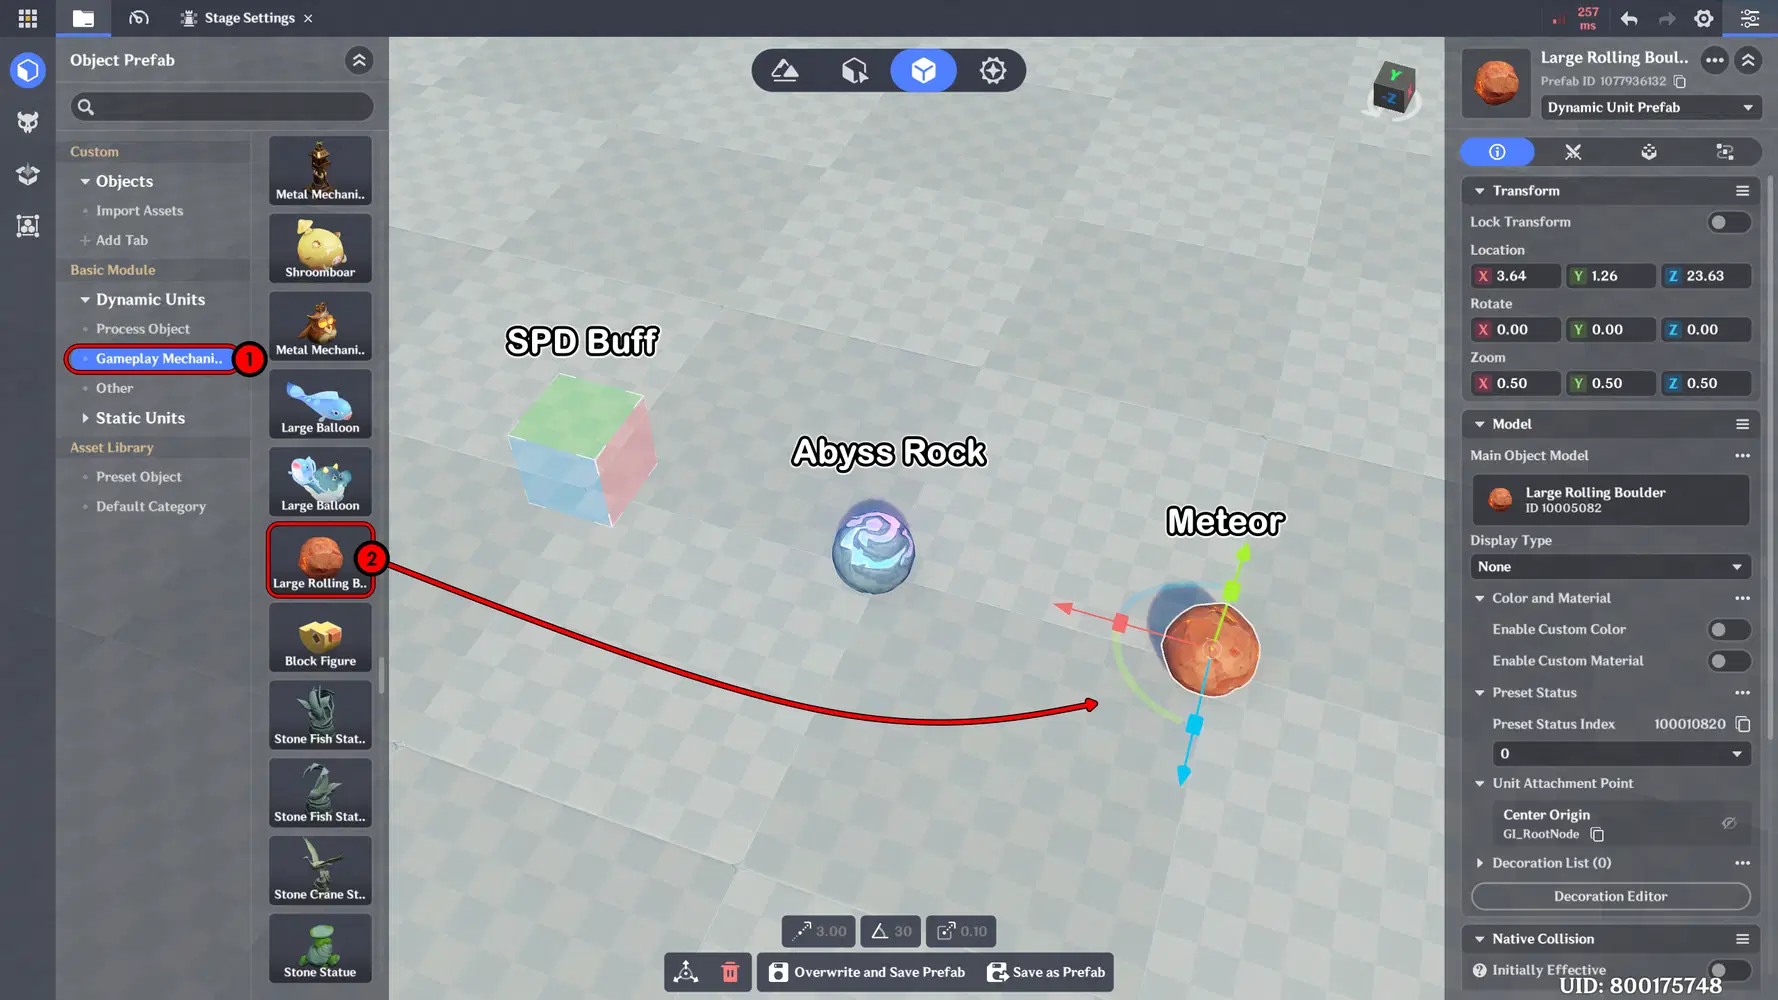
Type Falling Objects
Falling Object Setup
In this section, we will configure the falling objects and define how they behave during gameplay. This includes setting up their effects, movement, falling speed, and detection mechanics when they interact with the player or the detection area.
To make the falling objects more visually appealing, we can add VFX effects that match their appearance and function. For example, the Meteor can use a Pyro fire effect to make it look like it is burning while falling.
- Open the object's Details panel. Go to the Components section.
- Select Add Common Component.
- Choose VFX Playing to add a visual effect to the object.
- Open Advanced Editing to access the VFX settings.
- Set the VFX Asset Type to Looping so the effect continues playing while the object is active. Then, select the VFX you want and adjust it to match the object. For the Meteor, I use a Pyro effect to create a burning meteor appearance.
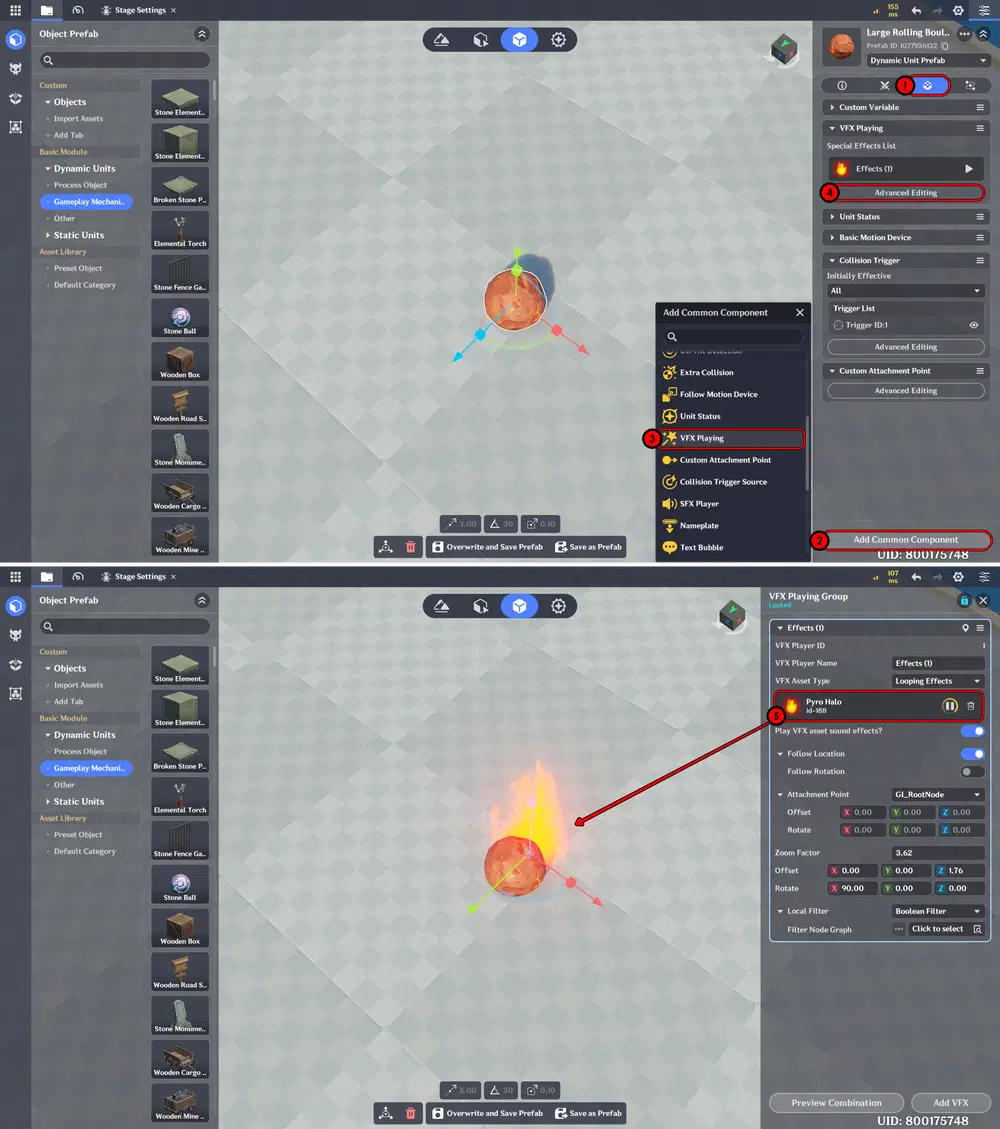
VFX Playing Setup
Next, we will configure the Meteor's falling movement. When the object appears, it should immediately move downward toward the detection area at the bottom of the arena.
- Select the object and open the Components section.
- Click Add Common Component.
- Select Basic Motion Device.
- Open Advanced Editing to access the motion settings.
- For the Motion Type, select Uniform Linear Motion. This allows the object to move in a straight line at a consistent speed.
- Under Advanced Settings, configure the movement path and destination point for the falling object. You can also use Preview to check how the object moves and adjust its trajectory as needed.
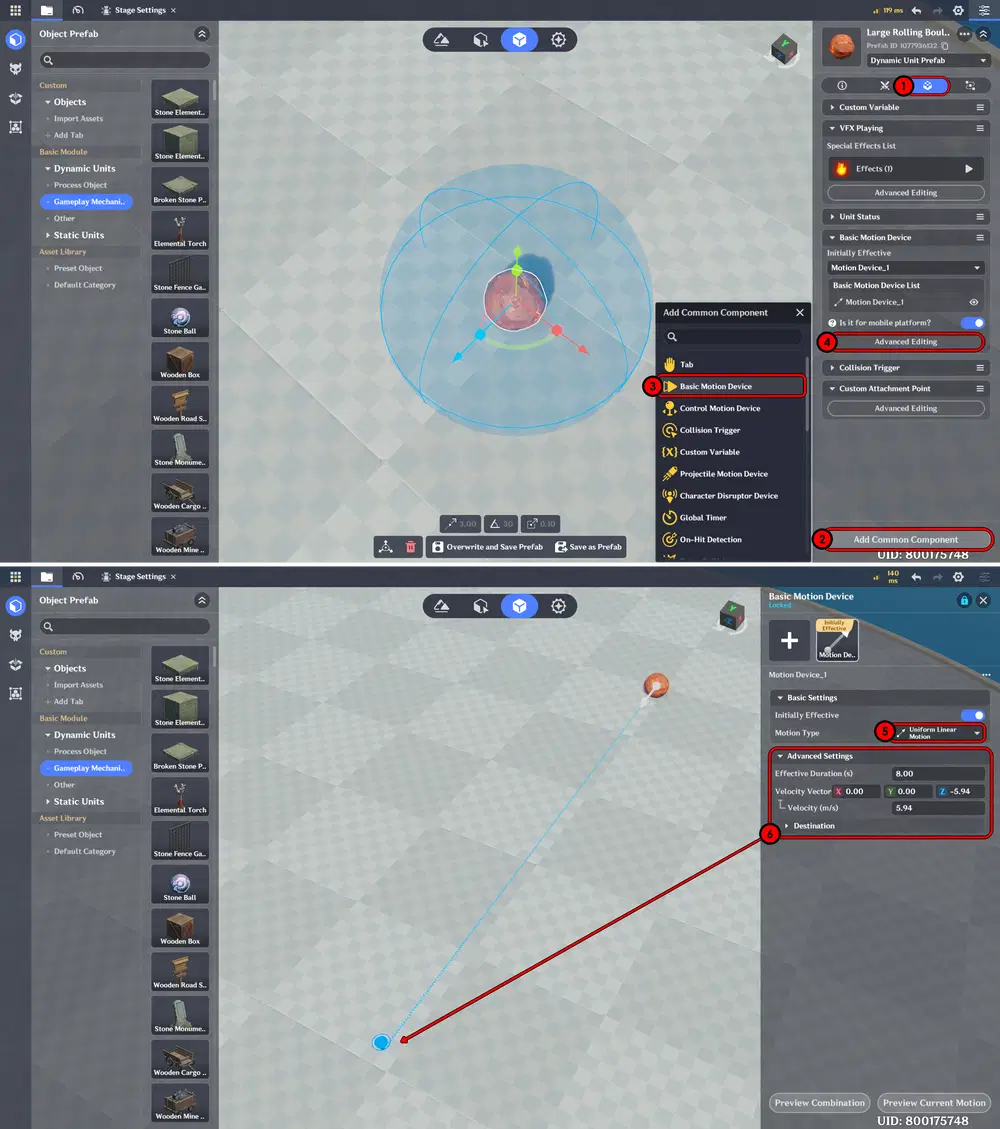
Basic Motion Device Setup
Next, we will create a detection area for the falling objects. When the object comes into contact with the player or the detection area below, it will be destroyed and trigger the appropriate gameplay effect, such as reducing the city's HP or activating a defensive interaction.
- Select the falling object and open the Components section.
- Click Add Common Component.
- Select Collision Trigger.
- Open Advanced Editing to access the collision settings.
- Adjust the size of the Collision Trigger. I recommend making the detection area slightly larger than the object itself to ensure that collisions are detected reliably, even when the object is moving quickly.
This setup will allow the falling object to detect collisions and trigger the appropriate gameplay mechanics when it hits the player or the detection area.
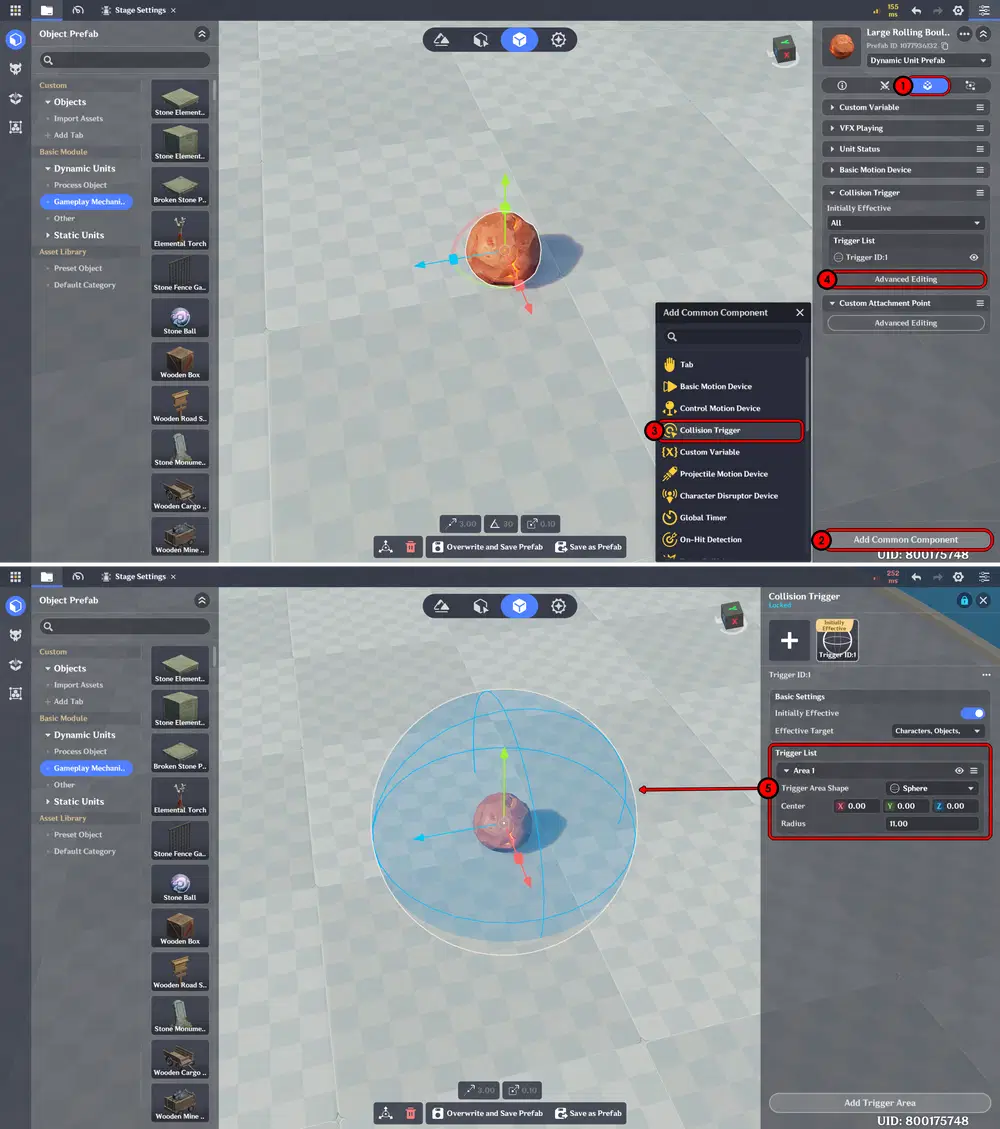
Collision Trigger Setup
Note. For Abyss Rocks and other rock objects, if you want to add variety, use the same settings and setup as this.
Next, we will create a Node Graph in server for the Meteor. This Node Graph will handle the logic that determines what happens when the Meteor successfully hits the player or enters the detection area.
It will also manage the score system and trigger additional visual, or gameplay effects based on the collision event.
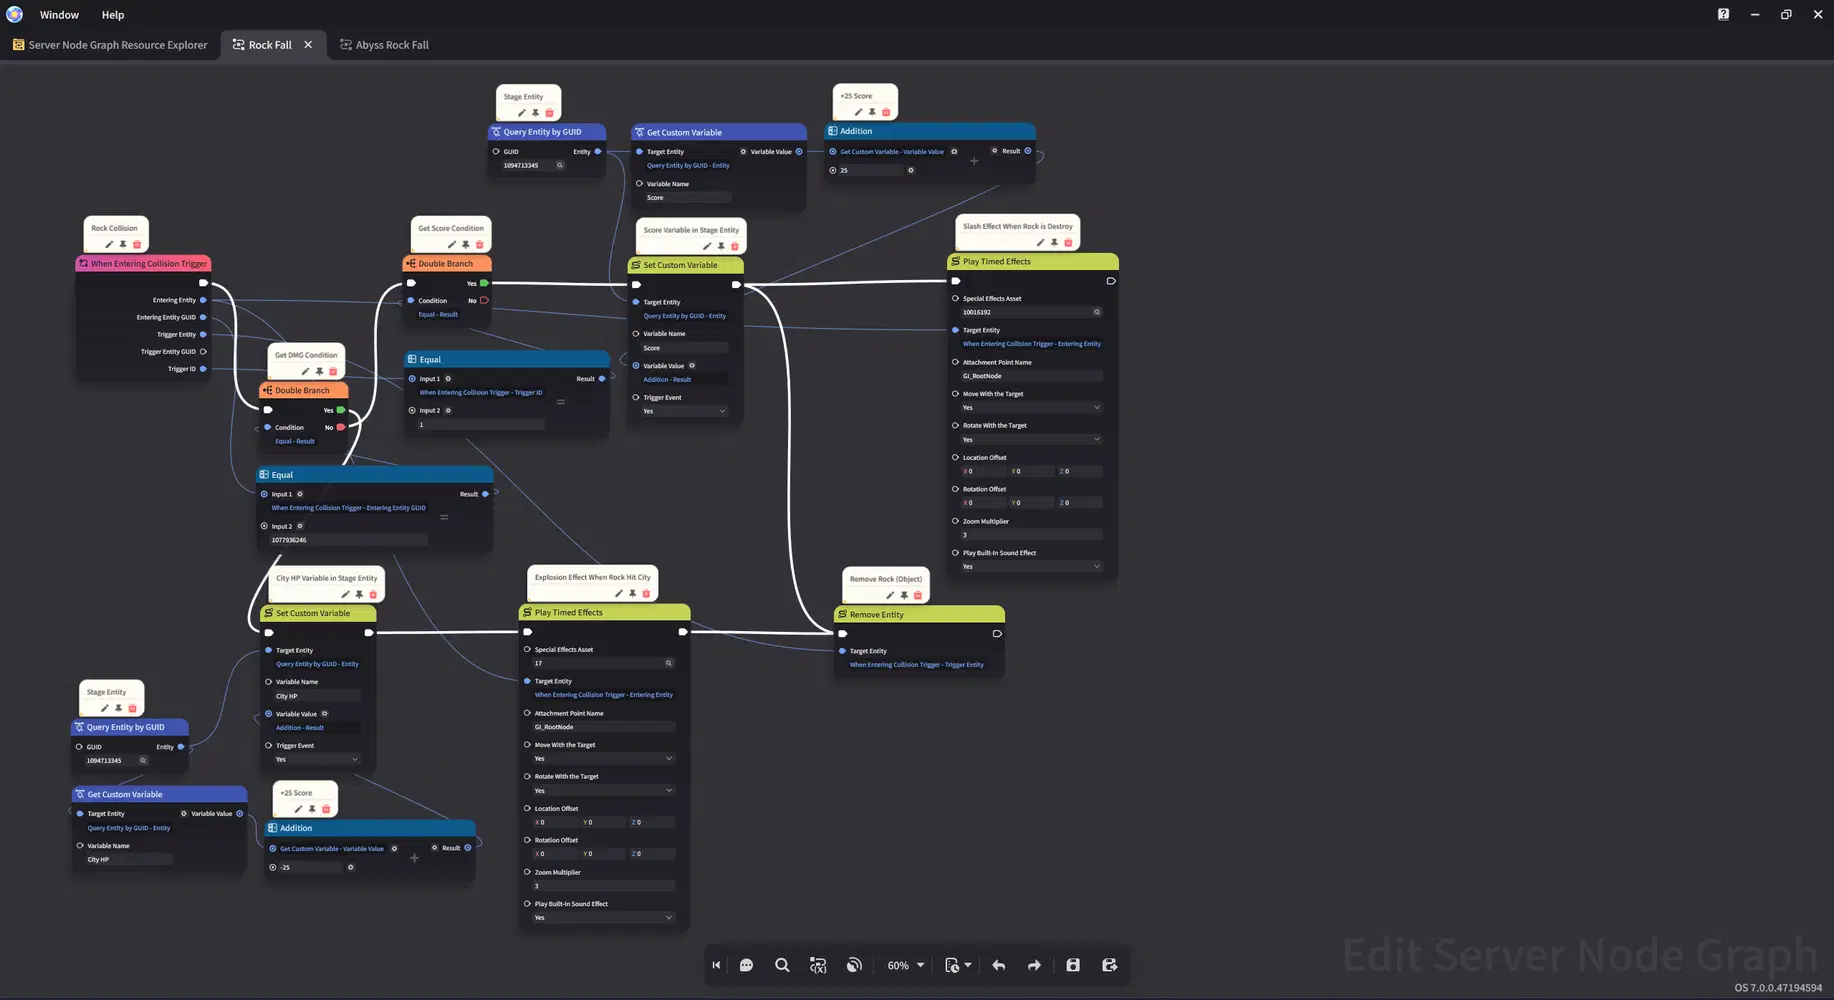
Meteor Node Graph Setup
Create another Node Graph for the Abyss Rock using a setup similar to the Meteor. Most of the logic will remain the same, including collision detection, score management, and triggering additional effects.
You can adjust the damage values, visual effects, and other properties to make the Abyss Rock behave differently from the Meteor.
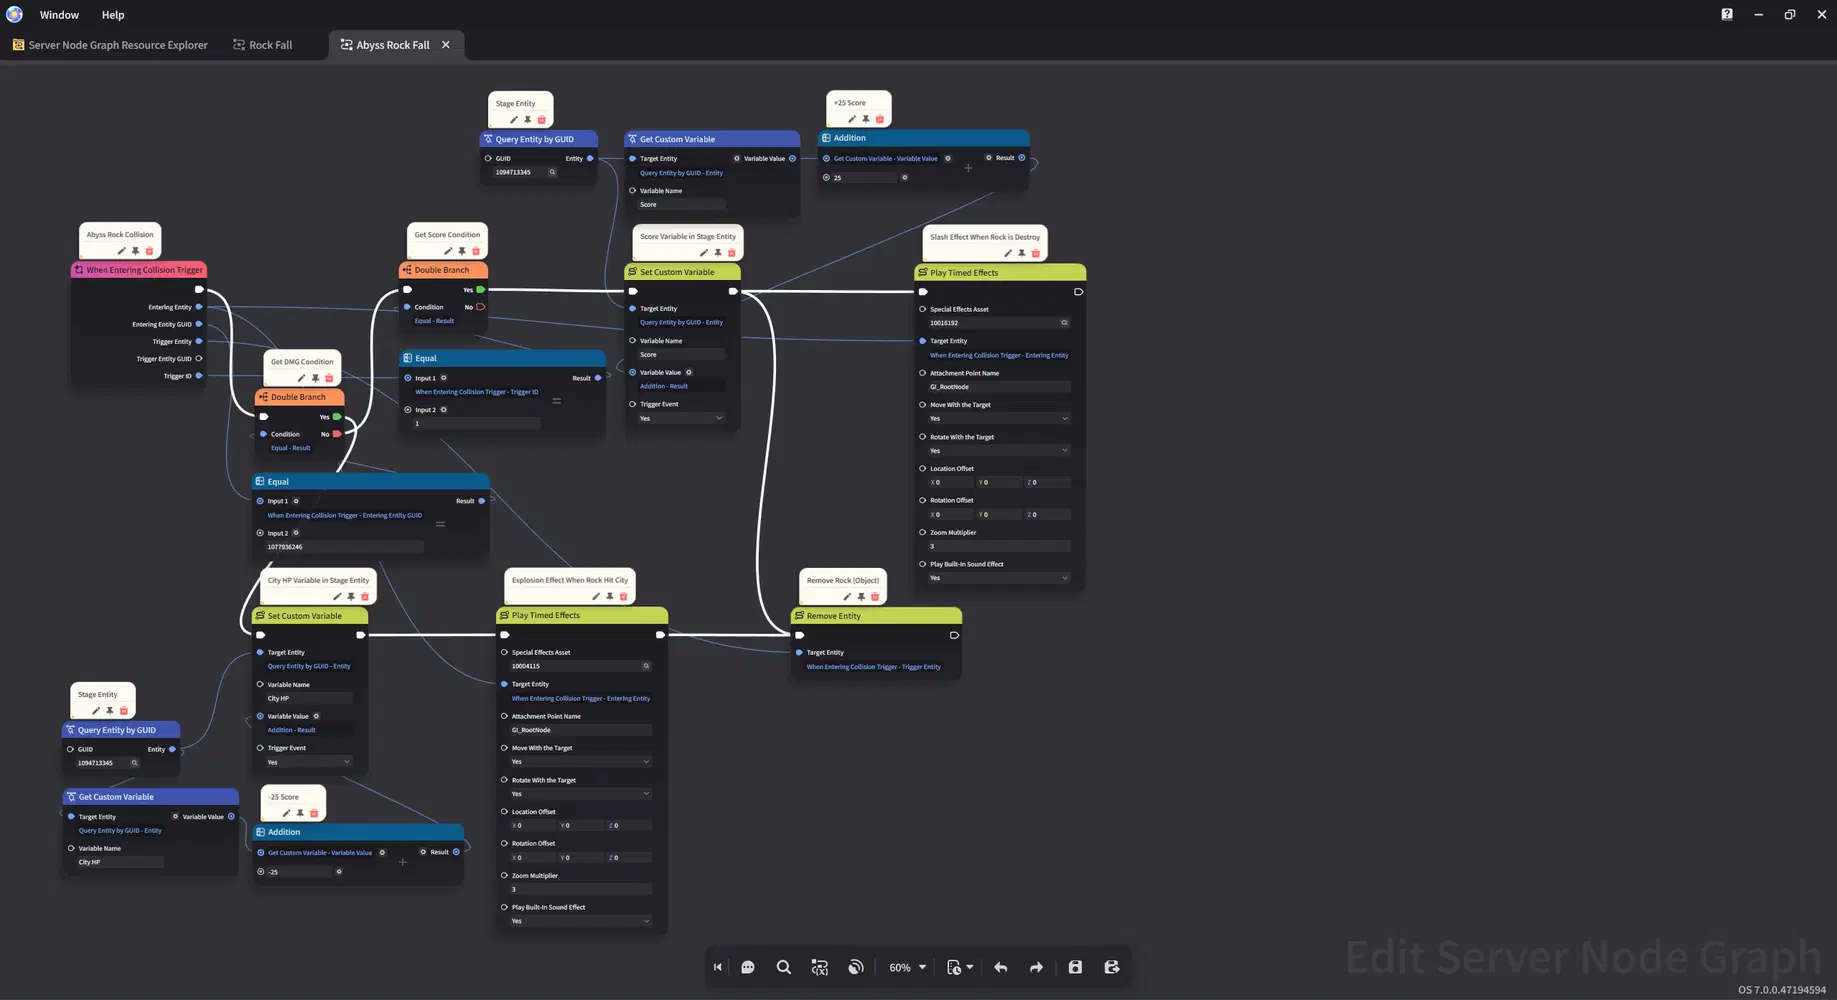
Abyss Rock Node Graph Setup
Last, assign each Node Graph to its corresponding object. Make sure the Meteor uses the Meteor Node Graph, while the Abyss Rock uses its own Node Graph. This ensures that each object executes the correct logic and effects during gameplay.
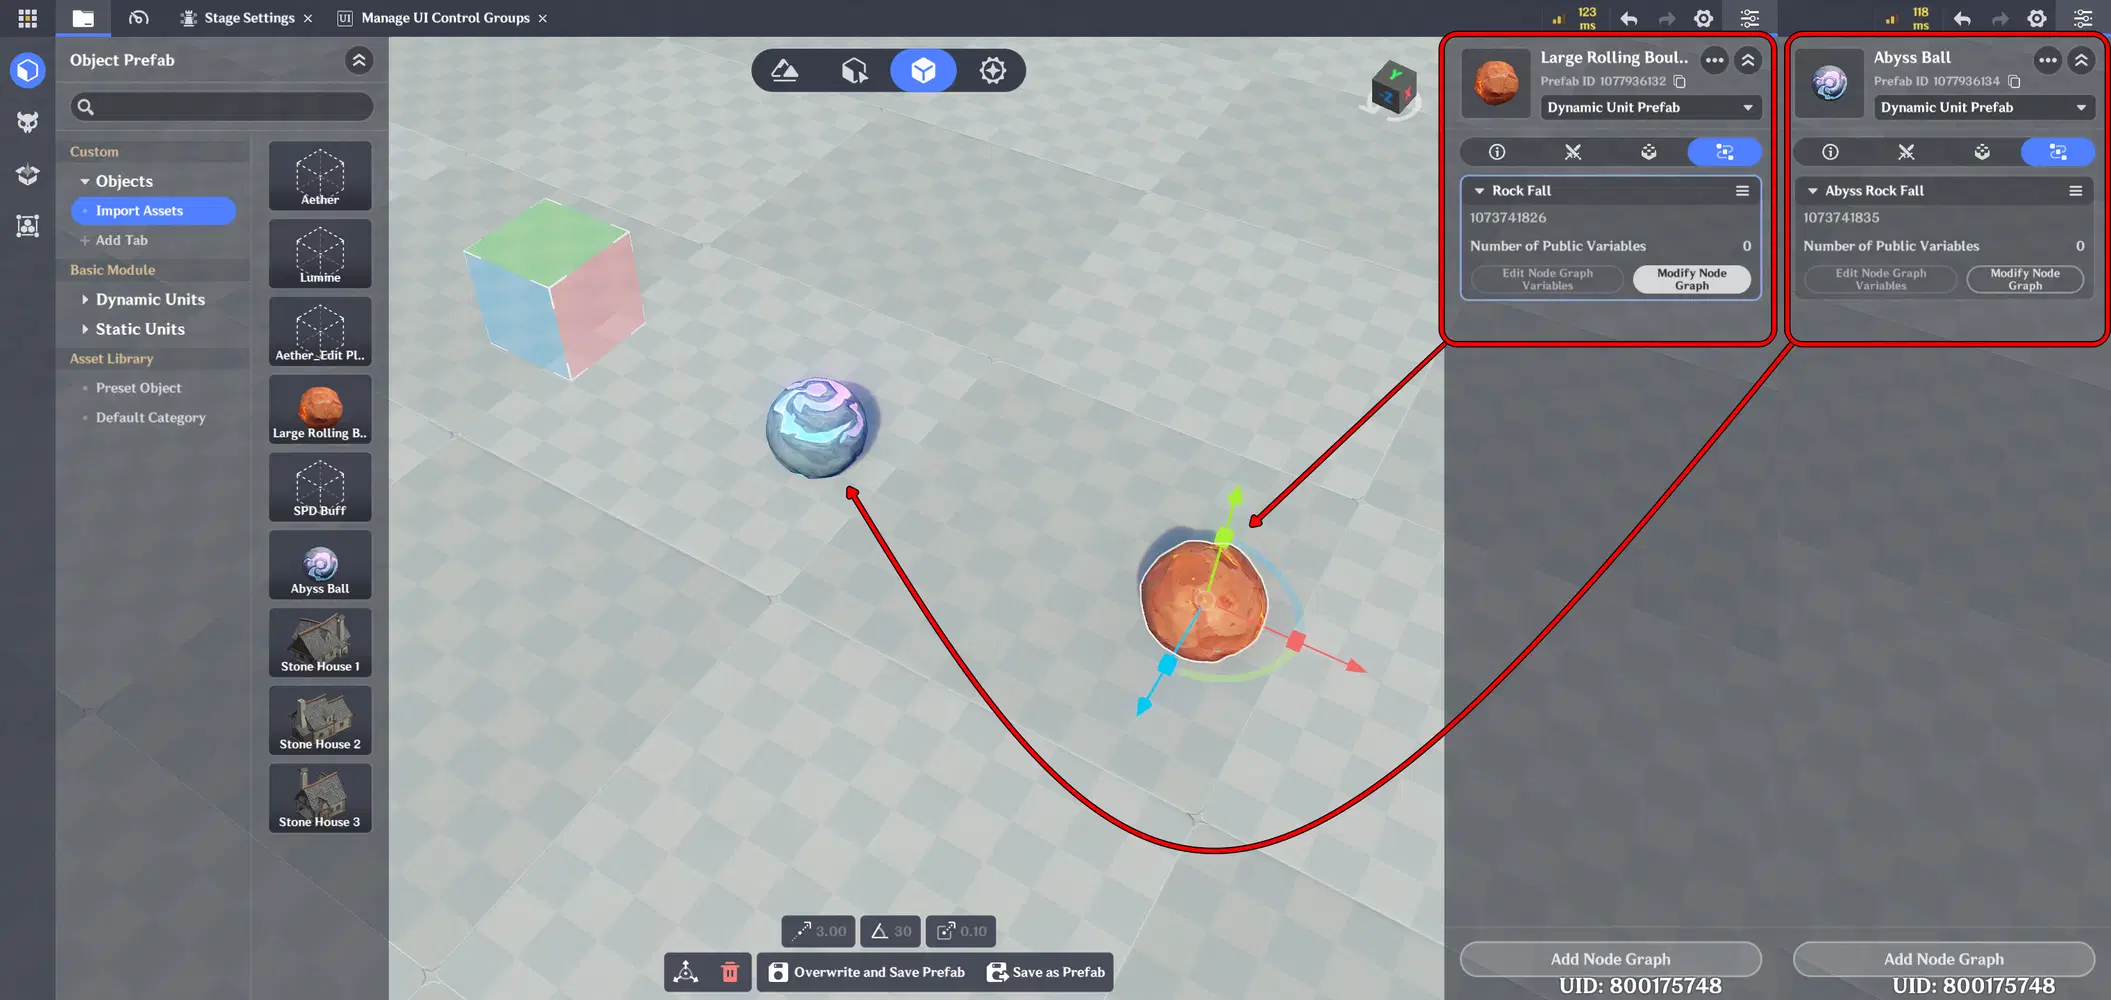
Assign Node Graph
Falling Buff Setup
For the Buff object, I use an Empty Model as the base. The appearance will then be customized using VFX to make the Buff more visually appealing and clearly communicate its function to the player.
- Select the Empty Model and open the Components section.
- Click Add Common Component.
- Select VFX Playing to add a visual effect to the Buff.
- Open Advanced Editing to access the VFX settings.
- Set the VFX Asset Type to Looping Effect so the effect continuously plays while the Buff is active. Choose a VFX that matches the function of the Buff. For this object, I use an effect that represents increased movement speed.
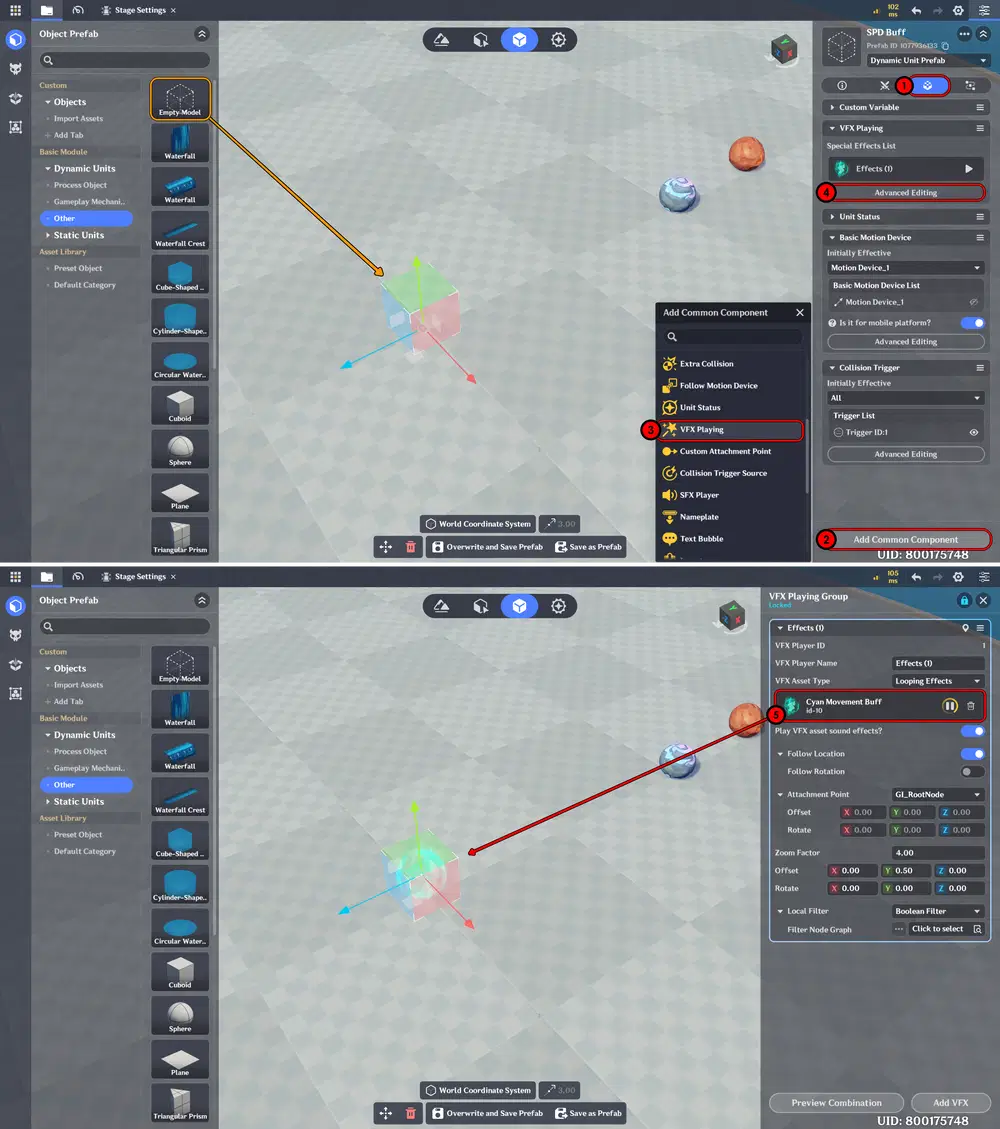
VFX Playing Setup
Next, we will configure the Buff's falling movement so that it moves toward the detection area in the same way as the other falling objects.
- Select the Buff object and open the Components section.
- Click Add Common Component.
- Select Basic Motion Device.
- Open Advanced Editing to access the movement settings.
- Set the Motion Type to Uniform Linear Motion so the Buff moves in a straight line at a consistent speed.
- Set the falling direction and destination point for the Buff. You can use Preview to check its movement and adjust the path if needed.
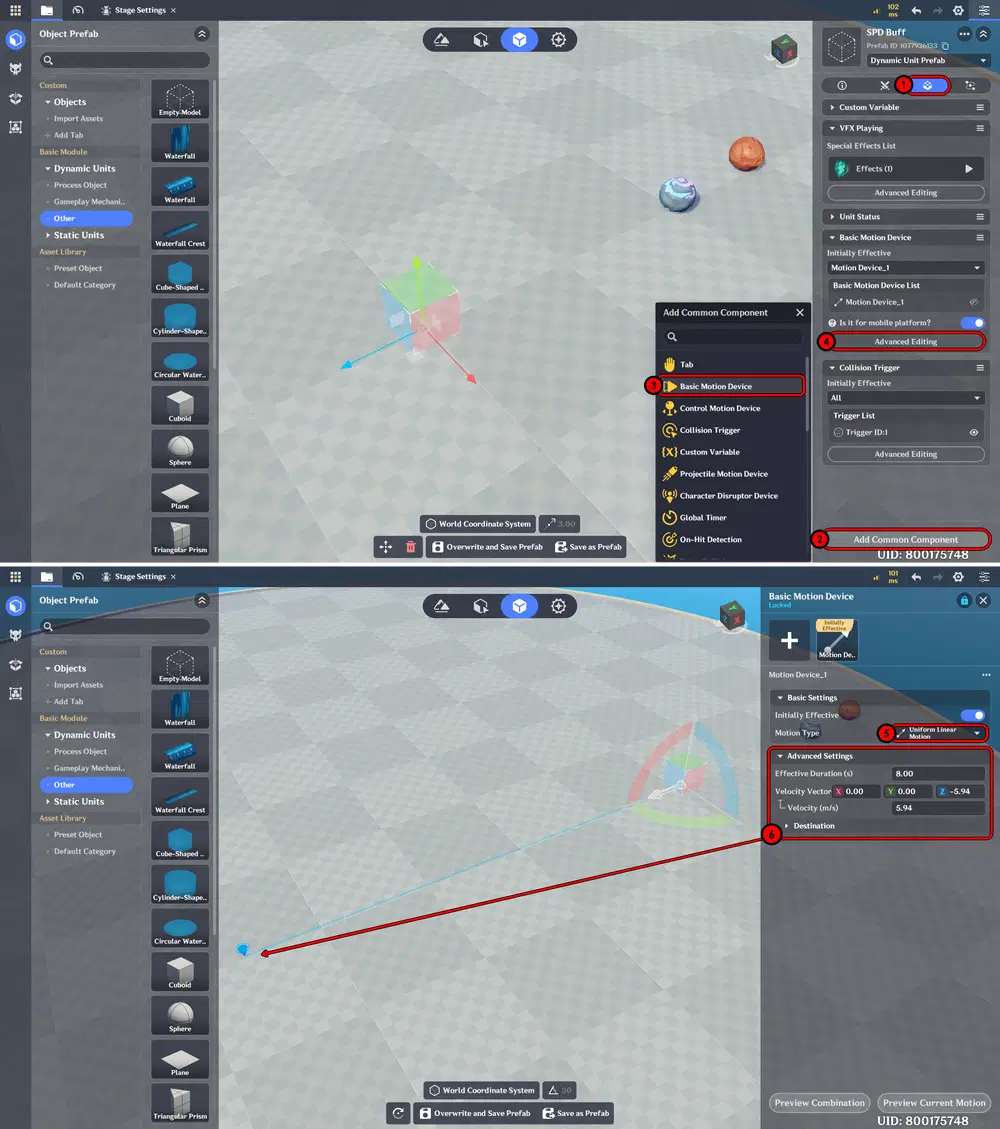
Motion Device Setup
Next, we will set up the detection area for the Buff. This allows the game to detect when the Buff comes into contact with the player.
- Select the Buff object and open the Components section.
- Click Add Common Component.
- Select Collision Trigger.
- Open Advanced Editing to access the collision settings.
- Adjust the size of the Collision Trigger. As with the previous objects, I recommend making the detection area slightly larger than the object itself. This helps ensure that the collision is detected reliably, especially when the Buff is moving.
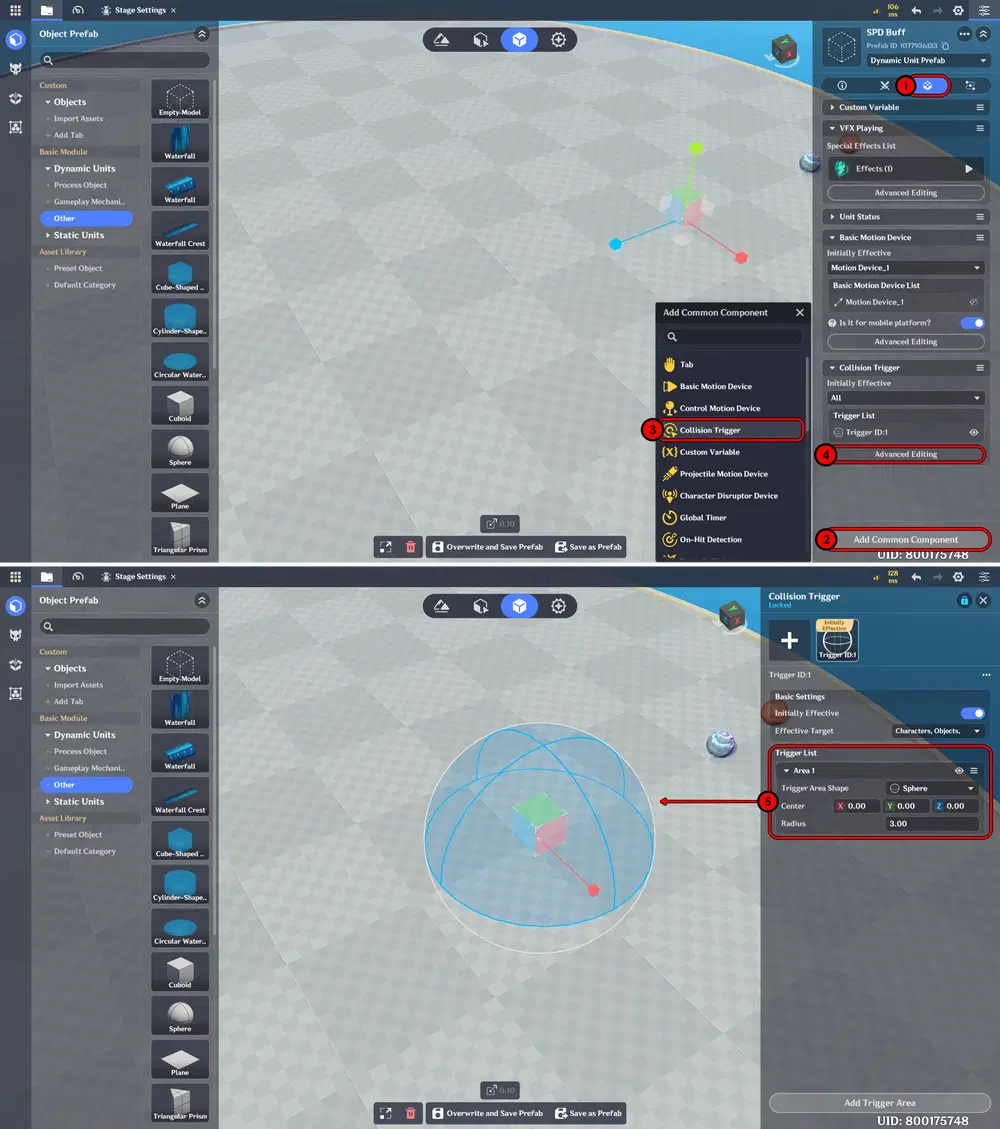
Collision Trigger Setup
Next, we will create a Unit Status to give the player a special effect when they collect the Buff. In this case, the status will temporarily increase the player's movement speed.
- Go to Combat Preset and select Unit Status.
- Create a New Status. Under Effect Details, add a new effect called Movement SPD Adjustment Rate and increase its value to the desired level. For this project, I set it to the maximum value to provide a significant movement speed increase.
This Unit Status is also the same system mentioned earlier in the Skill Mechanic section. You can use this Unit Status in the corresponding value of the Skill Node Graph to apply the same movement speed effect when the skill is activated.
Using the same Unit Status allows both the Buff and the Skill to share the same movement speed effect while keeping their individual mechanics separate.
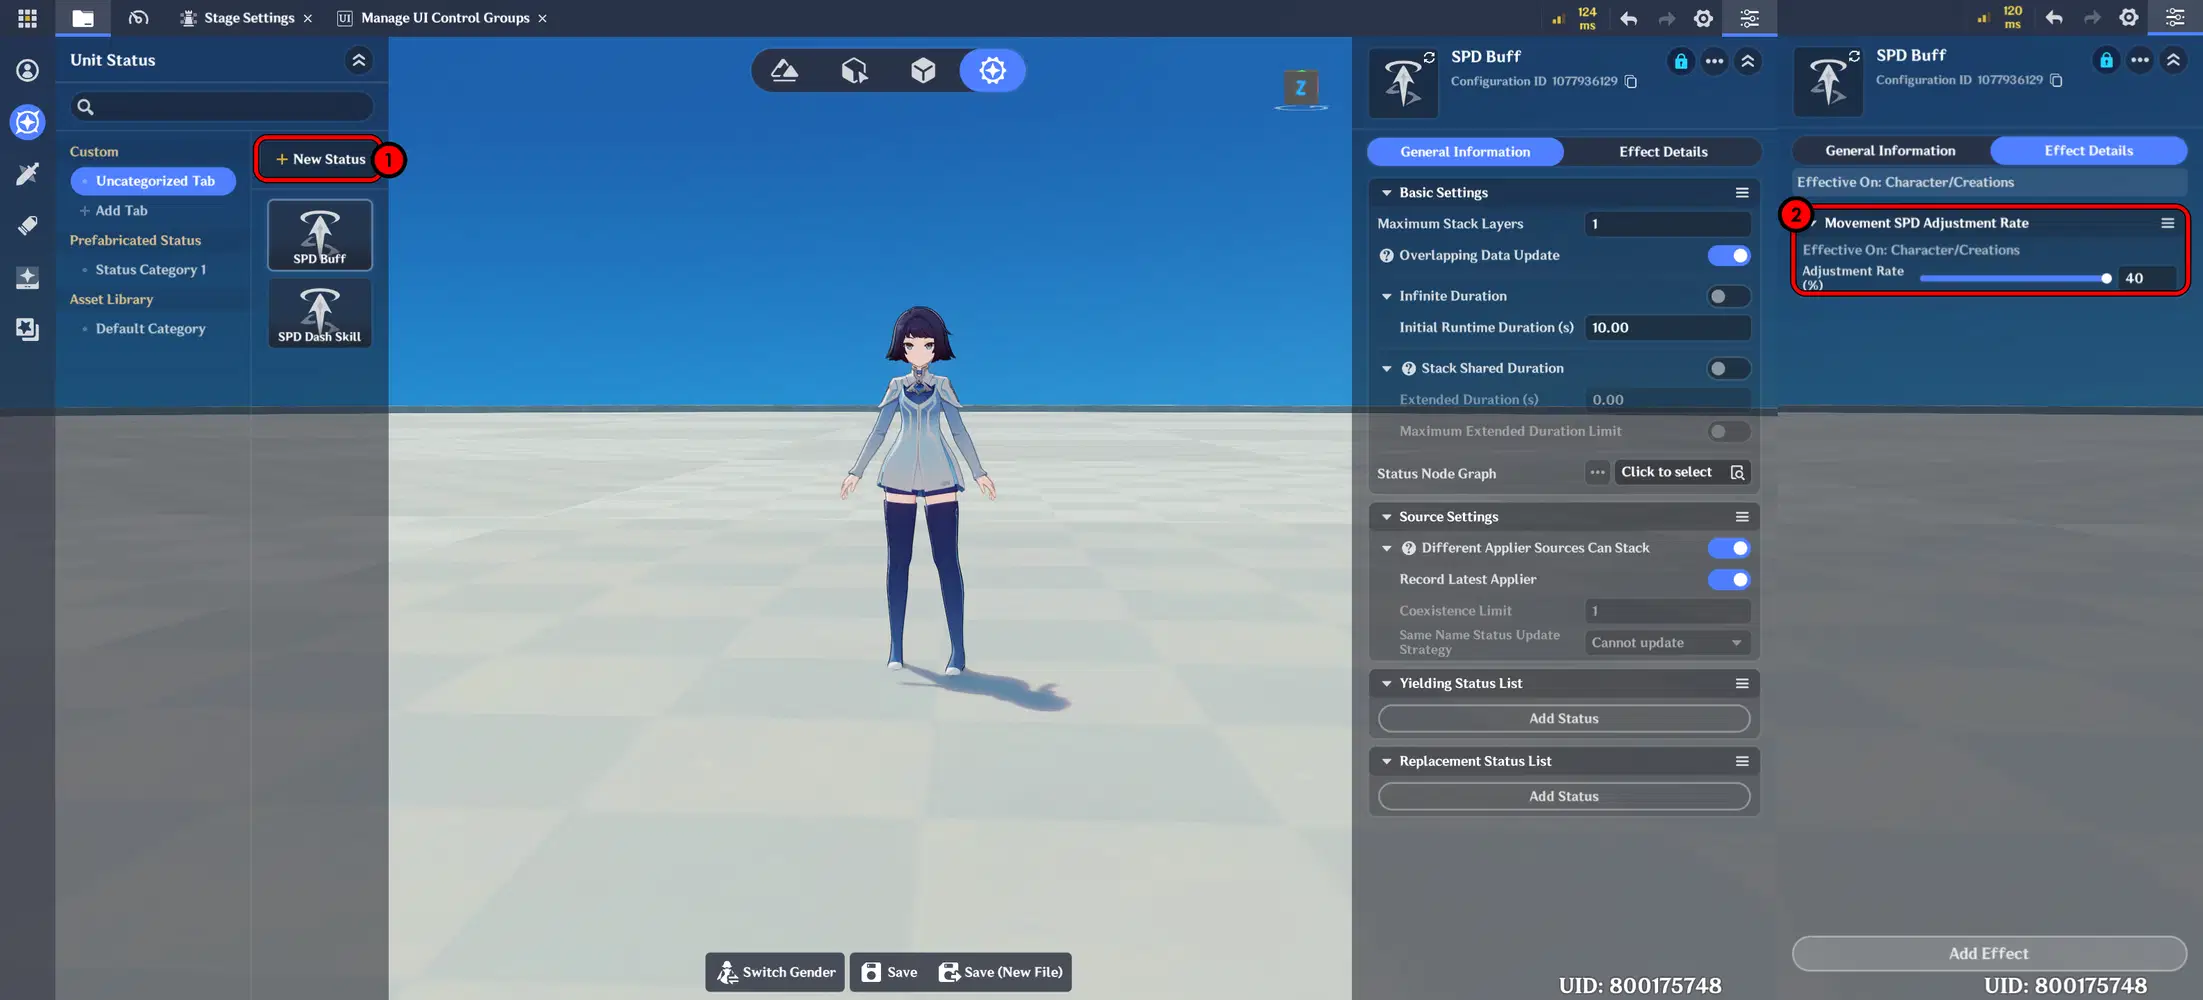
Unit Status Setup
Next, create a new Node Graph on the Server side. This Node Graph will handle the Buff's main logic, including detecting when the player collects the Buff and applying the Unit Status that increases the player's movement speed. When the player comes into contact with the Buff, the Node Graph will trigger the Unit Status and apply the movement speed effect to the player.
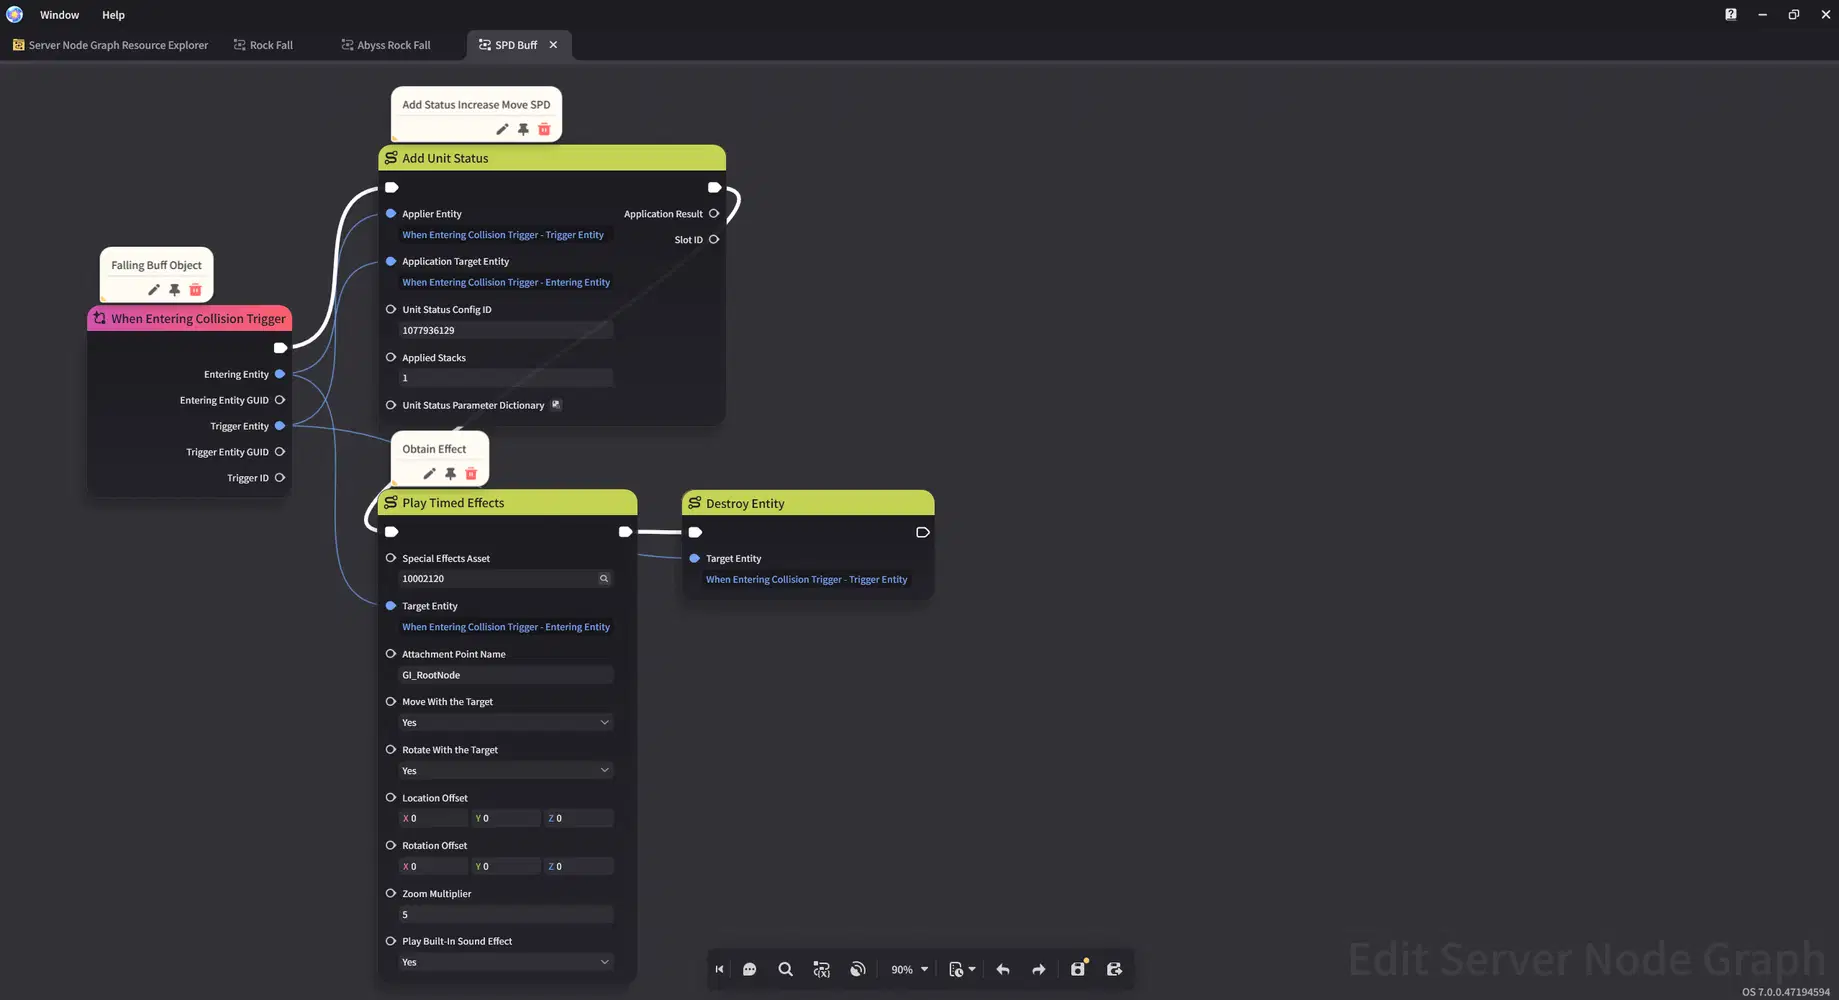
SPD Buff Node Graph
After creating the Node Graph, don't forget to assign it to the Empty Model used for the Buff. This allows the Empty Model to execute the Buff's logic, detect player interaction, and apply the Unit Status when the player collects it.
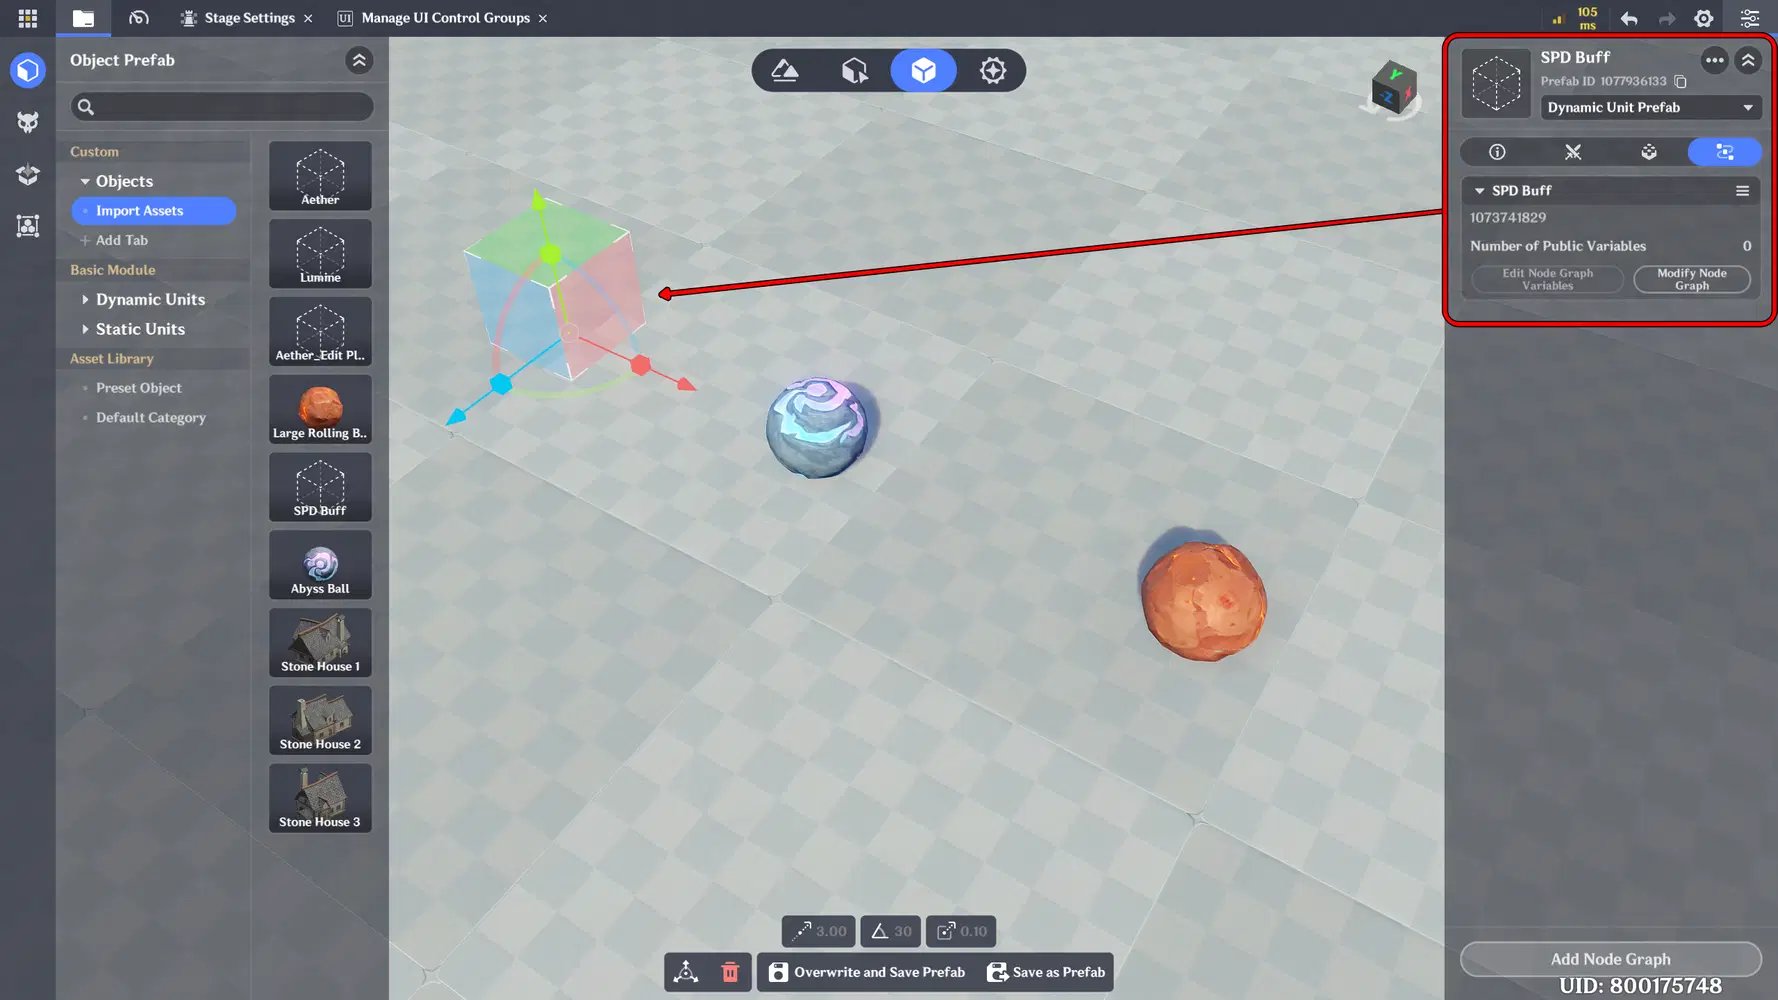
Assign Node Graph
Chapter 5: City HP
In this chapter, we will create the City HP and Score systems. We will set up the city's HP to decrease when falling objects reach the detection area, while the Score system will reward the player for successfully stopping incoming attacks.
HP System Setup
Before creating the HP and Score systems, we need to create variables to store and track the city's HP and the player's score during gameplay. These variables will later be connected to the Node Graph to update the values whenever the city takes damage, or the player successfully stops incoming objects.
- Select the Stage Entity located on the terrain, then open the Components section.
- Under Custom Variables, select Advanced Editing.
- Add two new variables for Score and City HP, both using the Integer data type. Set the initial values to 0 for Score and 100 for City HP.
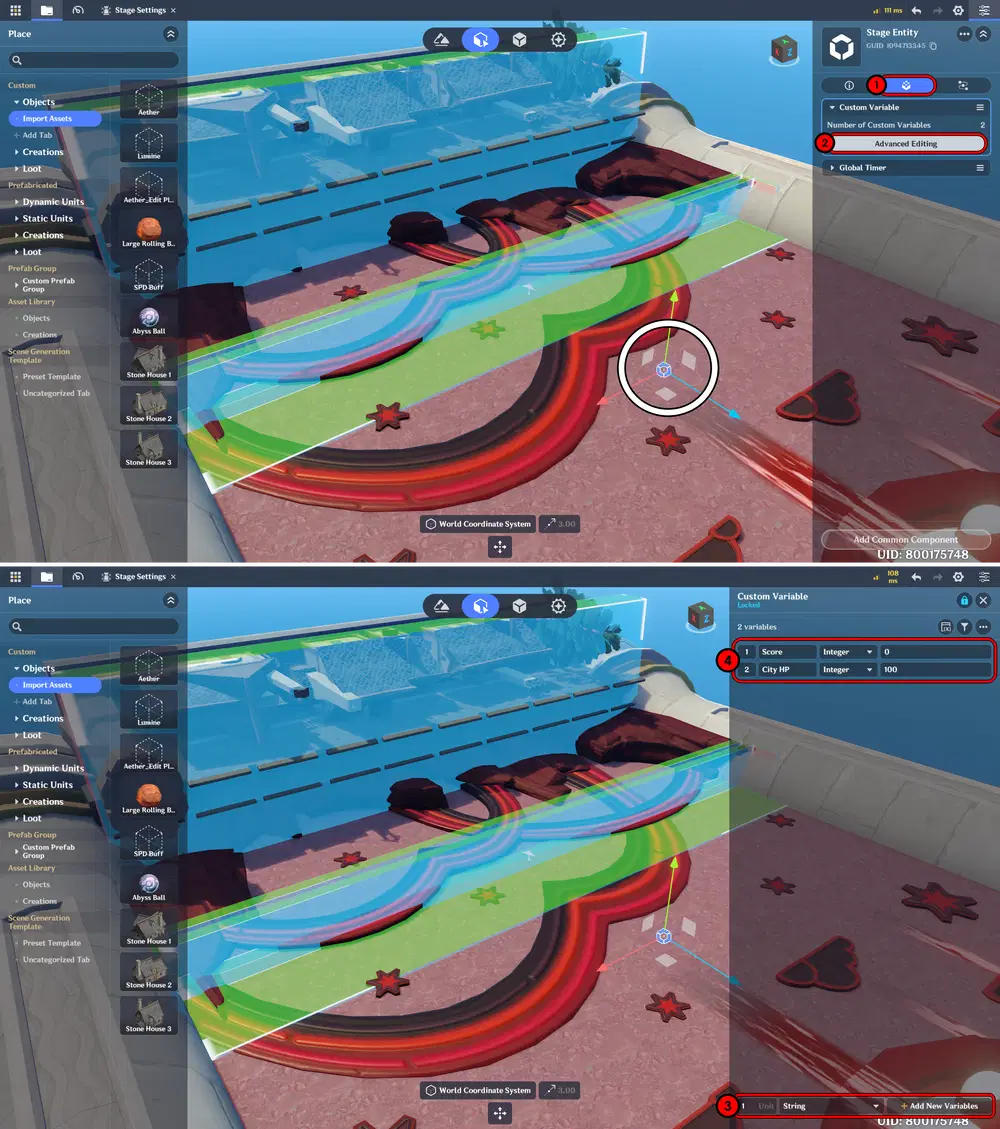
Next, we will create a Node Graph to manage the city's HP logic and gameplay responses. This Node Graph will monitor changes to the City HP variable and send signals that will be processed by the Monitor Node Graph.
The Monitor Node Graph will handle UI updates and determine the current state of the game, such as when the city is damaged or the game ends. We will also use this system to trigger effects on objects around the city, creating visual feedback that makes the falling objects feel impactful when they hit their targets and the player fails to stop them.
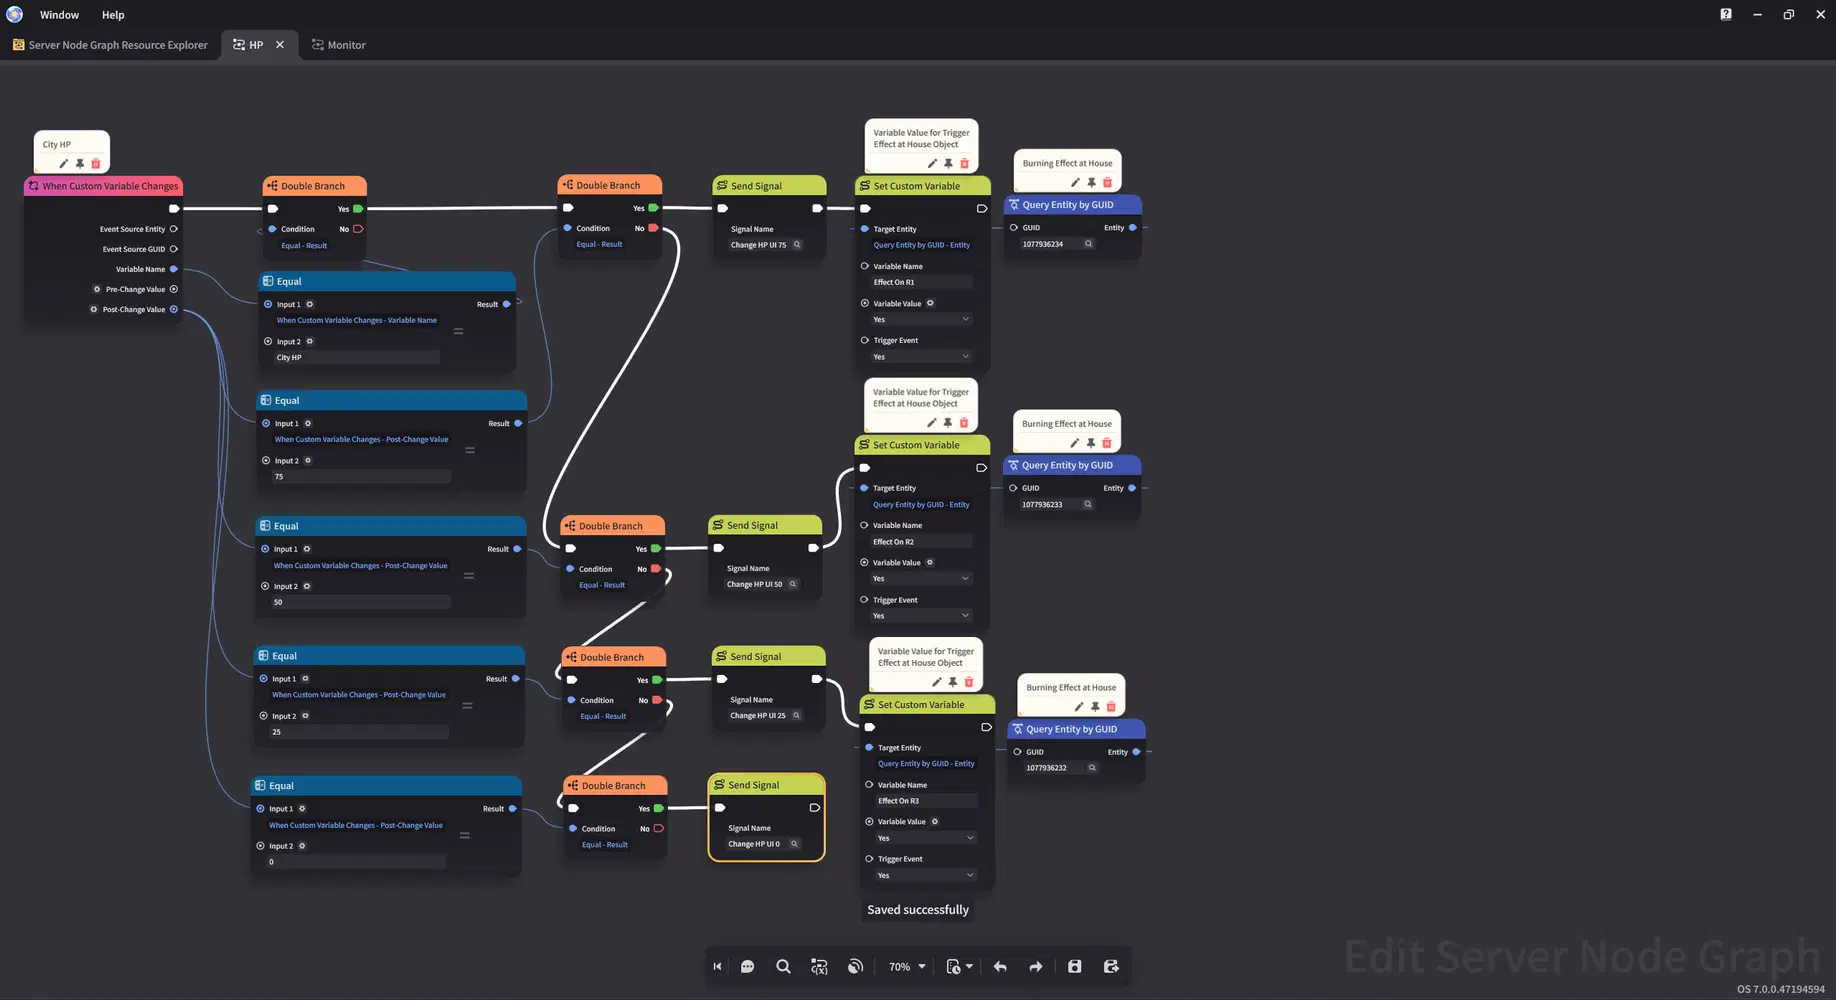
City HP Node Graph
Below is the Monitor Node Graph created on the Server side. This Node Graph is responsible for receiving and processing signals sent by the City HP Node Graph. It will handle the corresponding gameplay logic, including updating the game state, managing the UI.
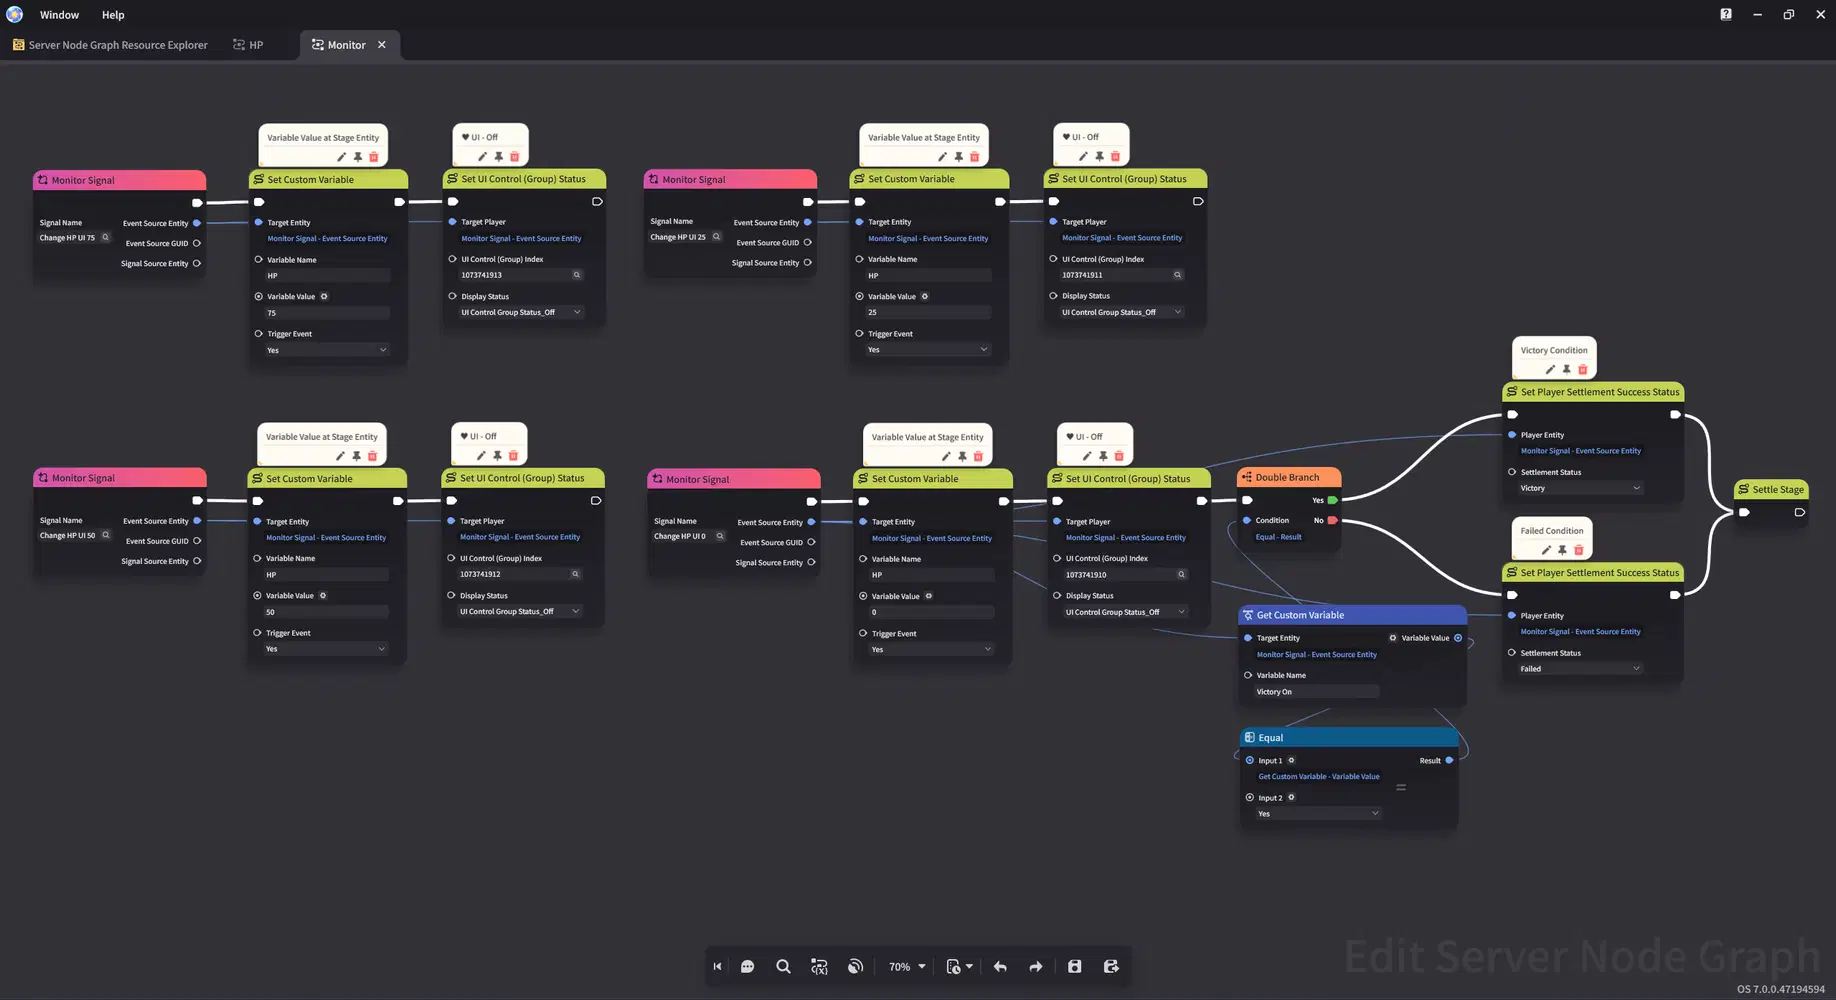
Monitor Node Graph
Last, assign each Node Graph to its corresponding entity to ensure the systems work properly.
- Place the City HP Node Graph on the Stage Entity.
- Place the Monitor Node Graph on the Player/Character.
With this setup, the City HP system can communicate with the Monitor Node Graph to process signals, update the game state, and trigger the appropriate effects during gameplay.
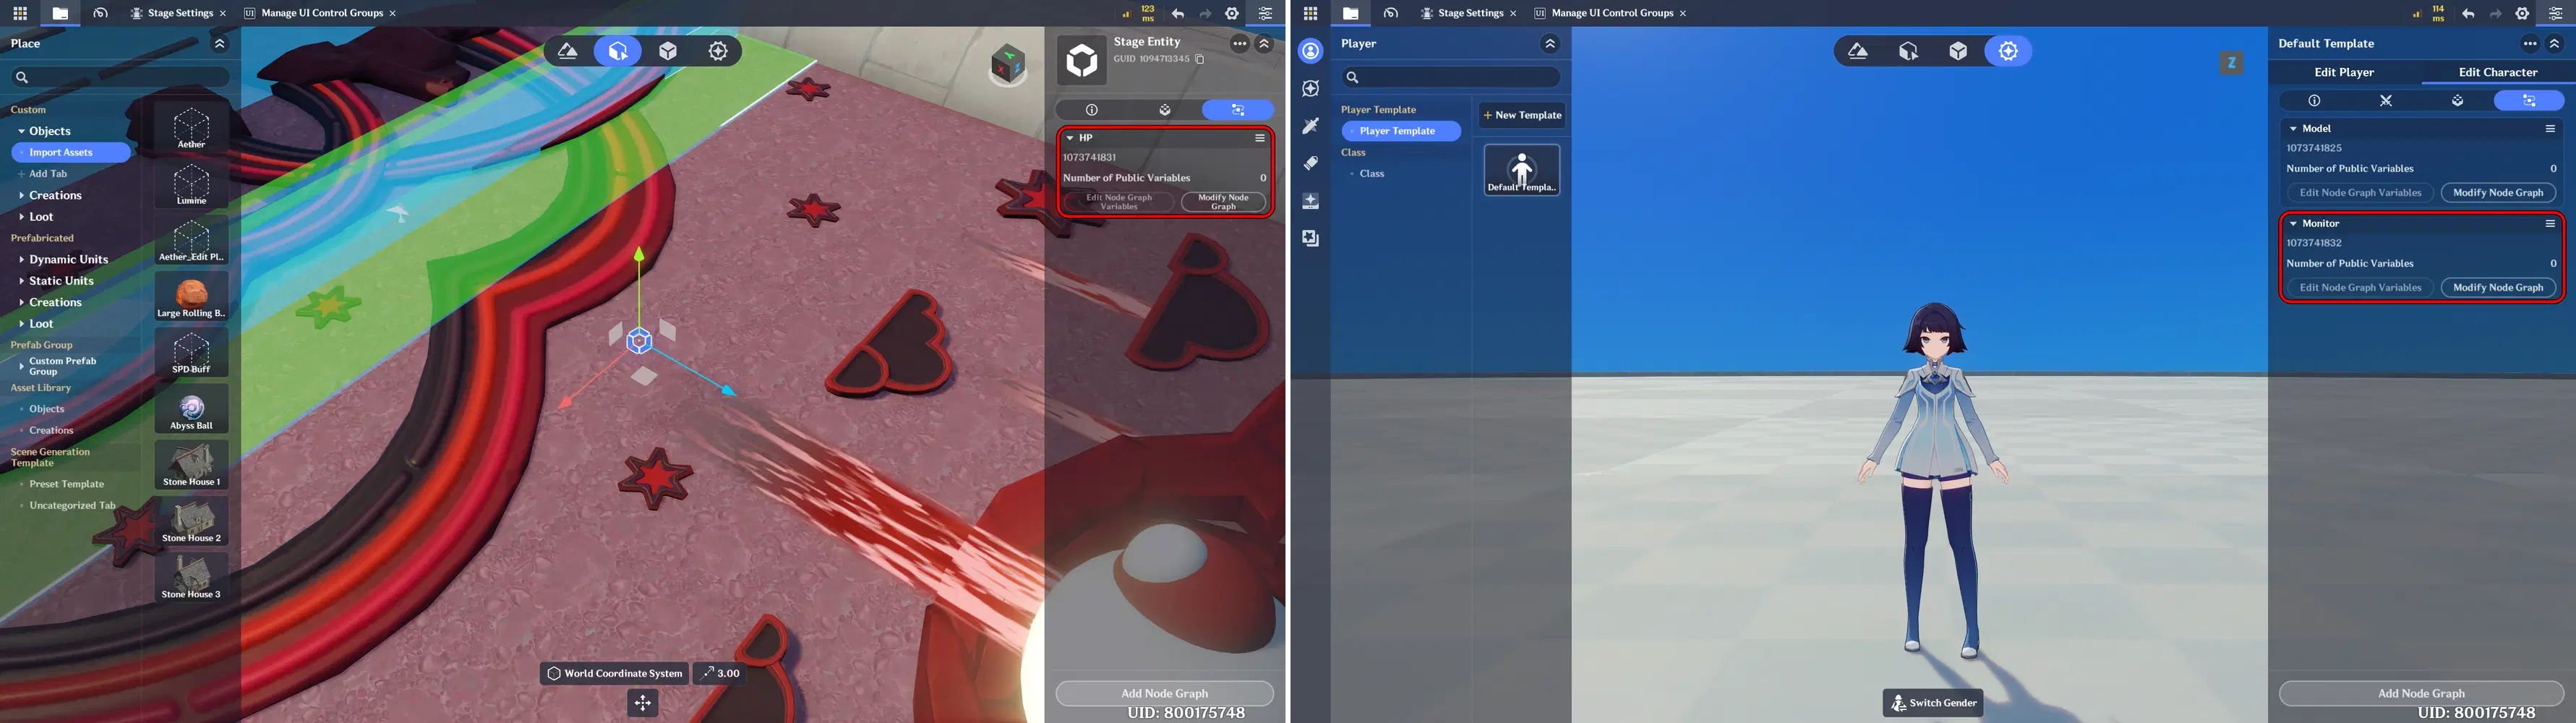
Assign Node Graph
Chapter 6: Difficulty & Random Spawn System
In this chapter, we will create a dynamic difficulty and random spawn system. We will configure difficulty progression, adjust the number of falling objects, and introduce randomized spawn positions to make each playthrough more challenging and unpredictable.
Timer & Difficulty Setup
In this section, we will set up the Timers that control the duration of the game. These timers will be used to manage the preparation period before the game starts and the duration of each challenge level.
For this project, I created five Timers in total: one Timer for the preparation countdown and four Timers for the duration of each challenge level.
- From the Main Menu, select Timer Management.
- Add a new Timer for the game preparation period. Set the Timer Type to Cooldown and the duration to 10 seconds.
- Next, create three additional Timers for the challenge levels. Set each Timer to Cooldown with a duration of 90 seconds.
- Last Timer Type to Stopwatch, because Endless Mode.
These Timers will later be connected to the Node Graph & UI to control the game's progression and determine when each challenge level starts and ends.
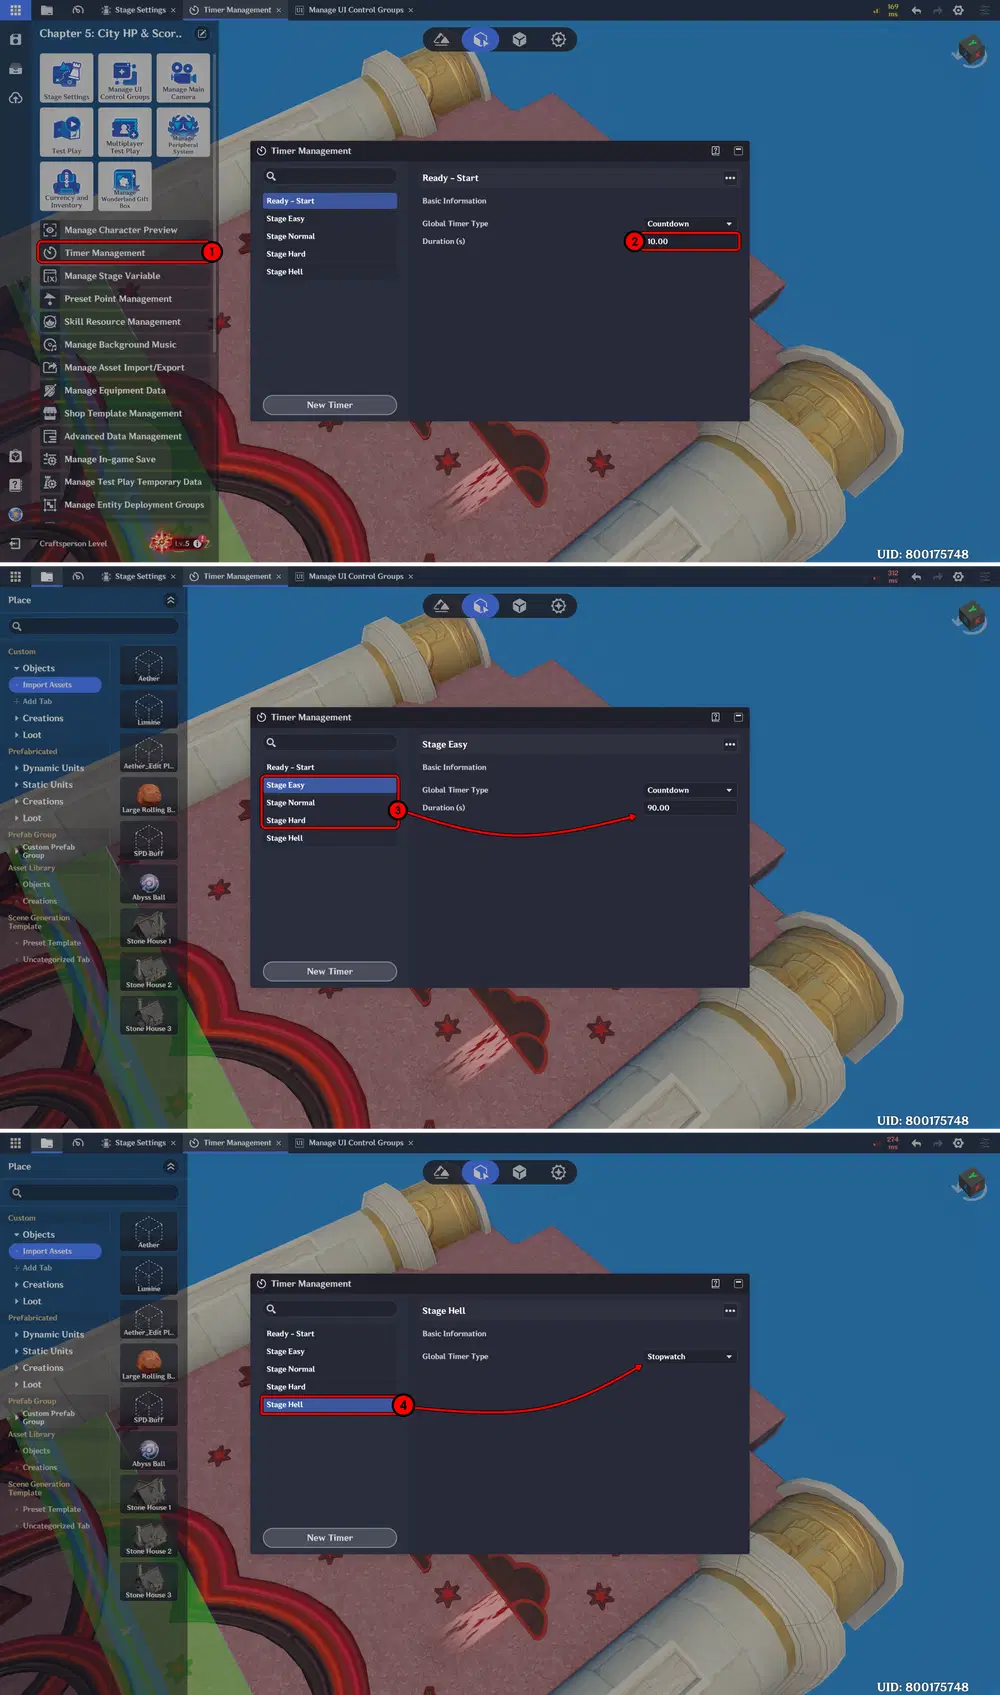
Timer Management
Next, create a new Node Graph on the Server side to control the game's Timers. This Node Graph will handle when each Timer starts and stops, as well as send signals based on the Timer's current state.
These signals will later be processed by the Monitor Node Graph to trigger the spawning of falling objects and Buff objects. This allows the Timer system to control the game's progression and determine when new objects should appear based on the difficulty level.
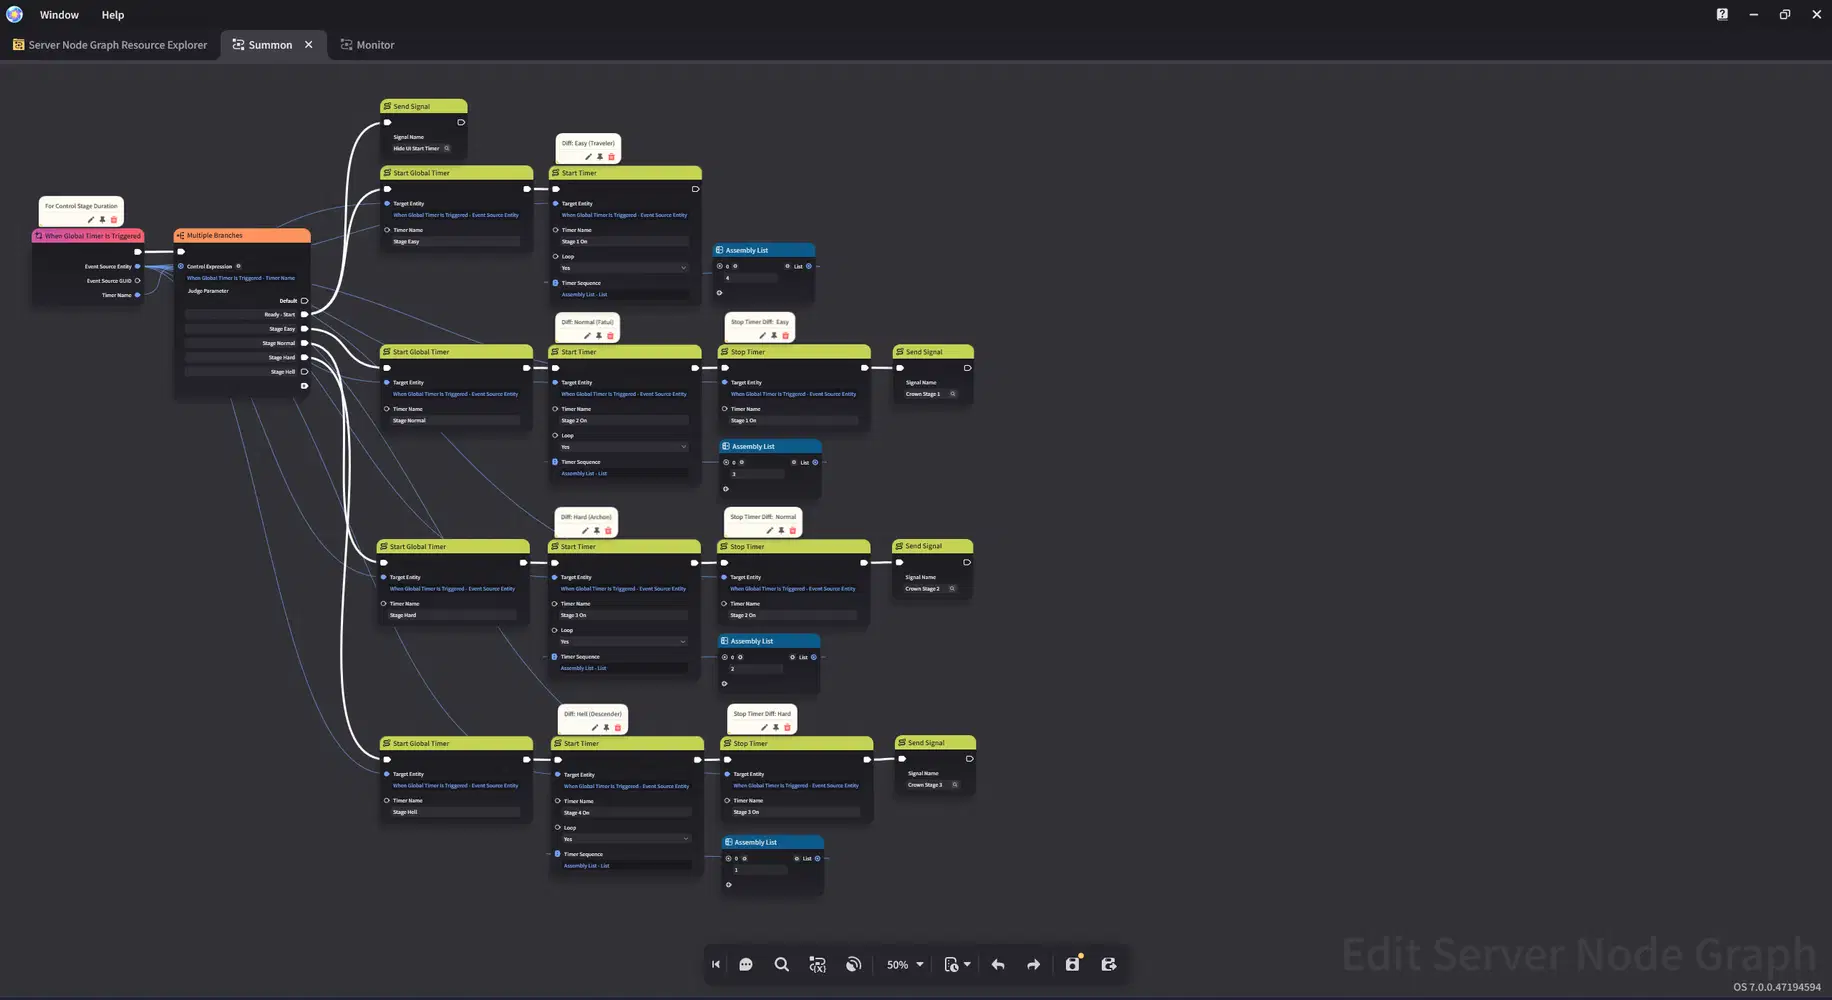
Timer Node Graph
Next, we will assign the preparation Timer to the Stage Entity. This allows the Timer to start automatically when the game begins and provides the player with a preparation period before the challenge starts.
- Open the Components section of the Stage Entity and select Add Common Component.
- Select the Global Timer component.
- Open Advanced Editing.
- Select Specify Timer.
- Select the Preparation Timer that we created earlier. This Timer will automatically start when the game begins.
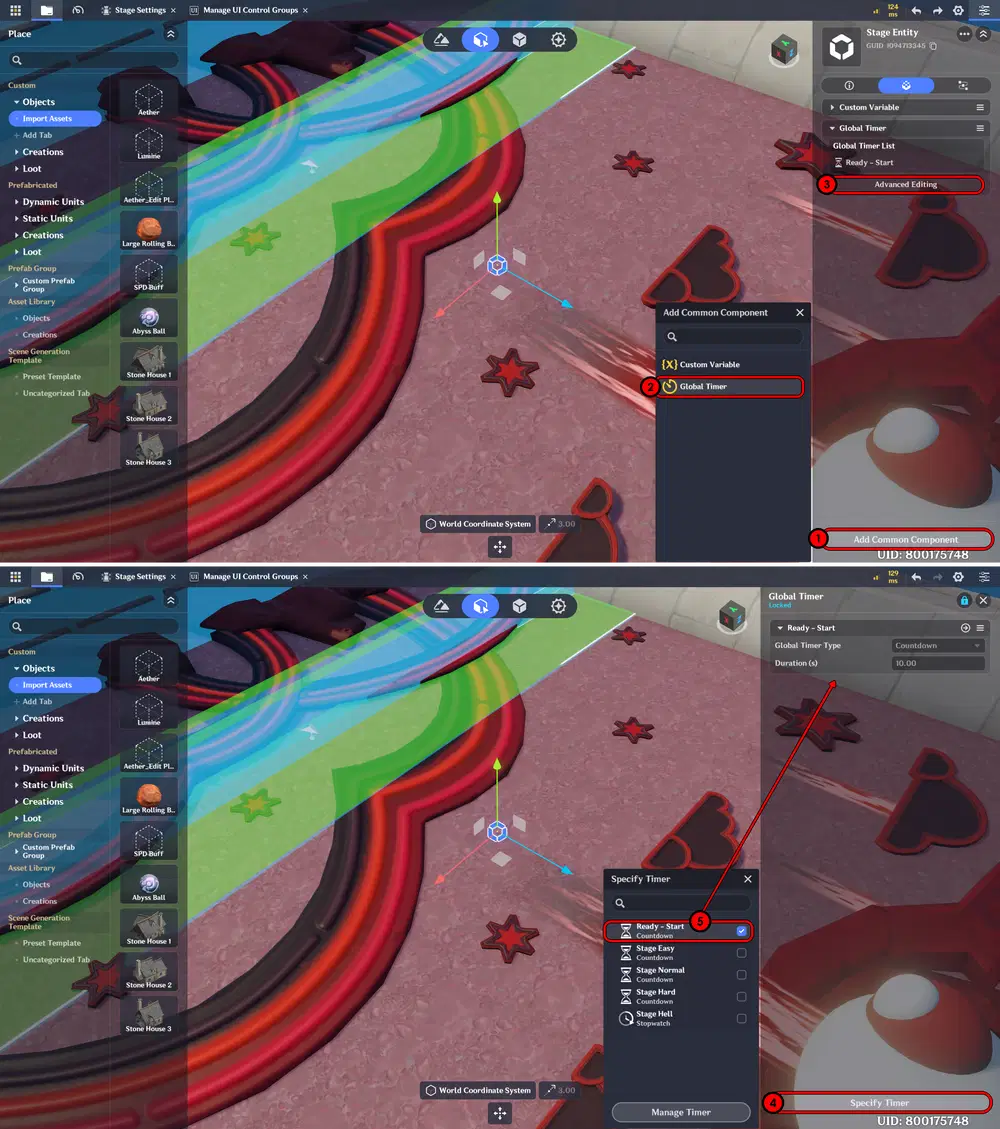
Timer Setup
After creating the Node Graph and setup Timer, assign it to the Stage Entity. This allows the Timer Node Graph to control the game's timers and send the required signals to the Monitor Node Graph during gameplay.
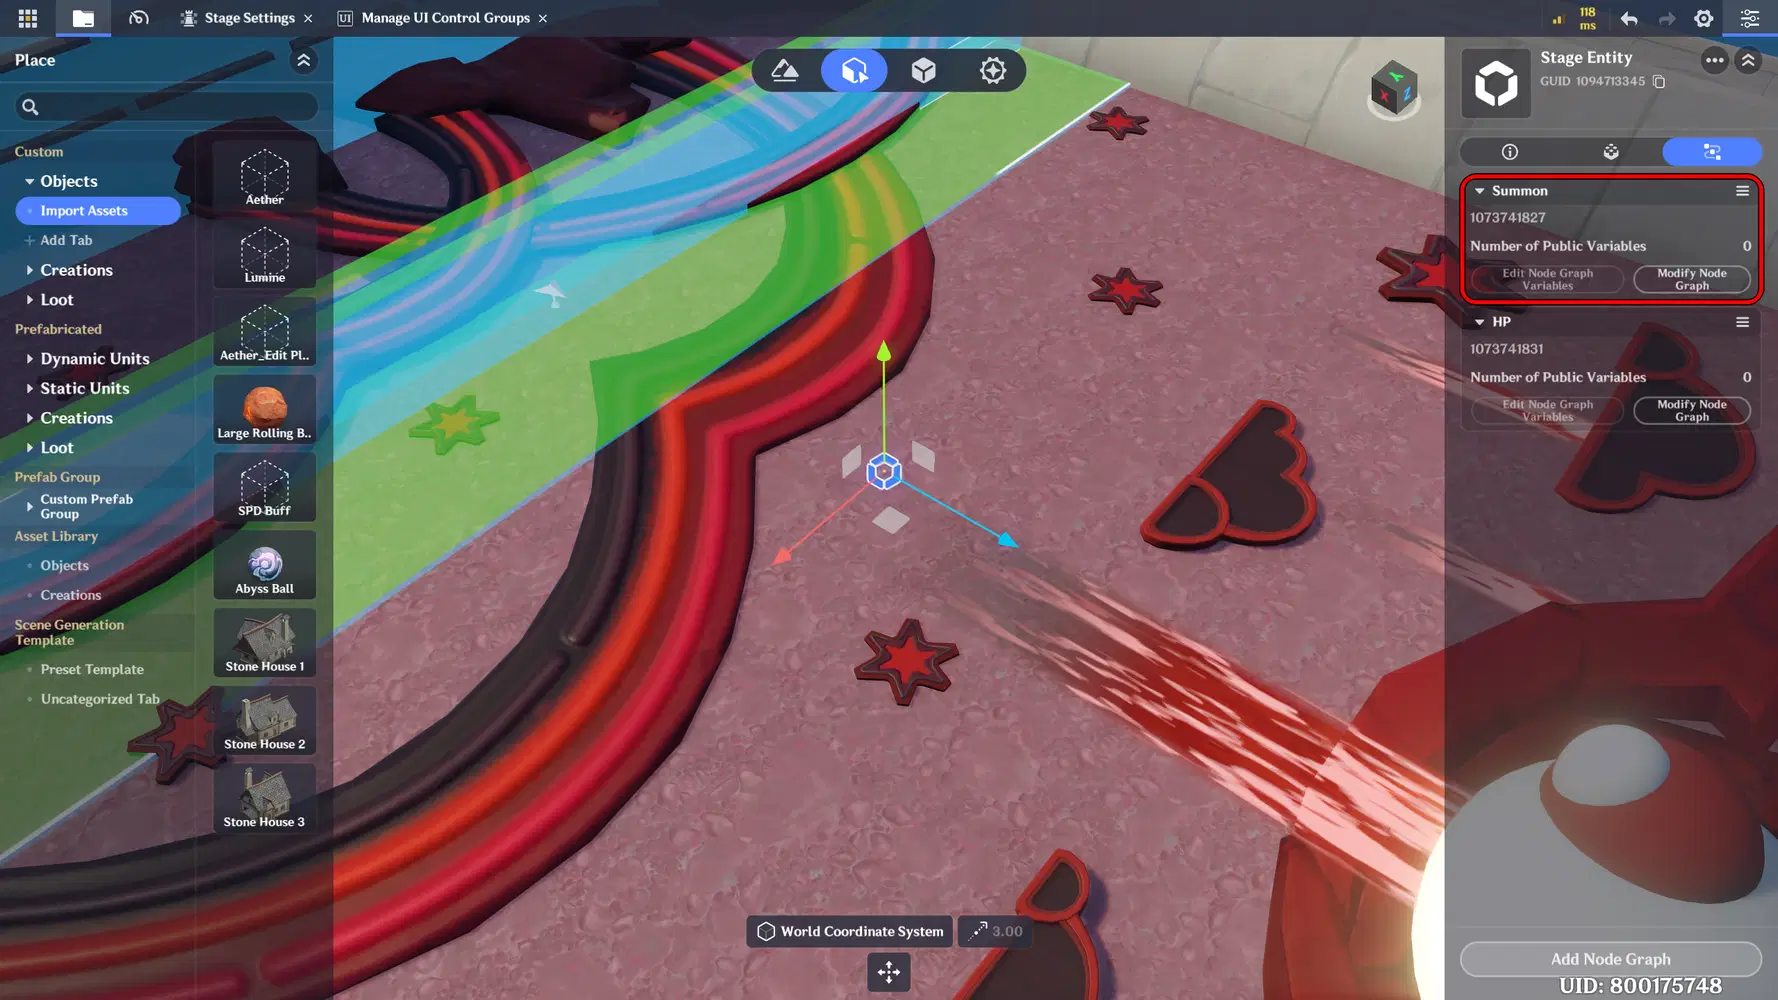
Assign Node Graph
Object Spawn Setup
Next, we will create the system that controls when and which objects appear during the game. The spawning process will be controlled through a Node Graph. You can also combine this logic with the Timer Node Graph created earlier to avoid creating too many separate Node Graphs.
When a Timer is triggered, the Node Graph will check the current game conditions and determine which object should be spawned. A Random Integer will be used and connected to a Branch to randomly select between different spawn options. This makes the falling objects and Buffs appear in a more dynamic and unpredictable way during each playthrough.
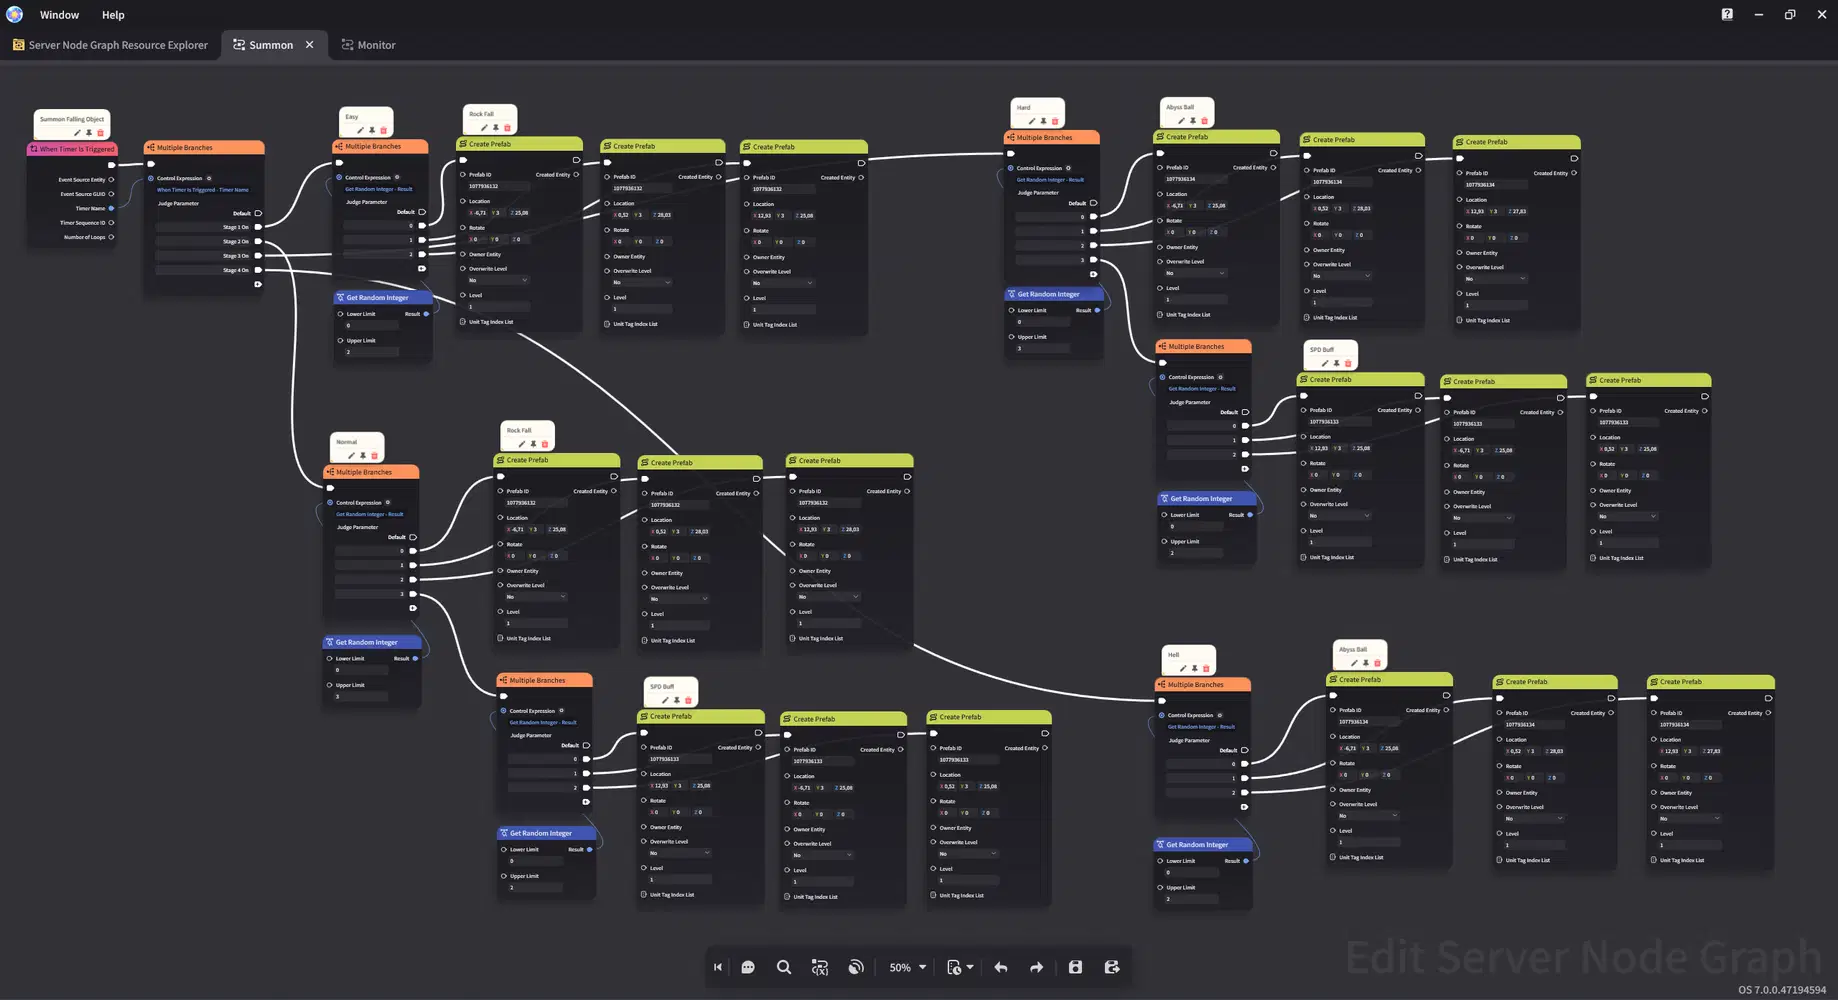
Random Spawn Node Graph
Next, add this Node Graph logic to the Monitor Node Graph created earlier. This allows the Monitor to handle several UI and gameplay functions throughout the challenge.
The Node Graph will be used to hide the Preparation Timer display when the preparation period ends, show notifications or indicators when a level is completed, and display the Completed Game button at the appropriate level. This helps the player clearly understand the current game progression and when the challenge can be completed.
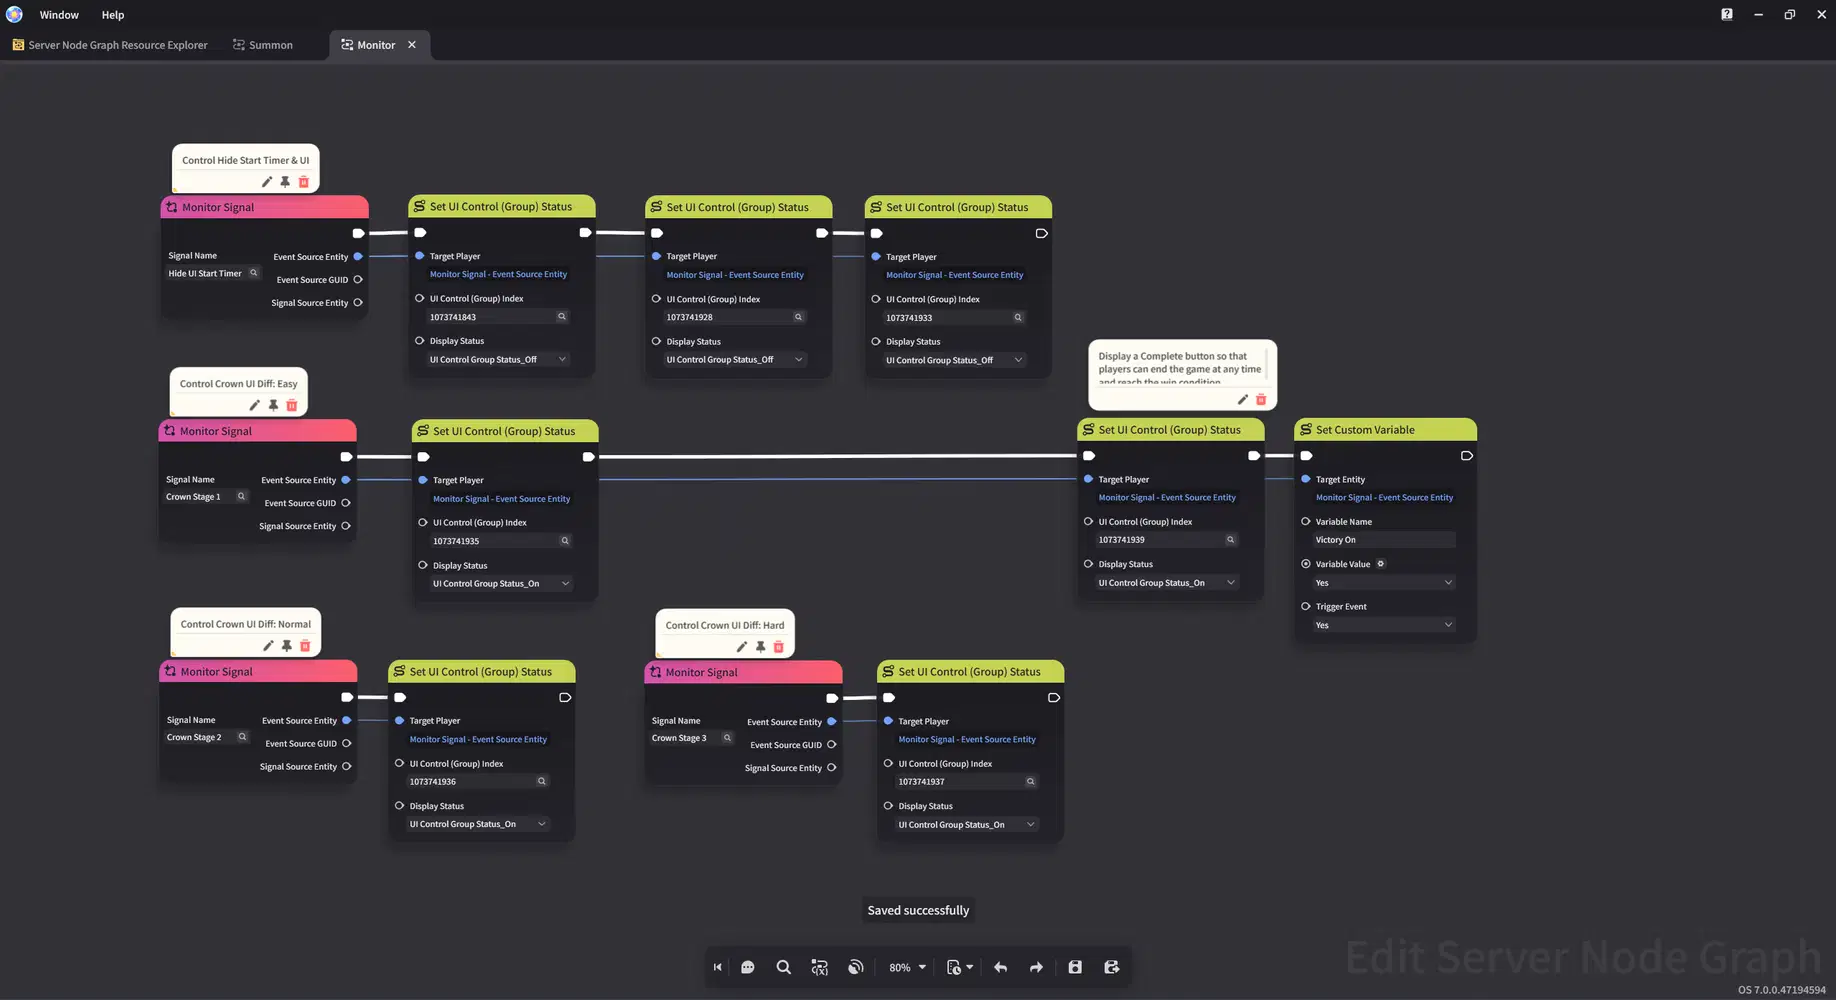
Control Timer & UI Indicator Node Graph
Here is the result of the random object spawn system. The falling objects will appear at random positions during the challenge, making their movement less predictable.
When a falling object comes into contact with the player, the Collision Trigger will detect the interaction and the object will be destroyed. This allows the player to defend themselves while keeping the gameplay dynamic.
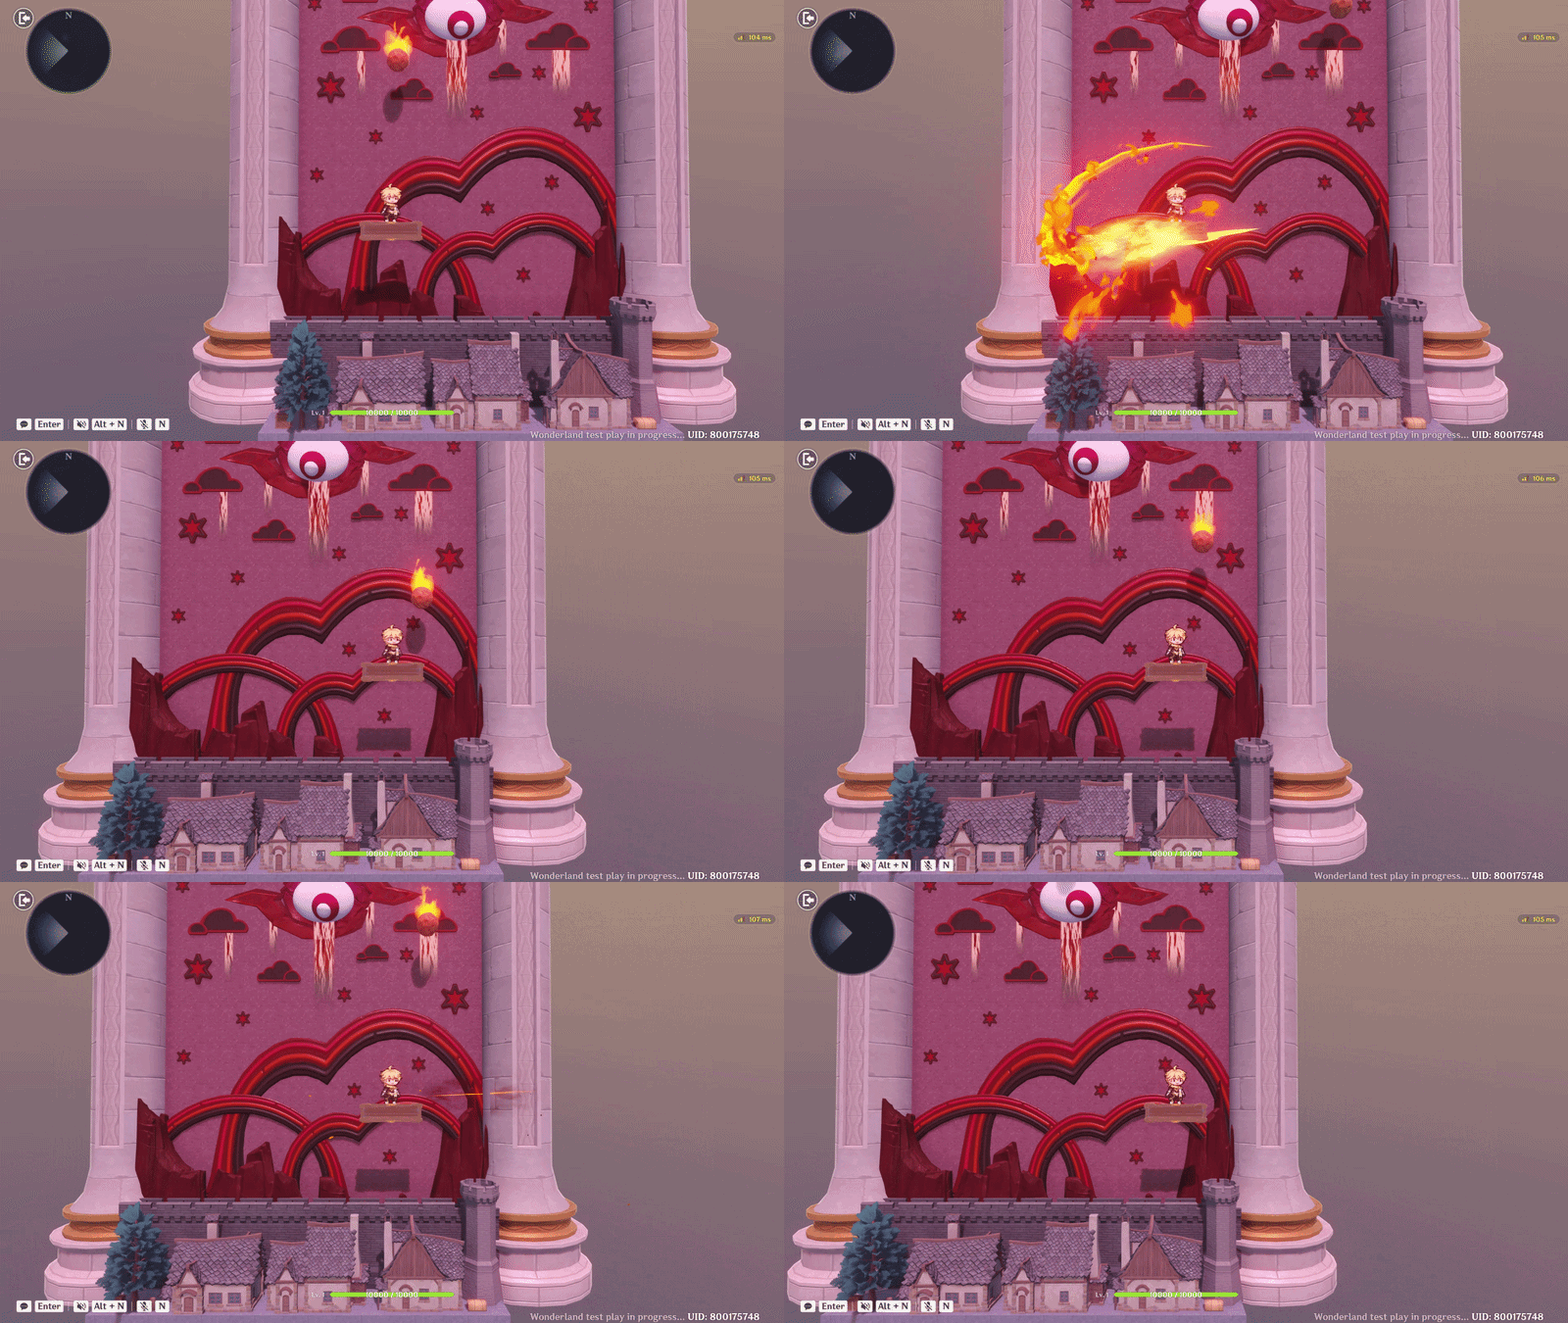
Random Object Spawn
Chapter 7: Creating the Game UI
In this chapter, we will create the Game UI to display important gameplay information. This includes the City HP, Score, Timer, Wave/Level, and other indicators that help players understand the current game state and track their progress.
Timer UI
In this section, we will create the Timer UI. The Timer logic and its functions were already set up in the previous chapter, so here we will focus on displaying the Timer on the screen and connecting it to the correct Timer source.
- Open the Main Menu and select Manage UI Control Group.
- Under Interface Layout, select Add UI Control.
- Select Timer and adjust its position according to your preference. For this project, I placed it in the center of the screen. I also added an Image as the Timer's background and a Text element to make its purpose clearer.
- Configure the Timer by setting the Warning Time and selecting the Specify Timer option. For the Source Entity, select the Stage Entity that was configured in Chapter 6.
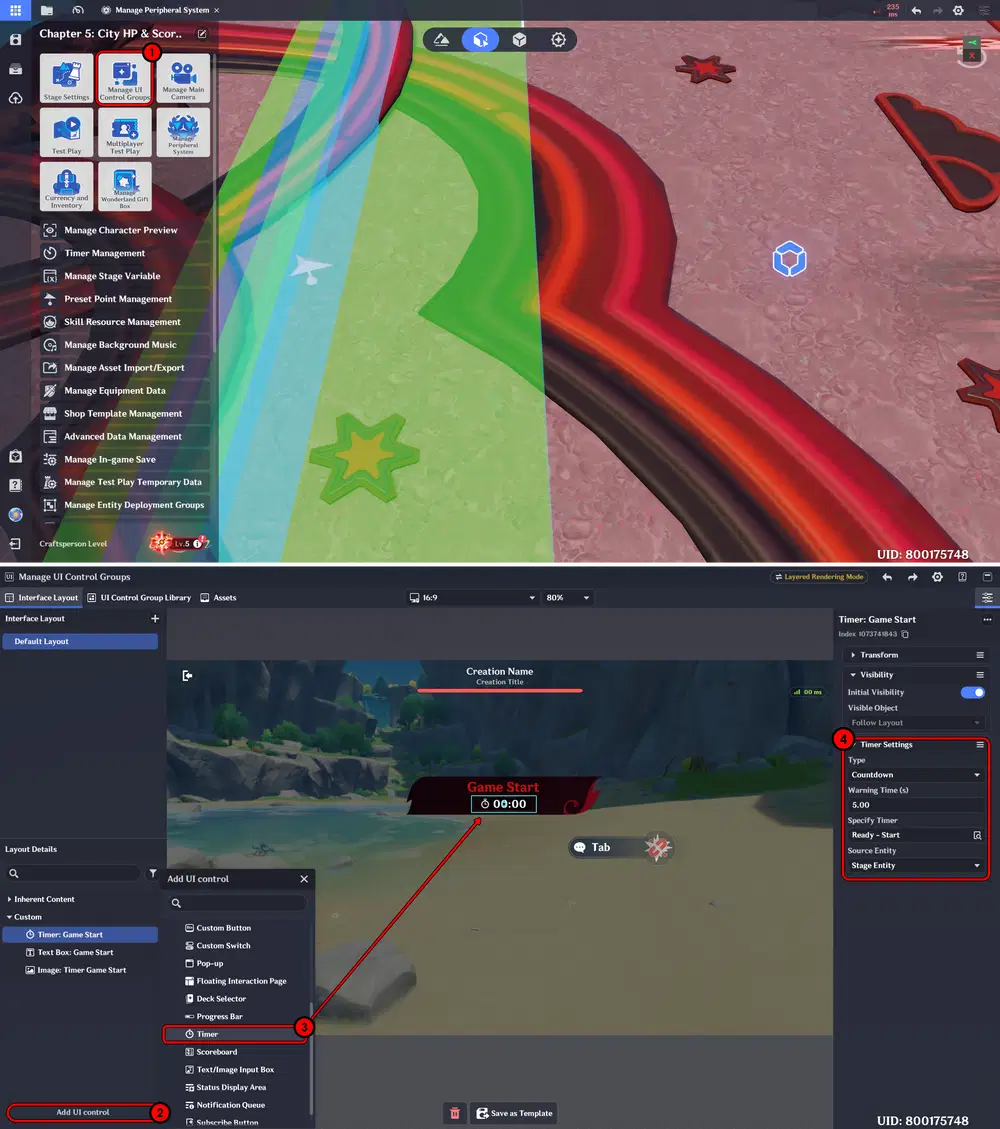
Create Timer UI
Here is the result when the game is play. The preparation timer will appear immediately, giving players time to get ready before the challenge begins.
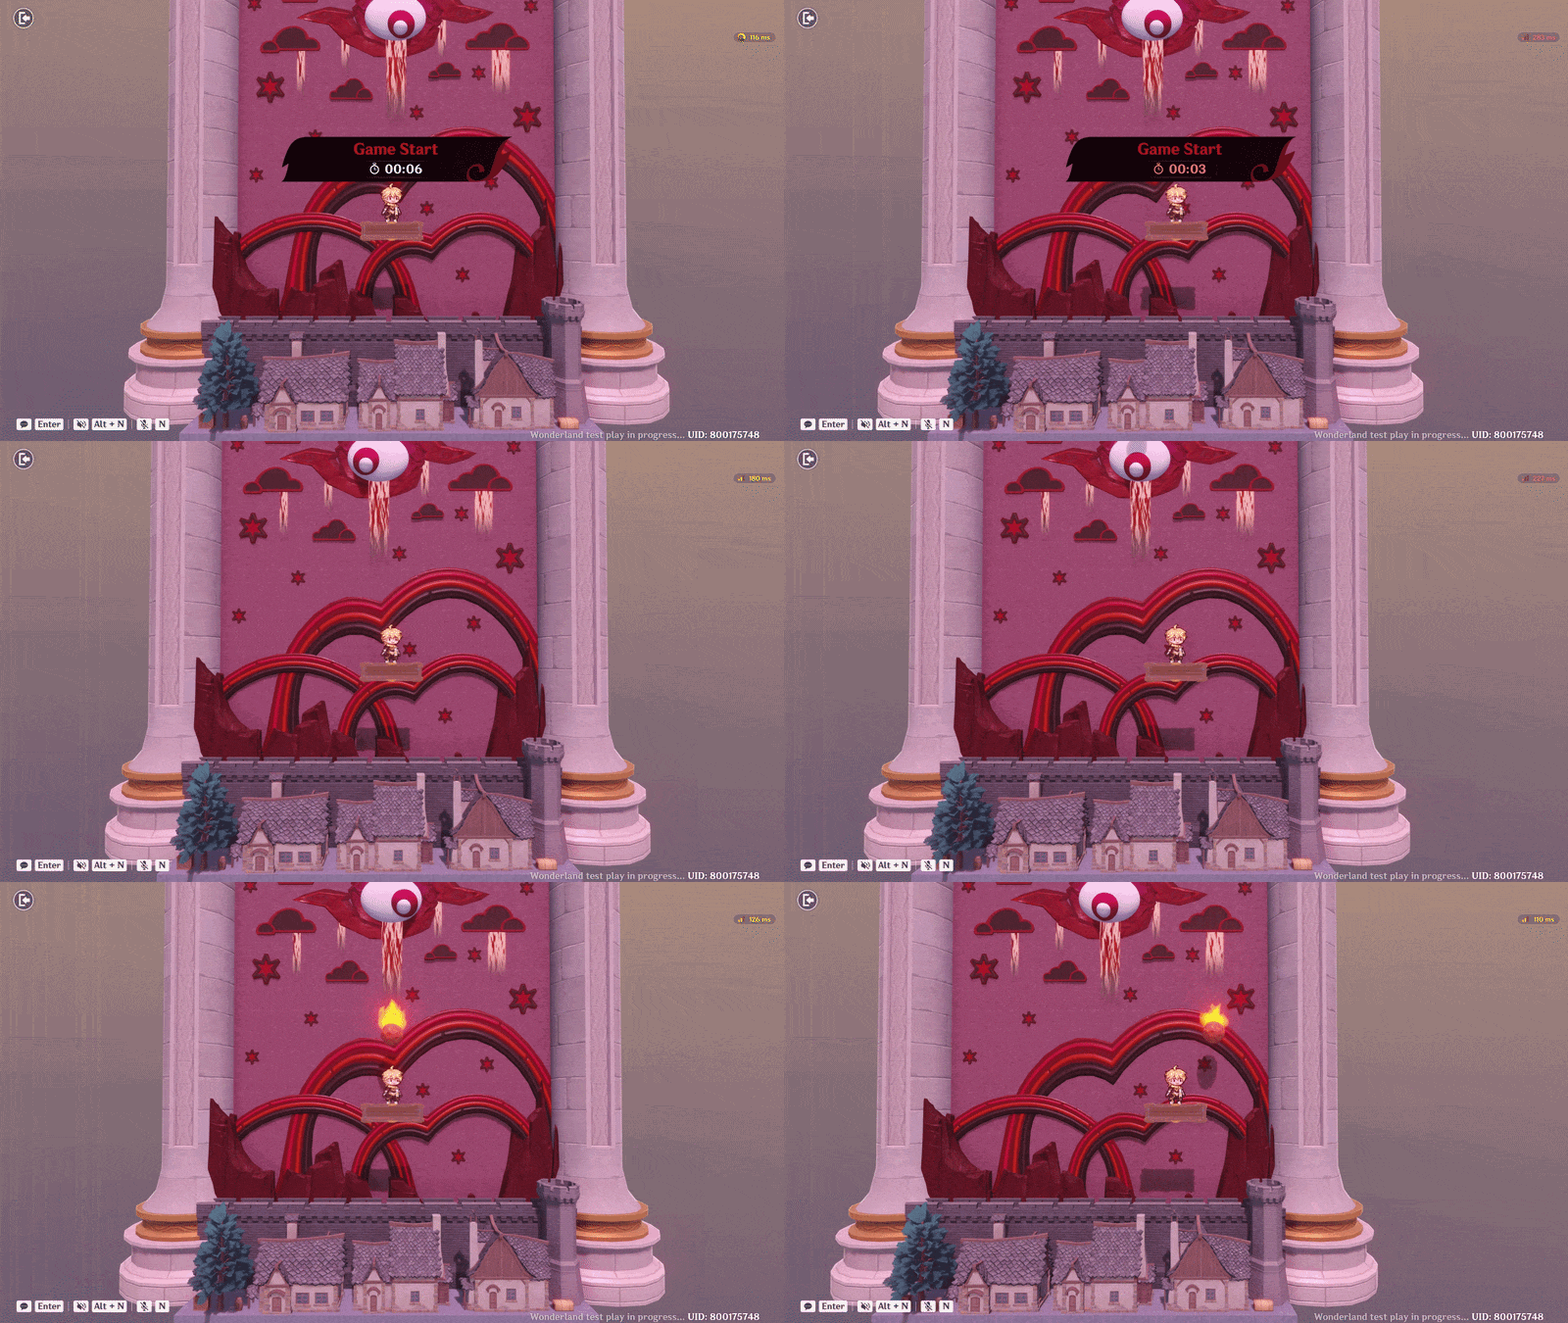
Preparation Timer
Next, we will add Timer UI for the level system. These Timers will display the remaining duration of each challenge level, allowing players to easily see how much time is left before the current level ends.
- Add Timer UI Controls, add four Timer UI Controls, one for each challenge level created in the previous chapter.
- Configure Each Timer, adjust the settings of each Timer so that it matches the corresponding challenge level.
- Set the Timer Specify For example, the Adventure level Timer uses Specify Timer and is connected to the Easy difficulty Timer. Repeat the same setup for the other levels using their respective difficulty Timers.
- Match the Timers with the Timer System Make sure each Timer UI is connected to the Timer created earlier. This allows the UI to display the correct countdown automatically when the corresponding level starts.
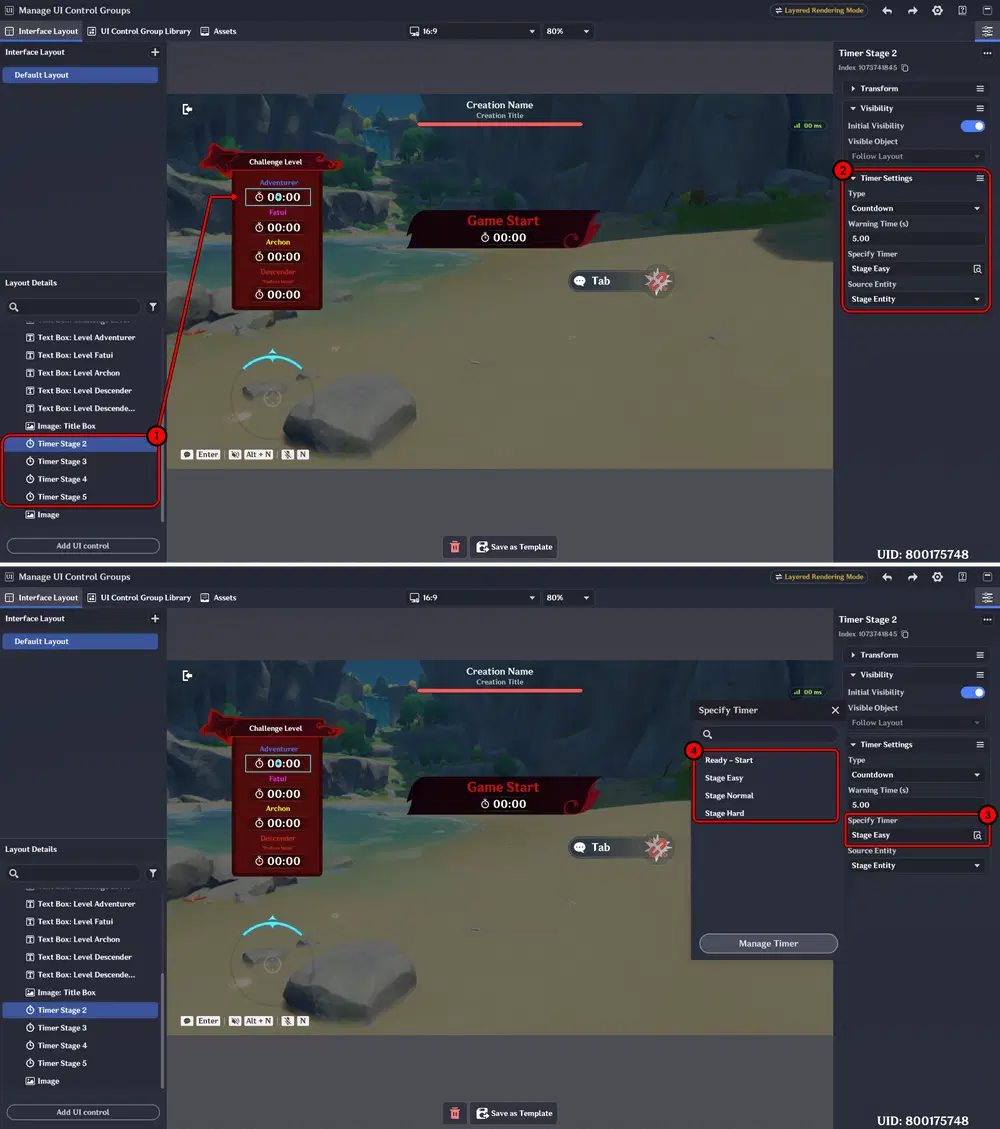
Challenge Level Timer Setup
Next, we will add an Image UI as an indicator when the player successfully completes a level. For this project, I use a Crown image to show that the current level has been completed.
- Add a UI Control: Image, then set the Asset Reference to the image you want to use. In this project, I use a Crown image.
- Set the Image's Visibility to Off. The image will remain hidden at the start and will be displayed later using the Node Graph created in the previous chapter.
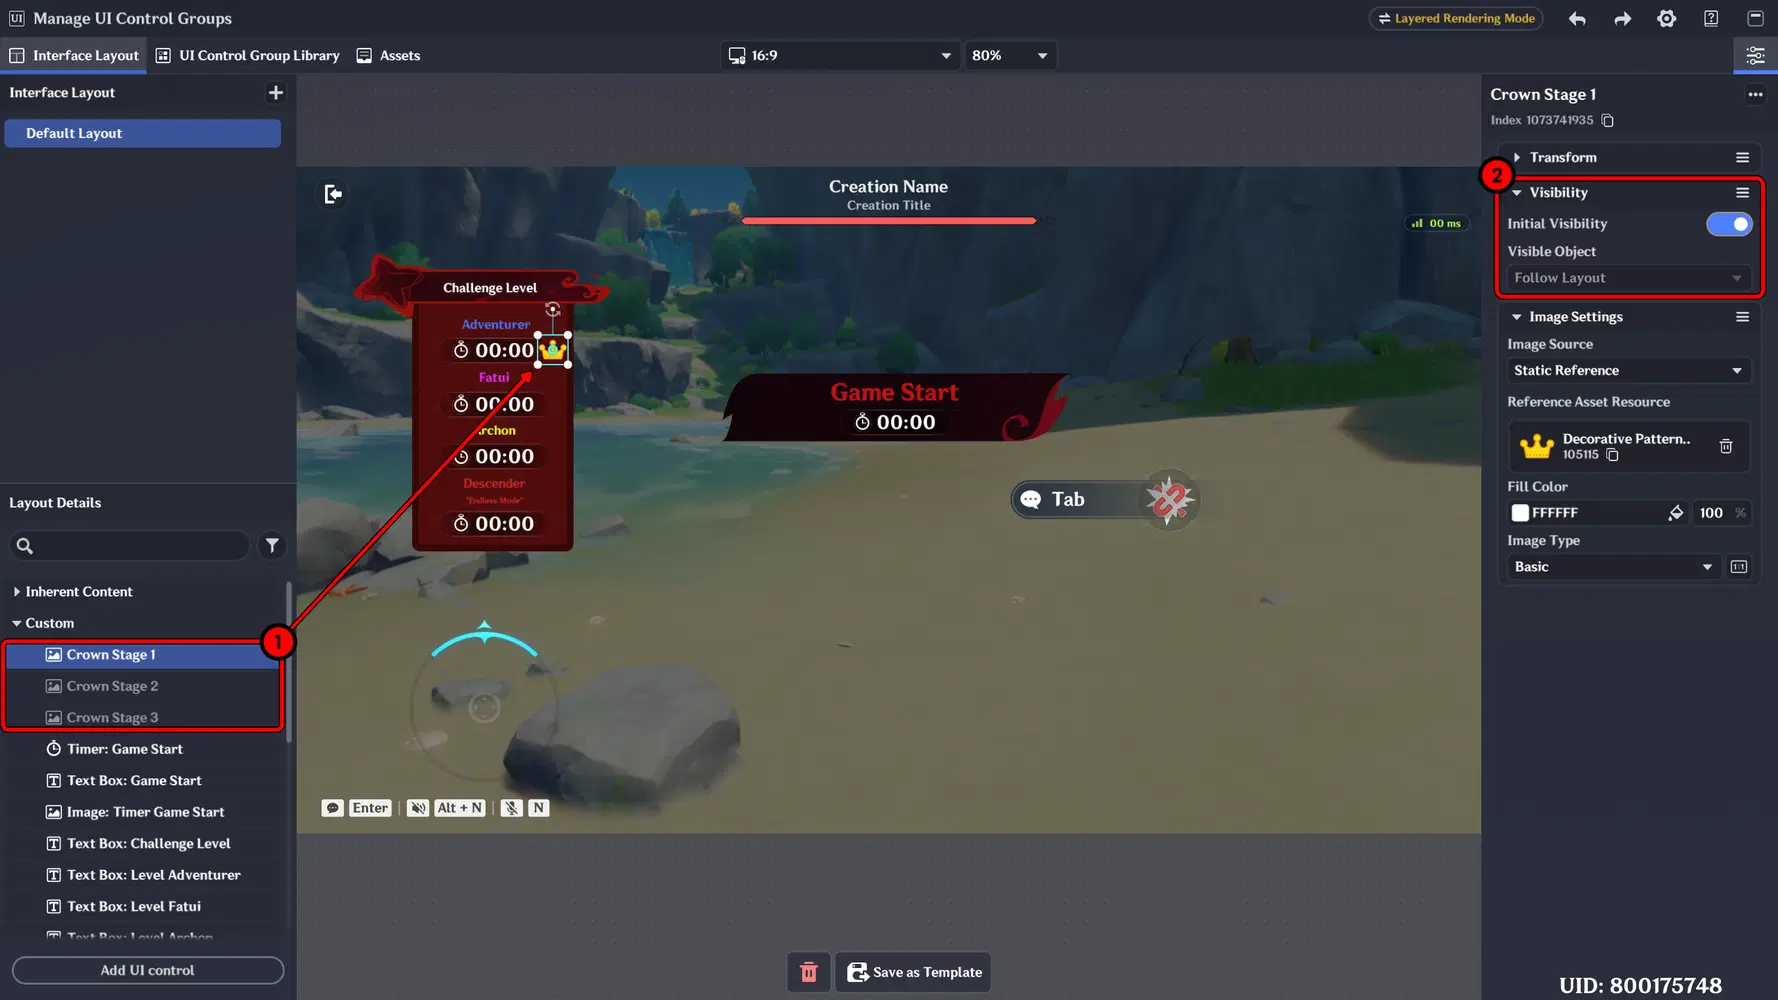
Level Completion Indicator UI
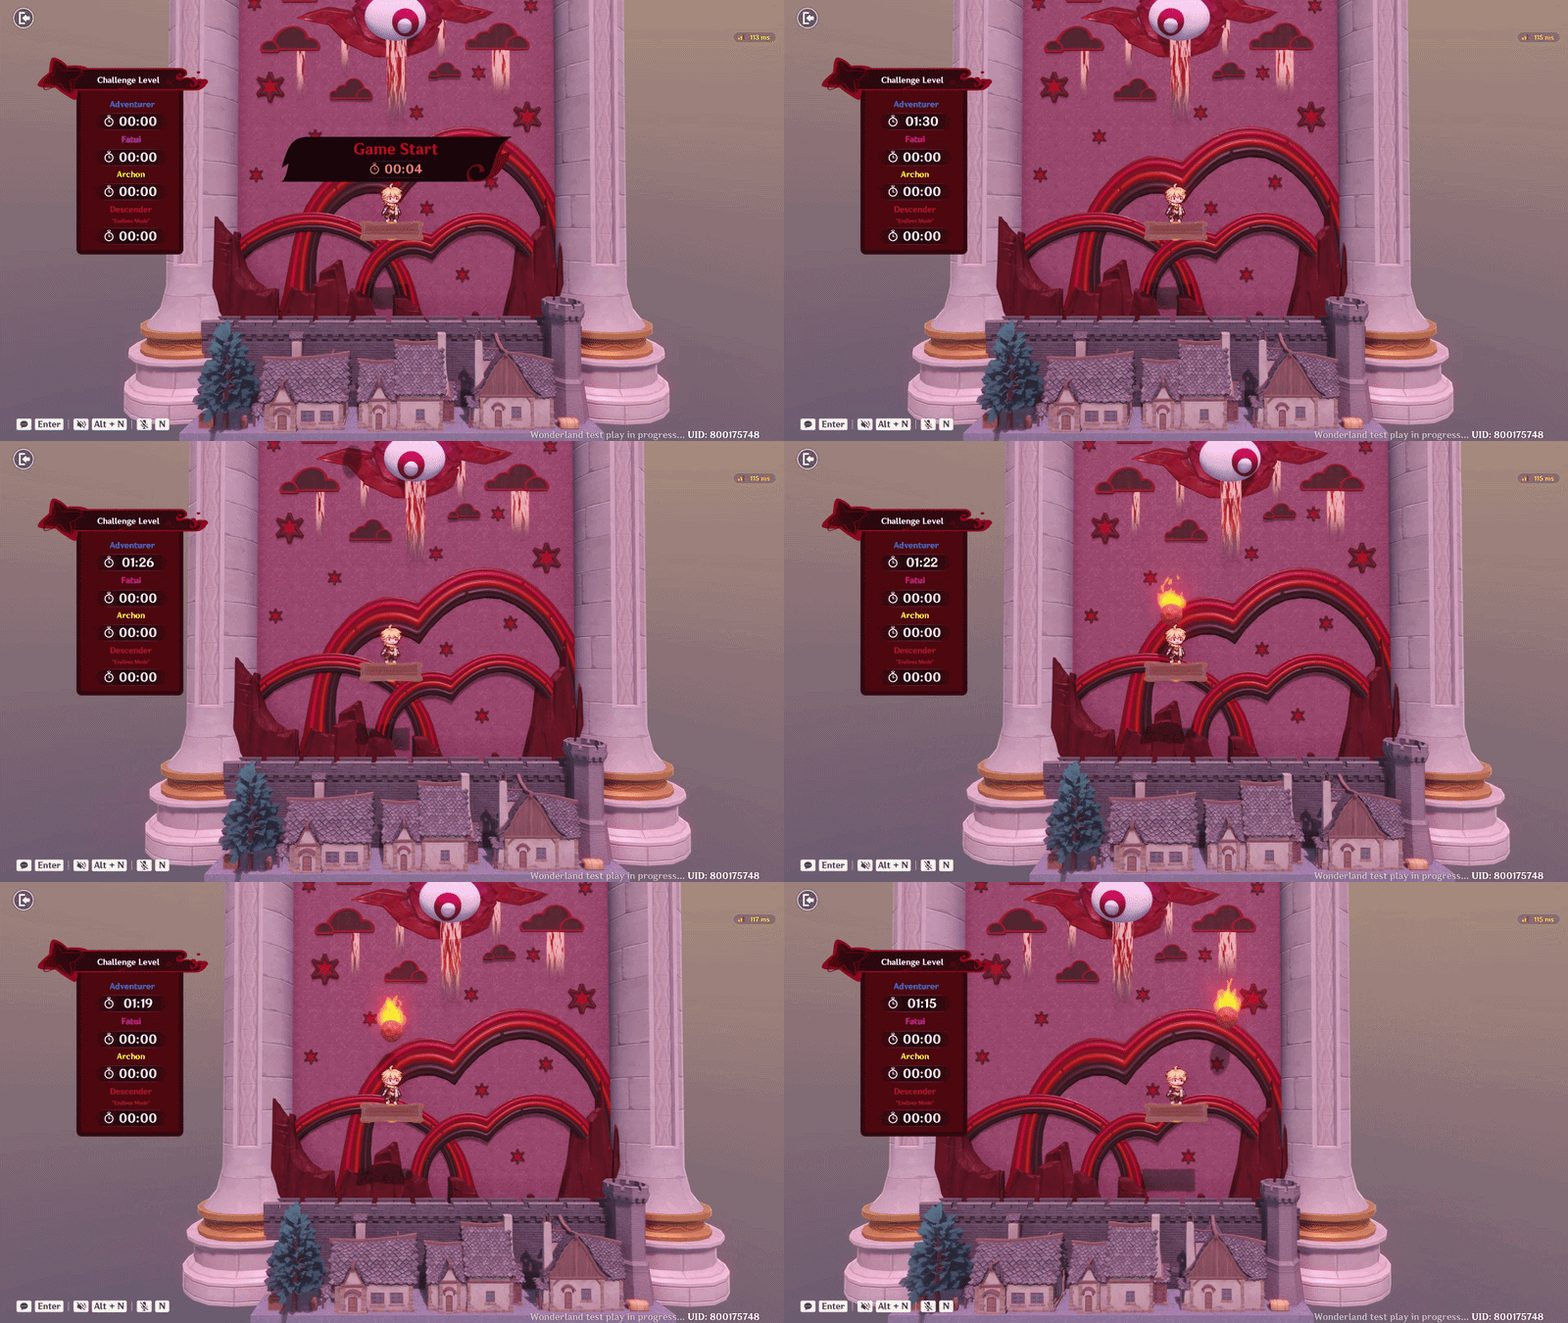
Here is the result. The challenge timer will start automatically, and the falling objects will begin spawning once the preparation timer ends.
Score UI
In this section, we will create the Score UI to display the player's score when successfully stopping the falling Meteor objects.
- Add a UI Control: Text and an Image for its background. Adjust their position on the screen according to your preference.
- Adjust the Text settings, such as its color, size, and alignment, to match your UI design.
- Connect the Text to the variable that was created in the Stage Entity in Chapter 5.
- Select the Score variable. The UI will now display the current score and update automatically whenever the score changes.
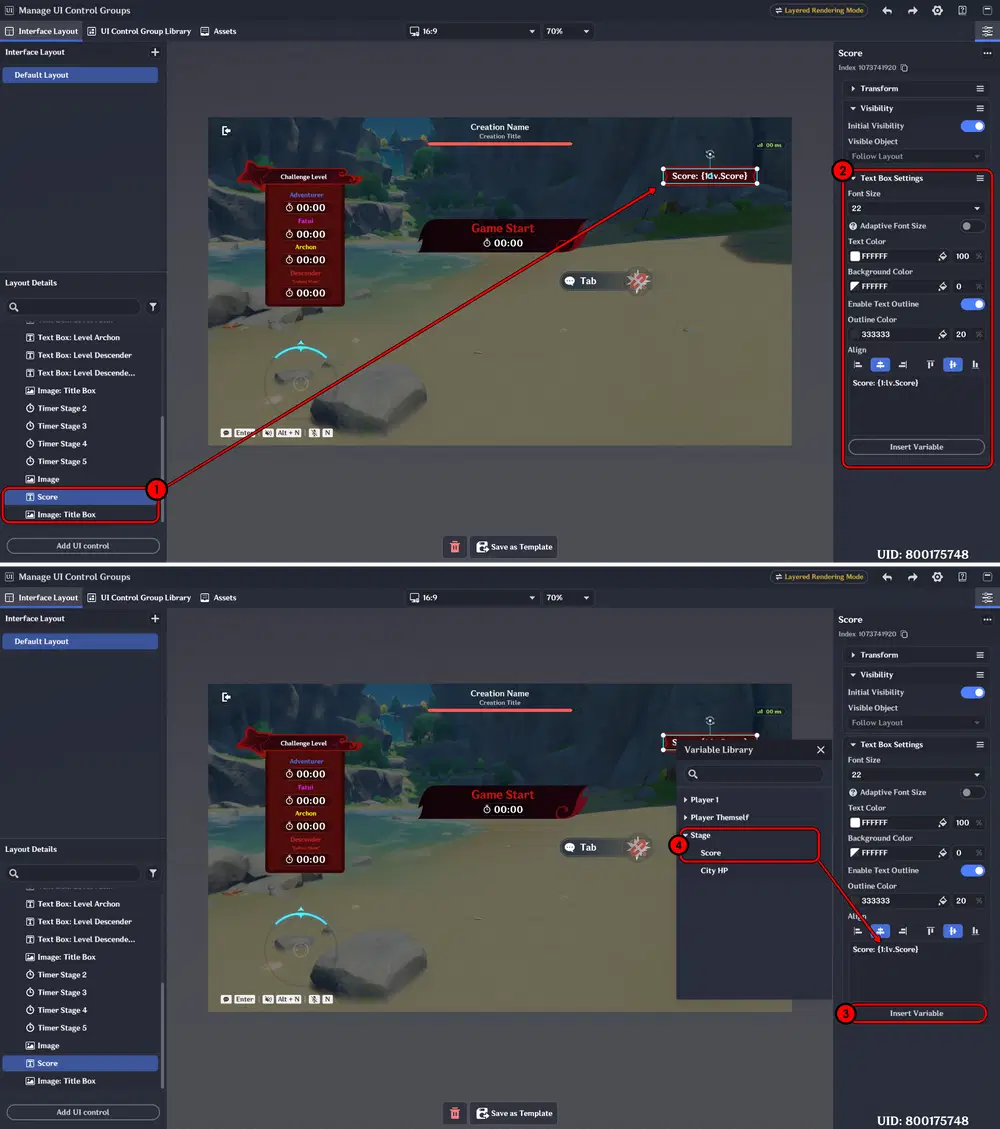
Score UI Setup
Here is the result. When the player successfully blocks a falling object, the Score will automatically increase.
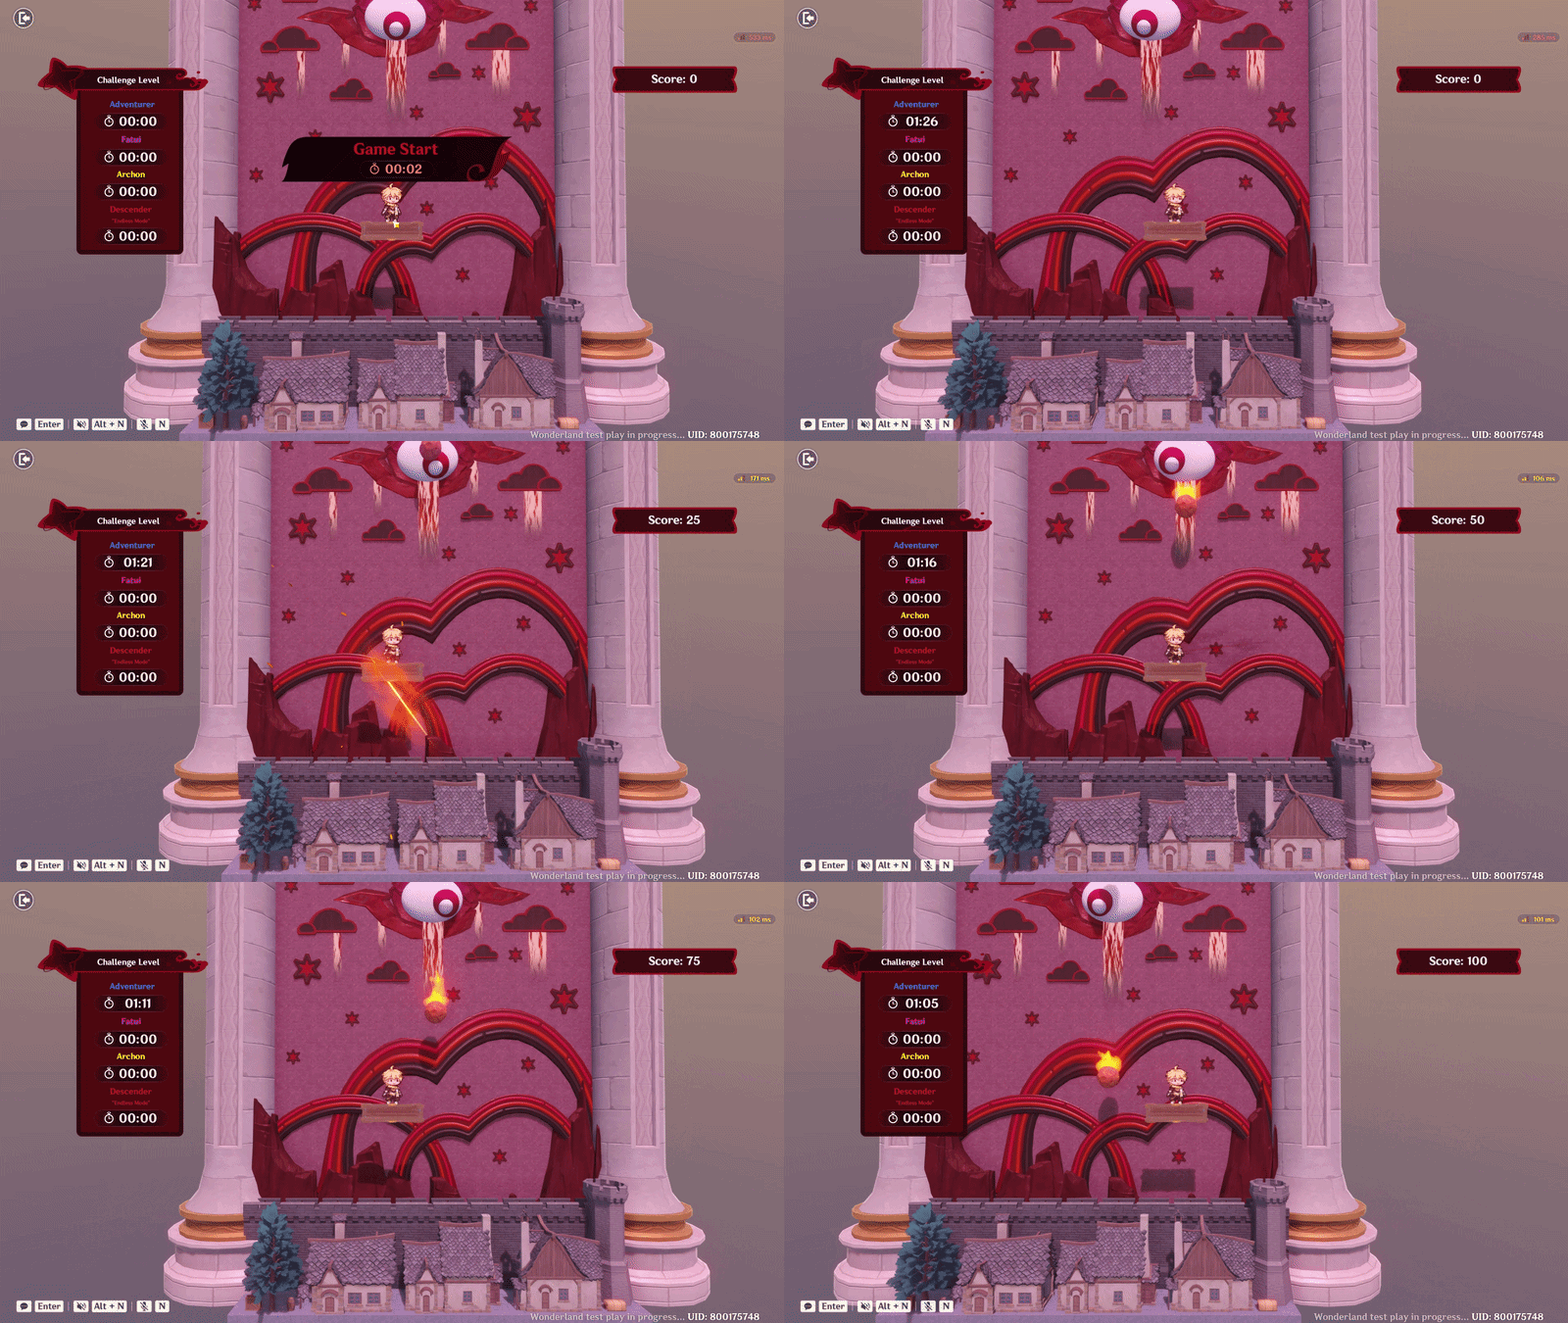
Score UI
City HP UI
In this section, we will create the City HP UI to display the current HP of the city. The UI will also use different visual states to make it easier to see when the city takes damage.
- Create two categories for the HP display: On and Off. The On state represents the normal HP condition, while the Off state will be used when the city takes damage and its HP decreases.
- For the On state, use the default or normal color. For the Off state, use a darker color to represent the lost HP.
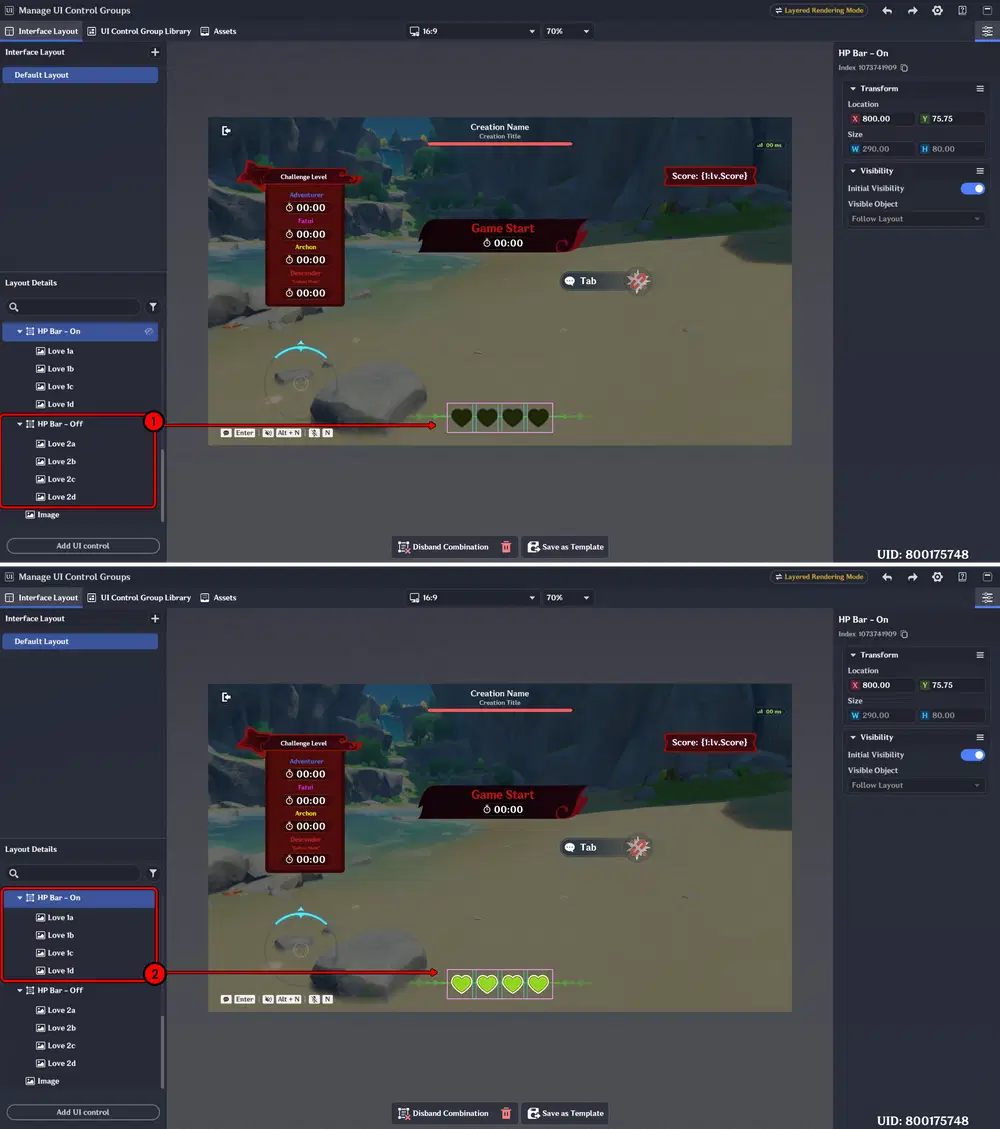
HP UI Setup
Here is an example demonstration of what happens when the player fails to stop the falling objects. When an object reaches the city, its HP will decrease based on the damage dealt by the object.
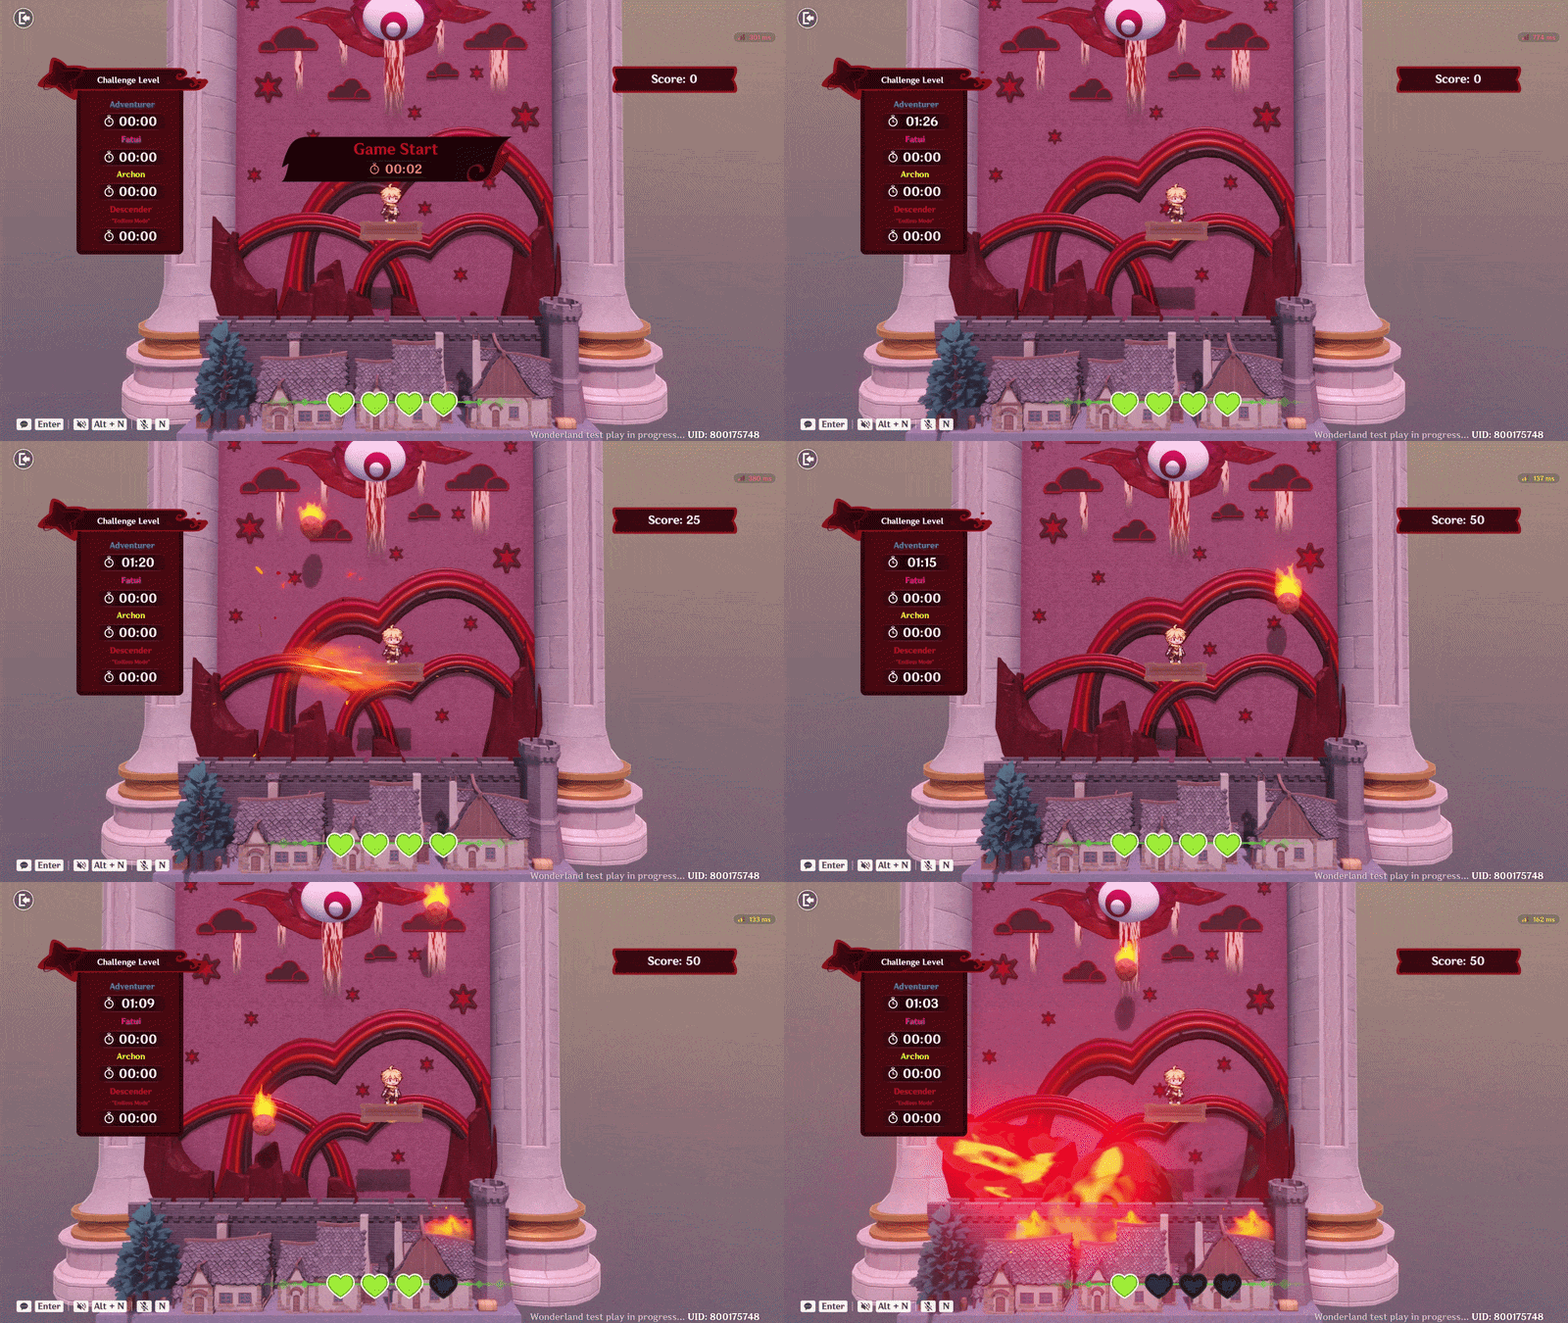
Falling Objects Damage the City & Decrease HP Bar
Skill Button UI
Next, we will create the Skill Button UI. This button allows the player to easily activate the Skill created in Chapter 3, while also showing the player which key is used to activate it.
- Add a UI Control: Interactive Button and Image to use as its background. Adjust the size and position according to your UI design.
- In Setting, make sure the button type is set to Button Skill. You can also configure the Key Mapping to choose which key the player will use to activate the Skill. Make sure all settings match the Skill configuration created in Chapter 3.
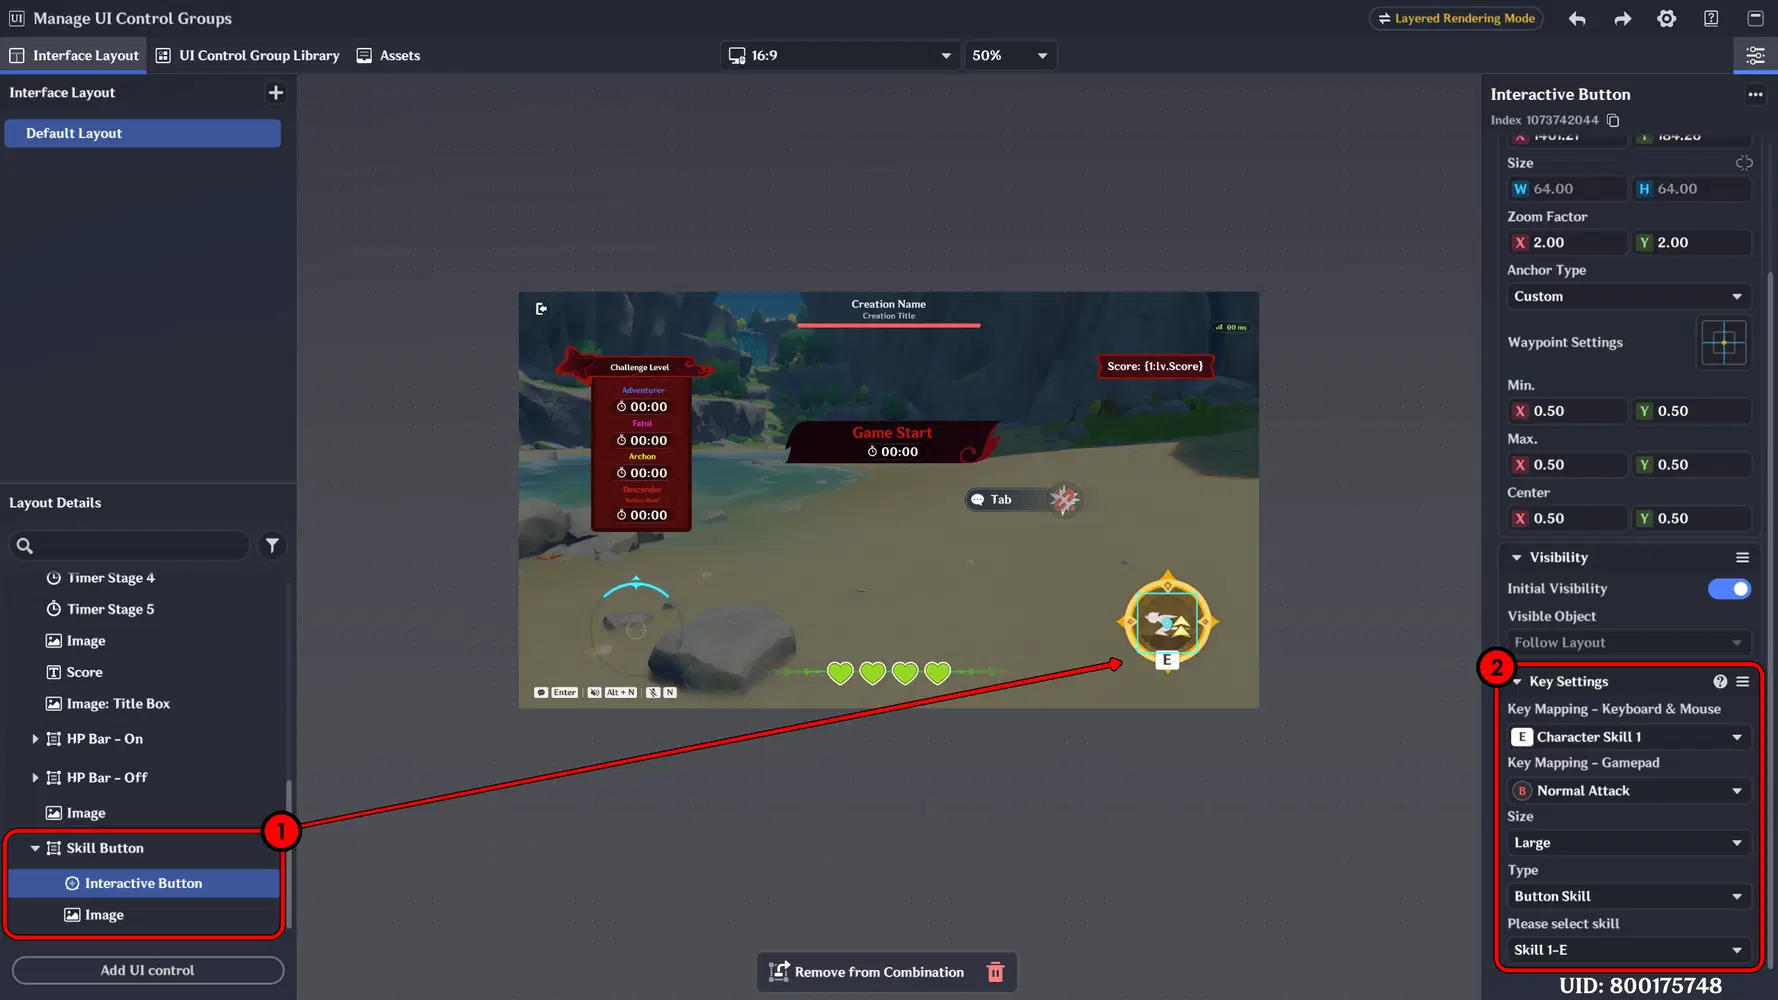
Skill Button UI Setup
Here is the result of the Skill UI system. Players can use the Dash Skill to quickly reach different areas and block falling objects.
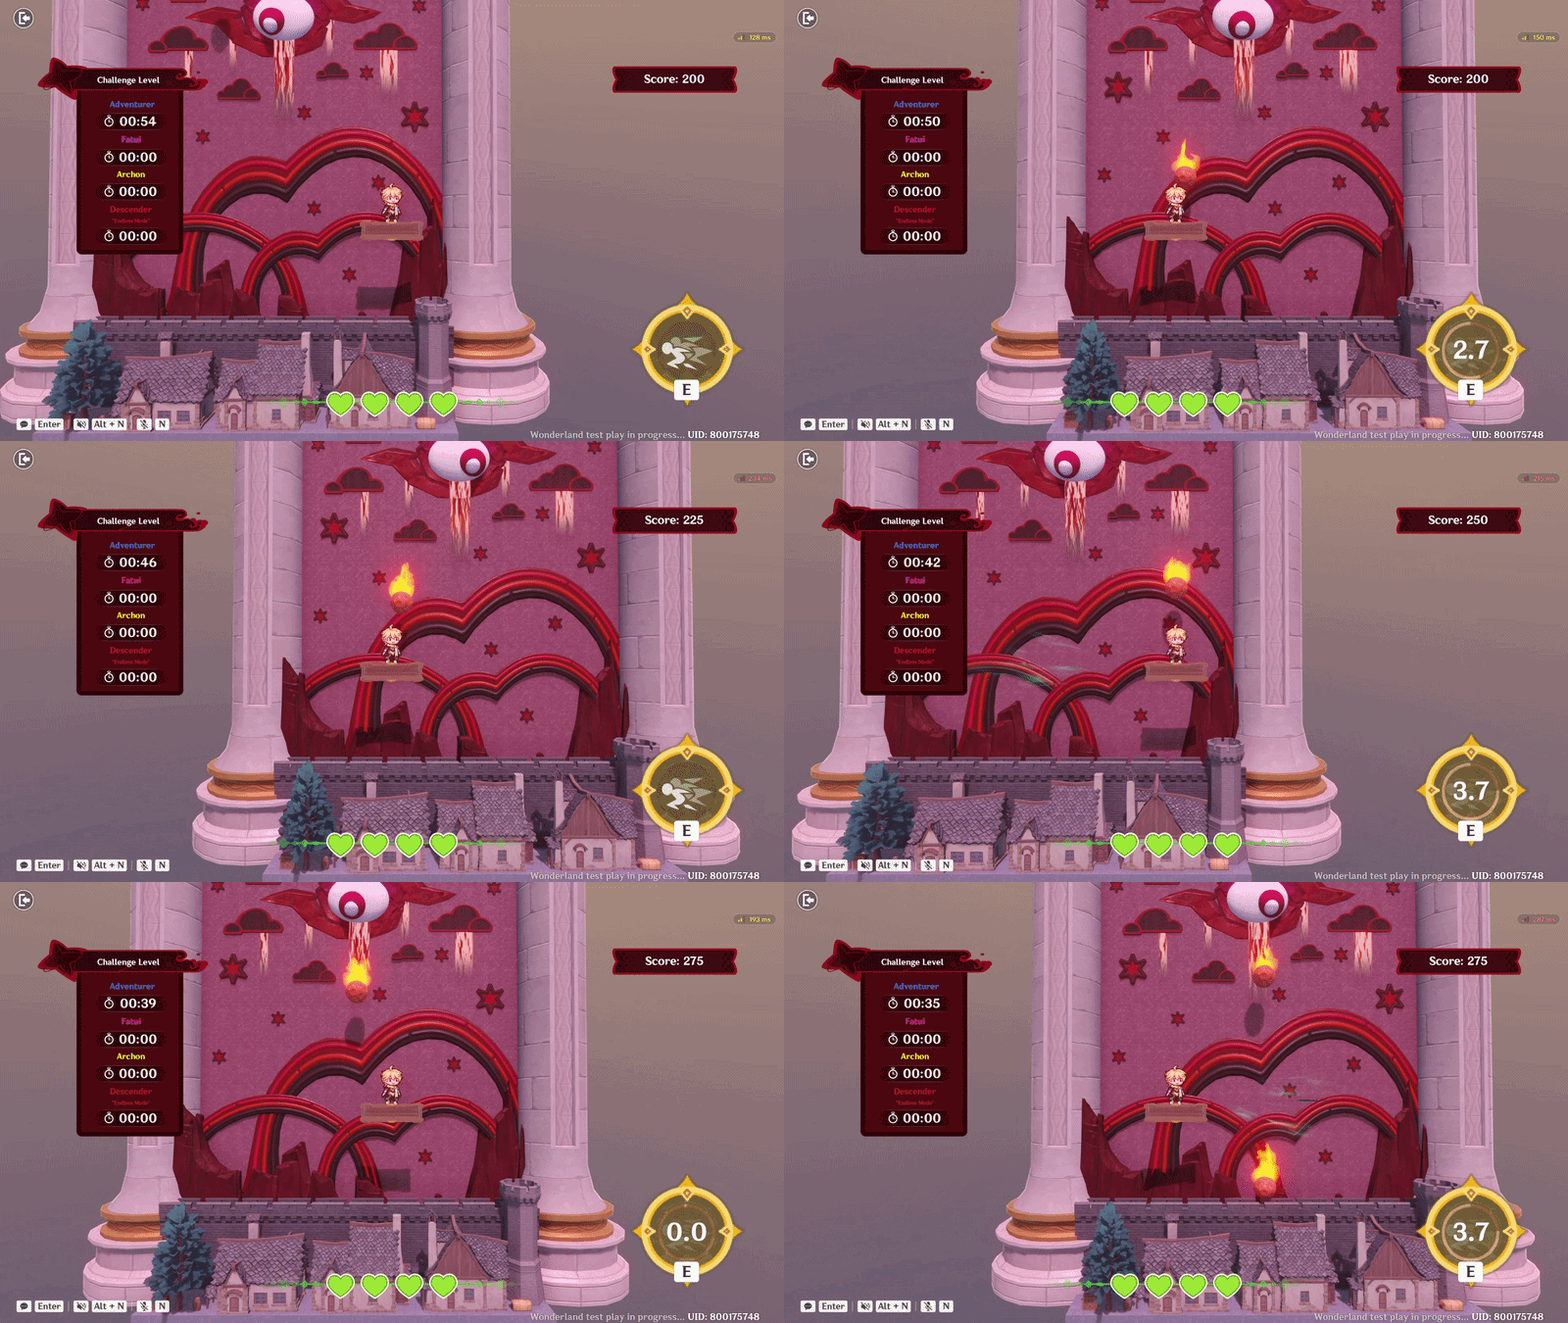
Skill UI
Complete & Pause Button UI
In this section, we will create the Pause and Complete buttons, along with the pages that appear when the player pauses or completes the game. These UI elements make it easier for players to pause the game, continue playing, or finish the current game.
- Go to the Asset section
- Create two categories: one for the Pause button and one for the Complete button. For each category, create a Text element and an Image to use as the button background and icon. Choose icons that clearly represent their functions.
- Go to Interface Layout.
- Add a Custom Button for each function. Example. Pause Button
- Change the Style of each Custom Button to Custom.
- Then, under Default Status Asset, select Edit Details and choose the button asset you created earlier for the default appearance. You can also customize the Hover and Press states to make the buttons more interactive.
- Go to the UI Control Group Library.
- Create two Floating Interactive Page categories. Use the first page for Pause and the second page for Complete.
- Open Edit Details for the Container of each page and add the required Text, Buttons, and other UI components. Customize the layout and information according to the function of each page.
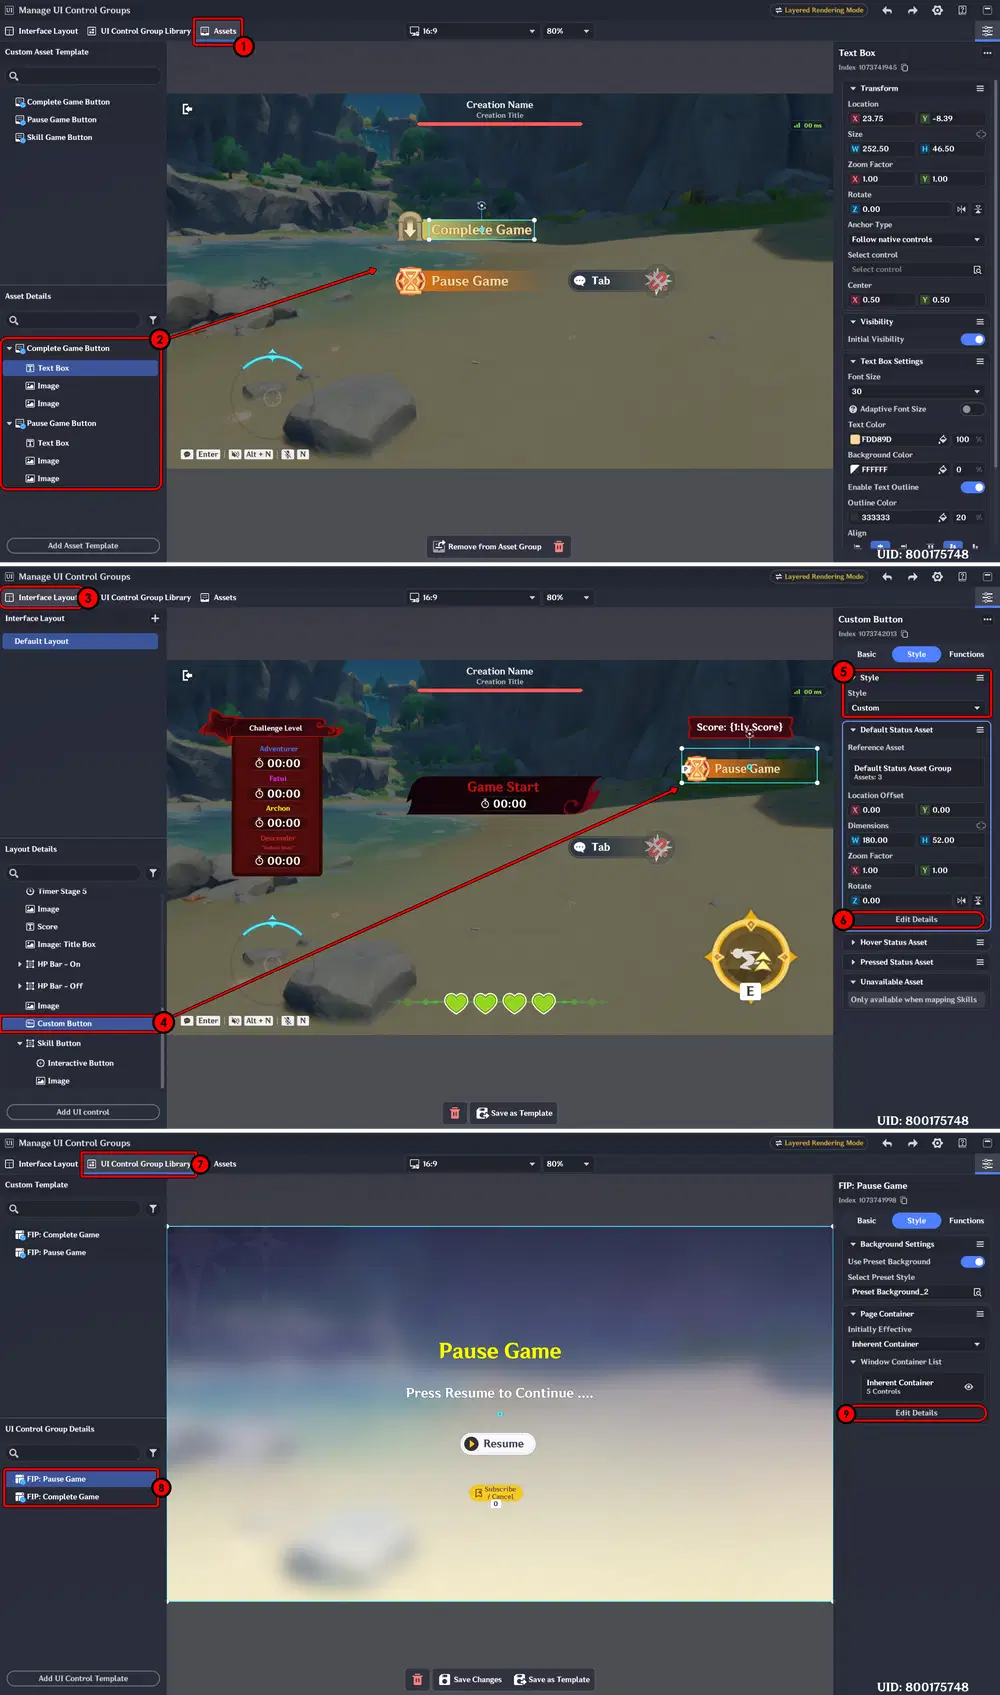
Complete & Pause Button UI Setup
Here is the result of the Pause & Complete system. When the Pause button is pressed, the game stops, including the timer and falling objects. Pressing Resume will continue the game from where it stopped.
When Complete is pressed, a confirmation window will appear. Select No to return to the game, or Yes to finish the game.
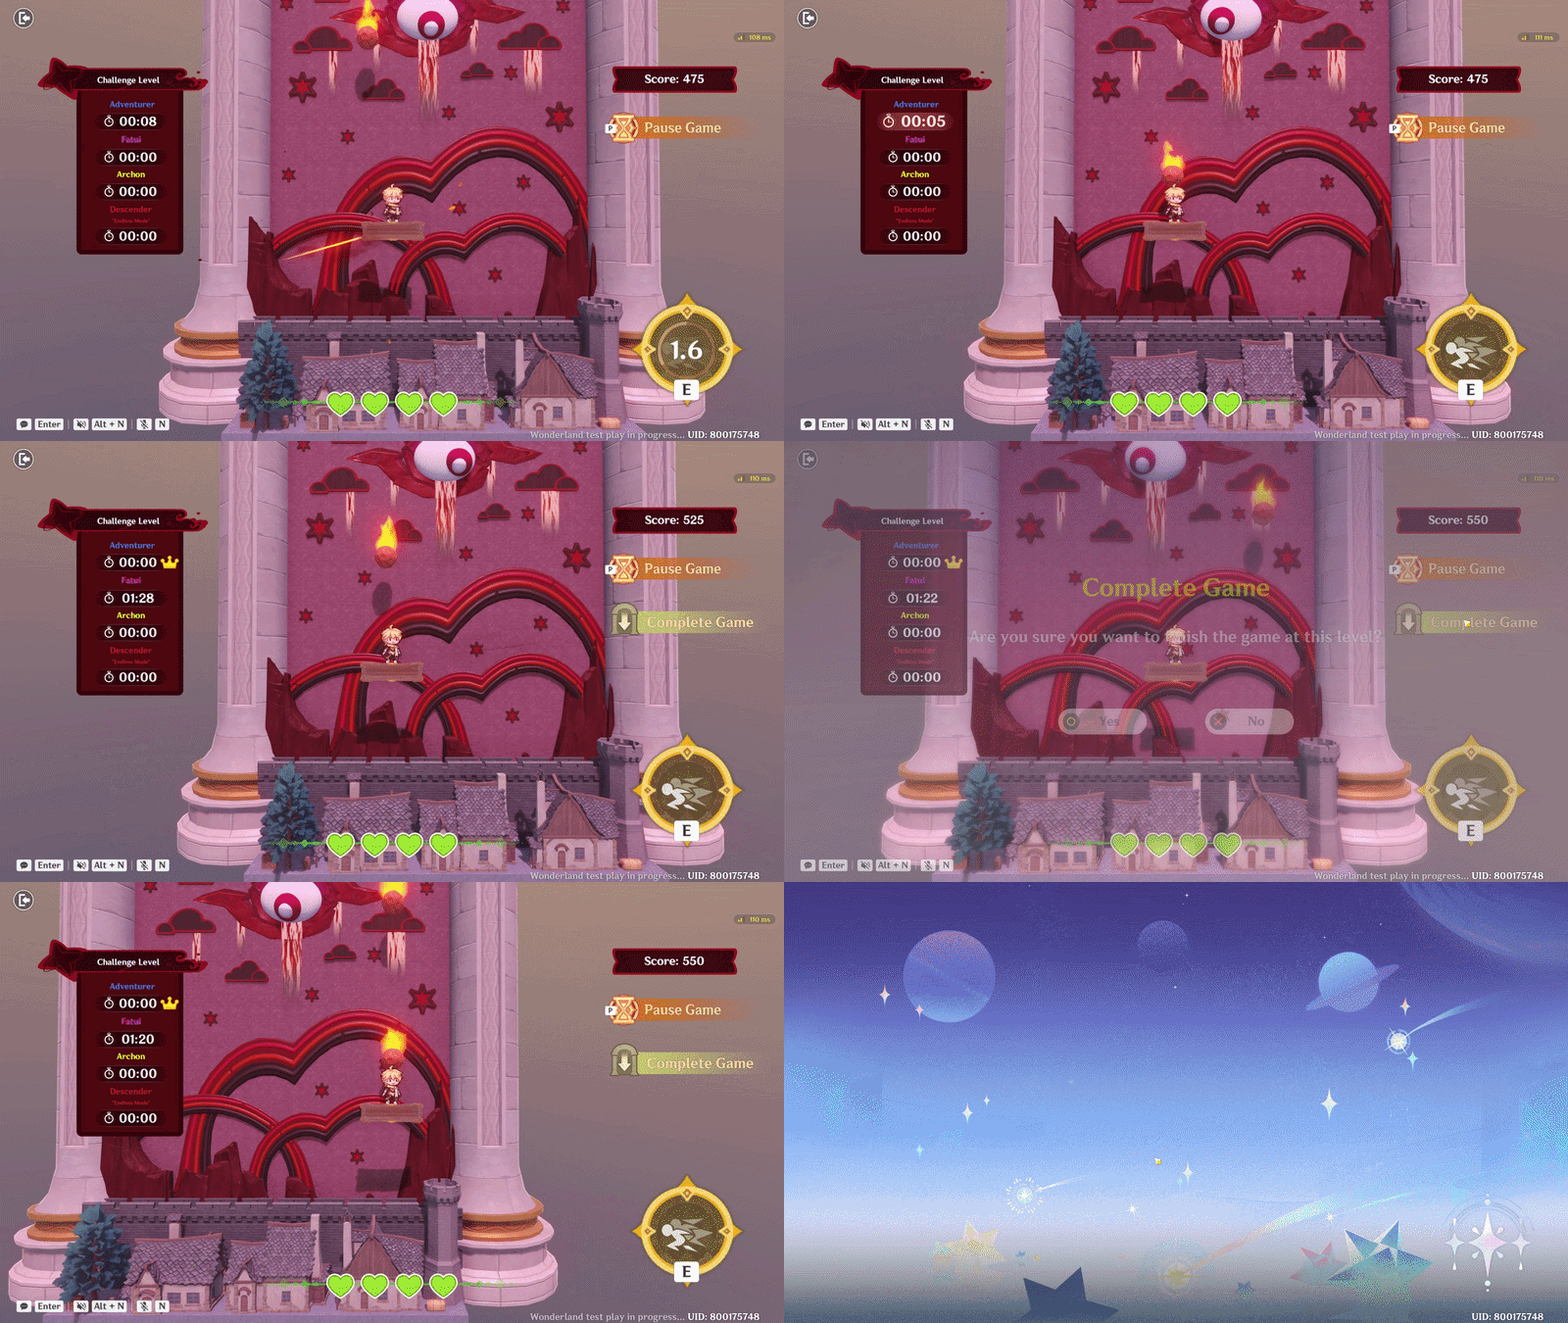
Pause & Complete UI
Chapter 8: Adding BGM
In this section, we will add Background Music (BGM) to make the gameplay more engaging. Make sure to choose music that matches the theme and atmosphere of your game.
- Open the Main Menu and select Manage Background Music.
- Select the BGM you want to use and choose music that fits the theme and atmosphere of your game.
- Enable Loop Playback so the BGM will continue playing repeatedly throughout the gameplay without stopping.
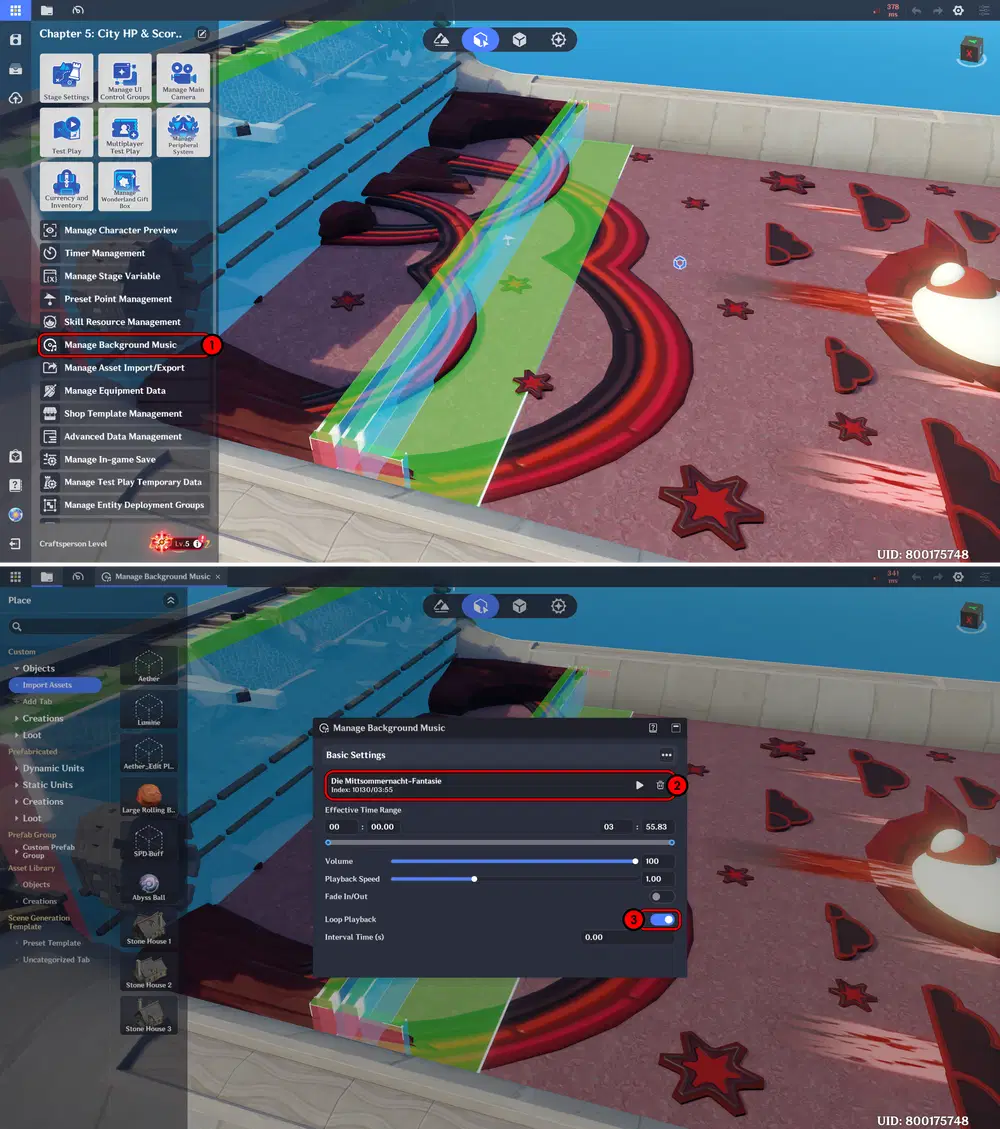
BGM Setup
Chapter 9: Achievement
In this chapter, we will add Achievements to give players additional goals to complete. Achievements can be unlocked by reaching specific score milestones, giving players more reasons to challenge themselves and improve their performance.
To create Achievements, you need to have at least Craftspeople Center account Level.4 Dreamweaver. Make sure you meet this requirement before setting up the Achievement system. If you have not reached the required level yet, you can skip this section for now.
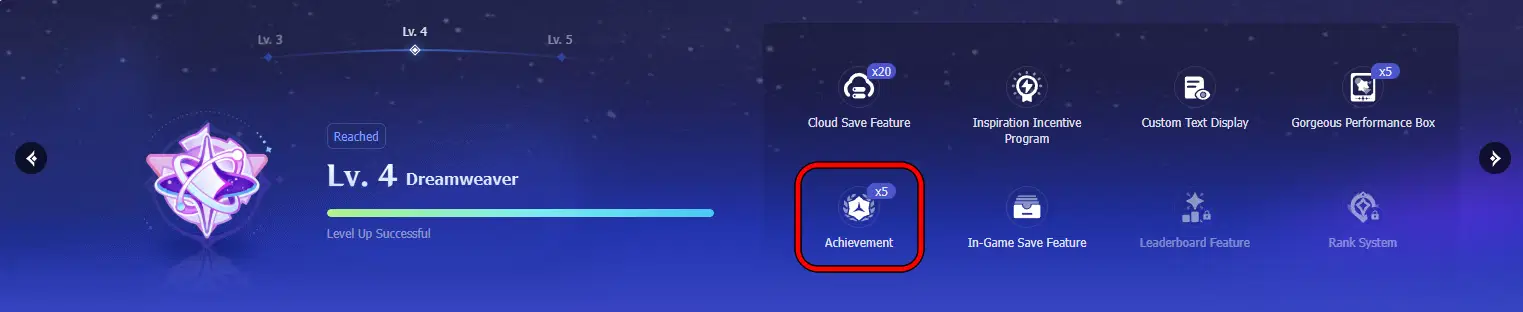
Level.4 Dreamweaver Benefit
Achievement
Once you meet the requirements, you can start creating your own Achievements. In this project, the Achievements are used to reward players for reaching specific score milestones. You can create several Achievement levels with different requirements, allowing players to gradually unlock them as they improve their performance. This also gives players an additional goal to aim for when replaying the game.
- Open the Main Menu and select Manage Peripheral System.
- Select the Achievement menu to access the Achievement settings.
- Add a new Achievement and configure its settings.
- There are three Achievement rarity levels: Bright Bronze, Starry Silver, and Glorious Gold. Set the Achievement Count to 1, then add a description for the Achievement. Make sure to arrange the Achievements from the easiest to the most difficult to obtain, so the progression is clear for players.
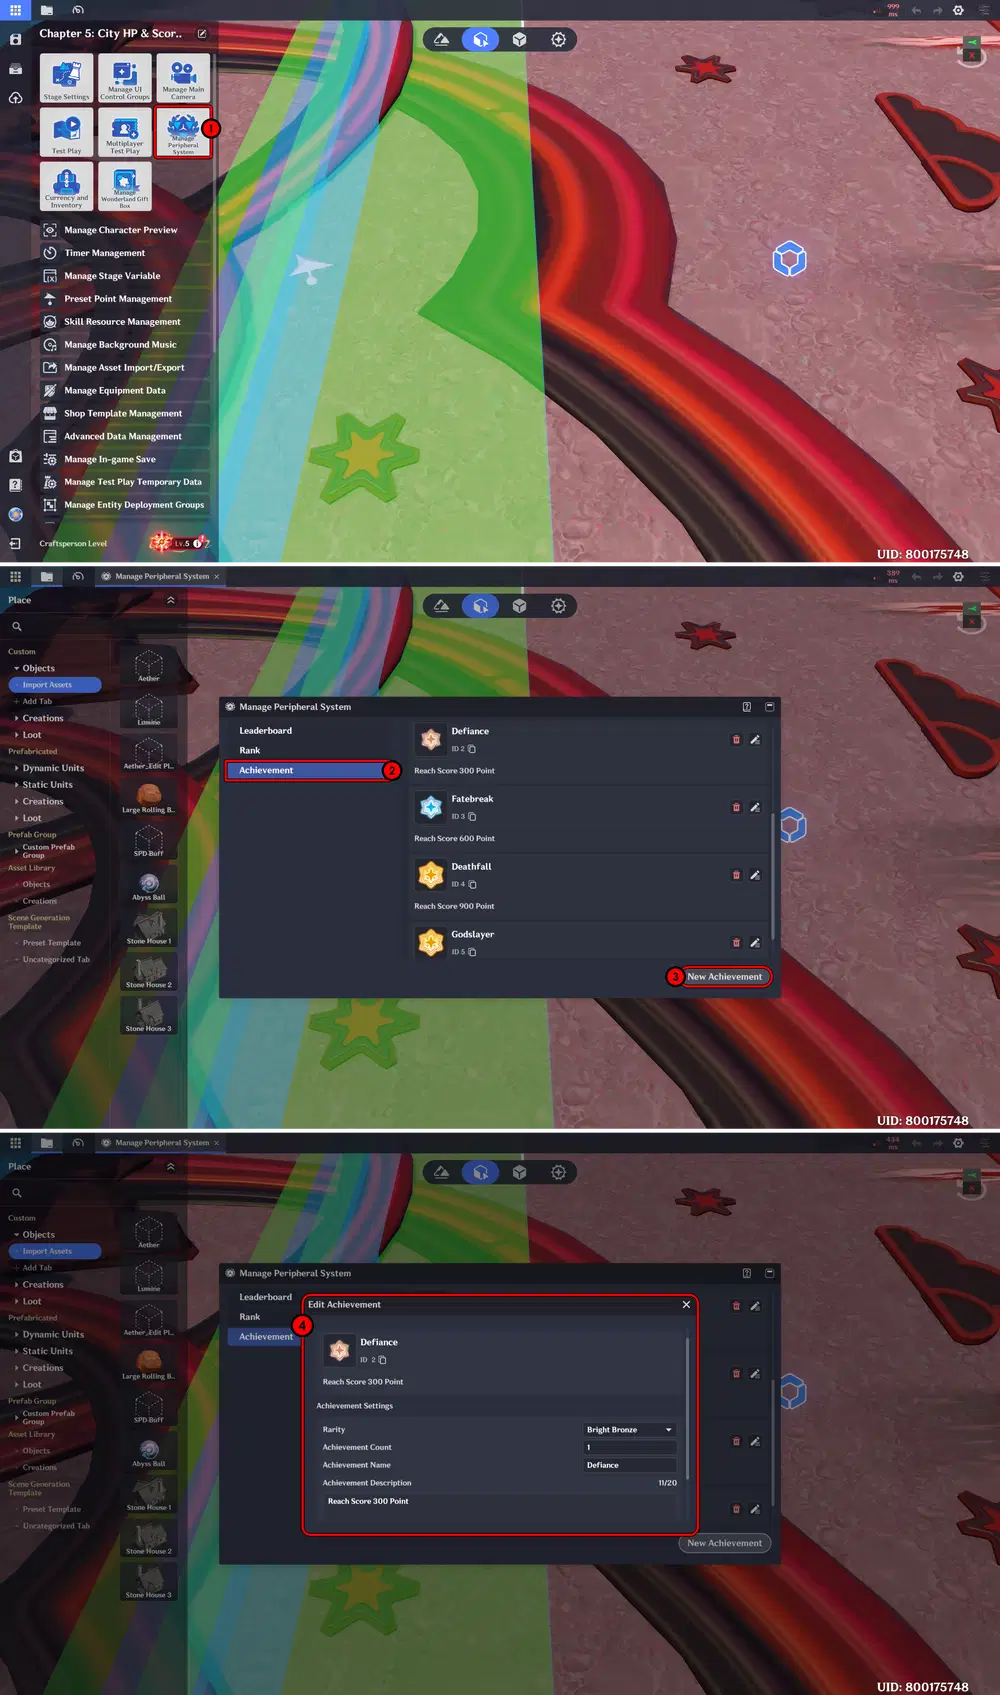
Achievement Setup
Next, create a new Server Node Graph. Since Achievements in this game are unlocked by reaching specific score milestones, we need to create a system that checks the player's current Score.
The logic is simple: when the Score variable reaches a specific value, the Node Graph will send a signal to trigger the corresponding Achievement. This signal will then be used to execute the Achievement unlock process.
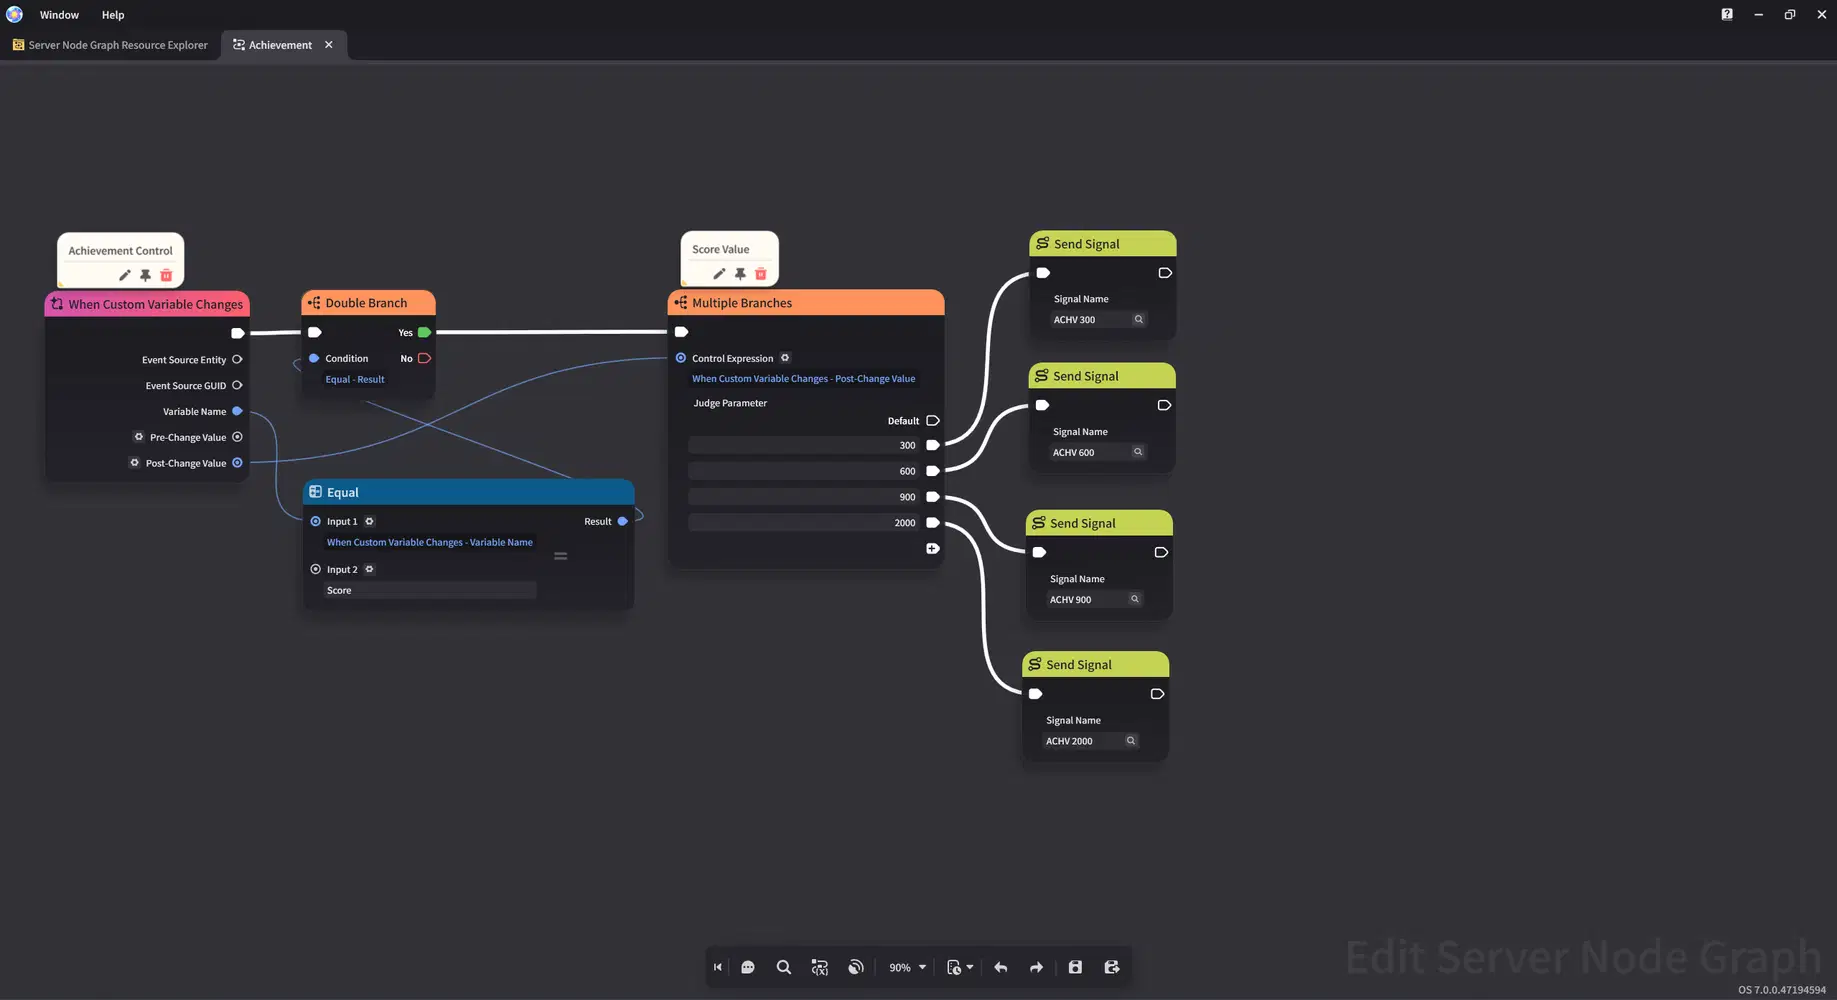
Achievement Node Graph
Next, open the Monitor Node Graph and add the required functions. This Node Graph will monitor the signals sent by the previous Node Graph and determine which Achievement requirement has been fulfilled.
When a matching signal is received, the Monitor Node Graph will execute the corresponding Achievement and unlock it for the player.
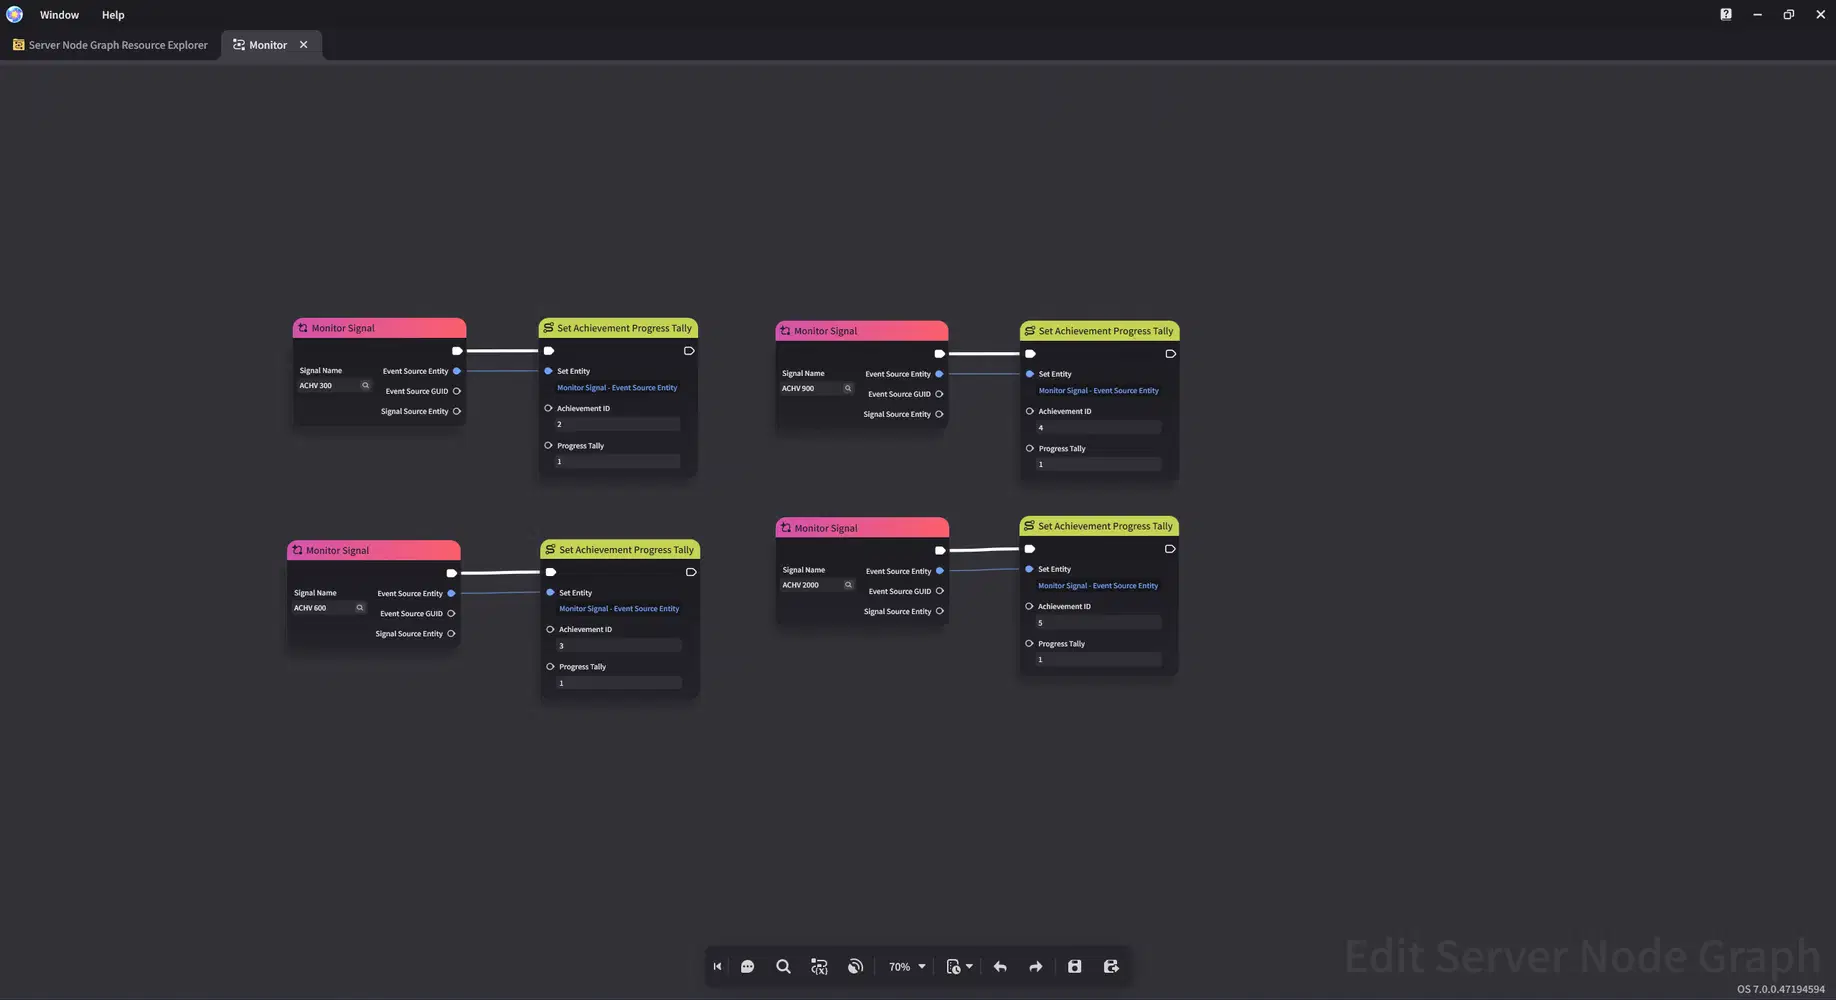
Achievement Monitor Node Graph
Last, assign the Achievement Node Graph to the Stage Entity.
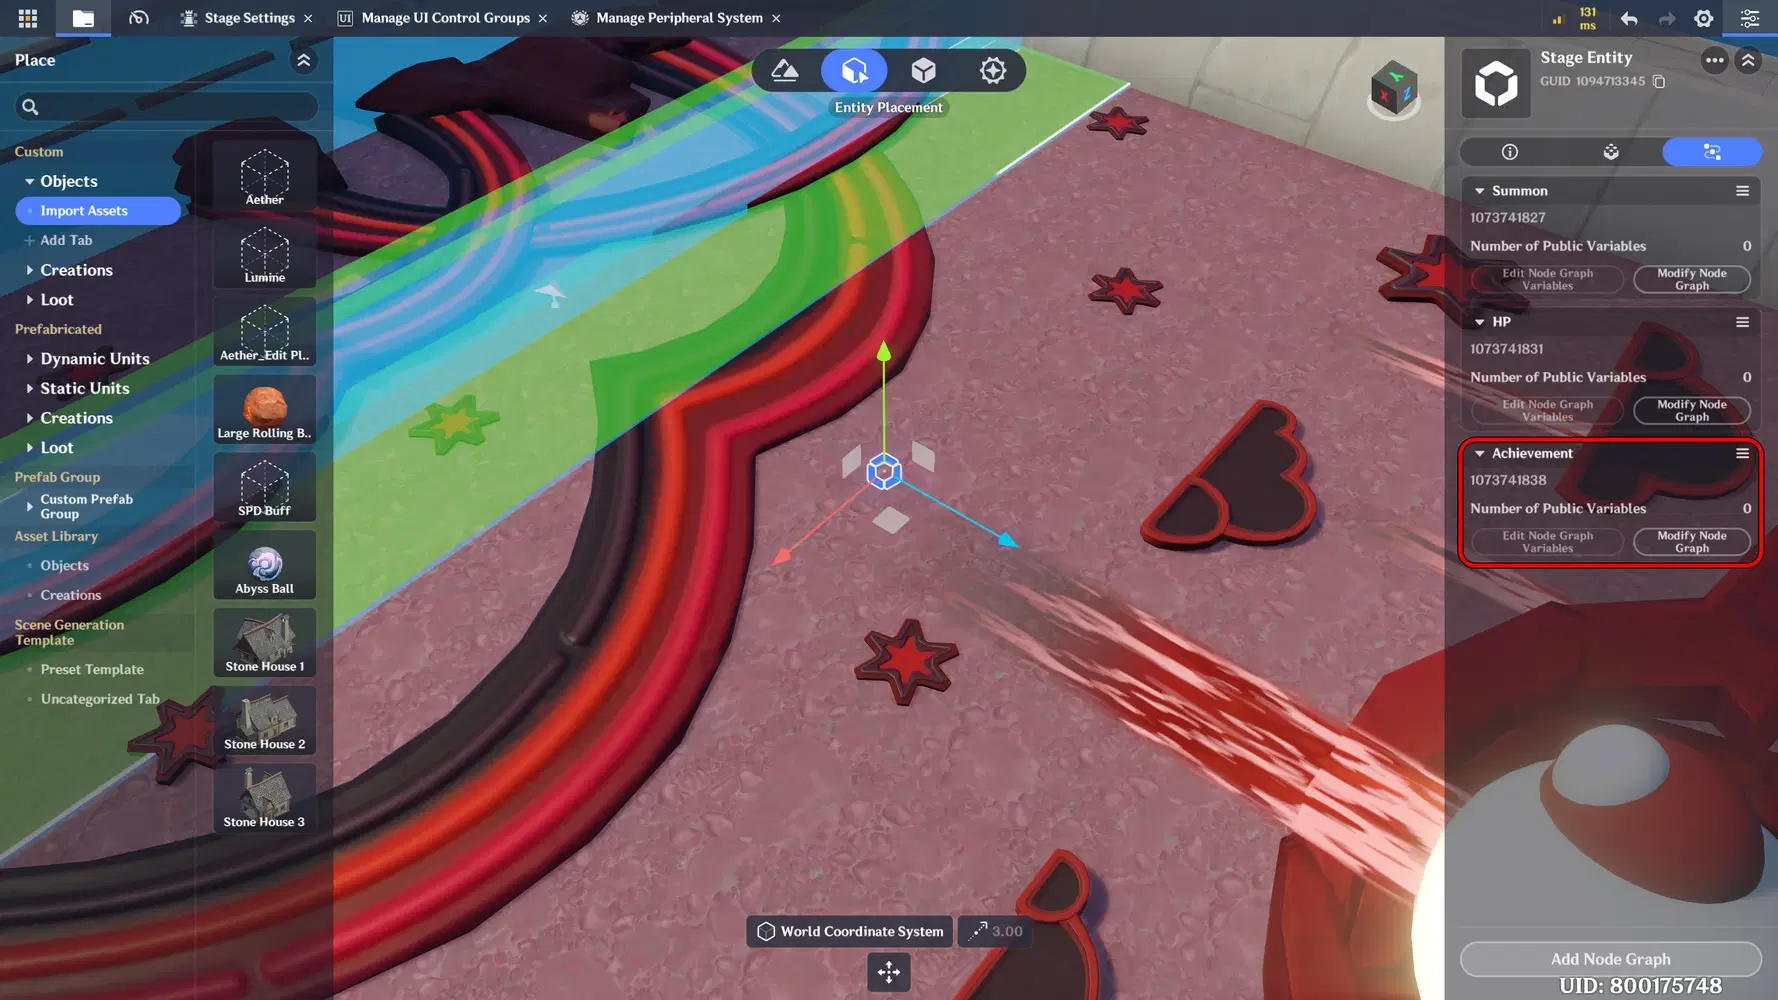
Assign Node Graph
The Achievements you unlock will be displayed at the end of the game once the challenge is completed.
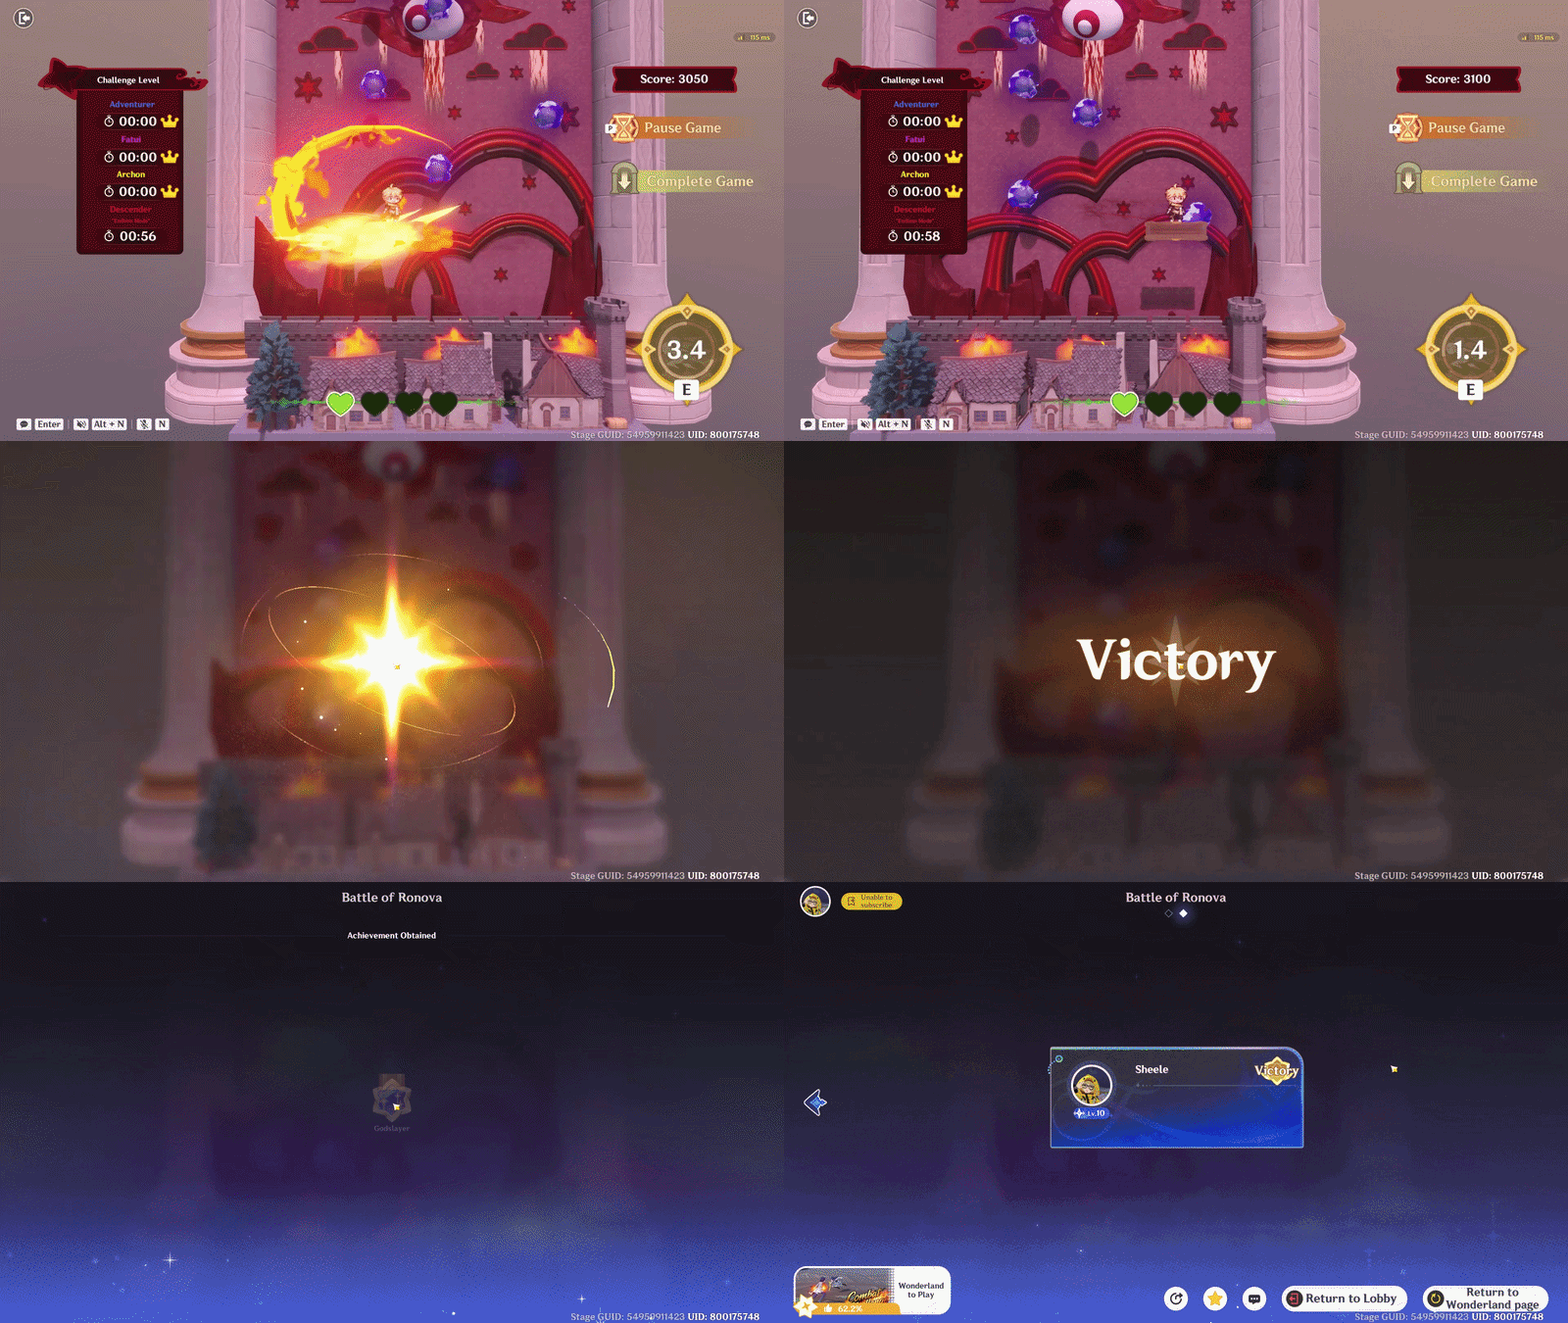
Achievement
Chapter 10: Finishing & Publish
In this final chapter, we will prepare the game for publishing by combining all the systems we have created throughout the previous chapters. Make sure the entire gameplay flow works properly, from the starting sequence to the Game Over screen.
Before publishing, perform a thorough test to check the gameplay mechanics, UI, timers, score system, Achievements, VFX, and BGM. Fix any issues you find and make sure everything is working as intended for a smooth player experience.
Upload Stage
Once everything is finished, thoroughly tested, and there are no remaining issues, you can upload the Stage to publish your game. After publishing, your Stage will be available for other players to discover and play.
- Open the Main Menu and select the Cloud icon on the left side to open the Stage upload menu.
- Select Upload New Stage because this is the first time you are publishing this Stage.
- Then select Submit Now and wait for review completed.
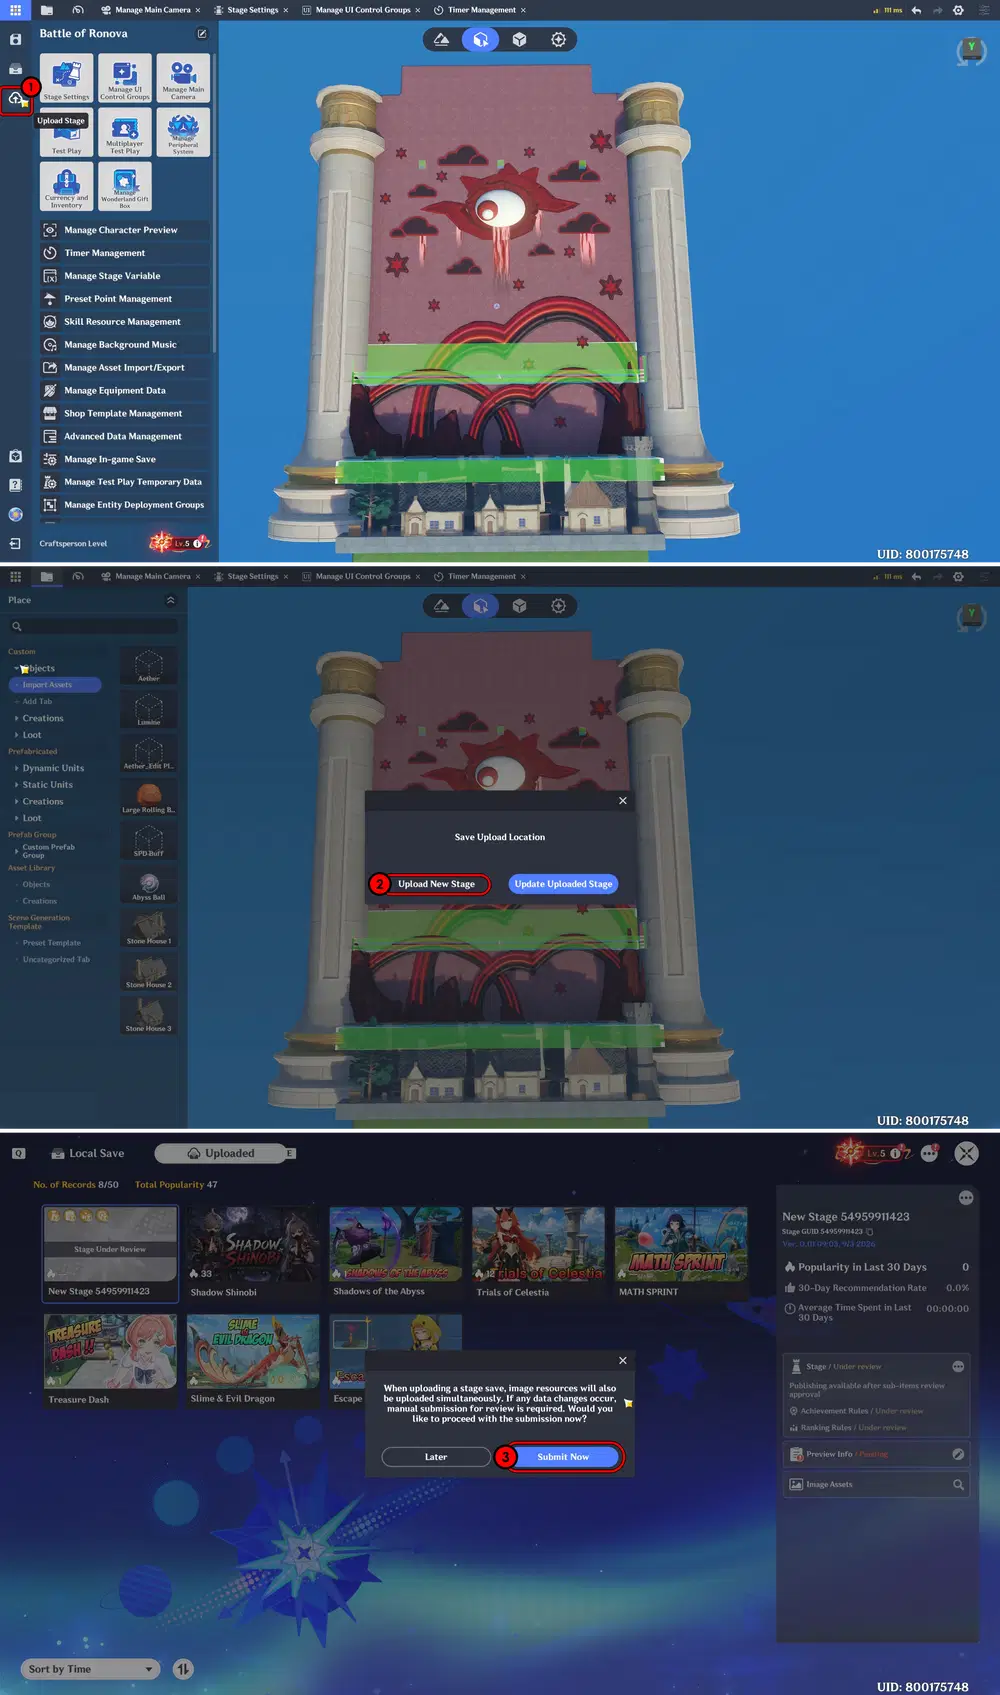
Upload Stage
While waiting for the approval process, you can fill in the important information about your game, such as the Stage Title, Thumbnail, Screenshots, Description, Tags, and other details. Make sure the information clearly represents your game and helps players understand what they can expect. Once everything is completed, select Post to finish the publishing process.
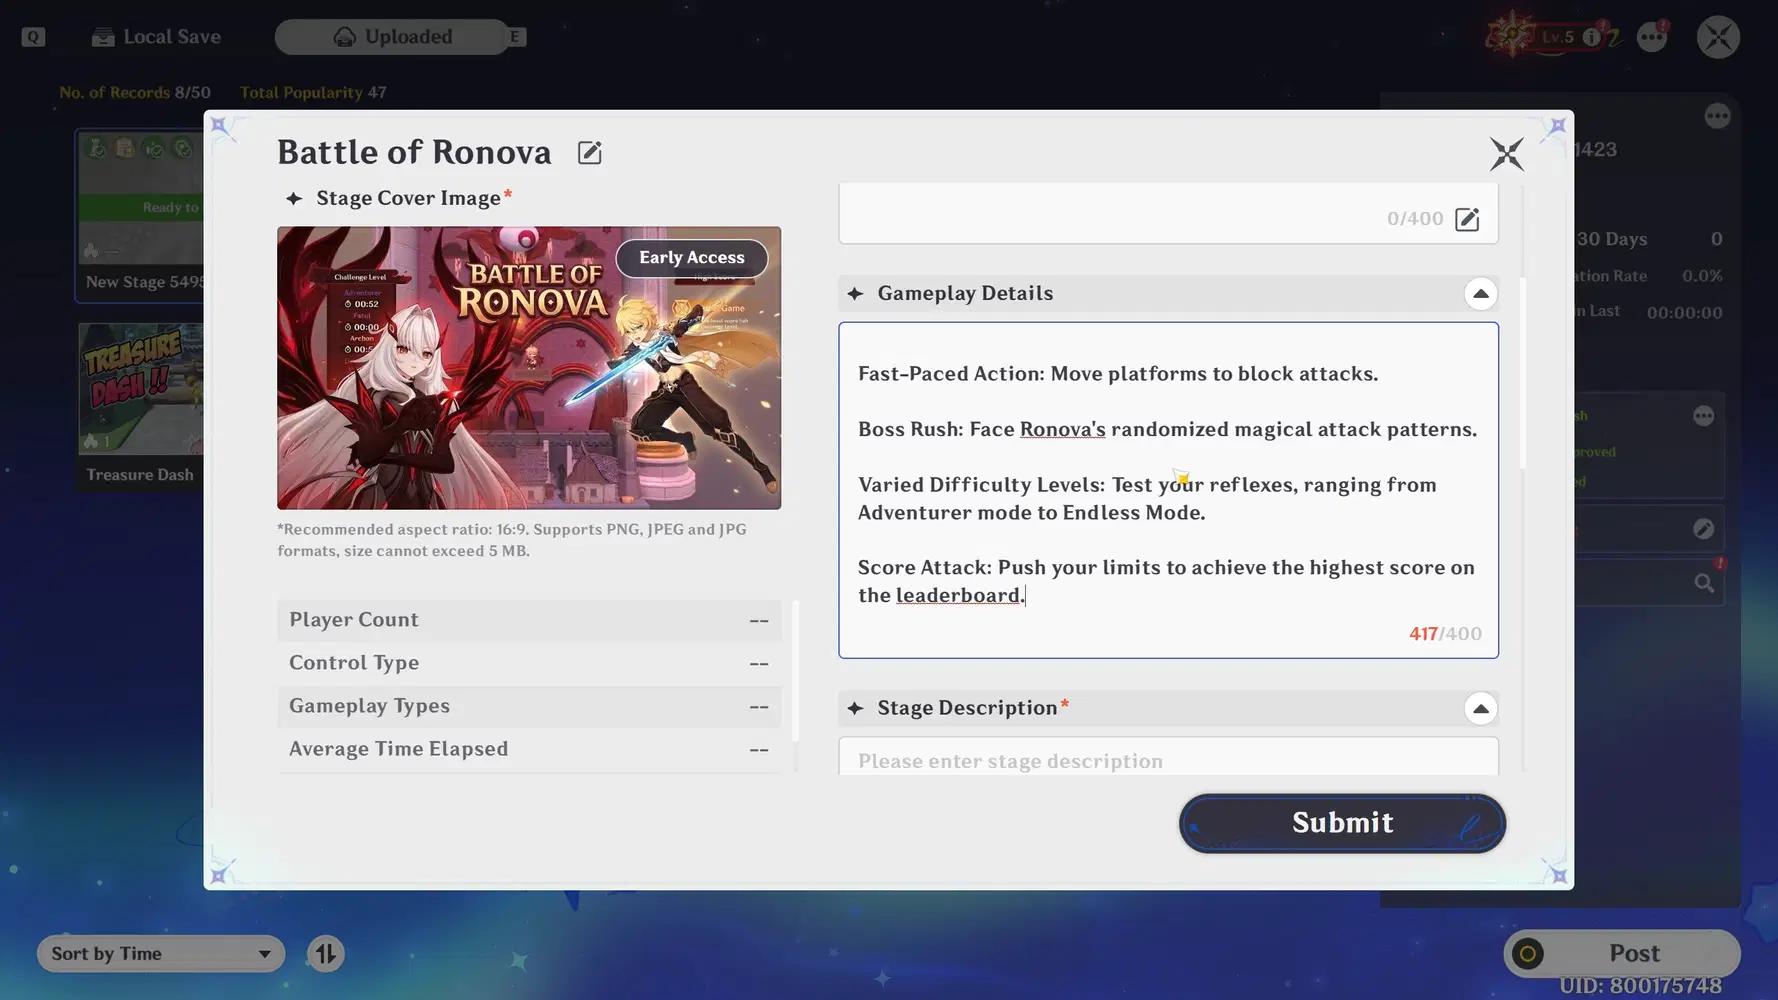
Fill Stage Description
After the Stage has been approved and published, other players can find and play your game by searching for its Stage GUID on the Miliastra Wonderland search page.
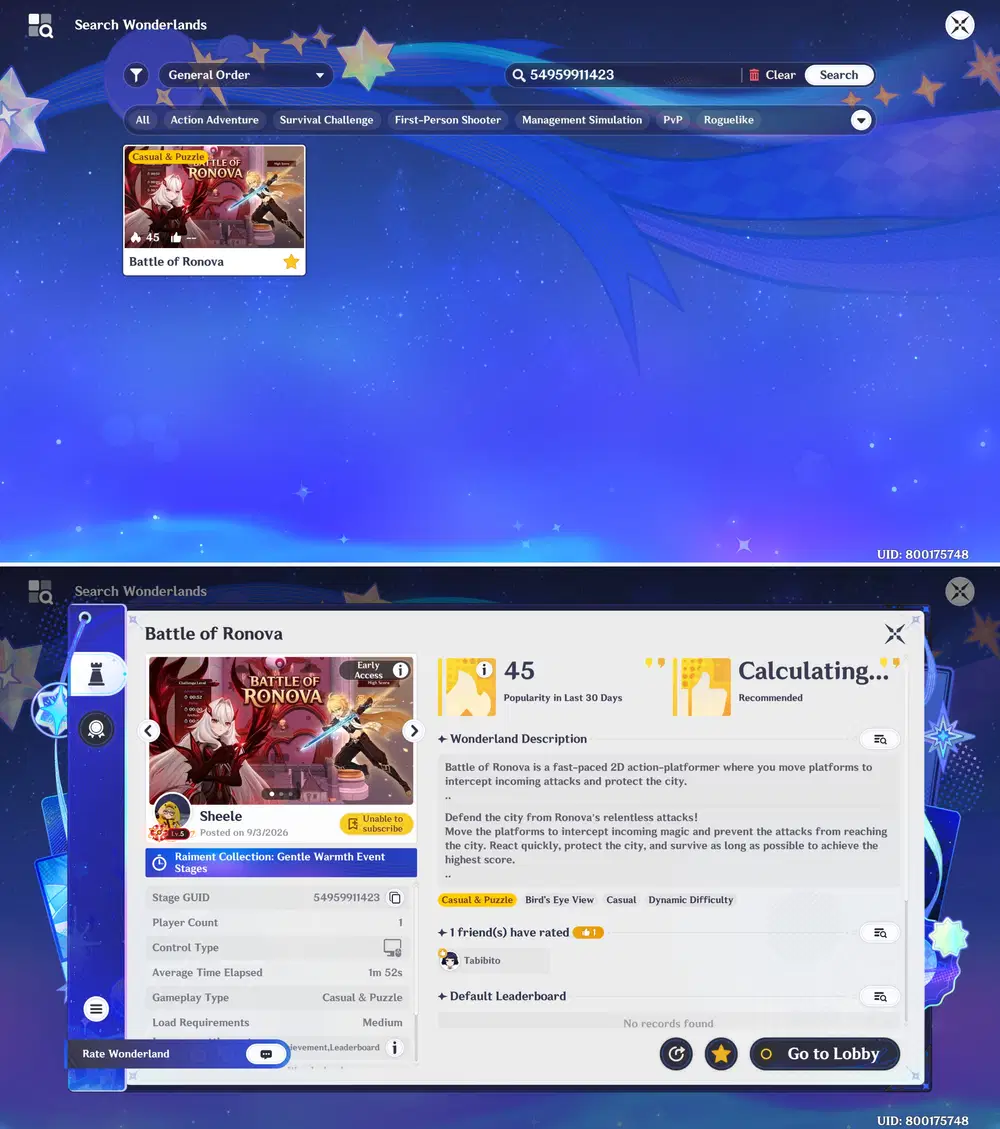
Battle of Ronova
Wonderland Stage Showcase
This is an example of a game that I made based on this guide, this game is still simple and can still be developed further to become a more complex and interesting game.
Stage GUID
- 54959911423 - ASIA
- 29039605753 - AMERICA
- 29177167323 - EU
- 29299961003 - TW, HK, MO
Miliastra Wonderland Guide Collection


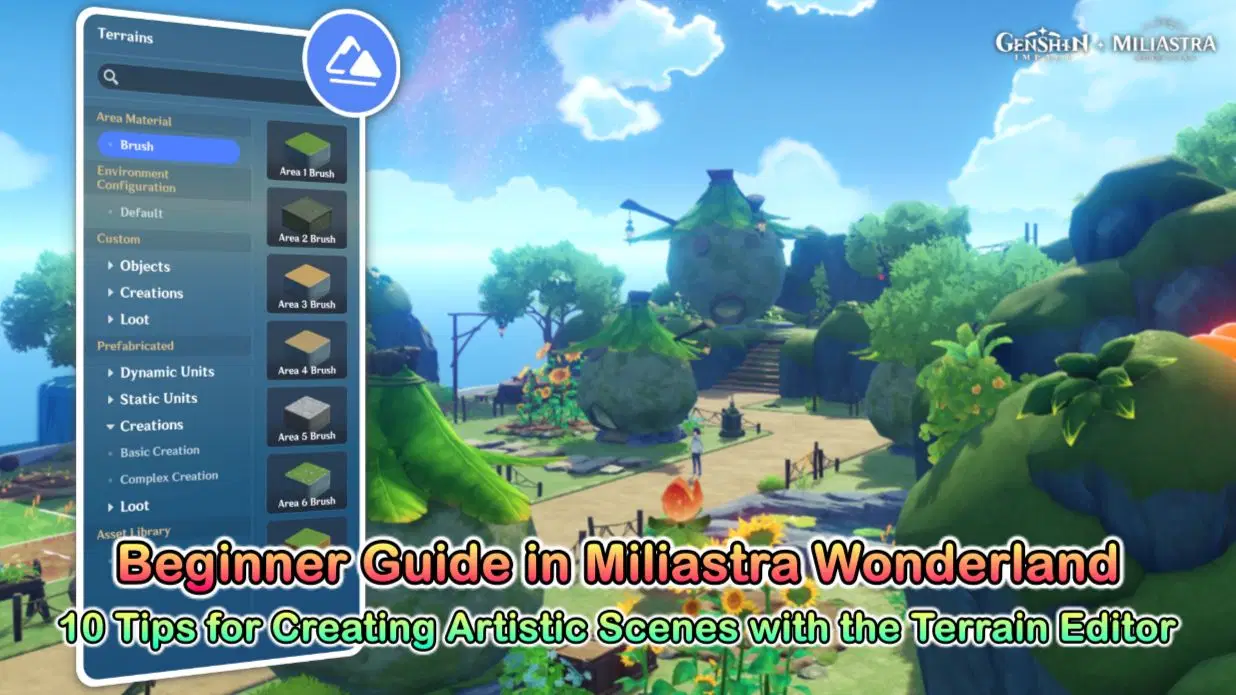
Reference Guide
As another source of guidance, you can visit the guide provided by the Official Genshin Impact x Miliastra Wonderland
Miliastra Wonderland - General Guide
Miliastra Wonderland - Tutorial