Introduction
Have you ever wondered how to implement a Headshot system into your Wonderlands in a similiar way to first and third person shooters?
In this guide, we will learn how to develop a headshot system that can be adapted to your needs in Miliastra Wonderland. For this system, we will be using a projectile shooting Character Skill, to which we will adapt the system to execute Headshots when the conditions are met.
Let's get started!
Initial Steps
Setting up the Character Skill Node Graph
To start we will create the base skill that will let us to fire projectiles.
To accomplish this, we will create the basic logic of our Skill by setting up a Character Skill Node Graph like it's shown below:
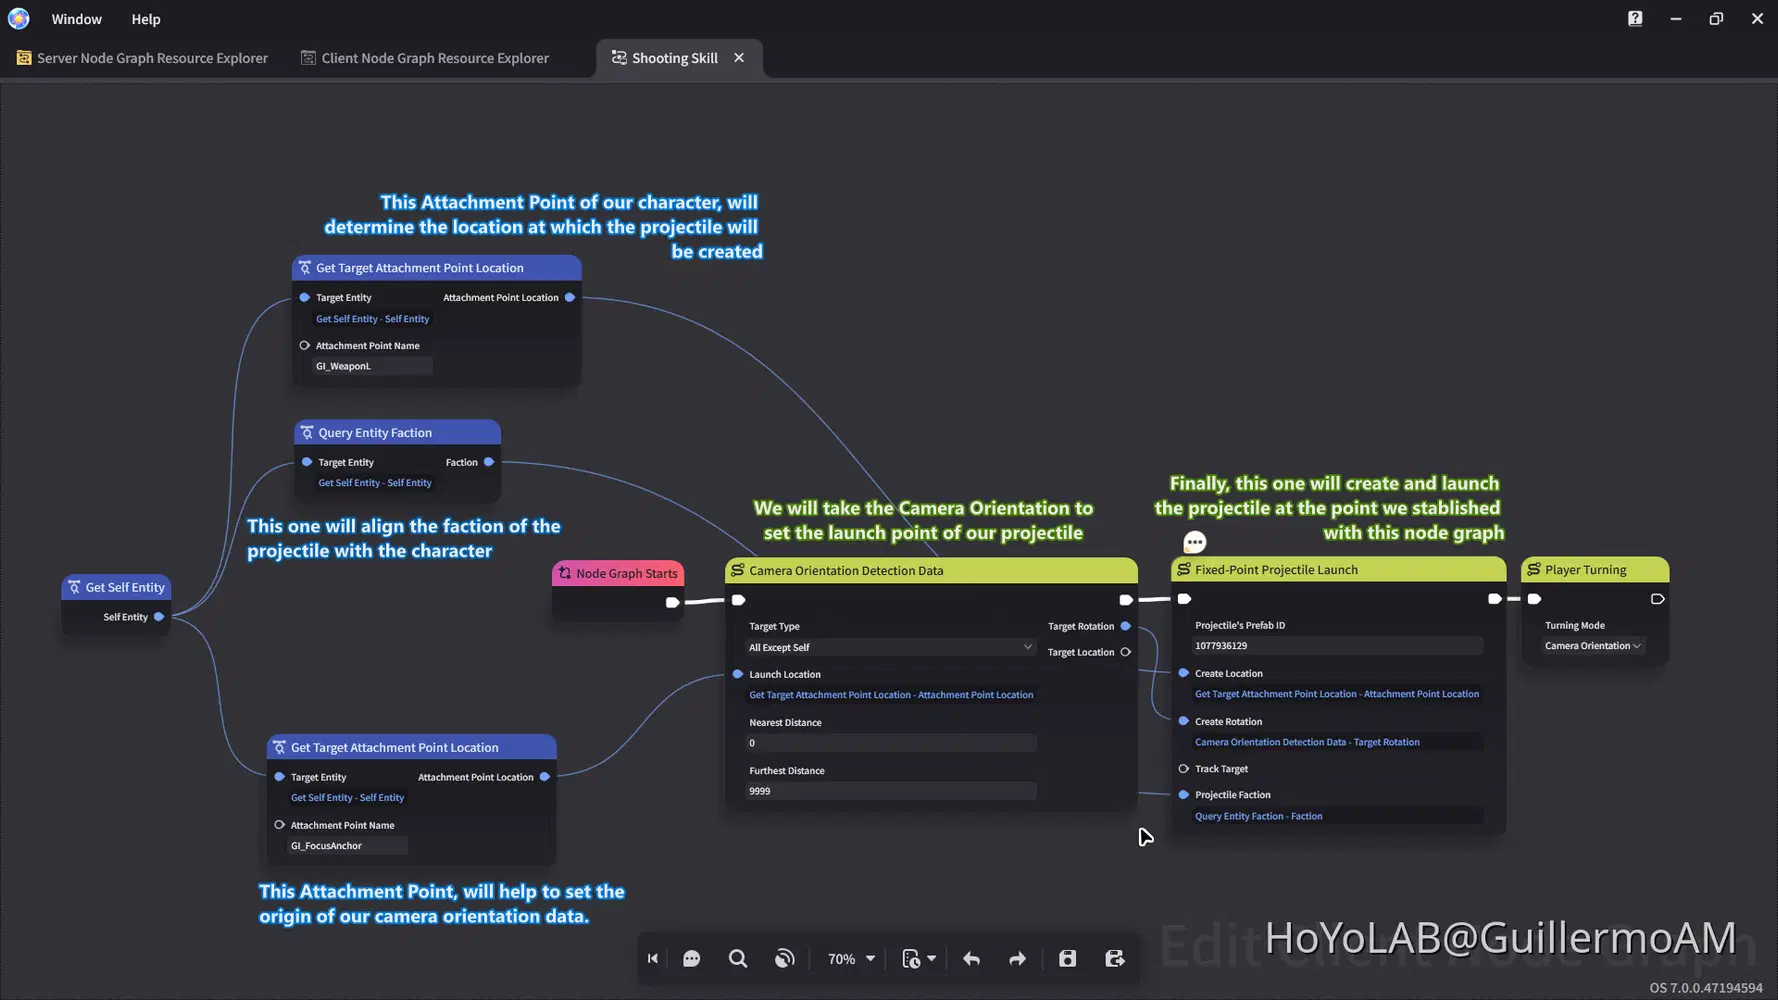
Basic Shooting Projectile Skill Nodegraph
Note: This is the basic template of our shooting skill. Later, after creating our skill, we will be upgrading it with our custom Headshot system.
Setting up the Character Skill
After our Character Skill Node Graph is ready, we will go to create the Skill that will let us to shoot projectiles with our Character.
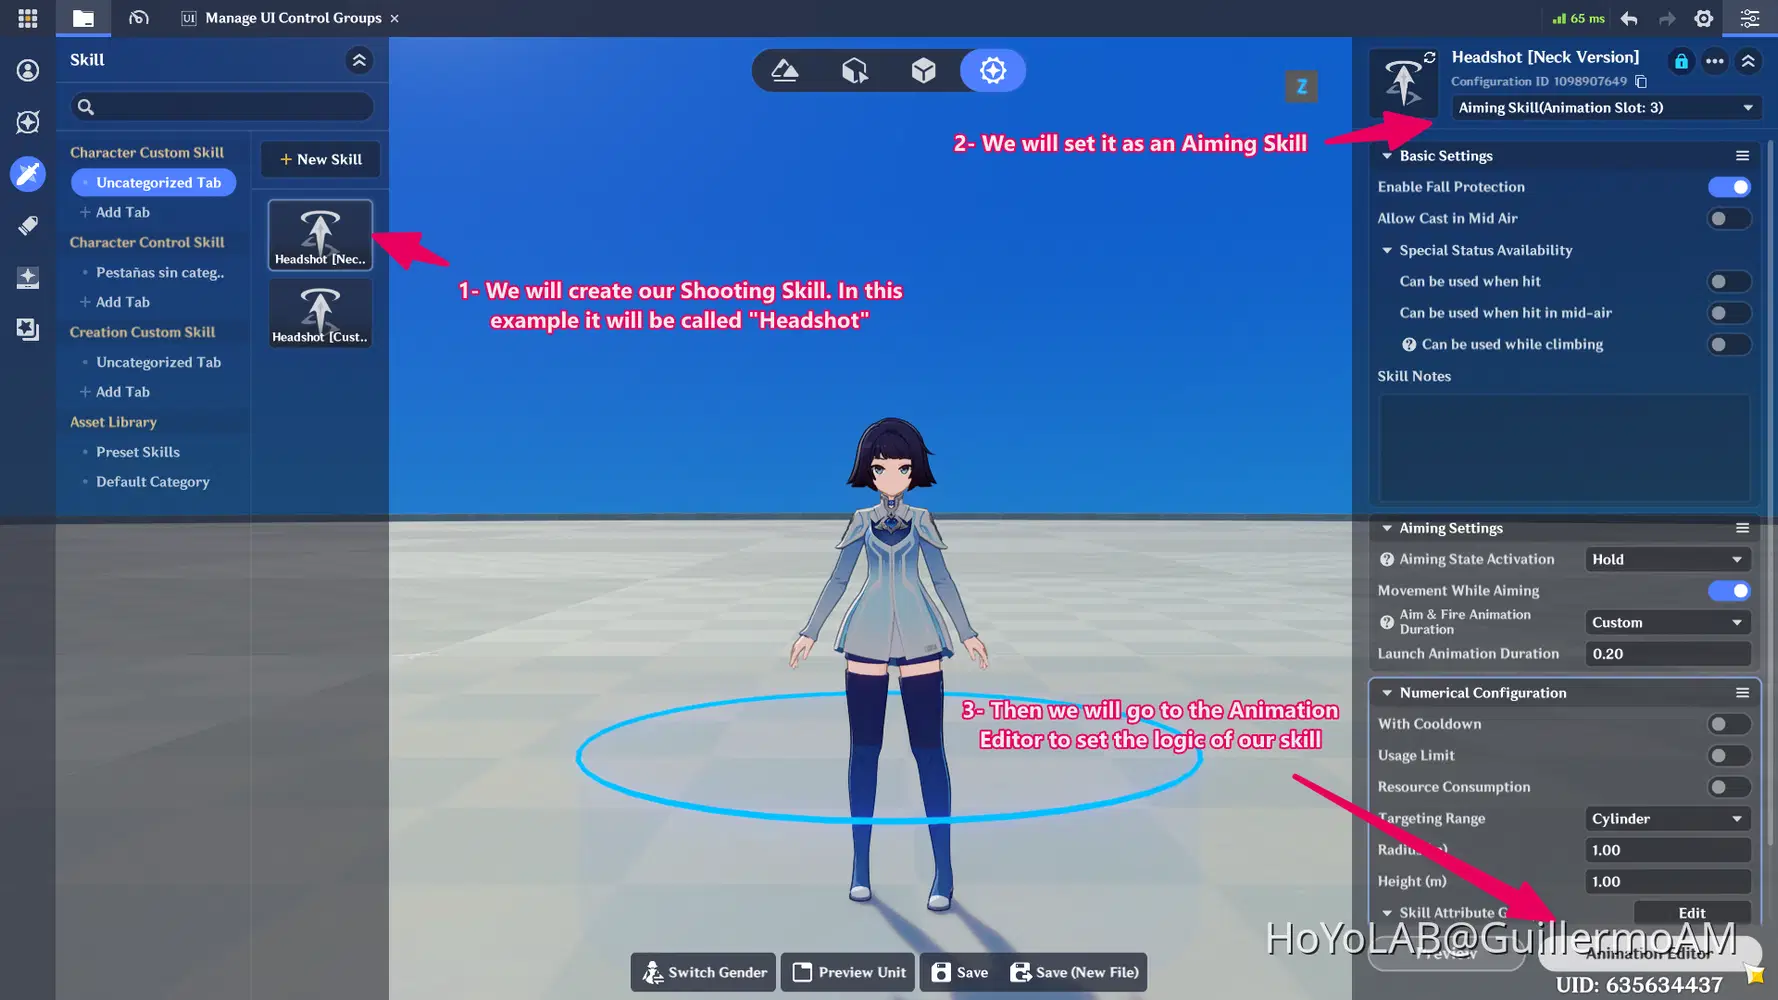
After the skill is created, we will add the animations, VFX and the logic inside the Animation Editor.
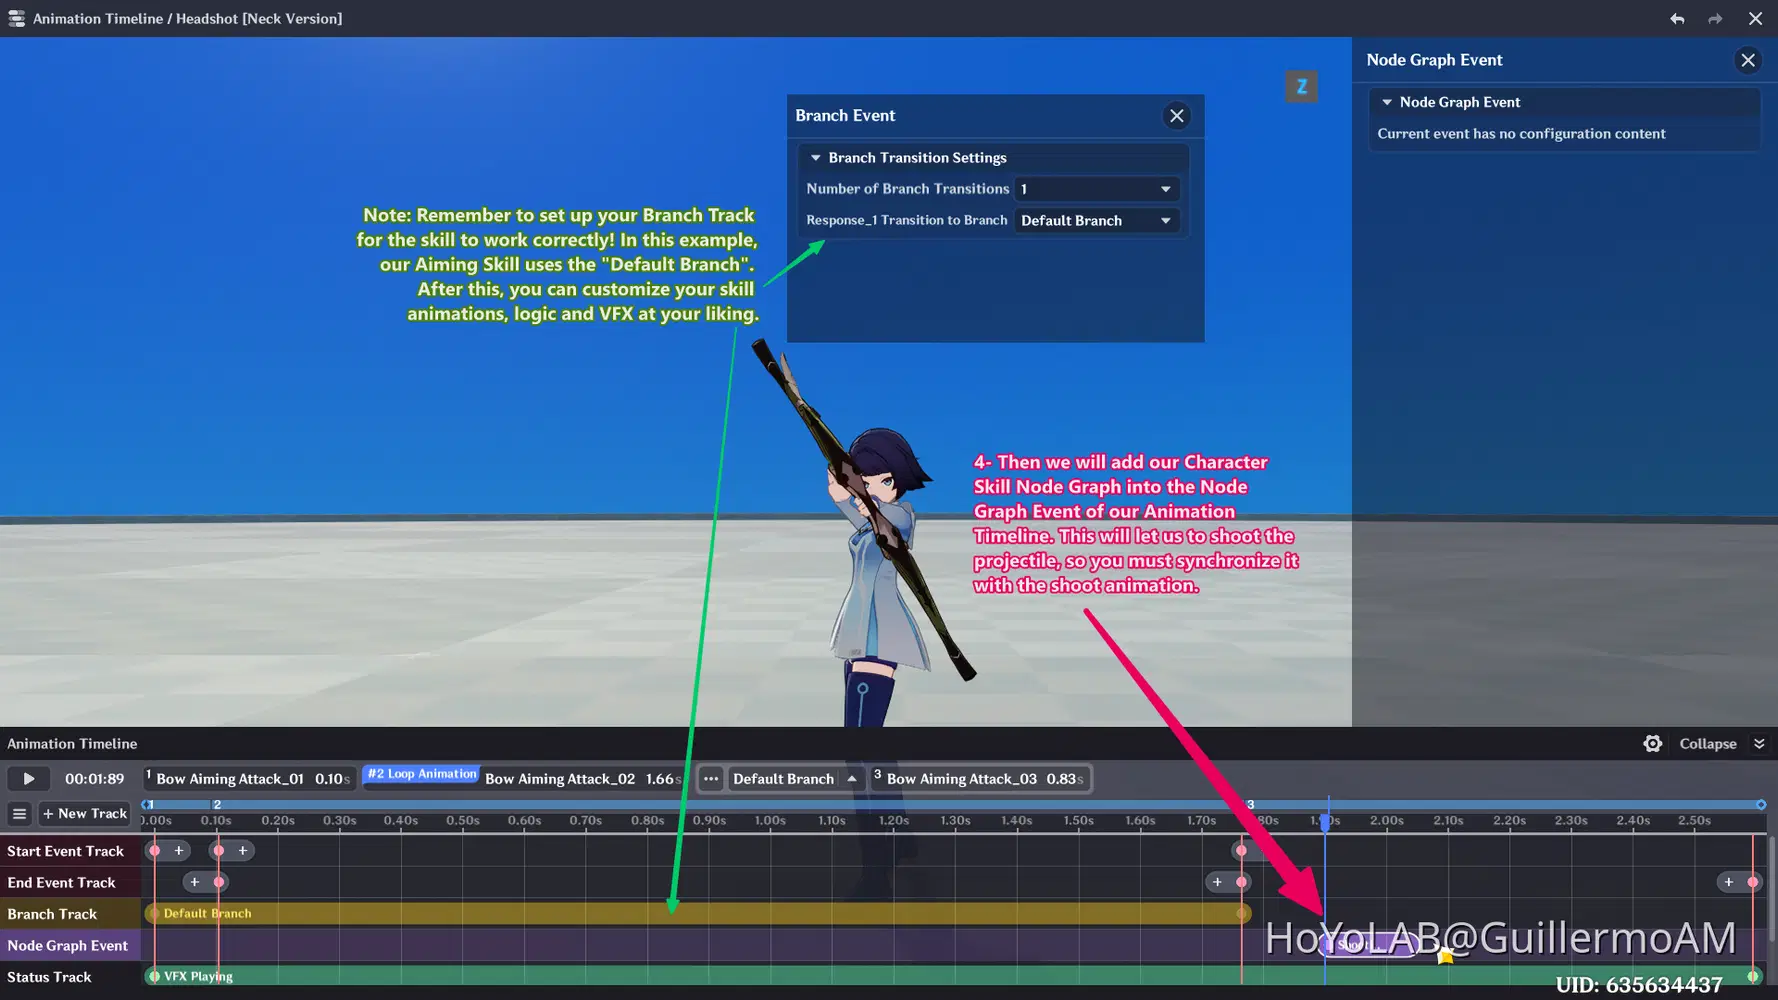
After this, we just need to asign the Skill into our Character.
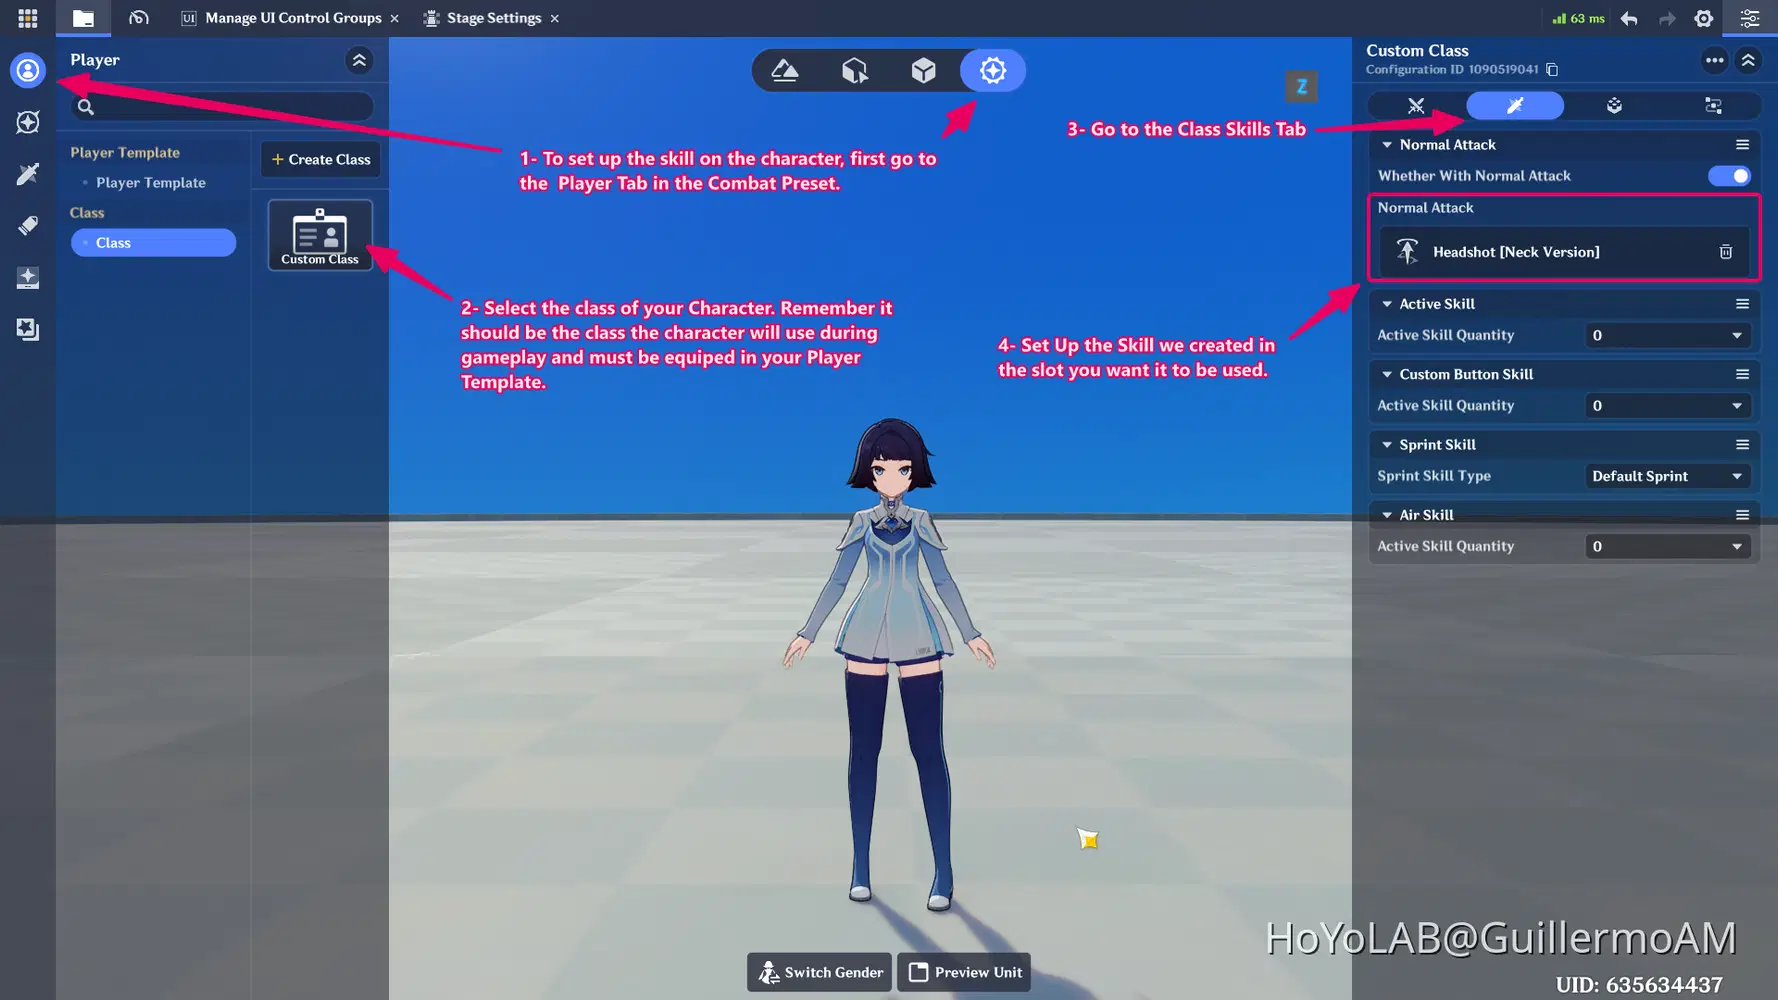
With this first steps ready, now we have our base Projectile Skill ready to be used. Now, we can go to the next steps, building the core mechanic of the Headshot System.
The Headshot System
Setting up the Main Logic Block - Character Skill Node Graph
The core of our Headshot system, works by calculating the location at which our projectile is launched and comparing it with a reference point to determine if the Headshot is True or Not. If its true, we will use a Tag that will be added to the "Attack Tag List" of the enemies that will help us to monitor when the Headshot is done and set the effects of this headshot.
It's important to note that our Skill works in the Client Server, although it also needs to comunicate with Server Node Graphs to execute additional logic into the enemies and the stage.
So let's start with the construction of the Core Logic in the Character Skill Node Graph of our Skill.
Note: For practilcal purposes, we will be showing two different methods to calculate the Headshot: Through the Neck and Trhough a Custom Attachment Point.
Neck Version
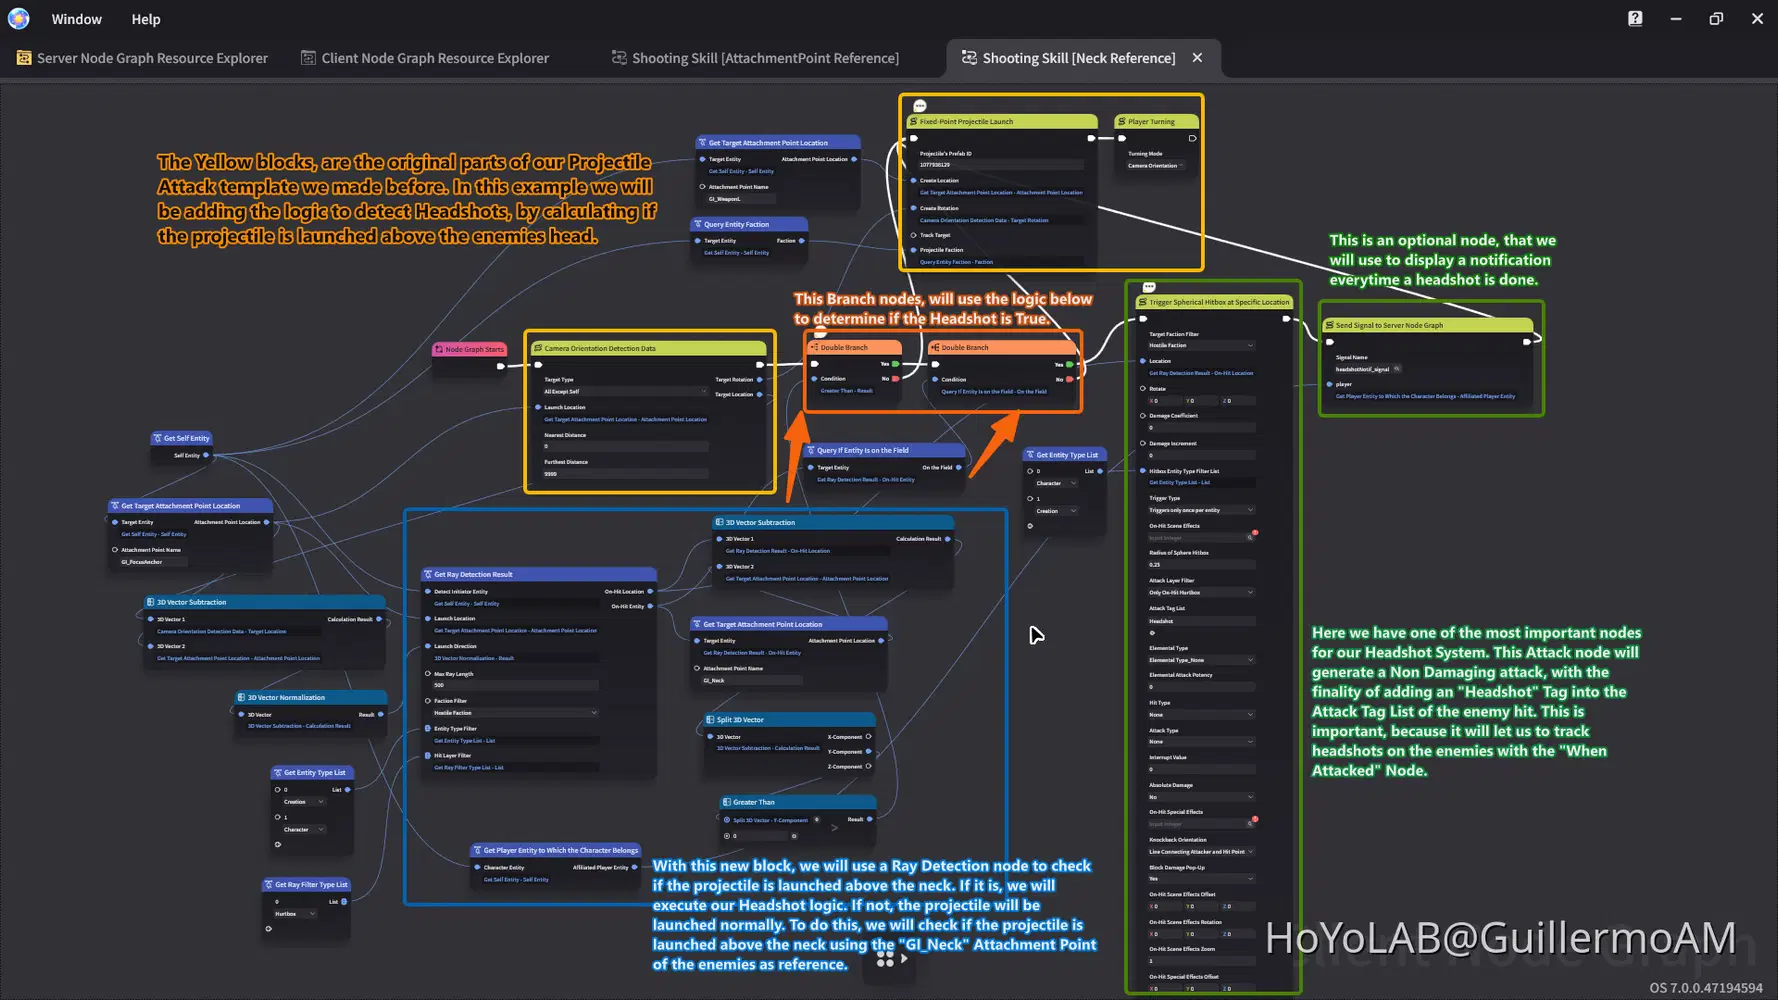
For the Neck Version, we will use the Attachment Point "GI_Neck" of the enemies to calculate if the Projectile is launched above or below the neck, and executing the Headshot if it goes over the neck.
For this purpose, we will add some new logic into the Character Skill Node Graph of our Skill. The new structure should look like this:
Custom Attachment Point Version
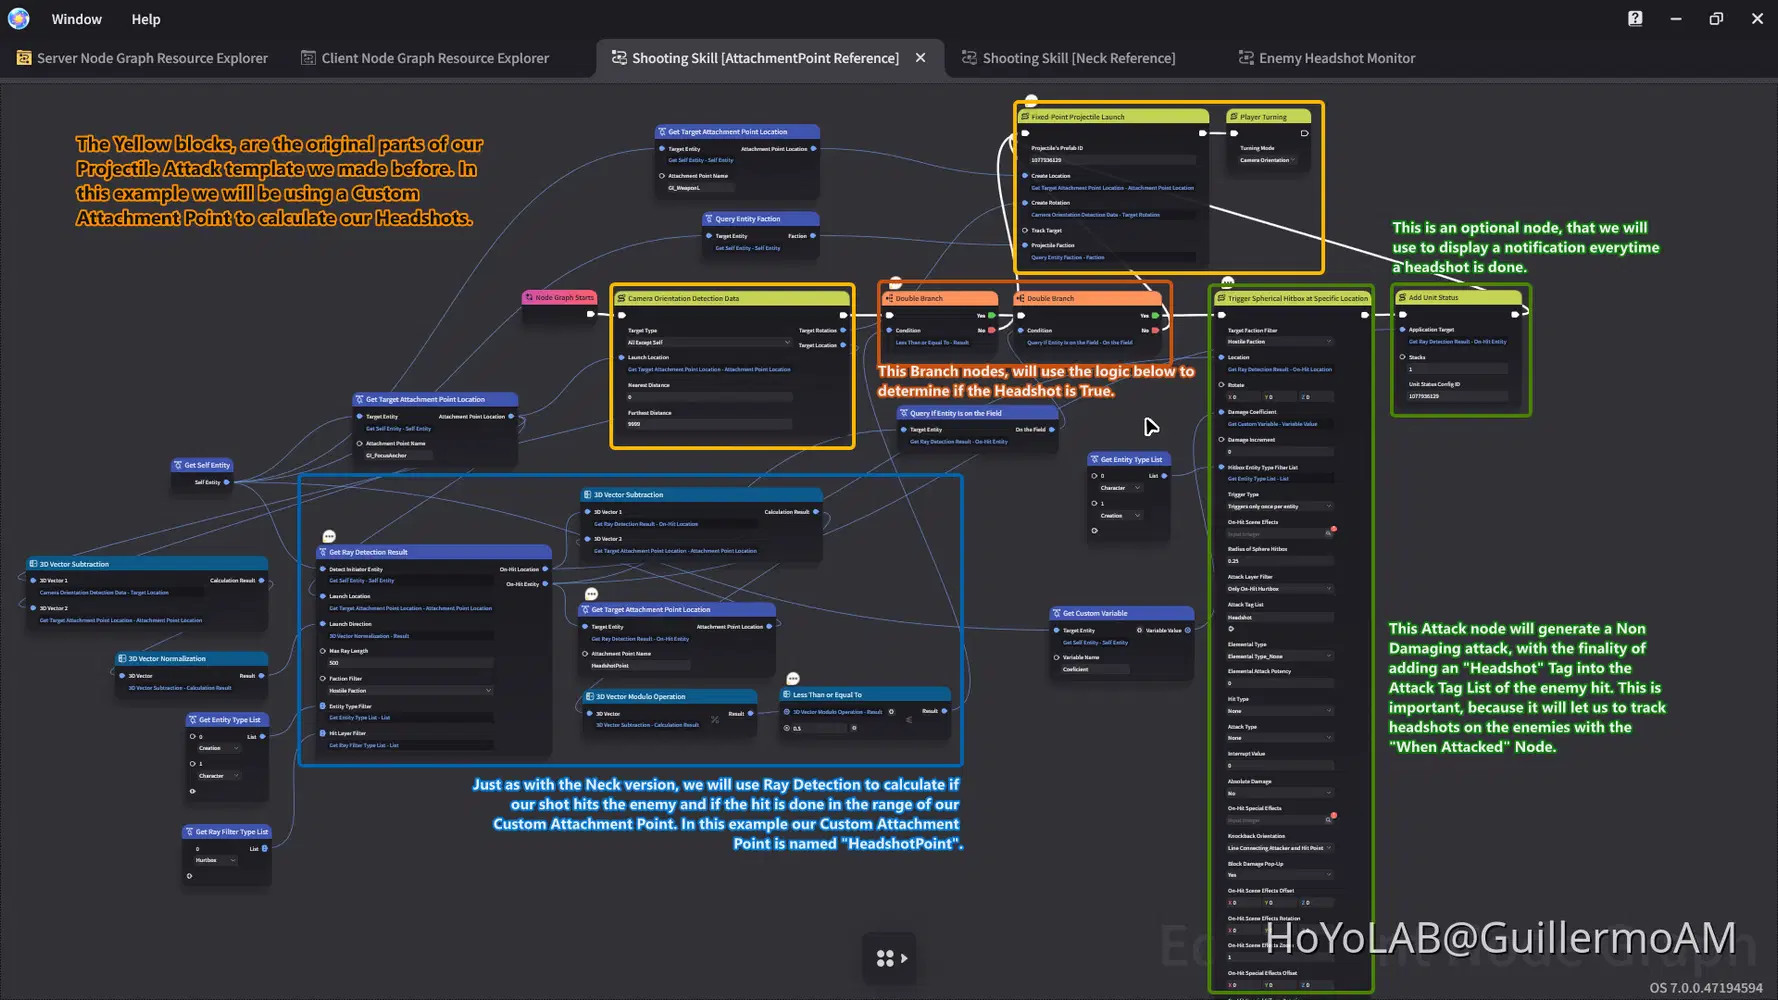
For this version, we will use a Custom Attachment Point to calculate if the projectile is launched in the range of our Custom Attachment Point.
The logic we should add in this version into our Character Skill Node Graph should look like the example below:
How to set up the Custom Attachment Points for my Creatures/Creations?
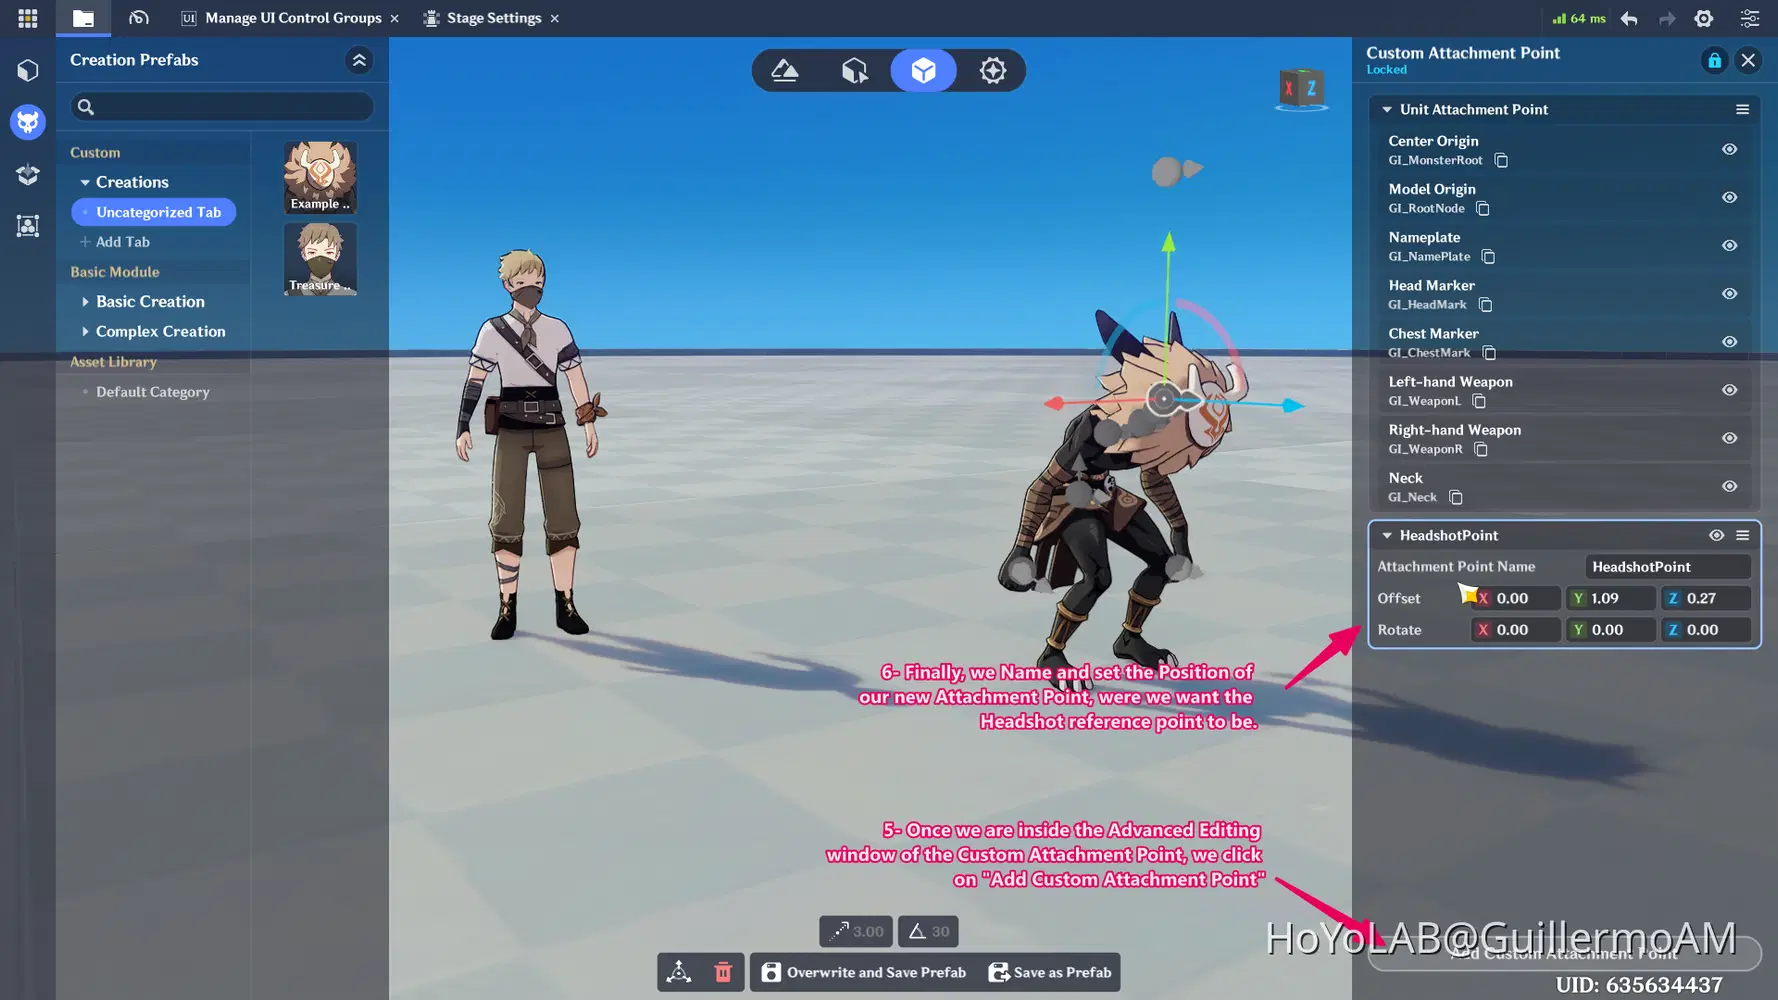
The first step, is to select your corresponding Creation prefab, then going to its Components tab, then to add a new Common Component of the type "Custom Attachment Point".
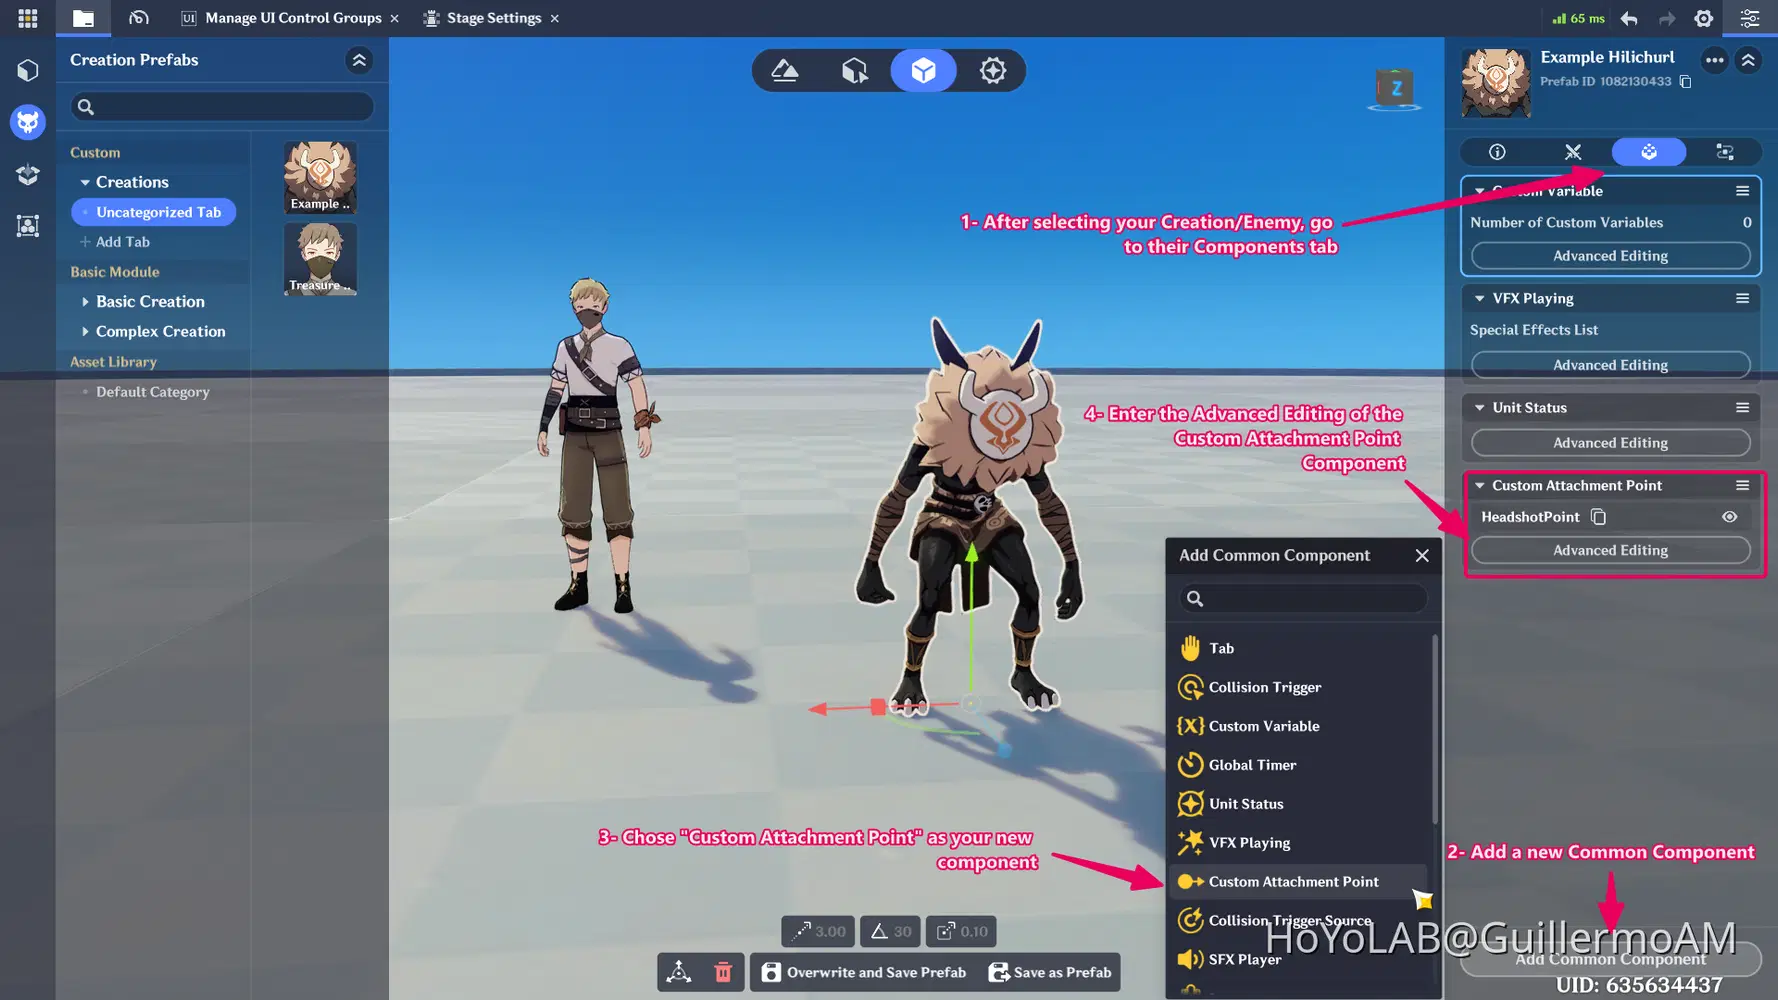
With the new Custom Attachment Point, the next step is to enter the Advaced Editing mode of the Custom Attachment Point component, and set our new Custom Attachment Point at the position we want to use as the Headshot reference. (Logically, it should be placed at the head, but you can use other parts or additional attachment points if you want to customize even more the aimiing system of your games)
Enemy Headshot Monitor
With our Skill and main logic ready, we now need to go to the Server Entity Node Graphs and create an Enemy Headshot Monitor that will help us to add the Attack Tag List into a Custom Variable, so we can access to this data when the enemy dies.
This Node Graph is really simple, we've just add the Attack Tag List of the most recent attack received by the enemy into a Custom Variable, which in this example is named "LastAttack_Tags". This is important, because it will add the Tag "Headshot" everytime we do one, thanks to the additional Non Damaging attack we implemented in the Character Skill Node Graph of our Skill.
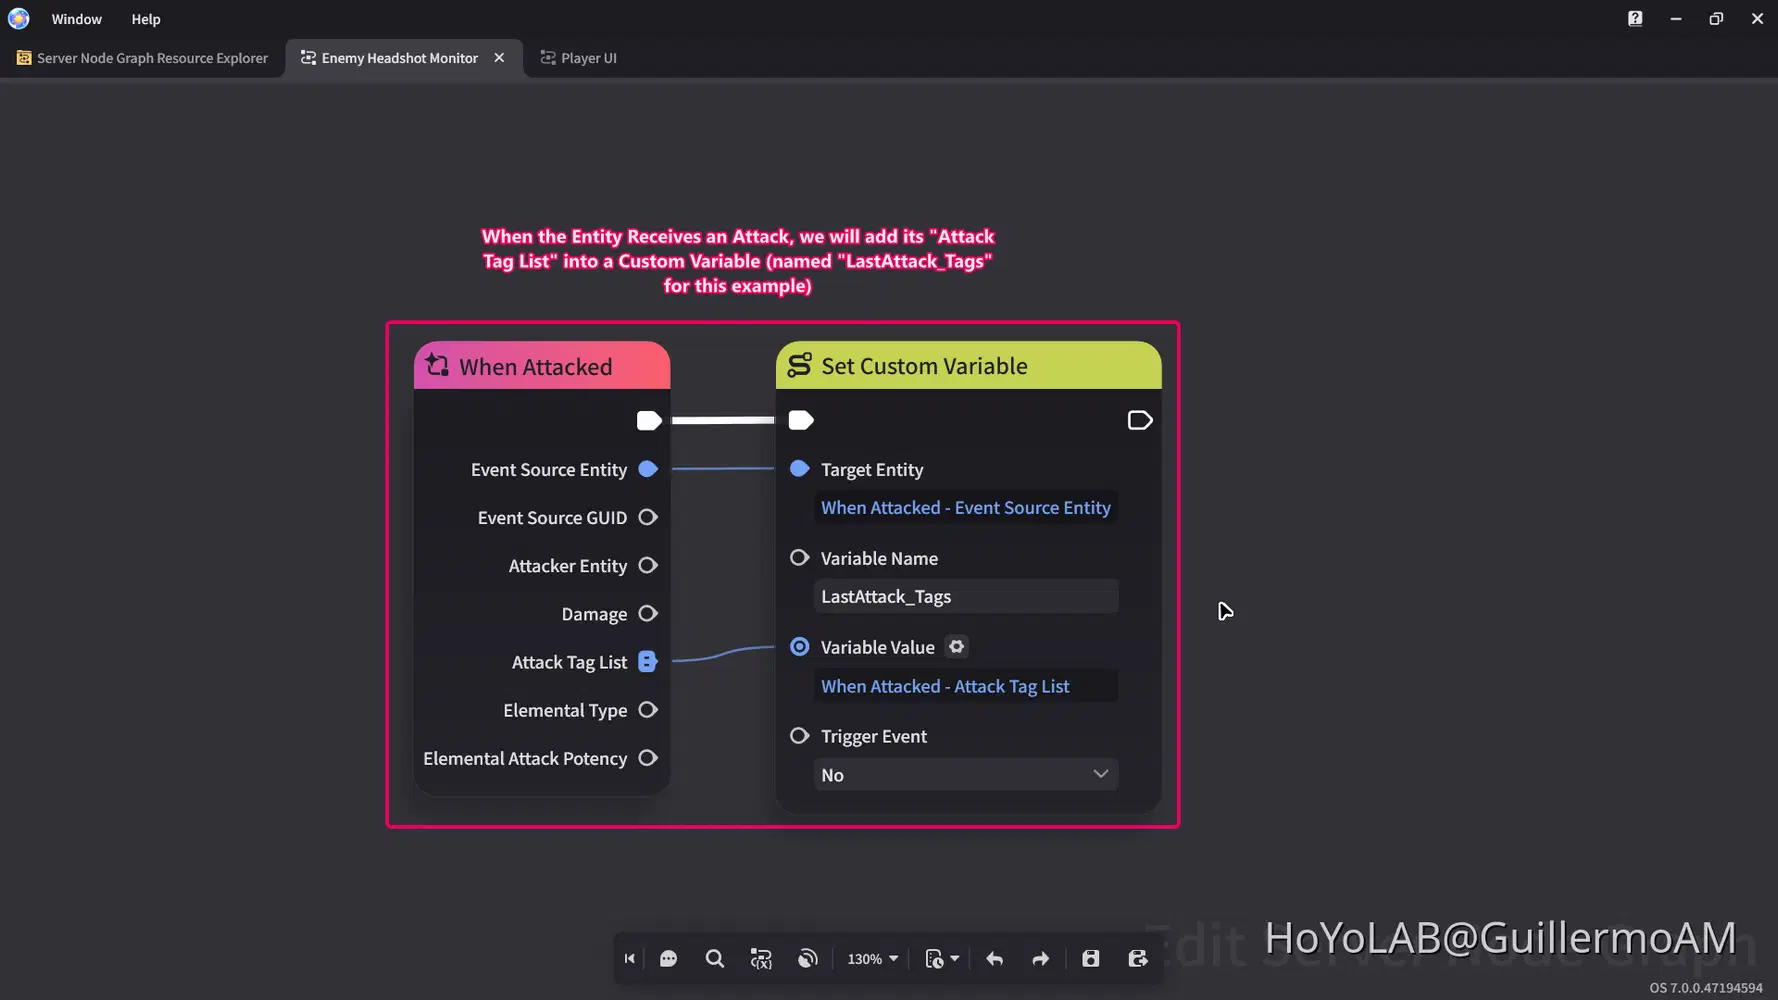
Its important to note, that after the "Set Custom Variable" node, you can customize your own logic after the enemy takes a Headshot. For example, you could set an Instakill or an additional attack after this.
Stage Headshot Monitor
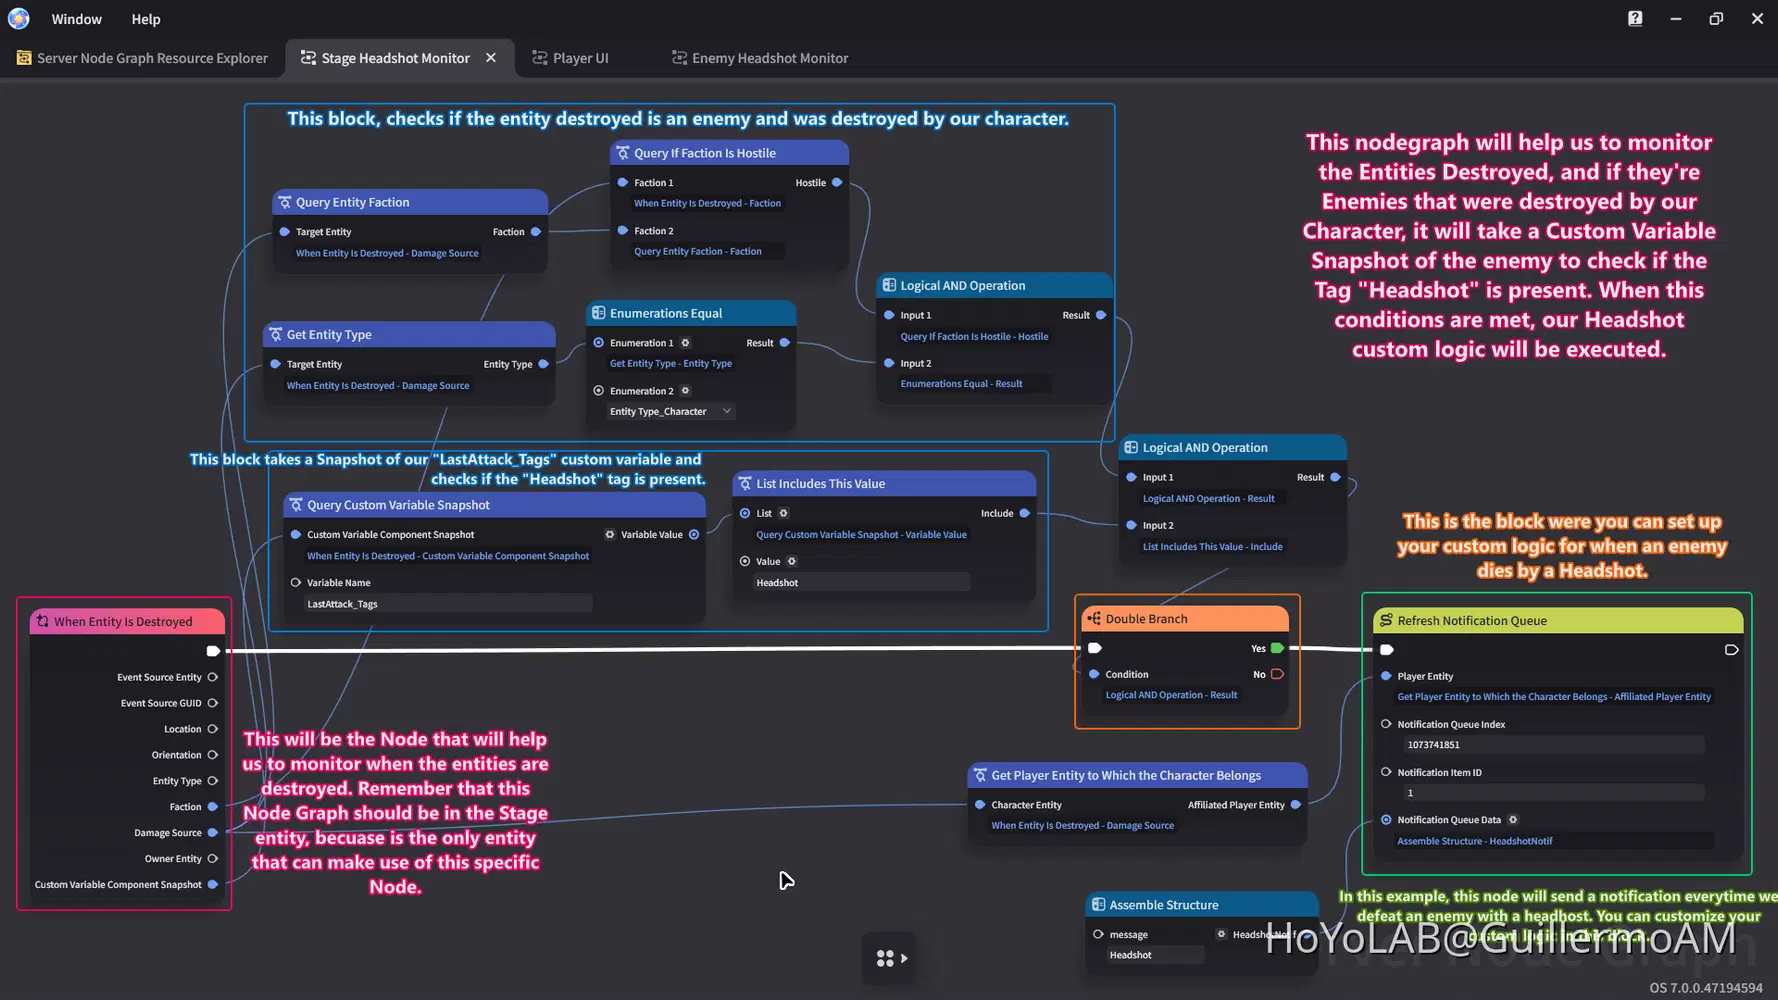
With our previous Monitor Node Graph Placed into the enemies, we now can also create another monitor to track when they die, and if they were destroyed by a Headshot. This will let us to add Custom Logic after we defeat the enemy with a Headshot.
For this we will create another Entity Node Graph for the Stage Entity. [Note: Is important to place it in the stage entity because is the only entity that can use the "When Entity is Destroyed" Event Node]
This is how it should look:
Last Steps
With these nodes ready, we finally will check that our nodes are placed in the correct places:
- The Character Skill Node Graph should be placed in our Character Skill via the Animation Editor.
- The Enemy Headshot Monitor should be placed on every enemy. Each one should also have a Custom Attachment Point named "HeadshotPoint" if they use the Custom Attachment Point method.
- The Stage Headshot Monitor should be placed into the Stage Entity.
With all these, our system should be working now! If you want to see the system in action, you can check it in the Video Tutorial below this section!
Video Tutorial
Resources
You can find a working example of this project here: Headshot System Resources
Conclusion
With all these elements ready, we have finished our Headshot system. Now, everytime a projectile is fired, our Headshot system will work and execute its logic depending on the conditions met.
Remember that this is the core of the system, but you can adapt it at your needs. For example, adding an Instakill when the headshot is True.
Hope this guide could be of help and have fun incorporating this mechanic into your next Wonderlands!