🎯 Long-Term Summary & Pull Recommendations
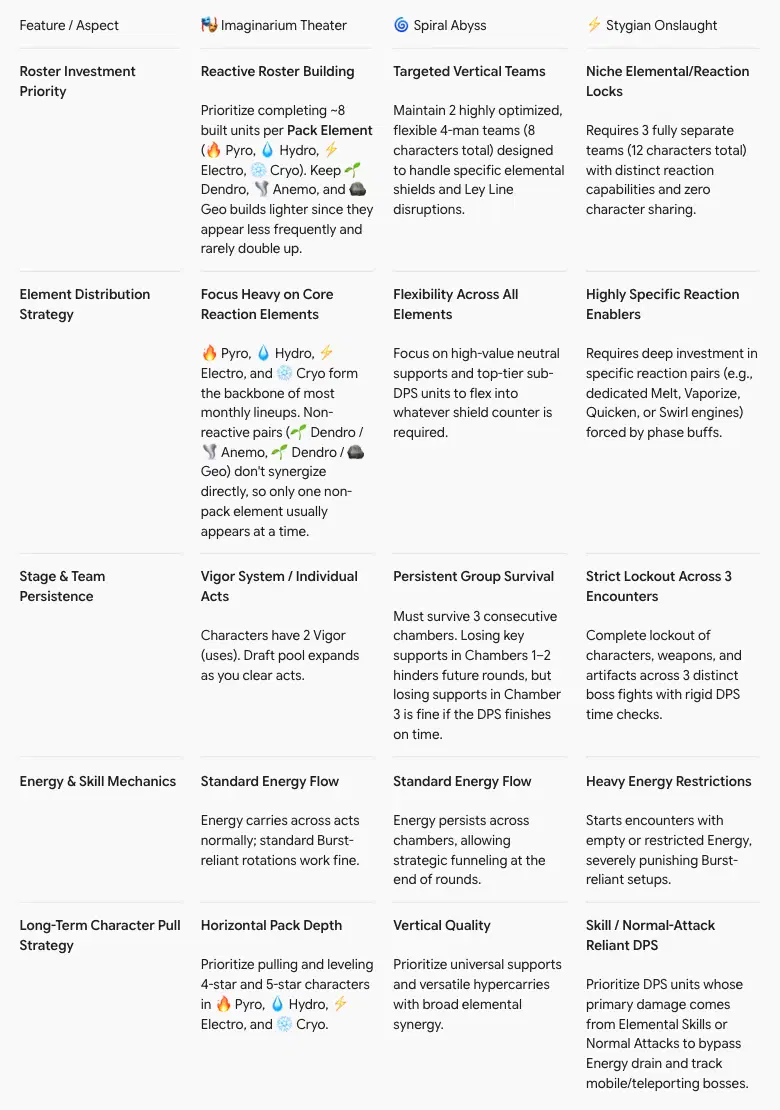
- 🎭 Imaginarium Theater Strategy: Build deep rosters in the four primary reaction elements (🔥 Pyro, 💧 Hydro, ⚡ Electro, ❄️ Cryo). Keep 🌱 Dendro, 🌪️️ Anemo, and 🪨 Geo rosters leaner since they appear less frequently and don't share forced synergies in the same rotation.
- 🌀 Spiral Abyss Strategy: Keep two strong, versatile teams focused on high vertical investment. Sacrificing supports in Chamber 3 is fine as long as your main DPS secures the clear.
- ⚡ Stygian Onslaught Strategy: Prioritize DPS characters reliant on Elemental Skills or Normal Attacks over Burst-heavy hypercarries to counter starting Energy drains and fast-teleporting bosses across all 3 locked rounds.
Based on the roster listed in the Genshin Impact Helper Team's guide, here is how the top DPS units break down according to this assessment—specifically targeting Skill-reliant and Normal/Charged Attack-reliant DPS units that bypass Stygian Onslaught's energy constraints while maintaining high mobility/chase potential.

⚠️ The Hidden Trap of Reaction-Exclusive Units & Gradient DMG in Imaginarium Theater ⚠️
When pulling and investing in your account, be extremely cautious with gradient reaction-exclusive units—such as Lunar team enablers (e.g., Flins, Ineffa, Nefer, Zibai for Lunar-Charged, Lunar-Bloom, or Lunar-Crystallize) and Stellar team enablers (e.g., Odette, Sandrone, Vesna for Stellar-Conduct or Stellar-Swirl), and perhaps in the future, Solar team (*following the pre-existing pattern of lunar/moon—stellar/star—solar/sun). While these specialized units are top-tier in modes like Spiral Abyss and Stygian Onslaught where you have total freedom over your party composition, Imaginarium Theater features only three specific elements per month. Because the game strictly locks your roster to those featured elements, there is a very high chance that the required reaction pair for a gradient team won't be available at the same time (for example, running a Stellar-Conduct core when Electro or Cryo isn't featured, or a Lunar-Charged core when Hydro or Electro is omitted). Without both enabling elements present, their kit passives and enhanced reaction mechanics are completely locked out, rendering what is usually an overpowered, meta-defining team setup virtually unusable for that rotation. Focus on versatile, elementally flexible units first before sinking heavy resources into gradient-locked kits.
🟢 Ideal Top-Tier Investments (Skill / NA / CA-Reliant DPS) = Stygian Onslaught
These units deal the majority of their damage directly from their Elemental Skill or Normal/Charged Attacks, without requiring 60–80 Burst energy to kickstart their rotation. They excel under Stygian Onslaught's zero-starting energy conditions and handle mobile/teleporting bosses far better.
- 🔥 Arlecchino (Pyro - Polearm): Consumes zero Burst energy to enter her Masque of the Red Death state. Her entire damage output is driven by Normal Attacks, allowing her to output top-tier DPS immediately upon entering the field.
- 💧 Neuvillette (Hydro - Catalyst): His primary damage comes from his Charged Attacks. While his Burst helps generate Sourcewater Droplets, his Elemental Skill alone provides enough droplets to launch his beam right away. Furthermore, his long-range beam tracks teleporting or far-away enemies instantly.
- ❄️ Odette (Cryo - Sword): A premier Skill-based Sub-DPS and Reaction Nuker. Her core damage engine comes from summoning her Solo Dance Double via her Elemental Skill and executing her enhanced duet hit (Coda at Dawn's Tolling). Because her high-multiplier frontloaded Nuke hit is executed via her Skill rather than an 80-energy Burst, she functions flawlessly without Energy and provides massive Stellar-Conduct/Swirl reaction value.
- ⚡ Clorinde (Electro - Sword): Her Night Vigil state is initiated entirely by her Elemental Skill, turning her Normal Attacks and Skill into high-speed, auto-chasing gunshot/dash combos that stick to mobile bosses.
- 🌾 Alhaitham (Dendro - Sword): Uses his Skill/Plunge/CA to generate Chisel-Light Mirrors for immediate Dendro projection attacks. He can execute full rotations fine without relying on an opening Burst.
- 🪨 Navia (Geo - Claymore): Her main damage source is her Elemental Skill (Rosula Shardshot). She relies on Crystallize shards rather than Burst energy to deal massive frontloaded burst damage.
- 🌪️ Wanderer (Anemo - Catalyst): Activates his Windfavored hovering state via Elemental Skill, converting Normal and Charged Attacks into ranged, highly mobile tracking strikes.
- 💧 Mualani (Hydro - Catalyst): Enters her Sharky Surfboard state via Elemental Skill to deal massive bite damage, completely independent of Burst energy.
🟡 Functional (Skill-Centric with Positioning Needs)
- ⚡ Yae Miko (Electro - Catalyst): Placing her 3 Sesshou Sakura totems requires zero Energy and offers consistent off-field/on-field damage. However, chasing fast-teleporting bosses out of totem range requires re-casting.
- 🍀 Tighnari (Dendro - Bow): His Skill grants instantly charged Wreath Arrows. Even though his Burst energy cost is very low (40 Energy), his Skill handles fast single-target burst windows well.
- ❄️ Wriothesley (Cryo - Catalyst): Uses his Skill to enter Chilling Penalty for enhanced Normal Attacks. Very Skill-reliant, though he relies on melee range against teleporting targets.
🔴 Challenging / High-Maintenance Investments (Burst-Gated DPS)
These units require substantial Burst Energy to launch their damage state or rely on stationary, high-cost rotations. Under Stygian Onslaught's starting energy restrictions and mobile bosses, they suffer from delayed setups or missed attacks unless heavily invested with constellations or high Energy Recharge/funneling.
- 🔥 Mavuika (Pyro): While incredibly strong, operating her effectively at C0 without starting energy requires precise timing, specific support battery setups, and catching mobile bosses between rotation windows. (owning constellations would ease the burden)
- ⚡ Raiden Shogun (Electro - Polearm): Her entire hypercarry output is locked behind her 90-energy Burst. Starting with zero energy forces her into a long battery phase before she can deal real DPS. (but you can still use her as an electro applicator)
- ❄️ Kamisato Ayaka (Cryo - Sword): Requires 80 energy for her Burst, which contains ~80% of her overall damage. If a boss teleports right after she Bursts, her rotation damage plummets.
- 🪨 Arataki Itto (Geo - Claymore) / ❄️ Eula (Physical - Claymore): Both require 80-energy Bursts to enter their primary damage modes, making zero-energy starts exceptionally slow.
- ⚡ Cyno (Electro - Polearm): Needs 80 energy to enter his Pactsworn Path state, making him vulnerable to energy drain effects and multi-wave/teleporting boss mechanics.
🟢 Top-Tier Skill-Reliant & Low-Energy Supports (Ideal for Stygian Onslaught)
These supports do not rely on their Elemental Burst to provide their main buffs, off-field elemental application, shields, or healing. They work instantly upon entering the field under 0-starting Energy conditions.
5☆ Premium Skill Supports
- 🪨 Xilonen (Geo - Sword): Activates her elemental RES shred and massive buffs directly via her Elemental Skill (Sampler/Source Samples). She requires 0 Burst Energy to shred enemy resistances across Pyro, Hydro, Electro, Cryo, and Geo.
- 🌾 Nahida (Dendro - Catalyst): Her entire off-field Dendro application (Tri-Karma Purification) and high damage come from her Elemental Skill. Her Burst only provides a secondary buff, making her 100% functional under zero energy.
- 💧 Furina (Hydro - Sword): Her 3 Salon Members (off-field damage, Hydro application, and party HP draining) are summoned via her Elemental Skill. While her Burst provides her massive DMG% buff, her Skill alone carries massive off-field value and automatically tracks moving/teleporting targets.
- 🔥 Nicole (Pyro - Catalyst): A premier Skill-reliant support and Hexerei buffer. Her Elemental Skill (Revelation: Uncreated Light) instantly provides a powerful shield and a massive teamwide ATK buff, completely independent of Burst energy.
- ⚡ Ineffa (Electro - Polearm): Provides a shield and off-field Electro application/damage through her Elemental Skill, making her completely self-sufficient at zero starting energy.
- 🪨 Zhongli (Geo - Polearm): Produces his indestructible shield and universal 20% RES Shred purely through his Hold Elemental Skill. Requires no Energy to make your team immortal.
- 🌪️ Xianyun (Anemo - Catalyst): Her triple-dash Skill offers instant mobility, grouping, and immediate Swirl/Anemo application without needing Burst energy.
4☆ Top-Tier Skill Supports
- ⚡ Fischl (Electro - Bow): The ultimate Skill-reliant battery and sub-DPS. Pressing her Elemental Skill summons Oz for 10–12 seconds of high-frequency Electro application, energy particle generation, and off-field damage without needing any Burst energy.
- 💧 Sangonomiya Kokomi / Barbara (Hydro): Kokomi's Bake-Kurage jellyfish and Barbara's melody loop provide immediate off-field Hydro application and healing purely via their Elemental Skill.
- 🌾 Kirara & 🪨 Layla (Dendro/Cryo - Sword): Both grant quick off-field shields and elemental application (Kirara's Cat Box / Layla's Night-Stars) exclusively through their Elemental Skill.
- ⚡ Kuki Shinobu (Electro - Sword): Her Grass Ring of Sanctification is activated via Elemental Skill, providing continuous AoE Electro application and healing at zero energy cost—ideal for Hyperbloom.
🟡 High-Value Burst-Dependent / Battery-Needing Supports
These supports provide game-changing buffs, but because their core utility is locked behind their Elemental Burst, they require high Energy Recharge (ER), Favonius weapons, or deliberate energy funneling in modes with energy restrictions like Stygian Onslaught.
5☆ Heavy-Buff Supports
- 🌪️ Kaedehara Kazuha (Anemo - Sword): While his Elemental Skill gathers enemies and shreds RES (via 4-piece Viridescent Venerer), his massive Elemental DMG% buff and widespread Swirl fields are maximized through his Burst.
- 🌾 Baizhu / 💧 Yelan (Dendro / Hydro): Both provide world-class off-field buffs and utility (Baizhu's reaction shields/healing, Yelan's scaling DMG% buff and coordinated Hydro strikes), but require ER investment to keep their Bursts up.
- ❄️ Shenhe (Cryo - Polearm): Provides flat damage additions via her Skill (Icy Quills), but her Cryo RES shred and Cryo DMG buffs require her Burst field.
4☆ Staples & Niche Enablers
- 🔥 Bennett (Pyro - Sword): The universal ATK buffer and healer. Because his entire ATK buff lives in his Burst field (Fantastic Voyage), he needs high Energy Recharge or a Favonius Sword to kickstart rotations in Stygian Onslaught.
- 🔥 Xiangling (Pyro - Polearm): A high-value off-field Pyro sub-DPS/enabler. Because her entire damage output and application rely on her 80-energy Burst (Pyronado), she is highly Burst-dependent and requires heavy Energy Recharge investment or a strong Pyro battery (like Bennett) in restriction-heavy modes.
- 🔥 Chevreuse (Pyro - Polearm): Provides 40% Pyro/Electro RES shred passively when Overloaded reactions occur, but her team ATK buff relies on holding her Skill after firing an Overcharged Ball.
- 🌪️ Sucrose (Anemo - Catalyst): Passes massive Elemental Mastery to the team via her Skill and Swirls, though her grouping/absorption is best with her Burst.
- 🌪️ Faruzan (C6) & 🪨 Gorou (Anemo / Geo Bows): Essential niche buffers for Anemo and Geo carries, but heavily reliant on their Bursts to maintain their stat fields.
🎭 Imaginarium Theater "Pack Element" Support Recommendations
For maximum efficiency in Imaginarium Theater, focus on accumulating these accessible 4★ and 5★ supports across the primary Pack Elements:
- 🔥 Pyro Support Core: Bennett, Chevreuse, Xiangling, Thoma, Dehya.
- 💧 Hydro Support Core: Furina, Xingqiu, Yelan, Kokomi, Barbara, Candace.
- ⚡ Electro Support Core: Fischl, Kuki Shinobu, Ineffa, Beidou, Kujou Sara, Iansan.
- ❄️ Cryo Support Core: Odette (Skill-Nuke/Support), Layla, Diona, Charlotte, Rosaria, Shenhe.