


Introduction
Hello again, stage creators! 
Want to make your Miliastra UI feel more dynamic? Starting with Genshin Impact version 7.1, Miliastra Wonderland supports Lua for creating user interfaces, opening up some exciting possibilities. I wrote this guide to help you get started, experiment with your first scripts, and try some of the available APIs and features.

Before we jump in, there's one important thing to know: Lua support in Genshin Impact 7.1 is client-side only. This means your Lua code will runs on each player's device, while server-side logic still needs to be handled by Node Graphs.
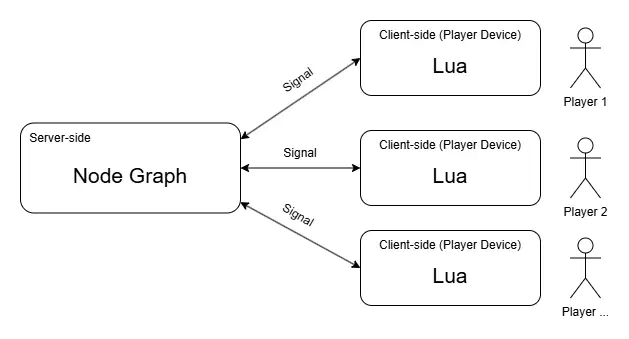
So, what does this mean in practice? Here are a few things to keep in mind:
- Use Lua for creating client-side UI behavior
For operations or features that are normally handled by server-side Node Graphs, you'll need to communicate with the server using custom signals from Lua.
- You can directly access custom variables on only three entity: Character, Player, and Stage
To access custom variables on other dynamic entity from Lua, you'll need to use custom signals and server-side Node Graphs to handle data read or write.
- Anticipate if player device's restarted or disconnected
Lua code may continue running on the player's device during brief disconnections. But if the game or the player device is restarted (or force close), the data stored in Lua may reset when player reconnected. So it's better to store temporary data only in Lua whenever possible.
- Store persistent or shared data on the server
For example, use a Stage Variable or Player Variable for data that needs to persist or be shared with other players.
- Use `OnUpdate` only if you want to run code on every frame
The actual update frequency may depend on the player's device and frame rate. Running heavy or unoptimized code on every frame may impact performance on low end device.
- Use Tween to animate UI elements
You can animate the position and other properties of existing UI elements to create more dynamic and complex interfaces. Since the animation runs on the client side, it doesn't require server-side processing for every animation frame.
If you want to move all your game logic into Lua, take a moment to consider these limitations first. Lua is great for creating client-side UI, but it can't fully replace server-side logic at the moment. You may still need to use signals to communicate with or control certain entities on the server.
This guide is intended for stage creators who are already familiar with basic Lua syntax. We'll focus on using Lua in Miliastra rather than explaining Lua fundamentals. If you find any of the code examples difficult to understand, feel free to ask an AI assistant to explain them in more detail.
Miliastra Wonderland currently uses Lua 5.3.
You can also learn Lua from here or other source like Youtube.
Alright, let's start with some examples and learn something along the way~ 
If you're completely new to Lua, you might find this guide a bit complex at first.
But I recommend getting the sample code working first, then experimenting with it and learn from the results.
Content Overview
In this guide, you will learn how to create your first UI in Miliastra using Lua. We will cover:
- Setting up Visual Studio Code for the first time
- Creating a simple animation with Tween
- Understanding the Script Lifecycle
- Make a button to update a text box value
- Showing and hiding UI elements with a script
- Reading custom variables from the Character entity
- Communicate with the server using Signal
For this guide, I may use simple and concise wording so you can follow along easily without spending too much time reading. But let me know in the comments if you find it confusing.


1. Setting Up Your Code Editor
For this setup, we will use the following third-party tools:
- Visual Studio Code (by Microsoft)
- Lua extension (by sumneko)
- MiliLua extension (by haminpants)
These tools are open source. You can visit their GitHub repositories if you want to see their source code.
✦ First time editor setup
You only need to complete this setup once:
- Make sure Visual Studio Code already installed on your computer and open it
- Open the Extensions panel from the Visual Studio Code editor's sidebar
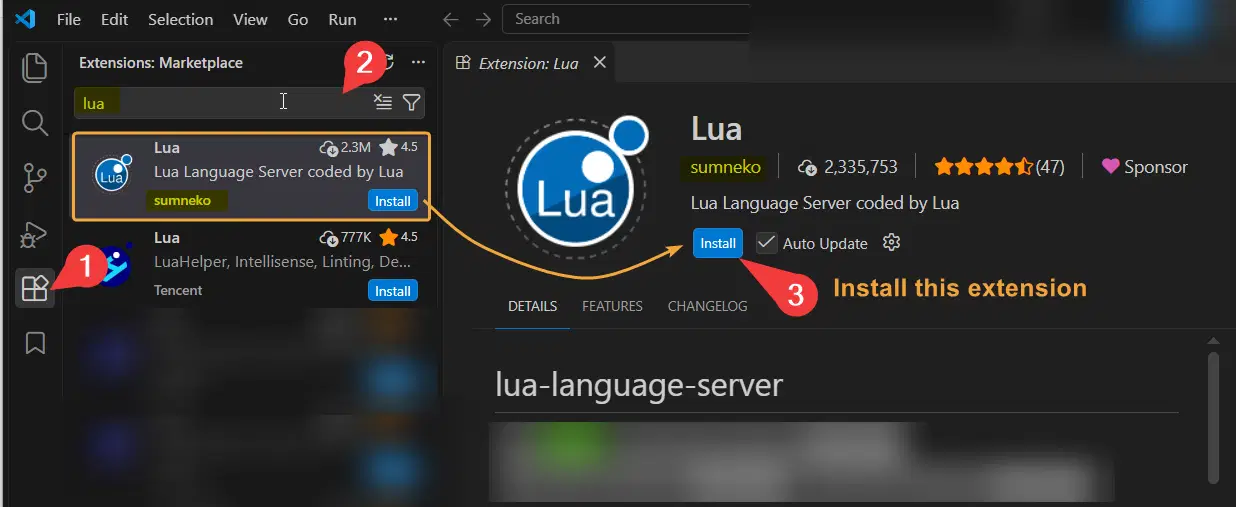
- Search for `Lua` and install the extension by sumneko
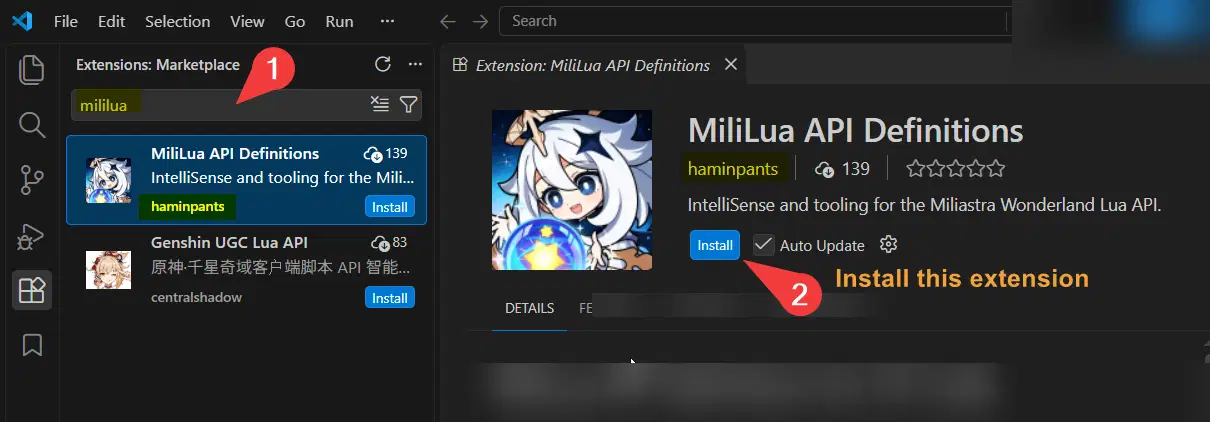
- Search for `MiliLua` and install the extension by haminpants
- Alright, you've completed the initial setup! You won't need to do it again for future experiments unless you switch devices~
✦ Create a workspace for your Stage
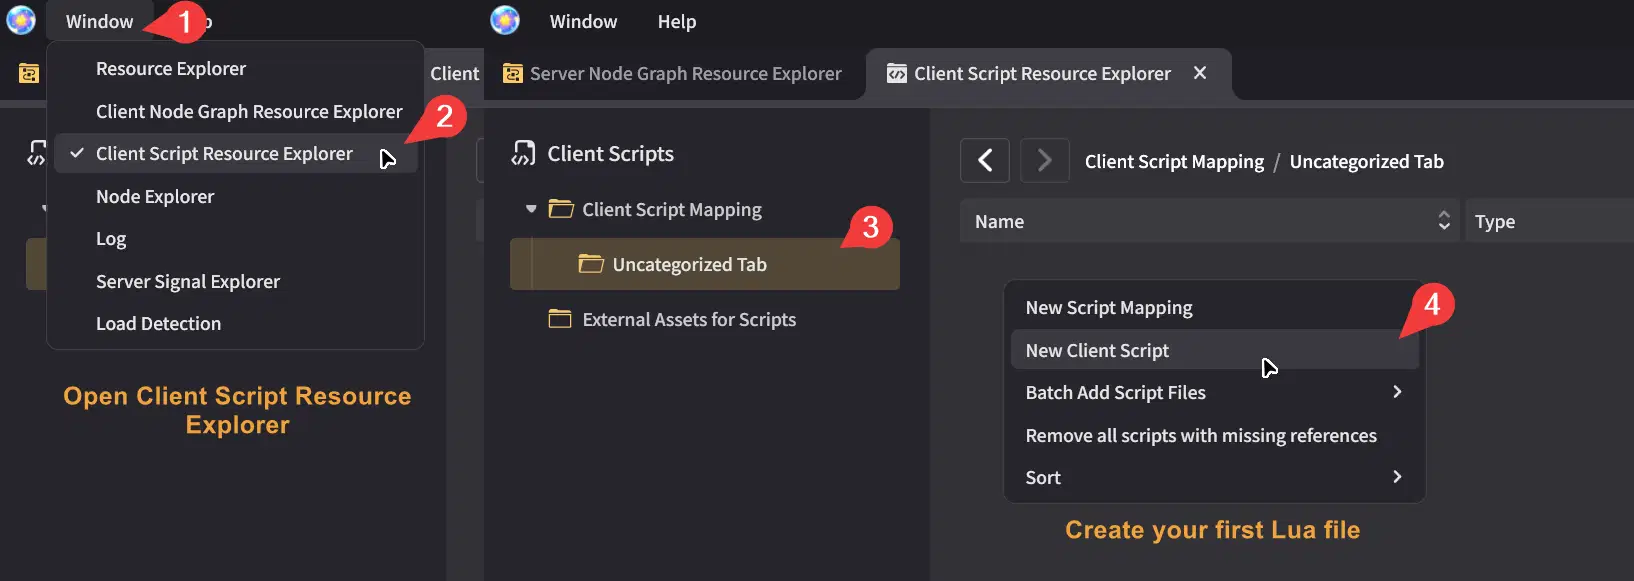
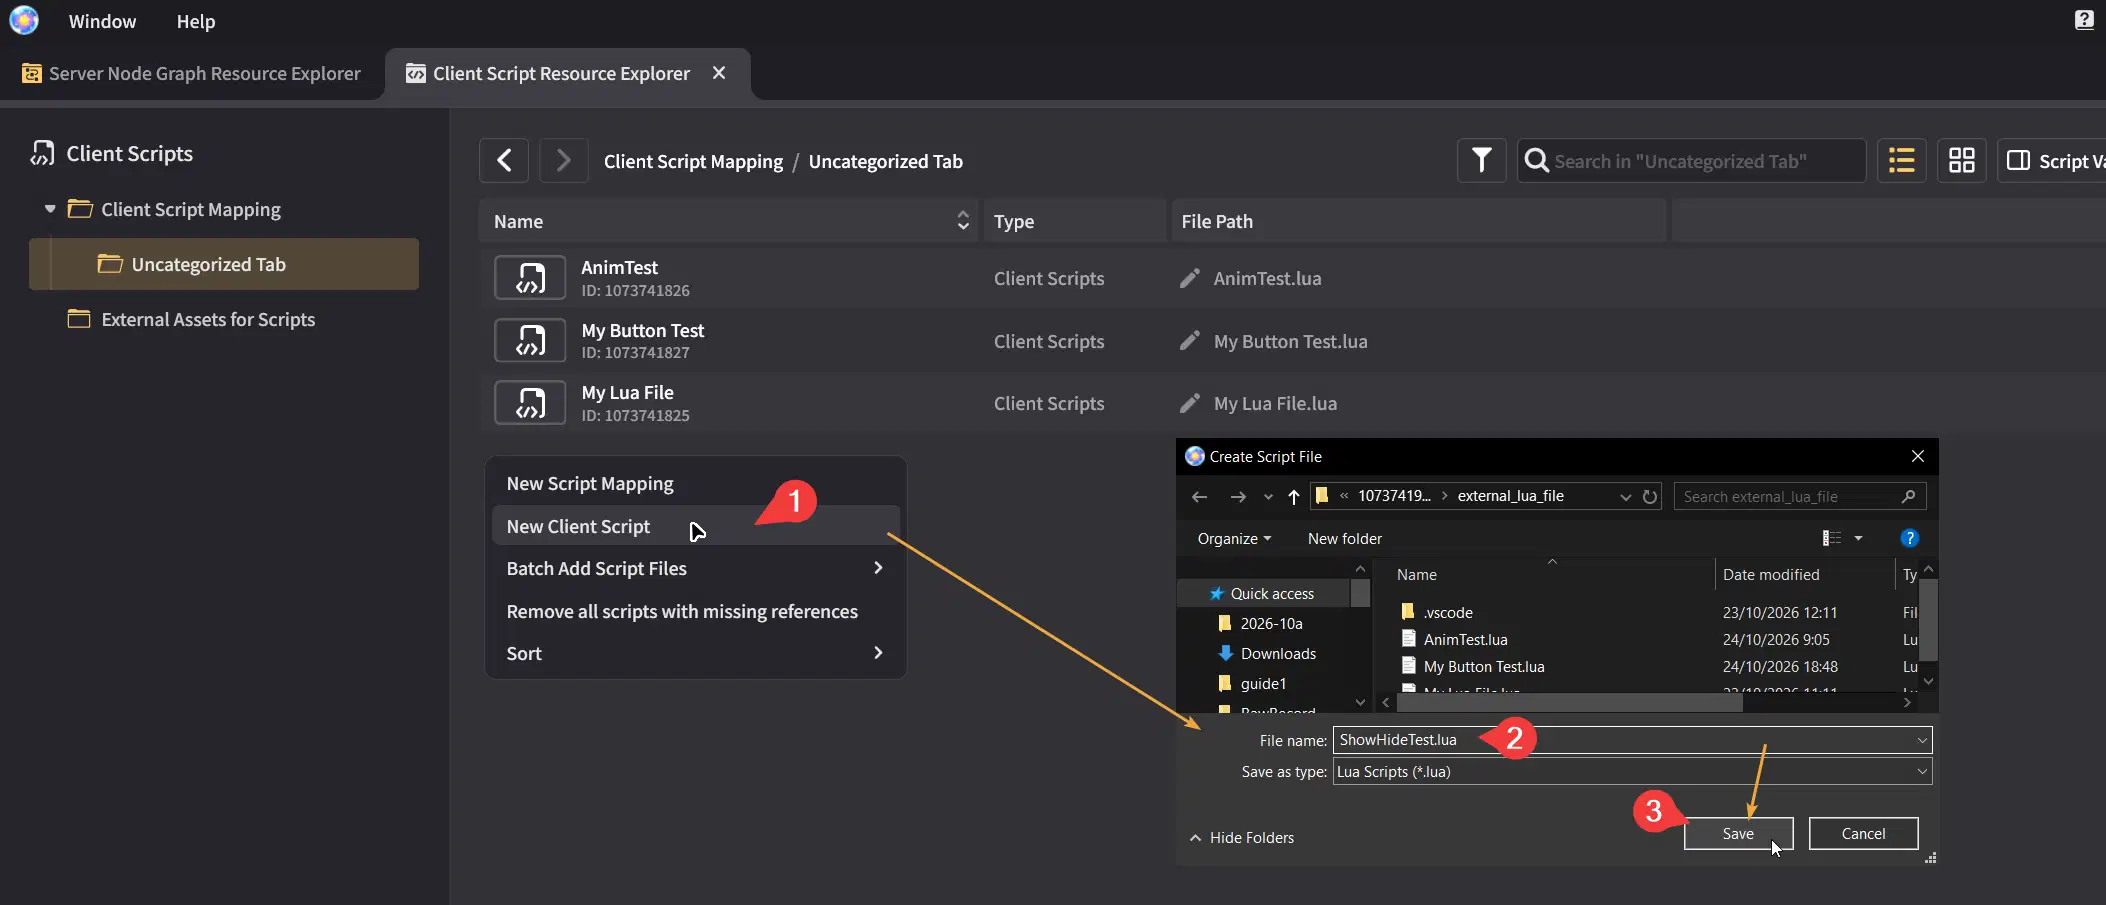
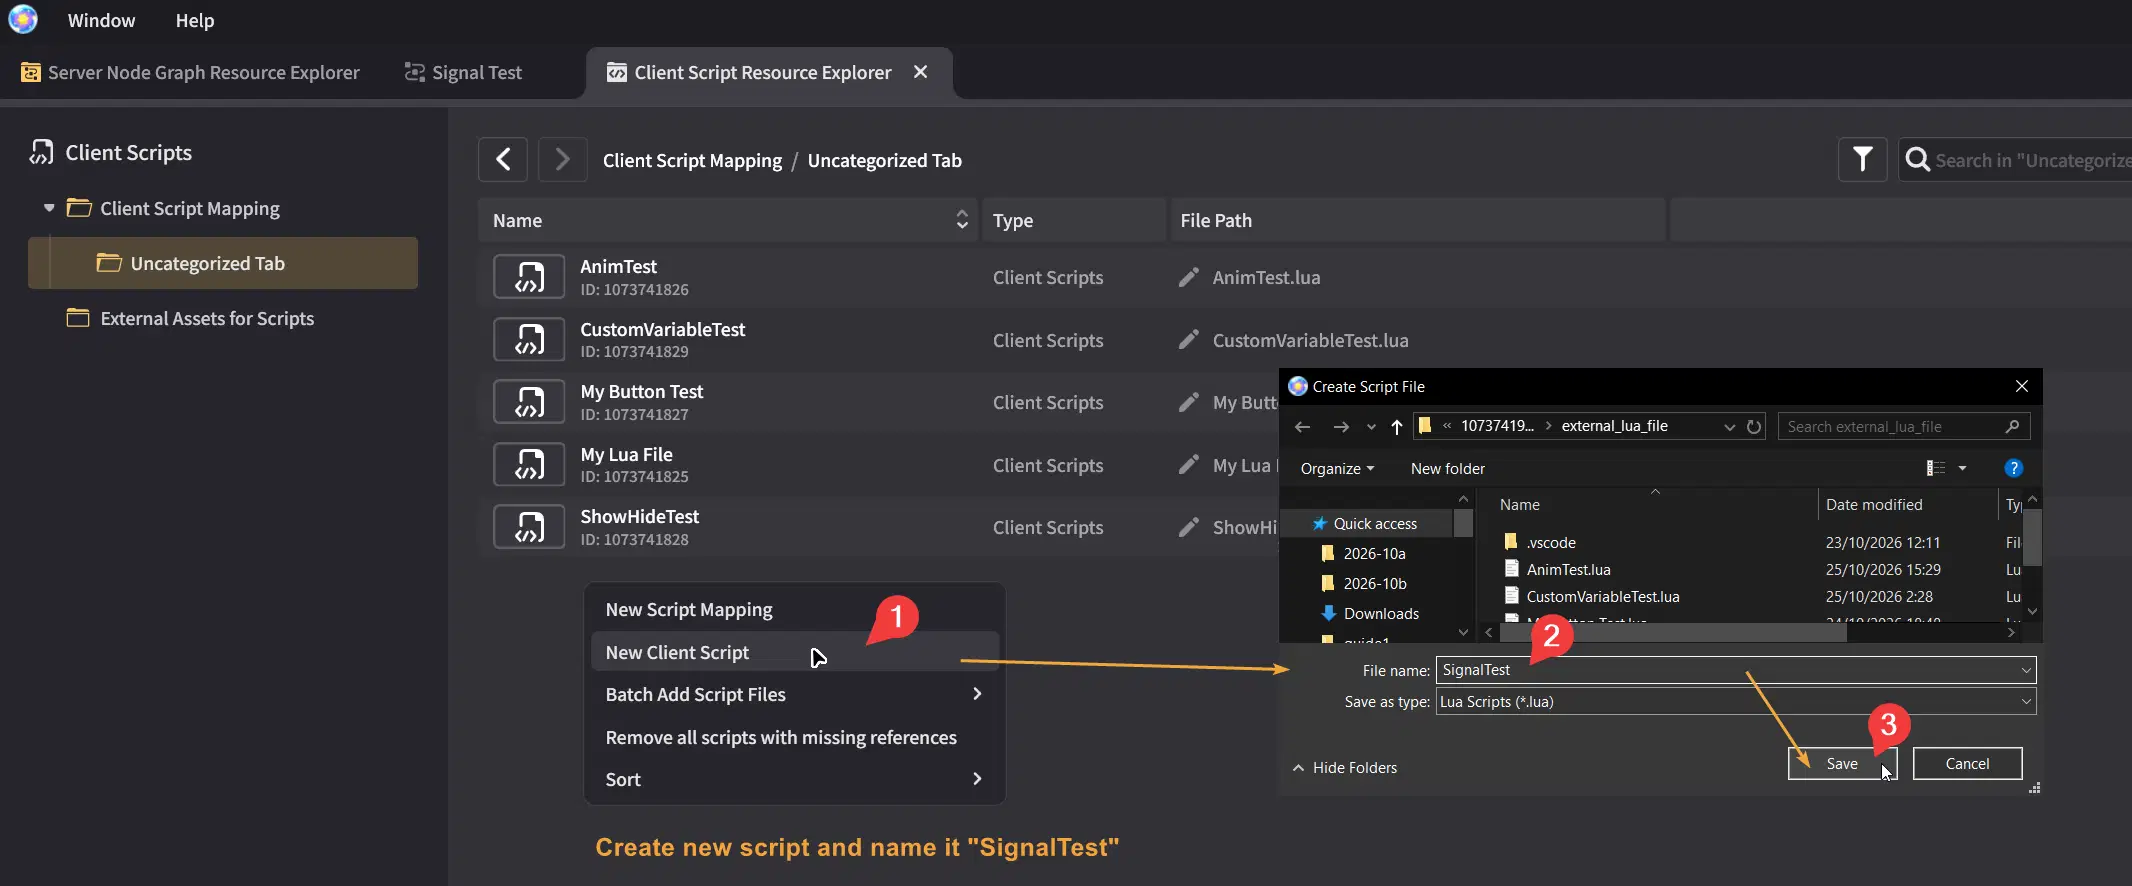
- Open Miliastra Sandbox Editor and open Client Script Resource Explorer from Window menu. Then create a New Client Script.
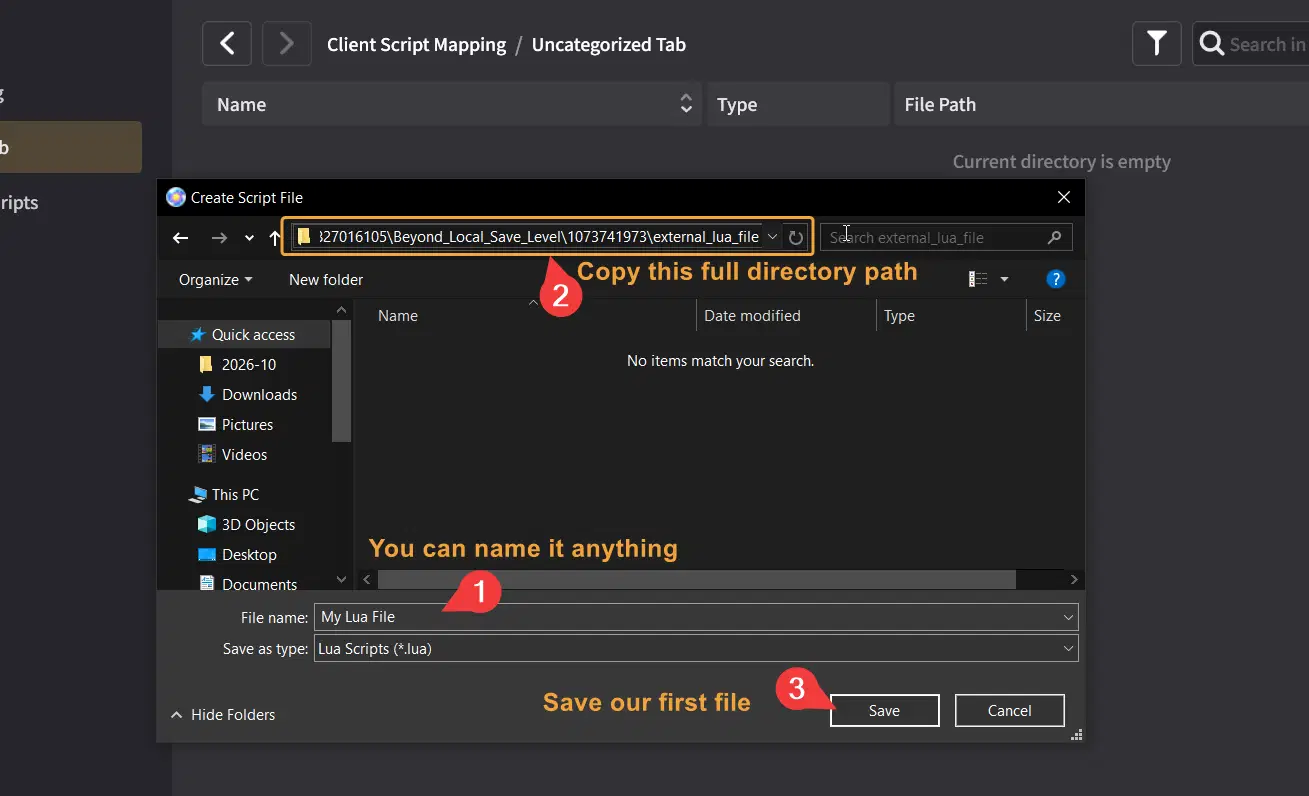
- Create an empty `.lua` file for your stage. You can give it any name, then copy the full directory path
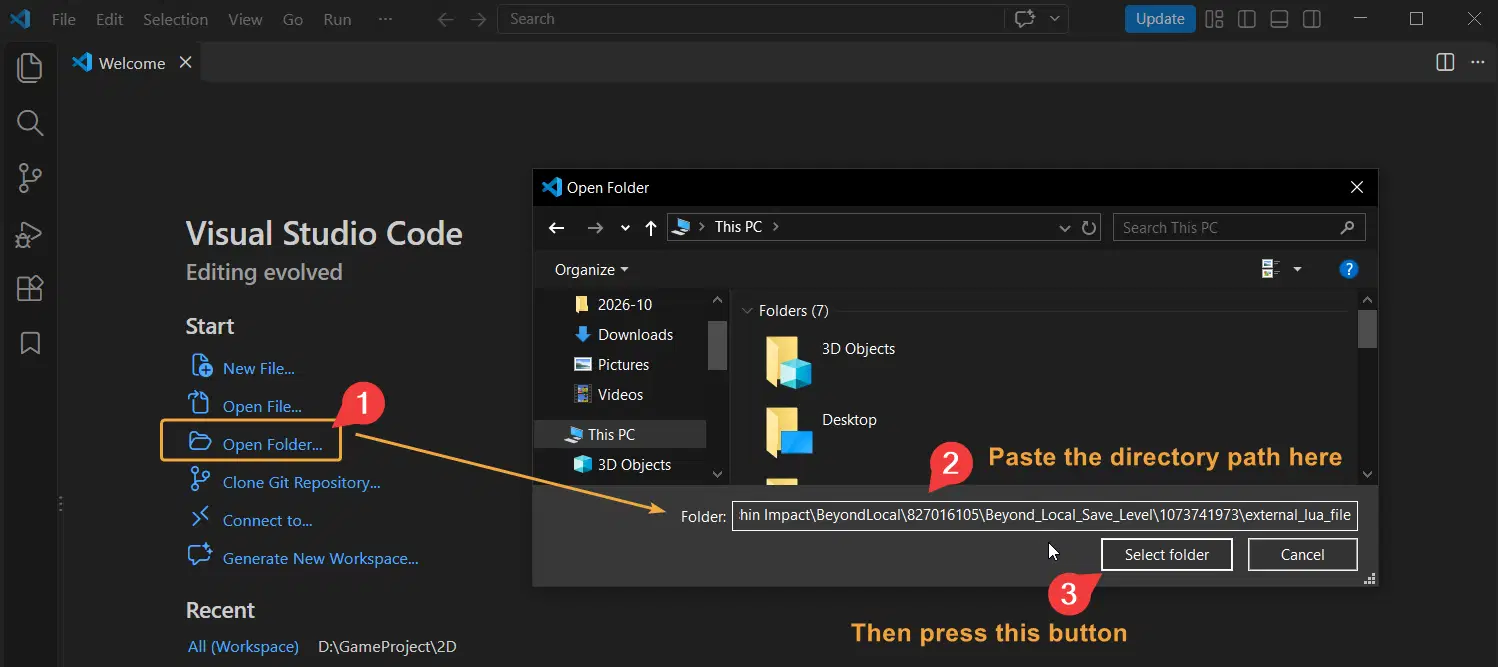
- Open Visual Studio Code and open the folder, as shown in the image below
- If Visual Studio Code asks whether you trust the folder, you'll need to trust it so that you can edit your Lua code
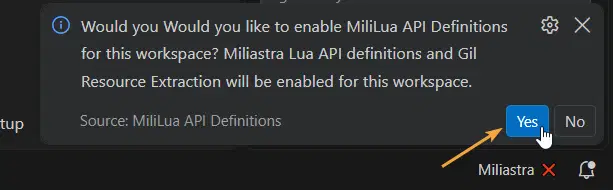
- You should see this notification in the bottom-left corner of Visual Studio Code, where you can enable the MiliLua extension
- Save your workspace so you can easily reopen it later. For example, I saved my workspace to the Desktop, as shown below
- Open your `.lua` file and try write some API. IntelliSense and code hints should now be enabled for your workspace, and you can start experimenting with Lua.
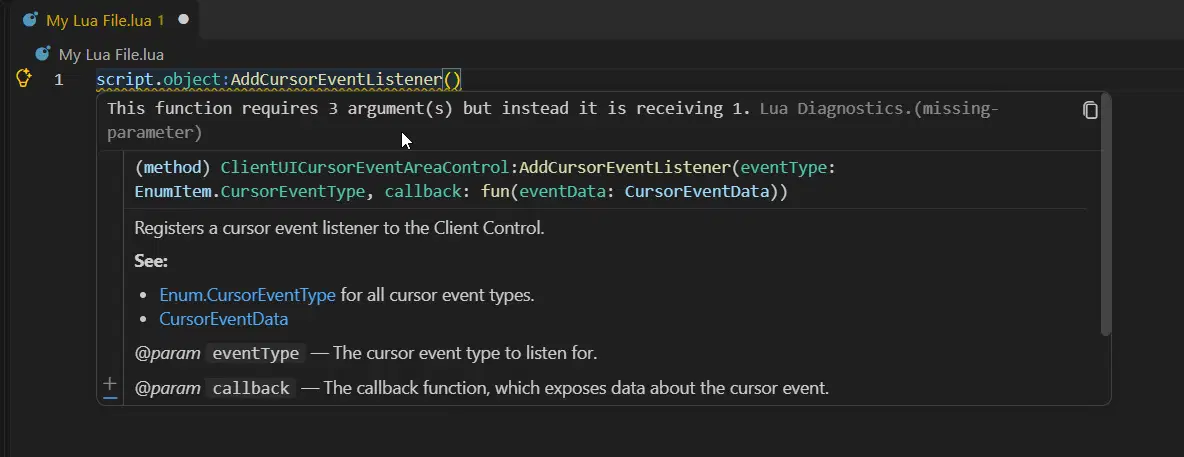
If you can see the code hints and autocomplete suggestions in your editor, as shown in the image above.
Congratulations! You've completed your first setup!
✦ Miliastra Lua API documentation
Miliastra provides many built-in APIs that you can use to create UI elements and implement other functionality.
These APIs are specific to Miliastra and are not part of the standard Lua language.
You can find the documentation for the currently available APIs at the link below:
You can use whichever documentation you prefer. These resources may receive updates over time, and new documentation may become available in the future.
2. Creating a Simple Animation with Tween
To get started, we'll create a simple image and use Lua to animate its rotation, scale, and position.
The final result should look like this:
Alright, let's follow the steps below to achieve the same result.
✦ Prepare the UI to be animated
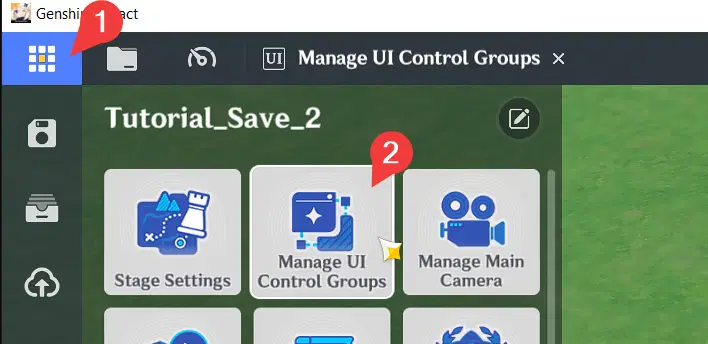
- Open the Miliastra editor in Genshin Impact
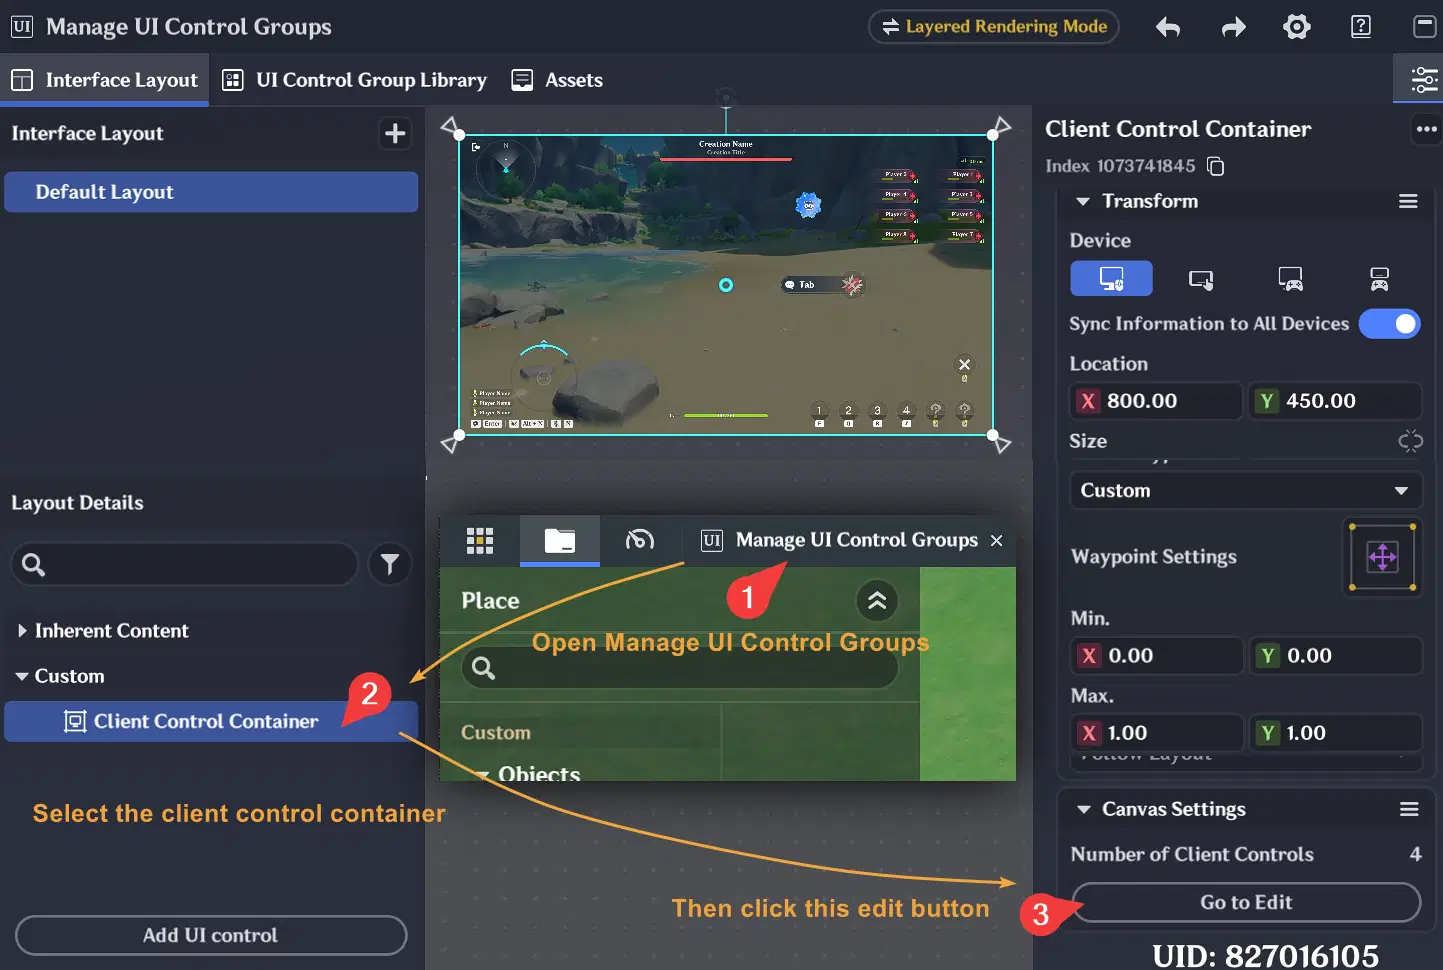
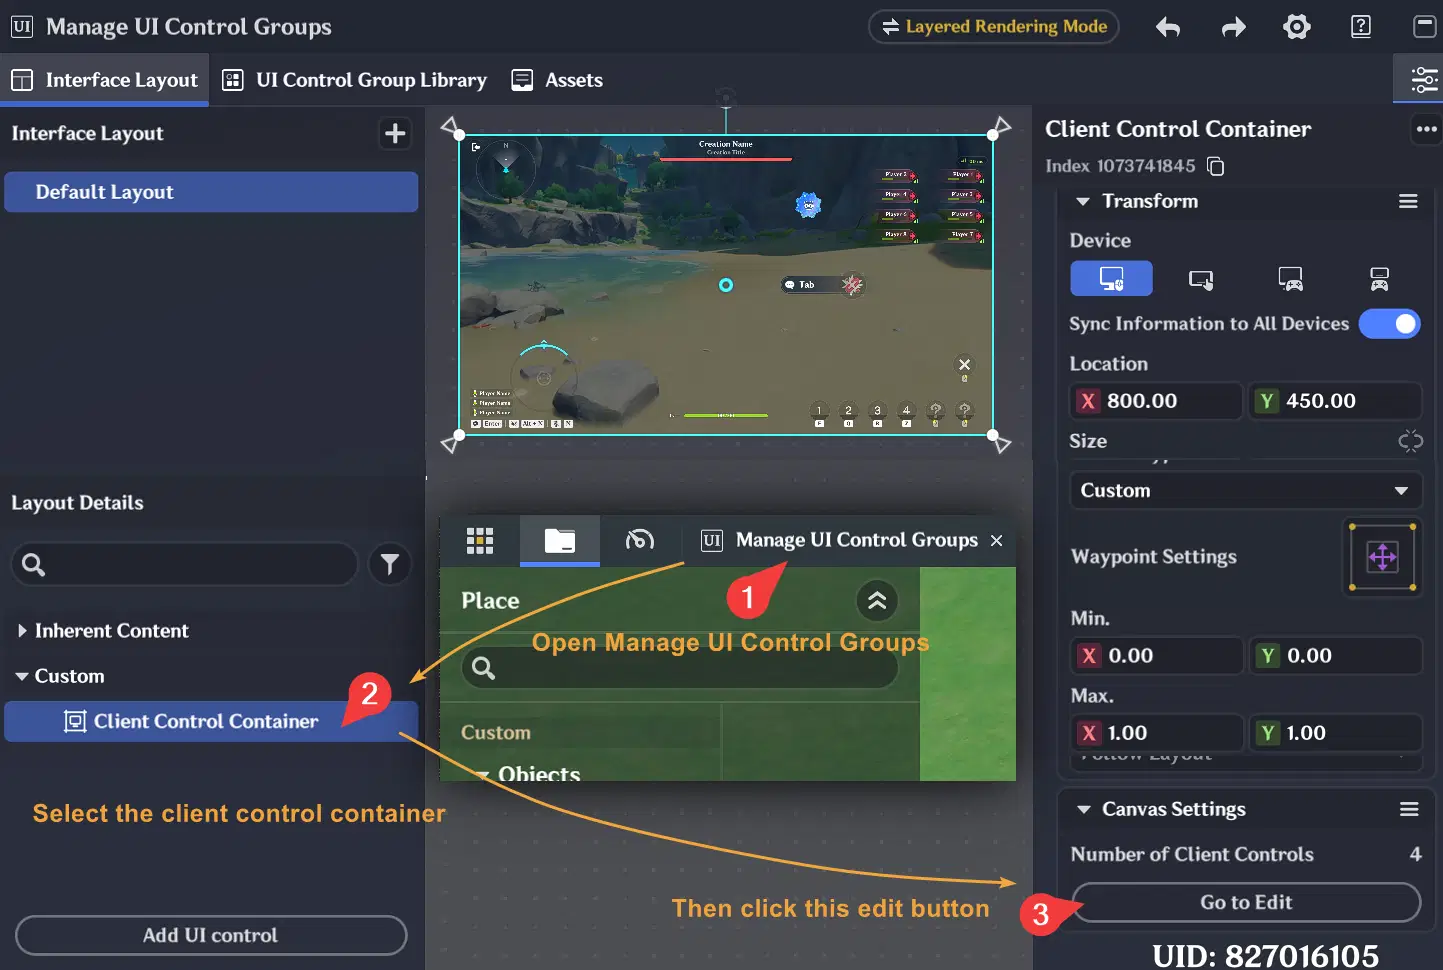
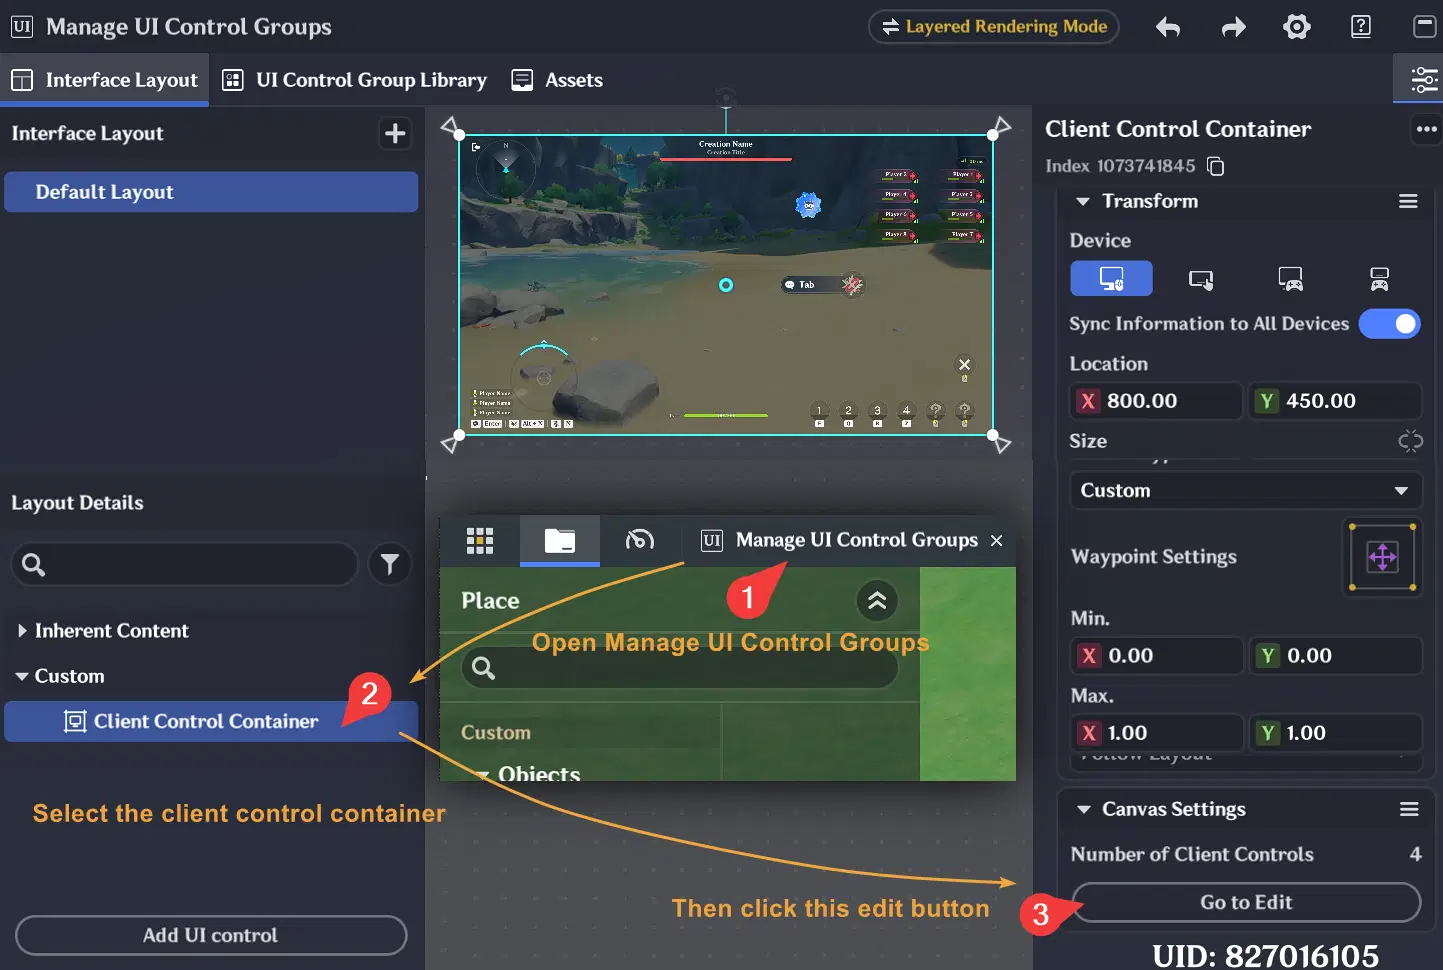
- Open the menu in the top-left corner and select Manage UI Control Groups
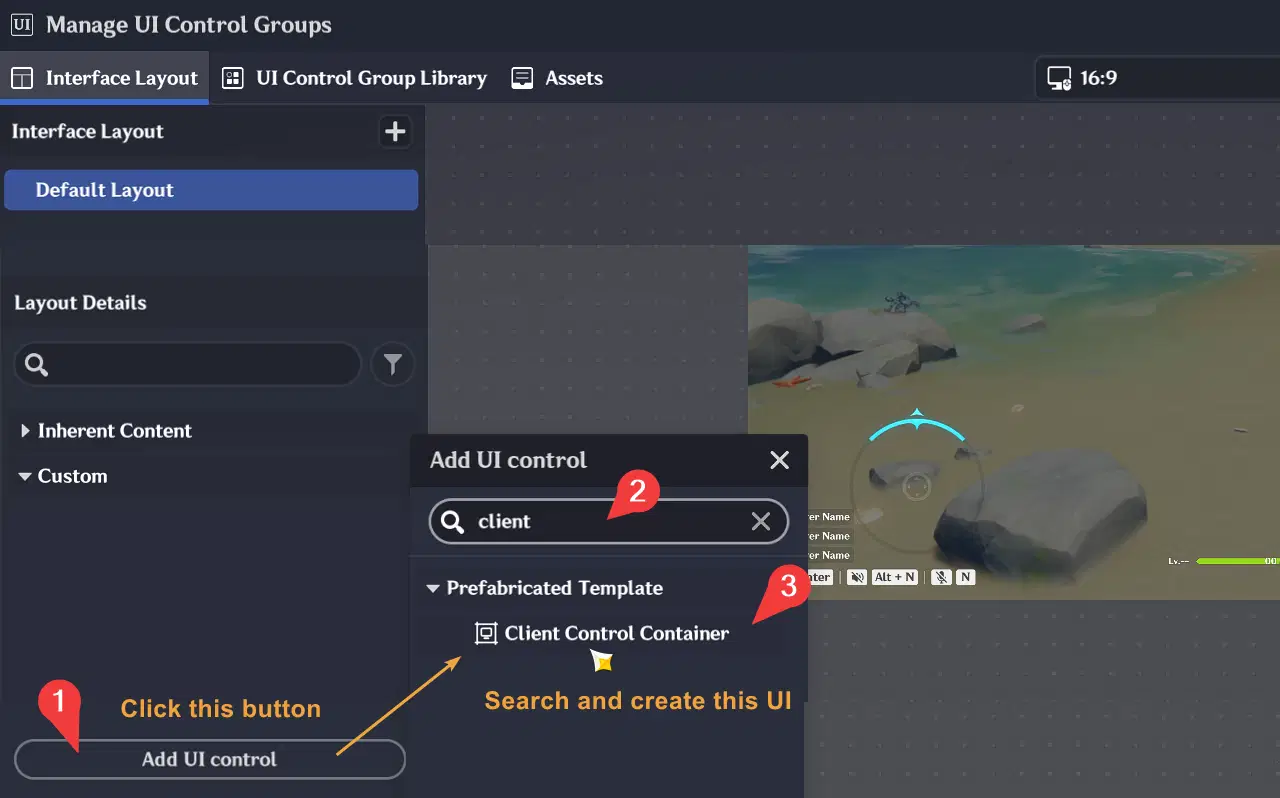
- Add UI control with template: Client Control Container
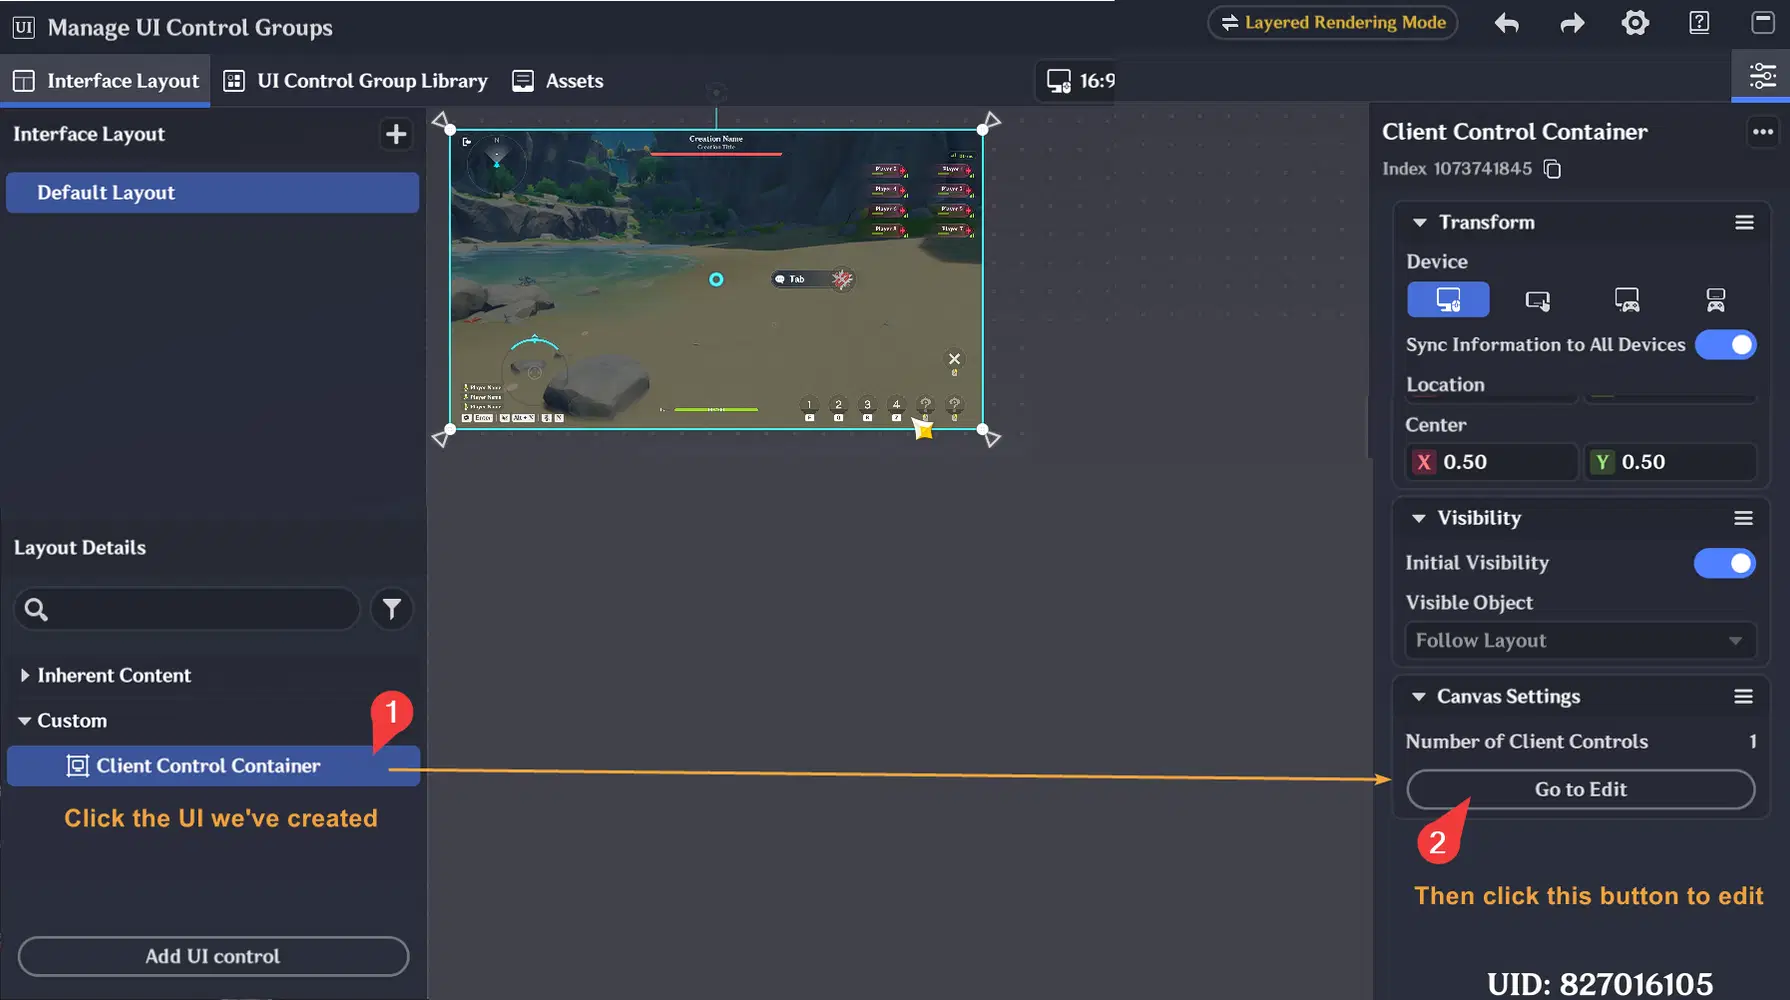
- Click Go to Edit button to edit the Client Control Container UI
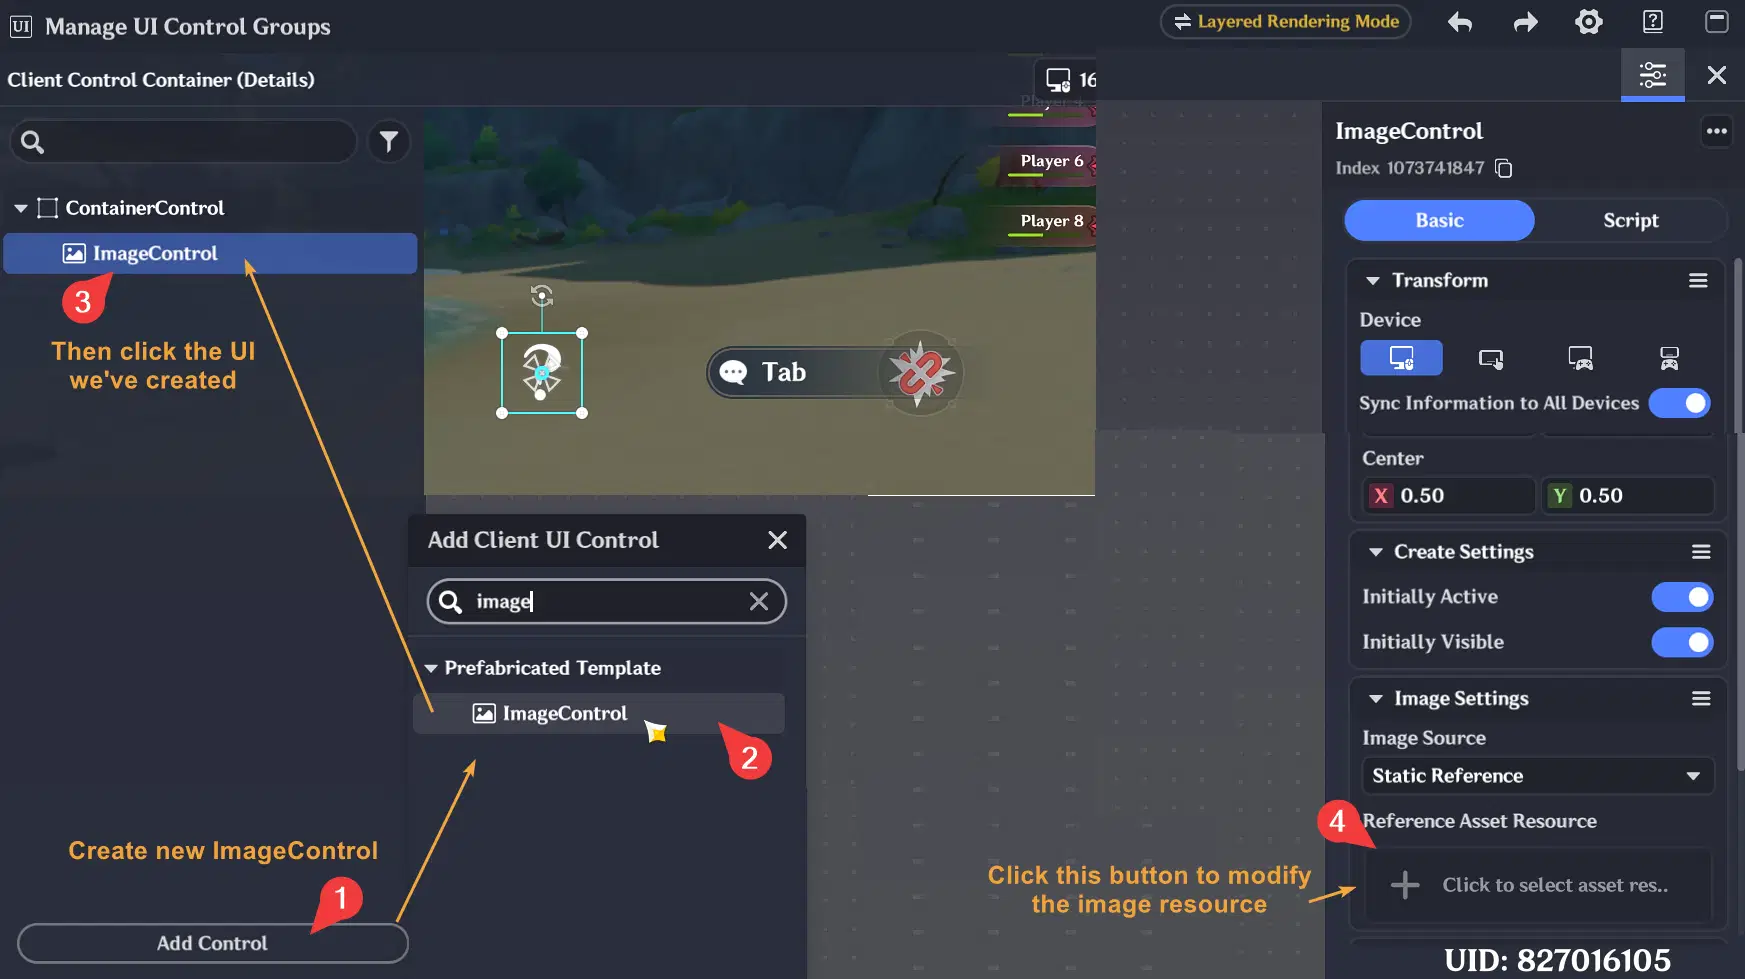
- Create new ImageControl and choose an image you'd like to animate.
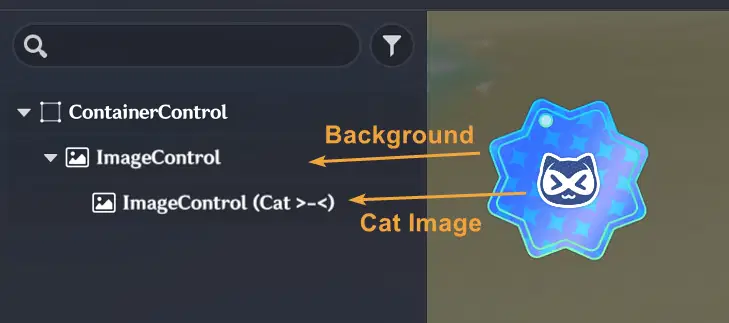
- You can also add more ImageControl to your UI. Child UI will be animated along with their parent. To make an ImageControl a child of another UI, simply drag and drop it onto the parent to make a hierarchy.
- Once your UI is ready, create an empty Lua file named `AnimTest.lua`
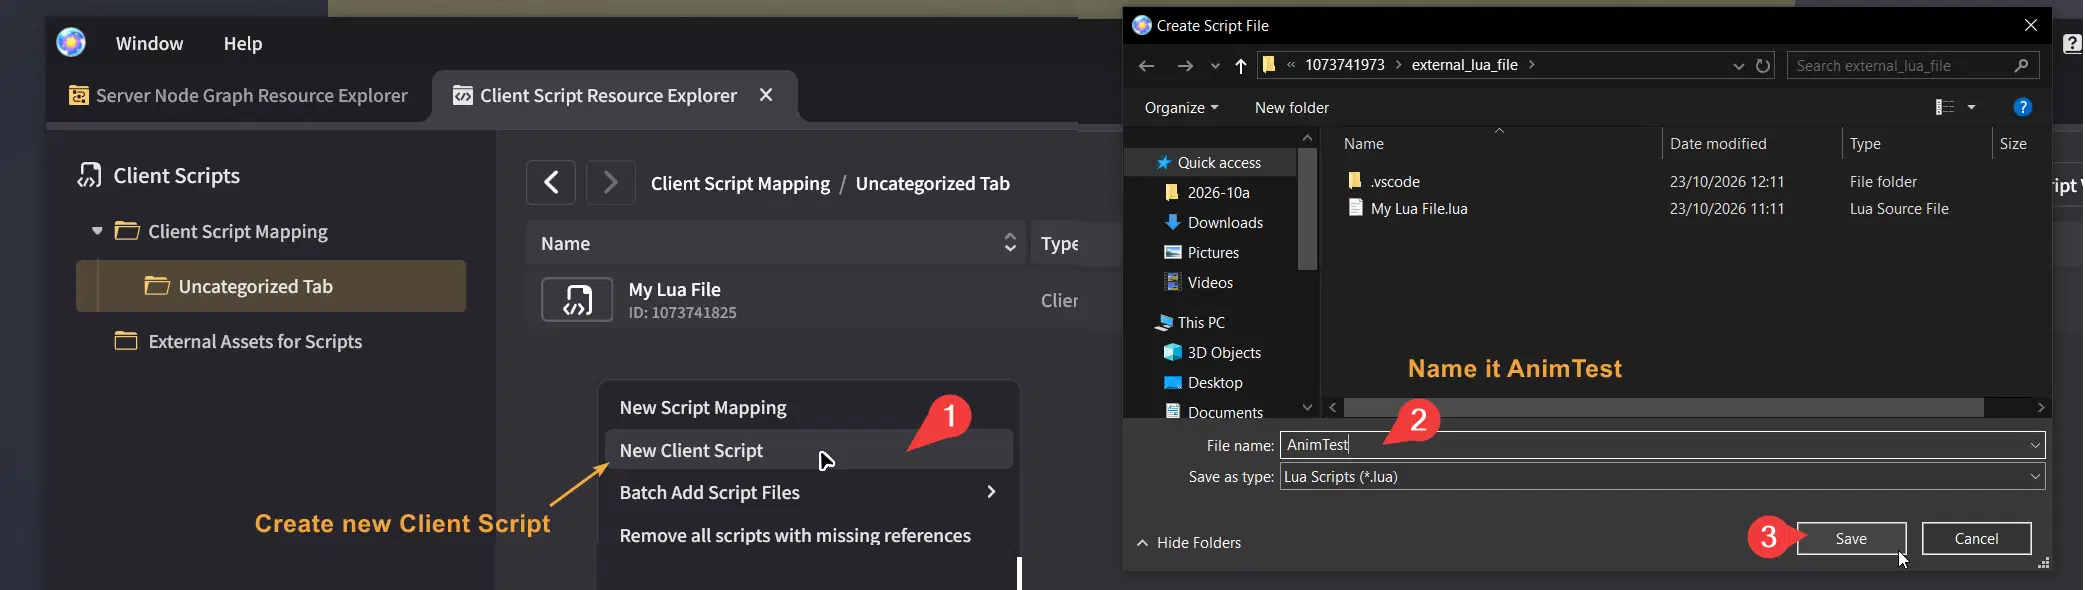
- Open your Visual Studio Code, open the `AnimTest.lua` file and add the following code
-------------------------------
-- OnStart is part of the lifecycle and is called automatically by the system
-- Make sure the function name matches exactly
function OnStart()
-- script.object refers to the UI that this script is attached to
local ui = script.object
-- Store the UI's original scale, Y position, and Z rotation
local origScaleX = ui.localScaleX
local origScaleY = ui.localScaleY
local origPositionY = ui.anchoredPositionY
local origRotationZ = ui.localRotationZ
-- Create a tween animation for this UI
local anim = game.Tween(ui, {
localScaleX = origScaleX + 1,
localScaleY = origScaleY + 1,
localRotationZ = origRotationZ + 720,
anchoredPositionY = origPositionY + 200,
}, 2)
-- Optional: add easing to make the animation feel smoother
anim:SetEase(Enum.EaseType.OutCubic)
-- Loop the animation instead of playing it only once
anim:SetLoops(-1)
-- Start the animation
anim:Play()
end
-------------------------------
- The pasted code should be like this, and make sure to save the file
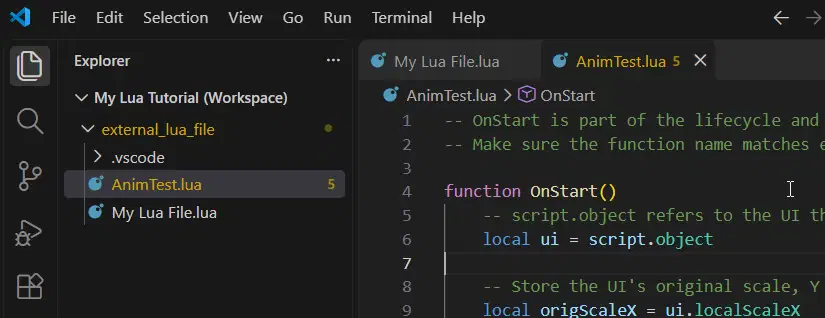
If you are new to Lua, you can use an AI assistant to help you understand the code. Keep in mind that some functions and APIs are specific to Miliastra, so check the Miliastra Lua documentation when needed.
After saving the file:
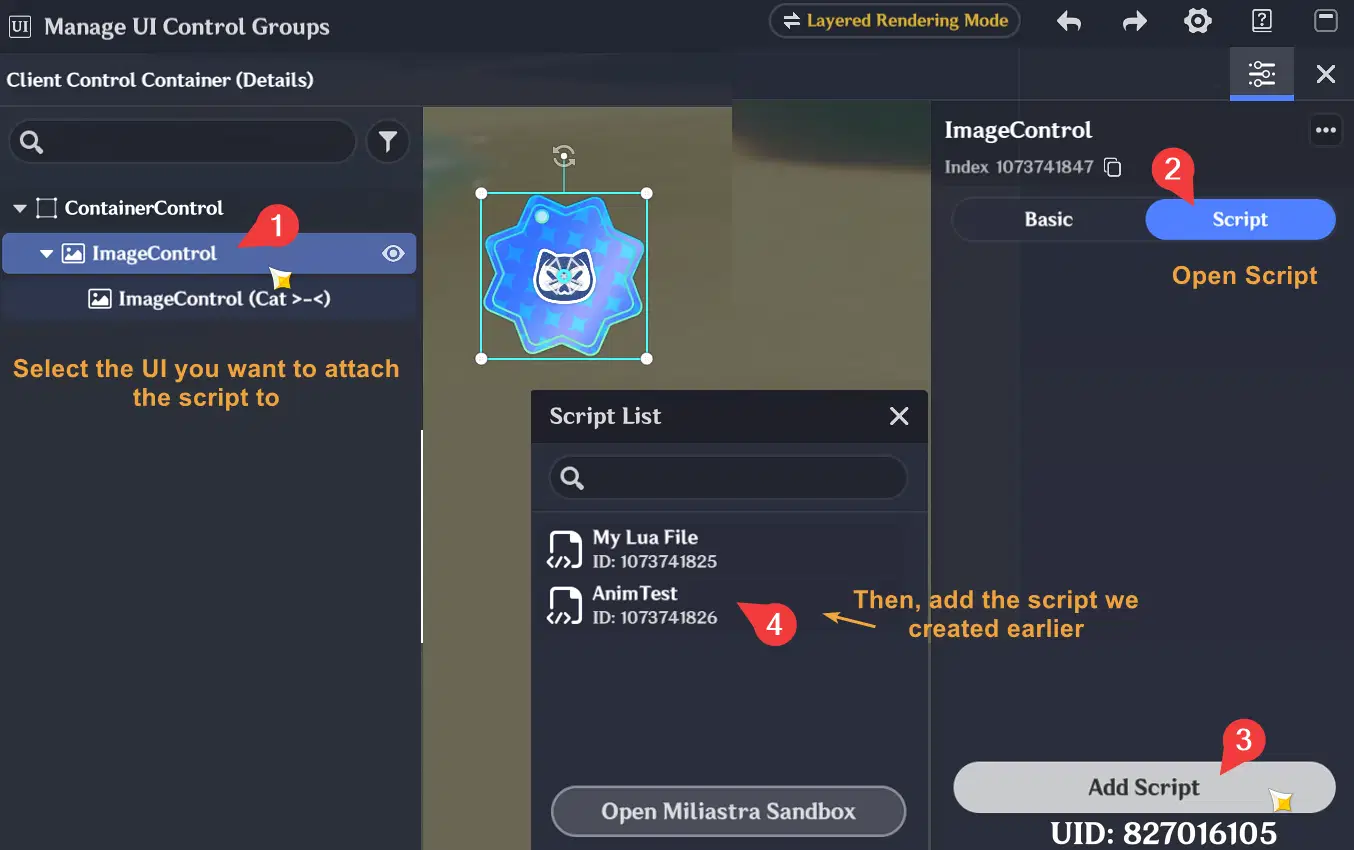
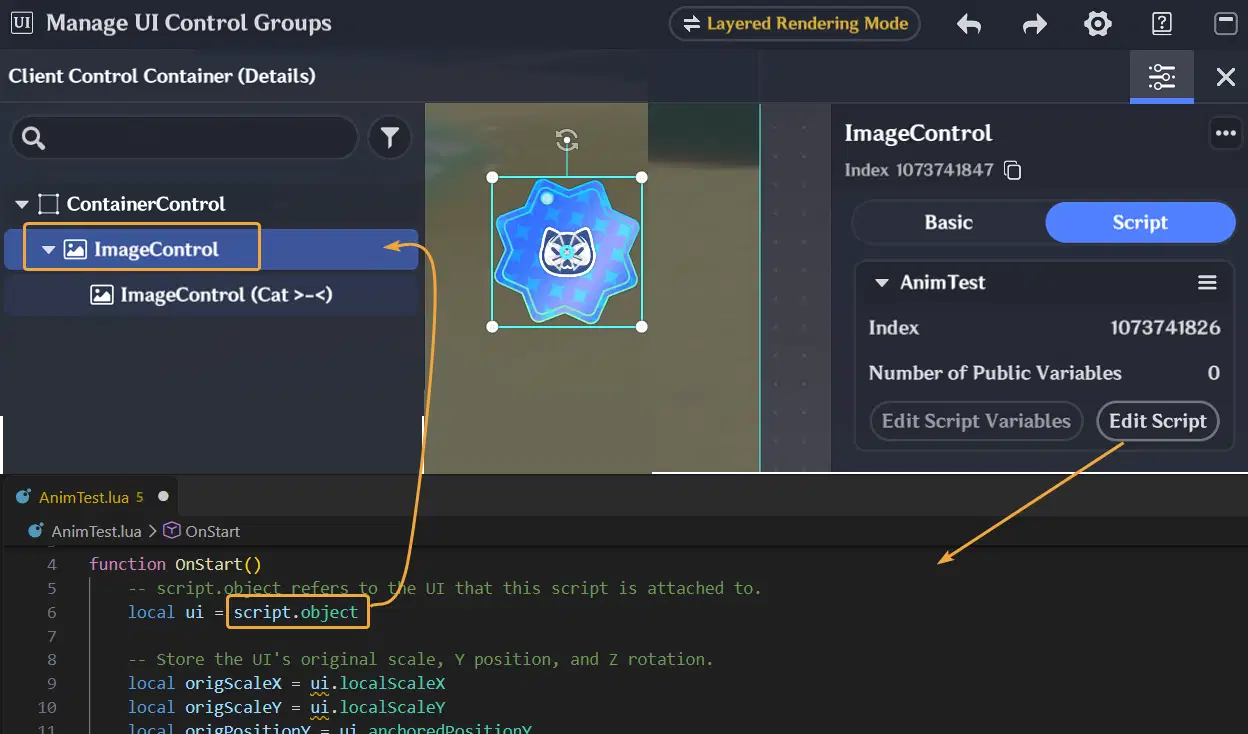
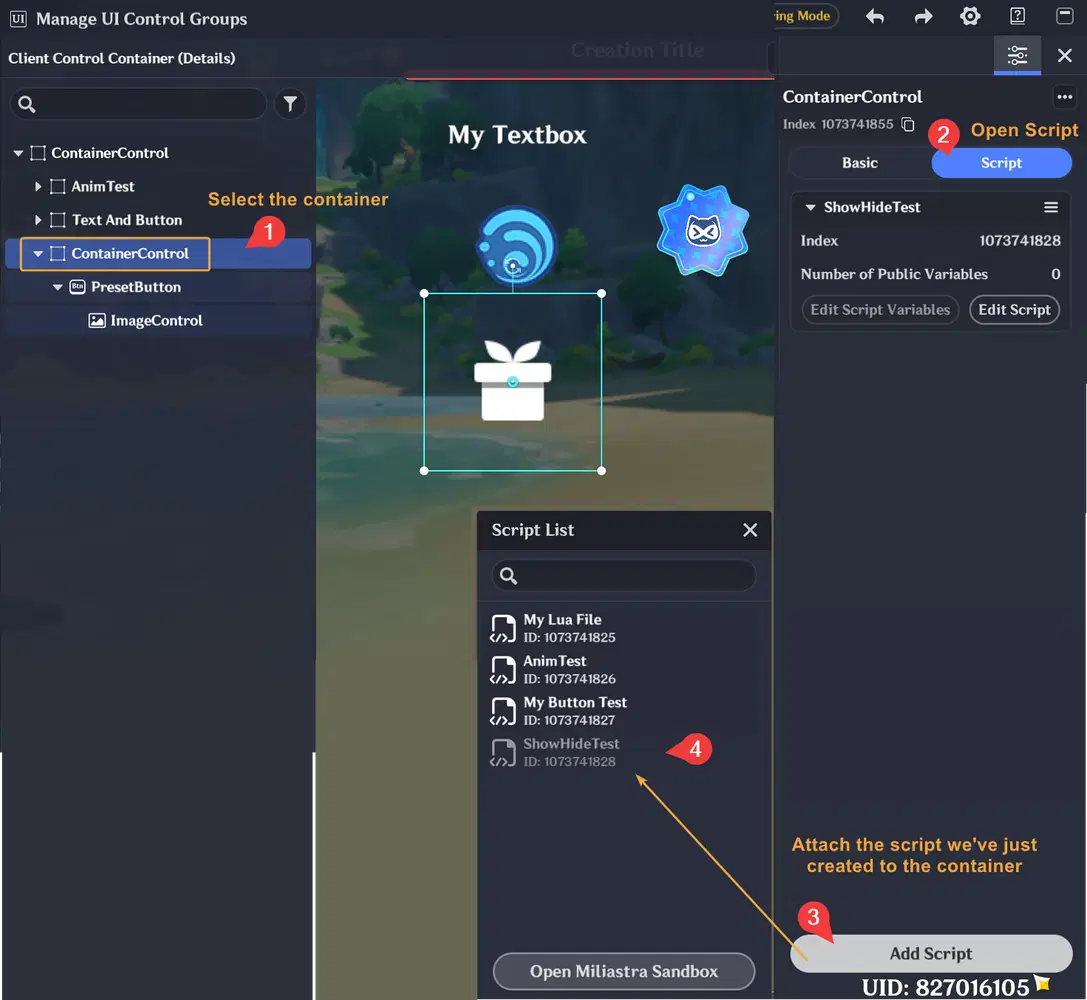
- Let's attach the script to the UI we created earlier. Make sure to attach it to the correct UI so that the `script.object` reference points to the intended UI element like shown below:
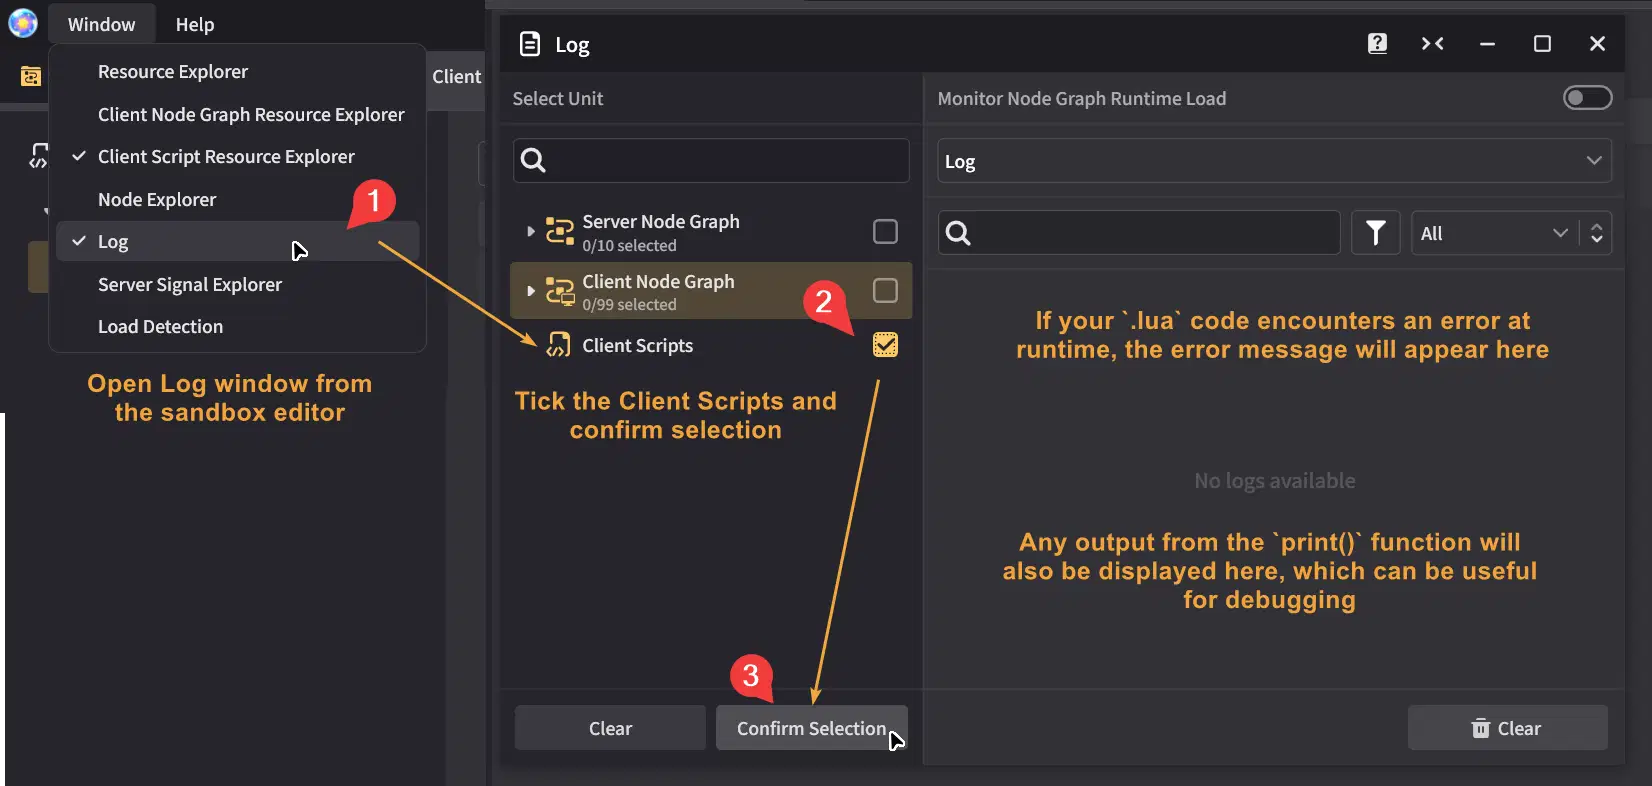
- Before testing our script, it's a good idea to enable the logs so we can check for any errors that occur while the .lua code is running in the background. Especially when you start to modify the working sample code, if any error occurs it will be shown in this log editor.
- Alright, let's run the Play Test. You'll see the result looks like this:
Congratulations if you made it!
You've just created your first working Lua script, and now you're ready to explore more!
✦ Playing animations in sequence
To play animations sequentially, with each animation starting after the previous one finishes, you can also use `TweenSequence`. We will rewrite our previous script for this experiment.
- Reopen `AnimTest.lua` in Visual Studio Code and replace all of its contents with the code below
-------------------------------
-- Here, script.object refers to the Image Control UI we've created earlier
function OnStart()
local ui = script.object
-- Store the UI's original scale and position
local origScaleX = ui.localScaleX
local origScaleY = ui.localScaleY
local origPositionX = ui.anchoredPositionX
local origPositionY = ui.anchoredPositionY
local anim = game.TweenSequence()
-- Animation 1: enlarge the image and move it along the X axis
anim:Append(game.Tween(ui, {
localScaleX = origScaleX + 0.3,
localScaleY = origScaleY + 0.3,
anchoredPositionX = origPositionX + 200,
}, 1))
-- Animation 2: make the image slightly smaller than its original size
-- and move it along the Y axis
anim:Append(game.Tween(ui, {
localScaleX = origScaleX - 0.1,
localScaleY = origScaleY - 0.1,
anchoredPositionY = origPositionY + 200,
}, 1))
-- Animation 3: shrink the image further and restore its X position
anim:Append(game.Tween(ui, {
localScaleX = origScaleX - 0.3,
localScaleY = origScaleY - 0.3,
anchoredPositionX = origPositionX,
}, 1))
-- Animation 4: restore the original scale and Y position
-- so the sequence is ready to loop from the original state
anim:Append(game.Tween(ui, {
localScaleX = origScaleX,
localScaleY = origScaleY,
anchoredPositionY = origPositionY,
}, 1))
-- Loop and start the sequence
anim:SetLoops(-1)
anim:Play()
end
-------------------------------
The finished animation sequence will look like below:
It consists of four animations that modify the position and the image scale
3. Understanding the Script Lifecycle
Now that your first script is up and running, let's take a closer look at the script lifecycle.
In the previous example, you've used the `OnStart` function and placed your code inside it. Some lifecycle functions are called automatically when defined in your `.lua` file, while others are only called under certain conditions. The call order is:
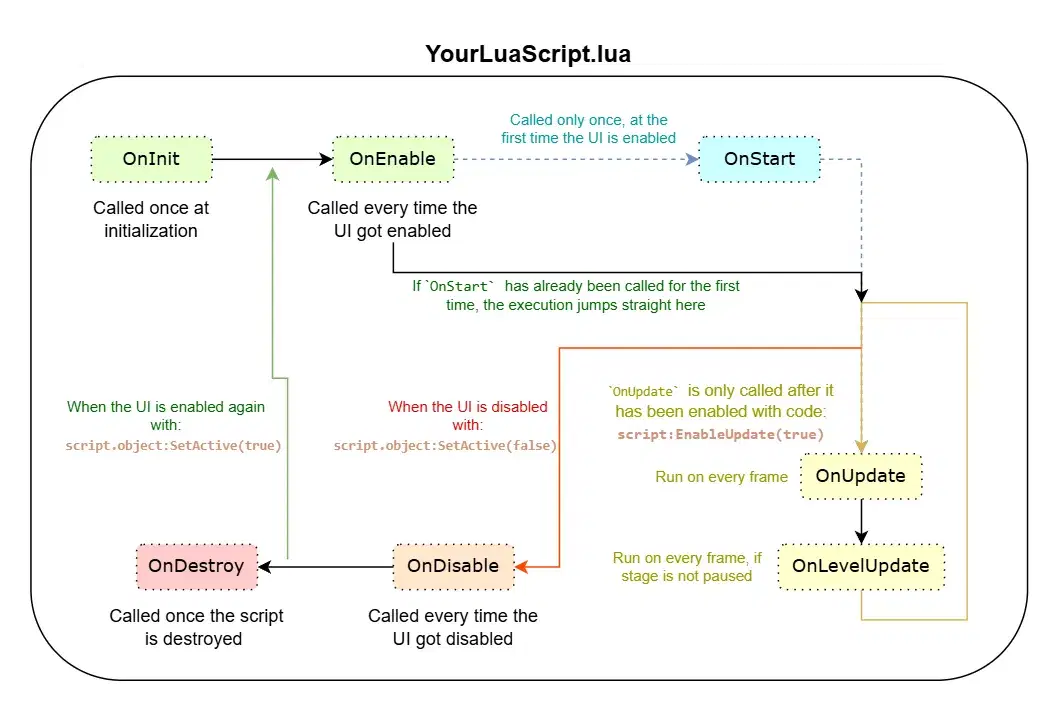
Here's a quick breakdown of what each function does:
- `OnInit` is called once for the element the script is attached to.
- `OnEnable` is called when the engine activates or enables the UI. It is commonly used to register event listeners, which can then be removed in `OnDisable` lifecycle
- `OnStart` is called once, when the UI is activated for the first time.
- `OnUpdate` is called every frame. You must first enable it with `script:EnableUpdate(true)`.
- `OnLevelUpdate` is called every frame while the Stage is not paused. You must also enable it with `script:EnableUpdate(true)`.
- `OnDisable` is called when the engine disables the UI so it is no longer shown to the player. It is a good place to unregister event listeners.
- `OnDestroy` is called once when the UI is removed and no longer used. You can use it to release references or update other variables.
✦ Additional Information About Scripts
The value of `script.object` depends on which UI control the script is attached to. It references the UI control that the script is attached to.
In our previous example, we attached the script to a UI control.
We can easily get reference of that control using `script.object` like below:
Alright, let's continue our experiment by create a basic interactive UI 
4. Make a button to update text box value
When creating user interface, it often contains controls that players can interact with, such as buttons, as well as text fields that display information. In this example, we'll learn how to listen for button clicks and use them to update the text field's value.
For a quick preview, we'll create a UI like the one shown below. When you click the Hydro image, the text box's value will change.
✦ Prepare the button and the text box
- Let's edit our Client Control Container again, so we can create new button and text box
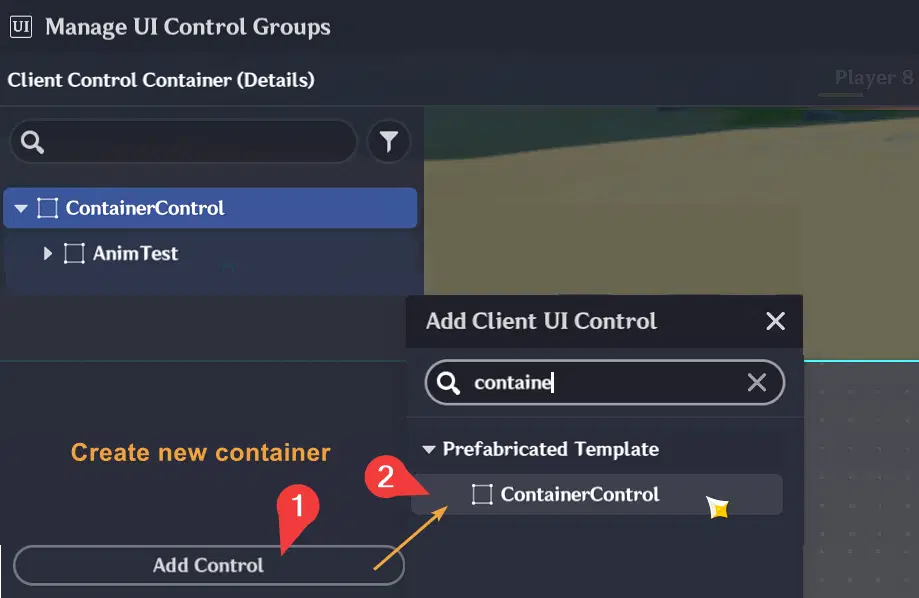
- Create a ContainerControl to hold the button and text field
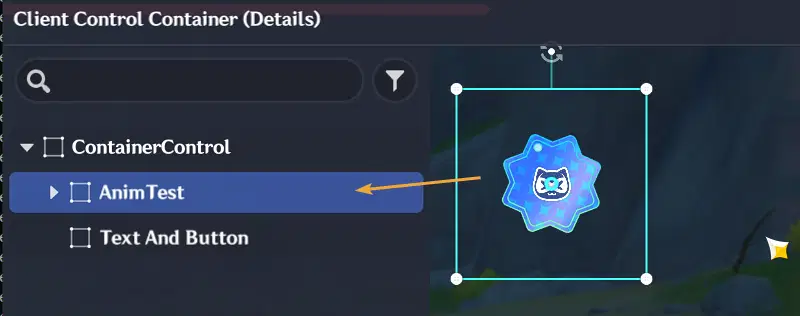
- I've also placed the UI from our previous example in a separate container to keep things organized
- Let's continue by adding a PresetButton and a TextBoxControl to our new container
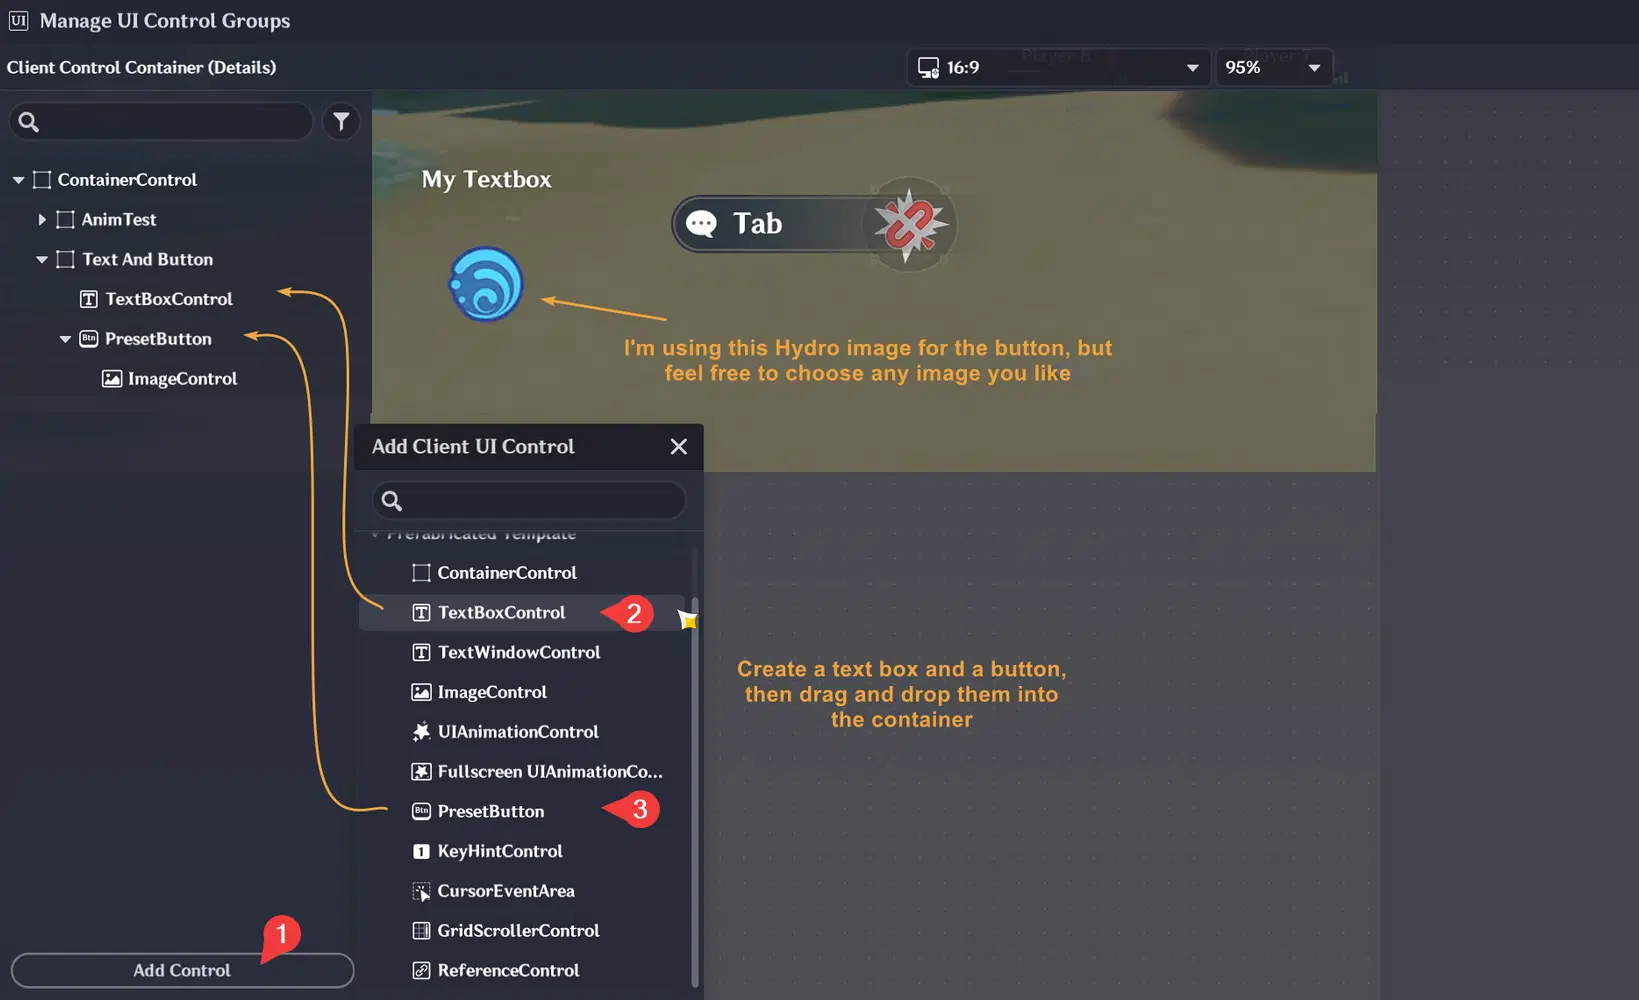
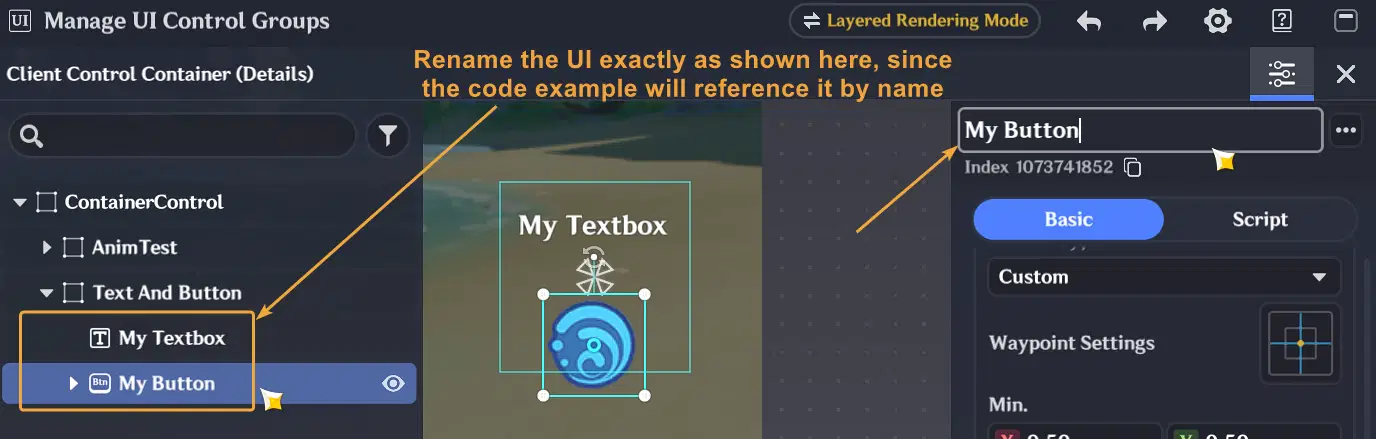
- Important: Rename the UI to `My Textbox` and `My Button` because the sample Lua code will looking for this name
- Create an empty `.lua` file and name it `My Button Test.lua`
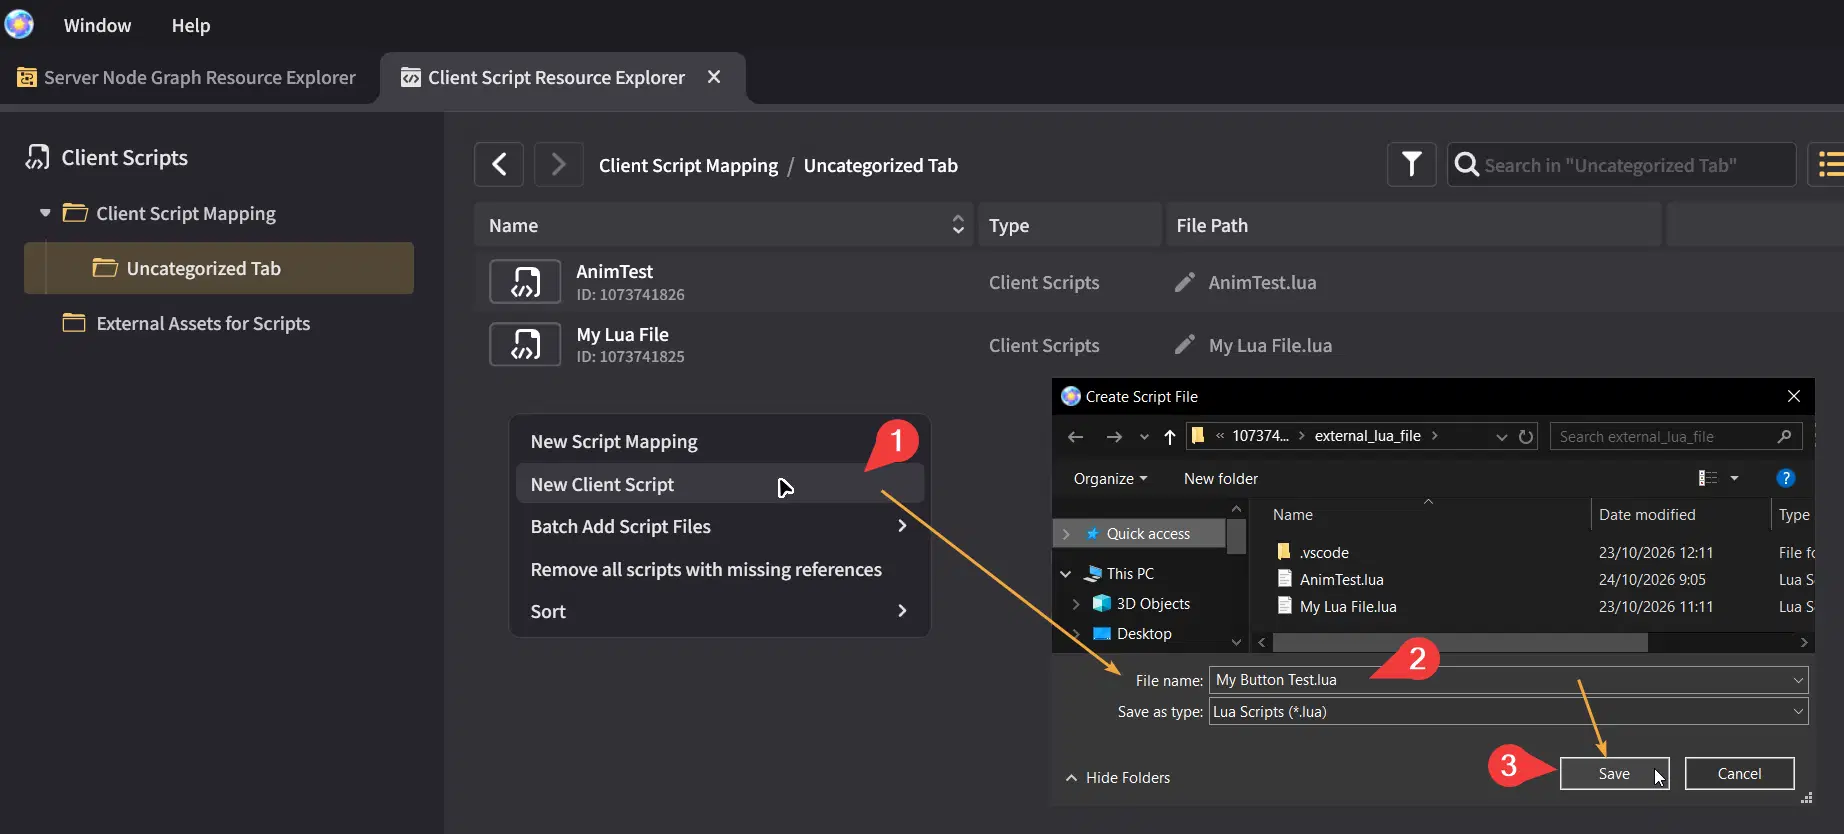
- Open the file in Visual Studio Code and add the following code to your Lua file:
-------------------------------
-- script.object refers to the ContainerControl
-- Register the button event listeners when the UI is enabled
function OnEnable()
local ui = script.object:FindChild("My Button")
ui:AddCursorEventListener(Enum.CursorEventType.CursorClick, MyButtonTrigger)
ui:AddKeyEventListener(Enum.KeyEventType.KeyboardCraftspersonKey13Down, MyButtonTrigger)
end
-- Remove the event listeners when the UI is disabled
-- This prevents duplicate listeners when the UI is enabled again later
function OnDisable()
local ui = script.object:FindChild("My Button")
ui:RemoveCursorEventListener(Enum.CursorEventType.CursorClick, MyButtonTrigger)
ui:RemoveKeyEventListener(Enum.KeyEventType.KeyboardCraftspersonKey13Down, MyButtonTrigger)
end
-- Keep the number outside the functions so it retains its value
-- and can be accessed by any function in this script
local myNumber = 0
function MyButtonTrigger()
local ui = script.object
myNumber = myNumber + 1
ui:FindChild("My Textbox").text = "Stored Number: " .. myNumber
end
-------------------------------
- Then attach the script to the ContainerControl so it can easily access both UI elements inside the container
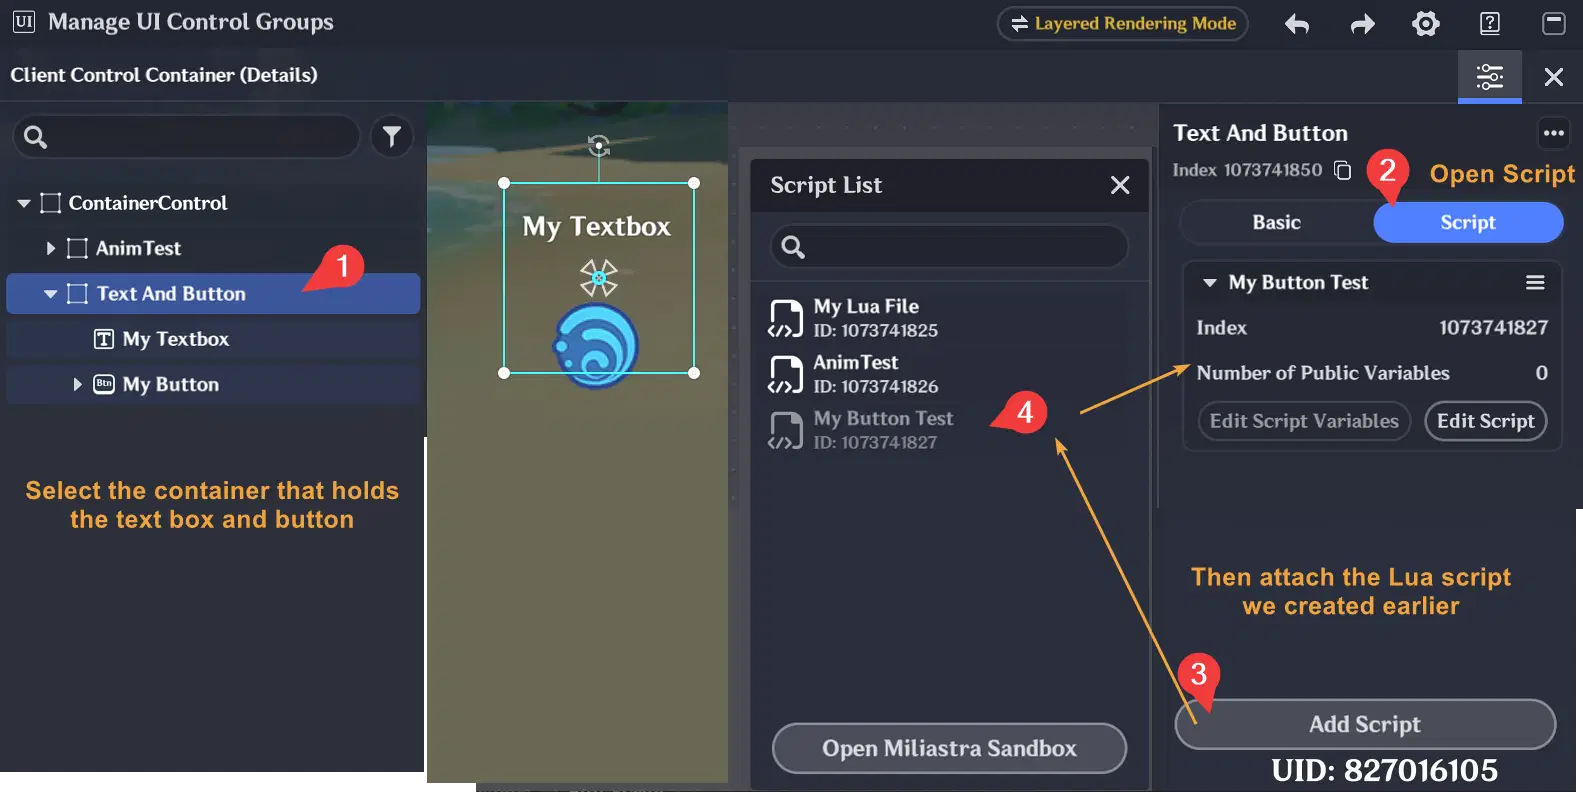
Quick check: the UI elements must be named exactly `My Button` and `My Textbox`, or you'll need to update the names in the code.
Let's start test it 
Each time the button is clicked, the number should increase and the text field should display the updated value like below:
5. Show and Hide UI with a Script
Next, let's make a simple toggle button that shows or hides the UI we created in our previous experiment. This example is pretty simple, but I hope it gives you an idea of how to show and hide UI elements.
For a quick preview, we'll create a button like the one shown below:
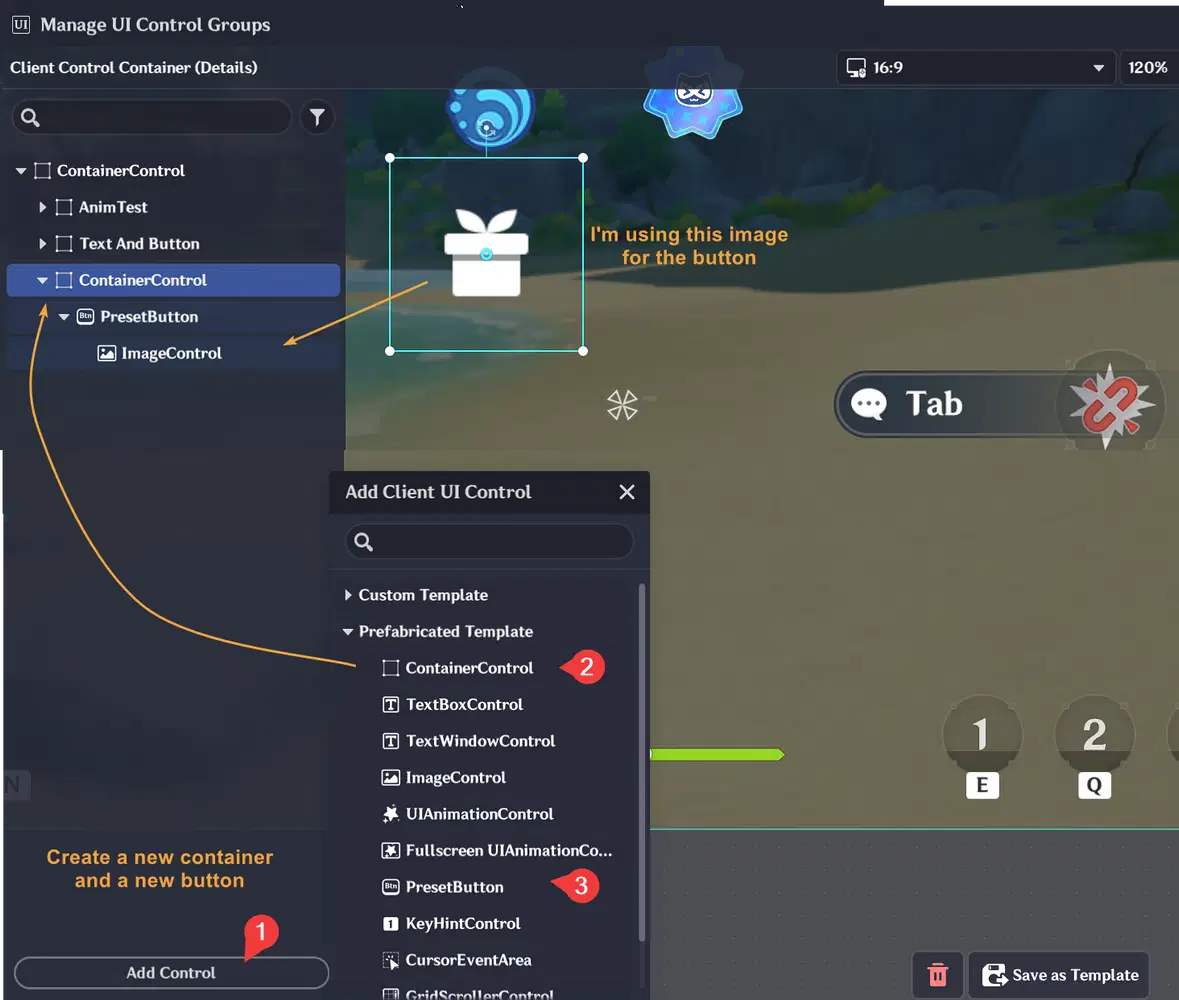
The white button that toggles the visibility of the other UI
✦ Let's set up the toggle button UI
- Let's edit our Client Control Container again, so we can create new button and text box
- Create a new ContainerControl and a PresetButton. You can use any image you like for the button.
- Create a Lua file named `ShowHideTest.lua`
- Then write the following code:
-------------------------------
-- script.object refers to the PresetButtonControl used as the toggle button
function OnEnable()
script.object:AddCursorEventListener(
Enum.CursorEventType.CursorClick,
MyToggleTrigger
)
end
function OnDisable()
script.object:RemoveCursorEventListener(
Enum.CursorEventType.CursorClick,
MyToggleTrigger
)
end
local isActive = true
function MyToggleTrigger()
local parentUI = script.object.parent
isActive = not isActive
-- You can use SetVisible instead of SetActive
-- SetVisible changes visibility without triggering OnEnable or OnDisable
-- on the target UI's attached script
--
-- SetActive activates or deactivates the target UI and triggers
-- OnEnable or OnDisable on its attached script
parentUI:FindChild("AnimTest"):SetActive(isActive)
parentUI:FindChild("Text And Button"):SetActive(isActive)
end
-------------------------------
Quick Check: make sure the target elements are named `AnimTest` and `Text And Button`, or change the names in the code to match your UI name.
- Then attach the script to the toggle button and test it
- Clicking the button should now show or hide both target UI elements (`AnimTest` and `Text And Button`)
6. Reading Custom Variables from the Character entity
So far, we've used Lua to control the UI itself. Now let's make it display data from the game. In this example, we'll listen for changes to a custom variable on the Character Entity using `script:RegisterCustomVariableChangedHandler(enum, varName, callback)`.
As of Genshin Impact version 7.1, you can read custom variables from these three entity types:
- Character Entity: `Enum.CustomVariableEntityType.AvatarSelf`
- Player Entity: `Enum.CustomVariableEntityType.PlayerSelf`
- Stage Entity: `Enum.CustomVariableEntityType.Level`
If you want to read a variable from another entity, such as a dynamic unit created from a prefab, you'll need to use a signal to transfer the data from the server to Lua.
For this experiment, we'll use `game.GetGlobalCustomVariableValue` to retrieve a custom variable value from a Character Entity.
Quick preview, here's what the result should look like after completing this tutorial.
The character's custom variable updates as it enters different zones, and the UI updates automatically:
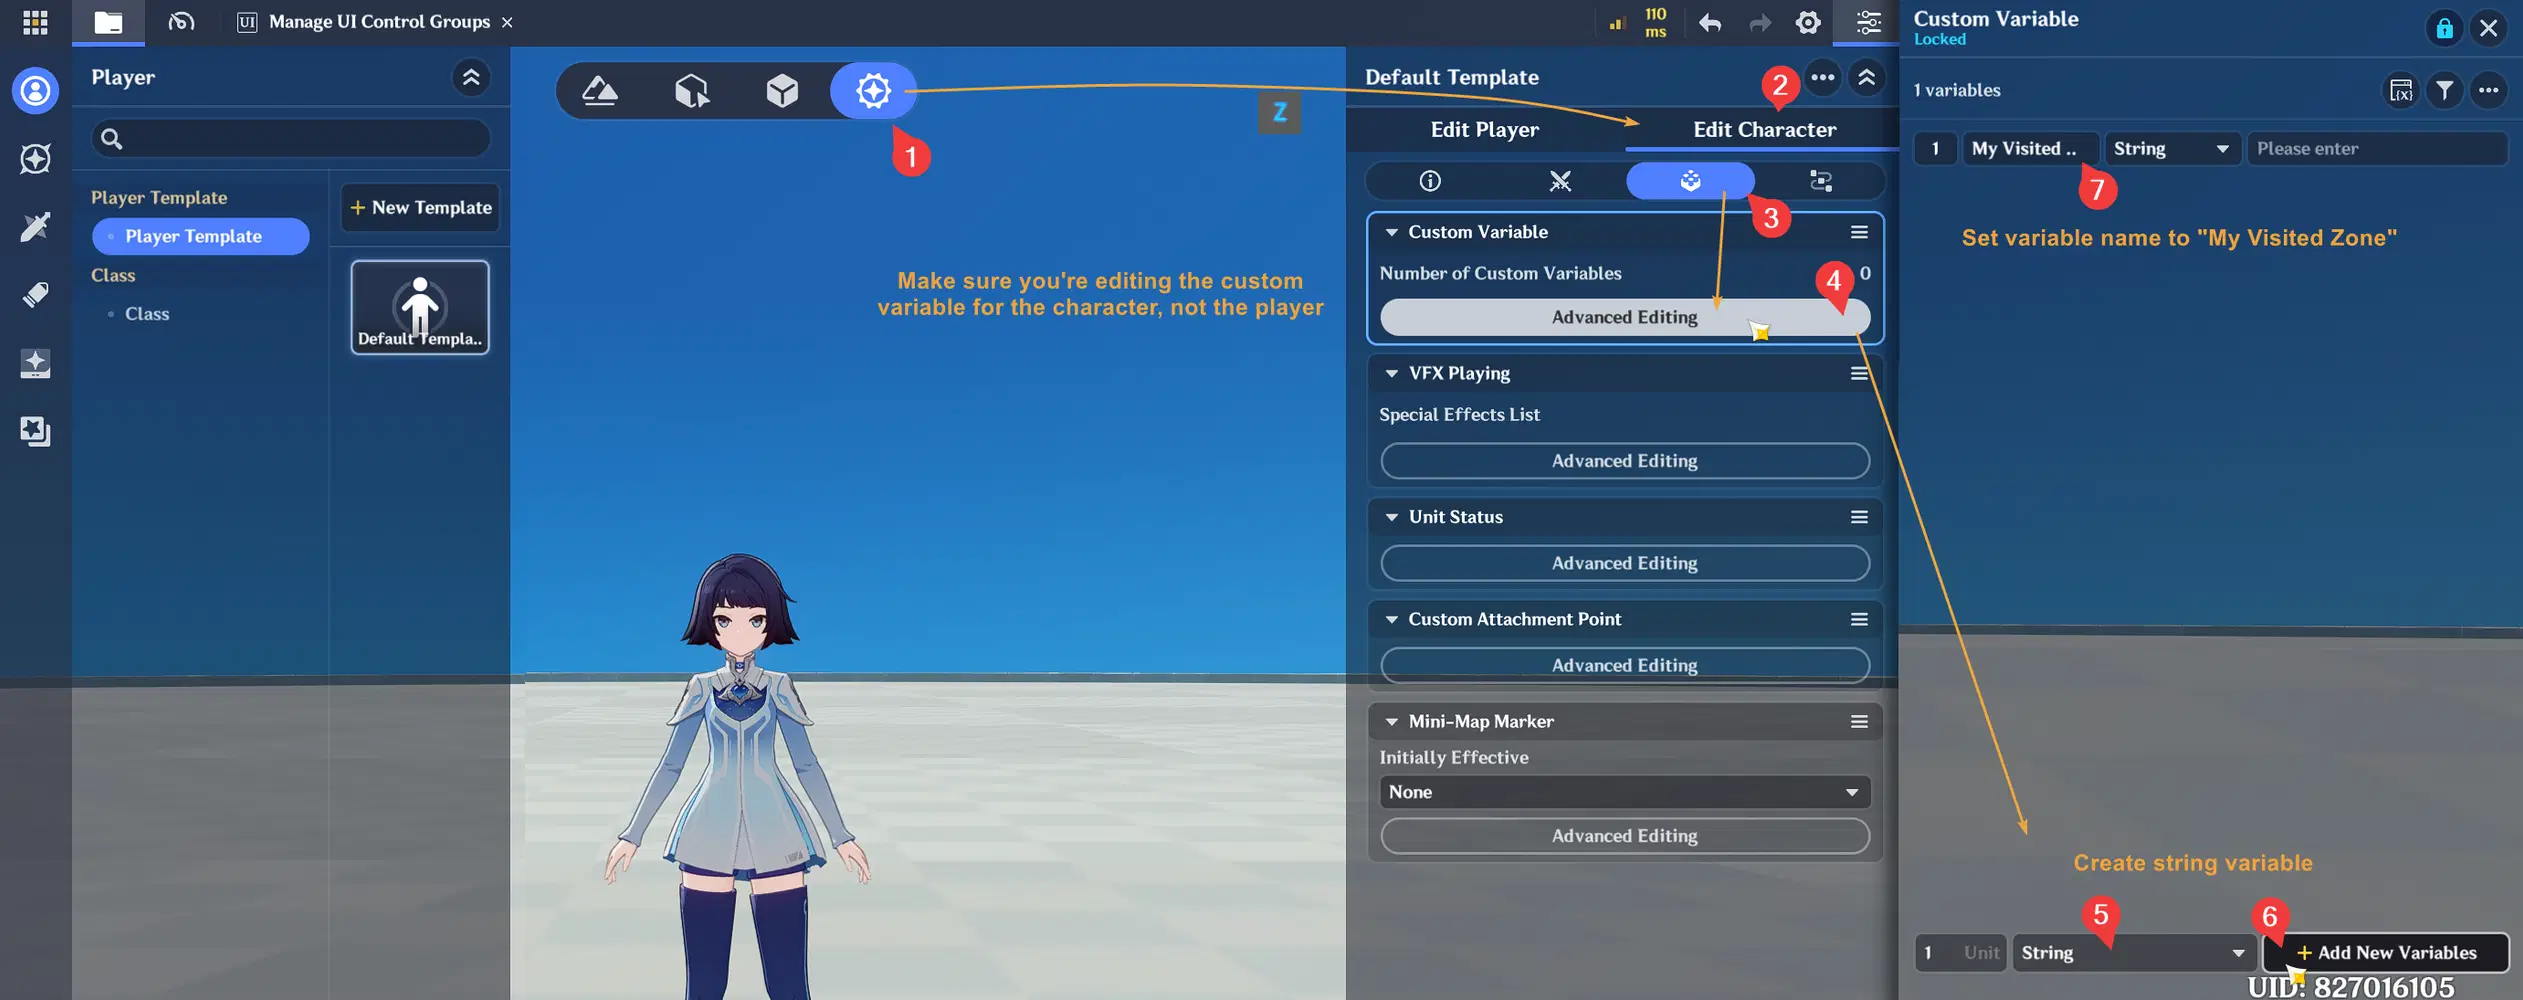
✦ Set up variable and entities for testing
- Let's create `My Visited Zone` custom variable for the character first. We'll then display its value in the UI
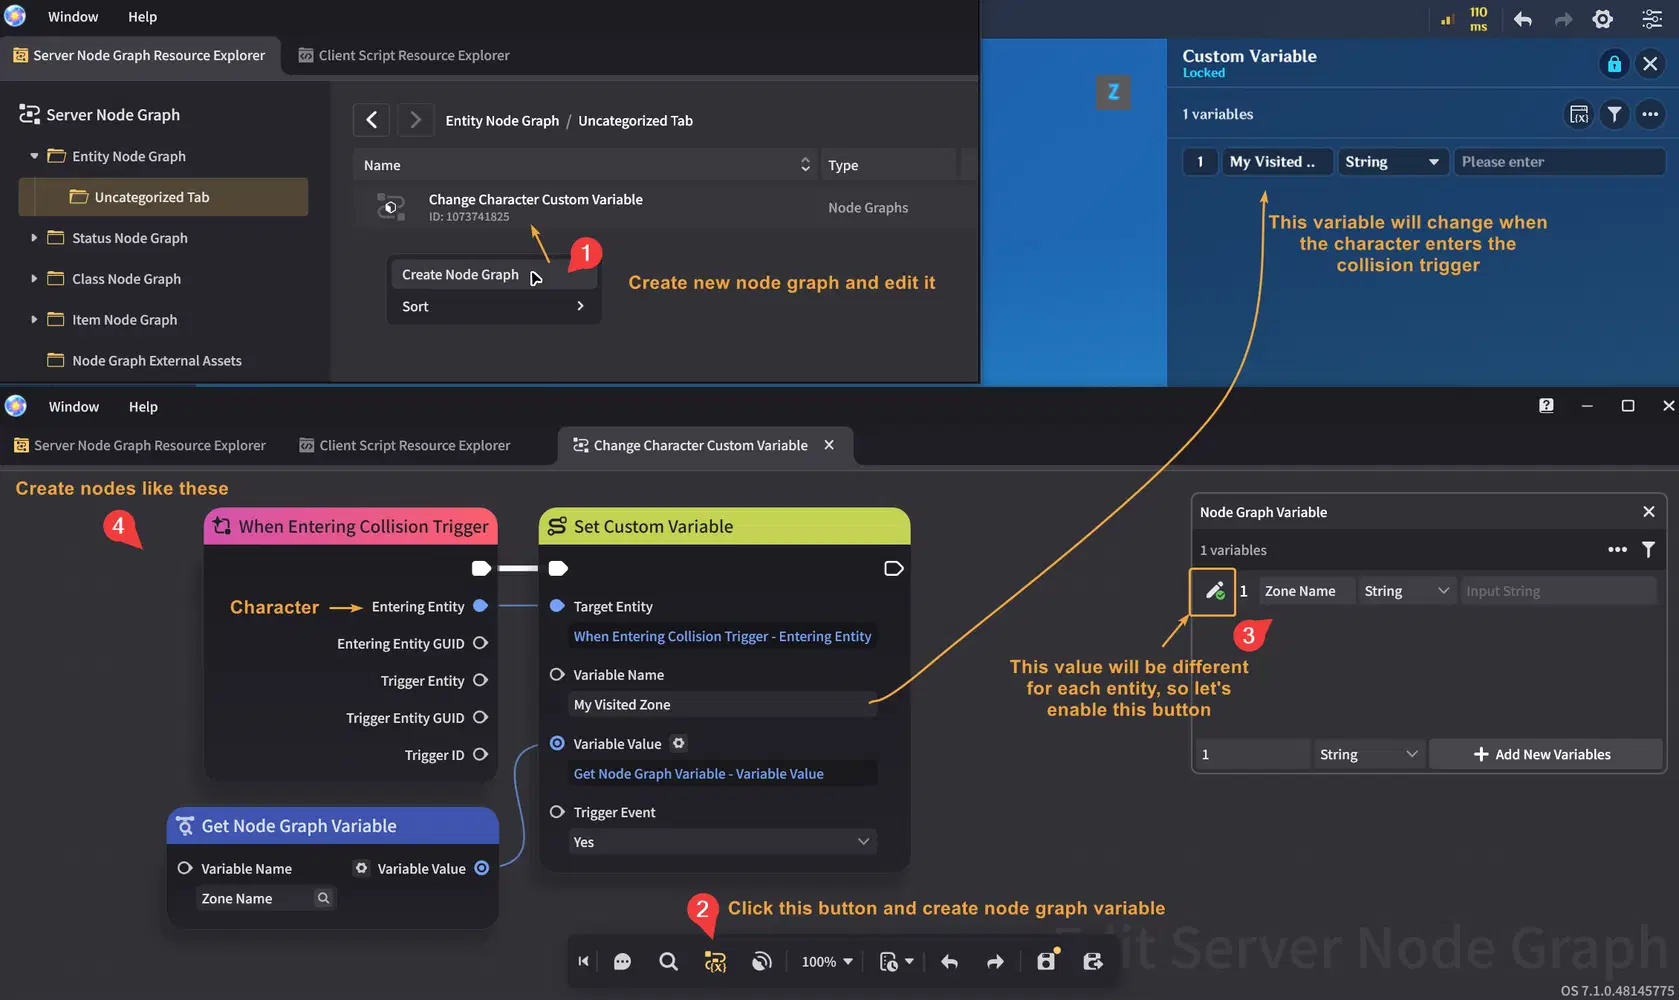
- Create new node graph to update that variable like image below:
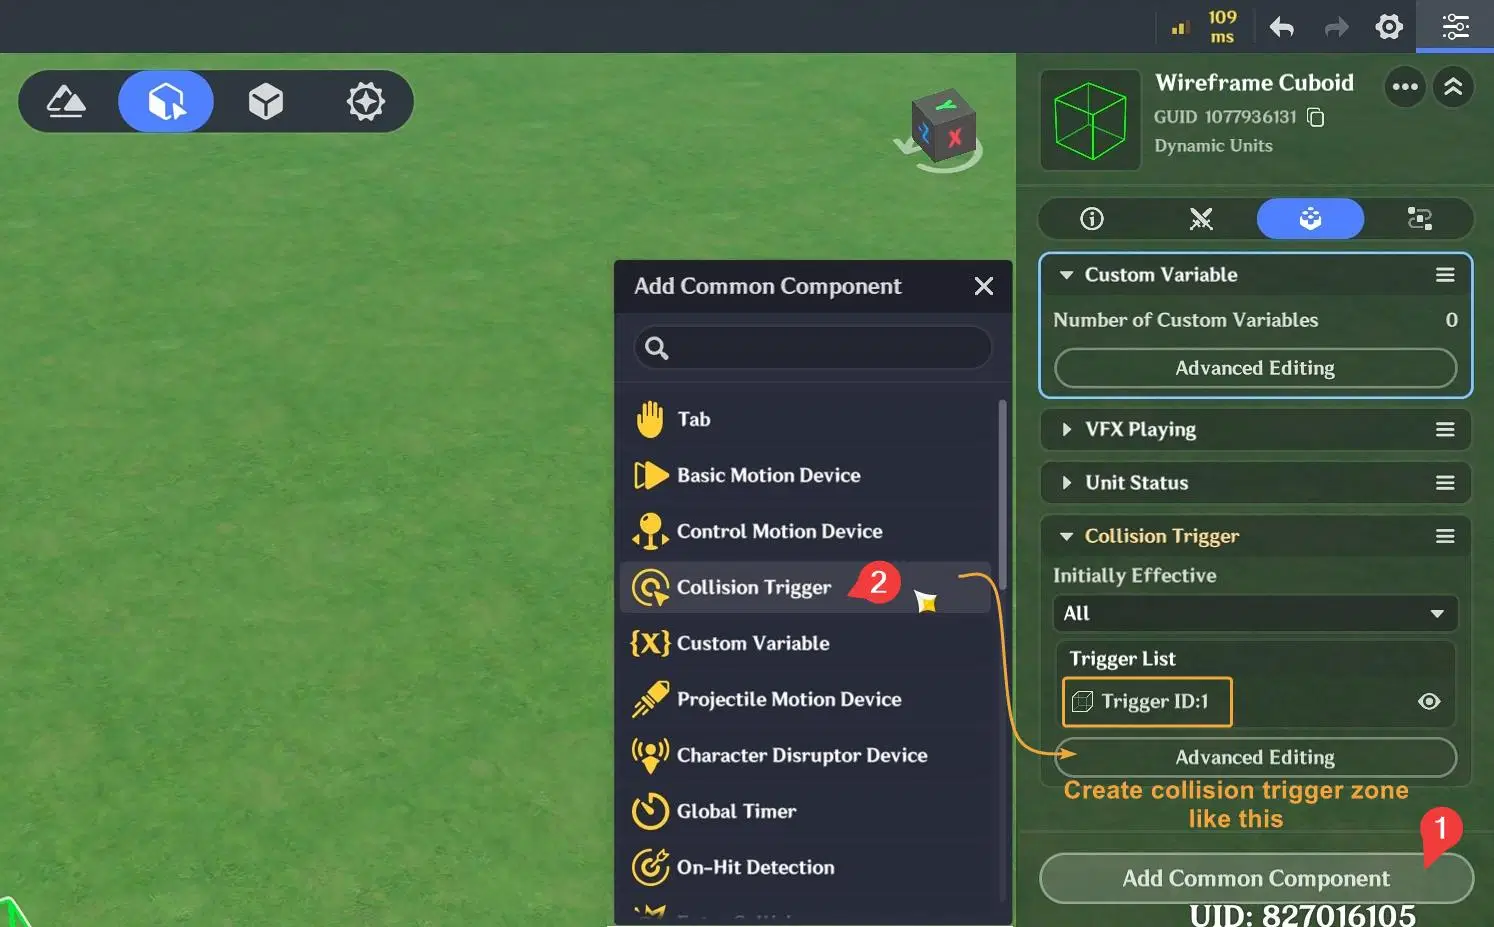
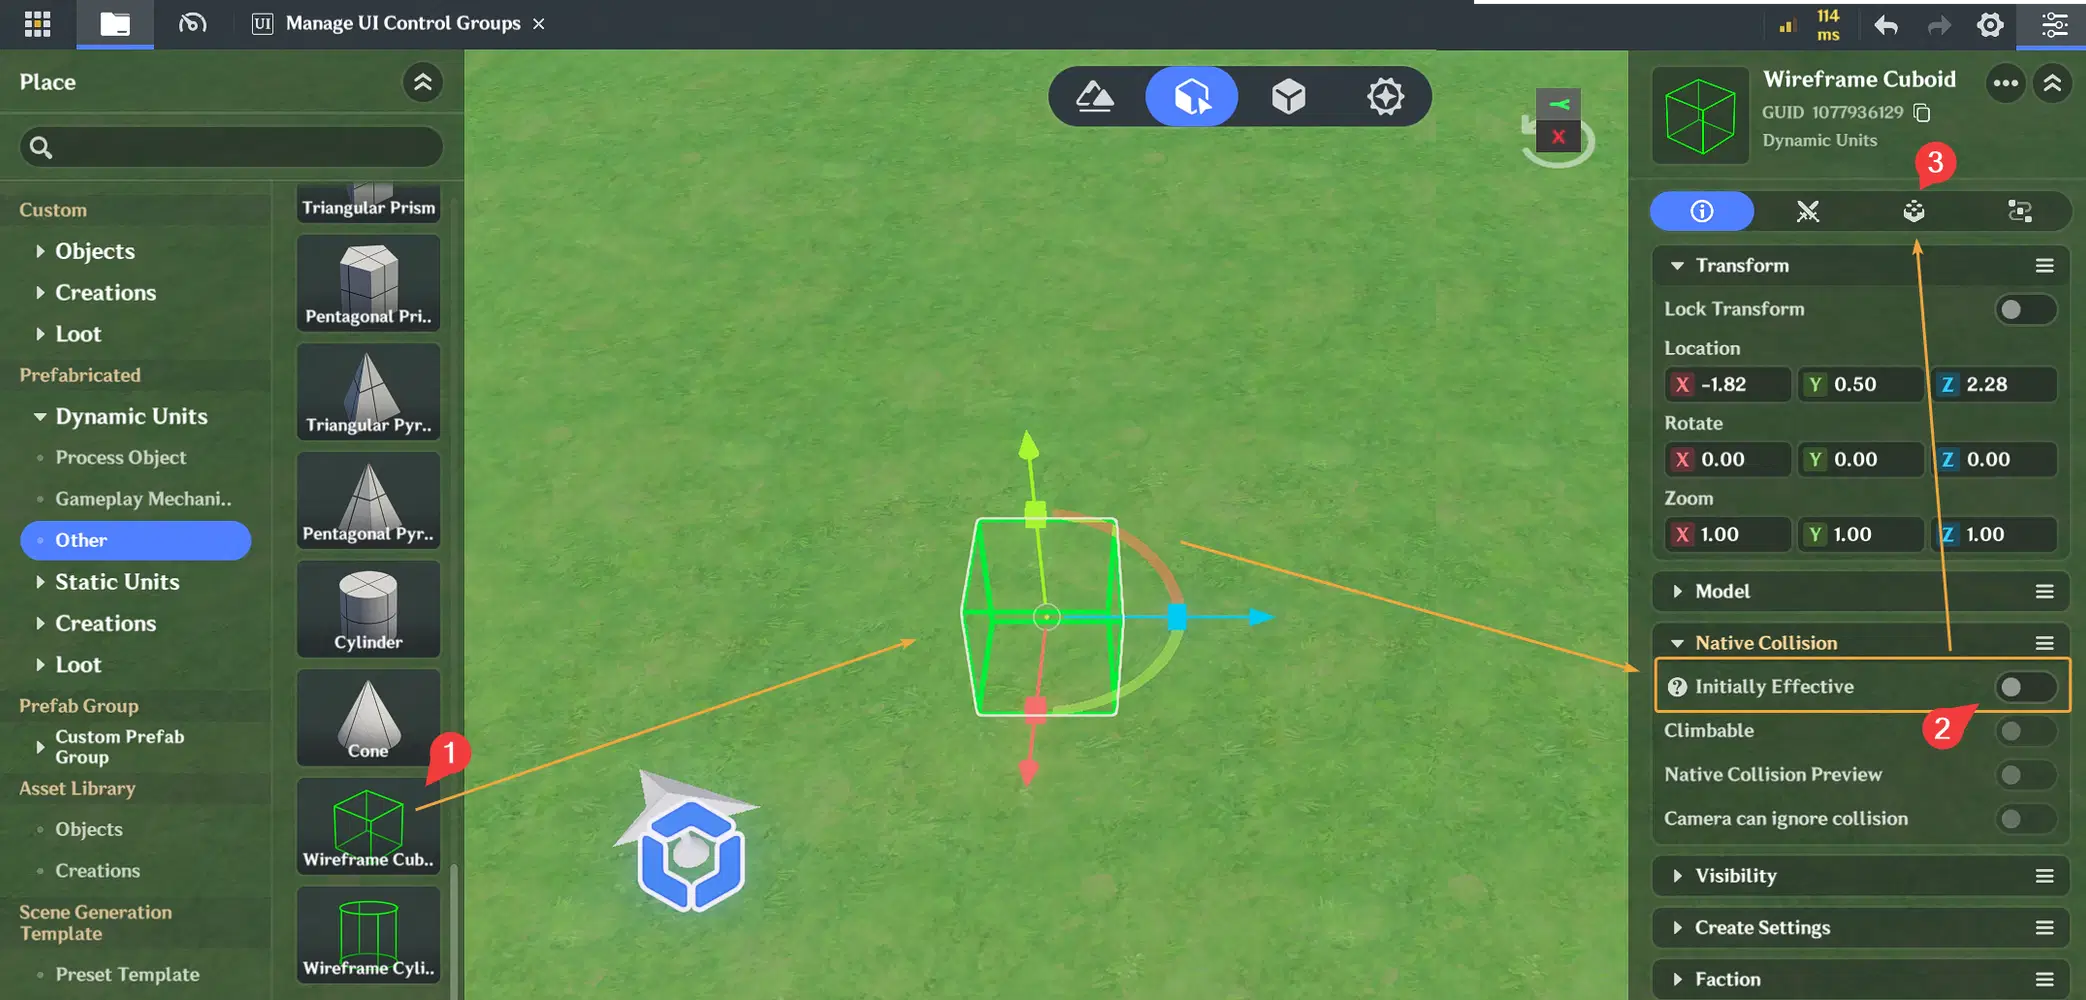
- Create a box with a collision trigger and disable its native collision
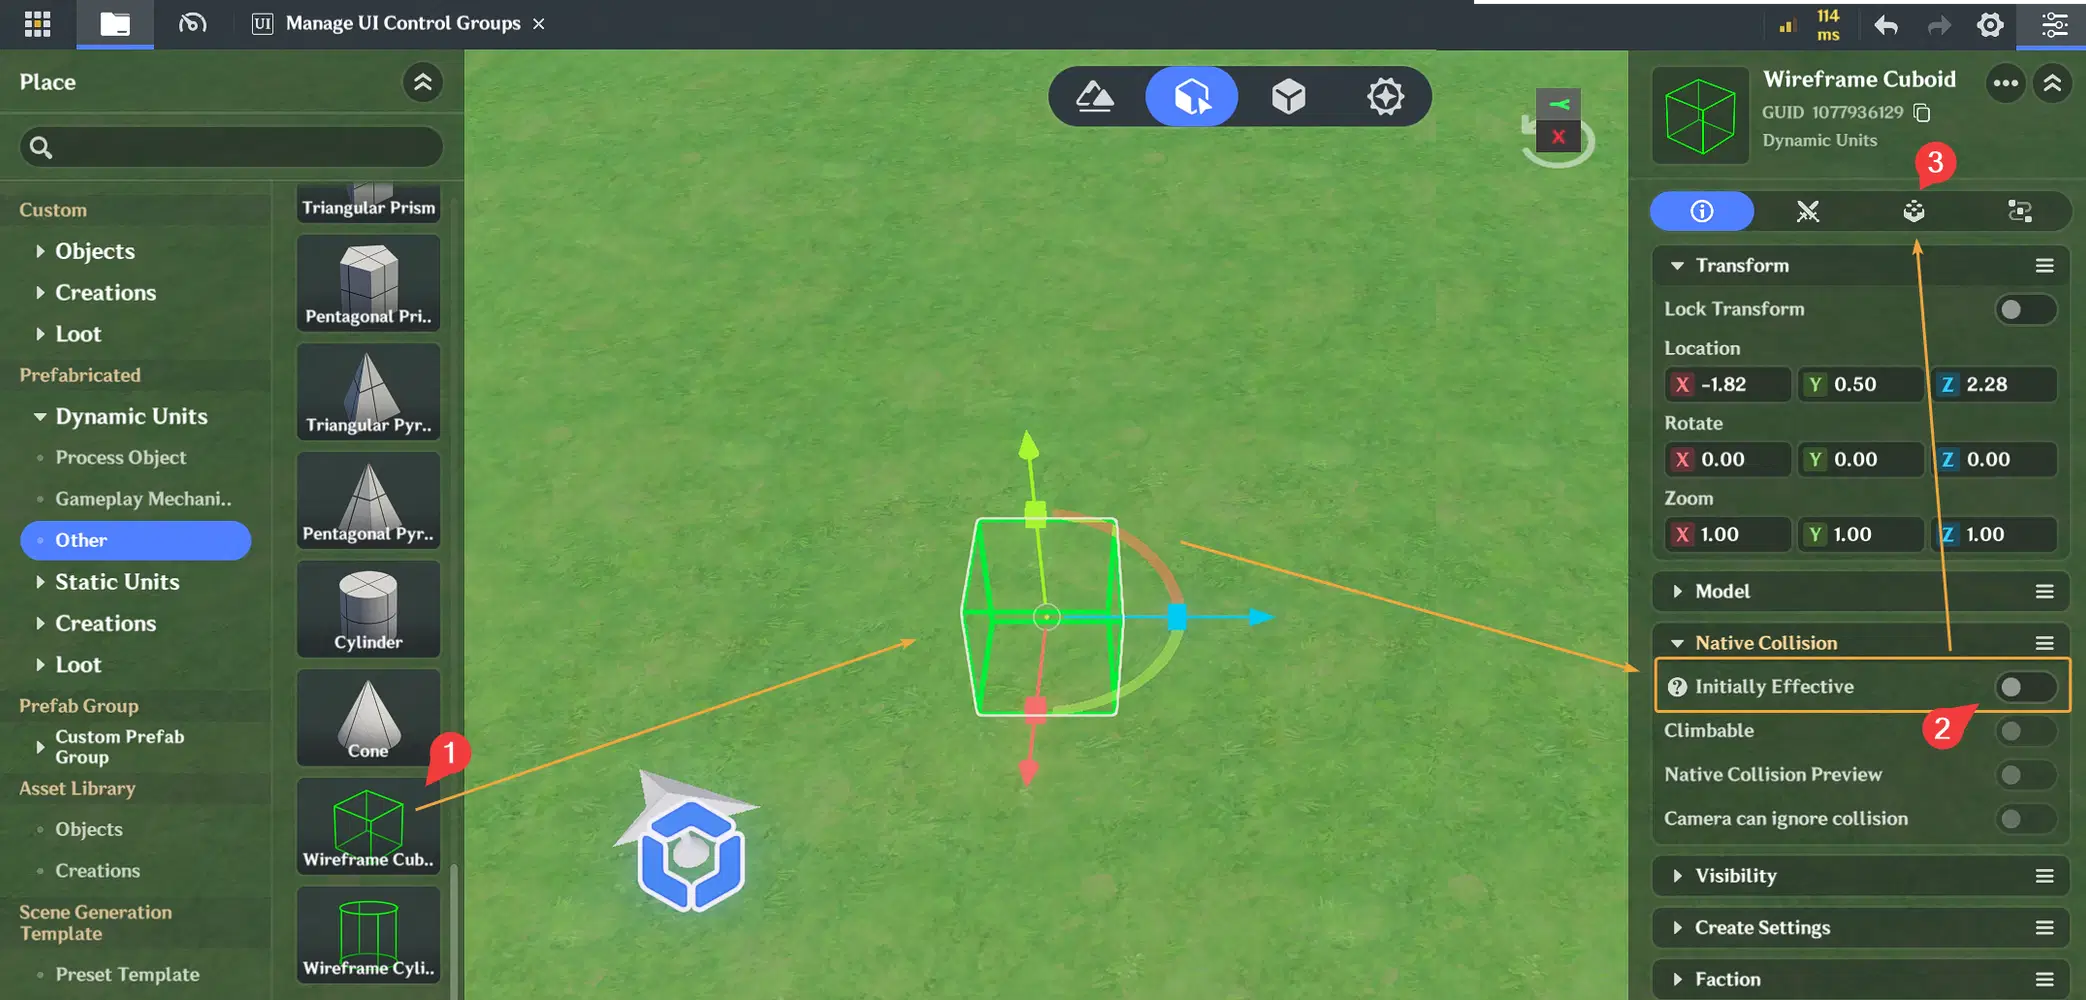
- Add Collision Trigger component, so whenever a character enters it, the node graph will be triggered to update the character's custom variable
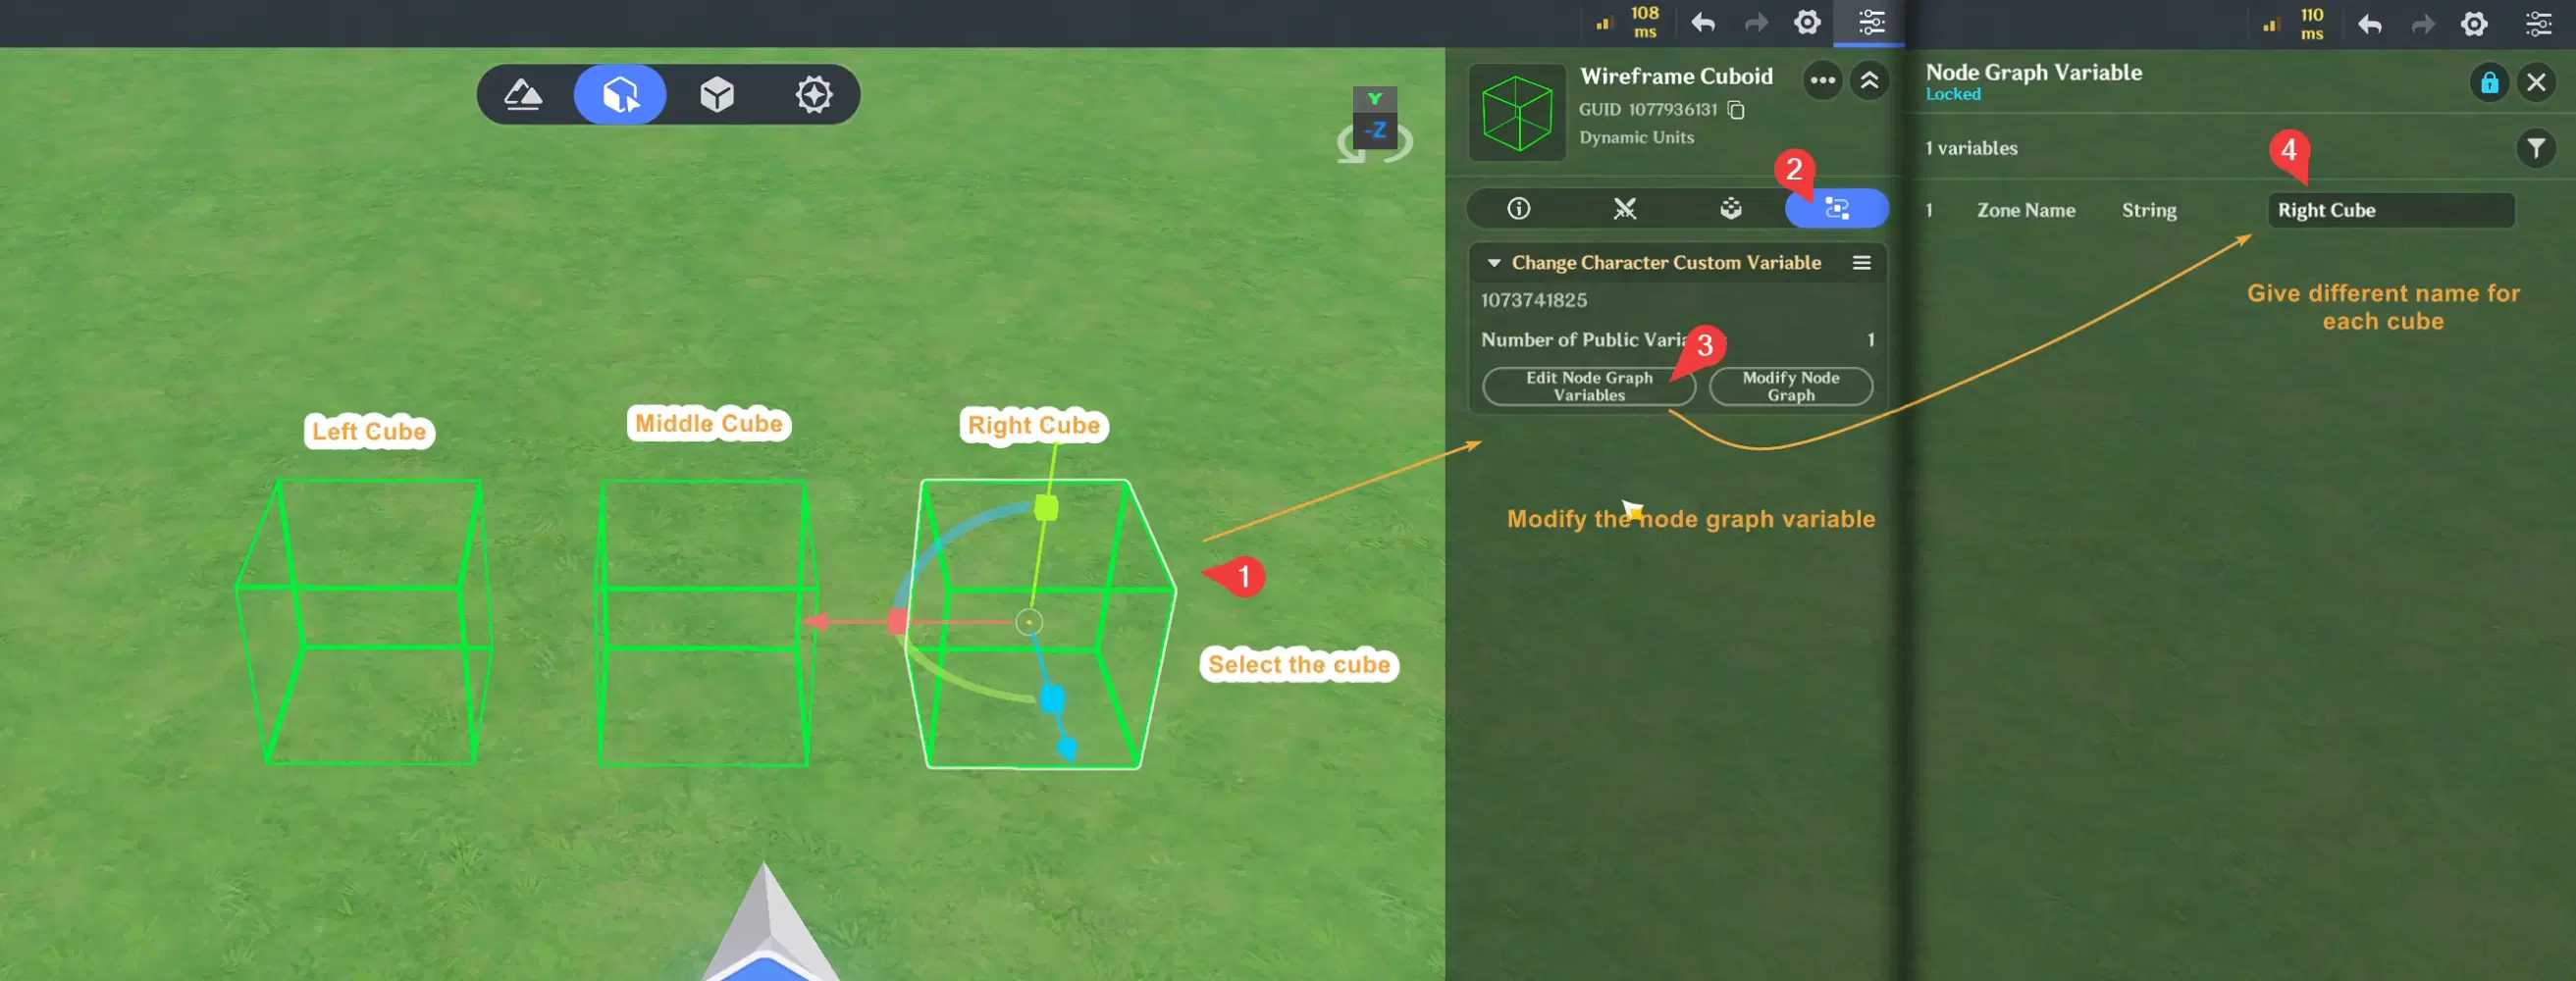
- Attach the Node Graph to the entity and duplicate the entity using Alt + Left Mouse Button
- Modify the variable in each entity's Node Graph so that each entity uses a unique value when the player enters its zone
✦ Set up UI to display variable updates
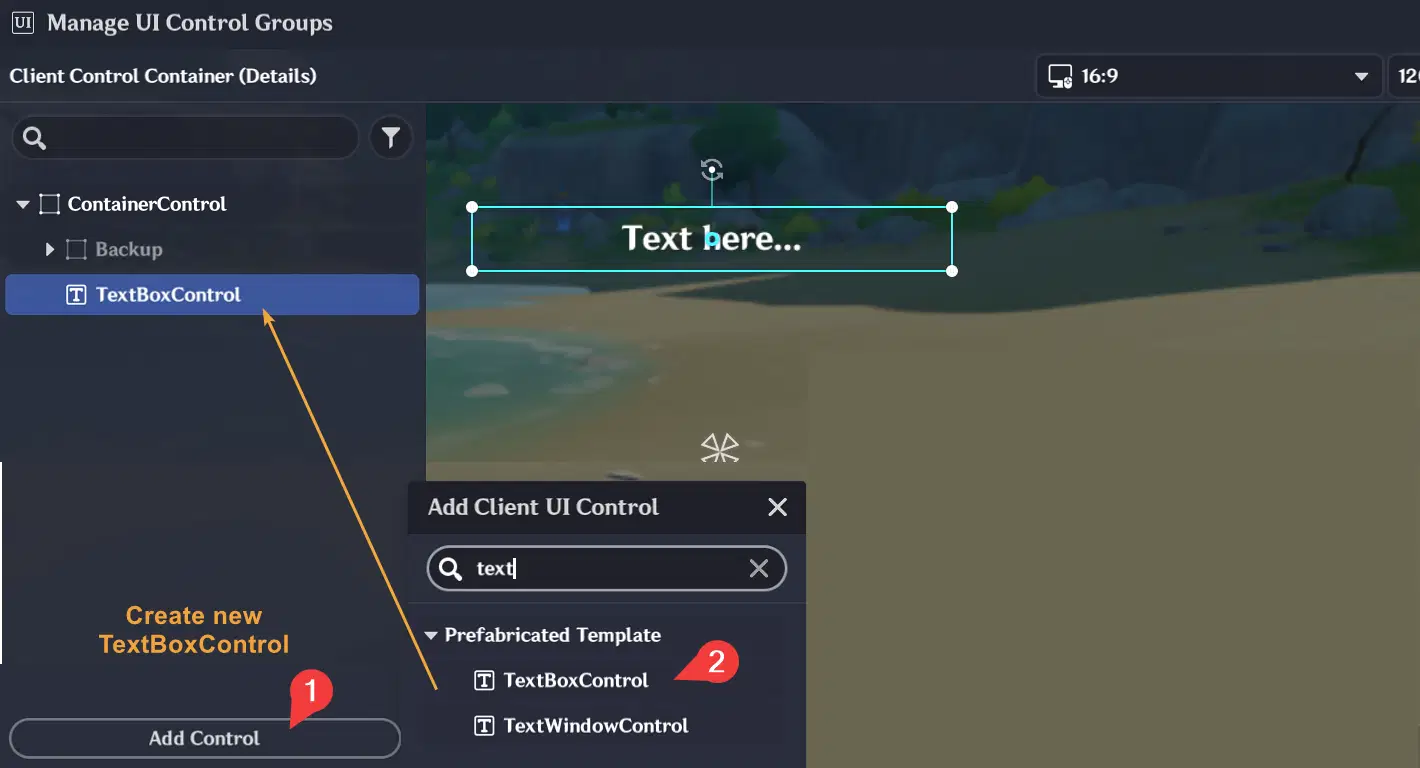
- Let's edit our Client Control Container again, so we can create a text box to monitor variable value
- Create new TextBoxControl like below:
- Create a Lua file named `CustomVariableTest.lua`
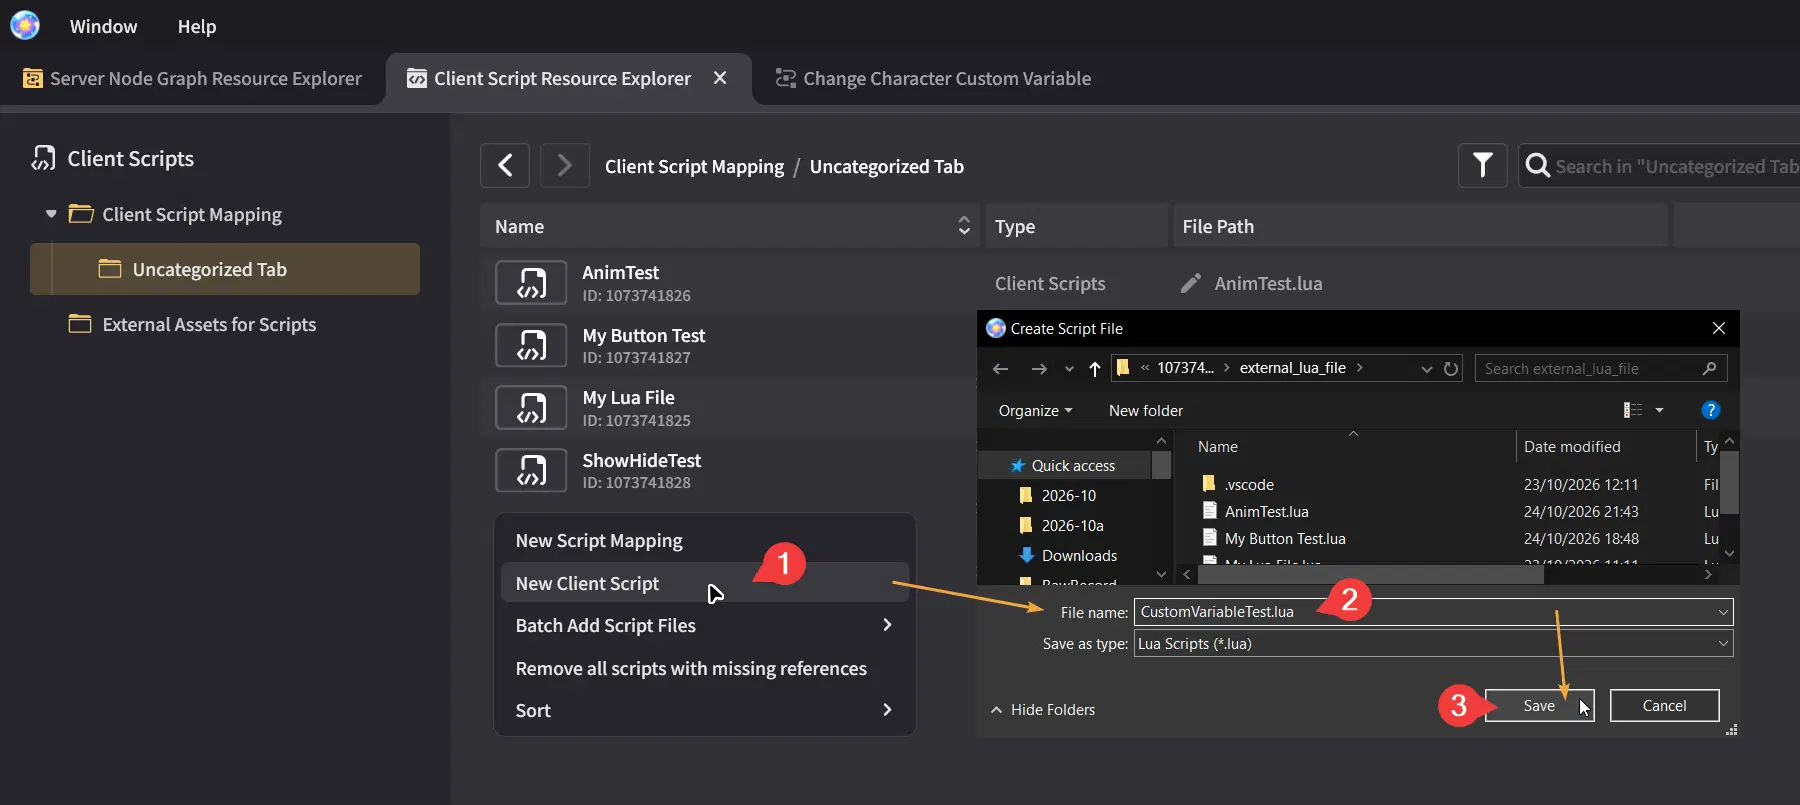
- Open the file in Visual Studio Code and add the following code to it:
-------------------------------
function OnEnable()
-- Listen for changes to the Character's custom variable
script:RegisterCustomVariableChangedHandler(
Enum.CustomVariableEntityType.AvatarSelf,
"My Visited Zone",
ZoneChanged
)
end
function OnDisable()
-- Unregister the listener added in OnEnable
script:UnregisterCustomVariableChangedHandler(
Enum.CustomVariableEntityType.AvatarSelf,
"My Visited Zone",
ZoneChanged
)
end
-- This function will be called automatically whenever the custom variable value changes
function ZoneChanged()
-- Read the custom variable value and update the text box
script.object.text = game.GetGlobalCustomVariableValue(
Enum.CustomVariableEntityType.AvatarSelf,
"My Visited Zone"
)
end
-------------------------------
Quick Check: Make sure the custom variable name in the character entity is named `My Visited Zone`.
- Attach the script to the UI containing the text box and test it
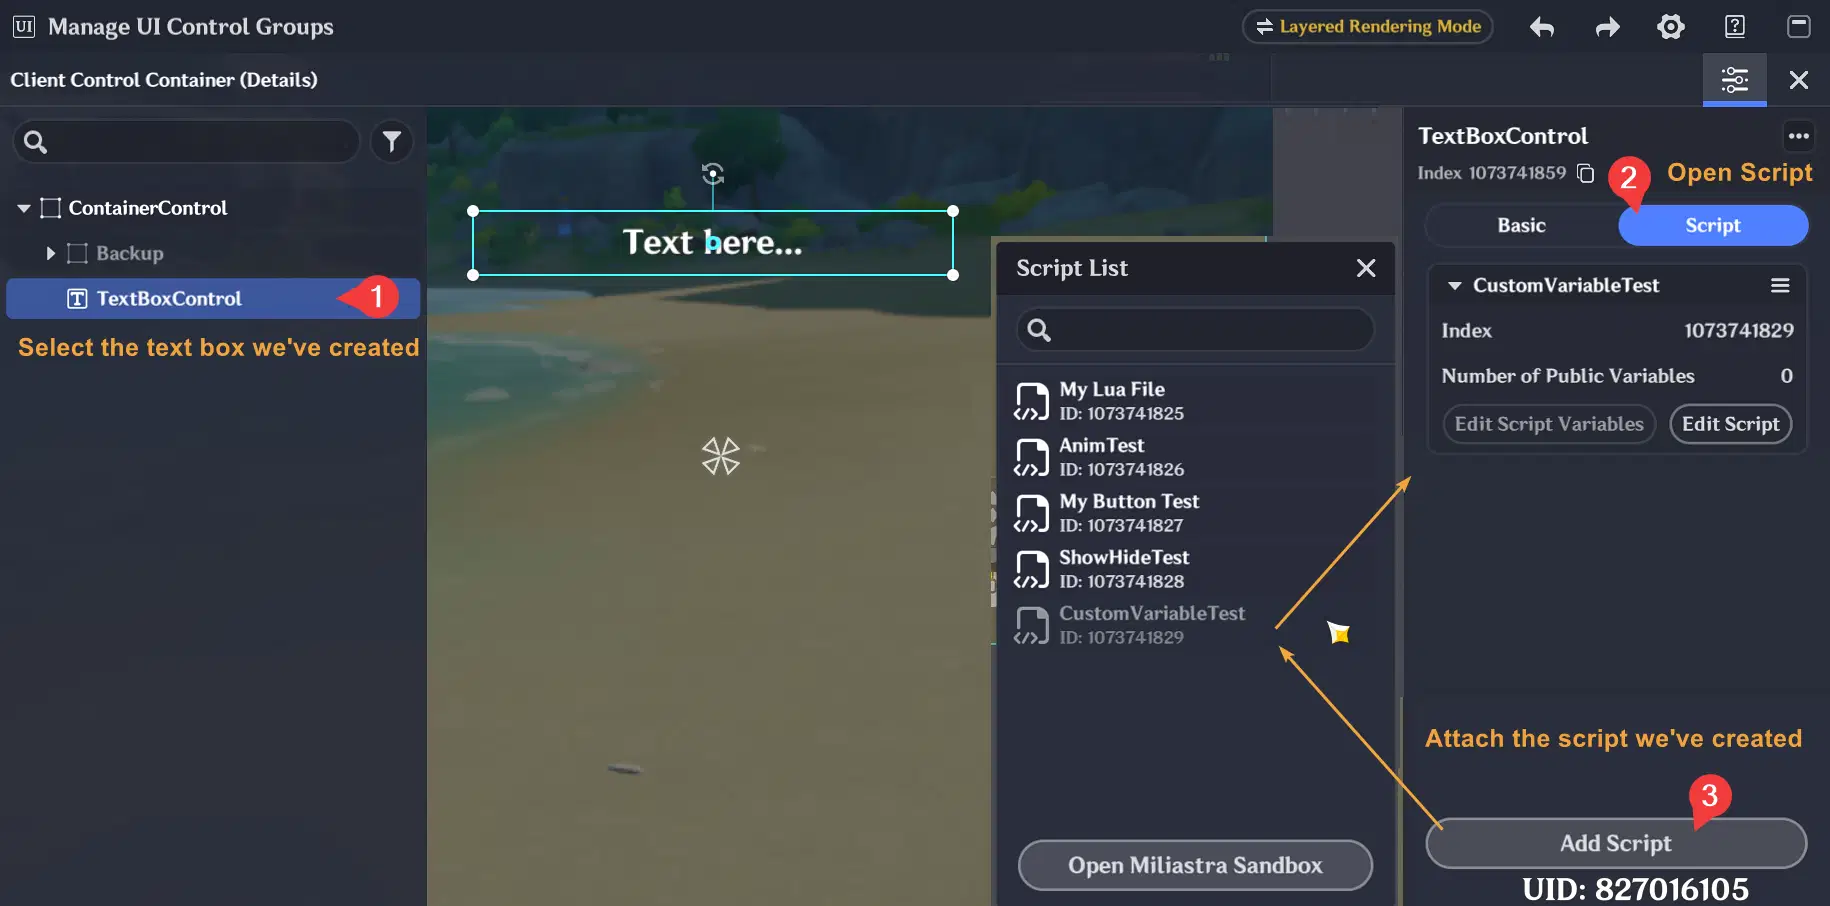
The text box now will reflect the value of the Character's custom variable.
7. Communicate with the server using Signal
In the previous section, we read custom variables directly from the Character entity. But what if the data belongs to another entity, or you need Lua to communicate with server-side logic?
That's where server signals come in. A signal lets your client-side Lua script send a message to the server, where a Node Graph can handle it. The server can then send a signal back to the client, allowing your UI to react to the response.
For this example, we'll keep things simple:
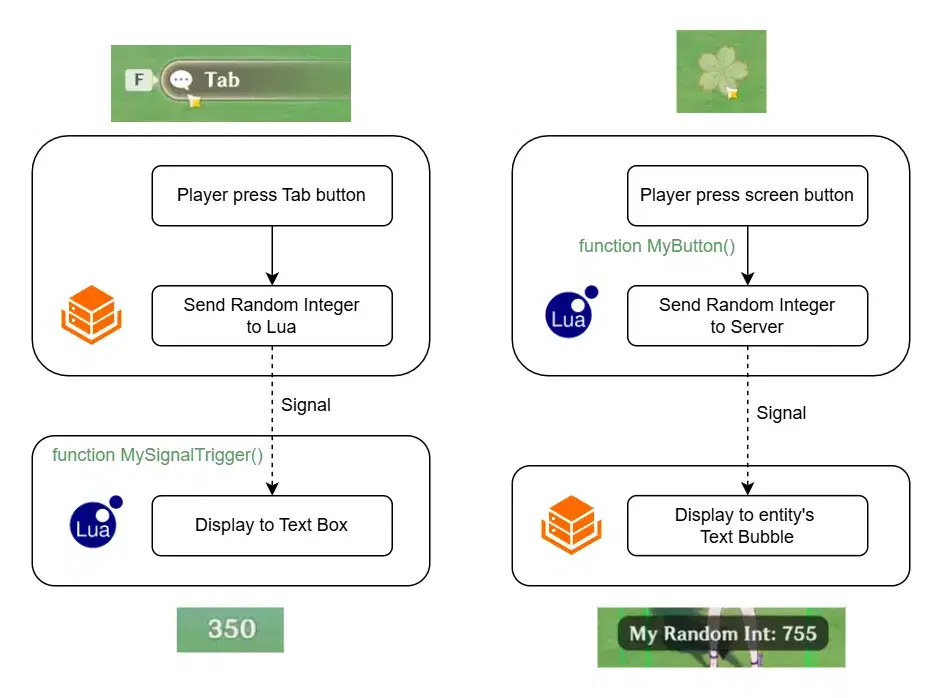
- Press a screen button = send a random number from Lua to the server, and display the string in entity's text bubble
- Press a Tab button = send a random number from the server to Lua, and display the string in screen text box
Below is the simple visualization flow about the process for this experiment:
Alright, let's do our practice to achieve the result~
✦ Prepare target entity to communicate with Lua
- Let's create this entity for our experiment, and make sure to disable the collision
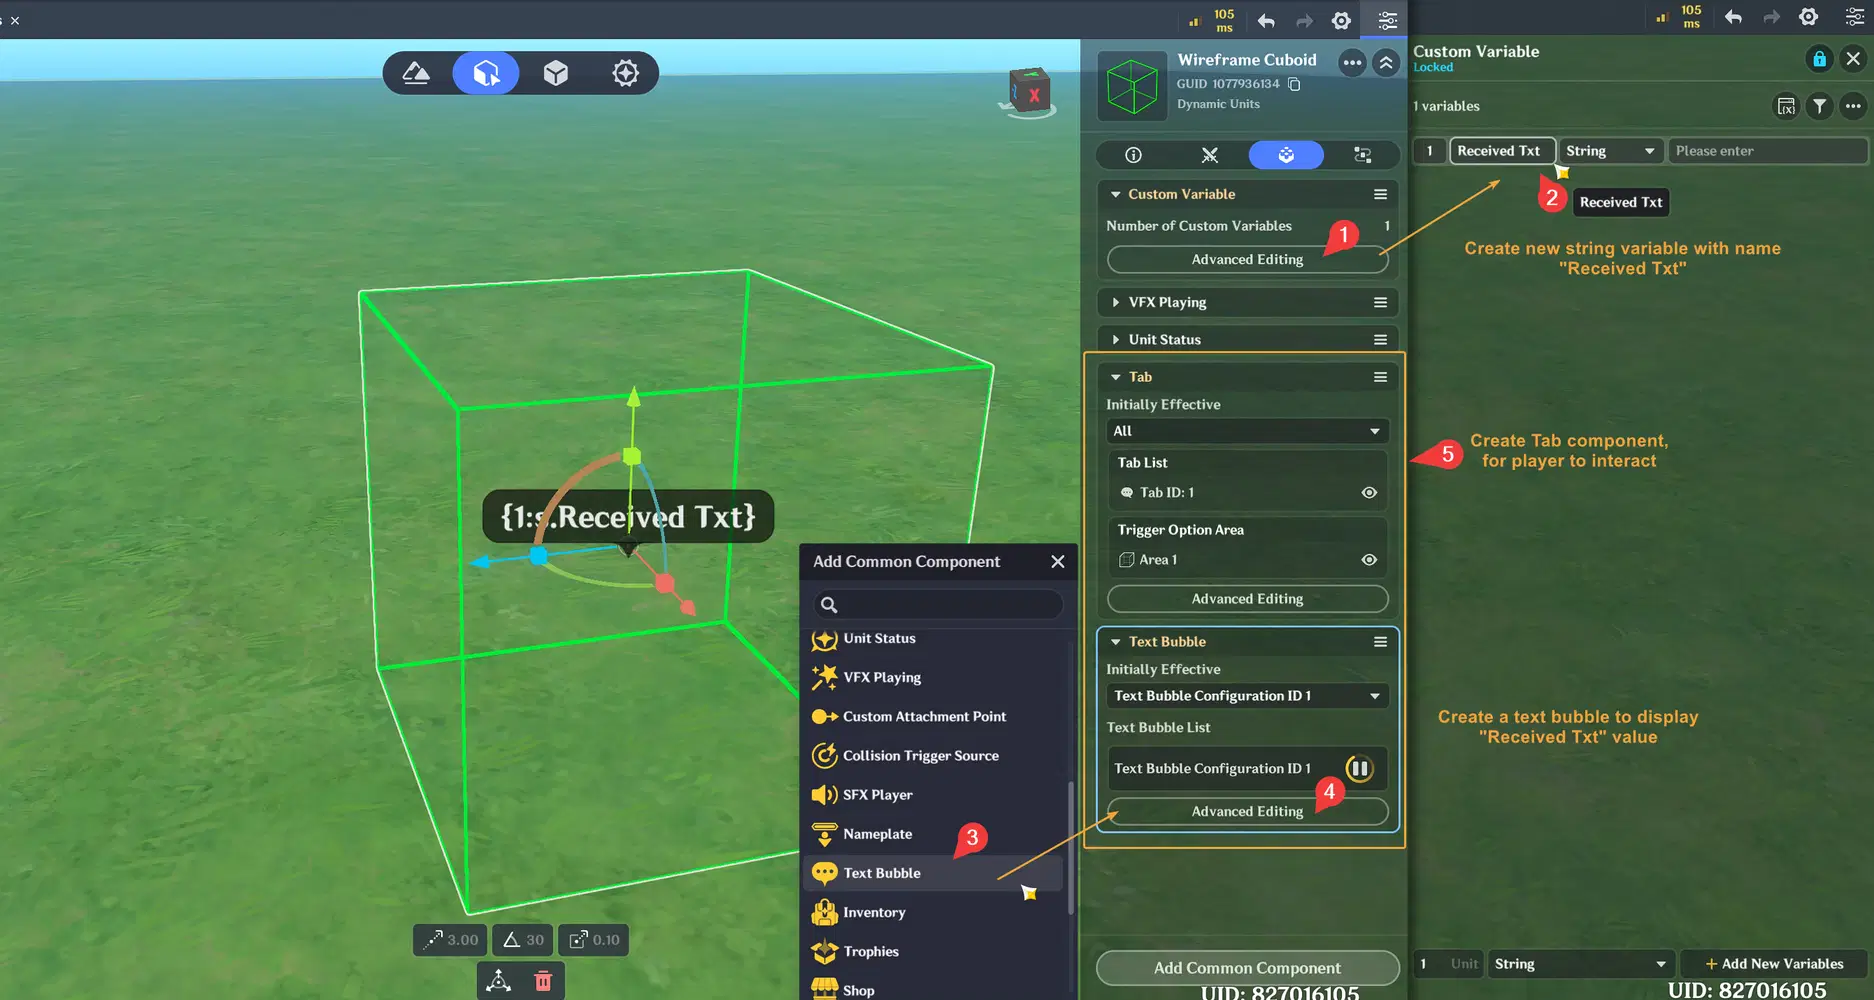
- Create a custom variable of type String named `Received Txt`, then add a Tab and a Text Bubble component. Configure the Text Bubble to display the value stored in the entity's custom variable
- Create new Node Graph and attach it to the entity, then modify the Node Graph
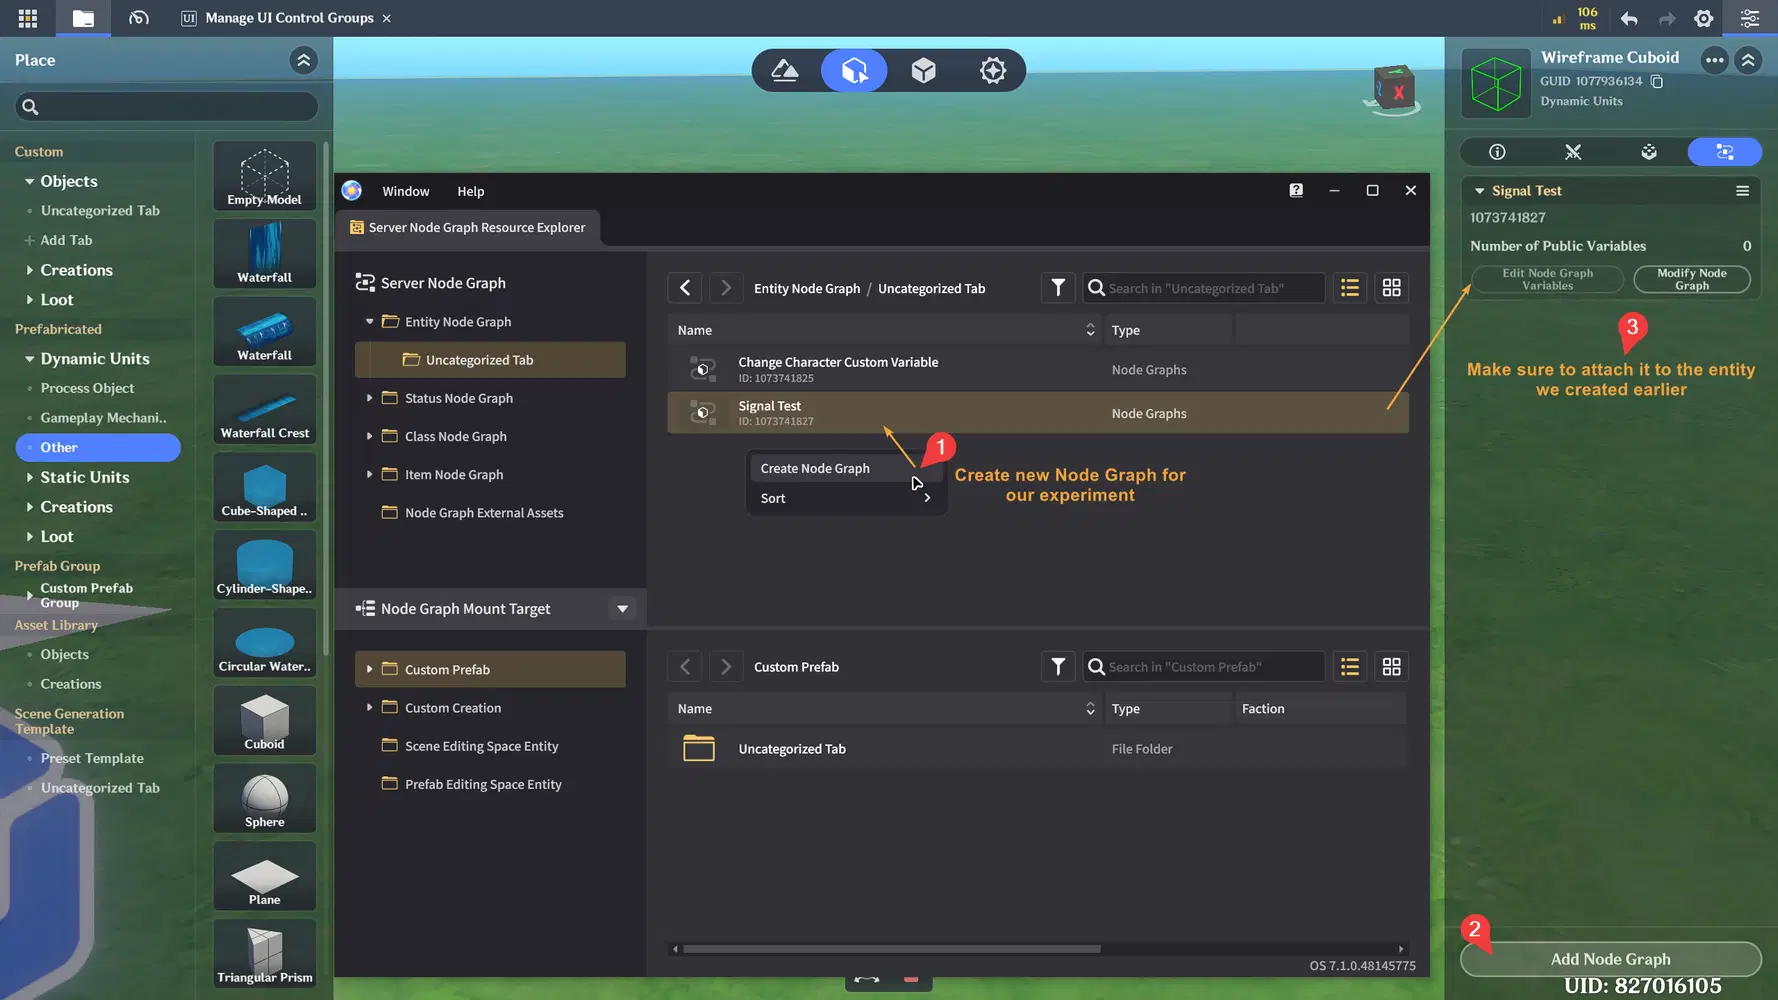
- Create the node graph as shown below, then create a server signal named `My Lua Signal`
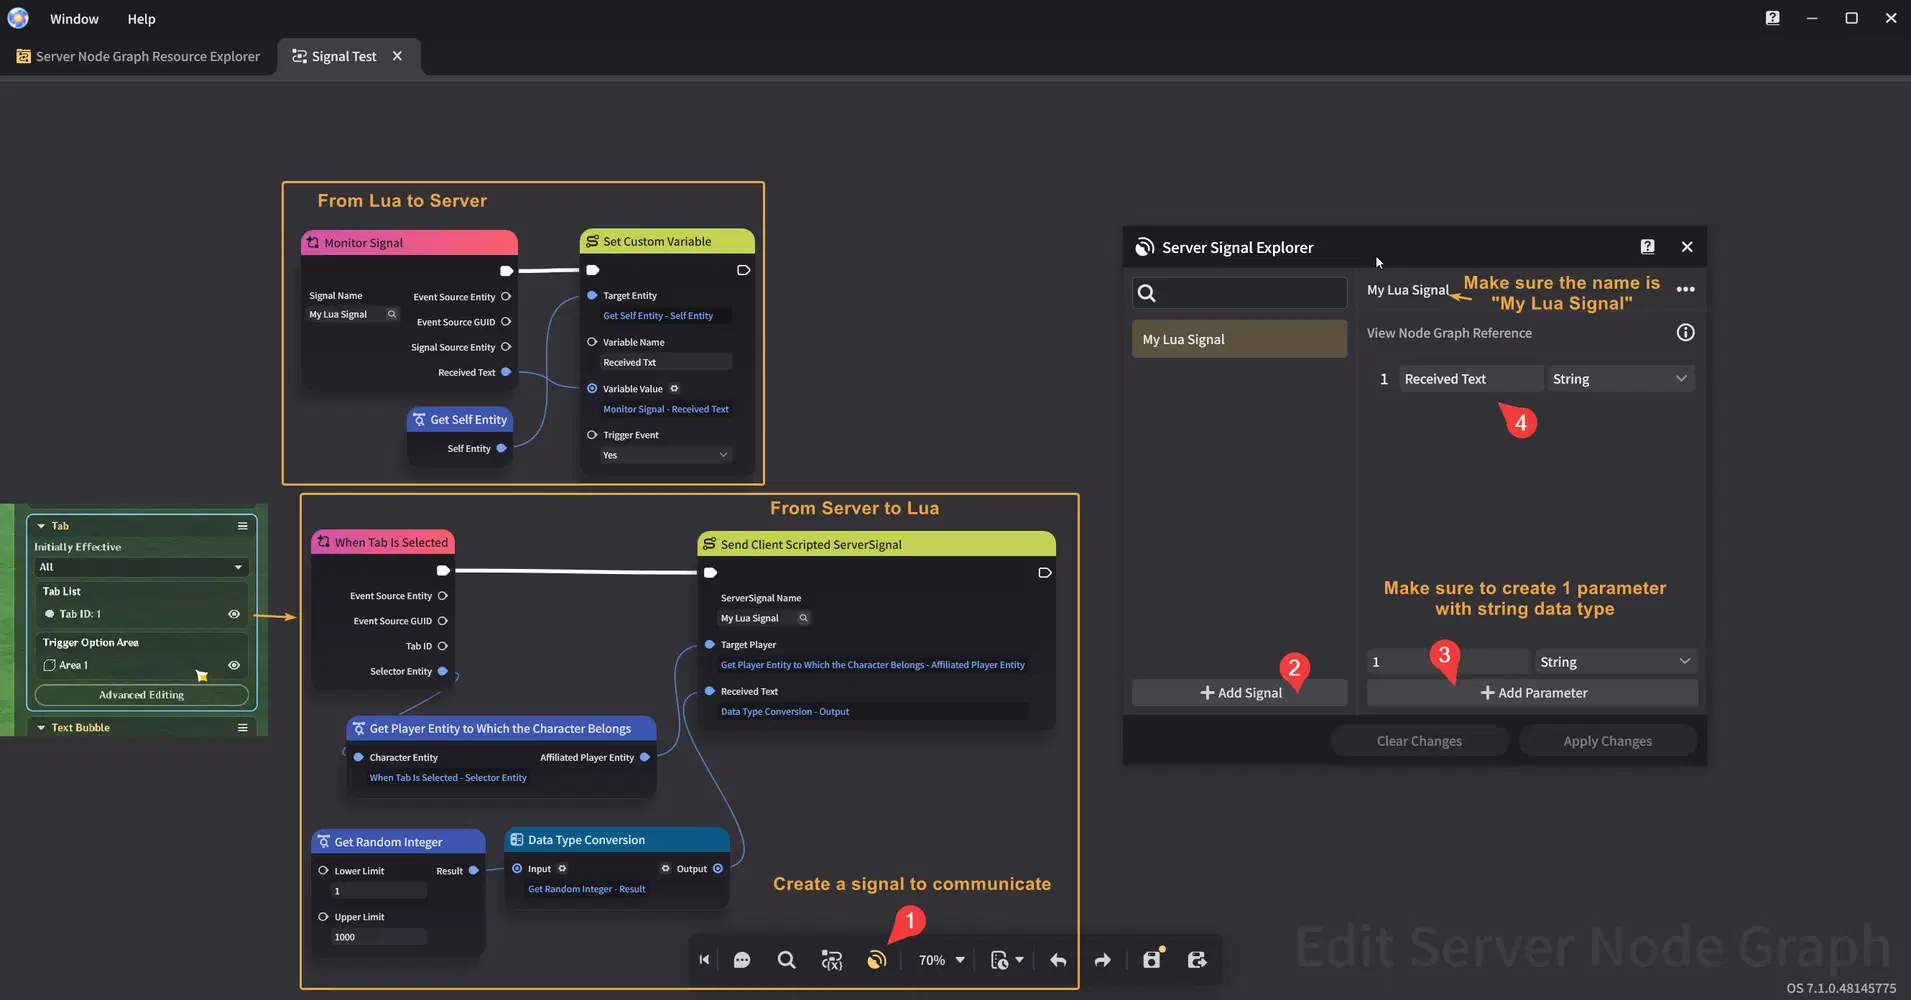
- Alright, we've finished setting up the entity for our experiment. Now, let's move on to creating the client-side UI.
✦ Prepare UI button and the text box
- Let's edit our Client Control Container again, so we can create new button and text box
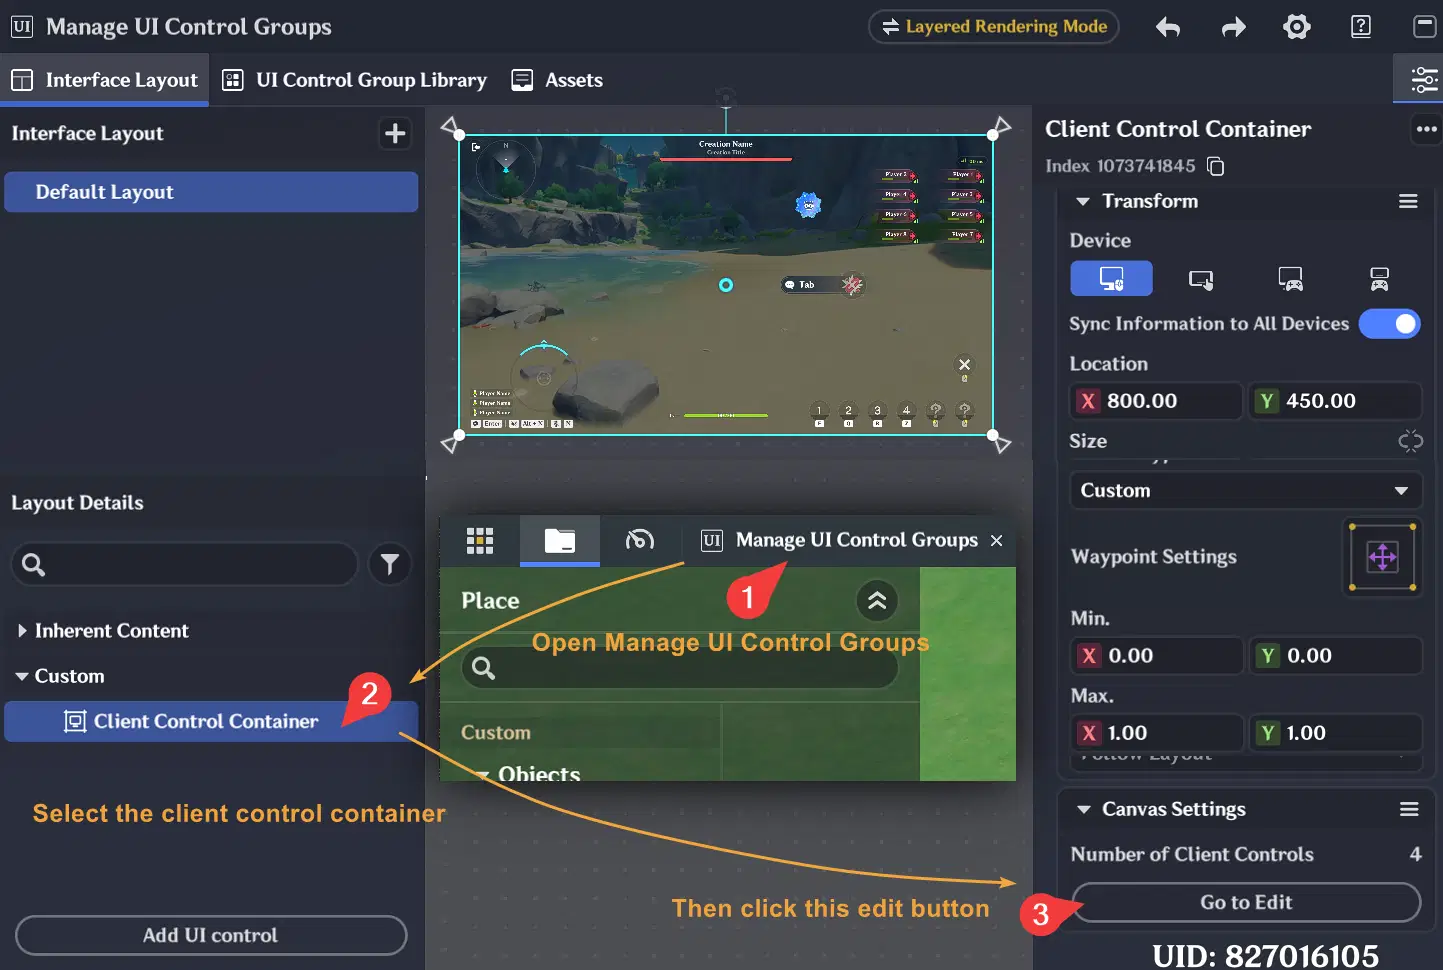
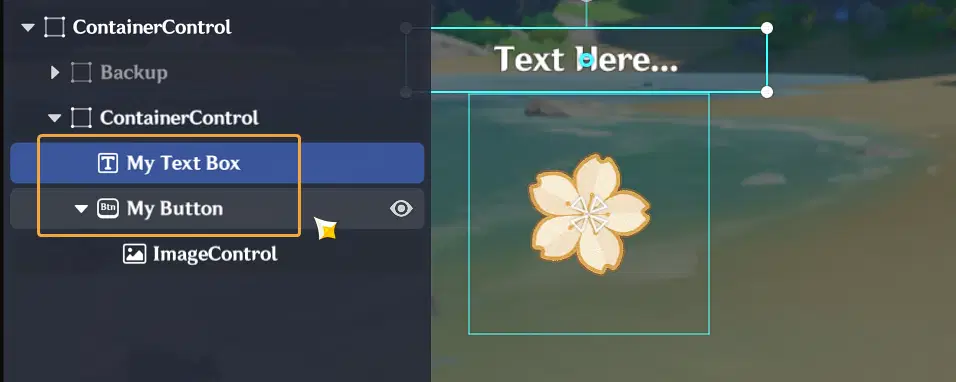
- Create a button and textbox, and put it inside a ContainerControl
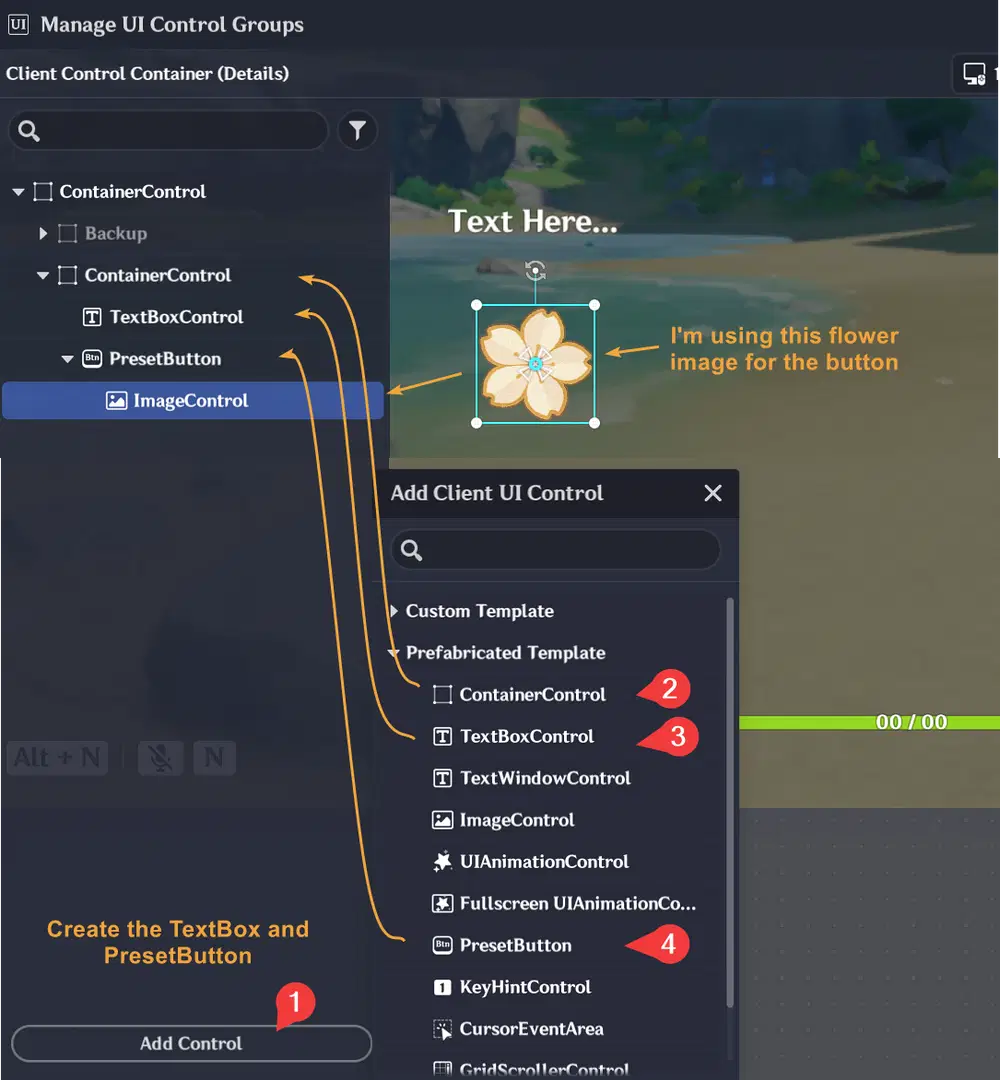
- Rename the button to `My Button` and the text box to `My Text Box`. Make sure the names match exactly, as the Lua code example will reference these elements by name
- Create a Lua file named `SignalTest.lua`
- Then add the following code from your Visual Studio Code editor:
-------------------------------
function OnEnable()
-- Listen for the server's response.
script:RegisterServerSignalHandler("My Lua Signal", MySignalTrigger)
-- Listen for button clicks.
script.object:FindChild("My Button"):AddCursorEventListener(
Enum.CursorEventType.CursorClick,
MyButton
)
end
function OnDisable()
-- Stop listening when the UI is disabled.
script:UnregisterServerSignalHandler("My Lua Signal")
script.object:FindChild("My Button"):RemoveCursorEventListener(
Enum.CursorEventType.CursorClick,
MyButton
)
end
function MySignalTrigger(signalName, params)
-- Read the first parameter returned by the server.
local stringParam = params[1]
-- Display the server's response in the text box.
script.object:FindChild("My Text Box").text = stringParam
end
function MyButton()
-- Create a signal to send a message to the server.
local signal = game.ServerSignal("My Lua Signal")
-- Send a random number as a string.
signal:AddString("My Random Int: " .. math.random(0, 1000))
signal:SendSignal()
end
-------------------------------
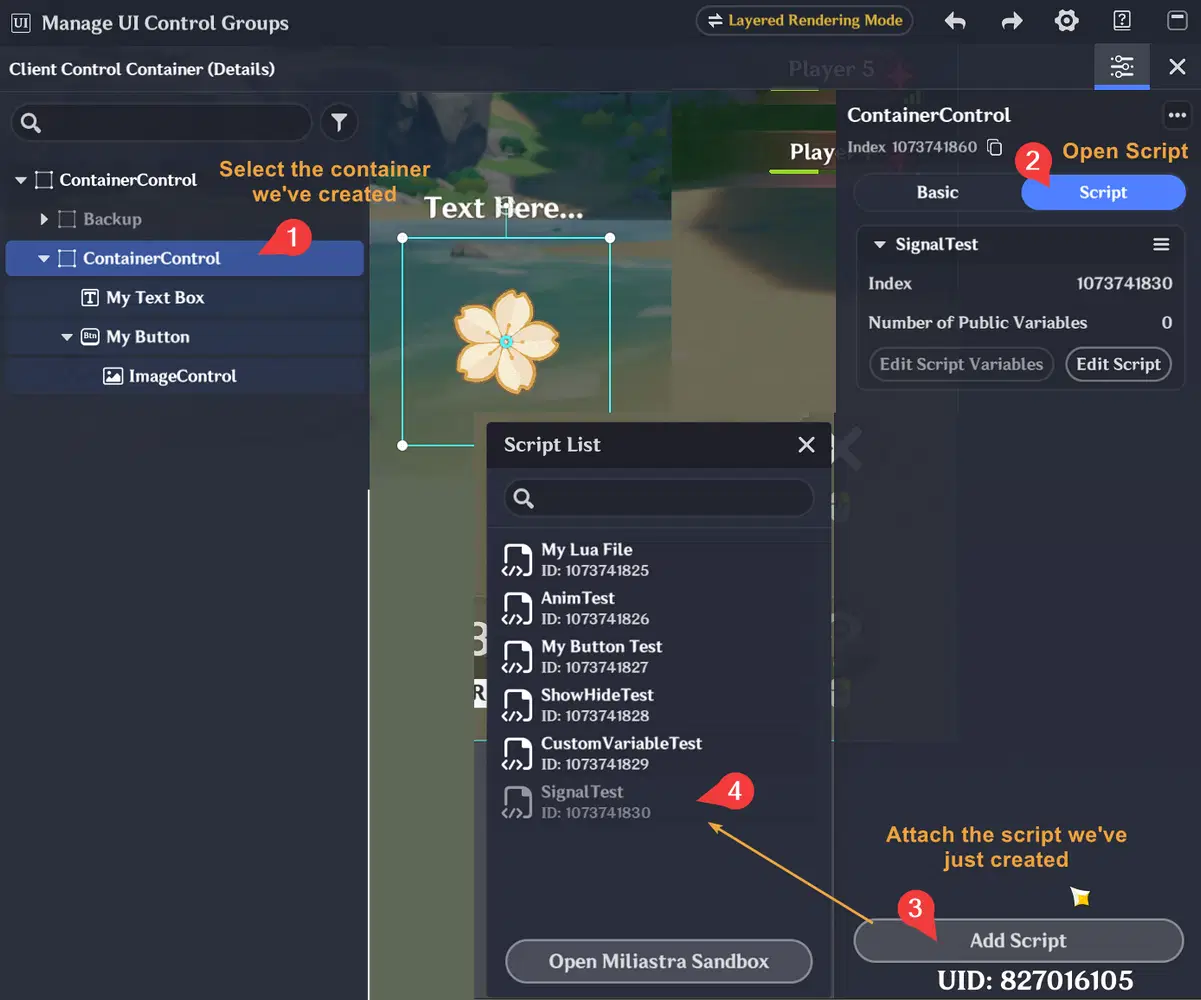
- Attach the script to the container UI that contains both `My Button` and `My Text Box`
- Alright, we've finished the setup! Let's test it in-game. The result should look something like this:
Here's a summary of the process flow to help explain how this experiment works:
- When the player clicks `My Button` (Flower button), the script sends a string such as `My Random Int: 527` through the `My Lua Signal` server signal. The server-side Node Graph receives the message and stores the data in the entity's custom variable. The updated value is then displayed in the entity's Text Bubble.
- When the player presses the Tab button, the server-side Node Graph listens for it. The Node Graph then uses the same signal to send a random integer to Lua. After the value is received by the listener defined in Lua, the text box value will be updated based on the value received from the server-side Node Graph.
Alright, I think that's all for now!
You've done your first step, and there's so much more you can create from here!
Congratulations for following this guide until the end! Hopefully this guide helps you better understand these features in the Miliastra Wonderland editor and gives you ideas for creating your own game interface in future projects.
Thank you for reading, and happy creating!




