In version 7.1 Miliastra Wonderland got client scripts: Lua code that runs directly on the player's device and controls a new type of UI, the client controls.
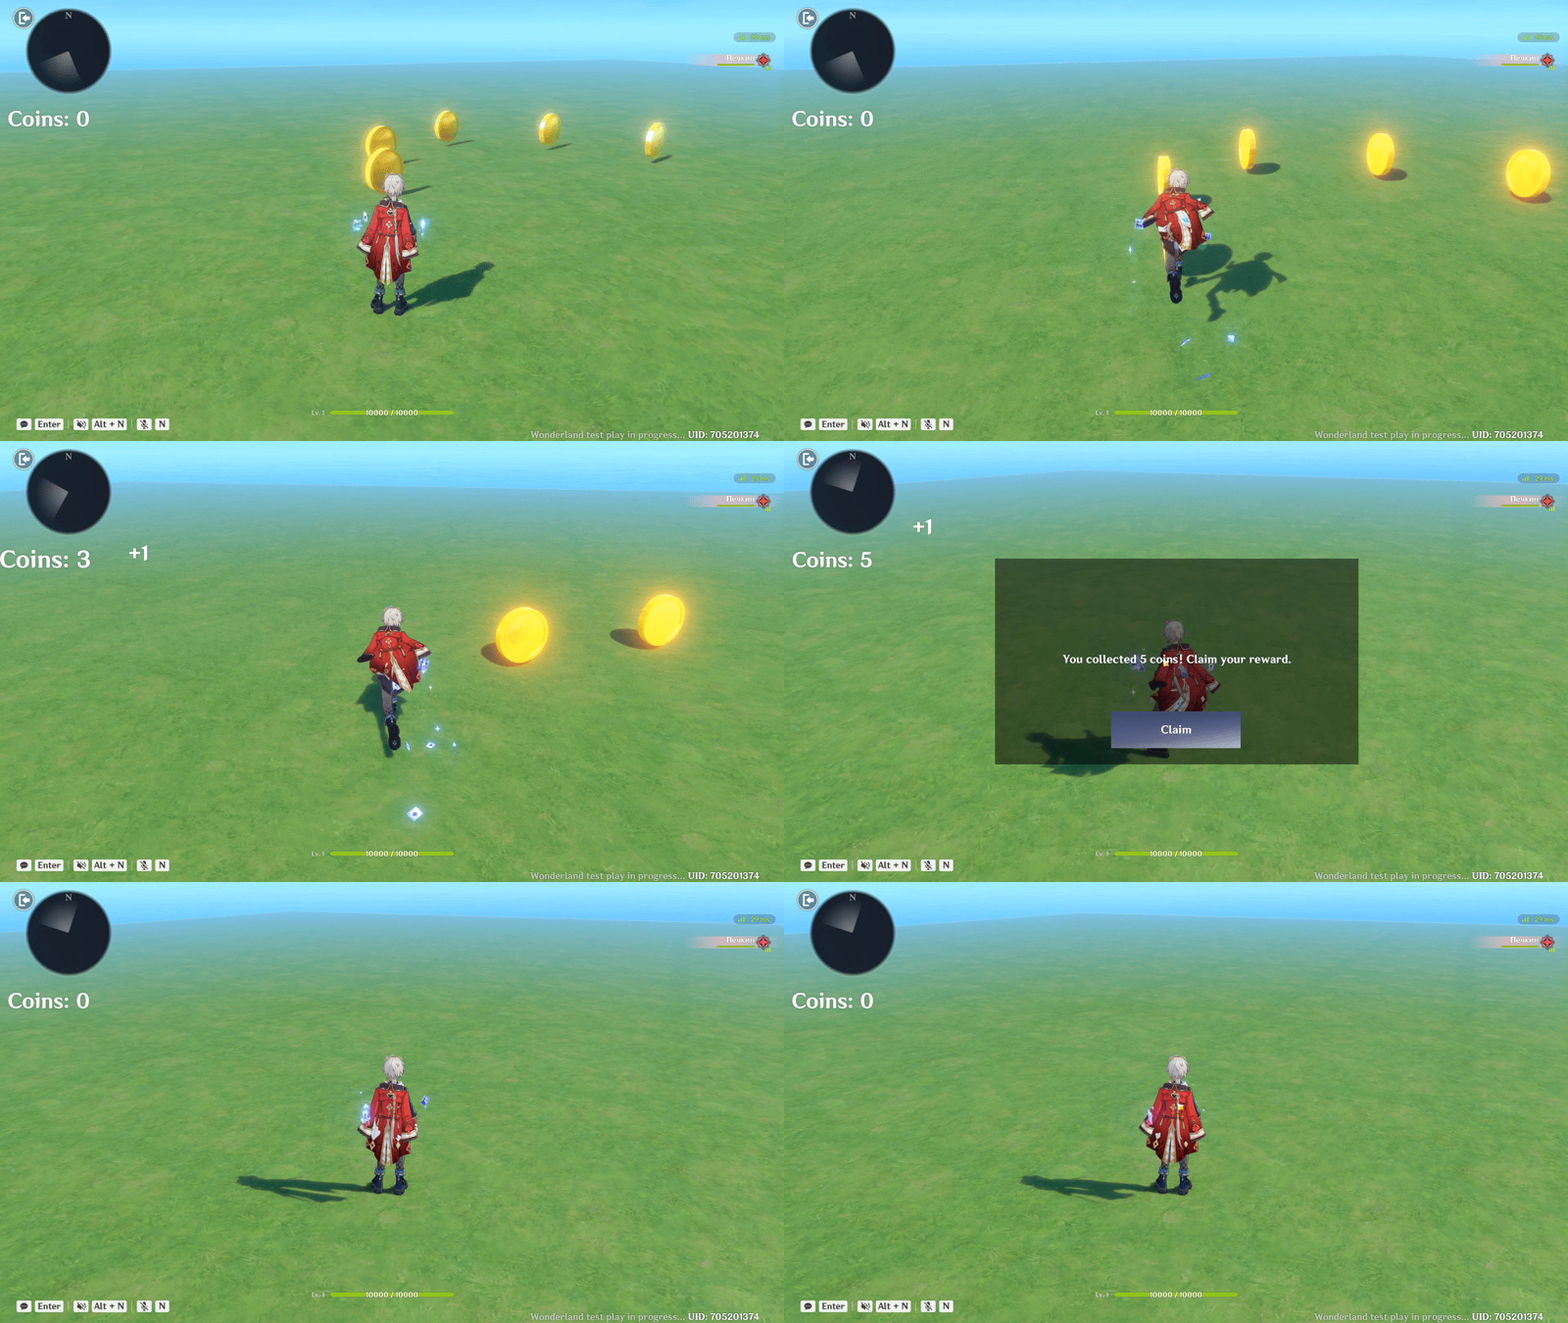
In this guide we will build one small but complete feature step by step:
- a coin counter that updates by itself when the server changes the player's coins, with a little "bounce" animation;
- a "+1" text that is spawned from a template, flies up and disappears;
- a reward popup that the server opens, with a Claim button that sends a message back to the server.
The goal is not only to show which buttons to press, but also why each step is done this way, so you can later build your own UI without copying this guide line by line.
We will cover the following topics:
- Server UI vs client UI: what Lua can and cannot do
- Preparing the tools
- Building the UI in the Client Control Container
- Creating a script and attaching it
- The script lifecycle and your first log message
- Reading a player variable and reacting when it changes
- Animations with Tween
- Spawning UI from a template
- Server → client: opening the popup with a signal
- Client → server: the Claim button
- Multiplayer: who sent the signal?
Who is this guide for? You should already know how to make a basic stage with node graphs. You don't need to be a programmer: every Lua line used here is explained. If you have never seen any code at all, a short "Lua basics" video will make this guide much easier.

1. Server UI vs client UI
Before 7.1, all UI was server UI: buttons, text boxes and pages that you place in Manage UI Control Groups and control with node graphs. Every click goes to the server, the server runs the graph, and the result comes back to the player.
Client controls work differently. They live on the player's device and are controlled only by Lua.
Server UI:
Where the logic runs: on the server
Reaction speed: has network delay
Animations: limited
Client UI:
Where the logic runs: on each player's device
Reaction speed: instant
Animations: full control (position, size, rotation, color)
Why does this matter? Lua cannot change the game world: it can't give items, change HP or write custom variables. It can only show things and listen to the player. So every real game action still goes through the server, and Lua talks to the server in exactly two ways:
- Signals, in both directions (server → client and client → server);
- Reading custom variables of the player, the character and the stage, plus an event when they change
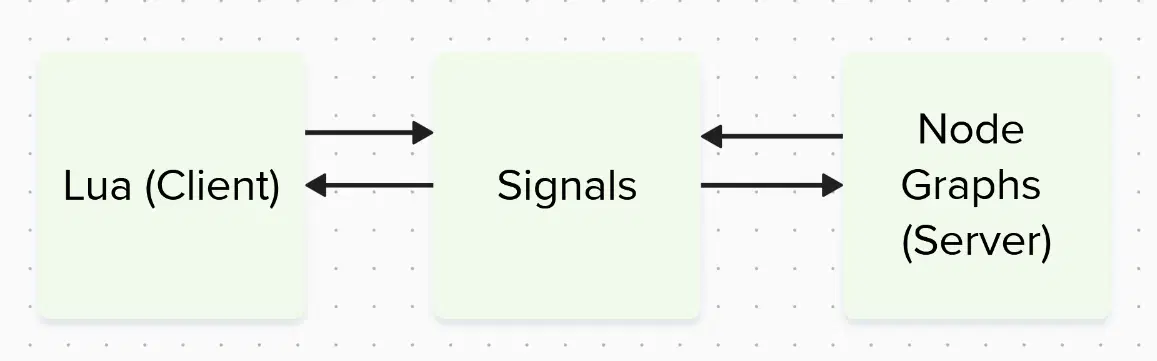
Our coin HUD uses all of these at once, which is why it is a good first project.
Important: every player runs their own copy of the script. If 4 players are in a stage, there are 4 independent copies of your Lua code. Keep this in mind for section 11.
2. Preparing the tools
2.1. VS Code and the MiliLua extension
You can write Lua in any text editor, but I strongly recommend VS Code with the community extension MiliLua API Definitions (by haminpants).
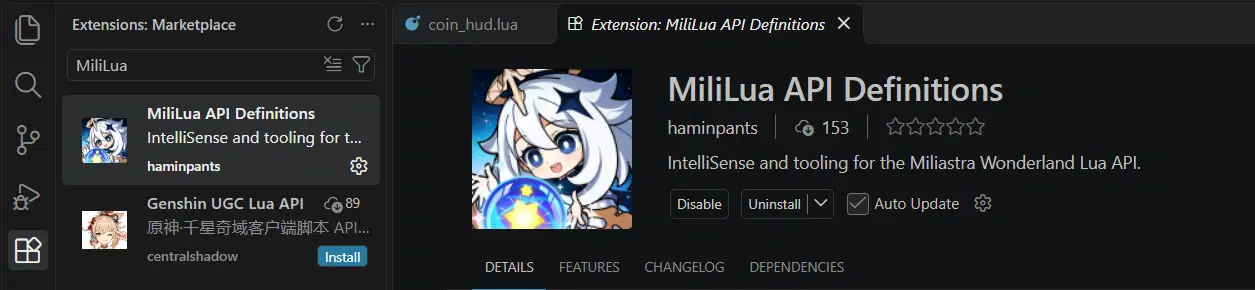
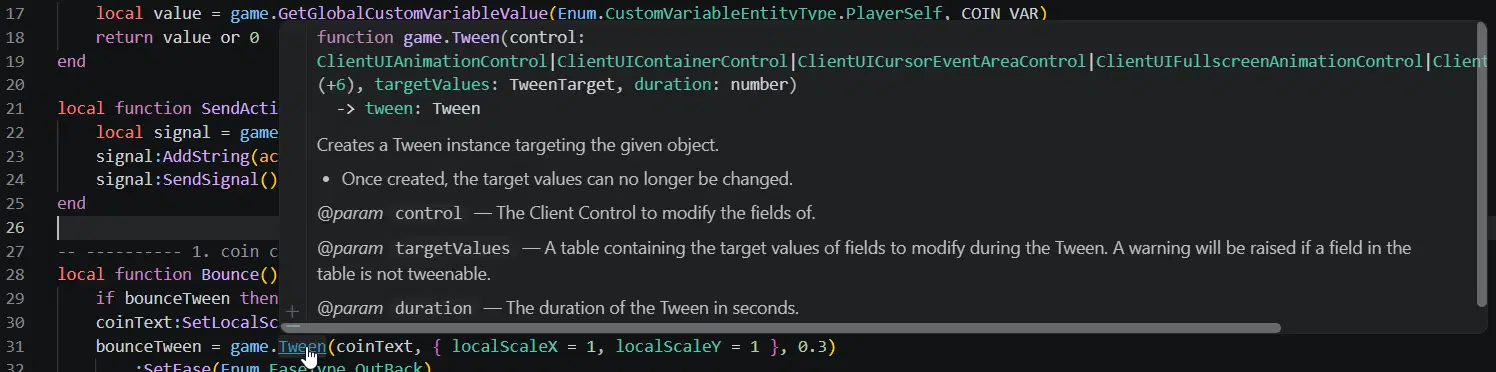
Why? The Miliastra Lua API is new and you won't find it in general Lua tutorials. The extension knows every Miliastra function and shows its description and parameters while you type. It also underlines mistakes (for example a missing parameter) before you start the game.
2.2. Turn on client script logs
print(...) in Lua writes a message to the log. This is the main way to check what your script is doing.
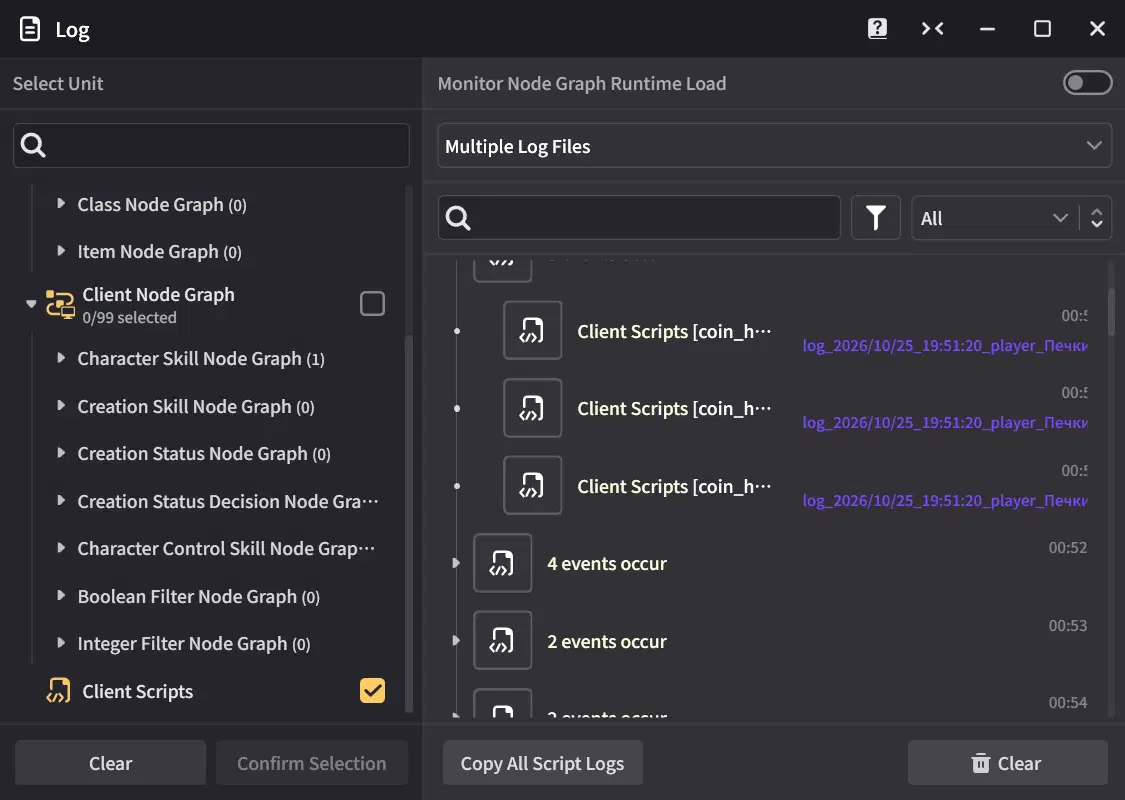
Why first? If something doesn't work and you have no logs, you are guessing. With logs, the script itself tells you "I started", "I can't find the element CoinText", and so on. Every script in this guide prints messages that start with [coin_hud], so you can find them quickly.
3. Building the UI
3.1. The Client Control Container
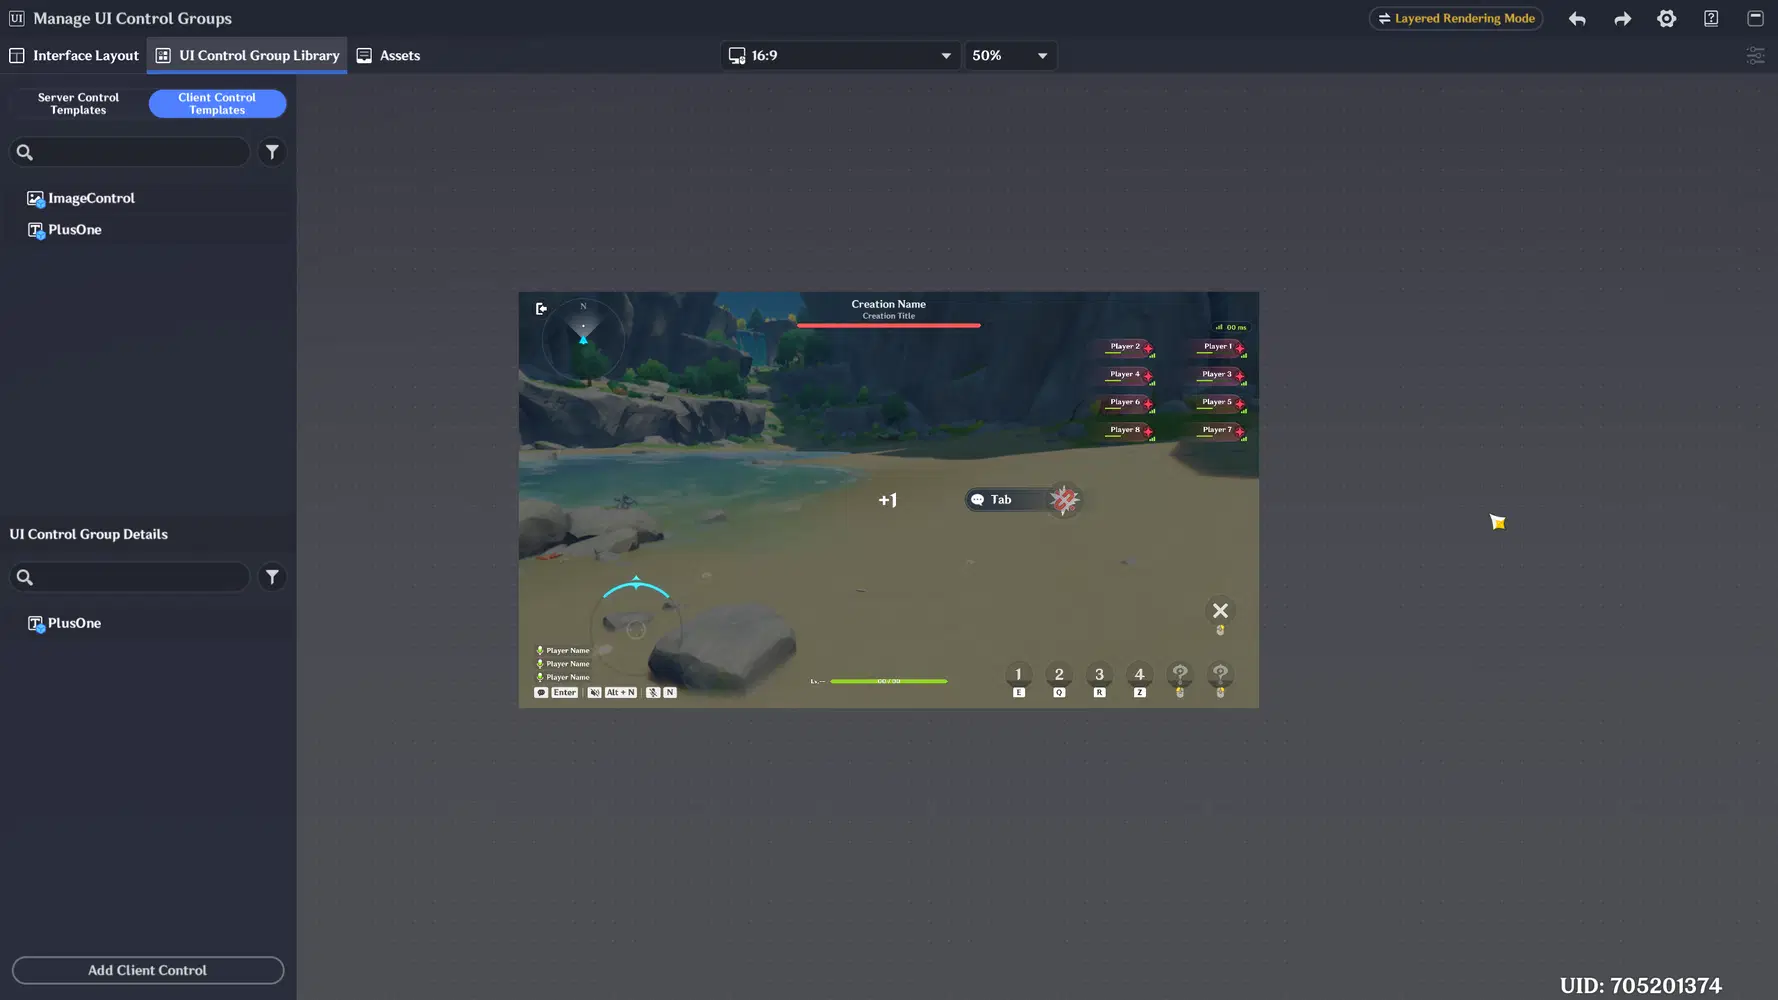
Client controls can't be placed directly on the screen. They always live inside a special server UI Control called the Client Control Container.
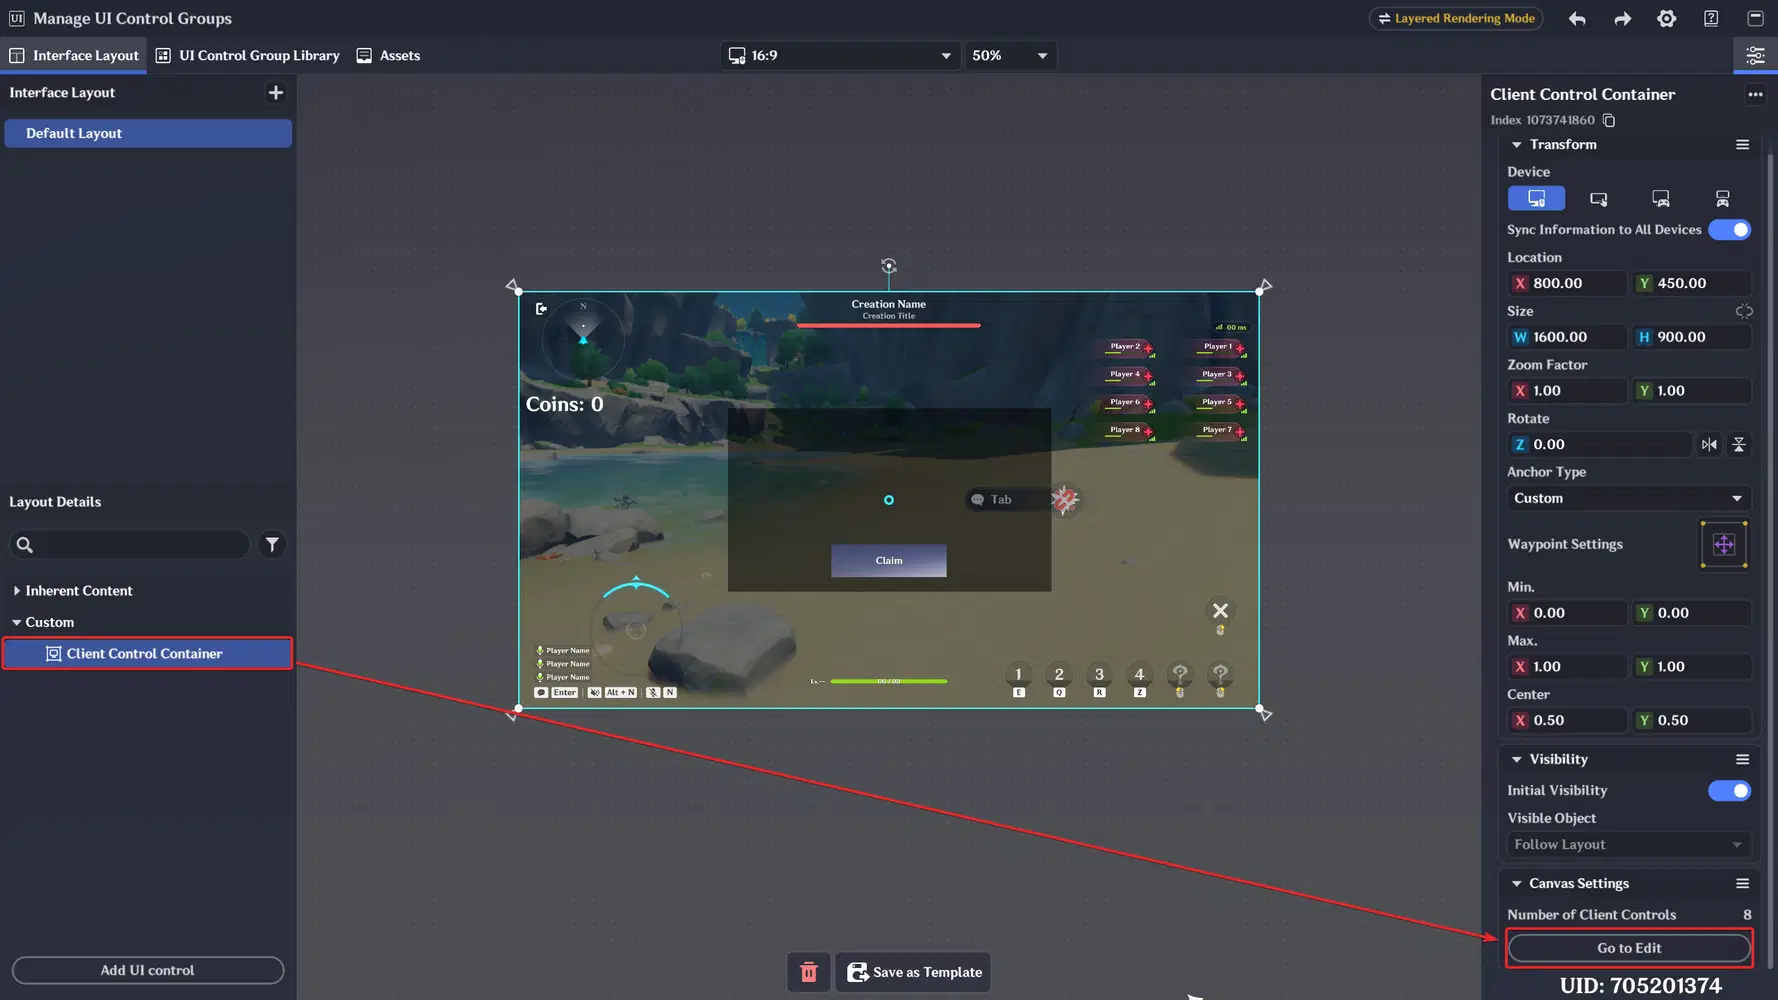
- Open Manage UI Control Groups → Interface Layout.
- Click Add UI control and add a Client Control Container.
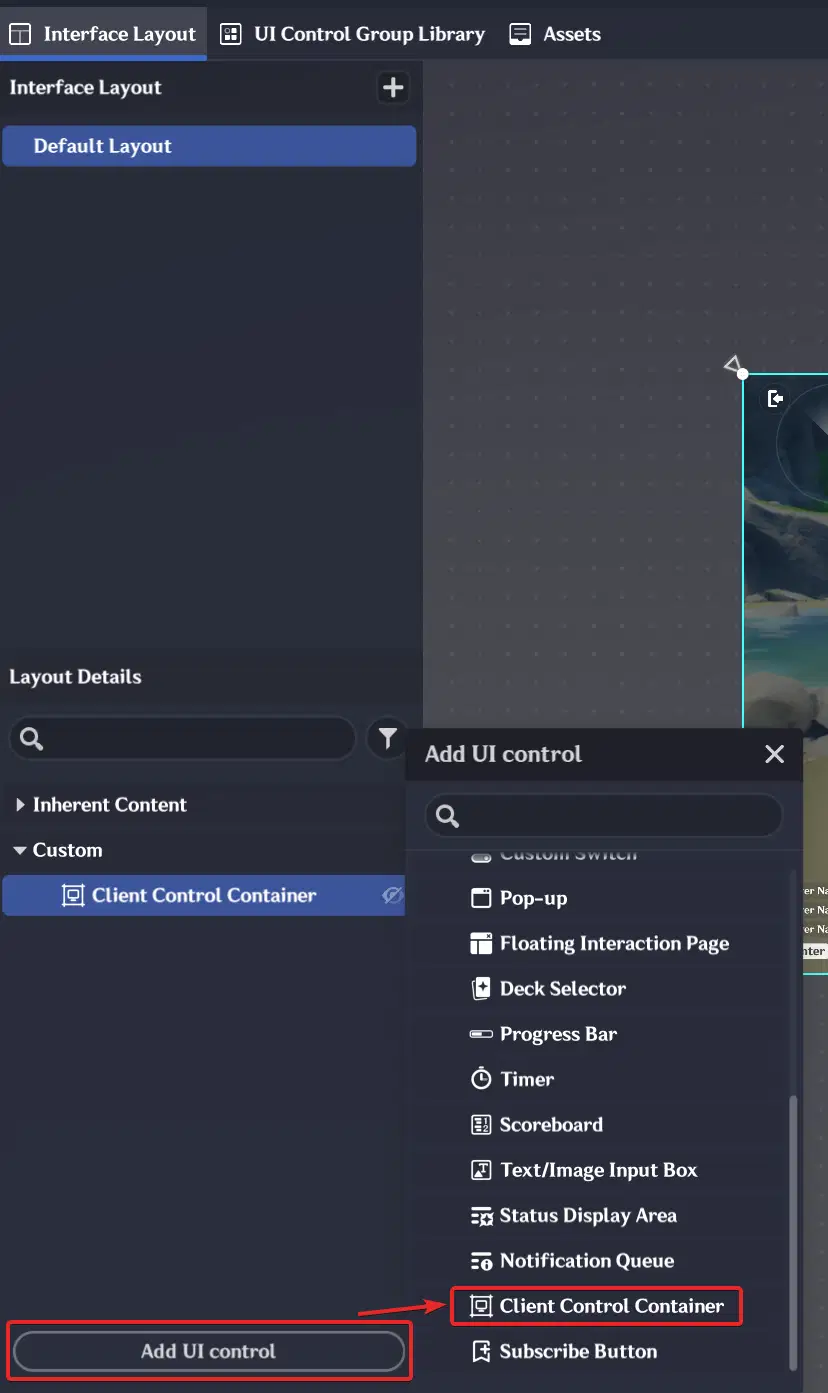
Why a whole-screen container? The container is the "canvas" for all client controls inside it. A full-screen canvas lets you put the coin counter in a corner and the popup in the center without fighting with the borders.
Why in the Interface Layout? Because we want the coin counter to be visible from the very start. If the container is hidden or removed, everything inside it is destroyed, including the scripts. You can also add the container later with nodes, the same way as any other UI.
3. Select the container and in Canvas Settings click Go to Edit.
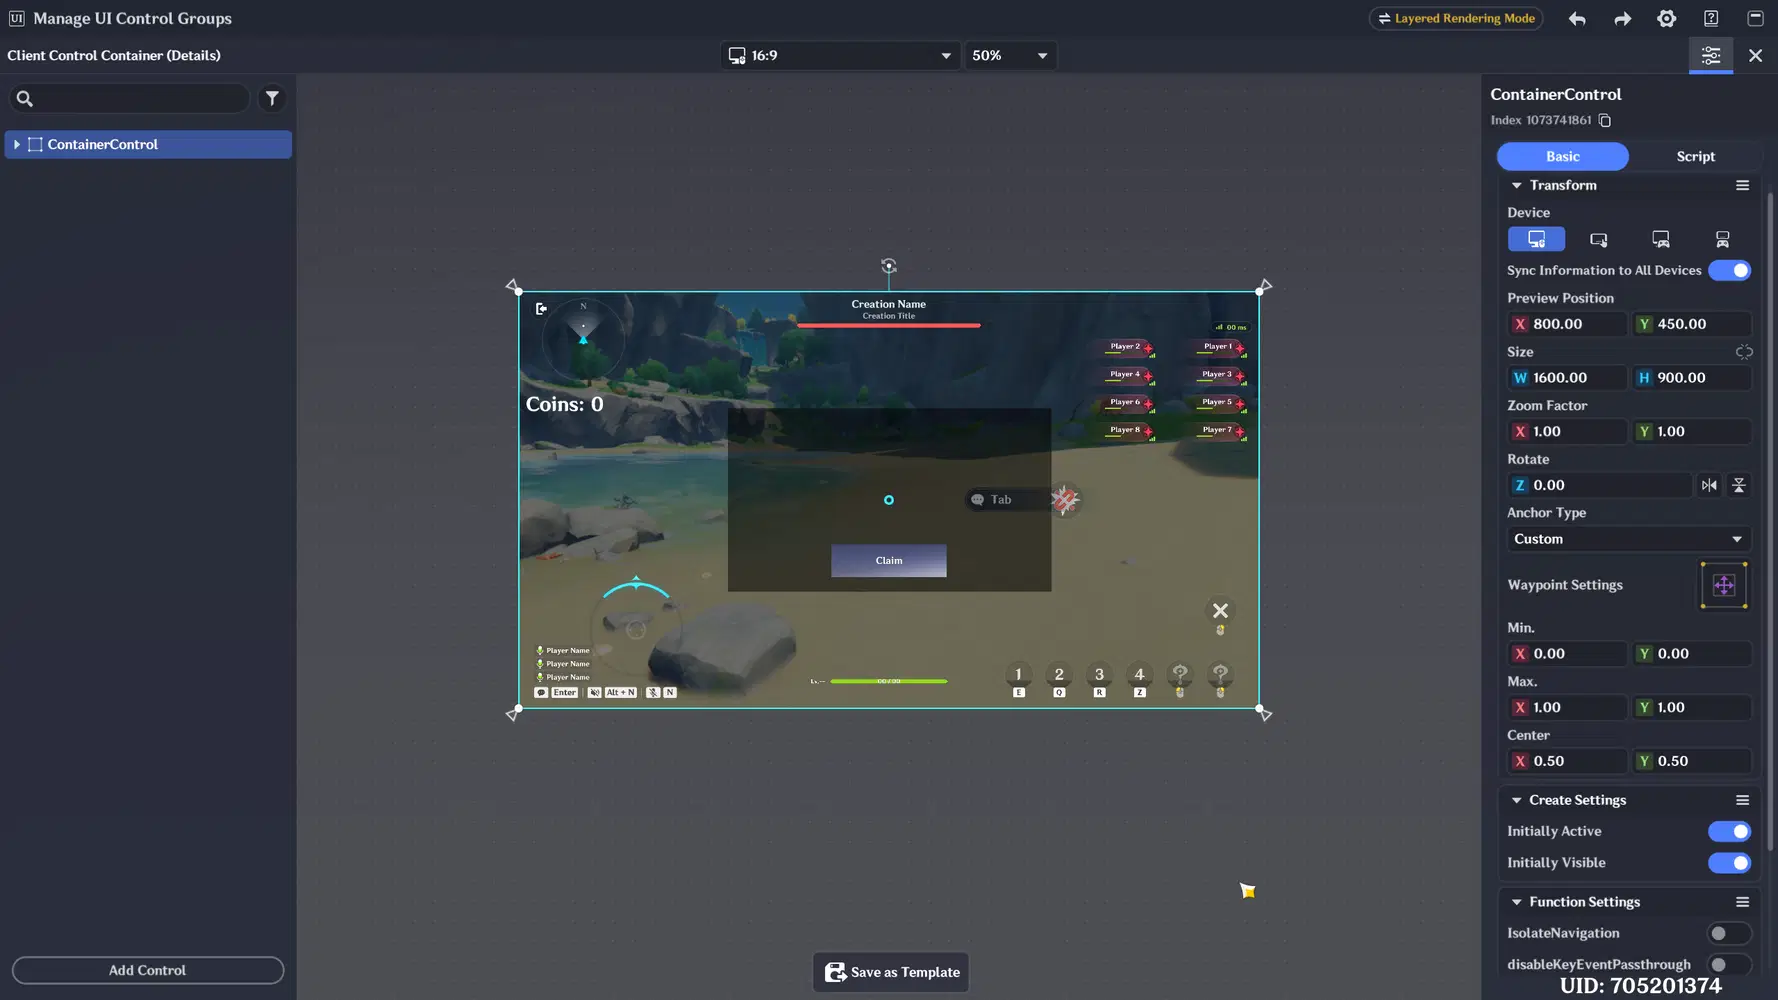
This opens a separate editor window with the hierarchy of client controls. Its root element is always called ContainerControl.
3.2. The hierarchy we need
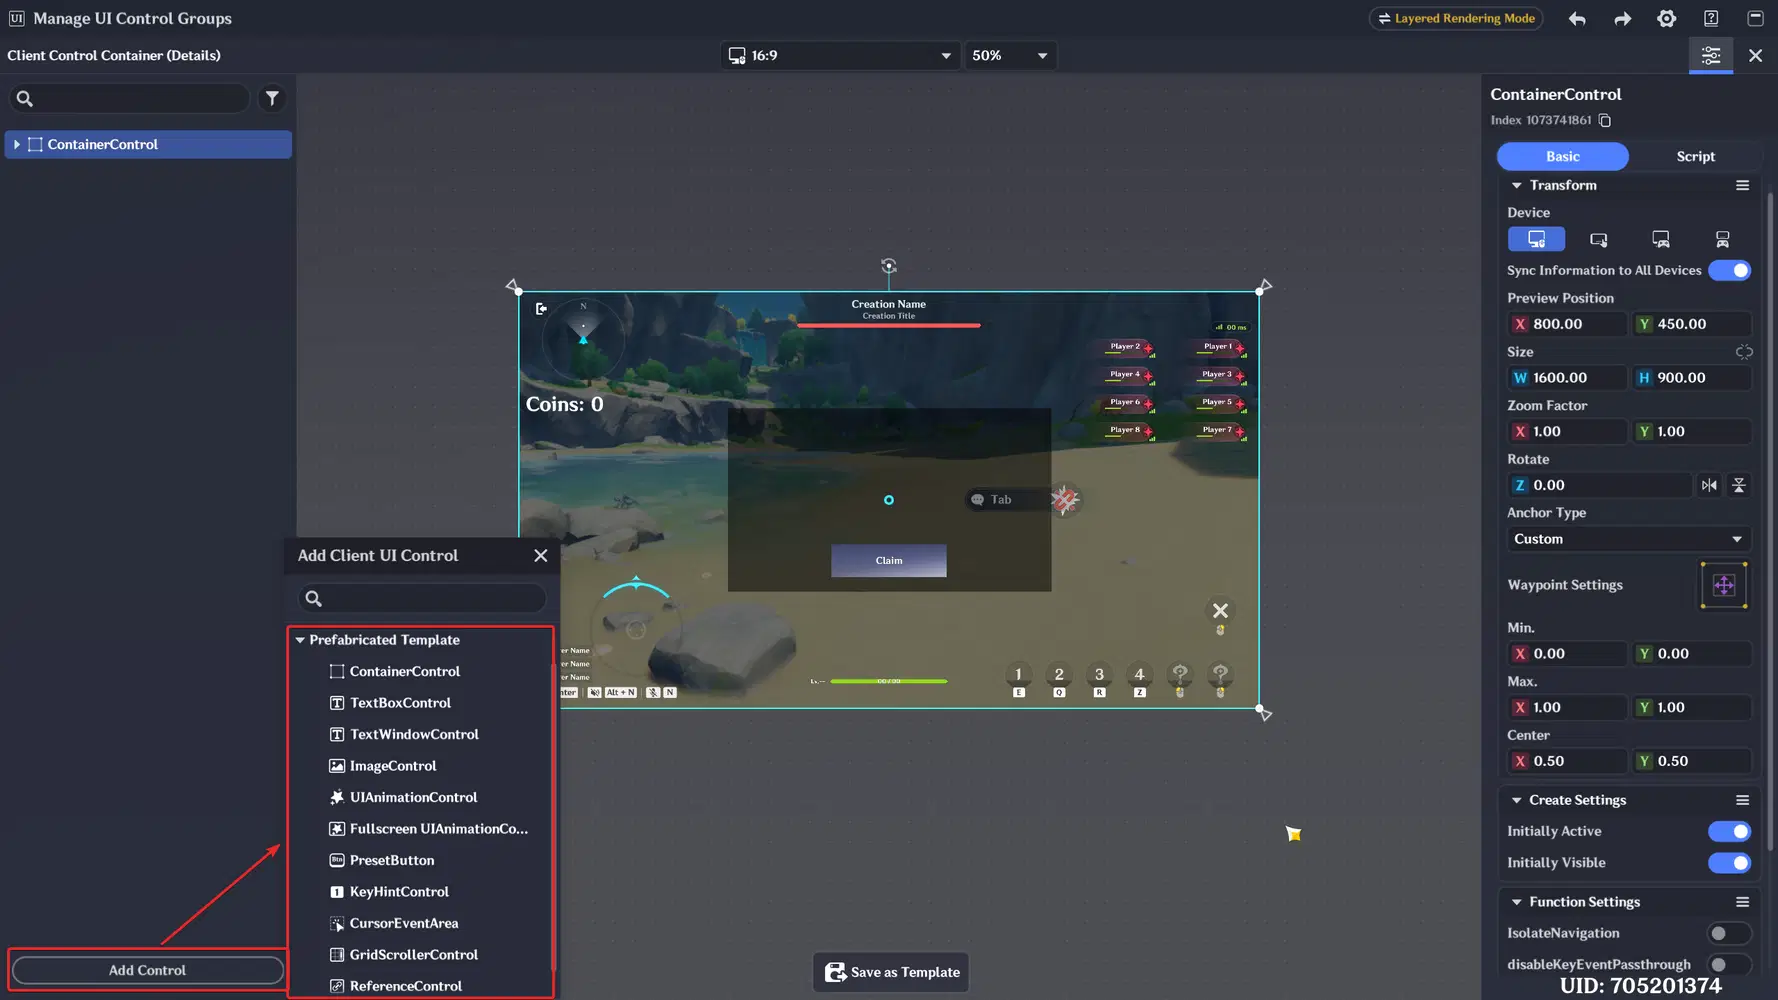
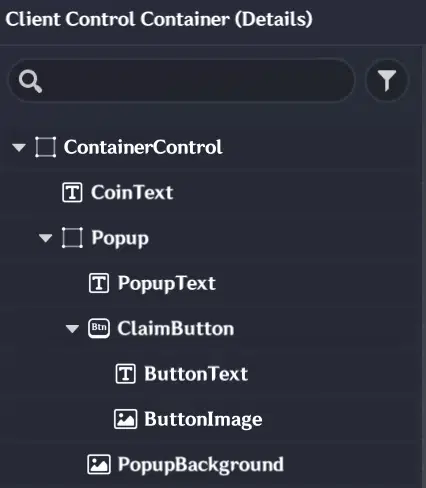
Use Add Control → Prefabricated Template and build this hierarchy:
ContainerControl (root, already exists)
├─ CoinText (TextBoxControl)
└─ Popup (ContainerControl)
├─ PopupText (TextBoxControl)
├─ ClaimButton (PresetButton)
└─ ButtonText (TextBoxControl)
└─ ButtonImage (ImageControl)
└─ PopupBackground (ImageControl)
A few words about the terms, because Lua uses them all the time:
- A control element placed inside another one is its child. The outer one is the parent. PopupText is a child of Popup, and Popup is a child of ContainerControl.
- When you move or hide a parent, all its children move or hide with it.
Why is the popup a separate ContainerControl? So we can show, hide and animate the whole window with one line of code. If the background, text and button were separate elements at the root, we would have to animate each of them separately and keep them in sync.
3.3. The names are part of the code
Rename the elements exactly as shown: CoinText, Popup, PopupText, ClaimButton.
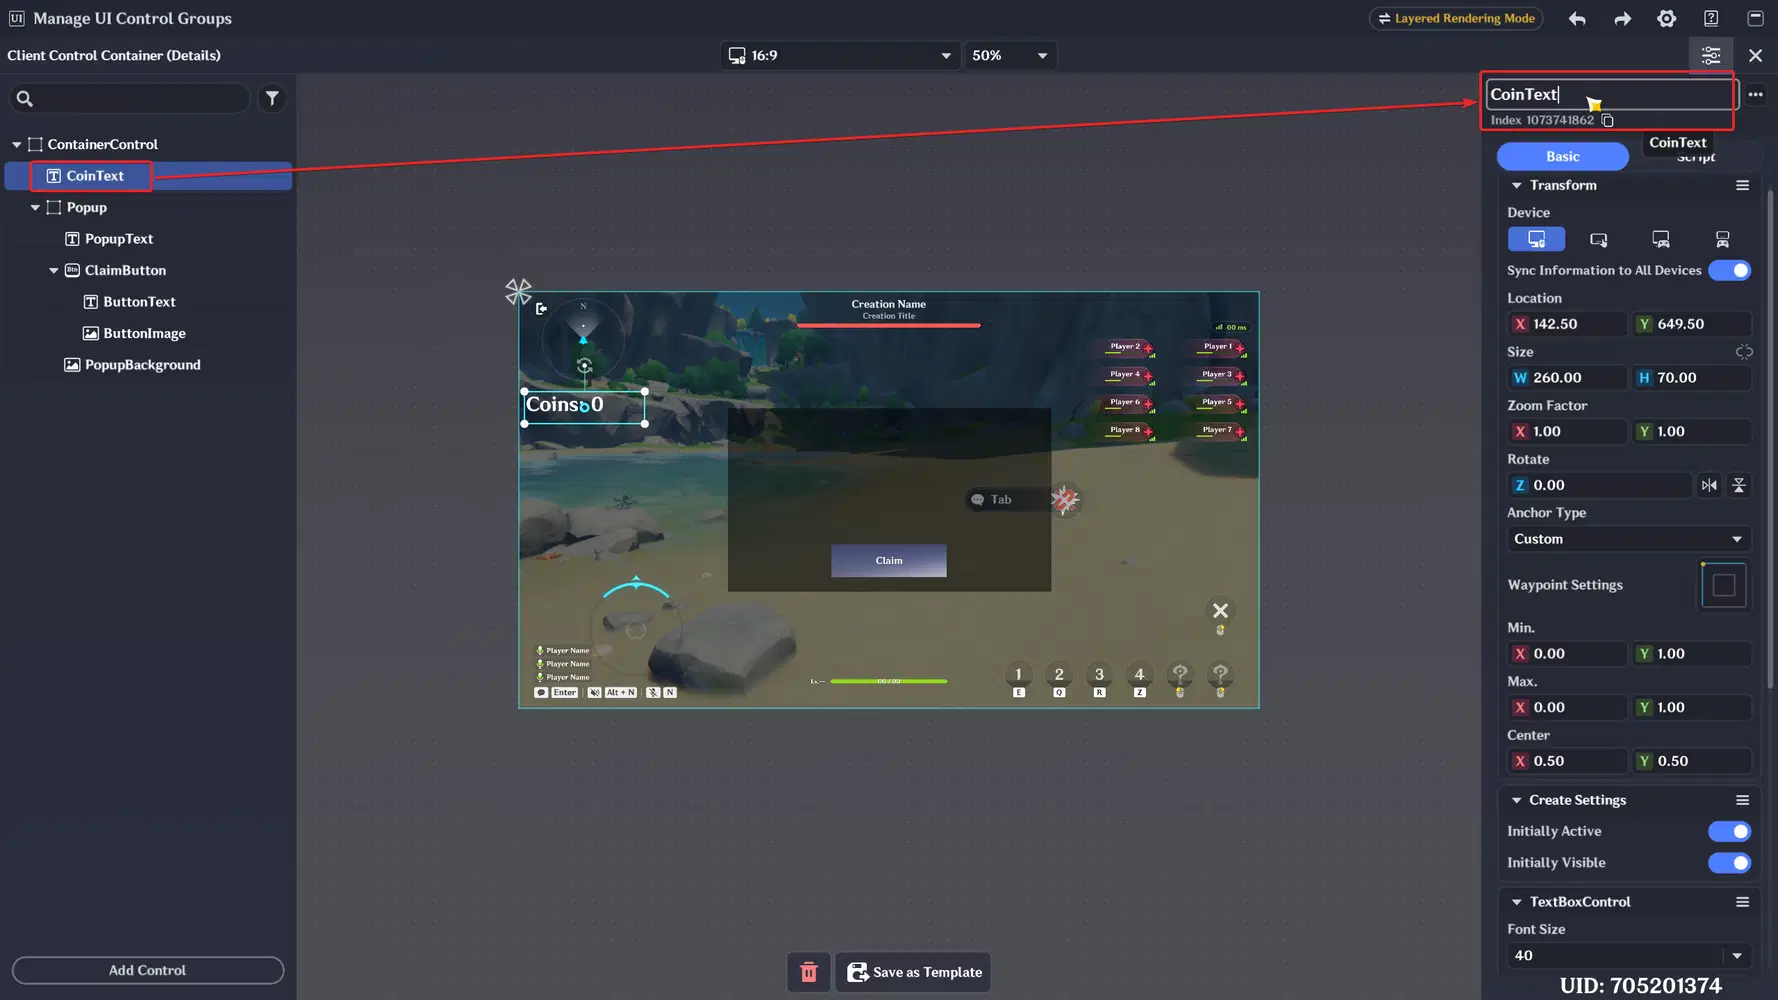
Why? The script finds elements by name: root:FindChild("CoinText"). If the element is called TextBoxControl or Coin Text (with a space), the script won't find it. Names are case-sensitive.
3.4. Layout settings
CoinText (top left corner):
- Anchor Type → Custom, Min. and Max. = 0, 1 (top left corner of the screen)
- font size about 40, text Coins: 0
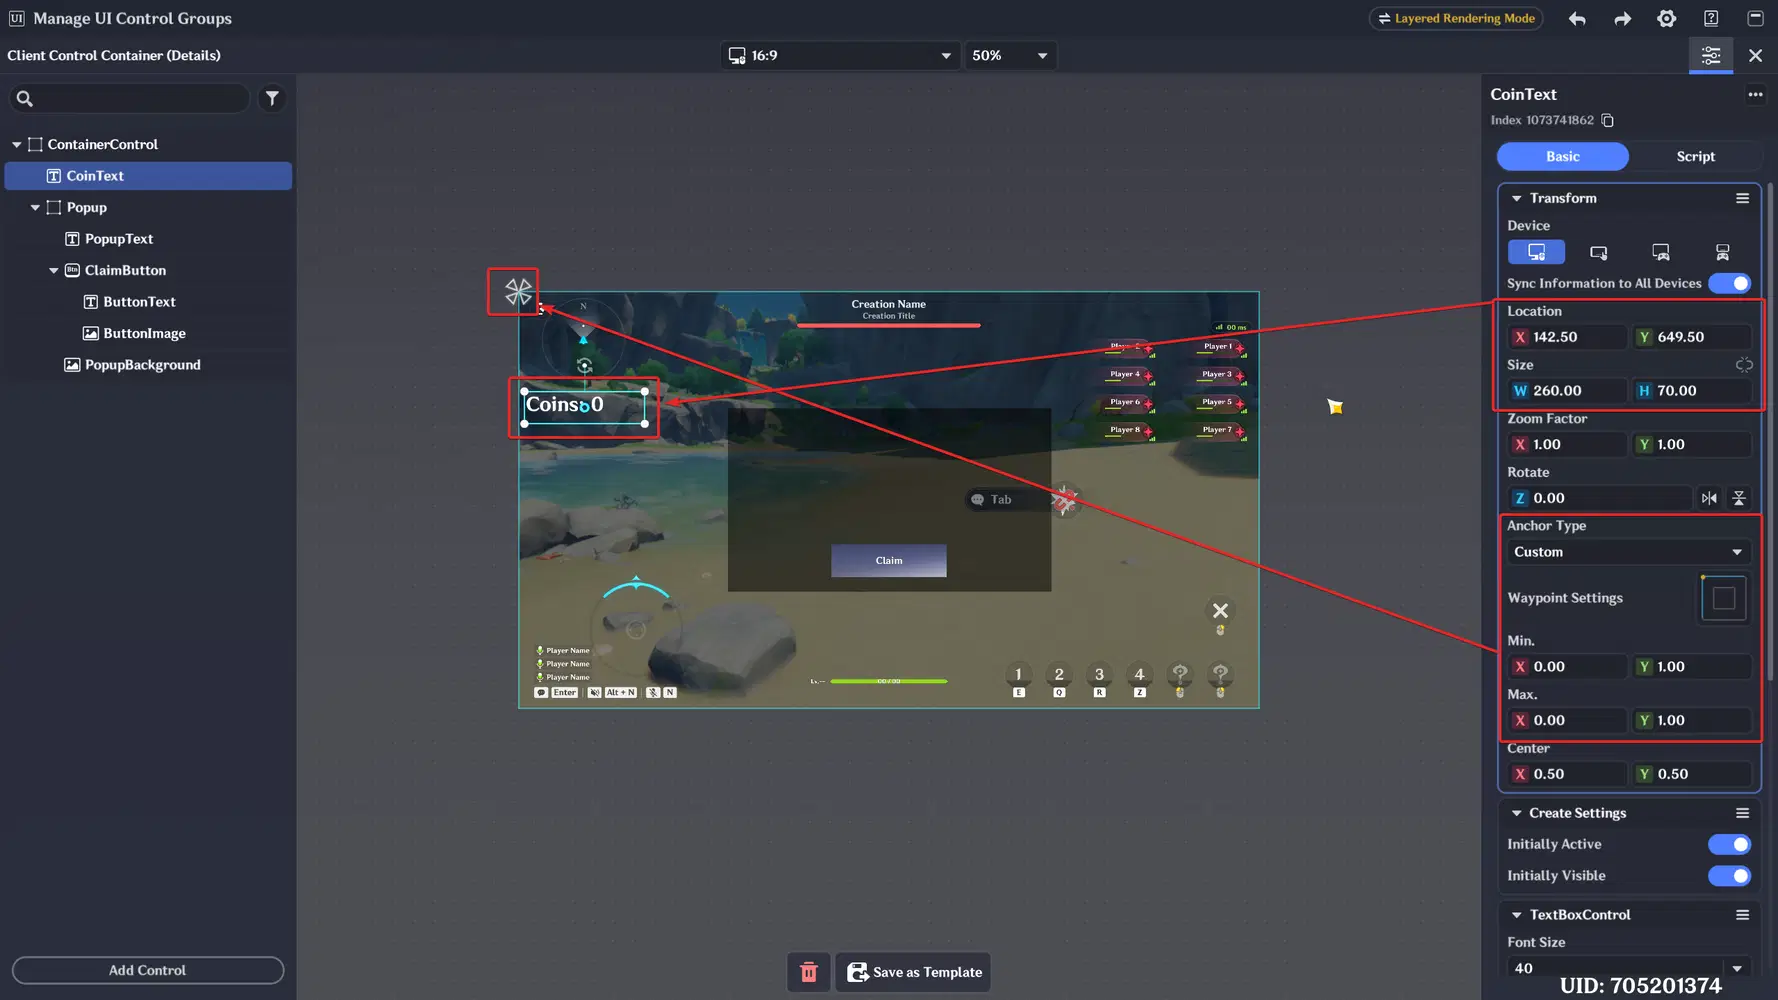
Why anchors? An anchor tells the element which point of the parent it is attached to. With the anchor in the top left corner, the counter stays in the corner on any screen: 16:9 monitors, ultrawide or phones. Without it, the position is counted from the center and the counter can end up in the wrong place on another device.
Popup (center): anchor 0.5, 0.5, size about 700 × 400.
- PopupBackground: fills the popup (anchors Min 0, 0, Max 1, 1), any dark image or color.
- PopupText: upper part, centered text.
- ClaimButton: lower part, button text "Claim".
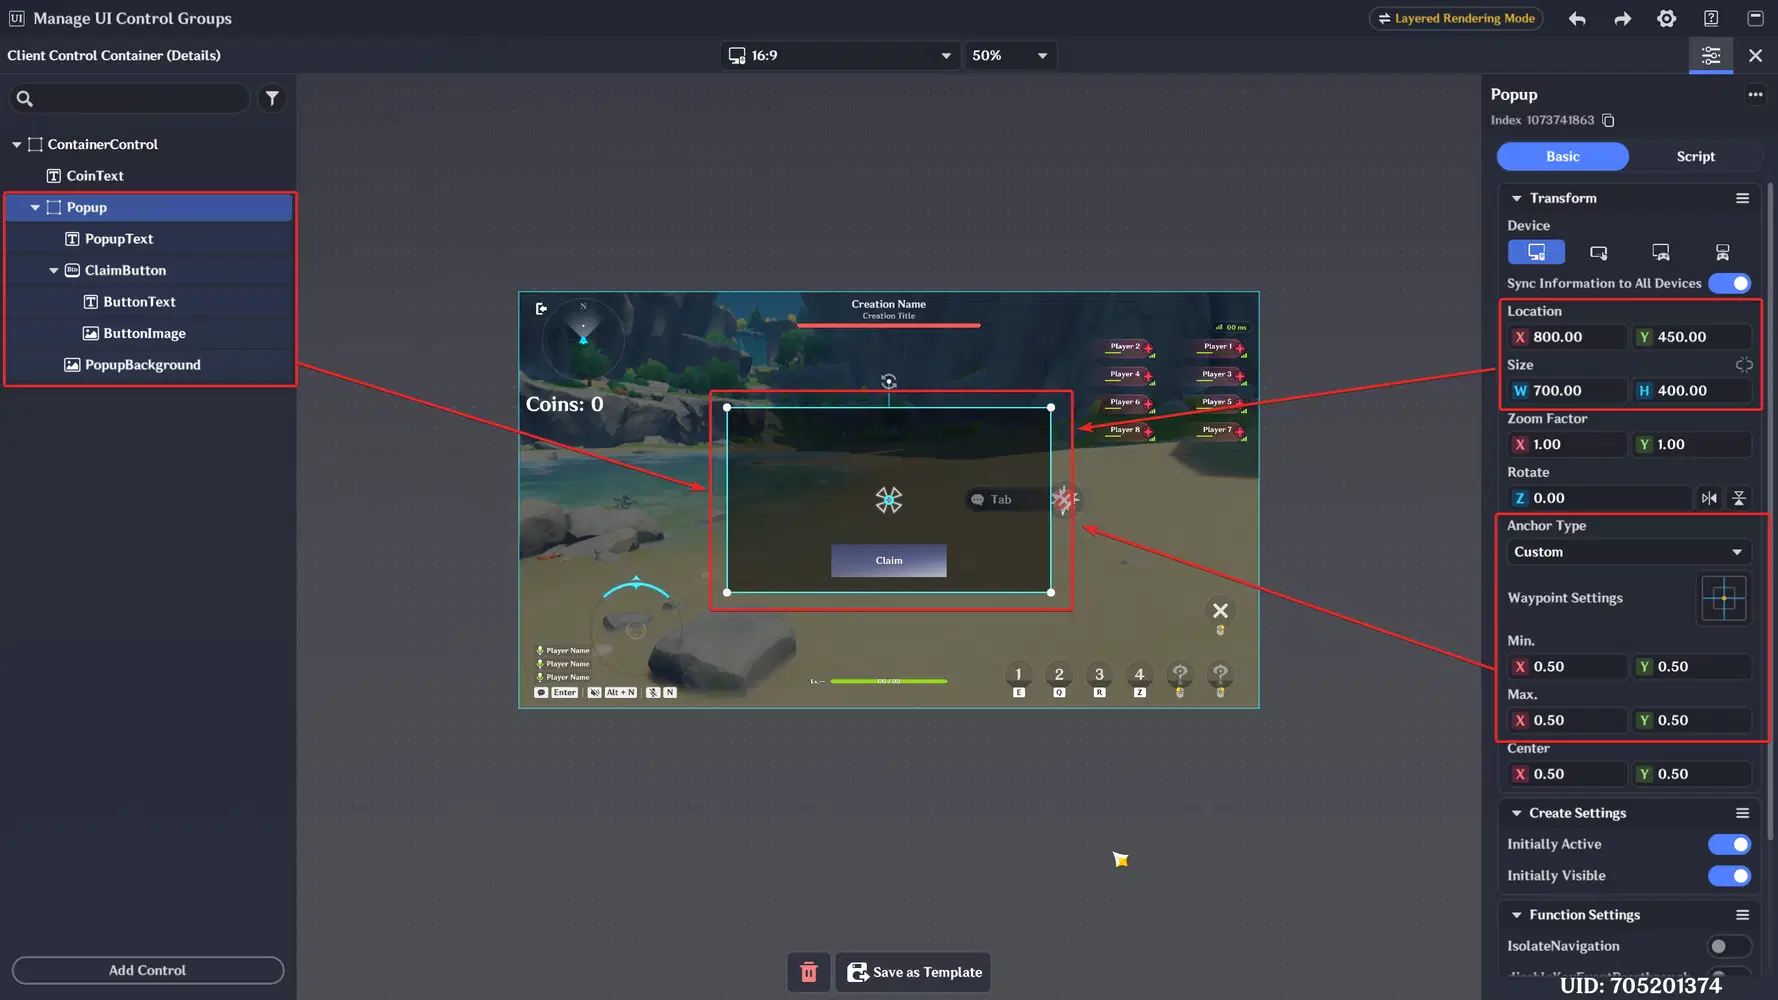
Leave Popup with Initially Visible turned on while you design it. The script hides it at start anyway.
Why let the script hide it instead of turning off Initially Visible? Because then the starting state is written in one place, the code.
3.5. The "+1" template
The flying "+1" is not placed on the screen. It is created by the script every time you get a coin. For that it must be a template.
- Add one more TextBoxControl, name it PlusOne, text +1, a bright color, font size about 44.
- Select it and click Save as Template at the bottom of the window.
- Delete PlusOne from the hierarchy. The template is saved in the library, and we don't need a copy on the screen.
4. Open UI Control Group Library → Client Control Templates, select the template and copy its Index (the number next to its name, like 1073741857).
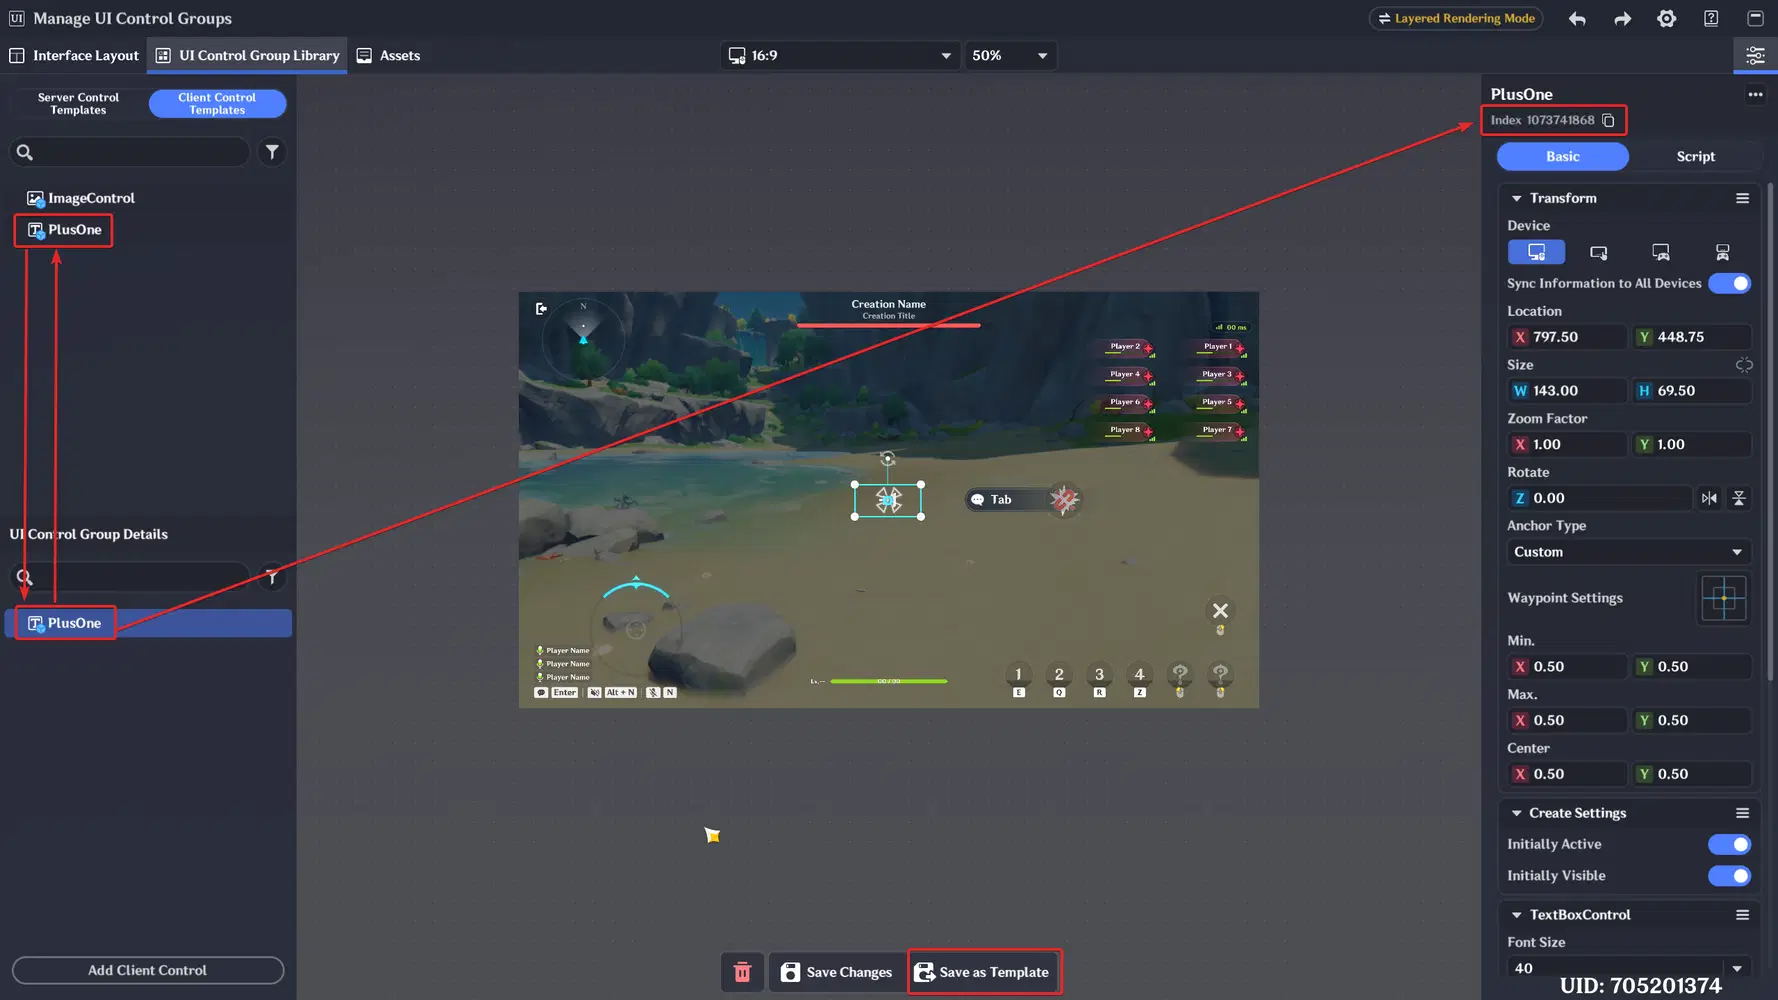
Why a template and not a basic control element? Lua can only create new elements from templates (game.InstantiateClientUIControl). It cannot copy an element that is already on the screen. A template is like a stamp: one stamp, as many copies as you need.
The most important rule of client UI: never attach scripts to elements that you save as templates. The script is saved inside the template. Every copy will run the same script, which creates a new copy, which runs the script again... and the game freezes on loading. Keep scripts only on the root ContainerControl. The script in this guide also checks the template and stops with an error if it finds a script inside.
4. Creating a script and attaching it
4.1. Create the file and the script mapping
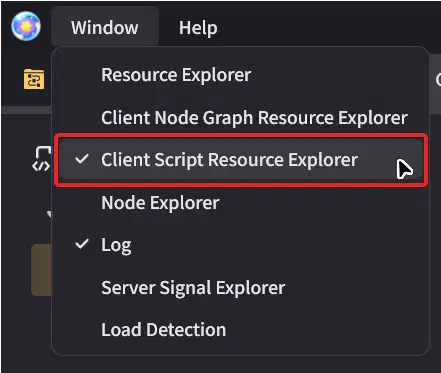
- Open the sandbox menu Window → Client Script Resource Explorer.
- Right click → New Client Script, name it coin_hud.
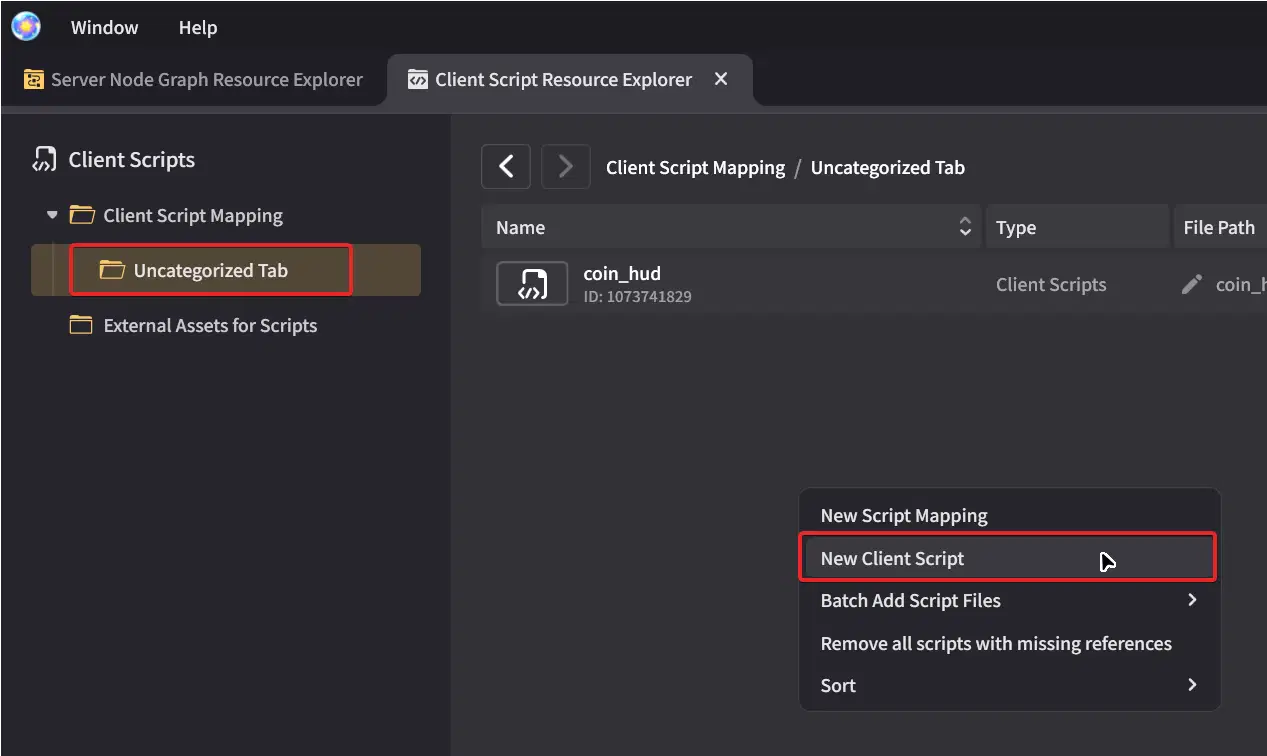
A Windows Explorer window opens in your project's script folder (...\Beyond_Local_Save_Level\\external_lua_file). Open this folder in VS Code.

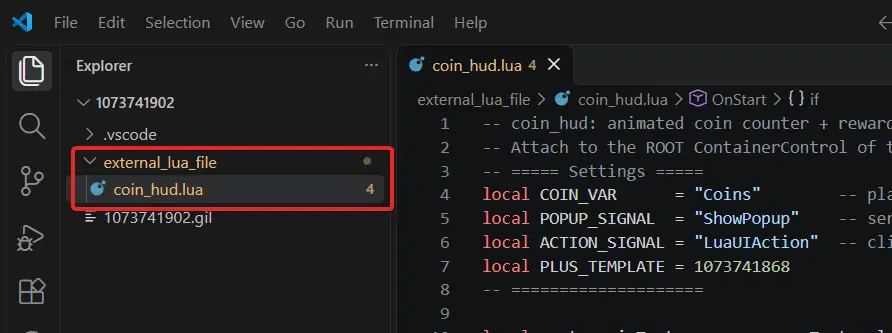
Why use "New Client Script" and not just create a .lua file? The game only sees scripts that have a script mapping. A mapping is the link between a file and the project. New Client Script creates the file and the mapping at once. A .lua file without a mapping simply doesn't exist for the game: it won't run and won't be saved into the project.
4.2. Attach the script to the root
Back in the container editor:
- Select ContainerControl (the root).
- Open the Script tab → Add Script → choose coin_hud.
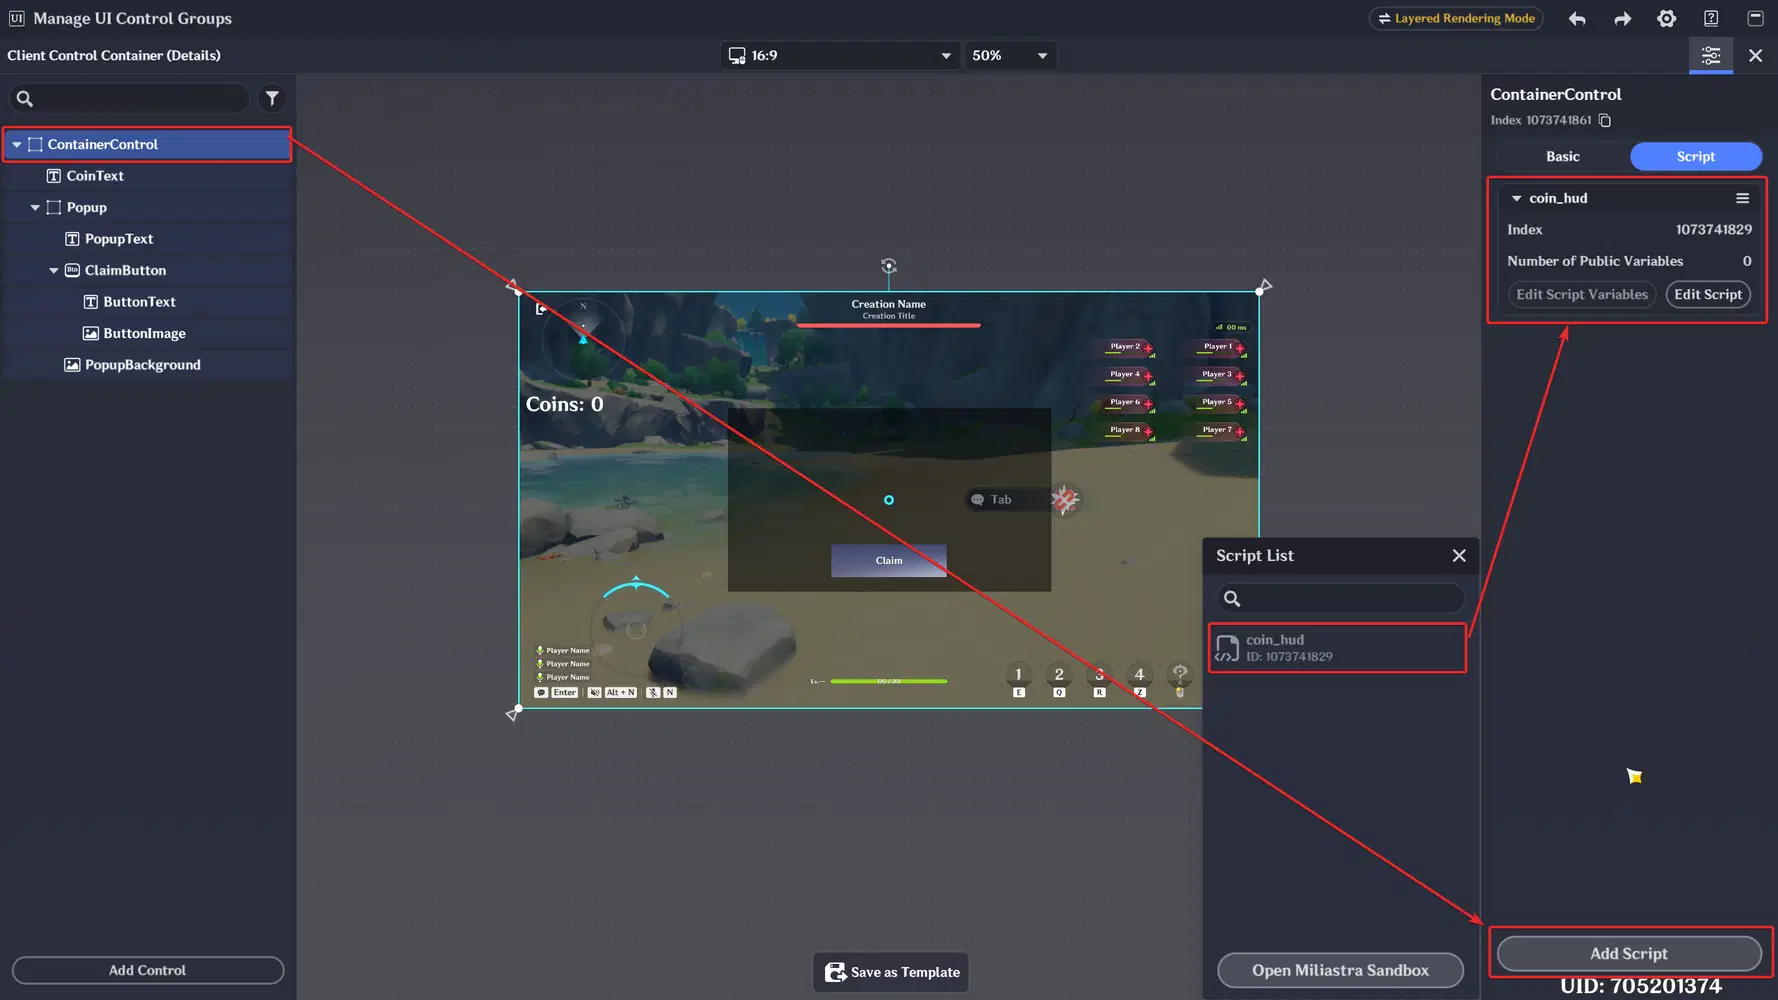
Why the root and not the button or the text? A script can see all children of the element it is attached to. One script on the root can control the counter, the popup and the button from one place. With three scripts on three elements, they would have to send messages to each other just to open one window.
5. The lifecycle and the first log message
Open coin_hud.lua in VS Code and write:
function OnStart()
print("[coin_hud] Hello from Lua!")
end
Save the file → save the project in the editor → start a Test Play.
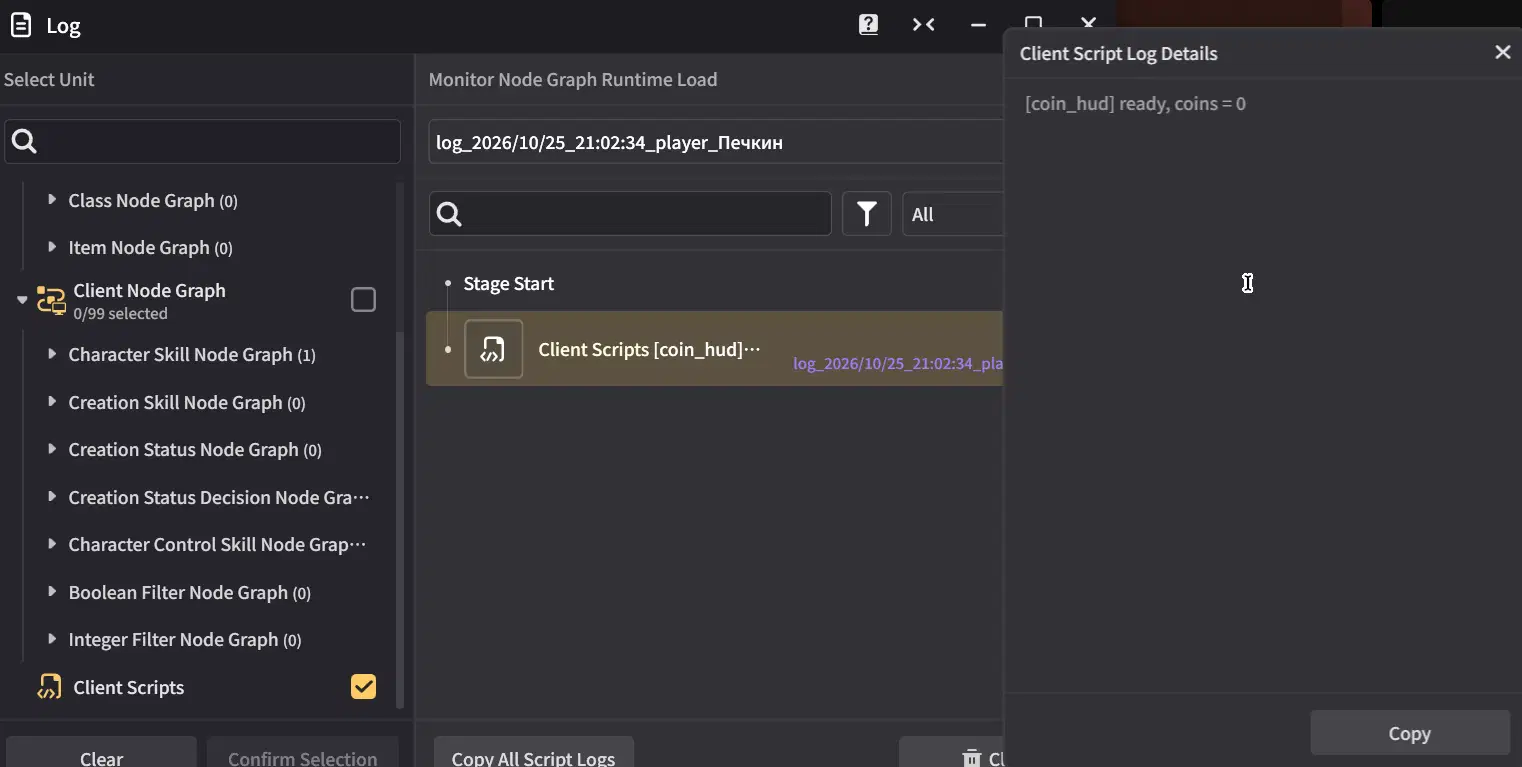
Always keep this order: save the .lua → save the project → Test Play. Otherwise the game may run the old version of your script.
5.1. Why OnStart?
You can't put your code just anywhere in the file and hope it runs at the right moment. Every client control has a lifecycle, and the game calls special functions at each stage:
OnInit():
When it is called: first, when the element is being set up
What it is good for: preparing data
OnStart()
When it is called: when everything is created and ready
What it is good for: finding elements, subscribing to events
OnUpdate(dt)
When it is called: every frame (only after script:EnableUpdate(true))
What it is good for: timers, smooth movement
OnDestroy()
When it is called: when the element is removed
What it is good for: cleaning up
We use OnStart because at this moment all children already exist, so we can safely search for CoinText and the others.
Remember: when a player teleports or reconnects, all client controls are destroyed and created again, and the script starts again from OnStart. That's why the important state (the coins) is stored on the server, in a variable, and not in Lua.
5.2. script.object and finding children
local root, coinText, popup, popupText, claimButton
function OnStart()
root = script.object
coinText = root:FindChild("CoinText")
popup = root:FindChild("Popup")
popupText = root:FindChild("Popup/PopupText")
claimButton = root:FindChild("Popup/ClaimButton")
print("[coin_hud] ready")
end
- script is the script itself, and script.object is the element it is attached to, in our case the root ContainerControl.
- FindChild("Popup/PopupText") finds a child by its path: first Popup, then inside it PopupText.
Why are the variables declared at the top, outside of OnStart? Because later other functions (the button, the popup) need them too. A variable created inside OnStart with local exists only inside OnStart.
Dot or colon? You will see both root.showCursor and root:FindChild(...). A dot reads or writes a property (coinText.text = "..."). A colon calls a function of this element and automatically passes the element itself into it. Rule of thumb: properties with a dot, actions with a colon. If VS Code complains "expected 2 arguments but got 1", you probably wrote a dot instead of a colon.
5.3. Fail loudly instead of silently
Add a check right after finding the elements:
if not (coinText and popup and popupText and claimButton) then
printerr("[coin_hud] some UI elements were not found - check their names")
game.PrintClientUITree()
return
end
Why? A typo in a name is the most common mistake. Without this check, the script crashes on the first line that uses the missing element, and the error message doesn't say which element is missing. With the check, you get a clear message and game.PrintClientUITree() prints the real element names, so you can compare.
6. Reading the coins and reacting to changes
6.1. Server side: the variable and the coin source
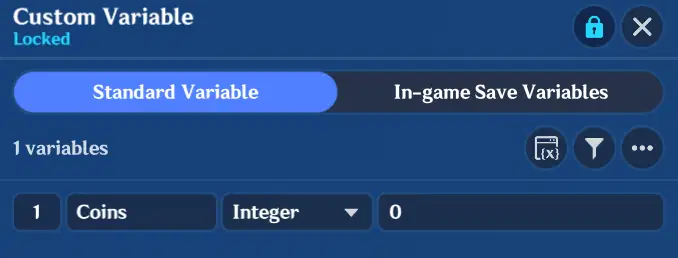
- On the player entity, create a custom variable Coins, type Integer, value 0.
2. Make anything that gives coins, for example an object with an interaction. In its graph: on interaction → Set Custom Variable Coins = Coins + 1 on the interacting player, with Trigger Event = Yes.
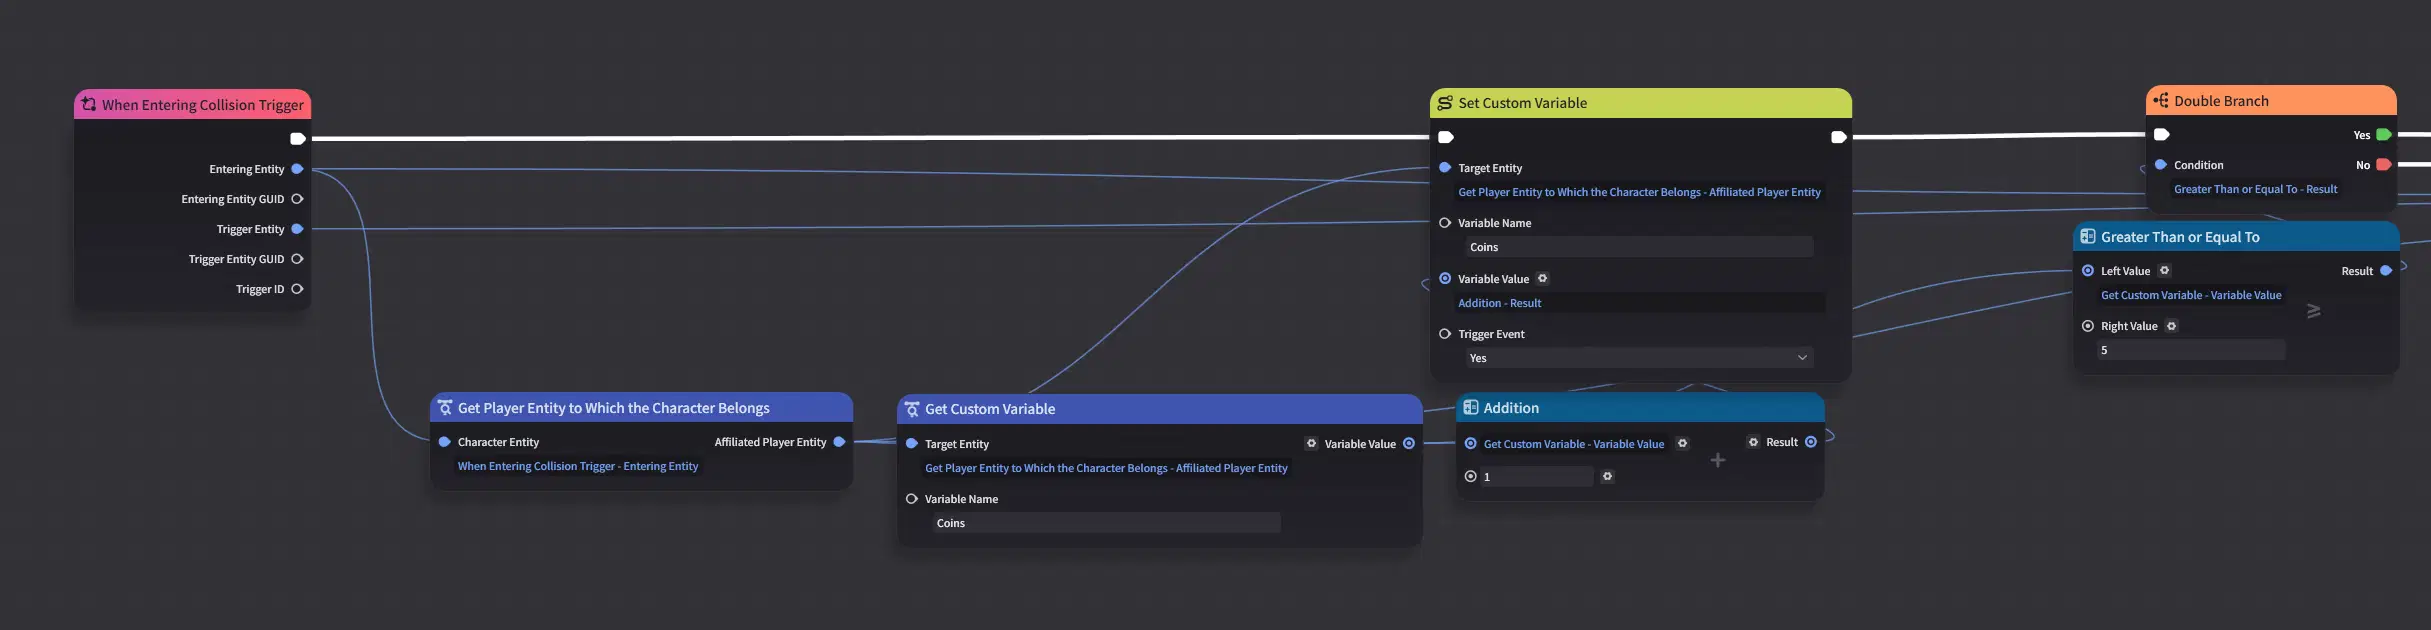
Why Trigger Event = Yes? This option makes the game fire a "variable changed" event. Node graphs use it, and Lua can listen to it too. Without it, Lua never learns that the coins changed.
6.2. Reading the value in Lua
local COIN_VAR = "Coins"
local function GetCoins()
local value = game.GetGlobalCustomVariableValue(Enum.CustomVariableEntityType.PlayerSelf, COIN_VAR)
return value or 0
end
- Enum.CustomVariableEntityType.PlayerSelf means "the variables of this player". The other options are AvatarSelf (this player's character) and Level (the stage).
- or 0 is a safety net: if the variable doesn't exist yet, we get 0 instead of nil and the script doesn't crash.
Why is the name in a variable at the top (COIN_VAR)? If you rename the variable in the editor later, you change it in one place, not in five.
6.3. Reacting to changes
local lastCoins = 0
local function RefreshCoins()
local coins = GetCoins()
coinText.text = "Coins: " .. coins
lastCoins = coins
end
-- inside OnStart, after the element check:
lastCoins = GetCoins()
coinText.text = "Coins: " .. lastCoins
script:RegisterCustomVariableChangedHandler(Enum.CustomVariableEntityType.PlayerSelf, COIN_VAR, RefreshCoins)
.. joins strings: "Coins: " .. 5 becomes "Coins: 5".
RegisterCustomVariableChangedHandler means: "when Coins of this player changes, call RefreshCoins". Note that we pass RefreshCoins without brackets. With brackets, the function would run right now and we would pass its result. Without brackets, we pass the function itself, to be called later.
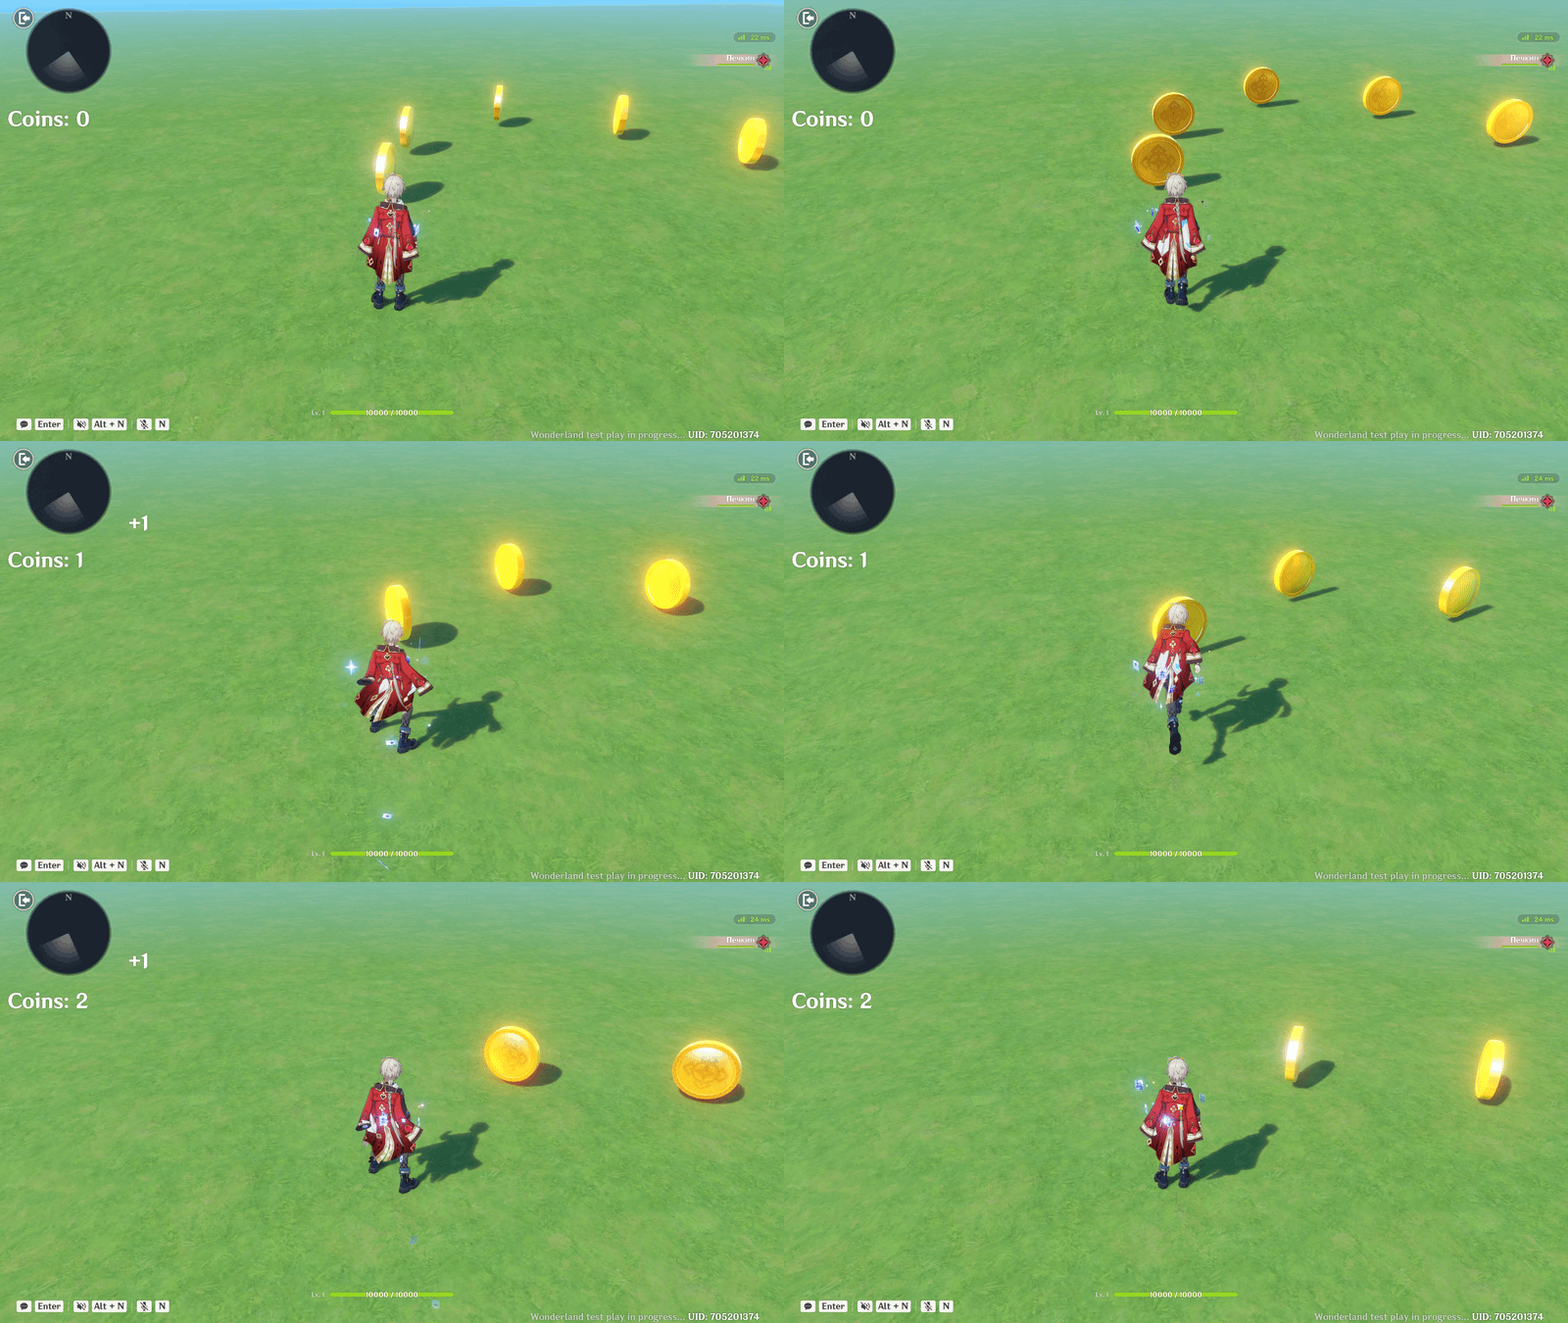
Why not just update the text right after the player picks up the coin? Because the coin is picked up on the server. The client learns about it only after the server has processed it and sent the new value back, and this takes some time (around 100 ms or more in co-op). If you read the variable too early, you get the old value. The "variable changed" event comes exactly when the new value has arrived, so it is always correct.
7. Animation with Tween
A Tween smoothly changes properties of an element from their current value to a target value over a given time.
local bounceTween
local function Bounce()
if bounceTween then bounceTween:Kill(false) end
coinText:SetLocalScale(1.35, 1.35, 1)
bounceTween = game.Tween(coinText, { localScaleX = 1, localScaleY = 1 }, 0.3)
:SetEase(Enum.EaseType.OutBack)
:SetOnComplete(function()
bounceTween:Kill(false)
bounceTween = nil
end)
bounceTween:Play()
end
Call Bounce() inside RefreshCoins, only when coins went up:
if coins > lastCoins then
Bounce()
end
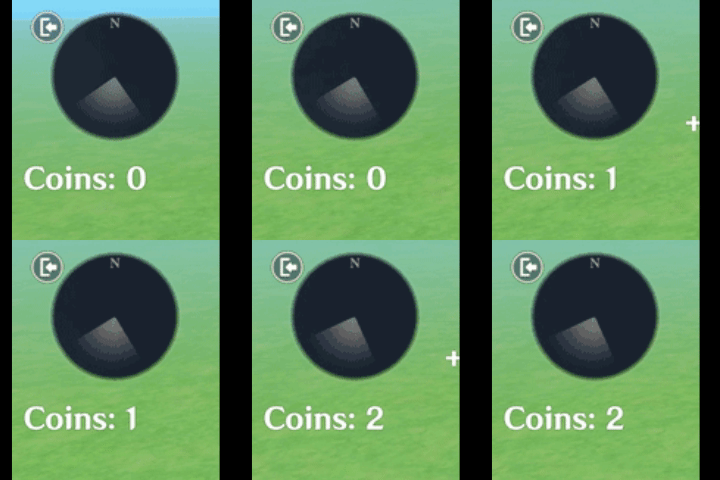
Line by line:
- SetLocalScale(1.35, 1.35, 1) makes the text bigger instantly;
- game.Tween(coinText, { localScaleX = 1, localScaleY = 1 }, 0.3) returns it to normal size over 0.3 seconds;
- SetEase(Enum.EaseType.OutBack) sets the "shape" of the motion. OutBack overshoots a little and comes back, which looks like a bounce. Try OutBounce, OutElastic or InOutSine to feel the difference. The site easelab (link at the end) shows all ease types visually.
Why Kill before a new tween? If you get two coins quickly, the second bounce starts while the first is still playing. A playing tween keeps controlling the scale, and the two would fight each other. Kill(false) stops the old one first.
Why Kill in SetOnComplete? A tween that has finished is not automatically removed. One-shot tweens that are never killed slowly pile up in memory.
Tween can animate: position (anchoredPositionX/Y), size (sizeDeltaX/Y), scale, rotation, anchors, and for images also the color.
8. Spawning "+1" from a template
local PLUS_TEMPLATE = 1073741857 -- <- your template Index from section 3.5
local function SpawnPlusOne()
local ok, plus = pcall(game.InstantiateClientUIControl, PLUS_TEMPLATE, root)
if not ok or not plus then
printerr("[coin_hud] can't create the +1 template: " .. tostring(plus))
return
end
plus:SetAnchorMin(coinText.anchorMinX, coinText.anchorMinY)
plus:SetAnchorMax(coinText.anchorMaxX, coinText.anchorMaxY)
plus:SetAnchoredPosition(coinText.anchoredPositionX + 140, coinText.anchoredPositionY)
local rise = game.Tween(plus, { anchoredPositionY = plus.anchoredPositionY + 90 }, 0.6):SetEase(Enum.EaseType.OutCubic)
local shrink = game.Tween(plus, { localScaleX = 0, localScaleY = 0 }, 0.2):SetEase(Enum.EaseType.InBack)
local seq = game.TweenSequence()
seq:Append(rise):Append(shrink):SetOnComplete(function()
seq:Kill(false)
game.DestroyClientUIControl(plus)
end):Play()
end
Call it together with Bounce() when the coins go up.
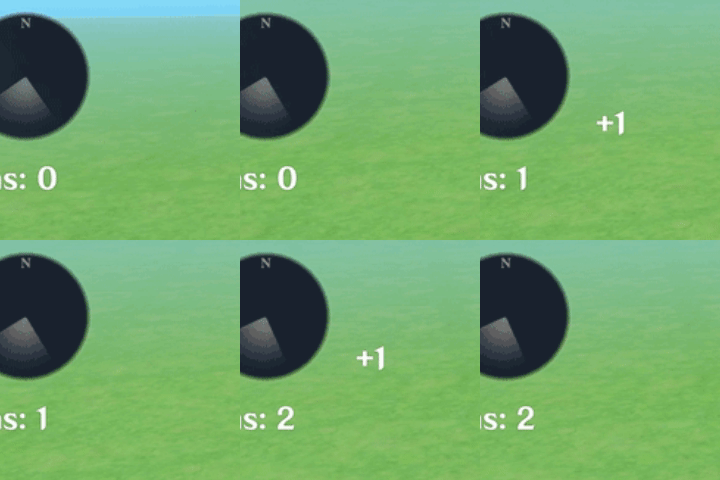
What happens here:
- InstantiateClientUIControl(template, parent) creates a copy of the template inside root.
- pcall(...) is a "protected call". If the Index is wrong, the function throws an error. Without pcall this would stop the whole script. With pcall, we get ok = false and print a clear message instead.
- We copy the anchors of CoinText and place the "+1" 140 pixels to the right of it. Why copy the anchors? anchoredPosition is counted from the anchor point. If the template's anchor is in the center and the counter's anchor is in the corner, the same numbers would put "+1" in a completely different place.
- TweenSequence plays tweens one after another, like a timeline: first fly up (rise), then shrink (shrink).
- At the end we destroy the copy. Otherwise, after 100 coins you would have 100 invisible "+1" elements on the screen.
When to create and when to reuse? Creating a few elements now and then (like this "+1") is fine. If you need hundreds of elements (particles, pixel images), create them once in OnStart and then only move and hide them. Creating and destroying hundreds of elements every frame will cause lag.
8.1. Protection against the endless copy loop
Remember the warning from section 3.5? Let's protect ourselves in code, on the very first copy:
local templateChecked = false
-- inside SpawnPlusOne, right after the pcall check:
if not templateChecked then
templateChecked = true
local okS, scripts = pcall(plus.GetScripts, plus)
if okS and type(scripts) == "table" and #scripts > 0 then
game.DestroyClientUIControl(plus)
printerr("[coin_hud] the +1 template has a script attached - remove it!")
PLUS_TEMPLATE = 0
return
end
end
And at the very top of OnStart, check that the script sits on the root:
if typeof(root) ~= "ClientUIContainerControl" then
printerr("[coin_hud] attach this script to the root ContainerControl")
return
end
Why both checks? The first one catches a script inside the template. The second one catches the case where the script was attached to the wrong element. In that case its copies would start creating copies too. A few lines of checks save you from a stage that freezes on loading with no error message at all.
9. Server → client: opening the popup
9.1. Create the signal
Open the Server Signal Manager → Add Signal → name it ShowPopup → Add Parameter: type String, name Message.
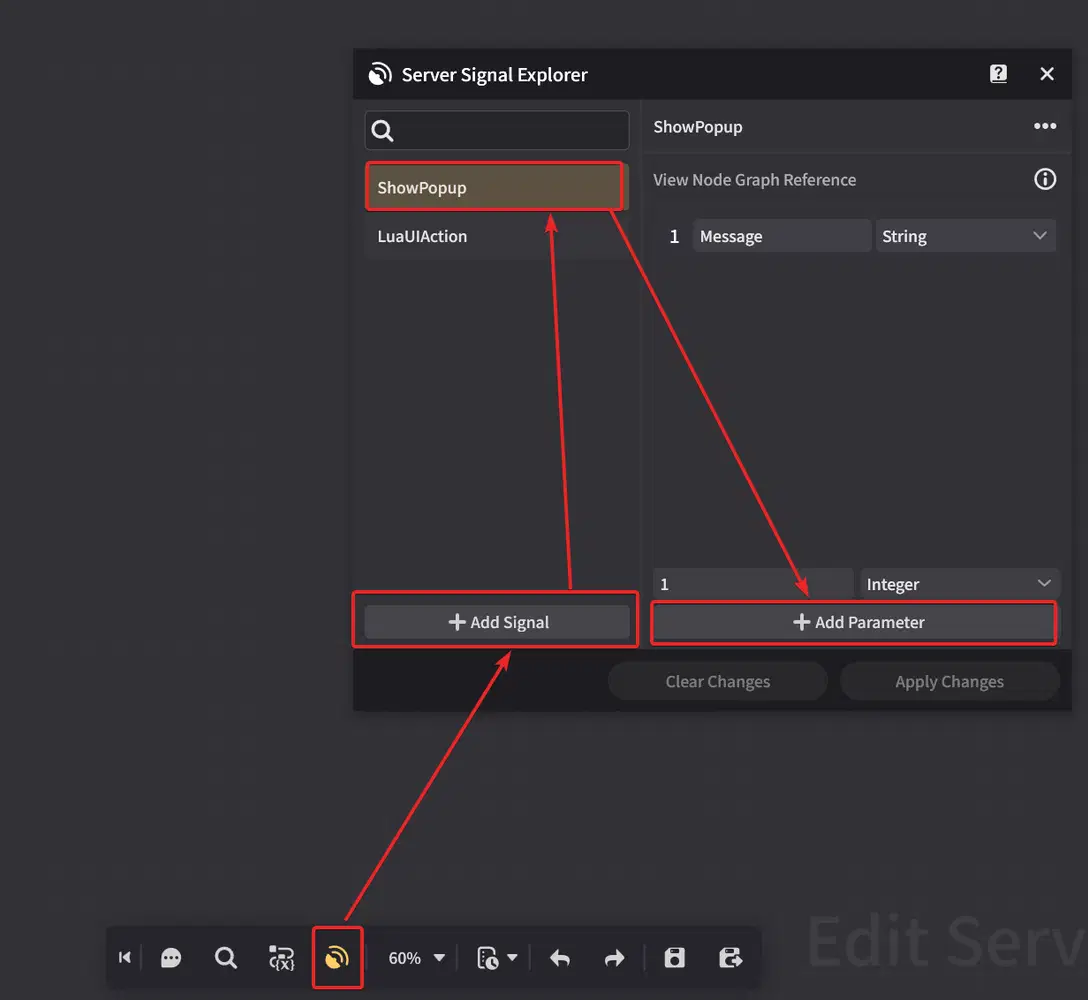
9.2. Send it from the server
When the player reaches 5 coins (in the coin graph, after Set Custom Variable): compare Coins >= 5 → if true, use the node Send Client Scripted Signal:
- Signal name: ShowPopup
- Target Player: the player who picked up the coin
- Message: You collected 5 coins! Claim your reward.
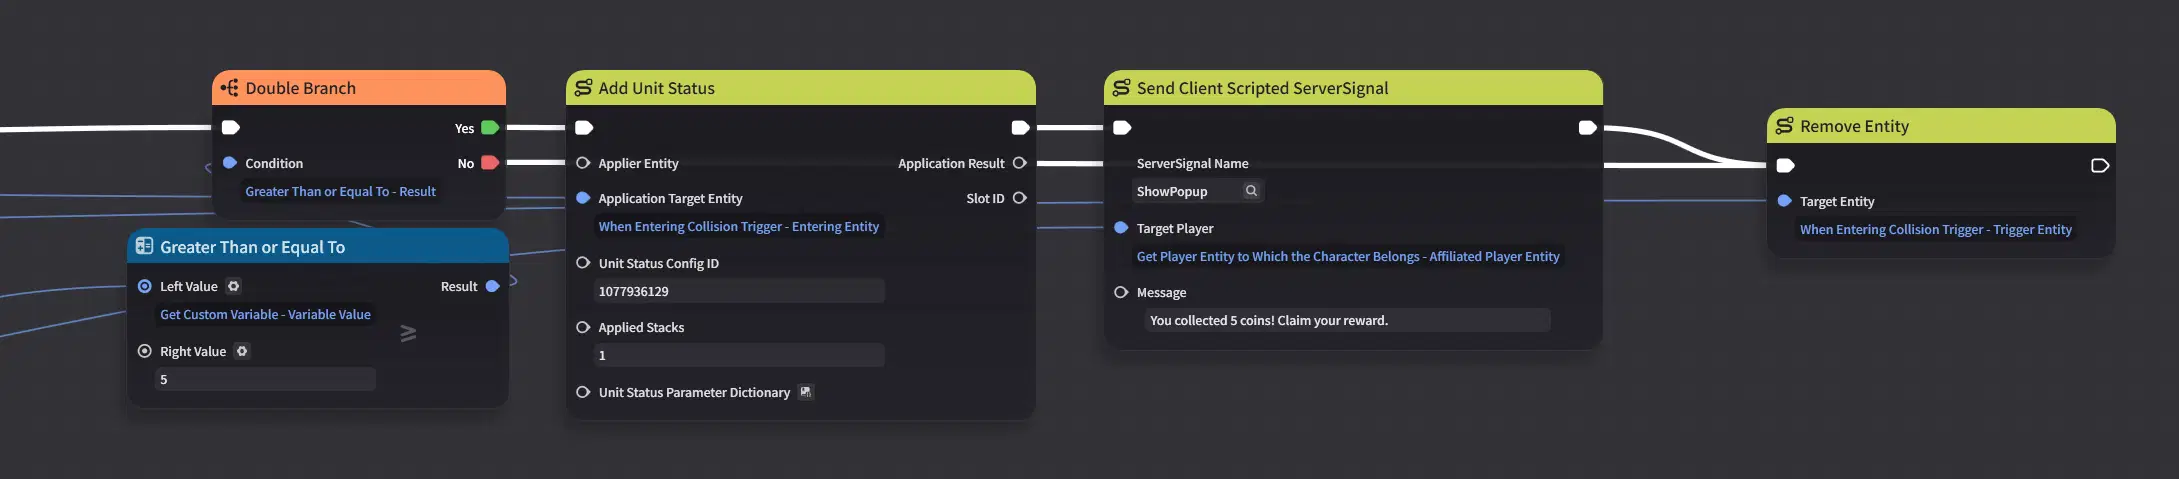
It must be Send Client Scripted Signal, not the normal Send Signal. Lua scripts don't receive normal signals, and node graphs don't receive client scripted signals. They are two separate channels.
Why is there a Target Player? Because every player has their own copy of the UI and the script. The server decides whose screen shows the popup. Only that player's script receives the signal.
In the same branch, right next to Send Client Scripted Signal, add one more action: apply the unit status Character Movement Disabled to the player's character for a short time, 0.5 seconds.
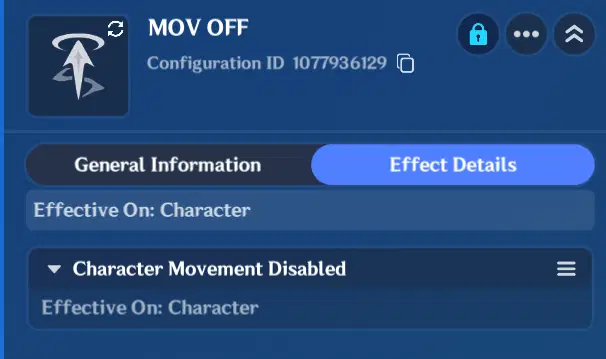
Why do we need this if Lua already locks the controls? The Lua lock (section 9.4) has one weak spot: if the player is running with W held at the moment the popup opens, the character keeps running behind the window. The full explanation is in section 9.4. The short status fixes it on the server: it stops the character no matter what keys are held.
Why only 0.5 seconds and not until the popup closes?
- Half a second is enough to stop the run. After that the Lua lock keeps the character still, because no new key presses reach it while the popup is open.
- The status removes itself, so the claim branch doesn't need an extra "remove status" node, and you can't forget to remove it.
- If something goes wrong with the popup (for example, the player reconnects and the UI is recreated), the character is never frozen for longer than half a second.
9.3. Receive it in Lua
local POPUP_SIGNAL = "ShowPopup"
-- inside OnStart:
popup:SetVisible(false)
script:RegisterServerSignalHandler(POPUP_SIGNAL, function(signalName, params)
local message = params and params[1]
ShowPopup(type(message) == "string" and message or "Reward!")
end)
- The handler receives the signal name and the list of parameters. params[1] is the first parameter (Message), params[2] would be the second, in the same order as in the Signal Manager.
- type(message) == "string" and message or "Reward!": if the parameter is missing for some reason, we show a default text instead of crashing.
9.4. Show the popup with an animation and block the character
Write these functions above OnStart (and above any other function that calls them).
Why above? We declare them with local function, and Lua reads the file from top to bottom. A local function only exists after the line where it is written, so the code that calls it must come later in the file. This is also why the full script in section 13 goes "helpers → counter → popup → OnStart".
local popupTween
local function SetPopupMode(open)
root.showCursor = open
root.disableKeyEventPassthrough = open
end
local function ShowPopup(message)
if popupTween then popupTween:Kill(false) end
popupText.text = message
popup:SetLocalScale(0, 0, 1)
popup:SetVisible(true)
SetPopupMode(true)
popupTween = game.Tween(popup, { localScaleX = 1, localScaleY = 1 }, 0.35):SetEase(Enum.EaseType.OutBack)
:SetOnComplete(function() popupTween:Kill(false); popupTween = nil end)
popupTween:Play()
end
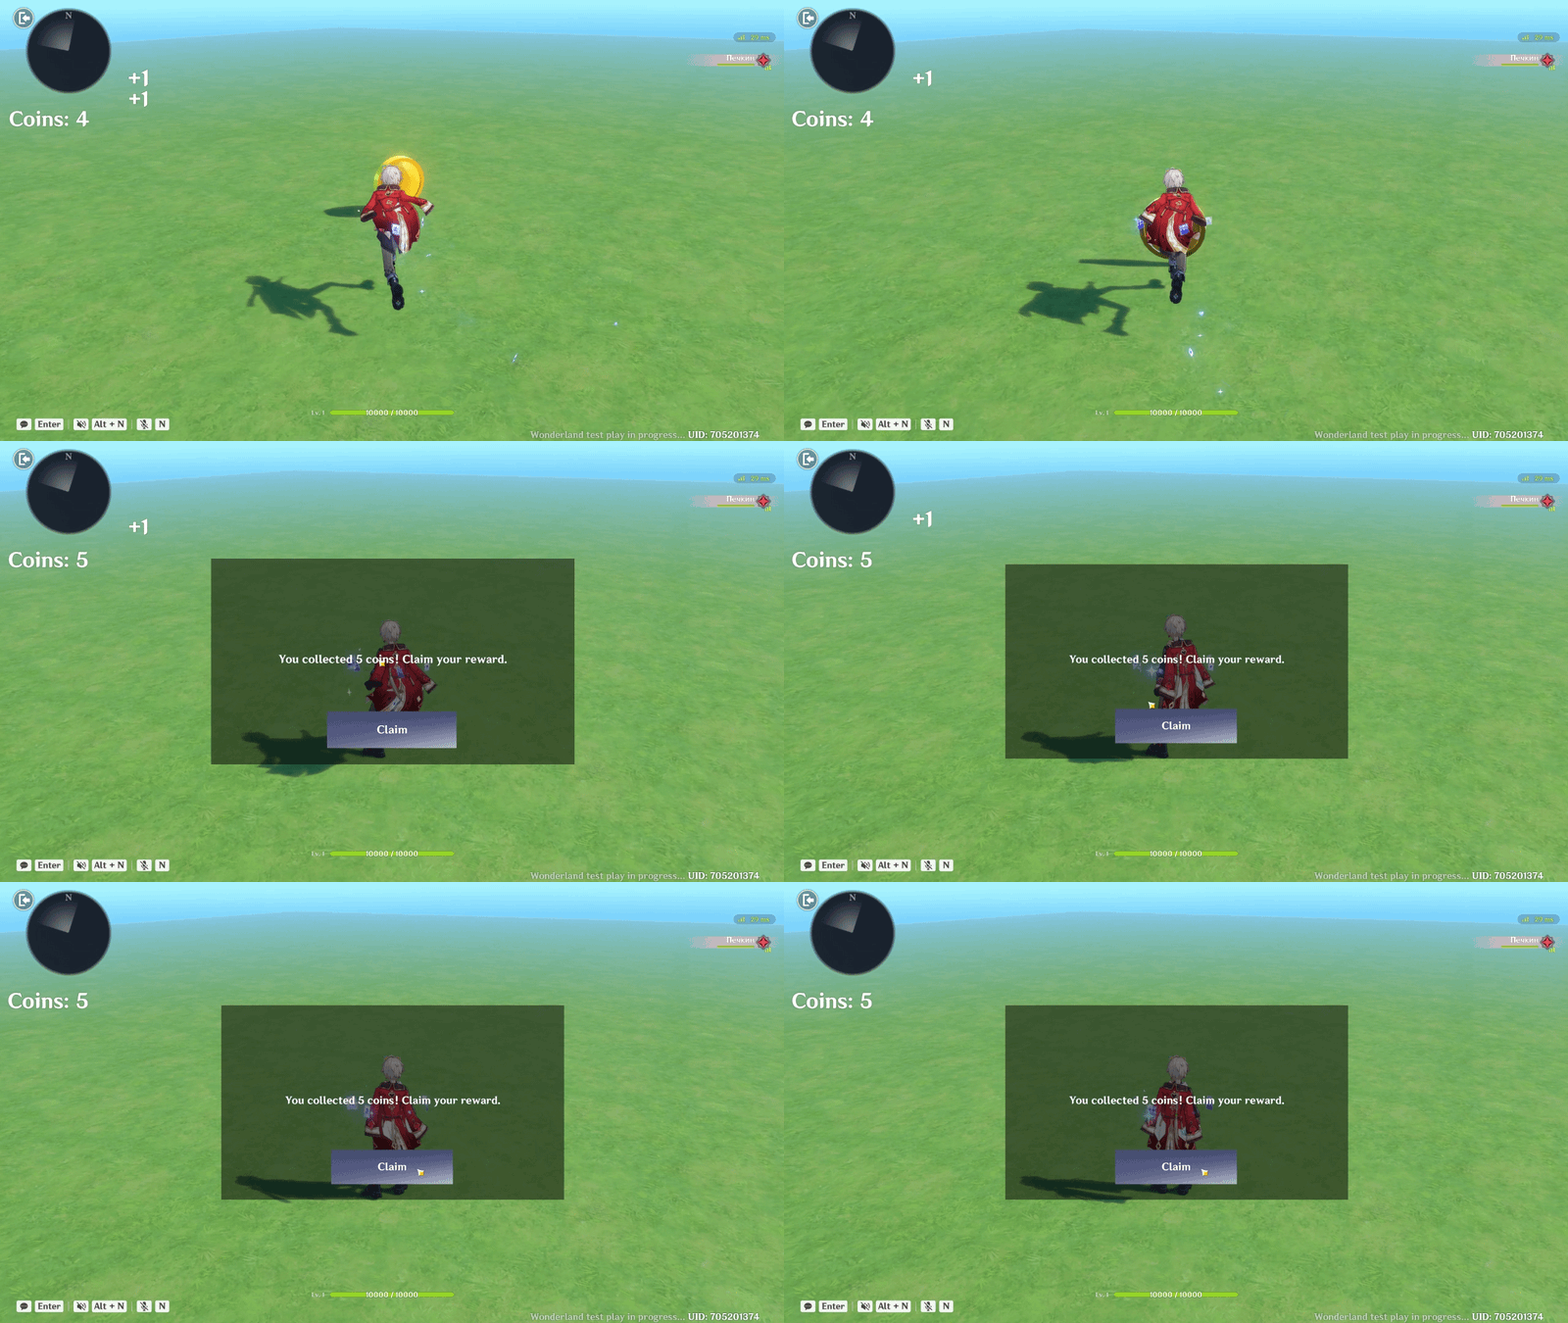
Why showCursor? On PC the cursor is hidden while you play. Without it, the player can't click the Claim button.
Why disableKeyEventPassthrough? Without it, the keyboard and mouse still control the game behind the window: the player clicks Claim and at the same time walks with WASD, turns the camera or casts skills. While this property is true, keyboard input and camera rotation don't reach the character.
The "keeps running" trap. disableKeyEventPassthrough blocks all keyboard events for the character, including the release of a key. If the player is holding W at the moment the popup opens, the character never learns that W was released, so for the game W is still pressed and the character keeps running behind the window.
Lua can't fix this: it can block keys, but it can't "release" a key for the player. That's why section 9.2 applies the unit status Character Movement Disabled for 0.5 seconds together with the popup. The server stops the character, and from then on the Lua lock keeps it still.
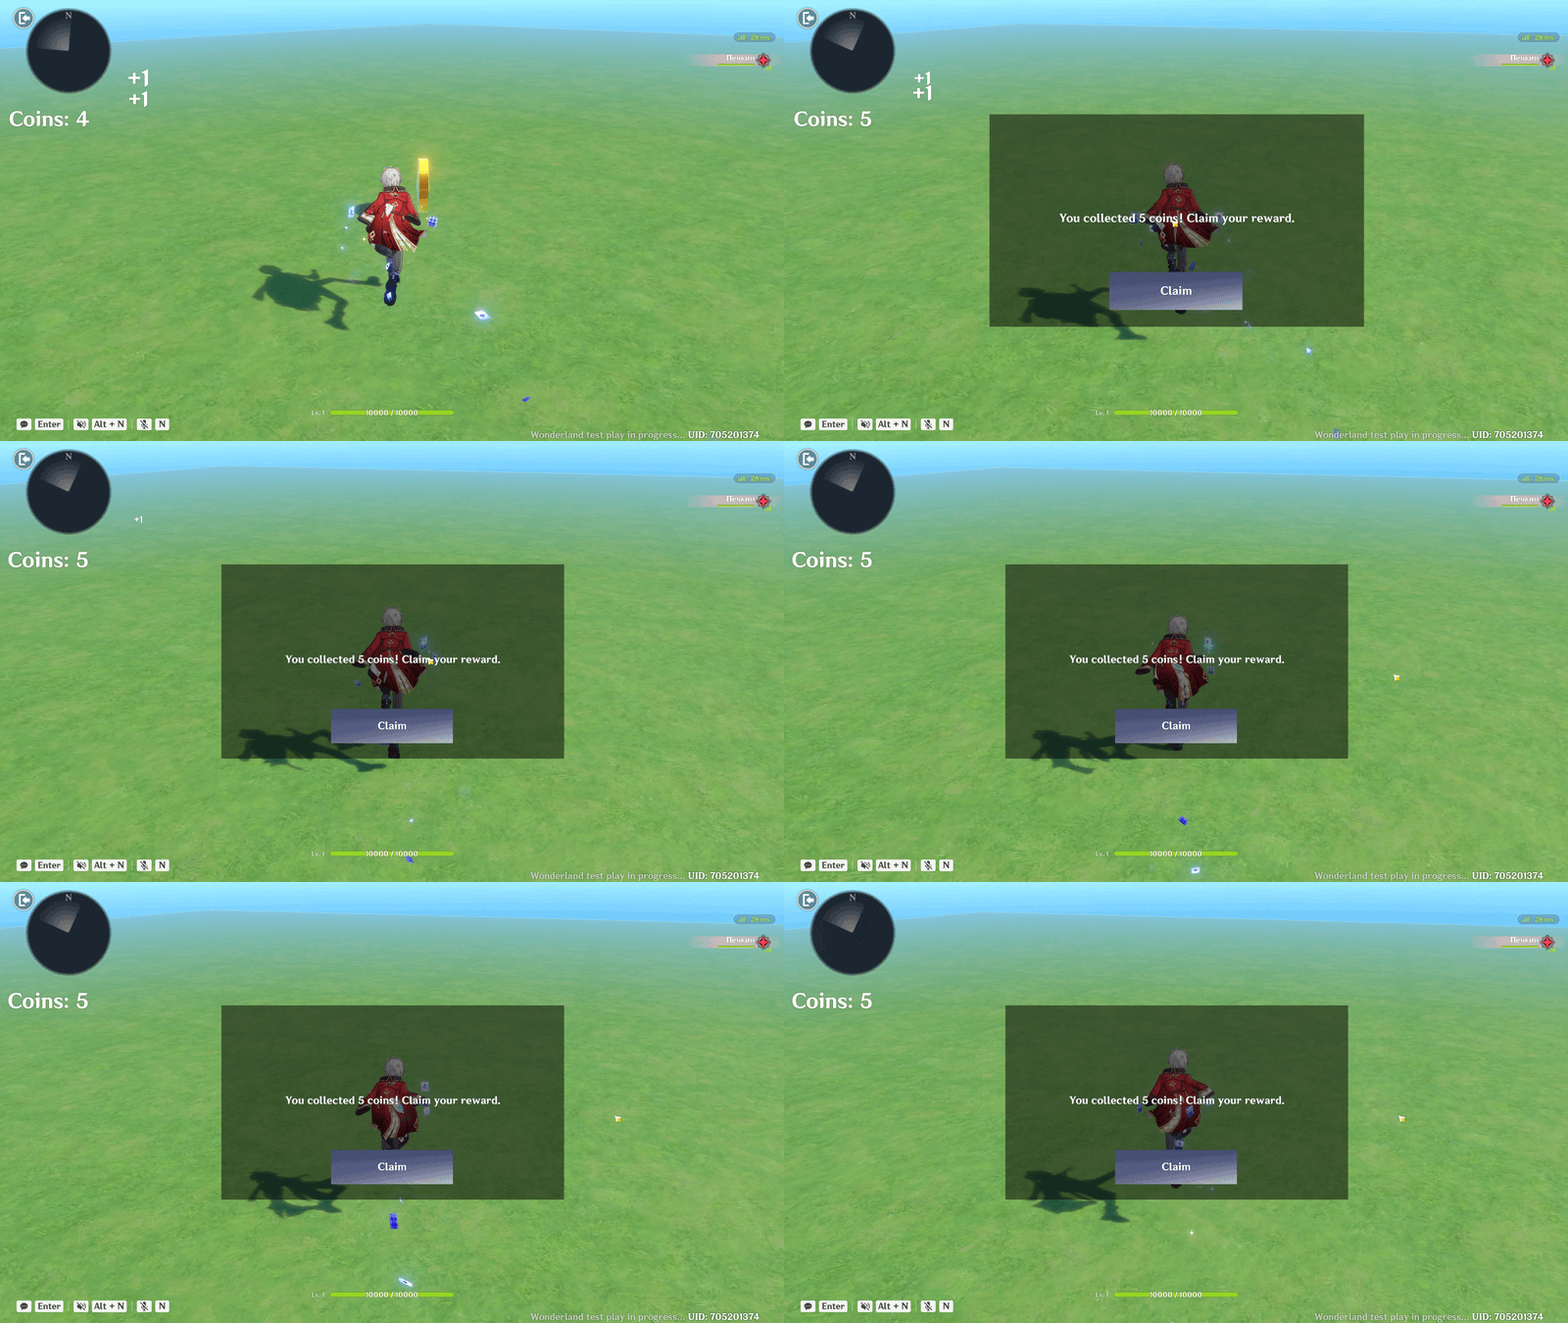
Behaviour without unit status
Why does the popup start at scale 0? So the animation has somewhere to grow from: from 0 to normal size with the OutBack bounce. This "pop" effect clearly tells the player that something new appeared.
Note: turn showCursor off yourself when the window closes (next section). Otherwise the cursor stays on the screen even after the popup is hidden.
10. Client → server: the Claim button
10.1. One generic signal for all UI actions
Create one more signal in the Server Signal Manager: LuaUIAction, parameter String ActionName.
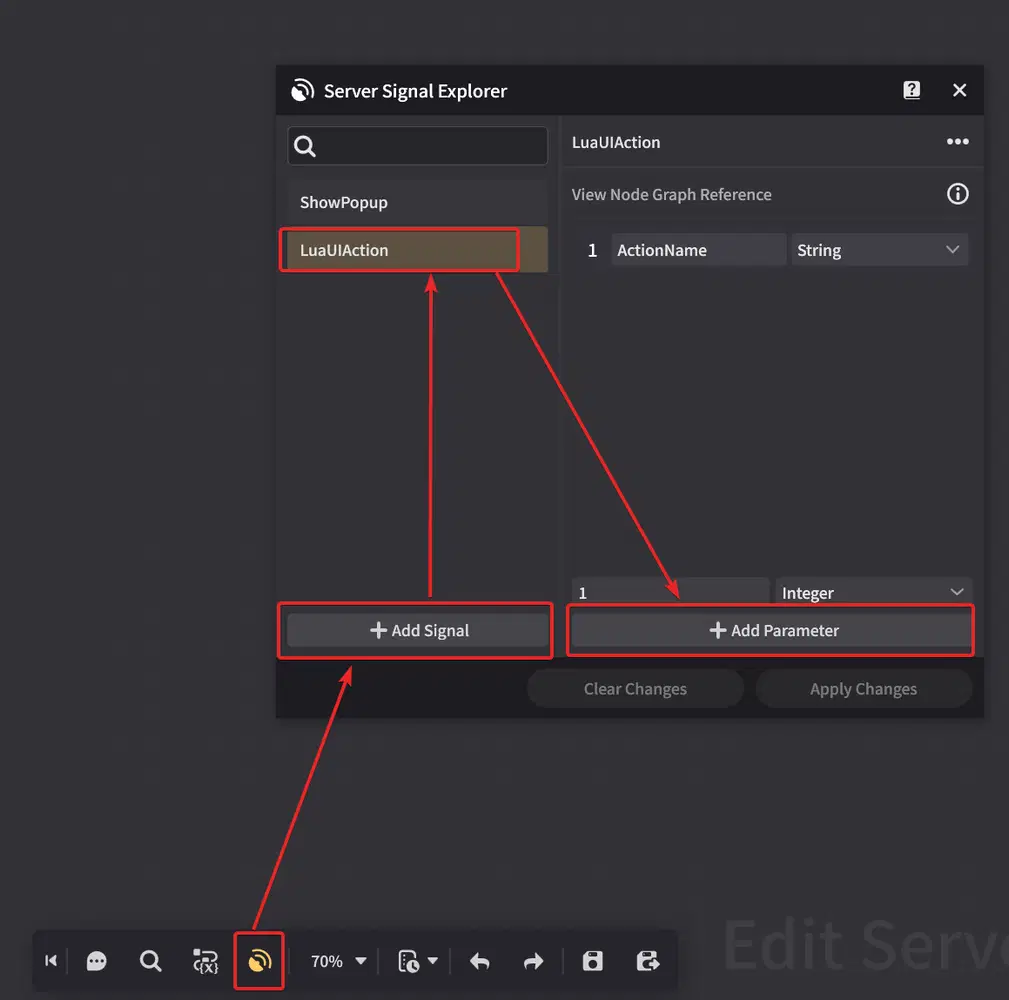
Why one generic signal instead of "ClaimReward", "CloseShop", "BuyItem"...? A stage can have at most 99 signals. In a real game you will have dozens of buttons. One signal with an "action name" parameter covers all of them, and the server decides what to do based on the name.
10.2. Send it from Lua
local ACTION_SIGNAL = "LuaUIAction"
local function SendAction(actionName)
local signal = game.ServerSignal(ACTION_SIGNAL)
signal:AddString(actionName)
signal:SendSignal()
end
-- inside OnStart:
claimButton:AddCursorEventListener(Enum.CursorEventType.CursorClick, function(eventData)
SendAction("claim_reward")
HidePopup()
end)
- game.ServerSignal(name) creates an empty signal, AddString adds parameters in the order from the Signal Manager, and SendSignal sends it. Why does the order matter? The server doesn't match parameters by name, only by position. If the first parameter in the manager is an Integer and you add a String first, the server receives a default value instead of your data.
- AddCursorEventListener(Enum.CursorEventType.CursorClick, function ...) calls the function when the button is clicked. Other event types exist too: CursorEnter / CursorExit (hover), CursorDown, CursorUp, drag events.
10.3. Close the popup
local function HidePopup()
if popupTween then popupTween:Kill(false) end
SetPopupMode(false)
popupTween = game.Tween(popup, { localScaleX = 0, localScaleY = 0 }, 0.2):SetEase(Enum.EaseType.InBack)
:SetOnComplete(function()
popup:SetVisible(false)
popupTween:Kill(false); popupTween = nil
end)
popupTween:Play()
end
Why close the popup in Lua immediately, without waiting for the server? Closing a window doesn't change the game state, it is only visual. Doing it on the client makes the button feel instant. The reward itself (the real game action) is still done by the server.
10.4. Receive it on the server
Create a node graph on the player, for example Lua UI Signals:
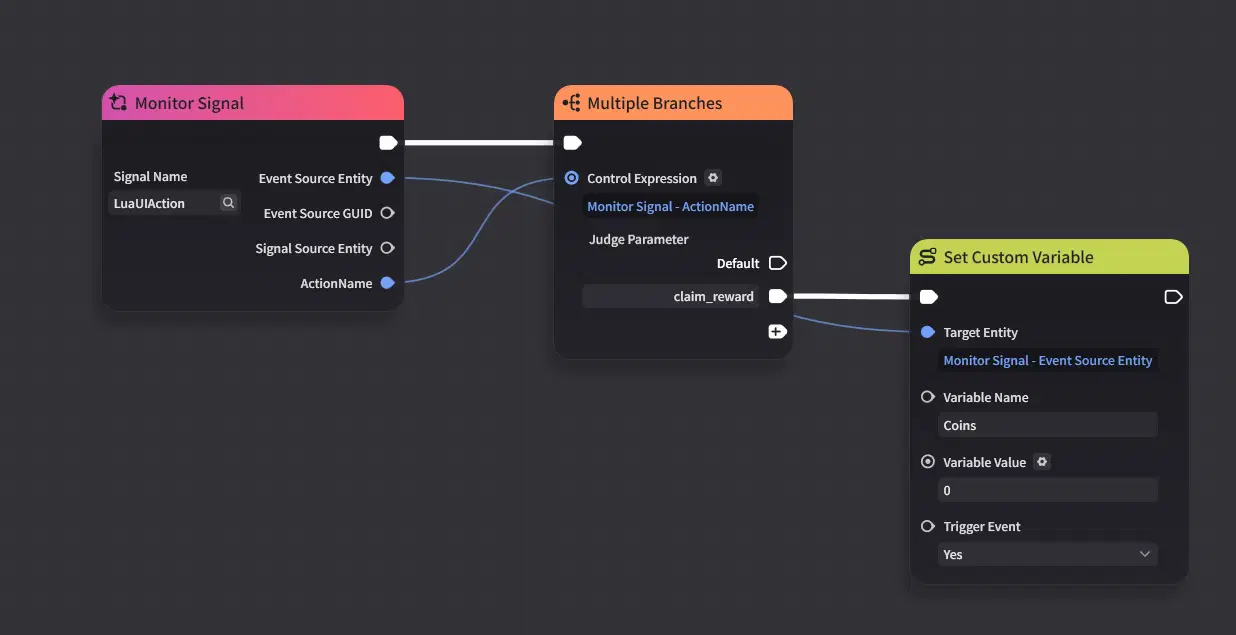
Monitor Signal (LuaUIAction) → Multiple Branch on ActionName → branch claim_reward → Set Custom Variable Coins = 0 (Trigger Event = Yes) + give the reward you like.
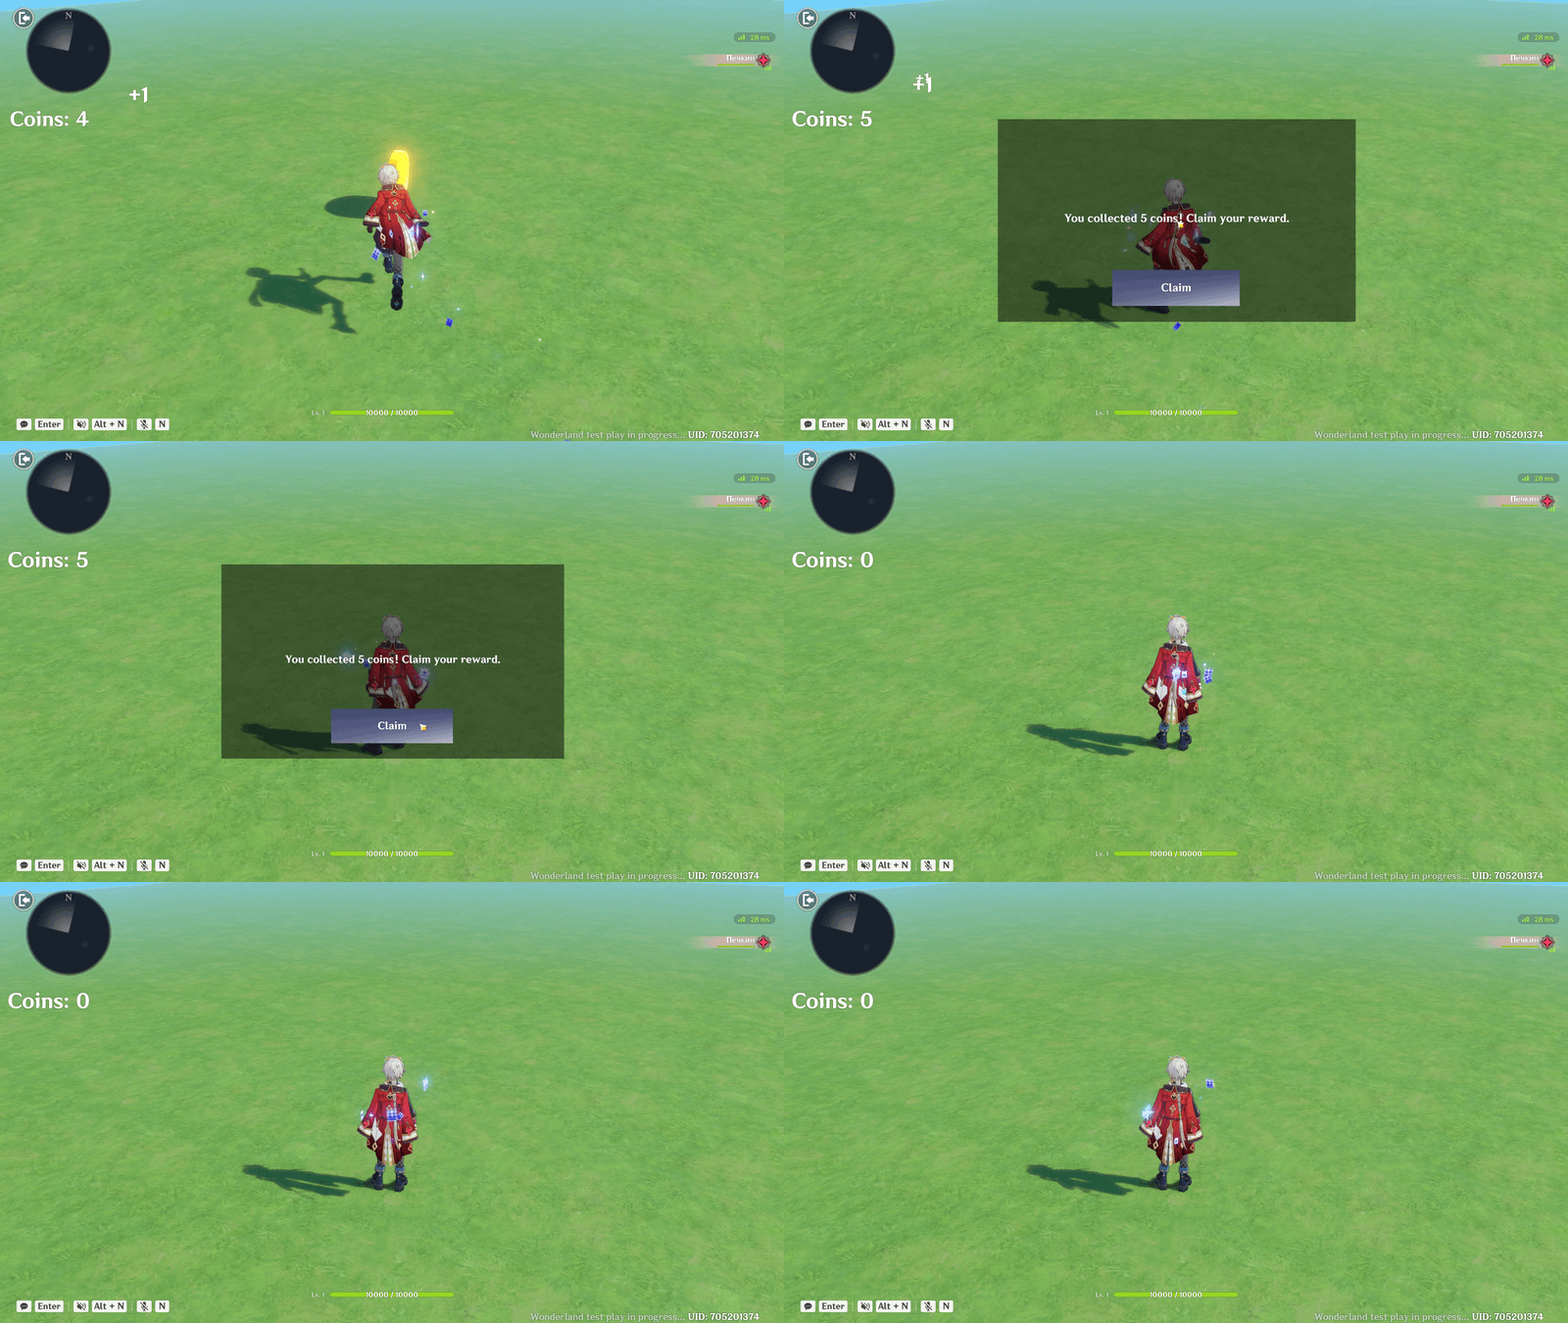
Notice the full loop: the server changes Coins → Lua updates the counter by itself. We never told Lua "set the text to 0". It reacted to the variable, just like when coins went up. This is the main idea of client UI: the server owns the data, Lua only displays it.
11. Multiplayer: who sent the signal?
The graph from 10.4 works perfectly in a single-player test. In multiplayer it has a hidden problem that is worth understanding.
When Lua sends a signal, the server doesn't know which player sent it: the signal source entity is always the stage entity. On top of that, signals are global, so a Monitor Signal on the player entity fires in the graph of every player. Result: one player clicks Claim, and everyone's coins are reset.
The fix: send the player's number together with the signal.
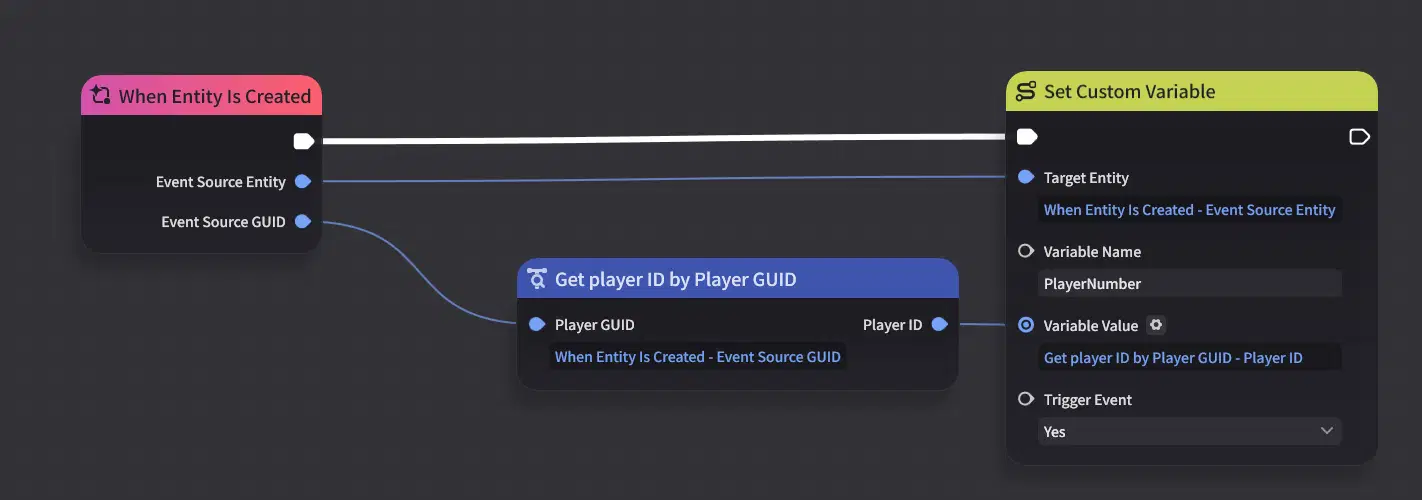
- On the player, create an Integer variable PlayerNumber. In the player graph: When Entity Is Created → Get Player ID by Player GUID → write the result into PlayerNumber.
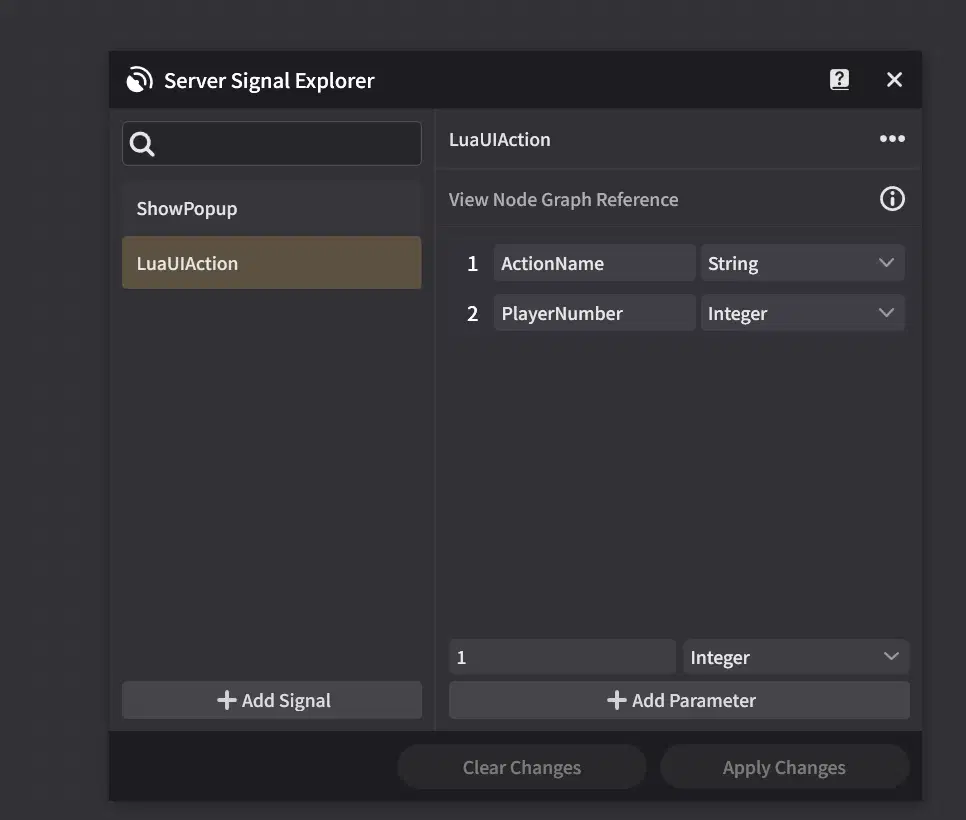
- In the Signal Manager, add a second parameter to LuaUIAction: Integer PlayerNumber.
- In Lua, read it and send it as the second parameter:
local number = game.GetGlobalCustomVariableValue(Enum.CustomVariableEntityType.PlayerSelf, "PlayerNumber") or 0
signal:AddString(actionName)
signal:AddInt(number)
signal:SendSignal()
4. On the server, react only if PlayerNumber from the signal equals the number of the player whose graph is running, or put the Monitor Signal on the stage and find the player with Get Player GUID by ID → Query Entity by GUID.
Why doesn't the server just know the sender? Client scripts are sandboxed: they can ask the server for something, but they can't act "as" an entity. The player number is information we add ourselves, so the server can route the request.
12. What's next?
With these lua building blocks you can make almost any client UI:
- Menus and shops: buttons + the generic LuaUIAction signal.
- HUDs: health bars, timers, quest trackers. Read variables and react to their changes.
- Mini-games: keyboard input (AddKeyEventListener, the same as in section 9.4), OnUpdate(dt) for every-frame logic, client-side sounds with game.PlayAudio2D(id) with no network delay.
- Visual effects: hundreds of elements created once from a template and moved with tweens.
I hope this guide helps you better understand how to design and implement client UI in your stages.