This guide explains how to design and implement custom character skills with the Skill Editor in Miliastra Wonderland.
Key Topics Covered:
- How a skill is put together: animation, timeline and Skill Node Graphs
- Skill Types and how to pick the right one
- Skill parameters: Basic Settings and Numerical Configuration
- The Animation Editor: slots, loop slot, branches and the Branch Track
- Event tracks, Loop Segments and the Status Track
- Character Skill Node Graphs and hitboxes
- Skill slots and assigning skills through the Class
- Skill Pre-Aim: max range, aiming area, target filtering and aiming visuals
- Skill Variables, Skill Attribute Groups and Skill Resources
- Sending information from a skill to a server node graph
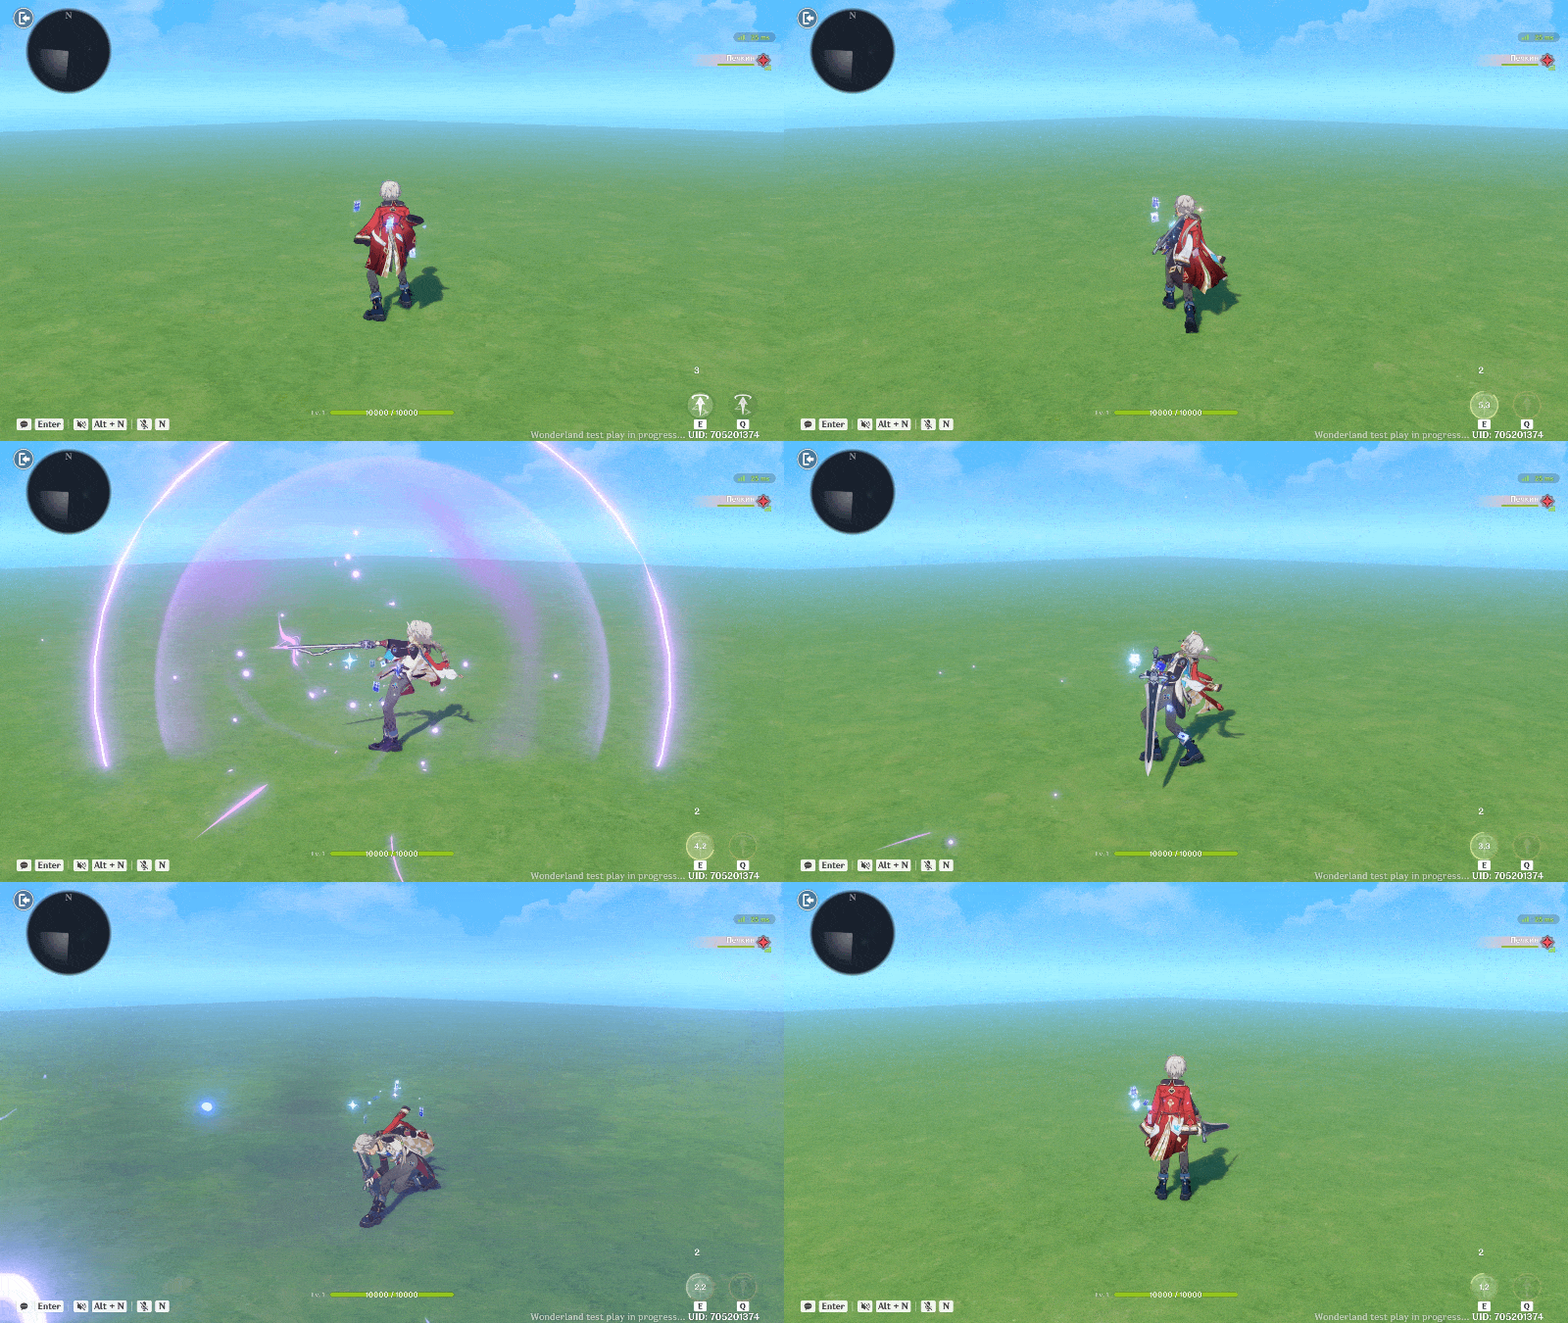
By the end of this guide you will have built two skills. Thunder Slam is a Hold Skill on the E key: tap it for a quick swipe, or hold it to charge and release a large Electro ground slam that launches enemies, without being interrupted while charging.
Lightning Leap is a Q skill with Skill Pre-Aim: hold the key to choose a landing spot using cursor, then leap there and strike every enemy around it.
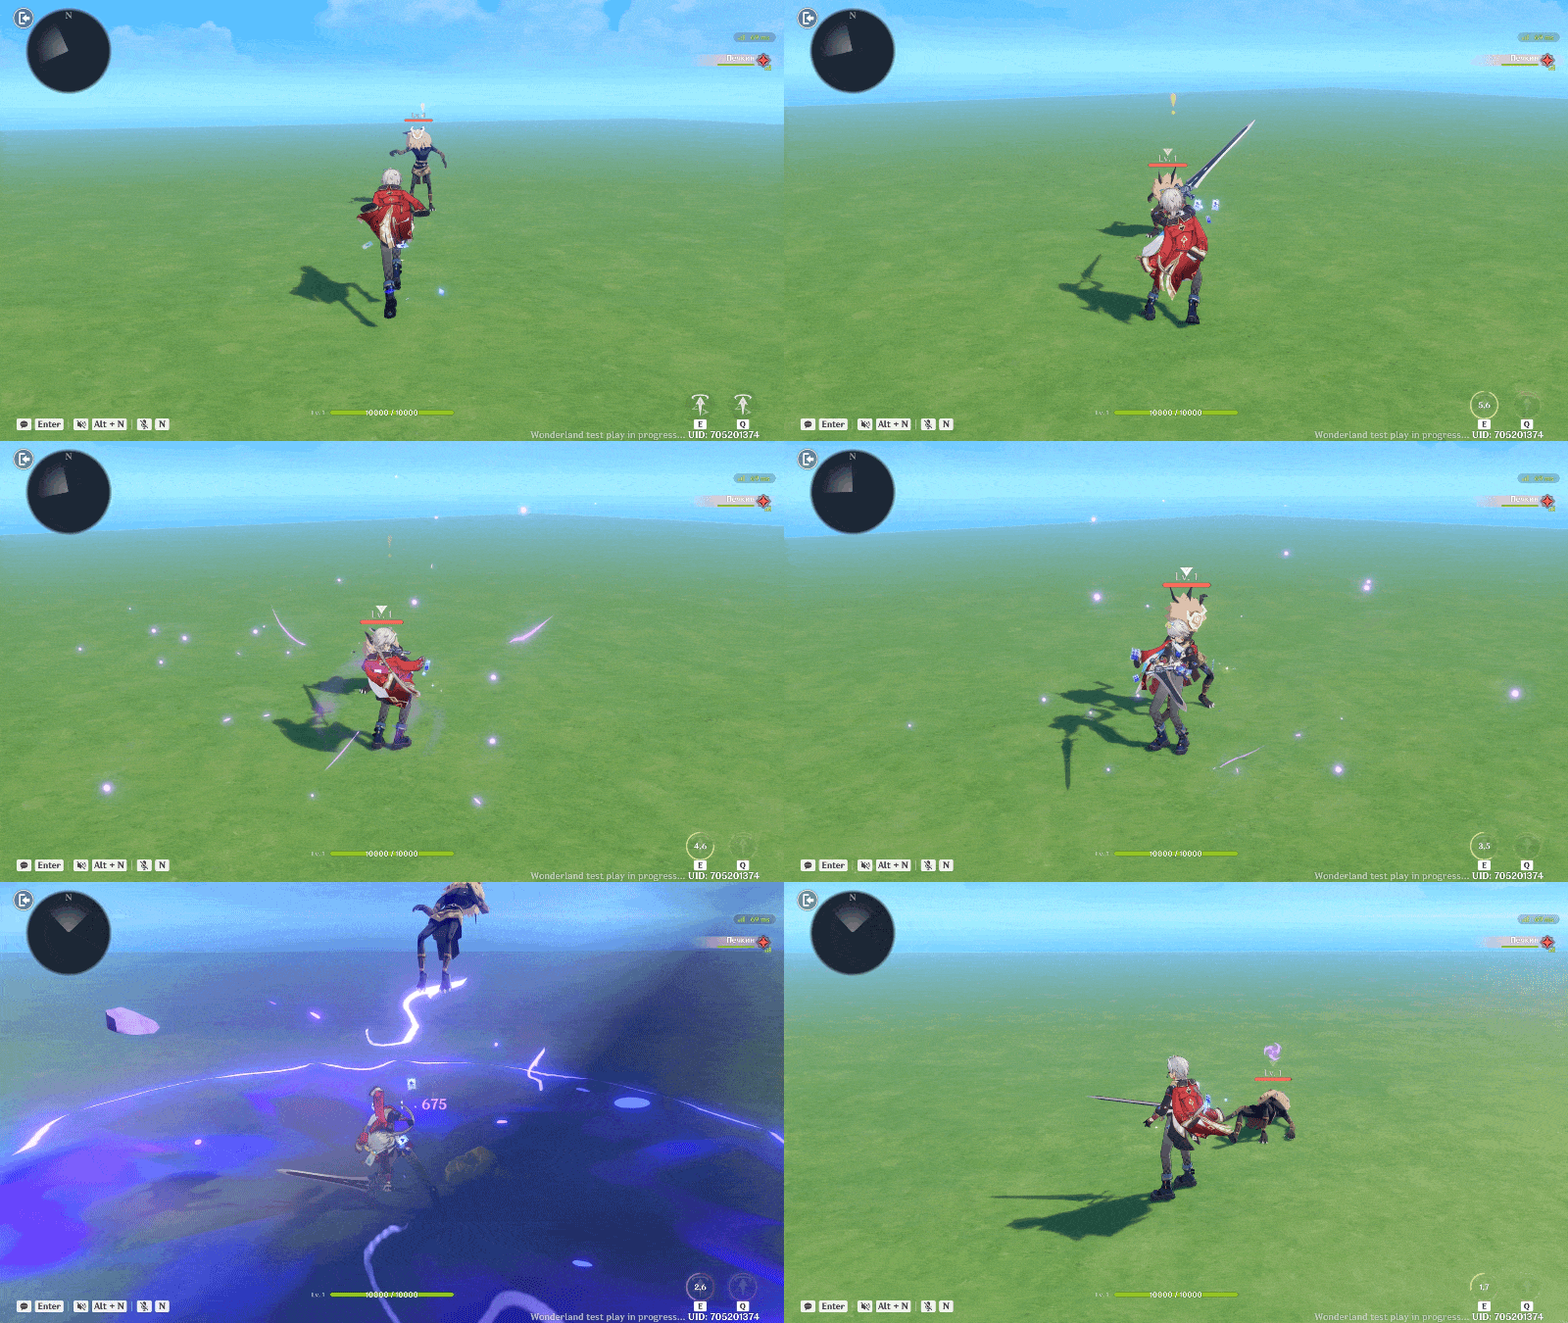
Thunder Slam
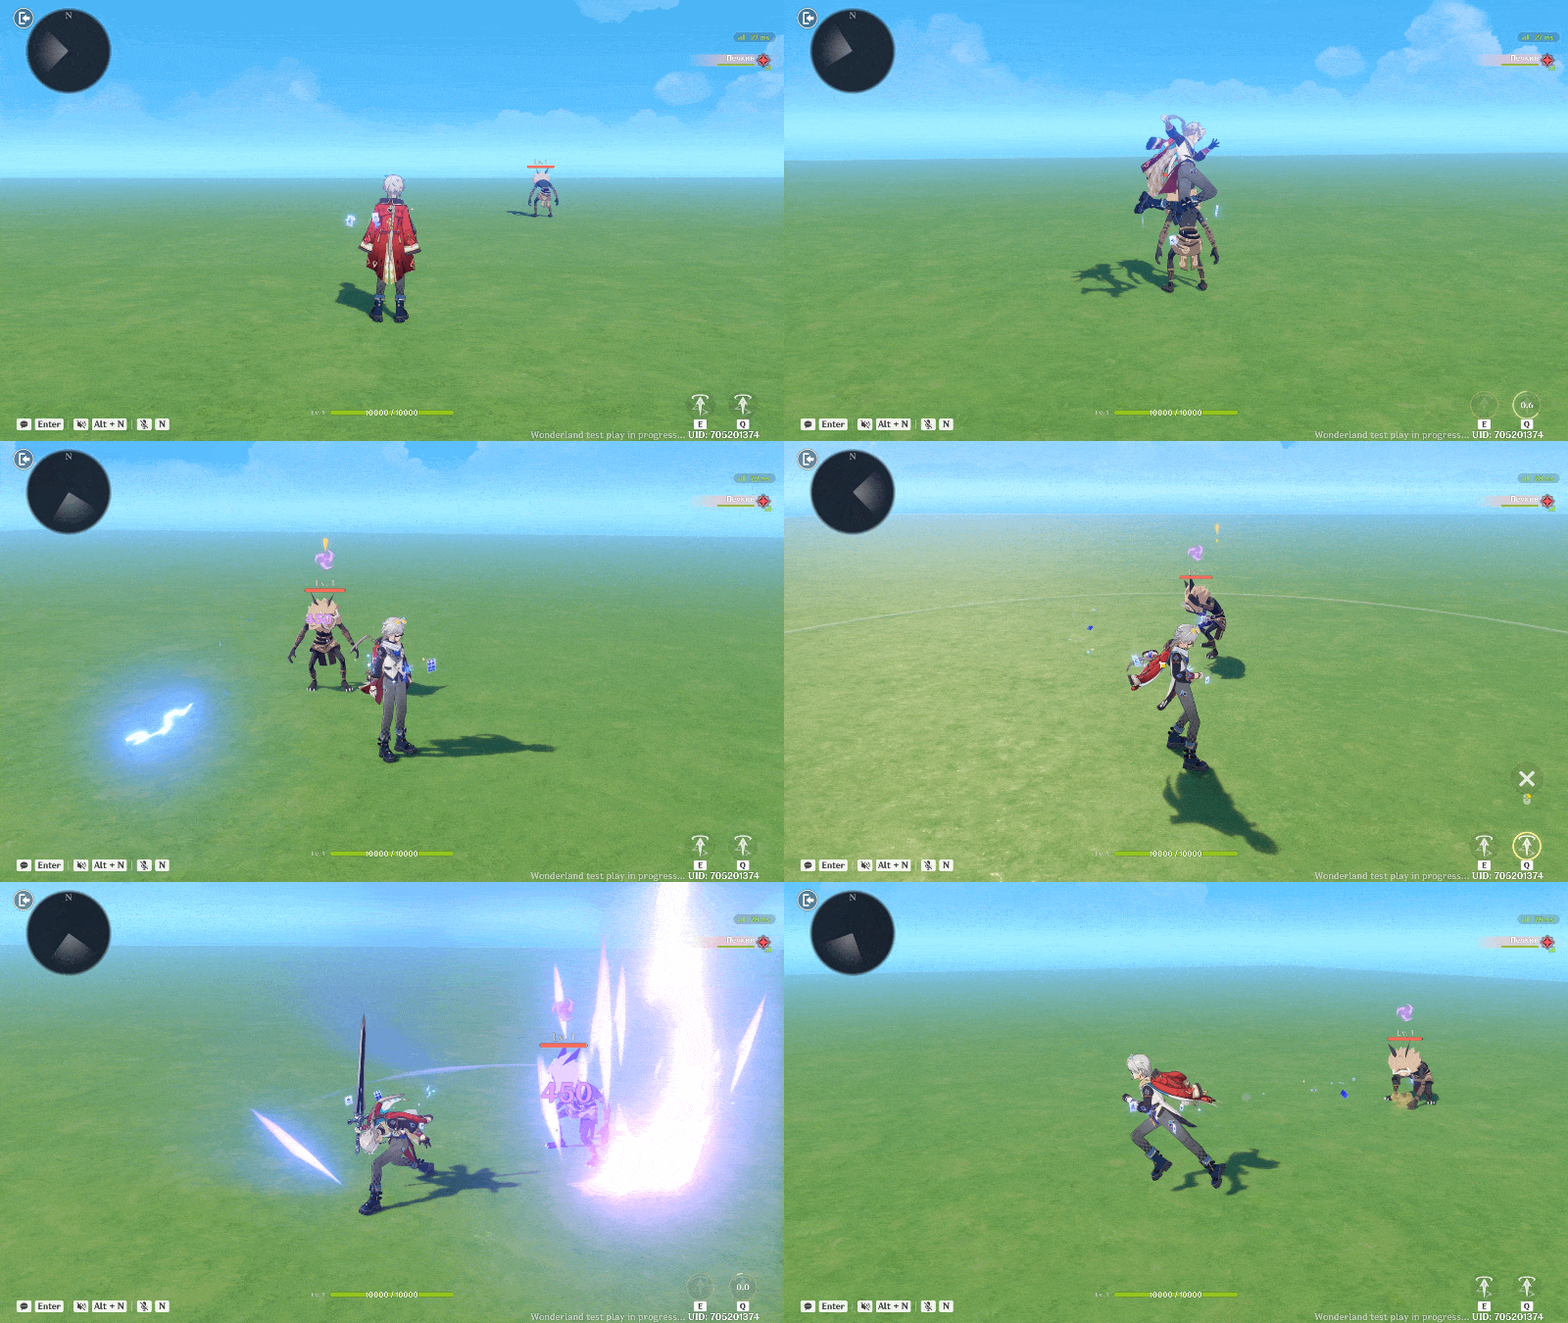
Lightning Leap
Custom character skills and Character Skill Node Graphs are only available in Beyond Mode. This guide focuses on skills - Class setup, Unit Statuses and UI are only touched on where a skill depends on them.

1. How a Skill Works
Before opening the editor, it helps to know what you are actually assembling. Every custom skill is built from three parts:
Character animation - What does the character's model do?
Example: "Raise the hammer, then smash it into the ground"
Skill Node Graphs on the timeline - What happens at a specific moment?
Example: "Trigger a hitbox at the frame where the hammer hits the ground"
Skill statuses - What lasts for a period of time?
Example: "Play the slam animation 30% faster for its first half"
Every event you add is placed at a point in timeline animation, therefore you always need to pick animations first and add logic second - if you change an animation later, your events may end up on the wrong frame.
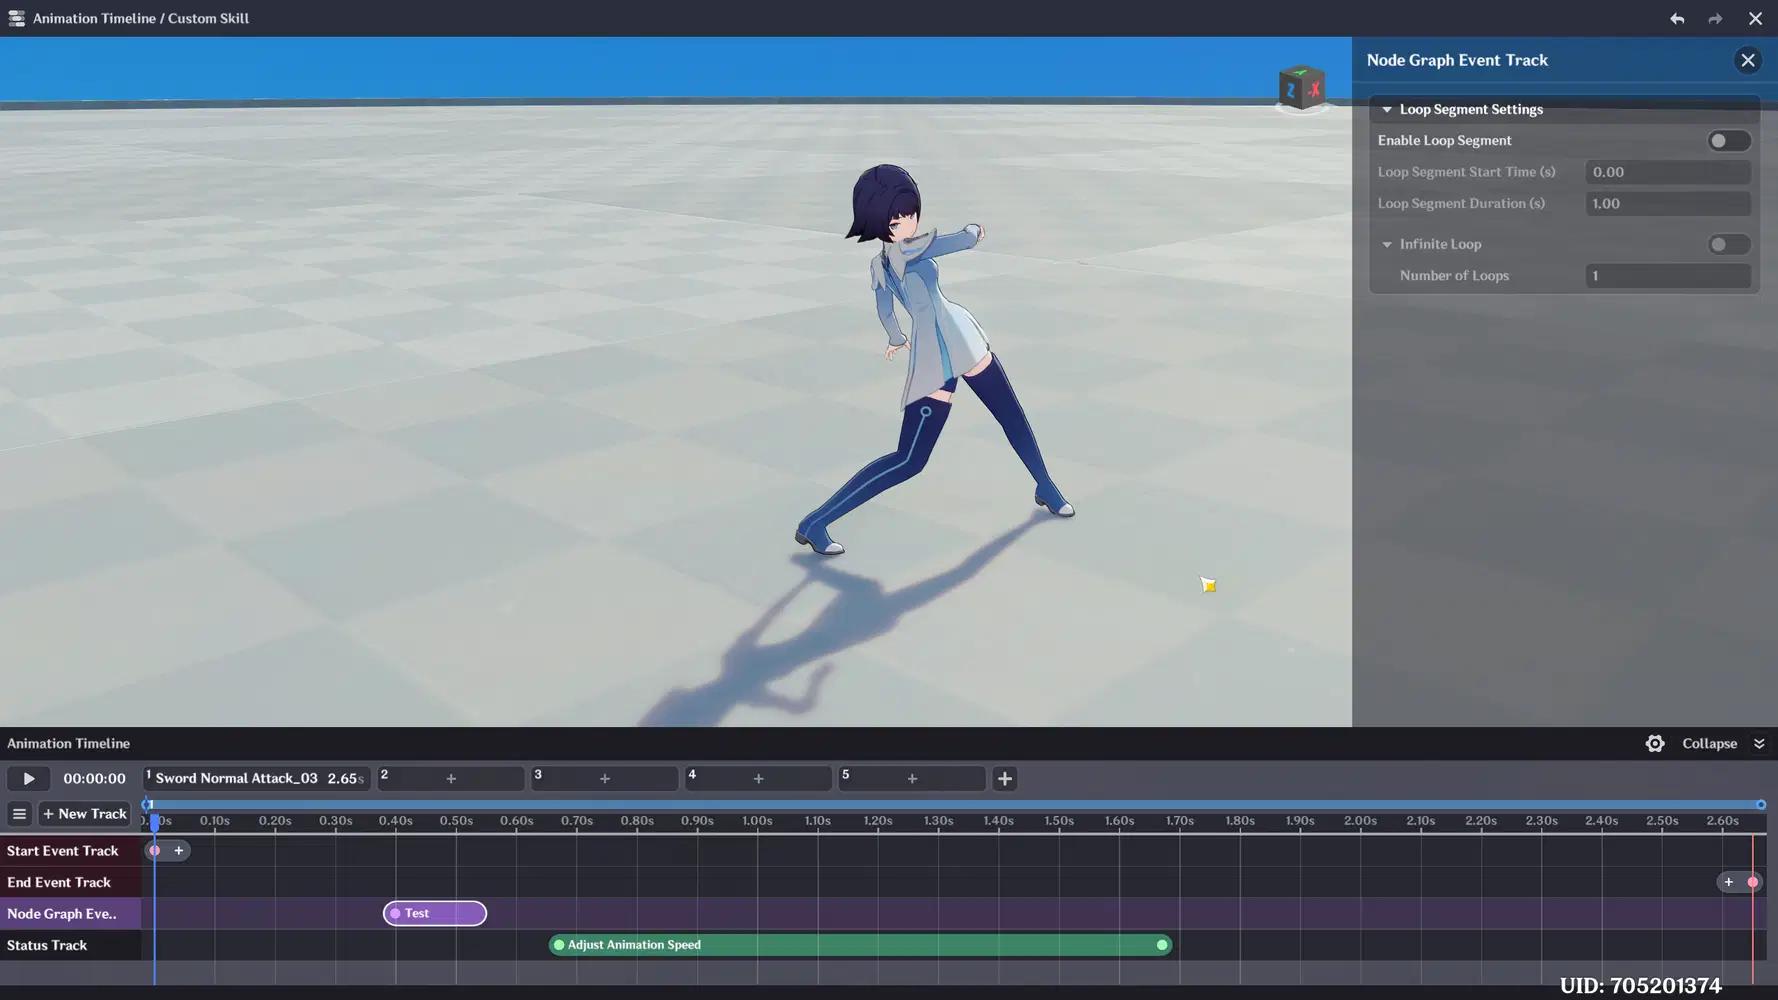

1.1 Skill Node Graphs run on the Client
Skill Node Graphs belong to the Client Node Graphs. They run on the player's device, not on the server. This is intentional: a skill has to feel instant, so the hitbox appears the moment the hammer lands instead of waiting for a round trip to the server.
This has two consequences:
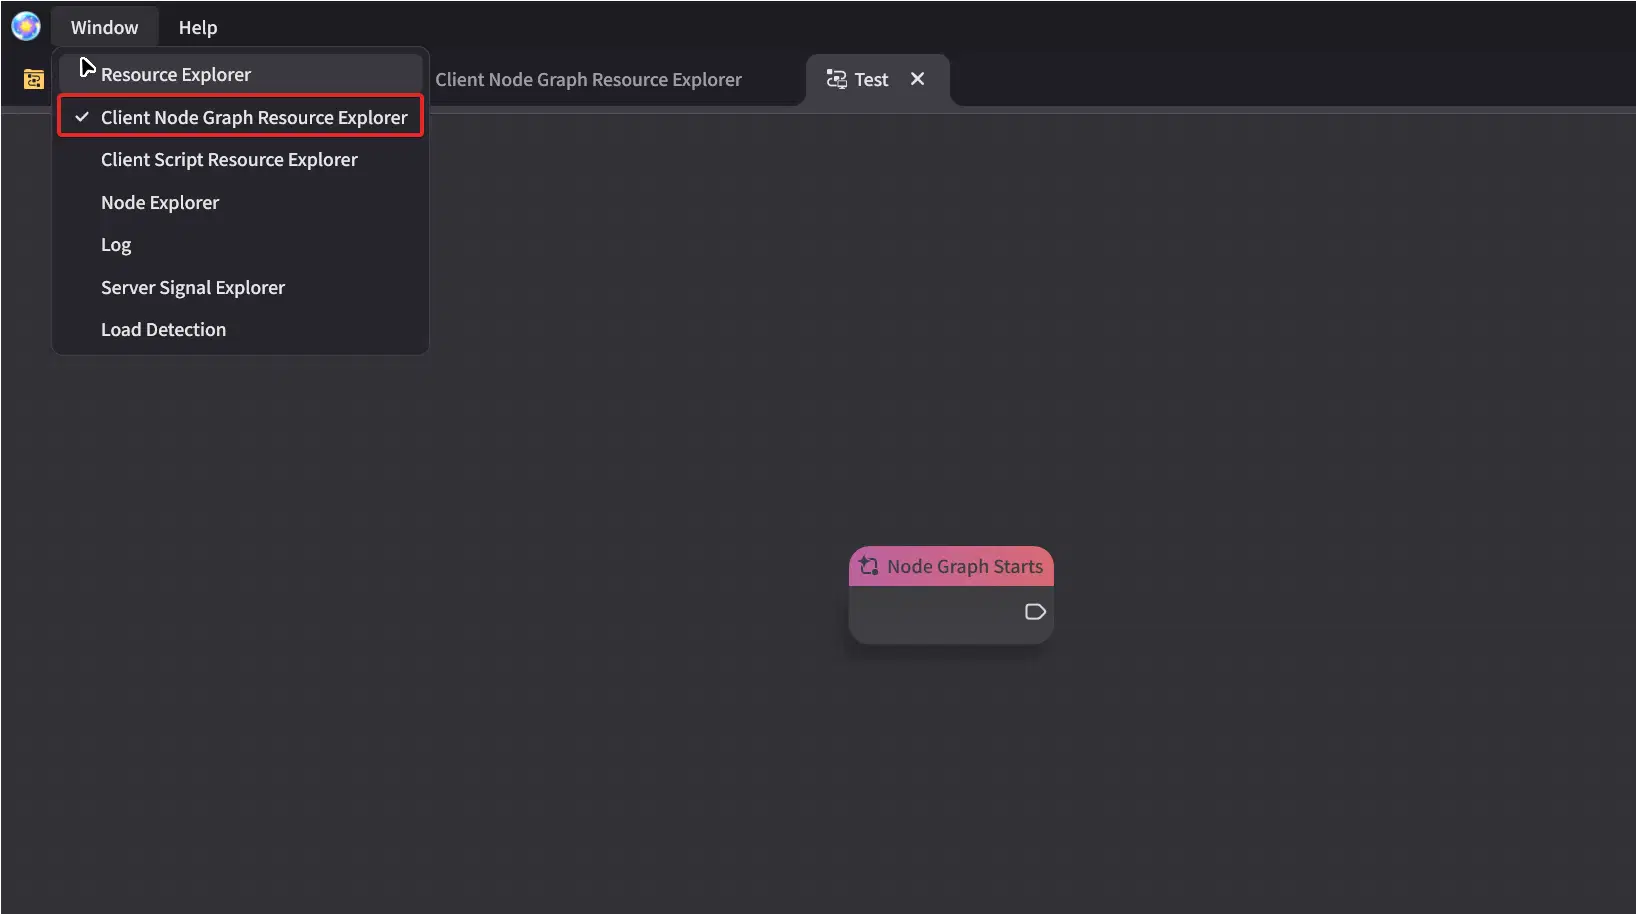
- A Skill Node Graph is not event-driven. It has no "When X happens" event nodes. It always starts from a single "Node Graph Starts" node and runs straight to the end. The timeline decides when it runs.
- Anything that needs to happen on the server - adding score, for example - can't be done from a skill graph directly. You need to send Notify Server Node Graph and catch it with the When Skill Node Is Called event on the server side or send Signal to Server Node Graph. We will do this in Section 11.
1.2 Configuration ID and Skill Instance
These two terms come up constantly, and mixing them up is the cause of most "my skill doesn't work" problems.
Configuration ID - the skill template you build in the Skill Editor. One per skill design.
Skill Instance - a copy of that template that a character actually owns. It has its own integer ID, its own cooldown and its own number of uses.
A character can hold several instances of the same skill. A skill slot (E, Q and so on) stores instances as a stack, and the most recently added one is shown on the button. An instance that is not bound to a slot still exists on the character, but the player can't press it - it can only be cast by nodes.
1.3 Choosing a Skill Type
The Skill Type is the first decision you make. Pick it based on what the player's input means:
Instant Skill - the effect happens the moment the key is pressed (a buff, a blink). No animation editing, only the Start Event Track.
Normal Skill - one fixed sequence of animations plays out. Full timeline.
Hold Skill - the result depends on how long the key is held. Timeline with a loop slot and branches.
Combo Skill - repeated taps chain into different moves, like a normal attack string. Combo track with input windows.
Aiming Skill - bow-style aiming with camera zoom and crosshair. Fixed animation set and branches.
Air Skill - the skill is used while airborne, like a plunging attack. Infinite Loop slot and Landing Branch.
Set Skill - a packaged animation set. Animations are not editable.
Thunder Slam has two different outcomes chosen by hold time, so Hold Skill is the only type that fits.
2. Preparation
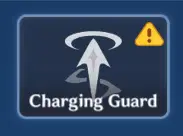
2.1 Charging Guard Unit Status
A charged attack that any enemy can cancel feels bad. We will make the character uninterruptible while charging with a Unit Status, added when charging starts and removed on release.
Open Combat Preset → Unit Status and press New Status → Confirm Create.
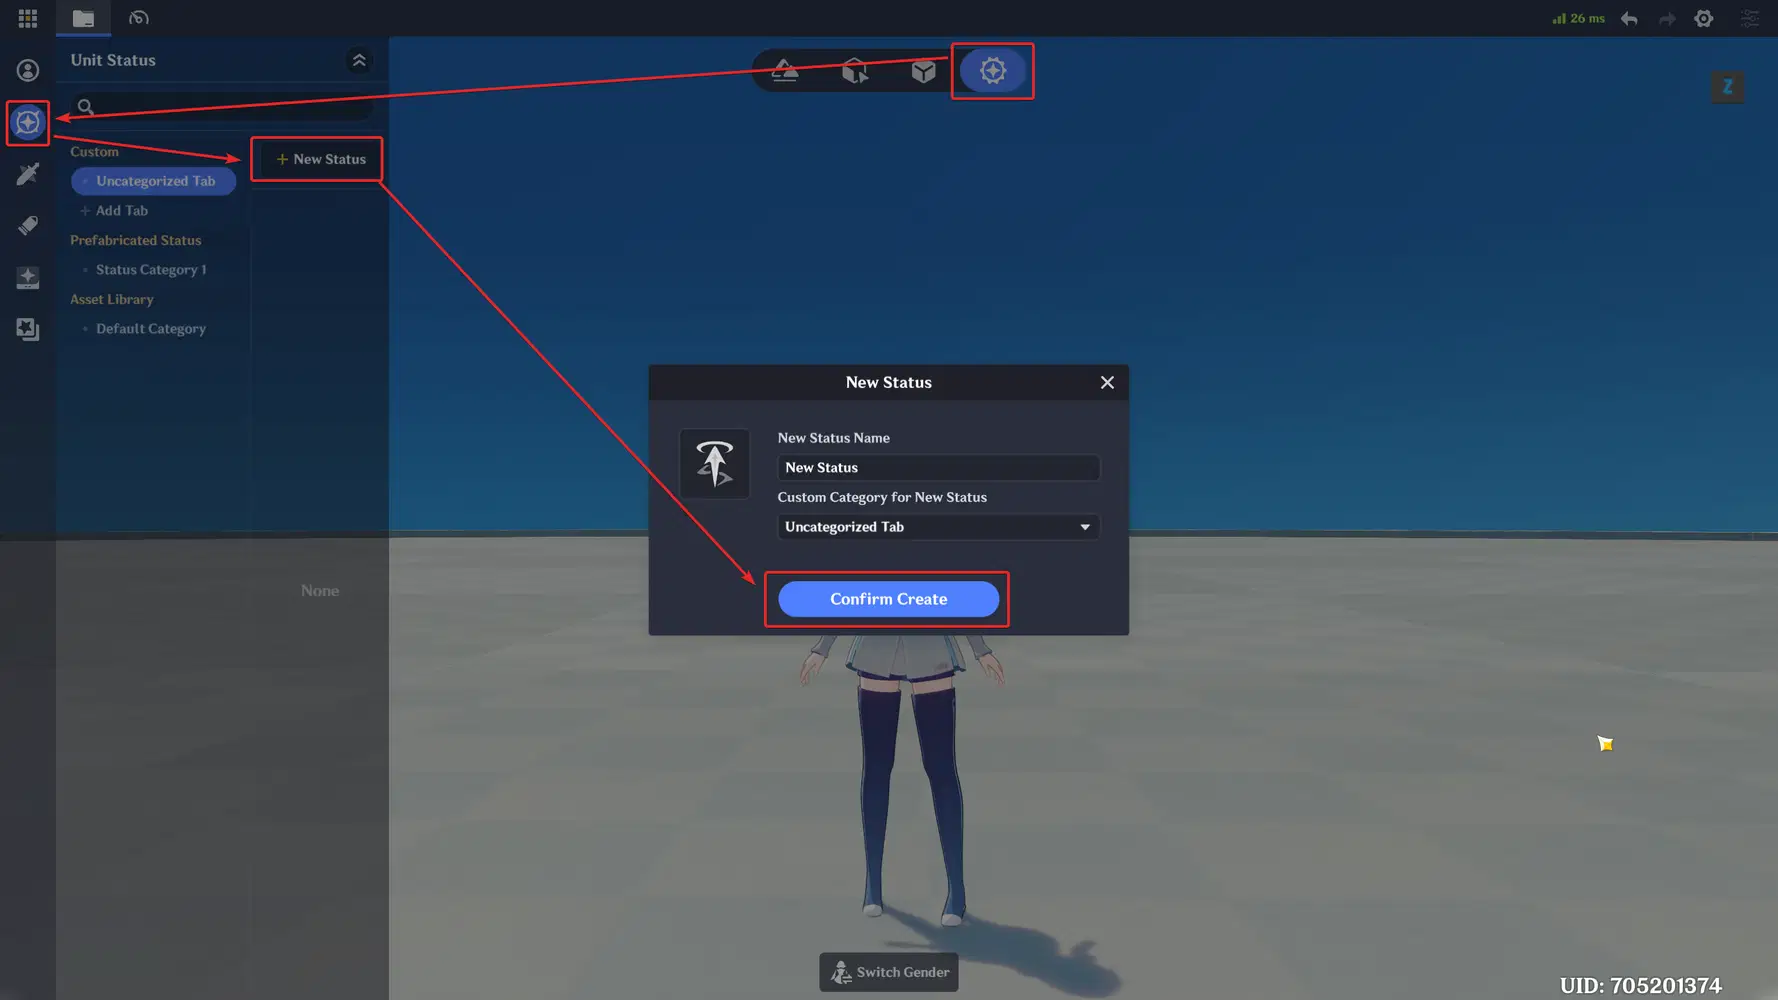
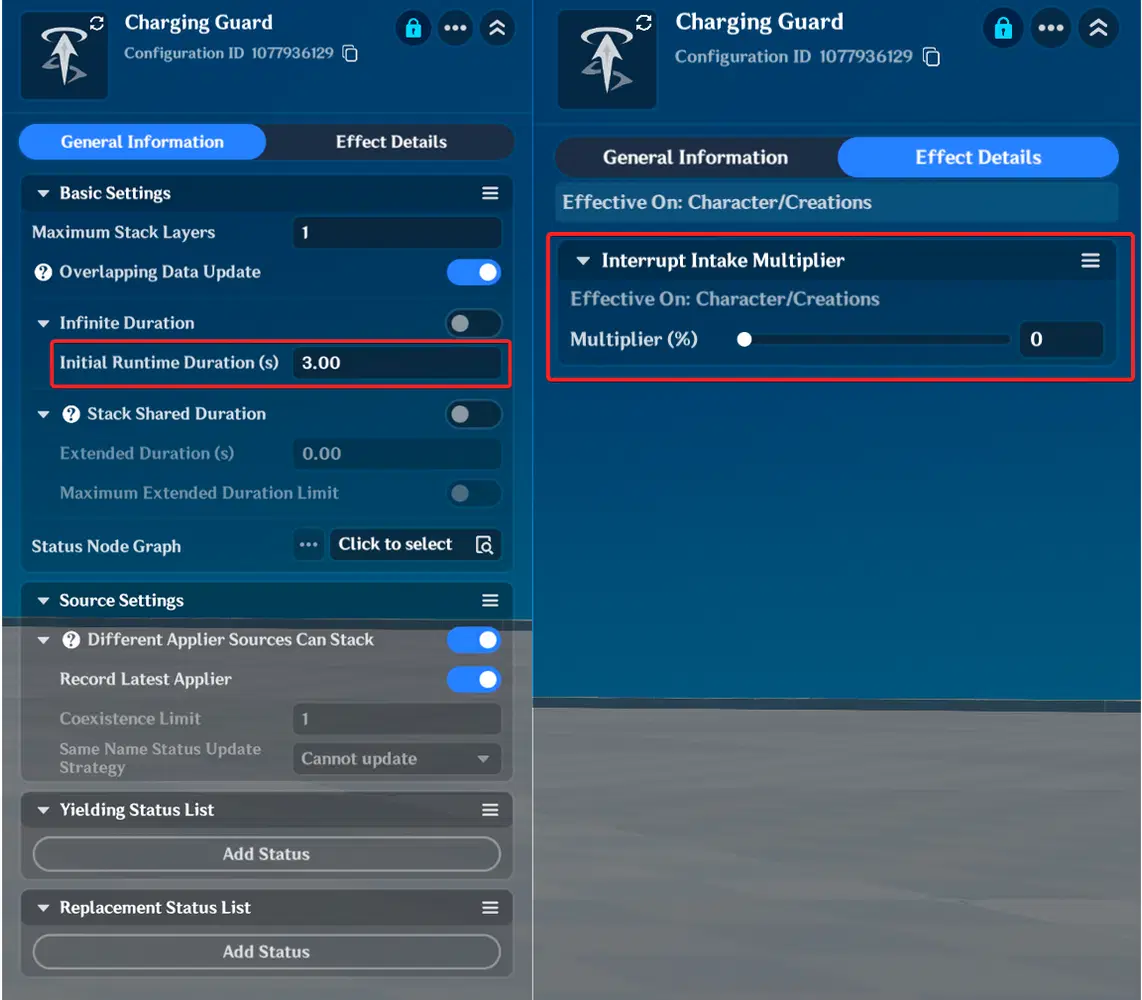
Name - Charging Guard. Status names must be globally unique; the Config ID is generated automatically.
Duration - finite, for example 3 s. This is a second safety net: even if every removal step fails, the status still expires on its own and the player never gets stuck with permanent super armor.
Effect - Interrupt Intake Multiplier set to 0. Taking damage no longer builds up the interrupt value, so the character isn't knocked back.
Unit Statuses, Skills, Local Projectiles and Items are not saved automatically. A yellow exclamation mark means you have unsaved changes - save manually before moving on.
2.2 VFX
We need three Timed Effects: a small spark for charging, a swipe effect and a large Electro burst for the slam. The Play Timed Effects node asks for a Special Effects Asset Configuration ID, so note down the IDs of the effects you like.
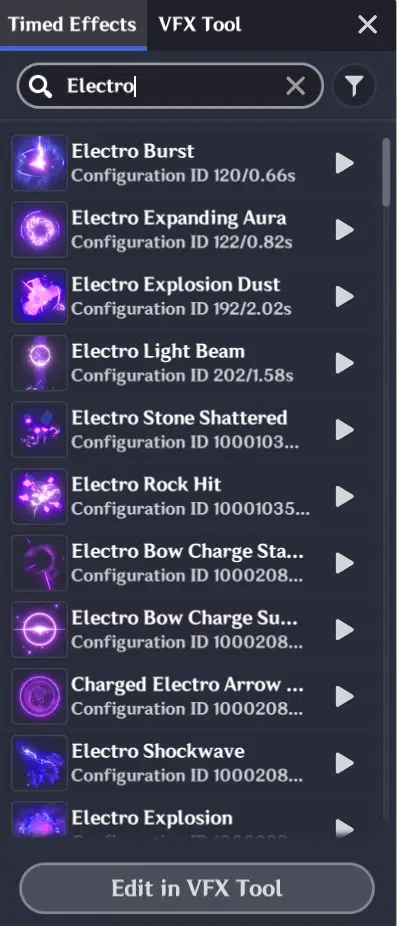
Hitboxes also have their own On-Hit Effects field (Timed Effects only). Use it for the spark on the enemy when it gets hit, and use Play Timed Effects for things that should appear even if nothing is hit, such as the shockwave on the ground.
3. Creating the Skill
Find the Skill Editor under Combat Preset → Skills and press New Skill → Confirm Create.
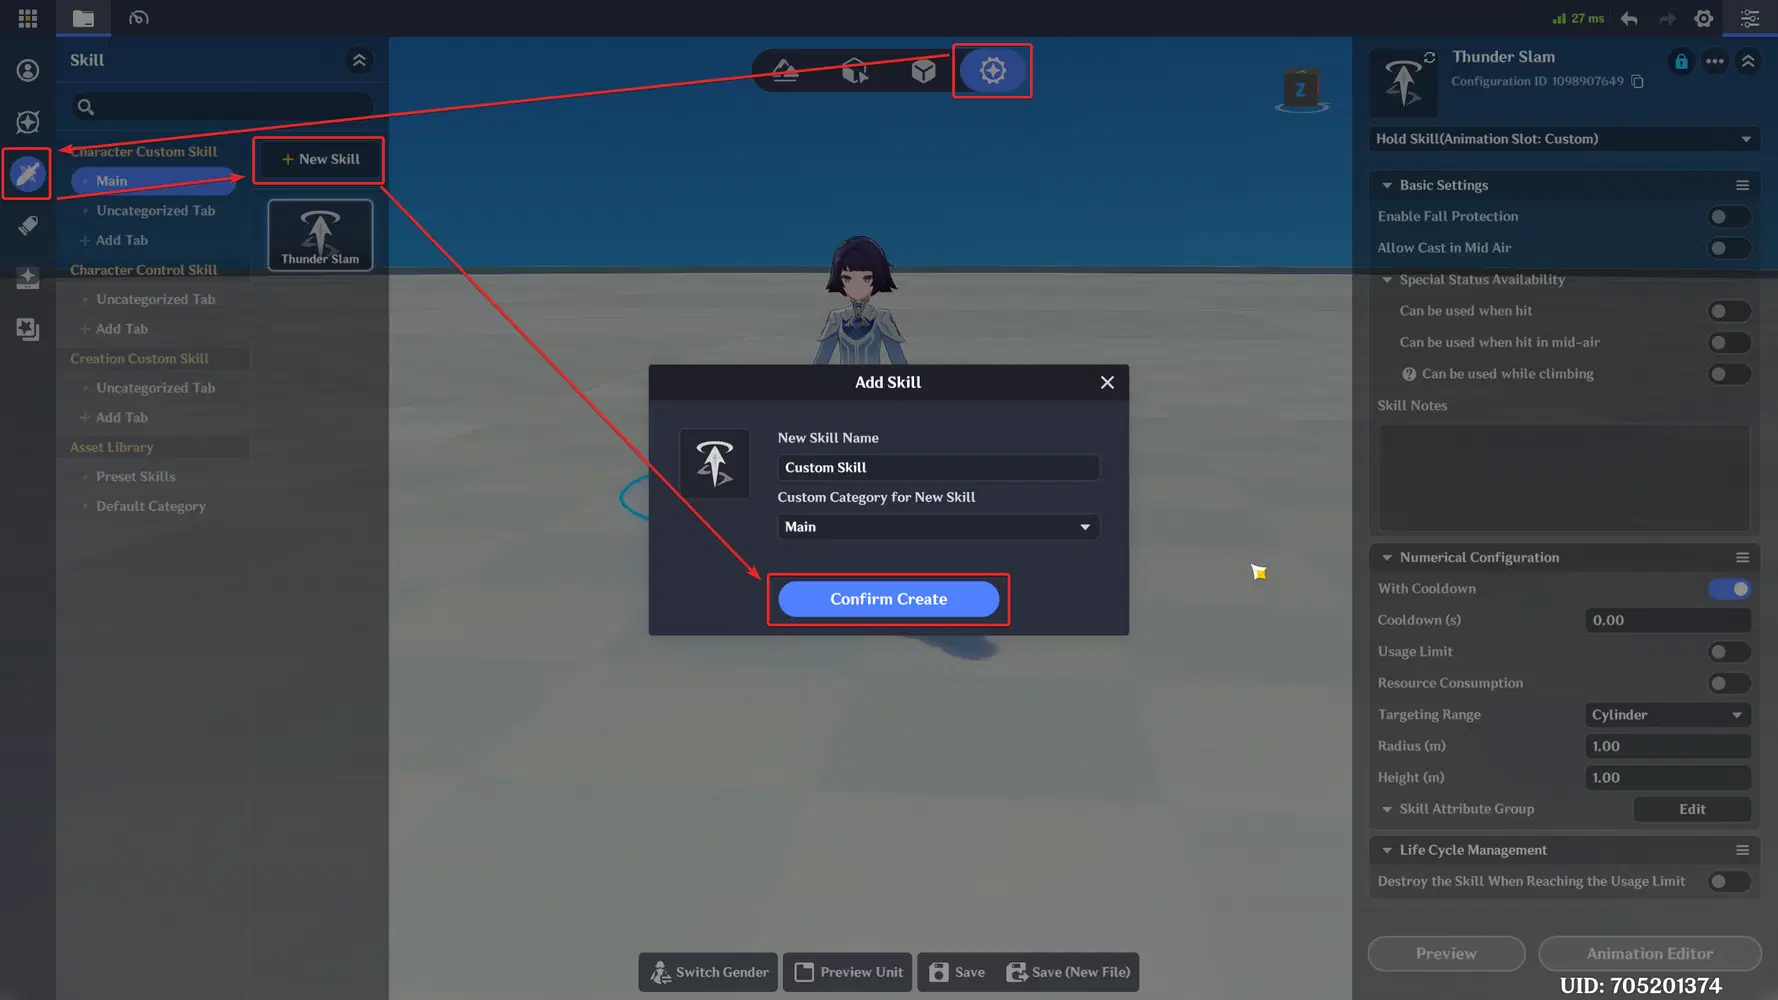
Name - Thunder Slam.
Configuration ID - copy it. Any node that refers to this skill, such as Add Character Skill, needs it.
Skill Type - Hold Skill.
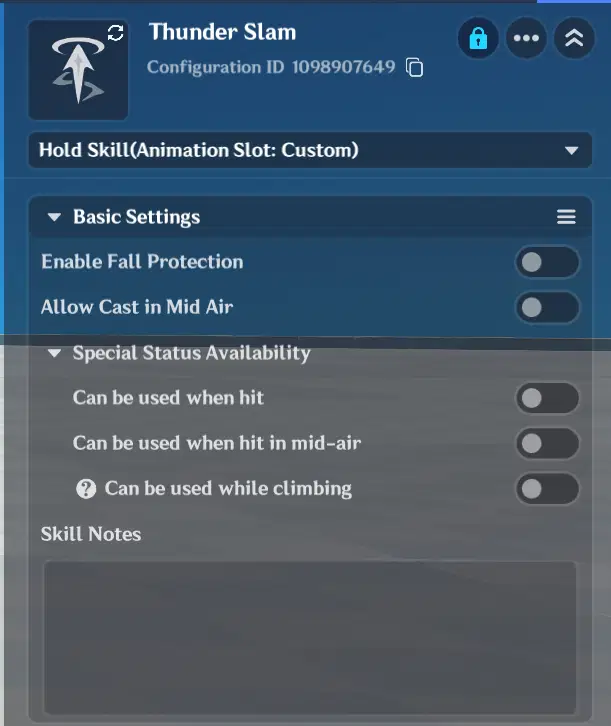
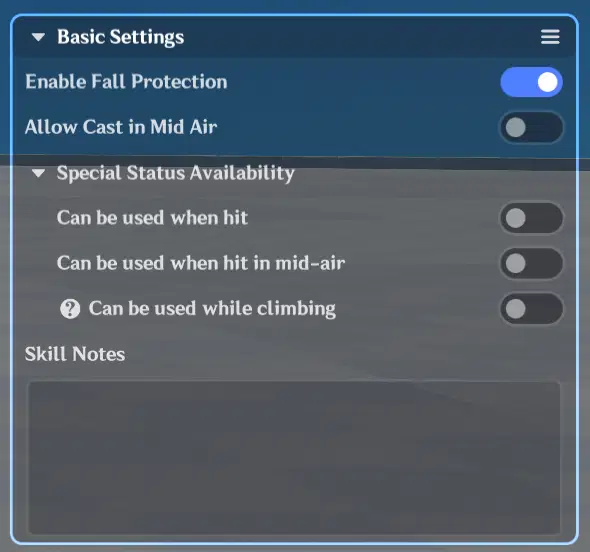
3.1 Basic Settings
Enable Fall Protection - On. The slam moves the character slightly, and fall protection keeps a skill with displacement from carrying the character off a cliff.
Allow Cast in Mid Air - Off. A ground slam in the air makes no sense.
Can be used when hit - Off. Charging Guard starts only after the cast begins. If the skill could be cast during a hit reaction, it would work as a free escape button.
Can be used while climbing - Off, for the same reason. The animation isn't made for walls.
3.2 Numerical Configuration
With Cooldown - On, 6 s. A large AoE launch needs a cost, otherwise it can be spammed.
Usage Limit - Off. With Usage Limit enabled a skill works like charges: for example 2 uses, with one use restored per cooldown.
Resource Consumption - Off for now.
Targeting Range - Cylinder, radius 5.
Skill Attribute Group - none for now. We use it in Section 10 to change the cooldown at runtime.
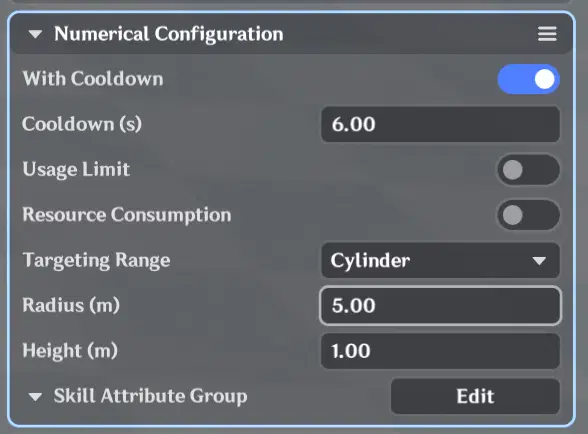
Targeting Range is the setting people most often misunderstand. It doesn't hit anything by itself - it's only the area in which the skill searches for targets that nodes can query. Damage always comes from hitboxes in your node graphs.
4. The Animation Editor
Press Animation Editor. This is where the skill gets its shape.
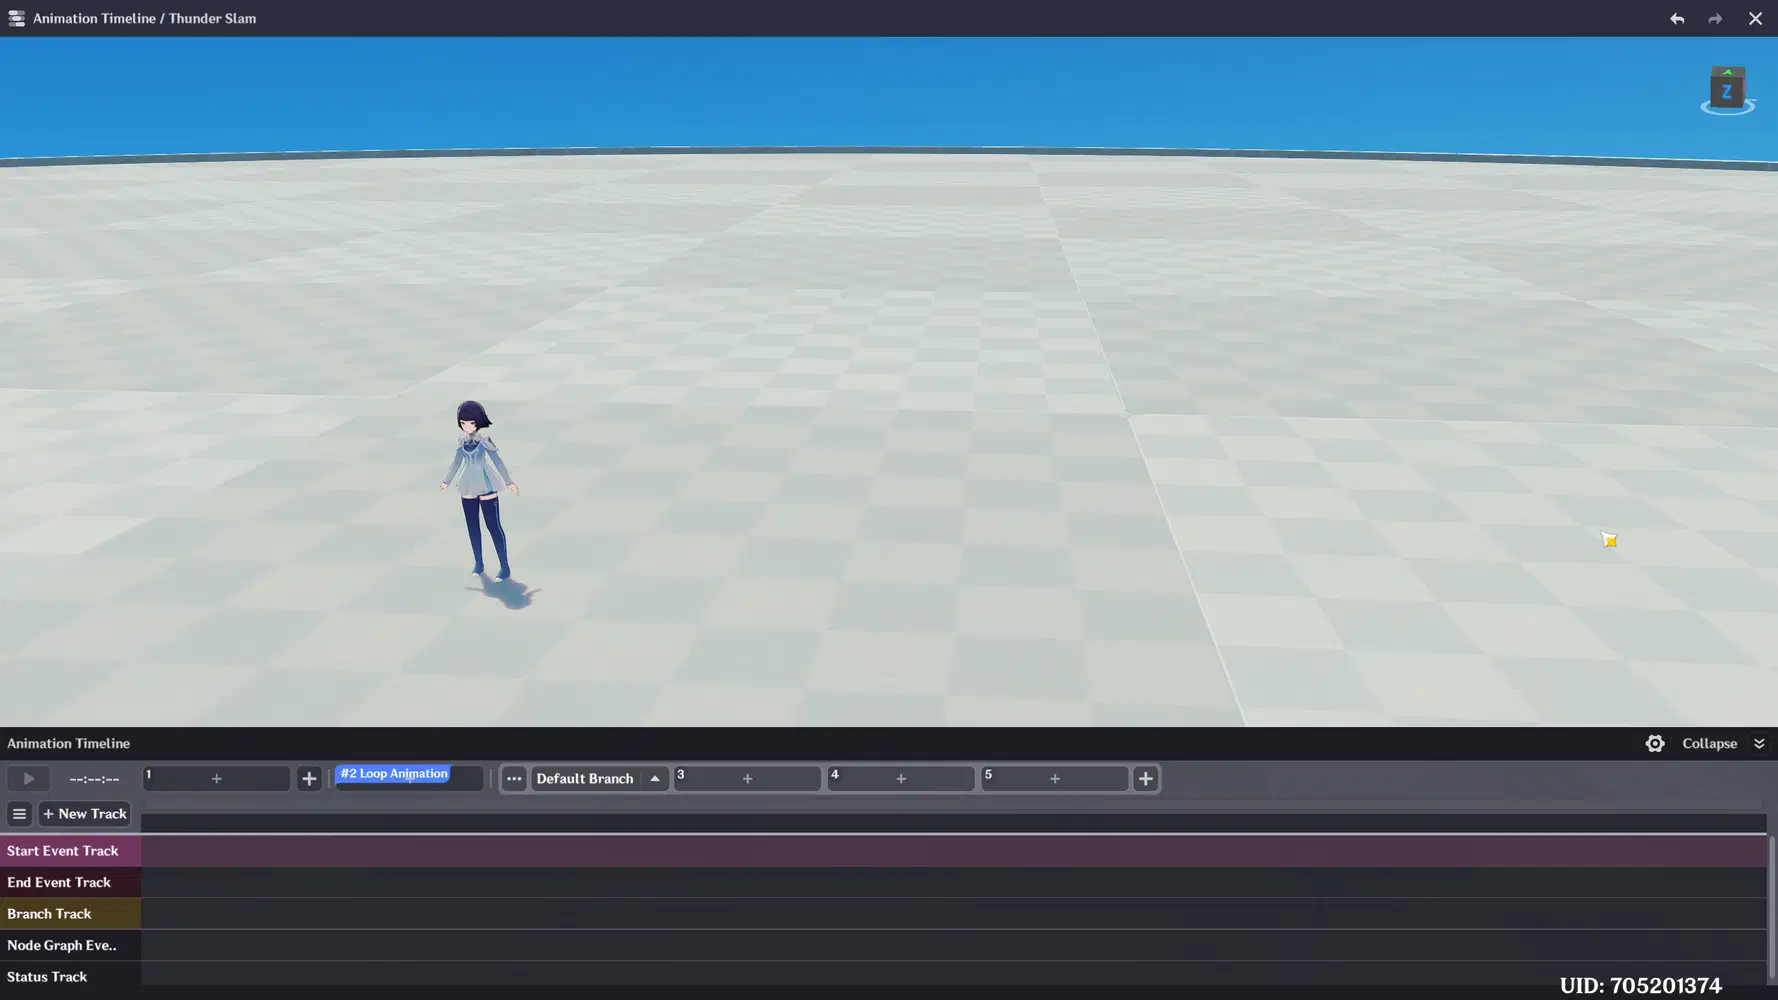
The editor is split into two halves. The action track (animation slots) holds what the character's model does, and the logic tracks (event and status tracks) hold what the game does. When the skill is cast, both play together along the same timeline.
4.1 Regular and Loop Slot
A Hold Skill has a regular slot for the wind-up and a loop slot for the charge.
Click the first slot and pick a short wind-up animation, for example raising the weapon.
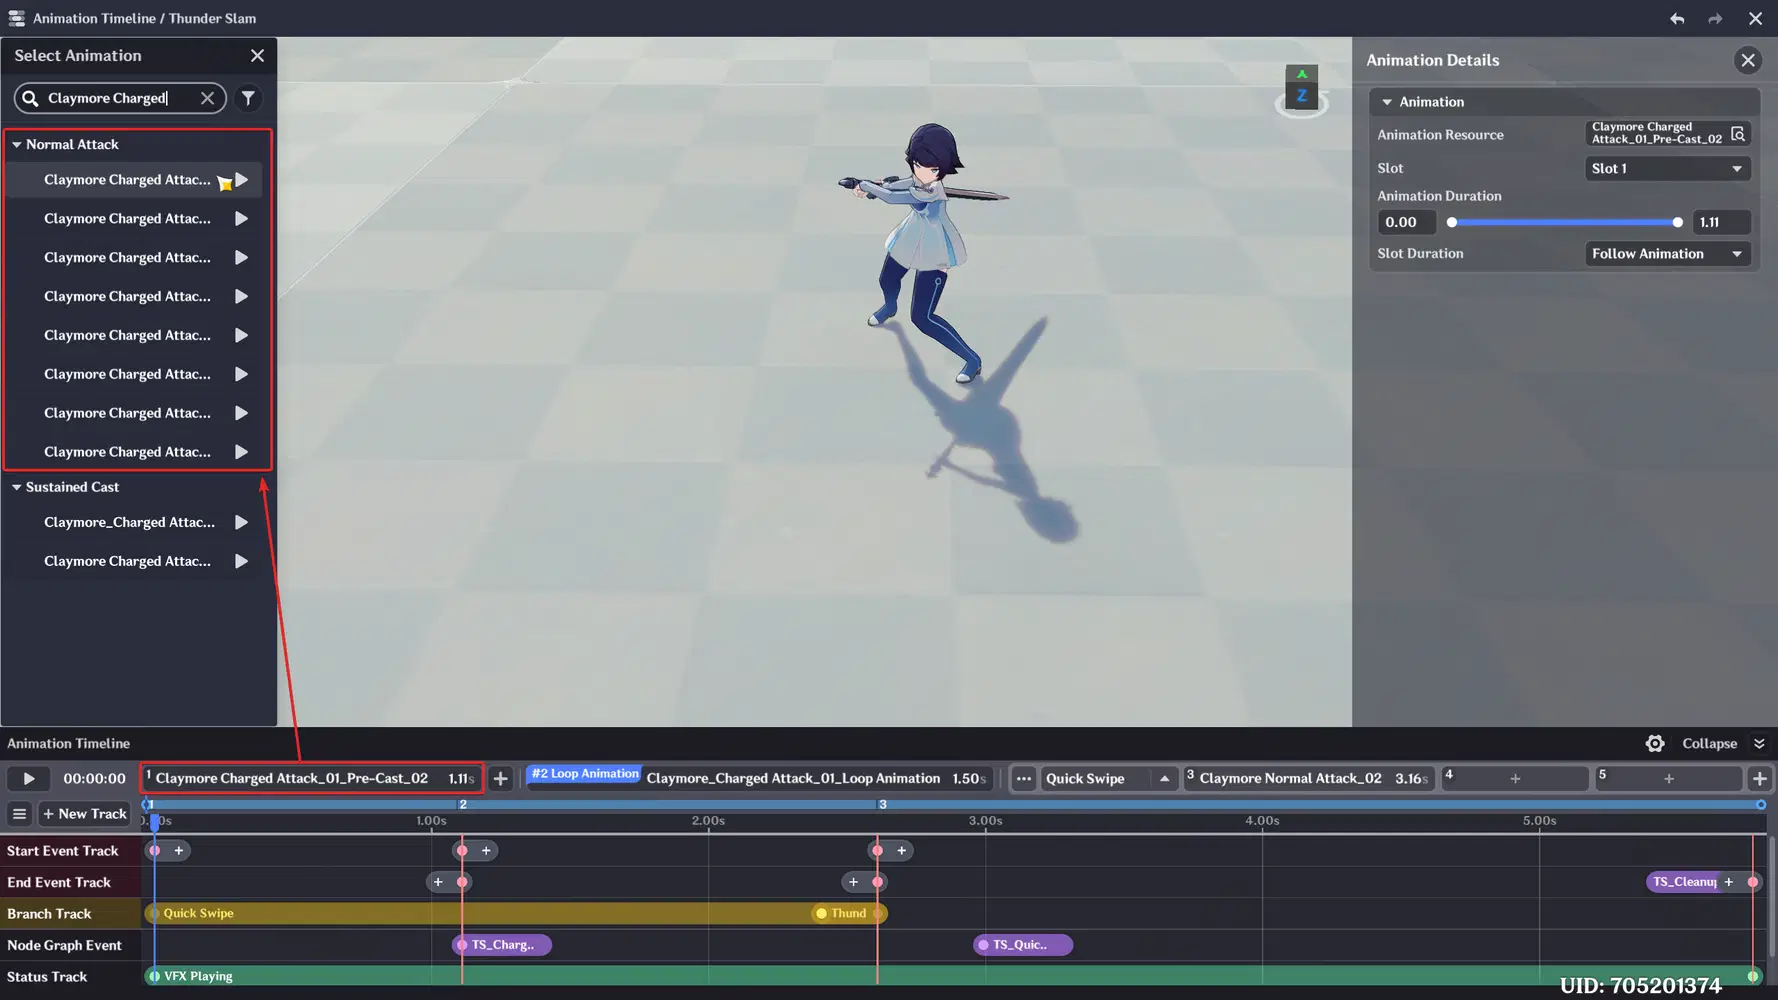
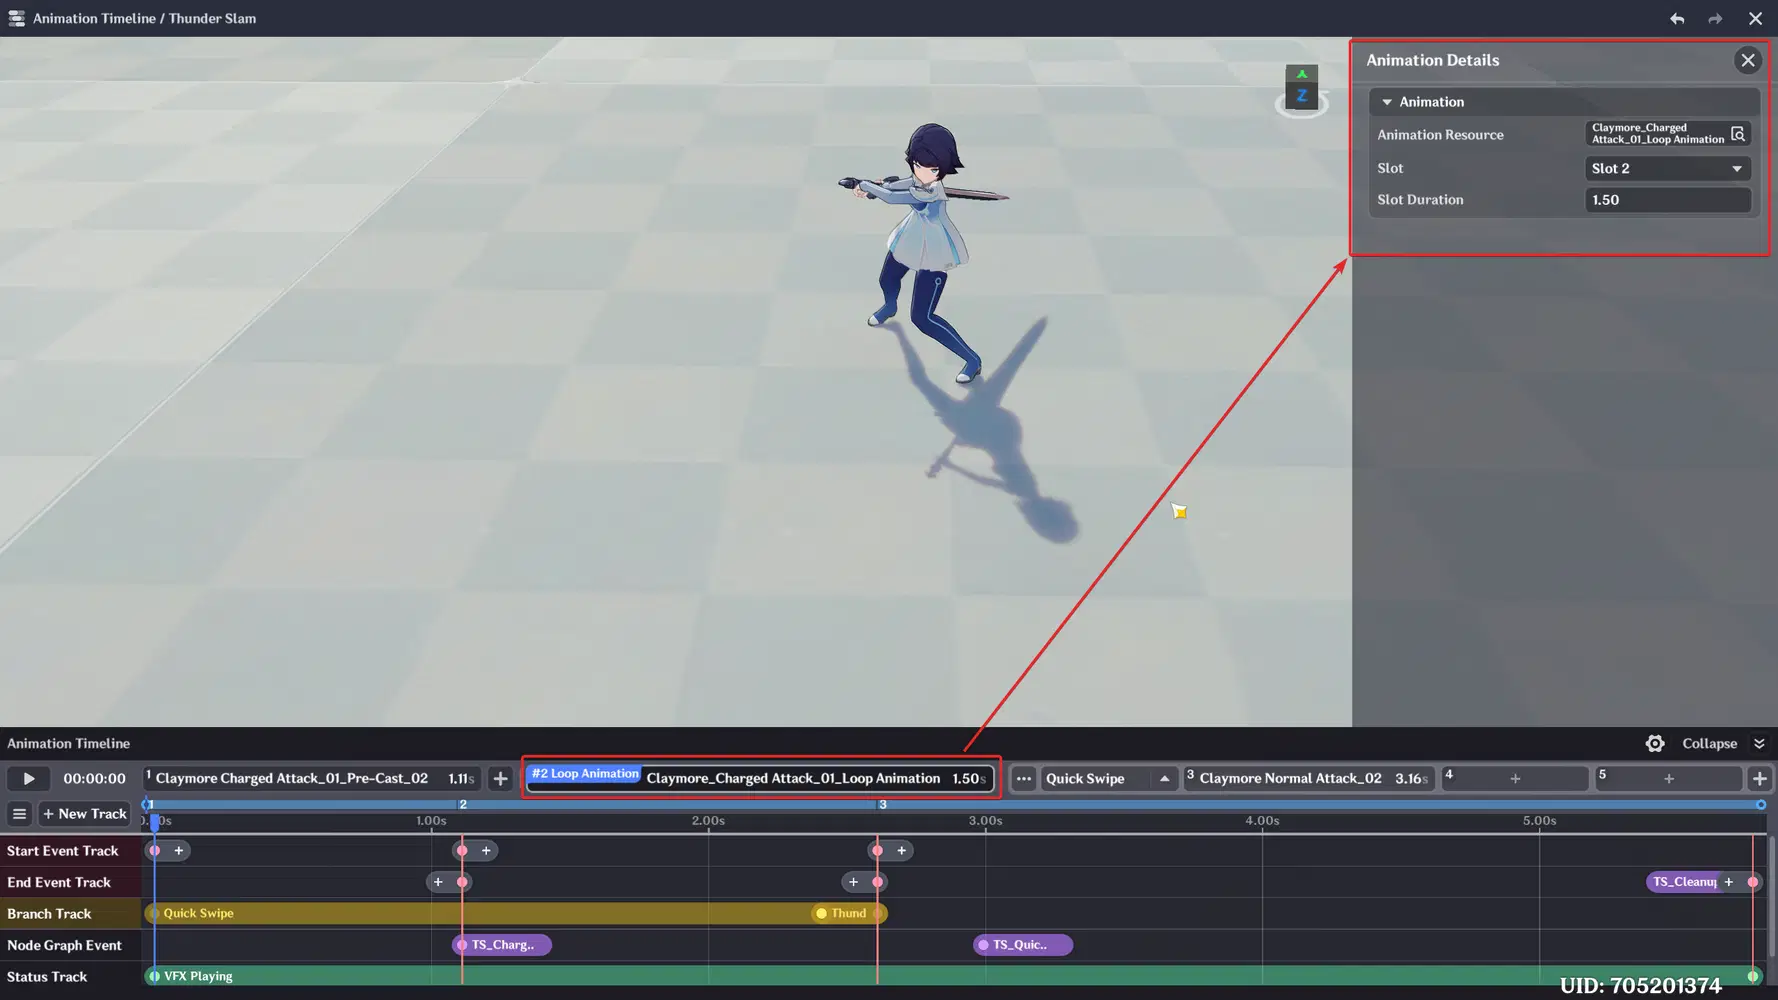
Click the loop slot, pick a looping holding / charging animation, and set its duration to 1.5 s. This is the maximum charge time.
The loop slot is the core of a Hold Skill, so it's worth knowing exactly how it behaves:
If the player keeps holding the key when the character enters the loop, the loop plays up to its duration limit.
If the player isn't holding the key, or releases it, the loop is interrupted immediately and the skill moves to a branch.
If the player holds for the full ~2.5 s, the loop ends and the skill also moves to a branch. A fully held key auto-releases into the slam, so the player can't charge forever.
Clicking a filled slot opens Animation Details. Here you can replace the animation, move it to a different slot, trim it with Animation Duration, or set Slot Duration to Custom (it can't exceed the animation length). Trimming is how you cut the slow recovery part off the end of a long animation so the skill feels snappier.
4.2 Branches
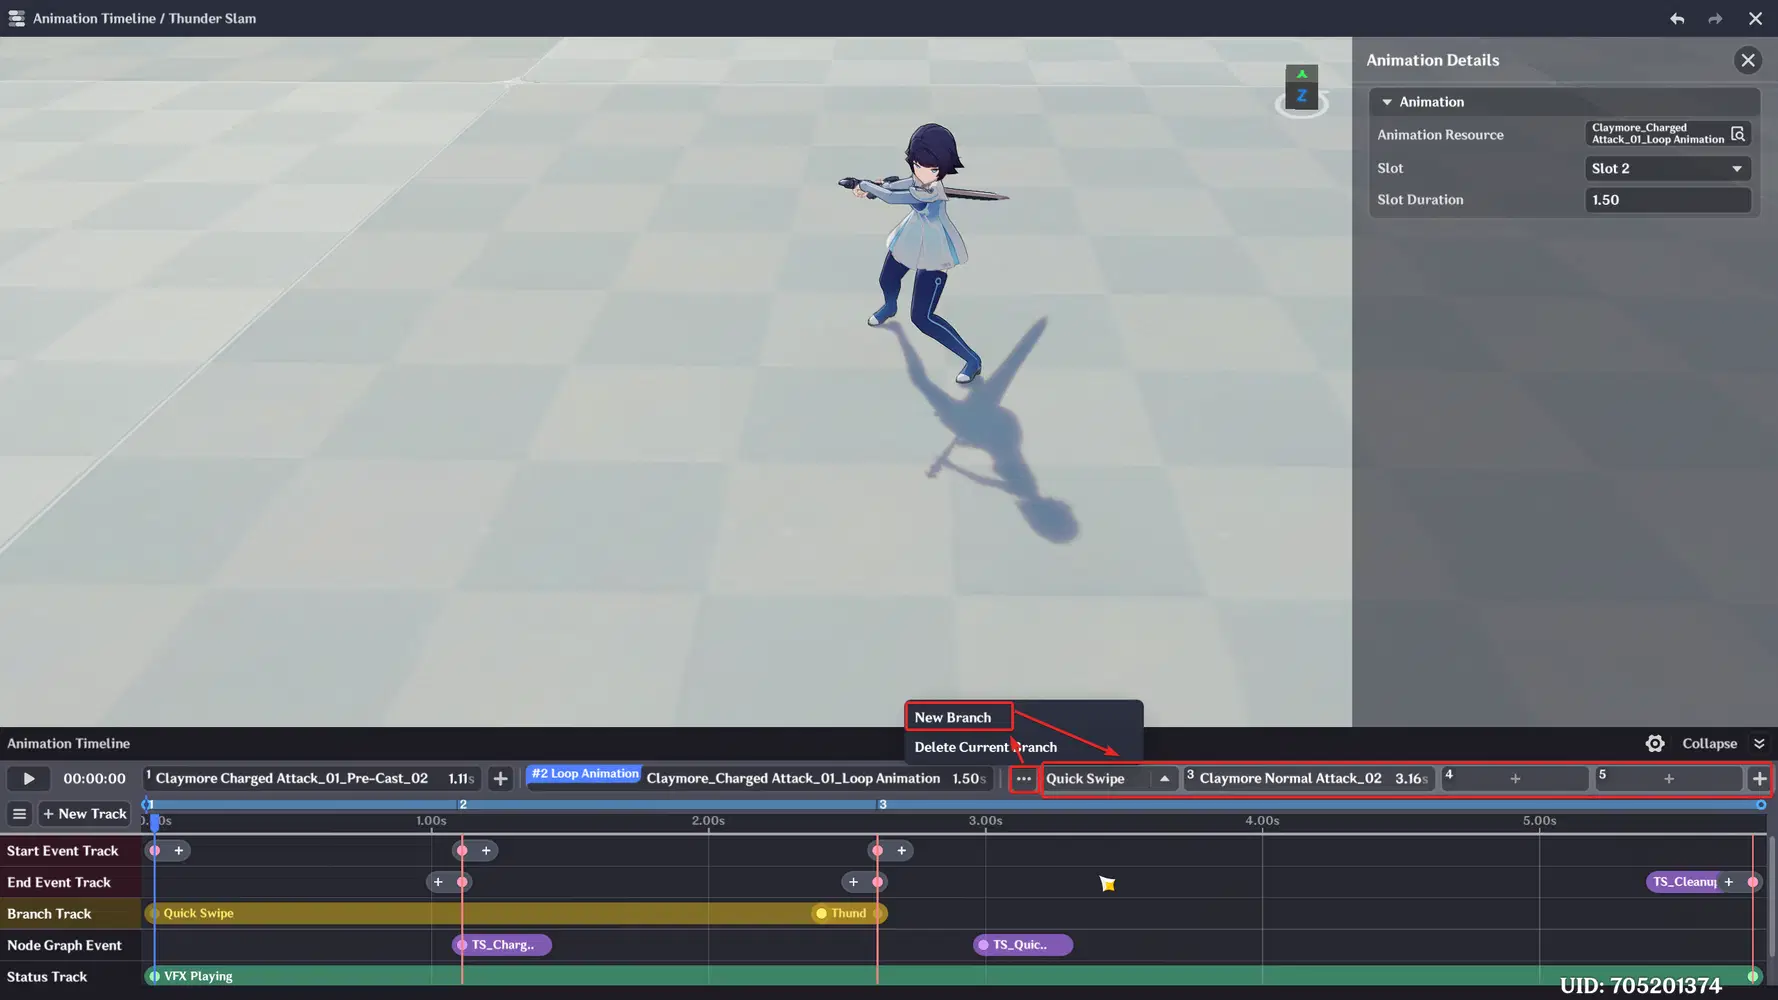
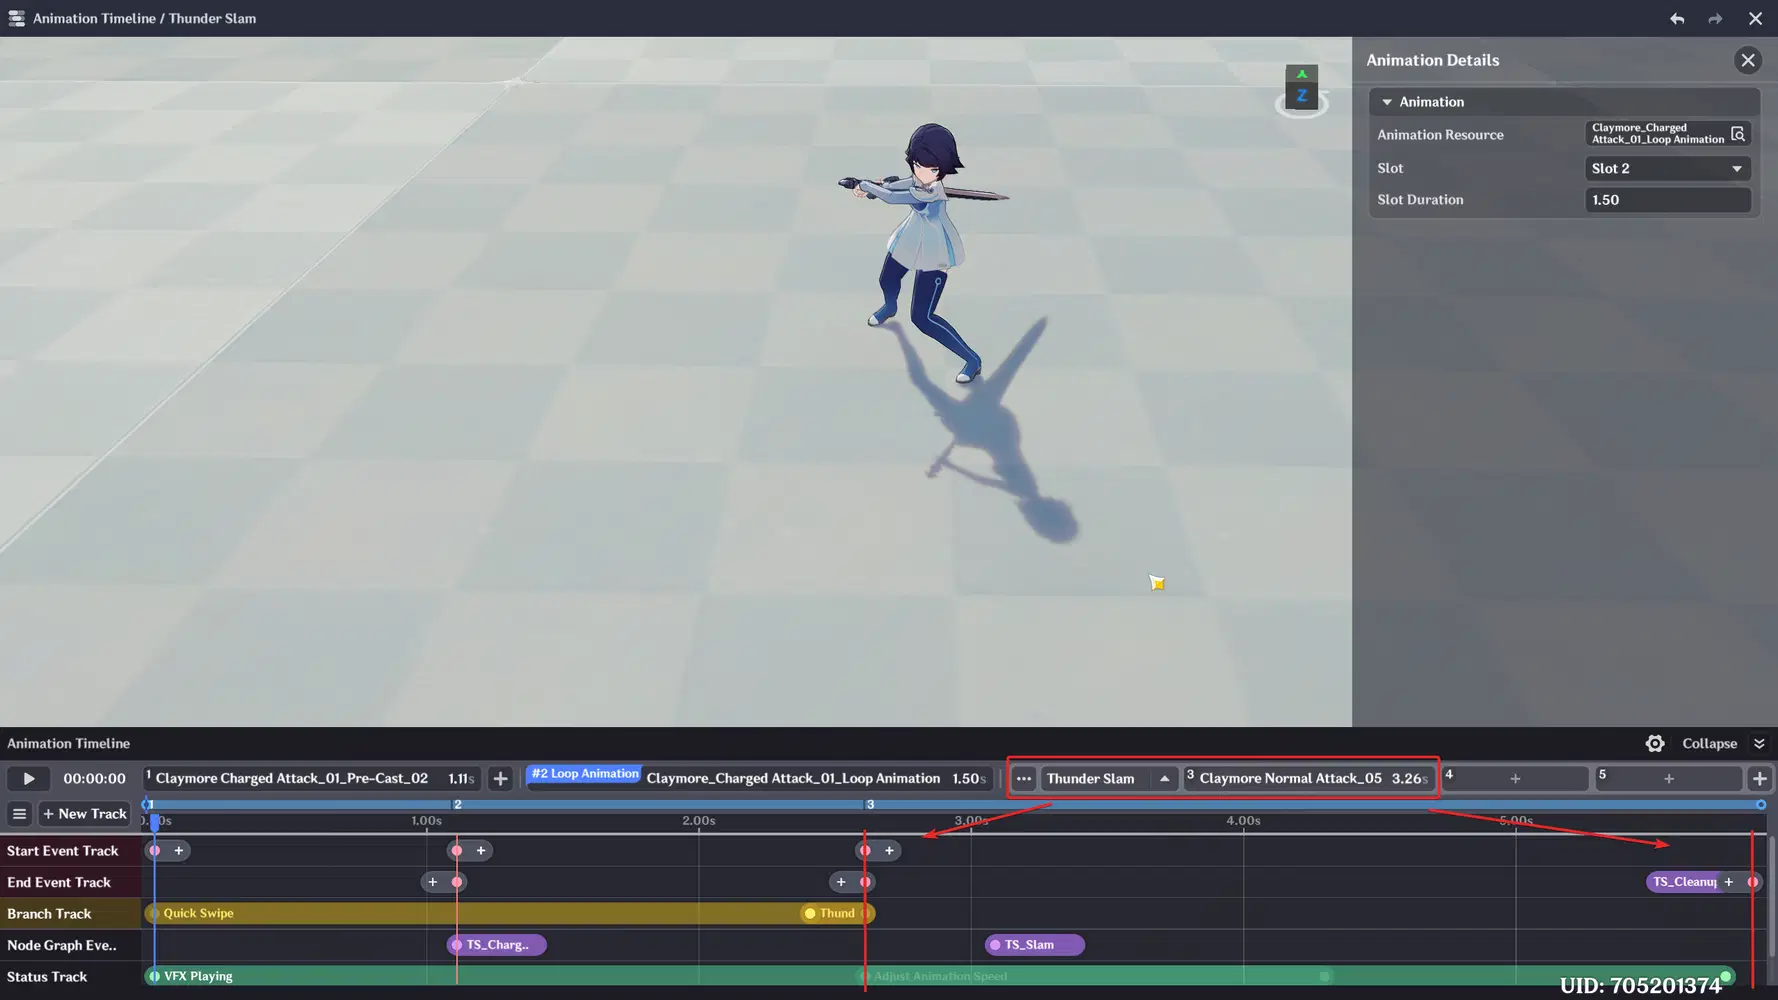
A branch is a bundle of animations that plays after the loop. Each branch can contain several clips, played in sequence.
Add two branches:
Branch 1, Quick Swipe - a fast horizontal slash animation.
Branch 2, Thunder Slam - a jump-and-smash animation.
4.3 Branch Track
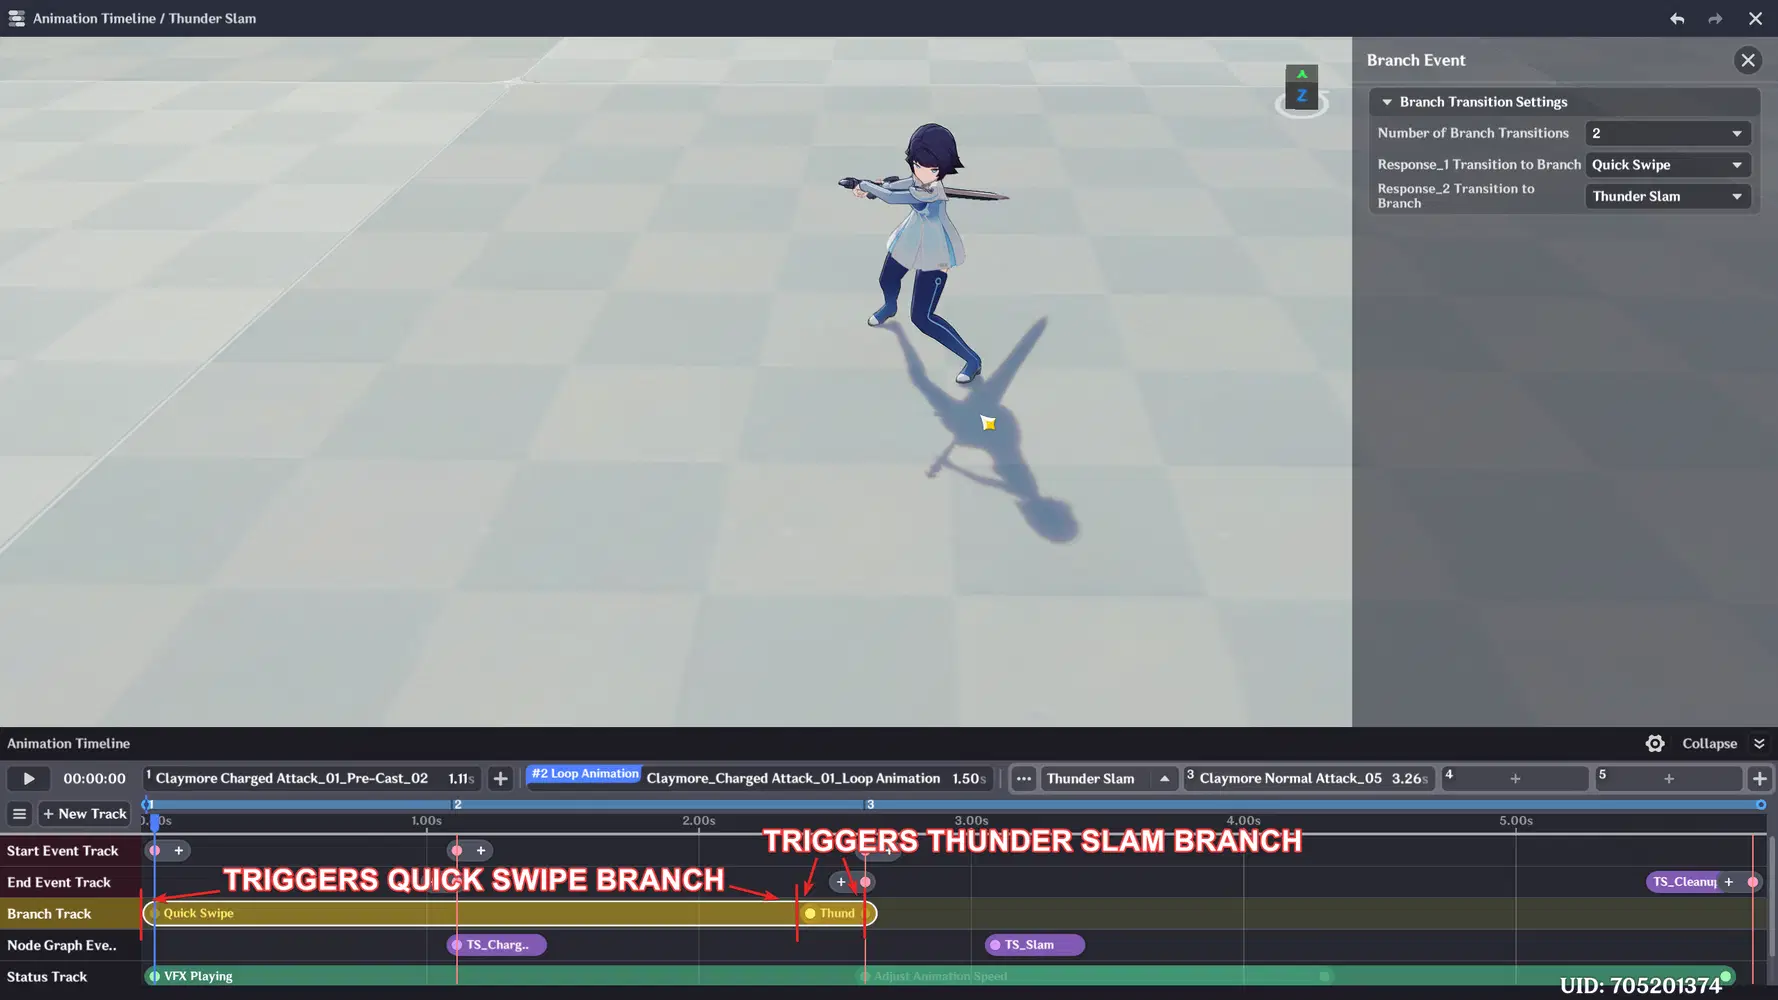
The Branch Track decides which branch the skill moves to, based on where in the loop the player released the key. Click the Branch Track to open its panel on the right.
Number of Branch Transitions - 2. This splits the track into two segments.
Response - segment 1 goes to Quick Swipe, segment 2 goes to Thunder Slam.
Segment border - drag Thunder Slam close to the end of the loop animation..
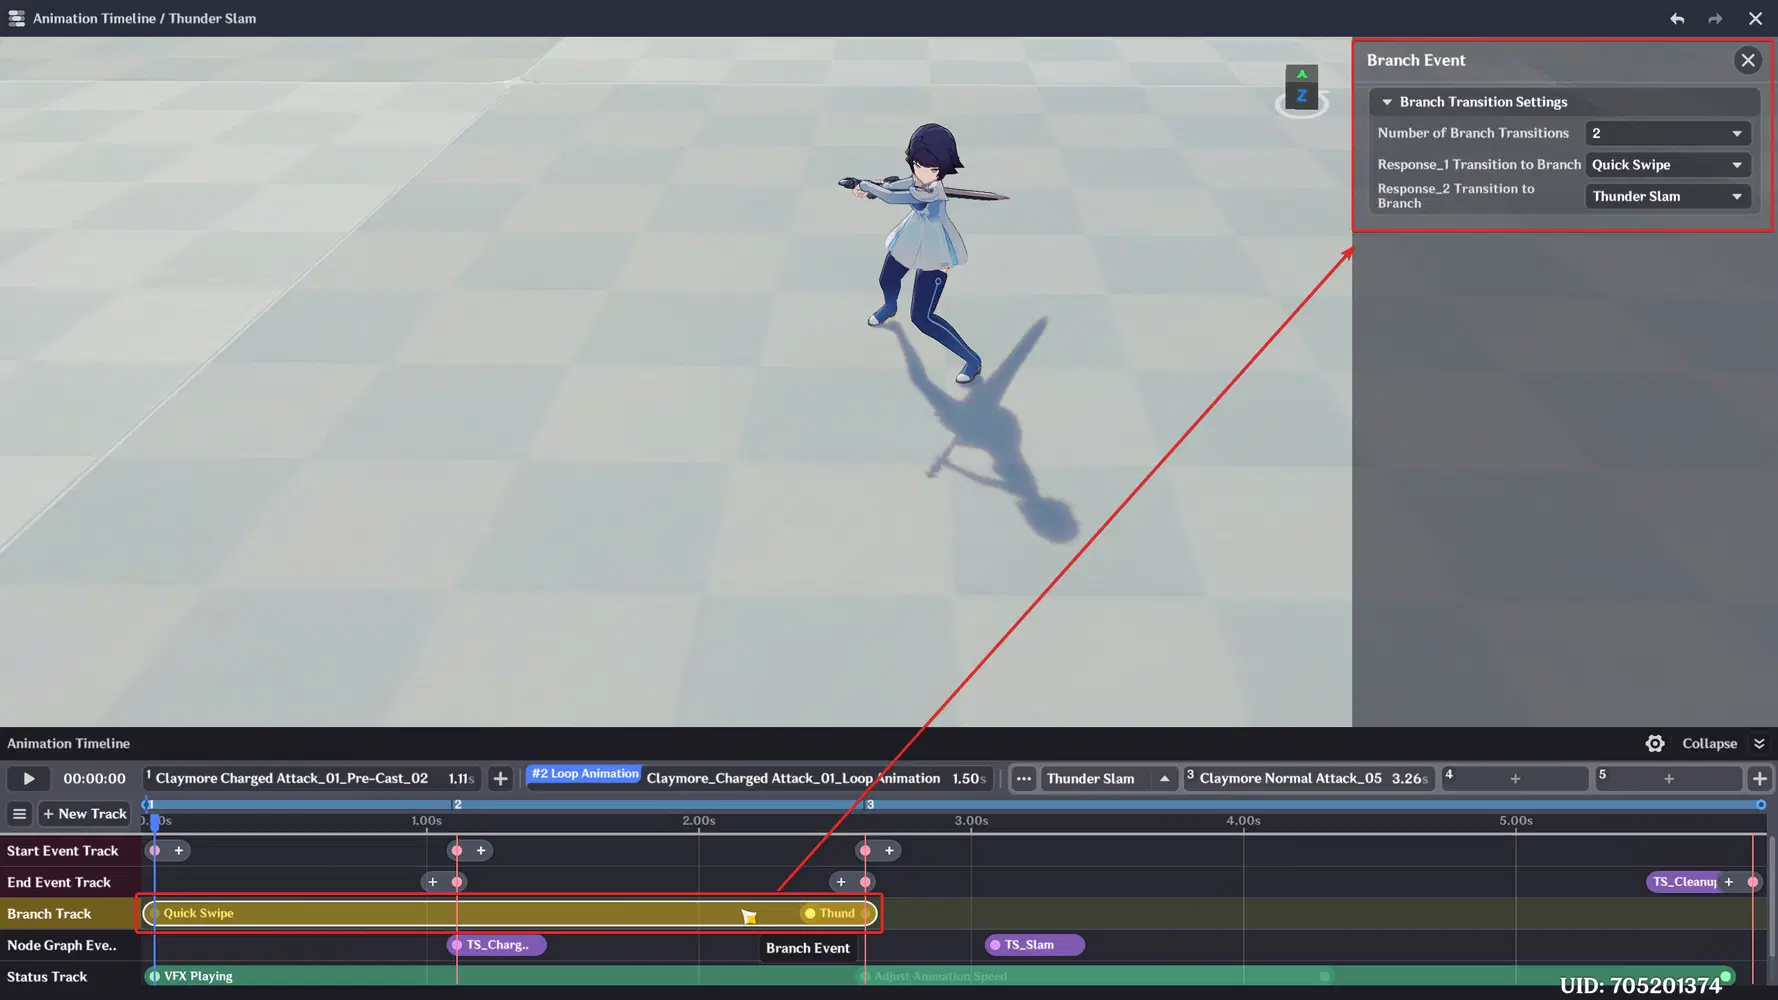
This border is an intent threshold. Releasing the button before this threshold is interpreted as "I just wanted a quick hit", while releasing it after the threshold indicates that the player is clearly charging the attack. Since the auto-release at ~2.5 seconds falls within segment 2, holding the button until the end will always trigger the slam.
You don't need any logic to measure how long the key was held - the Branch Track already does it. This is the main reason to pick a Hold Skill over a Normal Skill with timers in node graphs.
5. Skill Node Graphs
Now we create the logic that the timeline will trigger. Open the Client Node Graph Resource Explorer and create the graphs in the Character Skill Node Graph folder.
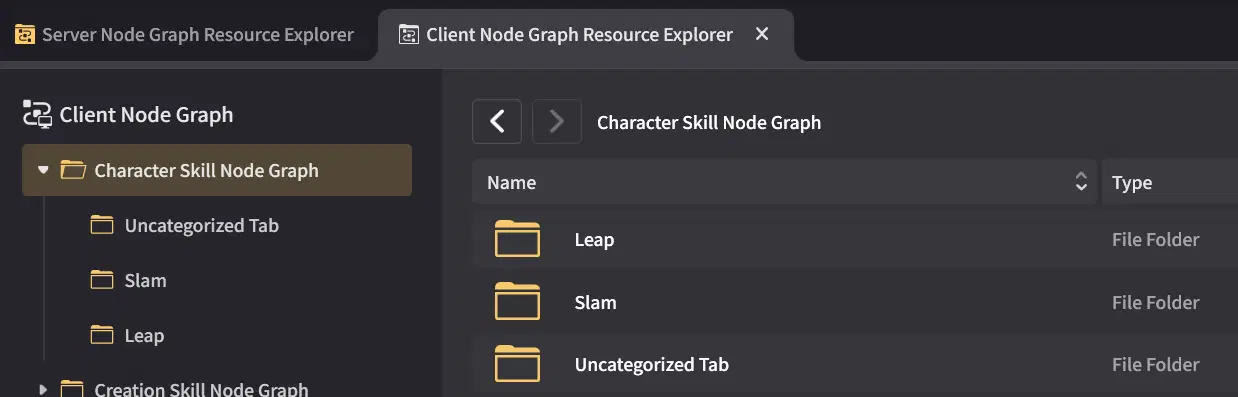
We will make five small graphs instead of one big one. Each Skill Node Graph runs once, from Node Graph Begins to its end, at one point on the timeline - one graph is one moment. Small graphs are also easy to reuse: the cleanup graph below is used in three different places.
5.1 TS_ChargeStart
This graph turns on Charging Guard and plays a small power-up flash.
Add Unit Status - Application Target: Get Self Entity, Stacks: 1, Unit Status Config ID: Charging Guard.
Play Timed Effects - your charge-start effect. Location and Rotate come from Get Entity Location and Get Entity Rotation with Get Self Entity as the input.
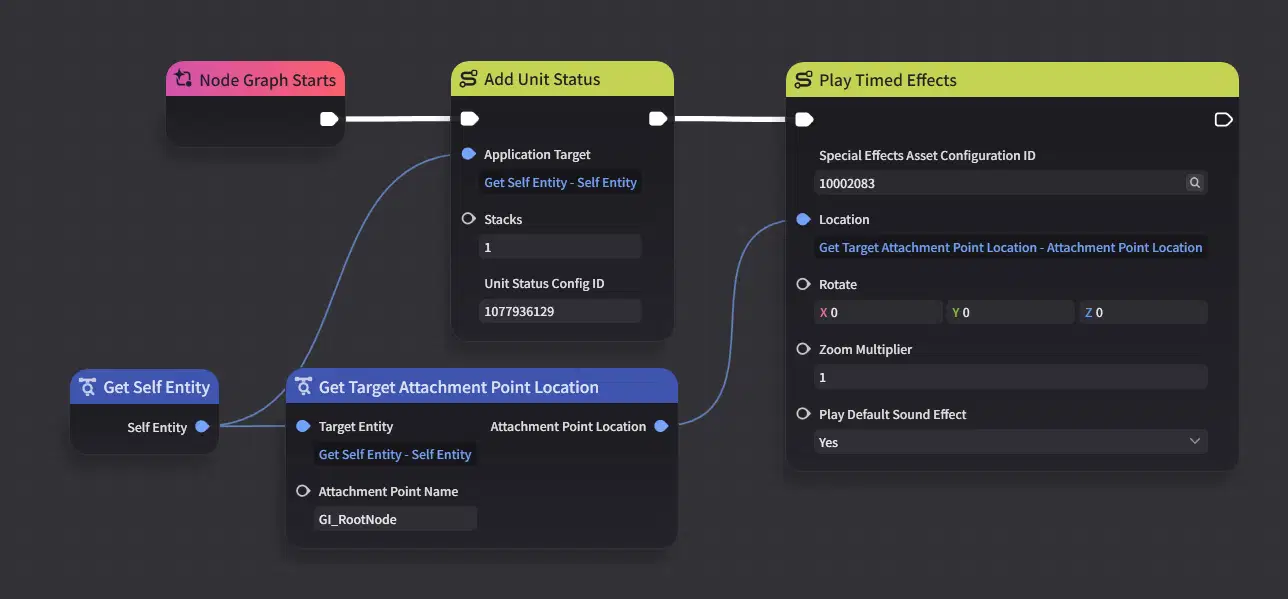
There is no "super armor" checkbox in the skill settings. Behaviour like this lives in Unit Statuses, which is exactly what lets us turn it on and off at precise frames.
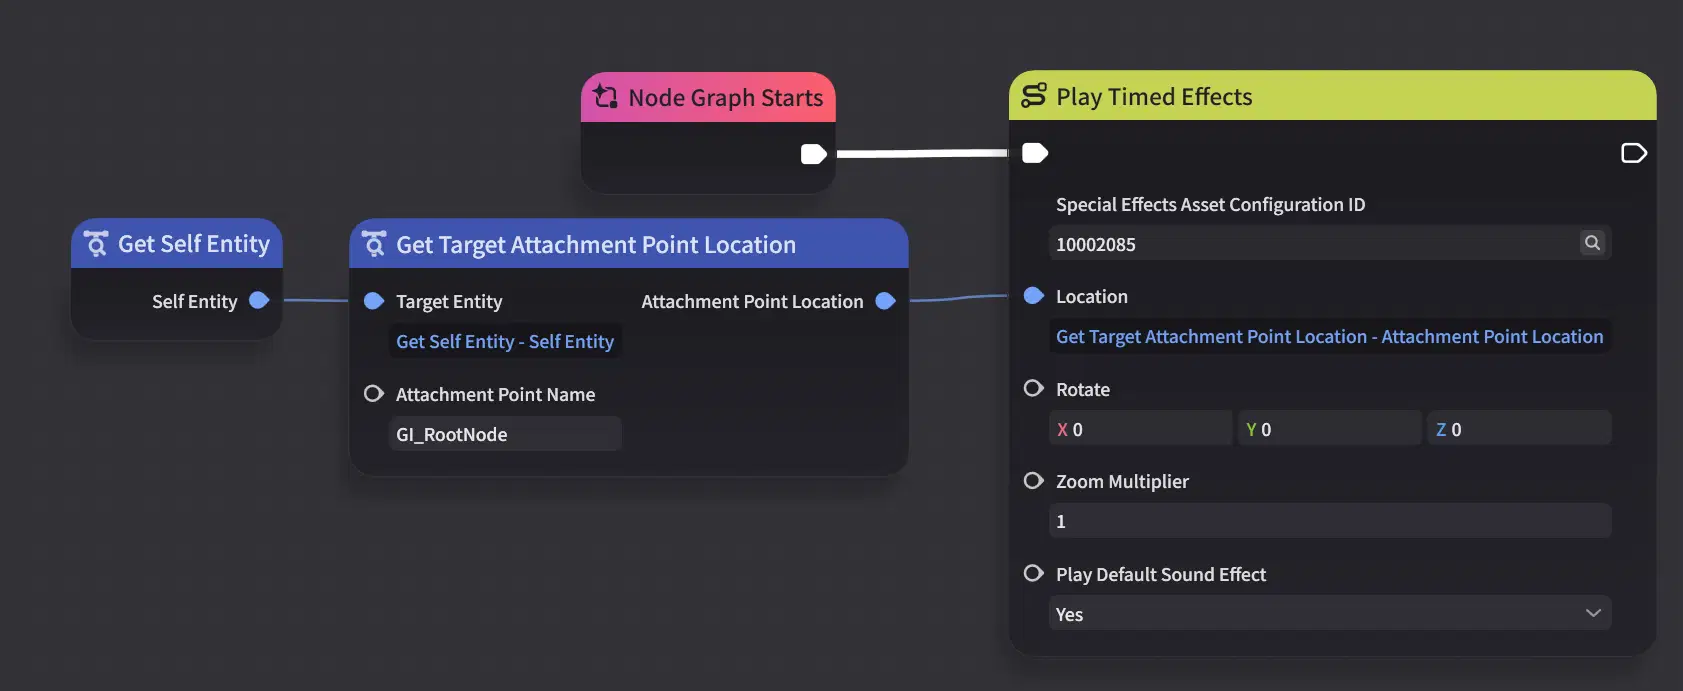
5.2 TS_ChargeSpark
A single Play Timed Effects node with a small Electro spark at the character's location. We will repeat it on a loop in section 6.2. Charging needs feedback - without it, the player can't tell when they have passed the threshold.
5.3 TS_Cleanup
A single Remove Unit Status node: Removal Target: Get Self Entity, Unit Status Config ID: Charging Guard.
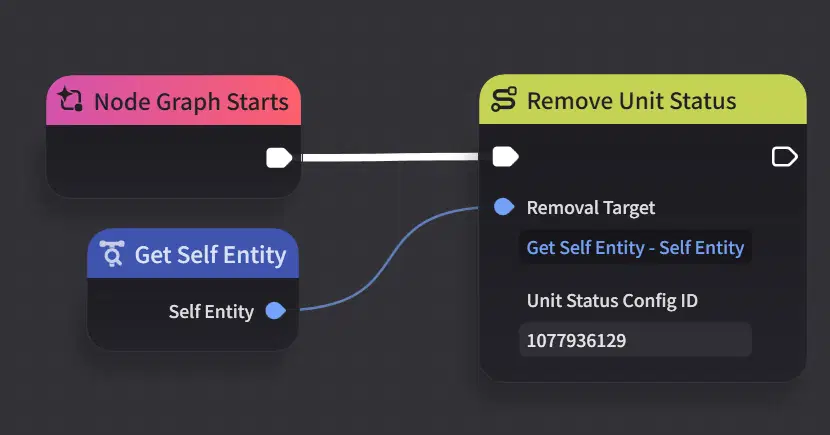
We need to remove the status in two places - both branches. Removing a status the character no longer has is harmless: a node that fails to execute doesn't stop the execution flow, so it's safe to call this more than once.
5.4 TS_QuickSwipe
The swipe hitbox should be 2 m in front of the character, not on top of it. Skill graphs place hitboxes in world coordinates, so we need to calculate "2 m in front of me" ourselves:
Create 3D Vector (0, 1, 2) - 2 m forward and 1 m up, in local space.
3D Vector Rotation - rotate that vector by the character's rotation from Get Entity Rotation. This converts local forward into world forward.
3D Vector Addition - add the result to the character's location from Get Entity Location.
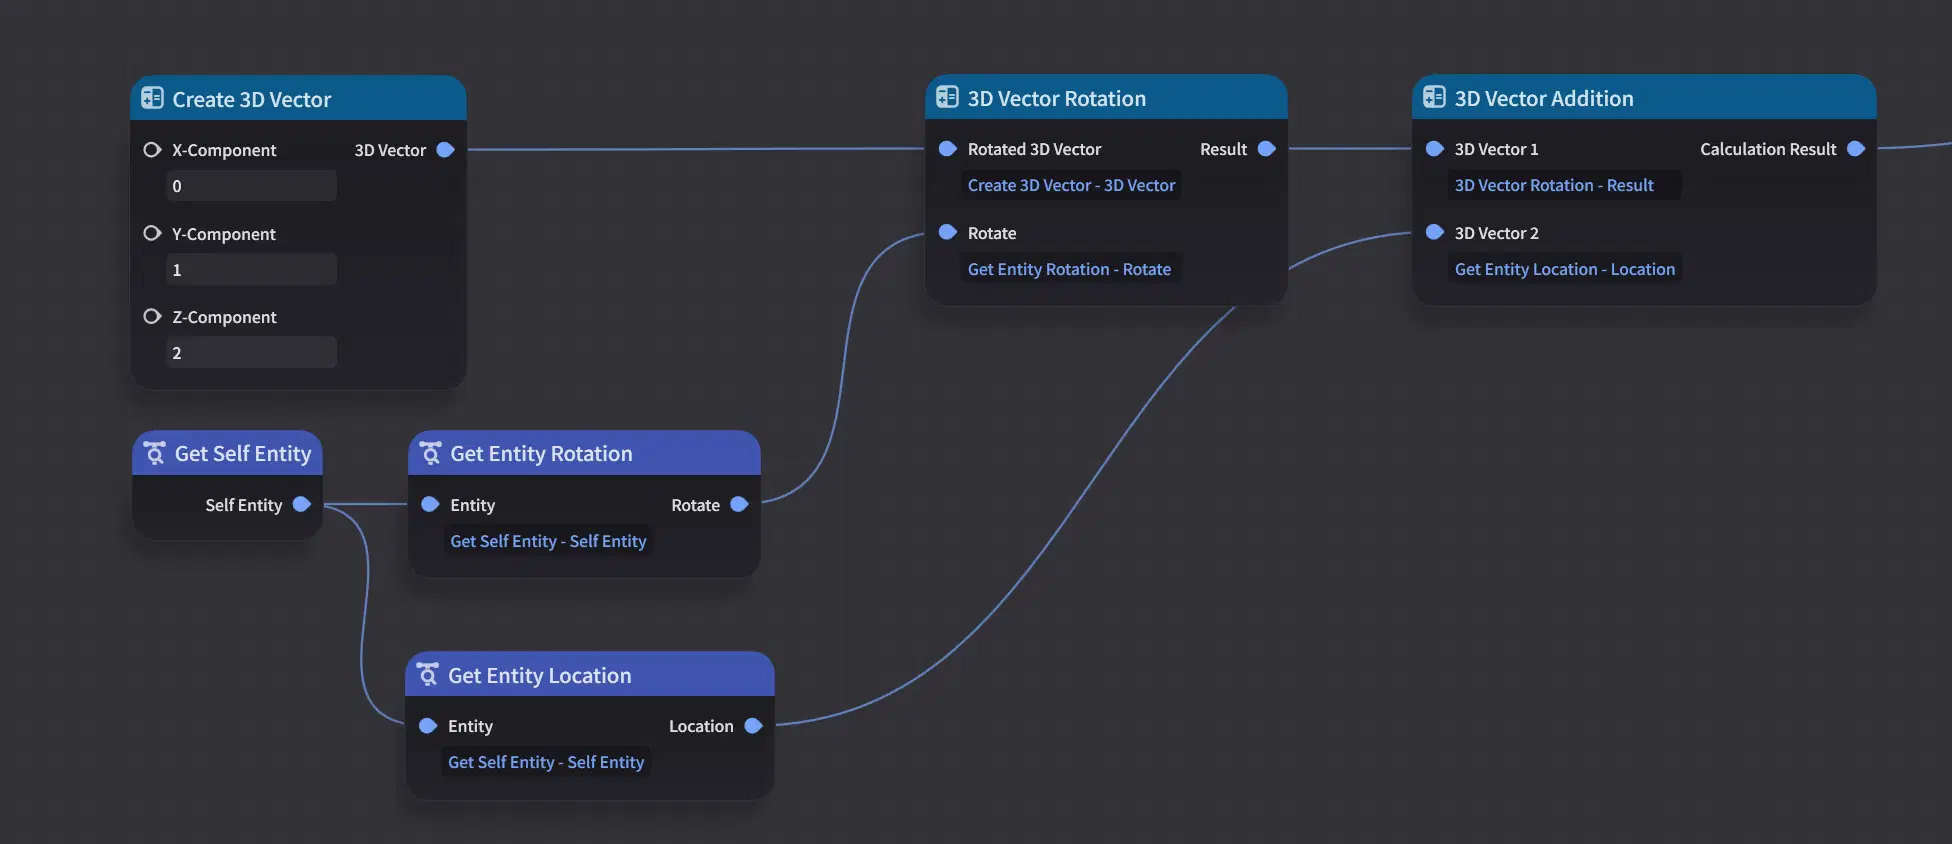
Without the rotation step, (0, 1, 2) would always point in the same world direction, and the swipe would hit the same side no matter where the character is facing. If the hitbox appears beside the character instead of in front of it, the forward axis is X instead of Z - use (2, 1, 0).
Then add the nodes:
Remove Unit Status - Charging Guard. The moment the player releases the key, the super armor should end, so this comes first.
Trigger Spherical Hitbox at Specific Location - with the calculated location.
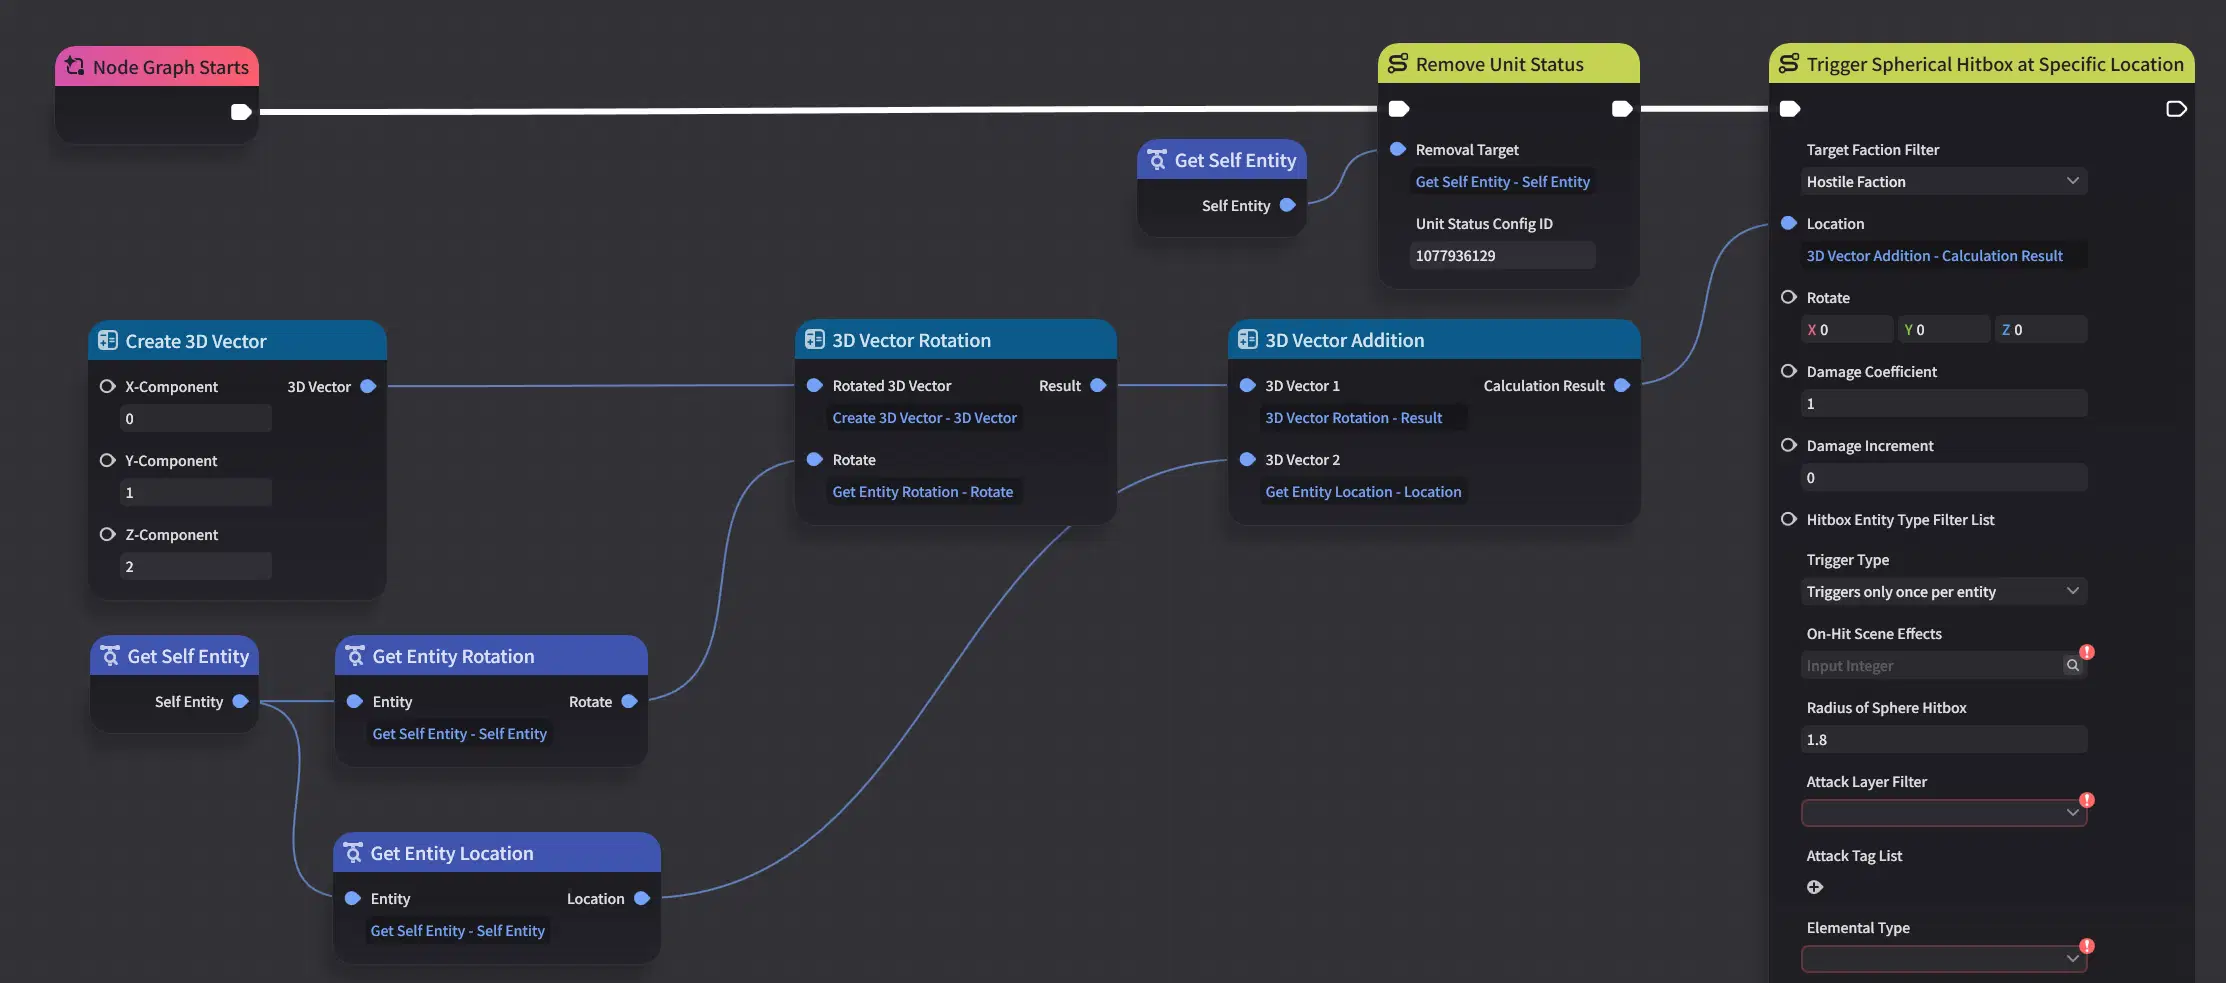
Key parameters:
Target Faction Filter - Hostile Faction. Keeps the hitbox off teammates and the caster.
Damage Coefficient - 1.0. Multiplies base damage. Damage Increment adds a flat amount on top.
Trigger Type - once per entity or once per lifecycle. Per lifecycle damages only the first entity hit; per entity hits every enemy in the sphere once, which is what you want for a swipe.
Radius of Sphere Hitbox - 1.8.
Hit Type - Slash. Hit Type sets the hit sound and base hit visual; a light attack shouldn't sound like a hammer.
Attack Type - Melee Attack. Can be used as a condition in other node graphs.
Interrupt Value - small.
On-Hit Special Effects - your swipe spark.
Knockback Orientation - Line Connecting Attacker and Hit Point.
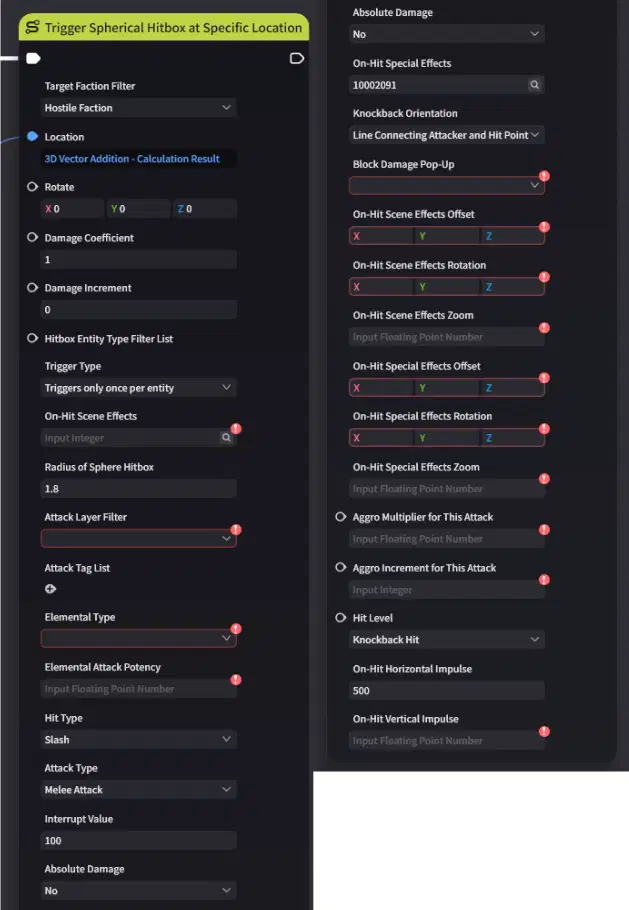
5.5 TS_Slam
Remove Unit Status - Charging Guard.
Play Timed Effects - large Electro burst at the character's location, Zoom Multiplier 2.
Trigger Spherical Hitbox at Specific Location - centered on the character.
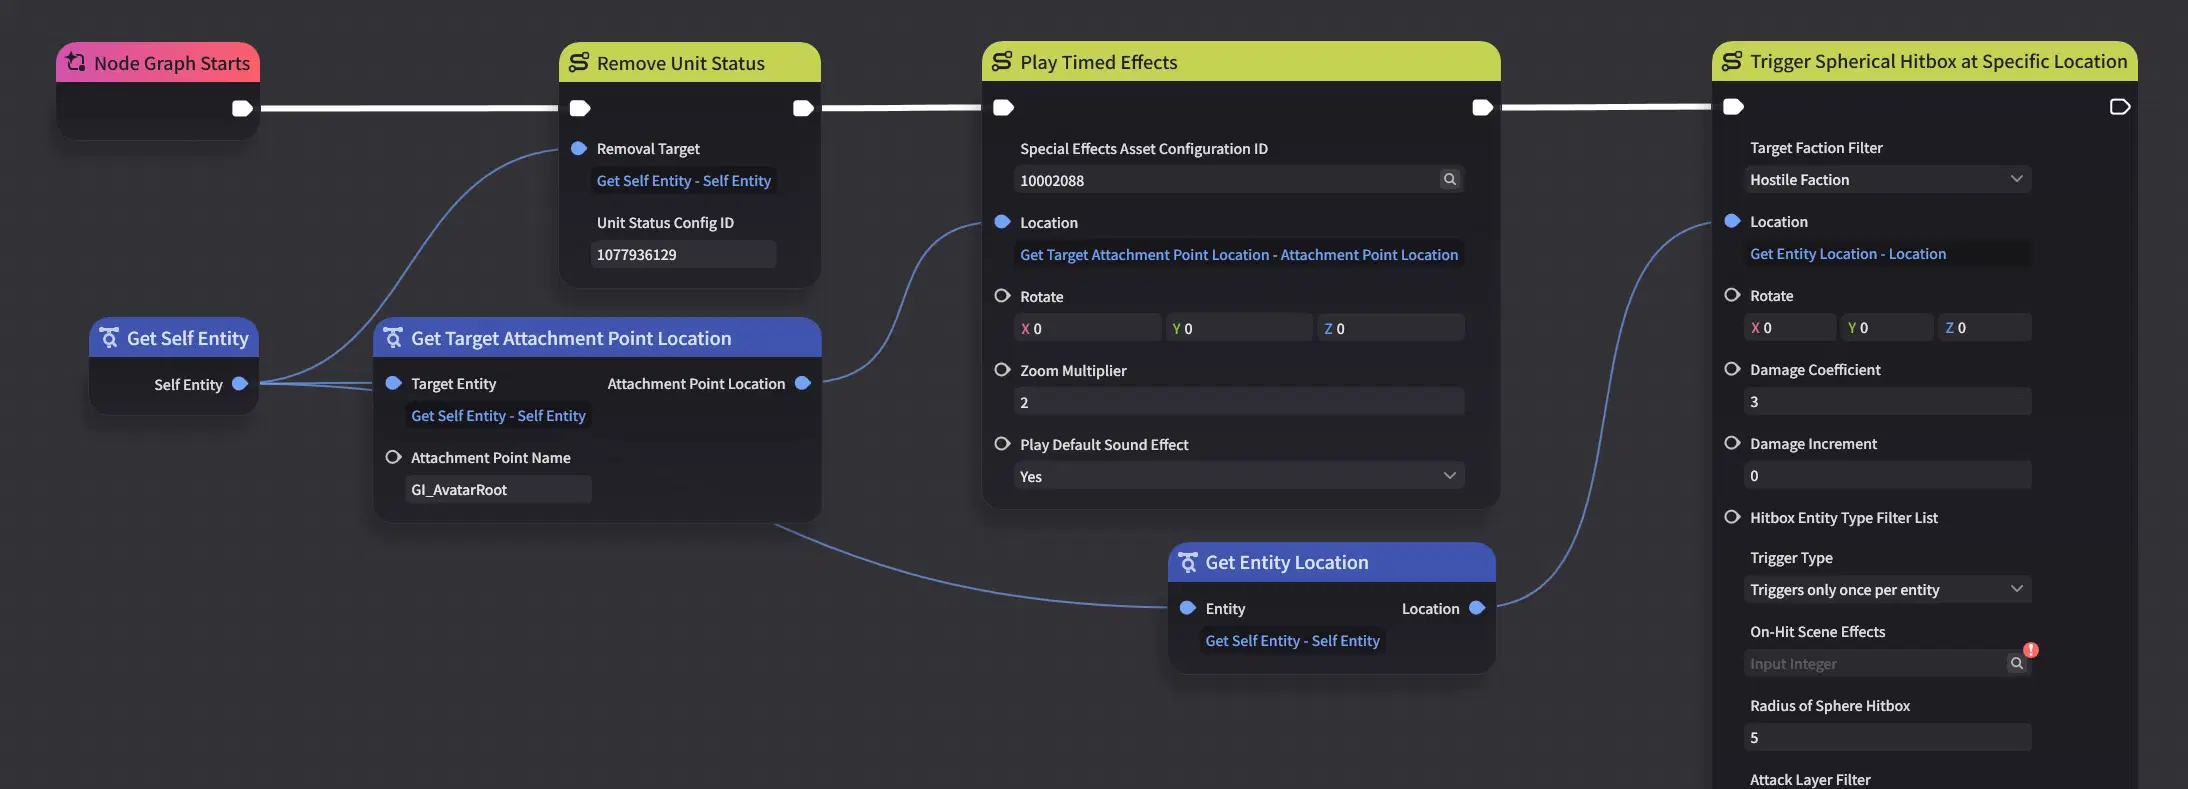
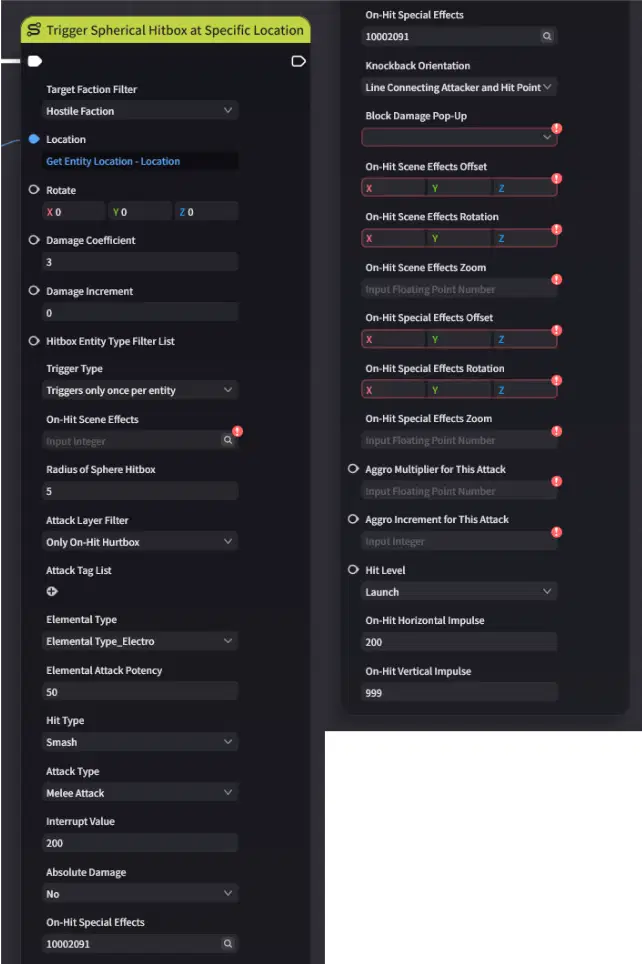
Key parameters:
Location - Get Entity Location of Get Self Entity. A slam is an AoE ring around the character, so no forward calculation is needed.
Radius of Sphere Hitbox - 5.
Damage Coefficient - 3.0.
Hit Type - Smash. Besides the heavy sound, Smash hits deal extra damage to Geo shields and trigger Shatter, which fits a charged hammer blow.
Elemental Type - Electro, with a medium Elemental Attack Potency.
Interrupt Value and On-Hit Vertical Impulse - both high. This pair is what makes enemies fly: impulse is the push, and Interrupt Value breaks through the enemy's interrupt resistance so the push actually happens.
Knockback Orientation - Line Connecting Attacker and Hit Point. Every enemy is pushed away from the center, which reads as a shockwave.
You could also use Fixed-Point Projectile Launch, but projectiles are for things that travel. The slam happens at one place at one moment, so an instant hitbox is simpler and has no flight delay.
6. Placing Logic on the Timeline
Return to the Animation Editor. There are four event tracks:
Start Event Track - fires the instant the skill starts. For setup that must happen immediately.
Node Graph Event Track - fires at a chosen animation progress point. For anything tied to a frame: hits, VFX.
Status Track - active between a start and an end time. For ongoing behaviour, such as animation speed changes.
End Event Track - fires after all animations have finished. For cleanup and fallback logic.
6.1 Charge Start
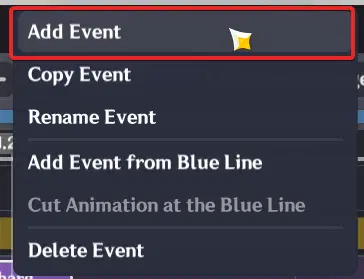
Right-click the Node Graph Event Track at the start of the loop slot → Add Event → select TS_ChargeStart.
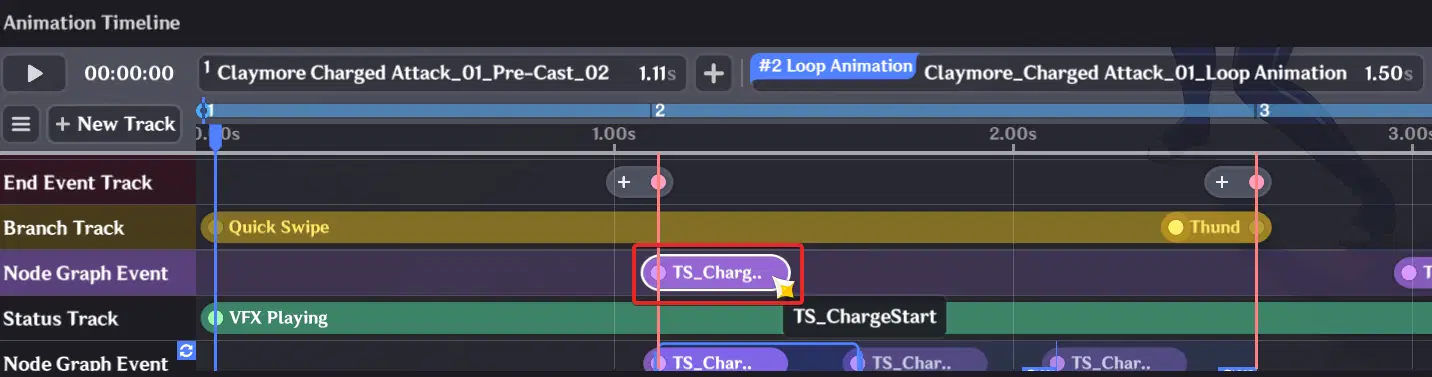
We use the start of the loop instead of the Start Event Track because the wind-up isn't charging yet. Super armor should start together with the charge.
6.2 Charge Sparks with a Loop Segment
Create a loop track with New Track, or select a Node Graph Event Track and enable Enable Loop Segment in its details panel. Then add TS_ChargeSpark at the start of the loop slot.
Loop Segment Start Time - start of the loop slot.
Loop Segment Duration - 0.5 s.
Infinite Loop - Off.
Number of Loops - 3.
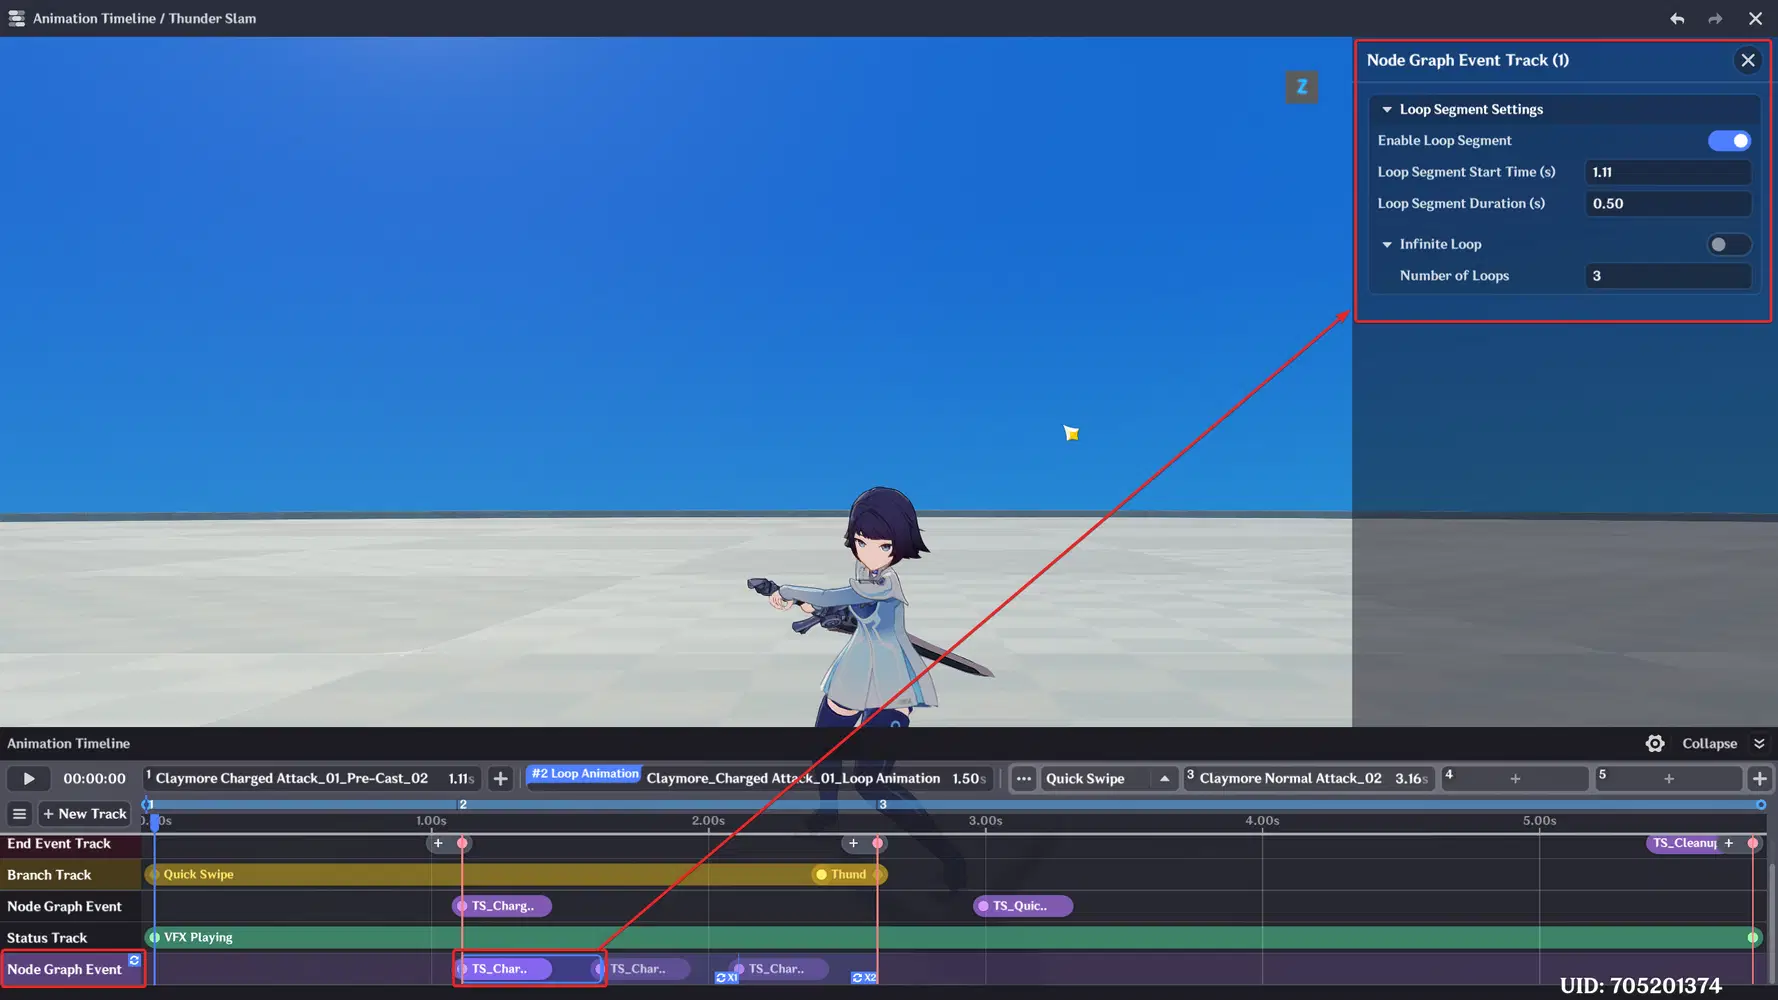

3 × 0.5 s equals exactly the 1.5 s loop slot, so the sparks never spill into the branches. A loop segment is also easier to maintain than three separate events: if you change the charge time later, you change one number instead of moving three events.
If the player releases early, the remaining sparks simply don't happen. Releasing interrupts the loop slot and jumps to a branch, so events later in that slot are never reached.
6.3 Damage on the Impact Frames
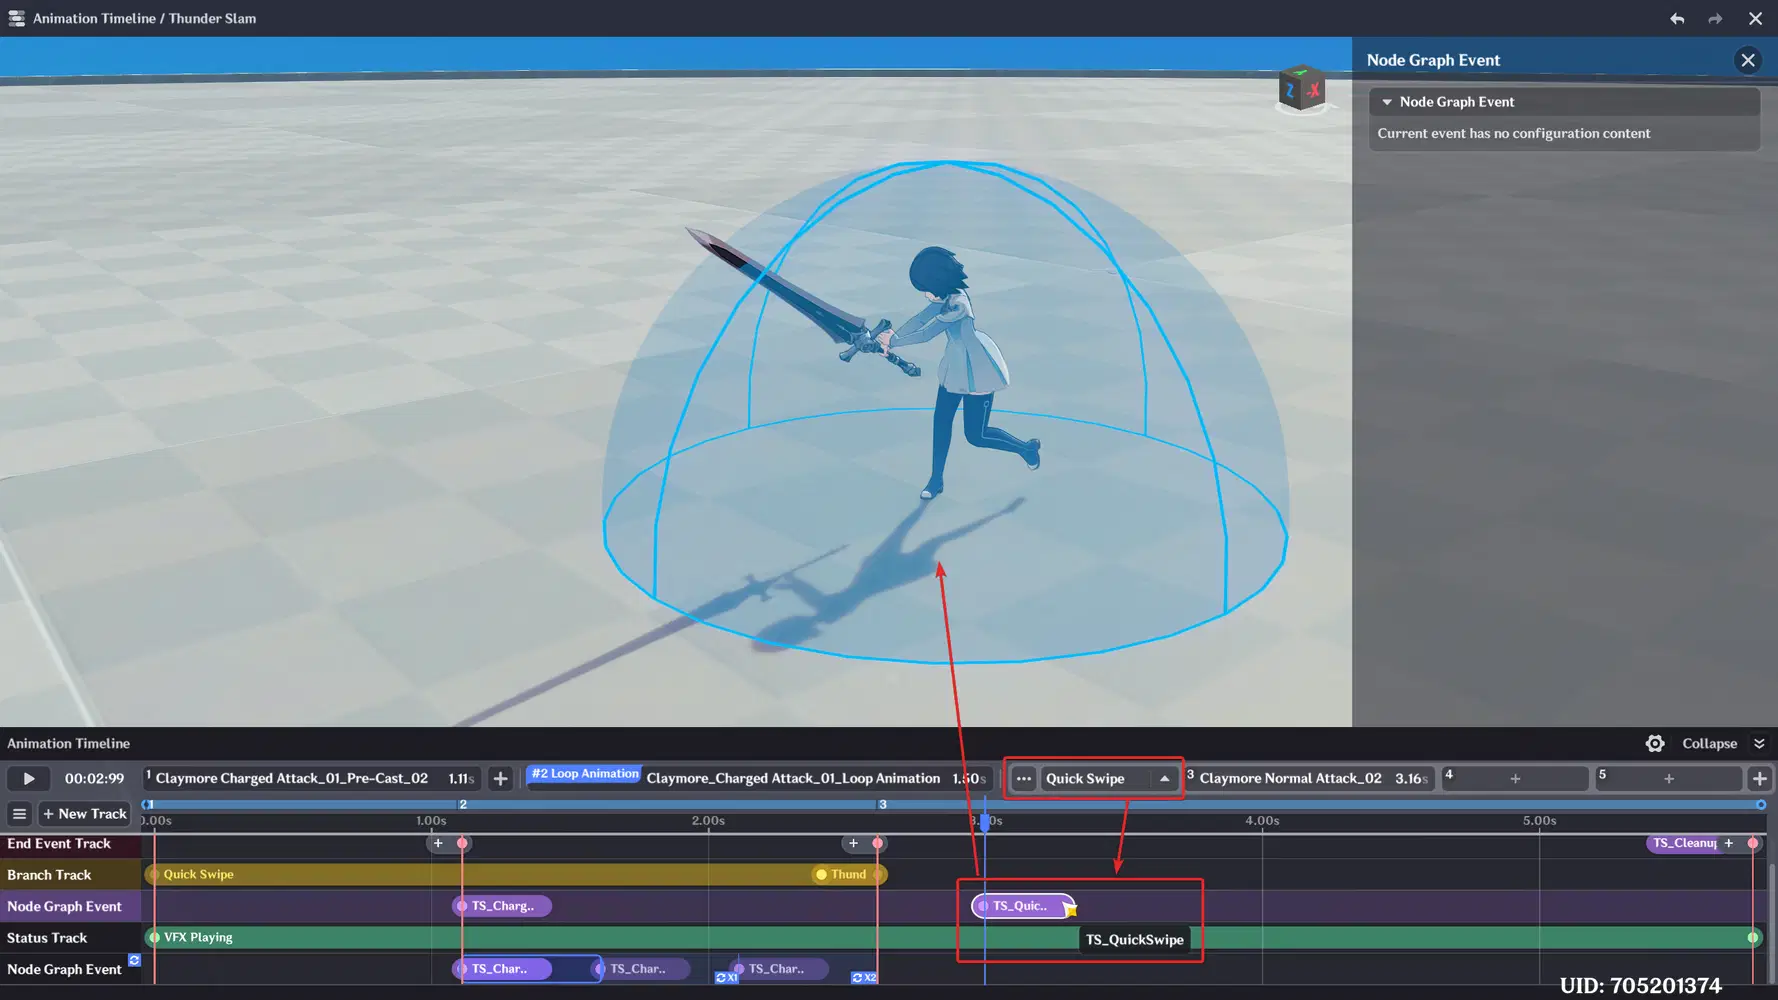
Switch to the Quick Swipe branch, scrub the preview to the frame where the blade crosses in front of the body, and add TS_QuickSwipe there.
Switch to the Thunder Slam branch, scrub to the frame where the weapon hits the ground, and add TS_Slam.
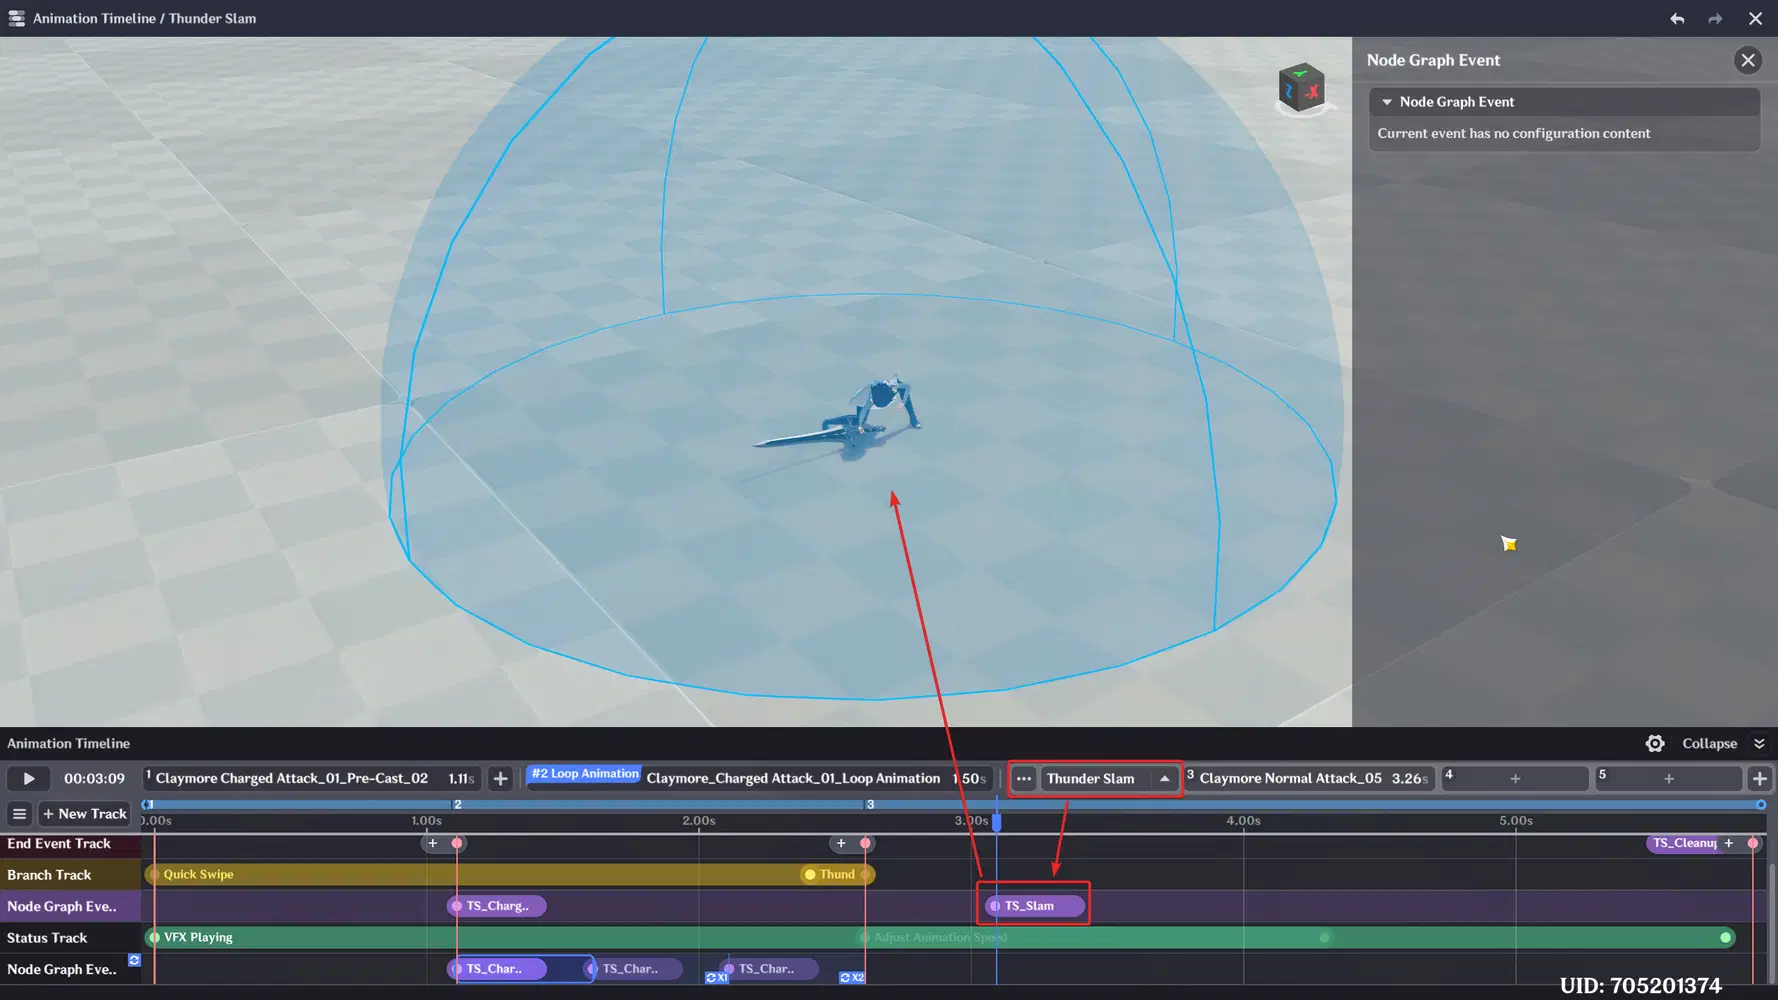
Damage that appears before the weapon lands feels floaty, and damage after it feels laggy. Lining logic up with the animation is the whole point of the timeline.
6.4 Status Track
Add Adjust Animation Speed to the Status Track over the first half of the Thunder Slam branch.
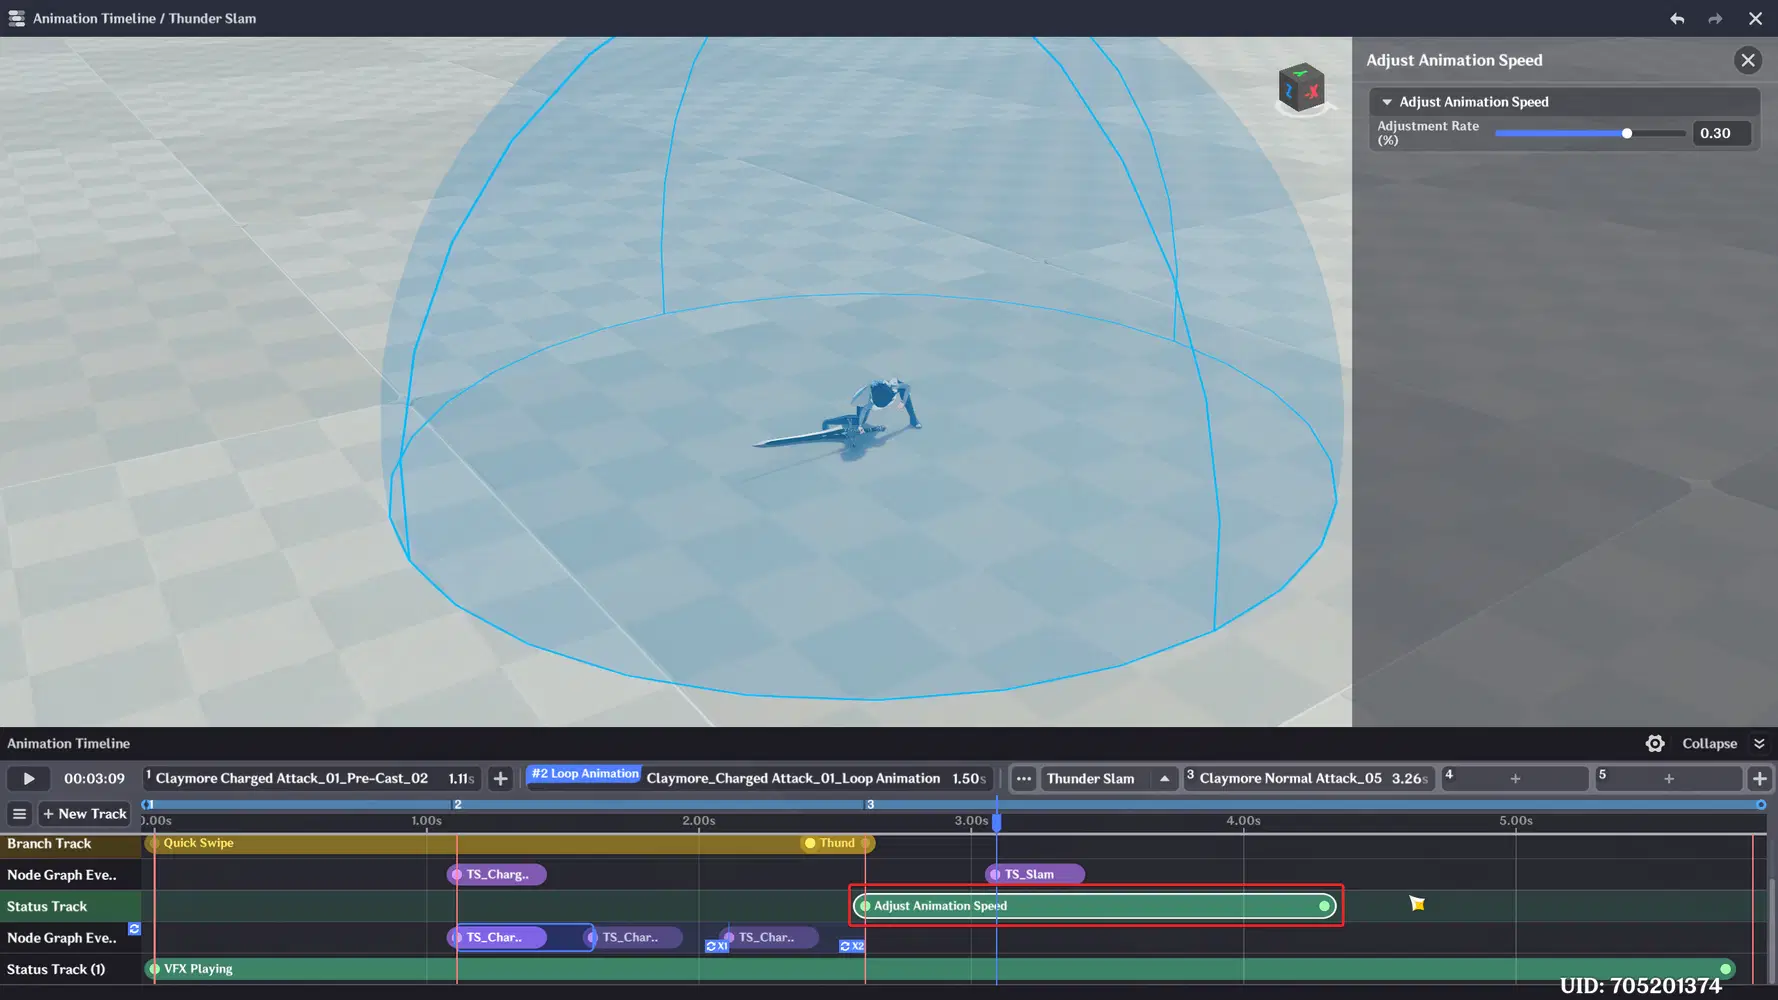
After a long charge, the player wants the payoff immediately. A faster drop makes the slam feel heavy and responsive.
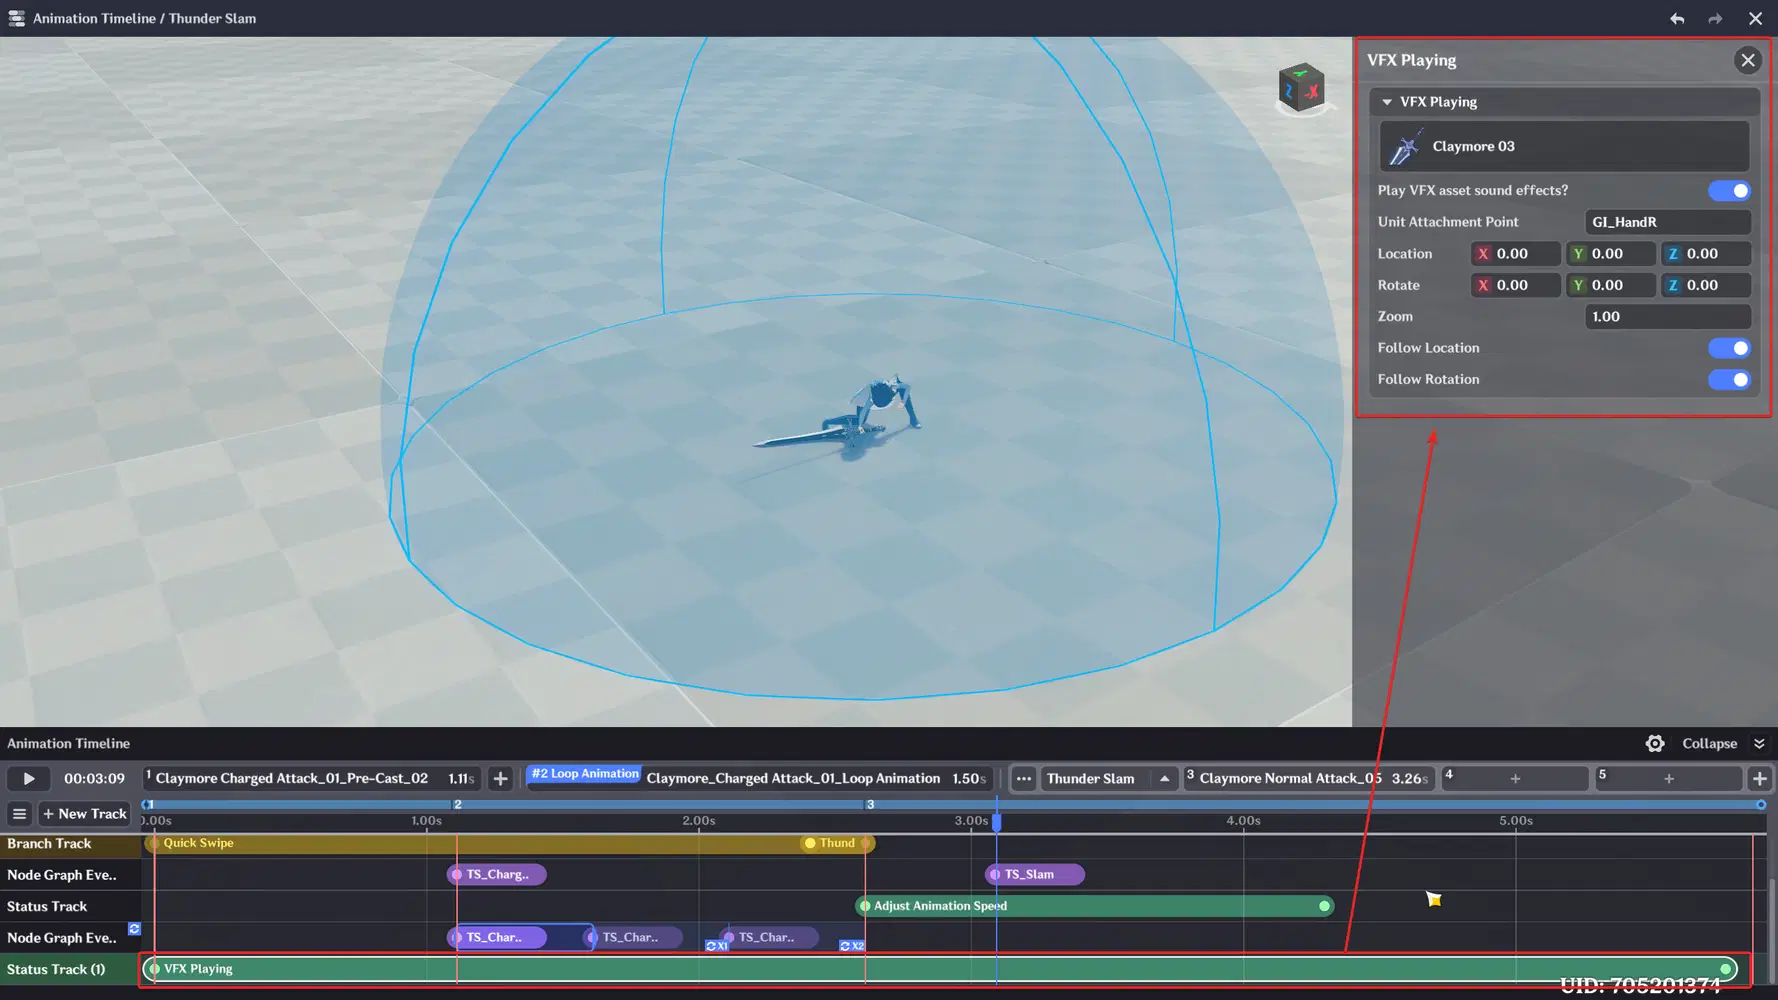
Also the character in a custom skill has an empty hand. The weapon is not part of the character model, so if you play only the animation, the character swings a sword that isn’t there. We add the weapon as a looping visual effect on the Status Track, attached to the character’s hand.
Open the Status Track, add a VFX Playing status and stretch it over the part of the timeline where the weapon should be visible.
Then set up the status in the panel on the right:
VFX asset - Claymore 03. Pick any weapon model from the VFX list that fits your animation.
Unit Attachment Point - GI_HandR. This is the character’s right hand. The weapon is mounted there, so it sits exactly where the animation holds it.
6.5 End Event Track Fallback
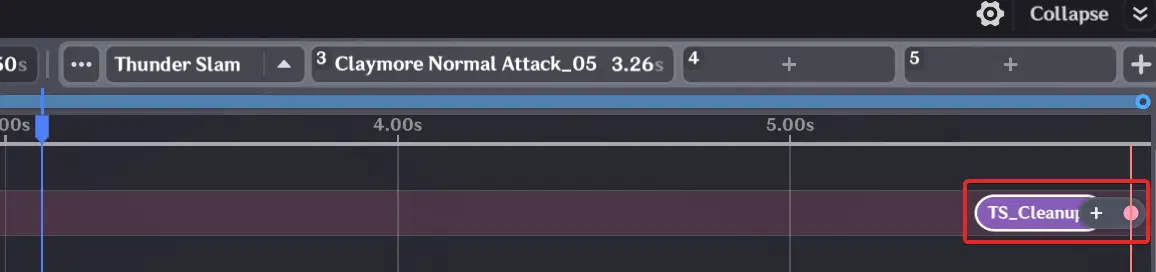
Add TS_Cleanup to the both branch End Event Track.
The official documentation warns that there is a very small chance an event on a Node Graph Event Track gets skipped, so key logic should also be placed on the End Event Track as a fallback. Removing super armor is exactly that kind of key logic. Together with the 3 s duration from section 2.1, Charging Guard has two safety nets and can't get stuck.
Save the skill - skills are saved manually.
7. Assigning the Skill
A skill in the editor is not yet usable. A character has to own an instance of it in a slot.
7.1 Through the Class
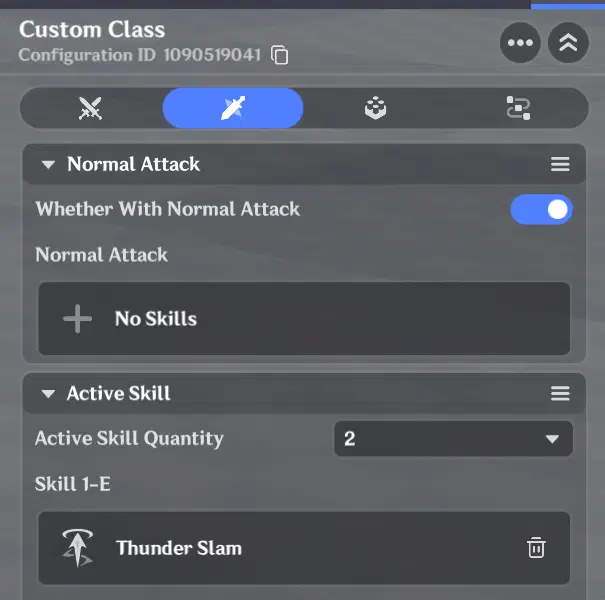
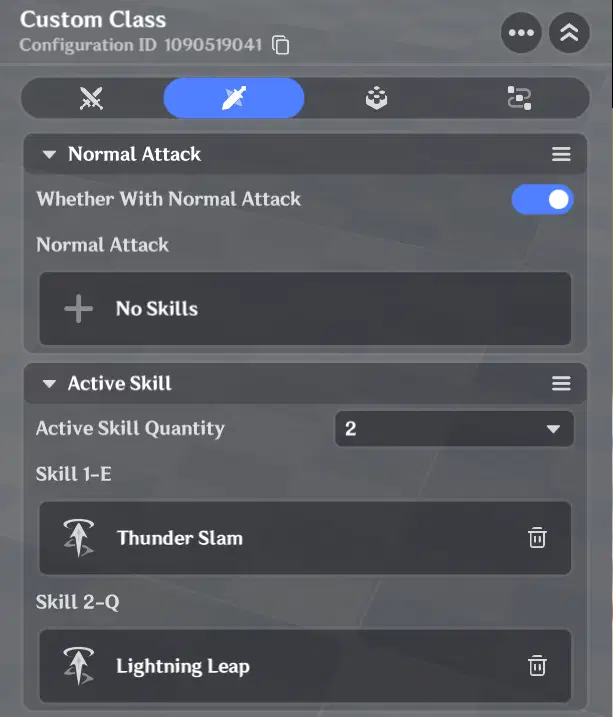
Open Combat Preset → Player → Class → Configure Skills and assign Thunder Slam to Skill E.
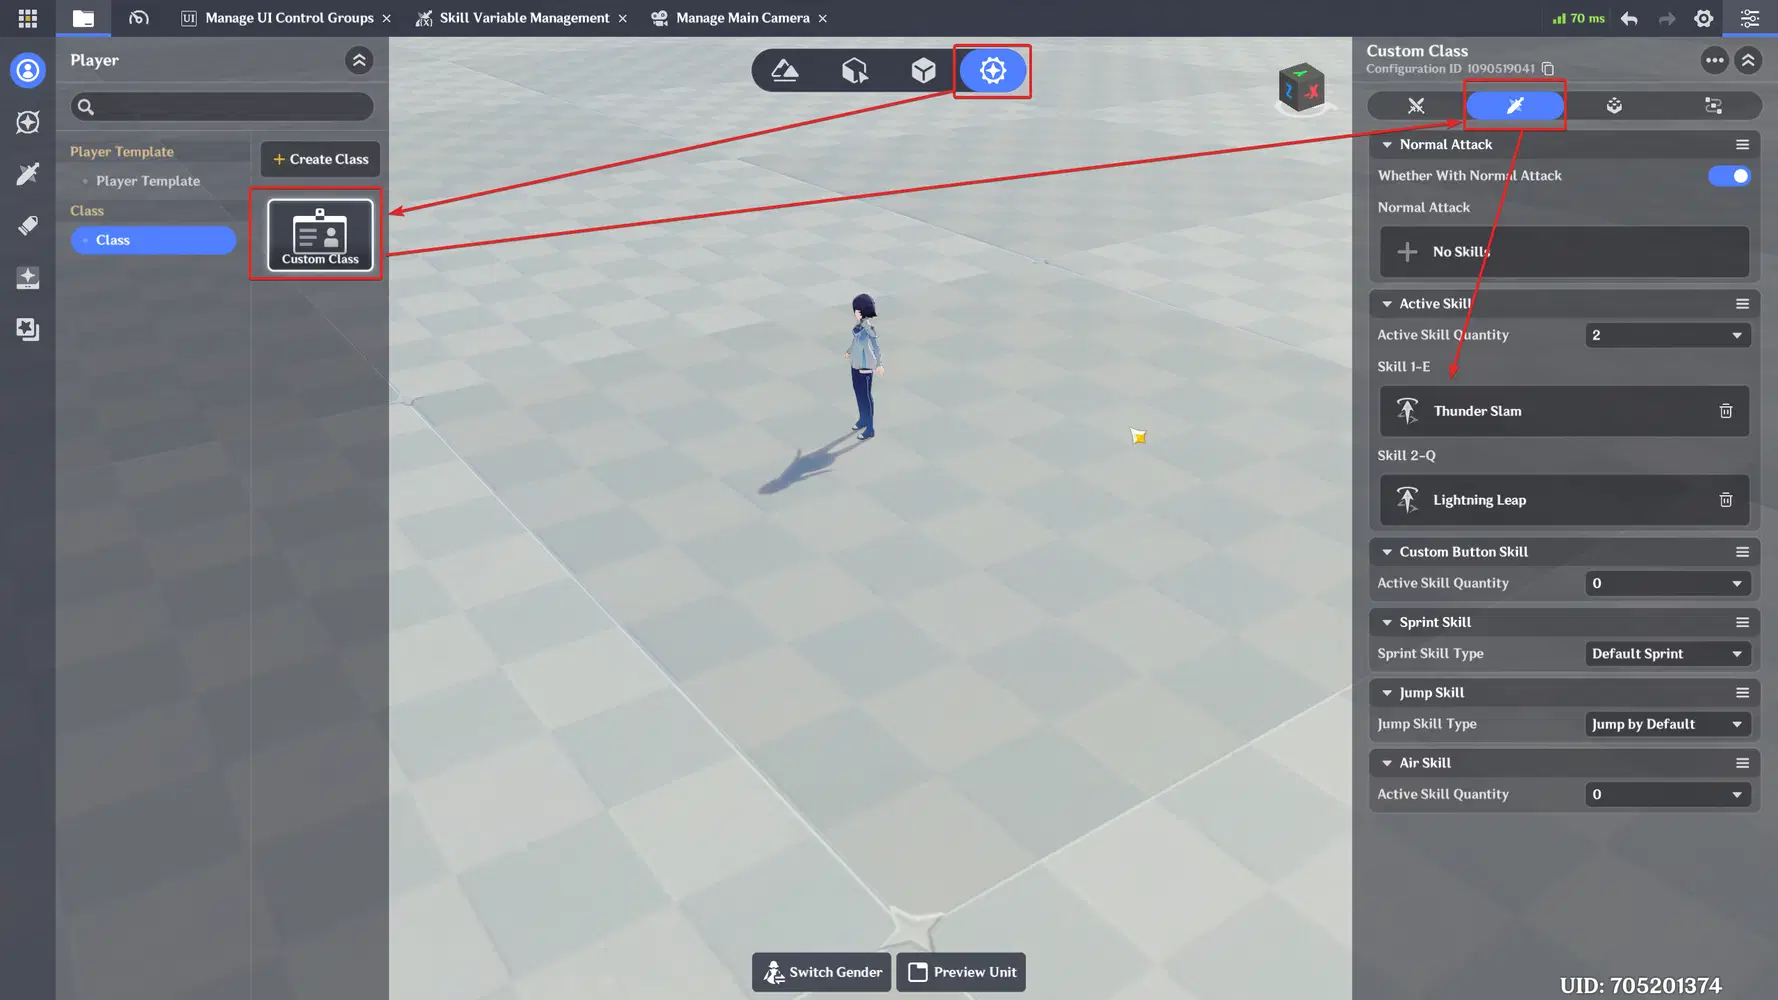
This is the simplest option. Skills configured in the Class are its default skills: they are applied automatically whenever a player switches to that class, without any node graph. The Initialize Character Skill node also resets a character's skills back to these defaults.
7.2 Through a Server Node Graph
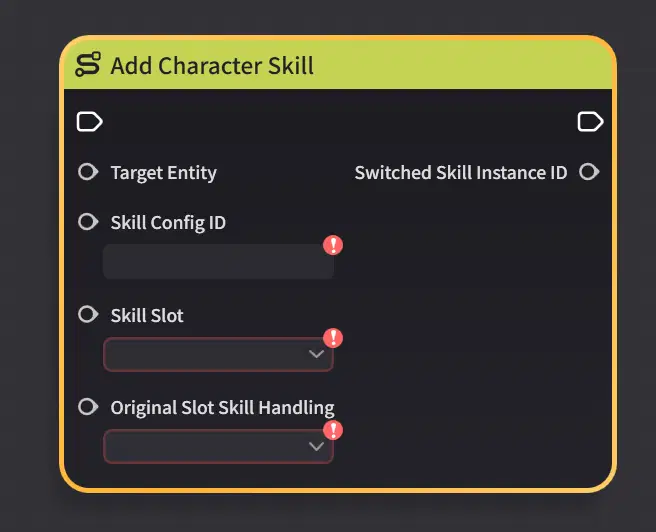
If the skill should be unlocked later, for example after picking up an item, use the Add Character Skill server node instead:
Target Entity - the character.
Skill Config ID - Thunder Slam's Configuration ID.
Skill Slot - Skill 1-E.
Original Slot Skill Handling - Destroy replaces the old skill. Preserve Slot Binding stacks the new skill on top, so removing Thunder Slam later brings the old E skill back automatically. That's ideal for temporary power-ups.
8. Thunder Slam Showcase
Enter Preview and test every case:
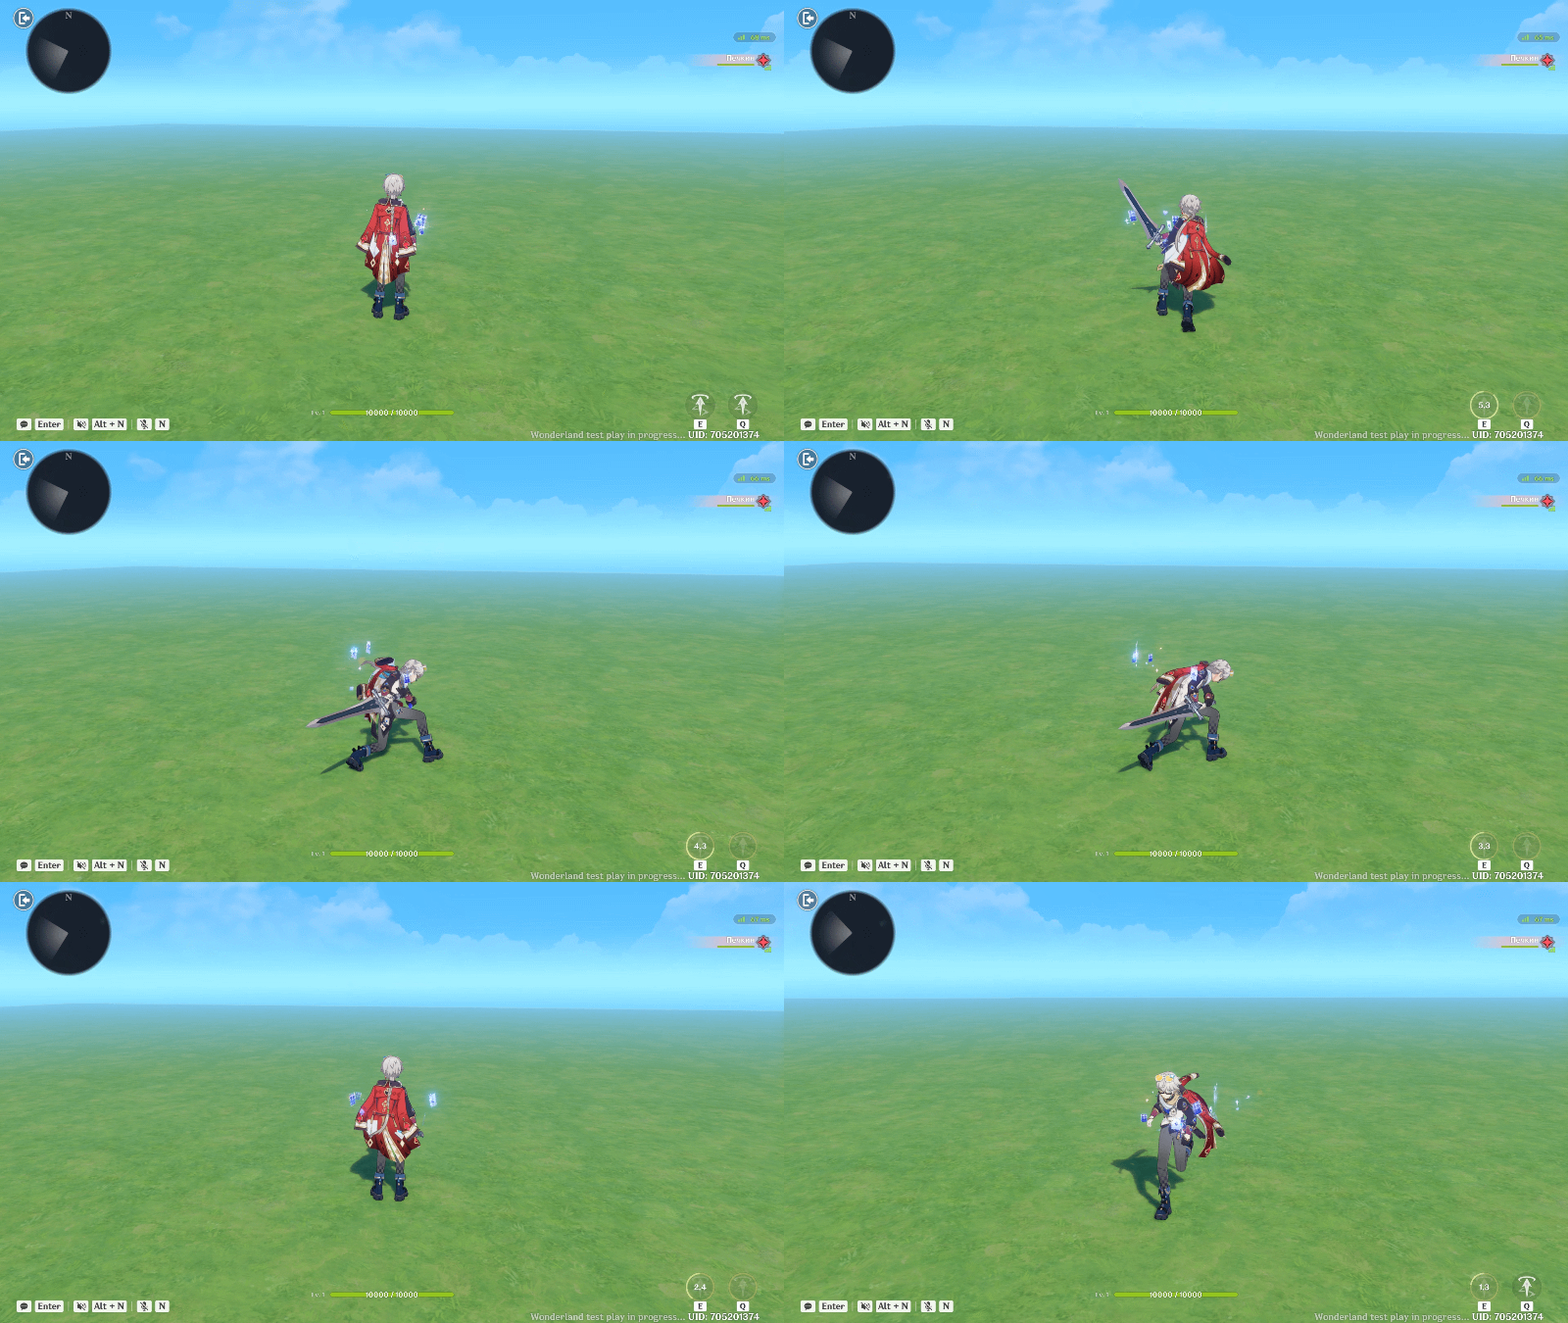
Quick Swipe
Thunder Slam
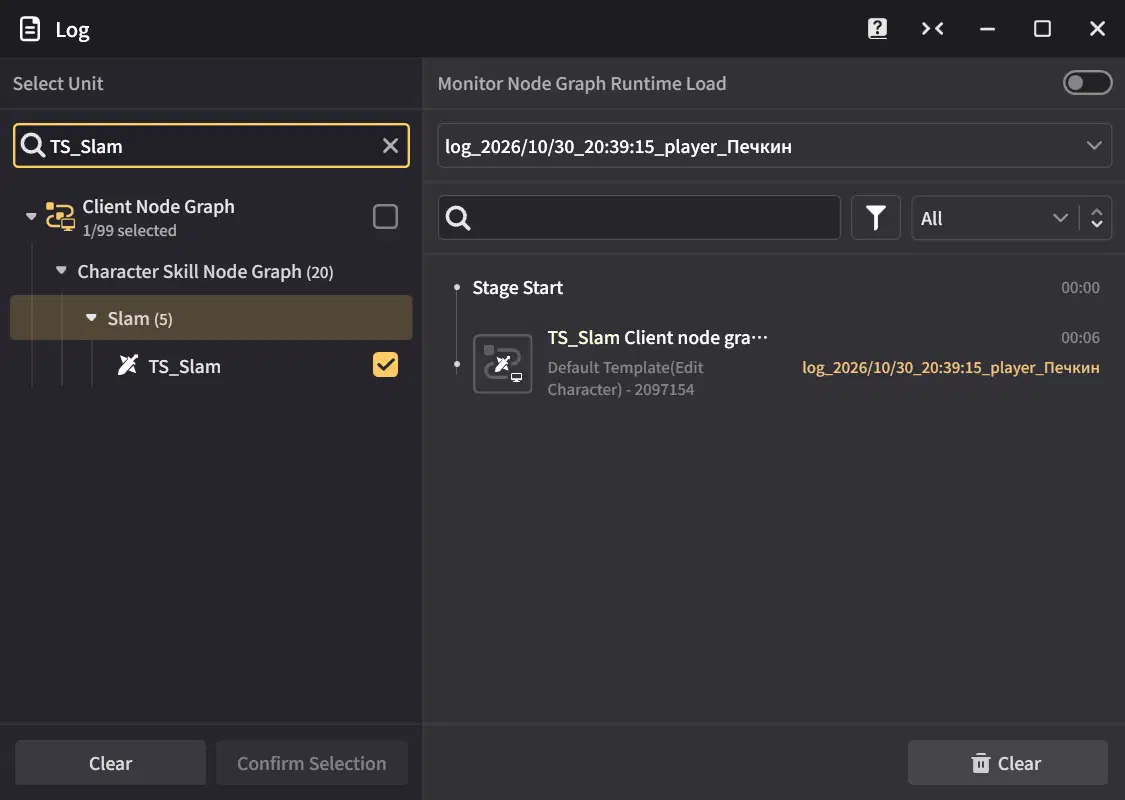
To check whether a graph actually ran, open the Node Graph Logs. If TS_Slam doesn't appear in the log, the problem is on the timeline. If it appears but nothing is hit, the problem is in the hitbox parameters.
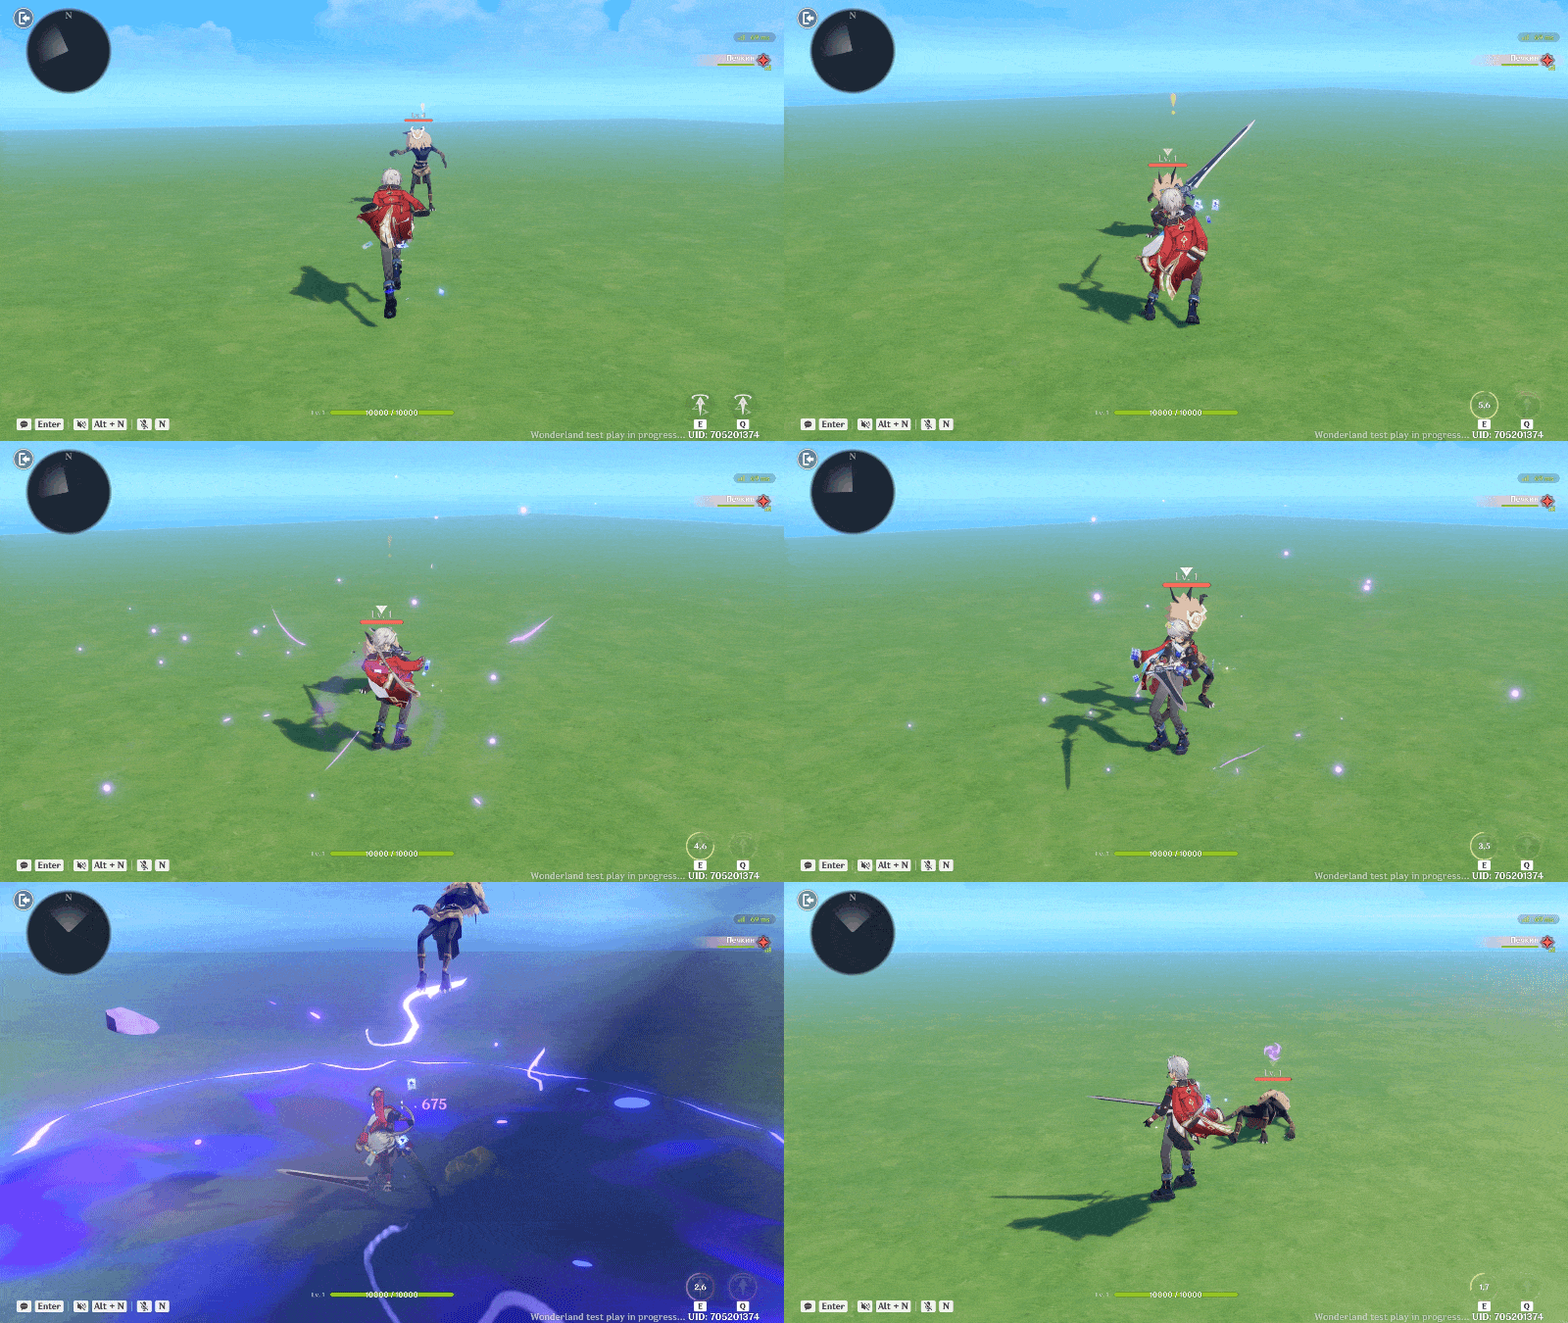
9. Lightning Leap with Skill Pre-Aim
Thunder Slam always hits around the character. Many skills need the player to choose a place or a target first: a meteor, a teleport, a heal on an ally. Doing this with node graphs alone - rays, cursor math, highlighting - is a lot of work. Skill Pre-Aim does it for you: it draws the range, follows the mouse, filters targets and hands the result to your node graphs.
The design: hold Q and a 10 m circle appears around the character, then drag the cursor to the location where you want to leap. Release Q and the character leaps to that spot and deals Electro damage in a 3 m radius on landing. Cooldown 10 s.
9.1 Pre-Aim Before Cast and During Cast
There are two kinds of Pre-Aim, and picking the right one is the first decision.
Pre-Aim Before Cast - What happens first, aiming or the skill?
Example: "Hold to aim, release to cast"
- Available for Instant, Normal and Combo Skills.
- Enabled with a toggle in the skill's right panel.
- The result is read by the skill's own timeline graphs.
- Good for "choose where, then do it" skills: leaps, meteors.
Pre-Aim During Cast - Should the player aim in the middle of a skill?
Example: "Jump up, then choose where to dive"
- Available for Normal and Hold Skills.
- Added as a Skill Aim state on the Status Track. When the timeline reaches it, the player holds to aim and releases to fire.
- The result goes to a Character Skill Node Graph set in the Pre-Aim settings.
- Limit Max Aim Success Count allows several aims in one cast.
Lightning Leap is "choose where, then do it", so we use Pre-Aim Before Cast on a Normal Skill.
9.2 Skill Variables
Lightning Leap uses two graphs at two different moments: one reads the aim result when the leap starts, and the other deals damage on landing. Each Skill Node Graph runs once and ends, and its local variables end with it. The landing point has to be stored somewhere the second graph can read.
Open Skill Variable Management in the System Menu → Add New Variables, and create LeapX, LeapY and LeapZ.
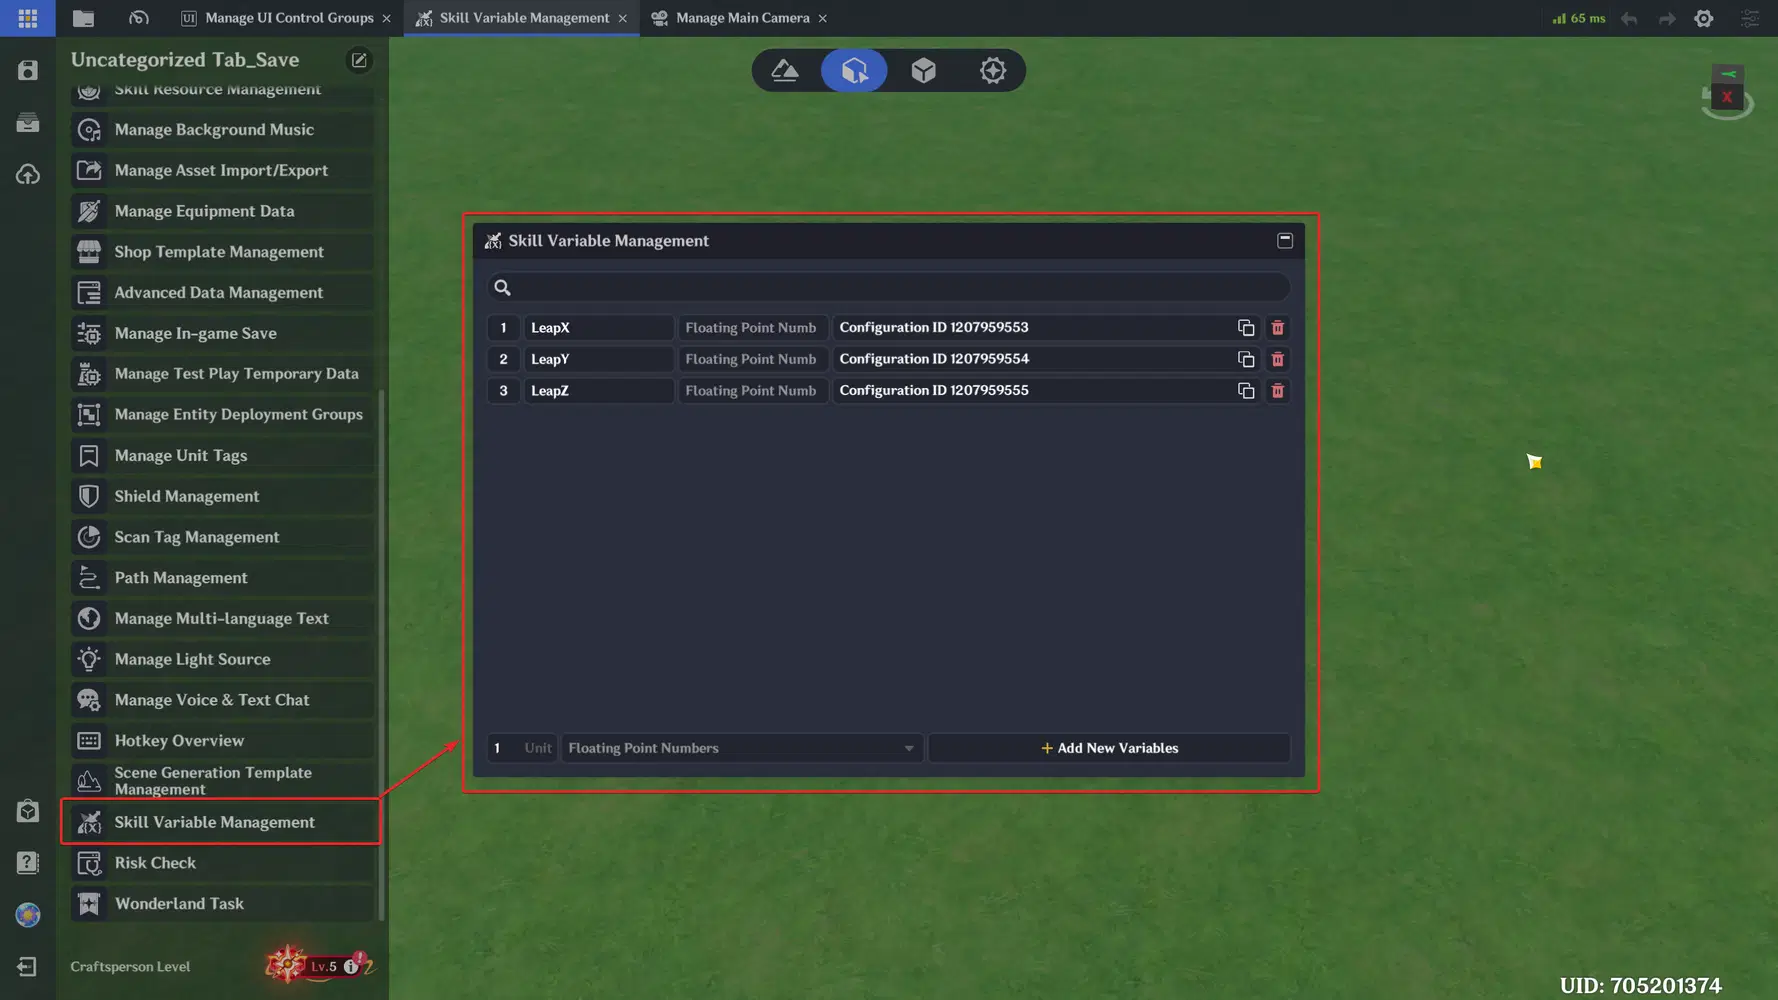
Skill Variables live on the client, so Client Nodes can change them and the change takes effect immediately - exactly the speed a skill needs. Their limitation is that they only support Floating Point Numbers. A 3D position doesn't fit into one variable, so we store X, Y and Z separately with Split 3D Vector and rebuild the position later with Create 3D Vector.
9.3 Creating the Skill
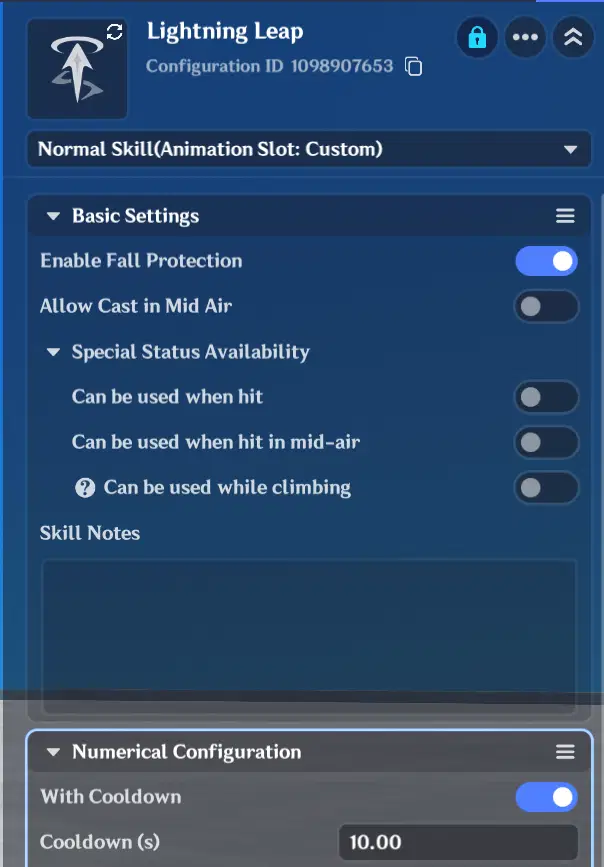
Combat Preset → Skills → New Skill. Name it Lightning Leap, set Skill Type to Normal Skill and copy the Configuration ID.
Enable Fall Protection - On. This one is a real trade-off. With it on, the leap can't carry the character off a cliff even if the player aims past the edge. With it off, players can leap down from ledges. For an arena, On is safer.
Allow Cast in Mid Air - Off. A leap needs ground to push off from.
Cooldown - 10 s. A gap-closer is strong, so it should be used less often than E.
9.4 Pre-Aim Settings
In the right panel, enable Skill Pre-Aim. From now on, holding the key starts aiming and releasing it casts the skill.
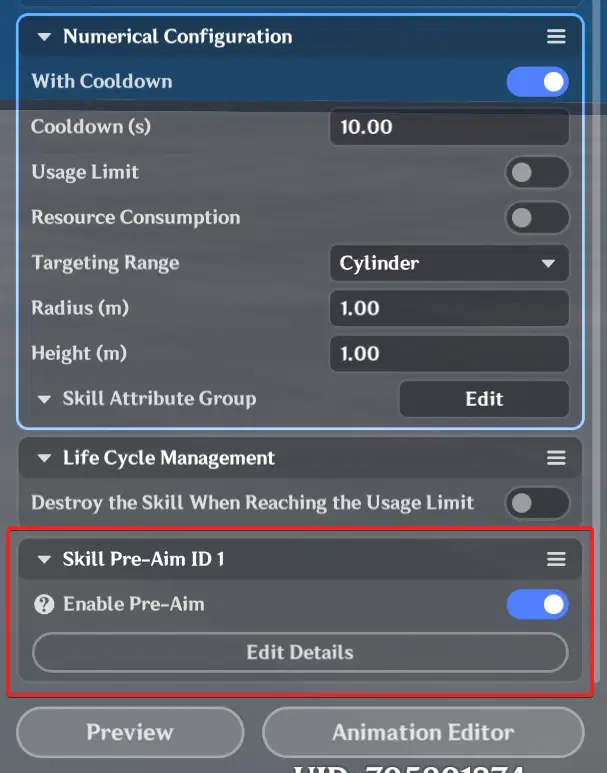
Basic Settings define the maximum range:
Base Object - Skill Owner. The range is centered on the character.
Radius - 10. How far the character can leap.
Height - 5. The range is a cylinder, and the height lets players aim slightly up or down on slopes.
Always Show Cursor While Aiming - On. On keyboard and mouse the player aims by moving the cursor.
Ray Hit Layer - Scene. The cursor ray should hit the ground, because the ground is where we leap to.
Max Ray Length - 30. Long enough to reach the ground from the camera.
Preview Max Pre-Aim Range - On while editing. It's only shown in the editor, never in-game.
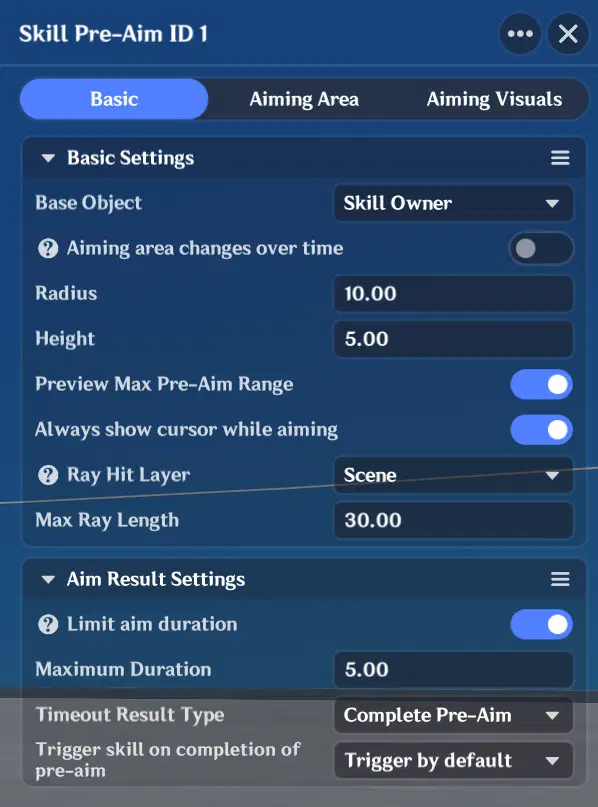
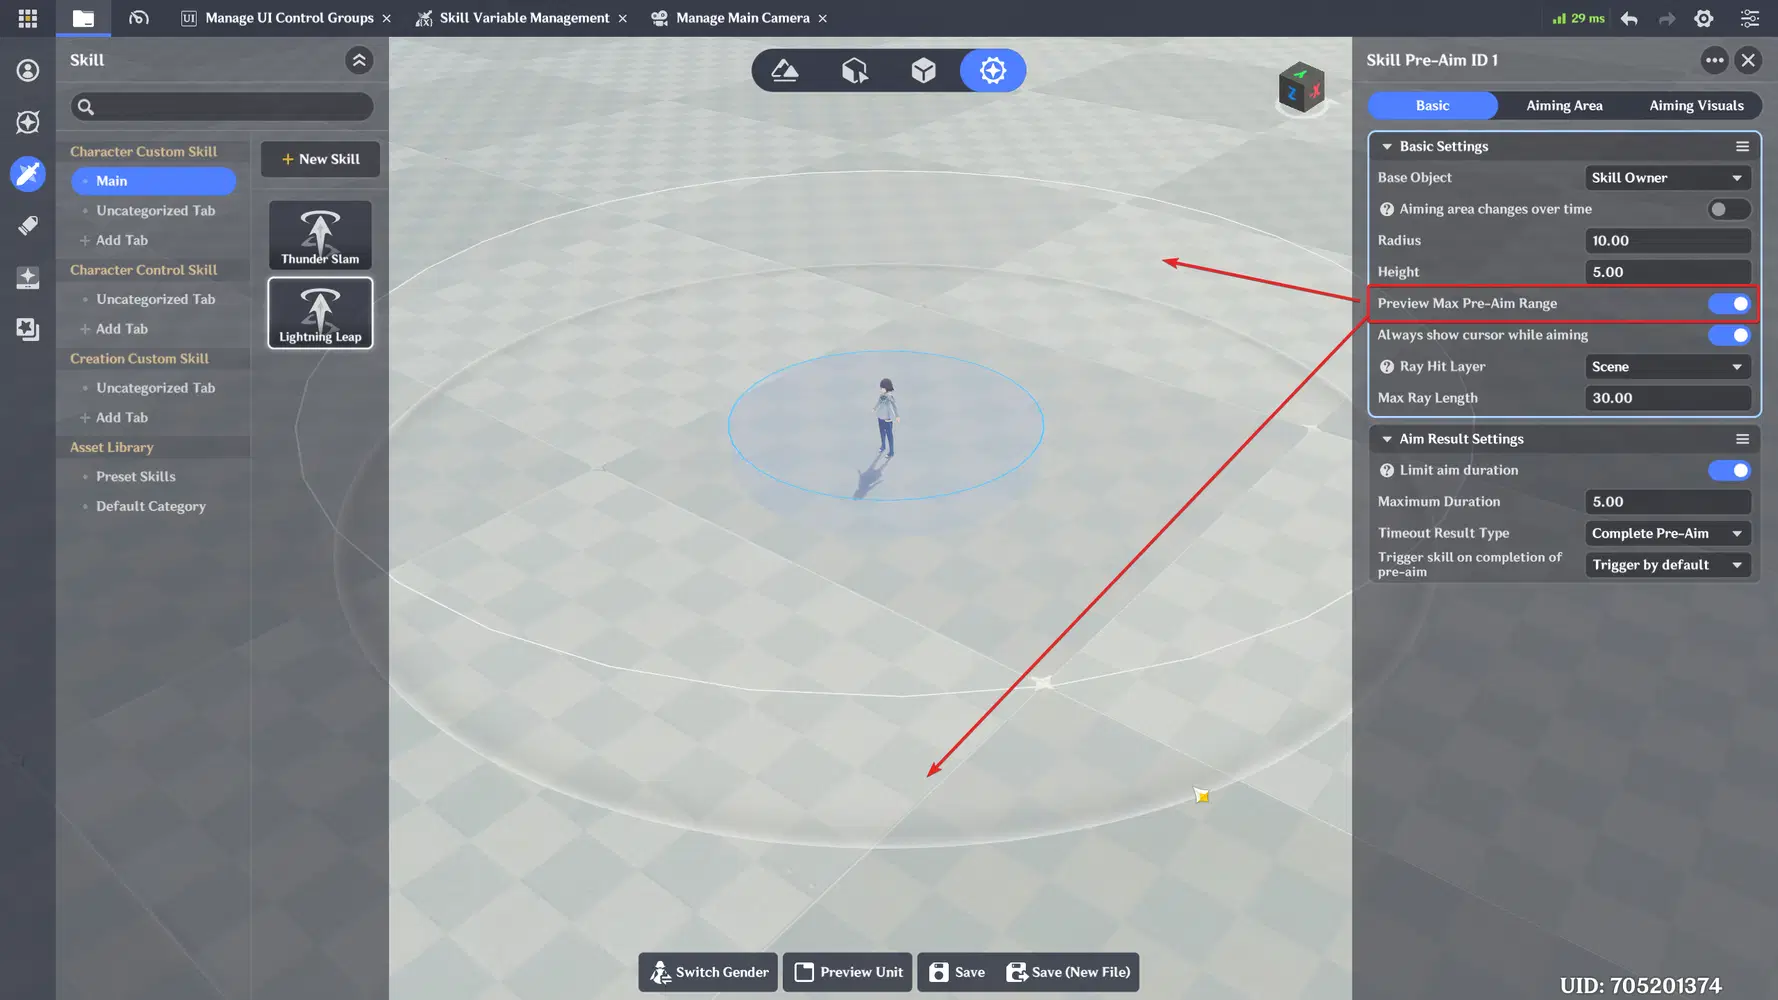
Aim Result Settings:
Limit Aim Duration - On, 5 s, with the Timeout Result Type set to cast the skill (Complete Pre-Aim). A player stuck holding Q in the middle of a fight is a soft-lock; ending the aim automatically keeps combat moving.
Trigger Skill on Completion of Pre-Aim - leave the filter empty for now. Later you can add a Boolean Local Filter here, for example "only cast if at least one enemy is in the aiming area". If the filter returns False, the aim counts as canceled and the skill doesn't fire.
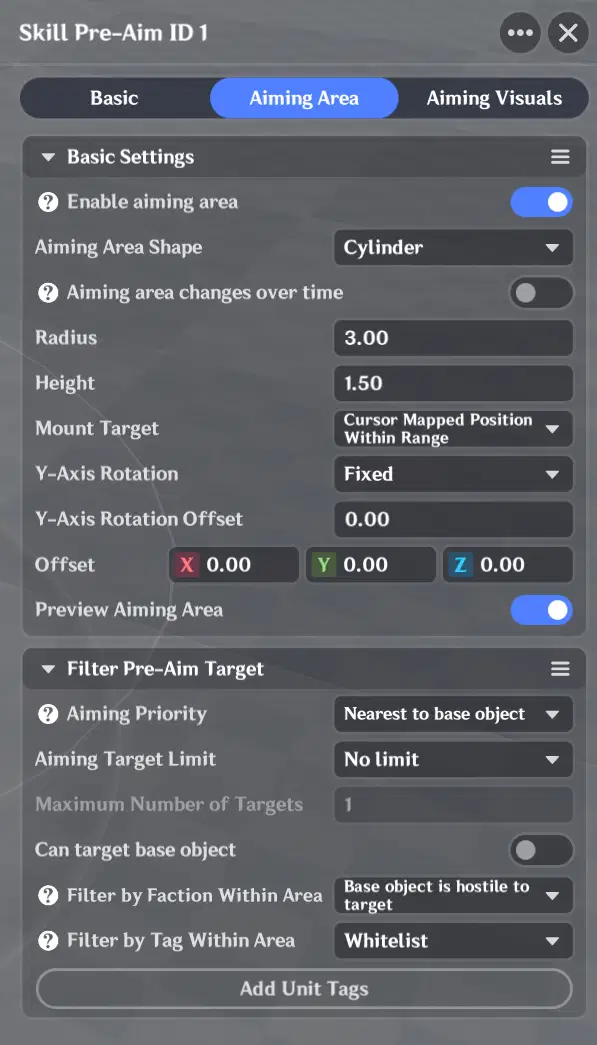
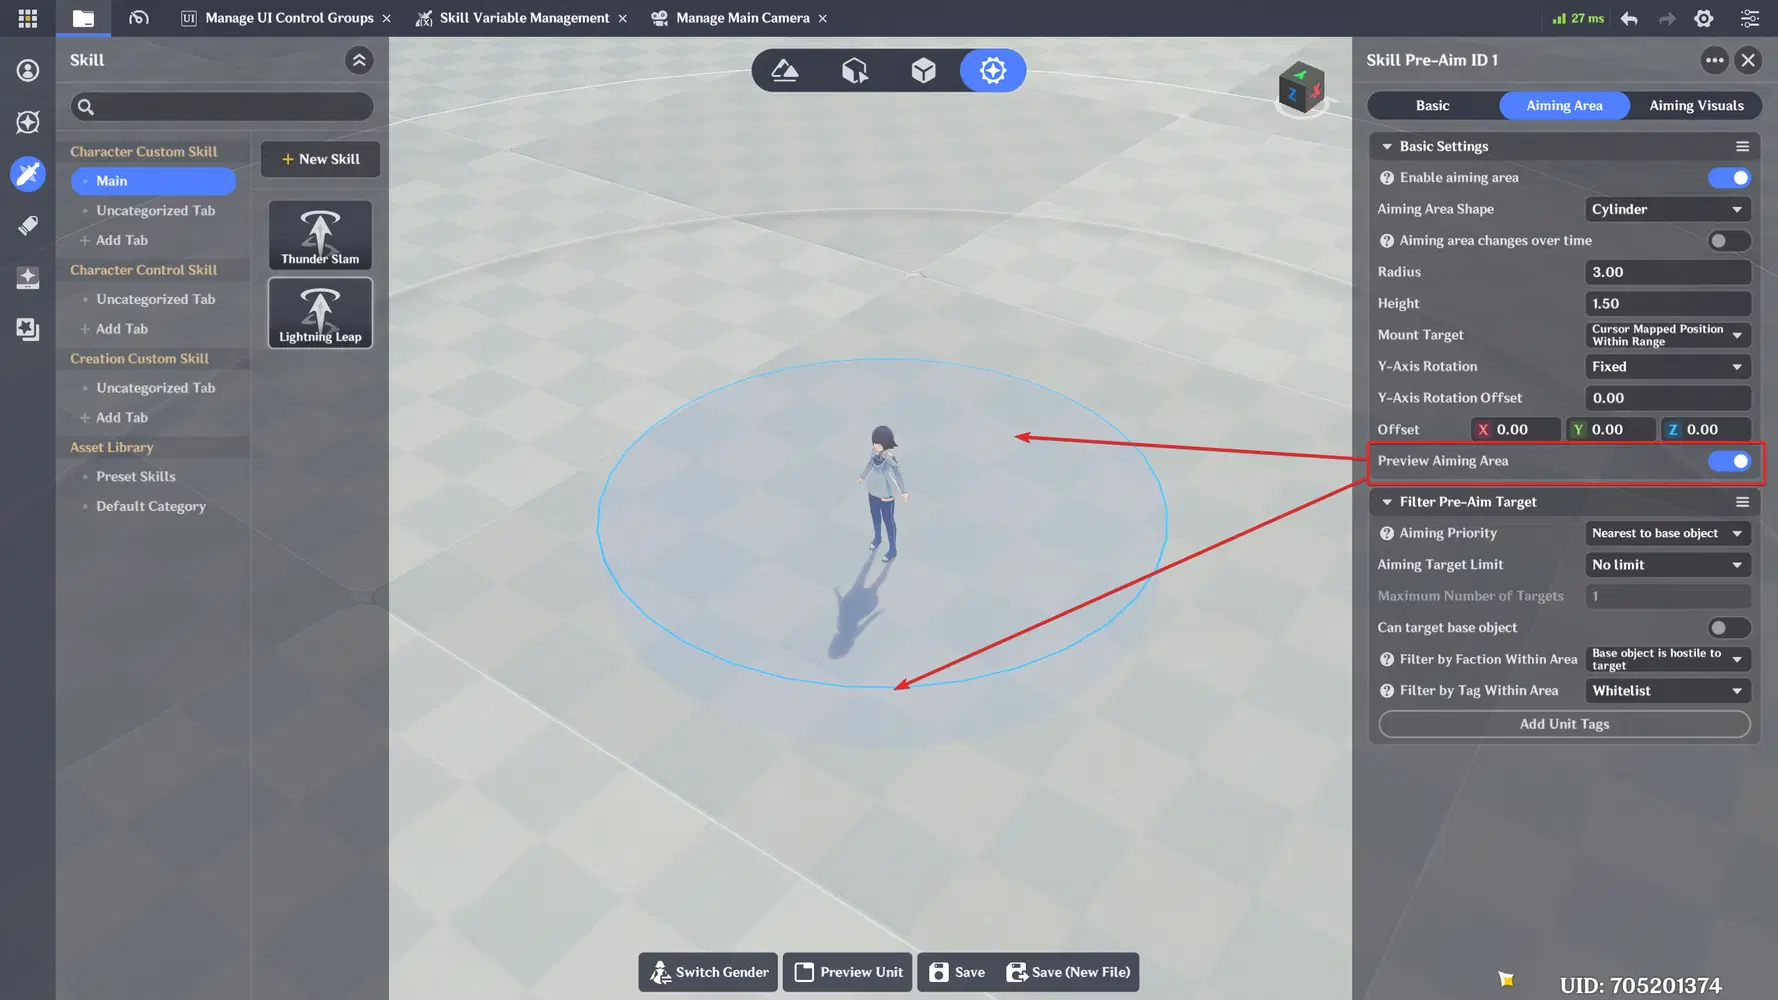
Aiming Area defines which enemies are affected:
Enable Aiming Area - On. Without it there are no Valid Targets or Optimal Target to show or query.
Aiming Area Shape - Cylinder, radius 3. The same size as the landing hitbox.
Mount Target - Cursor Mapped Position Within Range. The circle follows the cursor but stays clamped to the 10 m edge when the cursor goes further. Cursor Actual Mapped Position would let the circle leave the range, and the player would aim at a spot the character can't reach.
Can Target base object - Off.
Filter by Faction Within Area - Base object is hostile to target.
Aiming Visuals define what the player sees:
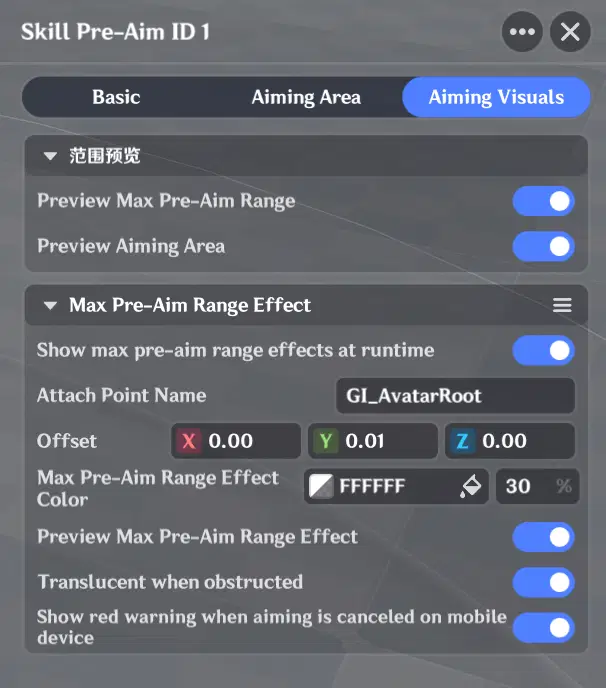
Show Max Pre-Aim Range Effects at Runtime - On. Draws the 10 m ring in-game. Lowering the color opacity makes the edge thinner and subtler. Enable Translucent When Obstructed so the ring stays readable behind walls.
Show Red Warning When Canceling Pre-Aim on Mobile - On. Tells touch players that dragging out of the area will cancel the aim.
9.5 Animations
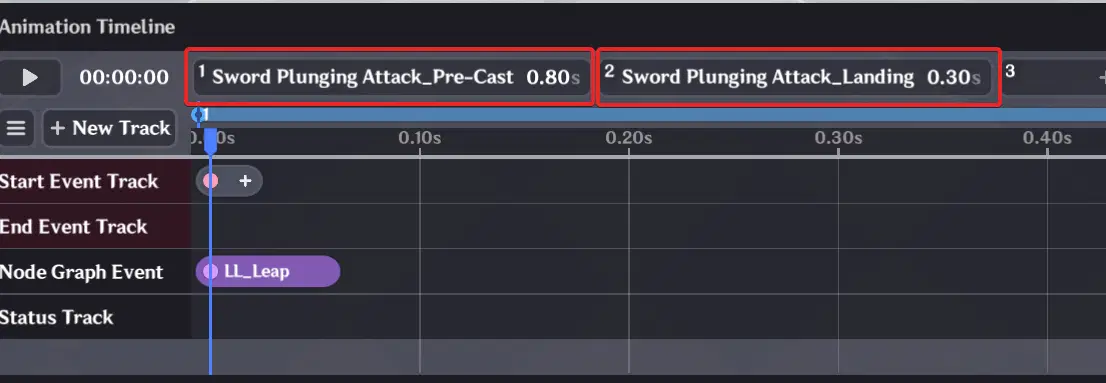
Add two clips to the action track: a jump-off and a landing. Trim the jump-off with Animation Duration so the character leaves the ground quickly.
9.6 LL_Leap
Now lets create Skill Node Graphs. LL_Leap graph reads the aim result, saves it and moves the character. It's placed on the Node Graph Event Track at the frame where the feet leave the ground.
Get Pre-Aim Result - type 1 into its Pre-Aim ID input. The Pre-Aim ID identifies the aiming of the skill, and in Lightning Leap it is 1. Do not use Get Current Active Pre-Aim ID here: it returns the aiming that is in progress right now, and by the time LL_Leap runs the player has already released the key, so it returns 0 and Get Pre-Aim Result gives you (0, 0, 0).
Split 3D Vector → three Set Skill Variable nodes - store X, Y and Z in LeapX, LeapY and LeapZ.
Player Turns to Face Set Direction - Orientation is 3D Vector Subtraction of the target point (Position Withing Range) minus the character's location. Without this the character could leap sideways or backwards.
Fixed-Point Displacement - Displacement Target Location: the target point, Displacement Duration: 0.4, Displacement Speed: 25, Terminate Displacement on Collision: On.
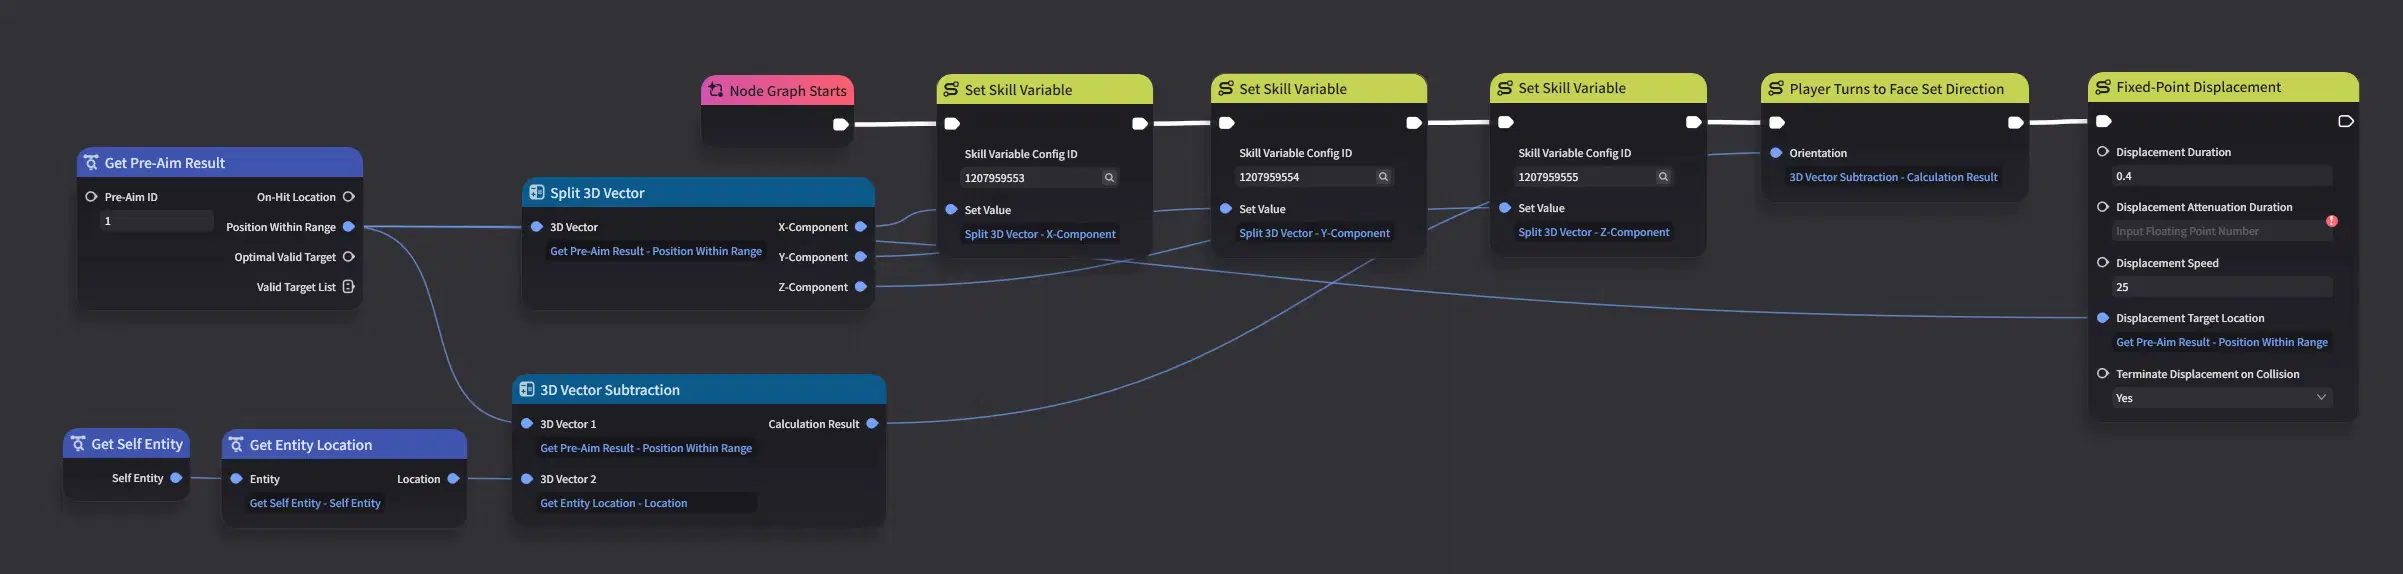
Get Pre-Aim Result has two location outputs, and the difference matters. On-Hit Location is where the cursor actually hit, which can be 25 m away. Position Within Range is the same point clamped to the edge of the 10 m range - the same rule we chose for the aiming area, so the leap always lands where the circle was drawn.
The point is saved to Skill Variables before anything else because the landing graph runs later and needs this exact value. If the cursor moves during the leap, the character still lands where the player released.
Terminate Displacement on Collision stops the character at a wall instead of sliding along it. Turn it off if you want the leap to slide around obstacles.
The documentation warns that if both displacement duration and speed are too small, the movement may not reach the target. 25 m/s for 0.4 s covers the full 10 m; if your leap falls short, raise the speed. If you prefer an instant jump over a movement, Character Blink to the target point works too, up to 200 m.
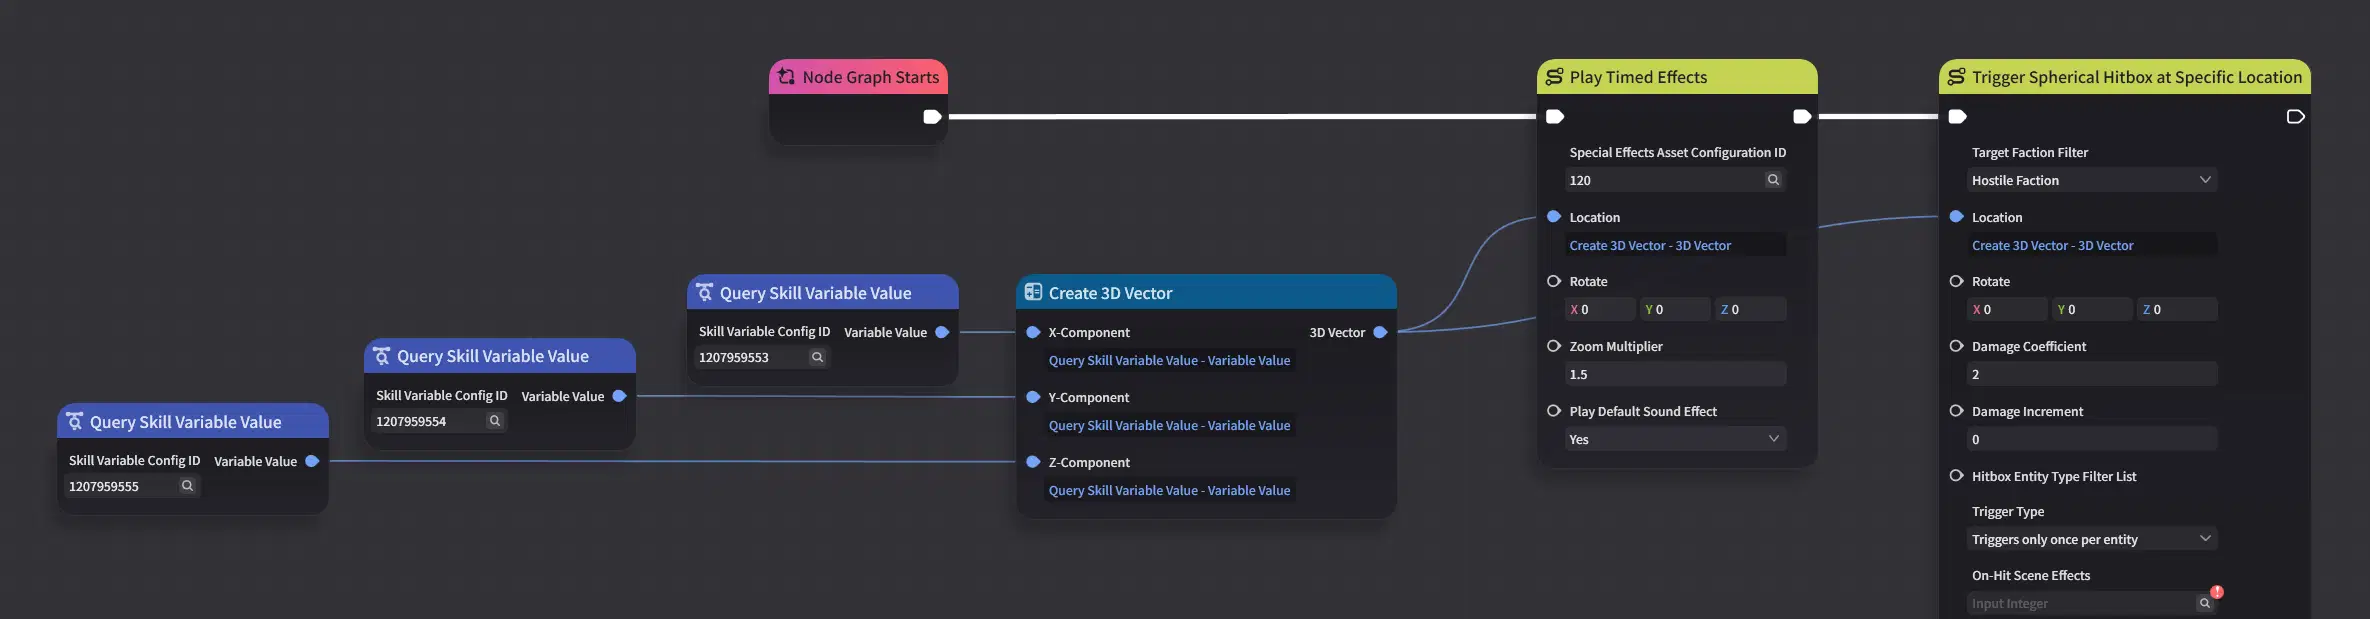
9.7 LL_Land
This graph strikes the landing zone. It's placed at the impact frame of the landing clip.
Create 3D Vector - X, Y and Z from three Query Skill Variable Value nodes (LeapX, LeapY, LeapZ). This is the landing point.
Play Timed Effects - Electro impact at the landing point.
Trigger Spherical Hitbox at Specific Location - Target Faction Filter: Hostile Faction, Location: the landing point, Damage Coefficient: 2.0, Trigger Type: once per entity, Radius: 3, Elemental Type: Electro, Hit Type: Smash, Knockback Orientation: Line Connecting Attacker and Hit Point.
9.8 Timeline and Slot
Place LL_Leap on the Node Graph Event Track at take-off and LL_Land on the impact frame of the landing clip. Save the skill, then assign it in Class → Configure Skills → Skill Q.

9.9 Lightning Leap Showcase
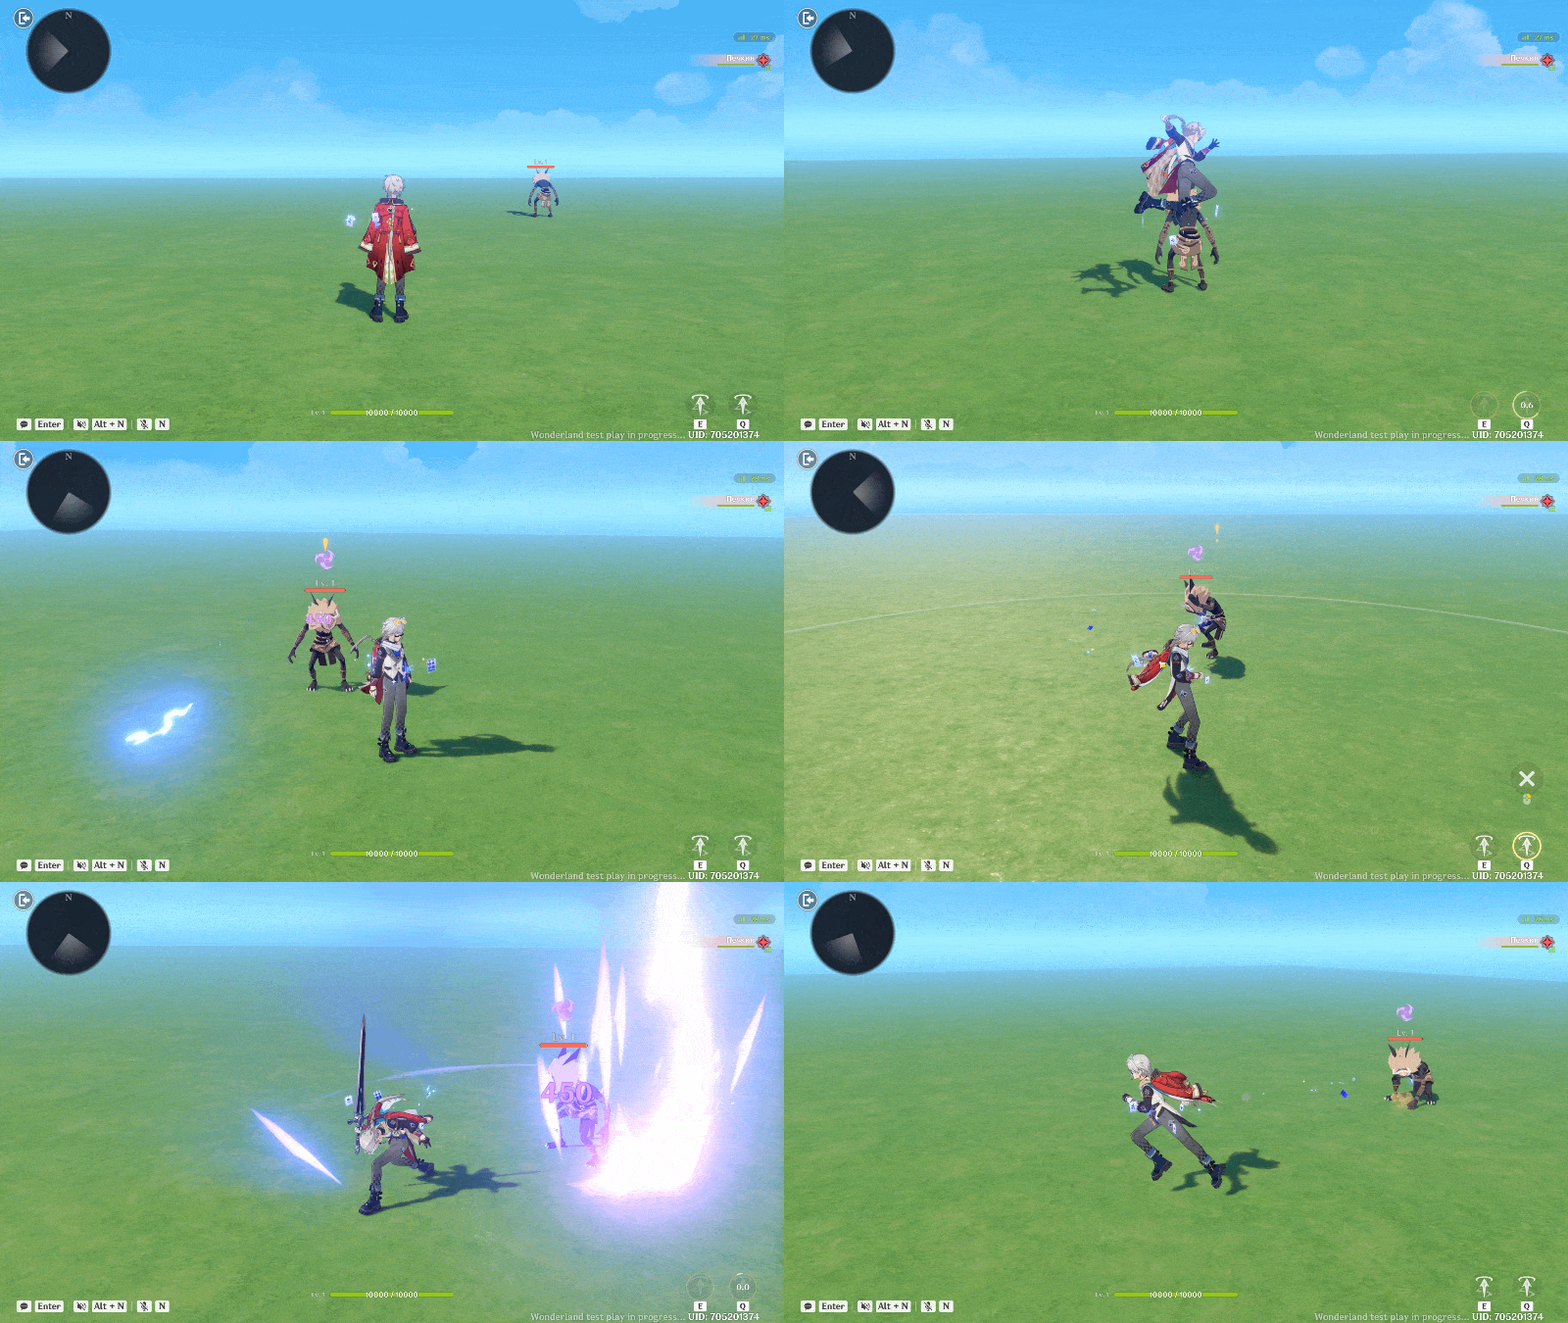
10. Overcharge: Skill Attribute Groups
Both skills work now. Sections 10 to 12 add one more system each. They are small additions to what you already built, not new skills, and later sections reuse the earlier ones, so follow them in order.
The first upgrade: after landing Lightning Leap, Thunder Slam's cooldown is halved for 8 seconds.
The 6 s cooldown in the Skill Editor is a fixed design value. Server nodes like Set Character Skill CD change the current countdown once, but they don't make the skill cool down faster in general. A Skill Attribute Group is a live multiplier attached to the skill, and Unit Statuses can push it up or down while they are active. When the status ends, the bonus disappears on its own, so there is nothing to clean up.
10.1 Creating the Attribute Group
Open Skill Resource Management in the System Menu → Skill Attribute Group tab, and add a new group:
Name - Thunder Slam CD.
Attribute Type - Cooldown Time Multiplier. The other type, Animation Speed Multiplier, works the same way for animation speed.
Initial value - 1, meaning 100% of the base cooldown.

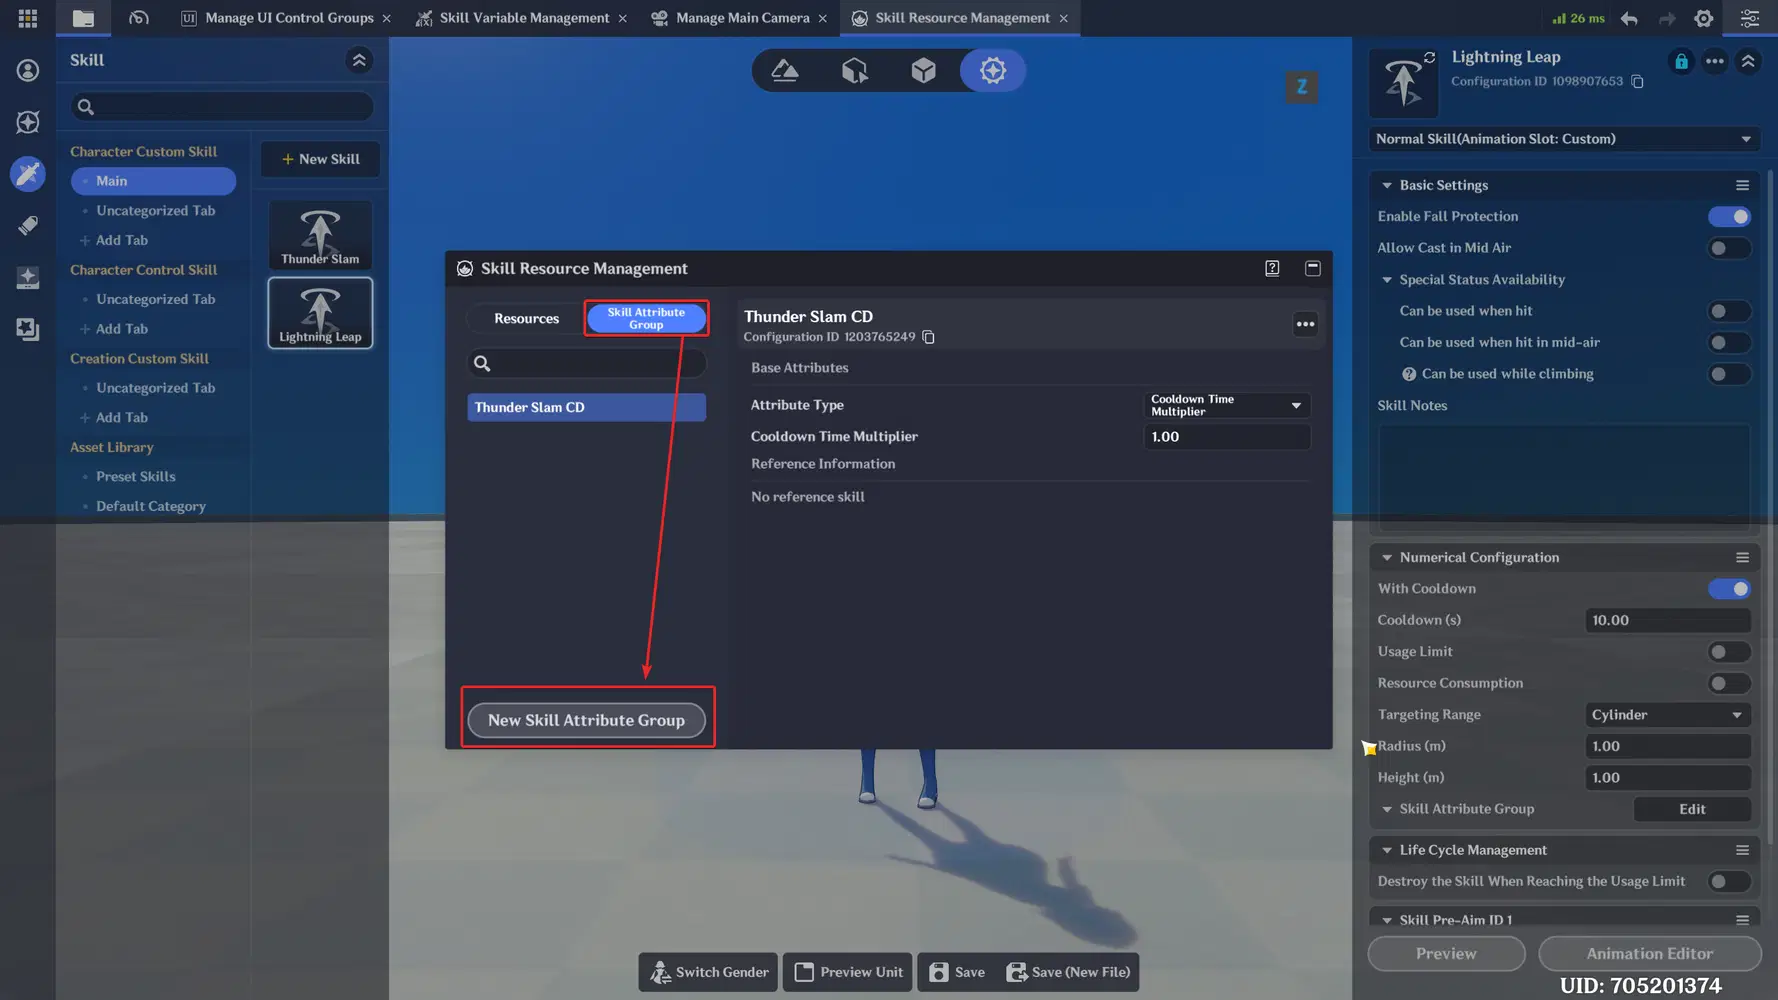
Then open Thunder Slam → Numerical Configuration → Skill Attribute Group → Edit, and select Thunder Slam CD.
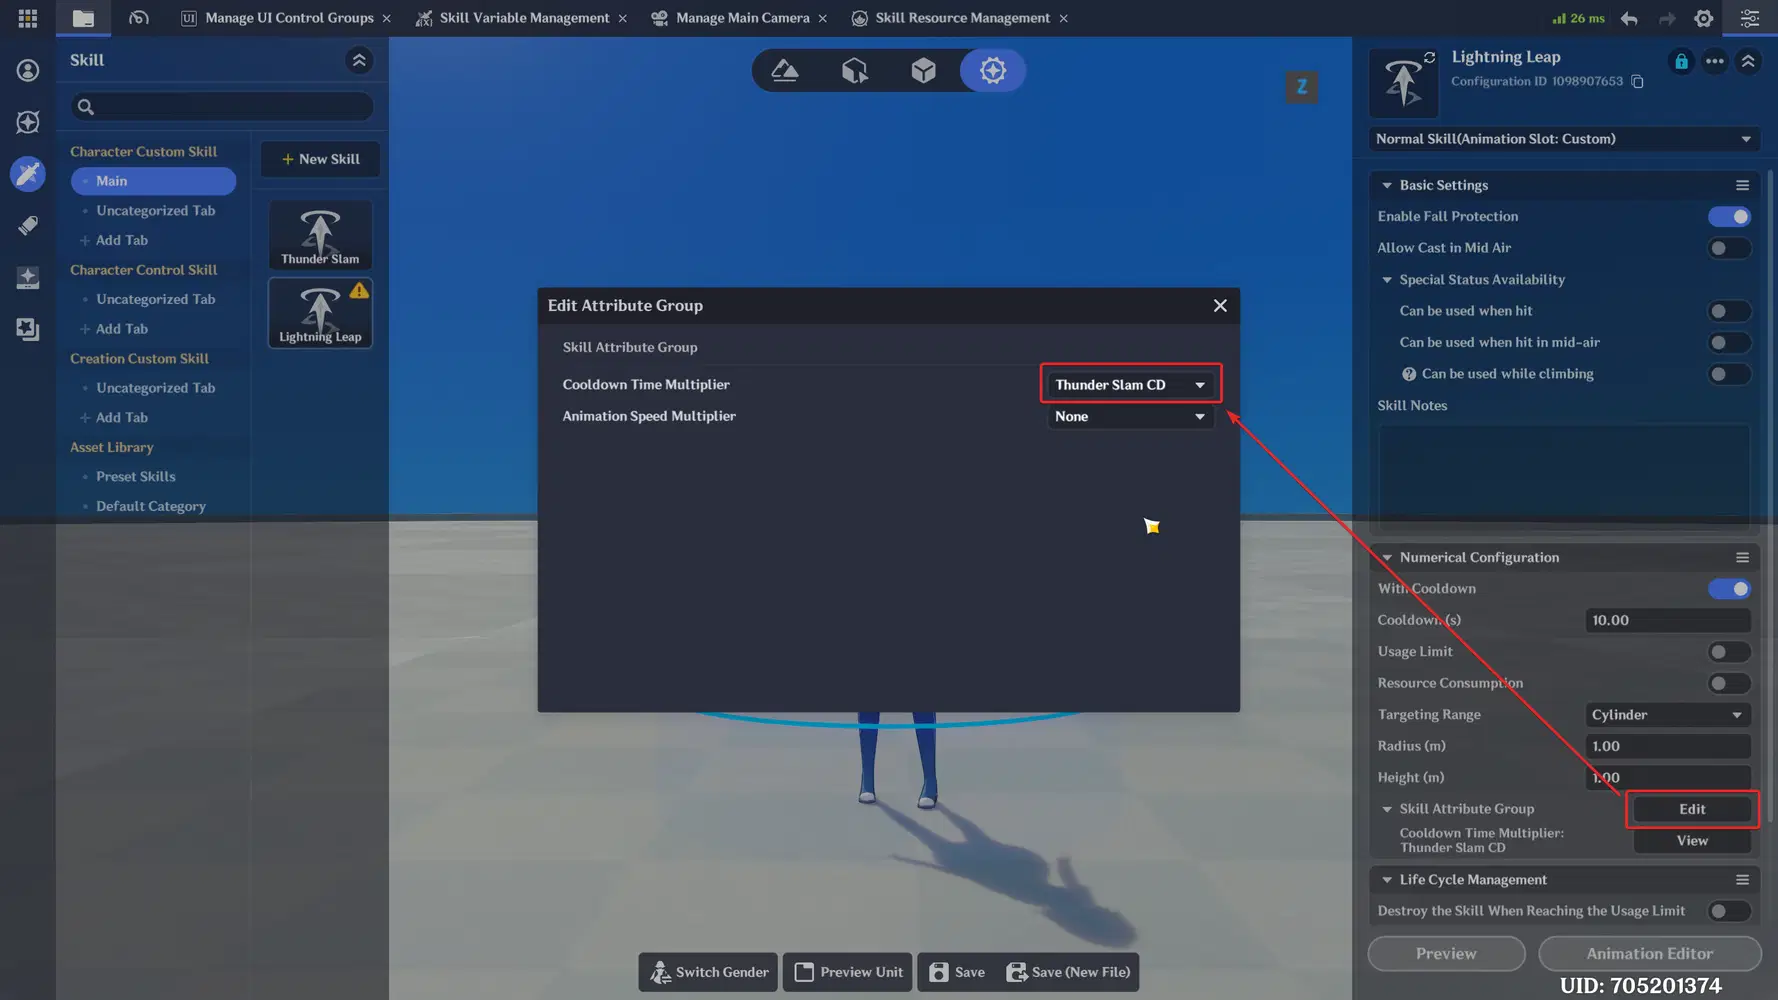
10.2 Overcharge Unit Status
Create a new Unit Status named Overcharge:
Duration - 10 s.
Maximum Stack Layers - 1.
Effect - Adjust Cooldown on the Thunder Slam CD group, with a modifier of -0.5.
Optional - Mount Special Effects with an Electro aura, so the player can see the buff is active.
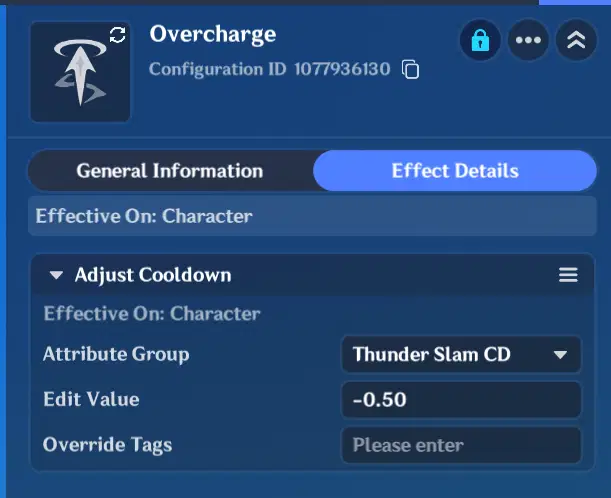
The final cooldown is calculated as:
Final Cooldown = Base Cooldown × (Initial Value + Σ(Status Modifier × Stacks))
- No buff - 10 × (1 + 0) = 10 s
- Overcharge, 1 stack - 10 × (1 - 0.5) = 5 s
- Overcharge, 2 stacks - 10 × (1 - 1.0) = 0 s
This is why Maximum Stack Layers must be 1. The modifier is multiplied by the number of stacks, so a second stack would remove the cooldown completely. With a single stack, re-applying the status only refreshes it.
10.3 Applying the Buff
Add one node at the end of LL_Land: Add Unit Status with Application Target: Get Self Entity, Stacks: 1, Unit Status Config ID: Overcharge.
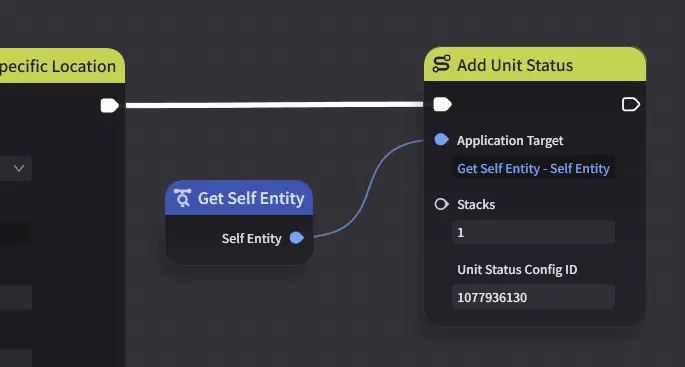
Applying it on landing rewards the combo "leap in, then slam". The two skills now support each other instead of being two separate buttons.
To check that it works, the server node Query Skill Attribute Group Value returns the current value of Thunder Slam CD for a character. Print it to the log: it should be 1 without the buff and 0.5 with it.
Note that the cooldown multiplier is read when a skill’s cooldown starts. A cooldown that is already running is not recalculated, so the first Thunder Slam cast after landing still uses the old cooldown, and the halved value appears on the cooldown that starts after it. To see the effect in the showcase, cast Thunder Slam twice inside the 8 seconds of Overcharge.
11. Score per Slam: Talking to the Server
The second upgrade: every slam adds 1 to a SlamScore that the server keeps, so it can be used for a scoreboard or a win condition.
Skill graphs run on the client. They are perfect for instant hits and VFX, but game state like score must live on the server, where every player sees the same value. The bridge between them is a pair of nodes:
Notify Server Node Graph - client execution node in the skill graph. Sends up to three strings.
When Skill Node Is Called - server event node. Receives Caller Entity and the three strings as Parameter 1, 2 and 3.
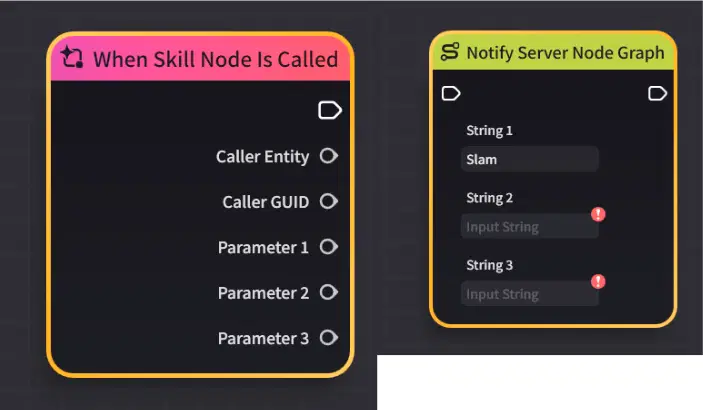
11.1 Score Variable
Open the Class → Class Components and add a Custom Variable to the Character Entity: SlamScore, Integer, value 0.
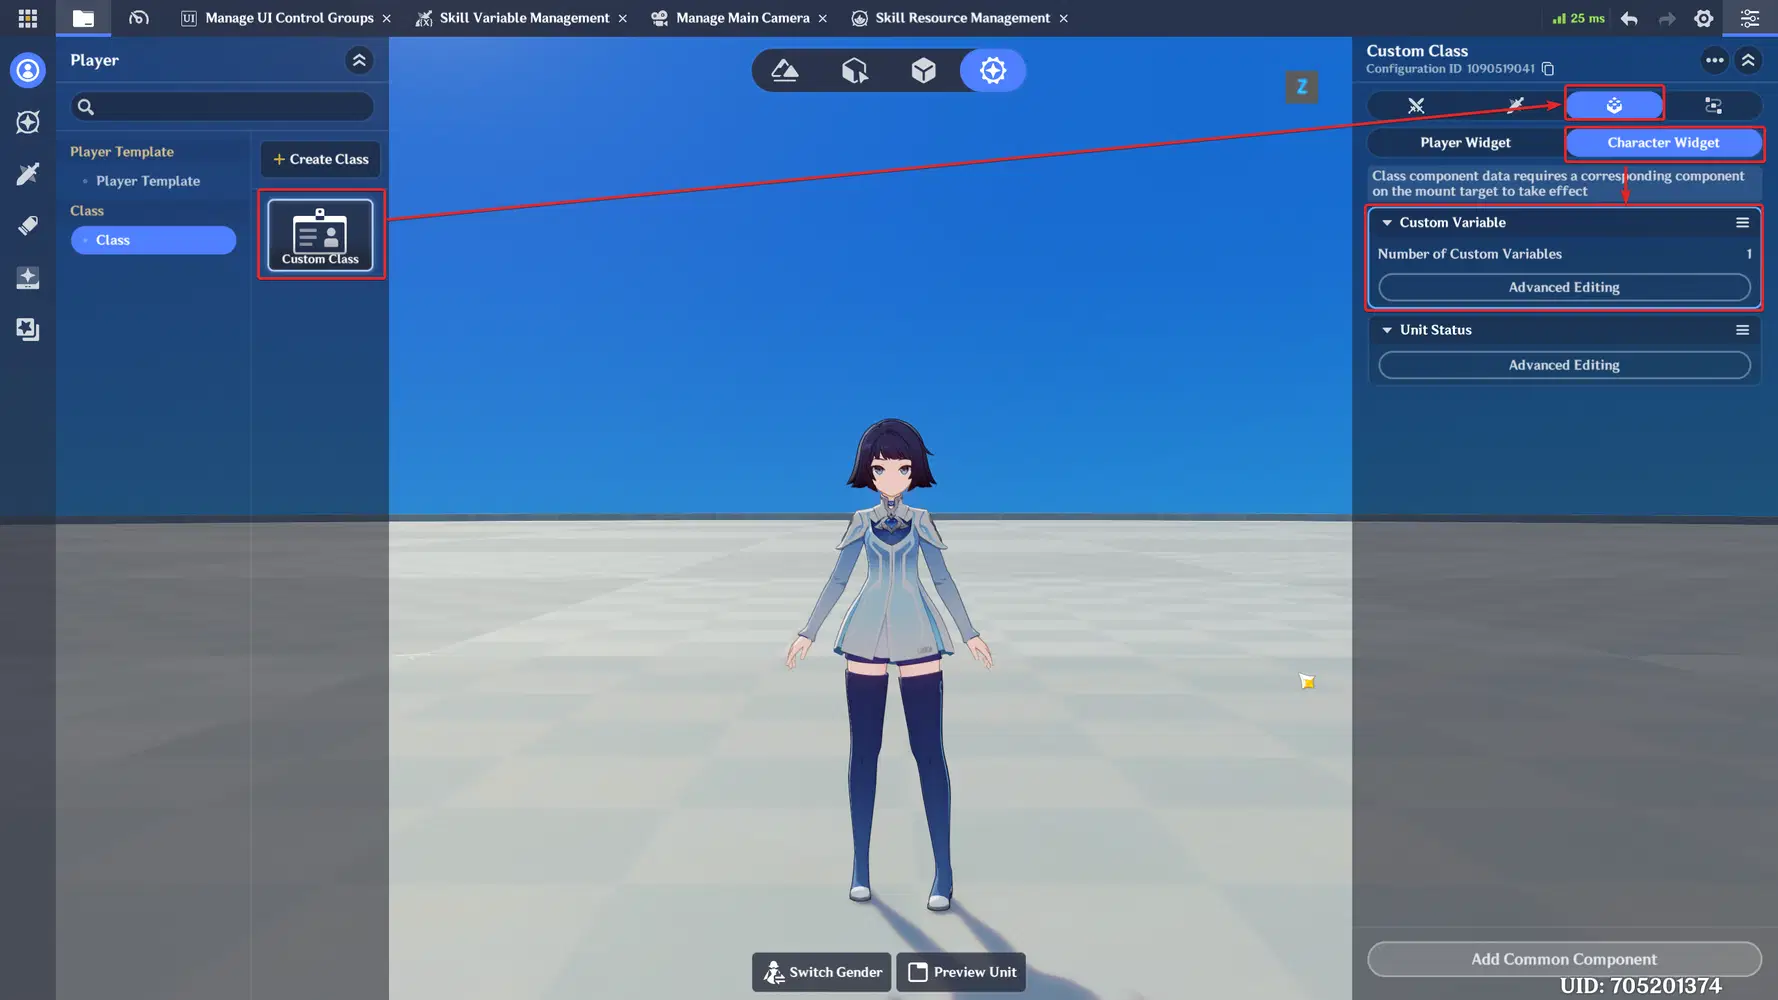
Class components are added automatically to every character of that class, so you don't need to set them up for each player.
11.2 Sending from the Skill
At the very end of TS_Slam, add Notify Server Node Graph with String 1 set to "slam".
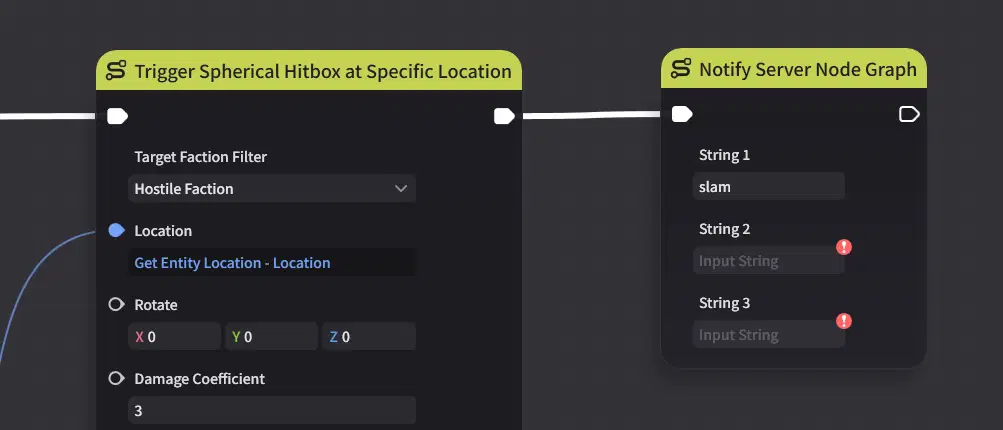
One server event, When Skill Node Is Called, receives notifications from every skill. The first string works as a message type, so the server knows who is calling and why. Parameters are strings only - to send a number, convert it with Data Type Conversion.
11.3 Receiving on the Server
Open the Class → Node Graph tab → Character Node Graph, and create a server graph named Skill_Server:
When Skill Node Is Called - the event.
Multiple Branches - Control Expression: Parameter 1. Add an output for "slam".
Set Custom Variable - Target Entity: Caller Entity, Variable Name: SlamScore, Variable Value: Addition of Get Custom Variable (Caller Entity, SlamScore) and 1.
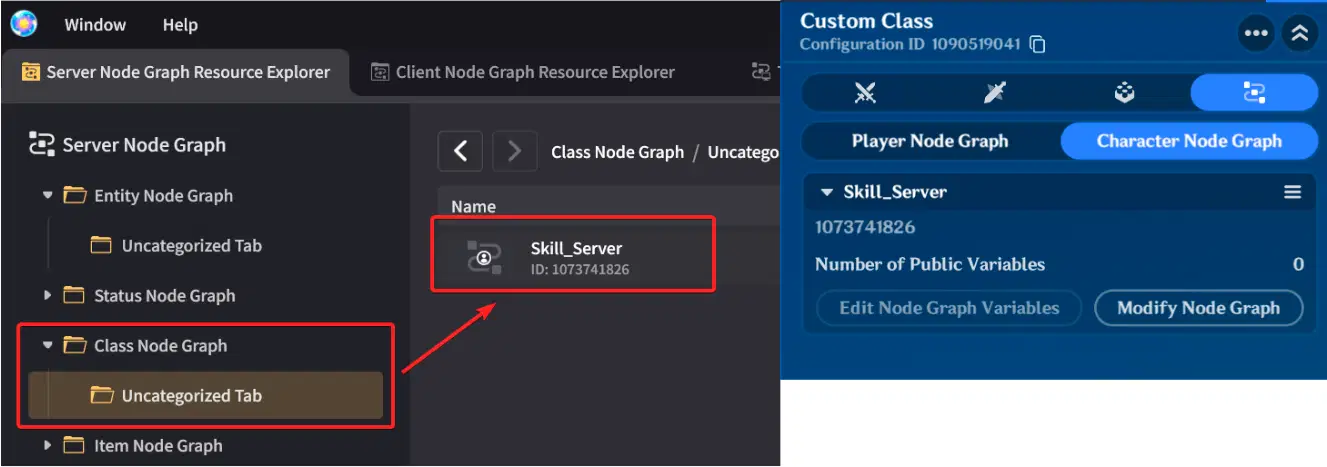
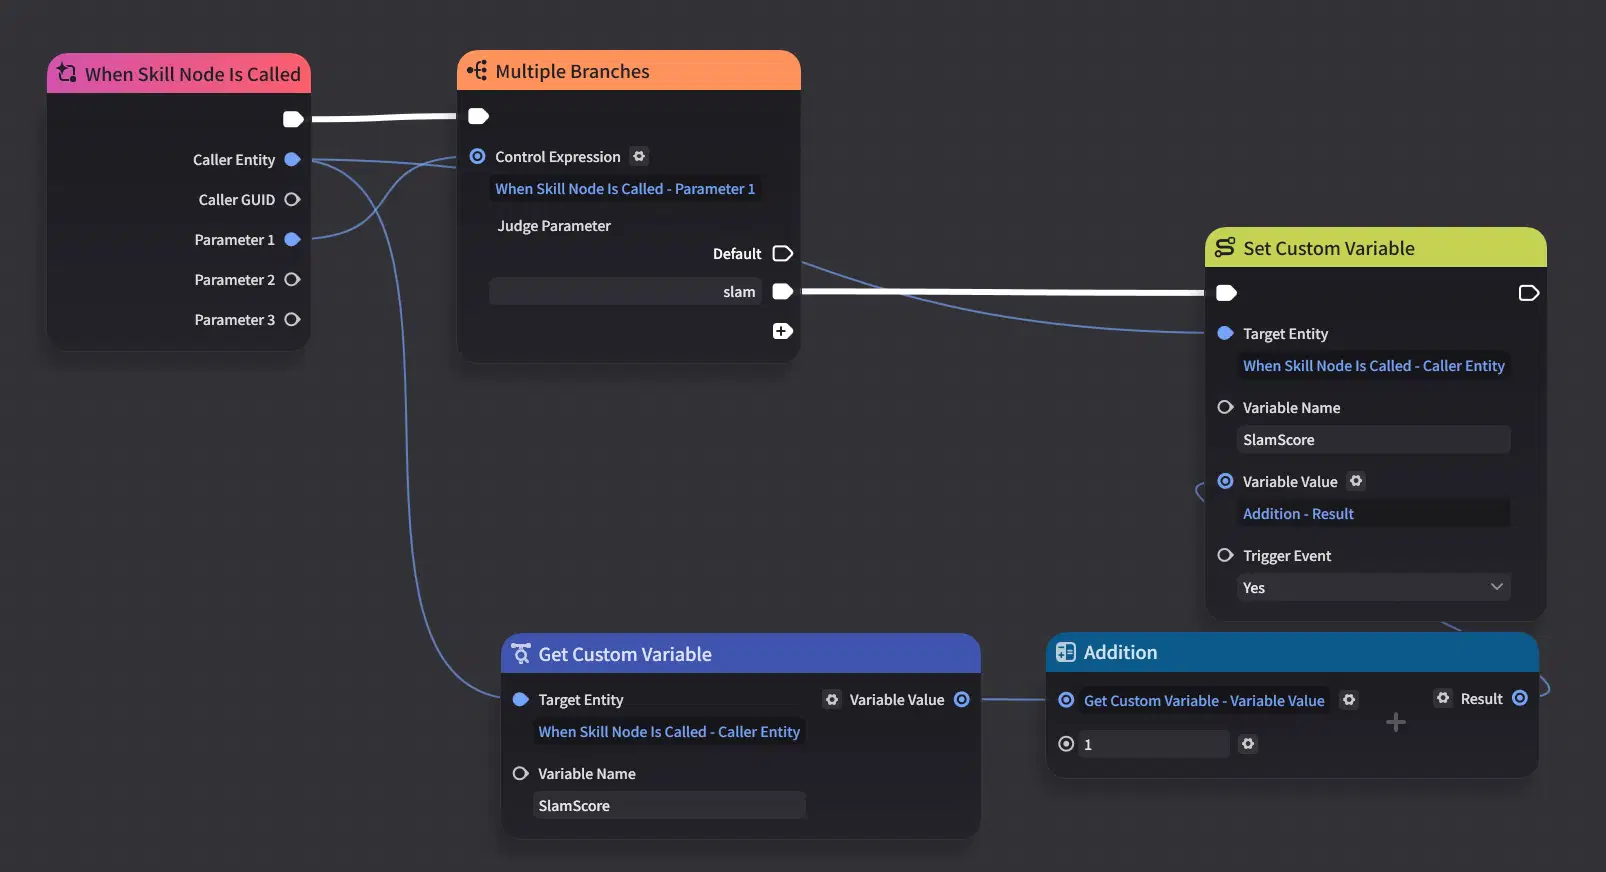
Caller Entity is the character whose skill sent the message. In multiplayer, each player's slams go to their own score without any extra logic.
12. Thunder Charge: Skill Resources
The third upgrade: Thunder Slam costs 1 Thunder Charge, the character can hold at most 3, and every Lightning Leap landing gives one back. The player now has to alternate skills instead of pressing E every time the cooldown ends.
Resource Consumption is built into the skill itself: the cost is checked at cast time, the skill can't be used without enough resource, and the amount is deducted automatically. With a Custom Variable you would have to build all three yourself, and a server check would arrive too late to stop a skill that is cast on the client.
12.1 Creating the Resource
Open Skill Resource Management in the System Menu and create a new skill resource:
Skill Resource Name - Thunder Charge.
Maximum Obtainable Value- 3.
Growth Type - Follow Skill (Retaining Value).
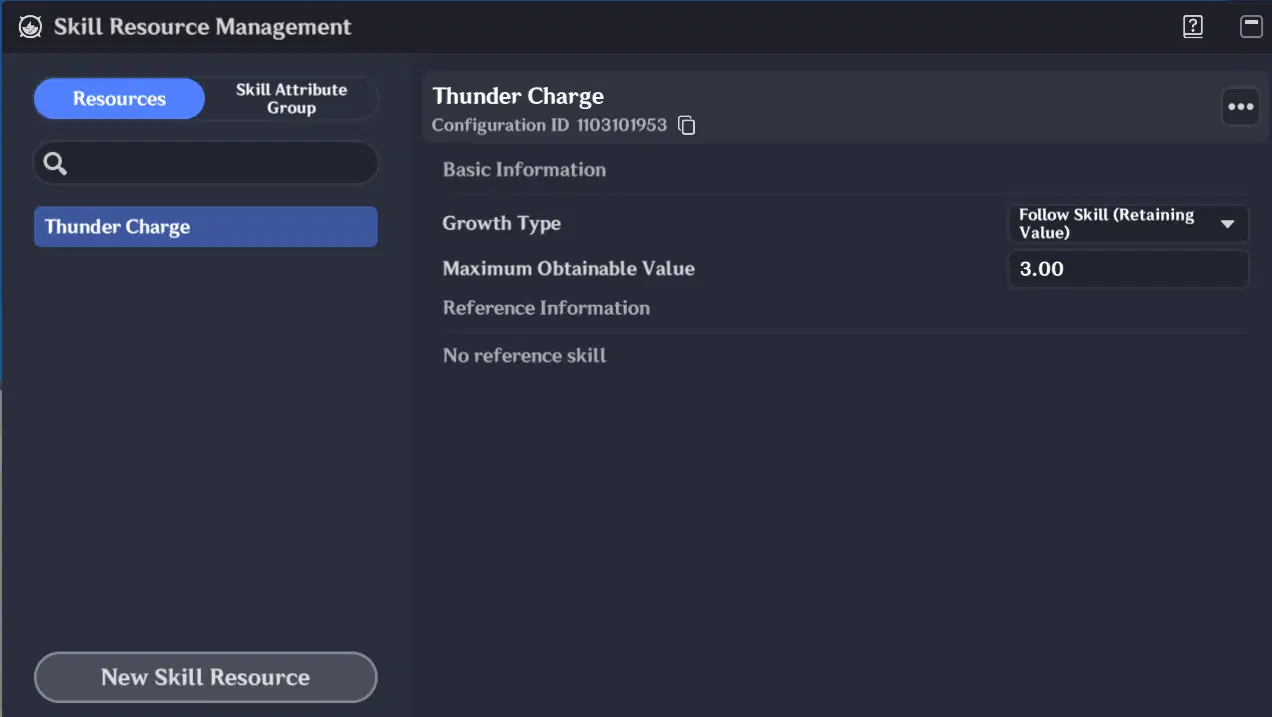
Growth Type decides whether the amount is allowed to change:
Unconditional Growth - the resource always grows, up to the maximum.
Follow Skill (Retaining Value) - the amount only changes while the character has a skill that uses this resource. If no skill uses it, the stored amount is kept.
Follow Skill (Not Retaining Value) - the same, but the amount resets to 0 when no skill uses it.
We use Retaining Value: a class without Thunder Slam gets nothing from leap rewards, and the stored charges are kept if Thunder Slam is temporarily replaced.
12.2 Adding the Cost
Open Thunder Slam → Numerical Configuration, enable Resource Consumption, set Consumption Type to Thunder Charge and Consumption to 1.
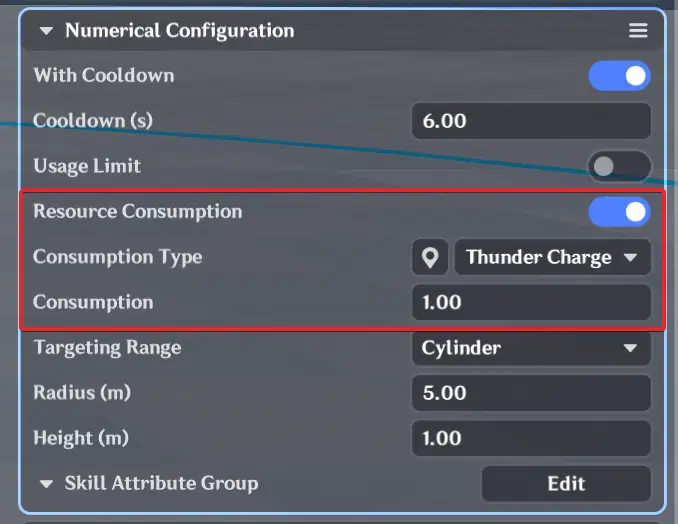
The cost belongs to the whole skill cast, not to a branch. Thunder Slam is a Hold Skill, so the Quick Swipe costs a charge too - it's the same cast. If you want a free swipe, make it a separate skill, for example on the Normal Attack slot.
12.3 Refilling from the Leap
Skill Resources are changed by server nodes, so we reuse the bridge from Section 11:
At the end of TS_Slam, add Notify Server Node Graph with String 1 set to "leap".
In Skill_Server, add a "leap" output to Multiple Branches, and connect Increase Skill Resource Amount: Target Entity: Caller Entity, Skill Resource Config ID: Thunder Charge, Increase Value: 1.
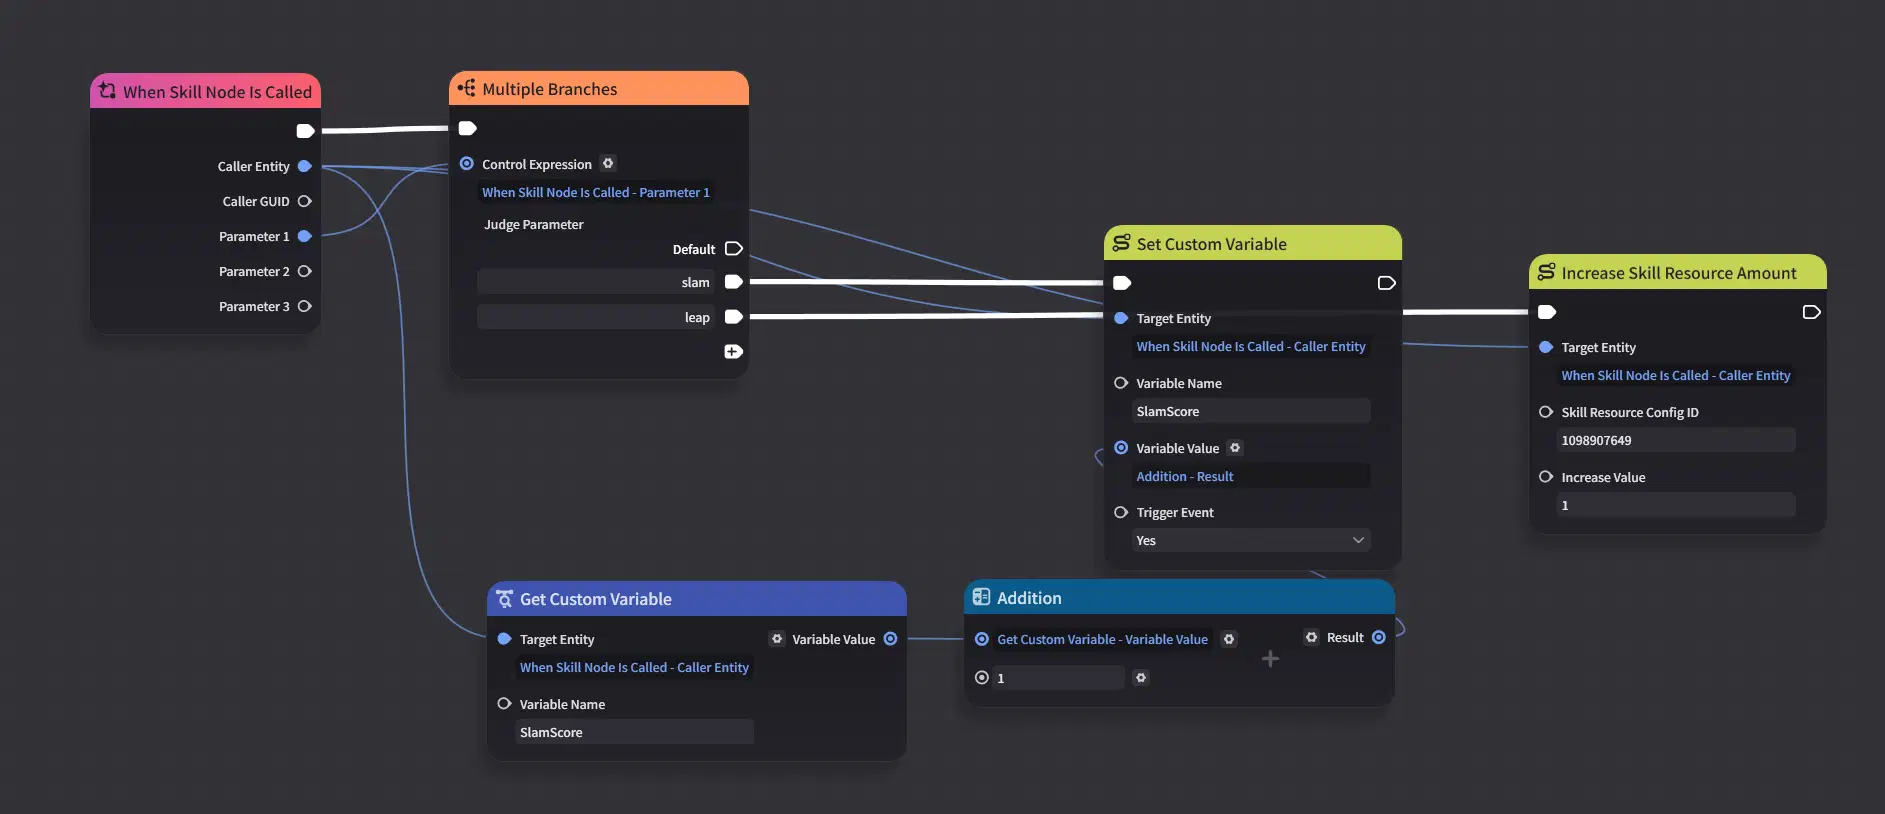
Maximum Obtainable Value caps the amount at 3, so you don't need a "less than 3" check.
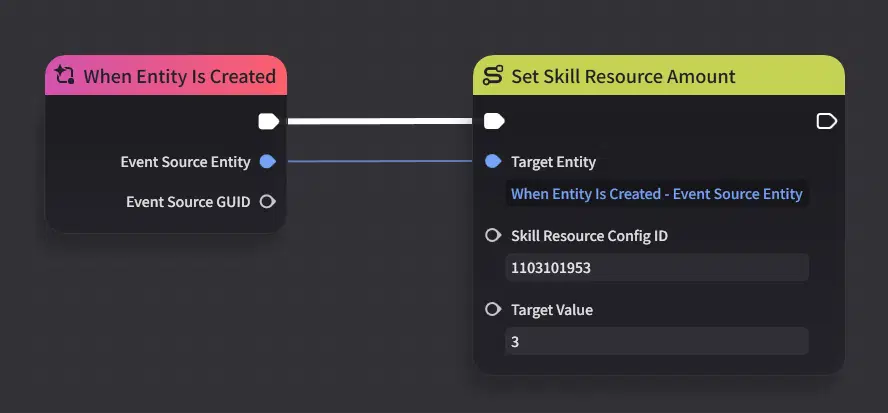
The resource starts at 0, which would block the first slam. In any server event that runs when the match starts, use Set Skill Resource Amount to give the character 3 Thunder Charge.
A Special Number UI control can display skill resources. Place one next to the E button so the player always sees how many slams are left.
I hope this guide helps you better understand how to design and implement custom skills with the Skill Editor.