Complete Guide to Building a Basic Roguelite Dungeon Adventure in Miliastra Wonderland
Introduction
Hi Travelers... Have you ever wanted to create your own Roguelite Dungeon Adventure in Miliastra Wonderland? In this guide, we’ll build a basic roguelite game, featuring random dungeons, exciting battles, character progression, and challenging boss fights. Best of all, you’ll have the freedom to design and customize the game with your own ideas and creative style.
We’ll start by creating a weapon selection system that allows players to choose between Sword, Claymore, and Bow. Next, we’ll build a random dungeon system where each portal leads to a different location, with randomized terrain and enemies to make every run feel unique.
Along the way, we’ll create an EXP and leveling system, allowing players to gain EXP by defeating enemies and level up their characters. Enemies will also drop Souls, which players can use to purchase potions or upgrade their levels. At the end of each stage, players must defeat a Normal Boss to obtain a chest containing Souls or a key required to unlock the next stage.
By the end of this guide, you’ll have built the core systems of a basic roguelite dungeon game, combining random exploration, combat, rewards, and character progression using the Miliastra Editor.
Whether you’re a beginner or an experienced Craftsperson, let’s start building your own Roguelite Dungeon Adventure!
Download Learning Resources & Game Templates

Chapter 1: Game Planning & Basic Setup
Before we start building our Roguelite Dungeon Adventure, let's plan the core gameplay and prepare our project in the Miliastra Editor. In this project, players will explore randomly generated dungeon locations, fight different enemies, collect Souls, gain EXP, and upgrade their characters. Their goal is to defeat the boss at the end of each stage and obtain rewards to continue their adventure.
1.1 Core Gameplay
Our game will include the following systems:
- Weapon Selection: Players can choose between Sword, Claymore, and Bow before entering the dungeon.
- Random Dungeon: Each portal leads to a randomly selected location with different terrain and enemies.
- Combat & Enemy Rewards: Players fight enemies to earn Souls and EXP.
- Level-Up System: Players gain EXP to increase their level and improve their character.
- Soul Shop: Players can spend Souls to purchase potions or upgrade their levels.
- Boss Battle: Players must defeat a Normal Boss at the end of each stage.
- Reward Chest: Defeating the boss allows players to obtain a chest containing Souls or a key to unlock the next stage.
These systems will work together to create a simple but engaging roguelite experience.
1.2 Prepare the Project
First, open the Miliastra Editor and create a new project for your Roguelite Dungeon Adventure.
📝 Wonderland Guide:
- Open the Paimon Menu and select My Miliastra Wonderland. Then, choose Create New Save to create a new project, select Beyond Mode for greater freedom and flexibility when managing your project, and finally click Edit to enter the Miliastra Editor and start building your Roguelite Dungeon Adventure.
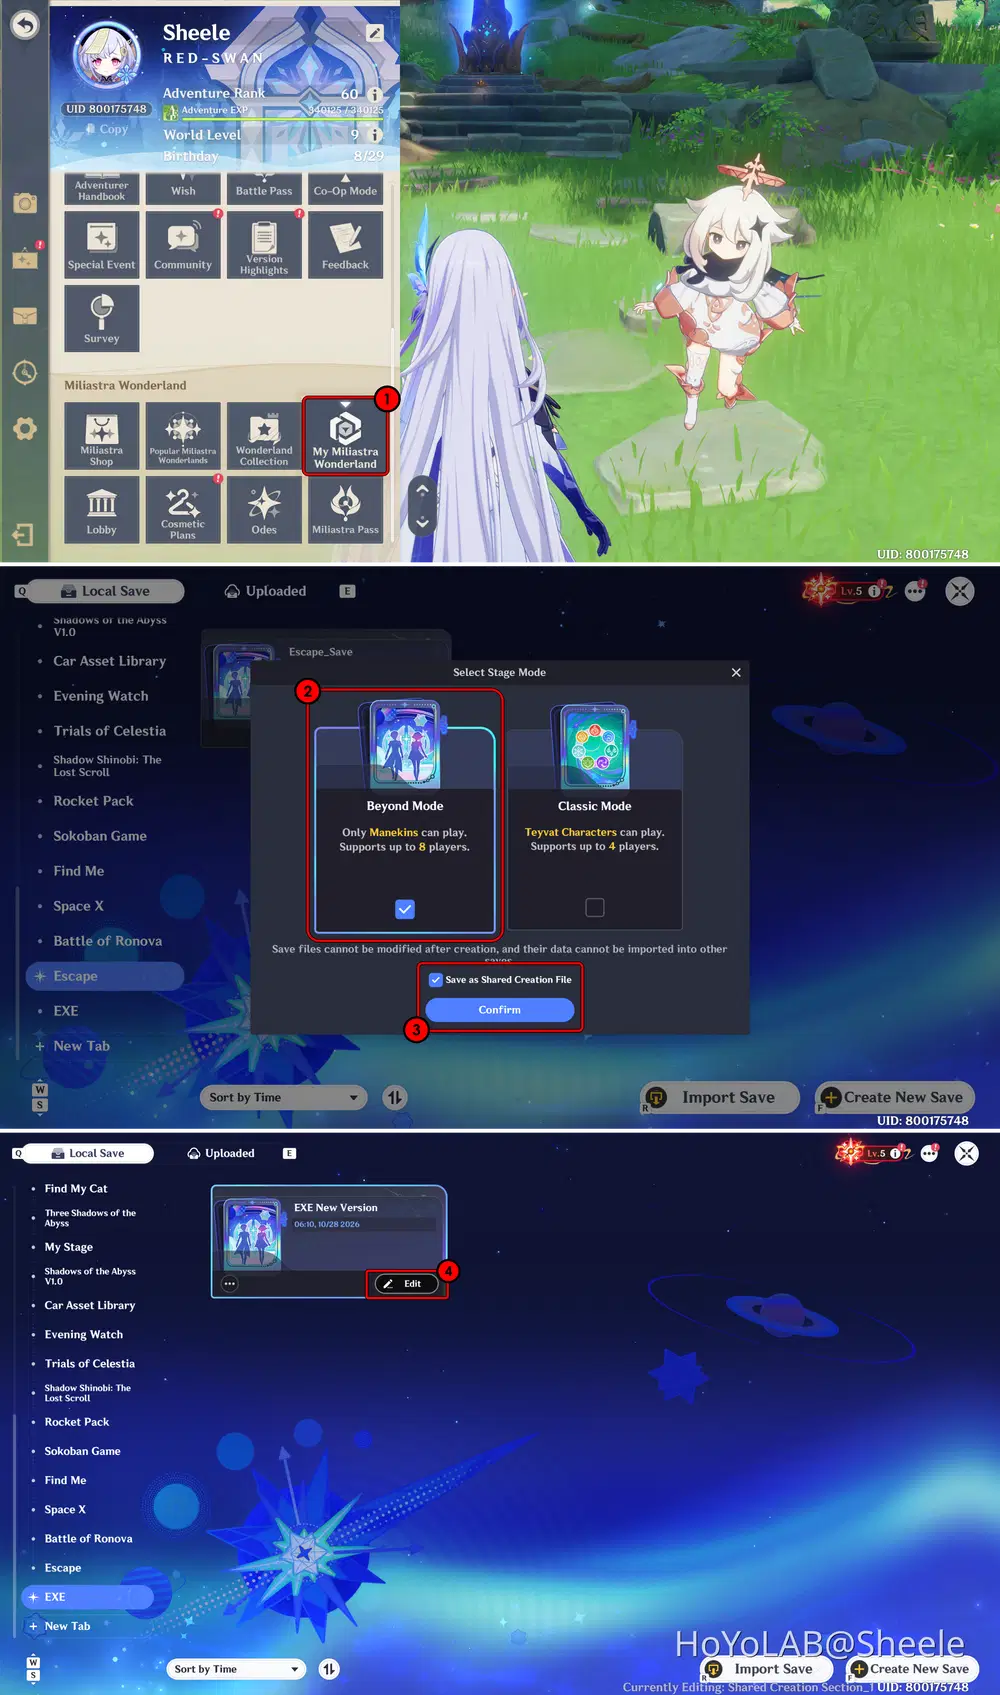
Create New Project
Before building the gameplay systems, prepare the basic stage structure and organize the objects you will use throughout the project. This will make it easier to manage your terrain, enemies, portals, UI, and other gameplay elements later.
1.3 Configure the Basic Stage Settings
Next, open the Stage Settings and configure the basic requirements for your game.
Make sure the stage settings match your intended gameplay, including the player count and resource requirements. Since this guide focuses on building a basic roguelite experience, you can start with a simple setup and adjust it as the project develops.
📝 Wonderland Guide:
- For the Effective Scene Range, I set it to the highest available value to provide more space for dungeon layouts and allow greater freedom when designing the environment.
- For the Load Requirement Level, I choose Medium to balance the project's resource requirements and performance.
- Finally, I set the Player Count to 1 Player because this project is currently designed as a single-player experience.
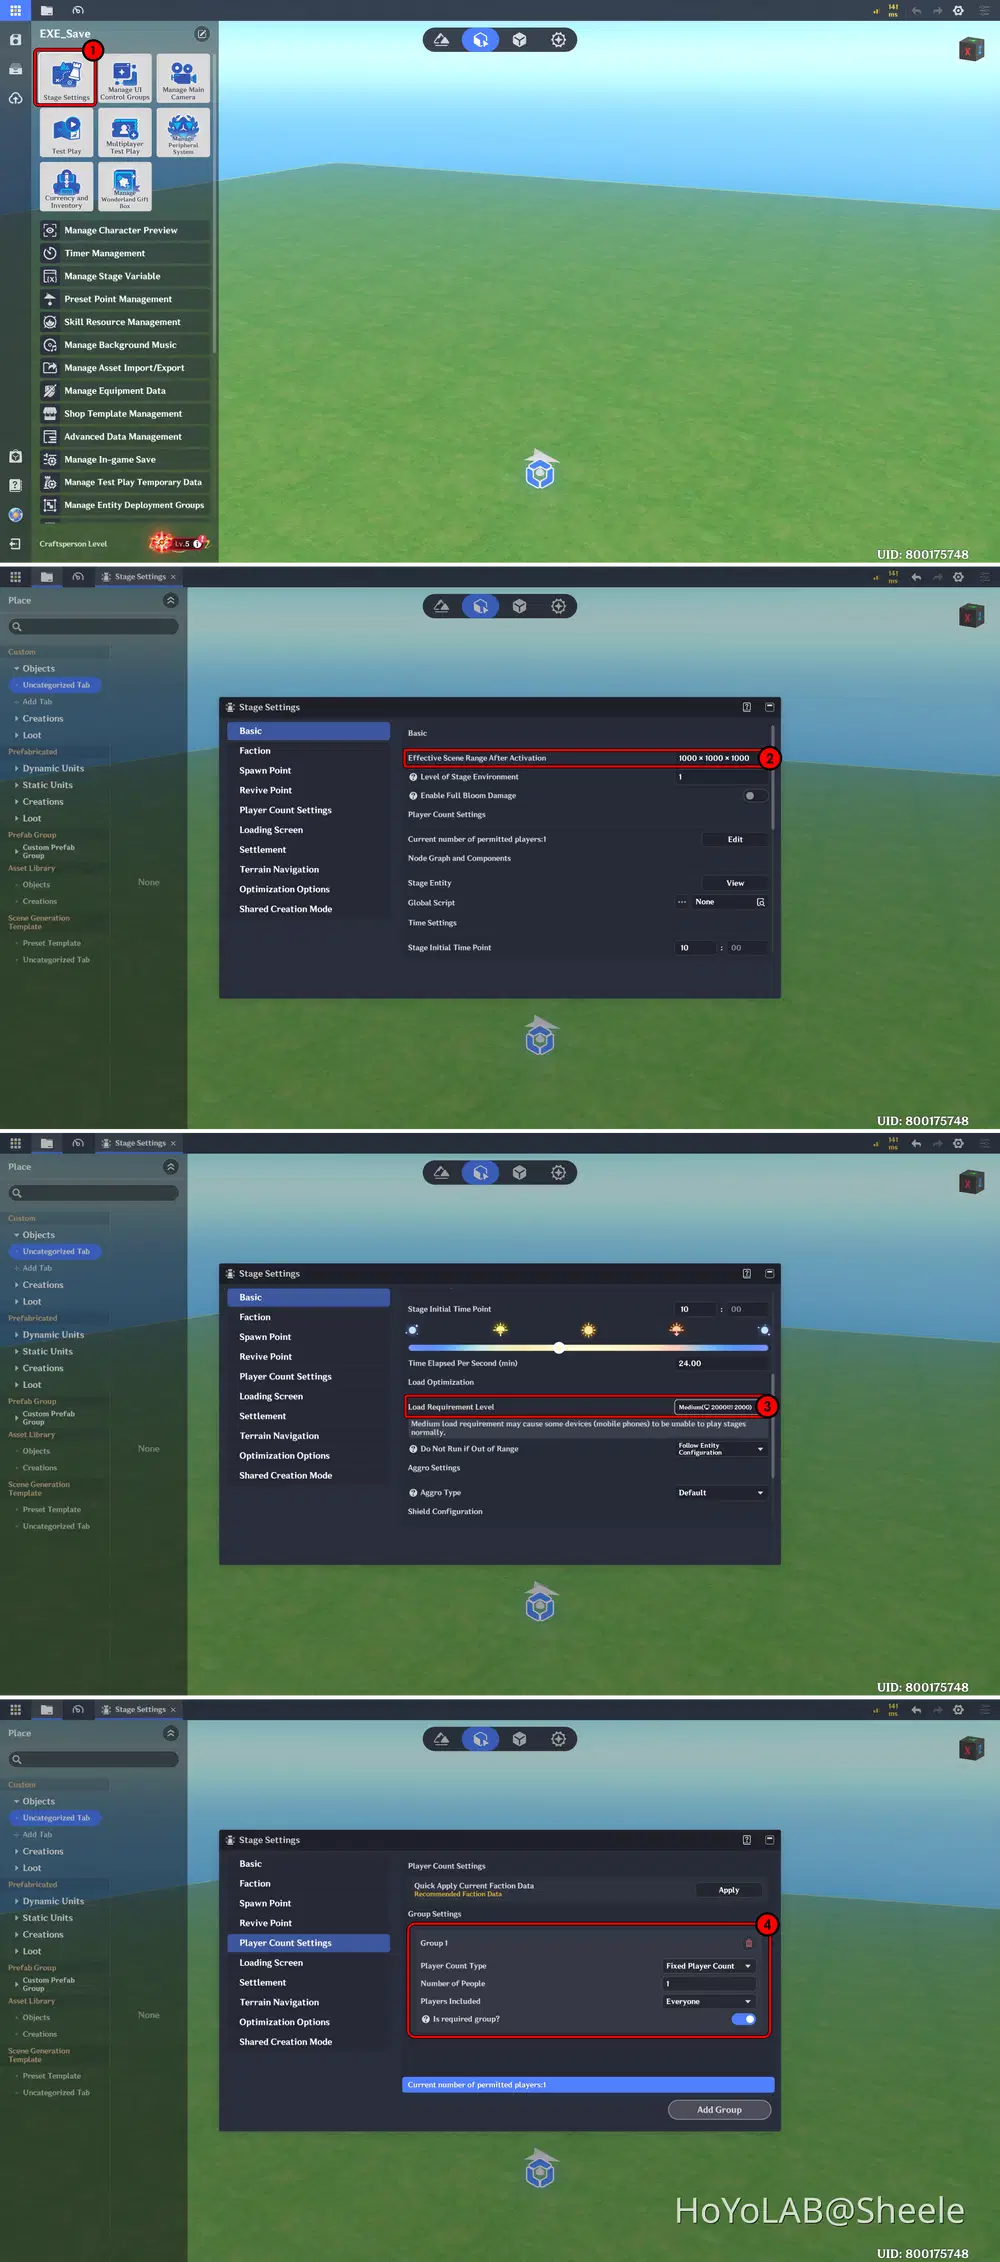
Stage Settings, Load Requirement Level & Player Count
1.4 Plan the Dungeon Flow
Before creating the Node Graph logic, let's outline how the game will progress:
- Players start the game, enter the dungeon and select their preferred weapon.
- Players enter a portal to access a dungeon location.
- They defeat enemies to collect Souls and EXP.
- Players use Souls to purchase potions, Equipment or upgrade their levels.
- After clearing the dungeon, players face the Normal Boss.
- Defeating the boss rewards players with a chest containing Souls or a key.
- Players use the key to unlock the next stage and continue their adventure.
This gameplay flow will serve as the foundation for the systems we will build in the following chapters.
Once the basic planning and project setup are complete, we're ready to start creating the weapon selection system in Chapter 2.
Chapter 2: Weapon Selection System
Before entering the dungeon, players need to choose their preferred weapon. In this chapter, we'll create a simple weapon selection system that allows players to choose between three weapon types: Sword, Claymore, and Bow.
Each weapon offers a different combat style, giving players the freedom to choose how they want to fight their enemies.
2.1 Class & Skill Setup
Before creating the weapon selection system, we need to prepare the character classes and their corresponding combat abilities. For this project, I will use four different character classes: Default Class for Lobby, Sword Master for Sword, Executioner for Claymore, and Hunter for Bow. Each class represents a different weapon type and provides players with a different combat experience.
Start by opening the Combat Preset and configuring the character classes. Prepare the required weapon setups for each class and make sure that the character can use the appropriate weapon when switching between them.
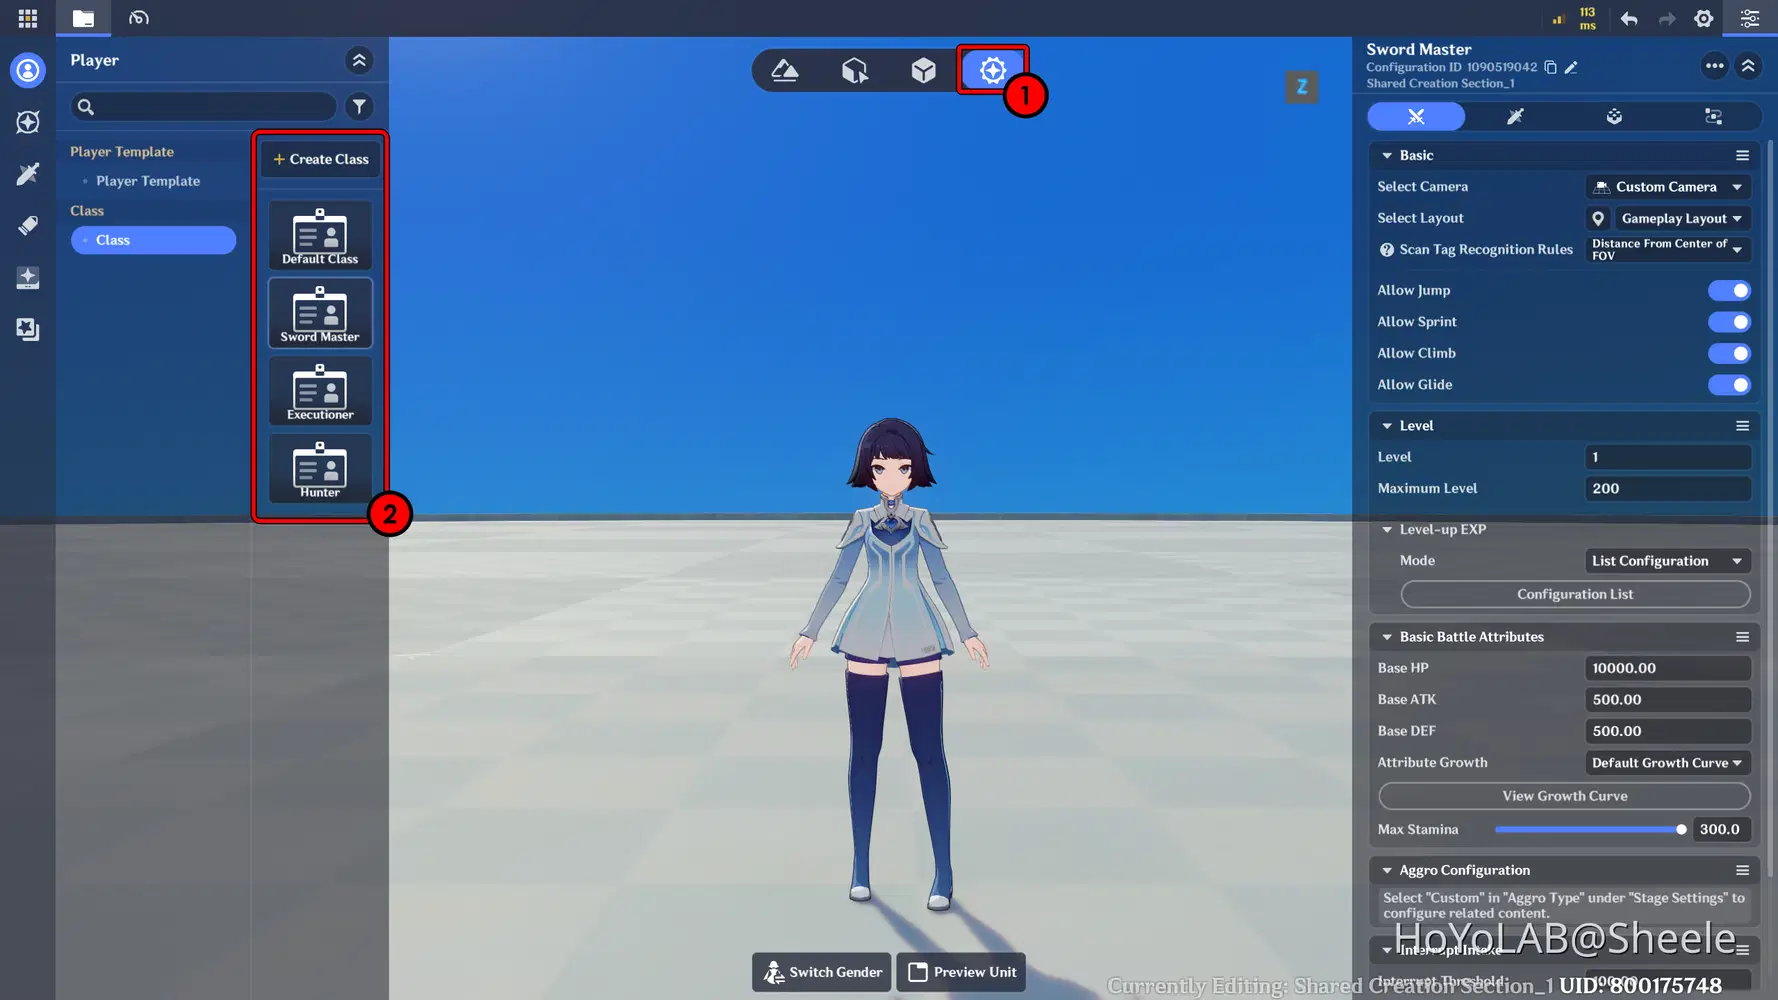
Create Class
Next, configure the skills and combat abilities for each class. You can use different attack styles and abilities to make each weapon feel unique. For example, Sword Master can focus on fast melee attacks, Claymore Master can deal powerful heavy attacks, while Bow Master can attack enemies from a distance.
Go to Combat Preset Skill to configure the skills for your character classes. You can either create your own skills manually or choose from the available presets in the Asset Library.
If you are new to the editor, I recommend using the existing Preset Skills to make the setup process easier and faster. These skills are already prepared and can be used as a starting point for your character's combat abilities.
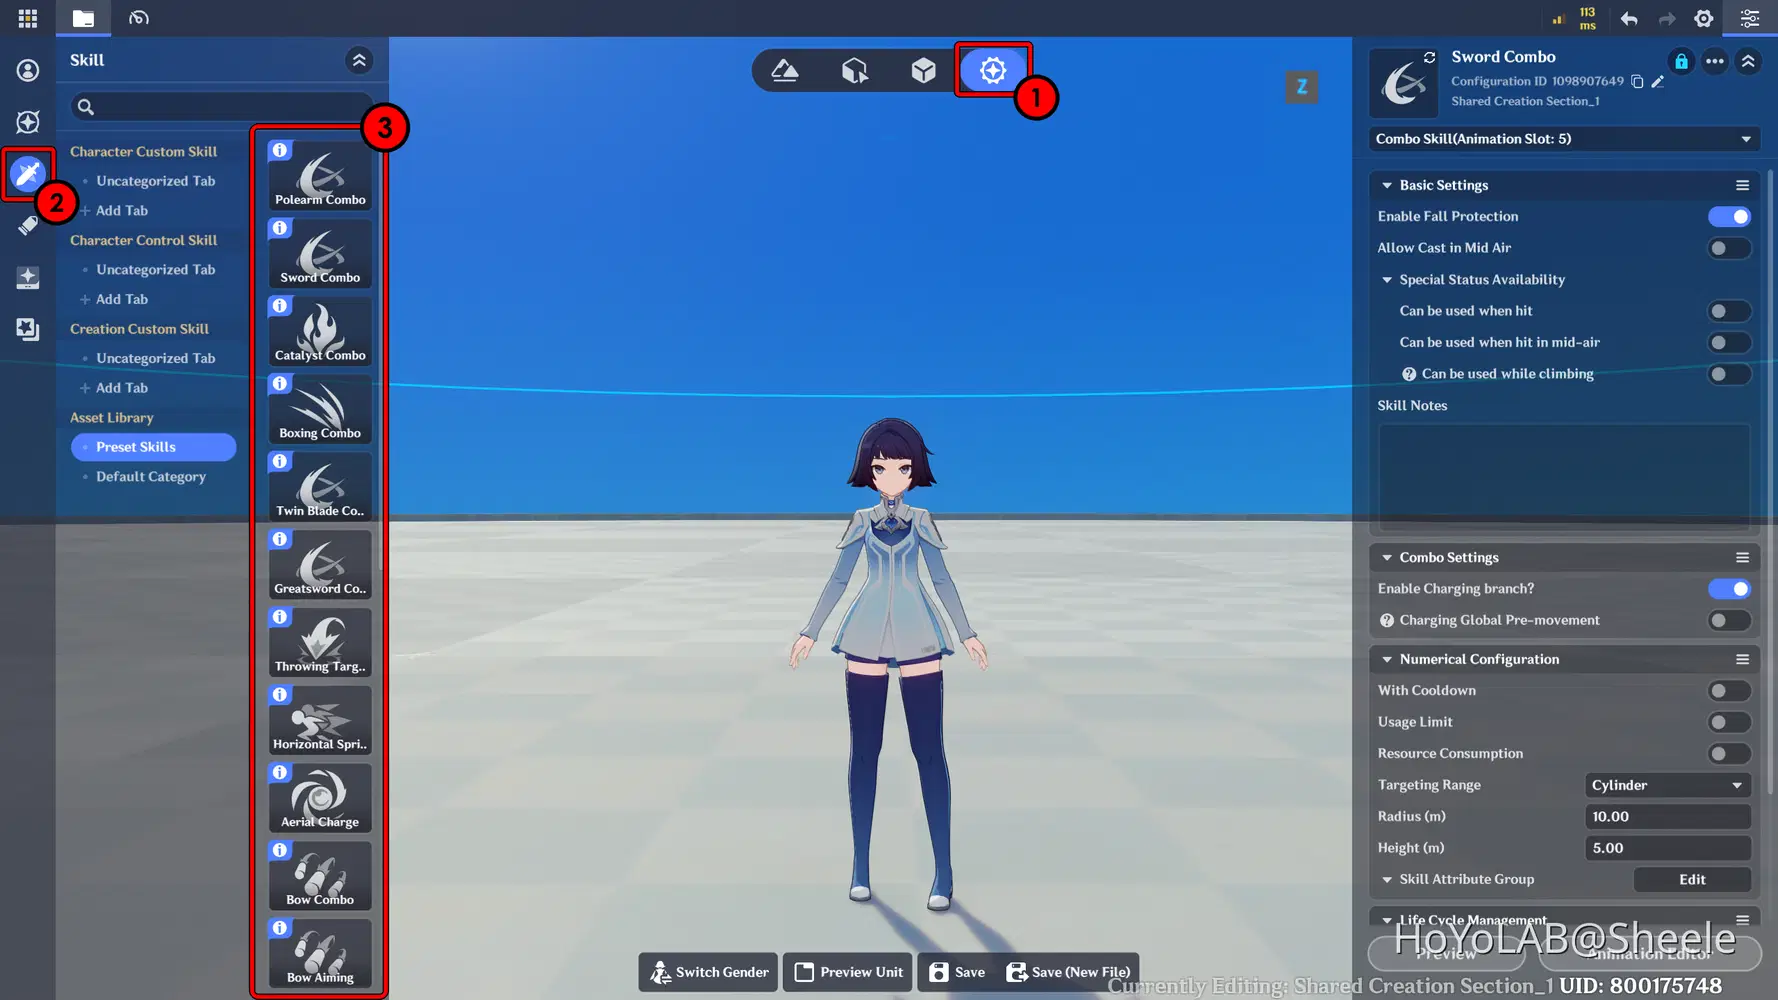
Preset Library Skill
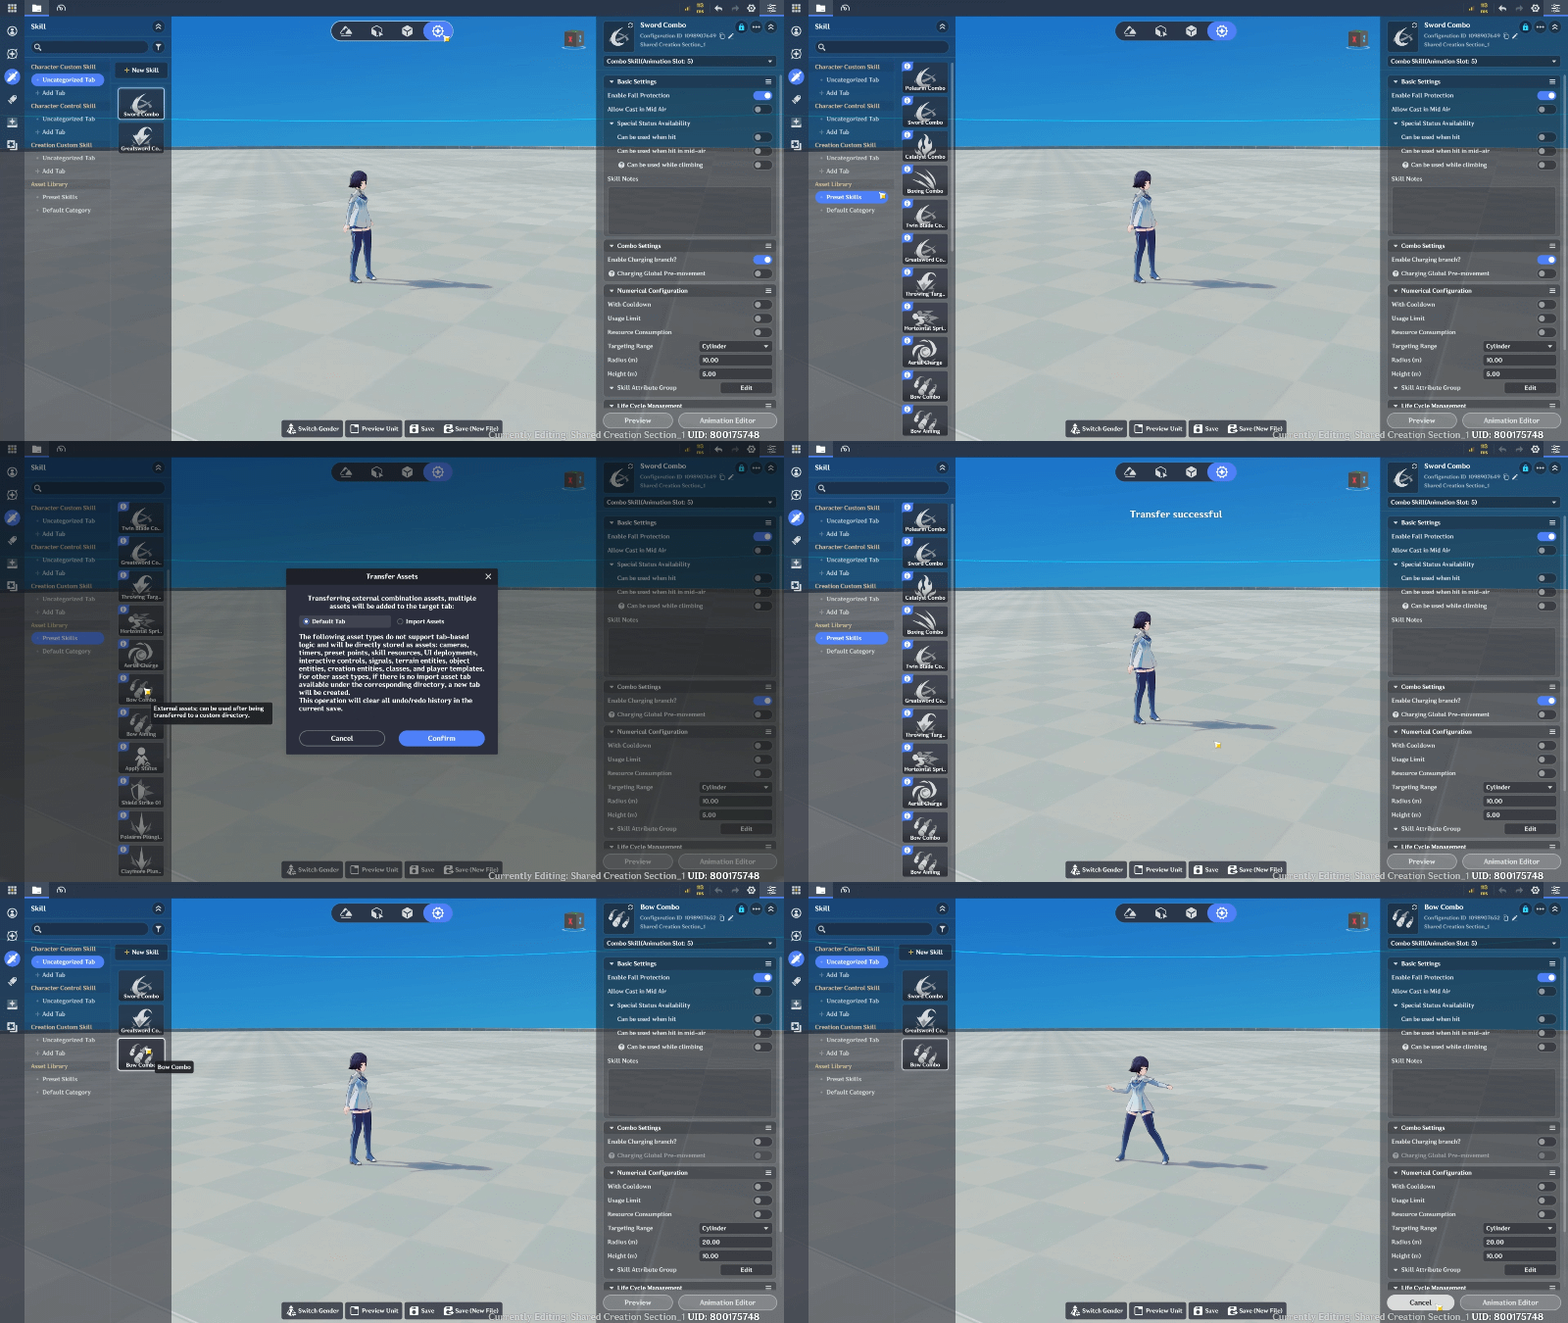
Create Skill
You can always customize or modify these skills later to better match your game's mechanics and the combat style of each character class. Don't forget to save your changes once you're done!
📝 Wonderland Guide:
For example, here I change the default appearance of the Bow skill by replacing it with another Bow visual effect available in the Asset Library, under the VFX Playing section. This allows me to customize the skill's appearance and make it better match the weapon used by the character.
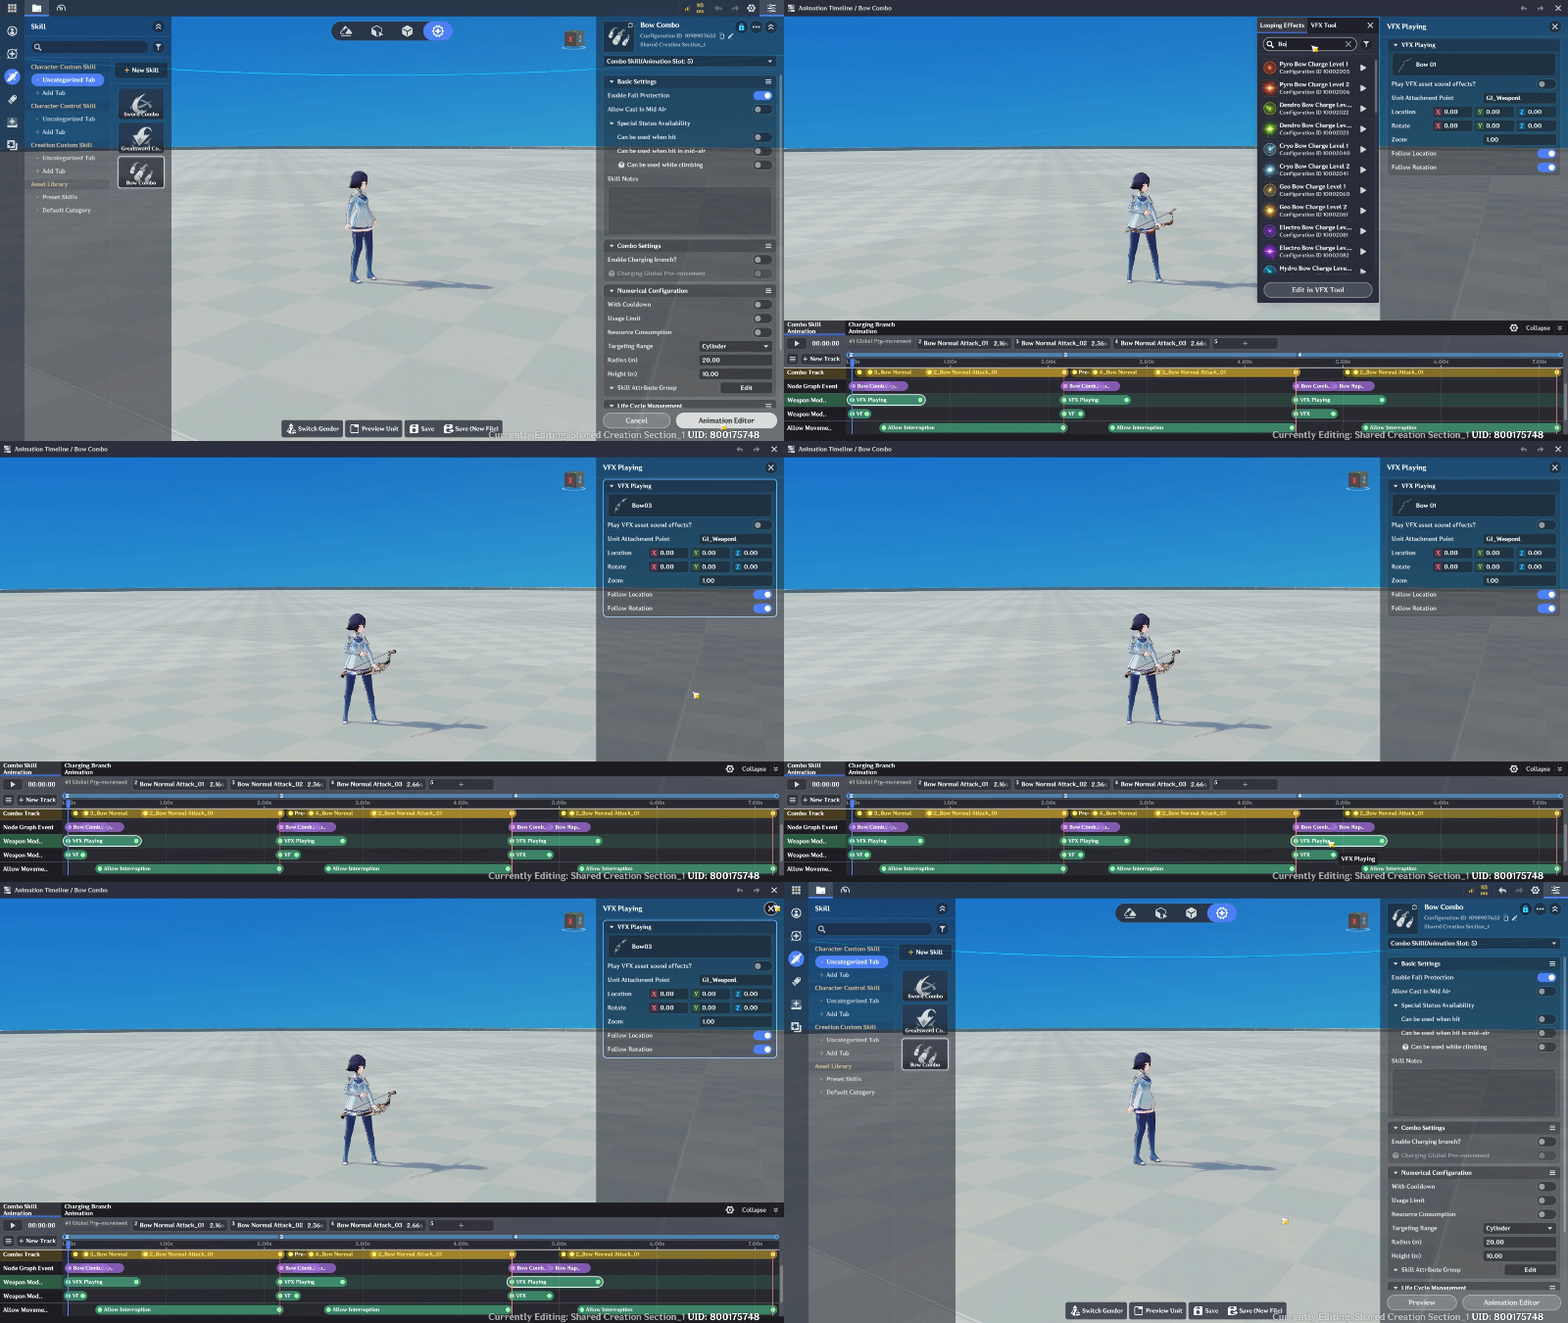
Custom Appearance of the Bow skill
Make sure each class has its own appropriate weapon and skill configuration. This will help distinguish their combat styles and give players more freedom to choose a playstyle that suits them.
Next, go to the Class section, select Combat, and open Normal Attack. Here, you can assign the appropriate skill to each class based on the skills you created or selected earlier. Make sure the assigned Normal Attack matches the weapon and combat style of each class.
*Repeat this process for all three classes so that Sword Master, Executioner, and Hunter each have their own corresponding Normal Attack skill.
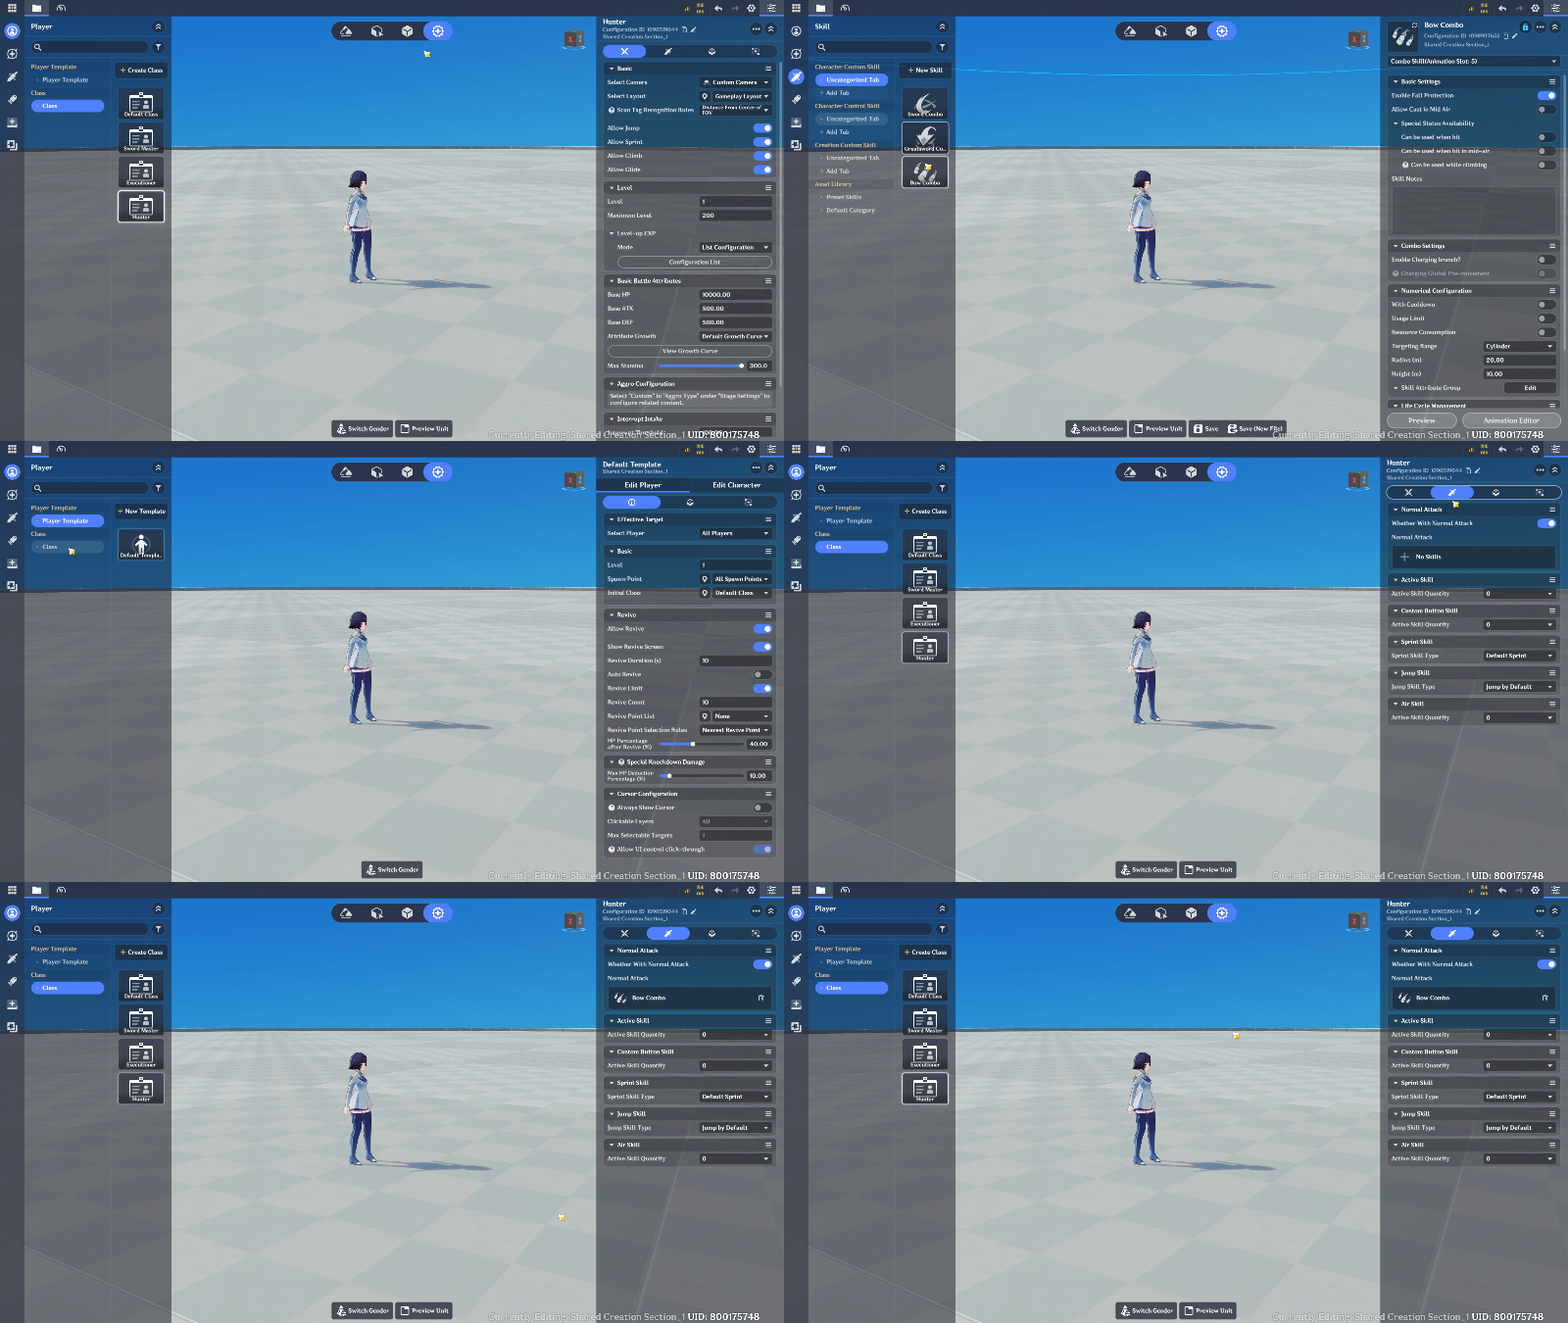
Add Skill to Class
Once all three classes are ready, we can connect them to the weapon selection system. When a player interacts with a weapon platform, the game will change the character's class to match the selected weapon.
This setup allows players to choose their preferred combat style before entering the dungeon, while also making it easier to expand the game with additional classes, weapons, and skills in the future.
2.2 Prepare the Weapon Selection Area
First, create a dedicated area where players can select their weapons before starting their adventure.
Prepare three weapon options and assign each one to a different weapon type:
- Sword: A balanced weapon for close-range combat.
- Claymore: A heavy weapon designed for powerful melee attacks.
- Bow: A ranged weapon that allows players to attack enemies from a distance.
You can use weapon displays, interactive objects, or a simple UI to present these choices to players.
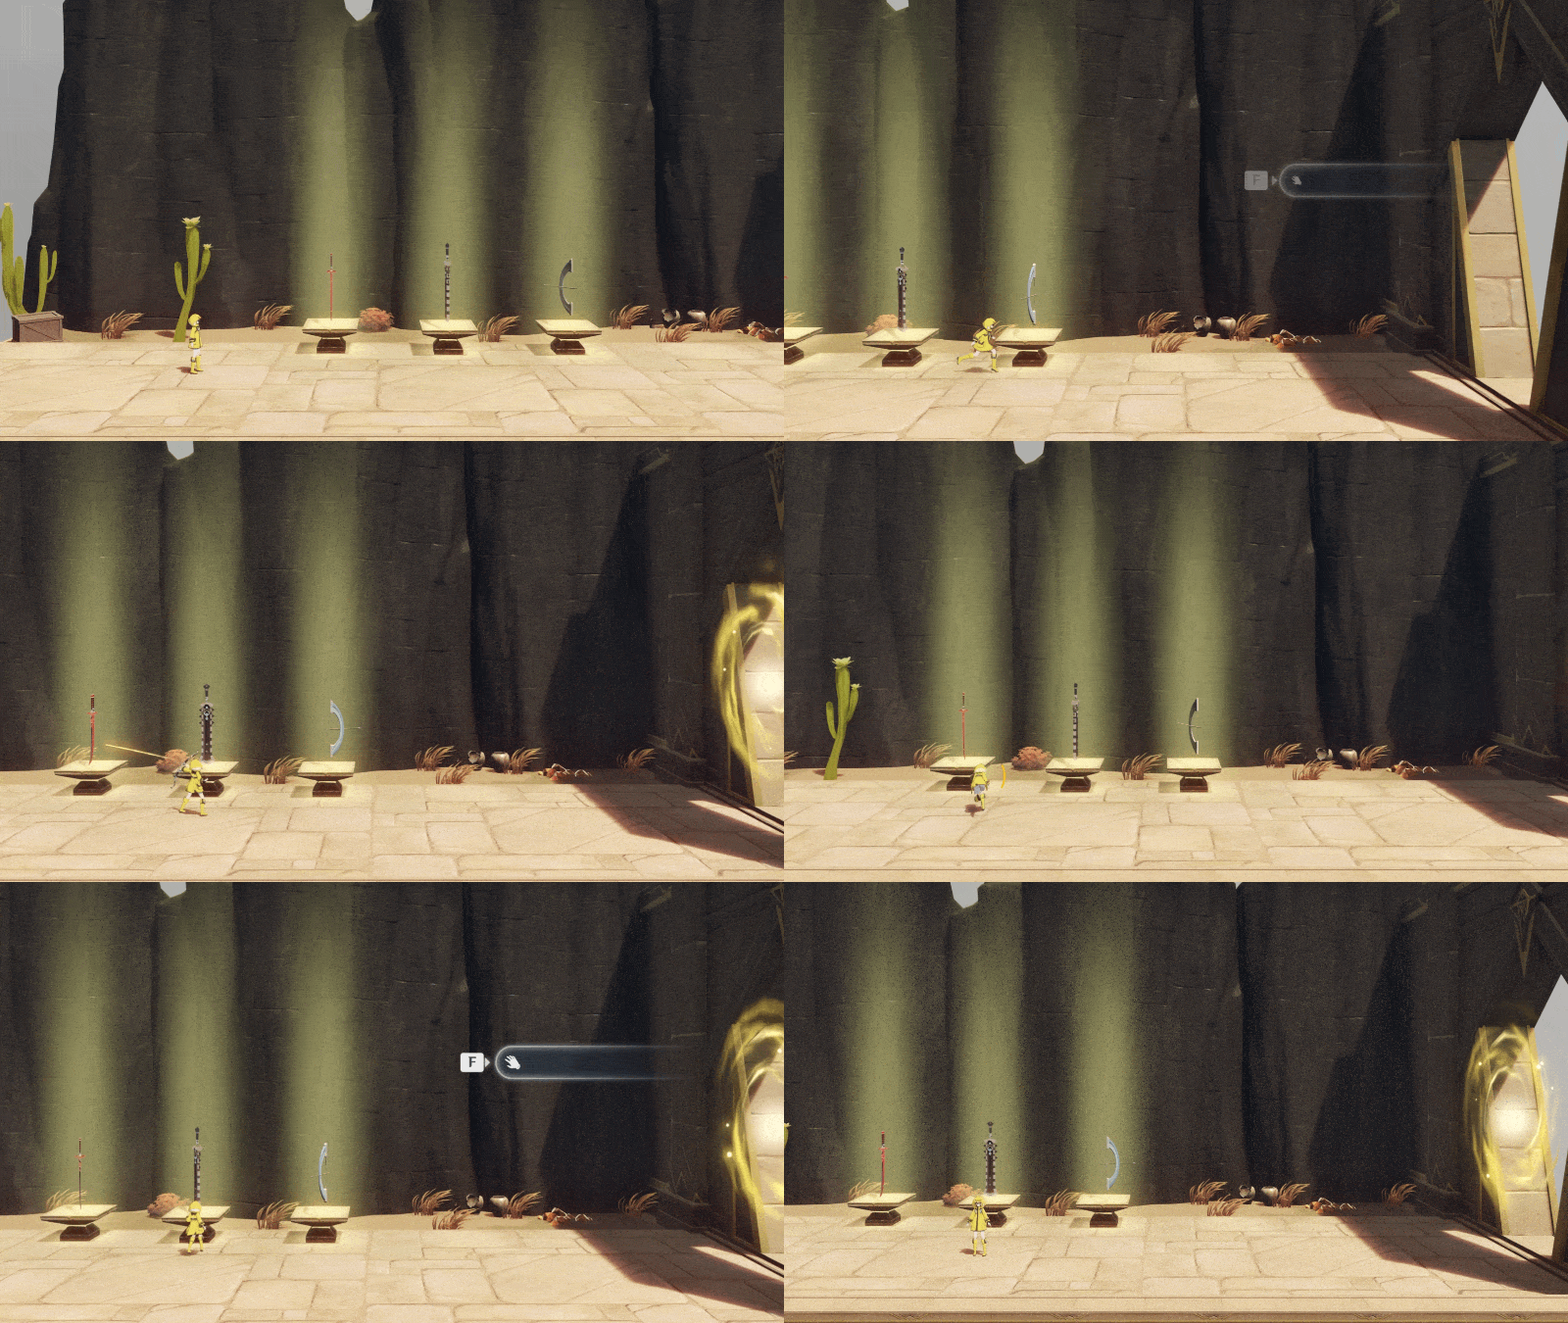
Weapon Selection
📝 Wonderland Guide:
Here, I use two objects to create the weapon display: a Weapon Object and a Weapon Platform.
1. First, the Weapon Object is used to display the weapon that the player can choose. I adjust its Native Collision settings to prevent unwanted physical interactions with the player or other objects. I also add a Basic Motion Device with a continuous rotating movement to make the weapon display more dynamic and immersive.
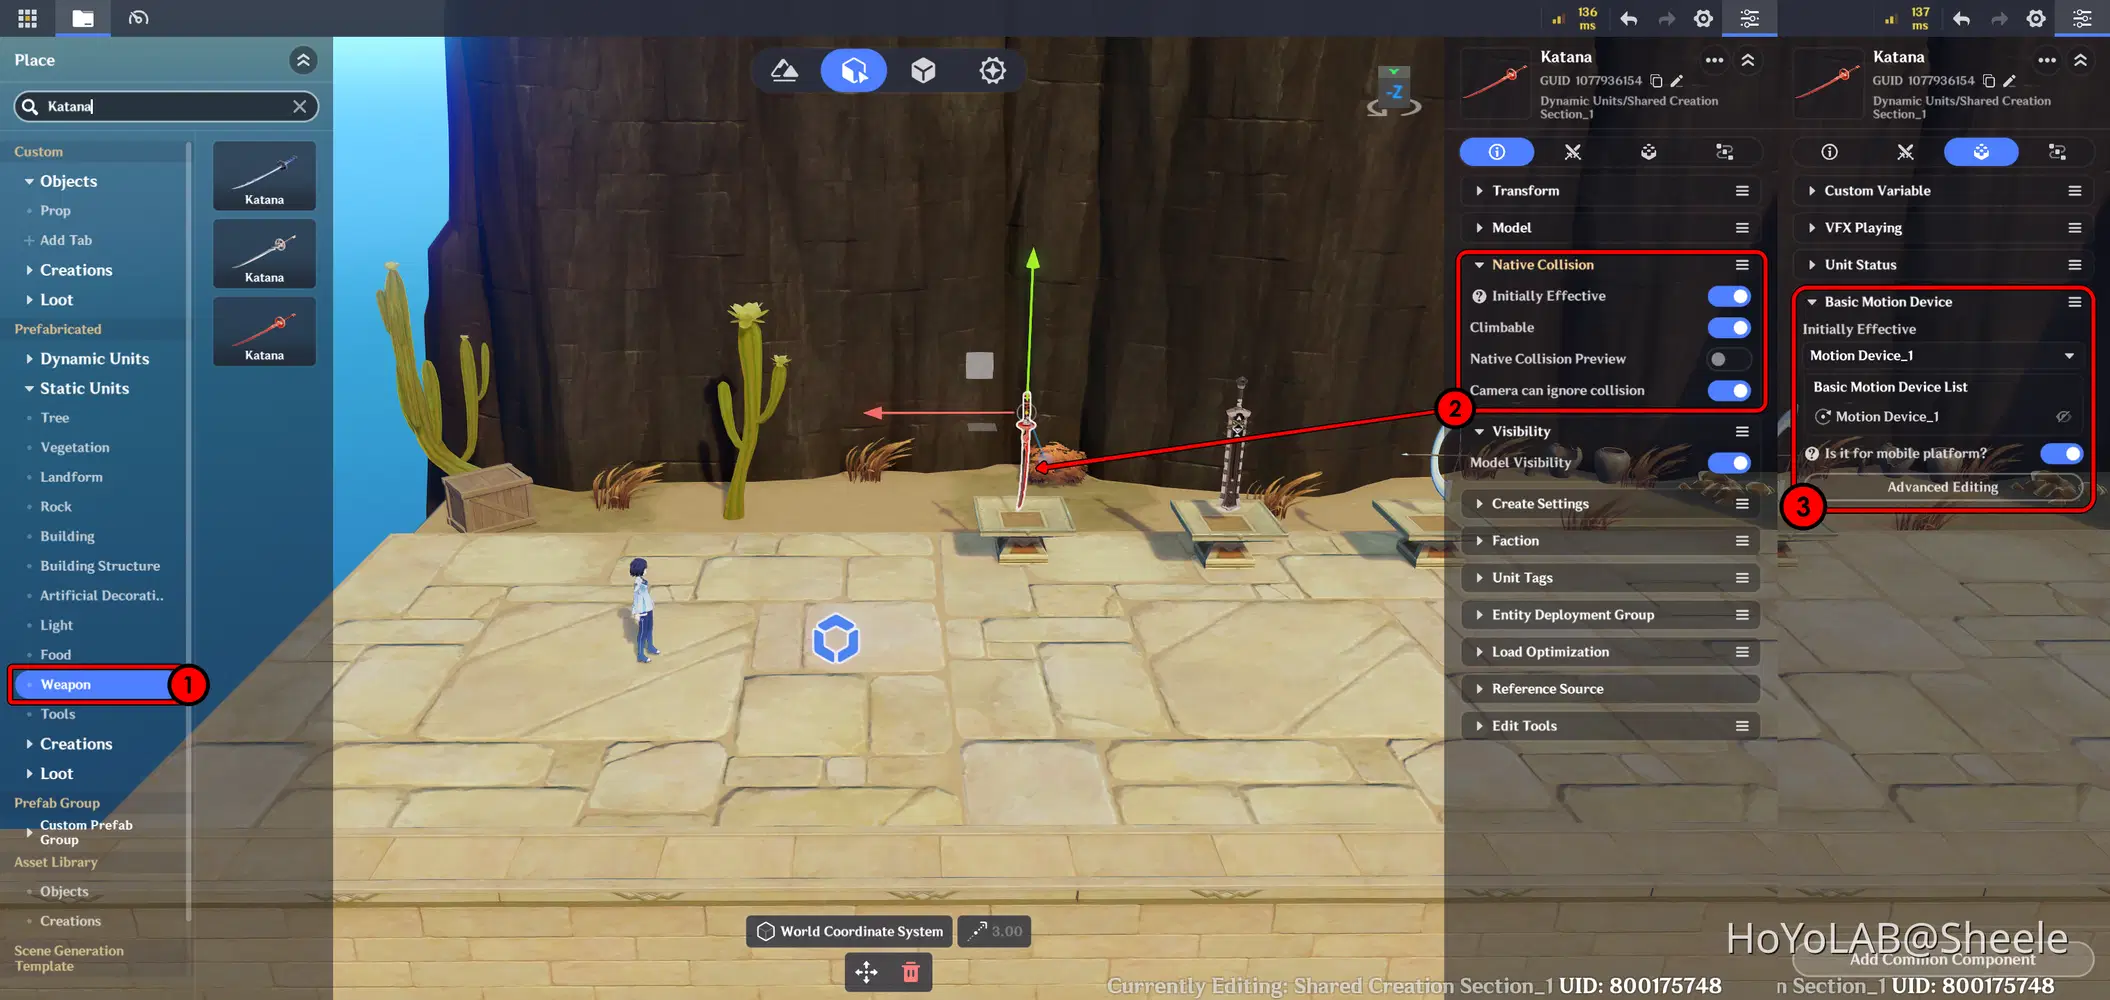
Weapon Motion
Motion Device Setup
- Motion Type : Uniform Rotation Motion
- Effective Duration(s) : 999999.00
- Relative Rotation A.O : X.0 - Y.0 - Z.20
- Angular Velocity : 100
With this setup, the weapon continuously rotates around its axis, making the display look more dynamic and visually appealing.
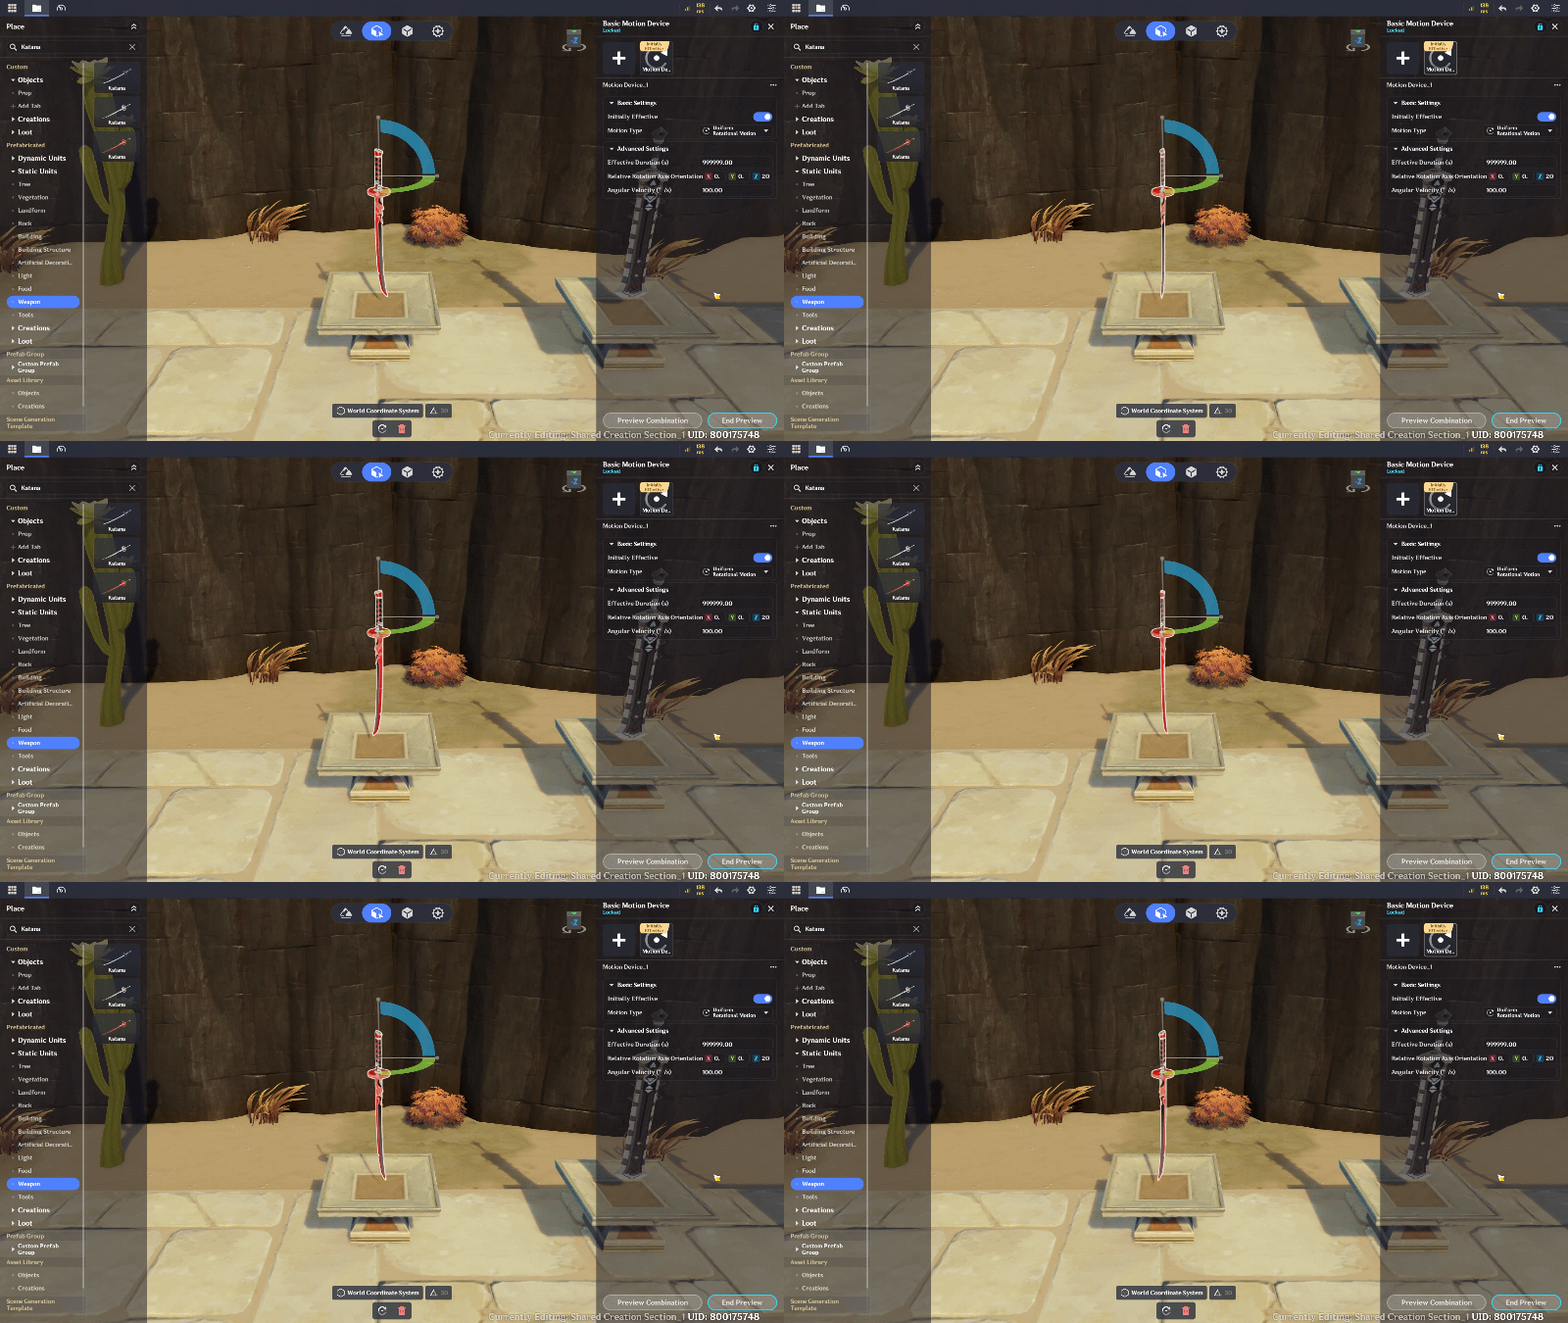
Basic Motion Device Setup
2. Next Weapon Platform, I configure the Native Collision settings to ensure that it does not interfere with the player's movement while allowing interaction. I then add a VFX Playing component with a glowing effect to make the platform stand out and indicate that it is an interactive object and part of the game's mechanics.
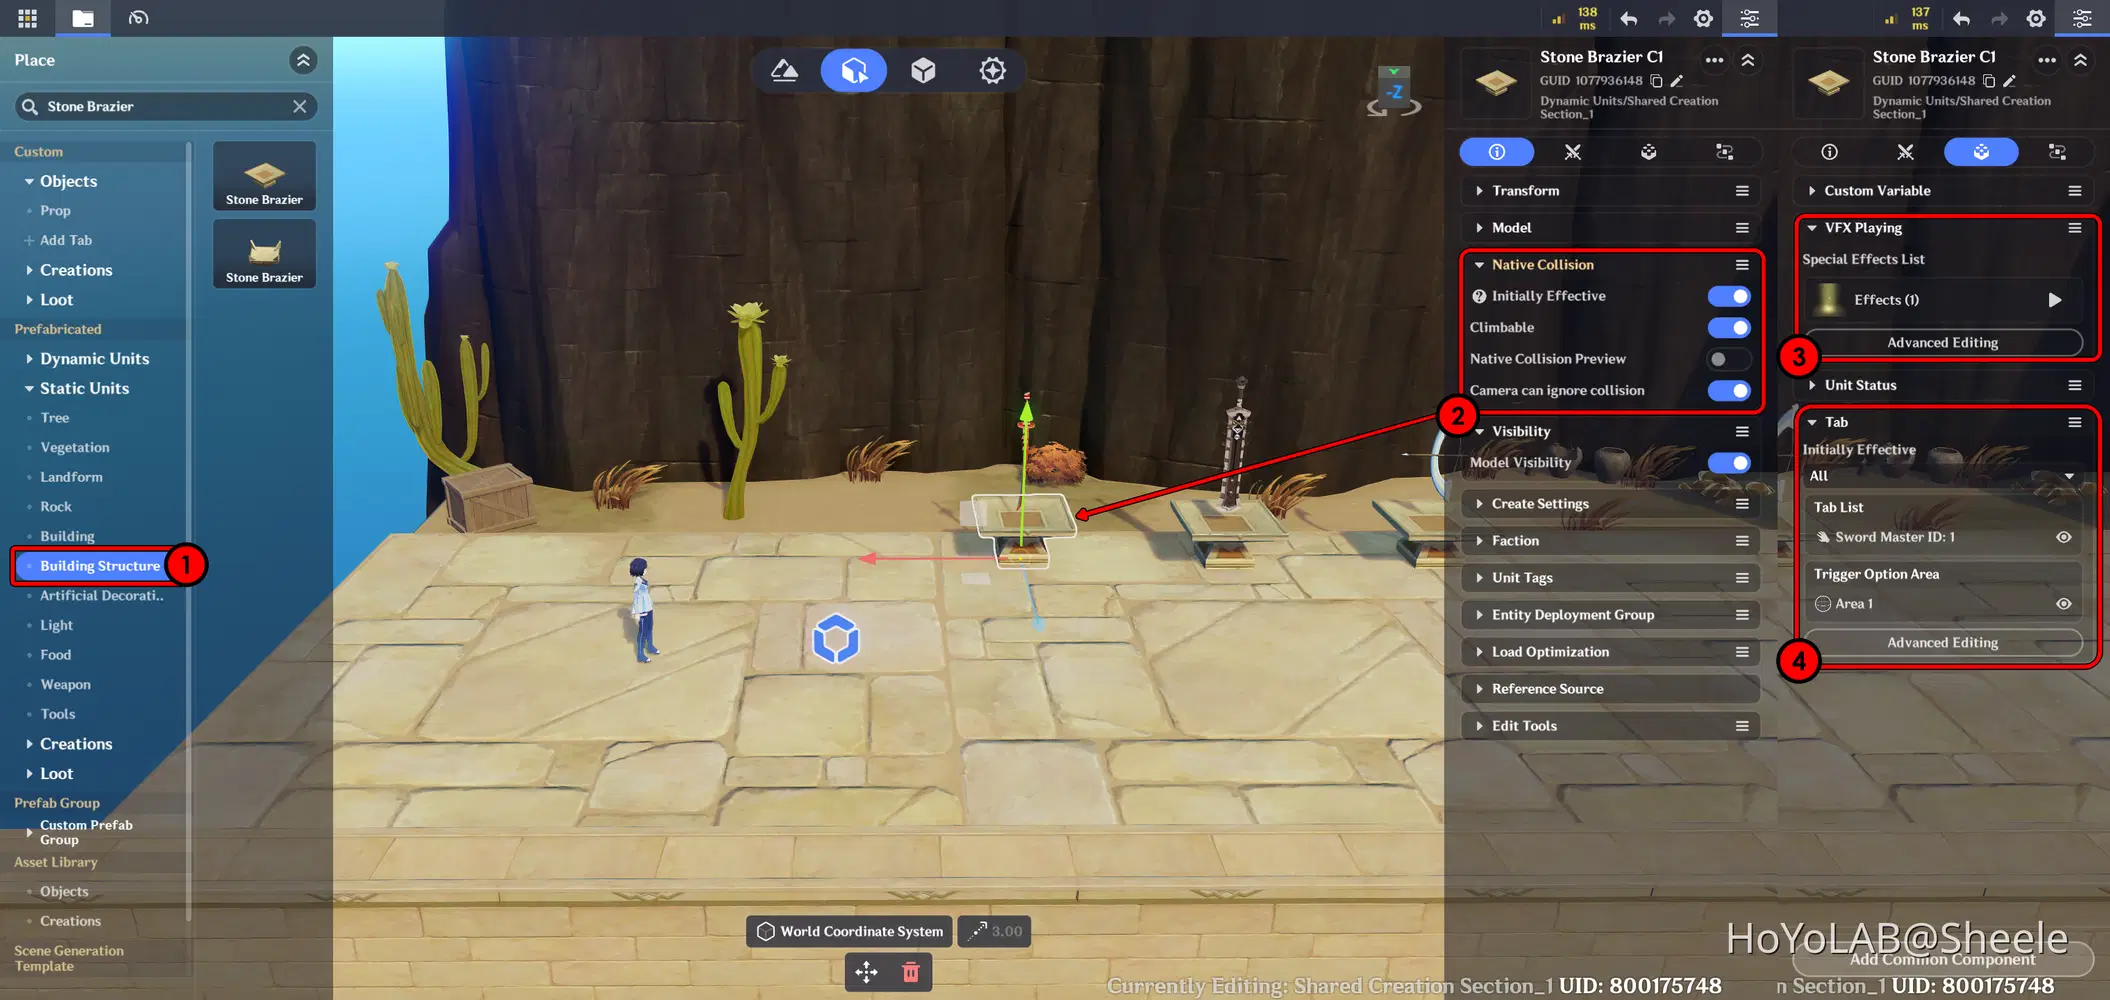
Weapon Platform
For the VFX Playing, select Looping Effect to make the visual effect play continuously without stopping, keeping the platform highlighted while the player is nearby. Next, choose your desired VFX asset and adjust its position so that the effect is properly aligned with the object.
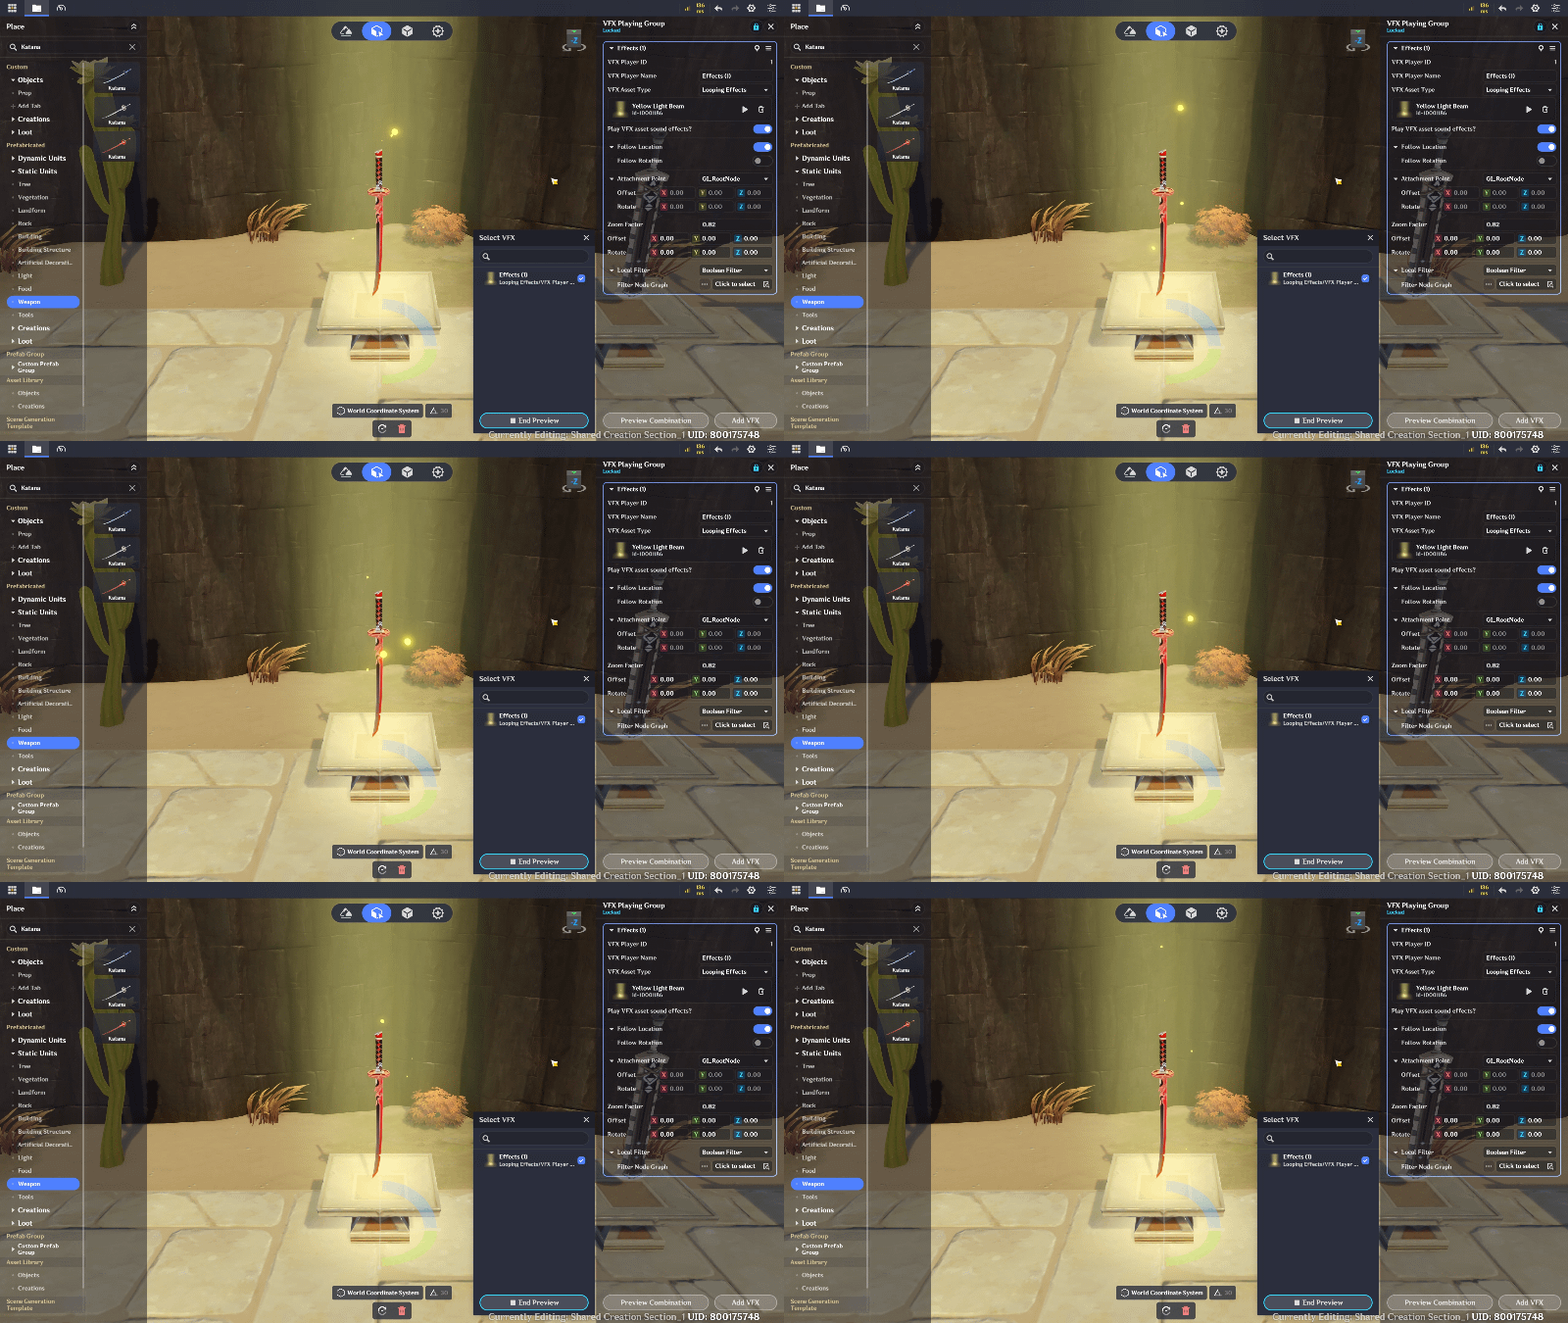
VFX Playing Setup
Next, configure the Tab component by selecting an icon and giving it a suitable name. For example, I use Sword Master to indicate that this option is intended for players who want to use a sword.
Then, add a Trigger Option Area and make sure its detection area is slightly larger than the weapon platform. This gives players enough space to interact with the Tab without needing to stand in an exact position. For this setup, I use the Sphere trigger area type to make interaction easier from different directions.
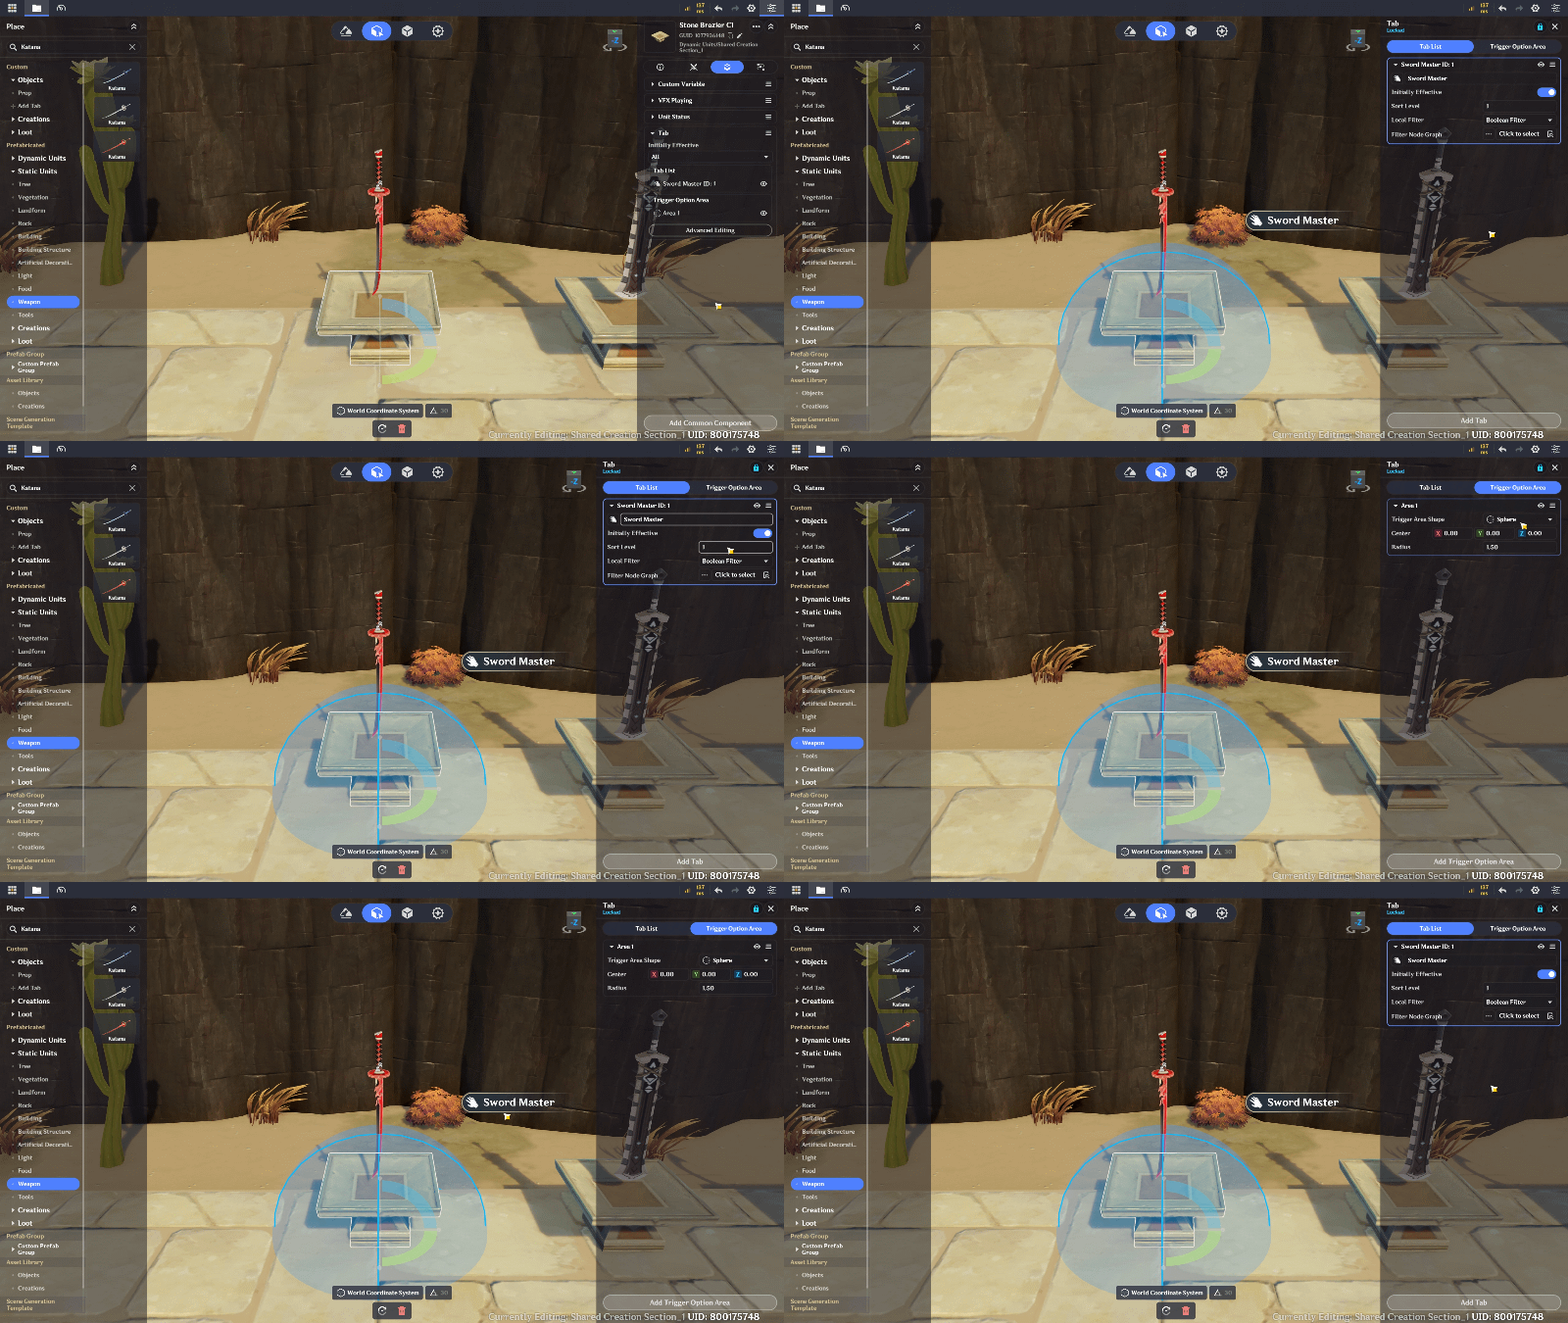
Interaction Setup
* Repeat the same setup for the remaining weapons, adjusting their visuals, platform effects, and Tab interaction settings accordingly.
2.3 Create the Weapon Selection Notification
Next, create a simple notification UI to inform players when they successfully select a weapon.
When a player interacts with one of the weapon platforms, display a notification showing the selected weapon's name. For example, "Sword Master Selected!", "Claymore Master Selected!", or "Bow Master Selected!".
📝 Wonderland Guide:
You can also use a Text Bubble on the character to display the notification directly above them. Whenever the player successfully changes their weapon or character class, the corresponding Text Bubble will appear to confirm their selection. This makes the weapon selection process more interactive and gives players clear feedback about their choice.
- Go to Combat Preset, select Edit Character, and add a Text Bubble component. Create three different Text Bubbles to represent the three available weapons or character classes: Sword Master (Sword), Executioner (Claymore), and Hunter (Bow). Each Text Bubble will display a corresponding notification when the player selects that weapon or class.
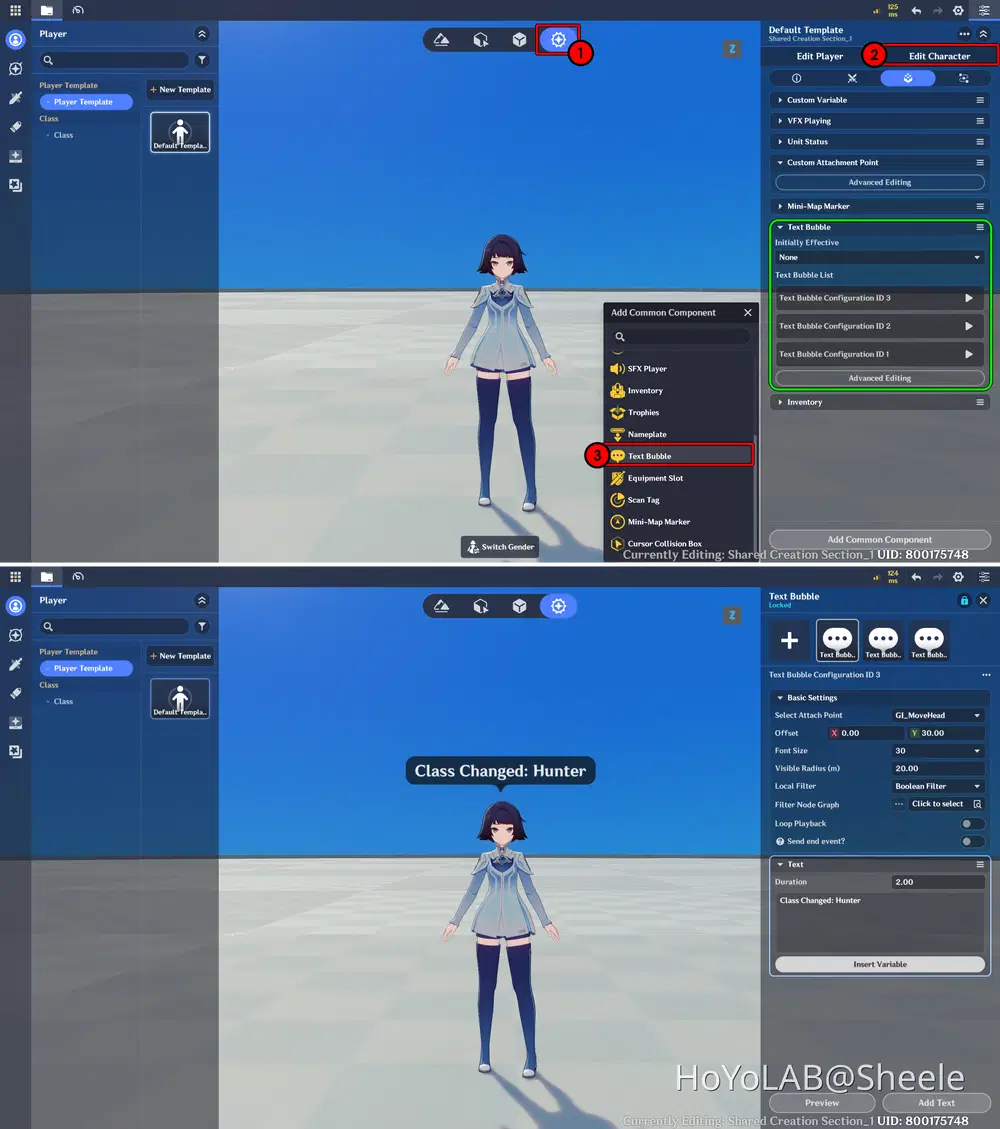
Add Text Bubble to Character
2.4 Save the Player's Weapon Choice
Now, set up the logic that handles weapon selection whenever a player interacts with a weapon platform.
The basic logic should work as follows:
- The player interacts with one of the available weapon platforms.
- The game checks which weapon platform the player has interacted with.
- Based on the selected platform, the game updates the player's character class to the corresponding weapon class: Sword Master, Executioner, or Hunter.
- The game displays a Text Bubble notification to confirm the selected weapon, and Activate Variable Gate for next area.
Repeat this logic for all three weapon platforms to ensure that each interaction assigns the correct character class and weapon selection.
📝 Wonderland Guide:
Create a new Node Graph in the Server Node Graph. When the player presses the Tab on a weapon platform, the system checks which platform was selected, assigns the corresponding character class, updates variable value to unlock access to the next area, and displays a Text Bubble notification to confirm the selection.
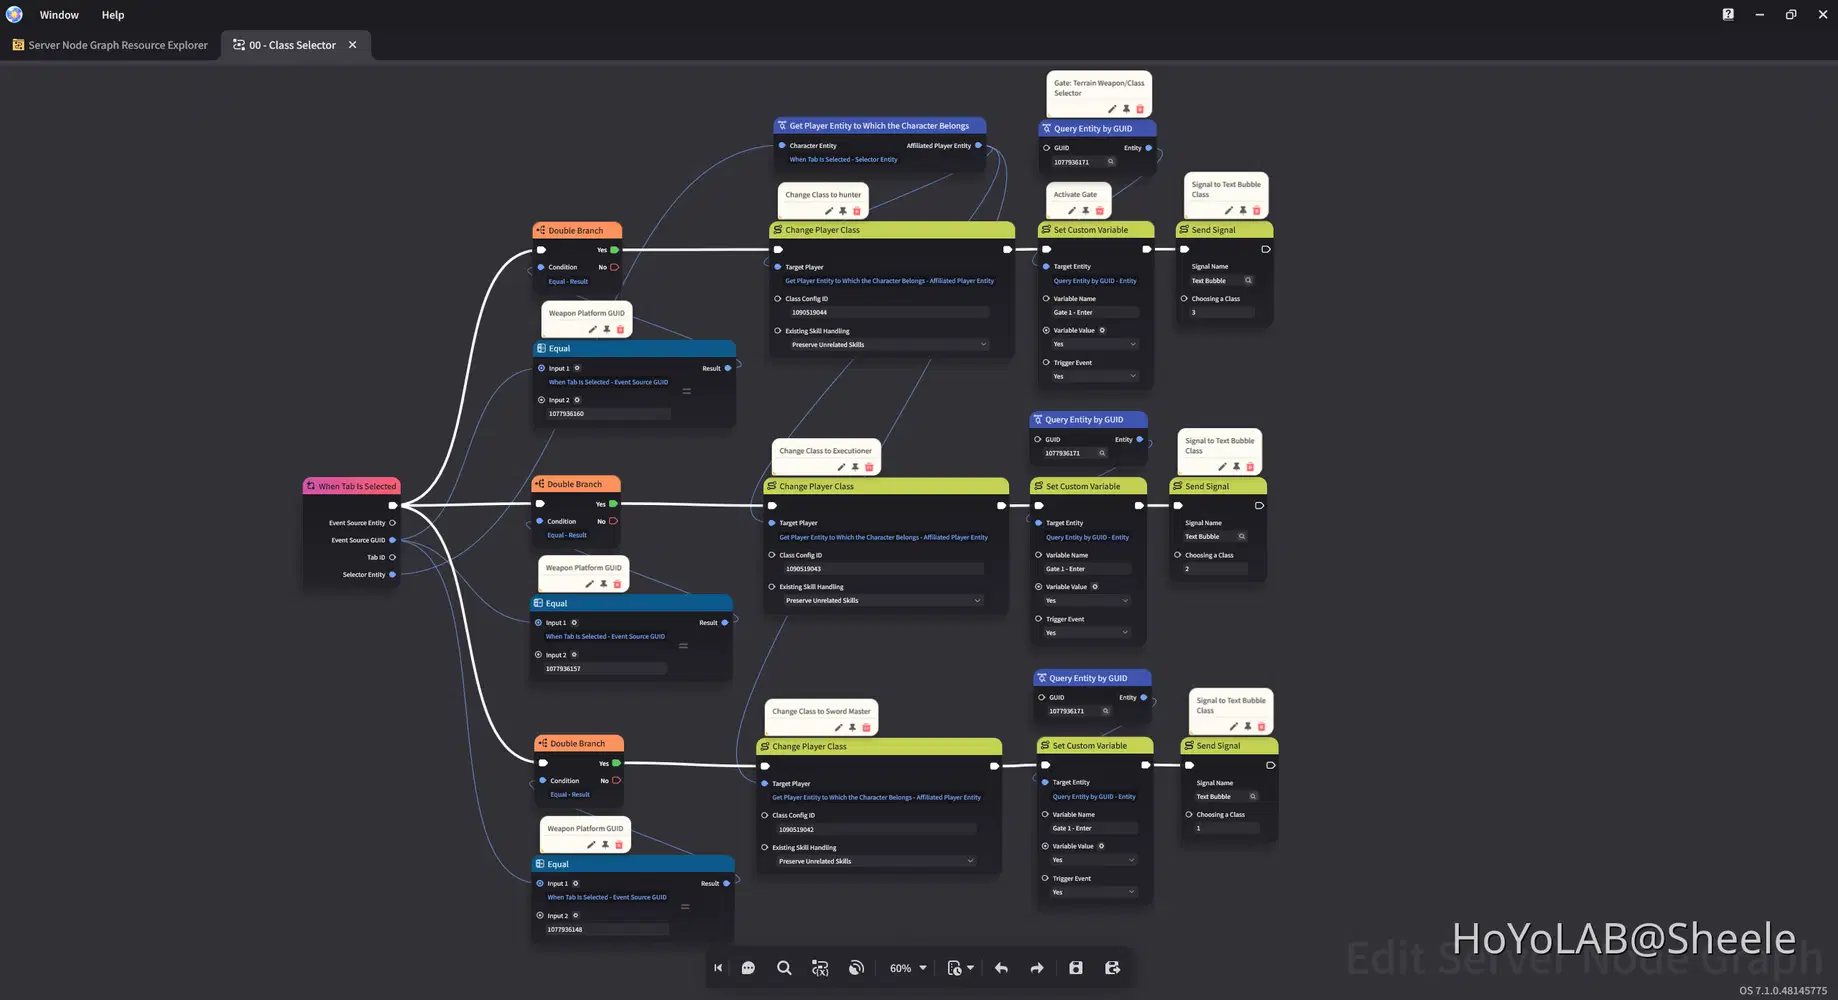
Weapon Selection Node Graph
Create a new Node Graph to monitor the signal sent by the previous Node Graph. When the signal is received, activate the corresponding Text Bubble to notify the player which weapon they have selected.
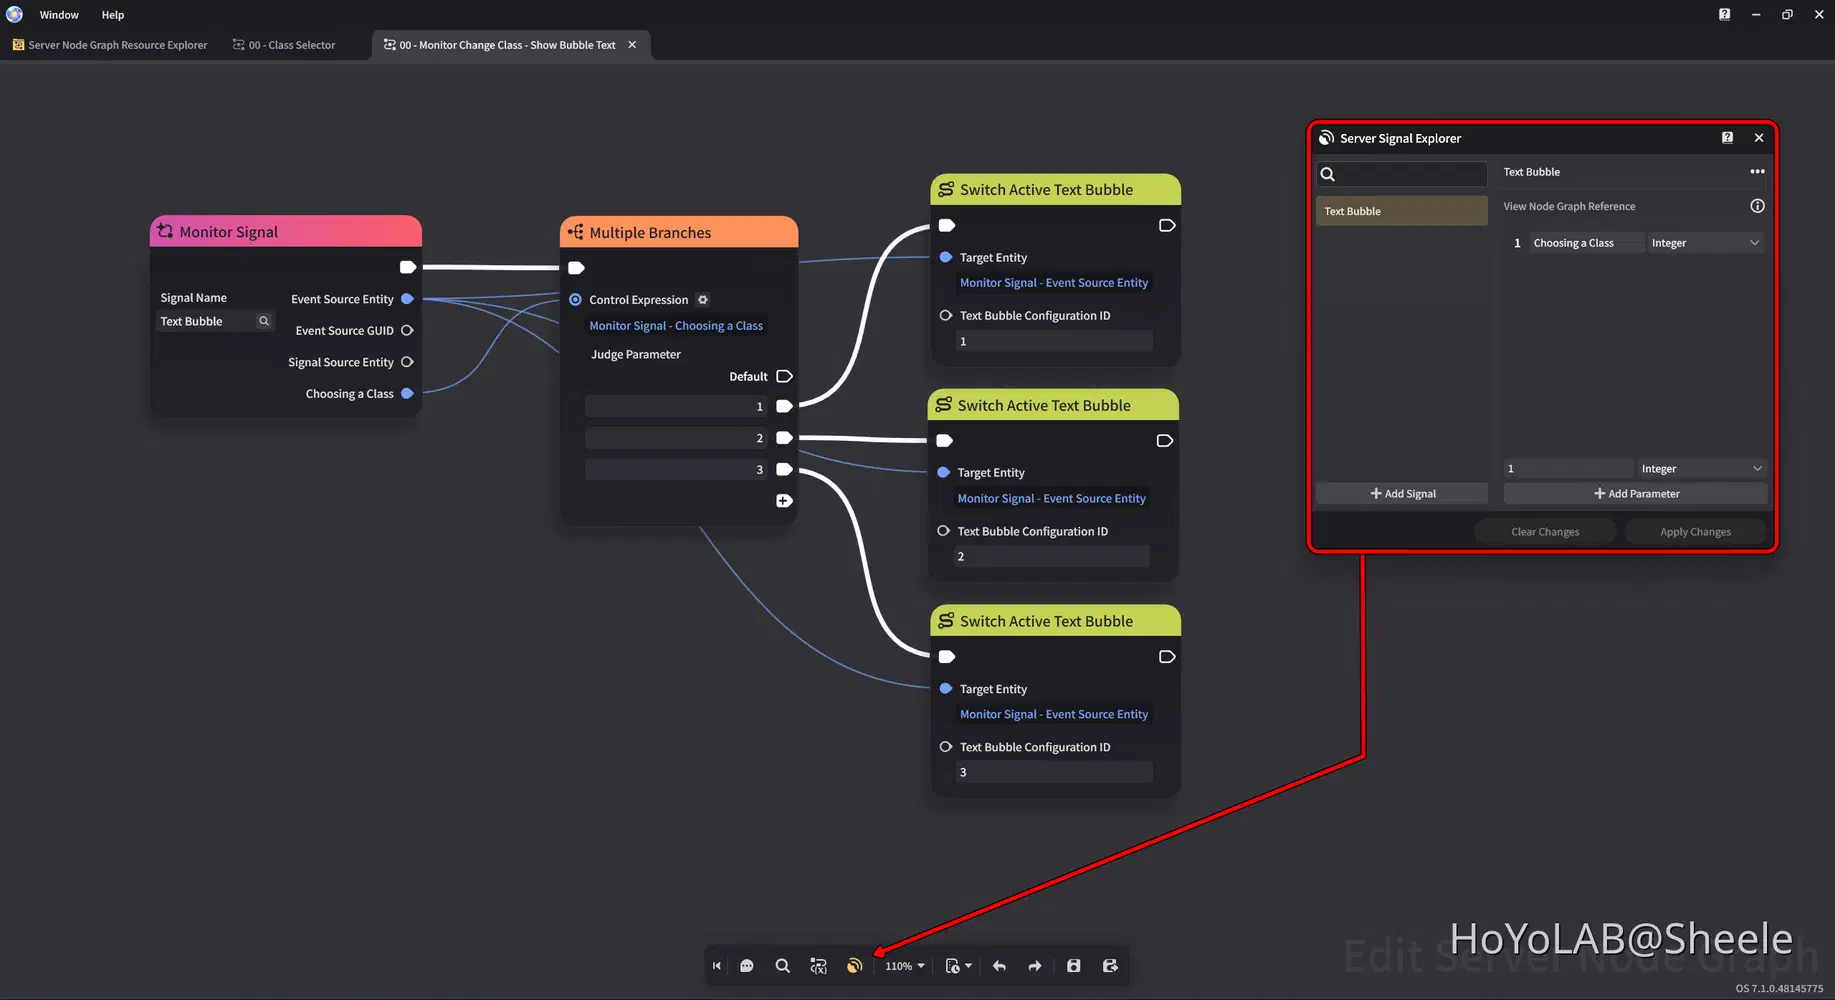
Text Bubble Monitor Node Graph
Next, assign the Node Graph to each of the weapon platforms you created earlier.
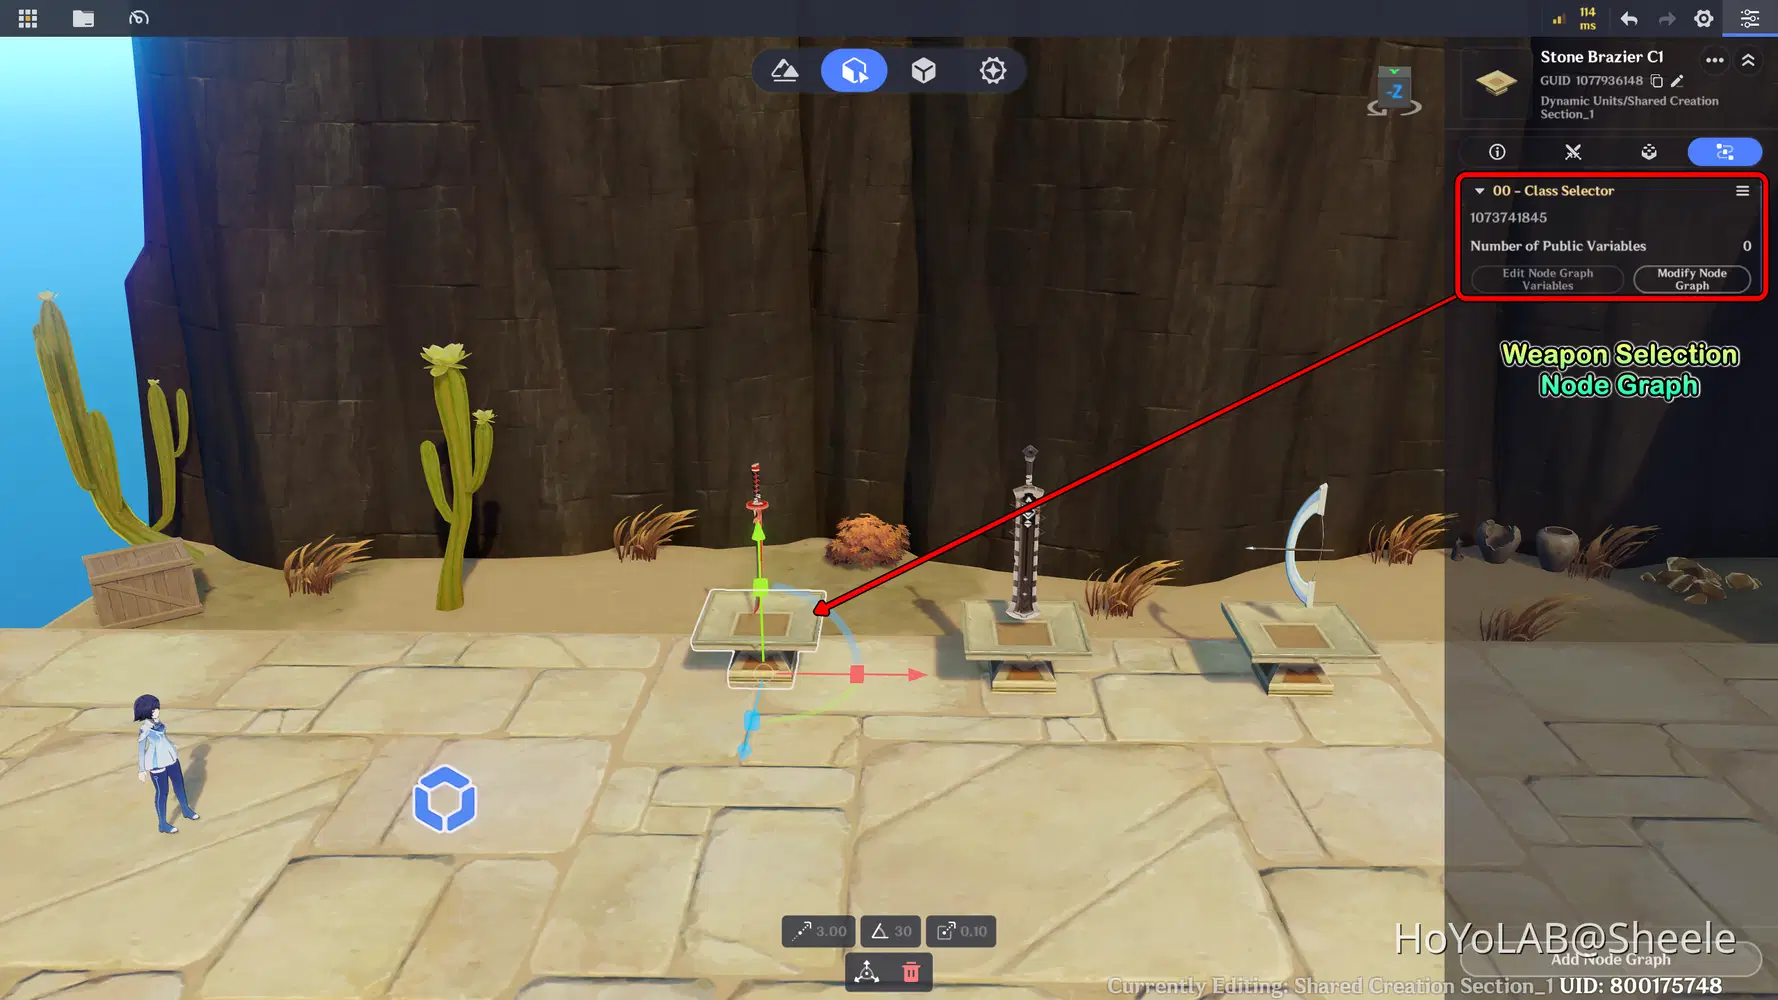
Platform Node Graph for Weapon Selection
For the Node Graph Monitor, assign to the player character to enable the Text Bubble.
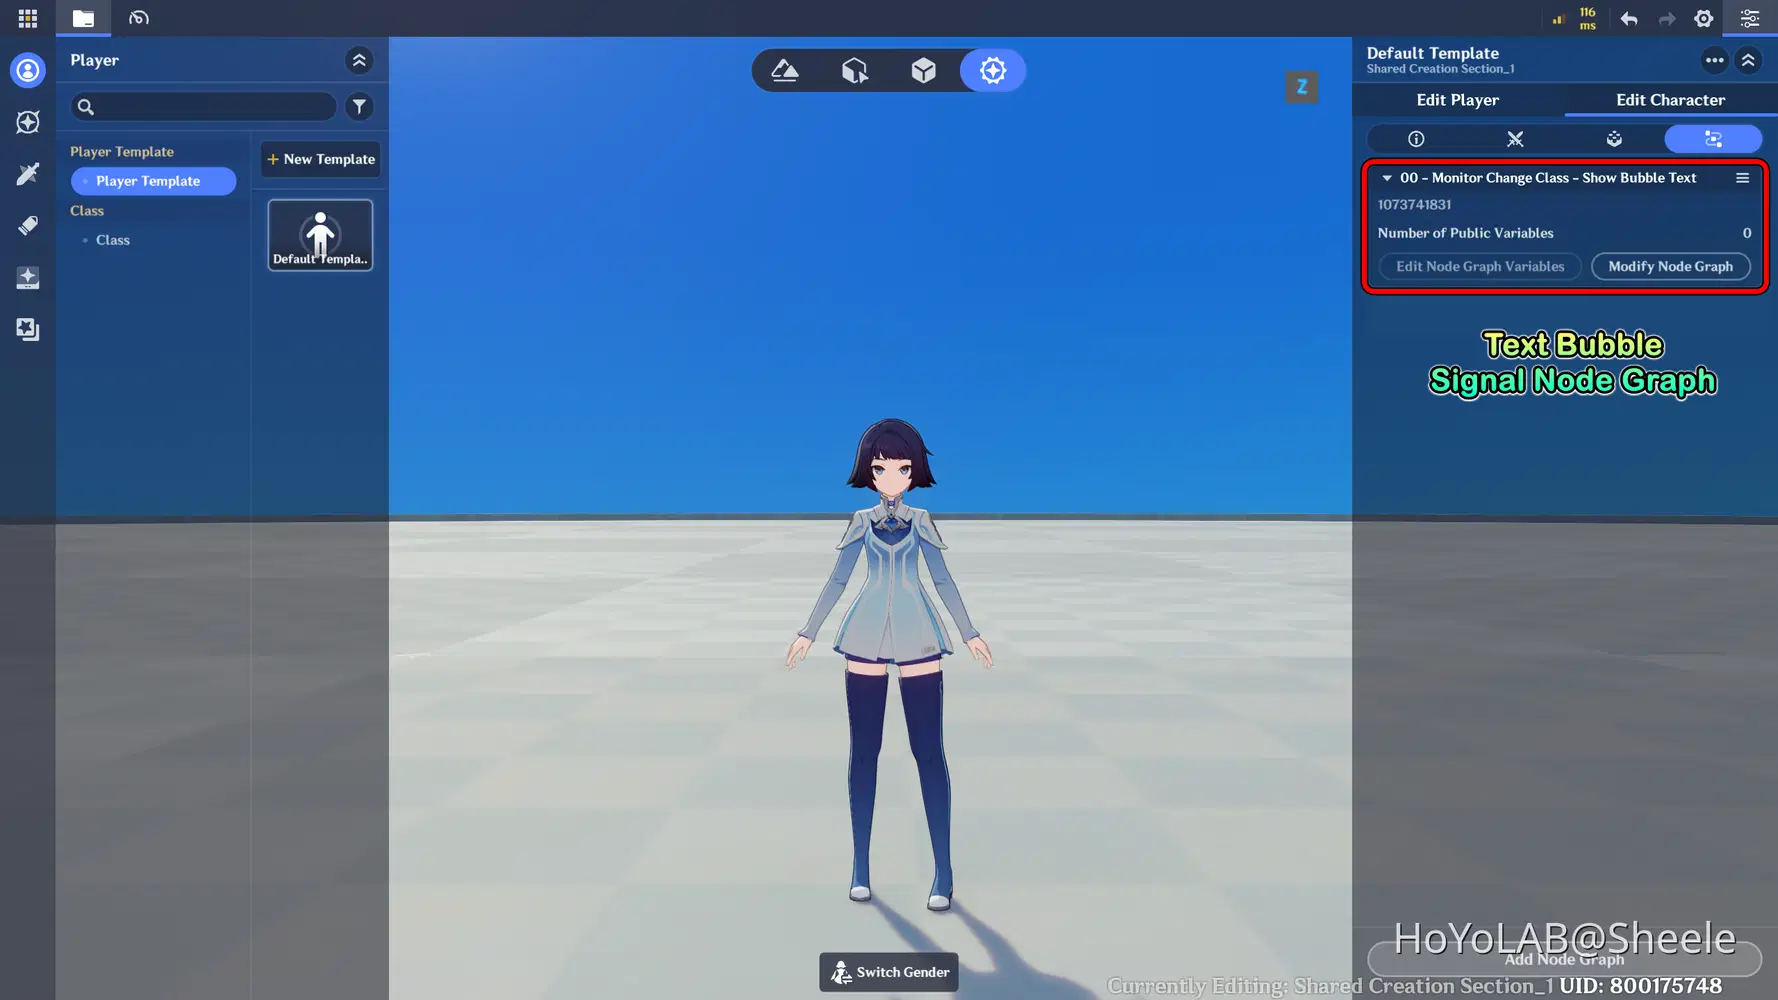
Monitor Node Graph Location
2.5 Enter the Dungeon Area
After choosing a weapon, players can interact with the dungeon entrance or portal to begin their adventure.
Before allowing them to proceed, check whether a weapon has been selected. If no weapon has been selected, ask the player to choose one first.
📝 Wonderland Guide:
First, I create a Gate Object that will serve as the entrance to the dungeon. This object will act as the main interaction point for players before starting their adventure. We will add several components to the gate to handle its appearance, interaction, and dungeon entry logic.
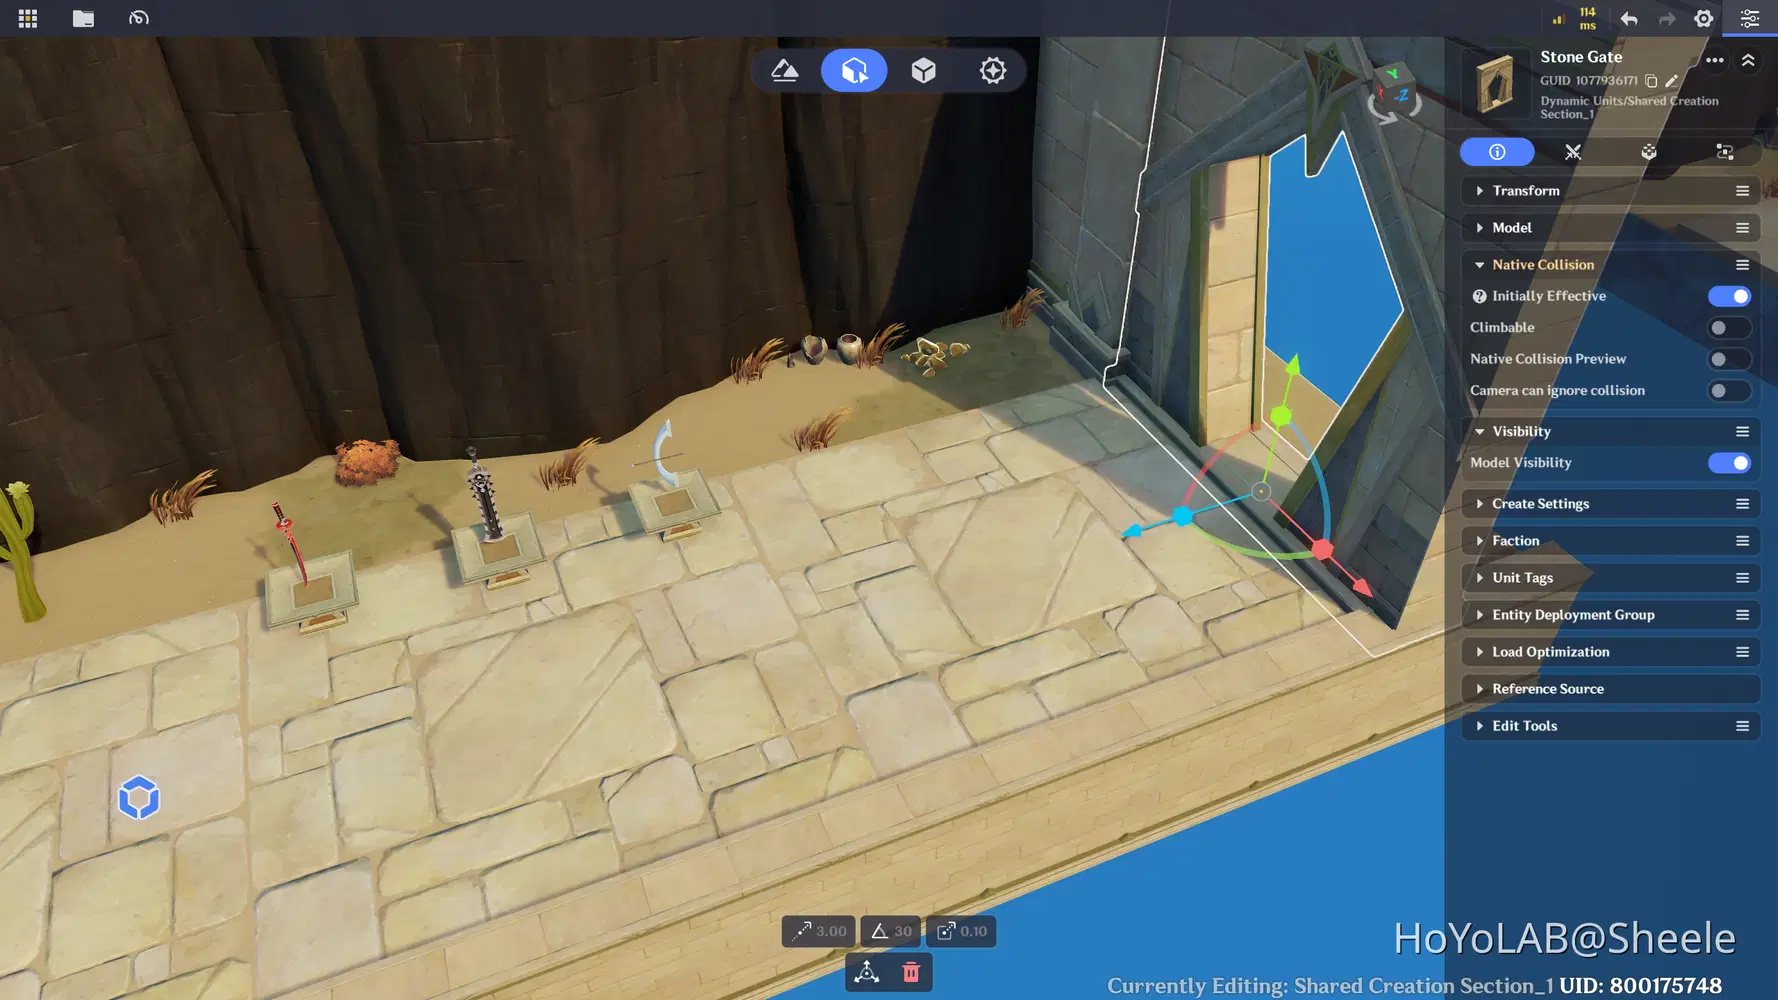
Create Dungeon Gate
The first component is a Boolean Variable, which will be used to control whether the gate is enabled or disabled. This variable determines whether the gate's interaction function (Tab) and visual effects can be activated.
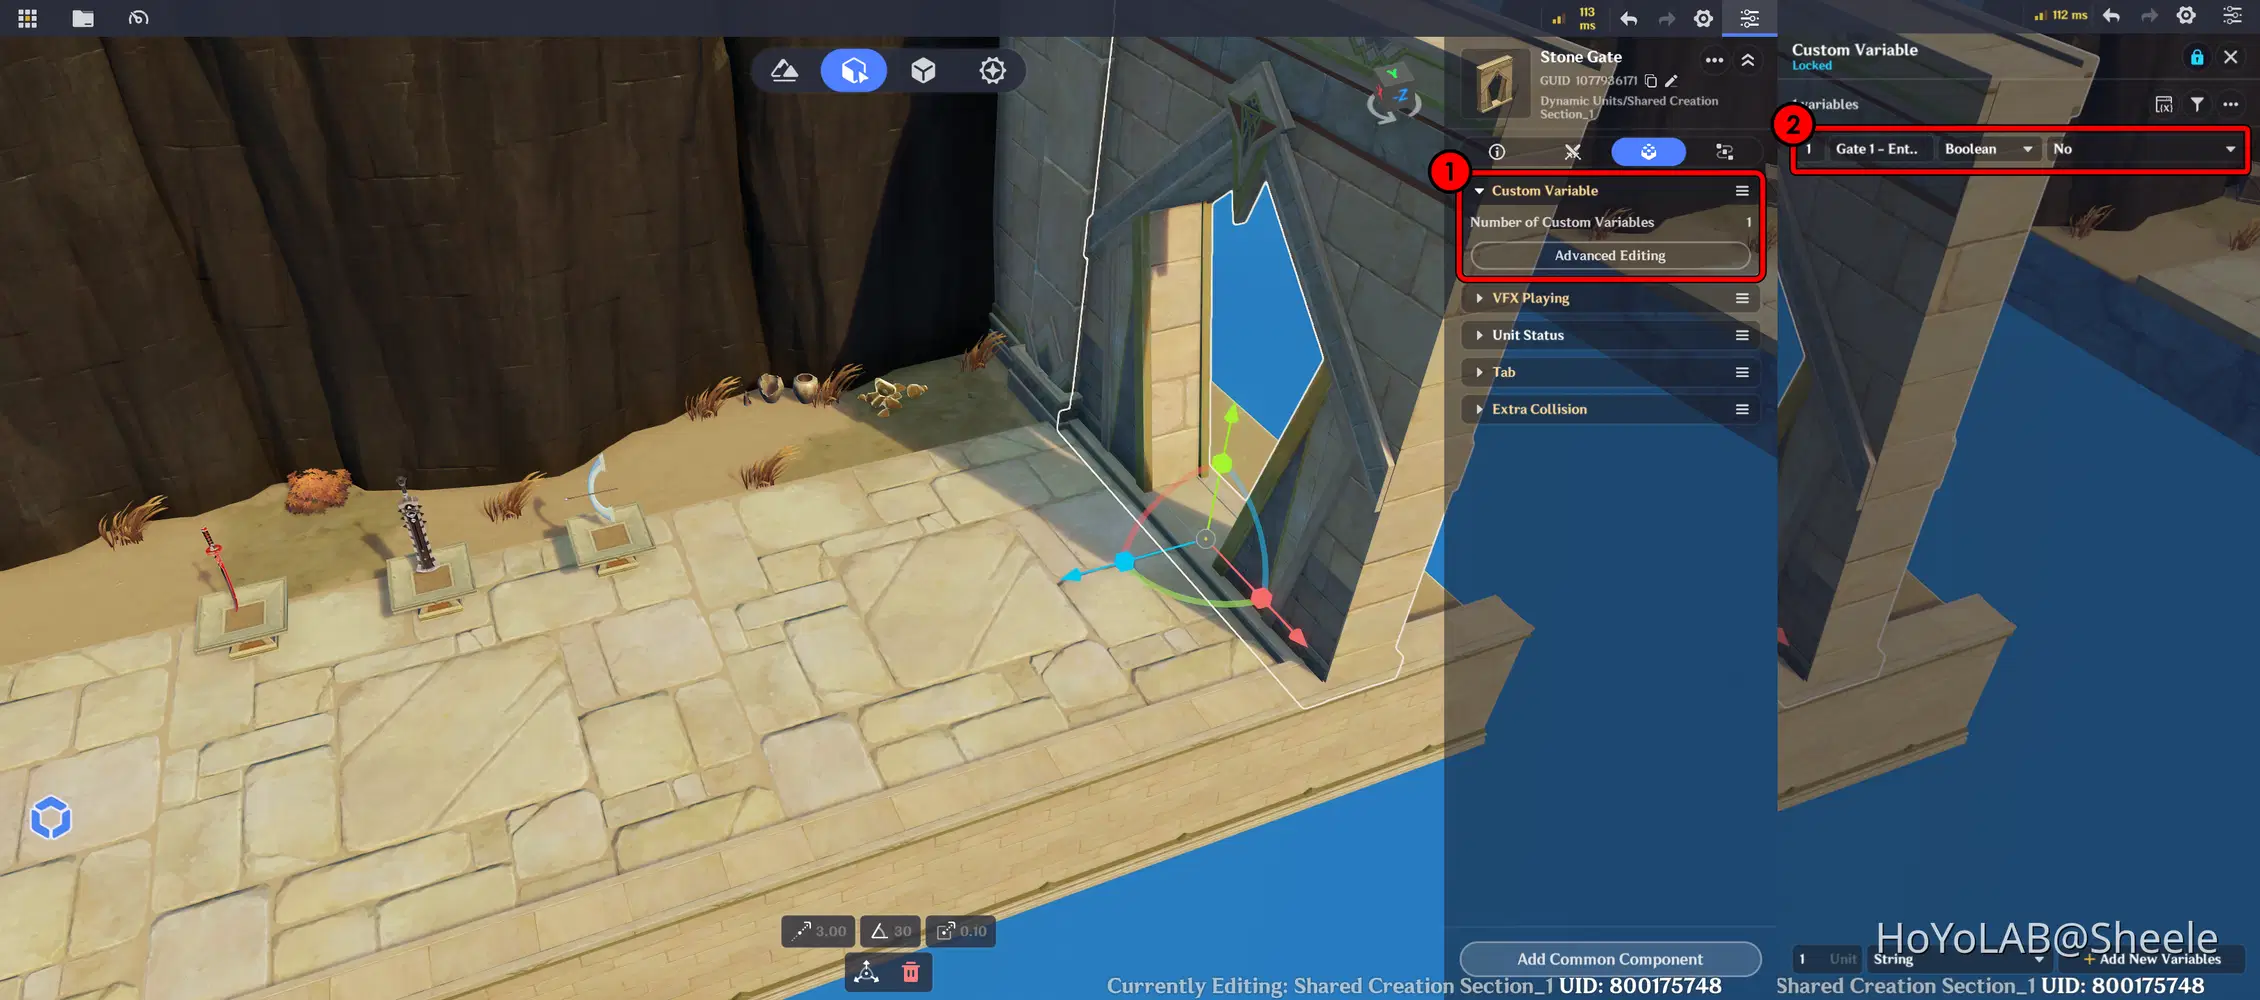
Custom Variable
Open Miliastra Sandbox and navigate to Client Node Graph. Create a new Node Graph inside the Boolean folder, add the required nodes, and assign the Boolean variable you created earlier.
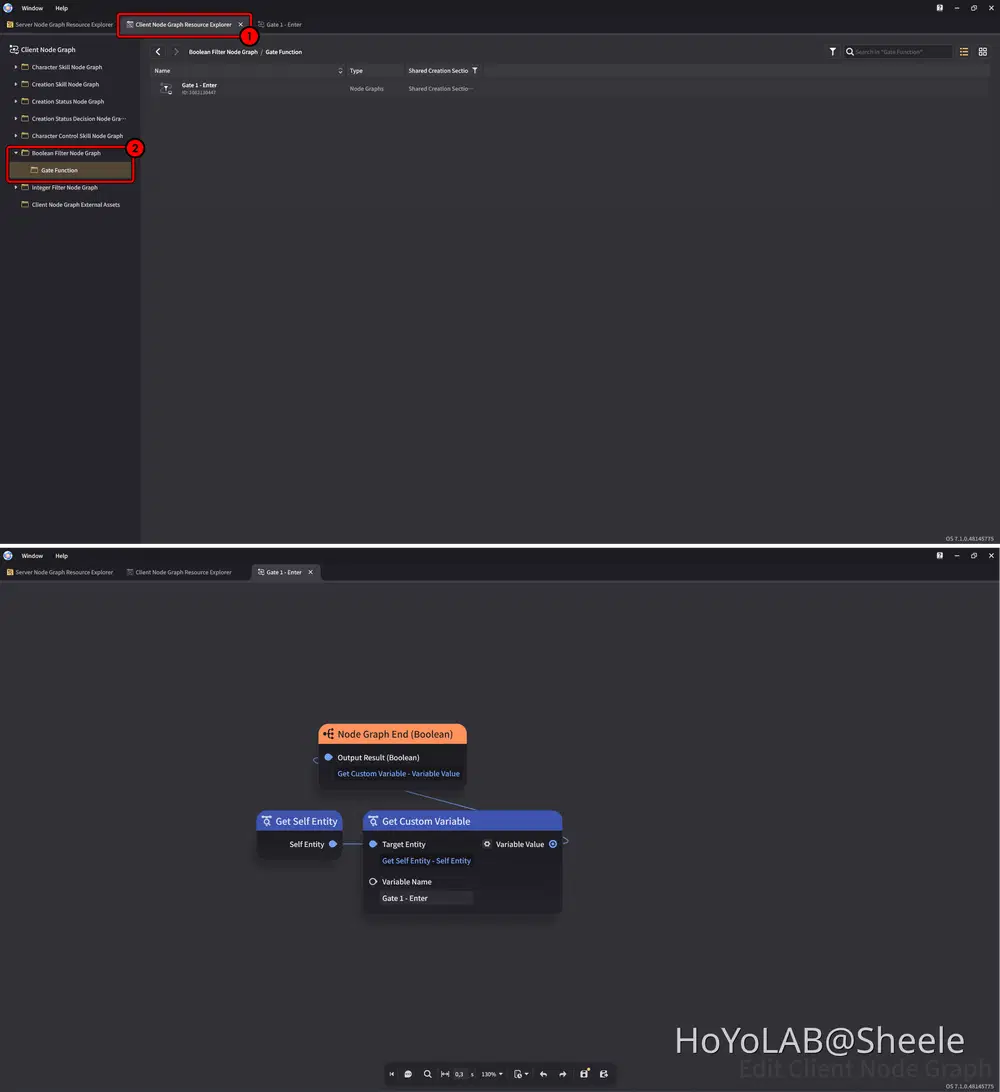
Boolean Filter Node Graph
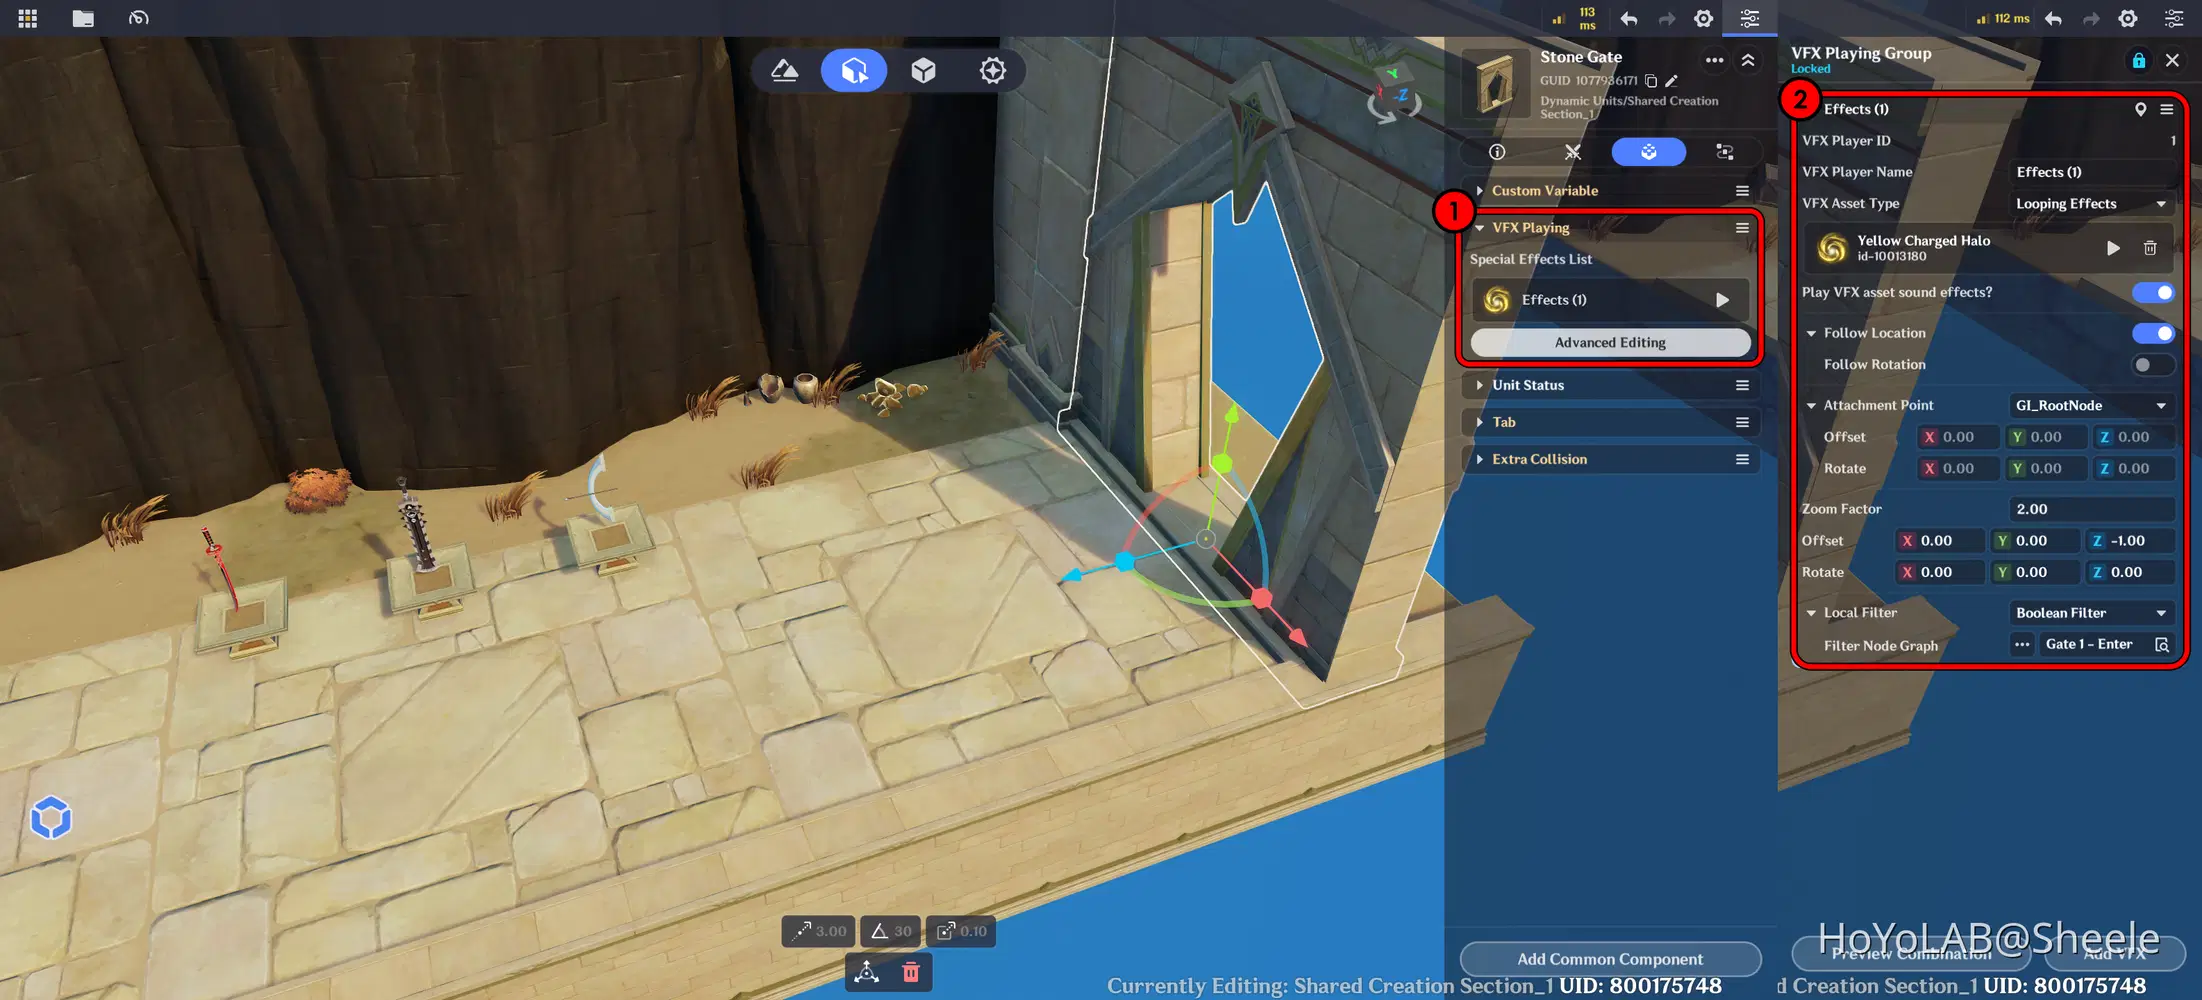
The second component is VFX Playing. Set its effect type to Looping and choose your desired VFX asset. Then, under Filter Node Graph, assign the Boolean Node Graph you created earlier to control when the visual effect is activated.
The third component is Tab, which allows players to interact with the gate. Under Filter Node Graph, assign the Boolean Node Graph you created earlier to control when the interaction becomes available.
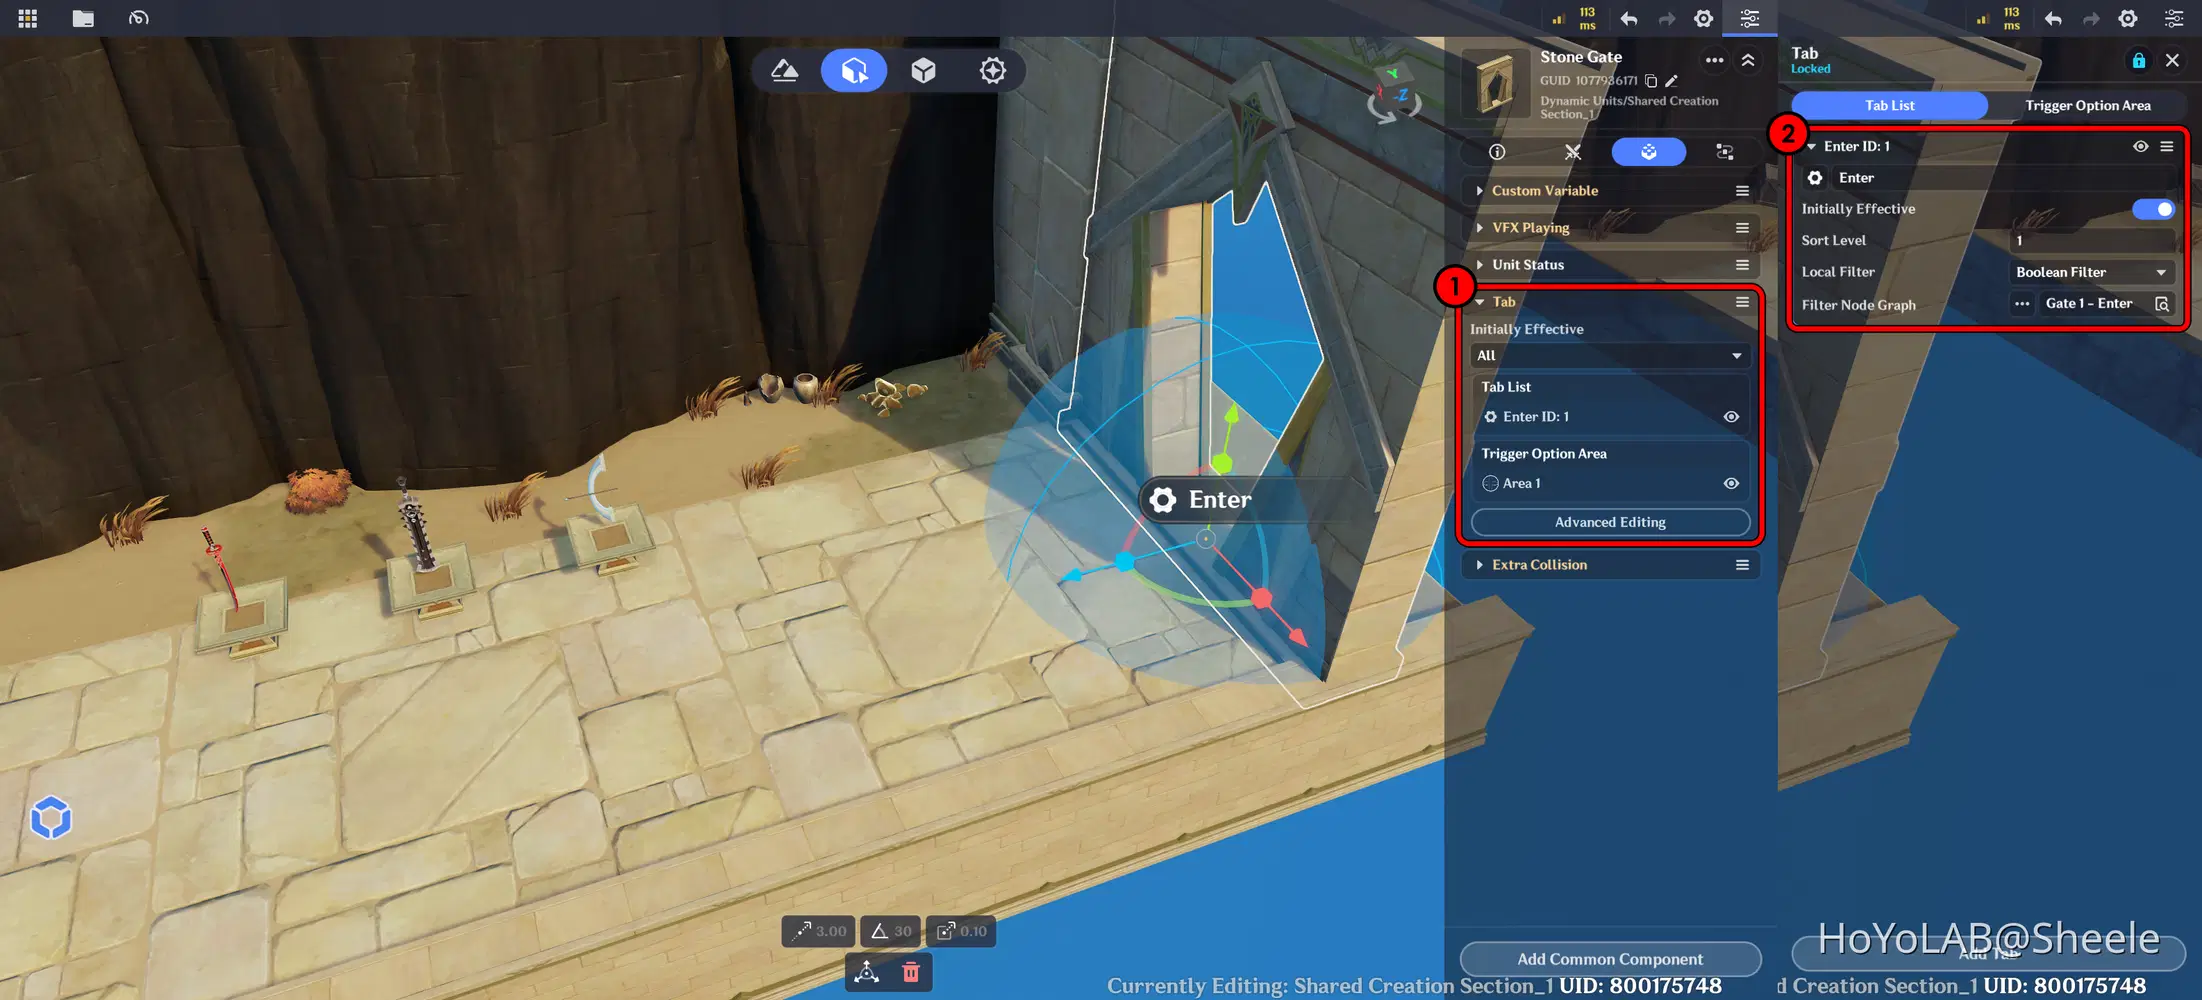
Next, open Miliastra Sandbox and create a new Node Graph on the Server side. Set up the nodes as shown below.
When the player presses the Tab on the gate, the system will generate a random number. This number determines which dungeon area will be selected, teleports the player to the corresponding location, and activates its Entity Deployment Group containing the terrain and gameplay objects.
Finally, send a signal to deactivate the weapon selection area so that it no longer interferes with the dungeon gameplay after the player has entered.
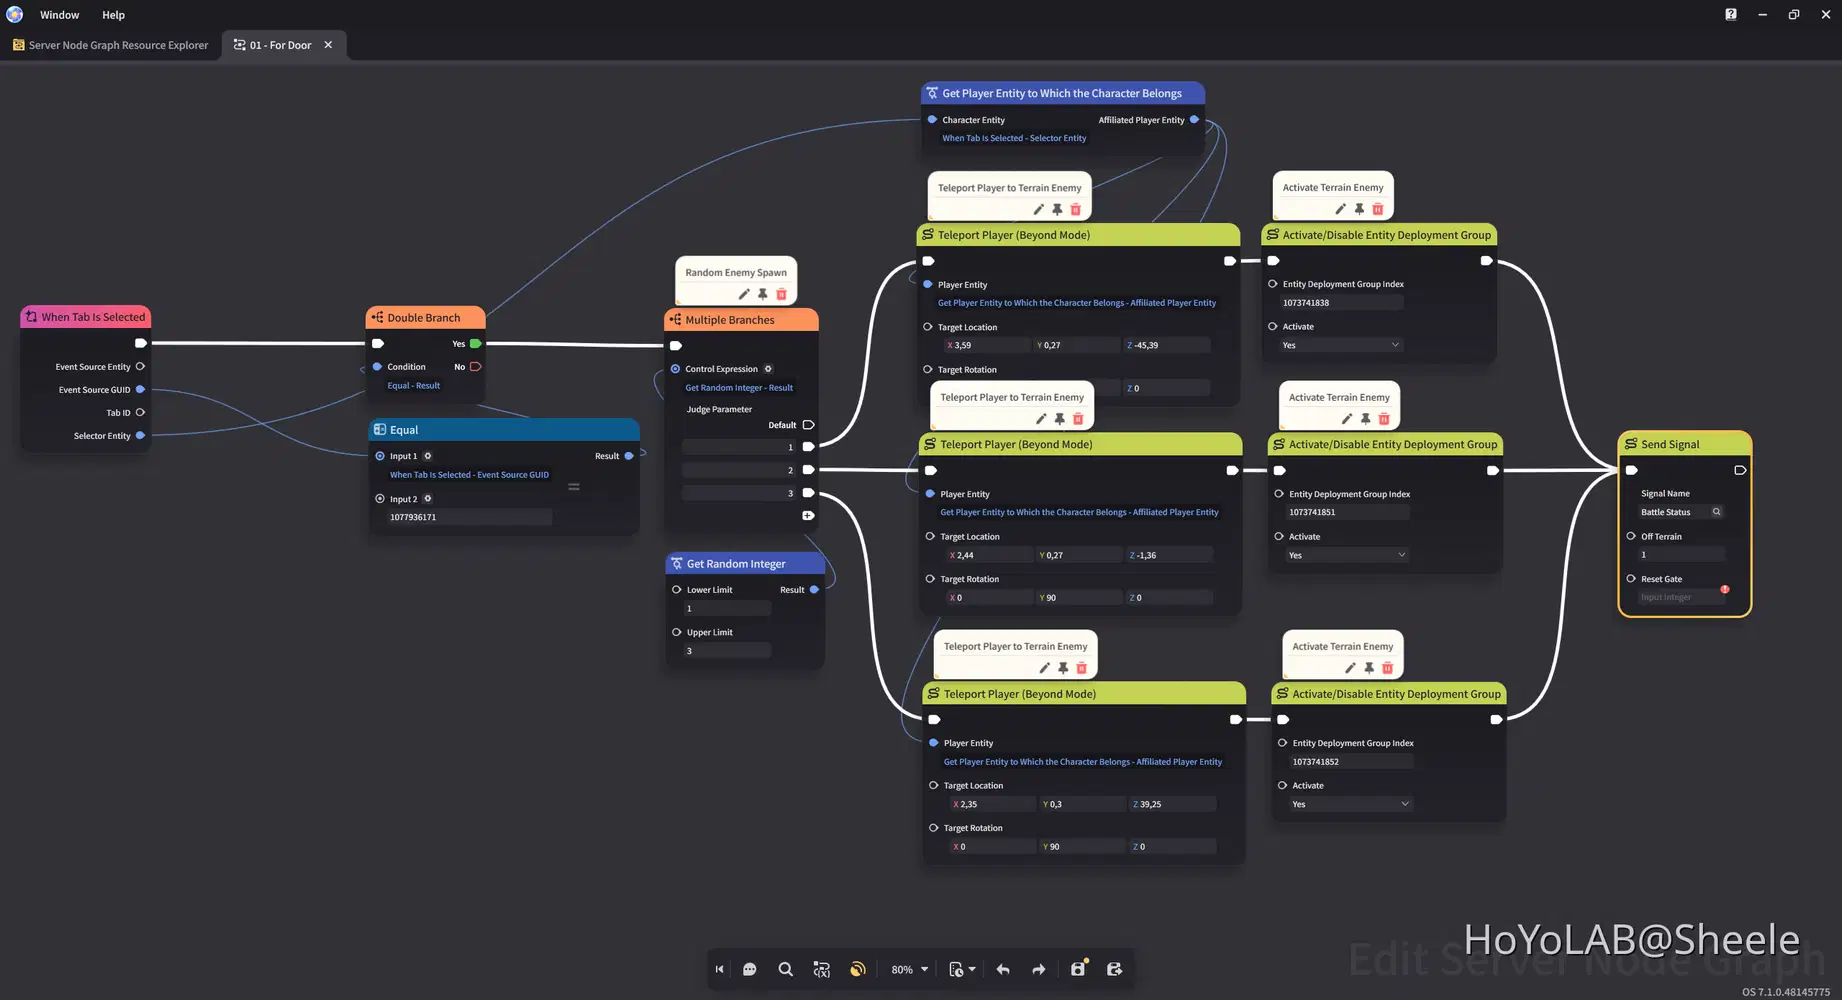
Initial Structure Node for a Random Dungeon Gateway
Finally, assign the Node Graph you created to the Gate Object.
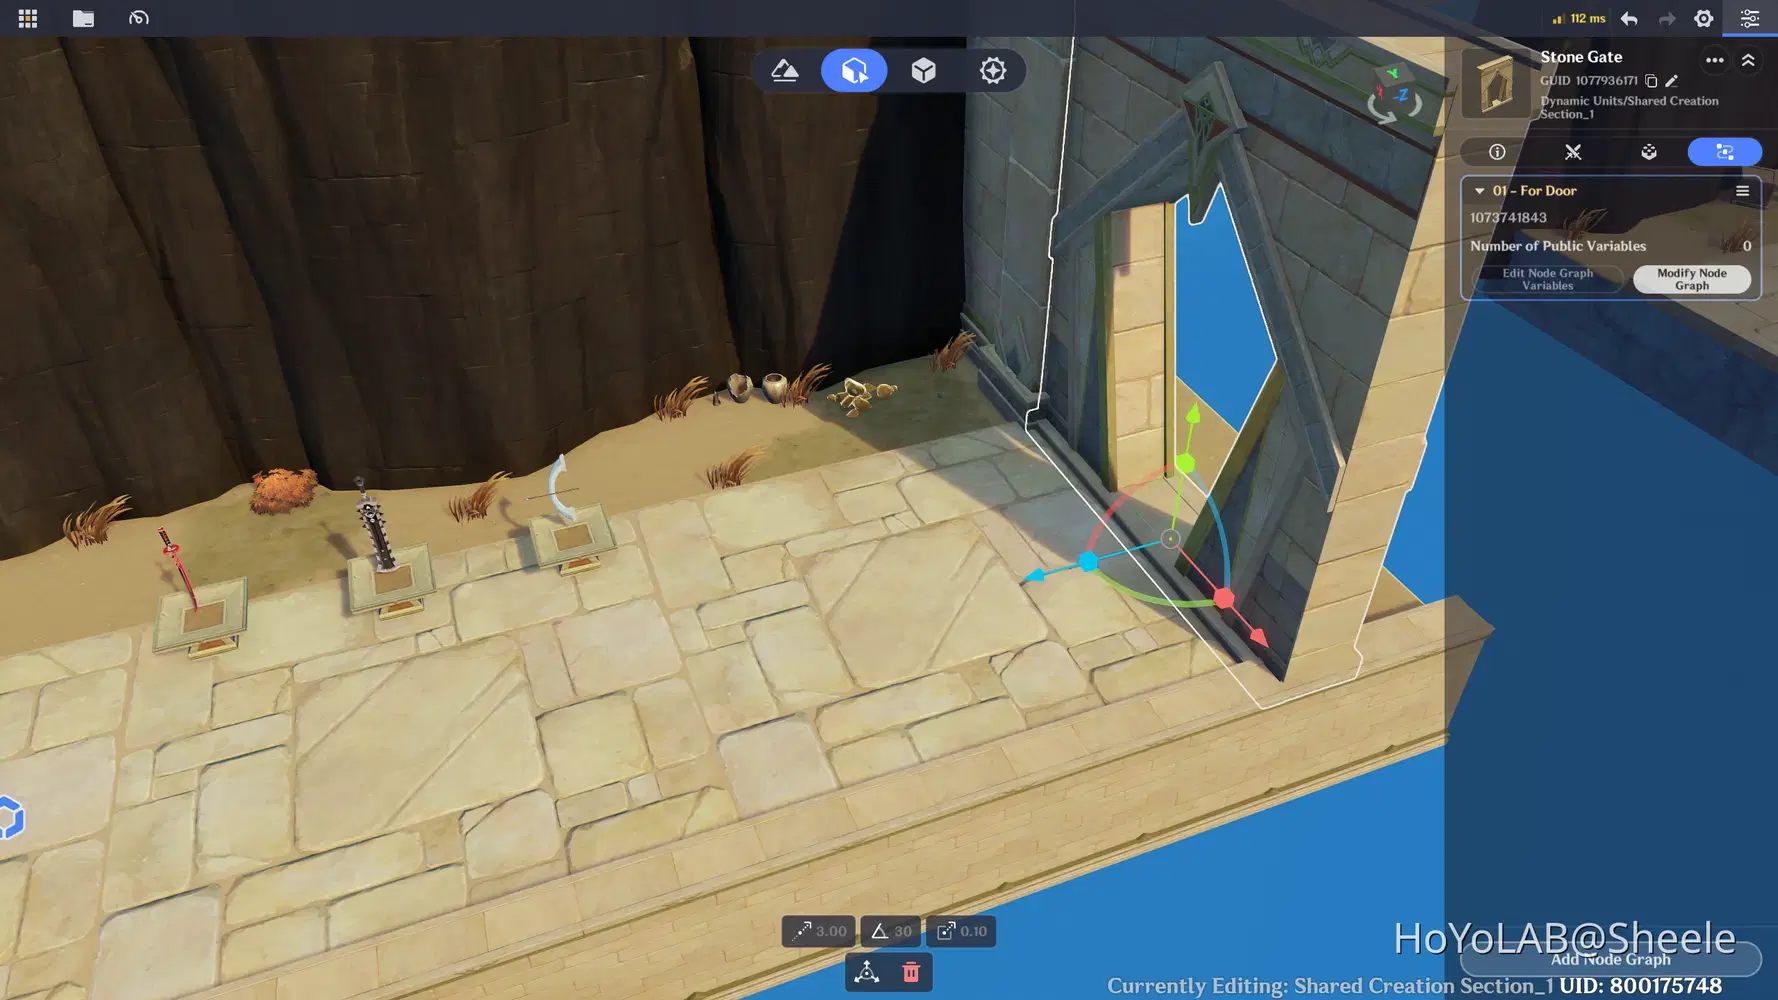
Assign the Node Graph
Once the selection is confirmed, the game can move the player to the first dungeon location. We'll develop the dungeon portal and random area location system in the next chapter.
Chapter Summary
In this chapter, we've planned the weapon selection area, prepared three weapon choices, and established the logic for saving the player's selection. This system will serve as the foundation for our combat mechanics. In the next chapter, we'll create the Random Dungeon & Terrain System, where players will explore different locations and encounter different enemies throughout their adventure.
Chapter 3: Random Dungeon & Terrain System
One of the most important features of a roguelite game is the ability to explore different locations during each run. In this chapter, we'll create a portal system that takes players to randomly selected dungeon locations, each featuring different terrain layouts and environments.
Instead of exploring the same dungeon every time, players will experience a different combination of locations throughout their adventure.
3.1 Prepare the Dungeon Locations
First, create several dungeon locations using the Terrain Editor. Each location can have its own terrain layout, environment, and visual theme.
For this basic roguelite project, you can prepare a few different dungeon variations, such as:
- Dungeon A: An open area with plenty of space for combat.
- Dungeon B: A narrow path surrounded by obstacles.
- Dungeon C: An arena with a more complex terrain layout.
These are just examples. You can design your own dungeon layouts and add more variations as your project develops.
Make sure each location has enough space for players to move around and fight enemies.
📝 Wonderland Guide:
For this guide, I'm using a Desert Dungeon theme, with desert plants, rocks, ruins, and other environmental objects that match the overall atmosphere.
First, create several new terrain layouts for the different dungeon locations. Open Terrain Management and create a new terrain. Then, use the terrain brushes to shape the ground and create the desired area. Adjust the length, width, and overall shape to provide enough space for player movement, enemy encounters, and other gameplay elements.
Repeat this process to create several terrain variations so that each dungeon can have its own layout while maintaining the same desert theme.
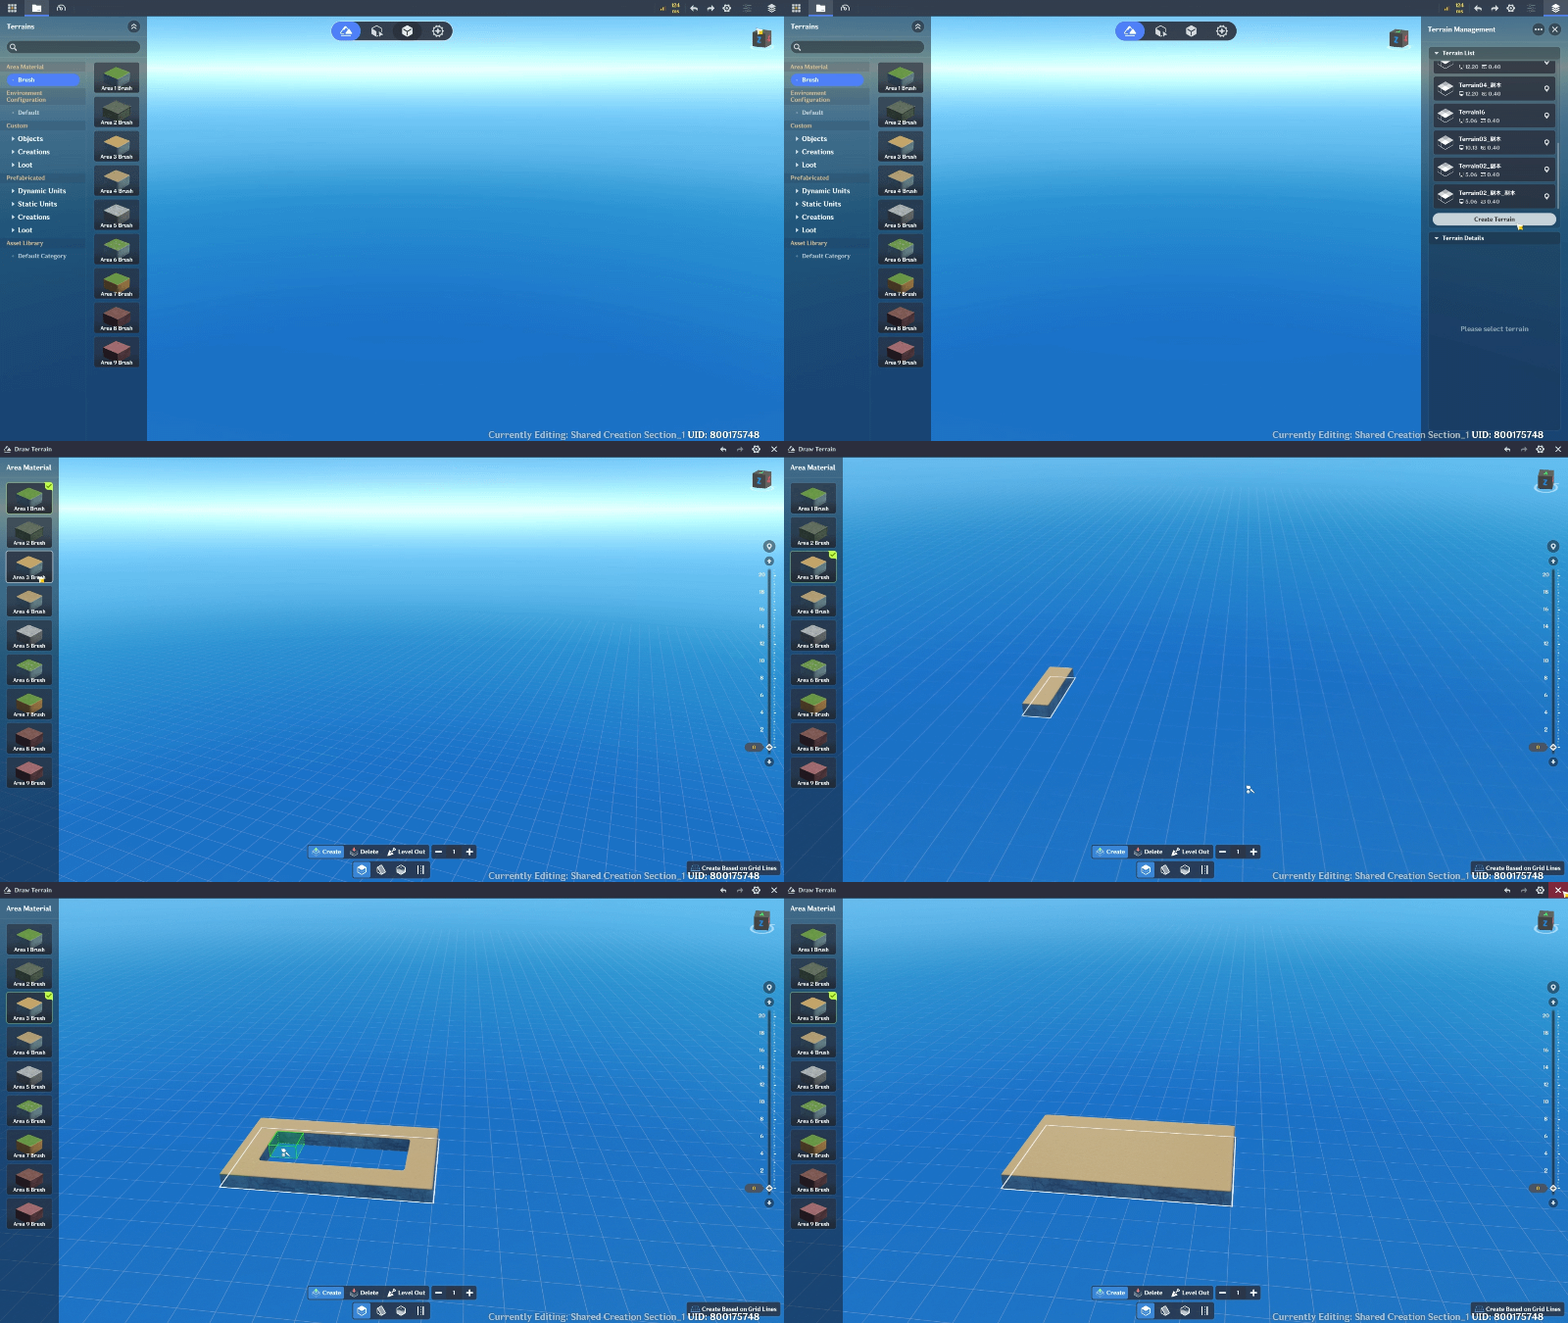
Create New Terrain
Next, add various environmental objects to make the area feel more detailed, lively, and immersive. For example, here I use rocks as background decorations to fill the empty spaces and create a more natural desert atmosphere.
To better match the desert theme, I also customize the rock colors. Enable Custom Color, select Multiply, and adjust the color to your preference. You can experiment with different shades to achieve the desired look and make the environment blend nicely with the overall desert theme.
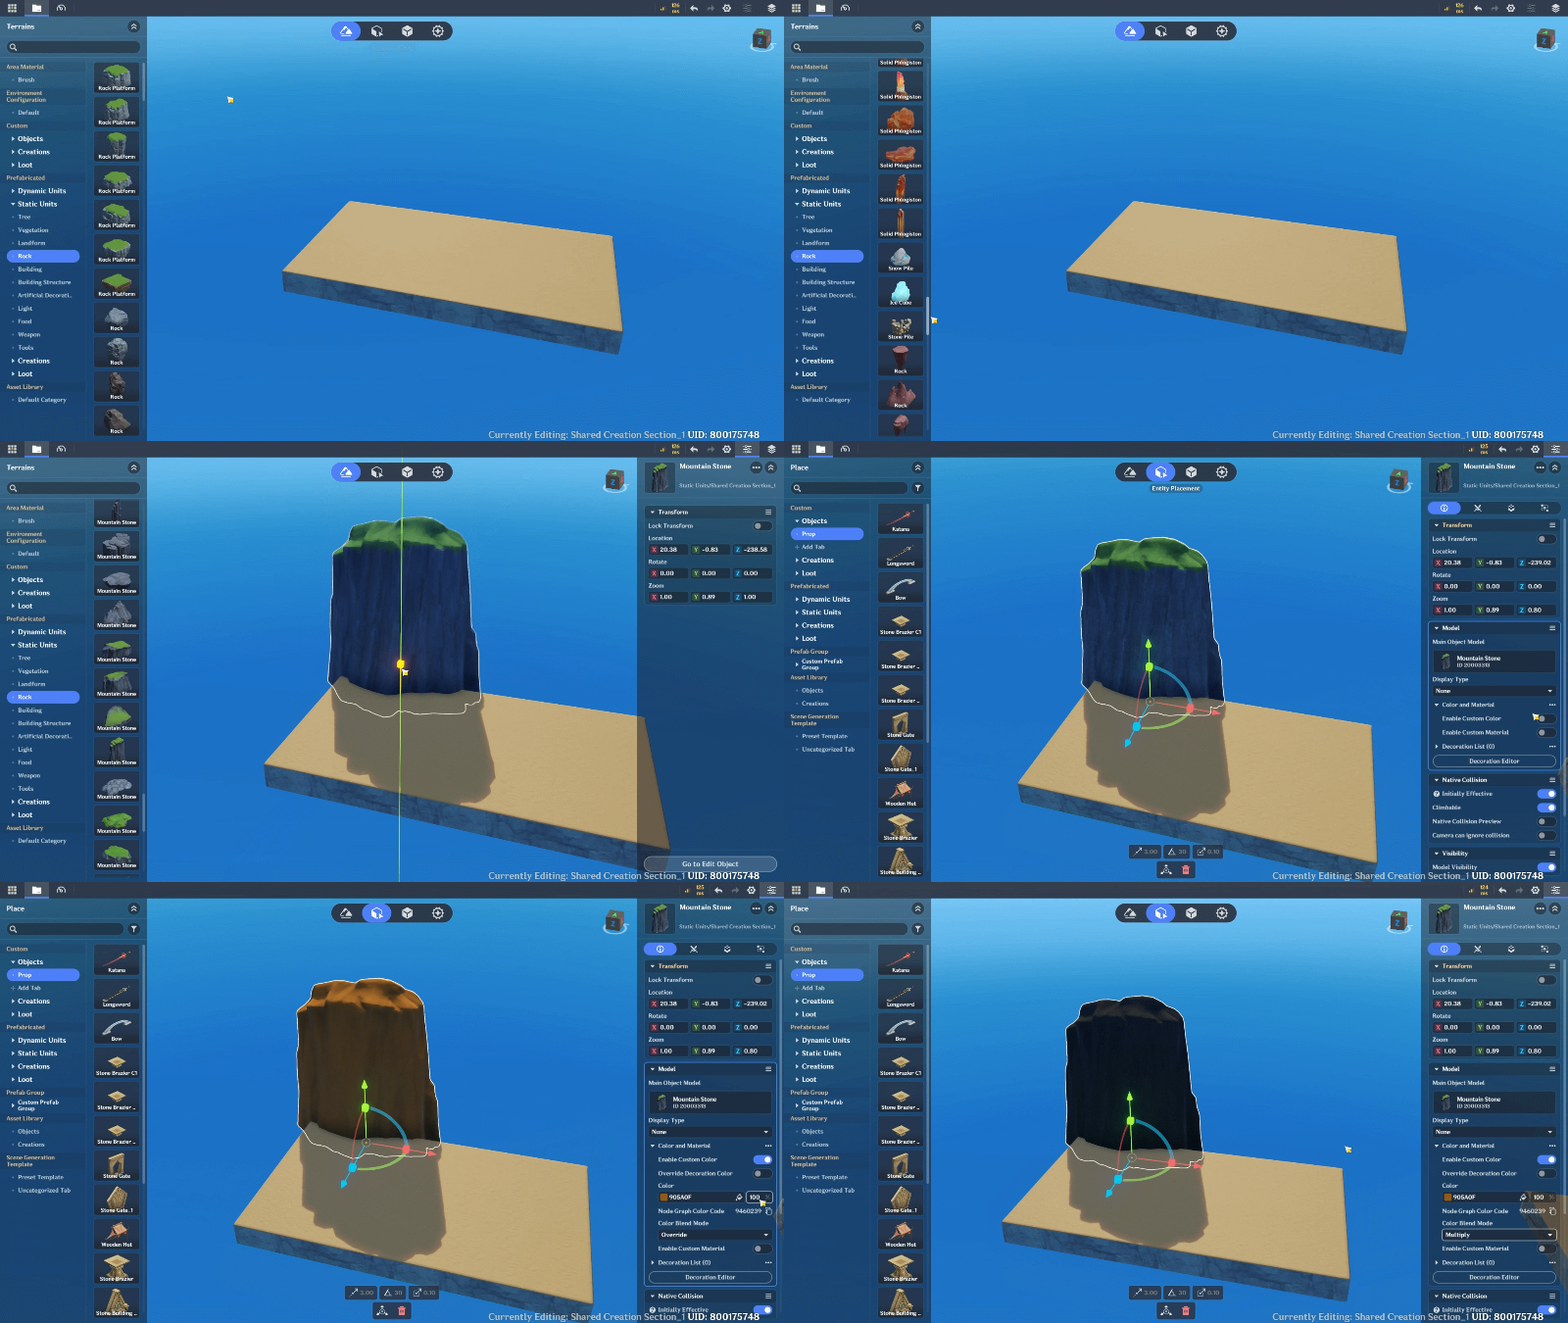
Add Object
Next, open the main menu and select Manage Entity Deployment Groups to create a new group. Then, select all the objects and components you have placed in the terrain, right-click, and choose Add to Entity Deployment Group.
This will organize all the selected objects into a single group, allowing you to easily activate, deactivate, or hide the entire terrain setup at once without managing each object individually.
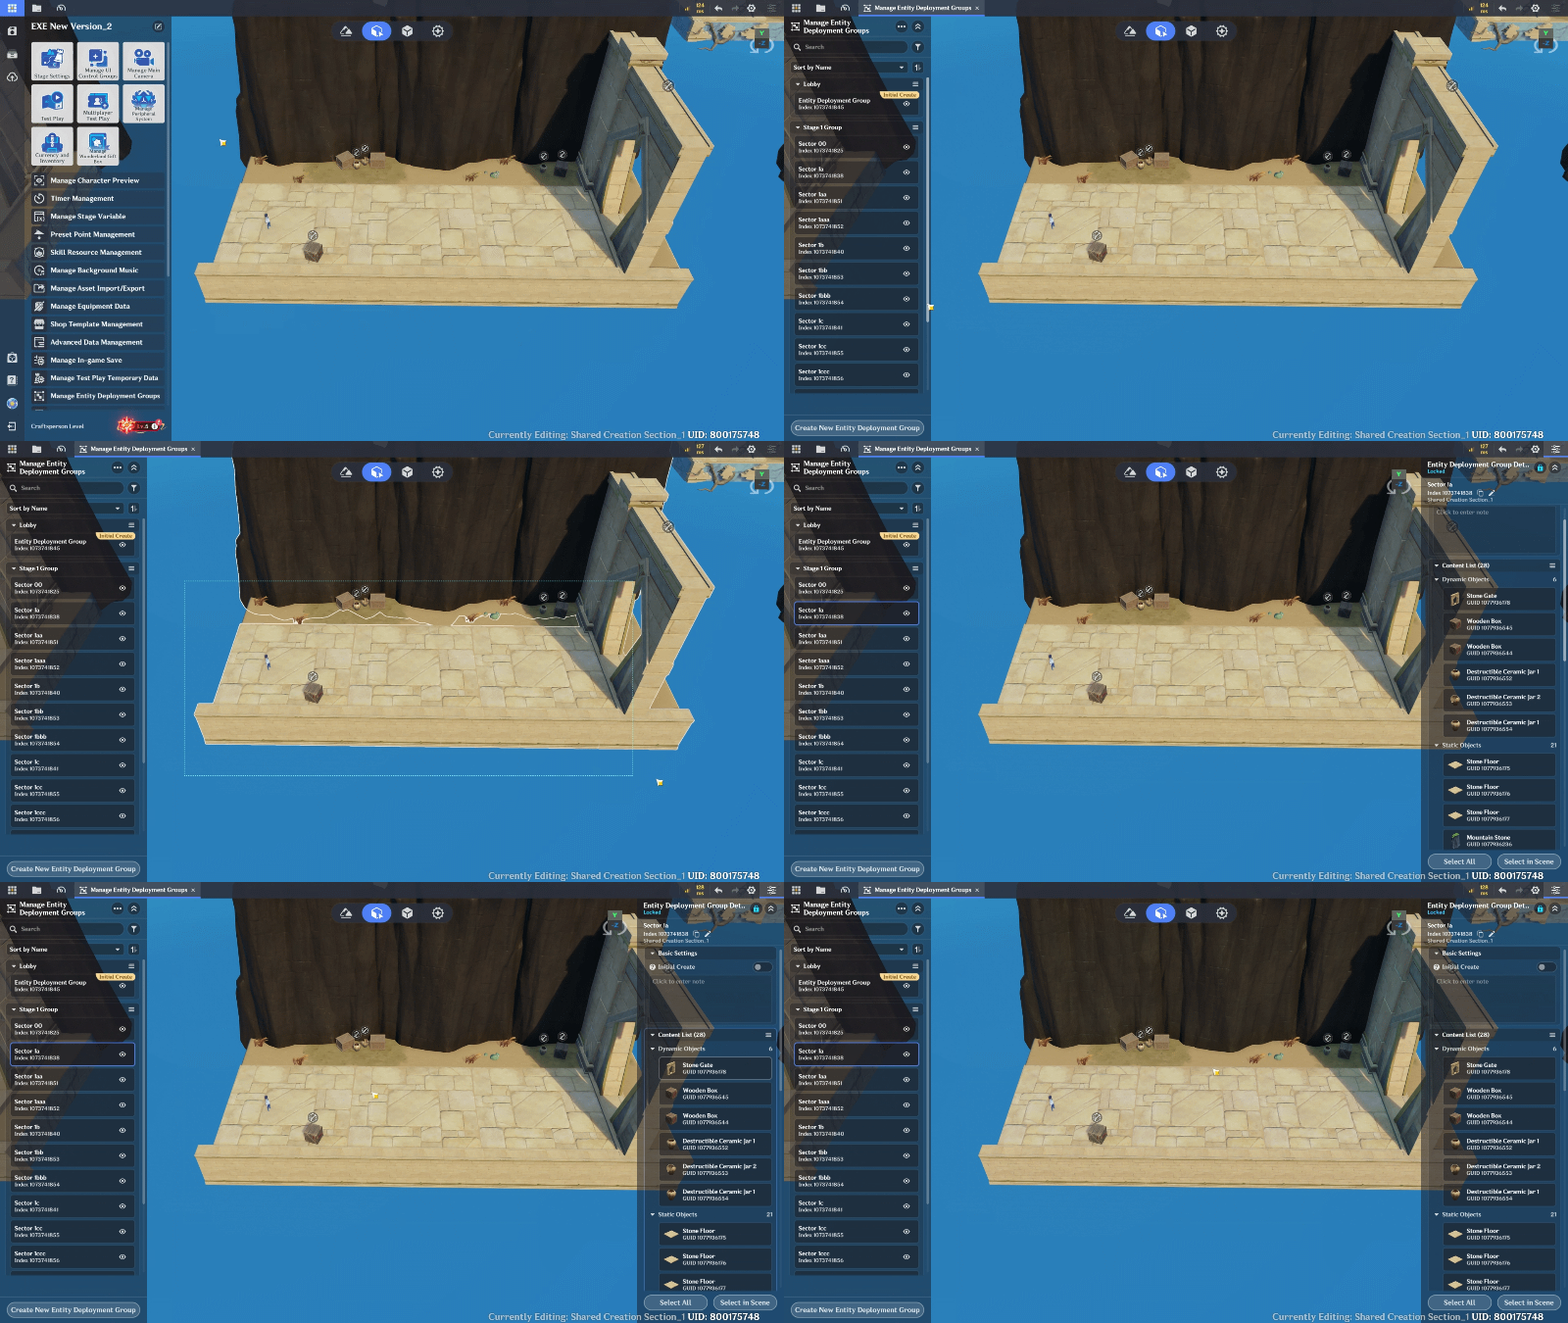
Entity Deployment Group
One important part of the dungeon setup is restricting player movement to prevent them from falling or escaping outside the designed gameplay area. To achieve this, you can create invisible walls that act as boundaries around the dungeon.
Here, I add an Extra Collision component to the Gate Object. Then, adjust its height, length, and width to create a wall-shaped collision area. Repeat this process around the edges of the dungeon to create invisible barriers that keep players within the intended play area without affecting the visual design.
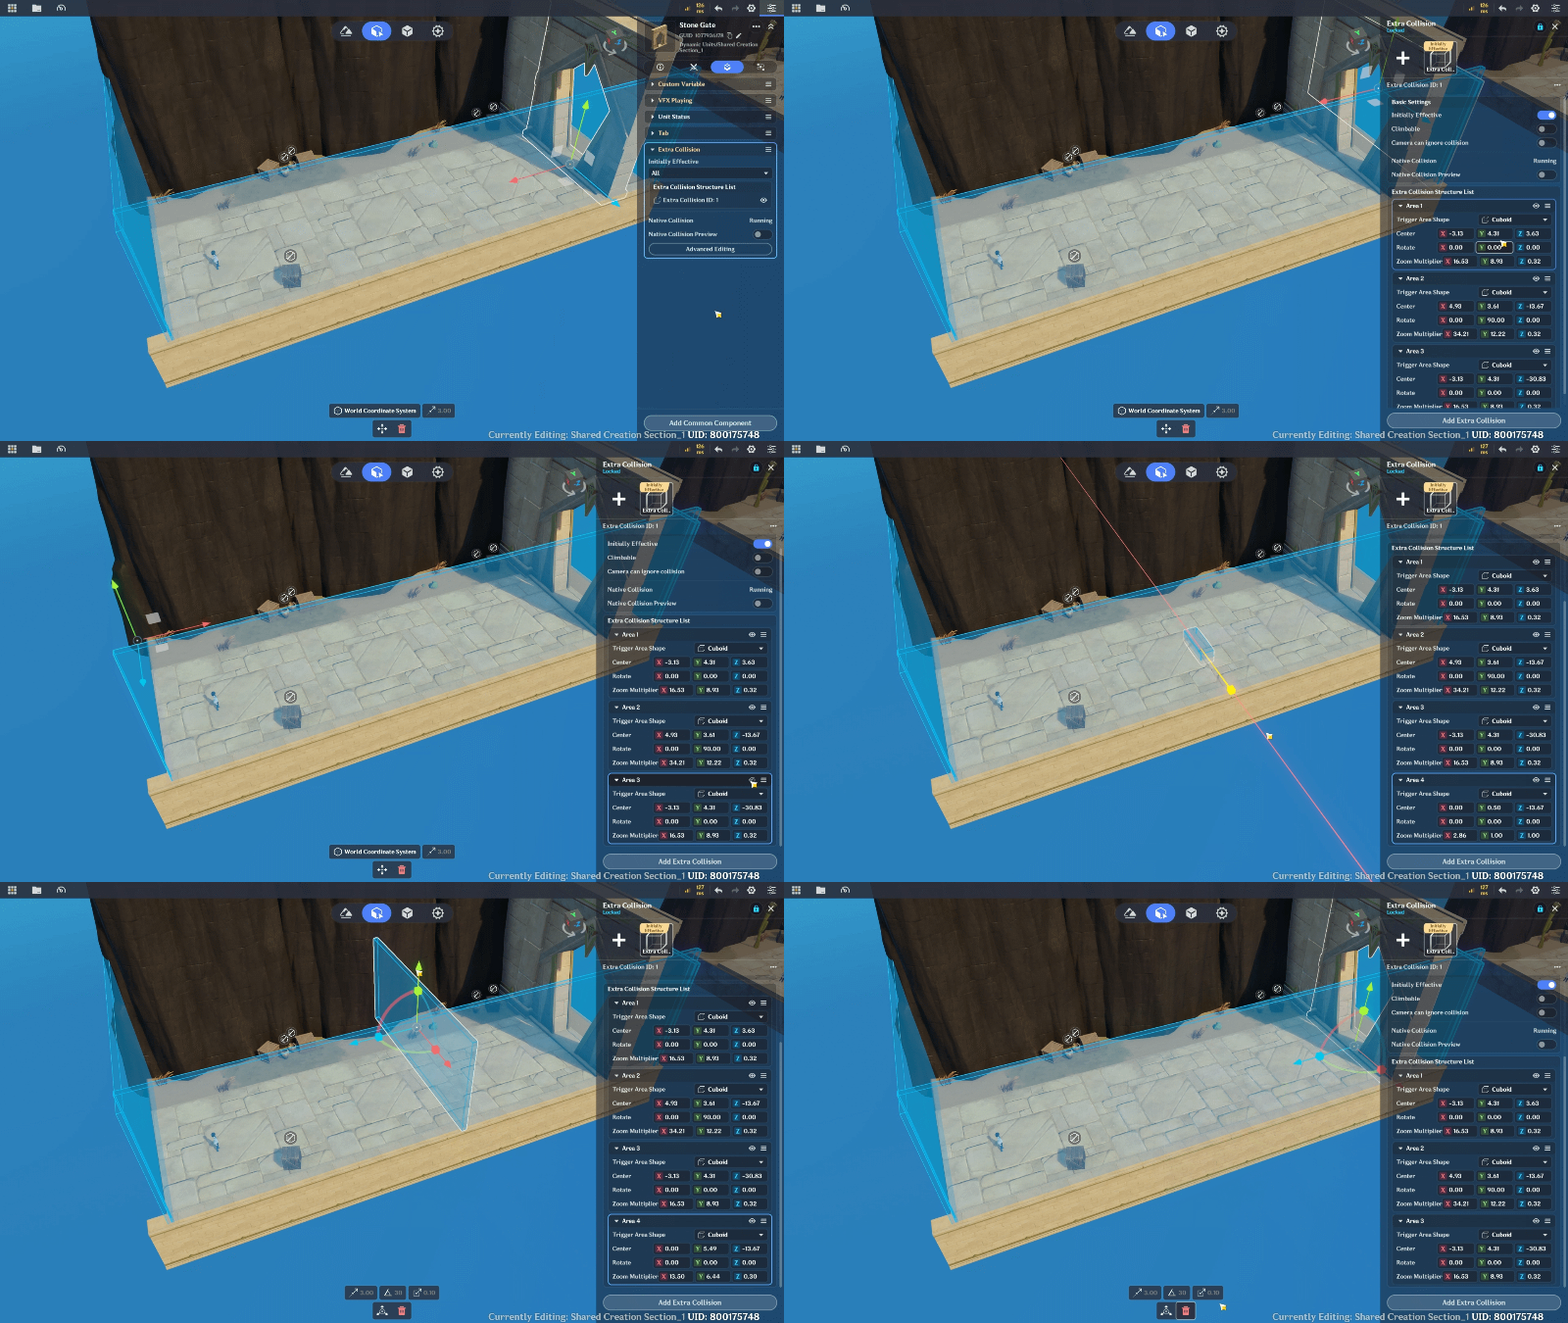
Add Extra Collision
And here is the result of the terrain preparation and dungeon environment setup. I also created a separate area for the Lobby, which will serve as the starting point of the game where players can prepare.
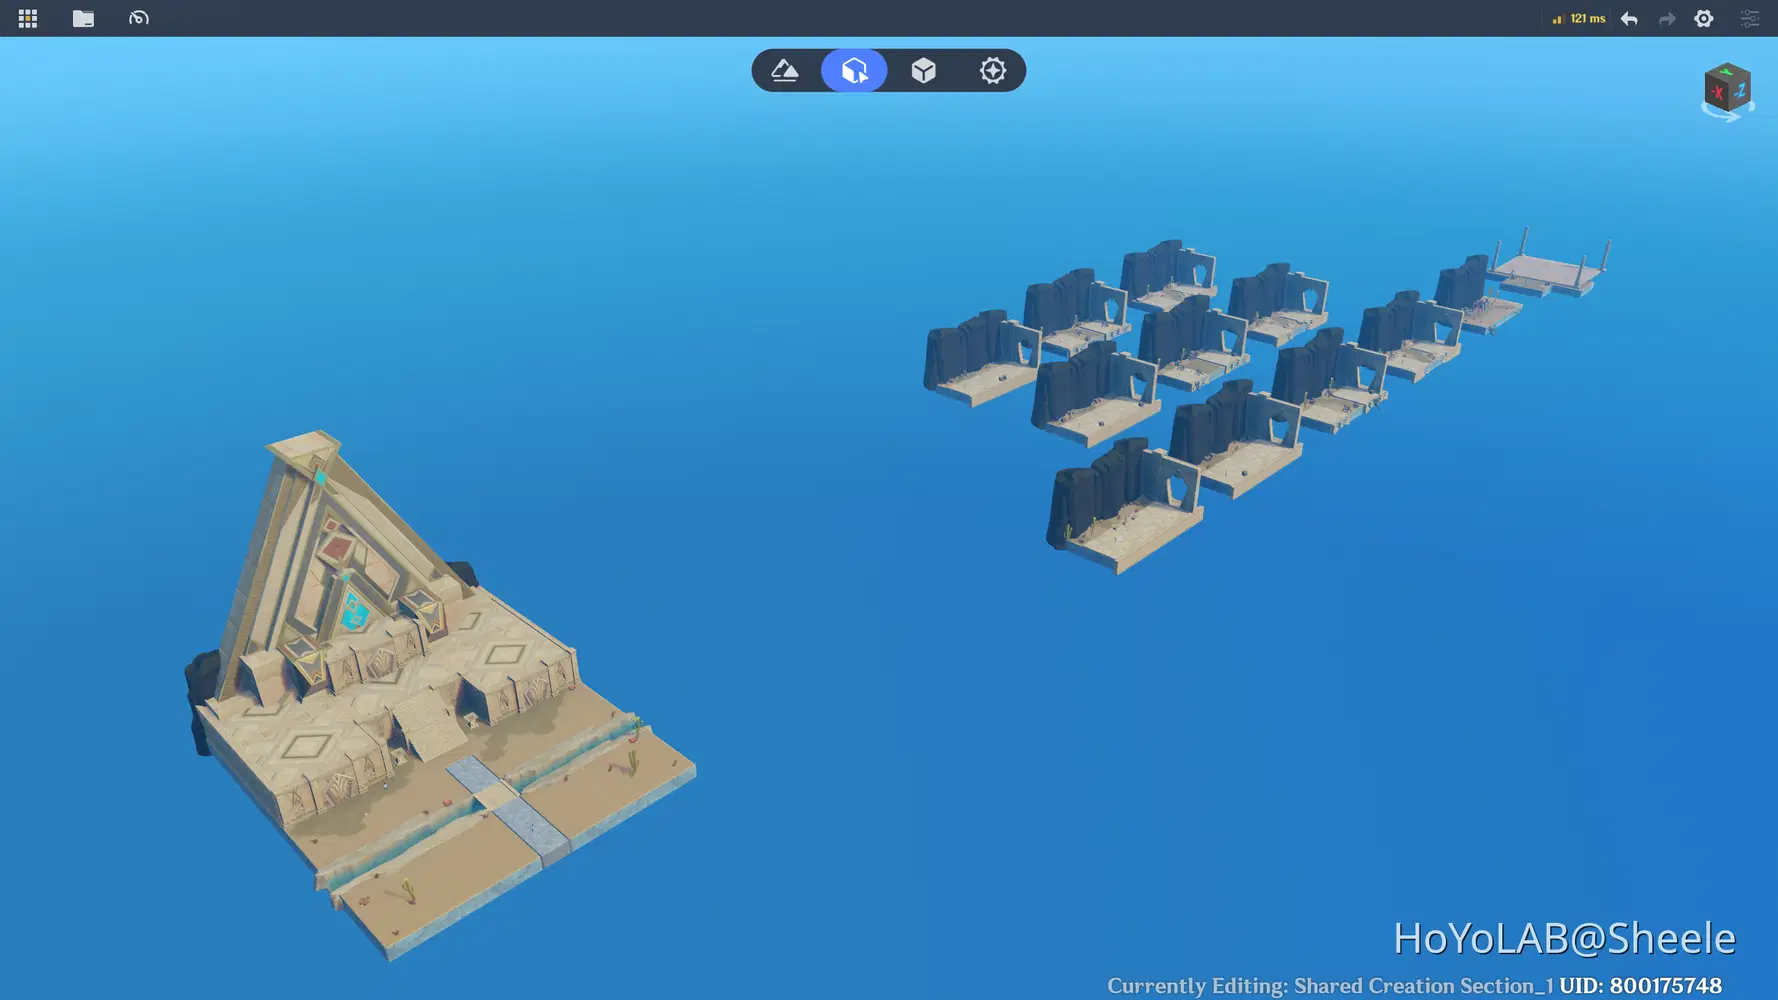
Mapping Structure
For the first Dungeon Stage, I divided the environment into six different areas, each serving a specific purpose in the dungeon layout. This includes three basic combat areas, each with three possible layout variations that can be randomly selected during gameplay.
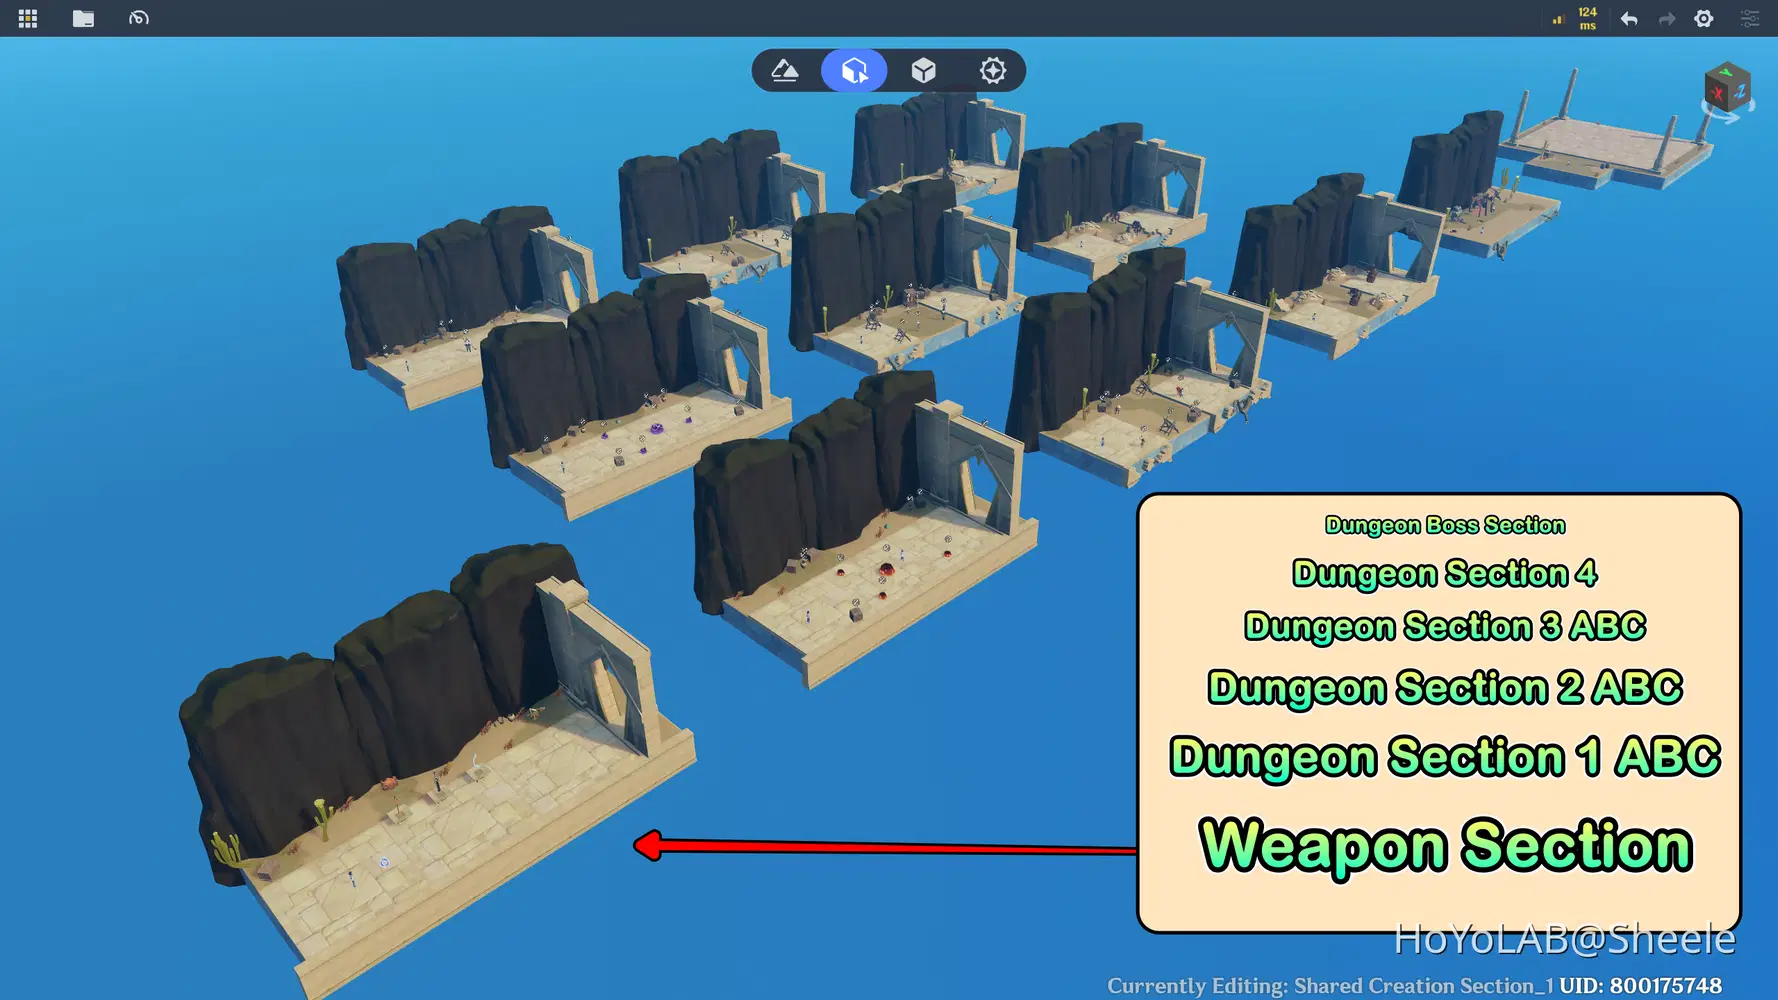
Mapping Structure
Here is the design of the first Dungeon Section, featuring three different area variations that can be randomly selected during gameplay.
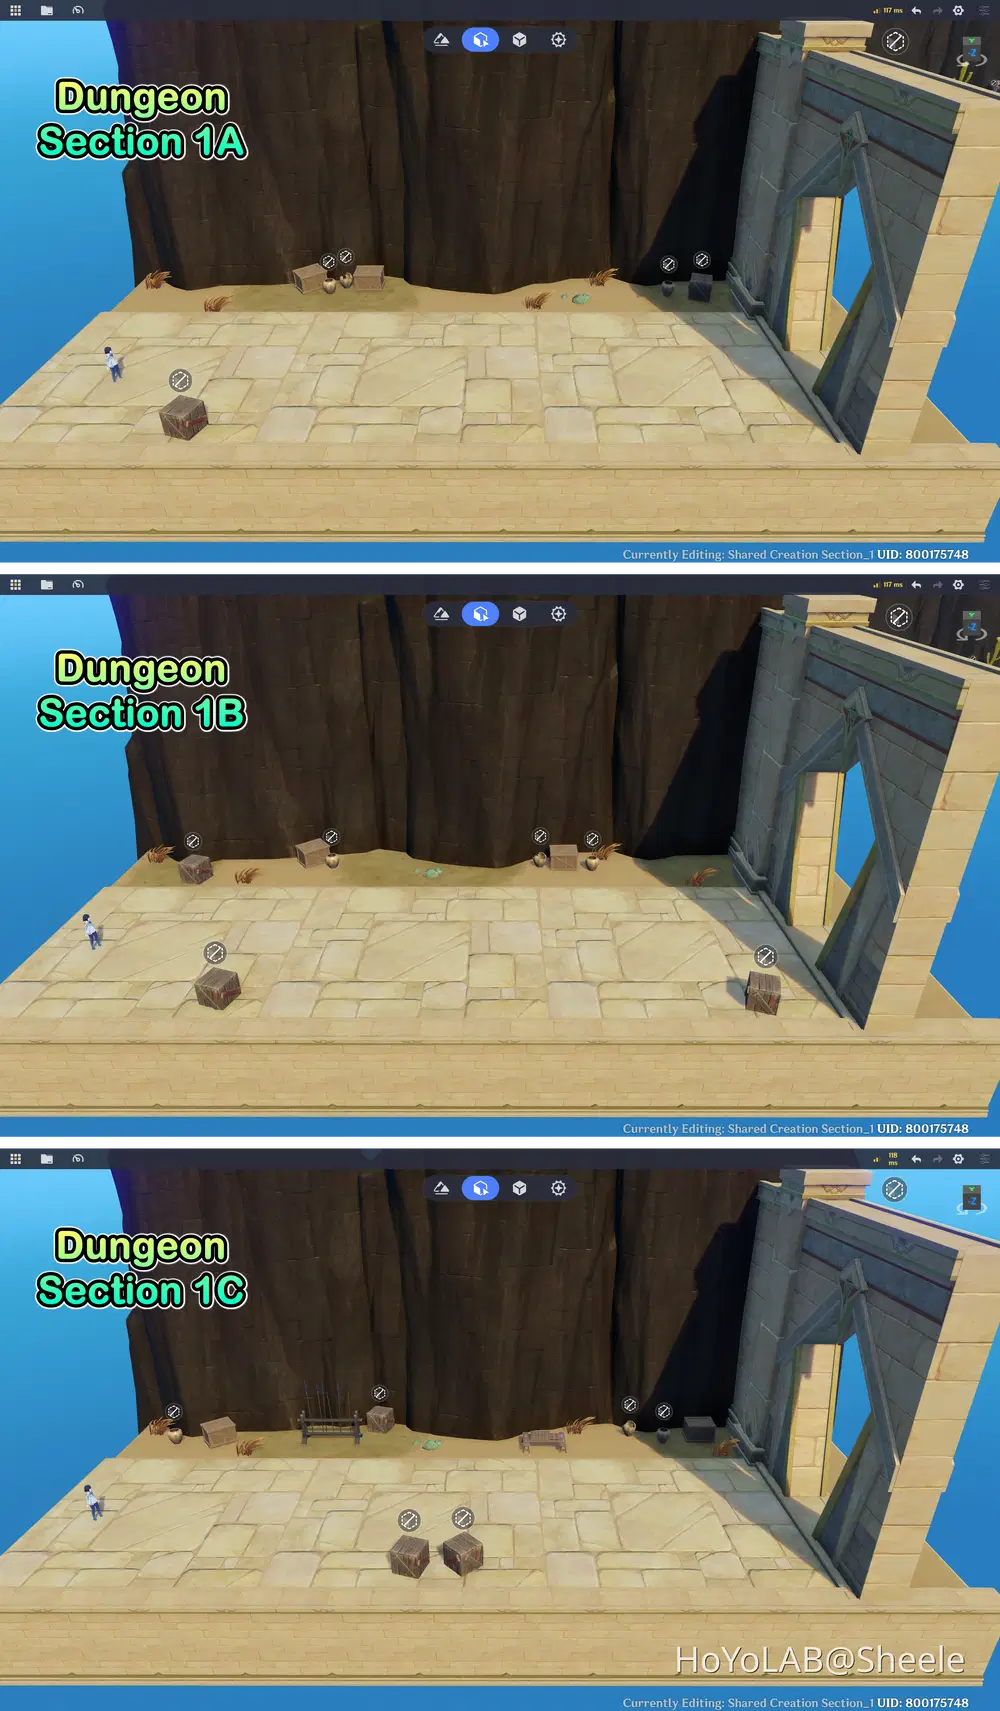
Dungeon Section 1
Here is the second Dungeon Section, which also features different area variations that can appear randomly during gameplay.
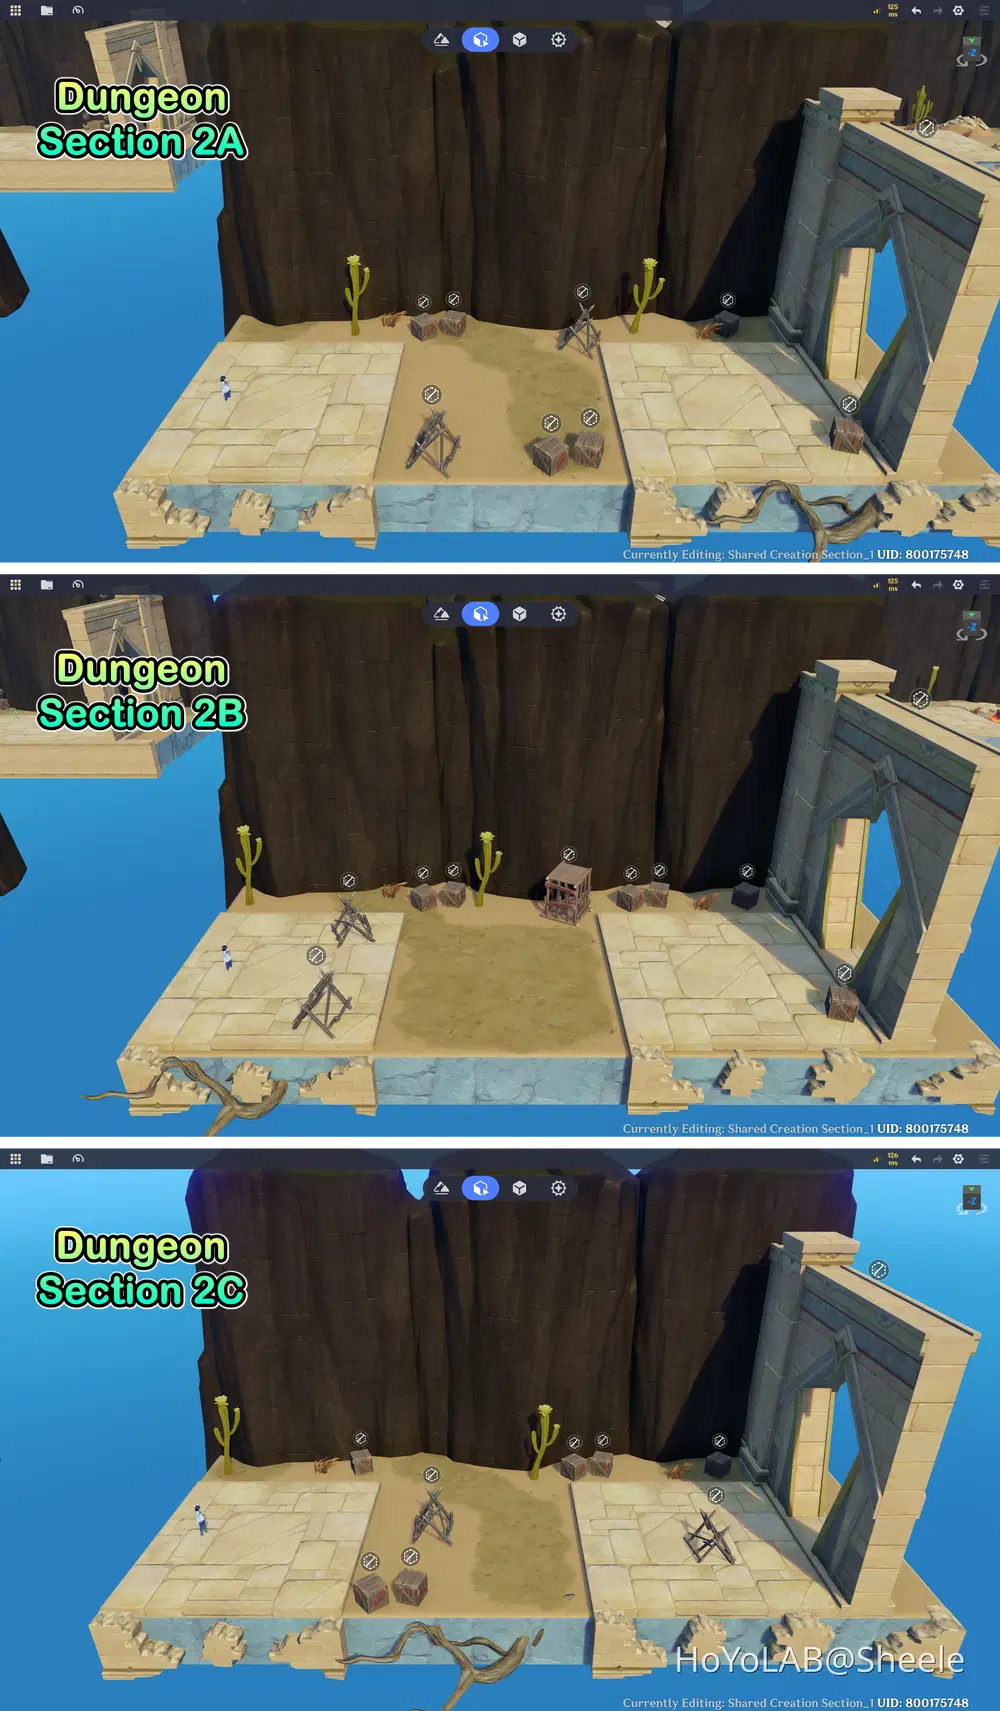
Dungeon Section 2
And here is the design of the third Dungeon Section, featuring additional area variations that can be randomly selected during gameplay.
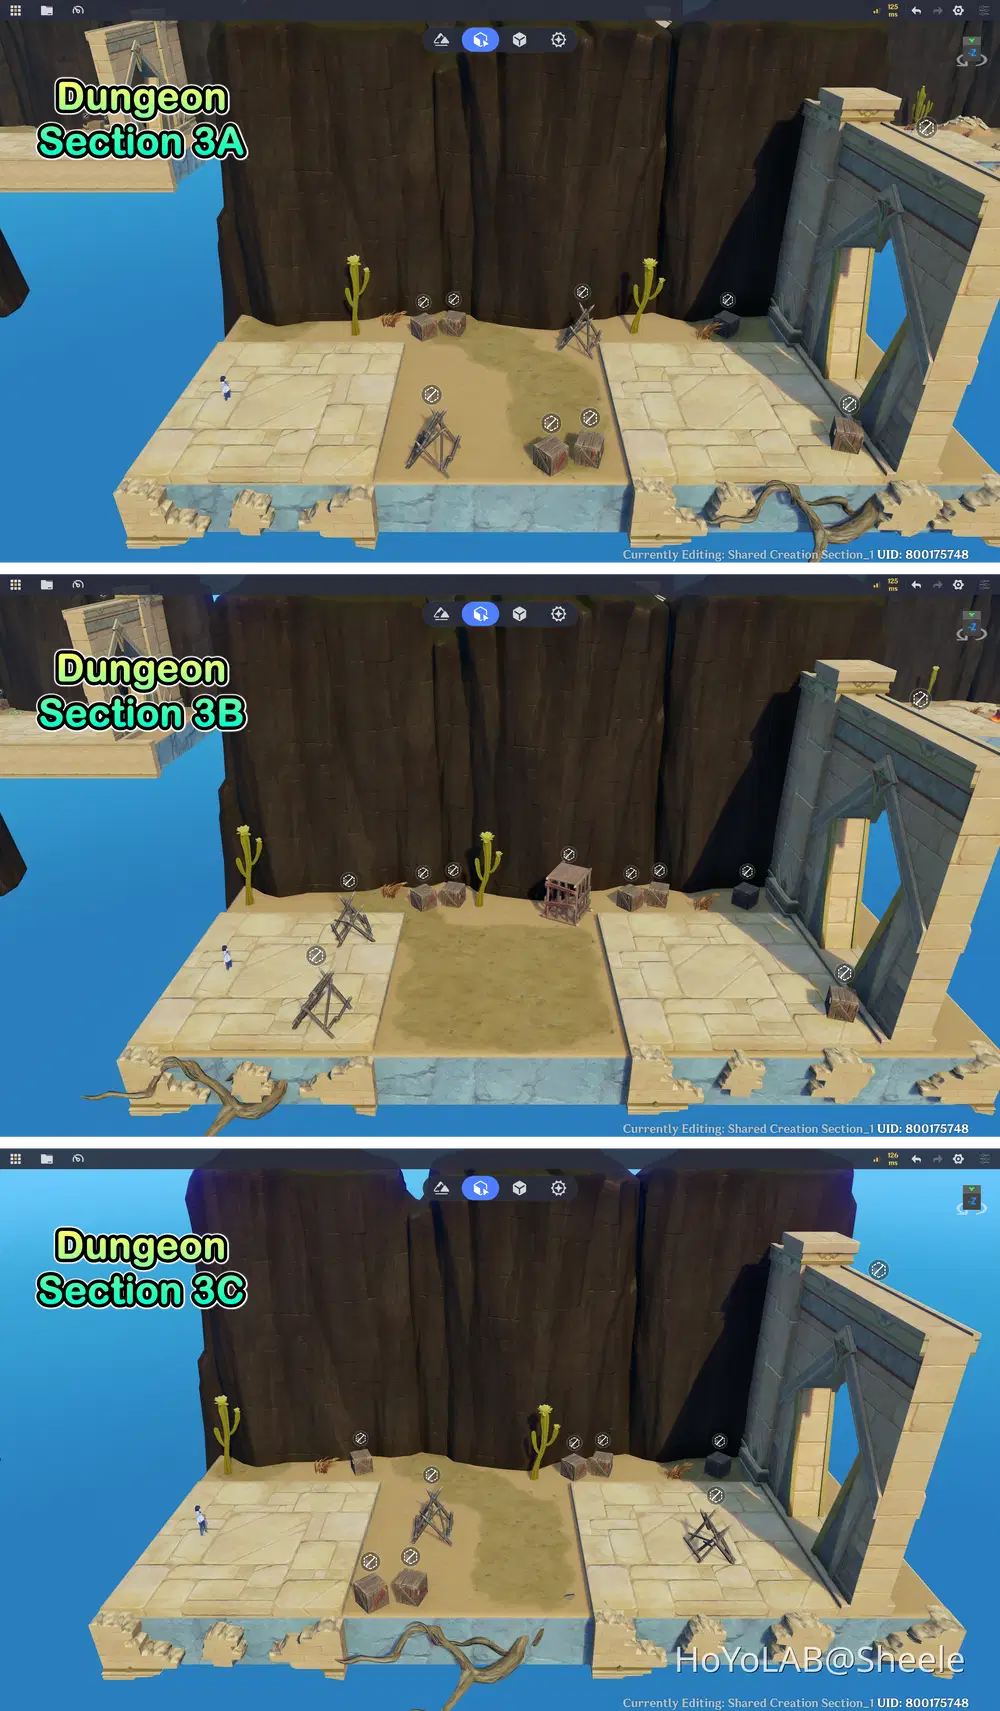
Dungeon Section 3
Next is the design of the fourth Dungeon Section, which can serve as a special location for NPCs and other interactive elements. You can use this area as a secret location, an NPC shop, a rest area, or other special encounters depending on your game's design and needs.
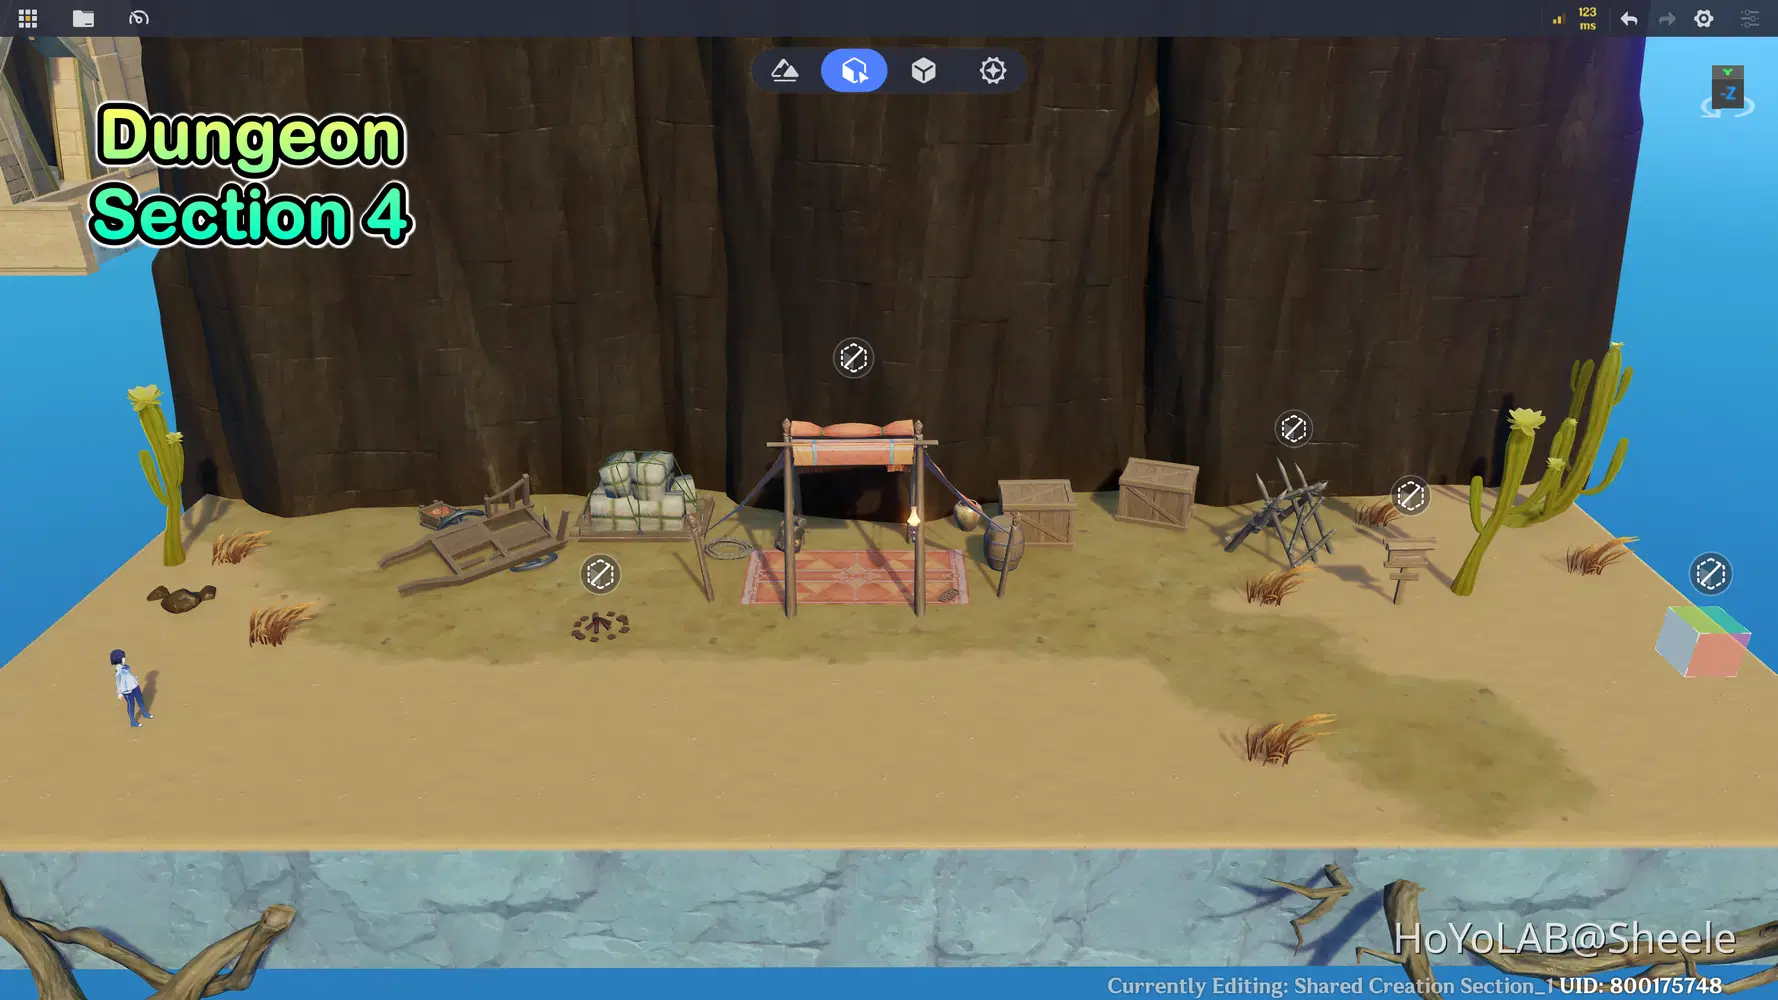
Dungeon Section 4
Last, this is the Normal Boss Area, where players will face a challenging boss encounter at the end of the dungeon. You can design this area as a dedicated battle arena, providing enough space for players to move, dodge attacks, and fight the boss.
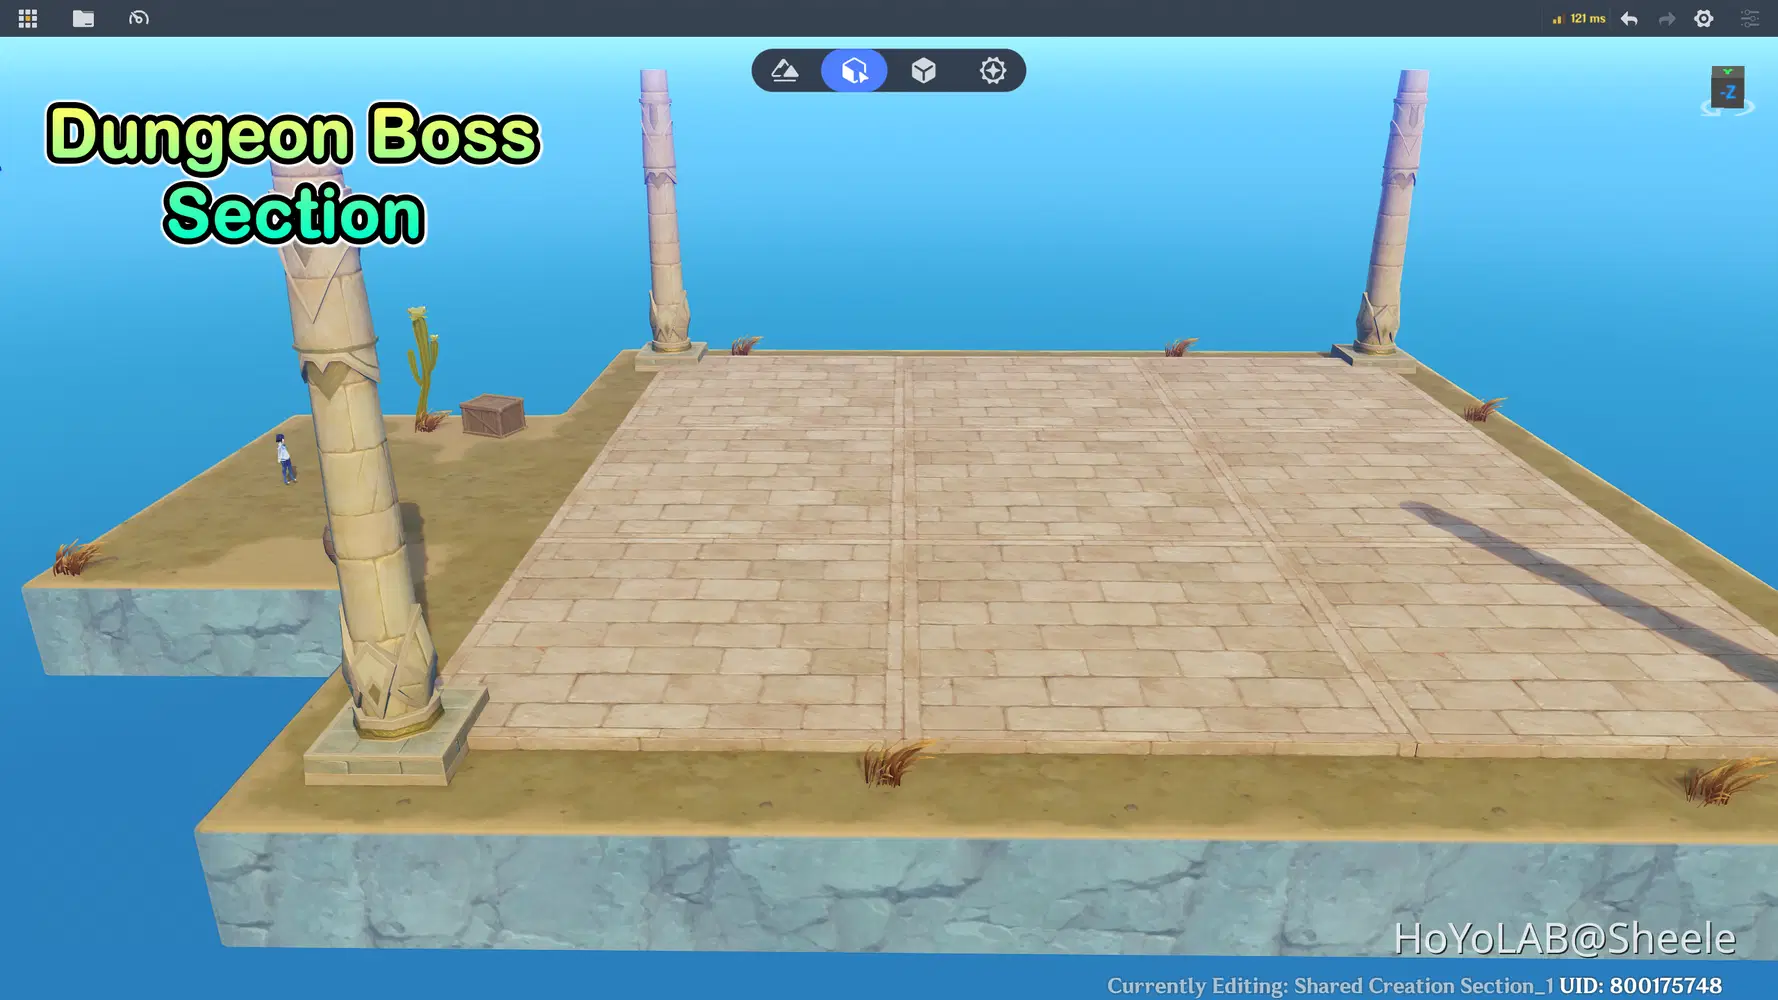
Dungeon Boss Section
3.2 Create the Dungeon Portal
Next, create a portal that allows players to travel from one dungeon location to another.
The portal will serve as the main transition point between dungeon areas. When players interact with it, the game will select a destination and move them to the corresponding location.
You can use a portal model, a visual effect, or an interactive object to represent the entrance.
📝 Wonderland Guide:
In this section, add the required components to each gate. Follow the same setup process explained earlier in Chapter 2.5, but this time apply it to all the gates corresponding to the dungeon areas you created previously.
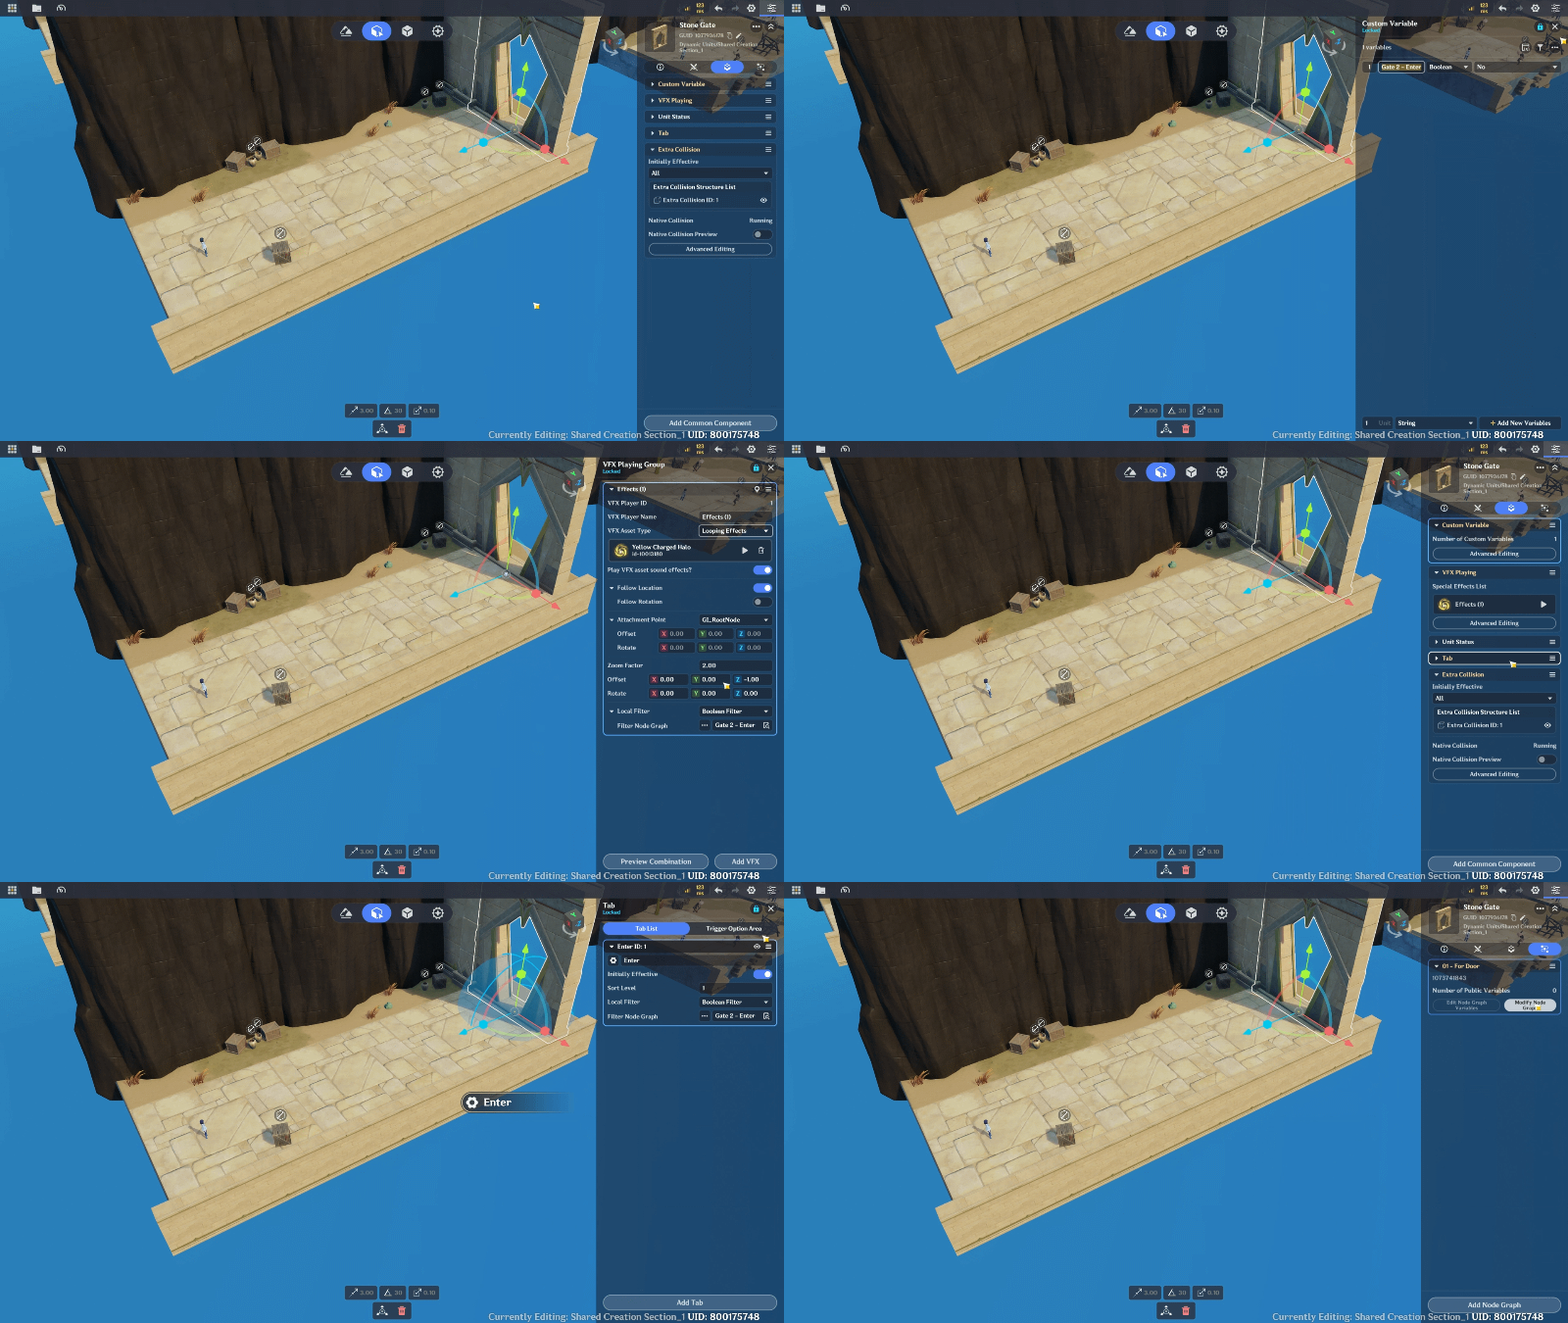
Gate Setup
Don't forget to create a new Node Graph in the Boolean folder to control the gate's activation state, including its visual effects and interaction availability.
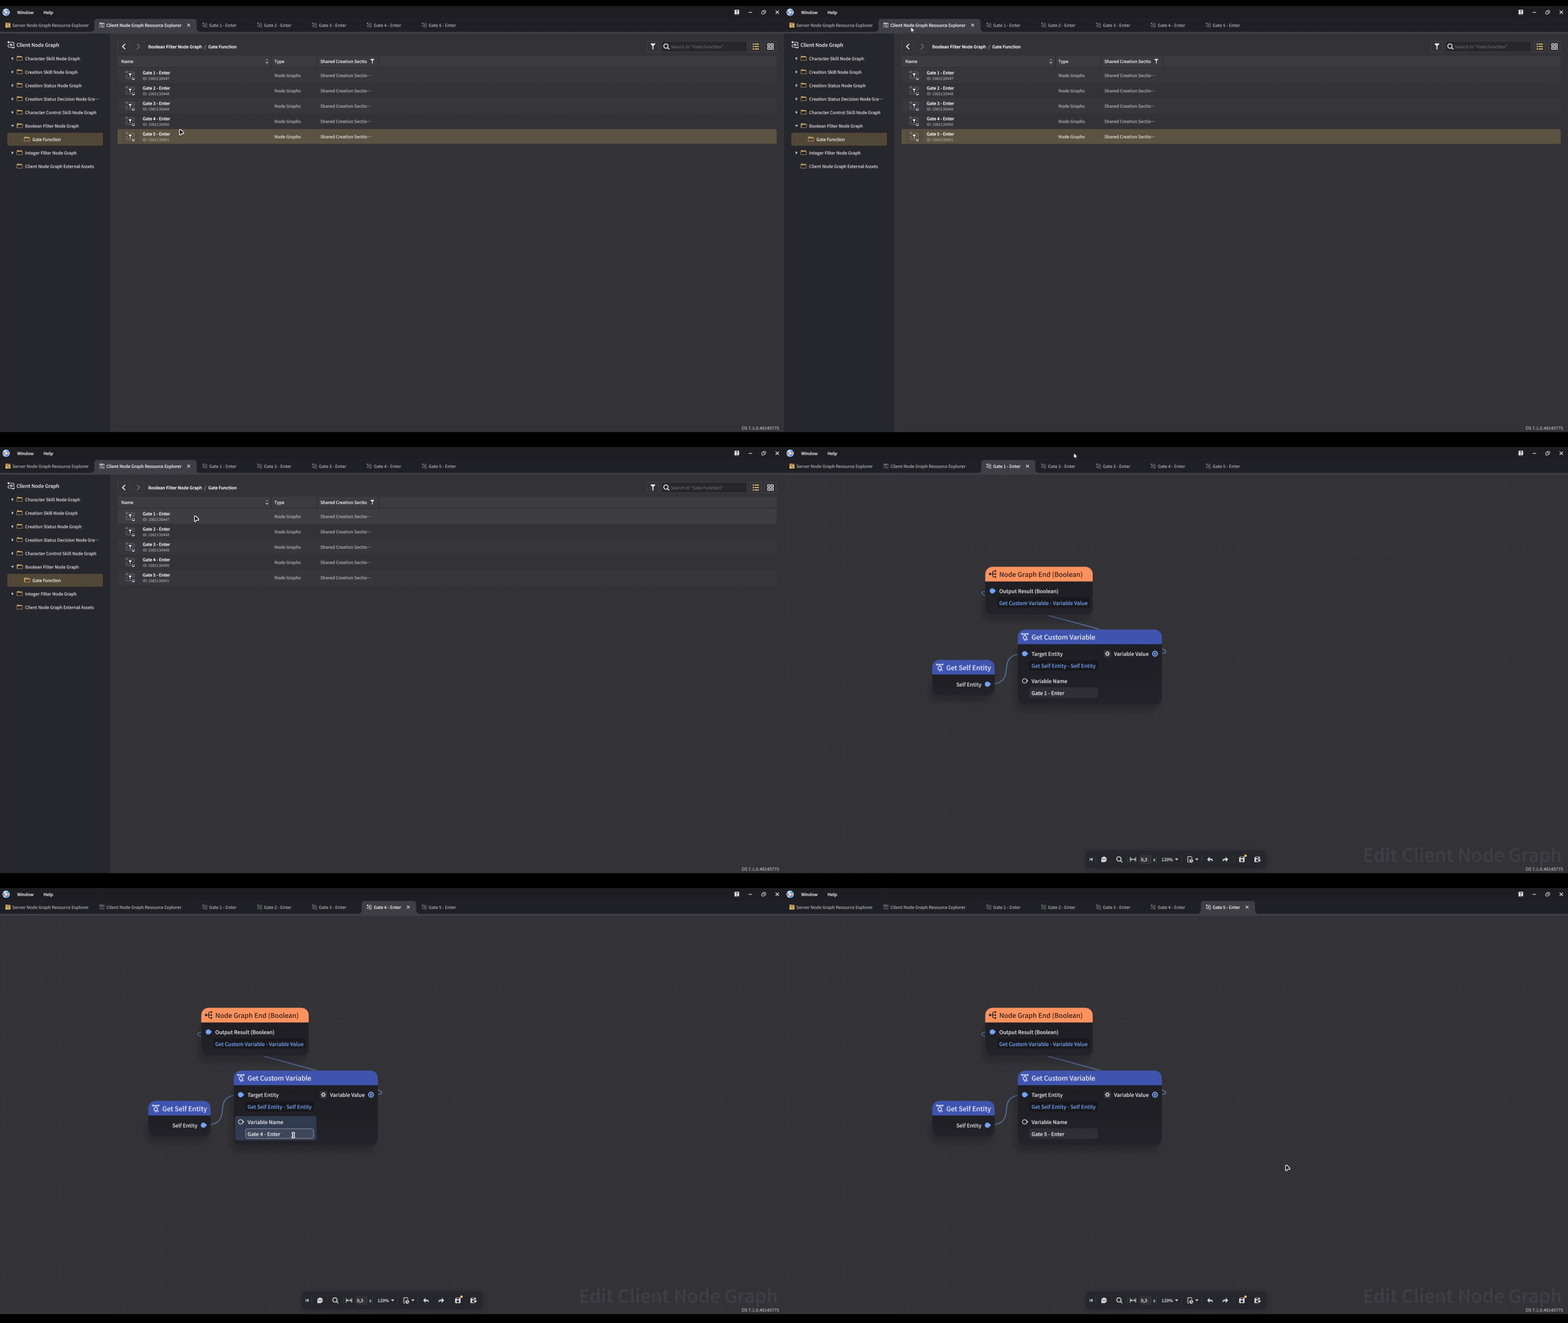
Boolean Node Graph
3.3 Create the Random Location System
Now, let's prepare the logic that determines which dungeon location the player will enter.
When the player activates the portal, the game should randomly select one of the available dungeon locations.
The basic logic works as follows:
- The player activates the portal.
- The game randomly selects a dungeon location.
- The game activates or loads the corresponding dungeon area.
- The player is moved to the designated spawn point.
Make sure each available location has a corresponding destination, so the player is always sent to the correct area.
📝 Wonderland Guide:
Here, you can continue using the Node Graph you created earlier in Chapter 2.5, since we have already prepared its basic structure. You only need to add the additional logic required to teleport the player to the next dungeon area.
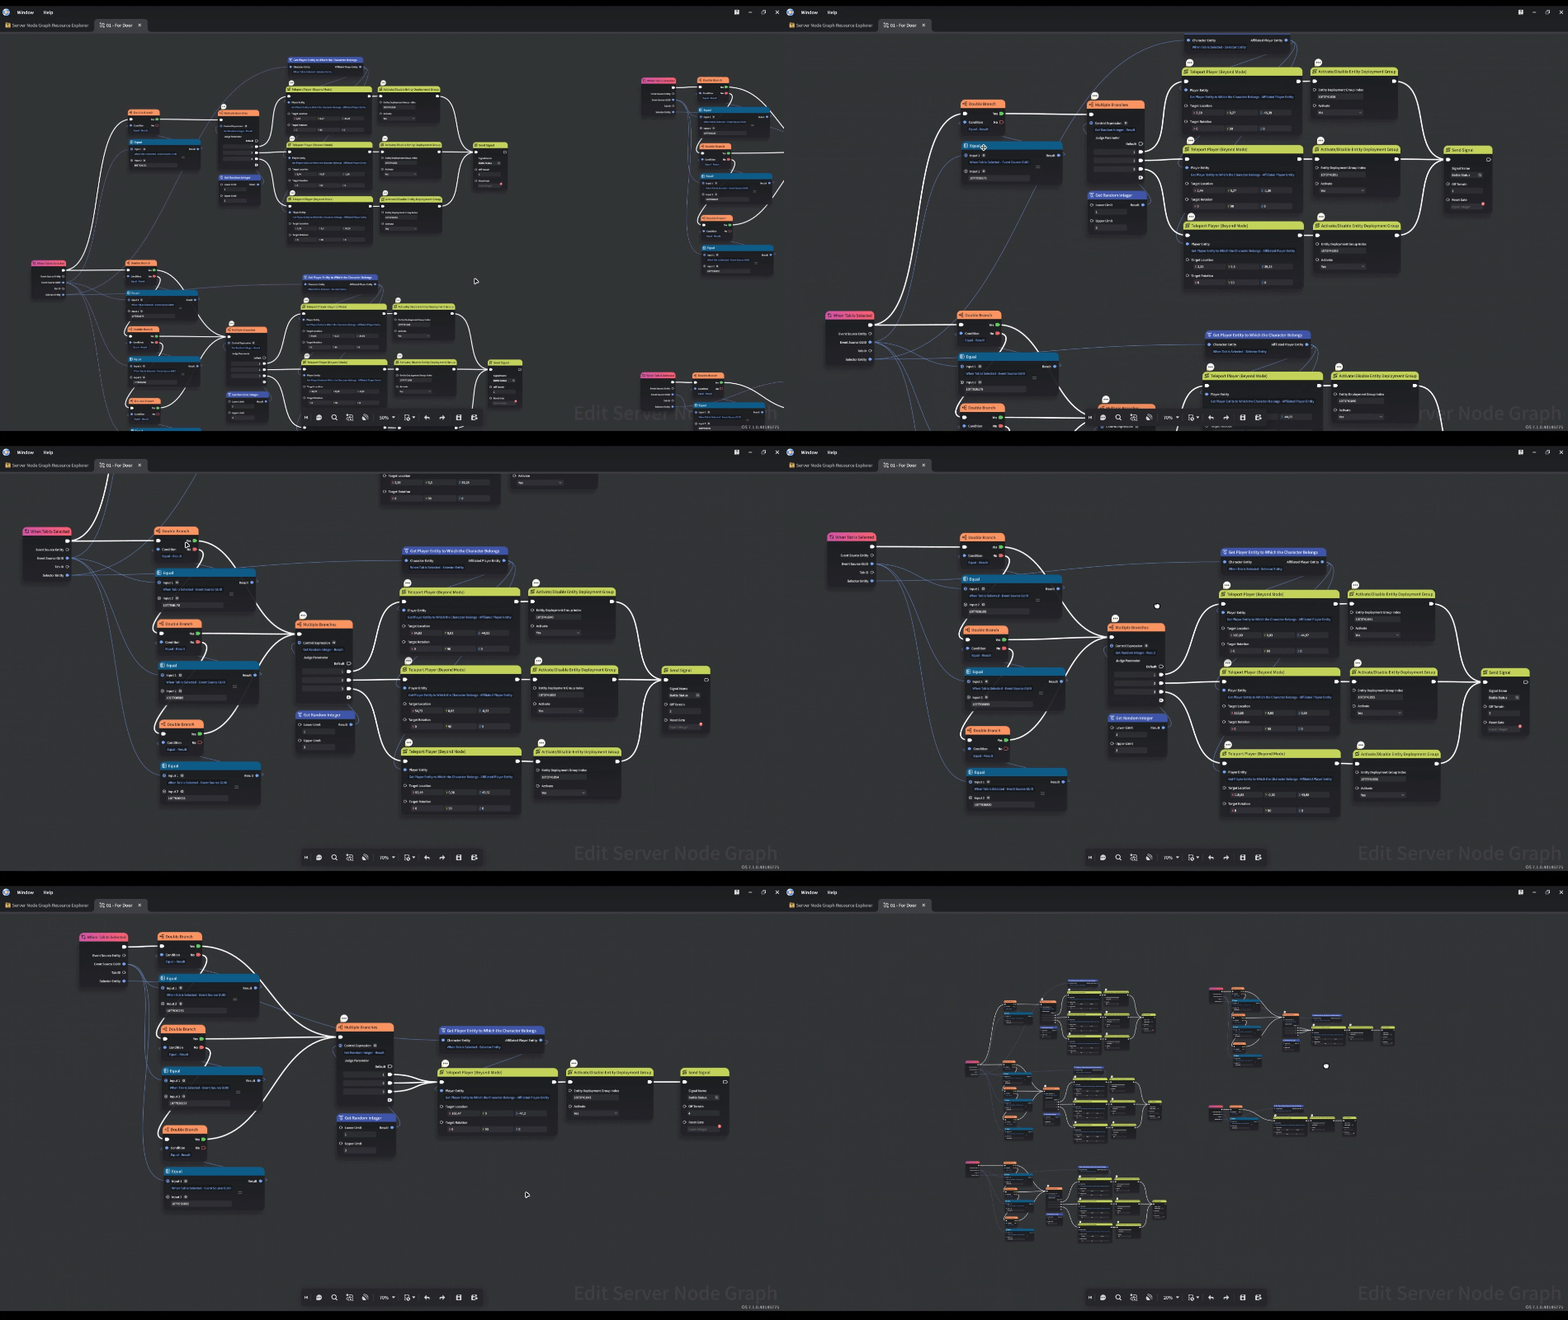
And here is the complete structure of the Random Location System, which is used to randomly select a dungeon location, activate its corresponding terrain and Entity Deployment Group, and teleport the player to the selected area.
I divide this system into five sections, corresponding to the five terrain layouts created earlier. Each section handles the activation of its respective terrain and Entity Deployment Group, as well as teleporting the player to the correct location based on the random selection result.
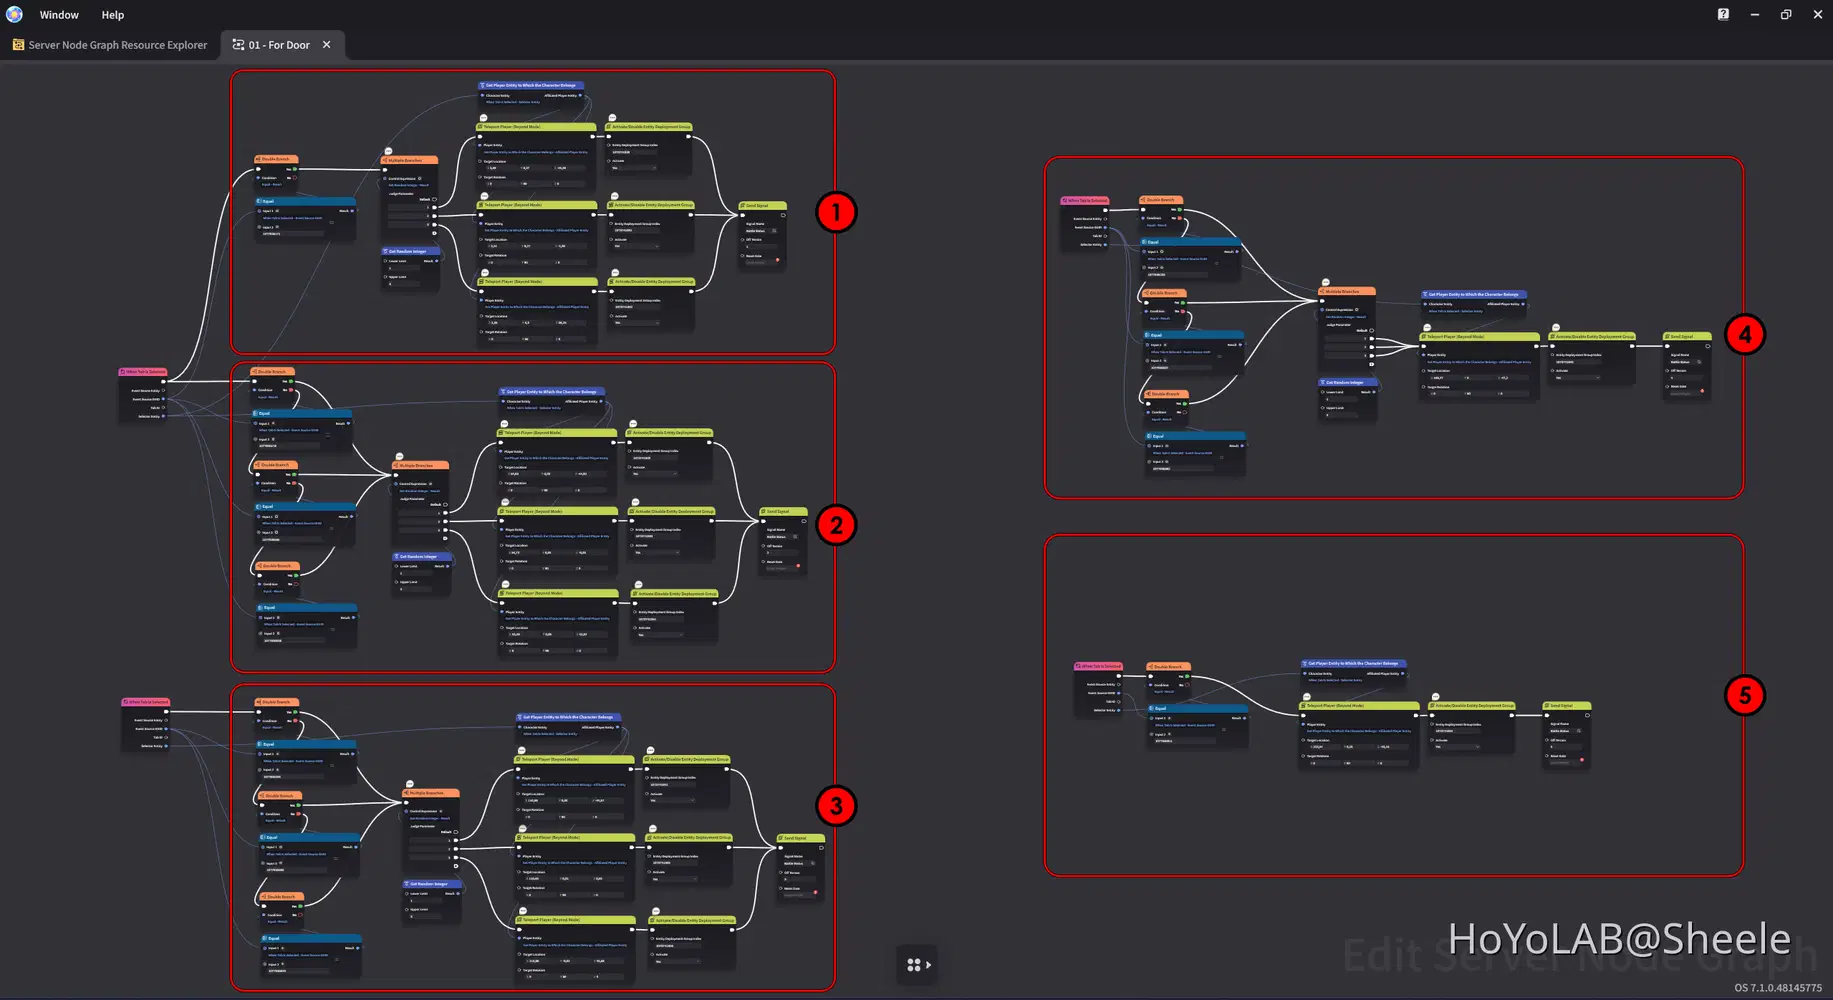
Random Location System
The first section handles the logic for directing the system to Section 1, where the corresponding dungeon terrain and Entity Deployment Group will be activated.
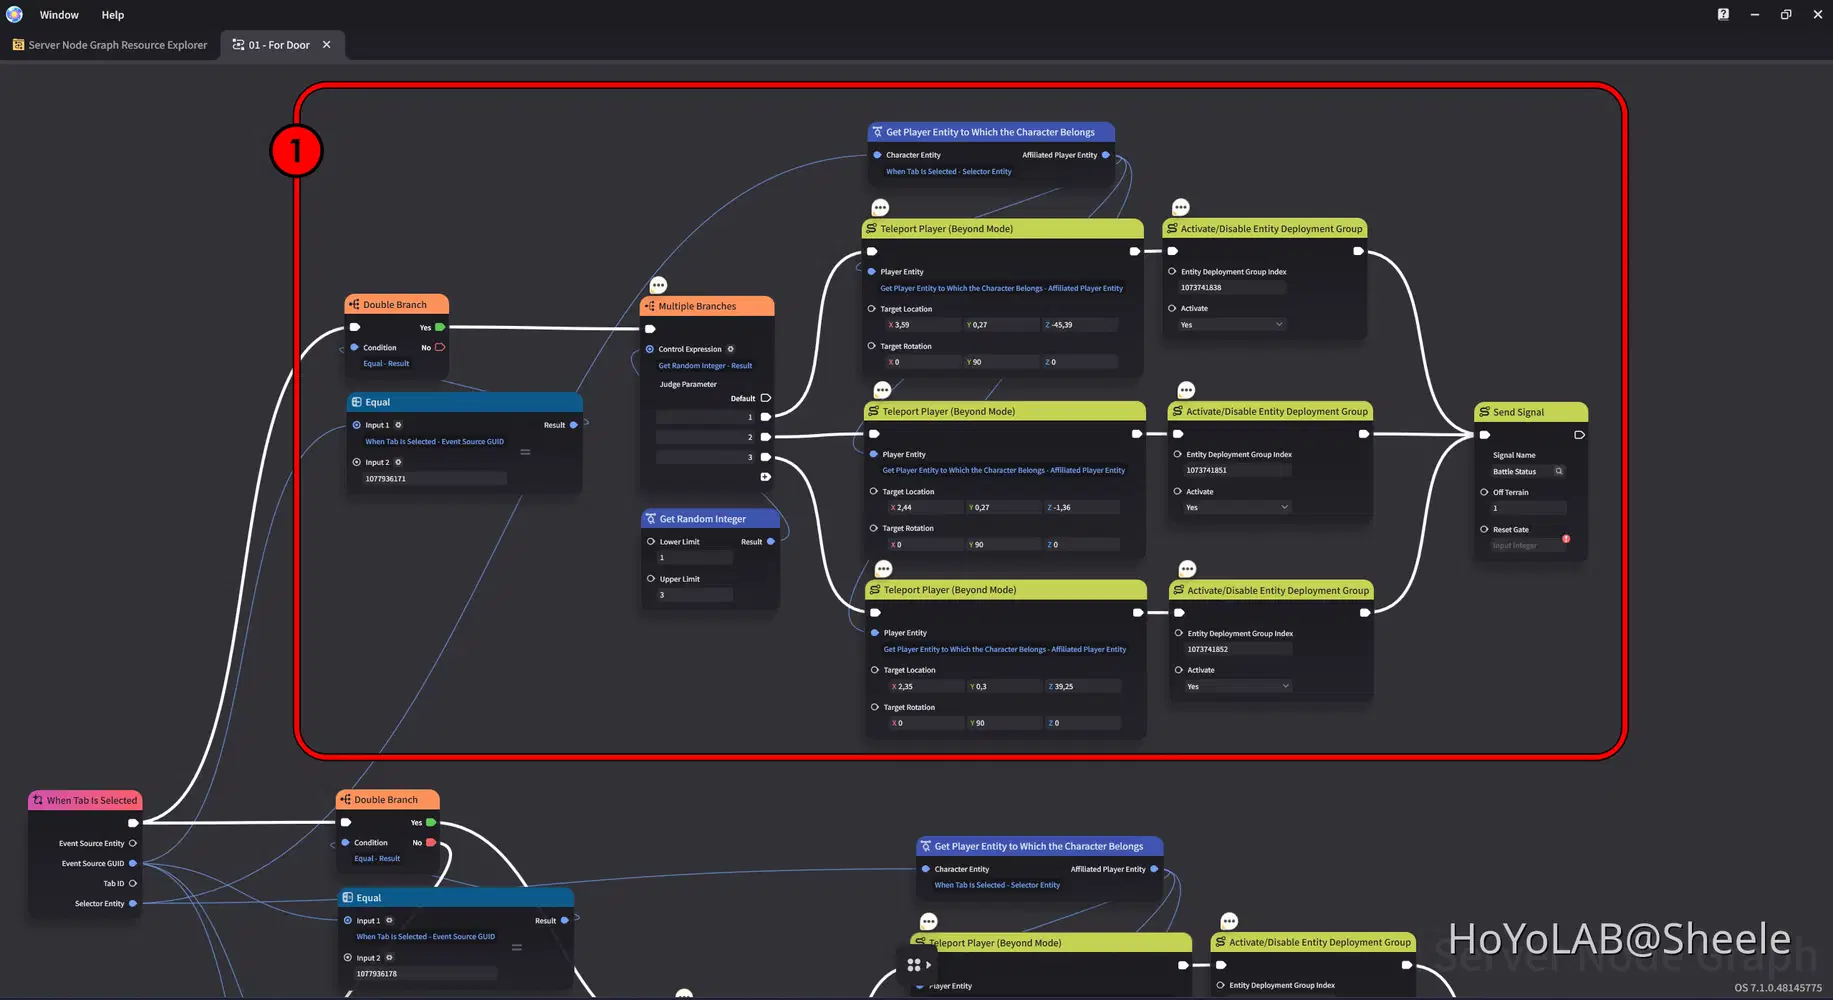
Section 1 Logic
Next, this section contains the logic for Section 2, which activates the corresponding dungeon terrain and Entity Deployment Group, then teleports the player to the designated location.
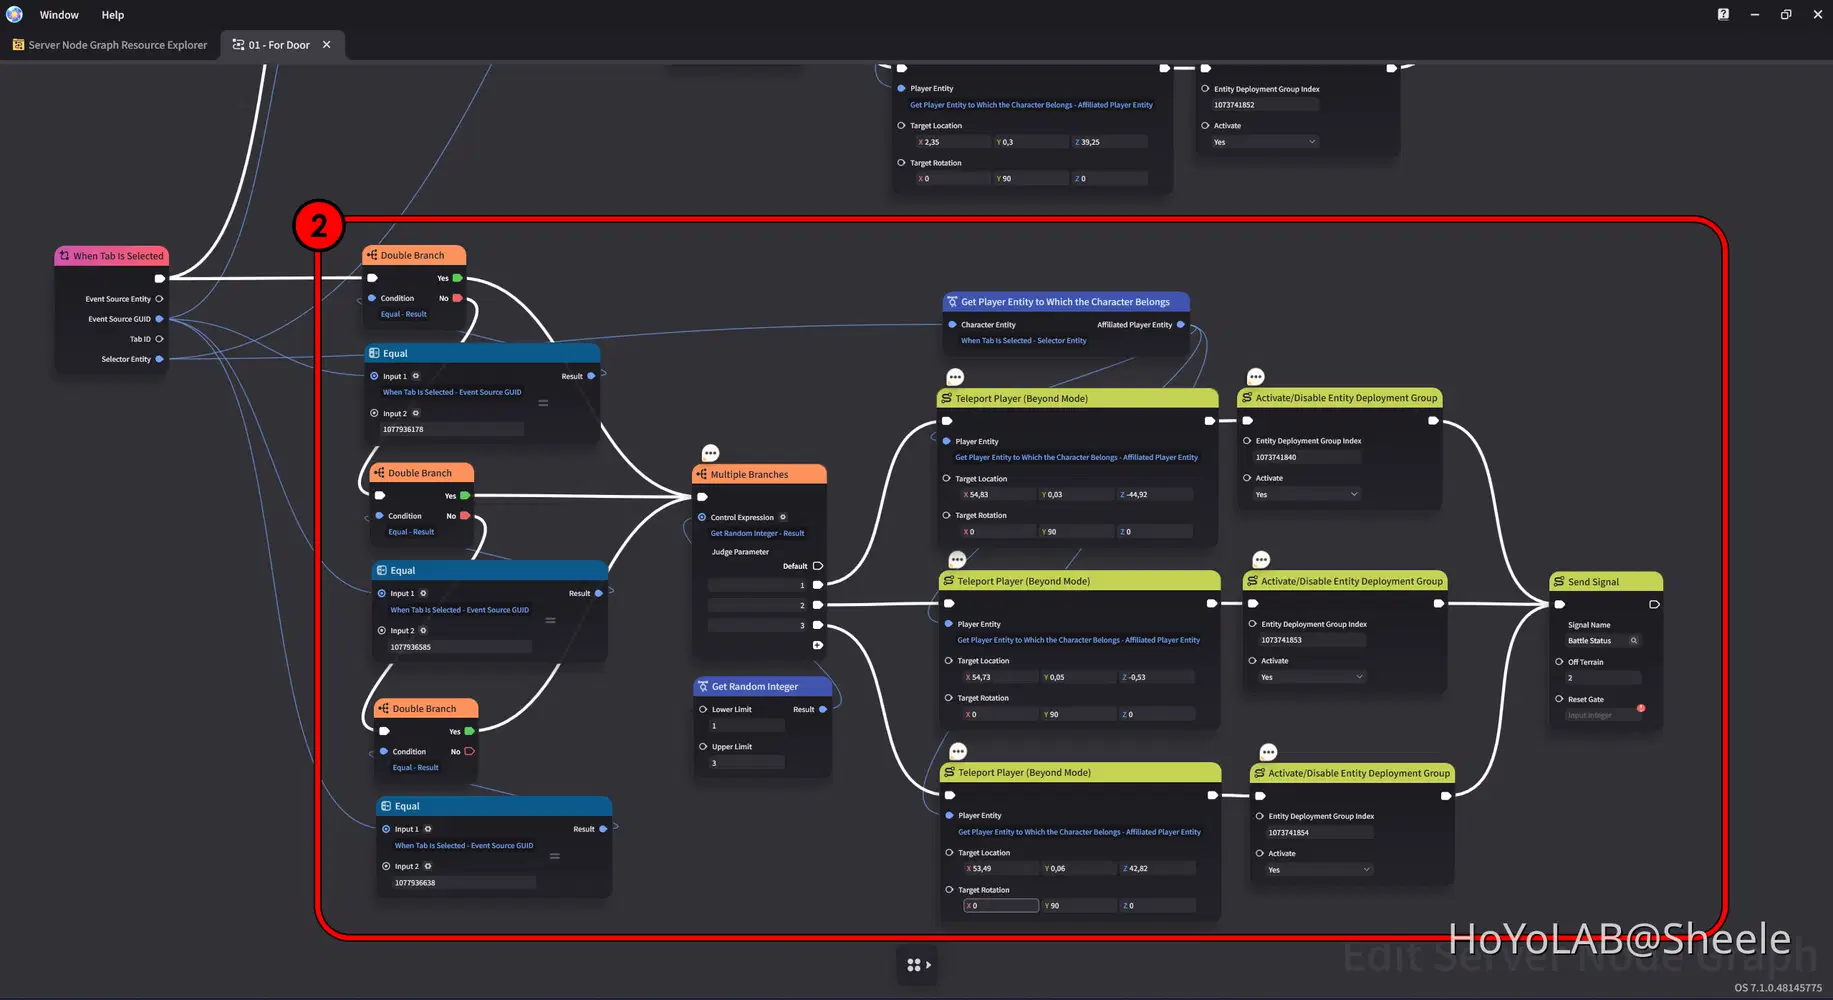
Section 2 Logic
Next, this is the logic for Section 3, which handles the activation of its corresponding dungeon terrain and Entity Deployment Group, followed by teleporting the player to the designated location.
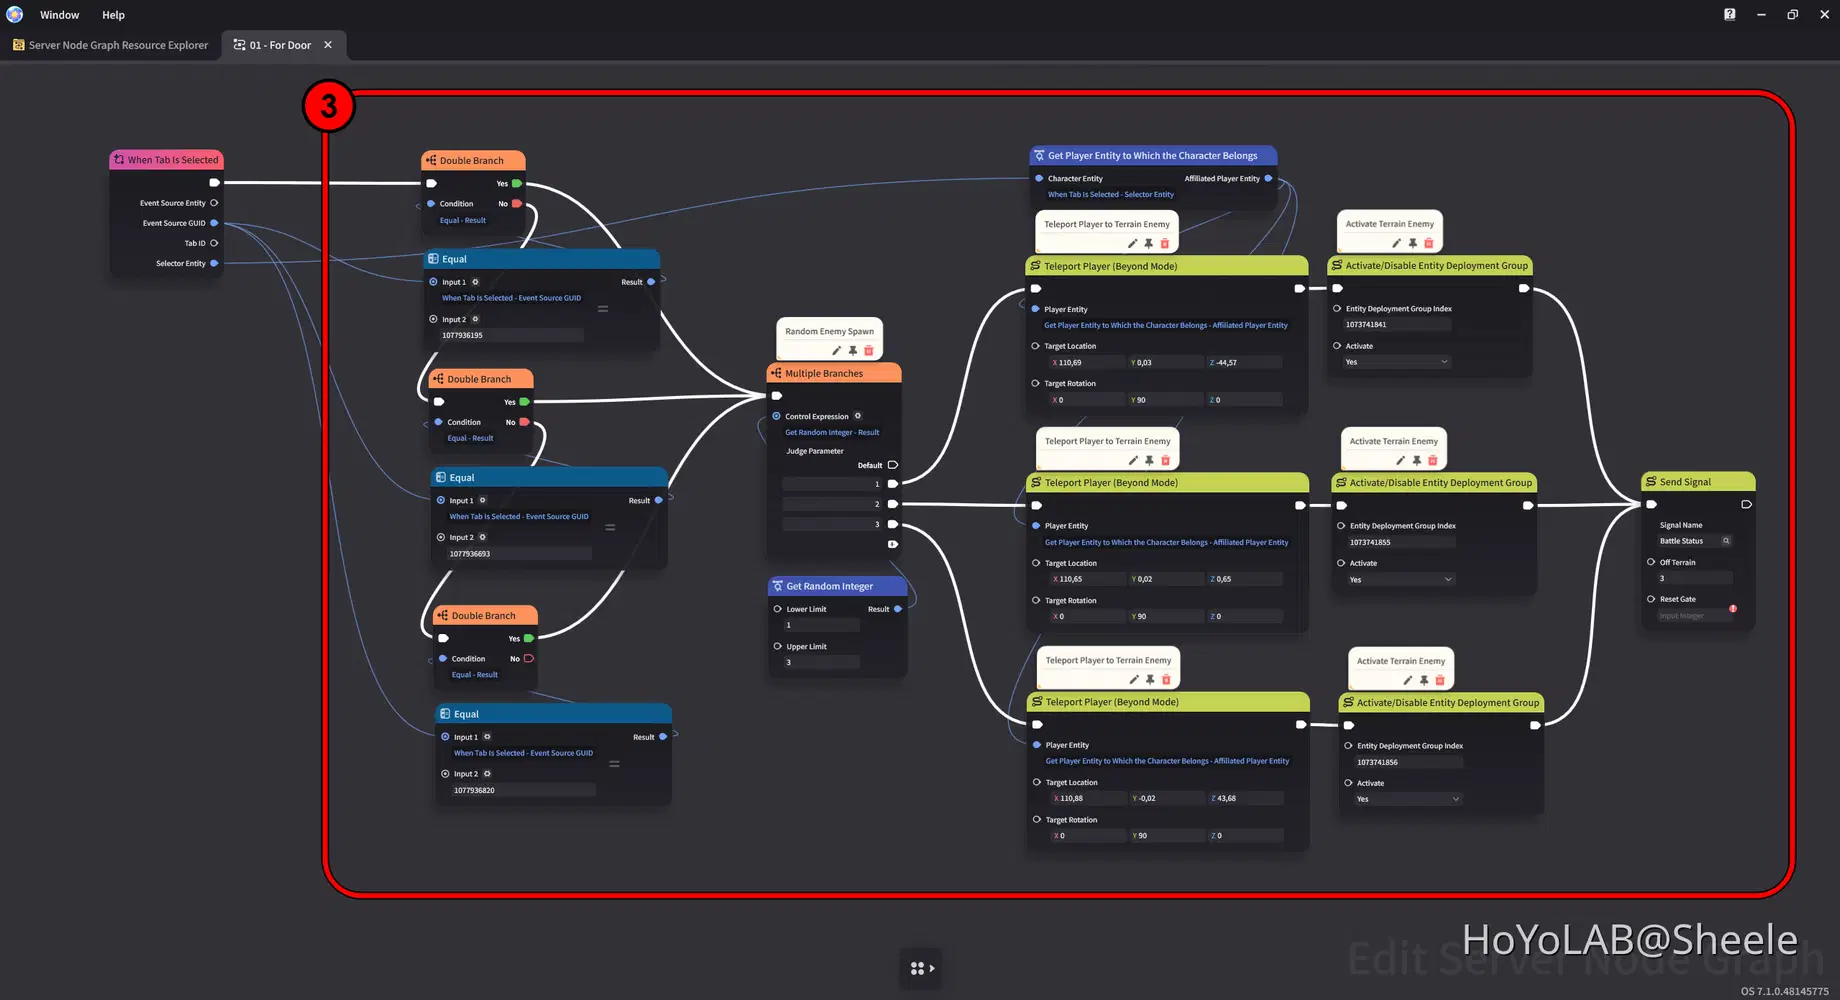
Section 3 Logic
Next, this is the logic for Section 4, which activates its corresponding dungeon terrain and Entity Deployment Group, then teleports the player to the designated location.
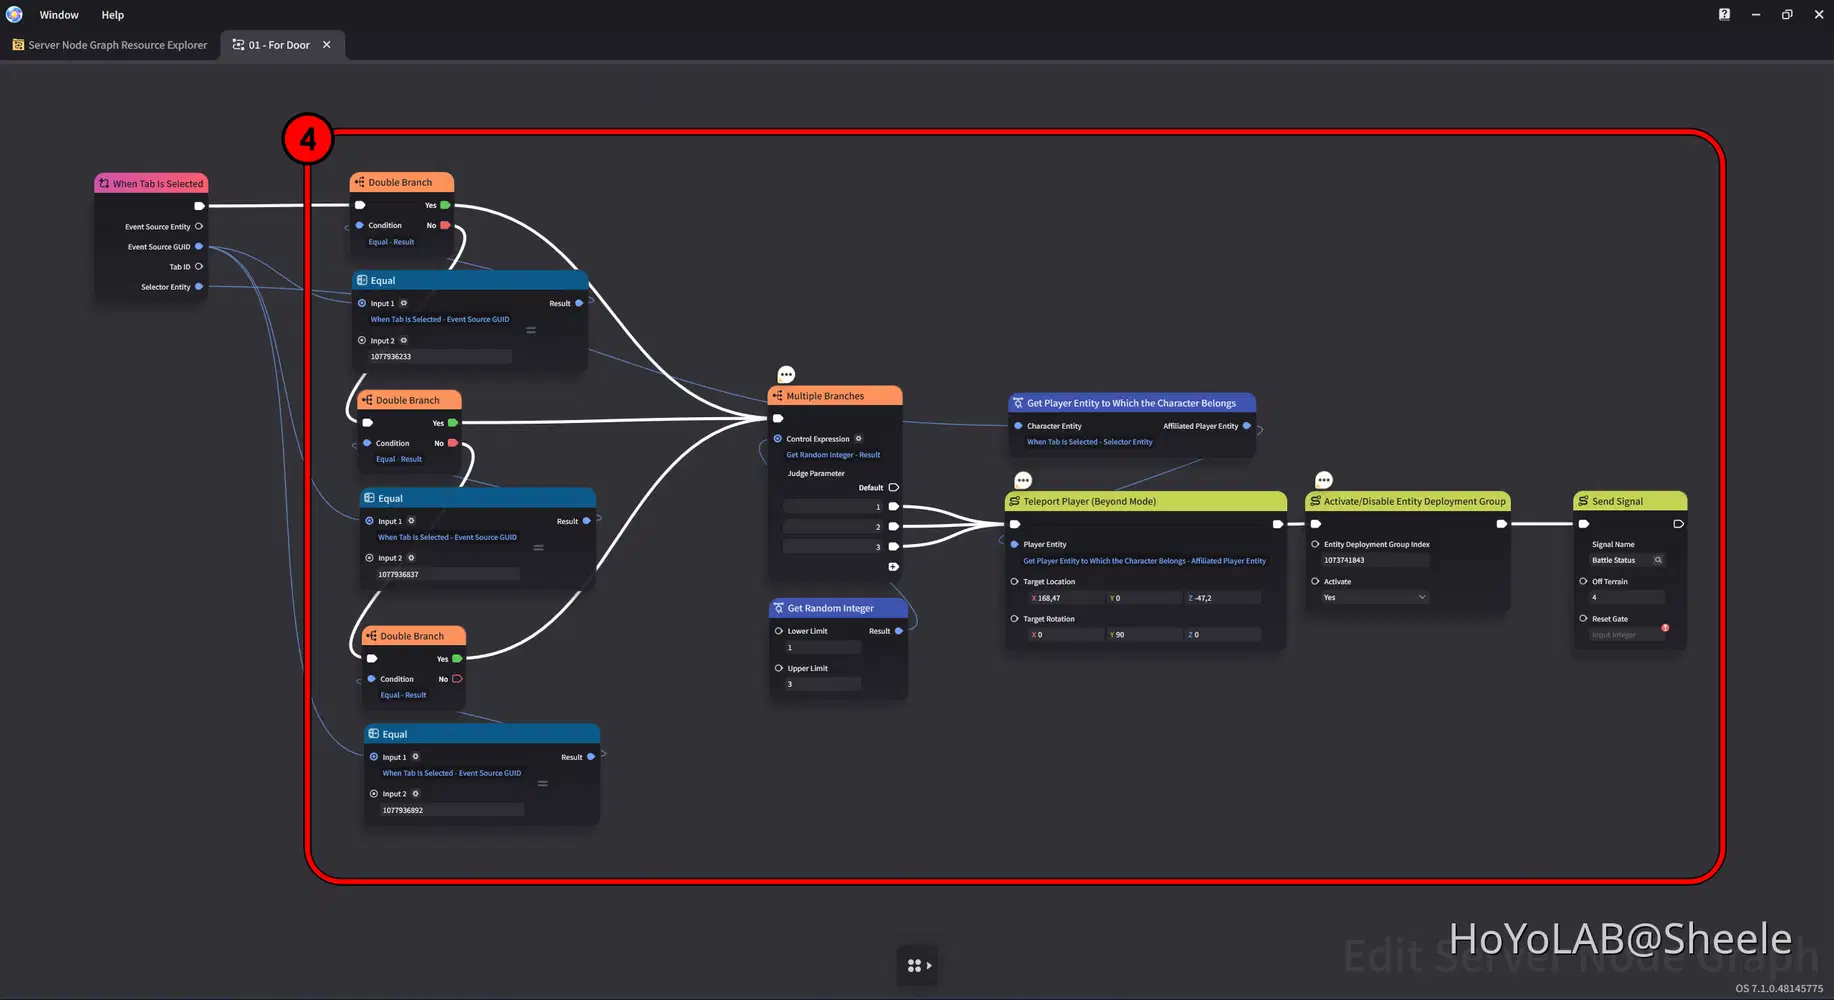
Section 4 Logic
Finally, this is the logic for the Boss Section, which activates the boss dungeon terrain and its corresponding Entity Deployment Group, then teleports the player to the designated boss arena.
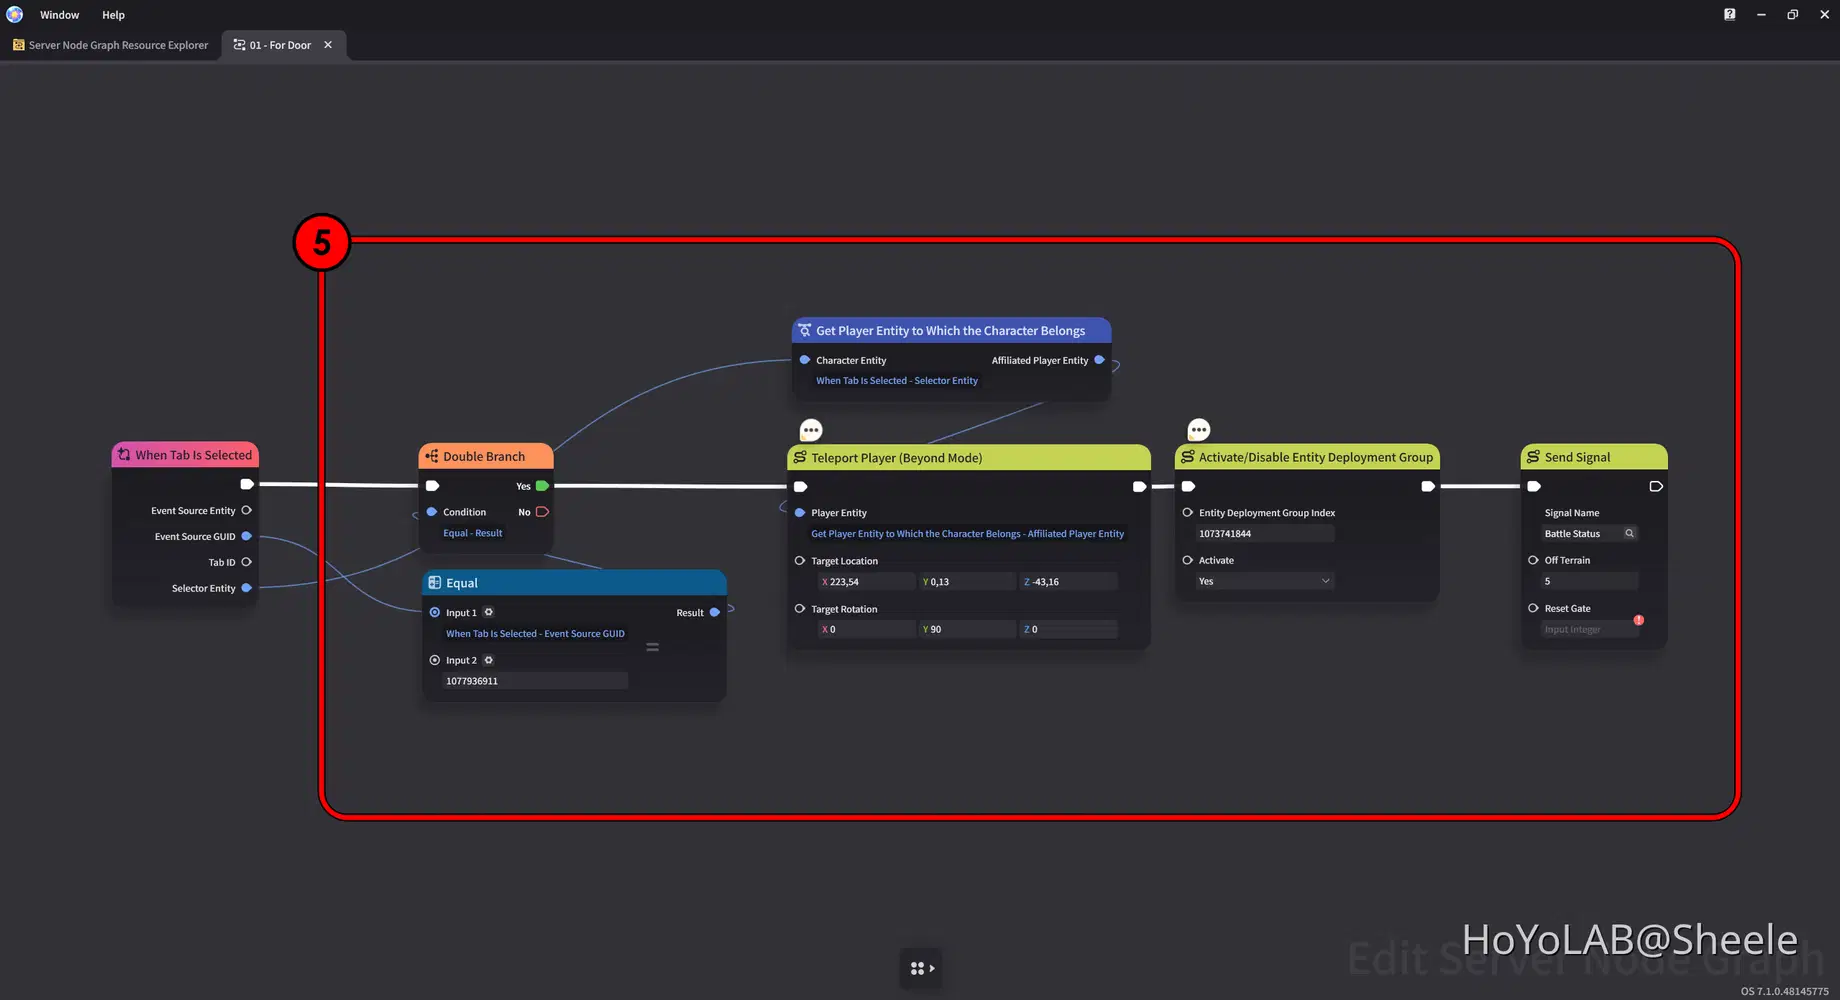
Section 5 Logic
Don't forget to save all the changes you have made, including the dungeon layouts and Node Graph settings.
And that's it! The basic Random Dungeon Location System is now ready. The game can randomly select one of the prepared dungeon areas, activate the corresponding terrain, and teleport the player to the selected location.
*However, we still need enemies in the dungeon. Players must defeat them before they can proceed to the next area. So, in the next step, we'll add enemies to the dungeon and set up the system that controls their appearance and progression.
3.4 Add Interactive Objects and Customize the Environment
To make each dungeon more interesting, add various environmental objects that match your chosen theme. You can also include interactive objects that players can destroy during their adventure.
- For example, you can place breakable objects such as crates, barrels, or rocks throughout the dungeon. These objects can later be used to add extra gameplay mechanics, such as dropping rewards or other useful items when destroyed by the player.
You can also customize the background colors to match the theme of your dungeon. For this project, I'm using a desert theme, so I adjust the background colors to create a warm atmosphere that fits the surrounding environment.
Feel free to experiment with different objects, decorations, and background colors to make each dungeon more attractive and give it its own unique atmosphere.
📝 Wonderland Guide:
To create objects that players can destroy, first place the desired objects in your dungeon terrain. Then, open the Combat section and configure the Battle Settings. Here, you can choose the VFX that will appear when the object is hit by the player's attack. Next, add a Hurt Box to the object and adjust its size to match the object's shape. This allows the player's attacks to hit the object properly, making it possible to damage and eventually destroy it during gameplay.
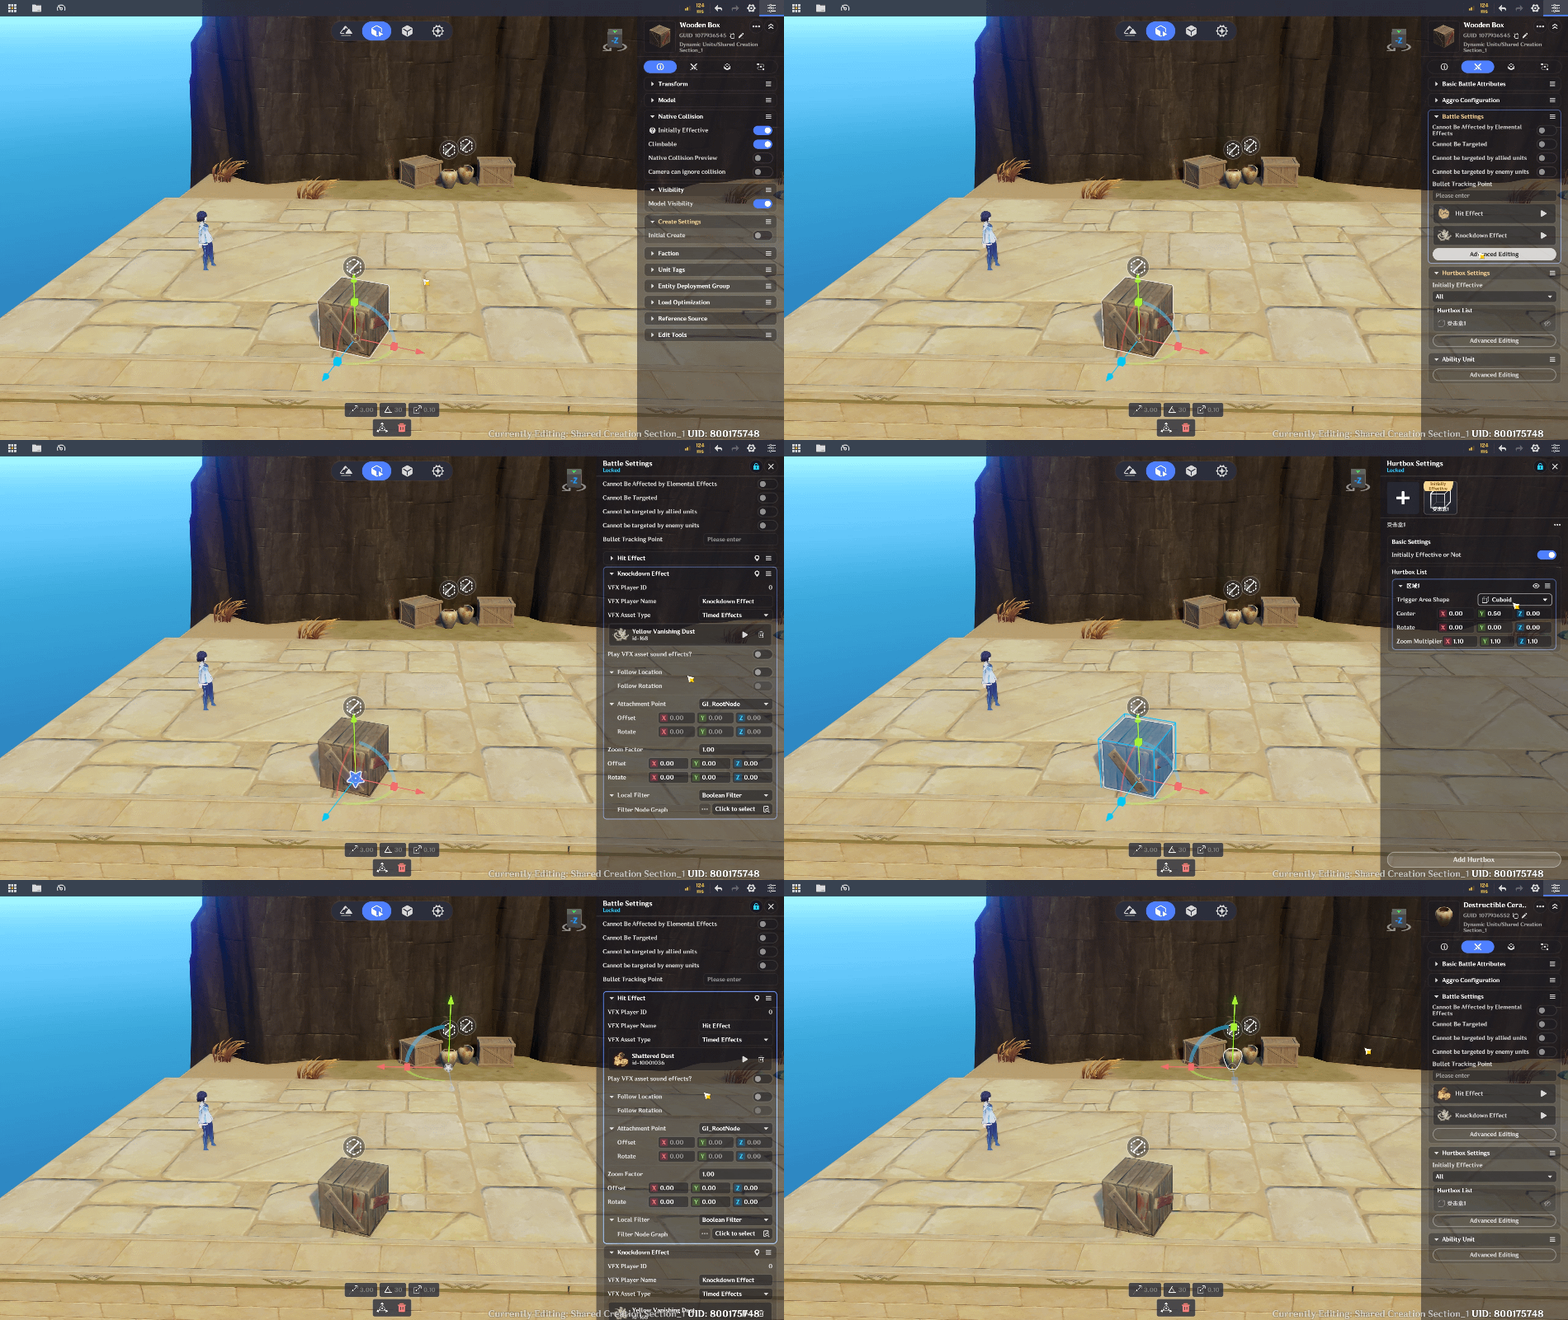
Destruct able Object Setup
To customize the background colors of your game, open Environment Configuration and set Effective Player to All Players. Then, adjust the available settings, such as colors, blur, brightness, and other visual effects, to match your chosen theme.
Feel free to experiment with these settings until you achieve the atmosphere you want for your dungeon. For this project, I adjust the colors to create a warm desert atmosphere that matches the environment.
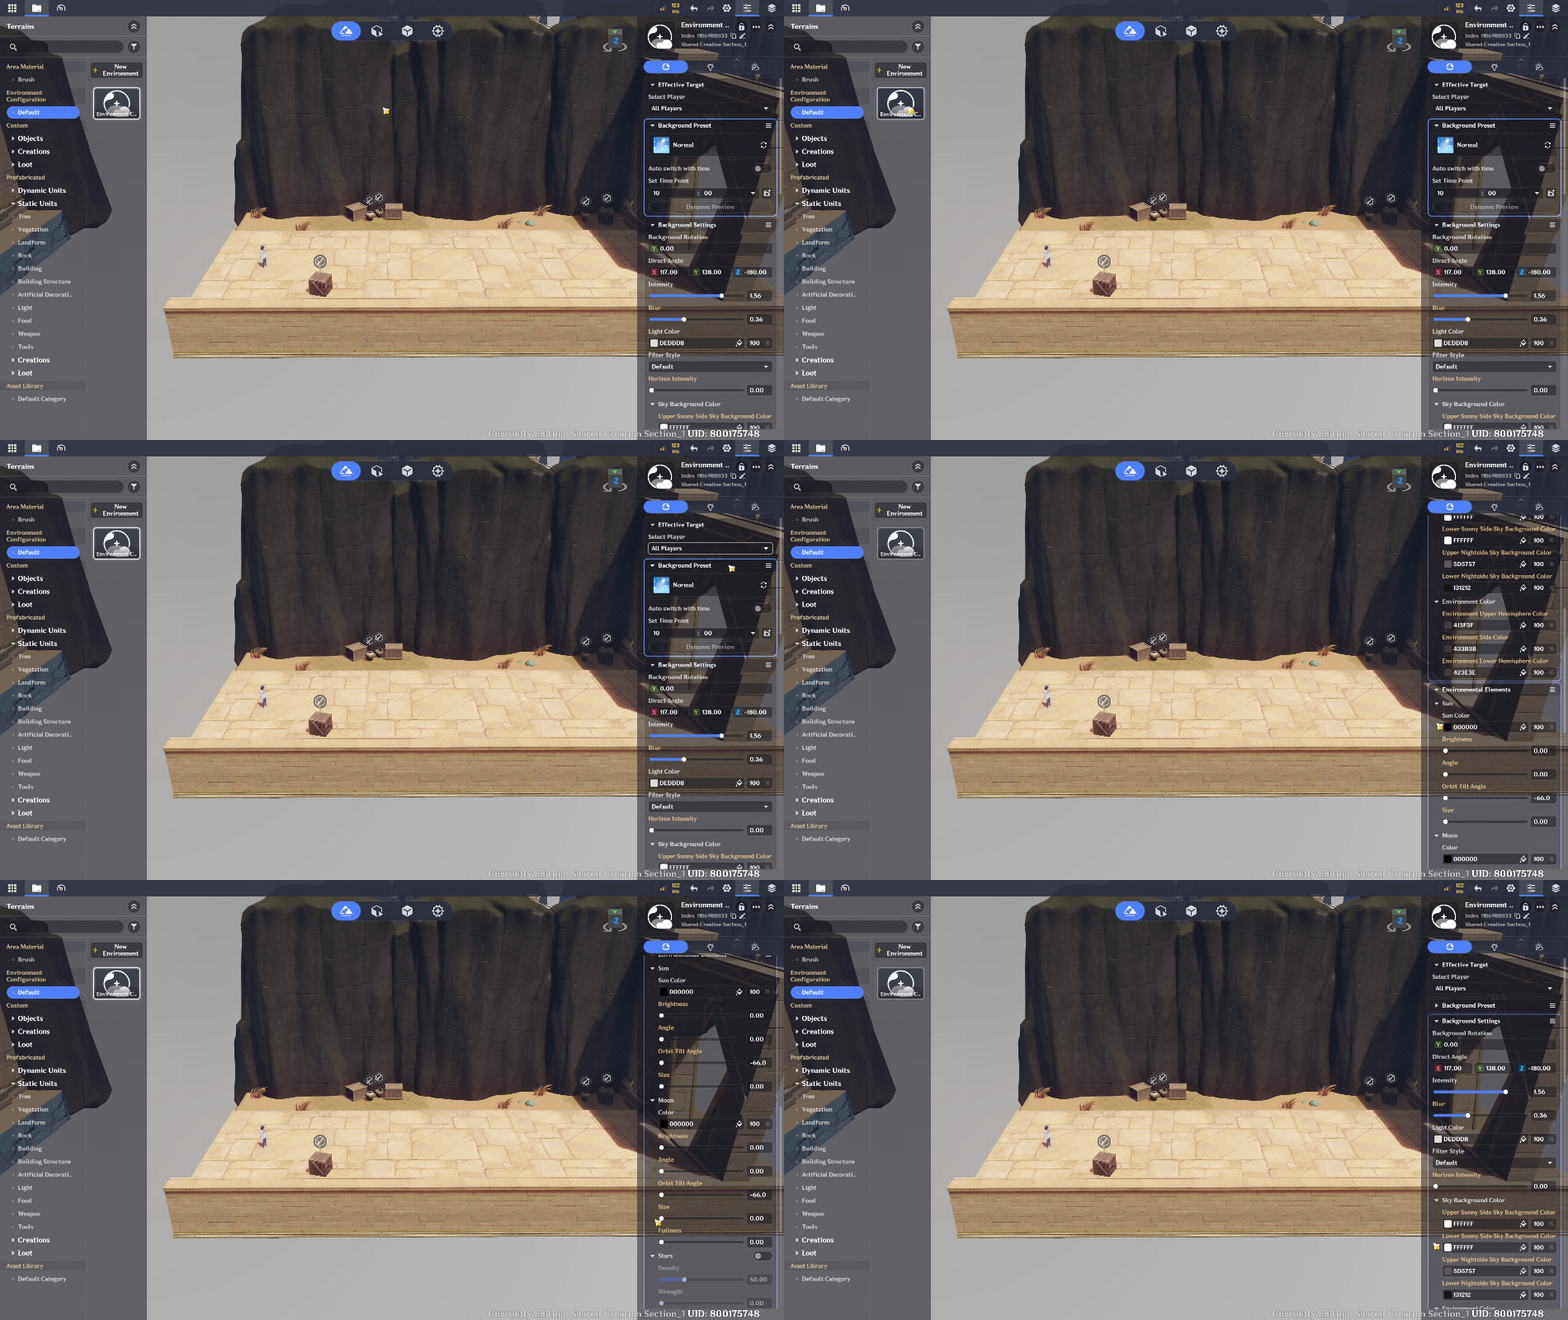
Environment Configuration
And here is the result! Players can now attack and destroy the objects placed throughout the dungeon, making the environment more interactive and adding another layer of fun to the gameplay.
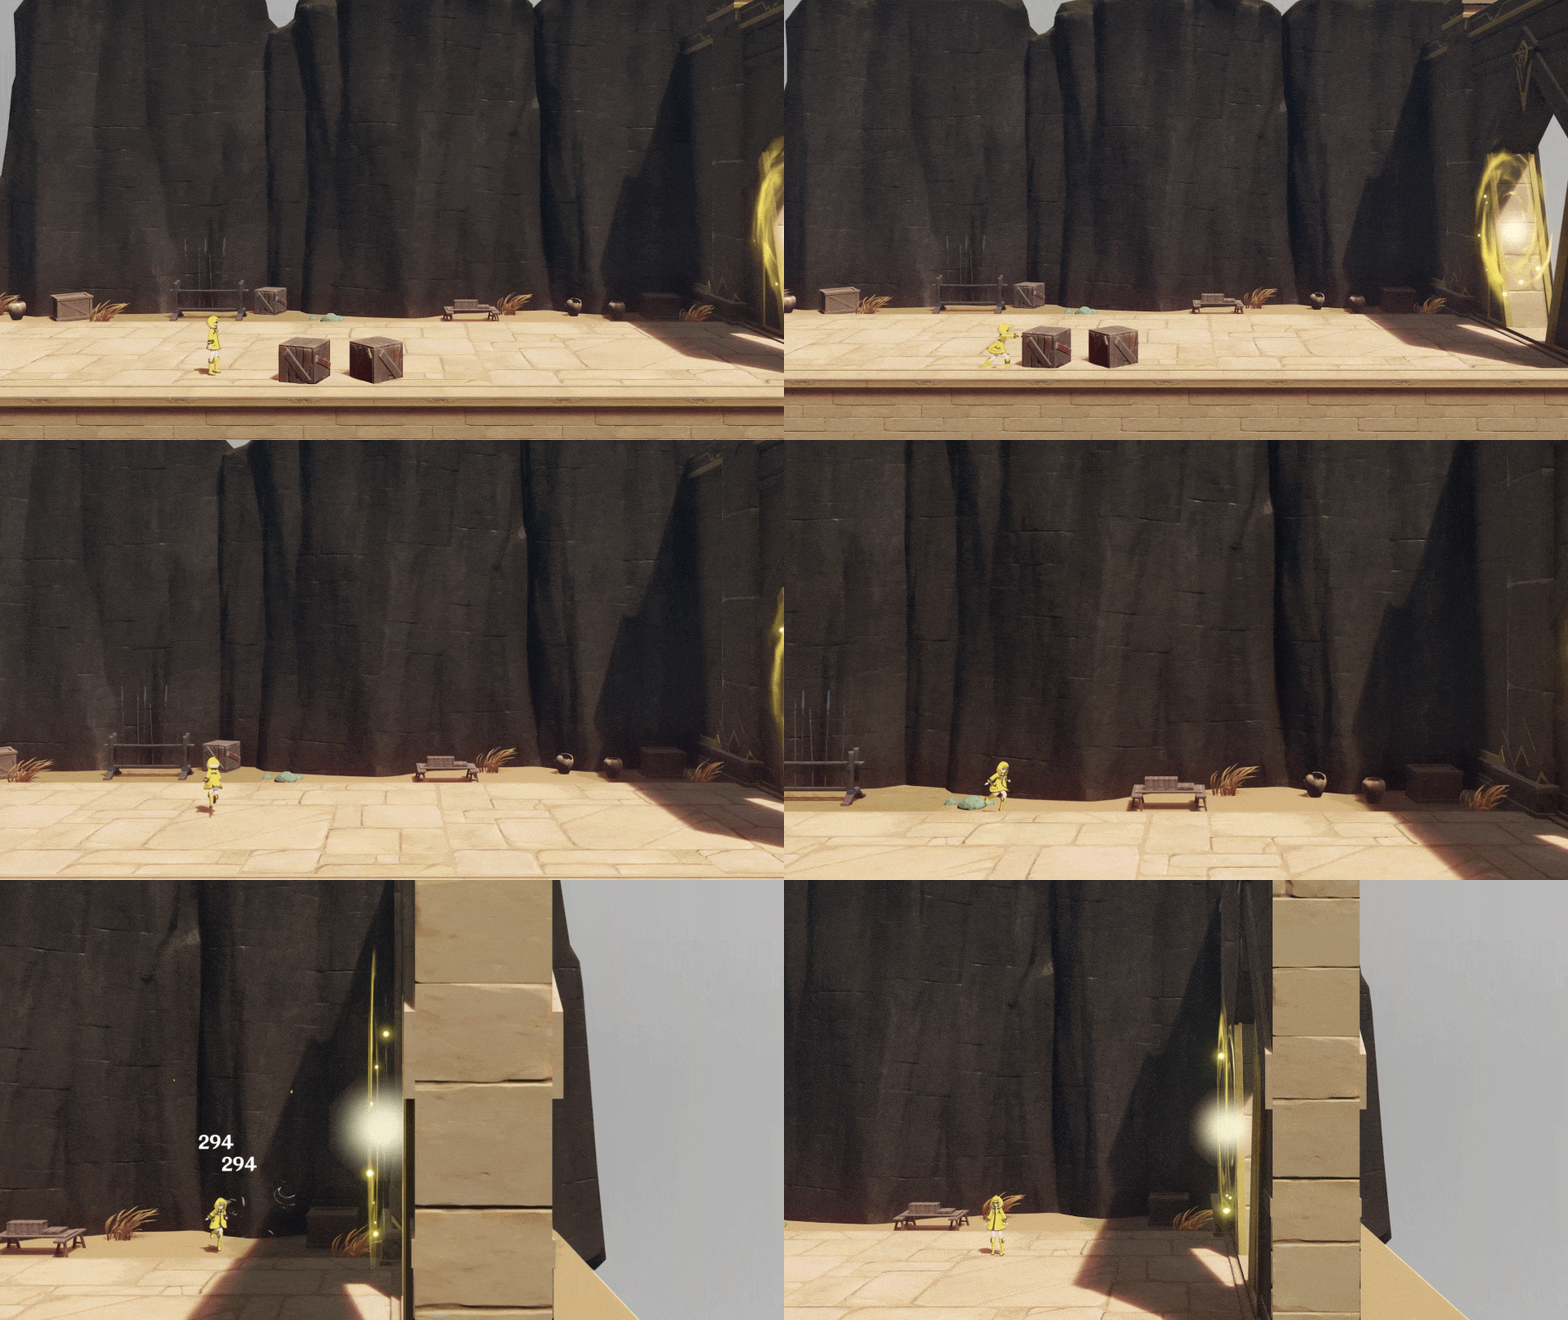
Interactive Objects Preview
3.5 Prepare for Random Enemy Encounters
Different dungeon locations can also feature different enemy types. To support this, prepare a way to associate each dungeon location with its corresponding enemy configuration.
For example, Dungeon A might contain basic melee enemies, while Dungeon B could feature ranged enemies or a different combination of opponents. We'll build the enemy spawning and combat mechanics in the next chapter. For now, make sure your dungeon selection system can identify the chosen location so the enemy system can use that information later.
Chapter Summary
In this chapter, we've prepared multiple dungeon layouts, created a portal concept, and planned a random selection system to determine the player's next destination.
By combining different terrain layouts and environments, each run can offer a different exploration experience.
In the next chapter, we'll create the Enemy Spawn & Combat System, allowing players to encounter enemies and fight their way through each dungeon!
Chapter 4: Enemy Spawn & Combat System
Now that our random dungeon system is ready, it's time to add enemies to our adventure!
In this chapter, we'll create an enemy spawning system that places different enemy types in each dungeon. We'll also prepare the basic combat mechanics so players can fight enemies and earn rewards for defeating them.
4.1 Prepare the Enemy Types
First, choose the enemy types you want to use in your game.
You can use different enemies to create more varied combat encounters. For example:
- Melee Enemies: Attack players at close range.
- Ranged Enemies: Attack players from a distance.
- Heavy Enemies: Have higher HP and are more difficult to defeat.
These are only examples. You can choose any suitable enemies available in Miliastra Wonderland and configure their attributes according to your game's design.
📝 Wonderland Guide:
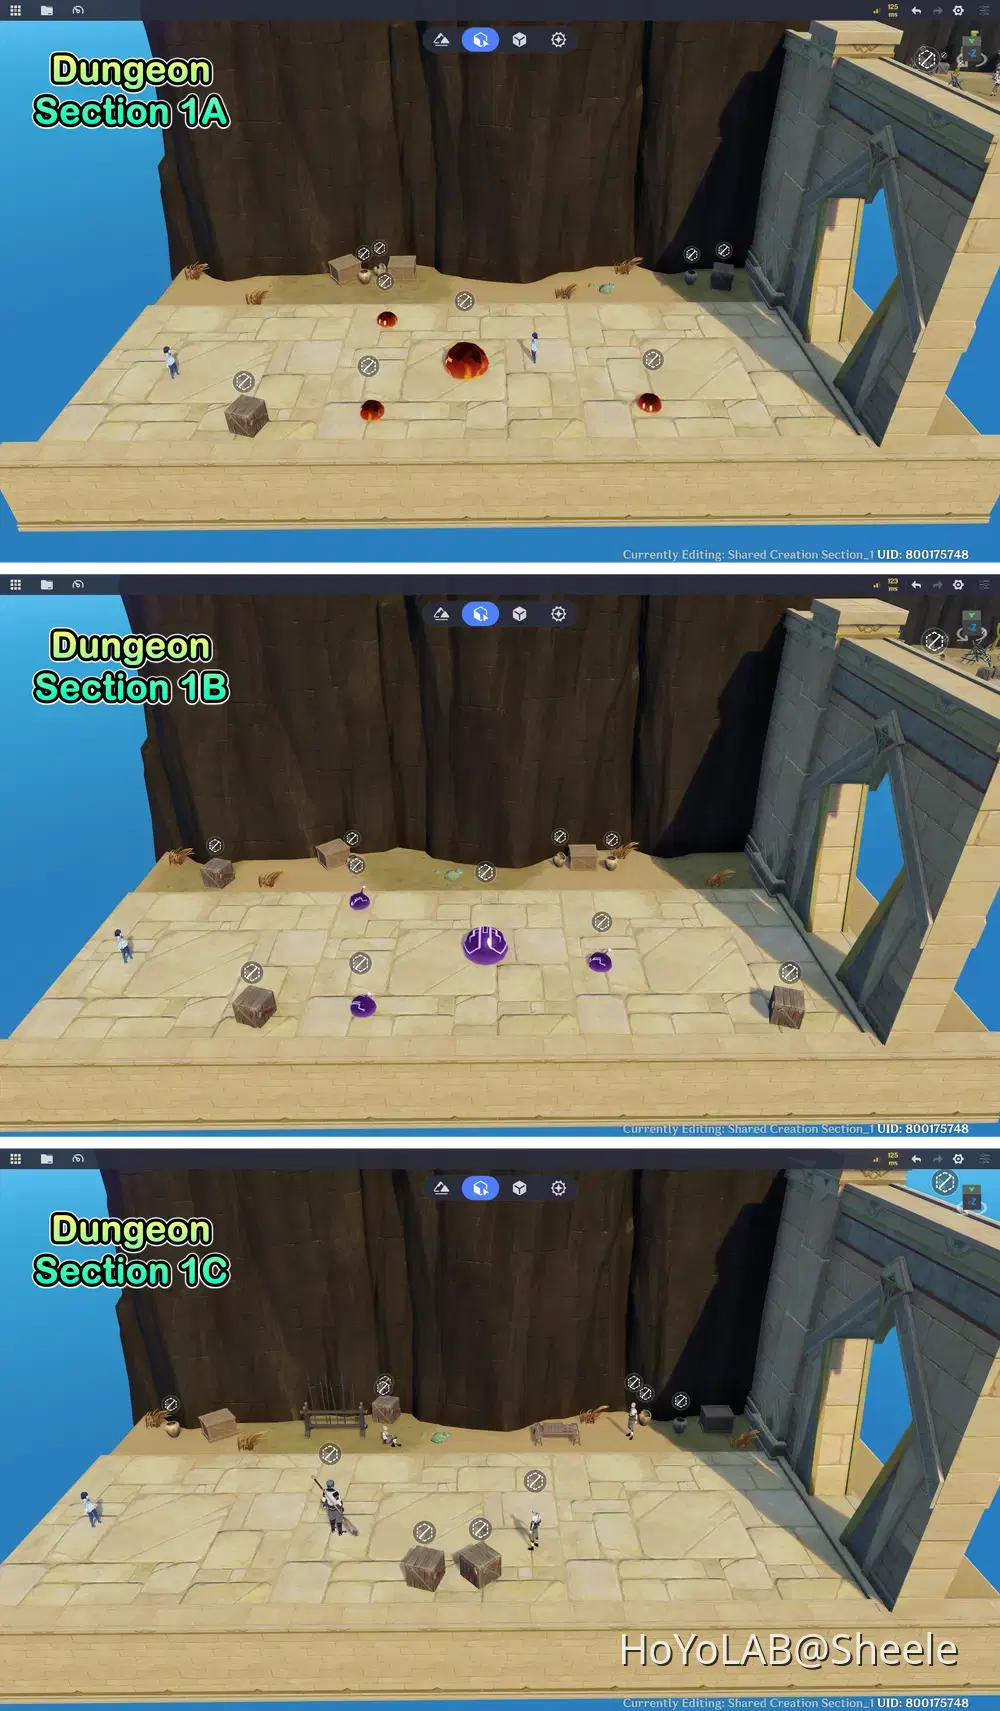
For the first dungeon section, I add some easy enemies to give players a simple introduction to combat. Here, I place several Slimes throughout the terrain as basic enemies. I also add a few Treasure Hoarders to provide some variety and make the first encounters more interesting.
Once all the enemies are placed, don't forget to add them to the appropriate Entity Deployment Group. This allows the game to activate or deactivate all enemies in this section together when the dungeon is selected.
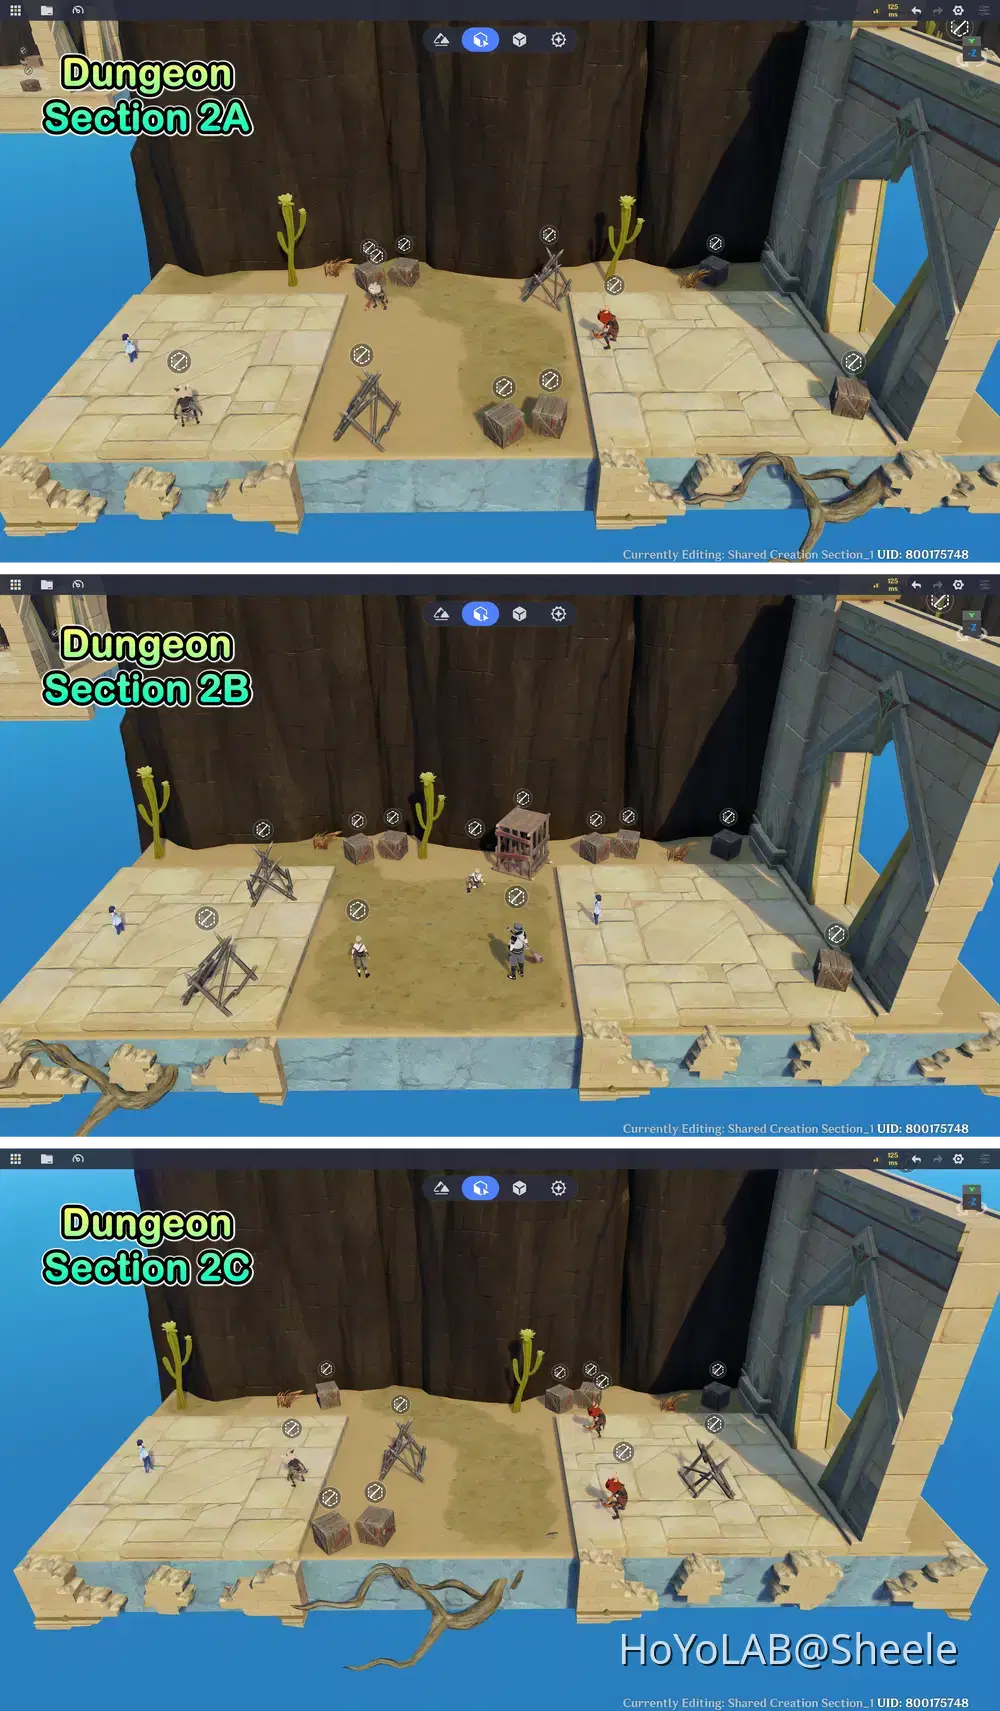
For Section 2, we start introducing more enemy variety to make the battles a little more challenging. For example, I add different types of Hilichurls, combining melee attackers and ranged attackers to create more interesting combat encounters. I also include some Treasure Hoarders to add even more variety to the enemy lineup.
Don't forget to place all the enemies in the appropriate Entity Deployment Group so they can be activated together when this dungeon section is selected.
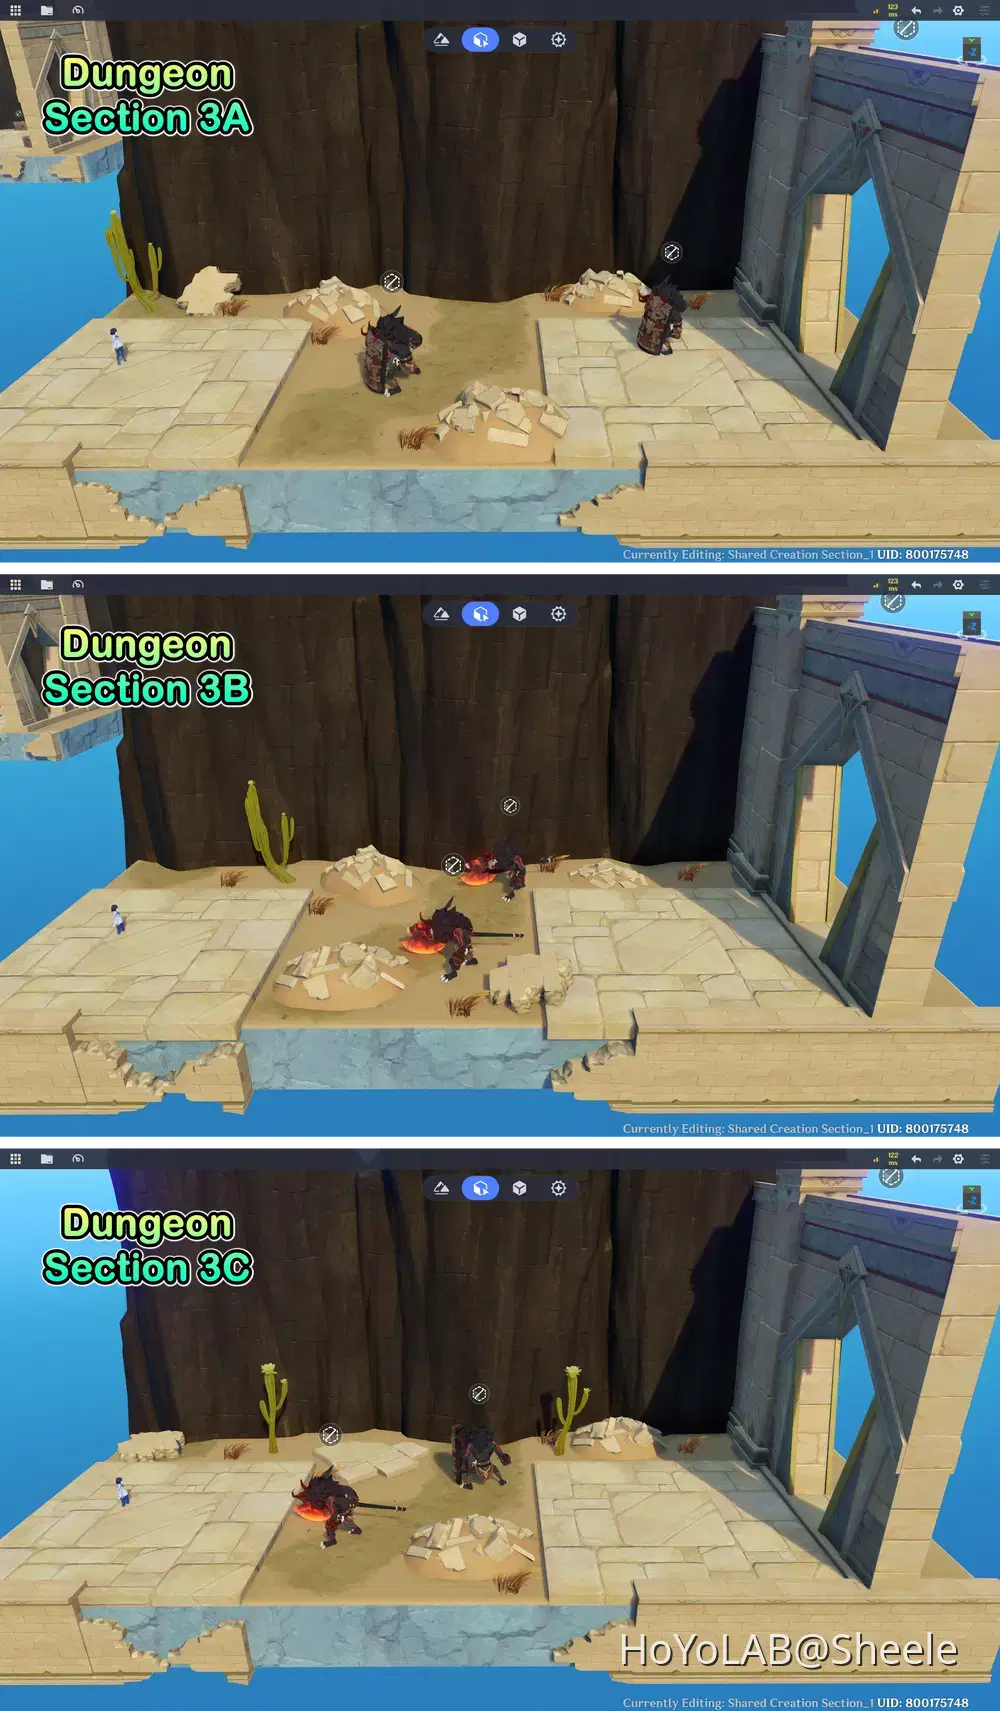
For Section 3, I introduce stronger enemies, such as Axe Mitachurls and Shield Mitachurls. These enemies are tougher to defeat and require players to think more carefully about their attack strategy and positioning. Players will need to find the right opportunities to attack while avoiding enemy attacks and defenses.
This section is designed to gradually increase the difficulty and encourage players to use better combat strategies.
You can also organize enemies into different groups based on their factions. This will make it easier to identify and select specific enemies later, especially when setting up the logic to check which enemies have been defeated.
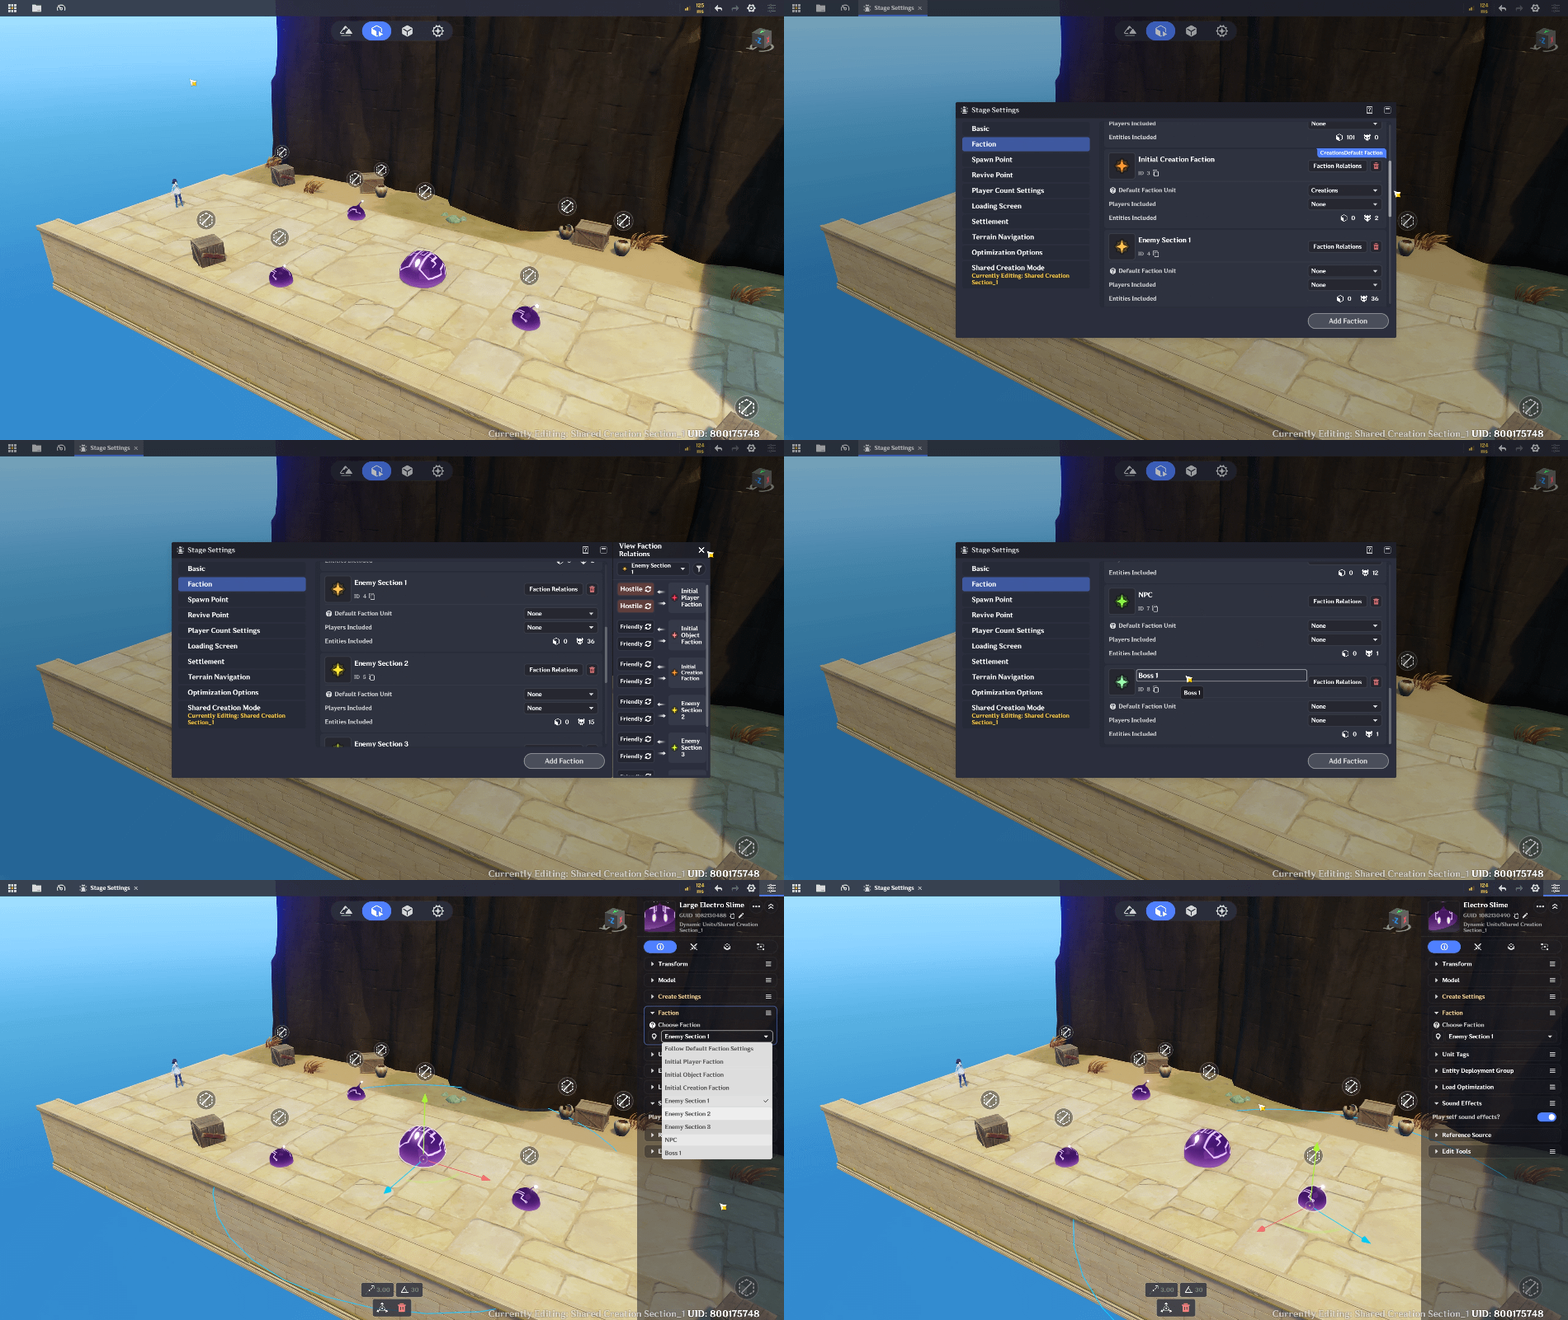
Enemy Factions
For this project, I create additional Factions for the enemies so they can be organized and managed more easily.
4.2 Configure Enemy Attributes
Next, prepare the basic combat attributes for each enemy.
Depending on the enemy configuration available in the editor, consider adjusting the following properties:
- HP: Determines how much damage an enemy can take before being defeated.
- ATK: Determines the damage dealt by the enemy.
- DEF: Determines the enemy's defensive strength, if supported.
- Movement: Controls how the enemy moves around the dungeon.
- Attack Behavior: Defines how the enemy attacks the player.
To keep things simple at this stage, you can use the default settings provided for each monster. You don't need to customize all their combat attributes yet. Simply increase their level in the Combat section to make them stronger.
For example, here I increase the Slime's level to 30 so that it won't be defeated with just one hit from the player. You can use the same method for other enemies and adjust their levels depending on how challenging you want each dungeon section to be.
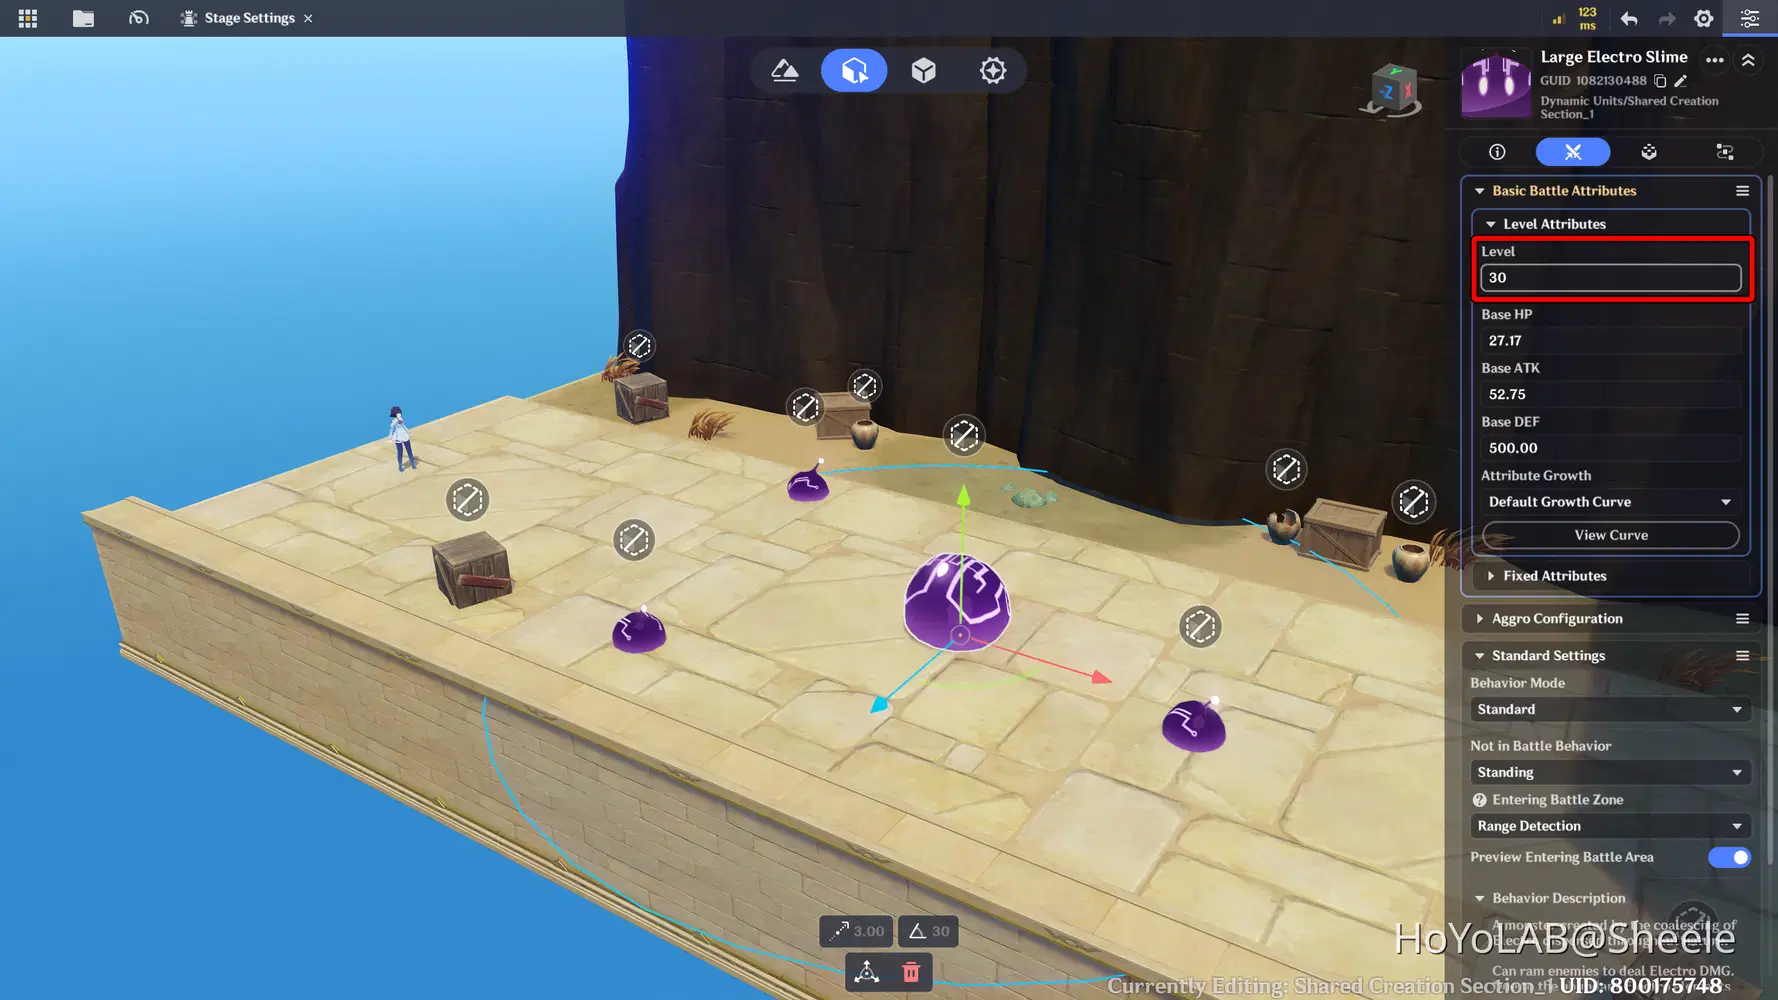
Enemy Attributes
You can always fine-tune their stats and difficulty later after testing the complete gameplay.
Chapter Summary
In this chapter, we've prepared different enemy types, configured their combat attributes, and established the basic logic for spawning enemies based on the selected dungeon. In the next chapter, we'll create the EXP, Soul & Level-Up System, allowing players to gain experience by defeating enemies and level up as they progress through the dungeon!
Chapter 5: EXP, Soul & Level-Up System
In a roguelite game, character progression is an important part of the gameplay experience. Players should become stronger as they explore dungeons and defeat enemies. In this chapter, we'll create an EXP & Soul system that rewards players for defeating enemies and allows them to level up during their adventure. As players gain more EXP, they can reach higher levels and improve their combat performance.
5.1 Create the Variables
First, prepare the variables needed to track the player's Soul and the number of defeated enemies.
For this basic system, we'll use the following variables:
- Soul: Stores the amount of Soul collected by the player.
- Section 1 Enemy Count: Tracks the number of enemies defeated in Section 1.
These variables will be used later to reward players with Souls and check whether all enemies in the current section have been defeated.
📝 Wonderland Guide:
Open Combat Preset, select Player Template, and go to Custom Variables under the Player section. Add the new variables and set their type to Integer so they can store numerical values.
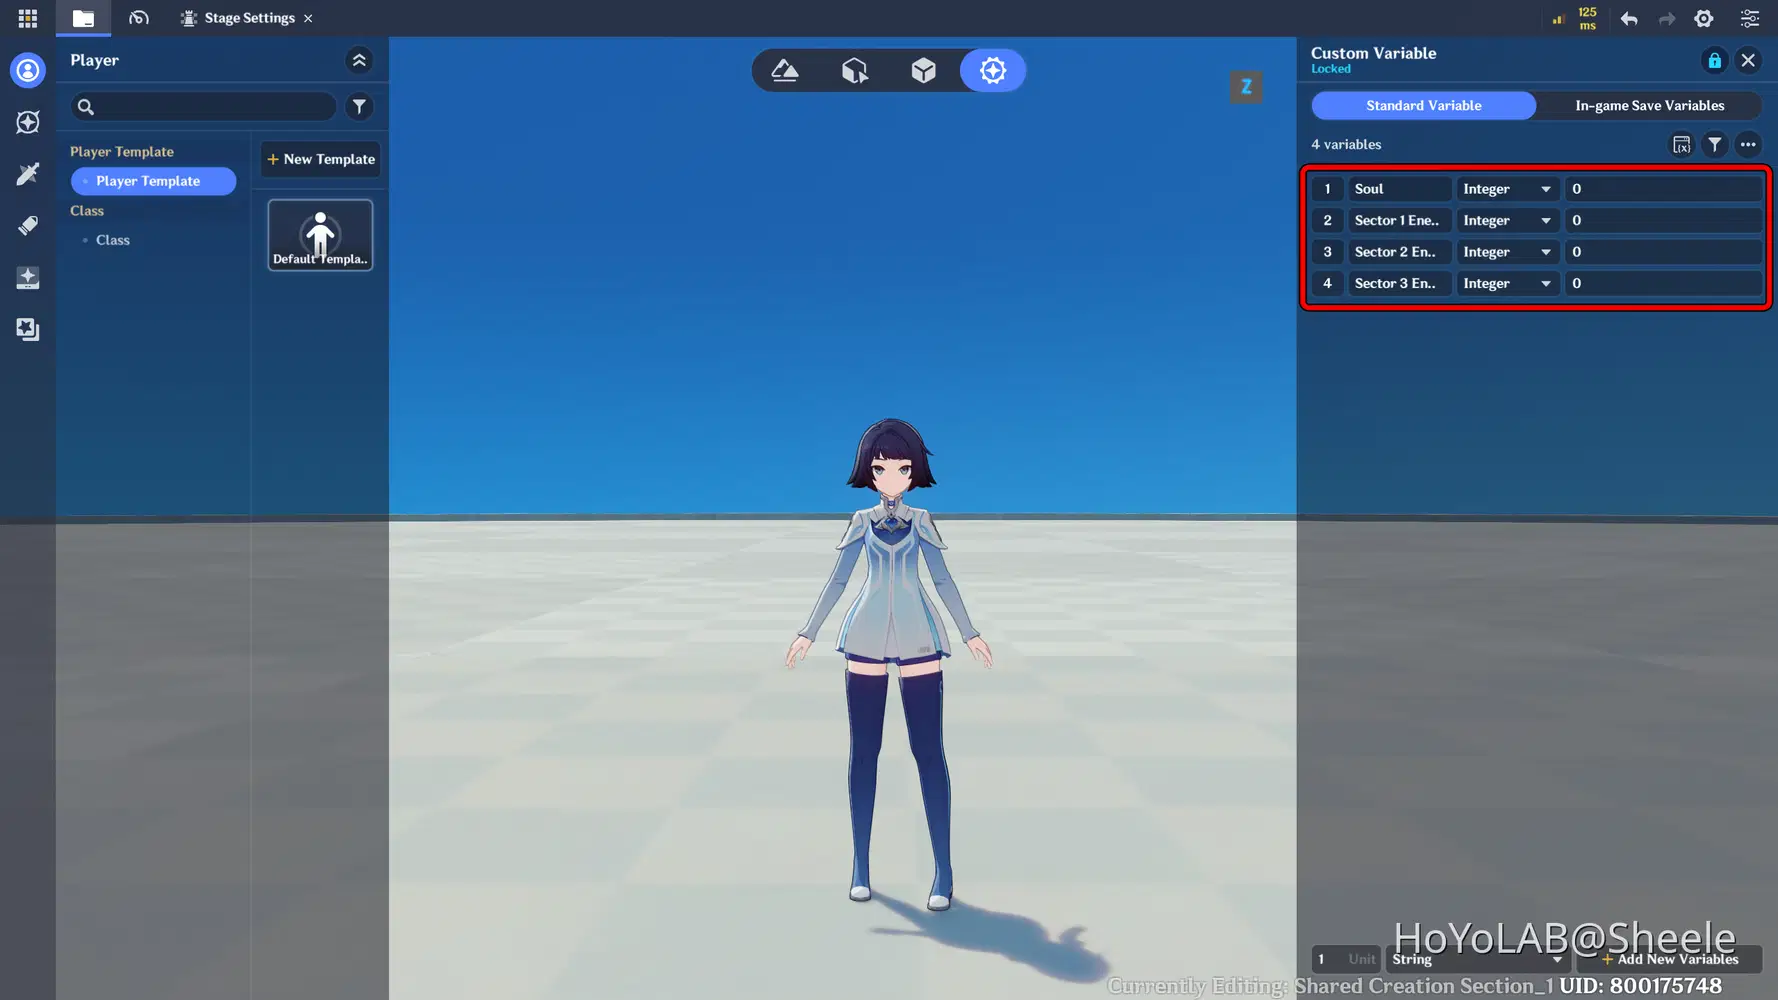
Variables Type
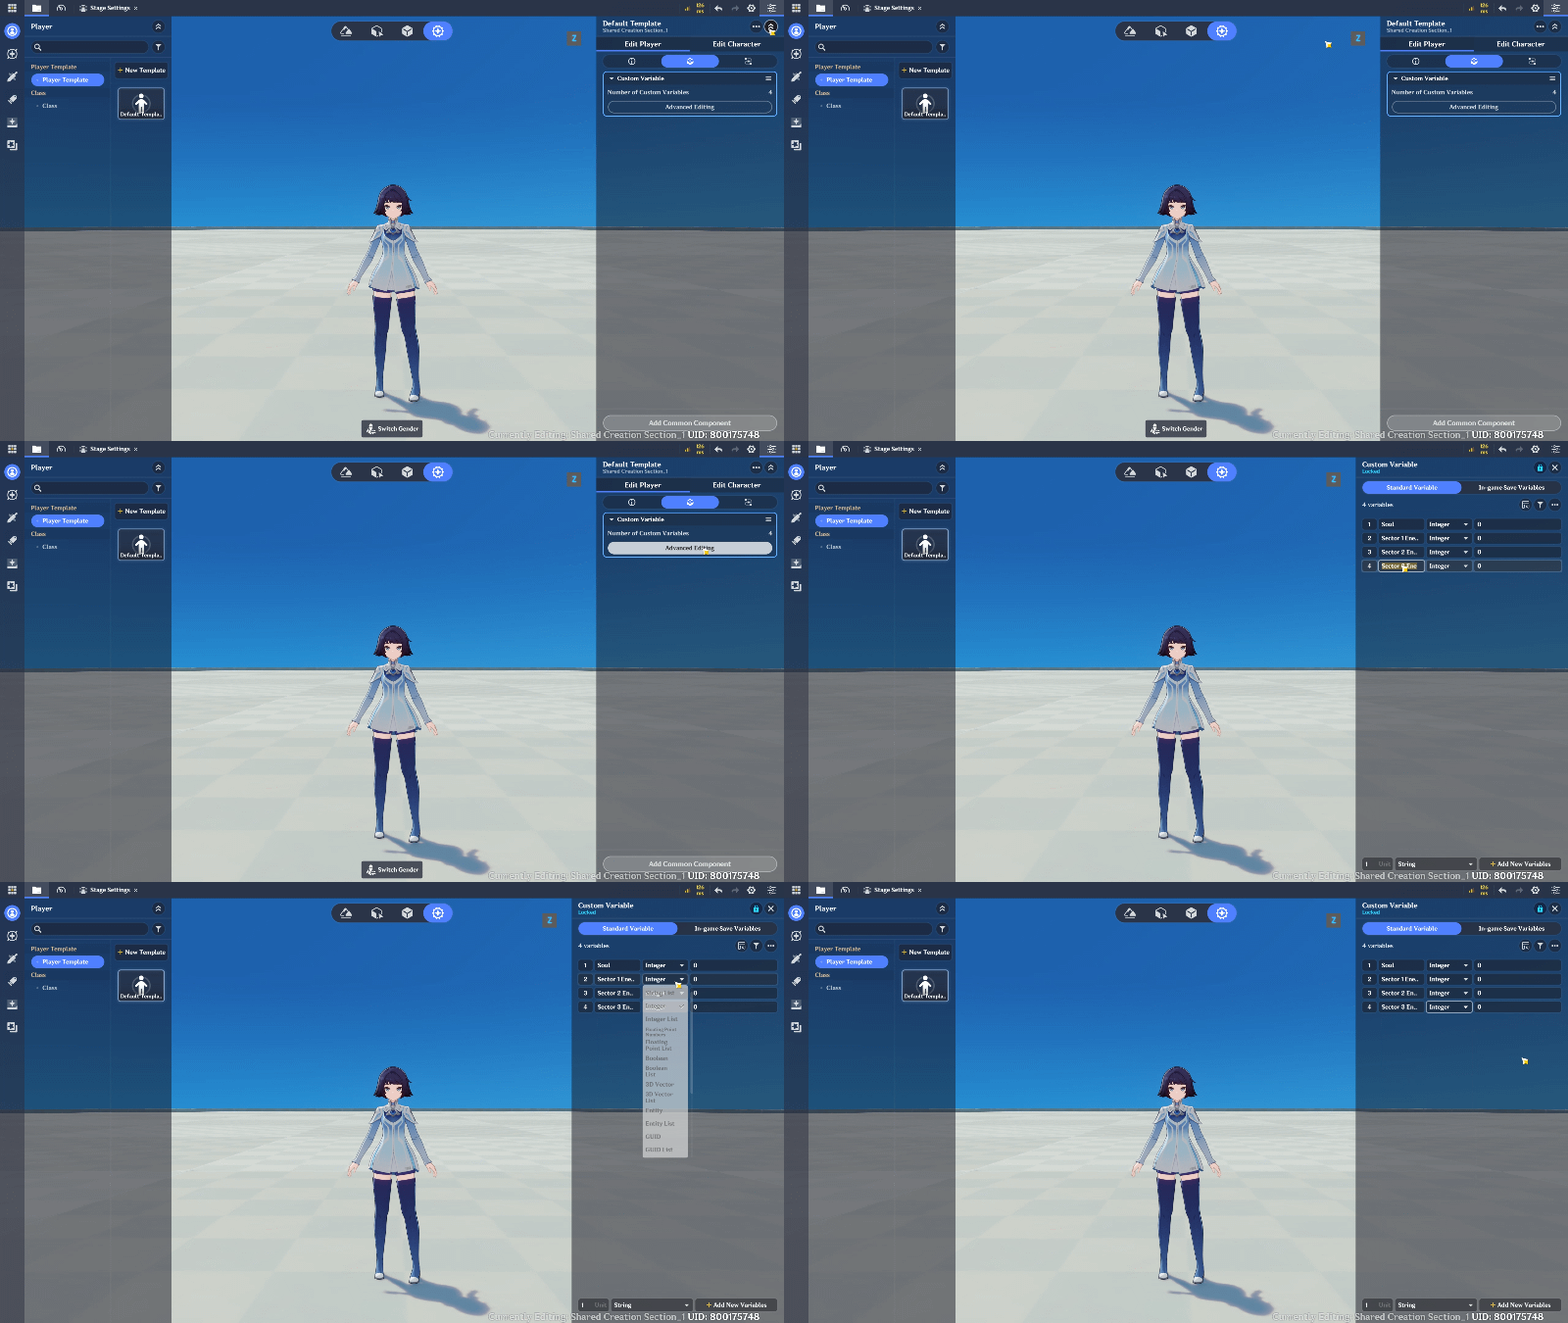
Create the Variables
5.2 Detect Enemy Defeats
Next, we need a way to detect when an enemy has been defeated. When an enemy is defeated, the game should trigger the appropriate defeat logic and preparing the reward process.
If you want players to clear a dungeon before progressing, track the number of remaining enemies and check whether all required enemies have been defeated.
For example:
- The game records the number of enemies in the current encounter.
- When the remaining count reaches zero, the encounter is considered cleared.
This system will also help us determine when to allow players to proceed to the next part of the dungeon.
📝 Wonderland Guide:
Open Miliastra Sandbox and create a new Node Graph in the Server Node Graph. Set up the logic so that whenever an enemy from the specified faction is defeated, the player receives 10 Souls and 250 EXP. At the same time, increase the defeated enemy count by 1.
This enemy count will later be used by the gate to check whether all enemies in the current section have been defeated. Once all enemies are defeated, the portal to the next stage can be unlocked.
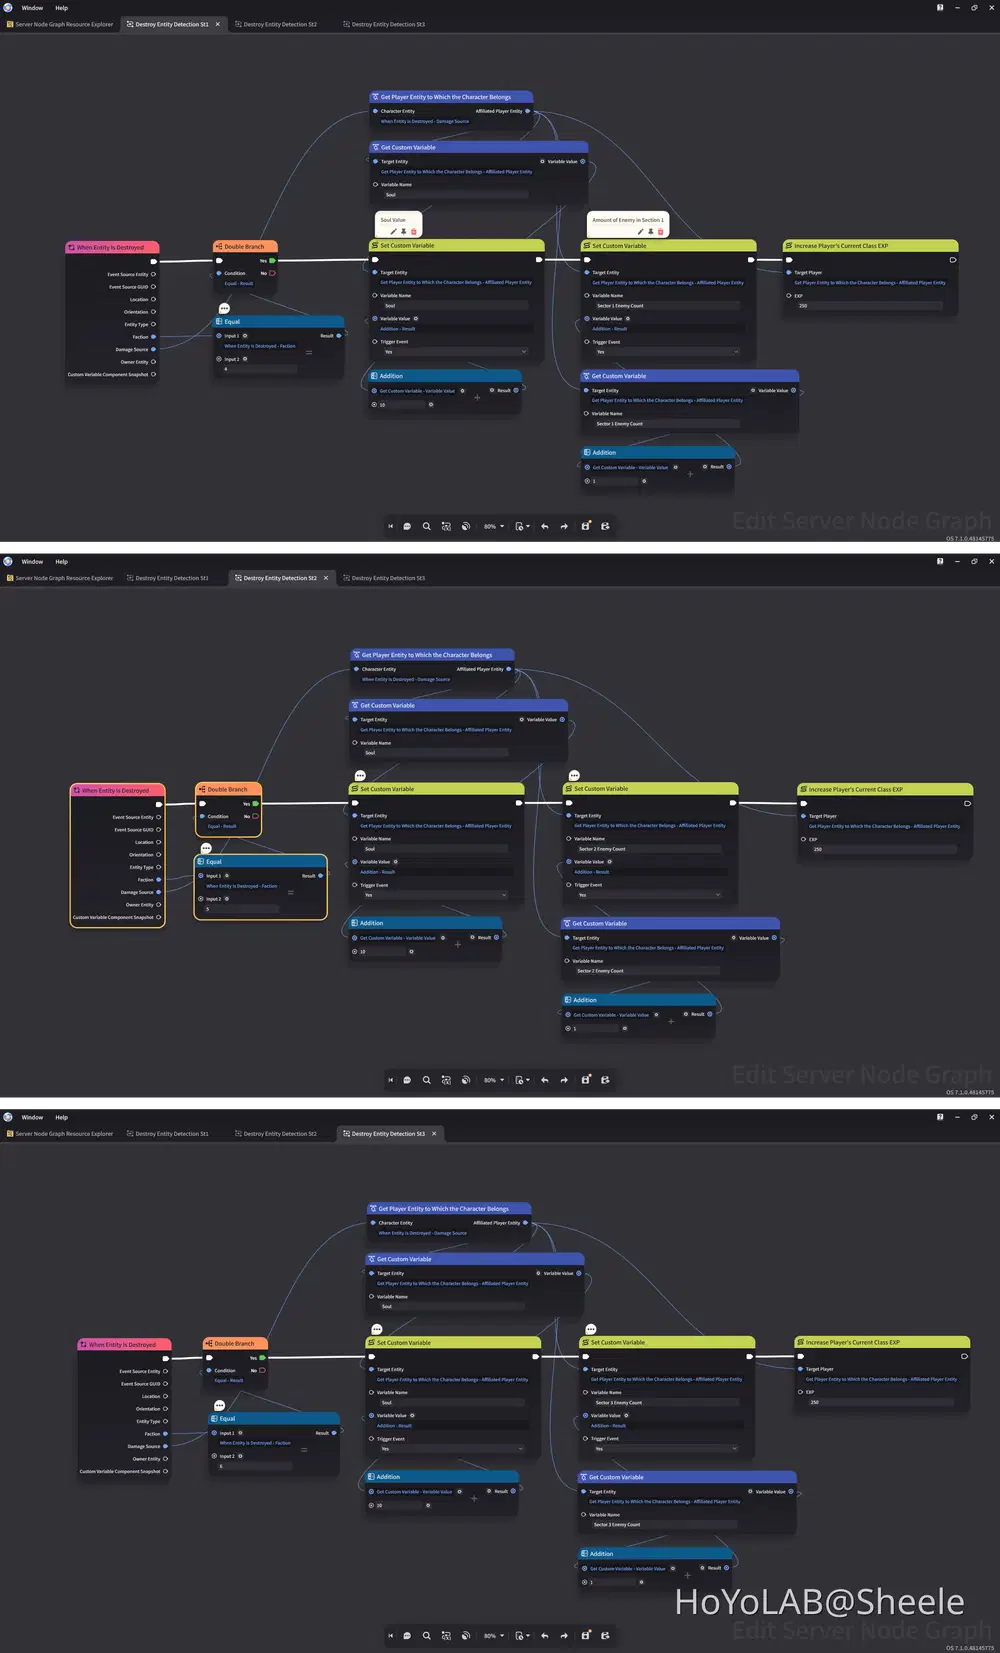
Detect Enemy Defeats Node Graph
Assign the Server Node Graph you created to the Stage Entity so it can handle the enemy defeat and reward logic.
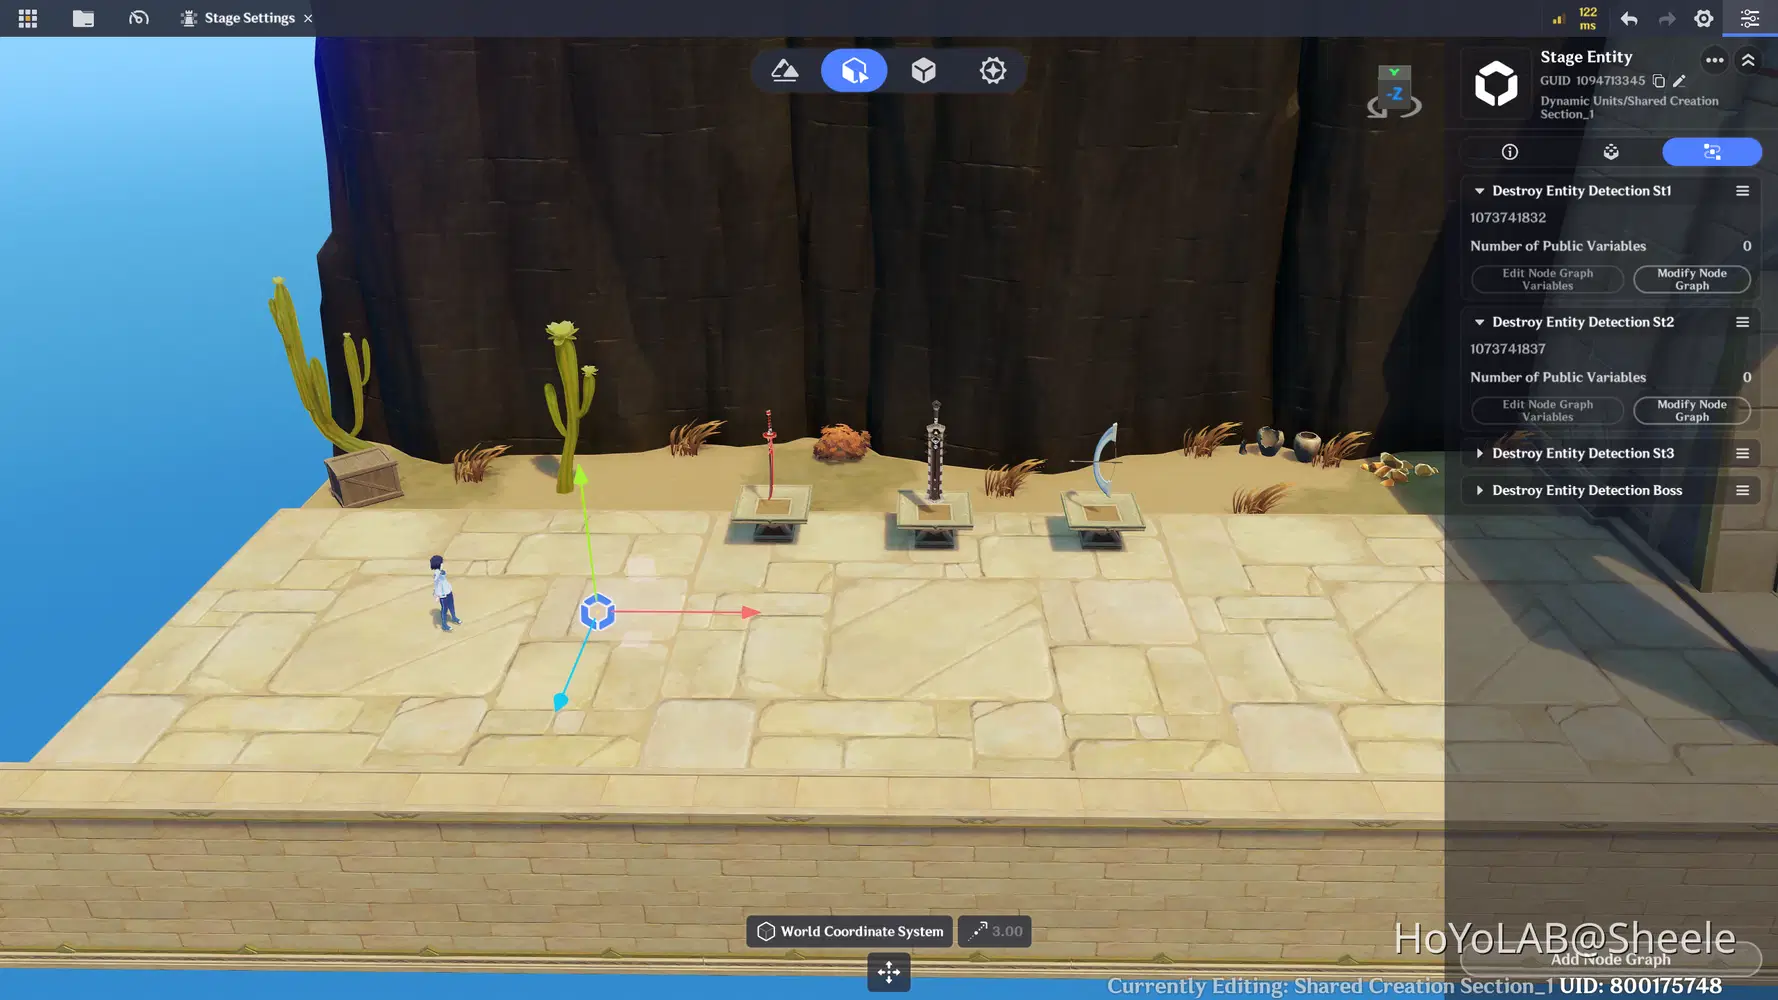
5.3 Character Level-Up Setup
In this section, we'll create the basic level-up system for the player. By collecting EXP from defeated enemies, players can increase their character level and become stronger as they progress through the dungeon.
You can decide how much EXP is required for each character level based on your game's difficulty and progression. For example, levels 1–10 can require 250 EXP per level, while levels 11–20 can require a higher amount, such as 500 EXP per level.
This way, players can level up more easily during the early stages of the game, while higher levels require more effort and time to achieve. You can adjust these EXP requirements to create a balanced progression system that keeps the gameplay challenging and rewarding.
📝 Wonderland Guide:
To adjust the EXP required for each character level, open Combat Preset and go to Class. Select Level, then find Level-Up EXP and open List Configuration. Here, you can edit the EXP requirements for each level according to your game's progression and difficulty.
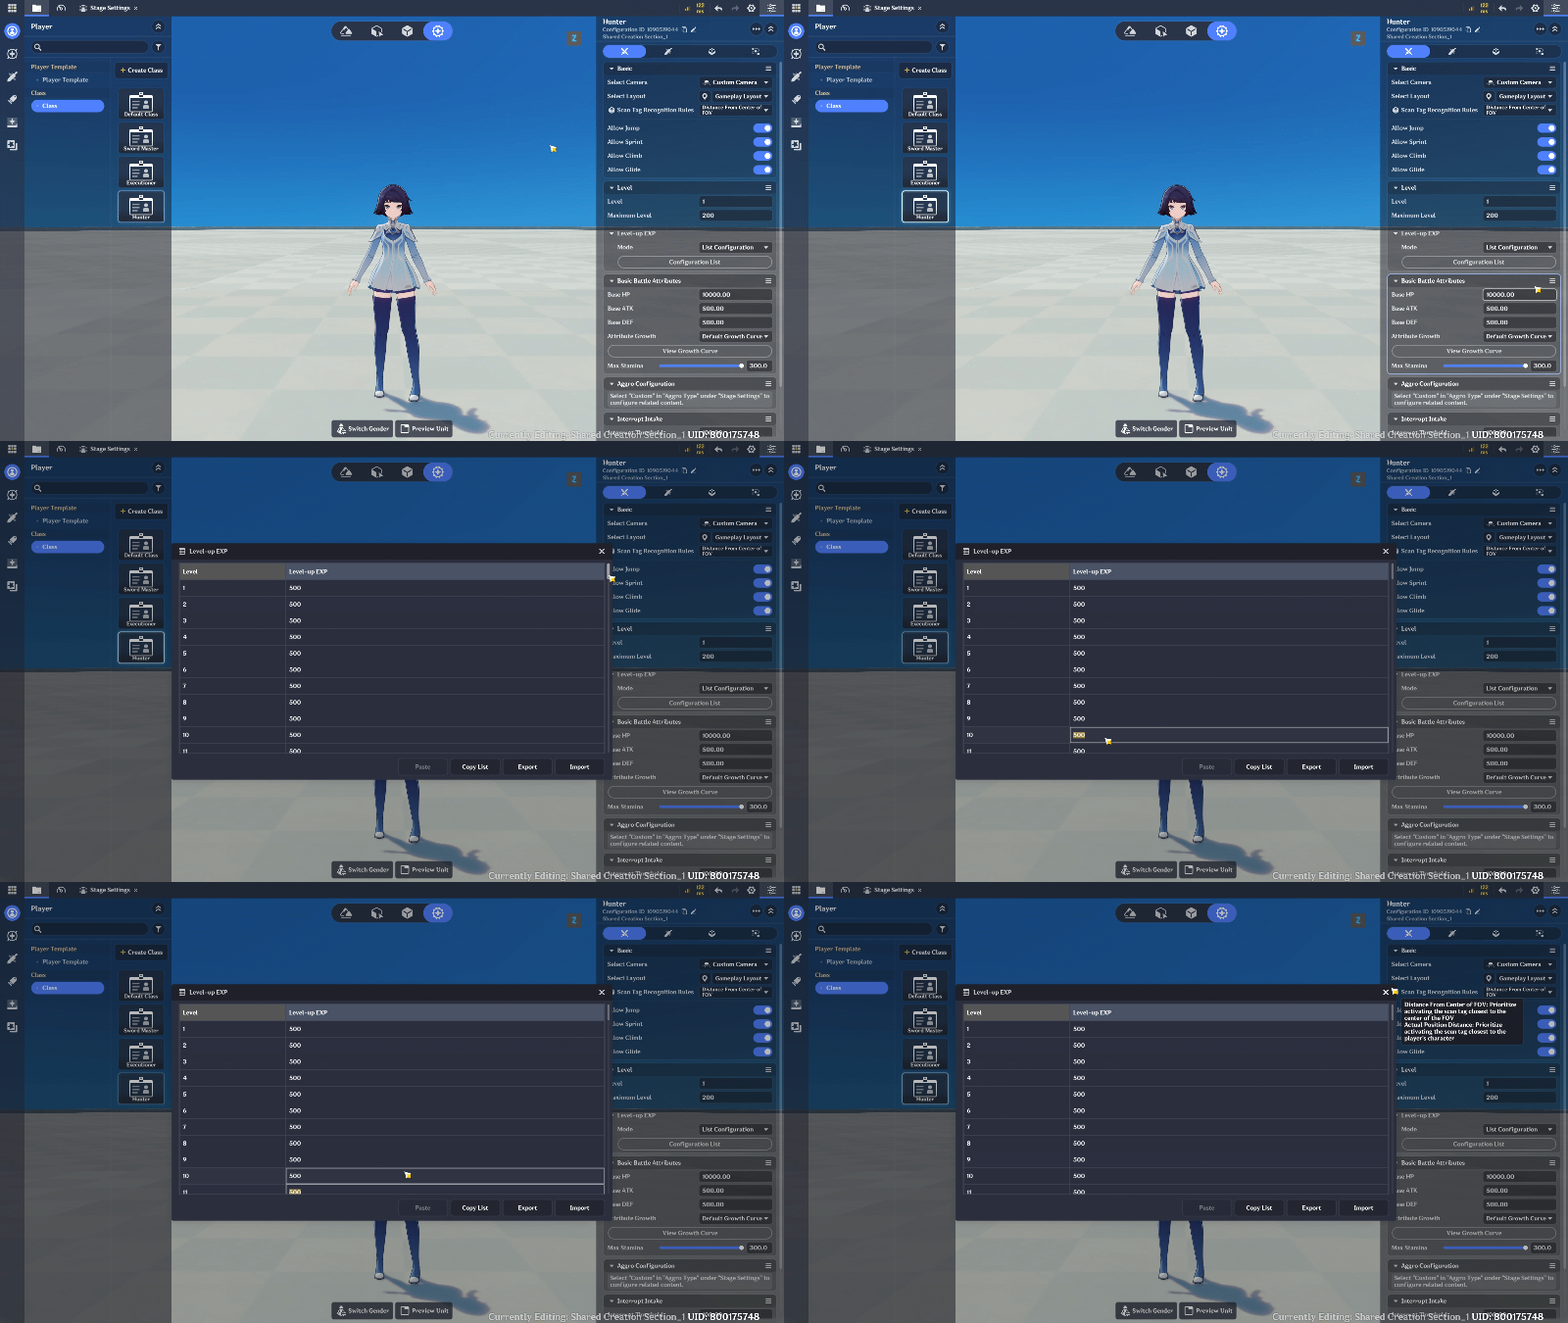
Character Level-Up Setup
5.3 Soul Setup
To let players see how many Souls they have collected after defeating enemies, we need to create a simple UI to display their current Soul.
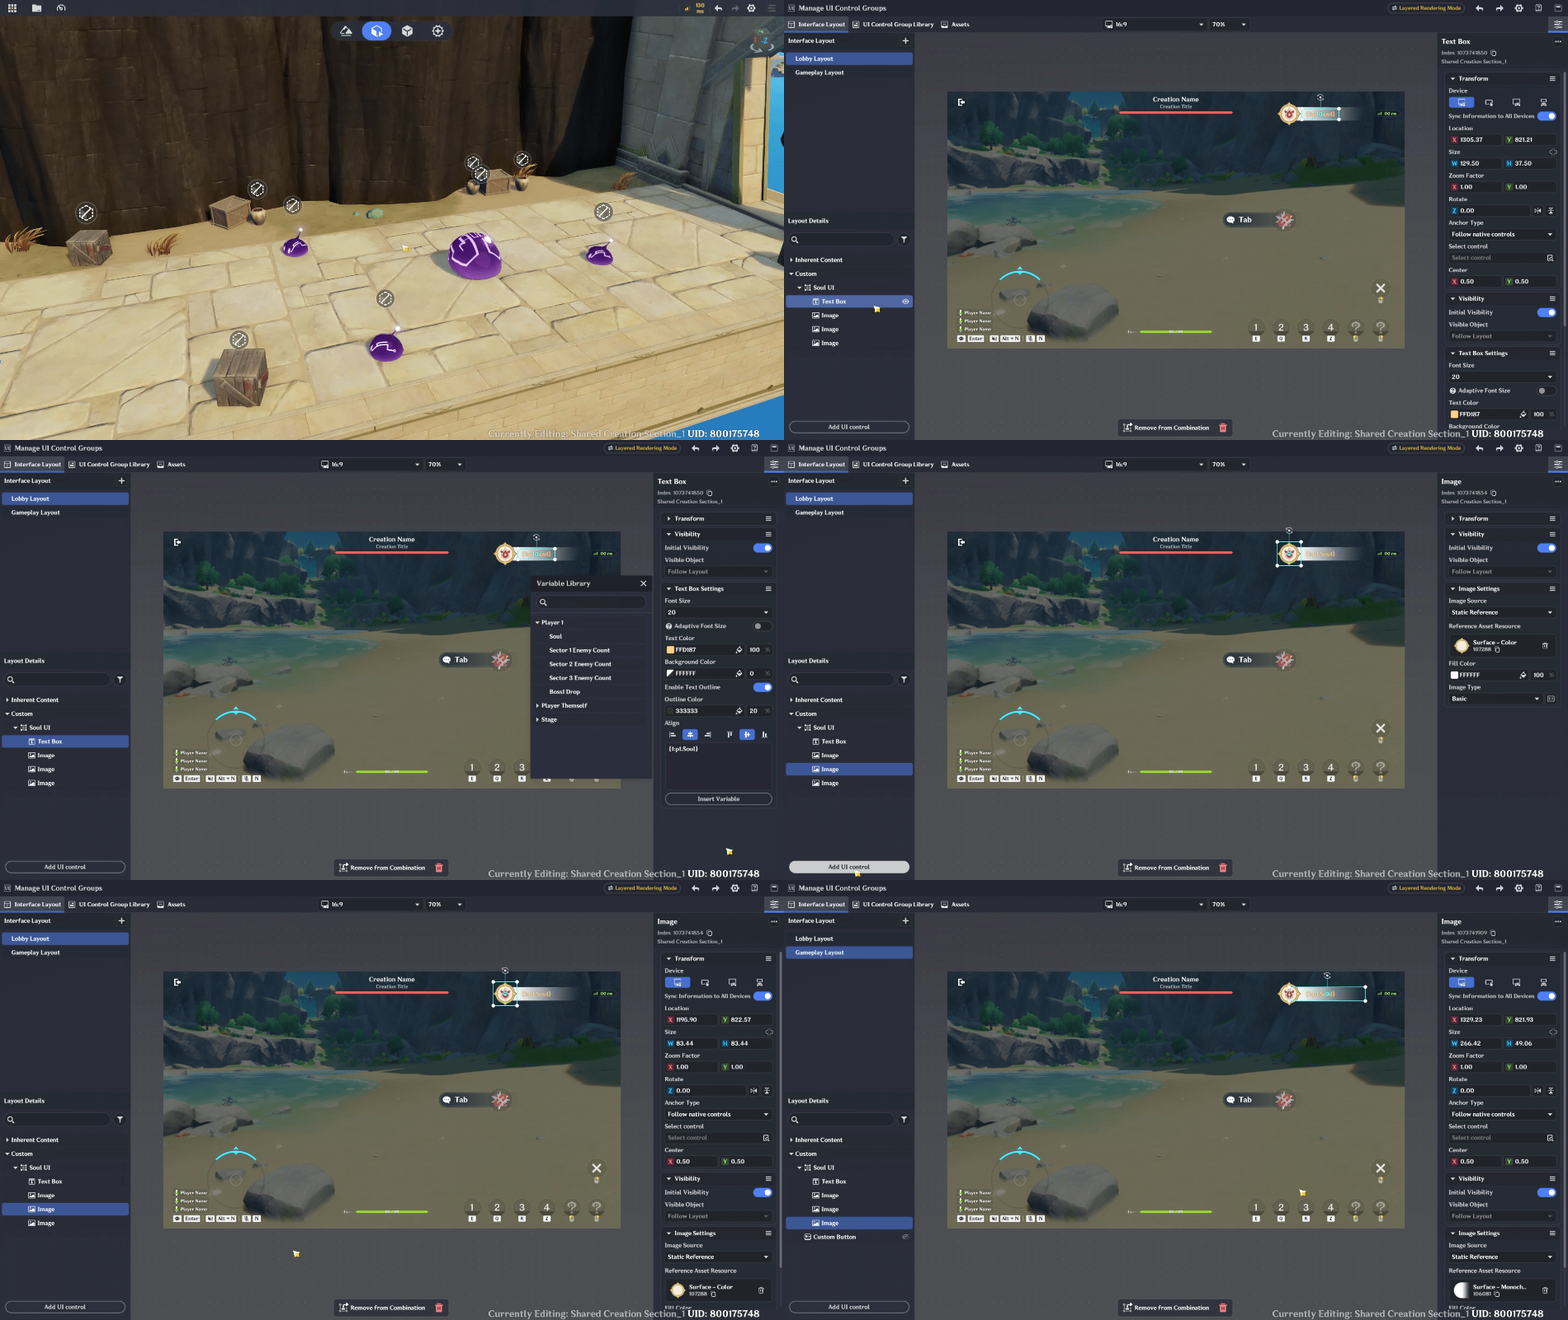
You can design the UI using a Text component and a few images or icons arranged in an attractive layout. Then, assign the Soul variable you created earlier to the Text component so that the displayed value updates whenever the player earns more Souls. This way, players can easily keep track of their collected Soul throughout the dungeon adventure.
📝 Wonderland Guide:
Open the main menu and select Manage UI Control Groups. Here, I create two different UI layouts: one for the Lobby and another for Gameplay. For the Soul UI, add an Image and a Text component, then arrange them to create a simple and attractive display. Finally, insert the Soul variable you created earlier into the Text component so the player's current Soul value can be displayed and updated during gameplay.
5.4 Test the EXP, Soul & Level-Up System
Before moving on, test the system to make sure everything works correctly.
Check the following:
- Defeating an enemy grant the correct amount of EXP & Soul.
- The player's level increases when enough EXP is collected.
- Excess EXP carries over to the next level.
- The required EXP updates correctly after leveling up.
- Any level-up bonuses are applied correctly.
Once everything works as intended, the EXP system is ready to support the rest of our roguelite gameplay.
And here is a preview of the result, When players defeat enemies, they will receive both EXP and Souls as soul. Once they collect enough EXP, their character will level up, and their attributes, such as ATK, will also increase.
This allows players to become stronger as they progress through the dungeon and gives them a reason to keep fighting enemies and collecting rewards.
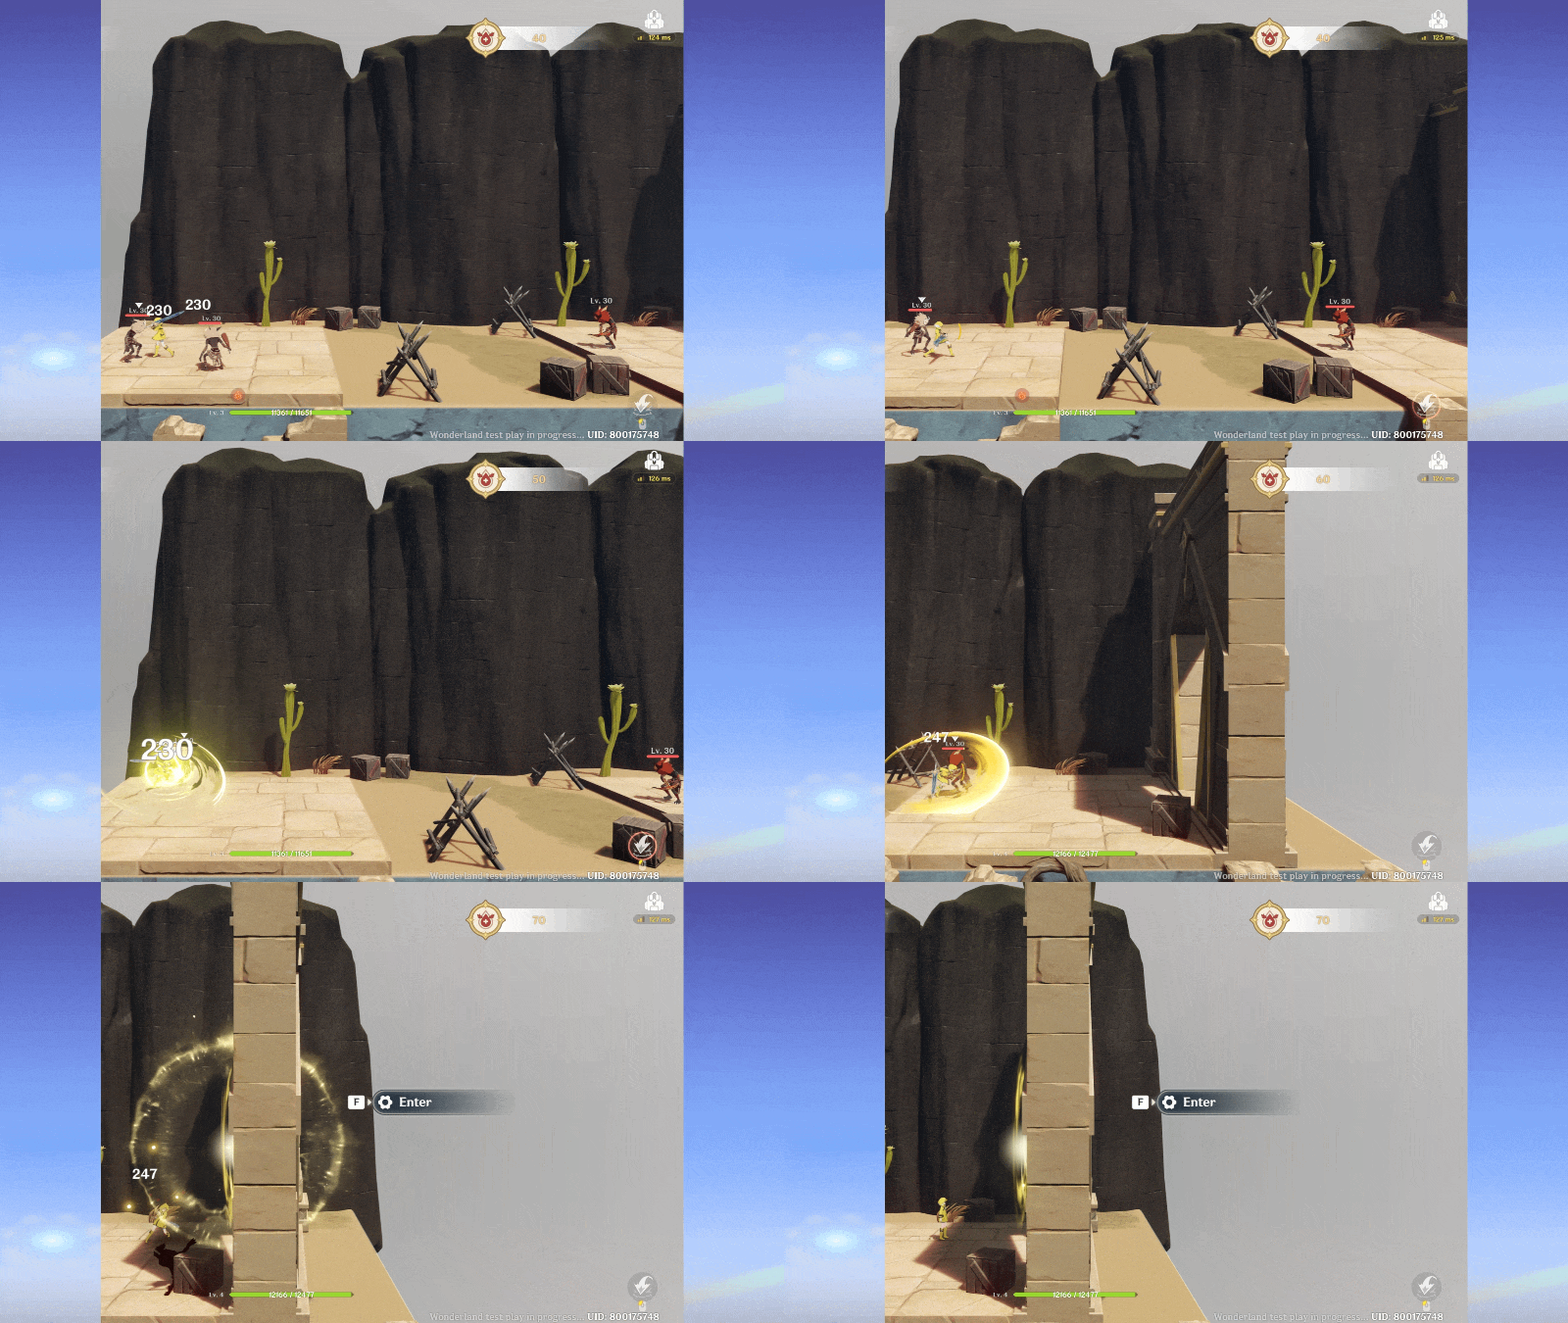
EXP, Soul & Level-Up System Preview
Chapter Summary
In this chapter, we've created the foundation of our EXP, Soul and Level-Up System. Players can now earn EXP & Soul by defeating enemies, increase their levels, and become stronger as they explore the dungeon.
In the next chapter, we'll create the Upgrade Shop, allowing players to spend them on potions or character upgrades.
Chapter 6: Unique Ability
In this chapter, we'll explore how to use Soul as a Value to upgrade character attributes and unlock special abilities using Unit Status. For example, players can interact with a Blessing Statue and spend 300 Souls to receive a special blessing that removes stamina consumption and increases movement speed.
6.1 Preparing the Blessing Statue
First, create a Blessing Statue that players can interact with to receive special upgrades. You can use any suitable object from the Asset Library. Place it in the lobby or dungeon area where players can easily find it.
Add a Tab component to the object so players can interact with the statue. You can also add suitable VFX to make it look more magical and attract the player's attention.
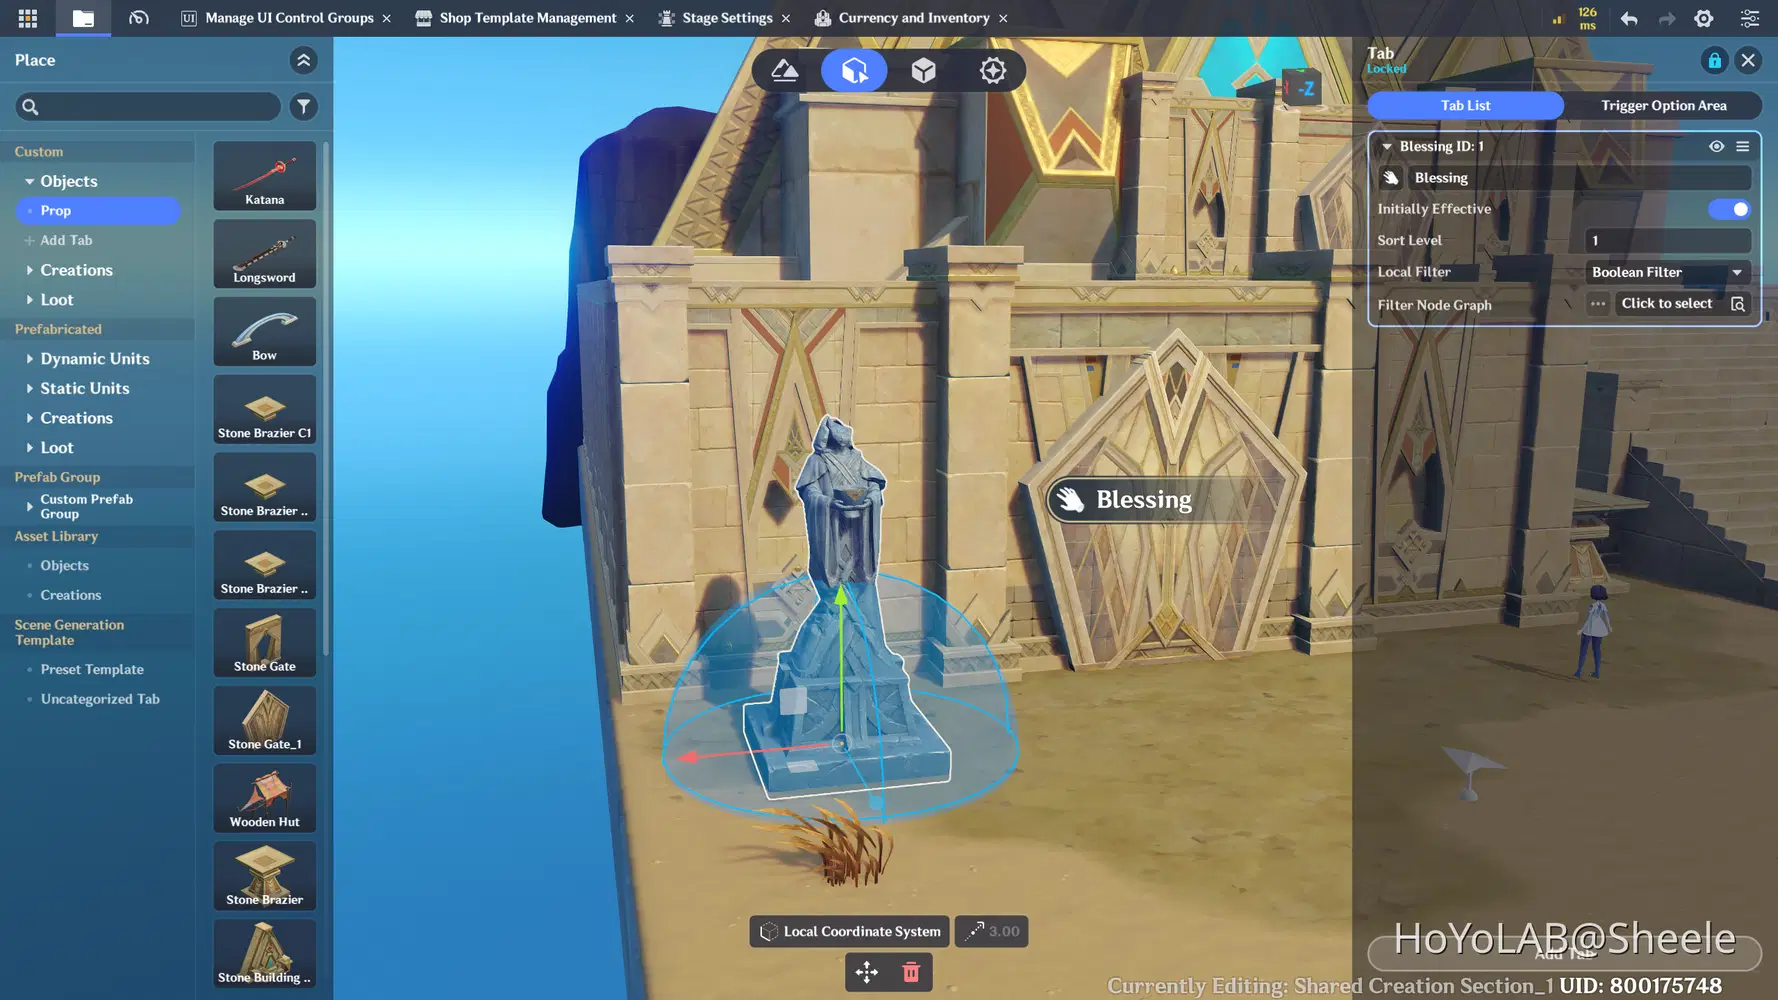
Add Tab Component
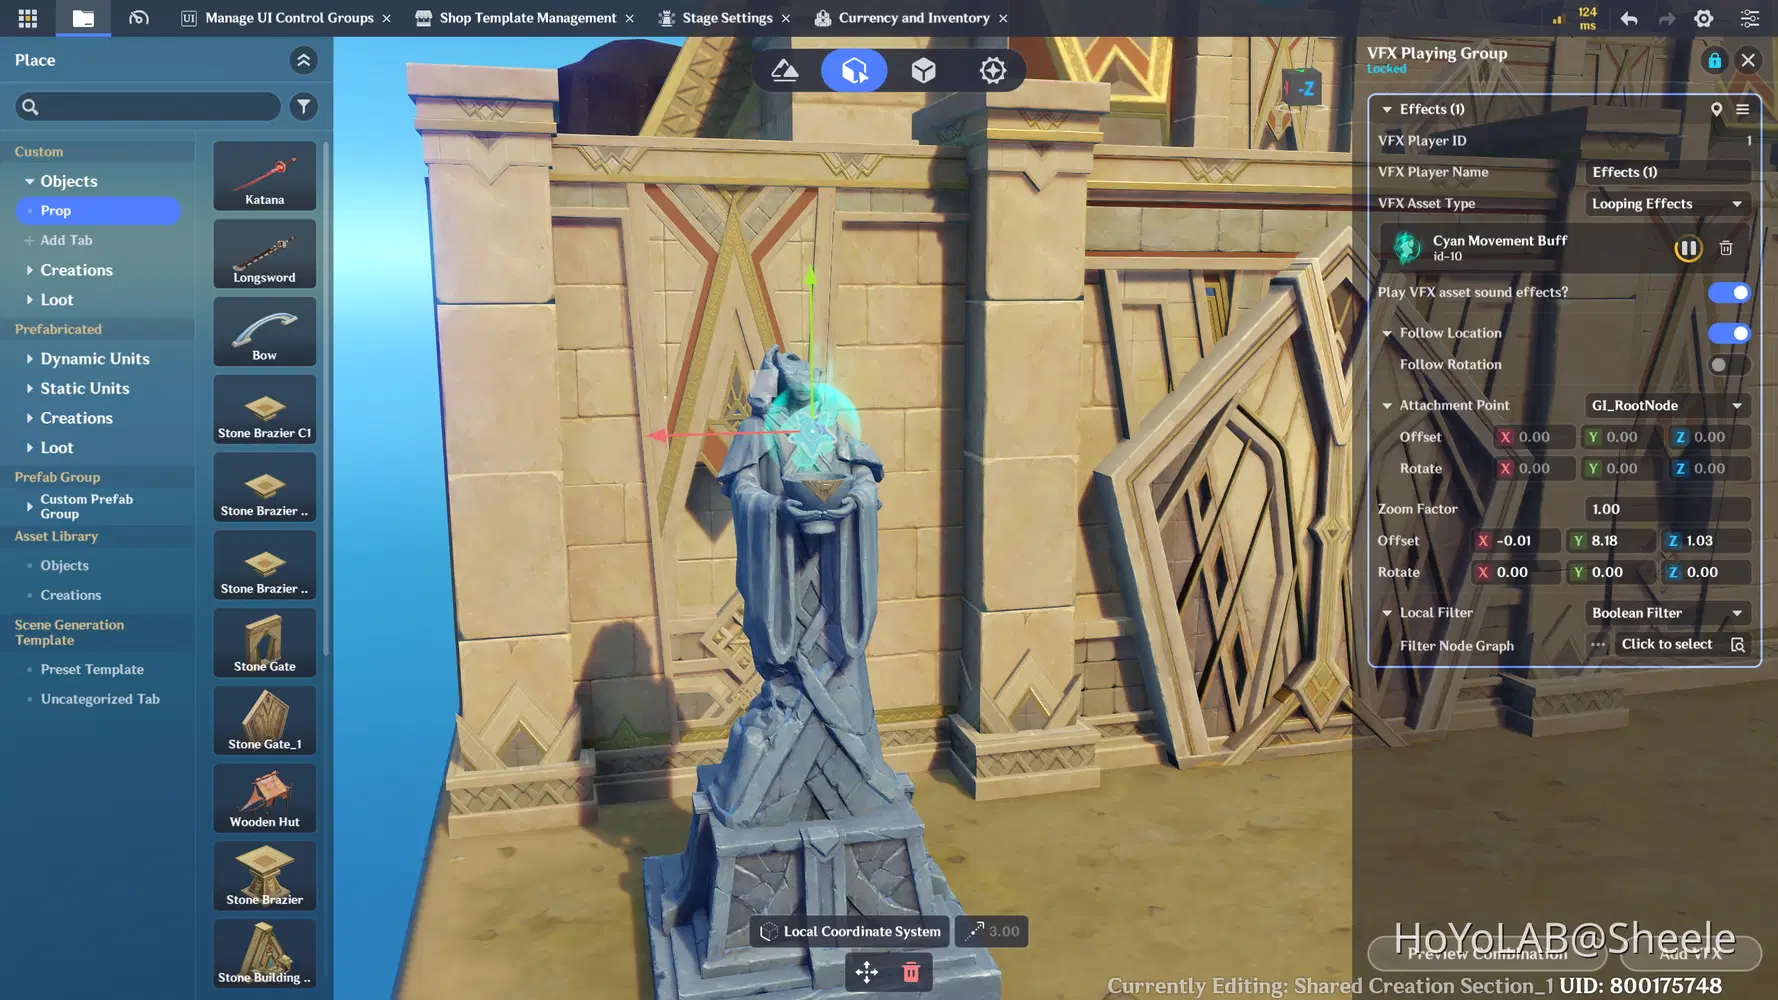
Add VFX Playing
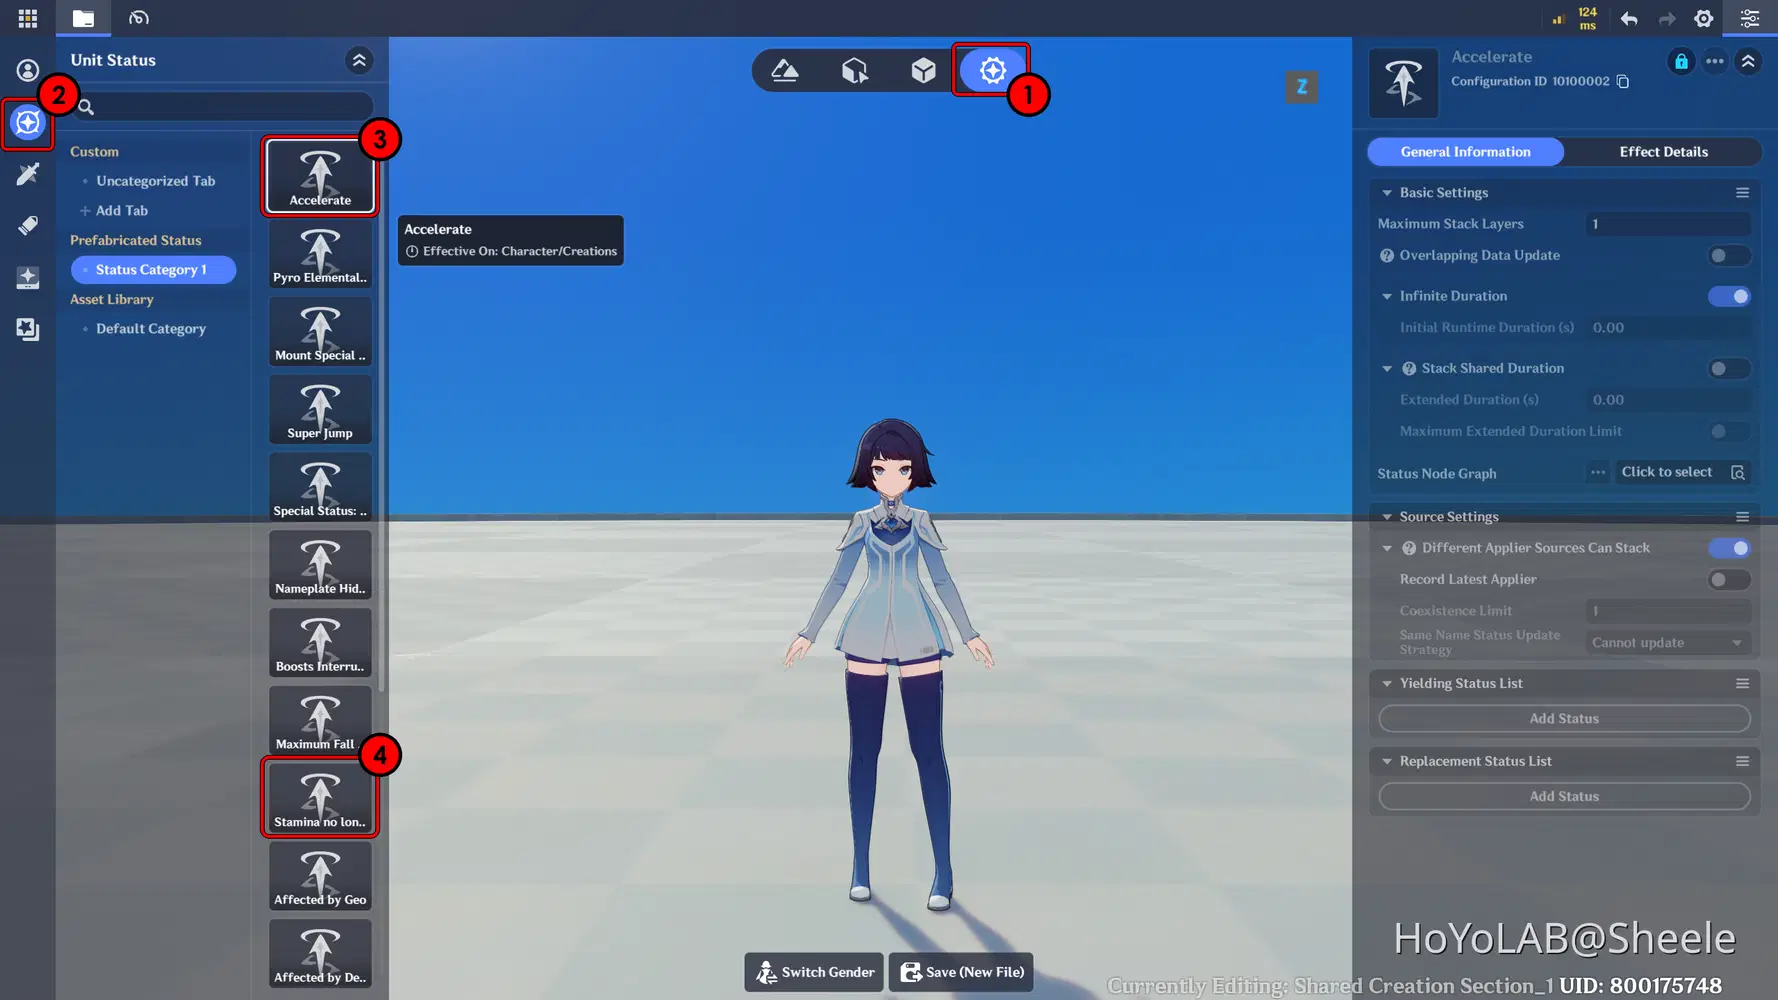
6.2 Configuring Unit Status
Now, let's configure the character upgrades using Unit Status. This allows us to modify certain character attributes and provide special bonuses.
For this tutorial, I'll create two upgrades:
- Unlimited Stamina: Removes stamina consumption, allowing players to perform actions without worrying about stamina.
- Accelerate (Movement Speed Boost): Increases the character's movement speed, making it easier to explore the dungeon.
You can adjust these status settings according to the type of upgrades you want to offer.
Unit Status
6.4 Creating the Blessing Interaction System
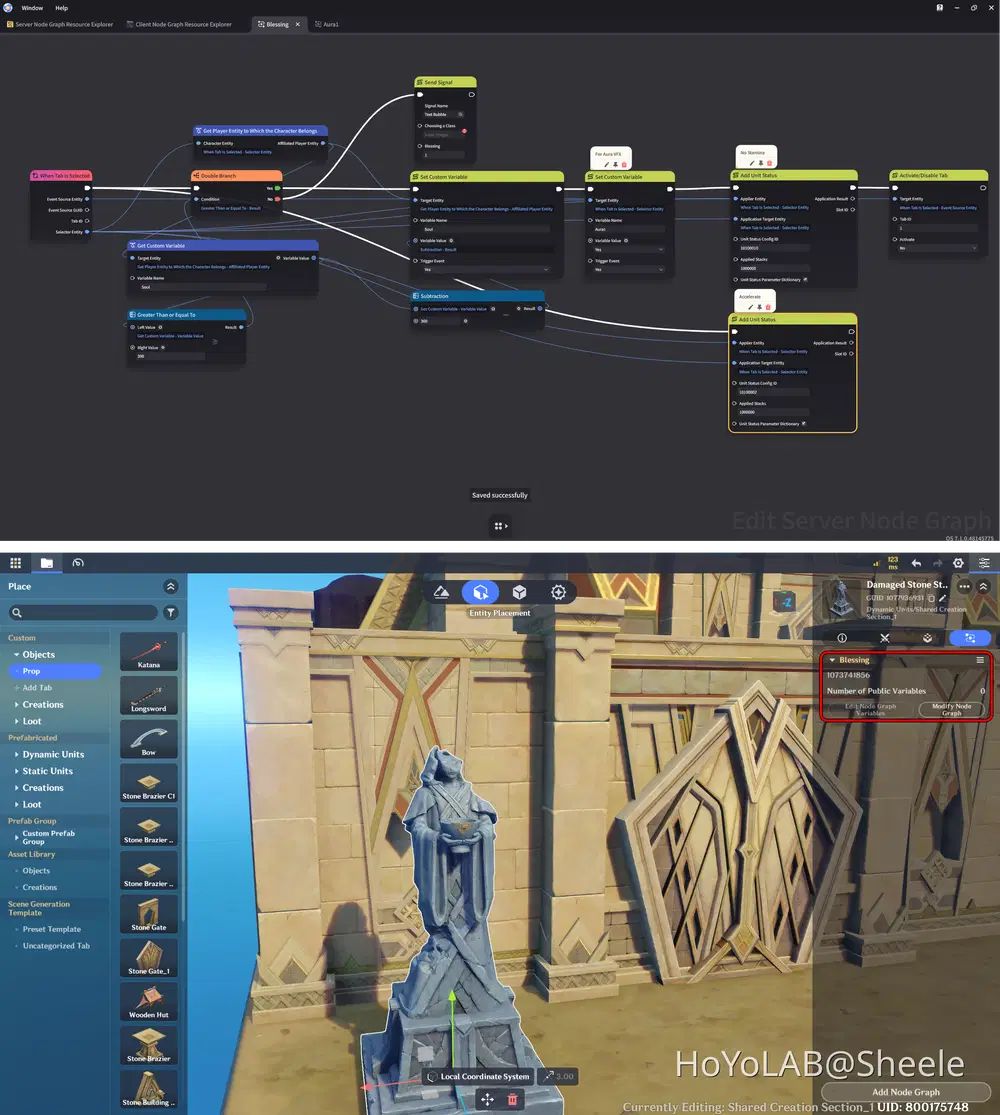
Next, create a new Server Node Graph to handle the Blessing Statue interaction.
The Node Graph should check the player's Soul balance when they interact with the statue. If they have at least 300 Soul, subtract 300 from their balance and activate the selected blessing. If they don't have enough Soul, the upgrade should not be activated.
You can also add a notification to inform players whether their purchase was successful or unsuccessful.
Blessing Interaction Node Graph
6.5 Applying Character Upgrades
Once the player successfully receives a blessing, 300 Soul will be deducted from their balance, and the selected Unit Status will be applied to their character.
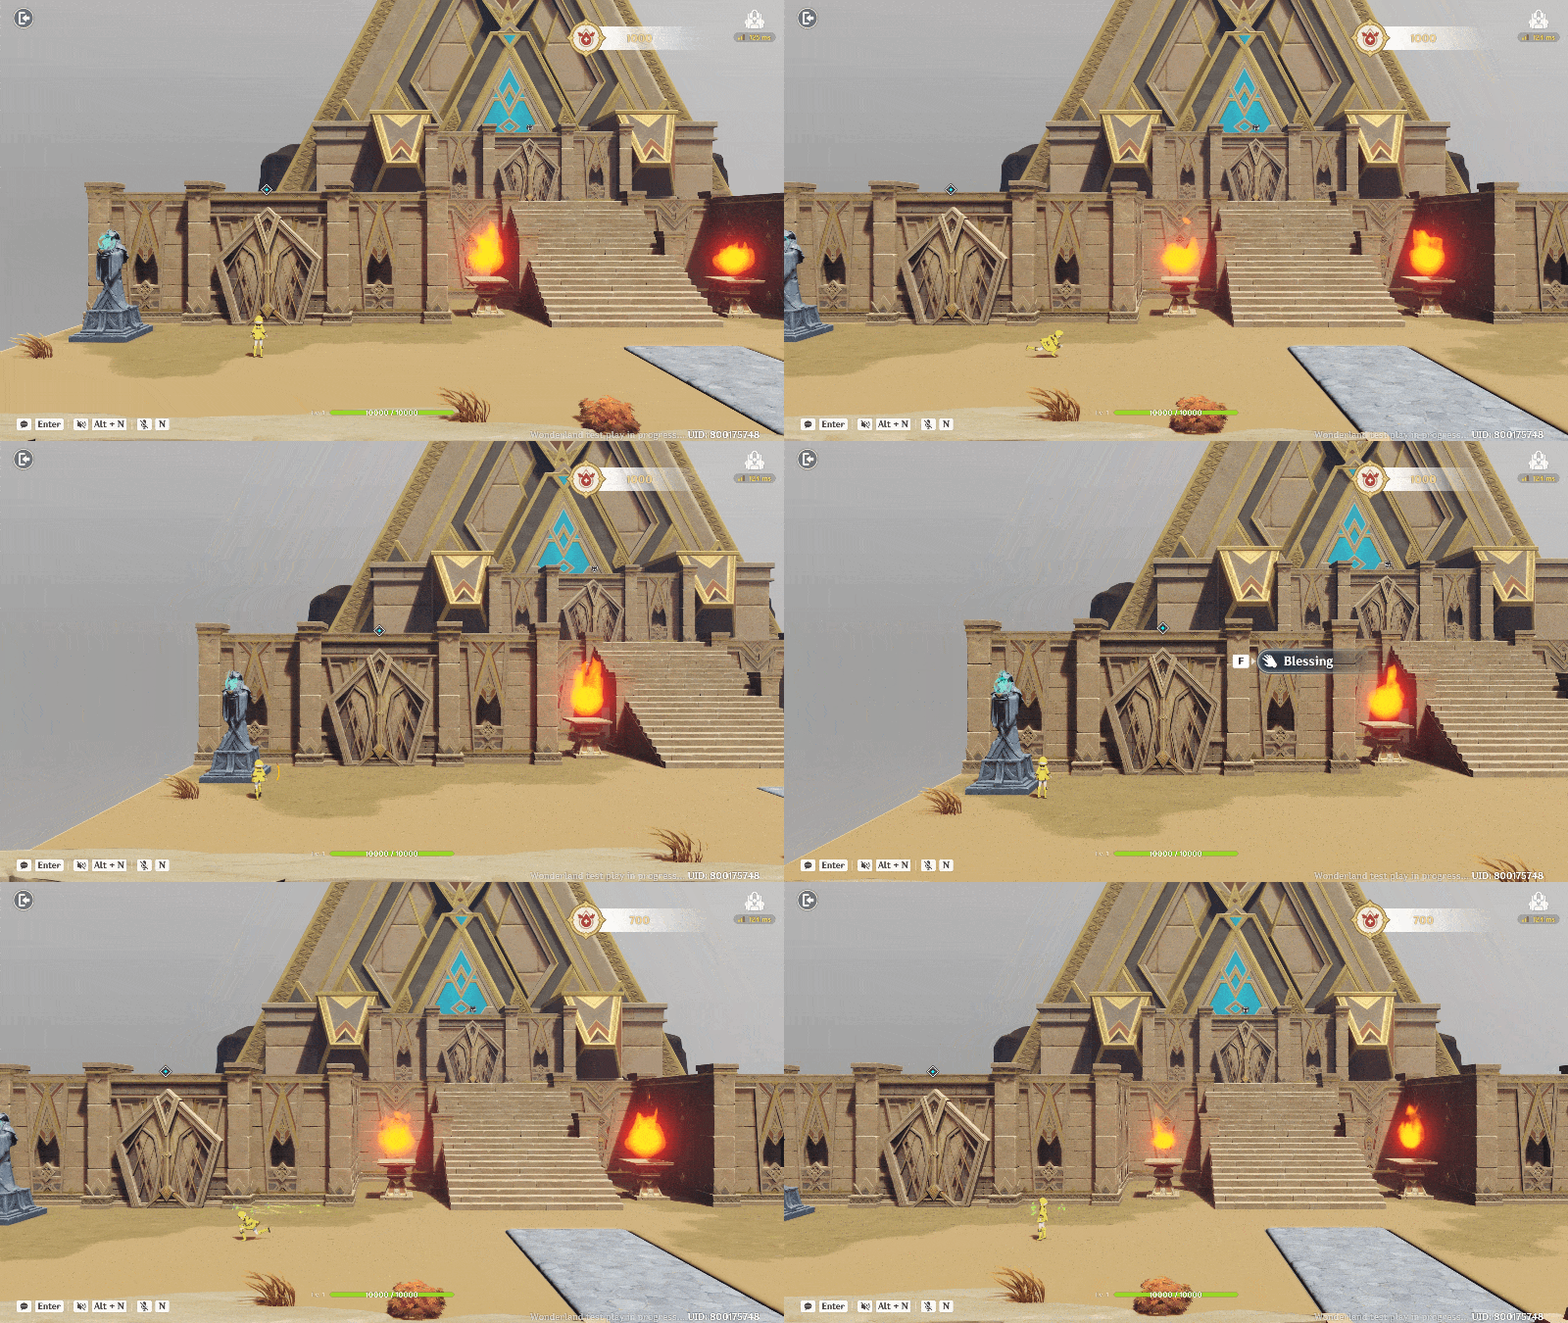
For this tutorial, I'll use two Unit Status effects: Accelerate, which increases the character's movement speed, and Unlimited Stamina, which removes stamina consumption. These blessings provide useful advantages when exploring the dungeon and fighting enemies. I also added a VFX effect to the character whenever a blessing is activated, making it easier for players to recognize when an upgrade has been successfully applied.
Unique Ability Preview
And here's the final result! After interacting with the Blessing Statue and spending 300 Soul, the character receives the selected upgrades. Their movement speed increases, and stamina consumption is disabled. A special VFX effect also appears around the character to indicate that the blessing has been activated successfully. Now, players can enjoy these additional abilities throughout their dungeon adventure!
Chapter Summary
In this chapter, we've created a Character Upgrade & Special Ability System using Soul and Unit Status. Players can interact with the Blessing Statue and spend 300 Soul to unlock special upgrades, such as Accelerate to increase movement speed and Unlimited Stamina to remove stamina consumption. We've also added VFX effects to indicate when a blessing is successfully activated.
With this system, players can use the Soul they collect throughout their adventure to strengthen their characters and gain useful abilities for future dungeon challenges!
Chapter 7: Boss Battle & Reward Chest
Every dungeon adventure needs a challenging encounter at the end of each stage. In this chapter, we'll create a Normal Boss battle and a reward chest system that gives players a reason to complete each dungeon.
After defeating the required enemies, players will face a Normal Boss. Once the boss is defeated, a reward chest will appear, containing either Souls or a key that allows players to progress to the next stage.
7.1 Prepare the Normal Boss
First, choose an enemy that will serve as the Normal Boss for your dungeon.
You can use an existing enemy and adjust its combat attributes to make the encounter more challenging than regular enemy battles.
Consider configuring the following properties:
- HP: Give the boss more HP than ordinary enemies.
- ATK: Adjust its attack damage to create a suitable challenge.
- Movement: Configure its movement behavior to fit the arena.
- Attack Behavior: Prepare its attack patterns or abilities, depending on the enemy mechanics available in the editor.
You can also use different Normal Boss types for different dungeon locations to make each run more varied.
📝 Wonderland Guide:
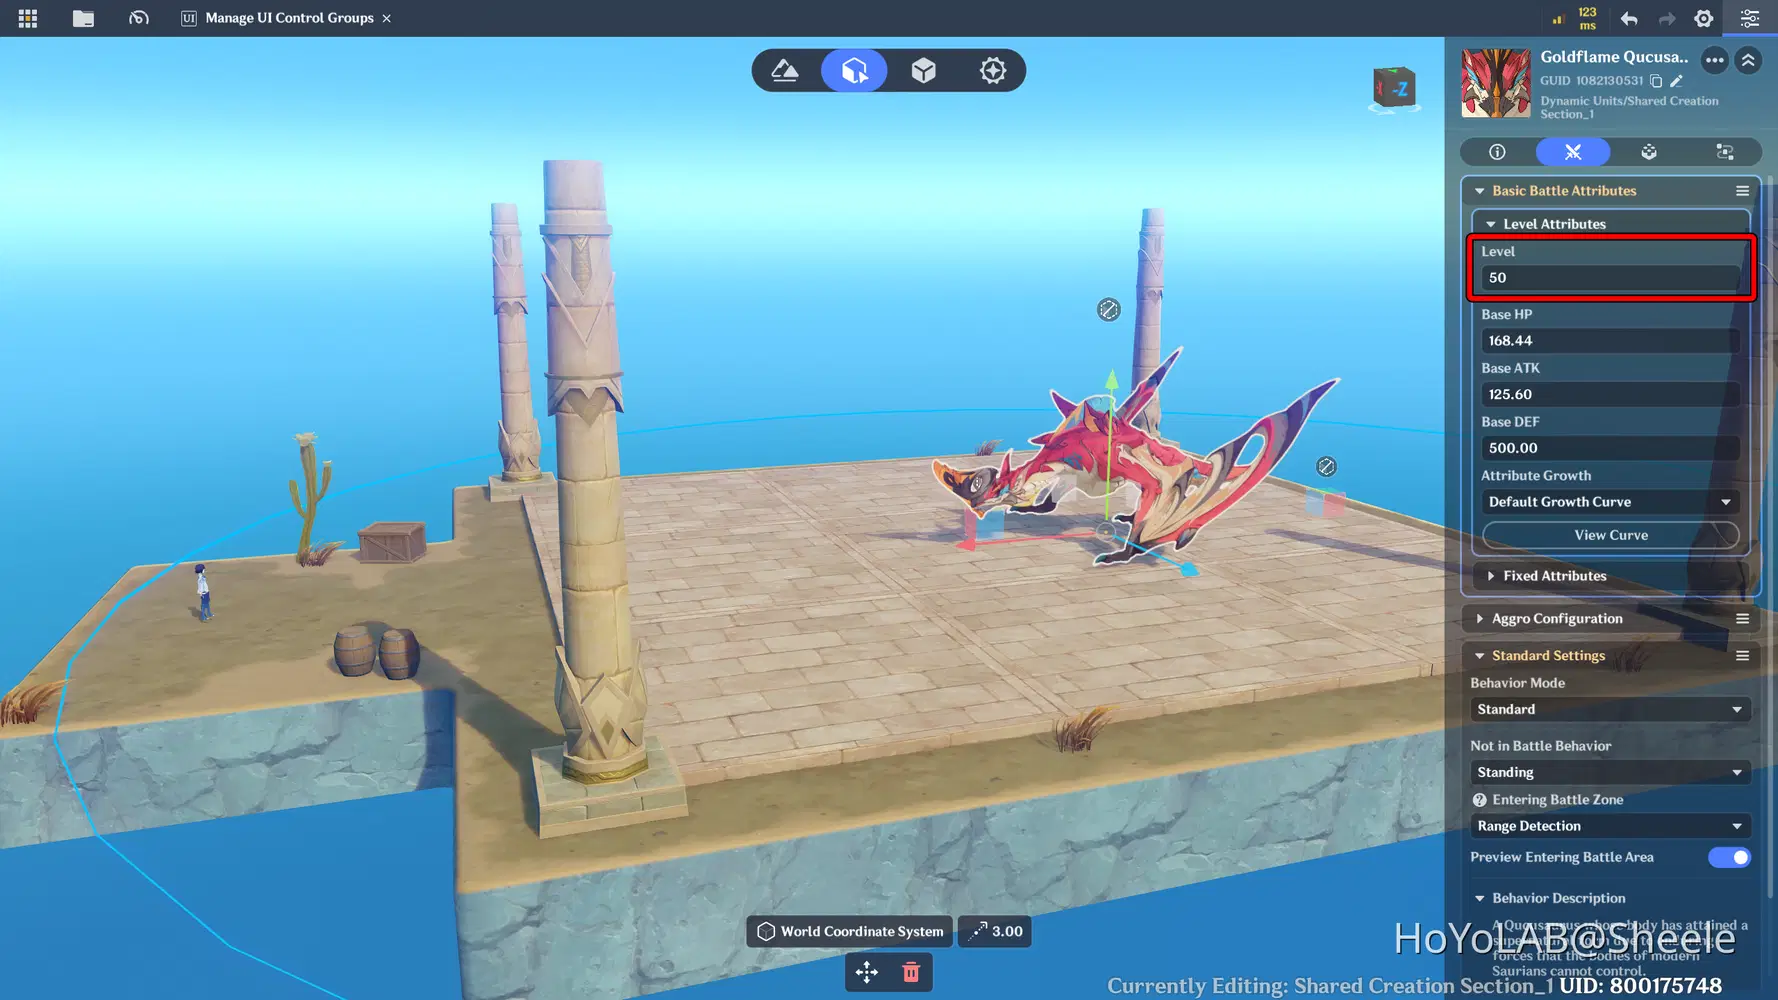
In this guide, I'm using the Goldflame Qucusaur Tyrant as the Normal Boss. By increasing its level to 50, it becomes the strongest enemy in the dungeon, making it a suitable challenge for players to face at the end of their adventure.
Boss Attribute
7.2 Trigger the Boss Battle
Next, create the logic that starts the boss encounter at the end of a dungeon.
The boss should appear only after the player has completed the required enemy encounter or reached the designated boss area.
The basic logic works as follows:
- The player enters the dungeon.
- The player interact object.
- The Normal Boss appears at the designated location.
- The player fights the boss until it is defeated.
Make sure the boss does not spawn multiple times because of repeated events or overlapping triggers.
You can also display a boss name or HP bar to help players recognize the encounter.
📝 Wonderland Guide:
Here, I'm still using an Entity Deployment Group to spawn the boss, but with a slightly different mechanism. When players enter the area, they must interact with a specific object to trigger the boss's appearance.
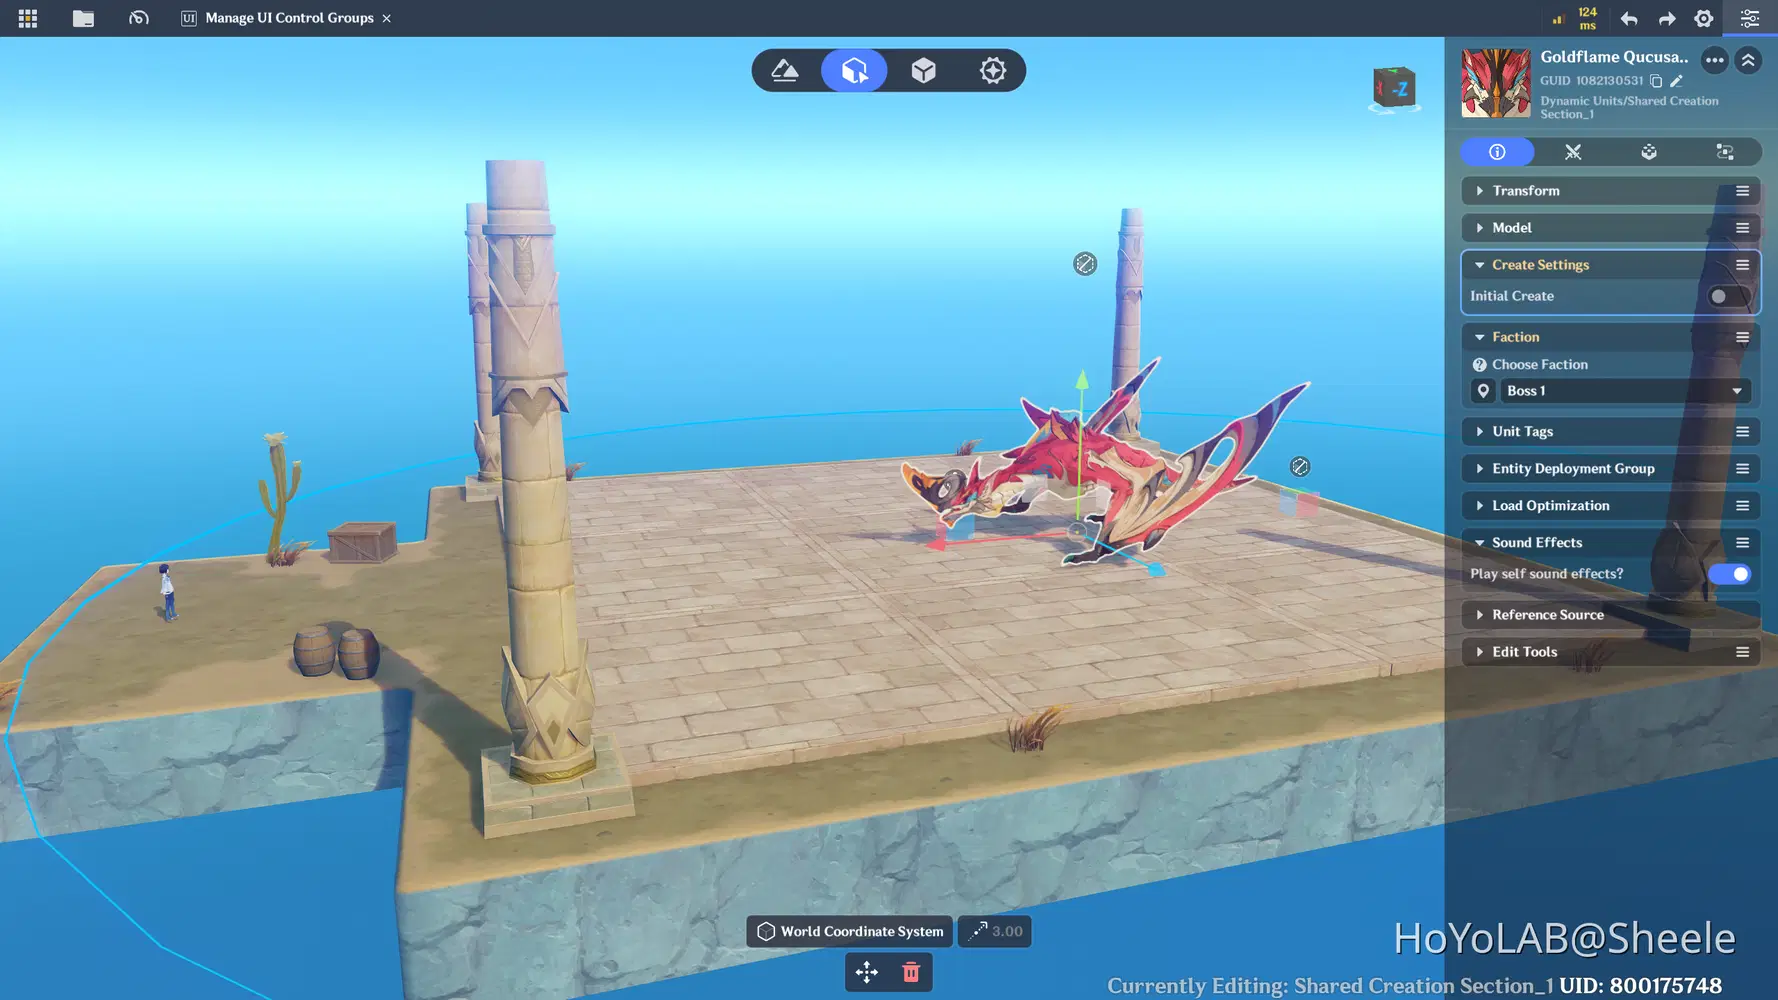
Create Creation as Boss
Here, I'm using an Empty Model with an Abyss-themed VFX to create the boss summoning effect. Add a VFX with the Looping type to make the effect play continuously.
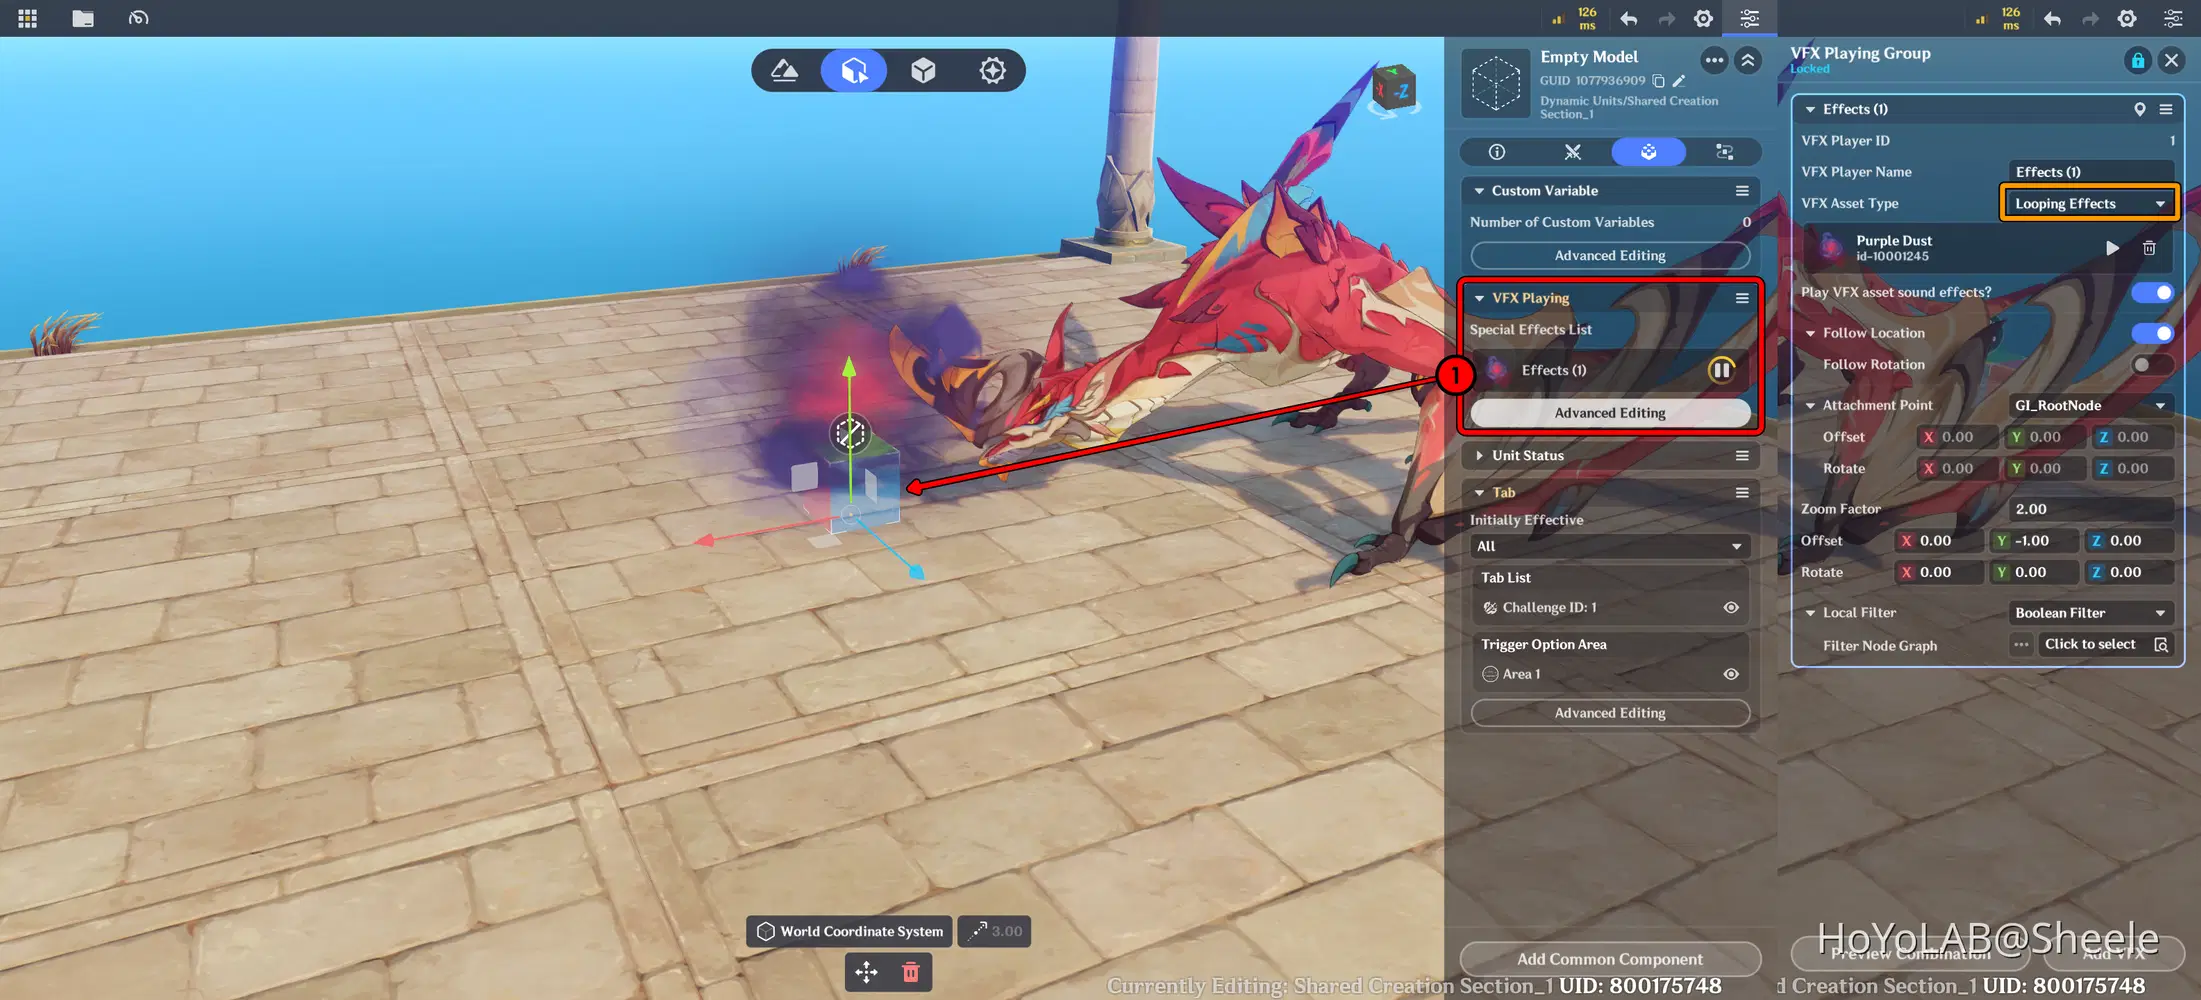
Add VFX Playing to Empty Model
Here, I'm using an Empty Model with an Abyss-themed VFX to create the boss summoning effect. Add a VFX with the Looping type to make the effect play continuously. Also, add a Tab component to the object so players can interact with it.
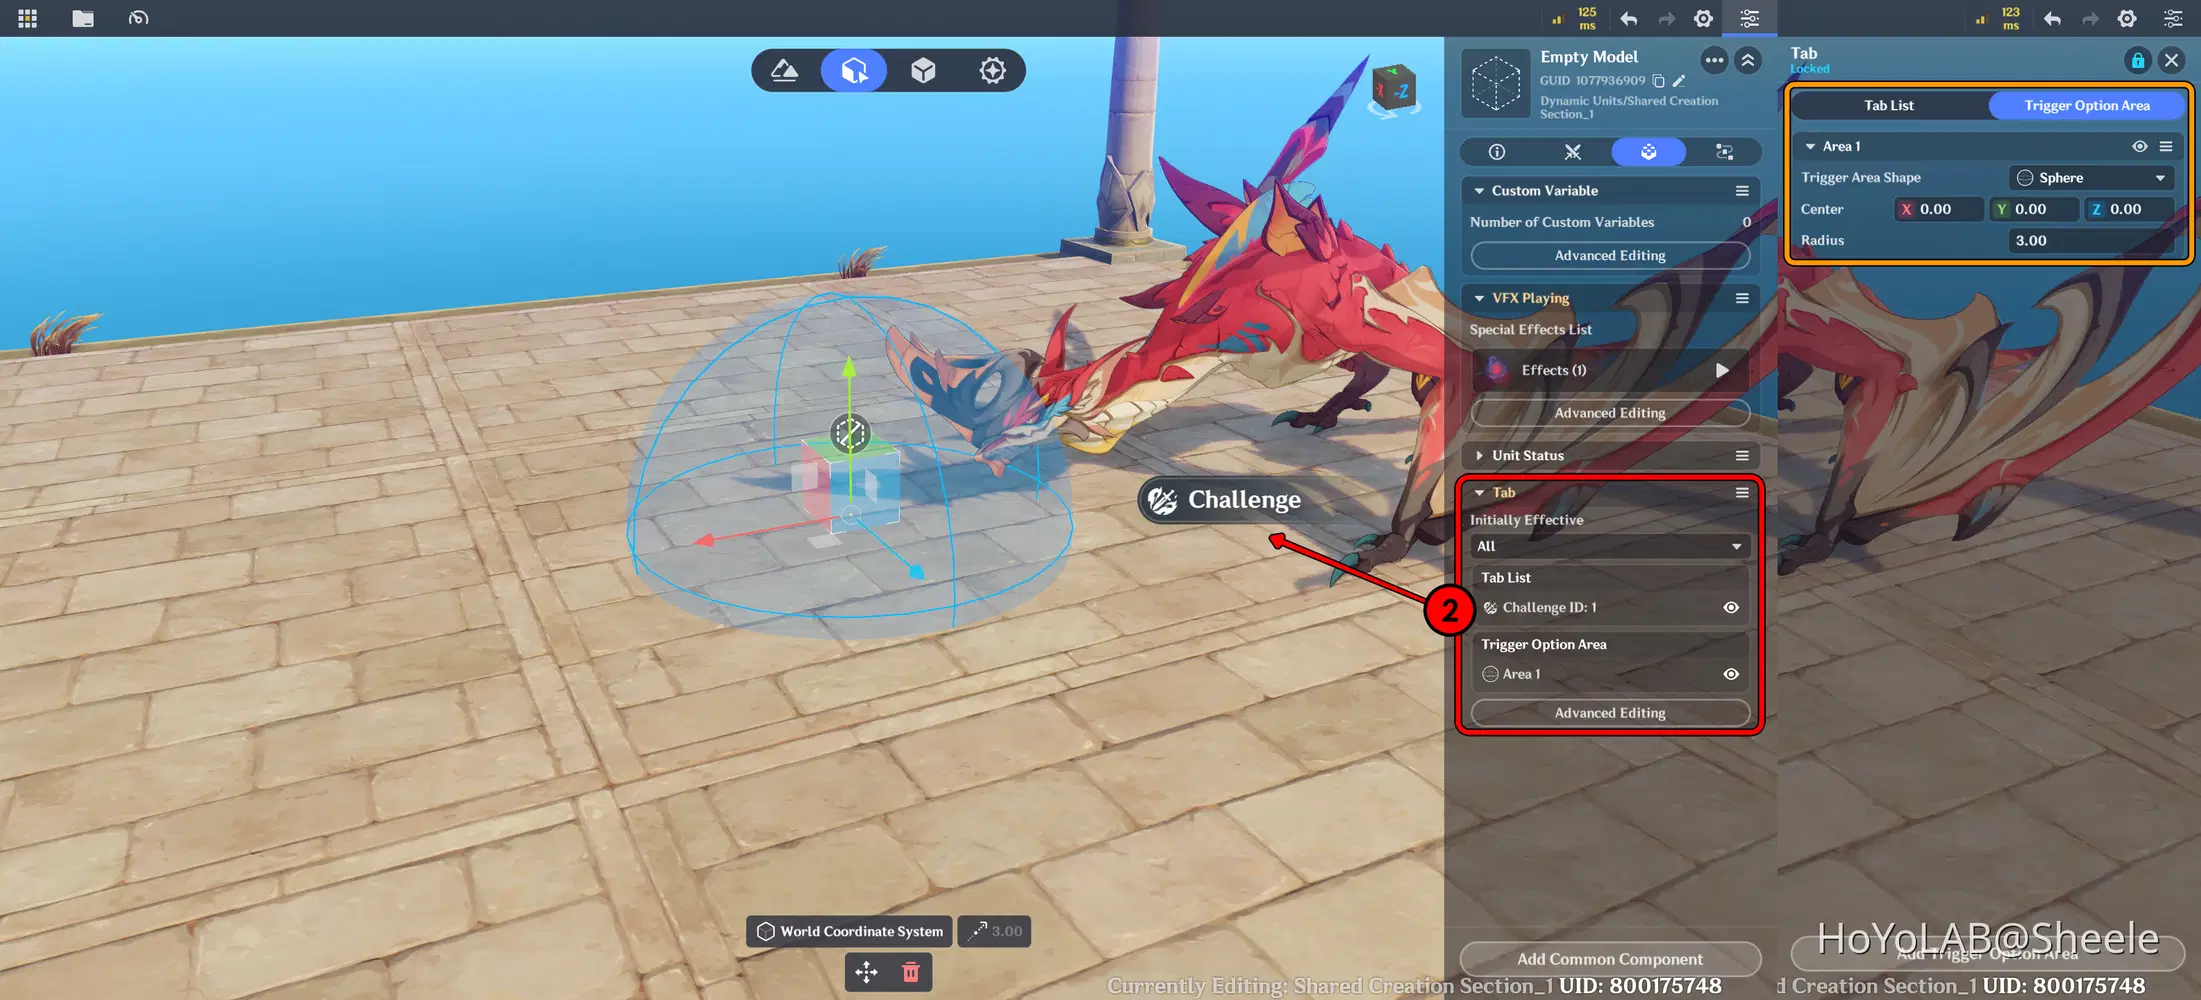
Add Tab to Empty Model
Next, create a new Node Graph to handle the interaction logic, then assign it to the Empty Object.
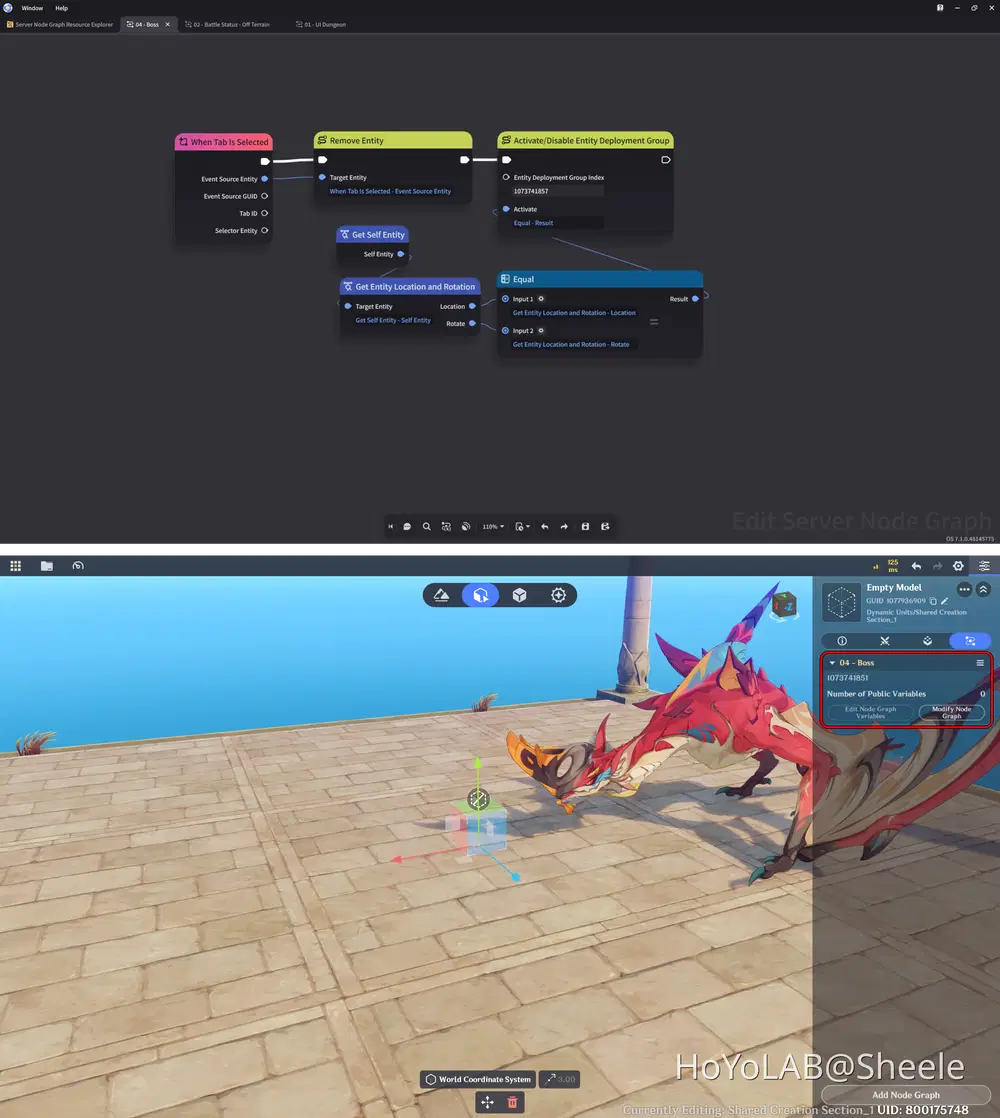
And here's the result! Interacting with the object successfully summons the Boss.
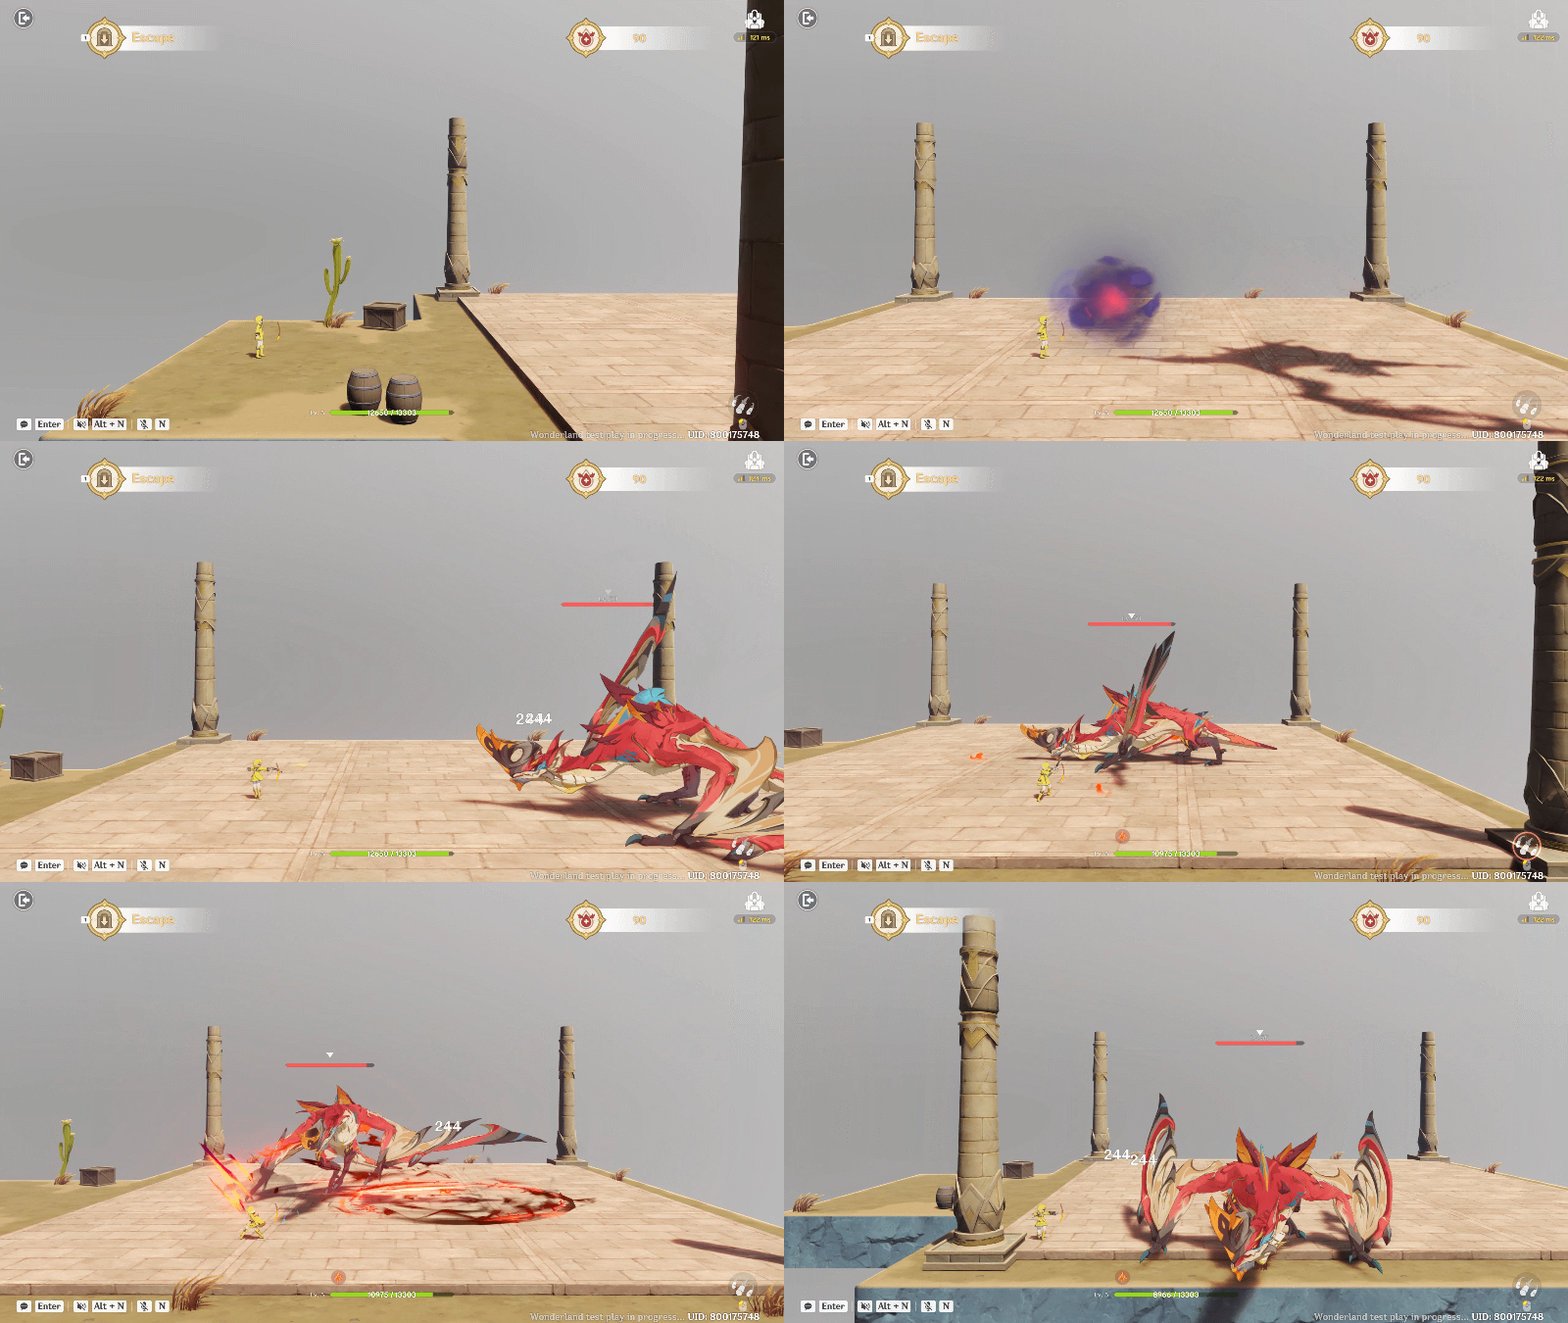
Boss Spawn Preview
7.3 Detect the Boss Defeat
Once the boss has been defeated, the game should trigger the reward sequence.
Use the appropriate enemy defeat event or boss state available in the Miliastra Editor to determine when the encounter ends.
The basic process is:
- Detect that the Normal Boss has been defeated.
- Prevent the boss encounter from starting again.
- Activate the reward chest.
- Allow the player to collect the reward.
Make sure the reward sequence can only be triggered once per boss encounter.
📝 Wonderland Guide:
Create a new Node Graph with a structure similar to the one used to detect defeated enemies. However, this time, it also needs to spawn a Reward Chest when the boss is defeated. You can refer to the node structure shown below for guidance. Once finished, assign the Node Graph to the Stage Entity.
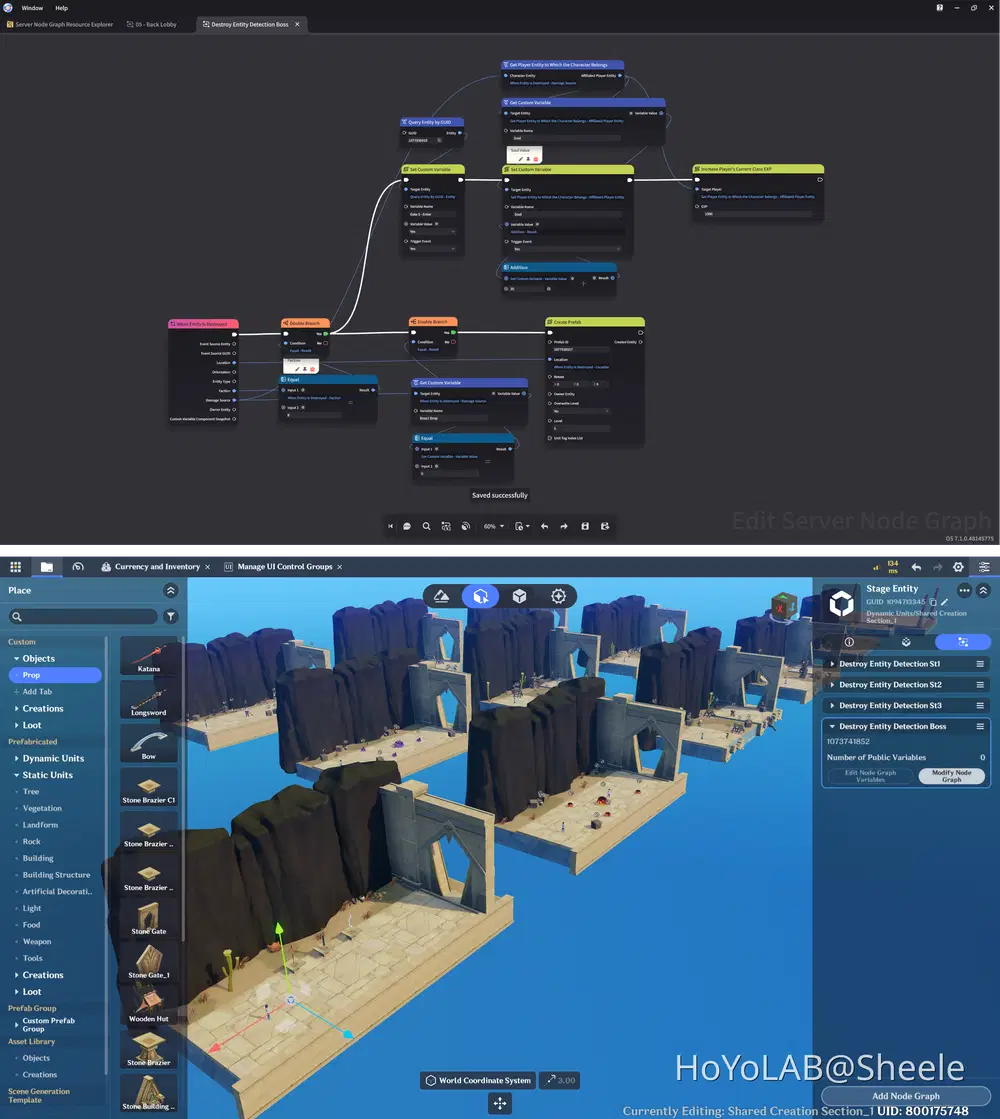
Node Graph for Detecting Boss Defeat
7.4 Create the Reward Chest
Now, let's create a chest that appears after the boss is defeated.
You can use a chest model or another suitable interactive object to represent the reward.
When the boss is defeated, activate the chest at the designated reward location. The player can then interact with it to receive the reward.
For this basic system, the chest can contain one of two rewards:
- Soul Reward: Gives the player additional Souls to spend at the shop.
- Key Reward: Provides a key required to unlock the next stage.
The reward can be selected randomly, allowing players to receive different rewards across their dungeon runs.
📝 Wonderland Guide:
Inventory Setup
First, we need to set up the Inventory, which will store the items obtained from opening boss reward chests. Go to Combat Preset - Player Template, then add the Inventory component to your character.
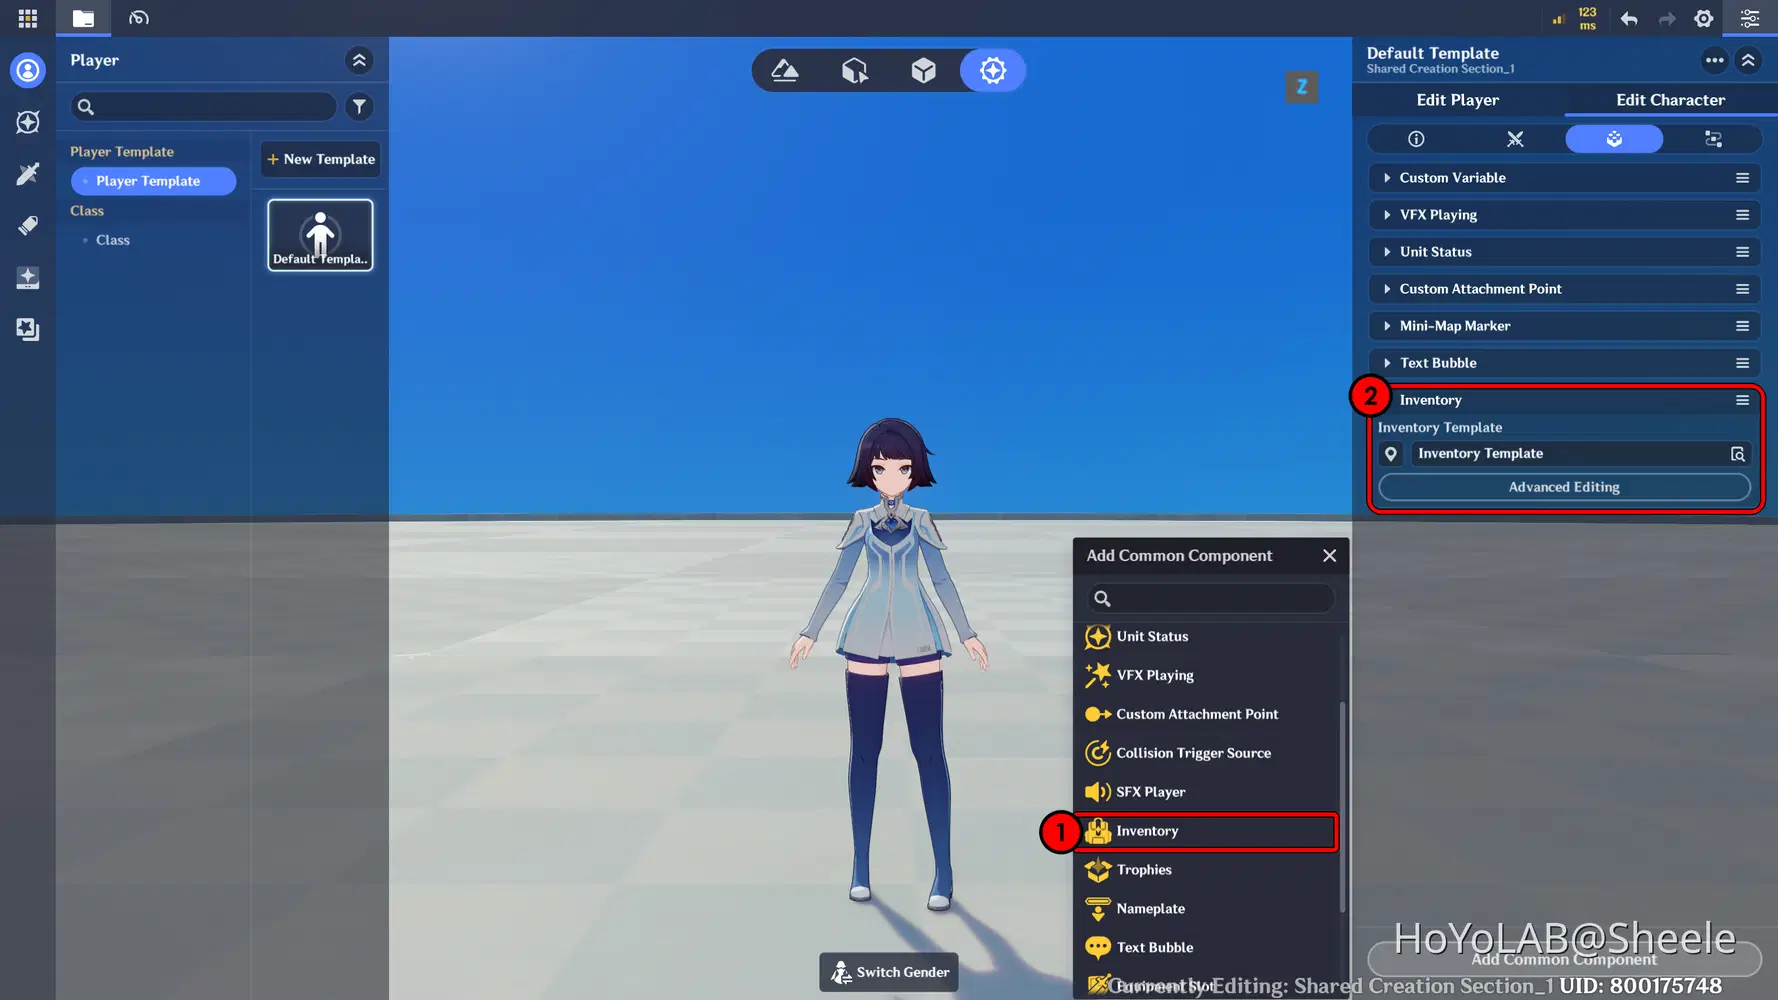
Add Inventory Component
If you don't have an Inventory Template yet, you can create one by adding a new Template. Once it's ready, make sure to select your newly created Inventory Template in the Inventory component.
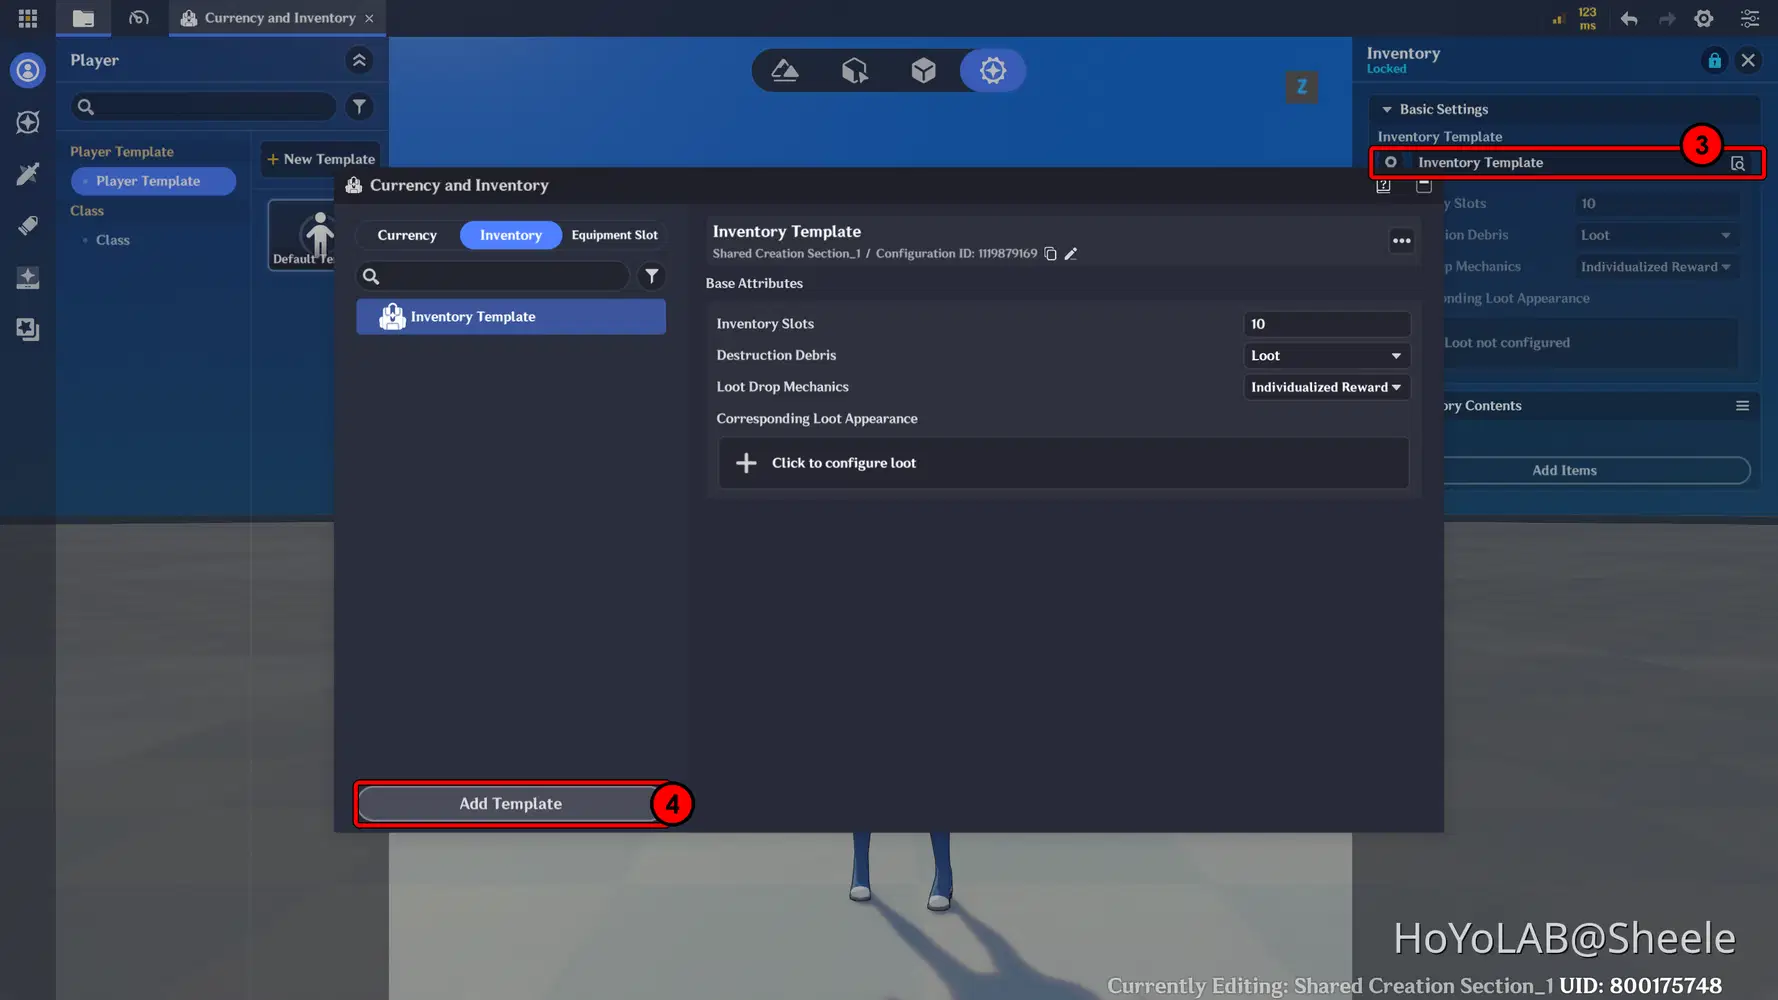
Inventory Template Setup
Now, you can open your inventory by clicking the Bag Icon on the screen or pressing the B key on your keyboard.
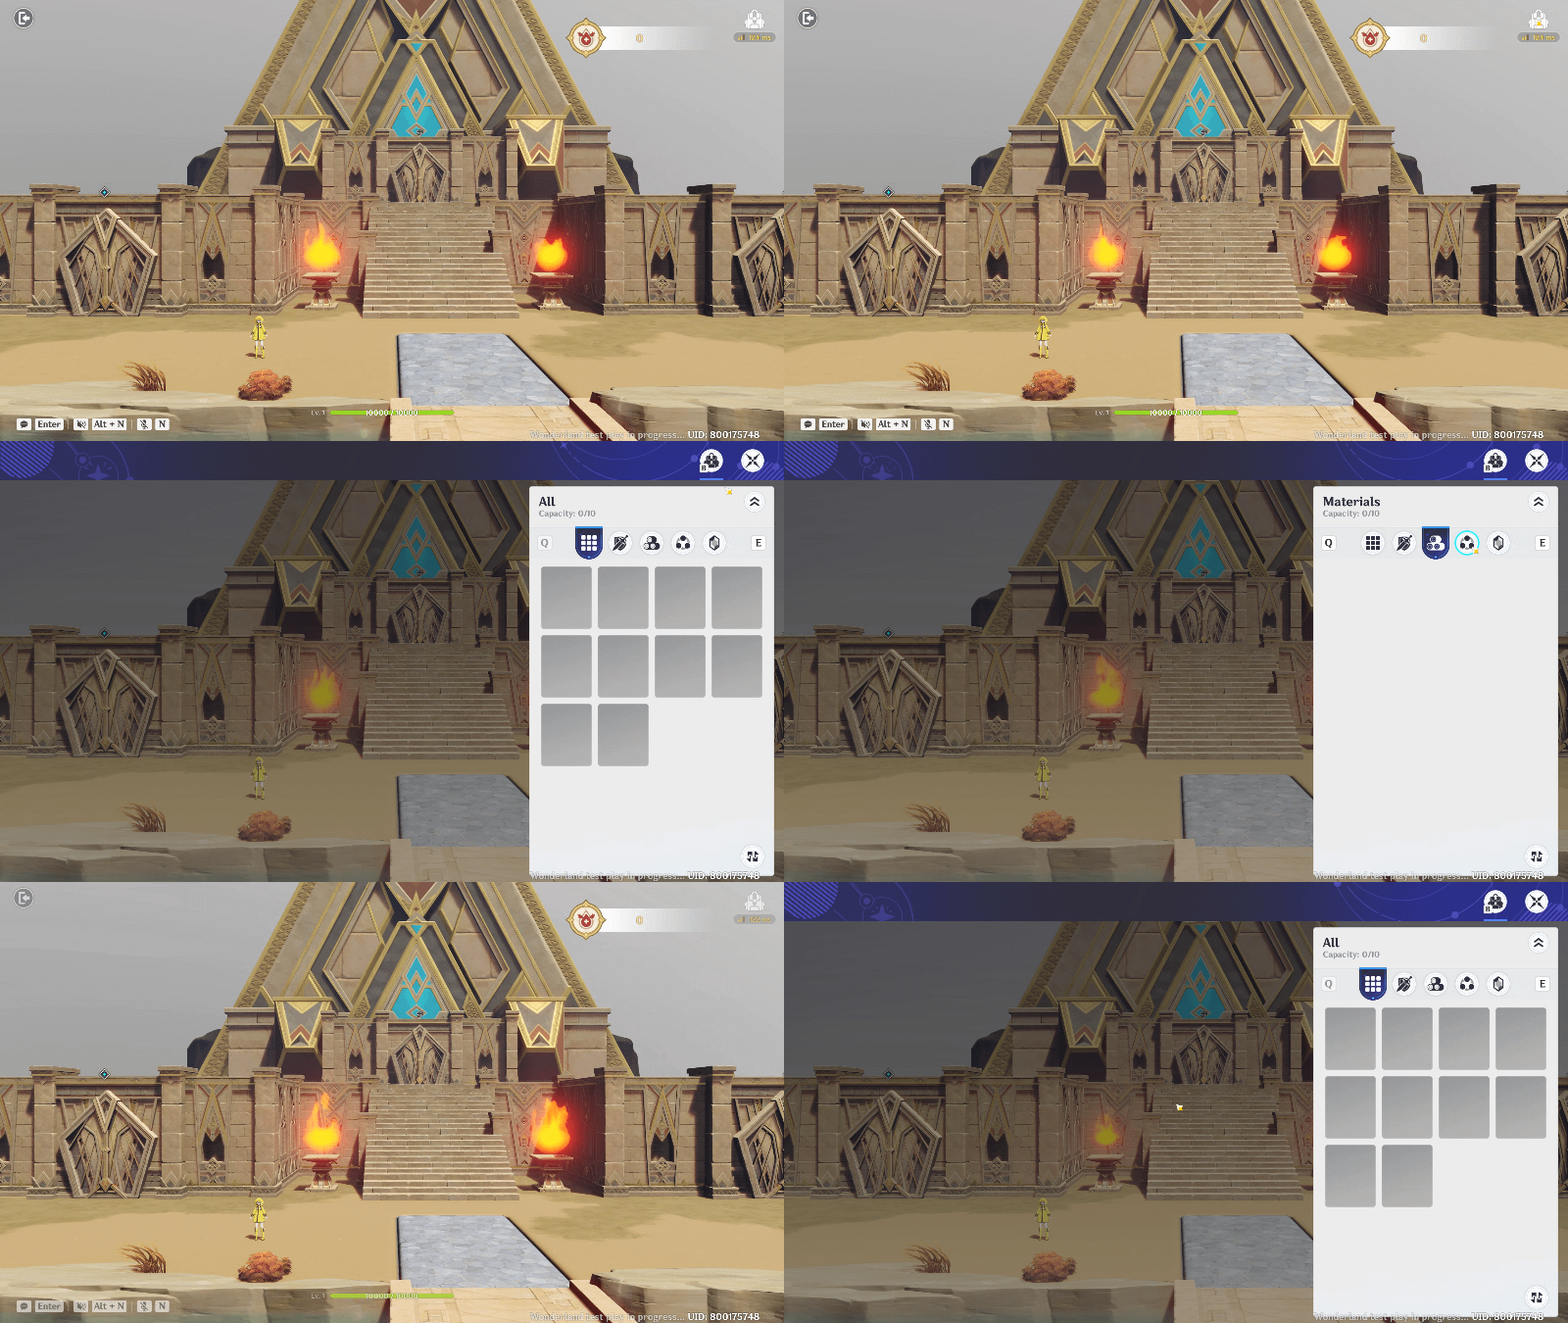
Inventory Preview
Create Chest
Next, create the Reward Chest that will appear when the boss is defeated. You can use one of the pre-made Chest Objects available in the Asset Library.
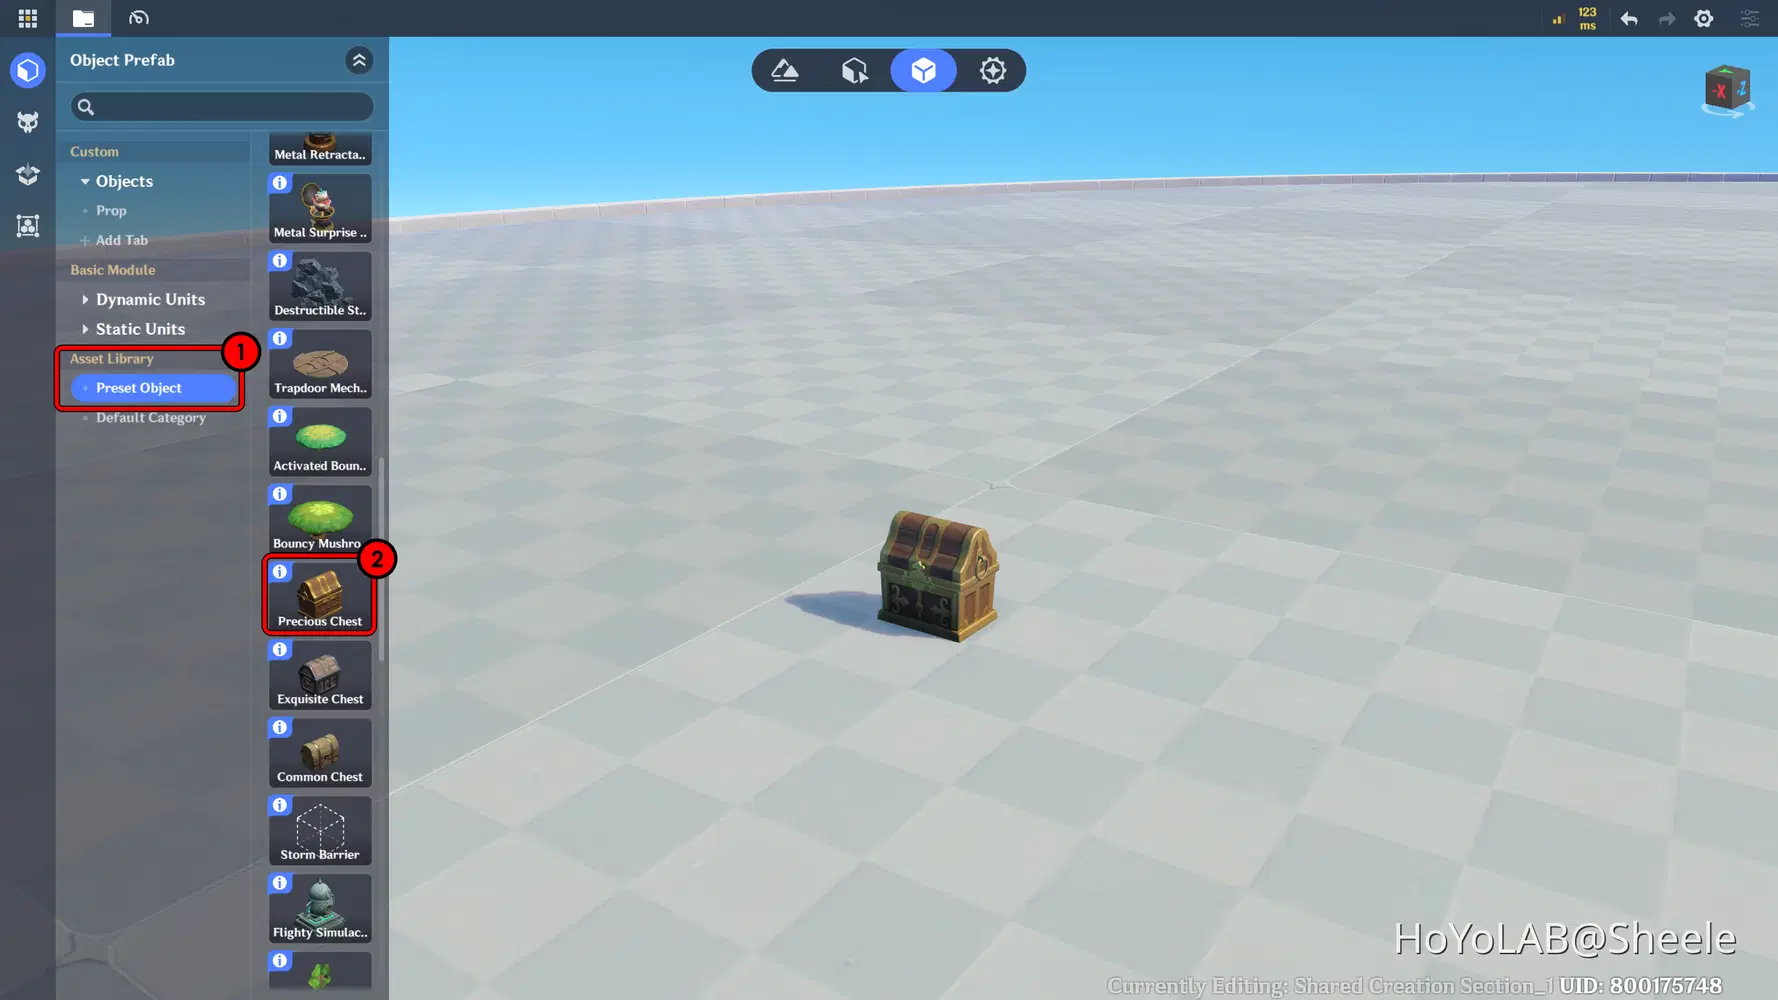
Create Chest
Next, add a Custom Variable with the ID List type. This variable will store the IDs of the items that will appear in the reward chest, especially the Soul reward, also known as Soul.
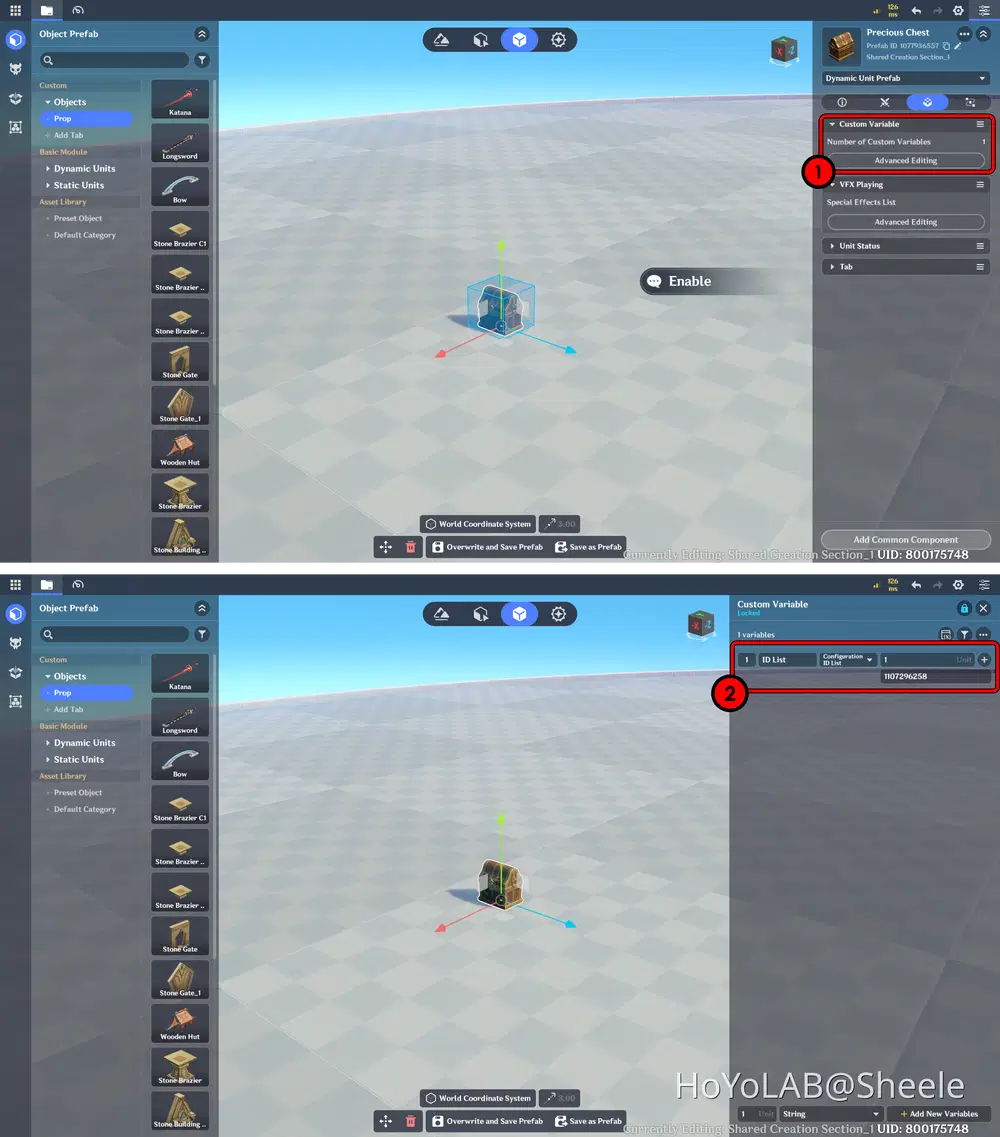
Add Variables
Create Item
Next, let's create the items. For this tutorial, I'll create two items: Dragon Soul, which instantly restores the player's HP when used, and a Key Item, which is required to unlock access to the next stage. To create these items, open Combat Preset - Menu Item and create a new item.
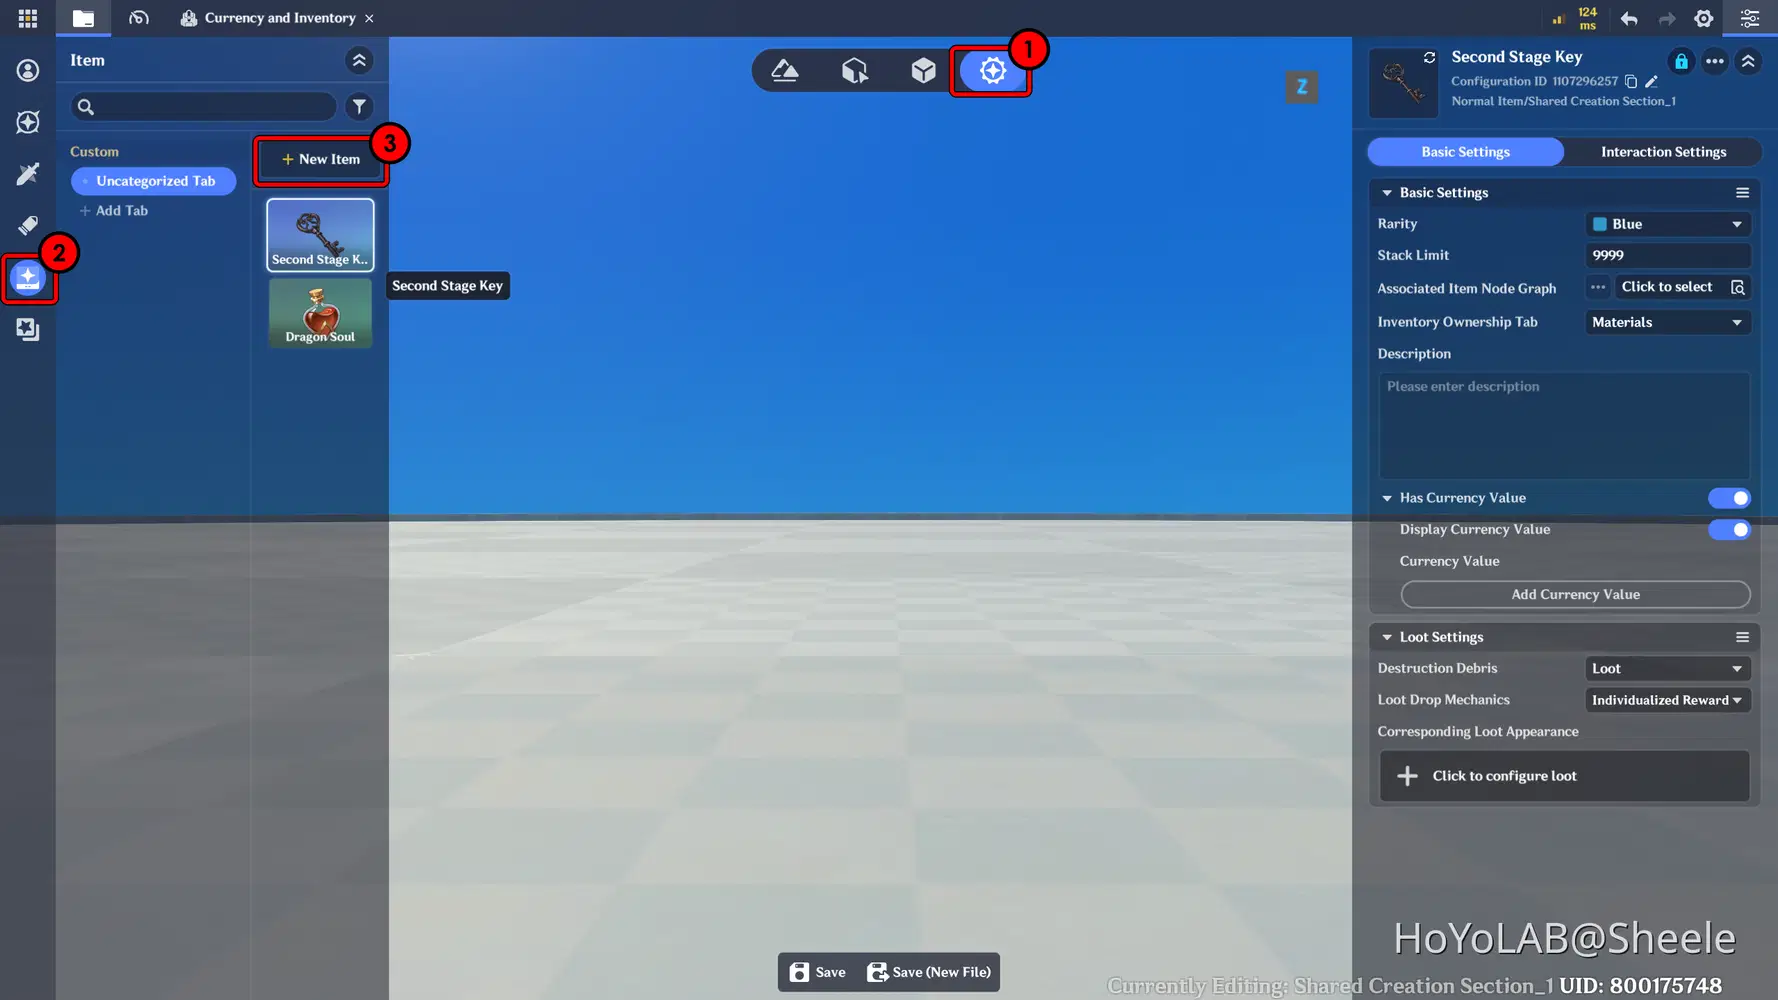
Create Item
Next, create a new Node Graph to handle the Reward Chest mechanics. When players interact with the chest and open it, there are two possible outcomes: they will either receive the Key Item or another random item, such as Dragon Soul. Once the chest is opened, a Portal leading back to the Lobby will appear.
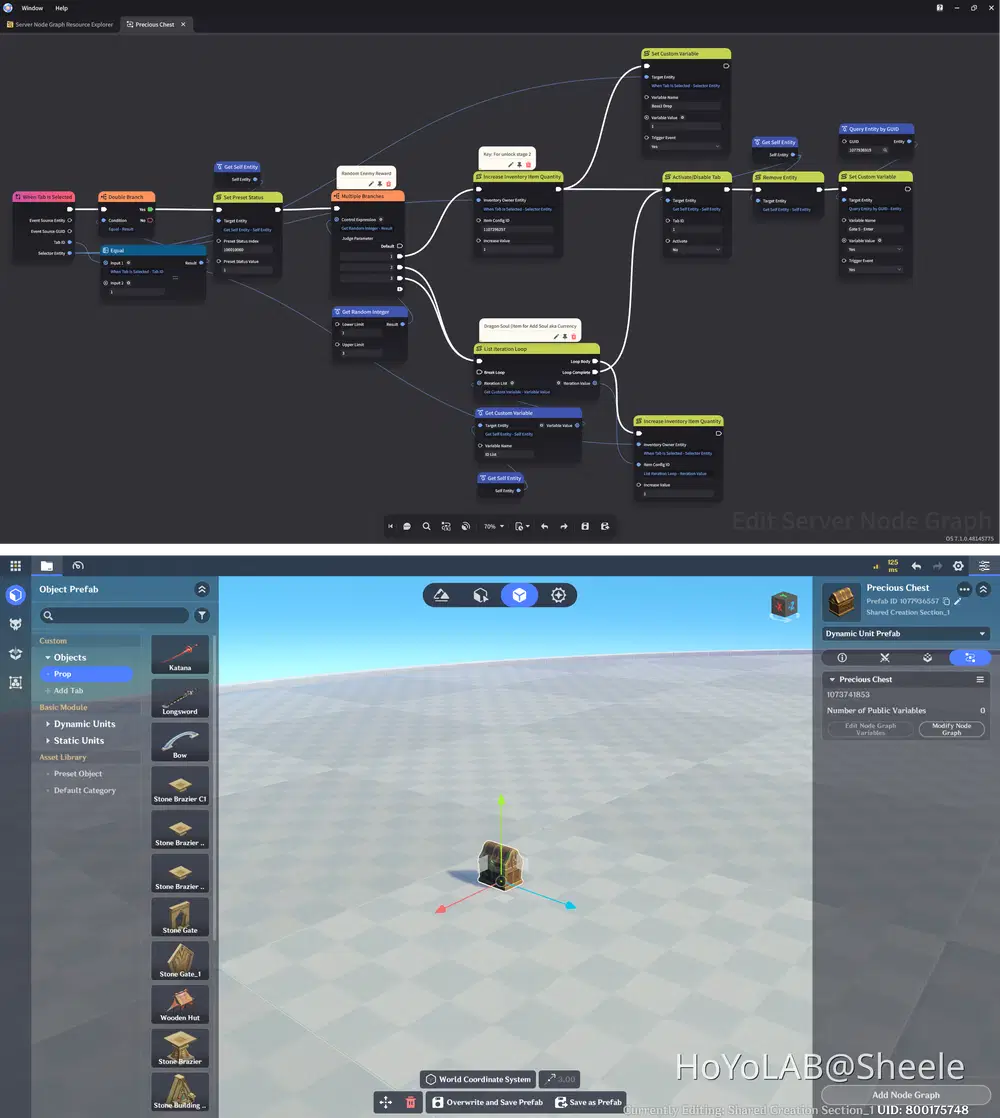
Chest Node Graph Setup
Here's the result, When the boss is defeated, it drops a Reward Chest. After opening the chest, the player receives an item that is automatically added to their Inventory.
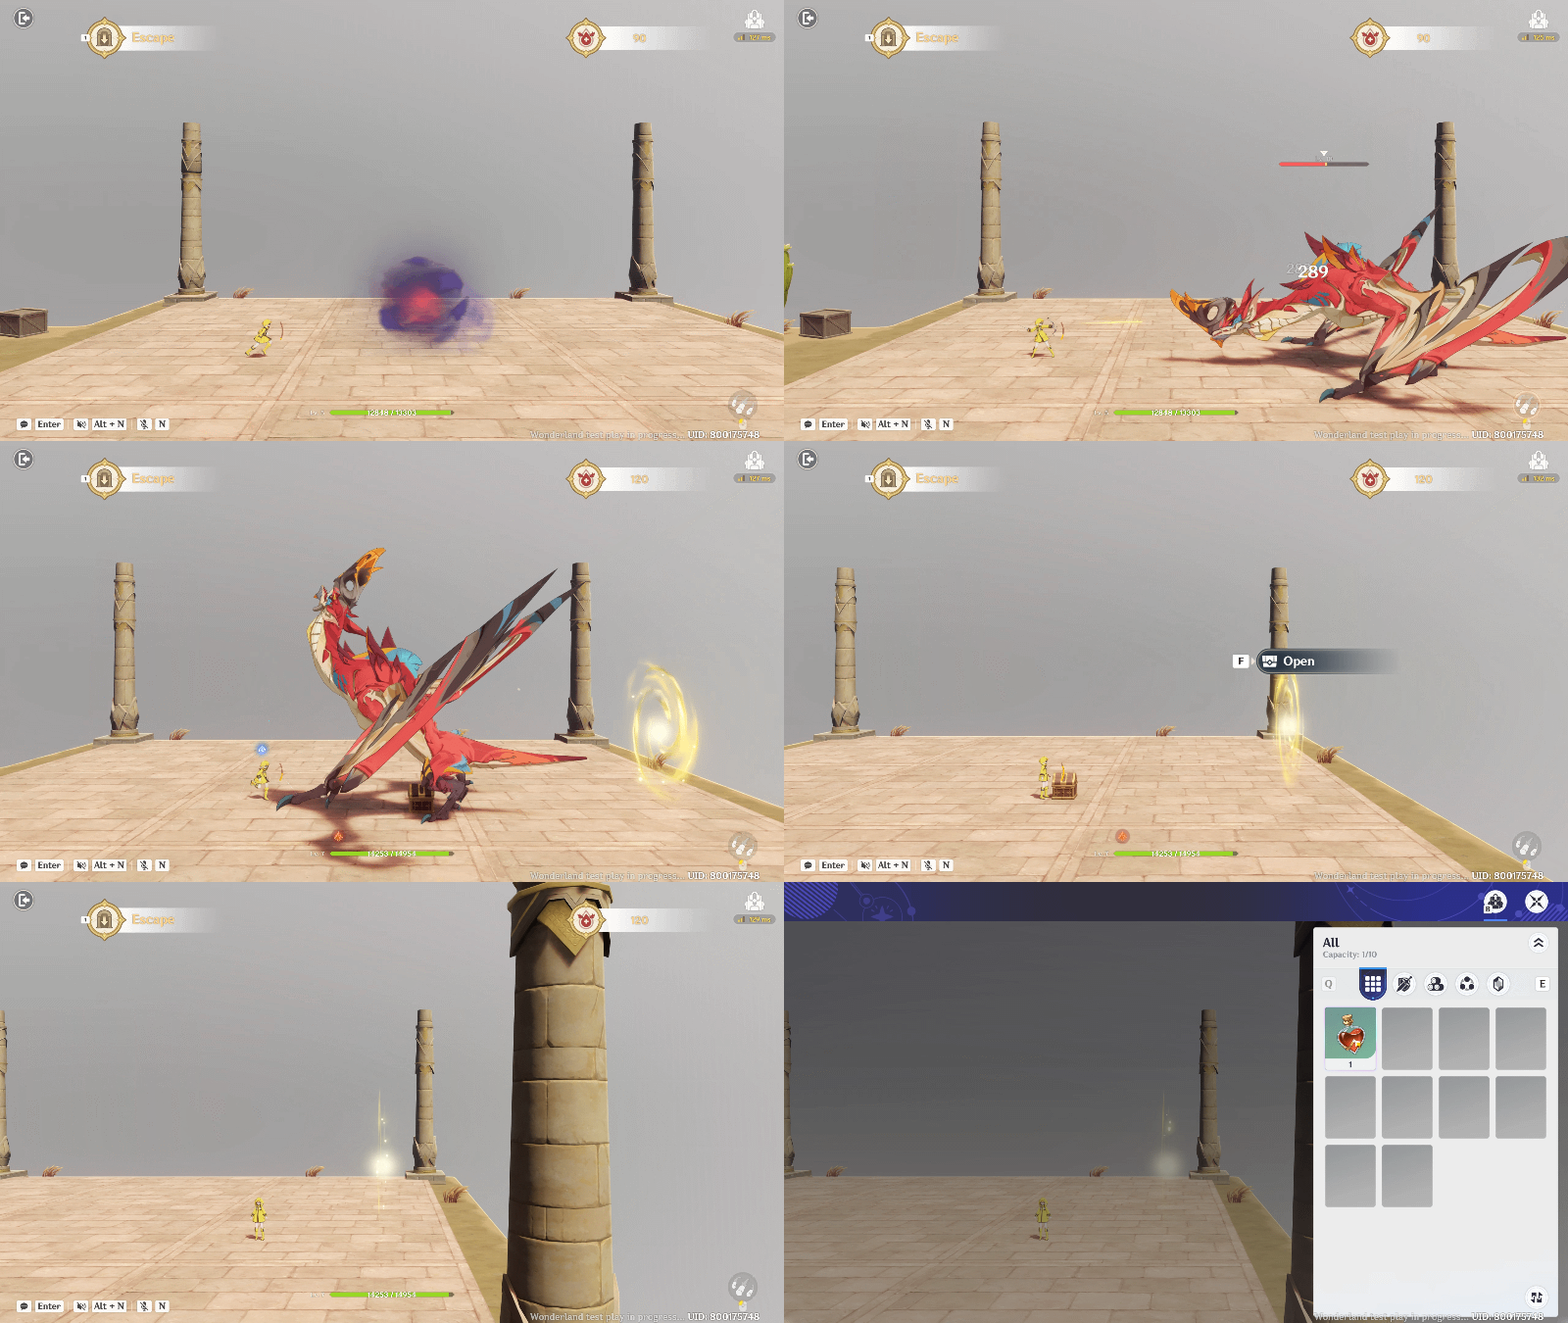
Boss Drop Reward
Chapter Summary
In this chapter, we've prepared a Normal Boss encounter, created a boss defeat trigger, and designed a reward chest that grants either Souls or a key.
These mechanics give players a clear objective at the end of each dungeon and connect boss battles to the game's reward and progression systems.
In the next chapter, we'll create the Dungeon Progression & Stage Transitions system, connecting our dungeon locations and allowing players to advance through their adventure!
Chapter 8: Escape & Dungeon Reset System
Now that our dungeon, combat, and reward systems are ready, it's time to make the dungeon experience more complete!
In this chapter, we'll create an Escape UI that allows players to leave the dungeon whenever they want and return to the Lobby. We'll also set up a Dungeon Reset System to ensure that enemies respawn and dungeon areas return to their initial state, giving players a fresh experience whenever they enter the dungeon again.
8.1 Creating the Escape UI
Selanjutnya membuat UI dan logika untuk mengoperasikannya jadi ketika tombol ini ditekan maka akan muncul floating page dimana akan ada pilihan kamu yakin untuk benar2 kembali ke lobby atau tidak, jika iya maka pemain akan dikirim kembali ke lobby,
📝 Wonderland Guide:
To create this UI, open the main menu and go to Manage UI Control Unit. First, create the UI assets using a combination of images and text.
Next, add a Floating Interaction Page from the UI Control Group Library. Inside it, create a container with a confirmation message and two buttons: YES and NO.
Finally, add a custom button to the layout and apply the style of the UI assets you created earlier.
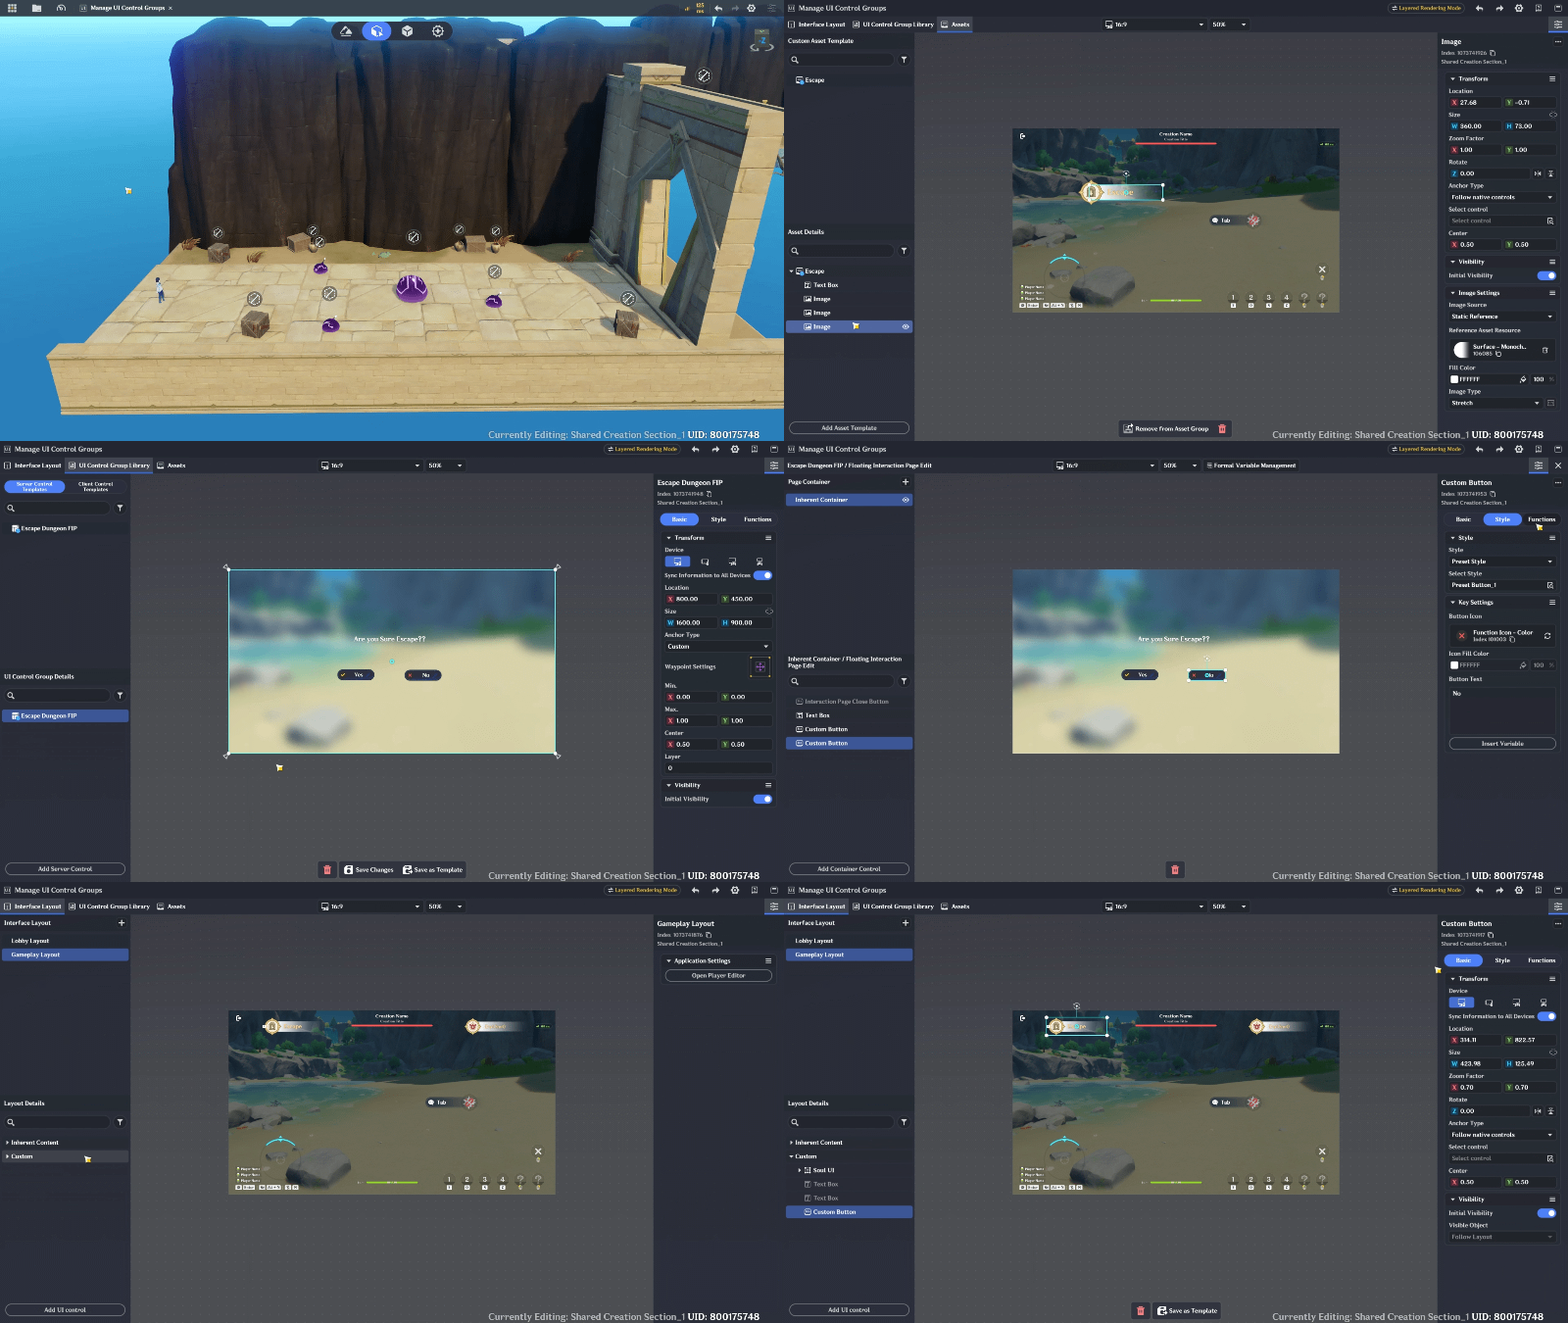
Create Escape UI
Next, create a new Node Graph to handle the UI button interactions and assign it to the Player.
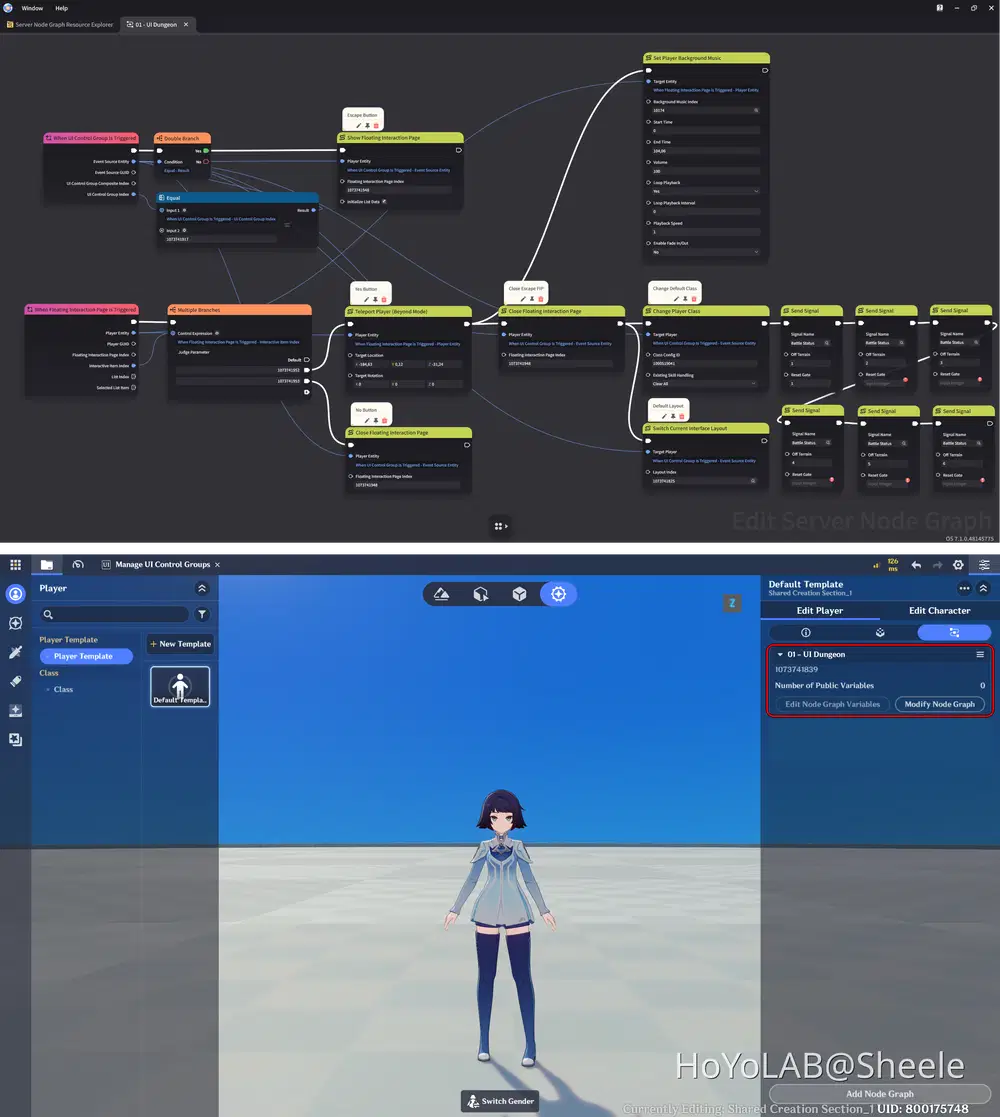
Escape Button Node Graph
And here's the result! When players press the Escape button while inside the dungeon, their character will be teleported back to the Lobby.
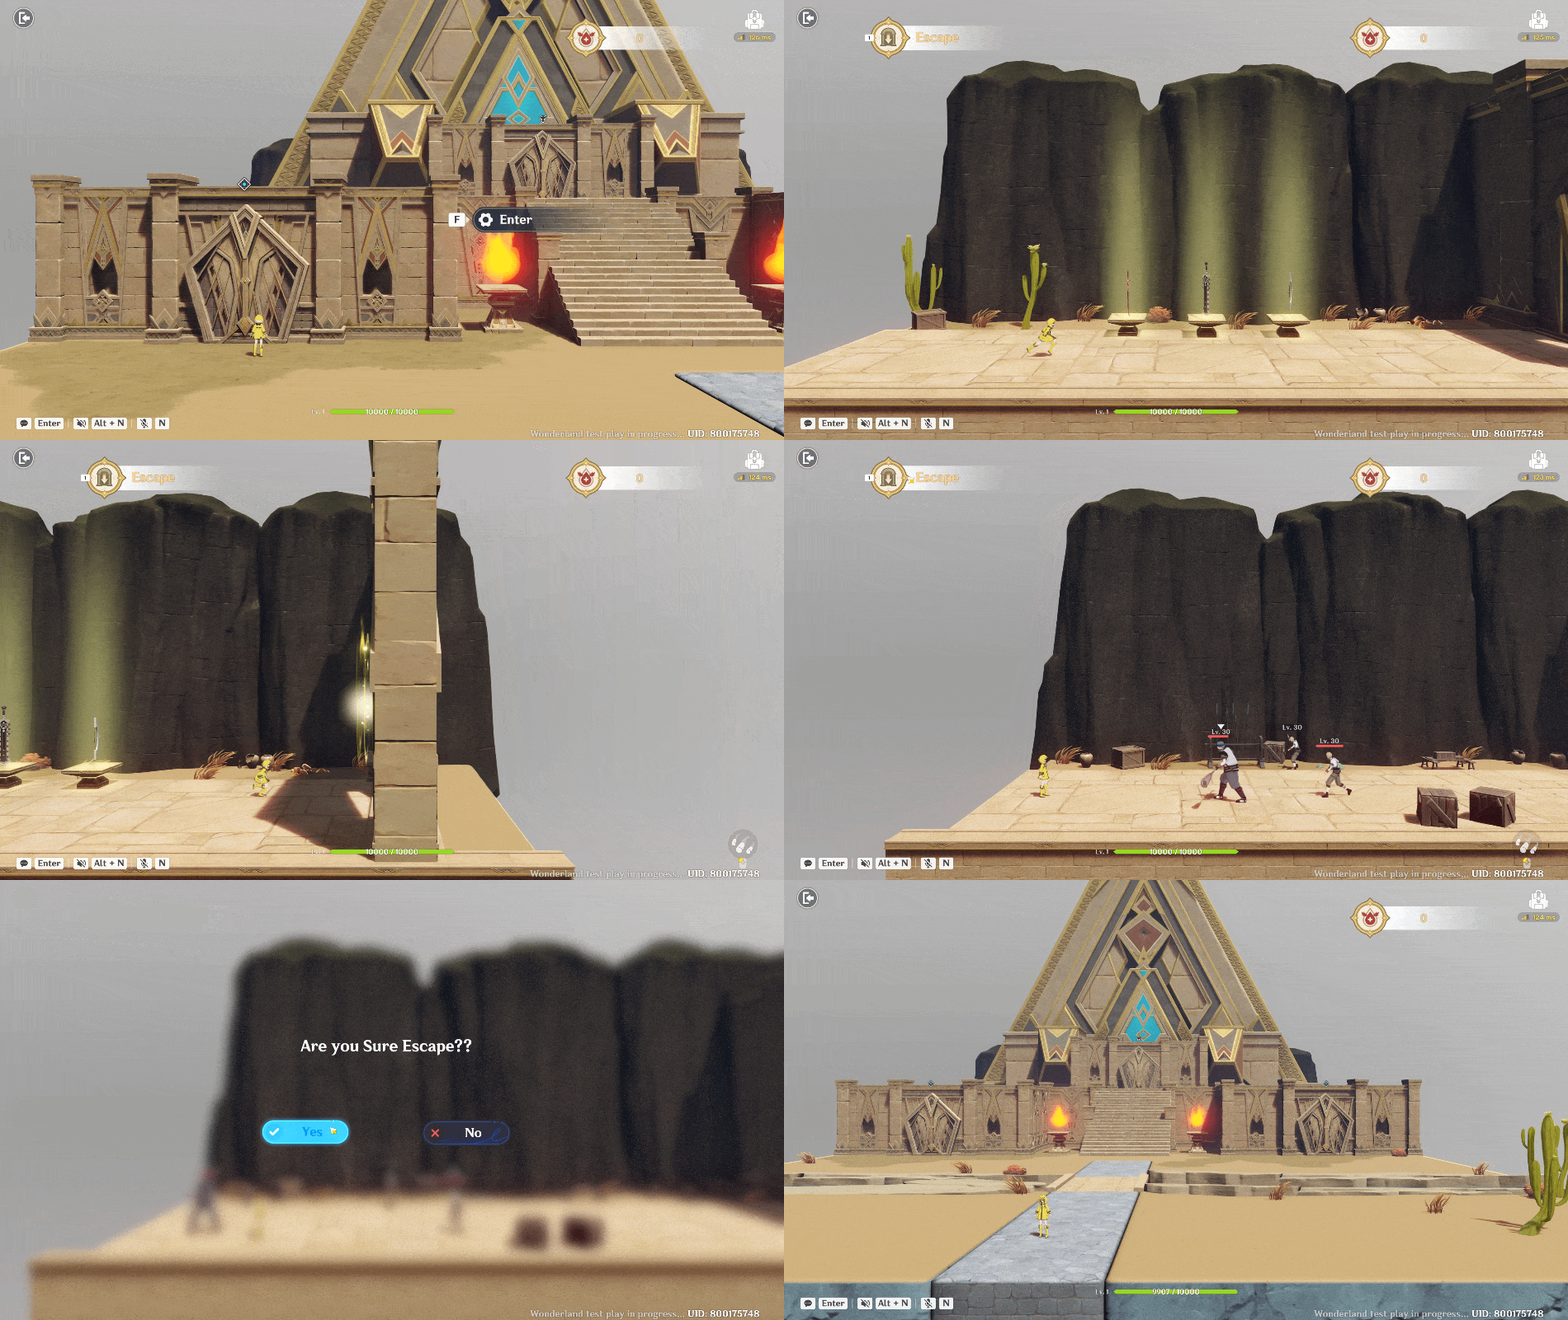
Escape Button Preview
8.2 Reset the Dungeon State
When entering a new stage, the game needs to reset the appropriate variables from the previous dungeon.
For example:
- Reset the current encounter's enemy count.
- Clear the previous dungeon's active enemies.
- Prepare the new dungeon's terrain and enemy configuration.
- Reset the boss encounter state.
- Ensure the previous reward chest cannot grant rewards again.
Be careful not to reset the player's entire progression unintentionally. The player's level, EXP, Soul balance, and other persistent run data should remain unchanged if your game is designed to carry them between stages.
The key should only be consumed according to your intended progression rules.
Here, I'm using Monitor nodes to organize the logic and deactivate the groups and variables used by the dungeon system, including the Gate and enemy spawning mechanisms.
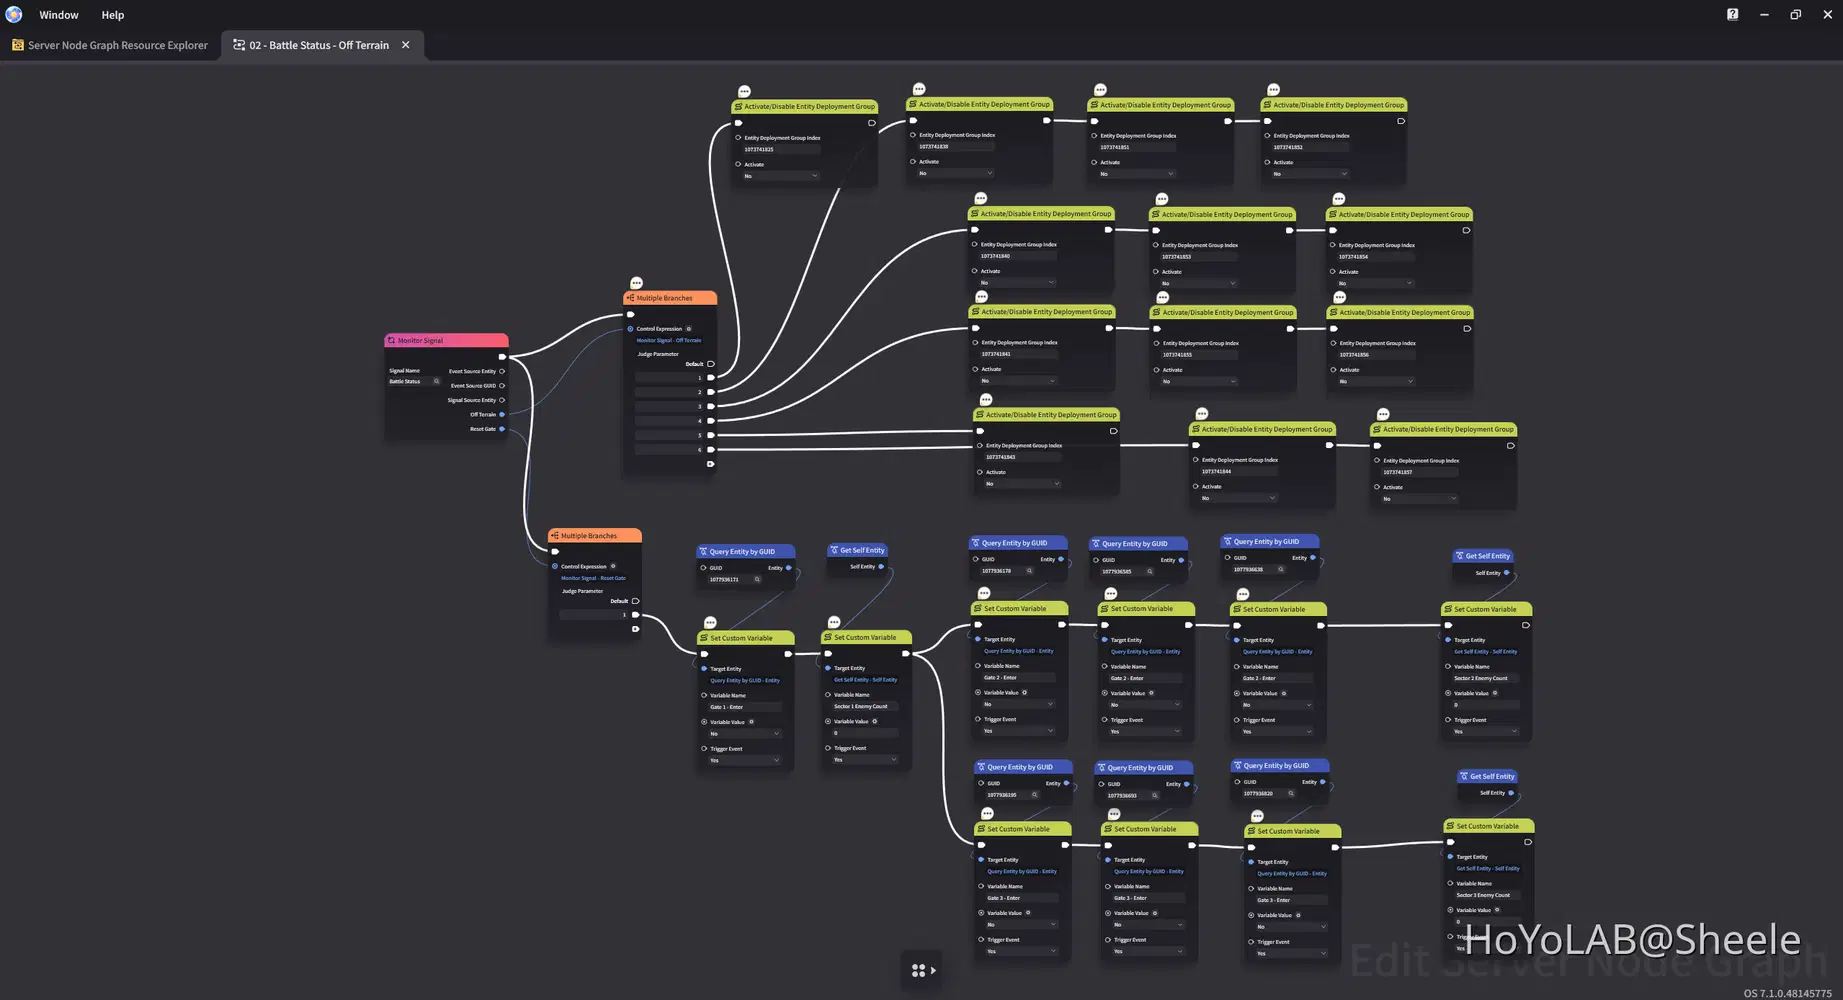
For Entity Group & Gate
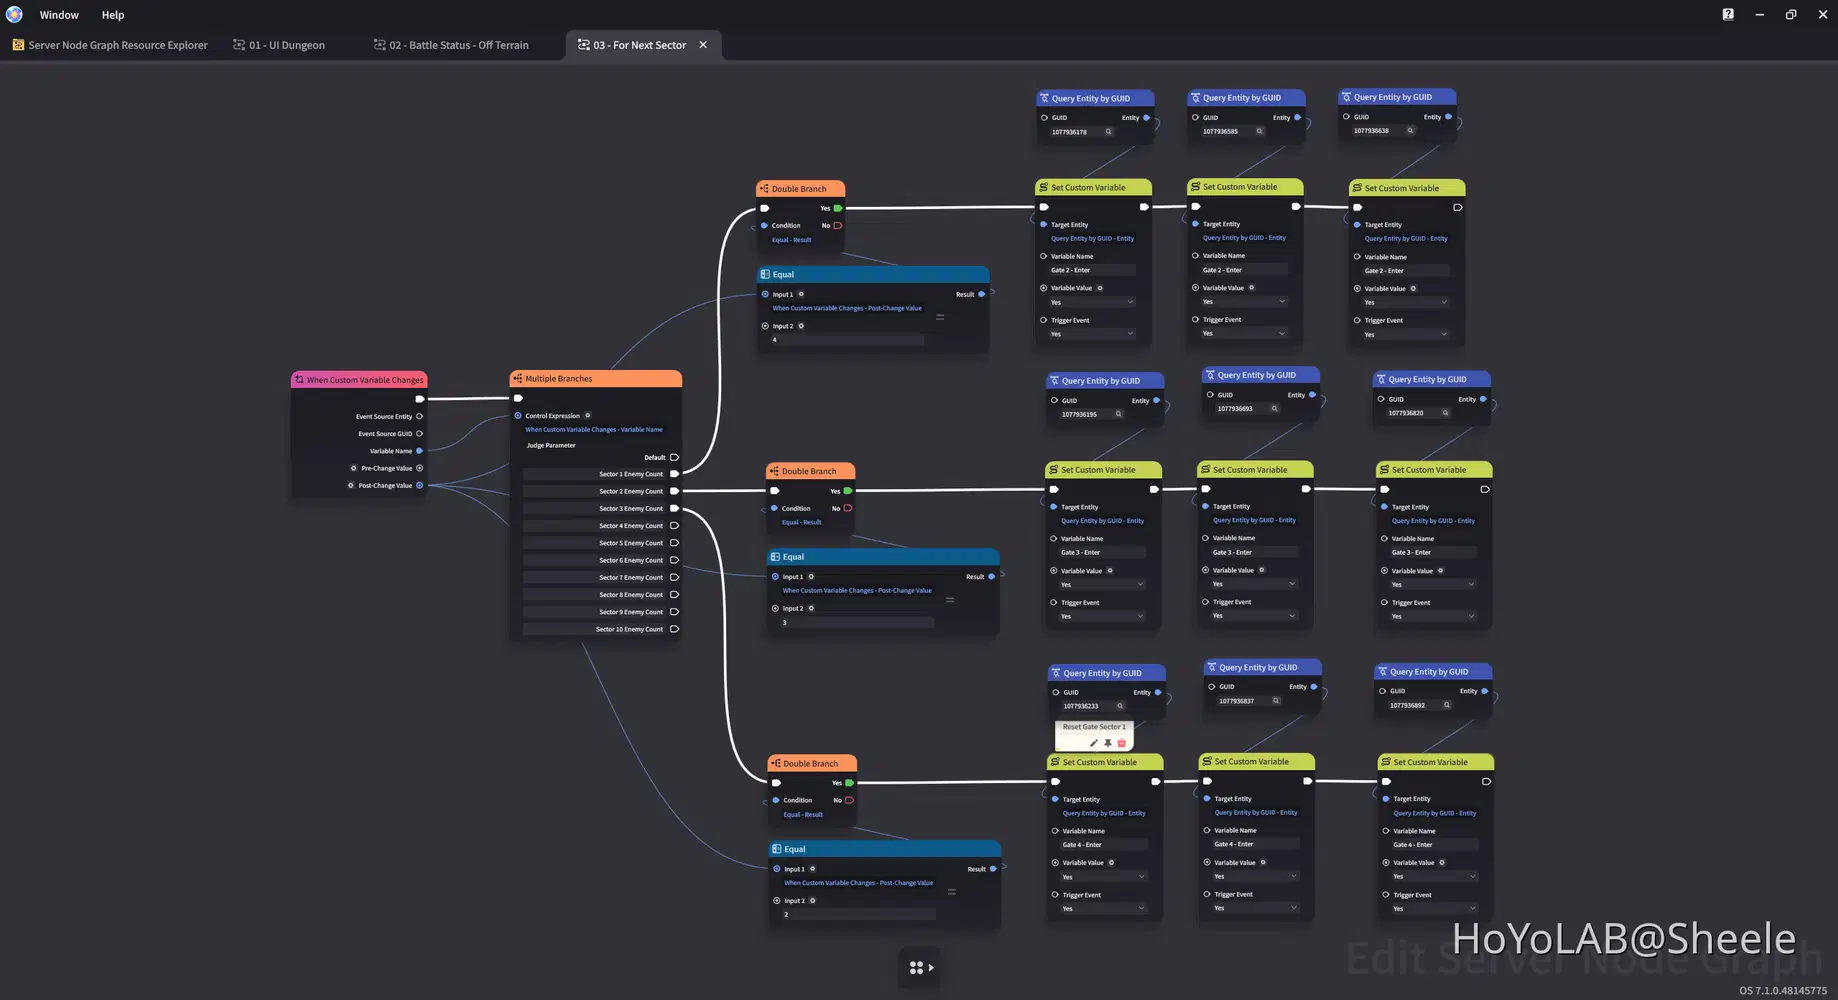
For Creation Count
8.3 Handle the Final Stage
After defeating the Boss, I also set up a New Node Graph for an Empty Model, which will serve as the portal to return to the Lobby.
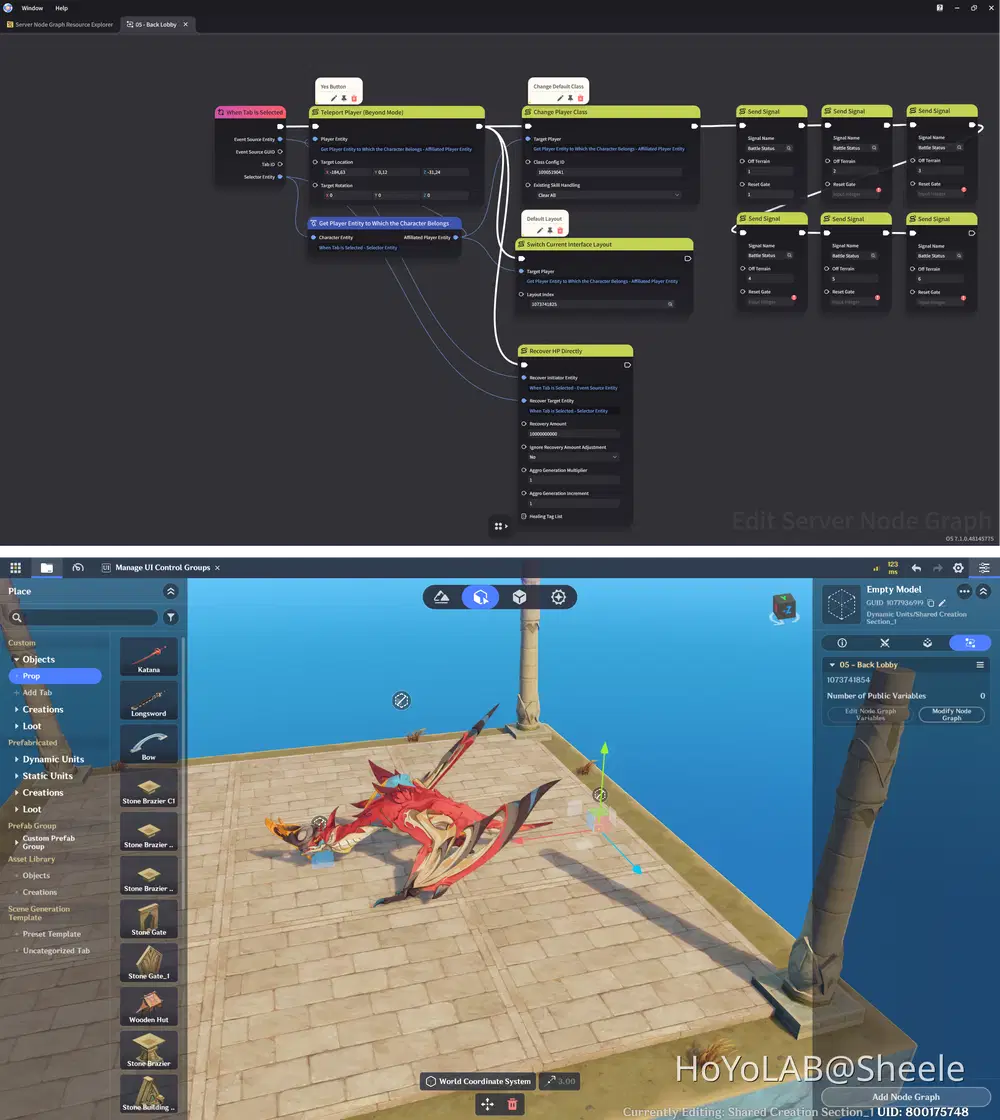
Back to Lobby
Chapter Summary
In this chapter, we've created an Escape UI that allows players to leave the dungeon and return to the Lobby at any time. We've also set up Node Graphs to manage dungeon groups, deactivate previously activated systems, and other. For the last, we've added a return portal after defeating the Boss, allowing players to return to the Lobby once their adventure is complete.
Chapter 9: Testing, Balancing, Final Improvements & Publish
Congratulations, Travelers! We've reached the final chapter of our Basic Roguelite Dungeon Adventure guide. Before publishing, make sure to test all gameplay systems, including weapon selection, random dungeon locations, enemy spawning, combat, EXP and level progression, Soul rewards, boss battles, and stage transitions. Check that everything works correctly, adjust the difficulty and rewards if necessary, and make any final improvements to the UI and overall gameplay experience. Once everything is ready, your Roguelite Dungeon Adventure is ready to be shared with other players.
Happy creating! (*・ω・)ノ ♥
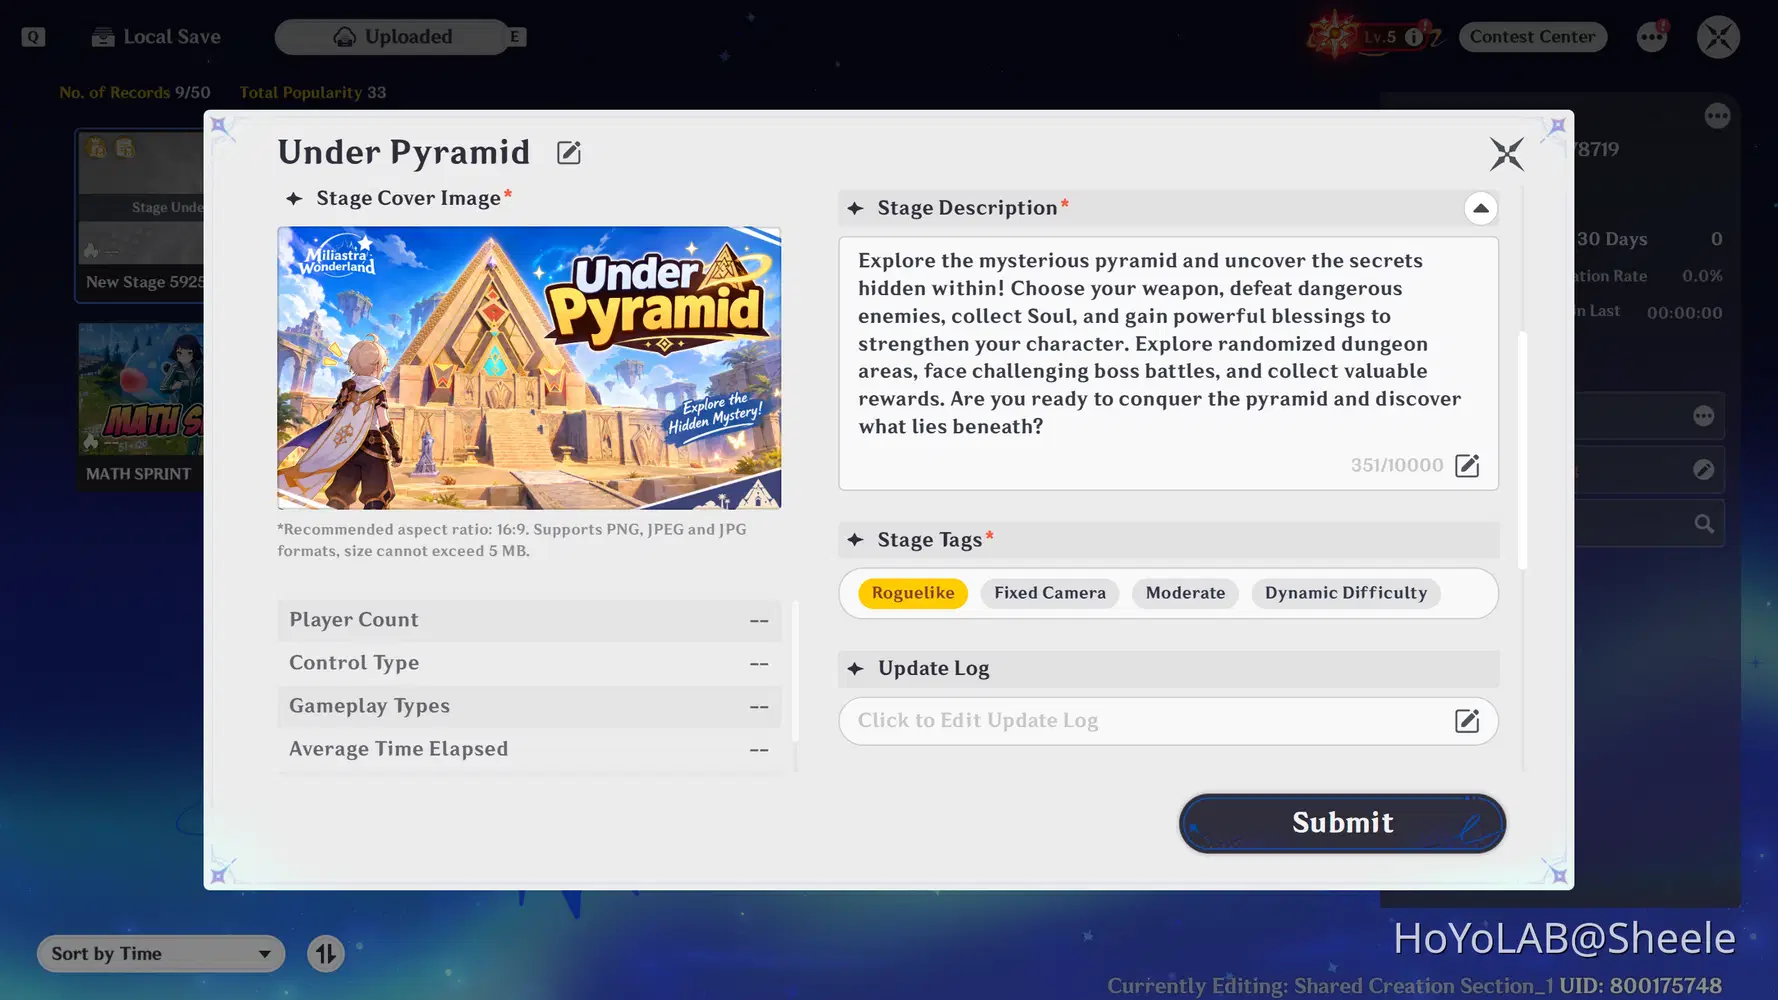
Submit & Publish
Final Summary
Travelers! You've now learned how to plan and build a basic roguelite dungeon game in Miliastra Wonderland.
Throughout this guide, we've covered weapon selection, randomized dungeon locations, enemy spawning, combat, EXP and level progression, Soul, shop upgrades, boss battles, reward chests, and stage transitions.
By combining these systems, you've created the foundation for a roguelite adventure inspired by games like Hades and Cult of the Lamb.
But this is only the beginning! You can expand your project with more weapons, additional dungeon variations, elite enemies, unique boss mechanics, new upgrades, and many other features to create an even more exciting experience.
Thank you for following this guide, and good luck with your next creation in Miliastra Wonderland!
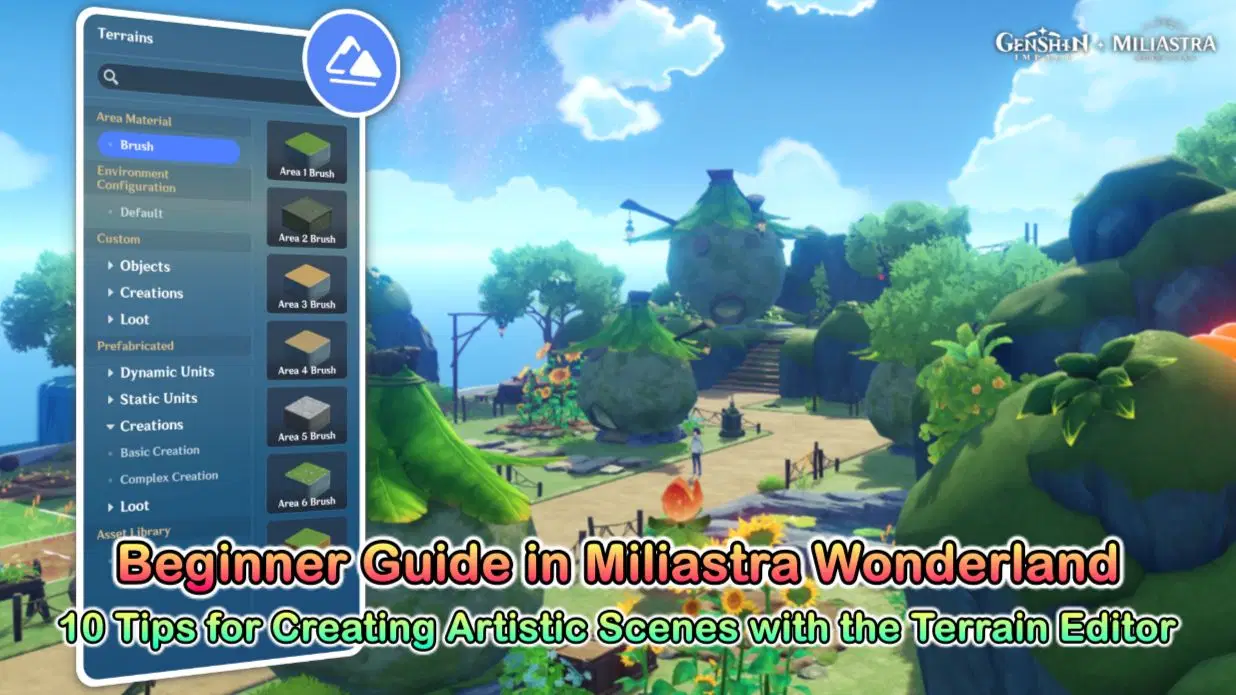
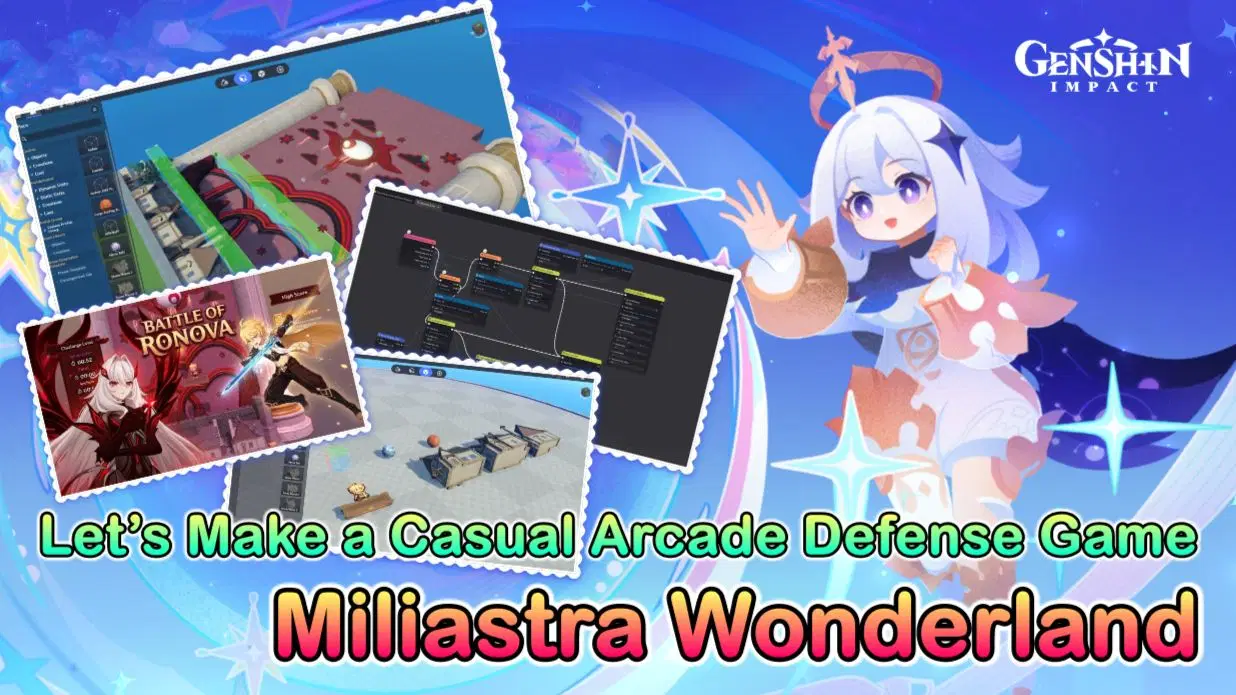
Miliastra Wonderland Guide Collection


Reference Guide
As another source of guidance, you can visit the guide provided by the Official Genshin Impact x Miliastra Wonderland
Miliastra Wonderland - General Guide
Miliastra Wonderland - Tutorial