Introduction
Welcome to another guide! With the newest Client Side UI Controls, this time we will center around one of the most important UI elements to build interesting User Interaces for your wonderlands.
Before we start
It's important to know that Client Control Containers make use of LUA scripting for being able to interact with the user. So it's important you have some basic undestanding on that scripting language to comprehend all things we will cover in this guide.
Additionally, is recommended to have an IDE (Integrated Development Environment) like VSCode in your PC to handle the code comfortably.
Important Concepts
Client Control Container
This is a Server-side Control Template that will let us to host a Client-sided UI into our Wonderlands. This will let us to access to a very powerful tool that will let us make almost anything with our Interface, from simple buttons to advanced LUA scripting that could help us to make full games inside the UI.
Note: The main difference between Server and Client, is where the workload of our Wonderland runs. If it runs in the Miliastra Server that hosts our Wonderland, or if it runs on the Players Device.
Client UI Controls
Inside the Client Control Container we can make use of the following Client UI Controls:
- Container Control: As its name indicates, its a UI element that can Contain other controls and serve as its root or attachment point. You can view it as a Group that contains the layers you use to create an UI element. It can help you to organize the UI more efficiently.
- Text Box Control: Its a box which lets you write and display text. The text displayed can be updated via Scripts.
- Text Window Control: Has the same functions as the "Text Box Control" described above, with the addition of supporting scrolling through the text. This can be useful for extensive displays of text such as instructions, lore or elements that requiere large amounts of text in reduced spaces. Its text can also be updated via Scripts.
- Image Control: It displays an image. The image and its attributes can be updated via Scripts.
- UI Animation Control: Lets you to set up an animation that can be played in the UI.
- Fullscreen UI Animation Control: Works similar to the UI Animation Control, with the only difference being this one has access to Fullscreen UI animations instead of smaller ones.
- Preset Button: This one has native functions to interact and support cursor events, which help to set up a button for the UI.
- KeyHintControl: Lets you to display a key and controller button hint. This can help you to show the players hotkeys to use your UI. It automatically shows the corresponding hint depending on which device the player is using.
- Cursor Event Area: Lets you to place an area in which you can receive cursor events. It also support touch screen interactions.
- Grid Scroller Control: Displays a scrollable list/grid of Client Control Templates. This one works in a similar way to Single Choice Windows from the Server-side Floating Interaction Pages. For example, you can create custom buttons that act as a selectable grid with multiple options for the player.
- Reference Control: This one references another Control Template you made. For example, you can reference a Button Template to instance them easily on multiple Containers.
First Steps: Create the UI container
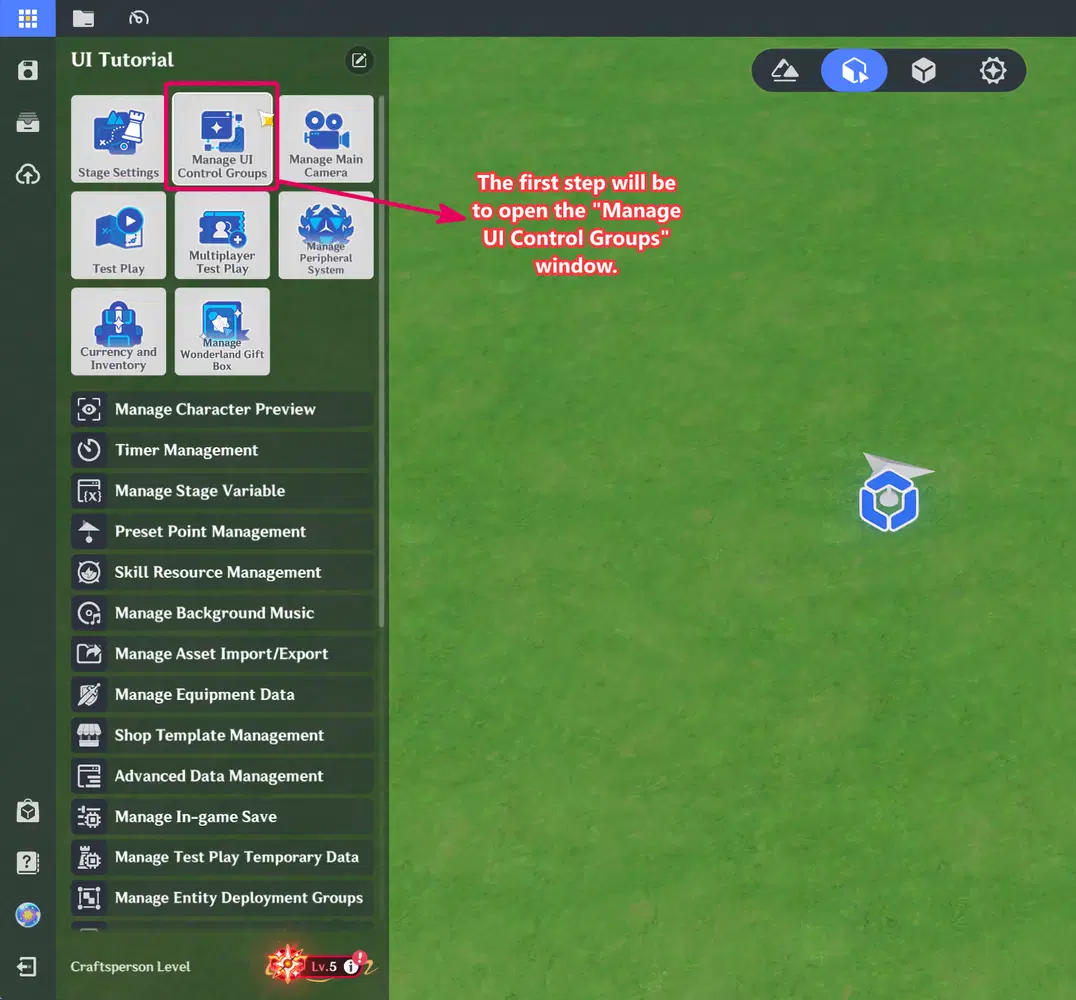
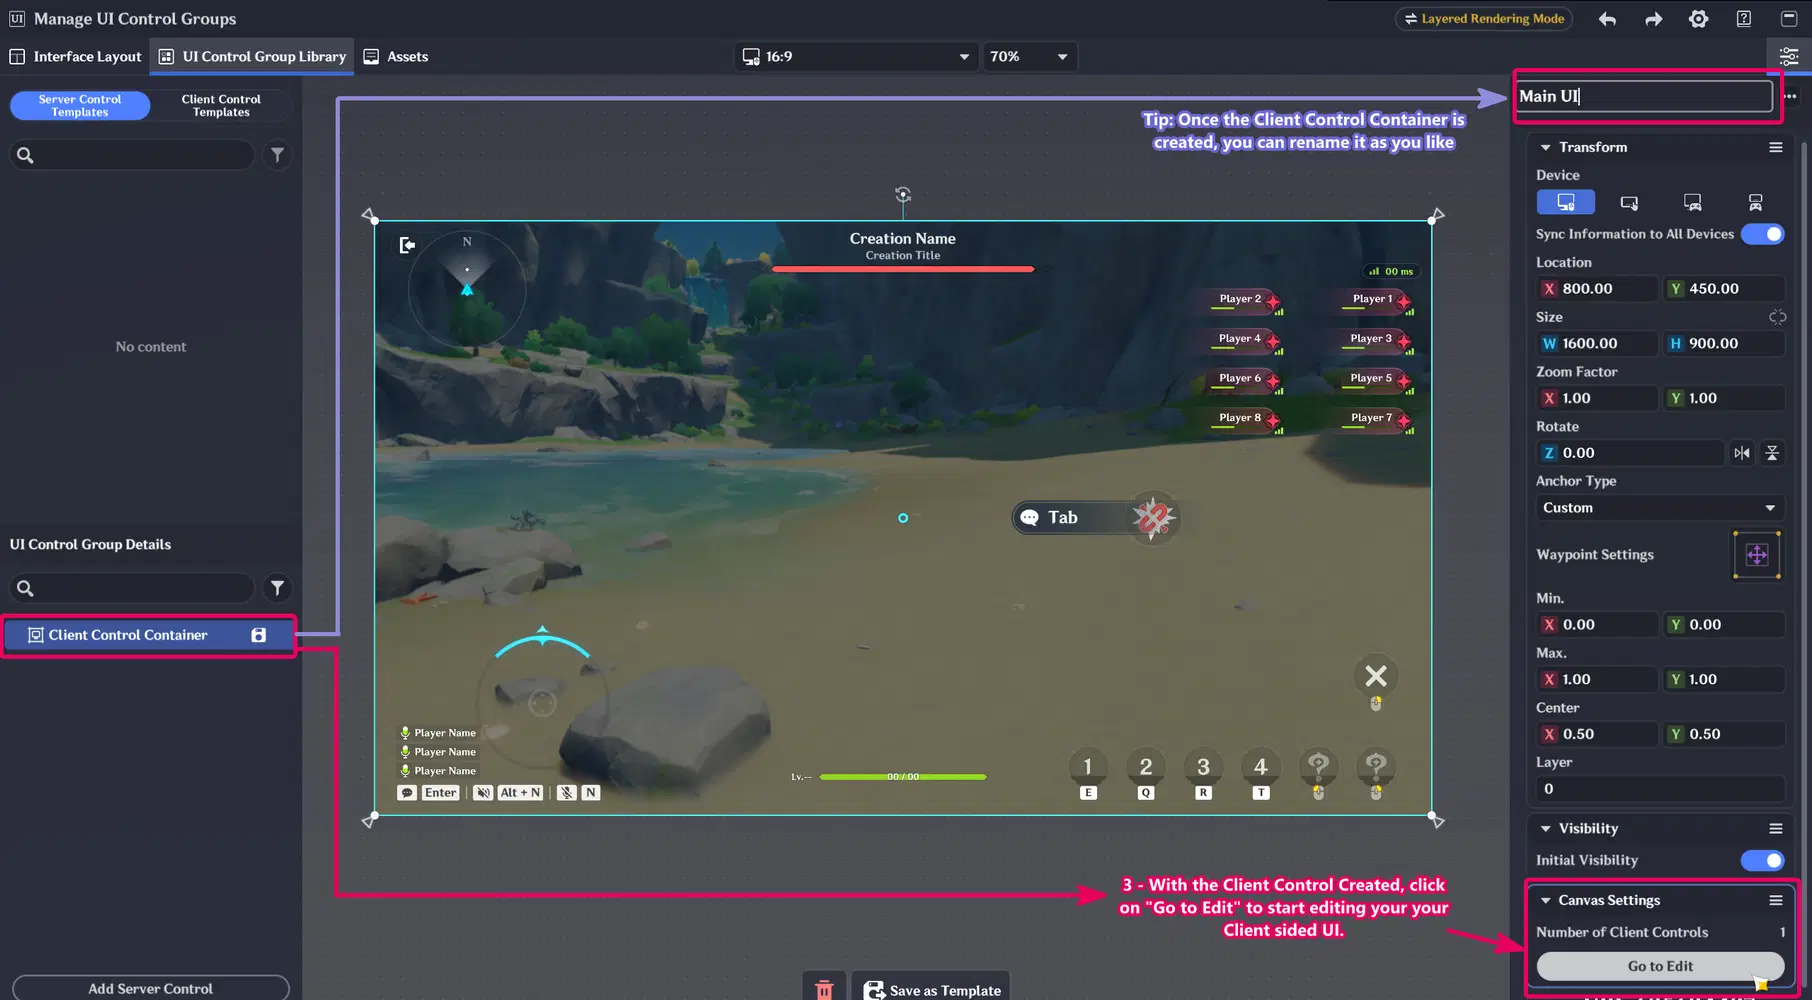
To start, we will go to the "Manage UI Control Groups", and then we will click on the "Add Server Control" to create a Client Control Container.
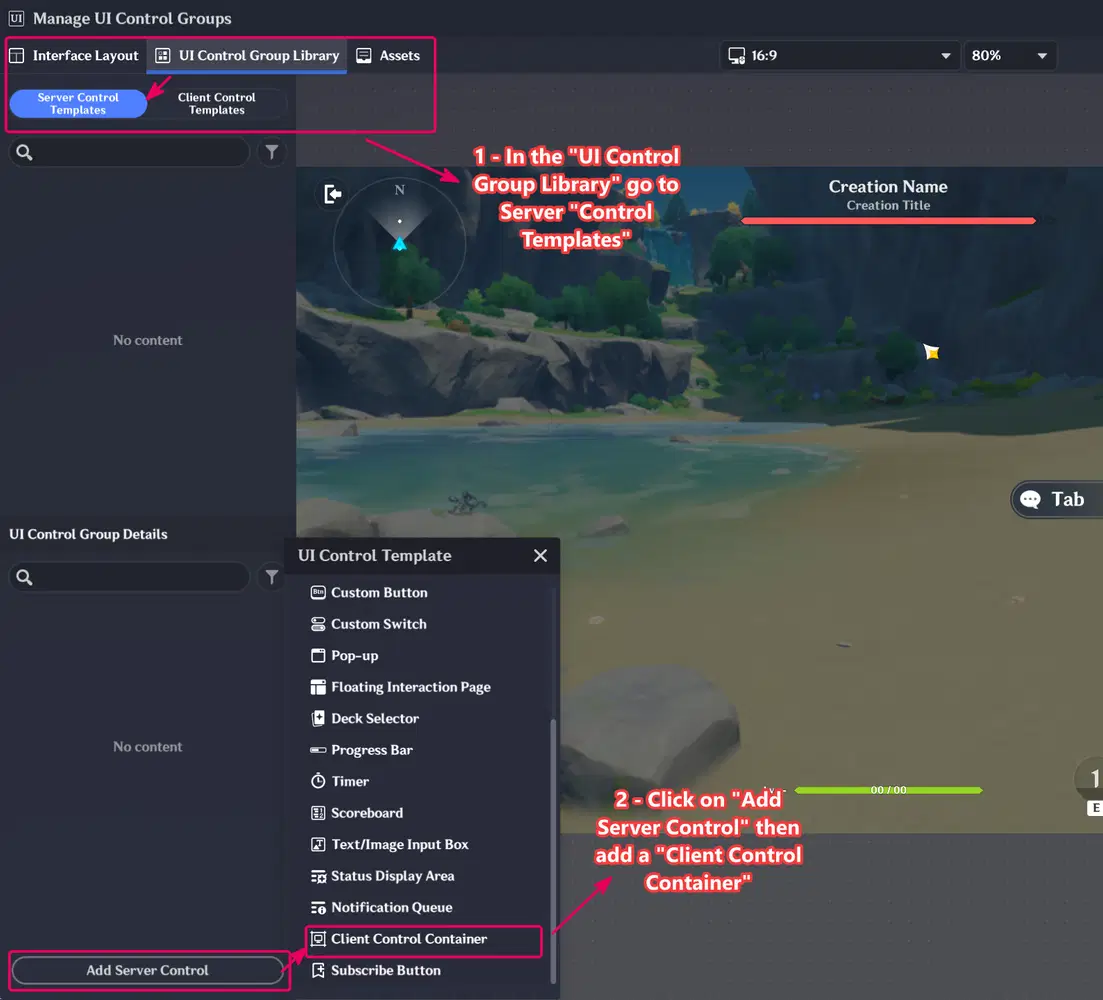
After the Client Control Container is created, we can now click on "Go to Edit" to start editing our Client-sided UI.
Knowing Mr Button
Let's create a Button
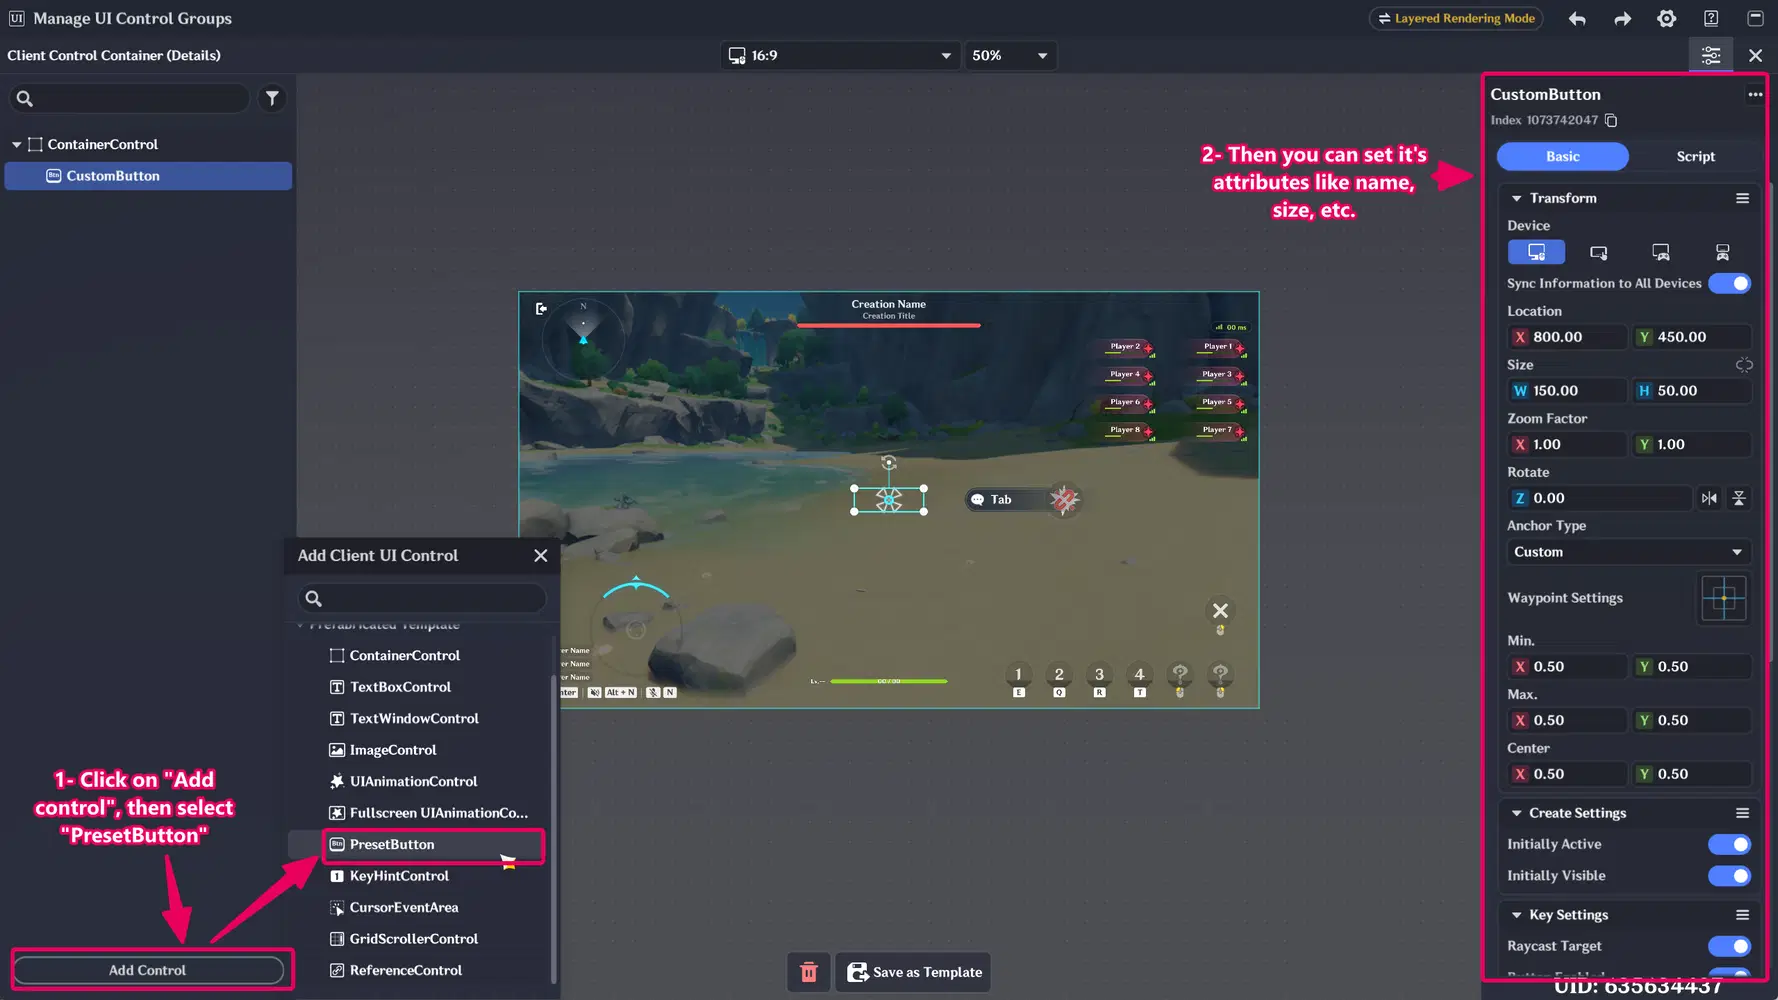
Once we have our Client Control Container, and we're on it's editing workspace; we can create a button as shown below:
Dressing up Mr Button
In Preset Buttons we can find in its key settings 4 Status Nodes that can help to switch their appearance easily, when the cursor interacts with them. They are:
- Standard - Its default state.
- Hover - When the cursor passes over the button.
- Pressed - When the button is pressed.
- Unavailable - When the button is disabled.
The button could look a bit better if we add some animations, so we can make use of ControlContainers to set up a Customized Design for each of them, like in the following example:
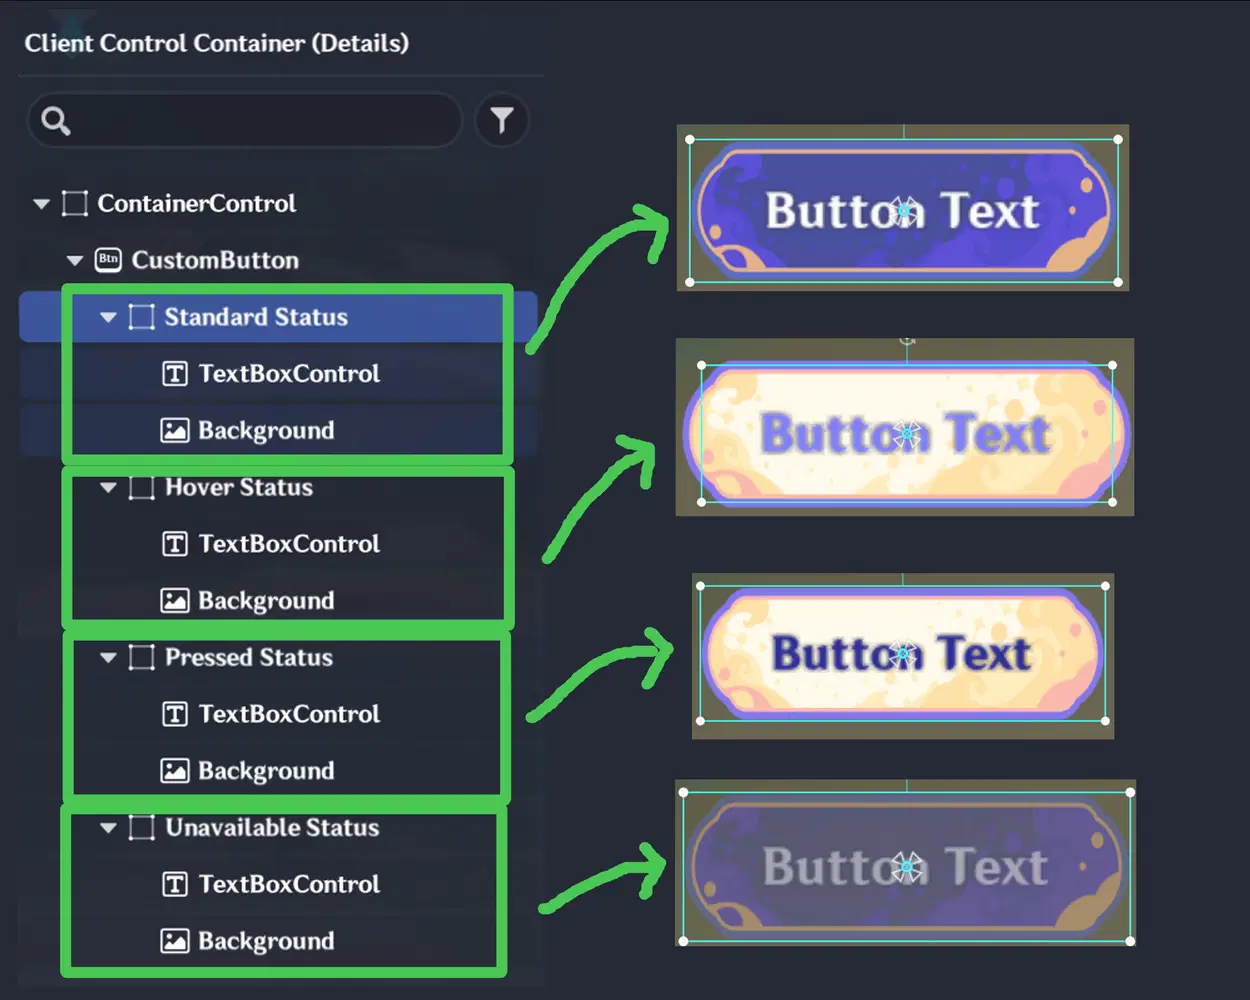
Each Status Control Container has a custom background and text color to differenciate them
Note: Try to mantain them in the same position and around the same size for the transtitions to look good. You can get creative with them!
Scripting Basic Click Logic
How button events work?
A PresetButton through the use of LUA scripts, can help us to track cursor events to know when the cursor enters, leaves, presses, or clicks the button. The script registers a listener for the event it cares about.
In the API we can the following cursor event types:
- Enum.CursorEventType.CursorEnter
- Enum.CursorEventType.CursorExit
- Enum.CursorEventType.CursorDown
- Enum.CursorEventType.CursorUp
- Enum.CursorEventType.CursorClick
The project
For our first script, we will use the CursorClick which is an event that gets executed everytime the Click is done. Its similar to the Event Node "When UI Control Group is Triggered" of the Server Node Graphs.
Now, we created our new "CustomButton", but it doesn't do anything when clicked! How can we make it work?
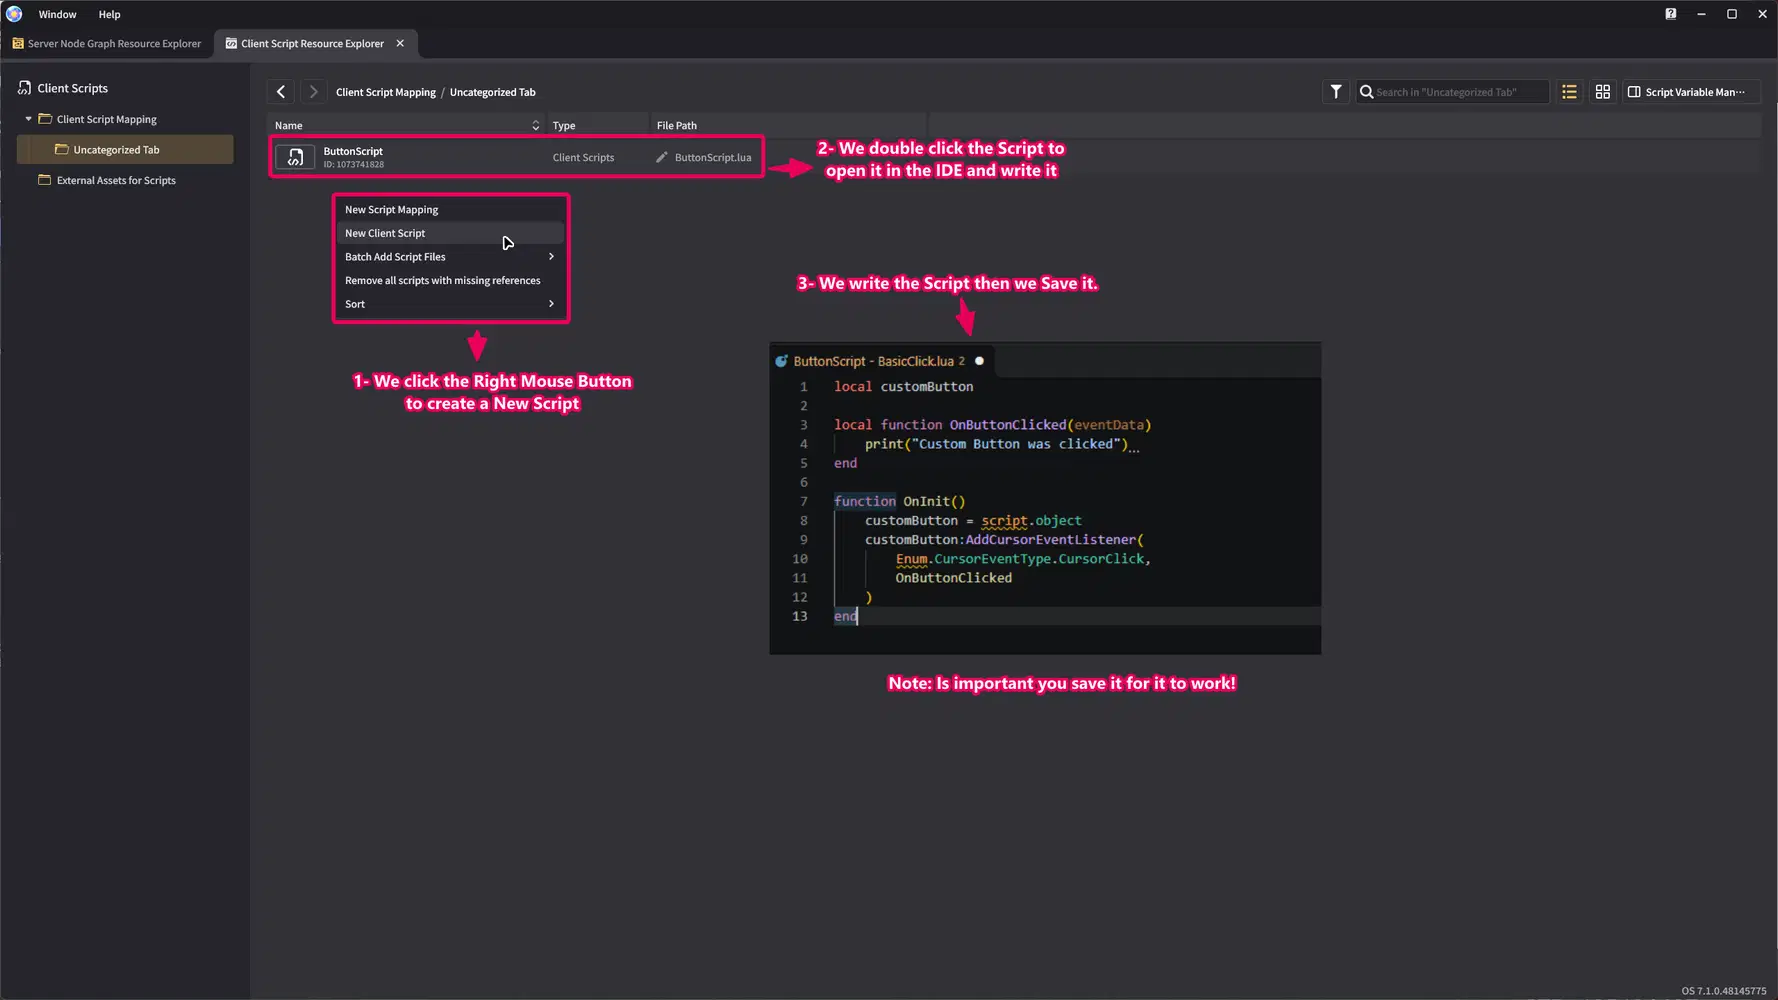
We will go to our Miliastra Sandbox and open the Client Script Resource Explorer. Once there we will go to the Client Script mapping and press our mouse Right Click to create a New Client Script.
Instructions to create the script
Note 1: This example assumes script.object is the PresetButton because the script is attached directly to it. If you attach the script to a parent container instead, find the button with GetChild("StartButton").
Note 2: You can also map existing scripts from your Wonderland "external_lua_file" folder.
After creating our new script, which in this example was called "ButtonScript", we will double click it to open it on our IDE (Being VSCode in this example).
Once we're on our IDE, we can proceed to write the script to program our UI controls. For this example, we wrote the following script:
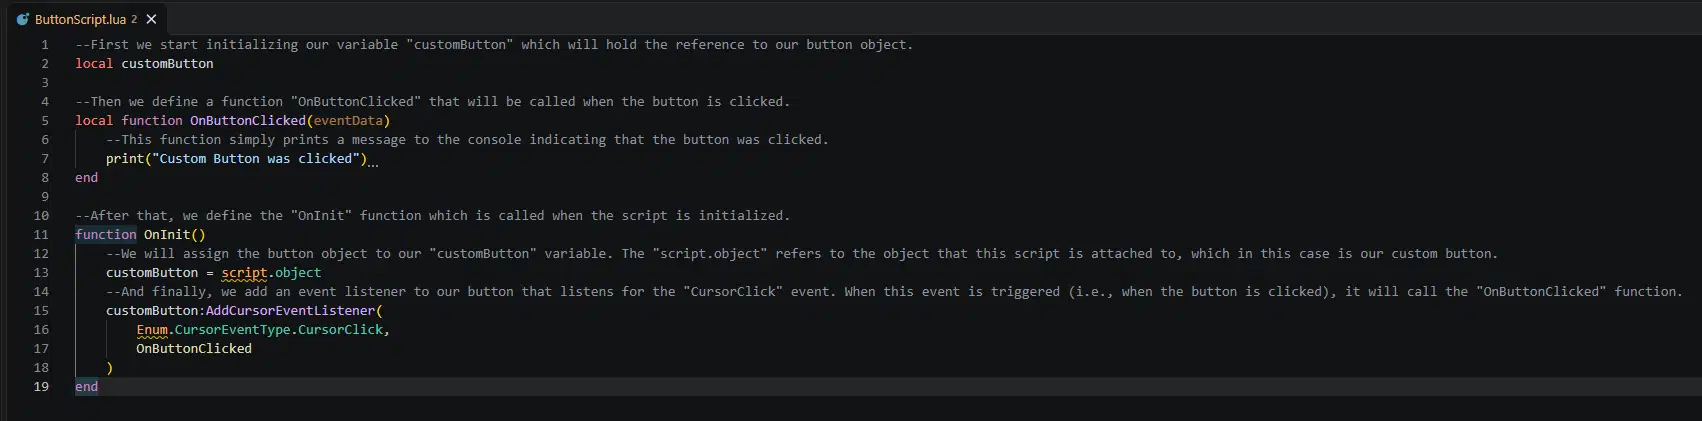
The text in gray after the "--" symbols, are notes to guide you understanding the code.
The notes in the script can help you to understand its functionality. It basically recognizes the Button in which the script was attached, to execute a function that prints "Custom Button was clicked" when it's clicked.
With our script ready, we will mount it by going to the PresetButton we created, CustomButton in this example. Then we will go to its Script Tab, we will click on the Add Script button, and finally we will select our Script. It's similar to mounting a node in the editor!
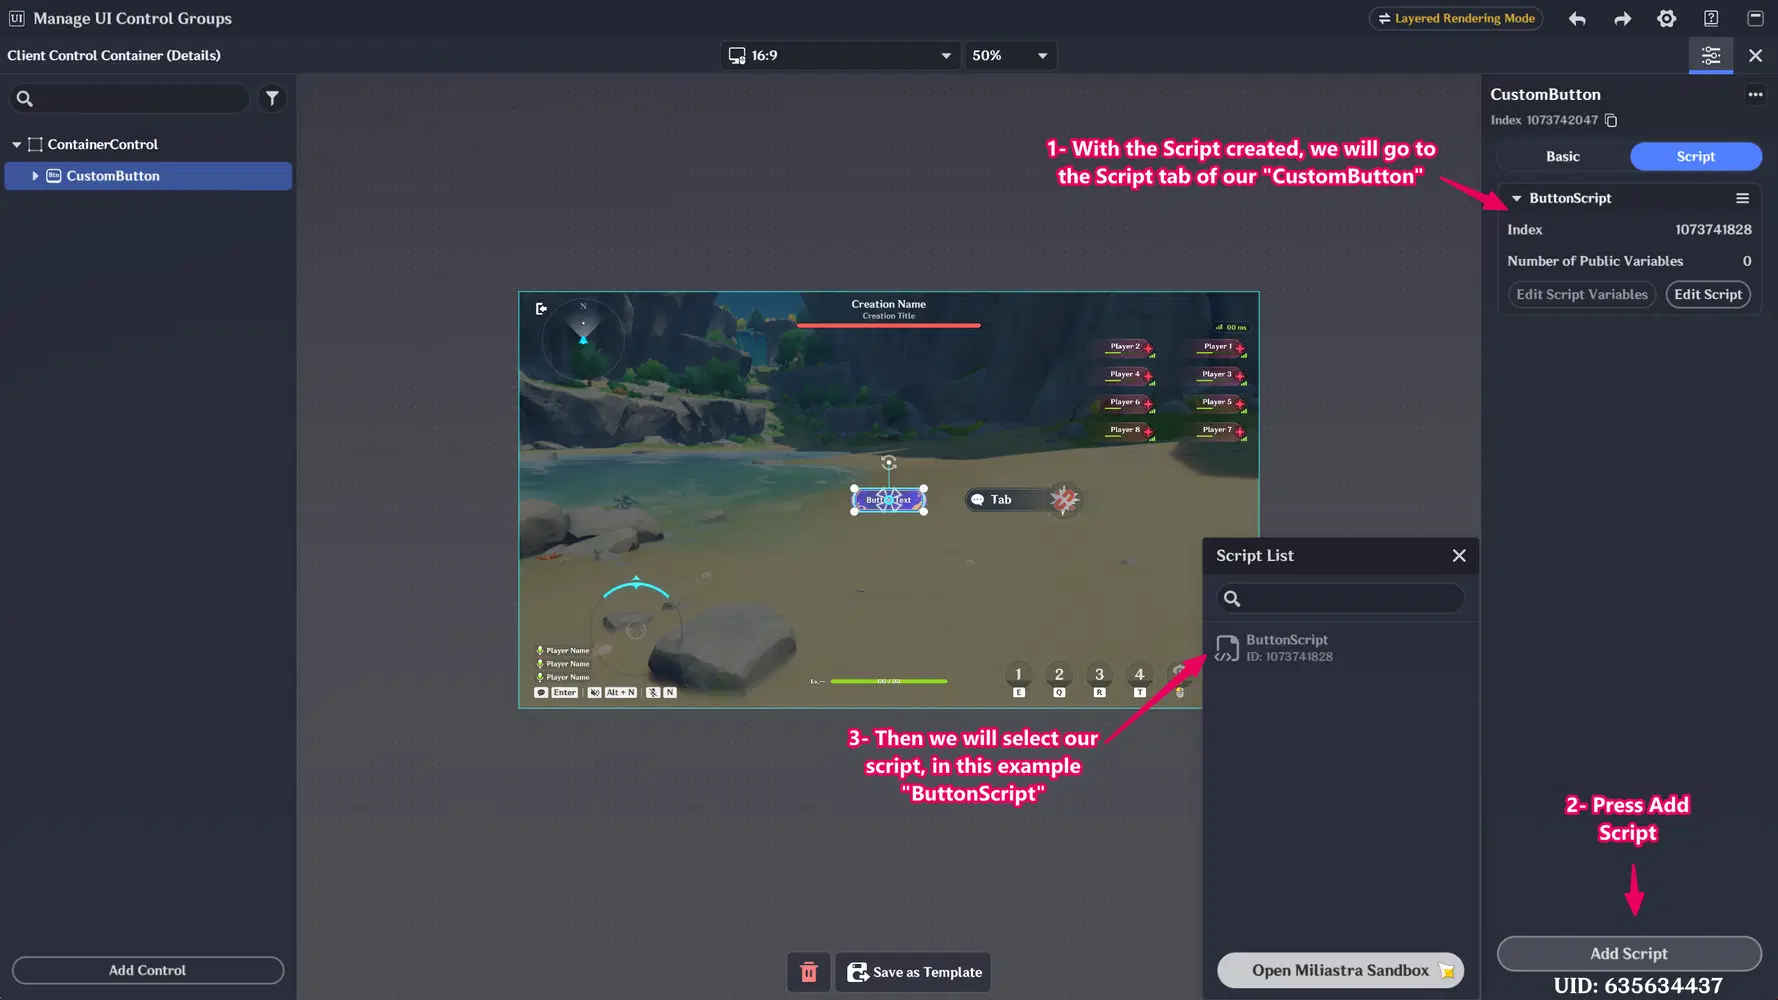
After this we will save our Server Client Control Container and proceed to test it!
The print from our script will be only visible in the logs, so open the Miliastra Sandbox Log panel to be able to observe the script working.
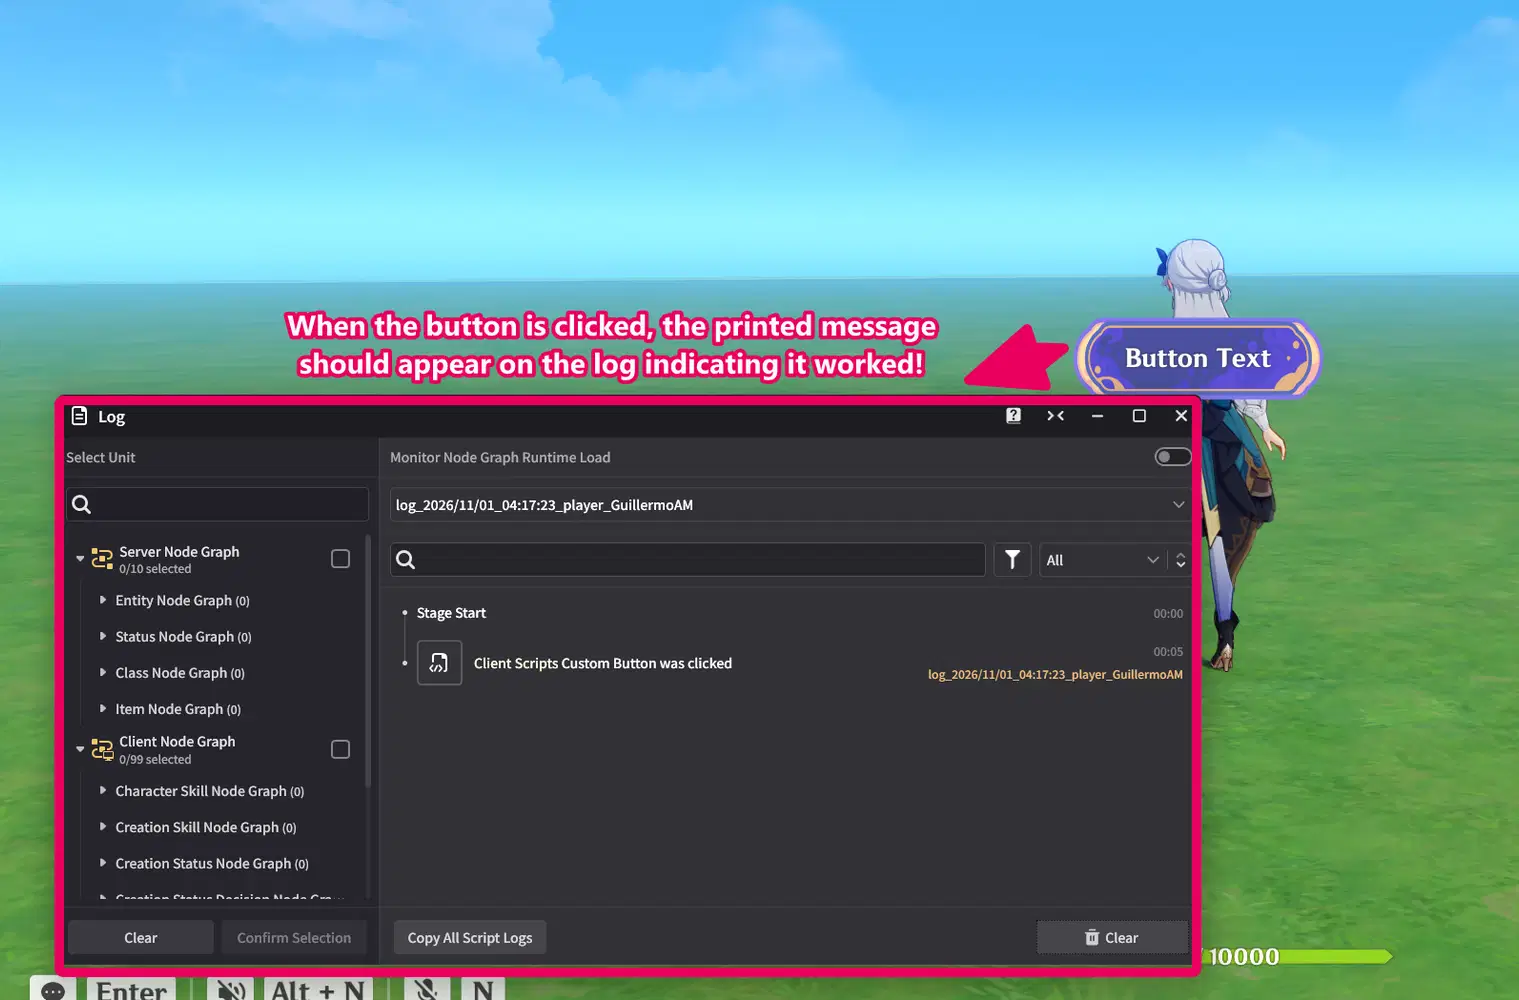
Tip: To perform a real action, replace the print line with the function you want to run, such as opening another UI Control.
Custom Templates and Reference Controls
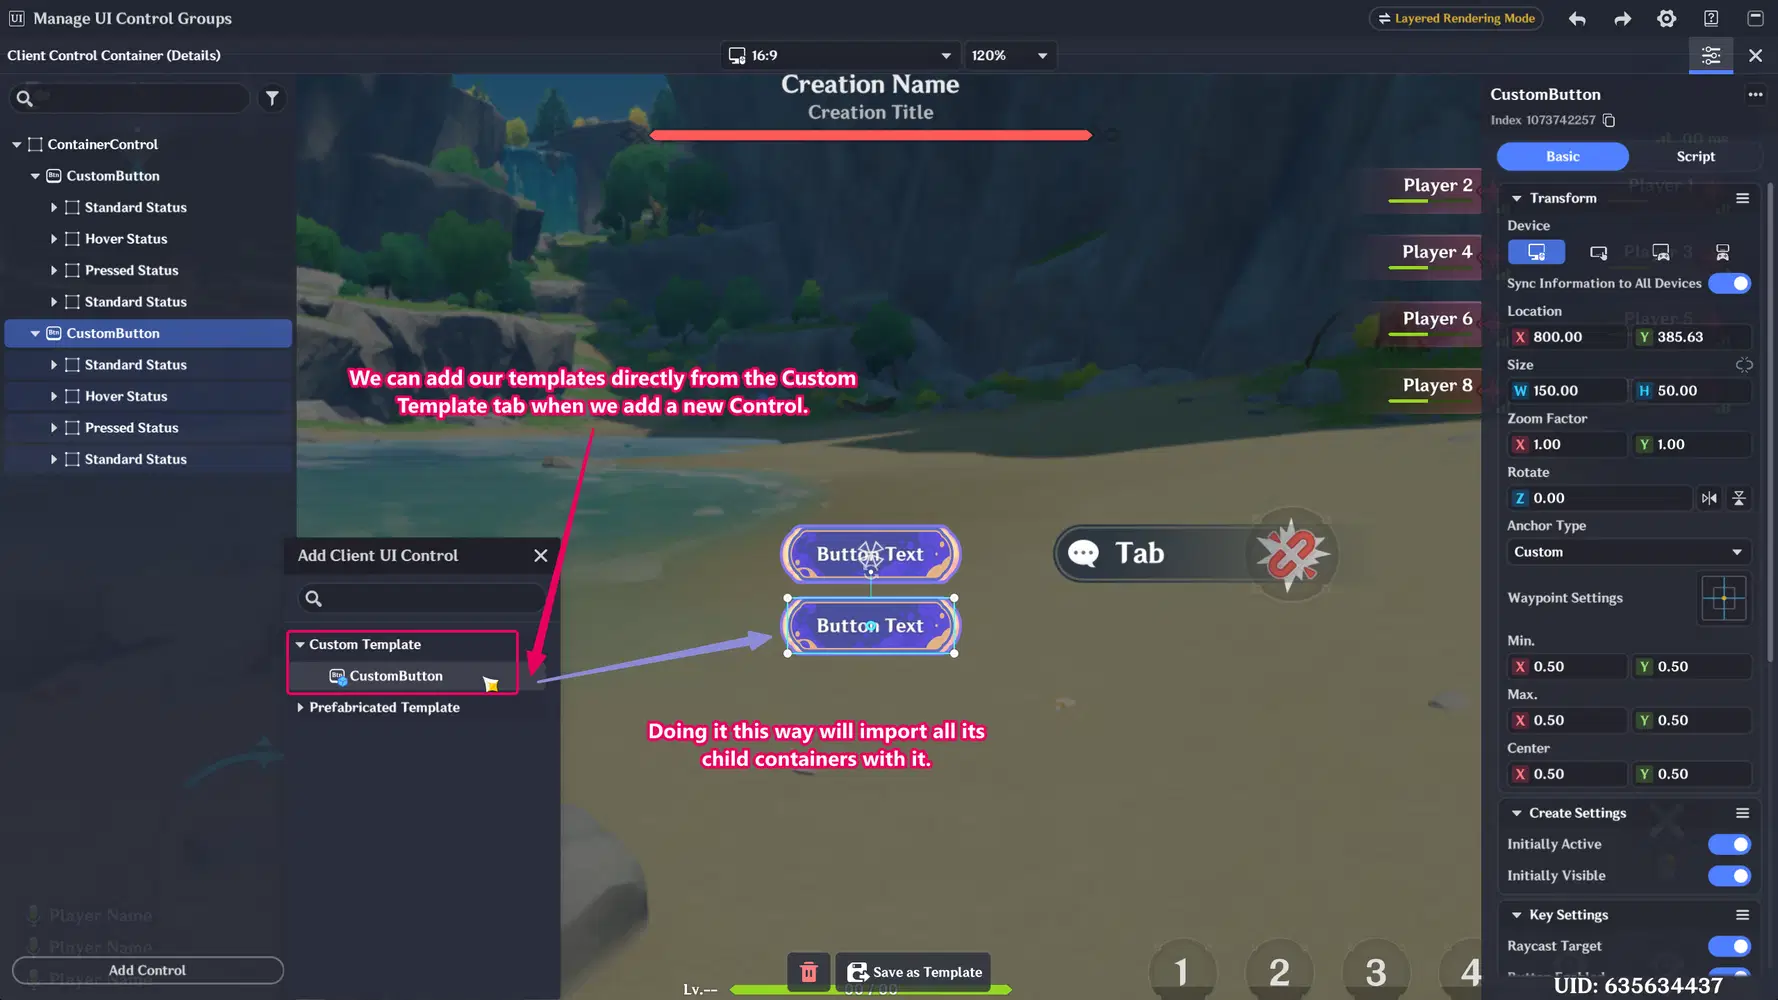
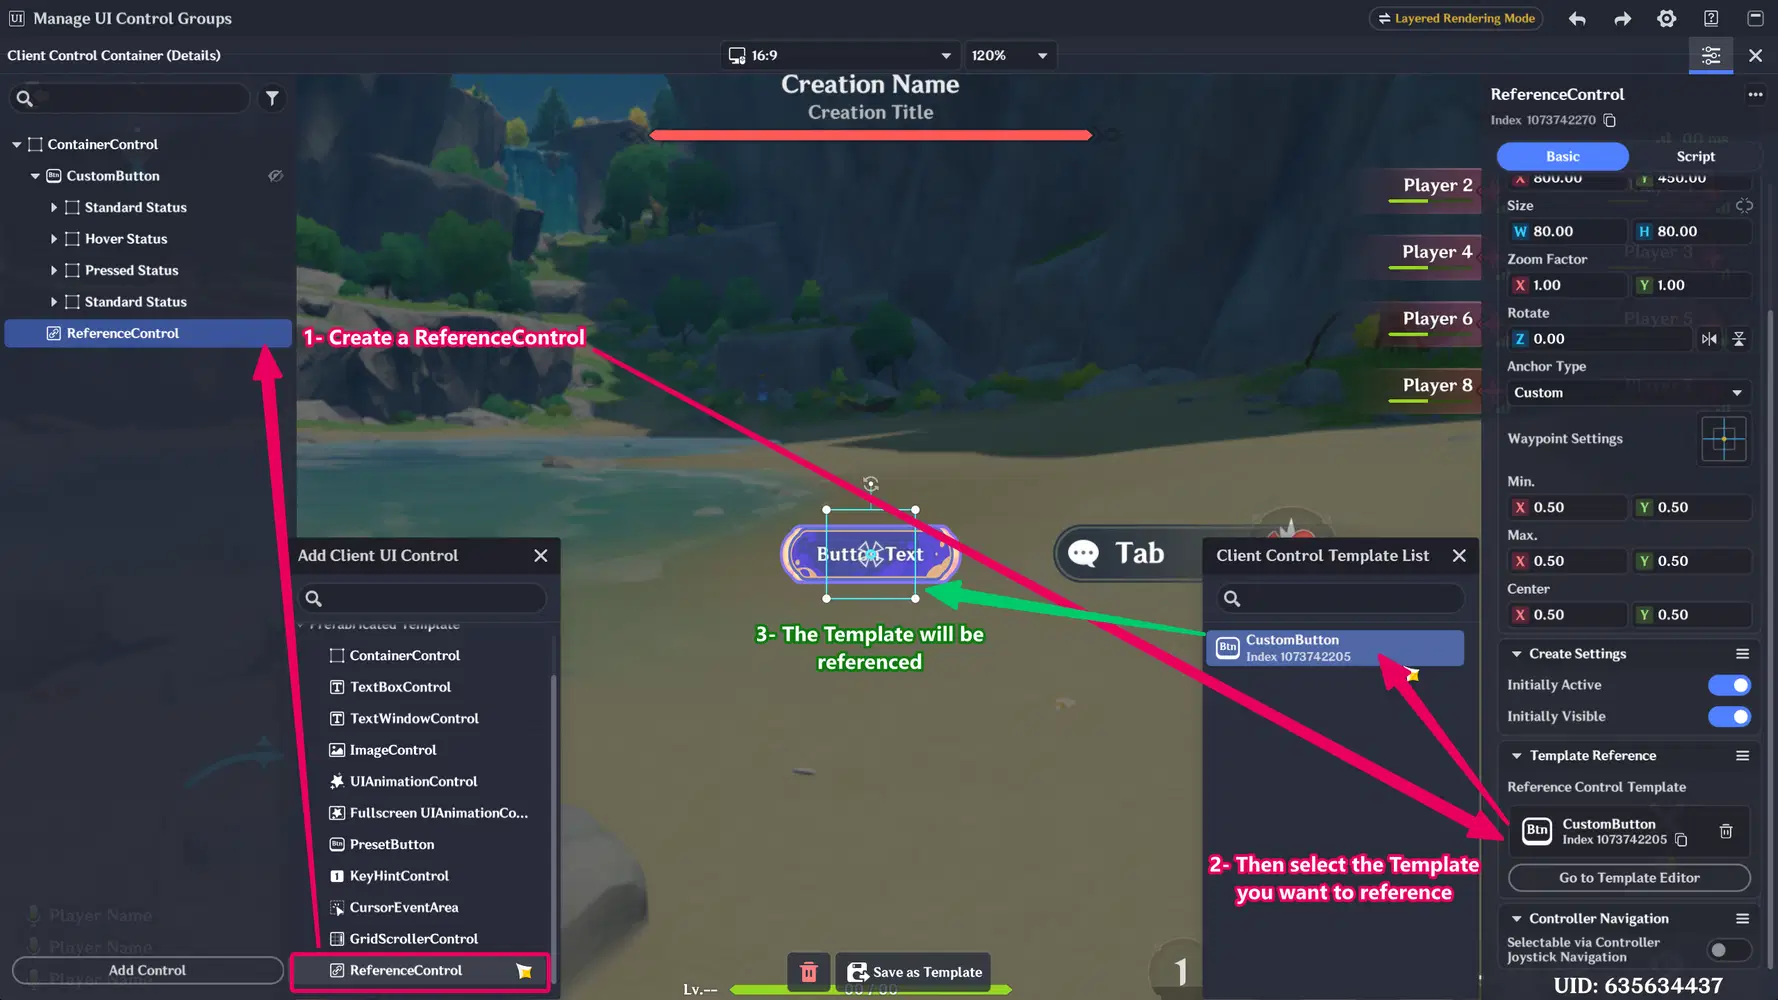
You can use Reference Controls to reference/instance Client Control Templates, that are Custom Templates you can make and reuse through your UI in a similar way as Custom Prefabs in the editor. You can instance them from the Custom Templates Tab when you add a new control in your "Client Control Containers", you can reference them directly from the "ReferenceControl" or you can even instance them through your scripts.
Creating a Client Control Template can be done by selecting and saving an already made Client Control, this can be done by right clicking on the and selecting "Save as Template" or just by clicking that button on the bottom center part of the page when you have a Container selected. You can also create and save them directly from the Client Control Templates tab.
Here's an example of how we can do it with the button we created previously.
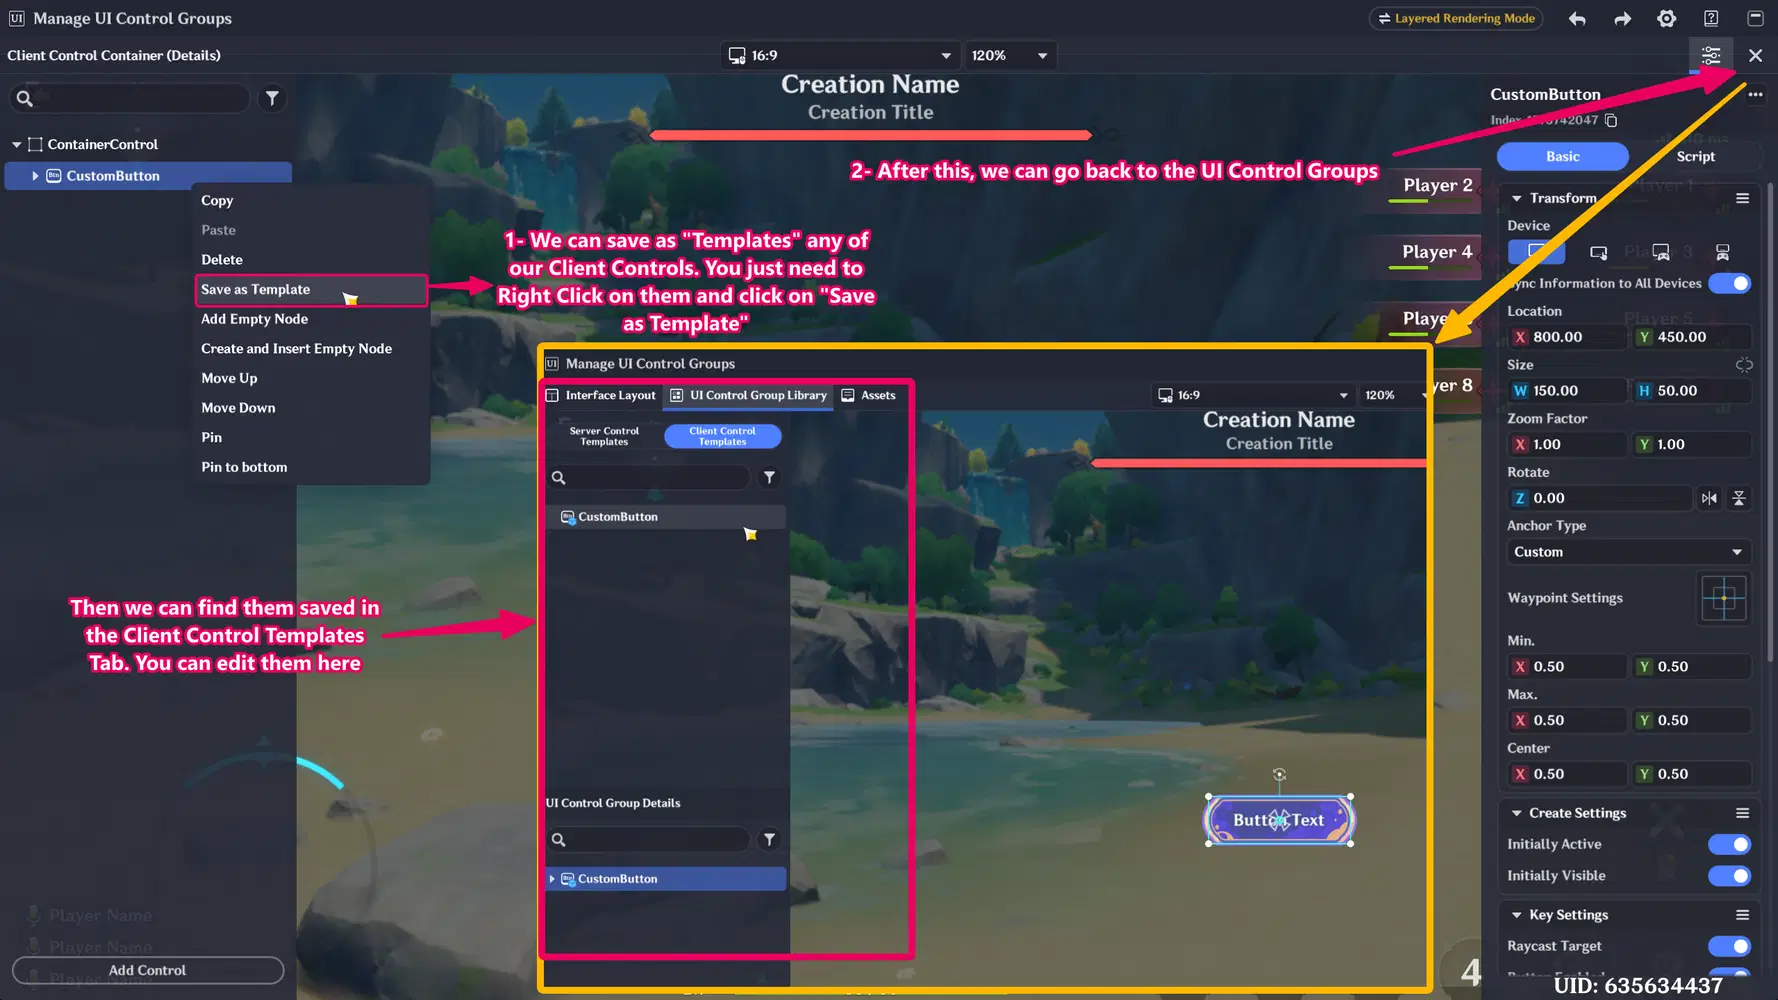
If you add them from the Custom Template tab when you add a new control, it will be created with all its structure intact, including all its children controls.
If you add them through a ReferenceControl, it will be referenced and adquire all its properties from the template, although at runtime the referenced Template has the same functionality as the original; this referenced instance can only be previewed inside the editor, and can only be modified by Scripts during Runtime. It can also be instantiated by scripts to add some of your UI assets during runtime.
Practical Exercises
Spawning UI Templates
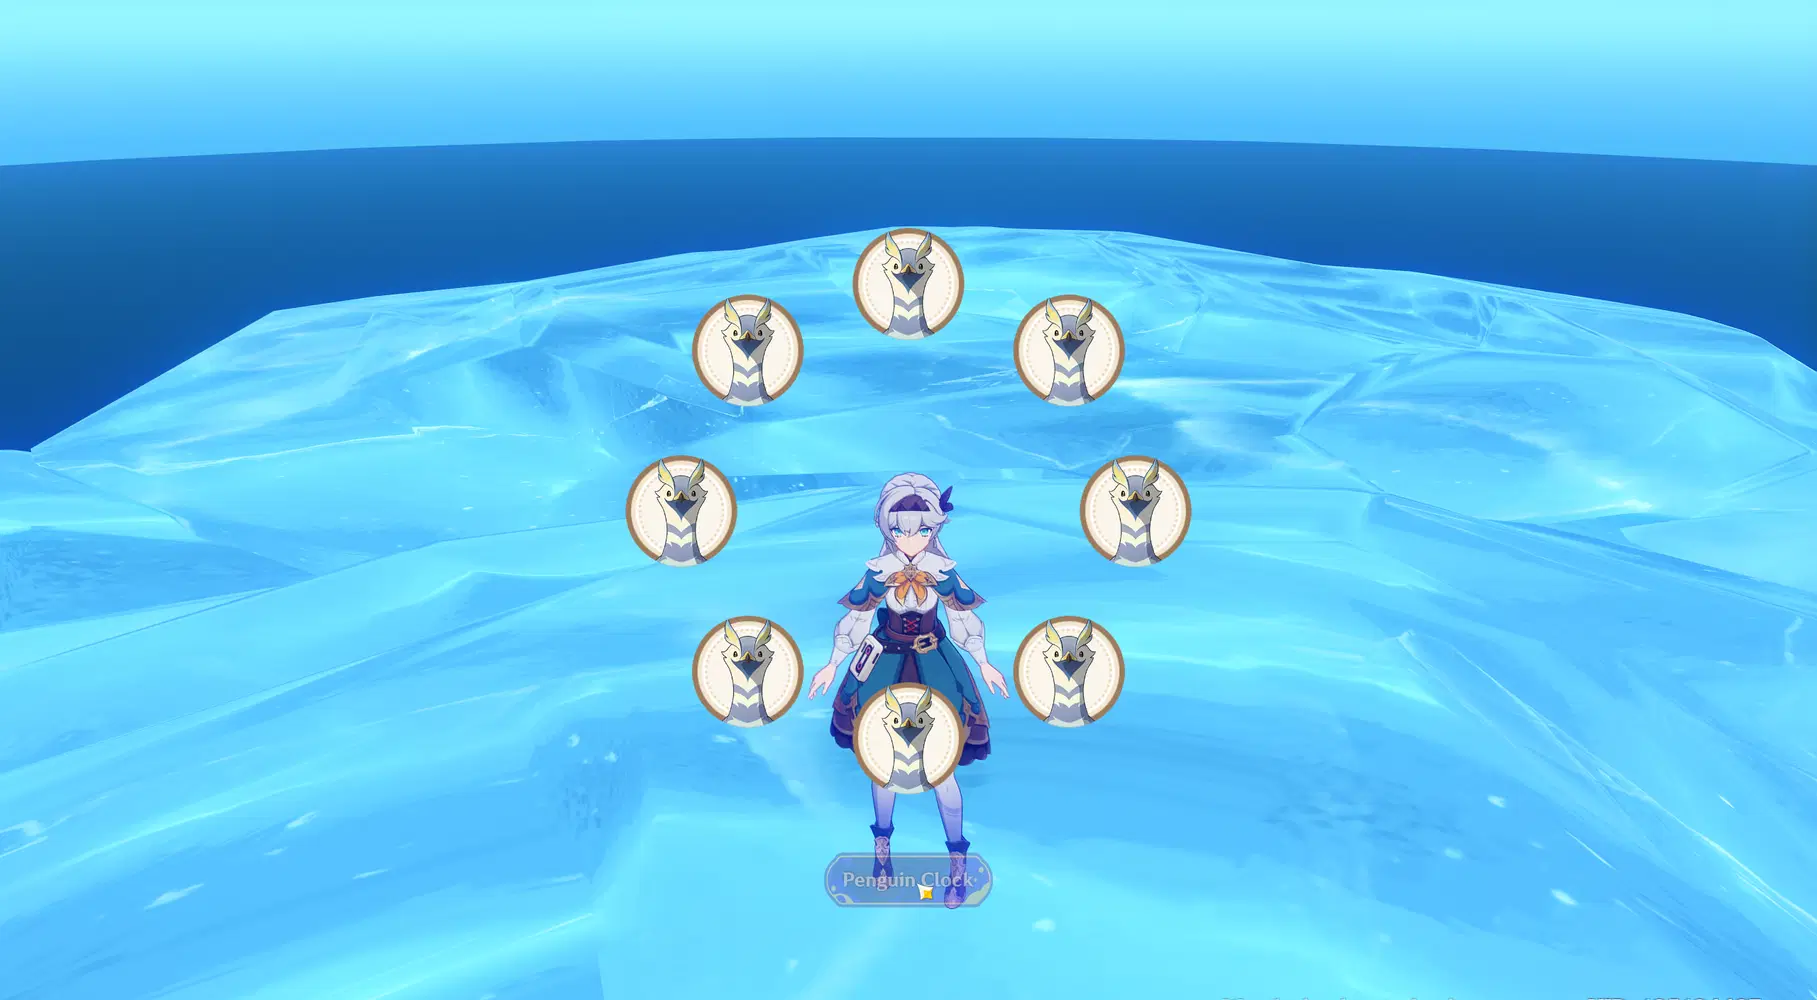
After introducing the basics of Custom Templates, it's time to learn a bit of how we can use them. So we will make that when the player clicks a button, we will create up to eight Penguin Images around it, after that the button will be disabled. The first appears above the center, and each new one is placed clockwise, with 200 pixels between the center and each item.
To instantiate a Client Control Template with our Lua Script, just like when we create a prefab in the Server Node Graphs, we will need its control template index. To do this we will use the API call game.InstantiateClientUIControl(controlPrefabIndex, parent). We’ll expose that index as a public script variable, then read it with script:GetParam(...).
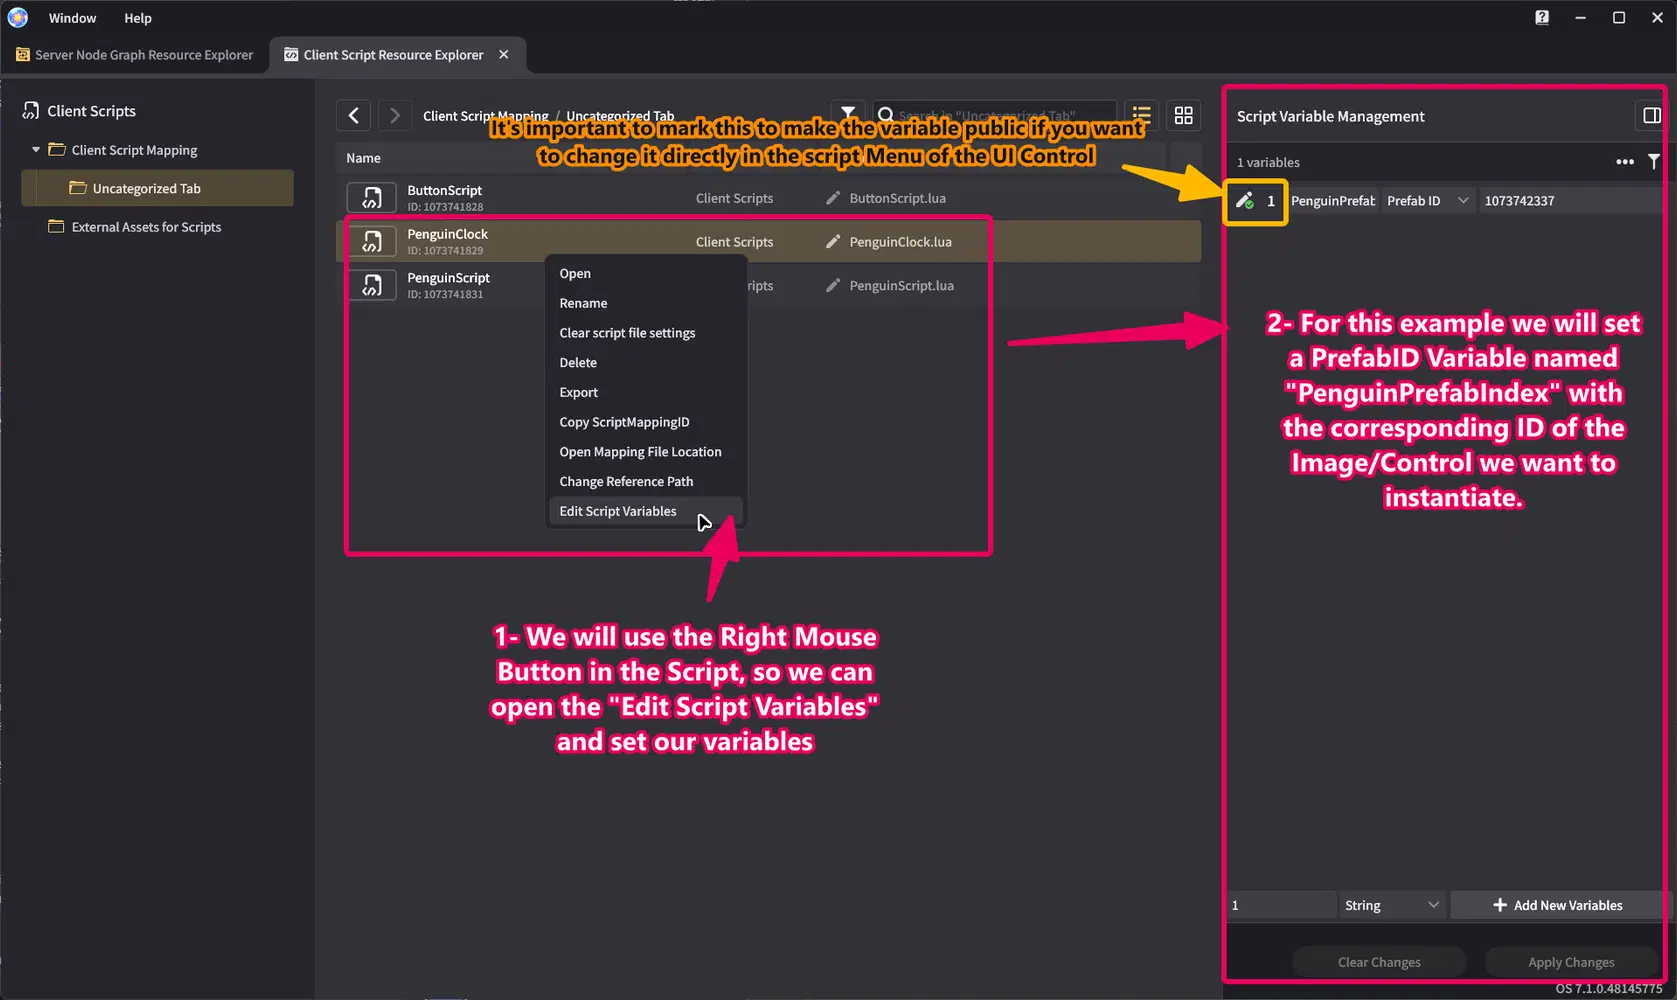
Setup note: Configure a public integer variable for the Penguin template’s control prefab index, then use that variable name in the script. The exact parameter name must match the one configured for the script.
Setting up the Script Variables
To start our script, we will setup our Custom Variables:
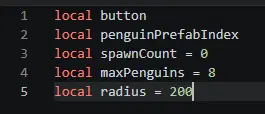
Our variables will help us in the next things:
button stores a reference to the Preset Button.
penguinPrefabIndex stores the index of the saved Penguin Client Control Template.
spawnCount tracks how many Penguins have been created.
maxPenguins sets the limit to eight.
radius sets how far each Penguin appears from the center, in UI units.
Calculate the Penguins placement
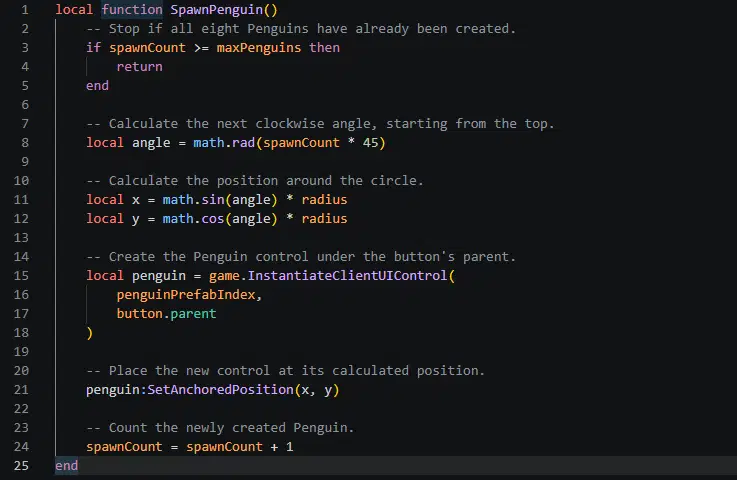
Then, we will set our main function that will calculate the location in which each penguin should spawn. A circle has 360 degrees. Dividing it into eight equal positions gives us 45 degrees per Penguin. spawnCount starts at zero, so the first Penguin appears at the top; each click advances the angle clockwise.
The control is created under button.parent, and its position is set relative to that parent. For that reason, the ring’s center is the parent’s anchored origin.
Disable the button after the eighth Penguin
After creating each Penguin, increase spawnCount. When the count reaches maxPenguins, set the button’s interactable field to false.
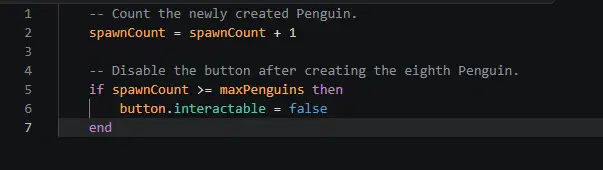
This check must come after the count increases. That way, when the eighth Penguin is created, spawnCount becomes 8 and the button is disabled immediately.
Connect the click event
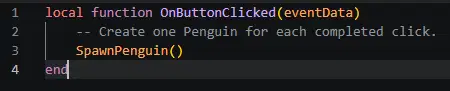
CursorClick runs after the click is completed. Each time it runs, SpawnPenguin() creates one Penguin, unless the maximum has already been reached.
Complete Script
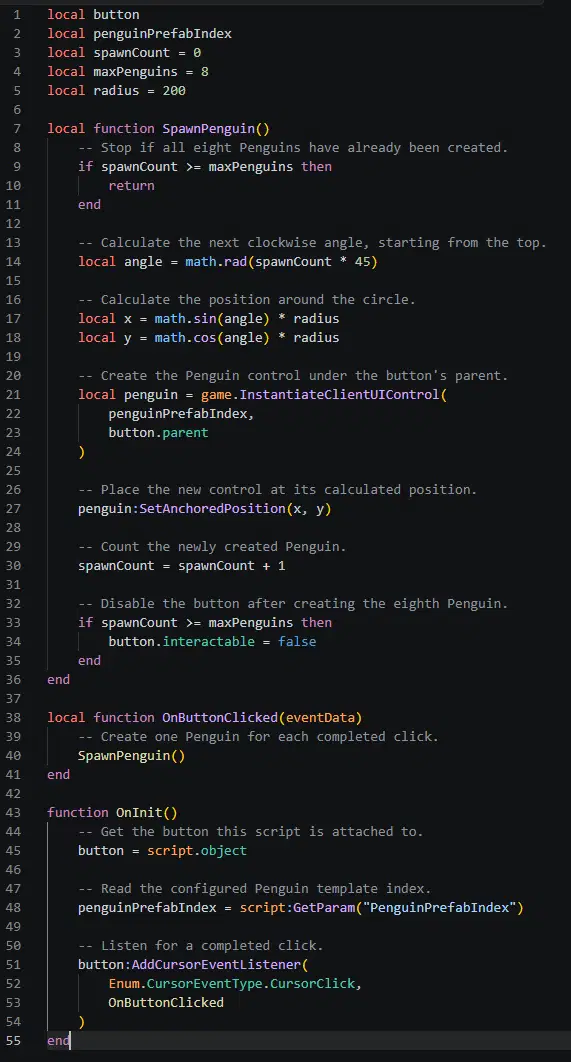
What happens when the button is clicked?
- The click event calls SpawnPenguin().
- The function calculates the next position around the circle.
- It creates one Penguin and moves it to that position.
- It increases spawnCount.
- When the count reaches eight, the button is disabled.
Send a Server Signal
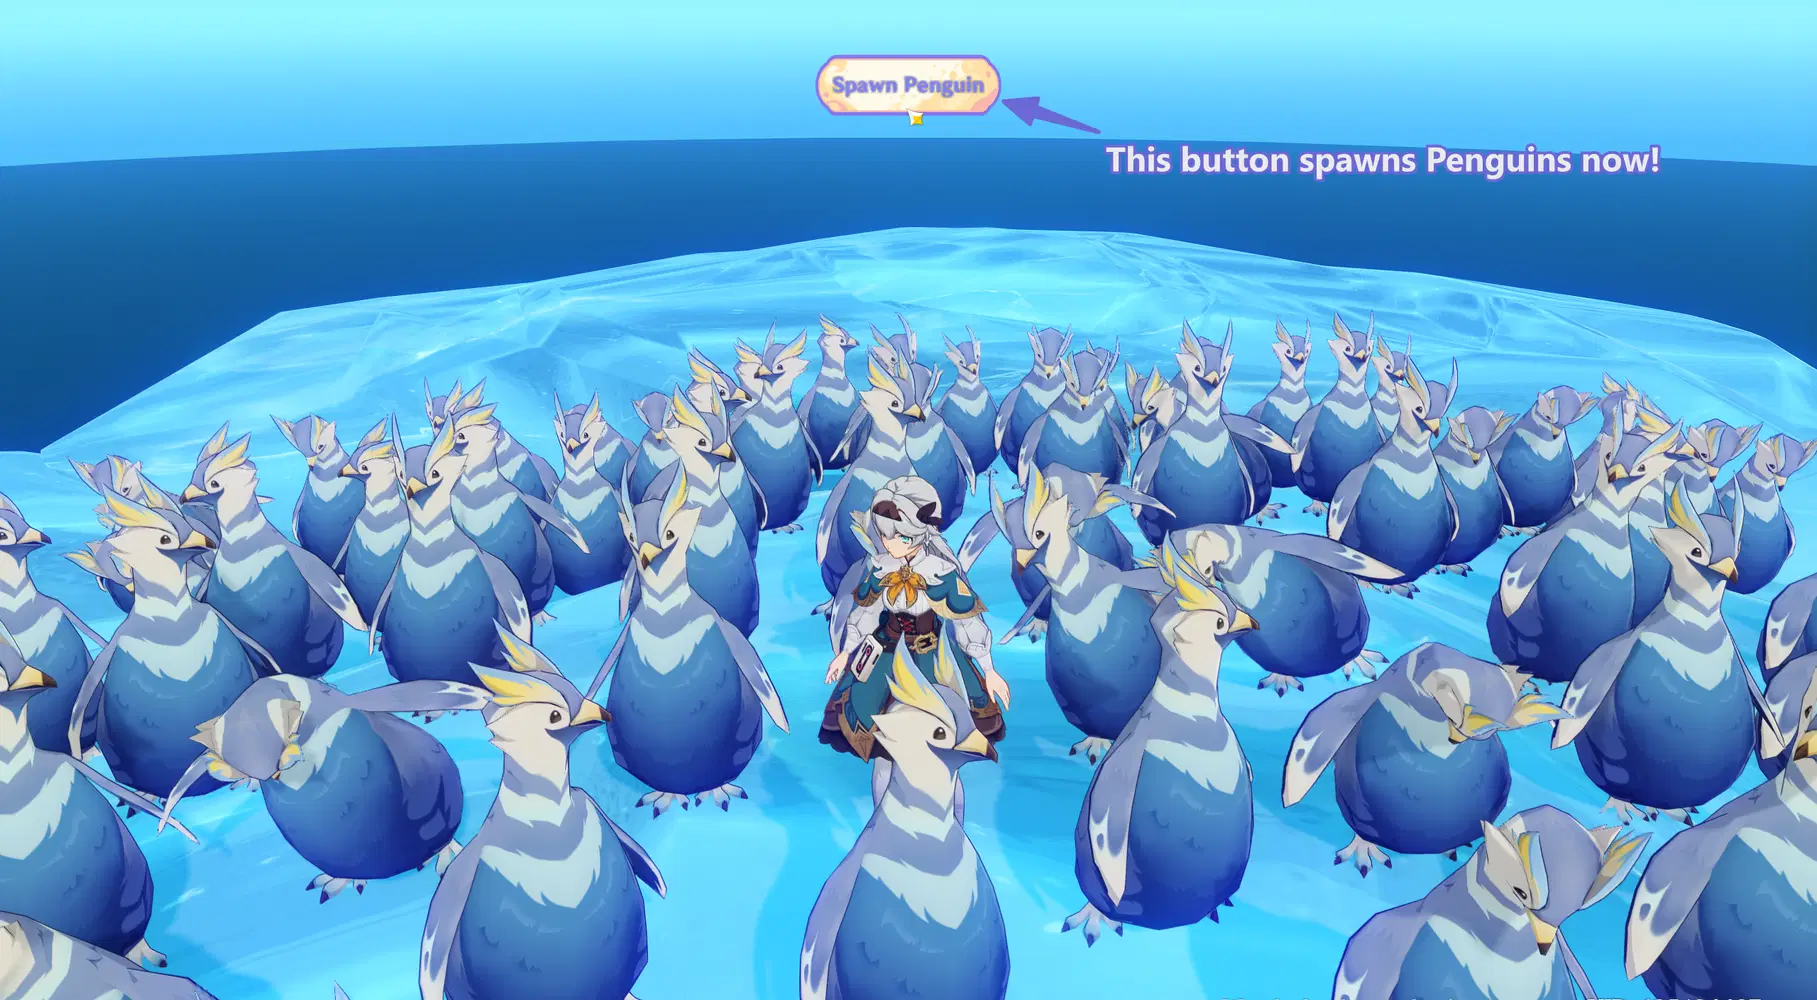
The previous example creates Client UI controls locally. In this section, the button will ask the server to create two Penguins by sending a signal named PenguinSignal.
Step 1: Create and send the signal
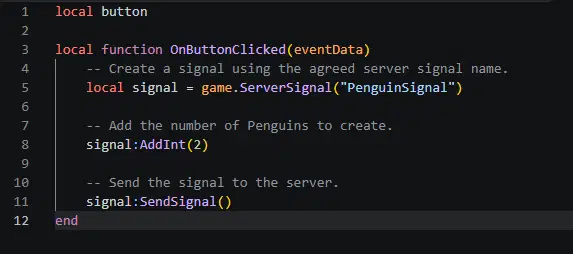
- game.ServerSignal("PenguinSignal") creates a signal with that name.
- signal:AddInt(2) adds the integer value 2.
- signal:SendSignal() sends the signal and its parameter to the server.
Connect the signal to the button
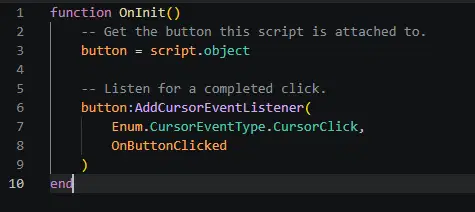
When the player clicks the button, the client sends PenguinSignal with the value 2.
Receive the signal on the server
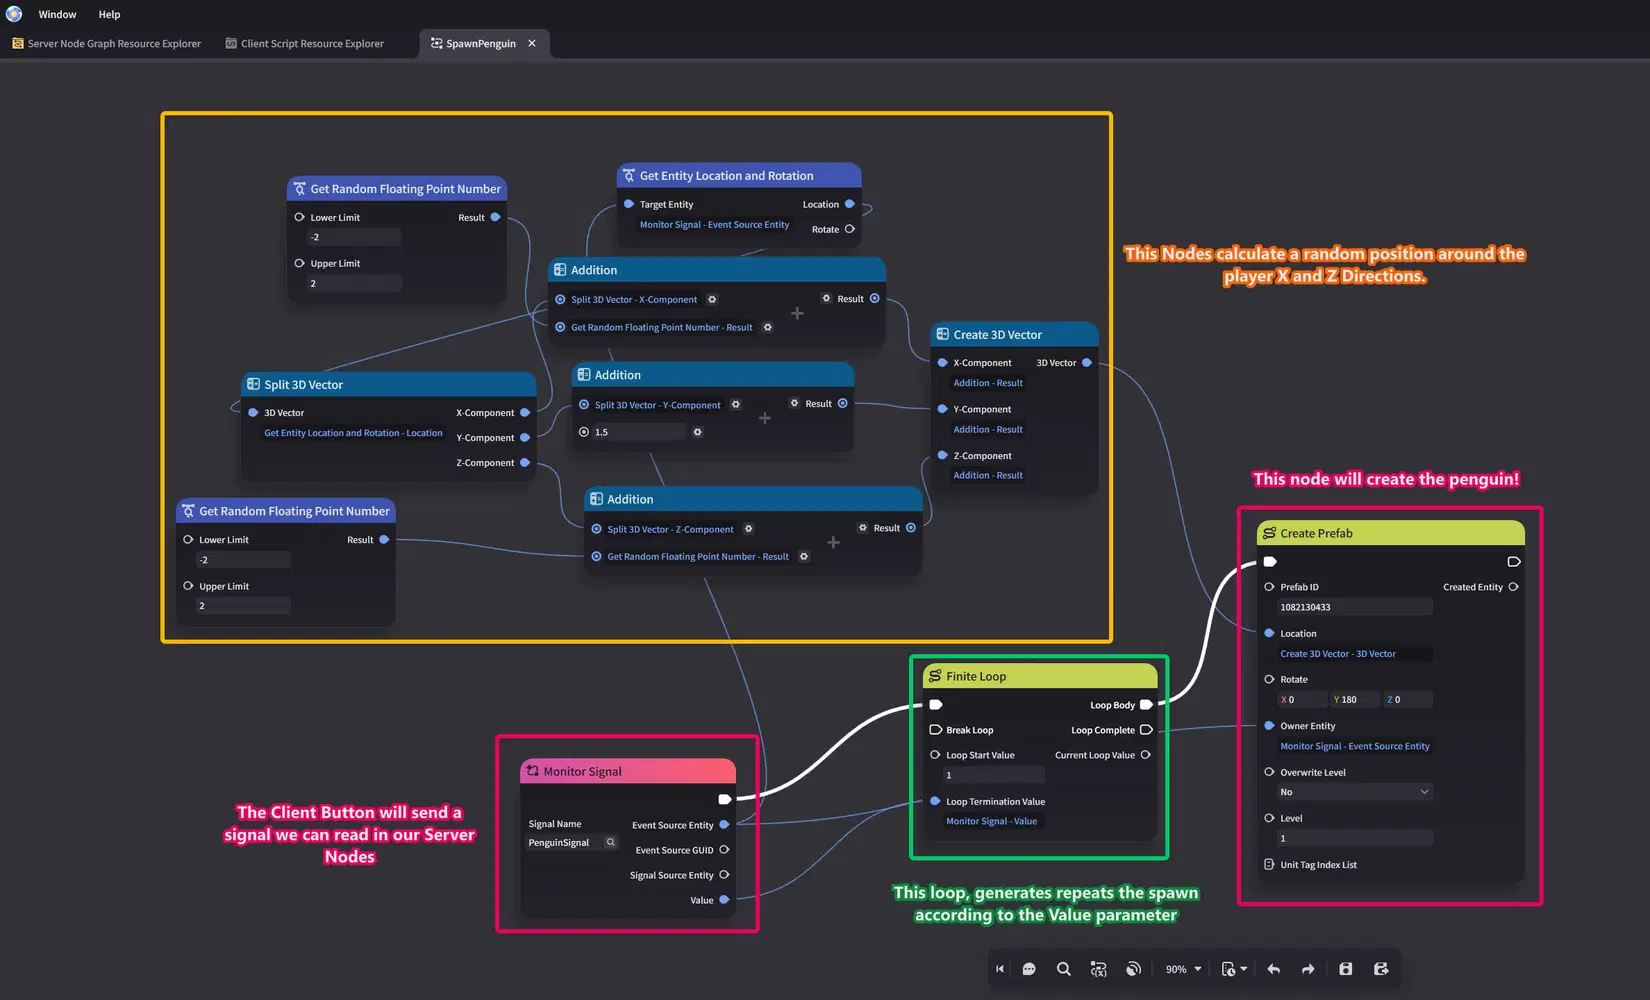
In the server node graph, we will use an Event Node "Monitor Signal" that listens to signal we named "PenguinSignal", it will be sent by our Client Script everytime our button gets pressed. Configure the server logic to read the first integer parameter as the number of Penguins to create.
The signal name and parameter order must match on both sides: the client sends one integer, 2, and the server uses that integer as the requested count.
Result
Conclusion
Hope this tutorial could be of help and gives you the tools to start utilizing this new Client Controls and its LUA scripting tools. This is just the start and much more can be done with it!
Have a nice day and thanks for reading!