Hello, everyone.
After the release of the previous class "Illustration Tutorial 101," there are surely many of you who want to learn more about digital board drawing tools and software! Don't worry, in this issue, neratt03 will walk us through how to use graphic tablets and software. You will definitely learn a lot! 

Hello, I’m Taren. Today’s guide is about graphic tablets and software! I will recommend some drawing tools and software for you to create digital illustrations, and I will highly teach you the basic skills to use Clip Studio Paint - the software that I am using.
Drawing Tools
Before I recommend some software, it’s important to recommend a device which is compatible with it. These are the devices that I highly recommend. I have used them, and haven’t encountered any huge problems. I had mentioned most of them on the last tutorial, if you had read, you can pass this part.
Tablet
I. iPad Pro 12.9 inch (4th generation)
Price: USD $749.00 up to USD $1,299.00 depending on specs
iPad Pro is a great choice for artists who like to draw in various places. It's light and portable, and is much easier to set up rather than a pen tab. The screen is large enough, and it has many storage options up to 1TB. iPad Pro also has a liquid retina and true tone display, so the color that you see on your iPad is much more accurate than most other devices.
The downside to the iPad is the screen. It’s made of glass and it feels nothing like paper. So it will take time for people to get used to the sensation when drawing on it.
II. Apple Pencil (2nd generation)
Price: USD $99
Apple pencil allows you to draw on an iPad screen. It’s very light, durable and sensitive to pressure. If by any chance the pen nib is broken or worn out, you can buy new pen nibs from Apple.
III. Wacom Intuos
Sizes : Small, Medium
Price : USD $110.00 to USD $290.00 depending on size and specs
Affordable high quality pen tablet for drawing. Compatible with PC, phone and tablet (via bluetooth). It usually comes with a free drawing software for up to 2 years. Very light, durable and pressure sensitive. The tablet texture feels like paper. There are buttons that can be customized according to the user’s wishes which makes drawing more convenient and effective. But it might take time to get used to it because you see your PC screen or other device without looking at your hands when drawing.
Software
Clip Studio Paint
Highly recommended for artists who would like to draw digital characters illustrations, comics/manhwa/manga/manhua/webtoon or create animations. It offers various assets created by different artists which can help enhance your art.
It’s compatible with iPad, phone and PC. Clip Studio Paint only offers a subscription plan for iPad, and for Mac/Windows there is a permanent license.
Clip Studio Paint PRO is suitable for character art, concept art and illustration.
Clip Studio Paint EX has more features than Clip Studio Paint PRO such as advanced manga, comic, webtoon and animation features.

Software Tutorial (Clip Studio Paint)
Now that I’ve recommended the necessary devices and software to create the art, I will teach you the basic skills to use Clip Studio Paint. In this tutorial, I will talk about a general guide towards layers, brushes, how to modify and how to save & export your art.
Layers
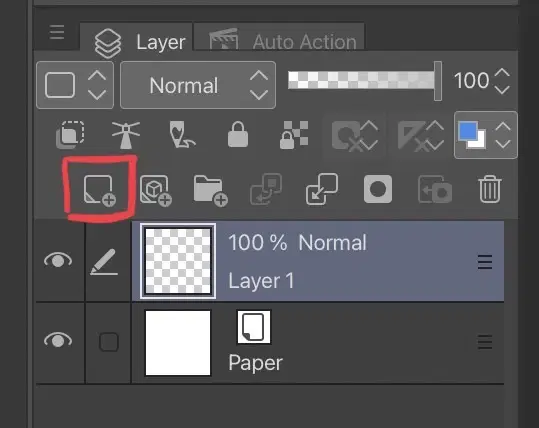
Create a new layer
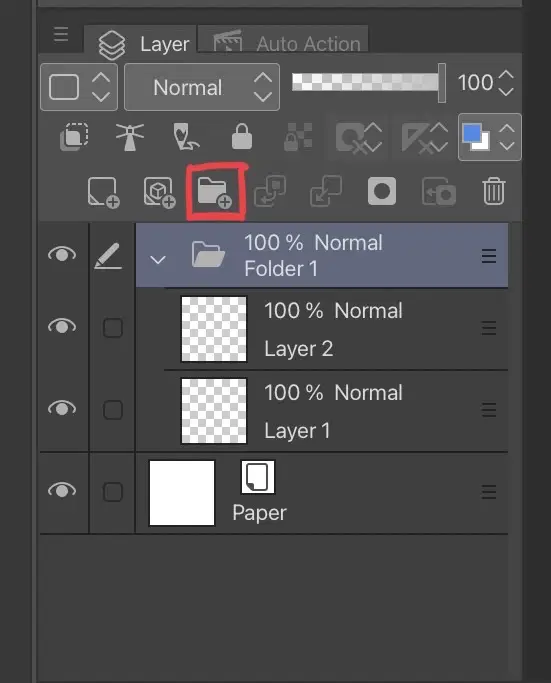
Create a new folder
You can group your layers into one folder by dragging the layers inside the folder.
How do layers work?
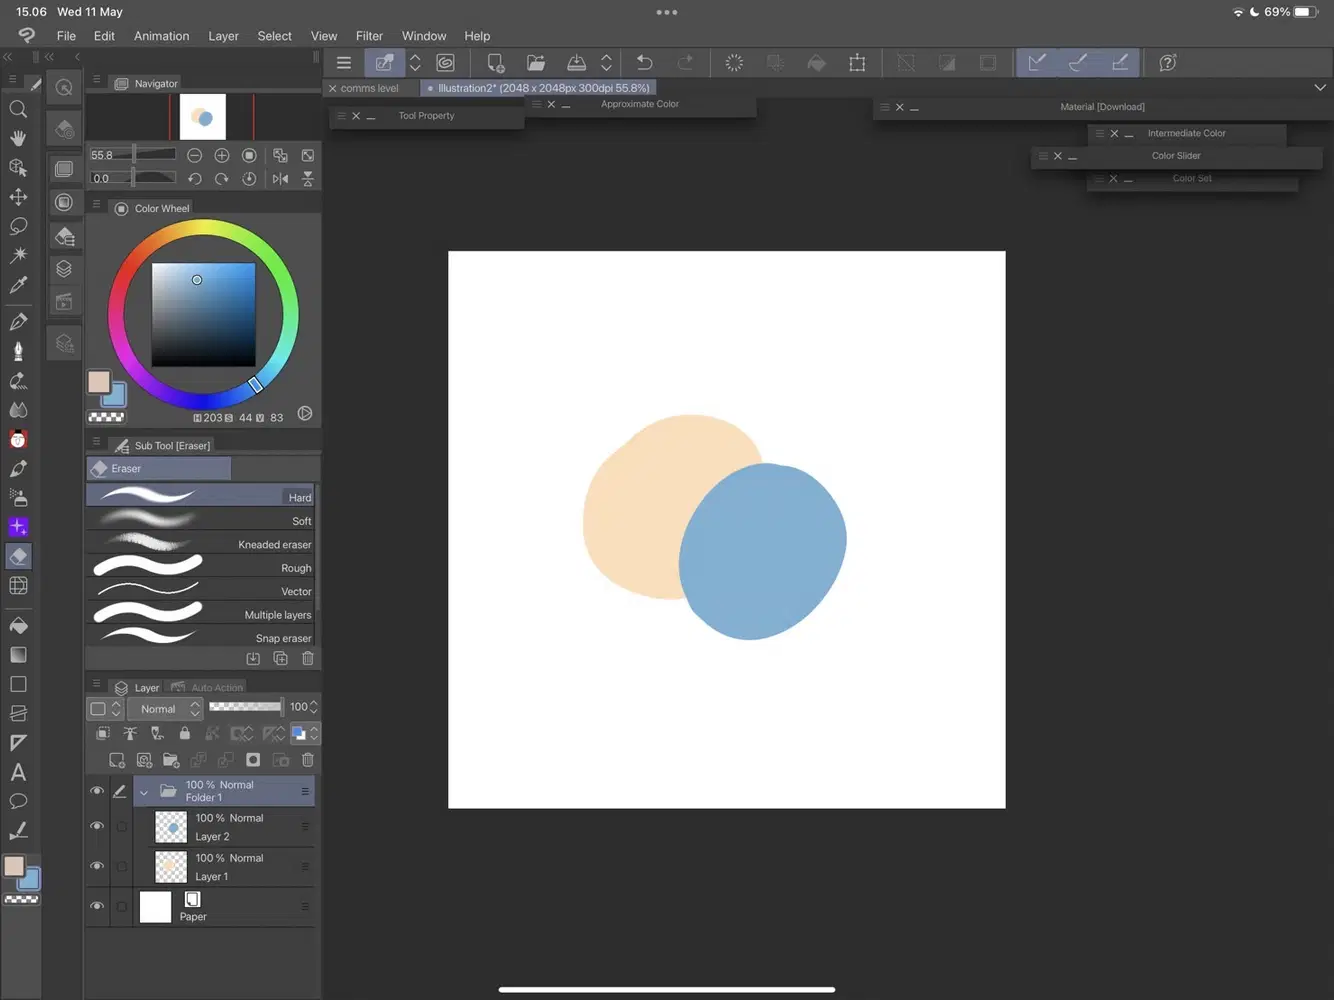
By default, if you draw something on the top-most layer, the drawing in bottom-most layer will be covered.
For example in this picture, I drew a yellow circle in the bottom layer (Layer 1), and a blue circle in the top layer (Layer 2). The blue circle overlaps the yellow circle.
How to hide layers?
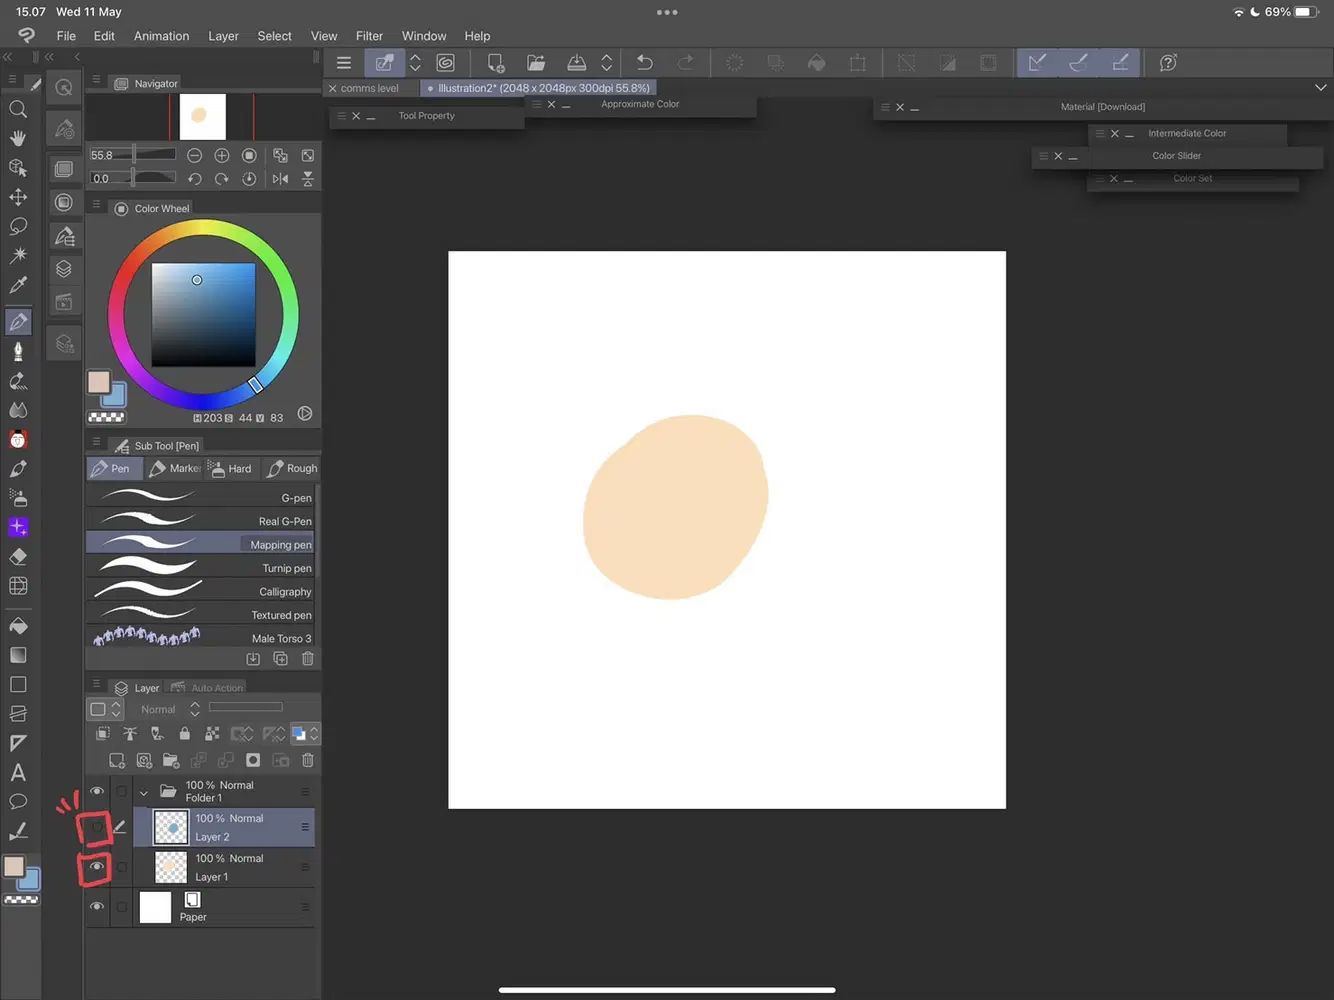
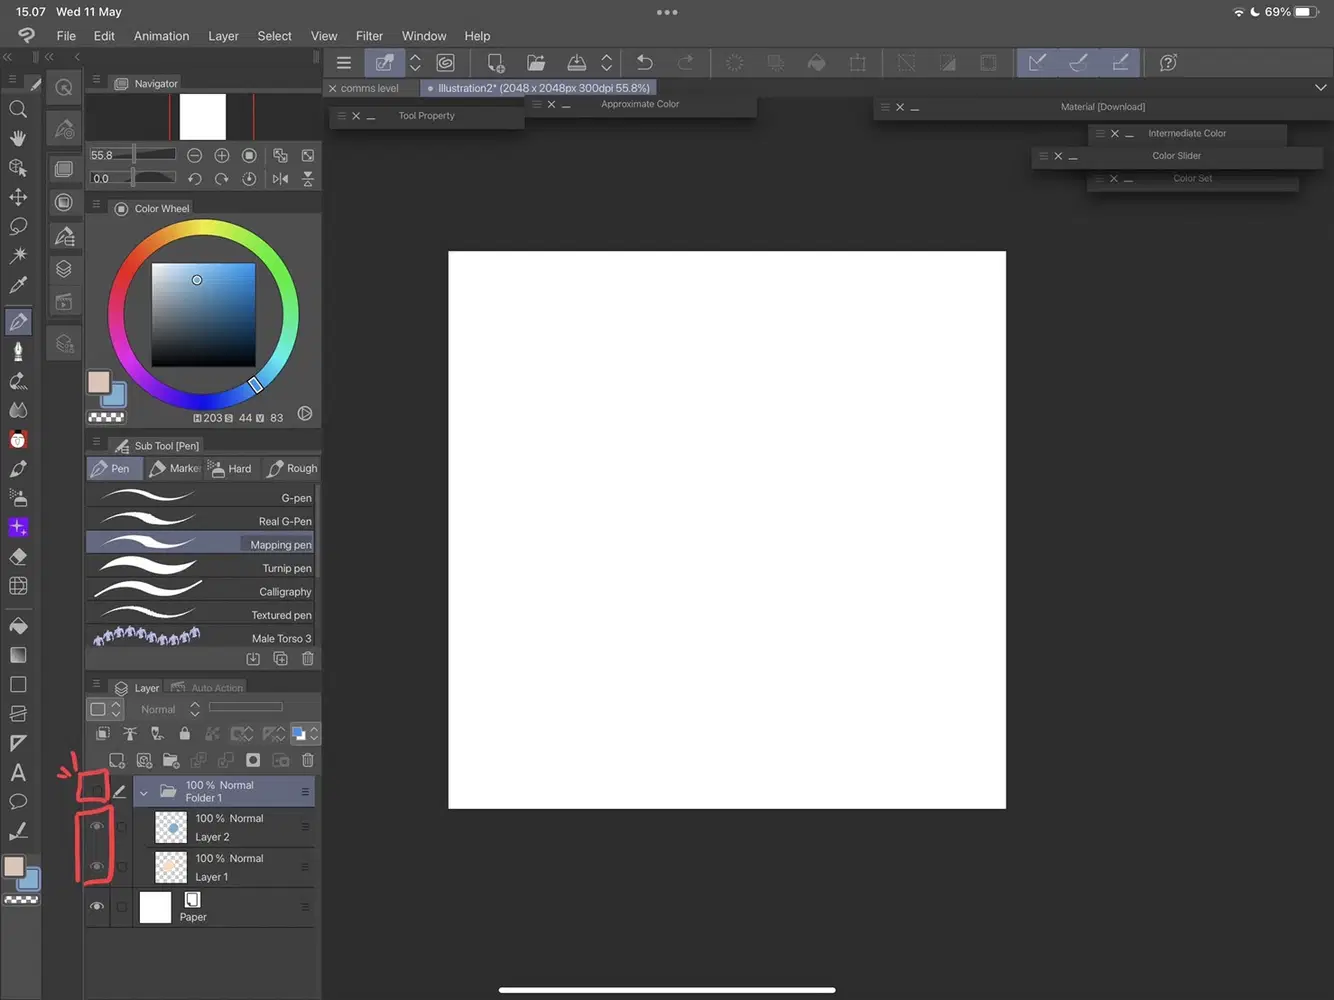
Press the eye icon on the layer you want to hide. For example in this picture, I hid the blue circle by pressing the eye icon on Layer 2. By hiding layers, you don’t have to delete your drawing and can unhide it to see it again whenever you want.
You can also hide a folder. Hiding a folder means you hide all the layers inside that specific folder.
Layer Clipping
If you clip the layer above, it will follow the shape of the layer below it. For example, in this picture I clip the layer with blue circle (Layer 2). The blue circle follows the shape of the yellow circle.
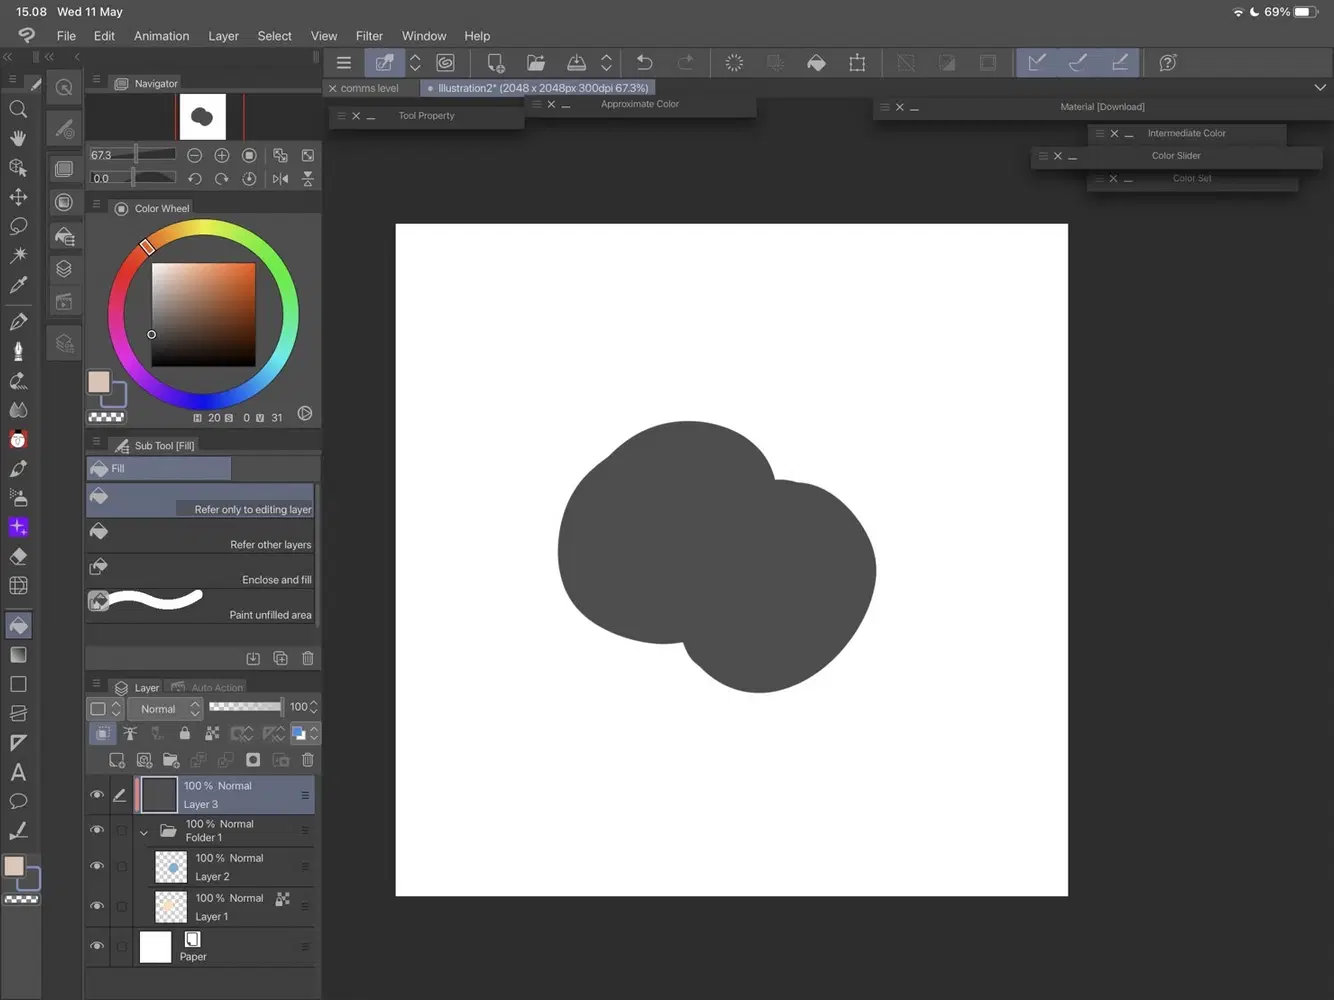
If i create another clipping layer on top of a folder. It will follow the shape of all the content inside the folder.
For example in this picture, I created a new clipping layer above the folder layer and used the bucket tool to fill it with dark gray color. The color will follow the shape of Layer 1 + Layer 2. Because Layer 1 and Layer 2 are inside the same folder.
Protect Alpha
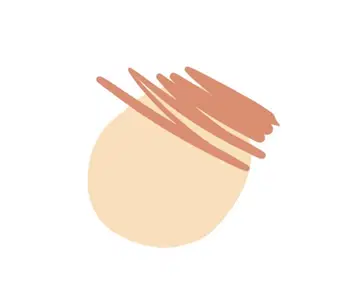
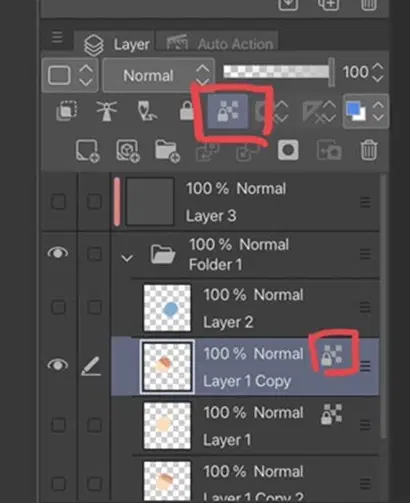
A feature that lets you paint without going over the previous shape in the same layer. Its similar to clipping layer, but protect alpha allows you to do this on the same layer. The first picture is an example of how I painted red strokes on Layer 1 without protect alpha. I used protect alpha feature on the second circle.

Its very easy to use this feature. Just press on this icon before you paint.
Layer Opacity
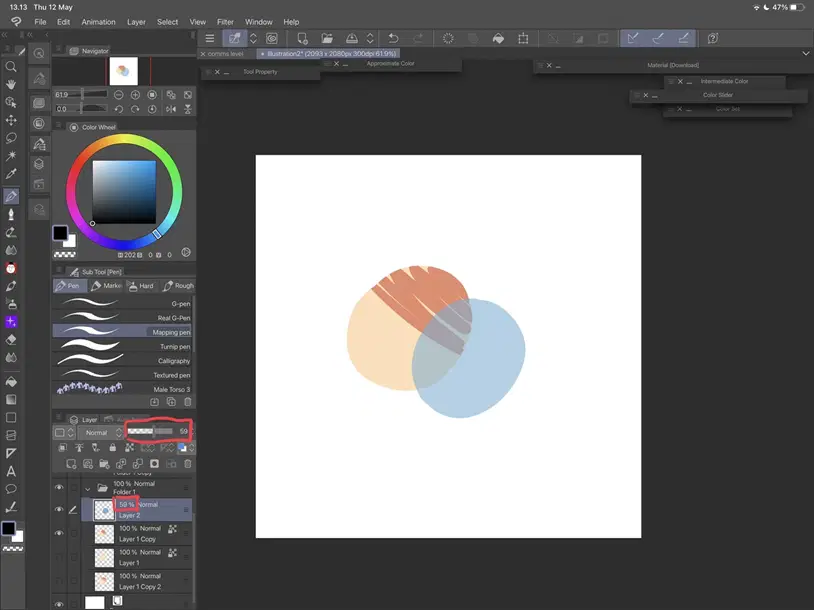
You can adjust the transparency of the layer by turning the opacity up or down. In the picture, you can see that I changed the opacity of Layer 2 from 100% to 59%. The blue circle looks more transparent.
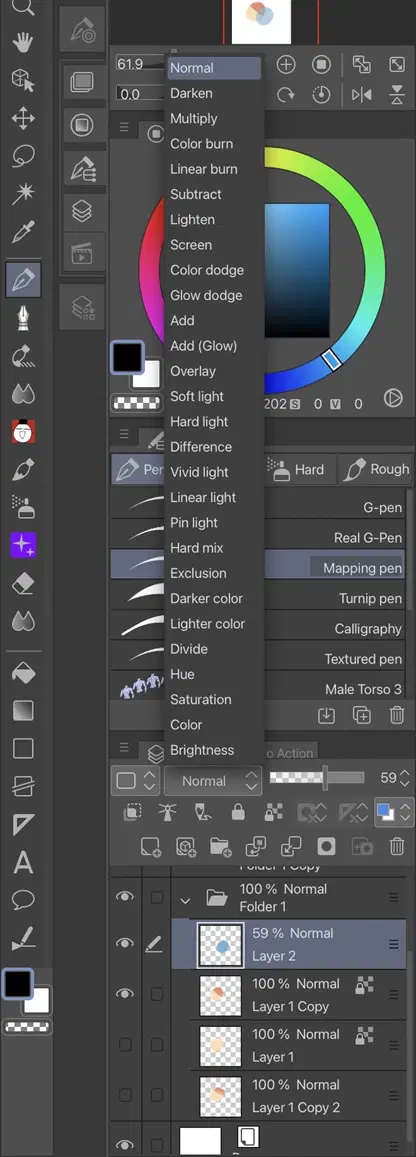
Layer Modes
There are many layer modes you can use. It modifies the color values of your layers. You can access this tab by pressing on the Normal button as seen in the picture.
Layer Tip
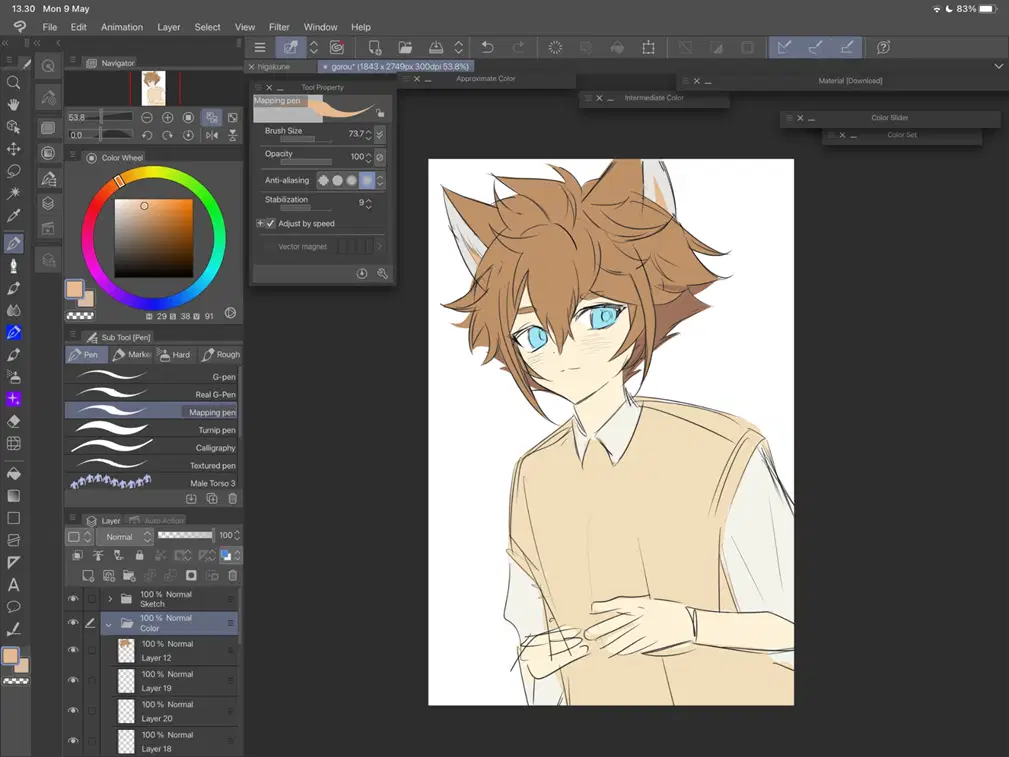
An important habit to have is to create a lot of separate layers when drawing or coloring. It makes it easier for the art to be modified and edited. Of course, if you prefer to paint on only one layer, that’s also fine! Everyone has different technique preferences.
Here is an example from a Gorou Illustration I drew. I created quite a lot of layers for the base colors. For example, I made a layer just for the skin color, and another separate layer to color the clothes. Then another different layer for the hair color.
Brushes
Different kinds of brushes have different uses and can create a variety of shading styles. Most brushes have different kinds of tool properties which can also be modified (Ex: brush density, color stretch, opacity, etc). This is a few examples on how to use default brushes from Clip Studio Paint.
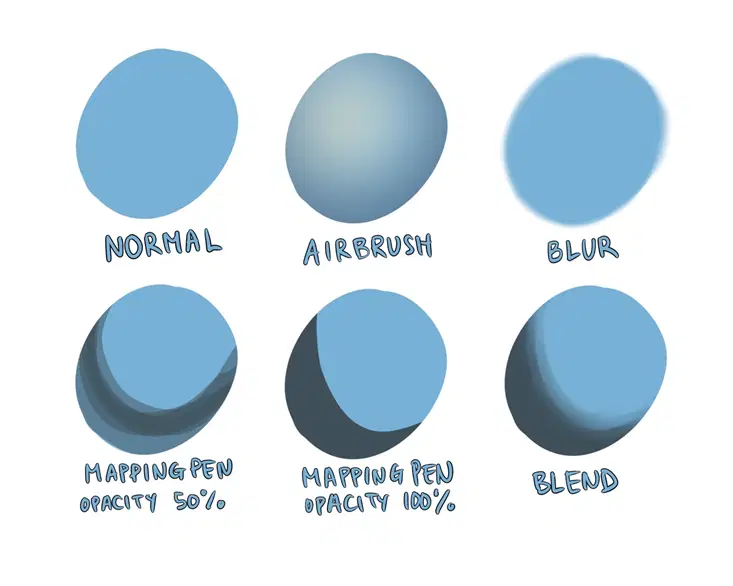
NORMAL - basic blue circle using a mapping pen.
SOFT AIRBRUSH - used for soft shading to define shape. It makes the circle look 3D. For example in the picture above, I used a darker color to shade around the corners of the circle, and picked a yellowish color to shade the lighter part.
BLUR - In the example, i blurred the edges of the circle.
MAPPING PEN (opacity 50%) - set the opacity of mapping pen brush to 50% on the tool property window. Can be used for hard shading by stacking brush strokes multiple times. The more you stroke, the darker the colors get.
MAPPING PEN (opacity 100%) - solid coloring, can be used for cell shading.
BLEND - can be used to blend colors. In the example, i blended the example for MAPPING PEN (opacity 100%). It appears more put together.
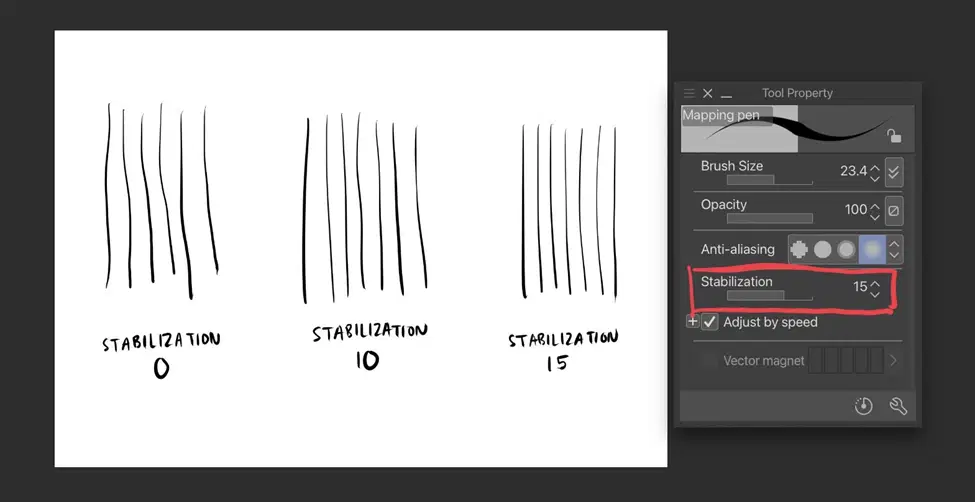
Stabilization
Increase the stabilization to make your lines look less wobbly. It really helps in lineart.
Clip Studio Assets
You can download many kinds of different brushes, 3d models and many more materials made by various creators. It can really speed up your drawing process/ make you enjoy drawing even more!
Source: https://assets.clip-studio.com/en-us/ranking

Modify
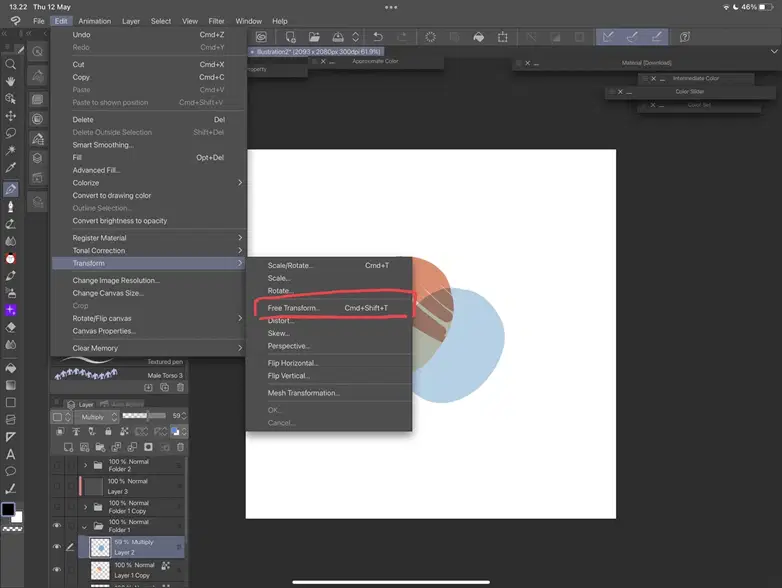
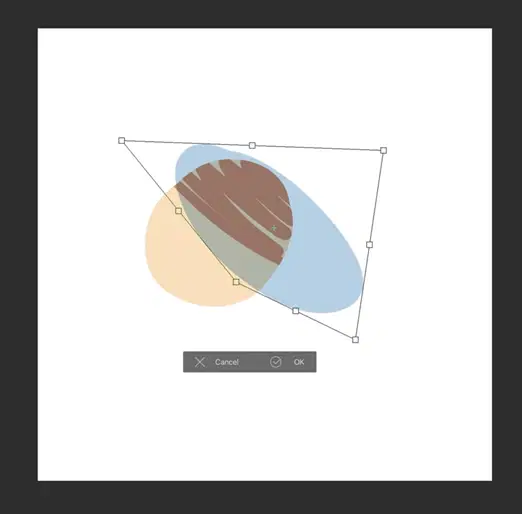
You can modify the shapes of your drawing by using Free Transform feature.
Make sure you are click on the layer you want to modify, then press Edit > Transform > Free Transform.
You can adjust the shape to your liking by moving the points.
Save & Export
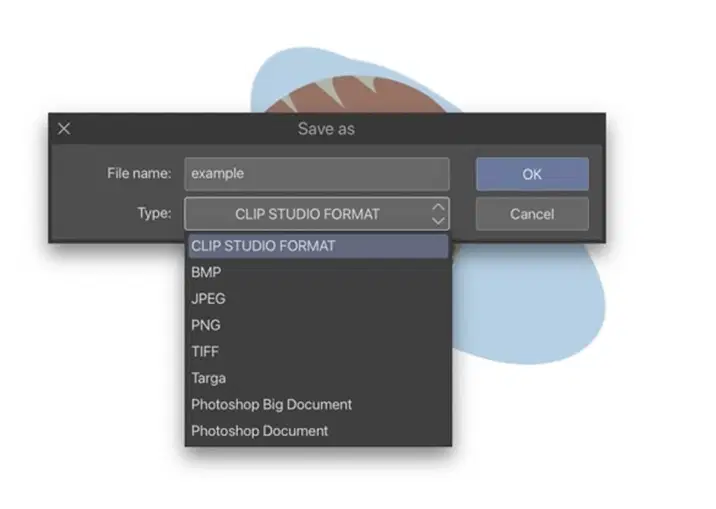
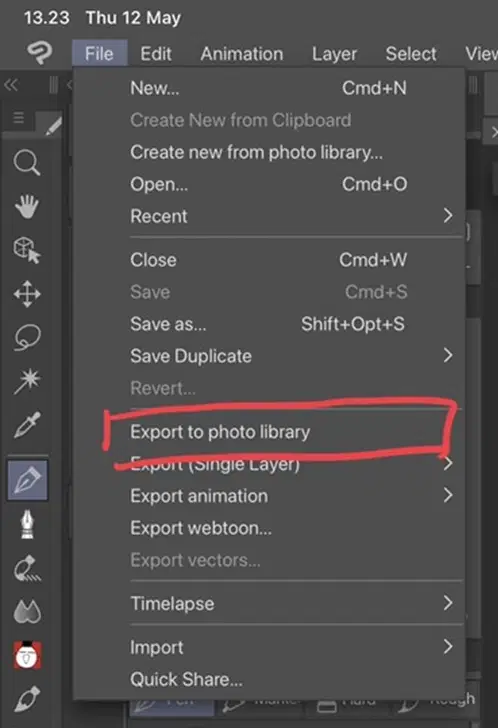
To save your file normally, just press File > Save as…
To save a duplicate of your file, press Save Duplicate
To save an existing file without renaming it, press Save
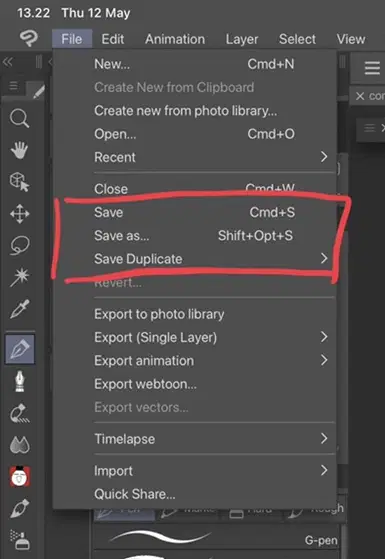
Then this tab will appear. You can choose any file format to save your work.
To export your work to your gallery, simply press Export to photo library.
That’s all for the graphic tablet & software guide! I hope you all find it helpful even if it’s just a bit. Feel free to leave some comments if you have any questions or if you have other tips/tricks you want to share! Thank you so much for reading.
And that's it for this issue of "Creator's Classroom"! Special thanks to neratt03 for sharing! What kind of content do you want to see in the next issue? Leave a suggestion for us in the comments below!
If you have any thoughts on Creator's Classroom, you can leave your feedback here: 
>>LINK<<
*The recommendations in this guide come from the creator and do not represent the views or position of HoYoLAB.