


Hello and welcome to the Genshin Starter Guide. You’re probably here because you recently downloaded the game on your sofa out of curiosity, and would like to have a guide to explain what is going on. Well good news for you, here’s a starter guide for you to plan and identify what's appearing on your screen, monitor, or your TV. Happy reading and enjoy the world of Teyvat!
Login Screen UI Explanation
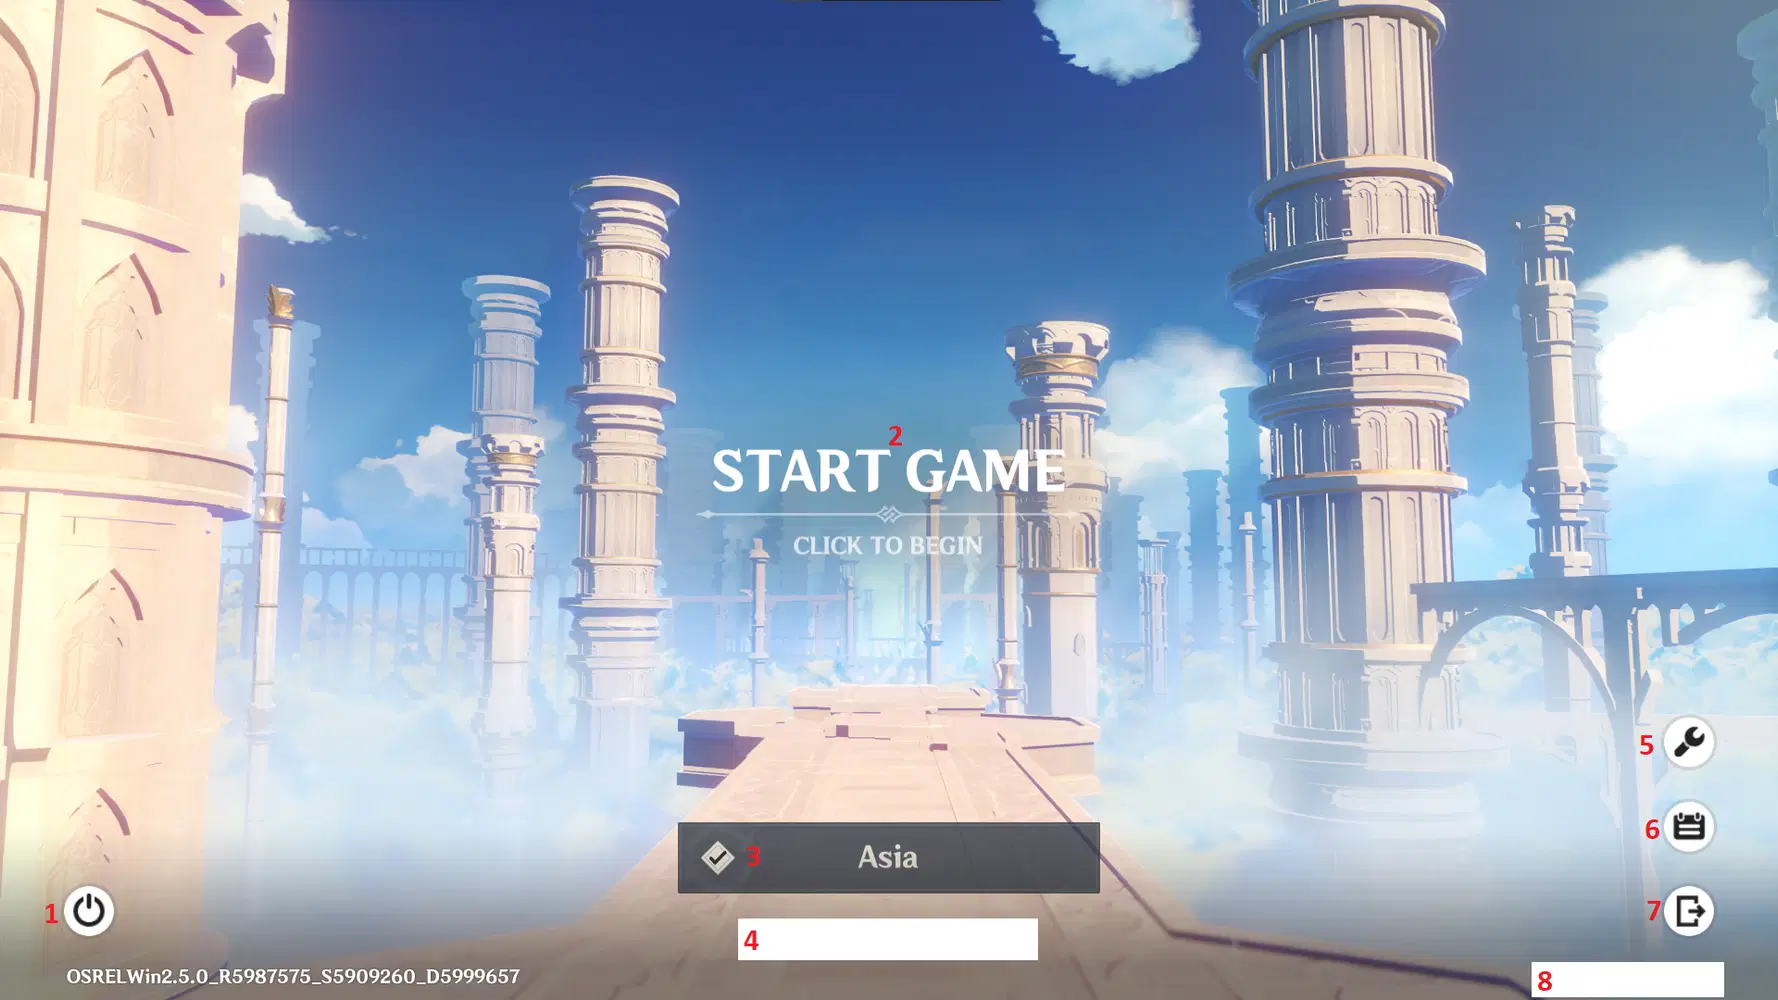
1. Quit Button - Exiting the Game
2. Start Button - You can click anywhere on the screen which doesn't have any buttons to start the game
3. Changing Server - Do note that progress doesn’t transfer between servers but you won’t lose data when changing servers
4. Account name - The one you use to login
5. Verifying file integrity - Use this to detect corrupted files
6. Notices - In-game notices for more information on the game
7. Log-out - Log out of your HoYoverse account
8. Your UID - This is always shown when inside the game at the bottom right corner, it will not show before you log in to the game.
In-Game UI Explanation

1. Paimon Menu (Hotkey: Esc) - You can access the different game menus by selecting the Paimon menu, including an option to exit the game.
2. Elemental Sight (Hotkey: press down on mouse wheel) - Shows you elemental traces that can be helpful for puzzles and other things. It can also identify mob names.
3. Co-Op Menu (Hotkey: f2) - Unlocks at AR 16. You can use this to find random people to play with.
4. Minimap - A brief view of the map of your surrounding area.
5. Events tab (Hotkey: f5) - Click here to view currently available events to participate.
6. Battle Pass (Hotkey: f4) - Unlocks at AR 20. Level up your battle pass to earn rewards by completing the given tasks.
7. Wishing screen (Hotkey: f3) - The gacha tab of the game, is your primary source of characters and weapons by “wishing” or rolling.
8. Adventure Handbook (Hotkey: f1) - Unlocked after completing the quest “Welcome to the Adventurers' Guild”
9. Inventory (Hotkey: B)
10. Character screen (Hotkey: C) - Here is where you can manage your character’s levels, gear, upgrade talents, and even some lore about that character.
11. Ping display
12. Quest log (Hotkey: J)
13. Current active party (use keys 1/2/3/4 to change the on-field character)
14. Chatbox (Hotkey: Enter bar)
15. Elemental Skill (Hotkey: E)
16. Elemental Burst (Hotkey: Q)
In-Game Map UI Explanation
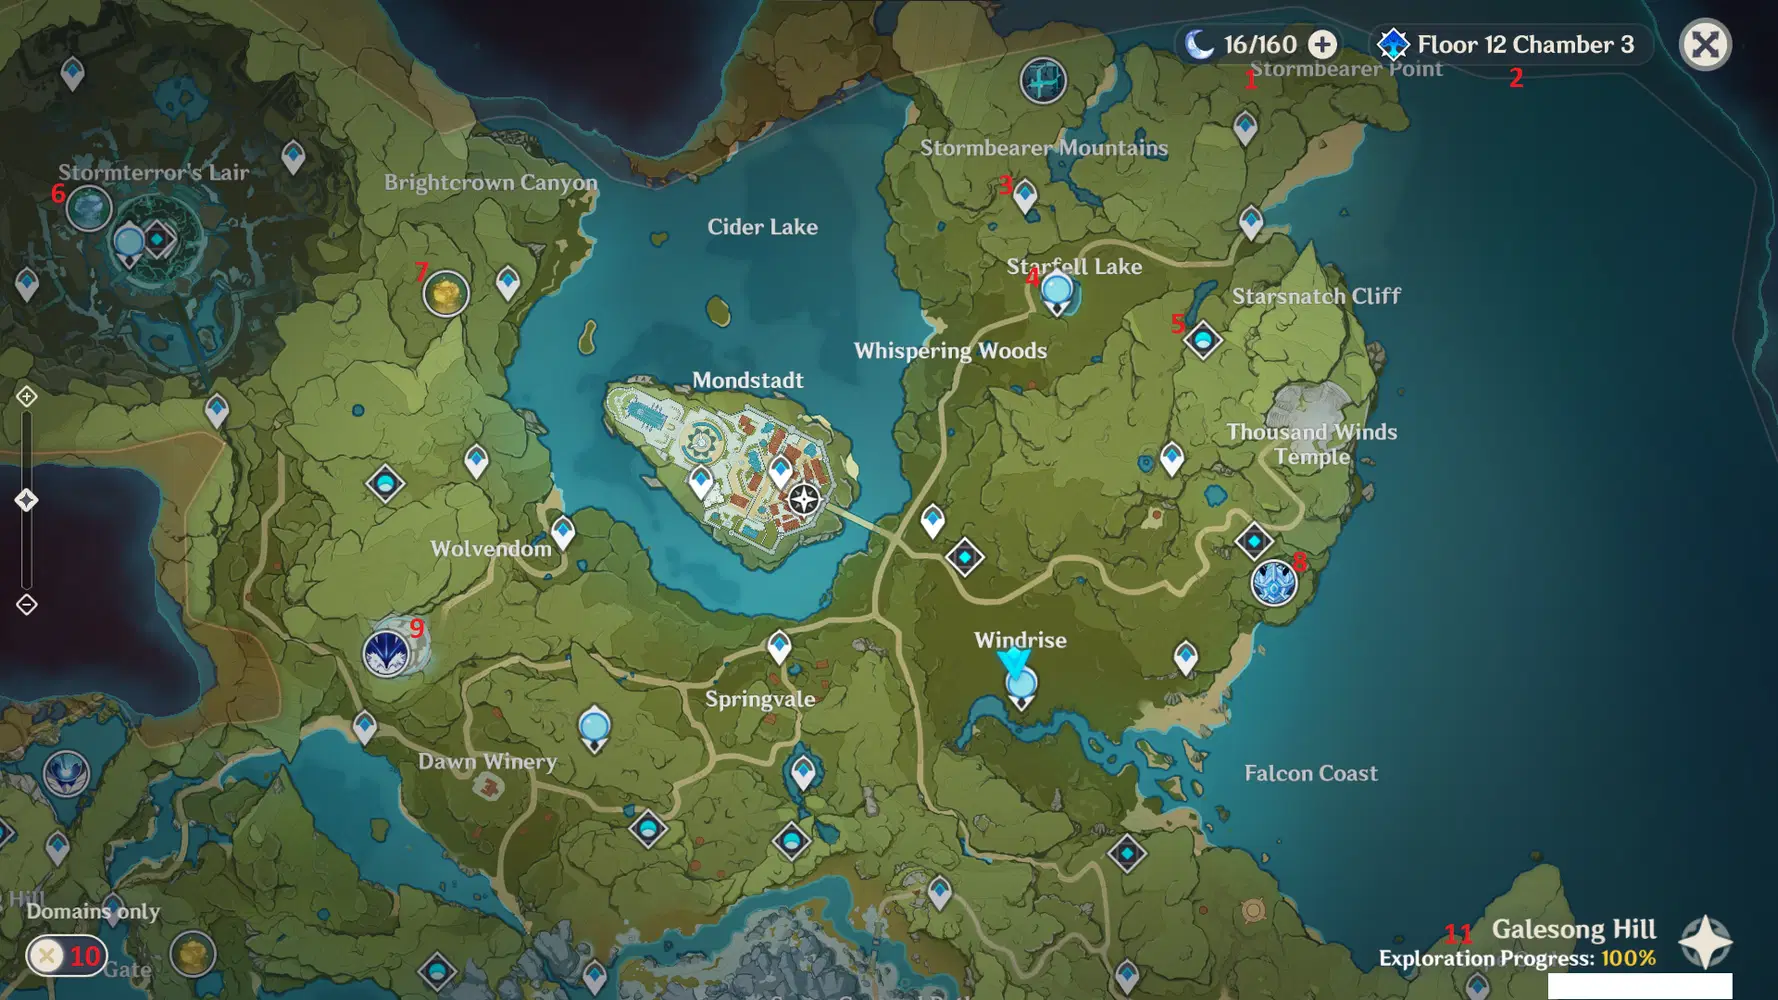
1. Resin Count - This is the currency needed to claim the rewards from various places such as leylines, domain runs, and world bosses.
2. Spiral Abyss - Indicates the abyss floor you’re currently at.
3. Teleport Waypoints - A quick way to go to various locations on the map.
4. Statue of the Seven - Works similar to teleport waypoints, but it can also heal you (but has a limit) and will light up your map after interacting with one.
5. Domains - 4 types of domains involve resin: Domain of Forgery (Weapon materials), Domain of Blessing (Artifacts), Domain of Mastery (Talent materials), and Trounce domains. There are other types of domains such as one-time domains, spiral abyss, and story/event-related domains.
6. Leyline Blossom of Revelation - Challenge that appears in every single region (Mondstadt, Liyue, and Inazuma), complete this and claim using resin to get character level up XP.
7. Leyline Blossom of Wealth - Challenge that appears in every single region (Mondstadt, Liyue, and Inazuma), complete this and claim using resin to get mora.
8. World Bosses - normal boss enemies that require 40 resin to claim their artifacts and character ascension materials rewards
9. Wolf of the North Challenge - The only weekly boss that is not inside a trounce domain as of now, you can challenge Boreas (wolf boss) after finishing Razor’s story quest and claim the reward with resin once every week.
10. Domain only Toggle - Hide or unhide other things except for Domains with this toggle.
11. Main Area - This tells the general area of where you’re located at
Paimon Menu UI Explanation
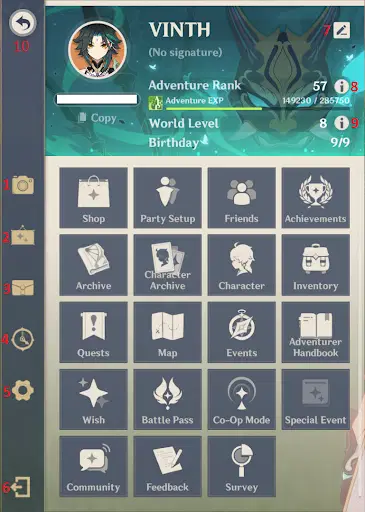
1. In-game camera
2. Notices
3. In-game mail
4. In-game time
5. Settings
6. Exit game
7. Account Info - you can edit your signature, nickname, and more
8. Adventure Rank info
9. World Level info - you can lower your WL from here starting from WL 5. You can only lower it by 1 and the cooldown between downgrading and reverting is 24 real-time hours.
10. Exit Paimon Menu
In-Game Notices
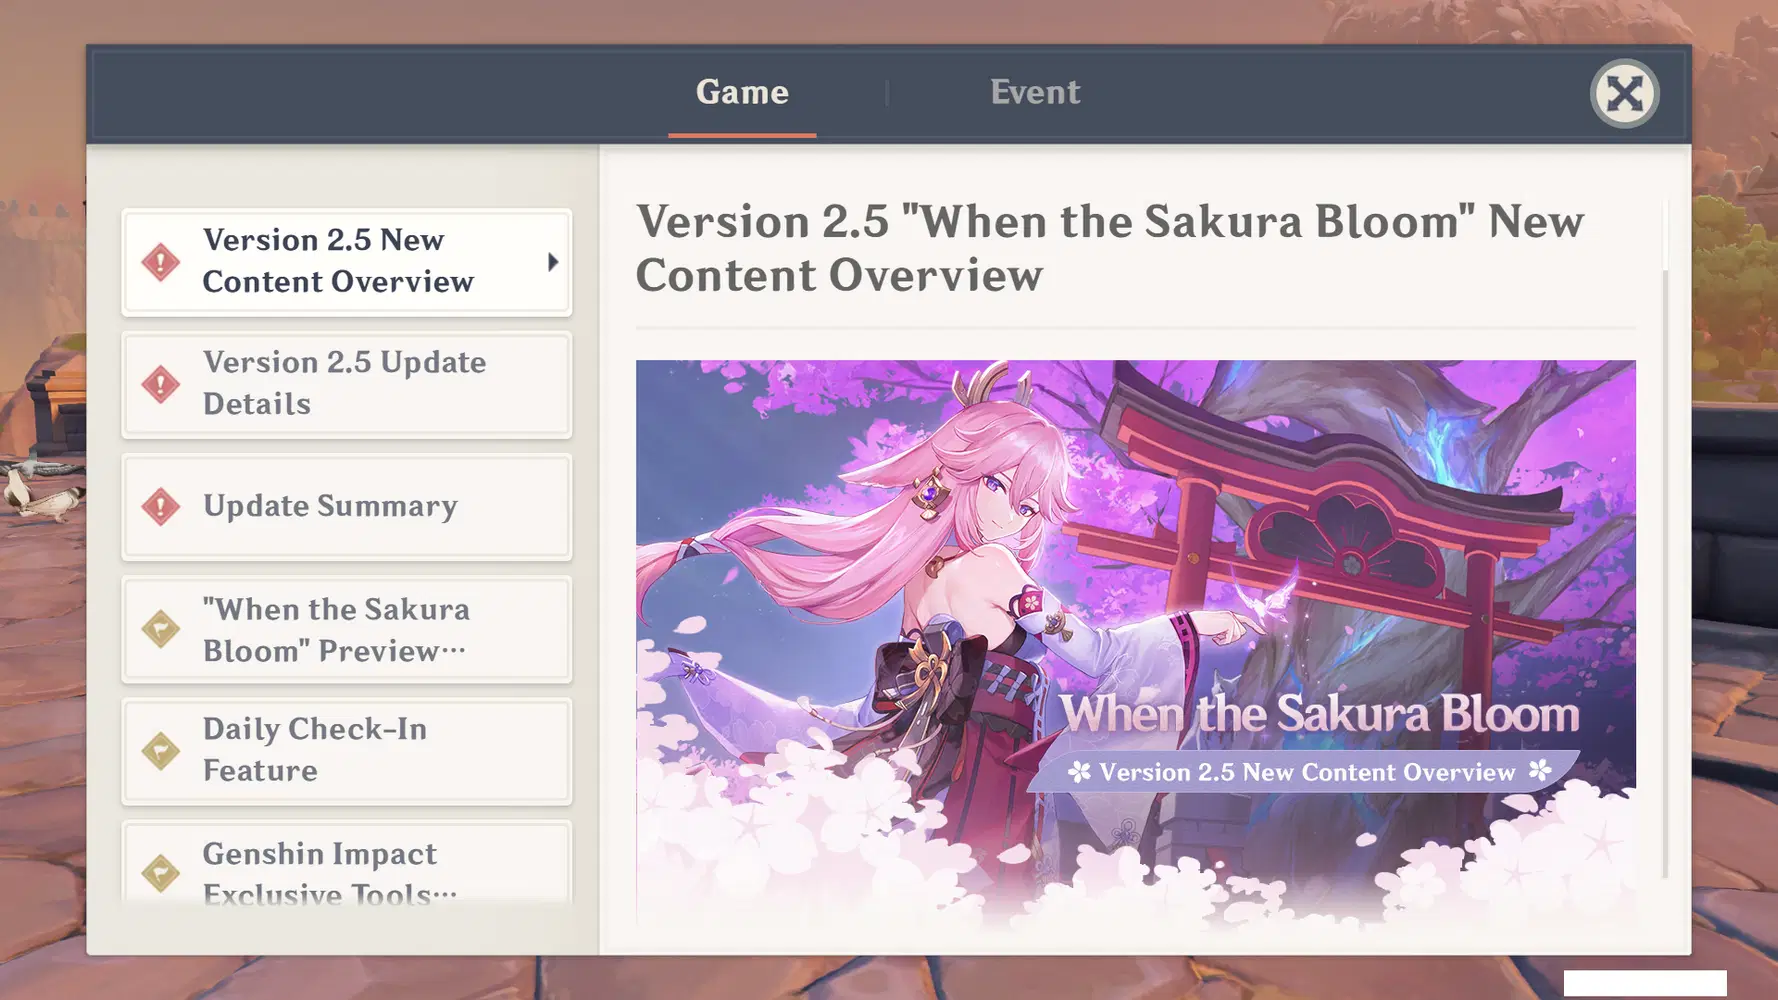
Here we can see announcements from the officials, update summaries, bug fixes, and version overview listed inside the Game tab while upcoming events including banners will be listed inside the Events tab.
In-Game Mail

This is the mailing system of the game. Any rewards from the officials are sent here, and occasional announcements such as event “x” is ending, BP is ending, or surveys regarding the game are sent here. Birthday presents from the characters in-game are sent here too.

Recently there’s a new feature implemented to keep character birthday mails inside 1 category, the Gift Mail Box system.
In-Game Time Controller

Occasionally you will find quests that need you to be at “x time tomorrow”. You can shorten the waiting process by using your in-game time control and going through the given time. Do note that not every time-related quest uses this time controller. Some quests require you to wait 24 real hours. You can control the time until the day after tomorrow, which means passing 2 in-game days.
In-Game Camera
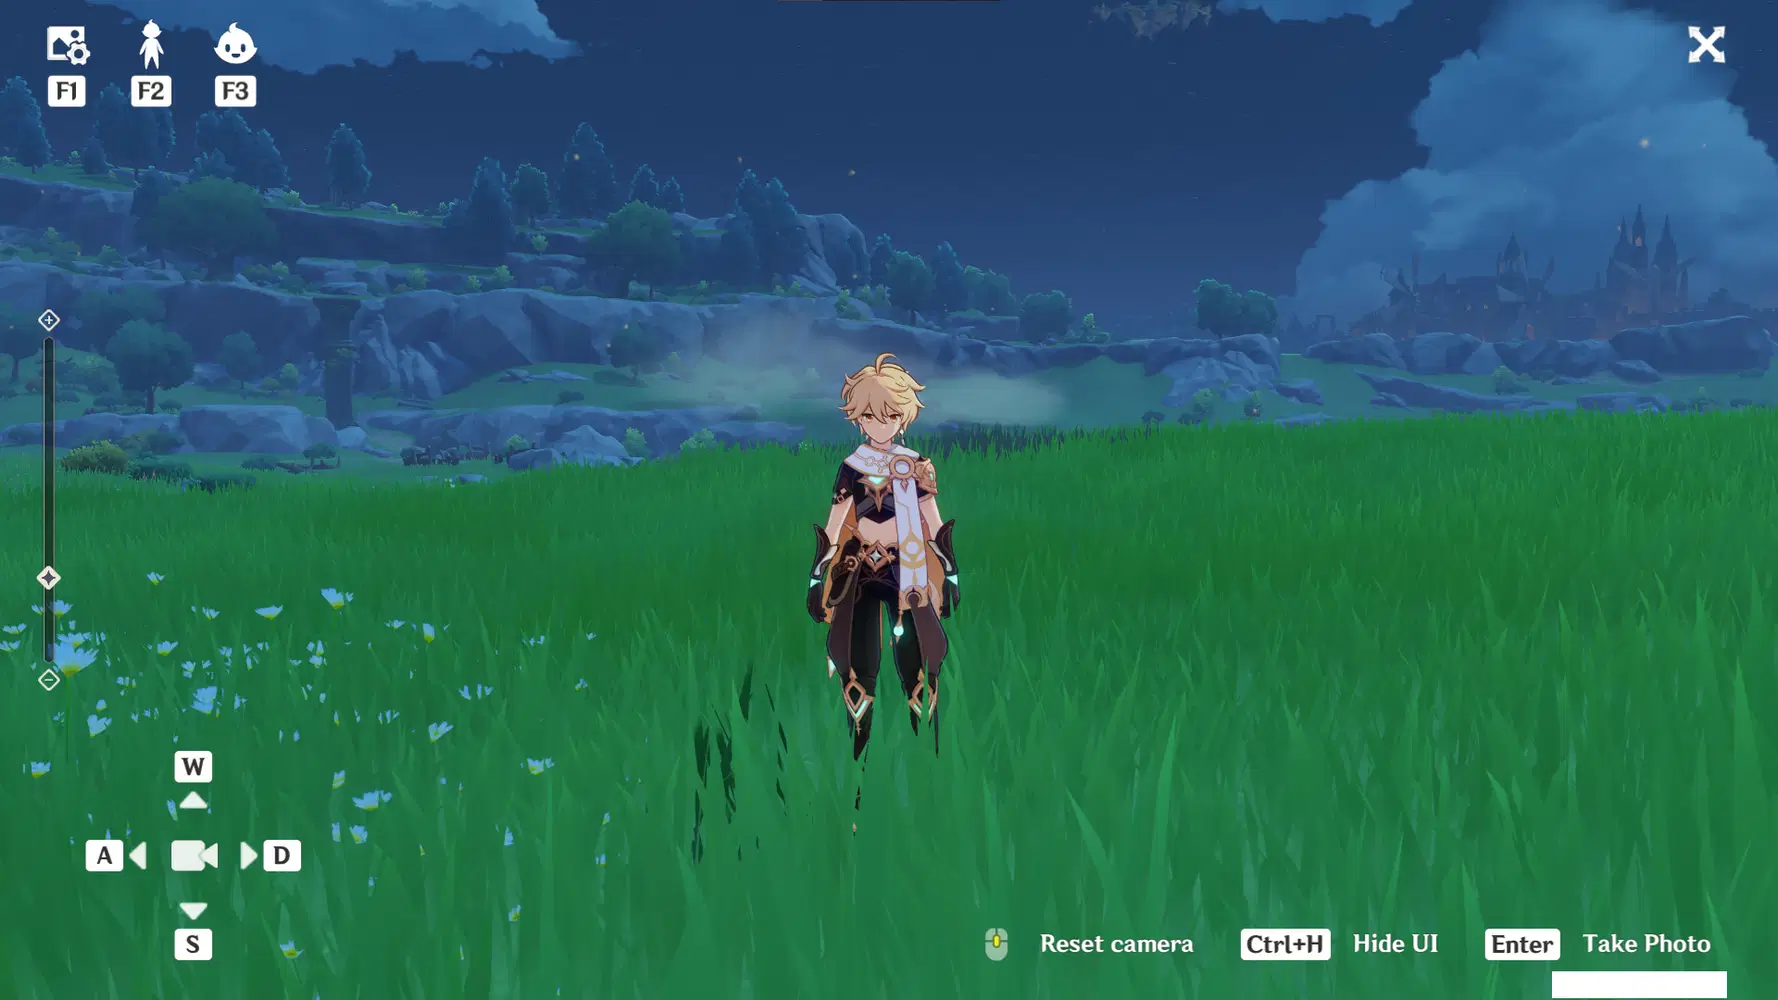
1. F1 - Basic settings, allow you to modify your image to be captured.
2. F2 - Characters pose. You can change your character’s pose from this setting.
3. F3 - Facial Expression. You can change your character’s expression from this setting.
4. Cam Control - Use WASD (PC) or touch screen (Mobile) to control where your cam would capture.
5. Scroll - Use this to zoom in or out.
6. X - Exit camera mode
Events Tab
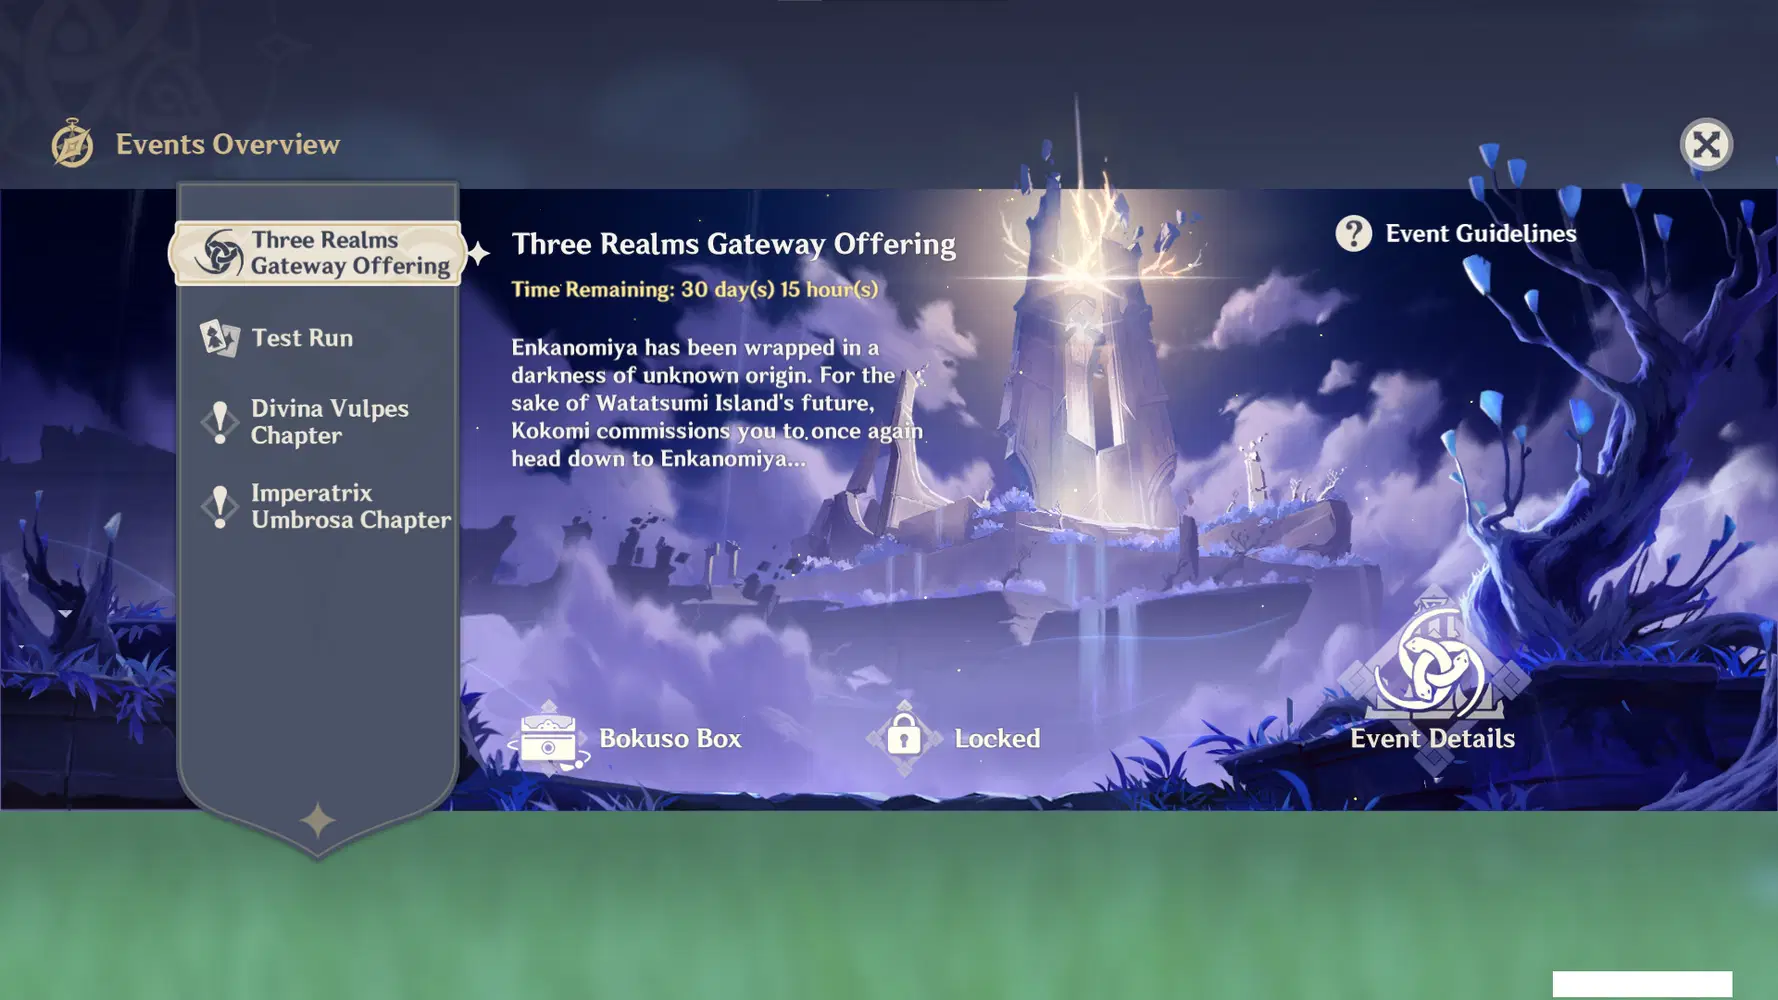
The events tab consists of current events to be played. You can also do character test runs (based on current banners in gacha) and they often showcase new content (New story quests, world bosses, etc.)
The Battle Pass System

This is the battle pass system of Genshin. Like any other game’s battle pass, this gives rewards for you by leveling up your BP level. There are also 2 paid options for spenders to choose from: Gnostic Hymn and Gnostic Chorus. Gnostic Chorus is just the normal Gnostic Hymn together with some extras; generally not worth it unless you’re quite a big spender or want the exclusive stuff.
1. Information about the battle pass system
2. Weekly XP limit system - You cannot get more than 10k a week, although XP you gain from the tasks under the “This BP Period” tab does not count towards the 10k limit.
3. Purchasing level - Generally not worth it since it costs Primogems which ideally should only be used to pull for characters and weapons.
4. Free BP reward section
5. Paid BP reward section - To distinguish the two available options when purchasing BP, Gnostic Hymn unlocks the second tier of rewards (including, but not limited to: ample EXP resources, a BP exclusive 4-star weapon, and a decent sum of primogems). Gnostic Chorus provides all previous benefits, while giving the Traveler an exclusive namecard, furnishing blueprint, advances current BP level by 10, and 5 fragile resin.

1. Daily Missions - These are your daily tasks. They reset every day at server reset (4 AM server time)
2. Weekly Missions - These are your weekly tasks. They reset every week on Monday server reset (4 AM server time)
3. This BP Period - This section doesn’t count towards the weekly XP limit and stays forever until the BP ends. Do note that event tasks are inside this section and do not stay as long as the BP.
All of this is part of a team doc project of mine, click here for the full starter guide doc



