As future updates get released, this guide may change to adjust to any future updates. As such, this guide is subject to change.
Disclaimer:
◇ This build is optimized for the character's overall performance rather than solely based on damage.
◇ This build can be used with any rotation without specific restrictions.

Other Related Guides
◇ Currently N/A!
Dehya Guide

Flame-Mane, Auric Blaze
Introduction
Dehya, also known as the Flame-Mane, is a 5-star Pyro Claymore user released on Version 3.5 "Windblume's Breath". Boasting multiple utilities in her kit, carrying a small make-up box in her pocket, and inviting a large wave of heated arguments over her character design, Dehya has certainly shown herself to be unique in how her kit functions and how she brings down the house with her fire as she can be quite a confusing character to understand at first sight.
The ability to deal damage, mitigate incoming damage, apply elements, sustain and heal herself when she reaches low HP, capability to support the team, as well as the ability to increase interruption resistance makes her a versatile character capable of being used in multiple, different ways depending on the player's preferences as she is not restricted to simply one role.
This guide will try to cover everything you need to know about Dehya, including her builds and other facts.
Talent Analysis
Normal Attack: Sandstorm Assault
Talent Info
Normal Attack
Performs up to 4 consecutive strikes using her Claymore and her martial arts.
Charged Attack
Drains Stamina over time to perform continuous slashes.
At the end of the sequence, performs a more powerful slash.
Plunging Attack
Plunges from mid-air to strike the ground, damaging opponents along the path and dealing AoE DMG upon impact.
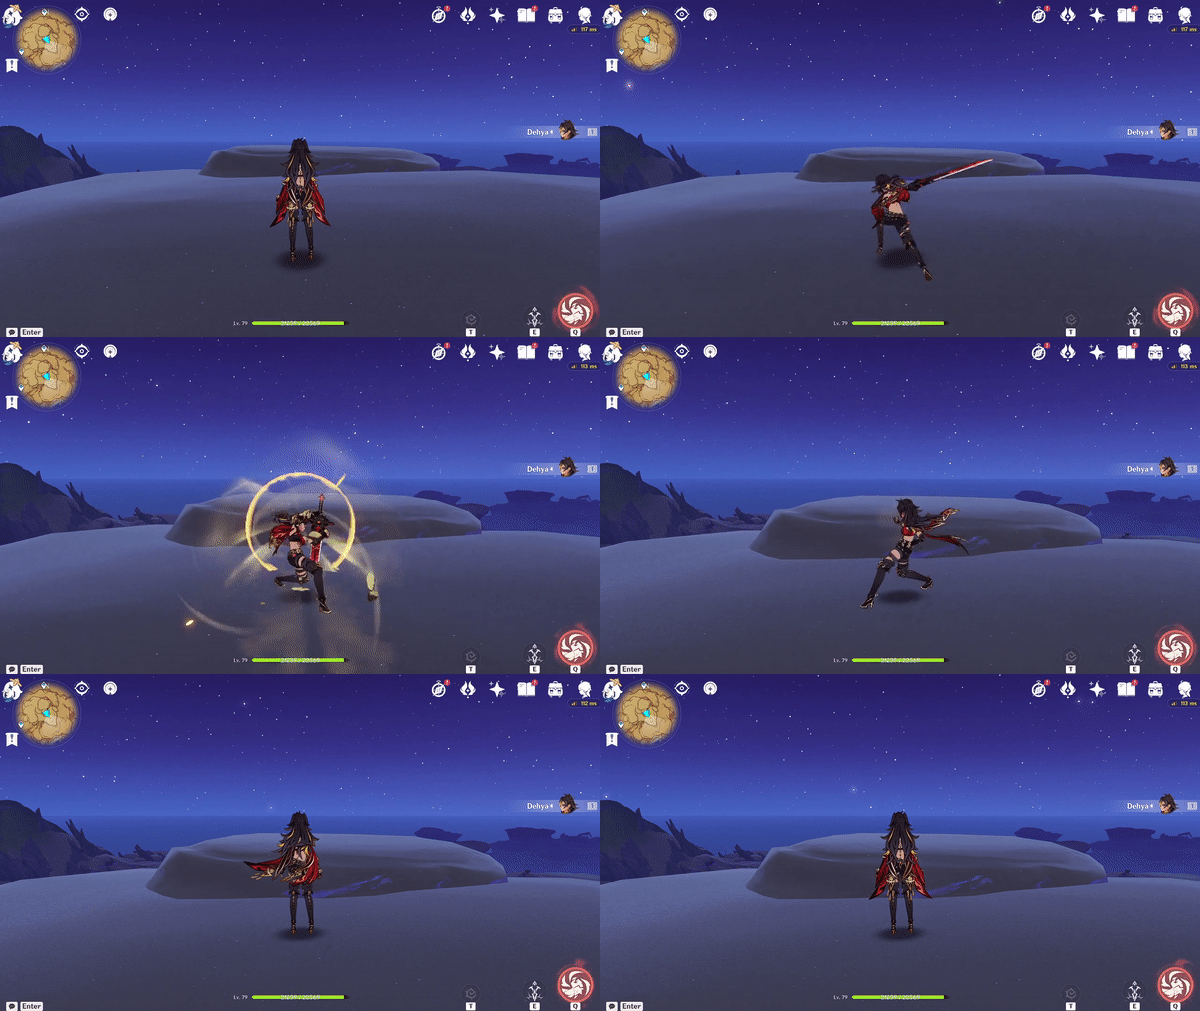
Normal Attack Sequence
They're as straightforward as you could've asked, Dehya does 4 Normal Attack sequences, does the swish swoosh on Charged Attack, and has a standard Claymore Plunge Attack animation. 3rd and 4th Normal Attacks have larger knockbacks than the 1st and 2nd Normal Attacks, but they're still within reach.
Elemental Skill (Molten Inferno)
Talent Info
This art of Dehya's own invention changes its method of use depending on the combat situation.
Indomitable Flame
This skill will be unleashed should there be no Fiery Sanctum field created by Dehya herself present at the time.
Deals AoE Pyro DMG, and creates a field known as Fiery Sanctum.
Ranging Flame
This skill will be unleashed should a Fiery Sanctum field created by Dehya herself already exist.
Dehya will perform a leaping attack, dealing AoE Pyro DMG before recreating a Fiery Sanctum field at her new position.
A Fiery Sanctum created this way will inherit the remaining duration of the previous field.
Ranging Flame can be used only once throughout a single Fiery Sanctum field's duration.
Fiery Sanctum
When an opponent within a Fiery Sanctum field takes DMG, the field will unleash a coordinated attack, dealing AoE Pyro DMG to them based on Dehya's ATK and Max HP. This effect can be triggered once every 2.5s.
Active characters within this field have their resistance to interruption increased, and when such characters take DMG, a portion of that damage will be mitigated and flow into Redmane's Blood. Dehya will then take this DMG over 10s. When the mitigated DMG stored by Redmane's Blood reaches or goes over a certain percentage of Dehya's Max HP, she will stop mitigating DMG in this way.
Only 1 Fiery Sanctum created by Dehya herself can exist at the same time.
Redmane's Blood Maximum: 200% Max HP / Field Duration: 12.0s / CD: 20.0s
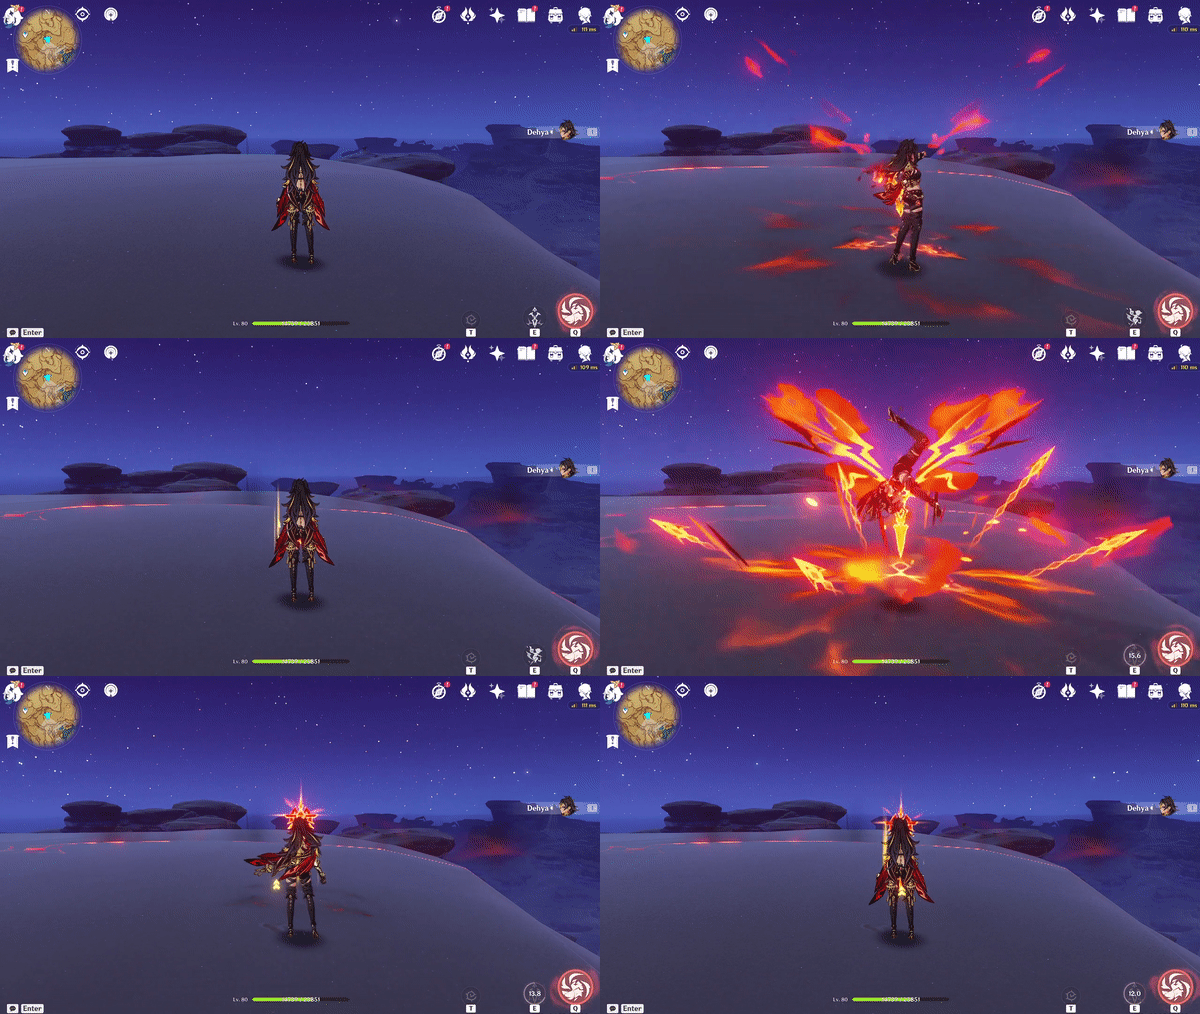
Elemental Skill (Indomitable Flame + Ranging Flame)
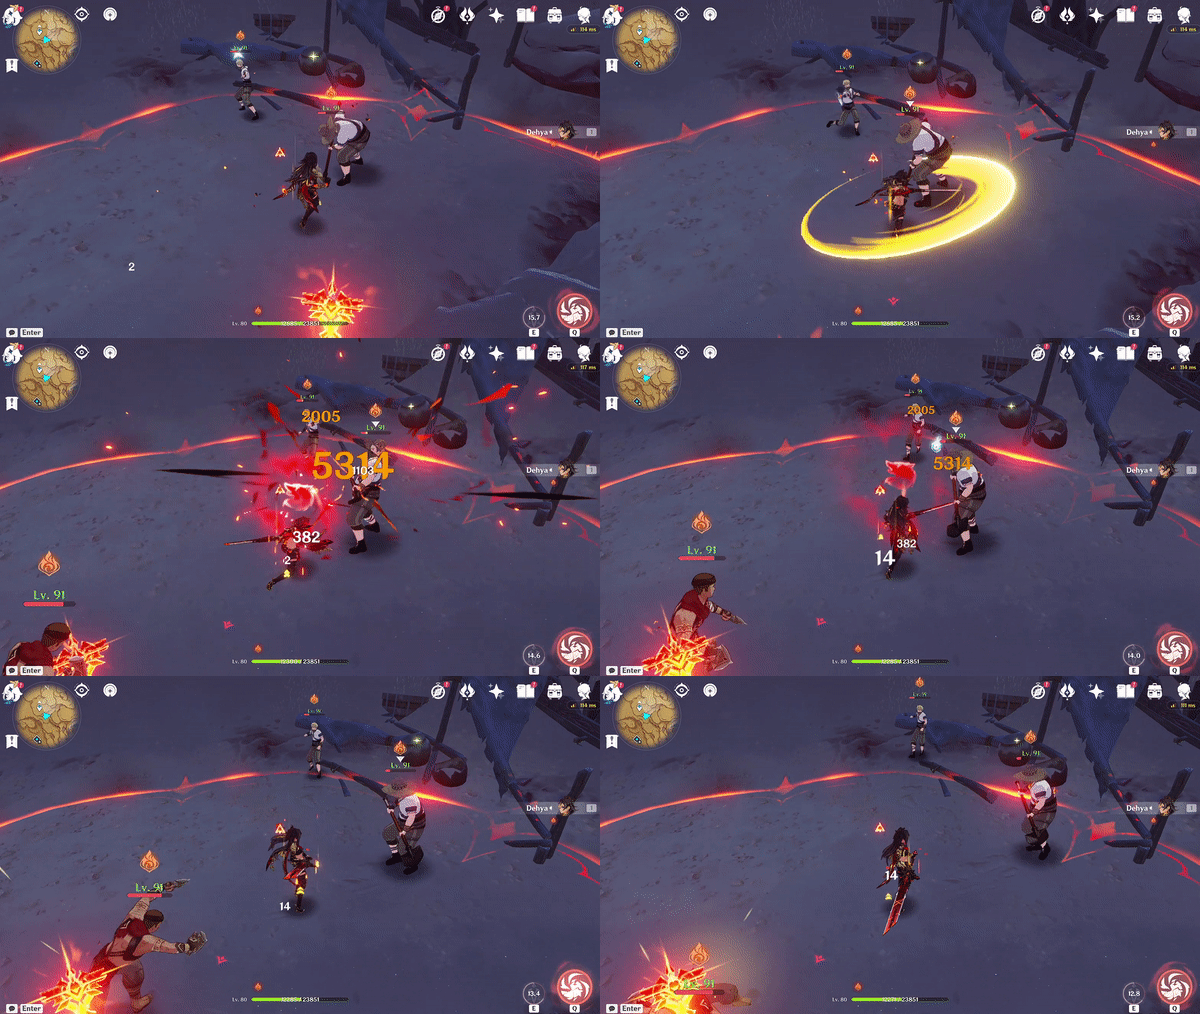
Elemental Skill (Fiery Sanctum)'s Coordinated Attack
Dehya deploys a field (Fiery Sanctum) that will land a coordinated attack on enemies when they take damage. Hitting Abyss Mage active shields or similar will not trigger the coordinated attack. The coordinated attack can only occur once every 2.5s, and can occur even when Dehya is off-field. The 2nd use of her Skill can be used to reposition her field or to simply deal more damage to enemies.
Dehya's field will also mitigate the damage active characters (including other co-op players' active characters) receives, reducing the damage they take in exchange for having Dehya herself receive the damage they take. She also increases the interruption resistance for any active characters inside the field. The 2nd use of her Skill can further increase interruption resistance when 1st Ascension Passive is unlocked, as well as reduce the damage Dehya receives while mitigating damage.
When mitigating damage received by teammates, Dehya will receive the Redmane's Blood status. This status is indicated by a small marker floating by her side (only displayed when Dehya is on-field). Redmane's Blood status can possibly kill Dehya when she receives too much damage, but her 1st Ascension Passive can compensate for this.

Redmane's Blood status, shown by the floating indicator beside Dehya.
Skill Properties:
- Snapshot: Yes (On cast)
- Size of Fiery Sanctum AoE: 10m Radius (Same size as Albedo's Skill)
- Number of Skill uses: 2 (Indomitable Flame + Ranging Flame)
Elemental Burst (Leonine Bite)
Talent Info
Unleashing her burning anger and casting her inconvenient blade aside, Dehya enters the Blazing Lioness state and increases her resistance to interruption.
In this state, Dehya will automatically and continuously unleash the Flame-Mane's Fists, dealing Pyro DMG based on her ATK and Max HP, and when its duration ends, she will unleash an Incineration Drive, dealing AoE Pyro DMG based on her ATK and Max HP.
If a Fiery Sanctum field created by Dehya's own Elemental Skill "Molten Inferno" exists when this ability is unleashed, Dehya will retrieve it, and then create another field once Blazing Lioness's duration expires. This field will take on the retrieved field's duration at the moment of its retrieval.
In this state, Dehya will be unable to cast her Elemental Skill, or perform Normal, Charged, and Plunging Attacks. "Normal Attack: Sandstorm Assault" and Elemental Skill "Molten Inferno" will be replaced by "Roaring Barrage."
Roaring Barrage
Unleashing Roaring Barrage within 0.4s after each Flame-Mane's Fist strike will increase the speed at which the next Flame-Mane's Fist strike will be triggered.
Blazing Lioness state Duration: 4.0s / CD: 18.0s / Energy Cost: 70
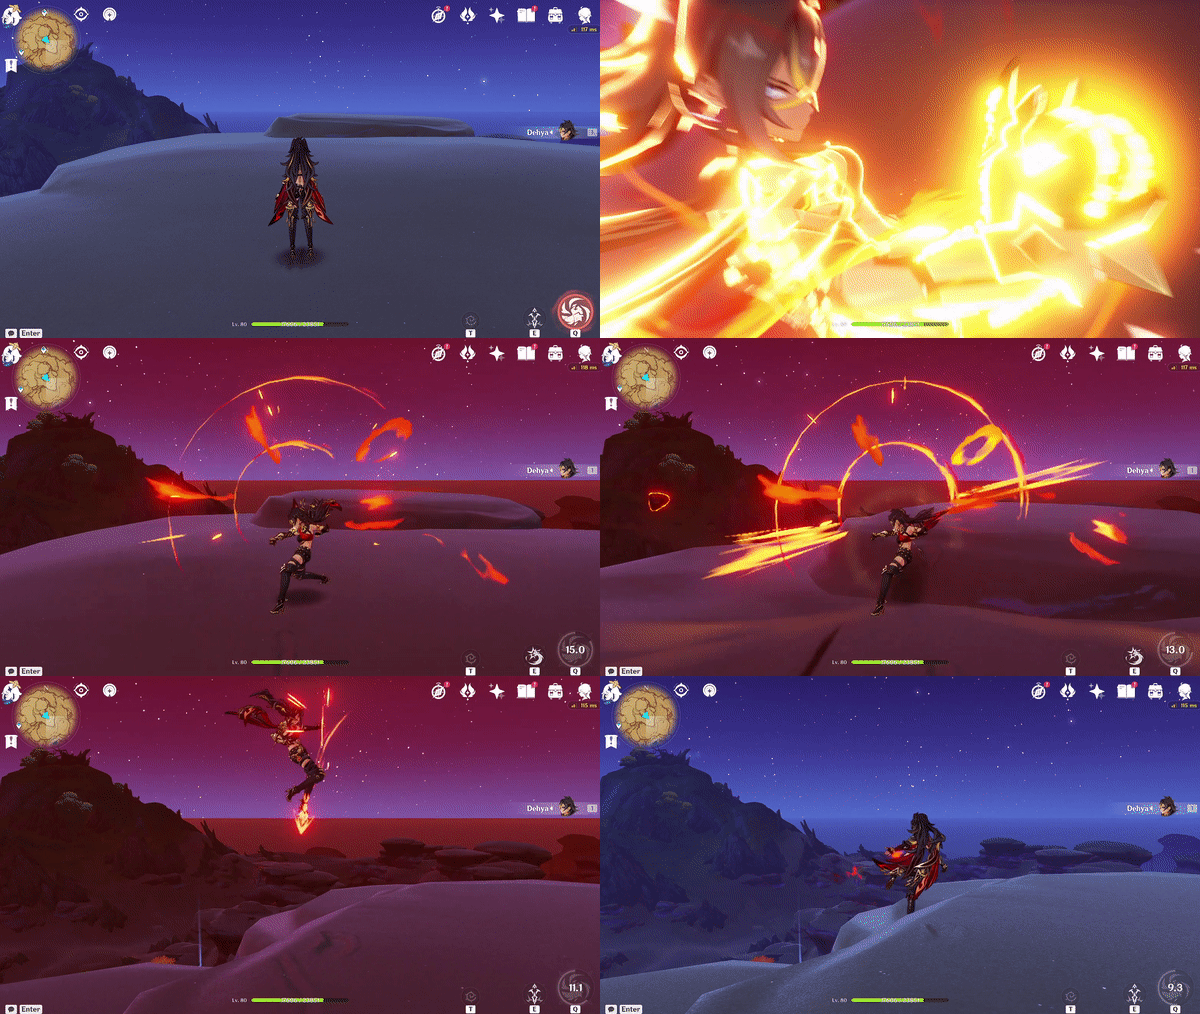
Elemental Burst (Leonine Bite)
Dehya's Elemental Burst allows her to deal multiple instances of punches to her enemies. Mashing your Normal Attack or Elemental Skill button can increase the number of hits she deals to her enemies, which can give you roughly about 30% damage increase. All of these hits except the final hit deal the same amount of damage.
Dehya will also retrieve her Elemental Skill's field on Burst cast and redeploy it at the end of her Burst with the remaining duration of the Fiery Sanctum cast on Skill. Redmane's Blood status will still be retained during the whole Burst's duration until the end of the status's duration (it's independent of the Skill's effect). With her Burst being used in the middle of her Elemental Skill duration, it's possible to adjust the field's duration so that Dehya's Fiery Sanctum field ends when her Skill is usable. Not exactly a 100% field uptime since Burst takes the field away, but it works.
It should be noted that your inputs will not be considered as Normal Attacks in this state, hence Dehya is unable to trigger effects that occur on executing a Normal Attack (Such as Xingqiu's Burst or Yelan's Burst) in this state.
You can Dash safely while in the Blazing Lioness state, but Swapping characters, Jumping, or getting Frozen will end the Burst's duration prematurely.
Dehya can receive damage while in the Blazing Lioness state.
Skill Properties:
- Snapshot: No
- Total number of hits:
- Flame-Mane's Fists (Continuous hits): 6~10 hits
- Incineration Drive (Final hit): 1 hit

Passives Analysis
1st Ascension Passive: Unstinting Succor
Passive Effect
Within 6 seconds after Dehya retrieves the Fiery Sanctum field through Molten Inferno: Ranging Flame or Leonine Bite, she will take 60% less DMG when receiving DMG from Redmane's Blood. This effect can be triggered once every 2s.
Additionally, within 9s after Dehya unleashes Molten Inferno: Indomitable Flame, she will grant all party members the Gold-Forged Form state. This state will further increase a character's resistance to interruption when they are within the Fiery Sanctum field. Gold-Forged Form can be activated once every 18s.
Decreases the damage she takes from Redmane's Blood status when she casts Skill for the 2nd time or uses her Burst. Also, increases the interruption resistance of characters inside Dehya's Fiery Sanctum field after Dehya uses her Skill for the 2nd time.
4th Ascension Passive: Stalward and True
Passive Effect
When her HP is less than 40%, Dehya will recover 20% of her Max HP and will restore 6% of her Max HP every 2s for the next 10s. This effect can be triggered once every 20s.
This passive recovers Dehya's HP. It's possible to recover Dehya's HP back to almost full HP with this since the passive itself heals a total of 50% HP throughout its whole duration.
Utility Passive: The Sunlit Way
Passive Effect
Increases the Movement SPD of your own party members by 10% during the day (6:00 – 18:00).
Does not take effect in Domains, Trounce Domains, or Spiral Abyss. Not stackable with Passive Talents that provide the exact same effects.
Increases your party's Movement SPD in the day.
Constellations
Constellation 1 - The Flame Incandescent
Dehya's Max HP is increased by 20%, and she deals bonus DMG based on her Max HP when using the following attacks:
- Molten Inferno's DMG will be increased by 3.6% of her Max HP.
- Leonine Bite's DMG will be increased by 6% of her Max HP.
Constellation 2 - The Sand-Blades Glittering
When Dehya uses Molten Inferno: Ranging Flame, the duration of the recreated Fiery Sanctum field will be increased by 4s.
Additionally, when a Fiery Sanctum exists on the field, DMG dealt by its next coordinated attack will be increased by 50% when active character(s) within the Fiery Sanctum field are attacked.
Constellation 3 - A Rage Swift as Fire
Increases the Level of Leonine Bite by 3.
Constellation 4 - An Oath Abiding
When Flame-Mane's Fist and Incineration Drive attacks unleashed during Leonine Bite hit opponents, they will restore 1.5 Energy for Dehya and 2.5% of her Max HP. This effect can be triggered once every 0.2s.
Constellation 5 - The Alpha Unleashed
Increases the Level of Molten Inferno by 3.
Constellation 6 - The Burning Claws Cleaving
The CRIT Rate of Leonine Bite is increased by 10%.
Additionally, after a Flame-Mane's Fist attack hits an opponent and deals CRIT Hits during a single Blazing Lioness state, it will cause the CRIT DMG of Leonine Bite to increase by 15% for the rest of Blazing Lioness's duration and extend that duration by 0.5s. This effect can be triggered every 0.2s. The duration can be extended for a maximum of 2s and CRIT DMG can be increased by a maximum of 60% this way.
Analysis Conclusion
Dehya's Roles in Team
Based on the talent analysis, multiple conclusions can be taken into account for Dehya's kit:
- She deals a respectable amount of damage and it makes up a large part of her kit, allowing her to be a DPS.
- She is capable of dealing continuous, multiple instances of AoE Pyro damage (albeit at a rather slow rate), allowing her to be a Burgeon DPS.
- She is capable of mitigating damage for her allies and increasing interruption resistance as well as some other utilities included, allowing her to be a Support.
- This form of support includes but is not limited to Elemental Applicators and alternatives to Shielders.
Therefore, she can be built as a DPS, a Burgeon DPS, and/or a Support.
ATK or HP for DPS? Which one is more important?
➔ Summary: ATK if C0, HP if C1+
To evaluate which stats play a more significant role in Dehya's damage, sample stats will be used to determine her damage. The following are considered:
- Dehya in this calculation is based on Lv90 stats, and is assumed she is dealing damage to a Lv90 enemy with 0% RES.
- Dehya is considered C0 in the following situation unless specified.
- Weapon will be Lv90 Prototype Archaic for ATK build, Lv90 The Bell for HP build.
- Weapon passives will be ignored in this calculation.
- Artifacts will be Crimson Witch of Flames 4-set (2 stacks), with all 5 artifact pieces at ☆5 and +20.
- Sands will be ATK for ATK build, HP for HP build.
- Goblet will be Pyro DMG Bonus.
- Circlet will be CRIT DMG.
- Artifact substats will be ignored in this calculation (all subtstats will be considered 0 value).
- Talent levels are considered Lv6.
- Supportive aspects of talents are not considered here, only damage aspects are considered.
- All of the calculations below are based on single-hit damage, not the total number of damage dealt by the talent.
With the above points, here are the stats used in the calculation.

Sample ATK & HP Build
Using the stats above, the following result is obtained:
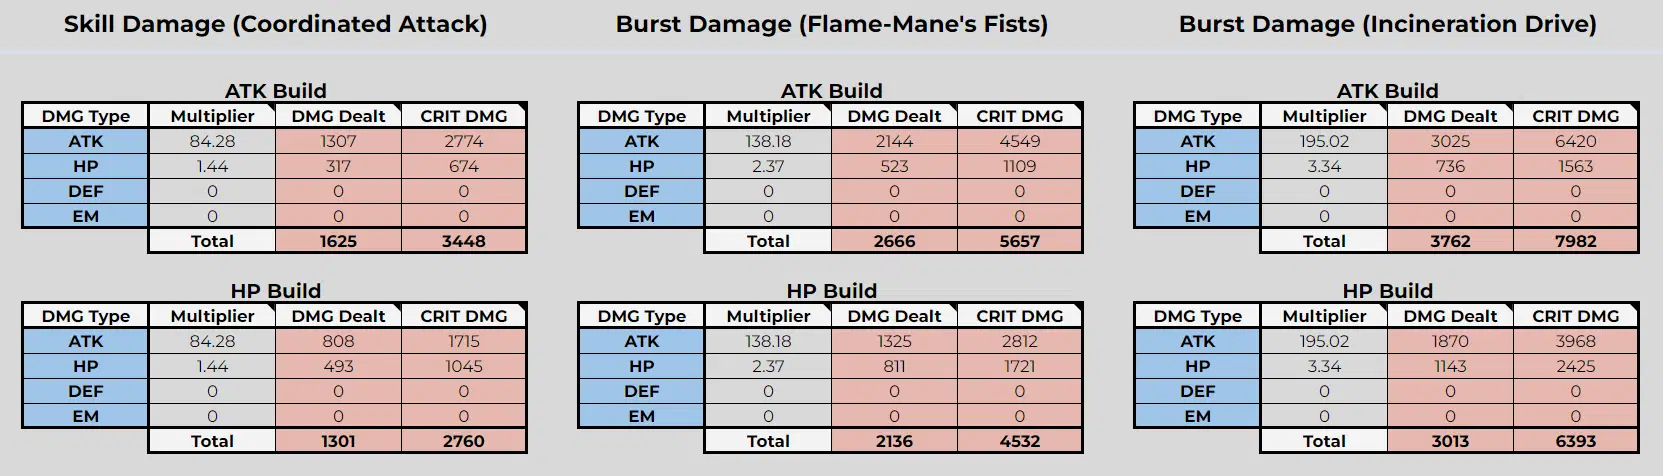
Damages dealt using the sample stats above
From this, it's apparent that ATK contributes to a larger portion of Dehya's damage.
Even when built with HP, ATK contributed more to the damage she deals.
Constellation 1 Activated
Constellation 1 increases the damage she deals toward enemies by a percentage of her HP. This damage is additive to the damage you deal to enemies. Because of this Constellation, another set of calculations will be done to see whether ATK still contributes larger than HP does to her damage. (Dehya's HP is also increased by 20% for this)
* This calculation is based on my understanding of the Constellation: Dehya's damage is increased by a percentage of her HP for every hit she lands, and is additive to her current damage.

Damages dealt using the sample stats above (+20% HP) and Constellation 1
Interestingly, on C1, her focus shifts from ATK to HP, since HP contributes to a larger portion of her damage now. However, ATK does remain as relevant as it is. Raising both ATK and HP is some tough and heavy work though, so for this situation, HP would be preferred to be raised instead of ATK.
Do remember that this is based on damage alone, and numbers may vary with different amounts of investments. HP remains significant for Dehya's overall utility.
Dehya Builds
( Rate of Investment: 6~7 / 10)
(Minimum Amount of Investment Needed)
Dehya's dual scaling meant that you'll have to either maximize your ATK or maximize your HP, trying to balance your stats between both would be difficult.
Even if you're building Dehya as a Burgeon DPS, you'll still need ATK/HP sub stats on top of EM/EM/EM artifact main stats.
Fortunately, there are plenty of F2P weapon options to go with.
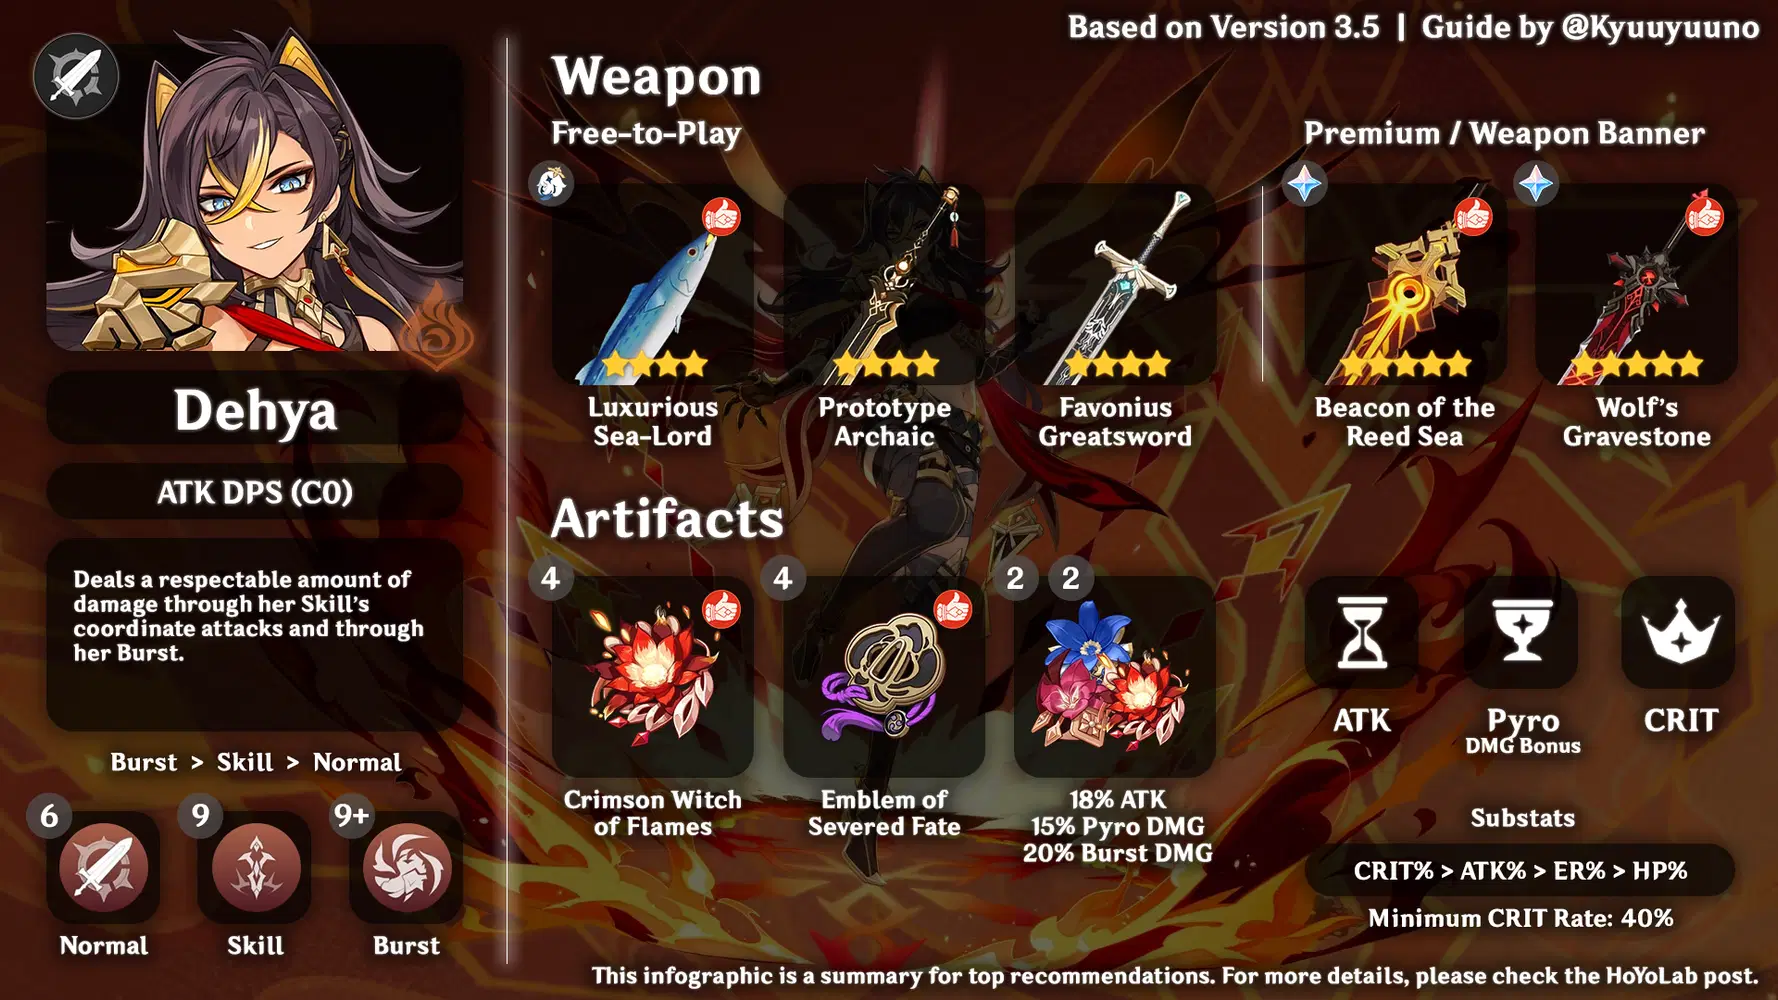
Dehya DPS Infographics (C0)
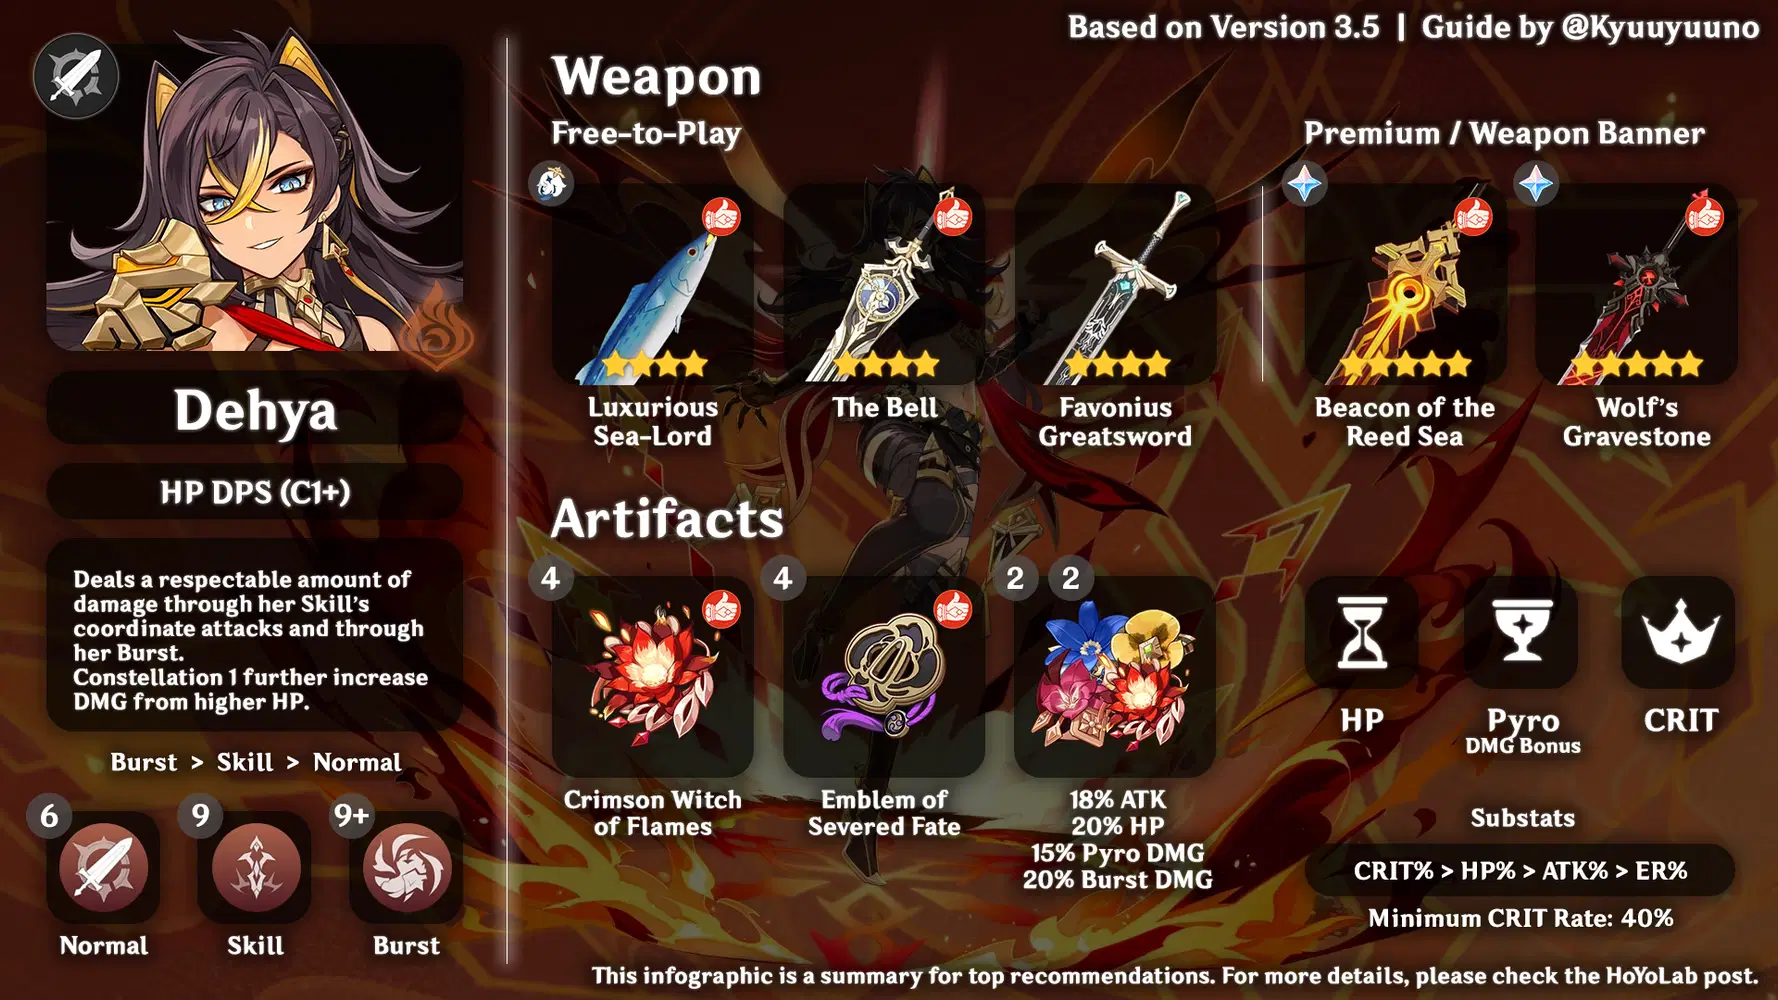
Dehya DPS Infographics (C1+)
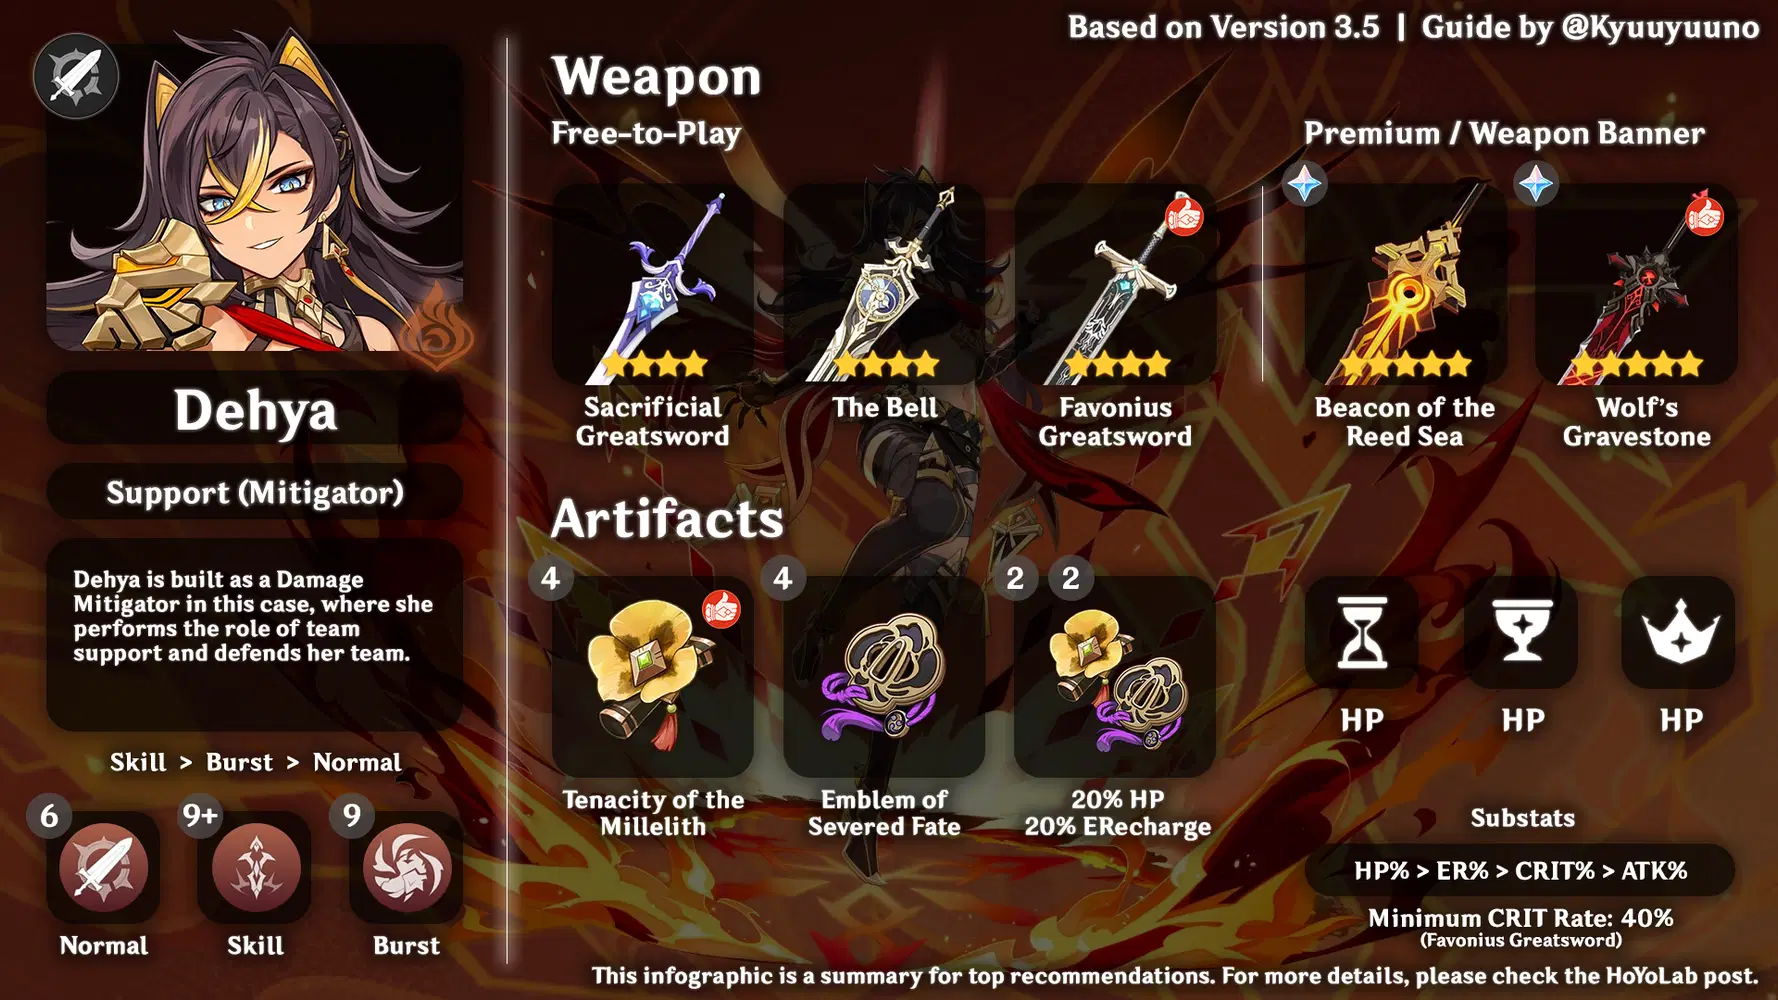
Dehya Support Infographics (Damage Mitigator)
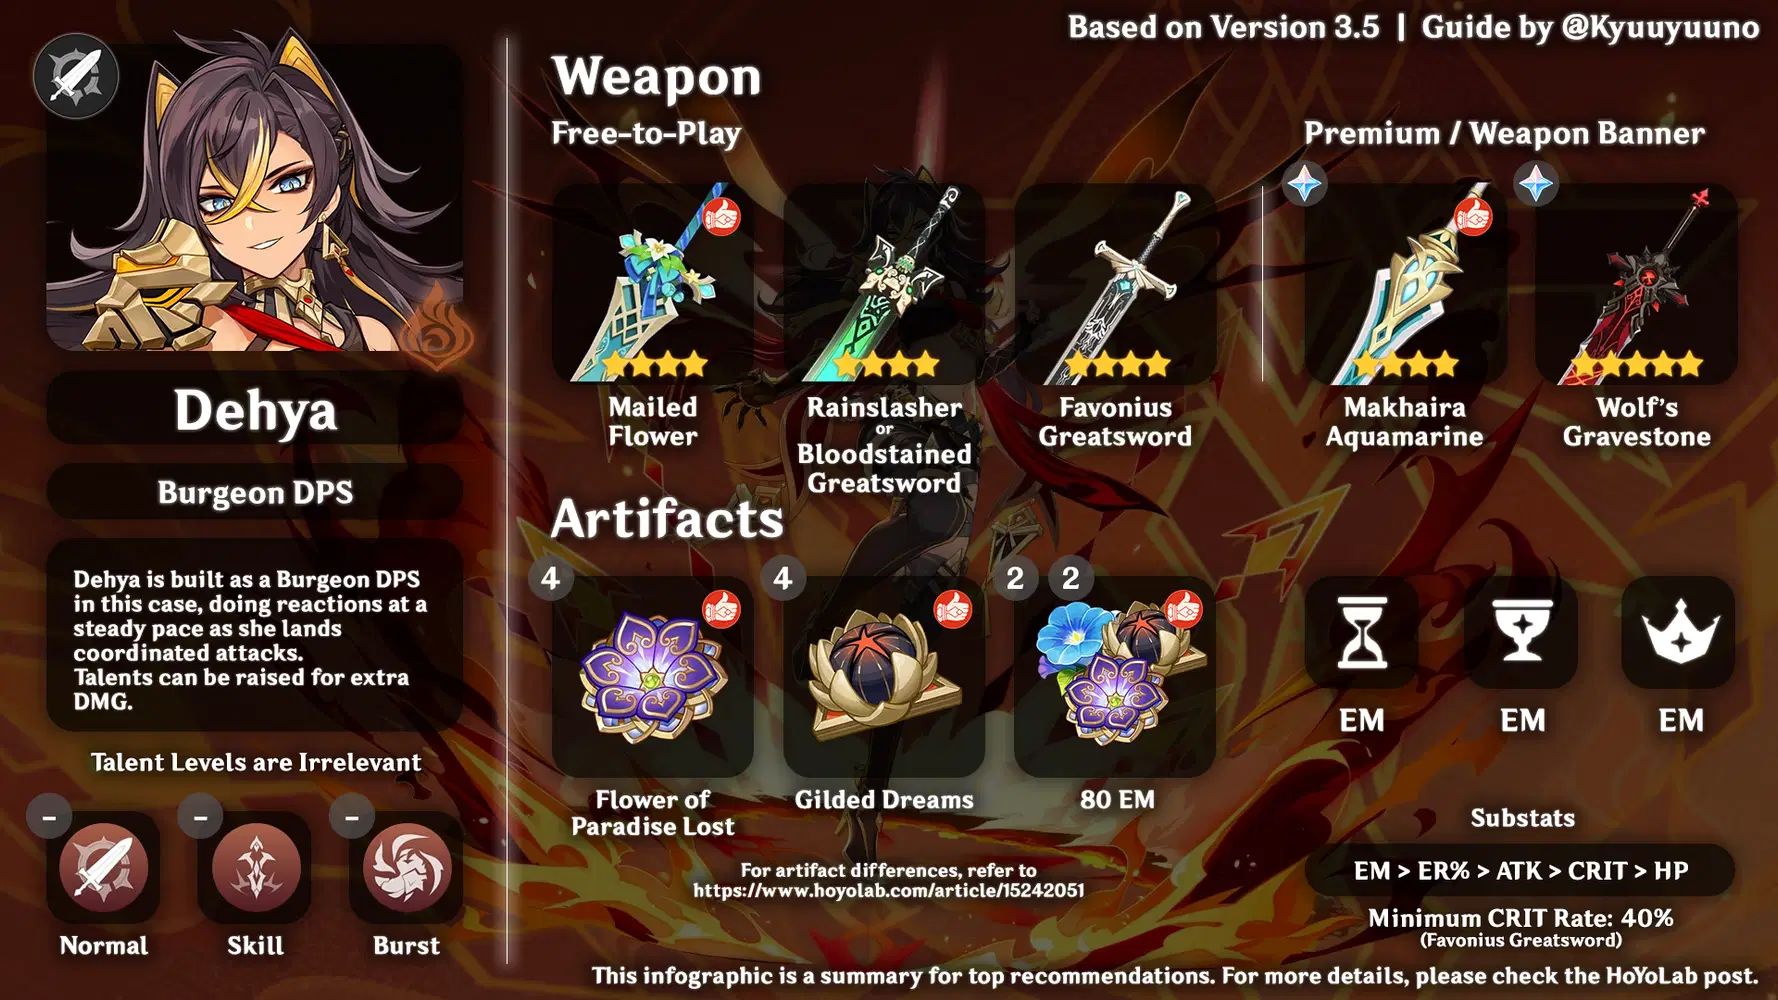
Dehya Burgeon DPS Infographics
These infographics are made as a summary for this post to explain Dehya's builds.
For more information, read further through the post.
Talent Levels
Please note that this is just a recommendation.
You don't have to follow this recommendation if you want to spend fewer or more resources.
Talent priority is as follows:
Burst > Skill > Normal
Talent: Normal Attack (6)
Dehya's playstyle causes Dehya to rarely use her Normal Attacks, making it not as useful as the other two talents. However, given the proper set-up or specialized supports (Such as Bennett C6), Normal Attack talent can be valuable for on-field DPS if that's how you intend to play Dehya.
For utility purposes, I would say to raise her Normal Attack talent level to 6, but feel free to manage your resources for this talent since gameplay varies between each player.
Talent: Elemental Skill (9)
Dehya's secondary damage source, raising her Skill's talent level increases her damage output as an Off-field DPS, as well as raising the damage mitigation Dehya applies.
For a Support role, this talent may be more relevant to raise than Burst.
Talent: Elemental Burst (9+)
Dehya's primary damage source, she deals a nice sum of damage via her Burst.
Raising her talent level will increase the damage her Burst deals.
Weapons
Free-to-Play
* Weapon recommendation depends on your build.
◇ Luxurious Sea-Lord (☆4) - Burst DPS
The delicious Tuna claymore here is a great weapon in terms of increasing Dehya's personal damage, and its Elemental Burst DMG focus makes it a favorable weapon to grill enemies with.
◇ The Bell (☆4) - Support or C1+ DPS
Finally, The Bell has some use?!
Admittingly, The Bell isn't exactly convenient to use, and as covered in the Analysis Conclusion above, HP isn't exactly relevant for DPS uses unless Dehya is C1 or above. The Passive is handy though, and Dehya can utilize it to her benefit since the Shield is retained and sticks to Dehya like glue (Character-specific shield) so the damage buff provided by The Bell's passive still apply while she is off-field. HP substat is also great for support uses.
◇ Prototype Archaic (☆4) / Lithic Blade (☆4) - DPS
ATK stat stick weapons. Lithic Blade is more beneficial when you have Liyue characters in your team.
◇ Blackcliff Slasher (☆4) - DPS
CRIT DMG stat stick weapons.
◇ Mailed Flower (☆4) / Rainslasher (☆4) / Bloodstained Greatsword (☆3) - Burgeon DPS
Beneficial weapon for Burgeon DPS purposes or Elemental Mastery stat stick, typically Mailed Flower is preferred over Rainslasher or Bloodstained Greatsword in general since Mailed Flower provides both high ATK and Elemental Mastery, and its effect is triggered easily.
Rainslasher & Bloodstained Greatsword's passives are irrelevant.
Below is a reference to the three weapons' stats.
- Mailed Flower (565 Base ATK, 110 EM + 24% ATK & 96 EM from passive = Total 206 EM),
- Rainslasher (510 Base ATK, 165 EM),
- Bloodstained Greatword (354 Base ATK, 187 EM)
◇ Favonius Greatsword (☆4) / Sacrificial Greatsword (☆4) - Support
Favonius helps supplies Dehya and her teammates with energy, while Sacrificial helps with refreshing Skill's uptime.
Favonius also can be considered for DPS builds, in the case of supplying self with energy for Burst uptime.
It's better to just put Favonius on someone else though than have Dehya hold it (when building Dehya as a DPS) since Favonius's passive is supportive, not offensive.
Premium / Weapon Banner
◇ Beacon of the Reed Sea (☆5) - DPS
A weapon tailored for Dehya, with passives that synergize with her kit. Excellent to use on her.
◇ Wolf's Gravestone (☆5) - General Use
A great weapon to use on Dehya that increases her damage. Also provides buffs to her team when the weapon's passive effect activates.
◇ The Unforged (☆5) - DPS
Passive somewhat synergizes with Dehya, making it a noteworthy weapon. Unfortunately, Dehya doesn't have her own built-in Shield, so she can't make full use of it without an external Shield source. At least she herself can use half of its passive effectively.
◇ Redhorn Stonethresher (☆5) - DPS
Stat stick weapon. Passive doesn't find any noteworthy use unless Dehya is played as an on-field DPS.
◇ Akuoumaru (☆4) - Burst DPS
Increases Dehya's Burst DMG based on the total amount of Energy each party member has combined.
◇ Makhaira Aquamarine (☆4) - Burgeon DPS
Can serve as a weapon for Burgeon DPS, buffing your own damage, as well as supporting your team's ATK at time intervals.
◇ Serpent's Spine (☆4) - DPS
Works as a stat stick at best.
While the passives are great to use in general to raise Dehya's damage, her Redmane's Blood mechanic (Gradual HP decrease per tick) makes the weapon passive's stacks deplete quickly since stacks deplete every time Dehya takes damage, which makes it difficult for Dehya to accumulate/maintain the number of stacks (especially considering how she stays off-field most of the time after casting Skill). The passive also may put her at risk of depleting her HP faster.
Artifacts
High-Performance Artifact Sets
◇ 4 - set | Crimson Witch of Flames (General DPS)
Set Bonus Effect
2-Piece Bonus
Pyro DMG Bonus +15%
4-Piece Bonus
Increases Overloaded and Burning, and Burgeon DMG by 40%. Increases Vaporize and Melt DMG by 15%. Using Elemental Skill increases the 2-Piece Set Bonus by 50% of its starting value for 10s. Max 3 stacks.
A general Pyro set Dehya can use with ease for flexible and general purposes. With 2 Skill uses, Dehya can gain up to 15% Pyro DMG Bonus (2 stacks) from the 4-Piece bonus. The reaction damage increase is also appreciated since Dehya can trigger reactions through her Skill's coordinated attacks continuously.
Usable in any situation.
◇ 4 - set | Lavawalker (The Other General DPS, but Niche)
Set Bonus Effect
2-Piece Bonus
Pyro RES increased by 40%.
4-Piece Bonus
Increases DMG against opponents affected by Pyro by 35%.
The other general Pyro set Dehya can use. Great in Mono Pyro or Burning teams, but nothing noteworthy outside of that.
Usable if Dehya is played in Mono Pyro or Burning teams, or when Dehya is not fighting enemies that apply elements to self.
◇ 4 - set | Emblem of Severed Fate (Burst DPS)
Set Bonus Effect
2-Piece Bonus
Energy Recharge +20%
4-Piece Bonus
Increases Elemental Burst DMG by 25% of Energy Recharge. A maximum of 75% bonus DMG can be obtained in this way.
An artifact set Dehya can use to increase overall damage from her Elemental Burst. This artifact set also allows you to invest in Energy Recharge and put it into use to build Dehya as a Burst DMG dealer, considering Dehya struggles with Energy problems when she has no Energy Recharge invested.
Usable in any situation, especially effective when using Dehya as a Burst DPS.
◇ 4 - set | Tenacity of the Millelith (Support)
Set Bonus Effect
2-Piece Bonus
HP +20%
4-Piece Bonus
When an Elemental Skill hits an opponent, the ATK of all nearby party members is increased by 20% and their Shield Strength is increased by 30% for 3s. This effect can be triggered once every 0.5s. This effect can still be triggered even when the character who is using this artifact set is not on the field.
Since Dehya is capable of continuously landing hits using her Skill while off-field, with a cooldown of 2.5 seconds per hit, Dehya can effectively trigger Tenacity of the Millelith's 4-set effect continuously for as long as she lands hits, buffing your team members in the process. Dehya also scales with both ATK and HP, so that works to her benefit. The Shield Strength buff is irrelevant.
◇ 4 - set | Gilded Dreams (Burgeon DPS)
Set Bonus Effect
2-Piece Bonus
Elemental Mastery +80
4-Piece Bonus
Within 8s of triggering an Elemental Reaction, the character equipping this will obtain buffs based on the Elemental Type of the other party members, ATK is increased by 14% for each party member whose Elemental Type is the same as the equipping character, and Elemental Mastery is increased by 50 for every party member with a different Elemental Type. Each of the aforementioned buffs will count up to 3 characters. This effect can be triggered once every 8s. The character who equips this can still trigger its effects when not on the field.
The Elemental Mastery increase is valuable for Dehya to increase her Elemental Reaction damages for Burgeon.
This artifact set may outshine Flowers of Paradise Lost for Burgeon DPS depending on how much EM you have (see below).
◇ 4 - set | Flowers of Paradise Lost (Burgeon DPS)
Set Bonus Effect
2-Piece Bonus
Increases Elemental Mastery by 80.
4-Piece Bonus
The equipping character's Bloom, Hyperbloom, and Burgeon reaction DMG are increased by 40%. Additionally, after the equipping character triggering Bloom, Hyperbloom, or Burgeon, they will gain another 25% bonus to the effect mentioned prior. Each stack of this lasts 10s. Max 4 stacks simultaneously. This effect can only be triggered once per second. The character who equips this can still trigger its effects when not on the field.
An artifact set that emphasizes increasing Burgeon (Bloom-related) damage. The difference in damage between Gilded Dreams and Flowers of Paradise Lost depends on your EM values on both sets. While this set does increase your Burgeon DMG more than Gilded Dreams would, Gilded Dreams may still be preferred since it has a more universal application than simply being restricted to Burgeon.
For more information on the difference between the Gilded Dreams 4-set and the Flowers of Paradise Lost 4-set, refer to this post here.
◇ 2+2 - set | 18% ATK / 20% HP / 15% Pyro DMG Bonus / 20% Elemental Burst DMG
Artifacts sets that meet the criteria are:
- 18% ATK - Gladiator's Finale, Shimenawa's Reminisence, Vermillion Hereafter, Echoes of an Offering
- 20% HP - Tenacity of the Millelith
- 15% Pyro DMG Bonus - Crimson Witch of Flames
- 20% Elemental Burst DMG - Noblesse Oblige
Other artifacts that are usable, but have a rather niche use (Such as Burgeon DPS):
- 80 Elemental Mastery - Wanderer's Troupe, Gilded Dreams, Flowers of Paradise Lost
Generally good to use on Dehya, provides boosts to her damage one way or another.
Other Notable Artifact Sets
◇ 4 - set | Vermillion Hereafter (DPS)
Set Bonus Effect
2-Piece Bonus
ATK +18%
4-Piece Bonus
After using an Elemental Burst. this character will gain the Nascent Light effect, increasing their ATK by 8% for 16s. When the character's HP decreases, their ATK will further increase by 10%. This increase can occur this way maximum of 4 times. This effect can be triggered once every 0.8s. Nascent Light will be dispelled when the character leaves the field. If an Elemental Burst is used again during the duration of Nascent Light, the original Nascent Light will be dispelled.
While this is an unusual suggestion, Dehya can utilize the Vermillion Hereafter artifact set to increase her damage since her Burst doesn't snapshot and since she is able to receive damage while in Burst. With the DoT effect from her Skill's damage mitigation, Dehya is capable of receiving full 4 stacks of Vermillion Hereafter easily, which means Dehya can easily gain up to 48% ATK increase from the 4-set bonus.
Dehya also can utilize the 4-set's effect for her Elemental Skill's DMG increase, since it snapshots on cast/deploy, hence the buff is not wasted when Dehya is switched.
The downside of using this artifact set is that it's complicated to use in general. It demands proper usage of her kit (Deploying her Skill, receiving a hit, using Burst, Skill is then deployed with remaining duration) and you need to receive damage at least 1 time during her Skill's duration for her to receive the DoT damage needed to utilize the HP decrease buffs.
In short, it can be a great artifact set but it's complicated and somewhat troublesome to use in practice.
You'll be better off using artifact sets such as Crimson Witch of Flames or Emblem of Severed Fate since they're much easier to use (And theoretically, those two sets benefit Dehya more than Vermillion does overall).
Usable in any situation, but due to its difficult usage and because artifact sets that are much easier to use exist, farming for this set specifically is not recommended.
Early Game Artifact Sets
The following suggestions are to help newer players equip lower rarity alternatives, and should not be invested deeply in mid/late game. Some can still be usable alternatives for mid/late game.
Artifacts are sorted in the order of their rarity, the number of pieces used to form the set effect used, and how accessible they are for new players.
◇ 2 - set | Adventurer (☆1~3)
Set Bonus Effect
2-Piece Bonus
Max HP increased by 1,000.
Source: Chests, Investigations, Bosses, Artifact Domain (Midsummer Courtyard)
Increases Dehya's max HP for higher damage & utility.
◇ 2 - set | Resolution of Sojourner (☆3~4)
Set Bonus Effect
2-Piece Bonus
ATK +18%.
Source: Adventurer Handbook, Adventure Rank Rewards, Artifact Domain (Midsummer Courtyard, Momiji-Dyed Court)
Dehya can utilize the 2-set for increasing her overall damage since Dehya has ATK scaling.
◇ 2 - set | Gambler (☆3~4)
Set Bonus Effect
2-Piece Bonus
Increases Elemental Skill DMG by 20%.
Source: Artifact Domains
Increases the damage Dehya deals from her Elemental Skill.
◇ 4 - set | Instructor (☆3~4)
Set Bonus Effect
2-Piece Bonus
Increases Elemental Mastery by 80.
4-Piece Bonus
Upon triggering an Elemental Reaction, increases all party members' Elemental Reaction by 120 for 8s.
Source: Elite enemy drops, certain Normal Bosses, Weekly bosses
Helpful for buffing your team's Elemental Mastery since Dehya can perform a supportive role for teams.
Note that 4-set effect doesn't activate when the holder is off-field.
◇ 4 - set | Berserker (☆3~4)
Set Bonus Effect
2-Piece Bonus
CRIT Rate +12%.
4-Piece Bonus
When HP is below 70%, CRIT Rate increases by an additional 24%.
Source: Elite enemy drops, certain Normal Bosses, Weekly bosses
Increases the frequency of CRIT hits Dehya lands. She gains more CRIT Rate if her HP is below 70%, and her off-field role meant it's easy to maintain this amount of HP, especially with her Skill's damage mitigation mechanic.
However, it should be noted that Dehya's Passive is capable of healing Dehya to full HP after receiving too much damage, so this artifact set may fail to function effectively at times.
◇ 4 - set | Brave Heart (☆3~4)
Set Bonus Effect
2-Piece Bonus
ATK +18%.
4-Piece Bonus
Increases DMG by 30% against opponents with more than 50% HP.
Source: Artifact domains
Increases the damage Dehya deals by 30% when the enemy's HP is above 50%. Damage increase applies to both Elemental Skill and Elemental Burst. Dehya can utilize the 2-set for increasing her overall damage since Dehya has ATK scaling.
Recommended Main Stats
- Sands of Eon - ATK% / HP% (Depends on your build & Constellation)
- Goblet of Eonothem - Pyro DMG Bonus
- Circlet of Logos - CRIT Rate / CRIT DMG
Dehya can use ATK% or HP% Main Stat as a placeholder alternative instead of the Main Stats mentioned above for Goblet or Circlet when the Main Stats mentioned above is not available.
Sub Stats Preferences
For artifact stats, it's preferred to look for (in order from most important to least important):
- CRIT Rate / CRIT DMG
- ATK
- HP
- Energy Recharge (May have higher priority than ATK or HP depending on build)
- Elemental Mastery (Situational)
Any stats not mentioned above do not benefit Dehya in any way.
◇ CRIT Rate / CRIT DMG
Minimum CRIT Rate: 40%
Since CRITs affect both Skill and Burst damages, it's preferred to prioritize raising CRIT stats to enhance both damage sources. This requires higher investment than in general, so it's only higher than ATK and HP in priority if you want to utilize Dehya's whole kit effectively and/or if you don't want to go through the hassle of changing Dehya's equipped gears as you transition from C0 to C1 in the future.
You can prioritize ATK or HP if you want to further emphasize Dehya's damage instead, or want to spend a lower amount of investment.
The minimum CRIT Rate is set to 40% because Dehya is somewhat single-hit per tick oriented but with continuous short intervals between each hit, with her whole damage output spread between each time her Elemental Skill/Burst lands a hit, hence she will not lose much from failing to land CRITs.
You can always raise CRIT Rate higher than this value, depending on how willing you are to invest in raising her.
◇ ATK
Dehya's primary scaling, which will increase the overall damage she deals through both Elemental Skill and Elemental Burst.
While this scales larger than HP does at C0, her C1 further increases the damage she does when building with HP.
◇ HP (Optional if C0 DPS, Primary Scaling if C1+ DPS, Mandatory if Support)
Dehya's secondary scaling, which will increase the overall damage she deals through both Elemental Skill and Elemental Burst.
On C0, ATK contributes to a larger part of her damage than HP does, but she gains much more increased damage when built with HP on C1 and above. You can opt for HP build instead of ATK for double benefit if you have her on C1 or above.
Dehya's supportive utility (Damage mitigation and self sustain healing) also scales with HP, so if you're building her as a Support instead of a DPS, HP becomes more relevant than ATK.
◇ Energy Recharge
If you're building Dehya as a DPS, Energy Recharge becomes more relevant since her Energy Cost is 70, which is fairly expensive. To add to that, Dehya generates 1 Pyro energy particle on every coordinated attack landed on enemies. With her mixed off-fielder and on-fielder role, the amount of Energy Recharge required for Dehya varies differently on how you'll use her, but she struggles to supply herself with energy if no external supports are provided.
◇ Elemental Mastery (Optional in General, Mandatory if Burgeon DPS)
Depending on how you want to play Dehya, Elemental Mastery may become either relevant or irrelevant. For the most part, Elemental Mastery isn't exactly relevant for Dehya because of the difficulty in supporting her damage aspects with Elemental Reactions, but Elemental Mastery becomes highly relevant if built as a Burgeon DPS (Elemental Reaction DPS).
Team Composition Ideas
The general rule for teams is that they should be composed of On-field DPS, Off-field DPS, Support, and Healer.
At times, Off-field DPS and Support / Healer and Support are interchangeable depending on the characters being used in the team.
Dehya is capable of filling multiple roles and her teams vary from one and another, hence her teammate preferences may vary from one team to another. Dehya may fill in the team as the Main DPS, Sub DPS, Support, or Elemental Mastery DPS depending on her build and how she is used. Other members will simply have to fill in the remaining slots that are not occupied by Dehya.
Since Dehya primarily works as a DPS & Support, an example of team compositions will be made for those two roles.
It should be noted that the characters listed are sorted in no particular order and that the recommended teammates are not limited to the infographic.

Dehya Example Teams for DPS/Support Builds.
Other Characters that Synergize
Below is a list of some characters whose kit synergizes with Dehya. This is not a comprehensive list of the characters who are compatible with being on the same team as Dehya, and some other characters not mentioned in this list may synergize with Dehya depending on your team composition/playstyle.
◇ Ganyu
Benefits a lot from the interruption resistance and the damage mitigation from Dehya's skill, as well as being able to utilize Dehya's Pyro application for Melt.
◇ Kaeya
Kaeya's Burst allows Dehya to perform Melt reactions since Dehya's Pyro has a slow apply rate.
◇ Xiangling
Xiangling can provide extra buffs for Dehya at C6 for the Pyro DMG Bonus 15%.
◇ Zhongli
Zhongli's Enemy RES Shred and his access to 4-Millelith set allows him to effectively support Dehya well.
◇ Kaedehara Kazuha
Kazuha can easily absorb Pyro and Swirl it, giving buffs to Dehya's damage and his access to 4-Viridescent meant he can shred the enemy's Pyro RES.
◇ Bennett
Gains full benefit from Bennett since Bennett gives ATK buff to Dehya. C6 further boosts the damage Dehya is capable of dealing toward enemies.
◇ Sangonomiya Kokomi
Provides healing and Hydro application for Dehya to perform Reverse Vaporizes.
◇ Dori
Dori can heal and replenish Dehya's energy using her Burst.
Other Notable Information
- Despite not exactly using her Claymore to land hits, Dehya's 3rd and 4th Normal Attack strings deplete Geo gauges more than her Claymore attack sequences. Crystal Chunks are used to display this point, where only the specified Normal Attack string is used to hit the Crystal Chunks.

Dehya's Skill is capable of hitting enemies located above her Skill's field but is not capable of hitting enemies located below her Skill's field. A Hilichurl Shooter's tower located at the Chasm Surface area as well as the Hilichurl itself is used to test this.
Change Logs
- Version 3.4
- 03/04 - Released.
- 03/28 - Adjusted and fixed some sentence wordings & added more description for some weapons.
Closing
Note that this guide is based on my view of the character mentioned above.
Leave a comment below if you have a different point of view or if you have questions!