Disclaimer:
◇ This build is optimized for the character's overall performance rather than solely based on damage.
◇ This build can be used with any rotation without specific restrictions.

Other Related Guides
◇ Currently N/A!
Sangonomiya Kokomi Guide

Introduction
Sangonomiya Kokomi is a 5-star Hydro Catalyst user released on Version 2.1. This fish-dragon (actually a human) Divine Priestess of Watatsumi Island and a descendant of the Sangonomiya Clan is an expert combat strategist powerful at providing healing and comfort to the team.
Having a powerful capability to sustain herself and her team, strong DPS output despite primarily being a healer, the ability to walk on water, along with the versatility of Hydro makes Kokomi a strong pick in teams requiring either Elemental Application or solo sustain.
This guide will try to cover everything you need to know about Kokomi, including her builds and other facts.
Talent Analysis
Normal Attack: The Shape of Water
Talent Info
Normal Attack
Performs up to 3 consecutive attacks that take the form of swimming fish, dealing Hydro DMG.
Charged Attack
Consumes a certain amount of Stamina to deal AoE Hydro DMG after a short casting time.
Plunging Attack
Gathering the might of Hydro, Kokomi plunges towards the ground from mid-air, damaging all opponents in her path. Deals AoE Hydro DMG upon impact with the ground.

Shoots out a fish projectile on each Normal Attacks, each projectile is able to reach a long range. Can be used to hit enemies from far away.
Can also be handy for activating Hydro monuments or hunting down animals from a far distance when utilized well.
Elemental Skill (Kurage's Oath)
Talent Info
Summons a "Bake-Kurage" created from water that can heal her allies.
Using this skill will apply the Wet status to Sangonomiya Kokomi.
Bake-Kurage
Deals Hydro DMG to surrounding opponents and heal nearby active characters at fixed intervals. This healing is based on Kokomi's Max HP.
Bake-Kurage Duration: 12.0s / CD: 20.0s
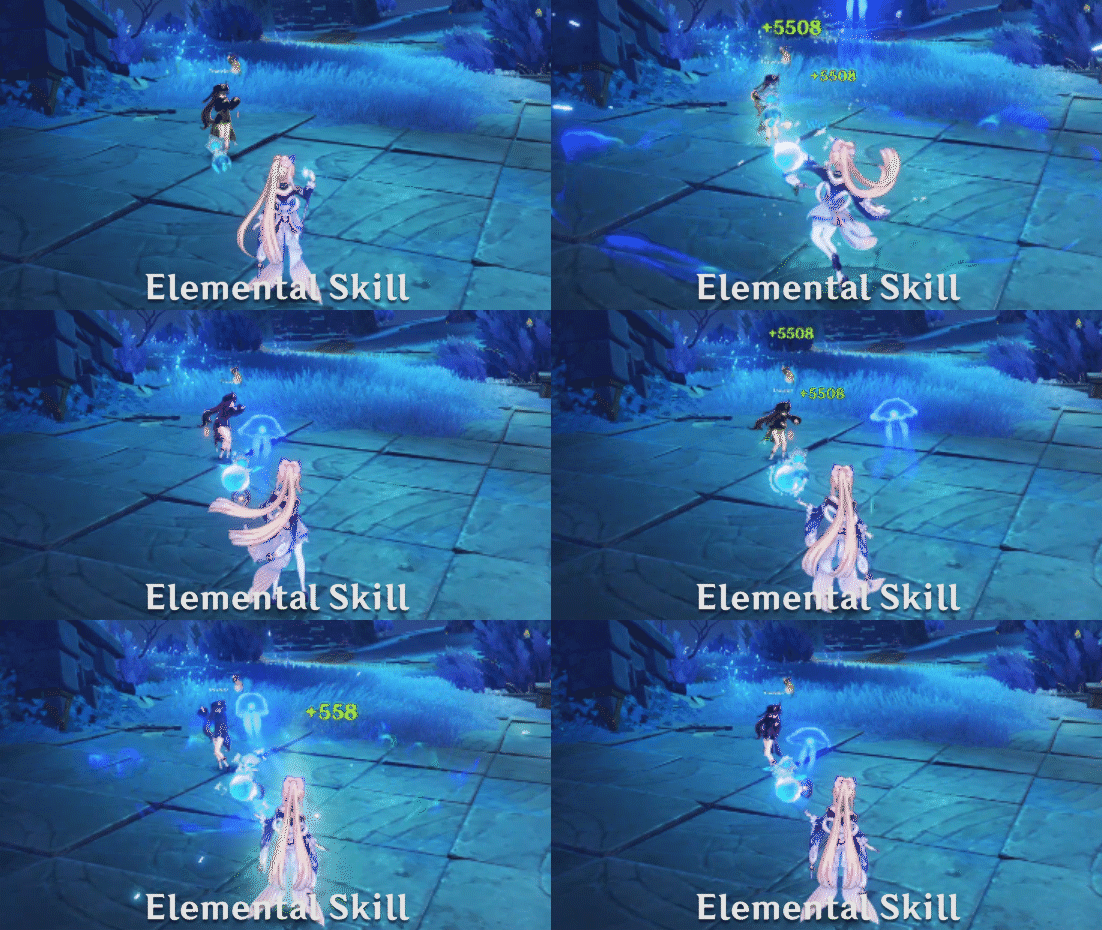
Summons a Bake-Kurage to deal damage and heal all allies within its area on every tick. Has a powerful Hydro application included in each hit. Healing is based on the amount of Max HP she has. Can heal multiple co-op members at the same time. Wet status applies only on initial cast, and will not occur repetitively.
Skill Properties:
- Snapshot: Yes (On cast)
- Size of Bake-Kurage AoE: 5m Radius
- Bake-Kurage tick intervals: Every 2s
Elemental Burst (Nereid's Ascension)
Talent Info
Summons the might of Watatsumi, dealing Hydro DMG to surrounding opponents, before robing Kokomi in a Ceremonial Garment made from the flowing waters of Sangonomiya.
Ceremonial Garment
- Sangonomiya Kokomi's Normal Attack, Charged Attack and Bake-Kurage DMG are increased based on her Max HP.
- When her Normal and Charged Attacks hit opponents, Kokomi will restore HP for all nearby party members, and the amount restored is based on her Max HP.
- Increases Sangonomiya Kokomi's resistance to interruption and allows her to walk on the water's surface.
These effects will be cleared once Sangonomiya Kokomi leaves the field.
Ceremonial Garment Duration: 10.0s / CD: 18.0s / Energy Cost: 70
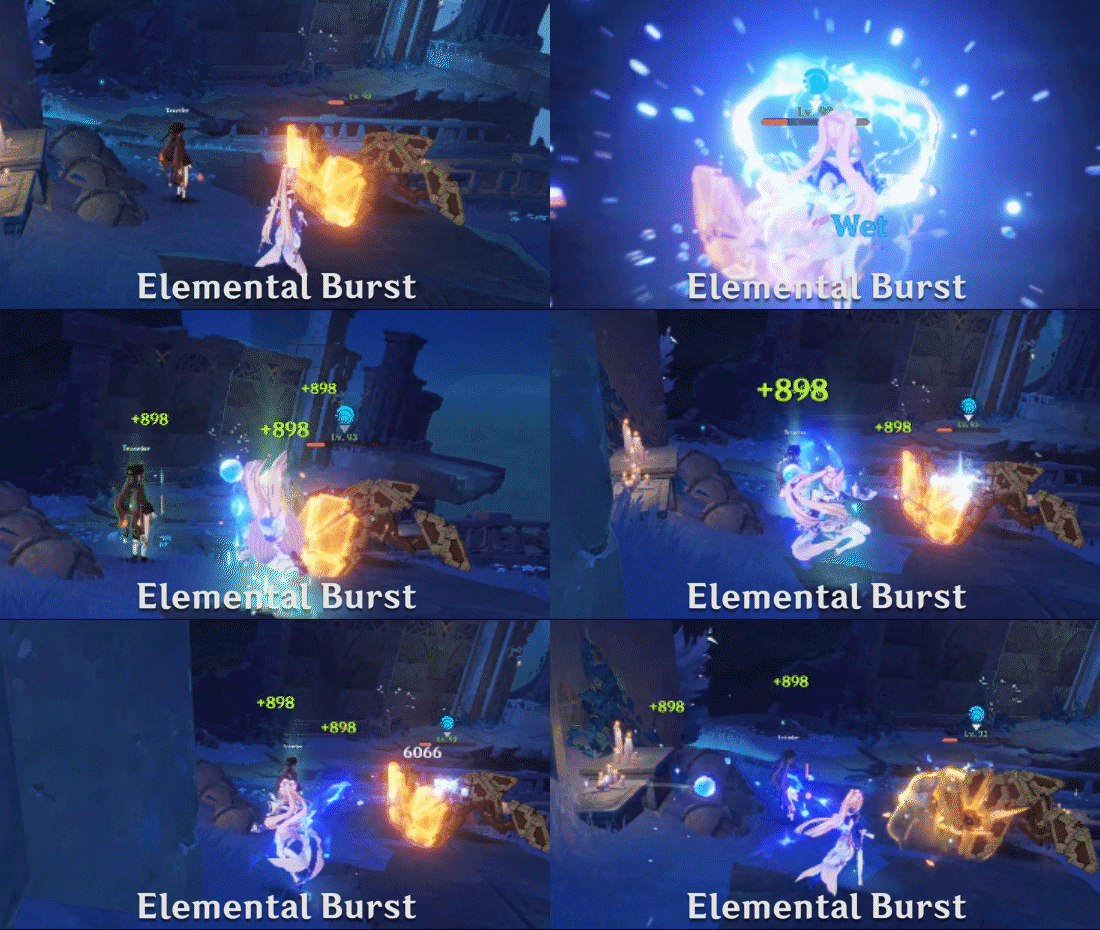
Kokomi gives herself the Ceremonial Garment state which increases all of her damage (dealt through her Normals, Charged, Plunge and Skill) based on her Max HP. During this state, all of Kokomi's Normals and Charged Attacks will heal all nearby party members based on her Max HP, regardless of whether they deal damage to the enemy or not.
Damage increase values will dynamically change based on her current Max HP.
Kokomi will also be able to walk on top of water surfaces while in the Ceremonial Garment state, treating water surfaces as if they are solid surfaces. Because of that, fall damages or similar mechanics that are mostly applicable only on the ground will also be applied on top of the water for as long as Kokomi remains in her Ceremonial Garment state.
Skill Properties:
- Snapshot: N/A

Passives Analysis
1st Ascension Passive: Tamakusi Casket
Passive Effect
If Sangonomiya Kokomi's own Bake-Kurage are on the field when she uses Nereid's Ascension, the Bake-Kurage's duration will be refreshed.
Through this Passive, Kokomi is able to maintain 100% Bake-Kurage up-time by using her Elemental Burst after your Kokomi has reached 10s or below remaining Skill Cooldown. The duration refresh occurs upon being applied with the Ceremonial Garment (Burst) state (after the Burst animation ends).
4th Ascension Passive: Song of Pearls
Passive Effect
While donning the Ceremonial Garment created by Nereid's Ascension, the Normal and Charged Attack DMG Bonus Sangonomiya Kokomi gains based on her Max HP will receive a further increase based on 15% of her Healing Bonus.
Increases the amount of damage you deal while in Ceremonial Garment (Burst) state. The damage increase obtained here is directly added to her damage increase multipliers in her talent information.
Utility Passive: Princess of Watatsumi
Passive Effect
Decreases swimming Stamina consumption for your own party members by 20%.
Not stackable with Passive Talents that provide the exact same effects.
Decreases swimming Stamina consumption.
Utility Passive: Flawless Strategy
Passive Effect
Sangonomiya Kokomi has a 25% Healing Bonus, but a 100% decrease in CRIT Rate.
This Passive exists simply for balancing purposes. The decrease in CRIT Rate is visible on your Advanced Stats screen, subtracting the base 5% CRIT Rate by 100%. Kokomi will still be able to land CRITs as long as you manage to get your CRIT Rate value above 0% (This can be done through certain character-given buffs or certain weapon/artifact sets).
Constellations
Constellation 1 - At Water's Edge
While donning the Ceremonial Garment created by Nereid's Ascension, the final Normal Attack in Sangonomiya Kokomi's combo will unleash a swimming fish to deal 30% of her Max HP as Hydro DMG.
This DMG is not considered Normal Attack DMG.
Constellation 2 - The Clouds Like Waves Rippling
Sangonomiya Kokomi gains the following Healing Bonuses with regard to characters with 50% or less HP via the following methods:
- Kurage's Oath Bake-Kurage: 4.5% of Kokomi's Max HP.
- Nereid's Ascension Normal and Charged Attacks: 0.6% of Kokomi's Max HP.
Constellation 3 - The Moon, A Ship O'er the Seas
Increases the Level of Nereid's Ascension (Burst) by 3.
Maximum upgrade level is 15.
Constellation 4 - The Moon Overlooks the Waters
While donning the Ceremonial Garment created by Nereid's Ascension, Sangonomiya Kokomi's Normal Attack SPD is increased by 10%, and Normal Attacks that hit opponents will restore 0.8 Energy for her.
This effect can occur once every 0.2s.
Constellation 5 - All Streams Flow to the Sea
Increases the Level of Kurage's Oath (Skill) by 3.
Maximum upgrade level is 15.
Constellation 6 - Sango Isshin
While donning the Ceremonial Garment created by Nereid's Ascension, Sangonomiya Kokomi gains a 40% Hydro DMG Bonus for 4s when her Normal and Charged Attacks heal, or would heal, any party member with 80% or more HP.
Analysis Conclusion
Kokomi's Roles in Team
Based on the talent analysis, the following conclusions can be taken into account for Kokomi's kit:
- She is capable of providing powerful Healing for the party, making her a powerful Healer.
- She also has certain supportive aspects included in her kit, such as the Hydro application on her Skill. Certain Weapons and Artifacts also allow Kokomi to provide support to the team. This makes her a great Support.
- She has the ability to deal a hefty sum of damage on her own during her Ceremonial Garment (Burst) state. Combined with her massive amount of healing and the availability of the Ocean-Hued Clam artifact set, she can be a DPS.
- Large HP pool and building her with full HP combined with powerful heals makes her viable for strategies that involve Kokomi as a Tanker/Guardian. Or maybe in Kokomi's case, might as well call her a Jellyfish. Get it?
Therefore, she can be built as a Healer, a Support, and/or a DPS. Additionally, she can function as a Tanker/Guardian/Jellyfish.
Kokomi Builds
( Rate of Investment: 2 / 10)
(Minimum Amount of Investment Needed)
Cheap and easy to raise, requires very little, and gives a lot in return. It fulfills all the different roles Weapon is easily secured through crafting or using whatever catalyst that drops from Wishes. No minimum amount of stats is required.
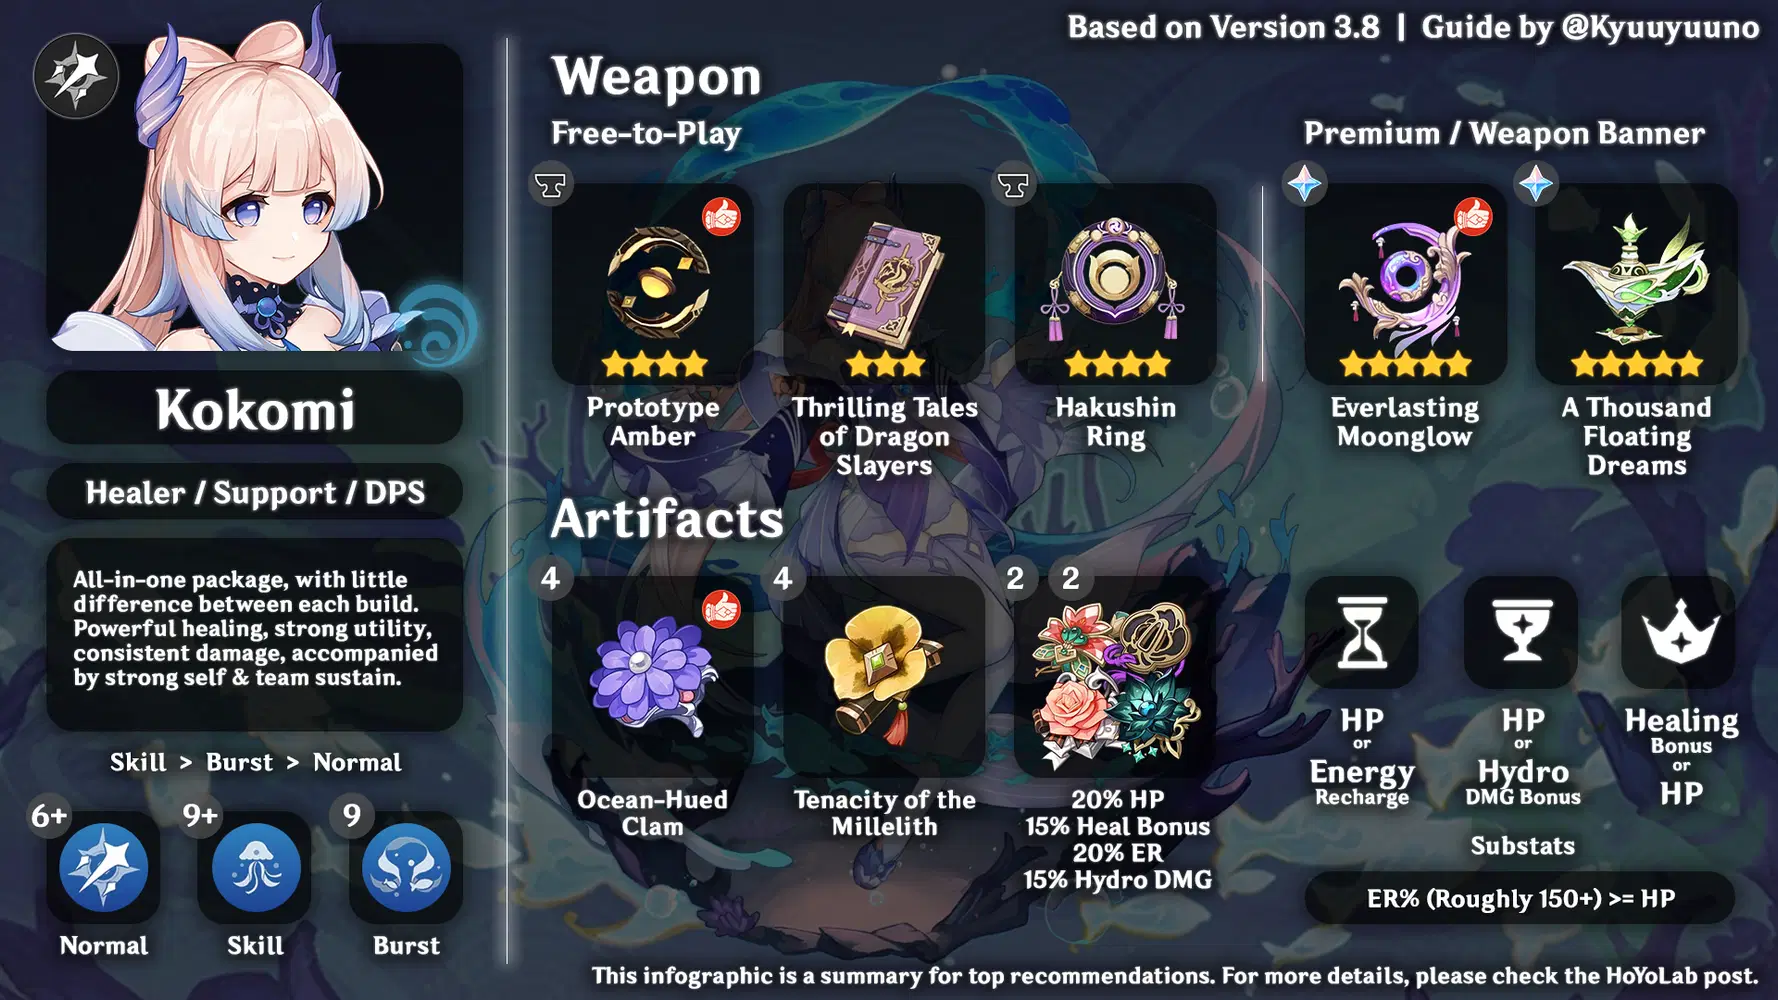
These infographics are made as a summary for this post to explain Kokomi's builds.
For more information, read further through the post.
Talent Levels
Please note that this is just a recommendation.
You don't have to follow this recommendation if you want to spend fewer or more resources.
Talent priority is as follows:
Skill > Burst > Normal

Talent: Normal Attack
While Kokomi mainly uses Normal Attacks while donning the Ceremonial Garment (Burst), leveling up her Normal Attack talent is quite irrelevant since her Normal Attacks during Ceremonial Garment (Burst) state mostly scales off her Elemental Burst talent level and the damage increase to her Normal Attacks comes in the form of an additive buff instead of multiplicative. For the most part, raising her Normal Attack talent would simply contribute little to increasing her Normal Attack damage during the Ceremonial Garment (Burst) state. Not to mention that because Kokomi mainly scales on HP instead of ATK, most of her Normal Attacks damage outside of the Ceremonial Garment (Burst) state isn't quite noticeable.
Leveling up her Normal Attack talent doesn't impact her damage/performance much, but it is by all means not useless and can be leveled up safely thanks to its frequent usage.
Talent: Elemental Skill
Kokomi's primary utility, used most often in teams for her ability to heal and apply Hydro while being off-field. Leveling up her Elemental Skill increases the amount of healing she provides through her Bake-Kurage, while also increasing Bake-Kurage's damage slightly.
Talent: Elemental Burst
Kokomi's primary damage source, as well as secondary utility. While in her Ceremonial Garment (Burst) state, all of her attack damages will increase based on her Max HP, while she is on the field. Excellent to raise when Kokomi is used for her on-field presence, but less relevant when used otherwise.
Weapons
* Weapon recommendation depends on your build.
* Elemental Mastery options are included for Bloom/Electro-charged teams.
Free-to-Play
◇ Prototype Amber (☆4) - Healer / DPS ★
Arguably Kokomi's favorite weapon. On top of being easily affordable, it greatly enhances her performance at both healing and DPS. Also makes it easier for Kokomi to reuse her Burst from its passive energy generation.
◇ Thrilling Tales of Dragon Slayers (☆3) - Healer / Support
Valuable weapon for early game, decent weapon for late game.
Prototype Amber is overall more useful and more universal in its usage, being able to replenish Kokomi's Energy as well as increase Kokomi's overall stats higher. If Kokomi is used solely for her Skill and is not utilized for her on-field presence to deal damage while in the Ceremonial Garment (Burst) state, some may find Thrilling Tales of Dragon Slayers to be more useful than Prototype Amber. It's only sometimes situationally more useful.
◇ Hakushin Ring (☆4) - Electro Support
This weapon only functions when you have an Electro character in your party.
Buffs characters who are involved in an Electro elemental reaction (Or to be specific, in Kokomi's case, Electro-charged). Without an Electro character in the party, this weapon is not applicable.
◇ Sacrificial Fragments (☆4) - Elemental Mastery
Used mostly for its Elemental Mastery substats, as its passive is somewhat less useful since Kokomi is able to facilitate 100% Bake-Kurage (Skill) uptime. Another reason for using its passive would be to readjust Bake-Kurage (Skill)'s position. Noted for its high Elemental Mastery, making it useful for teams that use Kokomi to inflict reactions (Example: Bloom, Electro-charged).
Premium / Weapon Banner
◇ Everlasting Moonglow (☆5) - Healer / DPS ★
Everlasting Moonglow puts a strong emphasis on increasing her Normal Attack damage, with some energy generation on Normals after using Elemental Burst. While it does have less energy restoration compared to Prototype Amber, the increase in damage still makes it a great weapon to use on her for her on-field presence.
◇ Jadefall's Splendor (☆5) - Healer / DPS
Although Kokomi is unable to effectively use this weapon due to its barely usable Passive's short duration, it still works for her to use. At this point, you might want to consider getting Prototype Amber instead.
◇ A Thousand Floating Dreams (☆5) - Elemental Mastery
Used in teams where Kokomi is used for Elemental Reactions, mostly to enhance her Elemental Reaction damage. Able to buff the party with a certain amount of Elemental Mastery depending on Refinement.
Artifacts
High-Performance Artifact Sets
◇ 4 - set | Ocean-Hued Clam (Healer / DPS) ★
Set Bonus Effect
2-Piece Bonus
Healing Bonus +15%.
4-Piece Bonus
When the character equipping this artifact set heals a character in the party, a Sea-Dyed Foam will appear for 3 seconds, accumulating the amount of HP recovered from healing (including overflow healing).
At the end of the duration, the Sea-Dyed Foam will explode, dealing DMG to nearby opponents based on 90% of the accumulated healing.
(This DMG is calculated similarly to Reactions such as Electro-Charged, and Superconduct, but it is not affected by Elemental Mastery, Character Levels, or Reaction DMG Bonuses).
Only one Sea-Dyed Foam can be produced every 3.5 seconds.
Each Sea-Dyed Foam can accumulate up to 30,000 HP (including overflow healing).
There can be no more than one Sea-Dyed Foam active at any given time.
This effect can still be triggered even when the character who is using this artifact set is not on the field.
An artifact set designed based on Kokomi's powerful ability to massively heal characters. This artifact converts a portion of her healing into extra Physical damage dealt to enemies nearby the user. This effectively makes her a strong DPS on her own, a DPS functioning based on her ability to heal. Effectively makes use of her kit to utilize the artifact to the fullest.
Usable in any situation. Universally usable.
◇ 4 - set | Tenacity of the Millelith (Support)
Set Bonus Effect
2-Piece Bonus
HP +20%
4-Piece Bonus
When an Elemental Skill hits an opponent, the ATK of all nearby party members is increased by 20% and their Shield Strength is increased by 30% for 3s. This effect can be triggered once every 0.5s. This effect can still be triggered even when the character who is using this artifact set is not on the field.
An artifact set that provides ATK buff to the party. The ability to provide support and the synergy the artifact provides makes it a good weapon to use for Support purposes. Under normal circumstances, the DPS provided through Ocean-Hued Clam's bubble pops covers larger overall team DPS than simply feeding off ATK buffs to the team.
Usable in any situation.
◇ 2+2 - set | 20% HP / 15% Healing Bonus / 15% Hydro DMG Bonus
Artifacts sets that meet the criteria are:
- 20% HP - Tenacity of the Millelith, Vourukasha's Glow
- 15% Healing Bonus - Maiden's Beloved, Ocean-Hued Clam
- 20% Energy Recharge - Emblem of Severed Fate
- 15% Hydro DMG Bonus - Heart of Depth, Nymph's Dream
Other artifacts that are usable, but have a rather niche use:
- 80 Elemental Mastery - Wanderer's Troupe, Gilded Dreams, Flowers of Paradise Lost
Generally good to use on Kokomi, provides boosts to her damage one way or another.
Other Notable Artifact Sets
The following sets are sets Kokomi can use as a DPS through raw Hydro DMG. It has either lost its relevance in terms of DPS ever since Ocean-Hued Clam exists or is decent at best, but still worth mentioning.
◇ 4 - set | Heart of Depth (DPS)
Set Bonus Effect
2-Piece Bonus
Hydro DMG Bonus +15%
4-Piece Bonus
After using an Elemental Skill, increases Normal Attack and Charged Attack DMG by 30% for 15s.
◇ 4 - set | Nymph's Dream (DPS)
Set Bonus Effect
2-Piece Bonus
Hydro DMG Bonus +15%
4-Piece Bonus
After Normal, Charged, and Plunging Attacks, Elemental Skills, and Elemental Bursts hit opponents. 1 stack of Mirrored Nymph will triggered, lasting 8s. When under the effect of 1, 2, or 3 or more Mirrored Nymph stacks, ATK will be increased by 7%/16%/25%, and Hydro DMG will be increased by 4%/9%/15% Mirrored Nymph created by Normal, Charged, and Plunging Attacks, Elemental Skills, and Elemental Bursts exist independently.
Early Game Artifact Sets
The following suggestions are to help newer players equip lower rarity alternatives, and should not be invested deeply in mid/late game. Some can still be usable alternatives for mid/late game.
Artifacts are sorted in the order of their rarity, the number of pieces used to form the set effect used, and how accessible they are for new players.
◇ 2 - set | Adventurer (☆1~3)
Set Bonus Effect
2-Piece Bonus
Max HP increased by 1,000.
Source: Chests, Investigations, Bosses, Artifact Domain (Midsummer Courtyard)
Increases Kokomi's max HP for higher healing and higher damage.
◇ 4 - set | The Exile (☆3~4)
Set Bonus Effect
2-Piece Bonus
Energy Recharge +20%
4-Piece Bonus
Using an Elemental Burst regenerates 2 Energy for all party members (excluding the wearer) every 2s for 6s. This effect cannot stack.
Source: Chests, Domain Reliquary, Elite enemy drops, certain Normal Bosses, Weekly bosses
Viable for supportive roles in teams, generating energy for the party after using Elemental Burst.
◇ 4 - set | Instructor (☆3~4)
Set Bonus Effect
2-Piece Bonus
Increases Elemental Mastery by 80.
4-Piece Bonus
Upon triggering an Elemental Reaction, increases all party members' Elemental Reaction by 120 for 8s.
Source: Elite enemy drops, certain Normal Bosses, Weekly bosses
Helpful for buffing your team's Elemental Mastery since Kokomi can perform a supportive role for teams.
Note that 4-set effect doesn't activate when the holder is off-field.
◇ 4 - set | Scholar (☆3~4)
Set Bonus Effect
2-Piece Bonus
Energy Recharge +20%
4-Piece Bonus
Gaining Elemental Particles or Orbs gives 3 Energy to all party members who have a bow or a catalyst equipped. Can only occur once every 3s.
Source: Certain Artifact Domains (Clear Pool and Mountain Cavern, Molten Iron Fortress)
Viable for supportive roles in teams, generating energy for the party members with specific weapons after gaining energy particles.
Recommended Main Stats
- Sands of Eon - HP% / ER%
- Goblet of Eonothem - HP% / Hydro DMG Bonus
- Circlet of Logos - Healing Bonus% / HP%
Kokomi works well with HP% pieces when the other Main Stats mentioned above is not available. The one thing you'd have to take note of would just be the Circlet, where Healing Bonus is preferred than HP%.
Sands and Goblet slot would depend on what weapon you are currently using, the amount of substat values on your existing pieces, and/or depending on how you plan to use Kokomi for.
- Sands: If you have sufficient Energy Recharge rolls on your other artifact pieces, using an Energy Recharge sands isn't necessary. However, if you find yourself unlucky in your search for Energy Recharge substats, using an Energy Recharge Sands will do you well. Search for a comfortable amount of Energy Recharge for your Kokomi, and decide from there.
- Goblet: Hydro DMG Bonus brings higher damage when using Kokomi as a DPS in her Ceremonial Garment (Burst) state, dishing out more Hydro DMG through Normal & Charged Attacks in exchange for less healing. HP% gives more balance between both DPS and Healing, with more survivability on top.
Sub Stats Preferences
For artifact stats, it's preferred to look for (in order from most important to least important):
- HP
- Energy Recharge
- Elemental Mastery (Optional)
- ATK (Optional)
Any stats not mentioned above do not benefit Kokomi in any way.
Note: Raising CRIT stats for Kokomi is not recommended due to her Passive: Flawless Strategy!
◇ HP
Kokomi's primary scaling, her whole kit simply revolves around HP. The amount of HP she has affects both her Heals and the damage she deals through Elemental Burst.
◇ Energy Recharge
Having an Elemental Burst cost of 70, Energy Recharge is essential for Kokomi to reuse her Elemental Burst, whether it's for the on-field presence as a DPS or simply to refresh her Bake-Kurage (Skill)'s remaining duration. Some weapons Kokomi prefers may either slightly/greatly reduce the amount of Energy Recharge Kokomi wants. Typically with Prototype Amber [R1+], about 150% Energy Recharge is enough to get you running around.
◇ Elemental Mastery (Optional in General)
Most of the time, Elemental Mastery isn't quite relevant to use for Kokomi. However, Kokomi may find Elemental Mastery to be useful/important when she is given the Supports for her to perform Vaporize hits, or when she is played in Bloom reaction teams where she is made to deal damage through creating Bloom seeds.
◇ ATK (Optional)
Honorable mention is given to ATK stat for being a stat that is used for Kokomi's DMG scaling outside of Elemental Burst state. Not important to raise and should not be prioritized, but don't be sad when you end up with some ATK substats in your artifacts.
Team Composition Ideas
The general rule for teams is that they should be composed of On-field DPS, Off-field DPS, Support, and Healer.
At times, Off-field DPS and Support / Healer and Support are interchangeable depending on the characters being used in the team.
Kokomi's ability to fulfill excellently in the Healer/Support department, plus a bonus of being able to fulfill other roles basically gives her the ability to fit in a lot of teams. If a single sentence has to be said to describe characters who synergize with Kokomi, it would be "Any character that works well with Hydro".
Some aspects Kokomi has should be considered in teams desiring a Healer/Support, though. For example, if your team's members constantly move around the combat area and are not compatible with staying in a specific area (or maybe they're just so good at pushing enemies away from you), then Kokomi might not be the Healer you need since Bake-Kurage isn't exactly portable.
Her Burst can be a point to consider as well: Are you going to keep using Kokomi for on-field DPS while her Burst is up, or are you going to switch her out as soon as you use her Burst to refresh Bake-Kurage's duration?

Other Characters That Synergize
Since Kokomi is flexible in usage, only some notably strong synergies will be listed. It should be noted that this is not a comprehensive list of the characters who are compatible with being on the same team as Kokomi, and some other characters not mentioned in this list may synergize with Kokomi depending on your team composition/playstyle.
◇ Nilou
Strongly appreciates Kokomi's presence to mitigate the harm the team receives from Bountiful Core DMG.
◇ Raiden Shogun
Both Kokomi and Raiden Shogun can fill in each other's downtimes and can support each other, forming synergy with each other. Raiden Shogun fills in team energy during her Burst duration, Kokomi heals the team and takes over the rest of the on-field duration as a DPS with her Burst. Raiden's presence also reduces the burden on Kokomi's ER needs.
Even with an Elemental Mastery build in Hyperbloom teams, both also form a strong synergy, able to keep each other's back. Raiden can't supply Kokomi's ER in this build, but they still synergize in terms of Hyperbloom triggers.
◇ Kamisato Ayaka / Ganyu
Helps in both healing and inflicting Freeze to support Ayaka. Ganyu also appreciates Kokomi's presence for freezing enemies, but she might not be able to effectively heal Ganyu without risks if Ganyu is played by maintaining a safe distance.
◇ Kaedehara Kazuha
An extremely strong duo for clearing contents when Kazuha is built as a DPS, an extremely strong support duo for teams that desire the presence of both as a Support.
◇ Nahida
Powerful Bloom seed generator when paired with Kokomi. Both may either fulfill their jobs as the core members or they may simply create strong comfort for either Hyperbloom/Burgeon teams or Nilou Bloom teams.
◇ Albedo
Kokomi enables Albedo to hit enemies with his Solar Isotomia, Albedo can provide support to the team. Both may serve as strong support for certain teams.
◇ Zhongli
Putting Zhongli and Kokomi together makes you pretty much immortal. Will come in as highly useful for high-difficulty content like certain events where you combat tough bosses.
Closing
Note that this guide is based on my view of the character mentioned above.
Leave a comment below if you have a different point of view or if you have questions!