


~ Please view this post in Dark Mode for the best experience ~
Guide Overview:
Hello, Travelers ~
➥ Today, I am bringing you a comprehensive guide on the locations of each of the 85 Hydroculus in the Court of Fontaine, Beryl Region, and Belleau Region in Fontaine.
- This is an extensive guide showcasing the locations of these 85 hydroculus on optimized routes throughout Fontaine. These routes will be separated into sections depending on their overall region and subarea. For example, we will start in Romaritime Harbor in the Belleau Region of Fontaine. If you are looking for hydroculus in a specific region/subarea, I recommend scrolling through the guide until you find the location you are looking for!
- At the beginning of each subarea of a region, there will be a map showing the locations of the hydroculus along with a number indicating which order they should be collected in, as well as how many will be collected in this area. Each hydroculus pin has a small circle behind it, this will tell you whether it is on the surface, underwater, or underground.
- After the map is shown, I will display in-game pictures of the hydroculus' locations in groups of three or four.
- Below these pictures, I will explain how to get to every single hydroculus from the previous hydroculus' location. This way, you can collect them in an orderly manner.
➥ If you notice any problems or errors in this guide, please let me know in the comments so I can fix it!
Disclaimer: I am making these routes under the assumption that you only have each of the Statues of the Seven unlocked. If you have closer teleport waypoints to the hydroculus, it may be faster to use those.

Belleau Region
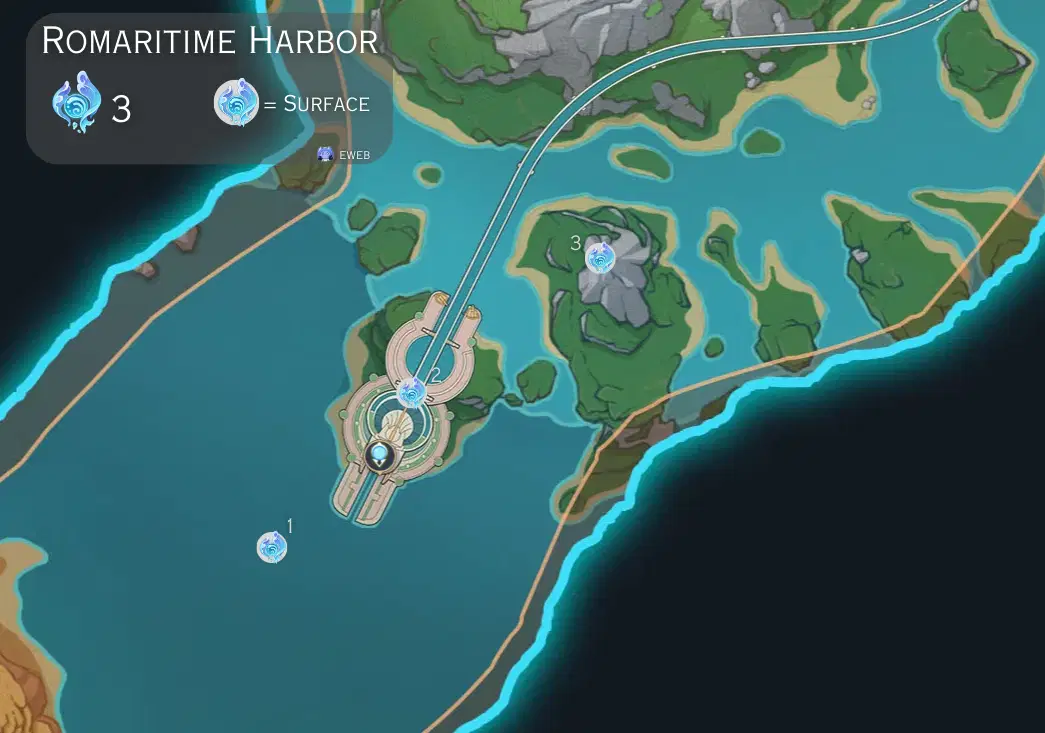
Romaritime Harbor [1-3]
-- -- --
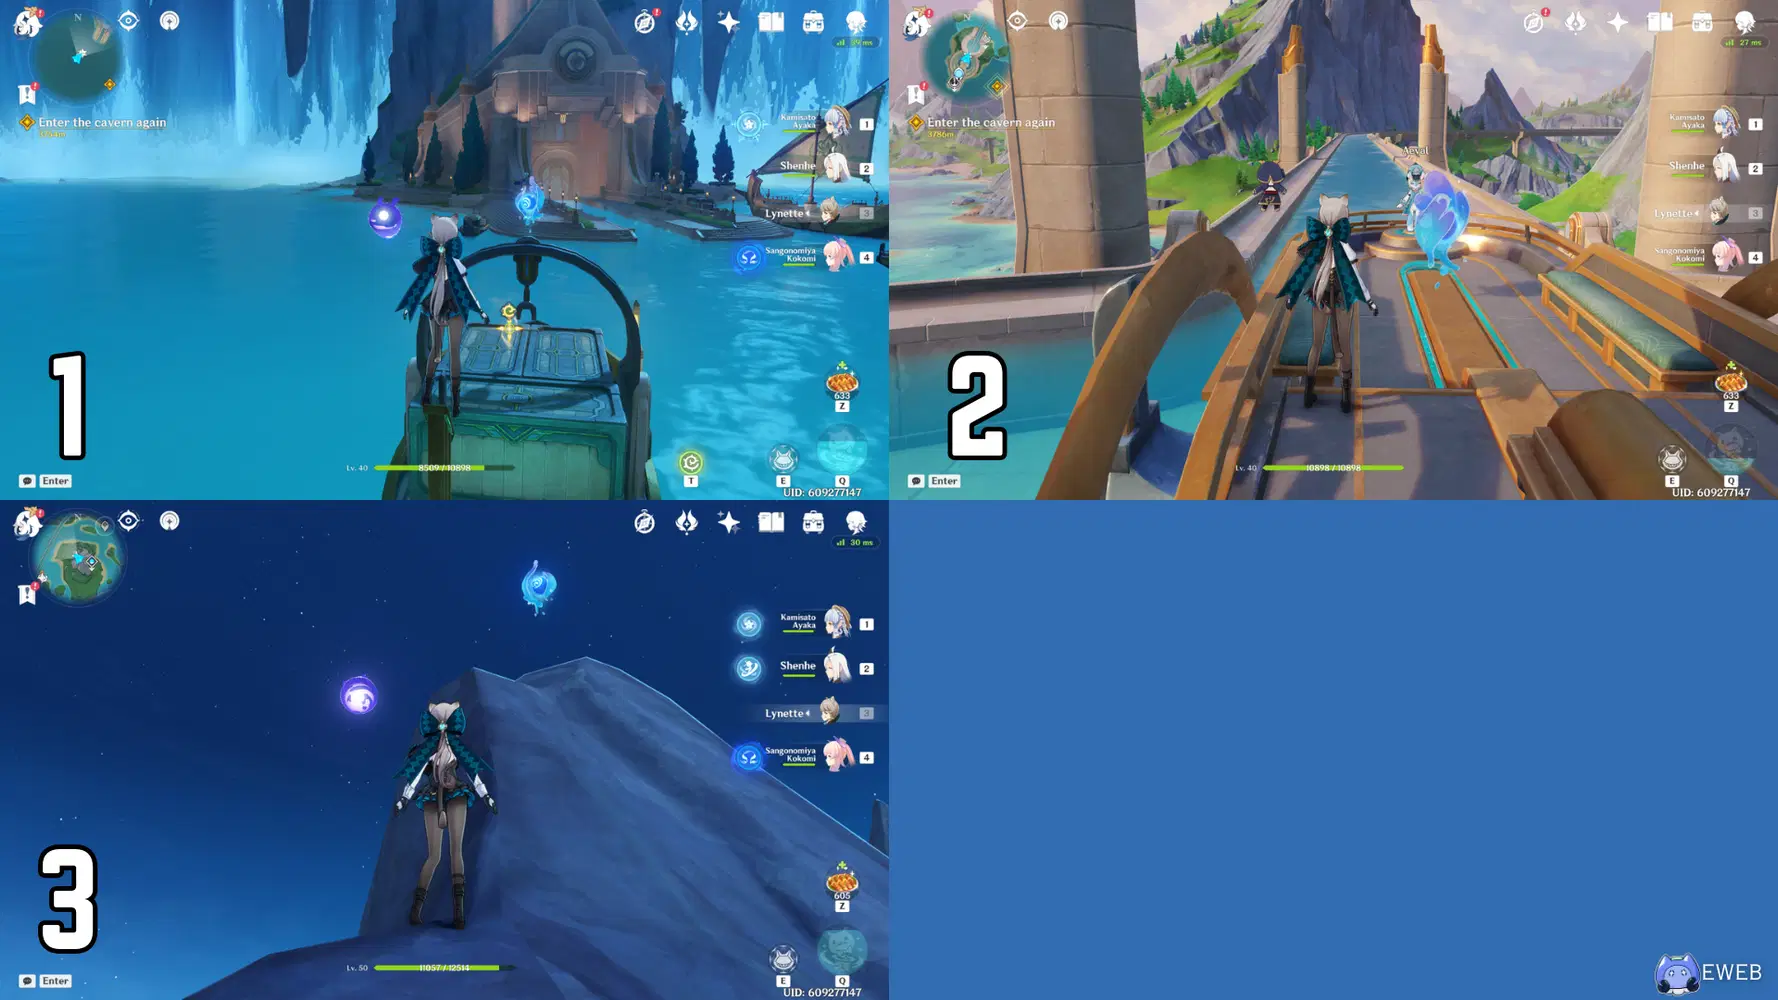
1-3
1. Teleport to the Statue of the Seven at the very beginning of Fontaine. Jump off the side of the tower and glide down over the water, heading towards the desert of Sumeru. Glide towards the boat with the hydroculus atop it.
2. Teleport back to the Statue of the Seven and head straight towards the aquabus pick-up area. If the aquabus is there, the hydroculus will be above it. If not, it will be floating above the water. You can call the aquabus to your location to pick it up more easily.
3. Keep going forward and jump off of the aquabus line, heading northeast towards the small mountain peak. You will need to climb to the top of this peak to grab the hydroculus.
-- -- --
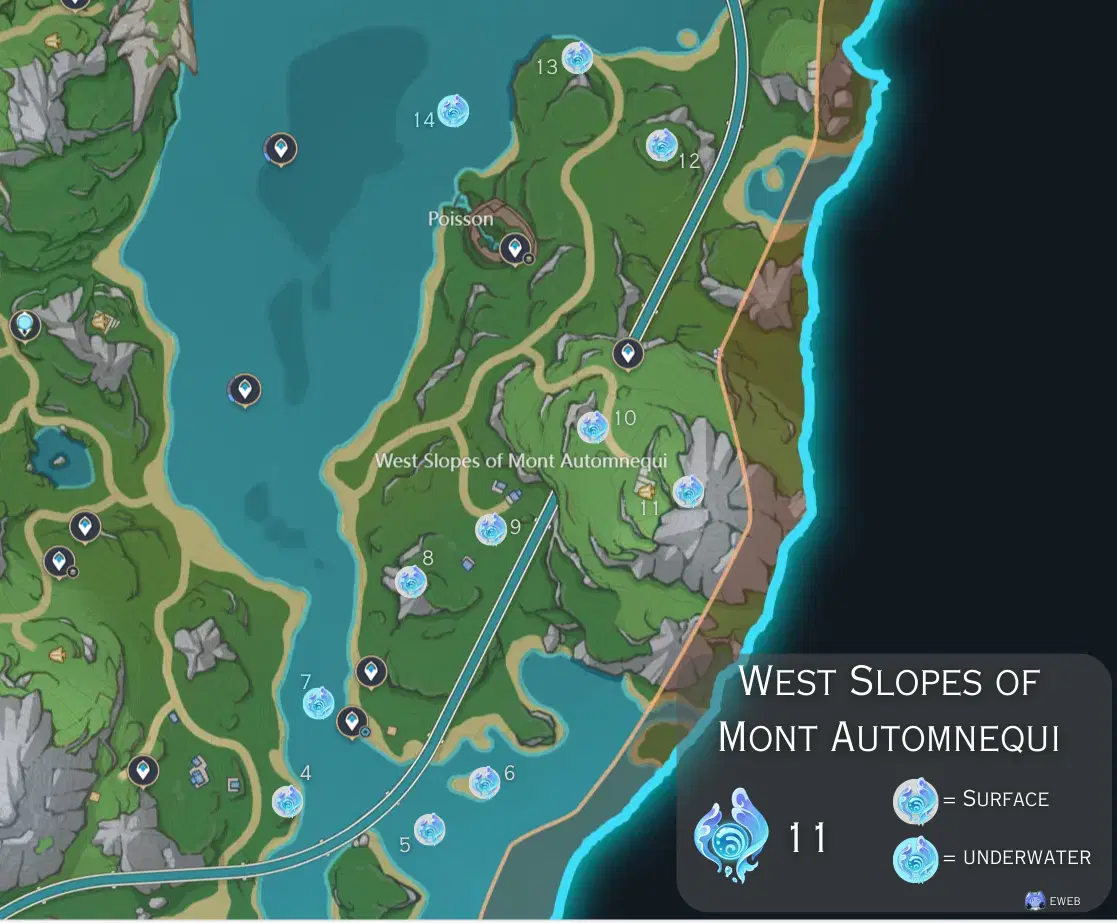
West Slopes of Mont Automnequi [4-14]
-- -- --
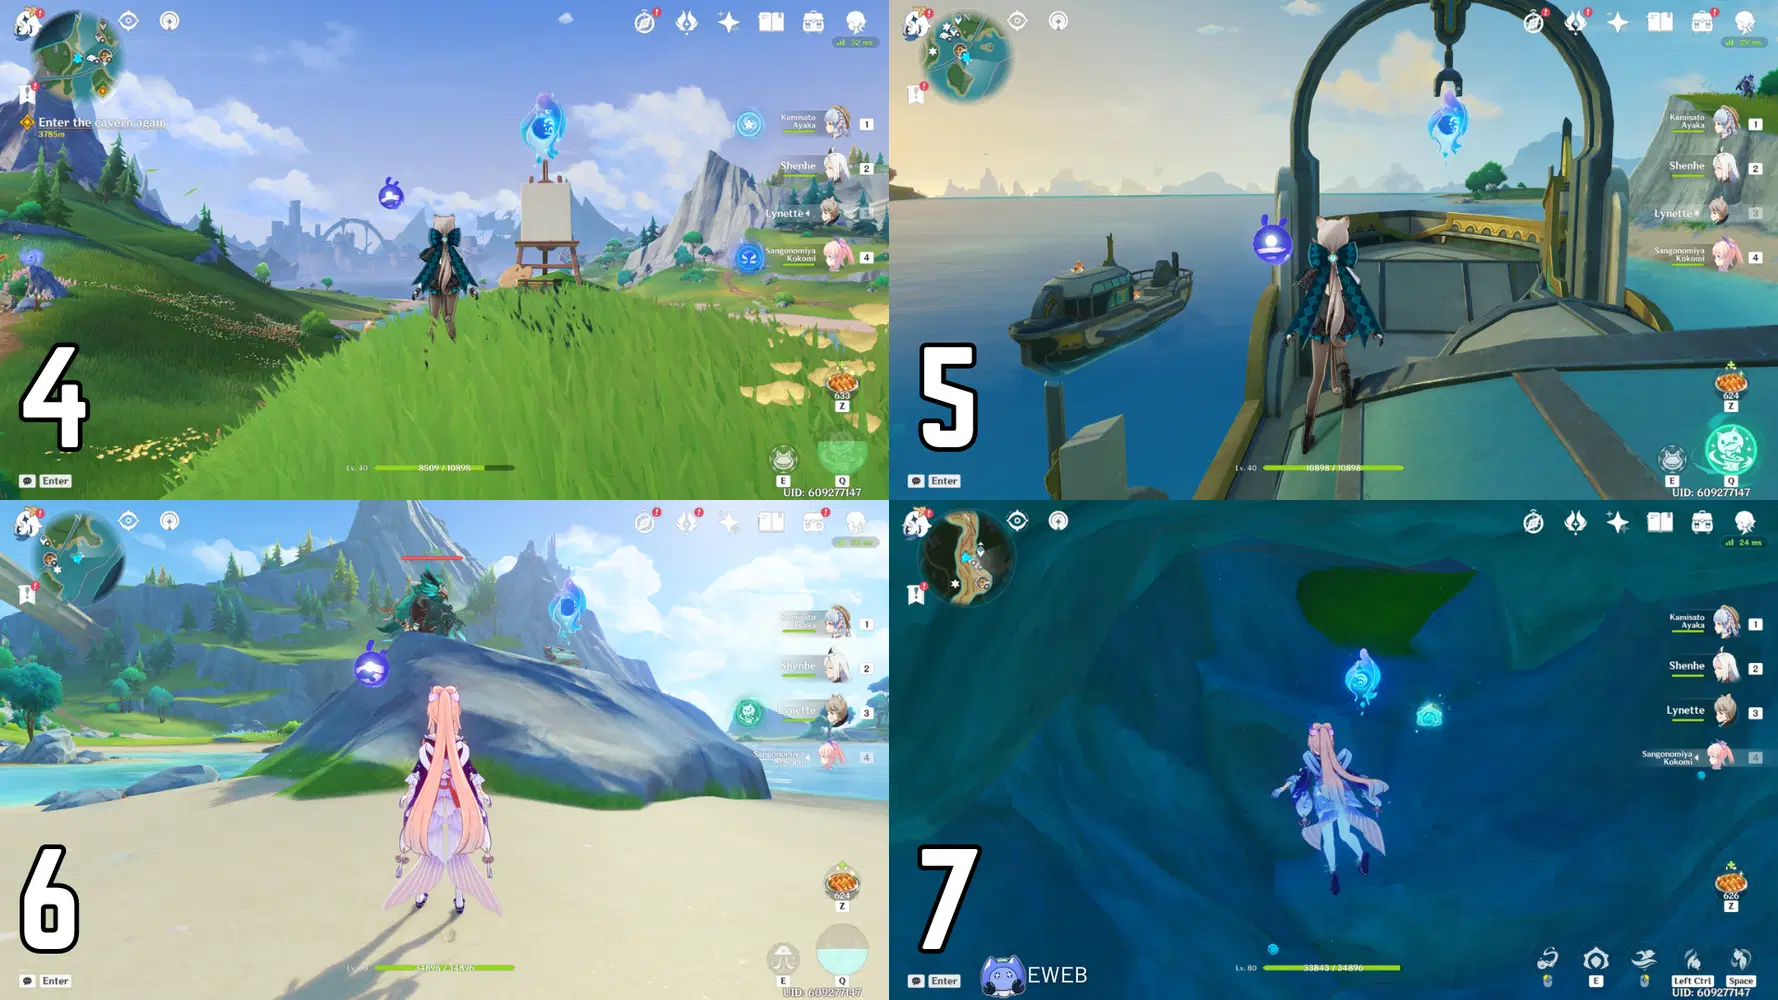
4-7
4. Jump off the peak and glide down, heading northeast towards the coastline of the bottom right of the Beryl Region. Continue down the coastline until you reach a small hill with a painting easel. The hydroculus will be above the easel.
5. Head east and swim towards the boat in the water. Climb onto the boat and grab the hydroculus.
6. Jump off the boat and swim northeast towards the small island with a rock. The hydroculus is sitting next to the Anemo Hilichurl Rogue.
7. Leave the island and run northwest along the coast. Once you reach the waypoint, head into the water and swim downwards into the underwater tunnel. Follow the tunnel until the end to find the hydroculus.
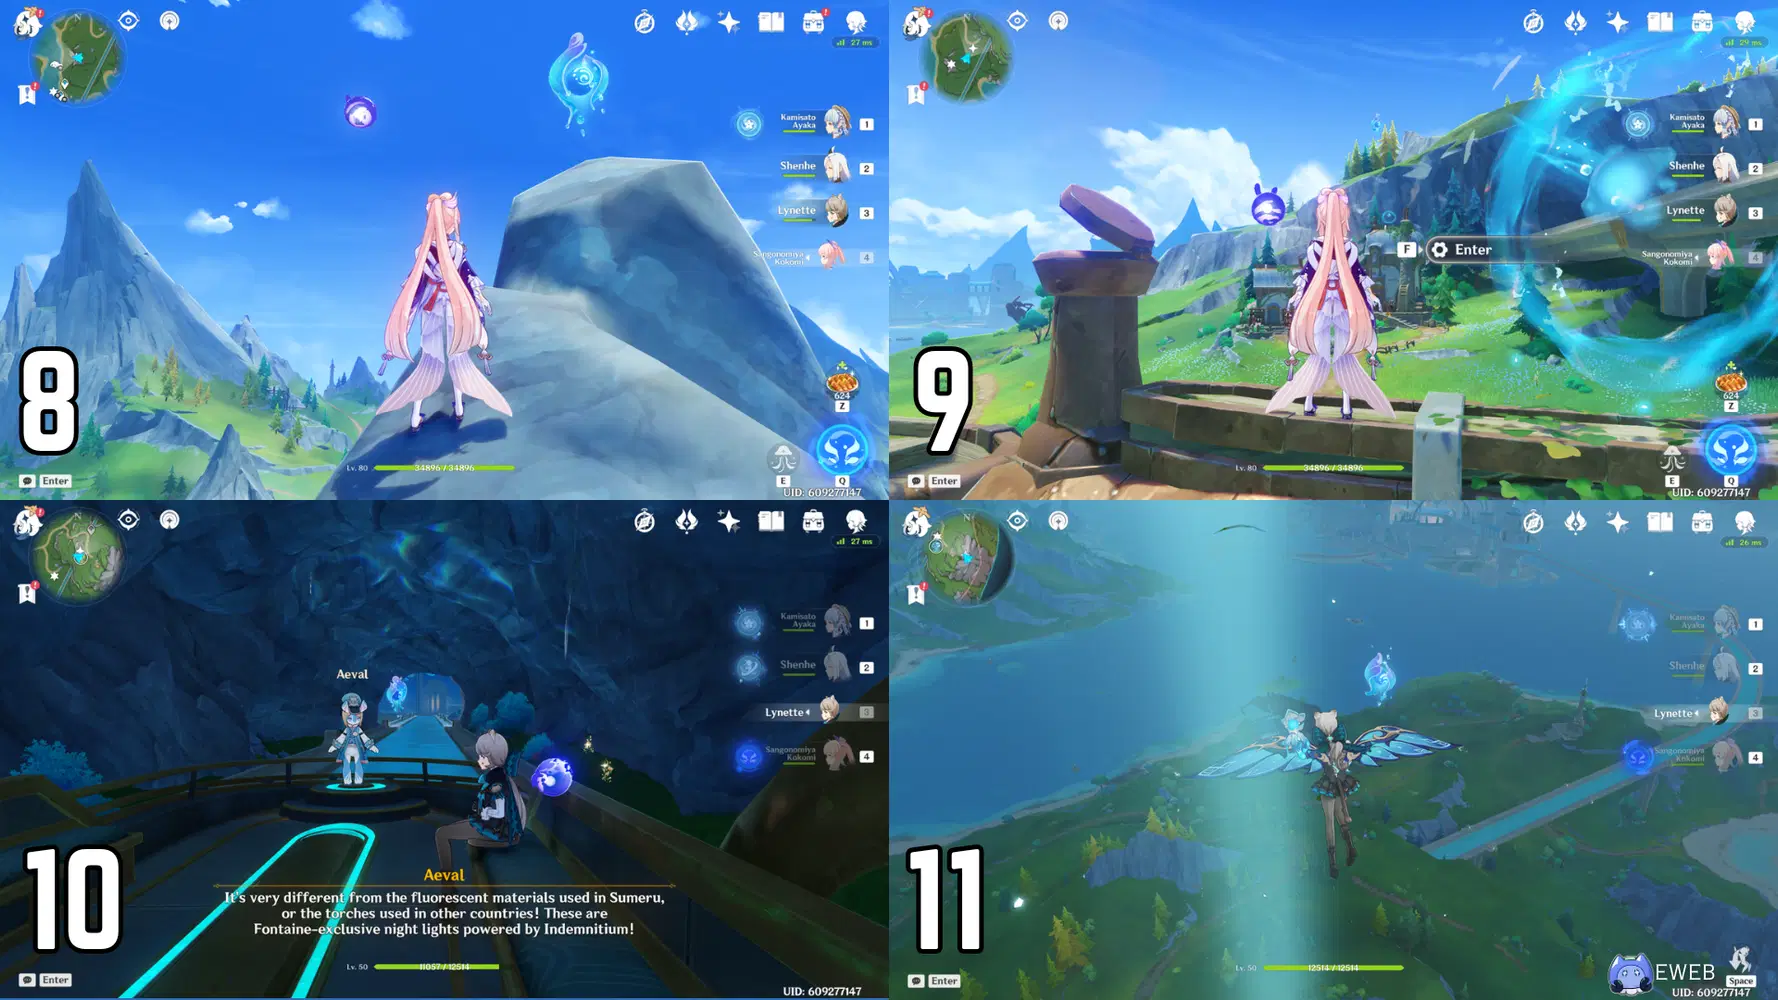
8-11
8. Head back the way you came and exit the water, back onto the coast. You will see a mountain peak to the northeast, close to the coastline. The hydroculus is at the top.
9. Jump off the peak and glide northeast towards the top of the closest house. Enter the launcher and it will bring you onto the hydroculus’s path, allowing you to obtain it.
10. Jump off the house the launcher has brought you to and head into the cave the aquabus line runs through. Run through the cave and you will find the hydroculus in the middle of the aquabus line.
11. Once you have reached the end of the cave, turn around and climb up the outside side of the cave. Head southeast towards the mountain peak, which is where the hydroculus is located. You can either climb to the top of the mountain and activate the pinwheel with an Anemo character in order to get the hydroculus, or you can take the airship at the bottom to easily get up. If you take the airship, make sure not to grab the chest that unlocks after your first ride before you grab the hydroculus. Once you grab the chest, the airship will immediately descend, and you will have to go all the way back up to grab the hydroculus.

12-14
12. Jump off the peak and glide north towards the spire in the distance, past the aquabus line. Solve the Pneumousia puzzle at the base of the spire in order to unlock a launcher that will take you directly to the hydroculus at the top.
13. After the spire, head northwest and either glide or jump onto the top of the house to grab the hydroculus.
14. Jump off of the house and head southwest towards the small island with trees in the distance. Jump into the water and swim underwater in the direction of this island. You will see the hydroculus on top of a large leaf.
-- -- --
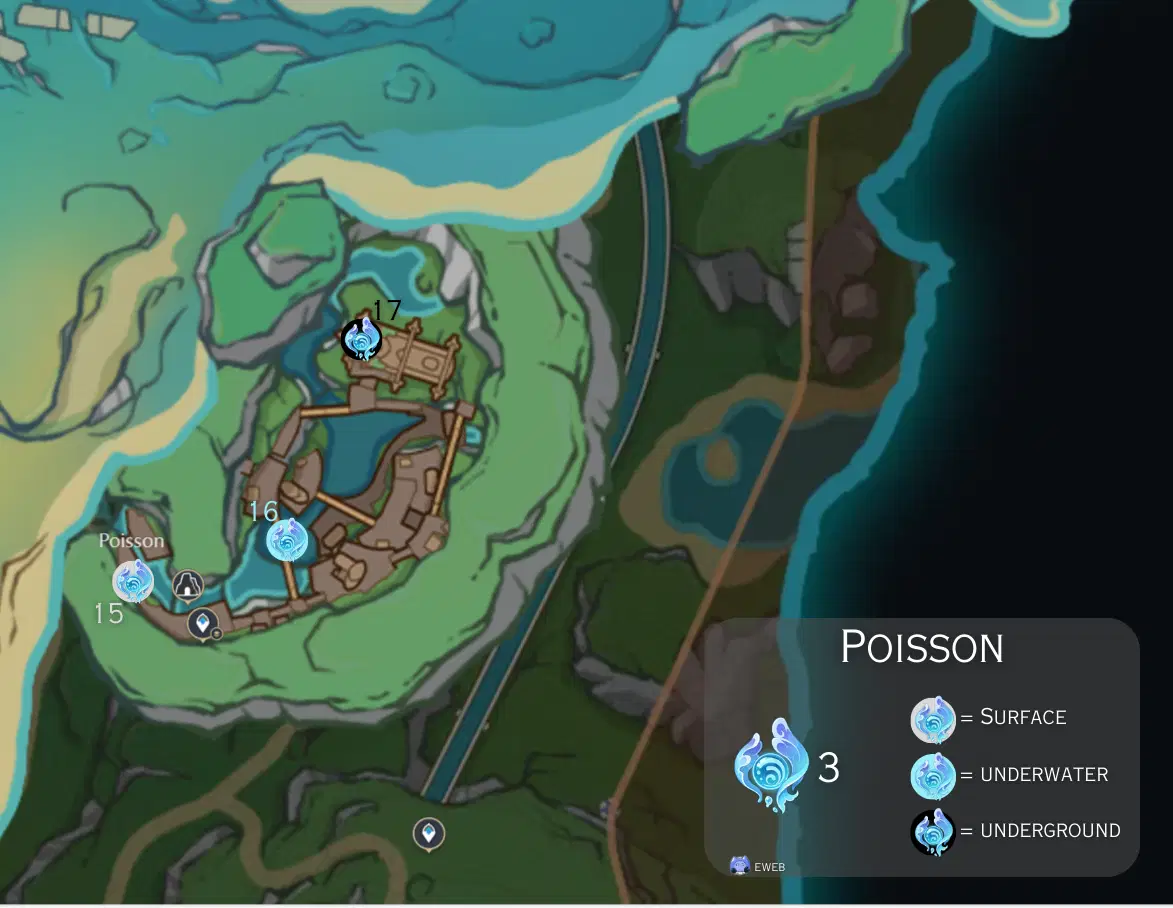
Poisson [15-17]
-- -- --
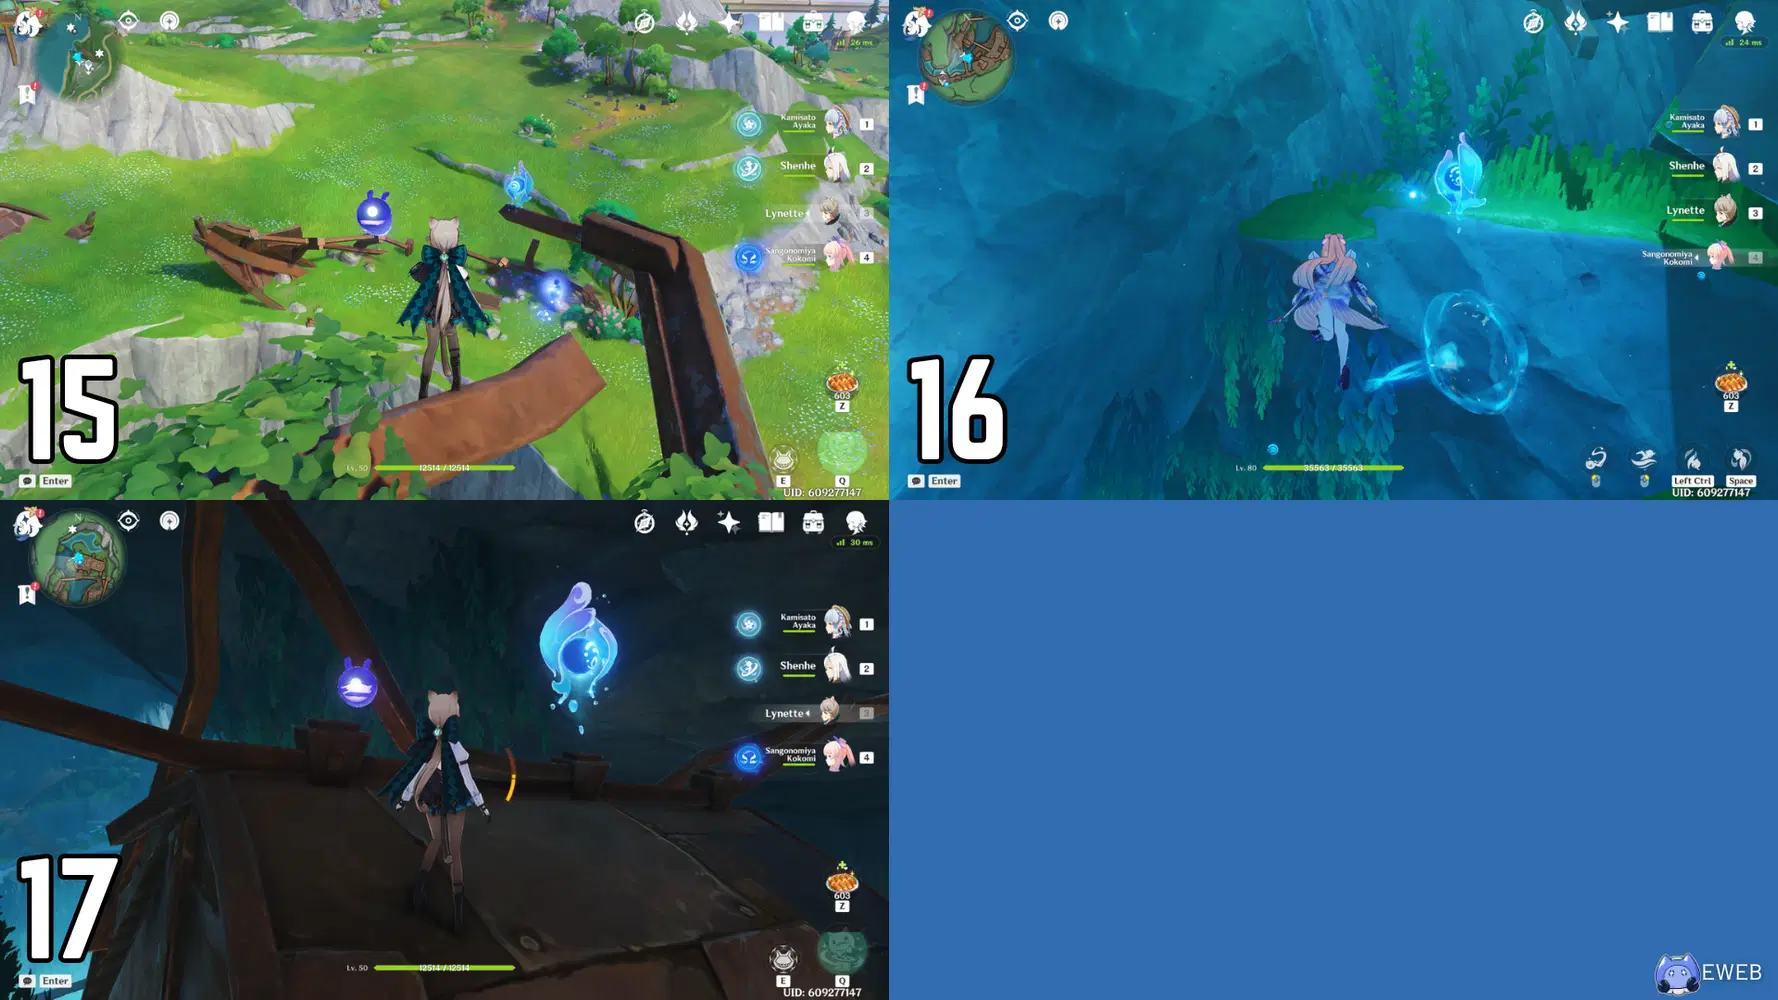
15-17
15. Turn and swim in the southeast direction, back to land. Climb to the top of the large, broken apart ship. At the very end of a piece of jutting out metal is the hydroculus.
16. Jump off of the ship and glide downward into Poisson. Jump into the water below the very first bridge you see. The hydroculus will be next to the launcher, underwater.
17. Exit the water and head further into Poisson, towards the large ship in the distance. Once you are in front of the ship, take the ramp up to the very top where the hydroculus is.
Beryl Region
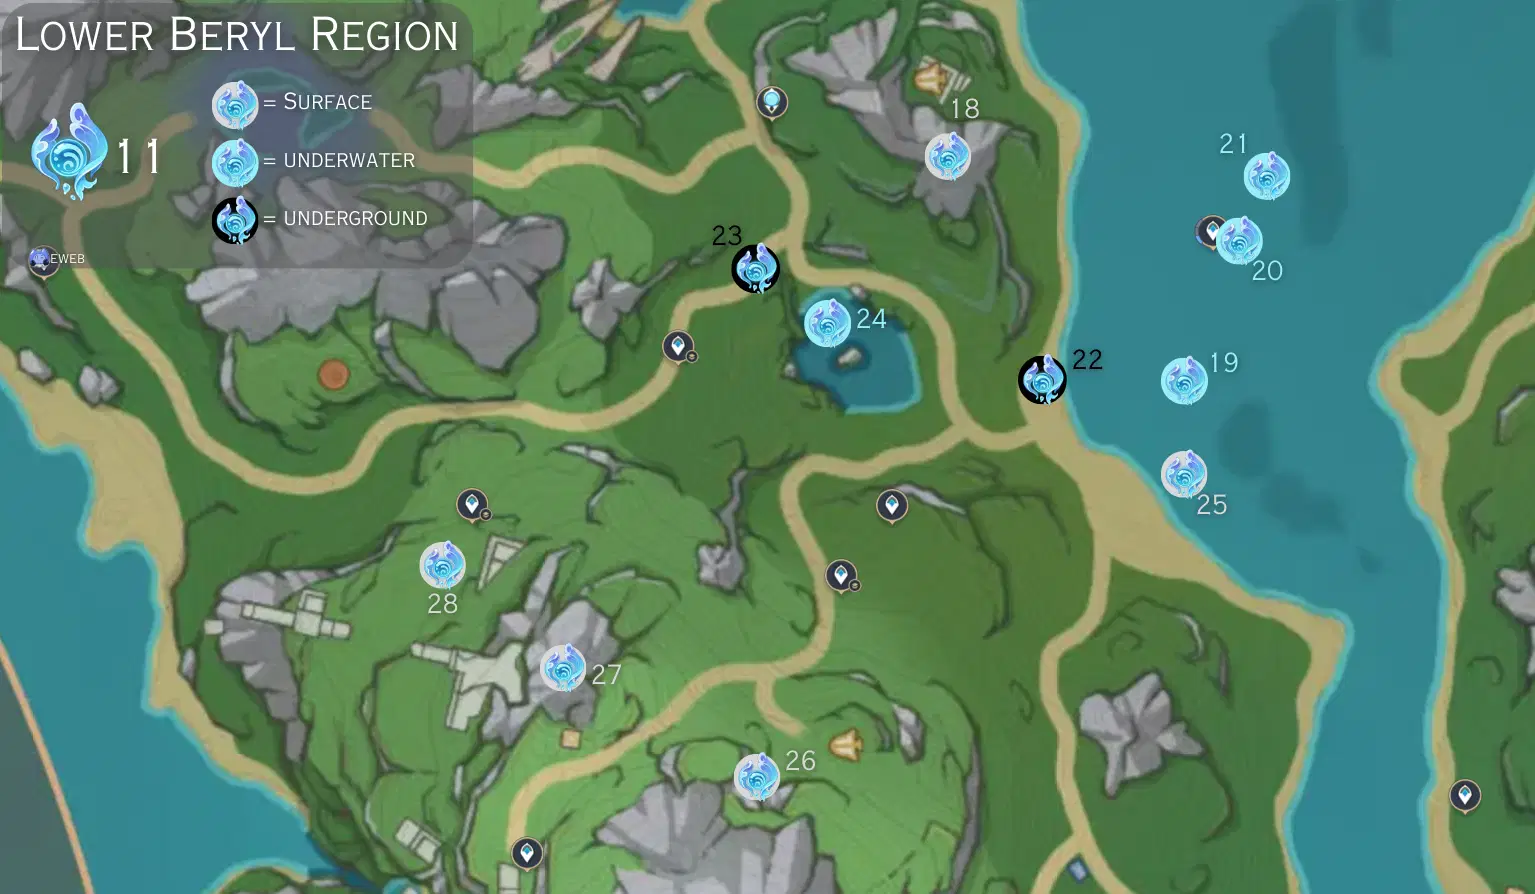
Lower Beryl Region [18-28]
-- -- --
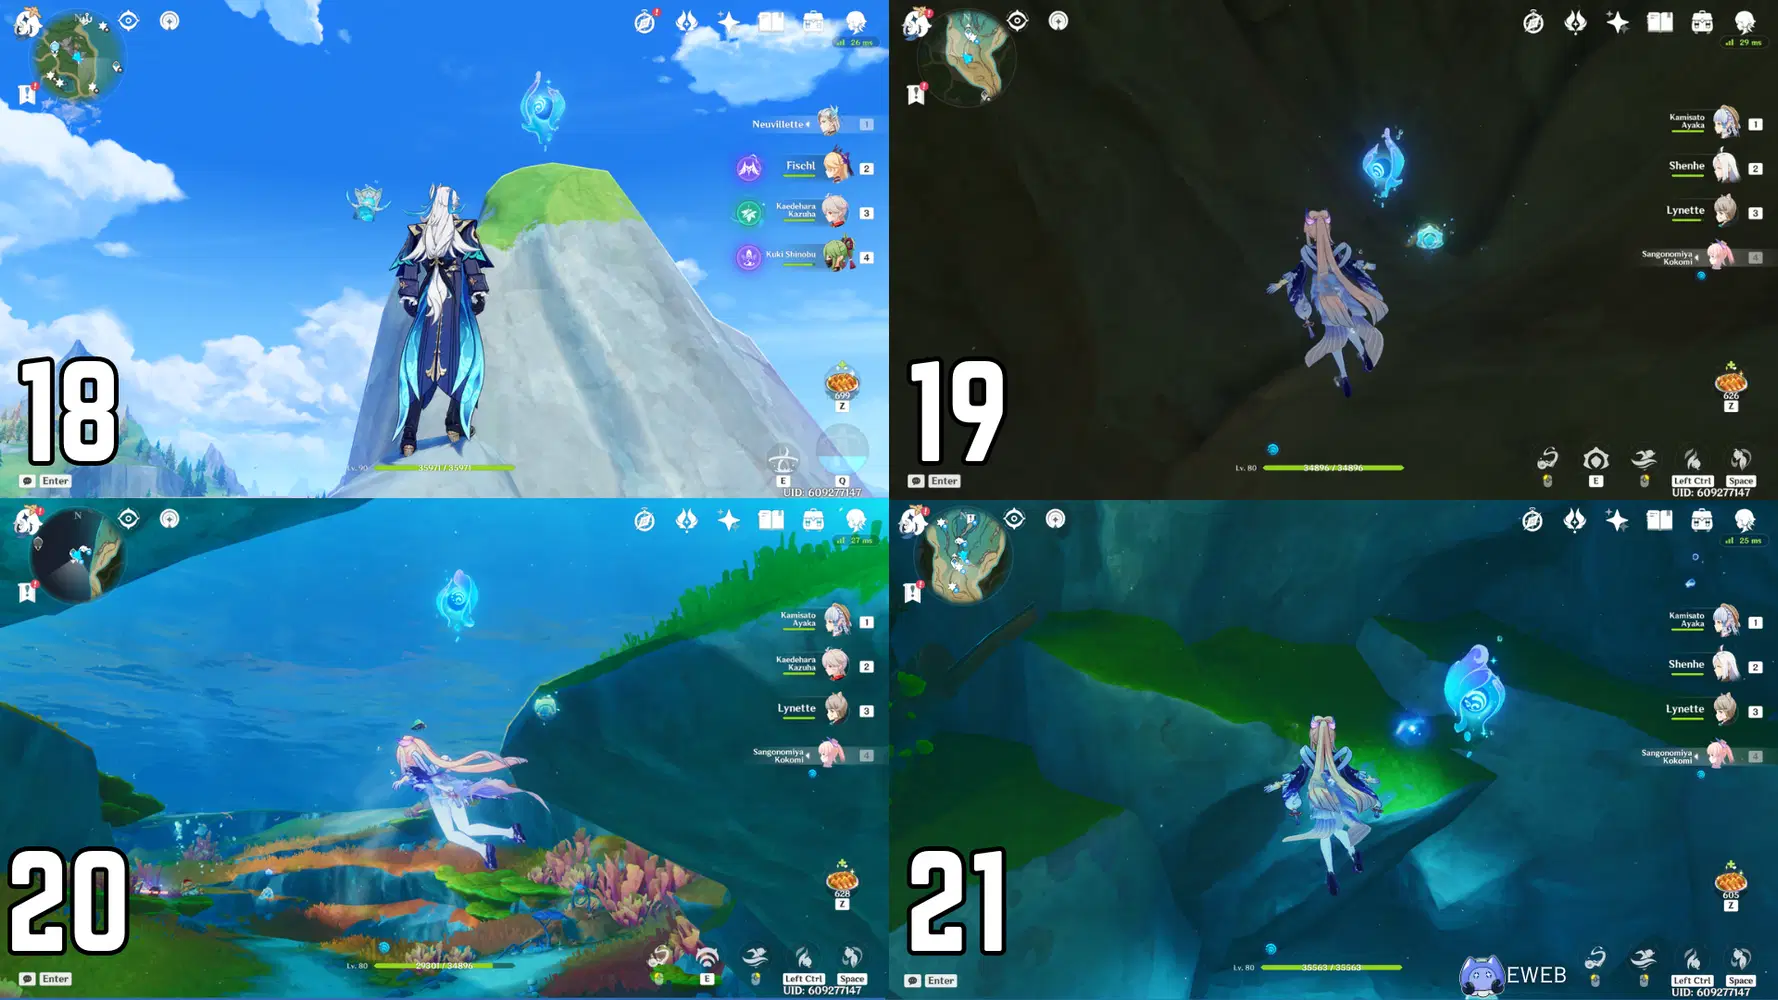
18-21
18. Teleport to the Statue of the Seven in the Beryl Region. Turn east from the Statue and head towards the mountain peak. Climb up to the top to grab the hydroculus.
19. Turn southwest from the peak and glide down towards the small body of water. Complete the first part of the Boiling Water puzzle, gathering the three Water Volume Detection Crystals in the surrounding area to the middle of the water. Once they have been gathered together and activated, a launch point will appear. Enter it and it will take you into the nearby water, down into an underground cavern, eventually breaking open a wall. This hydroculus will be located in a corner of this cavern, before where the wall breaks.
20. Before continuing farther into this cavern, turn back and head back up through the cavern. Swim north after exiting the cavern, towards the closest waypoint. You will see the hydroculus close by as you head that way.
21. Keep heading straight and then immediately dive downwards once you reach a point you are able to do so. Head down to the underwater cavern, which is where the hydroculus is located.
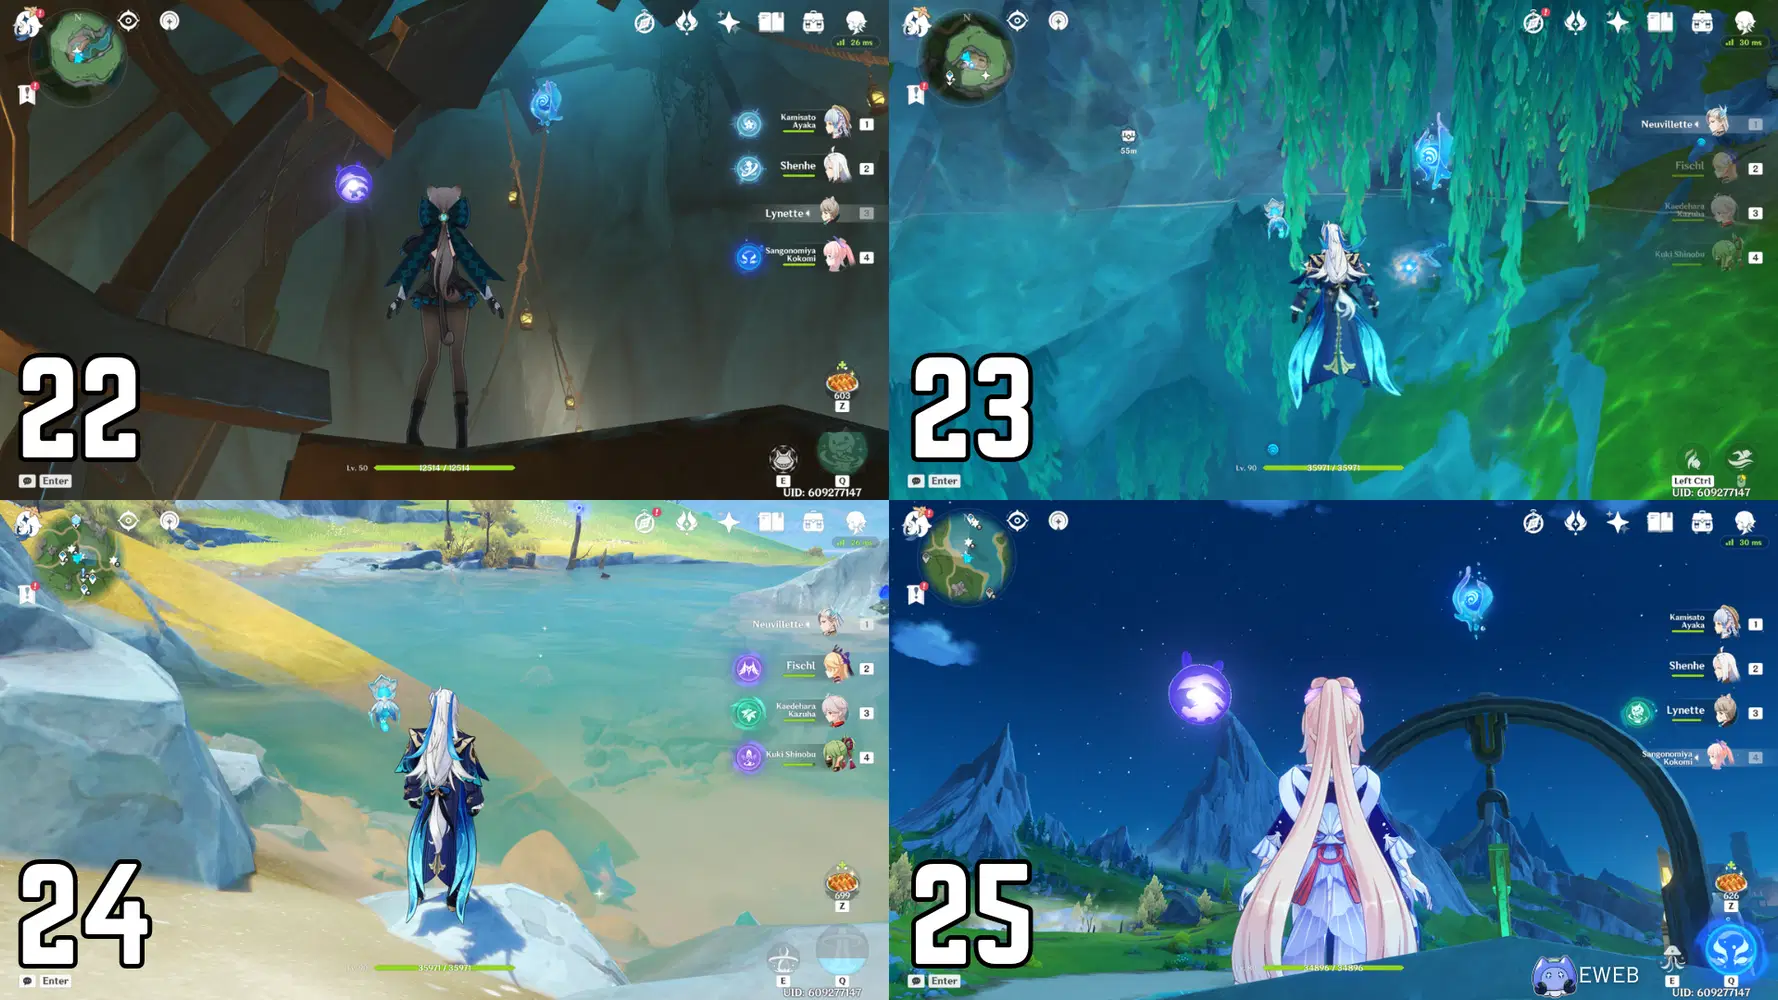
22-25
22. Keep swimming downwards and enter the launcher. It will take you through the rest of the tunnel and into an underground cave where a ship is located. The hydroculus will be floating above the ship. Climb to the top and jump off to grab it.
23. Turn and head back the way you came. Enter the launcher to make it back through the tunnel fast. Swim all the way back to the first underwater cavern we started at in #19. Continue completing the Boiling Water puzzle, eventually filling up the cavern with water, and defeating the Iron Viscount. Head into the current and reach an exit point. The hydroculus will be at the exit of the water.
24. Continue into the cave and find the exit and gain access to the surface. Head back to the body of water. Once the Boiling Water puzzle has been completed, the water which was once too hot to swim into will turn to normal water. Swim underwater and grab the hydroculus.
25. Head southeast towards the coastline. The hydroculus will be on top of the boat right off the coast.
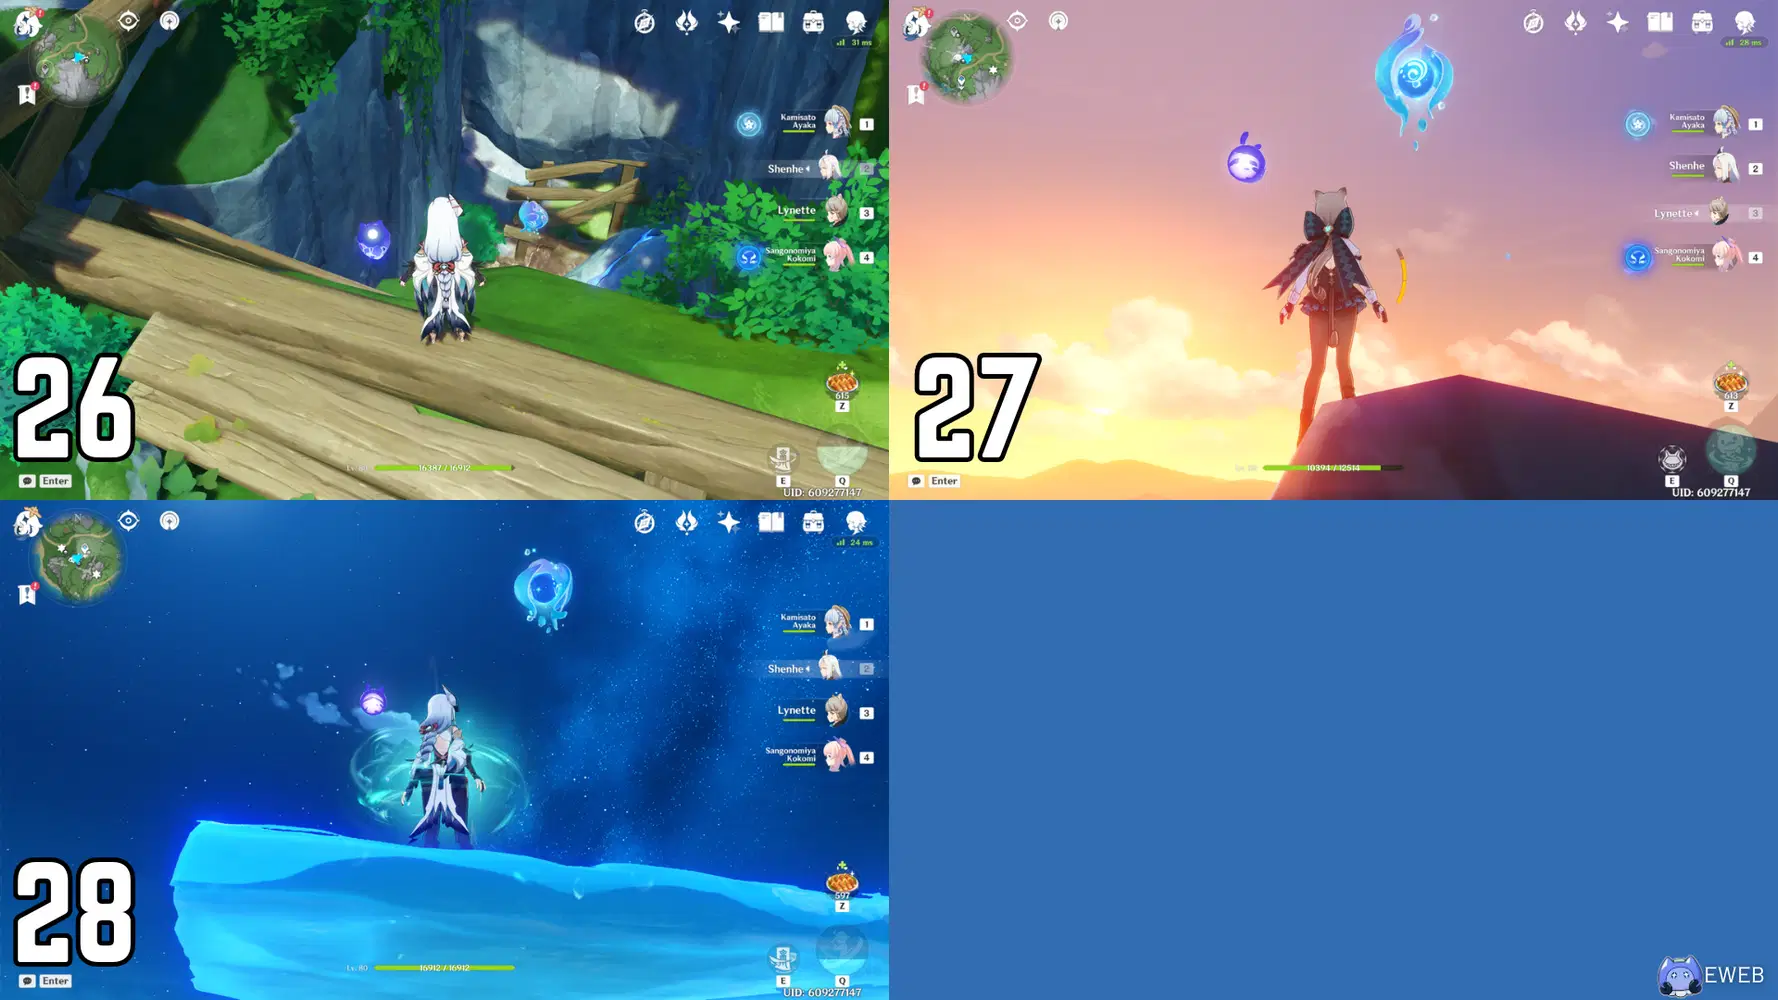
26-28
26. Now, head southwest, further inland, towards the tallest mountain peak you can see in the area. Past the airship you will see some enemies, defeat them to get easy access to the area behind. The hydroculus will be in the hole in the ground.
27. Head northwest to the mountain peak next to your location. The hydroculus will be at the top.
28. Jump off the peak and glide west towards the nearby ruins. There is a Seelie puzzle in these ruins which requires you to find three Seelies to unlock a chest. Each of the Seelies are in the surrounding area in the dilapidated buildings. Once you have escorted them to their statues, the chest will be unlocked and a launcher will appear. Take this up into the sky where you will be left on platforms with an enhanced jump ability. At the highest platform will be a Precious Chest and the hydroculus.
-- -- --
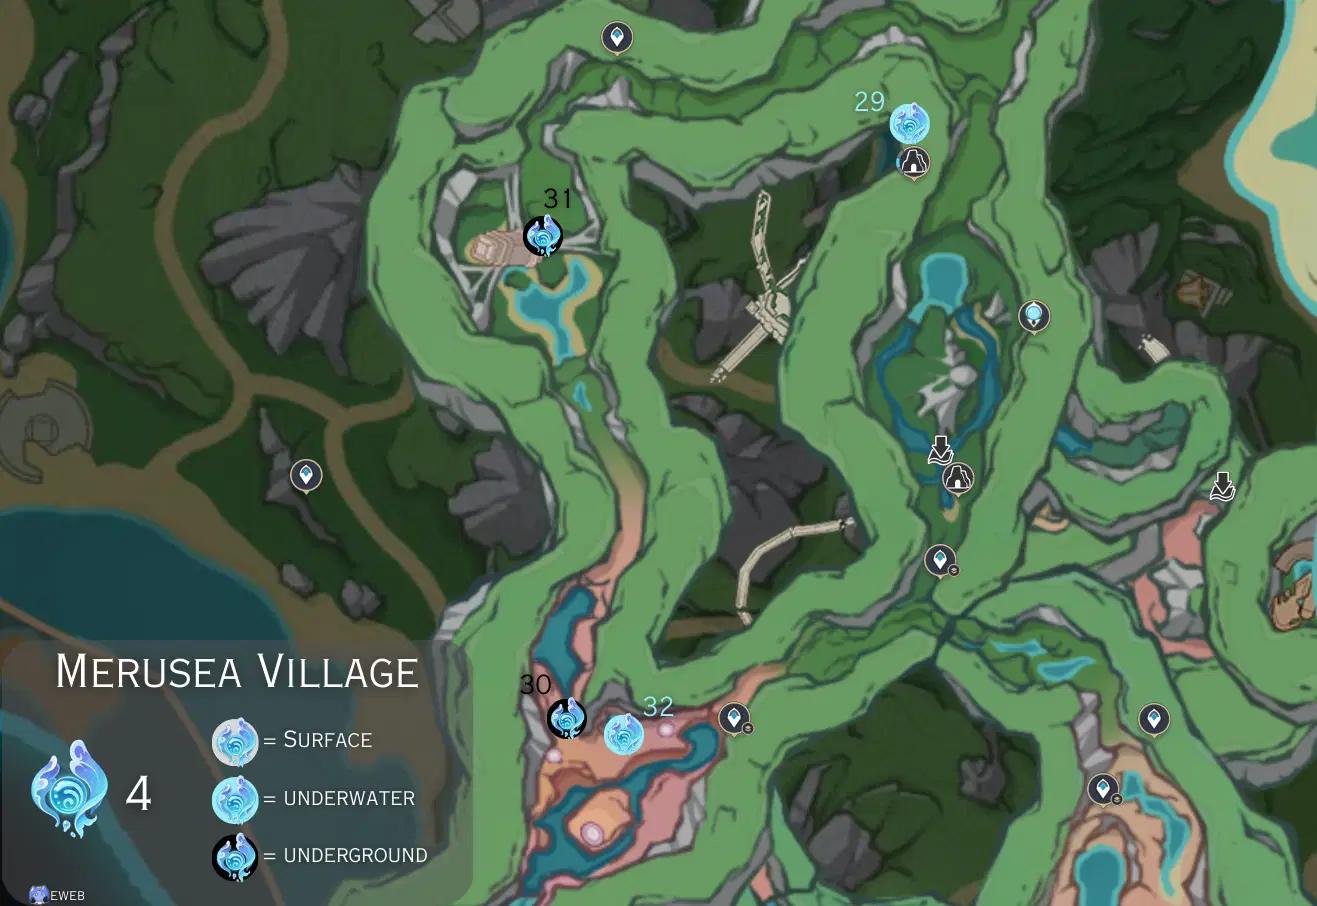
Merusea Village [29-32]
-- -- --
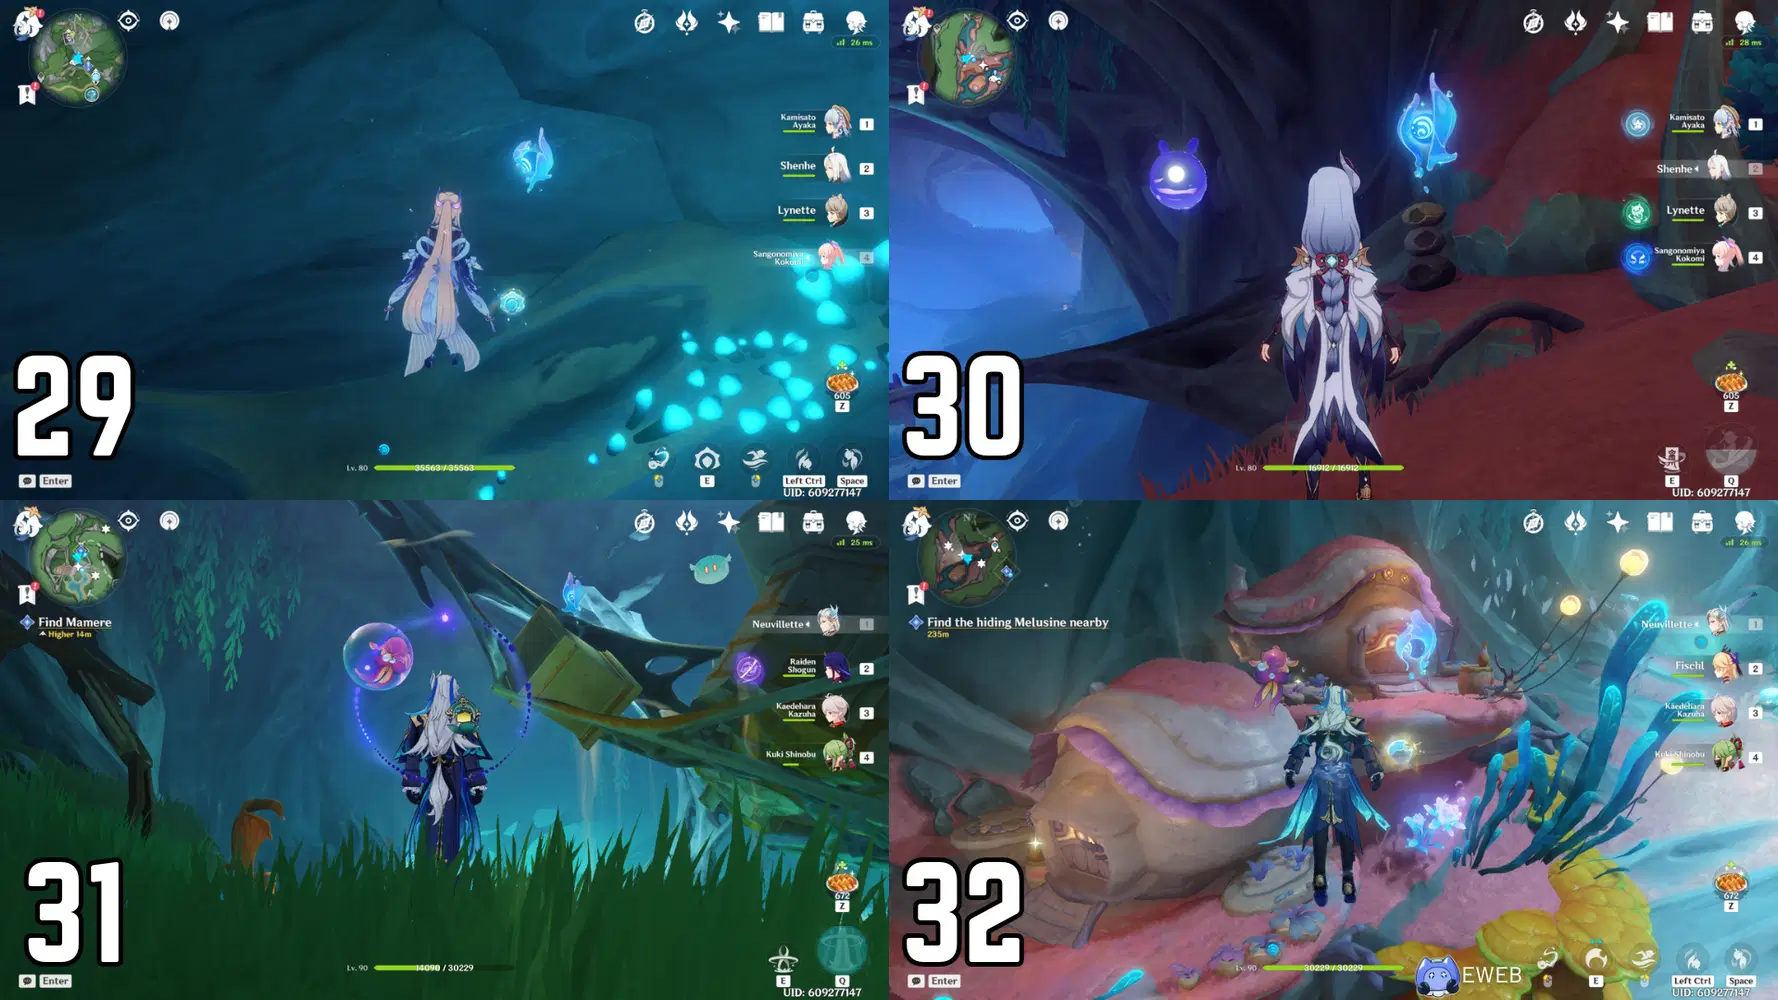
29-32
29. Teleport to the Statue of the Seven in the Beryl Region. Head northwest to the small body of water. Swim a little way down the underwater cavern. The hydroculus is located behind a rock, so make sure to find the Xenochromatic Armored Crab nearby to be able to break it.
30. Head further into the underwater cavern until you find an exit point. Leave the water and jump down the hole, gliding down and landing in “A Very Warm Place.” Continue south through the cavern, unlocking waypoints as you go. Eventually, you will find yourself in Merusea Village. Follow the right-hand path after the waypoint until you can head down another path, towards an isolated home. Before you reach the home, on the right side will be the hydroculus, on top of three stacked rocks.
31. From your current location, continue north and head towards the next cavern entrance in the distance. Keep heading this way and you will reach “A Lonely Place.” The hydroculus is located on top of the elevated broken structure in the middle of the cave. Jump off nearby structures and glide over to grab it.
32. This hydroculus is located in the underwater portion of Merusea Village, in front of a melusine’s home. This area can be unlocked during the World Quest, “Ancient Colors Act II: A Gradient of Dreams and Ochre.” As you work your way through the quest, you will be brought to this location.
-- -- --
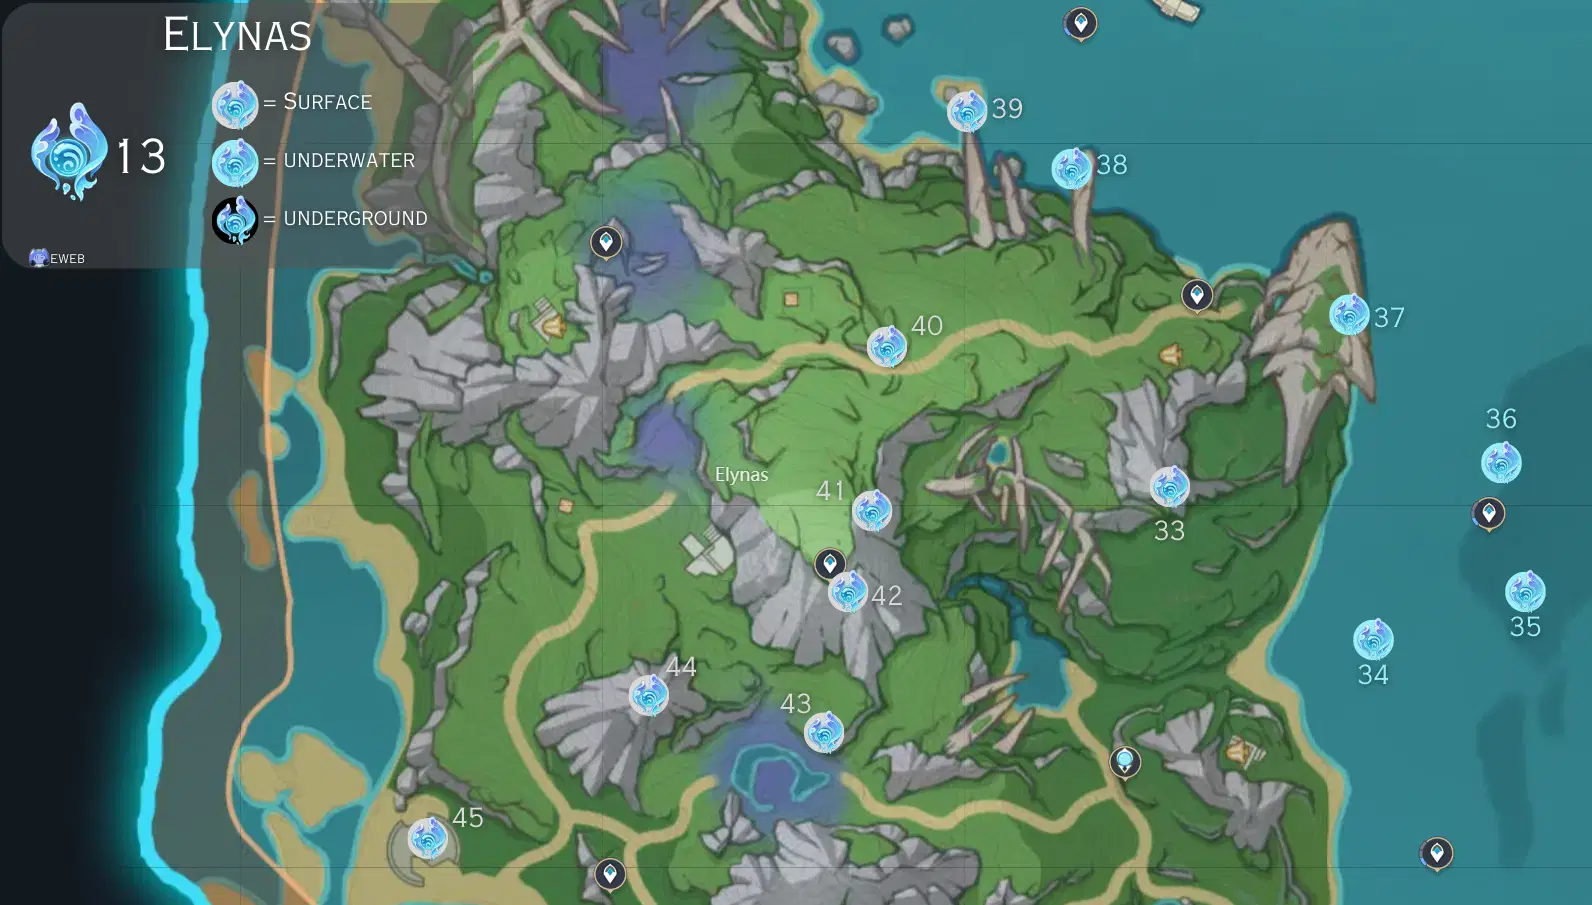
Elynas [33-45]
-- -- --
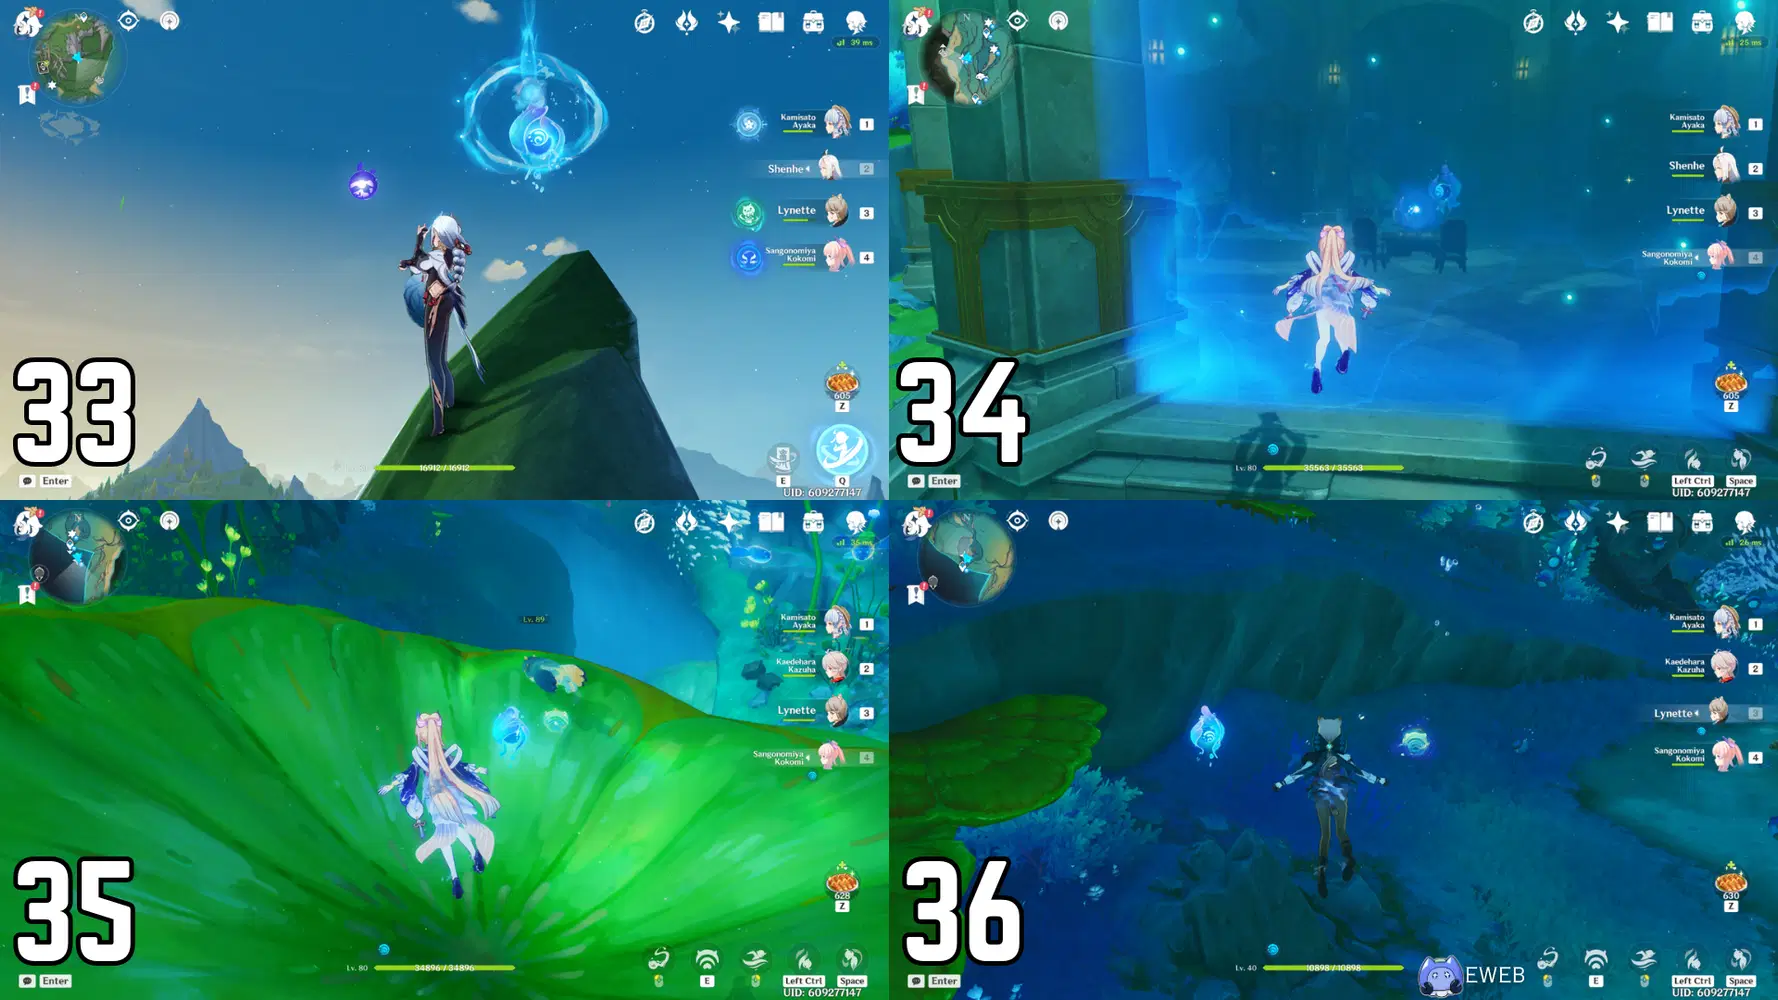
33-36
33. Teleport to the Statue of the Seven in the Beryl Region and head north towards what looks like a mountain peak. As you get closer, you will notice that it is actually overarching bones. The hydroculus will be located on top of the bone with a launcher.
34. Glide southwest towards the water, past the dock and fishing location. Drop into the water and swim down when you see the underwater building. Activate the Echoing Conch outside of the building to find the Pneumousia blocks and unlock it. The hydroculus will be located inside.
35. Leave the building and swim northeast. The hydroculus will be located nearby in the middle of the largest leaf.
36. Now, swim north and go past the nearest waypoint. The hydroculus will be located just past it.
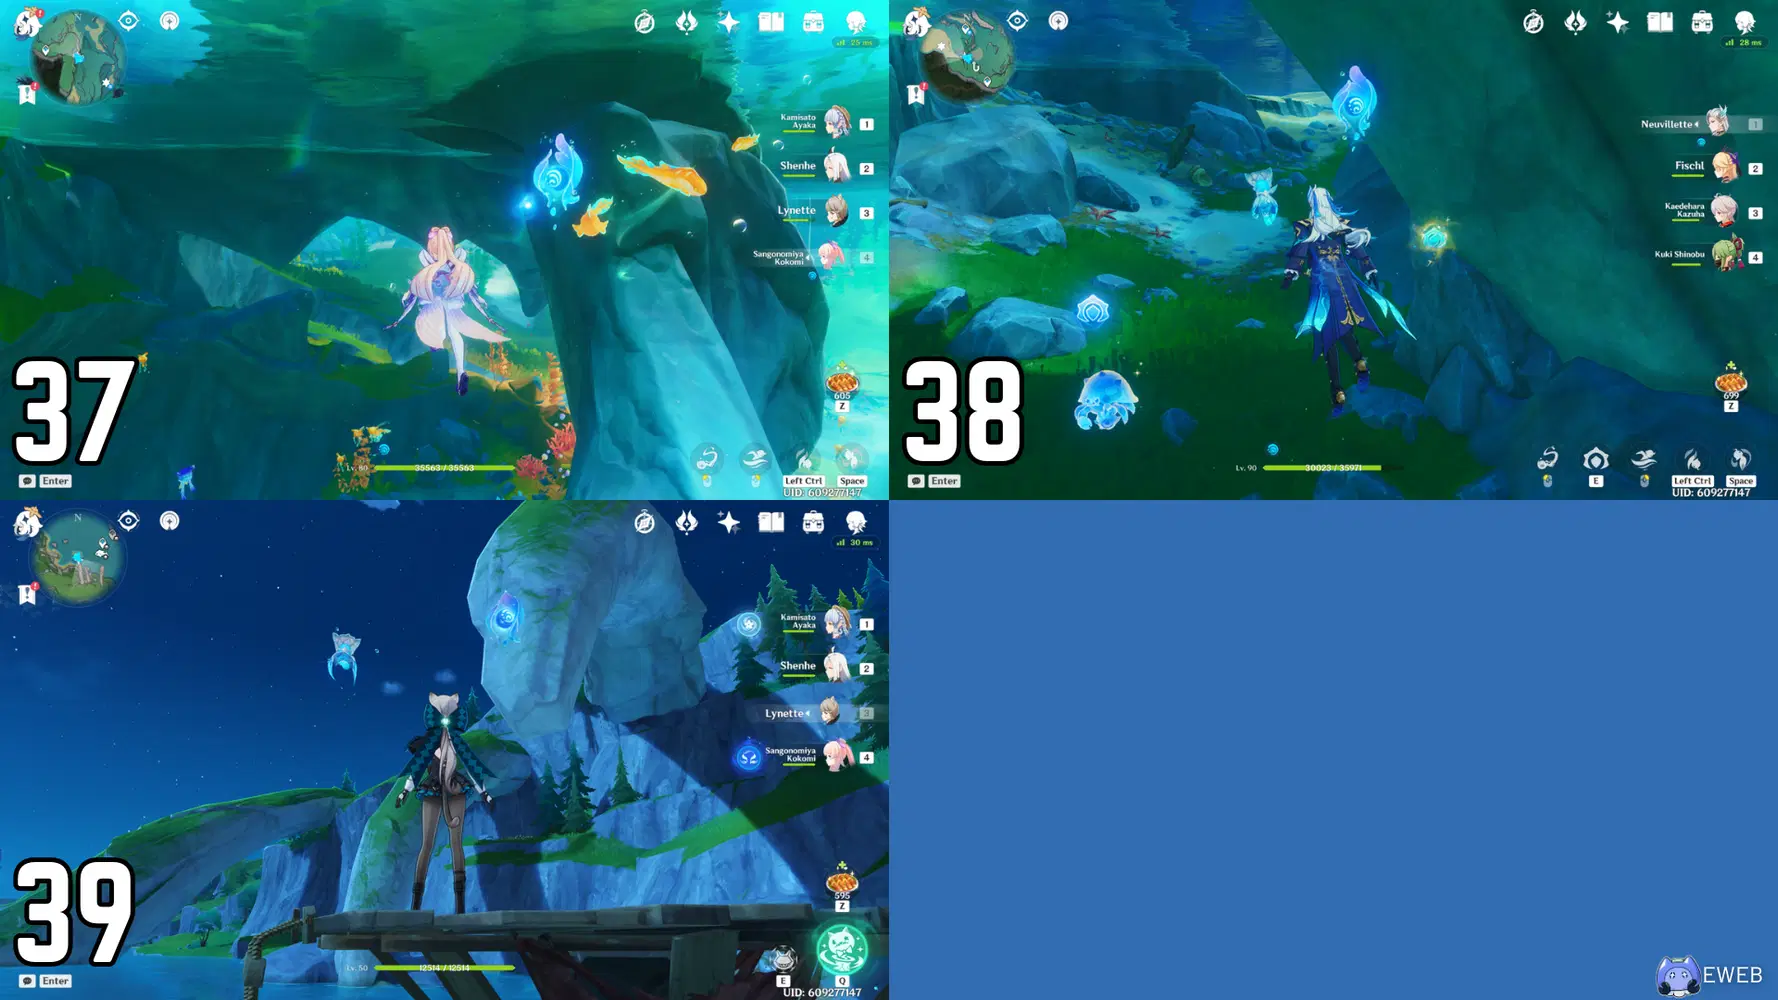
37-39
37. Swim northwest until you reach the giant skeletal head. This hydroculus will be located right near the surface of the water.
38. Swim northwest, along the coastline, until you reach an area where a puzzle and building in ruin is located. To the left of this building will be a Bullet Barnacle. Destroy the Bullet Barnacle to find the hydroculus inside.
39. Continue swimming northwest and exit the water once you see the bones overarching your location on the map. Climb up the cliffs to the side so you can gain access to the second bone, whose point does not touch the ground. Run along it until you reach the hydroculus at the end.
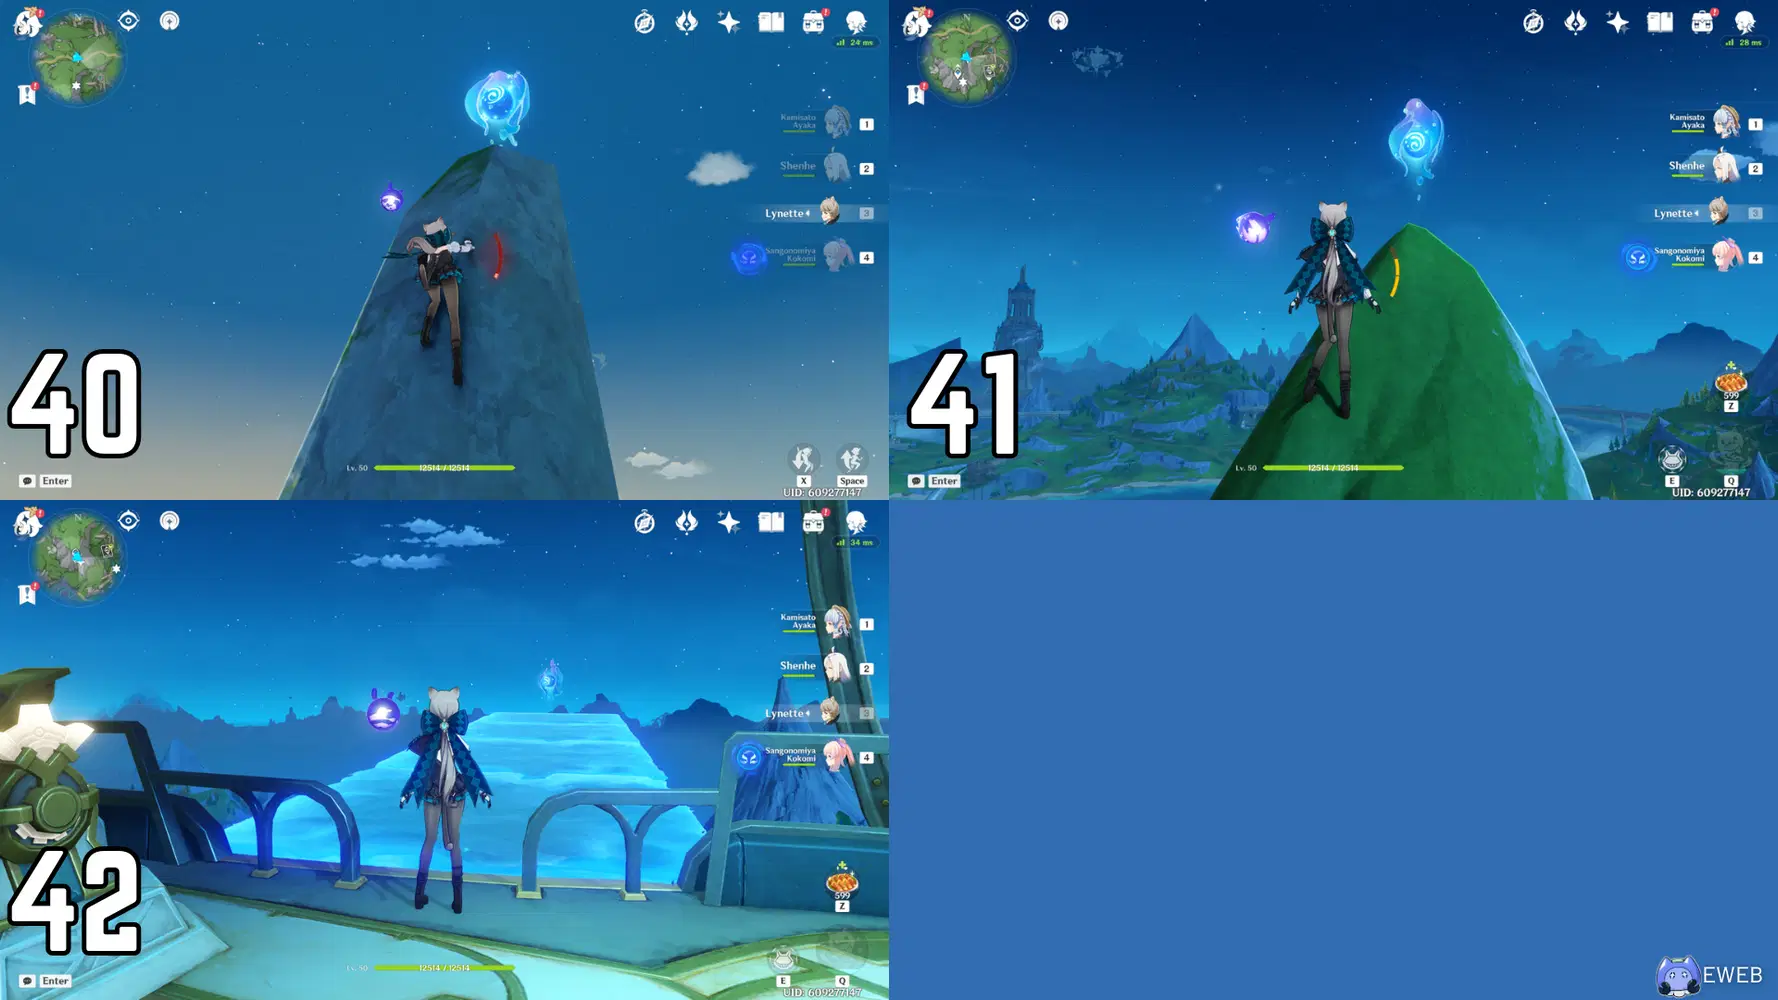
40-42
40. Now, head south inland. This hydroculus will be located at the tip of a large bone jutting out from the ground, skyward.
41. Glide down and go up the steep mountainside in front of you. This hydroculus is located at the tip of a bone jutting out of the side of this mountain.
42. Continue up the mountainside to the waypoint. At the waypoint, take the airship a bit higher into the air to reach this hydroculus.
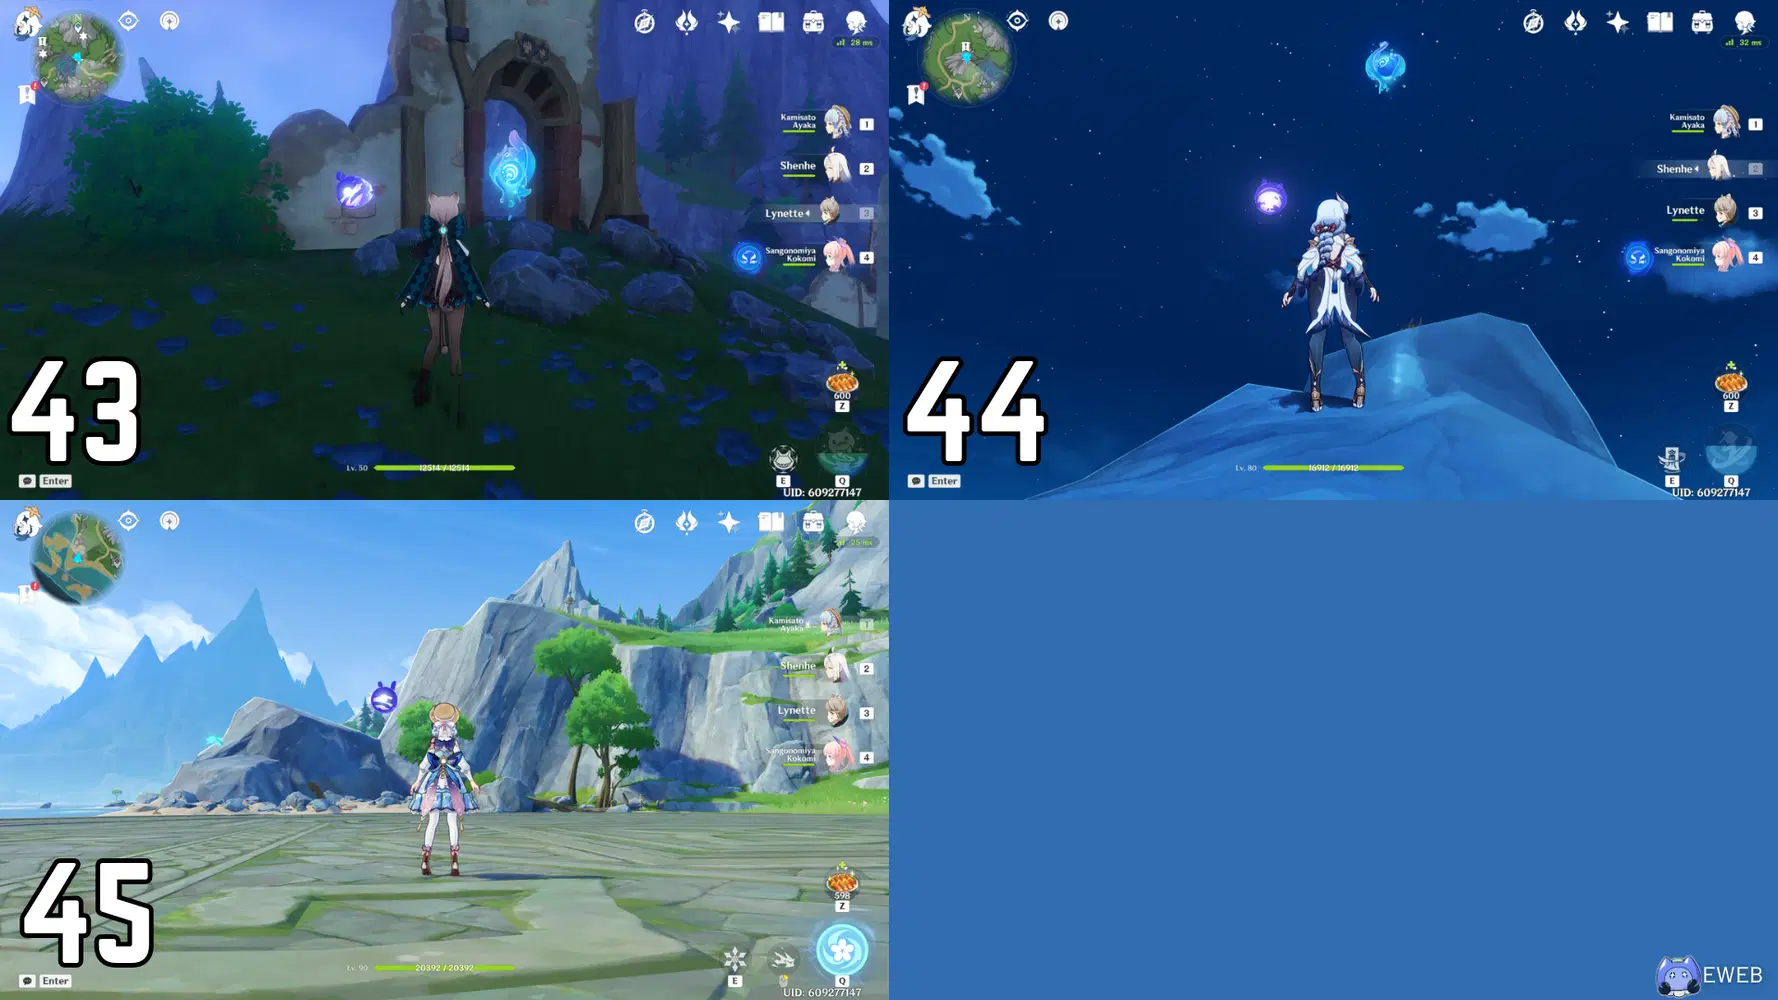
43-45
43. Glide south a little bit before dropping down and landing next to a dilapidated building's doorway. The hydroculus will be located in this doorway.
44. Continue directly west towards the mountain peak. The hydroculus will be located at the top.
45. Glide southwest towards the area circle on the coast. The hydroculus is high above the area. If it cannot be reached by gliding from the mountain peak, there is a launcher on a cliff nearby that will take you directly to its location.
Court of Fontaine
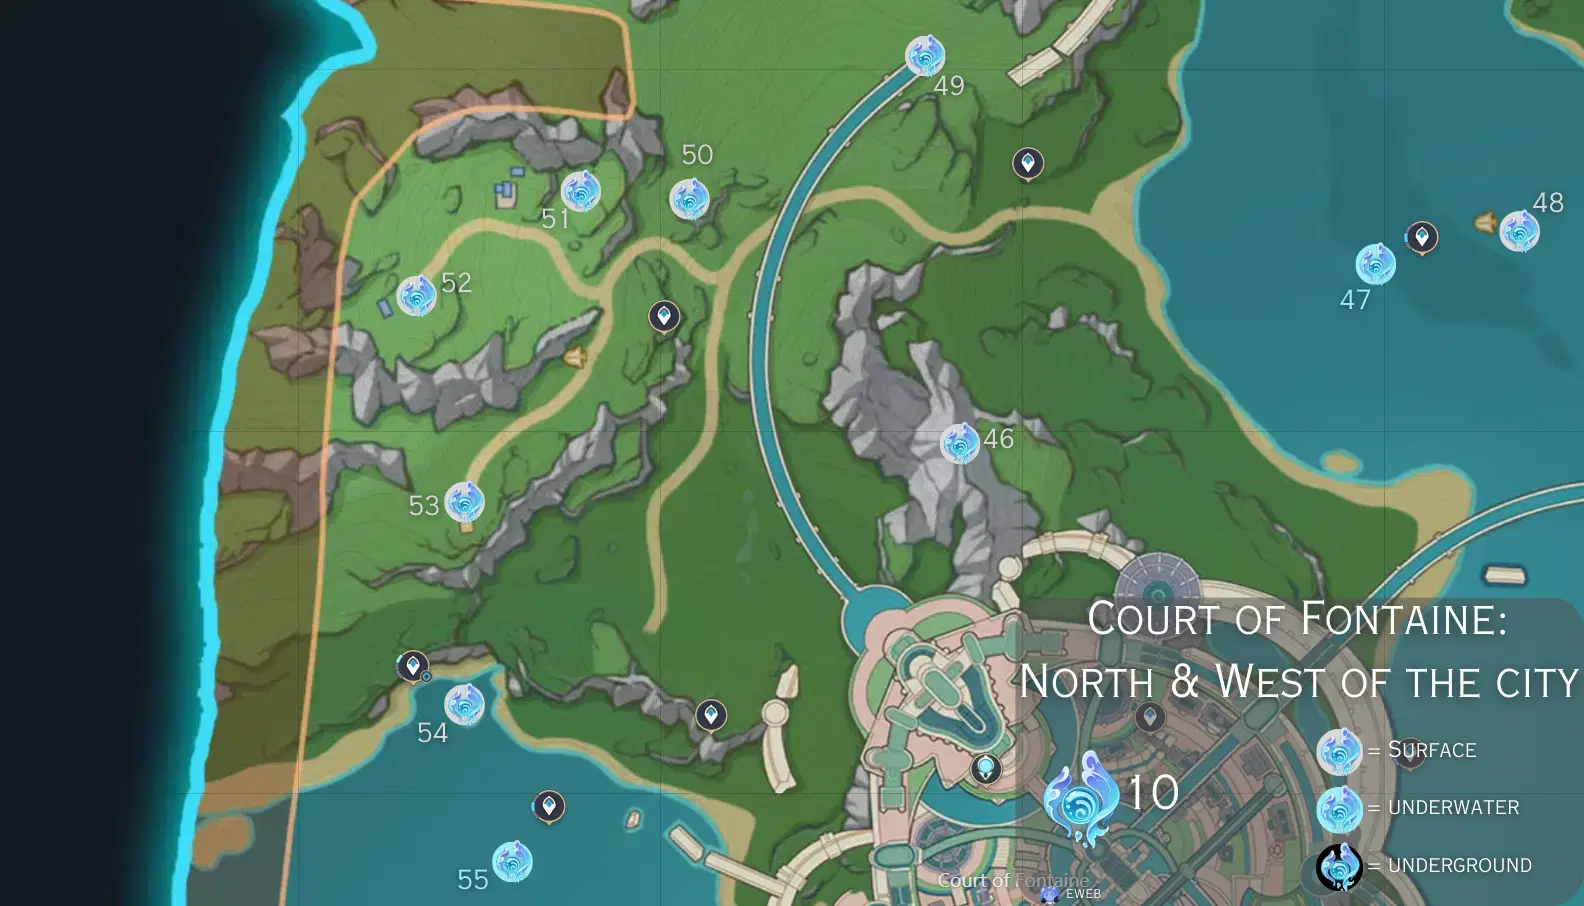
Court of Fontaine: North & West of the City [46-55]
-- -- --
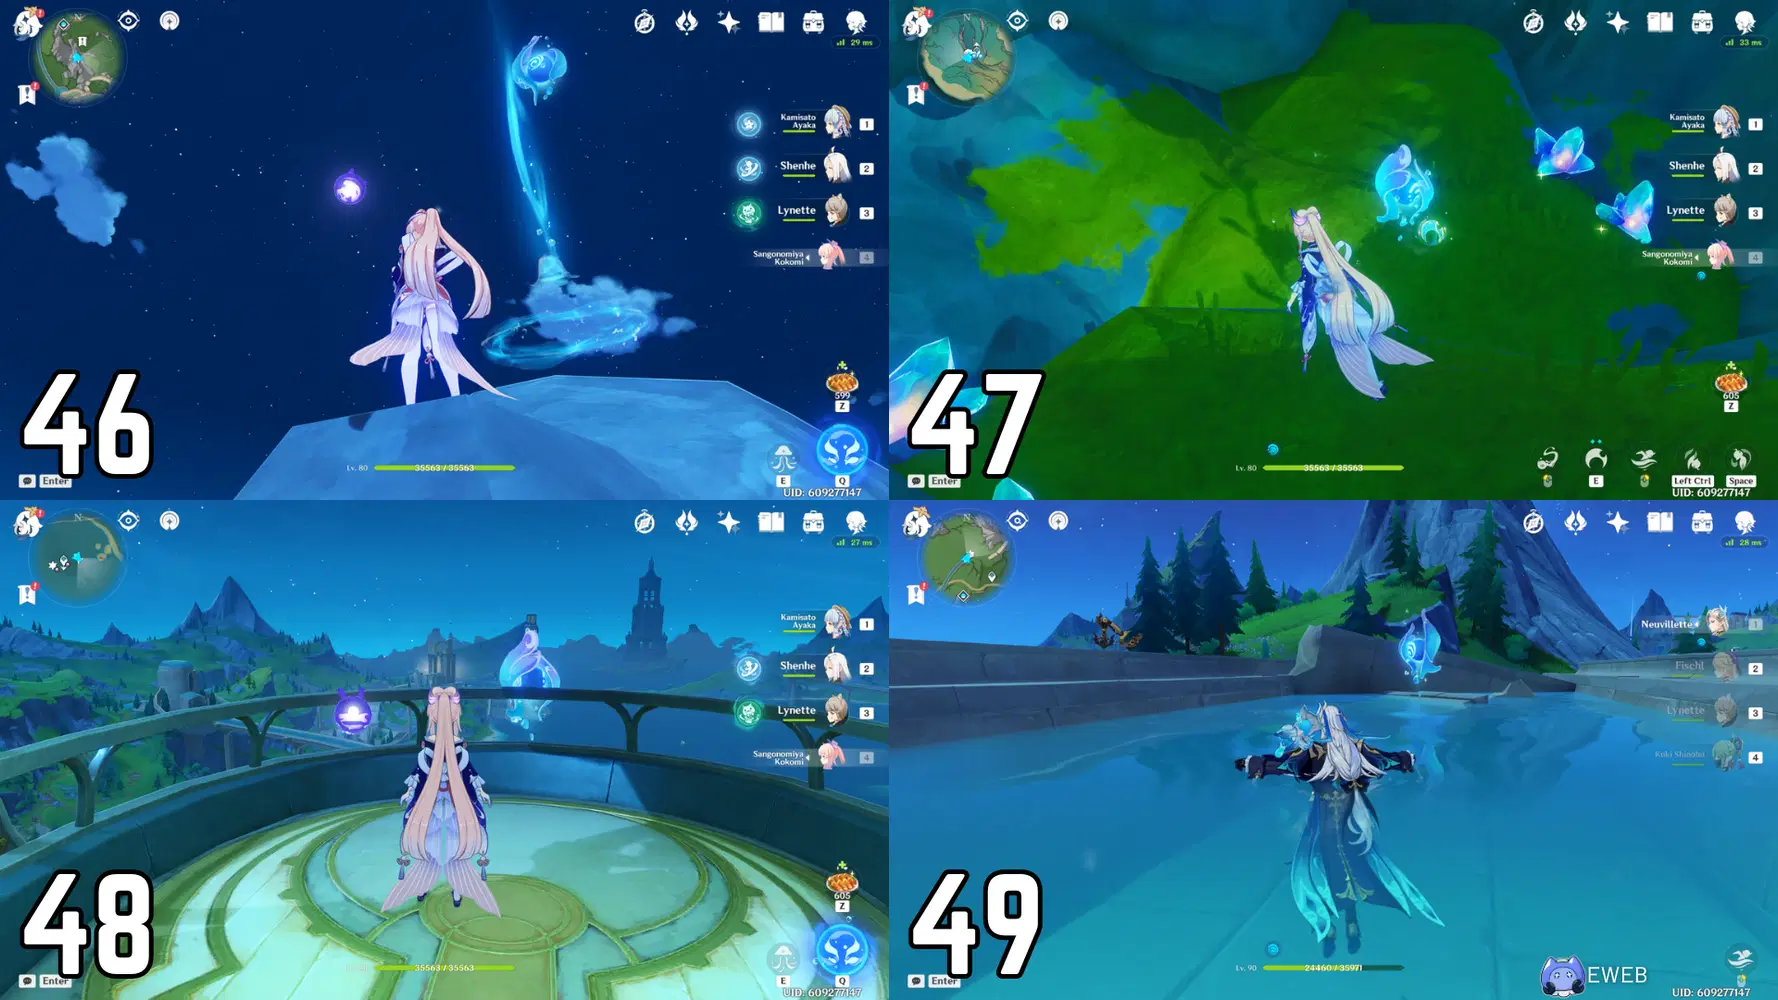
46-49
46. Teleport to the Statue of the Seven in the Court of Fontaine region. Head north of the city by going around to the backside of the Palais Mermonia. Once you reach the aquabus line, jump off in the northeast direction and glide over to the smaller of the two mountain peaks. Climb to the top to grab the hydroculus.
47. Jump off and head northeast towards the coast and get in the water. Swim down until you see the hyrdoculus, which is located in a small cavern blocked by a forcefield. In order to disperse this field, three Seelies need to be found in the surrounding area. The leftmost Seelie is to the left of the statues in a Fontemer Seagrass. Use the ability from the Xenochromatic Hunter Ray to cut the weak sections and release the Seelie. The middle Seelie is behind the waypoint, and you must beat the challenge (destroying Pufferfruits) in order to get the Seelie to float towards its statue. The final, and rightmost, Seelie is off to the right side. You need to defeat the enemies surrounding the locked chest before leading the Seelie to its statue. This will unlock the forcefield, and a Precious Chest, allowing you to obtain the hydroculus within!
48. Continue swimming east and up past the waypoint. You must go to the airship (Antoine Roger Aircraft) near this waypoint and cut the Fontemer Seagrass underwater, which is keeping it from flying. Afterwards, board the airship and it will take you to its destination in the sky, directly where the hydroculus is located.
49. Jump off of the aircraft and glide west, back inland towards the waypoint. From here, head northwest up the hill to the broken aquabus line. Climb the nearby hills so that you can jump off and glide onto the aquabus line. The hydroculus will be in the middle.
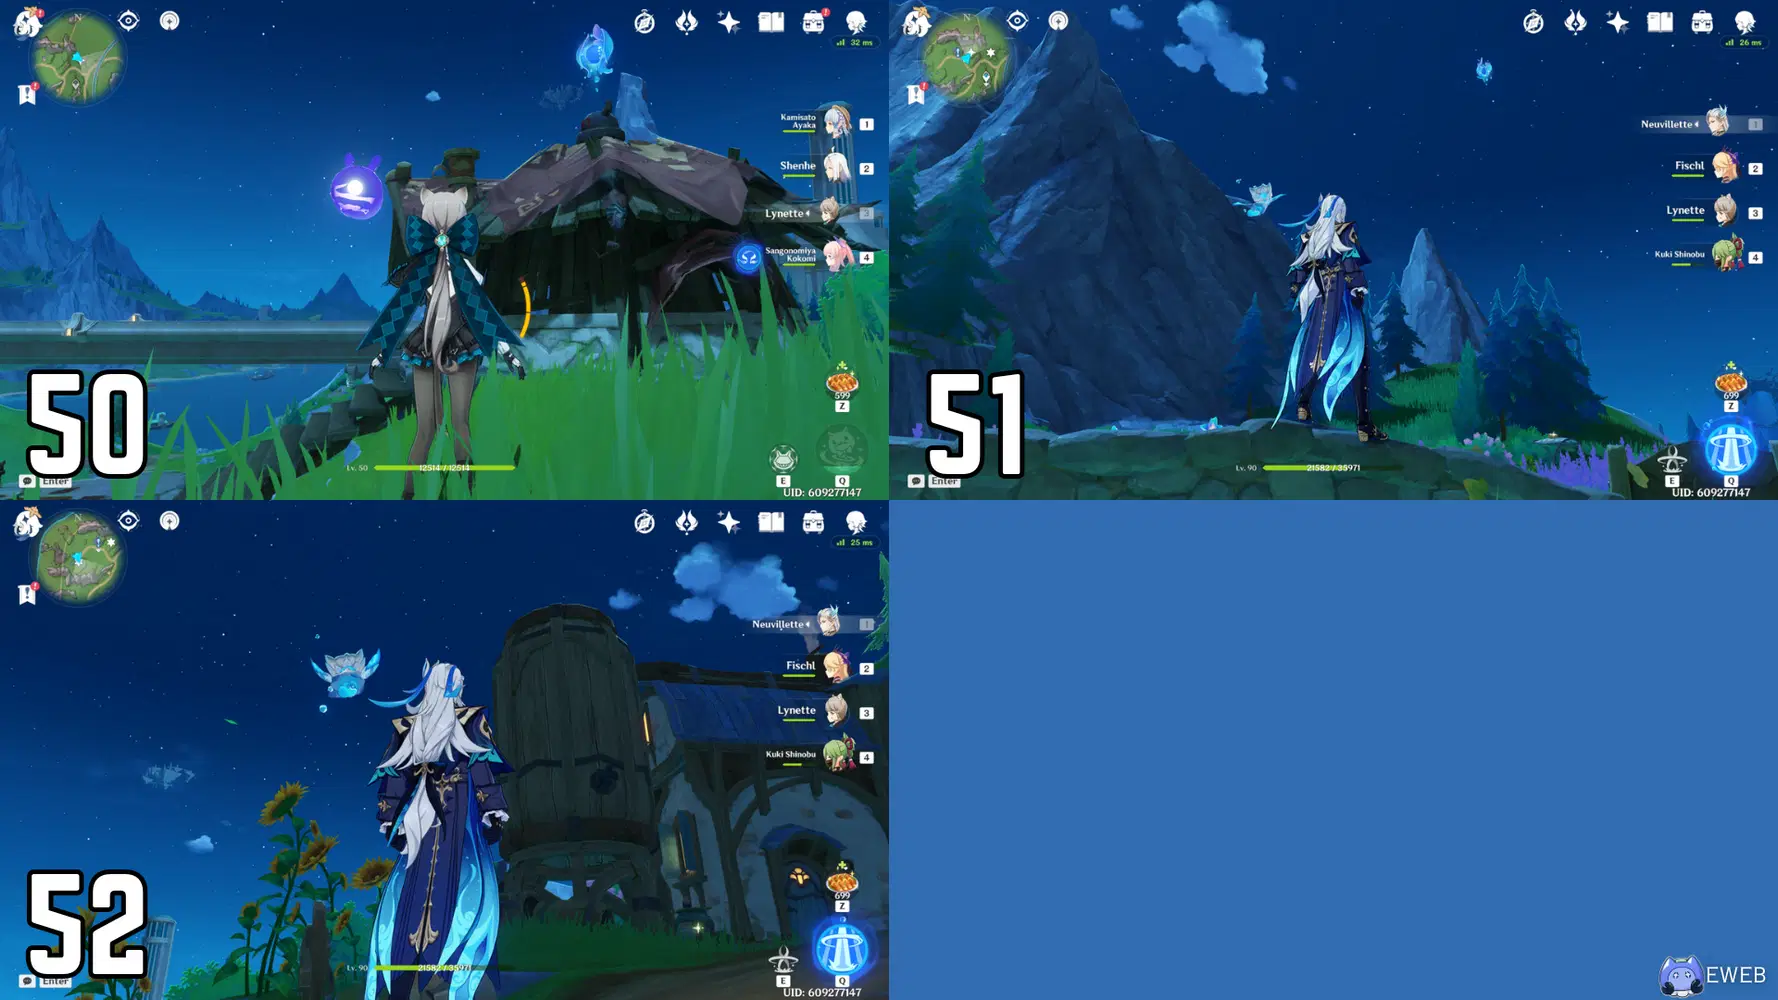
50-52
50. Jump off the aquabus line and glide southwest, towards the hilichurl camp in the distance. The hydroculus is located on top of the big hilichurl hut.
51. Head east from the hiluchurl camp until you run into a flower garden. In the corner of the flower garden is a pinwheel. Making sure not to stop on any of the flowers, make the pinwheel spin with Anemo and glide up the gust of wind to grab the hydroculus floating over the garden.
52. Continue up the hill, staying on the leftmost dirt path. Once you reach the home at the top, climb up the side and grab the hydroculus on top of it.
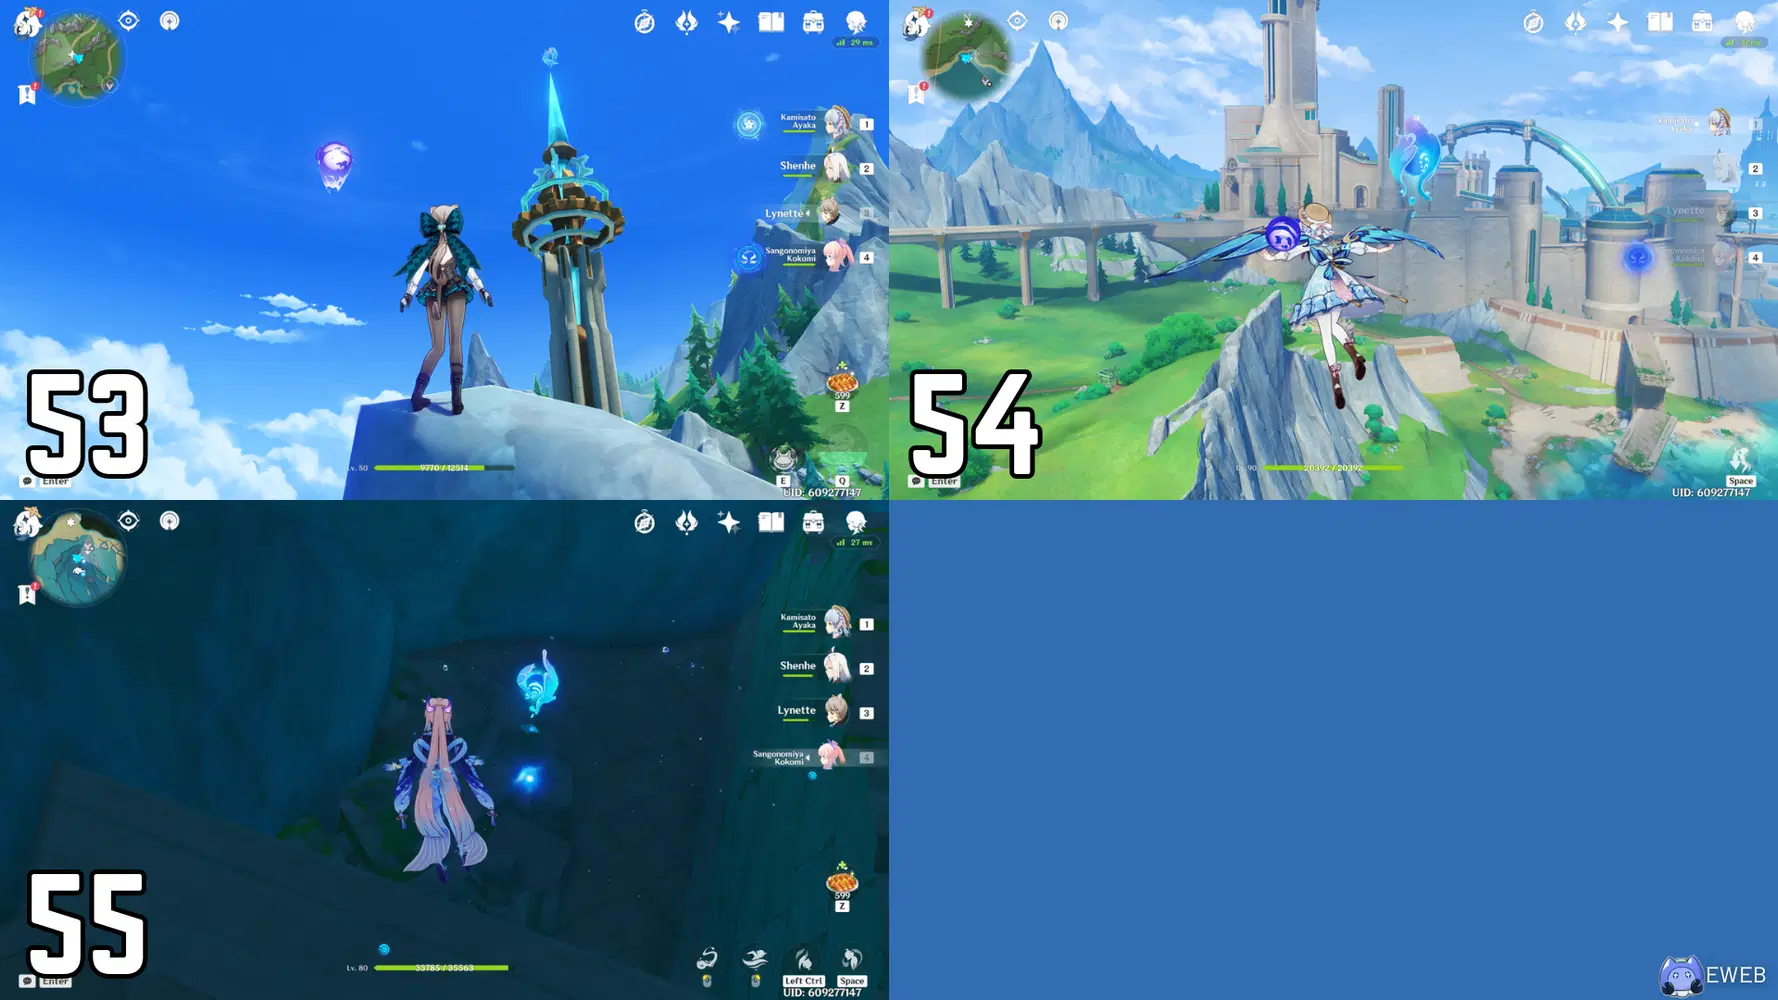
53-55
53. Before heading to this hydroculus, head east towards the closest waypoint and unlock it. We will be using this later to make this route faster. Now, head southwest until you reach a spire, where the hydroculus is located at the top. Use the launcher at the base to easily get access to the top.
54. Glide south towards the coastline where there is a rock, tree, and Seelie puzzle next to each other. Activate the Echoing Conch near the statues to see points of interest you should investigate. Once all Seelies are found and led to their statues, the chest will unlock and an updraft will appear. Glide up the updraft and grab the hydroculus.
55. Continue heading south into the water. Once you see an underground cavern head down into it. The hydroculus will be located near the entrance, in some ruins.
-- -- --
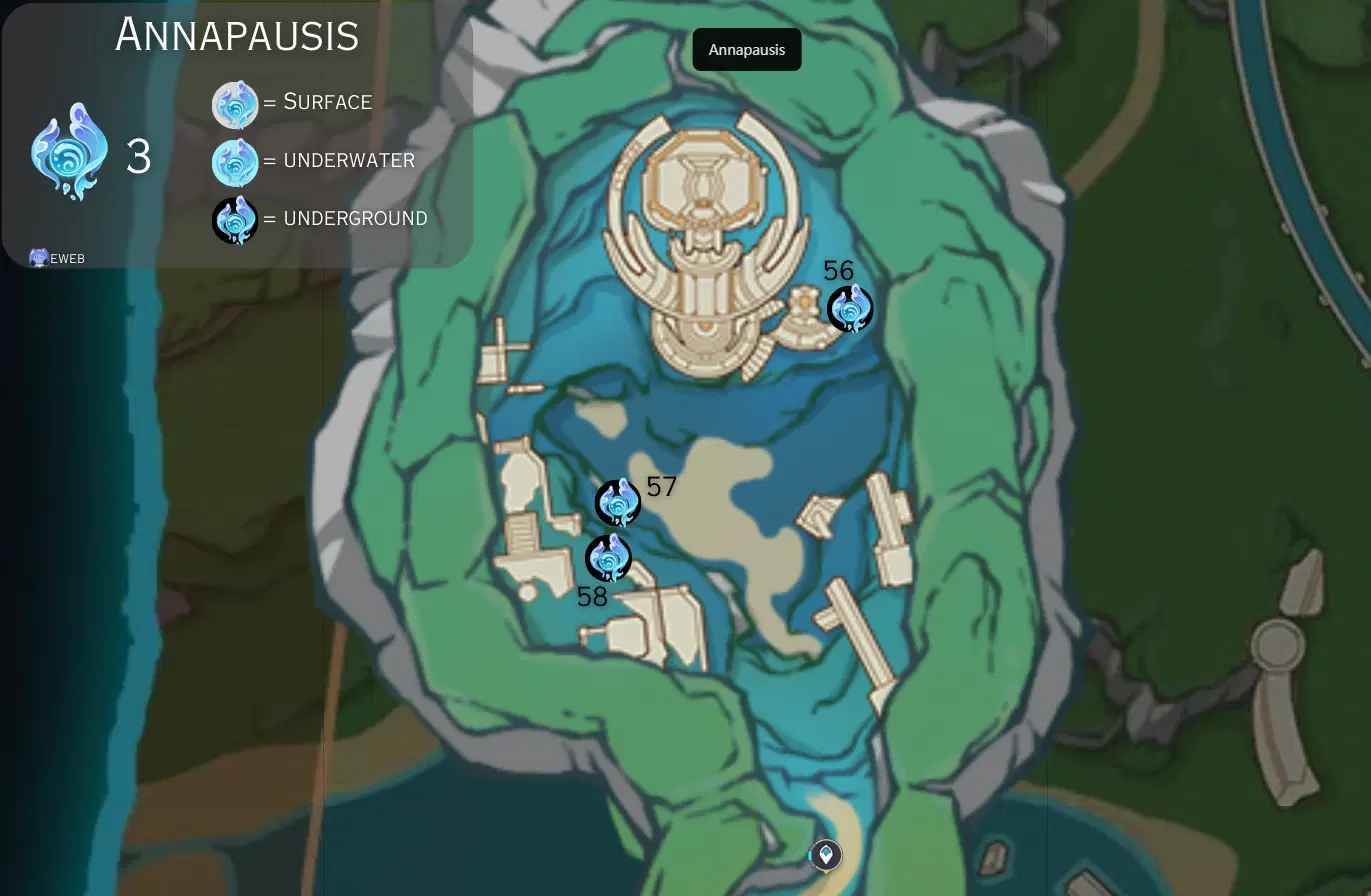
Annapausis [56-58]
-- -- --
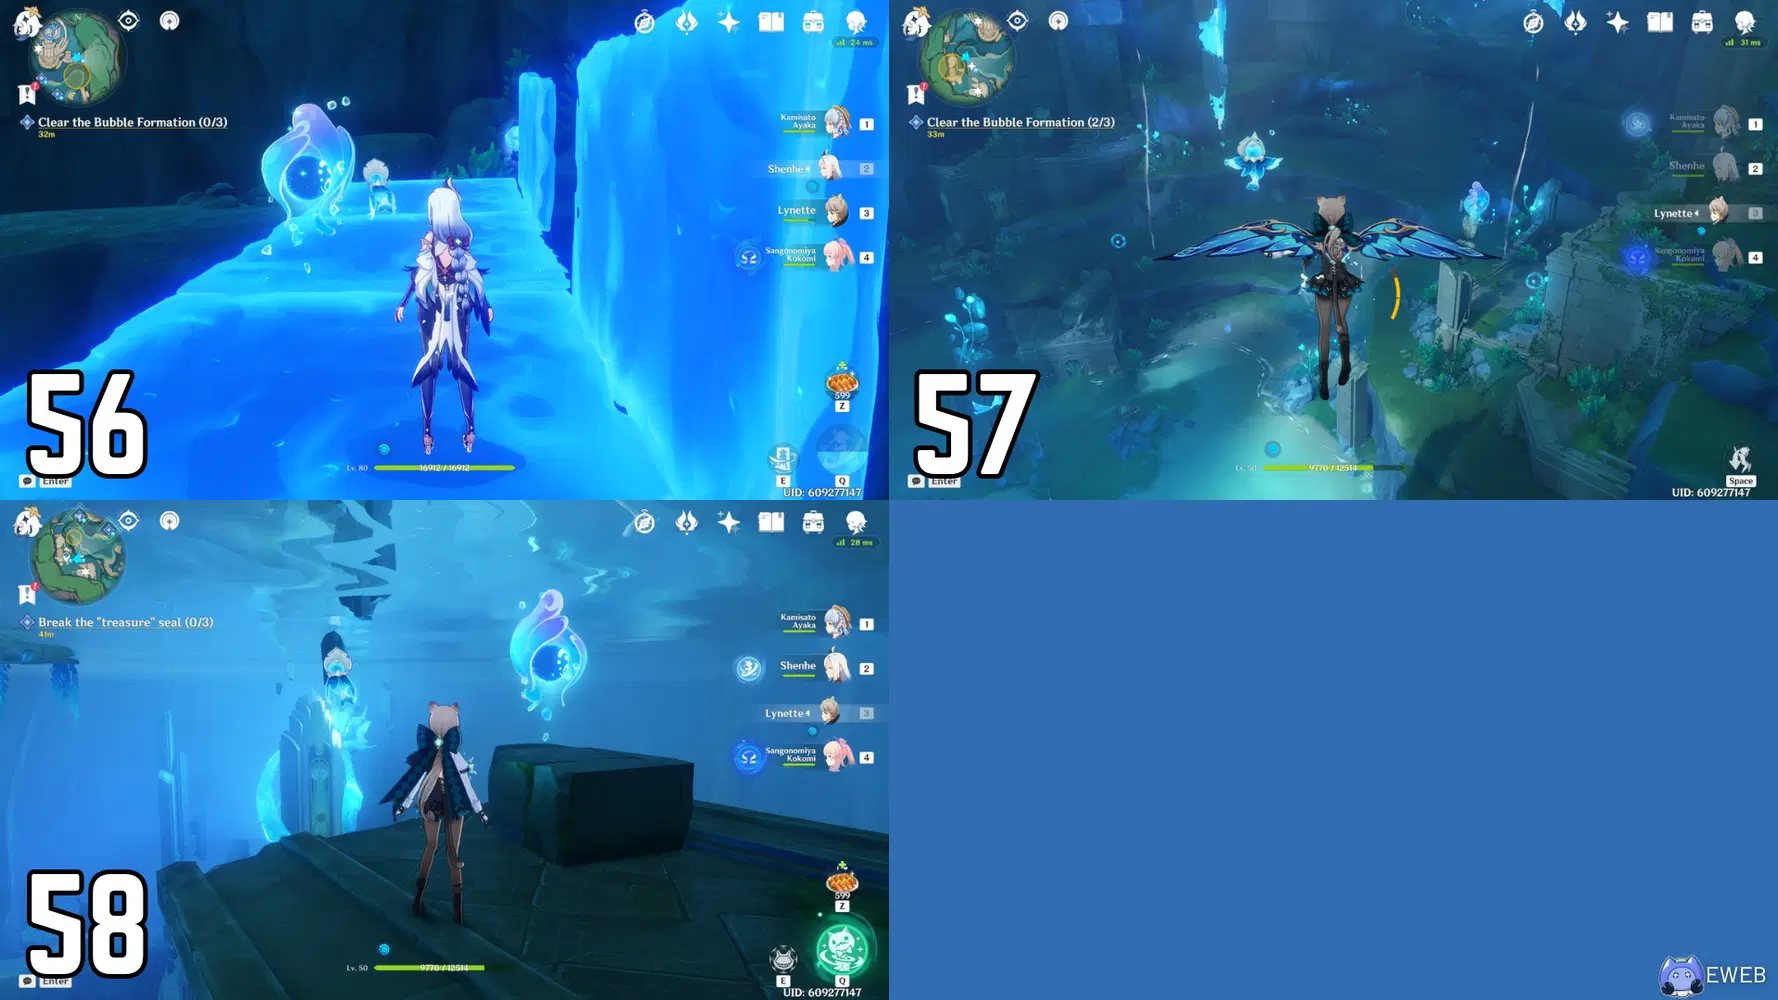
56-58
56. As you head deeper into this underground cavern, you will be led to the underground kingdom of Annapausis. You need to start the World Quest: The Narzissenkreuz Adventure (Act I) to access this location. As you go through the quest, you will reach a point where you must activate the crystal on the right side of the palace to create a bridge. This will allow you to reach the hydroculus.
57. This hydroculus is near the middle of the room, floating in the sky. You can jump off the nearby ledges that are higher than it to reach it easily. You need to start the World Quest: The Narzissenkreuz Adventure (Act I), and it will lead you to this point.
58. Continue through the first act of the World Quest: The Narzissenkreuz Adventure, and you will be brought up to the underwater section above the kingdom. Swim over to where the hydroculus is and drop down through the water back onto land and onto the section it is resting on.
-- -- --
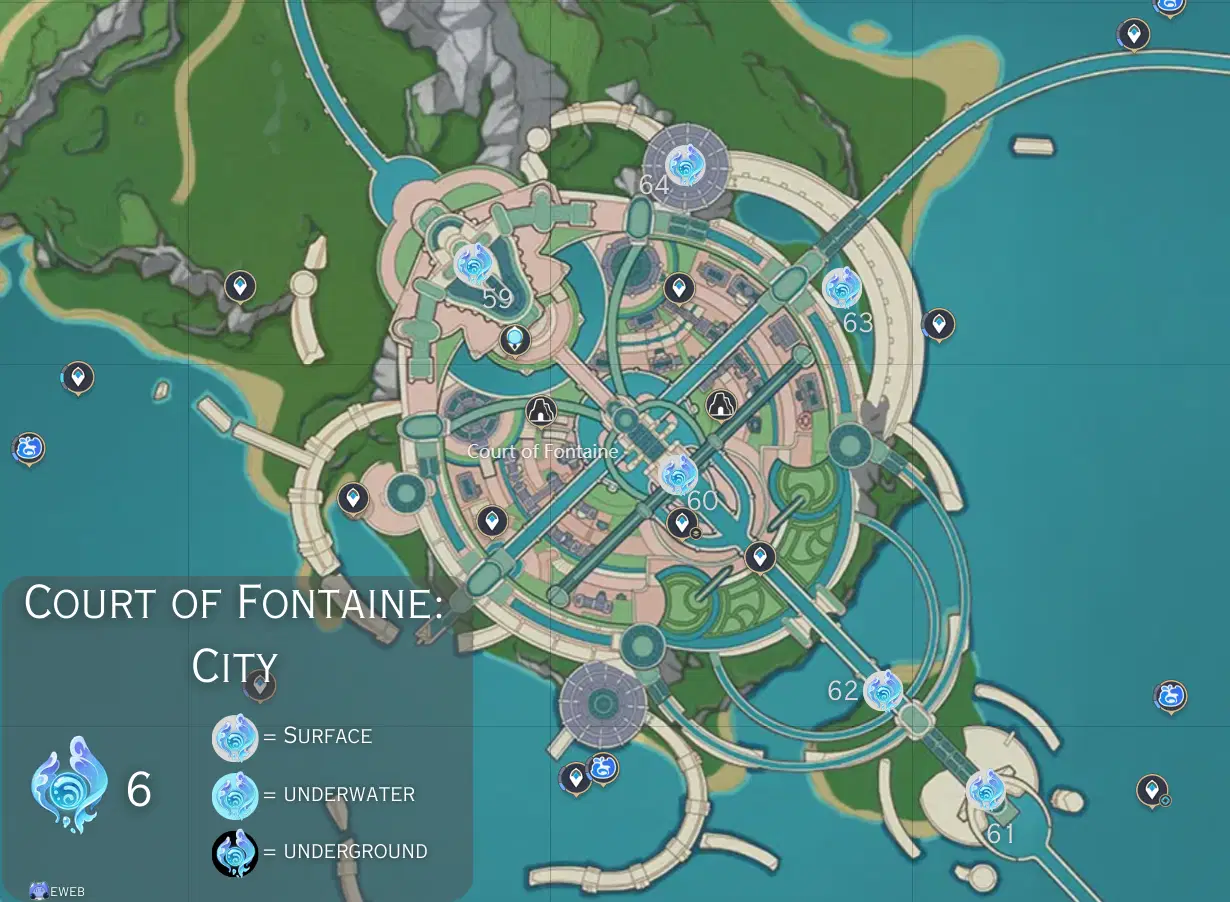
Court of Fontaine: City [59-64]
-- -- --
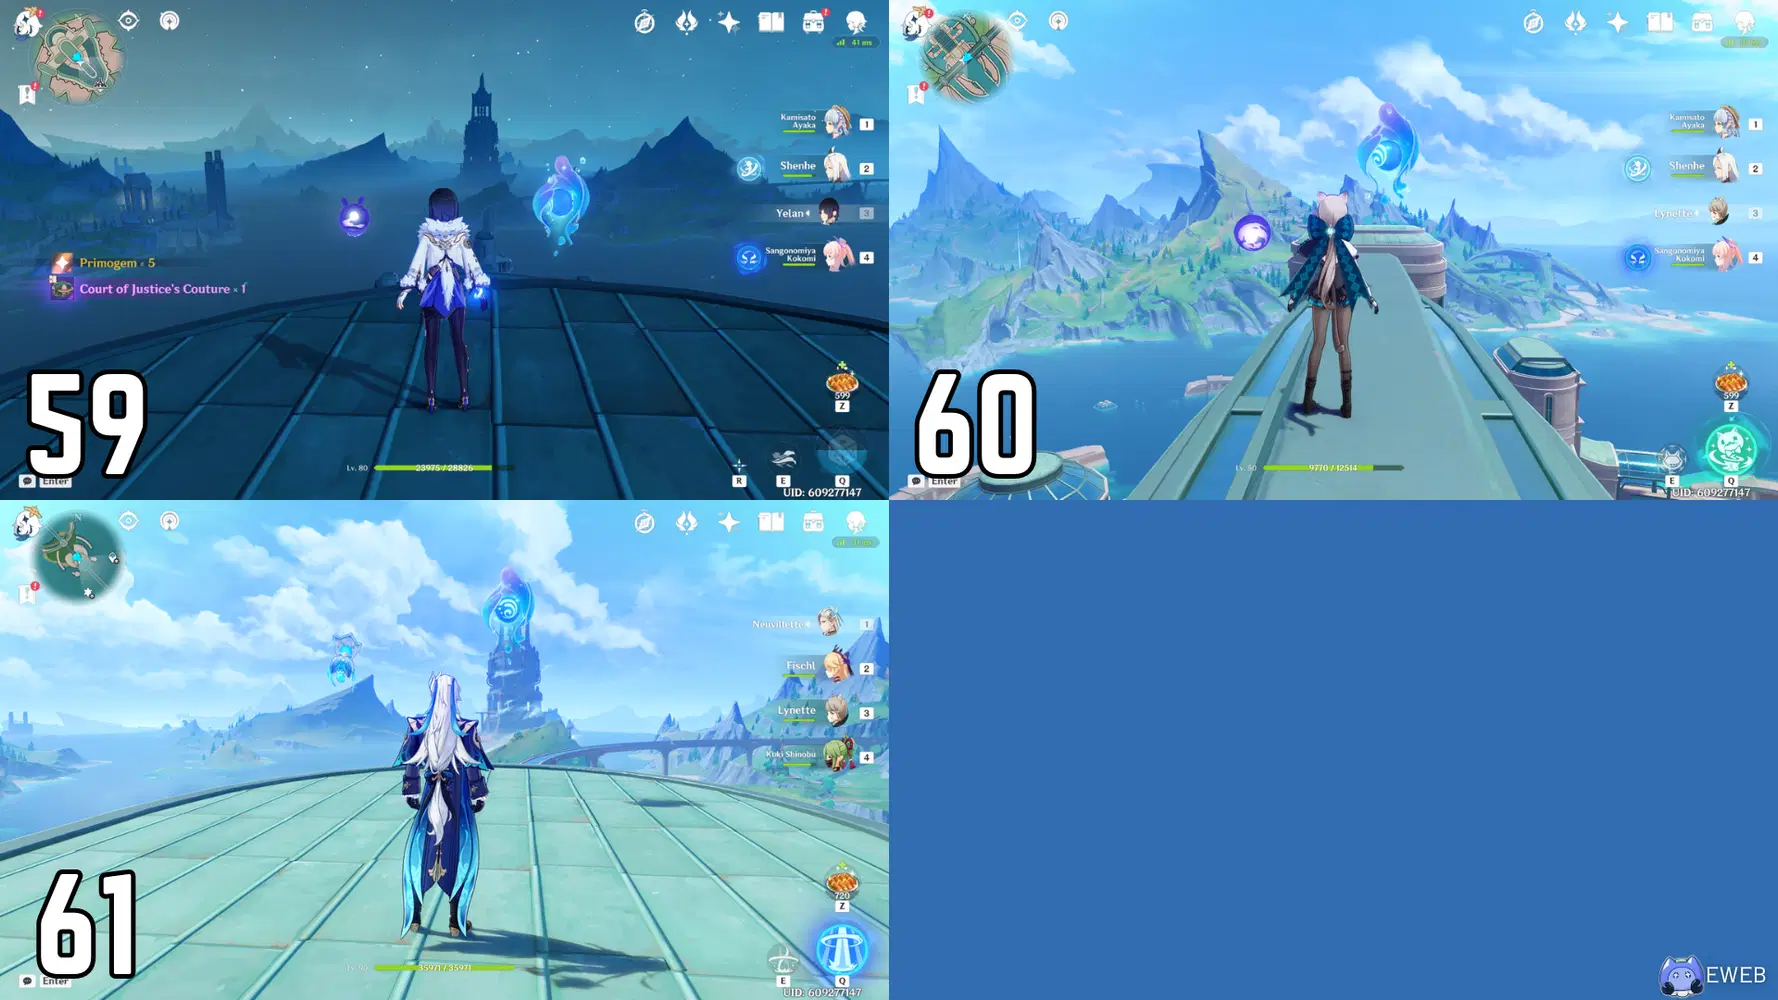
59-61
59. Teleport to the waypoint that is northwest of the city that we recently unlocked. Head west towards the airship close by and hop on it. The airship will take you to the top of the Palais Mermonia, where the hydroculus is located.
60. Jump off of the Palais Mermonia and glide southeast towards the arch that goes over the entire city. Once you reach it, the hydroculus will be in the middle on the top.
61. Jump off the arch and glide in the southeast direction, towards the entrance of the city, following the path of the aquabus line. Once you reach the building, land on the top and keep crossing the roofs covering the aquabus line until you finally climb up the last building. The hydroculus will be at the top.
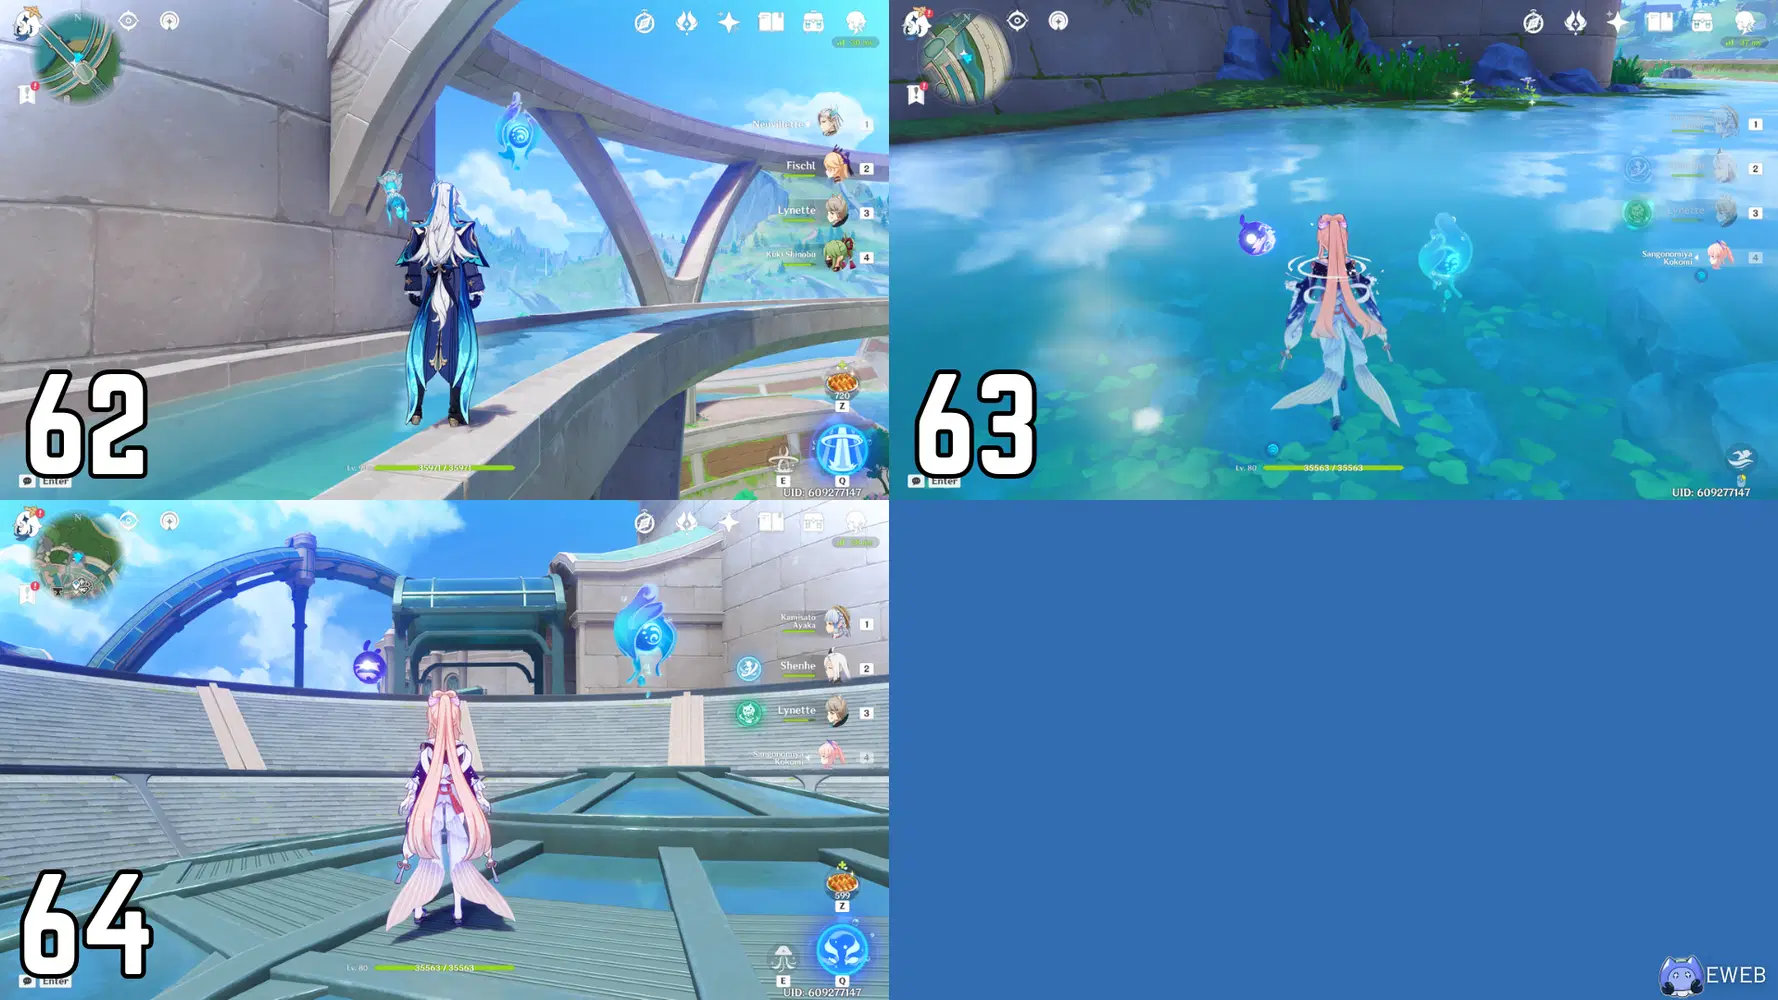
62-64
62. Turn and head back the way you came. Drop down to the aquabus line after you’ve reached the last building’s roof. The hydroculus will be located here.
63. Turn northeast and run along the edge of this line until you see the broken path outside of the city wall. Jump and glide to this path. Follow the path and climb up the walls until you reach the path directly outside the city wall. The hydroculus will be located in a small body of water here.
64. Head north on the outside wall’s path towards a circular building. Climb the side and find the hydroculus on the top. Now, jump down to the line below your location. The hydroculus will be located there.
-- -- --
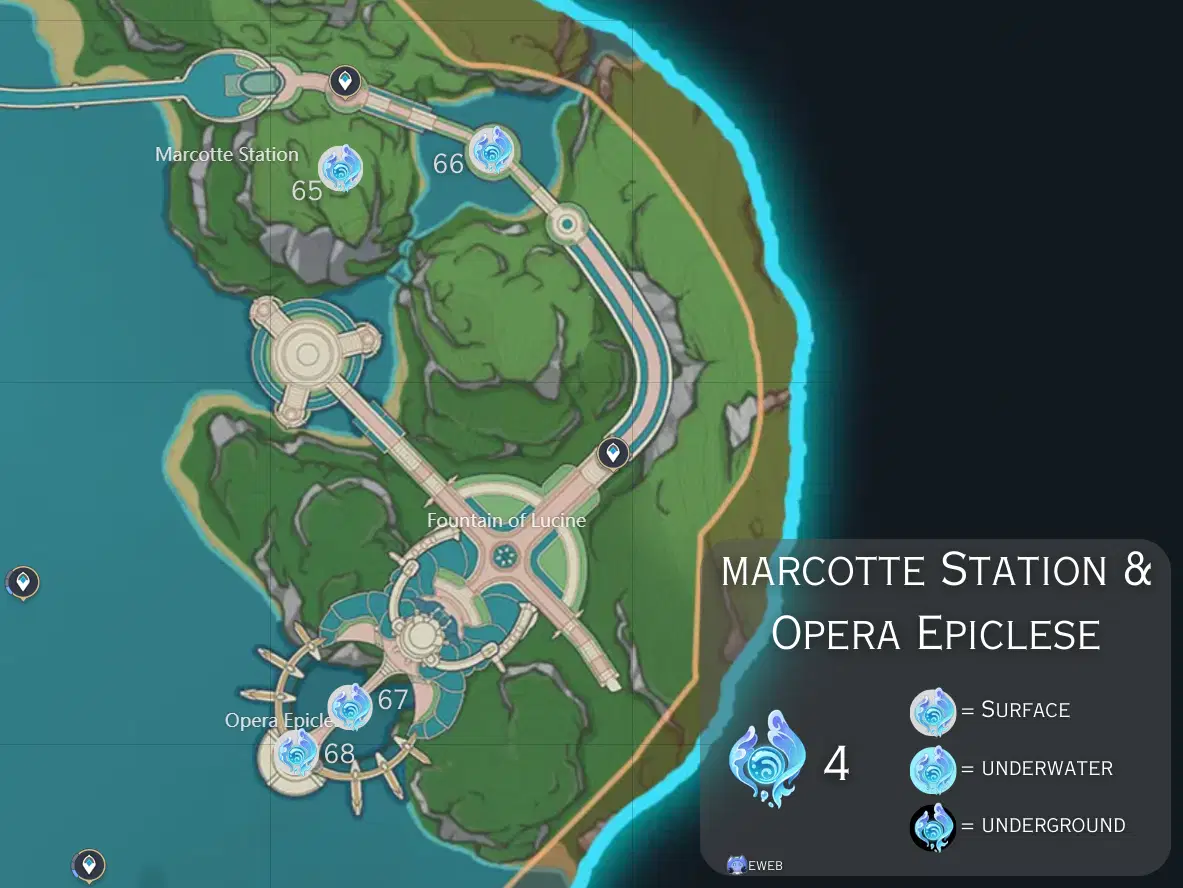
Marcotte Station & Opera Epiclese [65-68]
-- -- --
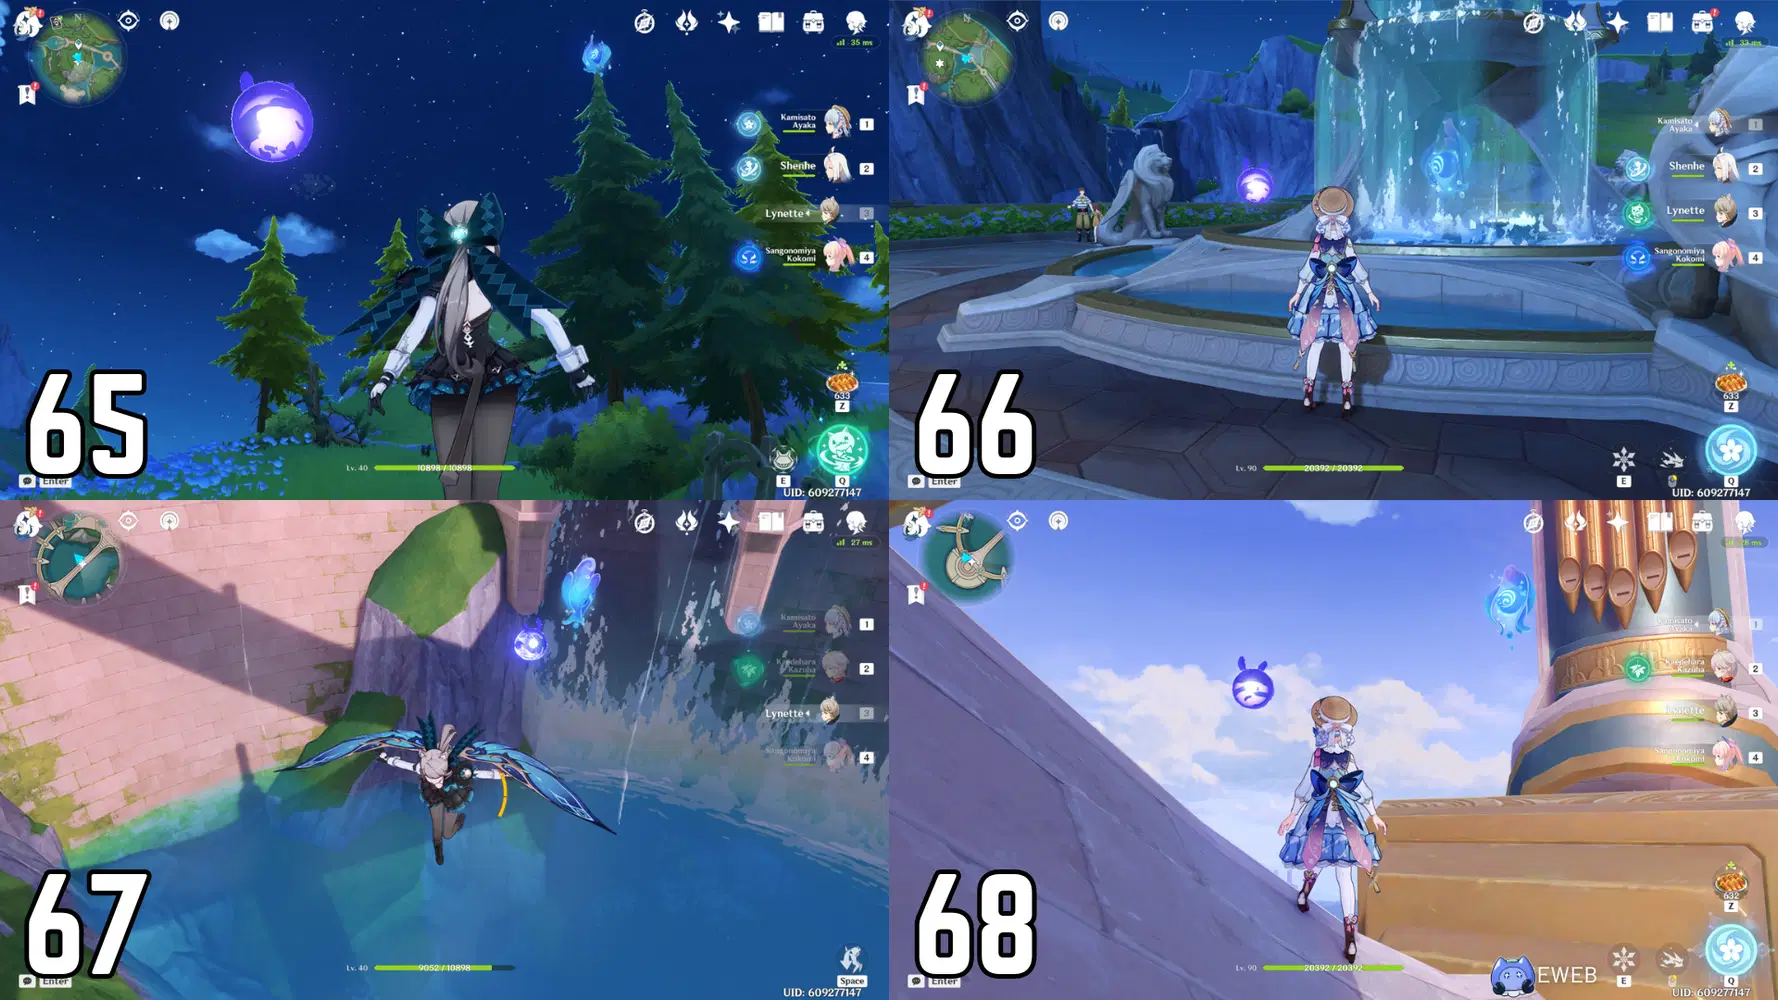
65-68
65. Teleport to the Statue of the Seven in the Court of Fontaine region. Head southeast from the statue and across the bridge directly in front of the Palais Mermonia. Call the lift and go to 3F: Navia Line. Take the aquabus and head to Marcotte Station. Once you reach Marcotte Station, head towards the waypoint and immediately bank south. Once you reach a launcher right off the path, enter it and it will take you above a tree, where the hydroculus is located.
66. Jump off of the cliff and glide northeast towards the fountain. The hydroculus will be located inside the fountain.
67. Follow the path until you reach the Opera Epiclese. Head behind the building and start to cross the bridge. At the halfway point, jump off and glide to the hydroculus directly under the bridge.
68. Teleport back to the Fountain of Lucine waypoint. Climb to the top of the Opera Epiclese and jump off, gliding towards the two towers behind the Opera building. Land on the side of one of the towers and climb the rest of the way to the top. The hydroculus will be at the connecting point in the middle, between the two towers.
-- -- --
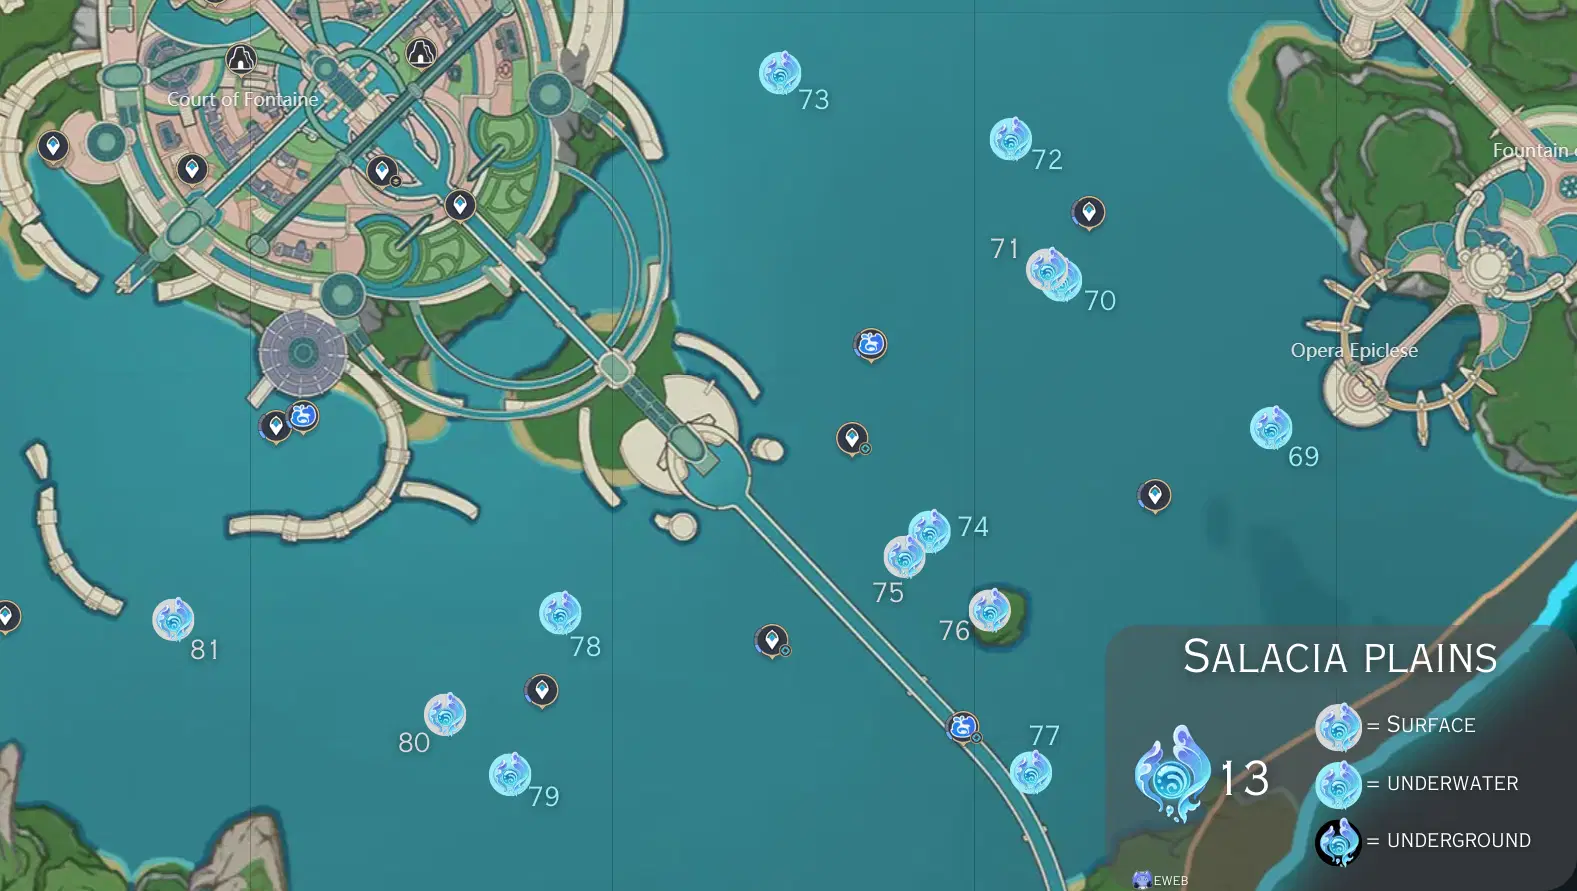
Salacia Plains [69-81]
-- -- --
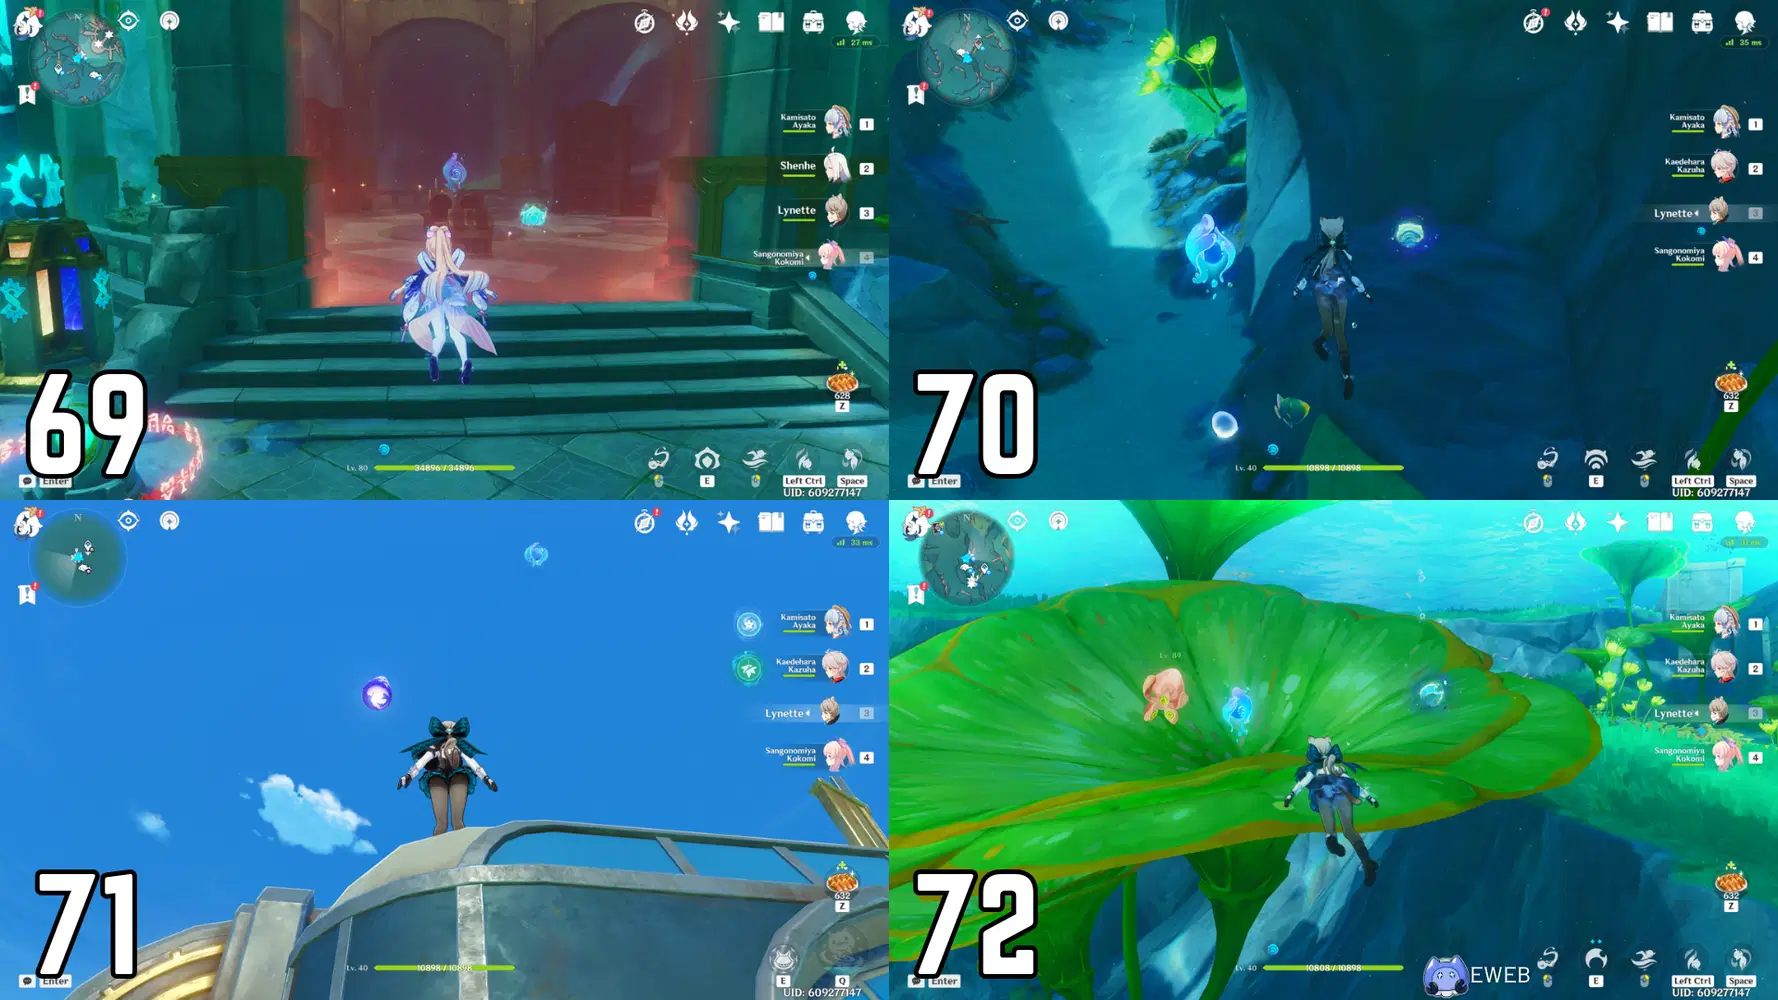
69-72
69. Jump off of the towers and into the water below. Head to the underwater building and solve the puzzle to gain access. There is a small blue stream coming out from each locked statue that will lead you to where you need to go. You must block the high-pressure water currents with the shield ability (from the Xenochromatic Armored Crab) to allow the Fantastical Floating Balls to line up with the corresponding rings. Activate the statues afterwards to unlock the building.
70. Swim northwest until you reach the end of the broken bridge with the waypoint. Dive further down into the ravine and grab the hydroculus.
71. Swim directly up to the surface from this point to reach the boat. After you catch a fish, there will be a launcher above the water that will take you into the sky to claim the hydroculus.
72. Head back into the water and swim north. The hydroculus will be located on a large leaf.
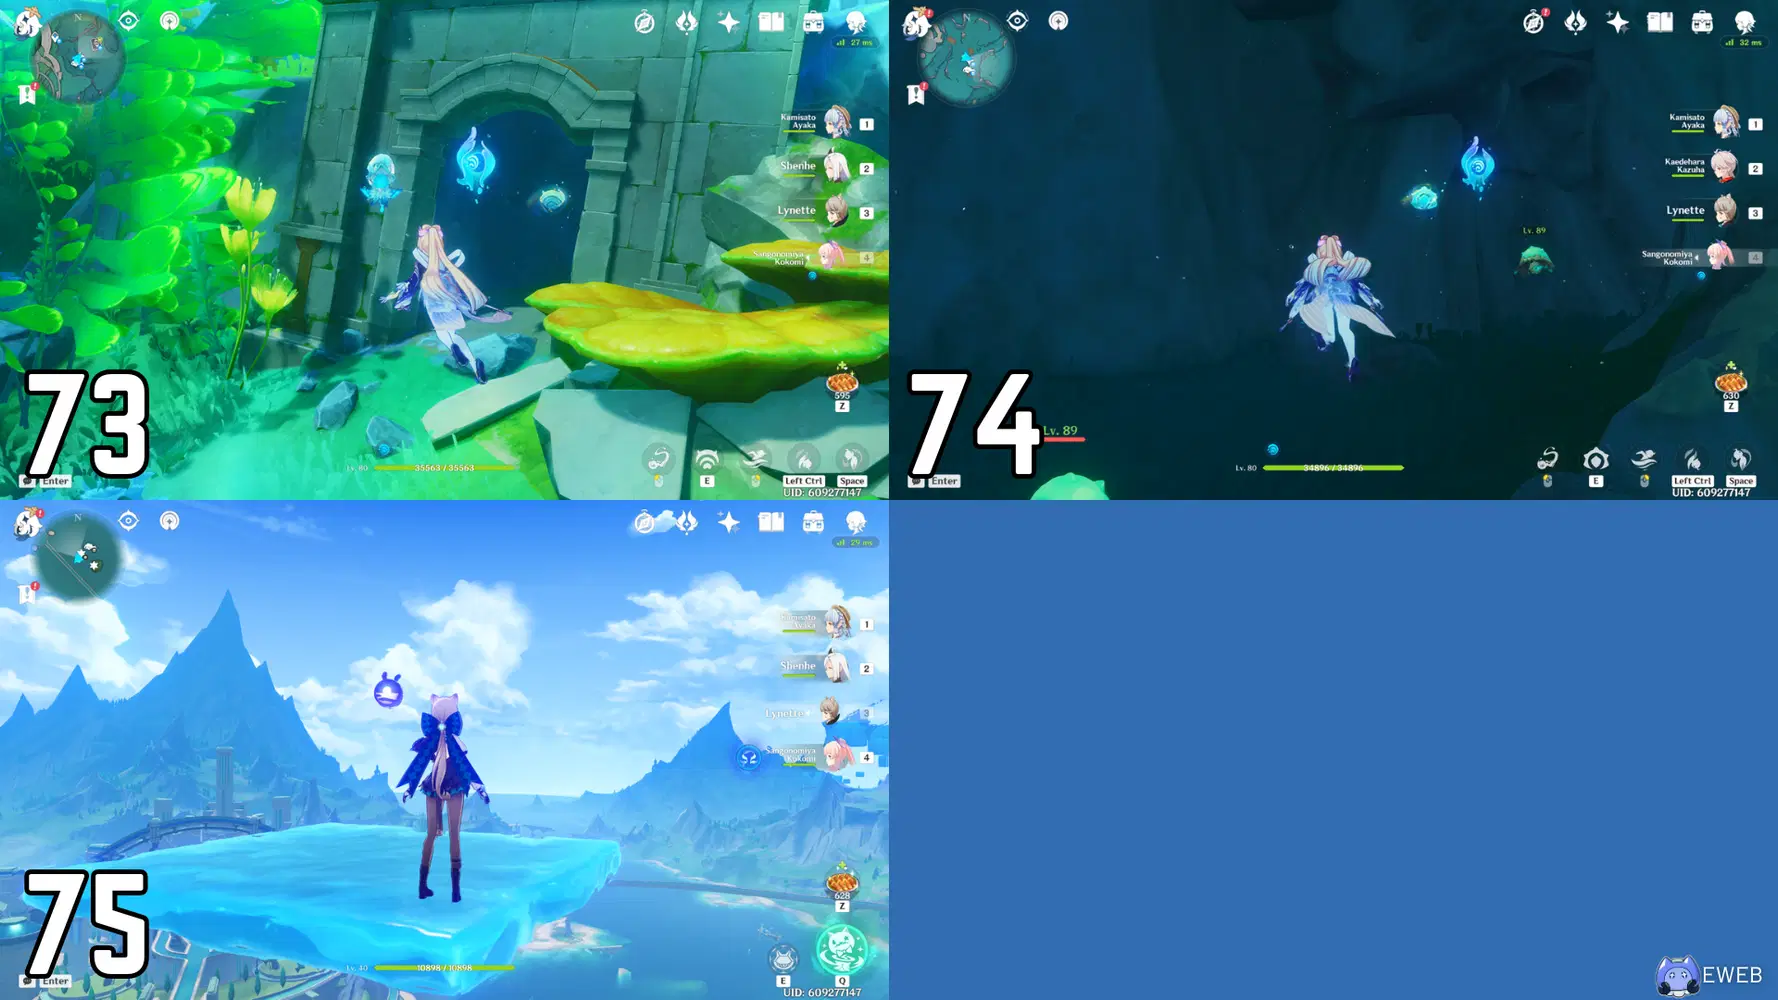
73-75
73. Swim northwest until you reach a hill. Go to the other side of the hill and you will find the hydroculus in the entrance of some building ruins.
74. Swim southeast and stay close to the ground, as you will eventually enter an underground cavern. Continue through the cavern and you will find the hydroculus on the left side.
75. Turn back and exit the cave the same way you entered. Swim south and you will eventually see a big conch shell surrounded by a shield and three Seelie statues. This hydroculus is not underwater, but in order to obtain it, you must solve this underwater puzzle. Each Seelie can be found in the surrounding area at the sunken ships. One Seelie will be unlocked after solving a simple Pneumousia puzzle. Once the shield is dispersed, activate the conch shell and a water current in the midst of a school of fish will appear. Enter the water current and it will launch you high into the sky to a floating platform above the water. The hyrdoculus is atop this.
- I was unable to take a picture of the hydroculus before I collected it.
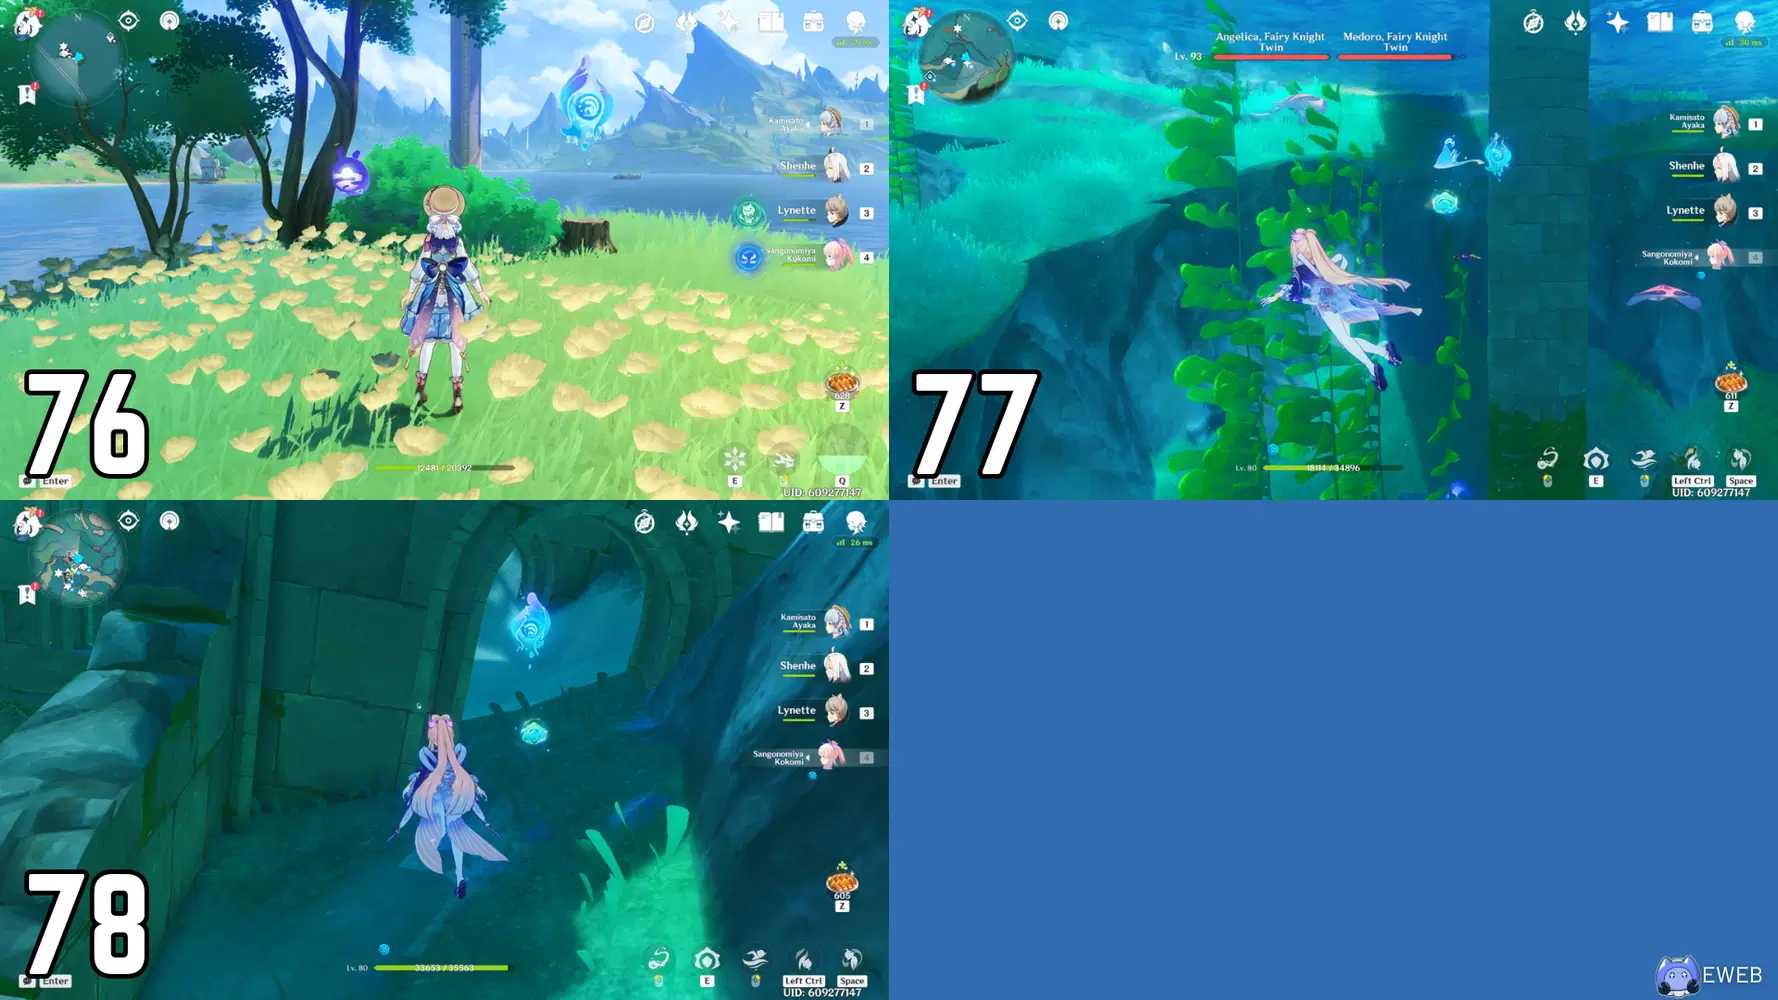
76-78
76. Jump off the platform in the southeast direction to the island below. The hydroculus will be in the middle of this island.
77. Swim south and you will encounter the “Fairy Knight Twin” enemies. The hydroculus is located between these two enemies. You do not need to beat them; you can just swim between them and grab it.
78. Swim northwest until you reach the waypoint. Directly north of this are some ruins in which the hydroculus is located inside.
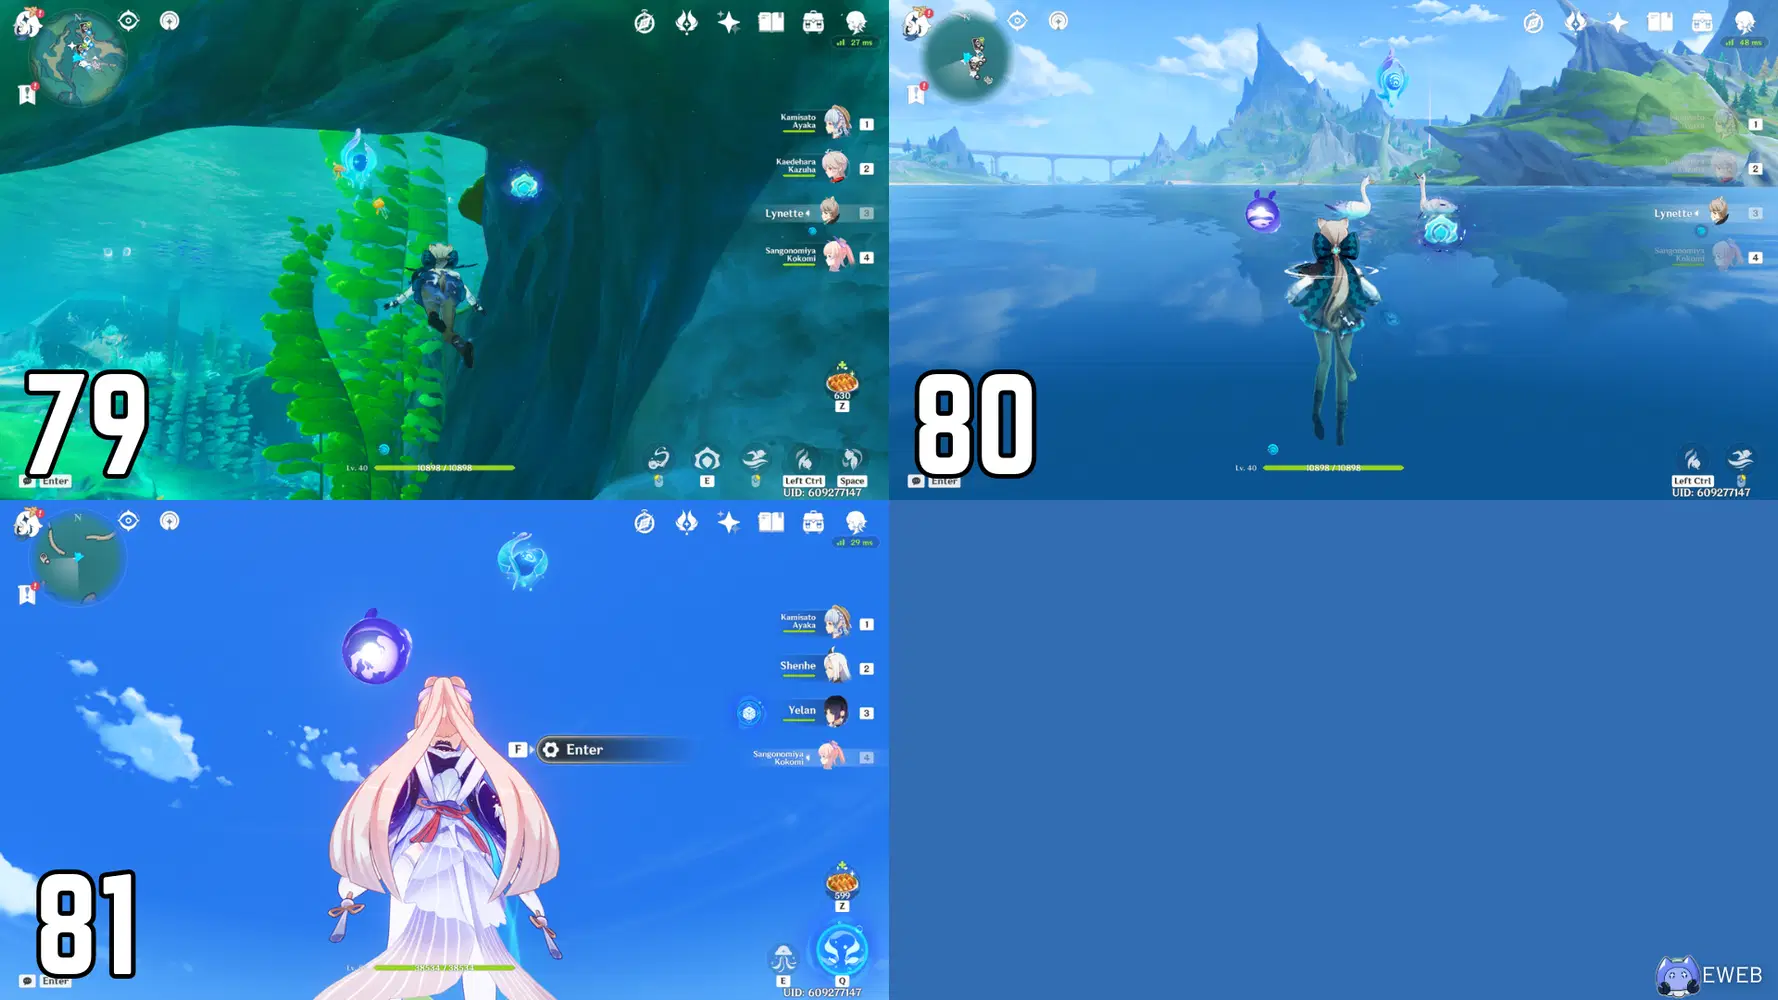
79-81
79. Now, swim directly south towards the hydroculus under the rock arch.
80. Close to the last location, swim a little bit northwest and the hydroculus will be located above the surface of the water. You can use a Fontaine character or the Traveler to jump high out of the water to grab it.
81. Swim northwest and once you reach the ruins, exit the water and climb on top of the tower. There will be a launcher that will take you into the sky to grab the hydroculus.
-- -- --
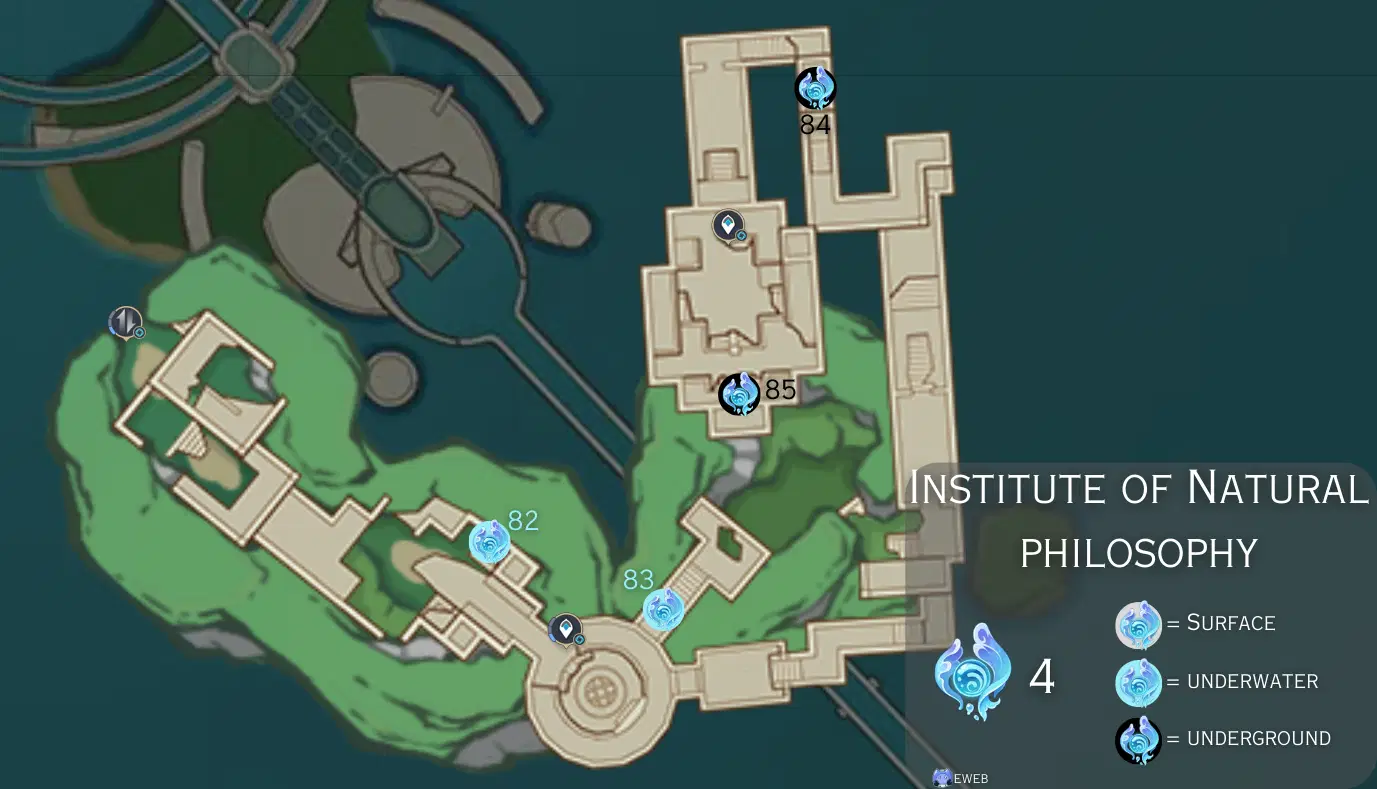
Institute of Natural Philosophy [82-85]
-- -- --
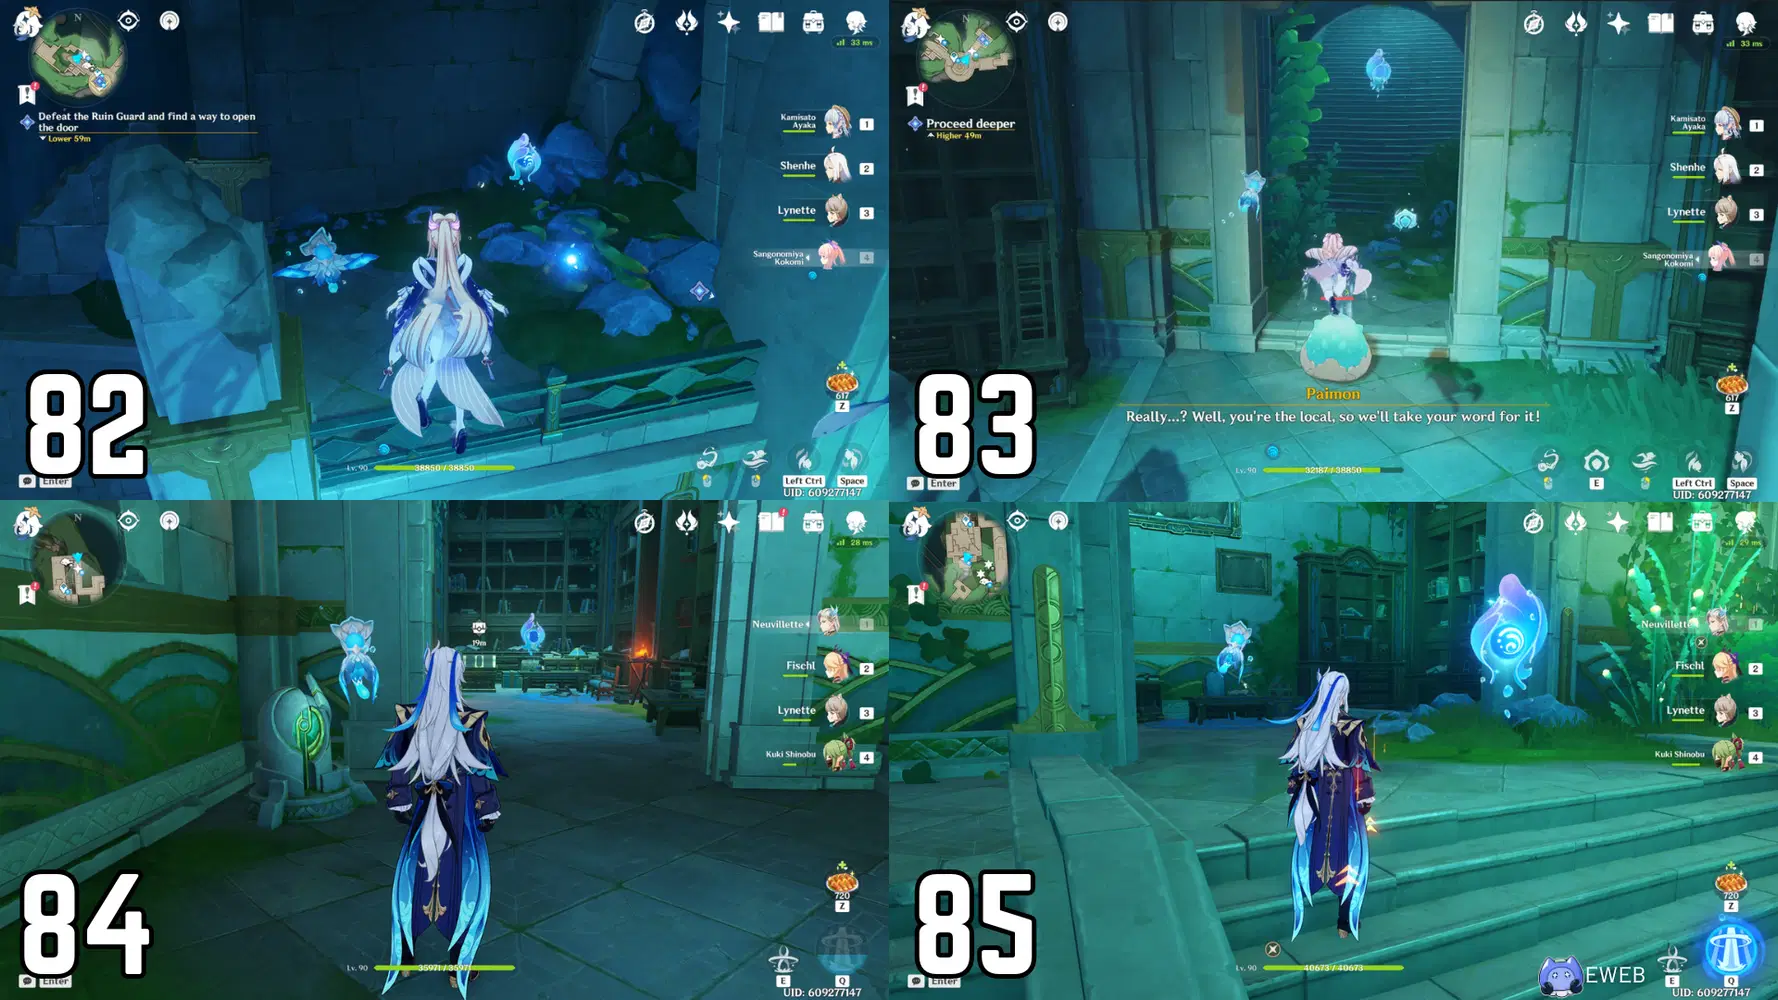
82-85
82. You must start the World Quest: Aqueous Tides to reach this hydroculus. Once you have reached this new area that was once blocked before starting the quest, you will find the first hydroculus. It will be inside a rock turret that you must break with the Xenochromatic Armored Crab ability. Pay attention to your in-game map for when its location appears.
83. You will need to continue through the World Quest: Aqueous Tides. This next hydroculus is directly after the last one after you have entered the open room. It is behind a closed gate so you must solve the puzzle that the quest prompts you to complete, and the gate will be opened.
84. While making your way through the World Quest: Aqueous Tides, you will reach a point where you find a pedestal with a mechanism on it after you exit some water. Use the mechanism to unlock the door. The hydroculus will be in the unlocked room.
85. After you complete the World Quest: Aqueous Tides, you will be able to grab this hydroculus in the final room of the Institute of Natural Philosophy.
Conclusion:
➥ Travelers, this marks the end of my comprehensive guide on collecting the 85 hydroculus in the Court of Fontaine, Beryl Region, and the Belleau Region in Fontaine!
- Please refer back to this guide whenever you need more details on the locations of these hydroculus.
-- -- --
♡ Please keep an eye out for any future guides & consider giving me a like and a follow if you enjoyed this guide! ♡


⚛Check out my social media ~eweb's Carrd⚛




