

I. Mini Guide
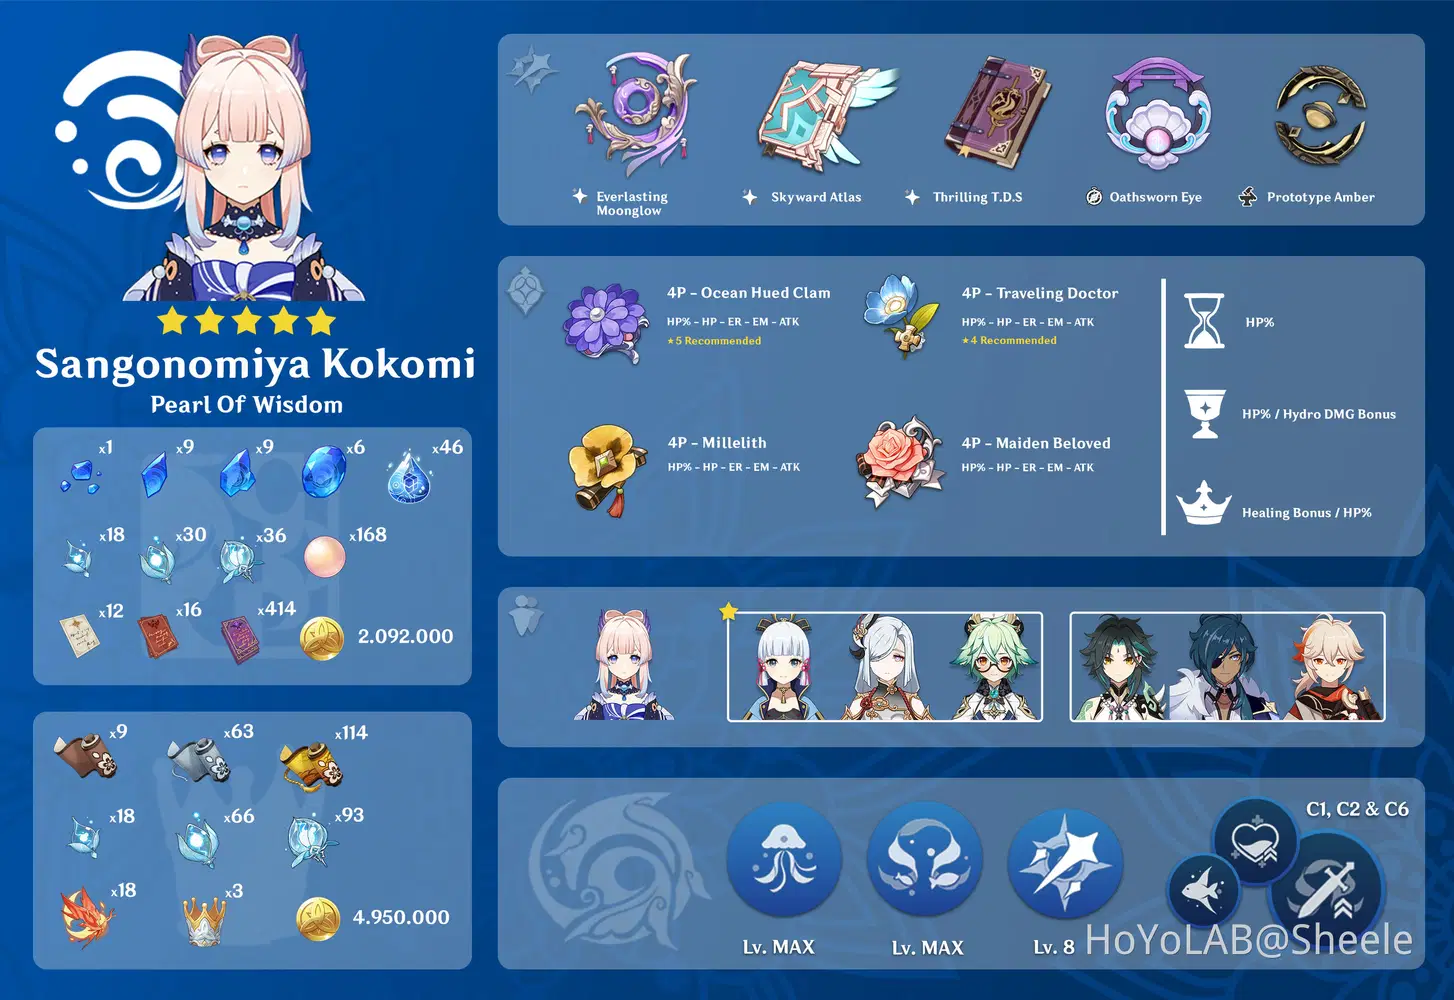
Mini Guide are short Character Guide that are easier to remember and use. Download available.
II. Full Guide
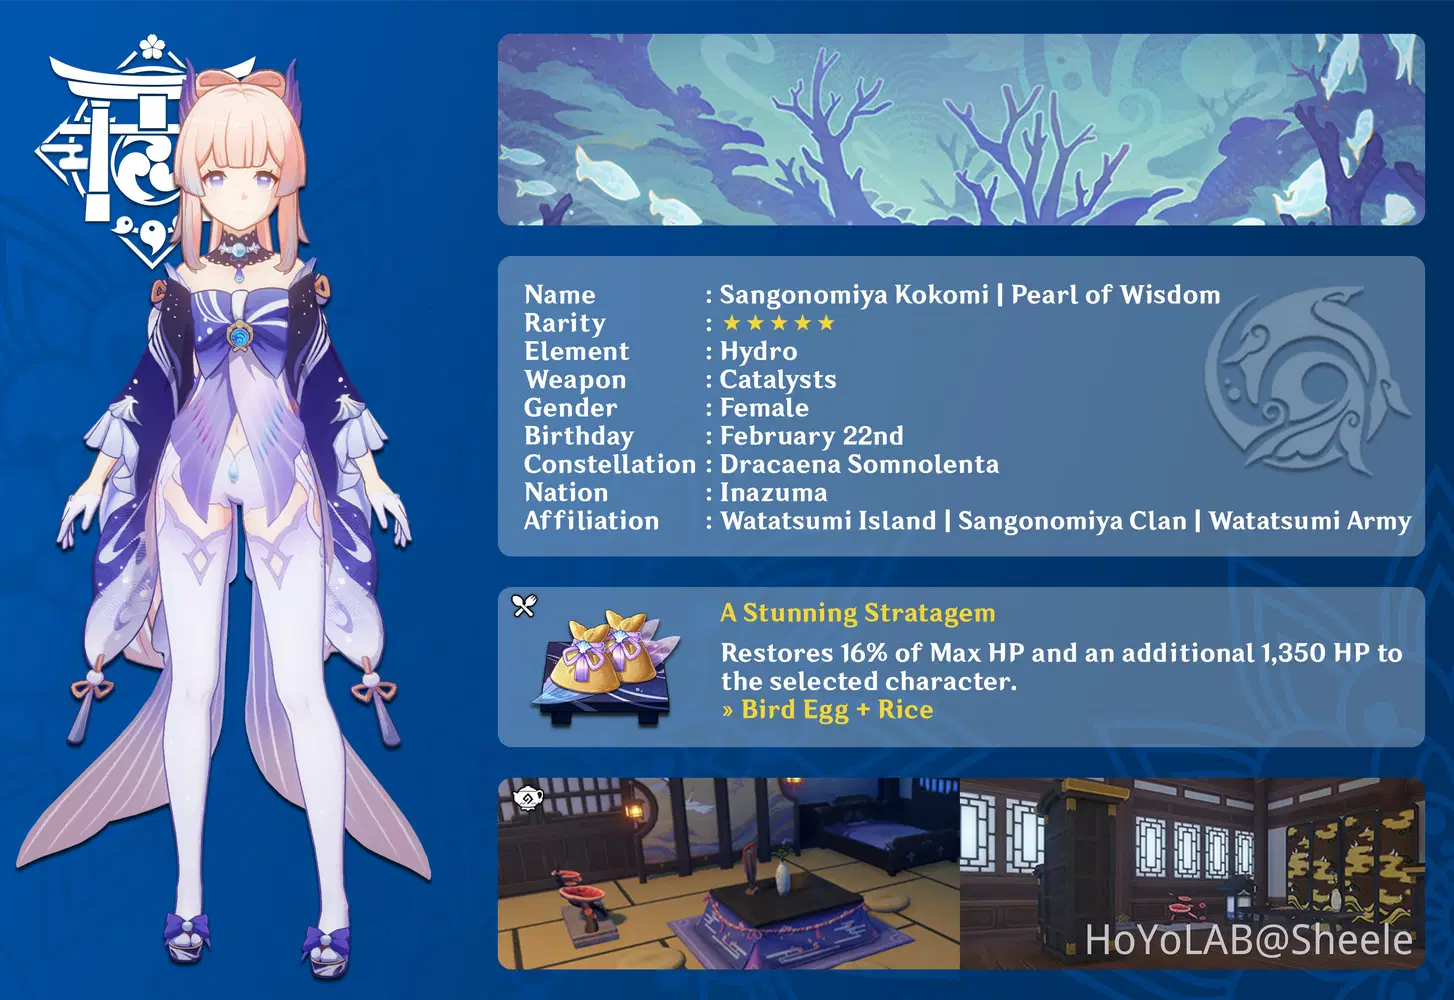
A. Character Details
B. Talents
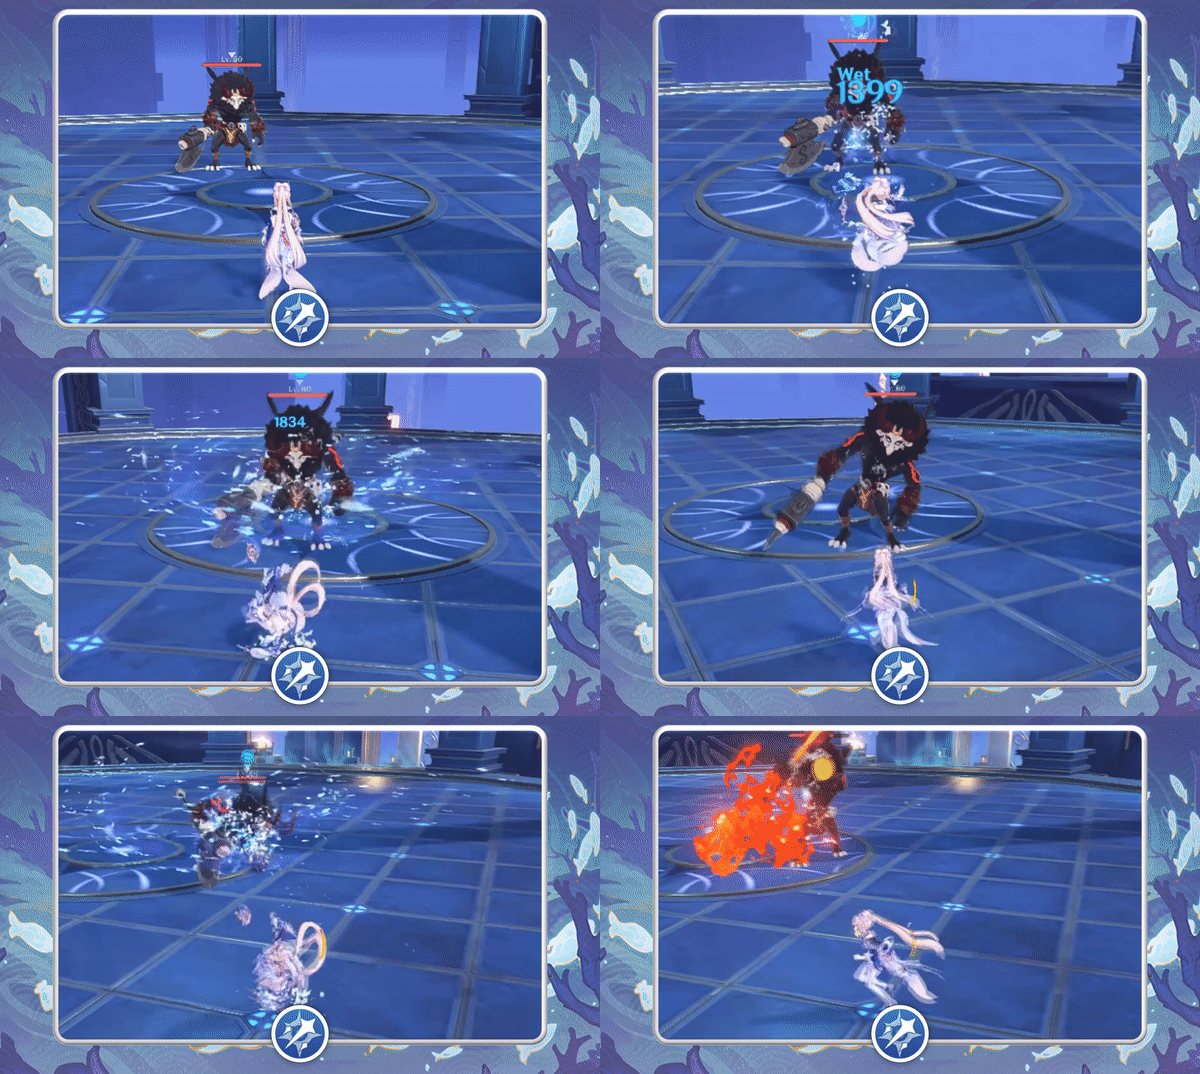
The Shape of Water [Normal Attack]
Normal Attack
Performs up to 3 consecutive attacks that take the form of swimming fish, dealing Hydro DMG.
Charged Attack
Consumes a certain amount of Stamina to deal AoE Hydro DMG after a short casting time.
Plunging Attack
Gathering the might of Hydro, Kokomi plunges towards the ground from mid-air, damaging all opponents in her path. Deals AoE Hydro DMG upon impact with the ground.
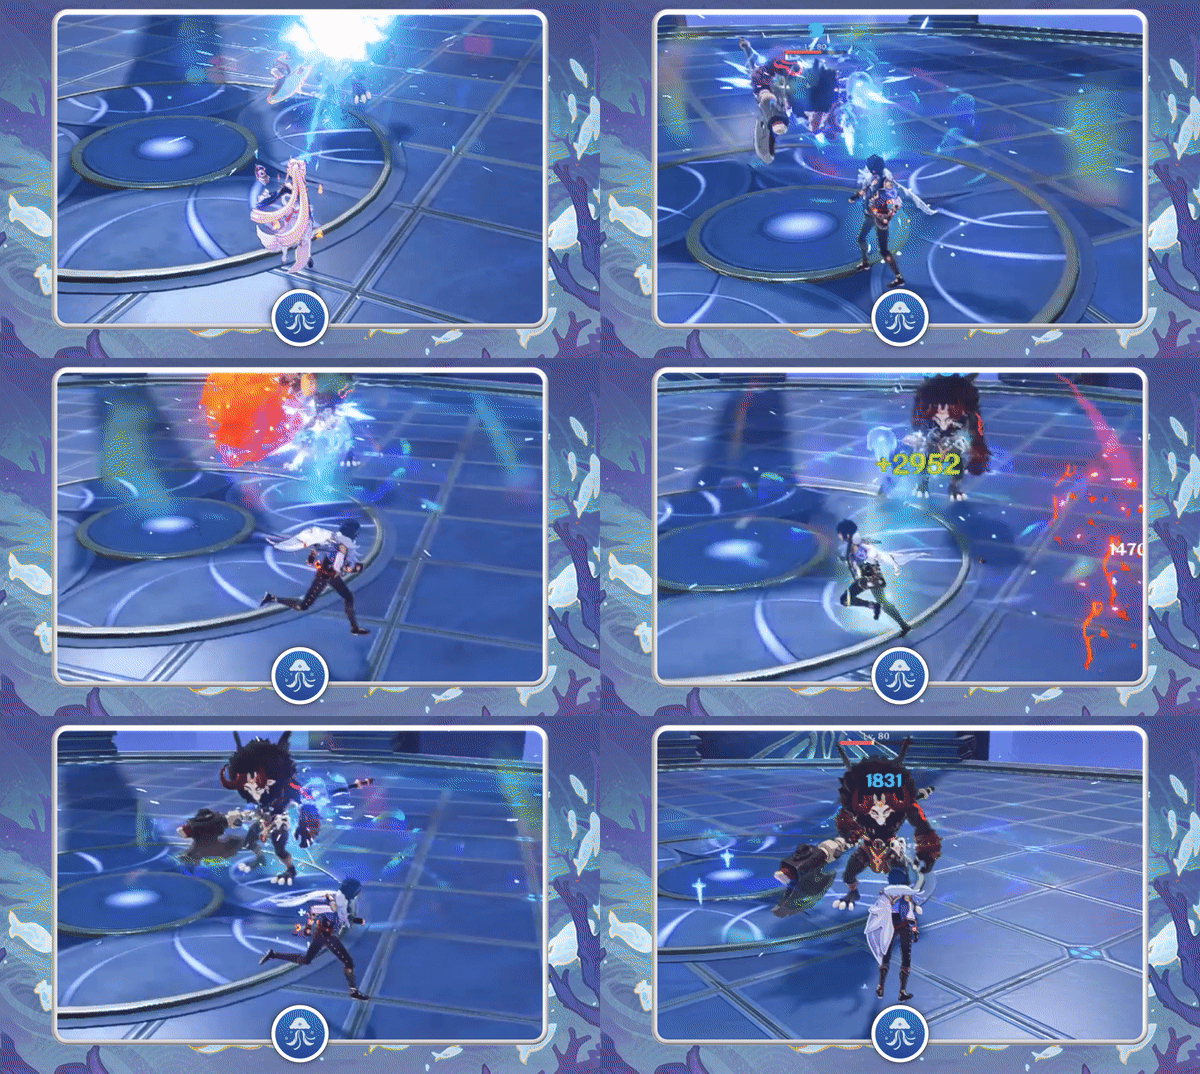
Kurage's Oath [Elemental Skill]
➤ Cooldown : 20 sec
➤ Duration : 12 sec
Summons a "Bake-Kurage" created from water that can heal her allies.
Using this skill will apply the Wet status to Sangonomiya Kokomi.
Bake-Kurage
• Deals Hydro DMG to surrounding opponents and heal nearby active characters at fixed intervals.
• This healing is based on Kokomi's Max HP.

Nereid's Ascension [Elemental Burst]
➤ Cooldown : 18 sec
➤ Duration : 10 sec
➤ Energy Cost : 70 sec
Summons the might of Watatsumi, dealing Hydro DMG to surrounding opponents, before robing Kokomi in a Ceremonial Garment made from the flowing waters of Sangonomiya.
Ceremonial Garment
• Sangonomiya Kokomi's Normal Attack, Charged Attack and Bake-Kurage DMG are increased based on her Max HP.
• When her Normal and Charged Attacks hit opponents, Kokomi will restore HP for all nearby party members, and the amount restored is based on her Max HP.
• Increases Sangonomiya Kokomi's resistance to interruption and allows her to walk on the water's surface.
These effects will be cleared once Sangonomiya Kokomi leaves the field.
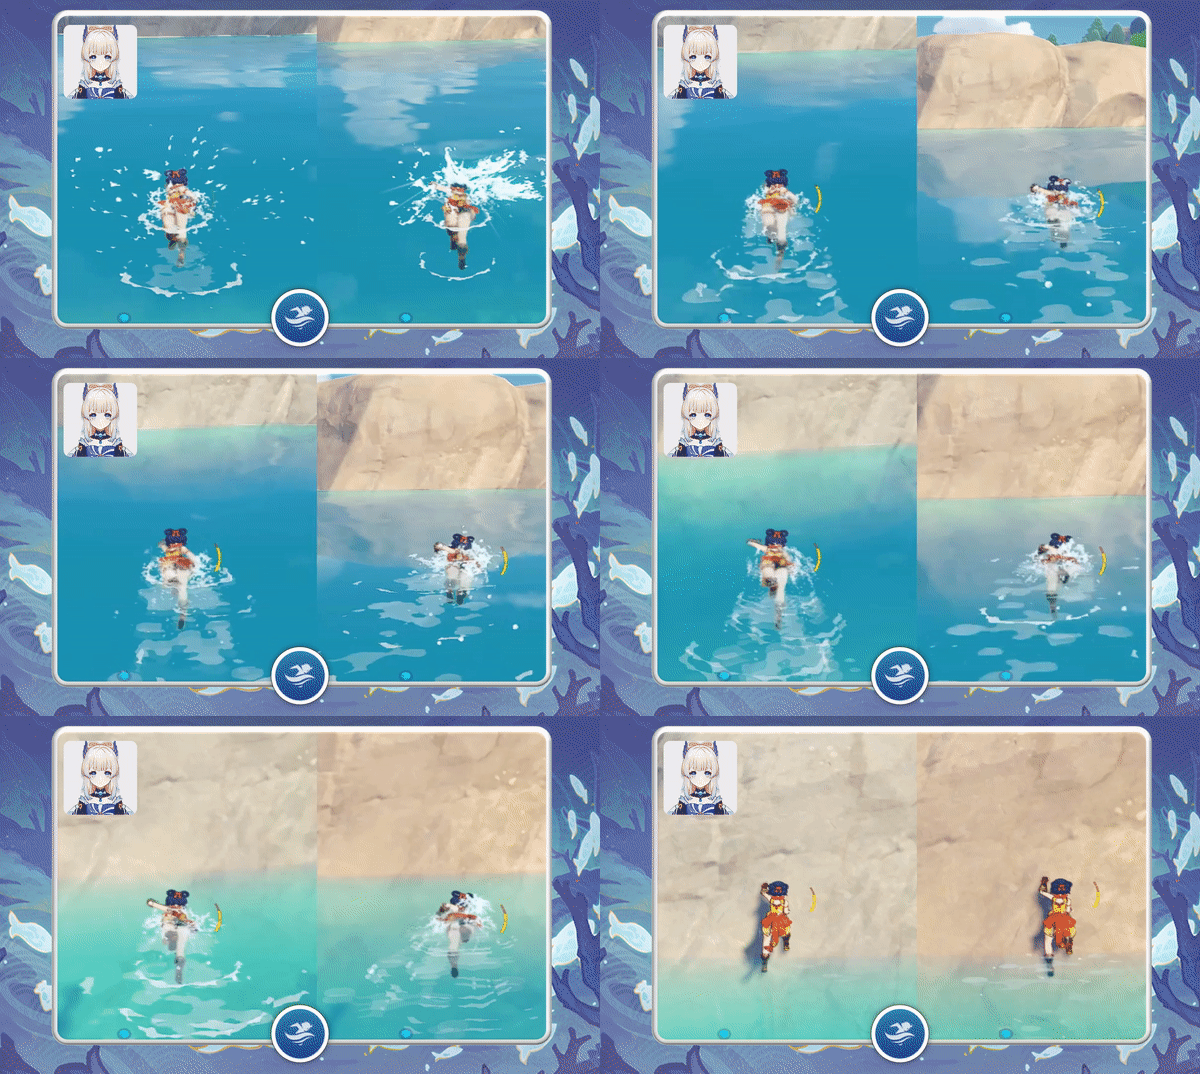
Princess of Watatsumi [Utility Passive]
Decreases swimming Stamina consumption for your own party members by 20%. Not stackable with Passive Talents that provide the exact same effects.
Tamanooya's Casket [Ascend Lv. 20]
If Sangonomiya Kokomi's own Bake-Kurage are on the field when she uses Nereid's Ascension, the Bake-Kurage's duration will be refreshed.
Song of Pearls [Ascend Lv.60]
While donning the Ceremonial Garment created by Nereid's Ascension, the Normal and Charged Attack DMG Bonus Sangonomiya Kokomi gains based on her Max HP will receive a further increase based on 15% of her Healing Bonus.
✦ Talent Priority ✦

Normal Attack Lv.8 - Elemental Skill Lv.Max - Elemental Burst Lv.Max
C. Constellation
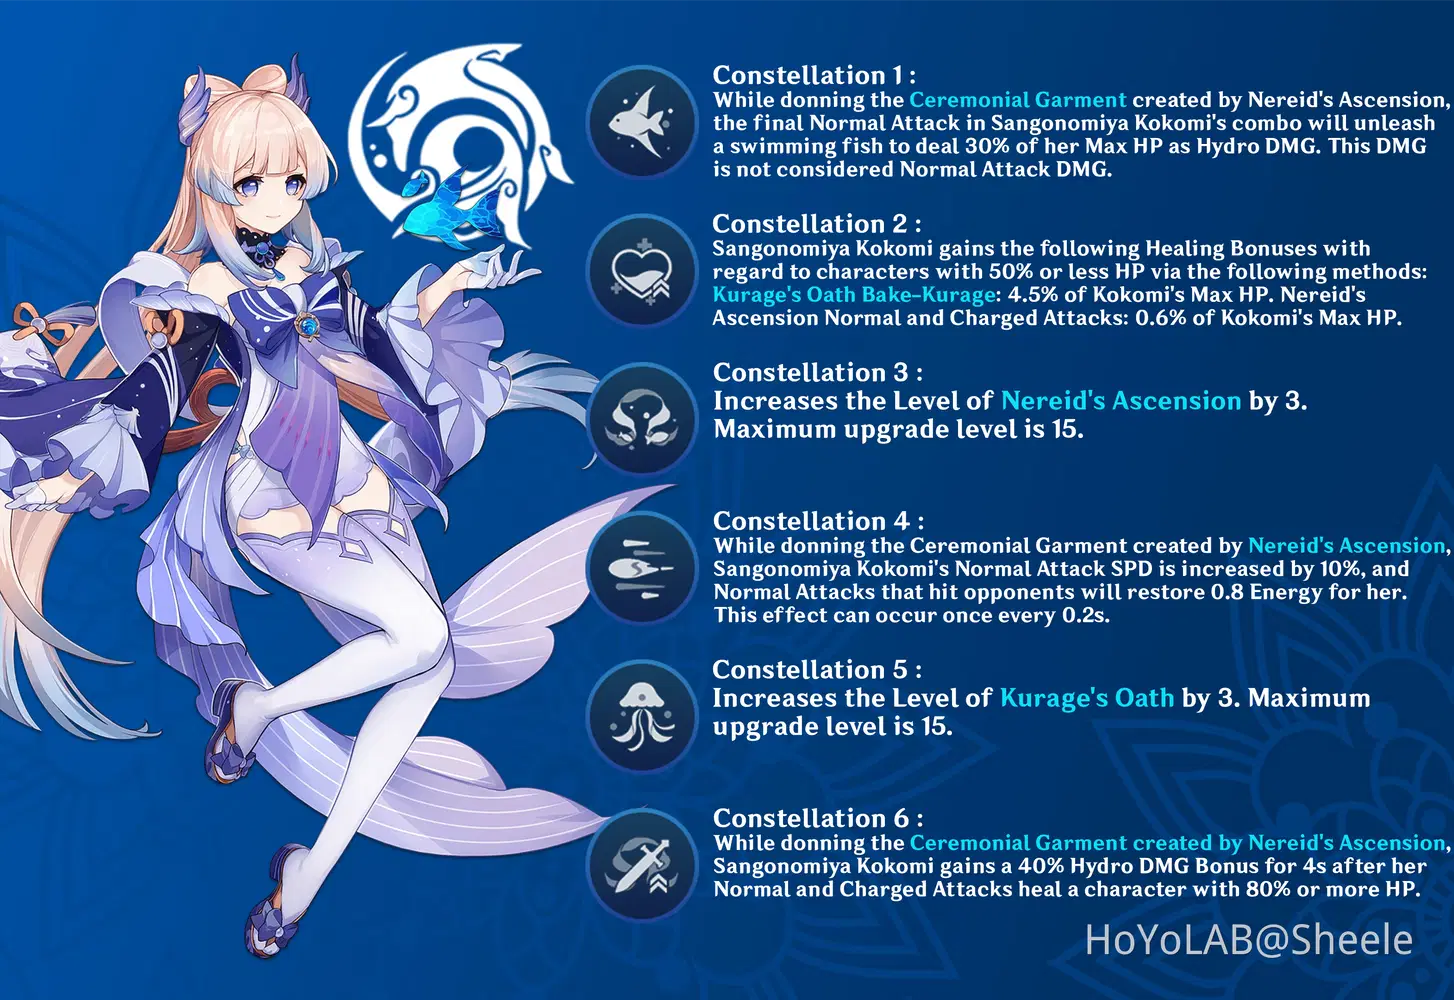
✦ Constellation Recomendation ✦

Constellation 1 - Constellation 2 - Constellation 6
D. Weapon Recomendation

Explanation :
Everlasting Moonglow is a 5-star weapon designed for Sangonomiya Kokomi, with a HP status that can increase the amount of Heal a party receives and its ability to increase the healing process. With this weapon Sangonomiya Kokomi can be used as Support and also Semi DPS which can deal Normal Attack Damage when Her enters burst mode.
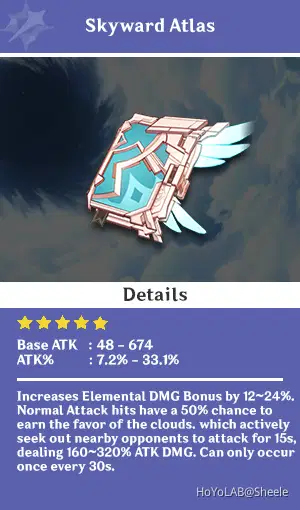
Explanation :
Skyward Atlas is a 5-star weapon that can increase Sangonomiya Kokomi's Elemental Skill and Normal Attack Damage, with this weapon the Hydro damage generated "Bake-Kurage" (Elemental Skill) will be higher.
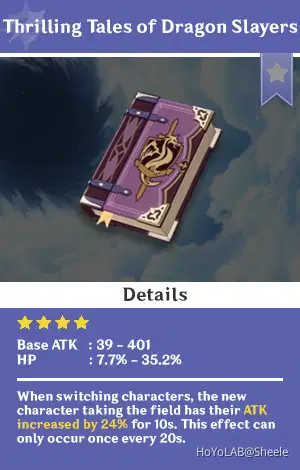
Explanation :
The next option is Thrilling Tales of Dragon Slayers this weapon is the best option for Sangonomiya Kokomi among other 4-star weapons because this weapon is able to increase HP and also has the ability to increase the ATK of party members.

Explanation :
Oathsworn Eye is a 4-star weapon obtained from the Event in version 2.5 and can be used by Sangonomiya Kokomi, with this weapon it can increase Energy Recharge so that the use of Elemental Burst is faster, this weapon also has an ATK% status which can increase the Damage of Sangonomiya Kokomi, and I think it's suitable for Semi DPS playing style.
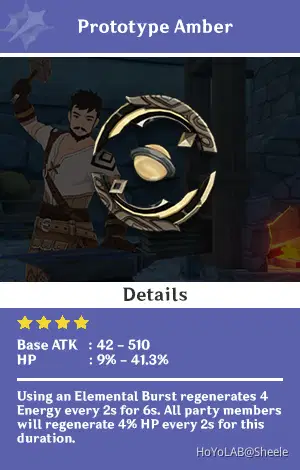
Explanation :
The last option is Prototype Amber, this weapon is obtained from the forging process. This weapon is also very good for Sangonomiya Kokomi who is oriented to do healing to the party. With this weapon's HP status, it will speed up the regeneration process.
E. Artifact Recomendation
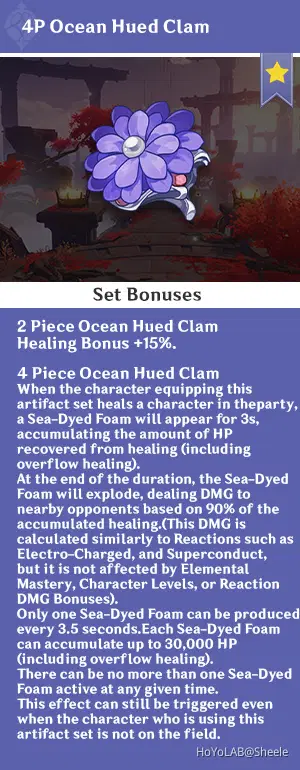
Explanation :
4P Ocean Hued Clam, This artifact can increase the healing process carried out by Sangonomiya Kokomi, besides this artifact can also inflict additional damage to the opponent with bubbles generated from the artifact effect.
⏳ Sand : HP% / Energy Recharge
🏆 Goblet : HP% / Hydro Damage Bonus / Physical Damage Bonus
👑 Circlet : Healing Bonus / HP%
Sub Status : HP% - HP - ER% - EM - ATK - ATK% - DEF% - DEF.

Explanation :
4P Maiden Beloved, If you want Sangonomiya Kokomi to focus on her healing ability this artifact becomes a good option.
⏳ Sand : HP% / Energy Recharge
🏆 Goblet : HP% / Hydro Damage Bonus
👑 Circlet : Healing Bonus / HP%
Sub Status : HP% - HP - ER% - EM - ATK - ATK% - DEF% - DEF.
Explanation :
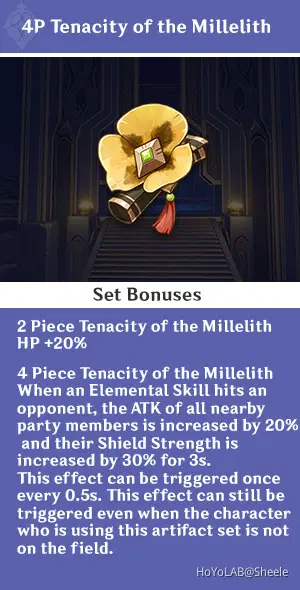
4P Tenacity of the Millelith, In addition to increasing the HP of Sangonomiya Kokomi so that it can affect the healing process, this Artifact can also increase the ATK of party members when the Elemental Skill of Sangonomiya Kokomi hits the opponent.
⏳ Sand : Energy Recharge / HP%
🏆 Goblet : HP% / Hydro Damage Bonus
👑 Circlet : Healing Bonus / HP%
Sub Status : HP% - HP - ER% - EM - ATK - ATK% - DEF% - DEF.

Explanation :
4P Traveling Doctor is the last option and I recommend it for beginners, with the bonus set will increase incoming healing will make Sangonomiya Kokomi have strong endurance so that it can continue to support the party. Besides that Sangonomiya Kokomi can also use other Artifacts such as The Exile, or a combination of 2P Gambler and 2P Scholar.
⏳ Sand : HP% / Energy Recharge
🏆 Goblet : HP% / Hydro Damage Bonus
👑 Circlet : Healing Bonus / HP%
Sub Status : HP% - HP - ER% - EM - ATK - ATK% - DEF% - DEF.
F. Team Composition
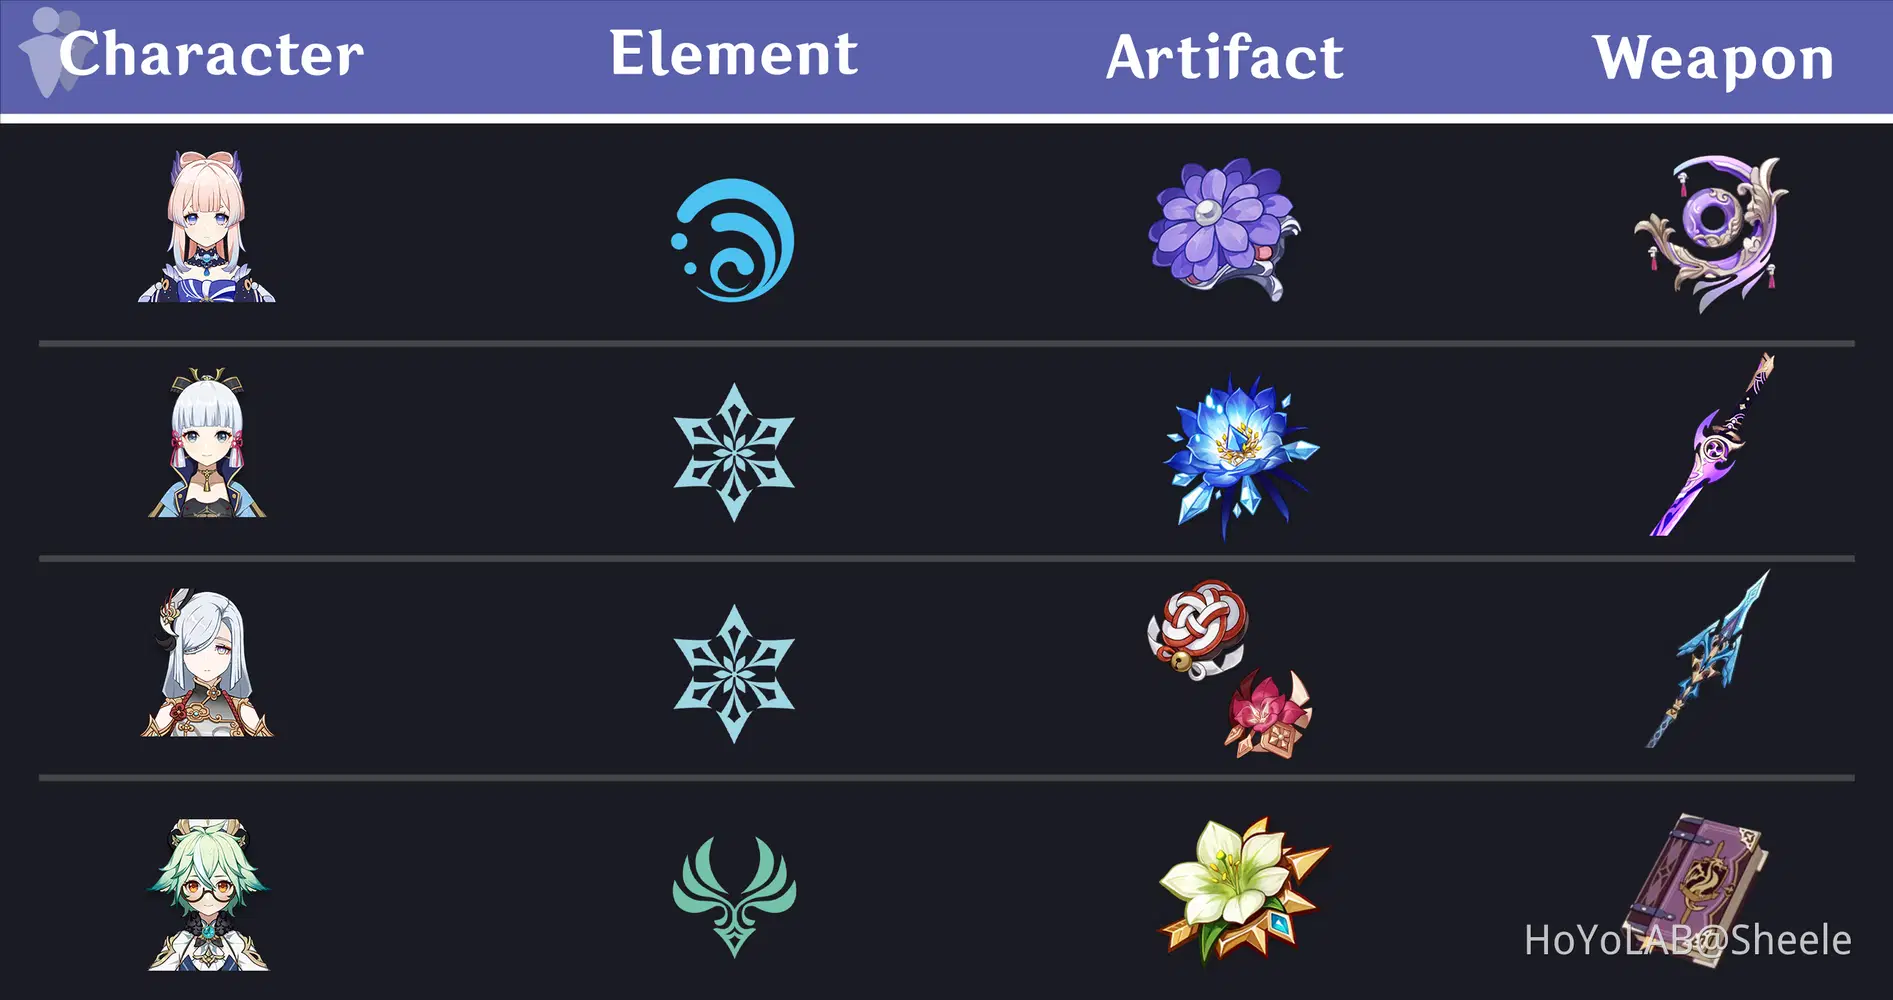
Explanation :
❖ Sangonomiya Kokomi as Support - Healer. In this party composition, Sangonomiya Kokomi will help in the healing process of Party members' HP, besides that Sangonomiya Kokomi also gives a hydro effect to nearby enemies so it's easier for the party to do elemental reactions. For Artifact, use 4P Ocean Hued Clam because to increase her healing ability and deal additional damage to the opponent with Bubbles from the artifact effect. And for weapons besides using Everlasting Moonglow, you can also use Thrilling Tales of Dragon Slayers.
❖ Kamisato Ayaka as Main DPS, Kamisato Ayaka as a character who deals the most damage to the opponent with his fast attack ability. With the help of Sangonomiya Kokomi's Elemental Skill, Kamisato Ayaka can easily freeze an opponent and maintain his HP. For Artifacts, you can use the 4P Blizzard Strayer because it gives Cryo DMG a bonus and allows you to get more Critical Rate. And for weapons other than using Mistsplitter Reforged Kamisato Ayaka can use Amenoma Kageuchi.
↪ Kamisato Ayaka Full Guide : Click Here !!
❖ Shenhe as Support - Buffer, focuses on using elemental skills to give bonus Cryo DMG to Main DPS Cryo in the party. The rotation of Shenhe in the party must be right so that the one who gets the Buff is the Main DPS whose role is to give the highest damage to the opponent. For Artifact I recommend 2P Gladiator's Finale and 2P Shimenawa Reminiscence to increase the high ATK status so that the effect of Icy Quill (Elemental Skill) will increase as well, and for weapons other than using Calamity Queller I recommend Lithic Spear or Favonius Lance
↪ Shenhe Full Guide : Click Here !!
❖ Sucrose as Support - Crowd Control, Sucrose utilizes elemental skills to attract and gather opponents in one area, the use of this ability also provides elemental particles that are useful for regenerating energy from party members. For Artifacts, you can use Viridescent Venerer for Anemo DMG and reduce the opponent's resistance. And for weapons, you can use Thrilling Tales of Dragon Slayers for additional ATK.
↪ Sucrose Full Guide : Click Here !!
Elemental Resonance :
2 Cryo Characters : Affected by Electro for 40% less time. Increases CRIT Rate against enemies that are Frozen or affected by Cryo by 15%.
Elemental Reaction :
Frozen : Freezes the target, and Makes enemies easier to attack.
Swirl : Deals extra elemental damage and spreads the effect.
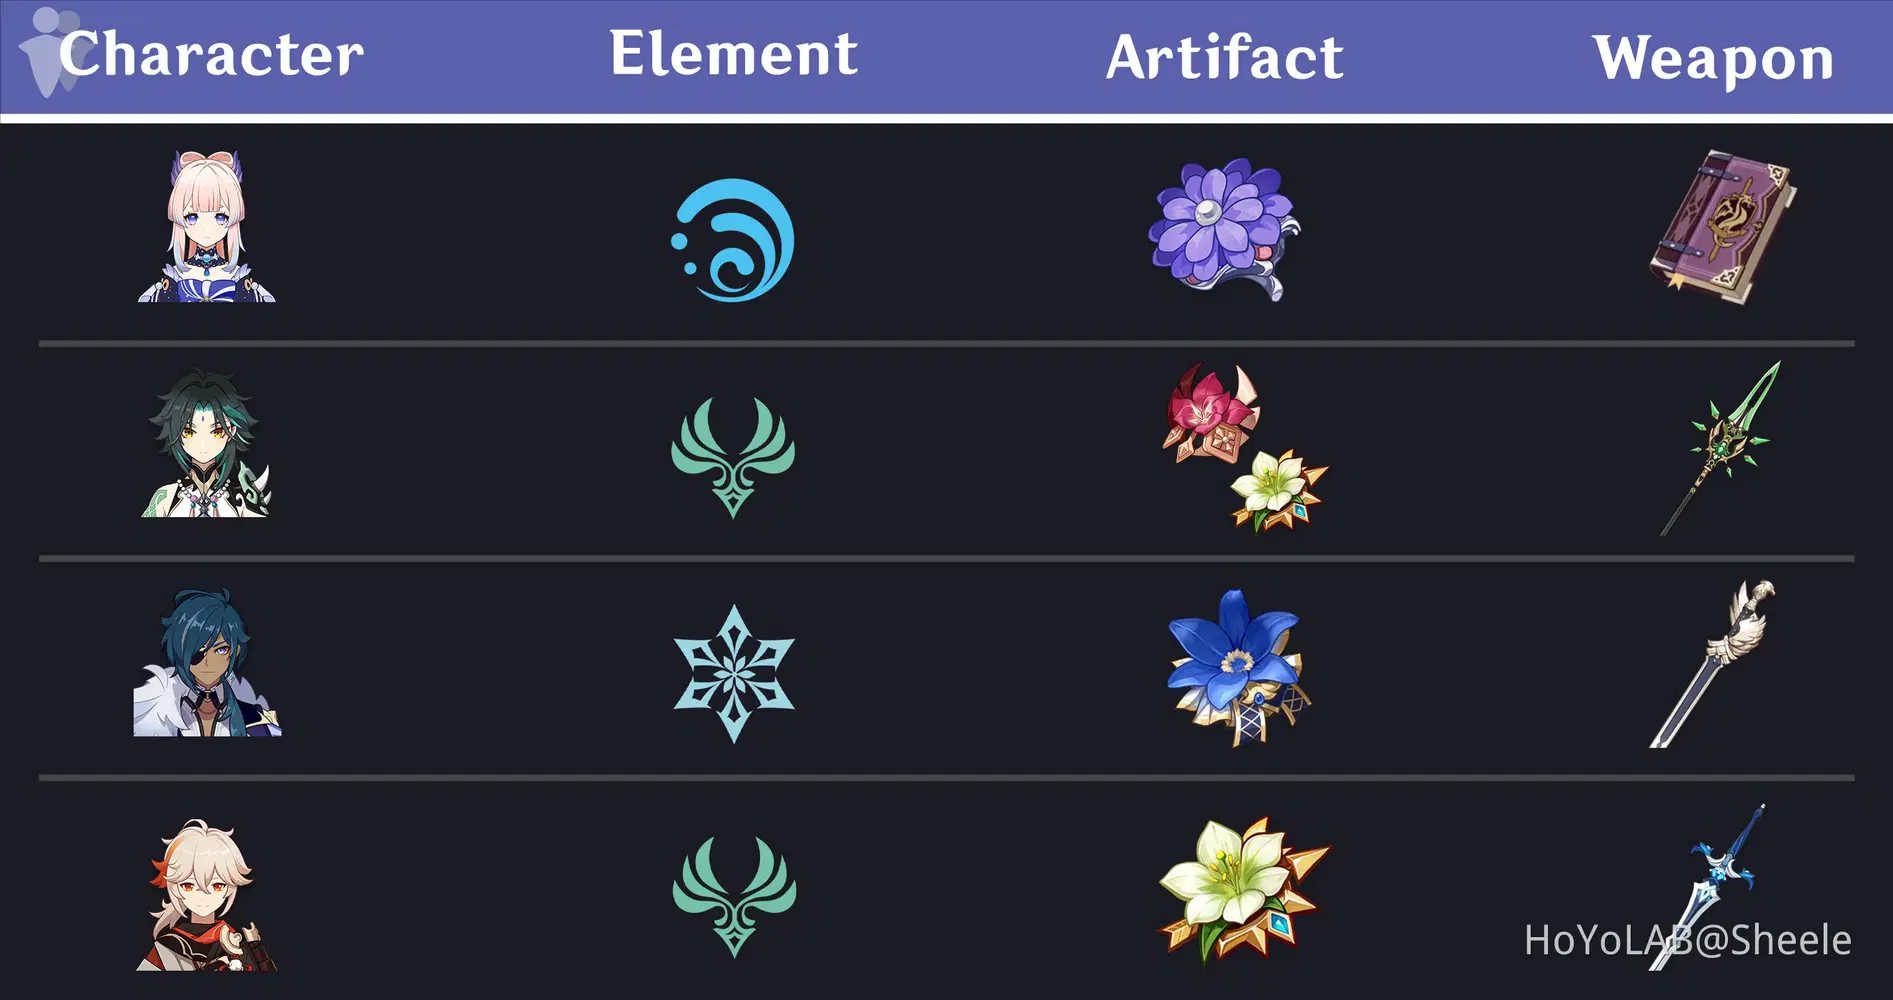
Explanation :
❖ Sangonomiya Kokomi as Support - Healer. In this party composition, Sangonomiya Kokomi will help in the healing process of Party members' HP, besides that Sangonomiya Kokomi also gives a hydro effect to nearby enemies so it's easier for the party to do elemental reactions. For Artifact, use 4P Ocean Hued Clam because to increase her healing ability and deal additional damage to the opponent with Bubbles from the artifact effect. And for weapons use Thrilling Tales of Dragon Slayers to give additional ATK to party members.
❖ Xiao as Main DPS, Xiao as a character who deals the highest damage to the opponent, by utilizing Elemental Skills for fast and agile attacks making it easier to eliminate opponents. Having Sangonomiya Kokomi in the party will increase the level of survivability so it doesn't die easily when Elemental Burst Xiao is active. Artifact can use 2P Gladiator's Finale and 2P Viridescent Venerer for stable damage between Anemo DMG and ATK%. And for weapons other than using the Primordial Jade Winged Spear, Xiao can use the Favonius Lance or Blackcliff Pole.
↪ Xiao Full Guide : Click Here !!
❖ Kaeya as Sub DPS - Off-Field Burst Dealer, Kaeya can help in giving Cryo effects to opponents, with a large enough Elemental Burst attack area, it will make it easier to give Cryo effects to opponents and easily trigger frozen reactions when combined with Sangonomiya Kokomi's Elemental Skill. Artifacts can use the 4P Noblesse Oblige to increase Elemental Burst Damage and deal additional ATK to the party. And for Weapons can use the Favonius sword to speed up the use of Elemental Burst.
↪ Kaeya Full Guide : Not Available !!
❖ Kaedehara Kazuha as Sub DPS - Crowd Control, With his ability to gather opponents Kaedehara Kazuha will make it easier for Main DPS to eliminate opponents, Kaedehara Kazuha also helps the party in gathering Energy to speed up the use of Elemental Burst. Artifact can use 4P Viridescent Veneer to increase Swirl Damage and reduce enemy resistance. For weapons I recommend Sacrificial Sword because it's possible to cast Elemental Skills repeatedly.
↪ Kaedehara Kazuha Full Guide : Click Here !!
Elemental Resonance :
2 Anemo Characters : Decreases Stamina Consumption by 15%. Increases Movement SPD by 10%. Shortens Skill CD by 5%.
Elemental Reaction :
Frozen : Freezes the target, and Makes enemies easier to attack.
Swirl : Deals extra elemental damage and spreads the effect.
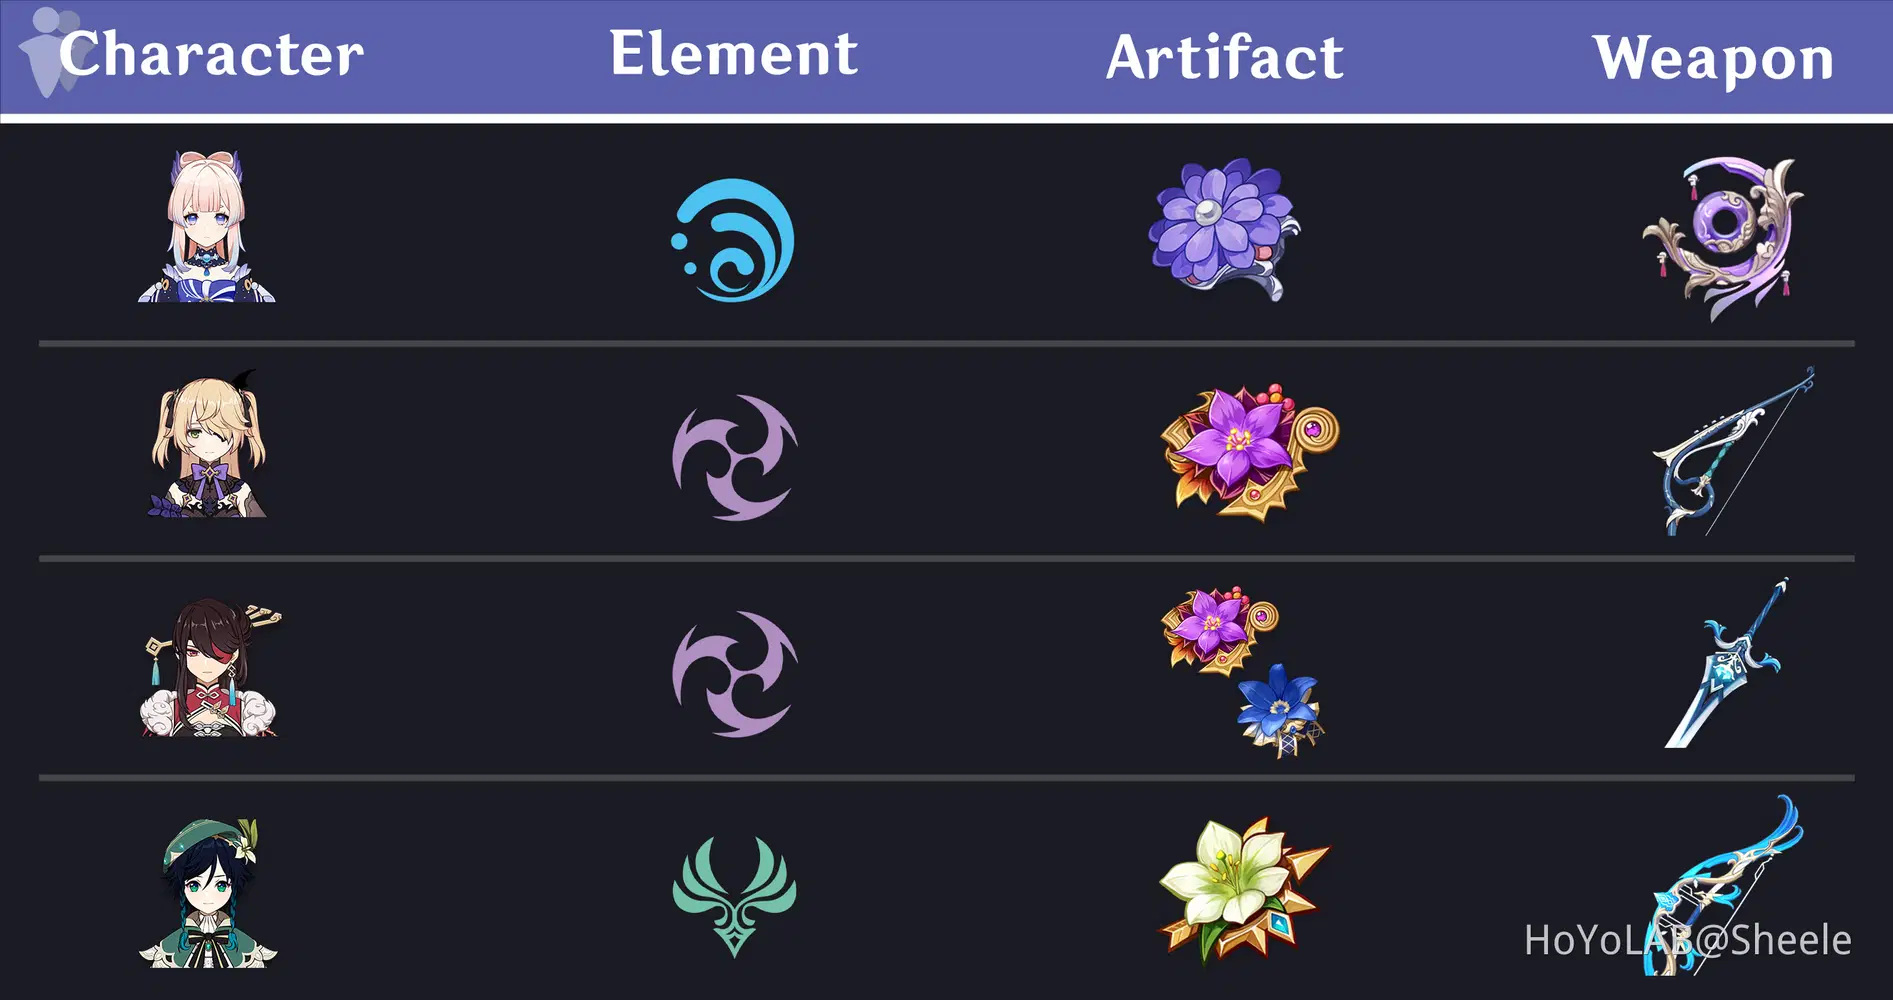
Explanation :
❖ Sangonomiya Kokomi as Support - Semi DPS Healer. In this party composition, Sangonomiya Kokomi will help in the healing process of Party members' HP, besides that Sangonomiya Kokomi also gives a hydro effect to nearby enemies so it's easier for the party to do elemental reactions. For Artifact, use 4P Ocean Hued Clam because to increase her healing ability and deal additional damage to the opponent with Bubbles from the artifact effect. And for weapons besides using Everlasting Moonglow, you can also use Skyward Atlas.
❖ Fischl as Sub DPS - Off-Field Damage Dealer, Fischl focuses on dealing damage with the use of Elemental Skills. With Fischl, it can also be a solution to fight enemies who have weak points such as Ruin Hunter or Ruin Guard. Artifacts can use 4P Thundering Fury for additional Electro DMG and Reaction DMG (Electro-Charged), besides using this Artifact can speed up the use of Elemental Skills.
↪ Fischl Full Guide : Click Here !!
❖ Beidou as Sub DPS - Off-Field Damage Dealer, Beidou can be used as a character to withstand the opponent's attack, with her ability to counter attack will certainly have an impact on the opponent. Besides that, Beidou's elemental burst also helps in generating Electro-Charged elemental reactions. Artifact can use 2P Thundering Fury and 2P Noblesse Oblige to increase Electro DMG and Damage from Elemental Burst. Artifacts can use 2P Thundering Fury and 2P Noblesse Oblige to increase Electro DMG and Damage from Elemental Burst, or can use 4P Emblem of Severed Fate. And for weapons, you can use the Sacrificial Greatsword to make it possible to perform elemental skills repeatedly.
↪ Beidou Full Guide : Click Here !!
❖ Venti as Support - Crowd Control, Venti utilizes elemental skills to attract and gather opponents in one area, the use of this ability also provides elemental particles that are useful for regenerating energy from party members. For Artifacts, you can use Viridescent Venerer for Anemo DMG and reduce the opponent's resistance. And for weapons, you can use Elegy of the End to increase elemental mastery so that the damage generated from elemental reactions is higher.
↪ Venti Full Guide : Click Here !!
Elemental Resonance :
2 Electro Characters : Affected by Hydro for 40% less time. Superconduct, Overloaded, and Electro-Charged have a 100% chance to generate an Electro Elemental Particle (CD: 5s).
Elemental Reaction :
Electro-Charged : Deals Electro DMG over time.
Swirl : Deals extra elemental damage and spreads the effect.

G. Level Up and Ascensions Materials & Talent Level Up Materials

III. Gameplay
IV. Conclussion
Sangonomiya Kokomi is a 5-star character with Hydro Element, Sangonomiya Kokomi is a character who can support party members with HP recovery and can inflict additional damage on opponents.
Sangonomiya Kokomi has several advantages:
1. Friendly to F2P players and easy to build.
2. With Sangonomiya Kokomi in the party, the survivability of party members is getting stronger and it's not easy to fall in battle.
3. Flexible characters.
4. Good Hydro Applicator.
Disadvantages of Sangonomiya Kokomi:
For kokomi, I don't think there are too significant drawbacks because her role is more inclined to support - healer, and indeed Sangonomiya Kokomi can be used to become a Sub DPS character, but in my opinion it will require quite a high effort. The lack of Hydro element type can make the party freeze when dealing with Cryo enemies, so be careful.
V. Polling
VI. Reference
Genshin Impact Official Website
VII. Closing