Are you lazy? Simply content to settle into a rich routine?
Then this guide is for you!
I will show you some of the most resource-dense spots for farming Inazuma-only materials to save you time and energy. I’ll also flag any hidden achievements or hidden ‘quests’ in the area as a bonus.
I hope you enjoy and find this helpful! [emoji]
Some general tips:
My farming team is composed of Diona, Eula, Beidou, and Fischl. This lets me smash ores with claymores and tag Sakura Blooms with electro quickly.
The Kairagi and Mirror Maidens/Fatui have long death animations, which you can skip by running a freeze team. Kill them when frozen and they drop their loot immediately!
Some sections of this farm are best done by with Ayaka, since her dodge/sprint let her cross water very quickly.
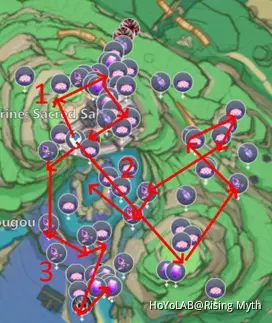
1 – Grand Narukami Shrine (<1min: 2 Naku Weed, 7 Sakura Blooms, 2 Hidden Achievements)
Already have Ayaka-chan at max ascension? Tired of hunting Sakura blooms across the island?
From the Grand Shrine waypoint, simply go left and go clockwise around the Grand Narukami shrine with an electro character like Beidou. This will get you 7 Sakura blooms and 2 Naku Weed with no effort. You can feed your Electro Sigils to the Tree while you’re here.
Bonus tip: There are two hidden achievements tied to the daily fortune slip – getting the best possible fortune and the worst possible fortune. So pull from the box and hand the slip to Ringou, a conversation plays if you pull an achievement.
2 – Extended Mt. Yougou and Roots Farm (~7mins: ~3 Onikabuto, 13 Sakura Blooms; 4 Naku Weed, 2 Amethyst Ore; ~3-5 crystal cores)
Note: The Roots section is only possible if you’ve completed the Cleansing questline.
From the Shrine waypoint: glide southeast to the mountain top with the little shrine and Sakura Blooms on top. Work your way down a bit until you get to the Amethyst Ores. Smash those then glide north to the Naku Weeds and Sakura Blooms.
Loop around the high parts here to collect the Sakura Blooms, dip down to collect two more, then zip-line back up. Head southwest to the rim of the Root section.
Grab the 2 Naku Weeds here, then glide gently coast down the giant hole collecting Onikabuto from the tree’s roots. You should be able to get 3 quite easily and can hunt for more if you’re interested.
From there, glide towards the center of the root system, where you’ll hopefully scare plenty of electro crystal flies towards you and you can mash F to collect as many crystal cores as you can, I usually get somewhere between 3 and 5, but if you’re less lazy you can probably get more. Then do a quick circuit below with an electro character to
pick up 5 more Sakura Blooms!
3 – Around the Rim and to the Overrun Shrine (~3 mins: 3 Naku Weed, 3 Sakura Bloom, 1 Mirror Maiden, 1 Kairagi, 5 Amethyst Ore)
Back to the Shrine waypoint. This time head southwest and jump off the cliff and aim for a cliff ledge that has the Naku Weed on it. It’s quite a fall, so you can save some time by not opening your glider until you’re close.
From there, glide down to the upper rim southeast of that and go counter-clockwise around it to get 2 more Naku Weeds and a Sakura bloom.
Then head south for 2 more Sakura bloom and a Mirror Maiden to kill.
Finally, jump into the crevasse to your east to kill a Kairagi and steal the ore he is guarding.
4 – Araumi Route (~3mins: 8 Sakura Blooms, 4 Ruin Sentinels, 4 Amethyst Ores)
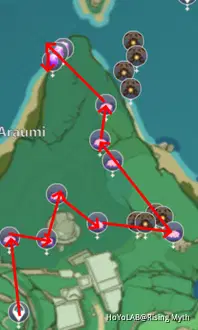
Over to the Araumi waypoint now.
Glide down north to the Sakura bloom and zig-zag east collecting the blooms as you go, then head north doing the same.
A group of 3 ruin sentinels will spawn either on your western landing zone or the far east and move counter-clockwise. The fourth ruin sentinel is in the far east corner, so it’s a bit more efficient if you can pull all four.
Once you’ve killed the 4 ruin sentinels and collected your 8 Sakura Blooms, jump off the cliff to the north and glide into the underhang below it to smash 4 Amethyst Ores.
5 – Jinren Kairagi Murderfest (~5mins: 12-18 Kairagi)
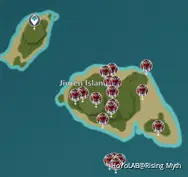
Head to the Jinren waypoint and then southeast to kill whichever Jinren are quick and easy for you. If you only
go for groups of them, you can get 12 Kairagi easily, but there are 18 on the island if you want to pick off lone ronin and the mini-boss to the southeast.
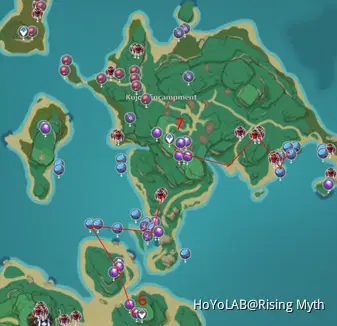
6 – Southern Kujou (~6mins: 7 Amethyst Ore, 4 Genoderma, 3 Naku Weed, 2 Kairagi)
Note: This is easier after you complete the Sakura Arborism world quest to deactivate the Thunder Sakura where
some of the resources are found.
Head to the eastern Tatarasuna Island Waypoint and drop down to your west. Smash the 2 Amethyst ore there,
then head north and smash the 3 ore there.
From there, head northwest and collect the 3 Ganoderma while going east across the shoreline towards the Thunder Sakura. Around this tree you will find 3 more Ganoderma, 3 Naku Weed, and 2 more Amethyst Ore.
You can call it here, or head north to kill 2 Kairagi.
7 – Eastern Kujou (~4mins: 5 Amethyst Ore, 7 Kairagi, 5 Ganoderma)
Note: You must complete the Circuit puzzle below the Kujou Encampment waypoint for this route to work.
Head to the Kujou Encampment waypoint and hop down the grate you opened after completing the circuit puzzle
here. Smash the 5 Amethyst Ore, then tap the electro engrams and head out the eastern barricade.
From there, head north to get ambushed by 4 Kairagi, then go southeast to get ambushed by 3 more Kairagi.
Collect the 5 Ganoderma nearby once you’re done.
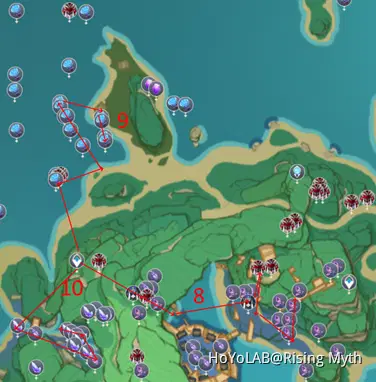
8 – Tatarasuna Forge (~7mins; 2 Mirror Maidens, 2 Kairagi, 9 Naku Weed; 2 Crystal Cores, Fatui bits)
Teleport to Xavier’s waypoint in western Tatarasuna and head southeast into the forge. Grab an electro engrama to stave off the constant electro damage and follow the route towards the bridge. Attack the lone Fatui Cicin mage and get ambushed by an Anemo boxer and Mirror Maiden.
Kill them, collect the parts, and go partway across the bridge while mashing F. Two electro crystal flies will float up through the bridge and you can snag them for some crystal cores.
Then glide north off the bridge towards the shore, grabbing 3 Naku weed as you head up towards the Mirror Maiden. An ice fatui will join her, kill them both. Most of the things to investigate here only drop food, but
feel free to investigate them if you want.
Head north and kill the two Kairagi in the heart of the forge. Investigate the things here for some ore and weapons. Then head southeast towards the Anemo boxer, a Fatui Agent will ambush you.
Grab the 5-8 Naku weed in the area, depending on how much you want to run around.
9 – Mysterious Conch Sadness (~3 mins: 12 Ganoderma, 2 Sea Grass, ~1-2 Kairagi; Whopperflower, Abyss Mage, and various Hillichurl bits; Hidden Achievement+Hamayumi Blueprint)
Teleport back to Xavier’s waypoint and glide north.
You’ll want to keep an eye out for sparkles that indicate spots where you can find Mysterious Conches to give to give to Takashi to open one of his chests. You need two things from these chests: a Bag of Seeds for a world quest to the south and the Hamayumi 4-star bow blueprint (and hidden achievement that comes with it). You can only open one chest a day, and it can take over a week to get the blueprint.
While here, kill whatever is in the area, including things that come out of the ground, and grab the 12 Ganoderma and 2 Sea Grass.
10 – Easy Crystal Marrow (~1min: 9 Crystal Marrow)
Back to Xavier’s waypoint.
Head southwest, glide down to the beach where you see your first Crystal Marrow.
Head inland, following the southern shore to pick up Crystal Marrow, then cross and pick up the rest.
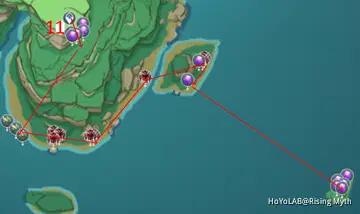
11 – Far Island Amethyst (~5mins: 13 Amethyst Ore, 3 Sea Grass, 8 Kairagi)
Teleport to the southern Tatarasuna Waypoint.
Bonus: Want to open this Luxurious Chest on the cliff? Jump on the chest, then fall off the cliff. Catch yourself, climb back and quickly open the chest.
Now fall the cliff for real and do a plunge in the middle of all those sweet Amethyst Ores. Farm the 5 here, then glide southwest. Grab the 3 Sea Grass, and fall the shoreline killing Kairagi and treasure hunters as you go. You should wind up at the island to the east of the waypoint, with 8 dead Kairagi.
Smash the 3 Amethyst Ore here, then grab the electro engram to zip-line across to the far island that has 5 more Amethyst Ore for you.
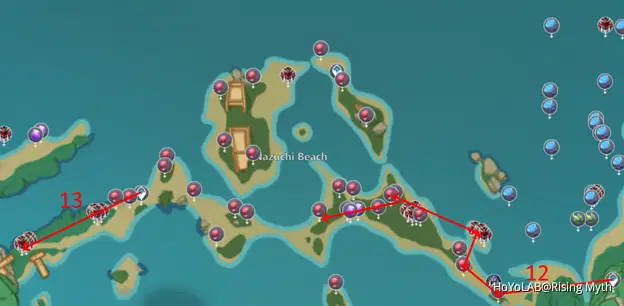
12 – Nazuchi Beach A (~5mins: 1 Mirror Maiden, 10 Dendrobium, 8 Kairagi, 3 Amethyst Ore; 2 Whopper Flowers; +6 Dendrobium if you want)
Back to Xavier waypoint.
This time head west to begin our casual, fun stroll up Nazuchi Beach.
Kill the Mirror Maiden just trying to get a tan, then follow the shore to the Kairagi having a beach cookout.
From there, head west into the shipwreck and kill all of the Kairagi there.
Head further west, collecting Dendrobiums and smashing ore as you go. Pull the two whopper flowers together into one encounter to kill them faster.
Optional: Instead of teleporting to 13, just keep heading west to collect 6 more Dendrobium.
13 – Murder Row (~3mins: 6 Kairagi, 2 Dendrobium)
Teleport to the western Nazuchi Beach waypoint.
Head southwest, collecting the 2 Dendrobium and killing the 6 Kairagi.
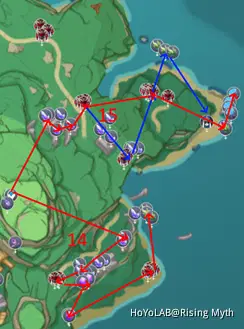
14 – Southeastern Yoshiori Island (~5mins: 9 Crystal Marrow, 5 Kairagi, 4 Amethyst Ore, 3 Sea Grass)
Teleport to the waypoint over the Maguu Kenki.
Glide southeast to the tip of the broken rib holding 2 Crystal Marrow, then work your southwest across the ribs to collect the other 7 Crystal Marrow.
Jump onto the open hill just west of the ribs to summon 3 Kairagi. Kill them.
Jump off the cliff to your southeast and smash the Amethyst Ores here. Head southwest to smash some treasure hunters and more Amethyst Ores, then loop back up the shore to kill 3 Kairagi and collect 3 Sea Grass.
15 – Eastern Yoshiori Island (~5-8mins: 3-5 Crystal Marrow, 8 Kairagi, 1 Mirror Maiden, 1 Sea Grass, 4 Ganoderma; Optional: +4-6 Crystal Marrow, +2 Kairagi, +3 Sea Grass)
Back to the Maguu Kenki’s waypoint.
Glide northeast and land on the broken ribs, collecting the Crystal Marrow as your care dictates. You should be able to grab 3-4 easily.
From there, drop down to your north east to fight 3 Kairagi.
Optional: Head south east, collecting 6 more Crystal Marrow and killing 2 more Kairagi, if you care too. Warning: These Kairagi like to die at the edge of the cliff and drop their loot off it, thereby reducing your efficiency.
Head to the camp of 5 Kairagi and kill them.
Optional: Head north to collect 3 Sea Grass.
Head east to kill a Mirror Maiden and collect 4 Ganoderma and 1 Sea Grass.
Thank you for taking the time to read my guide - I hope you found it helpful!
Please Like or Follow if you would like to see more of the same!
Want to add these routes to the Teyvat Interactive Map? Follow the link or QR Code below!
https://webstatic-sea.mihoyo.com/app/ys-map-sea/index.html?lang=en-us&bbs_presentation_style=no_header#/map/2?share_id=16282156951331918878444-1504b44b-d108-4869-9270-b0bcedc2fad3&index=37

Cheers,
Rising Myth
[emoji]