


Should you pull for Zhongli?
Pros:
➣ One of the best shielder in game, giving you a comfortable gameplay without much need for dodging opponent attacks
➣ Universal resistance shredder, having his Shield gives a 20% resistance shred to all elements including Physical
➣ Burst has high scaling, able to cause massive amount of damage as well as the benefit to stop all opponents from moving
➣ Able to use Tenacity of the Millelith artifact set to easily boost team damage
➣ Has access to Geo resonance when paired with another Geo teammate to easily boost team damage
Cons:
➣ Burst has a long animation, could be detrimental to team overall output if it does not deal enough damage
➣ Crystallize is the only reaction Geo has access to, and it has no impact to a team offense

Builds
Shield Bot Zhongli
This build focuses on building as much HP as possible to boost his Shield as much as possible.
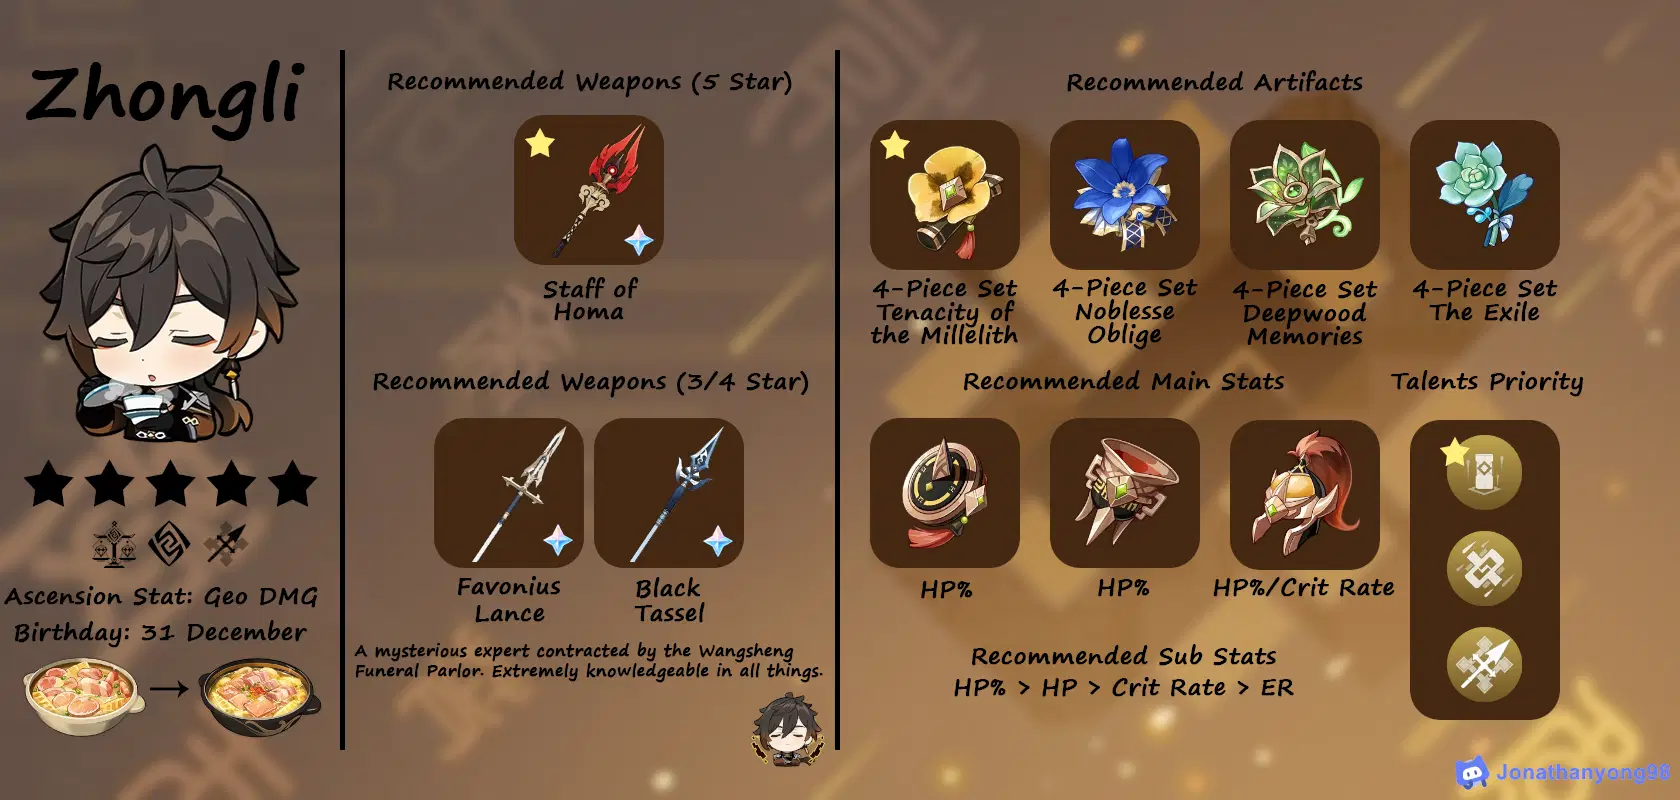
Weapon Recommendation
1. Staff of Homa
Pros:
➣ Passive easily gives a 20% HP boost
Cons:
➣ 5 star limited weapon
➣ Black Tassel easily gives more HP
2. Favonius Lance
Pros:
➣ Passive can provide Energy to other party members
Cons:
➣ Require to build Crit Rate in order to trigger passive consistently
3. Black Tassel
Pros:
➣ Gives a 46.9% HP boost at level 90
Artifact Recommendation
1. Tenacity of the Millelith
➣ Provides a 20% HP boost
➣ His Stone Stele from the skill periodically deals damage, triggering this set passive easily by giving the team a 20% Attack boost
2. Noblesse Oblige
➣ Having a 40 Energy burst cost helps him to trigger this set passive easily by giving the team a 20% Attack boost
➣ Require to build some Energy Recharge to ensure he can get his burst back upon cooldown
3. Deepwood Memories
➣ His Stone Stele from the skill periodically deals damage, triggering this set passive easily by reducing Dendro resistance by 30%
➣ Only works if you have a Dendro DPS on your team
4. The Exile
➣ Having a 40 Energy burst cost helps him to trigger this set passive easily by giving the team 6 Energy each
➣ Require to build some Energy Recharge to ensure he can get his burst back upon cooldown
Artifact Stat Priority
1. Flower of Life
➣ Prioritize HP% and HP for sub stats
➣ Add Energy Recharge if you are using artifact sets which require burst activation
➣ Add Crit Rate if you are using Favonius Lance
2. Plume of Death
➣ Prioritize HP% and HP for sub stats
➣ Add Energy Recharge if you are using artifact sets which require burst activation
➣ Add Crit Rate if you are using Favonius Lance
3. Sands of Eon
➣ Use HP% as the main stat
➣ Prioritize HP for sub stats
➣ Add Energy Recharge if you are using artifact sets which require burst activation
➣ Add Crit Rate if you are using Favonius Lance
4. Goblet of Eonothem
➣ Use HP% as the main stat
➣ Prioritize HP for sub stats
➣ Add Energy Recharge if you are using artifact sets which require burst activation
➣ Add Crit Rate if you are using Favonius Lance
5. Circlet of Logos
➣ Use HP% as the main stat
➣ Use Crit Rate as the main stat if you are using Favonius Lance
➣ Prioritize HP for sub stats
➣ Add Energy Recharge if you are using artifact sets which require burst activation
Stat Requirement Recommendation
➣ 40k HP and above
➣ 150% Energy Recharge and above if you are using artifact sets which require burst activation
➣ 50% Crit Rate and above if you are using Favonius Lance
Talent Priority
➣ Skill should be upgraded to at least level 8 to provide a strong Shield
Sub-DPS Zhongli
This build focuses on using his high scaling burst to deal massive Geo damage to opponents. This build is also flexible in either providing a stronger Shield or providing more burst damage.
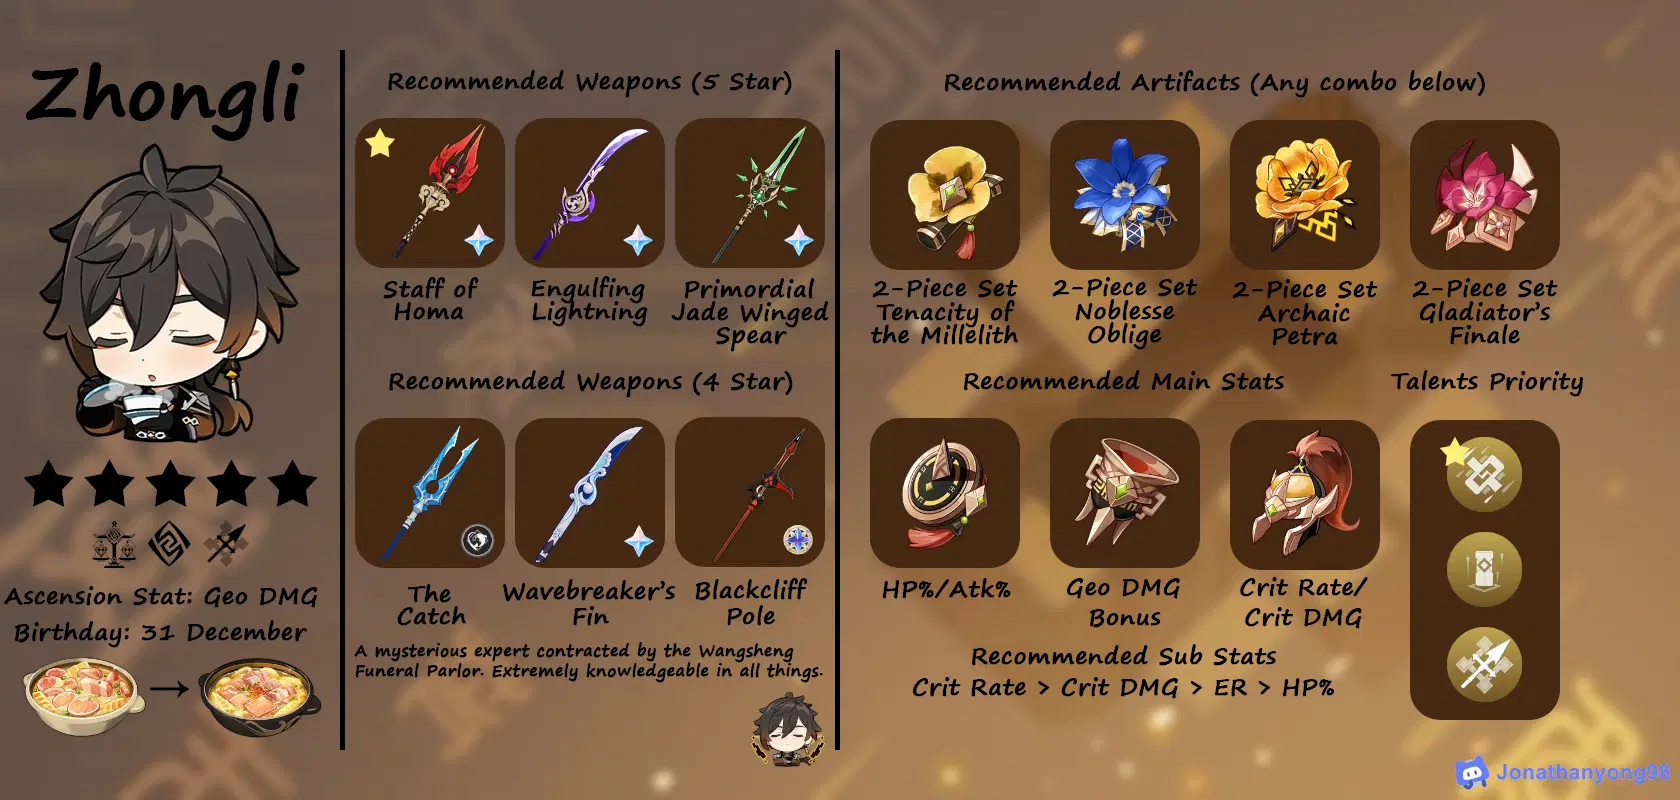
Weapon Recommendation
1. Staff of Homa
Pros:
➣ Provides a 66.2% Crit Damage boost at level 90
➣ Passive easily gives a 20% HP boost
Cons:
➣ 5 Star limited weapon
➣ When played with a teammate like Hu Tao, this will be better suited for her
2. Engulfing Lightning
Pros:
➣ Provides Energy Recharge to ensure getting burst back upon cooldown
Cons:
➣ 5 Star limited weapon
➣ Not efficient enough to build a lot of Energy Recharge as his burst cost is only 40, making the passive unable to unleash its max potential
3. Primordial Jade Winged-Spear
Pros:
➣ Provides a 22.1% Crit Rate boost at level 90
Cons:
➣ Does nothing else other than providing a Crit Rate boost as a 5 Star weapon
4. "The Catch"
Pros:
➣ Passive provides a 32% burst damage bonus and a 12% burst Crit Rate at R5
➣ Provides Energy Recharge to ensure getting burst back upon cooldown
➣ Can be obtained by fishing
5. Wavebreaker's Fin
Pros:
➣ Passive provides burst damage bonus based on the team total burst Energy cost, up to 80% at R5
Cons:
➣ Due to his low burst cost, he will be unable to reach the max potential provided by the passive
6. Blackcliff Pole
Pros:
➣ Provides a 55.1% Crit Damage boost at level 90
Cons:
➣ Can only be obtained from the Starglitter shop
Artifact Recommendation [Mix and match based on what you plan to achieve with your build]
1. Tenacity of the Millelith
➣ Provides a 20% HP boost for stronger Shield
➣ No boost to offense
2. Noblesse Oblige
➣ Provides a 20% burst damage bonus
3. Archaic Petra
➣ Provides a 15% Geo damage bonus
4. Gladiator's Finale
➣ Provides a 18% Attack boost
➣ Can be passively obtained through progression in game
➣ Other substitutes but requires resin: Shimenawa's Reminiscence, Vermillion Hereafter, Echoes of an Offering
Artifact Stat Priority
1. Flower of Life
➣ Prioritize Crit Rate and Crit Damage for sub stats
➣ Add HP% for stronger Shield
➣ Add Energy Recharge to ensure getting burst back upon cooldown
➣ Add Attack% for more burst damage
2. Plume of Death
➣ Prioritize Crit Rate and Crit Damage for sub stats
➣ Add HP% for stronger Shield
➣ Add Energy Recharge to ensure getting burst back upon cooldown
➣ Add Attack% for more burst damage
3. Sands of Eon
➣ Use HP% as the main stat
➣ Prioritize Crit Rate and Crit Damage for sub stats
➣ Add Energy Recharge to ensure getting burst back upon cooldown
➣ Add Attack% for more burst damage
4. Goblet of Eonothem
➣ Use Geo damage bonus as the main stat
➣ Prioritize Crit Rate and Crit Damage for sub stats
➣ Add HP% for stronger Shield
➣ Add Energy Recharge to ensure getting burst back upon cooldown
➣ Add Attack% for more burst damage
5. Circlet of Logos
➣ Use Crit Rate or Crit Damage as the main stat, depending on which you are lacking of
➣ Prioritize Crit Rate or Crit Damage for sub stats based on your main stat
➣ Add HP% for stronger Shield
➣ Add Energy Recharge to ensure getting burst back upon cooldown
➣ Add Attack% for more burst damage
Stat Requirement Recommendation
➣ 70% Crit Rate and above
➣ 140% Crit Damage and above
➣ 150% Energy Recharge and above
➣ 35k HP and above
Talent Priority
➣ Burst and skill should be upgraded to at least level 8
➣ You can crown the burst if you wish to
Constellation
Overall rating of 2.5 out of 5, not worth pulling for any constellations unless you really enjoy using him.
Constellation Level 1 [3/5 Rating]
➣ Able to summon a second Stone Stele, enabling an easier way to trigger Tenacity of the Millelith artifact set passive
Constellation Level 2 [2/5 Rating]
➣ Generates a Shield for all party members when the burst ends, enabling a 20% resistance shred to all elements including Physical in a larger AOE depending on how much each player is away from each other
➣ Only useful in co-op mode
Constellation Level 3 [3/5 Rating]
➣ Upgrades the skill talent level by 3, enabling a stronger Shield
Constellation Level 4 [2/5 Rating]
➣ Increases burst AOE and Petrification duration
Constellation Level 5 [2/5 Rating]
➣ Upgrades the burst talent level by 3
Constellation Level 6 [3/5 Rating]
➣ Able to heal the active character based on the damage the Shield receives
Material Requirement
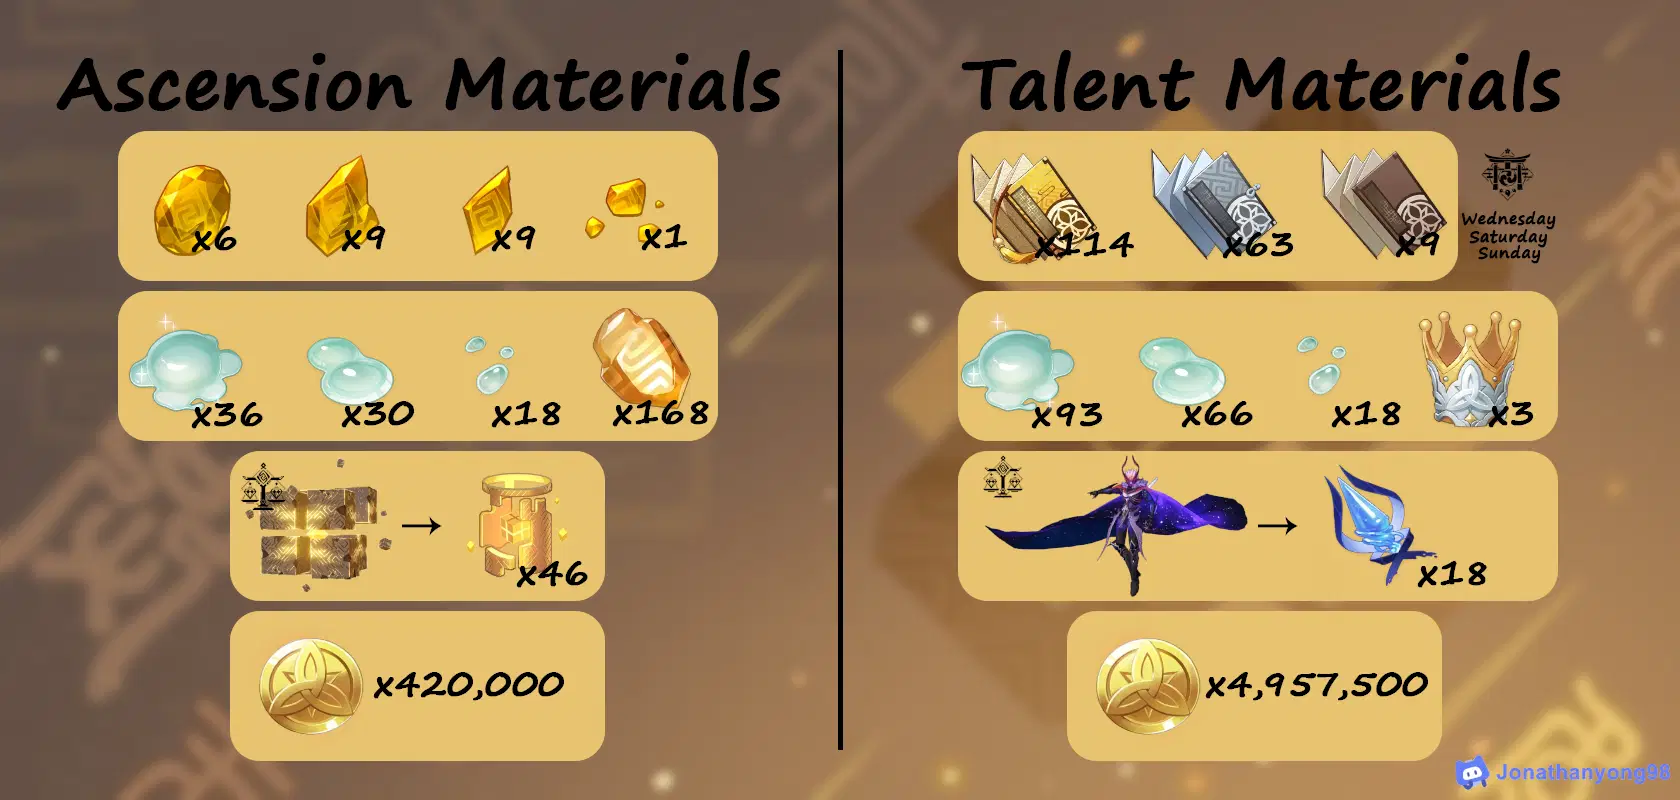
Passive Utility
➣ Refunds 15% of the ore used when crafting Polearm-type weapons




