

Intro
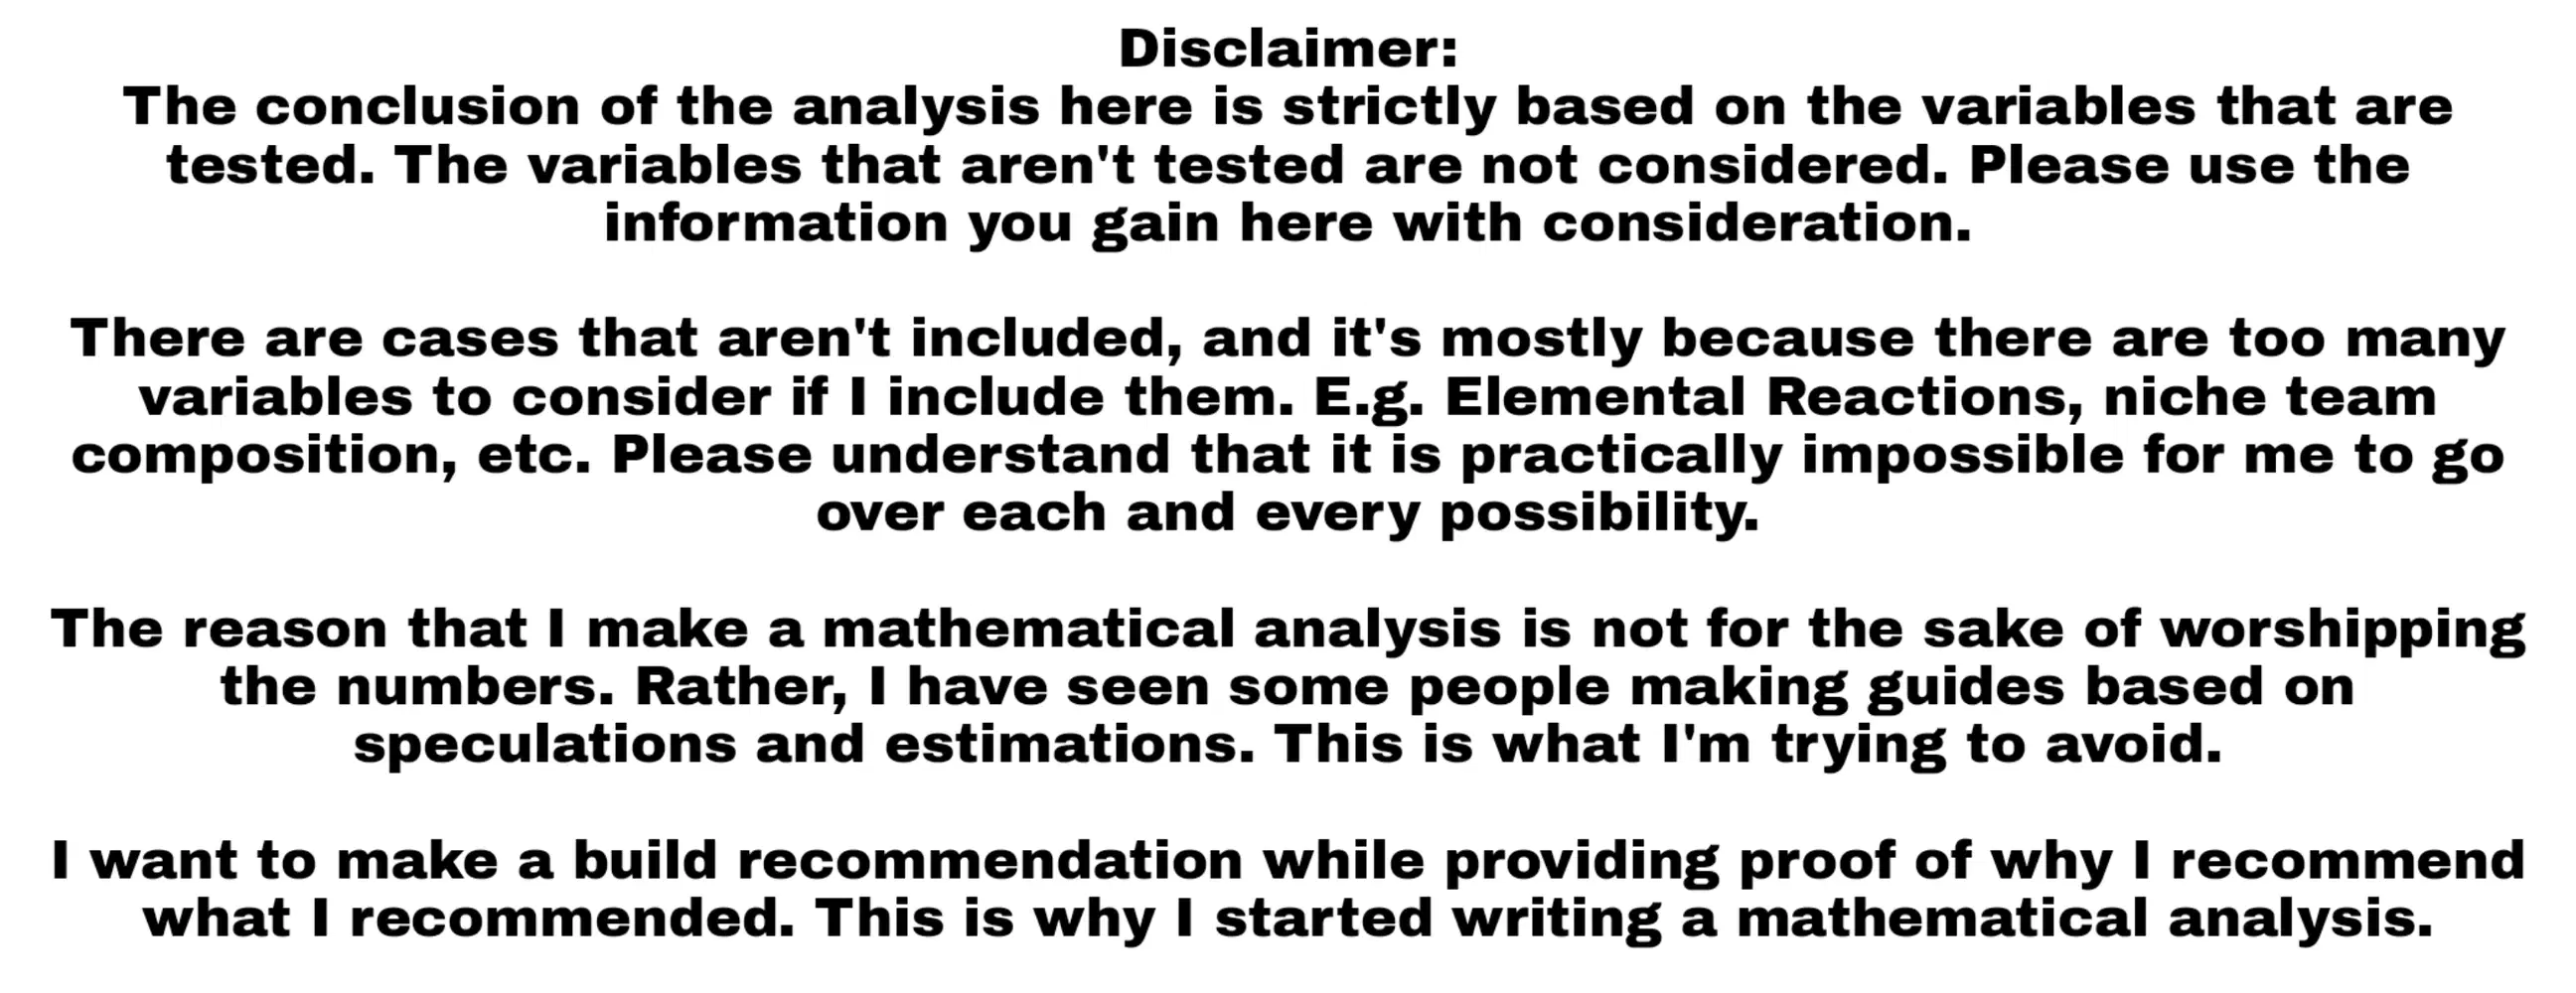
This time, I'm gonna be testing Sayu on damage and hybrid build. However, there'll be some things to note in this analysis. I hope you'll take some time to read the explanation so that you don't get lost in the conclusion.
I tested a lot of artifacts and main stats for this analysis. It'll be even longer than Kazuha's analysis if I post them all. Therefore, I will not be posting the whole spreadsheet. Instead, you can see the full result on this link:
Conclusion (TL;DR)
For both builds, it appears that a full Elemental Mastery build yields the best damage and healing. 4-Viridescent Venerer also creates a huge gap when compared to other artifacts sets. Katsuragikiri remains one of the best weapons for Sayu in most builds. Other than that, Skyward Pride, Wolf's Gravestone, and Rainslasher are also amazing.
Damage Build Sayu
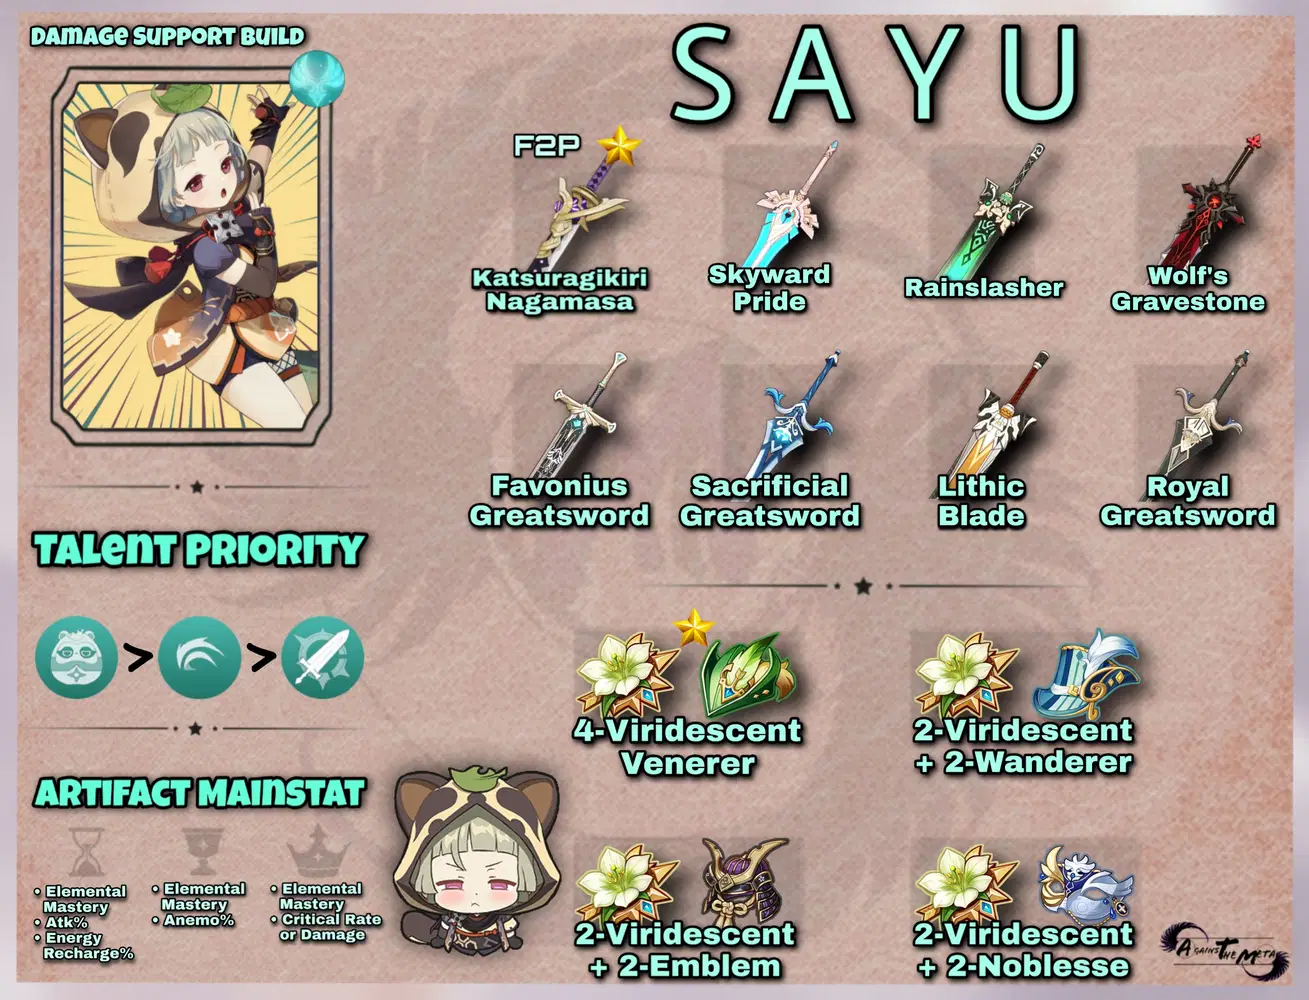
𝚂𝚊𝚢𝚞'𝚜 𝙳𝚊𝚖𝚊𝚐𝚎 𝙱𝚞𝚒𝚕𝚍 𝙸𝚗𝚏𝚘𝚐𝚛𝚊𝚙𝚑𝚒𝚌
EM = Elemental Mastery.
ER = Energy Recharge.
Crit = Critical Rate or Critical Damage, based on your need.
Artifact Main stat for Damage Build Sayu:
1. EM/EM/EM
2. EM/EM/Crit
3. EM/Anemo/Crit
4. Atk/Anemo/Crit
5. ER/Anemo/Crit
6. Atk/Atk/Crit
Best Artifact for Damage Build Sayu:
1. 4-Viridescent Venerer
2. 2-Viridescent Venerer + 2-Wanderer's Troupe
3. 2-Viridescent Venerer + 2-Emblem of Severed Fate
4. 2-Viridescent Venerer + 2-Noblesse Oblige
5. 2-Viridescent Venerer + 2-Gladiator's Finale
Best Weapon for Damage Build Sayu:
EM Build
1. Katsuragikiri Nagamasa
2. Skyward Pride
3. Rainslasher
4. Wolf's Gravestone
5. Favonius Greatsword
6. Sacrificial Greatsword
7. Lithic Blade
8. Royal Greatsword
9. Prototype Archaic
10. Serpent Spine
11. Blackcliff Slasher
Non-EM Build
1. Katsuragikiri Nagamasa
2. Rainslasher
3. Wolf's Gravestone
4. Skyward Pride
5. Favonius Greatsword
6. Lithic Blade
7. Sacrificial Greatsword
8. Royal Greatsword
9. Prototype Archaic
10. Serpent Spine
11. Blackcliff Slasher
Hybrid Build
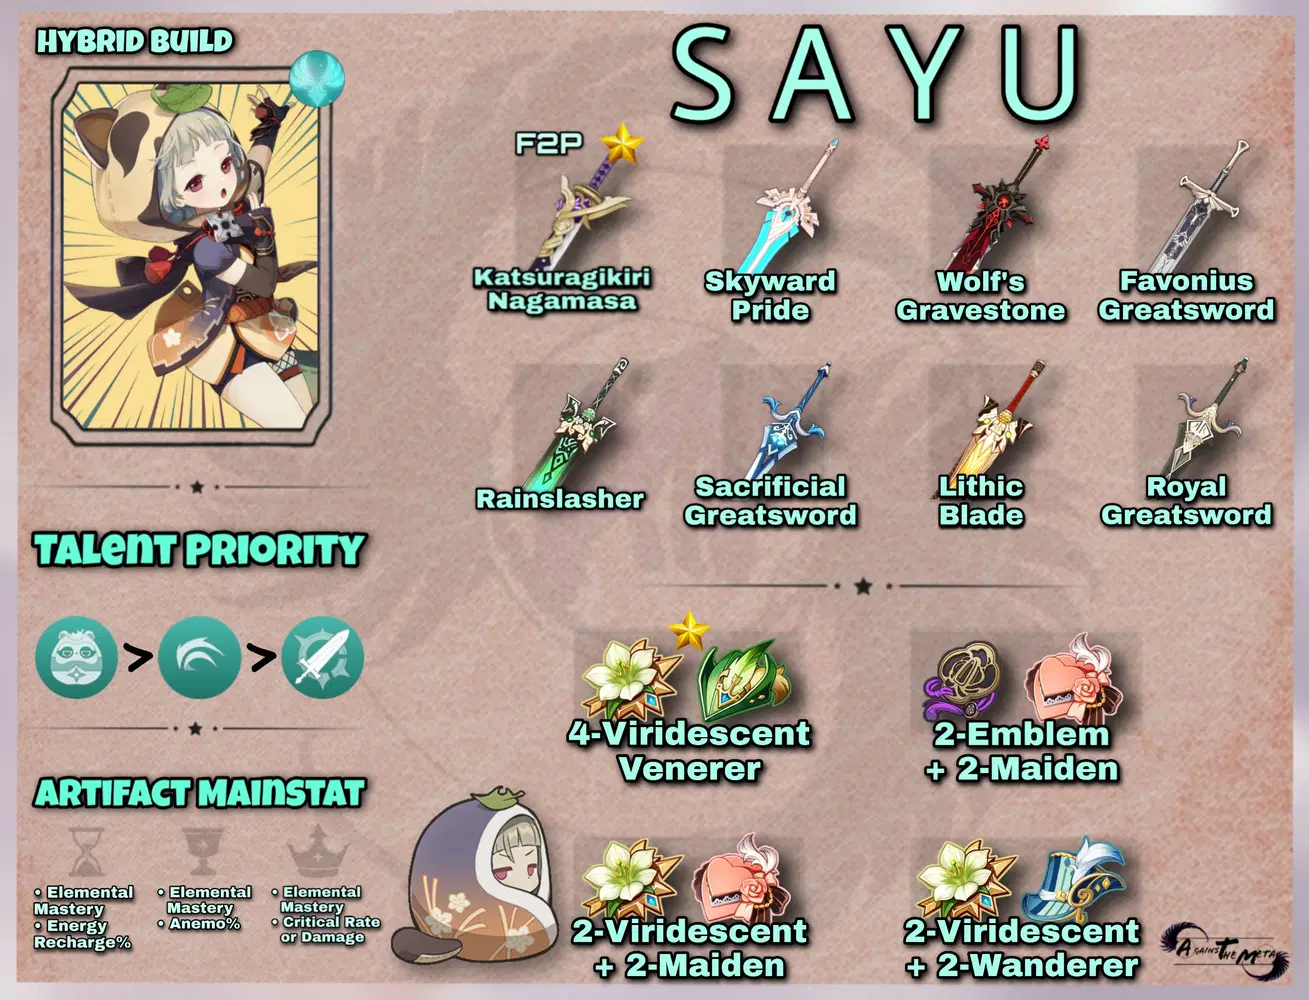
𝚂𝚊𝚢𝚞'𝚜 𝙷𝚢𝚋𝚛𝚒𝚍 𝙱𝚞𝚒𝚕𝚍 𝙸𝚗𝚏𝚘𝚐𝚛𝚊𝚙𝚑𝚒𝚌
Artifact Main stat for Hybrid Build Sayu:
1. EM/EM/EM
2. EM/EM/Crit
3. ER/Anemo/Crit
4. EM/Anemo/Crit
Best Artifact for Hybrid Build Sayu:
1. 4-Viridescent Venerer
2. 2-Maiden Beloved + 2-Emblem of Severed Fate
3. 2-Viridescent Venerer + 2-Maiden Beloved
4. 2-Viridescent Venerer + 2-Wanderer's Troupe
5. 2-Viridescent Venerer + 2-Gladiator's Finale
Best Weapon for Hybrid Build Sayu:
1. Katsuragikiri Nagamasa
2. Skyward Pride
3. Wolf's Gravestone
4. Favonius Greatsword
5. Rainslasher
6. Sacrificial Greatsword
7. Lithic Blade
8. Royal Greatsword
9. Prototype Archaic
10. Serpent Spine
11. Blackcliff Slasher
Sayu's Talents and Constellations Overview
Sayu's Elemental Skill:
Sayu deals "Fuufuu Windwheel" Damage and strikes "Fuufuu Whirlwind Kick" at the end of the Elemental Skill. This skill has a "Tap" and a "Hold" version.
For her tap skill, Sayu deals a Fuufuu Windwheel Damage and immediately strikes Fuufuu Whirlwind Kick. This skill has a 6 seconds cooldown.
For her hold skill, Sayu can continuously roll around to damage the enemy. This skill deals damage every 0.5 seconds and have a maximum duration of 10 seconds. After 10 seconds of rolling, Sayu will enter an 11 seconds cooldown.
I'd recommend not using Sayu's tap skill. Instead, you can press her hold skill and immediately end it. Doing so will put her Elemental Skill in a 6.2 seconds cooldown.
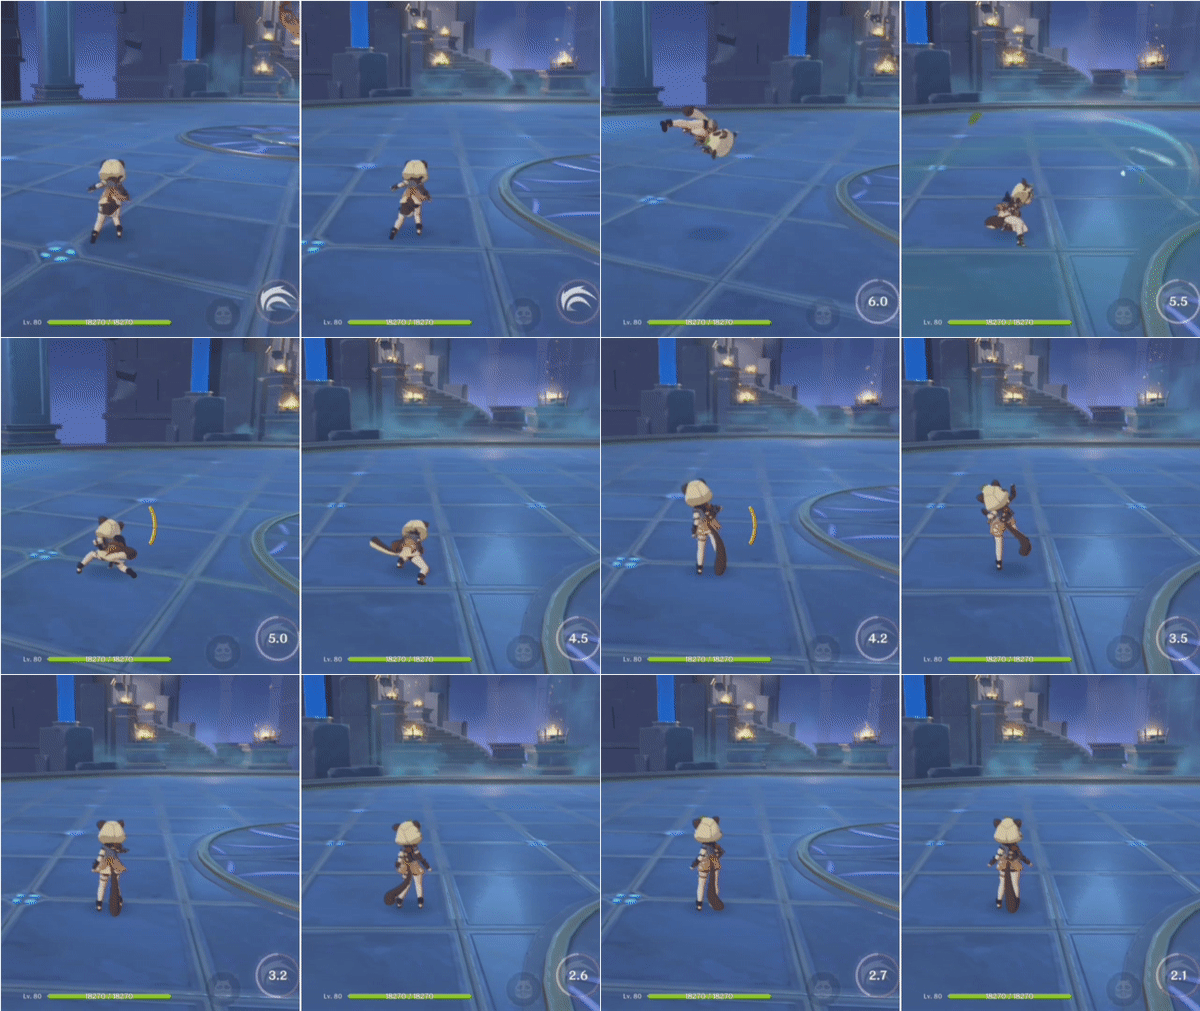
𝚂𝚊𝚢𝚞'𝚜 𝚑𝚘𝚕𝚍 𝚜𝚔𝚒𝚕𝚕 𝚅𝚂 𝚝𝚊𝚙 𝚜𝚔𝚒𝚕𝚕 𝚌𝚘𝚖𝚙𝚊𝚛𝚒𝚜𝚘𝚗
You can tell whether you use her hold skill or tap skill from the way she does her animation.
For tap skill, Sayu will kick from bottom left to upper right and end the skill with a "stretch".
For hold skill, Sayu will kick from upper left to bottom right and end the skill with a "dizzy" gesture.
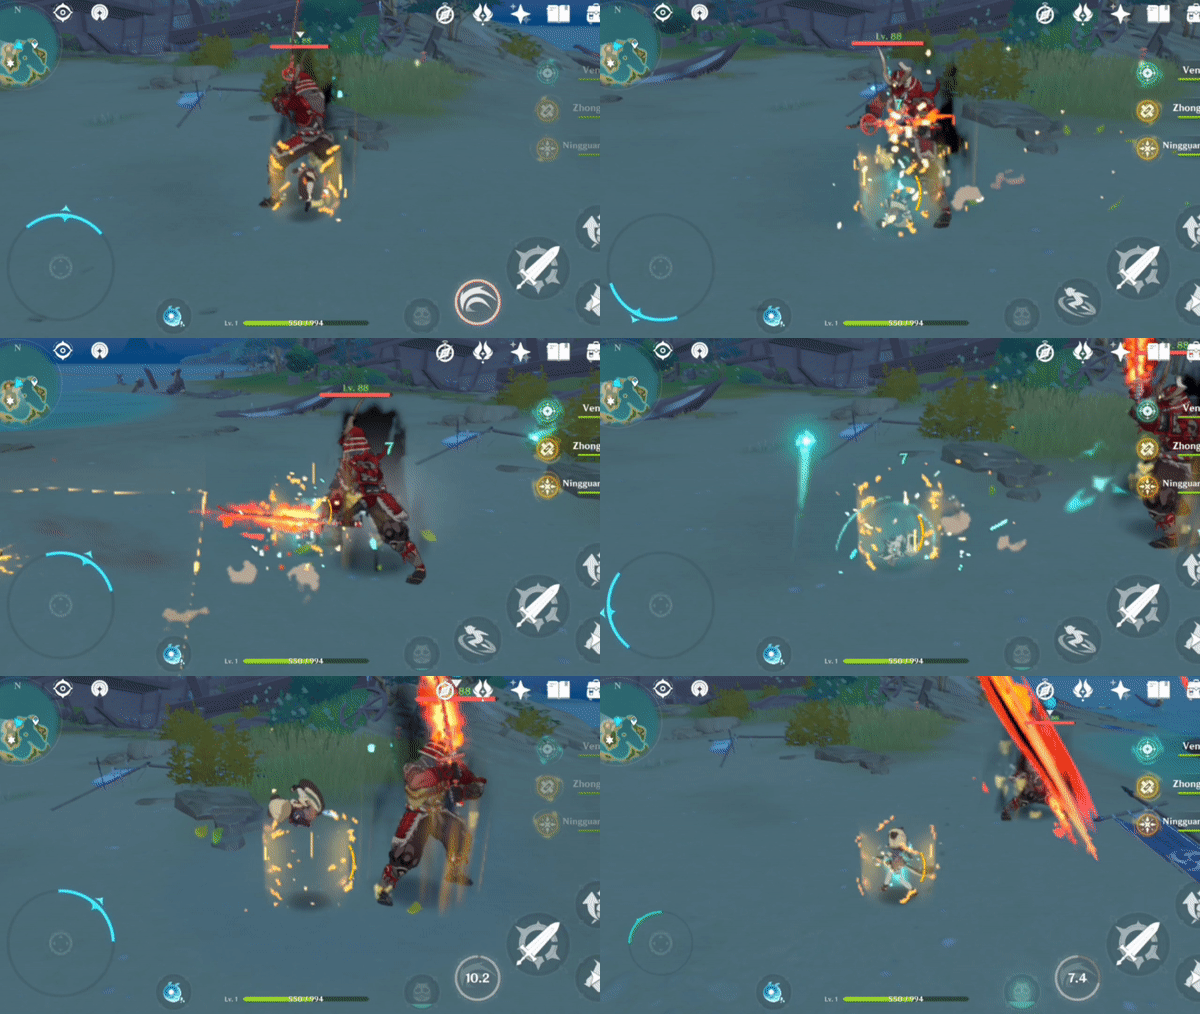
𝚂𝚊𝚢𝚞 𝚐𝚎𝚗𝚎𝚛𝚊𝚝𝚎𝚜 𝟹 𝚙𝚊𝚛𝚝𝚒𝚌𝚕𝚎𝚜 𝚠𝚑𝚎𝚗 𝚜𝚑𝚎 𝚛𝚘𝚕𝚕 𝚊𝚗𝚍 𝟸 𝚘𝚗 𝚔𝚒𝚌𝚔
Sayu's tap skill will generate 2 Energy, while her hold skill can generate up to 5 Energy. She will gain 1 Energy for every 2-3 seconds of her roll, and 2 Energy when she does her Fuufuu Whirlwind Kick. You can see her Elemental Burst symbol "blinking" when she gains energy.
Sayu's Elemental Burst:
Sayu summons a Muji-Muji Daruma that deals damage and heals the active character. Afterward, the Daruma will either heal or attack the enemy.
Healing will occur if there's an active character with less than 70% HP. If the HP of nearby characters is above 70%, it will attack a nearby opponent. If there's no enemy nearby, Muji-Muji Daruma will heal above 70% HP. This skill triggers every 1.5 seconds and ends after 7 ticks.
Sayu's Passive 1:
When Sayu triggers Swirl while active, she heals all allies for (300 + (1.2 x Elemental Mastery)) HP. This effect can be triggered once every 2s.

𝚂𝚊𝚢𝚞'𝚜 𝚂𝚠𝚒𝚛𝚕 𝚘𝚗𝚕𝚢 𝚑𝚎𝚊𝚕𝚜 𝚠𝚑𝚎𝚗 𝚜𝚑𝚎'𝚜 𝚘𝚗 𝚏𝚒𝚎𝚕𝚍
It's important to note that Sayu's Swirl only heals when she is active. So if you use her Elemental Burst then switch her out, she will not heal when triggering Swirl. This means Sayu will mostly heal through Swirl when she uses her Elemental Skill.
Sayu's Constellations:
C1: Sayu's first constellation is similar to Bennett's. It removes the HP restriction and allows Muji-Muji Daruma to heal and attack at the same time.
C2: Sayu's Fuufuu Windwheel state gains a 3.3% damage bonus every 0.5s (Max 66%). The 0.5-second trigger matches her damage per tick (as mentioned in the "Sayu's Elemental Skill" section).
C4: Sayu recovers 1.2 Energy when she triggers Swirl. This effect occurs every 2s.
I don't have C4 Sayu to test this out, but I'd assume that this only happens when she's the active character.
C6: Sayu's Elemental Burst will now benefit from her Elemental Mastery. For every 1 EM, Sayu will gain:
• Increases damage by 0.2% ATK. Maximum 400% ATK.
• Increases the HP restored by 3. Maximum 6000.
After unlocking this constellation, EM/EM/EM is pretty much the only sensible choice for Sayu.
Choosing the Weapons
1. Wolf's Gravestone
• Only +20% ATK passive is considered.
2. Skyward Pride
• Damage passive is not considered.
3. Favonius Greatsword
• Passive is not considered.
4. Rainslasher
• Passive is not considered.
5. Royal Greatsword
• Passive is not considered.
6. Sacrificial Greatsword
• Passive is not considered.
7. Katsuragikiri Nagamasa
• Passive regen 6 energy every 10s.
8. Prototype Archaic
• Passive is not considered.
9. Lithic Blade
• Will be tested in 0 and 3 stacks.
10. Blackcliff Slasher
• Passive is not considered.
11. Serpent Spine
• Passive is not considered.
Choosing the Artifacts
Tested Artifact Sets:
1. 4-Viridescent Venerer
2. 2-Viridescent + 2-Gladiator's Finale
3. 2-Viridescent + 2-Wanderer's Troupe
4. 2-Viridescent + 2-Noblesse Oblige
5. 2-Maiden + 2-Viridescent
6. 2-Maiden + 2-Emblem of Severed Fate
7. 2-Maiden + 2-Noblesse
Tested Main stats:
1. Atk/Anemo/Crit
2. EM/Anemo/Crit
3. ER/Anemo/Crit
4. EM/EM/EM
• Full EM build will not Crit at all.
5. Atk/Atk/Crit
6. EM/EM/Crit
Simulation and Assumptions
1. Sayu is level 90.
2. Talent Level 8, C1.
3. Passive 2 will not be considered.
4. Critical will occur 50% of the time, this is to give Crit build less edge.
Damage Simulation:
5. Sayu's Elemental Skill deals 20 x Anemo Damage, and 20 x Elemental Damage every 21 seconds.
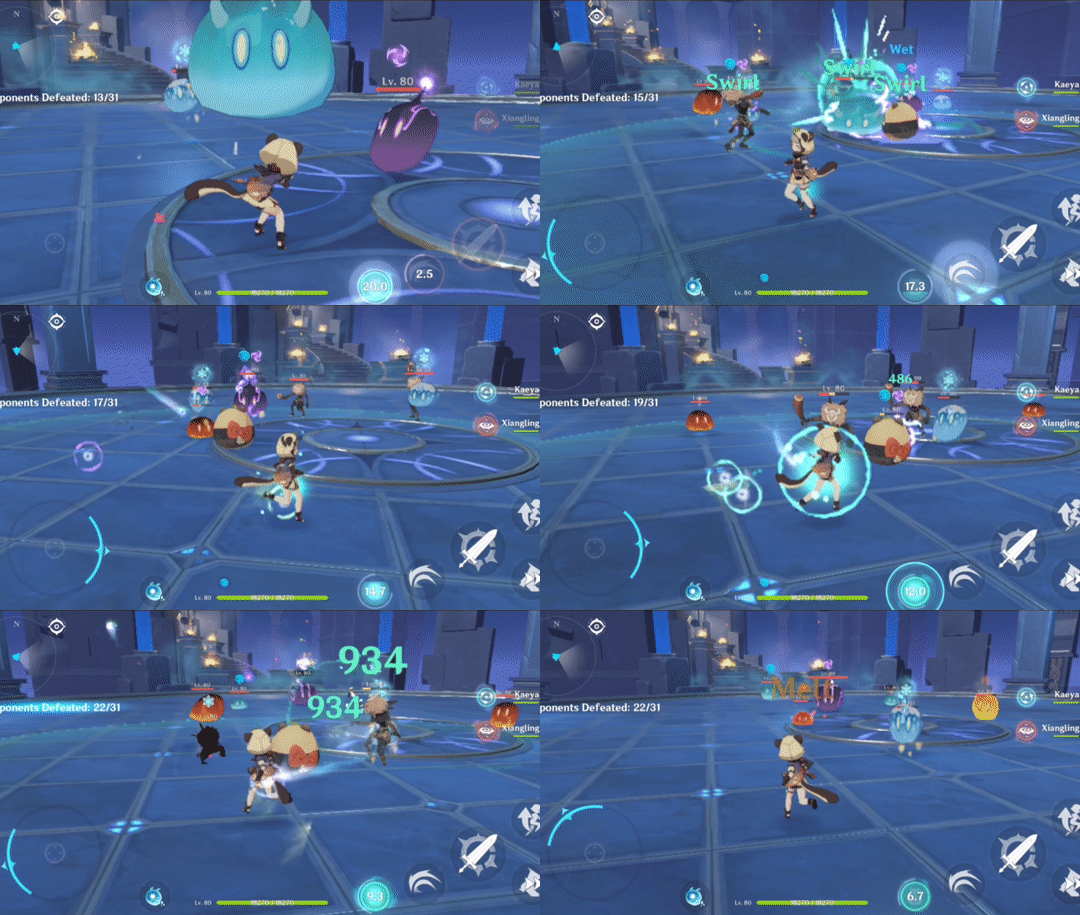
𝟽 𝚝𝚒𝚌𝚔𝚜 𝚘𝚏 𝚍𝚊𝚖𝚊𝚐𝚎 𝚏𝚛𝚘𝚖 𝚂𝚊𝚢𝚞'𝚜 𝙳𝚊𝚛𝚞𝚖𝚊
6. Elemental Burst deals damage 7 times + damage upon cast.
7. Swirl damage occurs 10 times in her Elemental Skill (She can deal up to 20, but I will assume less), and 16 times in her Elemental Burst ((7 tick+1 cast)x 2 Swirl each).
Healing Simulation:
8. In her 10 seconds roll, Sayu will deal around 10 Swirl reactions. Because Passive 1 only triggers every 2 seconds, she will be simulated to heal 5 times during her Elemental skill.
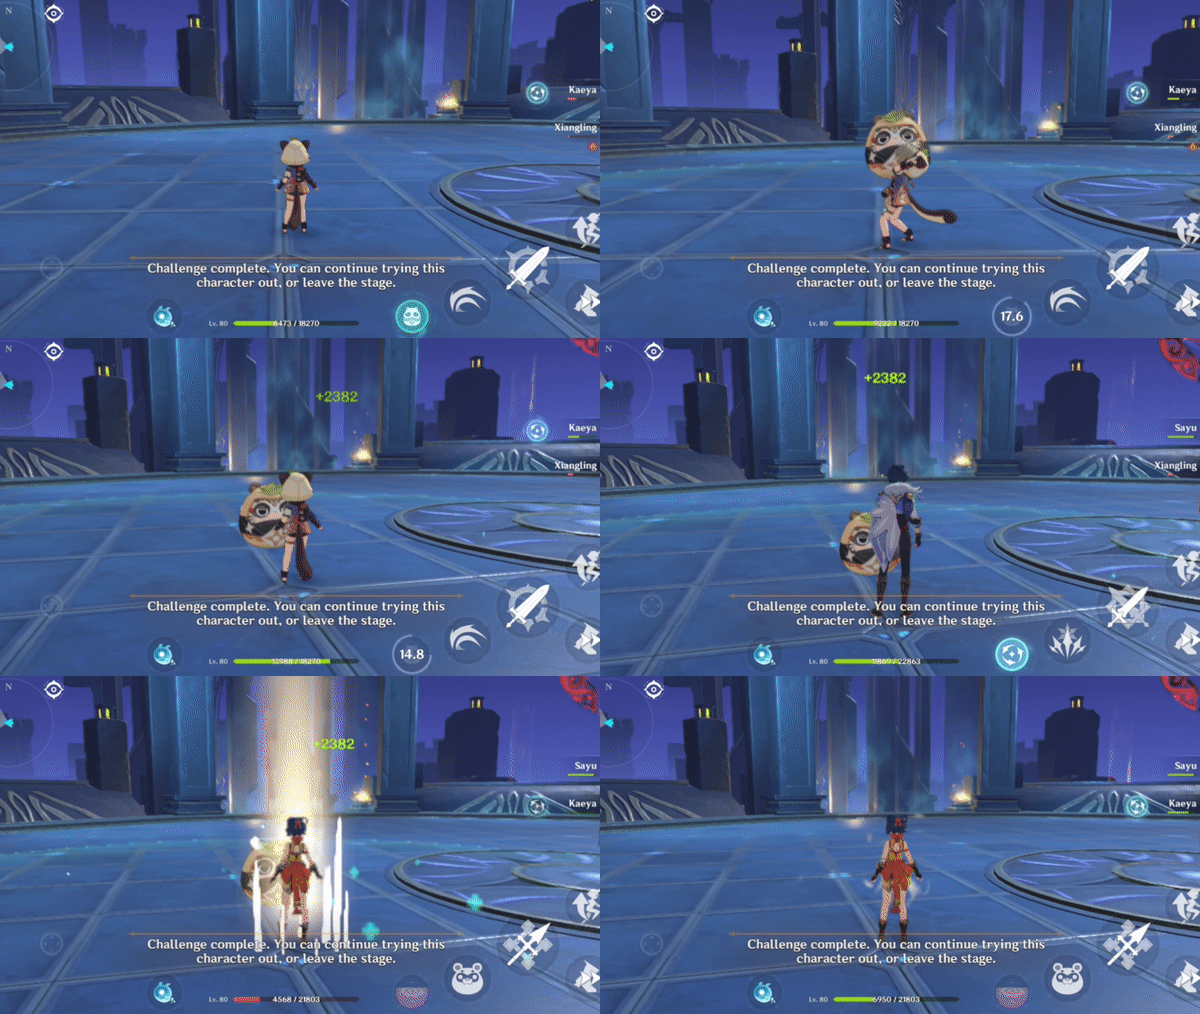
𝟽 𝚝𝚒𝚌𝚔𝚜 𝚘𝚏 𝚑𝚎𝚊𝚕𝚒𝚗𝚐 𝚏𝚛𝚘𝚖 𝚂𝚊𝚢𝚞'𝚜 𝙳𝚊𝚛𝚞𝚖𝚊
9. Sayu heals 7 times on her Elemental burst, and once upon cast. Each tick triggers every 1.5 seconds, which means her Passive 1 will not trigger every tick. Because she needs to be active to heal from Swirl, she will be simulated to heal (from Swirl) only 3 times during her Elemental burst.
Stat Overview
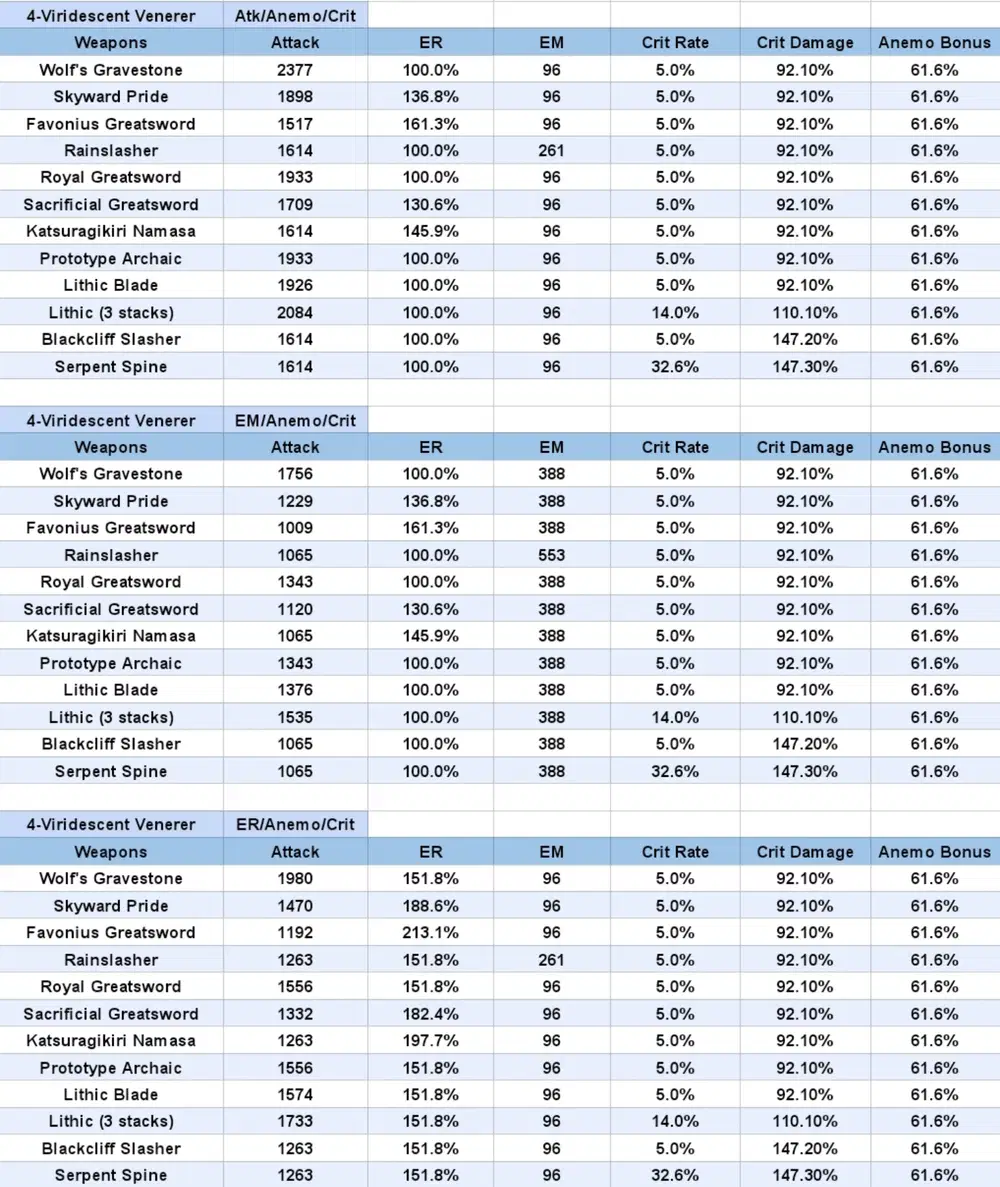
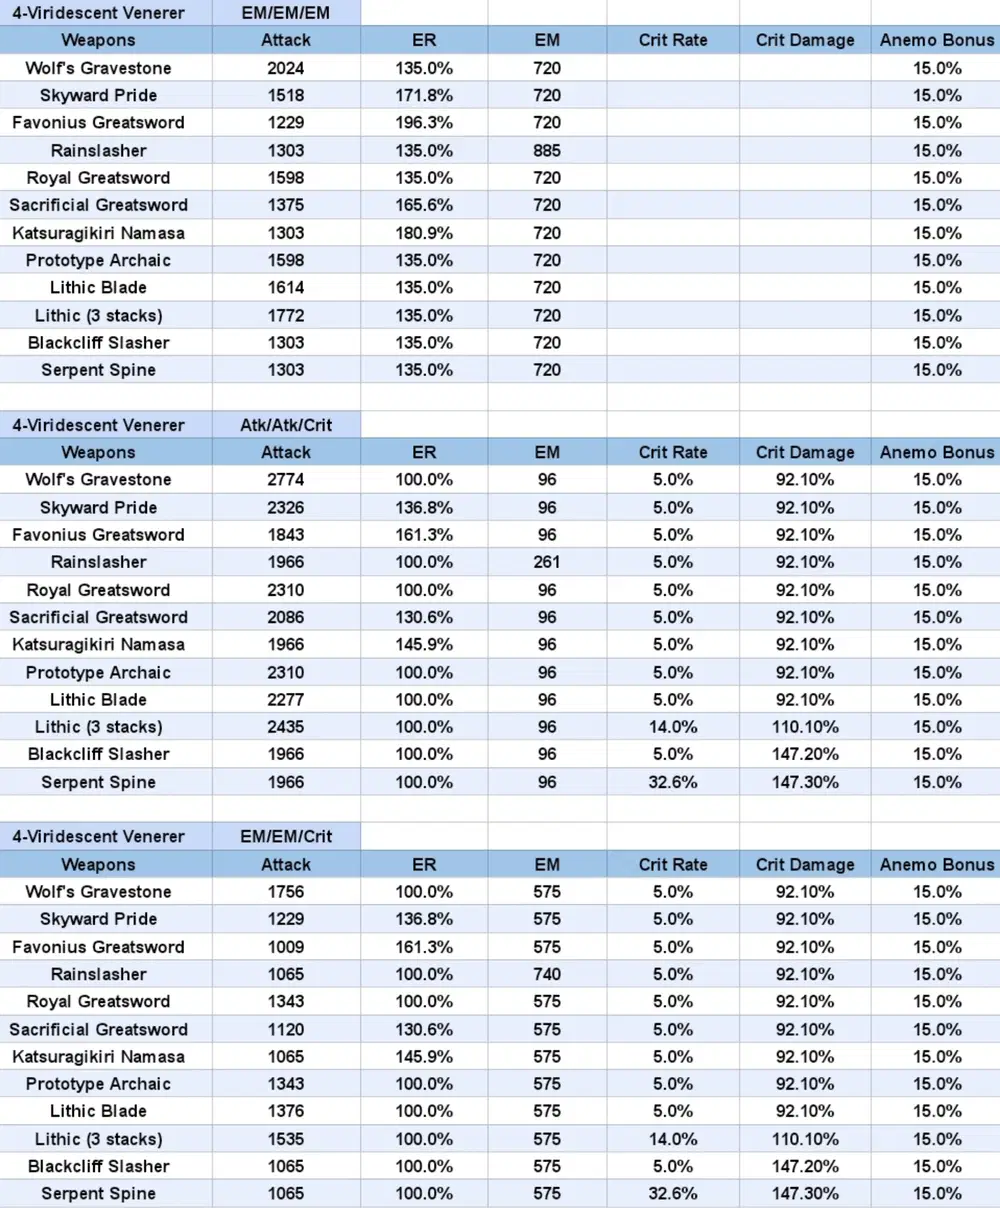
P.S. Thank you to Saenguiin for the correction!
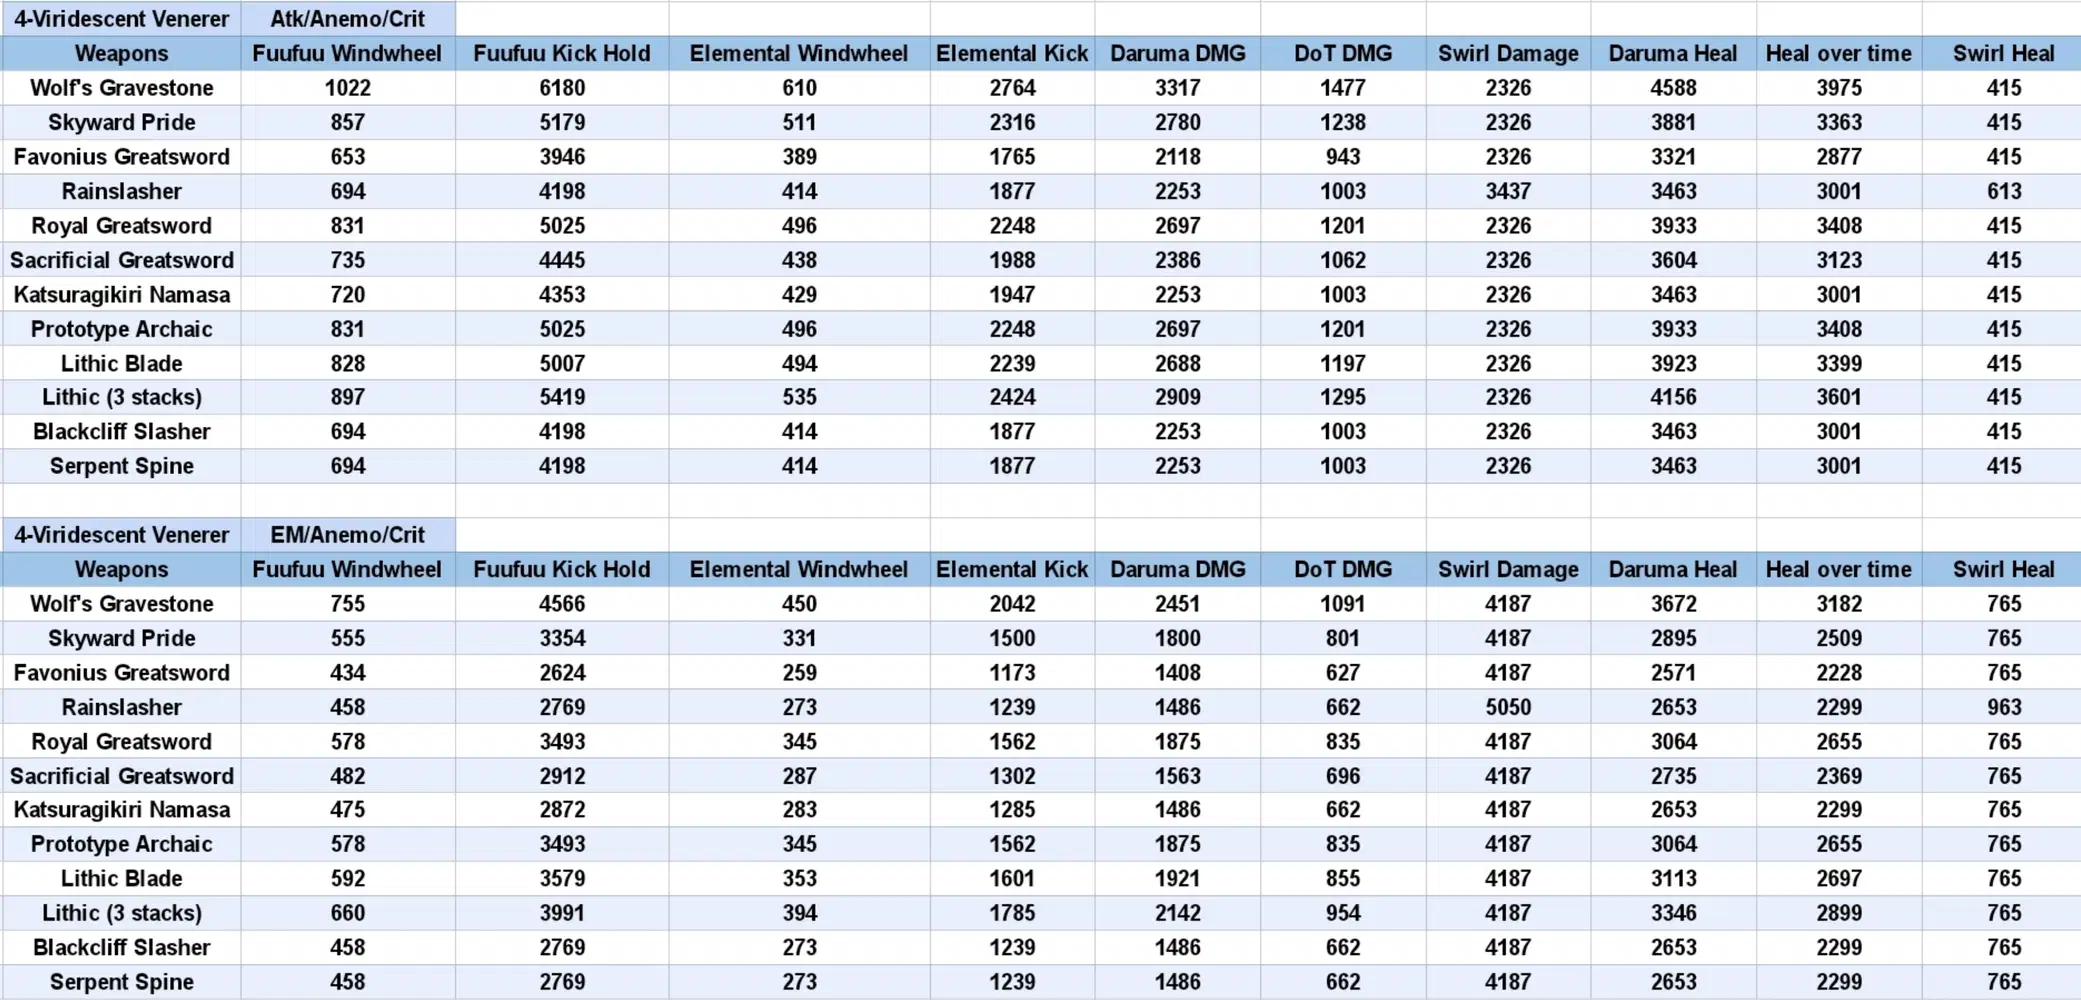
(Non-Crit) Damage and Healing Overview
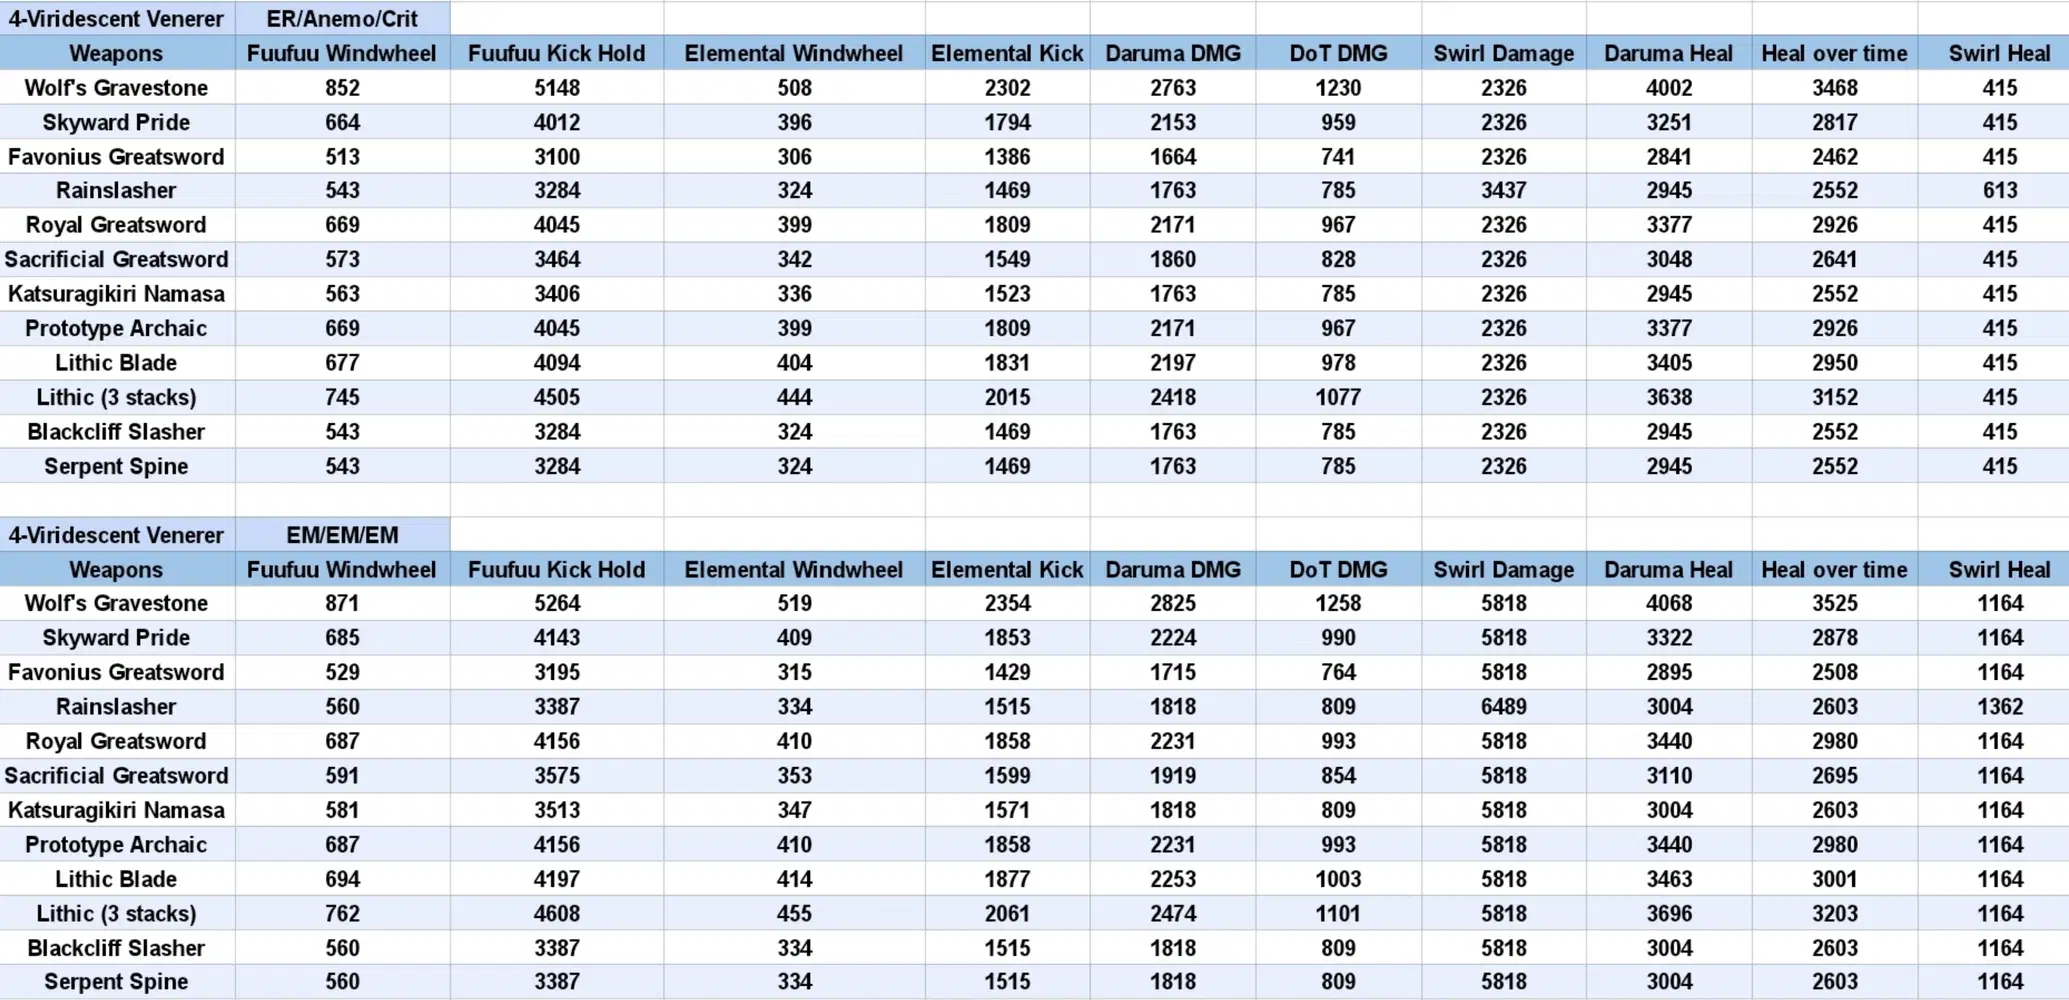
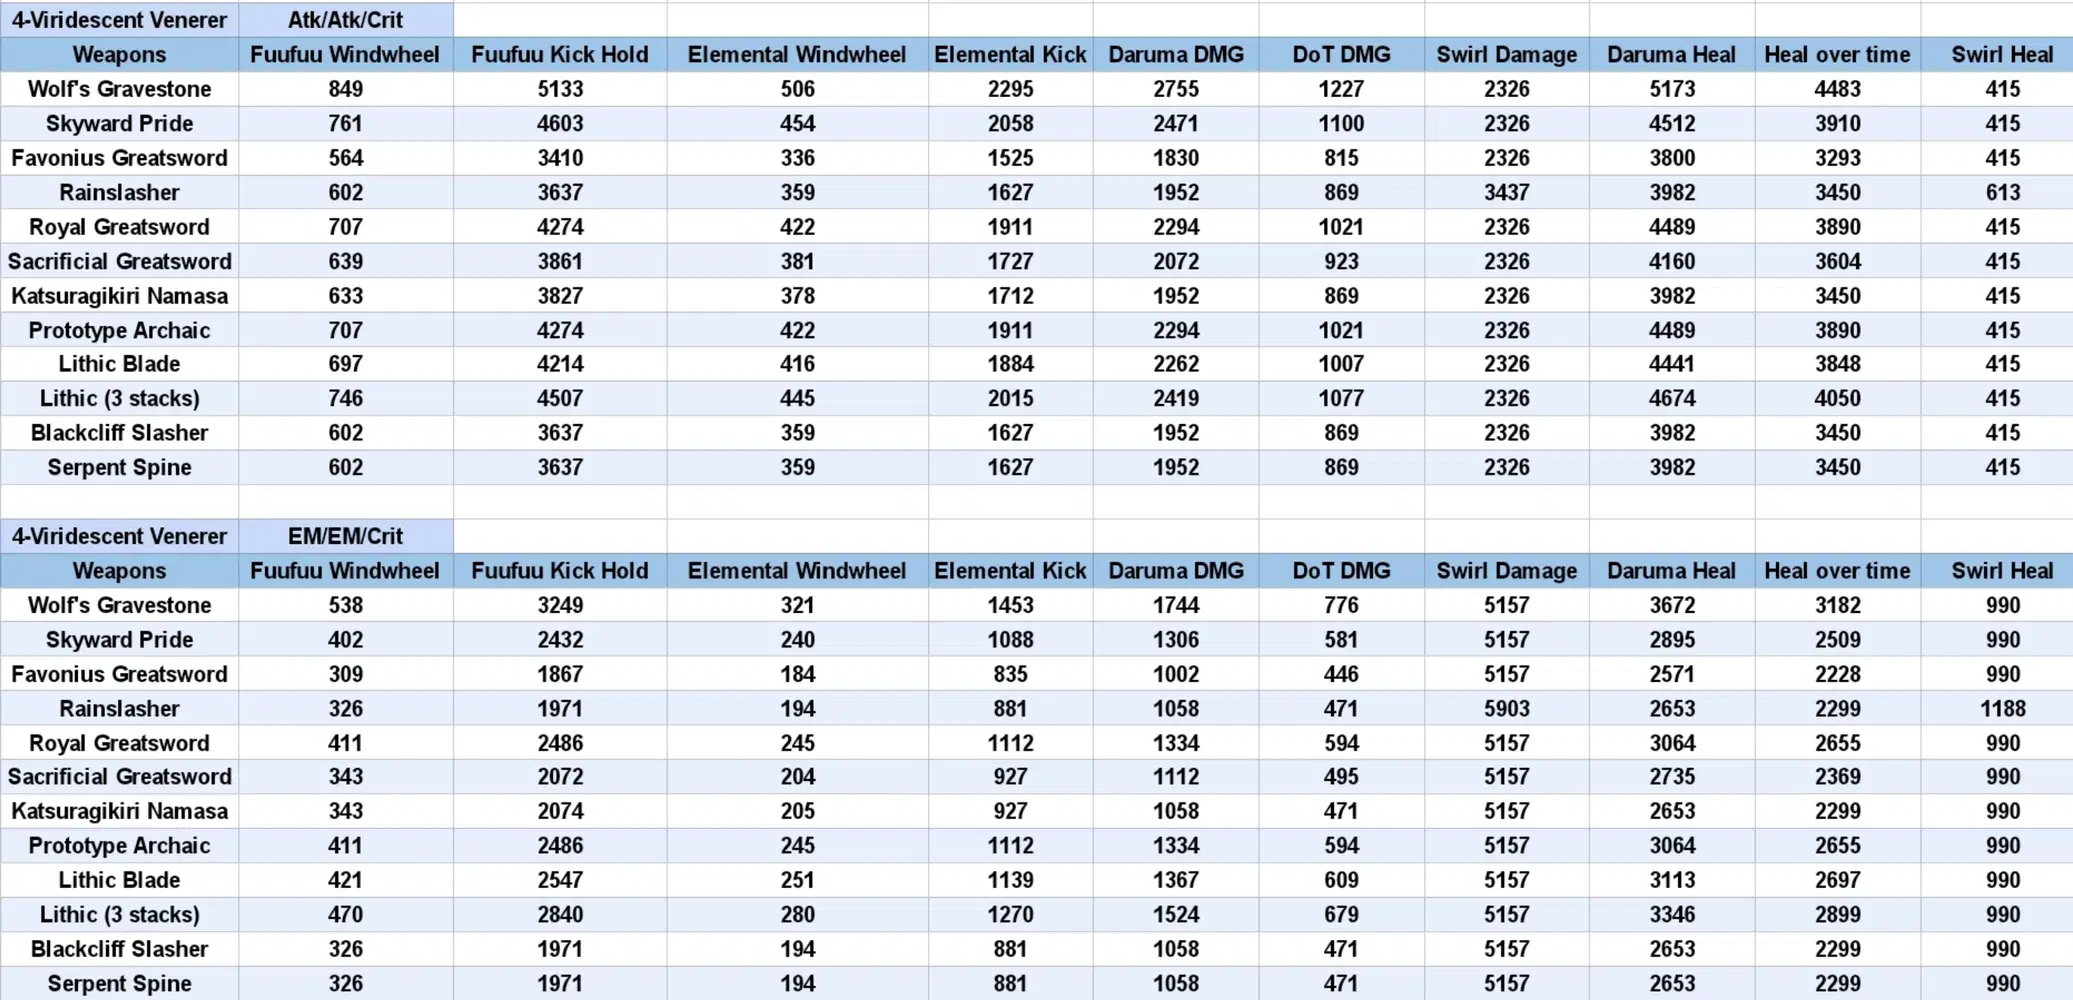
(Crit) Damage Overview
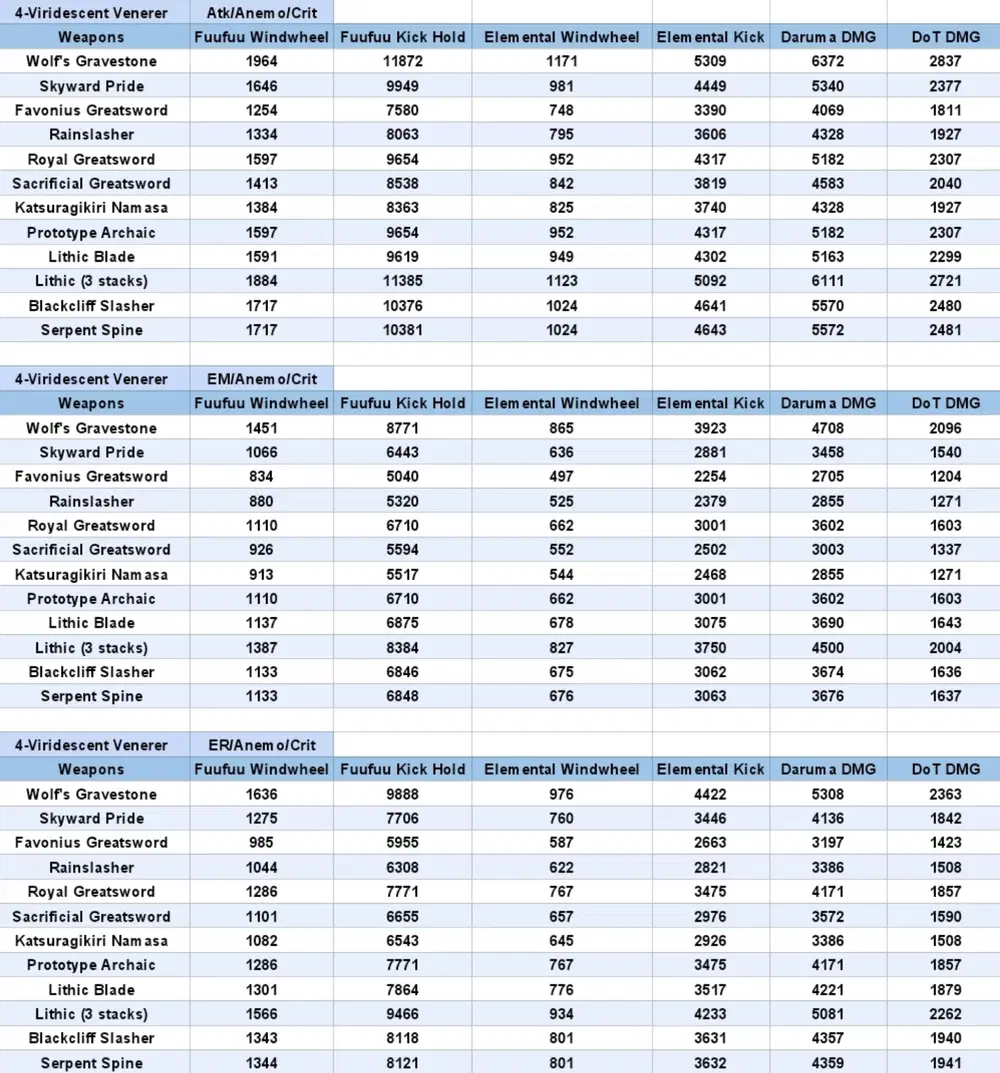
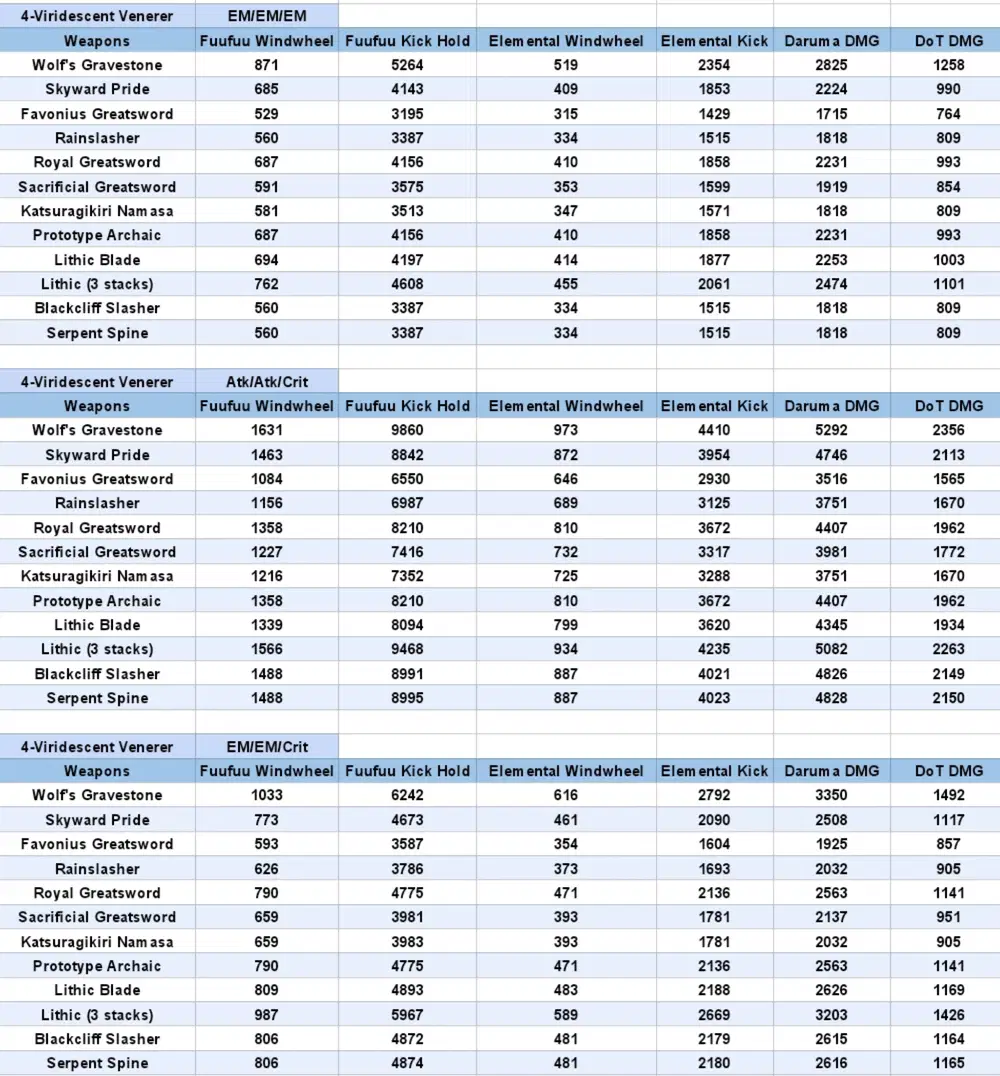
Simulation Result
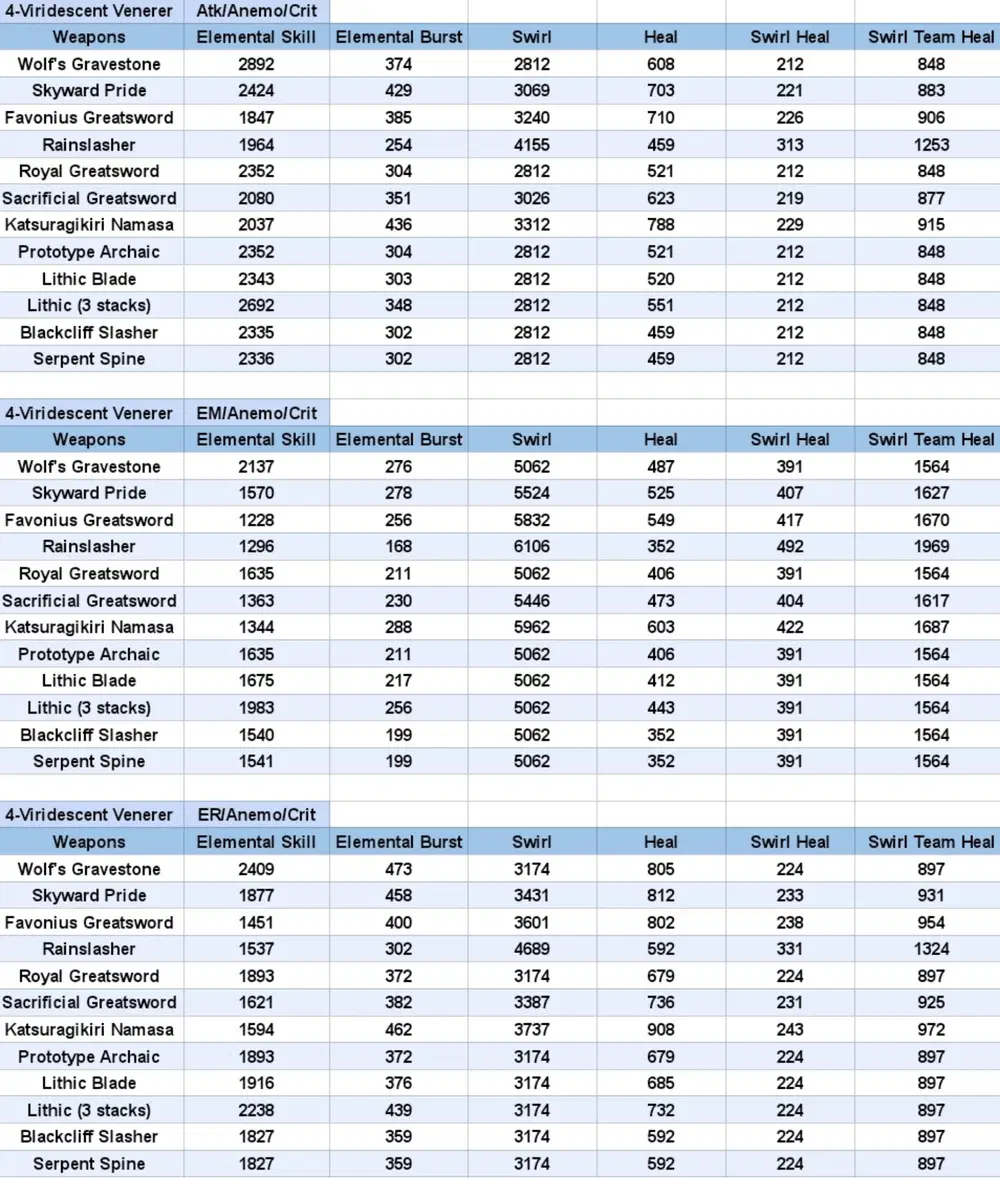
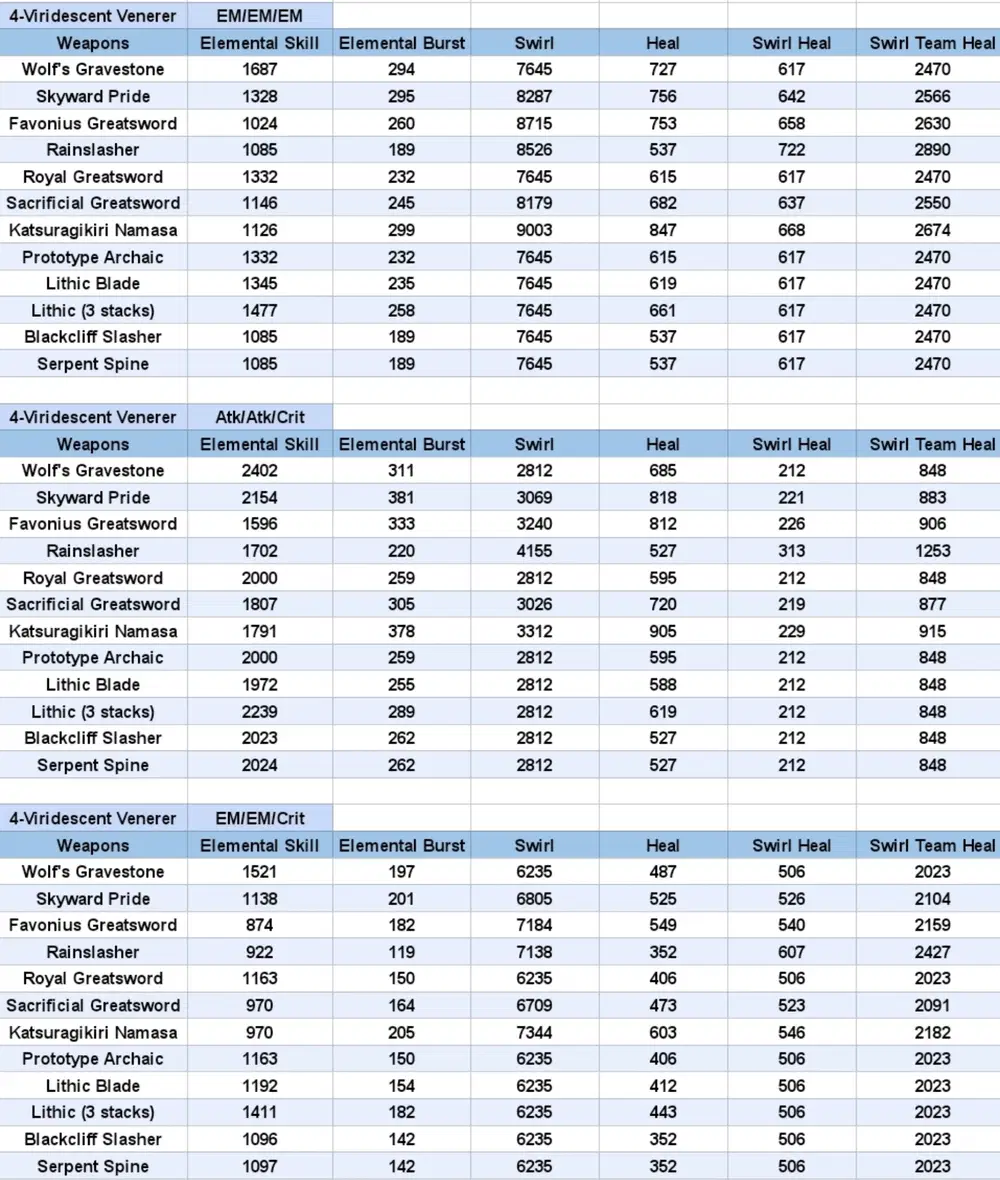
Result Overview
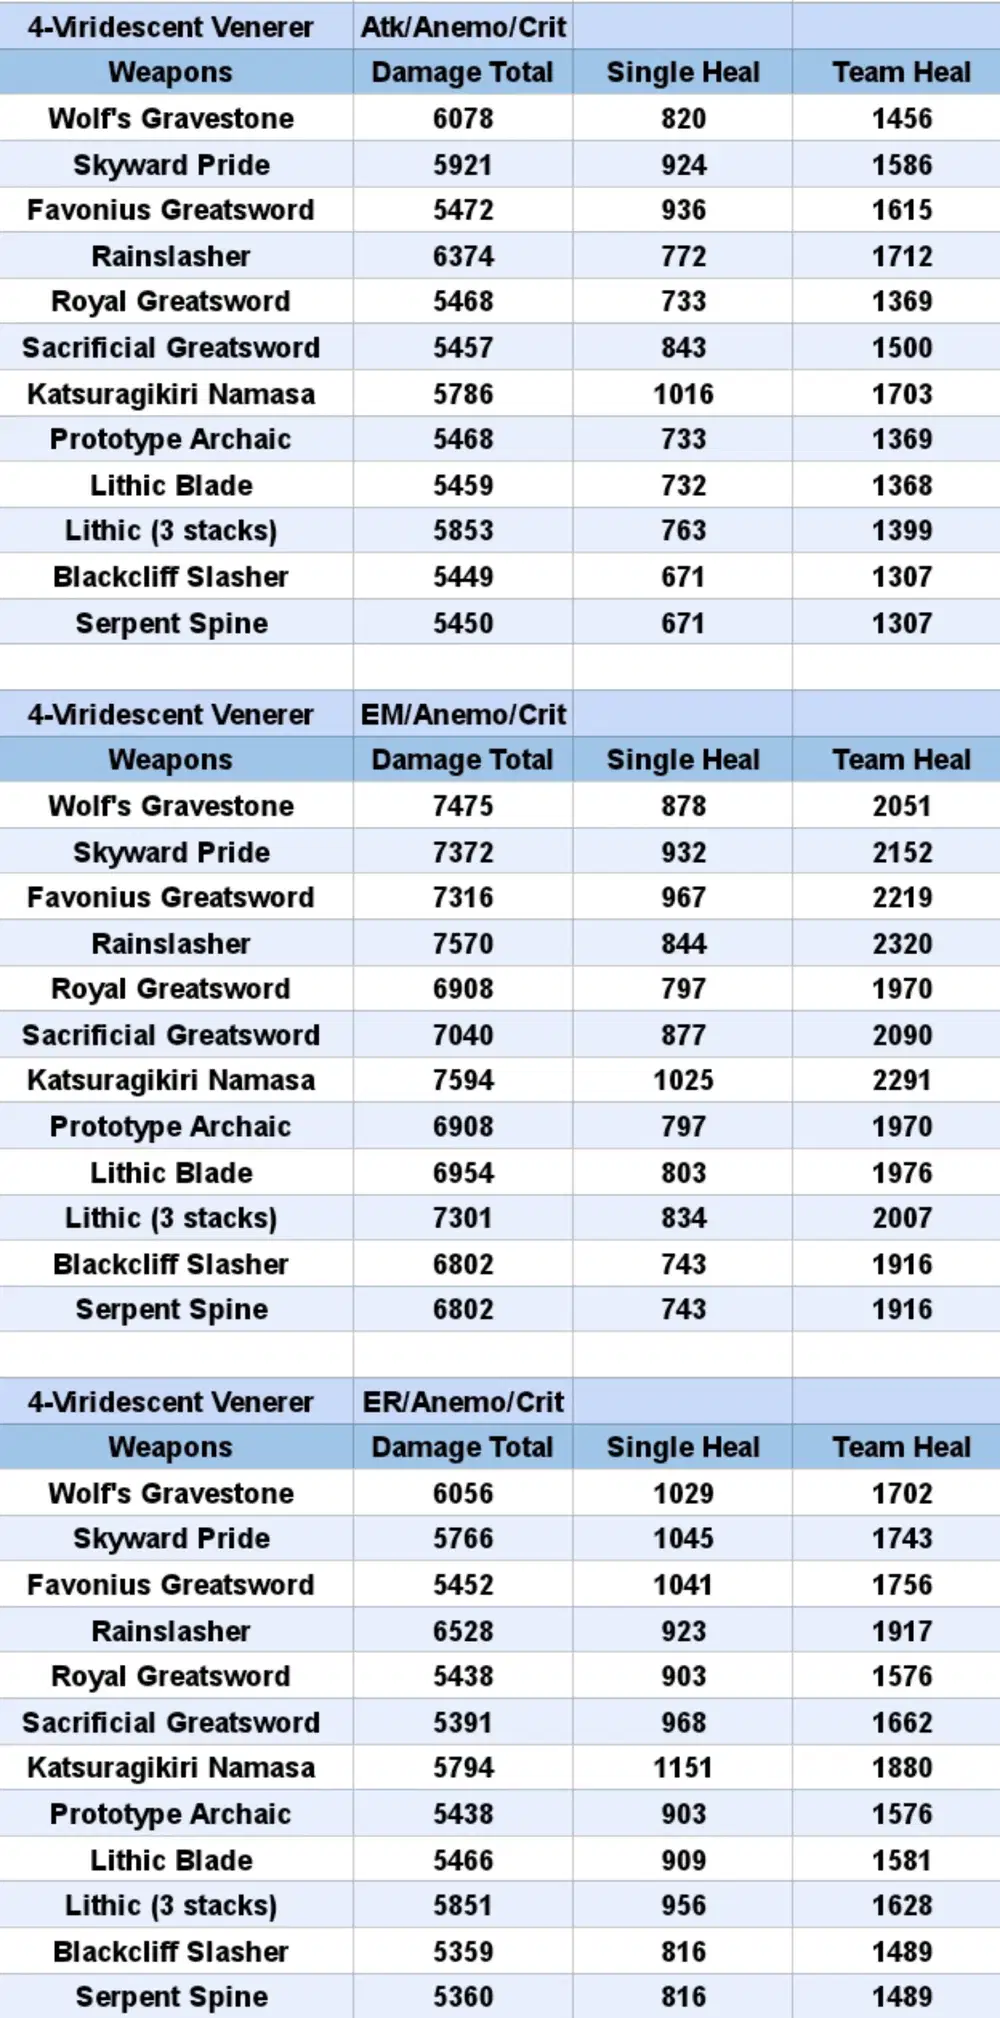
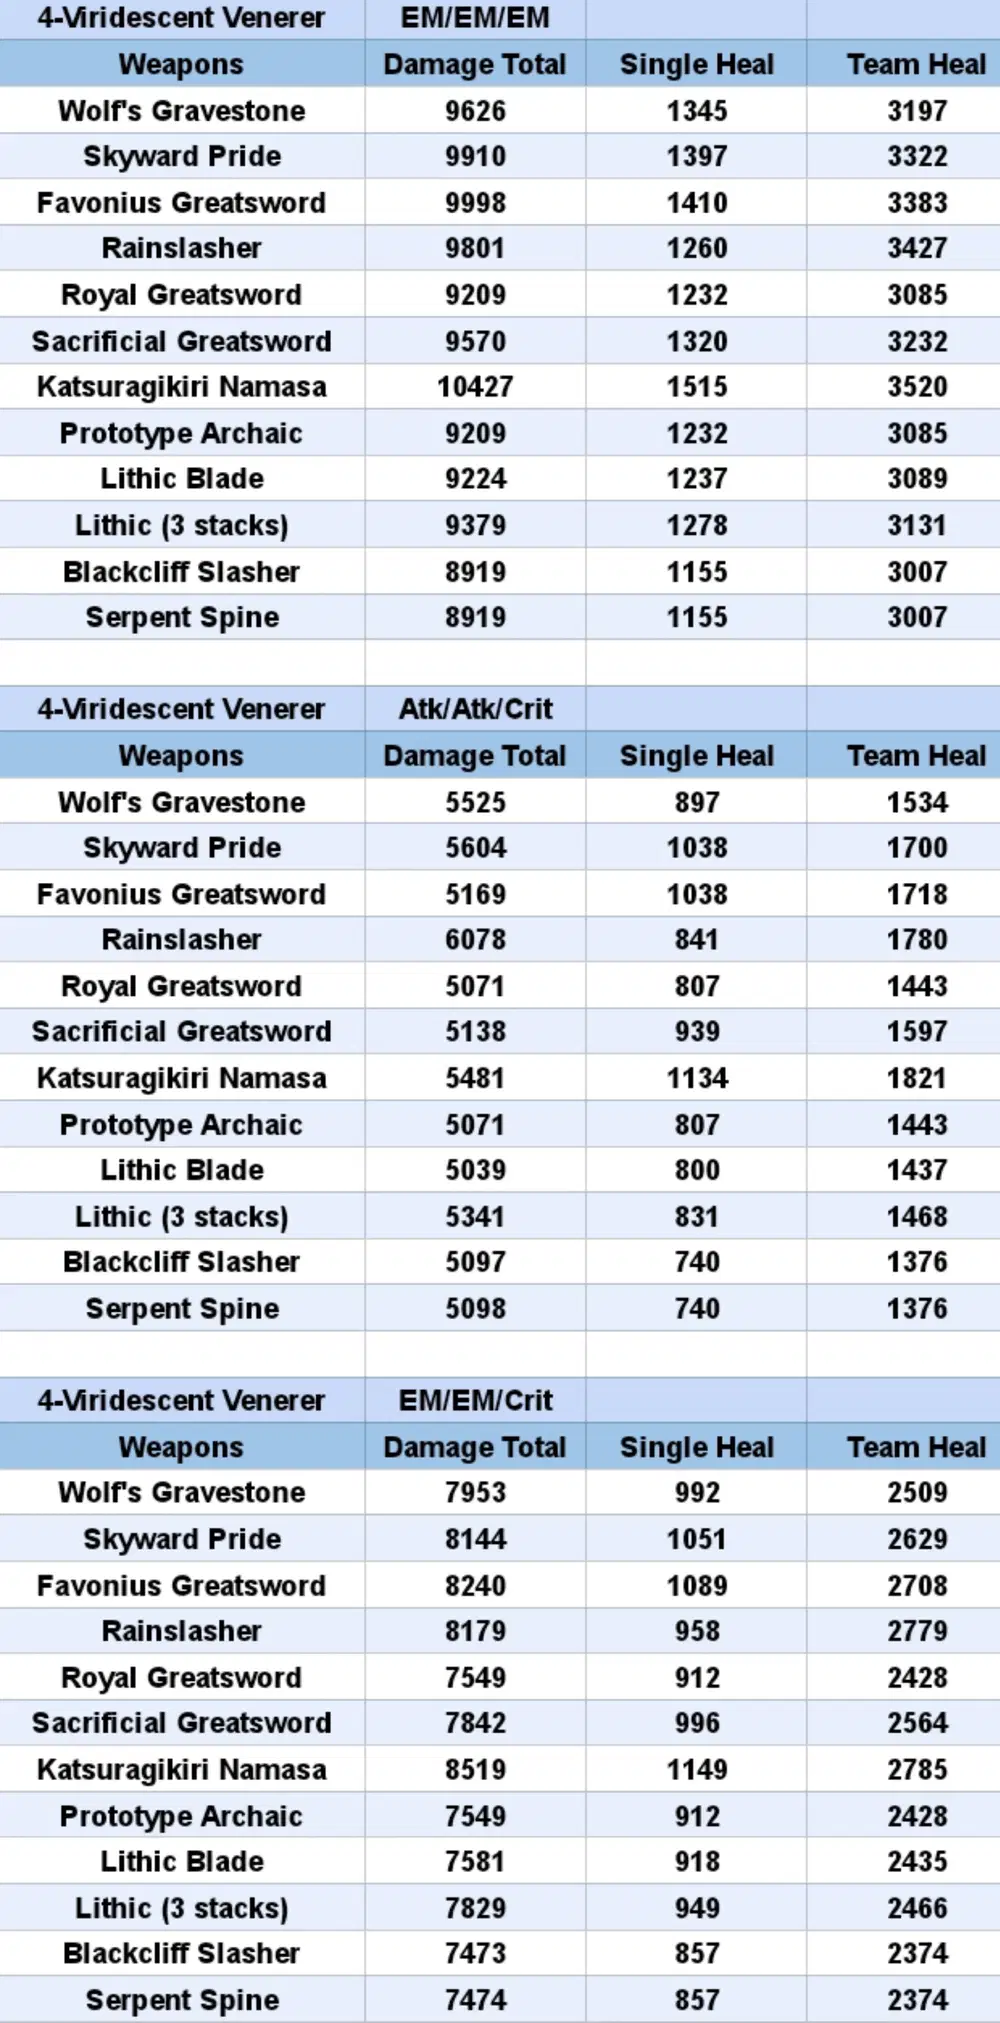
Note:
Damage Total = Elemental Skill + Elemental Burst + Swirl
Single Heal = Heal + Swirl Heal
Team Heal = Heal + Swirl Team Heal
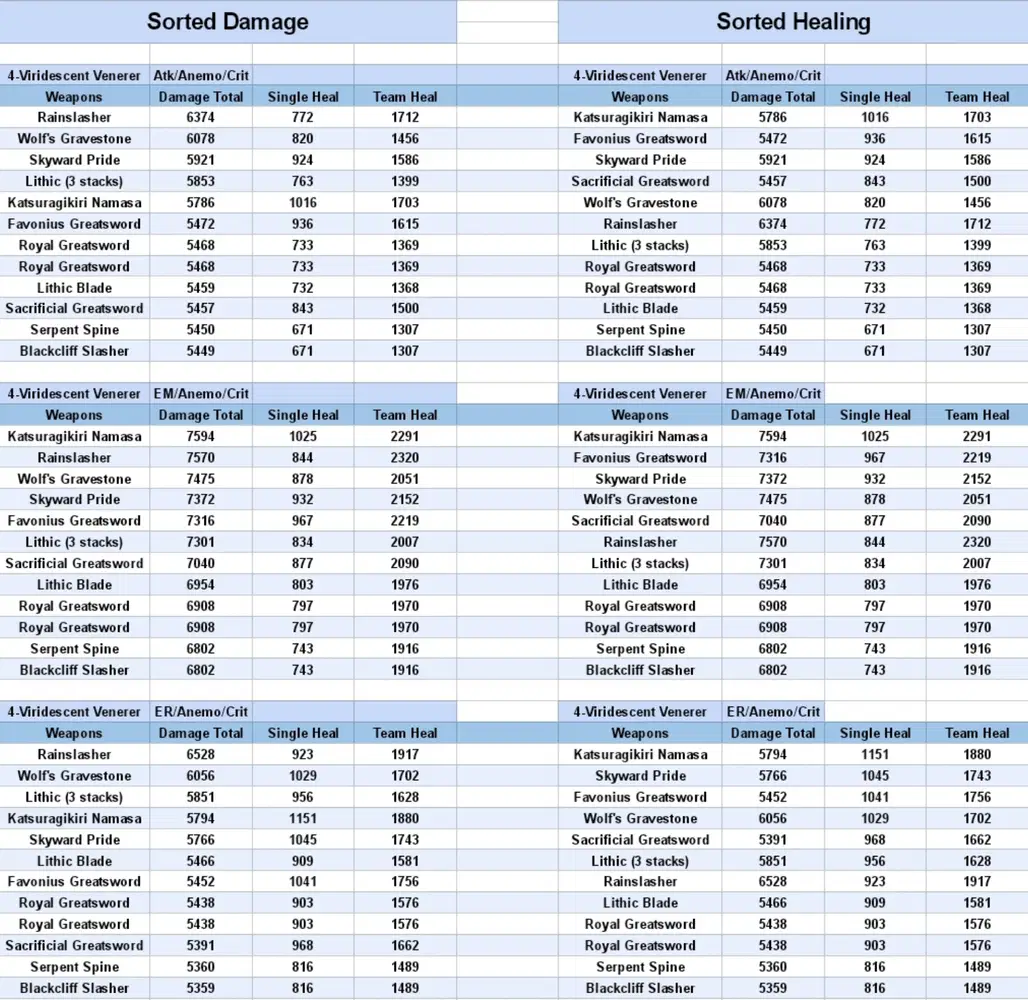
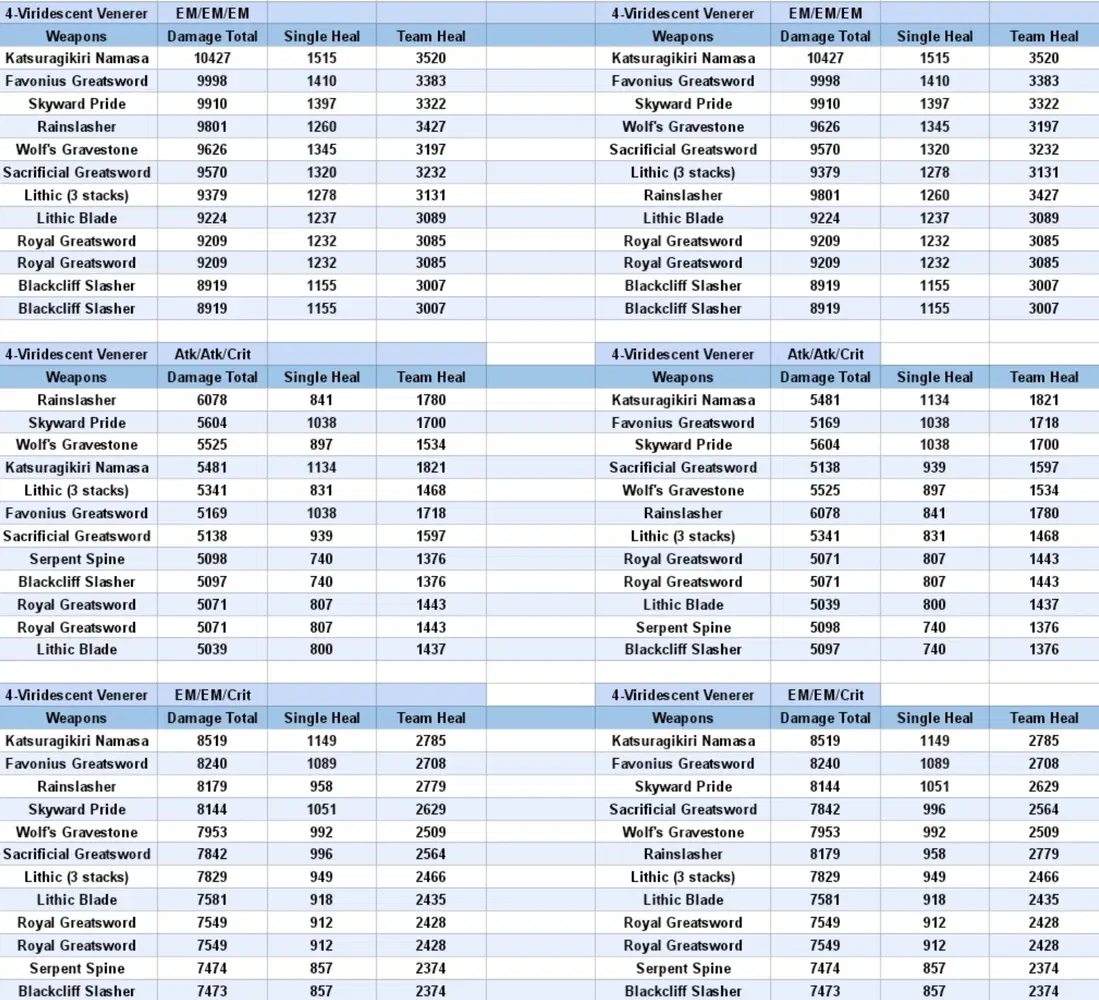
Sorted Damage and Healing
Personal Opinion
As you can see from the "Sorted Damage and Healing" spreadsheet, EM/EM/EM build out-damage all the other main stats. Not only that, but it also offers the best Single Heal and Team Heal. But please note that this result is obtained because I included Energy Recharge sub stat for triple EM build (Refer to Google Sheet link for details).
Swirl damage really should not be underestimated. Ever since the Elemental Reaction buff in Genshin Impact 1.6, Swirl is more viable than it was before. Even for Anemo characters that appear to be Attack-oriented, Elemental Mastery managed to outperform the offensive stat.
If I ever get to raise my Sayu, I'll definitely forge the Katsuragikiri Nagamasa for her (Finally my 6 Prototypes will have a use!). 4-Viridescent Venerer is no doubt the best option for Sayu to deal damage, and I'll pair her with an aura-attacker (Pyro, Hydro, Cryo, or Electro) for Swirl and Resistance Reduction.
I'm actually really liking her, but due to limited resources, she has to be benched for a while.
Penny for your Thoughts
Are you having fun with Sayu so far?
Are you building her as a healer, damage support, or hybrid support?
As usual, if you have any questions, corrections, or feedback, feel free to throw them in the comment!
Recent Analysis:
Is Emblem of Severed Fate good for Mona? | ER VS Attack Comparison for Mona
Yoimiya's Artifacts and Weapons
Interested in more? Click ☟
>> Link to all of my Analysis <<