


I decided to try something new, I will try to update the builds for Patch 7.5 characters to provide you with the best builds
that I could find for the Elysian Realm weather every patch update, I will be doing this for Part 2 characters specifically!
This will become a regular thing if it's successful so here's to that 
This guide will focus on the other characters released in Part 2 and builds for them for this weather!
This guide features Thelema / Coralie / Helia / Senadina.
If you would like a Guide for Lantern, please see the one specifically made for her here

Elysian Realm Update
Stage Effects
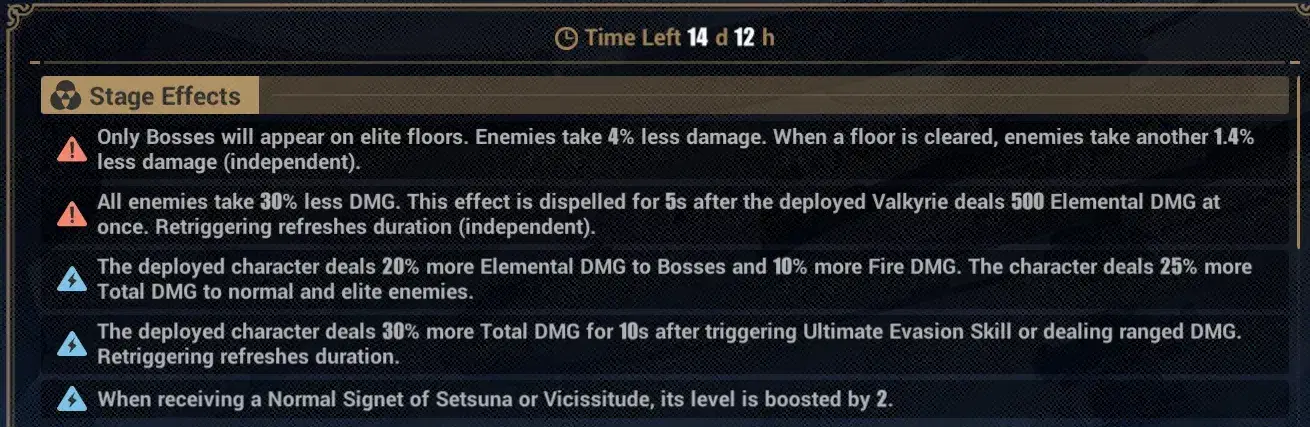
Patch 7.5 Stage Effect Change

Stage Effects
With this update to the Elysian Realm, buffs are switched out and changed from what they were the previous patch.
While it can feel like a bittersweet moment to see the removal of the "Reset Signets" button from patch 7.4, this patch comes with a unique stage effect that makes an even larger impact changing the fights on bonus rounds to have a single boss instead.

Senadina will love the floor 4 Bonus Round!
It's true that it doesn't help lower the signet RNG of a run like the Reset Signets button but it improves the clear times and makes it alot easier to get double Signet rewards from clearing the bonus round, this patch is more New Player and Speedrun friendly.

You can see the new Elite round bosses in the Boss Preview! for Floor 4 / 7 / 15.
Enemies will take 4% Less Damage and when a floor is cleared they will take another 1.4% less damage. (Independent)
Next, Enemies take 30% Less Total DMG but the effect is dispelled for 5 seconds if you deal 500 Elemental DMG in a single hit. -- This requirement isn't harmful unless you are using a Physical Valkyrie. The 500 Elemental DMG requirement is very easy to hit with any Elemental DPS. This effect is only there to prevent you from using Elemental Affixes on Physical Valkyries to gain the effect. This is an independent multiplier so it's going to be quite strong if you can actively trigger it.
The deployed character deals 20% more Elemental DMG to bosses and 10% more fire dmg The character also deals 25% more Total DMG to normal and elite enemies -- This buff is just a very strong free buff that has no requirements to trigger, very welcomed!
The deployed character deals 30% more Total DMG for 10 seconds after Triggering Ultimate Evasion or dealing Ranged DMG. Retriggering Refreshes Duration. - This is a strong Total DMG boost with a long duration provided you are able to trigger it either by dealing Ranged DMG or triggering an Ultimate Evasion.
Note: If your character cannot activate Ultimate Evasions easily, you can choose Sakura Core 2 to trigger Ultimate Evasion relying on the "Isshun state" buff. Not only is Sakura Signets +2 but this has good synergy with the Stage Effect.
You Enter Isshun state every 10 seconds, and the Total DMG buff lasts for 10 seconds after triggering an Ultimate Evasion!
When receiving a Normal Signet of Setsuna or Vicissitude, it's level is boosted by 2.
Buff List
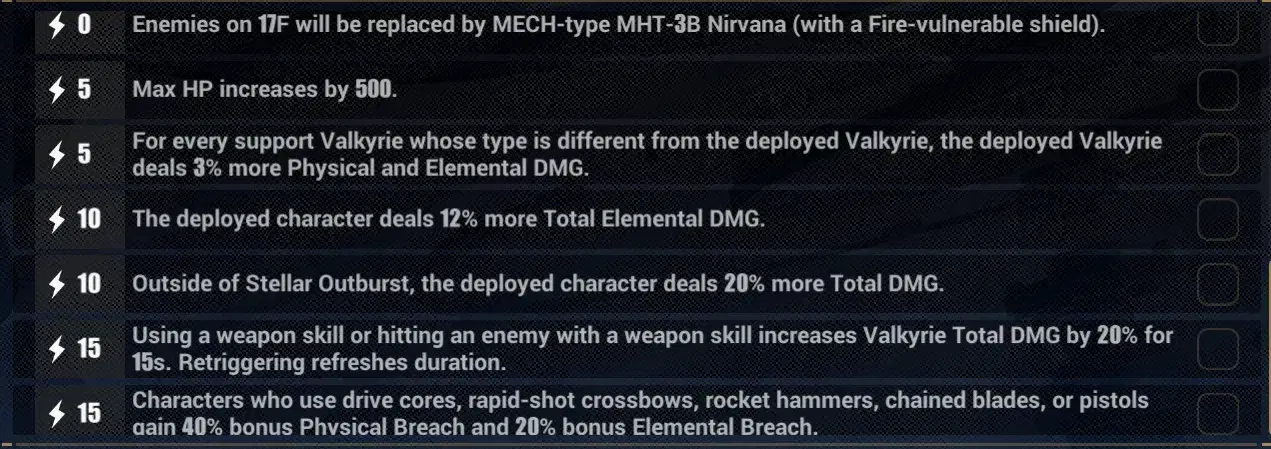
In Patch 7.5 The first buff has changed to replace enemies on floor 17 with Mech-Type MHT-3B with a Fire-vulnerable shield.
This is very strong for both PSY type Valkyries and Fire DPS characters like Coralie.

If you don't want to fight against MHT-3B (Nirvana) then the alternative will be to fight the SD-type Alien Guard: Supplement!
This is really good for Senadina~
Max HP increases by 500 - A common 5 energy costing buff that provides more health for characters who benefit from Kalpas Signets.
For Every support Valkyrie whose type is different from the deployed Valkyrie, the deployed Valkyrie deals 3% more Physical and Elemental DMG. - This is a low costing ( 5 energy ) buff that can serve to give you a small boost in damage up to 6%. It isn't recommended to take this due to the multipliers being too low unless you can't use the stronger buffs.
The deployed character deals 12% more Total Elemental DMG. - Now we are starting to get into the higher energy cost gains, this costs 10 energy and provides the character with an easy 12% Elemental DMG, this can be a good option if you are using a character that cannot take advantage of the 15 energy cost buffs.
Outside of Stellar Outburst, the deployed character deals 20% more Total DMG. -- This 10 energy cost buff is nice for
"No Stellar Outburst" builds like for Coralie, who is consistently superior with her non outburst build.
Using a weapon skill or hitting an enemy with a weapon skill increases Valkyrie Total DMG by 20% for 15s. Retriggering refreshes duration. - This gives a comparatively large ( compared to the other buffs ) amount of Total DMG as long as you use a weapon skill or hit an enemy with a weapon skill, this is easy for most Valkyries to take advantage of for a nice boost!
Characters who use Drive Cores ( Senadina ) Rapid-Shot Crossbows ( Helia / Lantern ) Rocket Hammers ( Coralie ) Fists, or chain blades ( Thelema ) or Pistols gain 40% bonus Physical Breach and 20% bonus Elemental Breach. - For our last 15 energy cost buff, characters who use certain weapons will gain 40% Physical and 20% Elemental Breach! This is an amazing buff and if your character meets the requirements it's a must take for sure~
What is the Nexus / Core ?
The "Nexus" or "Core" referred to in this guide is unlocked when you get your third Signet from a portal.
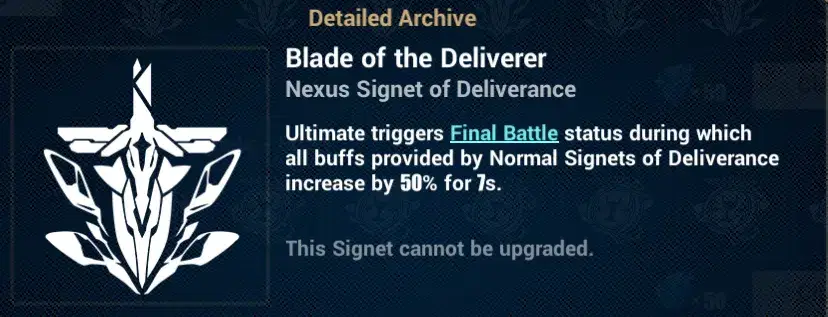
Finding the third signet from a Shop will not give you the "Nexus" or "Core" making it possible to need 4+ Signets to get it.
Bonus rounds will activate this feature however and still present you with the Nexus.
You will have a choice between two signets, the top one will be referred to as "Nexus 1" or "Core 1"
The second one will be referred to as "Nexus 2" or "Core 2"
Rewards:
The rewards you can obtain from Elysian Realm will refresh weekly.

These are the max obtainable rewards assuming you are able to clear the entire Elysian Realm!

You can get all crystal rewards if you clear Abstinence: with a 2.25x score boost.
To get the Final reward, you need to be able to clear at least Corruption: which gives a 2.5x score boost.

This in turn rewards you with the "Flame-Chasers' Integrity" emblem providing you with Elysian Realm related buffs.
- 12% Total DMG boost without any requirements.
- 400 max HP ( letting you further benefit from Kalpas Signets )
This will make your future runs easier so I would recommend getting this Emblem if possible.
Support Valkyrie explanation
Azure Empyrea brings grouping, causes enemies to take more elemental damage, gives breach and provides SP.
She is amazing early game grouping up enemies to get hit by her initial burst which otherwise has a small AoE and often misses.
If you are speedrunning or don't mind resetting a few times early game for enemies to be gathered then Senadina wins early too.
Senadina - Senadina is amazing, she deals 1000% ATK of Lightning DMG then generates an energy mass marked with Domain Resonance. It deals 280% ATK of Adaptive DMG and restore 3 SP, this effect can be triggered up to 8 times with a 0.7 second Internal cooldown. Senadina also causes the character to deal 20% more Elemental DMG and have 16% more Elemental Breach for 15 seconds. When Astral Ring: Wheel of Destiny is activated deal 12% more Elemental DMG during Stellar Outburst on this floor.
She is superior to Azure Empyrea in terms of damage output, SP regeneration, and offensive buffs. Because you don't rely on grouping on the later floors you don't mind or even notice her lack of gather either.
Blood Rose - She reduces the HP of the deployed Valkyrie by 30% and increases the Total DMG dealt by 60% for 10 seconds.
Her offensive buff is very powerful and Lantern has enough HP recovery to prevent you from ever being at risk of dying.
This enables you to select Blood Rose to explosively increase your damage output, just use it before Stellar Outburst!
Bright Knight Excelsis - for fighting Heimdall
Heimdall works like this, he has 4 shield layers called "Energy Shield DEF" which can be broken with certain charged attacks, abilities or Ultimates that have strong interrupt effects. If he gets hit too many times he will charge up his Energy field and enter Overdrive mode, in such mode he has a "massive ATK boost" attacks faster with increased frequency, and reduces all damage taken by a significant amount.
That's where Bright Knight: Excelsis comes in, her ability can break all 4 shield layers forcibly removing him from Overdrive mode and causing him to take more damage while the shields regenerate. Remember to only use her ability when he enters Overdrive mode so you can promptly break it.
For ELF / Astral OP I recommend Kiana ELF or Dreamseeker, Songque would be the best if you have her.
Thelema

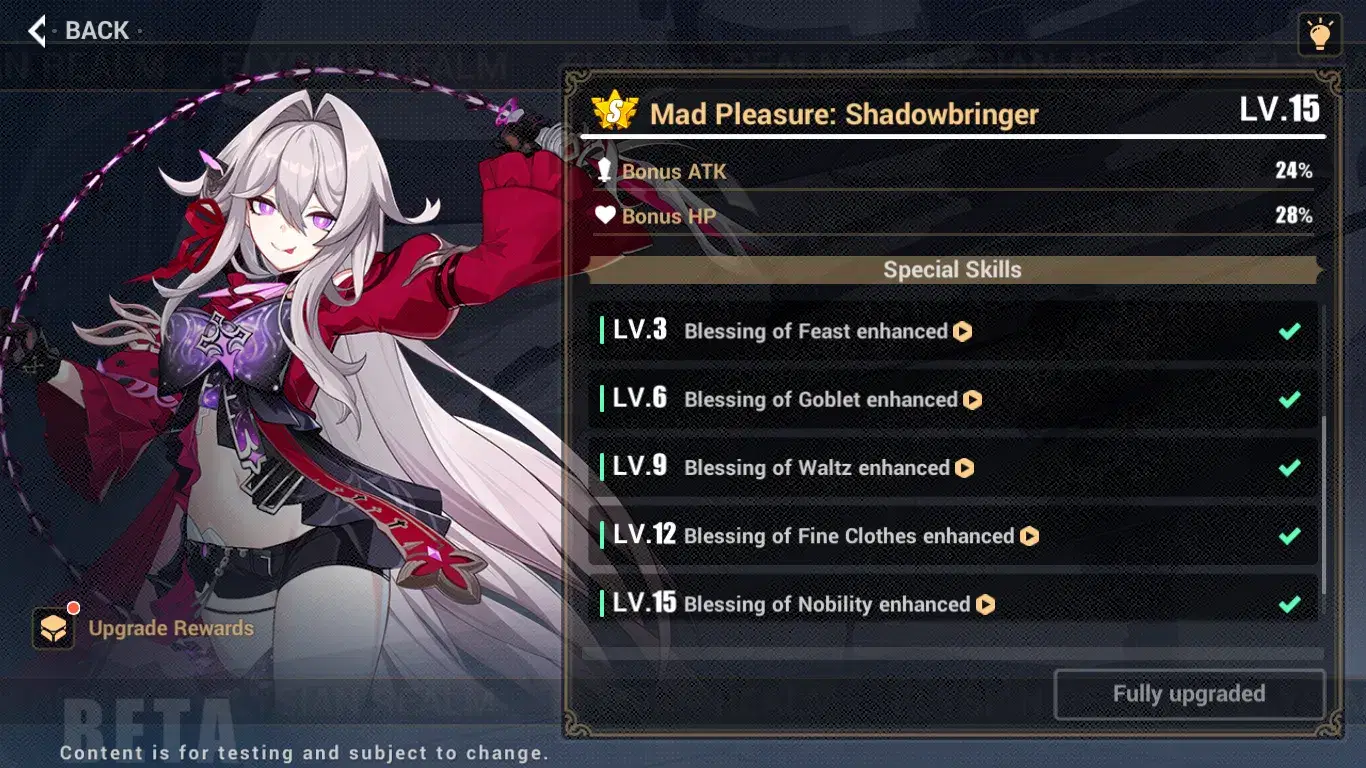
Level 15 Character stats, I recommend maxing her before trying the higher difficulties~
Recommended Gear: Banquet Rose: Faux Crown + Splen Songque Teatime T + Thelema Banquet M + Litost: Night Watch B
Alternative Gear: Phantom Seafarer + Peary TMB (Free from Starter Manual! If you already have Willows then use it~)
Boss Chosen: Aponia
Note: T = Top / M = Middle / B =Bottom (This refers to stigmata piece) Her gear is the "Spendors of Amber" stigmata set.
Thelema has been Buffed on her "Non Outburst" build, it is now her strongest build.
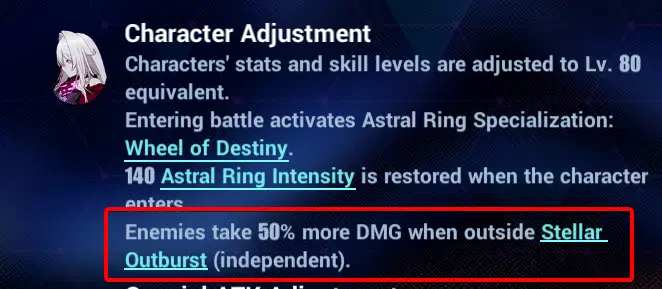
Special Adjustment Passive:
Old: Deal 30% less DMG during Stellar Outburst.
NEW: Enemies take 50% more DMG when outside Stellar Outburst ( independent )
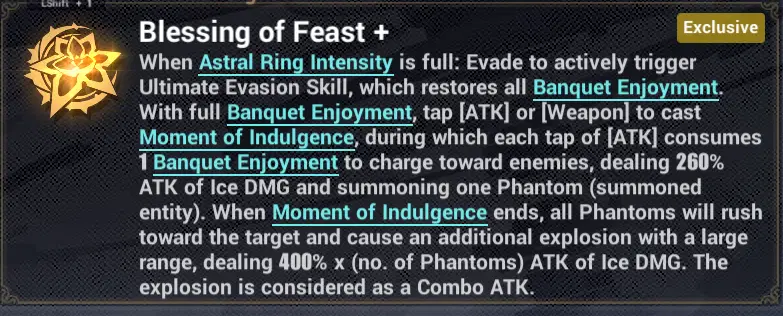
Signet Changes:
Blessing of Feast
Patch 7.4: Dealing 200% x (No of Phantom) ATK of Ice DMG / Moment of Indulgence DMG reduced by 80%
Patch 7.5: Dealing 400% x (no. of Phantoms) ATK of Ice DMG / Moment of Indulgence DMG reduction removed
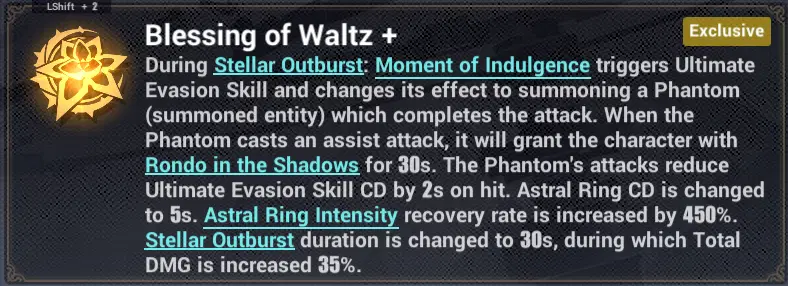
Blessing of Waltz
Patch 7.5: Added 35% Total DMG
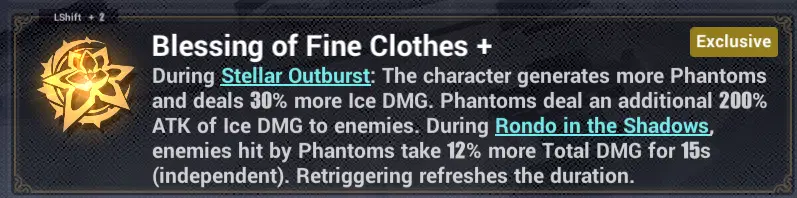
Blessing of Fine Clothes
Patch 7.4: Enemies hit by Phantoms take 10% more Total DMG for 15s (independent)
Patch 7.5: Enemies hit by Phantoms take 12% more Total DMG for 15s (independent)
Stellar Outburst Guide + Infographic
I am trying a new format with these, I hope it's to your liking!
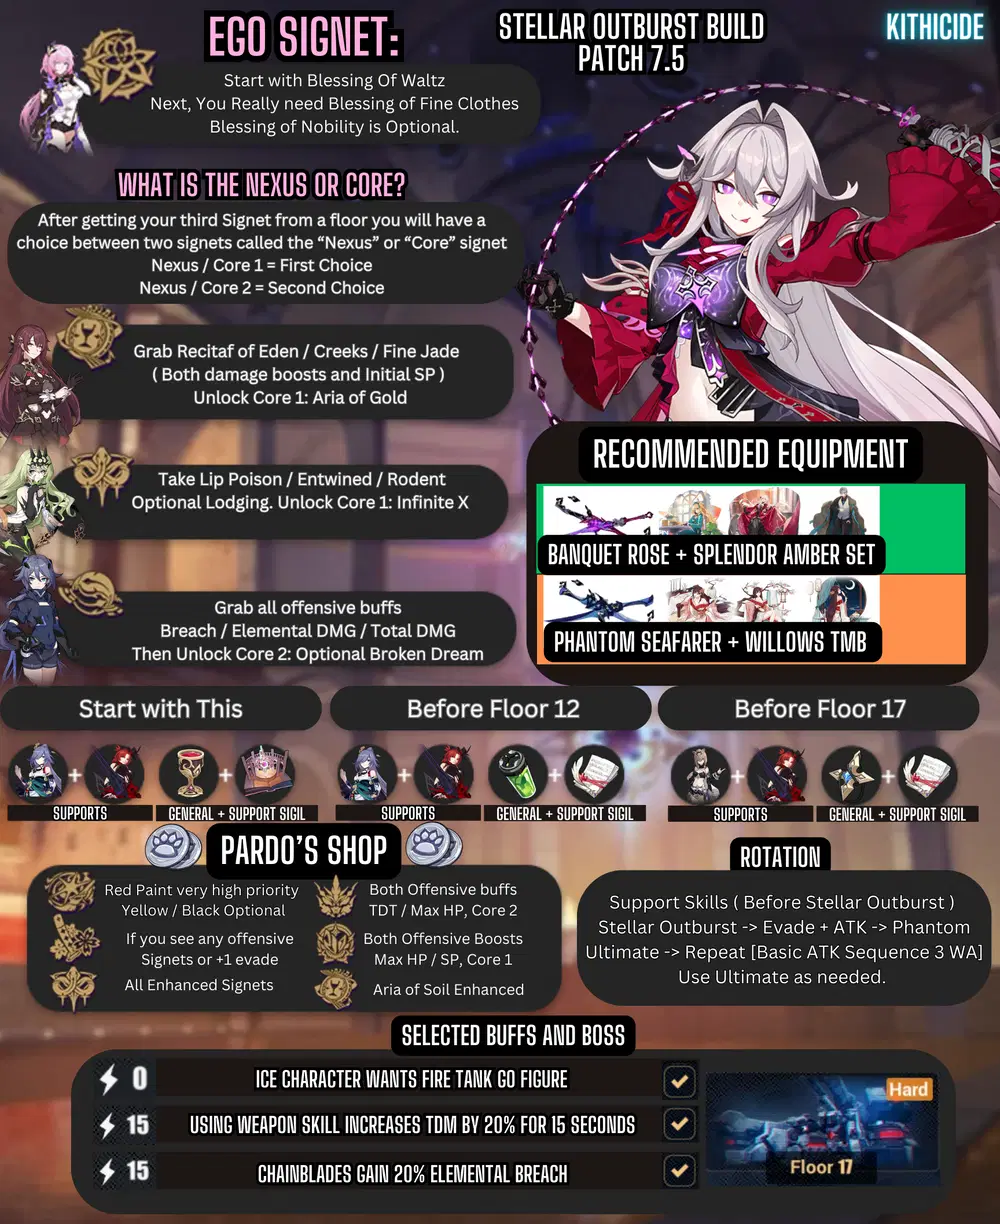
Playstyle / Rotation

Stellar Outburst Rotation
This is a very fun build but it's no longer the "Best in Slot" build after the Patch 7.5 update when they omega buffed non outburst.
With this build you focus on activating her Stellar Outburst then switching between Basic Attacks and Weapon abilities.
This build is pretty reliant on getting a second Ego, so I would recommend taking Because of You to get it.
Rotation:
The Rotation I found to work the best for me and have the most fun with is as follows.
Supports -> Stellar Outburst -> Evade + Attack ( Trigger a Moment of Indulgence ) -> Thelema Phantom ( Hit AE or BR ) -> Ultimate -> Loop 3 Attack + Weapon x3, use Phantom ( AE or BR ) alongside Moment of Indulgence and use Ultimate when possible. You can animation cancel "Moment of Indulgence" with Ultimate or Phantom cast to squeeze in some extra damage.
Build Priority
Elysia - Signet of ■■
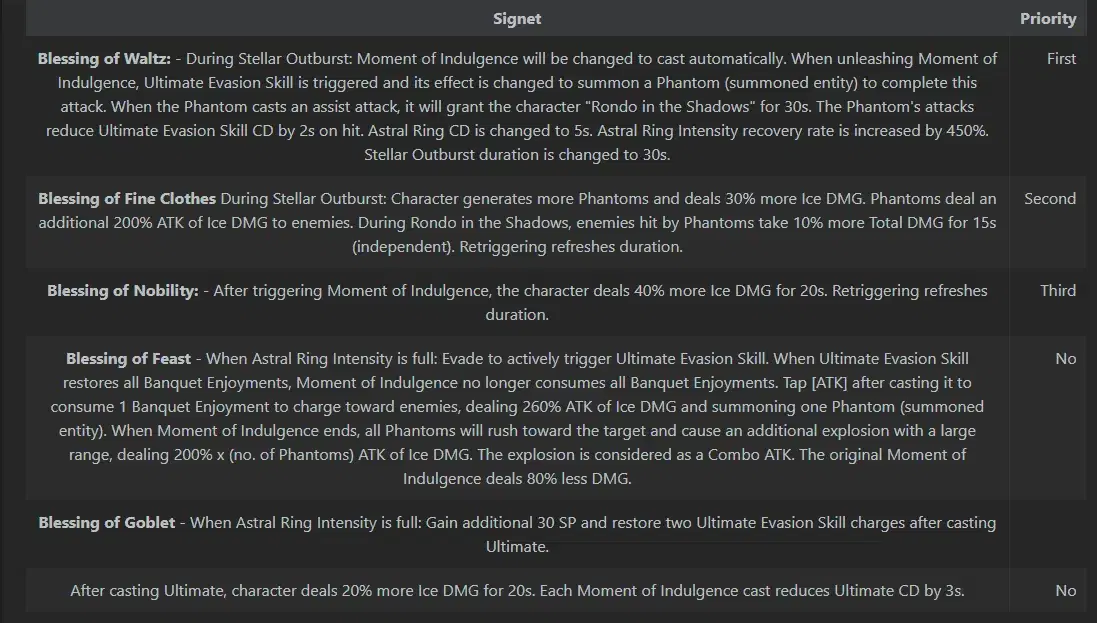
You want to start off with Blessing of Waltz which offers quite alot, to simplify it...
- During Stellar outburst, cast Moment of Indulgence automatically
- Ultimate Evasion will be triggered alongside Moment of Indulgence
- Phantom assist attacks reduce Ultimate Evasion CD on hit
- Astral Ring CD chaned to 5s, Stellar Outburst Duration to 30s
- 450% more Astral Ring Intensity recovery rate
This will grant you alot of initial damage as well a consistency through the Astral Ring Intensity rate being amplified.
After that, you would want to get Blessing of Fine Clothes to generate Additional Phantoms and increase their damage done. It also provides an Independent multiplier making the effect quite powerful.
Finally, wrap this build up with Nobility which is optional, but serves to make you deal 40% more Ice DMG essentially forever.
Eden - Signet of Gold
Eden is great to take due to how much you spam your Ultimate. This gives you high initial damage with the aim of enabling you to clear the bonus round easier. If you decide to reroll for an Ego door then you can replace this with Mobius initially.
Mobius - Signet of Infinity
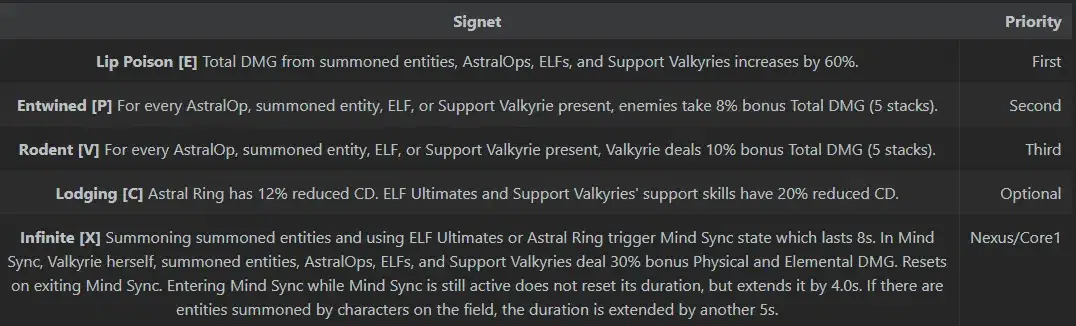
Mobius Signets should be taken next ideally, with you able to benefit and trigger it by using Stellar Outburst to trigger Mind Sync state. Dead X should only be taken from the shop.
Mobius Signets essentially require the second Ego to function properly since it's what enables you to have alot of Phantoms (Summoned Entity) and scale off of it, Mobius signets should be delayed slightly until you have Blessing of Fine Clothes.
Hua - Signet of Vicissitude
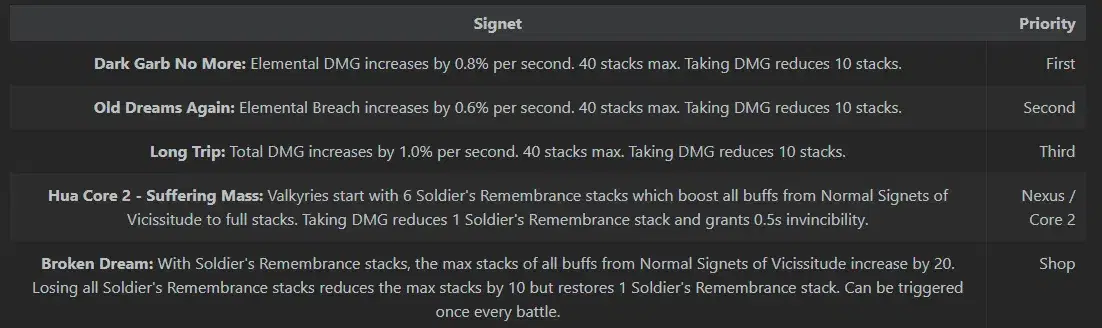
Vicissitude Signets while normally not a good signet in terms of damage amplification is actually pretty good right now because of the +2 effect this patch! Not only will it provide you with enhanced survivability but a nice damage boost, pair this with Kalpas!
Kalpas - Signet of Decimination
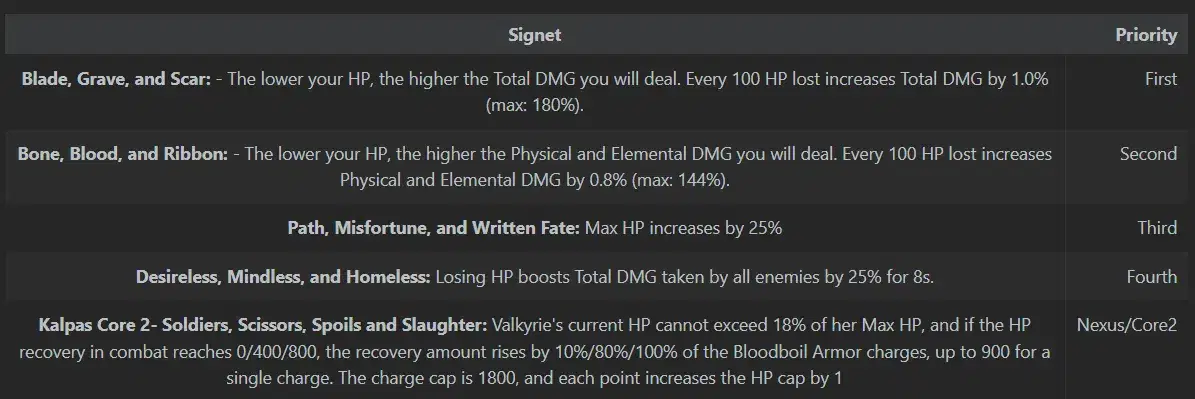
Kalpas remains one of the best sources of damage amplification in Elysian Realm, you shouldn't have any fear of dying either because of Vicissitude! If you still can't bring yourself to play on low HP thresholds then feel free to use Sakura 2 instead.
Pardofelis - Signet of Reverie
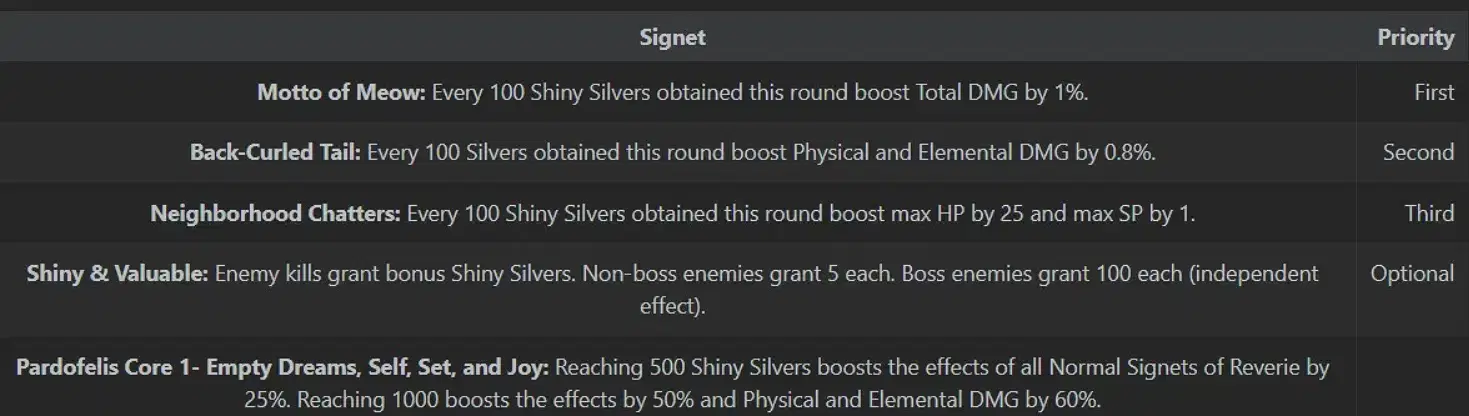
And finally wrap everything up with Pardo Core 1 as the last core when you have alot of Shiny Silvers for the boosted effects.
Neighborhood Chatters will allow you to double dip into added Max HP to benefit from Kalpas and Max SP to benefit from Eden!
Pardo's Shop:
Griseo - Red paint at a high priority
Kalpas - Both damage boosts / max hp / tdt Optional: Homeland and Friends.
Mobius - Any Enhanced signets if you see it in shop!
Pardo - Both damage boosts, max hp/sp: Take any Core 1 Enhanced you see in shop.
Eden - Optional: Aria of Soil
Early Game Strategy.
Start with Blessing of Waltz on floor 1, enter Gold signet doors and fight your way up to floor 4 with the boss bonus round.
After finishing you will get your first Core or Nexus, even if you didn't manage to clear the floor in time for the extra signet!
From there on you should immediately go to the shop and switch from Gold Goblet to work on another Signet of your choice depending on what you find in the shop. Hua, Kalpas, Mobius are good choices. Ideally you would use the free refresh and look to purchase two signets then refresh a door to get the third ( using the proper sigil to boost the chance for that respective signet of course ) Remember to switch sigils back if needed and plan for what core you will shoot for next if this happens.
Don't worry about refreshing the door this early on, you will have the free double door with Because of You on the next stage!
You will then use the power-spike from Eden first core and possibly a second core to help you beat the following bonus round without too much trouble, If you can't then it's fine taking Blessing of Fine Clothes as priority choice or Blessing of Nobility as second choice.
From there on you should work to complete your build with Kalpas being very strong but optional if you aren't comfortable playing at low health. You could also choose to wait until after floor 12 to complete Kalpas once you have defeated Heimdall who is much more aggressive than the final bosses, which is why I would recommend you delay it until after Vicissitude as well.
Gameplay Video
This gameplay is just an example for the playstyle and not indicative of actual performance this patch.
God Dash Guide + Infographic
I am trying a new format with these, I hope it's to your liking!
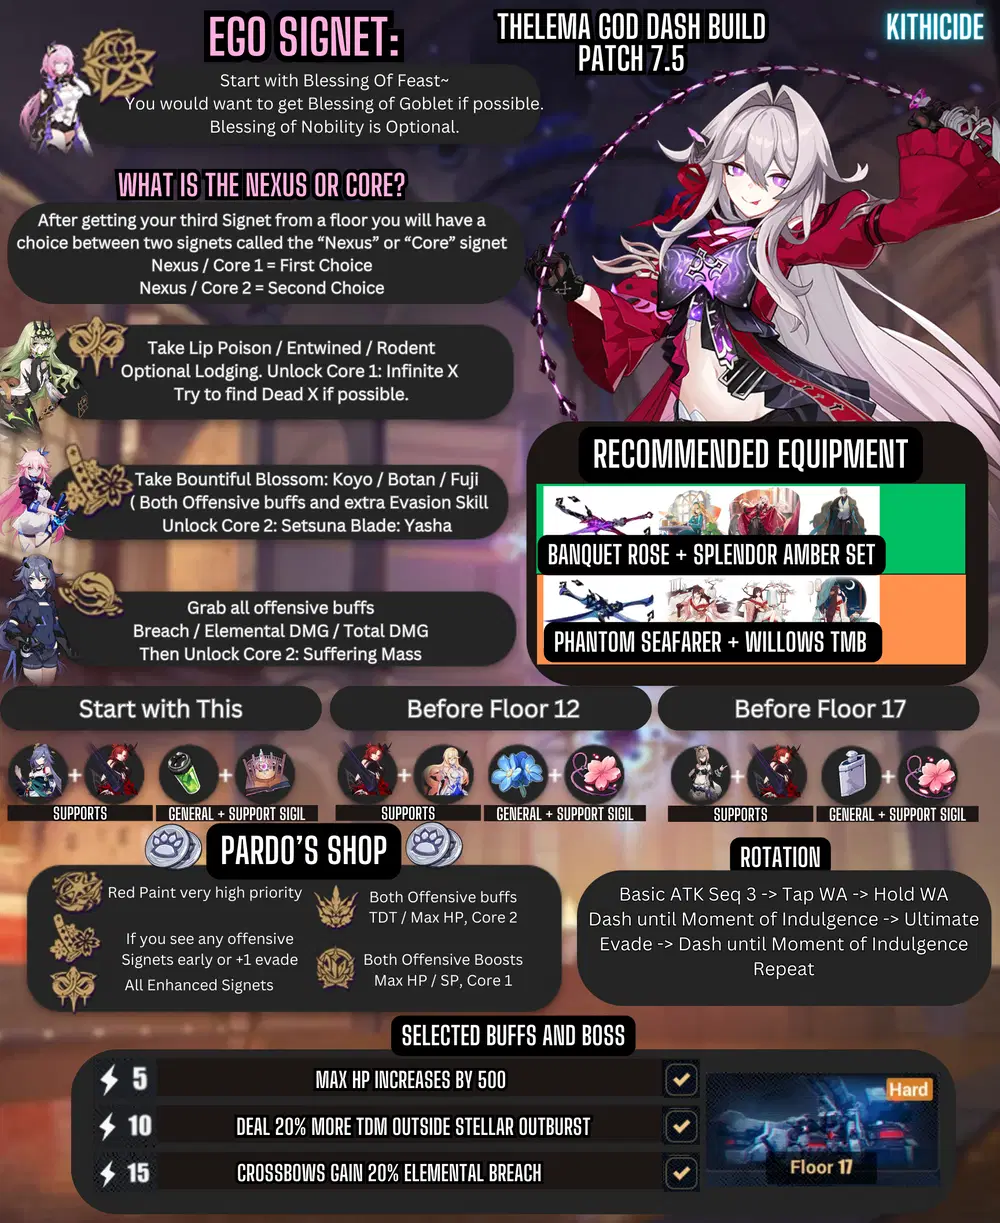
Playstyle / Rotation

This build is the shining star of the 7.5 Patch, the buff has made it overwhelmingly superior to her other build alongside the weather, If I had to recommend you to try any build it would be this one and I recommend doing it in the first week of Elysian Realm before the weather is updated to be more Lantern themed.
Not only is this build MUCH stronger now post buff but it's also easier to play compared to the Stellar Outburst build.
The playstyle revolves around spamming her Ultimate Evasion ( even more so than normal ) to the point that you don't use her Ultimate as often after the initial cast, instead preferring to wait until she runs out of Ultimate Evasions.
Rotation:
3 Basic Attack -> Tap Weapon Active -> Hold Weapon Active -> Moment of Indulgence -> Ultimate.
Evade (Restore Stacks) -> Dash until Moment of Indulgence -> Repeat.
When you run out of Ultimate Evasions, use "3 Basic Attack -> Tap Weapon Active -> Hold Weapon Active twice" to fill energy.
Note:
You can end her dashes early to use "A Moment of Indulgence" if you stop attacking, do this if you have enough damage to kill.
Build Priority
Elysia - Signet of ■■
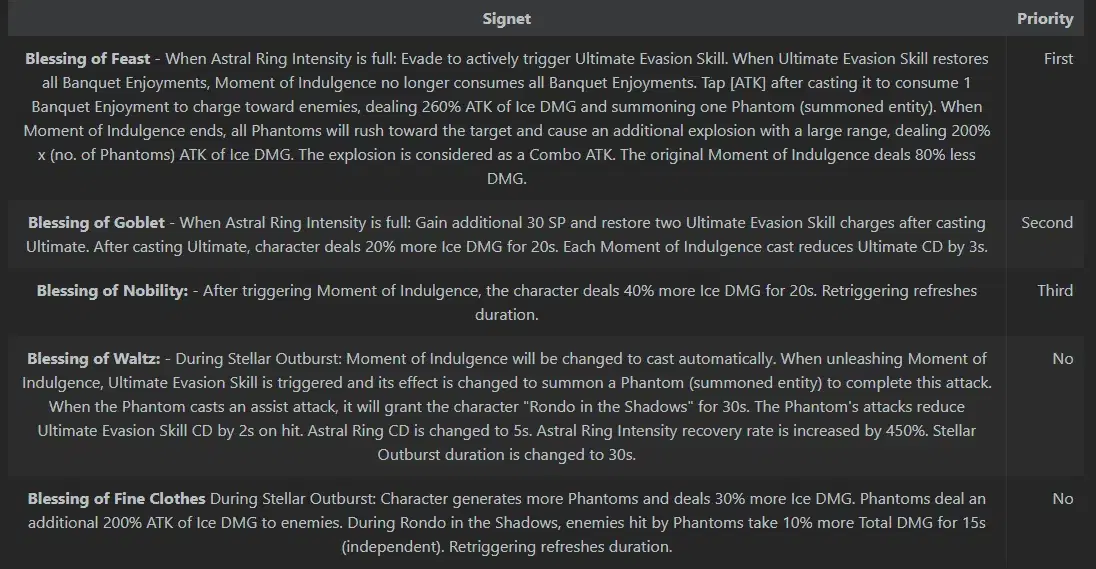
For this build, you would want to start off with Blessing of Feast, which offers a few things for this playstyle.
- Use Evasion to Trigger Ultimate Evasion ( As long as you don't use Stellar Outburst )
- After using Ultimate Evasion, restore all Banquet Enjoyment ( Energy )
- Moment of Indulgence doesn't take the entire energy bar anymore.
- Tap ATK after casting it to consume 1 stack to summon a phantom and use a cool attack animation!
- When Moment of Indulgence ends, all Phantoms will charge to the target and explode ( Combo ATK damage )
After getting Blessing of Feast, you would want to grab Blessing of Goblet which serves to enhance your gamplay loop, restoring two Ultimate Evasion charges after casting her Ultimate. Additionally, you will deal more DMG after using her Ultimate.
Ultimate Cooldown is also reduced and you will gain an additional 30 SP.
Finally, wrap this build up with Nobility which is optional, but the buff lets you deal 40% more Ice DMG essentially forever.
Mobius - Signet of Infinity
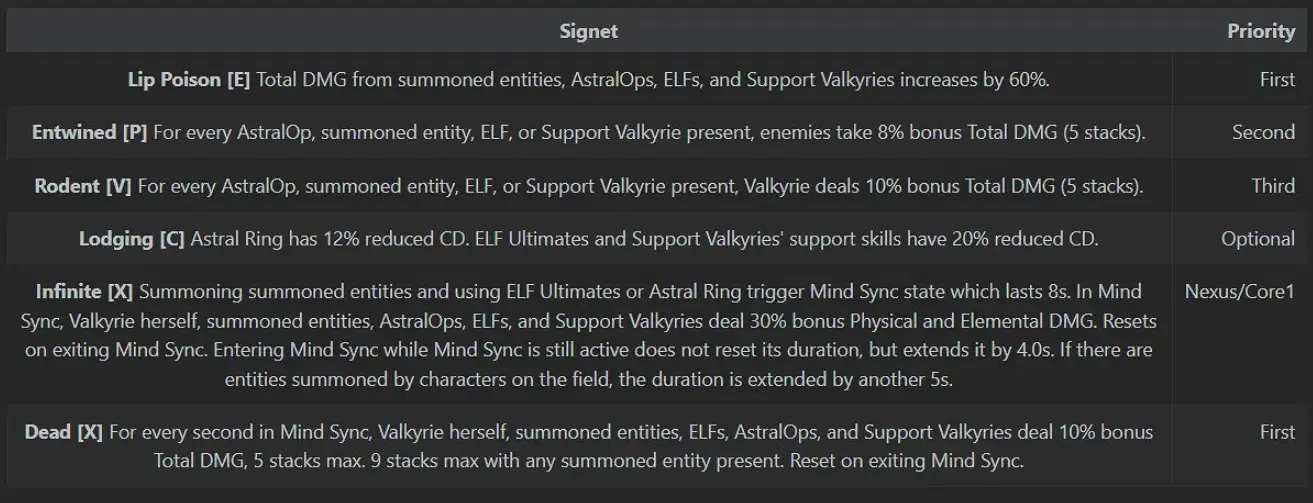
Because of how many summons you have I would highly recommend starting with Mobius and trying to get Dead X.
Mind Sync should last practically forever so that's an easy 90% Total DMG from a single signet, level this up in the shop to 3!
Sakura - Signet of Setsuna
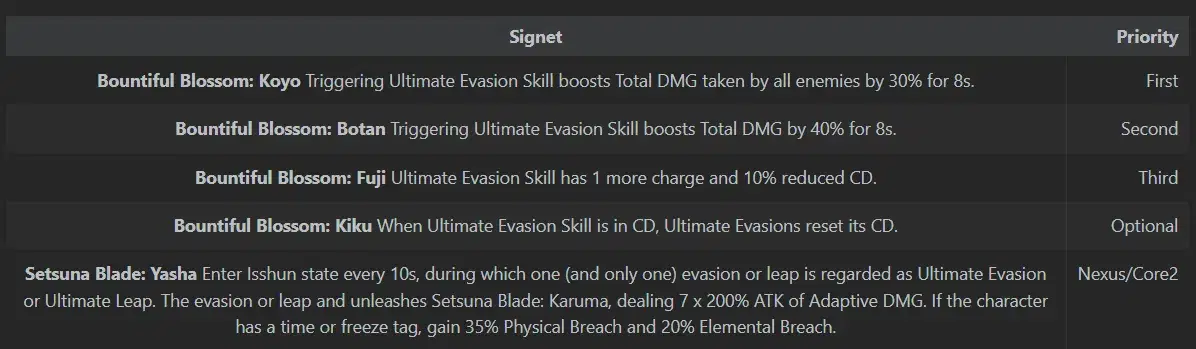
Sakura Signets will be part of her core build due, this isn't a surprise because her playstyle focuses on the spamming of Ultimate Evasions. Getting the extra evade and reduced cooldown will help with sustained damage over time too.
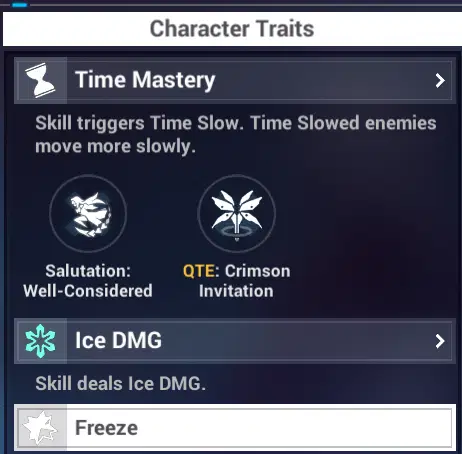
Thelema has both the Time and Freeze tag enabling her to gain an additional 20% Elemental Breach from the second core.
Hua - Signet of Vicissitude
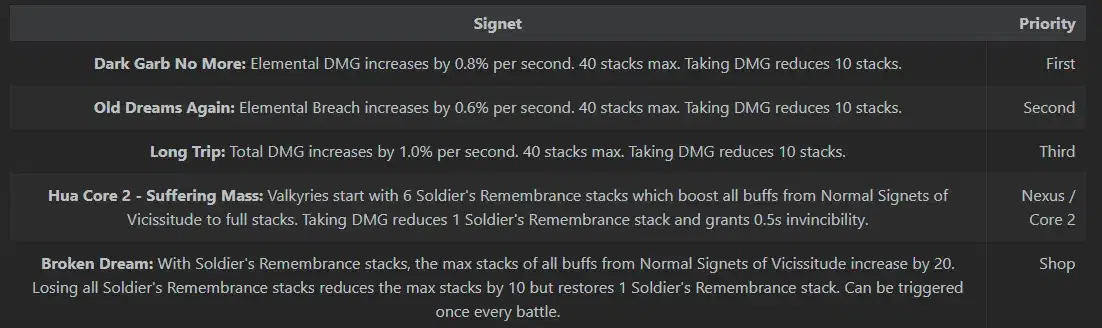
Vicissitude is taken not only for the extra survivability while you are in her dash animation, but also because it's +2 right now so the damage boost is actually quite powerful especially if you can find "Broken Dream" from the shop, this also makes getting Kalpas signets next that much easier with the increased defensive utility from Hua signets.
Kalpas - Signet of Decimation
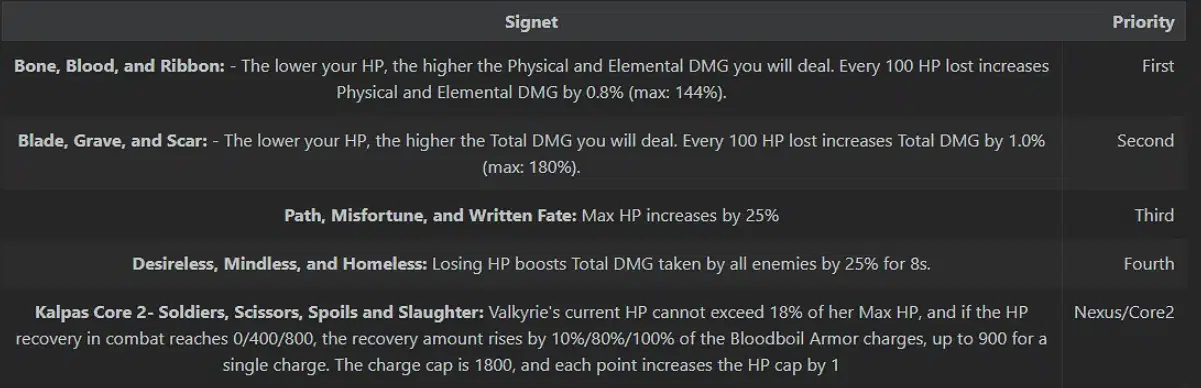
Kalpas is one of the strongest offensive signets in Elysian Realm, this normally comes with the drawback of needing to stay at low HP thresholds but that's made easier with Thelema's healing combined with Signets of Vicissitude you should be fine.
Pardofelis - Signet of Reverie
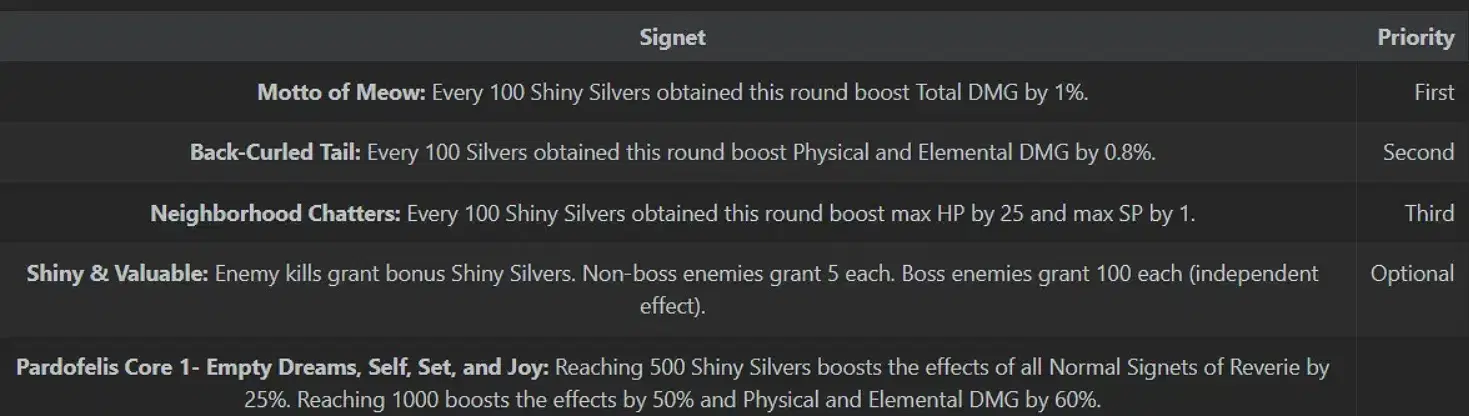
And finally wrap everything up with Pardo Core 1 as the last core when you have alot of Shiny Silvers for the boosted effects.
Pardo's Shop:
Griseo - Red paint at a high priority.
Mobius - Dead X If you didn't find it earlier at a high priority
Sakura - Both Total Damage buffs or evasion +1 / reset since you want to finish Core 2.
Kalpas - Both damage boosts / max hp / tdt since you aim to finish Core 2. Optional: Homeland and Friends.
Pardo - Both damage boosts, max hp/sp: Can take any Core 1 Enhanced you see in shop.
Early Game Strategy.
Start with Blessing of Feast on floor 1, enter only Mobius Signet doors and fight your way up to floor 4 with the bonus round.
From there you should enter one last Mobius portal to try and get "Dead X" before going to visit the shop, Upon reaching the shop remember to activate Because of you and wait for the portal to fully load before switching out the Sigil and purchasing any good Signets you see in the shop. I recommend working on Sakura Signets after completing Mobius Core 1.
When you clear the bonus round, grab Blessing of Goblet, if you were able to clear it in time you can also grab Blessing of Nobility. From there on you should work to complete your build with Kalpas being very strong but optional if you aren't confident playing on low health. You could also choose to wait until you got Signets of Vicissitude or even until after floor 12 before completing Kalpas.
Gameplay Video
Note: This is gameplay from patch 7.4 to showcase her playstyle before the buff.
I will be running it at 7.5 launch to show her buffed damage!
Coralie

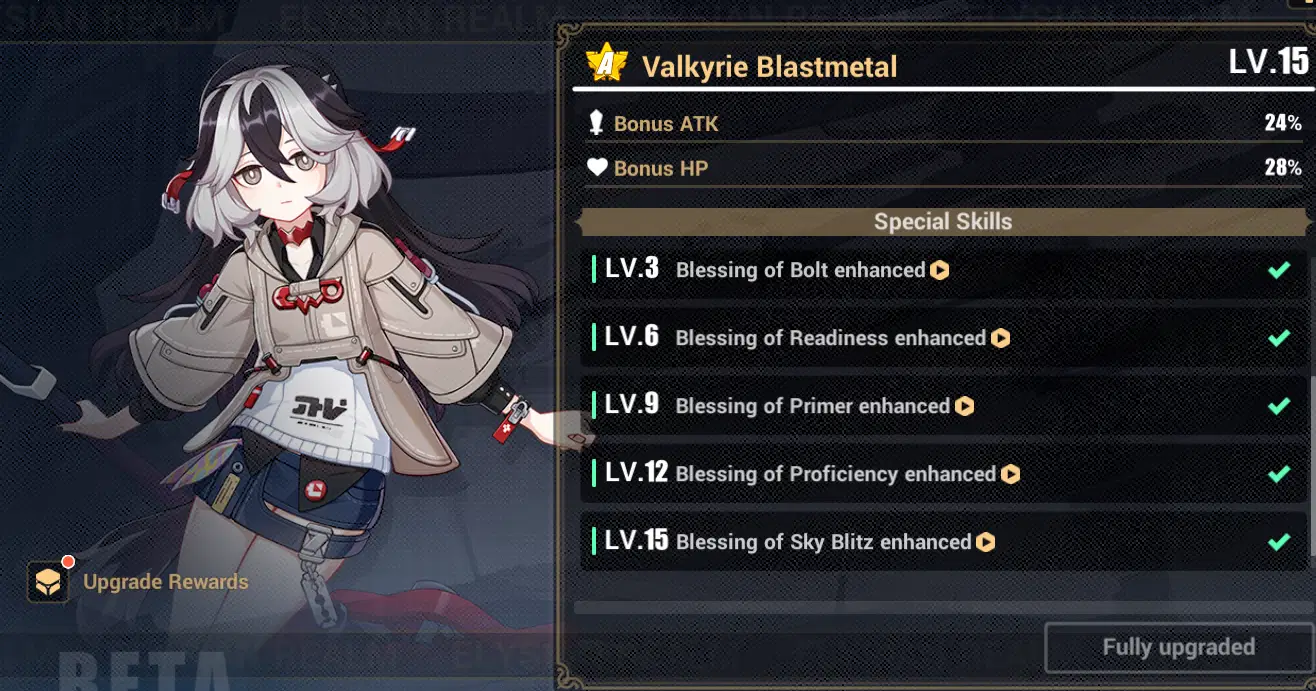
Level 15 Character stats, I recommend maxing her before trying the higher difficulties~
Recommended Gear: Blast Hammer + Fu Hua Ordinary
Alternative Gear: Blast Hammer + Tsiolkovsky
Boss Chosen: Elysia
Stellar Outburst Guide + Infographic
I am trying a new format with these, I hope it's to your liking!
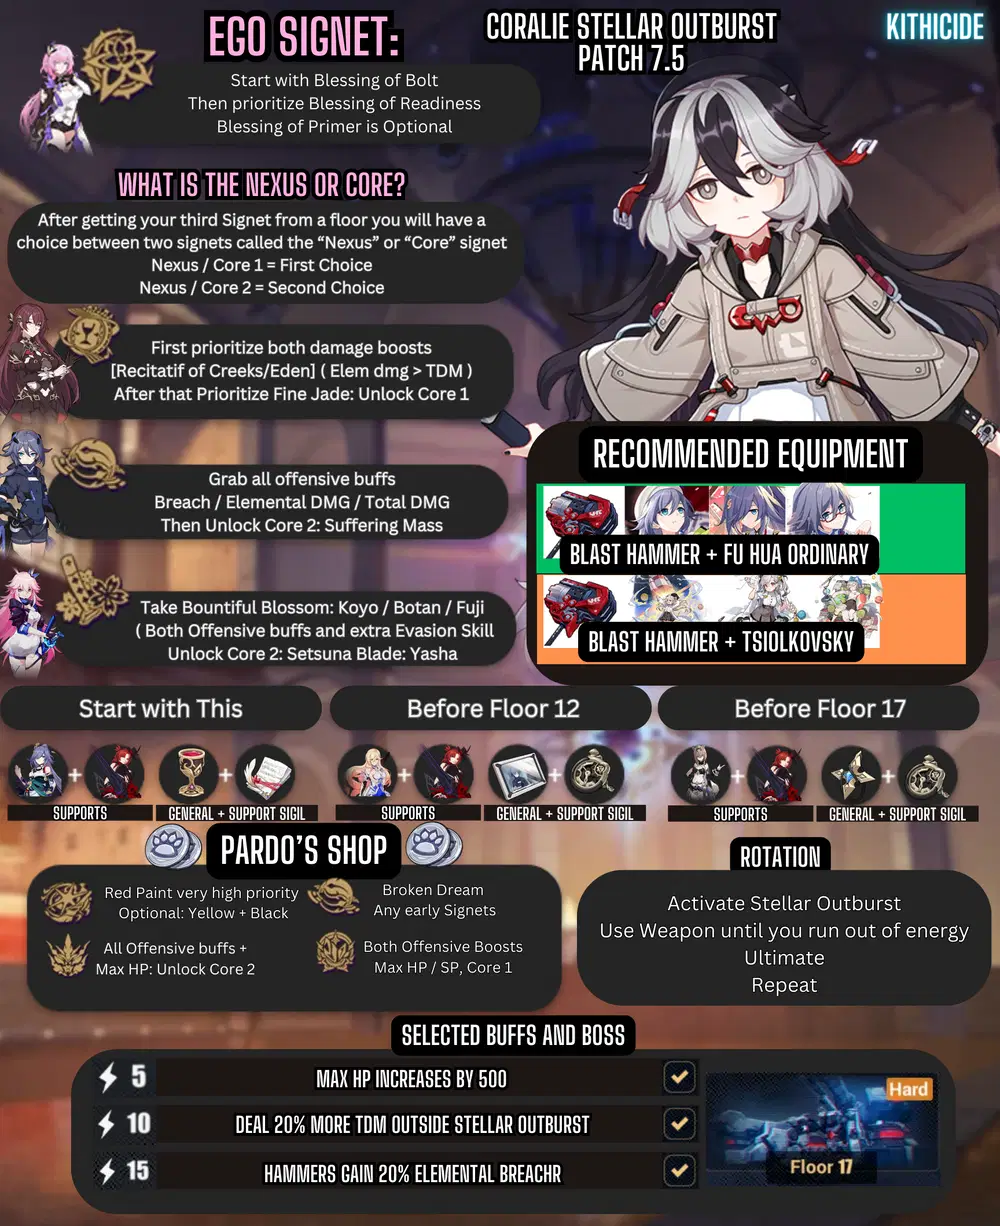
Playstyle / Rotation

This is her Stellar Outburst build and while it's not the strongest build it's still quite capable of clearing with respectable times.
This build has an emphasis on the continued spam of her Stellar Outburst's enhanced weapon attacks causing her to "spin"
Her Stellar Outburst duration is alot shorter than most, but you can easily fix this issue with her Ego signet "Blessing of Bolt"
This gives her the ability to reset the cooldown of her Stellar Outburst and continue the gameplay loop.
She does however want 2-3 Ego signets for comfortable gameplay, but you can get by with just 1.
Rotation:
Activate Stellar Outburst then use her Weapon Active until you run out of Quantum Mech Energy.
Use her Ultimate to reset the cooldown of Stellar Outburst then repeat this gameplay loop.
Note:

Quantum Mech Energy
Build Priority
Elysia - Signet of ■■
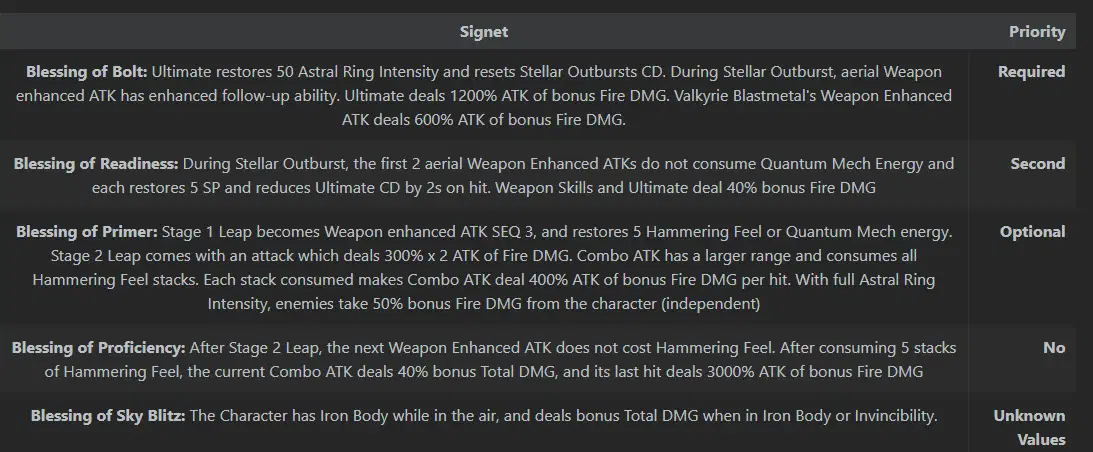
This build is made possible because of "Blessing of Bolt" because it manages to accomplish the following.
- Ultimate now restores 50 Astral Ring Intensity, without it you wouldn't get enough Intensity for a smooth rotation.
- Ultimate additionally resets the cooldown of Stellar Outburst.
- Ultimate deals 1200% ATK of bonus Fire DMG
- During Stellar Outburst her aerial WA has enhanced "follow up" or tracking ability
- Her aerial WA additionally deals 600% ATK of bonus Fire DMG.
With this build you really want Blessing of Readiness too, this further enables the build because it...
- Causes the first 2 aerial WA to not consume Quantum mech energy, effectively giving you another 2 per rotation.
- Restores SP so you can spam Ultimate more frequently and benefit more from Eden signets.
- Reduces Ultimate CD so you can have a smoother rotation.
- Causes your WA and Ultimate to deal bonus 40% Fire DMG.
Eden - Signet of Gold
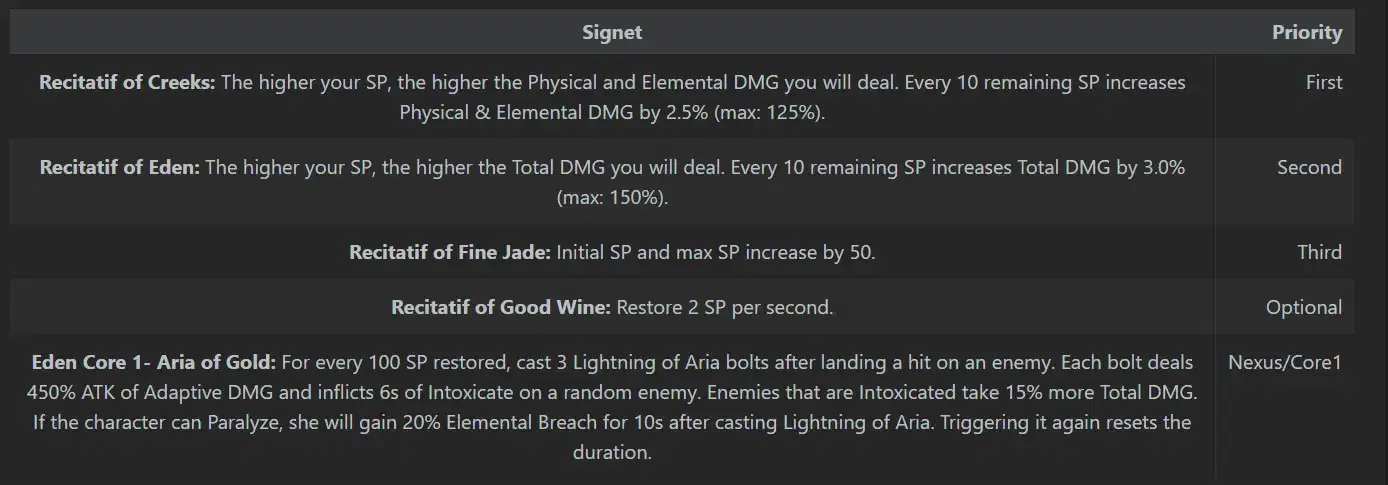
Eden is a strong early game signet that has good synergy with Coralie on her Stellar Outburst build, mostly due to how often she spams her Ultimate and trigger the effects of Core 1: Aria of Gold. Coralie has nice SP generation that lets her get some decent damage buffs from the SP to Elemental / Total DMG conversion. This was consistently the best early game Signet in my tests!
Hua - Signet of Vicissitude
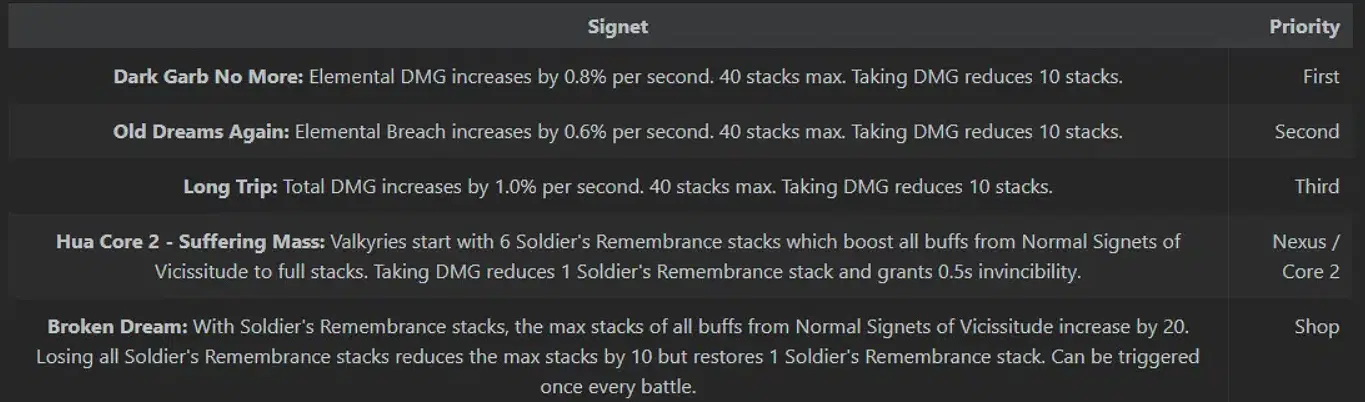
Vicissitude Signets are quite strong this patch because of the added +2 Effect. Later on in the run you will aim to take Kalpas signets if possible so it's nice to have the added defensive utility for ease of clear and comfort.
Sakura - Signet of Setsuna
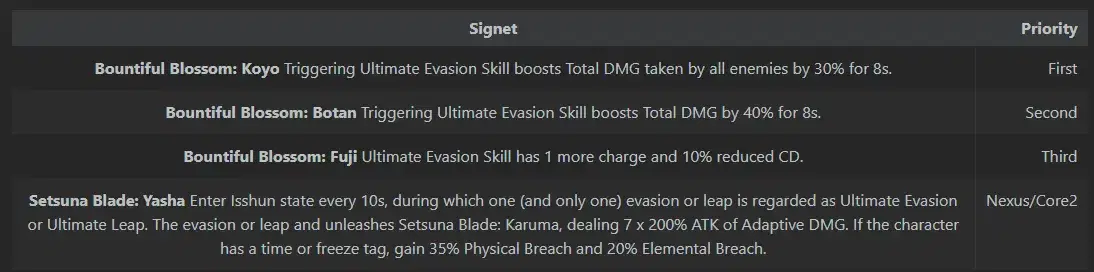
Setsuna Signets will be indirectly buffed this patch because of the Stage effect.

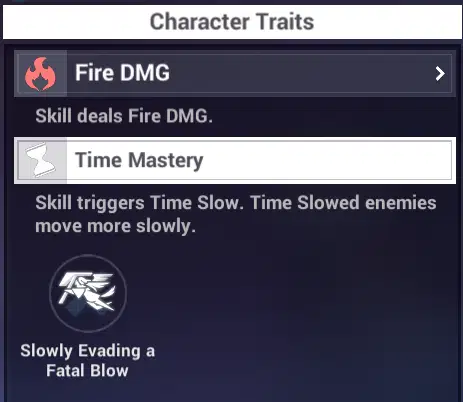
Coralie also has a "Time" Tag causing her to gain an additional 20% Elemental Breach from the first Core.
Kalpas - Signet of Decimination
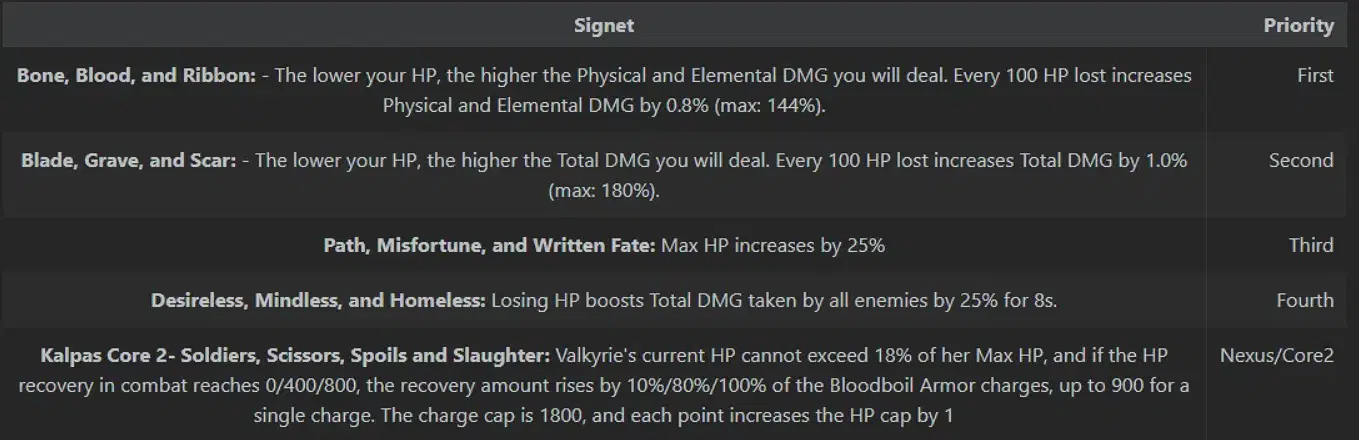
Kalpas Signets are one of the strongest signets in terms of offensive power, this drawback comes with you being forced to play on lower HP thresholds. You can think of this as being a "Glass Cannon" signet most of the time where you are rewarded for good gameplay. Vicissitude Signets remove the drawbacks of Kalpas Signets with the added defensive utility, you also put this off until after Heimdall who is the only overly offensive boss in the Elysian Realm so you should be fine with a comfy clear.
Pardofelis - Signet of Reverie
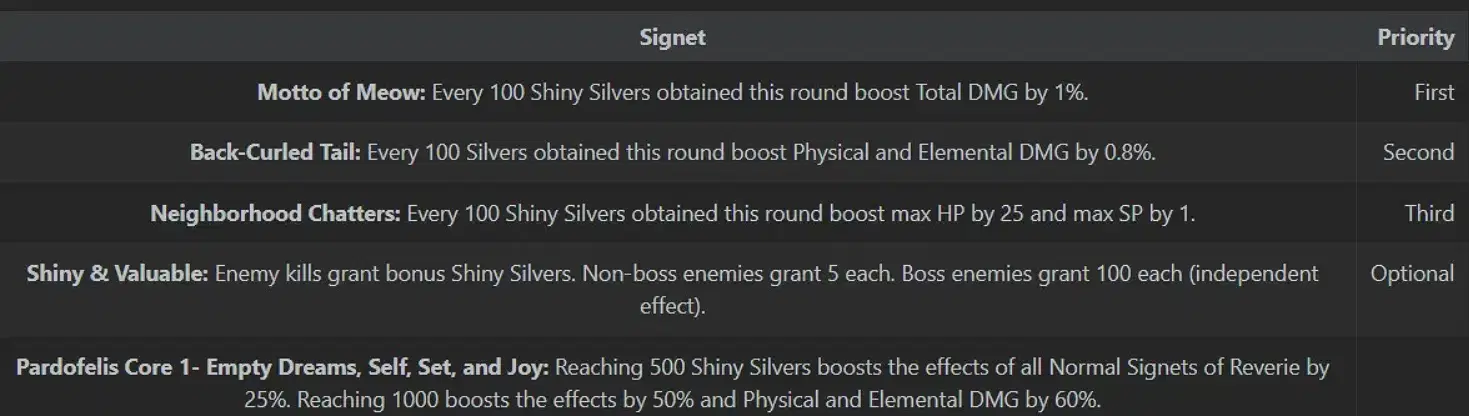
And finally wrap everything up with Pardo Core 1 as the last core when you have alot of Shiny Silvers for the boosted effects.
Neighborhood Chatters will allow you to double dip into added Max HP to benefit from Kalpas and Max SP to benefit from Eden!
Pardo's Shop:
Kalpas - Both damage boosts / max hp / vulnerability
Hua - Broken Dream if you see it in the shop
Sakura - Both Total Damage buffs or evasion +1 / reset since you do want to finish Core 2.
Pardo - Both damage boosts, max hp/sp:
Early Game Strategy.
Start with Blessing of Bolt then Reset for Elysia door and take Blessing of Readiness.
Next choose a Eden door and on the following door use the bonus reward to pickup core I, go to shop at round 6 and change Golden Goblet to Memory then buy important signets from the shop.
You may also opt to use "Because of You" from the start, then take advantage of the double round on floor 7 to grab both Blessing of Bolt and Blessing of Primer if you don't want to reset for an ego door. Just keep in mind your current capabilities and if you would be able to clear the bonus round within 80 seconds.
Gameplay Video
She seems very strong in the Patch 7.5 Elysian Realm, all footage in this video is taken from the 7.5 Beta.
Even with really bad luck and no core until mid game, still managed a 3:40 run!
No Outburst Guide + Infographic
I am trying a new format with these, I hope it's to your liking!
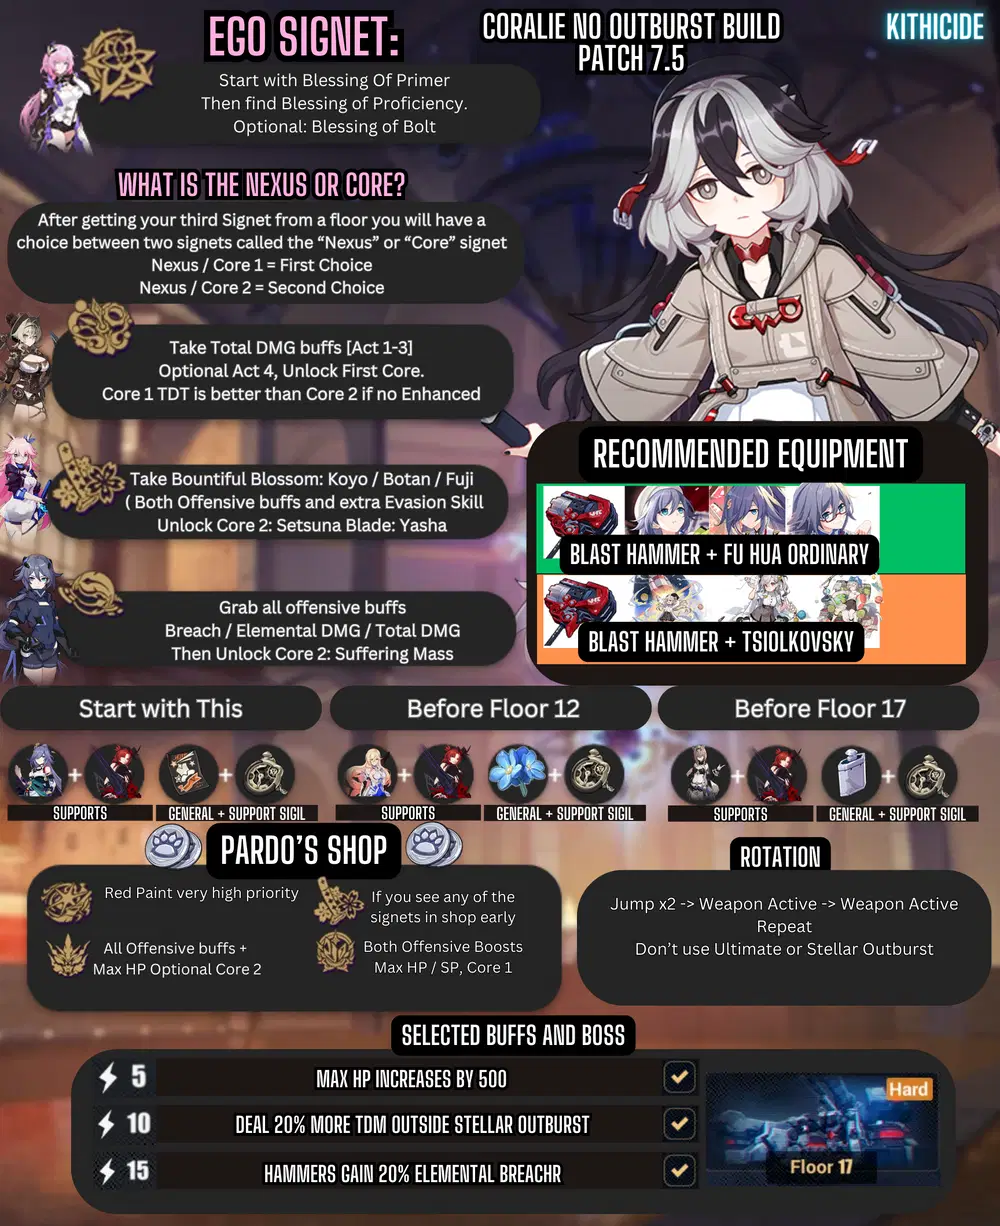
Playstyle / Rotation
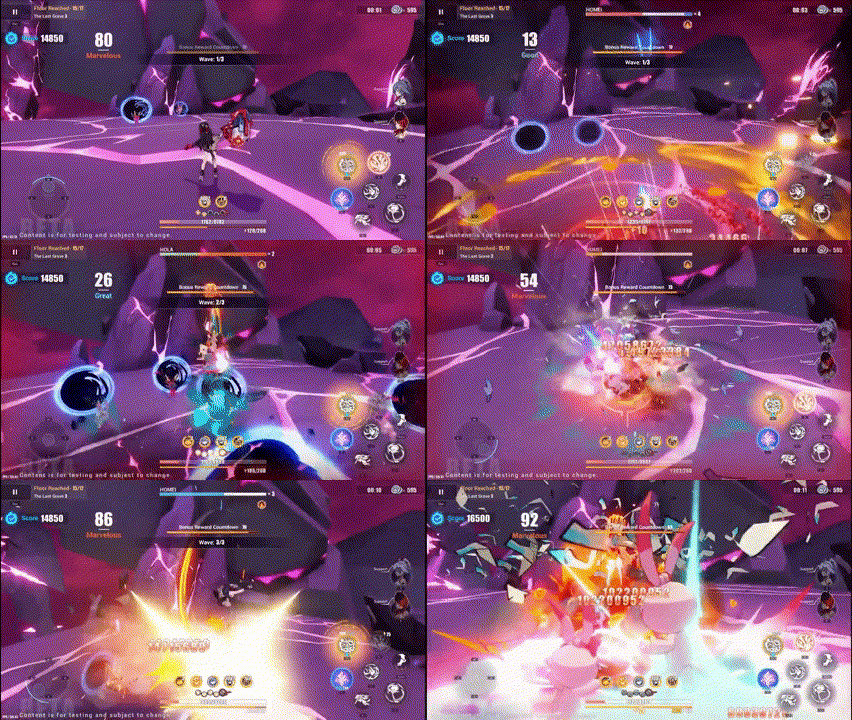
Her playstyle is fun but repetitive, for her rotation you Jump twice Weapon Active -> Weapon Active -> Repeat.
This build is enabled by her first Ego signet, but you would like to get the second one to bring out her full power.
Notes:
I recommend mapping jump to a key you are familiar with such as spacebar, to make it easier since you will be spamming it.
You can dash in the air to reposition yourself if needed.
Build Priority
Elysia - Signet of ■■
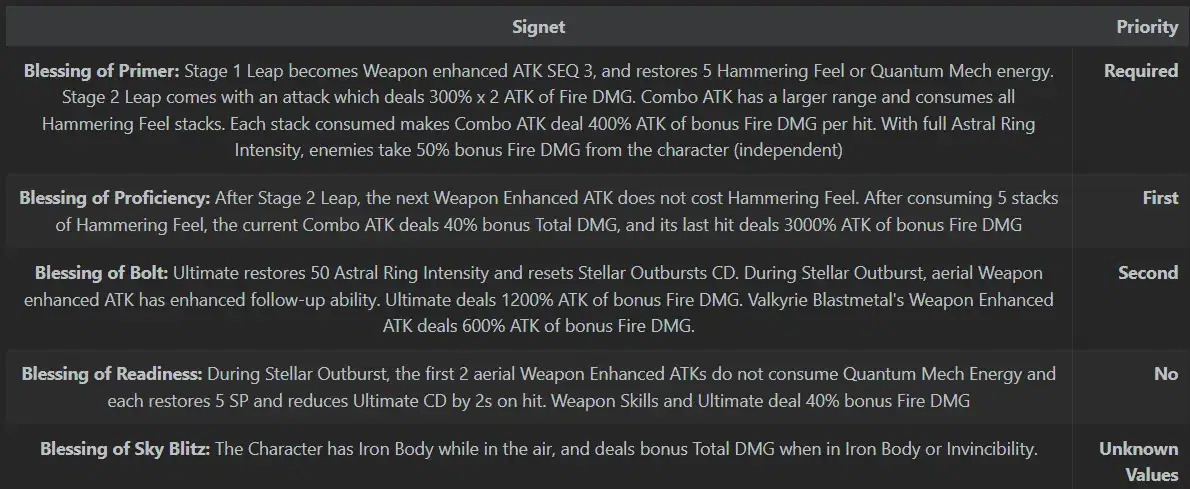
Blessing of Primer is prioritized and what enables this build because of the following added buffs.
- Stage 1 Leap ( Triggered with Jump ) becomes Weapon enhanced ATK Sequence 3
- Restores 5 Hammering Feel for sustained damage
- Stage 2 Leap comes with an attack that deals a large amount of damage, Increases Combo ATK range
- Combo ATK deals way more damage, enemies take 50% more independent Fire DMG from the character.
You would also want to get Blessing of Proficiency as soon as possible, it adds a ton of sustained and burst damage to Coralie!
Villv - Signet of Helix
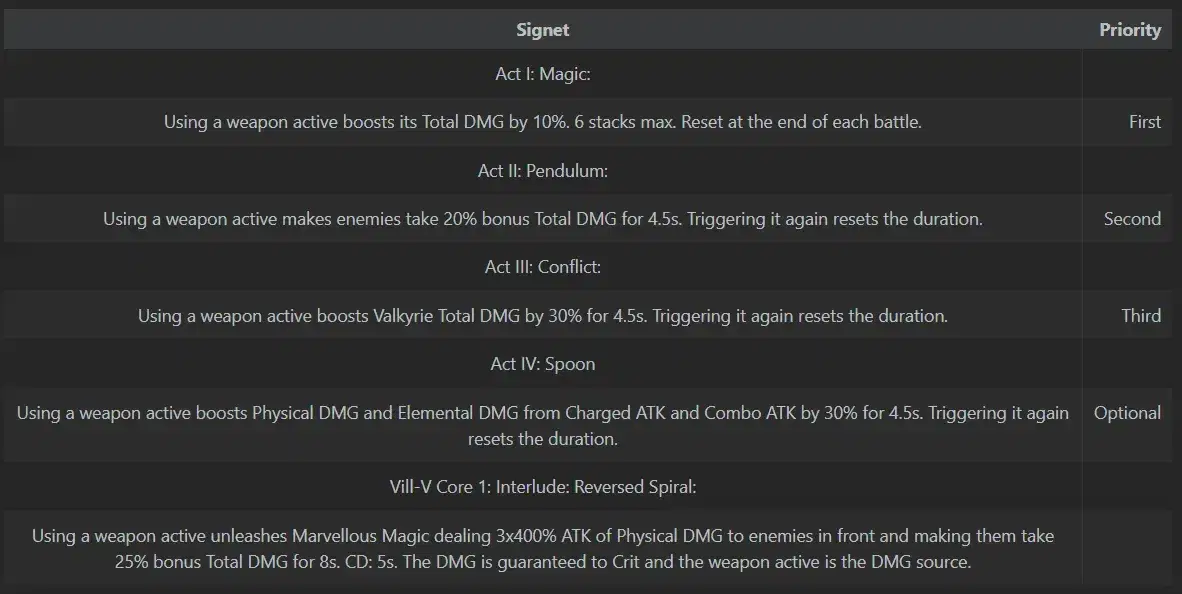
Helix Signets are prioritized because you practically only deal weapon damage, this makes Villv the best choice currently, even when other signets are +2. You take core 1 because it's superior to core 2 without Enhanced signets which we don't plan to get.
Sakura - Signet of Setsuna
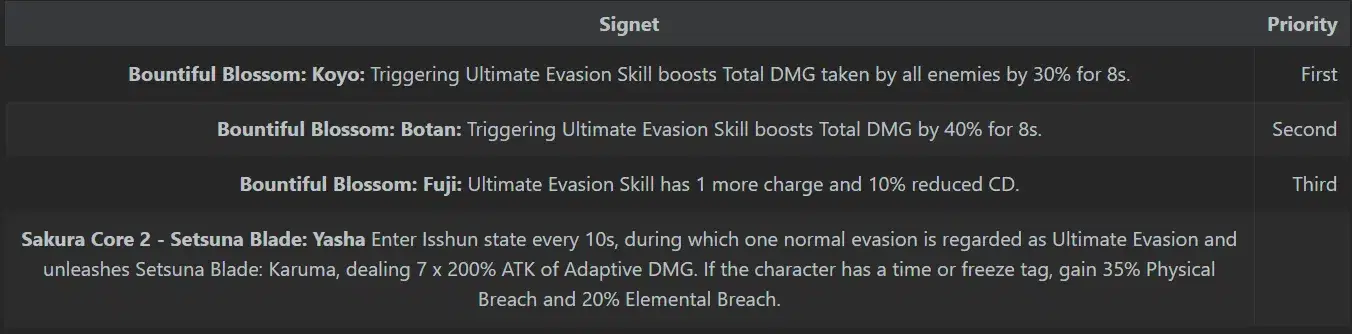
Sakura goes quite well alongside the Elysian Realm Stage effect.

I wouldn't bother going for Sakura signets if you aren't able to finish Core 2, this is entirely reliant on getting the core for evades!
If you are confident I would recommend getting Kalpas instead of Sakura, I held off recommending Kalpas because unlike the other characters I recommended Kalpas with, Coralie does not have an insane amount of self sustain to go along with the Vicissitude Signets. I was worried some people could die with Vicissitude alone which led to the Sakura recommendation.
I do want to say once more that Kalpas would be superior here no questions asked, especially if you are using FoV stigmata!
Hua - Signet of Vicissitude
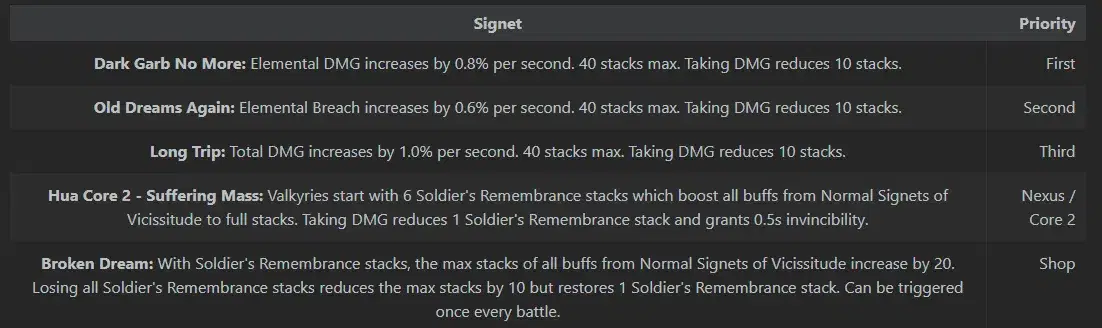
Even without Kalpas Signets, Vicissitude is +2 so the damage gain is pretty decent right now but you also intend to get Kalpas!
Kalpas - Signet of Decimination
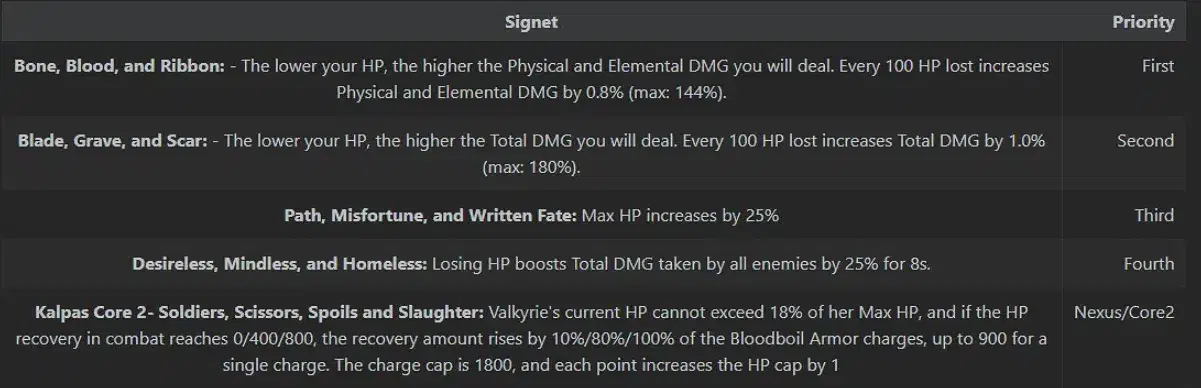
Kalpas is an incredibly potent source of damage consistently and that's true even for this patch, you have a good excuse to take it alongside Vicissitude signets with the increased survivability but don't feel forced to if you are uncomfortable.
Pardofelis - Signet of Reverie
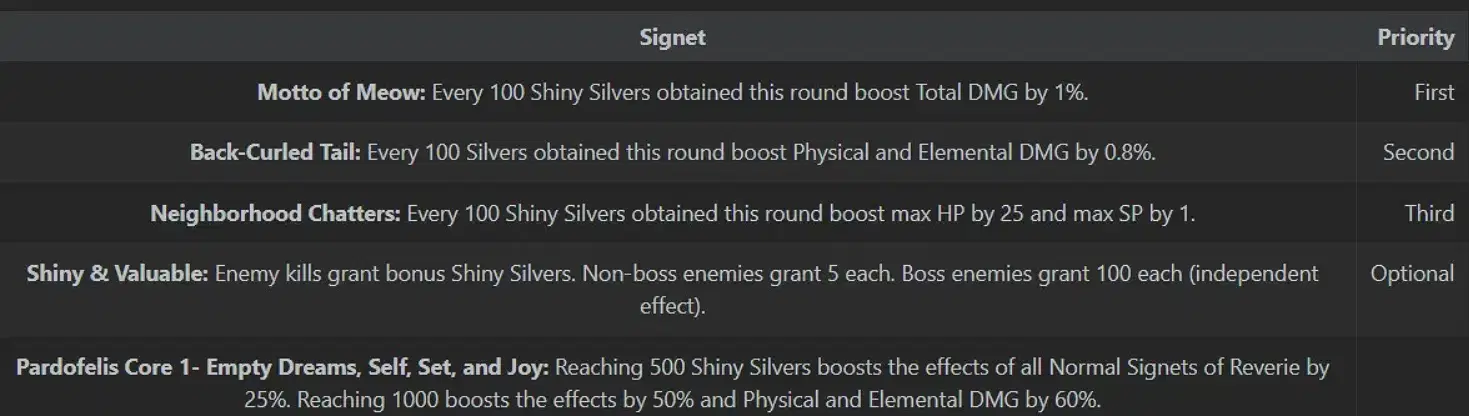
And finally wrap everything up with Pardo Core 1 as the last core when you have alot of Shiny Silvers for the boosted effects.
Pardo's Shop:
Griseo - Red paint at a high priority.
Sakura - Any of the Signets you normally need.
Su - Enhanced Breach signet, any normal signets you need.
Pardofelis - Both damage boosts, can get core 1.
Hua - All offensive buffs, aim for core 2.
Early Game Strategy.
Start with Blessing of Primer then Reset for Elysia door and take Blessing of Proficiency.
Next choose a Helix door and on the following door use the bonus reward to pickup core I, go to shop at round 6 and change Psuedo Miracle to Light as a Bodhi Leaf then buy important signets from the shop.
You may also opt to use "Because of You" from the start, then take advantage of the double round on floor 7 to grab both Blessing of Proficiency and Blessing of Bolt if you don't want to reset for an ego door. Just keep in mind your current capabilities and if you would be able to clear the bonus round within 80 seconds.
Gameplay Video
This video is just to give an example of her gameplay!
Helia

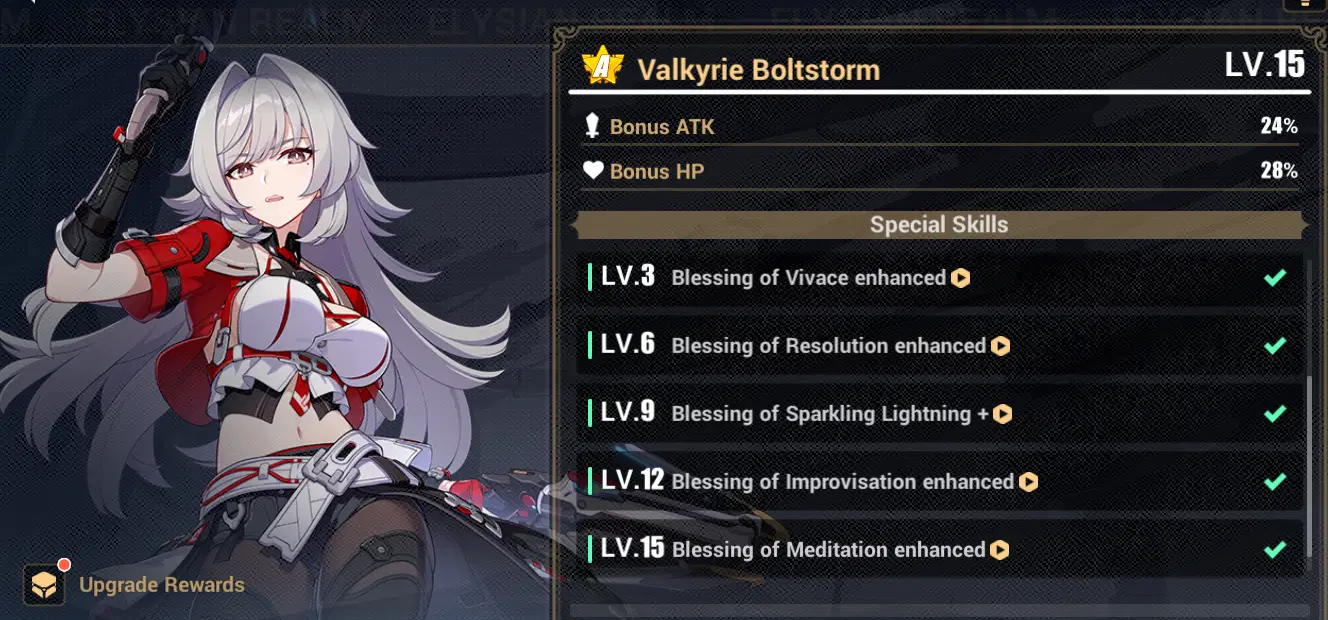
Recommended Gear: Electrifying Arc: Azure Sky + Von Neumann TB Handel M
Alternative Gear: Ta-Da! The Blow + Von Neumann TMB
Boss Chosen: Elysia
Note: T = Top / M = Middle / B =Bottom (This refers to stigmata piece)
Helia has also been buffed this patch with the removal of her debuff in the last line of Character Adjustments!
Patch 7.4 ( Old )
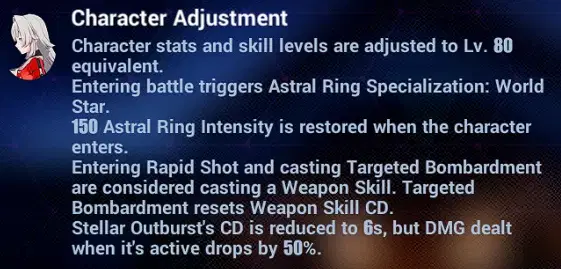
DMG dealt when Stellar Outburst is active drops by 50%
Patch 7.5 ( New )
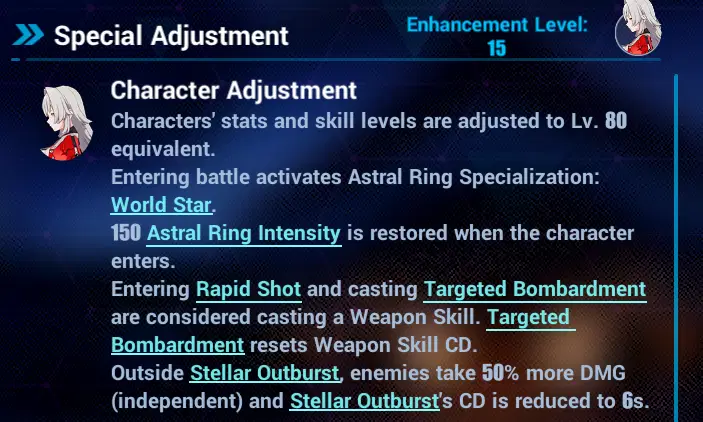
Outside Stellar Outburst, enemies take 50% more DMG ( independent)
This means Helia got a buff to both of her builds!!
Stellar Outburst Guide + Infographic
I am trying a new format with these, I hope it's to your liking!
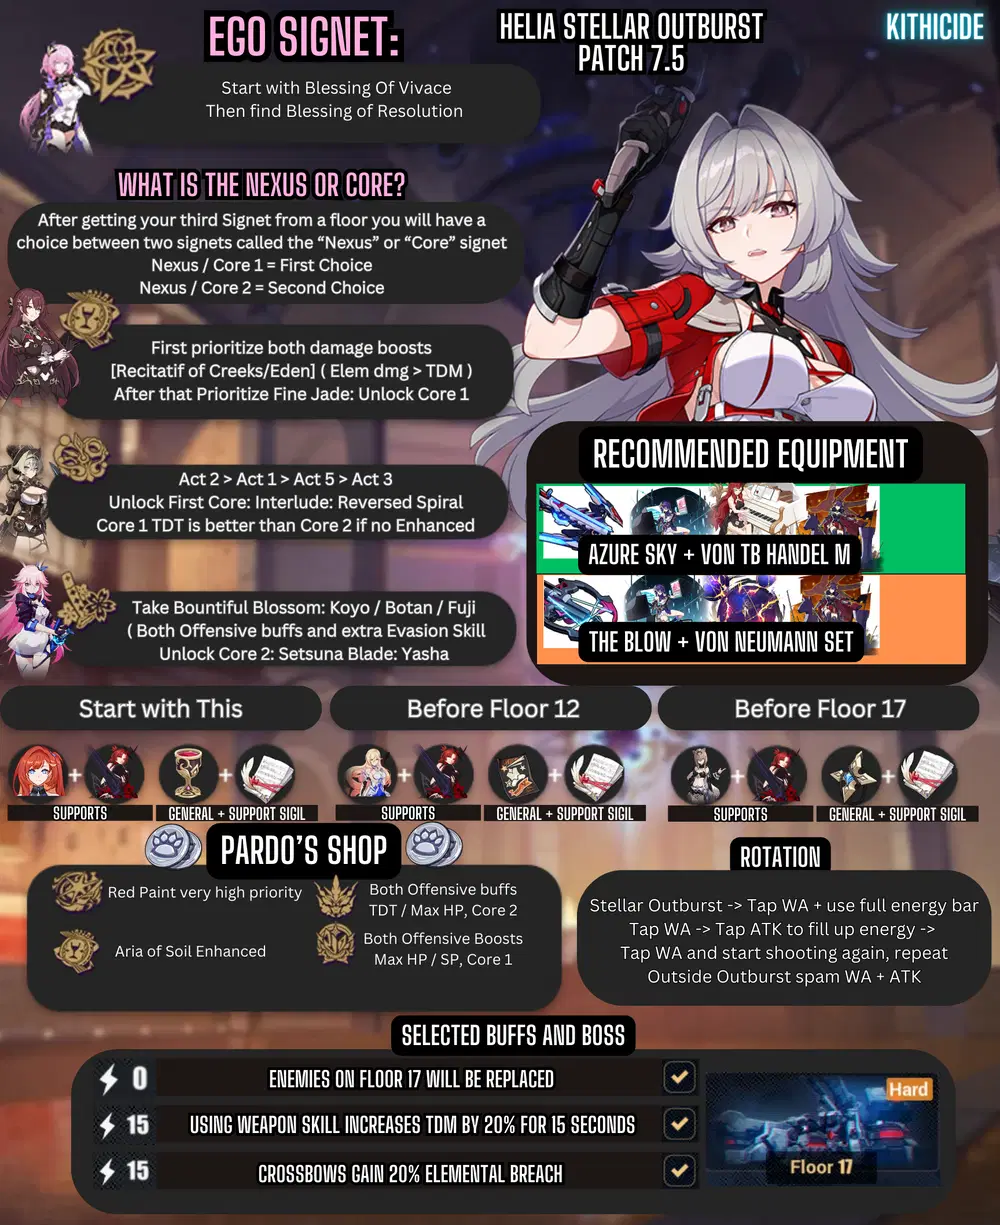
Playstyle / Rotation

This build is extremely strong in the patch 7.5 Elysian Realm, it feels even stronger than in Patch 7.3.
This is most likely due to the singular bosses being much better for her compared to multi-phase mobs and the Helia buffs!
Her single target burst is amazing with this build, this is her strongest and most fun build by an extremely large margin.
Rotation:
Enter Stellar Outburst then press her weapon active, you want to use the full energy bar unless you have overkill damage in which case you can tap her WA to end her rotation early. Tap Weapon Active -> ATK to fill up energy again and repeat.
If you run out of Stellar Outburst duration just spam WA -> Attack!
Build Priority
Elysia - Signet of ■■
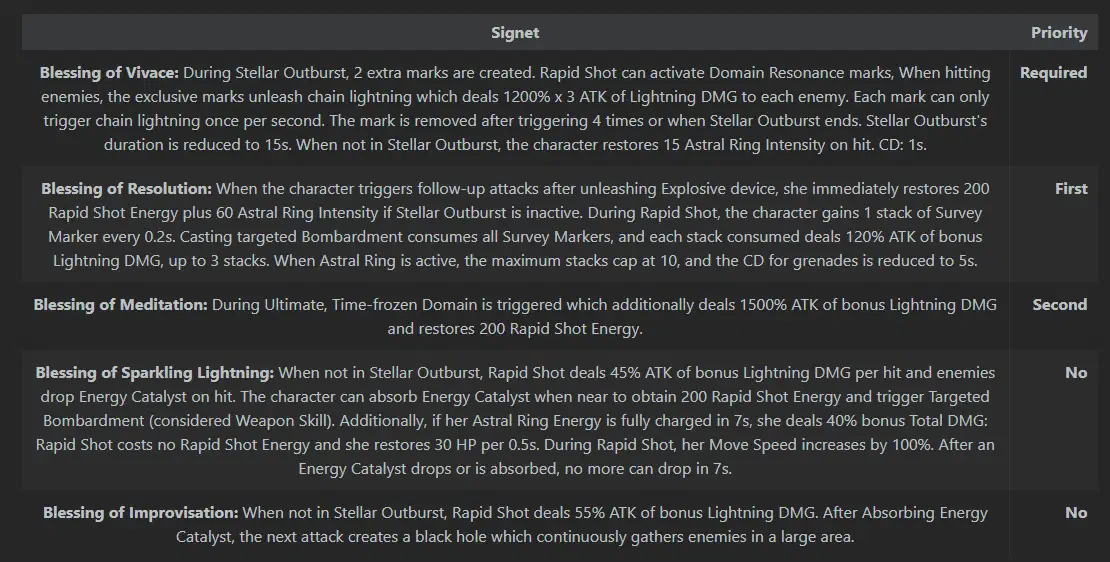
This build is amazing and her current strongest build, but it's only made possible through "Blessing of Vicace" because it...
- During Stellar Outburst she creates an additional 2 Domain Resonance marks instead of the normal single mark.
- Rapid Shot can activate her domain resonance marks letting her self trigger them.
- When hitting enemies her marks unleash the "chain lightning" effect dealing 1200% x3 ATK of DMG up to 4 times.
- When not in Stellar Outburst, restore 15 Astral Ring intensity on hit with a 1 second Internal cooldown.
From there she has alot to gain from "Blessing of Resolution" so I honestly recommend resetting for it instead of Because of You.
- When using her "follow-up" attacks after Explosive device restore 200 ( max ) Rapid Shot energy, this lets her get right back to shooting with little downtime and a very comfortable gameplay loop.
- If Stellar Outburst is inactive after unleashing Explosive device she will restore 60 Astral Ring Intensity, letting her get back to Stellar Outburst with little downtime if you are unable to kill everything in time.
- During Rapid Shot she will gain 1 stack of "Survey Marker" every 0.2s and casting Targeted bombardment will consume all marks ( up to 10 during Stellar Outburst ) and deal bonus damage for each mark.
- Cooldown for her grenades are reduced to 5 seconds.
Simply put it helps alot by restoring her energy, cutting downtime inside and outside of Stellar Outburst and buffing her damage.
Eden - Signet of Gold
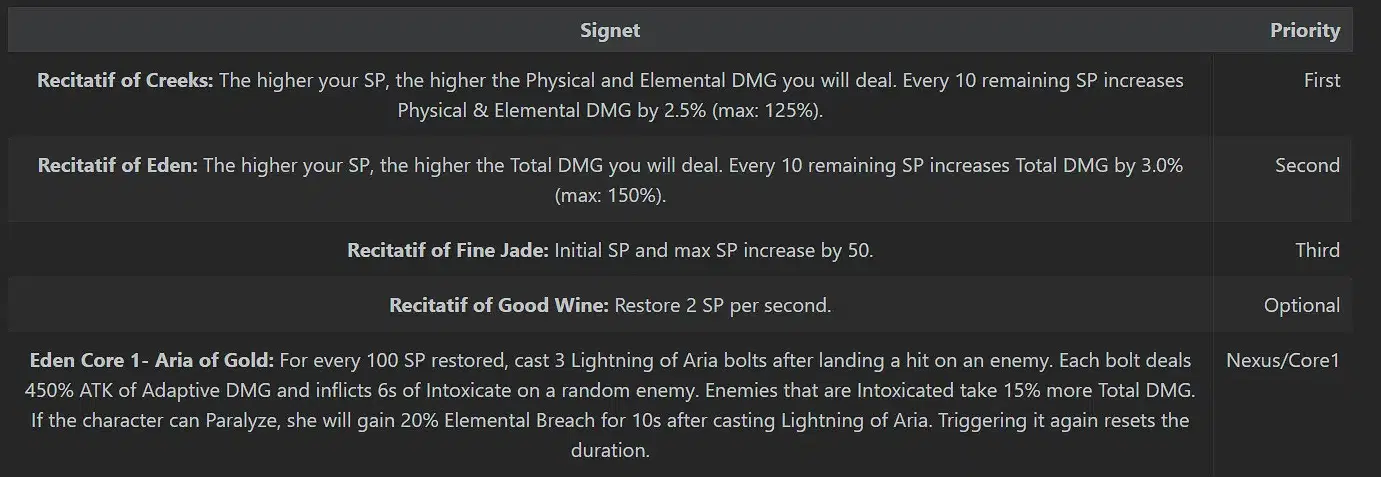
Eden is very strong on Helia and an amazing early game signet, Helia has amazing SP restoration letting her quickly activate the effects of Core 1: Aria of Gold. Helia doesn't use her Ultimate unless she manages to grab a third ego which is quite rare, letting her gain more bonuses from Recitatif of Creeks and Recitatif of Eden converting remaining SP to offensive damage buffs.
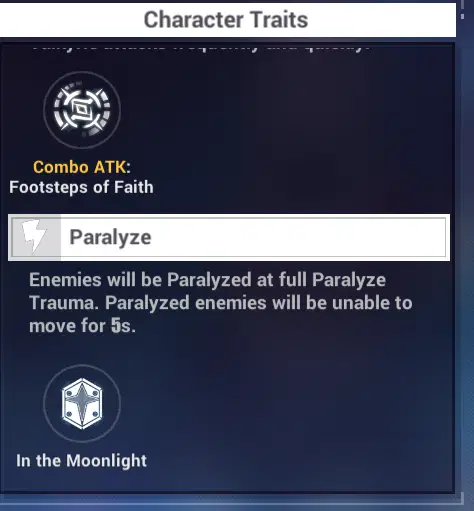
Helia has Paralyze so she will gain an additional 20% Elemental Breach after triggering the first core effects!
Villv - Signet of Helix
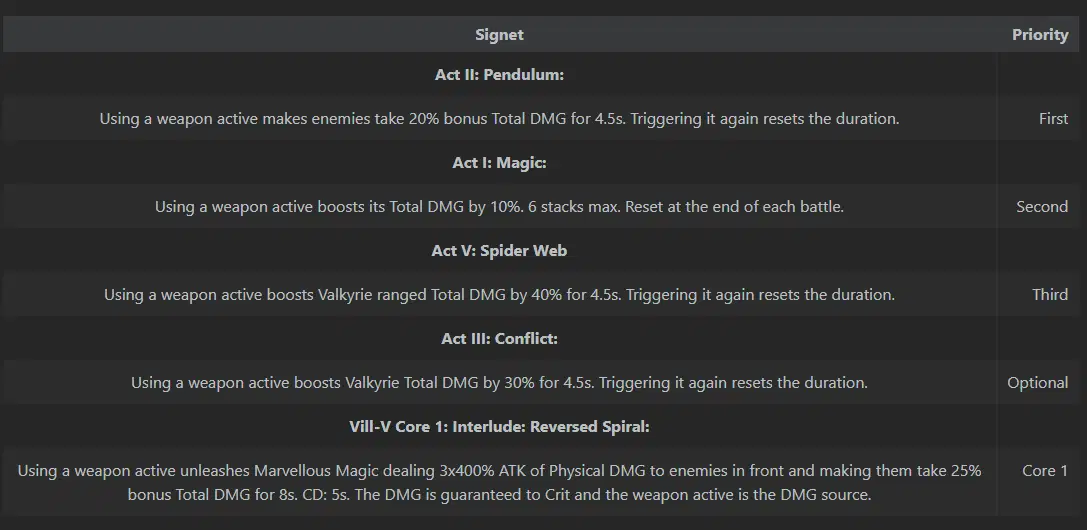
Next you want to prioritize Signets of Helix, Helia spams her weapon active quite frequently and I found this to be extremely strong on this build. You choose to take the first core for the 25% Total DMG Taken debuff, it's stronger than the second core if you don't get enhanced signets which we don't plan to do in favor of picking up different Signet cores.
The main benefit of the second core is the added grouping which is largely not needed, so you would rather have more damage.
Sakura - Signet of Setsuna
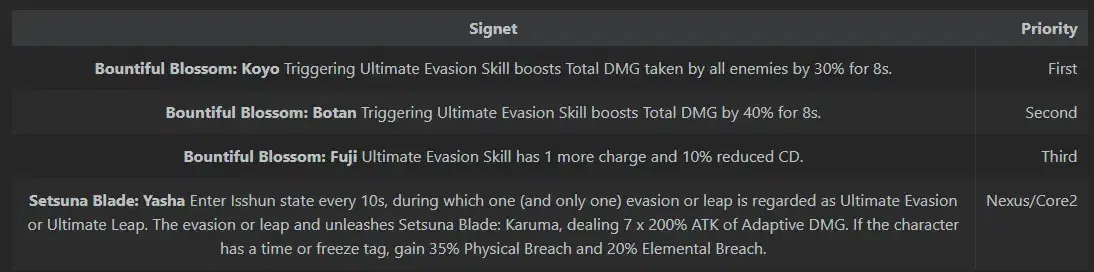
While she doesn't have Ultimate evasions built into her kit, getting Sakura second core would still be amazing on her and provide you with the means to actually use Ultimate Evasion on demand. Sakura is a strong pick this patch because of the +2 bonus.
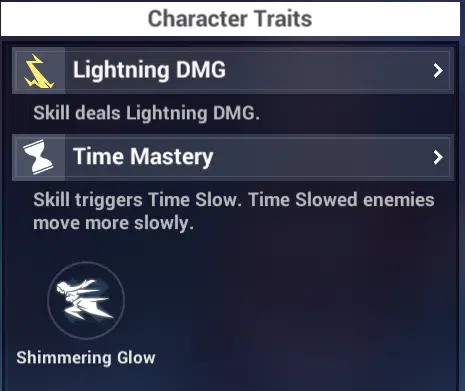
Helia also has the "Time Mastery" tag so she gains an added 20% Elemental Breach from the core!
That being said it's not a must and I managed to get a great clear ( See gameplay Video section ) without getting it because I couldn't find the last portal, all in all it's a very strong damage amplification if you can remember to manually evade to trigger it.

You don't technically need it for the "Stage Effect" either due to the second condition of "Ranged Damage"
Hua - Signet of Vicissitude
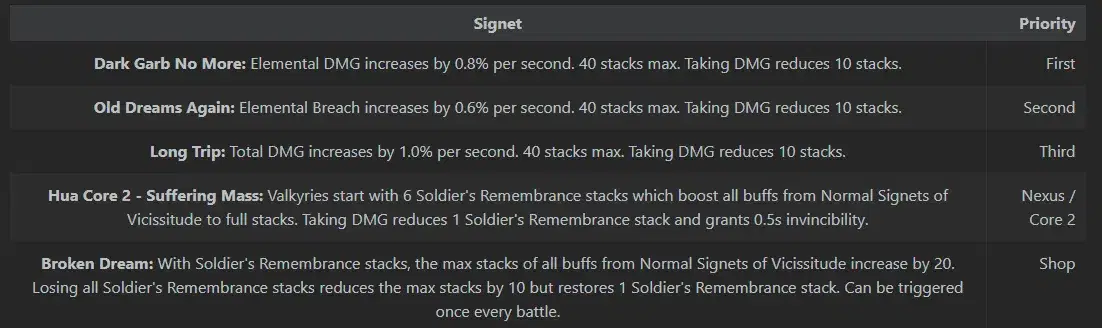
Vicissitude Signets are a good last pick factoring in the +2 bonus effects to it, if you find Kalpas Signets in the shop this makes it more justified to recommend buying those and looking to get the second core and run it alongside Vicissitude signets.
Pardofelis - Signet of Reverie
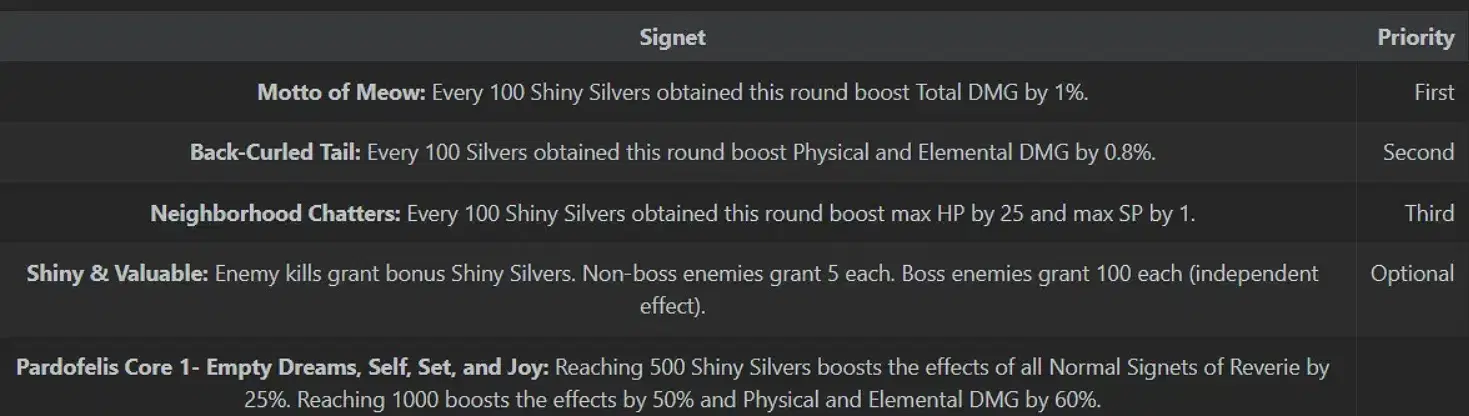
And finally wrap everything up with Pardo Core 1 as the last core when you have alot of Shiny Silvers for the boosted effects.
Pardo's Shop:
Griseo - Red paint at a high priority, optional Black Paint. Yellow requires third Ego signet.
Kalpas - Both damage boosts / max hp / tdt
Bodhi If you see alot of these signets in the shop I recommend grabbing both damage and combo buffs!
Pardo - Both damage boosts, max hp/sp: Take any Core 1 Enhanced you see in shop, need Sakura 2 for Evasion one.
Villv - Take Act 1 / 2 / 3 / 5 if you see it!
Early Game Strategy.
Start with Blessing of Vivace then Reset for Elysia door and take Blessing of Resolution.
Prioritize entering Eden doors and on the bonus round after defeating the boss use the bonus reward to grab the first core.
After finishing that stage, you can either enter another door depending on your choices or proceed immediately to the shop.
Good choices for other Signet doors to consider are Villv / Sakura / Kalpas / Hua / Pardo / Eden ( If you didn't get Initial SP )
When you get to Pardo shop you should change Gold GobletP to and buy out after purchasing important signets from the shop.
The signet you go for next will depend entirely on what you find in the Signet shop and may vary, but Villv ( Helix ) next is ideal.
For a list of some Signet recommendations please see the above "Pardo's Shop" section!
If you don't want to reset for an Ego door you could also get Because of You and use that to pickup Blessing of Resolution and Blessing of Meditation on Floor 7 Second bonus round, just keep in mind your current capabilities and if you have a Helia strong enough to successfully defeat the first two bonus rounds without having the second Ego signet or not.
Gameplay Video
She's honestly quite overpowered in the Patch 7.5 version of Elysian Realm, with the damage to melt through any boss!
No Outburst Guide + Infographic
I am trying a new format with these, I hope it's to your liking!
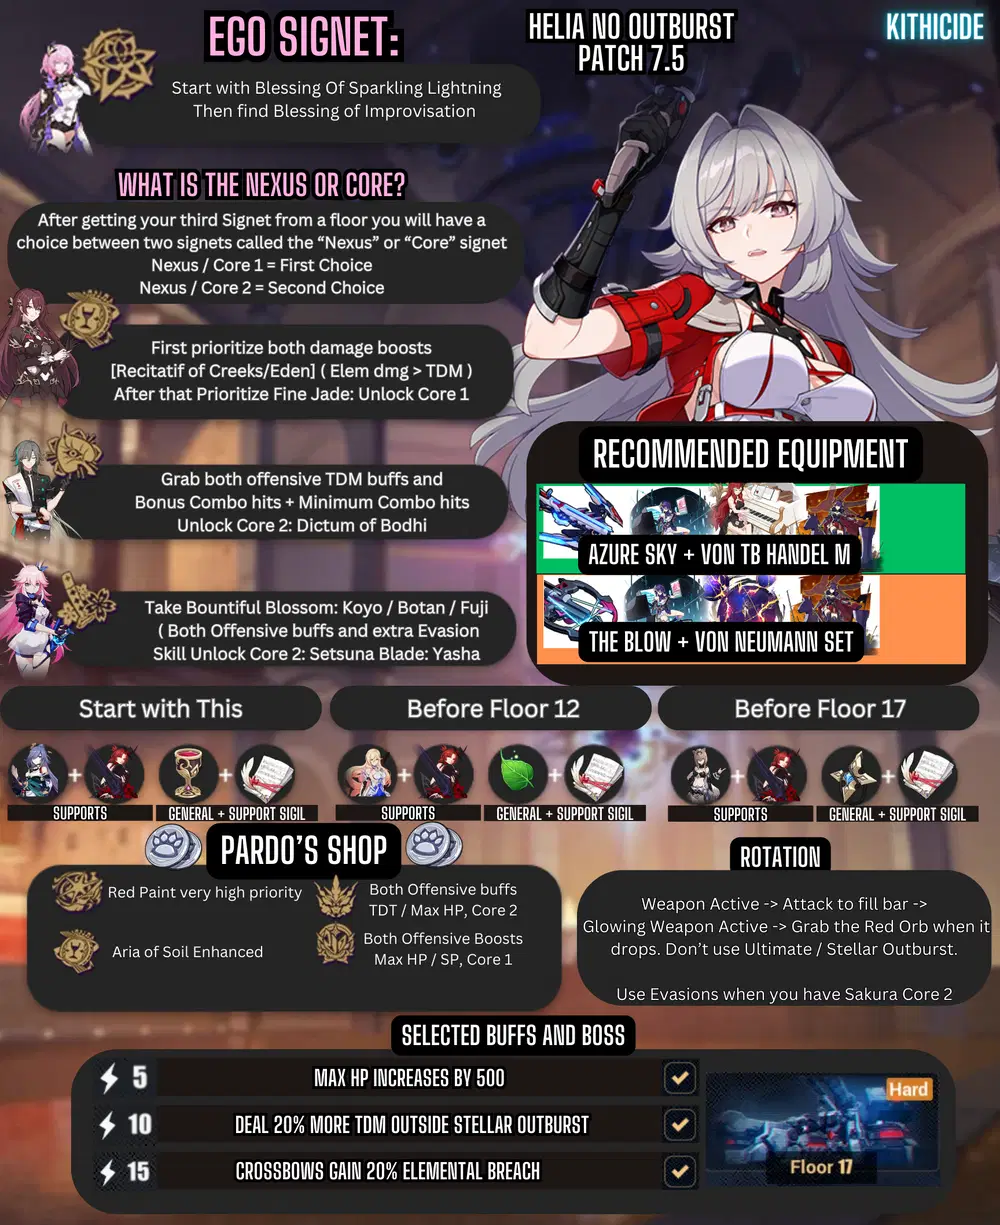
Playstyle / Rotation
This build focuses on
Rotation:
Build Priority
Elysia - Signet of ■■
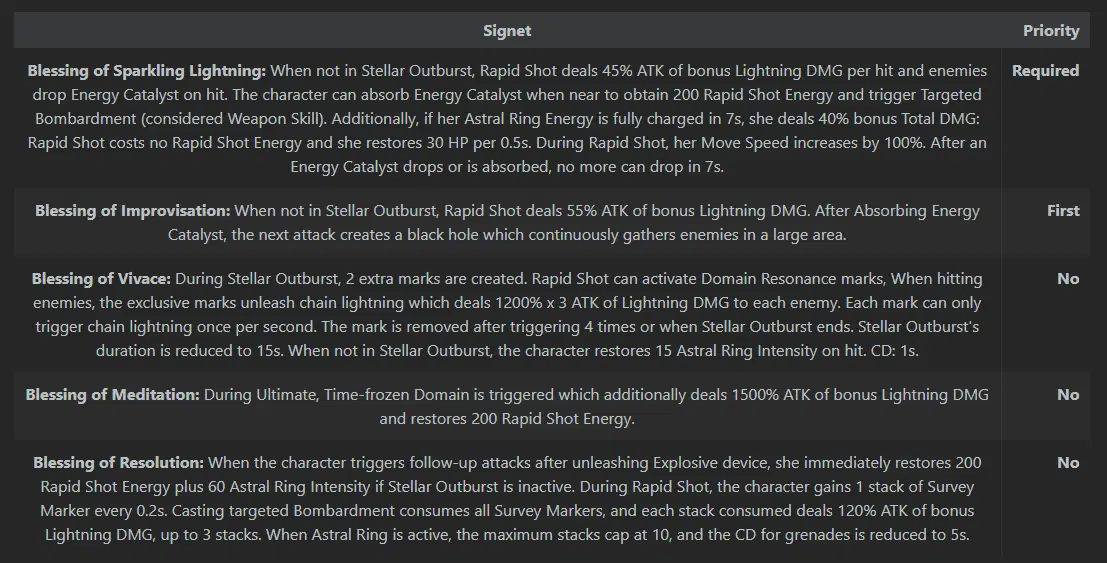
Eden - Signet of Gold
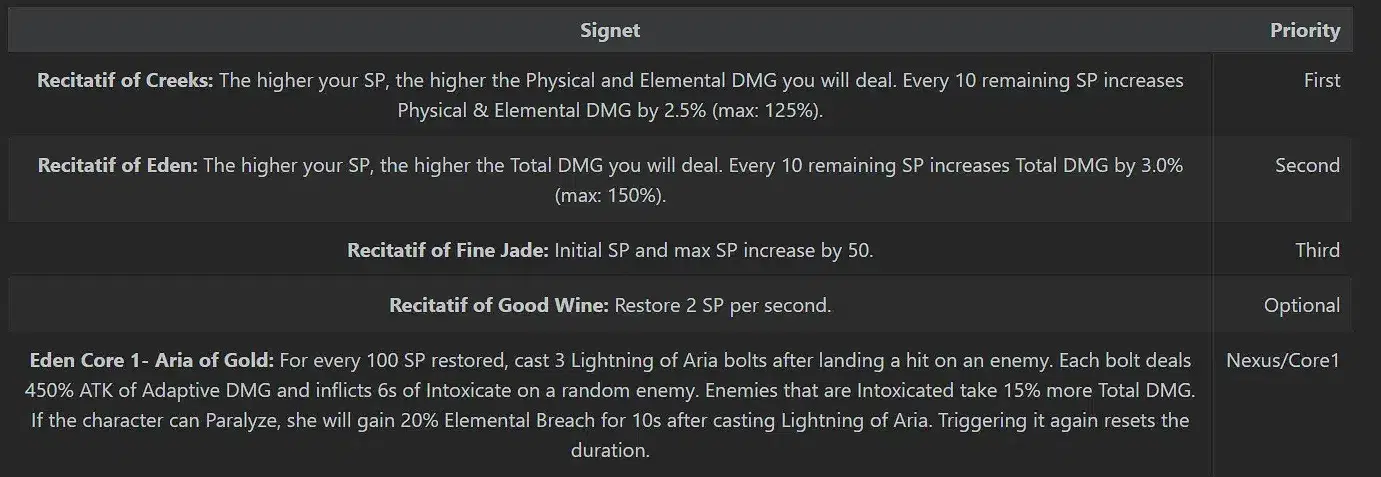
Eden is very strong on Helia and an amazing early game signet, Helia has amazing SP restoration letting her quickly activate the effects of Core 1: Aria of Gold. Helia doesn't use her Ultimate unless she manages to grab a third ego which is quite rare, letting her gain more bonuses from Recitatif of Creeks and Recitatif of Eden converting remaining SP to offensive damage buffs.
Su - Signet of Bodhi
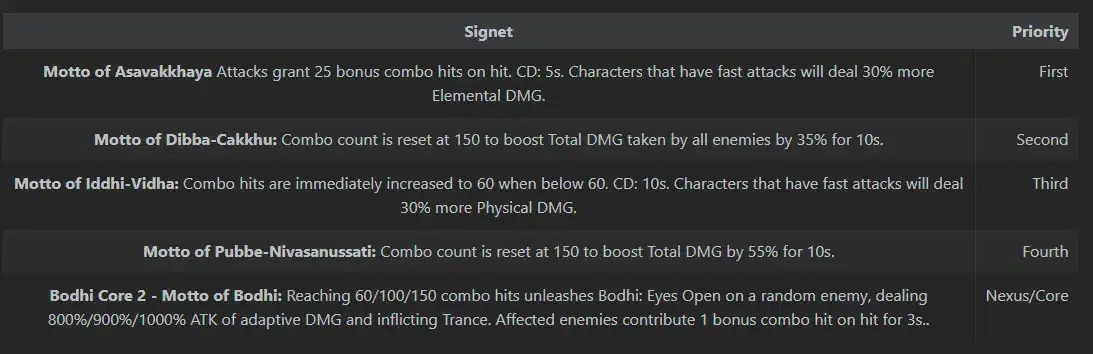
Helia has a very high hitcount with her nonstop shooting on this build, this will let her essentially have 100% uptime on Su buffs.
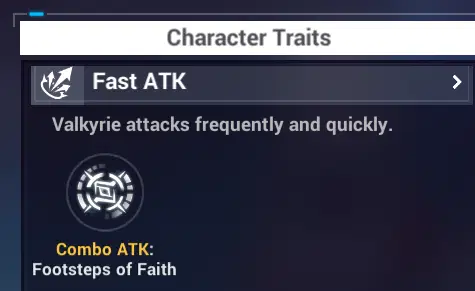
Helia also has the "Fast ATK" Character Trait which lets her benefit even more from Bodhi signets with 30% Elemental DMG!
Sakura Signet of Setsuna
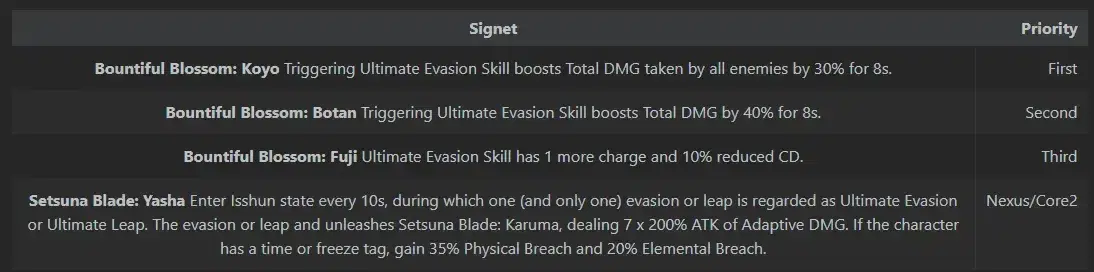
While she doesn't have Ultimate evasions built into her kit, getting Sakura second core would still be amazing on her and provide you with the means to actually use Ultimate Evasion on demand. Sakura is a strong pick this patch because of the +2 bonus.
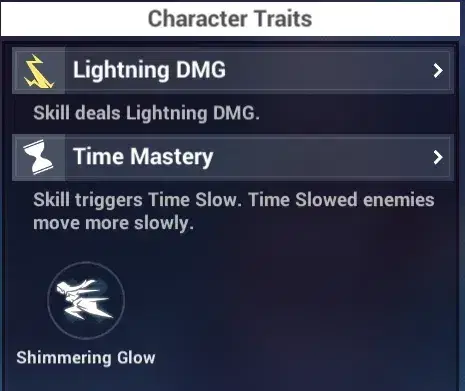
Helia also has the "Time Mastery" tag so she gains an added 20% Elemental Breach from the core!
It's a very strong damage amplification if you can remember to manually evade to trigger it, but if you can skip it on "AFK build"
Kalpas - Signet of Decimination
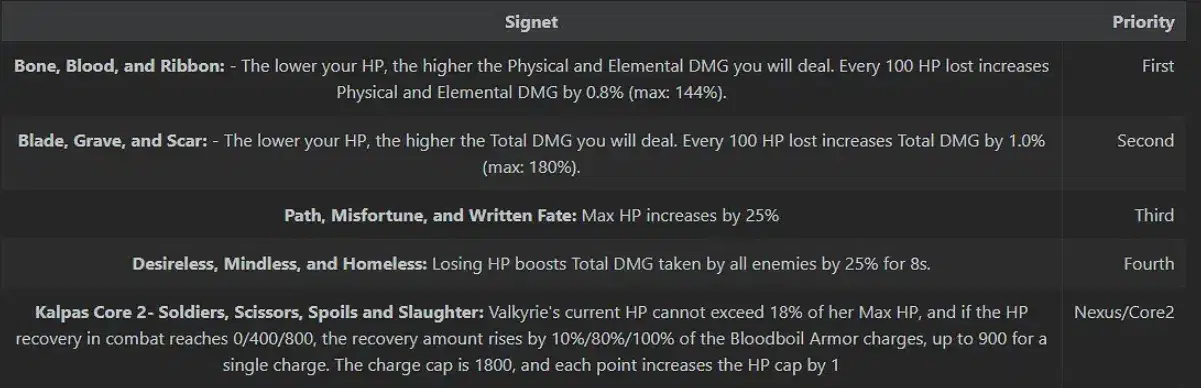
Kalpas is a very strong signet in terms of damage amplification, you want to put off Kalpas signets until after you finish Heimdall the most offensive enemy in the entire Elysian Realm, if you aren't confident in your abilities then you could instead get Vicissitude Signets instead of playing at low HP thresholds.
Pardofelis - Signet of Reverie
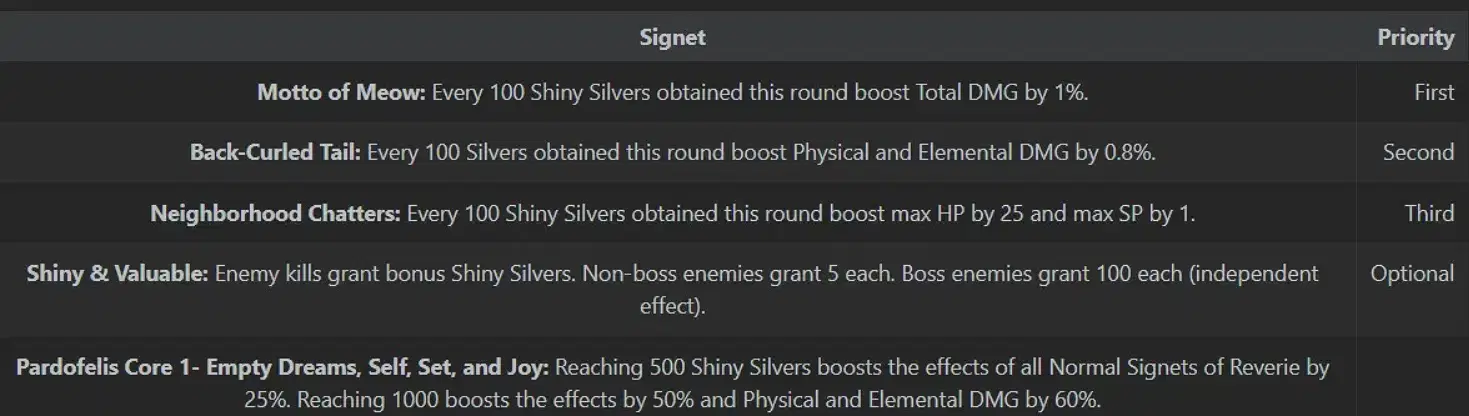
And finally wrap everything up with Pardo Core 1 as the last core when you have alot of Shiny Silvers for the boosted effects.
Neighborhood Chatters will allow you to double dip into added Max HP to benefit from Kalpas and Max SP to benefit from Eden!
Pardo's Shop:
Griseo - Red paint at a high priority, optional Black Paint. Yellow requires third Ego signet.
Kalpas - Both damage boosts / max hp / tdt This can be skipped if you aren't comfortable running Kalpas late game.
Hua - Take this if you are in a situation where you can easily buy some signets from shop and get portal, or if you don't Kalpas!
Bodhi Breach Enhanced Signet if you see it
Pardo - Both damage boosts, max hp/sp: Take any Core 1 Enhanced you see in shop, need Sakura 2 for Evasion one.
Early Game Strategy.
Start with Blessing of Sparkling Lightning then Reset for Elysia door and take Blessing of Improvisation.
Prioritize entering Eden doors and on the bonus round after defeating the boss use the bonus reward to grab the first core.
After finishing that stage, you can either enter another door depending on your choices or proceed immediately to the shop.
Good choices for other Signet doors to consider are Su / Sakura / Kalpas / Hua / Pardo / Eden ( If you didn't get Initial SP )
When you get to Pardo shop you should change Gold Goblet to Light as a Bodhi Leaf and buy important signets from the shop.
For a list of some Signet recommendations please see the above "Pardo's Shop" section!
If you don't want to reset for an Ego door you could also get Because of You and use that to pickup Blessing of Improvisation and Blessing of Meditation on Floor 7 Second bonus round, just keep in mind your current capabilities and if you have a Helia strong enough to successfully defeat the first two bonus rounds without having the second Ego signet or not.
Gameplay Video
This footage is just here to serve as a gameplay example and is not indicative of her clear time or optimized 7.5 performance!
Senadina

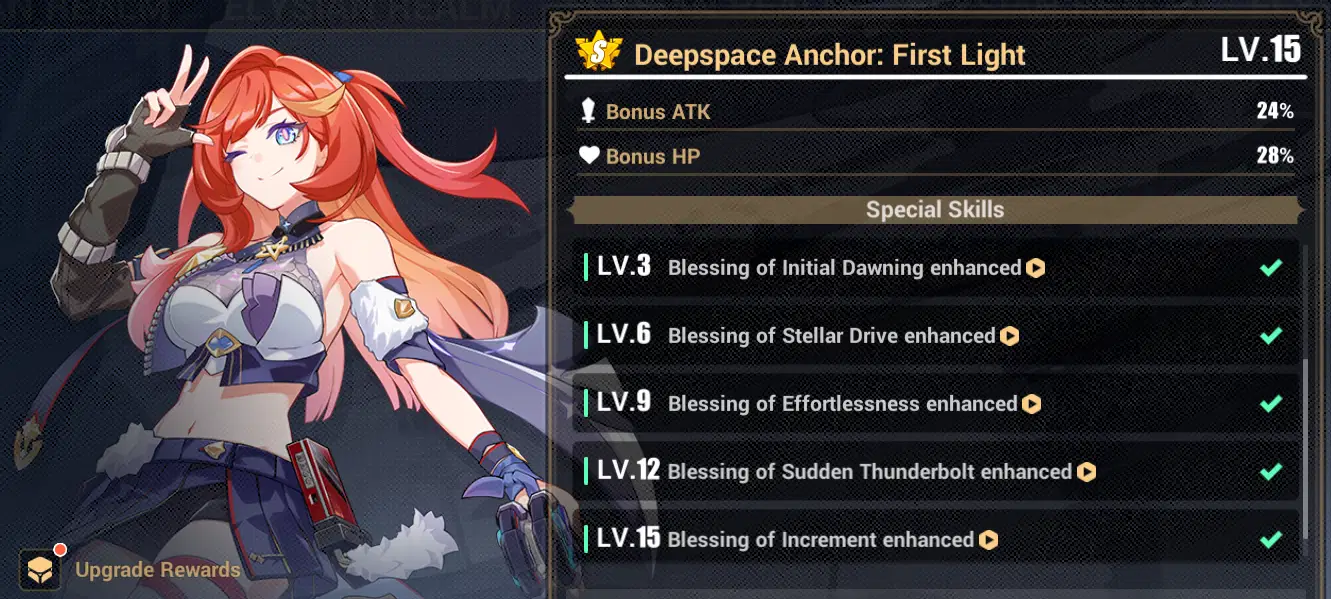
Recommended Gear: Red Star Thunderbolt: Breaking Dawn + Perfect Morning TMB
Alternative Gear: The Value of Pi + Handel
Boss Chosen: Elysia
Weapon Spam Guide + Infographic
I am trying a new format with these, I hope it's to your liking!
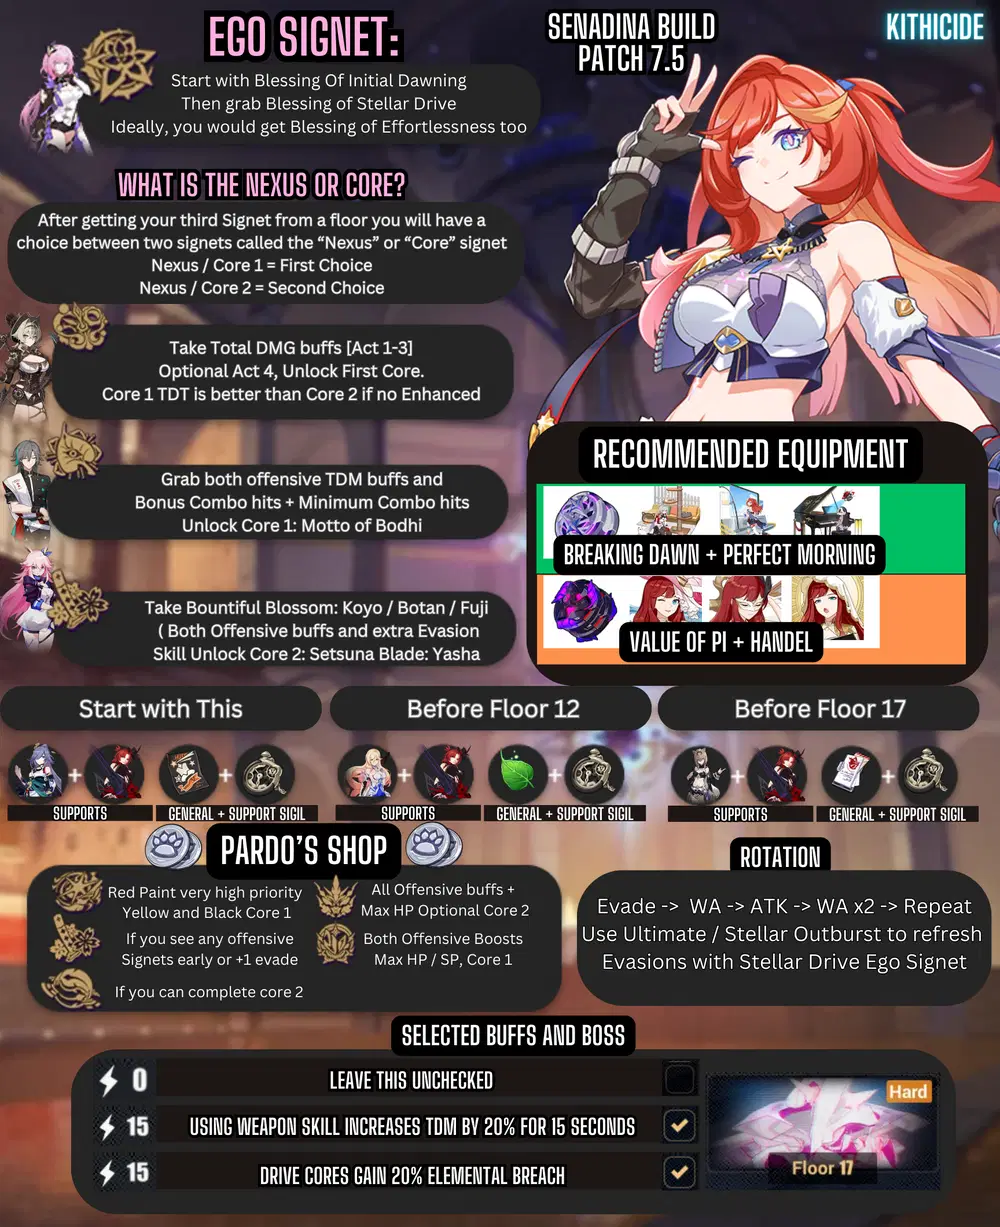
Playstyle / Rotation

This build is the only build Senadina has in Elysian Realm, she doesn't actually have a "non outburst" build like the others.
That being said while she does use Stellar Outburst she isn't "crippled" without it, still being capable of dealing high damage.
With this build she focuses on spamming her Weapon active thanks to her greatly reduced skill and ability cooldowns.
She doesn't have anymore overheat either provided you take Blessing of Initial Dawning and use Ultimate Evasion to clear it.
This effectively lets you rotate endlessly as long as you have Sakura signets for excess Ultimate Evasions alongside Dawning.
Rotation:
Evade -> Weapon Active -> Attack -> Weapon Active x2
Repeat this, use Ultimate / Stellar Outburst to refresh evasions.
This requires Blessing of Stellar Drive.
Build Priority
Elysia - Signet of ■■
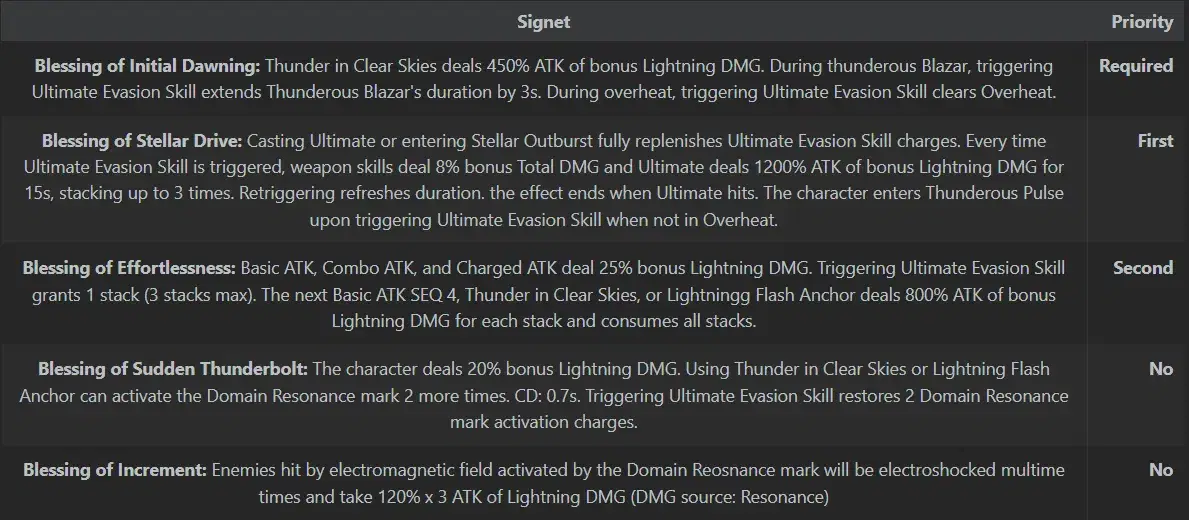
Senadina only has one build unlike most characters that have two, she is enabled by "Blessing of Initial Dawning" because it...
- Causes Thunder in Clear Skies to deal bonus Lightning DMG, this is one of her main sources of damage
- Makes triggering her Ultimate Evasion skill extend Thunderous Blazar duration by 3s giving her more DPS time.
- Finally, it lets Ultimate Evasion Skill clear "Overheat" getting rid of her downtime and back in action!
Ideally, you also want to get Blessing of Stellar Drive and I recommend resetting Elysian Realm to get it due to her reliance on it.
- Casting Ultimate or using Stellar Outburst will fully replenish Ultimate Evasion skill charges.
- Triggering Ultimate Evasion boosts the damage of weapon skills and Ultimate for 15 seconds ( 3 stacks max )
- When Ultimate hits enter Thunderous Pulse upon triggering Ultimate evasion skill when not in Overheat.
The most important factors here is the "Fully replenish Ultimate Evasion skill charges" so you can continue the gameplay loop without forced downtime if you run out of Ultimate Evasions. This signet is very important for it's utility but also boosts her output!
Villv - Signet of Helix
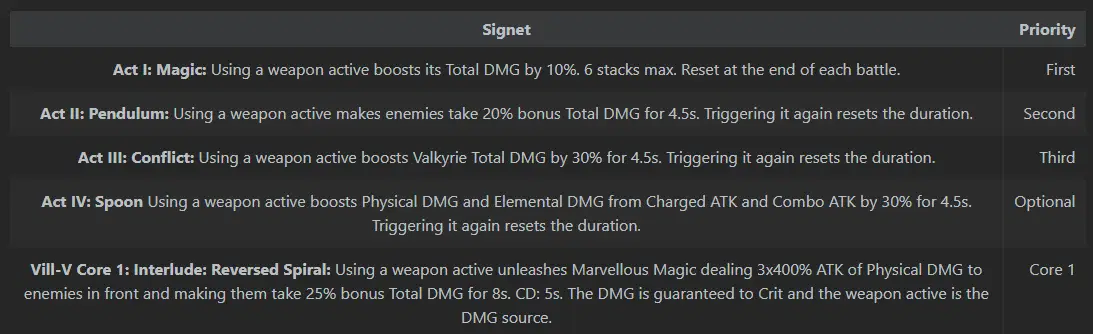
Senadina uses a "weapon spam" build so it only makes sense for her to want signets that helps amplify her WA damage.
Helix is hands down the strongest signet for Senadina to start with and she fully stacks up the Act I signet easily in normal play.
You decide to get the first "Core" because it has better performance compared to the second core without enhanced signets.
Look at it like this, the First core does Physical DMG sure, but it makes enemies take 25% bonus Total DMG.
The second core is great with the added grouping, but it's not as strong damage wise as 25% TDT even with adaptive DMG.
For the second core to be superior you would need to take the Enhanced Signets, but it's better to go for different signet types.
Su - Signet of Bodhi
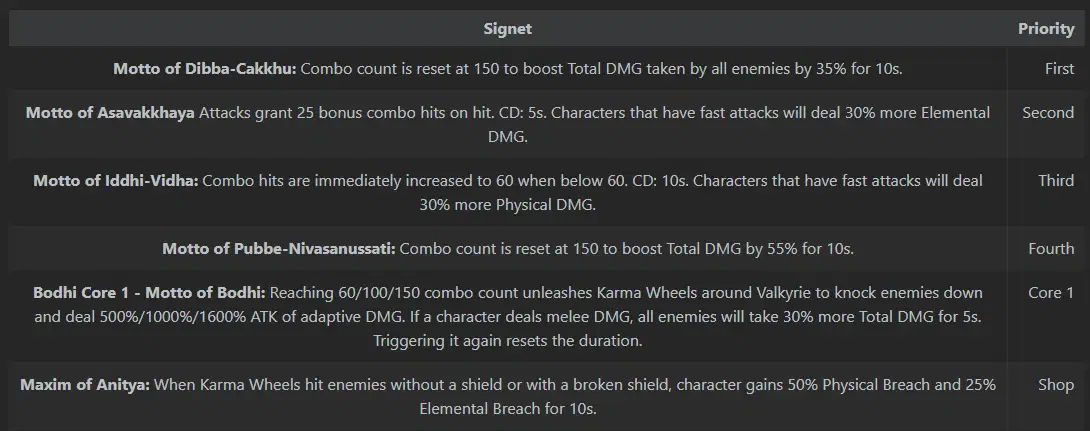
Despite not having the "Fast attack" tag Senadina has a deceptively high amount of hits on her weapon active letting her trigger Bodhi quite easily. Senadina is a melee DMG character so core 1 causes enemies to take 30% more Total DMG for 5 seconds. This makes Bodhi core 1 the best choice, superior to to the second core and giving more incentives to take Bodhi Signets!
If you are trying to speedrun, you could instead replace Bodhi signets with Kalpas and get it down the road.
Sakura - Signet of Setsuna
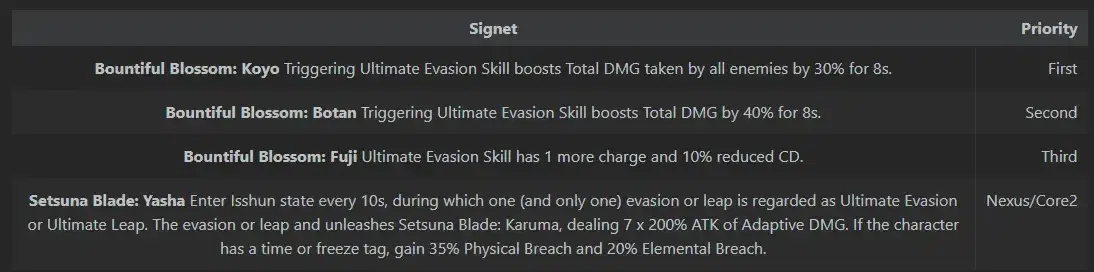
Senadina is extremely reliant on using Ultimate Evasions to deal her damage already, so taking Sakura Signets helps boost her performance without any forced changes to her gameplay at all. Because of how good it is I feel the need to point out the added Ultimate Evasion charge, it's good at helping with her gameplay loop and causing her to feel much smoother to play with it.
That being said, I prioritize the damage signets first against squishy enemies and get the longer rotation later for tanky enemies.
Sakura signets are currently +2 so she will benefit even more from the damage boosts and reduced Ultimate Evasion CD.
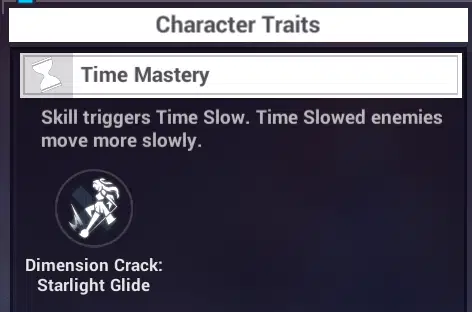
Because of her "Time Mastery" tag she will also gain additional bonuses from Sakura signets, 20% added Elemental Breach!
Griseo - Signet of Stars
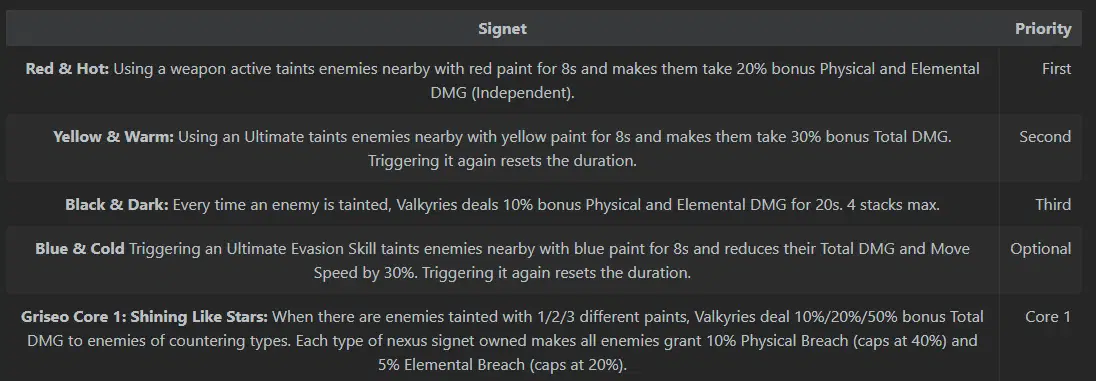
Well you definitely want Red paint, even if you choose to skip this Signet you want to get Red paint from shop for sure.
Red Paint is an independent multiplier so it scales differently compared to other Signets, It's probably the strongest Basic Signet!
Moving on, I recommend getting Griseo signets, Senadina is able to trigger all primary colors in her normal gameplay actions.
Because you are taking this later you will also get 20% Elemental Breach alongside the normal effects.
Pardofelis - Signet of Reverie
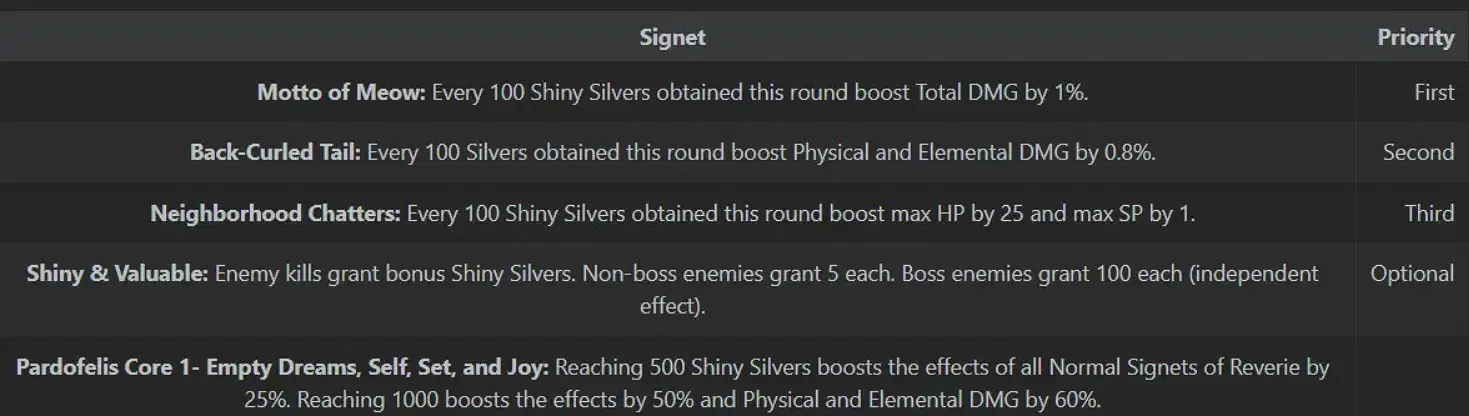
And finally wrap everything up with Pardo Core 1 as the last core when you have alot of Shiny Silvers for the boosted effects.
Pardo's Shop:
Griseo - Red paint if you manage to see it early, this is a very high priority.
Kalpas - Both damage boosts / max hp / vulnerability if you decide to go for core 2.
Hua - If you are in a position where you can easily finish the second core especially if you plan to use Kalpas.
Bodhi Breach Enhanced Signet if you see it
Pardofelis - Both damage boosts extra coins dropped from enemies is really strong too.
Early Game Strategy.
Start with Blessing of Initial Dawning and Reset for an Elysia door and with the aim to take Blessing of Stellar Drive.
From there on fight your way to floor 4 prioritize entering Helix doors and use the bonus reward after defeating the boss to pickup core I, go to the shop at round 6 and change Psuedo Miracle to work on another signet of your choice depending on what you can buy in the shop. In an ideal world you would find Bodhi signets letting you grab Light as a Bodhi Leaf as Sigil.
Other important things to find in the shop include Sakura and Griseo signets unless you are feeling confident enough to Kalpas.
If you don't feel like resetting take "Because of You" from the start, then take advantage of the double round on floor 7 to grab both Blessing of Stellar Drive and Blessing of Effortlessness. Just keep in mind your current capabilities and gearing level so you know if you would be able to clear the bonus round single boss within 80 seconds.
Gameplay Video
This is just a gameplay example and not indicative of her performance this version of Elysian Realm.
Closing
That's all for this guide~ I hope this helped!
Thanks to everyone that follows or leaves a like and follow I really appreciate it!
If you have any questions feel free to message me here or on discord "Kithicide"




