



Greetings Chests Hunters!
This is Part 3 of my Sumeru Desert Common Chest guide. There are a total of 201 Common Chests found in the desert. Due to the sheer amount of chests, the Sumeru Desert Common Chest guide is broken up into the following:
Part 1: Land of Lower Setekh: 1 - 71
Part 2: Land of Upper Setekh: 72 - 111
Part 3: Hypostyle Desert: 112 - 201 (You are here!)
For those who are looking for guides on the other types of Sumeru Desert chests, check out the link below:
Max Counts / All Chests for Sumeru Desert
This makes a total of 2373 Common Chests in the game. If you have higher than this number, you can check out the link below explaining bugs in the battle chronicle chest count.
Chest Bugs for Battle Chronicle
Guide Notes / Suggestions
1. Much of the Sumeru Desert exploration is locked behind quests, so I would highly suggest completing the Golden Slumber, Old Notes and New Friends, and Afratu's Dilema World Quests before conducting your chest sweeps
2. Missable Chest(s): Vase Chest (Chest 152)
3. The guide below is divided into an Above Ground and Below Ground section to make it easier to locate the chests.
4. Use Ctrl-F if you are looking for specific types of chests. I will be using the following key terms to make this easier:
Seelie
Time Trial Challenge
Quest
Mirage
Totem
Torch
Sandglass
Everlight Cell Puzzle
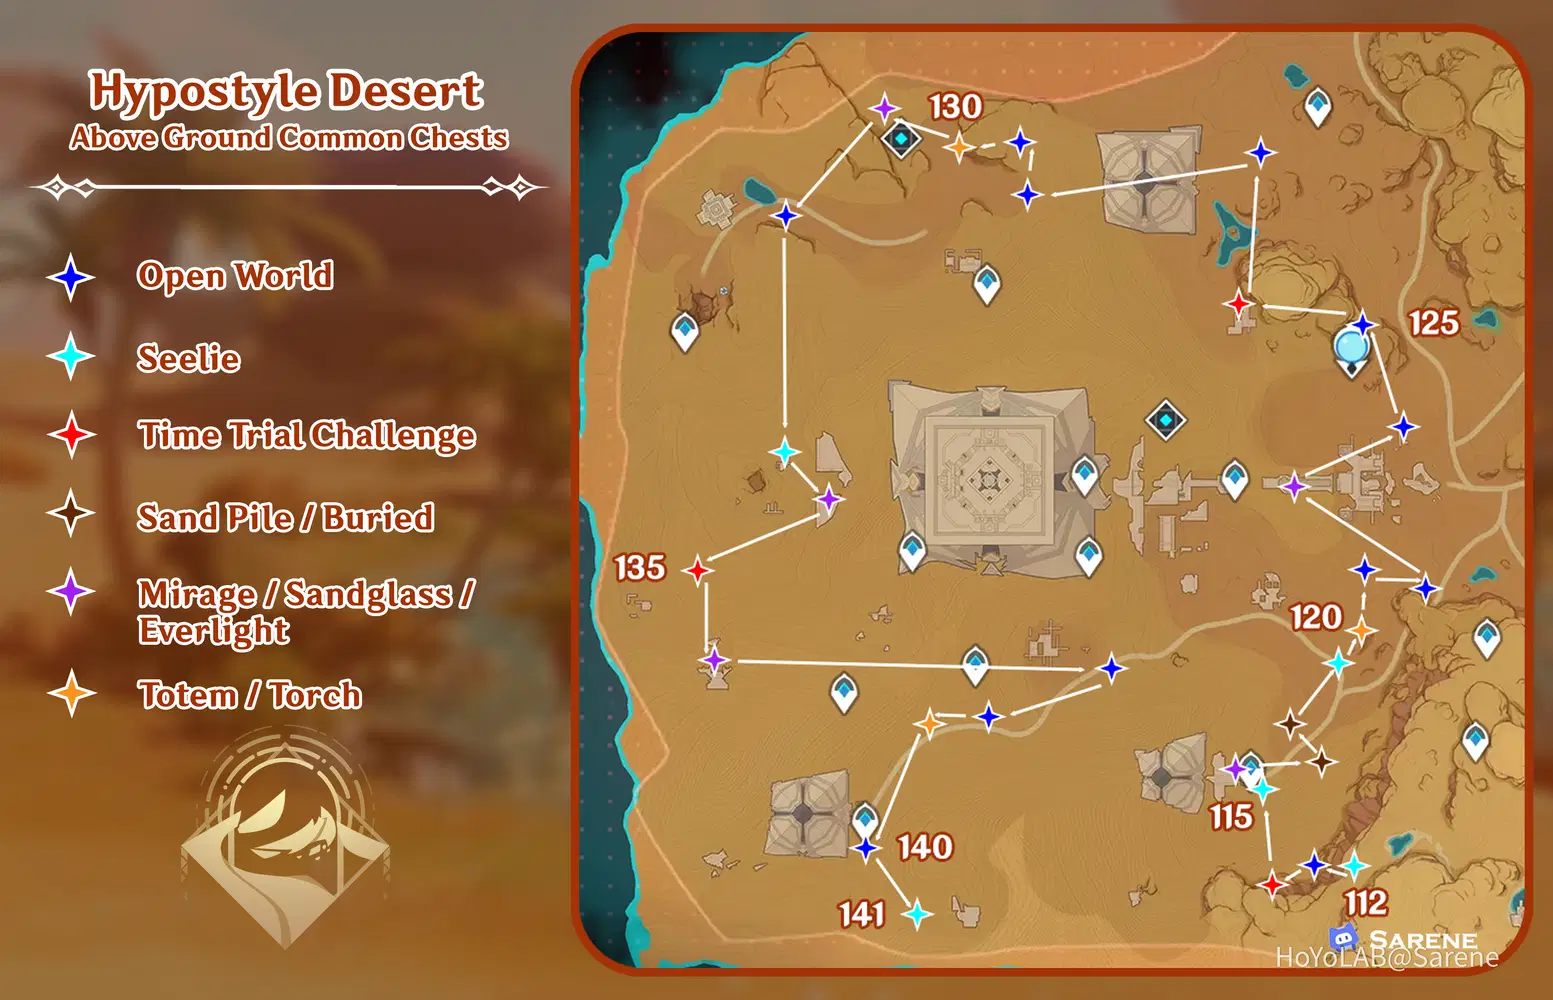
Hypostyle Desert - Above Ground
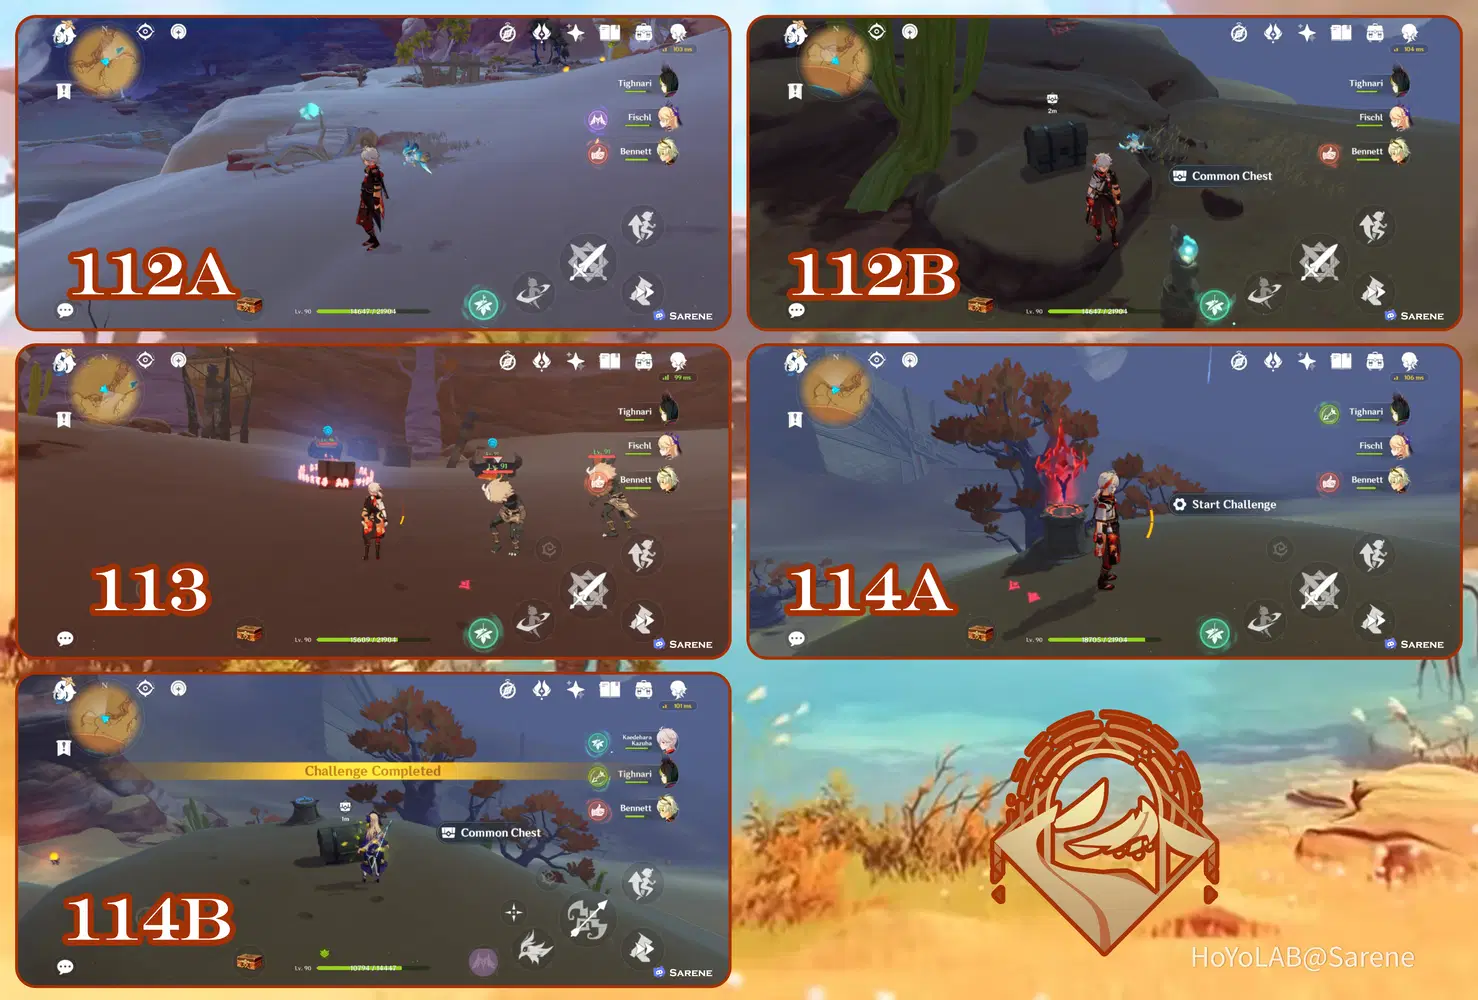
112 - 114
112. Follow the Seelie to its court
113. Defeat the Hilichurls
114. Complete the Time Trial Challenge

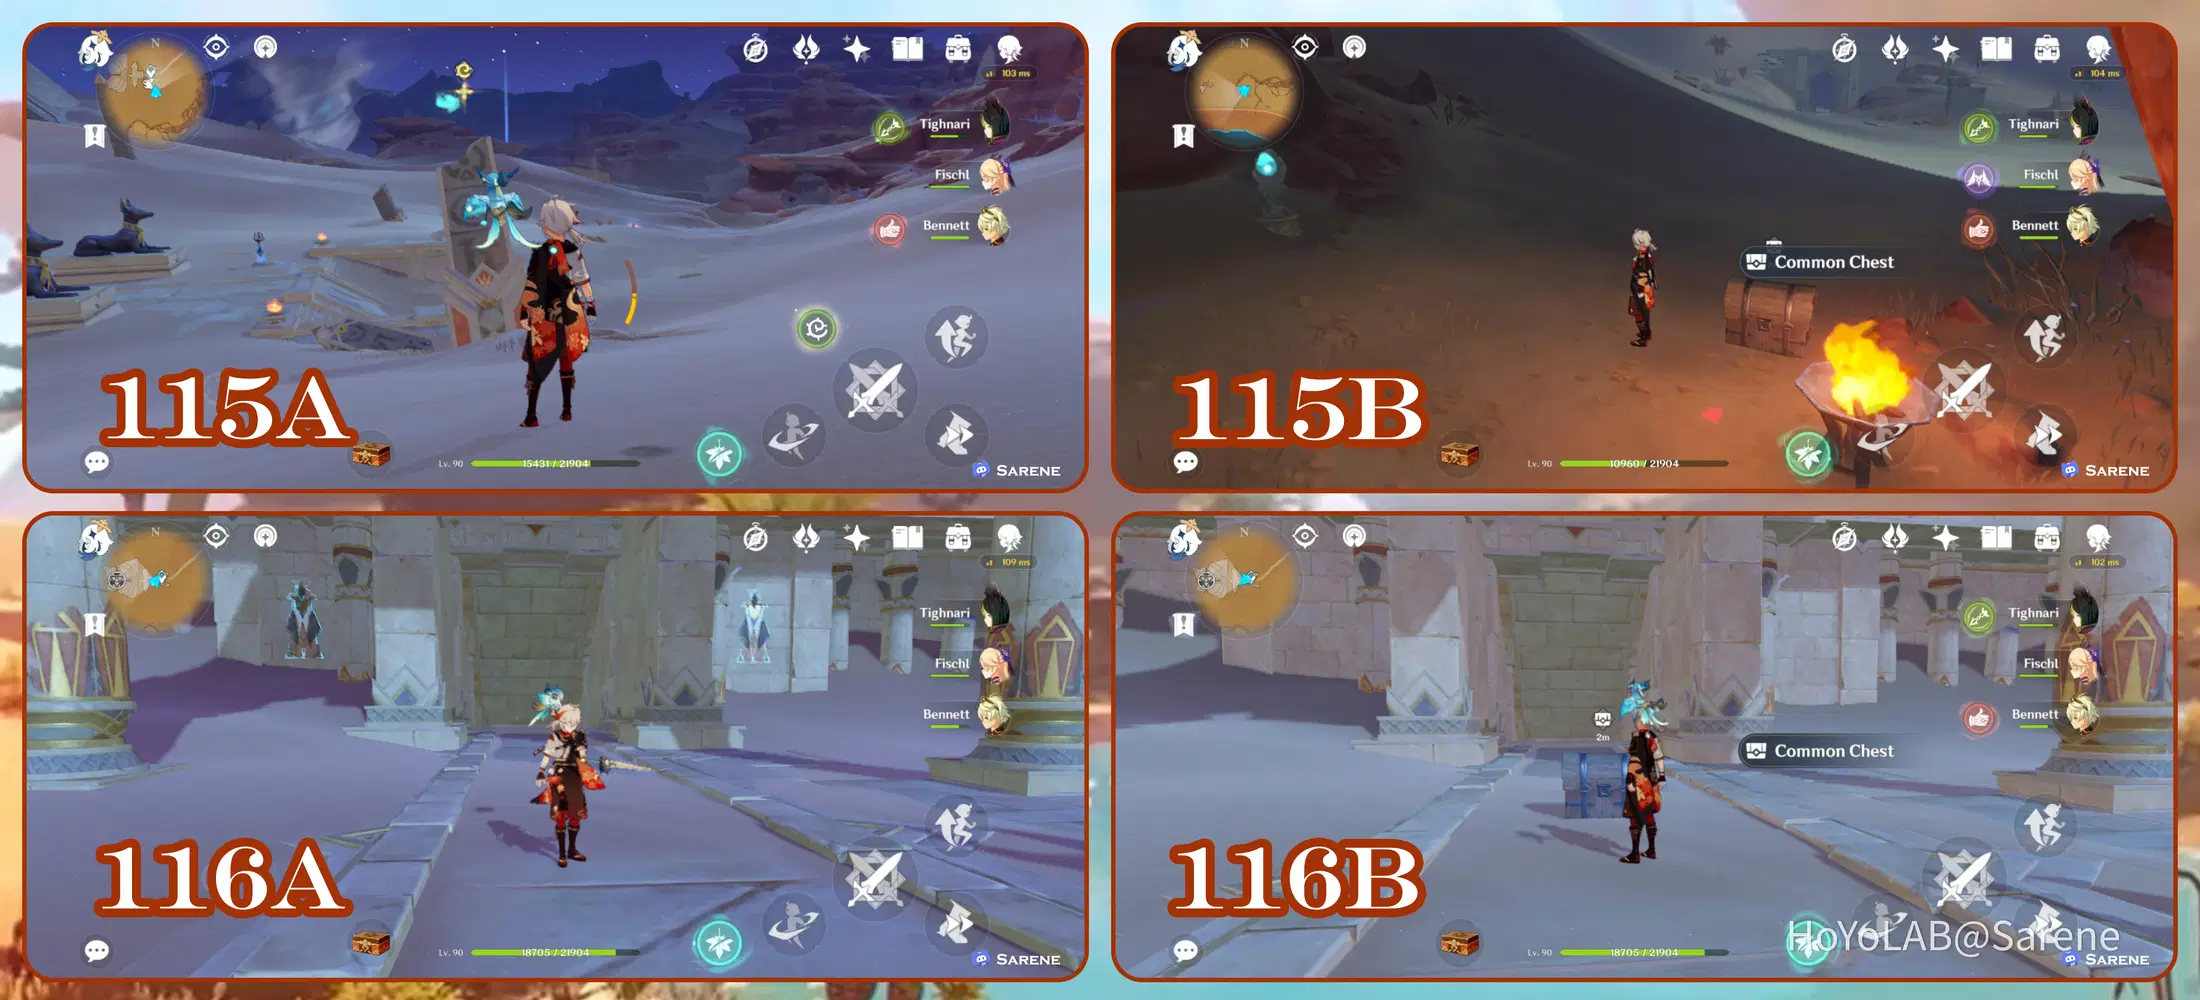
115 - 116
115. Follow the Seelie to its court
116. Make sure the time is set to night (18:00 - 6:00). Touch the Mirages and defeat the enemies to spawn the chest
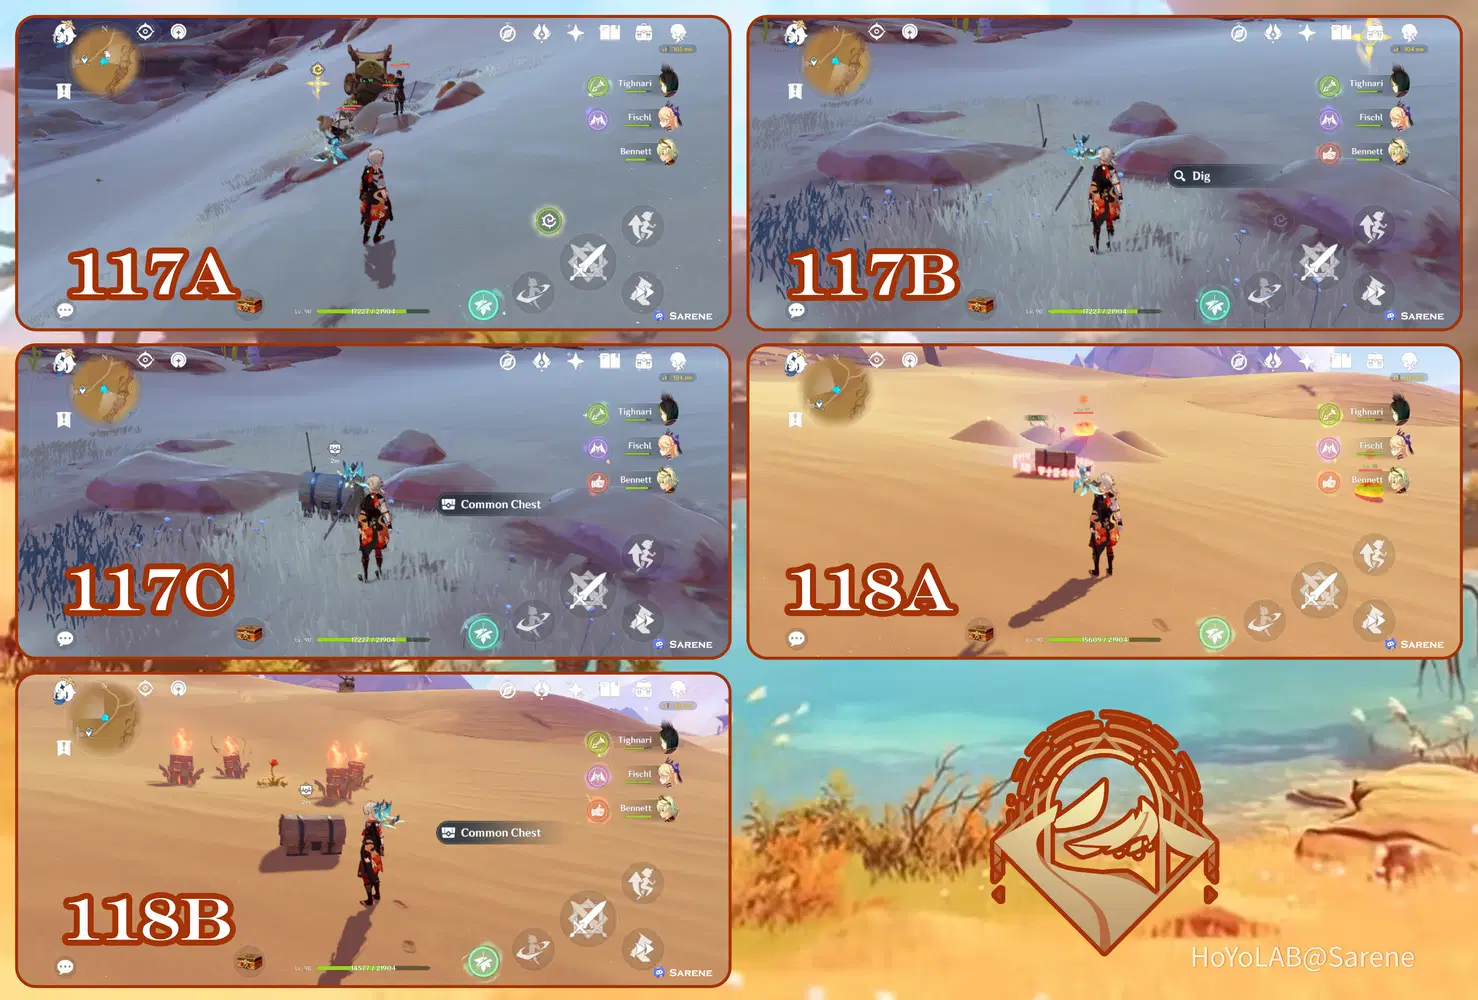
117 - 118
117. There will be some treasure hoarders near some shovels. Dig the buried chest located in the middle
118. Use Anemo to reveal the totems hidden under the Sand Piles. Then light the totems with pyro to reveal the chest.
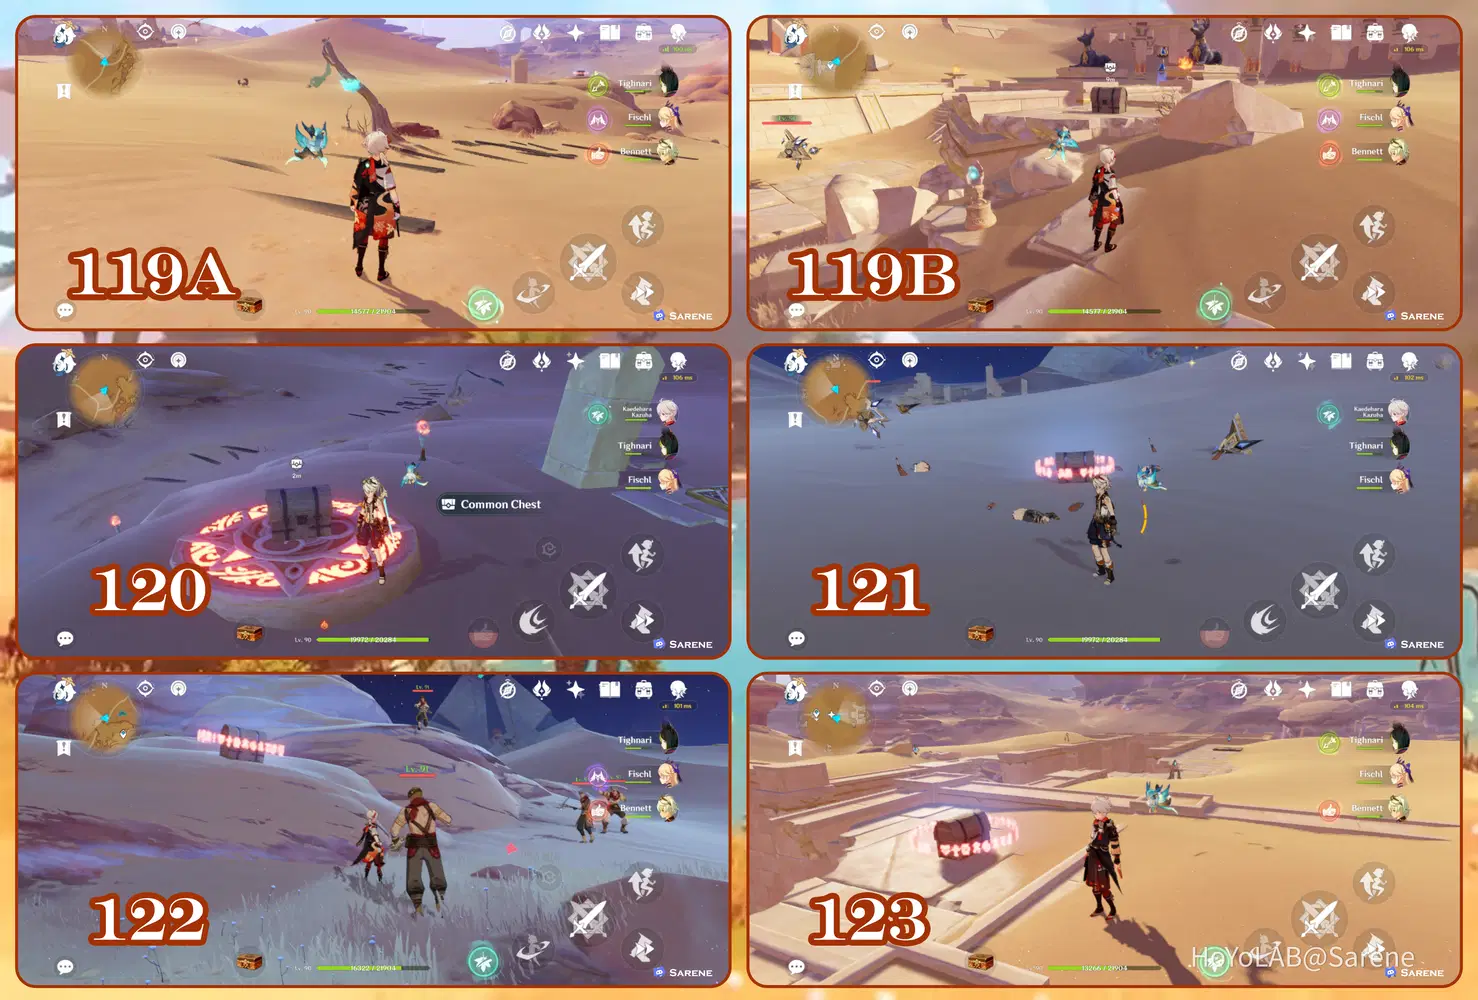
119 - 123
119. Follow the Seelie to its court
120. Light the torches. Use the nearby verity cell to reveal hidden torches.
121. Defeat the Primal Construct
122. Defeat the Treasure Hoarders
123. Complete the Everlight Cell Puzzle
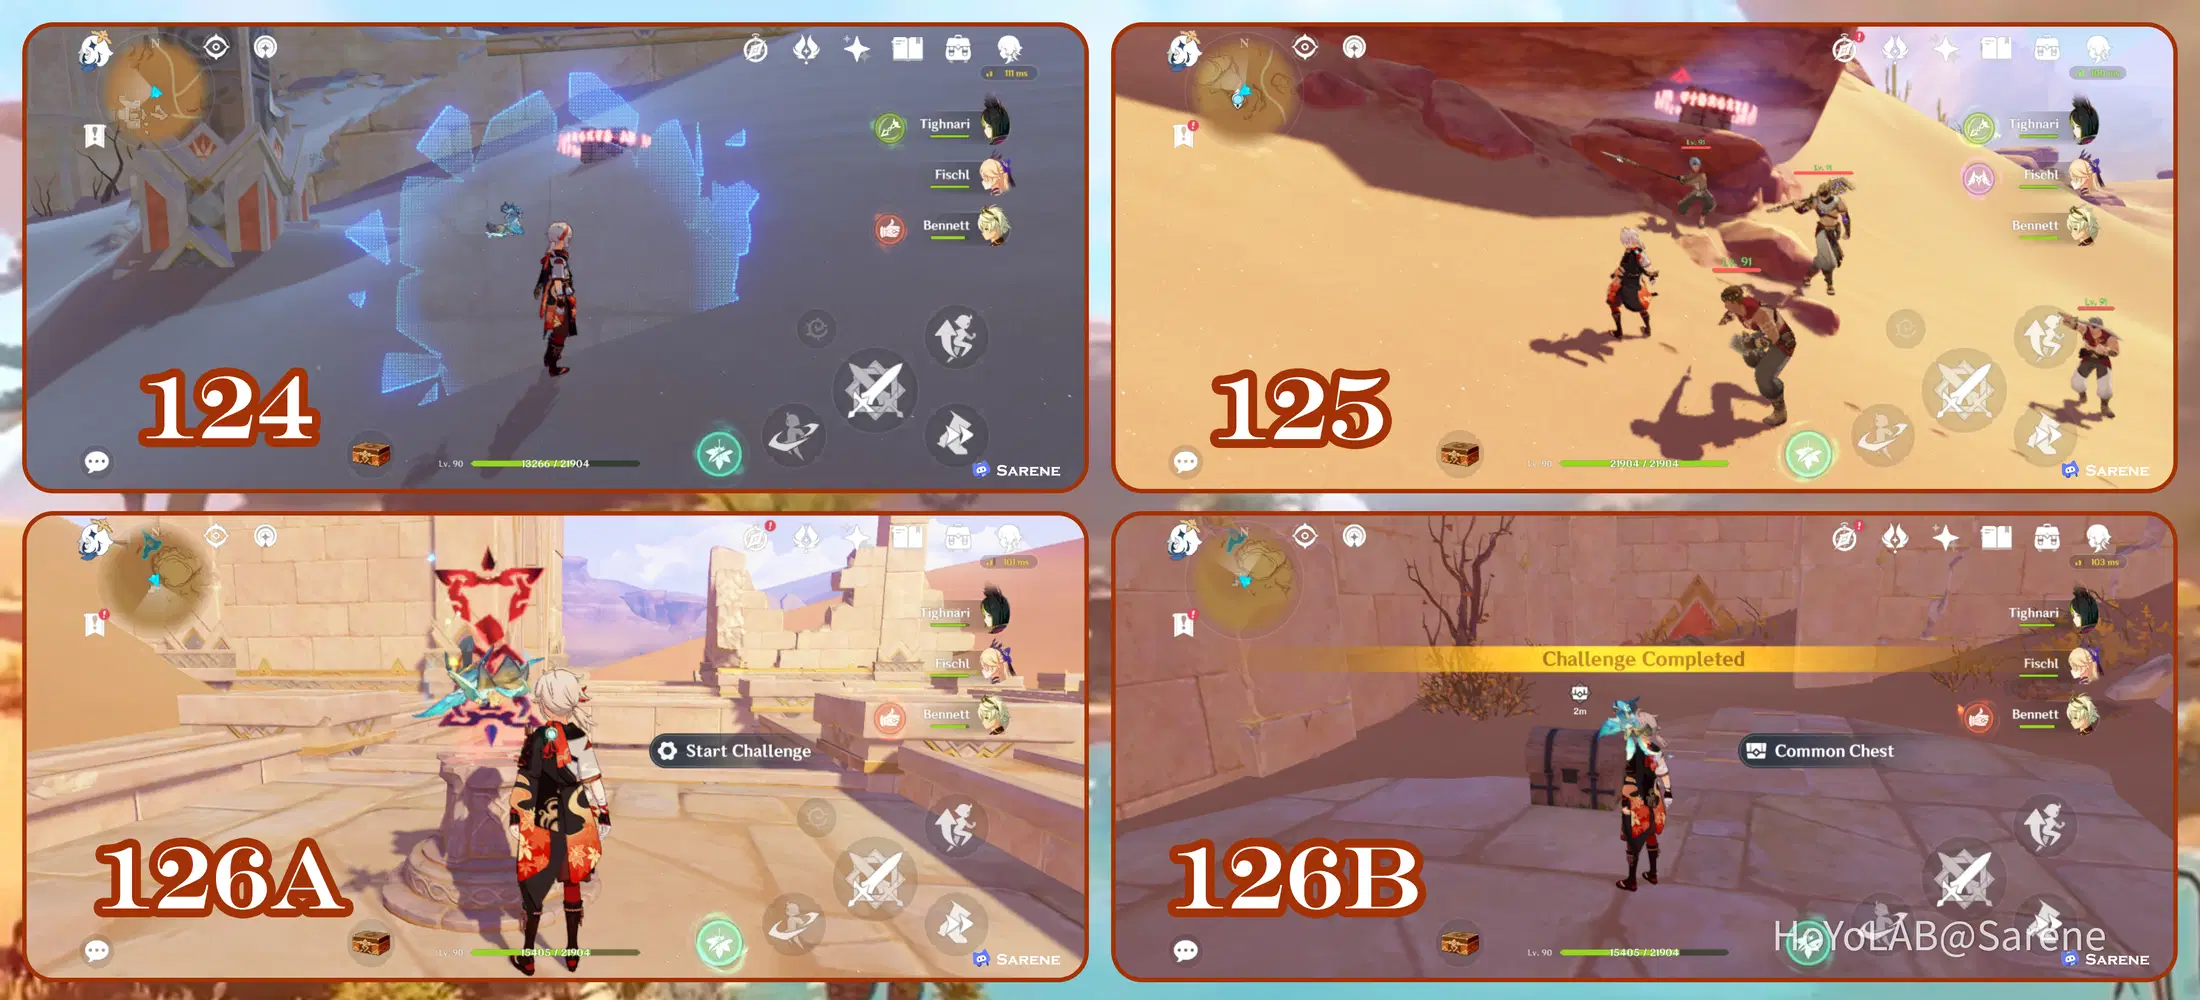
124 - 126
124. Reach the chest behind the invisible wall
125. Defeat the Eremites
126. Complete the Time Trial Challenge
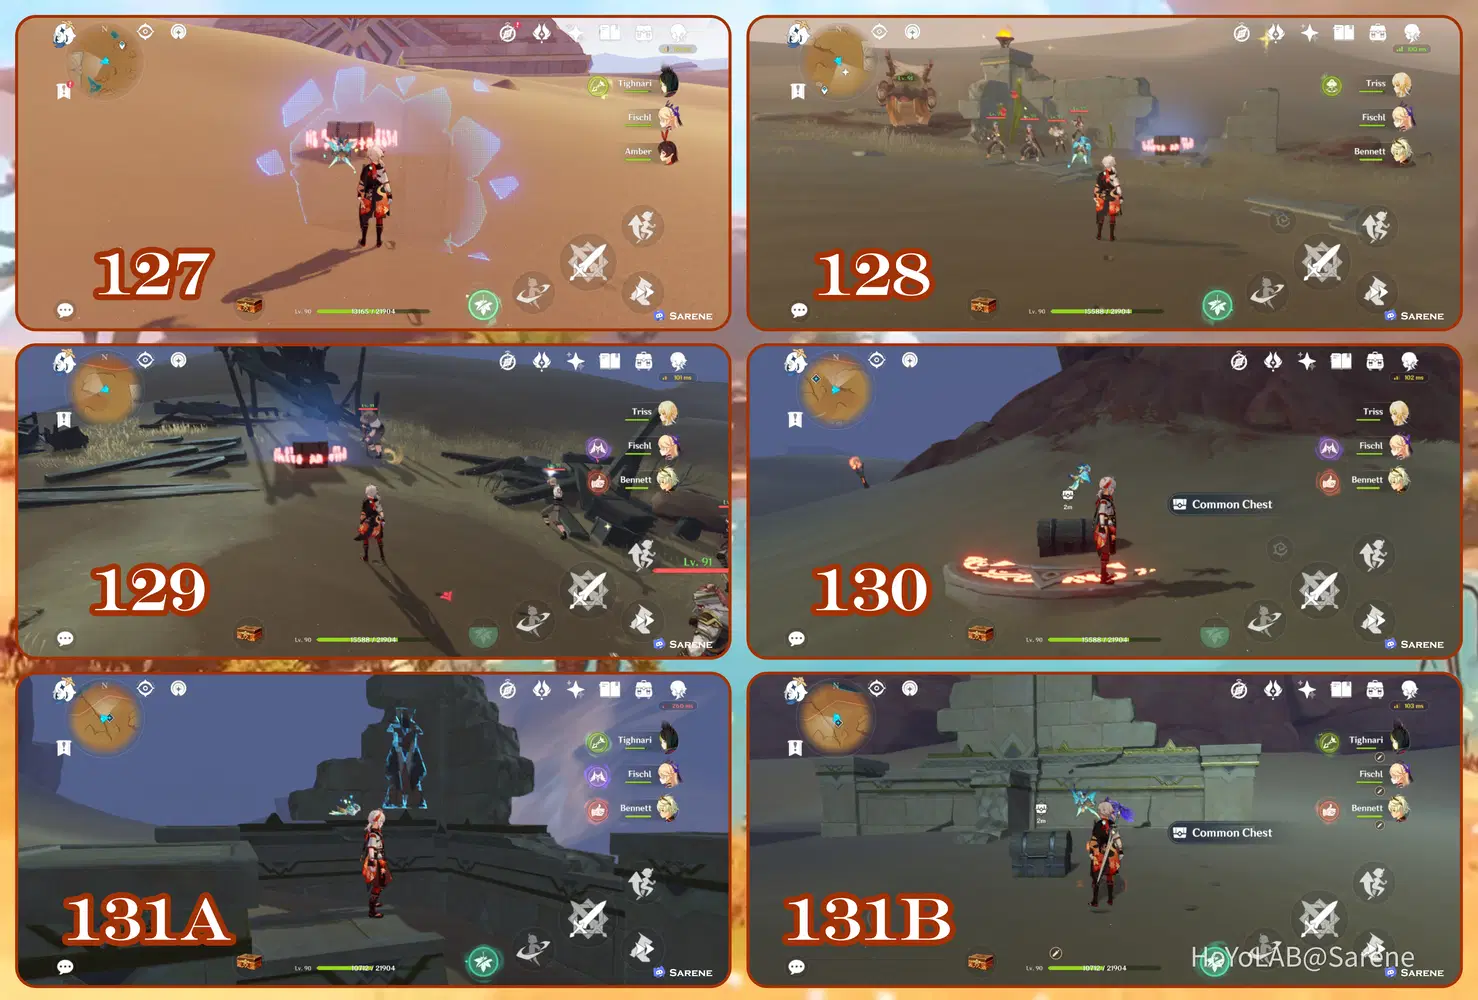
127 - 131
127. Find a path to the chest behind the hidden wall. (Hint: Go Up)
128. Defeat the Eremites
129. Defeat the Treasure Hoarders
130. Light the nearby torches
131. Make sure the time is set to night (18:00 - 6:00). Touch the Mirages and defeat the enemies to spawn the chest
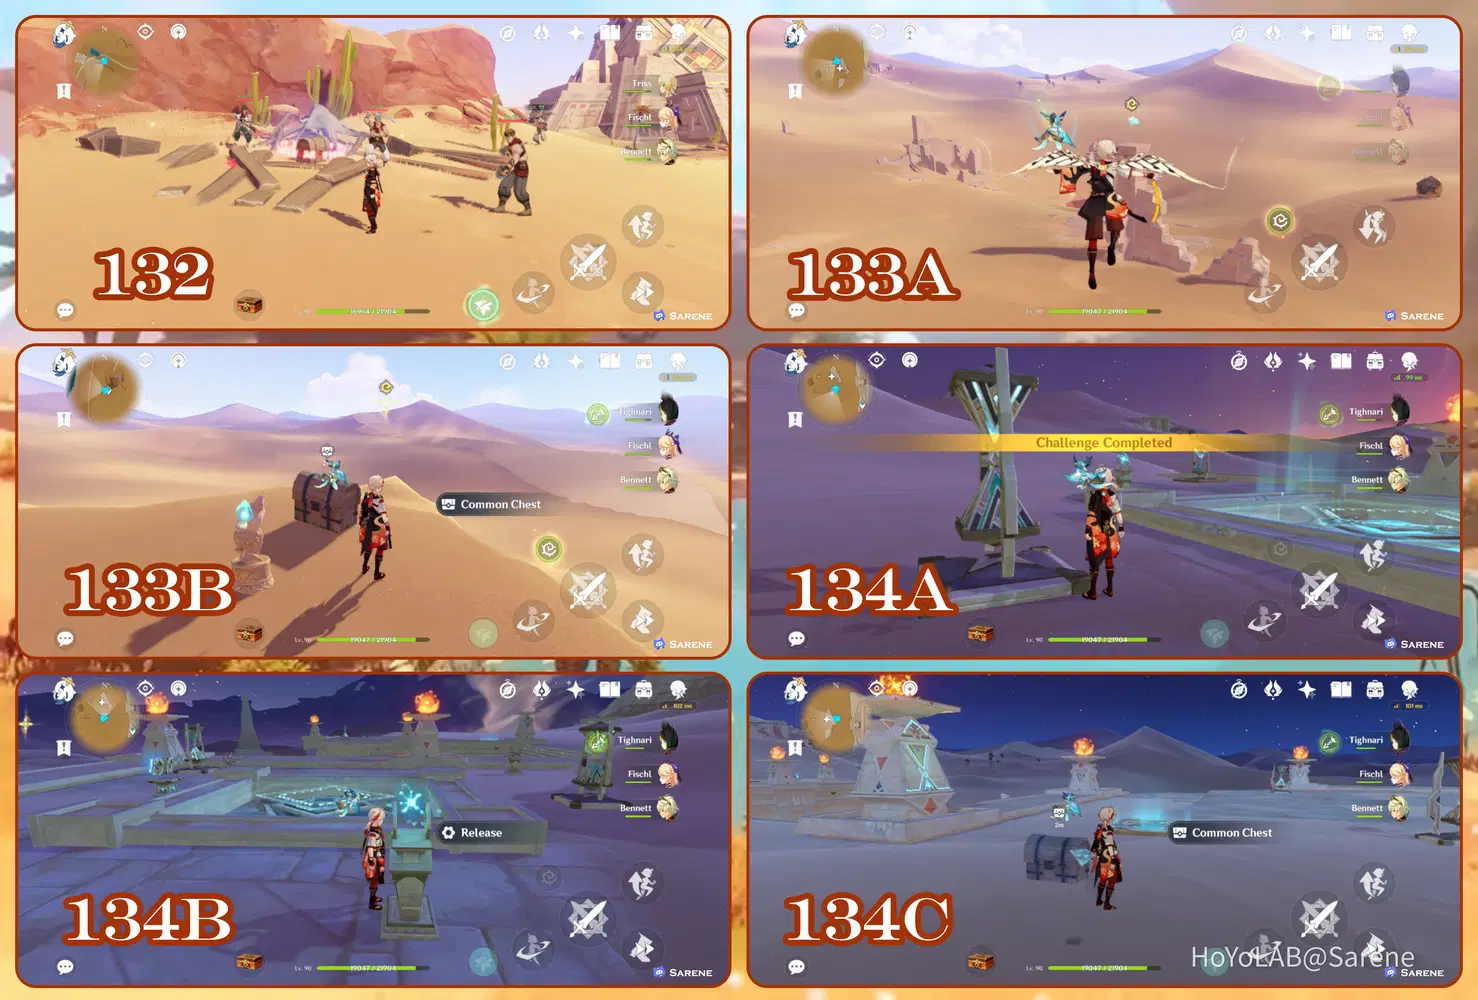
132 - 134
132. Defeat the Eremites
133. Follow the Seelie to its court
134. Complete the Sandglass Challenge. Then Release the Primal Ember to reveal the chest.
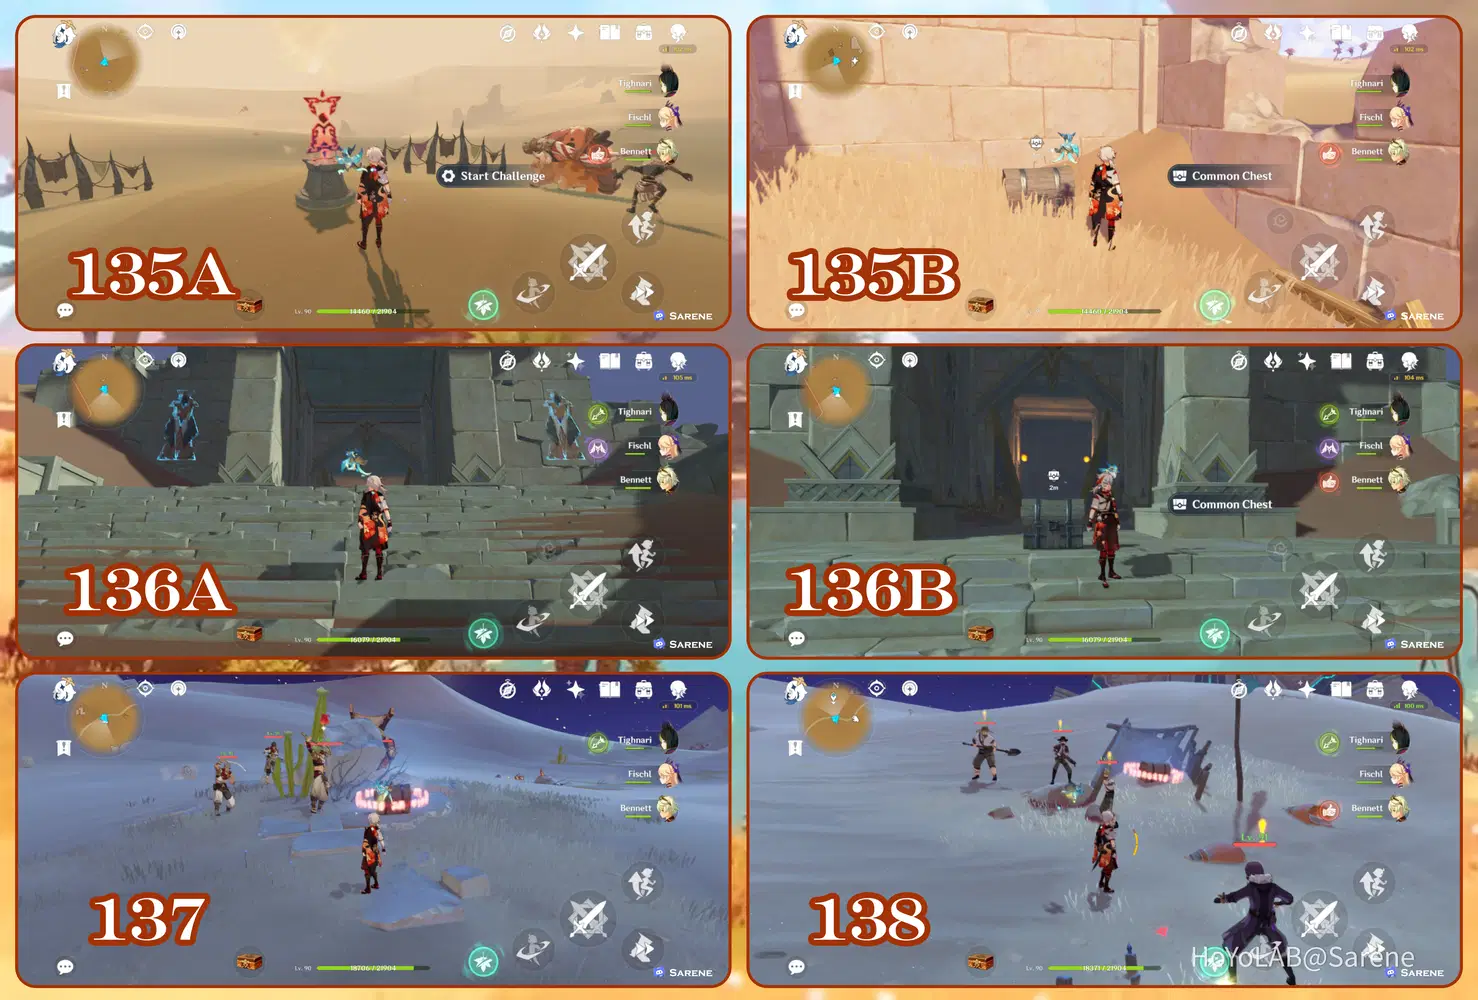
135 - 138
135. Complete the Time Trial Challenge
136. Make sure the time is set to night (18:00 - 6:00). Touch the Mirages and defeat the enemies to spawn the chest
137. Defeat the Eremites
138. Defeat the Treasure Hoarders
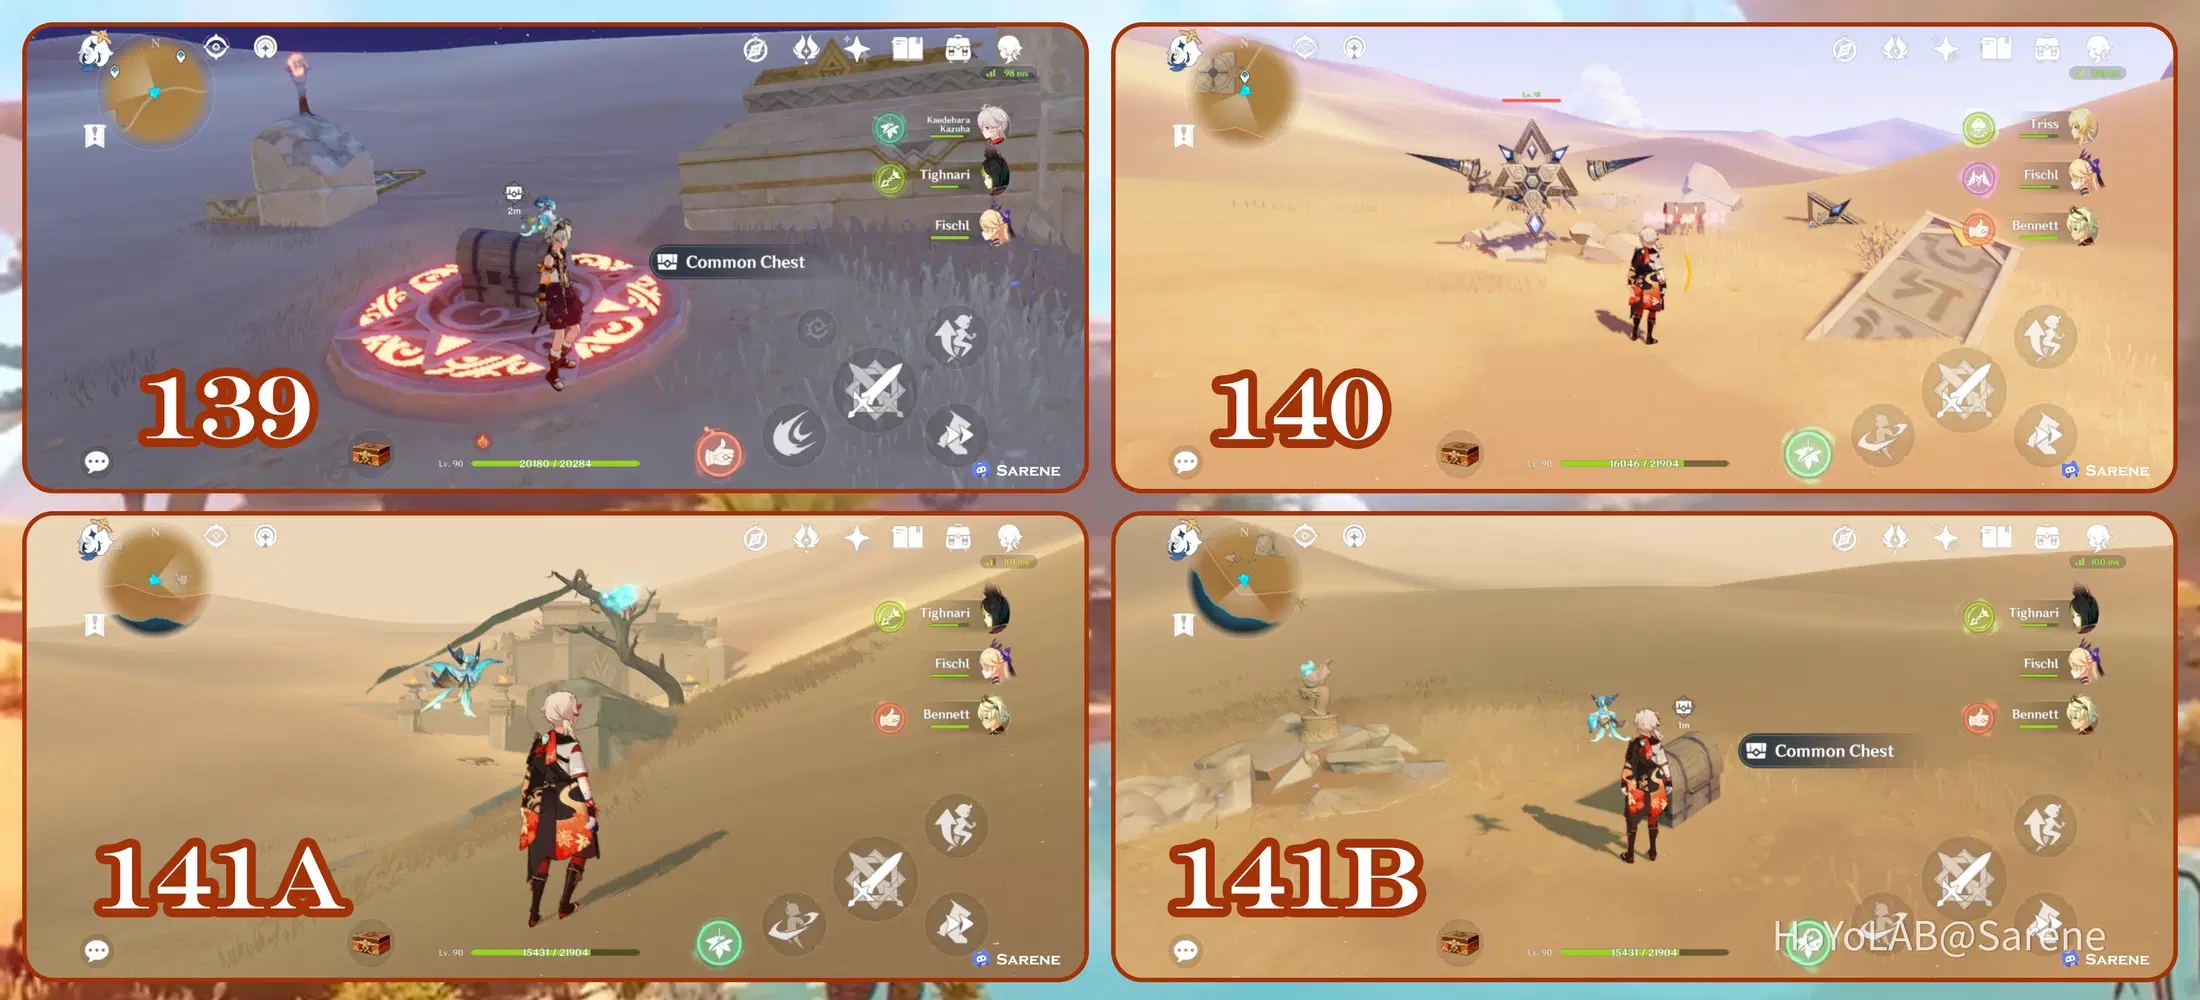
139 - 141
139. Light the nearby torches. Use the verity cell to reveal the hidden ones.
140. Defeat the Primal Construct
141. Follow the Seelie to its court
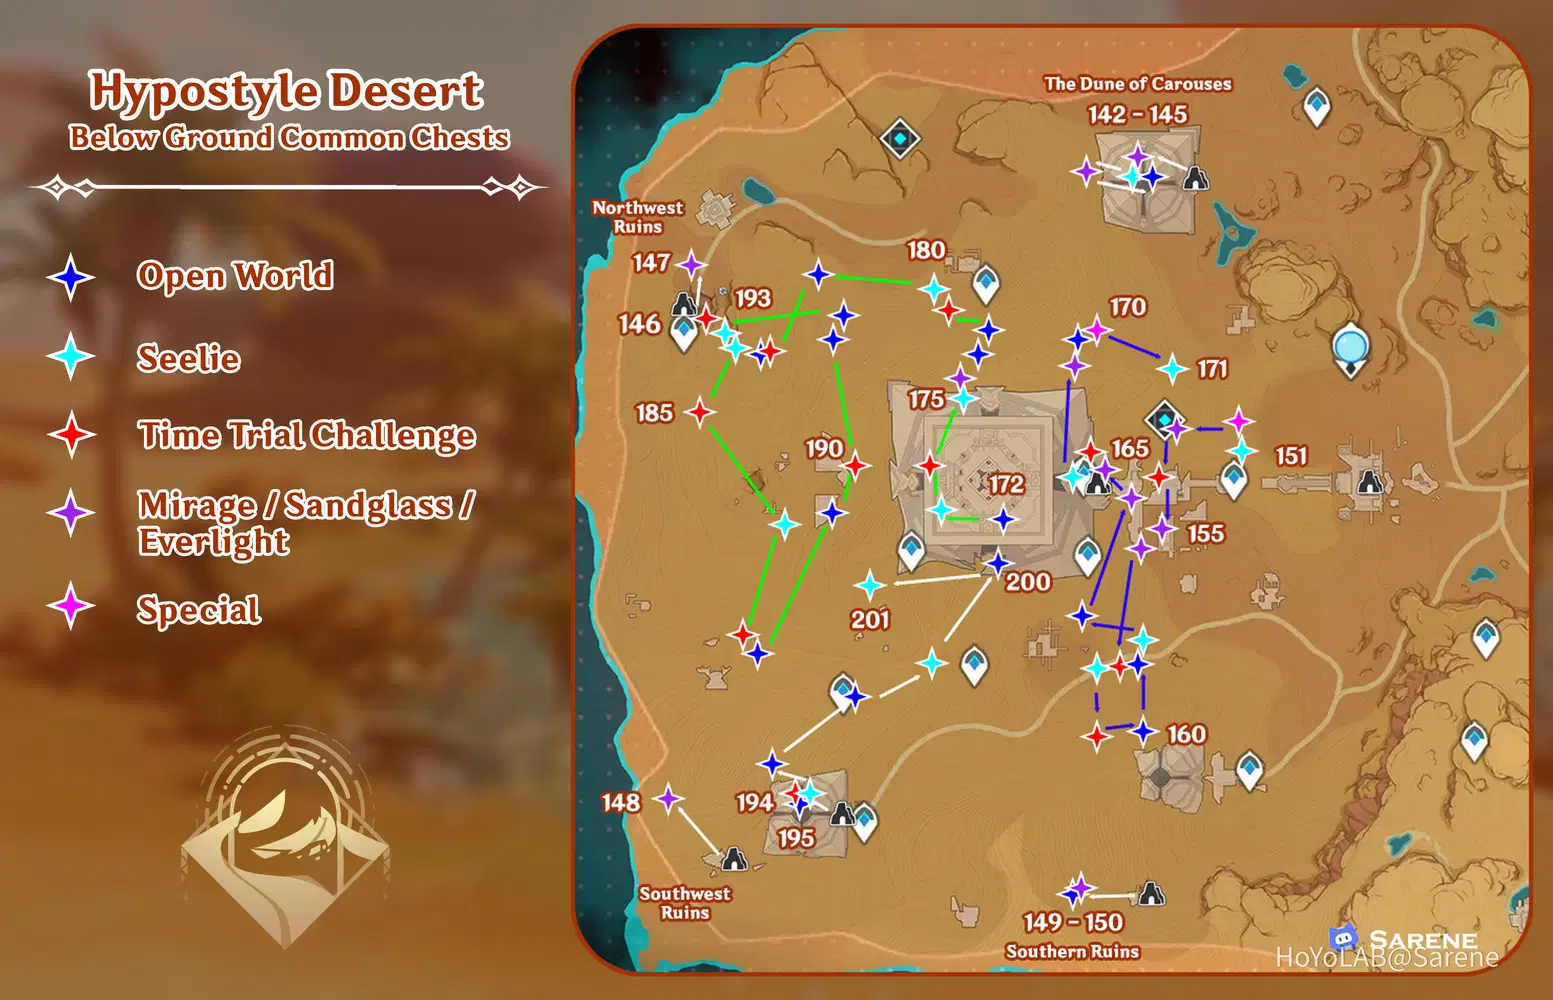
Hypostyle Desert - Below Ground
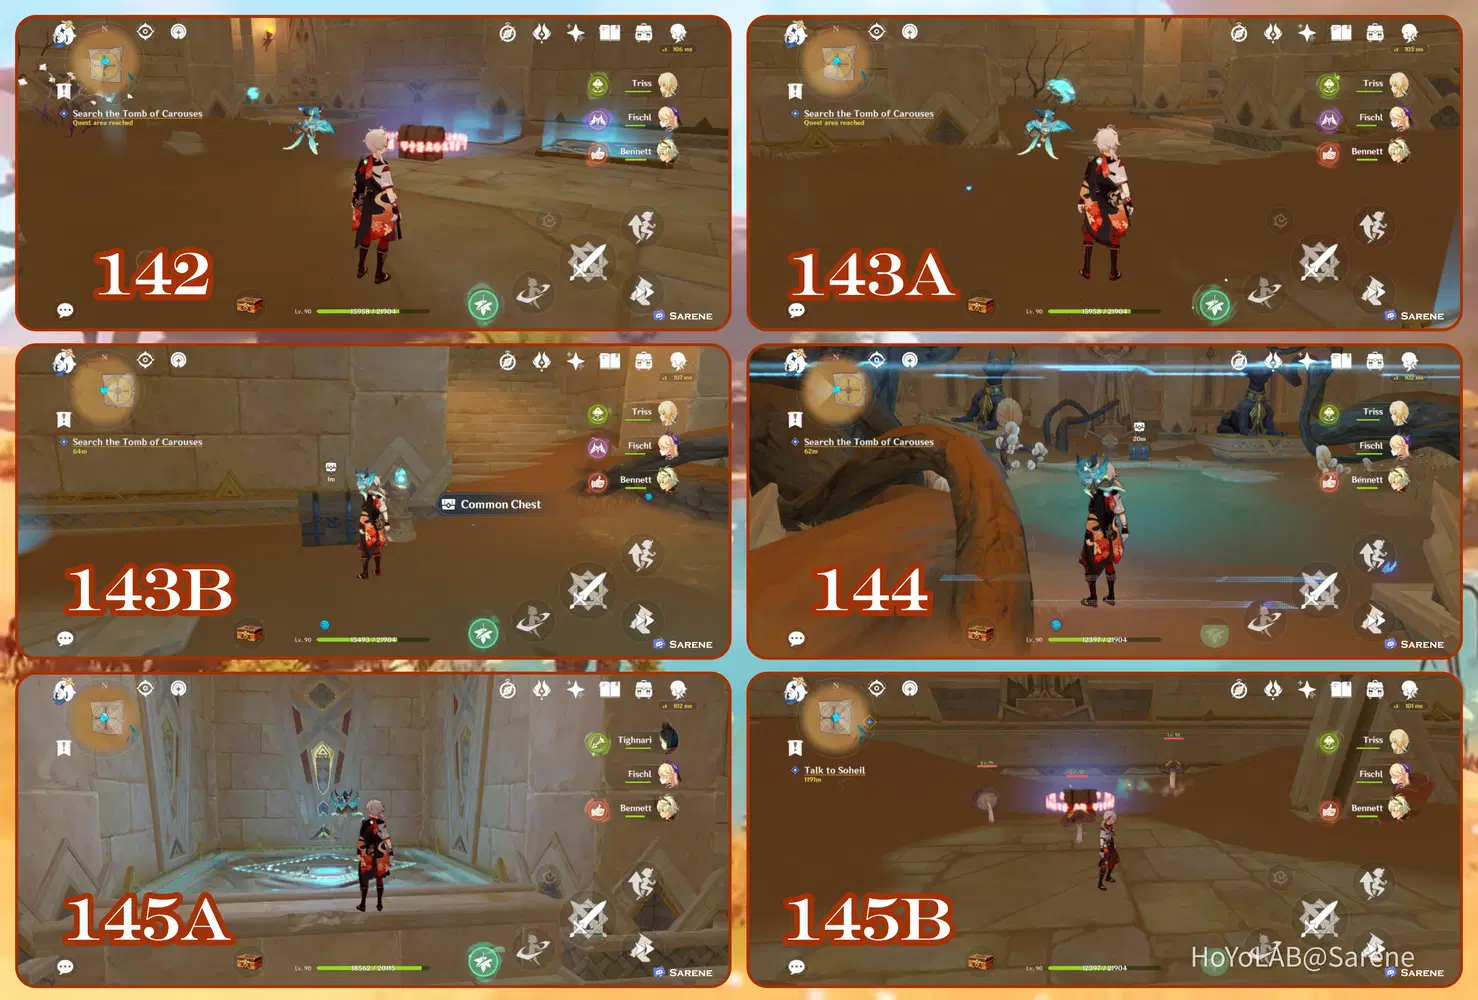
Chests 142 - 145 are all found in The Dune of Carouses. (Part of Soheil's Wish World Quest)
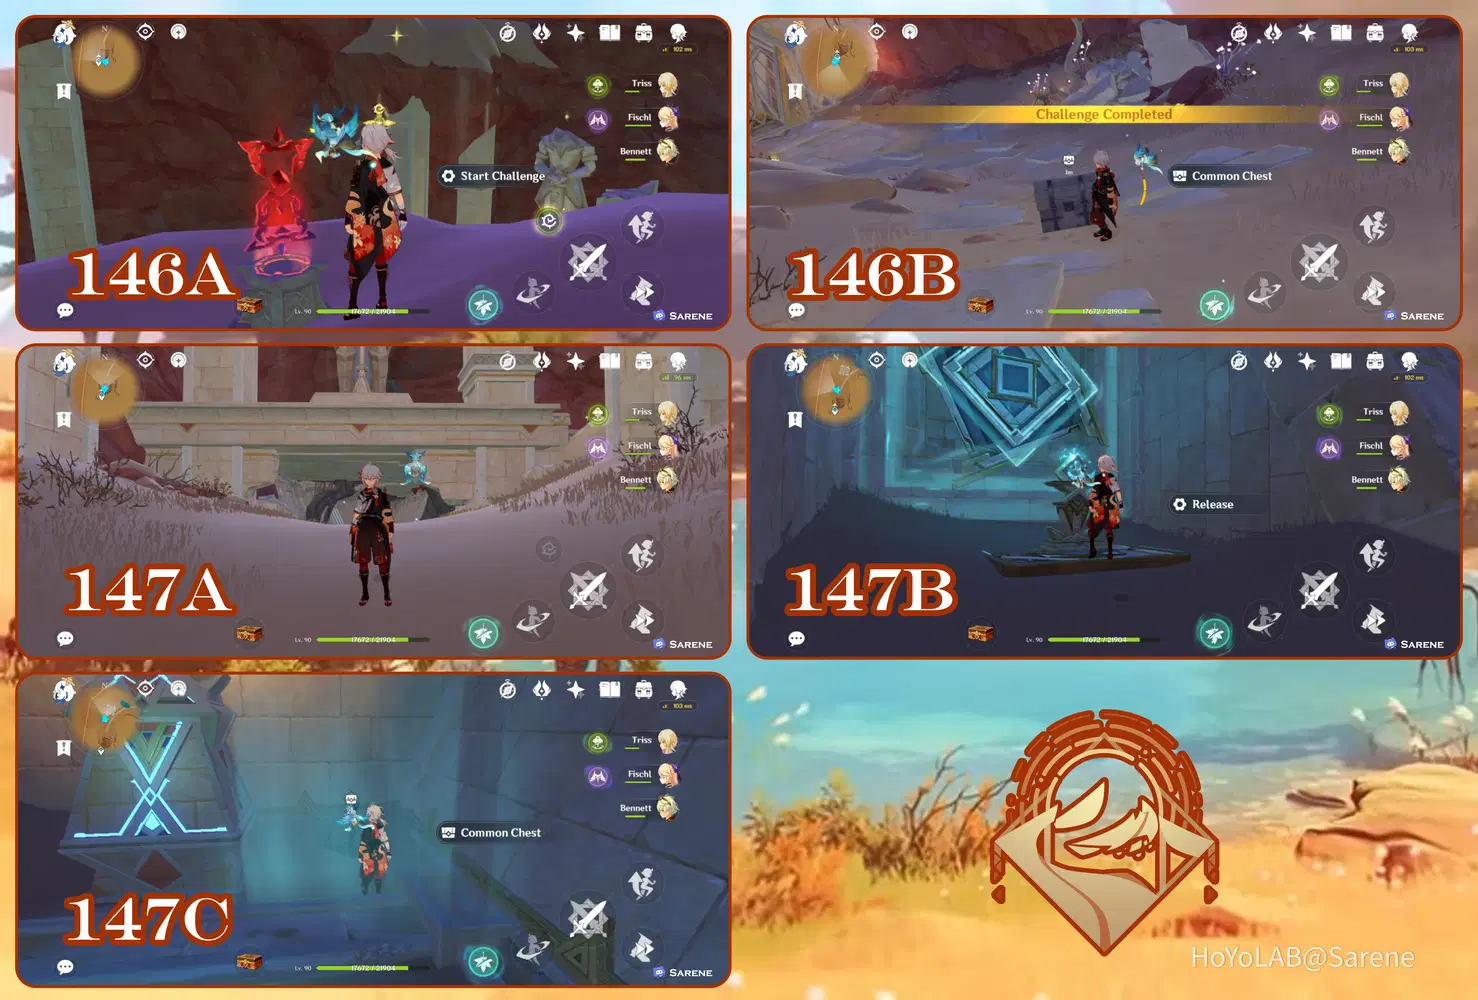
Chests 146 - 147 are found in the Northwestern Ruins
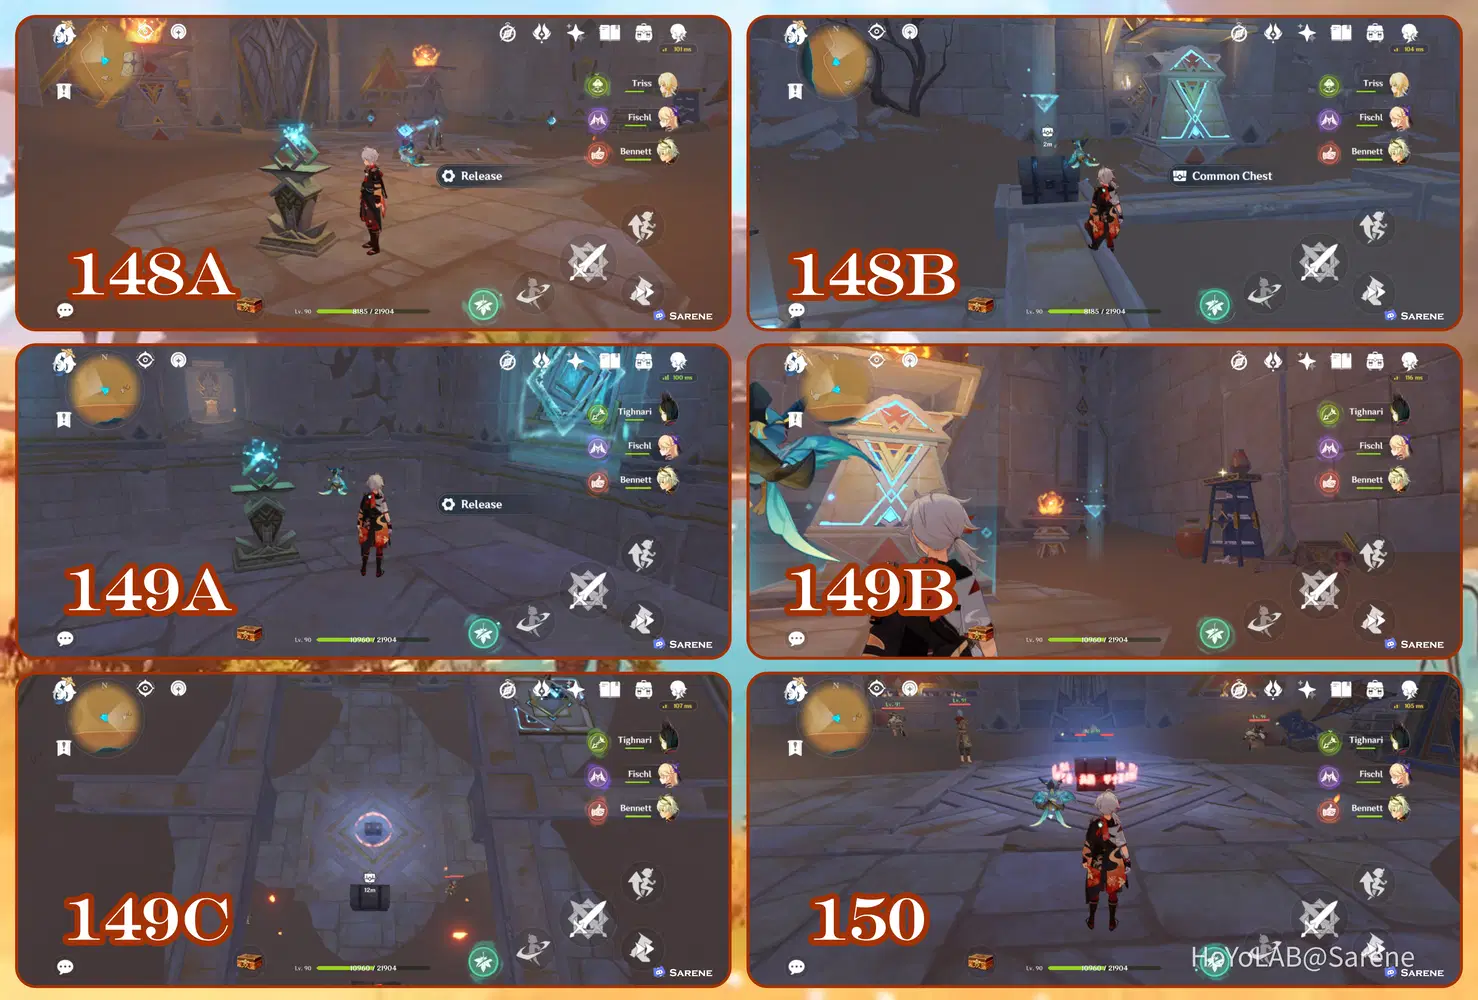
Chest 148 is in the Southwestern Ruins
Chests 149 - 150 are in the Southern Ruins
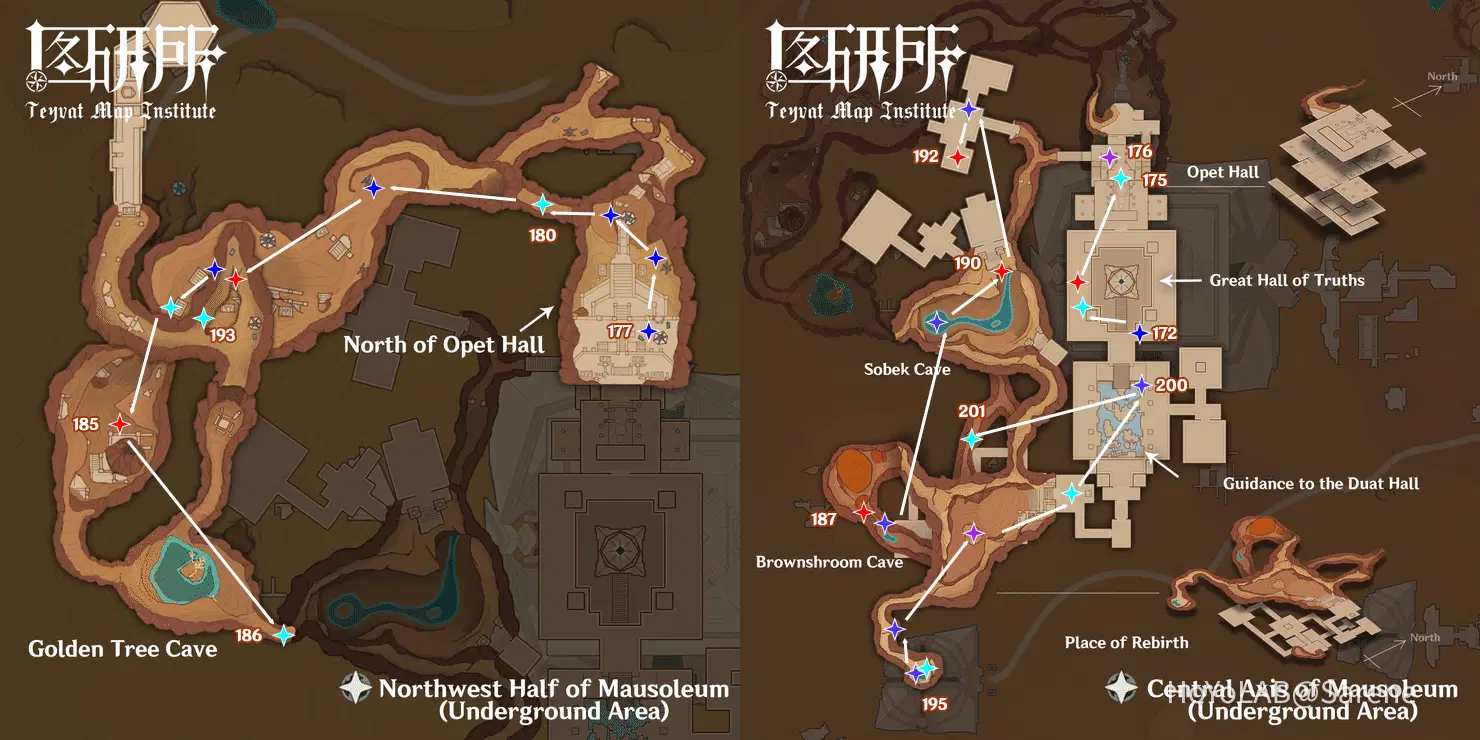
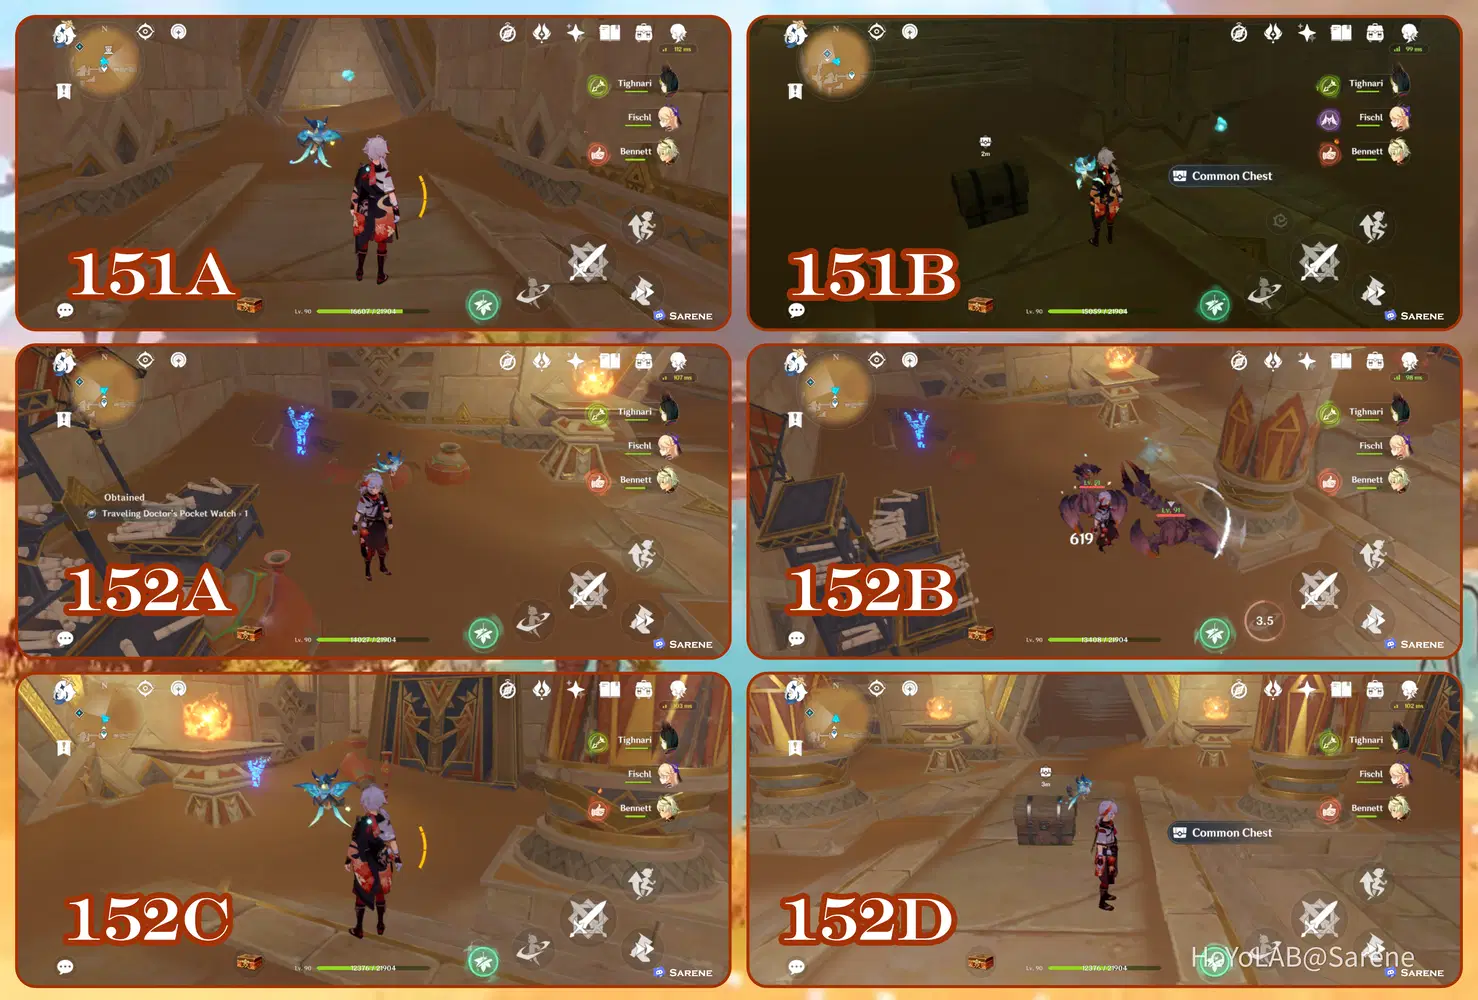
Chests 151 - 171 are found in the Eastern Half of the Mausoleum
Chests 172 - 193 are found in the Western Half of the Mausoleum
Chests 194 - 201 are found in the Southern Half of the Mausoleum
See the underground Map created by Teyvat Map Institute (提瓦特图研所 on Bilibili) below if you get lost. They were kind enough to allow me to use their map for my guides. You can check out their other amazing maps here.
142 - 145
142. Complete the Everlight Cell Puzzle
143. Follow the Seelie to its court
144. Complete the Everlight Cell Puzzle
145. Activate the ****on and use the fan to glide to the top level. Then defeat the fungi.
146 - 148
146. Complete the Time Trial Challenge
147. Go into the tunnel under the statue. Release the Primal Ember to light its torch.
148 - 150
148. Release the Primal Ember to light its torch
149. Release the Primal Ember to light its torch. Then obtain the Replicator Keystone to activate the Obscuring Cell which reveals the chest.
150. Take the elevator to the floor below Chest 149 and defeat the Eremites.
151 - 152
151. Follow the Seelie to its court
152. Drop down to the floor below. Go to the room with the invisible torches and destroy the vases in the corners of the room. Defeat the scorpions that spawn to obtain the chest.
153 - 155
153. Complete the Sandglass Challenge
154. Complete the Time Trial Challenge
155. Complete the Everlight Cell Puzzle
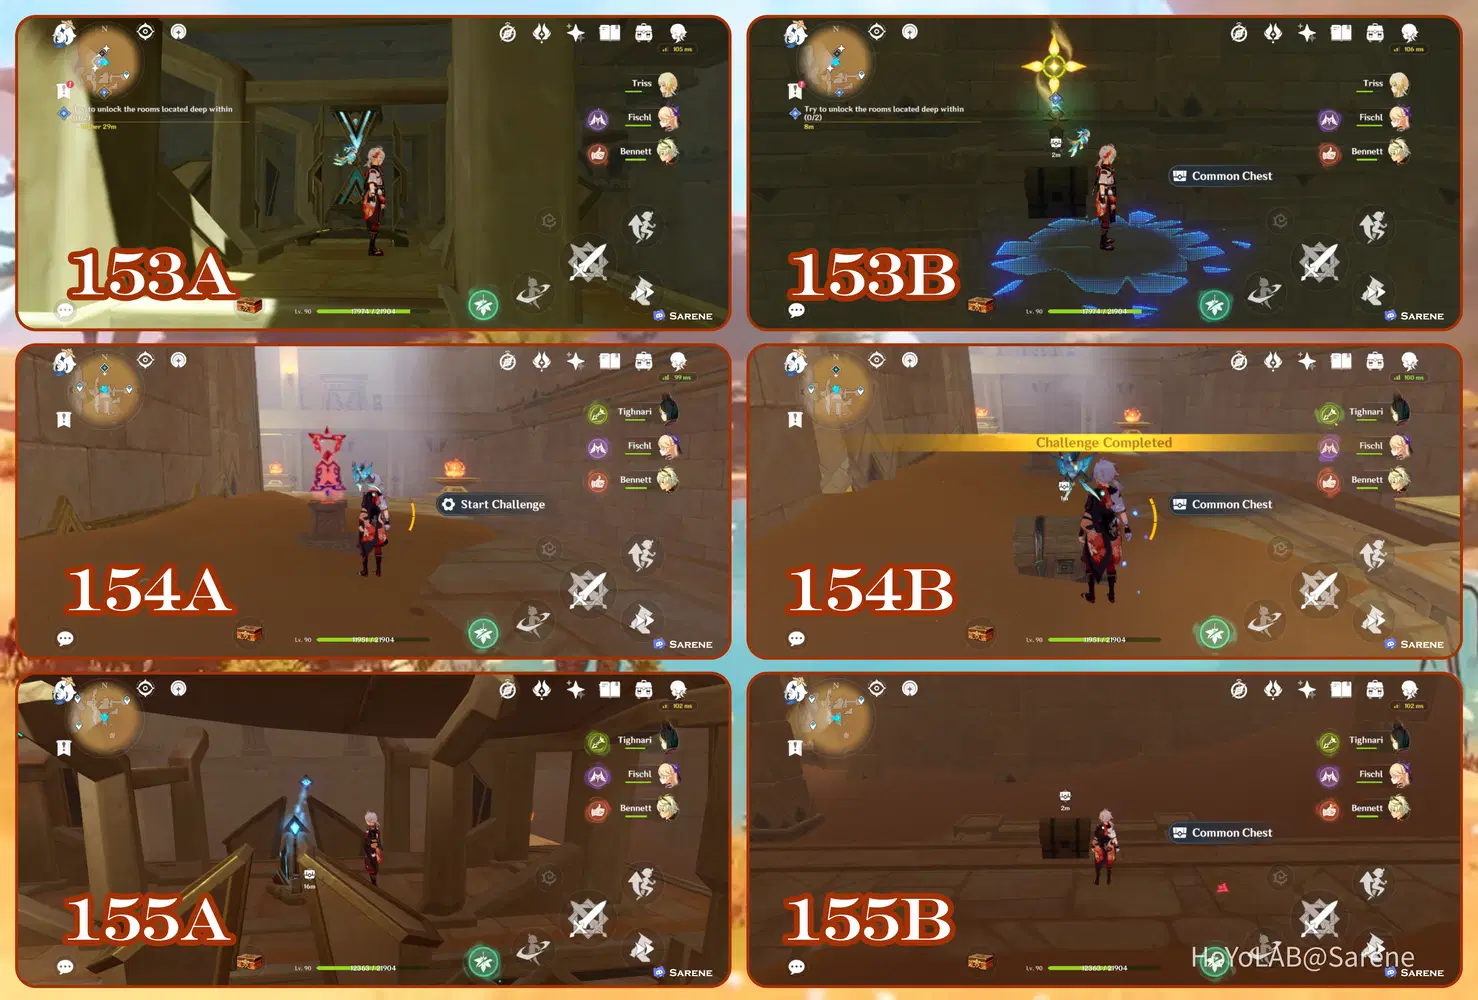
156 - 158
156. Drop down to the lower level and complete the Everlight Cell Puzzle
157. Complete the Time Trial Challenge
158. Follow the Seelie to its court
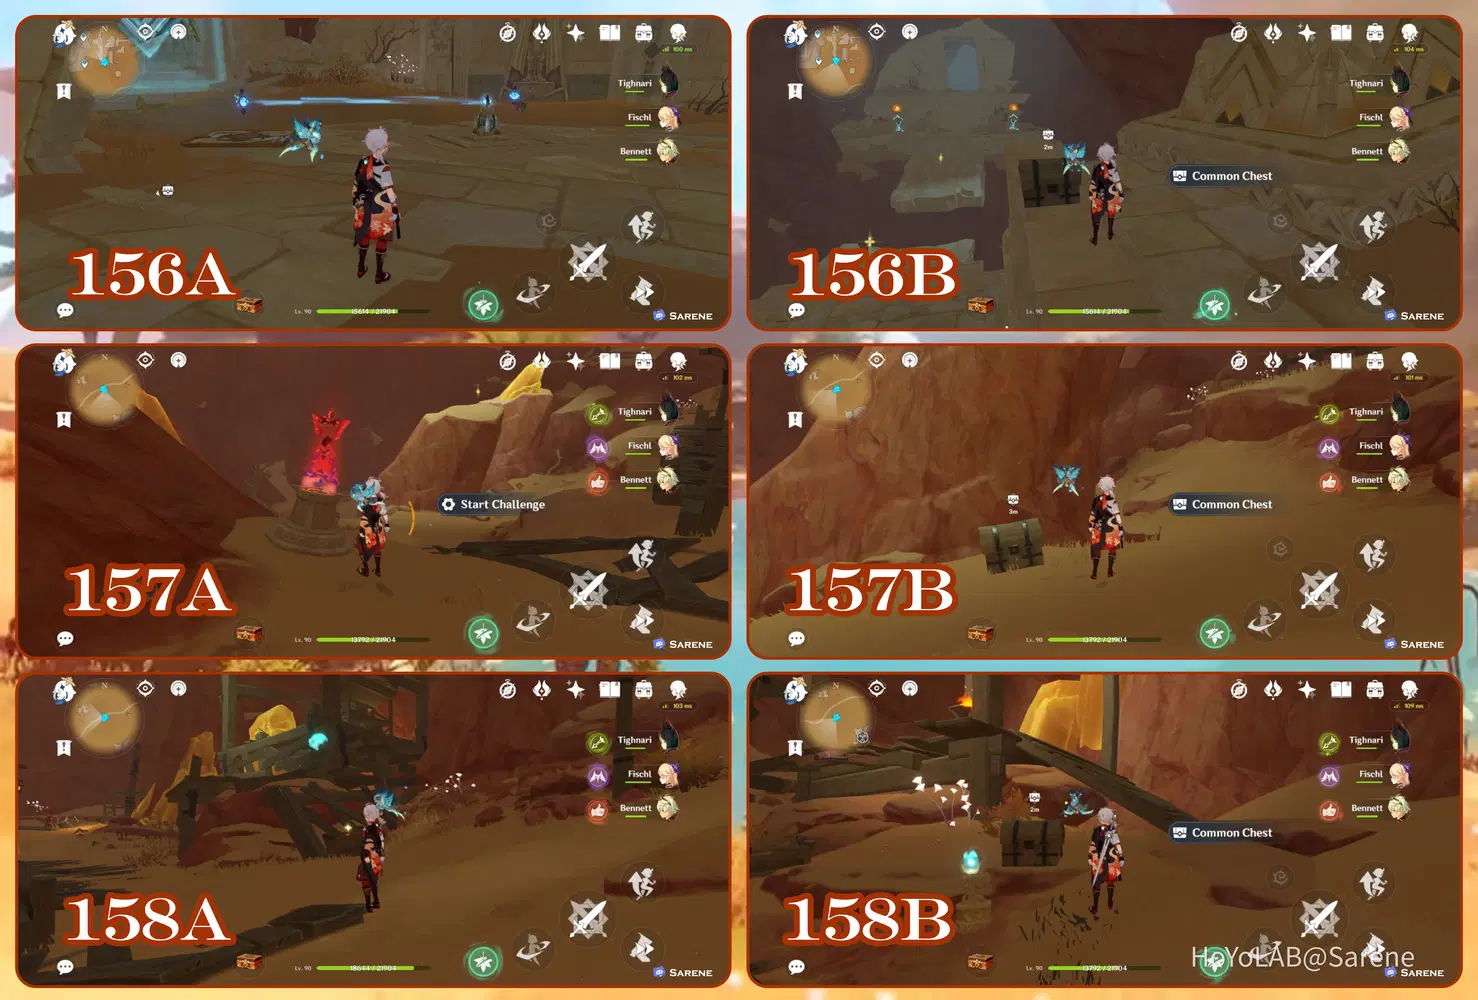
159 - 162
159. Complete the Time Trial Challenge
160. Defeat the Lawachurl
161. Defeat the Fungi
162. Follow the Seelie to its court
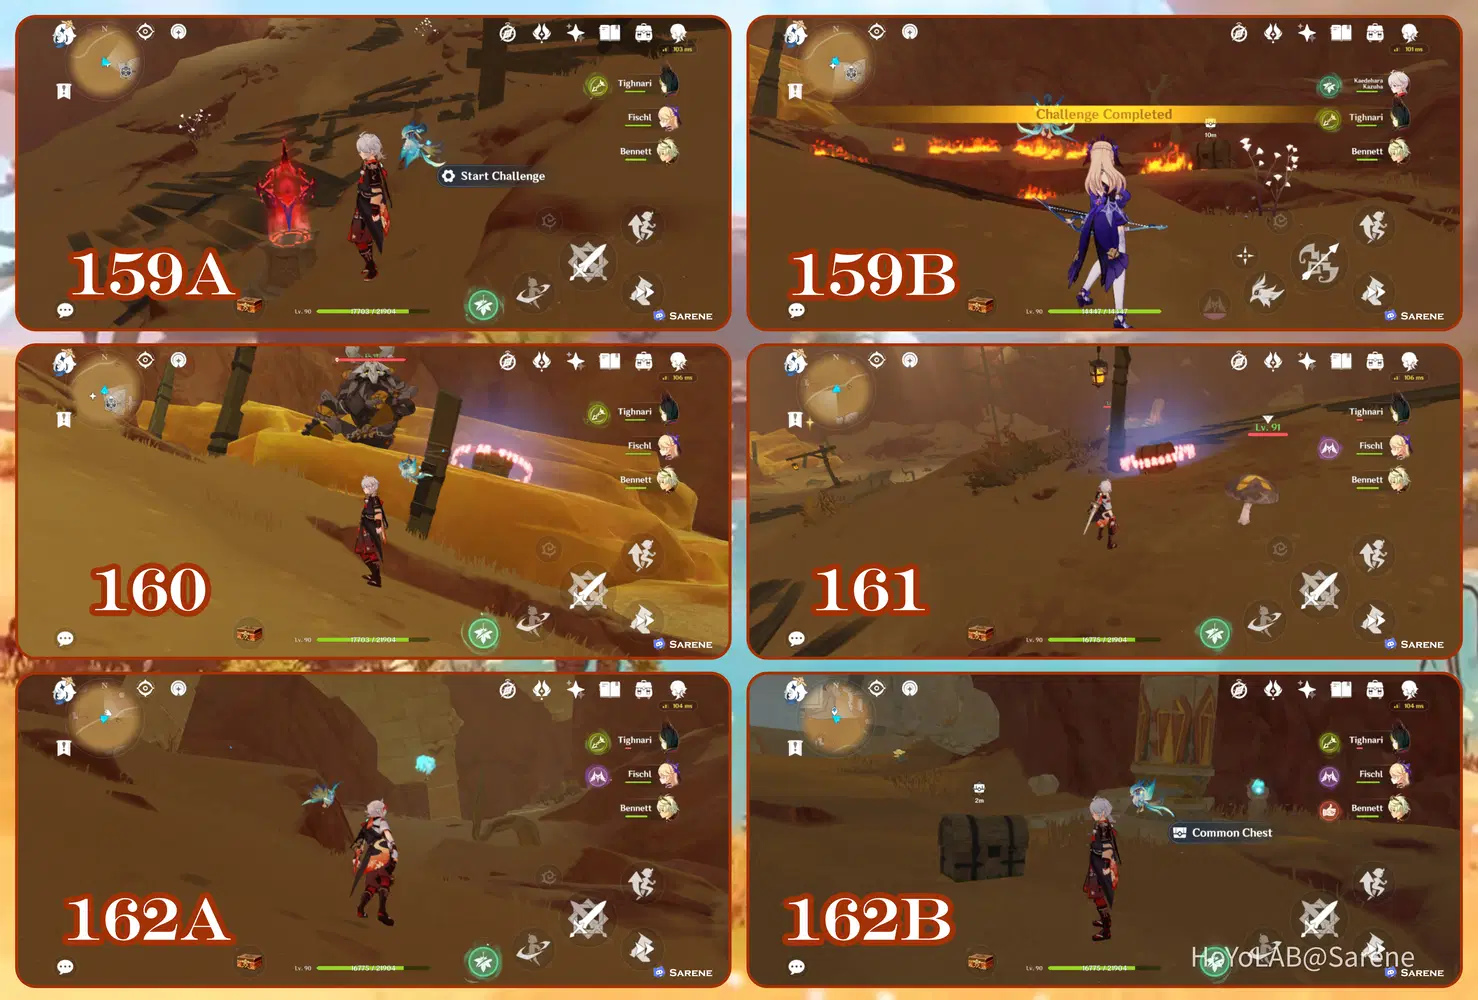
163 - 155
163. Defeat the Primal Construct
164. Enter Sekhem Hall. Take the first room on the right and go down one level below. Then complete the Everlight Cell Puzzle.
165. Complete the Sandglass Challenge
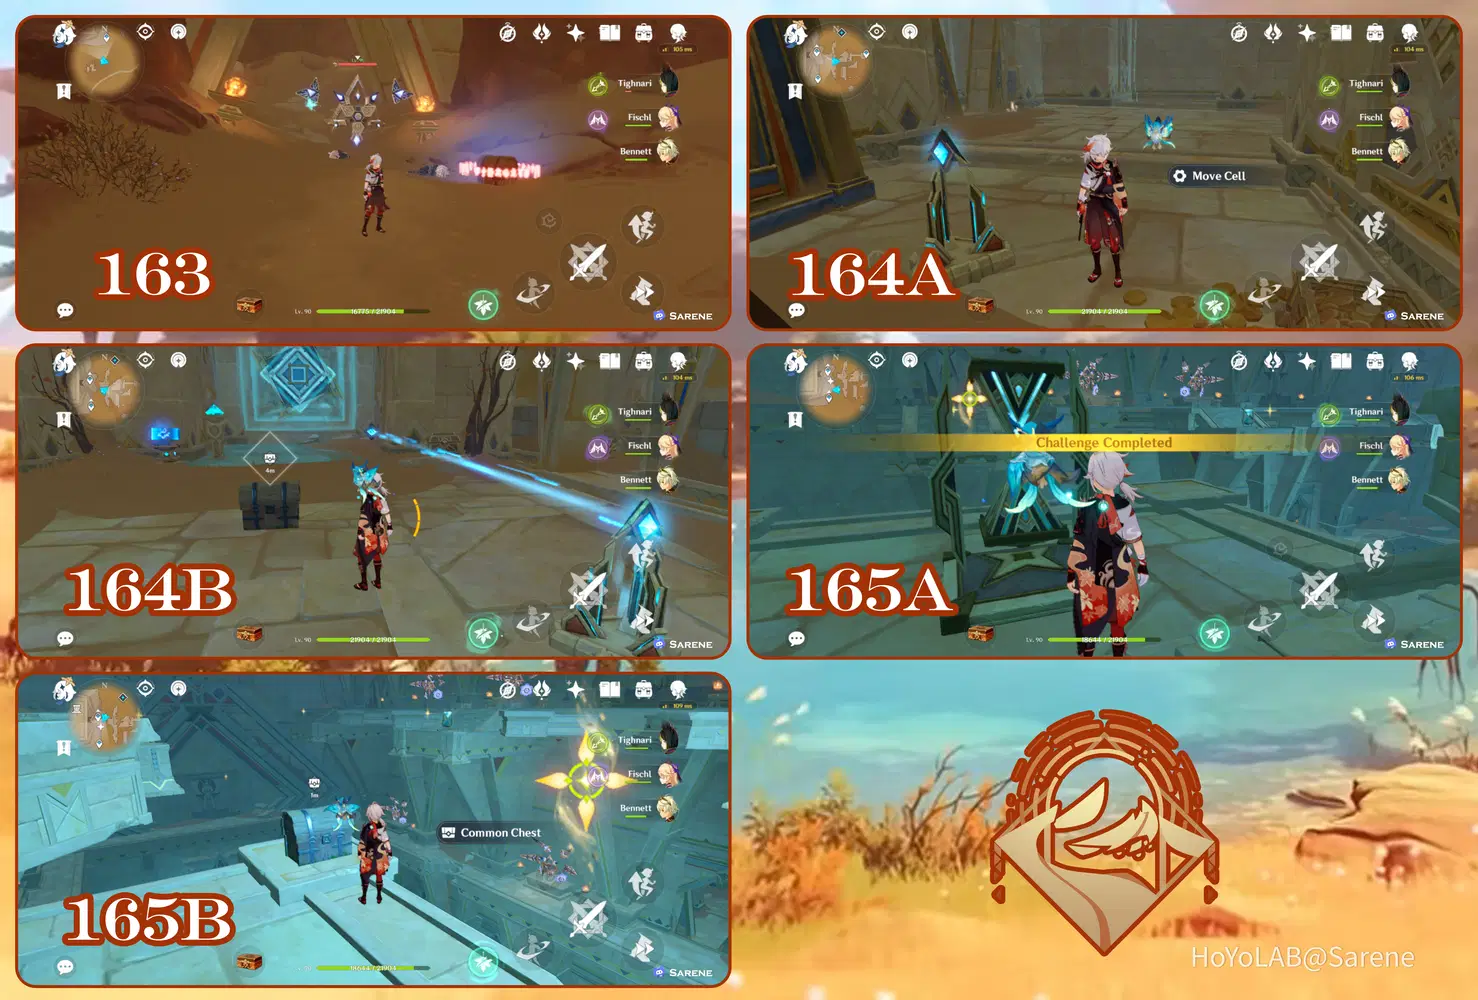
166 - 167
166. Complete the Time Trial Challenge
167. Follow the Seelie to its court
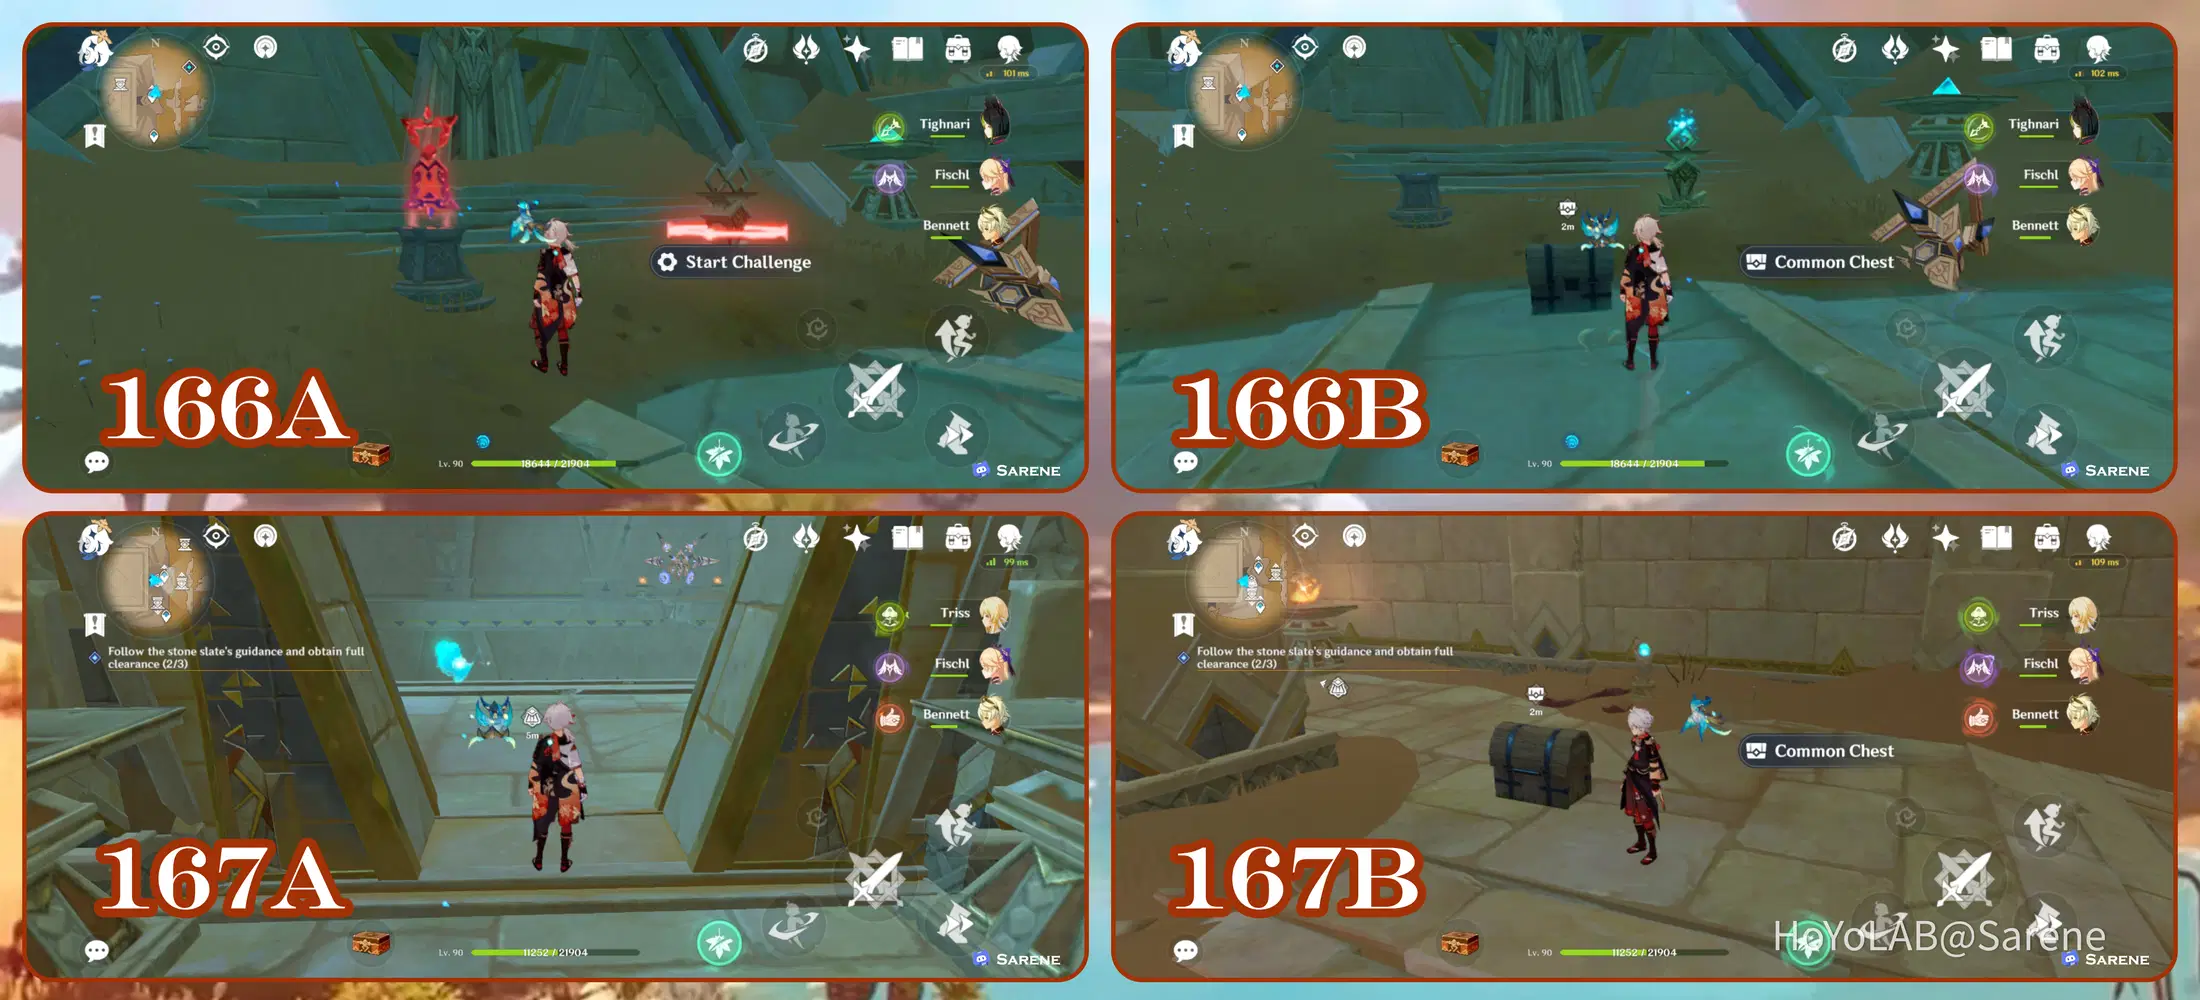
168 - 171
168. Complete the Everlight Cell Puzzle
169. Defeat the Hilichurls
170. Defeat the Fungi to spawn the chest
171. Follow the Seelie to its court
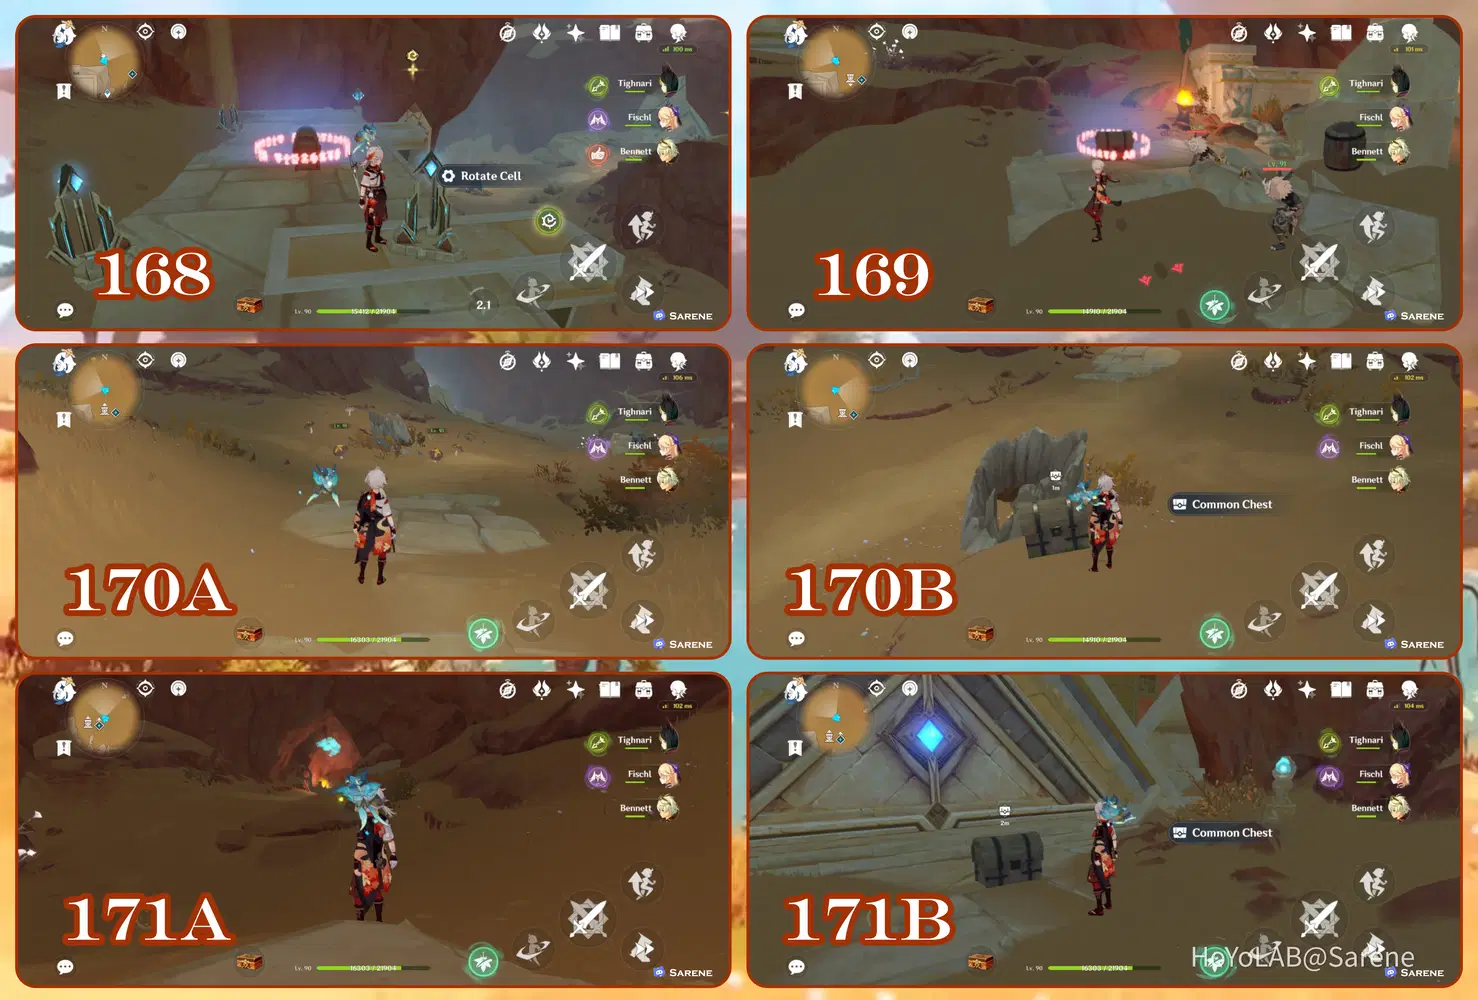
172 - 174
172. Defeat the Primal Construct
173. Follow the Seelie to its court
174. Complete the Time Trial Challenge
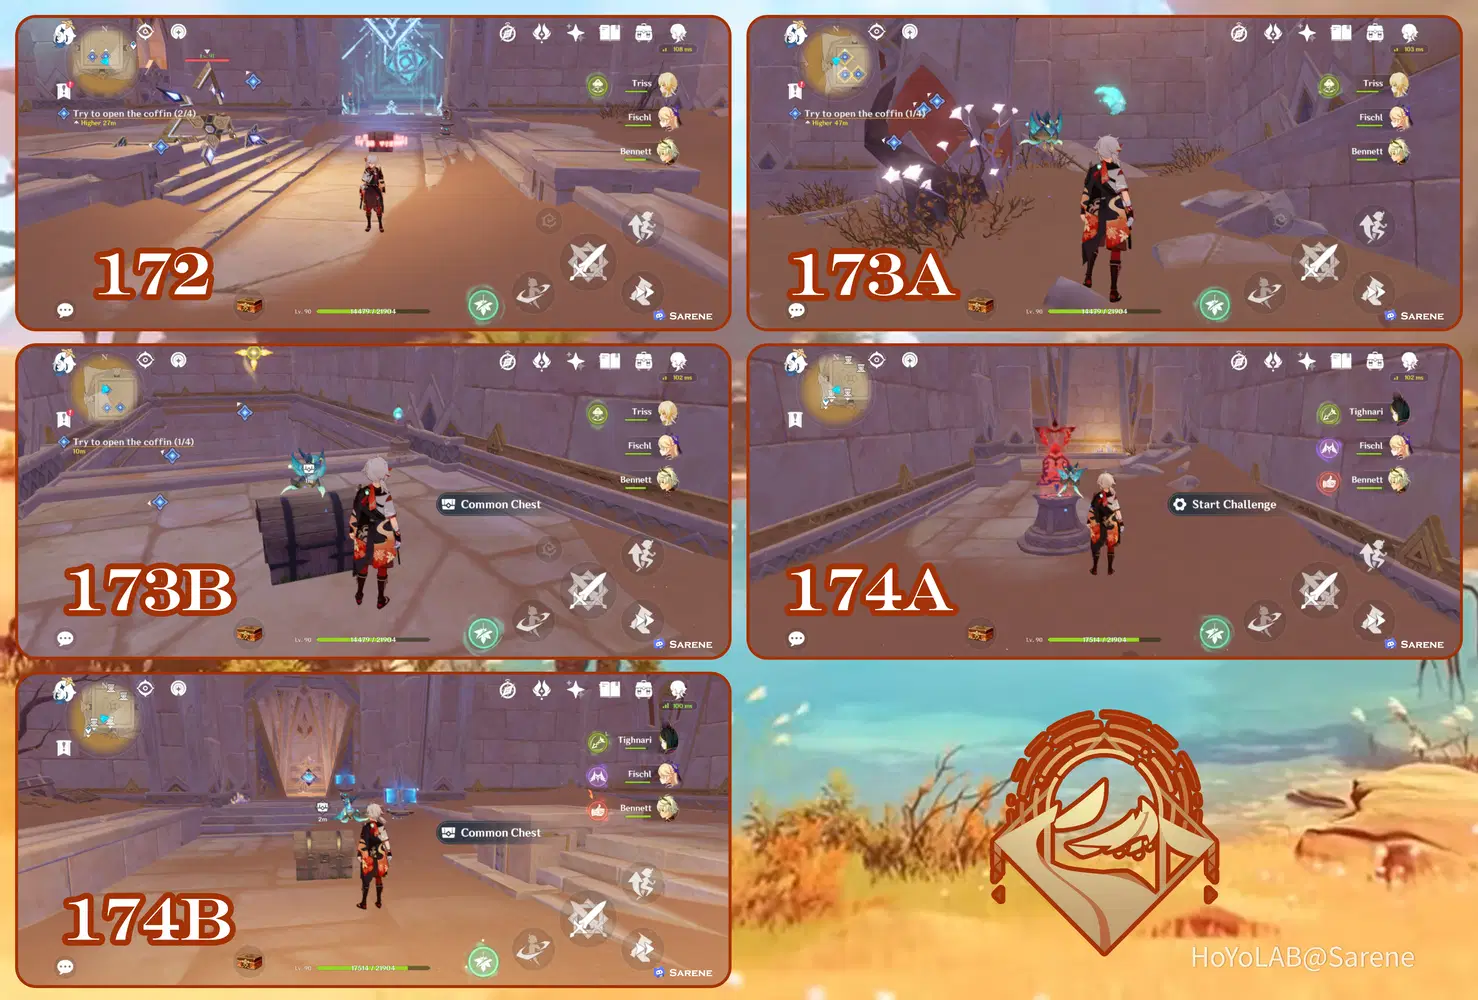
175 - 178
175. Follow the Seelie to its court
176. Complete the Sandglass Challenge
177. Defeat the Cicin Mage
178. Defeat the Fatui
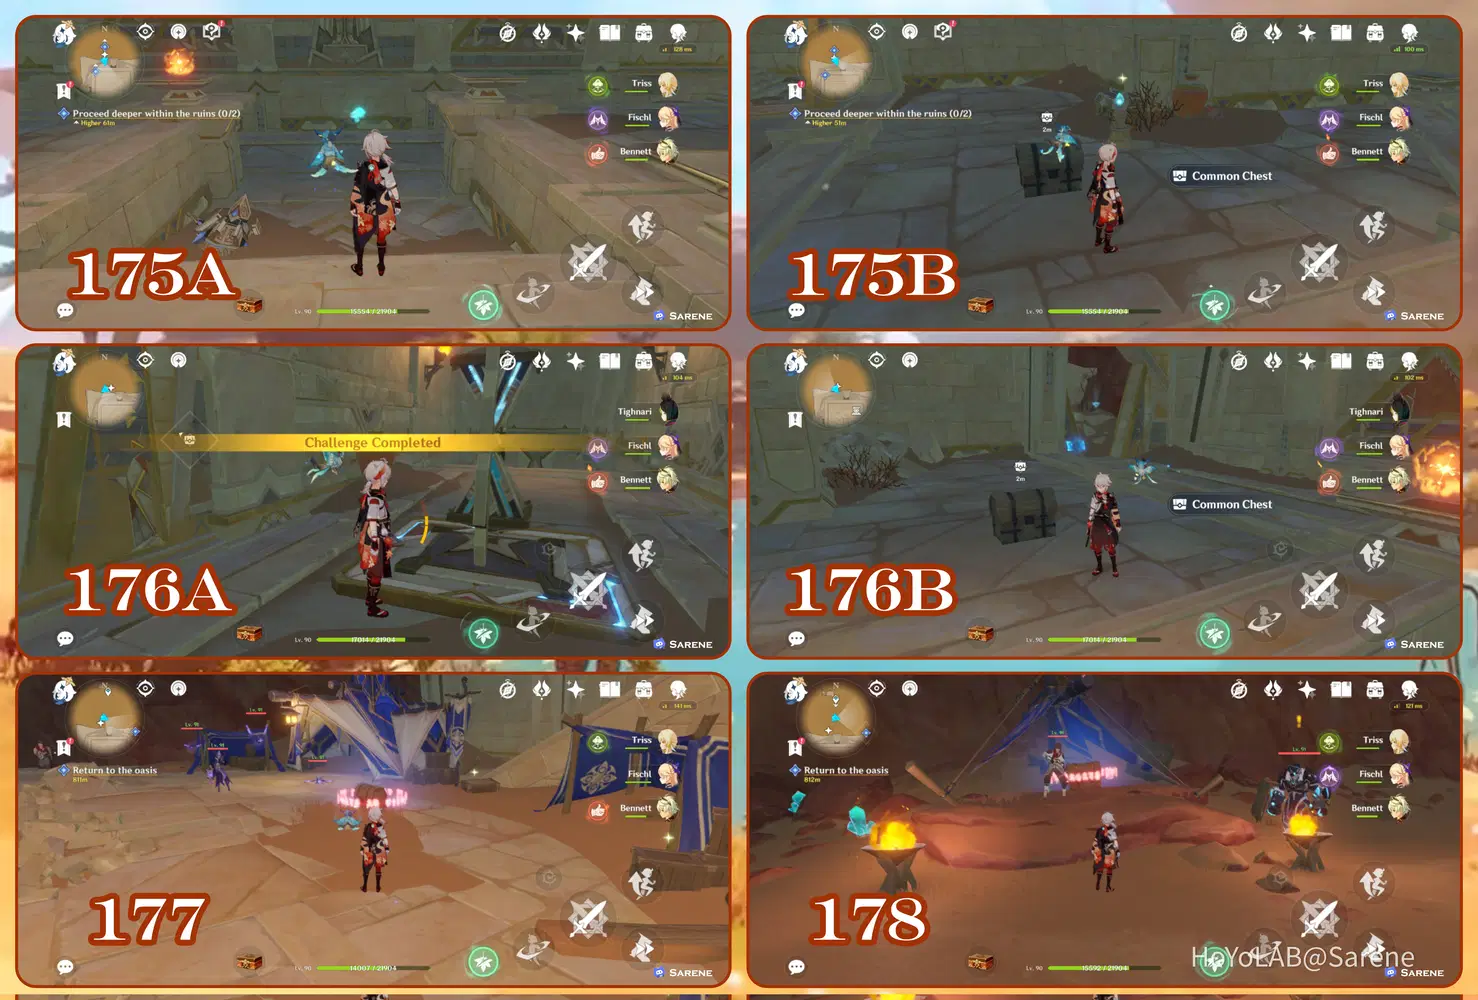
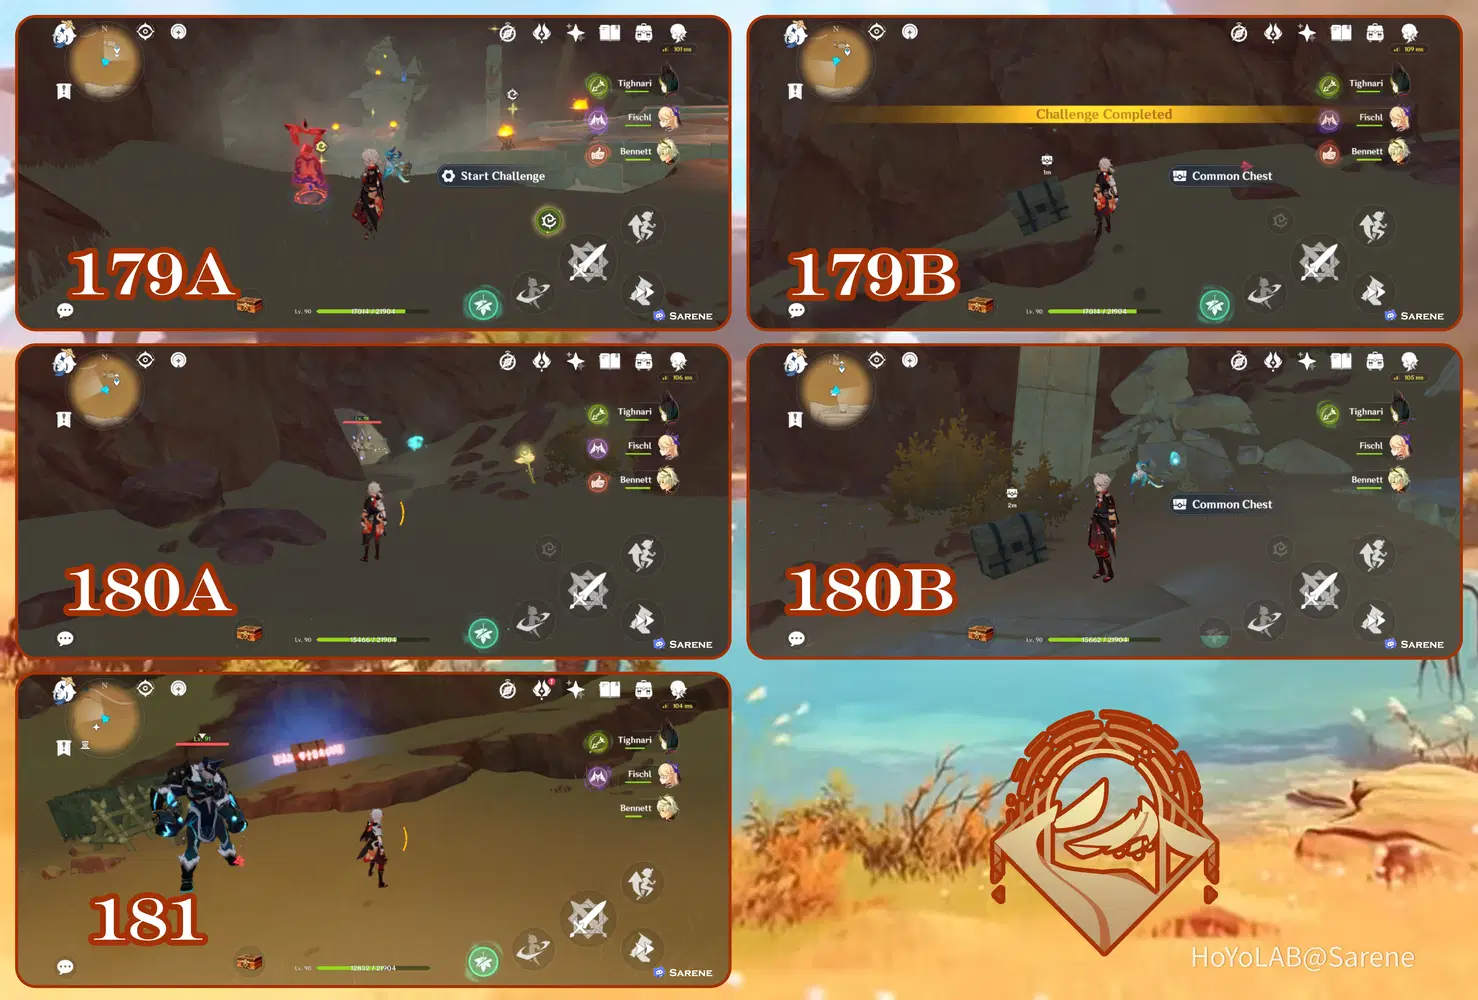
179 - 181
179. Complete the Time Trial Challenge
180. Follow the Seelie to its court
181. Defeat the Fatui
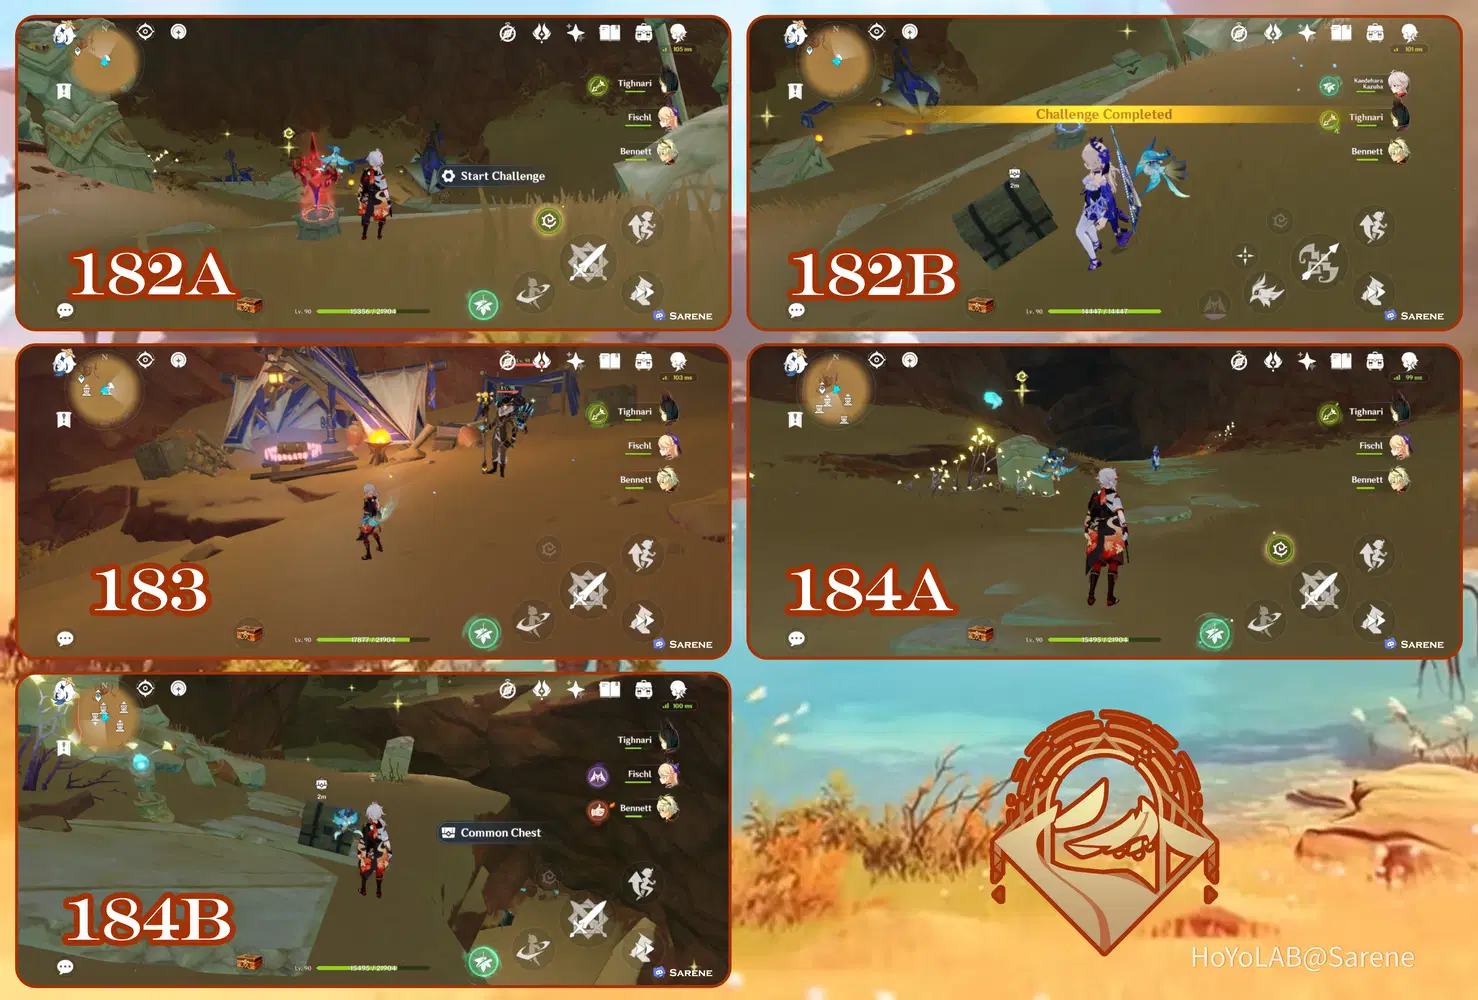
182 - 184
182. Complete the Time Trial Challenge
183. Defeat the Fatui
184. Follow the Seelie to its court
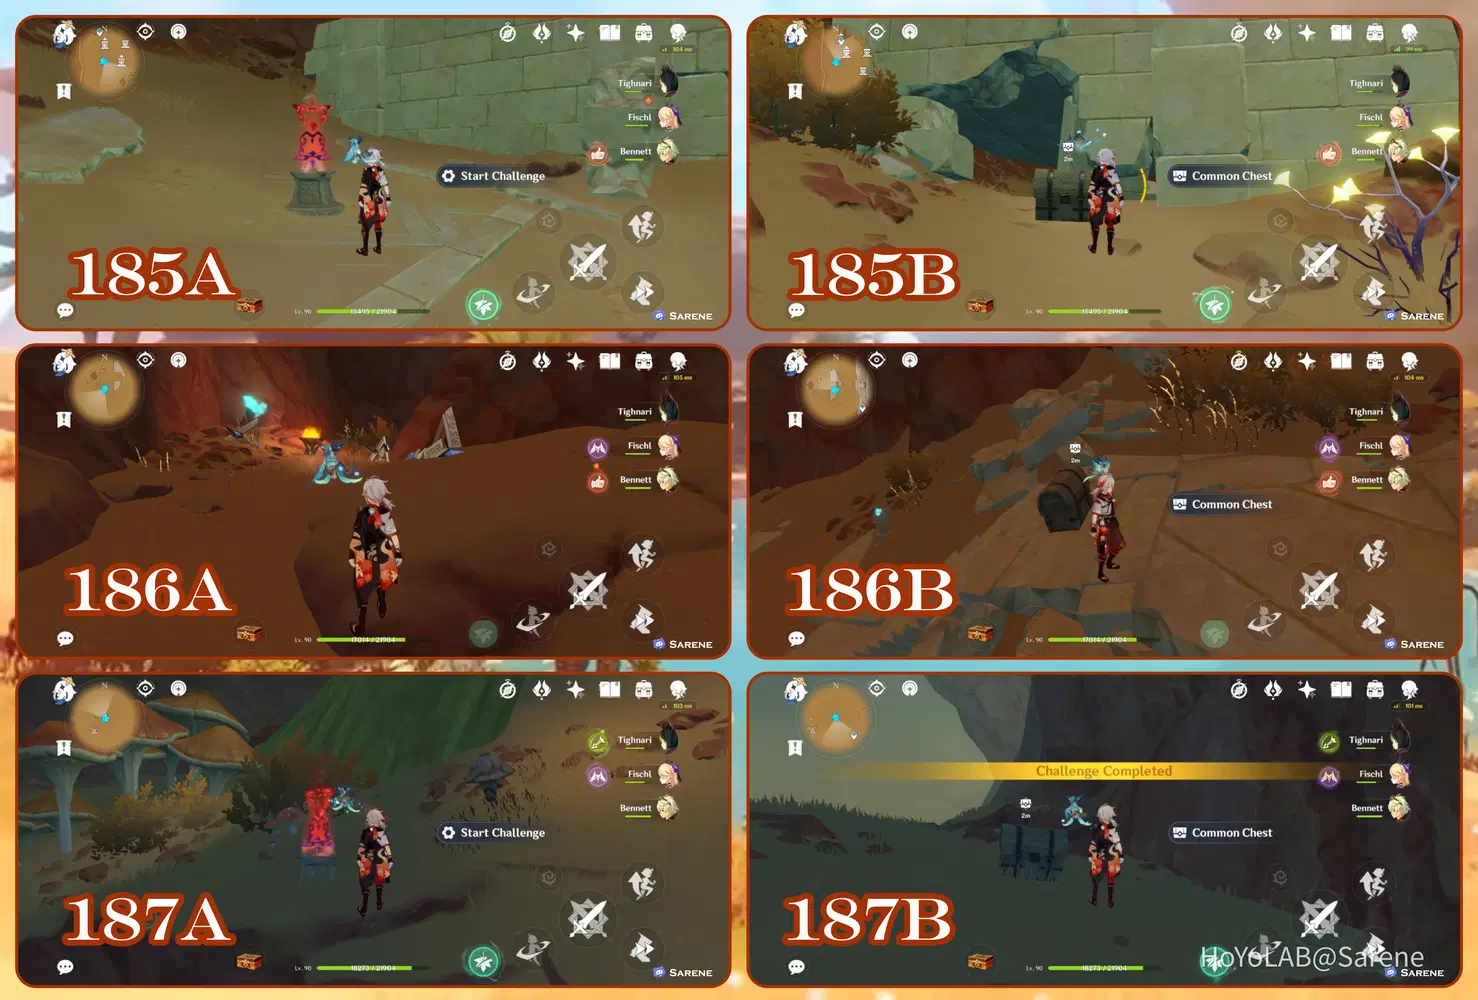
185 - 187
185. Complete the Time Trial Challenge
186. Follow the Seelie to its court
187. Complete the Time Trial Challenge
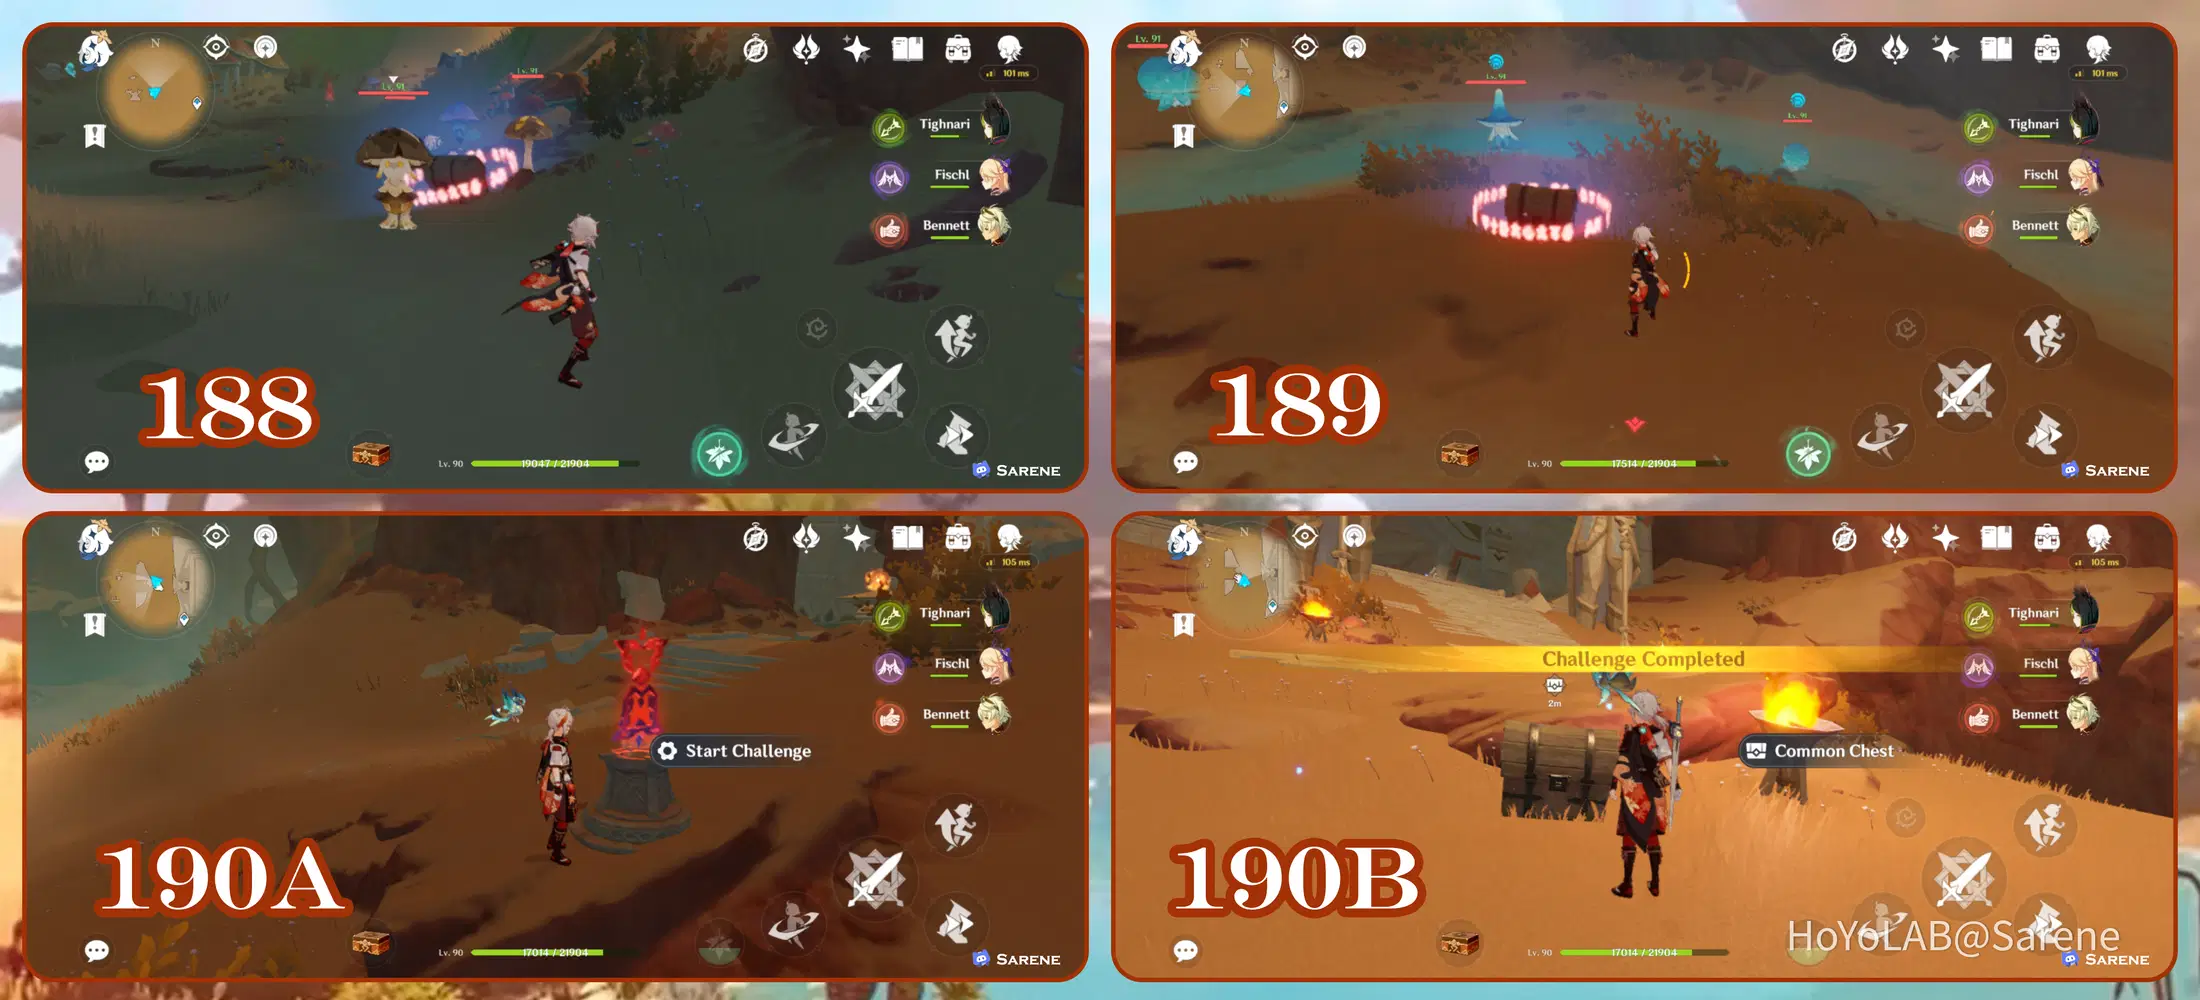
188 - 190
188. Defeat the Fungi
189. Defeat the Fungi
190. Complete the Time Trial Challenge
191 - 193
191. Defeat the Fungi
192. Defeat the Fungi
193. Follow the Seelie to its court
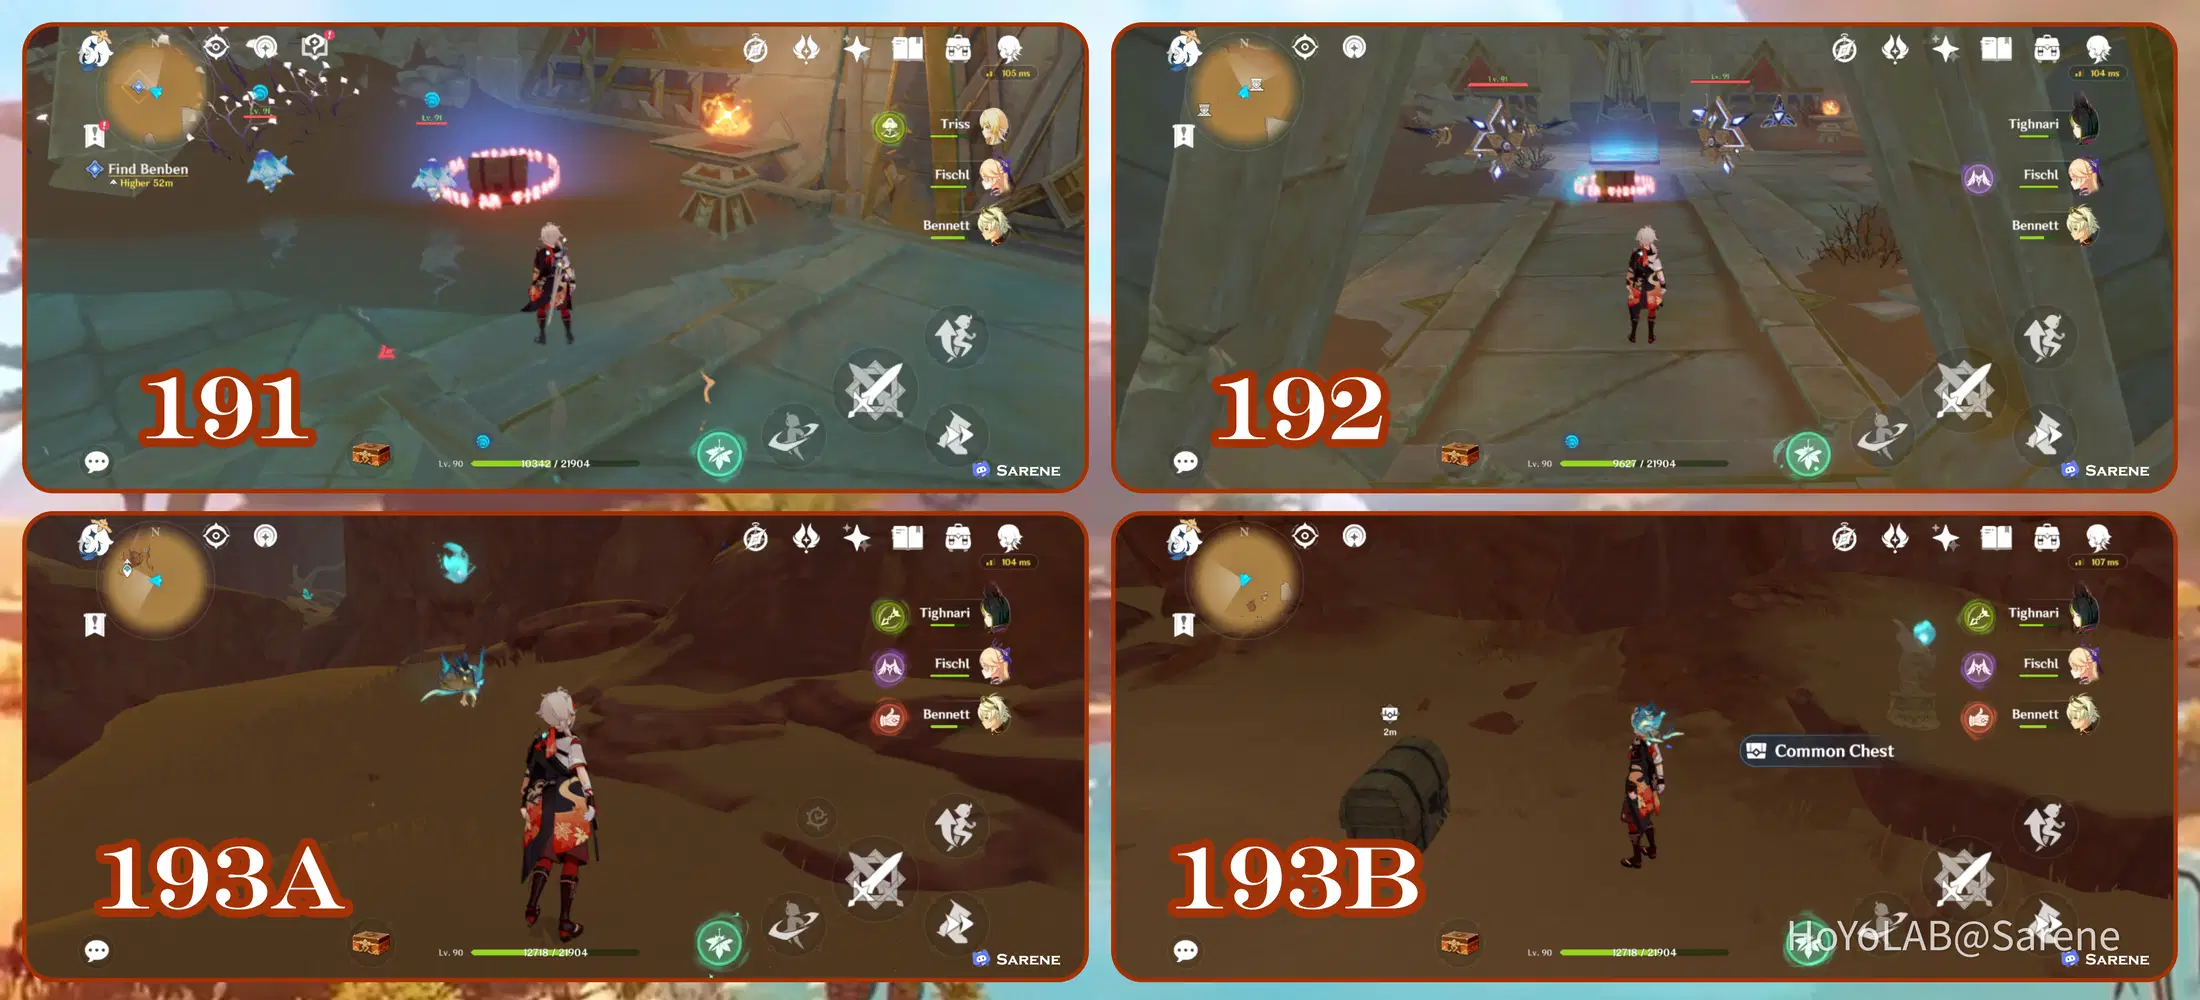
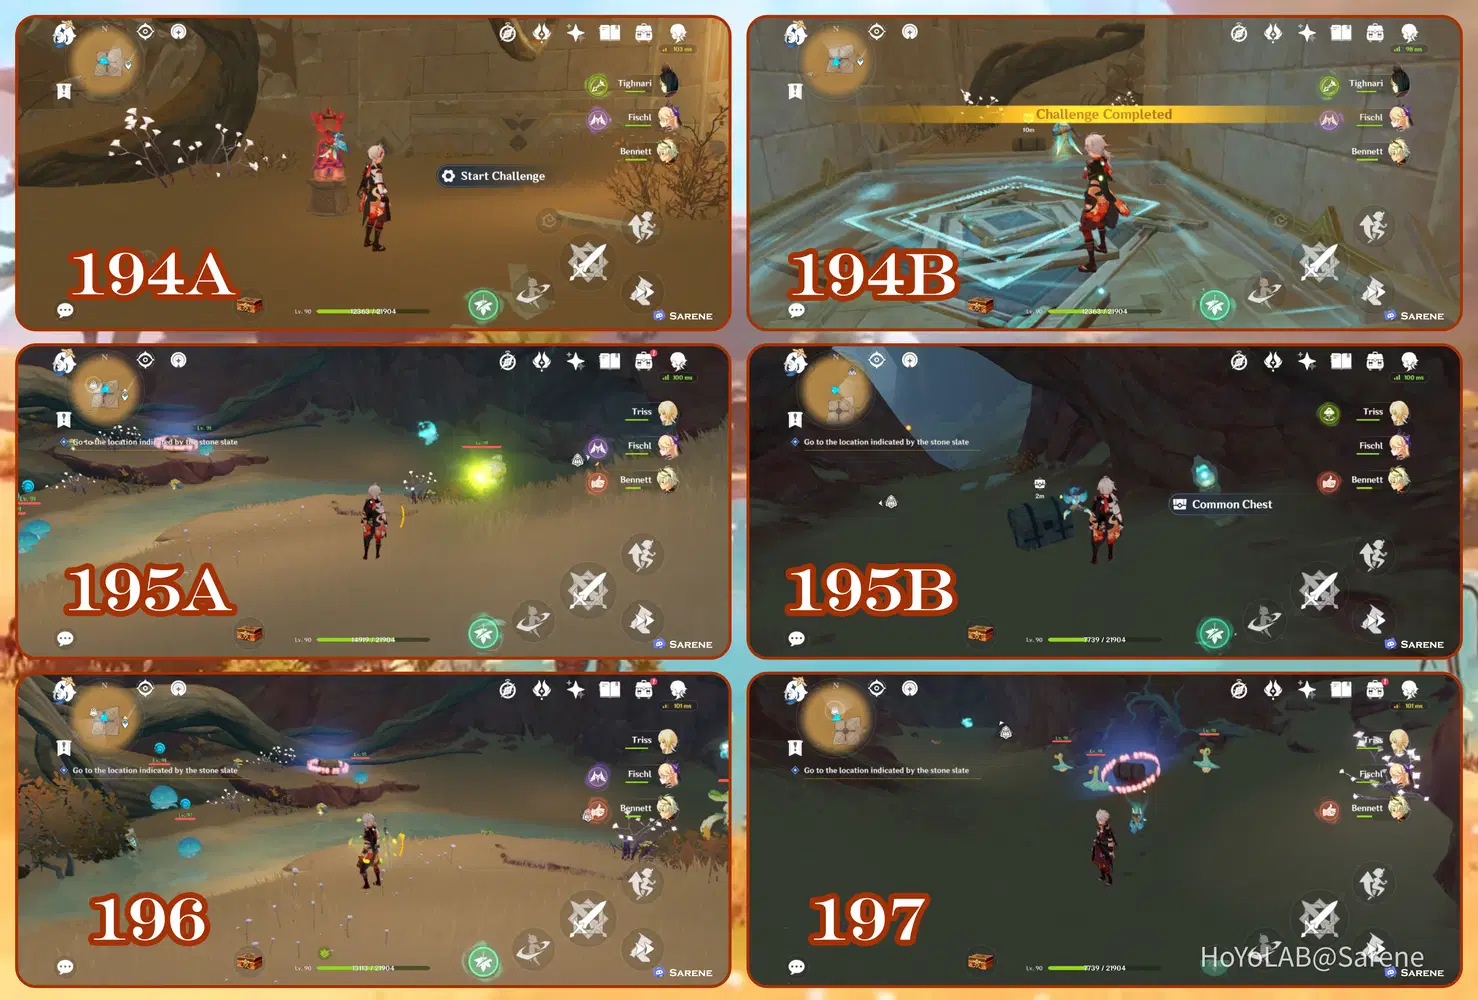
194 - 197
194. Complete the Time Trial Challenge
195. Follow the Seelie to its court
196. Defeat the Fungi
197. Defeat the Fungi
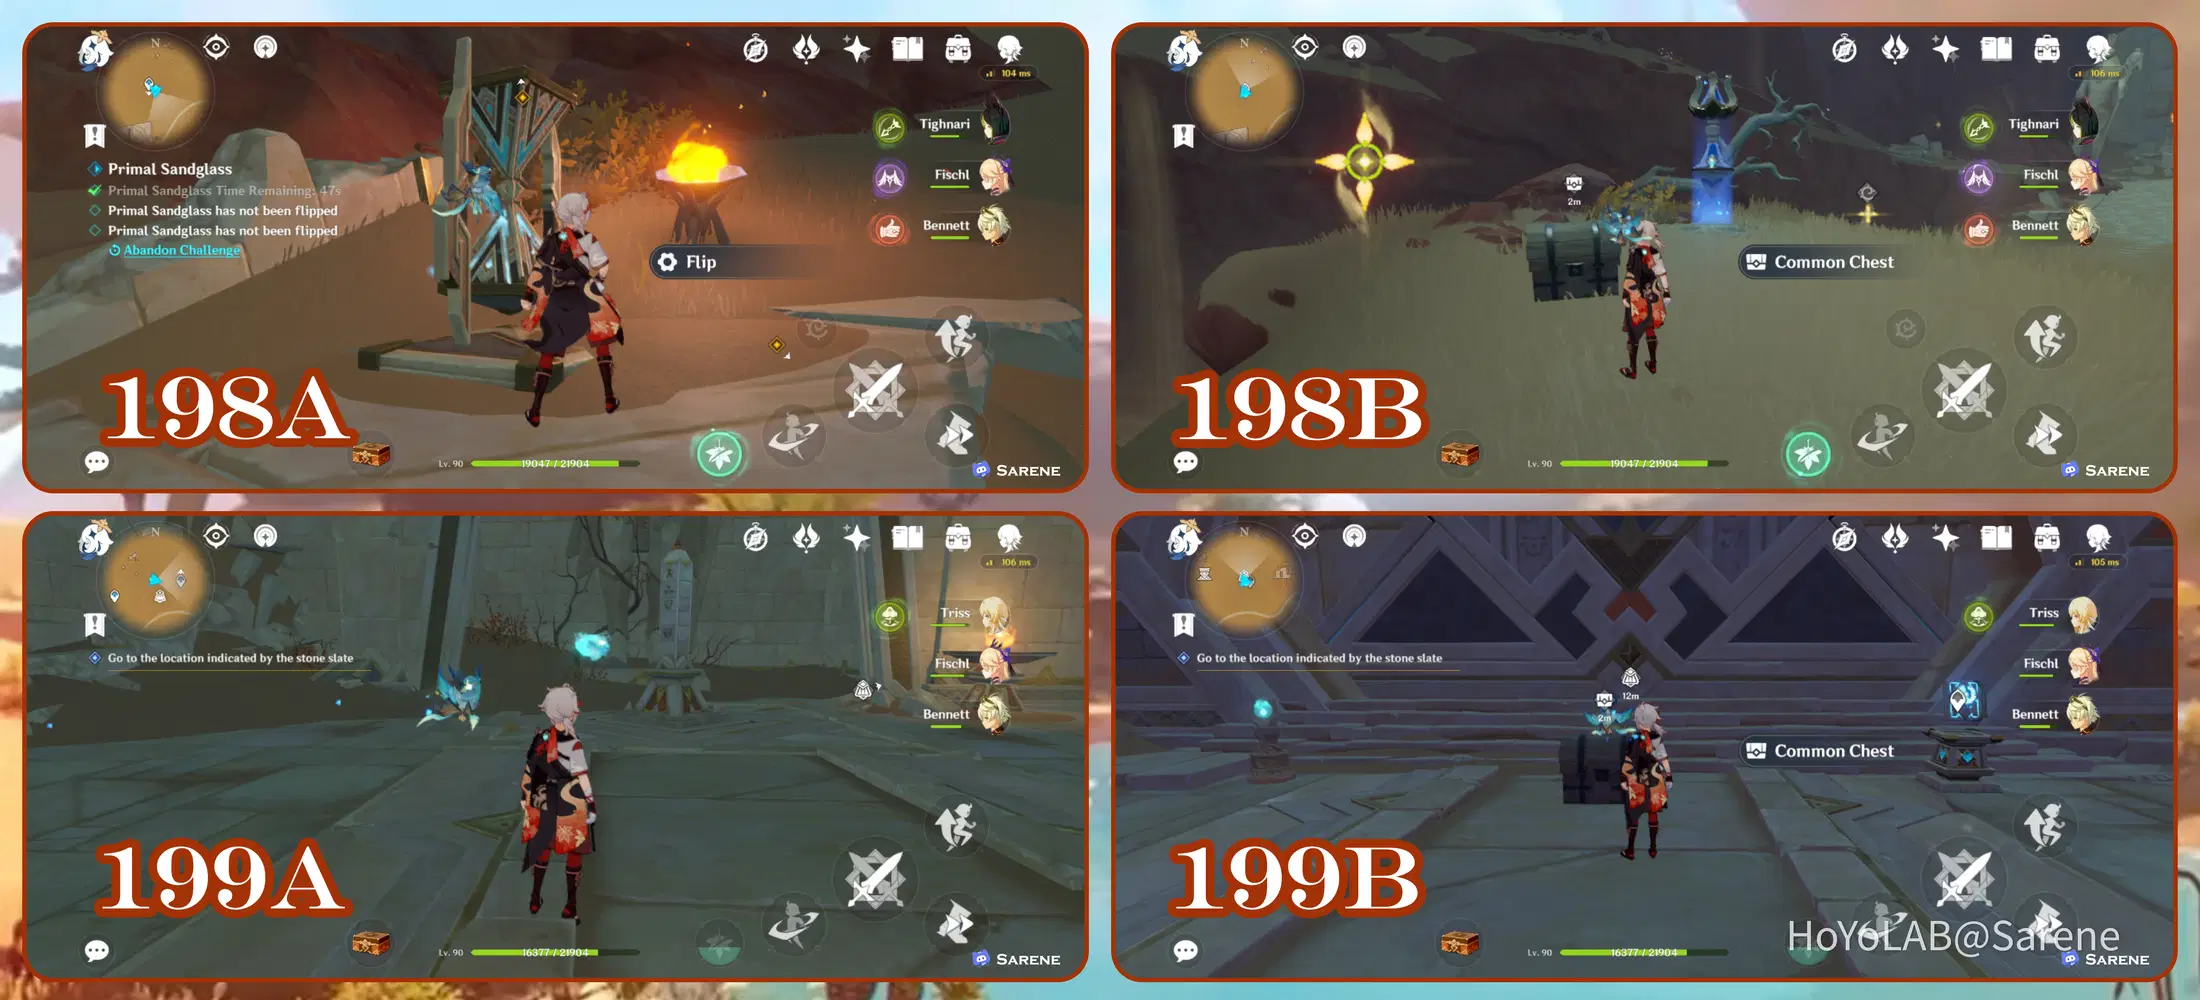
198 - 199
198. Complete the Sandglass Challenge
199. Follow the Seelie to its court
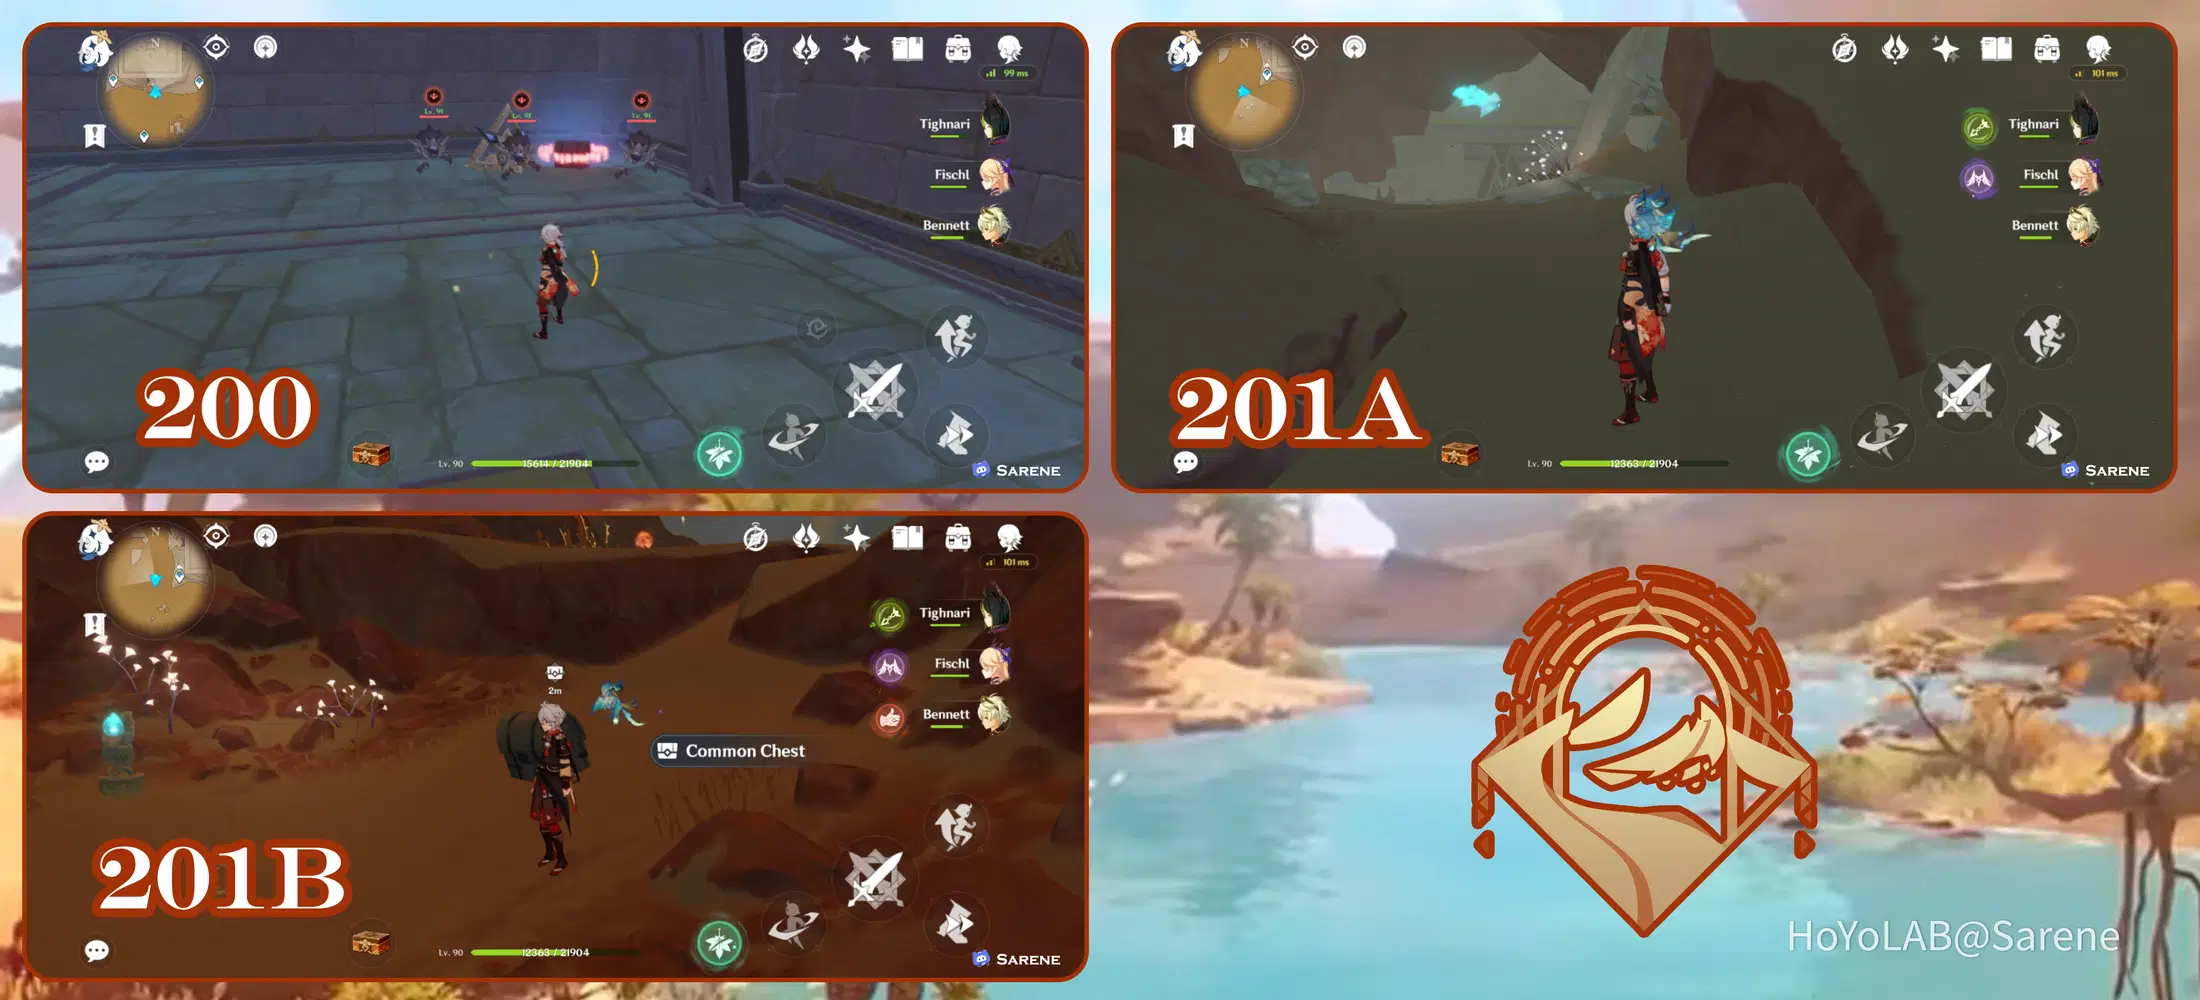
200 - 201
200. Defeat the Rifthound Whelps
201. Follow the Seelie to its court
Now you should have all the common chests from the Hypostyle Desert! Thanks for reading and feel free to leave a comment below if you have any questions.

Wishing you the best with your exploration!




